JVC KENWOOD 408000 144MHz FM Transceiver Model : TH-255A User Manual
JVC KENWOOD Corporation 144MHz FM Transceiver Model : TH-255A
UserManual.wiki
>
JVC KENWOOD
>
408000 User Manual
User Manual
Navigation menu
Upload a User Manual
Namespaces
Wiki Guide
HTML
PDF
Info
Views
User Manual
Discussion / Help
Navigation
![Thank YouWe are grateful you decided to purchase this Kenwood FM transceiver. Kenwood always provides Amateur Radio products which surprise and excite serious hobbyists. This transceiver is no exception. Kenwood believes that this product will satisfy your requirements for both voice and data communications.FeaTures• Compact design• Aluminum die-cast chassis• High output power (up to 5 W operation)• 100 memory channels or 50 channels with names• Long operation period with a Ni-MH battery pack (optional)WriTing ConvenTions FolloWed in This ManualThe writing conventions described below have been followed to simplify instructions and avoid unnecessary repetition.Instruction ActionPress [KEY]. Momentarily press [KEY].Press [KEY] (1s). Press and hold KEY for 1 second or longer.Press [F], [KEY]. Press the [F] key to enter Function mode, then press [KEY] to access its secondary function.Press [KEY] + Power ON.With the transceiver power OFF, press and hold [KEY] while turning the transceiver power ON.](https://usermanual.wiki/JVC-KENWOOD/408000/User-Guide-774049-Page-2.png)
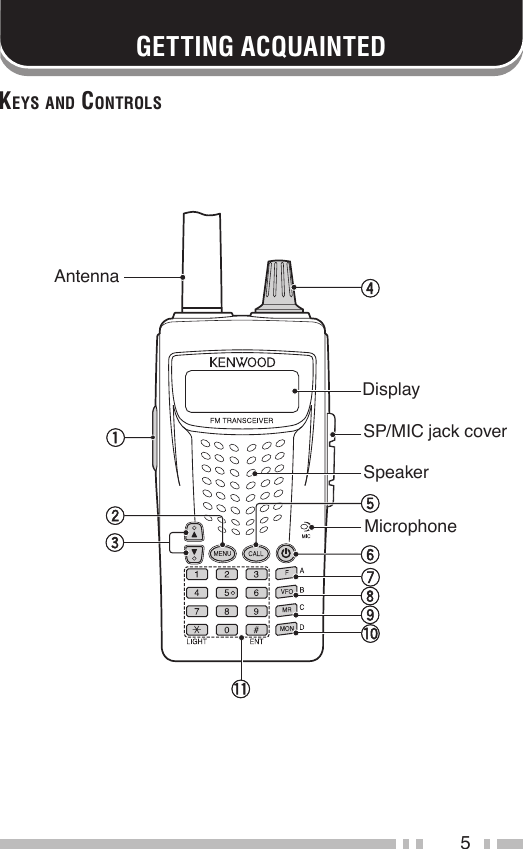
![6q [PTT] Press and hold [PTT] to transmit. Press [F], [PTT] to toggle the transmit output power between High and Low {page 14}.w [MENU] Press [MEMU] to enter Menu mode {page 15}.Press [MEMU](1s) to turn the transceiver key lock function ON or OFF {page 59}e [UP]( )/ [DOWN]( )Press [UP]/ [DOWN] to adjust the Volume Level {page 10}.r Selector Rotate the Selector to select an operating frequency or Memory channel, change the scan direction, select a Menu, etc.t [CALL]Press [CALL] to select the Call channel {page 34}.Press [CALL](1s) to start Call scan {page 40}.Press [F], [CALL] to store the current operating frequency to the Call channel {page 34}.y [ ] Press [ ] (POWER) to turn the transceiver power ON and OFF.u [F] Press [F] to enter MHz mode {page 12}.i [VFO] Press [VFO] to enter VFO mode {page 12}. Press [VFO](1s) to start Band scan {page 37}. Press [F], [VFO] to copy the current Memory channel or Call channel to the VFO (memory shift) {page 33}.o [MR] Press [MR] to enter Memory Channel mode {page 30}. Press [MR] (1s) to start Memory scan {page 39}. Press [F], [MR] to store the current operating frequency in the Memory channel {page 28}.](https://usermanual.wiki/JVC-KENWOOD/408000/User-Guide-774049-Page-14.png)
![7!0 [MON] Press [MON] to turn the Monitor function ON and OFF {page 62}. Press [F], [MON] to enter Squelch Level Adjustment mode {page 11}.!1 Numeric Keypad[1] Press [F], [1] to select the Signaling (Tone, CTCSS and DCS) function {pages 20, 44, 46}.[2] Press [F], [2] to enter the Tone frequency setup mode {page 20}. Press [F], [2](1s) to start Tone frequency ID scan {page 22}.[3] Press [F], [3] to change the Frequency step size {page 58}.[4] Press [F], [4] to enter the DCS code setup mode {page 47}. Press [F], [4](1s) to start DCS code ID scan {page 48}.[5] Press [F], [5] to enter the CTCSS frequency setup mode {page 44}. Press [F], [5](1s) to start CTCSS frequency ID scan {page 45}. Press [5](1s) to turn the Speaker Attenuation function ON and OFF {page 66}.[6] Press [F], [6] to turn the Priority Scan ON or OFF {page 40}.[7] Press [F], [7] to turn the Reverse function ON or OFF {page 24}. Press [7](1s) to turn the ASC function ON or OFF {page 24}.[8] Press [F], [8] to select an Offset direction {page 19}.[9] Press [F], [9] to turn Memory Channel Lockout ON or OFF {page 42}.[0] Press [0](1.5s) to turn the Emergency siren ON or OFF {page 65}.[ ] Press [ ] to illuminate the display and keys {page 58}. Press [ ](1s) to keep the light ON continuously. {page 58}.[#] Press [#] to enter the Direct frequency entry mode {page 12}. Press [F], [#] to enter the Volume Adjustment Operation Selection mode {page 10}.](https://usermanual.wiki/JVC-KENWOOD/408000/User-Guide-774049-Page-15.png)
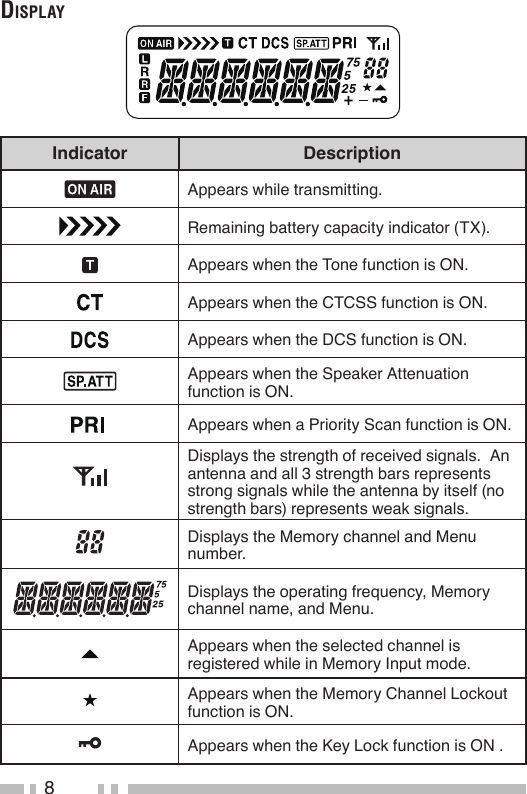
![9Indicator DescriptionAppears when the Offset direction is set to plus.Appears when the Offset direction is set to minus.Appears while using Low output power.Appears when the Reverse function is ON.Appears when the ASC function is ON. Blinks when the ASC function is performing an OK check.Appears when the [F] key is pressed.](https://usermanual.wiki/JVC-KENWOOD/408000/User-Guide-774049-Page-17.png)
![10Switching the power on/oFF1 Press [ ] (POWER) to switch the transceiver ON.• The power on message momentarily appears on the display.• If the transceiver password protection has been activated {page 67}, you must first enter your password before you can operate the transceiver.2 To switch the transceiver OFF, press [ ] (POWER) again.AdjuSting the VoluMePress [UP] to increase the audio output level and press [DOWN] to decrease the output level.• If you are not receiving a signal, press and hold [MON] to unmute the speaker, then adjust the volume control to a comfortable audio output level.VoluMe AdjuStMent operAtion Selection With the setting described below, you can adjust the volume using either the [UP]/ [DOWN] keys or by operating the Selector.1 Press [F], [#].• The selected display appears.BASIC OPERATION](https://usermanual.wiki/JVC-KENWOOD/408000/User-Guide-774049-Page-18.png)
![112 Press [F], [#] to toggle the setting between “SEL” and “UP/DN”. SEL: Adjust the volume using the Selector. To change the channel number or frequency, use the [UP]/ [DOWN] keys. UP/DN: Adjust the volume using the [UP]/ [DOWN] keys. To change the channel number or frequency, use the Selector.AdjuSting the Squelch leVelThe purpose of Squelch is to mute the speaker when no signals are present. With the squelch level correctly set, you will hear sound only while actually receiving signals. The higher the selected squelch level, the stronger the signals must be to receive. The appropriate squelch level depends on the ambient RF noise conditions.1 Press [F], [MON].• The current squelch level appears.2 Rotate the Selector (or press [UP]/ [DOWN]) to adjust the level.• Select the level at which the background noise is just eliminated when no signal is present.• The higher the level, the stronger the signals must be to receive.• 6 different levels can be set. 0: Minimum ~ 5: Maximum; 2 is the default value.3 Press any key other than [MON] or [ ] to store the new setting and exit the squelch adjustment.](https://usermanual.wiki/JVC-KENWOOD/408000/User-Guide-774049-Page-19.png)
![12Selecting A Frequency■ VFO Mode This is the basic mode for changing the operating frequency. Rotate the Selector clockwise (or press [UP]) to increase the frequency and counterclockwise (or press [DOWN]) to decrease the frequency.■ MHz Mode If the desired operating frequency is far away from the current frequency, it is quicker to use the MHz Tuning Mode. To adjust the MHz digit:1 Press [F].• The MHz digit blinks.2 Rotate the Selector (or press [UP]/ [DOWN]) to select the desired MHz value.3 After selecting the desired MHz value, Press any key other than [ ] to exit the MHz Tuning Mode and return to normal VFO Mode.4 Continue adjusting the frequency as necessary, using the Selector (or press [UP]/ [DOWN]) keys).](https://usermanual.wiki/JVC-KENWOOD/408000/User-Guide-774049-Page-20.png)
![13direct Frequency entryIn addition to rotating the Selector (or pressing [UP]/ [DOWN]), there is another way to select the frequency. When the desired frequency is far away from the current frequency, you can directly enter a frequency using the numeric keypad.1 Press [VFO].• You must be in the VFO Mode to make the direct frequency entry.2 Press [#].3 Press the numeric keys ([0] to [9]) to enter your desired frequency. [ ] allows you to complete the MHz digits entry.• Pressing [#] fills all remaining digits (the digits you did not enter) with 0 and completes the entry. For example, to select 145.000 MHz, press [1], [4], and [5], then press [#] to complete the entry.• If you want to revise the MHz digits only, leaving the kHz digits as they are, press [VFO] in place of [#].Note:◆ If the entered frequency does not match the current frequency step size, the frequency is automatically rounded down to the next available frequency.◆ When the desired frequency cannot be entered exactly, confirm the frequency step size {page 58}.◆ If you rotate the Selector (or press [UP]/ [DOWN]) while entering the frequency, the transceiver clears the entry and changes to the next available frequency.](https://usermanual.wiki/JVC-KENWOOD/408000/User-Guide-774049-Page-21.png)
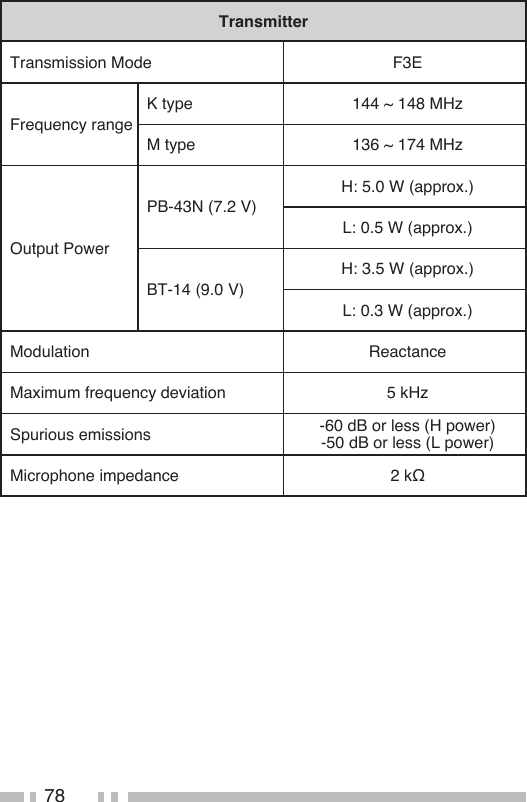
![14trAnSMitting1 To transmit, hold the transceiver approximately 5 cm (2 inches) from your mouth, then press and hold [PTT] and speak into the microphone in your normal tone of voice.• The “ ” icon and the bar-graph meter appears.• If you press [PTT] while you are outside of the transmission coverage, a high pitched error beep sounds.2 When you finish speaking, release [PTT].Note: If you continuously transmit for longer than the time specified in Menu No. 12 (default is 10 minutes) {page 64}, the internal timeout timer generates a warning beep and the transceiver stops transmitting. In this case, release [PTT] and let the transceiver cool down for a while, then press [PTT] again to resume transmission.Selecting An output powerSelecting a lower transmission power is the best way to reduce battery consumption, if communication is still reliable.Press [F], [PTT] to toggle between high and low.• The “ ” icon appears when the lower transmission power.• The output power varies depending on the battery type and operating voltage. The table below shows the approximate output power when the transceiver operates with different types of battery.• BT-14 (9.0V) : High - approx. 3.5 W/ Low - approx. 0.3 W • PB-43N (7.2V) : High - approx. 5.0 W/ Low - approx. 0.5 W](https://usermanual.wiki/JVC-KENWOOD/408000/User-Guide-774049-Page-22.png)
![15MENU SETUPwhAt iS A Menu?Many functions on this transceiver are selected or configured via a software-controlled Menu rather than through the physical controls of the transceiver. Once you become familiar with the Menu system, you will appreciate its versatility. You can customize the various timings, settings, and programming functions on this transceiver to meet your needs without using many controls and switches.Menu AcceSS1 Press [MENU].• A brief explanation of the Menu, and the setting and Menu No. appear on the display.2 Rotate the Selector (or press [UP]/ [DOWN]) to select your desired Menu.• As you change the Menu No., a brief explanation of each Menu appears along with its current parameter.3 Press [MENU] to configure the parameter of the currently selected Menu No.Function ParameterMenu No.](https://usermanual.wiki/JVC-KENWOOD/408000/User-Guide-774049-Page-23.png)
![164 Rotate the Selector (or press [UP]/ [DOWN]) to select your desired parameter.5 Press [MENU] to store the new setting.Note: Press any key other than [ ], [MON] or [MENU] to cancel the parameter setting and restore its old value.Menu Function ListMenu No. Display Displription Setting Values Default Setting Ref. Page1 P.VFO Programmable VFO 136 ~ 173 MHz – 632 OFFSET Repeater Offset Frequency0.000 ~ 29.950 MHz 0.600 193 SCAN Scan resume method TO/ CO/ SE TO 374 M.CH Memory channel capacity 50/ 100 50 265 M.NAME Memory name 6 characters – 326 MDFMemory name/ Frequency displayMN/ FRQ MN 337 SAV Battery saverOFF/ 0.2/ 0.4/ 0.6/ 0.8/ 1.0/ 2.0/ 3.0/ 4.0/ 5.01.0 558 APO Automatic Power-OFFOFF/ 30/ 60/ 90/ 120/ 180 min. 30 549 VOLUME Minimum volume/ Maximum volume 0 ~ 31 Mini:0Max: 31 6610 PASSWD Password protection 6 characters – 67](https://usermanual.wiki/JVC-KENWOOD/408000/User-Guide-774049-Page-24.png)

![19repeAter AcceSSMost repeaters use a receive and transmit frequency pair with a standard or non-standard offset (odd-split). In addition, some repeaters must receive a tone from the transceiver in order to gain access to the repeater. For details, consult your local repeater reference.■ Selecting an Offset Direction The offset direction allows your transmit frequency to be higher (+) or lower (–) than the receive frequency.1 Press [F], [8] to select an offset direction.• Continually press [F], [8] to toggle the functions as follows: “+” >> “–” >> OFF.2 Press any key other than the Selector (or [UP]/ [DOWN]) to store the setting.• The “ ” or “ ” icon appears above the frequency, indicating which offset direction is selected. If the offset transmission frequency falls outside the allowable range, transmission is inhibited. In this case, adjust the reception frequency so that the transmission frequency is within the band limits.Note: While using an odd-split memory channel or transmitting, you cannot change the offset direction.](https://usermanual.wiki/JVC-KENWOOD/408000/User-Guide-774049-Page-27.png)
![20■ Selecting an Offset Frequency To access a repeater which requires an odd-split frequency pair, change the offset frequency from the default which is used by most repeaters.1 Enter Menu mode and access Menu No. 2 (OFFSET).2 Press [MENU] and rotate the Selector (or press [UP]/ [DOWN]) to select the appropriate offset frequency value.• The selectable range is from 00.000 MHz to 29.950 MHz, in steps of 50 kHz.Note: After changing the offset frequency, the new offset frequency will also be used by Automatic Repeater Offset.ActiVAting the tone FunctionPress [F], [1] to turn the Tone function ON. • Continually press [F], [1] to toggle the functions as follows: Tone ON >> CTCSS ON >> DCS ON >> OFF.• The “ ” icon appears when the Tone function is ON.Selecting A tone FrequencyTo select the tone frequency required to access your desired repeater:1 Press [F], [2].• The current tone frequency appears on the display. The default frequency is 88.5 Hz.](https://usermanual.wiki/JVC-KENWOOD/408000/User-Guide-774049-Page-28.png)
![212 Rotate the Selector (or press [UP]/ [DOWN]) to select your desired frequency.3 Press any key other than the Selector (or press [UP]/ [DOWN]) to store the setting.Note: If you have set up a Memory channel with a tone setting, simply recall the Memory channel instead of setting up the tone frequency every time.Available Tone FrequenciesTone Frequency (Hz)67.0 82.5 100.0 123.0 151.4 186.2 225.7 69.3 85.4 103.5 127.3 156.7 192.8 229.1 71.9 88.5 107.2 131.8 162.2 203.5 233.6 74.4 91.5 110.9 136.5 167.9 206.5 241.8 77.0 94.8 114.8 141.3 173.8 210.7 250.3 79.7 97.4 118.8 146.2 179.9 218.1 254.1](https://usermanual.wiki/JVC-KENWOOD/408000/User-Guide-774049-Page-29.png)
![22tone Frequency id ScAnThis function scans through all tone frequencies to identify the incoming tone frequency on a received signal. You can use this function to find which tone frequency is required by your local repeater.1 Press [F], [2](1s) to start the Tone Frequency ID scan.• When the transceiver receives a signal, scan starts. The decimal point blinks during scan.• While the transceiver is receiving a signal during Tone Freq. ID Scan, the signal is emitted from the speaker.• To reverse the scan direction, rotate the Selector (or press [UP]/ [DOWN]).• When the tone frequency is identified, a beep sounds and the identified frequency blinks.2 Press [MENU] to program the identified frequency in place of the current tone frequency.• Press any key other than [ ] or [MON] to exit the Scan function.Note: Some repeaters do not re-transmit the access tone in the downlink signal. In this case, check the other station’s uplink signal to detect the repeater access tone.](https://usermanual.wiki/JVC-KENWOOD/408000/User-Guide-774049-Page-30.png)
![23AutoMAtic repeAter oFFSet (k type only)This function automatically selects an offset direction, according to the frequency on the 2 m band. The transceiver is programmed for offset directions as shown below. To obtain an up-to-date band plan for repeater offset direction, contact your national Amateur Radio association.1 Enter Menu mode and access Menu No. 25 (ARO).2 Press [MENU] and rotate the Selector (or press [UP]/ [DOWN]) to select “ON”.3 Press [MENU] to store the setting.• You will be transmitting on an offset frequency value determined from your offset setting value {page 19} and an offset direction depending on your selected frequency. Refer to the settings below for offset directions:Under 145.100 MHz: No offset (Simplex operation)145.100 ~ 145.499 MHz: Minus (–) offset145.500 ~ 145.599 MHz: No offset (Simplex operation)146.000 ~ 146.399 MHz: Plus (+) offset146.400 ~ 146.599 MHz: No offset (Simplex operation)146.600 ~ 146.999 MHz: Minus (–) offset147.000 ~ 147.399 MHz: Plus (+) offset147.400 ~ 147.599 MHz: No offset (Simplex operation)147.600 ~ 147.999 MHz: Minus (–) offset148.000 MHz and higher: No offset (Simplex operation)](https://usermanual.wiki/JVC-KENWOOD/408000/User-Guide-774049-Page-31.png)
![24reVerSe FunctionAfter setting a separate receive and transmit frequency, you can exchange these frequencies using the Reverse function. This allows you to manually check the strength of signals you receive directly from other stations, while using a repeater. If the station’s signal is strong, move to a simplex frequency to continue the contact and free up the repeater.Press [F], [7] to turn the Reverse function ON or OFF.• When the Reverse function is ON, the “ ” icon will appear on the display.Note:◆ If the transmit frequency is outside the allowable transmit frequency range when using Reverse, pressing [PTT] will cause an error tone to sound and transmission will be inhibited.◆ If the receive frequency is outside the receive frequency range when using Reverse, an error tone will sound and Reverse will not operate.◆ The ARO (Automatic Repeater Offset) will not function when Reverse is ON.◆ You cannot switch Reverse ON or OFF while transmitting.AutoMAtic SiMplex checker (ASc)While using a repeater, ASC periodically monitors the strength of signals you receive directly from the other stations.Press [7](1s) to turn the ASC function ON or OFF.• When the ASC is ON, the “ ” icon will appear on the display.](https://usermanual.wiki/JVC-KENWOOD/408000/User-Guide-774049-Page-32.png)
![25• While direct contact is possible, without the use of a repeater, the “ ” icon will blink.Note:◆ Pressing [PTT] will cause the icon to stop flashing.◆ ASC does not function if you are using simplex operation.◆ ASC does not function while scanning.◆ Activating ASC while using Reverse will switch the Reverse function OFF.◆ If you recall a Memory channel or the Call channel, and those channels are set up with the Reverse function switched ON, the ASC will switch OFF.◆ ASC causes received signals to be momentarily intermitted every 3 seconds.](https://usermanual.wiki/JVC-KENWOOD/408000/User-Guide-774049-Page-33.png)
![26MEMORY CHANNELSIn memory channels, you can store frequencies and related data that you frequently use so that you do not need to reprogram that data every time. You can quickly recall a programmed channel through simple operation. A total of 100 memory channels (50 when using the Memory Name function) are available for storing frequencies, modes and other operating conditions.Number of memory ChaNNelsThe transceiver must be configured to either 100 memory channels without using the Memory Name function or 50 memory channels with the Memory Name function (default).To change the memory channel capacity:1 Enter Menu mode and access Menu No. 4 (M.CH).2 Press [MENU] and rotate the Selector (or press [UP]/ [DOWN]) to select “50” or “100”.3 Press [MENU].• “SURE ? ” appears.4 Press [MENU] to accept.Note:◆ If you change the memory channel capacity from 100 channels to 50 channels after having stored data in channels 50 to 99, all memory channel data in channels 50 to 99 will be erased.◆ If you change the memory channel capacity from 50 channels to 100 channels after storing Memory names in those channels, all Memory](https://usermanual.wiki/JVC-KENWOOD/408000/User-Guide-774049-Page-34.png)
![28storiNg simplex frequeNCies or staNdard repeater frequeNCies1 Press [VFO].2 Rotate the Selector (or press [UP]/ [DOWN]) to select your desired frequency.• You can also directly enter a desired frequency using the keypad.3 If storing a standard repeater frequency, select the following data:• Offset direction• Tone function, if necessary• CTCSS/ DCS function, if necessary If storing a simplex frequency, you may select other related data (CTCSS or DCS settings, etc.).4 Press [F], [MR].• A memory channel number appears and blinks.• The “ ” icon appears when the channel contains data.• Memory channel number L0/U0 ~ L2/U2 {page 38} and Pr (Priority Channel) {page 40} are reserved for other functions.5 Rotate the Selector (or press [UP]/ [DOWN]) to select the memory channel in which you want to store the data.6 Press [MR] to store the data to the channel.storiNg odd-split repeater frequeNCiesSome repeaters use a pair of reception and transmission frequencies with a non-standard offset. If you store two separate frequencies in a memory channel, you can operate on those repeaters without programming the offset frequency and direction.1 Store the desired reception frequency and related data by following the procedure given for simplex or standard repeater frequencies.2 Rotate the Selector (or press [UP]/ [DOWN]) to select the desired transmission frequency.3 Press [F], [MR].](https://usermanual.wiki/JVC-KENWOOD/408000/User-Guide-774049-Page-36.png)
![294 Rotate the Selector (or press [UP]/ [DOWN]) to select the memory channel you programmed in step 1.5 Press [PTT] + [MR].• The transmission frequency is stored in the memory channel.Note: When you recall an odd-split memory channel, “ ” and “ ” appear on the display. To confirm the transmission frequency, press [F], [7] (Reverse function).CoNtiNuously storiNg iN simplex or split ChaNNelsUsing the following procedure will be easier to sequentially store frequencies and related data in more than one simplex or split memory channel.1 Press [PTT] + [MON] + Power ON to enter Memory Storage mode.2 Press [ ], then rotate the Selector (or press [UP]/ [DOWN]) to select the desired frequency and select related data as required (Tone, CTCSS, DTSS, etc.).• Pressing [ ] toggles frequency select (the MHz dot blinks) or channel select (the channel number blinks).3 Press [ ] again, then rotate the Selector (or press [UP]/ [DOWN]) to select the desired memory channel.4 Press [MR].• The selected frequency and related data are stored in the memory channel, and the memory channel number is incremented.](https://usermanual.wiki/JVC-KENWOOD/408000/User-Guide-774049-Page-37.png)
![305 Turn the transceiver power OFF, then ON to exit Memory Storage mode. To also store a transmit frequency, proceed to step 6; otherwise proceed to step 10.6 Press [ ], then rotate the Selector (or press [UP]/ [DOWN]) to select the desired transmit frequency.• The frequency selected in step 3 will be used as a receive frequency.7 Press [ ], then rotate the Selector (or press [UP]/ [DOWN]) to select the memory channel that you selected in step 4.8 Press [F].9 Press [PTT] + [MR].• The selected transmit frequency is stored in the memory channel, and the memory channel number is incremented.10 Repeat steps 3 to 5 (simplex) or 3 to 9 (split) to sequentially store in memory channels.• Turn the transceiver power OFF, then ON to exit Continuous Memory Storage mode.Note:◆ If you use Keypad Direct Entry {page 12} to select a frequency in step 2, you need not press [ ].◆ You cannot start Storage mode when in Channel Display mode.◆ You cannot start Menu mode when in Memory Storage mode.reCalliNg a memory ChaNNel■ Using the Selector (or [UP]/ [DOWN] keys)1 Press [MR] to enter Memory Recall Mode. The memory channel last used is recalled.2 Rotate the Selector (or press [UP]/ [DOWN]) to select your desired memory channel.• You cannot recall an empty memory channel.• To restore VFO Mode, press [VFO].](https://usermanual.wiki/JVC-KENWOOD/408000/User-Guide-774049-Page-38.png)
![31■ Using a Numeric Keypad You can also recall a memory channel by entering a desired memory channel number with the keypad.1 Press [MR] to enter Memory Recall Mode.2 Press [#], then enter the channel number using 2 digits.• For example, to recall channel 49, press [#], [4], [9].• You can also enter a memory channel number that is less than 10 by pressing [#] after entering the channel number. For example, to recall memory channel 9, press [#], [9], [#]. You can also press [#], [0], [9].Note:◆ You cannot recall an empty memory channel. An error beep sounds.◆ You cannot recall the Program Scan memory channels (L0/U0 ~ L2/U2), Priority Channel (Pr) using the numeric keypad.◆ When you recall an odd-split memory channel, “ ” and “ ” appear on the display. Press [F], [7] (Reverse function) {page 24} to display the transmission frequency.◆ After recalling a memory channel, you may modify data such as Tone or CTCSS. However, these settings are cleared once you select another channel or the VFO Mode. To permanently store the data, overwrite the channel contents {page 28}.CleariNg a memory ChaNNelTo clear the data from an individual memory channel:1 Recall the memory channel you want to clear.2 Press and hold [ ] (POWER) to switch the transceiver OFF.3 Press [MR] + Power ON .• A confirmation message appears.4 Press [MR] to clear the channel data.](https://usermanual.wiki/JVC-KENWOOD/408000/User-Guide-774049-Page-39.png)
![32• The contents of the memory channel are cleared.• To exit clearing the memory channel, press any key other than [ ] and [MR].Note:◆ Call Channel data cannot be cleared.◆ You can also clear the Priority Channel, and L0/U0 ~ L2/U2 channels.◆ While the transceiver is in Channel Display Mode or Lock function is activated, you cannot clear the channel data.NamiNg a memory ChaNNelYou can name memory channels using up to 6 alphanumeric characters. When you recall a named memory channel, its name appears on the display in place of the stored frequency. Names can be call signs, repeater names, cities, names of people, etc. In order to use the Memory Name function, the memory channel capacity must be set to 50 channels. To change the memory channel capacity from 100 to 50, access Menu No. 4 (M.CH).1 Enter Menu mode and access Menu No. 5 (M.NAME).2 Press [MENU].• A blinking cursor appears.3 Rotate the Selector (or press [UP]/ [DOWN]) to select a desired alphanumeric character.• You can enter the following alphanumeric characters: 0 ~ 9, A ~ Z,-(hyphen), / (slash), and a space.• Press [CALL] to delete the character at the current cursor position.4 Press [MENU].• The cursor moves to the next digit.5 Repeat steps 3 and 4 to enter up to 6 digits.](https://usermanual.wiki/JVC-KENWOOD/408000/User-Guide-774049-Page-40.png)
![33• To complete the entry, press [MENU] without selecting a character.• After storing a Memory name, the Memory name appears in place of the operating frequency. However, you can still display the operating frequency, if desired. To display the frequency rather than Memory name, access Menu No. 6 (MDF) and select “FRQ”. This menu toggles the display mode between the Memory name (“MN“) and frequency display (“FRQ”).Note:◆ You cannot name the Call Channel {page 34}.◆ You cannot assign a Memory name to a channel that does not contain data.◆ You can overwrite stored names by repeating steps 1 to 5.◆ The stored name is erased when you clear the Memory channel data.memory -to- Vfo traNsferTransferring the contents of a Memory channel or the Call channel to the VFO can be useful if you want to search for other stations or a clear frequency, near the selected Memory channel or Call channel frequency.1 Press [MR] or [CALL] to enter Memory Recall mode or select the Call channel.2 Rotate the Selector (or press [UP]/ [DOWN]) to select your desired channel. (This step is not necessary when selecting the Call channel.)3 Press [F], [VFO].• The entire contents of the Memory channel or Call channel are copied to the VFO, and VFO mode is selected after the transfer is complete.](https://usermanual.wiki/JVC-KENWOOD/408000/User-Guide-774049-Page-41.png)
![34• When copying a transmit frequency from an odd-split Memory or Call channel, you must first turn the Reverse function ON before pressing [F], [VFO].Call ChaNNelThe Call Channel can be recalled instantly no matter what frequency the transceiver is operating on. For instance, you may use the Call Channel as an emergency channel within your group. In this case, Call Scan {page 40} will be useful.The default Call Channel frequency is 144.000 MHz.Note: Unlike memory channels 0 to 99, the Call Channel cannot be cleared.reCalliNg the Call ChaNNelPress [CALL] to recall the Call Channel.• The Call Channel frequency and “C” appear.• To return to the previous frequency, press [CALL] again.reprogrammiNg the Call ChaNNel1 Select your desired frequency and related data (Tone, CTCSS, DCS, or offset direction, etc.).• When you program the Call Channel as an odd-split channel, select a reception frequency first.2 Press [F], [CALL].• The selected frequency and related data are stored in the Call Channel. To also store a separate transmit frequency, continue with the following steps.3 Select the desired transmission frequency.4 Press [F].](https://usermanual.wiki/JVC-KENWOOD/408000/User-Guide-774049-Page-42.png)
![355 Press [PTT] + [CALL].• The separate transmission frequency is stored in the Call Channel.Note:◆ When you recall an odd-split Call Channel, “ ” and “ ” appear on the display.◆ Transmit offset status and Reverse status are not stored in an odd-split Call Channel.ChaNNel displayWhile in this mode, the transceiver displays only memory channel numbers (or Memory names if they have been stored) instead of frequencies.Press [PTT] + [MR] + Power ON.• The transceiver displays the memory channel number in place of the operating frequencies.To recover normal operation, turn the transceiver OFF and press [PTT] + [MR] + Power ON again.Note:◆ To enter the Channel Display Mode, you must have at least one memory channel that contains the data.◆ If the memory channel contains the Memory name data, the Memory name is displayed in place of the “CH” characters.](https://usermanual.wiki/JVC-KENWOOD/408000/User-Guide-774049-Page-43.png)
![36SCANScan is a useful feature for hands-off monitoring of your favorite frequencies.Becoming comfortable with all types of Scan will increase your operating efficiency.This transceiver provides the following types of scans:◆ Band Scan Scans all frequencies on the current band.◆ Program Scan Scans the specified frequency ranges stored in Memory channels L0/U0 ~ L2/U2.◆ Memory Scan Scans all frequencies stored in the Memory channels.◆ Call Scan Scans the Call channel as well as the currently selected VFO frequency or Memory channel.◆ Priority Scan Checks the activities on the Priority channel (Pr) every 3 seconds.Note:◆ When the CTCSS or DCS function is activated, the transceiver stops at a busy frequency and decodes the CTCSS tone or DCS code. If the tone or code matches, the transceiver unmutes. Otherwise, it resumes scanning.◆ Press and hold [MON] to pause scan in order to monitor the scanning frequency. Release [MON] to resume scanning.◆ Pressing [MENU] causes scan to stop.◆ Starting scan switches OFF the Automatic Simplex Check (ASC).◆ If you press any key other than the following keys during scan, the transceiver exits scan (excluding Priority Scan). Priority Scan stops while “PRI” is blinking: [F], [F] (1 s), [MON], Selector, and [F] then [MON].](https://usermanual.wiki/JVC-KENWOOD/408000/User-Guide-774049-Page-44.png)
![37seleCtiNg a sCaN resume methodThe transceiver stops scanning at a frequency or Memory channel on which a signal is detected. It then continues scanning according to which resume mode you have selected. You can choose one of the following modes. The default is Time-operated mode.◆ Time-Operated mode (TO) The transceiver remains on a busy frequency or Memory channel for approximately 5 seconds, and then continues to scan even if the signal is still present.◆ Carrier-Operated mode (CO) The transceiver remains on a busy frequency or Memory channel until the signal drops out. There is a 2 second delay between signal drop-out and scan resumption.◆ Seek mode (SE) The transceiver remains on a busy frequency or Memory channel even after the signal drops out and does not automatically resume scanning.1 Enter Menu mode and access Menu No. 6 (SCAN).2 Rotate the Selector (or press [UP]/ [DOWN]) to select a Scan Resume mode to “TO”, “CO” or “SE”.baNd sCaNThe transceiver scans the entire band of the frequency you selected. For example, if you are operating and receiving at 144.525 MHz, it scans all the frequencies available for the 2 m band. When the current VFO receive frequency is outside the Program Scan frequency range {page 38}, the transceiver scans the entire frequency range available for the current VFO.1 Press [VFO].2 Turn the Tuning control to select the frequency outside of the Program Scan frequency range.](https://usermanual.wiki/JVC-KENWOOD/408000/User-Guide-774049-Page-45.png)
![383 Press [VFO] (1s).• Scan starts at the current frequency.• The 1 MHz decimal blinks while scanning is in progress.• To reverse the scan direction, rotate the Selector clockwise (or press [UP]) <upward scan> or counterclockwise (or press [DOWN]) <downward scan>.4 To exit Band Scan, press [VFO] again.program sCaNYou can limit the scanning frequency range. There are 3 memory channel pairs (L0/U0 ~ L2/U2) available for specifying the start and end frequencies. Program Scan monitors the range between the start and end frequencies that you have stored in these memory channels. Before performing Program Scan, store the Program Scan frequency range to one of the memory channel pairs (L0/U0 ~ L2/U2).■ Storing a Program Scan Frequency Range1 Press [VFO].2 Press [MENU] and rotate the Selector (or press [UP]/ [DOWN]) to select your desired frequency for the lower limit.3 Press [F], [MR] then rotate the Selector (or press [UP]/ [DOWN]) to select a memory channel from L0 ~ L2.4 Press [MR] to store the start frequency in the memory channel.5 Rotate the Selector (or press [UP]/ [DOWN]) to select your desired end frequency.6 Press [F], [MR] then rotate the Selector (or press [UP]/ [DOWN]) to select a channel from U0 ~ U2, corresponding to the channel selected in step 4.](https://usermanual.wiki/JVC-KENWOOD/408000/User-Guide-774049-Page-46.png)
![39• For example, if you selected L0 in step 4, select U0 for the end frequency.7 Press [MR] to store the end frequency in the memory channel.■ Using Program Scan1 Press [VFO].2 Rotate the Selector (or press [UP]/ [DOWN]) to select a frequency within the frequency range of memory channel L0/U0 ~ L2/U2.3 Press [VFO] (1 s) to start Program Scan.4 To stop Program Scan, press [VFO] or [PTT].Note:◆ If you press [MON], Program Scan temporarily pauses. Release [MON] to resume scanning.◆ The transceiver stops scanning when it detects a signal.◆ If more than 2 Program Scan channel pairs are stored and overlaps the frequency range among the pairs, the smaller Program Scan memory channel number has priority.◆ To perform Program Scan, the “L“ channel must be lower than the “U“ channel. memory sCaN1 Press [MR] (1 s).• Scan starts from the last memory channel number and ascends up through the channel numbers (default). • Rotate the Selector (or press [UP]/ [DOWN]) to change the scanning direction.2 To stop Memory Scan, press [MR] or [PTT].](https://usermanual.wiki/JVC-KENWOOD/408000/User-Guide-774049-Page-47.png)
![40Note:◆ You must have 2 or more memory channels that contain data, excluding special function memory channels (L0/U0 ~ L2/U2, and PRI).◆ You can perform Memory Scan in Channel Display Mode {page 35}.Call sCaN1 Select the frequency (in VFO or Memory Recall Mode) you want to monitor.• In VFO Mode, rotate the Selector (or press [UP]/ [DOWN]) to select the desired frequency.• In Memory Recall Mode, rotate the Selector (or press [UP]/ [DOWN]) to select the memory channel you want to monitor.2 Press [CALL] (1 s) to start the Call Scan.3 The Call Channel and the selected VFO frequency or memory channel are monitored.4 To stop Call Scan, press [CALL] or [PTT].Note:◆ The transceiver stops scanning when it detects a signal.◆ You can perform Call Scan even if the recalled memory channel has been locked out {page42}.priority sCaNYou may sometimes want to check your favorite frequency activities while monitoring other frequencies. In this case, use the Priority Scan function. Priority Scan checks the activities of the Priority Channel every 3 seconds. If the transceiver detects a signal on the Priority Channel, it recalls the frequency.Note: If you do not operate any control or key for 3 seconds after the signal drops, the transceiver returns to the original frequency and resumes Priority Scan.](https://usermanual.wiki/JVC-KENWOOD/408000/User-Guide-774049-Page-48.png)
![41■ Programming Priority Channels1 Press [VFO].2 Rotate the Selector (or press [UP]/ [DOWN]) to select your desired Priority Channel frequency.3 Select selective call functions, if necessary.4 Press [F], [MR].• The memory channel number appears and blinks.5 Rotate the Selector (or press [UP]/ [DOWN]) to select “Pr”.6 Press [MR] to store the data on the Priority Channel.■ Using Priority Scan1 Press [F], [6] to turn the Priority Scan ON or OFF.• The “ ” icon appears when the Priority Scan is ON.Note:◆ If a signal is received on a Priority Channel with a CTCSS or DCS code programmed, the Priority Channel is recalled only when the programmed tone/ code matches.◆ Press and hold [MON] to pause Priority Scan when the transceiver is not displaying the Priority Channel. Release [MON] to resume Priority Scan.◆ If you clear the Priority Channels, Priority Scan stops.◆ You can also press any key other than [ ], [MON], [F] then [MON] (Squelch lrvel adjustment), [F] then [MENU] (Key lock) and [PTT] to exit Priority Scan while “PRI” is blinking.](https://usermanual.wiki/JVC-KENWOOD/408000/User-Guide-774049-Page-49.png)
![42memory ChaNNel loCkoutYou can lock out memory channels that you prefer not to monitor during Memory Scan.1 Press [MR] to enter Memory Recall Mode.2 Rotate the Selector (or press [UP]/ [DOWN]) to select the memory channel to be locked out.3 Press [F], [9] to toggle locked out ON and OFF.• The “ ” icon appears below the memory channel number, indicating the channel is locked out.Note:◆ The Program Scan memories (L0/U0 ~ L2/U2), Priority Channel (Pr) cannot be locked out.◆ Even if a memory channel is locked out, you can perform Call Scan between the Call Channel and the memory channel.](https://usermanual.wiki/JVC-KENWOOD/408000/User-Guide-774049-Page-50.png)
![43SELECTIVE CALCoNtiNuous toNe Coded squelCh system (CtCss)You may sometimes want to hear calls only from specific persons. The Continuous Tone Coded Squelch System (CTCSS) allows you to ignore (not hear) unwanted calls from other persons who are using the same frequency. To do so, select the same CTCSS tone as selected by the other persons in your group. A CTCSS tone is subaudible and is selectable from among 42 tone frequencies.Note: CTCSS does not cause your conversation to be private. It only relieves you from listening to unwanted conversations.■ Using CTCSSPress [F], [1] 2 times to turn the CTCSS function ON.• Continually press [F], [1] to cycle through the functions as follows: Tone ON >> CTCSS ON >> DCS ON >> OFF.• The “ ” icon appears when the CTCSS function is ON.Note:◆ You cannot use the CTCSS and Tone/ DCS functions simultaneously. Switching the CTCSS function ON after having activated the Tone/ DCS functions deactivates the Tone/ DCS functions.◆ If you select a high CTCSS frequency, receiving audio or noise that contains the same frequency portions may cause CTCSS to function incorrectly. To prevent noise from causing this problem, select an appropriate squelch level}.](https://usermanual.wiki/JVC-KENWOOD/408000/User-Guide-774049-Page-51.png)
![44■ Selecting a CTCSS Frequency1 Press [F], [5].• The current CTCSS frequency appears on the display.2 Rotate the Selector (or press [UP]/ [DOWN]) to select your desired frequency.3 Press any key other than the Selector (or [UP]/ [DOWN]) to store the setting.• The selectable CTCSS frequencies are the same as those for the Tone frequency. Refer to the table on the following page for the available CTCSS frequencies.Available CTCSS Tone FrequenciesTone Frequency (Hz)67.0 82.5 100.0 123.0 151.4 186.2 225.7 69.3 85.4 103.5 127.3 156.7 192.8 229.1 71.9 88.5 107.2 131.8 162.2 203.5 233.6 74.4 91.5 110.9 136.5 167.9 206.5 241.8 77.0 94.8 114.8 141.3 173.8 210.7 250.3 79.7 97.4 118.8 146.2 179.9 218.1 254.1 ■ CTCSS Frequency ID Scan This function scans through all CTCSS frequencies to identify the incoming CTCSS frequency on the received signal. You may find this useful when you cannot recall the CTCSS frequency that the other persons in your group are using.1 Press [F], [5] (1s) to start the CTCSS Frequency ID scan.• While scanning, the decimal point of CTCSS frequency blinks.](https://usermanual.wiki/JVC-KENWOOD/408000/User-Guide-774049-Page-52.png)
![45• To reverse the scan direction, rotate the Selector (or press [UP]/ [DOWN]).• When a CTCSS frequency is identified, the identified frequency appears and blinks.2 Press [MENU] to program the identified frequency in place of the current CTCSS frequency.• Press any key other than [ ] or [MON] to exit the Scan function.Note:◆ Received signals are monitored through the speaker while scanning is in progress.◆ CTCSS Frequency ID Scan does not scan the tone if a signal is not detected.](https://usermanual.wiki/JVC-KENWOOD/408000/User-Guide-774049-Page-53.png)
![46digital Coded squelCh (dCs)Digital Code Squelch (DCS) is another application which allows you to ignore (not hear) unwanted calls. It functions the same way as CTCSS. The only differences are the encode/ decode method and the number of selectable codes. For DCS, you can select from 104 different codes.■ Using DCSPress [F], [1] 3 times to turn the DCS function ON.• Continually press [F], [1] to cycle through the functions as follows: Tone ON >> CTCSS ON >> DCS ON >> OFF.• The “ ” icon appears when the DCS function is ON.Note: You cannot use the DCS function and CTCSS/ Tone functions simultaneously. Switching the DCS function ON after having activated the CTCSS/ Tone functions deactivates the CTCSS/ Tone functions.■ Selecting a DCS Code1 Press [F], [4].• The current DCS code appears on the display.2 Rotate the Selector (or press [UP]/ [DOWN]) to select your desired code.3 Press any key other than the Selector (or press [UP]/ [DOWN]) to store the setting.](https://usermanual.wiki/JVC-KENWOOD/408000/User-Guide-774049-Page-54.png)
![47Available DCS Code023 025 026 031 032 036 043 047051 053 054 065 071 072 073 074114 115 116 122 125 131 132 134143 145 152 155 156 162 165 172174 205 212 223 225 226 243 244245 246 251 252 255 261 263 265266 271 274 306 311 315 325 331332 343 346 351 356 364 365 371411 412 413 423 431 432 445 446452 454 455 462 464 465 466 503506 516 523 526 532 546 565 606612 624 627 631 632 654 662 664703 712 723 731 732 734 743 754■ DCS Code ID Scan This function scans through all DCS codes to identify the incoming DCS code on the received signal. You may find this useful when you cannot recall the DCS code that the other persons in your group are using.1 Press [F], [4] (1s) to start the DCS code ID scan.• While scanning, the decimal point between “DCS” and the DCS code blinks.• To reverse the scan direction, rotate the Selector (or press [UP]/ [DOWN]).• When a DCS code is identified, the identified DCS code appears and blinks.](https://usermanual.wiki/JVC-KENWOOD/408000/User-Guide-774049-Page-55.png)
![482 Press [MENU] to program the identified DCS code in place of the current DCS code. • Press any key other than [ ] or [MON] to exit the Scan function.Note:◆ Received signals are monitored through the speaker while scanning is in progress.◆ DCS Code ID Scan does not scan the code if a signal is not detected.](https://usermanual.wiki/JVC-KENWOOD/408000/User-Guide-774049-Page-56.png)
![49DTMF FUNCTIONSThis transceiver provides you with 10 dedicated DTMF memory channels. You can store a DTMF number (16 digits max.) in each of these channels to recall later for speed dialing.Manual DialingThe numeric keypad functions as a DTMF keypad; the 12 keys found on a touch-tone phone plus 4 additional keys (A, B, C, D) on the rightmost column.To perform Manual Dialing, follow the steps below.1 Press and hold [PTT] to transmit.2 While transmitting, press the keys in sequence on the keypad, to send the DTMF tones.• The corresponding DTMF tones are transmitted and monitored through the speaker.Frequency(Hz) 1209 1366 1477 1633697 1 2 3 A770 4 5 6 B852 7 8 9 C941 0 # D• When DTMF TX Hold is ON, you do not need to continuously press [PTT] to remain in Transmission Mode. However, Transmission Mode is retained for only 2 seconds after pressing a key, so if the next key is not pressed within this time limit, the transceiver stops transmitting.](https://usermanual.wiki/JVC-KENWOOD/408000/User-Guide-774049-Page-57.png)
![50DTMF TX HolDThis function causes the transceiver to remain in Transmission Mode for 2 seconds after you release each key. So, you can release [PTT] while sending the DTMF tones.1 Enter Menu mode and access Menu No. 21 (DTH).2 Press [MENU] and rotate the Selector (or press [UP]/ [DOWN]) to select “ON”.3 Press [MENU] to store the setting.auToMaTic DialerIf you use the 10 dedicated memory channels to store DTMF numbers, you do not need to remember a long string of digits.■ Storing a DTMF Number in Memory1 Enter Menu mode and access Menu No. 19 (DTMF.MR).2 Press [MENU] and rotate the Selector (or press [UP]/ [DOWN]) to select your desired DTMF memory channel number from 0 to 9.3 Press [MENU].• The DTMF code entry display appears and the last digit blinks.4 Rotate the Selector (or press [UP]/ [DOWN]) to select a DTMF code.](https://usermanual.wiki/JVC-KENWOOD/408000/User-Guide-774049-Page-58.png)
![51• Press [CALL] to delete the character at the current cursor position.• On the transceiver display, DTMF code “ ” is represented by “E” and “#” is represented by “F”.• You can also enter a DTMF code using the keypad. Simply enter your desired DTMF codes on the keypad.5 Press [MENU] to select the DTMF code and move the cursor to the next digit.6 Repeat steps 5 and 6 to enter up to 16 digits.7 To complete the entry, press [MENU] without selecting a DTMF code. To confirm the stored DTMF number, perform steps 1 and 2, then press [MON]. The programmed DTMF code scrolls through the display without transmitting.■ Transmitting a Stored DTMF Number1 While pressing and holding [PTT], press [MENU].2 Release [MENU] (continue pressing [PTT]), then rotate the Selector (or press [UP]/ [DOWN]) to select the desired DTMF memory channel number.3 While still holding [PTT], press [MENU] again to transmit the selected DTMF tones.• The number stored in the channel scrolls across the display, accompanied by DTMF tones from the speaker.• After transmission, the frequency display is restored.• If you do not need to confirm the memory channel contents, press [0] ~ [9] instead of turning the Selector (or pressing [UP]/ [DOWN]) in step 2, to select a channel number. The stored DTMF number will be immediately transmitted. (You do not have to press [MENU] in step 3.)Note: If you select an empty DTMF memory channel and press [MENU], the frequency display is restored.](https://usermanual.wiki/JVC-KENWOOD/408000/User-Guide-774049-Page-59.png)
![52aDjusTing THe DTMF Tone TransMission speeD This transceiver allows you to configure the DTMF number transmission speed between Fast (default) and Slow. If a repeater cannot respond to the fast speed, adjust this parameter.1 Enter Menu mode and access Menu No. 20 (SPD).2 Press [MENU] and rotate the Selector (or press [UP]/ [DOWN]) to select “FA” (Fast) or “SL” (Slow).• The tone duration of FAST is 50 ms and SLOW is 100 ms. “FA” (Fast) is the default setting.3 Press [MENU] to store the setting. aDjusTing THe pause DuraTion You can change the pause duration (a space digit) stored in memory channels. The default setting is 500 milliseconds.1 Enter Menu mode and access Menu No. 22 (PA).2 Press [MENU] and rotate the Selector (or press [UP]/ [DOWN]) to select 100, 250, 500, 750, 1000, 1500, 2000 ms.3 Press [MENU] to store the setting.DTMF lock Assuming you have a transceiver with the optional speaker microphone installed and you are carrying it in the holder or bag, you sometimes may want to disable the keypad to avoid accidental DTMF transmission. In this case, turn the DTMF Lock function ON.1 Enter Menu mode and access Menu No. 23 (DT.L).](https://usermanual.wiki/JVC-KENWOOD/408000/User-Guide-774049-Page-60.png)
![532 Press [MENU] and rotate the Selector (or press [UP]/ [DOWN]) to select “ON”.3 Press [MENU] to store the setting.](https://usermanual.wiki/JVC-KENWOOD/408000/User-Guide-774049-Page-61.png)
![54AUXILIARY FUNCTIONSapo (auTo power oFF)The transceiver switches OFF automatically if no keys or controls are pressed or adjusted for 30 minutes (default). One minute before the transceiver switches OFF, warning beeps sound for a few seconds and “APO” blinks. You can select the APO time from OFF (disable), 30 (default), 60, 90, 120, or 180 minutes.1 Enter Menu mode and access Menu No. 8 (APO).2 Press [MENU] and rotate the Selector (or press [UP]/ [DOWN]) to select the APO time.3 Press [MENU] to store the setting.Note:◆ APO does not function while the transceiver is scanning.◆ The APO timer starts counting down the time when no key presses, no control adjustments.◆ The APO warning beep sounds and “APO” appears 1 minute before the transceiver turns OFF.◆ The APO warning beep sounds even if Menu No. 16 (BP) is set to “OFF”.reMaining BaTTery capaciTyYou can confirm the remaining battery capacity when you transmit in low power.To check the remaining capacity:1 Press and hold [PTT].• The bar-graph shows the remaining battery capacity.](https://usermanual.wiki/JVC-KENWOOD/408000/User-Guide-774049-Page-62.png)
![55: High battery power: :: : Low battery powerNo display : Recharge or replace the batteries.2 Release [PTT] to exit.Note: You may not be able to transmit at high power if the battery remaining indicator shows low battery power■ Battery Life Before you operate the transceiver outside using a battery pack, it is important to know how long the battery pack will last. The operating times listed in the table below are measured under the following cyclic conditions: TX: 6 seconds, RX: 6 seconds, Stand-by: 48 seconds We recommend you carry extra battery packs with you, in case the battery pack becomes discharged.Battery Type Output Power Operating Time/ Hours (Approx.)PB-43N (7.2 V) H 5.5L 11.0BT-14 (9.0 V) H 4.0L 10.5BaTTery saverThe Battery Saver extends the operating time of the transceiver. It automatically activates when the squelch is closed and no key is pressed for more than 10 seconds. To reduce battery consumption, this function shuts the receiver circuit OFF for the programmed time, then momentarily turn it back ON to detect a signal.To program the receiver shut-off period for the battery saver:1 Enter Menu mode and access Menu No. 7 (SAV).](https://usermanual.wiki/JVC-KENWOOD/408000/User-Guide-774049-Page-63.png)
![562 Press [MENU] and rotate the Selector (or press [UP]/ [DOWN]) to select the receiver shutoff period from OFF, 0.2, 0.4, 0.6, 0.8, 1.0, 2.0, 3.0, 4.0, or 5.0 seconds.3 Press [MENU] to store the setting.Note:◆ The longer the shut-off period, the more you can save on battery consumption. However, there is a greater chance of missing a signal.◆ When the CTCSS/ DCS code matches during reception, the battery saver function is turned OFF.◆ Battery Saver does not function while scanning.BeaT sHiFTSince the transceiver uses a microprocessor to control various functions of the transceiver, the CPU clock oscillator’s harmonics or image may appear on some spots of the reception frequencies {page 73}. In this case, turn the Beat Shift function ON.1 Enter Menu mode and access Menu No. 17 (BS).2 Press [MENU] and rotate the Selector (or press [UP]/ [DOWN]) to select “ON”.3 Press [MENU] to store the setting.Note: Beat Shift status can be stored to each Memory channel.](https://usermanual.wiki/JVC-KENWOOD/408000/User-Guide-774049-Page-64.png)
![57Beep FuncTionThe Beep function provides confirmation of entry, error status, and malfunctions of the transceiver. We recommend you leave this function ON in order to detect erroneous operations and malfunctions.However, to turn the beep function OFF:1 Enter Menu mode and access Menu No. 16 (BP).2 Press [MENU] and rotate the Selector (or press [UP]/ [DOWN]) to select “OFF”.3 Press [MENU] to store the setting.The transceiver generates the following warning beeps even if the beep function is turned OFF.• APO warning beeps• Time-Out Timer warning beepNote: The beep output level is linked to the volume control position.Busy cHannel lockouTThis function is used in order to prevent transmitting on a channel or frequency that somebody else is currently using. When turned ON, an error beep sounds and you cannot transmit even if you press [PTT].1 Enter Menu mode and access Menu No. 13 (BCL).2 Press [MENU] and rotate the Selector (or press [UP]/ [DOWN]) to select “ON” .3 Press [MENU] to store the setting.](https://usermanual.wiki/JVC-KENWOOD/408000/User-Guide-774049-Page-65.png)
![58Frequency sTep sizeChoosing the correct frequency step size is essential in order to select your exact receive frequency using the Selector (or [UP]/ DOWN). You can select your desired frequency step size from: 5, 6.25, 10, 12.5, 15, 20, 25, 30, 50, or 100 (kHz).To change the frequency step size:1 Press [F], [3].• The current frequency step size appears.2 Rotate the Selector (or press [UP]/ [DOWN]) to select your desired frequency step size.3 Press [MENU] to store the setting.Note: If you change to a frequency step size that does not match the current operating frequency, the transceiver automatically adjusts the frequency to match the new frequency step size.Back ligHTTo illuminate the display and keys:Press [ ].• If no other key is pressed, the light turns OFF approximately 5 seconds after releasing [ ].• Press any key (including [PTT]) other than [ ] while the display and keys are lit to restart the 5-second timer.• Press [ ] while the display and keys are lit to immediately turn the light OFF.To keep the light ON continuously:Press [ ](1s).• The light remains ON until you press [ ](1s) again.](https://usermanual.wiki/JVC-KENWOOD/408000/User-Guide-774049-Page-66.png)
![59lock FuncTionThe lock function disables most of the keys to prevent you from accidentally activating a function.1 Press [F], [MENU] to turn the Lock function ON or OFF.• The “ ” icon appears when the Lock function is ON.• The following keys cannot be locked: [F], [ ] (POWER), [PTT], [ ], [MON], Volume control and microphone PF key.2 Press [F], [MENU] to unlock the keys.Note: You cannot perform the Microprocessor Reset {page 71} while the Lock function is ON.selecTor unlockWhile the Lock function is ON, you sometimes may want to rotate the Selector (or press [UP]/ [DOWN]) to change the frequency. In this case, turn the Selector unlock function ON.1 Enter Menu mode and access Menu No. 18 (SEL).2 Press [MENU] and rotate the Selector (or press [UP]/ [DOWN]) to select “ON”.3 Press [MENU] to store the setting.](https://usermanual.wiki/JVC-KENWOOD/408000/User-Guide-774049-Page-67.png)
![60MicropHone key lockThe Microphone Key Lock function will lock the microphone PF keys.1 Enter Menu mode and access Menu No. 24 (M.PF.).2 Press [MENU] and rotate the Selector (or press [UP]/ [DOWN]) to select “ON”.3 Press [MENU] to store the setting.MicropHone pF keys (opTional)If you have an optional SMC-33 or SMC-34 speaker microphone, you can access many transceiver settings without using transceiver keys or controls. Microphone keys 1, 2, and 3, located on the top of the microphone, are programmable with transceiver functions.The microphone key default assignments are as follows:Mic [1]: VFO Mic [2]: MR Mic [3]: CALLNote:◆ Turn the transceiver OFF before connecting the optional speaker microphone.◆ While Menu No. 24 (M.PF.) is “ON” or the Lock function is ON {page 59}, you cannot program PF keys.◆ If the LOCK switch on the rear of the microphone is ON, you must move the switch to the OFF position to program the keys.1 Press one of the following key combinations to reprogram the keys on the speaker microphone.• Press Mic [1] + Power ON to reprogram Mic [1].• Press Mic [2] + Power ON to reprogram Mic [2].• Press Mic [3] + Power ON to reprogram Mic [3].2 Press a key or the key combination you want to assign to the microphone key.](https://usermanual.wiki/JVC-KENWOOD/408000/User-Guide-774049-Page-68.png)
![61Key name [KEY] [F] + [KEY] [KEY](1s or 1.5s)[UP] Volume or Function Up 1−[DOWN] Volume or Function Down 1−[MENU] MENU Key lock −[CALL] CALL CALL IN −[VFO] VFO MR to VFO −[MR] MR MR IN −[MON] MON Squelch level −[1] Recalling CH 1 Signaling −[2] Recalling CH 2 Tone frequency −[3] Recalling CH 3 Frequency step −[4] Recalling CH 4 DCS code −[5] Recalling CH 5 CTCSS frequency Speaker attenuation 2[6] Recalling CH 6 Priorty scan −[7] Recalling CH 7 Reverse −[8] Recalling CH 8 Offset derection −[9] Recalling CH 9 Channnel lock out −[0] Recalling CH 0 − −[ ] Back light On −To keep the light ON 2[#] Direct entry Volume adjustment operation selection −[PTT] VFO < > MR Transmit power −Selector Volume or Function Up or Down 1[REMO 1] 3~[REMO 2]REMO 1 ~ REMO 3REMO 1 ~ REMO 3−1 After saving a function to a microphone PF key, changing the volume adjustment operation selection setting of the transceiver will not cause the operation of the microphone PF key to change.2 You do not need to continuously hold the PF key.3 “REMO 1” ~ “REMO 3” are the current settings for the microphone PF keys.](https://usermanual.wiki/JVC-KENWOOD/408000/User-Guide-774049-Page-69.png)
![62MoniTorWhen you are receiving while the squelch function is ON, weak signals may become intermittent. If the CTCSS or DCS function is ON, you may want to disable the squelch function temporarily to monitor the current channel activities. In both of these cases, use the Monitor function to temporarily disable the squelch function.To activate the Monitor function:1 Press and hold [MON].• The speaker is unmuted and you can monitor the signals.2 Release [MON] to return to normal operation.power-on MessageYou can change the Power-ON Message (a maximum of 6 characters) when the transceiver is turned ON.1 Enter Menu mode and access Menu No. 15 (P.ON.MSG).2 Press [MENU].• A blinking cursor appears.3 Rotate the Selector (or press [UP]/ [DOWN]) to select a character.• You can enter the following alphanumeric characters: 0 ~ 9, A ~ Z, - (hyphen), / (slash) and a space.4 Press [MENU].• The cursor moves to the next digit.5 Repeat steps 3 and 4 to enter up to 6 digits.](https://usermanual.wiki/JVC-KENWOOD/408000/User-Guide-774049-Page-70.png)
![63• Press [CALL] to delete the character at the current cursor position.6 To complete the entry, press [MENU] without selecting a character. Otherwise press [PTT] to cancel the entry.prograMMaBle vFoIf you want to limit the operating frequencies within a certain range, program the upper and lower frequency limits to the programmable VFO parameters. For example, if you select 144 MHz for the lower limit and 145 MHz for the upper limit, the tunable range will be limited from 144.000 MHz to 145.995 MHz.1 Press [VFO].2 Enter Menu mode and access Menu No. 1 (P.VFO).3 Press [MENU].• The current programmable frequency range for the band appears.4 Rotate the Selector (or press [UP]/ [DOWN]) to select the lower limit frequency in MHz.5 Press [MENU] to store the lower limit frequency.• The upper limit frequency blinks.6 Rotate the Selector (or press [UP]/ [DOWN] to select the upper limit frequency in MHz.7 Press [MENU] to store the upper limit frequency.](https://usermanual.wiki/JVC-KENWOOD/408000/User-Guide-774049-Page-71.png)
![64Note:◆ You cannot program the 100 kHz or lower digits.◆ The upper limit frequency cannot be set lower than the selected lower limit frequency.TiMe-ouT TiMerThe Time-out Timer limits the time of each transmission. The built-in Time-out Timer limits each transmission time to a maximum of 3, 5 or 10 (default) minutes. Just before the transceiver stops the transmission, a warning beep sounds. This function is necessary to protect the transceiver from thermal damage and can therefore not be turned OFF.1 Enter Menu mode and access Menu No. 12 (TOT).2 Press [MENU] and rotate the Selector (or press [UP]/ [DOWN]) to select “3”, “5” or “10”.3 Press [MENU] to store the setting.Note: A warning beep sounds even if you set Menu No. 16 (BP) to OFF.TX inHiBiTYou can inhibit the transmission to prevent unauthorized individuals from transmitting, or to eliminate accidental transmissions while carrying the transceiver.1 Enter Menu mode and access Menu No. 14 (TXI).2 Press [MENU] and rotate the Selector (or press [UP]/ [DOWN]) to select “ON”.](https://usermanual.wiki/JVC-KENWOOD/408000/User-Guide-774049-Page-72.png)
![653 Press [MENU] to store the setting.• “TX INH” appears and an error beep sounds if the transceiver tries to transmit while TX Inhibit is ON.eMergency sirenPress and hold the [0] key for at least 1.5 seconds to emit the siren from the speaker at the selected volume level.To set the Emergency siren volume level:1 Enter Menu mode and access Menu No. 11 (EMG).2 Press [MENU] and rotate the Selector (or press [UP]/ [DOWN]) to select “OFF”, “VOL”, “MED” or “MAX”. OFF: The Emergency siren does not sound. VOL: The Emergency siren sounds at the same level as the current volume setting. MED: The Emergency siren sounds using volume level 20, no matter what the current volume level setting is. MAX: The Emergency siren sounds using volume level 31, no matter what the current volume level setting is.3 Press [MENU] to store the setting.■ Using the Emergency Siren1 Press [0](1.5s), to turn the Emergency siren ON.• “EMG” appears.2 Press [0](1.5s) , [PTT] or power OFF, to turn the Emergency siren OFF.](https://usermanual.wiki/JVC-KENWOOD/408000/User-Guide-774049-Page-73.png)
![66• When the Emergency siren sounds, press [PTT] to turn it OFF (without transmitting).• While the Emergency siren is sounding and a signal is being received (as shown by the signal meter), you will be unable to hear the signal from the speaker.• You can set the sound volume of the Emergency siren.• The Emergency siren will continue to sound until it has been turned OFF.When using an earphone or headset, do not turn the Emergency Siren function ON.MiniMuM/ MaXiMuM voluMeThe transceiver retains the same volume level when the Volume control is turned to the lowest limit. Maximum Volume level allows you to limit the volume level to be no higher than the configured level even if a user attempts to increase the volume level.1 Enter Menu mode and access Menu No. 9 (VOLUME).2 Press [MENU] and rotate the Selector (or press [UP]/ [DOWN]) to select the minimum volume level (0 - 31).3 Press [MENU] and rotate the Selector (or press [UP]/ [DOWN]) to) to select the maximum volume level (0 - 31).4 Press [MENU] to store the setting.](https://usermanual.wiki/JVC-KENWOOD/408000/User-Guide-774049-Page-74.png)
 to turn the Speaker Attenuation function ON.• The “ ” icon appears when the Speaker Attenuation function is ON.2 Press [PTT] or [5](1s) to turn the Speaker Attenuation function OFF.passworD proTecTionIf password protection is activated, you cannot operate the transceiver without first entering your password after turning the transceiver power ON. The password can contain up to 6 digits.1 Enter Menu mode and access Menu No. 10 (PASSWD).2 Press [MENU].• A blinking cursor appears.3 Press the [0] ~ [9] keys corresponding to the password.• Password protection will activate when one or more characters are set.• Press [CALL] to delete an incorrect character.](https://usermanual.wiki/JVC-KENWOOD/408000/User-Guide-774049-Page-75.png)
![684 Press [MENU].• “RE-ENT” appears.5 Re-enter the same password, for conformation.6 Press [MENU] to confirm the password.• If you enter an incorrect password, an error tone sounds and the transceiver remains locked.When turning the transceiver power ON while the Password function is programmed, “PASSWD” appears on the display. You must enter the password to unlock the transceiver. To enter the password:1 Press the [0] ~ [9] keys corresponding to the password.• Press [CALL] to delete an incorrect character.2 Press [MENU] to confirm the password.• If you enter an incorrect password, an error tone sounds and the transceiver remains locked.](https://usermanual.wiki/JVC-KENWOOD/408000/User-Guide-774049-Page-76.png)
![71Note:◆ Record the date of purchase, serial number and dealer from whom this product was purchased.◆ For your own information, retain a written record of any maintenance performed on this product.◆ When claiming warranty service, please include a photocopy of the bill of sale or other proof-of-purchase showing the date of sale.cleanInGTo clean the case of this product, use a neutral detergent (no strong chemicals) and a damp cloth.mIcroproceSSor reSetIf your transceiver seems to be malfunctioning, resetting the microprocessor may solve the problem. The following 2 reset Modes are available. When performing the reset, you may lose memory data and stored information. Back up or write down important data before performing the reset.VFO Reset This resets the transceiver parameters excluding the stored DTMF Numbers in Memory {page 50} and memory channel contents.Full Reset This resets all transceiver parameters to the factory default values.Note: While operating the transceiver in Channel Display Mode {page 35}, you cannot reset the transceiver.■ VFO ResetWhen the transceiver is turned OFF:1 Press [PTT] + [VFO] + Power ON.• The VFO reset confirmation message, “VF.RST?”, appears.](https://usermanual.wiki/JVC-KENWOOD/408000/User-Guide-774049-Page-79.png)
![722 Press [VFO] to proceed.• “SURE ?” appears.• Press any key other than [ ] or [VFO] to exit the Reset Mode.3 Press [VFO] to reset the transceiver.■ Full ResetWhen the transceiver is turned OFF:1 Press [PTT] + [F] + Power ON.• The full reset confirmation message, “FL.RST?”, appears.2 Press [F] to proceed.• “SURE ? ” appears.• Press any key other than [ ] or [F] to exit the Reset Mode.3 Press [F] to reset the transceiver.](https://usermanual.wiki/JVC-KENWOOD/408000/User-Guide-774049-Page-80.png)
![74TROUBLESHOOTINGThe problems described in this table are commonly encountered operational malfunctions and are usually not caused by circuit failure.Problem SolutionNothing appears on the display when the transceiver is switched ON, or the display is blinking ON and OFF.The battery pack is discharged. Recharge the battery pack or replace the batteries.Most keys and the Selector do not function.Transceiver Lock function is ON (the “ ” icon is visible). Press [F], [MUNU] to turn OFF Transceiver Lock. The transceiver is in Channel Display Mode. Press [PTT] + [MR] + Power ON to exit Channel Display Mode.You cannot recall any memory channel.You have stored no data in any of the memory channels. Store the desired frequencies in the memory channels.You cannot select the exact desired frequency using the selector.The current frequency step size does not allow the frequency to be selected. Select an appropriate frequency step size. Press [F], [3] to change the frequency step size.Programmable VFO frequency range is too narrow. Expand the frequency range in Menu No. 1 (P.VFO).Increasing the Volume control does not allow you to hear audio.The selective call function (CTCSS or DCS) is ON. Turn OFF the selective call function.](https://usermanual.wiki/JVC-KENWOOD/408000/User-Guide-774049-Page-82.png)
![75Problem SolutionYou cannot transmit by pressing [PTT].You selected a frequency outside the allowable range. Select a frequency within theallowable transmit frequency range.You selected a transmit offset that places the transmit frequency outside the limit. Select a proper offset direction or offset frequency.TX inhibit is ON. Access Menu No.14 (TXI) and select “OFF”.The battery pack voltage is too low to transmit. Change or replace the battery.Repeater cannot be accessed.Wrong tone frequency is selected. Select a proper repeater access tone.Wrong repeater offset frequency is selected. Access Menu No. 2 (OFFSET) and select an appropriate offset frequency.Wrong offset direction is selected. Try other offset directions.DTMF tone cannot be transmitted.DTMF Lock is ON. Access Menu No. 23 (DT.L) and select “OFF”.](https://usermanual.wiki/JVC-KENWOOD/408000/User-Guide-774049-Page-83.png)