JVC KENWOOD 431500 UHF DIGITAL TRANSCEIVER User Manual
JVC KENWOOD Corporation UHF DIGITAL TRANSCEIVER
UserManual.wiki
>
JVC KENWOOD
>
431500 User Manual
>
Users Manual
Contents
1.
Users Manual
2.
User Manual
Users Manual
Navigation menu
Upload a User Manual
Namespaces
Wiki Guide
HTML
PDF
Info
Views
User Manual
Discussion / Help
Navigation


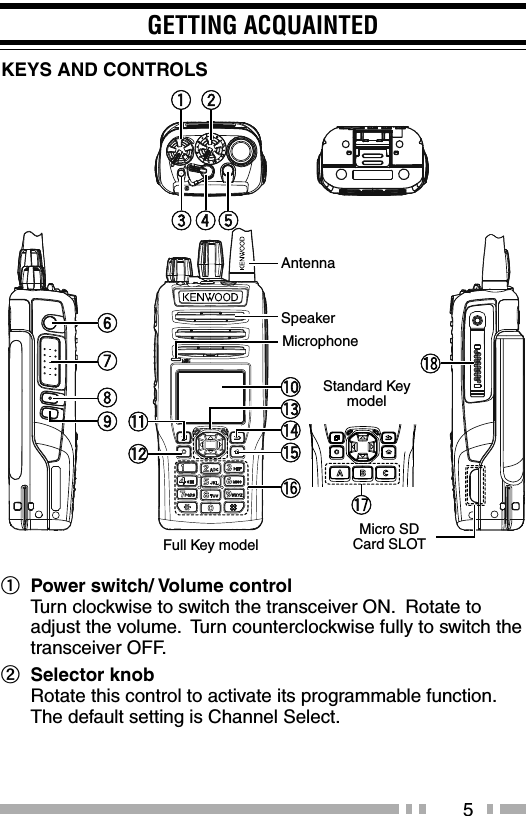
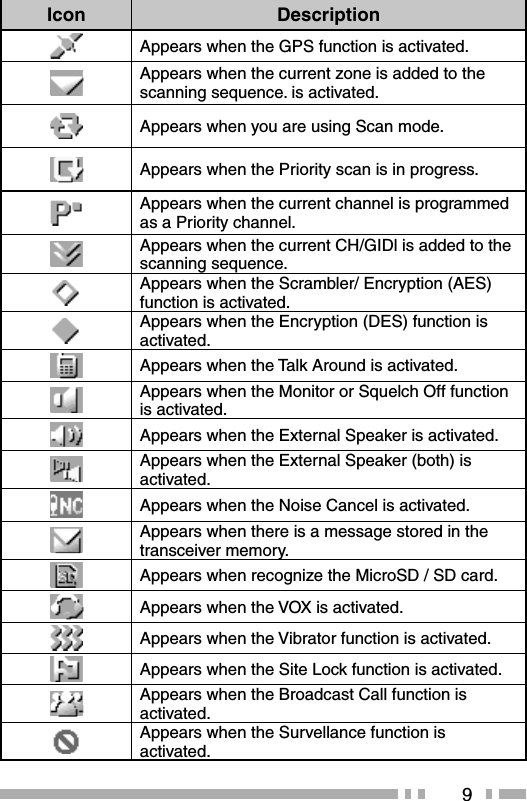
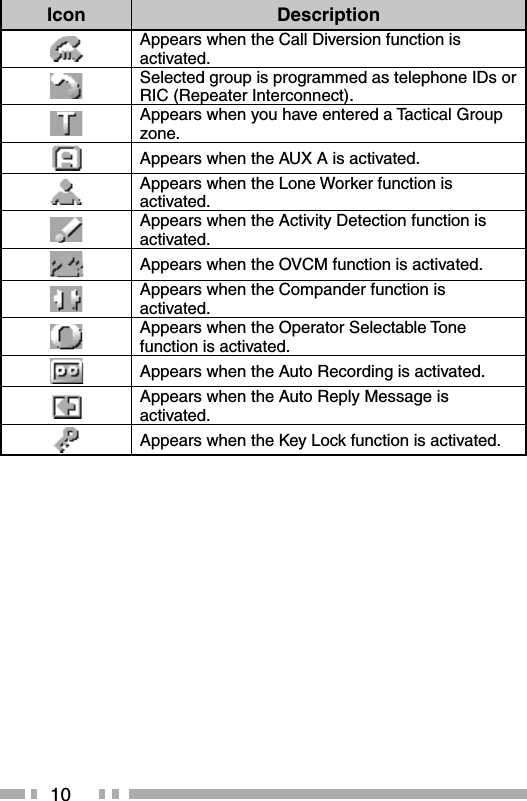
![6c Transmit/ Receive/ Battery low indicatorLights red while transmitting, green while receiving (on Conventional channels only), and orange when receiving an encoded call (i.e. 2-tone, DTMF signaling, etc.). Flashes red when the battery power is low while transmitting. Replace or recharge the battery pack when the battery power is low.Note: This indicator can be disabled by your dealer.d Lever switchSwitch the toggle position to activate its programmable function. The O position turns the function ON. The ● position turns the function OFF.e Auxiliary (orange) keyPress to activate its programmable function.f Side 1 keyPress to activate its programmable function. g PTT (Push-To-Talk) switchPress and hold this switch, then speak into the microphone to call a station.h Side 2 keyPress to activate its programmable function. Acts as an Up key for certain transceiver settings.i Side 3 keyPress to activate its programmable function. Acts as a Down key for certain transceiver settings.j LCD Display Refer to the display on page 8.k Menu key Press to activate its programmable function. The default key setting is [Menu].l Function key Press to activate its programmable function. The default key setting is [Function].](https://usermanual.wiki/JVC-KENWOOD/431500.Users-Manual/User-Guide-2347652-Page-20.png)
![7m Left/ Right/ Up/ Down key Press to activate its programmable function.n Back key Press to activate its programmable function. The default key setting is [Back].o Home key Press to activate its programmable function. The default key setting is [Home].p Keypad (Full key model only)Press the keys on the keypad to send DTMF tones. The keypad keys can also be programmed with secondary functions if a programmable function keys is programmed as Function.q A/ B/ C key (Standard key model only)Press to activate its programmable function. The programmed name appears on the bottom of the display.r Universal connectorConnect the (optional) speaker/ microphone here. Otherwise, keep the supplied cap in place.](https://usermanual.wiki/JVC-KENWOOD/431500.Users-Manual/User-Guide-2347652-Page-21.png)