JVC KENWOOD K1027 Digital Media Receiver User Manual Short Term Confidential
JVC KENWOOD Corporation Digital Media Receiver Short Term Confidential
(Short-Term Confidential) User Manual
ENGLISH 1
Introduction
Thank you for buying a Mitsubishi Motors product.
In order to fully utilize the functionality of this product and ensure safe and correct operation, please read this “User Manual” carefully before
operation. After reading this “User Manual,” ensure it is kept readily available, and refer to it again if you do not understand any points, or in the
event of problems.
Although the service area is expanding, Android Auto and CarPlay services are NOT available in some markets. Please check the latest
information concerning availability in your region from the below website.
• Android Auto: http://www.android.com/auto/#hit-the-road
• CarPlay: http://www.apple.com/ios/feature-availability/#applecarplay-applecarplay
LinkDisplayAudio_NAS.indb 1LinkDisplayAudio_NAS.indb 1 5/12/16 5:38 PM5/12/16 5:38 PM

2
Before Use ............................................. 3
User Terms .................................................................... 3
Important points on usage ..................................... 6
Important points on safety for the customer ... 7
Basics ..................................................... 8
Turning on/off the power ........................................8
Component names and functions ....................... 8
Common screen operations ................................... 8
Initial Settings ..................................... 13
Startup ..........................................................................13
Setting the clock .......................................................13
Connection .......................................... 15
Wired connection .....................................................15
Bluetooth connection .............................................17
General Operations ............................ 21
Adjusting the volume .............................................21
Turning off the audio source ................................21
Displaying the clock screen ..................................21
Turning off the screen ............................................22
Changing the brightness of the screen and the
button illumination—day/night setting
............22
Displaying the picture from the connected
camera ....................................................................22
Using voice control ..................................................23
Apps ..................................................... 25
Using Apps of iPhone—Apple CarPlay .............25
Using the Apps of an Android phone
—Android Auto™ ................................................27
Phone—Hands-free ............................ 29
Receiving a call ..........................................................29
Phone operations while talking ..........................30
Making a call ...............................................................31
Customizing the address book/favorites list
...34
Settings for mobile phone usage .......................36
iPod/iPhone ........................................ 38
Playback operations ................................................38
Settings for iPod/iPhone playback .....................40
USB ...................................................... 42
Playback operations ................................................42
Settings for USB playback .....................................44
Tuner—FM/AM/HD RadioTM........................... 46
About FM/AM radio .................................................46
About HD Radio™ Technology ............................46
Tuning in to a station ..............................................48
Presetting stations ...................................................49
Changing the HD Radio reception mode ........50
Scanning stations .....................................................51
Adjusting the sound while listening .................51
SiriusXM® Satellite Radio ................... 52
Activating subscription ..........................................52
Tuning in to a channel ............................................53
Presetting channels .................................................55
Replaying the contents ..........................................56
Using TuneMix™ ........................................................56
Using TuneStart™......................................................57
Using TuneScan™ .....................................................57
Receiving alerts for big plays
—SportsFlash™ ....................................................58
Receiving alerts for favorite games
—Game Alert .......................................................60
Receiving alerts for favorite contents
—Artist/Song Alert ............................................61
Restricting channel reception
—Parental Lock
....................................................64
Resetting SiriusXM settings ..................................66
Reading help information .....................................67
Adjusting the sound during playback ..............67
Bluetooth Audio ................................. 68
Playback operations ................................................68
Settings for Bluetooth audio device playback ...
69
External Components—HDMI ........... 71
Playing an HDMI device .........................................71
Adjusting the sound during playback ..............71
Steering Remote Control Switch
Operations ................................... 72
Settings ............................................... 73
Adjusting the sound ................................................73
Initializing the settings ...........................................75
Setting menu items .................................................76
Vehicle Information............................ 81
Checking Vehicle Information .............................81
Checking the Charging Cost.................................88
Checking the Air Conditioner Information .....88
Checking the current position of your car.......89
Vehicle Settings .................................. 90
Setting vehicle—ETACS .........................................90
Setting the timers for the air conditioning .....91
Setting the timers for charging the battery ....92
References ........................................... 93
Maintenance ..............................................................93
More information .....................................................93
Error message list .....................................................97
Troubleshooting .......................................................97
Specifications .............................................................99
Trademarks and licenses ..................................... 101
Software License Agreement .......... 104
Important Notice Concerning
the Software .............................. 105
Contents
Contents
LinkDisplayAudio_NAS.indb 2LinkDisplayAudio_NAS.indb 2 5/12/16 5:38 PM5/12/16 5:38 PM
ENGLISH 3
Before Use
Before Use
How to read this manual:
• The example screens used in this manual may
be different from those actually shown due to
the following reasons.
– Example screens are of plug-in hybrid
vehicles unless mentioned otherwise.
– Example screens are used to provide clear
explanations of the operations.
• This manual mainly explains operations using
the buttons on the monitor panel and touch
panel. For operations using the buttons on
the steering wheel, see page 72.
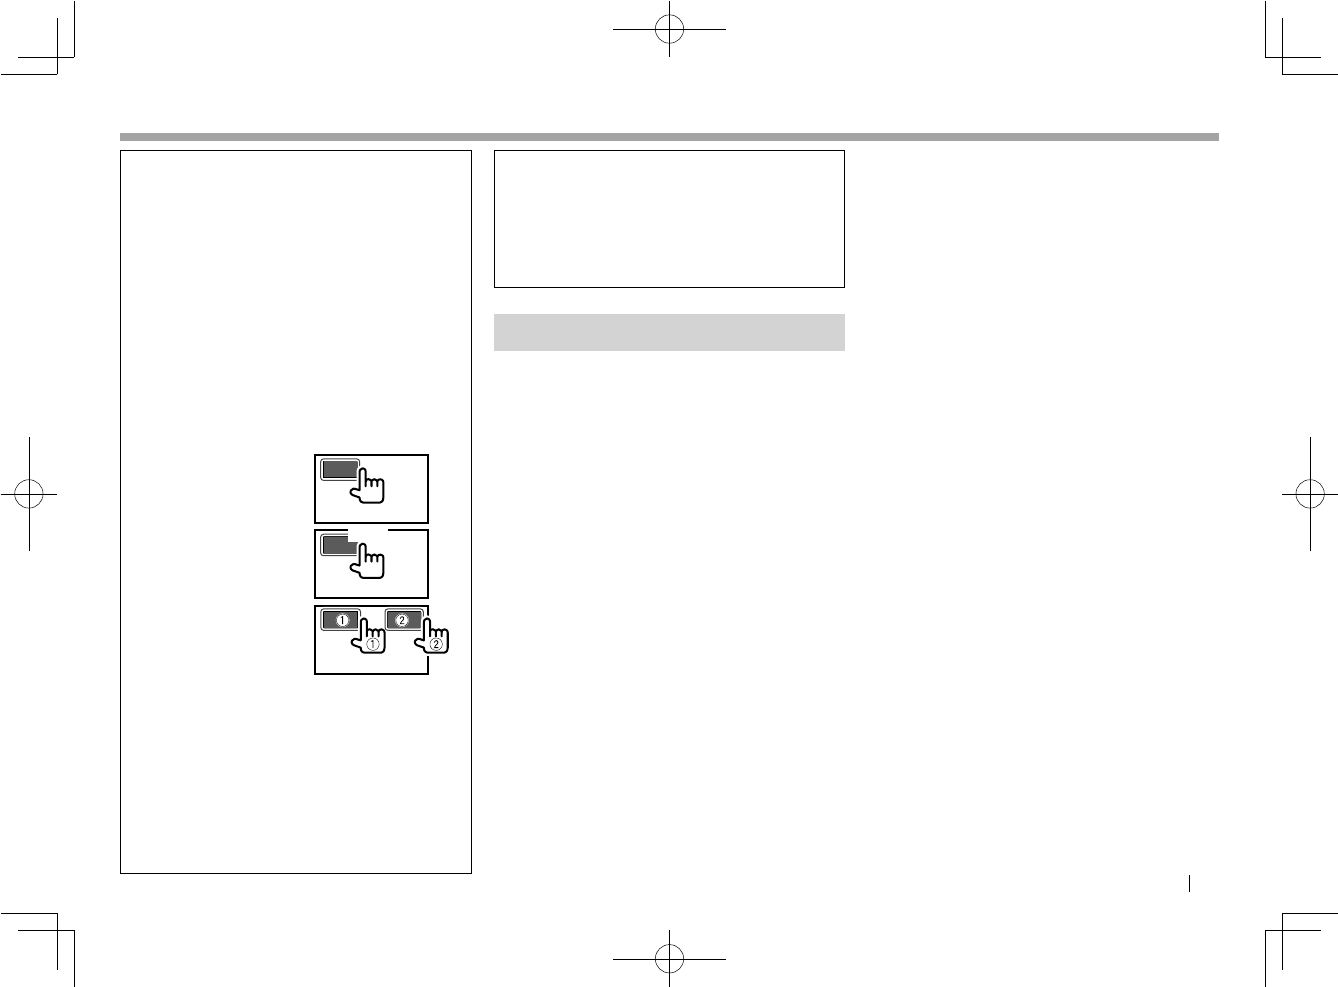
• The following illustrations are used to explain the
operations using buttons on the touch panel.
– Selecting a button:
– Touching and
holding a button:
– Selecting button 1
first, then selecting
button 2:
(Hold)
• < > Indicates the various screens/menus/
operations/settings that are displayed on the
touch panel.
• [ ] indicates the buttons on the touch panel.
• On-screen language: English is initially
selected for the on-screen language.
You can select on-screen language using
<Language Settings> on the <Settings>
screen. (Page 77)
V Caution on the volume setting:
Digital devices produce very little noise
compared with other sources. Lower the
volume before playing the digital sources
to avoid damaging the speakers by sudden
increase of the output level.
User Terms1
By using the product, the customer agrees that
the customer is bound by and complies with
these terms as well as any other written terms
and conditions, or policy that the customer may
receive or be provided with.
To the extent permitted by law, Mitsubishi
Motors reserves the right to modify, revise and
add to these user terms. Mitsubishi Motors will
exercise due care in order to notify the customer
in advance of the modification of the terms,
e.g., by publishing the information about such
modification on Mitsubishi Motors web page
[details of website]. The changes of these terms
enter into force within 14 days as of publishing it
on such website. If the customer does not agree
with the modifications, revisions or additions,
the customer’s sole and exclusive remedy is to
not use the product. In certain jurisdictions, the
limitations and exclusions contained in sections
1-3 will not apply to consumers.
1 Please note that the amendments included
within this document are summaries of our
understanding of the key points from each
local counsel in the launching countries and,
as such, are not intended to constitute legal
advice. It should also be noted that as the
User Terms are used with consumers this
means consumer laws which differ in each
of the launching countries will apply which
could make using the current User Terms
unenforceable as it is not always possible for
a supplier of goods when contracting with a
consumer, to exclude statutory warranties or
limit or exclude liability towards consumers.
1. Disclaimer of Warranties
1.1 SOME JURISDICTIONS DO NOT PERMIT THE
EXCLUSION OF IMPLIED WARRANTIES OR
CONSUMER OR STATUTORY GUARANTEES,
AND IN THOSE JURISDICTIONS THE
EXCLUSIONS BELOW APPLY TO THE
MAXIMUM EXTENT PERMITTED BY THE
APPLICABLE LAWS OF THE JURISDICTION. THE
CUSTOMER MAY HAVE OTHER RIGHTS WHICH
VARY BY JURISDICTION
1.2 THE CUSTOMER EXPRESSLY ACKNOWLEDGES
AND AGREES THAT THIS PRODUCT AND ANY
APPLICATION AND SOFTWARE INCLUDED
THEREIN IS PROVIDED “AS IS” AND “AS
AVAILABLE”, WITH ALL FAULTS. AND
WITHOUT ANY FURTHER WARRANTY OF
ANY KIND, WHETHER EXPRESS OR IMPLIED,
INCLUDING WITHOUT LIMITATION
Continued on the next page...
LinkDisplayAudio_NAS.indb 3LinkDisplayAudio_NAS.indb 3 5/12/16 5:38 PM5/12/16 5:38 PM

4
Before Use
Before Use
TO THE MAXIMUM EXTENT PERMITTED BY
LAW ANY IMPLIED WARRANTY OF TITLE,
MERCHANTABILITY, NON-INFRINGEMENT,
OR FITNESS FOR A PARTICULAR PURPOSE
CONCERNING THIS PRODUCT (INCLUDING
ANY APPLICATION AND SOFTWARE IN THIS
PRODUCT). MITSUBISHI MOTORS DOES NOT
GUARANTEE AND DISCLAIMS ANY WARRANTY
REGARDING THE ACCURACY OF DATA AND
INFORMATION PROVIDED BY THIS PRODUCT,
AND ANY APPLICATION AND SOFTWARE
IN THIS PRODUCT INCLUDING VEHICLE
INFORMATION OR DATA.
1.3 MITSUBISHI MOTORS MAKES NO
REPRESENTATIONS OR WARRANTIES THAT
THE PRODUCT WILL OPERATE AND WORK
PROPERLY IN CONNECTION WITH OR WITH
EVERY AND ALL TYPE OF CUSTOMER’S
DEVICE, EQUIPMENT, SMARTPHONE, AND
ANY APPLICATION AND SOFTWARE IN THE
PRODUCT, AND ONLY THE CUSTOMER
WILL BE RESPONSIBLE FOR PERFORMANCE,
FUNCTIONALITY, CONNECTIVITY WITH THE
CUSTOMER’S DEVICE, EQUIPMENT AND
SMARTPHONE, AND ANY APPLICATION
AND SOFTWARE IN THE PRODUCT, AND
ALL REPAIRS TO THE CUSTOMER’S DEVICE,
EQUIPMENT AND SMARTPHONE AND ANY
OTHER LOSSES AND DAMAGES ACTUALLY OR
ALLEGEDLY CAUSED BY THE PRODUCT AND
ANY APPLICATION AND SOFTWARE IN THE
PRODUCT.
1.4 MITSUBISHI MOTORS MAKES NO
REPRESENTATIONS OR WARRANTIES THAT
THE PRODUCT AND ANY APPLICATION OR
SOFTWARE IN THE PRODUCT WILL BE FREE
FROM ERROR, INTERRUPTION, CORRUPTION,
ATTACK, VIRUSES, INTERFERENCE, HACKING
OR OTHER SECURITY INTRUSION.
2. Limitation of Liability
2.1 WITHOUT LIMITING THE MANDATORY
WARRANTY RIGHTS RECOGNIZED BY THE
APPLICABLE LAWS AND TO THE MAXIMUM
EXTENT PERMITTED BY APPLICABLE LAW,
MITSUBISHI MOTORS, ITS SUBSIDIARIES,
AFFILIATES, EMPLOYEES, OFFICERS,
DIRECTORS AND AGENTS THEREOF ARE
NOT LIABLE IN ANY CASE WHATSOEVER
TO THE CUSTOMER: (A) WITH RESPECT TO
USE OF THE PRODUCT, THE APPLICATION,
SOFTWARE OR DATA IN THE PRODUCT; AND
(B) ERRORS, MISTAKES, OR INACCURACIES
OF THE APPLICATION, SOFTWARE, DATA OR
CONTENT IN THE PRODUCT; AND (C) ANY
BUGS, VIRUSES, TROJAN HORSES, WHICH
MAY BE TRANSMITTED TO OR THROUGH
THE APPLICATION OR SOFTWARE PROVIDED
BY ANY THIRD PARTY; AND (D) ANY
ERRORS OR OMISSIONS IN ANY DATA OR
CONTENT OR FOR ANY LOSS OR DAMAGE
OF ANY KIND WHATSOEVER INCURRED
AS A RESULT OF THE CUSTOMER’S USE OF
ANY DATA OR CONTENT POSTED, STORED
OR TRANSMITTED TO THE PRODUCT; AND
(E) ANY CORRUPTION, LOSS, CHANGE AND
ALTERNATION OF DATA OR CONTENT
POSTED, STORED OR TRANSMITTED TO THE
PRODUCT; AND (F) FOR ANY PERSONAL
INJURY OR PROPERTY DAMAGE ARISING
FROM OR RELATING TO THE CUSTOMER’S
USE OF THE PRODUCT, THE APPLICATION,
SOFTWARE OR DATA IN THE PRODUCT; AND
(G) ANY SERVICE, APPLICATION OR SOFTWARE
PROVIDED BY ANY THIRD PARTIES; AND (H)
FOR ANY INDIRECT, SPECIAL, INCIDENTAL,
CONSEQUENTIAL, PUNITIVE OR EXEMPLARY
DAMAGES ARISING OUT OF OR IN ANY WAY
RELATING TO THE CUSTOMER’S USE OF THE
PRODUCT, THE APPLICATION, SOFTWARE
OR DATA IN THE PRODUCT. MITSUBISHI
MOTORS ONLY SUPPLIES THE PRODUCT FOR
DOMESTIC AND PRIVATE USE. THE CUSTOMER
AGREES NOT TO USE THE PRODUCT FOR
ANY COMMERCIAL, BUSINESS OR RE-SALE
PURPOSE, AND MITSUBISHI MOTORS HAS NO
LIABILITY TO THE CUSTOMER FOR ANY LOSS
OF PROFIT, LOSS OF BUSINESS, BUSINESS
INTERRUPTION, OR LOSS OF BUSINESS
OPPORTUNITY.
2.2 NOTHING IN THESE TERMS SHALL LIMIT OR
EXCLUDE MITSUBISHI MOTORS LIABILITY
FOR (A) DEATH OR INJURY CAUSED BY ITS
NEGLIGENCE; (B) FRAUD OR FRAUDULENT
MISREPRESENTATION; OR (C) DAMAGES
CAUSED WILFULLY OR WITH GROSS
NEGLIGENCE.
LinkDisplayAudio_NAS.indb 4LinkDisplayAudio_NAS.indb 4 5/12/16 5:38 PM5/12/16 5:38 PM

ENGLISH 5
Before Use
Before Use
3. Indemnification
• To the maximum extent permitted by
applicable law and subject to section 2 above,
the customer agrees to indemnify, defend,
and hold harmless Mitsubishi Motors, its
subsidiaries, affiliates, employees, officers,
directors and agents thereof from any claims,
suits, damages, loses, costs, lawsuits, fines,
penalties, liabilities, interests, additional
taxes, demands, and expenses (including
legal and other professional fees) arising out
of or relating to: (a) the customer’s failure to
comply with or breach of these terms and any
other terms and conditions and policies to be
provided by Mitsubishi Motors.
4. Third-Party Applications
• The product may display or make available
content, data, information, services, software or
materials from third-party applications which
run on the customer’s device, equipment and
smartphone. Mitsubishi Motors has no control
over and is not responsible for examining or
evaluating the security, content, accuracy,
validity, legality or any other aspect of such
third-party applications. Mitsubishi Motors
assumes no responsibility or liability for the
availability, content, security, privacy policies,
practices, or performances of any such third
party application.
• To the maximum extent permitted by
applicable law, Mitsubishi Motors does not
warrant, guarantee or endorse any third-party
applications and is not liable to the customer
or any other party for its use or misuse of any
third-party application. The customer expressly
acknowledges and agrees that the use of
third-party applications is subject to the third
party’s terms and conditions and policies,
including its privacy policy, and such terms and
conditions and policies are agreed between the
customer and the third party. The customer is
consequently advised to check the third parties
applications’ terms and conditions and privacy
policies prior to accepting them. Mitsubishi
Motors is not responsible for any third-party
applications and any term and conditions
relating to the third-party applications.
Mitsubishi Motors may change, reduce, limit,
suspend, remove, modify access to or disable
access to any third-party applications at any
time and without notice to the customer
5. Modifications
• Mitsubishi Motors reserves the right to
improve, modify and change without liability
to the customer in its sole discretion: (a) the
specifications or external appearance of the
product. Mitsubishi Motors will exercise due
care in order to notify the customer in advance
of the modification of the specification or
external appearance of the product e.g.
by publishing the information about such
modification on Mitsubishi Motors web page
[details of website]. If the customer does not
agree with the improvements, modifications
and changes, the customer’s sole and exclusive
remedy is to not use the product.
• The customer expressly acknowledges and
agrees that this User Manual is for multiple
vehicle models, and there may be some
functions which may be not available and
workable in some vehicles models. To the
maximum extent permitted by applicable
law, Mitsubishi Motors will not be liable in
any case whatsoever for the difference or
inconsistency of functionality or performance
from or with this User Manual. The customer
further expressly acknowledges and agrees
that images and illustrations used in this User
Manual are either those used in development,
or for the purpose of explanations, and
these may differ from the actual images and
illustrations used in the product.
6. Force Majeure
• Mitsubishi Motors will not be liable for any
loss and damage due to acts, events or causes
constituting force majeure, including, but
not limited to, wars, riots, acts of terrorism,
epidemic diseases, civil commotion, fire,
earthquake, storm, flood, failure of public
utilities or common carriers, labor dispute,
general strikes, lock-outs, restrictions of law or
regulations.
Continued on the next page...
LinkDisplayAudio_NAS.indb 5LinkDisplayAudio_NAS.indb 5 5/12/16 5:38 PM5/12/16 5:38 PM

6
Before Use
Before Use
7. Others
• Mitsubishi Motors does not have access to and
does not process any personal information
stored in the product. The customer expressly
acknowledges and agrees that any personal
information (for example, addresses, telephone
numbers etc.) input into this product may be
stored in the memory of the product even if
the product is removed from the vehicle, and
the customer is solely responsible for proper
handling and management (including deleting)
of such personal information to protect privacy
including in the event of reselling or disposing
of this product. To the maximum extent
permitted by applicable law Mitsubishi Motors
will not be liable in any case whatsoever for the
personal information retained or stored in the
product.
• In certain jurisdictions, certain features of the
product may not be used while the vehicle
is moving or is stationary but not parked
under the road traffic laws that apply in those
jurisdictions. It is the responsibility of the driver
to understand and comply with the applicable
road traffic laws when using the product.
Important points on usage
• During operation, ensure that the vehicle is
not stationary in a garage or other confined
area with poor ventilation while the engine is
running. Otherwise, gas poisoning may result.
• For safety, the driver is not to operate this
product while the vehicle is moving. The driver
should also minimize as much as possible the
time spent viewing the screen. Being distracted
by the screen may result in an accident.
• Do not turn the volume up to the extent that
you cannot hear sounds outside the vehicle
while driving. Driving without being able to
hear sounds outside the vehicle may result in
an accident.
• Do not disassemble or modify the product.
Doing so may lead to malfunction, smoke, or
fire.
• Avoid relying on this product for guidance
to emergency facilities (hospitals, fire
departments, police stations, etc.). Contact
such emergency facilities directly.
• When operating, ensure that the vehicle is
stopped in a safe area in which stopping is
permitted.
• Continued usage of this product without the
motor or engine running may deplete the
vehicle’s battery, meaning that the motor or
engine may not be able to start.
Ensure this product is used while the motor or
engine is running.
• If you have parked the vehicle for a long time in
hot or cold weather, wait until the temperature
inside the vehicle has returned to normal
before operating the product.
• The following phenomena are characteristic
of LCD screens. They do not indicate a
malfunction.
– Small black dots or bright dots (red, blue,
green) on the screen.
– Slow screen movement during cold weather.
– The screen sometimes being dark in hot
weather.
– The picture quality, color tones, and
brightness vary depending on the viewing
angle.
• If you stick an commercially-available LCD
protective film or the like on the screen, it may
interfere with touch panel operation.
• If you operate the touch panel with a sharp
object (pen tip, finger nail, etc.), the screen
may be scratched and this product may be
damaged, leading to incorrect operation.
• Operating the touch panel with gloves on may
result in incorrect operation.
• Some operations are restricted while the
vehicle is moving. The driver should refrain
from operating this product while the vehicle is
moving. First stop the vehicle in a safe location,
then operate this product.
LinkDisplayAudio_NAS.indb 6LinkDisplayAudio_NAS.indb 6 5/12/16 5:38 PM5/12/16 5:38 PM

ENGLISH 7
Before Use
Before Use
Important points on safety for
the customer
This product features a number of pictorial
indications as well as points concerning handling
to ensure you can use the product correctly and
in a safe manner, as well as prevent injury or
damage to yourself, other users, or property.
V WARNING This indicates details regarding
handling of the product that,
if ignored, could be expected
to result in death or serious
injury.
V CAUTION This indicates details regarding
handling of the product that,
if ignored, could be expected
to result in personal injury or
property loss.
V WARNING
• The driver should not stare at the images on
the screen while driving.
Doing so may prevent the driver paying
attention to safe driving, and lead to an
accident.
• The driver should not perform complicated
operations while driving.
Doing so may prevent the driver paying
attention to safe driving, and lead to an
accident.
Therefore, stop the vehicle in a safe location
before performing such operations.
• Do not use this product if a malfunction has
occurred, such as when the screen does not
light up or no sound is audible.
This may lead to accident, fire, or electric shock.
• Ensure water or other foreign objects do not
enter the product.
Otherwise, smoke, fire, electric shock, or
malfunction may occur.
• In the event of abnormalities such as
smoke or a strange smell, stop using the
product immediately, and consult with your
Mitsubishi Motors Dealer.
Otherwise, an accident, fire, or electric shock
may occur.
• Do not disassemble or modify the product.
Doing so may lead to malfunction, fire, or
electric shock.
• During thunderstorms, do not touch the
antenna or the front panel.
Doing so may lead to electrical shock from
lightning.
V CAUTION
• Do not block ventilation holes or heat sinks
on the product.
Doing so may prevent heat from escaping
from within the product, leading to fire or
malfunction.
LinkDisplayAudio_NAS.indb 7LinkDisplayAudio_NAS.indb 7 5/12/16 5:38 PM5/12/16 5:38 PM
8
Basics
Basics
Turning on/off the power
The product is turned on when the power
(ignition) switch is set to the ACC or ON position,
and turned off when the power (ignition) switch
is set to the OFF position.
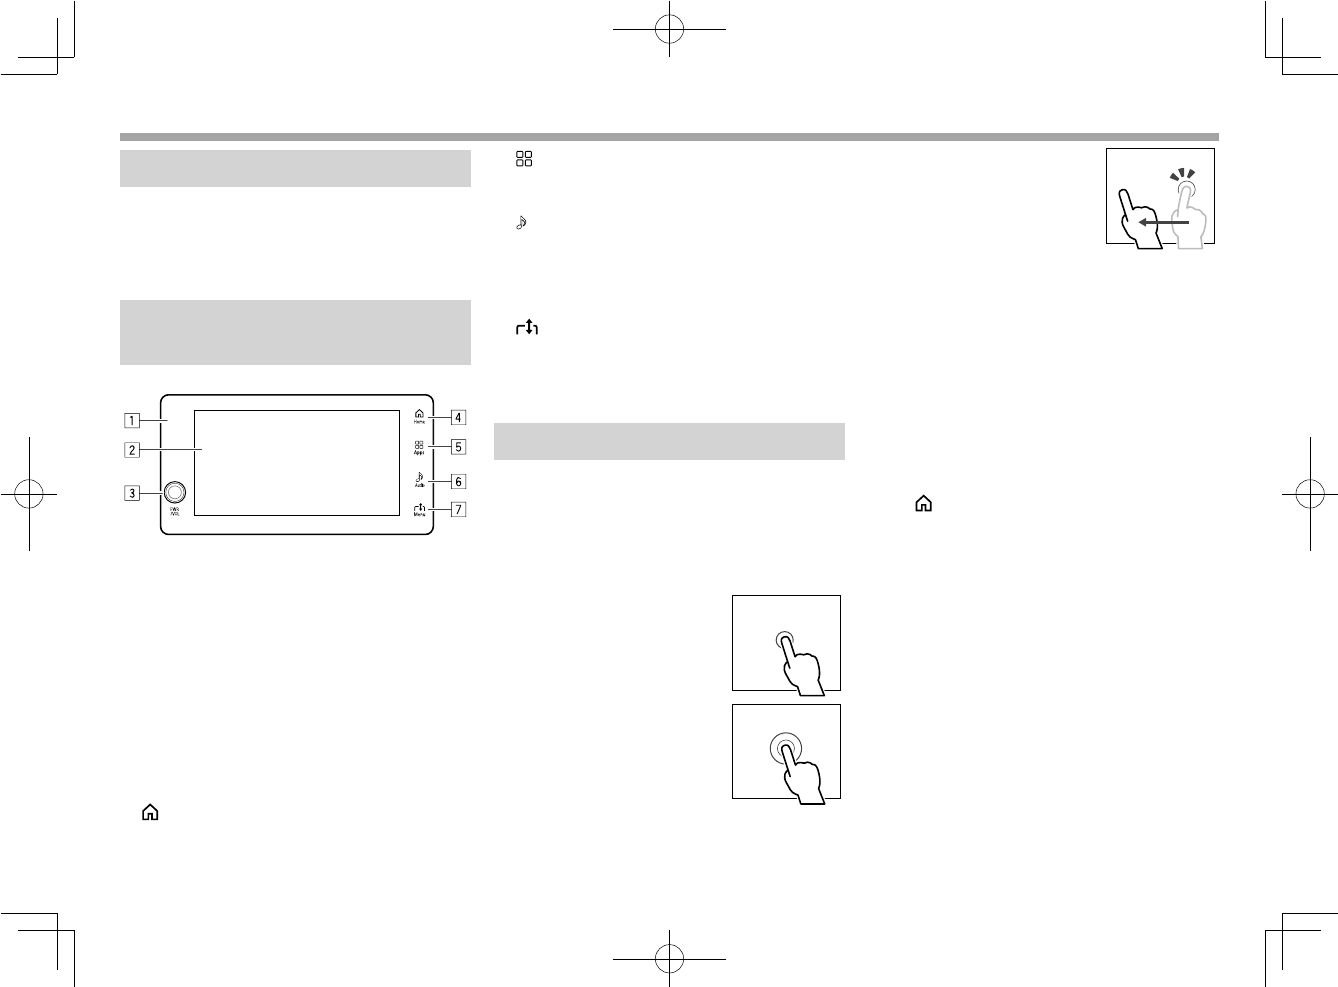
Component names and
functions
1 Monitor panel
2 Screen (touch panel)
3 PWR/VOL control
• Turns off audio. Playback stops while
playing the playback source. (Press)
(Page 21)
• If you press the button during “Audio Off,”
audio turns on and the last selected source
starts playback.
• If you press and hold the button, the screen
goes off and playback stops. (Page 21)
• Adjust the volume. (Turn) (Page 21)
4 Home button
Displays the <Home> screen. (Touch)
(See the rightmost column.)
5 Apps button
Displays the CarPlay/Android Auto screen.
(Touch) (Pages 26 and 28)
6 Audio button
• On the playback source control screen,
changes the playback source in turn.
• On the other screens, move to the current
playback source control screen.
7 Menu button
Displays/hides the menu window available
for the current source and function. (Touch)
(Page 11)
Common screen operations
❏Touch screen operations
To perform operations on the screen, you need to
touch, touch and hold, or flick to select an item,
display setting menu screen or change the page,
etc.
Touch
Touch the screen gently to
select an item on the screen.
Touch and hold
Touch the screen and keep
your finger in place until the
display changes or message is
displayed.
Flick
Slide your finger to the left or
right on the screen to change
the page.
• You cannot pinch the fingers to shrink or
enlarge the image on the screen.
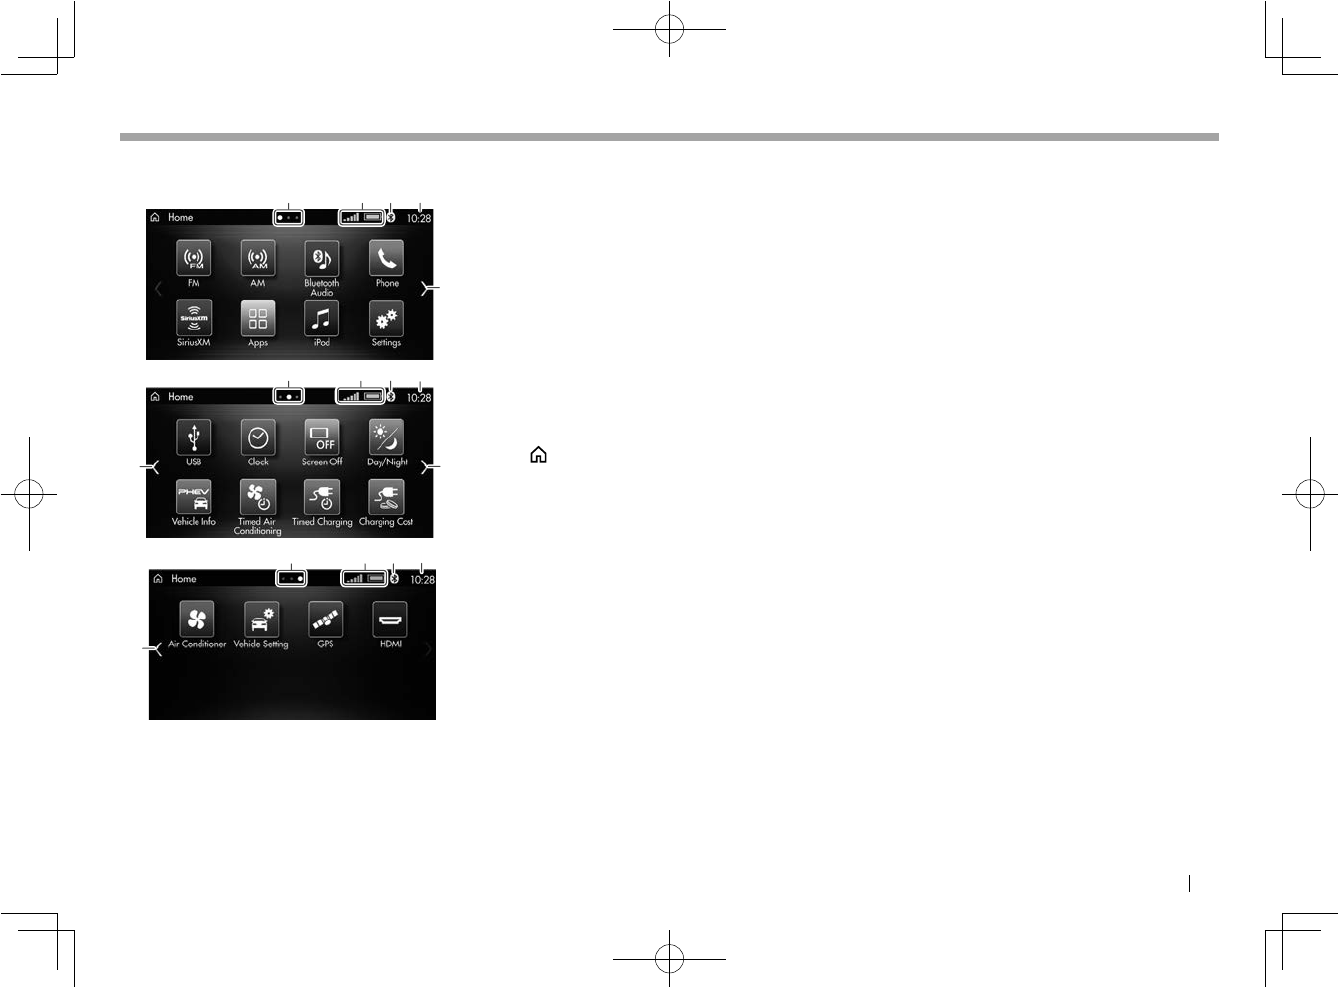
❏ <Home> screen descriptions
On the <Home> screen, you can select playback
sources, display setting screens, or display
information.
• The source and function icons to be displayed
differ among the car type.
To display the <Home> screen
Touch Home button on the monitor panel.
LinkDisplayAudio_NAS.indb 8LinkDisplayAudio_NAS.indb 8 5/12/16 5:38 PM5/12/16 5:38 PM
ENGLISH 9
Basics
Basics
Indication and buttons on the <Home> screen
5
3
3
2
2
1
1
5
4
4
5
5
3
21 4
1 Page indication
Shows the page currently displayed.
2 Battery level and signal strength of the
connected Bluetooth mobile phone
• Appears when a Bluetooth mobile phone is
connected.
3 Bluetooth indicator
• Lights up when a Bluetooth device is
connected.
• Touching this indicator displays the
<Bluetooth> setting screen. (Page 77)
4 Clock indication
• Touching this indication displays the
<Clock> setting screen. (Page 80)
5 Page scroll buttons
• You can also change the page by flicking
the screen.
• While displaying any page other than the
first page of the <Home> screen, you
can display the first page by touching the
Home button on the monitor panel.
Items selectable on the <Home> screen
[FM] Switches to the FM radio
broadcast. (Page 46)
[AM] Switches to the AM radio
broadcast. (Page 46)
[Bluetooth Audio]
Plays tracks on a device
connected via Bluetooth.
(Page 68)
[Phone] Displays the <Phone> screen to
make a call. (Page 31)
[SiriusXM]*1 Switches to the SiriusXM radio
broadcast. (Page 52)
[Apps]*2 Switches to the CarPlay screen
(Page 25) or Android Auto
screen (Page 27).
[iPod] Plays tracks on iPod/iPhone.
(Page 38)
[Settings] Displays the <Settings> screen
to configure the settings.
(Page 76)
[USB] Plays tracks on a USB device.
(Page 42)
[Clock] Displays the clock screen.
(Page 21)
[Screen Off] Turns off the screen. (Page 22)
[Day/Night] Changes the brightness of
the screen and the button
illumination. (Page 22)
[Vehicle Info]*3*4
Displays the vehicle information.
(Page 81)
[Timed Air Conditioning]*5
Sets the timers for air conditioner.
(Page 91)
[Timed Charging]*5
Sets the timers for battery
charging. (Page 92)
[Charging Cost]*6
Displays the electrical cost for
charging. (Page 88)
[Air Conditioner]*3
Displays the current operating
status of air conditioner
(Page 88)
[Vehicle Setting]*3
Customizes the vehicle functions.
(Page 90)
Continued on the next page...
LinkDisplayAudio_NAS.indb 9LinkDisplayAudio_NAS.indb 9 5/12/16 5:38 PM5/12/16 5:38 PM
10
Basics
Basics
[GPS] Displays the GPS information.
(Page 89)
[HDMI]*7 Plays content on a device
connected to the HDMI input
terminal. (Page 71)
*1 [SiriusXM] is displayed only for USA and Canadian models.
*2 When connecting iPhone compatible with CarPlay, [Apple
CarPlay] is displayed. When connecting an Android™ phone
compatible with Android Auto, [Android Auto] is displayed.
These cannot be displayed at the same time.
*3 This cannot be displayed depending on the car type.
*4
[Vehicle Info] for gasoline cars differs from the one shown here.
*5 This is displayed only for plug-in hybrid vehicles equipped with the
Mitsubishi Remote Control.
*6 This is displayed only for plug-in hybrid vehicles.
*7 [HDMI] is not displayed when the car is not equipped with the
HDMI input terminal or when an HDMI device is not connected.
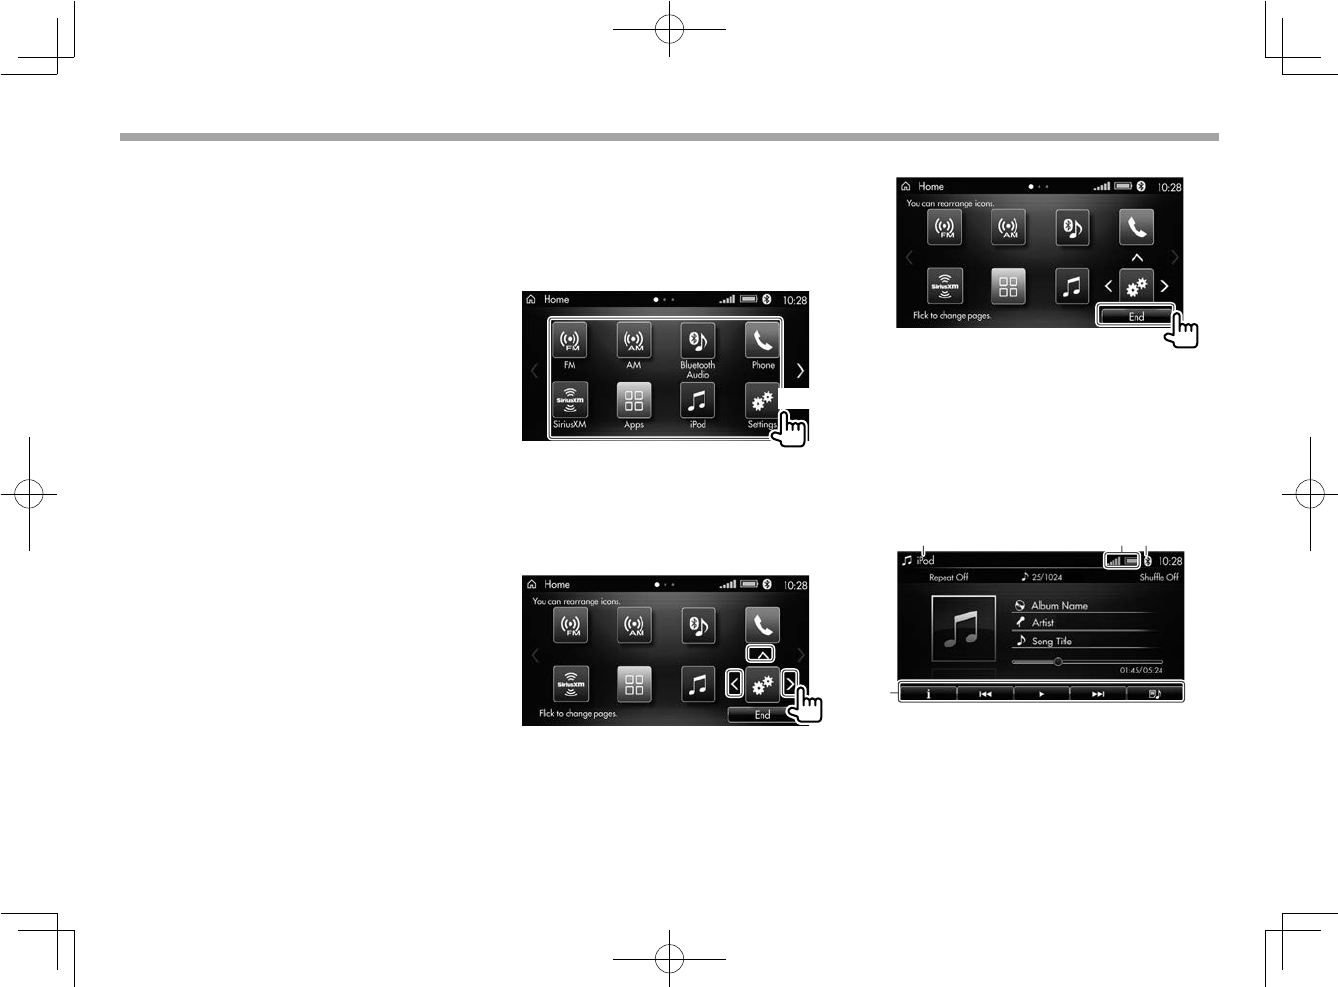
Customizing the <Home> screen
You can change the item order on the <Home>
screen.
1 Touch and hold the item you want to
move.
• To change the page, flick the screen.
(Hold)
Cursors appear around the selected item.
2 Move the item.
Touch the cursor of the desired direction
repeatedly until the item is placed in the
desired position.
3 Finish the procedure.
❏Source control screen descriptions
You can perform source playback operations on
the source control screen.
• The indicators and operation buttons displayed
on the screen differ among the sources.
Indications on the source control screen
132
4
LinkDisplayAudio_NAS.indb 10LinkDisplayAudio_NAS.indb 10 5/12/16 5:38 PM5/12/16 5:38 PM
ENGLISH 11
Basics
Basics
1 Source name
2 Battery level and signal strength of the
connected Bluetooth mobile phone
• Appears when a Bluetooth mobile phone is
connected.
3 Bluetooth indicator
• Lights up when a Bluetooth device is
connected.
4 Operation buttons
About the audio source status window
When you perform operations for the audio
source while displaying any screen other than the
audio source (such as the <Home> screen), the
status window for the audio source is displayed.
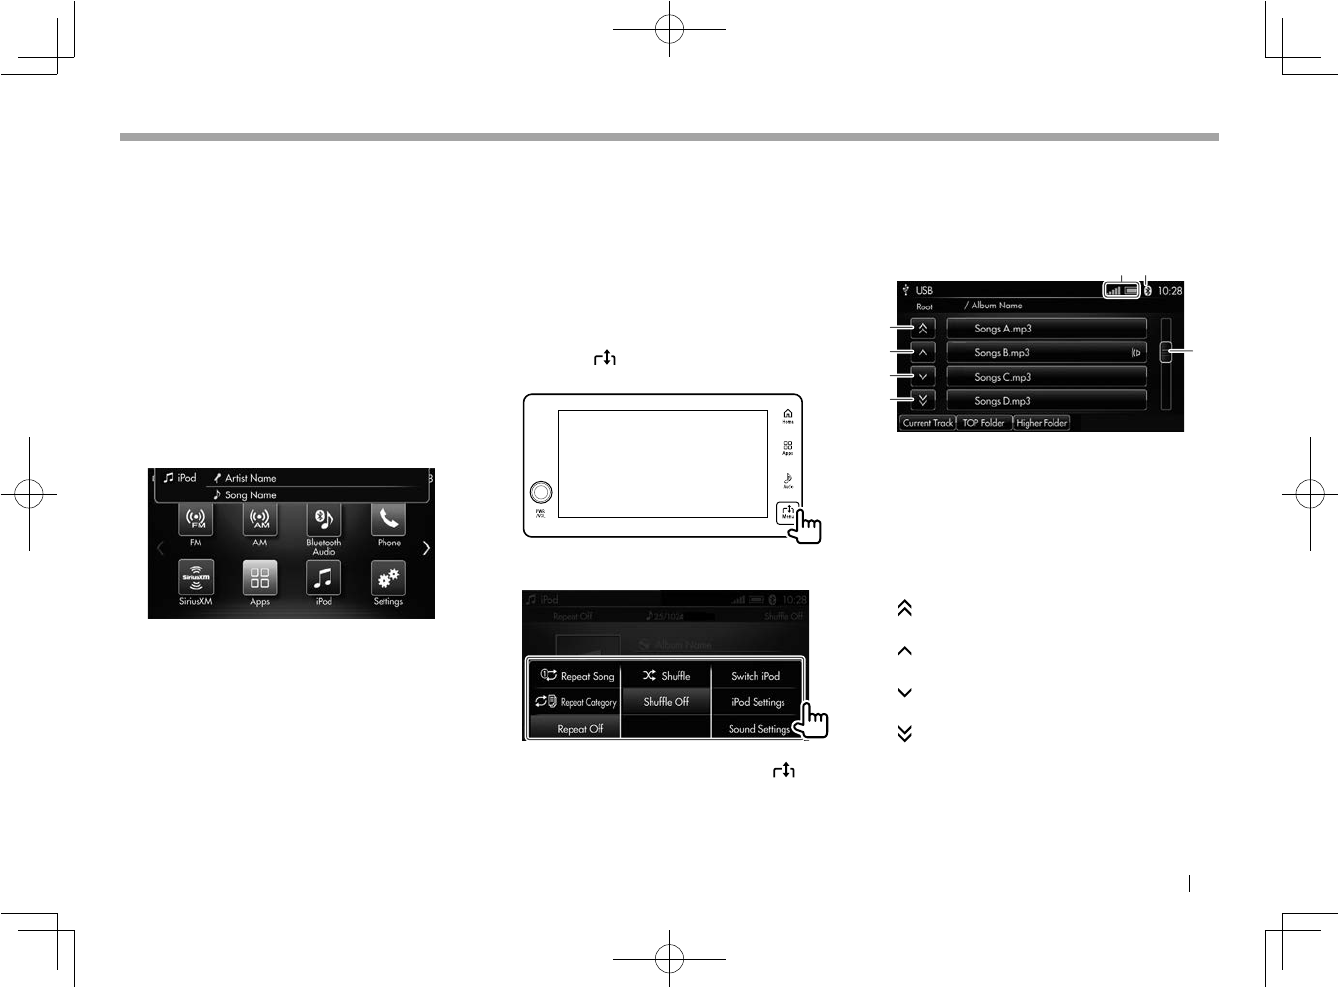
To display the menu window
You can display the menu window on the source
control screen. On the menu window, you can
change settings or jump to the <Settings>
screen.
• The items on the menu window differ among
the sources.
1 Display the menu window.
While the source control screen is displayed,
touch the Menu button on the monitor
panel.
2 Select an item.
• To hide the menu window, touch the Menu
button on the monitor panel again.
❏List screen descriptions
While displaying a list to make a selection, you
can display more items or change the page.
Indications and buttons on the list screen
21
3
4
5
6
7
1 Battery level and signal strength of the
connected Bluetooth mobile phone
• Appears when a Bluetooth mobile phone is
connected.
2 Bluetooth indicator
• Lights up when a Bluetooth device is
connected.
3 [ ] button
Displays the previous page.
4 [ ] button
Scrolls up the list.
5 [ ] button
Scrolls down the list.
6 [ ] button
Displays the next page.
7 Slider
Scrolls the list.
• For some lists, the initial letters of the
displayed items are shown in the balloon as
its category.
LinkDisplayAudio_NAS.indb 11LinkDisplayAudio_NAS.indb 11 5/12/16 5:38 PM5/12/16 5:38 PM
12
Basics
Basics
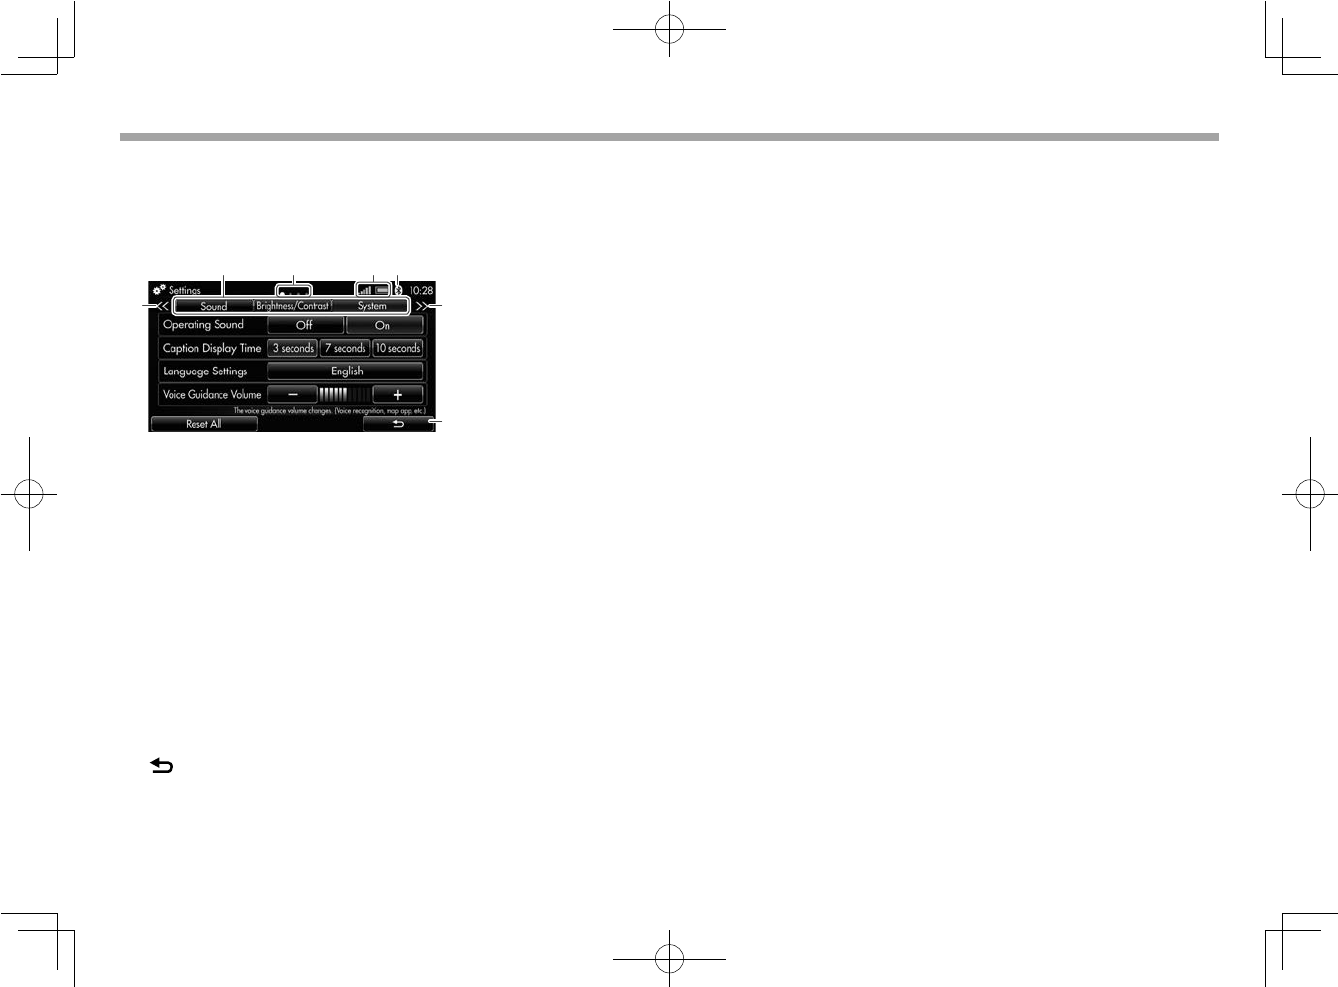
❏ <Settings> screen descriptions
You can change the precise settings. (Page 76)
Indications and buttons on the <Settings>
screen
1
6
7
5
432
1 Setting menu tabs
Selects the setting menu category.
2 Page indication
Shows the page currently displayed.
3 Battery level and signal strength of the
connected Bluetooth mobile phone
• Appears when a Bluetooth mobile phone is
connected.
4 Bluetooth indicator
• Lights up when a Bluetooth device is
connected.
5 [<<] button
Displays the previous setting tabs.
6 [>>] button
Displays the next setting tabs.
7 [ ] button
Returns to the previous screen.
LinkDisplayAudio_NAS.indb 12LinkDisplayAudio_NAS.indb 12 5/12/16 5:38 PM5/12/16 5:38 PM

ENGLISH 13
Initial Settings
Initial Settings
Startup
When the power (or ignition) switch is set to
the ACC or ON position, the product is turned
on. The first time the product is turned on, the
caution message screen is displayed. Perform the
following procedure to start the system.
1 Set the power (or ignition) switch to
the ACC or ON position.
2 Select the language used for on-
screen information.
3
Read the message, then touch [Agree].
The <Home> screen is displayed.
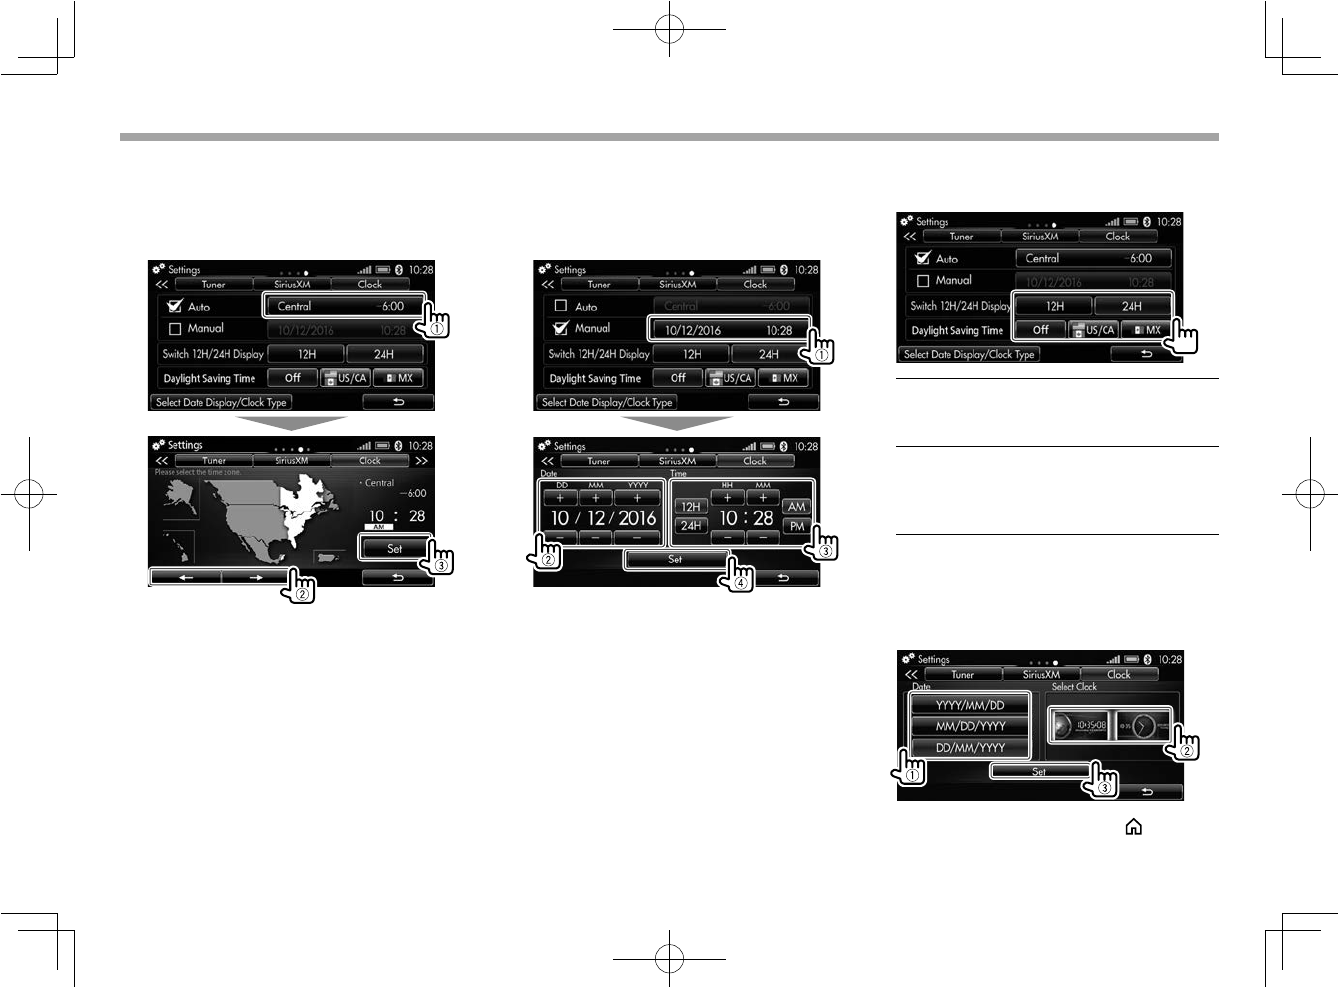
Setting the clock
Set the clock time displayed on the screen.
1 Display the <Settings> screen.
On the <Home> screen, touch [Settings].
2 Display the <Clock> settings screen
(1), then select the setting method
(2).
• Touch [<<]/[>>] repeatedly to display the
[Clock] setting tab. (Page 12)
<Auto> Synchronizes the clock time
with the GPS. (Go to step 3 .)
• When the GPS signal
reception is not good, it takes
time to set the clock time.
<Manual> Set the date and clock time
manually. (Go to step 4 .)
• The check mark ( ) appears in the check
box of a selected item.
LinkDisplayAudio_NAS.indb 13LinkDisplayAudio_NAS.indb 13 5/12/16 5:38 PM5/12/16 5:38 PM
14
Initial Settings
Initial Settings
3 To set the clock automatically: Display
the time zone selection screen (1),
select time zone (2), then confirm the
setting (3).
Then, go to step 5.
4 To set the date/time manually: Display
the manual clock setting screen (1),
set the date (2) and time (3), then
confirm the setting (4).
• To change the time display format, select
[12H] or [24H].
• When 12 hour time display format is
selected, you can change AM/PM by
selecting [AM]/[PM].
5 Select the time format and daylight
saving time setting .
<Switch 12H/24H
Display>
Selects the time format
([12H]: 12 hours/[24H]:
24 hours).
<Daylight Saving
Time>
Select your country to
activate the daylight
saving time. To deactivate
it, select [Off].
• In Mexico, select [US/CA] where US
daylight saving time is used.
6 Select the date display (1) and clock
type (2), then confirm the setting (3).
• To finish the procedure, touch the Home
button on the monitor panel.
LinkDisplayAudio_NAS.indb 14LinkDisplayAudio_NAS.indb 14 5/12/16 5:38 PM5/12/16 5:38 PM
ENGLISH 15
Connection
Connection
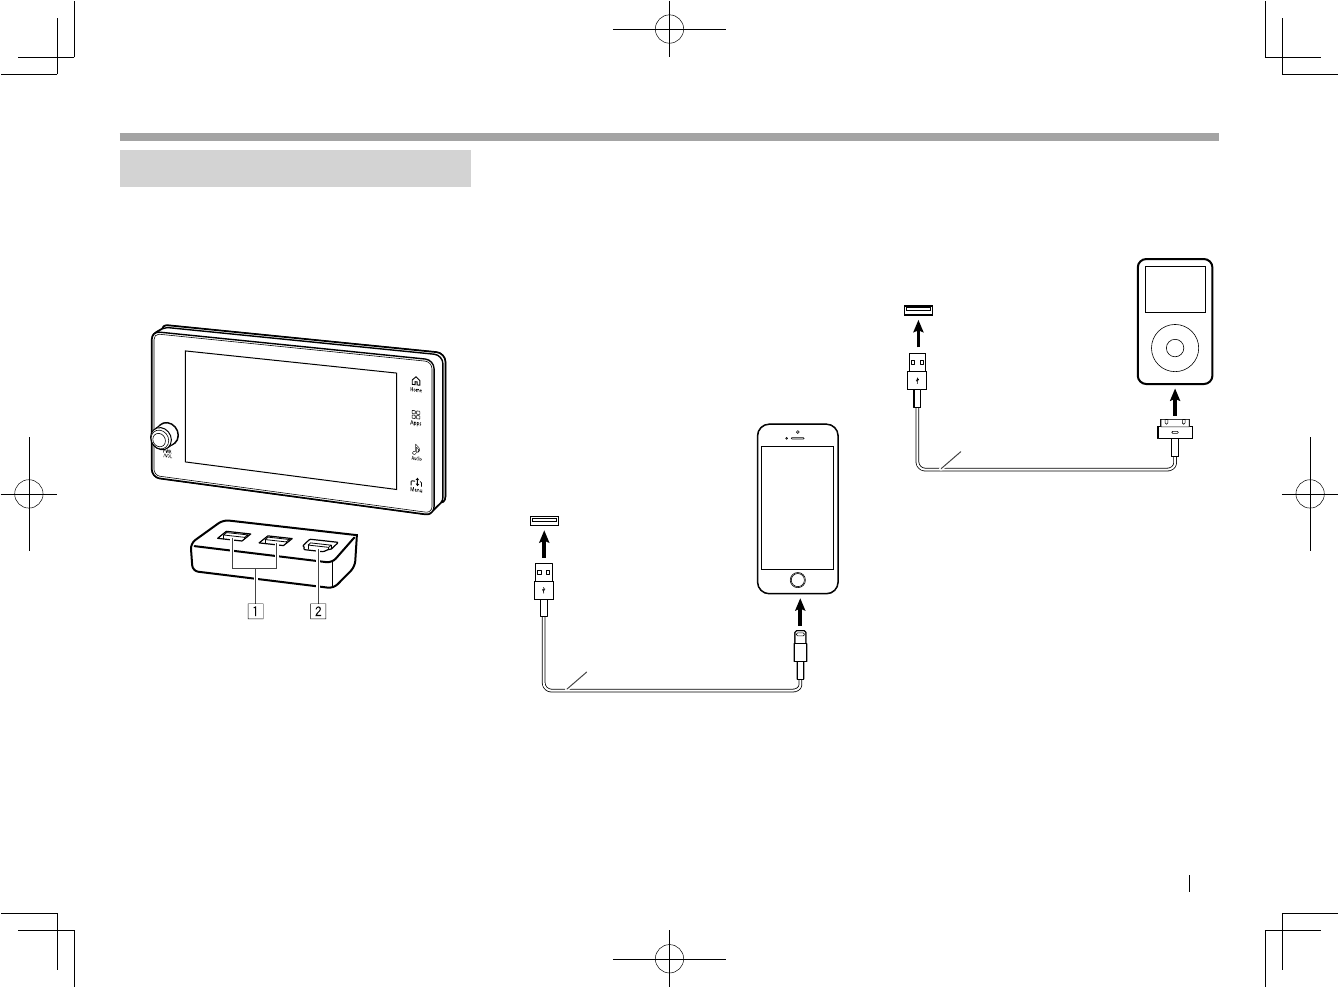
Wired connection
Connect the device you want to use before using
this product.
• The position and shape of connecting terminals
differ depending on the car type.
• HDMI input terminals are not provided for
some cars.
1 USB input terminals
You can connect the following devices.
• iPod/iPhone
• Android™ phone
• USB device
2 HDMI input terminal
You can connect an HDMI device.
❏ Connecting iPod/iPhone
Connect iPod/iPhone to the USB input terminal
using appropriate cable depending on the iPod/
iPhone model.
• Use a cable certified by Apple Inc., otherwise
functions may not be performed correctly.
• For playable iPod/iPhone types, see page 93.
For Lightning connector models
Use Lightning to USB cable (accessory of iPod/
iPhone) to connect iPod/iPhone.
iPod/iPhone (Lightning
connector model)
USB input terminal
Lightning to USB cable
(accessory of iPod/iPhone)
For 30-pin connector models
Use a 30-pin to USB cable (accessory of iPod/
iPhone) to connect iPod/iPhone.
USB input terminal
30-pin to USB cable
(accessory of iPod/iPhone)
iPod/iPhone (30-pin
connector model)
LinkDisplayAudio_NAS.indb 15LinkDisplayAudio_NAS.indb 15 5/12/16 5:38 PM5/12/16 5:38 PM
16
Connection
Connection
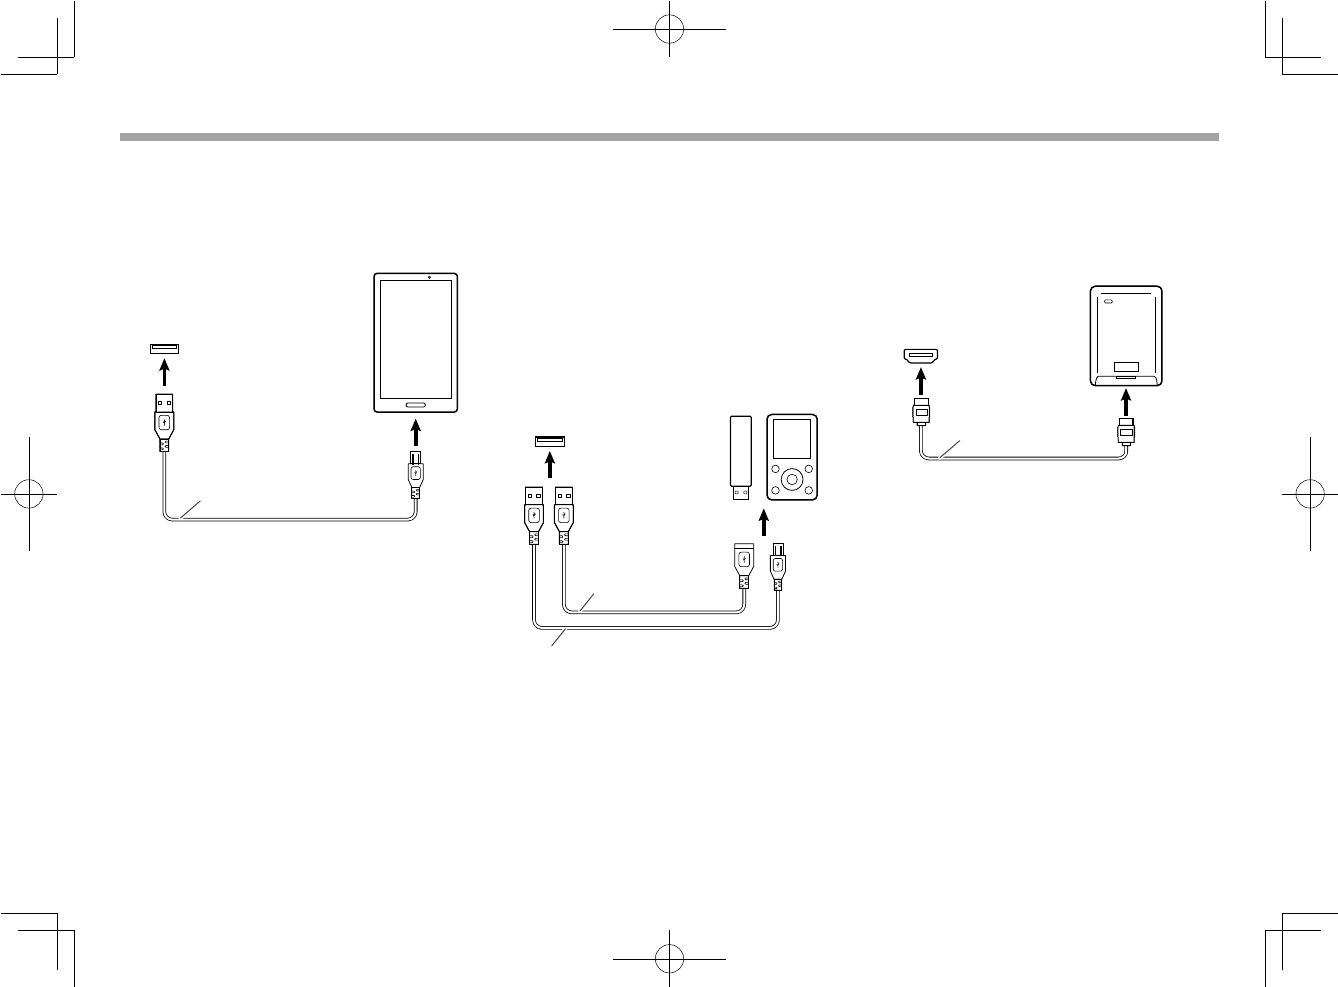
❏ Connecting an Android phone
Connect an Android phone to the USB input
terminal using a USB 2.0 cable (accessory of
Android phone).
USB input terminal
USB 2.0 cable
(commercially available)
Android phone
❏ Connecting a USB device
Connect a USB mass storage class device such as
a USB memory, smartphone, digital audio player,
etc. to the USB input terminal.
• Use a USB 2.0 cable (commercially available) or
USB extension cable (commercially available)
compatible with your USB device.
• You cannot connect a computer or portable
HDD to the USB input terminal.
• For playable file types and notes on using USB
devices, see page 94.
USB input terminal
USB device
USB 2.0 cable (commercially available)
USB extension cable
(commercially available)
❏ Connecting an HDMI device
Connect an HDMI device such as a portable
media player or portable DVD player to the HDMI
input terminal. (Only for the car equipped with
the HDMI input terminal.)
HDMI input
terminal
HDMI cable
(commercially available)
HDMI device
LinkDisplayAudio_NAS.indb 16LinkDisplayAudio_NAS.indb 16 5/12/16 5:38 PM5/12/16 5:38 PM
ENGLISH 17
Connection
Connection
Bluetooth connection
❏Information for using Bluetooth®
devices
Bluetooth is a short-range wireless radio
communication technology for mobile devices
such as mobile phones, portable PCs, and other
devices. Bluetooth devices can be connected
without cables and communicate with each
other.
• For notes on using Bluetooth devices, see
page 93.
V Caution
While driving, do not perform complicated
operations such as dialing numbers, using the
address book, etc. When you perform these
operations, stop your car in a safe place.
❏ Registering a new Bluetooth device
When you connect a Bluetooth device to the
product for the first time, pair this product and
the device. Pairing allows Bluetooth devices to
communicate with each other.
• When iPhone compatible with CarPlay is
connected to the USB input terminal, it cannot
be connected via Bluetooth. Use the phone and
audio player function on the CarPlay screen.
(Page 25)
• If you use CarPlay using iPhone connected
via Bluetooth, the Bluetooth connection is
canceled.
• When an Android phone compatible with
Android Auto is connected to the USB input
terminal, the device is connected via Bluetooth
automatically, and the Bluetooth mobile phone
currently connected is disconnected.
– If the mobile phone currently connected
is in use, it remains connected and the
Android phone compatible with Android
Auto is automatically registered. However, if
5 devices are already registered, registration
cannot be performed.
• Once the connection is established, it is
registered in this product even if you turn off
the product. Up to 5 devices can be registered
in total.
• To use the Bluetooth function, you need to turn
on the Bluetooth function of the device.
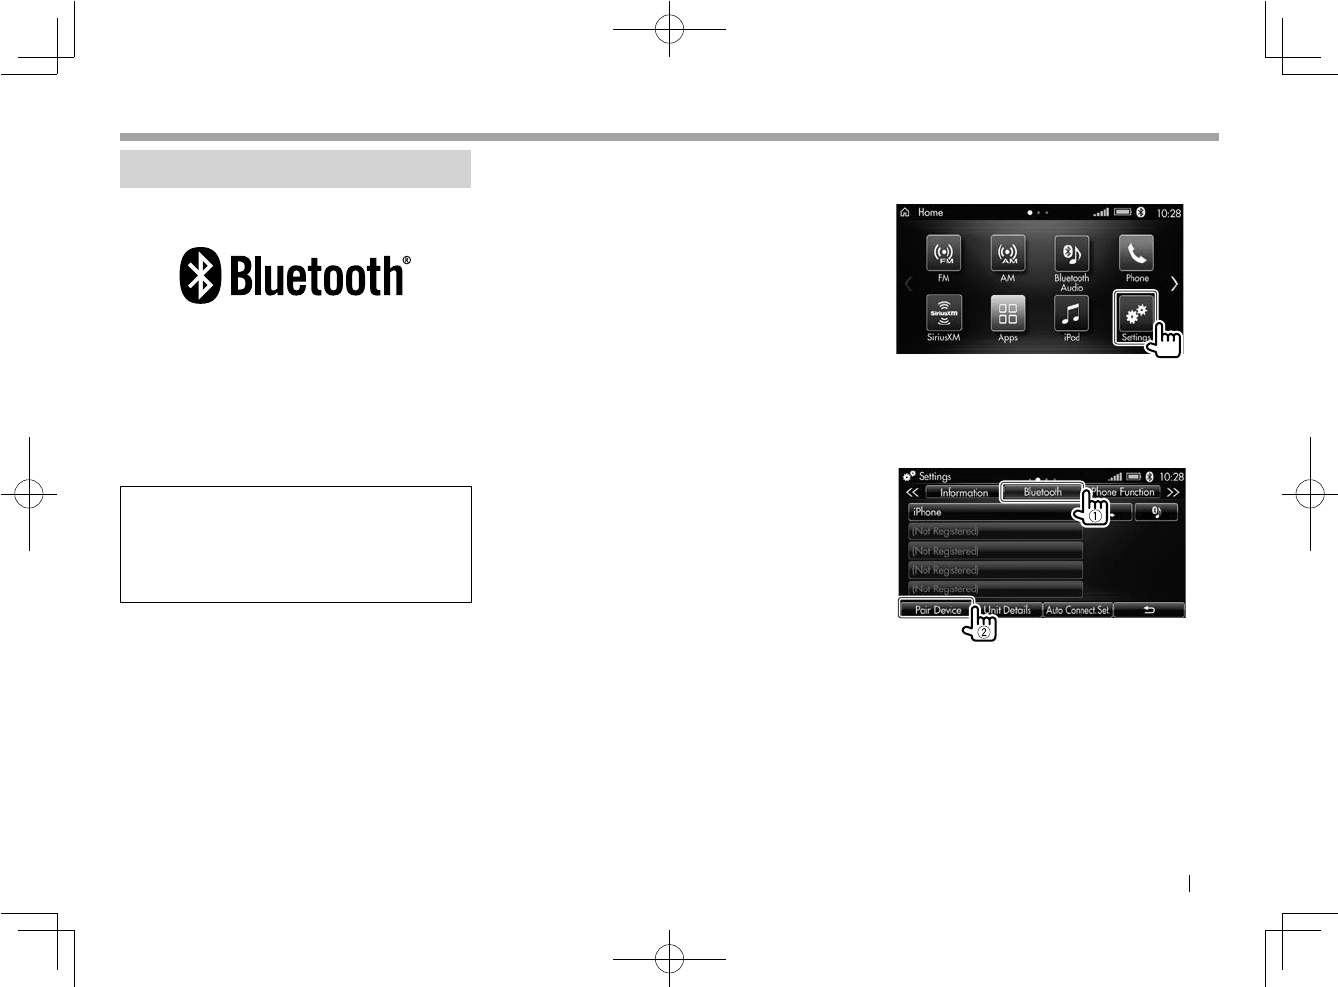
1 Display the <Settings> screen.
On the <Home> screen, touch [Settings].
2 Display the <Bluetooth> settings
screen (1), then start registration (2).
• Touch [<<]/[>>] repeatedly to display the
[Bluetooth] setting tab. (Page 12)
• To change the passkey (initial: “0000”), see
page 18.
• To check the device information of this
product, select [Unit Details].
LinkDisplayAudio_NAS.indb 17LinkDisplayAudio_NAS.indb 17 5/12/16 5:38 PM5/12/16 5:38 PM
18
Connection
Connection
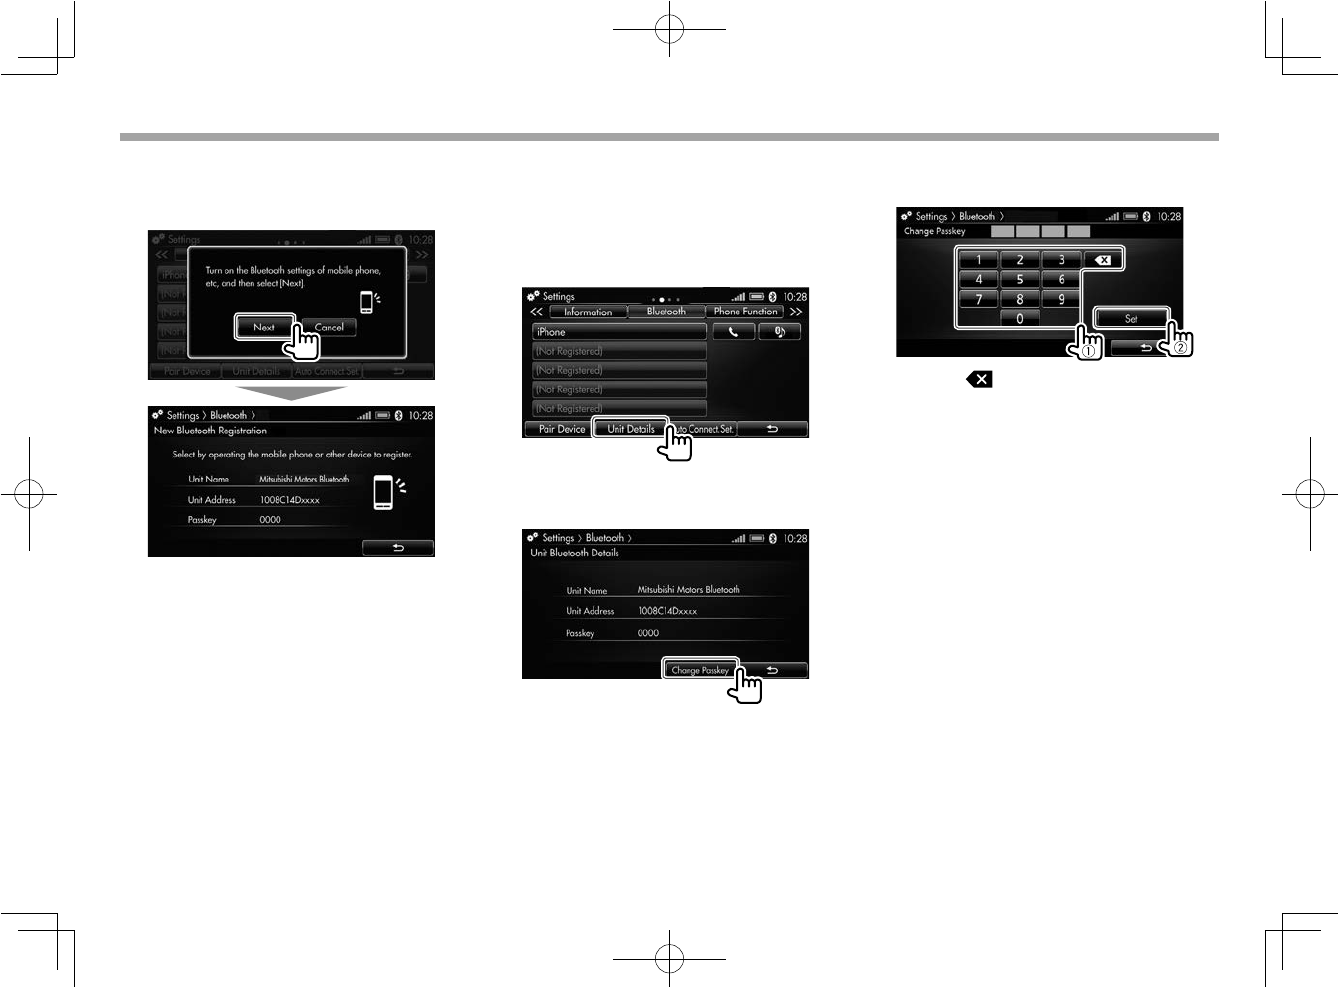
3 Activate the Bluetooth function on the
device, then select [Next].
• To cancel the procedure, touch [Cancel].
4 Operate the device to select
“Mitsubishi Motors Bluetooth” and
confirm the request.
• If a passkey is required, enter the passkey
displayed on the screen.
When the registration is complete, the
<Bluetooth> settings screen is displayed.
To change the passkey for registration
1 Display the <Bluetooth> settings
screen. (Page 17)
2 Display the <Unit Bluetooth Details>
screen.
3 Display the <Change Passkey>
screen.
4 Enter a 4 digit passkey (1), then
confirm the entry (2).
• Touch [ ] to delete the last entry.
LinkDisplayAudio_NAS.indb 18LinkDisplayAudio_NAS.indb 18 5/12/16 5:38 PM5/12/16 5:38 PM

ENGLISH 19
Connection
Connection
❏ Connecting/disconnecting a
registered Bluetooth device
Once the devices are registered, you can
disconnect the current device and connect
another device from the registered devices.
To connect a Bluetooth device manually
You can connect one mobile phone and one
audio device from the registered devices.
1 Display the <Bluetooth> settings
screen. (Page 17)
2 Select the device usage for the target
device.
[ ] Connect as a mobile phone.
[ ] Connect as an audio device.
The button for the connected device is
highlighted.
• When selecting the device usage while
another device is connected, a message
window is displayed. Select [Yes]. The
previously connected device will be
disconnected.
• To check the device information of the
registered device, touch the device name.
• When a mobile phone is connected, the signal
strength and battery level are displayed when
the information is acquired.
To disconnect a Bluetooth device
1 Display the <Bluetooth> settings
screen. (Page 17)
2 Select the device usage for the device
you want to disconnect.
A message window is displayed. Select [Yes].
LinkDisplayAudio_NAS.indb 19LinkDisplayAudio_NAS.indb 19 5/12/16 5:38 PM5/12/16 5:38 PM
20
Connection
Connection
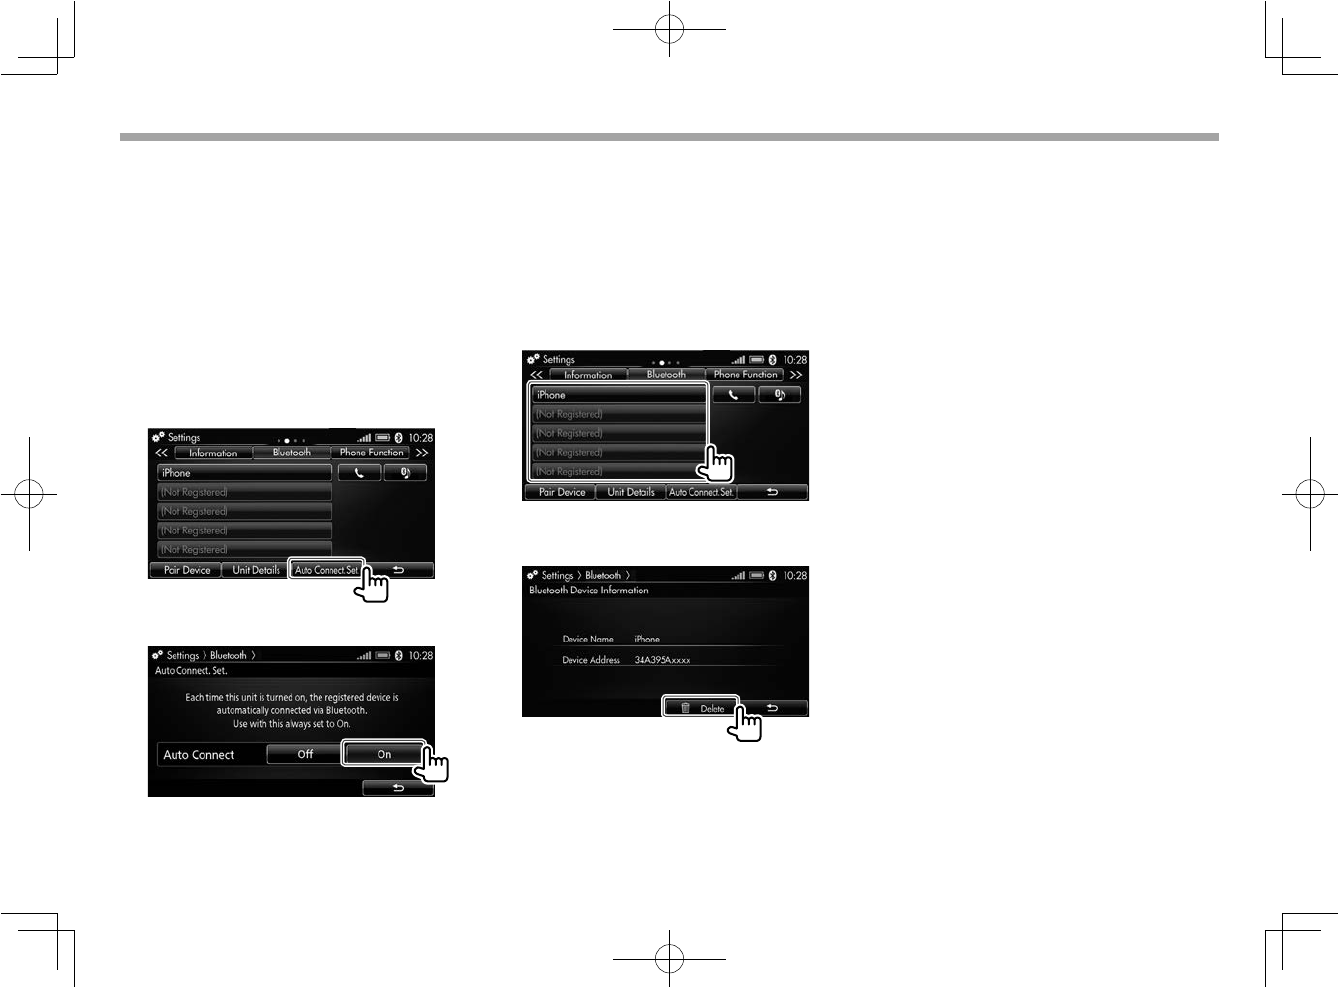
To connect a Bluetooth device automatically
When <Auto Connect> is set to [On], the
registered device last connected is automatically
connected via Bluetooth whenever it is turned
on.
• If the last connected device is not present,
another registered device is automatically
connected if present.
1 Display the <Bluetooth> settings
screen. (Page 17)
2 Display the <Auto Connect. Set.>
screen.
3 Activate the auto connection.
• To cancel the auto connection, select [Off].
❏ Deleting a registered Bluetooth
device
If you want to register a new device after 5
devices have been registered, or if a registered
device is no longer used, delete the registration.
1 Display the <Bluetooth> settings
screen. (Page 17)
2 Select the device to delete.
3 Delete the registration of the selected
device.
• A message window is displayed. Select [Yes].
LinkDisplayAudio_NAS.indb 20LinkDisplayAudio_NAS.indb 20 5/12/16 5:38 PM5/12/16 5:38 PM
ENGLISH 21
General Operations
General Operations
Adjusting the volume
You can adjust the volume for the following
situations.
• While listening to a source ( : 0 to 45)
• During a call ( : 0 to 11)
• During voice guidance ( : 0 to 11)
IncreasesDecreases
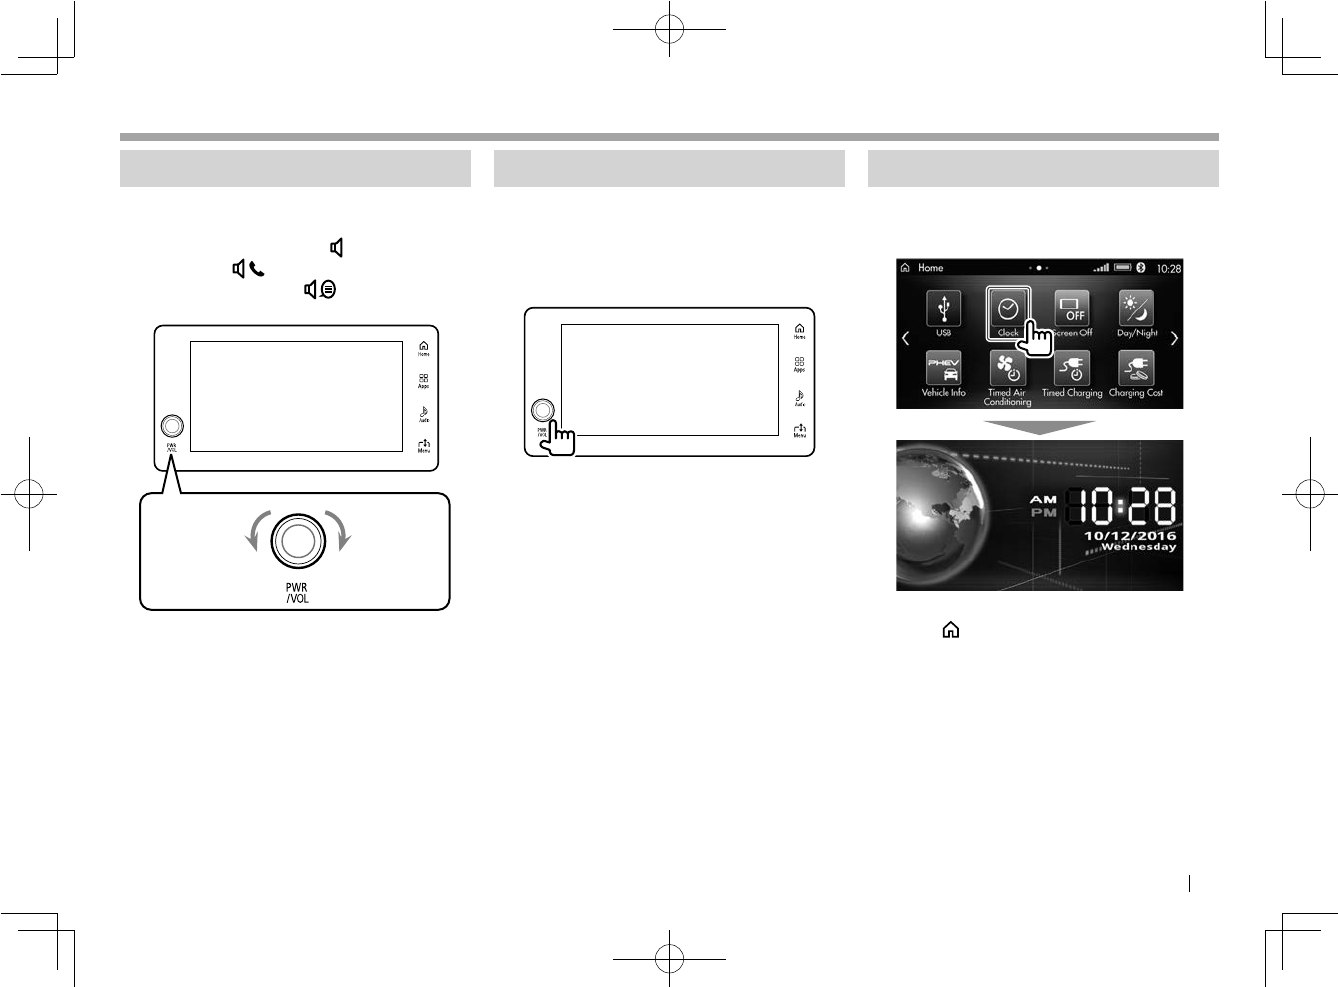
Turning off the audio source
You can turn off the audio source.
1 Press the PWR/VOL control on the
monitor panel.
To restore the audio source
Press the PWR/VOL control on the monitor panel
again.
Displaying the clock screen
You can display the large clock screen.
1 Touch [Clock] on the <Home> screen.
To return to the <Home> screen
Touch the Home button on the monitor panel.
You can display the <Clock> settings screen to
change the clock settings from the clock screen.
Touch the time/date display area to display the
<Clock> settings screen. (Pages 13 )
LinkDisplayAudio_NAS.indb 21LinkDisplayAudio_NAS.indb 21 5/12/16 5:38 PM5/12/16 5:38 PM
22
General Operations
General Operations
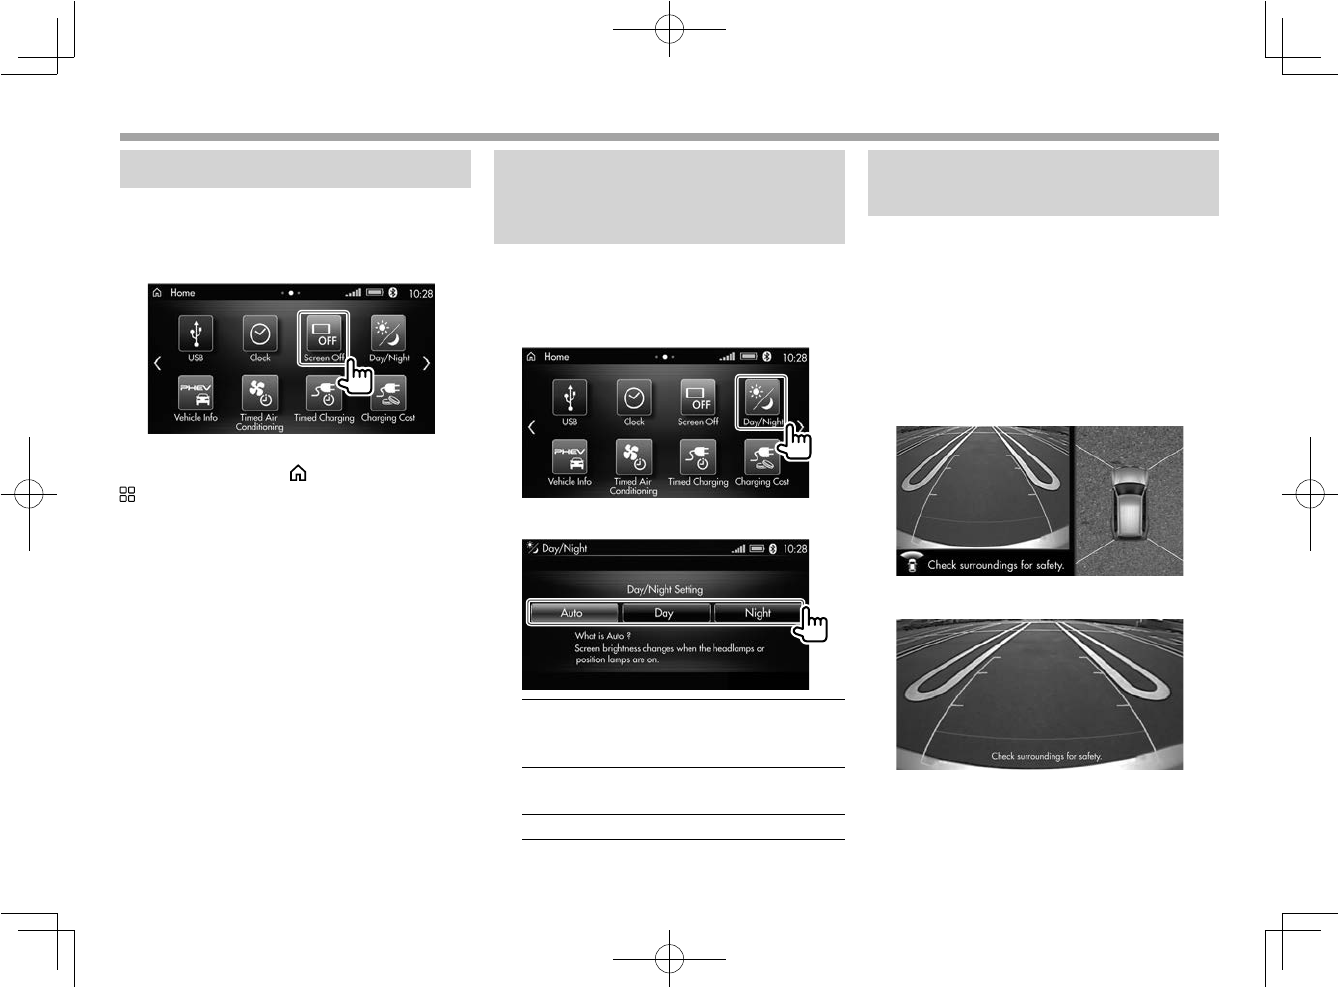
Turning off the screen
You can turn off the screen.
1 Touch [Screen Off] on the <Home>
screen
To turn on the screen
Touch the screen or the Home button or
Apps button on the monitor panel.
• You can also turn off the screen and audio
source at the same time by touching and
holding the PWR/VOL control on the monitor
panel.
– To restore the screen and audio source, press
the PWR/VOL control.
Changing the brightness of
the screen and the button
illumination—day/night setting
You can change the brightness of the screen and
the button illumination on the monitor panel.
1
Display the <Day/Night> settings screen.
On the <Home> screen, touch [Day/Night].
2 Select the brightness setting.
[Auto]
Dims the screen and button
illumination when you turn on the
headlights or position lamps.
[Day] Brightens the screen and button
illumination.
[Night]
Dims the screen and button illumination.
Displaying the picture from the
connected camera
The around view or rear view screen from the
connected camera is displayed when you shift
the gear to the reverse (R) position.
• Around view can be displayed when you press
the Multi around button on the steering.
• For details about viewing the screen from the
connected camera, refer to the owner’s manual
supplied with your car.
When a multi around monitor is connected:
When a rear view camera is connected:
LinkDisplayAudio_NAS.indb 22LinkDisplayAudio_NAS.indb 22 5/12/16 5:39 PM5/12/16 5:39 PM
ENGLISH 23
General Operations
General Operations
Using voice control
You can use 4 types of the voice recognition
function—voice recognition of this product,
Bluetooth interfaced voice recognition, CarPlay,
and Android Auto.
• For CarPlay, see page 26, and for Android
Auto, see page 28.
• For changing the settings for voice control, see
page 78.
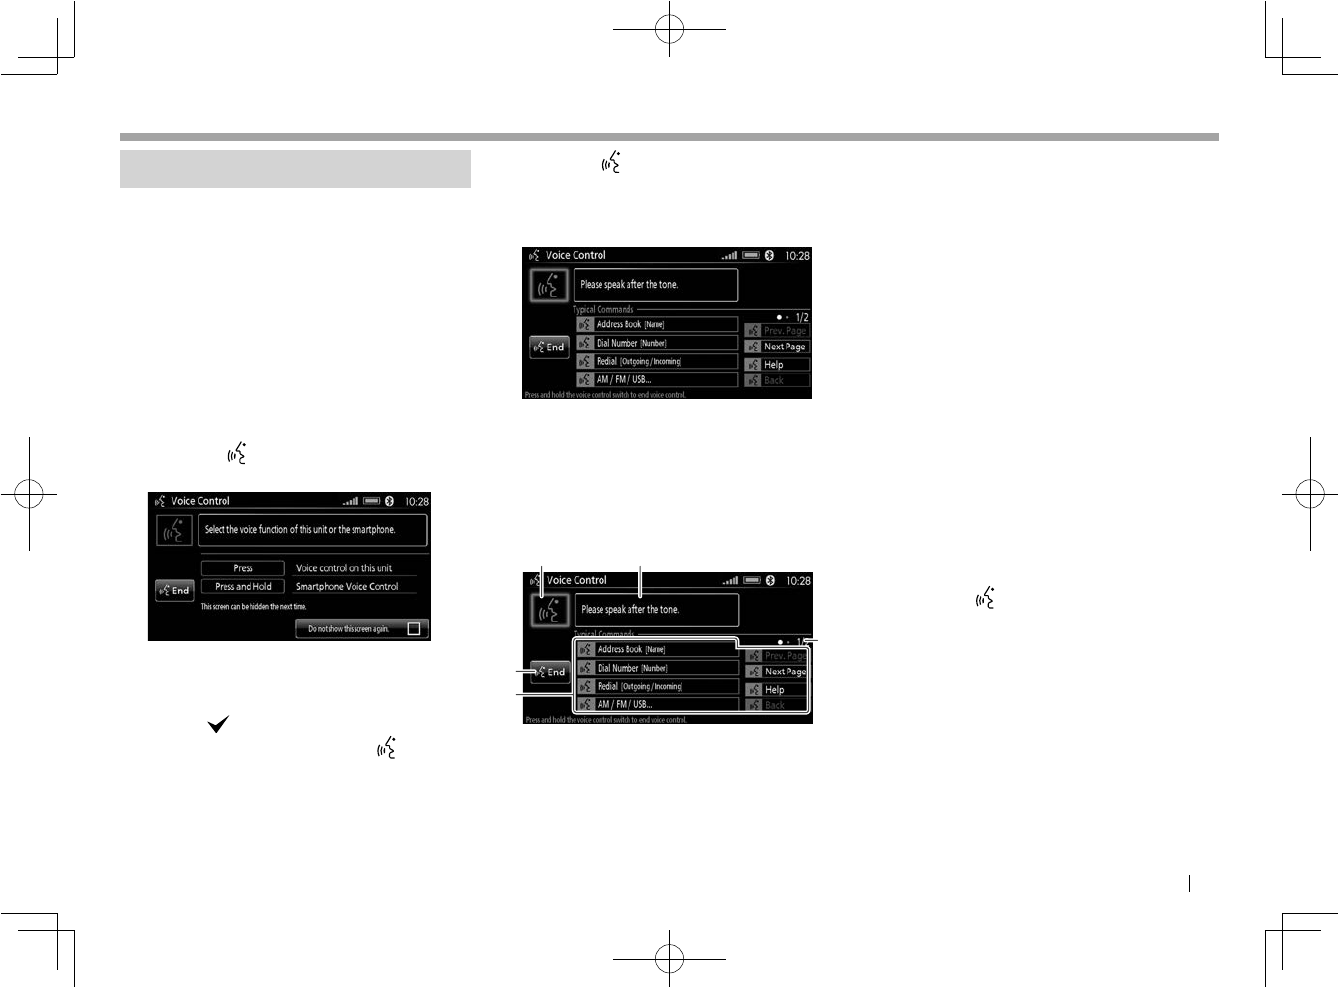
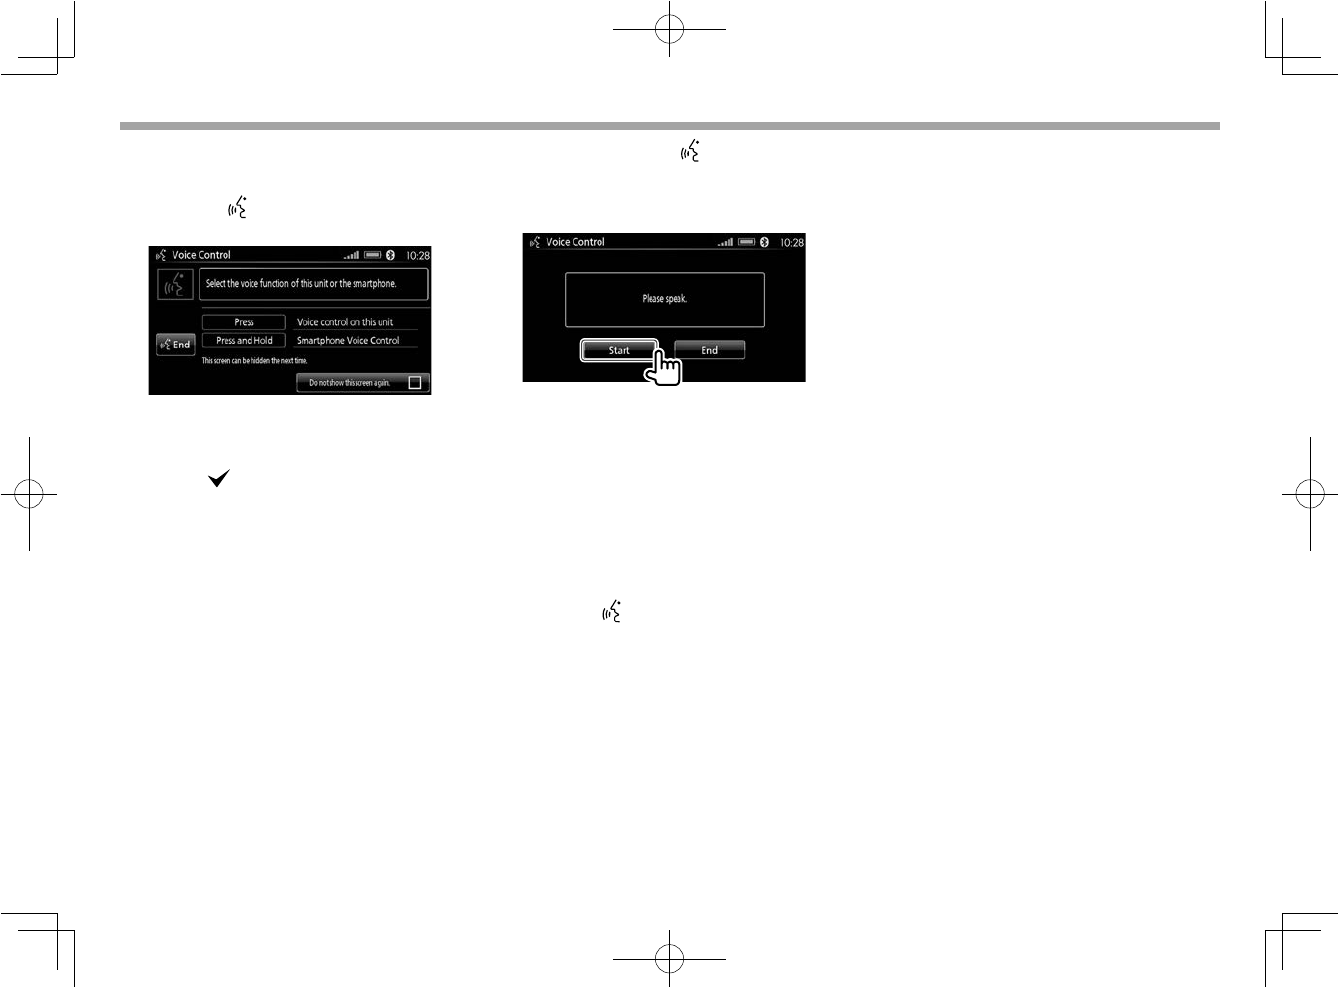
❏ Using the voice (control) recognition
of this product
1 Press the button on the steering
wheel. (Page 72)
• To not display this screen from the next
time on, touch the check box of <Do not
show this screen again.> so that the check
mark ( ) appears.
Once this is checked, pressing displays
the screen in step 2 from the next time on.
2 Press the button again on the
steering wheel.
The <Voice Control> screen for this product
appears.
3 Speak a voice command through the
microphone built in the car.
• For the available voice commands on this
product, see page 95.
About <Voice Control> screen for this product
12
3
5
4
1 Voice recognition status indicator
• You can speak voice commands only when
the indicator is highlighted.
2 Instruction message
Follow the message displayed.
3 [End] button
Touch or say “End” to exit the <Voice
Control> screen.
4 Voice command list
Say a command from the list.
• You can also perform an operation by
touching a voice command on the list.
• Unavailable commands are grayed out.
• To change the page, say “Prev. Page” or
“Next Page.”
• To return to previous screen, say “Back.”
• If you need help, say “Help” to activate voice
guidance.
5 Current page/total pages of the voice
command list
• When voice tags are registered for the contacts
registered in the <Favorites> screen, you can
call a contact by speaking the voice tag after
activating voice control. (Page 35)
To finish using voice control (recognition),
press and hold button on the steering wheel
or touch [End].
LinkDisplayAudio_NAS.indb 23LinkDisplayAudio_NAS.indb 23 5/12/16 5:39 PM5/12/16 5:39 PM
24
General Operations
General Operations
❏ Using the Bluetooth interfaced voice
recognition (control)
1 Press the button on the steering
wheel. (Page 72)
• To not display this screen from the next
time on, touch the check box of <Do not
show this screen again.> so that the check
mark ( ) appears.
• For the Bluetooth interfaced voice
recognition (control): Without checking the
box, you can start the voice recognition
(control) procedure in step 2 below from
the next time on.
2 Press and hold the button on the
steering wheel.
• By touching [Start] on the screen, you can
also activate voice control (recognition).
3 Speak to the connected Bluetooth
device through the microphone built
in the car.
• Voice control (recognition) may not work
when the Bluetooth connection is not
good.
To finish using voice control (recognition),
press and hold button on the steering wheel
or touch [End].
LinkDisplayAudio_NAS.indb 24LinkDisplayAudio_NAS.indb 24 5/12/16 5:39 PM5/12/16 5:39 PM
ENGLISH 25
Apps
Apps
Using Apps of iPhone—Apple
CarPlay
❏ About CarPlay
CarPlay is a smarter, safer way to use your iPhone
in the car. CarPlay takes the things you want
to do with iPhone while driving and displays
them on the screen of the product. You can
get directions, make calls, send and receive
messages, and listen to the music from iPhone
while driving. You can also use Siri voice control
to make it easier to operate iPhone.
• For details about CarPlay, visit
<https://ssl.apple.com/ios/carplay/> or
<https://support.apple.com/HT205634>.
• For CarPlay available Apps, visit
<http://www.apple.com/ios/carplay/>.
Although the service area is expanding,
CarPlay service is NOT available in some
markets. Please check the latest information
concerning availability in your region from the
below website.
http://www.apple.com/ios/feature-
availability/#applecarplay-applecarplay
Compatible iPhone devices
You can use CarPlay with the following iPhone
models of iOS 8 or later.
• iPhone 5
• iPhone 5c
• iPhone 5s
• iPhone 6
• iPhone 6 Plus
• iPhone 6s
• iPhone 6s Plus
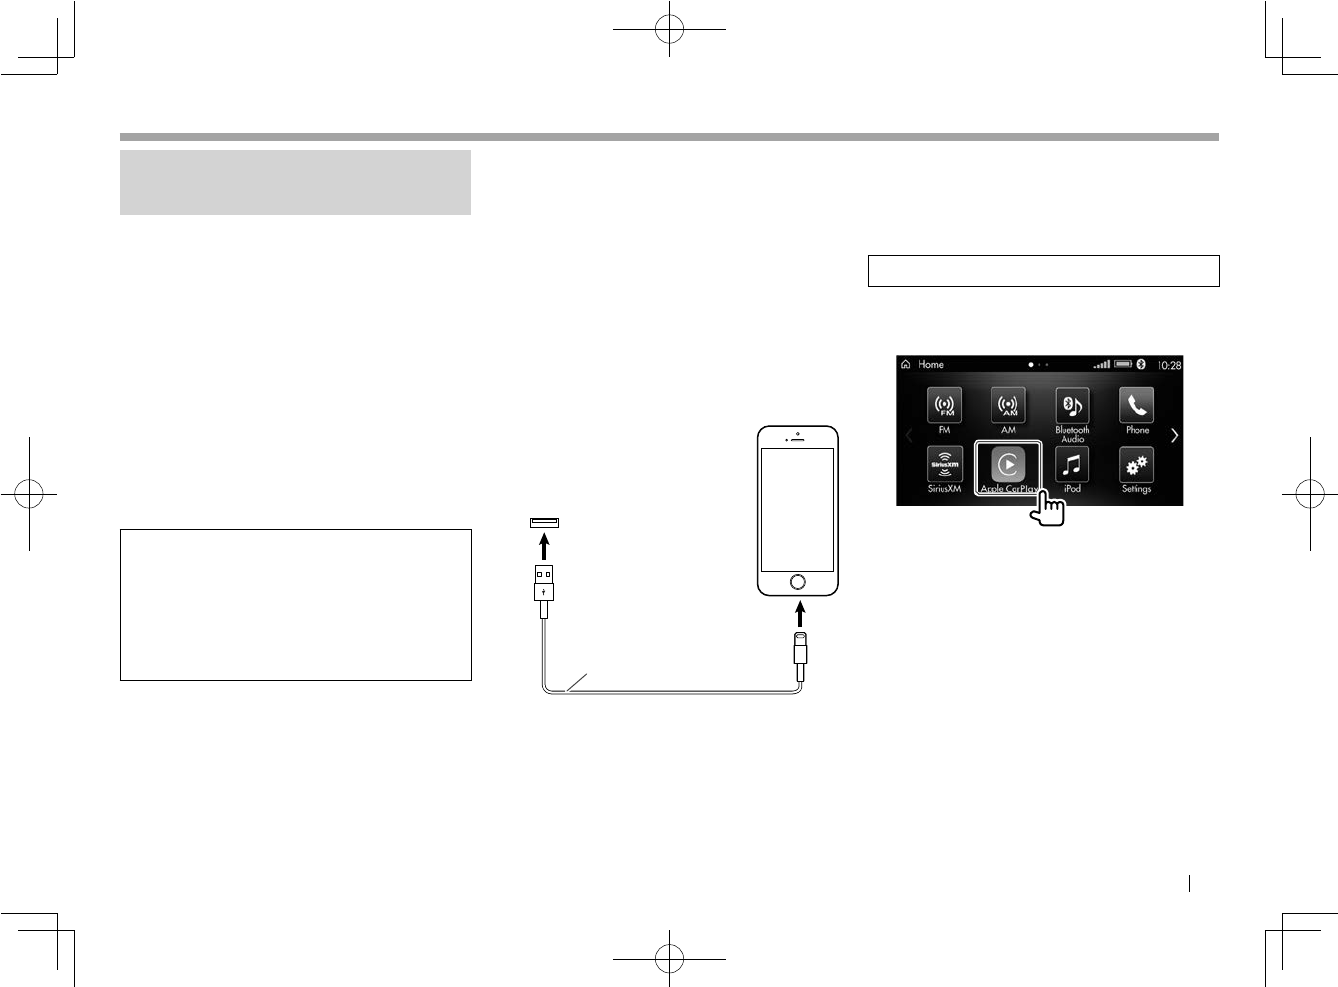
❏ Connecting iPhone compatible with
CarPlay
Connect iPhone compatible with CarPlay to the
USB input terminal using Lightning to USB cable
(accessory of iPhone).
• Use a cable certified by Apple Inc., otherwise
functions may not be performed correctly.
iPhone compatible
with CarPlay
USB input terminal
Lightning to USB cable
(accessory of iPhone)
• Bluetooth connection is canceled when the
iPhone is connected to the USB input terminal.
Use the phone and audio player function on
the CarPlay screen.
• If two iPhone devices compatible with CarPlay
are connected, the device recognized first is
used for CarPlay.
❏Starting CarPlay
Select [Apple CarPlay] on the <Home> screen to
display the CarPlay screen and enable use of the
Apps of the connected iPhone.
Preparation: Unlock your iPhone beforehand.
1 Touch [Apple CarPlay] on the
<Home> screen.
The home screen of CarPlay is displayed.
• [Apple CarPlay] is displayed only when a
compatible iPhone is connected.
LinkDisplayAudio_NAS.indb 25LinkDisplayAudio_NAS.indb 25 5/12/16 5:39 PM5/12/16 5:39 PM
26
Apps
Apps
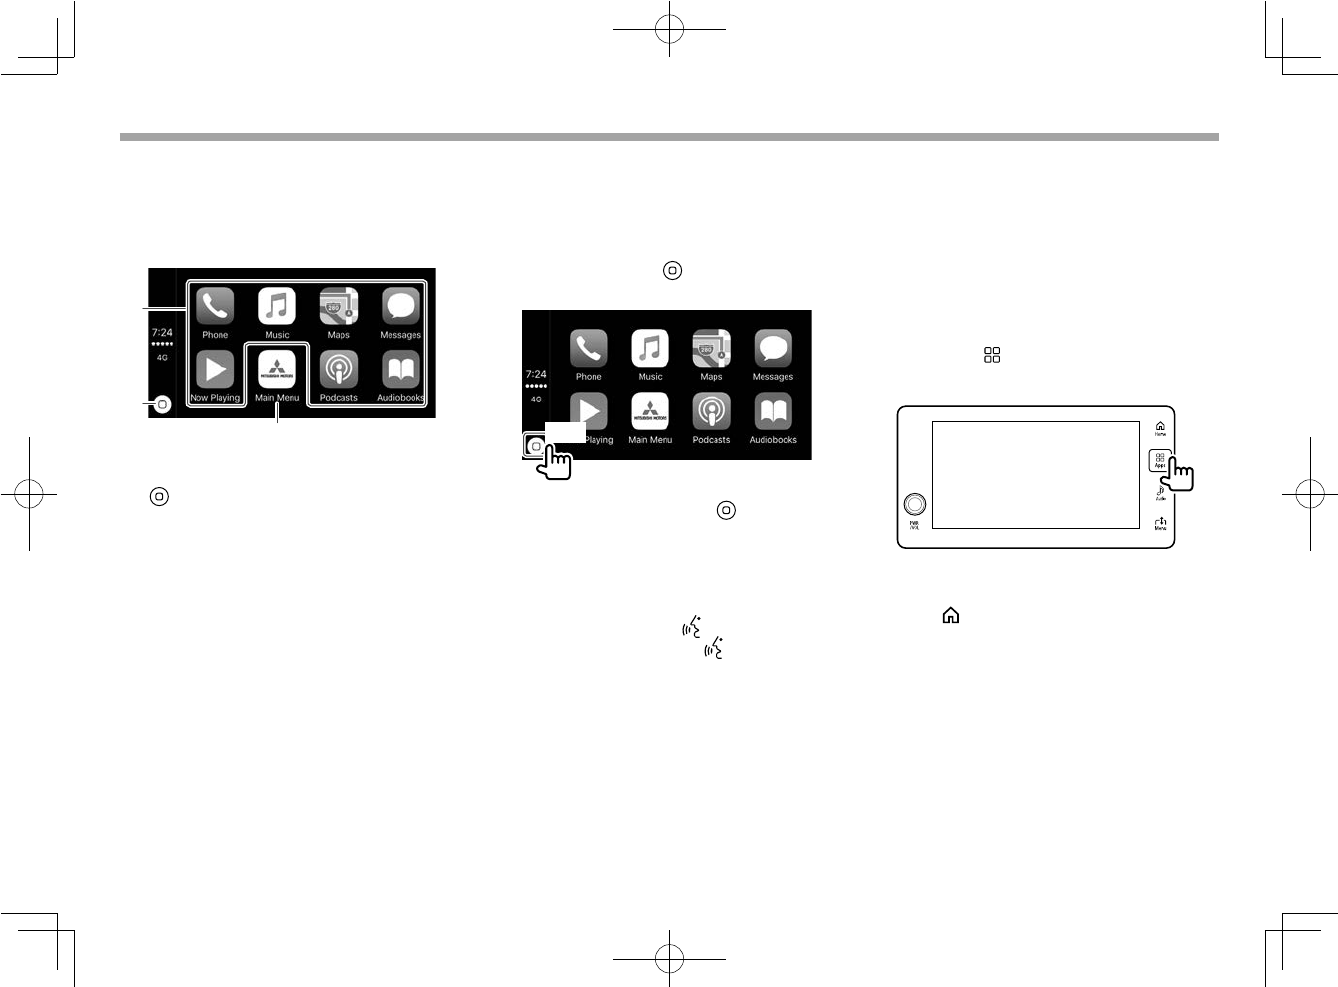
❏ Operation buttons on the home
screen of CarPlay
You can use the Apps of the connected iPhone.
• The items displayed and the language used on
the screen differ among the connected devices.
3
1
2
1 App/information button
Starts the App or displays the information.
2 [ ] (Home) button
• Displays the home screen of CarPlay.
(Touch)
• Activates Siri. (Hold) (See the right column.)
3 [Main Menu] button
Exits the CarPlay screen and displays the
<Home> screen.
❏ Using the voice control (recognition)
of CarPlay (Siri)
You can activate Siri while the CarPlay screen is
displayed.
1 Touch and hold [ ] (Home) to
activate Siri.
(Hold)
• To deactivate Siri, touch [ ] (Home).
2 Talk to Siri through the microphone
built in the car.
To operate using the buttons on the steering
wheel, press and hold the button. (Page 72)
• To deactivate Siri, press the button on the
steering wheel.
❏ Switching to the CarPlay screen while
displaying another screen
You can switch to the CarPlay screen while
listening to another source or displaying another
screen.
• The screen cannot be switched in some cases,
such as while the picture from the connected
camera is displayed.
1 Touch the Apps button to activate
CarPlay.
To exit the CarPlay screen
Touch the Home button on the monitor panel.
LinkDisplayAudio_NAS.indb 26LinkDisplayAudio_NAS.indb 26 5/12/16 5:39 PM5/12/16 5:39 PM
ENGLISH 27
Apps
Apps
Using the Apps of an Android
phone—Android Auto™
❏ About Android Auto
Android Auto enables you to use functions of
your Android phone convenient for driving. You
can easily access route guidance, make calls,
listen to music, and access convenient functions
on the Android phone while driving.
• For details about Android Auto, visit
<https://www.android.com/auto/> or
<https://support.google.com/androidauto>.
• For available Android Auto Apps, visit
<http://g.co/androidauto>.
Although the service area is expanding,
Android Auto service is NOT available in some
markets. Please check the latest information
concerning availability in your region from the
below website.
http://www.android.com/auto/#hit-the-road
Compatible Android phones
You can use Android Auto with Android phones
compatible with Android Auto of Android 5.0
(Lollipop) or later.
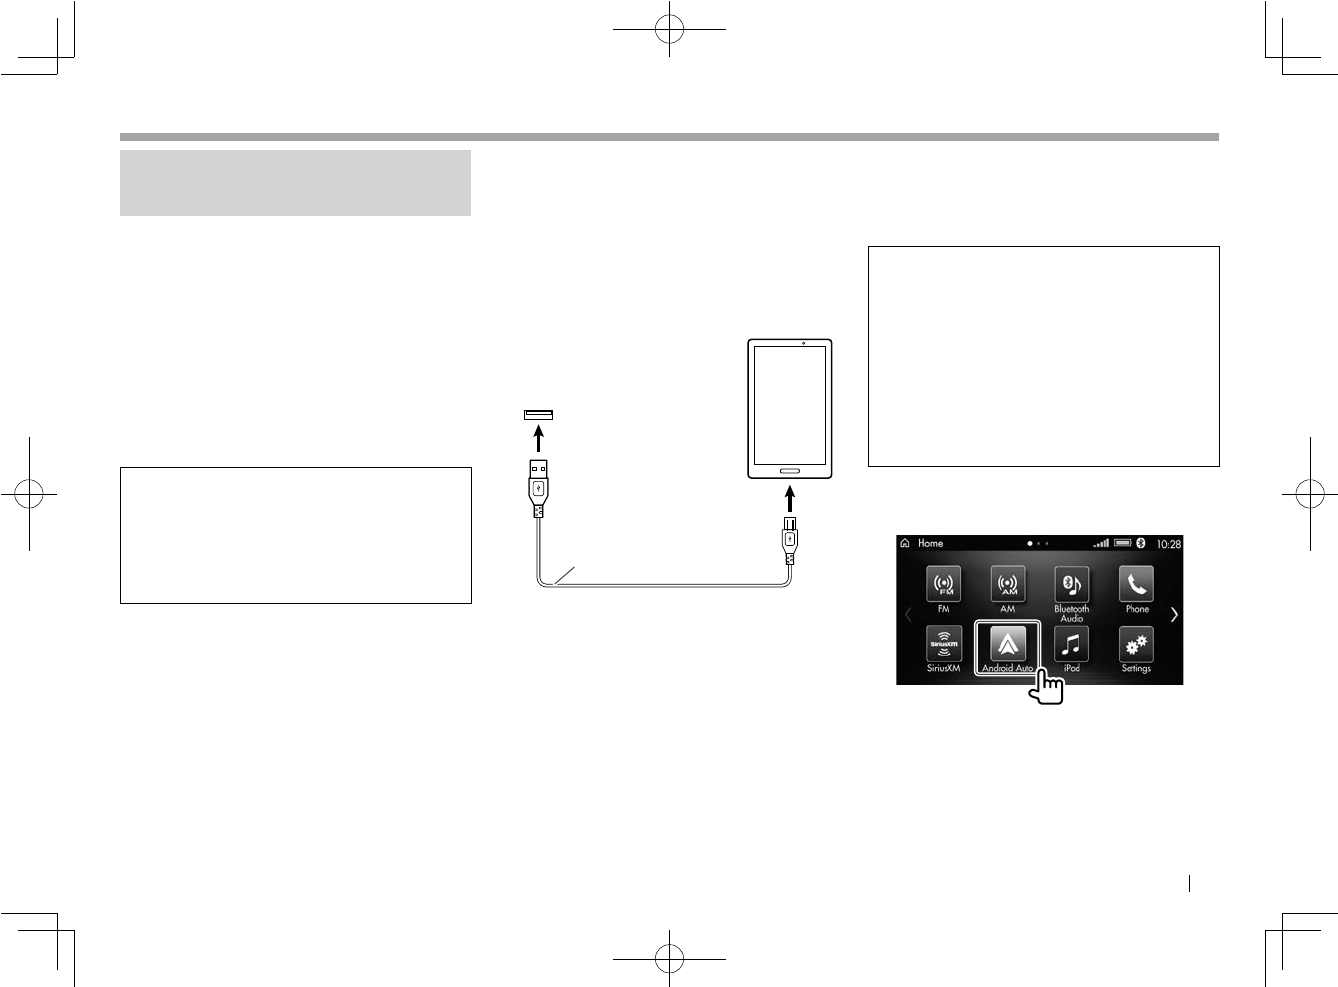
❏ Connecting an Android phone
compatible with Android Auto
Connect an Android phone compatible with
Android Auto to the USB input terminal using a
USB 2.0 cable (accessory of Android phone).
• If Android Auto and Apps are not ready, install
Android Auto and Apps beforehand.
USB input terminal
USB 2.0 cable
(commercially available)
Android phone
• Bluetooth connection is canceled when the
Android phone is connected to the USB input
terminal. Use the phone and audio player
function on the Android phone.
• If two Android phones compatible with
Android Auto are connected, the device
recognized first is used for Android Auto.
❏ Starting Android Auto
Select [Android Auto] on the <Home> screen to
display the Android Auto screen and enable use
of the Apps of the connected Android phone.
Preparation:
• To use the hands-free function, connect the
Android phone via Bluetooth. (Page 17)
– When an Android phone compatible with
Android Auto is connected to the USB
input terminal, the device is connected via
Bluetooth automatically, and the Bluetooth
mobile phone currently connected is
disconnected.
• Unlock your Android phone beforehand.
1 Touch [Android Auto] on the
<Home> screen.
The Android Auto screen is displayed.
• [Android Auto] is displayed only when a
compatible Android phone is connected.
LinkDisplayAudio_NAS.indb 27LinkDisplayAudio_NAS.indb 27 5/12/16 5:39 PM5/12/16 5:39 PM
28
Apps
Apps
❏Operation buttons on the Android
Auto screen
You can perform the operations of the Apps of
the connected Android phone.
• The items displayed on the screen differ among
the connected Android phones.
1
1 App/information button
Starts the App or displays the information.
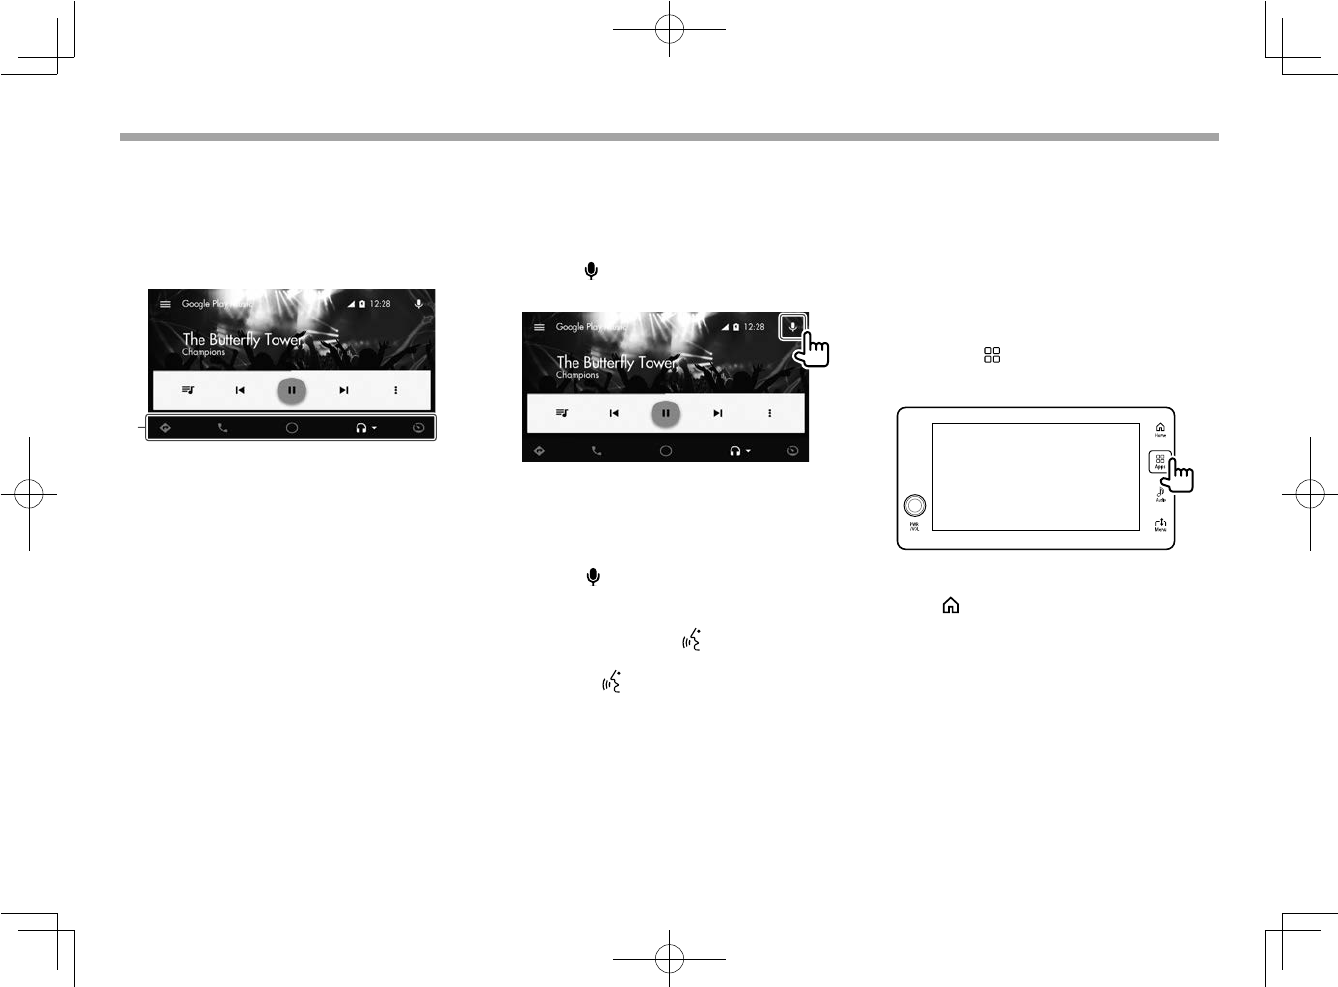
❏ Using voice control (recognition) of
the Android Auto
You can activate the voice control (recognition)
of the Android phone as follows.
1 Touch [ ] to activate voice control
(recognition).
2 Talk to the Android phone through the
microphone built in the car.
• To deactivate voice control (recognition),
touch [ ].
To operate using the buttons on the steering
wheel, press and hold the button. (Page 72)
• To deactivate voice control (recognition), press
and hold the button on the steering wheel.
❏ Switching to the Android Auto screen
while displaying another screen
You can switch to the Android Auto screen while
listening to another source or displaying another
screen.
• The screen cannot be switched in some cases,
such as while the picture from the connected
camera is displayed.
1 Touch the Apps button to activate
Android Auto.
To exit the Android Auto screen
Touch the Home button on the monitor panel.
LinkDisplayAudio_NAS.indb 28LinkDisplayAudio_NAS.indb 28 5/12/16 5:39 PM5/12/16 5:39 PM

ENGLISH 29
Phone—Hands-free
Phone—Hands-free
Preparation:
Connect a mobile phone compatible with
Phone Book Access Profile (PBAP) or Object
Push Profile (OPP) via Bluetooth. (Page 17)
• To check whether your mobile phone is
compatible with PBAP/OPP, consult with the
product information provided by the dealer
or the manufacturer.
About mobile phones compatible with
Phone Book Access Profile (PBAP)
If your mobile phone supports PBAP, phone
book and call histories stored on the mobile
phone are automatically transferred to the
product when the mobile phone is connected.
• Phone book: up to 1000 entries
• History (dialed calls, received calls, and
missed calls): up to 20 entries in total
Receiving a call
When a call comes in, the incoming call screen is
displayed.
• You can select the incoming call screen size
on the <Phone Function> settings screen.
(Page 37)
To receive a call
Touch [Answer].
• Incoming screen is shrunk when <Incoming
Screen Size> is set to [Small Screen]
(Page 37).
• When <Auto Answer> is set to [On]
(Page 37), the product answers incoming
calls automatically.
• To adjust the volume, touch [+]/[−].
• Call information is displayed if acquired.
• The incoming call screen is not displayed while
the picture from the connected camera is
displayed. (Page 22)
Use the buttons on the steering wheel to
answer/end a call. (Page 72)
To reject a call
Touch [Decline].
LinkDisplayAudio_NAS.indb 29LinkDisplayAudio_NAS.indb 29 5/12/16 5:39 PM5/12/16 5:39 PM

30
Phone—Hands-free
Phone—Hands-free
Phone operations while talking
While talking, available operation buttons are
displayed. You can make adjustments to the
mobile phone on the talking screen.
❏Ending a call
Select [End] on the talking screen to end the call.
❏Adjusting the volume during a call
You can adjust the volume level between 0 to 11
(initial: 6).
• You can also adjust the volume by turning the
PWR/VOL control on the monitor panel.
❏Muting the microphone volume
You can turn off the microphone temporarily.
• While muting, the [Mute] button is highlighted.
To restore the microphone volume: Touch
[Mute] again.
❏Turning off the hands-free mode
You can turns off the hands-free mode and talk
on the phone directly during a call.
• When the hands-free mode is off, any buttons
other than [End], [Small Screen], and [Hands-
free OFF] are disabled on the screen.
❏Entering numbers during a call
You can enter numbers when required during a
call using the DTMF (Dual Tone Multi Frequency)
function.
1 Display the keypad.
2 Enter numbers.
• To return to the talking screen, touch [ ].
LinkDisplayAudio_NAS.indb 30LinkDisplayAudio_NAS.indb 30 5/12/16 5:39 PM5/12/16 5:39 PM
ENGLISH 31
Phone—Hands-free
Phone—Hands-free
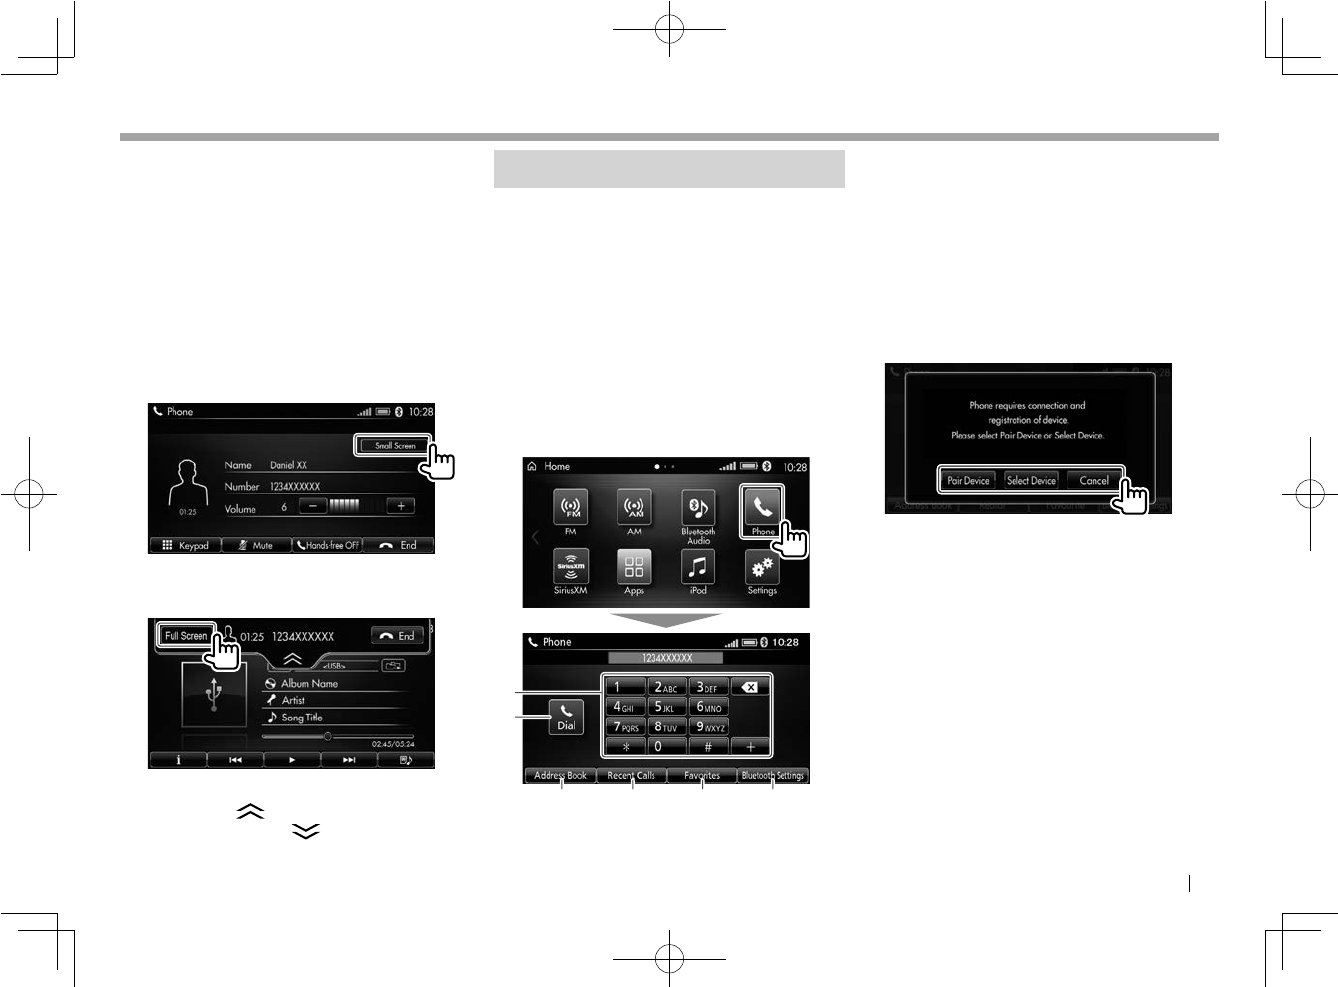
❏Shrinking/enlarging the talking
screen during a call
You can shrink or enlarge the talking screen
during a call so that you can see the current
source screen, or fully display the talking screen
to make adjustments.
• When <Incoming Screen Size> is set to [Small
Screen], the talking screen is also shrunk.
(Page 37)
To shrink the talking screen, touch [Small
Screen].
To enlarge the talking screen, touch [Full
Screen].
• You can also hide the talking screen by
touching the [ ] tab on the shrunk screen.
To restore, touch the [ ] tab.
Making a call
❏ Displaying the <Phone> screen
Select [Phone] on the <Home> screen to display
the <Phone> screen and select a method to
make a call from direct number entry, address
book, history, or favorites list.
• When <Phone Function Lock> is set to [On], a
password is required. (Page 36)
To unlock the security, enter the password,
then select [Enter].
1 Touch [Phone] on the <Home>
screen.
1
2
3456
1 Enters the phone number directly. (Page 32)
2 Makes a call.
3 Displays the address book. (Page 32)
4 Displays the call history. (Page 33)
5 Displays the favorites lists. (Page 33)
6 Displays <Bluetooth> settings screen.
(Page 17)
• If no mobile phone is connected via Bluetooth,
a message window is displayed.
– Select [Pair Device] to register a new device.
– Select [Select Device] to connect a
registered device.
– Select [Cancel] to cancel connection.
LinkDisplayAudio_NAS.indb 31LinkDisplayAudio_NAS.indb 31 5/12/16 5:39 PM5/12/16 5:39 PM
32
Phone—Hands-free
Phone—Hands-free
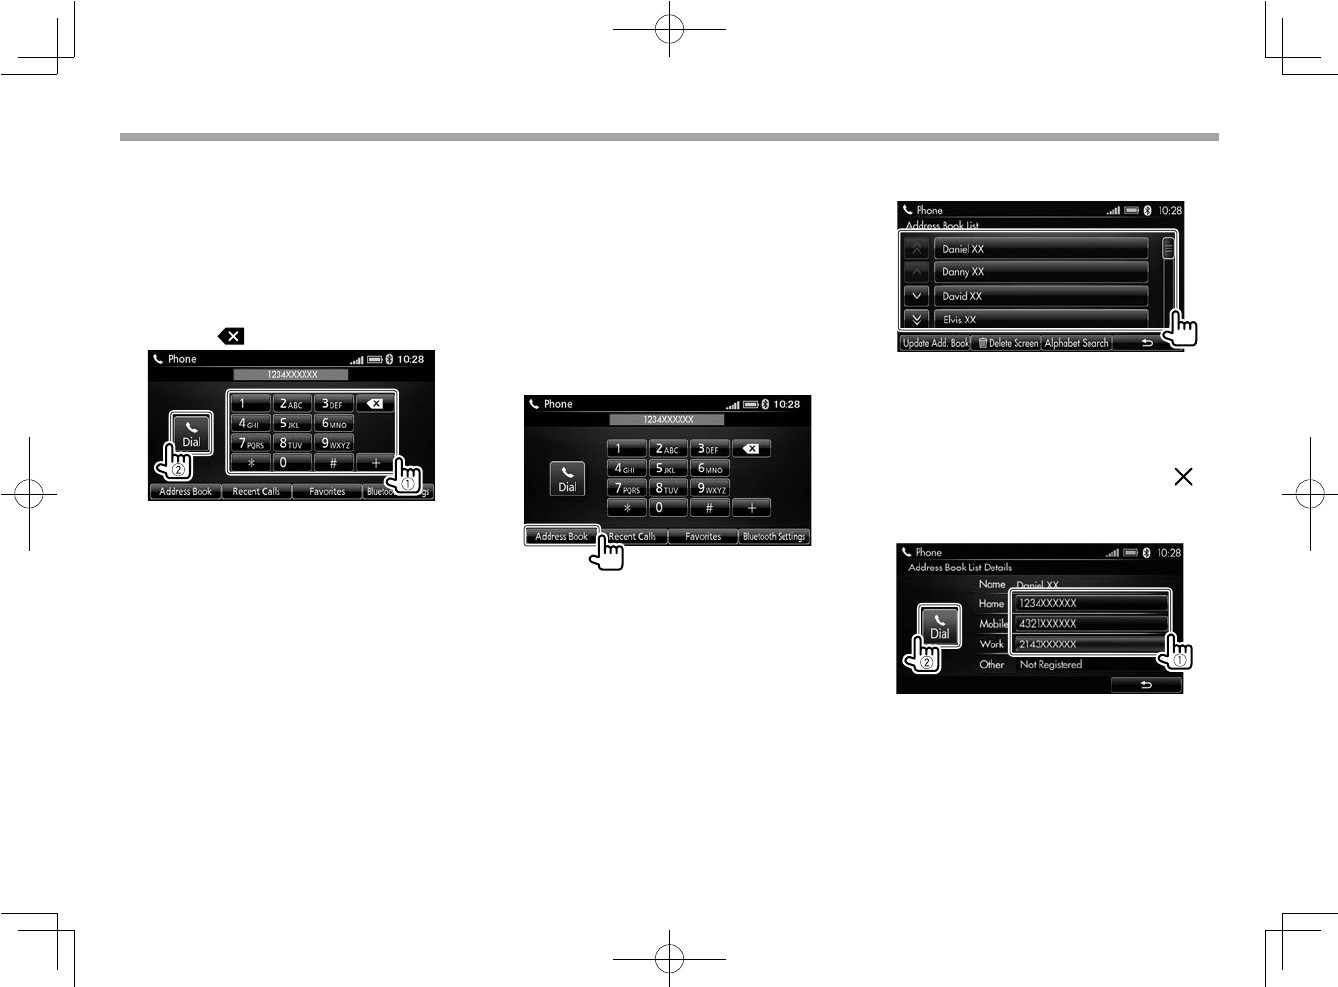
❏ Making a call by direct number entry
You can enter the phone number on the
<Phone> screen to make a call.
1 Display the <Phone> screen.
(Page 31)
2 Enter the phone number (1), then
make a call (2).
• Touch [ ] to delete the last entry.
❏ Selecting the phone number from the
address book
You can select the contact from the phone book
of the connected mobile phone.
• To customize the address book of this product,
see page 34.
1 Display the <Phone> screen.
(Page 31)
2 Display the <Address Book List>
screen.
• When an update of the address book is
required, see page 34.
3 Select the contact from the address
book.
• To search for the contact by initial, select
[Alphabet Search] to display the keypad,
then select the initial.
– If the initial of the contact is not a letter
or number, select [#$%].
– To close the keypad screen, touch [ ].
4 Select the phone number (1), then
make a call (2).
LinkDisplayAudio_NAS.indb 32LinkDisplayAudio_NAS.indb 32 5/12/16 5:39 PM5/12/16 5:39 PM
ENGLISH 33
Phone—Hands-free
Phone—Hands-free
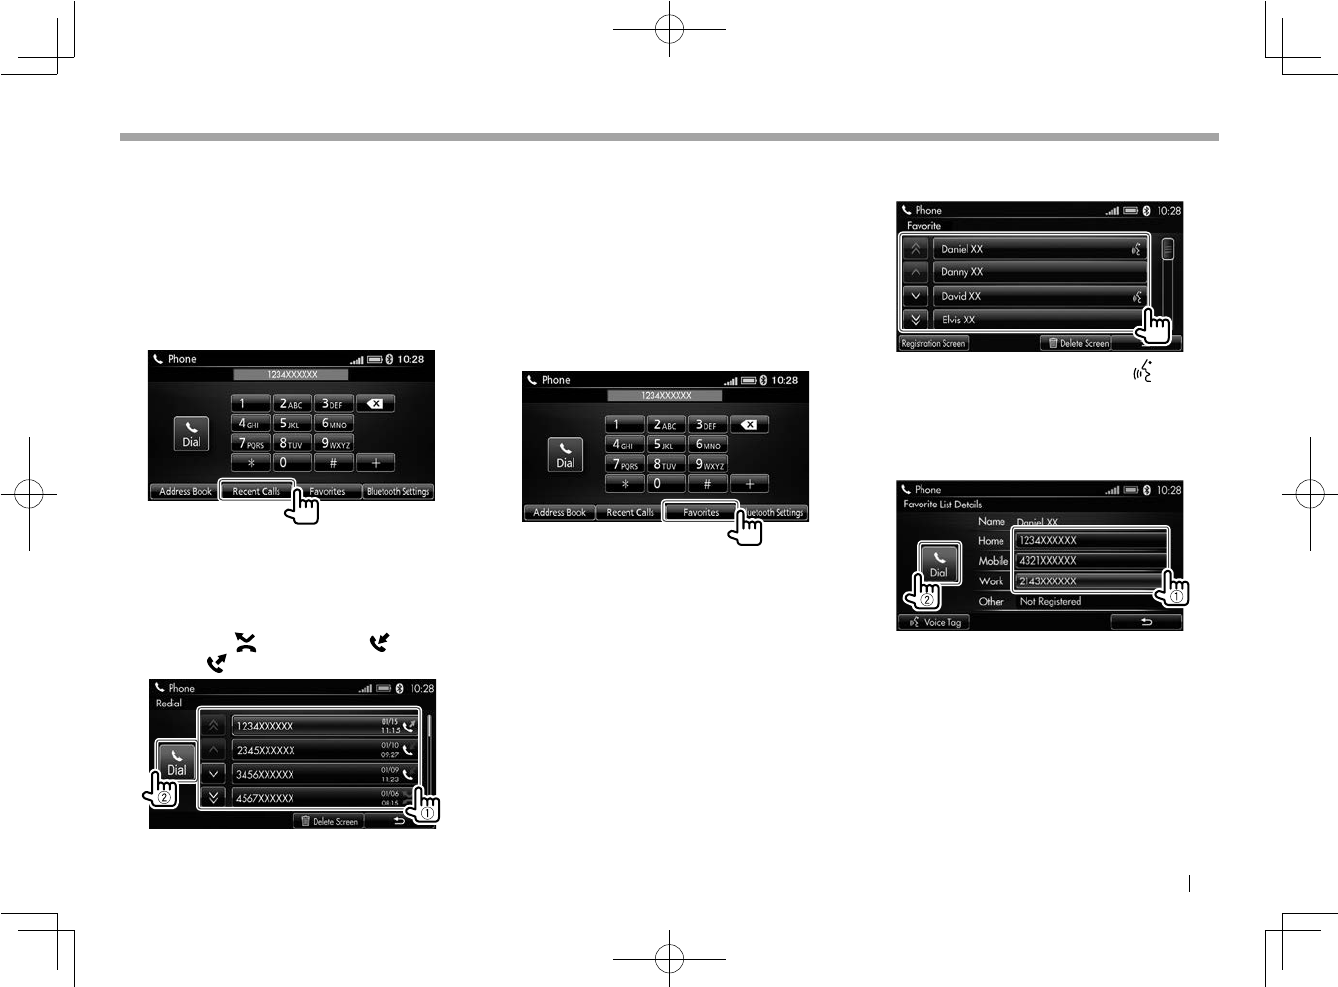
❏ Selecting the phone number from the
call history
You can select the contact from missed calls,
received calls, and dialed calls stored on the
connected mobile phone.
1 Display the <Phone> screen.
(Page 31)
2 Display the <Recent Calls> screen.
3 Select the phone number (1), then
make a call (2).
• The call history types are indicated by
the icons shown at the right of the phone
number ([ ]: missed calls/[ ] : received
calls/[ ] : dialed calls).
❏ Selecting the phone number from the
favorites list
You can register a contact from the address book
as a favorite to make access to the frequently
used phone numbers easier.
• To customize the favorites list, see page 34.
1 Display the <Phone> screen.
(Page 31)
2 Display the <Favorites > screen.
3 Select the contact from the favorites
list.
• When a voice tag is registered, “ ” appears
besides the contact on the <Favorites>
screen.
4 Select the phone number (1), then
make a call (2).
LinkDisplayAudio_NAS.indb 33LinkDisplayAudio_NAS.indb 33 5/12/16 5:39 PM5/12/16 5:39 PM
34
Phone—Hands-free
Phone—Hands-free
Customizing the address book/
favorites list
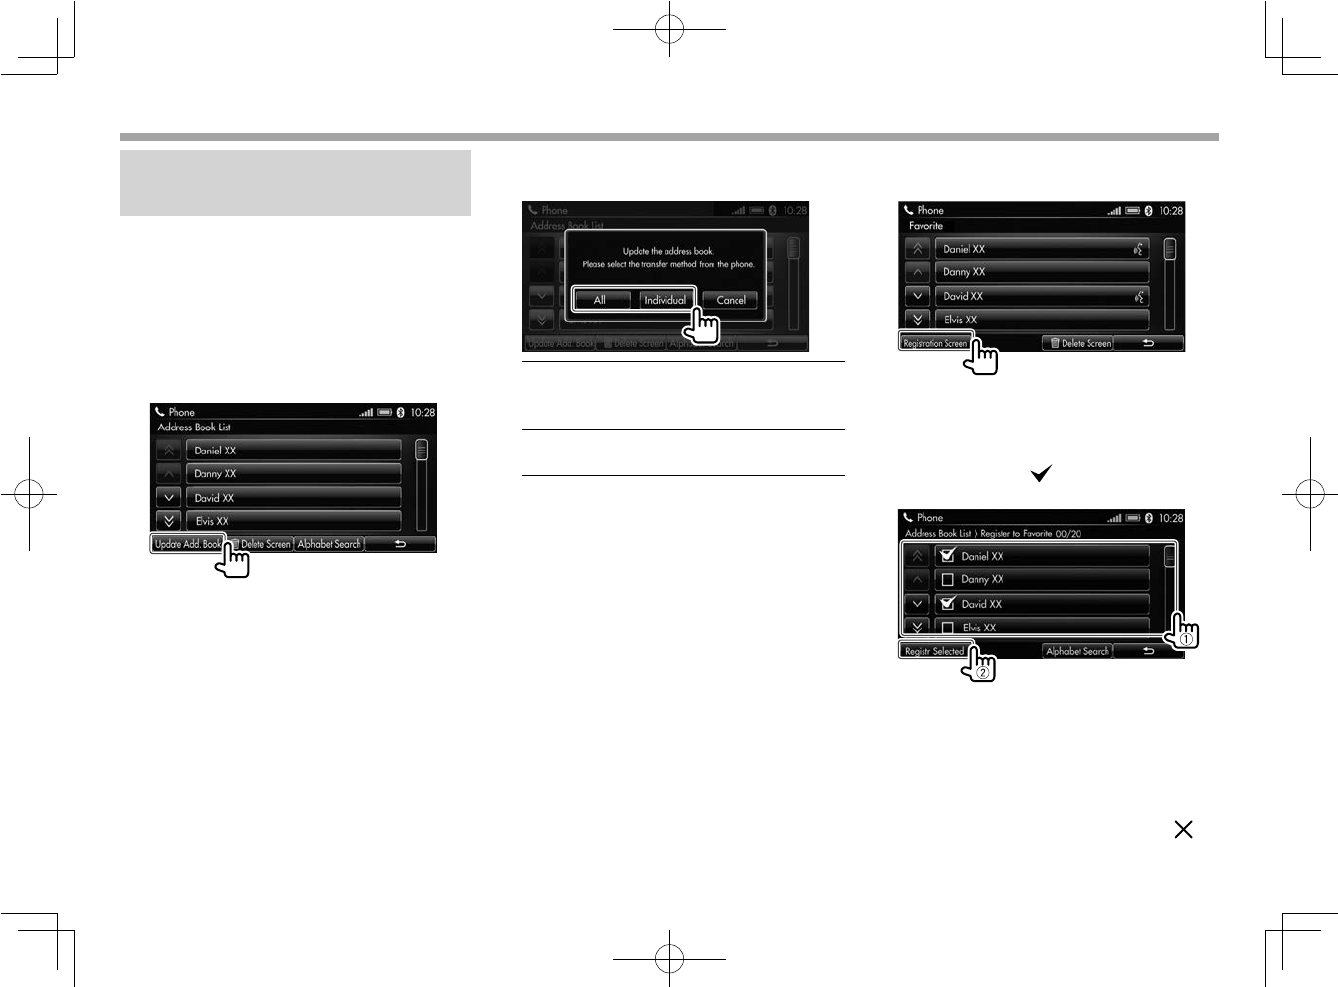
❏ Transferring the phone book
You can transfer items from the mobile phone to
the address book of the product.
1 Display the <Address Book List>
screen. (Page 32)
2 Display the transfer method selection
window.
3 Select the transfer method from the
mobile phone.
[All] Transfers all items registered in
the phone book of the mobile
phone.
[Individual] Selects items to transfer by
operating the mobile phone.
• To cancel the transfer, select [Cancel].
When the [All] transfer is completed, “Address
book update complete. ” is displayed.
• For some mobile phones, all items may not
be transferred.
• For some mobile phones, you may need to
operate the mobile phone to start transfer
of the phone book.
❏ Registering items to the favorites list
You can register up to 20 items from the address
book to the favorites list.
• When the mobile phone is unregistered, the
items on the favorites list are also cleared.
1 Display the <Favorites > screen.
(Page 33)
2 Display the <Register to Favorites>
screen.
3 Select the items to register from the
address book (1), then register the
selected items (2).
• The check mark ( ) appears in the check
box of a selected item.
A message window is displayed. Select [Yes].
• To search for the contact by initial, select
[Alphabet Search] to display the keypad,
then select the initial.
– If the initial of the contact is not a letter
or number, select [#$%].
– To close the keypad screen, touch [ ].
LinkDisplayAudio_NAS.indb 34LinkDisplayAudio_NAS.indb 34 5/12/16 5:39 PM5/12/16 5:39 PM
ENGLISH 35
Phone—Hands-free
Phone—Hands-free
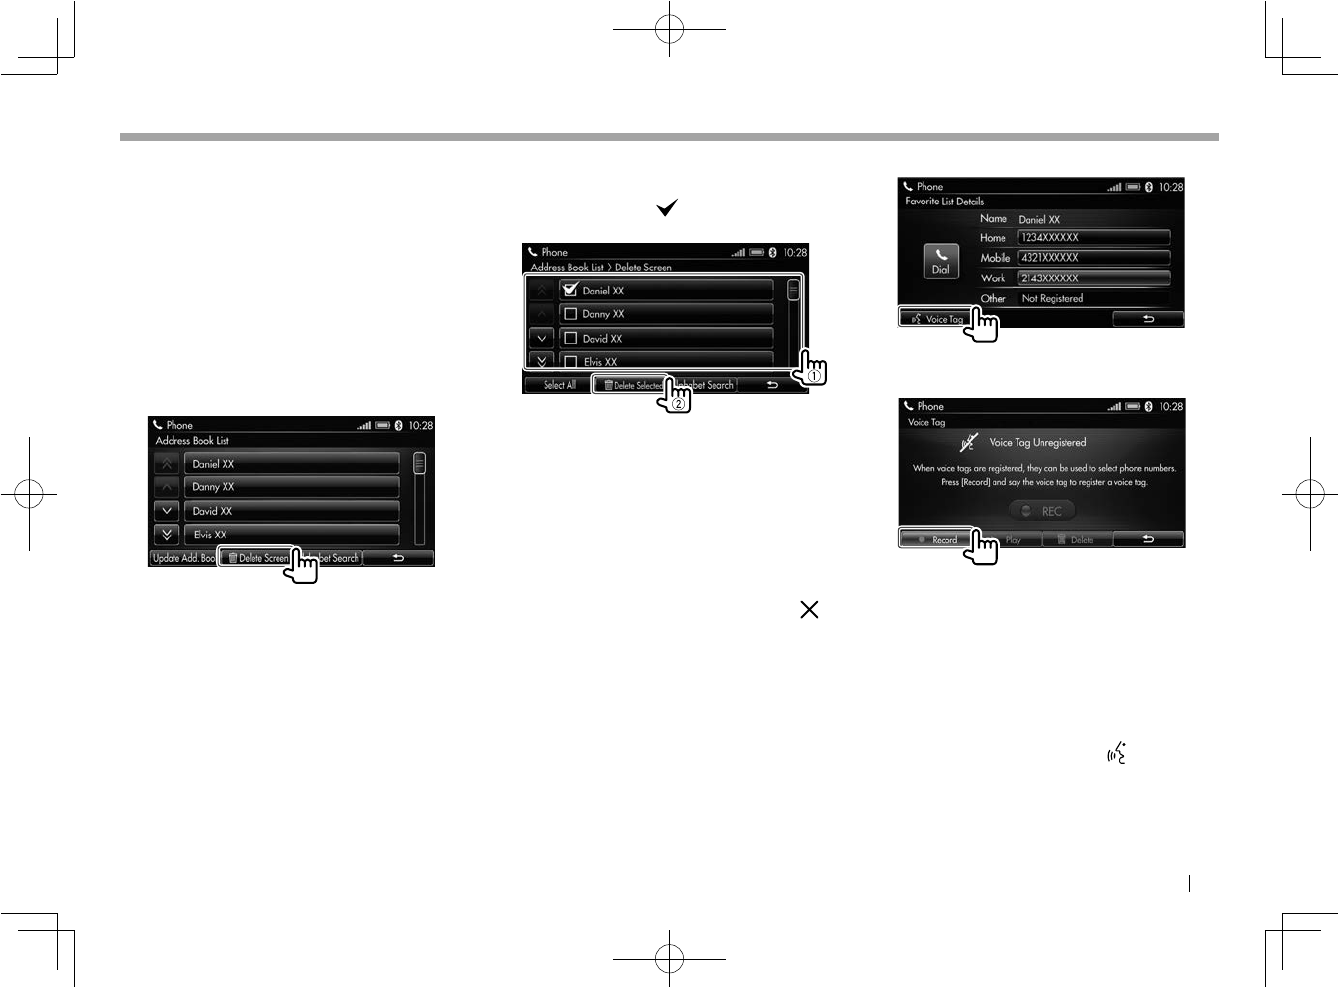
❏Deleting items from the address
book/favorites list
You can delete all items at once, or delete
individual items from the address book/favorites
list.
• Even if you delete items on the product, they
are not deleted on the mobile phone.
1 Display the <Address Book
List> (Page 32) or <Favorite s>
(Page 33) screen.
2 Display the delete screen.
3 Select items (1), then delete them
(2).
• The check mark ( ) appears in the check
box of a selected item.
A message window is displayed. Select [Yes].
• To select all items, select [Select All].
– To cancel all selections, select [Clear All].
• To search for the contact by initial, select
[Alphabet Search] to display the keypad,
then select the initial.
– If the initial of the contact is not a letter
or number, select [#$%].
– To close the keypad screen, touch [ ].
❏ Registering voice tags for contacts in
the favorites list
You can register voice tags for the contacts
registered in the favorites list to make calling
easier using voice control.
• You can call a contact by speaking the voice tag
after activating voice control. (Page 23)
1 Select the contact from the favorites
list. (Page 33)
2 Display the voice tag recording screen.
3 Record the voice tag.
R REC lights up on the screen while
recording.
• To stop recording, touch [R Record].
• To listen to the recorded voice tag, touch
[I Play].
– To stop playback, touch [W Stop].
• To delete the voice tag, touch [Delete].
• When a voice tag is registered, “ ” appears
besides the contact on the <Favorites> screen.
LinkDisplayAudio_NAS.indb 35LinkDisplayAudio_NAS.indb 35 5/12/16 5:39 PM5/12/16 5:39 PM
36
Phone—Hands-free
Phone—Hands-free
Settings for mobile phone
usage
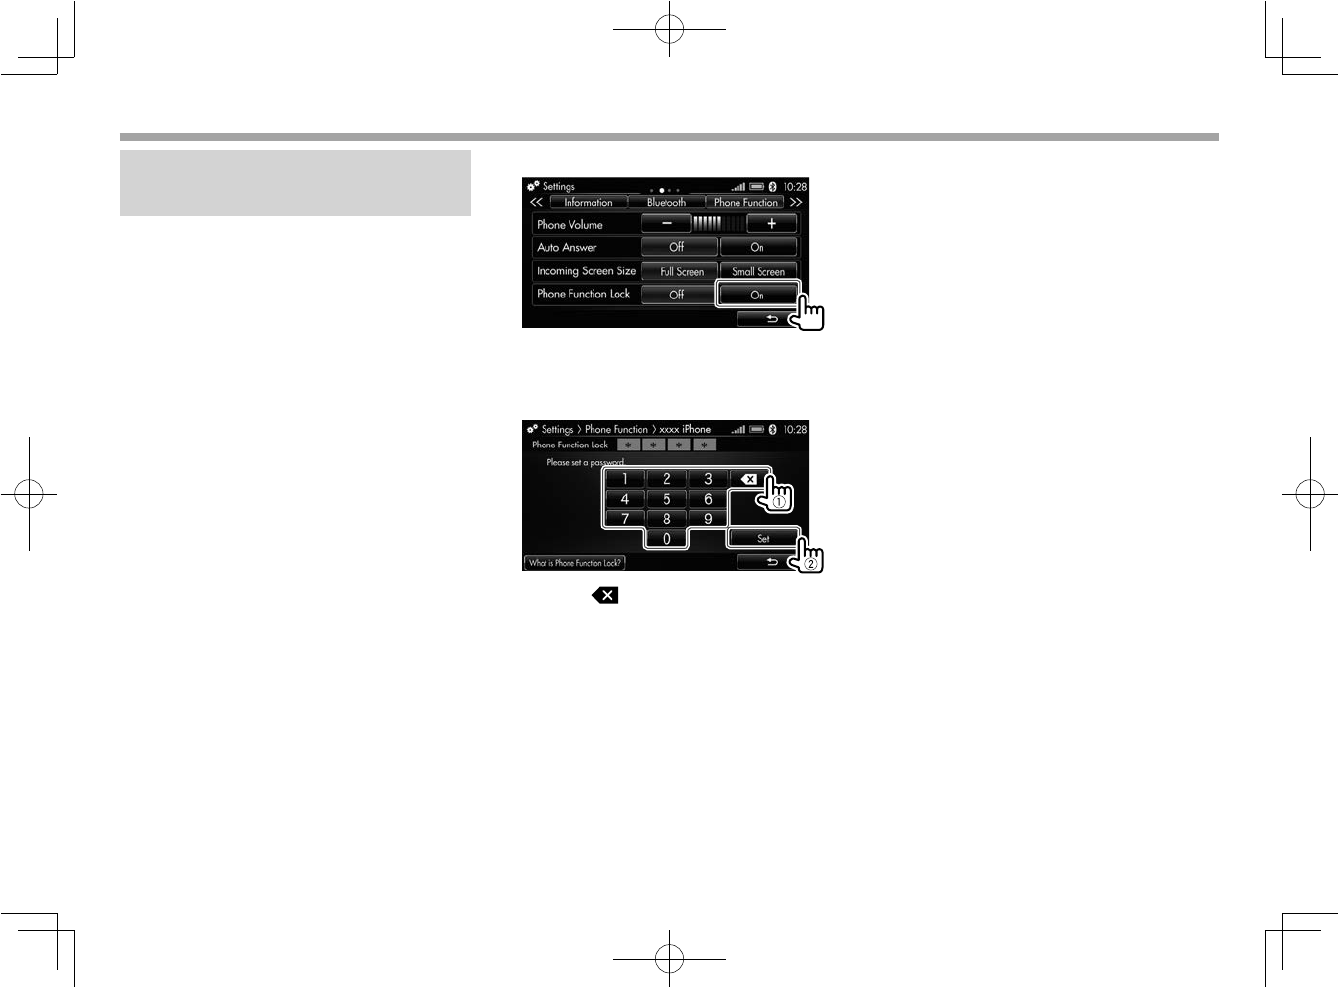
❏ Activating the mobile phone
security—Phone Function Lock
You can lock some functions of the mobile
phone. When activating the mobile phone
security, you are required to enter a password
to make calls and view the address book and
history.
• You can set <Phone Function Lock> for each
registered mobile phone.
• No password is set initially at the factory. Once
you have registered your password, note it
somewhere.
1 Display the <Phone Function>
settings screen.
• To display from the menu window, see
page 37.
• To display from the <Settings> screen, see
page 76.
2 Activate the mobile phone security.
The password setting screen is displayed.
3 Enter a 4 digit password (1), then
confirm the entry (2).
• Touch [ ] to delete the last entry.
• Touch [What is Phone Function Lock?] to
know about the <Phone Function Lock>.
– To close the message window, select
[Cancel].
4 Repeat step 3 to enter the password
again for confirmation.
The mobile phone security is activated.
• When displaying the <Phone> screen, a
password is required. Enter the password,
then touch [Enter] to unlock the security.
To deactivate the mobile phone security
Select [Off] for <Phone Function Lock>.
• The registered password is required. Enter the
password, then select [Set] to deactivate.
LinkDisplayAudio_NAS.indb 36LinkDisplayAudio_NAS.indb 36 5/12/16 5:39 PM5/12/16 5:39 PM
ENGLISH 37
Phone—Hands-free
Phone—Hands-free
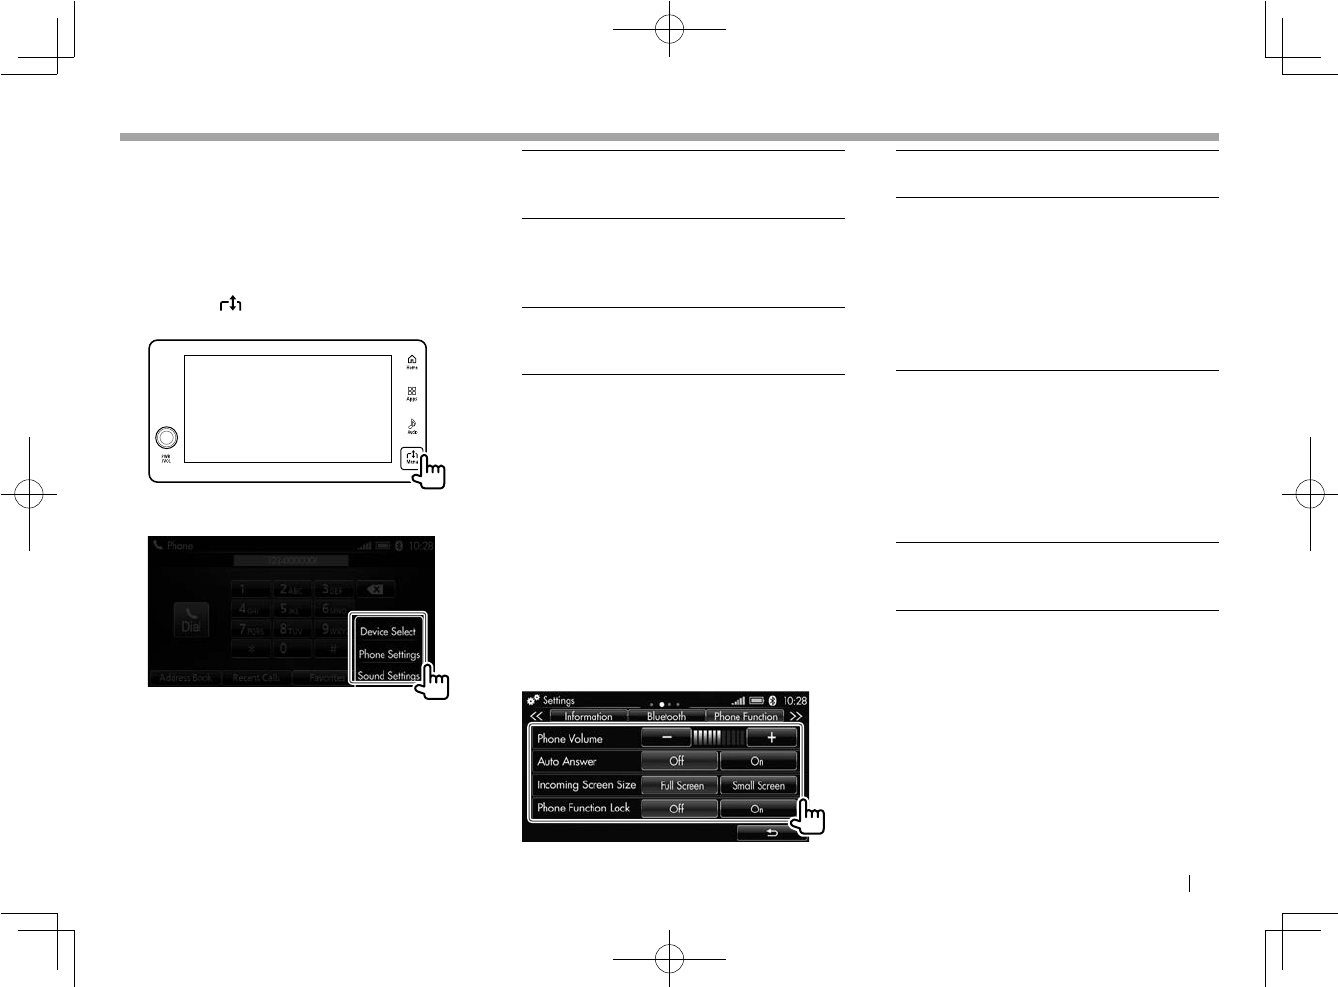
❏ Displaying the settings menu from
the menu window
You can change the settings for using a mobile
phone from the menu window.
1 Display the menu window.
While the <Phone> screen is displayed,
touch the Menu button on the monitor
panel.
2 Select the setting menu.
[Device
Select]
Displays the <Bluetooth>
settings screen to select another
mobile phone. (Page 19)
[Phone
Settings]
Displays the <Phone Function>
settings screen to change the
settings for using a mobile
phone. (See below.)
[Sound
Settings]
Displays the <Sound> settings
screen to adjust the sound.
(Page 73)
The selected settings screen is displayed.
❏ Settings on the <Phone Function>
settings screen
You can change the settings for using a mobile
phone.
1 Display the <Phone Function>
settings screen.
• To display from the menu window, see the
left column.
• To display from the <Settings> screen, see
page 76.
2 Change the settings.
<Phone
Volume>
Adjusts the volume level during
a call.
<Auto
Answer>
Activates/deactivates auto
answer.
• Off: The product does not
answer calls automatically.
Answer the calls manually.
• On: The product answers
incoming calls automatically
after 5 seconds.
<Incoming
Screen
Size>
Selects the incoming call screen
size.
• Full Screen: Displays the
incoming call screen at full
size.
• Small Screen: Displays the
incoming call screen at the
smaller size.
<Phone
Function
Lock>
Activates/deactivates the
mobile phone security.
(Page 36)
LinkDisplayAudio_NAS.indb 37LinkDisplayAudio_NAS.indb 37 5/12/16 5:39 PM5/12/16 5:39 PM
38
iPod/iPhone
iPod/iPhone
Playback operations
Preparation:
Connect iPod/iPhone to this product via the
USB input terminal. (Page 15)
• For playable iPod/iPhone types, see page
93.
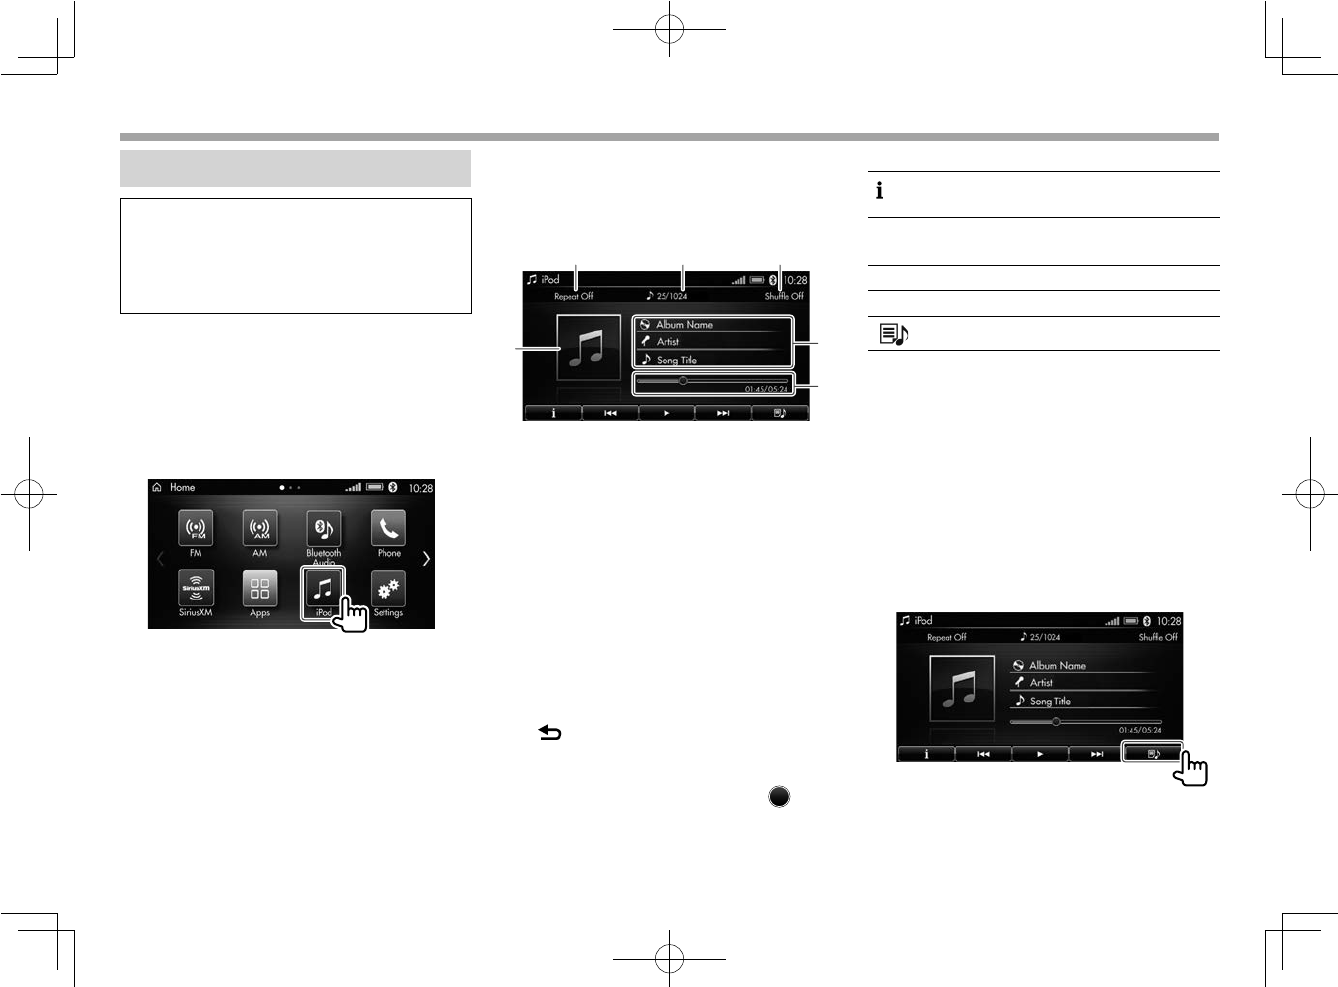
❏ Playing tracks on iPod/iPhone
Select [iPod] on the <Home> screen to display
the <iPod> source control screen and start
playback.
• You cannot play video on the product.
1 Touch [iPod] on the <Home> screen.
❏ Indications and buttons on the
source control screen
You can perform operations to play tracks
contained in the connected iPod/iPhone.
123
45
6
Playback information
1 Repeat mode indicator (Page 39)
2 Track number/total track number in the
current category
• Touching the number displays the track list
of the current category.
3 Shuffle mode indicator (Page 39)
4 Artwork (shown if the track contains artwork)
• To activate/deactivate the artwork, see
page 40.
5 Track information
• Touching the information area displays
detailed information of the current track.
To return to the source control screen, touch
[ ].
6 Progress bar and playing time/total playing
time
• By dragging the position indicator ( ) on the
bar, you can change the playback position.
Operation buttons
[ ] Displays the information of the
current track.
[S] [T]• Selects a track. (Touch)
• Rewinds/fast-forwards. (Hold)
[W]* Pauses playback.
[I]* Starts playback.
[ ]Displays the track/category list.
* During playback, [W] is displayed, and when playback is paused,
[I] is displayed.
❏ Selecting a track from the track/
category list
You can select a track from the track/category list.
• You can also select a track from the track list
of the current category by touching the track
number/total track number on the <iPod>
source control screen.
1 Display the track/category list.
LinkDisplayAudio_NAS.indb 38LinkDisplayAudio_NAS.indb 38 5/12/16 5:39 PM5/12/16 5:39 PM
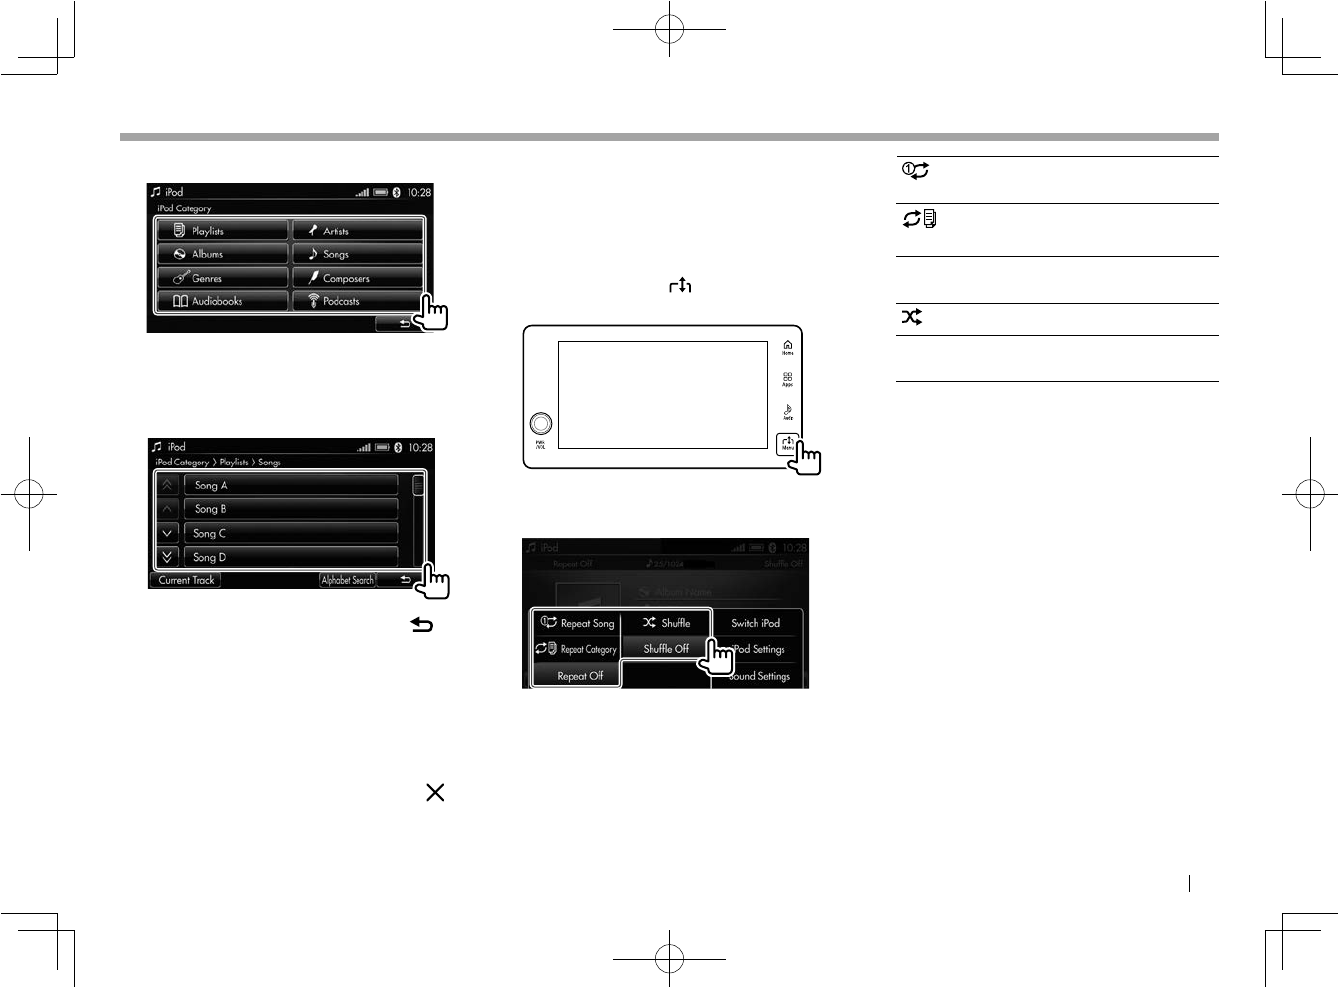
ENGLISH 39
iPod/iPhone
iPod/iPhone
2 Select a category.
The list previously displayed is shown.
3 Select a desired item.
Select an item in each layer until you reach
and select the desired track.
• To select another category, touch [ ]
repeatedly until the <iPod Category>
screen is displayed.
• To search for the track name by initial,
select [Alphabet Search] to display the
keypad, then select the initial.
– If the initial of the track is not a letter or
number, select [#$%].
– To close the keypad screen, touch [ ].
• To return to the current track playback
screen, select [Current Track].
❏ Selecting the playback mode
You can select the repeat mode and shuffle
mode.
1 Display the menu window.
While the <iPod> source control screen is
displayed, touch the Menu button on the
monitor panel.
2 Select a playback mode.
[ Repeat Song] Repeats the current
track.
[ Repeat
Category]
Repeats all tracks in
the current category.
[Repeat Off] Deactivates the repeat
mode.
[ Shuffle] Shuffles all tracks.
[Shuffle Off] Deactivates the shuffle
mode.
• You can also select the playback mode by
touching the repeat mode or shuffle mode
indicator on the <iPod> source control screen.
LinkDisplayAudio_NAS.indb 39LinkDisplayAudio_NAS.indb 39 5/12/16 5:39 PM5/12/16 5:39 PM
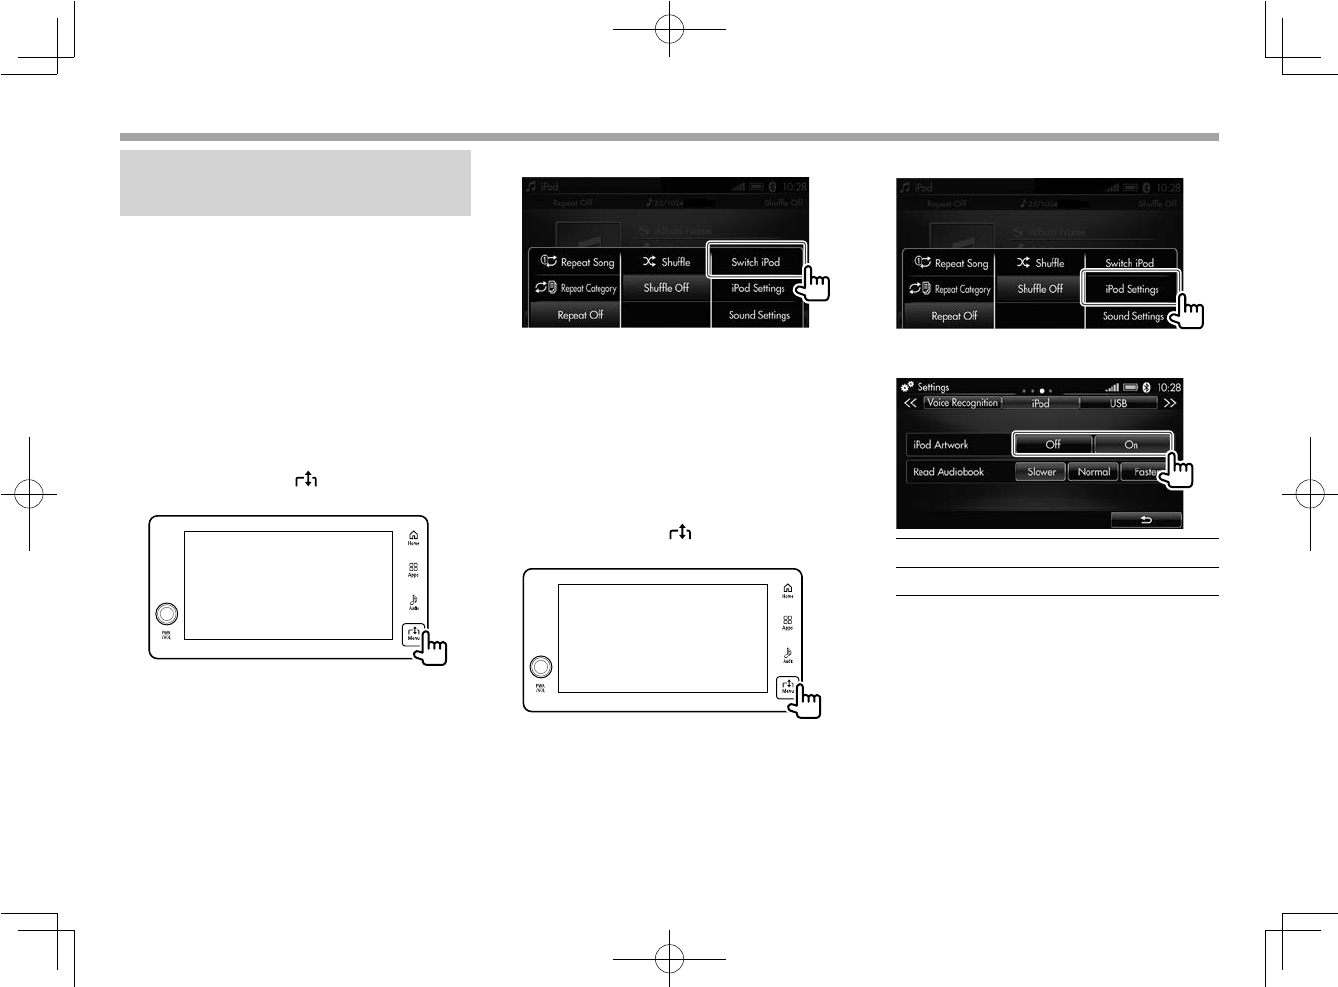
40
iPod/iPhone
iPod/iPhone.
Settings for iPod/iPhone
playback
You can change the settings for playing iPod/
iPhone from the menu window.
❏ Switching to another iPod/iPhone
When two iPod/iPhone devices are connected
to the USB input terminals, you can switch iPod/
iPhone to play.
• If iPhone compatible with CarPlay is connected,
you cannot switch to it.
1 Display the menu window.
While the <iPod> source control screen is
displayed, touch the Menu button on the
monitor panel.
2 Select [Switch iPod].
• Each time you touch [Switch iPod], the
iPhone/iPod changes alternately.
❏ Displaying/hiding the album artwork
You can display/hide the album artwork if the file
has tag data that includes the album artwork.
1 Display the menu window.
While the <iPod> source control screen is
displayed, touch the Menu button on the
monitor panel.
2 Display the <iPod> settings screen.
3 Change the settings.
[Off] Hides the artwork.
[On] Displays the artwork.
LinkDisplayAudio_NAS.indb 40LinkDisplayAudio_NAS.indb 40 5/12/16 5:39 PM5/12/16 5:39 PM
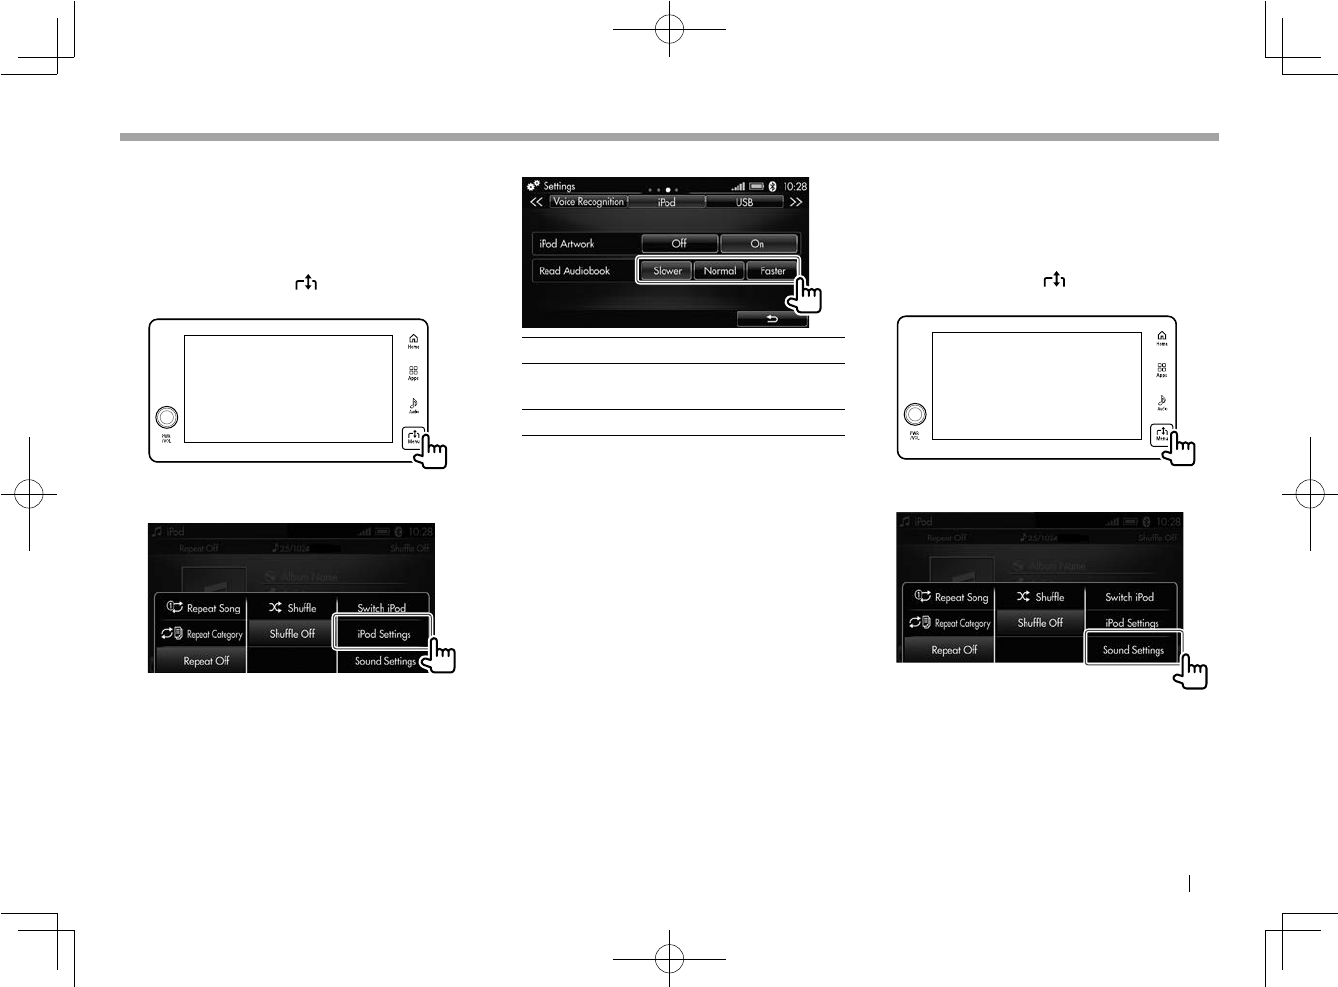
ENGLISH 41
iPod/iPhone
iPod/iPhone.
❏ Setting the speed of audiobook
You can change the speed of audiobook
playback.
1 Display the menu window.
While the <iPod> source control screen is
displayed, touch the Menu button on the
monitor panel.
2 Display the <iPod> settings screen.
3 Change the settings.
[Slower] Reads the contents slowly.
[Normal] Reads the contents at
normal speed.
[Faster] Reads the contents faster.
❏ Adjusting the sound during playback
You can adjust the sound for playing iPod/
iPhone.
1 Display the menu window.
While the <iPod> source control screen is
displayed, touch the Menu button on the
monitor panel.
2 Display the <Sound> settings screen.
3 Make adjustment on the <Sound>
settings screen. (Page 73)
LinkDisplayAudio_NAS.indb 41LinkDisplayAudio_NAS.indb 41 5/12/16 5:39 PM5/12/16 5:39 PM
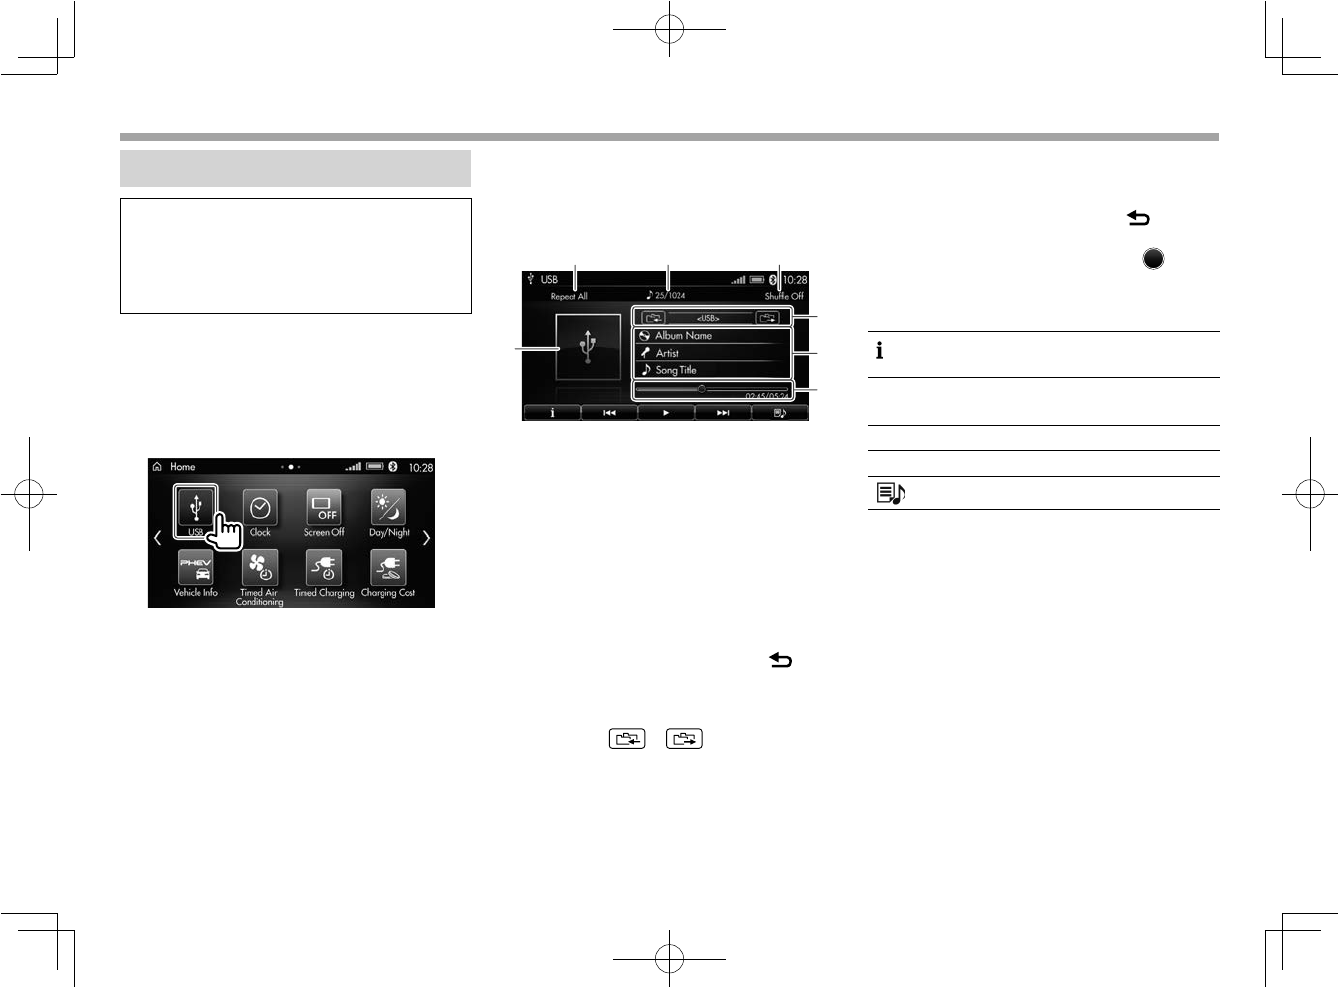
42
USB
USB
Playback operations
Preparation:
• Connect a USB device to the product via the
USB input terminal. (Page 16)
• For playable file types and notes on using
USB devices, see page 94.
❏ Playing tracks on a USB device
Select [USB] on the <Home> screen to display
the <USB> source control screen and start
playback.
1 Touch [USB] on the <Home> screen:
❏Indications and buttons on the
source control screen
You can perform operations to play tracks
contained in the connected USB device.
12 3
46
5
7
Playback information
1 Repeat mode indicator (Page 43)
2 Track number/Total track number in the
current folder
• Touching the number displays the track list
of the current folder.
3 Shuffle mode indicator (Page 43)
4 Album artwork (shown while playing if the file
has tag data that includes the album artwork)
• Touching artwork area displays detailed
information of the current track. To return to
the source control screen, touch
[ ].
• To activate/deactivate the album artwork,
see page 45.
5 Current folder
• Touching [ ] /[ ] skips to a track in
the previous/next folder.
6 Track information
• Touching the information area displays detailed
information of the current track. To return to
the source control screen, touch [ ].
7
Progress bar and playing time/total playing time
• By dragging the position indicator ( ) on the
bar, you can change the playback position.
Operation buttons
[ ] Displays the information of the
current track.
[S] [T]• Selects a track. (Touch)
• Rewinds/fast-forwards. (Hold)
[W]* Pauses playback.
[I]* Starts playback.
[ ]Displays the track/folder list.
* During playback, [W] is displayed, and when playback is paused,
[I] is displayed.
❏Selecting a track from the track/
folder list
You can select a track from the track/folder list.
• You can also select a track from the track list
of the current folder by touching the track
number/total track number on the <USB>
source control screen. (See above.)
LinkDisplayAudio_NAS.indb 42LinkDisplayAudio_NAS.indb 42 5/12/16 5:39 PM5/12/16 5:39 PM
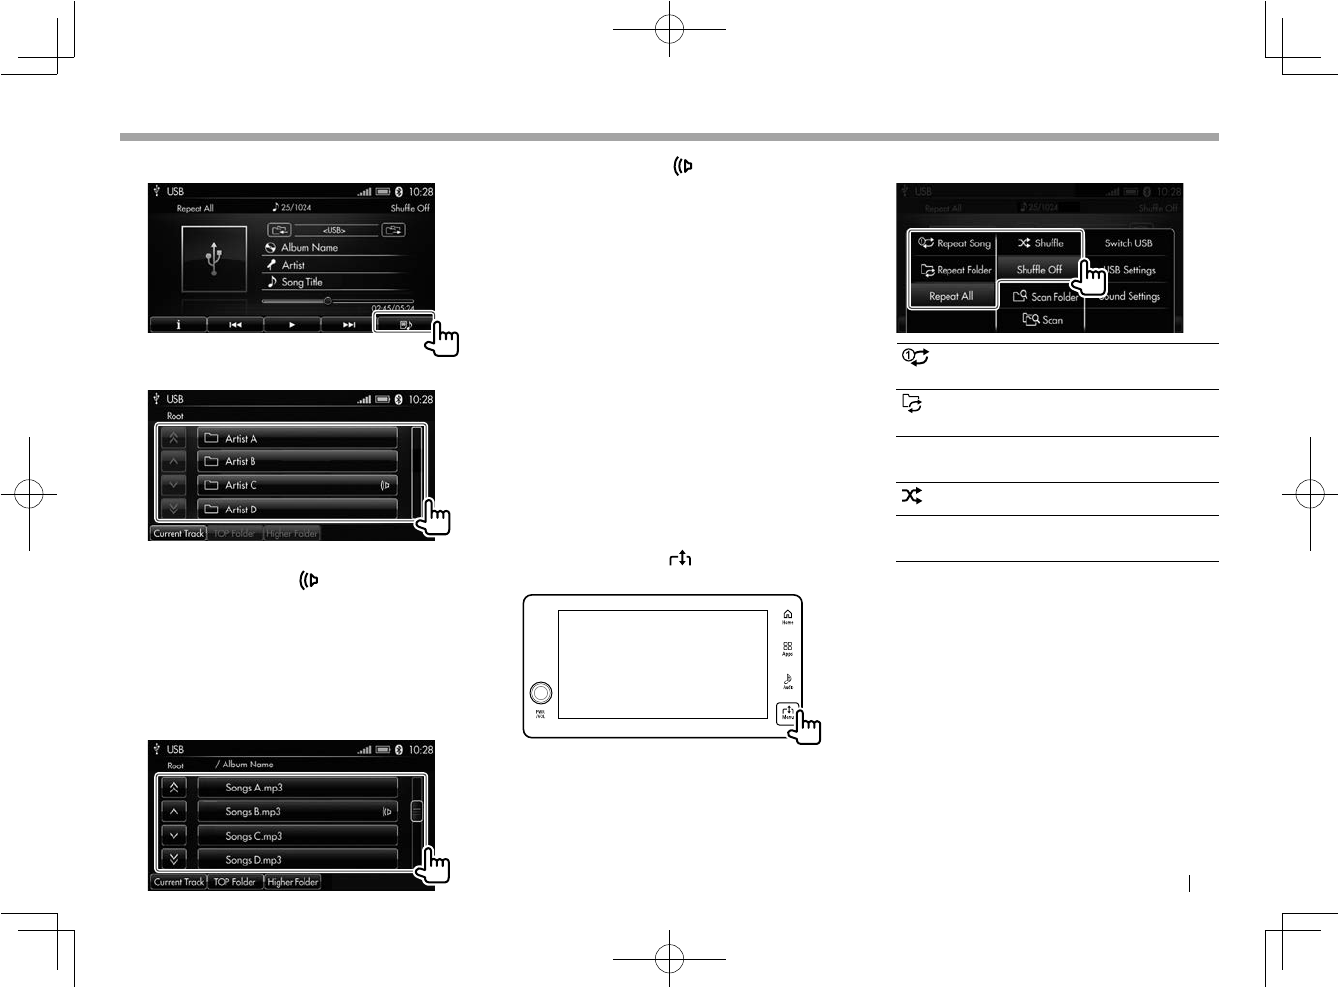
ENGLISH 43
USB
USB
1 Display the track/folder list.
2 Select a folder.
• The list previously displayed is shown.
• The speaker mark ( ) appears beside the
folder which contains the track currently
played back.
• To return to the current track playback
screen, select [Current Track].
3 Select a desired item.
Select an item in each layer until you reach
and select the desired track.
• The speaker mark ( ) appears beside the
track currently played back.
• To return to the higher folder, select
[Higher Folder].
• To return to the root folder, select [TOP
Folder].
• To return to the current track playback
screen, select [Current Track].
❏ Selecting the playback mode
You can select the repeat mode and shuffle
mode.
• You cannot activate both the repeat mode and
shuffle mode at the same time.
• You can play up to 65535 tracks in shuffle
mode.
1 Display the menu window.
While the <USB> source control screen is
displayed, touch the Menu button on the
monitor panel.
2 Select a playback mode.
[ Repeat Song] Repeats the current
track.
[ Repeat Folder] Repeats all tracks in
the current folder.
[Repeat All] Repeats all tracks in
the USB device.
[ Shuffle] Shuffles all tracks.
[Shuffle Off] Deactivates the
shuffle mode.
• You can also select the playback mode by
touching the repeat mode or shuffle mode
indicator on the <USB> source control screen.
LinkDisplayAudio_NAS.indb 43LinkDisplayAudio_NAS.indb 43 5/12/16 5:39 PM5/12/16 5:39 PM
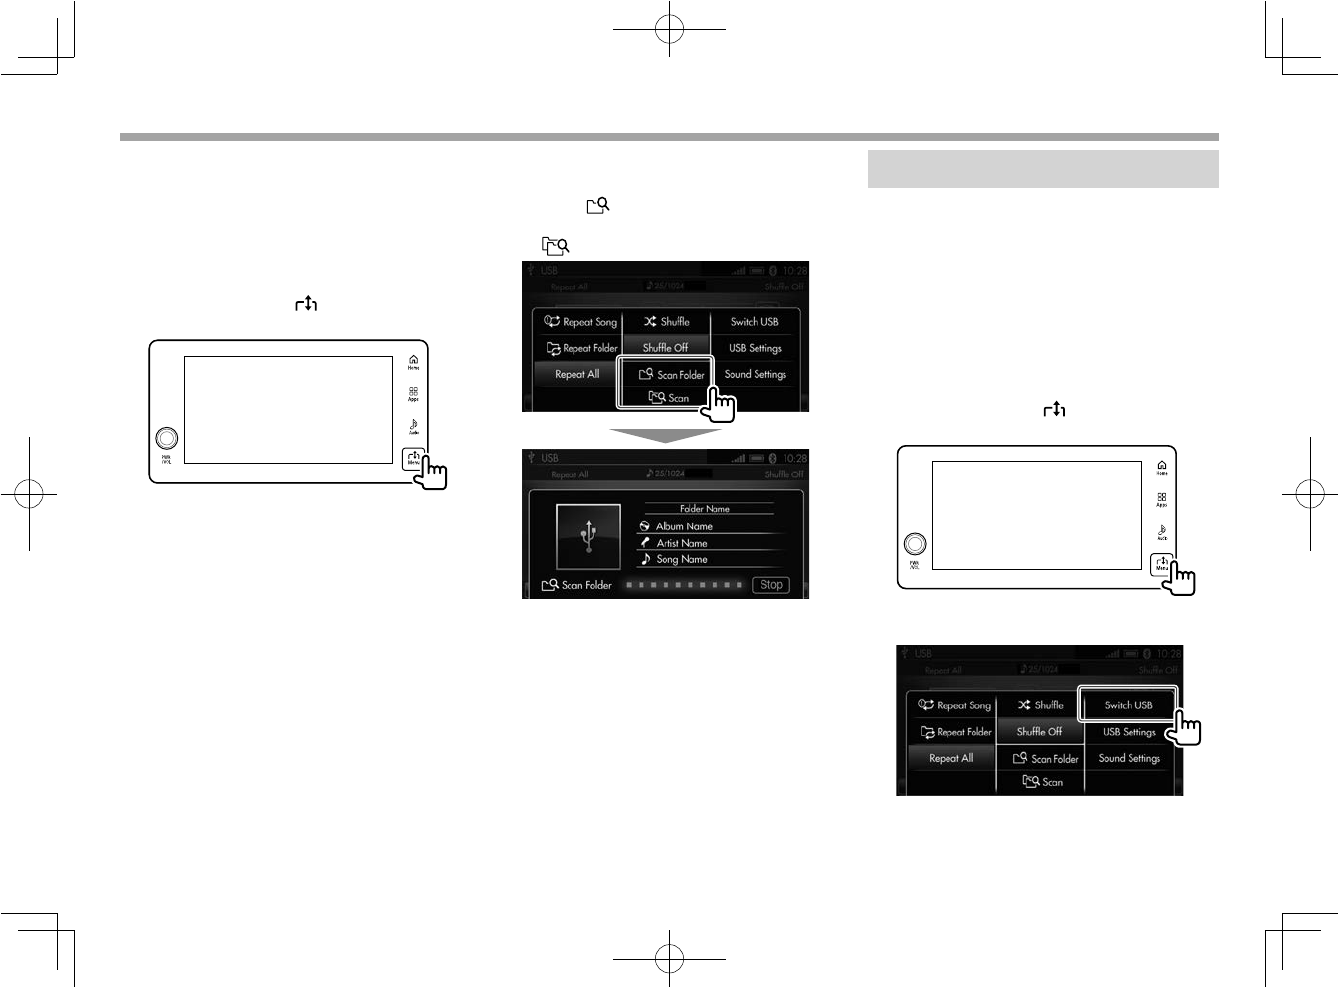
44
USB
USB
❏ Playing the beginning of a track—
track scan
You can listen to the first 10 seconds of each track
by scanning the tracks.
1 Display the menu window.
While the <USB> source control screen is
displayed, touch the Menu button on the
monitor panel.
2 Start the track scan.
• To scan all the tracks in the current folder,
select [ Scan Folder].
• To scan all tracks in the USB device, select
[ Scan].
• To stop the track scan, select [Stop].
Settings for USB playback
You can change the settings for playing USB
devices from the menu window.
❏ Switching to another USB device
When two USB devices are connected to the USB
input terminals, you can switch the USB device
to play.
1 Display the menu window.
While the <USB> source control screen is
displayed, touch the Menu button on the
monitor panel.
2 Select [Switch USB].
• Each time you touch [Switch USB], the USB
devices change alternately.
LinkDisplayAudio_NAS.indb 44LinkDisplayAudio_NAS.indb 44 5/12/16 5:39 PM5/12/16 5:39 PM
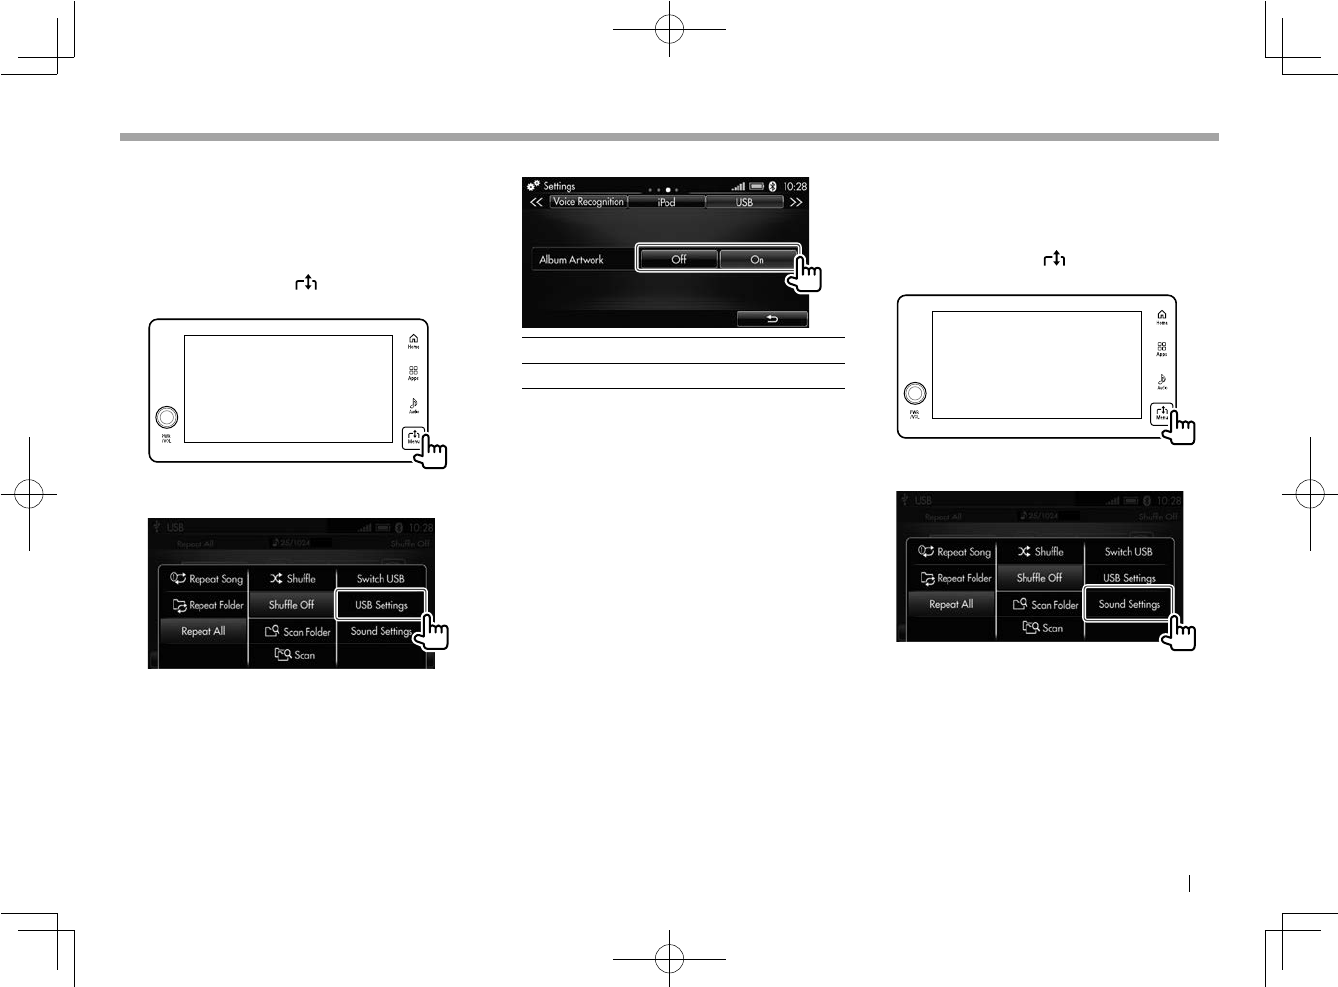
ENGLISH 45
USB
USB
❏ Displaying/hiding the album artwork
You can display/hide the album artwork if the file
has tag data that includes the album artwork.
1 Display the menu window.
While the <USB> source control screen is
displayed, touch the Menu button on the
monitor panel.
2 Display the <USB> settings screen.
3 Change the settings.
[Off] Hides the album artwork.
[On] Displays the album artwork.
❏ Adjusting the sound during playback
You can adjust the sound for playing USB devices.
1 Display the menu window.
While the <USB> source control screen is
displayed, touch the Menu button on the
monitor panel.
2 Display the <Sound> settings screen.
3 Make adjustment on the <Sound>
settings screen. (Page 73)
LinkDisplayAudio_NAS.indb 45LinkDisplayAudio_NAS.indb 45 5/12/16 5:39 PM5/12/16 5:39 PM
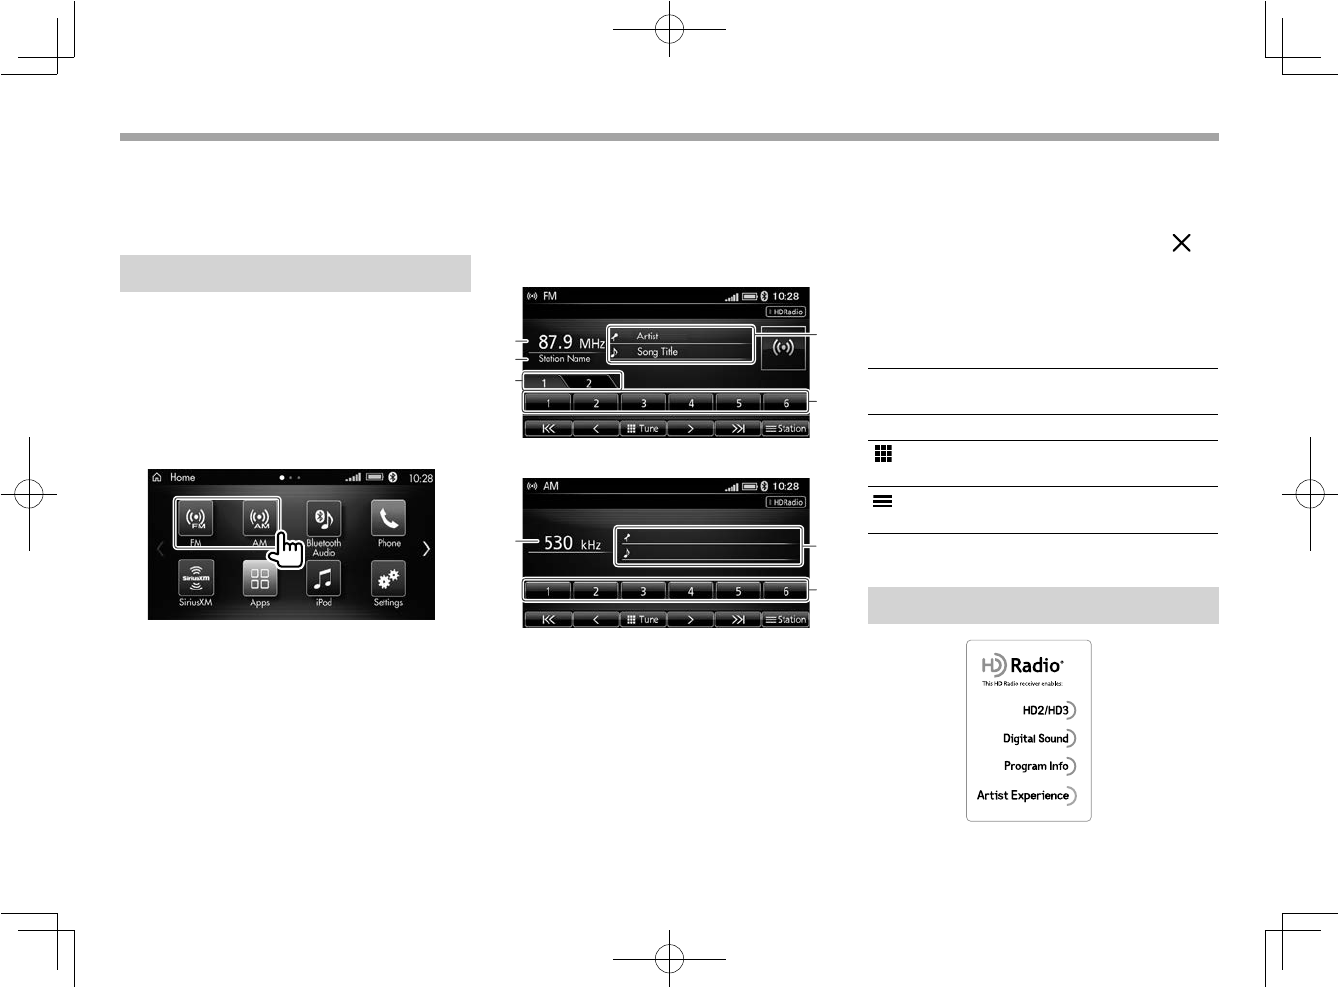
46
Tuner—FM/AM/HD Radio
Tuner—FM/AM/HD Radio
TM
TM
You can tune in to both conventional radio
station and HD Radio stations.
• In Canada, HD Radio is not available. You can
only enjoy the conventional analog broadcast.
About FM/AM radio
❏ Selecting FM/AM
Select [FM] or [AM] on the <Home> screen to
display the <FM> or <AM> source control screen
and tune in to a station.
1 Touch [FM] or [AM] on the <Home>
screen.
❏Indications and buttons on the
source control screen
You can perform operations to listen to a desired
station.
FM (analog stations)
1
2
3
4
5
AM (analog stations)
1
5
4
Tuner reception information for analog
stations:
1 Station frequency currently tuned in
2 Station name*
3 Preset list switch tab (only for FM)
Selects one of the preset lists where 6 stations
are registered.
4 Program information*
Touching the information area displays
detailed information sent by the current
station.
To close the information screen, touch [ ].
5 Preset list (Page 49)
* Displayed when the FM station sends the related signals. No
information is displayed for AM stations.
Operation buttons
[<]/[>] Changes the frequency step by
step. (Page 48)
[I<<]/[>>I] Searches for a station. (Page 48)
[ Tune] Enables direct entry of station
frequency. (Page 48)
[ Station] Displays the station list.
(Page 49)
About HD Radio™ Technology
LinkDisplayAudio_NAS.indb 46LinkDisplayAudio_NAS.indb 46 5/12/16 5:39 PM5/12/16 5:39 PM
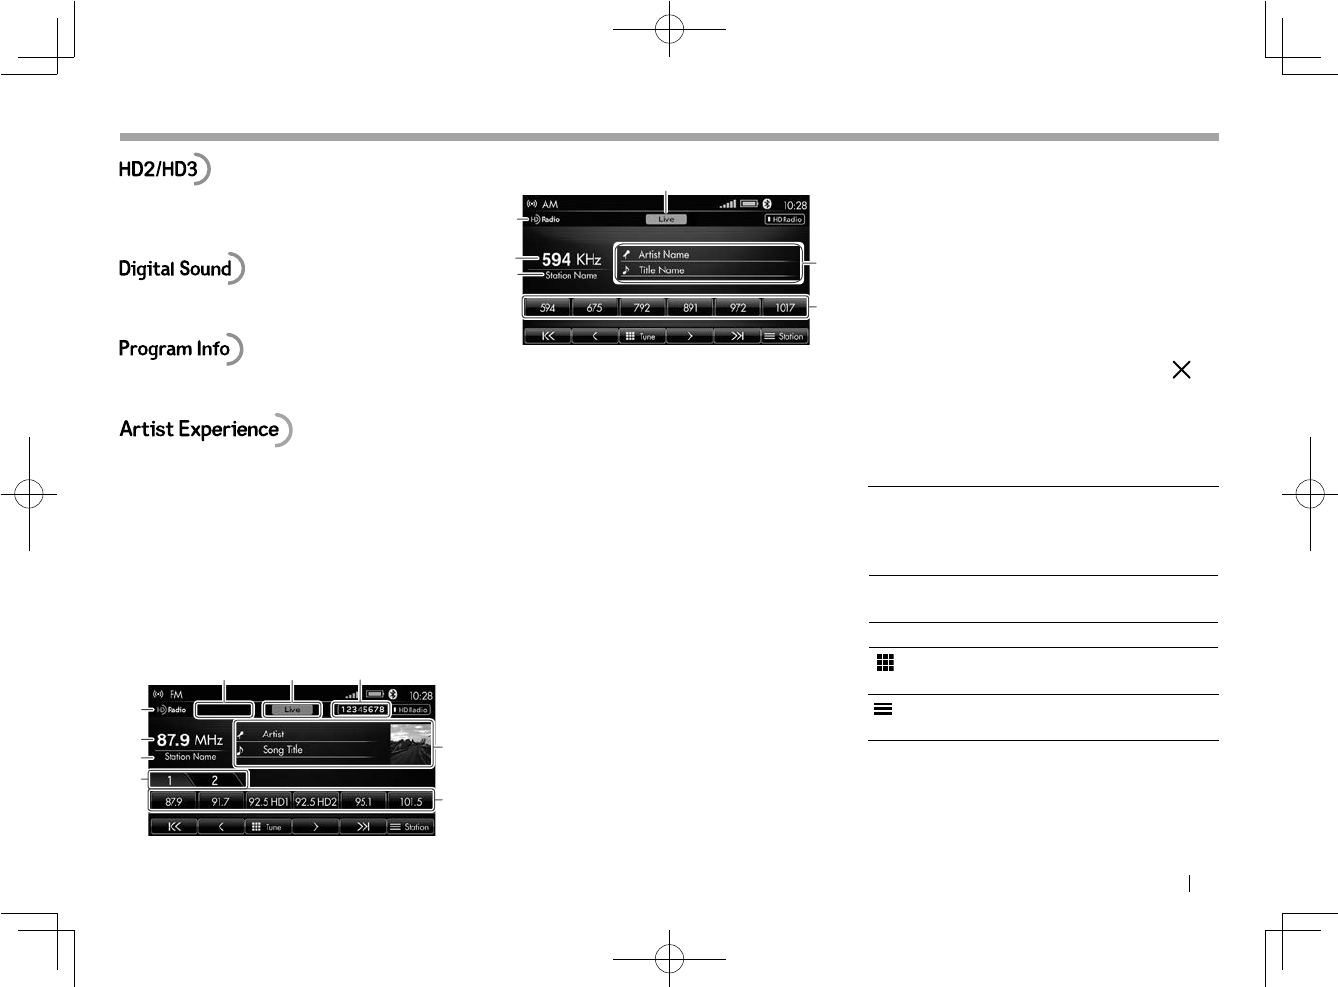
ENGLISH 47
Tuner—FM/AM/HD Radio
Tuner—FM/AM/HD Radio
TM
TM
• Adjacent to traditional main stations are HD2/
HD3 Channels, providing new original formats
on the FM dial.
• HD Radio broadcasts deliver crystal-clear, CD-
like digital audio quality to consumers.
• Provides song name, artist, station ID, and other
relevant data to enrich the listening experience.
Artist Experience is the synchronous
transmission, delivery, and display of images
on the HD Radio receiver that are related to the
specific audio segment.
• HD Radio is available in USA and Mexico. To
find HD Radio stations in your area, visit
<http://www.hdradio.com>.
FM (HD Radio stations)
3
4
5
6
7
8
9
12
AM (HD Radio stations)
5
9
2
6
4
8
Tuner reception information for HD Radio
stations:
1 Message area (only for FM)
2 Live indicator
• When receiving a live broadcast like
a baseball game, the indicator lights
up. Reception mode for HD Radio is
automatically switched to analog reception.
(Page 50)
3 Sub-channel indicator
• Lights up when the received station sends
sub-channel (HD2 – HD8) signals as well as
main channel signals (HD1). The currently
tuned channel lights up in orange.
4 HD Radio indicator
• Lights up in orange while receiving the
digital signals of HD Radio station.
• Lights up in gray while receiving the analog
signals of HD Radio station.
• Not displayed while receiving the signals of
conventional radio stations.
5 Station frequency currently tuned in
6 Station name
7 Preset list switch tab (only for FM)
Selects one of the preset lists where 6 stations
are stored.
8 Program information
Touching the information area displays
detailed information sent by the current
station. (Related picture or station logo is also
displayed if the related signals are sent.)
To close the information screen, touch [ ].
9 Preset list
Includes 6 preset stations. You can store either
main channel or sub-channel. (Page 49)
Operation buttons
[HD Radio] Selects the HD Radio reception
mode. When the digital reception
is selected, the indicator lights up
in orange. (Page 50)
[<]/[>] Changes the frequency step by
step. (Page 48)
[I<<]/[>>I] Searches for a station. (Page 48)
[ Tune] Enables direct entry of station
frequency. (Page 48)
[ Station] Displays the station list.
(Page 49)
LinkDisplayAudio_NAS.indb 47LinkDisplayAudio_NAS.indb 47 5/12/16 5:39 PM5/12/16 5:39 PM
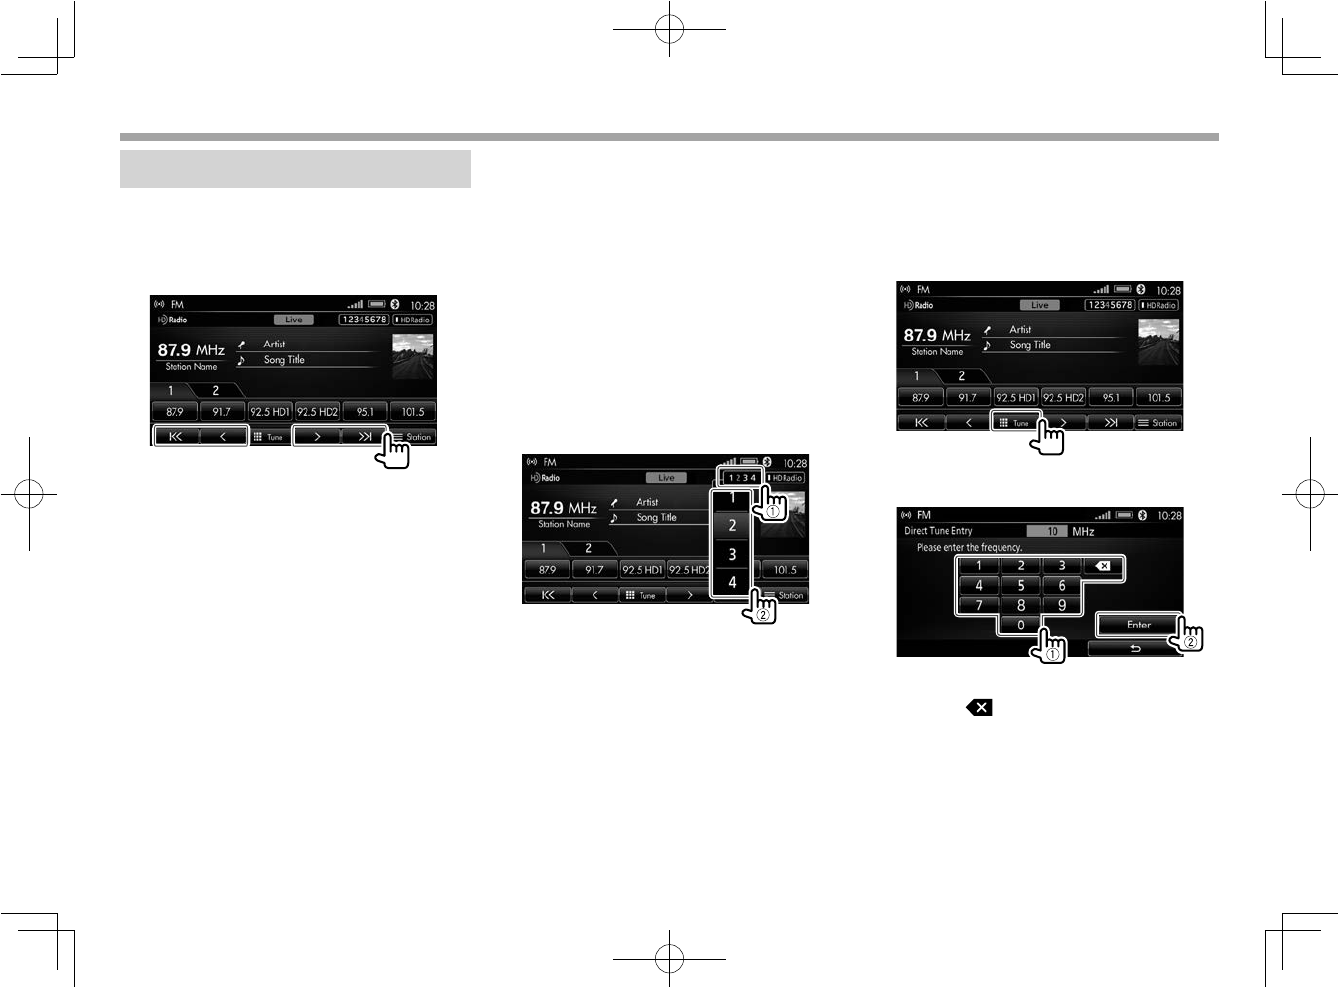
48
Tuner—FM/AM/HD Radio
Tuner—FM/AM/HD Radio
TM
TM
Tuning in to a station
❏ Searching for a station
You can search for a station manually or
automatically on the <FM> or <AM> source
control screen.
To tune in to a station manually
Touch [<]/[>] repeatedly. Each time you touch
the button, the frequencies change step by step.
• Touching and holding [<]/[>] changes the
frequencies continuously.
• For HD Radio: If the tuned HD Radio station
offers sub-channel programs, touching the
button will select each channel in turn, then
move to another station.
To search for a station automatically
Touch [I<<]/[>>I] until the station (main channel
and sub-channel for HD Radio) search starts.
When a station of sufficient signal strength is
found, the search stops automatically.
• Touching and holding [I<<]/[>>I] changes the
frequencies continuously. When you release
the button, search starts.
• To stop searching, touch [I<<]/[>>I].
To select sub-channels directly
You can select sub-channel (and main channel)
directly by touching the sub-channel indicator on
the source control screen.
To enter the station frequency directly
If you know the station frequency, you can enter
it directly to tune in to the station.
1 Display the <Direct Tune Entry>
screen.
2 Enter the station frequency.
• Touch [ ] to delete the incorrect entry.
Each time you touch the button, the last
entered number is deleted.
LinkDisplayAudio_NAS.indb 48LinkDisplayAudio_NAS.indb 48 5/12/16 5:39 PM5/12/16 5:39 PM
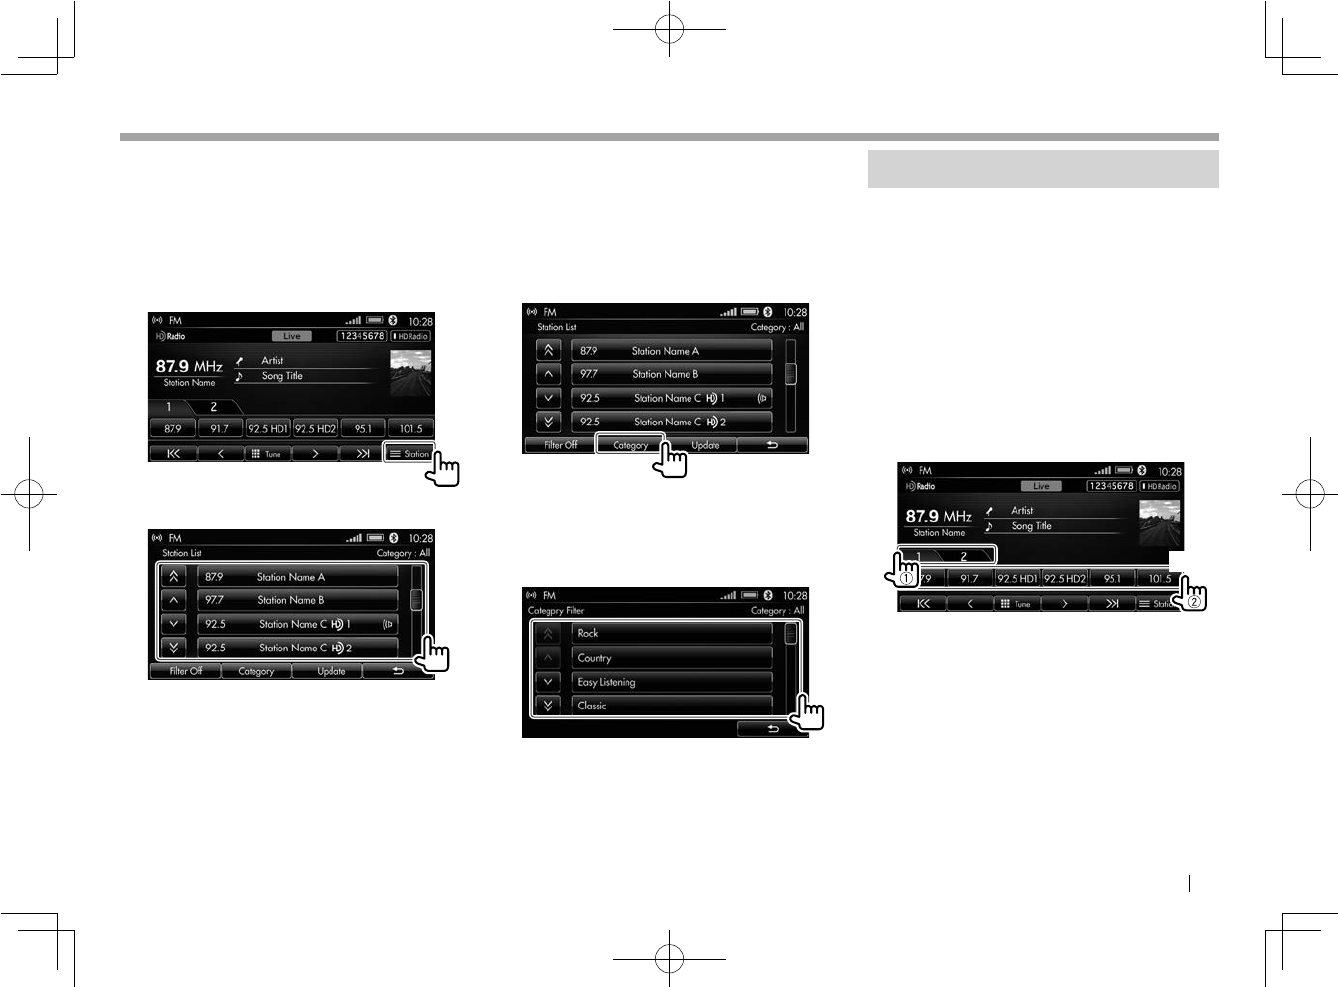
ENGLISH 49
Tuner—FM/AM/HD Radio
Tuner—FM/AM/HD Radio
TM
TM
Selecting a station from the list
You can easily find a station on the station list
which shows only the available stations.
• Only for HD Radio FM stations: You can list up
the programs being broadcast by selecting
category.
1 Display the <Station List> screen.
2 Select a station from the list.
• To update the station list, select [Update].
– Only for AM: A message window is
displayed. To cancel the update, touch
[Cancel] on the message window.
To search for a station by category—Category
Filter (only for FM HD Radio FM stations )
1 Display the <Station List> screen.
(See the left column.)
2 Display the <Category Filter> screen
(category list).
• To deactivate Category Filter, select [Filter
Off]. You can select a station from all
received stations.
3 Select a category.
The available stations for the selected
category are listed. The currently selected
category is highlighted.
4 Select a station from the list.
(See the left column.)
Presetting stations
❏Storing stations in memory
You can preset 6 stations for AM and 12 stations
for FM (6 stations for each preset list).
• For HD Radio stations: You can store either
main channel (HD1) or sub-channel (HD2 –
HD8).
1 Tune in to a station you want to
preset. (Page 48)
2 Select a preset list (for FM only) (1),
then touch and hold a preset button
to store (2).
(Hold)
The station selected in step 1 is stored.
If another station has been preset in the
button, it will be replaced.
3 Repeat steps 1 and 2 to preset other
stations.
LinkDisplayAudio_NAS.indb 49LinkDisplayAudio_NAS.indb 49 5/12/16 5:39 PM5/12/16 5:39 PM
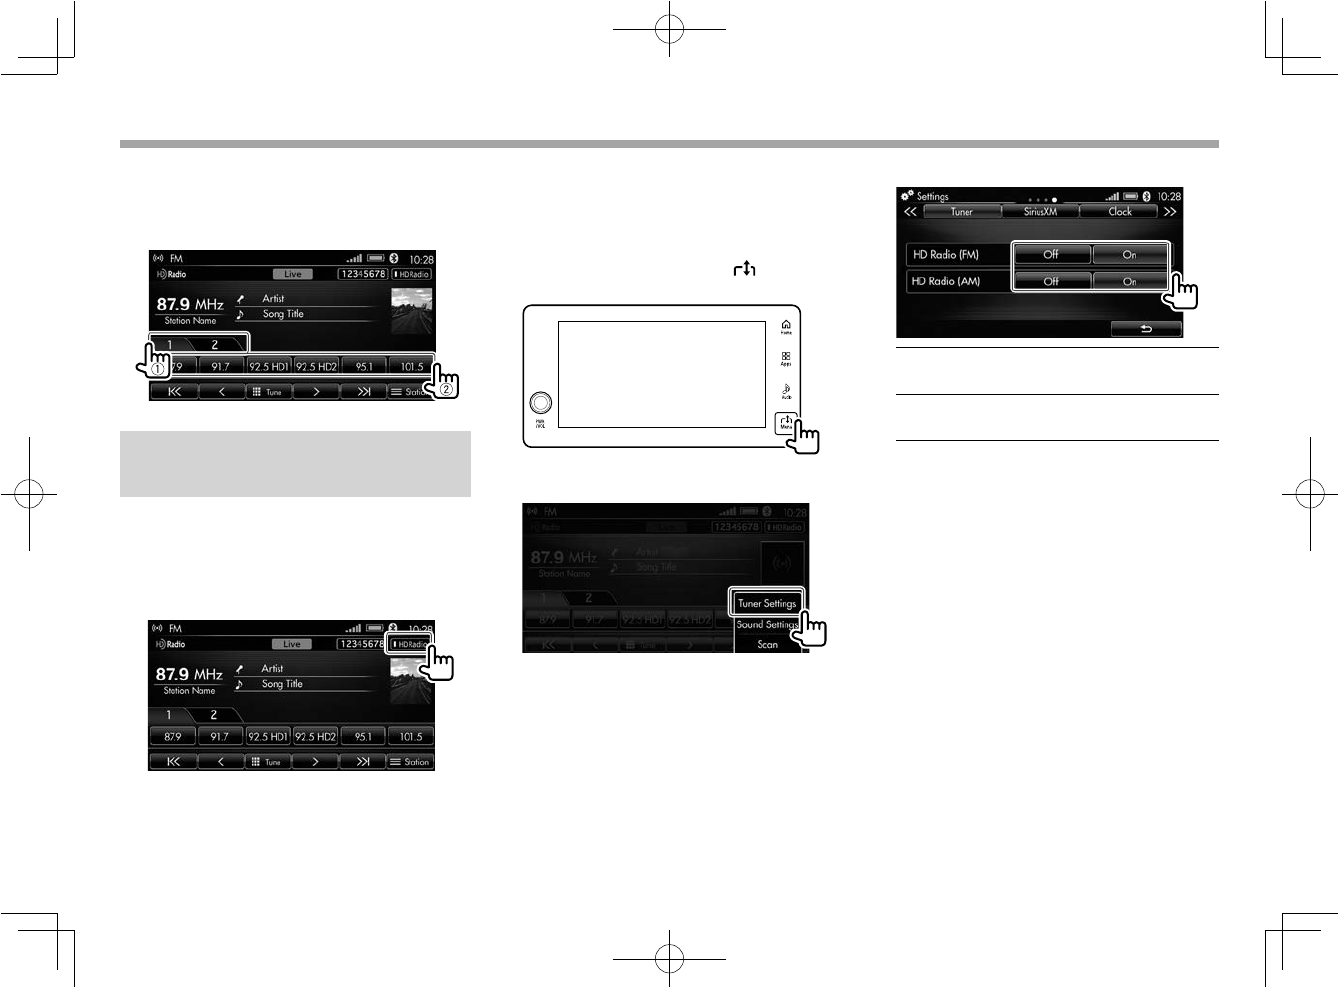
50
Tuner—FM/AM/HD Radio
Tuner—FM/AM/HD Radio
TM
TM
❏Selecting a preset station
You can select your favorite station easily from
the preset list. Select a preset list (for FM only)
(1), then a preset button (2).
Changing the HD Radio
reception mode
You can change HD Radio reception mode each
for FM and AM broadcast.
❏ Changing on the source control
screen
Each time you touch [HD Radio] on the source
control screen, HD Radio reception mode
changes to digital (On) or analog (Off) reception.
❏ Changing on the tuner setting menu
(only for HD Radio)
1 Display the menu window.
While the <FM> or <AM> source control
screen is displayed, touch the Menu
button on the monitor panel.
2 Display <Tuner> settings screen.
3 Change the settings.
<HD Radio
(FM)>
Selects the HD Radio
reception mode for FM.
<HD Radio
(AM)>
Selects the HD Radio
reception mode for AM.
• When the digital reception (On) is selected
The indicator of the [HD Radio] button lights
up in orange. You can listen to the digital
broadcast. But if reception becomes poor,
digital reception changes automatically to
analog reception.
• When the analog reception (Off) is selected
The indicator of the [HD Radio] button goes
off. You can listen to the analog broadcast.
LinkDisplayAudio_NAS.indb 50LinkDisplayAudio_NAS.indb 50 5/12/16 5:39 PM5/12/16 5:39 PM
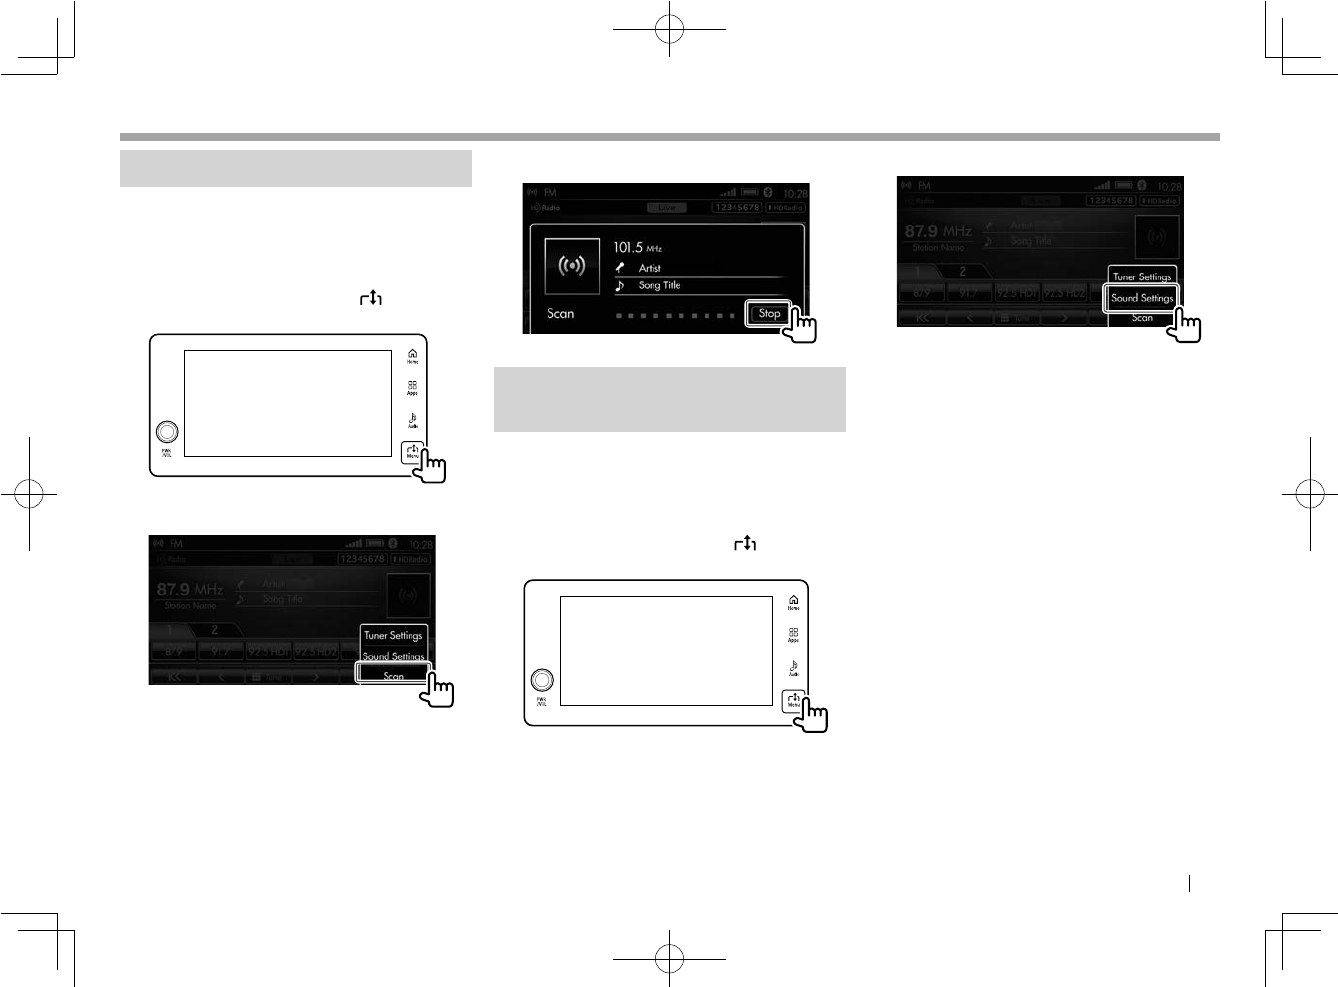
ENGLISH 51
Tuner—FM/AM/HD Radio
Tuner—FM/AM/HD Radio
TM
TM
Scanning stations
You can scan the stations (main-channels and
sub-channels) of the current received band.
1 Display the menu window.
While the <FM> or <AM> source control
screen is displayed, touch the Menu
button on the monitor panel.
2 Start scanning.
Once stations of sufficient signal strength
are found, scanning stops for a while. Then
scanning starts again until you stop.
3 Stop scanning to listen to the station.
Adjusting the sound while
listening
You can adjust the sound for while listening to
the radio from the menu window.
1 Display the menu window.
While the <FM> or <AM> source control
screen is displayed, touch the Menu
button on the monitor panel.
2 Display the <Sound> settings screen.
3 Make adjustment on the <Sound>
settings screen. (Page 73)
LinkDisplayAudio_NAS.indb 51LinkDisplayAudio_NAS.indb 51 5/12/16 5:39 PM5/12/16 5:39 PM
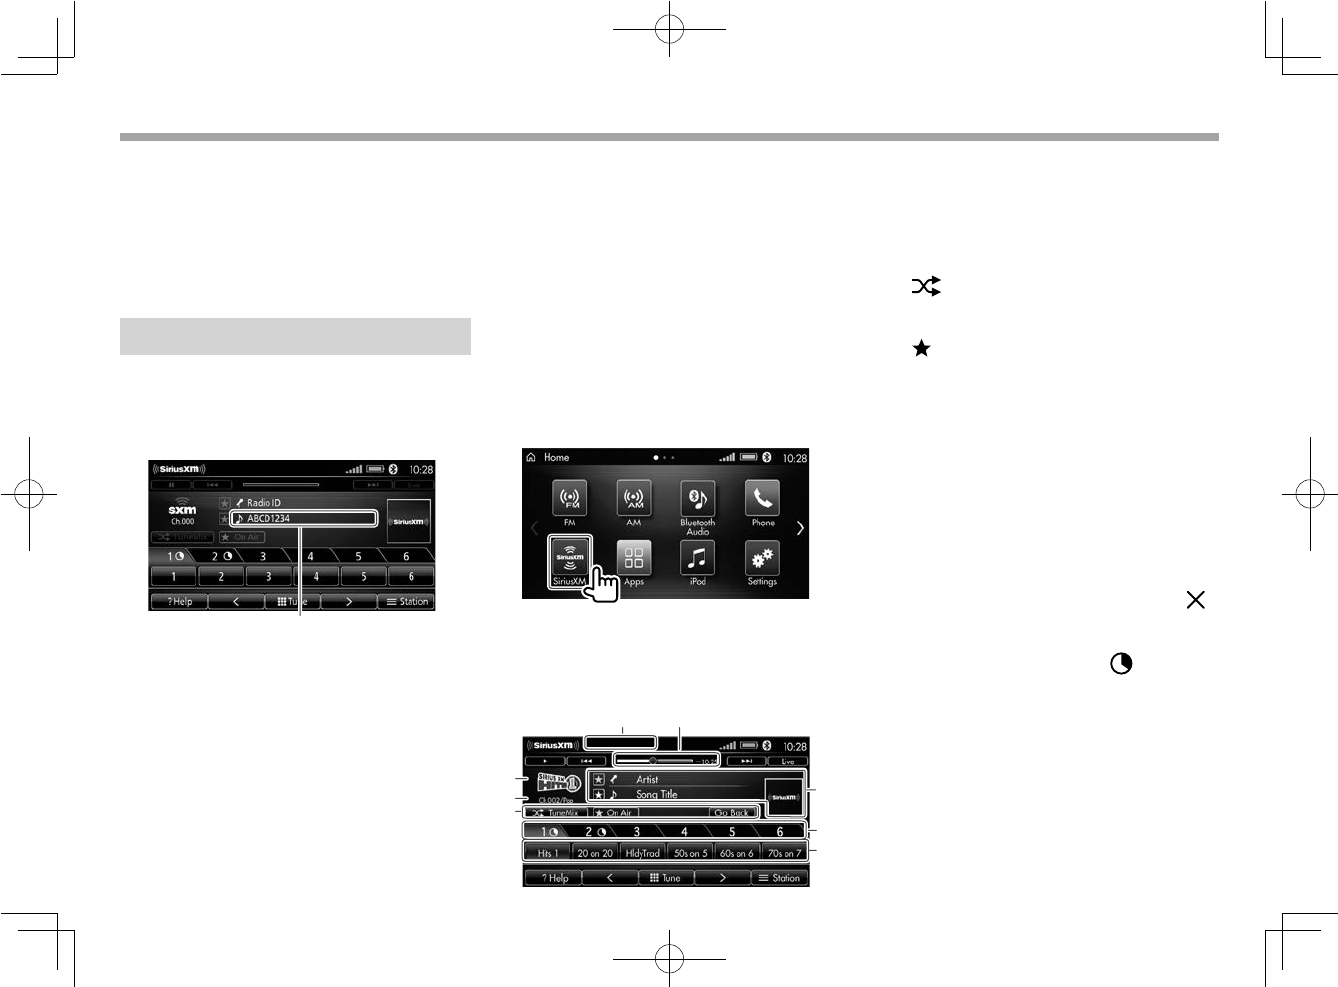
52
SiriusXM® Satellite Radio
SiriusXM® Satellite Radio
Only SiriusXM brings you more of what you love
to listen to, all in one place. Get over 140 channels,
including commercial-free music plus the best
sports, news, talk, comedy and entertainment.
A SiriusXM Subscription is required. For more
information, visit www.siriusxm.com.
• SiriusXM is available in USA and Canada only.
Activating subscription
1 Check your Radio ID.
The SiriusXM Satellite Radio ID is required for
activation and can be found by tuning in to
Channel 0. (Page 53)
Radio ID
• The Radio ID does not include the letters I,
O, S or F.
2 Activate the built-in SiriusXM Tuner
using one of the two methods below:
• For users in the USA:
– Online:
Visit www.siriusxm.com/activatenow
– Phone: Call SiriusXM Listener Care at
1-866-635-2349
• For users in Canada:
– Online: Visit www.siriusxm.ca/activatexm
– Phone: Call XM customer Care at
1-877-438-9677
3 When a confirmation message is
displayed, select [OK].
❏ Selecting SiriusXM
Touch [SiriusXM] on the <Home> screen to
display the <SiriusXM> source control screen
and listen to a channel.
1 Touch [SiriusXM] on the <Home>
screen.
❏Indications and buttons on the
source control screen
You can perform operations to listen to a favorite
service. 21
3
4
5
6
7
8
SiriusXM Satellite Radio reception information
1 Warning message area
2 Progress bar/time code (Page 56)
3 Channel logo
4 Channel number/Category
5 SiriusXM Satellite Radio indicators
• [ TuneMix]: Lights up in blue when
TuneMix is activated, and in white when it is
ready to use. (Page 56)
• [ On Air]: Lights up in yellow when
a selected alert program has started.
(Pages 60, 61)
• [Go Back]: Lights up when tuning in to a
SportsFlash alerted program. (Page 59)
6 Program information*
• Album picture is also displayed if the related
signals are sent.
• Touching the information area displays
detailed information sent by the current
station. Touching [>>] scrolls the text, if not
all of the text is shown.
To close the information screen, touch [ ].
7 Preset list switch tab
Selects one of the preset lists where 6
channels are stored. The mark ( ) in the tab
indicates that channels preset in this group
can be used for Smart Favorites. (Page 57)
8 Preset list
Includes 6 preset channels. (Page 55)
LinkDisplayAudio_NAS.indb 52LinkDisplayAudio_NAS.indb 52 5/12/16 5:39 PM5/12/16 5:39 PM
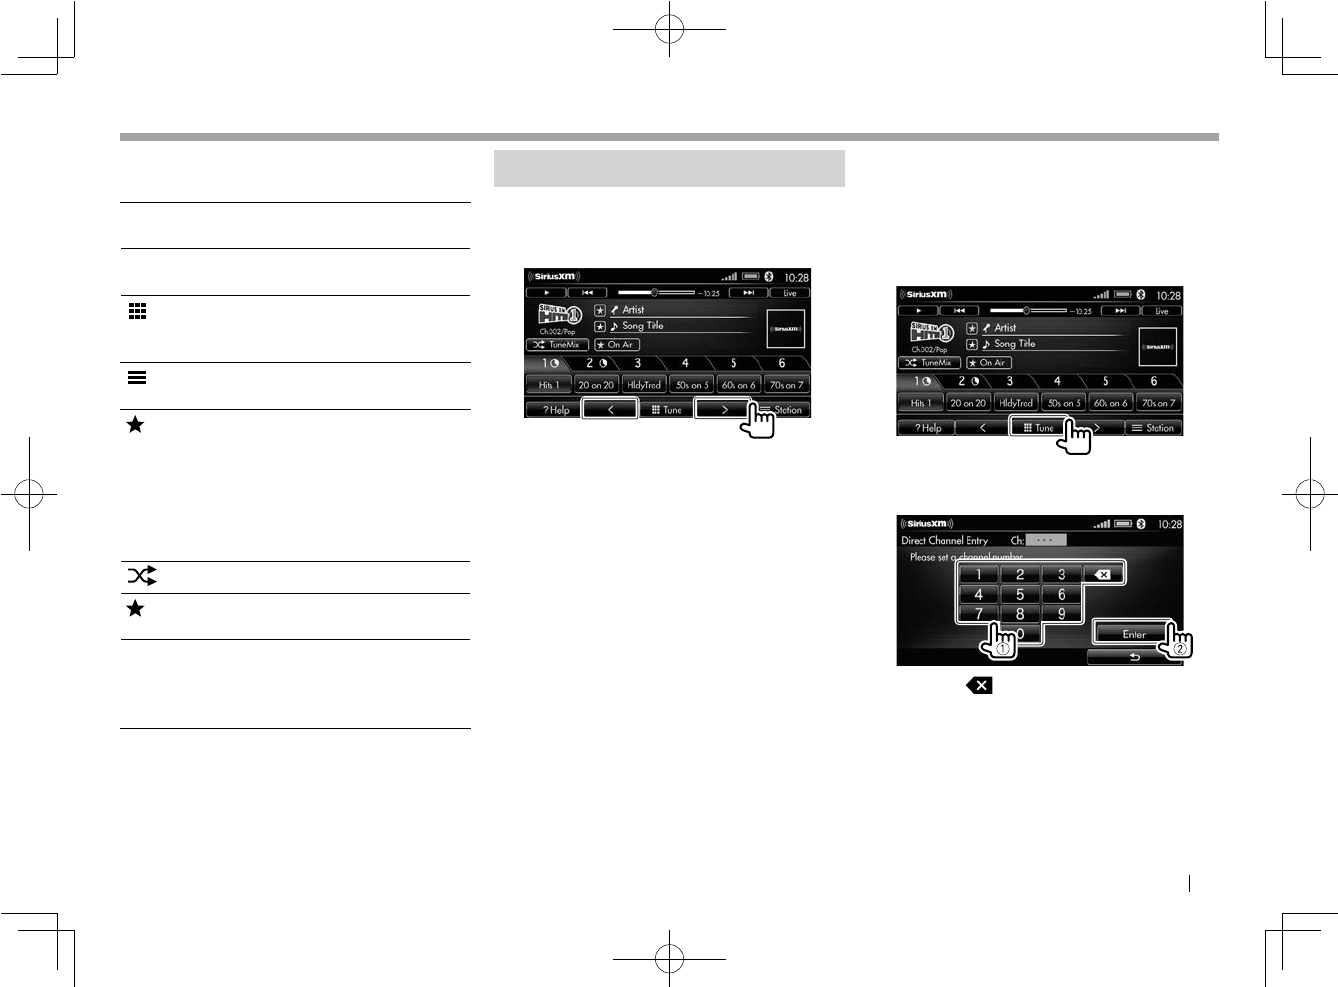
ENGLISH 53
SiriusXM Satellite Radio
SiriusXM Satellite Radio
Operation buttons while listening
• For Replay operation buttons, see page 61.
[? Help] Displays the help list to know
about SiriusXM. (Page 67)
[<]/[>] Changes the channel one by
one.
[ Tune] Enables direct entry of channel
number. (See the rightmost
column.)
[ Station] Displays the station list.
(Page 54)
[ ] Register or unregister the
current song or artist for Artist/
Song Alert. (Page 61) White
• When the button lights up in
white, it is not registered.
• When the button lights up in
yellow, it is registered.
[ TuneMix] Starts TuneMix. (Page 56)
[ On Air] Tunes in to your alert-set
program. (Pages 60, 61)
[Go Back] For SportsFlash: Returns to
your last tuned program from
SportsFlash alerted-program.
(Page 59)
Tuning in to a channel
❏ Searching for a channel
You can search for a channel on the <SiriusXM>
source control screen.
To tune in to a channel manually
Touch [<]/[>] repeatedly. Each time you touch
the button, the channels change one by one.
• Touching and holding [<]/[>] changes the
channels continuously.
❏ Entering the channel number directly
If you know the channel number, you can enter it
directly to tune in to the channel.
1 Display the <Direct Channel Entry>
screen.
2 Enter the channel number.
• Touch [ ] to delete the incorrect entry.
Each time you touch the button, the last
entered number is deleted.
LinkDisplayAudio_NAS.indb 53LinkDisplayAudio_NAS.indb 53 5/12/16 5:39 PM5/12/16 5:39 PM
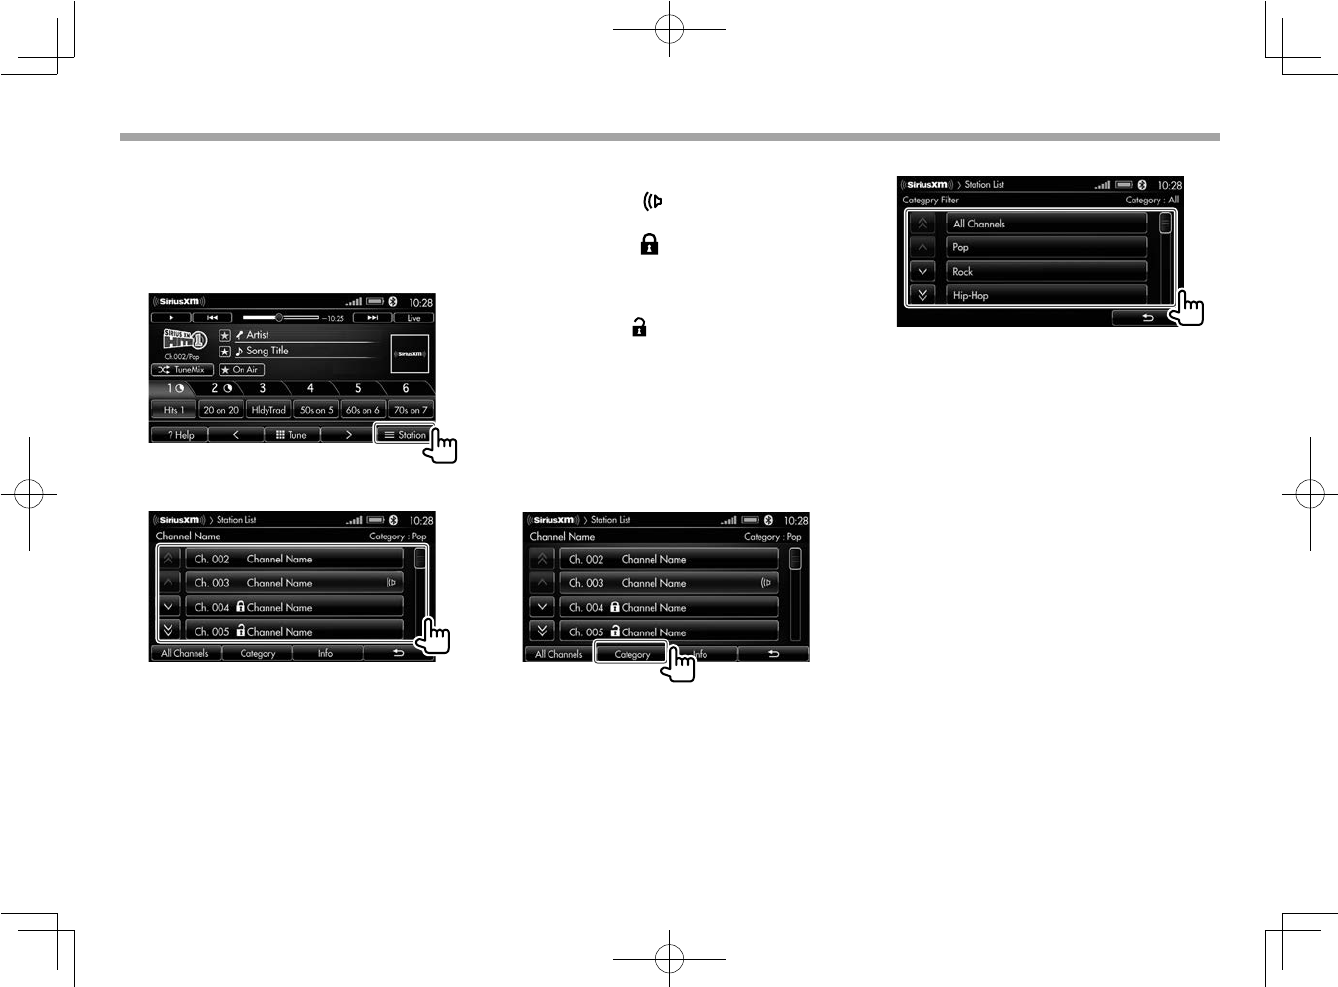
54
SiriusXM Satellite Radio
SiriusXM Satellite Radio
❏ Selecting a channel from the list
You can easily find a channel on the channel list
which shows only the available channels.
• You can also list up the channels being
broadcast by selecting the category.
1 Display the <Station List> screen.
2 Select a channel from the list.
Channel numbers are displayed with their
channel names, artist names, or song titles
on the list.
• To change the indications beside the
channel numbers, touch [Info].
Each time you touch the button, the
indications change in turn.
• The currently playing channel is
highlighted and also indicated by the
speaker mark ( )
• When the channels are parental-locked,
the lock mark ( ) is displayed. To select
this channel, you are required to enter the
password. (Page 64)
Once lock is canceled temporarily, the
unlock mark ( ) is displayed.
To list up channels by category—Category
Filter
1 Display the <Station List> screen.
(See the left column.)
2 Display the <Category Filter> screen
(category list).
3 Select a category.
The available channels for the selected
category are listed. The currently selected
category is highlighted.
• To deactivate Category Filter, select [All
Channels]. You can select a channel from
all received channels.
4 Select a channel from the list. (See the
leftmost column.)
LinkDisplayAudio_NAS.indb 54LinkDisplayAudio_NAS.indb 54 5/12/16 5:39 PM5/12/16 5:39 PM
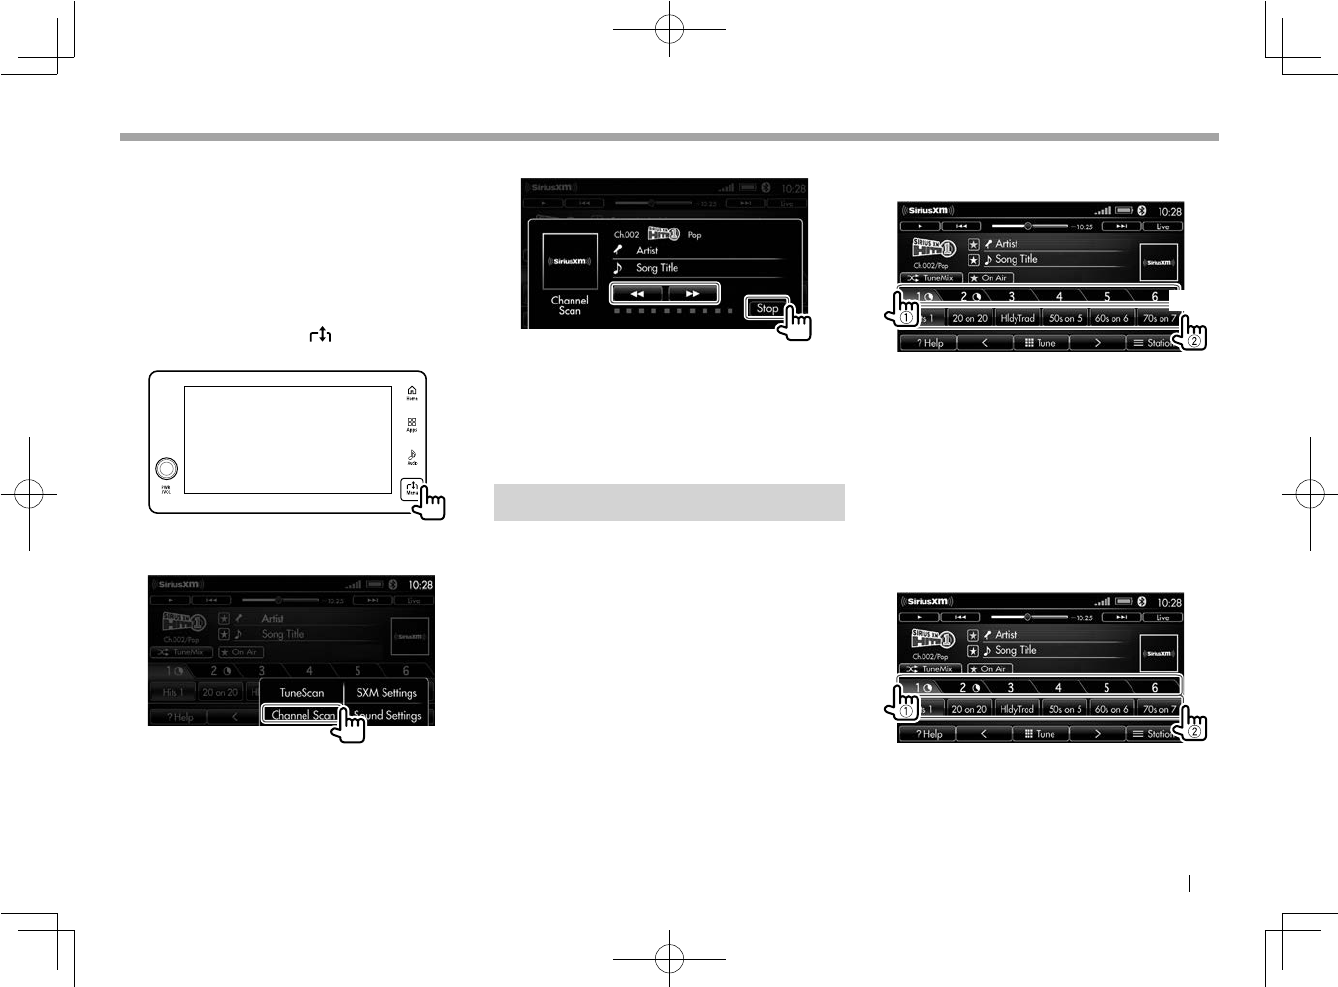
ENGLISH 55
SiriusXM Satellite Radio
SiriusXM Satellite Radio
❏ Selecting a channel while scanning—
Channel Scan
You can easily find a channel by scanning all
available channels.
To activate Channel Scan
1 Display the menu window.
While the <SiriusXM> source control screen
is displayed, touch the Menu button on
the monitor panel.
2 Select [Channel Scan].
Scanning starts, and the detected channel
plays for 10 seconds, then skips to the next
channels.
3 Find a favorite channel.
• To play the currently detected song, touch
[Stop].
• To skip to the previous/next song, touch
[O] or [N].
Presetting channels
❏ Storing channels in memory
You can preset 36 channels (6 for each preset list).
• You can only use the preset channels in preset
lists 1 and 2 for Smart Favorites. (Page 57)
1 Tune in to a channel you want to
preset. (Page 53)
2 Select a preset list (1), then touch and
hold a preset button to store (2).
(Hold)
The channel selected in step 1 is stored.
If another channel has been preset in the
button, it will be replaced.
3 Repeat steps 1 and 2 to preset other
channels.
❏Selecting a preset channel
You can select your favorite channel easily from
the preset list. Select a preset list (1), then a
preset button (2).
LinkDisplayAudio_NAS.indb 55LinkDisplayAudio_NAS.indb 55 5/12/16 5:39 PM5/12/16 5:39 PM
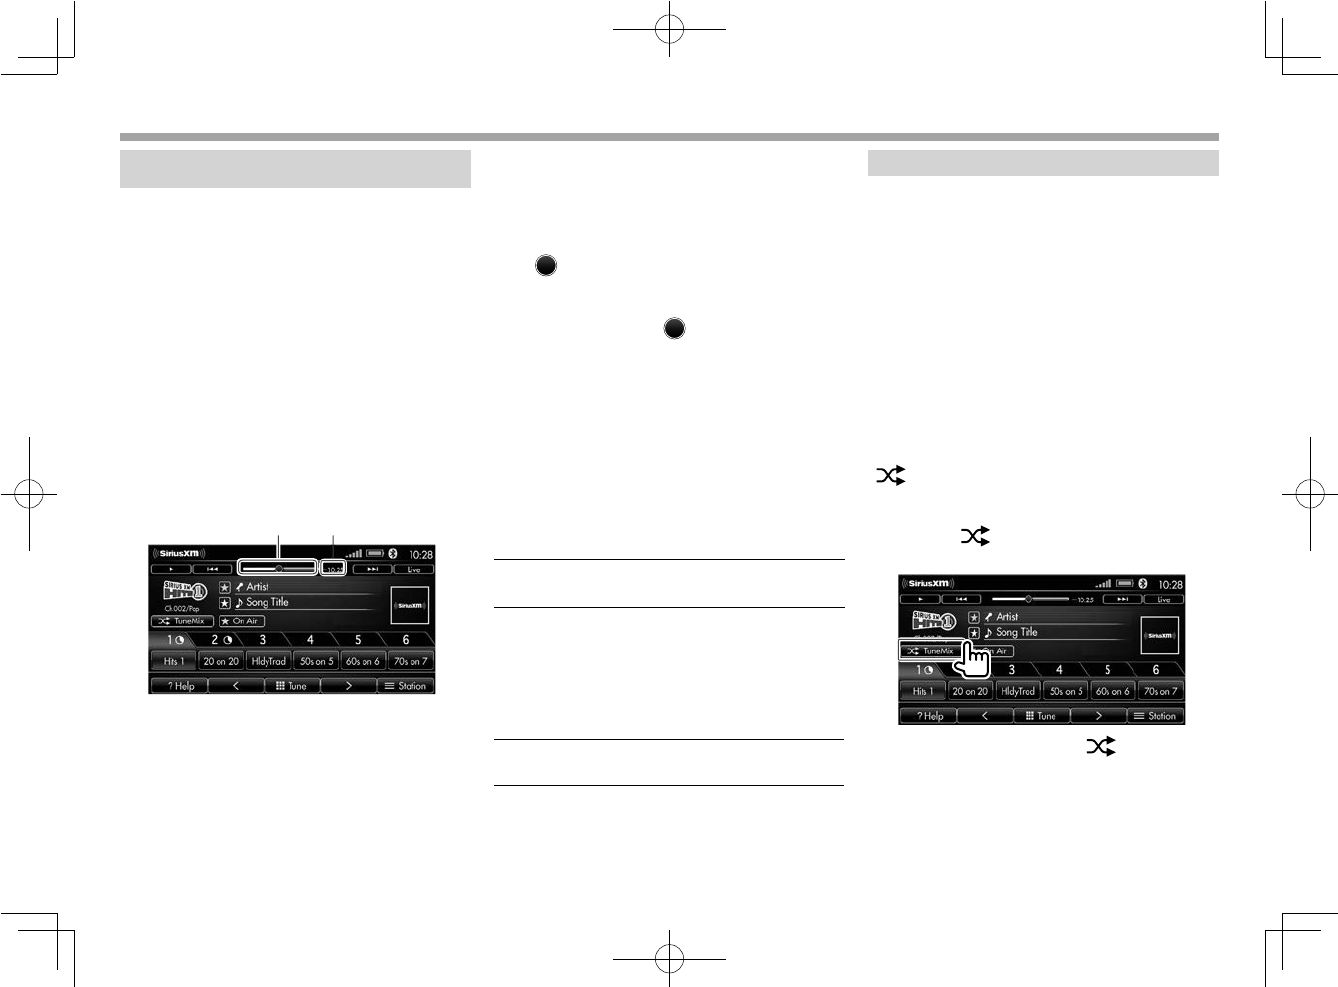
56
SiriusXM Satellite Radio
SiriusXM Satellite Radio
Replaying the contents
This product records the programs automatically
for replay. So you do not miss any of the news,
talk, sports or music content you like. You can
pause, rewind and replay the program.
• For the currently tuned programs: This
product continually buffers up to 60 minutes of
the contents.
• For the preset channels (Smart Favorites):
This product buffers up to 30 minutes of 12
preset channels of preset list 1 and 2 (Smart
Favorites channels).
❏ Indications on the Replay mode
screen
1 2
1 Progress bar
• While recording, the bar shows the amount
of buffered content and the remaining
capacity.
• While replaying, the position indicator
( )
on the bar shows where you are on the
buffered content.
• While listening to a live program, the
position indicator
( )
on the bar goes off.
2 Time code
Shows you the point in the Replay buffer you
are listening to.
• Example: –5:00
– You are listening to the portion of 5
minutes behind the current broadcast.
Operation buttons (for Replay)
The following buttons work for Replay and Smart
Favorites.
[W]/[I]• [W]: Pauses Replay.
• [I]: Starts Replay.
[S]/[T]• [S]: Skips Replay position
backward (touch), and reverses
(hold).
• [T]: Skip Replay position
forward (touch), and fast-
forwards (hold).
[Live] Finishes Replay and goes back to
the current broadcast.
• When you turn off the power switch (or
ignition), all buffer recording is deleted.
Using TuneMix™
You can listen to the music played or being
played in the 6 preset channels of the current
preset list. Playback order is randomly
determined.
TuneMix is only enabled if the following
conditions are satisfied.
• TuneMix works for the music channels certified
by SiriusXM.
• Preset channels are not parental-locked.
• At least 2 channels of above conditions have
been preset in the current preset list.
To activate TuneMix
When you can use this function, the
[ TuneMix] button lights up in white.
Otherwise, it will be grayed out.
1 Touch [ TuneMix] on the
<SiriusXM> source control screen.
When the TuneMix starts, the [ TuneMix]
button lights up in blue.
LinkDisplayAudio_NAS.indb 56LinkDisplayAudio_NAS.indb 56 5/12/16 5:39 PM5/12/16 5:39 PM
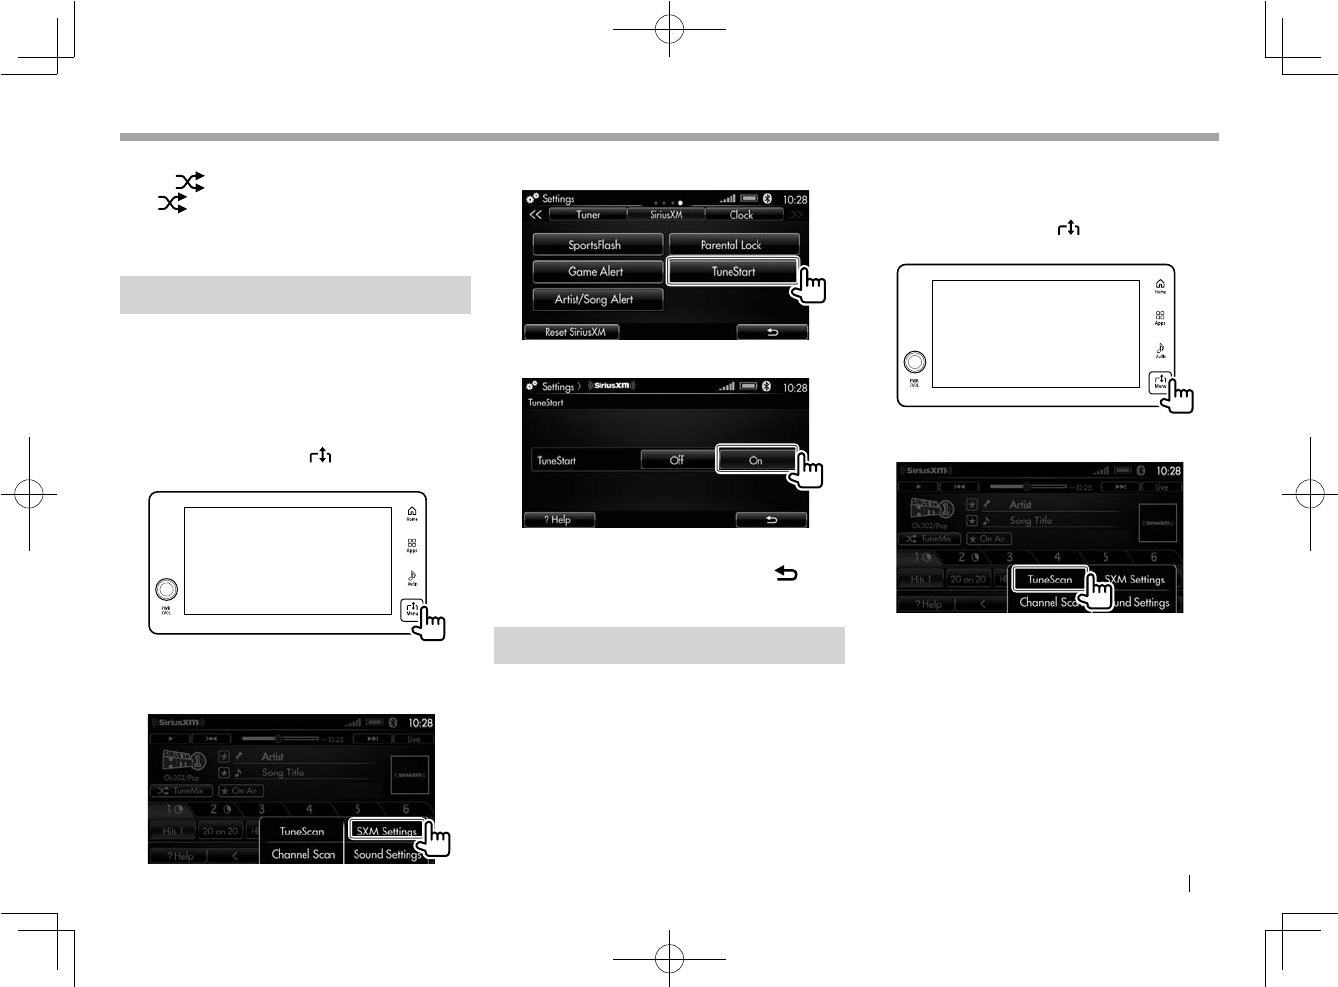
ENGLISH 57
SiriusXM Satellite Radio
SiriusXM Satellite Radio
To stop TuneMix
Touch [ TuneMix] again.
The [ TuneMix] button lights up in white.
• TuneMix is also canceled when you select
another preset list or channel.
Using TuneStart™
When you select a Smart Favorites channel, you
can listen to the current song from the beginning.
To activate TuneStart
1 Display the menu window.
While the <SiriusXM> source control screen
is displayed, touch the Menu button on
the monitor panel.
2 Display <Settings> screen for
SiriusXM.
3 Display <TuneStart> screen.
4 Select [On].
• To deactivate TuneStart, select [Off].
To return to previous screens, touch [ ].
Using TuneScan™
You can scan the buffer recordings (current
channel and Smart Favorites channels). So you
can find your favorite songs.
• TuneScan works for the music channels
certified by SiriusXM.
• You can also scan the buffer recording of the
channels which are not parental-locked.
• When no buffer recording is available, you
cannot activate TuneScan.
To activate TuneScan
1 Display the menu window.
While the <SiriusXM> source control screen
is displayed, touch the Menu button on
the monitor panel.
2 Select [TuneScan].
Scanning starts, and the detected songs plays
for 10 seconds, then skips to the next song.
Continued on the next page...
LinkDisplayAudio_NAS.indb 57LinkDisplayAudio_NAS.indb 57 5/12/16 5:39 PM5/12/16 5:39 PM
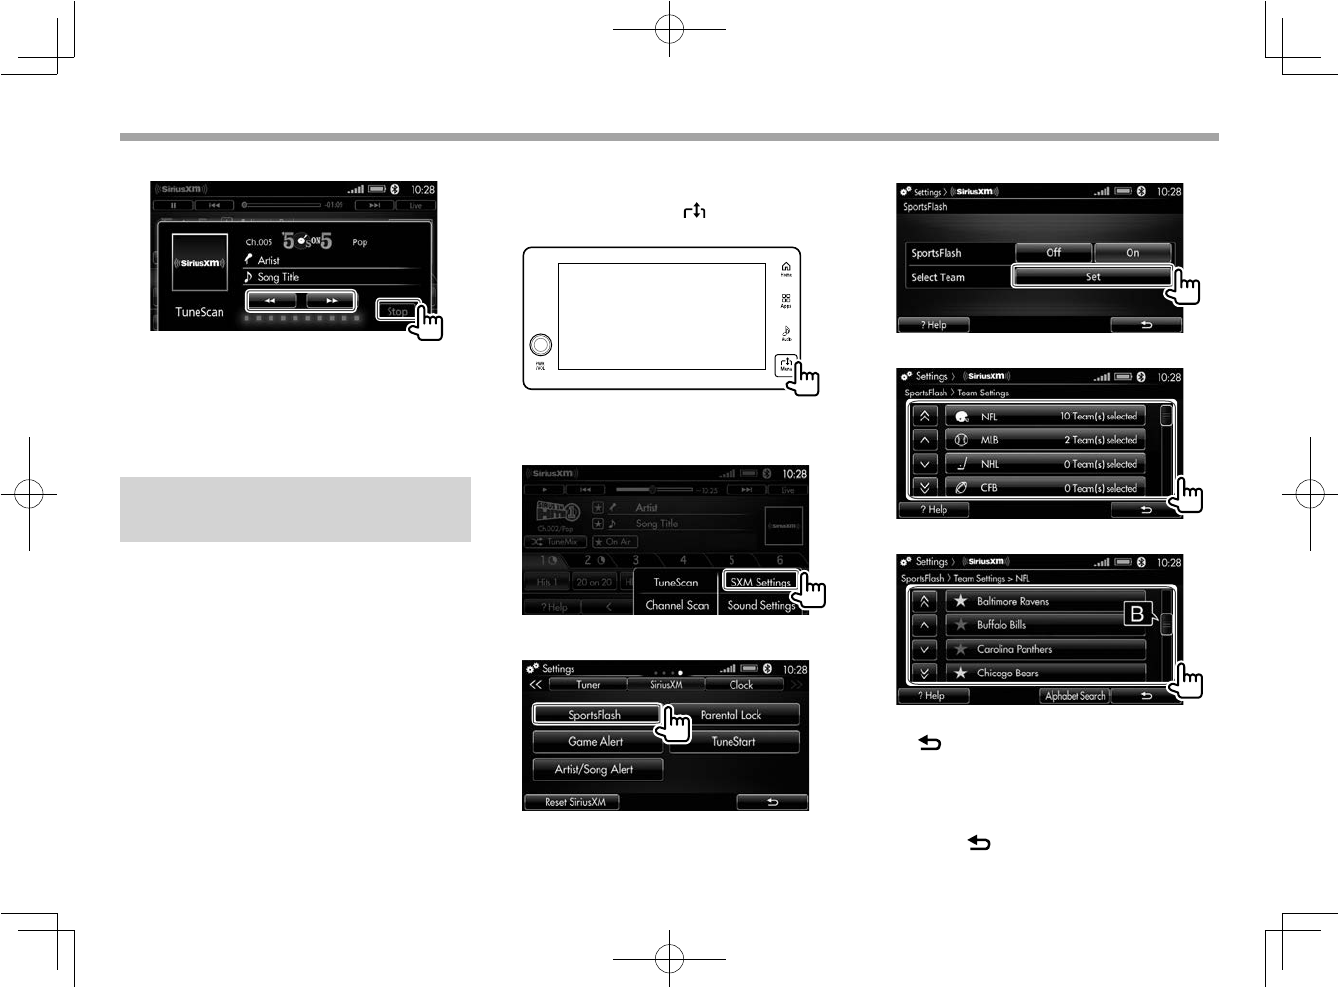
58
SiriusXM Satellite Radio
SiriusXM Satellite Radio
3 Find your favorite song.
• To play the currently detected song, touch
[Stop].
• To skip to the previous/next song, touch
[O] or [N].
Receiving alerts for big plays—
SportsFlash™
SportsFlash will notify you when a big play
happens during a game played by one of your
favorite sports teams. You can tune in to the
channel and hear the play unfold as though it is
live. Continue listening to the game, or you can
return to your previous channel.
❏Selecting your favorite teams
You can register up to 12 teams for SportsFlash.
You can receive information for up to 5 games at
the same time.
1 Display the menu window.
While the <SiriusXM> source control screen
is displayed, touch the Menu button on
the monitor panel.
2 Display <Settings> screen for
SiriusXM.
3 Display <SportsFlash> screen.
4 Display <Team Settings> screen.
5 Select a league.
6 Select favorite teams.
• To select teams of other leagues, touch
[ ] and repeat this step.
• To select teams by the team name, touch
[ Alphabet Search] then enter the first
letter of the team name.
To return to previous screens after setting is
done, touch [ ] repeatedly.
LinkDisplayAudio_NAS.indb 58LinkDisplayAudio_NAS.indb 58 5/12/16 5:39 PM5/12/16 5:39 PM
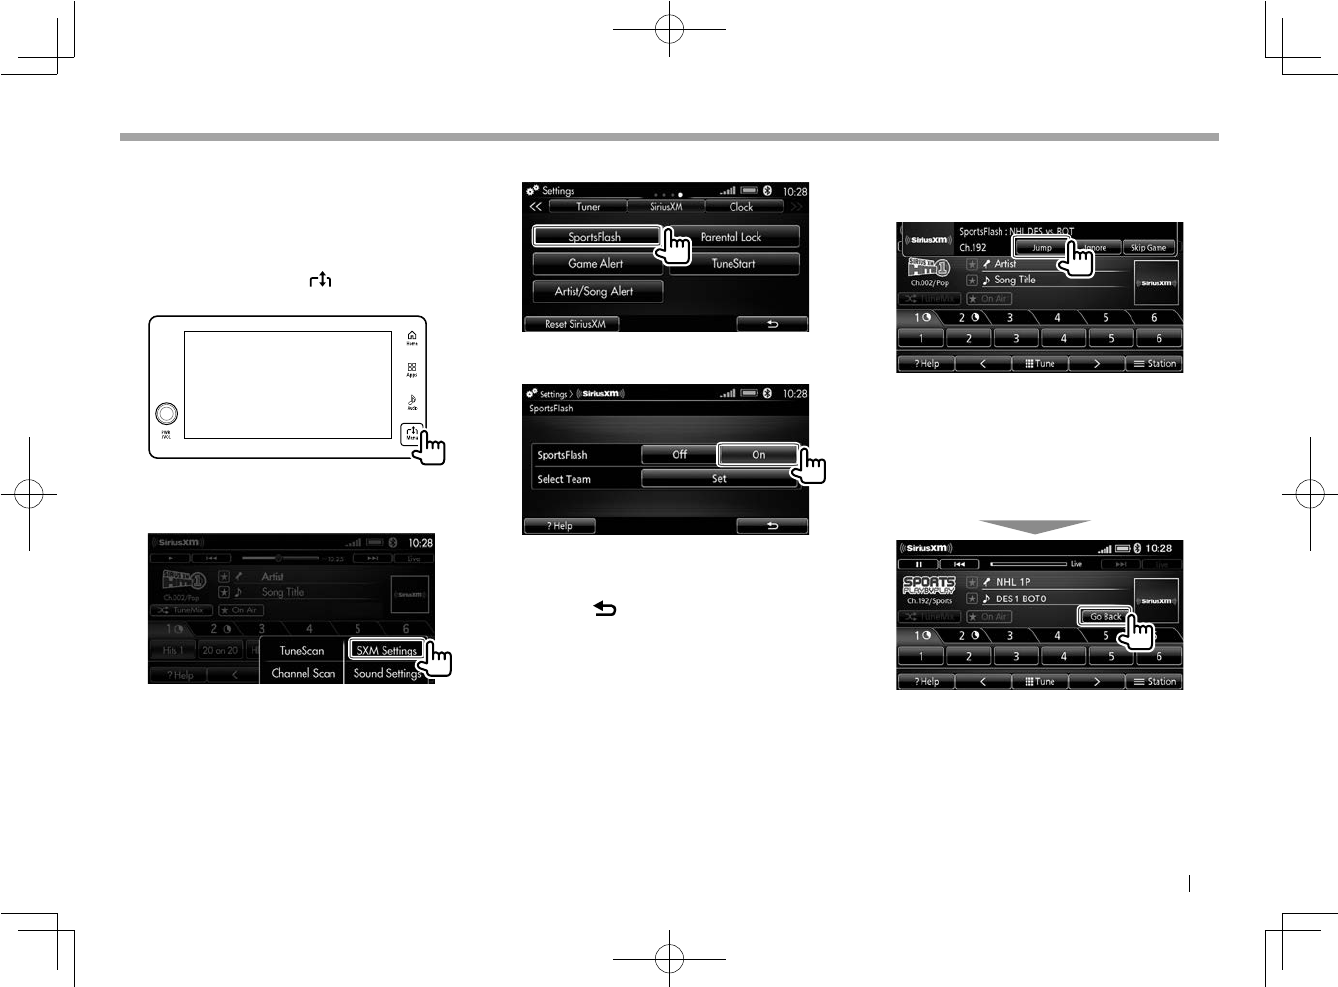
ENGLISH 59
SiriusXM Satellite Radio
SiriusXM Satellite Radio
❏Activating SportsFlash alert
Activation is required once you select the favorite
teams.
1 Display the menu window.
While the <SiriusXM> source control screen
is displayed, touch the Menu button on
the monitor panel.:
2 Display <Settings> screen for
SiriusXM.
3 Display <SportsFlash> screen.
4
Select [On] for <SportsFlash>.
• To deactivate SportsFlash, select [Off].
To return to previous screens after setting is
done, touch [ ].
❏ Switching to the game information
When a big play happens during one of the
games, an alert screen appears.
Touch [Jump] to listen to the big play.
• To cancel the currently received alert, touch
[Ignore].
– You will receive future alerts for the game.
• To cancel the alert for this game, touch [Skip
Game].
Once you move to the alerted game, you can go
back to the previous channel by touching [Go
Back].
• If you remain tuning in to the alerted game for
about 5 minutes, [Go Back] disappears from
the screen.
LinkDisplayAudio_NAS.indb 59LinkDisplayAudio_NAS.indb 59 5/12/16 5:39 PM5/12/16 5:39 PM
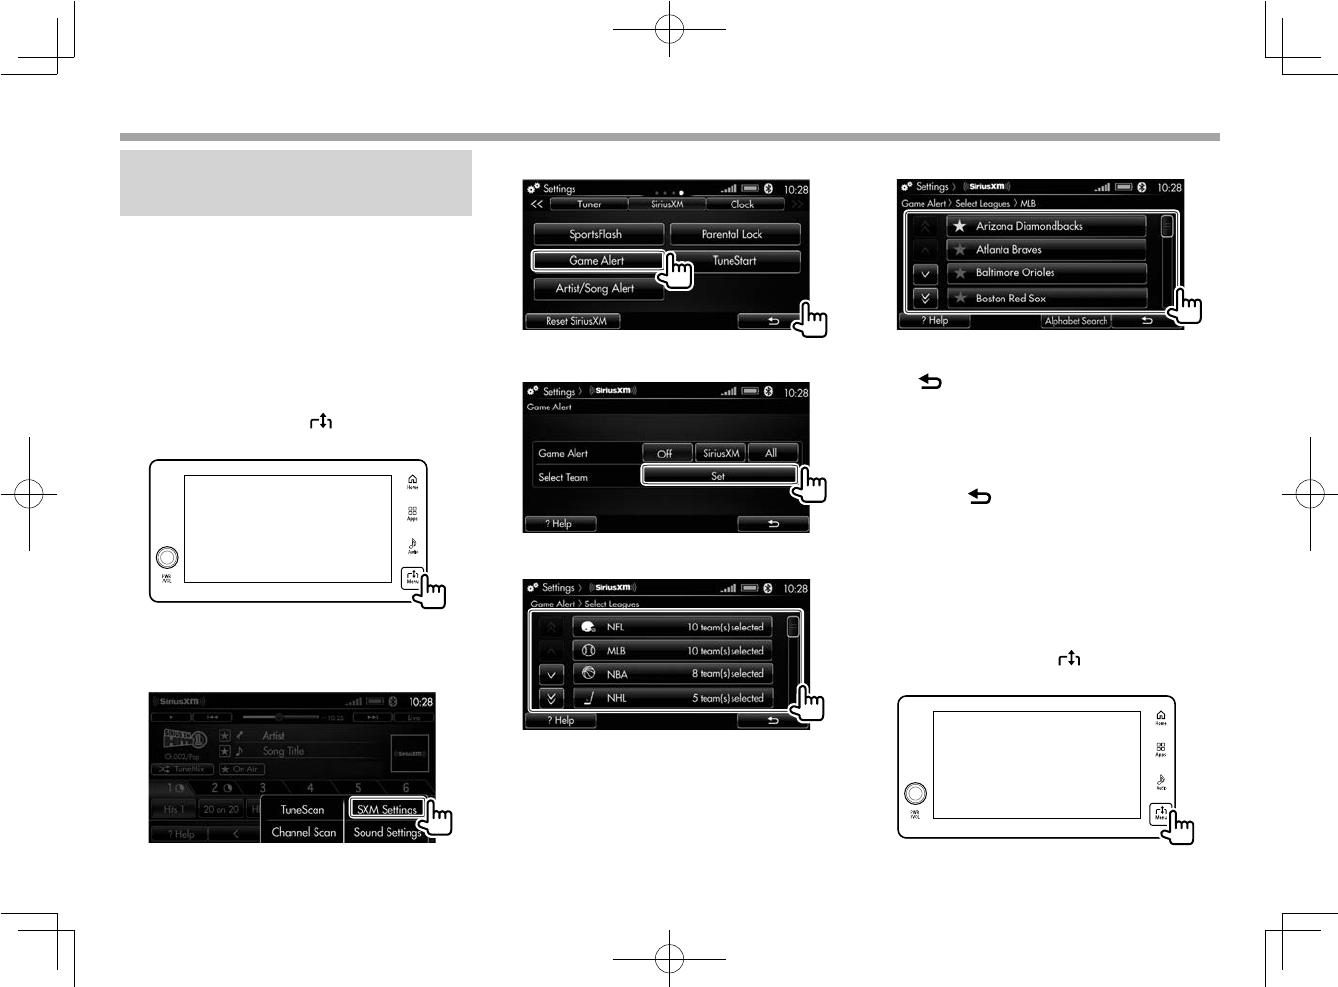
60
SiriusXM Satellite Radio
SiriusXM Satellite Radio
Receiving alerts for favorite
games—Game Alert
Game Alert will notify you when your favorite
teams start playing. You can tune in to the
channel broadcasting the games.
❏Selecting your favorite teams
You can register up to 48 teams for Game Alert.
1 Display the menu window.
While the <SiriusXM> source control screen
is displayed, touch the Menu button on
the monitor panel.
2 Display <Settings> screen for
SiriusXM.
3 Display <Game Alert> screen.
4 Display <Select Leagues> screen.
5 Select a league.
6 Select favorite teams.
• To select teams of other leagues, touch
[ ] and repeat this step.
• To select teams by the team name, touch
[ Alphabet Search] then enter the first
letter of the team name.
To return to previous screens after setting is
done, touch [ ] repeatedly.
❏ Activating Game Alert
Activation is required once you select the favorite
teams.
1 Display the menu window.
While the <SiriusXM> source control screen
is displayed, touch the Menu button on
the monitor panel.
LinkDisplayAudio_NAS.indb 60LinkDisplayAudio_NAS.indb 60 5/12/16 5:39 PM5/12/16 5:39 PM
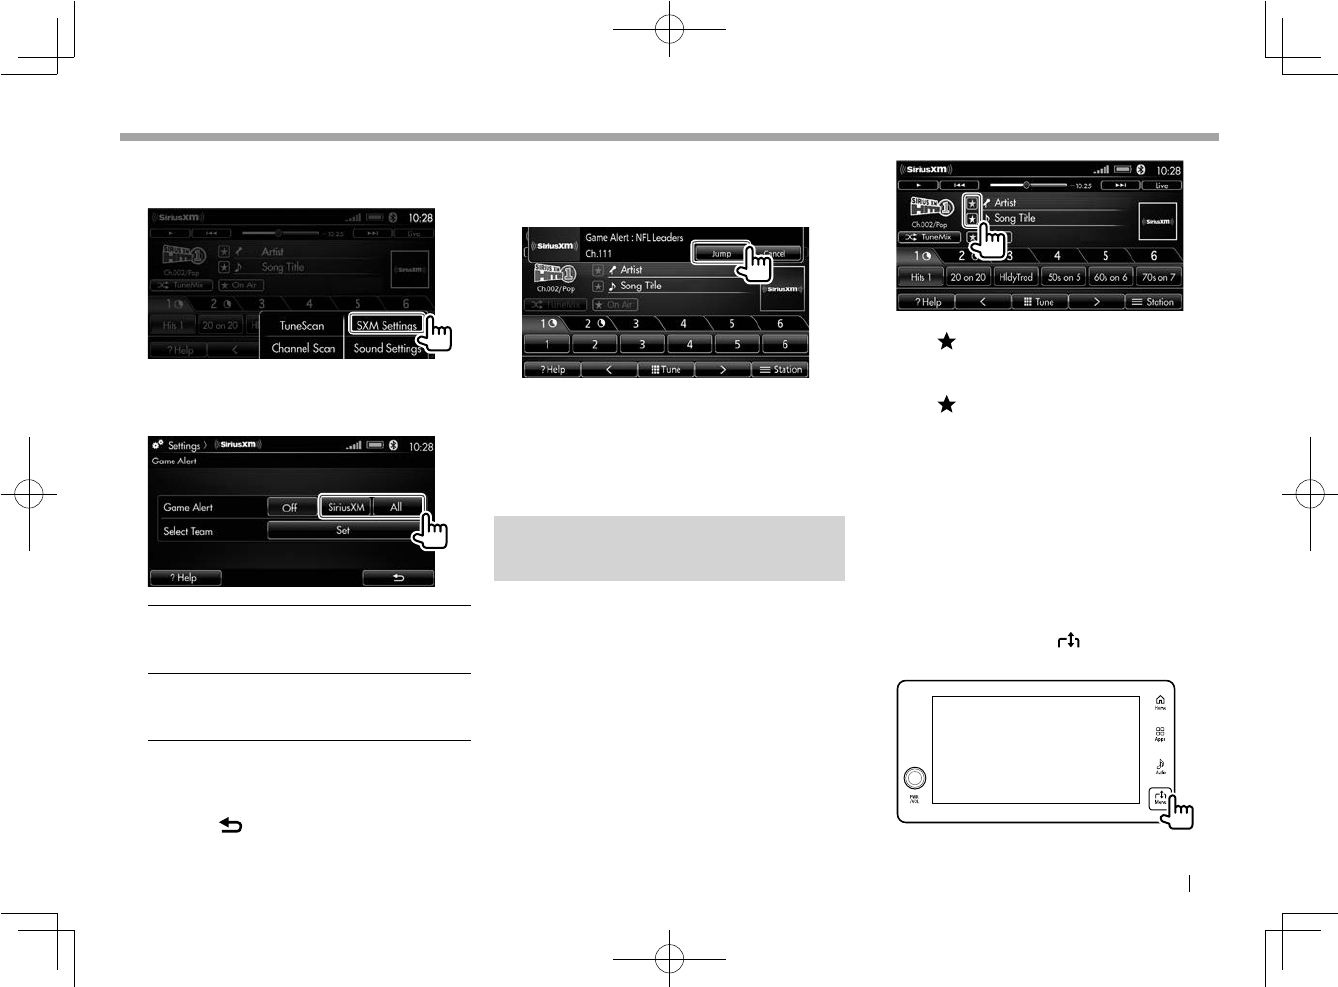
ENGLISH 61
SiriusXM Satellite Radio
SiriusXM Satellite Radio
2 Display <Settings> screen for
SiriusXM.
3 Select [SiriusXM] or [All] for <Game
Alert> settings.
[SiriusXM] You can receive alerts only
when the playback source is
SiriusXM.
[All] You can receive alerts
regardless of the playback
source.
• To deactivate Game Alert, select [Off].
To return to previous screens after setting is
done, touch [ ] repeatedly.
❏Switching to the game
When a game of your favorite teams starts, an
alert screen appears.
Touch [Jump] to tune in to the alerted game
broadcast program.
• To cancel the alert for this game, touch
[Cancel].
Receiving alerts for favorite
contents—Artist/Song Alert
Artist/Song Alert will notify you when your
favorite contents (artists/songs) start playing.
You can tune in to the channel broadcasting your
favorite contents (artists/songs).
❏ Registering your favorite artists and
songs
You can register the artists and songs while
listening to your favorite songs. (Total number of
contents (artists/songs) you can register is 60).
• Touch [ ] beside the artist name to register
the artist. Each time you touch the button, it
changes registered and unregistered
• Touch [ ] beside the song title to register
the song. Each time you touch the button, it
changes registered and unregistered
❏Selecting your favorite artists and
songs
You need to select your favorite artists and songs
for Artist/Song Alert.
1 Display the menu window.
While the <SiriusXM> source control screen
is displayed, touch the Menu button on
the monitor panel.
Continued on the next page...
LinkDisplayAudio_NAS.indb 61LinkDisplayAudio_NAS.indb 61 5/12/16 5:39 PM5/12/16 5:39 PM

62
SiriusXM Satellite Radio
SiriusXM Satellite Radio
2 Display <Settings> screen for
SiriusXM.
3 Display <Artist/Song Alert> screen.
4 Display <Artist Setting> or <Song
Setting> screen.
5 Select favorite artists or songs.
Ex.: On the <Artist Setting> screen
The star mark ( ) beside the artist name
or song title turns yellow when activated for
Artist/Song Alert.
• To select artists and songs by name, touch
[ Alphabet Search] then enter the first
letter of the name.
To return to previous screens after setting is
done, touch [ ] repeatedly.
❏Activating Artist/Song Alert
You need to activate Artist Alert and Song Alert
separately. Song Alert has priority over Artist
Alert if both alerts are received at the same time.
1 Display the menu window.
While the <SiriusXM> source control screen
is displayed, touch the Menu button on
the monitor panel.
2 Display <Settings> screen for
SiriusXM.
LinkDisplayAudio_NAS.indb 62LinkDisplayAudio_NAS.indb 62 5/12/16 5:39 PM5/12/16 5:39 PM
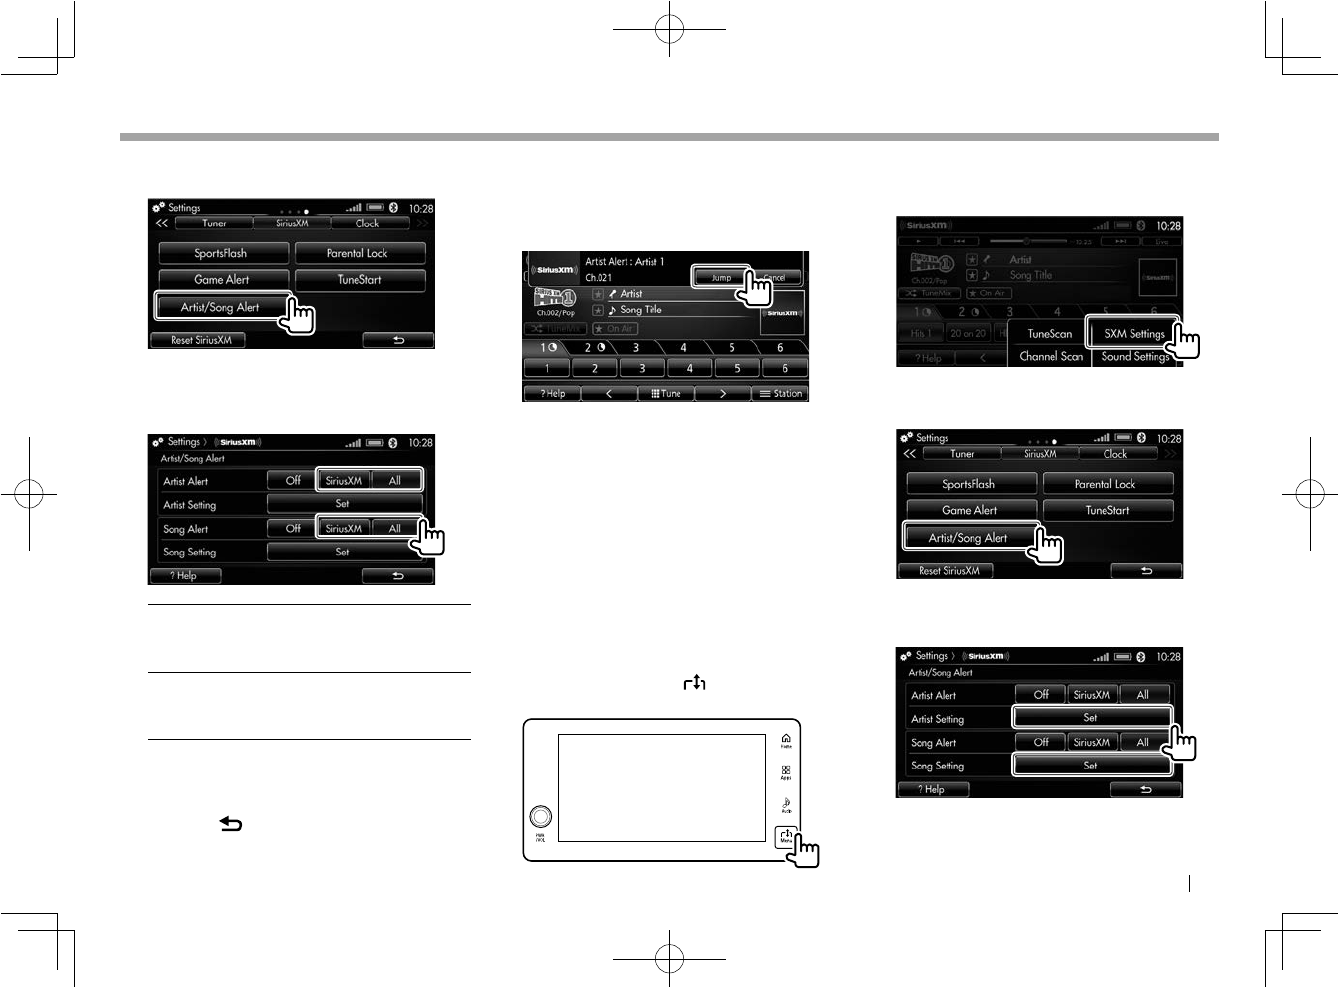
ENGLISH 63
SiriusXM Satellite Radio
SiriusXM Satellite Radio
3 Display <Artist/Song Alert> screen.
4 Select [SiriusXM] or [All] for <Artist
Alert> and <Song Alert>.
[SiriusXM] You can receive alerts only
when the playback source is
SiriusXM.
[All] You can receive alerts
regardless of the playback
source.
• To deactivate Artist/Song Alert, select [Off].
To return to previous screens after setting is
done, touch [ ] repeatedly.
❏Switching to the broadcast channel
of your favorite artist/song
When one of your favorite contents (artists/
songs) starts playing, an alert screen appears.
Touch [Jump] to tune in to the alerted broadcast
program.
• To cancel the alert for this content, touch
[Cancel].
❏Deleting artists and songs from the
list
You can delete unwanted artists and songs from
the lists.
1 Display the menu window.
While the <SiriusXM> source control screen
is displayed, touch the Menu button on
the monitor panel.
2 Display <Settings> screen for
SiriusXM.
3 Display <Artist/Song Alert> screen.
4 Display <Artist Setting> or <Song
Setting> screen.
Continued on the next page...
LinkDisplayAudio_NAS.indb 63LinkDisplayAudio_NAS.indb 63 5/12/16 5:39 PM5/12/16 5:39 PM
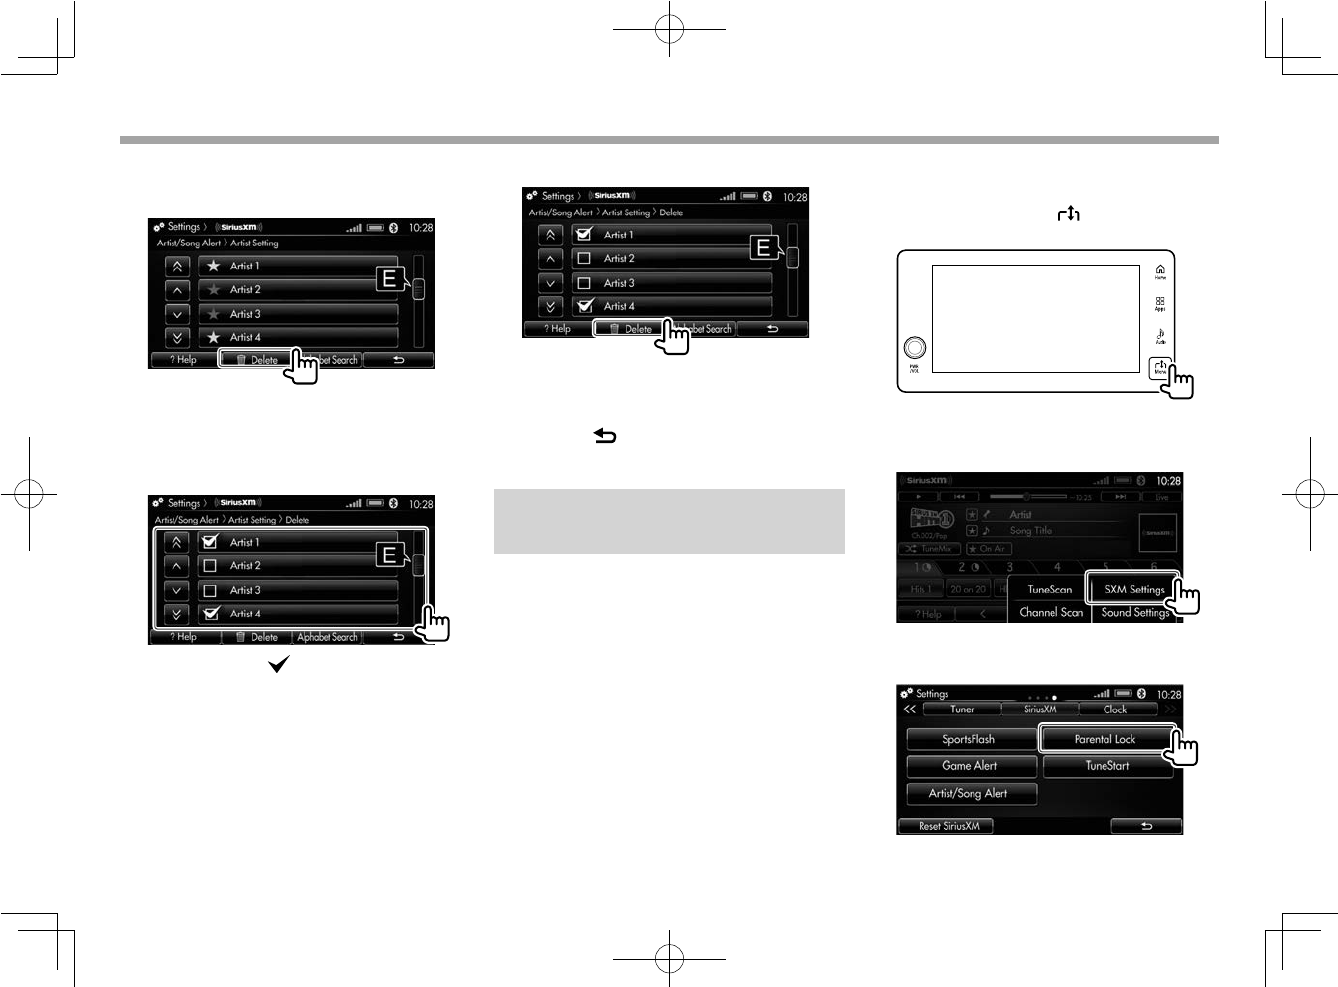
64
SiriusXM Satellite Radio
SiriusXM Satellite Radio
5 Display the <Delete> screen.
Ex.: On the <Artist Setting> screen
6 Select unwanted contents (artists/
songs).
Ex.: On the <Artist Setting> screen
The check mark ( ) appears beside the
artist name or song title.
• To select artists and songs by name, touch
[ Alphabet Search] then enter the first
letter of the name.
7 Delete unwanted artists or songs.
A message window is displayed. Select [Yes].
To return to previous screens after setting is
done, touch [ ] repeatedly.
Restricting channel
reception—Parental Lock
You can restrict access to some SiriusXM
channels.
❏Restricting channel reception
You need to enter the password to restrict
channel reception.
• No password is set initially at the factory. Once
you have registered your password, note it
somewhere.
1 Display the menu window.
While the <SiriusXM> source control screen
is displayed, touch the Menu button on
the monitor panel.
2 Display <Settings> screen for
SiriusXM.
3 Display <Parental Lock>.
LinkDisplayAudio_NAS.indb 64LinkDisplayAudio_NAS.indb 64 5/12/16 5:39 PM5/12/16 5:39 PM
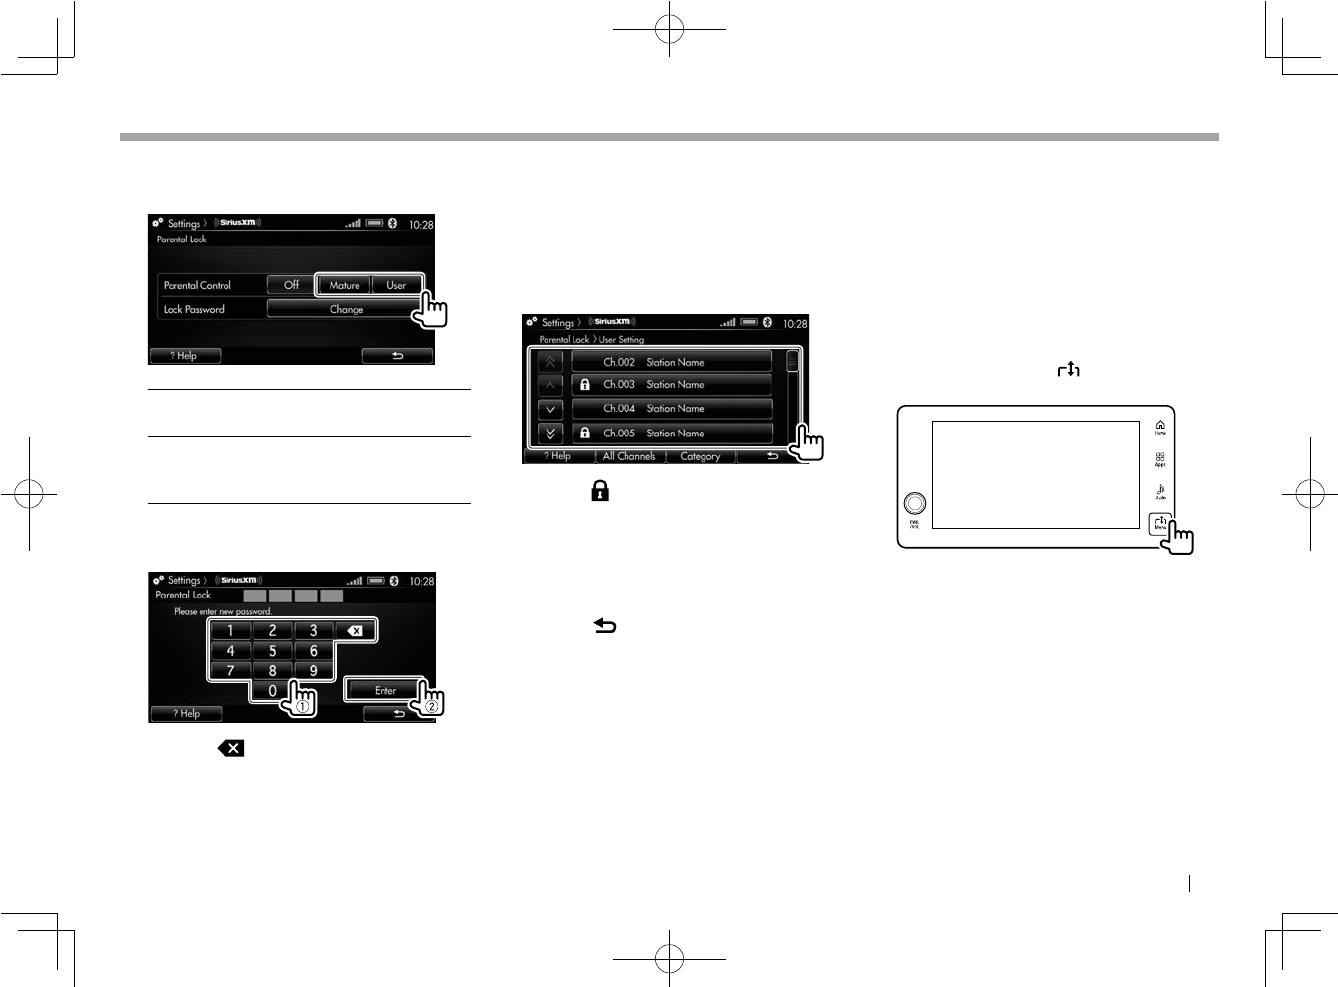
ENGLISH 65
SiriusXM Satellite Radio
SiriusXM Satellite Radio
4 Select [Mature] or [User] for
<Parental Control>.
[Mature] Channels specified by
SiriusXM can not be tuned.
[User] You can restrict channel
reception yourself on the
channel list.
• To deactivate Parental Lock, select [Off].
5 Enter your password.
• Touch [ ] to delete the incorrect entry.
Each time you touch the button, the last
entered number is deleted.
6 When no password has been set, you
are required to enter your password
again for reconfirmation.
For [Mature] setting, Parental Lock is completed.
The following steps are only for [User] setting.
7 Select the channels on the channel list.
The lock ( ) marks beside the channel
numbers are highlighted, once Parental Lock
is set for the channels.
• To change the channel list, touch
[Category] or [All Channel].
To return to previous screens after setting is
done, touch [ ] repeatedly.
❏Changing the password
You can use your own password (4-digit number).
• Once you change the password, note it
somewhere.
• If you forget the password, reset the system
(Page 75). Remember all other settings will
be also reset.
1 Display the menu window.
While the <SiriusXM> source control screen
is displayed, touch the Menu button on
the monitor panel.
Continued on the next page...
LinkDisplayAudio_NAS.indb 65LinkDisplayAudio_NAS.indb 65 5/12/16 5:39 PM5/12/16 5:39 PM

66
SiriusXM Satellite Radio
SiriusXM Satellite Radio
2 Display <Settings> screen for
SiriusXM.
3 Display <Parental Lock>.
4 Select [Change] for <Lock
Password>.
5 Enter the current password.
• Touch [ ] to delete the incorrect entry.
Each time you touch the button, the last
entered number is deleted.
6 Enter a new password.
• Touch [ ] to delete the incorrect entry.
Each time you touch the button, the last
entered number is deleted.
7 Enter the new password again for
confirmation.
• Touch [ ] to delete the incorrect entry.
Each time you touch the button, the last
entered number is deleted.
Resetting SiriusXM settings
You can reset all SiriusXM settings.
To reset settings
1 Display the menu window.
While the <SiriusXM> source control screen
is displayed, touch the Menu button on
the monitor panel.
2 Display <Settings> screen for
SiriusXM.
LinkDisplayAudio_NAS.indb 66LinkDisplayAudio_NAS.indb 66 5/12/16 5:39 PM5/12/16 5:39 PM
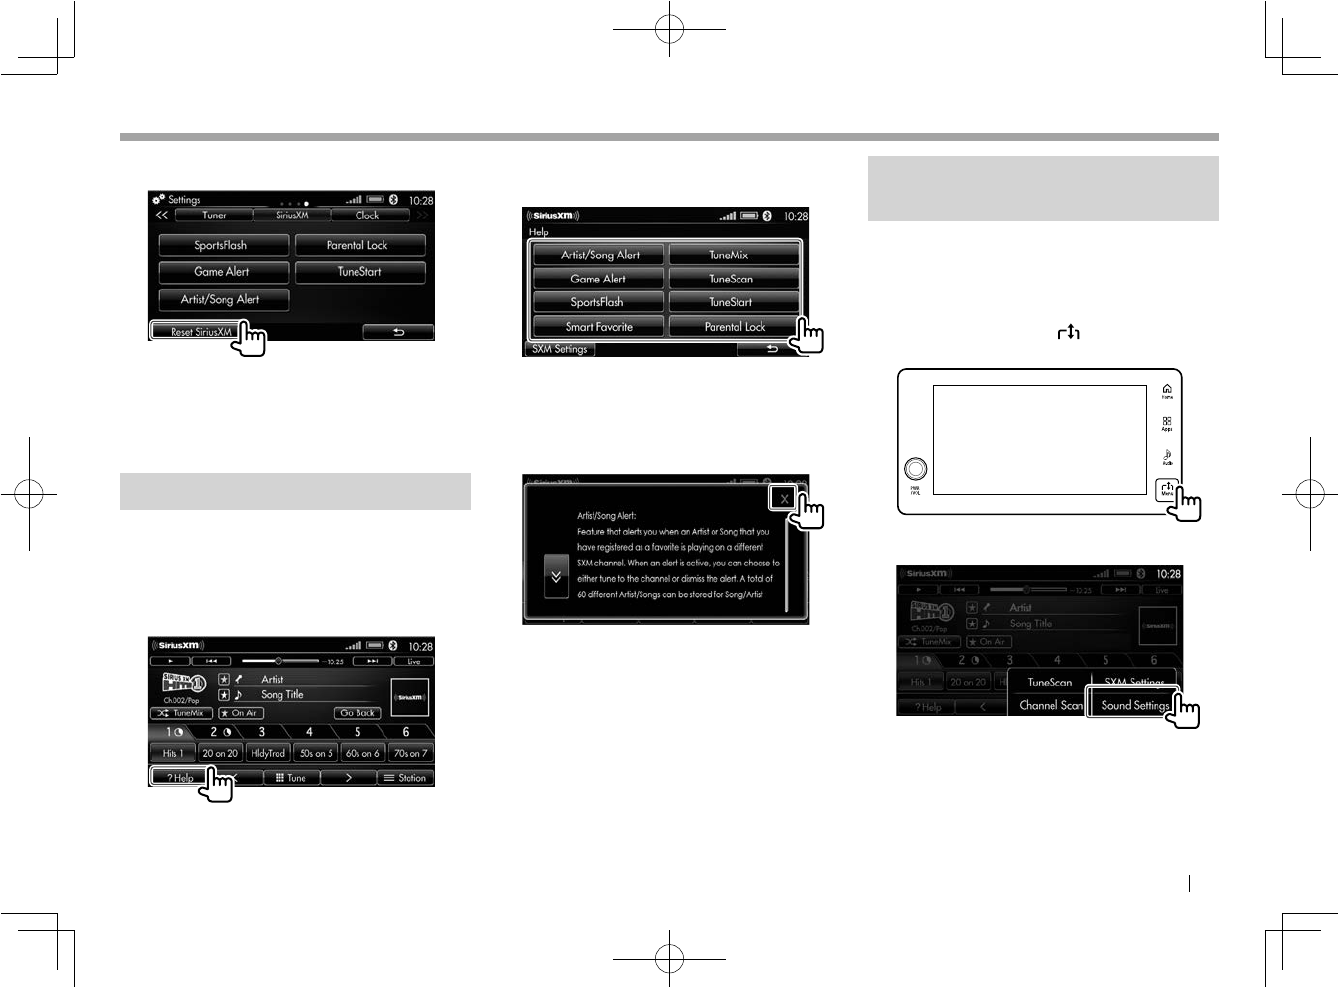
ENGLISH 67
SiriusXM Satellite Radio
SiriusXM Satellite Radio
3 Select [Reset SiriusXM].
A message window is displayed.
• Touch [Yes] to reset the settings.
• Touch [No] to cancel reset.
Reading help information
To know what this function is, you can use the
[? Help] button on the current screen if available.
1 Display the <Help> screen.
While the <SiriusXM> source control screen
is displayed, touch [? Help].
2 Select the function that you want to
know about.
• To use the functions listed on the screen,
touch [SXM Settings]. The <Settings>
screen for SiriusXM is displayed.
3 Close the help window.
Adjusting the sound during
playback
You can adjust the sound for listening to the
SiriusXM from the menu window.
1 Display the menu window.
While the <SiriusXM> source control screen
is displayed, touch the Menu button on
the monitor panel.
2 Display the <Sound> settings screen.
3 Make adjustment on the <Sound>
settings screen. (Page 73)
LinkDisplayAudio_NAS.indb 67LinkDisplayAudio_NAS.indb 67 5/12/16 5:39 PM5/12/16 5:39 PM
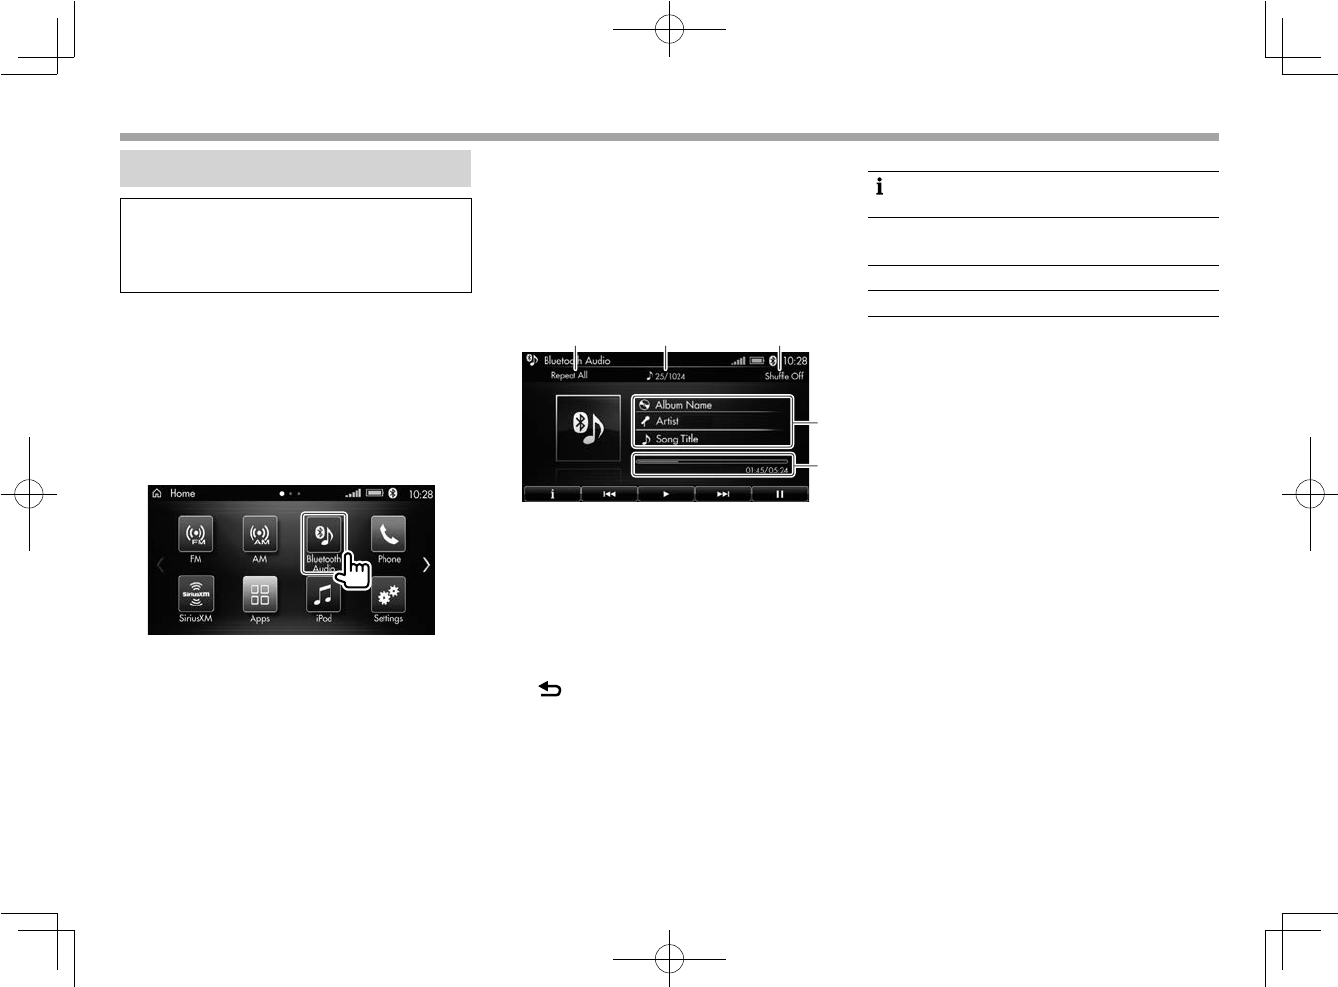
68
Bluetooth Audio
Bluetooth Audio
Playback operations
Preparation: Connect a Bluetooth audio
device via Bluetooth. (Page 19)
• Some operations cannot be performed
depending on Bluetooth audio device.
❏ Playing tracks on a Bluetooth audio
device
Select [Bluetooth Audio] on the <Home> screen
to display the <Bluetooth Audio> source control
screen and start playback.
1 Touch [Bluetooth Audio] on the
<Home> screen.
❏ Indications and buttons on the
source control screen
You can perform operations to play tracks
contained in the connected Bluetooth audio
device.
• The operation buttons, indications and
information displayed on the screen differ
among the connected devices.
12 3
4
5
Playback information
1 Repeat mode indicator (Page 69)*1
2 Track number/Total track number
3 Shuffle mode indicator (Page 69)*1
4 Track information*2
• Touching the information area displays
detailed information of the current track.
To return to the source control screen, touch
[ ].
5 Progress bar and playing time/total playing
time
Operation buttons
[ ]*2Displays the information of the
current track.
[S] [T]*1• Selects a track. (Touch)
• Rewinds/fast-forwards. (Hold)
[I]Starts playback.
[W]Pauses playback.
*1 Available only when the connected device is compatible.
*2 Not displayed when the device is only compatible with AVRCP 1.0.
LinkDisplayAudio_NAS.indb 68LinkDisplayAudio_NAS.indb 68 5/12/16 5:39 PM5/12/16 5:39 PM
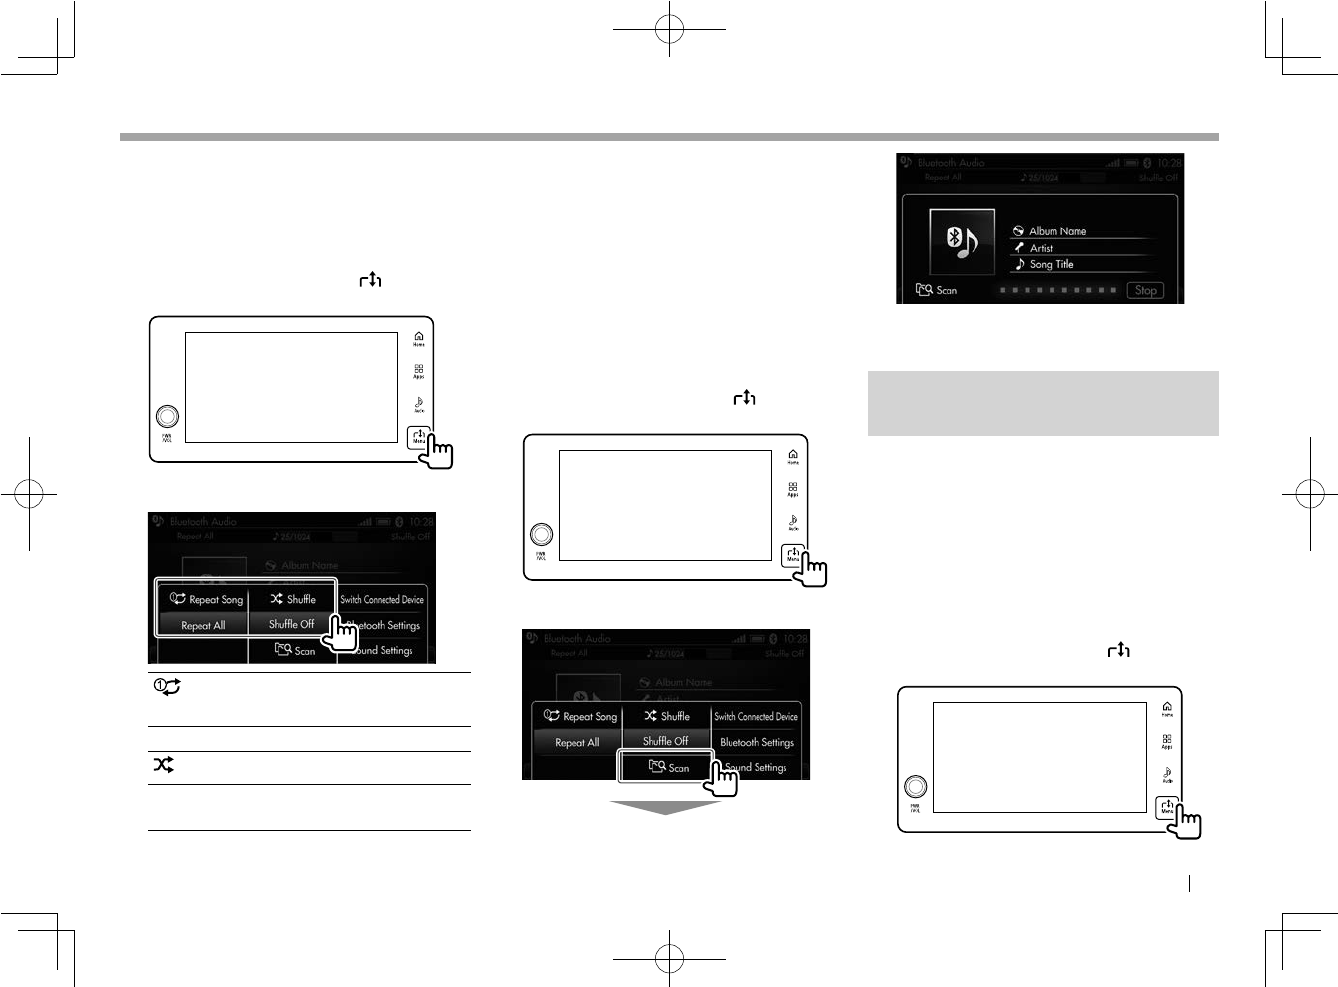
ENGLISH 69
Bluetooth Audio
Bluetooth Audio
❏ Selecting the playback mode
You can select the repeat mode and shuffle
mode.
1 Display the menu window.
While the <Bluetooth Audio> source control
screen is displayed, touch the Menu
button on the monitor panel.
2 Select a playback mode.
[ Repeat Song] Repeats the current
track.
[Repeat All] Repeats the all tracks.
[ Shuffle] Shuffles all tracks.
[Shuffle Off] Deactivates the shuffle
mode.
• You can also select the playback mode by
touching the repeat mode or shuffle mode
indicator on the <Bluetooth Audio> source
control screen.
❏ Playing the beginning of a track—
track scan
You can listen to the first 10 seconds of each track
by scanning the tracks.
1 Display the menu window.
While the <Bluetooth Audio> source control
screen is displayed, touch the Menu
button on the monitor panel.
2 Start the track scan.
• To stop the track scan, select [Stop].
Settings for Bluetooth audio
device playback
You can change the settings for playing
Bluetooth audio devices from the menu window.
❏ Switching to another Bluetooth
device
When two Bluetooth devices are connected, you
can switch the Bluetooth device to use.
1 Display the menu window.
While the <Bluetooth Audio> source control
screen is displayed, touch the Menu
button on the monitor panel.
Continued on the next page...
LinkDisplayAudio_NAS.indb 69LinkDisplayAudio_NAS.indb 69 5/12/16 5:39 PM5/12/16 5:39 PM
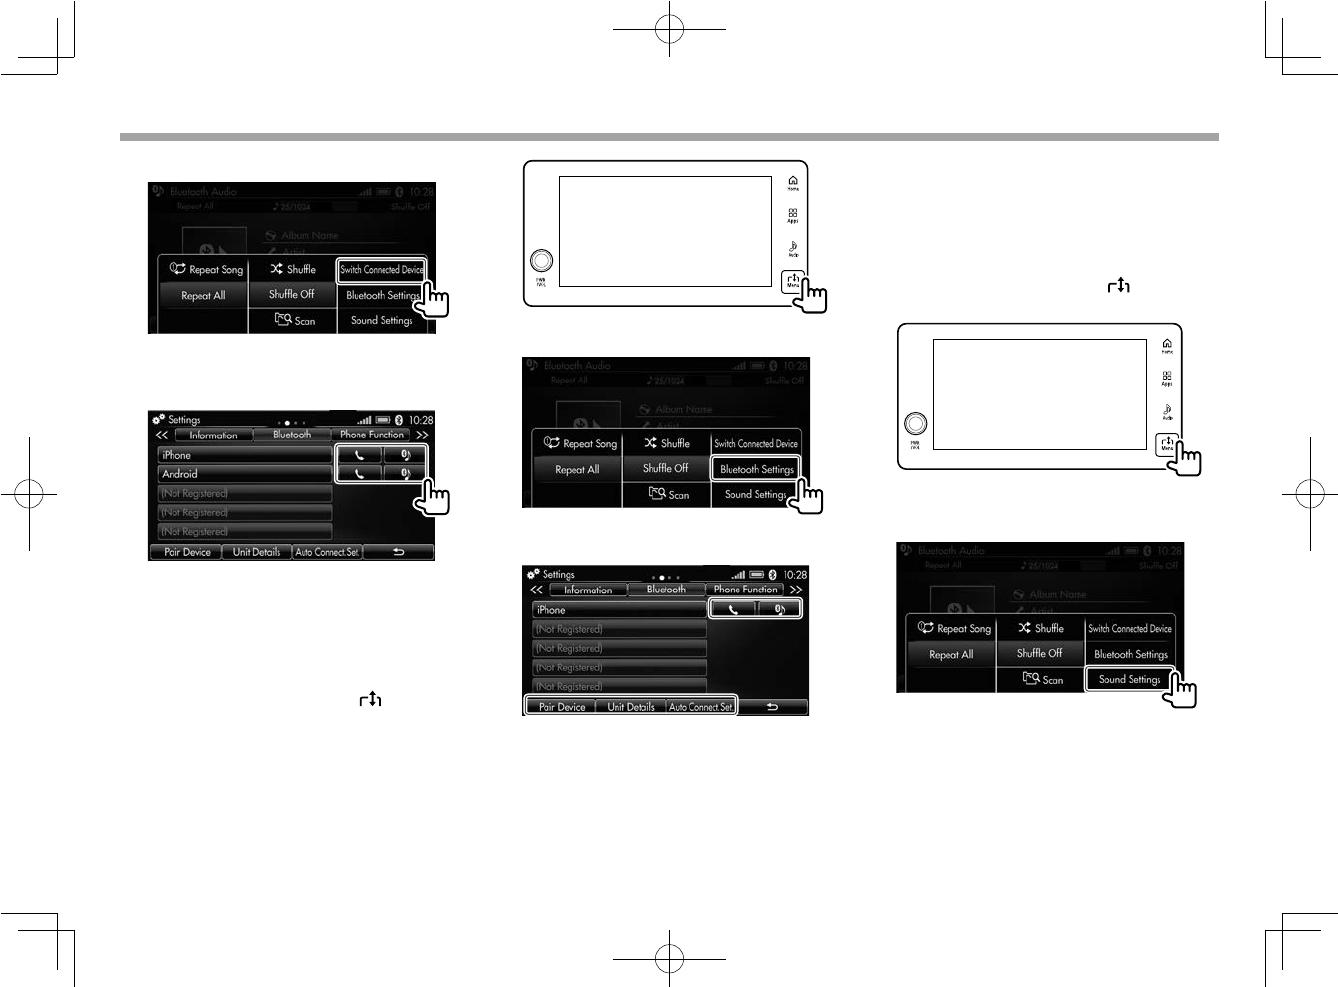
70
Bluetooth Audio
Bluetooth Audio
2 Select [Switch Connected Device].
3 Select the usage of another device to
use. (Page 77)
A message window is displayed. Select [Yes].
❏ Setting Bluetooth audio devices
1 Display the menu window.
While the <Bluetooth Audio> source control
screen is displayed, touch the Menu
button on the monitor panel.
2 Select [Bluetooth Settings].
3 Change the settings.
• For details on settings, see page 77.
❏ Adjusting the sound during playback
You can adjust the sound for playing Bluetooth
audio devices.
1 Display the menu window.
While the <Bluetooth Audio> source control
screen is displayed, touch the Menu
button on the monitor panel.
2 Display the <Sound> settings screen.
3 Make adjustment on the <Sound>
settings screen. (Page 73)
LinkDisplayAudio_NAS.indb 70LinkDisplayAudio_NAS.indb 70 5/12/16 5:39 PM5/12/16 5:39 PM
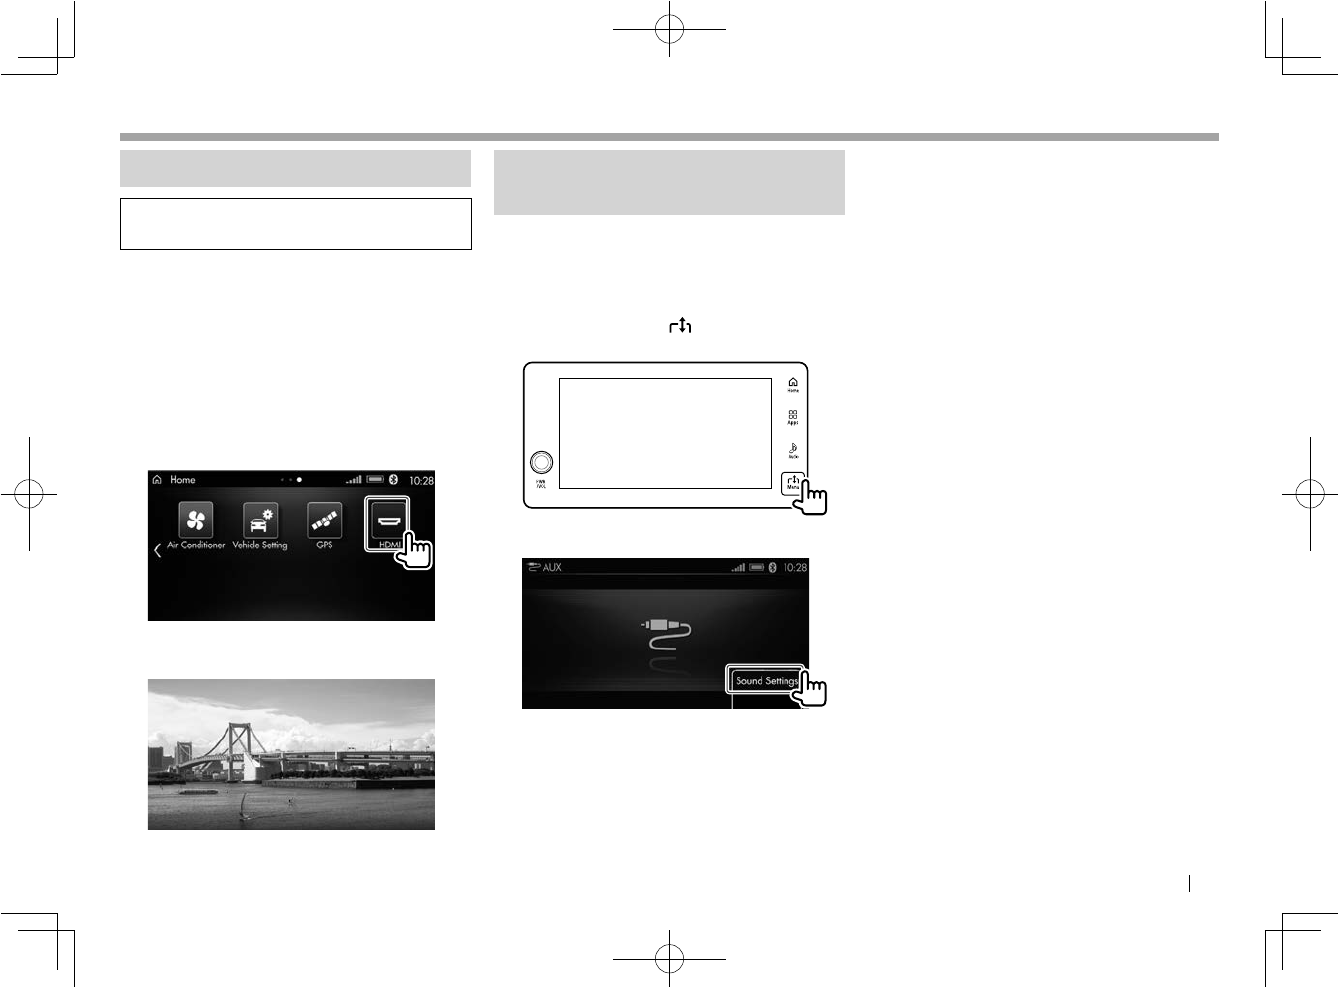
ENGLISH 71
External Components—HDMI
External Components—HDMI
Playing an HDMI device
Preparation: Connect an HDMI device to the
product via the HDMI input terminal. (Page 16)
❏ Playing content on an HDMI device
Select [HDMI] on the <Home> screen to display
the screen of the connected HDMI device and
start playback.
• [HDMI] is not displayed when the car is not
equipped with the HDMI input terminal or
when an HDMI device is not connected.
• Video will not be displayed while driving.
1 Select [HDMI] as the source.
On the <Home> screen, touch [HDMI].
2 Turn on the connected HDMI device
and start playback.
Adjusting the sound during
playback
You can adjust the sound for playing external
components from the menu window.
1 Display the menu window.
While the <HDMI> source control screen is
displayed, touch the Menu button on the
monitor panel.
2 Display the <Sound> settings screen.
3 Make adjustment on the <Sound>
settings screen. (Page 73)
LinkDisplayAudio_NAS.indb 71LinkDisplayAudio_NAS.indb 71 5/12/16 5:39 PM5/12/16 5:39 PM
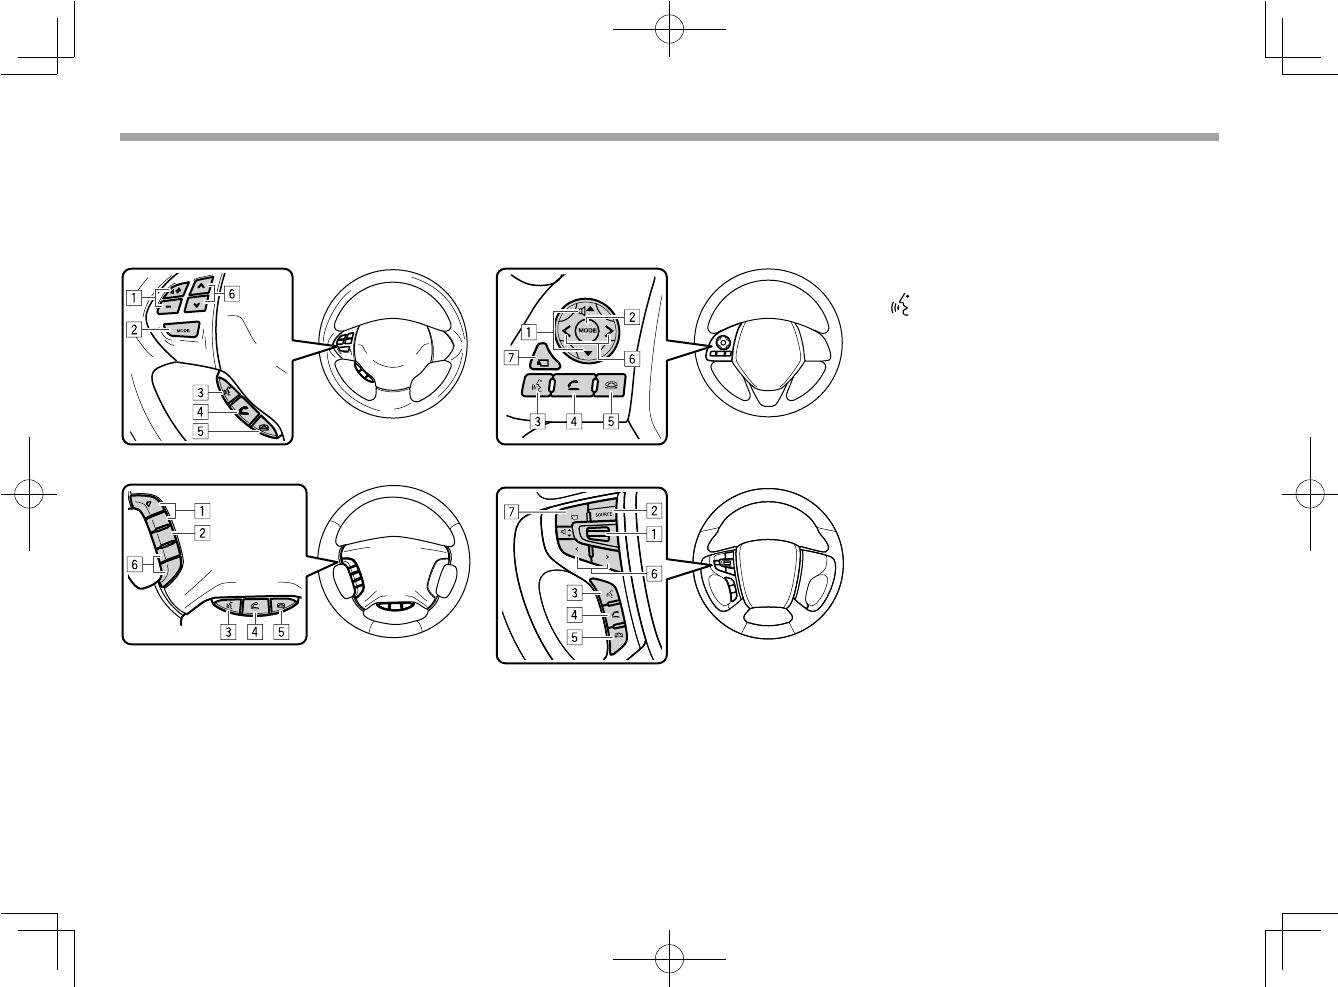
72
Steering Remote Control Switch Operations
Steering Remote Control Switch Operations
You can perform operations from the remote
control switches on the steering wheel.
• The buttons and layouts differ among the
steering types.
Type A
Type B
∧
MODE
+
−
∧
Type C
Type D
1 Volume buttons/switch
Adjusts the audio and other voice guidance
volume. (Page 21)
2 For Type A/B/C: MODE button
For Type D: SOURCE button
• Selects the playback source. (Press)
• Turns off/on the playback source. (Hold)
3 button
Used for the voice control (recognition).
• For operating this product, see page 23.
• For operating the Bluetooth interfaced
device, see page 24.
• For operating CarPlay, see page 26.
• For operating Android Auto, see page 28.
4 Answer button
Receives the call.
5 Hang up button
Ends the call.
6 Selection buttons
• Selects the tracks, stations, and channels.
(Press)
• Rewinds/fast-forwards the track, or searches
for stations/channels. (Hold)
7 Multi around button
Displays the around view on the monitor.
LinkDisplayAudio_NAS.indb 72LinkDisplayAudio_NAS.indb 72 5/12/16 5:39 PM5/12/16 5:39 PM
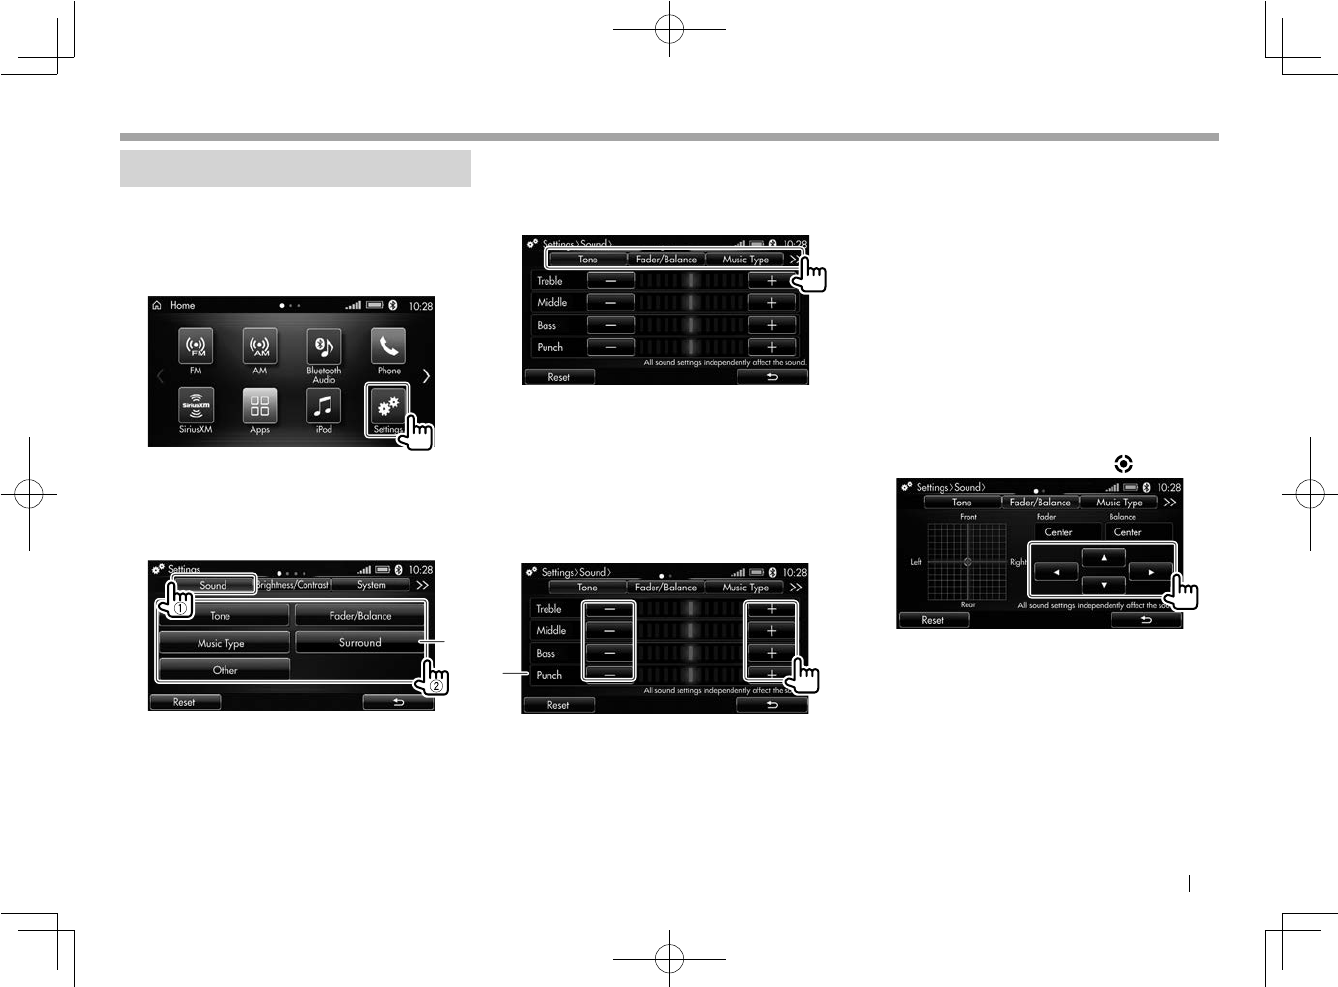
ENGLISH 73
Settings
Settings
Adjusting the sound
You can adjust the sound for listening to the
playback source on the <Sound> settings screen.
1 Display the <Settings> screen.
On the <Home> screen, touch [Settings].
2 Display the <Sound> settings screen
(1), then select the setting item (2).
• Touch [<<]/[>>] repeatedly to display the
[Sound] tab.
*
• To clear the adjustments made on all
<Sound> setting items, select [Reset].
– A message window is displayed. Select
[Yes].
* [Surround] is displayed only when your car is equipped
with a premium audio system.
3 Adjust the settings.
• You can also select setting items by
touching tabs on the <Sound> settings
screen.
❏ Adjusting the sound tone
You can adjust the tone for treble/middle/bass/
punch* sounds.
1 Select [Tone] on the <Sound>
settings screen. (See the left column.)
2 Adjust the tone for each sound.
*
• Touch [+] to increase and [–] to decrease.
• To clear the adjustments on the [Tone]
setting screen, select [Reset].
* The <Punch> setting is adjustable only when your car is
equipped with a premium audio system (with sub-woofer).
❏ Adjusting the speaker output
balance
You can adjust the output balance of the front/
rear speakers and the left/right speakers.
1 Select [Fader/Balance] on the
<Sound> settings screen. (See the far
left column.)
2 Adjust the speaker output balance.
• Touch [J]/[K] to adjust front and rear
speaker output balance (Fader).
• Touch [H]/[I] to adjust left and right
speaker output balance (Balance).
• You can also adjust the speaker output
balance by dragging cursor ( ).
• To clear the adjustments on the <Fader/
Balance> setting screen, select [Reset].
LinkDisplayAudio_NAS.indb 73LinkDisplayAudio_NAS.indb 73 5/12/16 5:39 PM5/12/16 5:39 PM
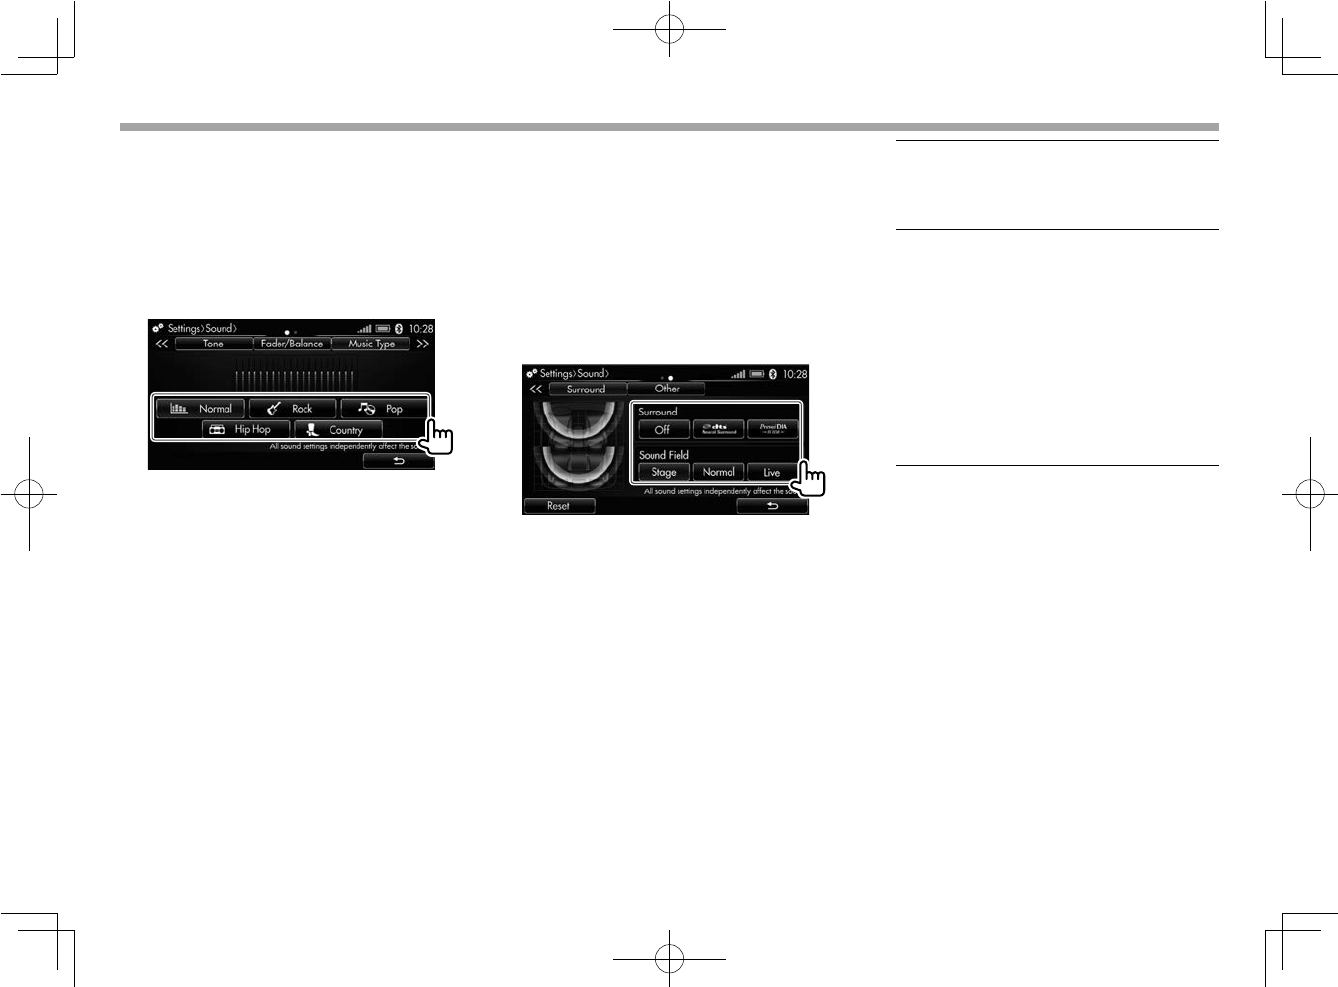
74
Settings
Settings
❏ Selecting the music type suitable for
the current track
You can apply the sound equalization to the
music by selecting the music type.
1 Select [Music Type] on the <Sound>
settings screen. (Page 73)
2 Select the music type
❏ Enjoying surround sound (only when
your car is equipped with a premium
audio system)
You can activate surround and select the
listening position when your car is equipped with
a premium audio system.
1 Select [Surround] on the <Sound>
settings screen. (Page 73)
2 Change the surround settings.
<Surround> Sets the surround type.
• Off: Deactivates surround.
• dts Neural Surround*1*2
• PremiDIA WIDE*2
<Sound
Field>*1
Sets the center position in
the sound field.
• Stage: Select this when
only the driver is in the car.
• Normal: Select this when
the listeners are sitting on
the front seats.
• Live: Select this when the
listeners are sitting on
both the front and rear
seats.
• To clear the adjustments on the <Surround>
setting screen, select [Reset].
*1 Displayed when your car is equipped with a premium audio system
(with sub-woofer).
*2 Does not work when the playback source is the tuner (FM/AM
analog broadcast).
LinkDisplayAudio_NAS.indb 74LinkDisplayAudio_NAS.indb 74 5/12/16 5:39 PM5/12/16 5:39 PM
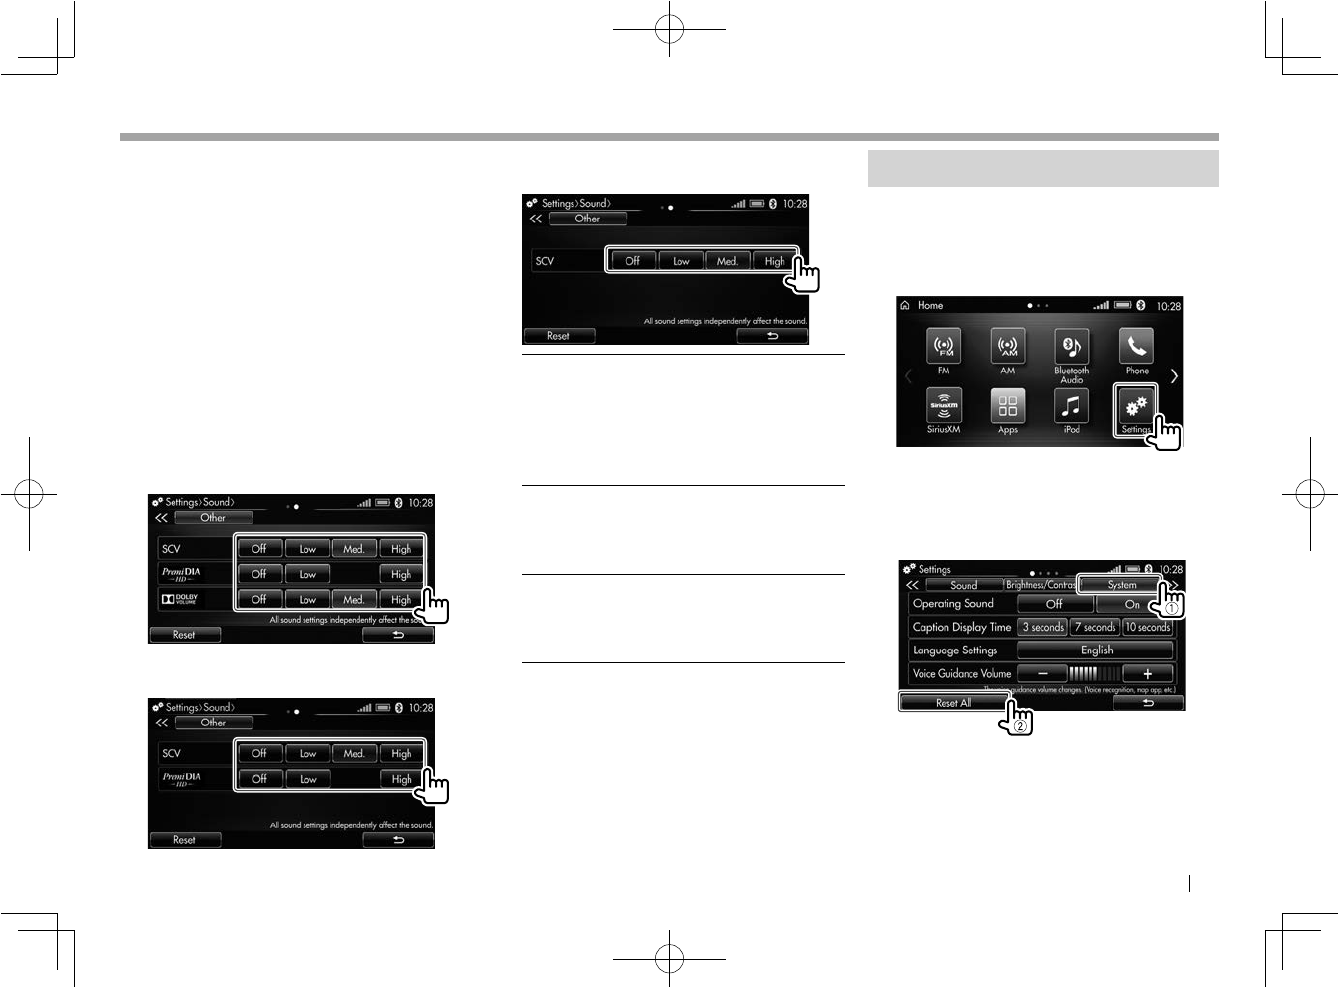
ENGLISH 75
Settings
Settings
❏ Adjusting audio/volume settings
You can adjust the following audio/volume
settings precisely:
• The sensitivity of the speed compensated
volume to adjust the volume automatically
according to the car speed
• The compressed audio correction level using
PremiDIA HD technology
• The automatic volume adjustment level using
Dolby volume technology
1 Select [Other] on the <Sound>
settings screen. (Page 73)
2 Change the surround settings.
When your car is equipped with a premium
audio system (with sub-woofer):
When your car is equipped with a premium
audio system (without sub-woofer):
When your car is not equipped with a
premium audio system:
<SCV> Selects the sensitivity of the
speed compensated volume.
• Low/Med./High
• Off: Deactivates the speed
compensated volume
effect.
<PremiDIA
HD>*1
Selects the compressed audio
correction level.
• Low/High
• Off: Deactivates the effect.
<DOLBY
VOLUME>*2
Selects the automatic volume
adjustment level.
• Low/Med./High
• Off: Deactivates the effect.
• To clear the adjustments on the <Other>
settings screen, select [Reset].
*1 Displayed when your car is equipped with a premium audio system
(with/without sub-woofer).
*2 Displayed when your car is equipped with a premium audio system
(with sub-woofer).
Initializing the settings
To restore the initial settings, follow the
procedure below.
1 Display the <Settings> screen.
On the <Home> screen, touch [Settings].
2 Display the <System> settings screen
(1), then select [Reset All] (2).
• Touch [<<]/[>>] repeatedly to display the
[System] tab.
A message window is displayed. Select [Yes].
The product is reset and the initial screen is
displayed.
LinkDisplayAudio_NAS.indb 75LinkDisplayAudio_NAS.indb 75 5/12/16 5:39 PM5/12/16 5:39 PM
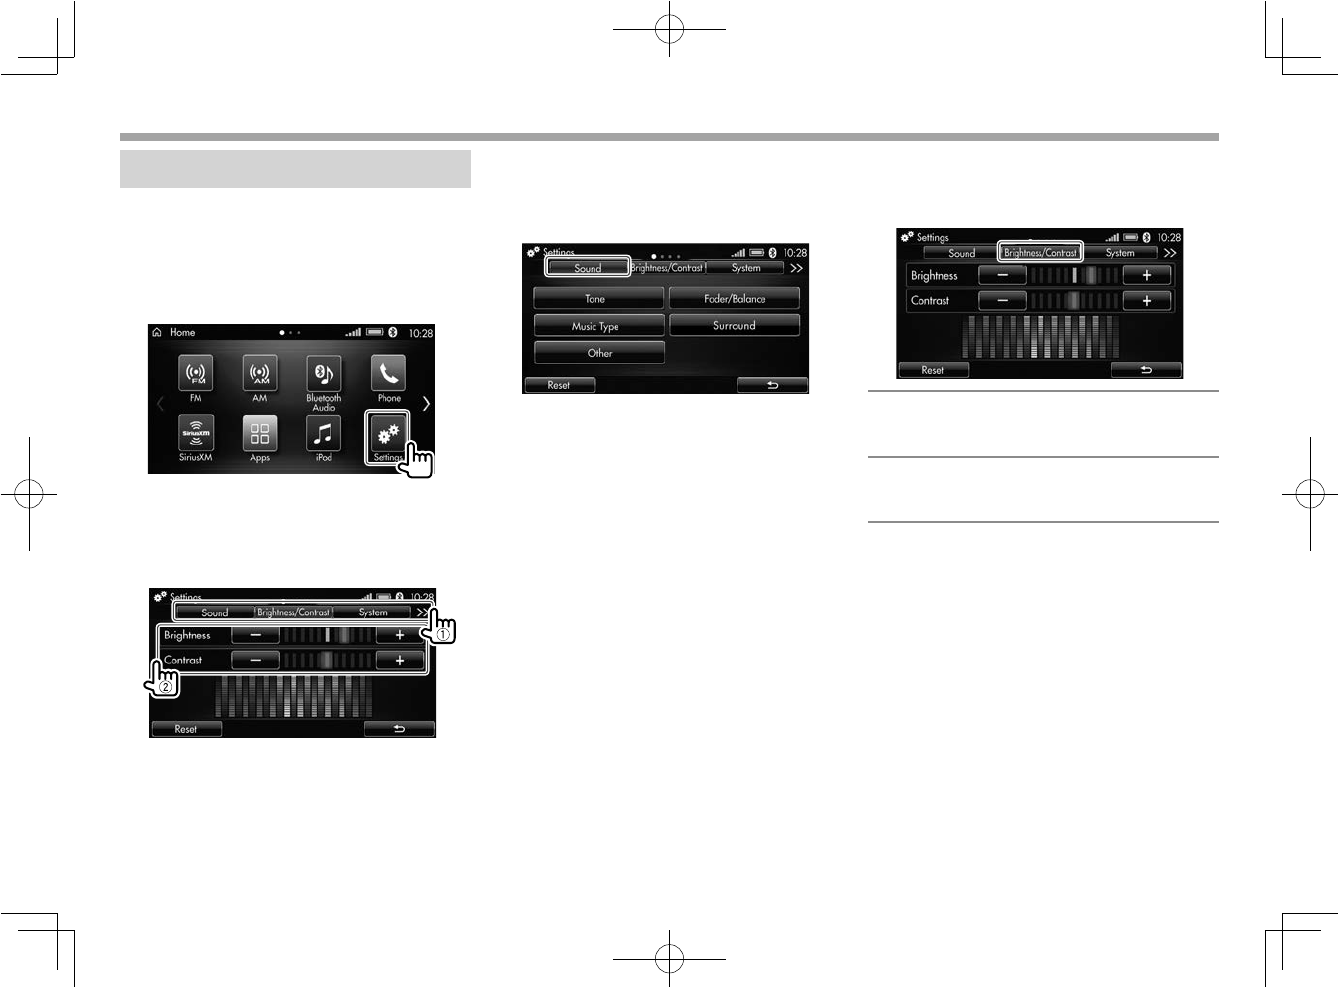
76
Settings
Settings
Setting menu items
❏Displaying the <Settings> screen
You can make adjustments and change settings
on the <Settings> screen.
1 Display the <Settings> screen.
On the <Home> screen, touch [Settings].
2 Select the setting tab (1), then select
an item (2).
• Touch [<<]/[>>] repeatedly to display
other setting tabs.
❏<Sound> settings screen
Adjust the sound for listening to the audio
sources.
• For details, see page 73– 75.
❏<Brightness/Contrast> settings
screen
Adjust the brightness and contrast of the screen.
<Brightness>
Adjusts the brightness of the screen.
• –5 to +5 (Initial: +3 for <Day>/+2 for <Night>)
<Contrast>
Adjusts the contrast of the screen.
• –5 to +5 (Initial: 0)
• To clear the adjustments on the <Brightness/
Contrast> settings screen, select [Reset].
LinkDisplayAudio_NAS.indb 76LinkDisplayAudio_NAS.indb 76 5/12/16 5:39 PM5/12/16 5:39 PM
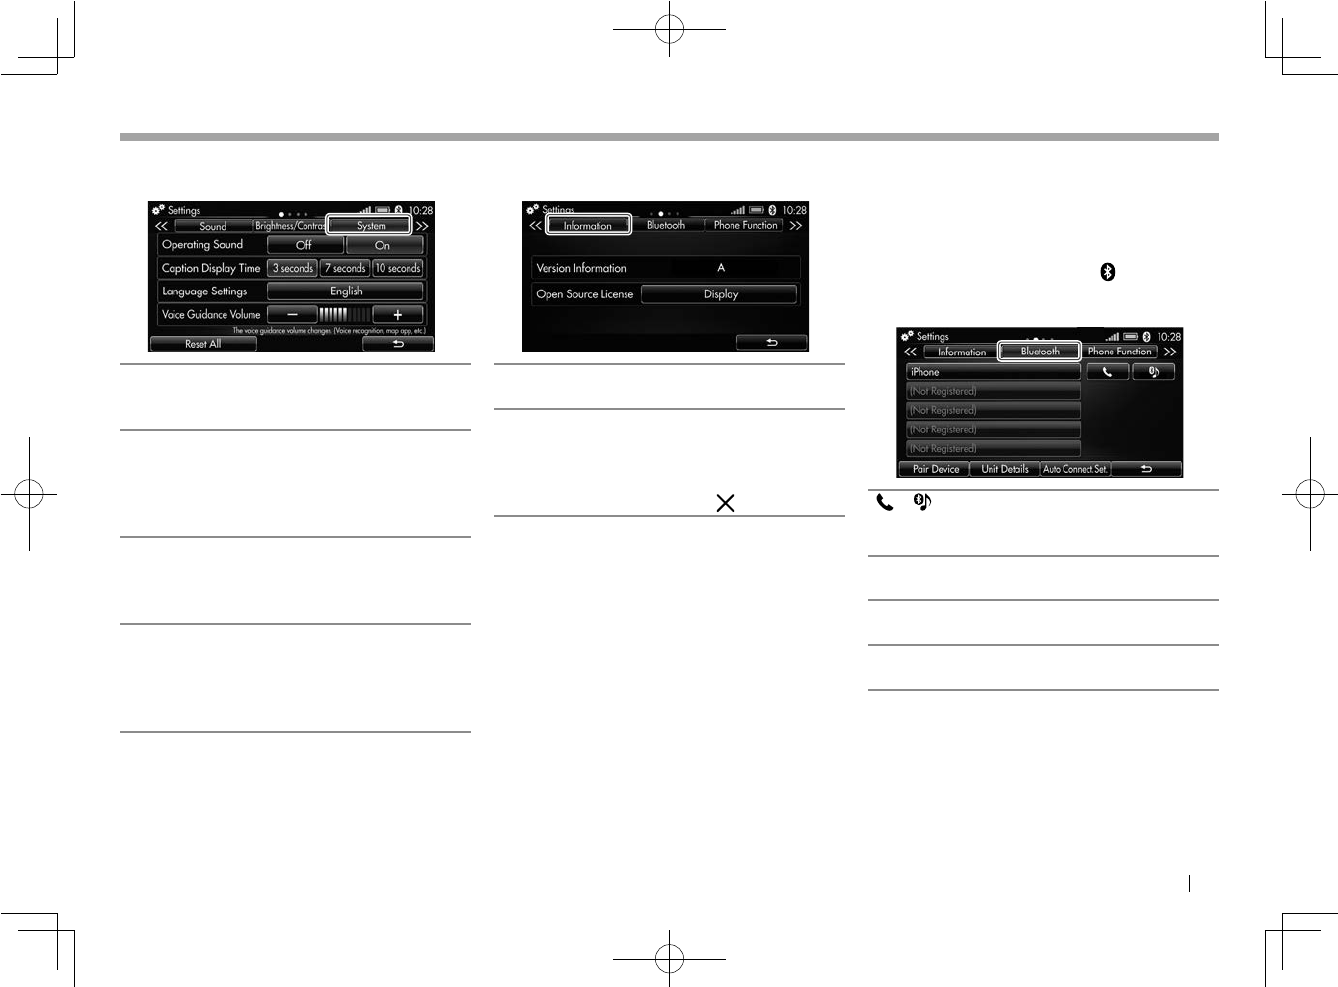
ENGLISH 77
Settings
Settings
❏<System> settings screen
Change the settings for operating the product.
<Operating Sound>
Activates/deactivates key-touch tone.
• Off/On (Initial)
<Caption Display Time>
Selects the display time for the message windows
and information on the screen.
• 3 seconds (Initial)/7 seconds/
10 seconds
<Language Settings>
Selects the language used for on-screen
information.
• English (Initial)/Français/Español
<Voice Guidance Volume>
Adjusts the volume of the voice guidance.
• The <Voice Guidance Volume> of the other
settings screens is also changed.
• 0 to 11 (Initial: 6)
❏<Information> screen
Confirm the information about the product.
<Version Information>
Shows the version of the product.
<Open Source License>
Shows the open source license.
• Touch [Display] to display the Open Source
License.
– To close the screen, touch [ ].
❏ <Bluetooth> settings screen
Configure settings for using Bluetooth devices,
such as registration, connection and other
general operations.
• For details, see pages 17 – 20.
• Touching the Bluetooth mark ( ) on the
source control screen also displays the
<Bluetooth> settings screen.
[ ]/[ ]
Activates the Bluetooth device either as phone or
audio device.
<Pair Device>
Displays the pairing screen.
<Unit Details>
Displays the <Unit Bluetooth Details> screen.
<Auto Connect. Set.>
Displays the <Auto Connect. Set.> screen.
LinkDisplayAudio_NAS.indb 77LinkDisplayAudio_NAS.indb 77 5/12/16 5:39 PM5/12/16 5:39 PM
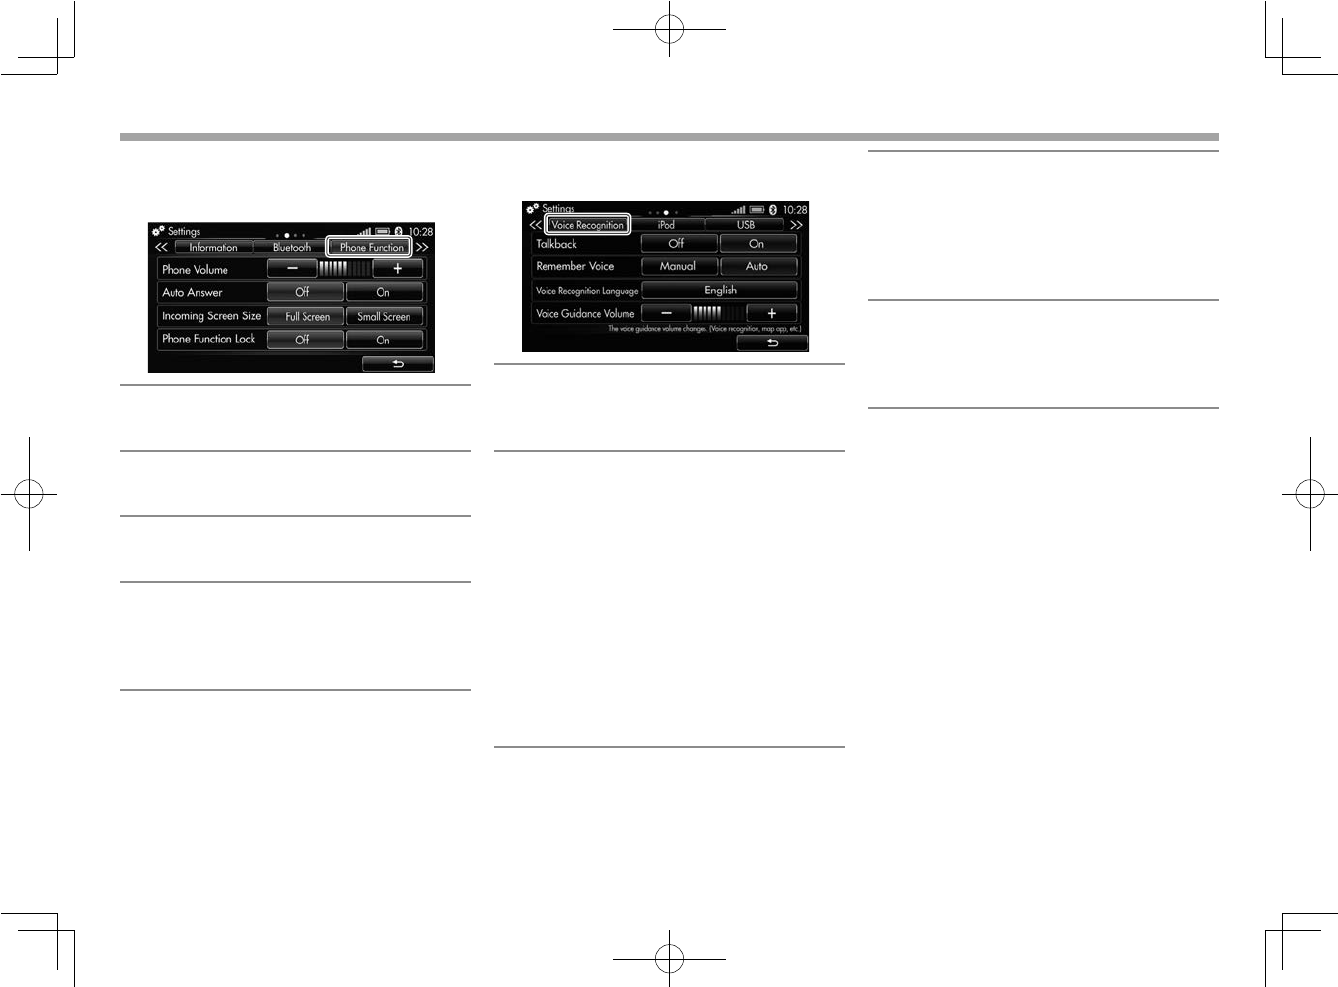
78
Settings
Settings
❏<Phone Function> settings screen
Configure settings for using mobile phones.
• For details, see pages 36 – 37.
<Phone Volume>
Adjusts the volume level of the mobile phone.
• 0 to 11 (initial: 6)
<Auto Answer>
Activates/deactivates auto answer.
• Off (Initial)/On
<Incoming Screen Size>
Selects the incoming call screen size.
• Full Screen (Initial)/Small Screen
<Phone Function Lock>
Activates/deactivates the mobile phone security.
• This can be used when a mobile phone is
connected via Bluetooth.
• Off (Initial)/On
❏ <Voice Recognition> settings screen
Configure settings for using voice control.
<Talkback>
Activates/deactivates talk back which helps you
with audio guidance to operate the product.
• Off/On (Initial)
<Remember Voice>
Changes the learning method for voice
commands of the product.
• Manual: Learns voice commands manually to
recognize your voice better.
– Selecting [Manual] displays the voice
command setup screen. After the message
window is displayed, select [Yes]. Select
[Start] on the next message window, then
register voice commands.
– Use the manual setup in the quiet place
when your car is parked.
• Auto (Initial): Learns your voice automatically
as you speak voice commands.
<Voice Recognition Language>
Selects the language used for voice control of the
product.
• English (Initial)/Français/Español
– Does not affect the on-screen language
set on the <Language Settings> screen.
(Page 77)
<Voice Guidance Volume>
Adjusts the volume level of the voice guidance.
• The <Voice Guidance Volume> of the other
settings screens is also changed.
• 0 to 11 (initial: 6)
LinkDisplayAudio_NAS.indb 78LinkDisplayAudio_NAS.indb 78 5/12/16 5:39 PM5/12/16 5:39 PM
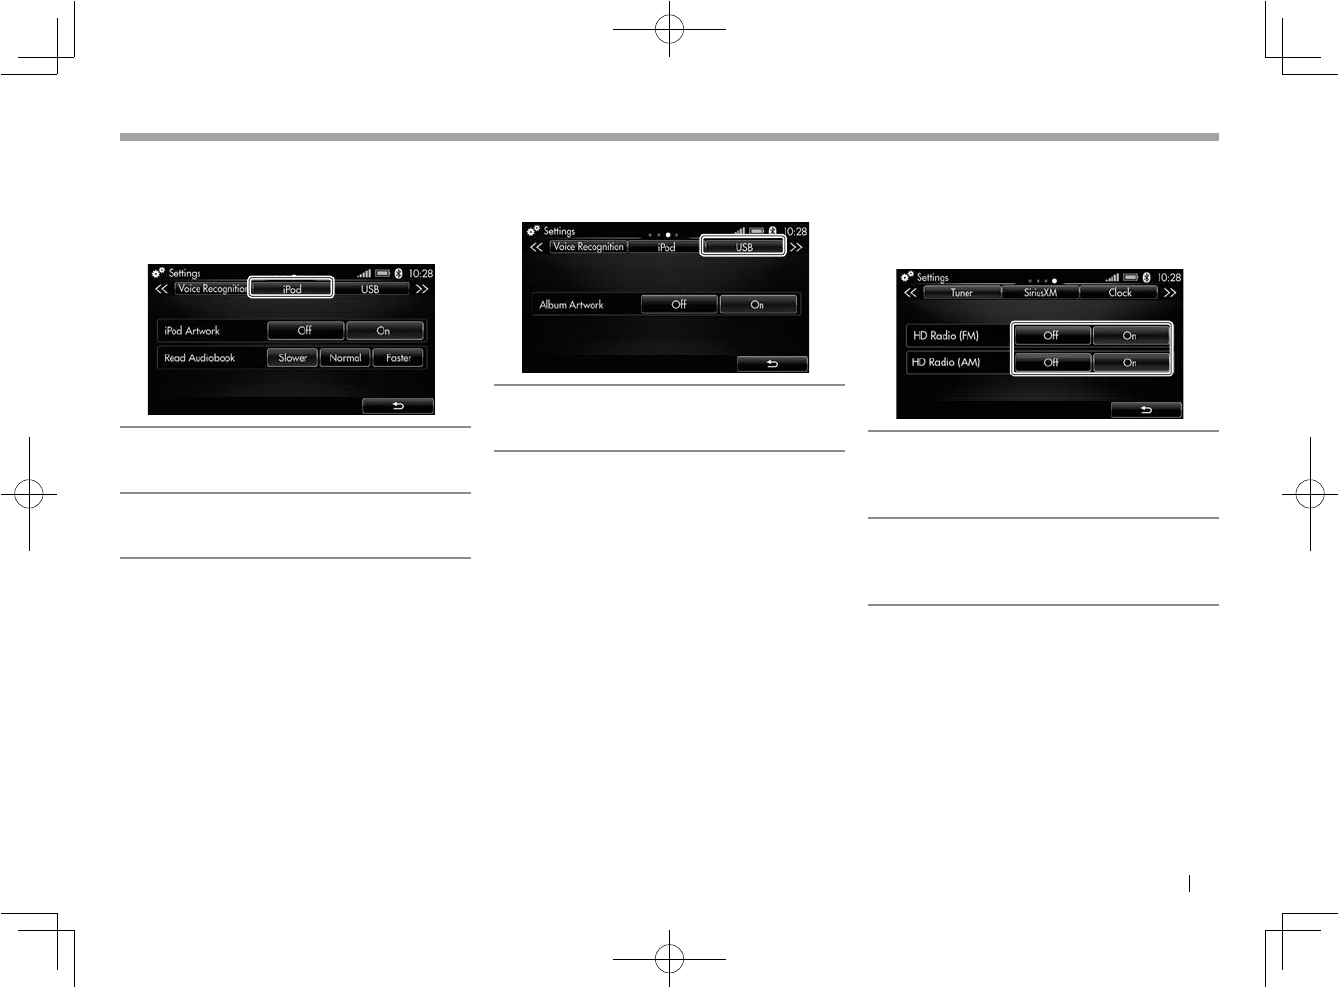
ENGLISH 79
Settings
Settings
❏ <iPod> settings screen
Configure settings for using iPod/iPhone.
• This can be used when iPod/iPhone is
connected to the USB terminal.
• For details, see page 40.
<iPod Artwork>
Displays/hides artwork of iPod/iPhone.
• Off/On (Initial)
<Read Audiobook>
Selects the speed of audiobooks.
• Slower/Normal/Faster
❏ <USB> settings screen
Configure settings for using USB devices.
• For details, see page 45.
<Album Artwork>
Displays/hides artwork of the USB device.
• Off/On (Initial)
❏ <Tuner> settings screen
Configure settings for HD Radio reception (FM
and AM).
• HD Radio is not available in Canada.
• For details, see pages 50.
<HD Radio (FM)>
Activates HD Radio reception mode for FM.
• For USA and Mexico: Off/On (Initial)
• For Canada: Off (Initial)/On
<HD Radio (AM)>
Activates HD Radio reception mode for AM.
• For USA and Mexico: Off/On (Initial)
• For Canada: Off (Initial)/On
LinkDisplayAudio_NAS.indb 79LinkDisplayAudio_NAS.indb 79 5/12/16 5:39 PM5/12/16 5:39 PM

80
Settings
Settings
❏ <SiriusXM> settings screen
Configure settings for SiriusXM reception.
• SiriusXM is available in USA and Canada.
• For details, see pages 56 – 66.
<SportsFlash>
Activates/deactivates SportsFlash to notify you
when a big play happens during a game played
by one of your favorite sports teams.
<Game Alert>
Activates/deactivates Game Alert to notify you
when your favorite teams start playing games.
You can tune in to the channel broadcasting the
games.
<Artist/Song Alert>
Activates/deactivates Artist/Song Alert to notify
you when your favorite contents (artists/songs)
start playing.
<Parental Lock>
You can restrict access to some SiriusXM channels.
<TuneStart>
You can scan the buffer recordings (current
channel and Smart Favorites channels).
• This function can be used for the music
channels certified by SiriusXM.
❏ <Clock> settings screen
Configure settings for the clock time and clock
design.
• For details, see pages 13 – 14.
• Touching the clock indication on the source
control screen also displays the <Clock>
settings screen.
<Auto>
Synchronizes the date and the clock time with
the GPS.
• Off/On (Initially checked: Eastern)
<Manual>
To set the clock manually, check [Manual], then
touch the date and time button shown here to
display manual clock settings screen.
• Off (Initial)/On
<Switch 12H/24H Display>
Selects the time display format.
• 12H (Initial)/24H
<Daylight Saving Time>
Select your country to activate the daylight
saving time.
• In Mexico, select [US/CA] where US daylight
saving time is used.
• Off (Initial)/US/CA/MX
<Select Date Display/Clock Type>
Select the data and clock display type.
❏ <Energy Monitor> settings screen
Only for plug-in hybrid vehicles: Configure
settings for peak hold indication in the <Charge>
graph and display limit for cumulative amount of
regenerated electrical power.
• For details, see pages 81 – 82.
<Peak Hold>
Displays instantaneous maximum value for
<Charge> graph.
• Off/On (Initial)
<Reset Timing>
Sets the reset timing of peak value (only used
when <Peak Hold> is set to [On]).
• Power Off (Initial)/Drive
<Cumulative Amount Display Limit>
Selects the display limit .
• 3 kWh/6 kWh (Initial)/12 kWh
• To check the function description, touch [What
is Peak Hold?].
LinkDisplayAudio_NAS.indb 80LinkDisplayAudio_NAS.indb 80 5/12/16 5:39 PM5/12/16 5:39 PM
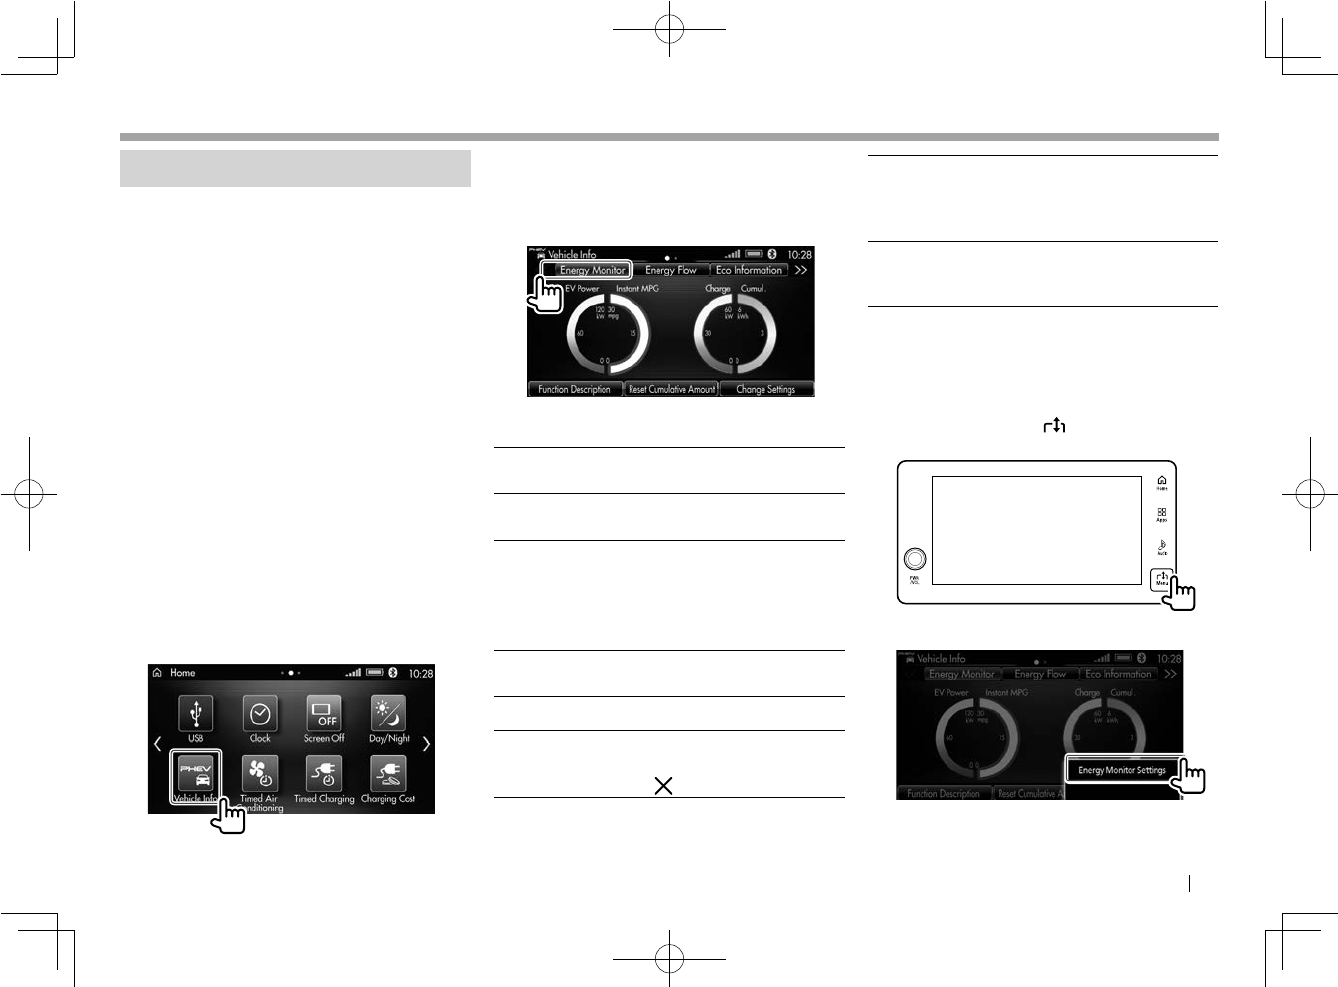
ENGLISH 81
Vehicle Information
Vehicle Information
Checking Vehicle Information
You can check the following information.
• Available functions differ among the car type.
• For plug-in hybrid vehicles
– Energy Monitor
– Energy Flow
– Eco Information
– History Information
• For gasoline cars
– MPG Information
– Eco Information (for only the cars equipped
with Idling Stop System)
– History Information
❏For plug-in hybrid vehicles
To monitor energy consumption—[Energy
Monitor]
You can check the energy consumption and
remaining energy.
1 Display the <Vehicle Info> screen.
On the <Home> screen, touch [Vehicle].
2 Display the <Energy Monitor> screen.
• Touch [<<]/[>>] to display the [Energy
Monitor] setting tab if this screen is not
displayed.
Indications on the screen
<EV Power> Indicates instantaneous electrical
power consumption.
<Instant
MPG>
Indicates instantaneous fuel
consumption.
<Charge> Indicates instantaneously
regenerated electrical power.
• This shows the electrical power
charged by Regenerative Brake,
but not by the engine.
<Cumul.> Indicates cumulative amount of
regenerated electrical power.
Function buttons on the screen
[Function
Description]
You can read the function
description. After you read it,
touch [ ] to close the window.
[Reset
Cumulative
Amount]
Resets cumulative amount of
regenerated electrical power.
When a message window is
displayed, select [Yes].
[Change
Settings]
Displays the <Energy Monitor>
settings screen. (See page 80 to
change the settings.)
To display the settings menu from the menu
window
1 Display the menu window.
While the <Energy Monitor> screen is
displayed, touch the Menu button on the
monitor panel.
2 Select the setting menu.
The <Energy Monitor> settings screen is
displayed (Page 80).
Continued on the next page...
LinkDisplayAudio_NAS.indb 81LinkDisplayAudio_NAS.indb 81 5/12/16 5:39 PM5/12/16 5:39 PM
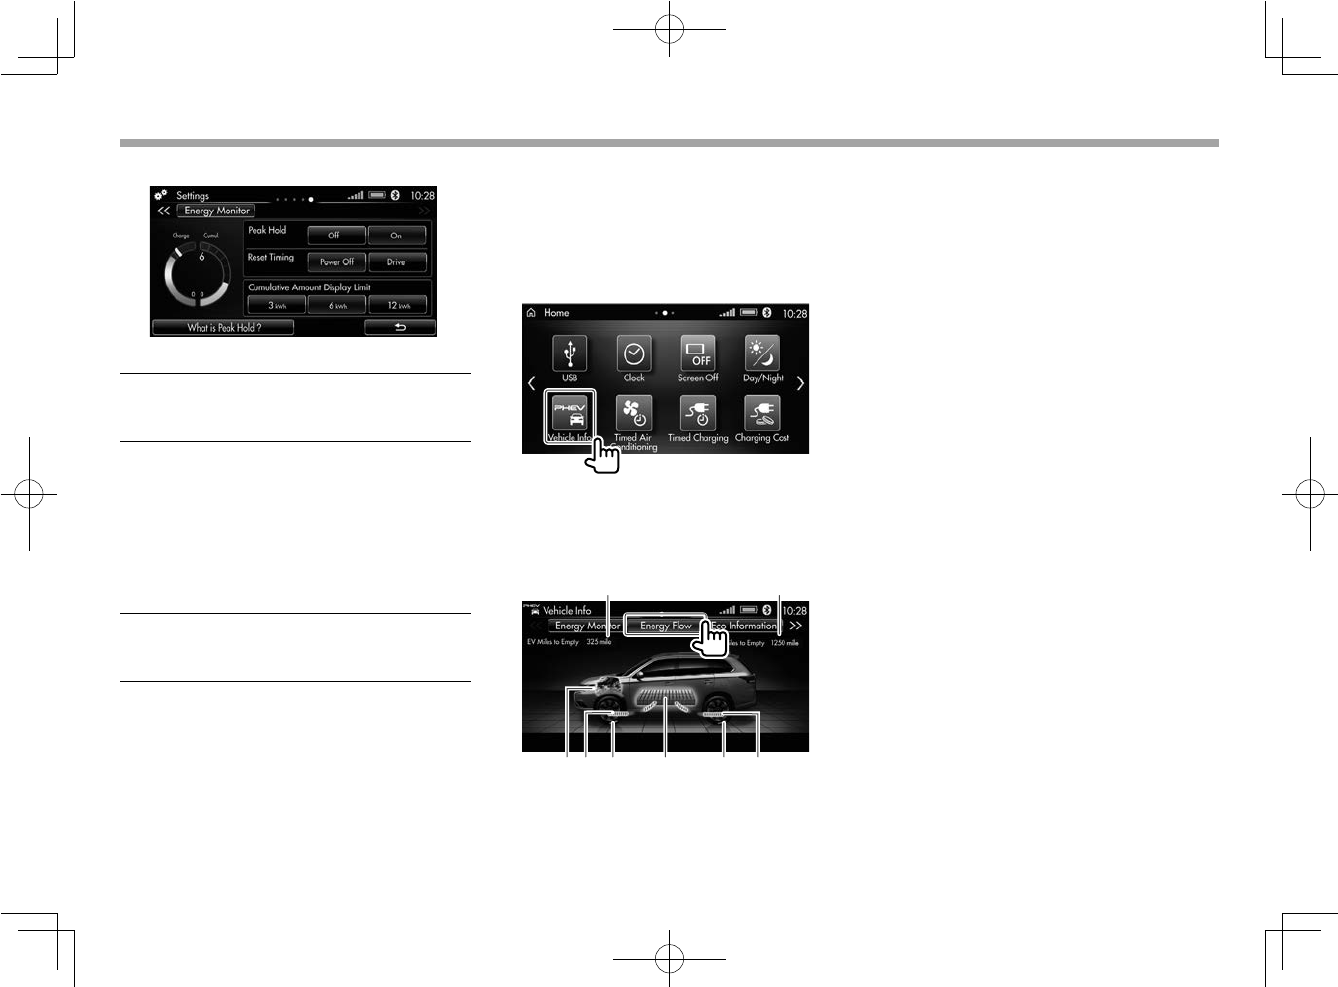
82
Vehicle Information
Vehicle Information
To change the settings
<Peak Hold> • [On]: Displays instantaneous
maximum value.
• [Off]: Does not display.
<Reset
Timing>
Sets the reset timing of peak
value (only used when <Peak
Hold> is set to [On] ).
• [Power Off]: Resets when
the power switch is set to the
OFF or ACC position.
• [Drive]: Reset when you start
the car after stop.
<Cumulative
Amount
Display Limit>
Select from [3 kWh] / [6 kWh] /
[12 kWh].
• To check the function description, touch [What
is Peak Hold?].
To monitor energy flow—[Energy Flow]
You can check how energy is generated by the
battery and engine and how it is consumed by
them.
1 Display the <Vehicle Info> screen.
On the <Home> screen, touch [Vehicle Info].
2 Display the <Energy Flow> screen.
• Touch [<<]/[>>] to display the [Energy
Flow] setting tab if this screen is not
displayed.
21
57634 4
Indications on the energy flow screen
1 Distance you can drive only by electric power
2 Total distance you can drive (both by
electricity and fuel)
3 Engine status indicator
4 Energy flow indicator
This indicator changes its position, direction,
and color depending on the running status.
5 Regenerating status of the front wheels
6 Battery capacity indicator (16 steps)
7 Regenerating status of the rear wheels
LinkDisplayAudio_NAS.indb 82LinkDisplayAudio_NAS.indb 82 5/12/16 5:39 PM5/12/16 5:39 PM
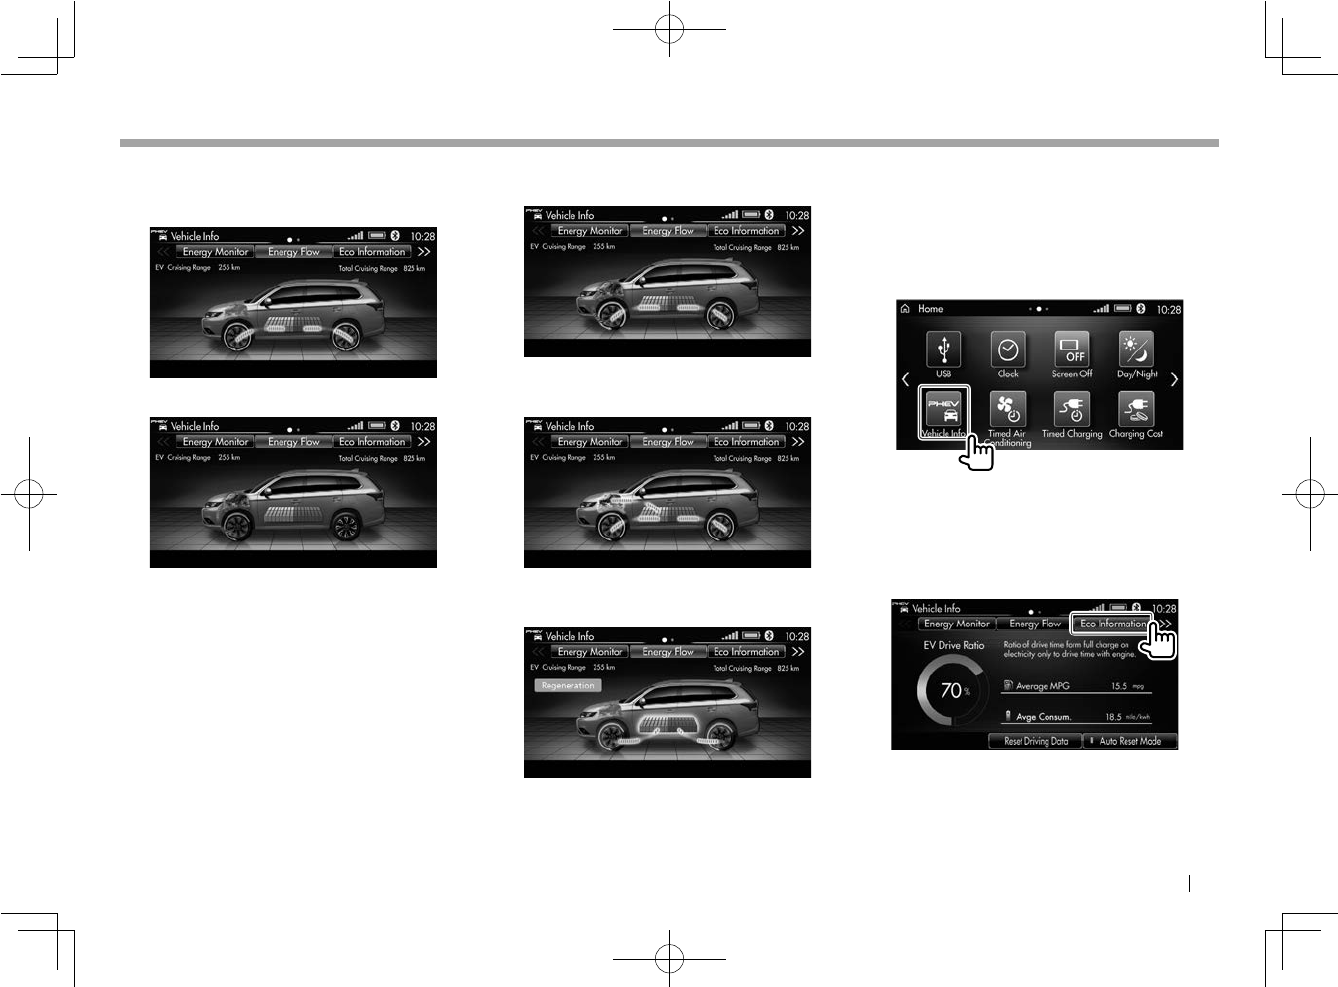
ENGLISH 83
Vehicle Information
Vehicle Information
To know more about indications on <Energy
Flow> screen
• While running by electrical power:
• While running by fuel:
• The car is driven by 4 wheels (4WD).
• While running by both electrical power and
fuel:
• While charging electrical power with the
engine:
• While regenerating electrical power by
braking (Regenerative Brake):
To monitor energy consumption—[Eco
Information]
You can check your Eco driving level (Average
Consumption of electricity and gasoline).
1 Display the <Vehicle Info> screen.
On the <Home> screen, touch [Vehicle Info].
2 Display the <Eco Information>
screen.
• Touch [<<]/[>>] to display the [Eco
Information] setting tab if this screen is
not displayed.
<EV Drive Ratio> will be reset and become 100%
when the battery is fully charged.
Continued on the next page...
LinkDisplayAudio_NAS.indb 83LinkDisplayAudio_NAS.indb 83 5/12/16 5:39 PM5/12/16 5:39 PM
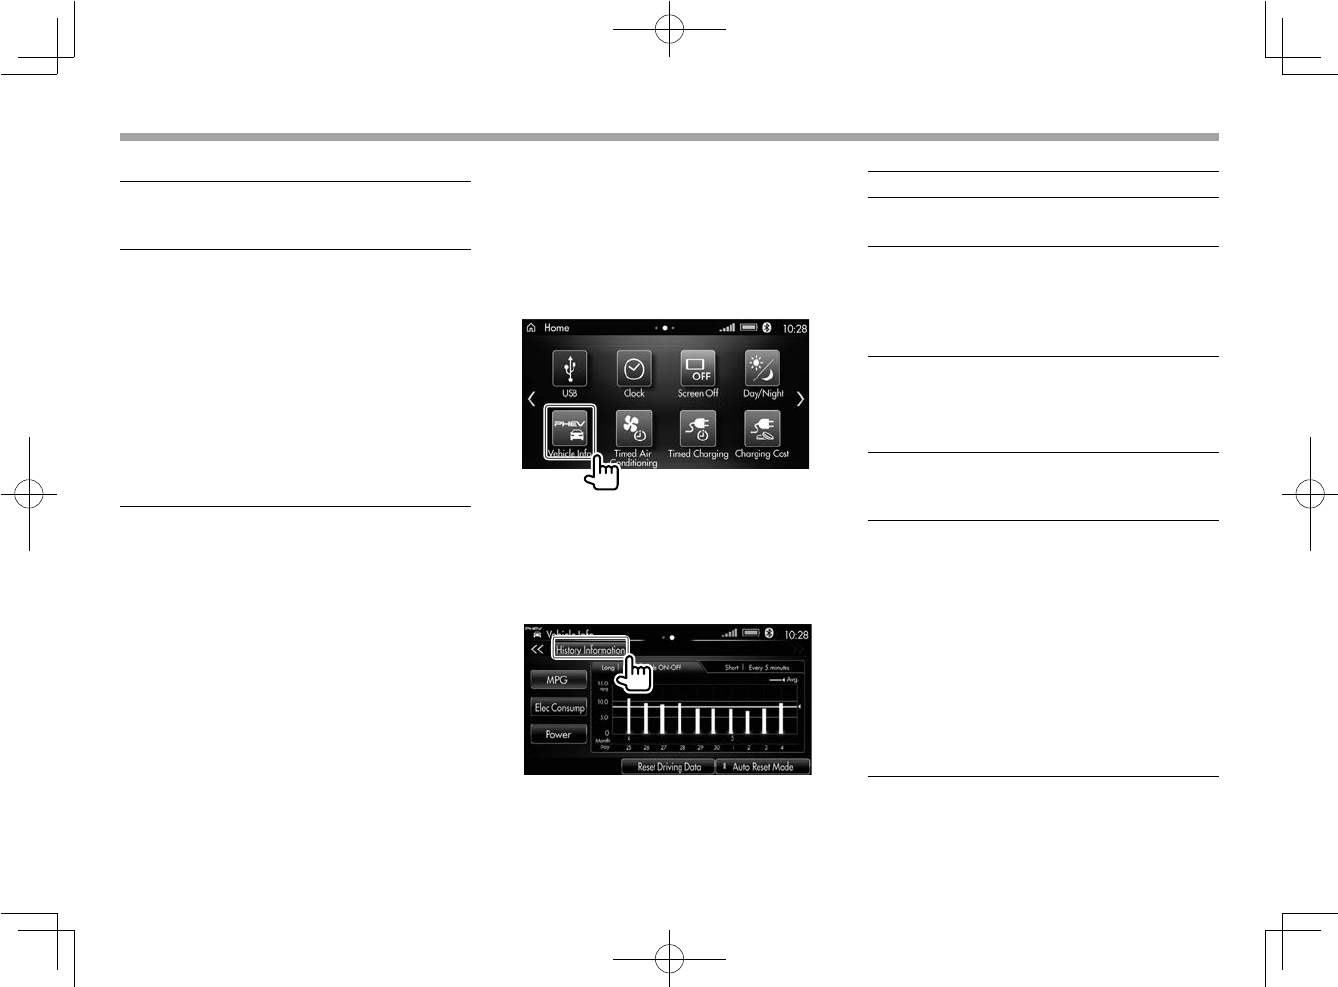
84
Vehicle Information
Vehicle Information
Function buttons on the screen
[Reset
Driving
Data]
Resets driving data on this screen.
When a message window is
displayed, select [Yes].
[Auto Reset
Mode]
Displays the automatic reset
mode screen where you can
change the reset mode setting.
Select [Yes] to use Auto Reset.
• With Auto Reset Mode
activated: The indicator on the
button lights up. Driving data
is reset when the power switch
has been off for about 4 hours.
• To manually reset the driving
data, select [No]—Manual Reset
Mode.
• Auto Reset and Manual Reset are both linked to
settings of the meters.
To monitor fuel and electricity consumption—
[History Information]
You can check the fuel consumption and
electricity consumption both in a long term and
in a short term.
1 Display the <Vehicle Info> screen.
On the <Home> screen, touch [Vehicle Info].
2 Display the <History Information>
screen.
• Touch [<<]/[>>] to display the [History
Information] setting tab if this screen is
not displayed.
Function buttons on the screen
[MPG] Displays fuel consumption (MPG).
[Elec
Consump]
Displays electricity consumption.
(mile/kWh).
[Power] Displays electricity consumption
used for driving and for air
conditioner.
• Regenerated electricity level is
also displayed.
You can switch the above graphs to check the
long term history and the short term history.
Touch the title of graph [Long] or [Short].
[Reset
Driving
Data]
Resets driving data on this screen.
When a message window is
displayed, select [Yes].
[Auto Reset
Mode]
Displays the automatic reset
mode screen where you can
change the reset mode setting.
Select [Yes] to use Auto Reset.
• With Auto Reset Mode
activated: The indicator on the
button lights up. Driving data
is reset when the power switch
has been off for about 4 hours.
• To manually reset the driving
data, select [No]—Manual Reset
Mode.
• Auto Reset and Manual Reset are both linked to
settings of the meters.
LinkDisplayAudio_NAS.indb 84LinkDisplayAudio_NAS.indb 84 5/12/16 5:39 PM5/12/16 5:39 PM
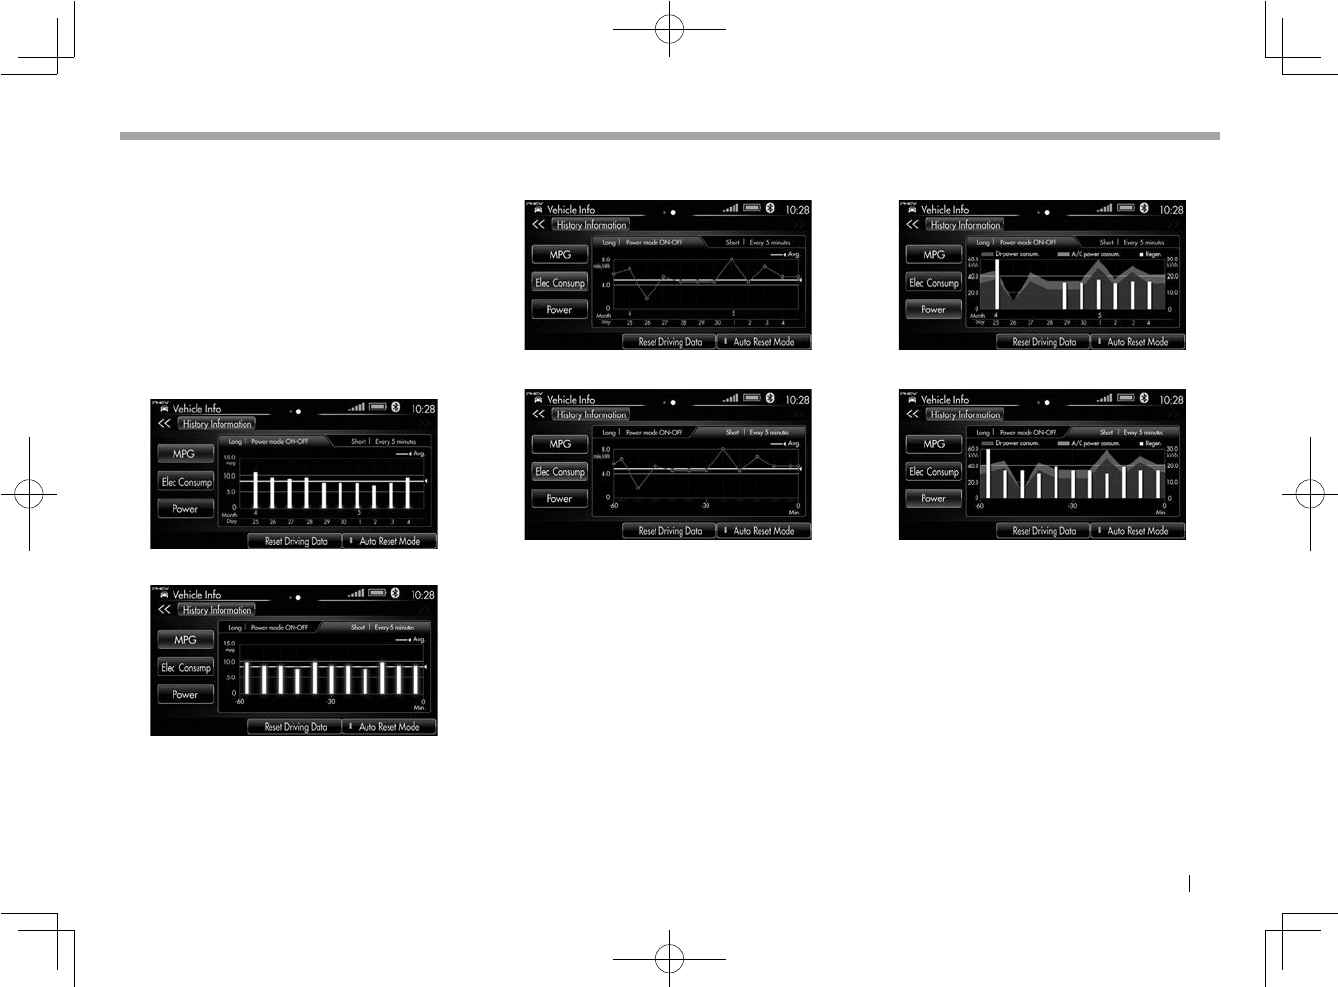
ENGLISH 85
Vehicle Information
Vehicle Information
To know more about indications on <History
Information> screen
• Long-term history records each time when
power is turned on and off.
• Short-term history records every 5 minutes.
If the power switch is set to the OFF or ACC
position within 5 minutes after it is turned ON,
short-term history does not keep the record on
the graph.
<MPG> histories
• Long-term history:
• Short-term history:
<Elec Consump> histories
• Long-term history:
• Short-term history:
<Power> histories
• Long-term history:
• Short-term history:
LinkDisplayAudio_NAS.indb 85LinkDisplayAudio_NAS.indb 85 5/12/16 5:39 PM5/12/16 5:39 PM
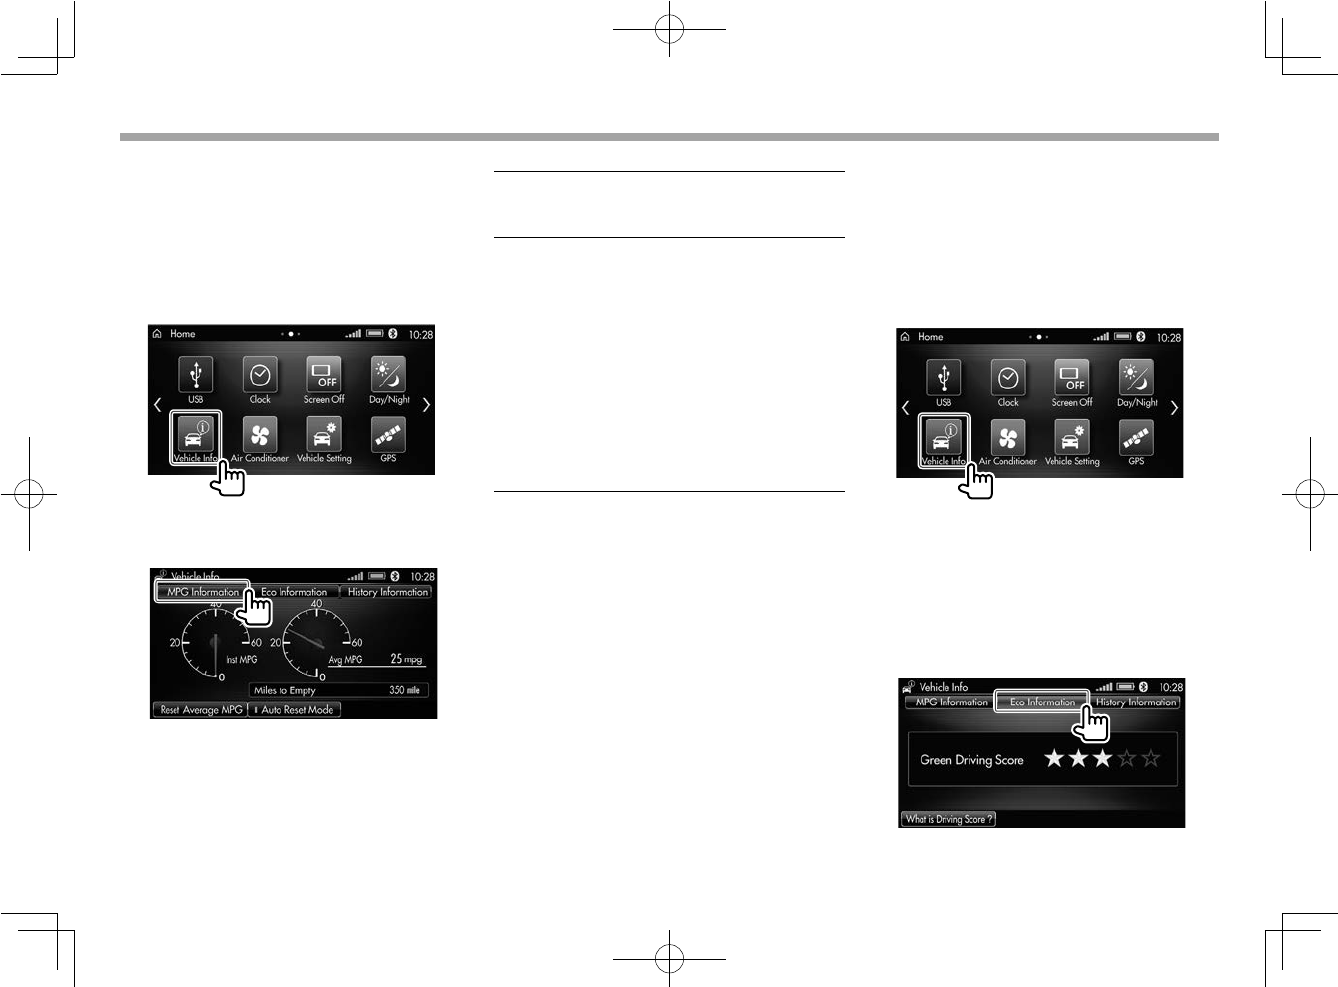
86
Vehicle Information
Vehicle Information
❏For gasoline cars
To monitor fuel consumption—[MPG
Information]
You can check instantaneous fuel consumption
and average consumption.
1 Display the <Vehicle Info> screen.
On the <Home> screen, touch [Vehicle].
2 Display the <MPG Information>
screen.
Function buttons on the screen
[Reset
Average
MPG]
Resets average MPG data on this
screen. When a message window
is displayed, select [Yes].
[Auto Reset
Mode]
Displays the automatic reset mode
screen where you can change the
reset mode setting. Select [Yes] to
use Auto Reset.
• With Auto Reset Mode activated:
The indicator on the button
lights up. MPG is reset when the
power switch has been off for
about 4 hours.
• To manually reset average MPG
data, select [No]—Manual Reset
Mode.
• Auto Reset and Manual Reset are both linked to
settings of the meters.
To monitor your Eco driving level—[Eco
Information]
You can check your Eco driving level—Driving
Score.
• This function is only for the cars equipped with
Idling Stop System.
1 Display the <Vehicle Info> screen.
On the <Home> screen:
2
Display the <Eco Information> screen.
• The screen to be displayed differs among
the car type.
• When operating the buttons on the screen,
consider your car type not to operate
wrong.
• For the car without Idling Stop System:
LinkDisplayAudio_NAS.indb 86LinkDisplayAudio_NAS.indb 86 5/12/16 5:39 PM5/12/16 5:39 PM
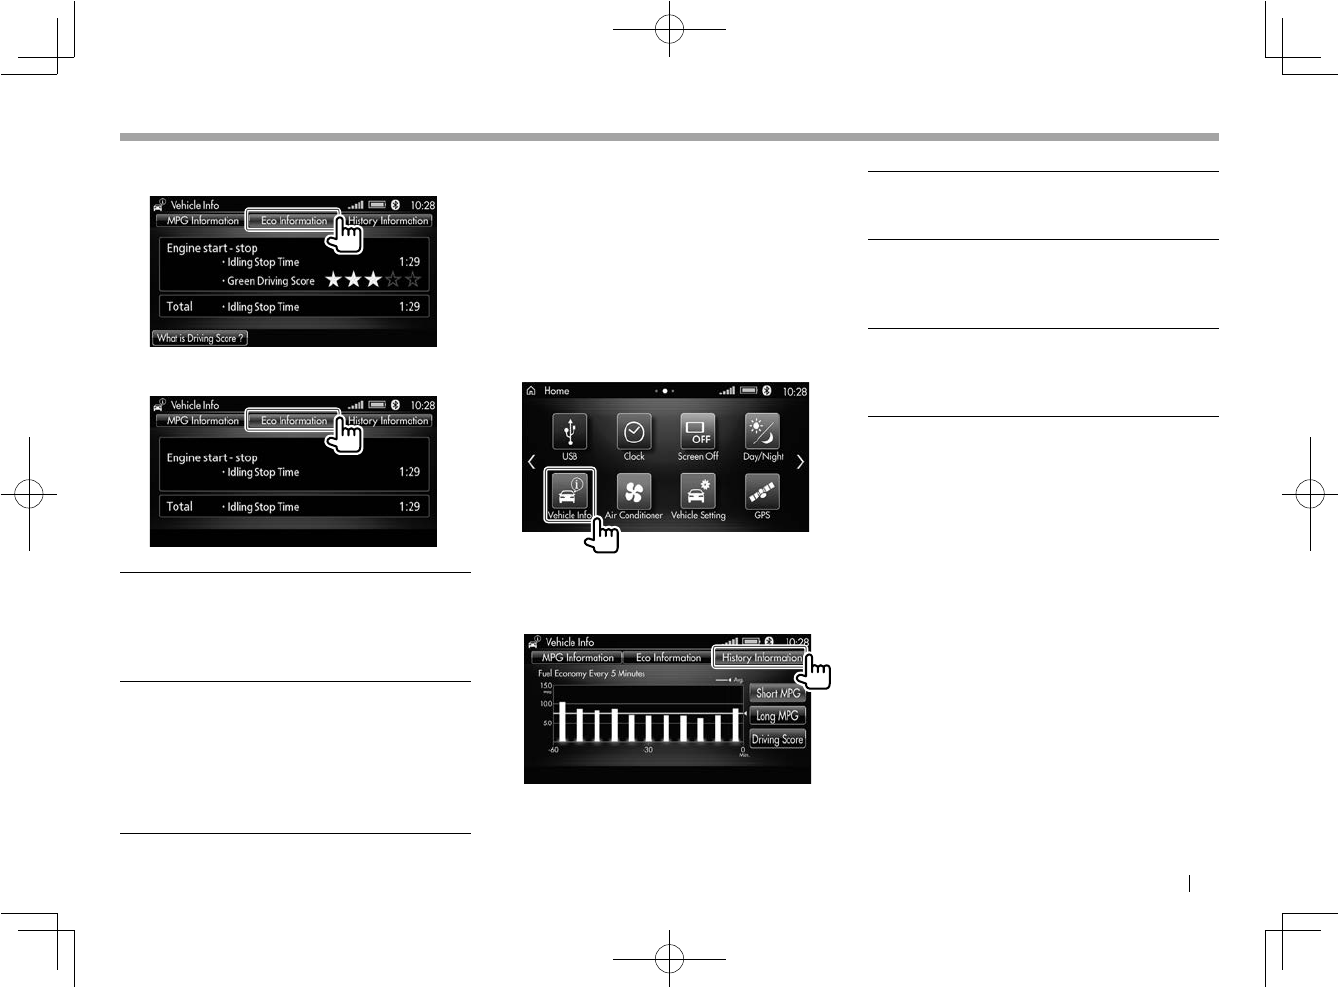
ENGLISH 87
Vehicle Information
Vehicle Information
• For the car with Idling Stop System and
Eco Driving Score:
• For the car only with Idling Stop System:
<
Green Driving
Score
>
You are scored according to
how you step on the accelerator
pedal and brake. The more stars,
the better your driving is for fuel
economy.
<Idling Stop
Time>
• <Engine start-stop>: The
total idling time after the
previous engine-start time to
the current time.
• <Total>: Total time of idling
stop time after the driving
data is reset previously.
• To know about Driving Score, touch [What is
Driving Score?].
To monitor fuel consumption—[History
Information]
You can check the fuel consumption both in a
long term and in a short term, and the history of
your driving scores.
1 Display the <Vehicle Info> screen.
On the <Home> screen, touch [Vehicle].
2 Display the <History Information>
screen.
Function buttons on the screen
[Short MPG] Displays fuel consumption in a
short term every 5 minutes when
the engine is on.
[Long MPG] Displays fuel consumption in a
long term, recorded each time
when the engine is turned on
and off.
[Driving
Score]*
Displays the history of your
driving scores.
• To know about Driving Score,
touch [What is Driving Score?].
* This button is not displayed for the car not equipped with Driving
Score function.
LinkDisplayAudio_NAS.indb 87LinkDisplayAudio_NAS.indb 87 5/12/16 5:39 PM5/12/16 5:39 PM
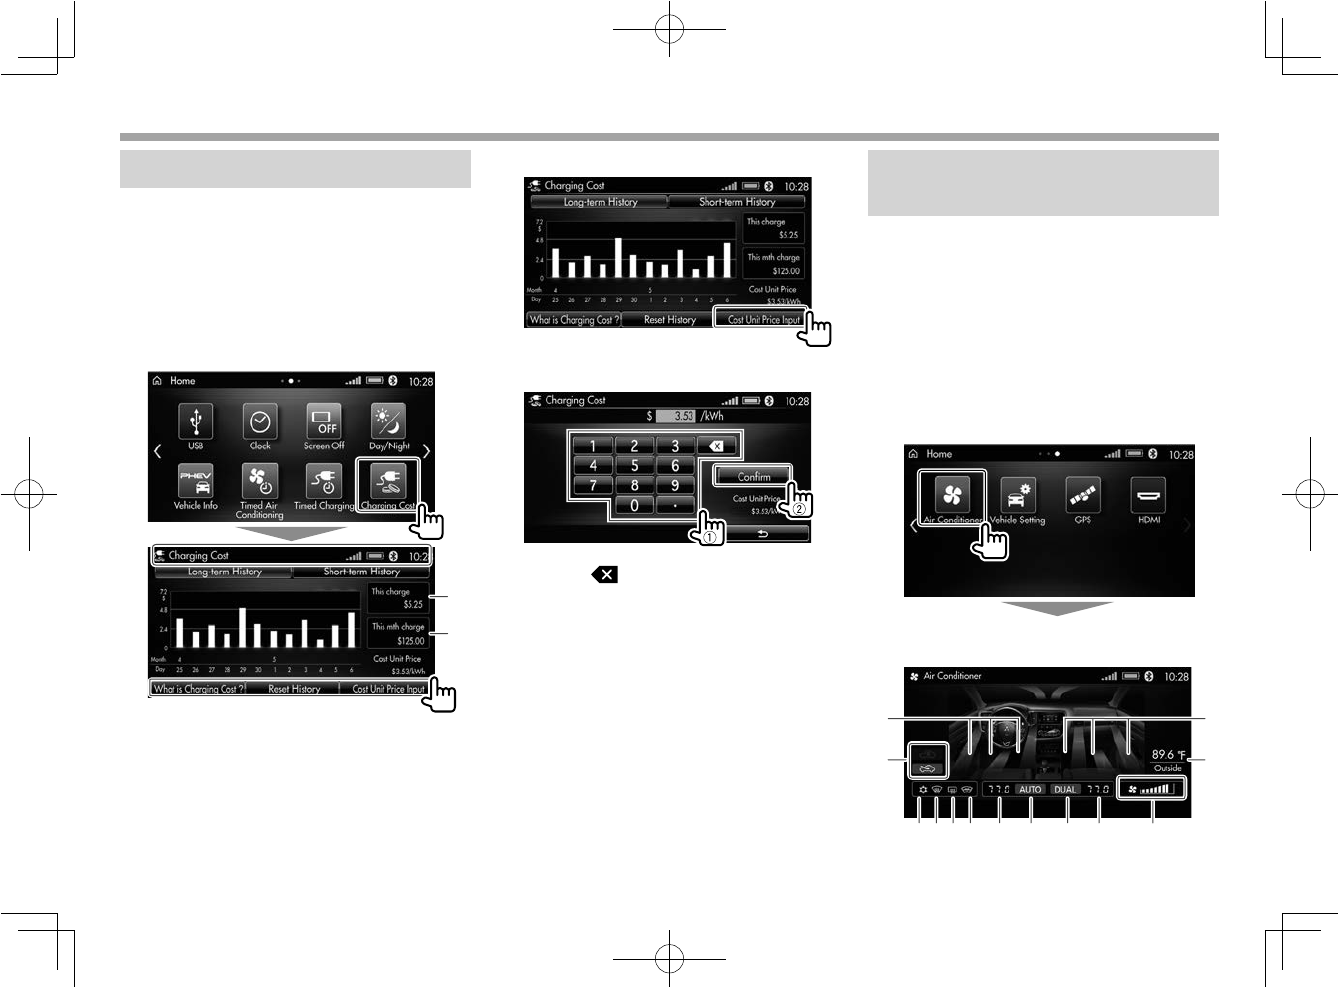
88
Vehicle Information
Vehicle Information
Checking the Charging Cost
You can check the electricity cost used for
charging the battery.
To use this function, you must enter the
electricity unit price first. (See steps 2 and 3.)
• This function is available only for plug-in hybrid
vehicles.
1 Display the <Charging Cost> screen.
On the <Home> screen, touch [Charging Cost].
2
1
1 Cost of the last charging
2 Total charging cost of this month
• Select the [Long-term History] or
[Short-term History] screen.
• To know about Charging Cost, touch [What
is Charging Cost?].
• To reset all history, touch [Reset History].
2 Touch [Cost Unit Price Input].
3 Enter the electricity unit price per kWh.
• Touch [ ] to delete the incorrect entry.
Each time you touch the button, the last
entered number is deleted.
After you enter the price, you can check the
following on the screen.
• On [Long-term History], you can check the
electricity price for the last 12 months by
touching [Cost].
• On [Short-term History], you can check the
electricity cost of each day of the month.
Electricity cost for the last charge and total cost
for the month are also shown.
Checking the Air Conditioner
Information
You can check the current air conditioner settings
and outside temperature, etc.
• This function is not available depending on the
car type.
• When you operate the air conditioner, the
information window appears temporarily on
the monitor screen.
1 Touch [Air Conditioner] on the
<Home> screen.
For the car equipped with dual air
conditioning system:
3 564
2
1
q7 9 p8
w
1
LinkDisplayAudio_NAS.indb 88LinkDisplayAudio_NAS.indb 88 5/12/16 5:39 PM5/12/16 5:39 PM
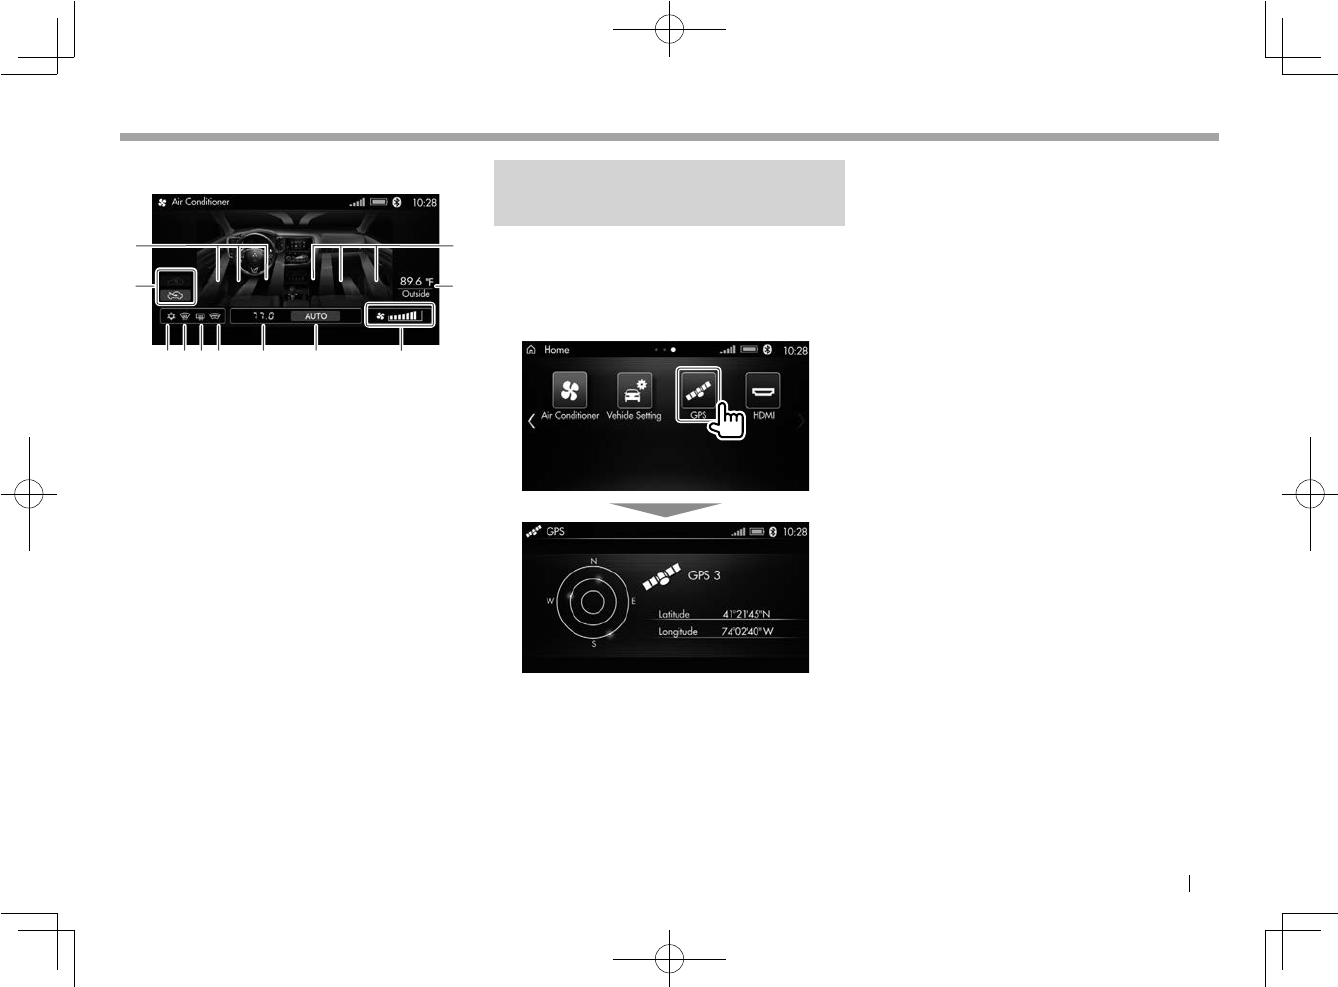
ENGLISH 89
Vehicle Information
Vehicle Information
1 Air outlet indicators
To upper body/to windowshield/to feet
2 Recirculation indicators (internal air
recirculation and external air intake)
3 Air conditioner indicator
Lights up when air conditioner is in use.
4 Front defroster indicator
Lights up when front defroster is in use.
5 Rear defroster indicator
Lights up when rear defroster is in use.
6 Heated windowshield indicator
Lights up when heated windowshield is in use.
7 Temperature set for the left air conditioner
8 AUTO indicator
Lights up when air conditioning system is set
to AUTO.
9 DUAL indicator
Lights up when dual air conditioning system
is in use.
p Temperature set for the right air conditioner
q Wind strength indicators
w Outside temperature
e Temperature set for the air conditioner
Checking the current position
of your car
You can check the current position of your car
and the number of the satellites you are receiving
the signals from.
1 Touch [GPS] on the <Home> screen.
For the car equipped with single air
conditioning system:
3 564
2
qe 8
w
1 1
LinkDisplayAudio_NAS.indb 89LinkDisplayAudio_NAS.indb 89 5/12/16 5:39 PM5/12/16 5:39 PM
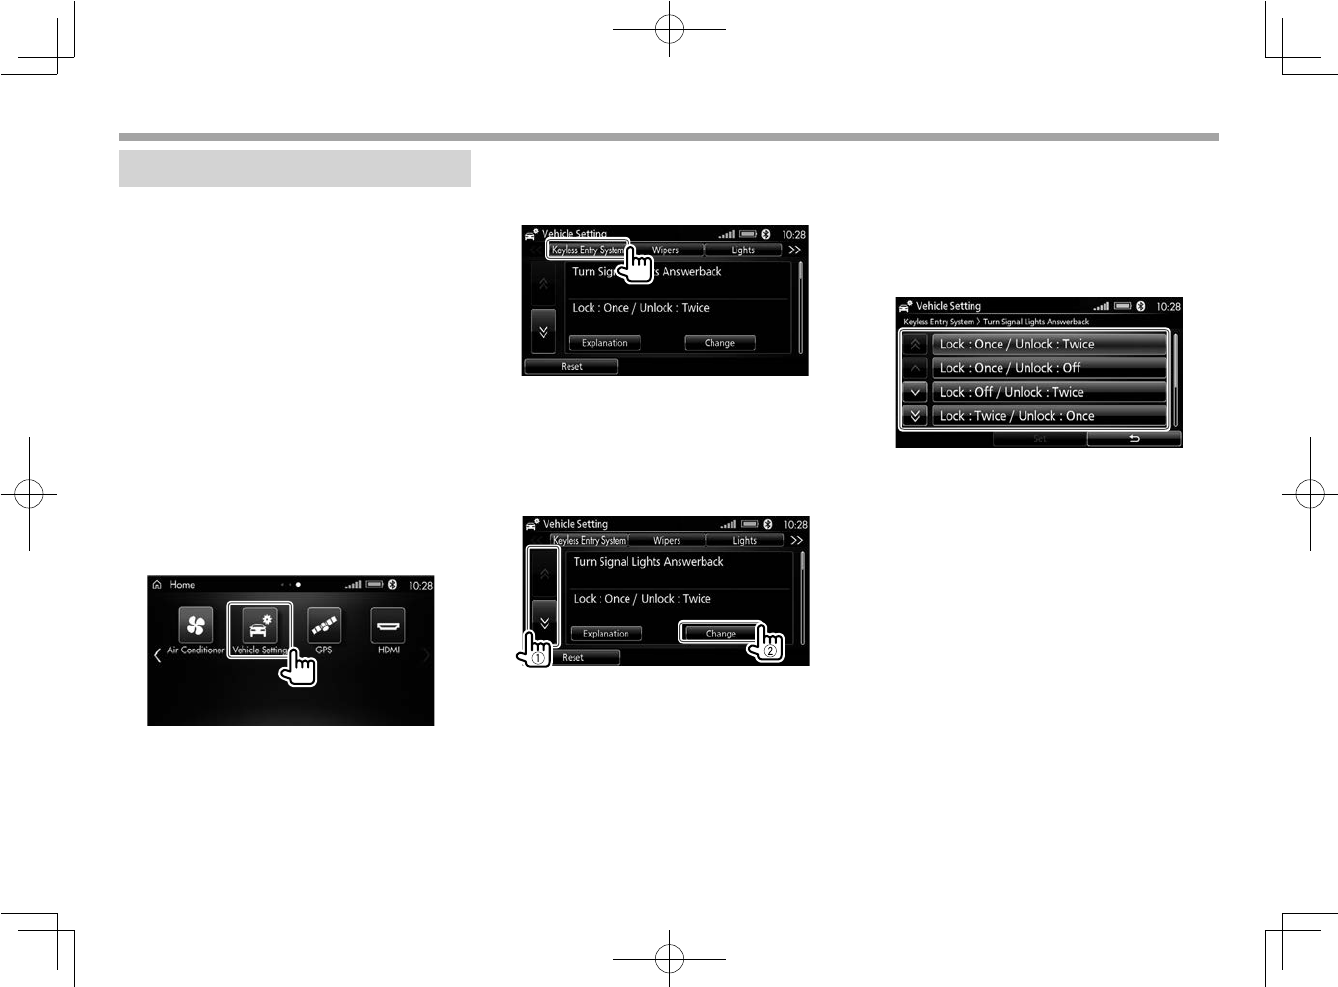
90
Vehicle Settings
Vehicle Settings
Setting vehicle—ETACS
On the <Vehicle Setting> screen, you can set
the following. (Some of the following cannot be
displayed for your car, depending the car type
and the provided equipment.)
• Keyless Entry System or Keyless Operation
(depending on your car type and provided
equipment)
• Wipers
• Lights
• Security Alarm
• Turn Signal
• Door Unlock & Lock
• Air Conditioner
• Others
1 Display the <Vehicle Setting> screen.
On the <Home> screen, touch [Vehicle
Setting].
2 Select the function to set.
• Touch [<<]/[>>] if the function setting tab
you want is not displayed.
The screen shows the menu item name
and its current setting. (Ex.: <Keyless Entry
System> screen)
3 Select the item to change (1), then
display the setting screen (2).
Ex.: To set <Turn Signal Lights
Answerback>
Available functions are displayed on the
screen.
• To know about the function, touch
[Explanation].
• To reset the function, touch [Reset]. A message
window is displayed. Select [Yes].
4 Change the setting as you want on the
setting screen.
Available setting values are displayed on the
screen.
• For details on the available functions for
<Vehicle Setting>, refer to the User Manual
supplied for your car.
LinkDisplayAudio_NAS.indb 90LinkDisplayAudio_NAS.indb 90 5/12/16 5:39 PM5/12/16 5:39 PM

ENGLISH 91
Vehicle Settings
Vehicle Settings
Setting the timers for the air
conditioning
You can preset 5 timers for air conditioning. You
can turn on the air conditioner automatically.
• This function is available only for plug-in hybrid
vehicles equipped with the Mitsubishi Remote
Control.
• You cannot set the timers while driving.
To set the timer
1 Display the <Timed Air
Conditioning> screen.
On the <Home> screen, touch [Timed Air
Conditioning].
2 Display the timer you want to set.
• The currently used air conditioning is
checked on the screen. You can change
the air conditioning type by touching the
button. ([Heater] and [Defroster] are
displayed for the car equipped with the
electric heater.)
• To know about this function, touch [What
is Timed AC?].
• To reset all timers, touch [Reset All]. A
message window is displayed. Select [Yes].
3 Set the timer.
• Select the day of the week, start time, and
timer operating duration.
• To reset the timer, touch [Reset]. A
message window is displayed. Select [Yes].
4 Set the other timers by repeating steps
2 and 3.
To activate the timer
The timer is activated by either the clock built
in this product or the one built in the bluetooth
phone connected. Depending on the timer
settings, the timer may start working at the time
you have not expected.
1 Display the <Timed Air
Conditioning> screen.
On the <Home> screen, touch [Timed Air
Conditioning].
2 Activate the timers you want to use.
• To deactivate the timers, select [Off].
LinkDisplayAudio_NAS.indb 91LinkDisplayAudio_NAS.indb 91 5/12/16 5:39 PM5/12/16 5:39 PM
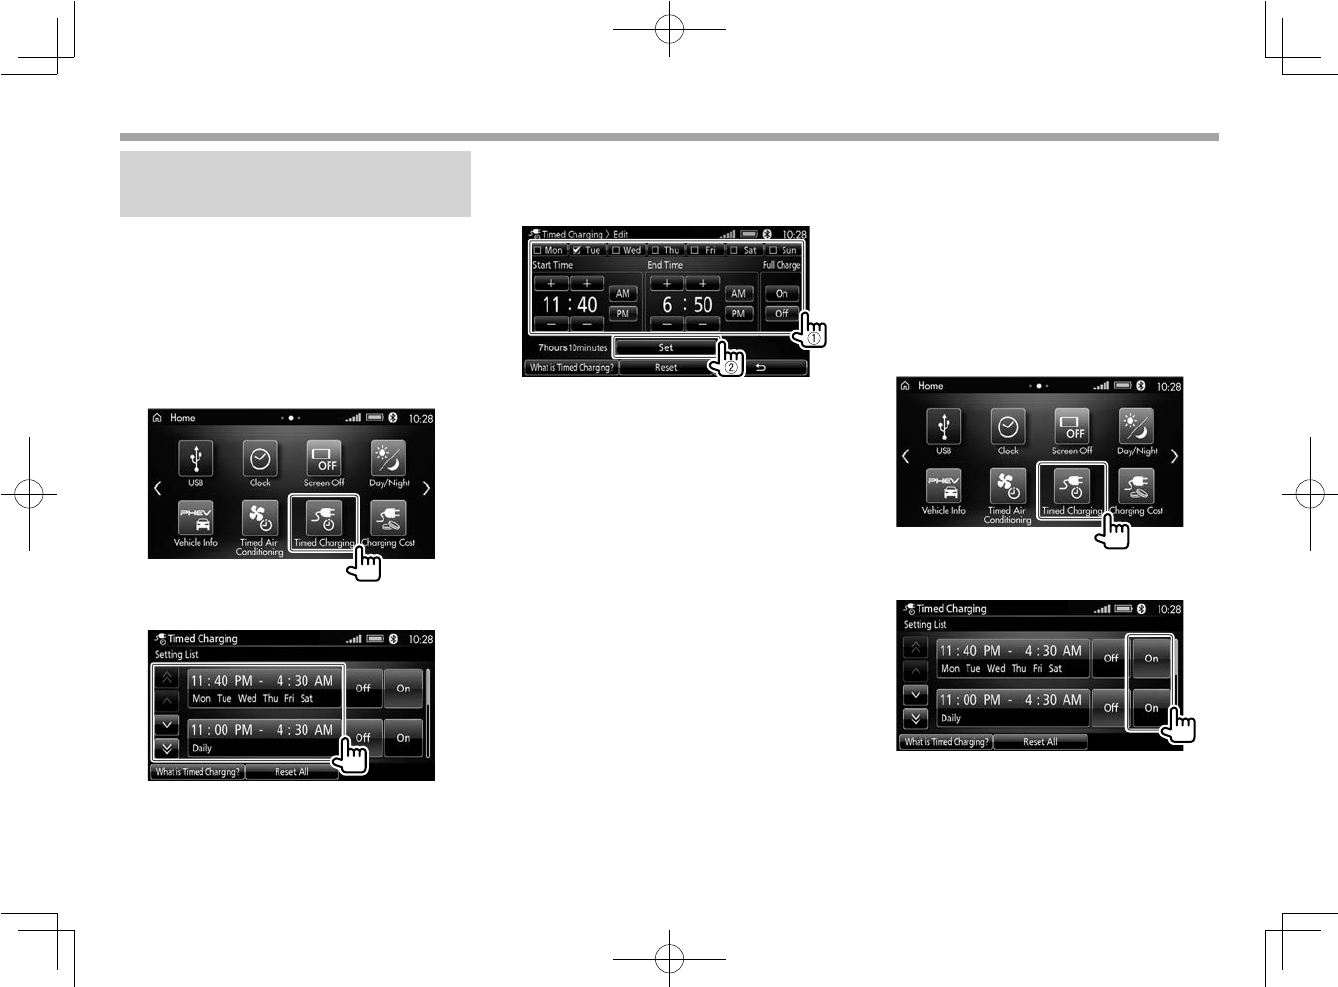
92
Vehicle Settings
Vehicle Settings
Setting the timers for charging
the battery
You can preset 5 timers for charging the battery.
• This function is available only for plug-in hybrid
vehicles equipped with the Mitsubishi Remote
Control.
• You cannot set the timers while driving.
1
Display the <Timed Charging> screen.
On the <Home> screen, touch [Timed
Charging].
2 Display the timer you want to set.
• To know about this function, touch [What
is Timed Charging?].
• To reset all timers, touch [Reset All]. A
message window is displayed. Select [Yes].
3 Set the timer.
• Select the day of the week, start time, and
end time.
• To fully charge the battery, touch [On] for
<Full Charge>. Charging stops only after
fully charged.
• To reset the timer, touch [Reset]. A
message window is displayed. Select [Yes].
4 Set the other timers by repeating steps
2 and 3.
To activate the timer
The timer is activated by either the clock built
in this product or the one built in the bluetooth
phone connected. Depending on the timer
settings, the timer may start working at the time
you have not expected.
1 Display the <Timed Charging>
screen.
On the <Home> screen, touch [Timed
Charging].
2 Activate the timers you want to use.
• To deactivate the timers, select [Off].
LinkDisplayAudio_NAS.indb 92LinkDisplayAudio_NAS.indb 92 5/12/16 5:39 PM5/12/16 5:39 PM

ENGLISH 93
References
References
Maintenance
❏Caution on cleaning the product
Do not use benzine, paint thinners, anti-static
agents, or other chemical wipes. They could
scratch the screen.
Recommended cleaning method:
Gently wipe the screen and monitor panel with a
soft, dry cloth.
❏Moisture condensation
Moisture may condense inside the product in the
following cases:
• After starting the heater in the car.
• If it becomes very humid inside the car.
Should this occur, the product may malfunction.
If it happens, leave the product turned on for a
few hours until the moisture evaporates.
More information
❏ Notes on using Bluetooth devices
• Some Bluetooth devices may not be connected
to this product depending on the Bluetooth
version of the device.
• This product may not work for some Bluetooth
devices.
• Connecting conditions may vary depending on
the environment.
• Avoid using a Bluetooth device if it might affect
driving safety.
❏ Notes on using Android phone
• When you turn on the product, the Android
phone connected to the USB terminal is
charged through the product if it is ready to be
charged.
• Make sure all important data in the Android
phone has been backed up to avoid losing it.
• Avoid using Android phone if it might affect
driving safety.
• For Android phone compatible with this
product, check the Inter Operability List:
<http://www.iopinfo-sda.mitsubishi-motors.
com/cs/bt/index.php>.
❏ Notes on playing iPod/iPhone
• The following iPod/iPhone can be connected to
this product:
– You can also check updated information
about iPhone models compatible with this
product. Check the Inter Operability List:
<http://www.iopinfo-sda.mitsubishi-motors.
com/cs/bt/index.php>.
Made for
– iPod classic
– iPod nano (7th Generation)
– iPod nano (6th Generation)
– iPod nano (5th Generation)
– iPod nano (4th Generation)
– iPod nano (3rd Generation)
– iPod nano (2nd Generation)
– iPod touch (6th Generation)
– iPod touch (5th Generation)
– iPod touch (4th Generation)
– iPod touch (3rd Generation)
– iPod touch (2nd Generation)
– iPod touch (1st Generation)
– iPhone 6s Plus
– iPhone 6s
– iPhone 6 Plus
– iPhone 6
– iPhone 5s
– iPhone 5c
– iPhone 5
– iPhone 4s
– iPhone 4
– iPhone 3GS
– iPhone 3G
• For some iPod/iPhone models, the
performance may be abnormal or unstable
during operation. If it happens, disconnect
iPod/iPhone, then check its condition.
If the performance is not improved or slow,
reset your iPod/iPhone.
• When you turn on the product, iPod/iPhone
connected to the USB terminal is charged
through the product.
• The text information may not be displayed
correctly.
• Make sure all important data has been backed
up to avoid losing it.
• Avoid using iPhone/iPod if it might affect
driving safety.
LinkDisplayAudio_NAS.indb 93LinkDisplayAudio_NAS.indb 93 5/12/16 5:39 PM5/12/16 5:39 PM

94
References
References
❏ USB playback
Playable files on a USB device
• This product can play MP3/WMA/AAC/FLAC/
Vorbis/WAV files stored in a USB mass storage
class device.
• Make sure all important data has been backed
up to avoid losing it.
Notes on creating audio files (MP3/WMA/AAC/
FLAC/Vorbis/WAV)
• This product can play back files with the
extension code <.mp3>, <.wma>, <.m4a>,
<.flac>, <.fla>, <.ogg>, or <.wav> (regardless of
the letter case—upper/lower).
• This product can play back files that meet the
conditions below:
– Bit rate:
MP3/WMA/AAC: 8 kbps – 320 kbps
WAV: 128 kbps – 1 411.2 kbps
– Sampling frequency:
MP3/WMA/AAC/Vorbis: 16 kHz – 48 kHz
FLAC/WAV: 16 kHz – 88.2 kHz
• This product can show ID3 Tag Version
1.0/1.1/2.2/2.3/2.4 (for MP3).
• This product can also show WMA/AAC/Vorbis
Comment/RIFF LIST Tag.
• This product can play back MP3/AAC/Vorbis
files recorded in VBR (variable bit rate).
• Files recorded in VBR have a discrepancy in
elapsed time indication.
• This product cannot play back the following
files:
– MP3 files encoded with MP3i or MP3 PRO
format.
– MP3 files encoded with Layer 1/2.
– WMA files encoded with lossless,
professional, or voice format.
– WMA files which are not based upon
Windows Media® Audio.
– WMA/AAC files copy-protected with DRM.
– AAC files encoded using any other
application than iTunes.
– AAC files copy-protected with FairPlay
(except those stored on iPod).
– Files which have data such as AIFF, ATRAC3,
etc.
Notes on using a USB device:
• This product may not play back files in a USB
device properly when using a USB extension
cable.
• USB devices equipped with special functions
such as data security functions cannot be used
with the product.
• Do not use a USB memory which has been
divided into 2 or more partitions.
• Depending on the shape of the USB device and
connection port, some USB devices may not be
attached properly or the connection might be
loose.
• This product may not recognize a memory card
inserted into the USB card reader.
• When connecting with a USB cable, use a USB
2.0 cable.
• Maximum number of characters (when the
characters are 1 byte):
– Folder names: 255 characters
– File names: 255 characters including file
extension
• Avoid using a USB device if it might affect
driving safety.
• Do not pull out and connect the USB device
repeatedly while “Checking the file...” is shown
on the screen.
• Electrostatic shock at connecting a USB device
may cause abnormal playback of the device. If
this happens, disconnect the USB device then
reset this product and the USB device (if it can
be reset).
• Operation and power supply may not work as
intended for some USB devices.
• Do not leave a USB device in the car, or expose
it to direct sunlight or high temperatures
to prevent deformation and damage to the
device.
❏ Notes on listening to HD Radio
stations (for USA and Mexico)
• Though the HD Radio reception mode to
set to digital reception, it changes to analog
reception automatically when “Live” broadcast
starts.
LinkDisplayAudio_NAS.indb 94LinkDisplayAudio_NAS.indb 94 5/12/16 5:39 PM5/12/16 5:39 PM
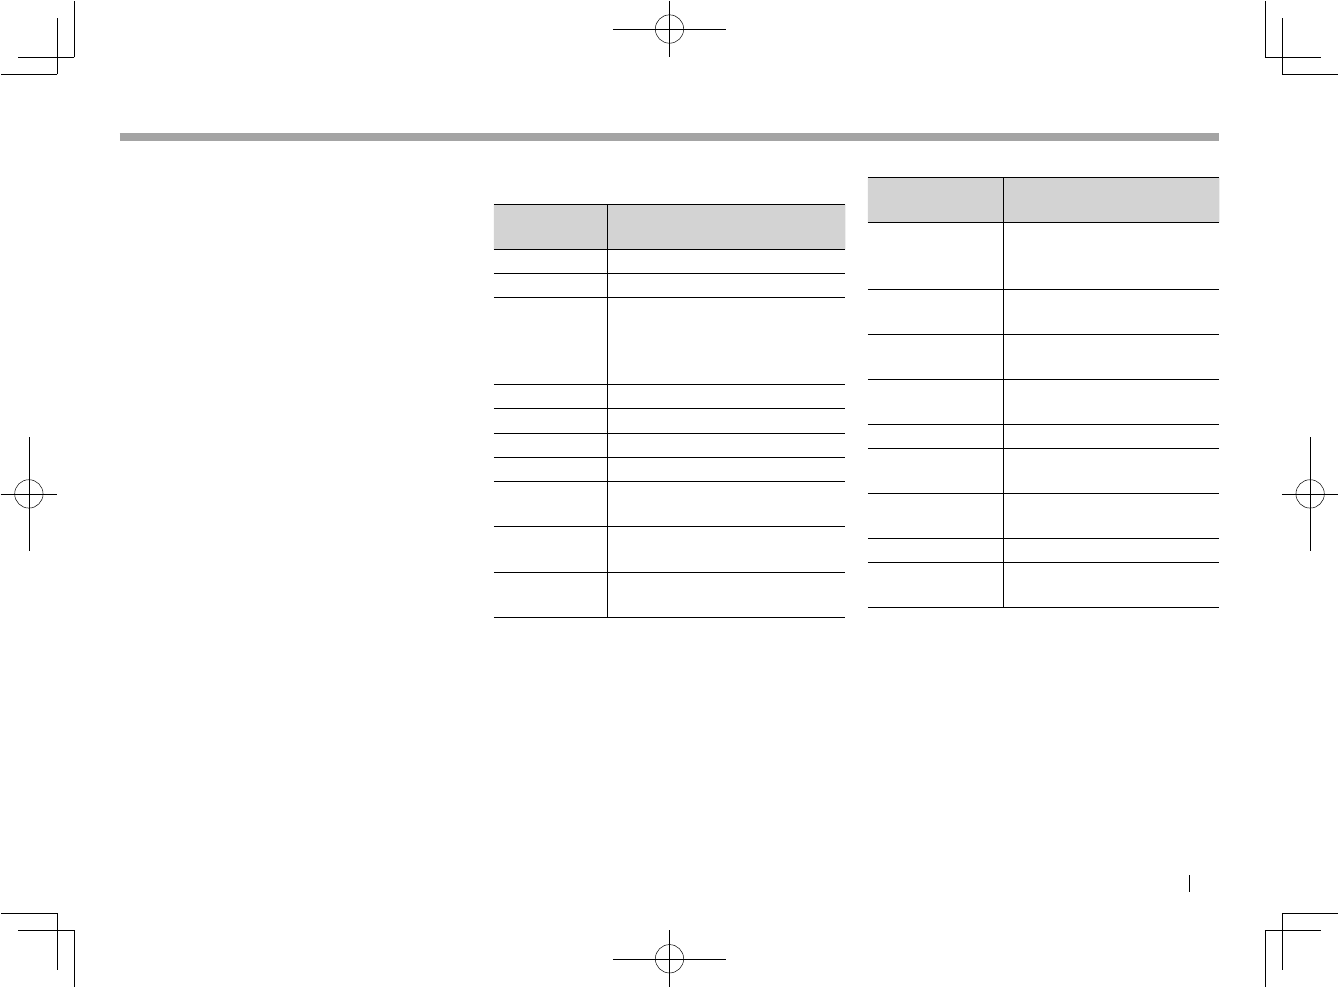
ENGLISH 95
References
References
• When you seek up the channels, all the
channels (both main channels and sub-
channels are scanned). However, when you
seek down, only main channels are scanned
(except currently received channel).
❏ Notes on listening to SiriusXM
(for USA and Canada)
• After turning on this product, you cannot use
TuneMix until this product receives the related
signals.
• You cannot use TuneScan in the following cases:
– When the beginning of a song is not
recorded.
– When a song is recorded less than 45 seconds.
– When a song has been played for 30 seconds.
❏Notes on using voice control
When using voice control, be aware of the
following to make voice recognition easier and to
avoid recognition mistakes.
• Speak clearly at a normal speed (not too fast
and not too slow) and normal volume (not too
loudly and not too quietly).
• Speak the voice commands only.
• Close the windows before speaking the
commands.
• Only one person should speak at a time.
• Avoid using voice control when driving with
ambient noise—through a tunnel, or driving
with chains on the tires, etc.
• Make sure that the air flow from the air
conditioner or heater is not too strong.
❏ Voice command list
To switch the source
Voice
commands
Operations
Audio On Turns on the audio source.
Audio Off Turns off the audio source.
Source List Announces the source names.
Once all source names are
announced, returns to the
previous screen.
AM Switches to the <AM> source.
FM Switches to the <FM> source.
iPod Switches to the <iPod> source.
USB Switches to the <USB> source.
Bluetooth
Audio
Switches to the <Bluetooth
Audio> source.
SiriusXM*1Switches to the <SiriusXM>
source.
HDMI*2Switches to the <HDMI>
source.
*1 SiriusXM is only for USA and Canada.
*2 This feature is available only for cars equipped with HDMI input
terminal and HDMI device is connected.
Tuner operations
Voice
commands
Operations
Seek Up Tunes in to the available
station of higher
frequencies.
Seek Down Tunes in to the available
station of lower frequencies.
Tune Up Increases the tuner
frequency.
Tune Down Decreases the tuner
frequency.
Scan/Scan On Starts frequency scan.
Direct Tune Displays the direct
frequency entry screen.
Direct Tune XX.X
(frequency)
Tunes in to the specified
frequency.
Station List Displays the station list.
Preset List Displays the preset station
list.
Continued on the next page...
LinkDisplayAudio_NAS.indb 95LinkDisplayAudio_NAS.indb 95 5/12/16 5:39 PM5/12/16 5:39 PM
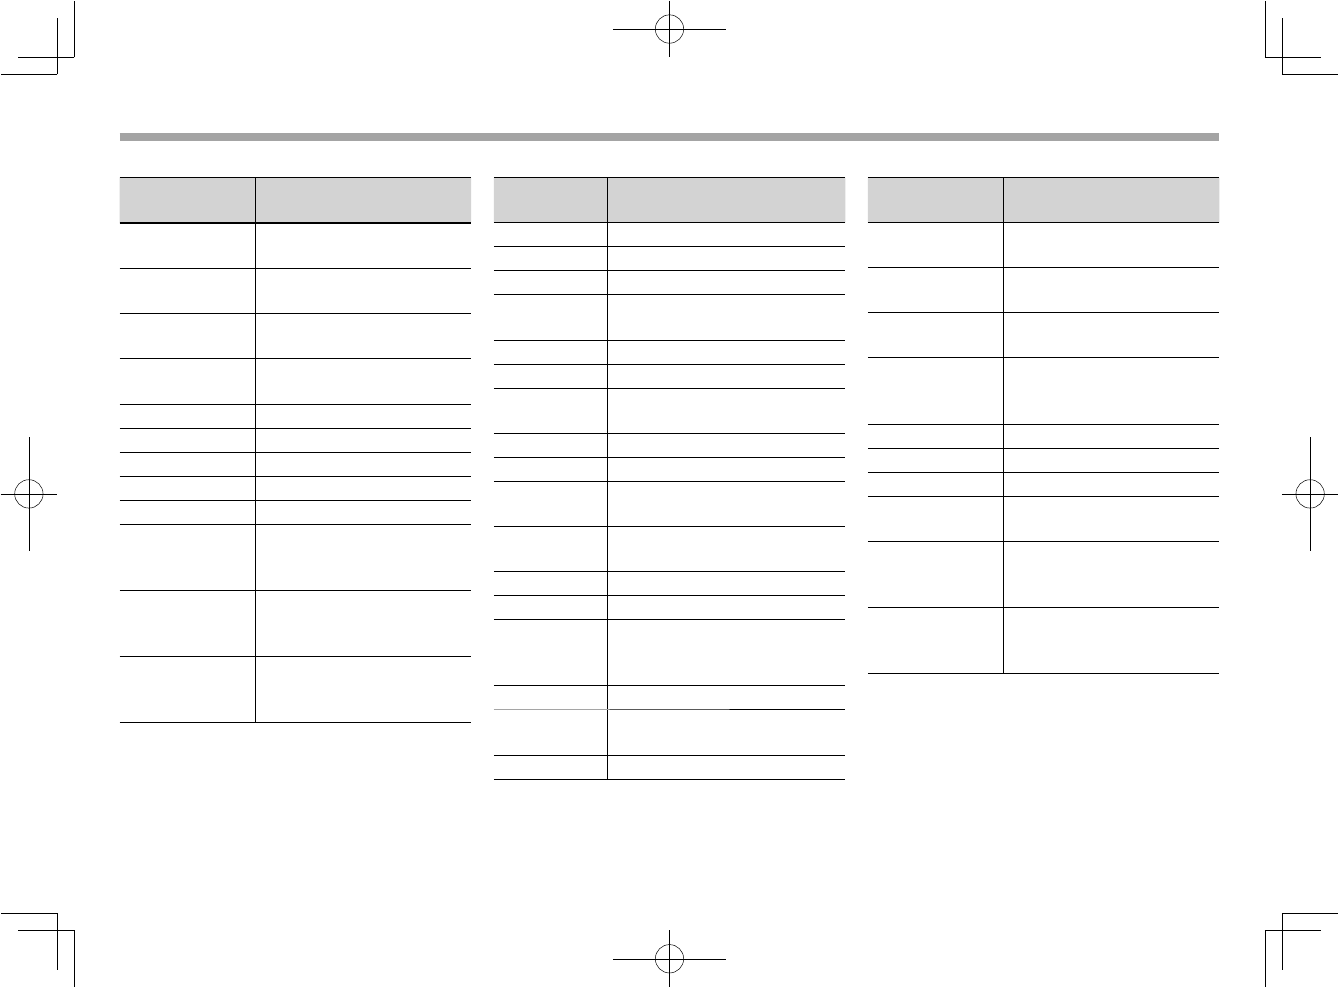
96
References
References
SiriusXM operations (Only for USA and Canada)
Voice
commands
Operations
Channel Up Increases the channel
numbers.
Channel Down Decreases the channel
numbers.
Direct Channel Displays the direct channel
entry screen.
Direct channel
XXX
Tunes in to the specified
channel.
Scan/Scan On Starts Channel Scan.
TuneScan Starts TuneScan.
Channel Starts channel scan.
TuneMix Starts TuneMix.
TuneMix Off Stops TuneMix.
Favorite Register either the currently
playing artist or song into
the list for Artist/Song Alert.
Favorite Song Register the current playing
song into the list for Song
Alert.
Favorite Artist Register the current playing
artist into the list for Artist
Alert.
Playback operations
Voice
commands
Operations
Track Up Plays the next track.
Track Down Plays the previous track.
Folder Up*1Skips to the next folder.
Folder
Down*1
Skips to the previous folder.
Shuffle Activates the shuffle mode.
Shuffle Off Deactivates the shuffle mode.
Repeat Displays the repeat mode
selecting screen.
Repeat On*2Activates the repeat mode.
Repeat Track Repeats the current track.
Repeat
Category*3
Repeats all tracks in the current
category.
Repeat
Folder*1
Repeats all tracks in the current
folder.
Repeat Off*3Deactivates the repeat mode.
Repeat All*1*2Repeats all tracks in the device.
Scan*1 *2For USB: Select “All” or “Folder.”
For Bluetooth Audio: Scan
starts.
Scan On*2Starts the track scan.
Scan Folder*1Scans all the tracks in the
current folder.
Scan All*1Scans all tracks in the device.
*1 Available only for USB device operations.
*2 Available only for Bluetooth audio device operations.
*3 Available only for iPod/iPhone operations.
Phone operations
Voice
commands
Operations
Address Book Displays the <Address Book
List> screen.
Address Book
XXXX (name)
Calls the specified contact in
the address book.
Phone Number Displays the phone number
entry screen.
Phone Number
XXXX-XXXX-
XXXX (number)
Calls the specified phone
number.
Redial Displays the call history.
Redial Incoming Displays the incoming calls.
Redial Outgoing Displays the outgoing calls.
Mute Mutes the microphone
volume.
Call Mode Switches the talking method
between hands-free mode
and phone mode.
Waiting Hold the current call when
receiving another incoming
call while talking.
LinkDisplayAudio_NAS.indb 96LinkDisplayAudio_NAS.indb 96 5/12/16 5:39 PM5/12/16 5:39 PM
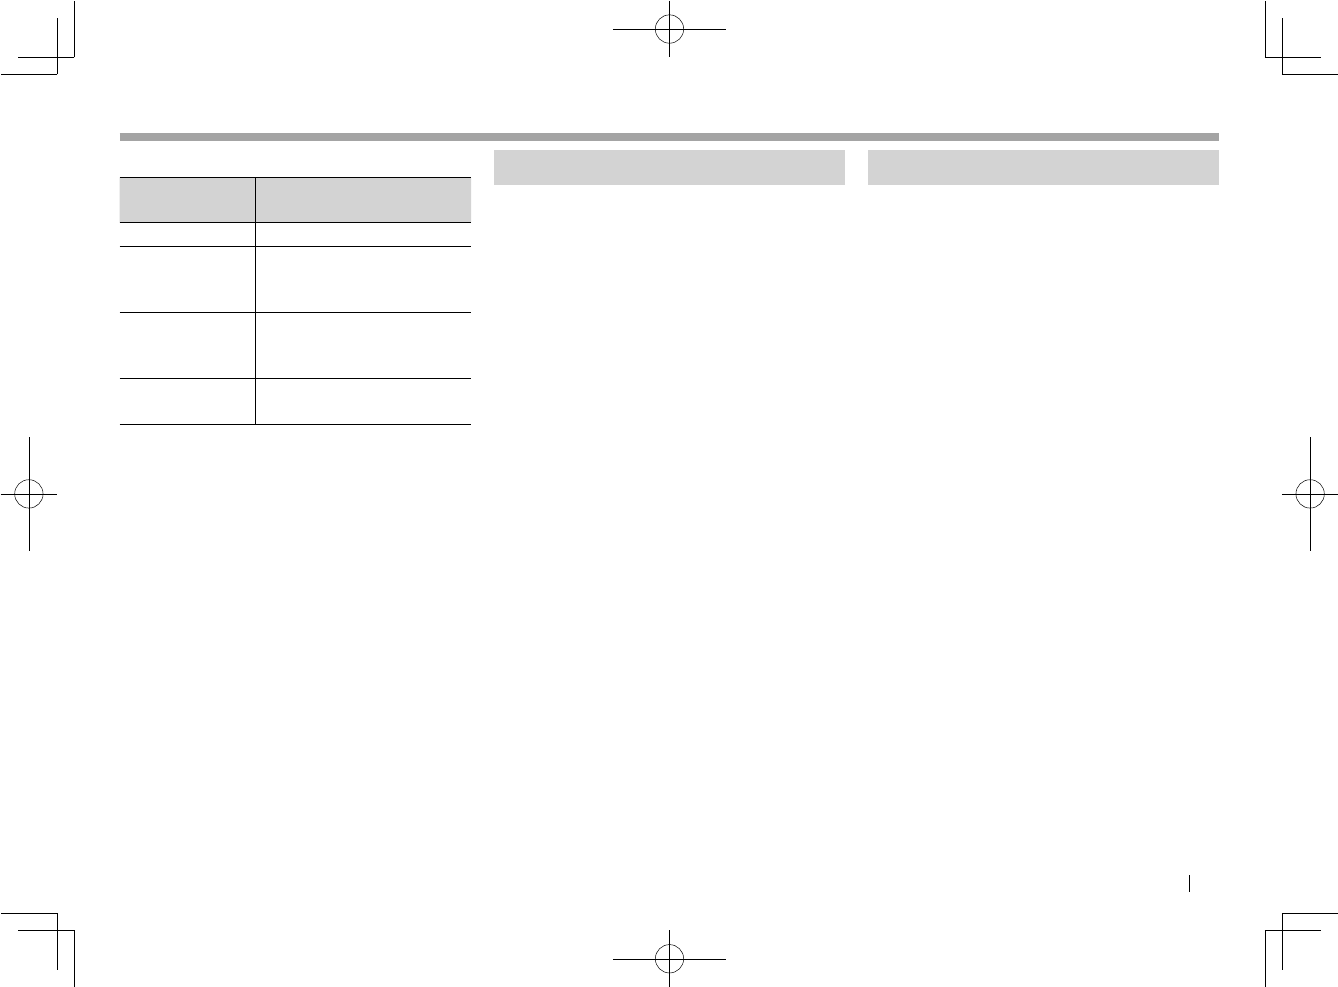
ENGLISH 97
References
References
<Settings> screen operations
Voice
commands
Operations
Settings Displays the setting items.
Settings Select
Phone
Selects the registered
Bluetooth mobile phone to
connect.
Settings Select
Bluetooth Audio
Selects the registered
Bluetooth audio device to
connect.
Settings Phone
Lock
Activates/deactivates the
mobile phone security.
Error message list
If an error occurs while using the product, a
message is displayed. Take appropriate action
according to the following message/remedy/
cause list.
“An error has occurred in the connection
to the vehicle. Contact your dealer for
inspection.”
• A connection error between the product and
the vehicle is detected. Contact your Mitsubishi
Motors Dealer.
“An error has occurred with the GPS antenna.
Contact your dealer for inspection.”
• The GPS antenna is not connected or the
connection is loose. Contact your Mitsubishi
Motors Dealer.
“The microphone has a bad connection.
Contact your dealer for inspection.”
• No microphone is connected or the connection
is loose. Contact your Mitsubishi Motors Dealer.
Troubleshooting
What appears to be trouble is not always serious.
Check the following points before calling your
Mitsubishi Motors Dealer.
• For operations with the external components,
refer also to the instructions supplied with
the adapters used for connection (as well as
the instructions supplied with the external
components).
❏General
No sound comes out of the speakers.
• Adjust the volume to the optimum level.
The screen blanks.
• Turn on the screen. (Page 22)
The product does not work properly.
• Switch the power switch (or ignition) of the car
off then on. If this does not work, contact your
Mitsubishi Motors Dealer.
❏Bluetooth connection
The Bluetooth device does not detect the
product.
• Turn off, then turn on the Bluetooth device.
• Turn off, then turn on the product.
LinkDisplayAudio_NAS.indb 97LinkDisplayAudio_NAS.indb 97 5/12/16 5:39 PM5/12/16 5:39 PM

98
References
References
The product does not pair with the Bluetooth
device.
• When the device is connected via cable,
disconnect it.
• Turn off, then turn on the Bluetooth device.
• When the connected Bluetooth device is used
for Android Auto, pairing is not allowed.
The device is disconnected automatically or
the device cannot be connected.
• When iPhone compatible with CarPlay is
connected to the USB input terminal, it cannot
be connected via Bluetooth. Use the phone and
audio player function on the CarPlay screen.
(Page 25)
• When an Android phone compatible with
Android Auto is connected to the USB input
terminal, the device is connected via Bluetooth
automatically, and the Bluetooth mobile phone
currently connected is disconnected.
You forgot the passkey for the Bluetooth
registration.
• Check the passkey on the <Unit Bluetooth
Details> screen. (Page 18)
❏Apps (Apple CarPlay/Android Auto)
[Apple CarPlay] or [Android Auto] is not
displayed on the <Home> screen.
• Check the connected device is compatible with
CarPlay or Android Auto. (Pages 25 and 27)
• When iPhone is connected, check whether the
cable is certified by Apple Inc.
• Disconnect the device, then connect it again.
• Check restriction function is activated for the
connected iPhone.
App (such as map) does not work correctly.
• You cannot use some Apps when reception
status of the connected device is poor. This is
not a malfunction of the product.
❏Phone
Phone sound quality is poor.
• Reduce the distance between the product and
the Bluetooth mobile phone.
• Move the car to a place where you can get a
better signal reception.
❏iPod/iPhone
No sound comes out of the speakers.
• Disconnect iPod/iPhone from the USB input
terminal, then connect it again.
• Select another source, then select [iPod] again.
iPod/iPhone does not turn on or does not
work.
• Check the connecting cable and its connection.
• Update the firmware version.
• Charge the battery.
• Reset iPod/iPhone.
Sound is distorted.
• Deactivate the equalizer on iPod/iPhone and
select [Normal] for <Music Type>. (Page 74)
A lot of noise is generated.
• Turn off (uncheck) “VoiceOver” on iPod/iPhone.
For details, visit <http://www.apple.com>.
No operations are available when playing
back a track containing artwork.
• Operate the product after the artwork has been
displayed.
❏USB
“Checking the file...” does not disappear from
the screen.
• Disconnect then connect the USB device.
While playing a track, sound is sometimes
interrupted.
• The files have not been properly recorded into
the USB device. Record the files again, and try
again.
Tracks are not played back as you have
intended them to play.
• The playback order may differ depending on
the USB device.
LinkDisplayAudio_NAS.indb 98LinkDisplayAudio_NAS.indb 98 5/12/16 5:39 PM5/12/16 5:39 PM
ENGLISH 99
References
RFM/AM
Static noise while listening to the radio.
• The antenna may not be connected or the
connection may be loose. Contact your
Mitsubishi Motors Dealer.
Digital reception is canceled.
• When digital reception becomes poor, the
reception automatically changes to analog
reception.
• When a “Live” broadcast starts, digital reception
automatically changes to analog reception.
RSiriusXM
No channel can be received.
• The antenna may not be connected or the
connection may be loose. Contact your
Mitsubishi Motors Dealer.
RBluetooth audio
The connected audio player cannot be
controlled.
• Check whether the connected audio player
supports AVRCP (Audio Video Remote Control
Profile).
The sound is interrupted or skipped while
using a Bluetooth audio player.
• Reduce the distance between the product and
the Bluetooth audio player.
• Disconnect the device connected for Bluetooth
phone.
• Turn off, then turn on the product.
– When the sound is not yet restored, connect
the player again.
RHDMI
Only for the car equipped with the HDMI input
terminal:
No video is shown on the screen.
• While driving, no video is shown. You can only
listen to the sounds.
• Disconnect then connect the HDMI device.
• Turn on the HDMI device.
• Connect the HDMI device correctly.
Specifications
RMonitor section
Picture Size 6.95 inches (diagonal) wide
156.6 mm (H) × 81.6 mm (V)
Display System Transparent TN LCD panel
Drive System TFT active matrix system
Number of Pixels 1 152 000 (800H × 480V × RGB)
Pixel Arrangement
RGB striped arrangement
Back Lighting LED
RBluetooth section
Technology Bluetooth 3.0 + EDR
Frequency 2.402 GHz to 2.480 GHz
Output Power +4 dBm (MAX), 0 dBm (AVE),
Power Class 2
Maximum Communication Range
Line of sight approx. 10 m
Audio Codec SBC/AAC/MP3
Profile Object Push Profile (OPP)
HFP (Hands-Free Profile)
PBAP (Phone Book Access
Profile)
A2DP (Advanced Audio
Distribution Profile)
AVRCP (Audio/Video Remote
Control Profile)
LinkDisplayAudio_NAS.indb 99 5/12/16 5:39 PM
+1dBm ± 1dB (AVE)
100
References
RUSB interface section
USB Standard USB 2.0 High Speed
File System FAT 16/32
Maximum Power Supply Current
DC 5 V 1 A
D/A Converter 24 bit
Audio Decoder MP3/WMA/AAC/FLAC/Vorbis/
WAV
RFM tuner section
Frequency Range (200 kHz)
87.75 MHz to 107.9 MHz
Usable Sensitivity (S/N: 26 dB)
Digital: –90 dBm
Analog: 6.2 dBf (0.56 μV/75 Ω)
RAM tuner section
Frequency Range (10 kHz)
530 kHz to 1 710 kHz
Usable Sensitivity
Digital: –99 dBm
Analog: 25 dBμ
RSiriusXM tuner section
Frequency Range
2333.465 MHz to 2344.045 MHz
Dynamic Range
Satellite 1.2: –94.0 dBm
Terrestrial –90.0 dBm
RHDMI interface section
Connector Type TYPE-E
HDMI Standard HDMI 1.4
RAudio section
Maximum Power (Front & Rear)
35 W × 4 (at 14.4 V)
Power Output Full Bandwidth Power
(at less than 1%THD)
24 W × 4
External Audio Max Input Level
1 Vrms/100 kΩ
Speaker Impedance
4 Ω
RGeneral
Operating Voltage
13.2 V (10 V to 16 V allowable)
Maximum Current Consumption
10 A
Installation Dimensions (W × H × D)
209.5 mm × 108.0 mm ×
158.2 mm
Operational Temperature Range
–30°C to +70°C
Weight 1.85 kg
Design and specifications are subject to change
without notice.
LinkDisplayAudio_NAS.indb 100 5/12/16 5:39 PM
1.92

ENGLISH 101
References
References
Trademarks and licenses
• THIS PRODUCT IS LICENSED UNDER THE
VC-1 PATENT PORTFOLIO LICENSE FOR THE
PERSONAL AND NON-COMMERCIAL USE
OF A CONSUMER TO (i) ENCODE VIDEO IN
COMPLIANCE WITH THE VC-1 STANDARD (“VC-1
VIDEO”) AND/OR (ii) DECODE VC-1 VIDEO THAT
WAS ENCODED BY A CONSUMER ENGAGED
IN A PERSONAL AND NON-COMMERCIAL
ACTIVITY AND/OR WAS OBTAINED FROM A
VIDEO PROVIDER LICENSED TO PROVIDE VC-1
VIDEO. NO LICENSE IS GRANTED OR SHALL BE
IMPLIED FOR ANY OTHER USE. ADDITIONAL
INFORMATION MAY BE OBTAINED FROM MPEG
LA, L.L.C. SEE HTTP://WWW.MPEGLA.COM
• The “AAC” logo is a trademark of Dolby
Laboratories.
• Microsoft and Windows Media are either
registered trademarks or trademarks of
Microsoft Corporation in the United States and/
or other countries.
• “PremiDIA HD” and “PremiDIA WIDE” are
trademarks of Mitsubishi Electric Corporation.
Trademarks are pending in someregions.
• Manufactured under license from Dolby
Laboratories. Dolby and the double-D symbol
are trademarks of Dolby Laboratories.
• Manufactured under license from DTS
Licensing Limited. DTS, the Symbol, & DTS and
the Symbol together are registered trademarks
& DTS Neural Surround is a trademark of DTS,
Inc. Product includes software. © DTS, Inc. All
Rights Reserved.
• “Made for iPod,” and “Made for iPhone”
mean that an electronic accessory has been
designed to connect specifically to iPod, or
iPhone, respectively, and has been certified
by the developer to meet Apple performance
standards. Apple is not responsible for the
operation of this device or its compliance
with safety and regulatory standards. Please
note that the use of this accessory with iPod,
or iPhone may affect wireless performance.
iPhone, iPod, iPod classic, iPod nano, and iPod
touch are trademarks of Apple Inc., registered
in the U.S. and other countries.
• Lightning is a trademark of Apple Inc.
• Apple, Siri, Apple CarPlay and Apple CarPlay
logo are trademarks of Apple Inc., registered in
the U.S. and other countries.
• Android, Android Auto, and other marks are
trademarks of Google Inc.
• The Bluetooth® word mark and logos are
registered trademarks owned by Bluetooth
SIG, Inc. and any use of such marks by
JVC KENWOOD Corporation is under license.
Other trademarks and trade names are those of
their respective owners.
• The terms HDMI and HDMI High-Definition
Multimedia Interface, and the HDMI logo are
trademarks or registered trademarks of HDMI
Licensing LLC in the United States and other
countries.
• HD Radio Technology manufactured under
license from iBiquity Digital Corporation. U.S.
and Foreign Patents. HD Radio™ and the HD,
HD Radio, and “Arc” logos are proprietary
trademarks of iBiquity Digital Corp.
• Sirius, XM and all related marks and logos are
trademarks of Sirius XM Radio Inc. All right
reserved.
LinkDisplayAudio_NAS.indb 101LinkDisplayAudio_NAS.indb 101 5/12/16 5:39 PM5/12/16 5:39 PM

102
References
References
• libogg
Copyright (c) 2002, Xiph.org Foundation
Redistribution and use in source and binary
forms, with or without modification, are
permitted provided that the following
conditions are met:
– Redistributions of source code must retain
the above copyright notice, this list of
conditions and the following disclaimer.
– Redistributions in binary form must
reproduce the above copyright notice, this
list of conditions and the following disclaimer
in the documentation and/or other materials
provided with the distribution.
– Neither the name of the Xiph.org Foundation
nor the names of its contributors may be
used to endorse or promote products derived
from this software without specific prior
written permission.
THIS SOFTWARE IS PROVIDED BY THE
COPYRIGHT HOLDERS AND CONTRIBUTORS
“AS IS” AND ANY EXPRESS OR IMPLIED
WARRANTIES, INCLUDING, BUT NOT
LIMITED TO, THE IMPLIED WARRANTIES OF
MERCHANTABILITY AND FITNESS FOR A
PARTICULAR PURPOSE ARE DISCLAIMED.
IN NO EVENT SHALL THE FOUNDATION OR
CONTRIBUTORS BE LIABLE FOR ANY DIRECT,
INDIRECT, INCIDENTAL, SPECIAL, EXEMPLARY,
OR CONSEQUENTIAL DAMAGES (INCLUDING,
BUT NOT LIMITED TO, PROCUREMENT OF
SUBSTITUTE GOODS OR SERVICES; LOSS
OF USE, DATA, OR PROFITS; OR BUSINESS
INTERRUPTION) HOWEVER CAUSED AND
ON ANY THEORY OF LIABILITY, WHETHER
IN CONTRACT, STRICT LIABILITY, OR TORT
(INCLUDING NEGLIGENCE OR OTHERWISE)
ARISING IN ANY WAY OUT OF THE USE OF
THIS SOFTWARE, EVEN IF ADVISED OF THE
POSSIBILITY OF SUCH DAMAGE.
• libFLAC
Copyright (C) 2000,2001,2002,2003,2004,2005,
2006,2007,2008,2009 Josh Coalson
Redistribution and use in source and binary
forms, with or without modification, are
permitted provided that the following
conditions are met:
– Redistributions of source code must retain
the above copyright notice, this list of
conditions and the following disclaimer.
– Redistributions in binary form must
reproduce the above copyright notice, this
list of conditions and the following disclaimer
in the documentation and/or other materials
provided with the distribution.
– Neither the name of the Xiph.org Foundation
nor the names of its contributors may be
used to endorse or promote products derived
from this software without specific prior
written permission.
THIS SOFTWARE IS PROVIDED BY THE
COPYRIGHT HOLDERS AND CONTRIBUTORS
“AS IS” AND ANY EXPRESS OR IMPLIED
WARRANTIES, INCLUDING, BUT NOT
LIMITED TO, THE IMPLIED WARRANTIES OF
MERCHANTABILITY AND FITNESS FOR A
PARTICULAR PURPOSE ARE DISCLAIMED.
IN NO EVENT SHALL THE FOUNDATION OR
CONTRIBUTORS BE LIABLE FOR ANY DIRECT,
INDIRECT, INCIDENTAL, SPECIAL, EXEMPLARY,
OR CONSEQUENTIAL DAMAGES (INCLUDING,
BUT NOT LIMITED TO, PROCUREMENT OF
SUBSTITUTE GOODS OR SERVICES; LOSS
OF USE, DATA, OR PROFITS; OR BUSINESS
INTERRUPTION) HOWEVER CAUSED AND
ON ANY THEORY OF LIABILITY, WHETHER
IN CONTRACT, STRICT LIABILITY, OR TORT
(INCLUDING NEGLIGENCE OR OTHERWISE)
ARISING IN ANY WAY OUT OF THE USE OF
THIS SOFTWARE, EVEN IF ADVISED OF THE
POSSIBILITY OF SUCH DAMAGE.
LinkDisplayAudio_NAS.indb 102LinkDisplayAudio_NAS.indb 102 5/12/16 5:39 PM5/12/16 5:39 PM

ENGLISH 103
References
References
FCC WARNING
This equipment may generate or use radio
frequency energy. Changes or modifications to
this equipment may cause harmful interference
unless the modifications are expressly approved
in the instruction manual. The user could lose
the authority to operate this equipment if an
unauthorized change or modification is made.
FCC NOTE
This equipment has been tested and found to
comply with the limits for a Class B digital device,
pursuant to Part 15 of the FCC Rules. These limits
are designed to provide reasonable protection
against harmful interference in a residential
installation.
This equipment may cause harmful interference
to radio communications, if it is not installed
and used in accordance with the instructions.
However, there is no guarantee that interference
will not occur in a particular installation. If this
equipment does cause harmful interference
to radio or television reception, which can be
determined by turning the equipment off and
on, the user is encouraged to try to correct the
interference by one or more of the following
measures:
• Reorient or relocate the receiving antenna.
• Increase the separation between the
equipment and receiver.
• Connect the equipment into an outlet on a
circuit different from that to which the receiver
is connected.
• Consult the dealer or an experienced radio/TV
technician for help.
This transmitter must not be co-located or
operated in conjunction with any other antenna
or transmitter.
IC (Industry Canada) Notice
This device complies with Industry Canada’s
license-exempt RSSs. Operation is subject to the
following two conditions:
(1) This device may not cause interference; and
(2) This device must accept any interference,
including interference that may cause undesired
operation of the device.
Le présent appareil est conforme aux CNR
d’Industrie Canada applicables aux apprareils
radio exempts de licence. L’exploitation est
autorisée aux deux conditions suivantes:
1) l’appareil ne doit pas produire de brouillage;
2) I’utilisateur de l’appareil doit accepter tout
brouillage radioélectrique subi, même si le
brouillage est susceptible d’en compromettre le
fonctionnement.
The term “IC: ” before the certification/
registration number only signifies that the
Industry Canada technical specification were met.
CAUTION
This equipement complies with FCC/IC radiation
exposure limits set forth for an uncontrolled
environment and meets the FCC radio frequency
(RF) Exposure Guidelines and RSS-102 of the
IC radio frequency (RF) Exposure rules. This
equipment has very low levels of RF energy
that is deemed to comply without maximum
permissive exposure evaluation (MPE). But it is
desirable that it should be installed and operated
keeping the radiator at least 20 cm or more away
from person’s body.
Cet équipement est conforme aux limites
d’exposition aux rayonnements énoncées pour
un environnement non contrôlé et respecte les
règles les radioélectriques (RF) de la FCC lignes
directrices d’exposition et d’exposition aux
fréquences radioélectriques (RF) CNR-102 de
l’IC. Cet équipement émet une énergie RF très
faible qui est considérée comme conforme sans
évaluation de l’exposition maximale autorisée
(MPE). Cependant, il est souhaitable qu’il devrait
être installé et utilisé en gardant une distance
de 20 cm ou plus entre le radiateur et le corps
humain.
Para cumplimiento de la COFETEL
La operación de este equipo está sujeta a las
siguientes dos condiciones: (1) es posible que
este equipo o dispositivo no cause interferencia
perjudicial y (2) este equipo o dispositivo debe
aceptar cualquier interferencia, incluyendo la que
pueda causar su operación no deseada.
LinkDisplayAudio_NAS.indb 103LinkDisplayAudio_NAS.indb 103 5/12/16 5:39 PM5/12/16 5:39 PM

104
Software License Agreement
Software License Agreement
The software embedded in the Product (hereinafter the
“Licensed Software”) provided by JVC KENWOOD Corporation
(hereinafter the “Licensor”) is copyrighted to or sublicensable
by the Licensor, and this Agreement provides for the terms
and conditions which Users shall follow in order to use the
Licensed Software.
The User shall use the Licensed Software by agreeing with the
terms of this Software License Agreement. This Agreement
shall be deemed completed at the time the User (hereinafter
the “User”) initially used the Product in which the “Licensed
Software” is embedded.
The Licensed Software may include the software which has
been licensed to the Licensor directly or indirectly from any
third party. In such case, some third parties require the Users
to follow their conditions for use separately from this Software
License Agreement. Such software shall not be subject to this
Agreement, and the Users are urged to read the “Important
Notice concerning the Software” to be provided separately.
Article 1 General Provision
The Licensor shall grant to the User a non-exclusive and non-
transferable (other than the exceptional case referred to in
Article 3, Paragraph 1) licensed to use the Licensed Software
within the country of the User.
Article 2 License
1. The license granted under this Agreement shall be the right
to use the Licensed Software in the Product.
2. The User shall not duplicate, copy, modify, add, translate
or otherwise alter, or lease the Licensed Software and any
related documents, whether in whole or in part.
3. The use of the Licensed Software shall be limited to
personal purpose, and the Licensed Software shall not
be distributed, licensed or sub-licensed whether it is for
commercial purpose or not.
4.
The User shall use the Licensed Software according to the
directions described in the operation manual or help file,
and is prohibited to use or duplicate any data in a manner
violating the Copyright Law or any other laws and regulations
by applying whole or a part of the Licensed Software.
Article 3 Conditions for Grant of License
1. When the User transfers the Product, it may also transfer
the license to use the Licensed Software embedded in
the Product (including any related materials, updates and
upgrades) on condition that no original, copies or related
materials continue in the possession of the User, and that
the User shall cause the transferee to comply with this
Software License Agreement.
2. The User shall not carry out reverse engineering,
disassembling, decompiling or any other code analysis
works in connection with the Licensed Software.
Article 4 Right Pertaining to the Licensed
Software
Any and all copyrights and other rights pertaining to the
Licensed Software and related documents shall belong to the
Licensor or the original holder of the right who granted to the
Licensor the license or sublicense for the Licensed Software
(hereinafter the “Original Rightholder”), and the User shall
not be entitled to any right other than the license granted
hereunder, in respect of the Licensed Software and any related
documents.
Article 5 Indemnification of Licensor
1. Neither the Licensor nor the Original Rightholder shall be
liable for any damage incurred by the User or any third
party due to the exercise of the license granted to the User
under this Agreement, unless otherwise restricted by law.
2. The Licensor will offer no guarantee for the merchantability,
convertibility and consistency with certain objective of the
Licensed Software.
Article 6 Liability to Third Party
If any dispute has arisen with any third party due to an
infringement upon a copyright, patent or any other intellectual
property right that was caused by the User’s use of the
Licensed Software, the User shall settle such dispute at its
own cost and hold the Licensor and the Original Rightholder
harmless from any inconvenience it may cause.
Article 7 Confidentiality
The User shall keep the confidentiality of such portion of the
Licensed Software, related documents thereof or any other
information to be granted under this Agreement, as well as the
conditions of this Agreement as has not yet entered the public
domain, and shall not disclose or divulge the same to any third
party without approval of the Licensor.
Article 8 Termination
In case the User falls under any of the events described in
the following items, the Licensor may immediately terminate
this Agreement or claim that the User compensates for the
damage incurred by the Licensor due to such event:
1. When the User violated any provision of this Agreement; or
2. When a petition has been filed against the User for an
attachment, provisional attachment, provisional disposition
or any other compulsory execution.
Article 9 Destruction of the Licensed
Software
If this Agreement is terminated pursuant to the provision of
Article 8, the User shall destroy the Licensed Software, any
related documents and copies thereof within two (2) weeks
from such date of termination.
Article 10 Protection of Copyright
1. The copyright and all the other intellectual property rights
relating to the Licensed Software shall belong to the
Licensor and the Original Rightholder, and in no event shall
they be under the ownership of the User.
2. The User shall, whenever it uses the Licensed Software,
comply with any laws relating to the copyright and other
intellectual property rights.
LinkDisplayAudio_NAS.indb 104LinkDisplayAudio_NAS.indb 104 5/12/16 5:39 PM5/12/16 5:39 PM

ENGLISH 105
Software License Agreement
Software License Agreement
Article 11 Export Restriction
1. It is prohibited to export the Licensed Software and
any related documents outside the country of the User
(including transmission thereof outside the country of the
User via Internet of other communication tools).
2. The User shall understand that the Licensed Software shall
be subject to the export restrictions adopted by the country
of User and any other countries.
3. The User shall agree that the software will be subject to
any and all applicable international and domestic laws
(including the export control regulation of the country
of User and any other countries, and any restrictions
concerning the end-users, the use by end-users and
importing countries to be provided by the country of User
and any other countries, and any other governmental
authorities).
Article 12 Miscellaneous
1. In the event any part of this Agreement is invalidated by
operation of law, the residual provisions shall continue in
force.
2. Matters not stipulated in this Agreement or any ambiguity
or question raised in the construction of this Agreement
shall be provided or settled upon good-faith consultation
between the Licensor and the User.
3. The Licensor and the User hereby agree that this
Agreement is governed by the laws of Japan, and any
dispute arising from, and relating to the rights and
obligations under, this Agreement shall be submitted to the
exclusive jurisdiction of the Tokyo District Court for its first
instance.
Important Notice Concerning the Software
Important Notice Concerning the Software
Software License Attached to the Product
The Software embedded in the Product is composed of several
independent software components, and in each of such
individual components, a copyright of either JVC KENWOOD or
a third party subsists.
The Product uses the software component designated in the
End-User License Agreement that was executed between
JVC KENWOOD and a third party (hereinafter “EULA”).
“EULA” covers those corresponding to free software, and,
as a condition of distribution of the software component
in executable format which is based on the license granted
under the GNU General Public License or Lesser General Public
License (hereinafter “GPL/LGPL”), it requires an availability of
the source code for the relevant component. For details of the
software component covered by “GPL/LGPL”, please visit the
following website:
URL : http://www2.jvckenwood.com/gpl/
Please note that we are unable to answer any inquiry relating
to the contents, etc. of the source code.
In addition, the software component of the Product
includes the software developed or created independently
by JVC KENWOOD, and there exists an ownership of
JVC KENWOOD in such software and any accompanying
documents, which is protected by the Copyright Law, any
international treaties and other applicable laws.
As to matters concerning the handling of JVC KENWOOD
software components, please refer to the “Software License
Agreement” attached hereto. Please note that any software
component licensed under “EULA” which is not subject to
“GPL/LGPL”, and those developed or created independently
by JVC KENWOOD shall not be subject to the requirement for
provision of the source code.
The software component distributed under “GPL/LGPL”
shall be licensed to users without charge, and, therefore,
no warranty is given for such software component, either
express or implied, within the scope of the applicable laws and
regulations.
Unless otherwise permitted by applicable laws and regulations
or agreed in written form, none of the owners of the copyright
or persons entitled to alter or redistribute the software
component under the said license shall have any liability for
any type of damage or loss resulting from the use of or inability
to use such software component. For further details of the
conditions of use of such software component or matters
required to be complied with, please refer to the relevant “GPL/
LGPL”.
Users are urged to read the details for the relevant license
carefully before using the software component covered by
“GPL/LGPL” and embedded in the Product. Since the terms
and conditions of individual licenses are provided by parties
other than JVC KENWOOD, the original English version will be
included.
LinkDisplayAudio_NAS.indb 105LinkDisplayAudio_NAS.indb 105 5/12/16 5:39 PM5/12/16 5:39 PM