JVCKENWOOD K9T002 Card Printer w/Built-in RFID Tag User Manual CX210COVER
JVC KENWOOD Corporation Card Printer w/Built-in RFID Tag CX210COVER
UserManual.wiki
>
JVCKENWOOD
>
K9T002 User Manual
Users Manual
Navigation menu
Upload a User Manual
Namespaces
Wiki Guide
HTML
PDF
Info
Views
User Manual
Discussion / Help
Navigation
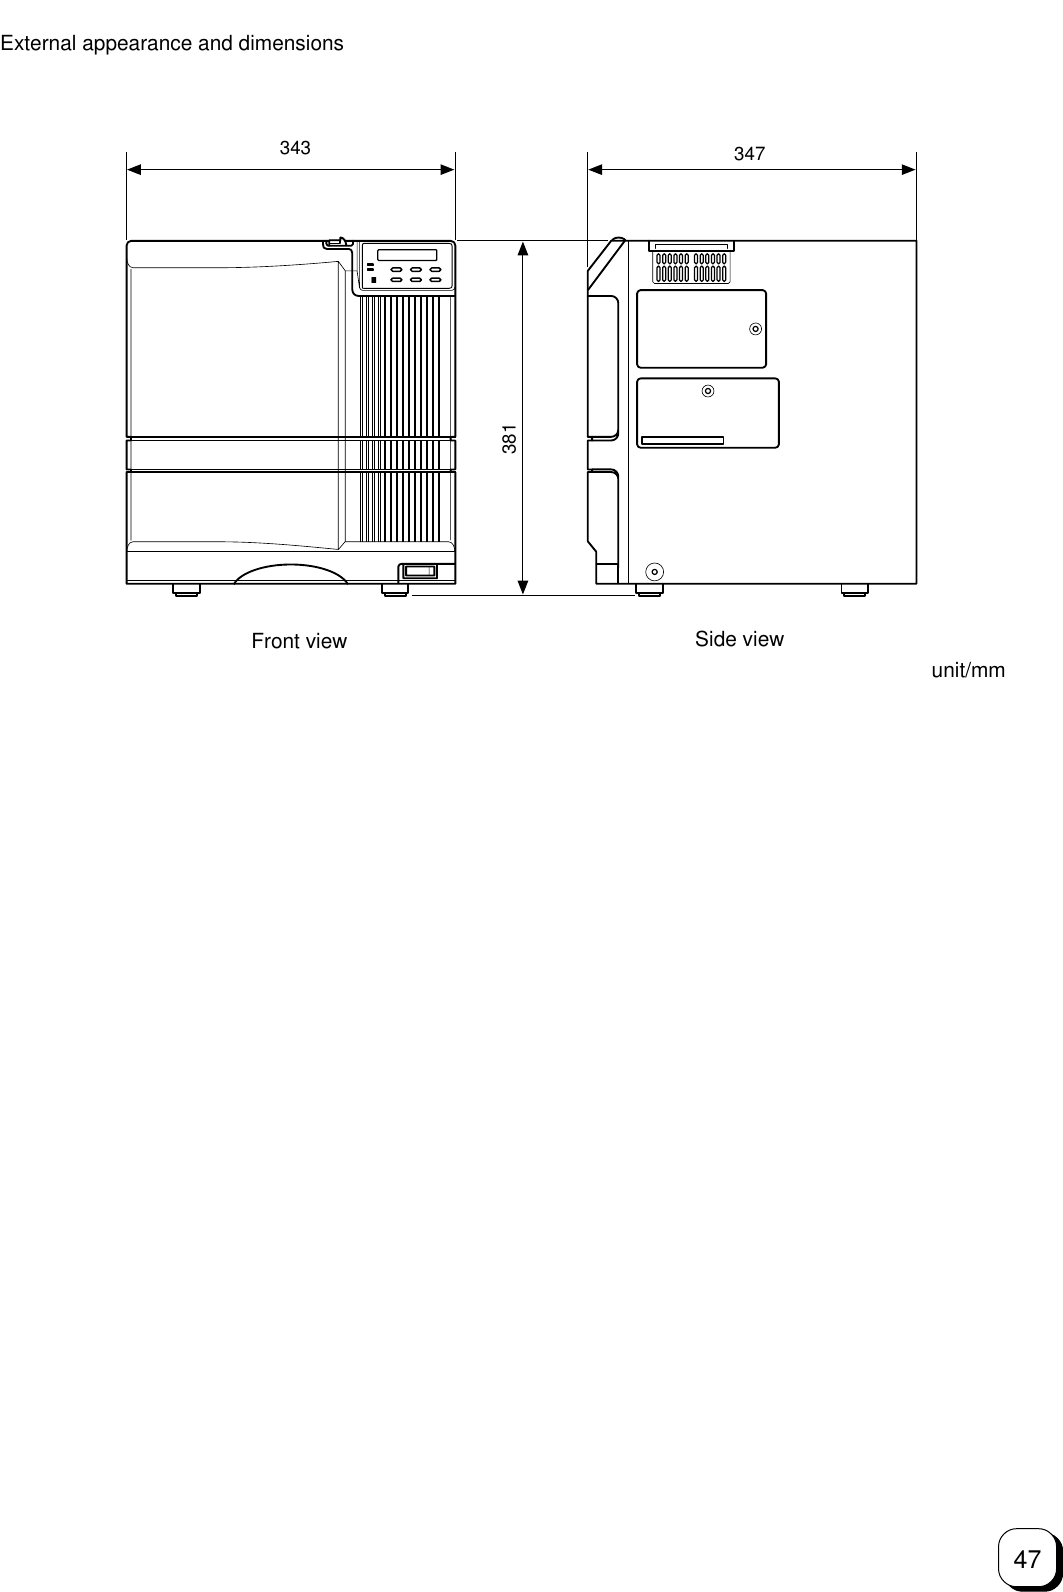
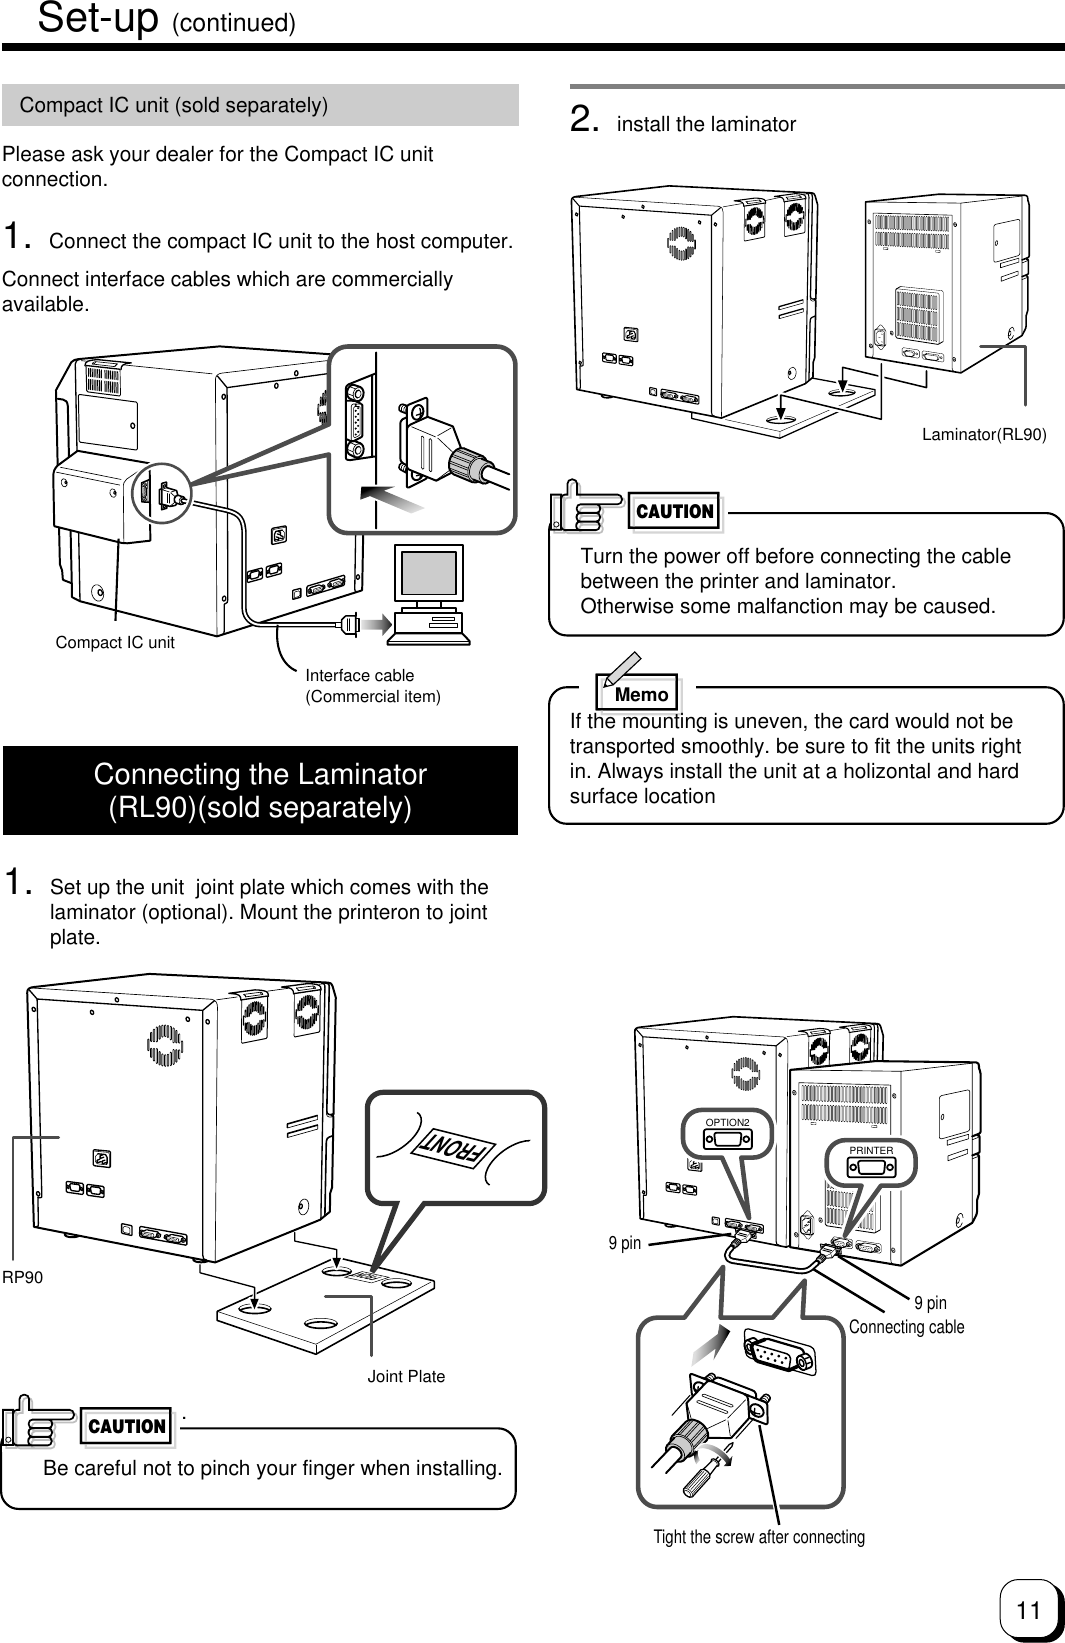
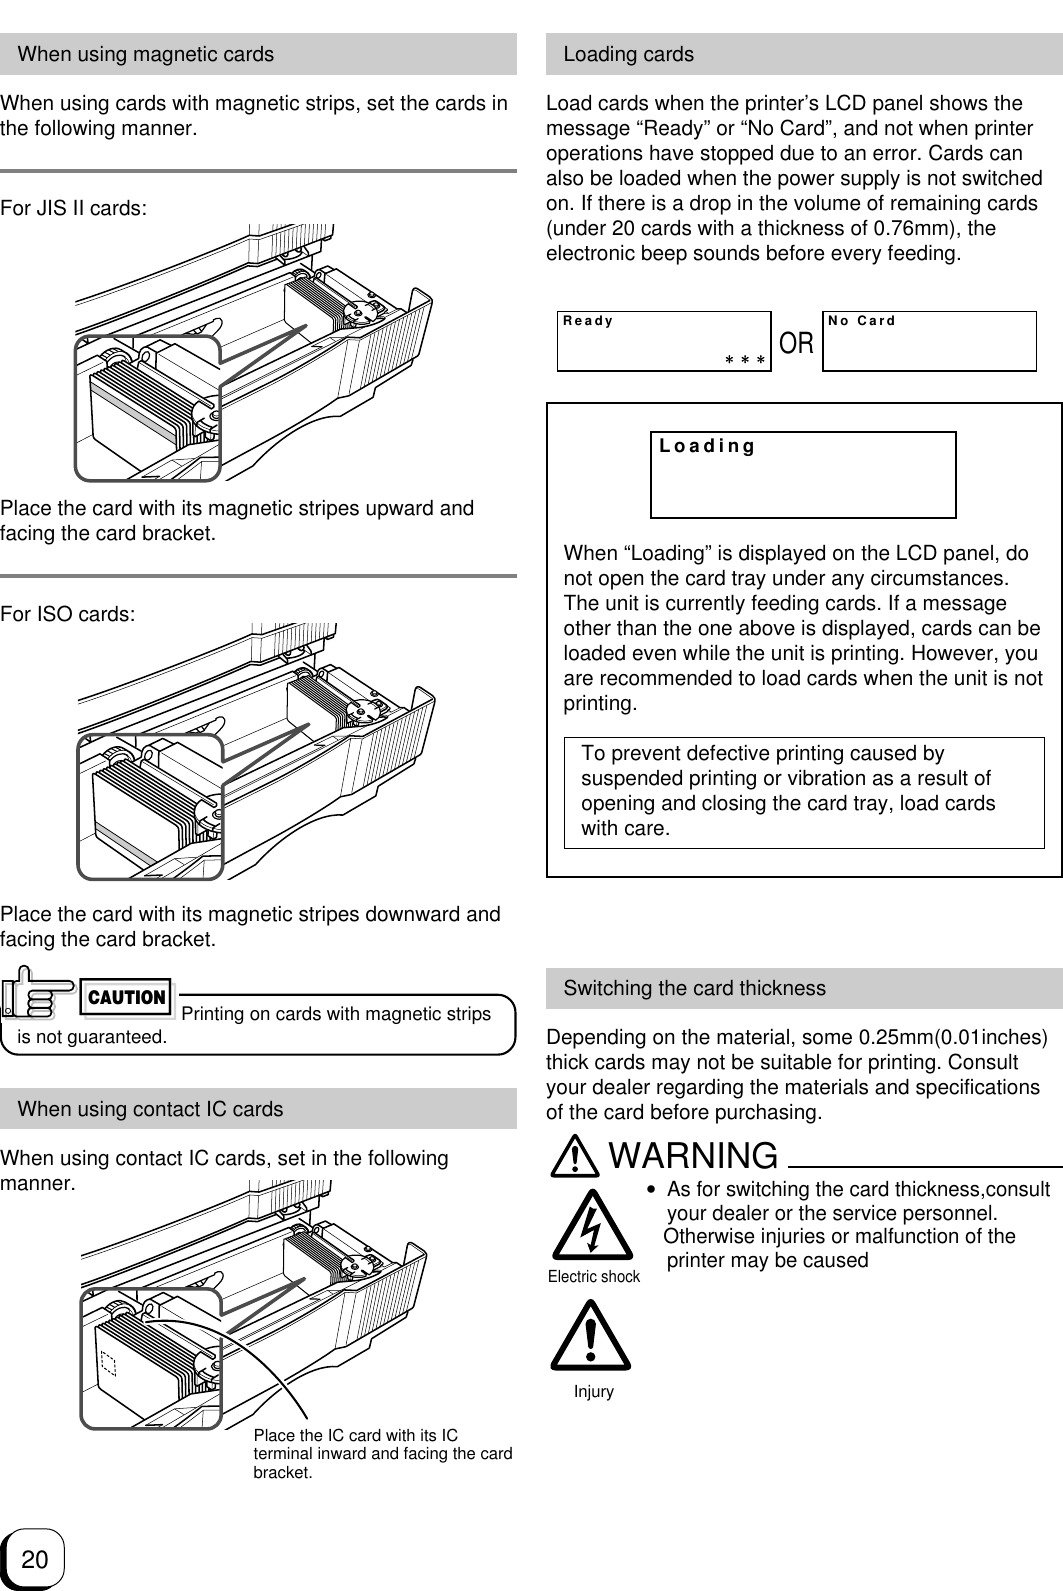
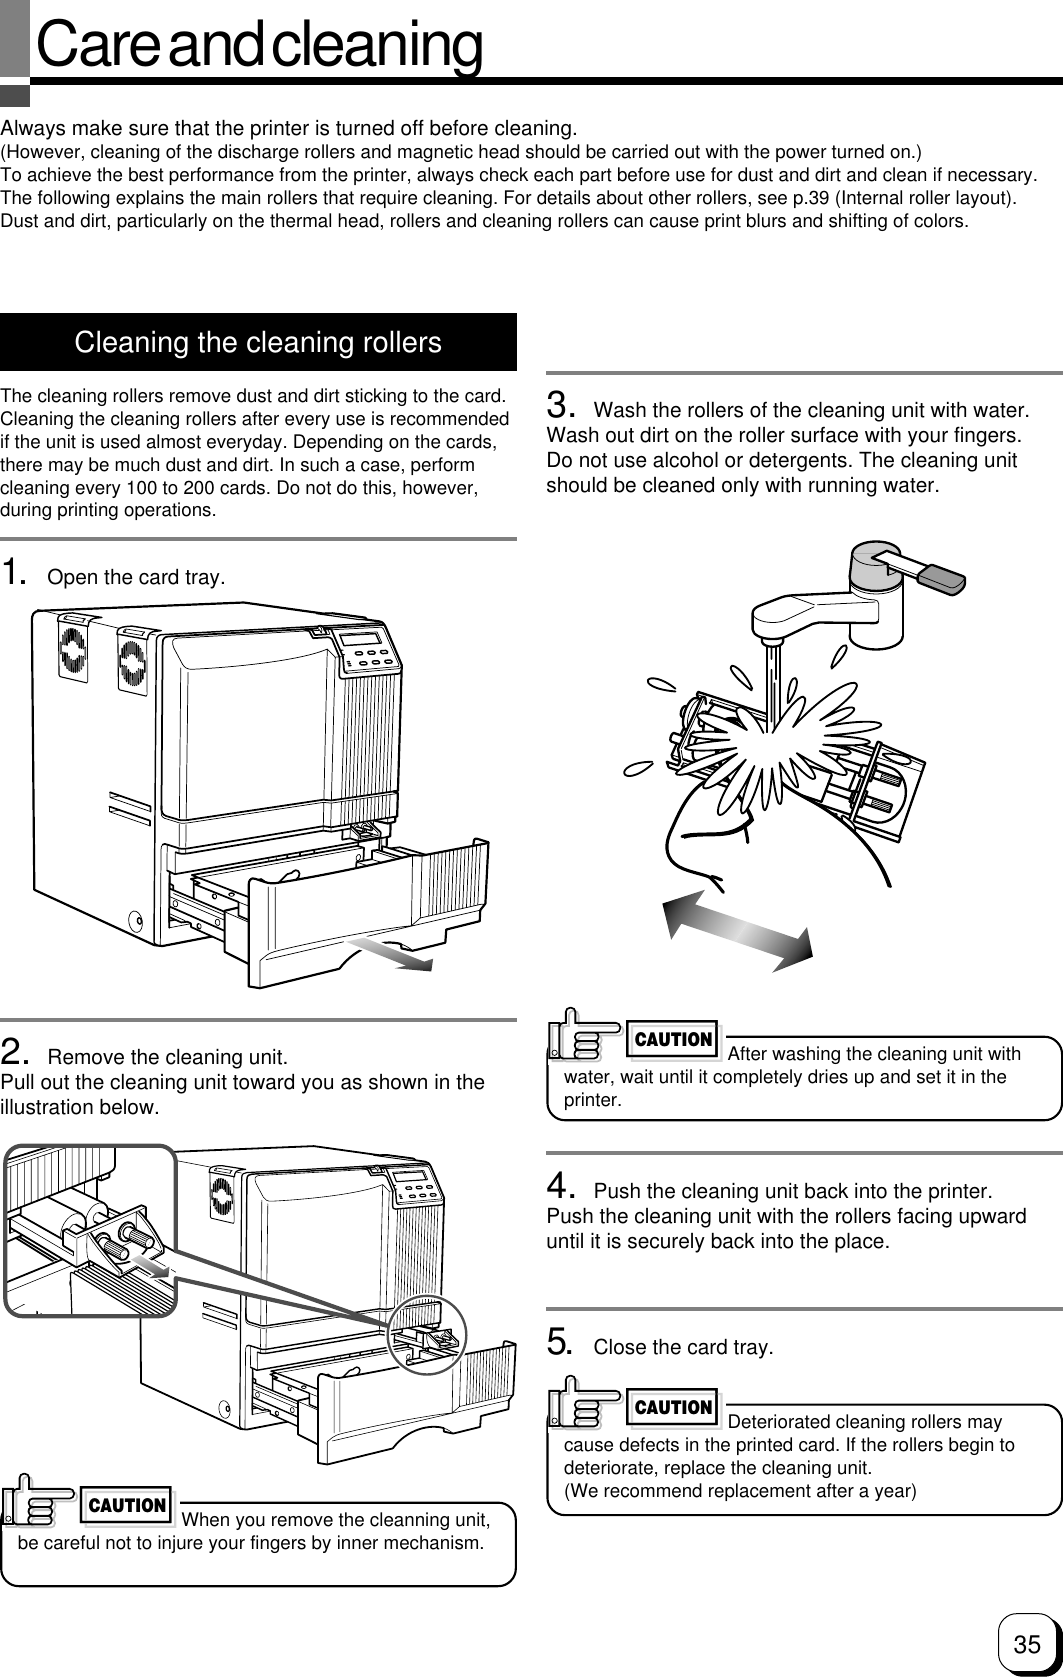
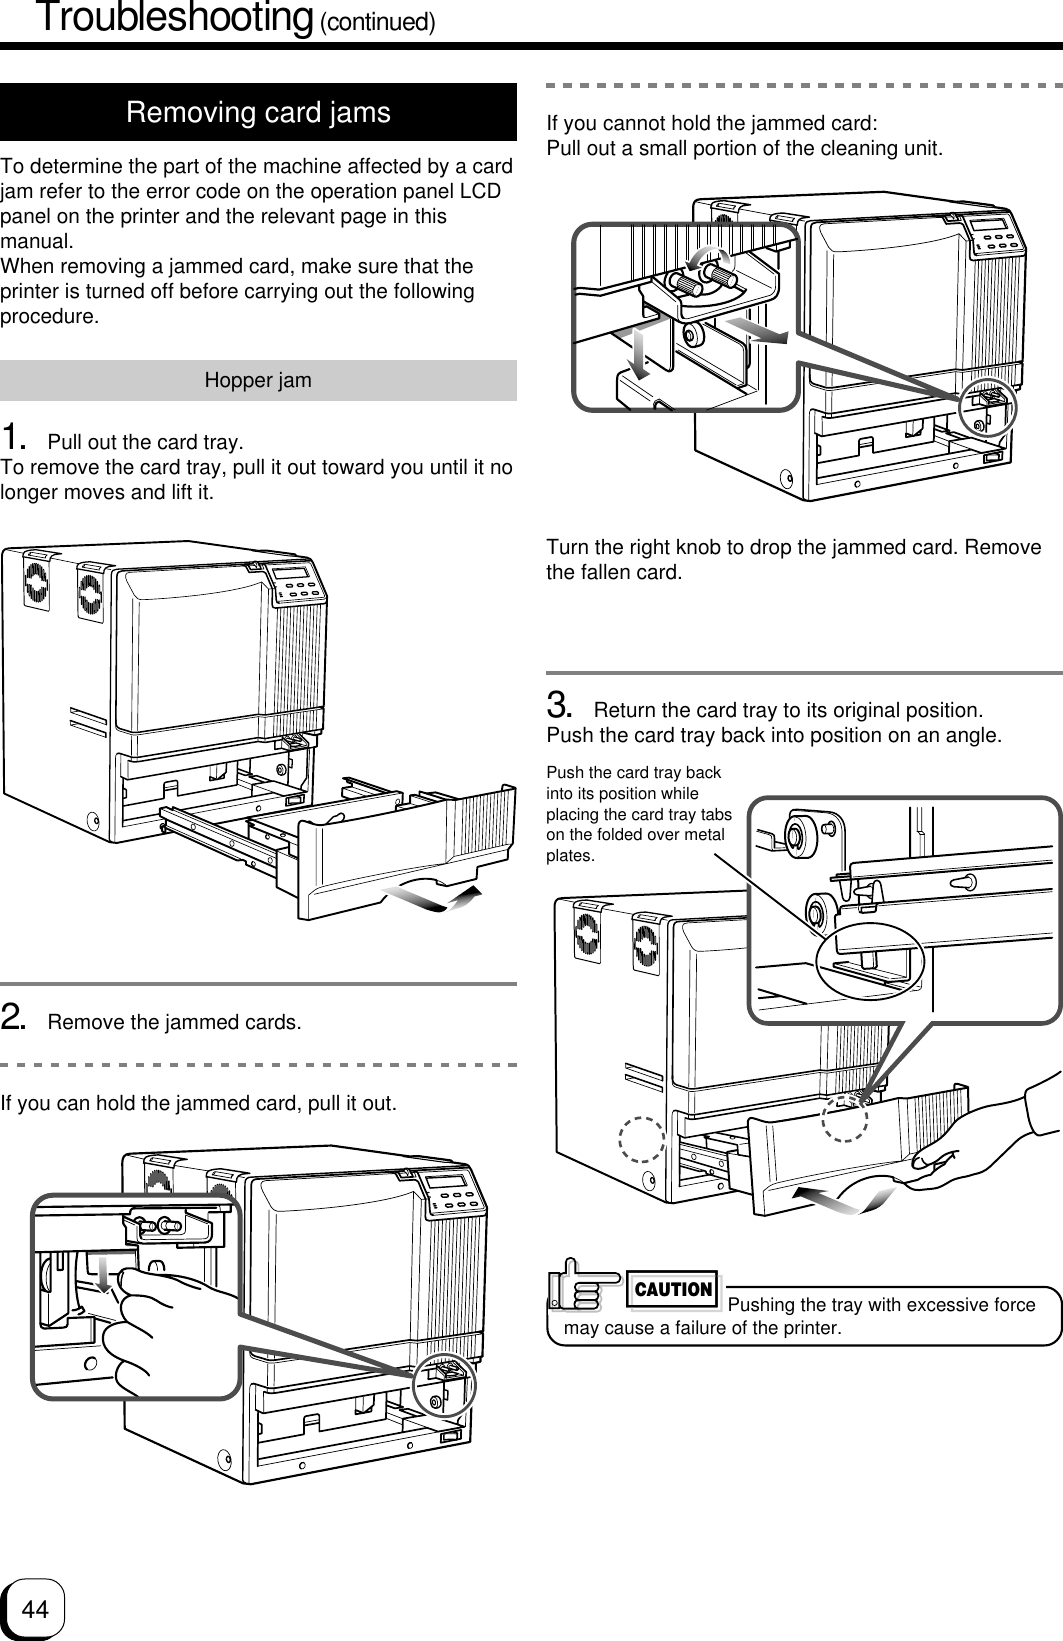
![4ContentsBefore use ..................................................... 7Product features .................................................... 7Checking accessories............................................ 7Handling of transfer film, ink ribbons and cards .... 7Handling ............................................................. 7Storage .............................................................. 7Storing and handling cards after printing ........... 7Purchasing print media and cards ..................... 7Installation ............................................................. 8Escape Clause ...................................................... 8Installation diagram ............................................ 8Names of parts .............................................. 9Front................................................................... 9Rear ................................................................... 9When the printer door is open............................ 9Set-up.......................................................... 10Connecting the IC unit (sold separately) ............. 10Large size IC unit (sold separately) ................. 10Compact IC unit (sold separately).................... 11Connecting the power cord.................................. 11Installing the card stacker .................................... 12Discharging the card ........................................ 12Setting the ink ribbon ........................................... 13Setting the retransfer film .................................... 15Caution when loading the retransfer film cassetteand/or the ink ribbon cassette ............................. 17Setting cards........................................................ 17Inserting cards ................................................. 18When using magnetic cards............................. 19When using contact IC cards ........................... 19Loading cards .................................................. 19Switching the card thickness............................ 19Connecting with a host computer ........................ 20 Software Licencing Agreement .......................... 20 Operation Environment...................................... 20 About Software .................................................. 20Installation of CX-320 Printer Driver .................... 20Connecting Multiple Printers ............................... 20Before use ................................................... 21Names of parts on the operation panel ............... 21Setting buttons ................................................. 21Operation display LED ..................................... 21LCD panel ........................................................ 21Operation display LED contents andthe LCD panel...................................................... 22Initialization period ........................................... 22Preheating period............................................. 22LCD operation display content ............................ 22Operation .................................................... 23Turning on the power........................................... 23Turning off the power........................................... 24About the RESET button ..................................... 24On Initialization when the retransfer film cassetteand/or the ink ribbon cassette is loaded .............. 24User modes ......................................................... 25User mode screen flow ........................................ 25User mode settings.............................................. 26Display mode settings ......................................... 27Clearing the free counter ..................................... 28Cleaning mode .................................................... 28Ink mode setting .................................................. 29Retransfer mode setting ...................................... 30Buzzer mode setting ............................................ 31Power saving mode settings................................ 31Setting the bend remedy mode ........................... 32Card size setting mode ........................................ 33Coercivity setting mode ....................................... 33Non-contact IC antenna setting mode ................. 33IC contact setting mode ....................................... 33Test print .............................................................. 33Transport mode ................................................... 33Care and cleaning ....................................... 34Cleaning the cleaning rollers ............................... 34Cleaning the thermal head .................................. 35Cleaning the fan filter........................................... 35Cleaning the dust filter on the right side .............. 36Cleaning the card feed rollers and heat rollers.... 36Cleaning the magnetic head................................ 37Once printer servicing and cleaning have beencompleted ............................................................ 38Request for periodical maintenance .................... 38Troubleshooting........................................... 39Layout of rollers inside the printer ....................... 39Error code listing.................................................. 40Mending broken ink ribbon and retransfer film .... 42About printing errors ............................................ 42When retransfer operation is not complete ......... 42Caution when prunting characters ....................... 42Removing card jams ............................................ 43Hopper jam ...................................................... 43Turnover section [Jam (turnover)] .................... 44Retransfer section [Jam (transfer)] .................. 44Specifications .............................................. 45Main specifications .............................................. 45Software use permission contract ........ P1~P4](https://usermanual.wiki/JVCKENWOOD/K9T002/User-Guide-592487-Page-4.png)


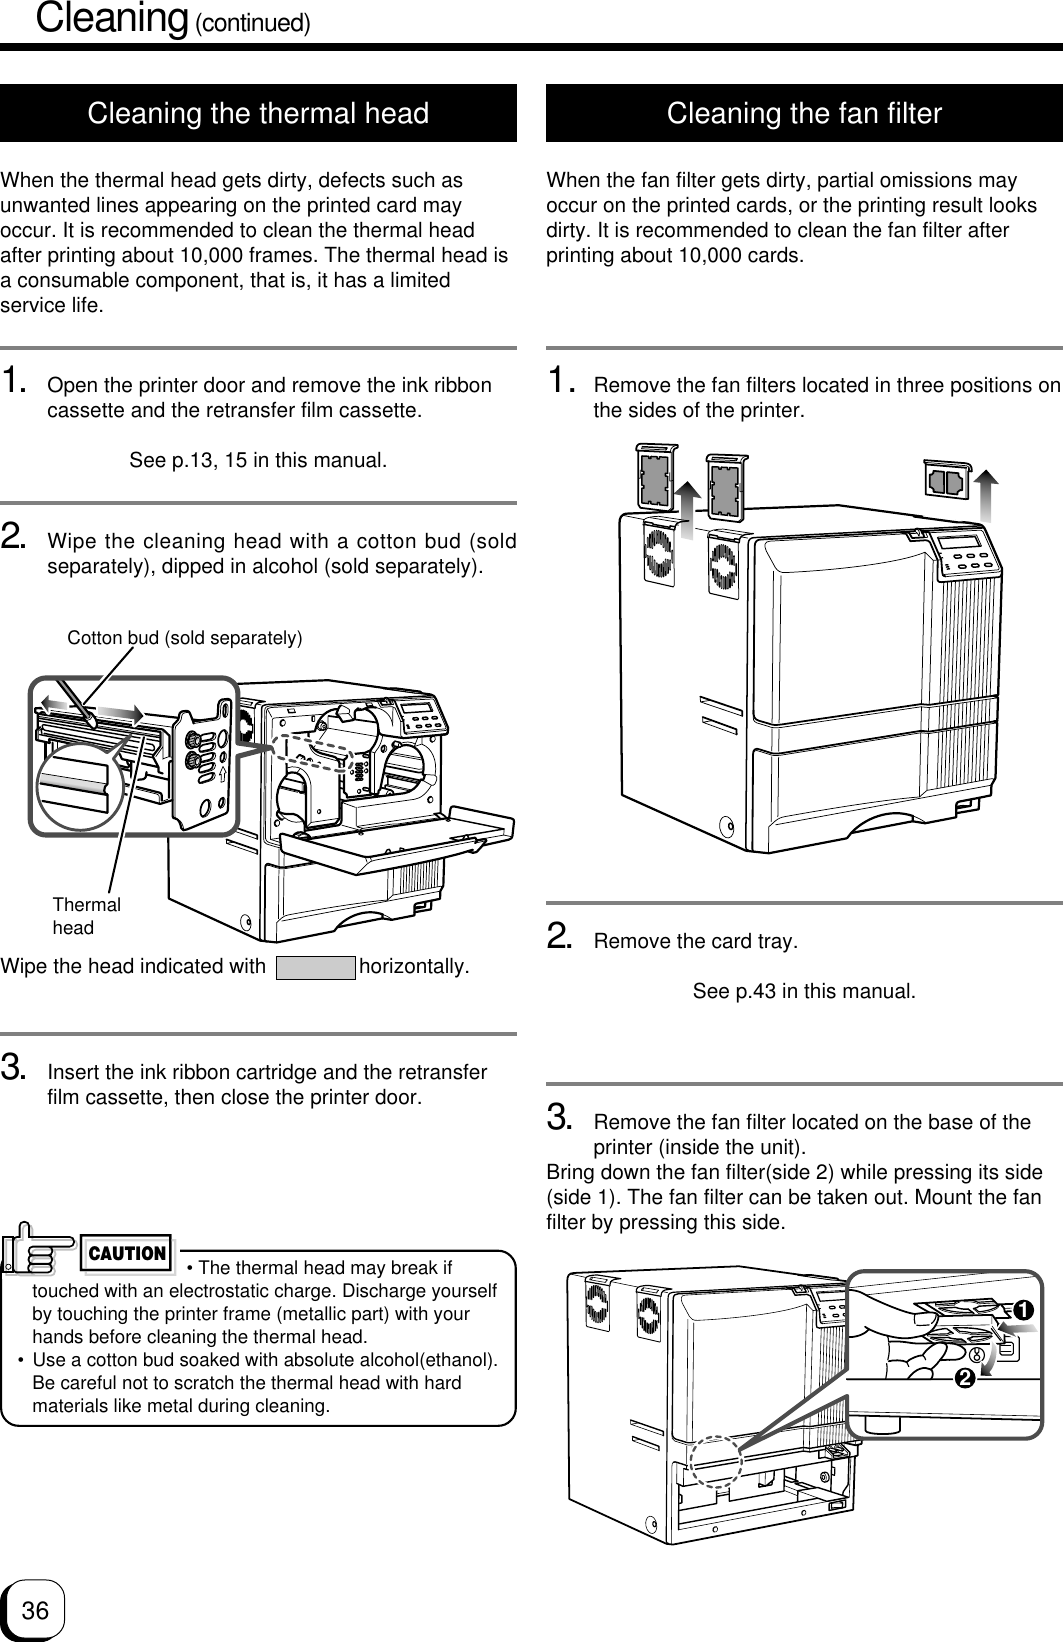
![27(to the next page)User mode settings>Bend Remedy>>Retransfer>>>Media Type>>Temp. Level>>Speed (Front)>>Speed (Back)Std(1000/roll):00(Standard)-2-2Standard (1000/roll):0Standard +1+2+2Off+2NoneYMCK : 0000SKY BLUEOffStandardHi-CoOnTotal>>Temp. Level>>Speed>>Cooling TimeOff-2None>Ink> >>Ink Type>>Black LevelYMCK:00(Standard)>>Black Mode>>SP-Ink1 LevelStandard-3>>SP-Ink2 Level-3>Display>>Power Saving>>Counter>>Contrast>>Back ColorTotal-2BLUE>Cleaning>>Card Thickness>MG ISO Type>Buzzer>Transport mode>Counter ResetOffStandardLo-CoOnOK?OK?>IC Antenna Pos.None>IC Contact Pos.None>Test PrintOK?>>MG Print(JIS)OffOff>Unit No:No.1? No.1>>Standby modeFront WaitFront WaitMain menu SubmenuFactory settingDisplay modeInk modeRetransfer modeBend Remedymode3 counter type settings: [Total, Head, Free]LCD panel contrast setting: 7 gradations from –3 to +3, the higher the value the stronger the contrast.LCD pamel background color setting: 8 optionsSee p. 27See p. 29See p. 30See p. 32See p. 28See p. 28See p. 31See p. 31See p. 32See p. 33See p. 33See p. 33See p. 33Counter reset modeFor free counter resetting: press the ENTER button.Cleaning modeFor cleaning mode setting: Magnetic head and card feeder roller executionDisplay on ink ribbon : the ink type being used is displayedDisplay only because of automatic setting by RF-ID(Setting is not possible)Setting the black value K: 9 gradations can be set from –3 to +5, thelarger the value the darker the printing.Setting the K printing mode: 2 options [standard and fine]Setting the retransfer film: setting the film type[1000,750] - two typesSetting the retransfer roller temperature:6 gradations can be set from –3 to +2,the larger the value the higher thetemperature.Setting the retransfer speed: 13 gradations can be set from –10 to +2,the larger the value the faster the speed.Setting the rear retransfer speed: 13 gradations can be set from –10 to +2, thelarger the value the faster the speed.Buzzer modeSetting the buzzer ON/OFF: 2 settings [onand off]Power saving modeSetting the time for the power saving mode:9 options [off, 5, 10, 15, 20, 25, 30, 45 and60] (units: minutes)Bend remedy roller temperature setting: 7 gradations can be set from –5 to 0 oroff, the larger the value the higherthe temperature.Bend remedy speed setting: 5 gradations can be set from –2 to +2, thelarger the value the faster the speed.Cooling time setting: 16 gradations can be set: none and 1–15 (unitsseconds).Card tickness setting mode:Card thickness setting: 2 options [Standard,Thin]Coercivity setting mode:ISO card coercivity setting: 2 options [Lo-Coand Ho-Co]Non-contact IC antenna setting mode:Non-contact IC antenna position setting: 3 options [None, Ext. Unit, Added on]IC contact position setting mode:IC contact position setting: 3 options [None, Built-in, Ext. Unit]Test print mode:to carry out test printing: press the ENTER button.Setting the special ink SP-Ink 1, SP-Ink2 darkness:9 gradations can be set from –3 to +5, the larger the valuethe darker the printing.Transfer Mode:Transfer mode setting: press the ENTER button.See p. 33Setting the way of peeling off the retransfer film: 2 settings [on and off]See p. 33Unit No: 7 options [No.1 to No.7]Unit No. setting: press the ENTER button.Stand by selection: In case of both side printing with optional unit connected,select either one of the card sides for standby.](https://usermanual.wiki/JVCKENWOOD/K9T002/User-Guide-592487-Page-27.png)
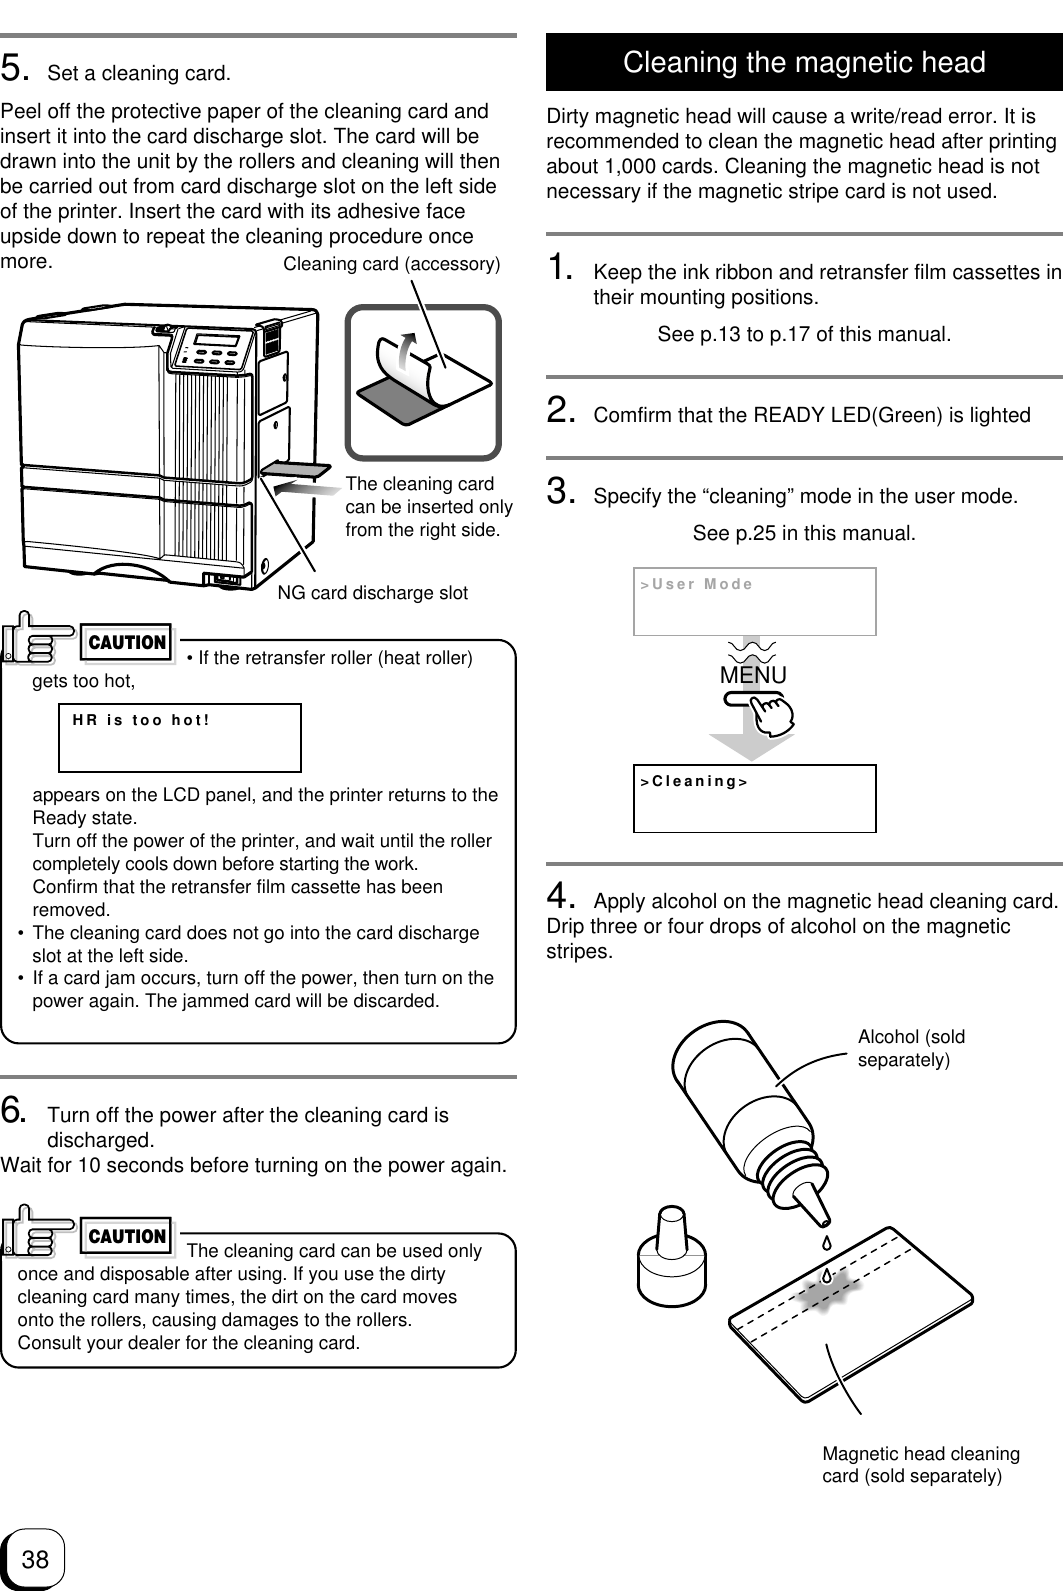
![29(to the next page)Clearing the free counterReset the free counter.The [Total] counter and [Head] counter cannot be reset.Cleaning modeThe printer is provided with an operation mode forcleaning the card feed roller and the magnetic head tokeep the printer in the best condition.See p.37,38 and p.39 for executing the cleaning mode.>Counter ResetOK?EXITENTERExit user mode.Press to reset.(The electronic beep sounds .)To check that the counter is reset to zero, select “FreeCounter” in “Setting the counter type” on p.27.CAUTIONThe head counter is cleared to zeroeach time the thermal head is replaced.>Cleaning>>>RollersOK?>>MGHeadOK?ENTERENTERENTERENTERExecution (The electronic beep sounds.)Select the cleaning item with and press for execution.(The electronic beep sounds .)To exit the cleaning mode, turn off the power aftercleaning.](https://usermanual.wiki/JVCKENWOOD/K9T002/User-Guide-592487-Page-29.png)
![31(to the next page)Retransfer mode setting>Retransfer>ENTERENTERENTERENTERRESET ENTERMENUMENUMENUEXITEXITEXITENTEREXIT-2RESET ENTER>>Speed (Front)MENUEXIT>>Speed (Back)•When setting "On",printing time will be longer by about1,5s•No mprovement is expected for the cards with ISO magnetic stripes.>>Media TypeStd(1000/roll):0>>Temp.Level0(Standard)-2>>MG Print (JIS)MENUEXIT>>MG Print (JIS)EXIT MENU•Double-sided printing results in a warp depending on the cards. Change the speed to correct it.Exit user modeSet retransfer film: Set film typeTwo types of frame settings (1000 or 750 frames per film)•In addition to setting the number of frames, change the setting when using special films (not yet available). To use these films, the firmware of this machine needs upgrading. Please consult your dealer.Press to select the setting and press to save.(The electronic beep sounds .)*After exiting the user mode, press and then press to initialize.*After exiting the user mode, press and then press to initialize.If initialization is not carried out, the film type setting will have no effect onthe printer.If initialization is not carried out, the temperature will have no effect on the the printer.Set the retransfer temperature.6 gradations can be set(from –3 to +2, the larger the value the higher the temperature)•Retransfer may be not performed well depending on the cards. Increase the temperature level step by step until the card can be printed clearly.Press to select the setting value and press to save.(The electronic beep sounds .)Set the retransfer speed:13 gradations can be set(from –10 to +2, the larger the value the faster the speed)• Partial incompletions may occur depending on the cards during retransfer. The performance is increased as the value is lowered. Specify the value mainly onthe retransfer roller tem- perature setting and use the speed setting for fine adjustments.Press to select the setting value and press to save.(The electronic beep sounds .)(The electronic beep sounds .)Set the reverse retransfer speed:13 gradations can be set(from –10 to +2, the higher the value the faster the speed.)Press to select the setting value and press to save.Set the way of the peeling off the retransfer film2 settings[On and Off]Depending on the card used,peeling off the retransfer filmmay not be complete.For the cards with JIS magnetic stripes,setting "On" isrecommended.Standby selection:In case of both side printing with optionalunit connected ,select either one of the card sides for standby.Change settings according to the retranfer film and card used.](https://usermanual.wiki/JVCKENWOOD/K9T002/User-Guide-592487-Page-31.png)
![32Operation (continued)Buzzer mode settingThe buzzer indicating errors can be turned on or off.Power saving mode settingsThe printer enters into the power save mode after aspecified period of time if none of operation buttons aretouched in the Ready state. The heat roller forretransfer, bend remedial roller, and back-light of theLCD panel are turned off in the power save mode.>BuzzerOnEXITENTERExit user modeSet the buzzer:there are two settings (On, off)Press to select the setting and press to save.(The electronic beep sounds.)>Power SavingoffEXITENTERExit user modePower saving settings:there are 9 options.Press to select the setting and press to save.(The electronic beep sounds.)Off:Not in power saving mode.Setting options: [5,10,20,25,30,45,60] (units: minutes)[5,10,15,20,25,30,45,60] (units: minutes)If printing is not to be carried out for a period longer than theset time, switch the unitís heater off. (Power save status)When Off is specified,•electronic beep sound indicating an error,•electronic beep sound indicating the number of cards,and•electronic beep sound indicating settings saved with theENTER button in the user mode are muted.Press the EXIT button to cancel the user mode, and theprinter starts.“Sleeping” appears on the LCD panel in the power savemode. The operation buttons are disabled in this mode.See step 2 in “Canceling the power save mode” toenable the operation buttons.The printer moves to the power save mode when thespecified time arrives even if you turns off the printerand turn it on again.Canceling the power save mode1. From the host computerEnter a control command to print the card. The powersave mode is cancelled, and printing automaticallystarts upon completion of preheating.2. Temporary cancellationTo cancel the power save mode temporarily on theprinter, press RESET, then ENTER to initialize the printer.3. Permanent cancellationCancel the power save mode temporarily as describedin step 2, and change the power save mode setting toOFF.Sleeping](https://usermanual.wiki/JVCKENWOOD/K9T002/User-Guide-592487-Page-32.png)
![33(to the next page)Setting the bend remedy modeSingle-sided printing may cause a bend depending on thecards. Adjust the setting to get rid of the bend.CAUTION>Bend Remedy>>>Temp Level>>Speed>>Cooling Timeoff-2-2ENTERENTERMENUMENUMENUEXITEXITEXITENTEREXITRESET ENTERENTERExit user modeSet the bend remedy roller temperatureThere are 7 bend remedy roller temperature settings:(off and from –5 to 0 the larger the value the higher the temperature).Press to select the setting and press to save.(The electronic beep sounds.)*After exiting the user mode, press and then press to initialize.If initialization is not carried out, the temperature setting will have no effect on the printer.Bend remedy speed settings5 gradations can be set(from –2 to +2, the larger the value the faster the speed.)Press to select the setting value and press to save.(The electronic beep sounds.)Cooling time setting:16 gradations can be set (none and 1-15, unit: seconds).Press to select the setting value and press to save.(The electronic beep sounds.)If the bend remedy temperaturesetting is set to off from any other setting, the preheatingstatus will remain the same until the roller temperaturefalls (for approximately 10 minutes).This is not a malfunction. Leave the unit in ready statusand wait. 1.Setting temperature and speed of thebend remedial roller. Adjust the “rollertemperature” setting in principle to correct thebend of the card, and use the “correctionspeed” setting for fine adjustments.2. Setting waiting time for cooling the cardThis provides the time for a special film, whichwill be marketed in the future, to cool down toprevent the card and retransfer film fromsticking together after printing.CAUTIONWhen printing on both sides is donewith “Remedy roller temperature setting” set to a hightemperature, the cards may show a large deformation.Please set this item to OFF for printing on both sides.MemoCard Thickness setting modeThe printer is designed to load only the 0.76mm or 0.25mmthick cards. So set card thickness depending on the cardused.>Card SizeStanardEXITENTERExit user modeSet the card thickness:2 settings [Standard and Thin]Press to select the setting and press to save.(The electronic beep sounds.)Standard:0.76mm(0.03inches)-thickThin: 0.25mm(0.01inches)-thickFor changing card thickness, see “switching the cardthickness” on Page 19 of this manual](https://usermanual.wiki/JVCKENWOOD/K9T002/User-Guide-592487-Page-33.png)
![34Operation (continued)Coercivity setting modeSet coercivity for writing data on the ISO compatiblemagnetic stripe card.>MG ISO TypeLo-CoEXITENTERExit user modePress to select the setting and press to save.(The electronic beep sounds.)Lo-Co238×102 [A/m] (300 [Oe])Hi-Co218×103 [A/m] (2750 [Oe])Non-contact IC antenna setting modeTo use non-contact IC cards, set the antenna positionat which the cards stop.>IC Contact Pos.NoneEXITENTERExit user modeSet IC contact position:3 settingsPress to select the setting and press to save.(The electronic beep sounds.)NoneNo contactBuilt-inA built-in contact is being usedExt. UnitAn IC unit contact is being usedIC contact setting modeWhen using IC cards, specify the contact position tostop the cards.Test printTest print is provided for printing a test patterncontained in the printer (there is only one pattern).Operating the printer independent of the host computerenables you to find out the source of trouble if there is aproblem in the system.>IC Antenna Pos.NoneEXITENTERExit user modeNon-contact IC antenna position:3 settingsPress to select the setting and press to save.(The electronic beep sounds.)NoneNo antennaExt. UnitAn IC unit antenna is being usedAdded onA compact IC unit is being used.>Test PrintOK?Printing..ENTEREXITExit user modePress to carry out test printing.(The electronic beep sounds.)Transport modeTo set the transport mode.CAUTIONWhen shipping or moving the printer,you must set the transport mode. If the printer is not setthe transport mode, it may have a damage.>Transport modeOK?ENTEREXITPlease,Power offExit user modePress to carry out transport mode.(The electronic beep sounds.)Please turn off the power.Turnning on the power, then the transport mode is canceled.A single-sided color pattern is printed. When testprinting is completed, the unit will automatically return toready staus.Unit No SettingSet Unit No.of the printers to be connected>Unit No;No.1EXITUnit No:7 settingsENTERPlease,Power offAfter that pressEXIT,Then the message is displayed as shown below.Exit user modeTurn off the powerAnd then by turning on the power,Unit No. setting mode is cancelled.(The electronic beep sounds.)Press to select the setting and press to save.](https://usermanual.wiki/JVCKENWOOD/K9T002/User-Guide-592487-Page-34.png)
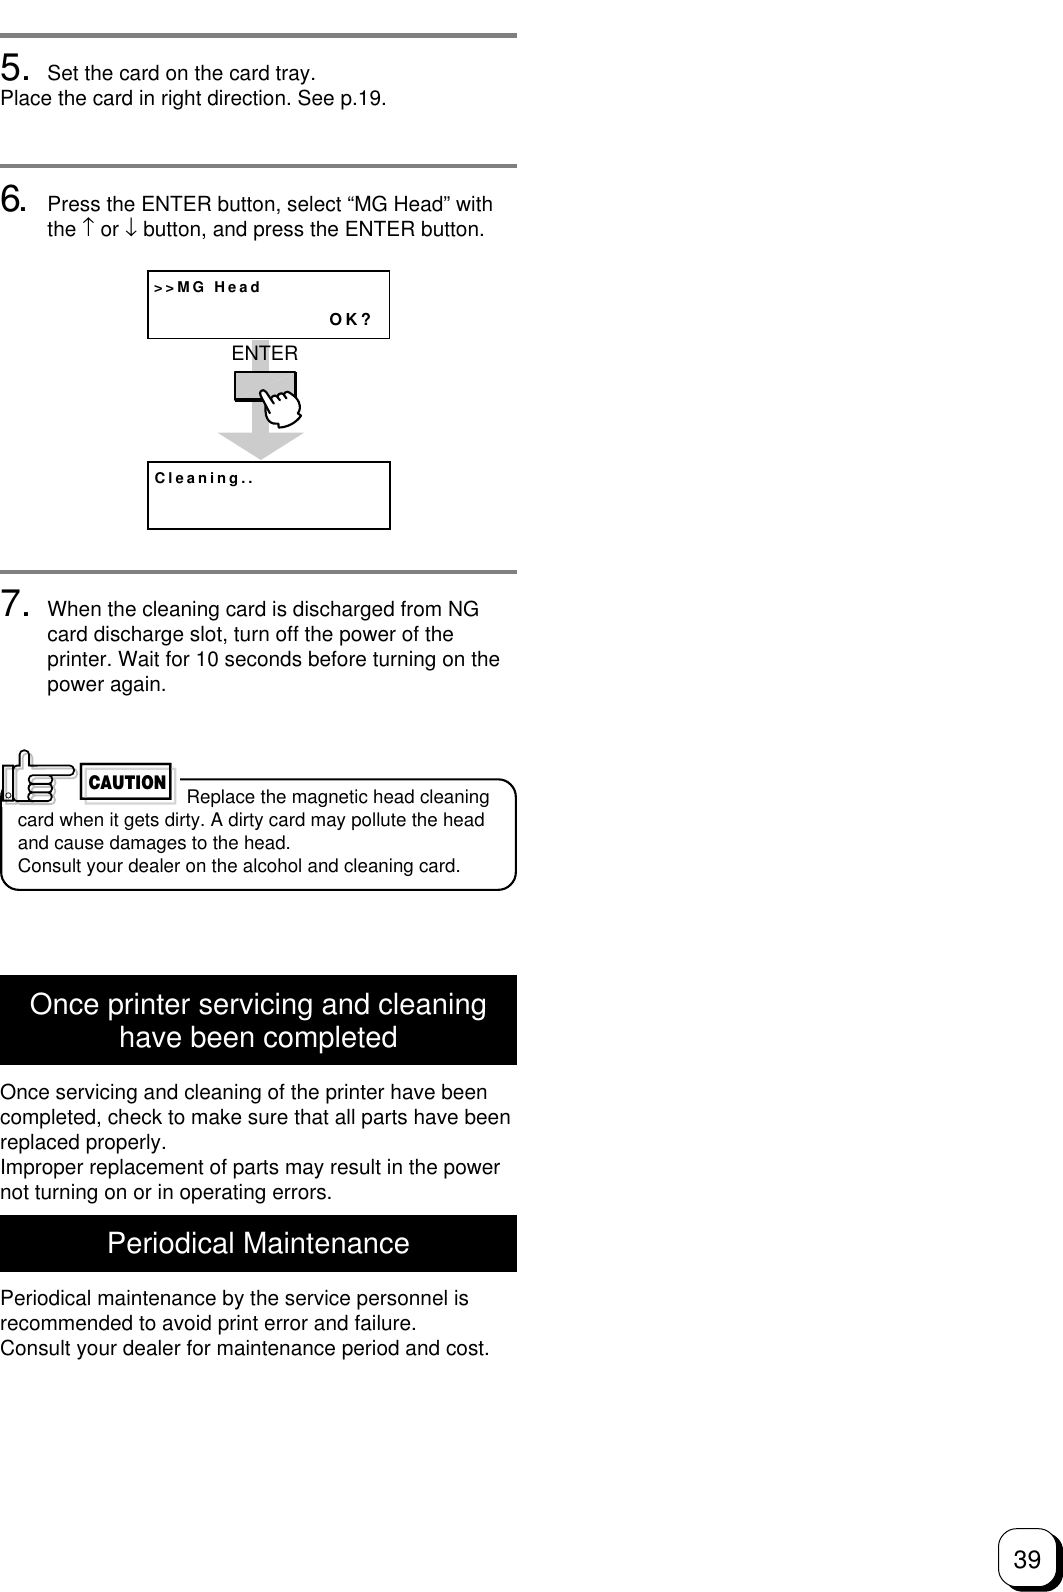
![37(to the next page)4. Remove dirt on the fan filter using a vacuumcleaner or other cleaning equipment.Hold the sponge with your hand so that it is not suckedinto the cleaner.Side filterPress down the sponge intothe dents at four corners, andset it under the tabs on theframe.Bottom filterPlace the spongeunder the tabs on theframe.Replace the fan filter when it begins to deteriorate.(the elasticityof the sponge is lost and the sponge tends to be broken intopieces.) It is recommended that fan filter should be replacedonce a year. Contact your dealer for details of replacing the filter. If the sponge is removed, attach it again as shownbelow.Cleaning the card feed rollers and heatrollersDirty rollers are the major cause of jamming of thecards. It is recommended to clean the rollers once afterprinting about 1,000 cards. It is also recommended tocarry out cleaning before the work, because theretransfer roller (heat roller) does not operate while it ishot.1. Remove the retransfer film cassette.See p.15 in this manual.2. Turn on the power of the printer.The printer initializes, and the [No Cassette] error isindicated.3. From user mode select cleaning mode.4. Press the ENTER button. Select [Rollers] with ↑and ↓ buttons, and press the ENTER button.See p.28 in this manual.Insert the cleaning card in about 10 seconds. If you failsto set the card within this time, the printer returns to“Start OK?” Press the ENTER button again to proceed.>Cleaning>>User ModeMENU>>RollersOK?Cleaning..Start OK?ENTERCleaning..ENTER5. Install the fan filters back to the original positions.](https://usermanual.wiki/JVCKENWOOD/K9T002/User-Guide-592487-Page-37.png)
![45Turnover section [Jam (turnover)]1. Open the printer door and remove the ink ribboncassette.See p.13 in this manual.2. Remove any jammed cards.Retransfer section [Jam (transfer)]1. Open the printer door and remove the retransferfilm cassette.See p.15 in this manual.2. A jog lever are supplied as standard.The jog lever are attached to the center of the card tray.Turn the tabs in the arrow direction and take out the joglever and removal stick.3. Turn the jog dial.Turn the jog dial with the attached jog lever.4. Remove the card.Remove the card. Some parts inside the printer may behot. Be careful when removing the card.CAUTION• If the jammed cards come out of the turnover table,push them back into the table, and rotate the tableslowly (as it is positioned vertically) until the table islocated so that the cards can be taken out.CAUTION•When rotating the turnover table, be carefulnot to touch the metal edge. Wear a glovefor this work.Injury• If you can pull out the jammed cards, take them out.Jog lever](https://usermanual.wiki/JVCKENWOOD/K9T002/User-Guide-592487-Page-45.png)