JVC KENWOOD V1U001 Wireless Transmitter User Manual Cover RV NB10 J 2
JVC KENWOOD Corporation Wireless Transmitter Cover RV NB10 J 2
User Manual
Victor Company of Japan, Limited
Victor Company of Japan, LimitedVictor Company of Japan, Limited
Victor Company of Japan, Limited
G-1
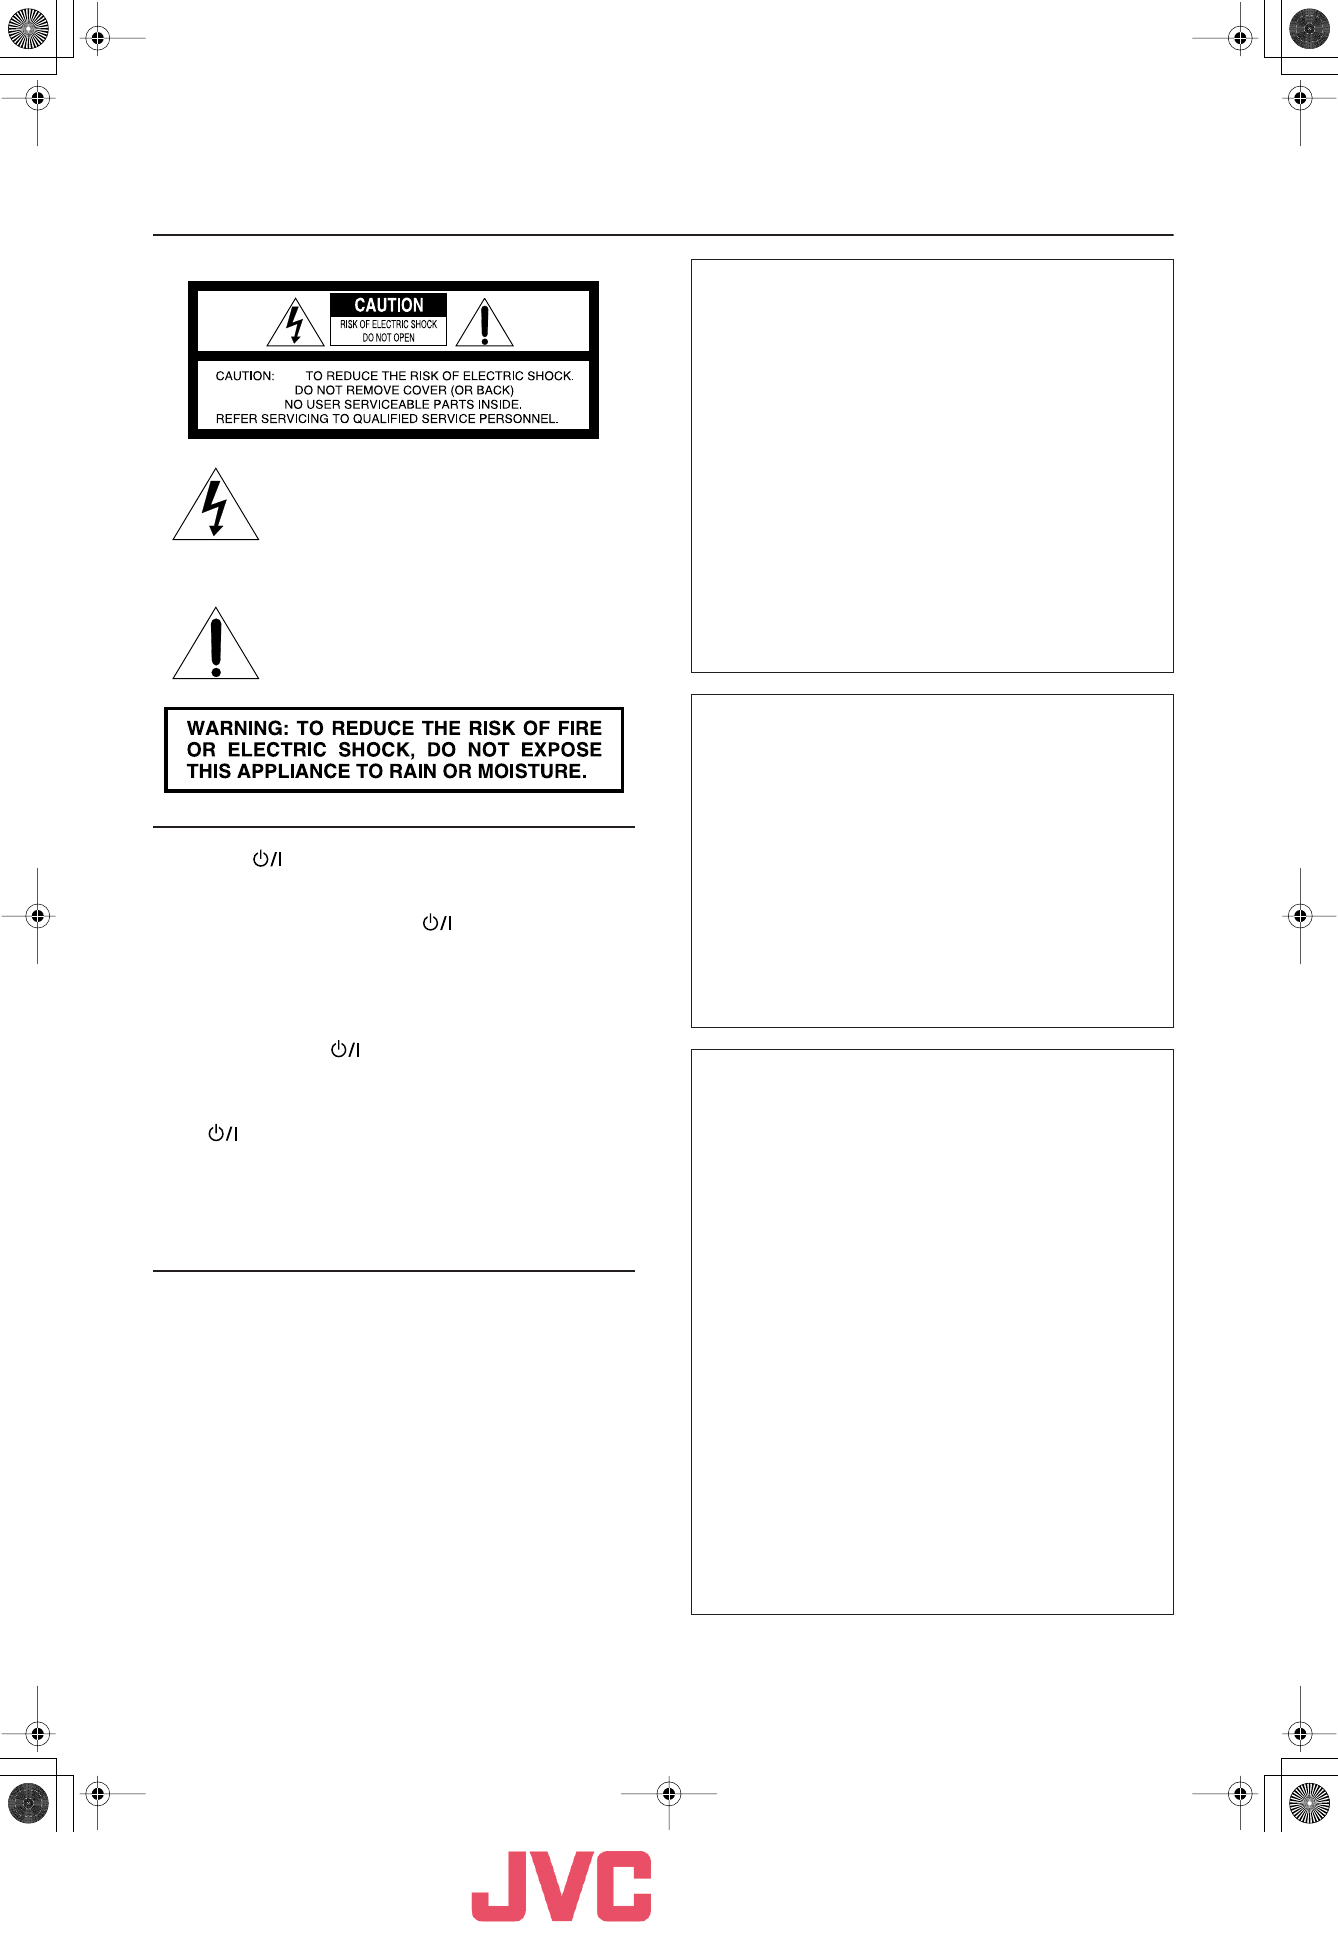
Warnings, Cautions and Others
Mises en garde, précautions et indications diverses
The lightning flash with arrowhead symbol,
within an equilateral triangle is intended to alert
the user to the presence of uninsulated
“dangerous voltage” within the product’s
enclosure that may be of sufficient magnitude to
constitute a risk of electric shock to persons.
The exclamation point within an equilateral
triangle is intended to alert the user to the
presence of important operating and
maintenance (servicing) instructions in the
literature accompanying the appliance.
CAUTION
—
ON/STANDBY button!
Disconnect the mains plug to shut the power off completely (the
STANDBY lamp goes off). When installing the apparatus, ensure
that the plug is easily accessible. The ON/STANDBY button in
any position does not disconnect the mains line.
• When the unit is on standby, the STANDBY lamp lights red.
• When the unit is turned on, the STANDBY lamp goes off.
The power can be remote controlled.
ATTENTION
—
Touche
ON/STANDBY!
Déconnectez la fiche secteur pour mettre l’appareil complètement
hors tension (le témoin STANDBY l s’éteint). Lors de l’installation de
l’appareil, assurez-vous que la fiche soit facilement accessible. La
touche ON/STANDBY dans n’importe quelle position ne
déconnecte pas l’appareil du secteur.
• Quand l’appareil est en mode d’attente, le témoin STANDBY est
allumé en rouge.
• Quand l’appareil est sous tension, le témoin STANDBY s’éteint.
L’alimentation ne peut pas être commandée à distance.
CAUTION
To reduce the risk of electrical shocks, fire, etc.:
1. Do not remove screws, covers or cabinet.
2. Do not expose this appliance to rain or moisture.
ATTENTION
Afin d’éviter tout risque d’électrocution, d’incendie, etc.:
1. Ne pas enlever les vis ni les panneaux et ne pas ouvrir le coffret
de l’appareil.
2. Ne pas exposer l’appareil à la pluie ni à l’humidité.
For U.S.A.
This equipment has been tested and found to comply with the
limits for a Class B digital device, pursuant to part 15 of the
FCC Rules. These limits are designed to provide reasonable
protection against harmful interference in a residential
installation. This equipment generates, uses, and can radiate
radio frequency energy and, if not installed and used in
accordance with the instructions, may cause harmful
interference to radio communications. However, there is no
guarantee that interference will not occur in a particular
installation. If this equipment does cause harmful interference
to radio or television reception, which can be determined by
turning the equipment off and on, the user is encouraged to try
to correct the interference by one of the following measures:
Reorient or relocate the receiving antenna.
Increase the separation between the equipment and receiver.
Connect the equipment into an outlet on a circuit different from
that to which the receiver is connected.
Consult the dealer or an experienced radio/TV technician for
help.
For wireless transmitter
This device complies with Part 15 of the FCC Rules. Operation
is subject to the following two conditions:
(1) This device may not cause harmful interference.
(2) This device must accept any interference received, including
interference that may cause undesired operation.
IMPORTANT NOTE:
FCC Radiation Exposure Statement:
This equipment complies with FCC RF radiation exposure limits
set forth for an uncontrolled environment. To maintain
compliance with FCC RF exposure compliance requirements,
please avoid direct contact to the transmitting antenna during
transmitting.
This transmitter must not be co-located or operating in
conjunction with any other antenna or transmitter.
For Canada/pour le Canada
THIS DIGITAL APPARATUS DOES NOT EXCEED THE
CLASS B LIMITS FOR RADIO NOISE EMISSIONS
FROM DIGITAL APPARATUS AS SET OUT IN THE
INTERFERENCE-CAUSING EQUIPMENT STANDARD
ENTITLED “DIGITAL APPARATUS,” ICES-003 OF THE
DEPARTMENT OF COMMUNICATIONS.
CET APPAREIL NUMERIQUE RESPECTE LES
LIMITES DE BRUITS RADIOELECTRIQUES
APPLICABLES AUX APPAREILS NUMERIQUES DE
CLASSE B PRESCRITES DANS LA NORME SUR LE
MATERIEL BROUILLEUR: “APPAREILS
NUMERIQUES”, NMB-003 EDICTEE PAR LE
MINISTRE DES COMMUNICATIONS.
Operation is subject to the following two conditions: (1) this
device may not cause interference, and (2) this device must
accept any interference, including interference that may cause
undesired operation of the device.
L’utilisation de ce dispositif est autorisée seulement aux
conditions suivantes : (1) il ne doit pas produire de brouillage et
(2) l’utilisateur du dispositif doit être prêt à accepter tout
brouillage radioélectrique reçu, même si ce brouillage est
susceptible de compromettre le fonctionnement du dispositif.
Caution_RV-NB10[J]f.fm Page 1 Friday, January 20, 2006 4:58 PM
Wireless (FM) Transmitter
Model: VFT-001/VFT-001W
User's Manual 1 / 9
Victor Company of Japan, Limited
Victor Company of Japan, LimitedVictor Company of Japan, Limited
Victor Company of Japan, Limited
G-2
IMPORTANT FOR LASER PRODUCTS
1. CLASS 1 LASER PRODUCT
2.
CAUTION:
Do not open the top cover. There are no user
serviceable parts inside the unit; leave all servicing to qualified
service personnel.
3.
CAUTION:
Visible and/or invisible class 1M laser radiation when
open. Do not view directry with optical instruments.
IMPORTANT POUR PRODUITS LASER
1. PRODUIT LASER CLASSE 1
2.
ATTENTION:
N’ouvrez pas le couvercle supérieur. Il n’y a
aucune pièce réparable par l’utilisateur à l’intérieur de l’appareil;
confiez toute réparation à un personnel qualifié.
3.
ATTENTION:
Rayonnement laser visible et/ou invisible de
classe 1M une fois ouvert.
Ne pas regarder directement avec des
instruments optiques.
CAUTION:
• Do not block the ventilation openings or holes. (If the
ventilation openings or holes are blocked by a newspaper or
cloth, etc., the heat may not be able to get out.
• Do not place any naked flame sources, such as lighted
candles, on the apparatus.
• When discarding batteries, environmental problems must be
considered and local rules or laws governing the disposal of
these batteries must be followed strictly.
• Do not expose this apparatus to rain, moisture, dripping or
splashing and that no objects filled with liquids, such as vases,
shall be placed on the apparatus.
ATTENTION:
• Ne bloquez pas les orifices ou les trous de ventilation. (Si les
orifices ou les trous de ventilation sont bloqués par un journal
un tissu, etc., la chaleur peut ne pas être évacuée
correctement de l’appareil.)
•Ne placez aucune source de flamme nue, telle qu’une bougie,
sur l’appareil.
• Lors de la mise au rebut des piles, veuillez prendre en
considération les problèmes de l’environnement et suivre
strictement les règles et les lois locales sur la mise au rebut
des piles.
• N’exposez pas cet appareil à la pluie, à l’humidité, à un
égouttement ou à des éclaboussures et ne placez pas des
objets remplis de liquide, tels qu’un vase, sur l’appareil.
[European Union Only]
[Union européenne seulement]
Caution_RV-NB10[J]3.fm Page 2 Thursday, January 19, 2006 4:58 PM
Wireless (FM) Transmitter
Model: VFT-001/VFT-001W
User's Manual 2 / 9
Victor Company of Japan, Limited
Victor Company of Japan, LimitedVictor Company of Japan, Limited
Victor Company of Japan, Limited
5
Connections
■Connecting the microphone/guitar
(See page 18.)
■
Connecting the auxiliary equipment
(See page 17.)
■Connecting the AC power cord
■Connecting to the car battery
Power cord
CAUTIONS:
• ONLY USE THE JVC POWER CORD PROVIDED WITH
THIS SYSTEM TO AVOID MALFUNCTION OR
DAMAGE TO THE SYSTEM.
•BE SURE TO UNPLUG THE POWER CORD FROM THE
OUTLET WHEN GOING OUT OR WHEN THE SYSTEM
IS NOT IN USE FOR AN EXTENDED PERIOD OF TIME.
CAUTION:
• Be sure to use the specified car adapter (JVC model CA-R120) to prevent
mishaps or damage resulting from different polarity design.
•For safety, stop the car before performing operations.
•Be sure to start the engine when you use the car adapter; otherwise, the car
battery will be exhausted.
• During transport, stabilize the system in a box, etc.
•To prevent malfunctions, do not leave the system in a car for a long time.
• If the power is supplied through the car battery, the display will be blank
with the system turned off (at standby).
Unplug the AC power cord from the system to supply the power
through the car battery; otherwise, the system does not work.
■Memory backup batteries
“R6(SUM-3)/AA(15F)”
size batteries (not
supplied)
Match the polarity (+ and –) on the batteries
with the + and – markings in the battery
compartment.
Battery cover
To car’s cigarette
lighter socket (DC12V)
Car adapter JVC model
CA-R120 (not supplied)
(not supplied)
(not supplied)
Auxiliary equipment
(not supplied)
Headphones jack
■Wireless connection (See page 16.)
Auxiliary equipment
(not supplied)
Wireless transmitter
(supplied) Pin-plug x 2
Signal cord (not supplied)
Stereo mini plug
CAUTION: Make all connection before plugging the system into an AC power outlet.
EN01-06_RV-NB10[J]2.fm Page 5 Thursday, January 12, 2006 1:14 PM
Wireless (FM) Transmitter
Model: VFT-001/VFT-001W
User's Manual 3 / 9
Victor Company of Japan, Limited
Victor Company of Japan, LimitedVictor Company of Japan, Limited
Victor Company of Japan, Limited
6
Match the polarity (+ and –) on the batteries
with the + and – markings in the battery
compartment.
Battery cover
To remove the batteries, remove battery
“3” first.
Notes:
• The memory backup batteries will not be
consumed as long as the power is supplied
from an AC outlet, loaded 10 batteries, or
car battery (DC12V). However, if no power
is supplied to the system, the memory
backup batteries should be replaced with
new ones approximately every 12 months to
securely maintain the contents of the
memory.
• Before replacing the memory backup
batteries, always connect the AC power cord
to the system to prevent the contents of
memory from being erased.
• When a power failure occurs, the time
indication disappears from the display to
save the battery power of the memory
backup batteries.
CAUTION:
To avoid battery leakage or explosion:
• When you need to replace the batteries,
replace all batteries at the same time with
new ones. Before replacing, you need to
supply AC power to the system.
• Do not use an old battery with new ones.
• Do not use different types of batteries
together.
■Operating the system on
batteries
“R20/D(13F)” size
batteries (not supplied)
To remove the batteries, remove battery
“10” first.
Notes:
• When you operate the system on mains
(AC) power or on car battery (DC12V), the
power source automatically switches from
batteries to AC or DC12V. However, you
should remove the 10 batteries when
operating on AC power or car battery
(DC12V).
• When the batteries are exhausted, the
following symptoms will occur:
– Mistracking occurs during disc playback.
– Sounds are distorted intermittently during
tape playback.
– “DC OFF” flashes on the display, then the
power goes off.
If this happens, replace the batteries.
• It is recommended to use AC power cord
when recording important material or
listening to a disc.
CAUTION:
To avoid battery leakage or explosion:
• Remove the 10 batteries when the system is
not in use for an extended period of time.
• When you need to replace the batteries,
replace all batteries at the same time with
new ones.
• Do not use different types of batteries
together.
• If the power is supplied through the
batteries, the display will be blank with the
system turned off (at standby).
Unplug the AC power cord from the
system to supply the power through the
batteries; otherwise, the system does
not work.
PHONES jack
EN01-06_RV-NB10[J]2.fm Page 6 Thursday, January 12, 2006 1:14 PM
Wireless (FM) Transmitter
Model: VFT-001/VFT-001W
User's Manual 4 / 9
Victor Company of Japan, Limited
Victor Company of Japan, LimitedVictor Company of Japan, Limited
Victor Company of Japan, Limited
16
■■
Listening to auxiliary equipment
You can listen to auxiliary equipment with the following methods:
•Transmitting sound on FM wave
• Connecting to the AUX IN jack
Note:
For operation of the auxiliary equipment, refer to its instructions.
■
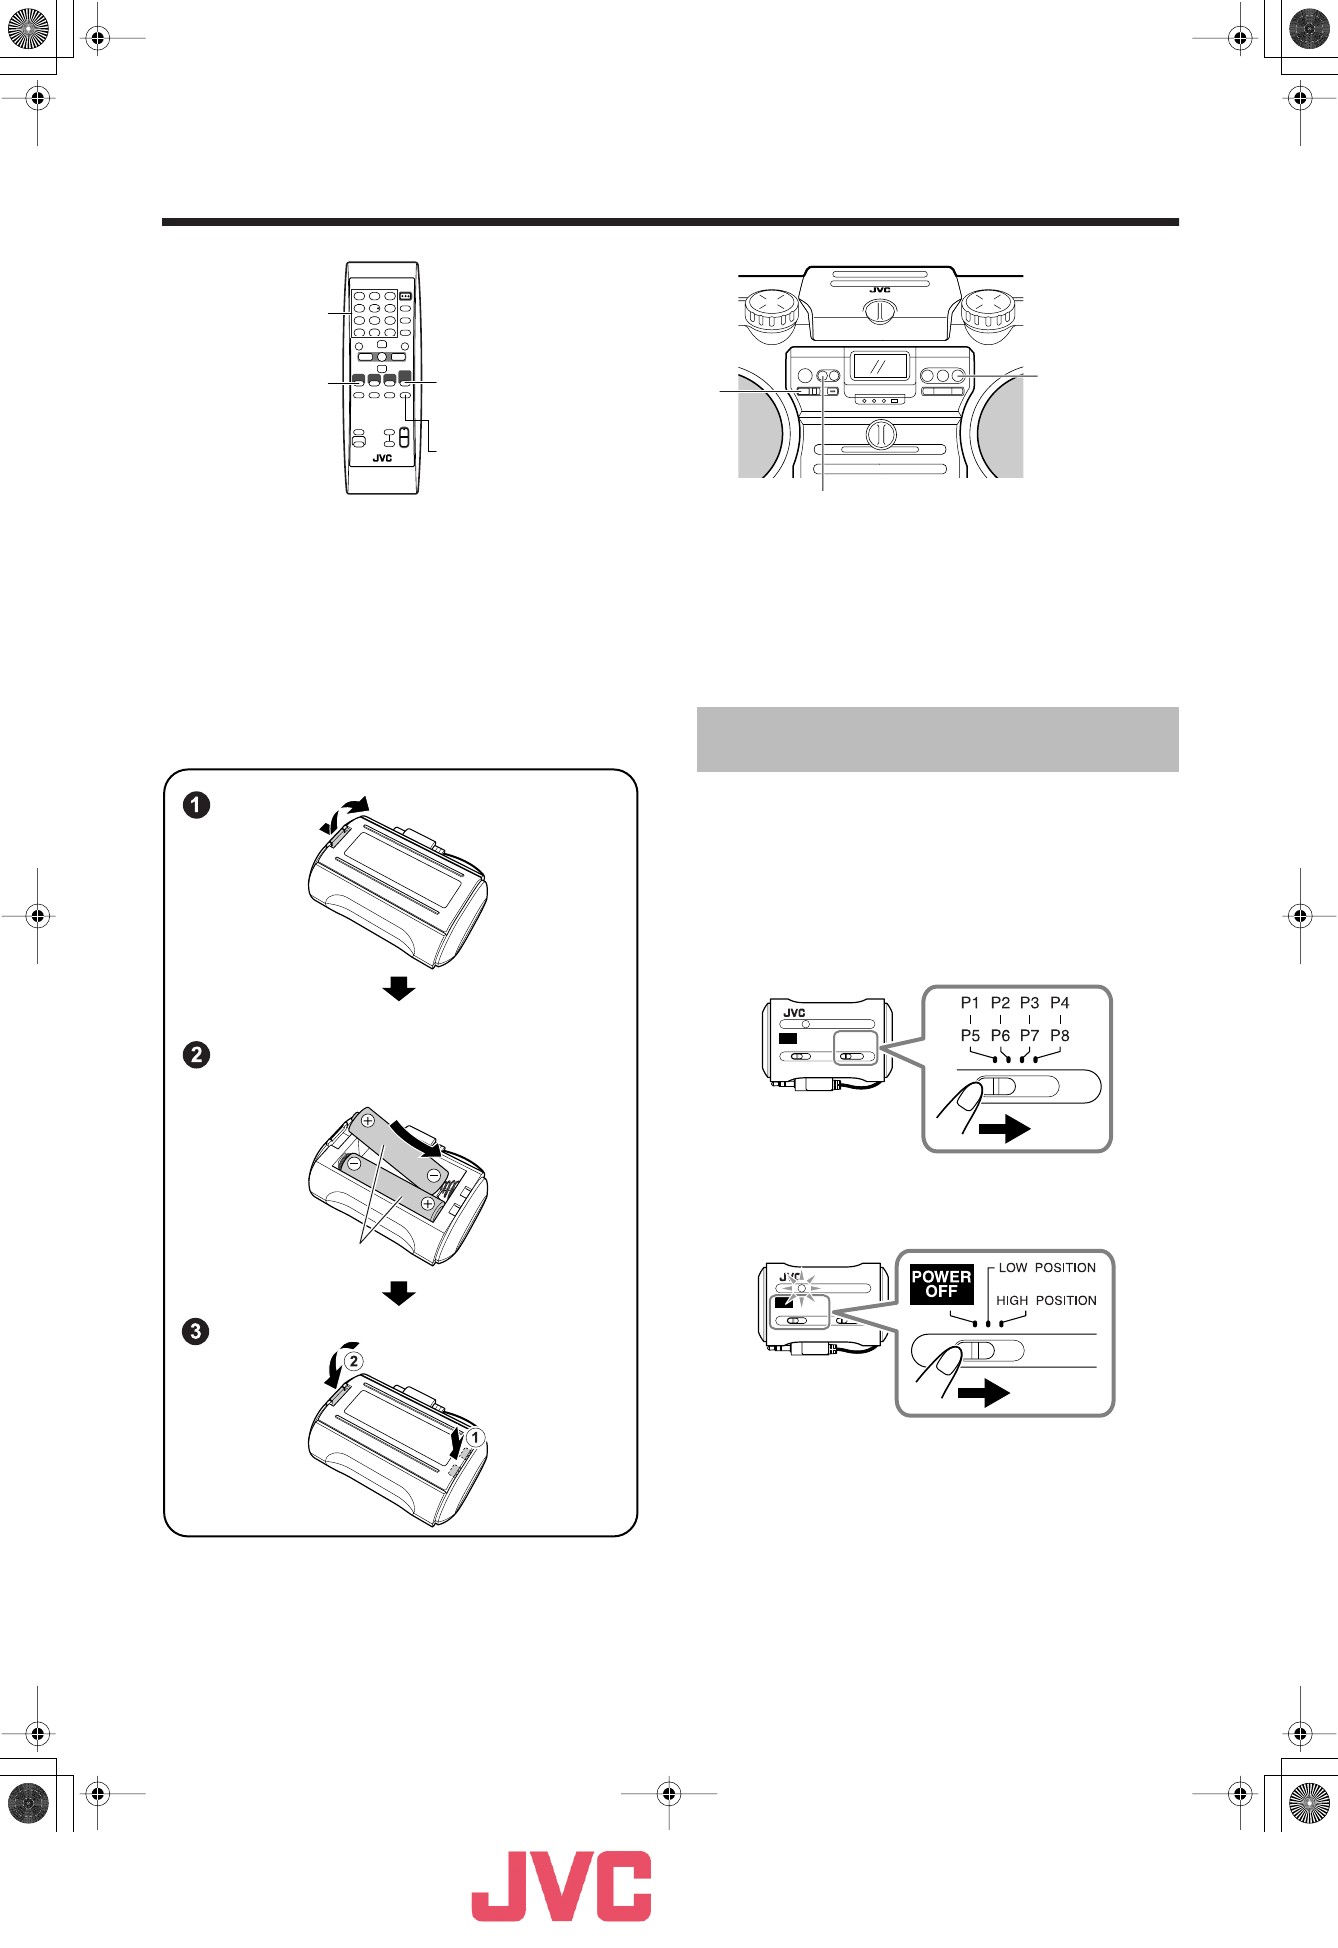
Transmitting sound on FM wave
You can connect auxiliary equipment such as a digital audio player to the wireless transmitter, then transmit the sound signals on FM wave.
■
Installing the batteries to the wireless
transmitter
■
1.Connect the wireless transmitter to the
headphones jack of auxiliary equipment.
■
2.Select one of the position numbers on the
wireless transmitter.
•To check the assigned frequency to each the position number,
refer to the label put on the rear of the wireless transmitter.
•Make sure that no local FM station in you area uses the same
frequency.
■
3.Turn on the wireless transmitter.
The red lamp lights up.
•To select a position number from P1 - P4, set the switch to
LOW POSITION.
•To select a position number from P5 - P8, set the switch to
HIGH POSITION.
■
4.Set the volume level of the system to
minimum.
Continued on the next page...
AUX
AUX WIRELESS/
FM/AM
WIRELESS/
FM/AM PRESET TUNING
Number buttons
FM MODE
R6(SUM-3)/AA(15F)
(supplied)
Match the polarity (+ and –) on the batteries with the +
and – markings in the battery compartment.
Listening to auxiliary
equipment
EN07-20_RV-NB10[J]3.fm Page 16 Thursday, January 19, 2006 7:03 PM
Wireless (FM) Transmitter
Model: VFT-001/VFT-001W
User's Manual 5 / 9
Victor Company of Japan, Limited
Victor Company of Japan, LimitedVictor Company of Japan, Limited
Victor Company of Japan, Limited
17
■
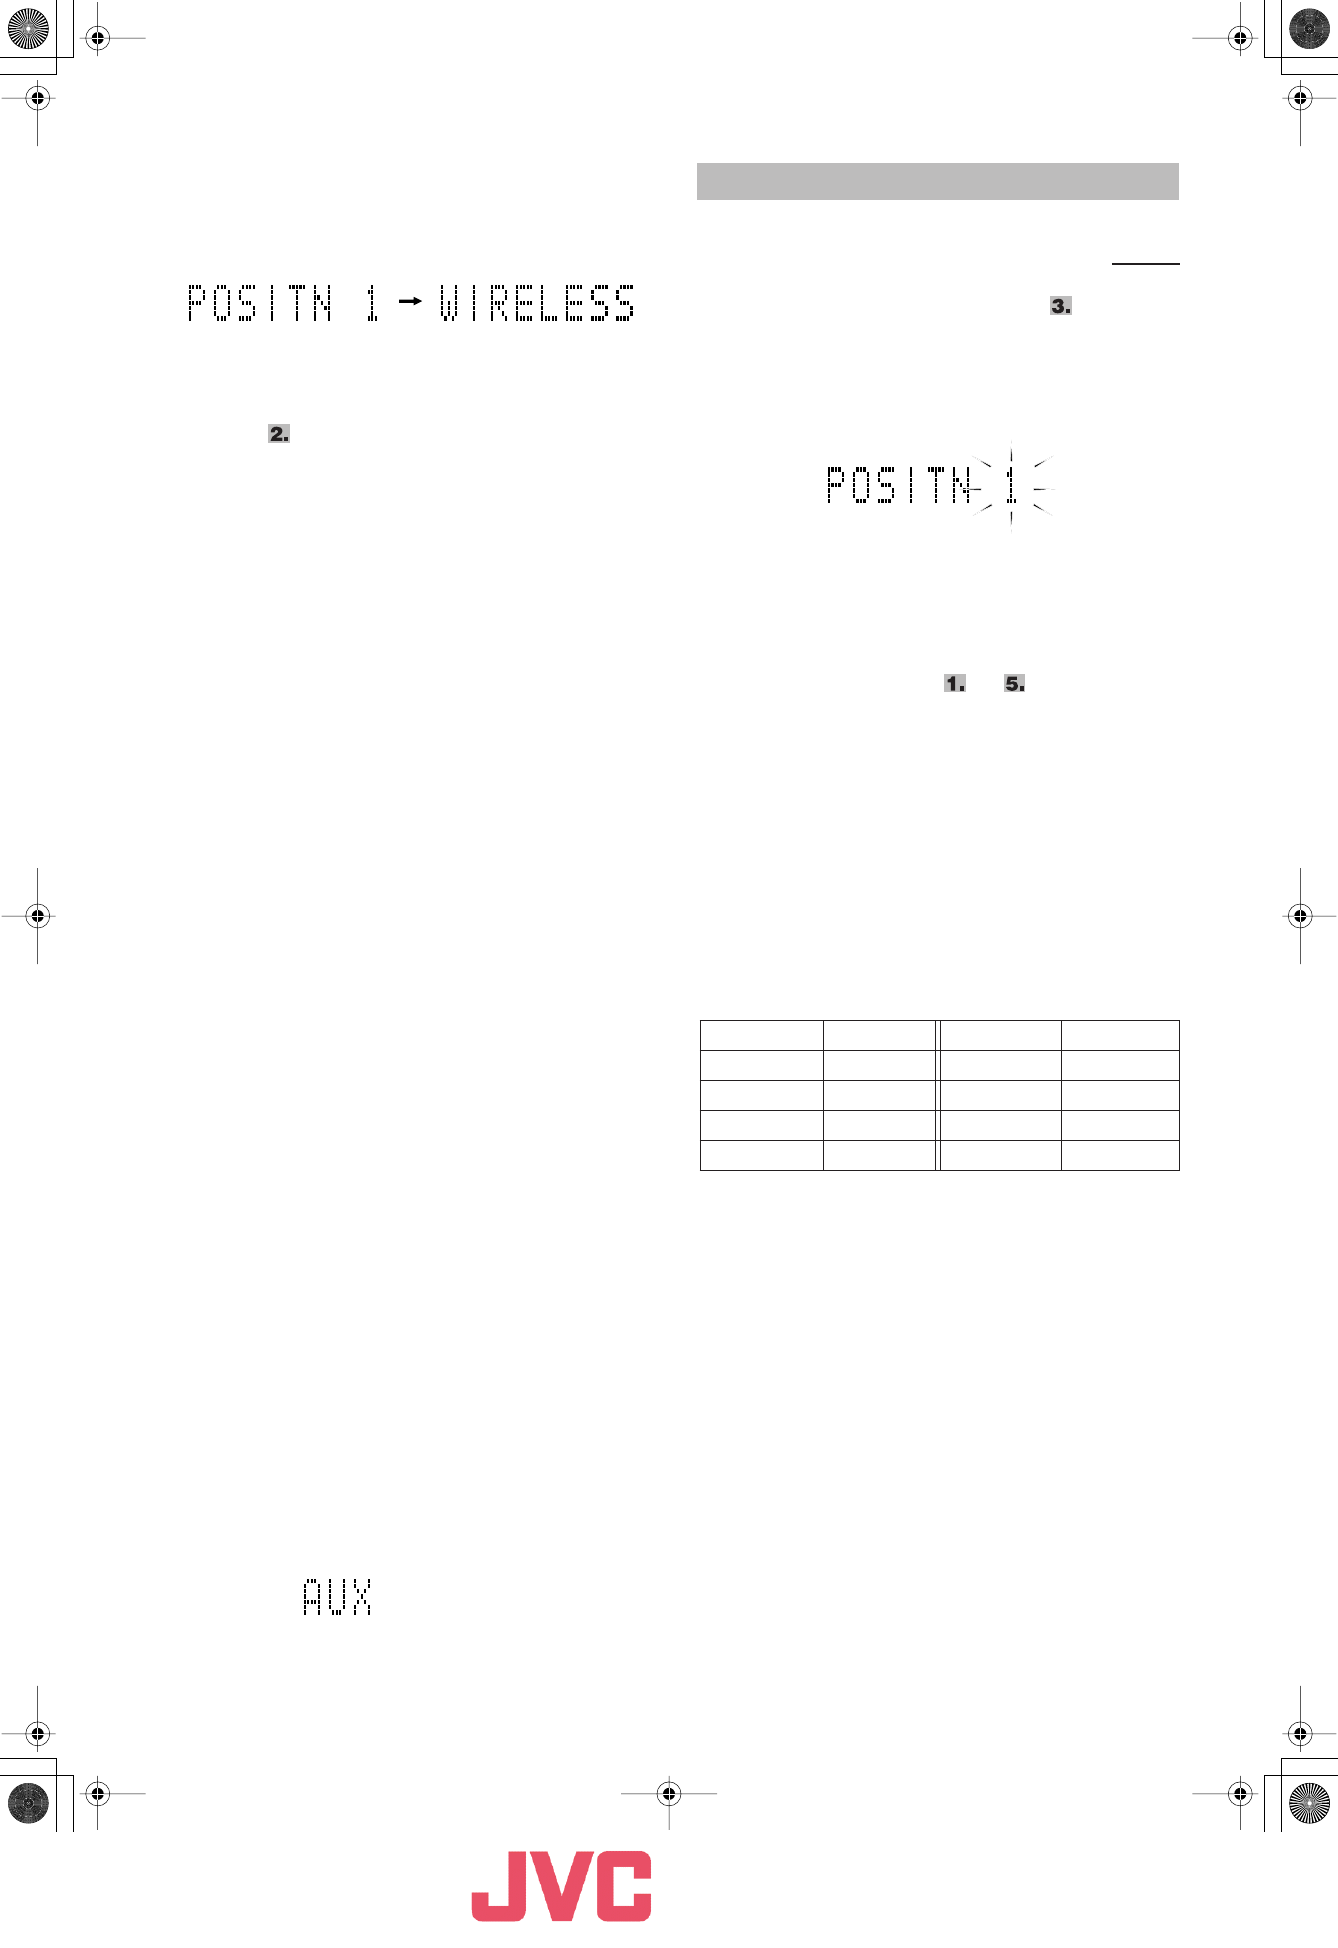
5.Press WIRELESS/FM/AM to select
WIRELESS as the source.
The system tunes in to the last tuned frequency. The following
information appears on the display.
■
6.Select the same position number as you
have selected on the wireless transmitter
in step on page 16.
•
On the remote control:
Press the number button
corresponding to the position number.
•
On the system:
Press PRESET TUNING repeatedly to
select the position number.
■
7.Start playing the connected equipment,
then adjust the volume on the equipment.
■
8.Adjust the volume of the system to the
desired listening level.
•
If received sounds are noisy,
press FM MODE on the
remote control. The MONO indicator lights up and the sound
becomes monaural, but the reception improves. When you
tune in to another frequency using 4
or ¢
, the MONO
indicator goes off and stereo effect restores automatically.
Notice: • To adjust the reception condition
Adjust the FM telescopic antenna’s length, angle and
direction until the best reception is obtained (see page
9).
•To avoid sound distortion
Make sure not to increase the volume of the connected
equipment too high.
Notes:
• If the frequency (position number) you select to receive the
signals from the wireless transmitter is used by an FM station or
is adjacent to an FM station frequency, it interferes with the
reception from the wireless transmitter. If this happens, select
another frequency (position number).
• If you are nearby the TV or FM stations which transmit strong
signals, it interferes with the reception from the wireless
transmitter. In this case, you may not be able to use the wireless
transmitter.
•To get good reception from the wireless transmitter:
– Make sure that there is no obstruction between the system and
the wireless transmitter.
– Straighten the connecting cord of the wireless transmitter as
much as possible.
You can preset up to eight frequencies.
There is a time limit in doing the following steps. If the setting is
canceled before you finish, start again from step
.
■
1.Select WIRELESS by pressing WIRELESS/
FM/AM.
■
2.Press 4
or
¢
to tune in to a frequency.
■
3.Press SET.
■
4.Press the number buttons (1 – 8) to select
the preset number you want.
■
5.Press SET.
“STORED” appears on the display and the frequency is stored.
■
6.Repeat above steps to for each
frequency you want to store into memory
with a preset number.
To change the preset frequencies,
repeat the same steps
as above to overwrite a new frequency.
Note:
When you listen to an auxiliary equipment connected to the
wireless transmitter after changing the preset frequency initially
memorized in the system, set the frequency back to the initial one
according to the above procedure; otherwise, you cannot receive
the signal even though you select the same position number as the
one on the transmitter.
Following table shows the initial settings of the position numbers
on the system.
Initial settings of the position numbers:
CAUTION: To prevent the preset frequencies
from being erased because of a power failure,
etc., install memory backup batteries in the
system. (See pages 5 and 6.)
■
Connecting to the AUX IN jack
First make sure that the auxiliary equipment is properly connected to the system. (See pages 5 and 6.)
■
1.Set the volume level to minimum.
■
2.Press AUX.
“AUX” appears on the display.
•To listen to the auxiliary equipment, start playing the auxiliary
equipment.
■
3.Adjust the volume to the desired listening
level.
■
4.Apply sound effects, if you wish.
• Adjust the super woofer volume to reinforce the bass sound.
(After one second)
Presetting frequencies
Using the remote control only
Position no. Frequency Position no. Frequency
POSITN 1 88.10 MHz POSITN 5 107.10 MHz
POSITN 2 88.30 MHz POSITN 6 107.30 MHz
POSITN 3 88.50 MHz POSITN 7 107.50 MHz
POSITN 4 88.70 MHz POSITN 8 107.70 MHz
EN07-20_RV-NB10[J]3.fm Page 17 Thursday, January 19, 2006 6:10 PM
Wireless (FM) Transmitter
Model: VFT-001/VFT-001W
User's Manual 6 / 9

Victor Company of Japan, Limited
Victor Company of Japan, LimitedVictor Company of Japan, Limited
Victor Company of Japan, Limited
22
■■
Specifications
Amplifier
Output Power
6 W per channel, min. RMS, at 4
Ω
from 150 Hz to 15
kHz with no more than 10% total harmonic distortion.
20 W per channel woofer, min. RMS into 4
Ω
at 60 Hz
with no more than 10% total harmonic distortion.
Input Sensitivity/Impedance (1 kHz)
AUX IN 300 mV/47 k
Ω
MIC/GUITAR INPUT: Switchable
MIC 200
Ω
– 2 k
Ω
(6.3 mm dia. plug)
GUITAR 100 k
Ω
– 1 M
Ω
(6.3 mm dia. plug)
Output Sensitivity/Impedance (1 kHz)
Phones 16
Ω
– 1 k
Ω
0 – 12 mW/ch output into 32
Ω
Cassette Deck
Frequency Response
Type II (High position) 60 Hz – 14 kHz
Wow and Flutter 0.15% (WRMS)
Disc Player
Dynamic range 90 dB
Signal-to-noise ratio 95 dB
Wow and Flutter Unmeasurable
Tuner
WIRELESS
Tuning Range 87.50 MHz – 108.00 MHz
FM Tuner
Tuning Range 87.5 MHz – 108.0 MHz
AM Tuner
Tuning Range 530 kHz – 1 710 kHz
Antenna FM telescopic antenna
Ferrite core antenna for AM
Speakers
Full range 8 cm (3-3/16")
×
2, 4
Ω
Super woofer 16 cm (6-5/16")
×
2, 4
Ω
Wireless Transmitter
(VFT-001)
Power Requirements DC 3 V (“R6/AA(15F)” batteries [2])
Transmitting Frequencies
88.10 MHz, 88.30 MHz, 88.50 MHz,
88.70 MHz, 107.10 MHz, 107.30 MHz,
107.50 MHz, 107.70 MHz
Input terminal Stereo mini plug
Frequency response 50 Hz to 12 000 Hz
Battery life (at normal temperature)
Approx. 50 hours (with Alkaline batteries)
Approx. 20 hours (with Manganese batteries)
Dimensions 78 mm
×
55 mm
×
35 mm (W/H/D)
(3-1/8"
×
2-3/16"
×
1-7/16")
Mass Approx. 50 g (0.12 lbs) (without batteries)
General
Dimensions 690 mm
×
239 mm
×
296 mm (W/H/D)
(27-3/16"
×
9-7/16"
×
11-11/16")
Mass 9.5 kg (21 lbs) (without batteries)
10.6 kg (23.4 lbs) (with batteries)
Power Specifications
Power Requirements AC 120 V , 60 Hz
DC 15 V (“R20/D(13F)” batteries [10])
External DC 12 V (car battery via optional
CA-R120 car adapter)
Power Consumption 50 W (power on mode)
1.6 W (in standby mode)
Symptom Possible cause Action
Unable to operate the remote control. • The path between the remote control and
the sensor on the system is blocked.
• The batteries have lost their charge.
• Remove the obstruction.
• Replace the batteries.
Operations are disabled. The built-in microprocessor has
malfunctioned due to external electrical
interference.
Unplug the system then plug it back in
after a few minutes.
The cassette holder cannot be opened. During tape play, the power cord has been
unplugged.
Plug in the power cord and press the
ON/STANDBY button.
Indicators and the display do not light up
while in standby mode.
Batteries or DC power is used to supply
the power.
Design and specifications are subject to change without notice.
EN07-22_RV-NB10[J]f.fm Page 22 Tuesday, January 24, 2006 2:06 PM
Wireless (FM) Transmitter
Model: VFT-001/VFT-001W
User's Manual 7 / 9

Victor Company of Japan, Limited
Victor Company of Japan, LimitedVictor Company of Japan, Limited
Victor Company of Japan, Limited
For U.S.A.
Warranty_RV-NB10[J]2.fm Page 1 Thursday, January 12, 2006 1:17 PM
Wireless (FM) Transmitter
Model: VFT-001/VFT-001W
User's Manual 8 / 9
Victor Company of Japan, Limited
Victor Company of Japan, LimitedVictor Company of Japan, Limited
Victor Company of Japan, Limited
For U.S.A.
Warranty_RV-NB10[J]2.fm Page 2 Thursday, January 12, 2006 1:17 PM
Wireless (FM) Transmitter
Model: VFT-001/VFT-001W
User's Manual 9 / 9