JVC DD 3B 8_DD 3_separate_volume_B User Manual 3B, 8B LVT1547 002C
DD-8B DD-8B LVT1547-002C English, Instructions for network
User Manual: JVC DD-3B DD-3B, DD-8B English, Instructions for network
Open the PDF directly: View PDF ![]() .
.
Page Count: 22
SEPARATE VOLUME
INSTRUCTIONS FOR NETWORK
FUNCTION
LVT1547-002C
[B]
DD-8
DD-3
This manual explains the network function of this system.
DD-83[B]-frontcover.fm Page 1 Wednesday, December 27, 2006 2:18 PM

1
•DLNA CERTIFIED
TM Audio/Video/Image Player
• This system complies with DLNA Guidelines 1.0.
• You can play back the following file types using
the network function of this system.
LPCM, WAV, MP3, WMA, JPEG, ASF, DivX,
MPEG1, MPEG2
NOTE
• “DLNA” stands for “Digital Living Network Alli-
ance”. Refer to the following website for details.
http://www.dlna.org/
CyberLink Media Server is a registered trademark along with other company and product names mentioned
in this publication, used for identification purposes and remain the exclusive property of their respective own-
ers.
DLNA and DLNA CERTIFIED are trademarks and/or service marks of Digital Living Network Alliance.
Microsoft, Windows, Windows XP are registered trademarks or trademarks of Microsoft Corporation in the
United States and other countries.
Information on DLNA
DD-83[B]-gpage.fm Page 1 Friday, August 25, 2006 9:37 AM

2
Introduction....................................3
Introduction to the network function................ 3
General flow chart for the network
function ......................................................... 4
Preparation.....................................5
Computer ........................................................5
Networking device...........................................5
Connection .....................................6
Connecting the main unit to the router............6
Installing CyberLink Media
Server..............................................7
Installing CyberLink Media Server .................. 7
Specifying the shared folders..........................8
Confirming the connection
to the computer..............................9
Starting CyberLink Media Server ....................9
Setting up the IP address............11
Occasions requiring the IP address
setup ........................................................... 11
Determining the IP address of the
computer..................................................... 11
Assigning the IP address to the
main unit .....................................................13
Playing back files stored on the
computer ......................................16
Playing back audio files ................................16
Reference .....................................18
Adding shared folders ...................................18
Connecting the main unit to the
computer directly ........................................19
Troubleshooting...........................20
Introduction
Connection
Installing CyberLink Media
Server
Confirming the connection to
the computer
Setting up the IP address
Playing back files stored on
the computer
Reference
Table of contents
DD-83[B]-01.fm Page 2 Wednesday, August 23, 2006 4:01 PM
3
Introduction
You can play back video, audio and still picture
files stored on your computer by setting up the net-
work with the computer and the main unit.
You must install CyberLink Media Server from the
bundled CD-ROM to your computer.
CyberLink Media Server is a software for send-
ing video, audio and still picture files stored on
your computer to the main unit.
The network can be easily set up without having to
manually configure the IP address of the main unit
by simply connecting a router with a DHCP func-
tion to the main unit. The DHCP function of the
router automatically assigns the IP address to the
main unit.
NOTE
• If the router does not have a DHCP function or
you do not use the DHCP function, you must
assign the IP address to the main unit manually.
• You can also use the network function by con-
necting the main unit to the computer directly.
(Refer to page 19.)
You can play back the following file types using the
network function of this system.
LPCM, WAV, MP3, WMA, JPEG, ASF, DivX,
MPEG1, MPEG2
NOTE
• You cannot use the network function to play
back a DivX DRM file stored on the connected
computer.
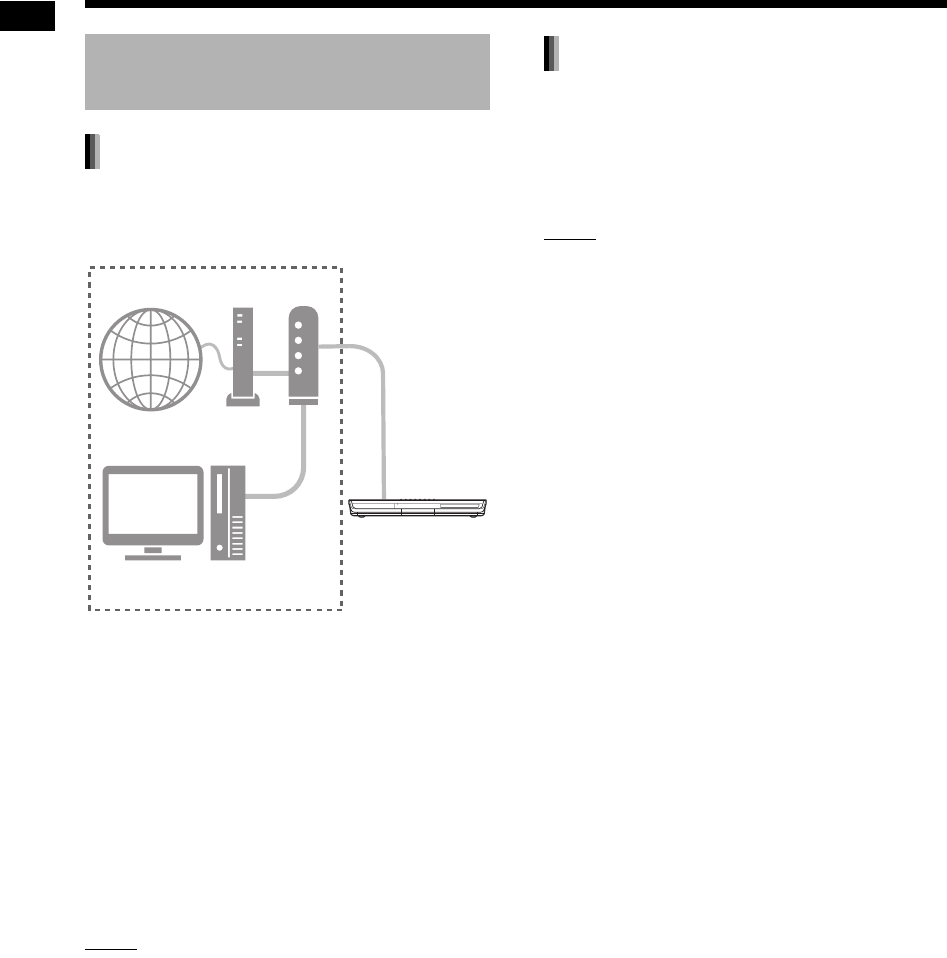
Introduction to the network
function
Outline of the network function
Internet Modem Router
Environment in use
Computer
Main unit
File types compatible with this system
Introduction
DD-83[B].book Page 3 Wednesday, October 4, 2006 5:24 PM
4
Introduction
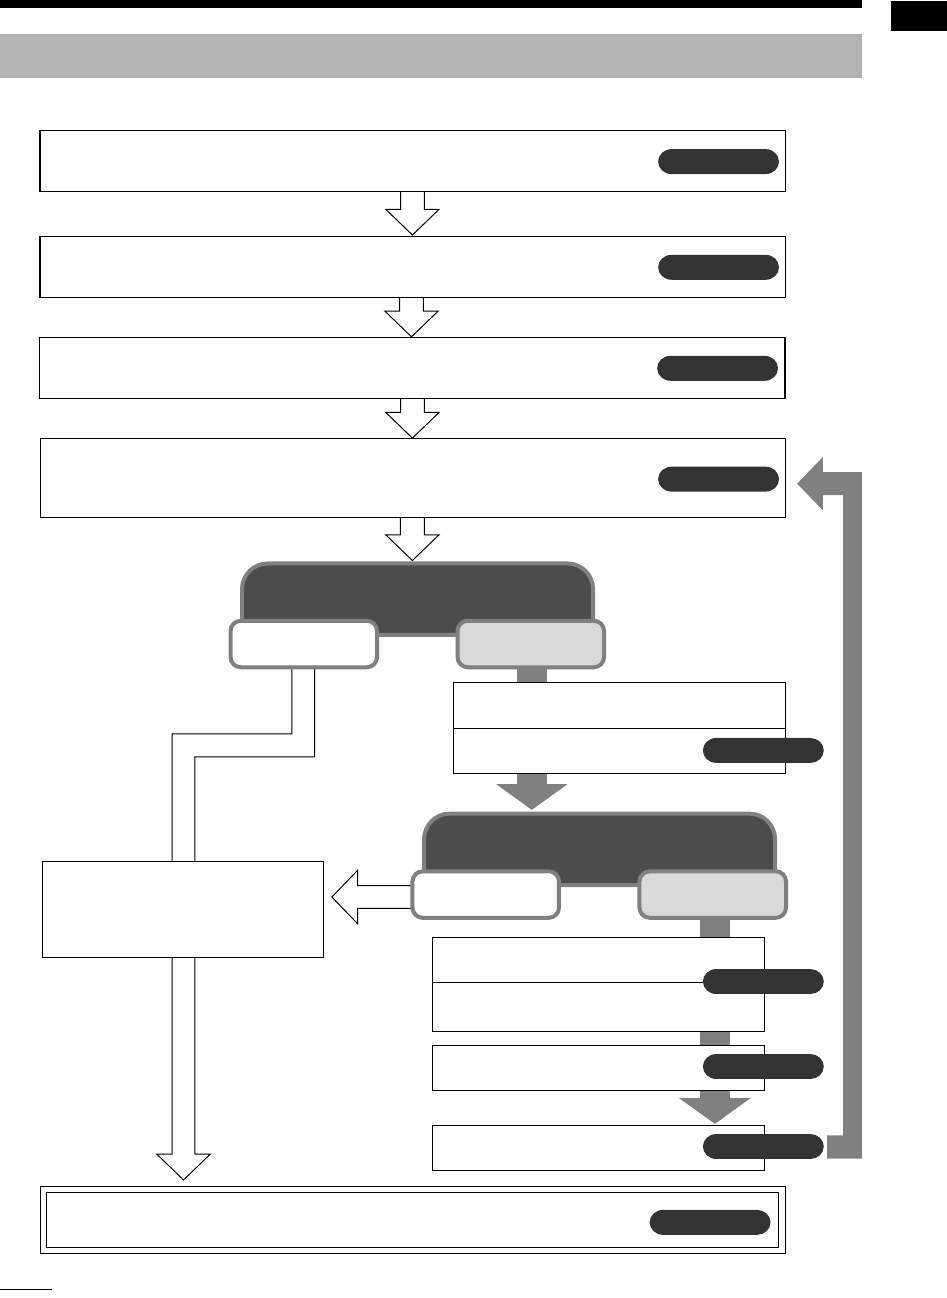
Set up the system following the flow chart shown below. The procedure for setting up the system differs
depending on your usage environment.
NOTE
• To connect the main unit to the computer directly, refer to “Connecting the main unit to the computer directly”
on page 19.
General flow chart for the network function
Page 6
Install CyberLink Media Server to your computer.
Connect the main unit to the router connected to your computer.
Page 7
Page 9
Page 10
Page 10
Page 11
Page 13
Page 16
Page 8
Start CyberLink Media Server, and then make sure that the main unit
recognizes CyberLink Media Server.
Make sure that the main unit
is turned on.
Check the cable connection.
The IP address has to be set up
manually.
Exit CyberLink Media Server.
Find out the IP address of your
computer.
Assign the IP address to the main
unit.
The setup is complete.
Now you can enjoy playback of files stored on the computer!
Specify the shared folders.
The IP address is assigned auto-
matically using the DHCP func-
tion of the router.
Does the main unit recognize
CyberLink Media Server?
Does the main unit recognize
CyberLink Media Server?
Yes
Yes
No
No
DD-83[B]-02.fm Page 4 Wednesday, August 23, 2006 3:41 PM
5
Preparation
Set up your computer and network environment as
follows.
You must install CyberLink Media Server from the
bundled CD-ROM to your computer for playing back
files stored on the computer with this system.
Operating system
• Requirement: Microsoft Windows XP Home Edi-
tion SP2, Windows XP Professional SP2, Win-
dows XP Media Center Edition SP2
Processor
• Requirement: A 800 MHz processor, such as an
Intel Pentium III or Advanced Micro Devices
(AMD) processor
• Recommendation: A 2.0 GHz processor or
faster
Random Access Memory (RAM)
• Requirement: 256 MB
• Recommendation: 512 MB
Free hard disk space
• Requirement: 50 MB
• Recommendation: 200 MB
Network Interface Card
• Requirement: Ethernet (802.3) or WiFi (802.11a
or 802.11g) network adapter
VGA
• Requirement: Intel, nVidia or ATI VGA card with
64 MB VRAM
Make sure that there is an available LAN terminal
on the router.
Also, make sure that there is an available Ethernet
cable (straight-through cable, not supplied). This
cable is used for connecting the router and the
main unit as shown on page 6.
NOTE
• To connect the main unit to the computer
directly, refer to “Connecting the main unit to the
computer directly” on page 19.
Computer
System Requirements
Networking device
Internet Modem Router
Environment in use
Computer
Preparation
DD-83[B]-03.fm Page 5 Wednesday, August 23, 2006 3:42 PM

6
Connection
This part explains the procedure for connecting the
main unit to the computer via a router with an
Ethernet cable and confirming that the connection
is completed properly.
NOTE
• Before following this procedure, connect the
main unit, speakers and a TV referring to the
main volume of the operation manual for this
system.
• To connect the main unit to the computer
directly, refer to “Connecting the main unit to the
computer directly” on page 19.
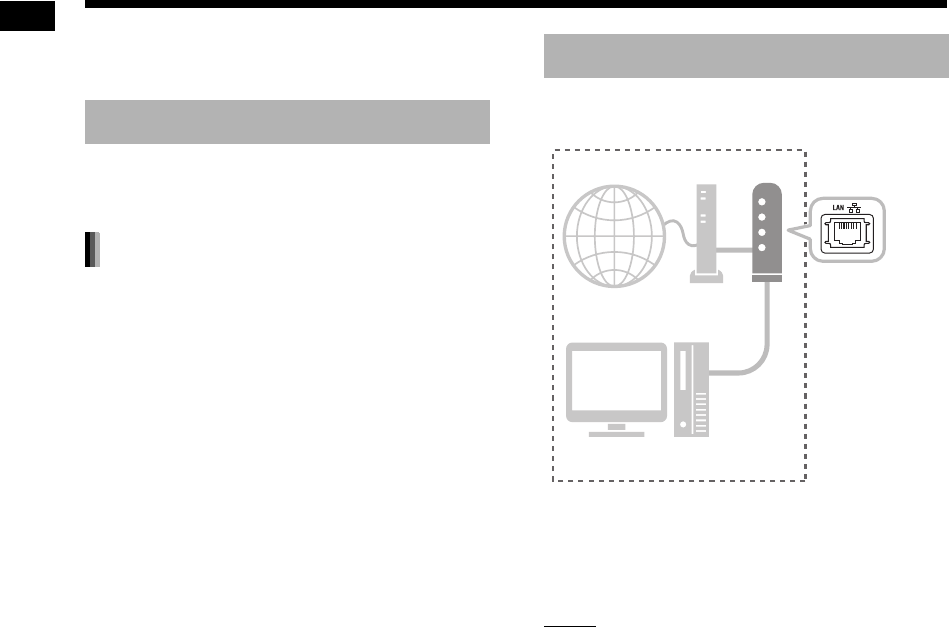
This part explains the procedure for connecting the
main unit to the computer linked to the Internet via
a router.
• The diagram shown above has been simplified
by omitting the connection of the main unit,
speakers and a TV. Refer to the main volume of
the operation manual for connecting the devices
shown above.
• The diagrams of the Internet and modem are
omitted in the later explanations.
* Use a shielded twisted-pair (STP) Ethernet
cable.
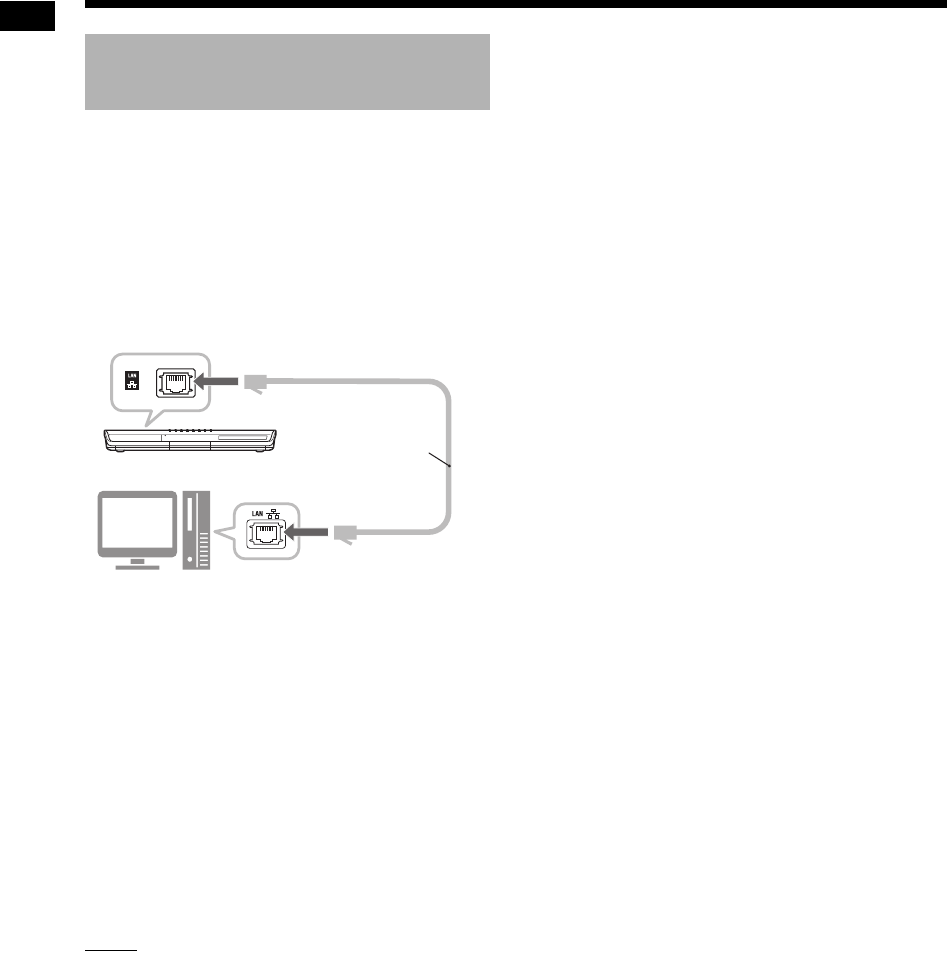
1Connect one end of the Ethernet
cable (straight-through cable, not
supplied) to the LAN terminal on
the router.
2Connect the other end of the
Ethernet cable to the LAN terminal
on the main unit.
Connecting the main unit to
the router
Internet Modem Router
To the LAN
terminal on the
router
Computer
Ethernet cable
(straight-
through cable,
not supplied)*
Connection
DD-83[B]-04.fm Page 6 Monday, January 15, 2007 8:53 AM
7
Installing CyberLink Media Server
The example TV and computer screenshots used
in this manual may differ from the actual screen
displays.
CyberLink Media Server is a software for sending
video, audio and still picture files stored on your
computer to the main unit.
This part explains the procedure for installing
CyberLink Media Server from the bundled CD-
ROM to the computer.
NOTE
• Make sure you close all anti-virus and other
applications running on your computer before
starting installation.
• This manual explains operations with the
English version of both Windows XP and Cyber-
Link Media Server as examples. Follow the
explanation referring to the actual operations of
your language version.
• Log onto the computer with administrative rights
(Administrators).
• After installing CyberLink Media Server from the
supplied CD-ROM, it is recommended that you
upgrade CyberLink Media Server to enable you
to utilize the latest functions. Refer to the web-
site http://www.victor.co.jp/english/download/
index-e.html for upgrading CyberLink Media
Server.
(On the computer)
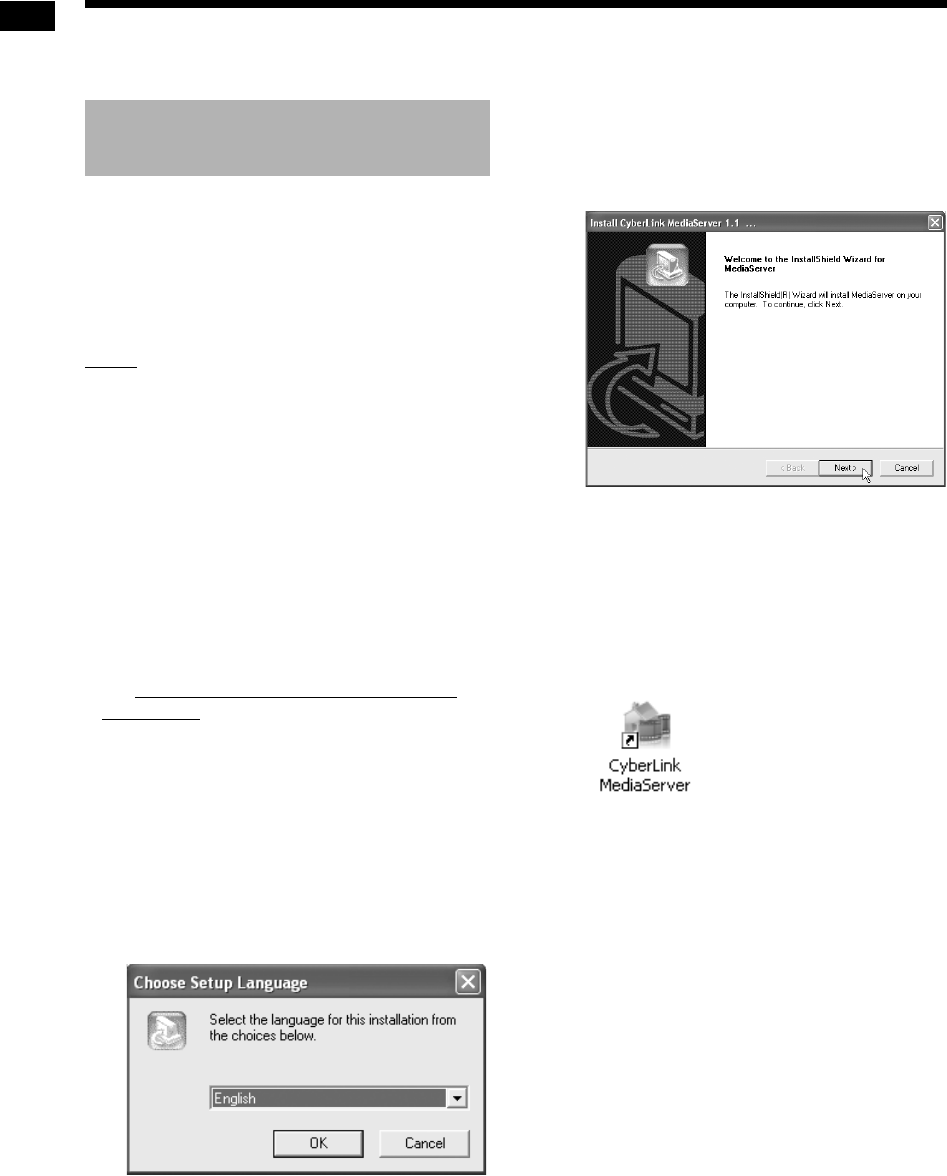
1Start up Windows, and place the
CyberLink Media Server Software
CD-ROM into your computer’s CD-
ROM drive.
The installer should start up automatically,
and display the screen shown below.
2Select the language of the version
you want to install, and then click
[OK].
The program file runs and the “Install
CyberLink MediaServer” window is displayed.
3Click [Next >].
The license agreement is displayed.
• After finishing this step, install CyberLink
Media Server following the actual displayed
explanations.
4Confirm that the “CyberLink Medi-
aServer” icon is displayed on the
desktop.
You have finished installing CyberLink Media
Server.
Installing CyberLink Media
Server
Installing CyberLink Media Server
DD-83[B].book Page 7 Wednesday, October 4, 2006 5:24 PM
8
Installing CyberLink Media Server
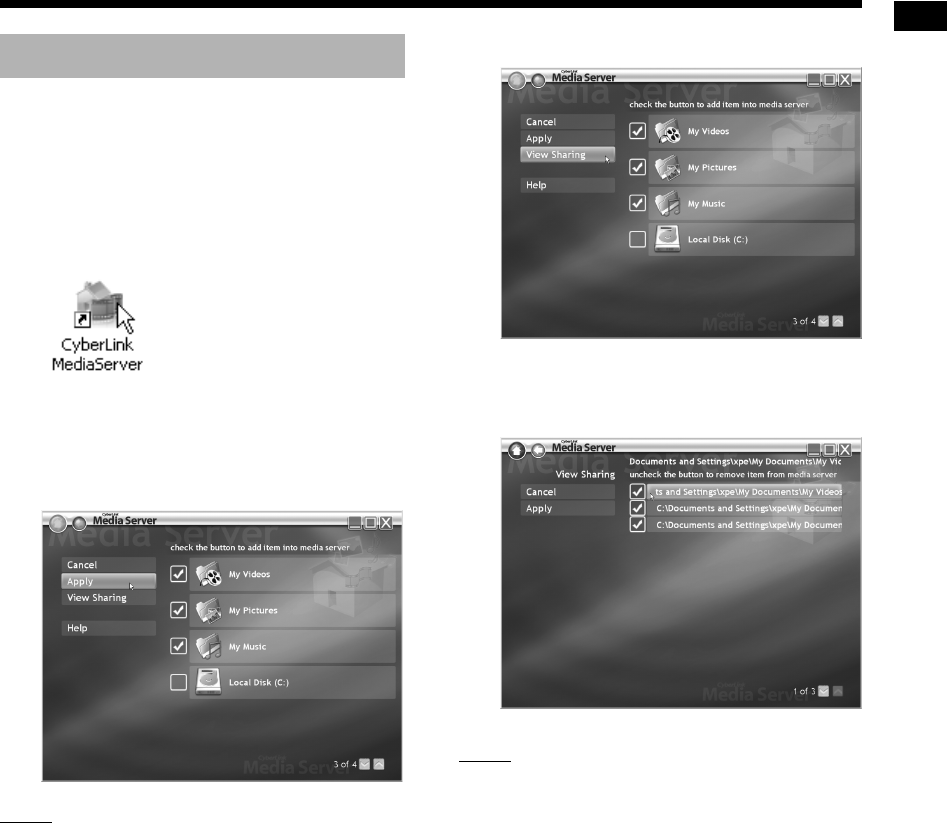
This part explains the procedure for selecting the
default folders (“My Videos”, “My Pictures” and “My
Music”) as examples.
(On the computer)
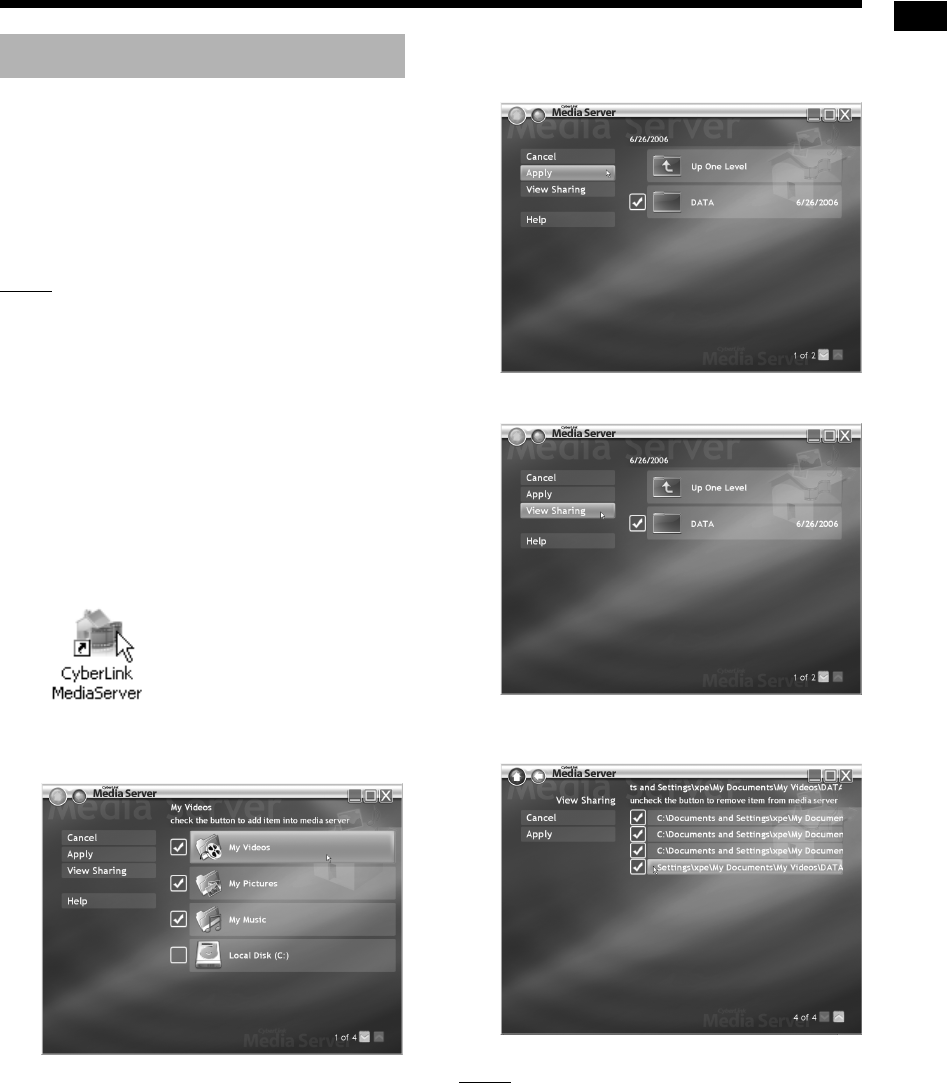
1Double-click the “CyberLink Medi-
aServer” icon on the desktop.
CyberLink Media Server starts.
2Select the check boxes next to
“My Videos”, “My Pictures” and
“My Music”, and click [Apply].
NOTE
• To select folders other than the default folders,
refer to “Adding shared folders” on page 18.
• You can store files of different types in one
folder. For example, even when video files and
still picture files are stored in the “My Music”
folder, you can play back those files.
3Click [View Sharing].
4Confirm that the names of the
shared folders are displayed on
the list.
NOTE
•To stop sharing a folder
Clear the check box next to it and click [Apply].
•To go back to the previous screen
Click [+] in the upper left portion of the screen.
•To exit CyberLink Media Server
Click [M] in the upper right portion of the screen.
• Before deleting a shared folder or file on the con-
nected computer, cancel folder/file sharing on
CyberLink Media Server.
Specifying the shared folders
DD-83[B].book Page 8 Wednesday, October 4, 2006 5:24 PM
9
Confirming the connection to the computer
This part explains how to start CyberLink Media
Server for the first time and how to perform the fol-
lowing.
• Confirming that the main unit recognizes the
computer. (On the remote control)
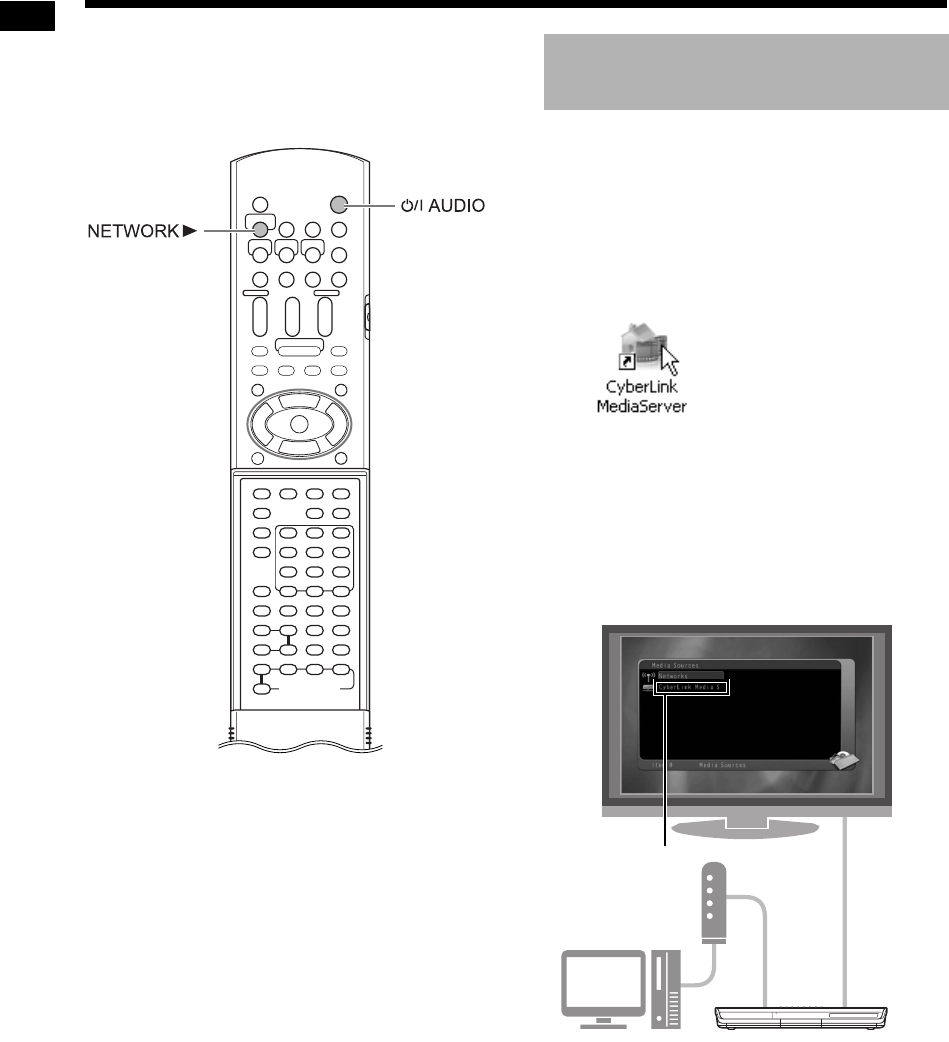
1Press [F AUDIO] to turn on the
main unit.
(On the computer)
2Double-click the “CyberLink Medi-
aServer” icon on the desktop.
CyberLink Media Server starts.
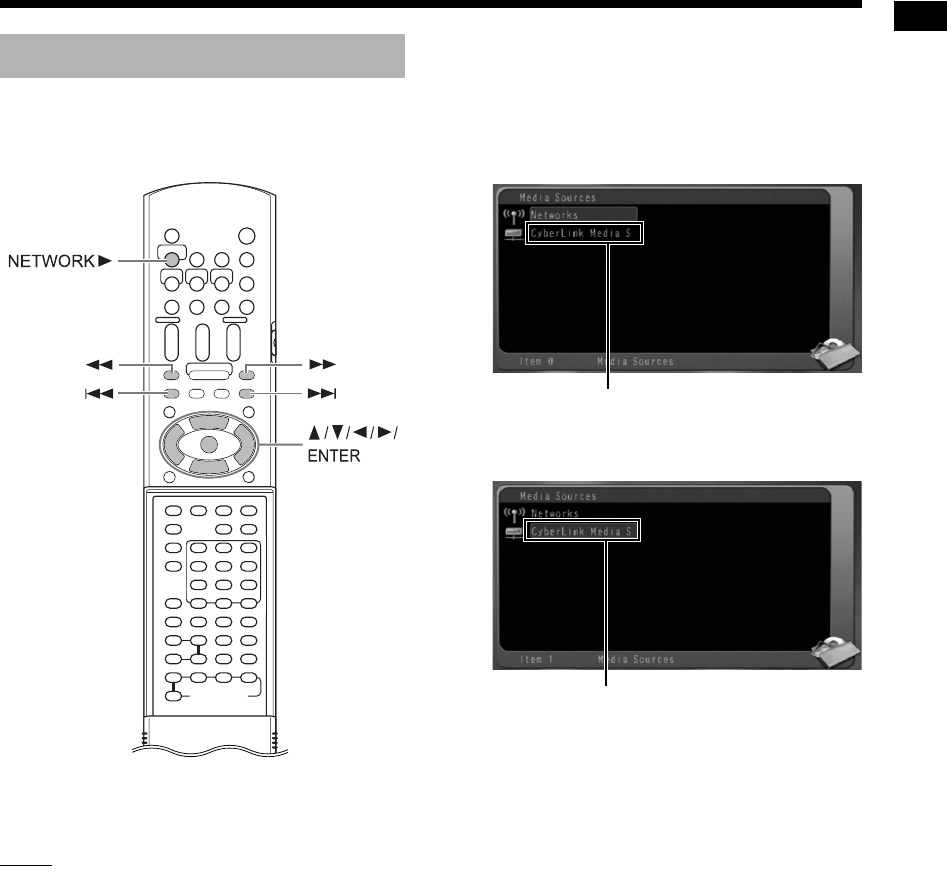
(On the remote control)
3Press [NETWORK 3].
4Confirm that “CyberLink Media
Server” is displayed on the TV
screen.
Proceed to “Playing back files stored on the
computer” on page 16.
Starting CyberLink Media
Server
TV
“CyberLink Media
Server”
Confirming the connection to the computer
DD-83[B]-05.fm Page 9 Friday, August 25, 2006 9:39 AM

10
Confirming the connection to the computer
If “CyberLink Media Server” is not displayed
The main unit may not detect the CyberLink Media
Server for any of the following reasons.
Determine the reason by referring to A and B
shown below.
A The Ethernet cable may not be con-
nected properly.
Possible cause:
The Ethernet cable may be of the wrong
type (a crossover cable may be used) or
may not be connected securely.
Possible solution:
Refer to “Connecting the main unit to the
router” on page 6 to check that the Ether-
net cable is a straight-through cable and is
connected securely.
B You may be using a router that requires
the IP addresses to be set up manually.
Possible cause:
The router connected to the main unit may
not have a DHCP function that assigns the
IP addresses automatically. Another possi-
bility is that the IP addresses may be
assigned manually without using the
DHCP function of the router.
Possible solution:
The IP address of the main unit must be
set up manually. Click [Cancel] to close the
display on the computer screen and exit
CyberLink Media Server. Next, assign the
IP address to the main unit referring to
“Setting up the IP address” on page 11.
DD-83[B].book Page 10 Wednesday, October 4, 2006 5:24 PM
11
Setting up the IP address
You can skip this part when the main unit and the
computer are connected to a router that uses
DHCP function.
You must assign the IP address to the main unit
manually in the following cases.
Case 1: When you have assigned an IP address
to the computer manually
Case 2: When you have connected the main
unit to the computer directly
Refer also to “Connecting the main unit to
the computer directly” on page 19.
This part explains the procedure for determining
the IP address of the computer by displaying the
network setup.
NOTE
• Depending on the computer settings, you may
need operations different from the explanation
given in this part. Refer to “Help” in Windows for
the following steps.
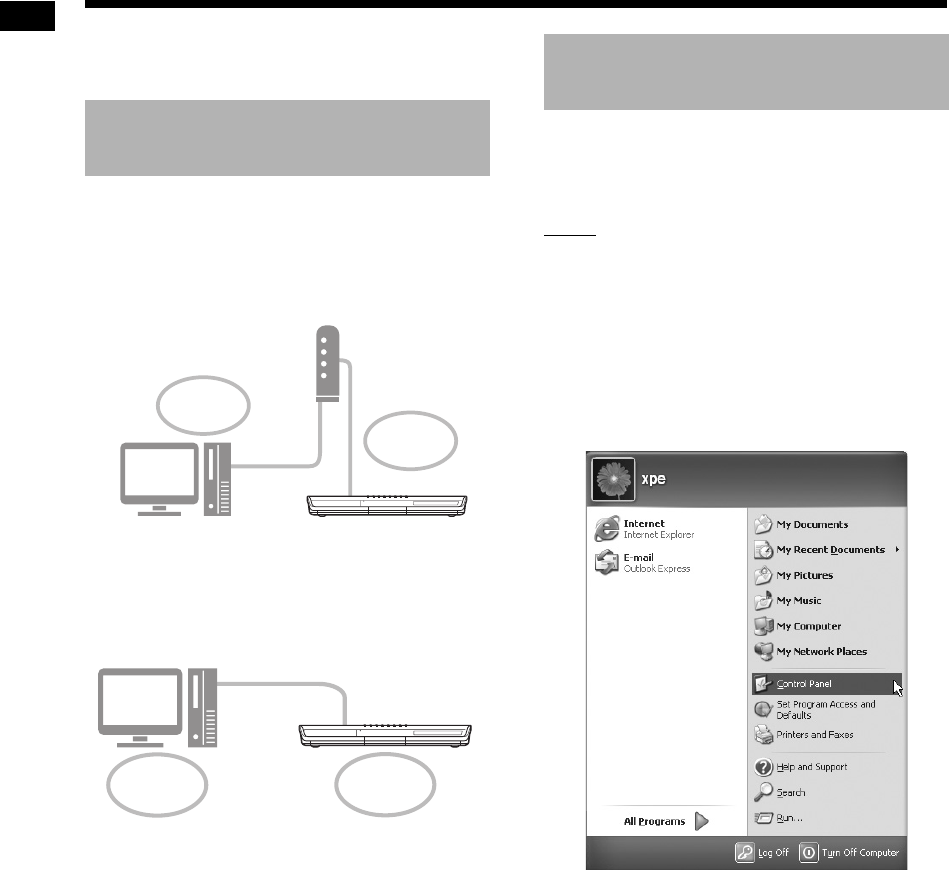
(On the computer)
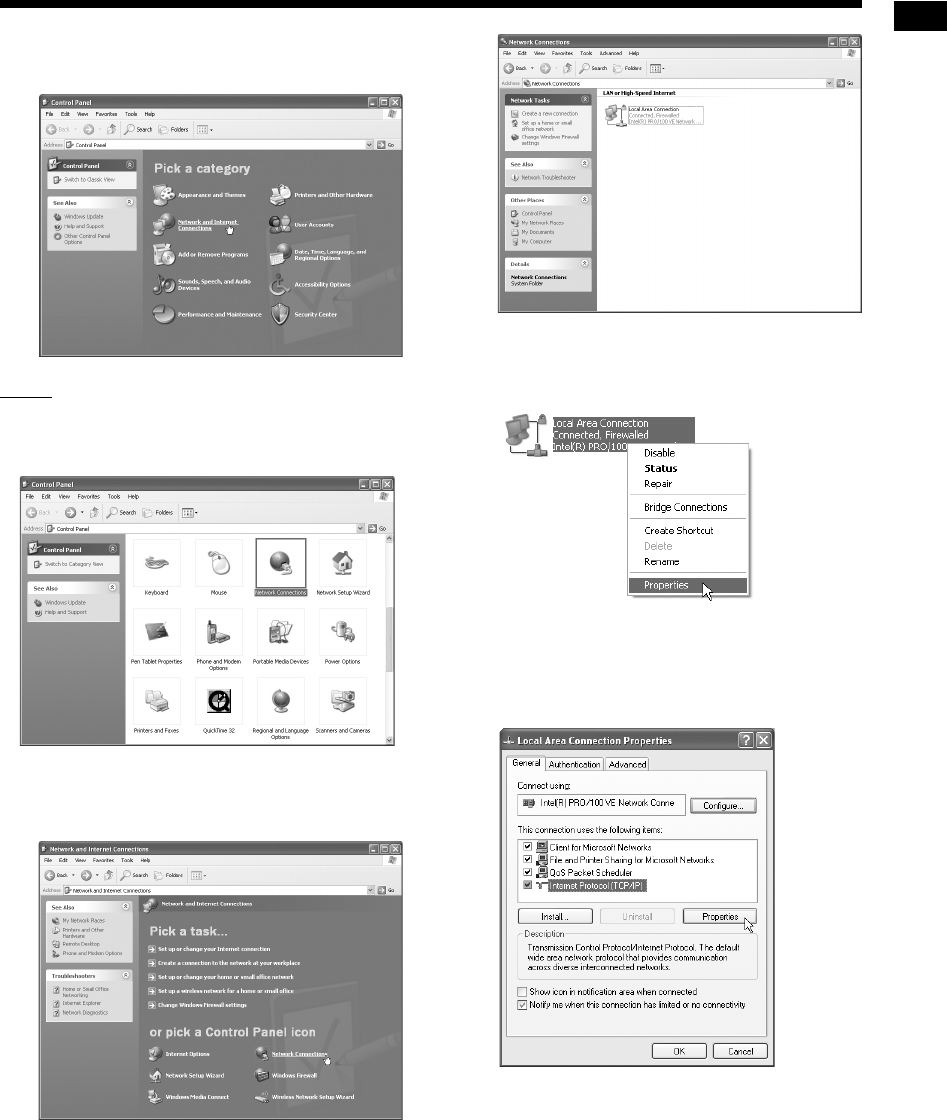
1Click [Start] and then “Control
Panel”.
The “Control Panel” dialog box is displayed.
Occasions requiring the IP
address setup
Manual
setup for IP
address
Router
Manual
setup for IP
address
Example:
192. 168. 0. 3
Example: 192. 168. 0. 4
Manual
setup for IP
address
Example: 192. 168. 0. 3
Example: 192. 168. 0. 4
Manual
setup for IP
address
Determining the IP address of
the computer
Setting up the IP address
DD-83[B]-06.fm Page 11 Wednesday, August 23, 2006 3:42 PM
12
Setting up the IP address
2Click “Network and Internet Con-
nections”.
NOTE
• Depending on the computer settings, the “Con-
trol Panel” dialog box is displayed as shown
below.
In this case, double-click the “Network Connec-
tions” icon and then proceed to step 4.
3Click “Network Connections”.
The “Network Connections” dialog box is
displayed.
4Right-click the “Local Area Con-
nection” icon and then click [Prop-
erties].
The “Local Area Connection Properties”
dialog box is displayed.
5Click “Internet Protocol (TCP/IP)”
and then click [Properties].
The “Internet Protocol (TCP/IP) Properties”
dialog box is displayed.
(Continued on the next page.)
DD-83[B].book Page 12 Wednesday, August 2, 2006 10:18 AM
13
Setting up the IP address
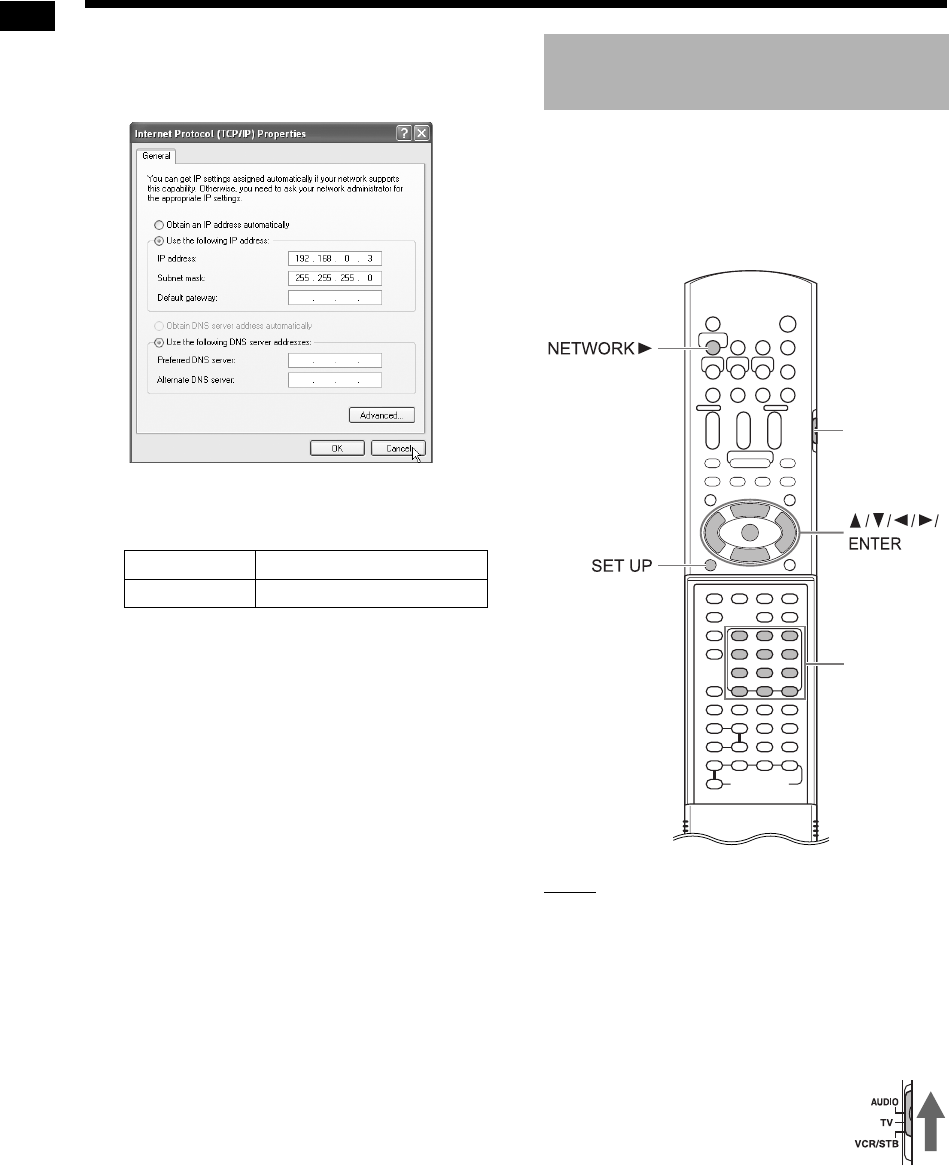
6Confirm the values displayed in
“IP address:” and “Subnet mask:”.
Example
Fill out the blank column with the values.
(The values are to be used in step 8 on page
15.)
7Click [Cancel].
The dialog box is closed.
You have finished confirming the IP address of the
computer.
This part explains the procedure for setting up the
IP address of the main unit manually.
You can skip this part when the main unit and the
computer are connected to a router using a DHCP
function.
NOTE
• Before assigning the IP address to the main unit,
press [NETWORK 3] to select the connected
computer as the source. “NETWORK SETUP”
on the preference screen is disabled when
another source is selected.
(On the remote control)
1Slide the remote con-
trol mode selector to
[AUDIO].
IP address . . .
Subnet mask . . .
Assigning the IP address to
the main unit
Number
buttons
Remote control
mode selector
DD-83[B].book Page 13 Wednesday, August 2, 2006 10:18 AM
14
Setting up the IP address
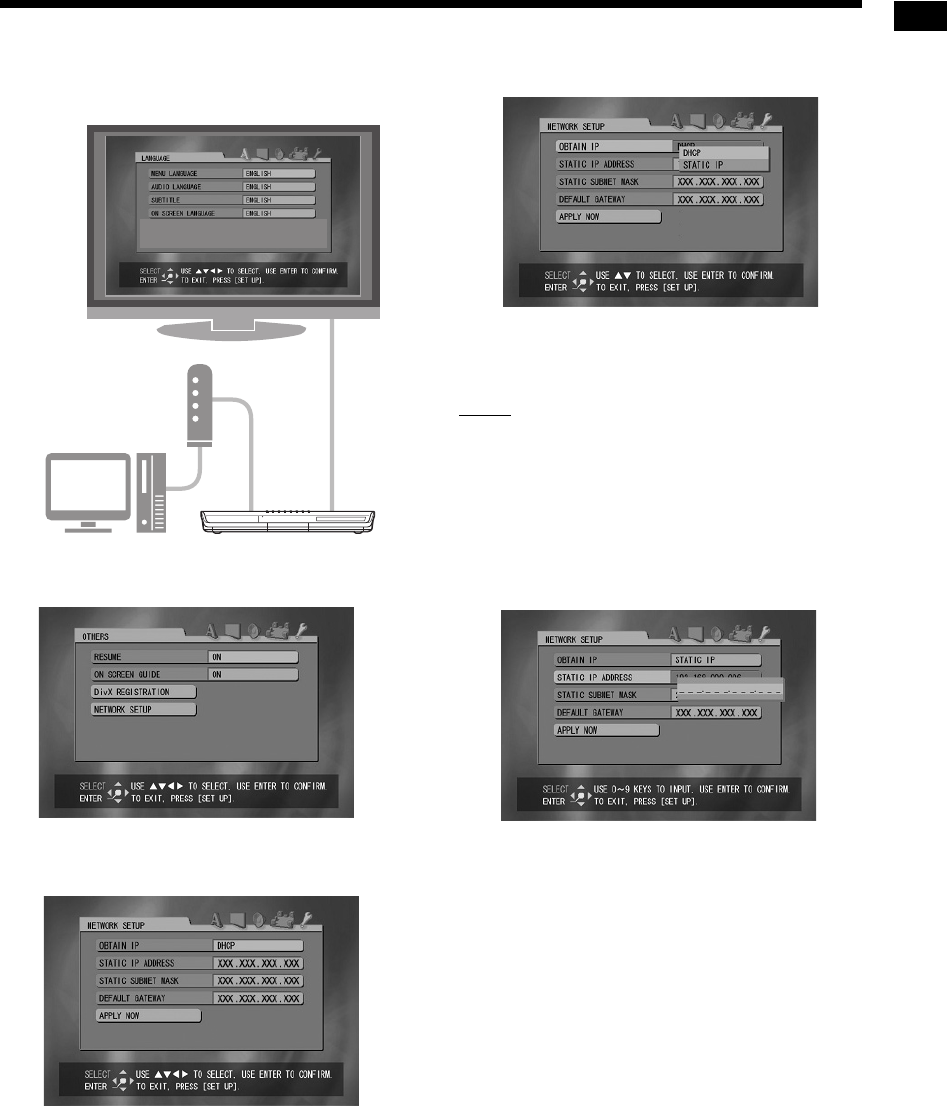
2Press [SET UP] .
The preference screen is displayed on the TV
screen.
3Press 3 repeatedly to display
“OTHERS”.
4
Press
/
to select “NETWORK
SETUP” and then press [ENTER].
5Select “OBTAIN IP” and then press
[ENTER].
6Press 5 or / to select “STATIC
IP” and then press [ENTER].
NOTE
• When changing the Internet connection environ-
ment by using a DHCP router or other devices
that assign IP addresses automatically, select
“DHCP” for “OBTAIN IP”.
7
Press
/
to select “STATIC IP
ADDRESS” and then press
[ENTER].
(Continued on the next page.)
TV
DD-83[B]-06.fm Page 14 Wednesday, August 23, 2006 3:42 PM
15
Setting up the IP address
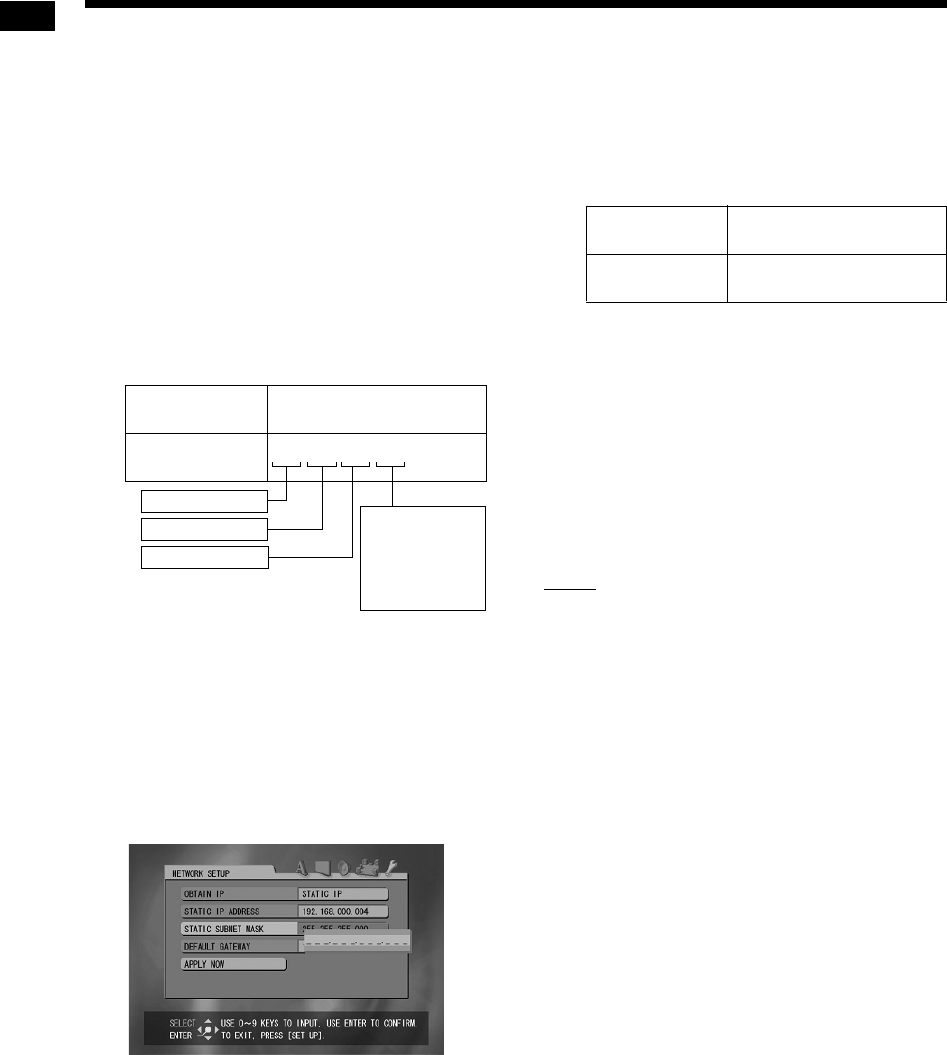
8Enter the IP address using the
number buttons.
Confirm the IP address you have written
down in the column on page 13.
Enter the same values of the IP address of
the computer into the first, second and third
group of digits (the first, second and third
numerical blocks from the left).
Enter an arbitrary value (1 - 254) other than
the one used in the IP address of the com-
puter into the fourth group of digits (the first
numerical block from the right).
Example for setup:
Note that the fourth group of digits should be
different from the ones of other devices con-
nected to the network.
9Press [ENTER].
10 Press / to select “STATIC SUB-
NET MASK” and then press
[ENTER].
11 Enter the subnet mask using the
number buttons.
Confirm the subnet mask you have written
down in the column on page 13, and then
enter the same value.
Example for setup:
12 Press [ENTER].
13 Press / to select “APPLY NOW”
and then press [ENTER].
The settings are stored.
You have finished setting up the IP address of the
main unit. Return to page 8.
NOTE
• Usually, you do not have to set “DEFAULT
GATEWAY”.
For normal usage, leave the initial setting
unchanged. Set “DEFAULT GATEWAY” only
when you want to play back files stored on a
computer that belongs to another network.
IP address of
the computer
192.168. 0. 3
(=192.168.000.003)
IP address of
the main unit 192.168.000.004
The fourth group
(Only this value
should be different
from the one of
the computer IP
address.)
The third group
The second group
The first group
Subnet mask of
the computer
255.255.255. 0
(=255.255.255.000)
Subnet mask of
the main unit 255.255.255.000
DD-83[B]-06.fm Page 15 Wednesday, August 2, 2006 1:46 PM
16
Playing back files stored on the computer
This part explains the procedure for playing back
audio files stored on the computer.
You can play back video files and still picture files
with almost the same procedure.
NOTE
• Store files you want to play back in the shared
folders before proceeding.
• This part explains the procedure for playing back
the “TRACK0001” file stored in the “My Music”
folder as an example.
• Refer to the main volume of the operation man-
ual for details on operating the main unit.
(On the computer)
1Start CyberLink Media Server.
(On the remote control)
2Press [NETWORK 3].
“CyberLink Media Server” is displayed.
3Press / to select “CyberLink
Media Server”.
(Continued on the next page.)
Playing back audio files
“CyberLink Media Server”
Selected item is highlighted.
Playing back files stored on the computer
DD-83[B]-07.fm Page 16 Friday, August 25, 2006 9:41 AM
17
Playing back files stored on the computer
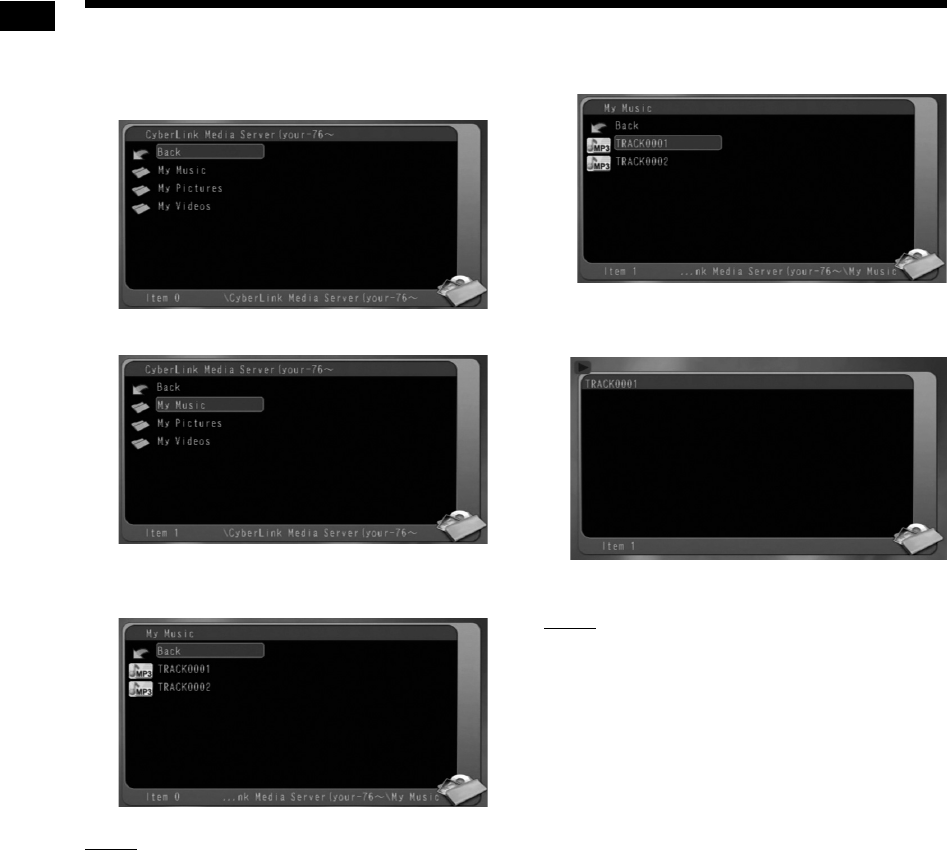
4Press [ENTER].
The shared folders are displayed.
Example:
5Press / to select “My Music”.
6Press [ENTER].
The list of the audio files is displayed.
NOTE
• If the file list is not displayed, confirm that the
files you want to play back are stored in the
shared folder.
7Press 5 or / to select the file you
want to play back.
8Press [ENTER].
Playback starts.
Press 7 to stop playback.
NOTE
• You can use the buttons shown below to navi-
gate among the pages.
Pressing 2 or 3 displays the previous or next
page.
Pressing 1 or ¡ skips 10 pages forward or
backward.
Pressing 4 or ¢ skips to the top or bottom
of the folder/file list.
• This part only explains the basic procedure for
playing back files.
DD-83[B]-07.fm Page 17 Friday, August 25, 2006 9:41 AM
18
Reference
This part explains the procedure for adding shared
folders (folders in which files you want to play back
are stored).
You can add a shared folder, by 1) storing the
desired folder in one of the default folders, and
then 2) selecting the desired folder using Cyber-
Link Media Server.
NOTE
• You can also access the desired folder from
CyberLink Media Server by moving down from
the local disk to the subdirectories.
• This part explains the procedure for storing the
“DATA” folder in the default “My Videos” folder
and adding the “DATA” folder to the shared fold-
ers as examples.
1Store the “DATA” folder in the “My
Videos” folder using Windows.
2Double-click the “CyberLink Medi-
aServer” icon on the desktop.
CyberLink Media Server starts.
3Click [My Videos].
4Select the check box next to
[DATA], and click [Apply].
5Click [View Sharing].
6Confirm that the “DATA” folder is
added to the list of shared folders.
NOTE
•To stop sharing a folder
Clear the check box next to it and click [Apply].
•To go back to the previous screen
Click [+] in the upper left portion of the screen.
•To exit CyberLink Media Server
Click [M] in the upper right portion of the screen.
Adding shared folders
Reference
DD-83[B].book Page 18 Wednesday, August 2, 2006 10:18 AM
19
Reference
This part explains the procedure for connecting the
main unit to the computer directly.
You must install CyberLink Media Server to your
computer before connecting the main unit to the
computer. (Refer to page 7.)
1Connect the main unit and the
computer as shown in the diagram
below.
2Set up the computer so that it can
obtain its IP address automatically.
Select “Obtain an IP address automatically” in
step 6 on page 13, and then click [OK].
3Set up the main unit so that it can
obtain its IP address automatically.
Select “DHCP”, and then click [ENTER] in
step 6 on page 14. (“DHCP” is selected as the
initial setting.)
The main unit and the computer start to
obtain the IP addresses recognizable by each
other. Wait about one minute until the setup is
complete.
NOTE
• You can also assign arbitrary values for the IP
addresses by following pages 11 to 15.
* Use a shielded twisted-pair (STP) Ethernet
cable.
4Confirm the connection to the
computer.
Set up the shared folders referring to
“Specifying the shared folders” on page 8 and
“Confirming the connection to the computer”
on page 9.
• After finishing the shared folder setup, pro-
ceed to “Playing back files stored on the
computer” on page 16.
Connecting the main unit to
the computer directly
Ethernet cable
(straight-through cable
or crossover cable, not
supplied)*
DD-83[B]-08.fm Page 19 Monday, January 15, 2007 8:54 AM

20
Reference
Problem Possible cause Possible solution Reference
page
Files stored on the
computer are not
displayed.
The Ethernet cable is not
connected.
Make sure the Ethernet cable is connected
properly. (Insert the Ethernet cable until it
clicks.)
6
A wrong cable is used. When connecting the main unit to a router,
use a straight-through cable. 6
CyberLink Media Server is
not installed.
Install CyberLink Media Server to the com-
puter. 7
Incorrect IP addresses
have been set manually.
(When DHCP function is
not used)
Check that the same values are set in the
first, second and third group of digits and dif-
ferent values are set in the fourth group of
digits for the main unit and the computer.
11-15
A file is not played
back properly.
Another device is using the
network connected to the
main unit.
If another device is using the network while
the main unit is playing back a file, the net-
work may be confused, image frames may
drop and sound may skip. Remove the
device from the network before playing back
a file.
-
A video, audio or
still picture file can-
not be played back.
The file type is not compati-
ble with this system.
Use a file of the playable type. 3
The file is corrupted. You cannot play back a corrupted file. -
Troubleshooting
DD-83[B]-08.fm Page 20 Wednesday, August 23, 2006 3:50 PM
0806SKMMODJEM
2006VictorCompanyofJapan,Limited
EN
c
DD-83[B]-backcover.fm Page 21 Wednesday, August 23, 2006 4:11 PM
