JVC DD 3J 8_DD 3_separate_volume_J User Manual Other LVT1547 001A
DD-3J DD-3J, DD-8J LVT1547-001A English, French, Instructions for network
DD-8J DD-8J LVT1547-001A English, French, Instructions for network
User Manual: JVC DD-3J other
Open the PDF directly: View PDF ![]() .
.
Page Count: 42
- Information on DLNA
- Introduction
- Connection
- Installing CyberLink Media Server
- Confirming the connection to the computer
- Setting up the IP address
- Playing back files stored on the computer
- Reference
- Informations sur DLNA
- Introduction
- Connexion
- Installation de CyberLink Media Server
- Confirmation de la connexion à l’ordinateur
- Configuration de l’adresse IP
- Lecture des fichiers stockés sur l’ordinateur
- Référence

EnglishFrançais
SEPARATE VOLUME
INSTRUCTIONS FOR NETWORK
FUNCTION
REGISTRE SEPARÉ
INSTRUCTIONS POUR LA
FONCTION RÉSEAU
LVT1547-001A
[J]
DD-8
DD-3
This manual explains the network function of this system.
Ce manuel explique les fonctions réseau de ce système.
DD-83[J].book Page 1 Thursday, September 28, 2006 9:16 AM

1
•DLNA CERTIFIED
TM Audio/Video/Image Player
• This system complies with DLNA Guidelines 1.0.
• You can play back the following file types using
the network function of this system.
LPCM, WAV, MP3, WMA, JPEG, ASF, DivX,
MPEG1, MPEG2
NOTE
• “DLNA” stands for “Digital Living Network Alli-
ance”. Refer to the following website for details.
http://www.dlna.org/
CyberLink Media Server is a registered trademark along with other company and product names mentioned
in this publication, used for identification purposes and remain the exclusive property of their respective own-
ers.
DLNA and DLNA CERTIFIED are trademarks and/or service marks of Digital Living Network Alliance.
Microsoft, Windows, Windows XP are registered trademarks or trademarks of Microsoft Corporation in the
United States and other countries.
Information on DLNA
DD-83[J].book Page 1 Thursday, September 28, 2006 9:16 AM

2
Introduction....................................3
Introduction to the network function................3
General flow chart for the network
function ......................................................... 4
Preparation.....................................5
Computer ........................................................5
Networking device...........................................5
Connection .....................................6
Connecting the main unit to the router............6
Installing CyberLink Media
Server..............................................7
Installing CyberLink Media Server .................. 7
Specifying the shared folders..........................8
Confirming the connection
to the computer..............................9
Starting CyberLink Media Server ....................9
Setting up the IP address............11
Occasions requiring the IP address
setup ........................................................... 11
Determining the IP address of the
computer..................................................... 11
Assigning the IP address to the
main unit .....................................................13
Playing back files stored on the
computer ......................................16
Playing back audio files ................................16
Reference .....................................18
Adding shared folders ...................................18
Connecting the main unit to the
computer directly ........................................19
Troubleshooting...........................20
Introduction
Connection
Installing CyberLink Media
Server
Confirming the connection to
the computer
Setting up the IP address
Playing back files stored on
the computer
Reference
Table of contents
DD-83[J].book Page 2 Thursday, September 28, 2006 9:16 AM
English
Introduction
3
You can play back video, audio and still picture
files stored on your computer by setting up the net-
work with the computer and the main unit.
You must install CyberLink Media Server from the
bundled CD-ROM to your computer.
CyberLink Media Server is a software applica-
tion for sending video, audio and still picture files
stored on your computer to the main unit.
The network can be easily set up without having to
manually configure the IP address of the main unit
by simply connecting a router with a DHCP func-
tion to the main unit. The DHCP function of the
router automatically assigns the IP address to the
main unit.
NOTE
• If the router does not have a DHCP function or
you do not use the DHCP function, you must
assign the IP address to the main unit manually.
• You can also use the network function by con-
necting the main unit to the computer directly.
(Refer to page 19.)
You can play back the following file types using the
network function of this system.
LPCM, WAV, MP3, WMA, JPEG, ASF, DivX,
MPEG1, MPEG2
NOTE
• You cannot use the network function to play
back a DivX DRM file stored on the connected
computer.
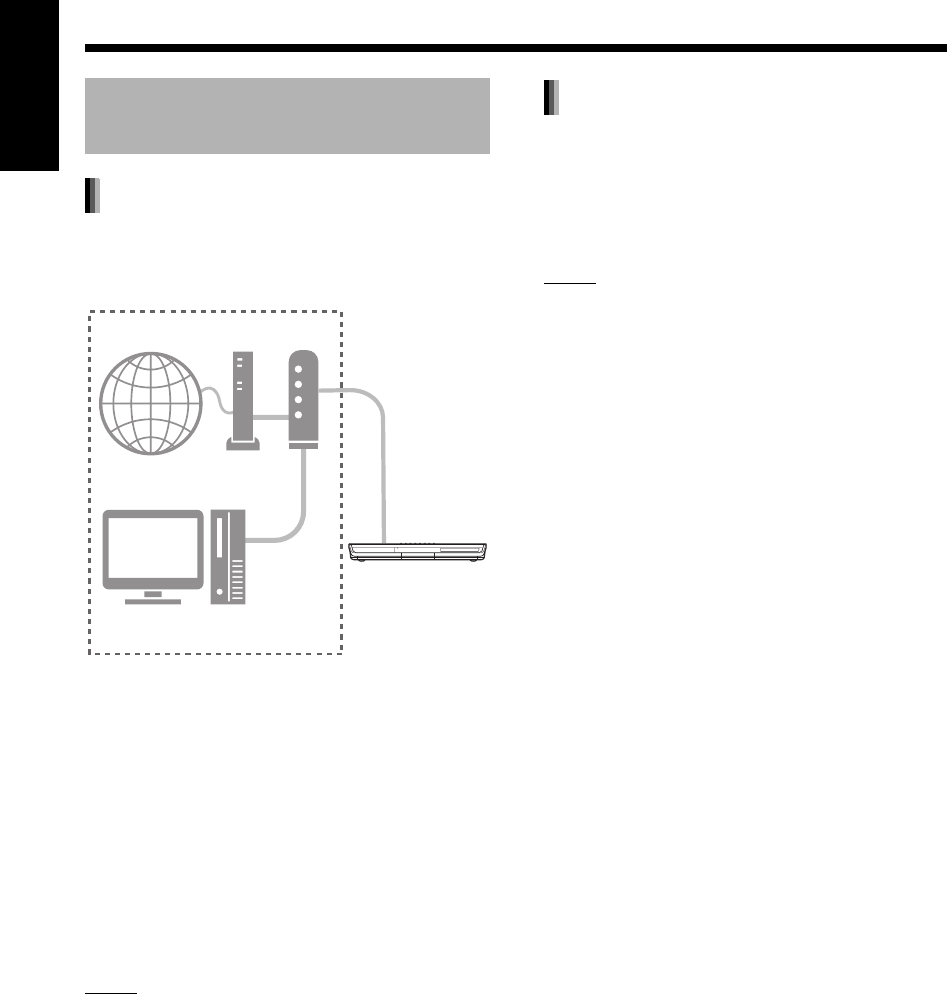
Introduction to the network
function
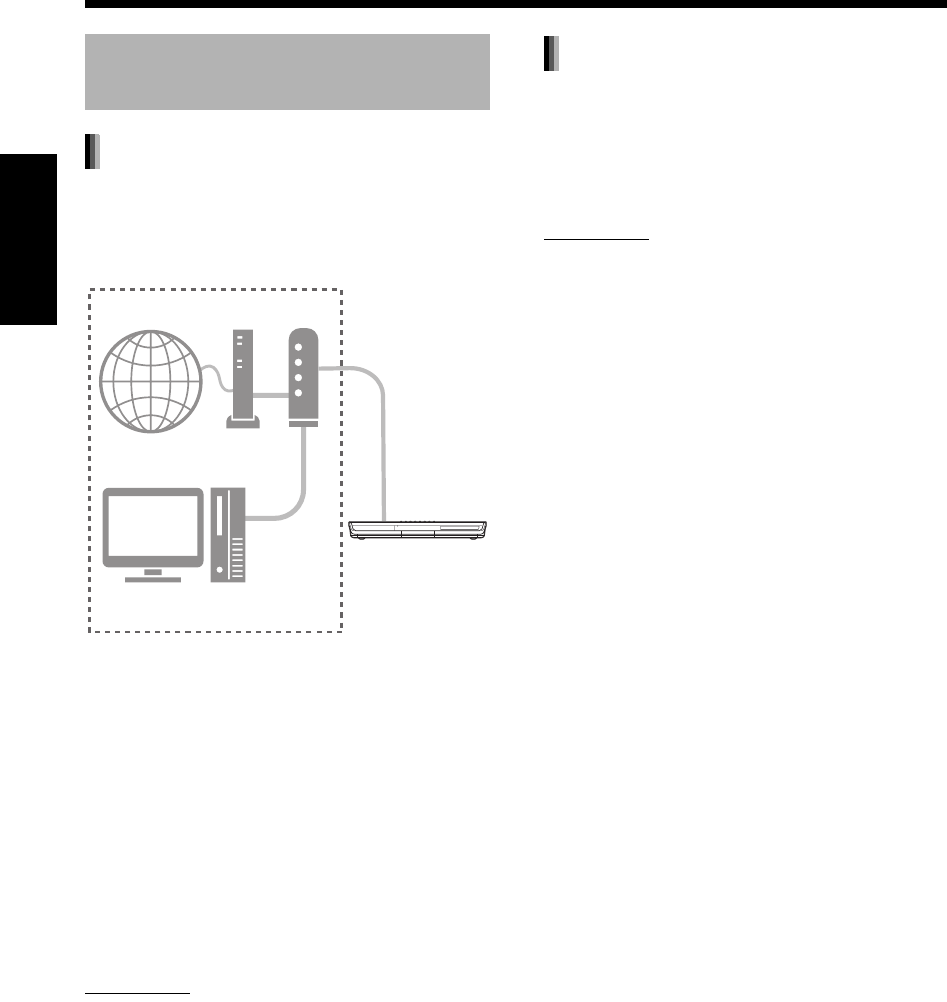
Outline of the network function
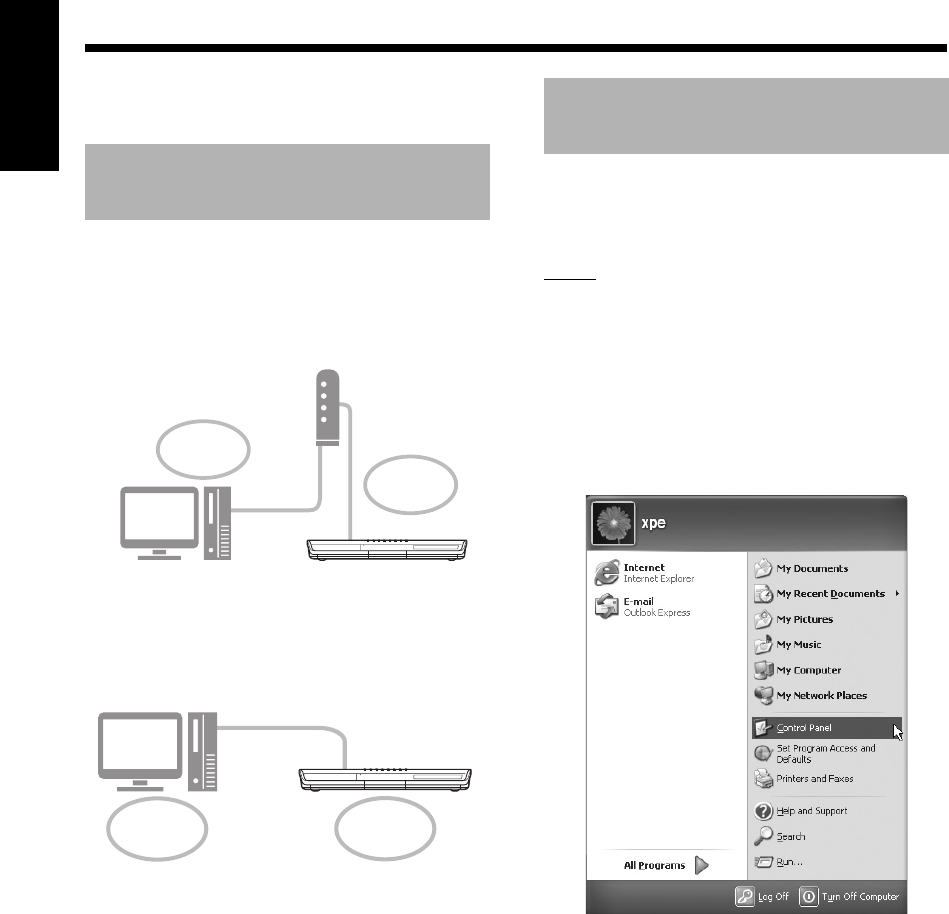
Internet Modem Router
Environment in use
Computer
Main unit
File types compatible with this system
Introduction
DD-83[J].book Page 3 Thursday, September 28, 2006 9:16 AM

4
English
Introduction
Set up the system following the flow chart shown below. The procedure for setting up the system differs
depending on your usage environment.
NOTE
• To connect the main unit to the computer directly, refer to “Connecting the main unit to the computer directly”
on page 19.
General flow chart for the network function
Page 6
Install CyberLink Media Server to your computer.
Connect the main unit to the router connected to your computer.
Page 7
Page 9
Page 10
Page 10
Page 11
Page 13
Page 16
Page 8
Start CyberLink Media Server, and then make sure that the main unit
recognizes CyberLink Media Server.
Make sure that the main unit
is turned on.
Check the cable connection.
The IP address has to be set up
manually.
Exit CyberLink Media Server.
Find out the IP address of your
computer.
Assign the IP address to the main
unit.
The setup is complete.
Now you can enjoy playback of files stored on the computer!
Specify the shared folders.
The IP address is assigned auto-
matically using the DHCP func-
tion of the router.
Does the main unit recognize
CyberLink Media Server?
Does the main unit recognize
CyberLink Media Server?
Yes
Yes
No
No
DD-83[J].book Page 4 Thursday, September 28, 2006 9:16 AM
5
English
Introduction
Set up your computer and network environment as
follows.
You must install CyberLink Media Server from the
bundled CD-ROM to your computer for playing back
files stored on the computer with this system.
Operating system
• Requirement: Microsoft Windows XP Home Edi-
tion SP2, Windows XP Professional SP2, Win-
dows XP Media Center Edition SP2
Processor
• Requirement: A 800 MHz processor, such as an
Intel Pentium III or Advanced Micro Devices
(AMD) processor
• Recommendation: A 2.0 GHz processor or
faster
Random Access Memory (RAM)
• Requirement: 256 MB
• Recommendation: 512 MB
Free hard disk space
• Requirement: 50 MB
• Recommendation: 200 MB
Network Interface Card
• Requirement: Ethernet (802.3) or WiFi (802.11a
or 802.11g) network adapter
VGA
• Requirement: Intel, nVidia or ATI VGA card with
64 MB VRAM
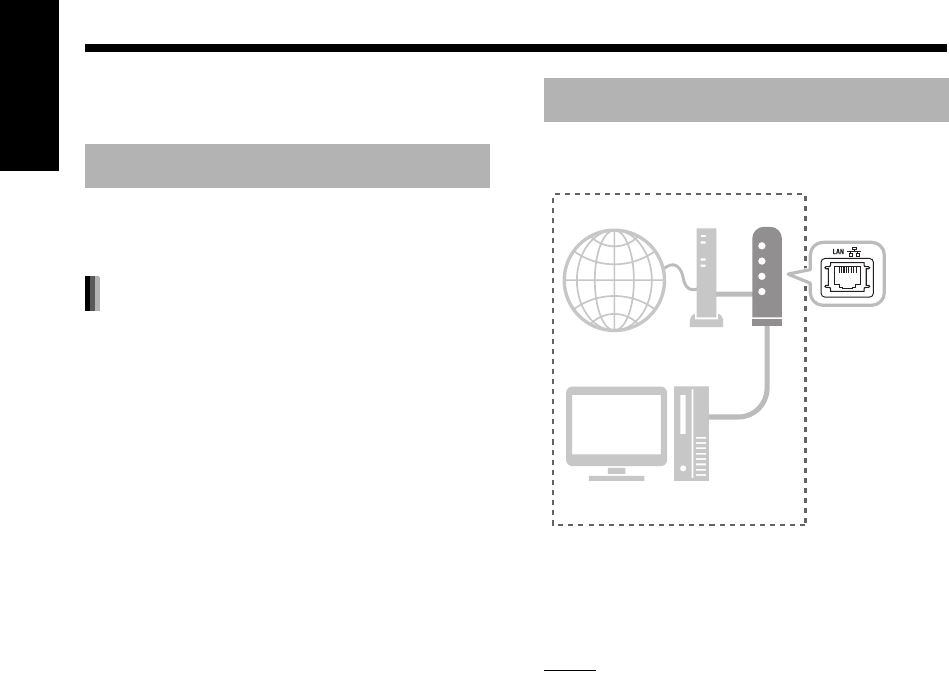
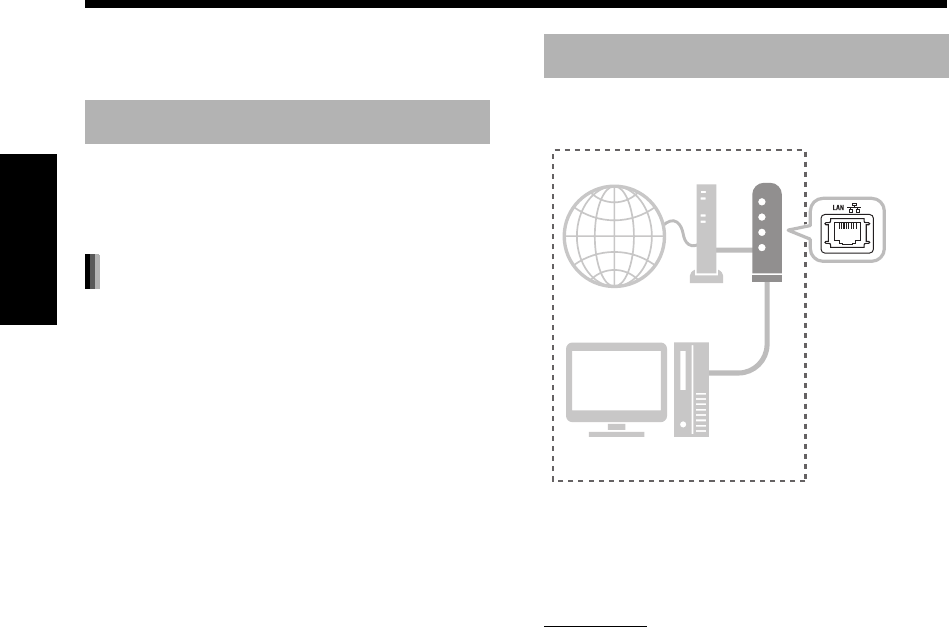
Make sure that there is an available LAN terminal
on the router.
Also, make sure that there is an available Ethernet
cable (straight-through cable, not supplied). This
cable is used for connecting the router and the
main unit as shown on page 6.
NOTE
• To connect the main unit to the computer
directly, refer to “Connecting the main unit to the
computer directly” on page 19.
Computer
System Requirements
Networking device
Internet Modem Router
Environment in use
Computer
Preparation
DD-83[J].book Page 5 Thursday, September 28, 2006 9:16 AM
6
English
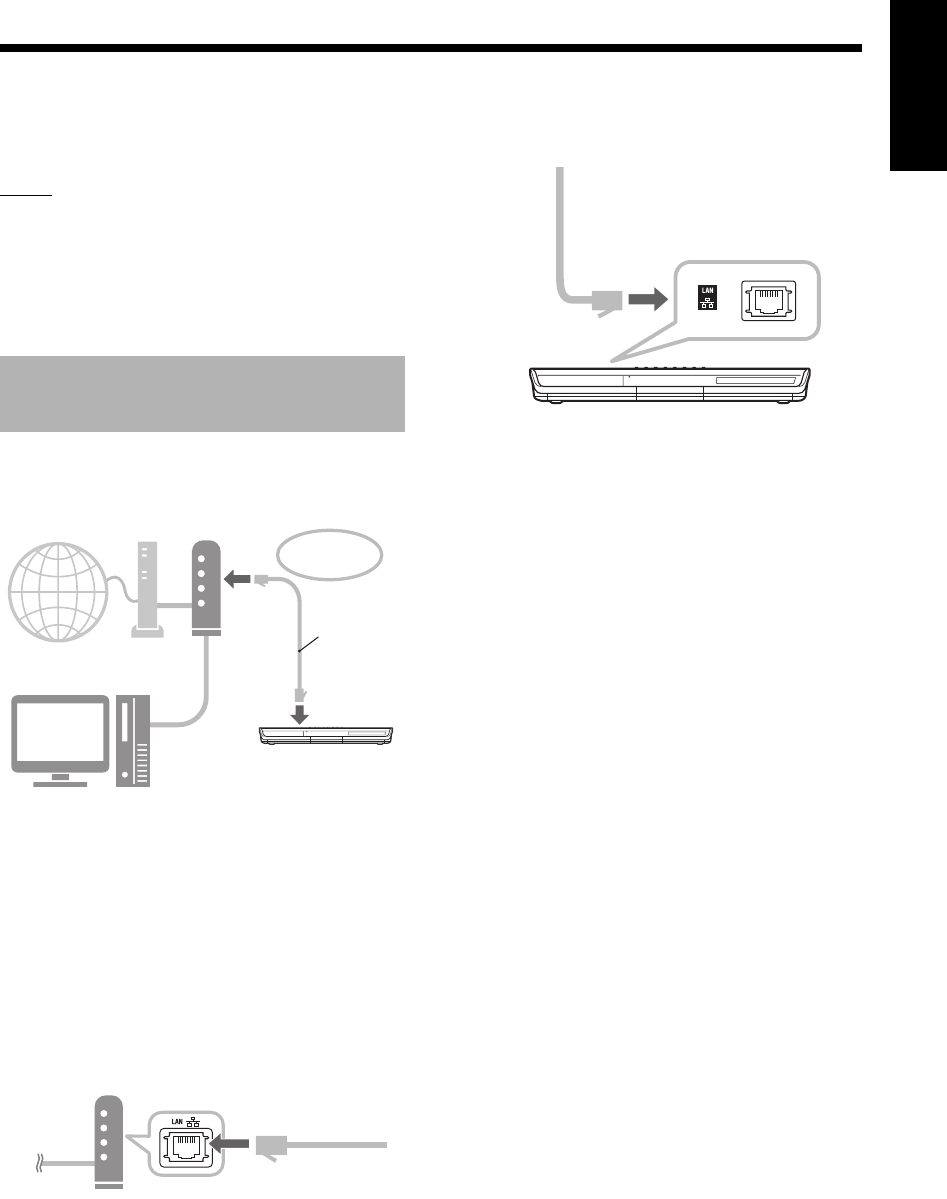
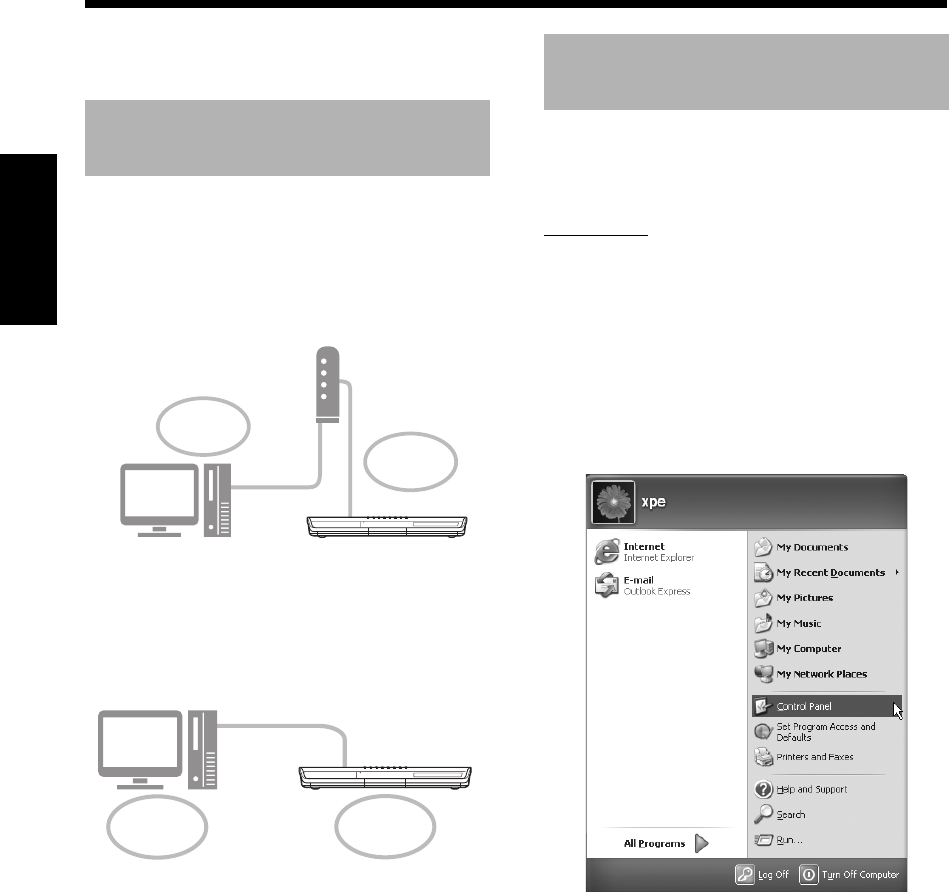
Connection
This part explains the procedure for connecting the
main unit to the computer via a router with an
Ethernet cable and confirming that the connection
is completed properly.
NOTE
• Before following this procedure, connect the
main unit, speakers and a TV referring to the
main volume of the operation manual for this
system.
• To connect the main unit to the computer
directly, refer to “Connecting the main unit to the
computer directly” on page 19.
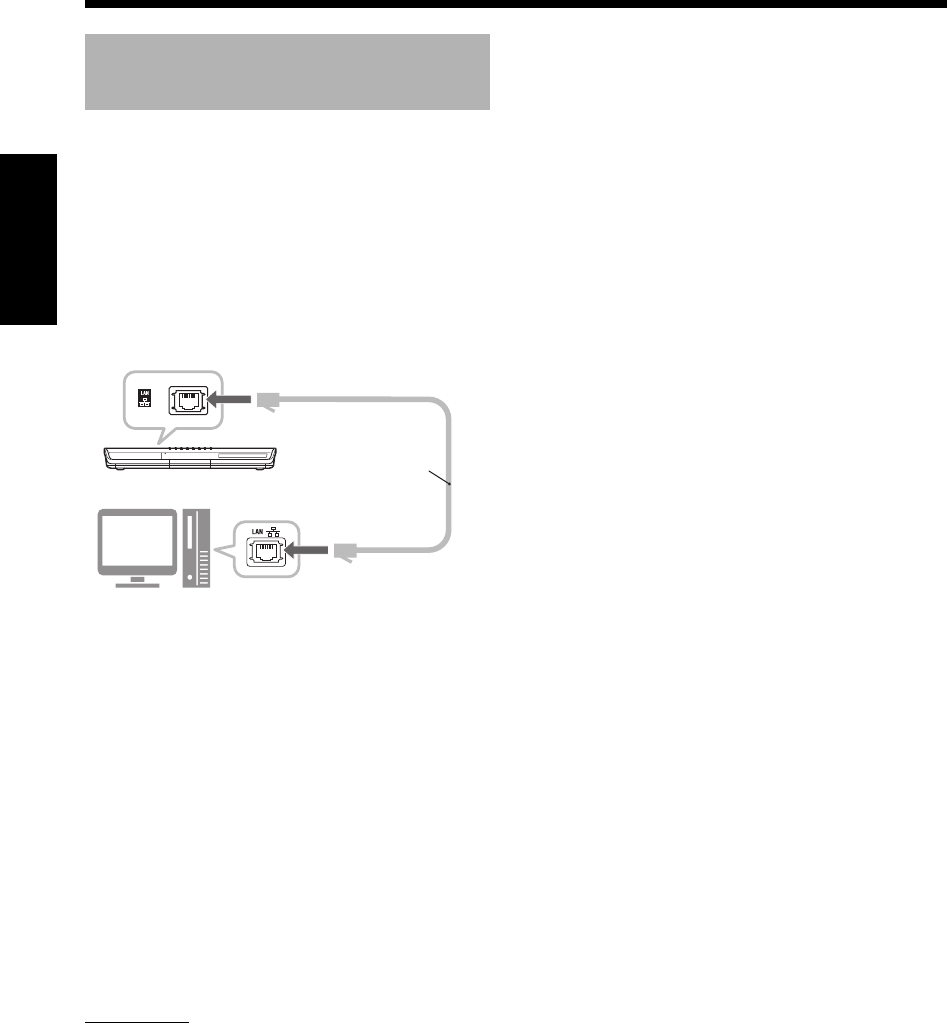
This part explains the procedure for connecting the
main unit to the computer linked to the Internet via
a router.
• The diagram shown above has been simplified
by omitting the connection of the main unit,
speakers and a TV. Refer to the main volume of
the operation manual for connecting the devices
shown above.
• The diagrams of the Internet and modem are
omitted in the later explanations.
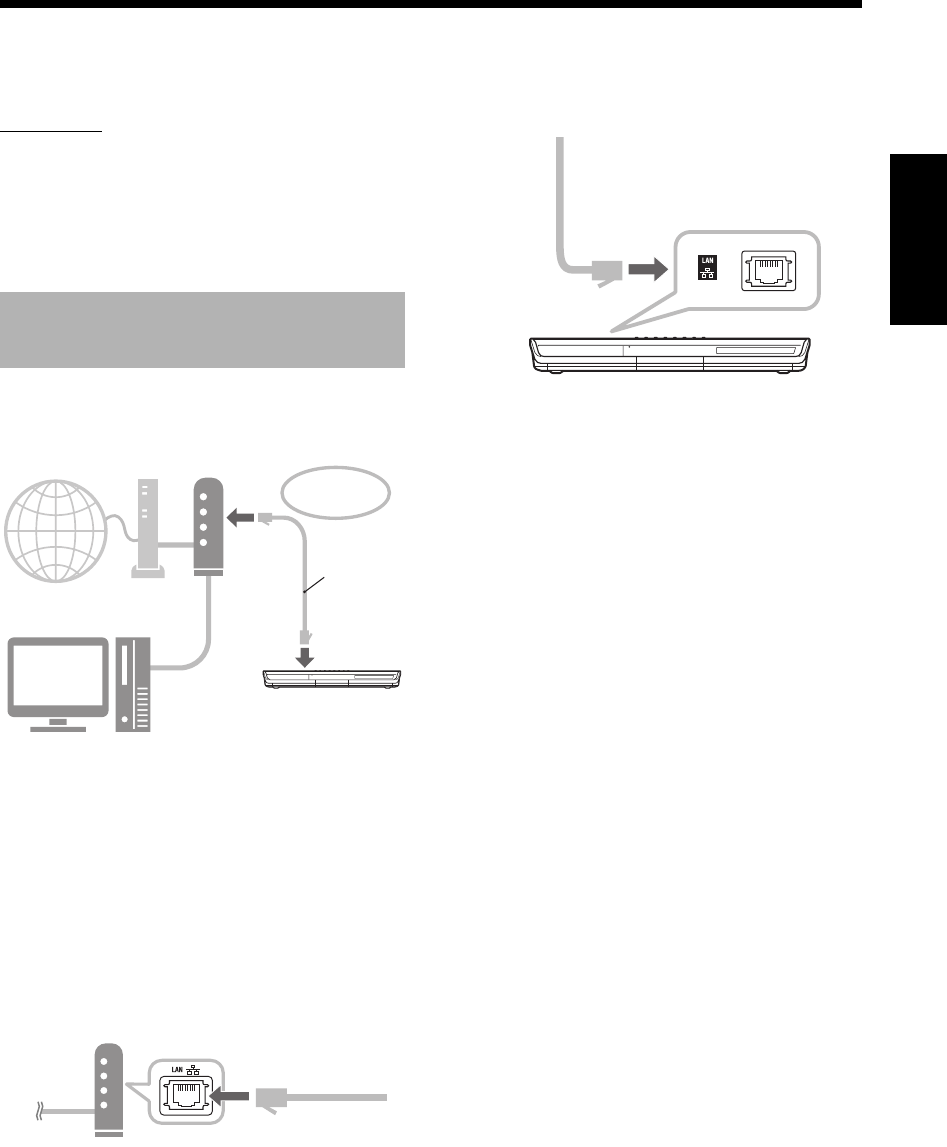
1Connect one end of the Ethernet
cable (straight-through cable, not
supplied) to the LAN terminal on
the router.
2Connect the other end of the
Ethernet cable to the LAN terminal
on the main unit.
Connecting the main unit to
the router
Internet Modem Router
To the LAN
terminal on the
router
Computer
Ethernet cable
(straight-
through cable,
not supplied)
Connection
DD-83[J].book Page 6 Thursday, September 28, 2006 9:16 AM
7
English
Installing CyberLink Media Server
The example TV and computer screenshots used
in this manual may differ from the actual screen
displays.
CyberLink Media Server is a software application
for sending video, audio and still picture files
stored on your computer to the main unit.
This part explains the procedure for installing
CyberLink Media Server from the bundled CD-
ROM to the computer.
NOTE
• Make sure you close all anti-virus and other
applications running on your computer before
starting installation.
• This manual explains operations with the
English version of both Windows XP and Cyber-
Link Media Server as examples. Follow the
explanation referring to the actual operations of
your language version.
• Log onto the computer with administrative rights
(Administrators).
• After installing CyberLink Media Server from the
supplied CD-ROM, it is recommended that you
upgrade CyberLink Media Server to enable you
to utilize the latest functions. Refer to the web-
site http://www.victor.co.jp/english/download/
index-e.html for upgrading CyberLink Media
Server.
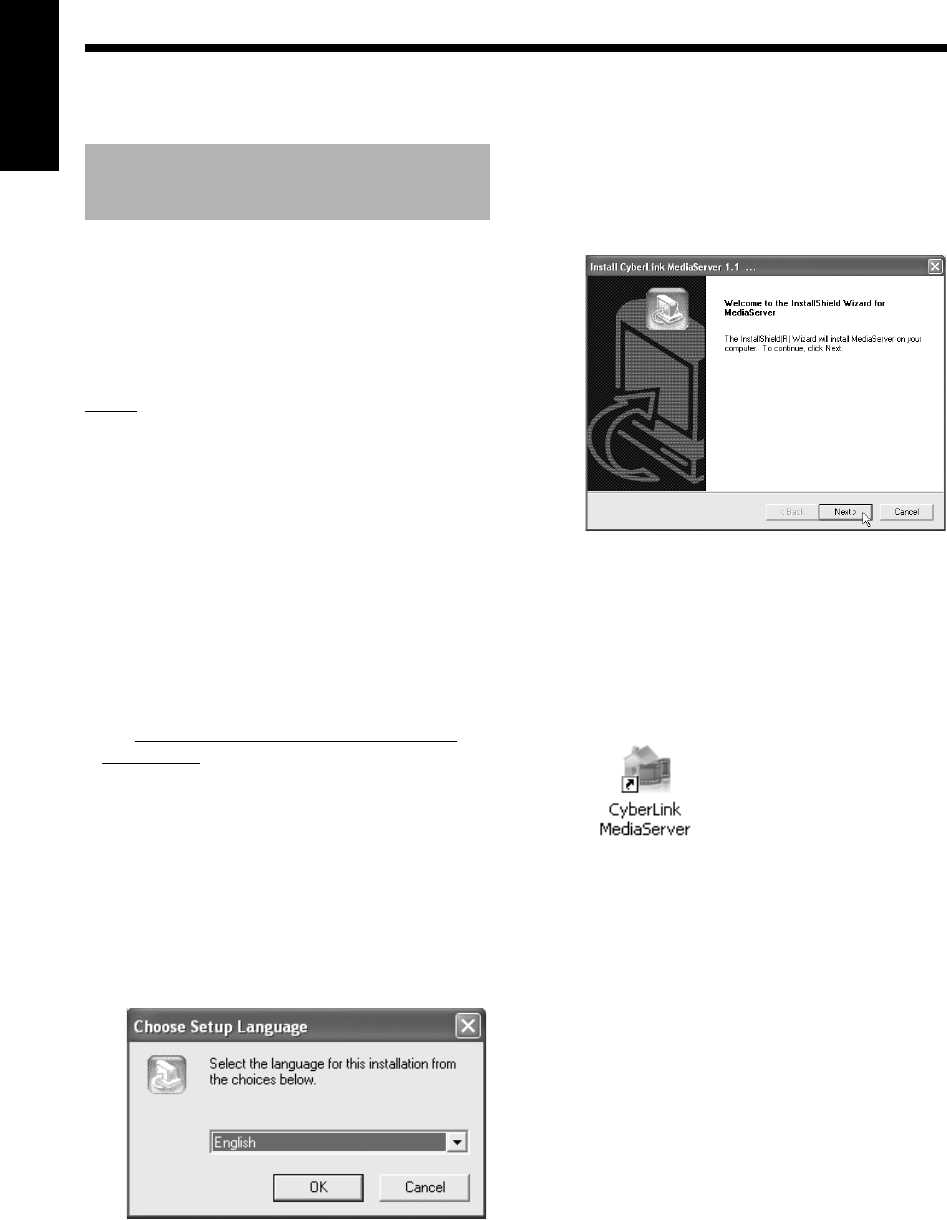
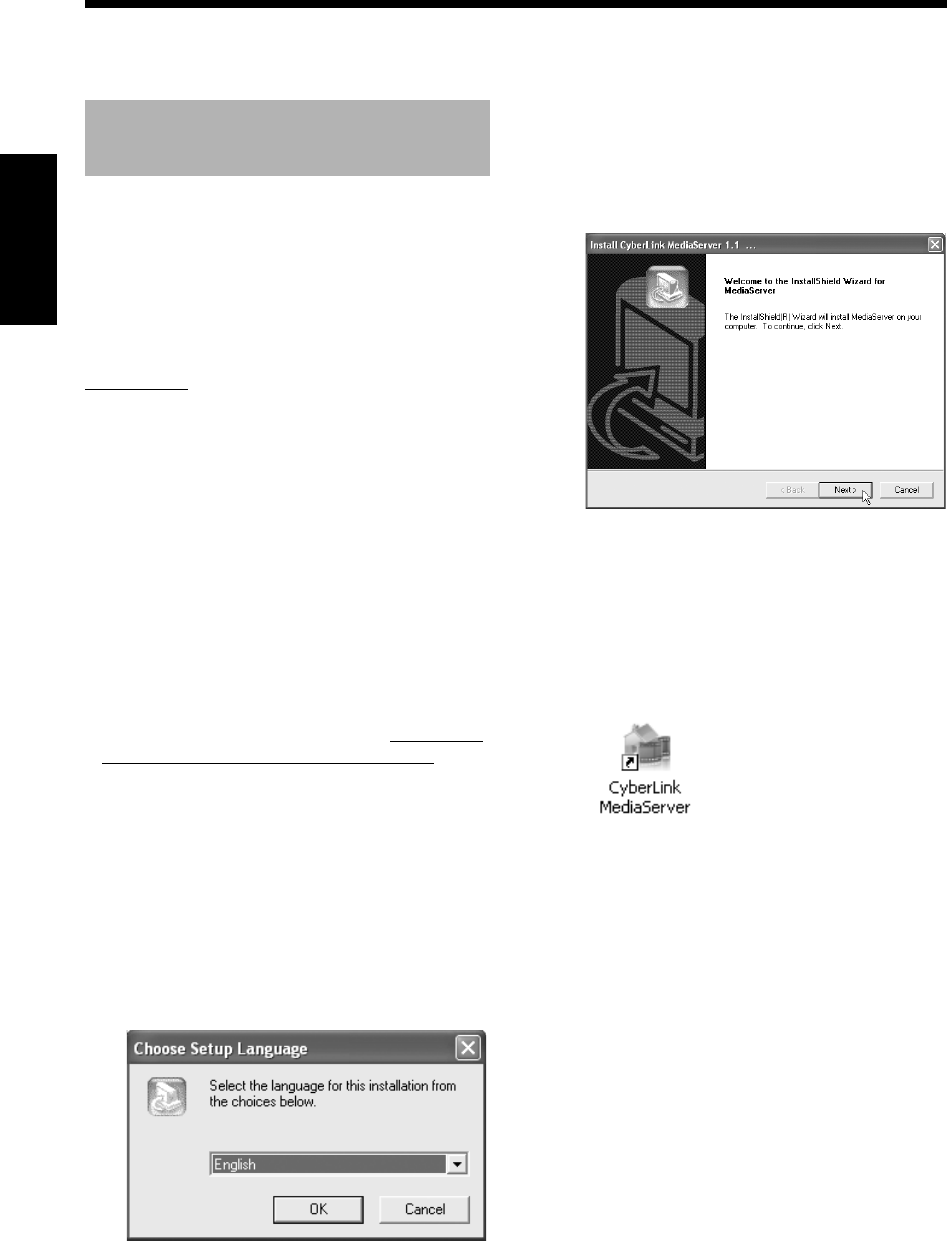
(On the computer)
1Start up Windows, and place the
CyberLink Media Server Software
CD-ROM into your computer’s CD-
ROM drive.
The installer should start up automatically,
and display the screen shown below.
2Select the language of the version
you want to install, and then click
[OK].
The program file runs and the “Install
CyberLink MediaServer” window is displayed.
3Click [Next >].
The license agreement is displayed.
• After finishing this step, install CyberLink
Media Server following the actual displayed
explanations.
4
Confirm that the “CyberLink Media-
Server” icon is displayed on the
desktop.
You have finished installing CyberLink Media
Server.
Installing CyberLink Media
Server
Installing CyberLink Media Server
DD-83[J].book Page 7 Thursday, September 28, 2006 9:16 AM
8
English
Installing CyberLink Media Server
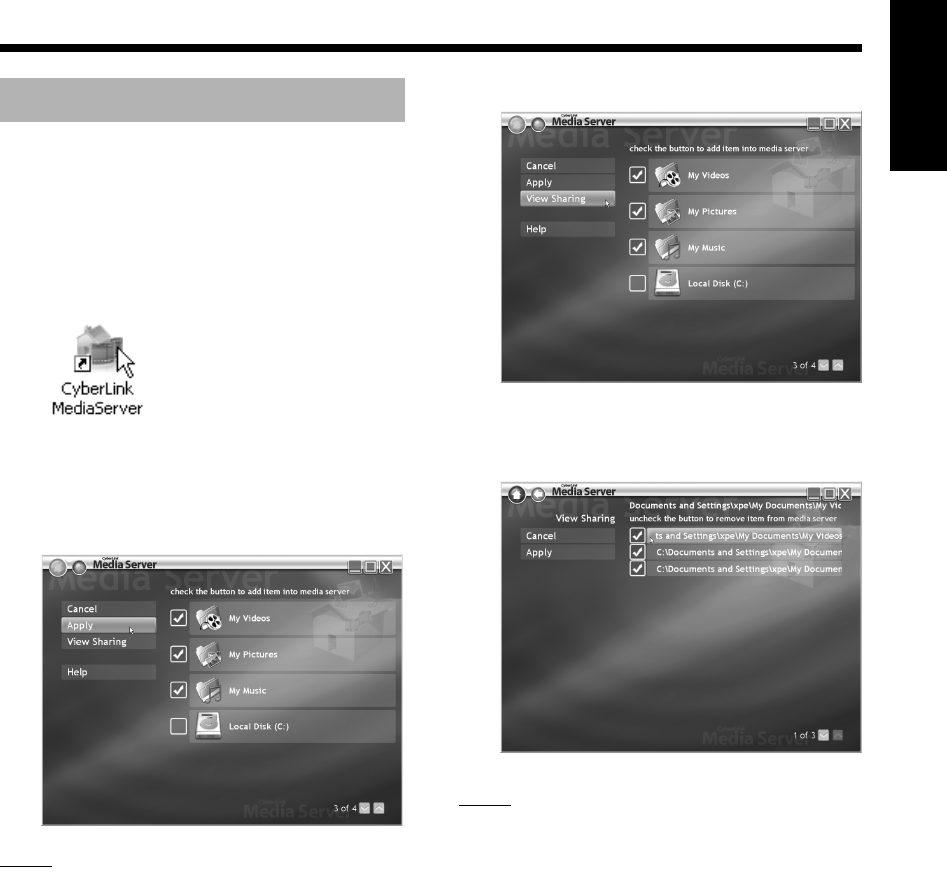
This part explains the procedure for selecting the
default folders (“My Videos”, “My Pictures” and “My
Music”) as examples.
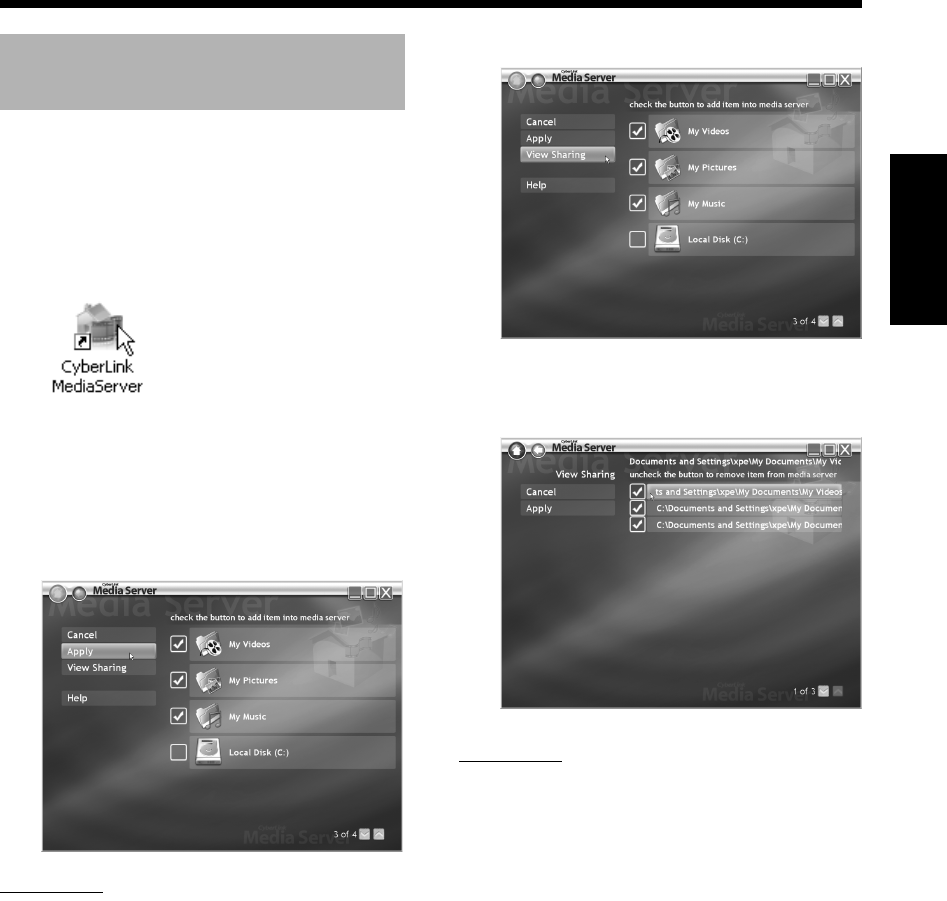
(On the computer)
1
Double-click the “CyberLink Media-
Server” icon on the desktop.
CyberLink Media Server starts.
2Select the check boxes next to
“My Videos”, “My Pictures” and
“My Music”, and click [Apply].
NOTE
• To select folders other than the default folders,
refer to “Adding shared folders” on page 18.
• You can store files of different types in one
folder. For example, even when video files and
still picture files are stored in the “My Music”
folder, you can play back those files.
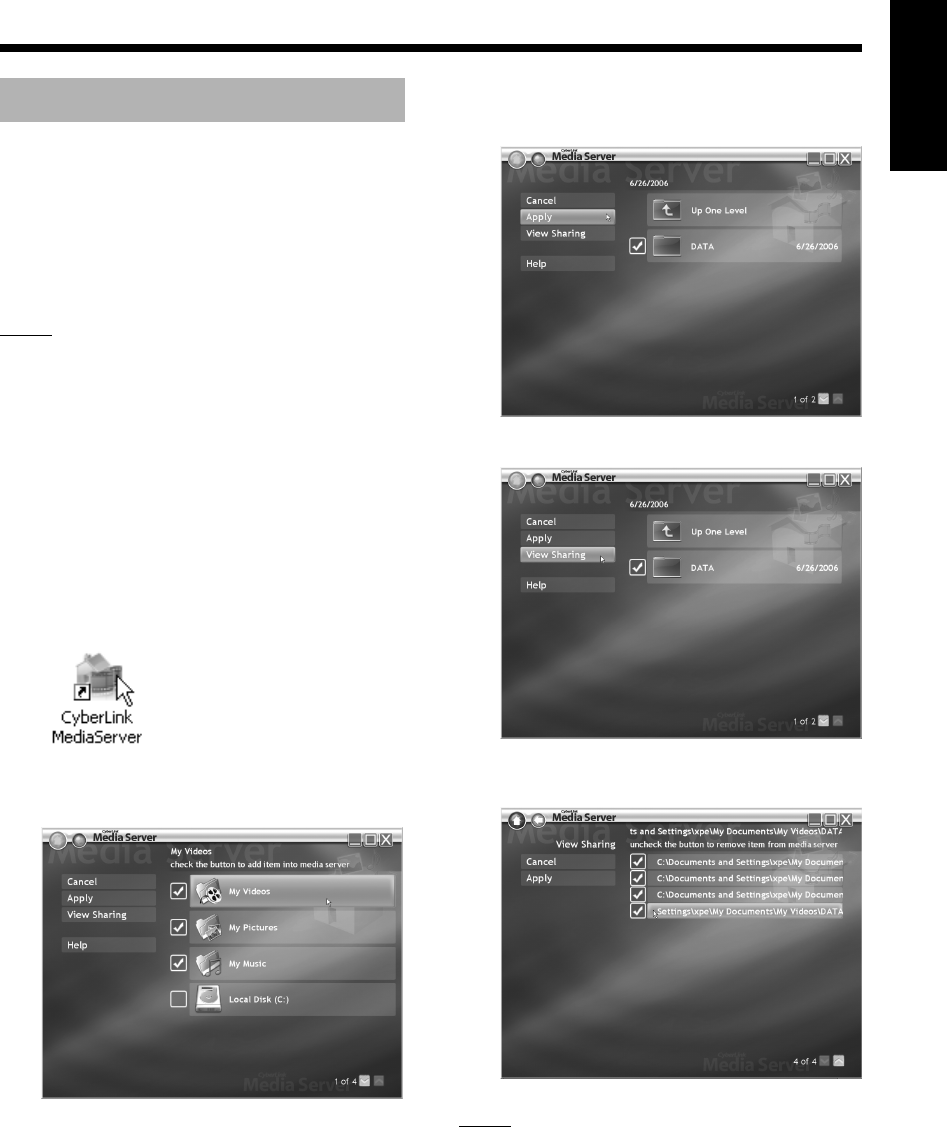
3Click [View Sharing].
4Confirm that the names of the
shared folders are displayed on
the list.
NOTE
•To stop sharing a folder
Clear the check box next to it and click [Apply].
•To go back to the previous screen
Click [+] in the upper left portion of the screen.
•To exit CyberLink Media Server
Click [M] in the upper right portion of the screen.
• Before deleting a shared folder or file on the con-
nected computer, cancel folder/file sharing on
CyberLink Media Server.
Specifying the shared folders
DD-83[J].book Page 8 Thursday, September 28, 2006 9:16 AM

9
English
Confirming the connection to the computer
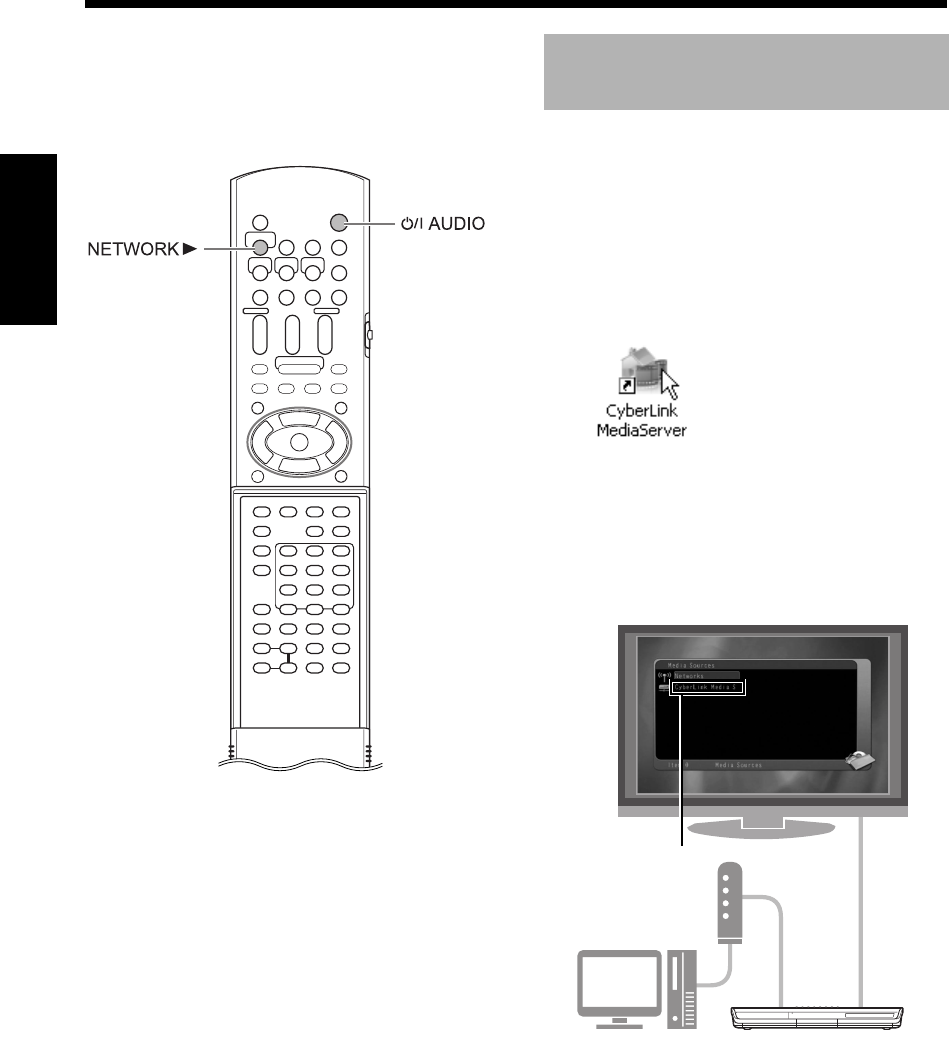
This part explains how to start CyberLink Media
Server for the first time and how to perform the fol-
lowing.
• Confirming that the main unit recognizes the
computer. (On the remote control)
1Press [F AUDIO] to turn on the
main unit.
(On the computer)
2
Double-click the “CyberLink Media-
Server” icon on the desktop.
CyberLink Media Server starts.
(On the remote control)
3Press [NETWORK 3].
4Confirm that “CyberLink Media
Server” is displayed on the TV
screen.
Proceed to “Playing back files stored on the
computer” on page 16.
Starting CyberLink Media
Server
TV
“CyberLink Media
Server”
Confirming the connection to the computer
DD-83[J].book Page 9 Thursday, September 28, 2006 9:16 AM

10
English
Confirming the connection to the computer
If “CyberLink Media Server” is not displayed
The main unit may not detect the CyberLink Media
Server for any of the following reasons.
Determine the reason by referring to A and B
shown below.
A The Ethernet cable may not be con-
nected properly.
Possible cause:
The Ethernet cable may be of the wrong
type (a crossover cable may be used) or
may not be connected securely.
Possible solution:
Refer to “Connecting the main unit to the
router” on page 6 to check that the Ether-
net cable is a straight-through cable and is
connected securely.
B You may be using a router that requires
the IP addresses to be set up manually.
Possible cause:
The router connected to the main unit may
not have a DHCP function that assigns the
IP addresses automatically. Another possi-
bility is that the IP addresses may be
assigned manually without using the
DHCP function of the router.
Possible solution:
The IP address of the main unit must be
set up manually. Click [Cancel] to close the
display on the computer screen and exit
CyberLink Media Server. Next, assign the
IP address to the main unit referring to
“Setting up the IP address” on page 11.
DD-83[J].book Page 10 Thursday, September 28, 2006 9:16 AM
11
English
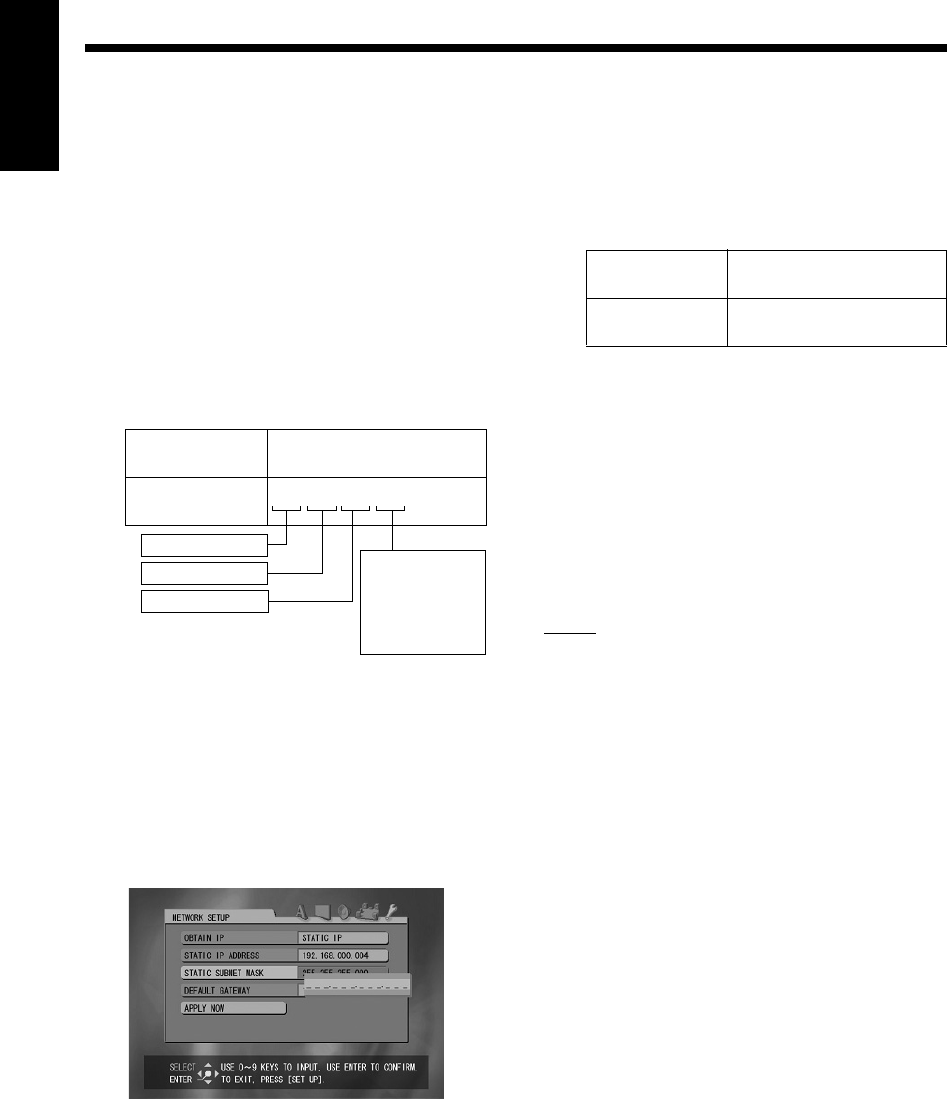
Setting up the IP address
You can skip this part when the main unit and the
computer are connected to a router that uses
DHCP function.
You must assign the IP address to the main unit
manually in the following cases.
Case 1: When you have assigned an IP address
to the computer manually
Case 2: When you have connected the main
unit to the computer directly
Refer also to “Connecting the main unit to
the computer directly” on page 19.
This part explains the procedure for determining
the IP address of the computer by displaying the
network setup.
NOTE
• Depending on the computer settings, you may
need operations different from the explanation
given in this part. Refer to “Help” in Windows for
the following steps.
(On the computer)
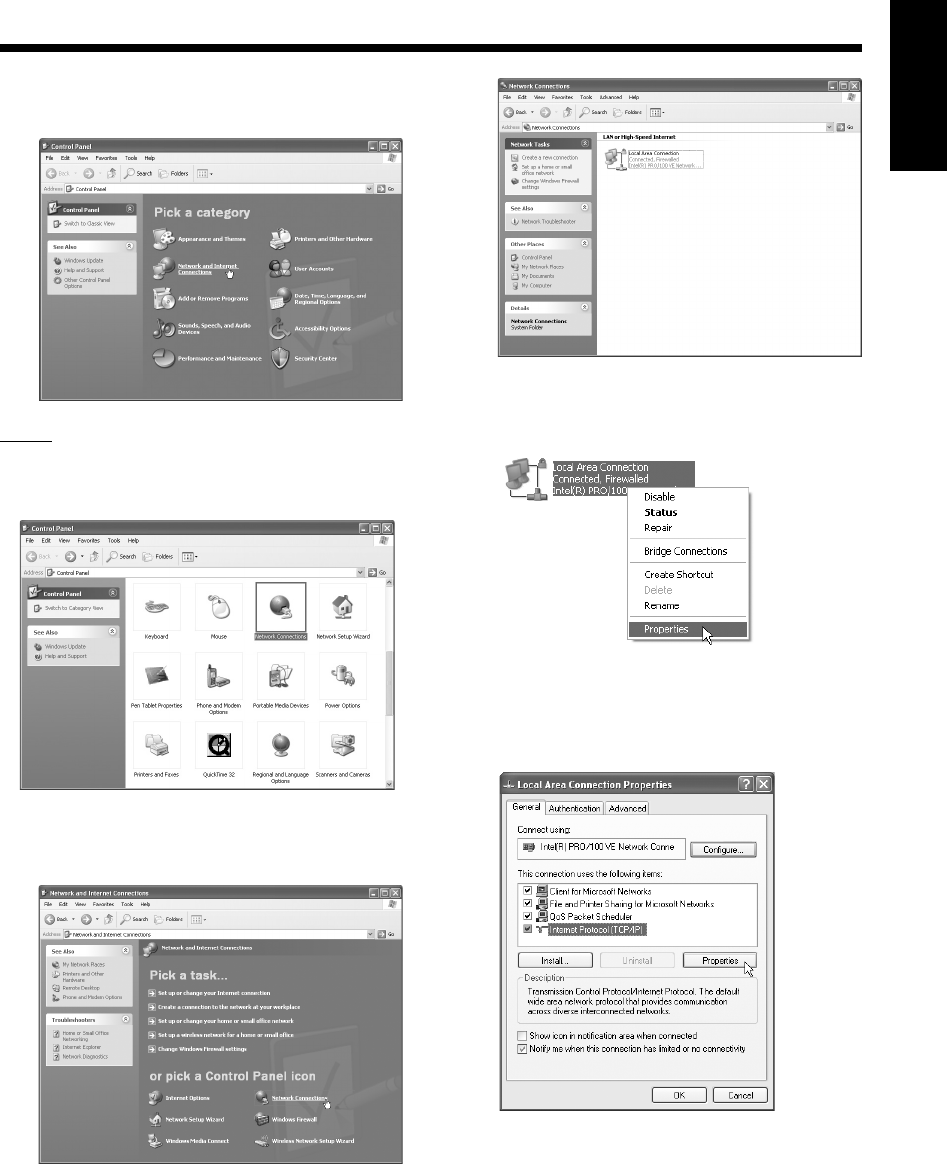
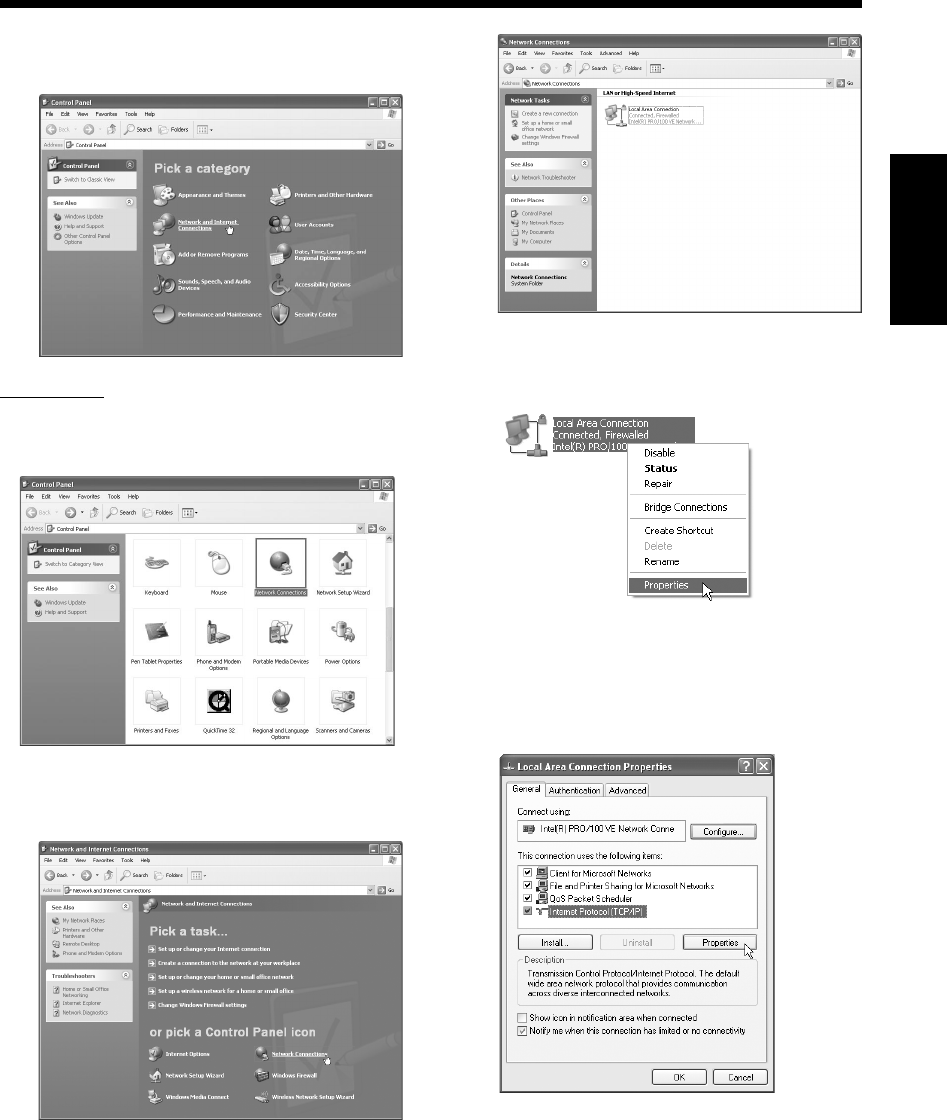
1Click [Start] and then “Control
Panel”.
The “Control Panel” dialog box is displayed.
Occasions requiring the IP
address setup
Manual
setup for IP
address
Router
Manual
setup for IP
address
Example:
192. 168. 0. 3
Example: 192. 168. 0. 4
Manual
setup for IP
address
Example: 192. 168. 0. 3
Example: 192. 168. 0. 4
Manual
setup for IP
address
Determining the IP address of
the computer
Setting up the IP address
DD-83[J].book Page 11 Thursday, September 28, 2006 9:16 AM
12
English
Setting up the IP address
2Click “Network and Internet Con-
nections”.
NOTE
• Depending on the computer settings, the “Con-
trol Panel” dialog box is displayed as shown
below.
In this case, double-click the “Network Connec-
tions” icon and then proceed to step 4.
3Click “Network Connections”.
The “Network Connections” dialog box is
displayed.
4Right-click the “Local Area Con-
nection” icon and then click [Prop-
erties].
The “Local Area Connection Properties”
dialog box is displayed.
5Click “Internet Protocol (TCP/IP)”
and then click [Properties].
The “Internet Protocol (TCP/IP) Properties”
dialog box is displayed.
(Continued on the next page.)
DD-83[J].book Page 12 Thursday, September 28, 2006 9:16 AM
13
English
Setting up the IP address
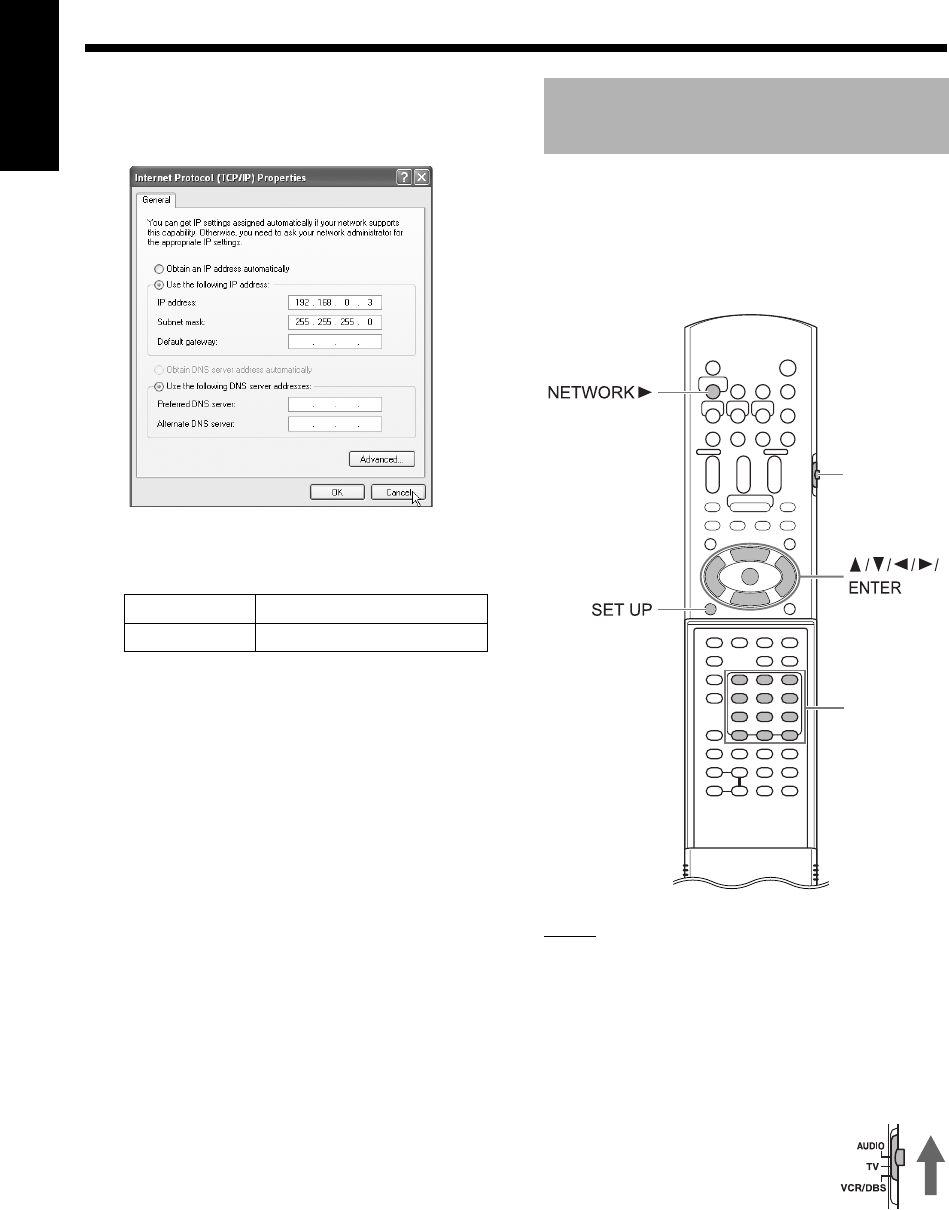
6Confirm the values displayed in
“IP address:” and “Subnet mask:”.
Example:
Fill out the blank column with the values.
(The values are to be used in step 8 on page
15.)
7Click [Cancel].
The dialog box is closed.
You have finished confirming the IP address of the
computer.
This part explains the procedure for setting up the
IP address of the main unit manually.
You can skip this part when the main unit and the
computer are connected to a router using a DHCP
function.
NOTE
• Before assigning the IP address to the main unit,
press [NETWORK 3] to select the connected
computer as the source. “NETWORK SETUP”
on the preference screen is disabled when
another source is selected.
(On the remote control)
1Slide the remote con-
trol mode selector to
[AUDIO].
IP address . . .
Subnet mask . . .
Assigning the IP address to
the main unit
Number
buttons
Remote control
mode selector
DD-83[J].book Page 13 Thursday, September 28, 2006 9:16 AM
14
English
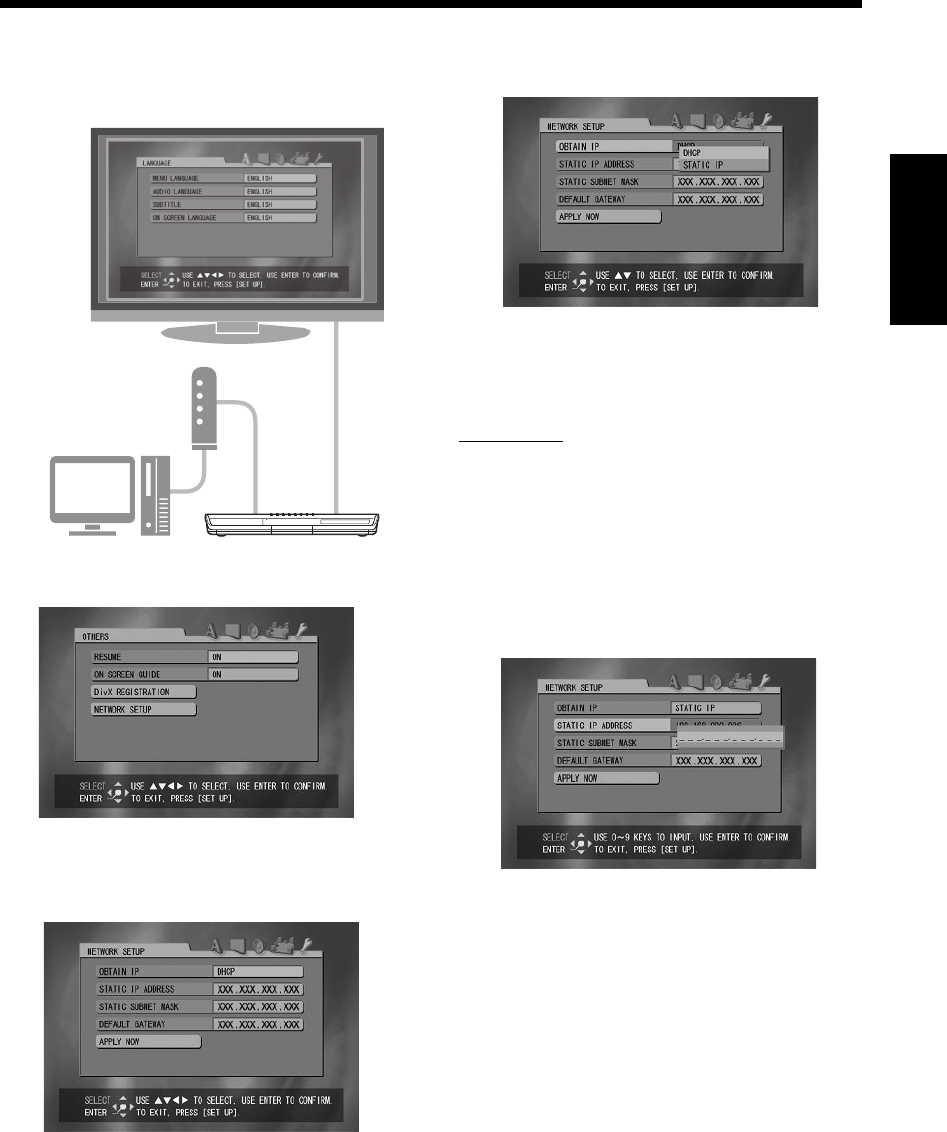
Setting up the IP address
2Press [SET UP] .
The preference screen is displayed on the TV
screen.
3Press 3 repeatedly to display
“OTHERS”.
4
Press
/
to select “NETWORK
SETUP” and then press [ENTER].
5Select “OBTAIN IP” and then press
[ENTER].
6Press 5 or / to select “STATIC
IP” and then press [ENTER].
NOTE
• When changing the Internet connection environ-
ment by using a DHCP router or other devices
that assign IP addresses automatically, select
“DHCP” for “OBTAIN IP”.
7
Press
/
to select “STATIC IP
ADDRESS” and then press
[ENTER].
(Continued on the next page.)
TV
DD-83[J].book Page 14 Thursday, September 28, 2006 9:16 AM
15
English
Setting up the IP address
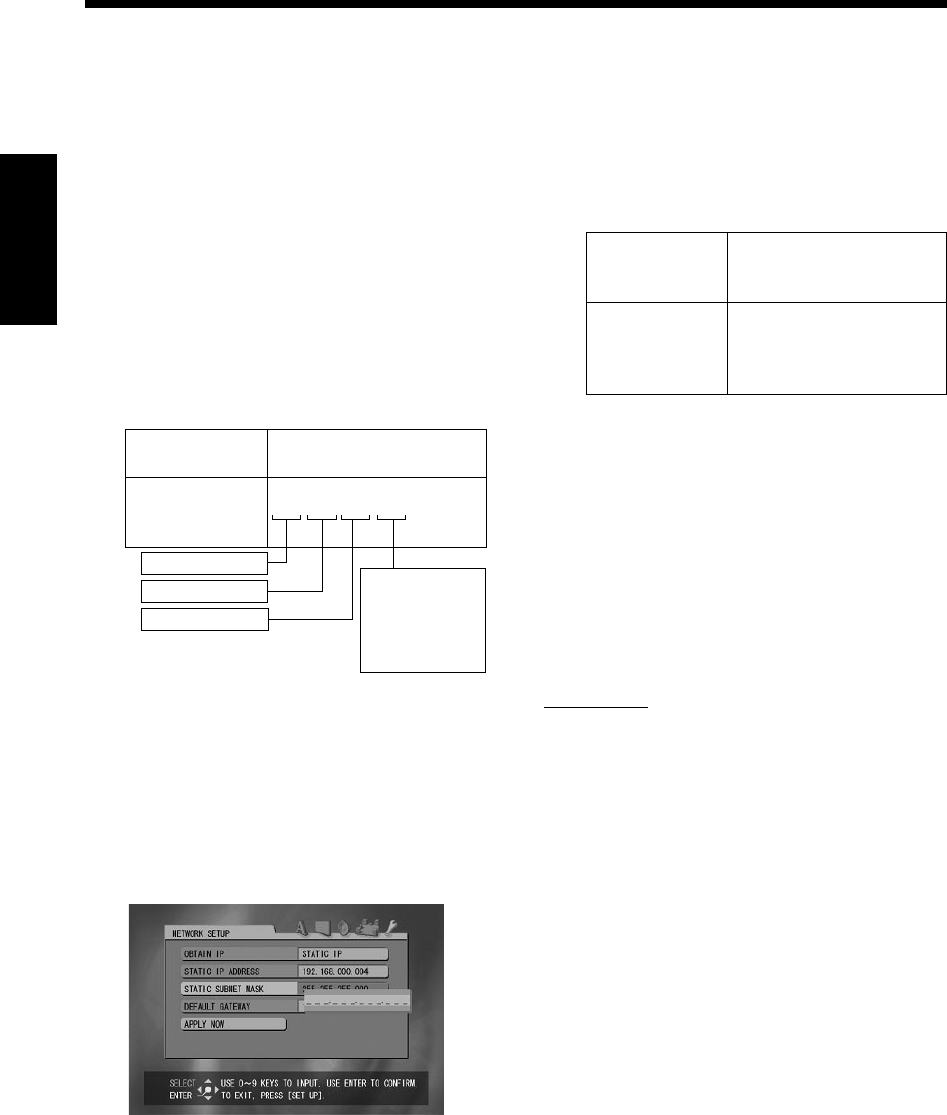
8Enter the IP address using the
number buttons.
Confirm the IP address you have written
down in the column on page 13.
Enter the same values of the IP address of
the computer into the first, second and third
group of digits (the first, second and third
numerical blocks from the left).
Enter an arbitrary value (1 - 254) other than
the one used in the IP address of the com-
puter into the fourth group of digits (the first
numerical block from the right).
Example for setup:
Note that the fourth group of digits should be
different from the ones of other devices con-
nected to the network.
9Press [ENTER].
10 Press / to select “STATIC SUB-
NET MASK” and then press
[ENTER].
11 Enter the subnet mask using the
number buttons.
Confirm the subnet mask you have written
down in the column on page 13, and then
enter the same value.
Example for setup:
12 Press [ENTER].
13 Press / to select “APPLY NOW”
and then press [ENTER].
The settings are stored.
You have finished setting up the IP address of the
main unit. Return to page 8.
NOTE
• Usually, you do not have to set “DEFAULT
GATEWAY”.
For normal usage, leave the initial setting
unchanged. Set “DEFAULT GATEWAY” only
when you want to play back files stored on a
computer that belongs to another network.
IP address of
the computer
192.168. 0. 3
(=192.168.000.003)
IP address of
the main unit 192.168.000.004
The fourth group
(Only this value
should be different
from the one of
the computer IP
address.)
The third group
The second group
The first group
Subnet mask of
the computer
255.255.255. 0
(=255.255.255.000)
Subnet mask of
the main unit 255.255.255.000
DD-83[J].book Page 15 Thursday, September 28, 2006 9:16 AM
16
English
Playing back files stored on the computer
This part explains the procedure for playing back
audio files stored on the computer.
You can play back video files and still picture files
with almost the same procedure.
NOTE
• Store files you want to play back in the shared
folders before proceeding.
• This part explains the procedure for playing back
the “TRACK0001” file stored in the “My Music”
folder as an example.
• Refer to the main volume of the operation man-
ual for details on operating the main unit.
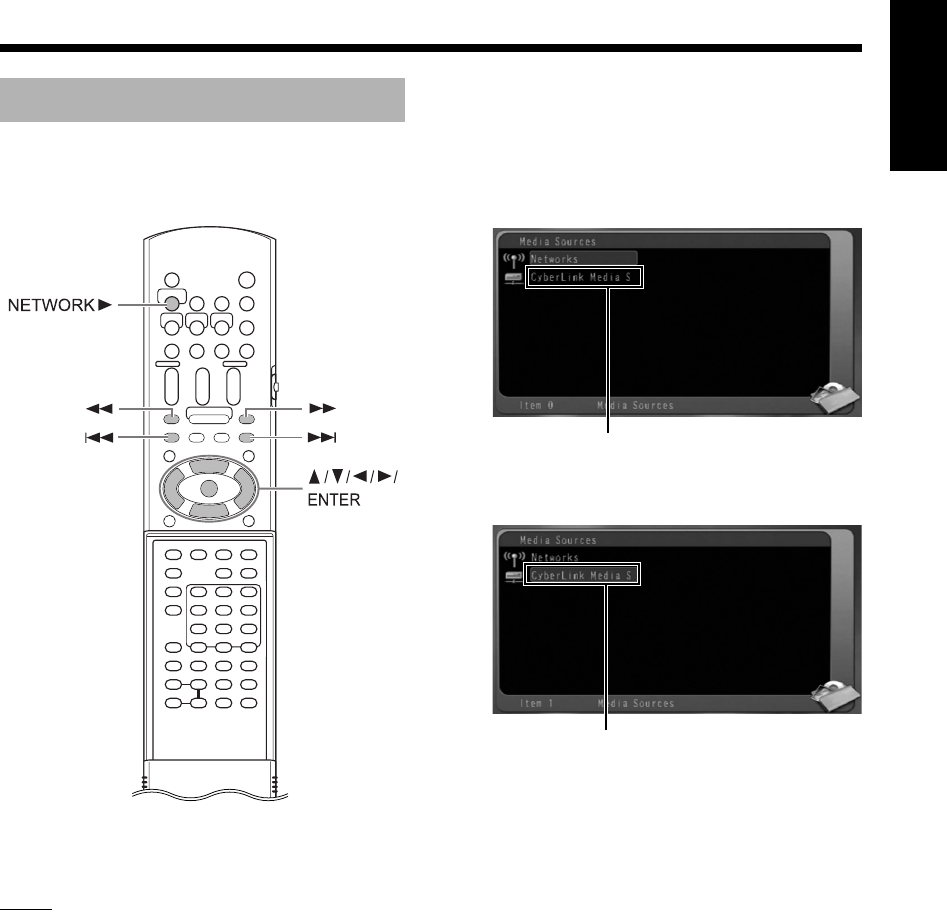
(On the computer)
1Start CyberLink Media Server.
(On the remote control)
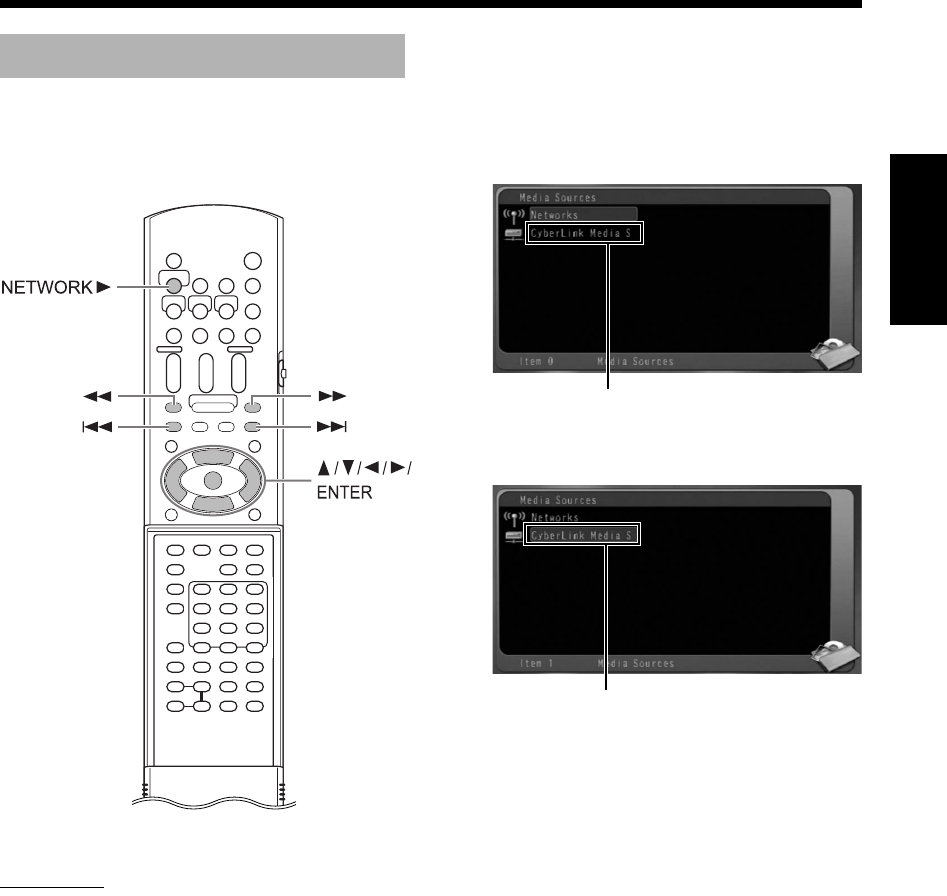
2Press [NETWORK 3].
“CyberLink Media Server” is displayed.
3Press / to select “CyberLink
Media Server”.
(Continued on the next page.)
Playing back audio files
“CyberLink Media Server”
Selected item is highlighted.
Playing back files stored on the computer
DD-83[J].book Page 16 Thursday, September 28, 2006 9:16 AM
17
English
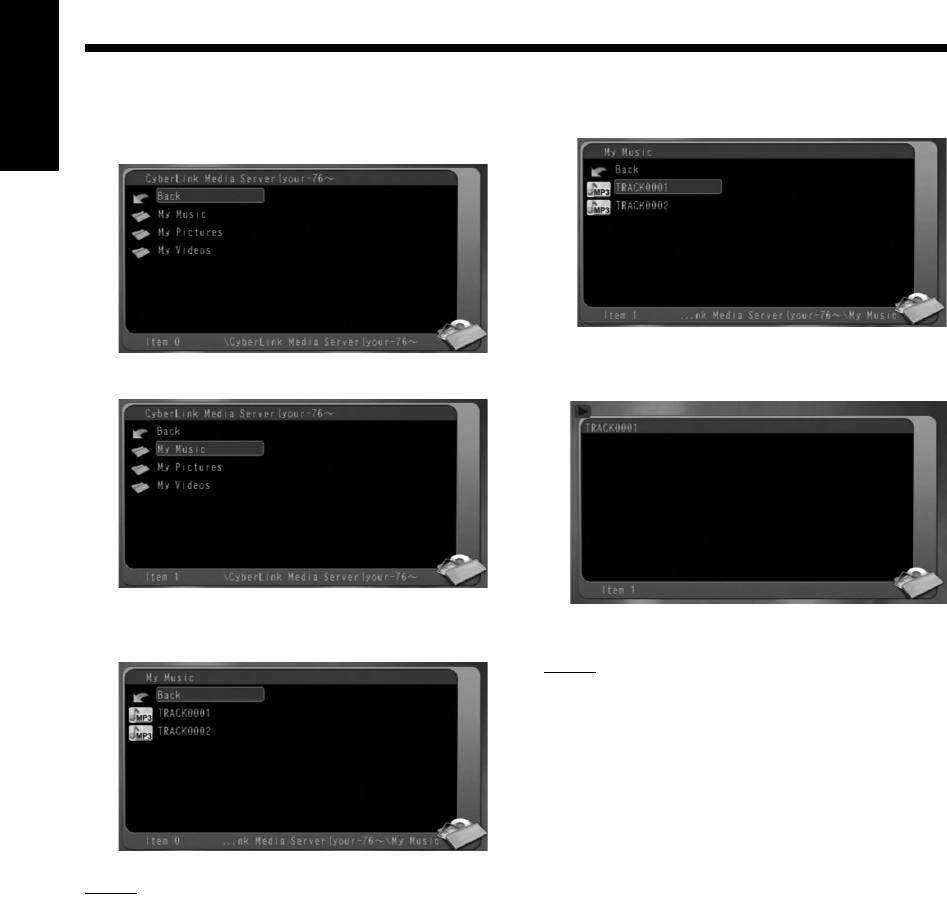
Playing back files stored on the computer
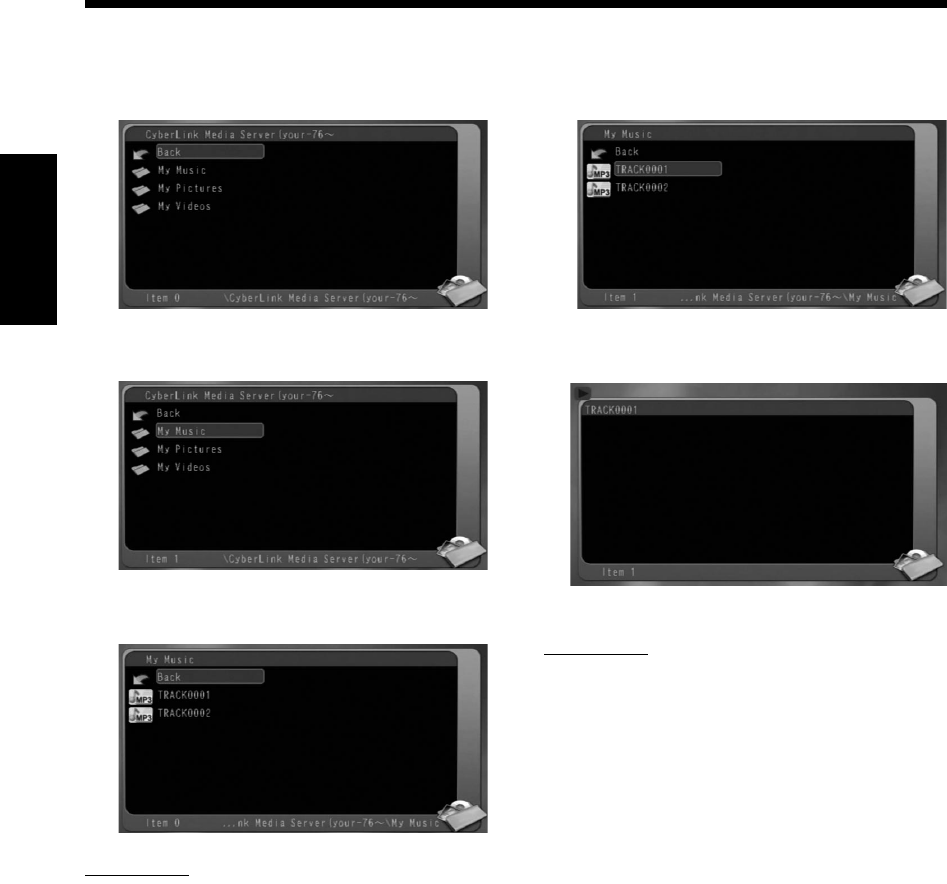
4Press [ENTER].
The shared folders are displayed.
Example:
5Press / to select “My Music”.
6Press [ENTER].
The list of the audio files is displayed.
NOTE
• If the file list is not displayed, confirm that the
files you want to play back are stored in the
shared folder.
7Press 5 or / to select the file you
want to play back.
8Press [ENTER].
Playback starts.
Press 7 to stop playback.
NOTE
• You can use the buttons shown below to navi-
gate among the pages.
Pressing 2 or 3 displays the previous or next
page.
Pressing 1 or ¡ skips 10 pages forward or
backward.
Pressing 4 or ¢ skips to the top or bottom
of the folder/file list.
• This part only explains the basic procedure for
playing back files.
DD-83[J].book Page 17 Thursday, September 28, 2006 9:16 AM
18
English
Reference
This part explains the procedure for adding shared
folders (folders in which files you want to play back
are stored).
You can add a shared folder, by 1) storing the
desired folder in one of the default folders, and
then 2) selecting the desired folder using Cyber-
Link Media Server.
NOTE
• You can also access the desired folder from
CyberLink Media Server by moving down from
the local disk to the subdirectories.
• This part explains the procedure for storing the
“DATA” folder in the default “My Videos” folder
and adding the “DATA” folder to the shared fold-
ers as examples.
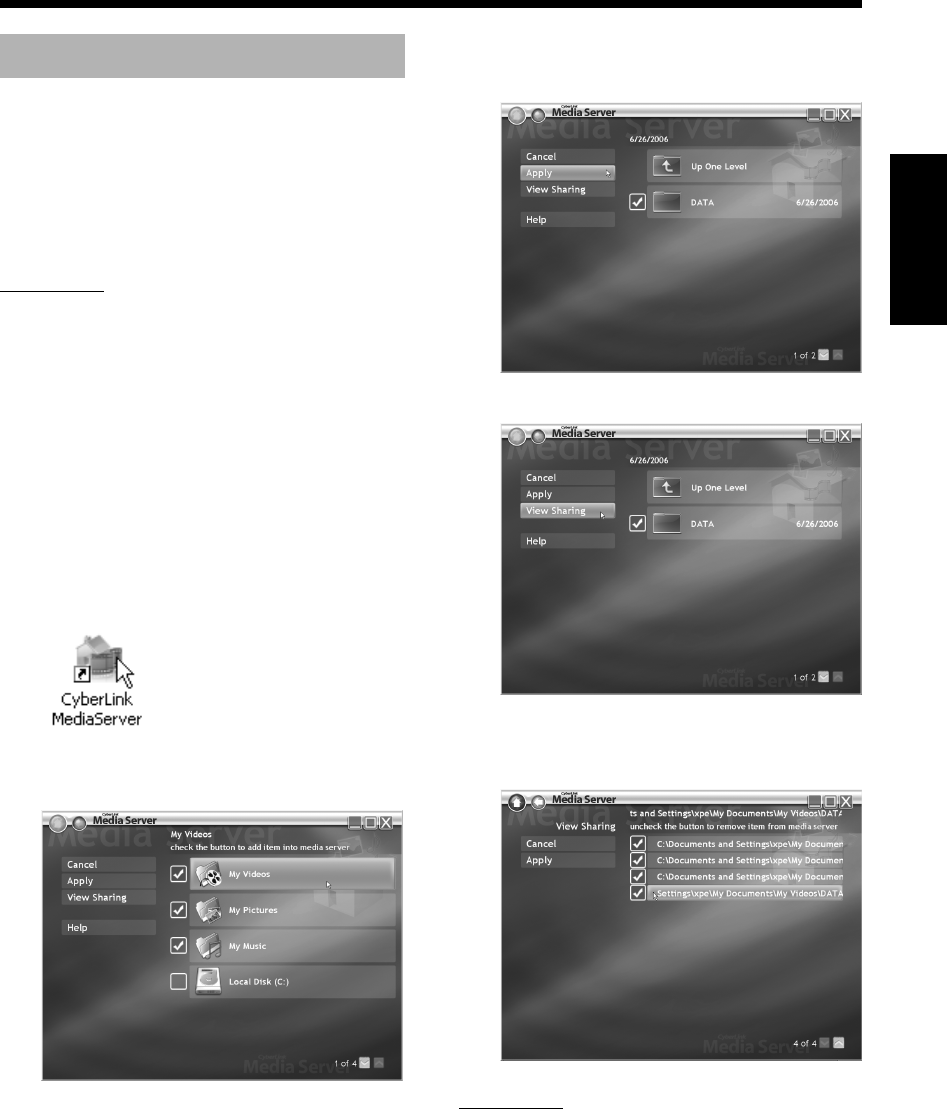
1Store the “DATA” folder in the “My
Videos” folder using Windows.
2
Double-click the “CyberLink Media-
Server” icon on the desktop.
CyberLink Media Server starts.
3Click [My Videos].
4Select the check box next to
[DATA], and click [Apply].
5Click [View Sharing].
6Confirm that the “DATA” folder is
added to the list of shared folders.
NOTE
•To stop sharing a folder
Clear the check box next to it and click [Apply].
•To go back to the previous screen
Click [+] in the upper left portion of the screen.
•To exit CyberLink Media Server
Click [M] in the upper right portion of the screen.
Adding shared folders
Reference
DD-83[J].book Page 18 Thursday, September 28, 2006 9:16 AM

19
English
Reference
This part explains the procedure for connecting the
main unit to the computer directly.
You must install CyberLink Media Server to your
computer before connecting the main unit to the
computer. (Refer to page 7.)
1Connect the main unit and the
computer as shown in the diagram
below.
2Set up the computer so that it can
obtain its IP address automatically.
Select “Obtain an IP address automatically” in
step 6 on page 13, and then click [OK].
3Set up the main unit so that it can
obtain its IP address automatically.
Select “DHCP”, and then click [ENTER] in
step 6 on page 14. (“DHCP” is selected as the
initial setting.)
The main unit and the computer start to
obtain the IP addresses recognizable by each
other. Wait about one minute until the setup is
complete.
NOTE
• You can also assign arbitrary values for the IP
addresses by following pages 11 to 15.
4Confirm the connection to the
computer.
Set up the shared folders referring to
“Specifying the shared folders” on page 8 and
“Confirming the connection to the computer”
on page 9.
• After finishing the shared folder setup, pro-
ceed to “Playing back files stored on the
computer” on page 16.
Connecting the main unit to
the computer directly
Ethernet cable
(straight-through cable
or crossover cable, not
supplied)
DD-83[J].book Page 19 Thursday, September 28, 2006 9:16 AM

20
English
Reference
Problem Possible cause Possible solution Reference
page
Files stored on the
computer are not
displayed.
The Ethernet cable is not
connected.
Make sure the Ethernet cable is connected
properly. (Insert the Ethernet cable until it
clicks.)
6
A wrong cable is used. When connecting the main unit to a router,
use a straight-through cable. 6
CyberLink Media Server is
not installed.
Install CyberLink Media Server to the com-
puter. 7
Incorrect IP addresses
have been set manually.
(When DHCP function is
not used)
Check that the same values are set in the
first, second and third group of digits and dif-
ferent values are set in the fourth group of
digits for the main unit and the computer.
11-15
A file is not played
back properly.
Another device is using the
network connected to the
main unit.
If another device is using the network while
the main unit is playing back a file, the net-
work may be confused, image frames may
drop and sound may skip. Remove the
device from the network before playing back
a file.
-
A video, audio or
still picture file can-
not be played back.
The file type is not compati-
ble with this system.
Use a file of the playable type. 3
The file is corrupted. You cannot play back a corrupted file. -
Troubleshooting
DD-83[J].book Page 20 Thursday, September 28, 2006 9:16 AM

1
Français
• Lecteur Audio/Vidéo/Image DLNA CERTIFIEDTM
• Ce système est conforme au guide DLNA 1.0.
• Vous pouvez reproduire les types de fichiers sui-
vants en utilisant la fonction réseau de ce sys-
tème.
LPCM, WAV, MP3, WMA, JPEG, ASF, DivX,
MPEG1, MPEG2
REMARQUE
• “DLNA” signifie “Digital Living Network Alliance
(Alliance de Réseau Numérique Domestique)”.
Consultez les sites Internet suivants pour plus
d’informations.
http://www.dlna.org/
CyberLink Media Server est une marque déposée ainsi que toutes autres entreprises et tous noms de pro-
duits mentionnés dans cette publication, utilisés à des fin d’identification et restent la propriété exclusive de
leurs propriétaires respectifs.
DLNA et DLNA CERTIFIED sont des marques déposées et/ou marques de service de Digital Living Network
Alliance.
Microsoft, Windows, Windows XP sont des marques déposées ou des marques de Microsoft Corporation aux
Etats-Unis et dans d’autres pays.
Informations sur DLNA
DD-83[J].book Page 1 Thursday, October 19, 2006 12:00 PM

2
Français
Introduction....................................3
Introduction à la fonction réseau.....................3
Organigramme général de la fonction réseau
...4
Préparation.....................................5
Ordinateur ....................................................... 5
Appareil de réseau..........................................5
Connexion ......................................6
Connexion de l’unité principale au routeur......6
Installation de CyberLink Media
Server..............................................7
Installation de CyberLink Media Server .......... 7
Spécification des dossiers partagés ...............8
Confirmation de la connexion à
l’ordinateur .....................................9
Démarrage de CyberLink Media Server .........9
Configuration de l’adresse IP .....11
Evénements qui exigent la configuration de
l’adresse IP.................................................11
Déterminer l’adresse IP de l’ordinateur......... 11
Attribution de l’adresse IP
à l’unité principale.......................................13
Lecture des fichiers stockés sur
l’ordinateur ...................................16
Lecture des fichiers audio .............................16
Référence .....................................18
Ajout de dossiers partagés ...........................18
Connexion directe de l’unité principale à
l’ordinateur ..................................................19
Dépannage ...................................20
Introduction
Connexion
Installation de CyberLink
Media Server
Confirmation de la
connexion à l’ordinateur
Configuration de l’adresse IP
Lecture des fichiers stockés
sur l’ordinateur
Référence
Table des matières
DD-83[J].book Page 2 Thursday, October 19, 2006 12:00 PM
3
Introduction Français
Vous pouvez reproduire des fichiers vidéo, audio
et même photos stockés sur votre ordinateur en
configurant le réseau entre l’ordinateur et l’unité
principale.
Vous devez installez CyberLink Media Server sur
votre ordinateur à partir du tas de CD-ROM.
CyberLink Media Server est un logiciel qui sert à
envoyer vers l’unité principale des fichiers vidéo,
audio et des images fixes stockés sur votre ordi-
nateur.
Le réseau peut être facilement configuré sans pas-
ser par une configuration manuelle de l’adresse IP
de l’unité principale, en branchant simplement un
routeur comportant une fonction DHCP à l’unité
principale. La fonction DHCP du routeur attribue
automatiquement l’adresse IP à l’unité principale.
REMARQUE
• Si le routeur ne comporte pas de fonction DHCP
ou que vous n’utilisez pas la fonction DHCP,
vous devez attribuer manuellement l’adresse IP
à l’unité principale.
• Vous pouvez aussi utiliser la fonction réseau en
connectant directement l’unité principale à l’ordi-
nateur. (Consultez la page 19.)
Vous pouvez reproduire les types de fichiers sui-
vants en utilisant la fonction réseau de ce système.
LPCM, WAV, MP3, WMA, JPEG, ASF, DivX,
MPEG1, MPEG2
REMARQUE
• Vous ne pouvez pas utiliser la fonction réseau
pour lire un fichier DivX protégé par DRM enre-
gistré sur l’ordinateur connecté.
Introduction à la fonction
réseau
Présentation de la fonction
Internet Modem Routeur
Environnement utilisé
Ordinateur
Unité principale
Types de fichiers compatibles avec ce système
Introduction
DD-83[J].book Page 3 Thursday, October 19, 2006 12:00 PM
4
Introduction Français
Configuration du système en suivant l’organigramme indiqué audessous. La procédure de configuration du
système varie selon votre environnement d’utilisation.
REMARQUE
• Pour raccorder directement l’unité principale à l’ordinateur, consultez “Connexion directe de l’unité princi-
pale à l’ordinateur” à la page 19.
Organigramme général de la fonction réseau
Page 6
Installez CyberLink Media Server sur votre ordinateur.
Branchez l’unité principale au routeur connecté à votre ordinateur.
Page 8
Page 9
Page 10
Page 10
Page 11
Page 13
Page 16
Démarrez CyberLink Media Server, puis assurez-vous que l’unité prin-
cipale reconnaisse CyberLink Media Server.
Assurez-vous que l’unité
principale soit sous tension.
Vérifiez le raccord des
câbles.
L’adresse IP doit être configurée
manuellement.
Terminez CyberLink Media Server.
Recherchez l’adresse IP de
votre ordinateur.
Attribuez l’adresse IP à l’unité
principale.
L’installation est terminée.
Vous pouvez désormais profiter de la lecture des fichiers stockés sur votre ordinateur!
L’adresse IP est attribuée
automatiquement en utilisant
la fonction DHCP du routeur.
L’unité principale reconnaît-elle
CyberLink Media Server?
L’unité principale reconnaît elle
CyberLink Media Server?
Oui
Oui
Non
Non
Page 7
Spécifiez les dossiers partagés.
DD-83[J].book Page 4 Thursday, October 19, 2006 12:00 PM
5
Introduction Français
Configurez votre environnement d’ordinateur et de
réseau comme suit.
Vous devez installer CyberLink Media Server sur
votre ordinateur à partir du tas de CD-ROM, pour
pouvoir lire les fichiers stockés sur votre ordinateur
avec ce système.
Système d’exploitation
• Exigence : Microsoft Windows XP Home Edition
SP2, Windows XP Professional SP2, Windows
XP Media Center Edition SP2
Processeur
• Exigence : Un processeur à 800 MHz, tel qu’un
processeur Intel Pentium III ou Advanced Micro
Devices (AMD)
• Recommandation : Un processeur de 2,0 GHz
ou plus rapide
Mémoire vive (RAM)
• Exigence : 256 Mo
• Recommandation : 512 Mo
Espace libre de disque dur
• Exigence : 50 Mo
• Recommandation : 200 Mo
Carte réseau
• Exigence : Carte réseau Ethernet (802.3) ou
WiFi (802.11a ou 802.11g)
Carte vidéographique (VGA)
• Exigence : Carte Intel, nVidia ou ATI VGA avec
64 Mo de mémoire vidéo (VRAM)
Assurez-vous qu’il existe un terminal LAN disponi-
ble sur le routeur.
Aussi, vérifiez que vous disposez d’un câble Ether-
net disponible (câble intermédiaire, non fourni). Ce
câble est utilisé pour raccorder le routeur à l’unité
principale comme indiqué page 6.
REMARQUE
• Pour raccorder directement l’unité principale à
l’ordinateur, consultez “Connexion directe de
l’unité principale à l’ordinateur” à la page 19.
Ordinateur
Exigences du système
Appareil de réseau
Internet Modem Routeur
Environnement utilisé
Ordinateur
Préparation
DD-83[J].book Page 5 Thursday, October 19, 2006 12:00 PM
6
Français
Connexion
Les écrans de téléviseur et d’ordinateur utilisés en
example dans ce manuel peuvent être différents
des écrans de votre appareil.
REMARQUE
• Avant de suivre cette procédure, branchez
l’unité principale, les haut-parleurs et un télévi-
seur se rapportant au volume principal du
manuel d’utilisation de ce système.
• Pour raccorder directement l’unité principale à
l’ordinateur, consultez “Connexion directe de
l’unité principale à l’ordinateur” à la page 19.
Cette section explique la procédure de connexion
de l’unité principale à l’ordinateur relié à Internet
via un routeur.
• Ce diagramme indiqué ci-dessus, a été simplifié
en omettant la connexion de l’unité principale, les
haut-parleurs et un téléviseur. Consultez le
volume principal du manuel d’utilisation pour la
connexion des appareils indiqués au dessus.
• Les diagrammes d’Internet et du modem sont
omis dans les explications qui suivent.
1Raccordez une extrémité du câble
Ethernet (câble intermédiaire, non
fourni) au terminal LAN sur le rou-
teur.
2
Connectez l’autre extrémité du câble
Ethernet au terminal LAN sur l’unité
principale.
Connexion de l’unité
principale au routeur
Internet Modem Routeur
Vers le terminal
LAN sur le
routeur
Ordinateur
Câble
Ethernet
(câble
intermédiaire,
non fourni)
Connexion
DD-83[J].book Page 6 Thursday, October 19, 2006 12:00 PM
7
Installation de CyberLink Media Server Français
Les écrans de TV et d'ordinateur utilisés en exam-
ple dans ce manuel peuvent être différents des
écrans de votre appareil.
CyberLink Media Server est un logiciel qui sert à
envoyer vers l’unité principale des fichiers vidéo,
audio et des images fixes stockés sur votre ordina-
teur.
Cette section décrit la procédure pour l’installation
de CyberLink Media Server sur l’ordinateur à partir
du tas de CD-ROM.
REMARQUE
• Assurez-vous que toutes les applications antivi-
rus et autres en cours d’exécution sur l’ordina-
teur soient fermées, avant de démarrer
l’installation.
• Ce manuel explique les opérations en servant
comme exemples des versions anglaises de
Windows XP et CyberLink Media Server. Suivez-
les explications se rapportant à l’opération
actuelle dans le version de votre langue.
• Connectez-vous à l'ordinateur en tant qu'admi-
nistrateur (Administrateurs).
• Après avoir installé CyberLink Media Server
depuis le CD-ROM fourni, il est recommandé
d’effectuer une mise à niveau de CyberLink
Media Server afin de bénéficier des fonctions les
plus récentes. Veuillez visiter le site http://www.
victor.co.jp/english/download/index-e.html pour
mettre à niveau CyberLink Media Server.
(Sur l’ordinateur)
1Démarrez Windows, puis introdui-
sez le CD-ROM du logiciel Cyber-
Link Media Server dans le lecteur
de CD-ROM de l’ordinateur.
L’installation devrait démarrer
automatiquement, et afficher l’écran indiqué
ci-dessous.
2Sélectionnez la langue de la ver-
sion que vous souhaitez installer,
puis cliquez sur [OK].
Le fichier de programme s’exécute et la
fenêtre “Install CyberLink MediaServer”
s’affiche.
3Cliquez sur [Next >].
La licence d’utilisation du logiciel s’affiche.
• Une fois cette étape terminée, installez
CyberLink Media Server en suivant les
explications affichées.
4Confirmez que l’icône de “Cyber-
Link MediaServer” s’affiche sur le
bureau.
Vous avez terminé l’installation de CyberLink
Media Server.
Installation de CyberLink
Media Server
Installation de CyberLink Media Server
DD-83[J].book Page 7 Thursday, October 19, 2006 12:00 PM
8
Français
Installation de CyberLink Media Server
Cette section explique la procédure pour sélectionner
les dossiers par défaut en exemples (“My Videos”,
“My Pictures” et “My Music”).
(Sur l’ordinateur)
1Double-cliquez sur l’icône “Cyber-
Link MediaServer” sur le bureau.
CyberLink Media Server démarre.
2Sélectionnez les cases à cocher
près de “My Videos”, “My Pictu-
res” et “My Music”, puis cliquez
sur [Apply].
REMARQUE
• Pour sélectionner des dossiers autres que les
dossiers par défaut, consultez “Ajout de dossiers
partagés” à la page 18.
• Vous pouvez stocker des fichiers de types diffé-
rents sur un dossier. Par exemple, même lors-
que les fichiers vidéo et fichiers de photos fixes
sont stockés sur le dossier “My Music”, vous
pouvez lire ces fichiers.
3Cliquez sur [View Sharing].
4Confirmez que les noms des dos-
siers partagés soient affichés dans
la liste.
REMARQUE
• Pour arrêter de partager un dossier
Décochez la case à cocher et cliquez sur
[Apply].
• Pour revenir à l’écran précédent
Cliquez sur [
+] dans la partie supérieure gau-
che de l’écran.
• Pour terminer CyberLink Media Server
Cliquez sur [
M] dans la partie supérieure droite
de l’écran.
• Pour pouvoir supprimer un dossier ou un fichier
partagé sur l’ordinateur connecté, vous devez
annuler le partage de dossier/fichier sur Cyber-
Link Media Server.
Spécification des dossiers
partagés
DD-83[J].book Page 8 Thursday, October 19, 2006 12:00 PM
9
Confirmation de la connexion à l’ordinateur Français
Cette section explique comment démarrer Cyber-
Link Media Server pour la première fois et com-
ment effectuer ce qui suit.
• Confirmation que l’unité principale reconnaît
l’ordinateur
(Sur la télécommande)
1Appuyez sur [F AUDIO] pour
mettre l’unité principale sous ten-
sion.
(Sur l’ordinateur)
2Double-cliquez sur l’icône “Cyber-
Link MediaServer” sur le bureau.
CyberLink Media Server démarre.
(Sur la télécommande)
3Appuyez sur [NETWORK 3].
4Vérifiez que “CyberLink Media Ser-
ver” s'affiche sur l'écran TV.
Exécutez “Lecture des fichiers stockés sur l’ordinateur”
à la page 16.
Démarrage de CyberLink
Media Server
“CyberLink Media
Server”
Confirmation de la connexion à l’ordinateur
Téléviseur
DD-83[J].book Page 9 Thursday, October 19, 2006 12:00 PM

10
Français
Confirmation de la connexion à l’ordinateur
Si “CyberLink Media Server” ne s’affiche pas
Il se peut que l’unité principale ne détecte pas Cyber-
Link Media Server pour les raisons suivantes.
Déterminez la cause en consultant A et B indiqués
ci-dessous.
A Le câble Ethernet pourrait ne pas être
connecté correctement.
Cause possible :
Le câble Ethernet pourrait être du mauvais
type (un câble croisé peut être utilisé) ou
pourrait ne pas être raccordé en toute
sécurité.
Solution possible :
Consultez “Connexion de l’unité principale
au routeur” à la page 6 pour vérifier que le
câble Ethernet est bien un câble intermé-
diaire et connecté en toute sécurité.
B Vous pourriez utiliser un routeur qui
exige que l’adresse IP soit configurée
manuellement.
Cause possible :
Le routeur connecté à l’unité principale
pourrait ne pas avoir une fonction DHCP
qui attribue automatiquement l’adresse IP.
Une autre possibilité serait que les adres-
ses IP soient attribués manuellement sans
utiliser la fonction DHCP du routeur.
Solution possible :
L’adresse IP de l’unité principale doit être
configurée manuellement. Cliquez sur [Can-
cel] pour fermer l’affichage de l’écran de
l’ordinateur et terminez le programme
CyberLink Media Server. Ensuite, attribuez
l’adresse IP à l’unité principale en consul-
tant “Configuration de l’adresse IP ”
à la
page 11.
DD-83[J].book Page 10 Thursday, October 19, 2006 12:00 PM
11
Configuration de l’adresse IP Français
Vous pouvez sauter cette section lorsque l’unité
principale et l’ordinateur sont connectés à un rou-
teur qui utilise la fonction DHCP.
Vous devez attribuer manuellement l’adresse IP à
l’unité principale dans les cas suivants.
Boîtier 1 : Lorsque vous avez attribué
manuellement une adresse IP à
l’ordinateur
Boîtier 2 : Lorsque vous avez branché
directement l’unité principale à
l’ordinateur
Consultez “Connexion directe de l’unité
principale à l’ordinateur” à la page 19.
Cette section explique la procédure pour détermi-
ner l’adresse IP de l’ordinateur en affichant la con-
figuration de réseau.
REMARQUE
• Selon les réglages de l’ordinateur, vous devrez
effectuer des opérations différentes des explica-
tions données dans cette section. Consultez le
menu “Help” dans Windows pour les étapes sui-
vantes.
(Sur l’ordinateur)
1Cliquez sur [Start] puis sur “Con-
trol Panel”.
La boîte de dialogue de “Control Panel”
s’affiche.
Evénements qui exigent la
configuration de l’adresse IP
Configuration
manuelle de
l’adresse IP
Routeur
Configuration
manuelle de
l’adresse IP
Exemple :
192. 168. 0. 3
Exemple : 192. 168. 0. 4
Configuration
manuelle de
l’adresse IP
Exemple : 192. 168. 0. 3
Exemple : 192. 168. 0. 4
Configuration
manuelle de
l’adresse IP
Déterminer l’adresse IP de
l’ordinateur
Configuration de l’adresse IP
DD-83[J].book Page 11 Thursday, October 19, 2006 12:00 PM
12
Français
Configuration de l’adresse IP
2Cliquez sur “Network and Internet
Connections”.
REMARQUE
• Selon les réglages de l’ordinateur, la boîte de
dialogue “Control Panel” s’affiche comme indi-
qué ci-dessous.
Dans ce cas, double-cliquez sur l’icône “Network
Connections” puis effectuez l’étape 4.
3
Cliquez sur “Network Connections”.
La boîte de dialogue de “Network
Connections” s’affiche.
4Cliquez avec le bouton de droite
sur l’icône “Local Area Connec-
tion” puis cliquez sur [Properties].
La boîte de dialogue de “Local Area
Connection Properties” s’affiche.
5Cliquez sur “Internet Protocol
(TCP/IP)” puis cliquez sur [Proper-
ties].
La boîte de dialogue de “Internet Protocol
(TCP/IP) Properties” s’affiche.
(Suite page suivante.)
DD-83[J].book Page 12 Thursday, October 19, 2006 12:00 PM
13
Configuration de l’adresse IP Français
6Confirmez les valeurs affichées
dans “IP address:” (Adresse IP) et
“Subnet mask:” (Masque de sous-
réseau).
Exemple :
Remplissez la colonne vide avec les valeurs.
(Les valeurs doivent être utilisées lors de
l’étape 8, à la page 15.)
7Cliquez sur [Cancel].
La boîte de dialogue est fermée.
Vous avez terminé de confirmer l’adresse IP de
l’ordinateur.
Cette section explique la procédure de configura-
tion manuelle de l’adresse IP de l’unité principale.
Vous pouvez sauter cette section lorsque l’unité
principale et l’ordinateur sont connectés à un rou-
teur qui utilise la fonction DHCP.
REMARQUE
• Avant d’attribuer l’adresse IP à l’unité principale,
appuyez sur [NETWORK 3] pour sélectionner
l’ordinateur connecté comme source.
“NETWORK SETUP” sur l’écran des préféren-
ces est désactivé lorsqu’une autre source est
sélectionnée.
(Sur la télécommande)
1
Faire glisser le sélecteur
du mode de télécom-
mande sur [AUDIO].
Adresse IP . . .
Masque de
sous-réseau . . .
Attribution de l’adresse IP à
l’unité principale
Boutons
numériques
Sélecteur de
mode de la
télécommande
DD-83[J].book Page 13 Thursday, October 19, 2006 12:00 PM
14
Français
Configuration de l’adresse IP
2Appuyez sur [SET UP] .
L’écran des préférences s’affiche sur l’écran
TV.
3Appuyez plusieurs fois sur 3 pour
afficher “OTHERS”.
4
Appuyez sur
/
pour sélectionner
“NETWORK SETUP” puis appuyez
sur [ENTER].
5Sélectionnez “OBTAIN IP” puis
appuyez sur [ENTER].
6Appuyez sur 5 ou / pour sélec-
tionner “STATIC IP” puis appuyez
sur [ENTER].
REMARQUE
• Si vous changez l’environnement de connexion
Internet en utilisant le routeur DHCP ou d’autres
appareils qui attribuent automatiquement des
adresses IP, sélectionnez “DHCP” au lieu de
“OBTAIN IP”.
7
Appuyez sur
/
pour sélectionner
“STATIC IP ADDRESS” puis
appuyez sur [ENTER].
(Suite page suivante.)
Téléviseur
DD-83[J].book Page 14 Thursday, October 19, 2006 12:00 PM
15
Configuration de l’adresse IP Français
8Entrez l’adresse IP en utilisant les
boutons numériques.
Confirmez l’adresse IP que vous venez
d’écrire dans la colonne, voir page 13.
Entrez les mêmes valeurs de l’adresse IP de
l’ordinateur dans le premier, deuxième et troi-
sième groupe de chiffres (les premier,
deuxième et troisième blocs numériques en
partant de la gauche).
Entrez une valeur arbitraire (1 – 254), autre
que celle utilisée dans l’adresse IP de l’ordi-
nateur, dans le quatrième groupe de chiffres
(le premier bloc numérique en partant de la
droite).
Exemple de configuration :
Notez que le quatrième groupe de chiffres
doit être différent de ceux des autres appa-
reils connectés au réseau.
9Appuyez sur [ENTER].
10 Appuyez sur / pour sélectionner
“STATIC SUBNET MASK” puis
appuyez sur [ENTER].
11 Entrez le masque de sous-réseau
en utilisant les boutons numéri-
ques.
Confirmez le masque de sous-réseau que
vous venez d’écrire dans la colonne sur la
page 13, puis entrez la même valeur.
Exemple de configuration :
12 Appuyez sur [ENTER].
13 Appuyez sur / pour sélectionner
“APPLY NOW” puis appuyez sur
[ENTER].
Les réglages ont été enregistrés.
Vous avez terminé la configuration de l’adresse IP
de l’unité principale. Revenez à la page 8.
REMARQUE
• Normalement, vous ne devez pas configurer
“DEFAULT GATEWAY”.
Pour une utilisation normale, ne changez pas les
paramétres initiaux. Configurez “ DEFAULT
GATEWAY” uniquement si vous voulez lire des
fichiers stockés sur un ordinateur qui fait partie
d’un autre réseau.
Adresse IP de
l’ordinateur
192.168. 0. 3
(=192.168.000.003)
Adresse IP de
l’unité princi-
pale
192.168.000.004
Le quatrième
groupe
(Seule cette valeur
doit être différente
de celle de l’adresse
IP de l’ordinateur.)
Le troisième groupe
Le deuxième groupe
Le premier groupe
Masque de
sous-réseau de
l’ordinateur
255.255.255. 0
(=255.255.255.000)
Masque de
sous-réseau de
l’unité princi-
pale
255.255.255.000
DD-83[J].book Page 15 Thursday, October 19, 2006 12:00 PM
16
Français
Lecture des fichiers stockés sur l’ordinateur
Cette section explique la procédure pour lire des
fichiers audio stockés sur l’ordinateur.
Vous pouvez lire des fichiers vidéo et des fichiers
de photos fixes en suivant quasiment la même
procédure.
REMARQUE
• Stockez les fichiers que vous souhaitez lire dans
les dossiers partage, avant de commencer la
procédure.
• Cette section donne en exemple la procédure de
lecture du fichier “TRACK0001” stocké dans le
dossier “My Music”.
• Consultez le chapitre principal du manuel d’utili-
sation pour plus de détails sur le fonctionnement
de l’unité principale.
(Sur l’ordinateur)
1Démarrez CyberLink Media Server.
(Sur la télécommande)
2Appuyez sur [NETWORK 3].
“CyberLink Media Server” s'affiche.
3Appuyez sur / pour sélectionner
“CyberLink Media Server”.
(Suite page suivante.)
Lecture des fichiers audio
“CyberLink Media Server”
L’élément sélectionné s’affilche en surbrillance.
Lecture des fichiers stockés sur l’ordinateur
DD-83[J].book Page 16 Thursday, October 19, 2006 12:00 PM
17
Lecture des fichiers stockés sur l’ordinateur Français
4Appuyez sur [ENTER].
Les dossiers partagés s'affichent.
Exemple :
5Appuyez sur / pour sélectionner
“My Music”.
6Appuyez sur [ENTER].
La liste des fichiers audio s’affiche.
REMARQUE
• Si la liste des fichiers ne s’affiche pas, confirmez
que les fichiers que vous voulez lire sont stockés
dans le dossier partagé.
7Appuyez sur 5 ou / pour sélec-
tionner le fichier que vous souhai-
tez lire.
8Appuyez sur [ENTER].
La lecture démarre.
Appuyez sur
7 pour arrêter la lecture.
REMARQUE
• Les boutons ci-dessous vous permettent de faire
défiler les pages.
Appuyez sur 2 ou 3 pour passer à la page
précédente ou suivante.
Appuyez sur 1 ou ¡spour reculer ou avan-
cer de 10 pages.
Appuyez sur 4 ou ¢ pour atteindre le début
ou la fin de la liste de fichiers/dossiers.
• Cette section explique uniquement la procédure
de base pour la lecture des fichiers.
DD-83[J].book Page 17 Thursday, October 19, 2006 12:00 PM
18
Français
Référence
Cette section explique la procédure d’ajout de dos-
siers partagés (dossiers dans lesquels les fichiers
que vous souhaitez lire sont conservés).
Vous pouvez ajouter un dossier partagé, en 1)
stockant le dossier voulu dans un des dossiers par
défaut, puis ensuite 2) en sélectionnant le dossier
voulu à l’aide de CyberLink Media Server.
REMARQUE
• Vous pouvez aussi accéder au dossier voulu à
partir de CyberLink Media Server en le dépla-
çant du disque local vers les sous-répertoires.
• Cette section explique, en exemple, la procé-
dure de stockage du dossier “DATA” dans le
dossier par défaut “My Videos” et l’ajout du dos-
sier “DATA” dans les dossiers partagés.
1Stockez le dossier “DATA” dans le
dossier “My Videos” en utilisant
Windows.
2Double-cliquez sur l’icône “Cyber-
Link MediaServer” sur le bureau.
CyberLink Media Server démarre.
3Cliquez sur [My Videos].
4Cochez la case à cocher de
[DATA], et cliquez sur [Apply].
5Cliquez sur [View Sharing].
6Confirmez que le dossier “DATA”
est ajouté à la liste des dossiers
partagés.
REMARQUE
• Pour arrêter de partager un dossier
Décochez la case à cocher et cliquez sur
[Apply].
• Pour revenir à l’écran précédent
Cliquez sur [+]dans la partie supérieure gauche
de l’écran.
• Pour terminer CyberLink Media Server
Cliquez sur [M] dans la partie supérieure droite
de l’écran.
Ajout de dossiers partagés
Référence
DD-83[J].book Page 18 Thursday, October 19, 2006 12:00 PM
19
Référence Français
Cette section explique la procédure pour connec-
ter directement l’unité principale à l’ordinateur.
Vous devez installer CyberLink Media Server sur
votre ordinateur avant de connecter l’unité princi-
pale à l’ordinateur. (Consultez la page 7.)
1Connectez l’unité principale et
l’ordinateur comme indiqué sur le
diagramme ci-dessous.
2
Configurez l’ordinateur pour obtenir
son adresse IP automatiquement.
Sélectionnez “Obtain an IP address
automatically” lors de l’étape 6 à la page 13,
puis cliquez sur [OK].
3Configurez l’unité principale pour
obtenir son adresse IP automati-
quement.
Sélectionnez “DHCP”, puis cliquez sur [ENTER]
lors de l’étape 6 à la page 14. (“DHCP” est
sélectionné en tant que paramètre initial.)
L’unité principale et l’ordinateur commencent
à chercher les adresses IP reconnaissables
pour les deux. Patientez environ une minute
jusqu’à l’installation complète.
REMARQUE
• Vous pouvez aussi attribuer arbitrairement des
valeurs pour les adresses IP en suivant les indi-
cations des pages 11 à 15.
4
Confirmez la connexion à l’ordinateur.
Configurez les dossiers partagés en
consultant “Spécification des dossiers
partagés” à la page 8 et “Confirmation de la
connexion à l’ordinateur” à la page 9.
• Après avoir terminé la configuration du dos-
sier partagé, lancez “Lecture des fichiers
stockés sur l’ordinateur ” à la page 16.
Connexion directe de l’unité
principale à l’ordinateur
Câble Ethernet
(câble intermédiaire ou
câble croisé, non
fournis)
DD-83[J].book Page 19 Thursday, October 19, 2006 12:00 PM

20
Français
Référence
Problème Cause possible Solution possible Page de
référence
Les fichiers stockés
sur l’ordinateur ne
s’affichent pas.
Le câble Ethernet n’est pas
connecté.
Assurez-vous que le câble Ethernet soit con-
necté correctement. (Insérez le câble Ether-
net jusqu’à entendre un clic.)
6
Un mauvais câble est uti-
lisé.
Lors de la connexion de l’unité principale au
routeur, utilisez un câble direct. 6
CyberLink Media Server
n’est pas installé.
Installez CyberLink Media Server sur l’ordi-
nateur. 7
Des adresses IP incorrec-
tes ont été configurées
manuellement. (Lorsque la
fonction DHCP n’est pas
utilisée)
Vérifiez que les mêmes valeurs ont été
entrées dans le premier, deuxième et troi-
sième groupe de chiffres et que des valeurs
différentes composent le quatrième groupe
de chiffres pour l’unité principale et l’ordina-
teur.
11-15
Un fichier n’est pas
lu correctement.
Un autre appareil utilise le
réseau connecté à l'unité
principale.
Si un autre appareil utilise le réseau pendant
que l’unité principale lit un fichier, le réseau
peut être perturbé, entraînant des interrup-
tions de cadres d’images et sonores. Décon-
nectez l'appareil du réseau avant de lire un
fichier.
-
On ne peut pas lire
de fichiers vidéo,
audio ou de photos
fixes.
Le type de fichier n’est pas
compatible avec ce sys-
tème.
Utilisez un fichier qui fait partie de la liste des
fichiers lisibles. 3
Le fichier est corrompu. Vous ne pouvez pas lire un fichier corrompu. -
Dépannage
DD-83[J].book Page 20 Thursday, October 19, 2006 12:00 PM

1106SKMMODJEM
2006VictorCompanyofJapan,Limited
EN,FR
c
DD-83[J].book Page 21 Thursday, September 28, 2006 9:16 AM
