JVC EX A15E A15 User Manual LVT2040 003B
User Manual: JVC EX-A15E EX-A15E nglish,
Open the PDF directly: View PDF ![]() .
.
Page Count: 2
– 3 – – 4 –
– 1 – – 2 –
LV T20 40 - 0 03B
COMPACT COMPONENT SYSTEM
EX-A15
—Consists of RX-EXA15, XV-EXA15 and SP-EXA15
Thank you for purchasing a JVC product.
INSTRUCTIONS
[ E ]
0 7 0 9 S K M M O D J M M
EN
©2009 Victor Company of Japan, Limited
English English
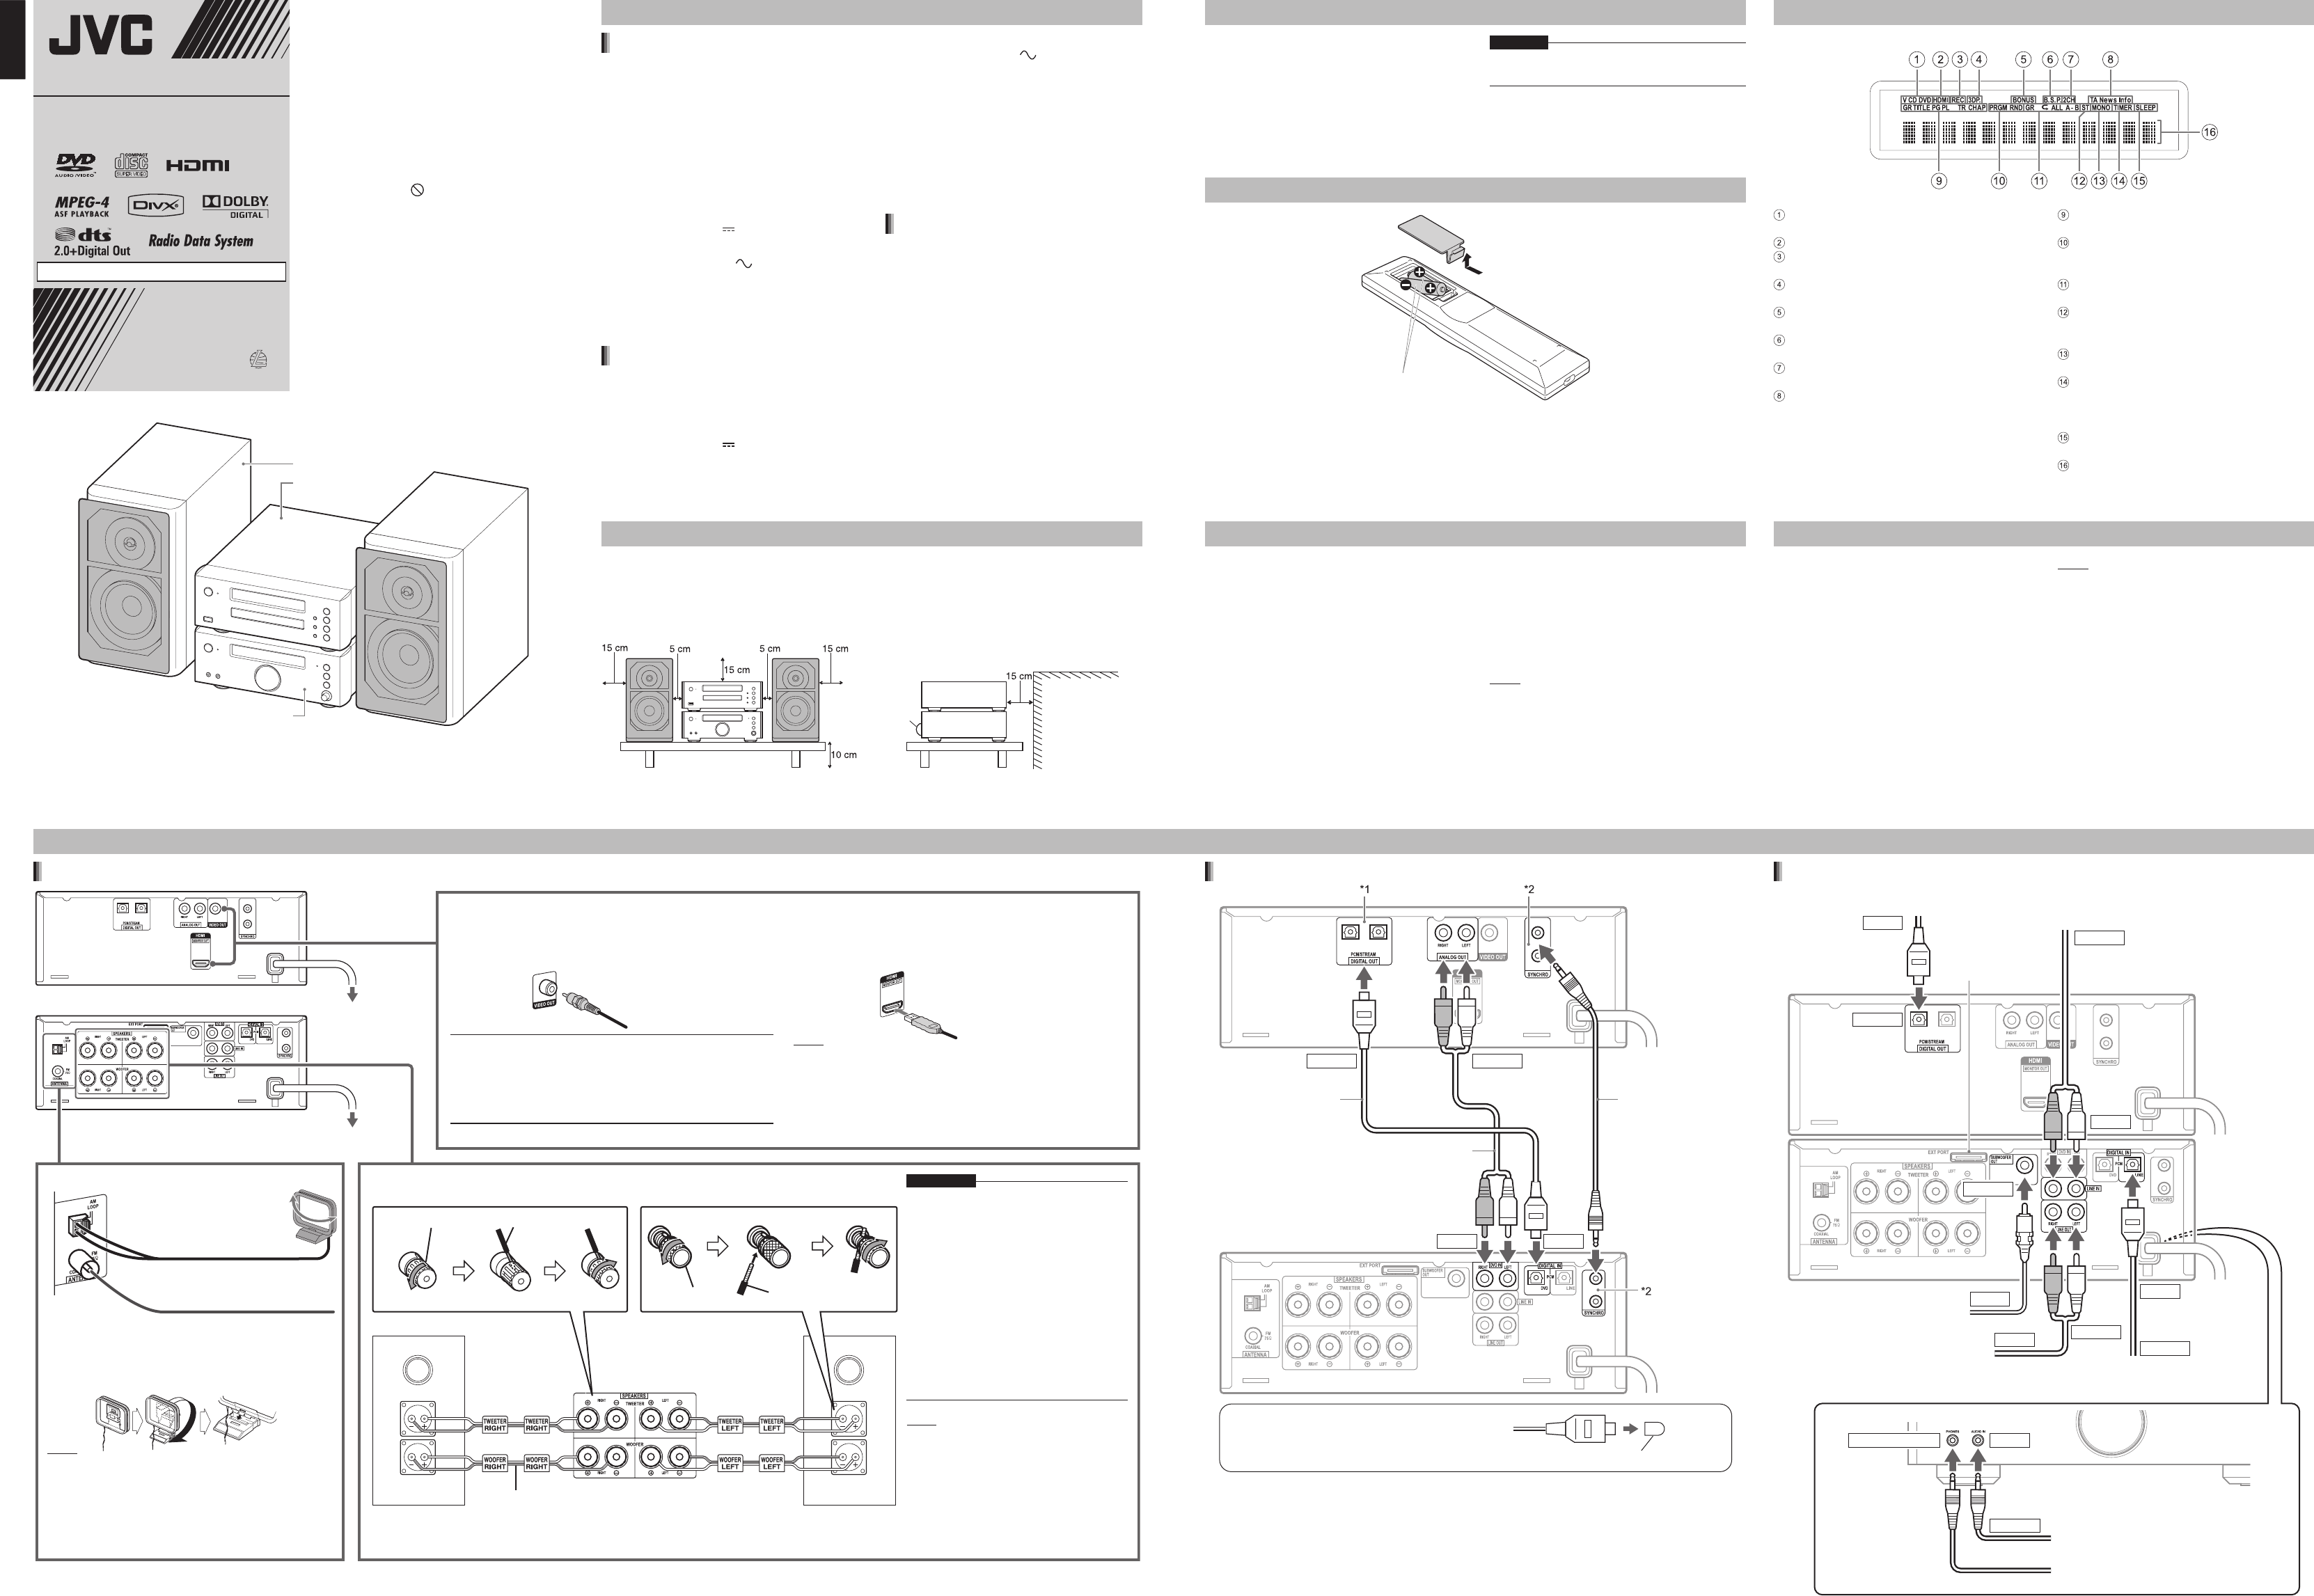
Supplied accessories
Connections
Connecting the receiver and the DVD player
Synchronization
cable (supplied)
Audio cable
(supplied)
Optical digital
cable (supplied)
Protection cap
If protection caps cover the tips of the optical
digital cable, pull off the protection caps before
connecting.
OUTPUT OUTPUT
INPUTINPUT
*1 The supplied optical digital cable can be connected to either the left or right terminal of the [DIGITAL
OUT] terminals.
*2 The supplied synchronization cable can be connected to either the upper or lower terminal of the
[SYNCHRO] terminals.
Specifications
Connecting basic parts
To an AC outlet
To an AC outlet
Connecting the antennas Connecting the speakers
Connecting a TV
Setting up the AM loop antenna
FM antenna (supplied)
Stretch out the FM antenna to the best
position for radio reception.
AM loop antenna (supplied)
Turn the AM loop antenna
to find the best position for
radio reception.
CAUTION
• Improper speaker cable connection may
damage this system. Connect the speaker
properly following the diagram shown on the left.
• The supplied speakers are magnetically
shielded, but color irregularity may occur on the
TV depending on some conditions. To prevent
color irregularity, set up the speakers following
the instructions below.
1. Turn off the main power of the TV before
setting up the speakers.
2. Place the speakers enough distance from the
TV so that they do not cause color irregularity
on the TV.
3. Wait approximately 30 minutes before turning
on the main power of the TV again.
NOTE
• When you use external speakers, instead of the
supplied SP-EXA15 of this system, use the
[WOOFER] terminals to connect the external
speakers and the receiver, and select the
amplifier setting to "2ch-AMP MODE". (Refer to
page 7.)
• The supplied SP-EXA15 is dedicated to the
supplied RX-EXA15. Connecting SP-EXA15 to a
device other than RX-EXA15 may cause damage.
You can playback a video or still picture on a TV compatible with either composite or HDMI connection. Generally, the picture quality is
better via HDMI connection than one via composite connection. HDMI (High Definition Multimedia Interface) enables you to enjoy the
picture with uncompressed digital video signals.
HDMI cable (not supplied)
Composite video cable
(supplied)
■ IMPORTANT
• Connect the DVD player directly to a TV (or a monitor) without
routing through a video cassette recorder (VCR). Otherwise
picture distortion may occur during playback.
• Connecting the DVD player to a VCR-built-in TV may also
cause picture distortion during playback.
NOTE
• If the picture is distorted while an HDMI TV is connected, turn off
the DVD player and turn it on again.
• A TV compatible with HDCP (High-Bandwidth Digital Content
Protection) can also be connected to the [HDMI] terminal, so that
the uncompressed HD video signal type can be output as well.
Speaker terminal Speaker cable
Speaker cables
(supplied)
Receiver (rear view)
Right speaker
(rear view)
Left speaker
(rear view)
Speaker terminal Speaker cable
NOTE
• Keep the AM loop antenna cable wrapped around the
AM loop antenna frame, otherwise the effectiveness and
sensitivity of the AM loop antenna may be reduced.
• When FM reception is poor, instead of the supplied FM
antenna, connect an outdoor FM antenna with a coaxial
converter compatible with 75 C.
Connecting optional devices
Optical digital cable connected to an AV
amplifier with a built-in decoder (not supplied)
Audio cable connected to a cassette tape
player or other analog audio output device
(not supplied)
Audio cable connected to a
subwoofer with a built-in amplifier
(not supplied)
Optical digital cable connected to
a satellite receiver (not supplied)
Audio cable connected to a cassette tape
recorder or other analog audio input device
(not supplied)
OUTPUT
OUTPUT
INPUT
INPUT
OUTPUT
OUTPUT
OUTPUT
Headphones OUT
OUTPUT
Front view of the receiver
Stereo mini plug cable connected to a portable
digital audio player or other audio device (not
supplied)
Stereo mini plug of headphones (not supplied)
INPUT
INPUT
INPUT
INPUT
Refer to another sheet.
Receiver (RX-EXA15)
Tuner
FM frequency:
87.50 MHz – 108.00 MHz
AM frequency:
522 kHz – 1 629 kHz
Amplifier
Tweeter output power: 30 W + 30 W at 4
C
(10 kHz, THD 10 %)
Woofer output power: 40 W + 40 W at 4
C
(1 kHz, THD 10 %)
EXT PORT
Output power: DC 5 V 500 mA
General
Power source: AC 230 V , 50 Hz
Power consumption (in operation): 35 W
Power consumption (on standby): 1.00 W or less
Dimensions (W x H x D) [including projecting
parts]: 255 mm x 96 mm x 289 mm
Mass: 2.8 kg
DVD player (XV-EXA15)
USB
Compatible with USB 2.0 Full-Speed
Compatible device: USB mass storage class
device
Compatible file system: FAT16, FAT32
Output power: DC 5 V 500 mA
•
•
•
•
•
•
•
•
•
•
•
•
•
•
General
Power source: AC 230 V , 50 Hz
Power consumption (in operation): 12 W
Power consumption (on standby): 1.00 W or less
Dimensions (W x H x D) [including projecting
parts]: 255 mm x 96 mm x 260.3 mm
Mass: 2.3 kg
Quantitative restriction on recognizable/playable
data
Up to 4 000 tracks and files per disc
Up to 999 tracks and files per group
Up to 99 groups per disc
Speaker (SP-EXA15)
Speaker type: 2-way bass reflex type
Magnetically shielded type
Tweeter
- Driver: 2-cm wood dome
- Impedance: 4
C
- Power handling capacity: 30 W
Woofer
- Driver: 10.5-cm wood cone
- Impedance: 4
C
- Power handling capacity: 100 W
Dimensions (W x H x D) [including projecting
parts]: 163 mm x 273 mm x 249 mm
Mass (1 speaker): 4.4 kg
•
•
•
•
•
•
•
•
•
•
•
•
•
•
How to read this manual
This manual explains the operations assuming
that you will use the remote control. Some
buttons on the receiver or the DVD player are the
same as those on the remote control. You can
use either button in this case.
This manual uses the English diagrams for TV
screen usage.
Some diagrams in this manual are simplified or
exaggerated for the purpose of explanation.
This manual explains the operations when mainly
using a DVD VIDEO, CD, MP3 and WMA file.
Some functions may not work with another disc
or file. When the mark appears on the TV, you
cannot use the function.
Depending on the disc/file, you may not obtain
the explained result even after following the
operation in this manual.
You can operate some functions differently from
the explanation given in this manual.
•
•
•
•
•
•
SP-EXA15 (speaker)
RX-EXA15 (Receiver)
XV-EXA15
(DVD player)
Remote control x 1
Batteries x 2
FM antenna x 1
AM loop antenna x 1
Speaker cable x 4
Composite video cable x 1
Audio analog cable x 1
Optical digital cable x 1
Synchronization cable x 1
•
•
•
•
•
•
•
•
•
CAUTION
Do not fold the optical digital cable as this may
damage the inner wire.
•
Inserting the batteries into the remote control
R03 (UM-4)/AAA (24F) type
dry-cell batteries (supplied)
If the range or effectiveness of the remote control decreases, replace both batteries.
•
Indicators in the display window
The receiver and the DVD player use the same design for their display windows.
Lights up when a VCD, SVCD, CD or DVD is
selected as the source.
Lights up when an HDMI video signal is output.
Lights up when recording starts. (Refer to page
12.)
Lights up when the 3D phonic function is
activated. (Refer to page 7.)
Lights up when a loaded DVD AUDIO has a
“bonus group”. (Refer to page 13.)
Lights up when a loaded DVD AUDIO has
“browsable still pictures”. (Refer to page 13.)
Lights up when “2ch-AMP MODE” is selected.
(Refer to pages 3 and 7.)
Lights up when the Enhanced Other Networks
function selects a traffic announcement, news
or certain program. (Refer to page 6.)
Indicates the number of a selected group, title,
original program, play list, track or chapter.
Lights up when the program or random
playback function is activated. (Refer to page
11.)
Lights up when the repeat playback function is
activated. (Refer to page 11.)
Lights up when an FM stereo broadcast is
received with sufficient signal intensity. (Refer
to page 6.)
Lights up when an FM broadcast is received in
monaural. (Refer to page 6.)
Lights up when the playback timer is activated.
Turns off when the receiver is turned off. (At this
time, instead, the [STANDBY] indicator starts
flashing.) (Refer to page 8.)
Lights up when the sleep timer is activated.
(Refer to page 5.)
Main display
Using an external device other than XV-EXA15
Do not connect the power cable until all other connections have been made.
Designs and specifications are subject to change without notice.
CAUTION — Proper Ventilation
To avoid risk of electric shock and fire and to protect from damage, locate the apparatus as follows:
Top/Front/Back/Sides: No obstructions should be placed in the areas shown by the dimensions below.
Bottom: Place on the level surface. Maintain adequate air path for ventilation by placing on a
stand with a height of 10 cm more.
In addition, maintain the best possible air circulation.
Front view Side view
Wall or
obstructions
Front
Selecting the video signal type
To view an image on the TV screen, select the video signal type correctly according to the TV after
connecting the DVD player to the TV.
1 Turn on this system.
2 Slide the remote control mode selector
to the [DVD] position.
3 Press [DVD/CD] or [USB].
When a disc is loaded or a USB device is
connected, press
7 to stop playback.
4 Press [SCAN MODE].
5 Press
2 or
3 (cursor) repeatedly to
select the video signal type suitable for
the connected TV.
•
For a composite connection, you can select
“576i” (interlaced format) or “576p”
(progressive format).
For an HDMI connection, you can select
“AUTO”, “576p”, “720p”, “1080i” or “1080p”.
Select “AUTO” for normal usage.
NOTE
When both the [VIDEO OUT] and [HDMI]
terminals are connected, you can select only the
items for the HDMI connection.
6 Press [ENTER].
•
•
•
1 Connect an external device other than
XV-EXA15.
2 Slide the remote control mode selector
to the [RECEIVER] position.
3 Hold down [DVD/CD] repeatedly to
select “DVD-DIGITAL” or “DVD-
ANALOG” in the display window on the
receiver.
NOTE
When using the supplied XV-EXA15 of this
system, hold down [DVD/CD] repeatedly to select
“DVD-AUTO” in the display window on the
receiver. Either digital or analog input, whichever
is more appropriate, is automatically selected.
•
Before disconnecting the power cable, be sure to press
F to turn off the power.
LVT2040-003.indd 1LVT2040-003.indd 1 2009/11/02 14:21:572009/11/02 14:21:57
– 7 – – 8 –
– 5 – – 6 –
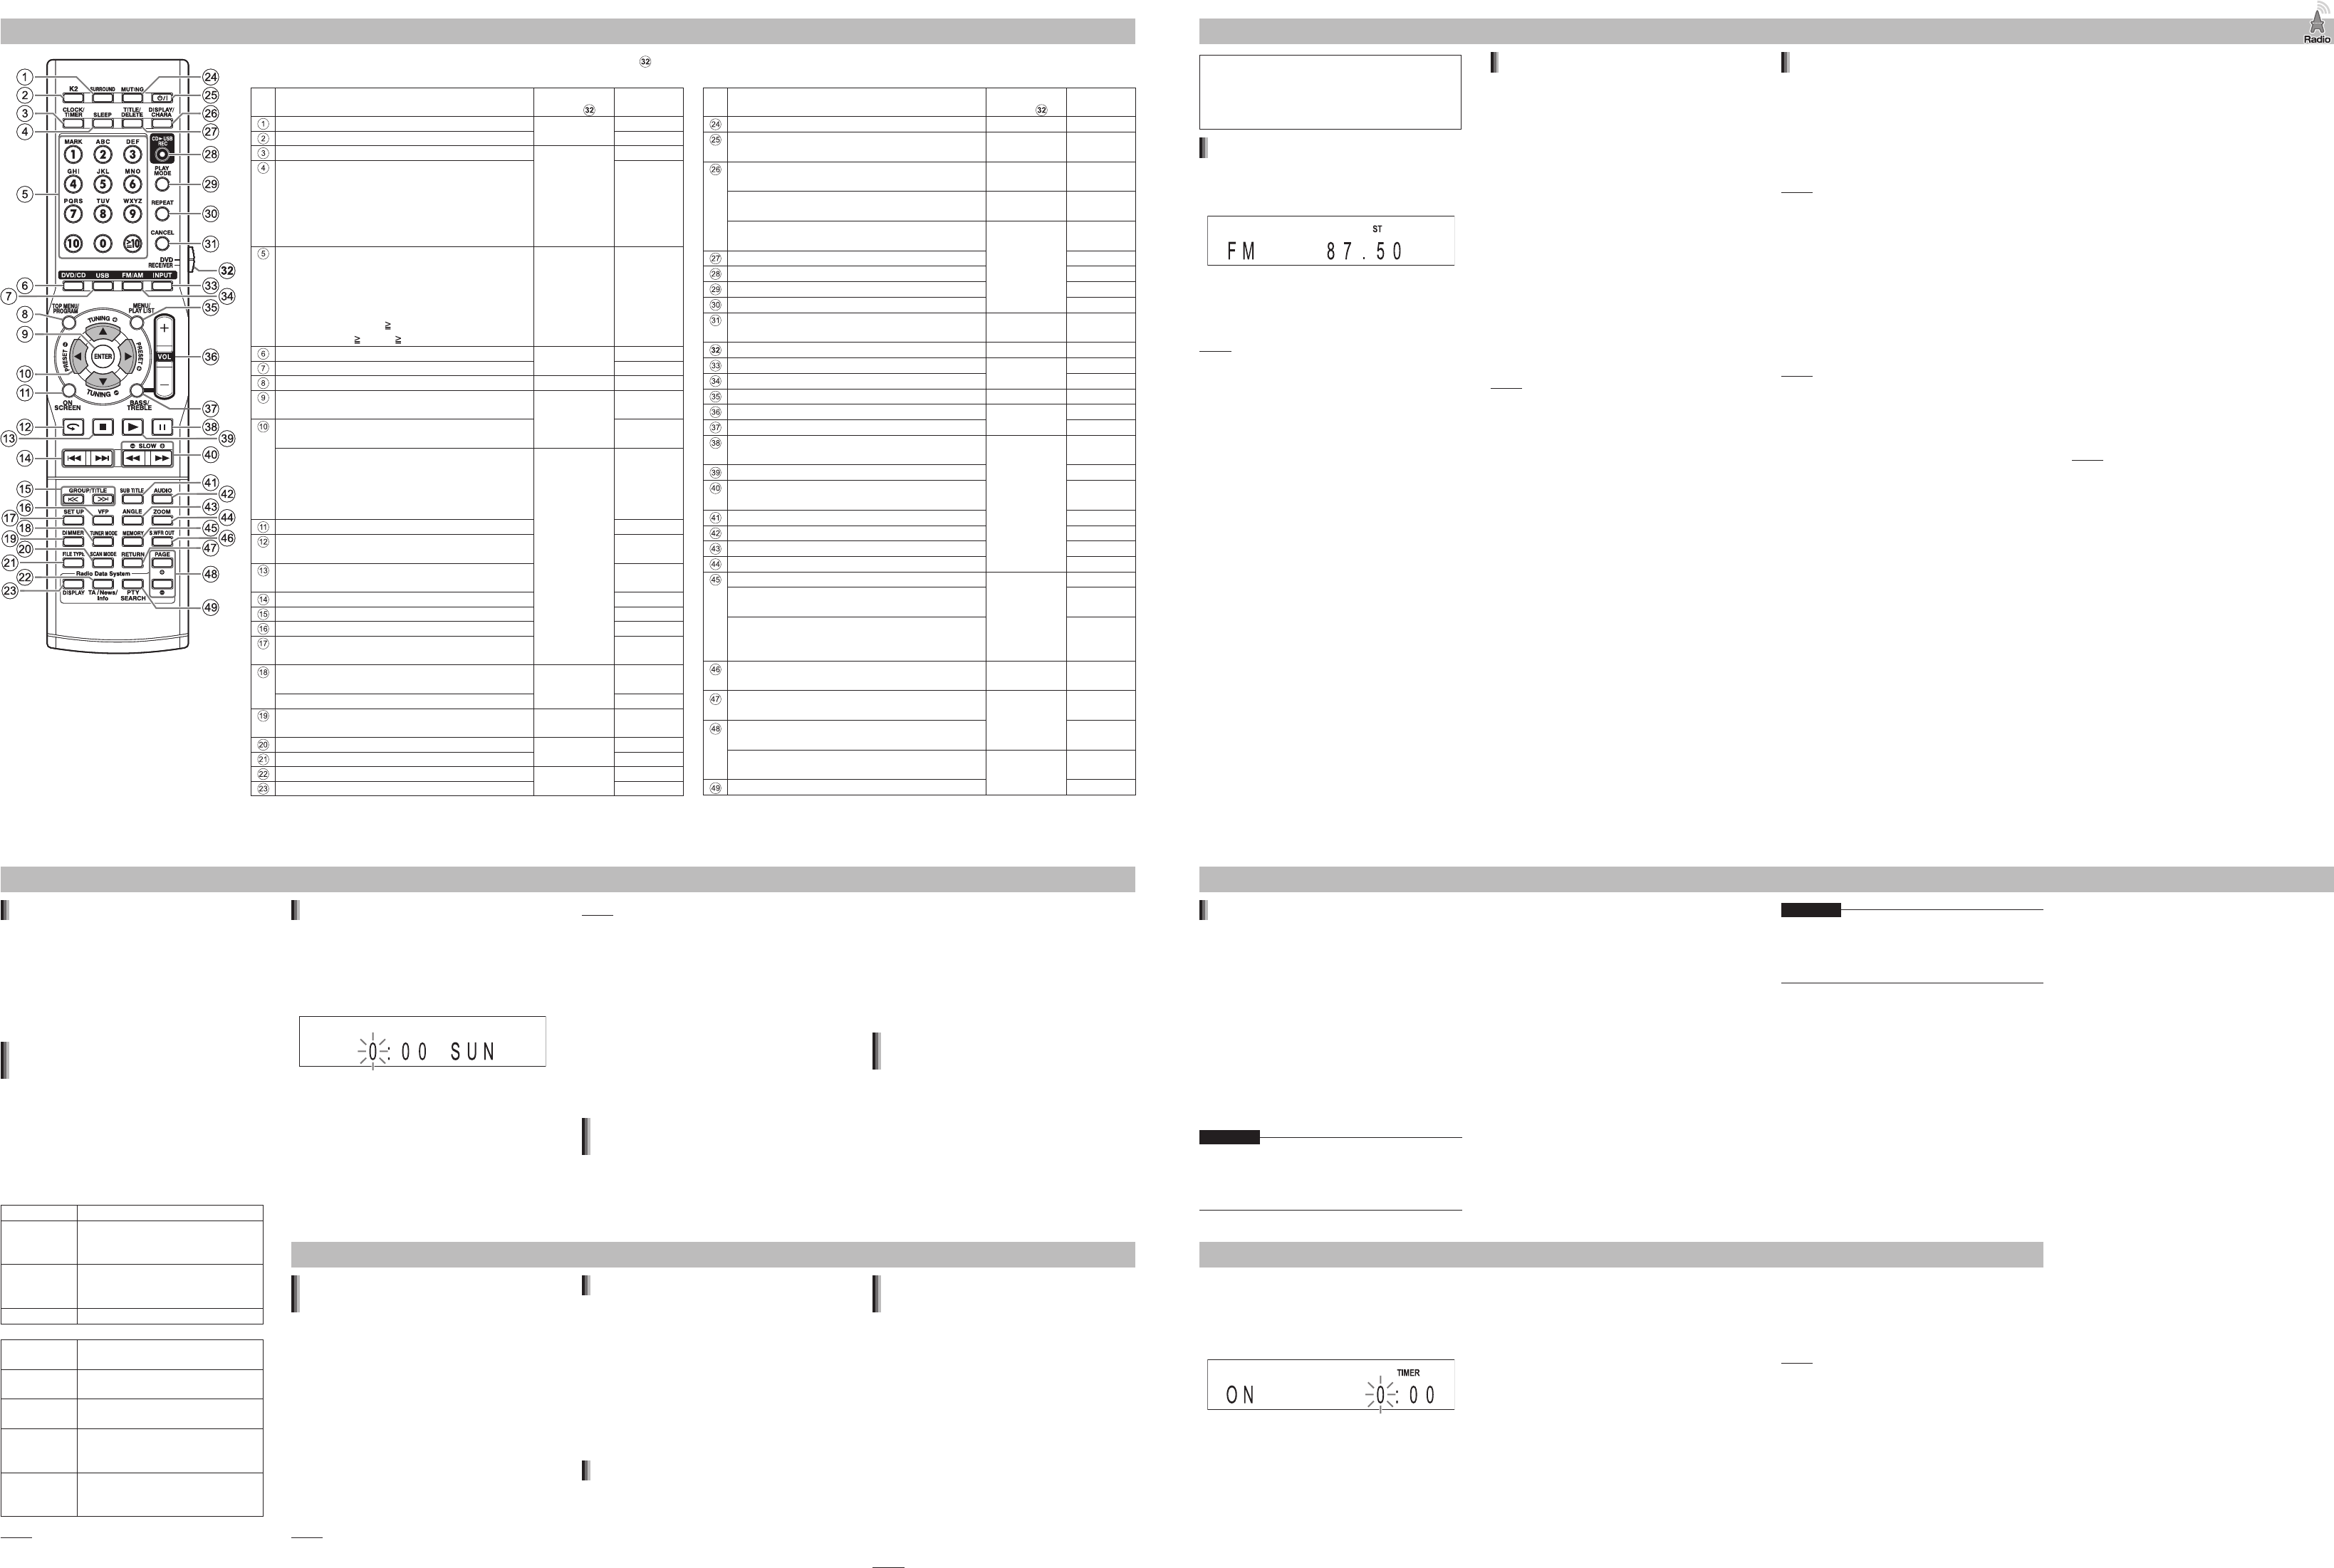
Remote control operation Listening to radio broadcasts
Tuning in to a preset radio station
Presetting radio stations in the receiver allows you
to easily tune in to a radio station.
Presetting radio stations
1 Select a radio station you want to store.
Refer to “Selecting a radio station” shown on
the left.
You can also preset selected stereo or
monaural reception for an FM broadcast.
2 Press [MEMORY].
The preset number flashes in the display
window on the receiver.
3 Use [PRESET
9 ], [PRESET
( ] or the
number buttons to select the preset
number you want to assign.
4 Press [ENTER].
“STORED” appears in the display window on
the receiver and the selected radio station is
stored.
NOTE
You can store up to 30 FM radio stations and up
to 15 AM radio stations.
When you store a radio station to a preset
number to which another radio station has
previously been stored, the newly set radio
station replaces the previously stored radio
station.
Tuning in to a preset radio station
When an FM or AM radio broadcast is
selected as the source
Press the number buttons, [PRESET
9 ] or
[PRESET
( ] to select the preset number of
the radio station.
•
•
•
•
•
•
■
Settings Reference
Condensation
Under the following conditions, you may not be
able to operate this system properly due to
condensation formed on the lens of this system:
When you have just started a heater to warm your
room
When you have placed the system in an area with
high humidity
When you have moved the system from a cold
place to a warm place
When condensation forms, leave the system turned
on, wait approximately 1 or 2 hours, and then
operate the system.
Cleaning this system
If the operation panel becomes dirty, dust it with a
soft dry cloth. If the operation panel is very dirty,
wipe it with a cloth dampened with a small amount
of a neutral detergent, and then wipe it with a soft
dry cloth.
•
•
•
Before using the functions explained
on this chapter, slide the remote
control mode selector to the
[RECEIVER] position.
Selecting a radio station
1 Press [FM/AM] repeatedly to select “FM”
or “AM” in the display window on the
receiver.
2 Press [TUNING
9 ] or [TUNING
( ]
repeatedly to select a radio station.
Holding down [TUNING
9 ] or [TUNING
( ]
changes radio stations sequentially.
NOTE
If an FM stereo broadcast is difficult to hear,
press [TUNER MODE] to turn on the “MONO”
(monaural) indicator in the display window on the
receiver. The monaural reception may dissipate
noise and enable you to hear the broadcast more
clearly. To return to stereo reception, press
[TUNER MODE] again to turn on the “ST” (stereo)
indicator.
If a beeping sound disturbs your AM broadcast,
you can reduce the noise. Repeatedly pressing
[TUNER MODE] changes “AM BEAT CUT1” to
“AM BEAT CUT4” in the display window on the
receiver for a short time and reduces the noise.
Select each item one by one to find the best
reception.
•
•
•
Adjusting the bass/treble
1 Press [BASS/TREBLE] repeatedly to
select “BASS” or “TREBLE” in the
display window on the receiver.
2 Press [VOL +] or [VOL –] repeatedly to
adjust the sound quality.
Adjustable sound quality is from –5 to +5.
Changing the sound quality (K2/3D
phonic)
The K2 function enhances the playback sound.
The original range of frequency is automatically
detected and extended to a specific range.
The 3D phonic function produces an effect
resembling surround sound. This function is
available for disc/file playback.
Press [K2] or [SURROUND] repeatedly to
select the desired sound effect.
[K2] item Function
“K2 Mode 1” Plays back a digital source with
non-compressed sound signals
(linear PCM).
“K2 Mode 2” Plays back a digital source with
compressed sound signals (Dolby
digital, DTS, MP3 or WMA).
“K2 OFF” Cancels the K2 function.
[SURROUND]
item
Function
“ACTION” To enjoy action movies, sport
programs or other lively programs.
“DRAMA” To enjoy a sound effect with a
relaxing, natural atmosphere.
“THEATER” To enjoy a sound effect as if you
were watching the movie in a
theater.
“3D PHONIC
OFF”
Cancels the 3D phonic function. If
noise is produced or sound is
distorted, select this item.
NOTE
If the 3D phonic function is activated when the K2
function has already been activated, the K2
function turns off automatically and the 3D phonic
function turns on.
•
•
•
•
Setting the clock
1 Slide the remote control mode selector
to the [RECEIVER] position.
2 Press [CLOCK/TIMER] to display the
clock in the display window on the
receiver.
3 Use
2 or
3 (cursor) and [ENTER] to
select the hour, the minute and the day
of the week.
The clock starts from 0 seconds in the minute
you set.
•
NOTE
While setting the clock, you can return to the
previous step by pressing [CANCEL] or you can
stop the setting by pressing [CLOCK/TIMER].
To adjust the clock, press [CLOCK/TIMER]
repeatedly to display the clock. The remaining
step is the same as step 3.
To display the clock, slide the remote control
mode selector to the [RECEIVER] position, and
then press [DISPLAY/CHARA] repeatedly.
The clock gains or loses approximately 1 minute
per month.
If the power cable of the receiver is disconnected
from the AC outlet, the clock setting is lost.
Changing the brightness of the display
window
When the receiver or the DVD player is
turned on
1 Slide the remote control mode selector
to the [RECEIVER] or [DVD] position.
•
•
•
•
•
■
2 Press [DIMMER] repeatedly.
Each time you press [DIMMER], the setting
changes to “DIMMER 1”, “DIMMER 2”,
“DIMMER AUTO” or “DIMMER OFF” in the
display window.
When “DIMMER AUTO” is selected, the
display window automatically becomes darker
during video playback.
Temporarily displaying the clock when
the receiver is turned off
When the receiver is turned off
1 Slide the remote control mode selector
to the [RECEIVER] position.
2 Press [DIMMER].
The clock is displayed in the display window
for a short time.
•
•
■
•
Playing back sources from external devices
Playing back sources from external
devices
1 Press [INPUT] repeatedly to select the
desired external device in the display
window on the receiver.
“AUDIO IN” is for selecting the device
connected to the [AUDIO IN] terminal on the
receiver as the sound source.
“LINE” is for selecting the device connected
to the [LINE IN] terminals on the receiver as
the sound source.
“LINE DIGITAL” is for selecting the device
connected to the [DIGITAL IN LINE] terminal
on the receiver as the sound source.
2 Start playback on the connected device.
NOTE
Before connecting or disconnecting an external
device, set the volume of this system to the
minimum.
•
•
•
•
Selecting the signal gain
You can select the gain of the signal from the
[AUDIO IN] terminal.
When “AUDIO IN” is selected as the source
1 Slide the remote control mode selector
to the [RECEIVER] position.
2 Press [MEMORY] repeatedly.
Each time you press [MEMORY], the signal
gain setting changes in 3 levels in the display
window on the receiver.
Selecting the built-in amplifier setting
Hold down [S. WFR OUT].
Each time you hold down [S. WFR OUT], the
setting toggles between “Bi-AMP MODE” and
“2ch-AMP MODE” in the display window on the
receiver.
Select “Bi-AMP MODE” to use the speakers of
this system (SP-EXA15). Select “2ch-AMP
MODE” to use external speakers other than
SP-EXA15.
■
•
•
•
Producing sound from an external
subwoofer
When you connect this system to an external
subwoofer with a built-in amplifier, you can enjoy a
more dynamic bass sound. Refer to the manual of
the subwoofer for details.
1 Connect the external subwoofer.
2 Press [S. WFR OUT] repeatedly to select
“S WOOFER LOW” or “S WOOFER
HIGH” in the display window on the
receiver.
The bass sound from the left and right
speakers is automatically turned down, and
the bass sound is emitted mainly from the
subwoofer.
“S WOOFER LOW” and “S WOOFER HIGH”
differ in the sound power level.
NOTE
When not using the subwoofer, press [S. WFR
OUT] repeatedly to select “S WOOFER OFF”.
•
•
•
CAUTION
Do not wipe the operation panel with thinners,
benzenes or other chemical agents. Do not spray
insecticides onto the operation panel. These may
discolor and damage the surface.
Notes on handling
Important cautions
Installation of the system
Select a place that is level, dry and neither too
hot nor too cold, and between 5°C and 35°C.
Leave sufficient distance between the system
and the TV.
Do not use the system in a place subject to
vibration.
•
■
•
•
•
Power cable
Do not handle the power cable with wet hands!
A small amount of power is always consumed
while the power cable is connected to the wall
outlet.
When unplugging the power cable from the wall
outlet, always pull on the plug, not the power
cable.
To prevent malfunctions of the system
There are no user-serviceable parts inside. If
anything goes wrong, unplug the power cable and
consult your dealer.
Do not insert any metallic object into the system.
Note about copyright laws
Check the copyright laws in your country before
recording from CDs. Recording of copyrighted
material may infringe copyright laws.
Safety precautions
Avoid moisture, water and dust
Do not place the system in moist or dusty places.
Avoid high temperatures
Do not expose the system to direct sunlight and do
not place it near heating equipment.
When you are away
When away on travel or for other reasons for an
extended period of time, disconnect the power
cable plug from the wall outlet.
Do not block the vents
Blocking the vents may damage the system.
Care of the cabinet
When cleaning the system, use a soft cloth and
follow the relevant instructions on the use of
chemically-coated cloths. Do not use benzene,
thinner or other organic solvents including
disinfectants. These may cause deformation or
discoloring.
If water gets inside the system
Turn the system off and disconnect the power
cable plug from the wall outlet, then call the store
where you made your purchase. Using the system
in this condition may cause fire or electrical shock.
•
•
•
•
•
■
Notes on operation
Suitable locations for this system
Do not place the system in the following locations:
In a location subject to high humidity or
considerable dust
On an uneven or unstable surface
Near a heat source
Near a computer, fluorescent light or other
electric appliance
In a small room with insufficient ventilation
In a location exposed to direct sunlight
In a location exposed to excessive cold
In a location exposed to strong vibration
Near a TV, other amplifier, or tuner
Near a magnetic source
CAUTION
The operating temperature range of this system
is from 5°C to 35°C. Use in temperatures outside
this range may cause a malfunction or damage
the system.
•
•
•
•
•
•
•
•
•
•
•
Setting the playback timer
Set the clock beforehand. (Refer to page 7.)
1 Slide the remote control mode selector
to the [RECEIVER] position.
2 Press [CLOCK/TIMER] twice.
3 Set the starting time (ON) and ending
time (OFF) with
2 ,
3 (cursor) or the
number buttons and [ENTER].
4 Press
2 or
3 (cursor) to select
“WEEKLY” or “ONCE”, and then press
[ENTER].
When you select “ONCE”, the playback timer
works once.
When you select “WEEKLY”, the playback
timer works weekly or every day.
•
•
5 Press
2 or
3 (cursor) to select the
desired day of the week, and then press
[ENTER].
You can select “SUN”, “MON”, “TUE”, “WED”,
“THU”, “FRI”, “SAT”, “SUN”, “MON→FRI”,
“MON→SAT” or “EVERYDAY”.
When you select “MON→FRI”, the playback
timer works Monday to Friday.
When you select “MON→SAT”, the playback
timer works Monday to Saturday.
When you select “EVERYDAY”, the playback
timer works every day.
6 Press
2 or
3 (cursor) to select the
desired source, and then press
[ENTER].
If you have selected “FM” or “AM” in this step,
press 2 or 3 (cursor) or the number buttons
to select the preset number of the radio
station, and then press [ENTER].
One of the source displays may be “NO
EXTERNAL”. It means that no device is
connected to the [EXT PORT] terminal.
•
•
•
•
•
•
7 Press
2 or
3 (cursor) to adjust the
playback volume, and then press
[ENTER].
8 Press
F to turn off the receiver.
NOTE
While setting the playback timer, you can return
to the previous step by pressing [CANCEL] or you
can stop the setting by pressing [CLOCK/
TIMER].
To cancel the playback timer, slide the remote
control mode selector to the [RECEIVER]
position, and then press [CLOCK/TIMER]. “ON ?
[ENTER]” and “OFF ? [CANCEL]” flashes in the
display window on the receiver. At this time, press
[CANCEL]. To activate the playback timer again,
slide the remote control mode selector to the
[RECEIVER] position, press [CLOCK/TIMER],
[ENTER], and then F .
When the power cable of the receiver is
disconnected from the AC outlet, the clock and
playback timer settings are lost.
•
•
•
Radio Data System
Radio Data System information in the display
window on the receiver
“PS”: program service
“PTY”: program type
“RT”: radio text
Enhanced Other Networks: Refer to the part
shown on the right.
NOTE
For more information on Radio Data System,
refer to the website “http://www.rds.org.uk”.
Changing the Radio Data System
information
When listening to an FM radio broadcast
Press [DISPLAY] (Radio Data System)
repeatedly.
The program service (PS), program type (PTY)
or radio text (RT) appears in the display window
on the receiver.
NOTE
“WAIT PS”, “WAIT PTY” or “WAIT RT” may
appear in the display window on the receiver
before the Radio Data System information
appears.
“NO PS”, “NO PTY” or “NO RT” appears in the
display window on the receiver when no Radio
Data System information is received.
Searching for programs by PTY codes
(PTY search)
The PTY search is applicable only to the preset
radio stations.
When an FM radio broadcast is selected as
the source
1 Press [PTY SEARCH].
“PTY SELECT” starts flashing in the display
window on the receiver.
2 Press
9 or
( repeatedly to select a
PTY code.
•
•
•
•
•
■
•
•
•
■
•
Before using a function button, slide the remote control mode selector ( ) to the [RECEIVER] or [DVD] position.
Most of the buttons are assigned to the specific remote control modes.
Main function
Position of the
selector
( )
Reference
page
Operates the 3D phonic function. [DVD] or
[RECEIVER]
7
Operates the K2 function. 7
Operates the clock or playback timer setting. [RECEIVER] 7, 8
Operates the sleep timer setting. Each time you
press [SLEEP], the time indicated in the display
window on the receiver changes. You can set the
time to 10, 20, 30, 60, 90, 120, 150 or 180 minutes.
When the time you select elapses, the receiver
automatically turns off.
―
Selects a track/group number or another
numerical value in various settings. Selects a
letter or number to enter a track or group title.
Basic usage
To select 5, press [5].
To select 15, press [ 10] → [1] → [5].
To select 150, [ 10] → [ 10] → [1] → [5] → [0].
[DVD] or
[RECEIVER]
(According to
the desired
function, select
the appropriate
position.)
6, 8, 10-13
Selects a loaded disc as the source. [DVD] or
[RECEIVER]
2, 9, 10, 12
Selects a connected USB device as the source.
2, 9, 10, 12
Selects the top menu or the original program of a disc.
[DVD] 10
Sets the selected setting. [DVD] or
[RECEIVER]
2, 6-8,
10-13, 15
Selects various settings including the radio frequency
setting and the preset radio frequency setting.
2, 5-8,
10-13, 15
Pressing
2 or
3 skips forward/backward at 30
second or 5 minute intervals when a DivX or
MPEG1 or MPEG2 file is played back. (The
length of the interval differs depending on the
previous or next interval.)
[DVD] ―
Displays the status bar and the menu bar. 13
Skips backward 10 seconds during disc
playback.
―
Stops playback of a disc or file. 2, 10, 12,
13, 15
Skips to the beginning of a chapter, track or file.
10, 12
Skips to the beginning of a title or group. 10, 13
Adjusts the picture quality (VFP). 11
Displays the preference screen to change the
initial settings.
15
Changes the FM broadcast sound in monaural
or stereo reception.
[RECEIVER] 6
Reduces noise during AM reception. 6
Changes the brightness of the display window. [DVD] or
[RECEIVER]
7
Selects the video signal type. [DVD] 2
Selects the file type. 10
Operates the Enhanced Other Networks function.
[RECEIVER] 6
Displays the Radio Data System information. 6
Main function
Position of the
selector
( )
Reference
page
Turns on/off the sound temporarily. [RECEIVER] ―
Turns on/off the receiver or the DVD player. [DVD] or
[RECEIVER]
―
Changes the display on the DVD player to
check the disc or file status.
[DVD] 10
Changes the display on the receiver to check
the clock.
[RECEIVER] 7
Changes the character type setting to enter a
track or group title.
[DVD] 12
Edits a track or group on a connected USB device.
12
Starts recording sound from a CD to a USB device.
12
Selects program playback or random playback. 11
Selects repeat playback. 11
Cancels various settings. [DVD] or
[RECEIVER]
7, 8, 11, 12
Selects the remote control mode. ― ―
Selects a connected external device as the source.
[DVD] or
[RECEIVER]
7
Selects a radio broadcast as the source. 6
Selects the menu or the play list of a disc. [DVD] 10
Adjusts the volume. [DVD] or
[RECEIVER]
7
Adjusts the bass or treble. 7
Pauses playback of a disc or file.
Advances the paused picture frame by frame.
[DVD] 10
Starts playback of a disc or file.
9, 10, 11, 15
Fast reverses or fast forwards during playback.
Plays back a paused disc in slow motion.
10
Selects the subtitle language. 11
Selects the audio language. 11
Selects the view angle. 11
Magnifies the picture. 11
Stores the radio station in the memory. [RECEIVER] 6
Selects the signal gain from a connected
external device.
7
Synchronizes and desynchronizes the
connection between the receiver and the DVD
player.
16
Produces sound from a connected external
subwoofer.
[DVD] or
[RECEIVER]
7
Moves to the upper layer during VCD or SVCD
playback.
[DVD] ―
Changes browsable still pictures during DVD
AUDIO playback.
13
Selects a PTY code assigned to a specific type
of radio program.
[RECEIVER] 6
Operates the PTY search. 6
3 Press [PTY SEARCH].
While the receiver is searching for a radio
program, “SEARCH” and the selected PTY
codes appear in the display window on the
receiver.
The receiver searches 30 preset FM radio
stations, stops when the one you have
selected is found, and then tunes in to the
radio station. To search for the next radio
station, press [PTY SEARCH] while the
selected frequency and PTY code are
flashing in the display window on the receiver.
To stop searching, press [PTY SEARCH].
If no program is found, “NOT FOUND”
appears in the display window on the
receiver.
The Enhanced Other Networks
function
You can change a program type temporarily. The
Enhanced Other Networks function is applicable
only to the preset radio stations.
Press [TA/News/Info] repeatedly until the
“TA”, “News” or “Info” indicator lights up
in the display window on the receiver.
For details on the indicator, refer to page 2.
NOTE
To cancel the Enhanced Other Networks function,
press [TA/News/Info] repeatedly until the “TA”,
“News” or “Info” indicator turns off.
While the Enhanced Other Networks function is
working, you can only use [TA/News/Info] and
[DISPLAY]. If you press any other button,
“LOCKED” appears in the display window on the
receiver.
•
•
•
•
•
•
•
LVT2040-003.indd 2LVT2040-003.indd 2 2009/11/02 14:21:592009/11/02 14:21:59
