JVC FS G6 User Manual Tabletop Systems Manuals And Guides L0209262
JVC Tabletop Systems Manual L0209262 JVC Tabletop Systems Owner's Manual, JVC Tabletop Systems installation guides
XT-UXG6 L0209262
User Manual: JVC FS-G6 FS-G6 JVC Tabletop Systems - Manuals and Guides View the owners manual for your JVC Tabletop Systems #FSG6. Home:Electronics Parts:Jvc Parts:Jvc Tabletop Systems Manual
Open the PDF directly: View PDF  .
.
Page Count: 40
JVC
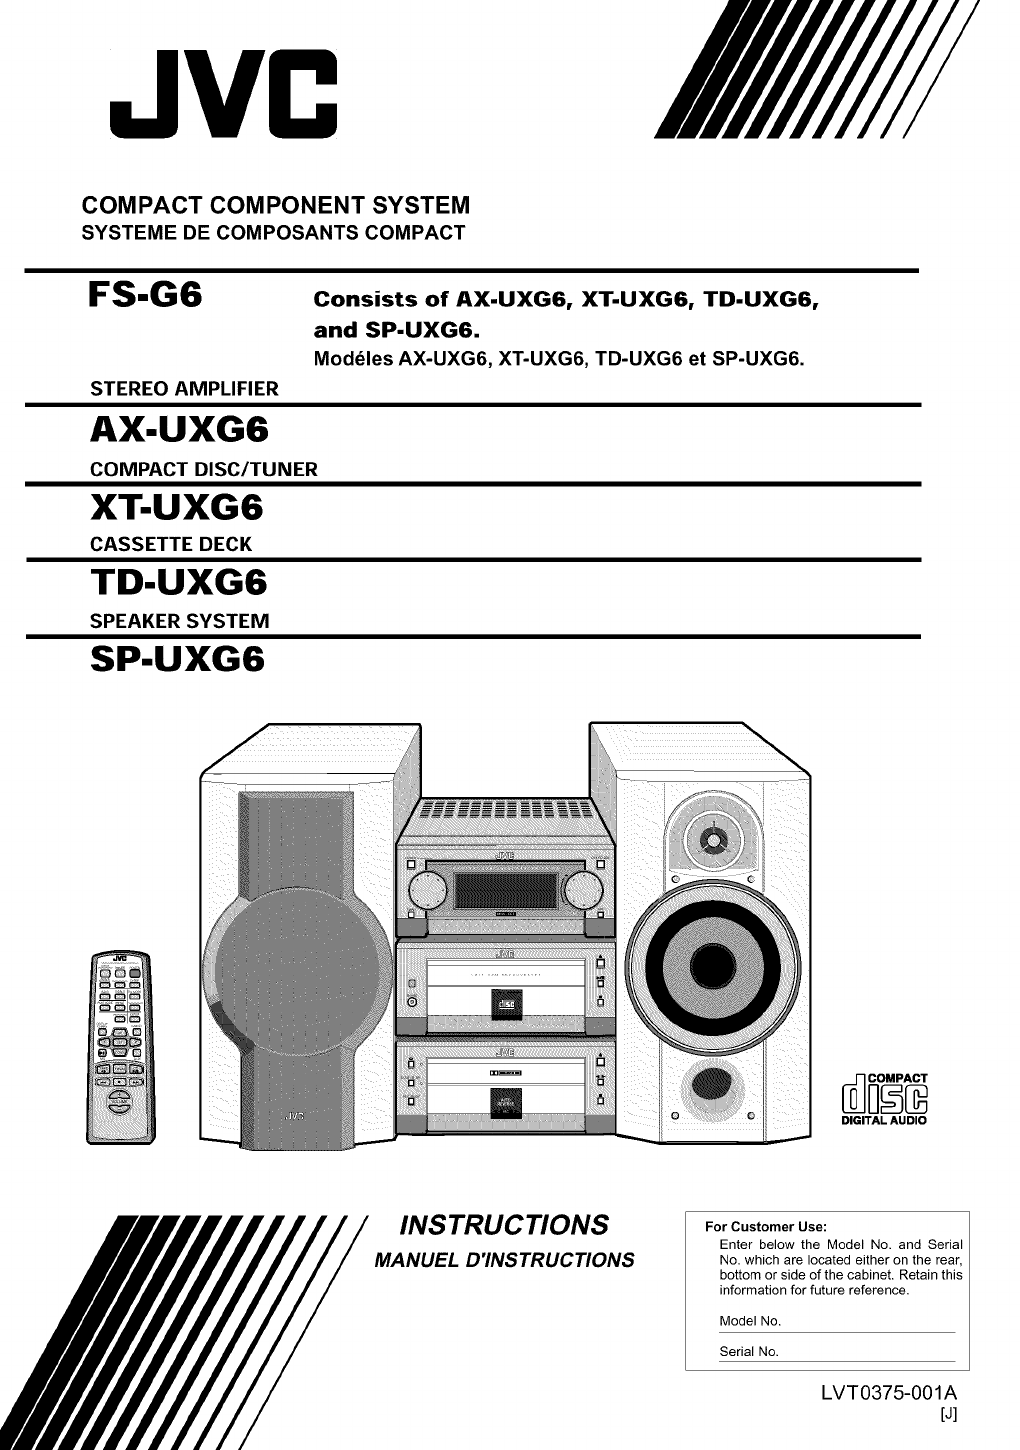
COMPACT COMPONENT SYSTEM
SYSTEME DE COMPOSANTS COMPACT
FS-G6
STEREO AMPLIFIER
AX.UXG6
COMPACT DISC/TUNER
XT.UXG6
CASSETTE DECK
TD.UXG6
SPEAKER SYSTEM
SP.UXG6
Consists of AX-UXG6, XT-UXG6, TD-UXG6,
and SP-UXG6.
ModUles AX-UXG6, XT-UXG6, TD-UXG6 et SP-UXG6.
Innm
m
DIGITALAUDIO
INSTRUCTIONS
MANUEL D'INSTRUCTIONS
For Customer Use:
Enter below the Model No. and Serial
No. which are located either on the rear,
bottom or side of the cabinet. Retain this
information for future reference.
Model No.
Serial No.
LVT0375-001A
[J]
Warnings, Cautions and Others
Mises en garde, precautions et indications diverses
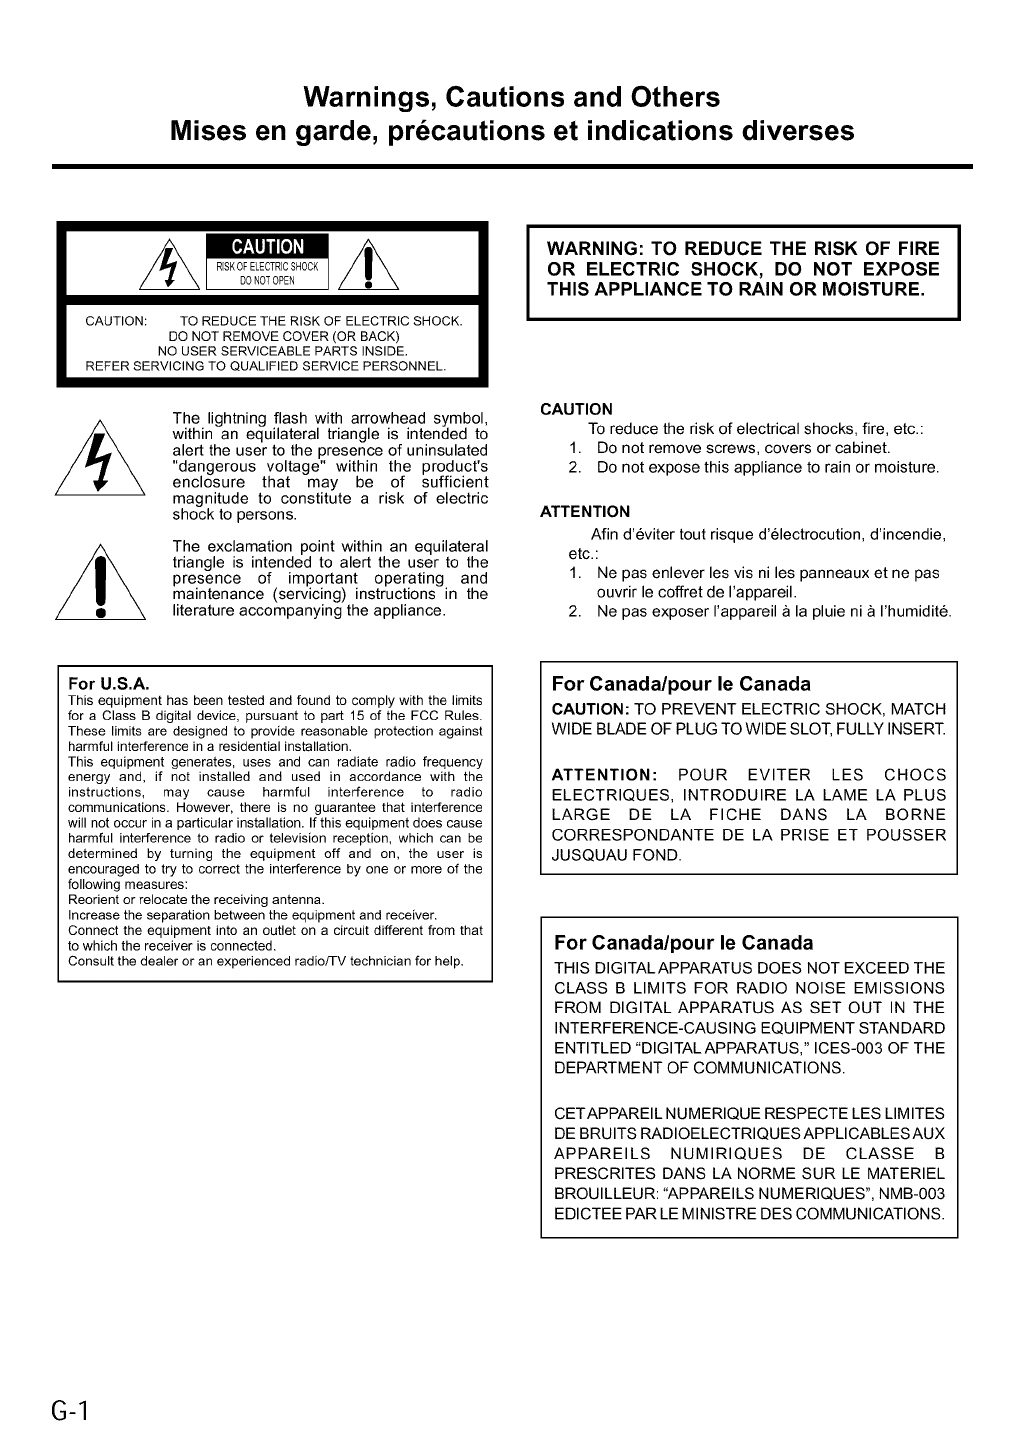
CAUTION: TO REDUCE THE RISK OF ELECTRIC SHOCK.
DO NOT REMOVE COVER (OR BACK)
NO USER SERVICEABLE PARTS INSIDE.
REFER SERVICING TO QUALIFIED SERVICE PERSONNEL.
The lightning flash with arrowhead symbol,
within an equilateral triangle is intended to
alert the user to the presence of uninsulated
"dangerous voltage" within the product's
enclosure that may be of sufficient
magnitude to constitute a risk of electric
shock to persons.
The exclamation point within an equilateral
triangle is intended to alert the user to the
presence of important operating and
maintenance (servicing) instructions in the
literature accompanying the appliance.
WARNING: TO REDUCE THE RISK OF FIRE
OR ELECTRIC SHOCK, DO NOT EXPOSE
THIS APPLIANCE TO RAIN OR MOISTURE.
CAUTION
To reduce the risk of electrical shocks, fire, etc.:
1. Do not remove screws, covers or cabinet.
2. Do not expose this appliance to rain or moisture.
ATTENTION
Afin d'eviter tout risque d'electrocution, d'incendie,
etc.:
1. Ne pas enlever les vis ni les panneaux et ne pas
ouvrir le coffret de I'appareil.
2. Ne pas exposer I'appareil a la pluie ni a I'humidite.
For U.S.A.
This equipment has been testedand found to complywith the limits
for a Class B digital device, pursuantto part 15 of the FCC Rules.
These limits are designed to provide reasonable protection against
harmfulinterference in a residential installation.
This equipment generates, uses and can radiate radio frequency
energy and, if not installed and used in accordance with the
instructions, may cause harmful interference to radio
communications. However, there is no guarantee that interference
will not occur in a particular installation. If this equipment does cause
harmful interferenceto radio or television reception, which can be
determined by turning the equipment off and on, the user is
encouragedto try to correct the interferenceby one or more of the
following measures:
Reorientor relocate the receivingantenna.
Increasethe separation betweenthe equipmentand receiver.
Connectthe equipment into an outlet on a circuit different from that
to which the receiver is connected.
Consultthe dealer or an experiencedradio/TV technicianfor help.
For Canada/pour le Canada
CAUTION: TO PREVENT ELECTRIC SHOCK, MATCH
WIDE BLADE OF PLUG TO WIDE SLOT, FULLY INSERT.
ATTENTION: POUR EVITER LES CHOCS
ELECTRIQUES, INTRODUIRE LA LAME LA PLUS
LARGE DE LA FICHE DANS LA BORNE
CORRESPONDANTE DE LA PRISE ET POUSSER
JUSQUAU FOND.
For Canada/pour le Canada
THIS DIGITALAPPARATUS DOES NOT EXCEED THE
CLASS B LIMITS FOR RADIO NOISE EMISSIONS
FROM DIGITAL APPARATUS AS SET OUT IN THE
INTERFERENCE-CAUSING EQUIPMENT STANDARD
ENTITLED "DIGITAL APPARATUS," ICES-003 OF THE
DEPARTMENT OF COMMUNICATIONS.
CETAPPAREIL NUMERIQUE RESPECTE LES LIMITES
DE BRUITS RADIOELECTRIQUES APPLICABLESAUX
APPAREILS NUMIRIQUES DE CLASSE B
PRESCRITES DANS LA NORME SUR LE MATERIEL
BROUILLEUR: "APPAREILS NUMERIQUES", NMB-003
EDICTEE PAR LE MINISTRE DES COMMUNICATIONS.
G-1
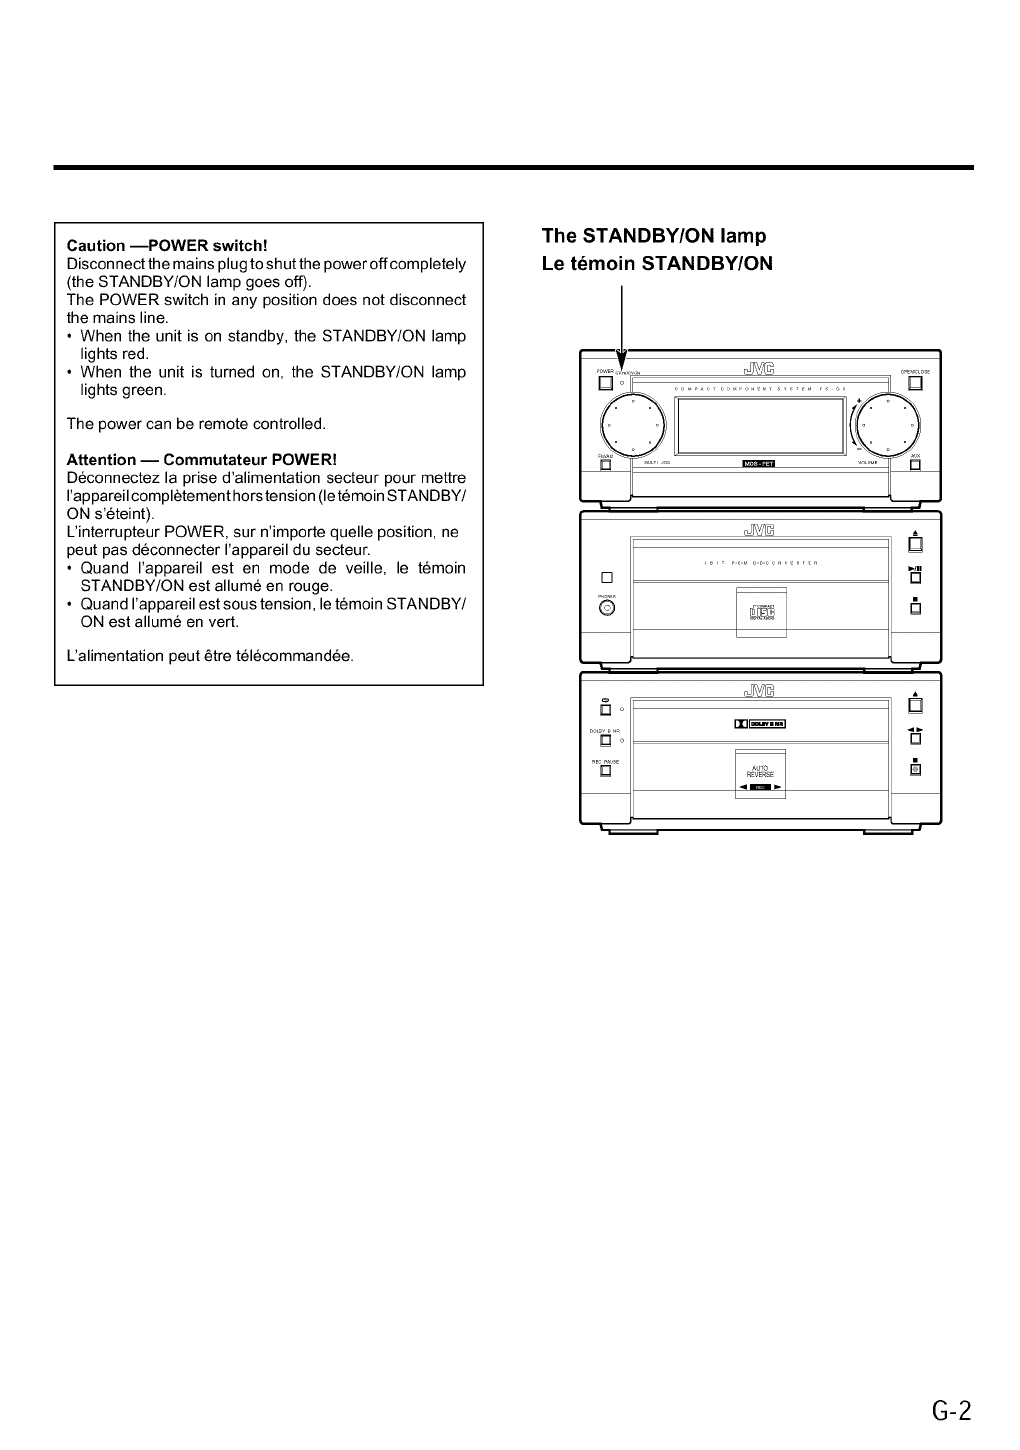
Caution iPOWER switch!
Disconnect the mains plug to shut the power off completely
(the STANDBY/ON lamp goes off).
The POWER switch in any position does not disconnect
the mains line.
• When the unit is on standby, the STANDBY/ON lamp
lights red.
• When the unit is turned on, the STANDBY/ON lamp
lights green.
The power can be remote controlled.
Attention iCommutateur POWER!
Deconnectez la prise d'alimentation secteur pour mettre
I'appareil completement hors tension (le temoin STANDBY/
ON s'eteint).
L'interrupteur POWER, sur n'importe quelle position, ne
peut pas deconnecter I'appareil du secteur.
• Quand I'appareil est en mode de veille, le temoin
STANDBY/ON est allume en rouge.
• Quand I'appareil est sous tension, le temoin STANDBY/
ON est allume en vert.
L'alimentation peut 6tre tel6command6e.
The STANDBY/ON lamp
Le temoin STANDBY/ON
| |
a-2
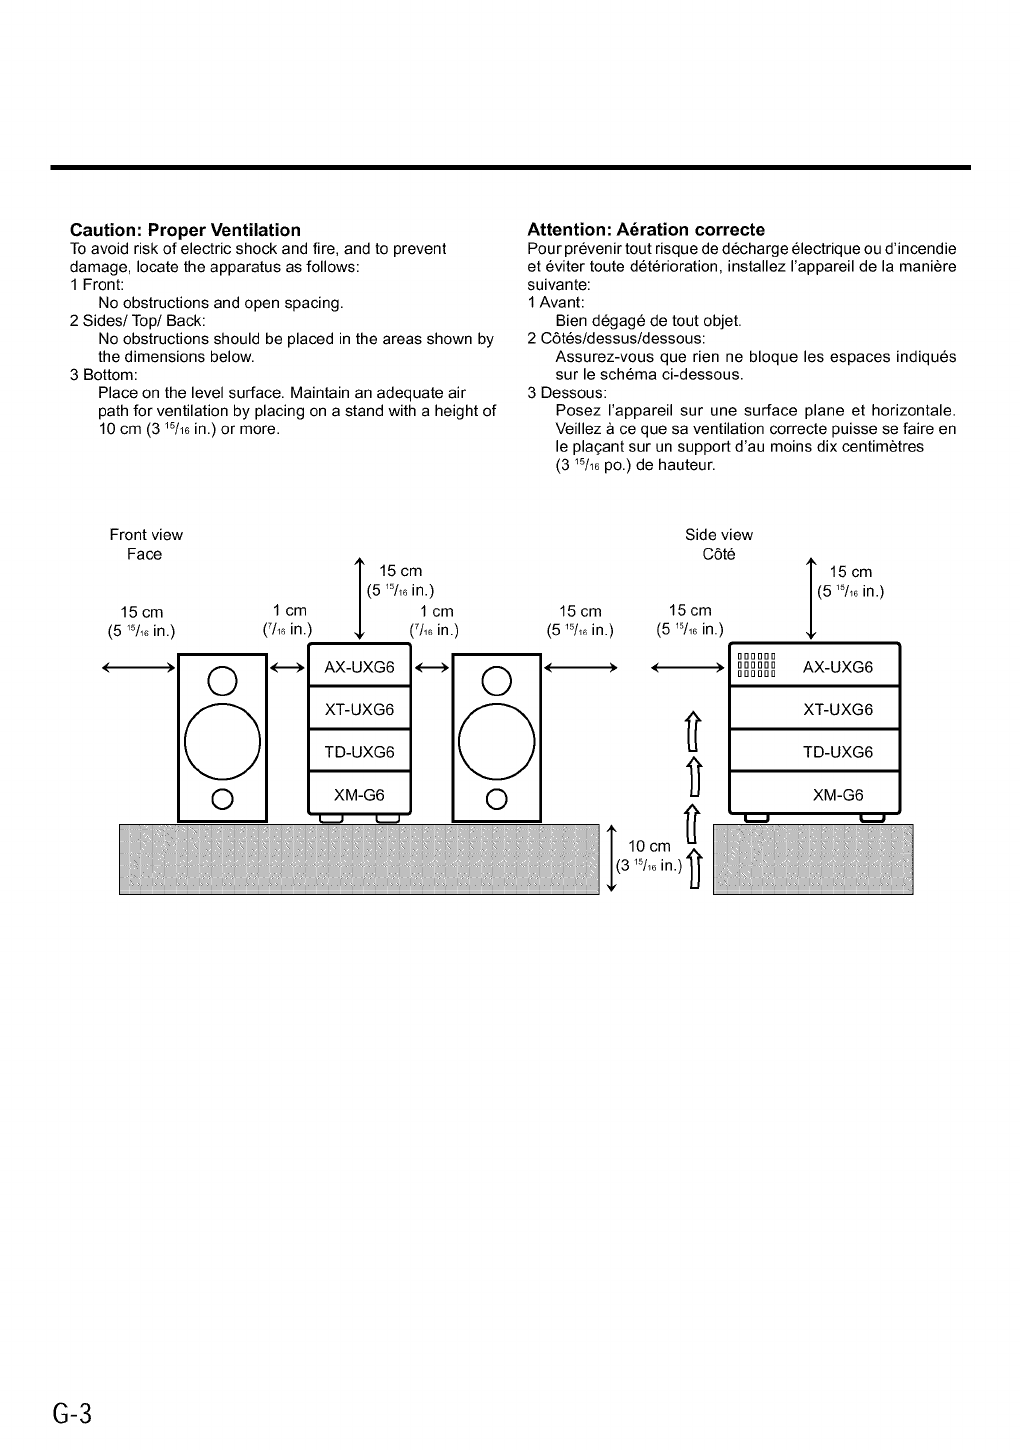
Caution: Proper Ventilation
To avoid risk of electric shock and fire, and to prevent
damage, locate the apparatus as follows:
1 Front:
No obstructions and open spacing.
2 Sides/Top/Back:
No obstructions should be placed in the areas shown by
the dimensions below.
3 Bottom:
Place on the level surface. Maintain an adequate air
path for ventilation by placing on a stand with a height of
10 cm (3 15/16 in.) or more.
Attention: Adration correcte
Pour prevenir tout risque de decharge electrique ou d'incendie
et eviter toute det6rioration, installez I'appareil de la maniere
suivante:
1 Avant:
Bien degag6 de tout objet.
2 C6tes/dessus/dessous:
Assurez-vous que rien ne bloque les espaces indiques
sur le schema ci-dessous.
3 Dessous:
Posez I'appareil sur une surface plane et horizontale.
Veillez & ce que sa ventilation correcte puisse se faire en
le pla£;ant sur un support d'au moins dix centimetres
(3 W16po.) de hauteur.
Front view
Face
15 cm
(5 _5/_6in.)
1 cm
(7/16in.)
0
0
©
I 15cm
(5 15/16in.)
1 cm
(7/16in.)
AX-UXG6
XT-UXG6
TD-UXG6
XM-G6
©
©
Side view
C6te
15 cm 15 cm
(5 15/1_in.) (5 _%6in.)
10cm "_
1315/16in.) _"
I 15cm
(5 _%6in.)
000000
oooooo AX-UXG6
000000
XT-UXG6
TD-UXG6
XM-G6
G-3
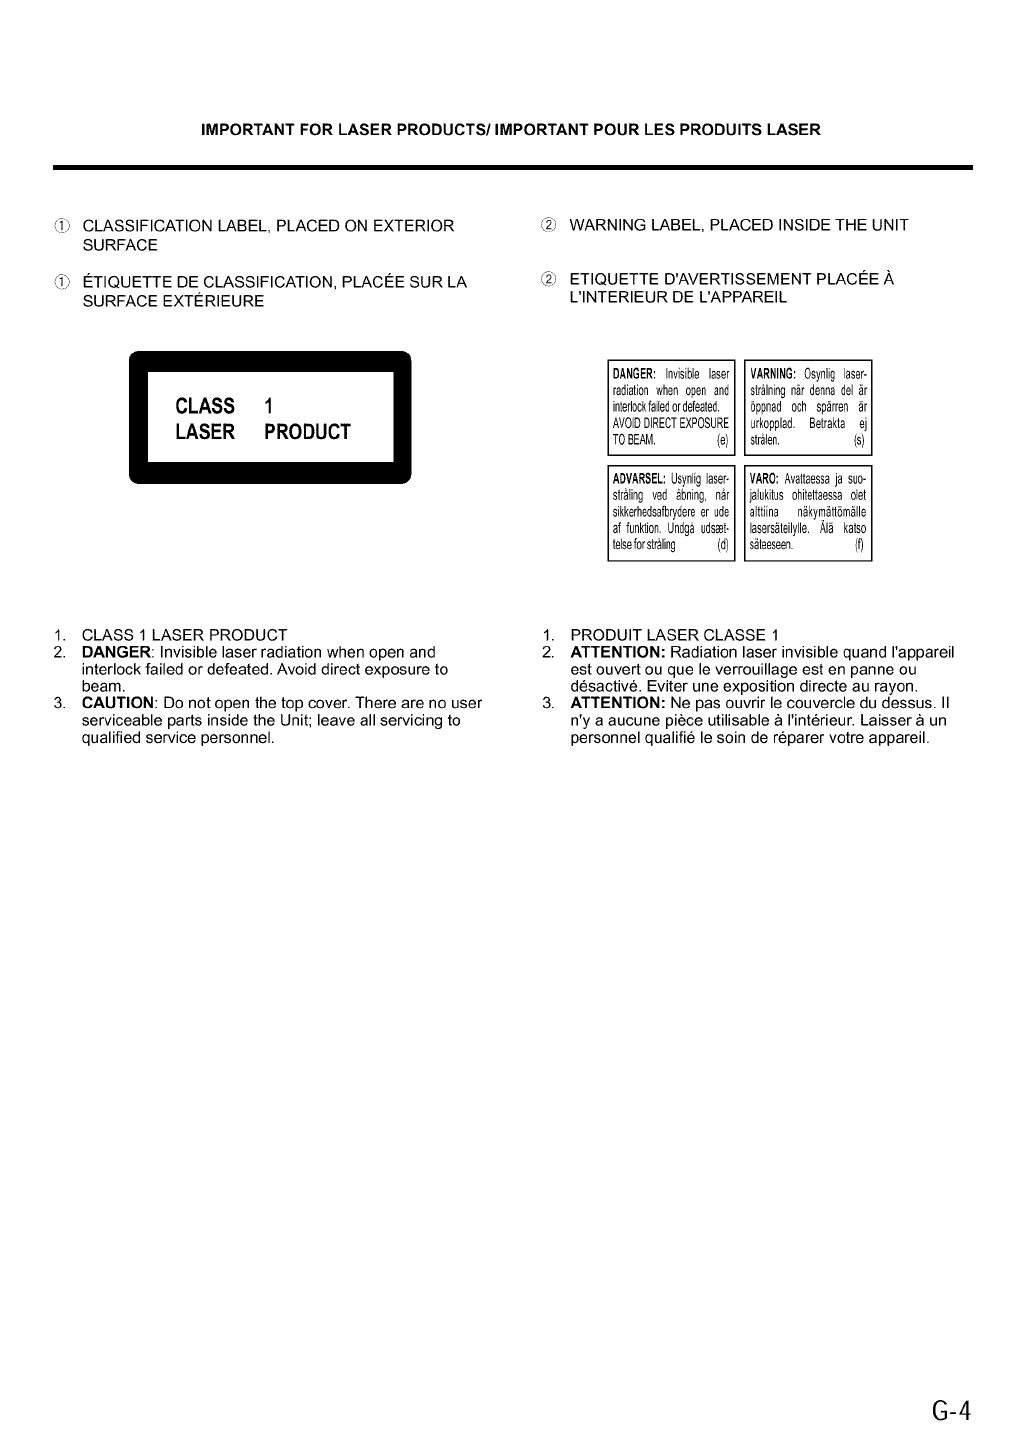
IMPORTANT FOR LASER PRODUCTS/IMPORTANT POUR LES PRODUITS LASER
CLASSIFICATION LABEL, PLACED ON EXTERIOR
SURFACE
€:TIQUETTE DE CLASSIFICATION, PLACI'--E SUR LA
SURFACE EXTI_RIEURE
42) WARNING LABEL, PLACED INSIDE THE UNIT
42) ETIQUETTE D'AVERTISSEMENT PLACI'--E ]k
L'INTERIEUR DE L'APPAREIL
ILASS 1 I
LASER PRODUCT
DANGER:Invisiblelaser
radiationwhenopenand
interlockfailedordefeated.
AV01DDIRECTEXPOSURE
TOBEAM. (e)
ADMARSEL:Usynliglaser-
str_iingved &bning,n_r
sikkerhedsafbrydereerude
af funkti0n.Undg&uds_et-
telseforstr&ling d
VARNING:0synlig laser-
strainingn_rdonnadel _r
6ppnad 0ch sp_rren _r
urk0pplad. Betrakta ej
str&ten, s
VAR0:Avattaessaja sue
jalukJtus0hitettaessaolet
alttiina n_kym_tt6m_lle
lasers_teilylle.AI_ katso
s_teeseen. (f)
1. CLASS 1 LASER PRODUCT
2. DANGER: Invisible laser radiation when open and
interlock failed or defeated. Avoid direct exposure to
beam.
3. CAUTION: Do not open the top cover. There are no user
serviceable parts inside the Unit; leave all servicing to
qualified service personnel.
1. PRODUIT LASER CLASSE 1
2. ATTENTION: Radiation laser invisible quand I'appareil
est ouvert ou que le verrouillage est en panne ou
desactiv6. Eviter une exposition directe au rayon.
3. ATTENTION: Ne pas ouvrir le couvercle du dessus. II
n'y a aucune piece utilisable a I'interieur. Laisser a un
personnel qualifie le soin de reparer votre appareil.
G-4
Introduction
We would like to thank you for purchasing one of our JVC products.
Before operating this compact component system, read this manual
carefully and thoroughly to obtain the best possible performance
from your system, and retain this manual for future reference.
About This Manual
This manual is organized as follows:
•The manual mainly explains operations using the buttons
and controls on the units. You can also use the buttons
on the remote control if they have the same or similar
names (or marks) as those on the units.
If operation using the remote control is different from
that using each unit, it is then explained.
• Basic and common information that is the same for many
functions is grouped in one place, and is not repeated in
each procedure. For instance, we do not repeat the
information about turning on/off the system, setting the
volume, changing the sound effects, and others, which
are explained in the section "Basic Settings" and
"Common Operations" on pages 10 to 13.
• The following marks are used in this manual:
Gives you warnings and cautions to
prevent from a damage or risk of fire/
electric shock.
Also gives you information which is not
good for obtaining the best possible
performance from the units.
Gives you information and hints you hadbetter know.
Precautions
Installation
•Install in a place which is level, dry and neither too hot
nor too cold -- between 5°C (41°F) and 35°C (95°F).
• Install the units in a location with adequate ventilation to
prevent internal heat buildup in the units.
• Leave sufficient distance between the units and the TV.
• Keep the speakers away from the TV to avoid interference
with TV.
DO NOT install the units in a location near heatsources, or in a place subject to direct sunlight,
excessive dust or vibration.
Powersources
•When unplugging from the wall outlet, always pull the
plug, not the AC power cord.
_4_DO NOT handle the AC power cord with wethands.
Moisture condensation
Moisture may condense on the lens inside the units in the
following cases:
• After starting heating in the room
• In a damp room
• If the units are brought directly from a cold to a warm
place
Should this occur, the system may malfunction. In this case,
leave the units turned on for a few hours until the moisture
evaporates, unplug the AC power cord, and then plug it in
again.
Others
• Should any metallic object or liquid fall into a unit, unplug
the units and consult your dealer before operating any
further.
• If you are not going to operate the units for an extended
period of time, unplug the AC power cord from the wall
outlet.
DO NOT disassemble the units since there are
no user serviceable parts inside.
If anything goes wrong, unplug the AC power cord and
consult your dealer.
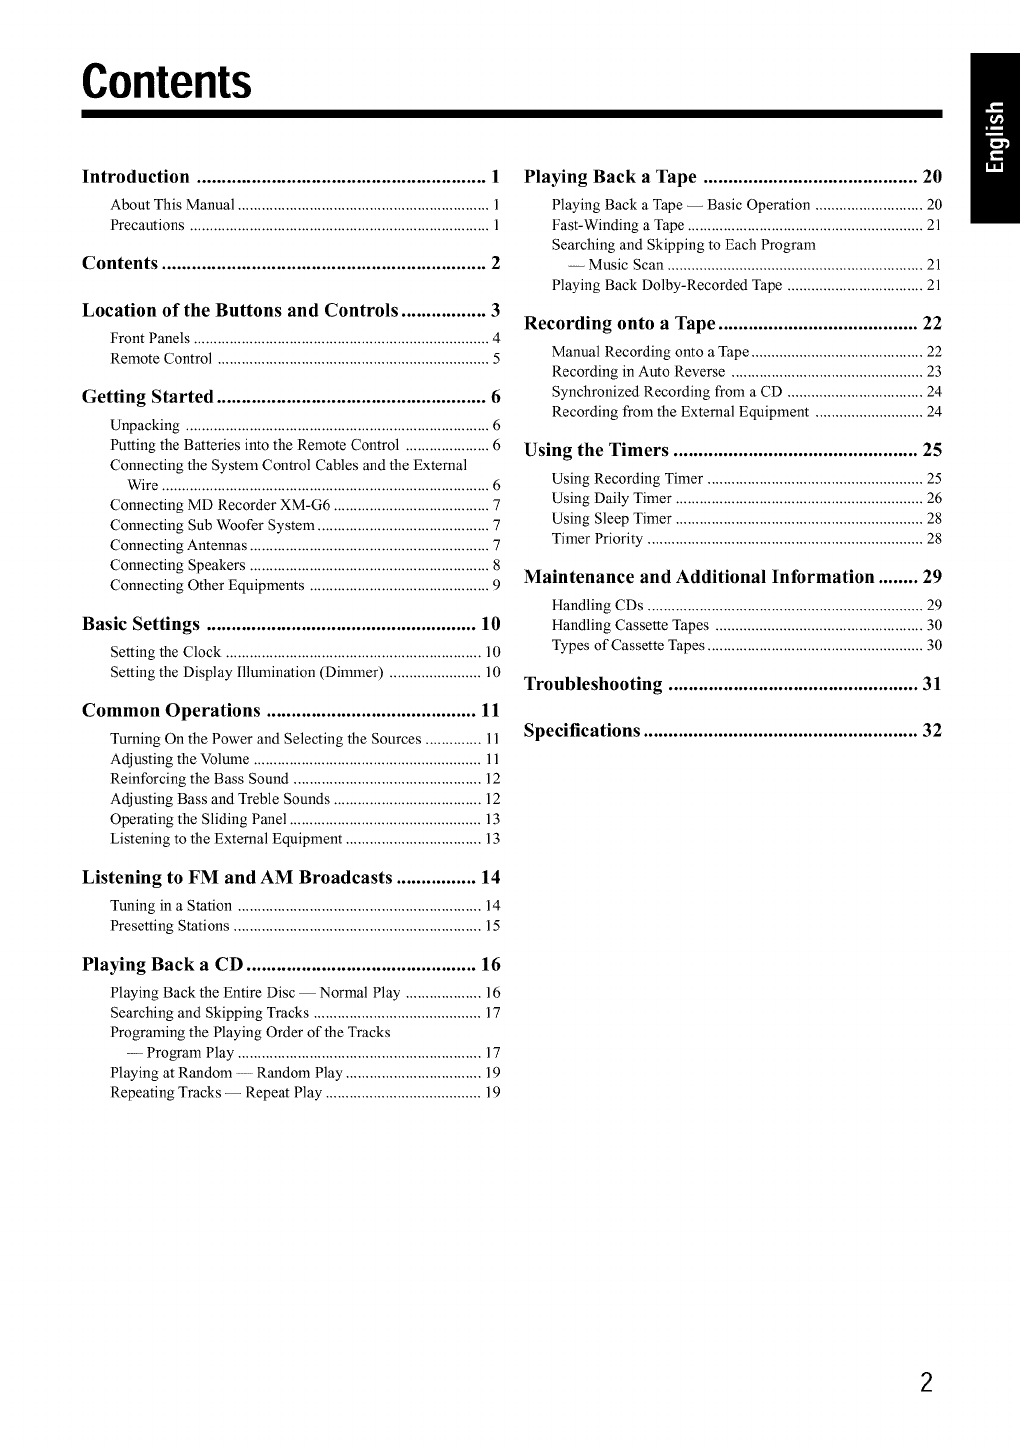
Contents
Introduction .......................................................... 1
About This Manual ............................................................... 1
Precautions ........................................................................... 1
Contents ................................................................. 2
Location of the Buttons and Controls ................. 3
Front Panels .......................................................................... 4
Remote Control .................................................................... 5
Getting Started ...................................................... 6
Unpacking ............................................................................ 6
Putting the Batteries into the Remote Control ..................... 6
Connecting the System Control Cables and the External
Wire .................................................................................. 6
Connecting MD Recorder XM-G6 ....................................... 7
Connecting Sub Woofer System ........................................... 7
Connecting Antennas ............................................................ 7
Connecting Speakers ............................................................ 8
Connecting Other Equipments ............................................. 9
Basic Settings ...................................................... 10
Setting the Clock ................................................................ 10
Setting the Display Illumination (Dimmer) ....................... 10
Common Operations .......................................... 11
Turning On the Power and Selecting the Sources .............. 11
Adjusting the Volume ......................................................... 11
Reinforcing the Bass Sound ............................................... 12
Adjusting Bass and Treble Sounds ..................................... 12
Operating the Sliding Panel ................................................ 13
Listening to the External Equipment .................................. 13
Listening to FM and AM Broadcasts ................ 14
Tuning in a Station ............................................................. 14
Presetting Stations .............................................................. 15
Playing Back a CD .............................................. 16
Playing Back the Entire Disc -- Normal Play ................... 16
Searching and Skipping Tracks .......................................... 17
Programing the Playing Order of the Tracks
-- Program Play ............................................................. 17
Playing at Random -- Random Play .................................. 19
Repeating Tracks -- Repeat Play ....................................... 19
Playing Back a Tape ........................................... 20
Playing Back a Tape -- Basic Operation ........................... 20
Fast-Winding a Tape ........................................................... 21
Searching and Skipping to Each Program
-- Music Scan ................................................................ 21
Playing Back Dolby-Recorded Tape .................................. 21
Recording onto a Tape ........................................ 22
Manual Recording onto a Tape ........................................... 22
Recording in Auto Reverse ................................................ 23
Synchronized Recording from a CD .................................. 24
Recording from the External Equipment ........................... 24
Using the Timers ................................................. 25
Using Recording Timer ...................................................... 25
Using Daily Timer .............................................................. 26
Using Sleep Timer .............................................................. 28
Timer Priority ..................................................................... 28
Maintenance and Additional Information ........ 29
Handling CDs ..................................................................... 29
Handling Cassette Tapes .................................................... 30
Types of Cassette Tapes ...................................................... 30
Troubleshooting .................................................. 31
Specifications ....................................................... 32
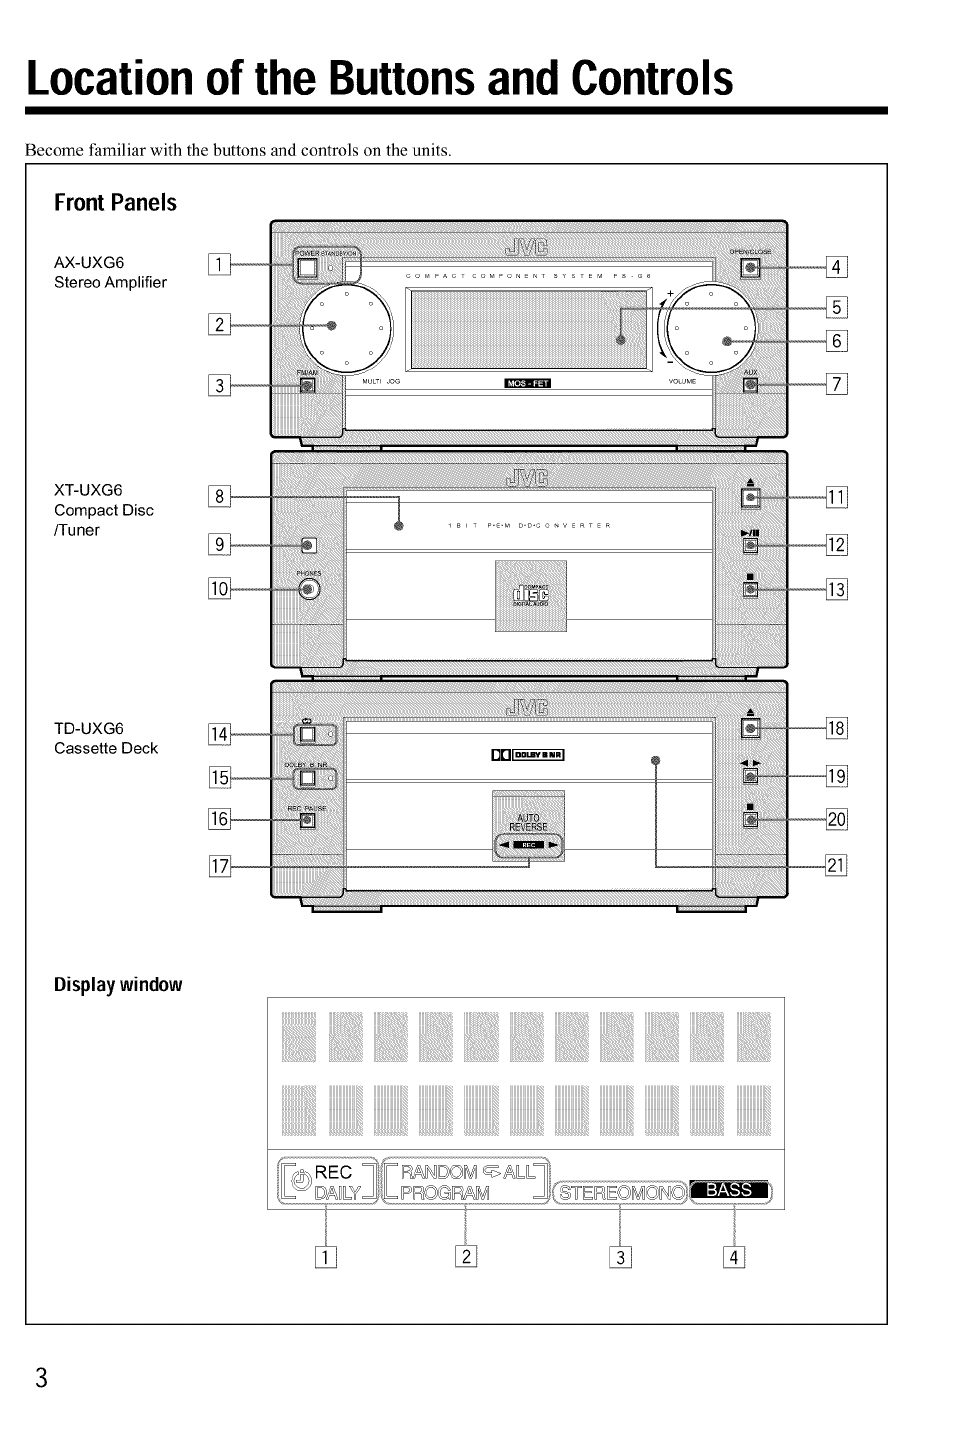
Location of the Buttons and Controls
Become familiar with the buttons and controls on the units.
Front Panels
AX-UXG6
Stereo Amplifier
XT-UXG6
Compact Disc
/Tuner
TD-UXG6
Cassette Deck oo_ T
Displaywindow
i ii'iiii!i!ii'iiii!i! ii'iiii!i!
[] [] []
3
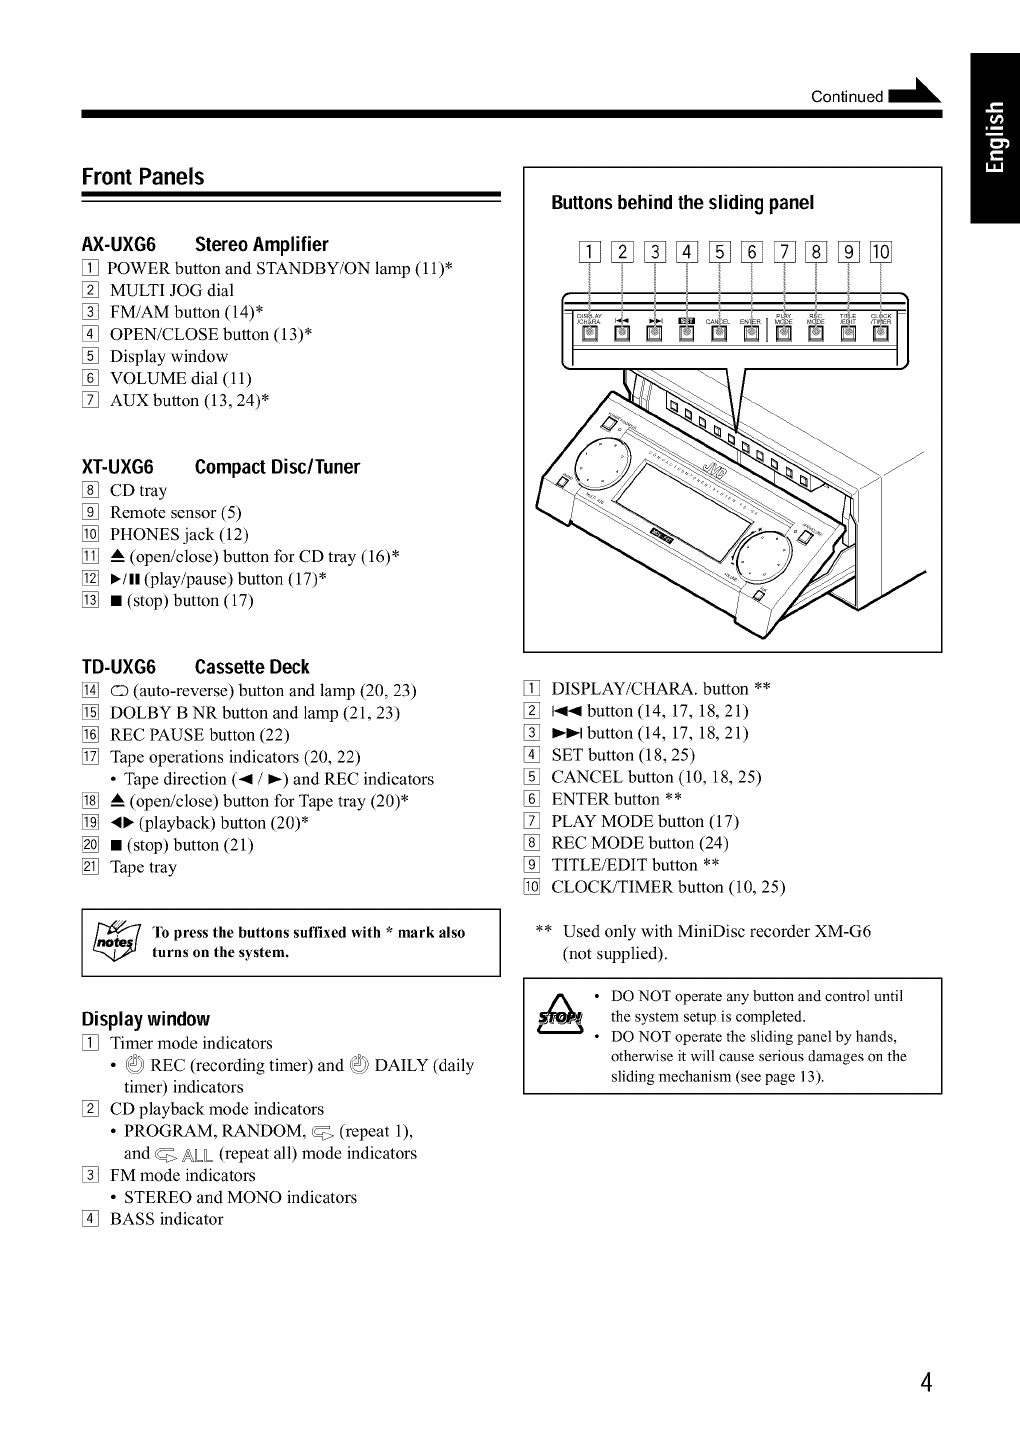
Front Panels
AX-UXG6 StereoAmplifier
POWER button and STANDBY/ON lamp (11)*
[_ MULTI JOG dial
[_ FM/AM button (14)*
[_ OPEN/CLOSE button (13)*
[_ Display window
[f_ VOLUME dial (11)
[_ AUX button (13, 24)*
XT-UXG6 Compact Disc/Tuner
[_ CD tray
[_ Remote sensor (5)
[_ PHONES jack (12)
[_ _ (open/close) button for CD tray (16)*
[_ ,/11 (play/pause) button (17)*
[_ • (stop) button (17)
Continued I_
Buttonsbehindthe slidingpanel
TD-UXG6 Cassette Deck
[_ Q (auto-reverse) button and lamp (20, 23)
[_ DOLBY B NR button and lamp (21, 23)
[_ REC PAUSE button (22)
[_ Tape operations indicators (20, 22)
•Tape direction (-< /I_) and REC indicators
[_ _ (open/close) button for Tape tray (20)*
[_ ,I_ (playback) button (20)*
[_ • (stop) button (21)
[_ Tape tray
To press the buttons suffixed with * mark also
turns on the system.
Displaywindow
[_ Timer mode indicators
• @ REC (recording timer) and @) DAILY (daily
timer) indicators
[_ CD playback mode indicators
•PROGRAM, RANDOM, @ (repeat 1),
and _<> ALL (repeat all) mode indicators
[_ FM mode indicators
• STEREO and MONO indicators
[_ BASS indicator
[_ DISPLAY/CHARA. button **
[_ I<< button (14, 17, 18, 21)
[_ I_1_1button (14, 17, 18, 21)
[_ SET button (18, 25)
[_ CANCEL button (10, 18, 25)
[f_ ENTER button **
[_ PLAY MODE button (17)
[_ REC MODE button (24)
[_ TITLE/EDIT button **
[_ CLOCK/TIMER button (10, 25)
** Used only with MiniDisc recorder XM-G6
(not supplied).
DO NOT operate any button and control until
the system setup is completed.
DO NOT operate the sliding panel by hands,
otherwise it will cause serious damages on the
sliding mechanism (see page 13).
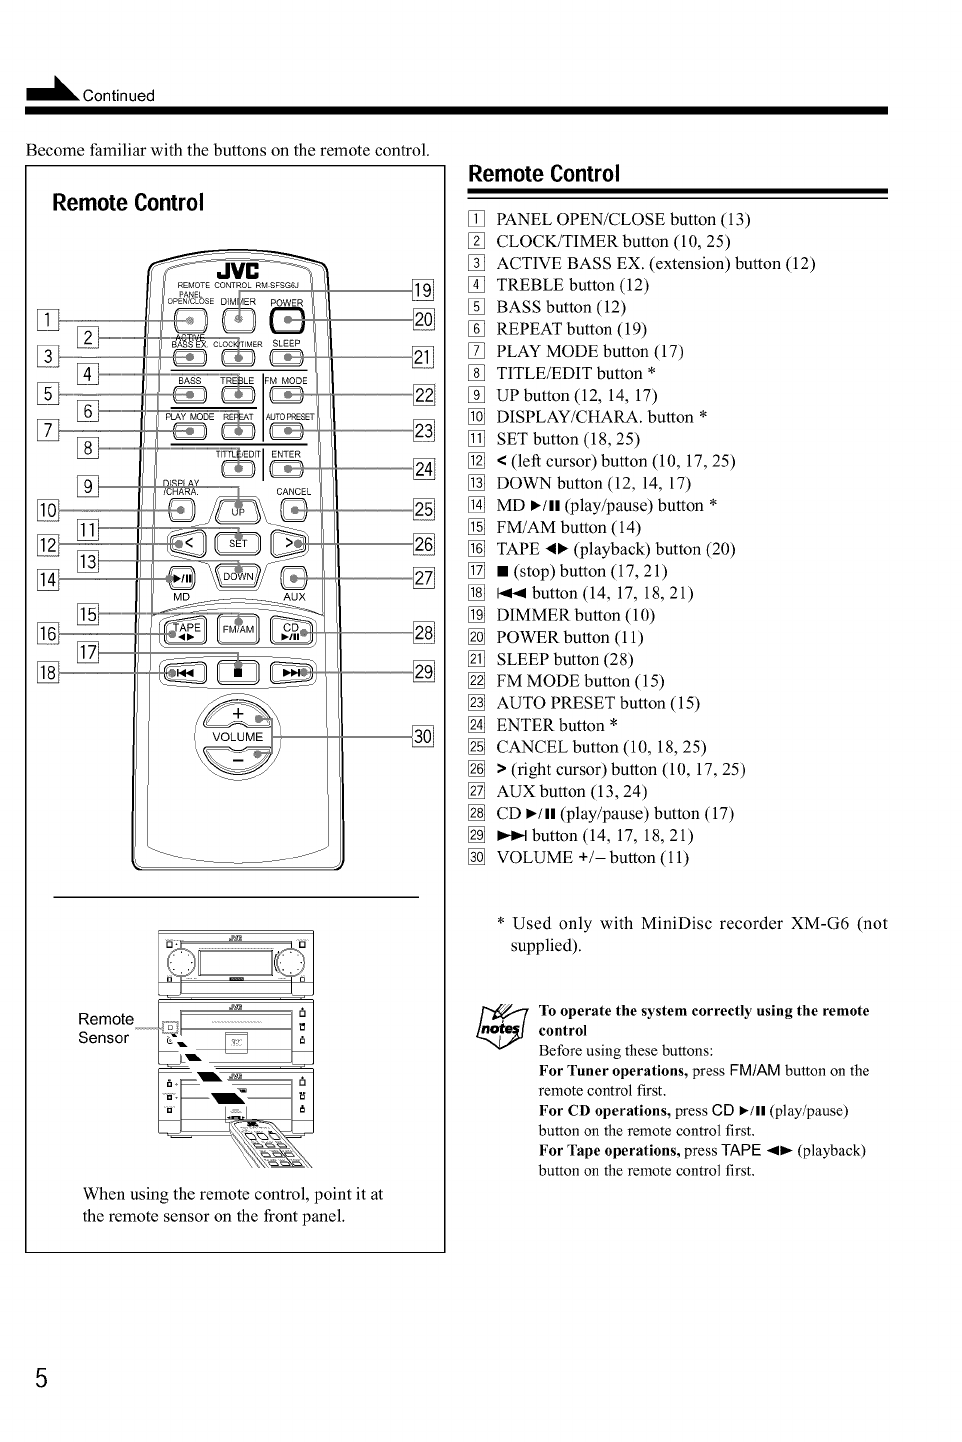
Become familiar with the buttons on the remote control.
Remote Control
Remote
Sensor
When using the remote control, point it at
the remote sensor on the front panel.
Remote Control
[_ PANEL OPEN/CLOSE button (13)
[_ CLOCK/TIMER button (10, 25)
[_ ACTIVE BASS EX. (extension) button (12)
[_ TREBLE button (12)
[_ BASS button (12)
[f_ REPEAT button (19)
[5_J PLAY MODE button (17)
_j TITLE/EDIT button *
[_ UP button (12, 14, 17)
[_ DISPLAY/CHARA. button *
[_ SET button (18, 25)
[_ <(left cursor) button (10, 17, 25)
[_ DOWN button (12, 14, 17)
[_ MD I_/ll (play/pause) button *
[_ FM/AM button (14)
[_ TAPE "_1_(playback) button (20)
[_ • (stop) button (17, 21)
[_ I_1 button (14, 17, 18, 21)
[_ DIMMER button (10)
[_ POWER button (11)
[_ SLEEP button (28)
[_ FM MODE button (15)
[_ AUTO PRESET button (15)
[_ ENTER button *
[_ CANCEL button (10, 18, 25)
[_ >(right cursor) button (10, 17, 25)
[_ AUXbutton (13, 24)
[_ CD I_/11 (play/pause) button (17)
[_ _ button (14, 17, 18, 21)
[_ VOLUME +/- button (11)
* Used only with MiniDisc recorder XM-G6 (not
supplied).
To operate the system correctly using the remote
control
Before using these buttons:
For Tuner operations, press FM/AM button on the
remote control first.
For CD operations, press CD I_/11(play/pause)
button on the remote control first.
For Tape operations, press TAPE -.9_ (playback)
button on the remote control first.
5
Getting!Started
Unpacking
After unpacking, check to be sure that you have all the
following items.
The number in the parentheses indicates the quantity of the
pieces supplied.
• AM loop antenna (1)
• FM antenna (1)
• Remote control (1)
• Batteries (2)
• Speaker cords (2)
• External wire (1)
If any is missing, consult your dealer immediately.
Puttingthe Batteriesintothe Remote
Control
Insert the batteries -- R6P (SUM-3)/AA (15F) -- into the
remote control, by matching the polarity (+ and -) on the
batteries with the + and - markings on the battery
compartment.
When the remote control can no longer operate the units,
replace both batteries at the same time.
R6P(SUM-3)/AA(15F)
3
DO NOT use an old battery together with a new
"one.
DO NOT use different types of batteries together.
• DO NOT expose batteries to heat or flame.
• DO NOT leave the batteries in the battery
compartment when you are not going to use the
remote control for an extended period of time.
Otherwise, it will be damaged from battery
leakage.
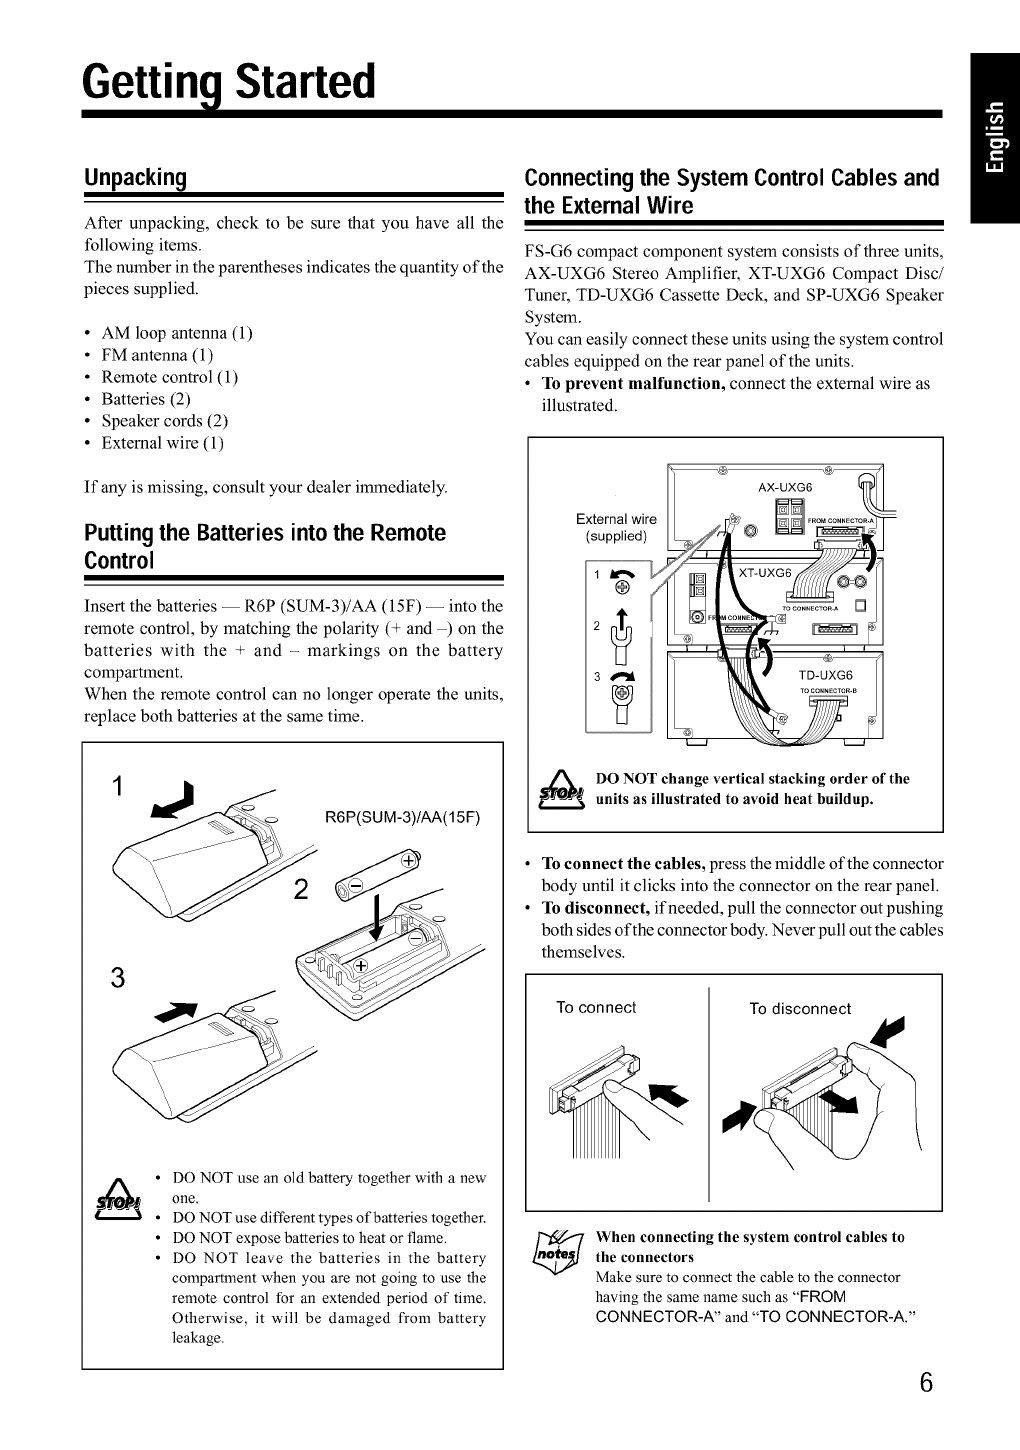
Connecting the System Control Cables and
the External Wire
FS-G6 compact component system consists of three units,
AX-UXG6 Stereo Amplifier, XT-UXG6 Compact Disc/
Tuner, TD-UXG6 Cassette Deck, and SP-UXG6 Speaker
System.
You can easily connect these units using the system control
cables equipped on the rear panel of the units.
• To prevent malfunction, connect the external wire as
illustrated.
External wire
(supplied)
AX-UXG6
2 nln
DO NOT change vertical stacking order of the
units as illustrated to avoid heat buildup.
To connect the cables, press the middle of the connector
body until it clicks into the connector on the rear panel.
To disconnect, if needed, pull the connector out pushing
both sides of the connector body. Never pull outthe cables
themselves.
To connect To disconnect
When connecting the system control cables to
the connectors
Make sure to connect the cable to the connector
having the same name such as "FROM
CONNECTOR-A" and "TO CONNECTOR-A."
!1
6
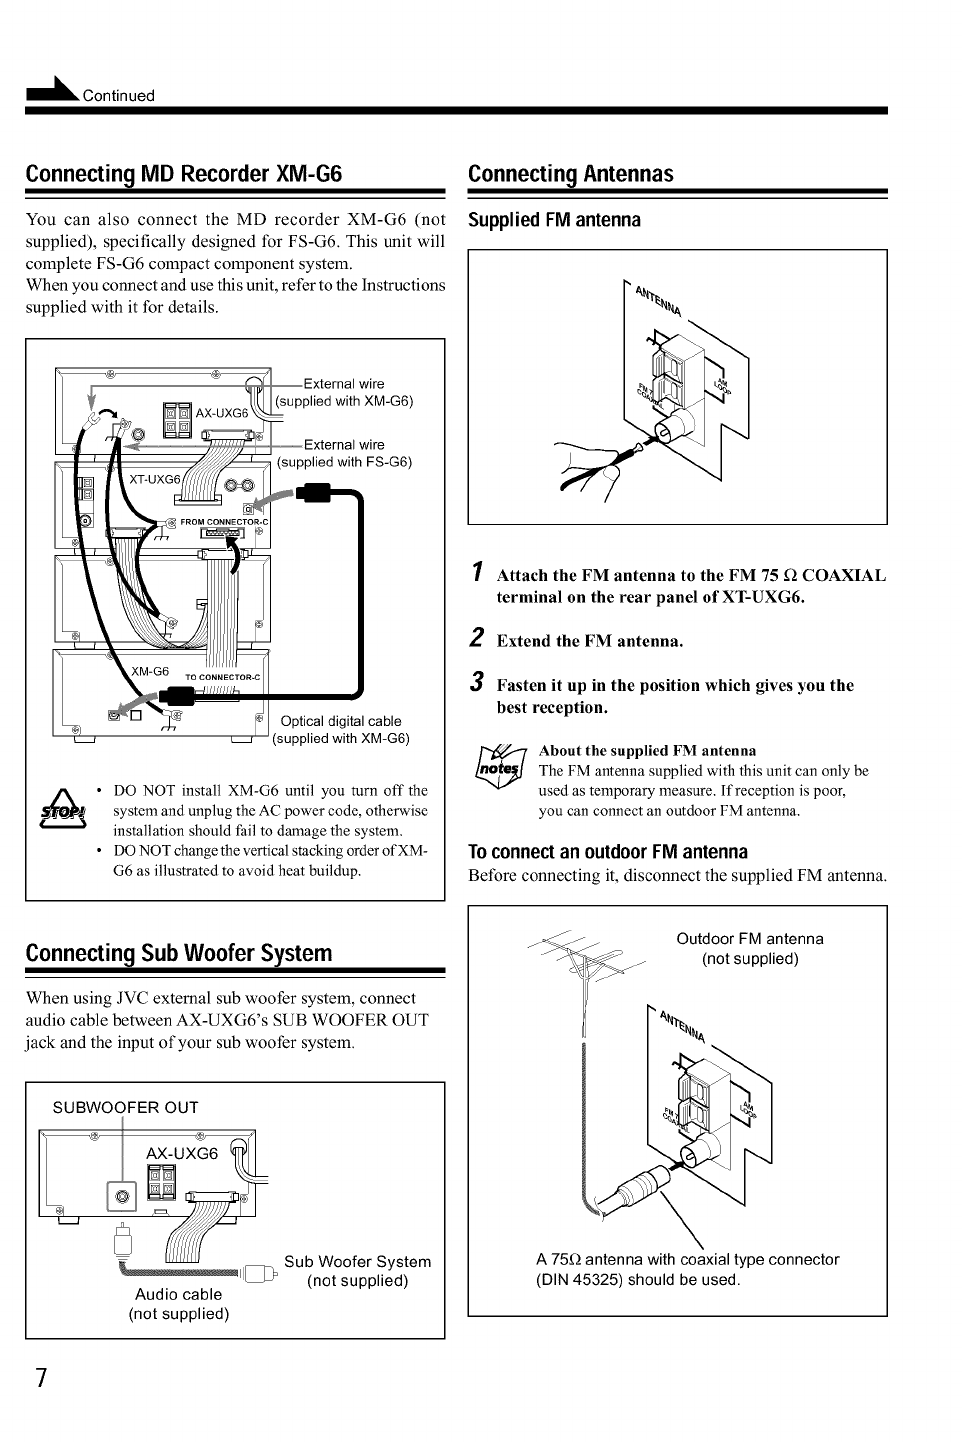
Connecting MD Recorder XM-G6
You can also connect the MD recorder XM-G6 (not
supplied), specifically designed for FS-G6. This unit will
complete FS-G6 compact component system.
When you connect and use this unit, refer to the Instructions
supplied with it for details.
Connecting Antennas
SuppliedFM antenna
"_External wire
upplied with XM-G6)
External wire
_ (supplied with FS-G6)
..........
<M-G6 TO CONNECTOR-C_[
/"//((///h _1 Optical digital cable
(supplied with XM-G6)
• DO NOT install XM-G6 until you turn off the
system and unplug the AC power code, otherwise
installation should fail to damage the system.
• DO NOT change the vertical stacking order of XM-
G6 as illustrated to avoid heat buildup.
2
Attach the FM antenna to the FM 75 _) COAXIAL
terminal on the rear panel of XT-UXG6.
Extend the FM antenna.
3Fasten it up in the position which gives you the
best reception.
About the supplied FM antenna
The FM antenna supplied with this unit can only be
used as temporary measure. If reception is poor,
you can connect an outdoor FM antenna.
Toconnectan outdoorFM antenna
Before connecting it, disconnect the supplied FM antenna.
ConnectingSubWooferSystem
When using JVC external sub woofer system, connect
audio cable between AX-UXG6's SUB WOOFER OUT
jack and the input of your sub woofer system.
SUBWOOFER OUT
Audio cable
(not supplied)
Sub Woofer System
(not supplied)
Outdoor FM antenna
(not supplied)
A 75D antenna with coaxial type connector
(DIN 45325) should be used.
ContinuedI_
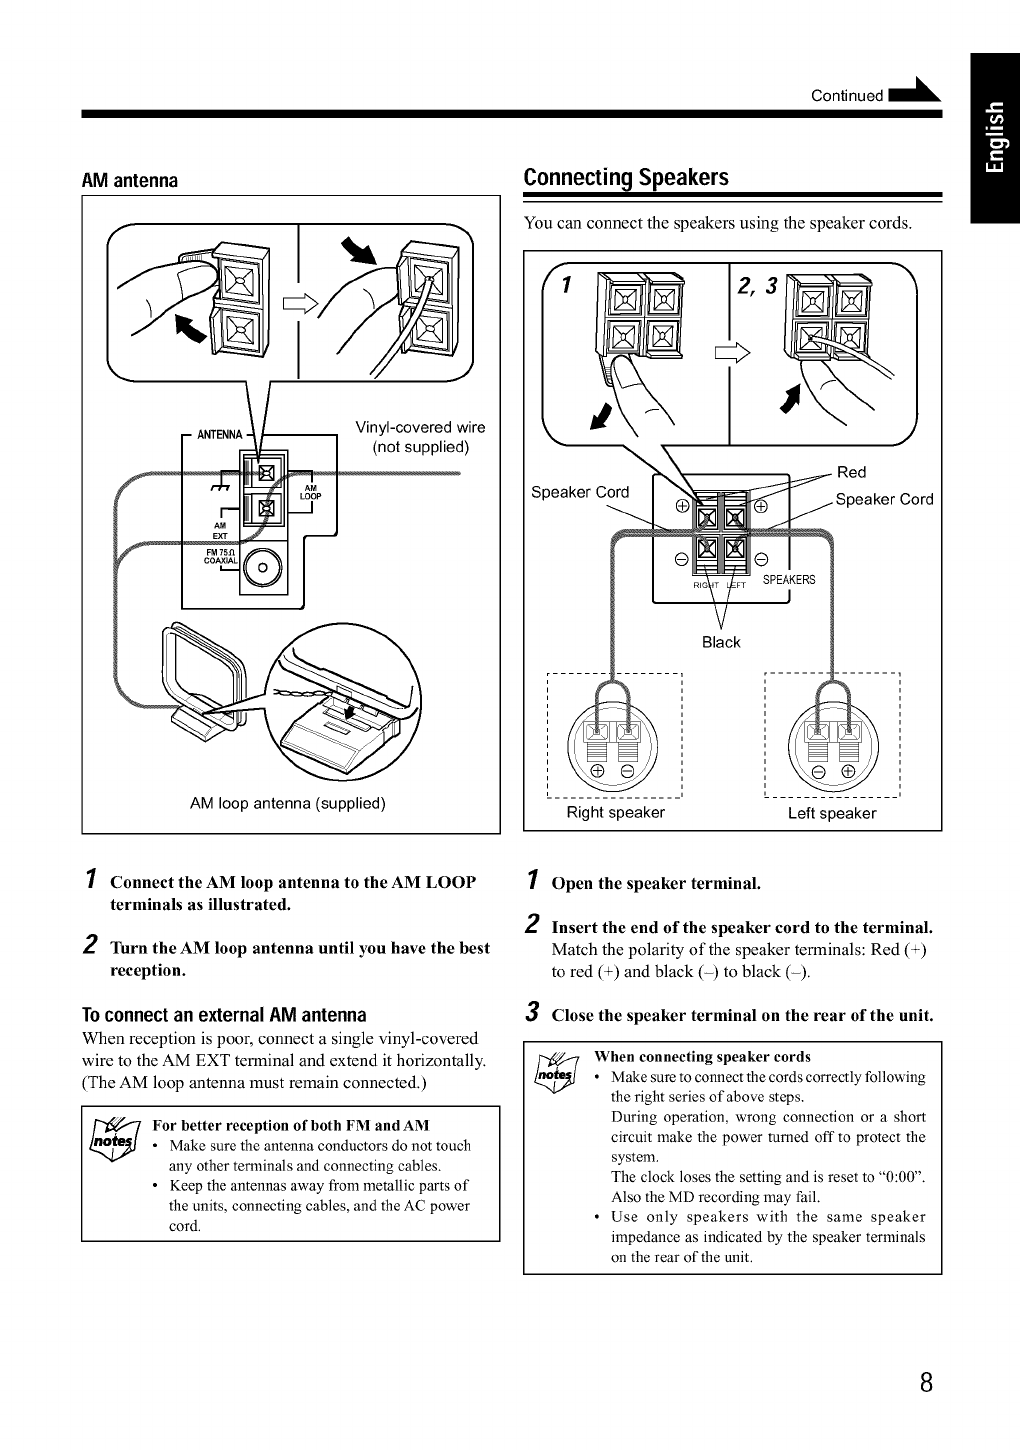
AM antenna
Vinyl-covered wire
(not supplied)
AM loop antenna (supplied)
ConnectingSpeakers
You can connect the speakers using the speaker cords.
Speaker Cord
Red
Speaker Cord
Black
Right speaker Left speaker
1Connect the AM loop antenna to the AM LOOP
terminals as illustrated.
2Turn the AM loop antenna until you have the best
reception.
Toconnectan externalAM antenna
When reception is poor, connect a single vinyl-covered
wire to the AM EXT terminal and extend it horizontally.
(The AM loop antenna must remain connected.)
For better reception of both FM andAM
•Make sure the antenna conductors do not touch
any other terminals and connecting cables.
•Keep the antennas away from metallic parts of
the units, connecting cables, and the AC power
cord.
1Open the speaker terminal.
2Insert the end of the speaker cord to the terminal.
Match the polarity of the speaker terminals: Red (+)
to red (+) and black (-) to black (-).
3Close the speaker terminal on the rear of the unit.
When connecting speaker cords
• Make sure to connect the cords correctly following
the right series of above steps.
During operation, wrong connection or a short
circuit make the power turned off to protect the
system.
The clock loses the setting and is reset to "0:00".
Also the MD recording may fail.
• Use only speakers with the same speaker
impedance as indicated by the speaker terminals
on the rear of the unit.
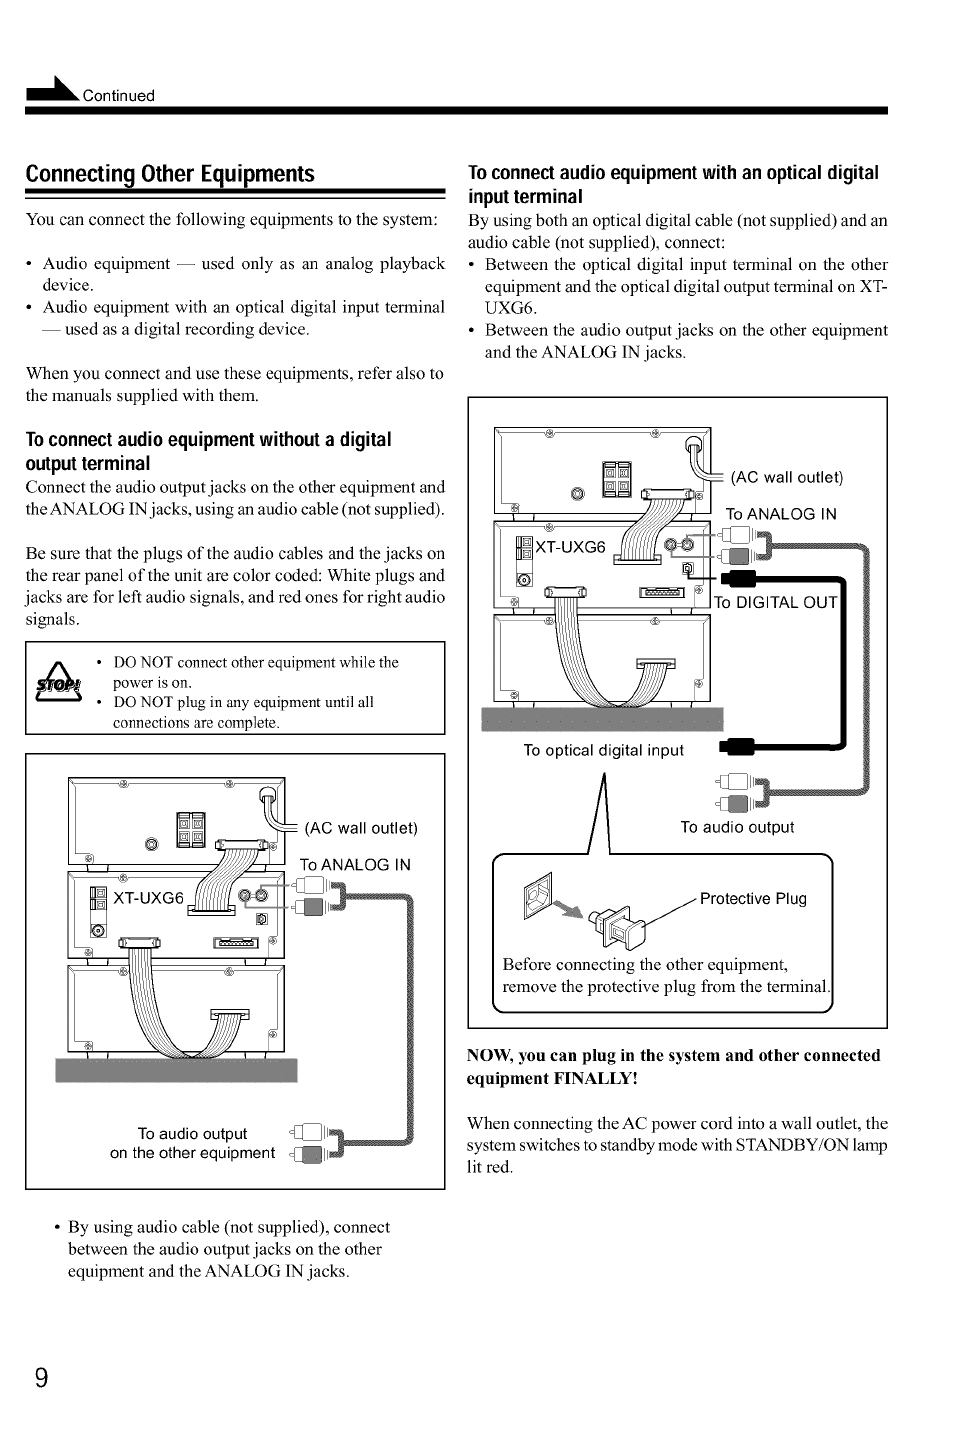
Connecting Other Equipments
You can connect the following equipments to the system:
• Audio equipment -- used only as an analog playback
device.
• Audio equipment with an optical digital input terminal
-- used as a digital recording device.
When you connect and use these equipments, refer also to
the manuals supplied with them.
Toconnectaudio equipmentwithouta digital
outputterminal
Connect the audio outputjacks on the other equipment and
theANALOG INjacks, using an audio cable(not supplied).
Be sure that the plugs of the audio cables and the jacks on
the rear panel of the unit are color coded: White plugs and
jacks are for left audio signals, and red ones for right audio
signals.
._ •DO NOT connect other equipment while the
power is on.
DO NOT plug in any equipment until all
connections are complete.
@(AC wall outlet)
To ANALOG IN
To audio output _4_11_
on the other equipment _11_
Toconnect audio equipment with an optical digital
input terminal
By using both an optical digital cable (not supplied) and an
audio cable (not supplied), connect:
•Between the optical digital input terminal on the other
equipment and the optical digital output terminal on XT-
UXG6.
• Between the audio output jacks on the other equipment
and the ANALOG IN jacks.
@(AC wall outlet)
To ANALOG IN
To DIGITAL OUT
To optical digital input
A To audio output
_ Protective Plug
Before connecting the other equipment,
remove the protective plug from the termina
NOW, you can plug in the system and other connected
equipment FINALLY!
When connecting the AC power cord into a wall outlet, the
system switches to standby mode with STANDBY/ON lamp
lit red.
• By using audio cable (not supplied), connect
between the audio output jacks on the other
equipment and the ANALOG IN jacks.
9
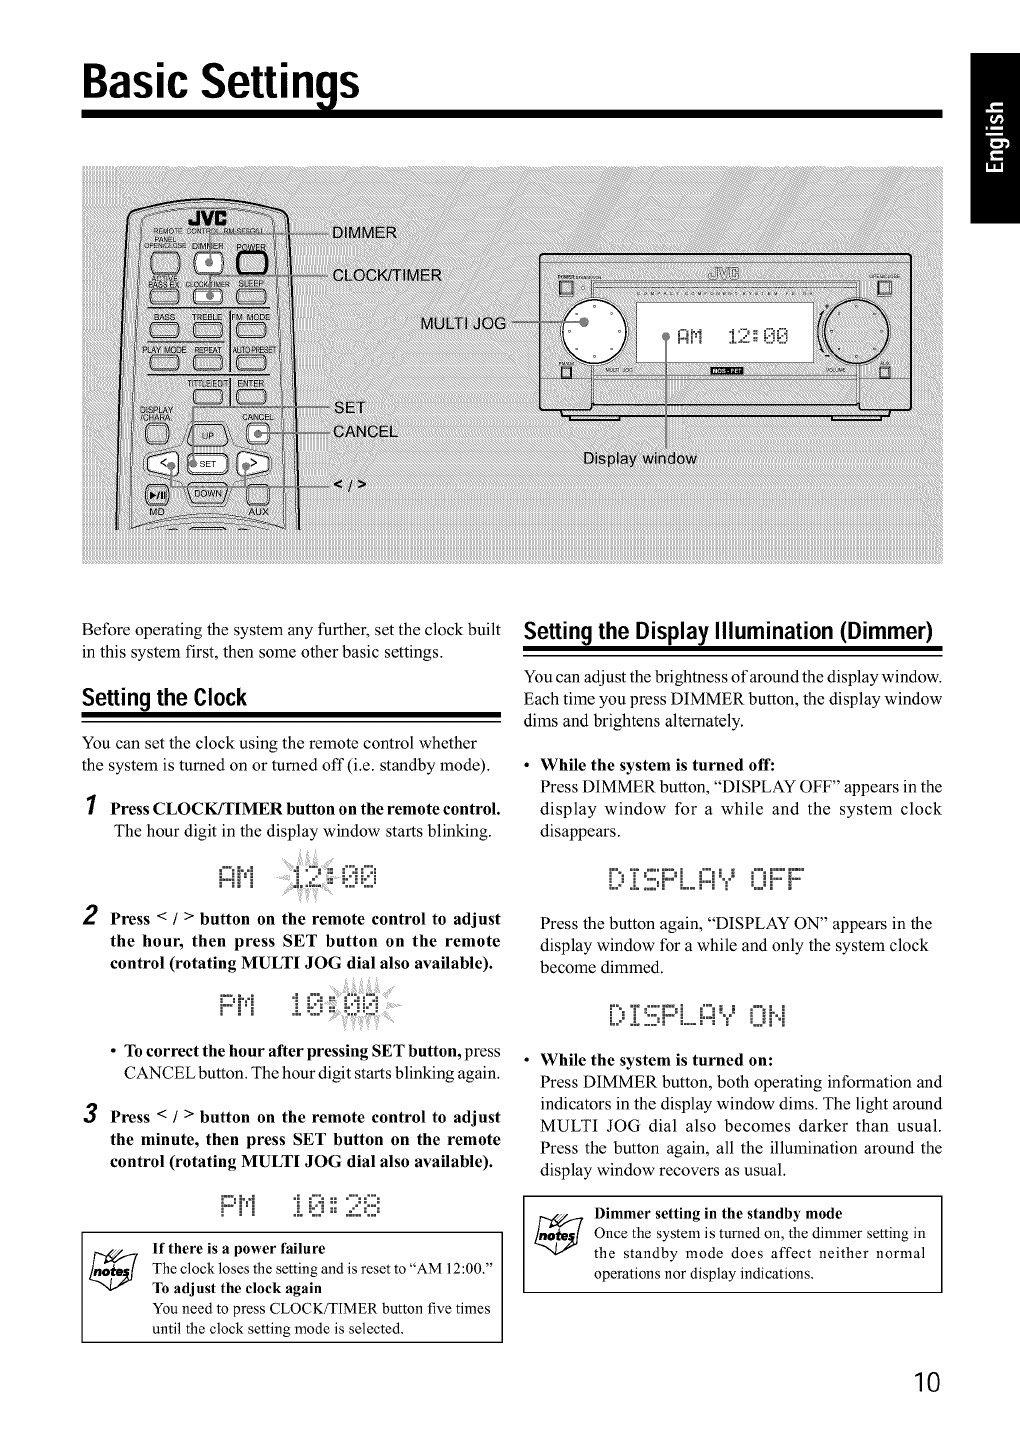
BasicSettings
Before operating the system any further, set the clock built
in this system first, then some other basic settings.
Setting the Clock
You can set the clock using the remote control whether
the system is turned on or turned off (i.e. standby mode).
1Press CLOCK/TIMER button on the remote control.
The hour digit in the display window starts blinking.
2Press </>button on the remote control to adjust
the hour, then press SET button on the remote
control (rotating MULTI JOG dial also available).
; ;o,'_ :: ;,,'; ;,o,; ....
•To correct the hour after pressing SET button, press
CANCEL button. The hour digit starts blinking again.
3Press < !>button on the remote control to adjust
the minute, then press SET button on the remote
control (rotating MULTI JOG dial also available).
°ii;:iii ?i:::i
If there is a power failure
The clock loses the setting and is reset to "AM 12:00."
To adjust the clock again
You need to press CLOCK/TIMER button five times
until the clock setting mode is selected.
Setting the Display Illumination (Dimmer)
You can adjust the brightness of around the display window.
Each time you press DIMMER button, the display window
dims and brightens alternately.
•While the system is turned off:
Press DIMMER button, "DISPLAY OFF" appears in the
display window for a while and the system clock
disappears.
[)i::iii:F::°L..i:::iYi:iF::'i:::"
Press the button again, "DISPLAY ON" appears in the
display window for a while and only the system clock
become dimmed.
[)i::!!!:PL..A°.?Oi',i
While the system is turned on:
Press DIMMER button, both operating information and
indicators in the display window dims. The light around
MULTI JOG dial also becomes darker than usual.
Press the button again, all the illumination around the
display window recovers as usual.
Dimmer setting in the standby mode
Once the system is turned on, the dimmer setting in
the standby mode does affect neither normal
operations nor display indications.
10
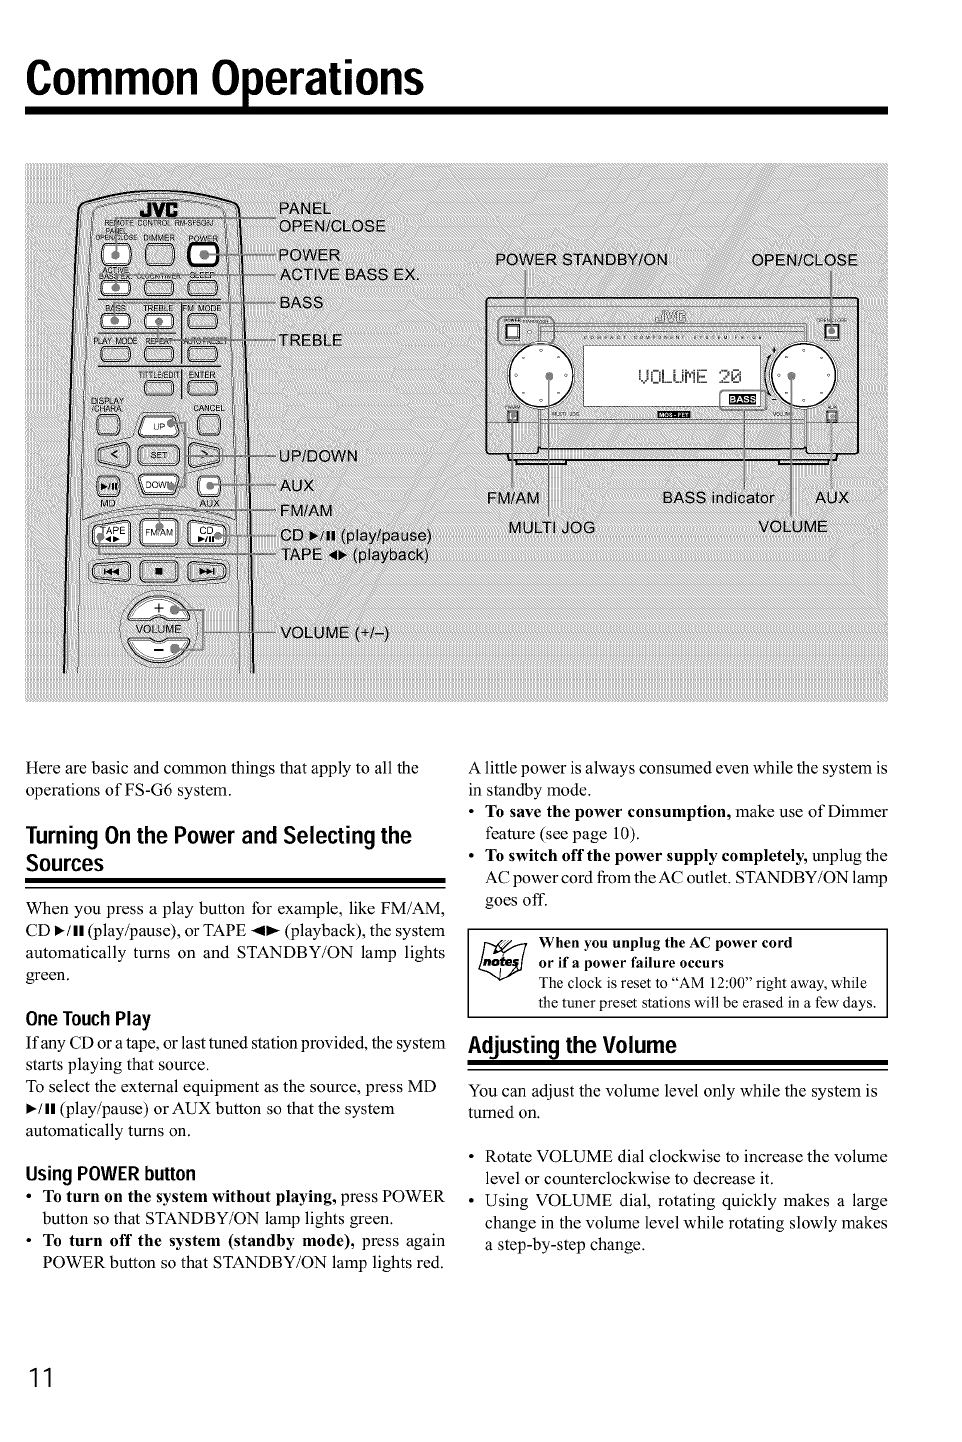
Common0 erations
Here are basic and common things that apply to all the
operations of FS-G6 system.
Turning On the Power and Selecting the
Sources
When you press a play button for example, like FM/AM,
CD •/ll (play/pause), or TAPE <_ (playback), the system
automatically turns on and STANDBY/ON lamp lights
green.
One TouchPlay
If any CD or a tape, or last tuned station provided, the system
starts playing that source.
To select the external equipment as the source, press MD
•/II (play/pause) or AUX button so that the system
automatically turns on.
UsingPOWERbutton
•To turn on the system without playing, press POWER
button so that STANDBY/ON lamp lights green.
• To turn off the system (standby mode), press again
POWER button so that STANDBY/ON lamp lights red.
A little power is always consumed even while the system is
in standby mode.
• To save the power consumption, make use of Dimmer
feature (see page 10).
• To switch off the power supply completely, unplug the
AC power cord from the AC outlet. STANDBY/ON lamp
goes off.
When you unplug the AC power cord
or ifa power failure occurs
The clock is reset to "AM 12:00" right away, while
the tuner preset stations will be erased in a few days.
Adjusting the Volume
You can adjust the volume level only while the system is
turned on.
• Rotate VOLUME dial clockwise to increase the volume
level or counterclockwise to decrease it.
• Using VOLUME dial, rotating quickly makes a large
change in the volume level while rotating slowly makes
a step-by-step change.
11
Continued Id_
• When using the remote control, press VOLUME + button
to increase the volume level or press VOLUME - button
to decrease it.
The volume level (from 0 to 50) appears in the display
window as follows:
| |_'°°M _ _Eo.ol|.... o'%:'5
:..,::..JL..:...:F iC. .:::.i:::
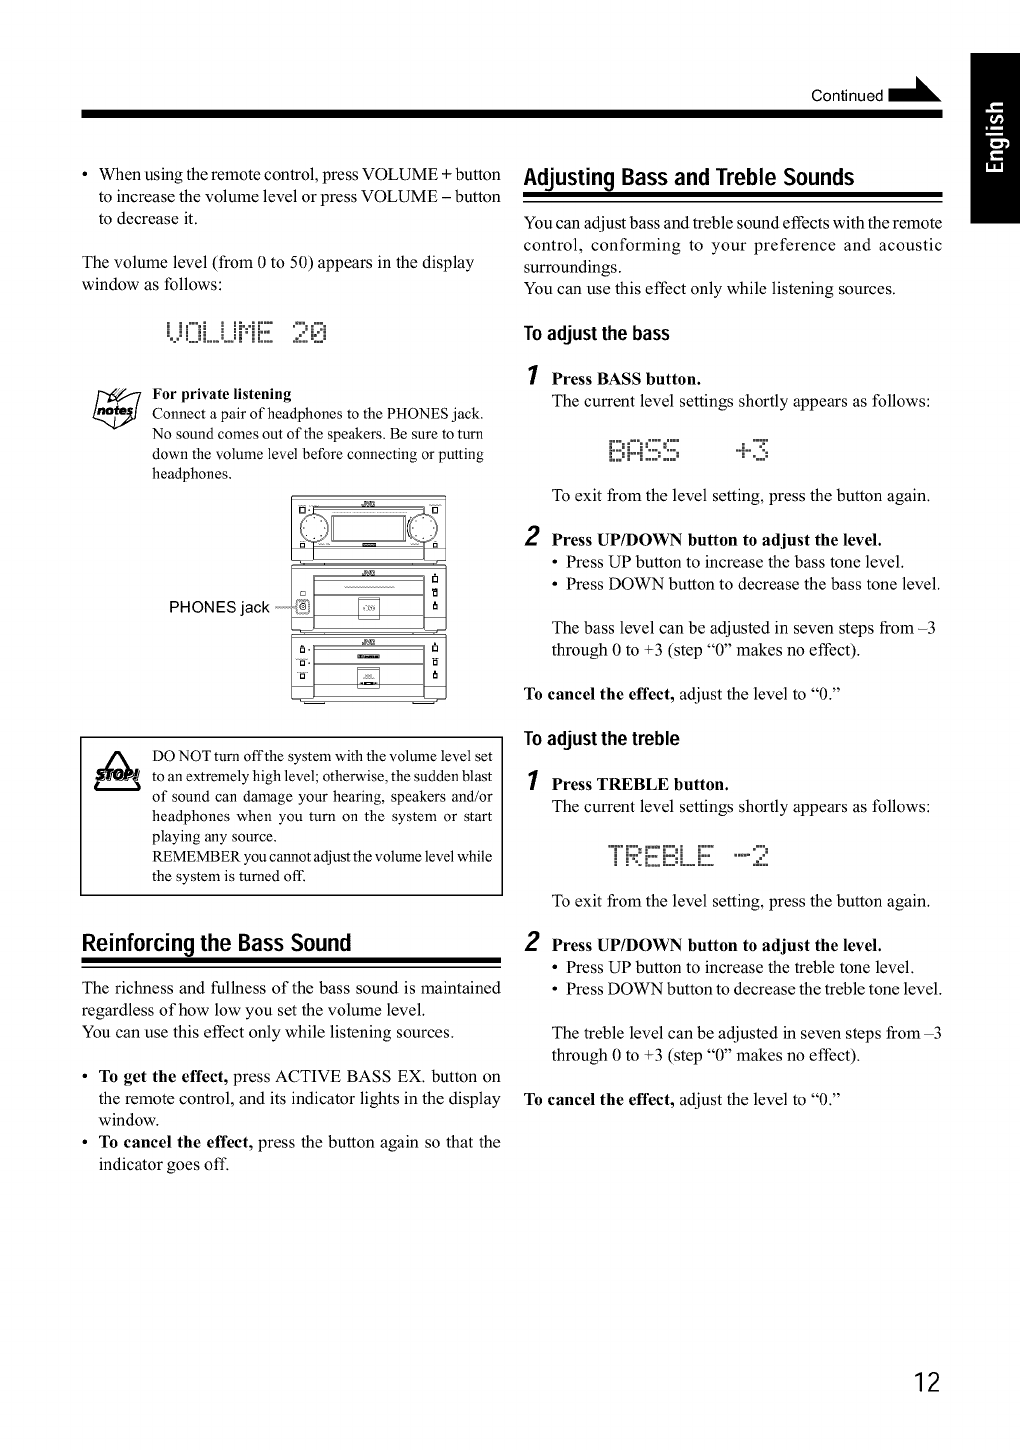
For private listening
Connect a pair of headphones to the PHONES jack.
No sound comes out of the speakers. Be sure to turn
down the volume level before connecting or putting
headphones.
DO NOT turn off the system with the volume level set
to an extremely high level; otherwise, the sudden blast
of sound can damage your hearing, speakers and/or
headphones when you turn on the system or start
playing any source.
REMEMBER you cannot adjust the volume level while
the system is turned off.
Reinforcing the Bass Sound
The richness and fullness of the bass sound is maintained
regardless of how low you set the volume level.
You can use this effect only while listening sources.
• To get the effect, press ACTIVE BASS EX. button on
the remote control, and its indicator lights in the display
window.
• To cancel the effect, press the button again so that the
indicator goes off.
Adjusting Bass and Treble Sounds
You can adjust bass and treble sound effects with the remote
control, conforming to your preference and acoustic
surroundings.
You can use this effect only while listening sources.
Toadjust the bass
1Press BASS button.
The current level settings shortly appears as follows:
L==iF°°| oooo:,=j
To exit from the level setting, press the button again.
2Press UP/DOWN button to adjust the level.
•Press UP button to increase the bass tone level.
•Press DOWN button to decrease the bass tone level.
The bass level can be adjusted in seven steps from -3
through 0 to +3 (step "0" makes no effect).
To cancel the effect, adjust the level to "0."
Toadjustthe treble
1Press TREBLE button.
The current level settings shortly appears as follows:
.....i;?[i[ii?:Liiii:.....2
To exit from the level setting, press the button again.
2Press UP/DOWN button to adjust the level.
•Press UP button to increase the treble tone level.
•Press DOWN button to decrease the treble tone level.
The treble level can be adjusted in seven steps from -3
through 0to +3 (step "0" makes no effect).
To cancel the effect, adjust the level to "0."
12
Operating the Sliding Panel
You can use the sliding panel to enable advanced operations
features provided for FS-G6 compact component system.
Listening to the External Equipment
You can listen to an external equipment such as MD recorder,
VCR, and other auxiliaries.
First make sure that the external equipment is properly
connected to the system (see page 7 and 9). For operation
of the equipment, refer to its Instructions.
Press AUX button to select an external source.
• To play an audio equipment without optical digital
output, select AUX so that the following information
appears in the display window.
2
3
i'"| i i:...:
i'"i "=..."."°°:
Start playing back the external equipment.
Adjust the volume level to the desired listening
level.
4Apply other sound effects, if you wish.
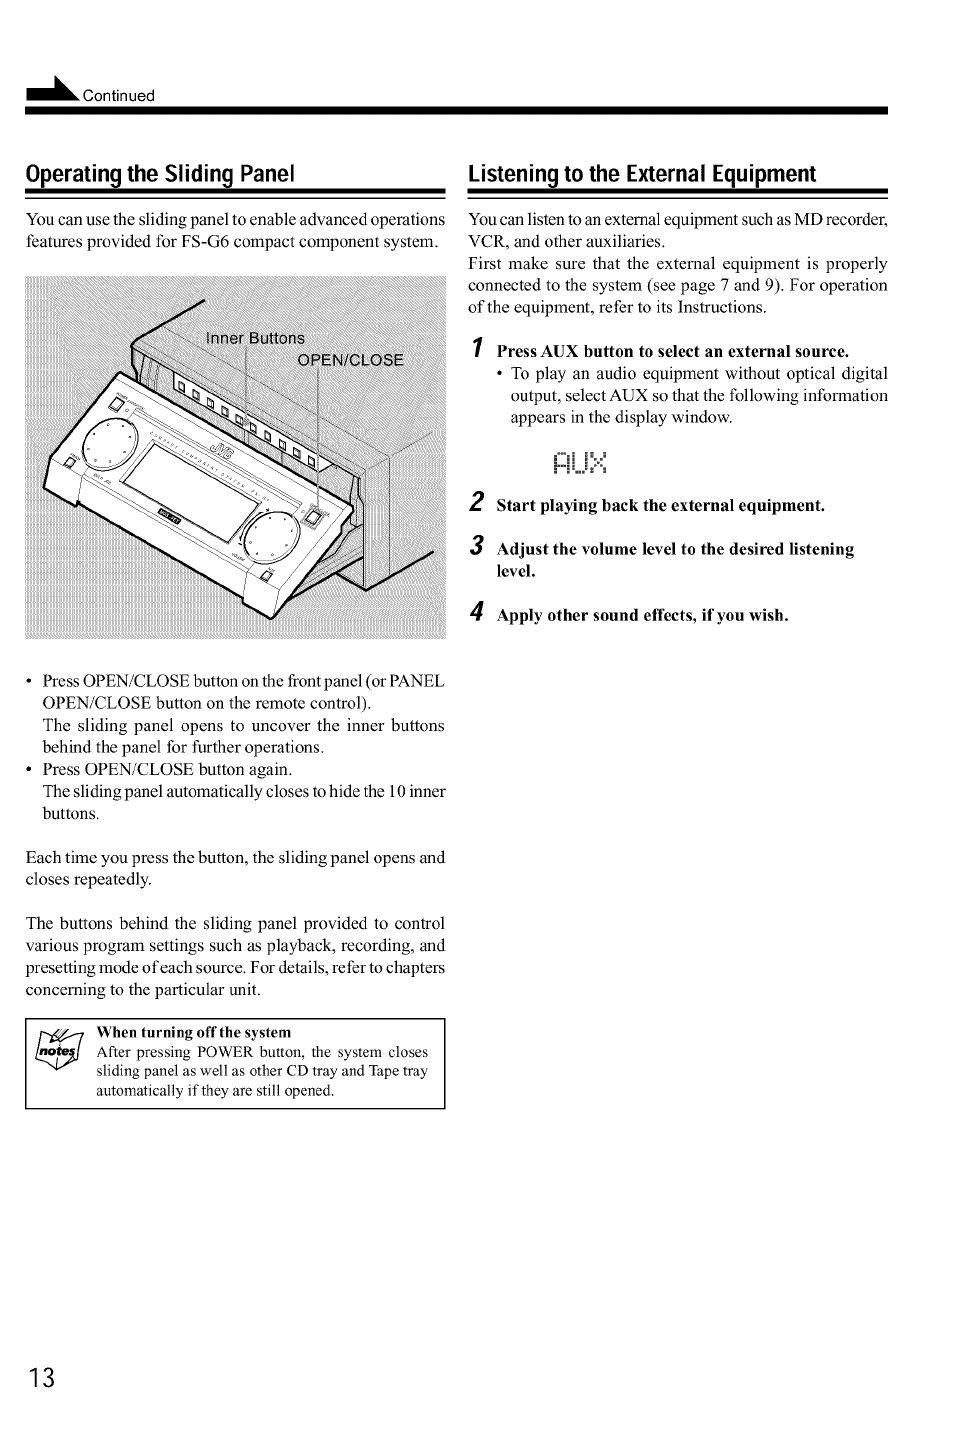
• Press OPEN/CLOSE button on the front panel (or PANEL
OPEN/CLOSE button on the remote control).
The sliding panel opens to uncover the inner buttons
behind the panel for further operations.
• Press OPEN/CLOSE button again.
The sliding panel automatically closes to hide the 10 inner
buttons.
Each time you press the button, the sliding panel opens and
closes repeatedly.
The buttons behind the sliding panel provided to control
various program settings such as playback, recording, and
presetting mode of each source. For details, refer to chapters
concerning to the particular unit.
When turning off the system
After pressing POWER button, the system closes
sliding panel as well as other CD tray and Tape tray
automatically if they are still opened.
13
Listenin9to FM and AM Broadcasts
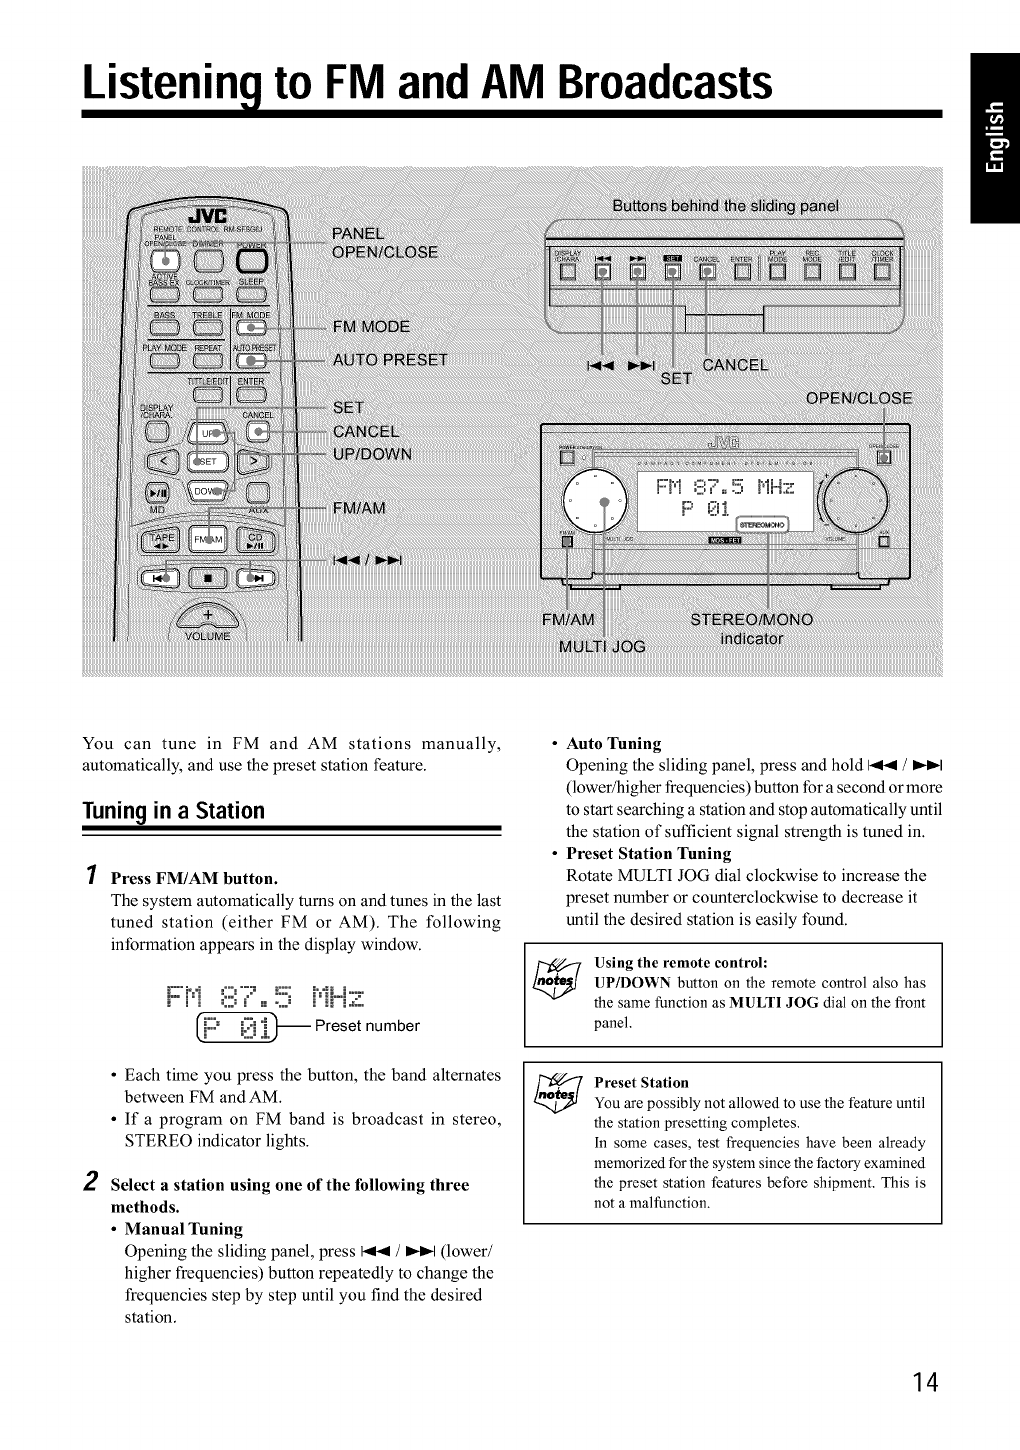
You can tune in FM and AM stations manually,
automatically, and use the preset station feature.
Tuning in a Station
1Press FM/AM button.
The system automatically turns on and tunes in the last
tuned station (either FM or AM). The following
information appears in the display window.
2
F::iM8;: .... =
ii -=====
-- Preset number
• Each time you press the button, the band alternates
between FM and AM.
• If a program on FM band is broadcast in stereo,
STEREO indicator lights.
Select a station using one of the following three
methods.
•Manual Tuning
Opening the sliding panel, press 1_141/_ (lower/
higher frequencies) button repeatedly to change the
frequencies step by step until you find the desired
station.
•Auto Tuning
Opening the sliding panel, press and hold _ /I_1
(lower/higher frequencies) button for a second or more
to start searching a station and stop automatically until
the station of sufficient signal strength is tuned in.
•Preset Station Tuning
Rotate MULTI JOG dial clockwise to increase the
preset number or counterclockwise to decrease it
until the desired station is easily found.
Using the remote control:
UP/DOWN button on the remote control also has
the same function as MULTI JOG dial on the front
panel.
Preset Station
You are possibly not allowed to use the feature until
the station presetting completes.
In some cases, test frequencies have been already
memorized for the system since the factory examined
the preset station features before shipment. This is
not a malfunction.
14
Presetting Stations
You can preset up to 30 FM and 15 AM stations into memory
by following two methods: manual/automatic presettings.
• There is a time limit in doing the following steps. If the
setting is canceled before you finish, start from step 1
again.
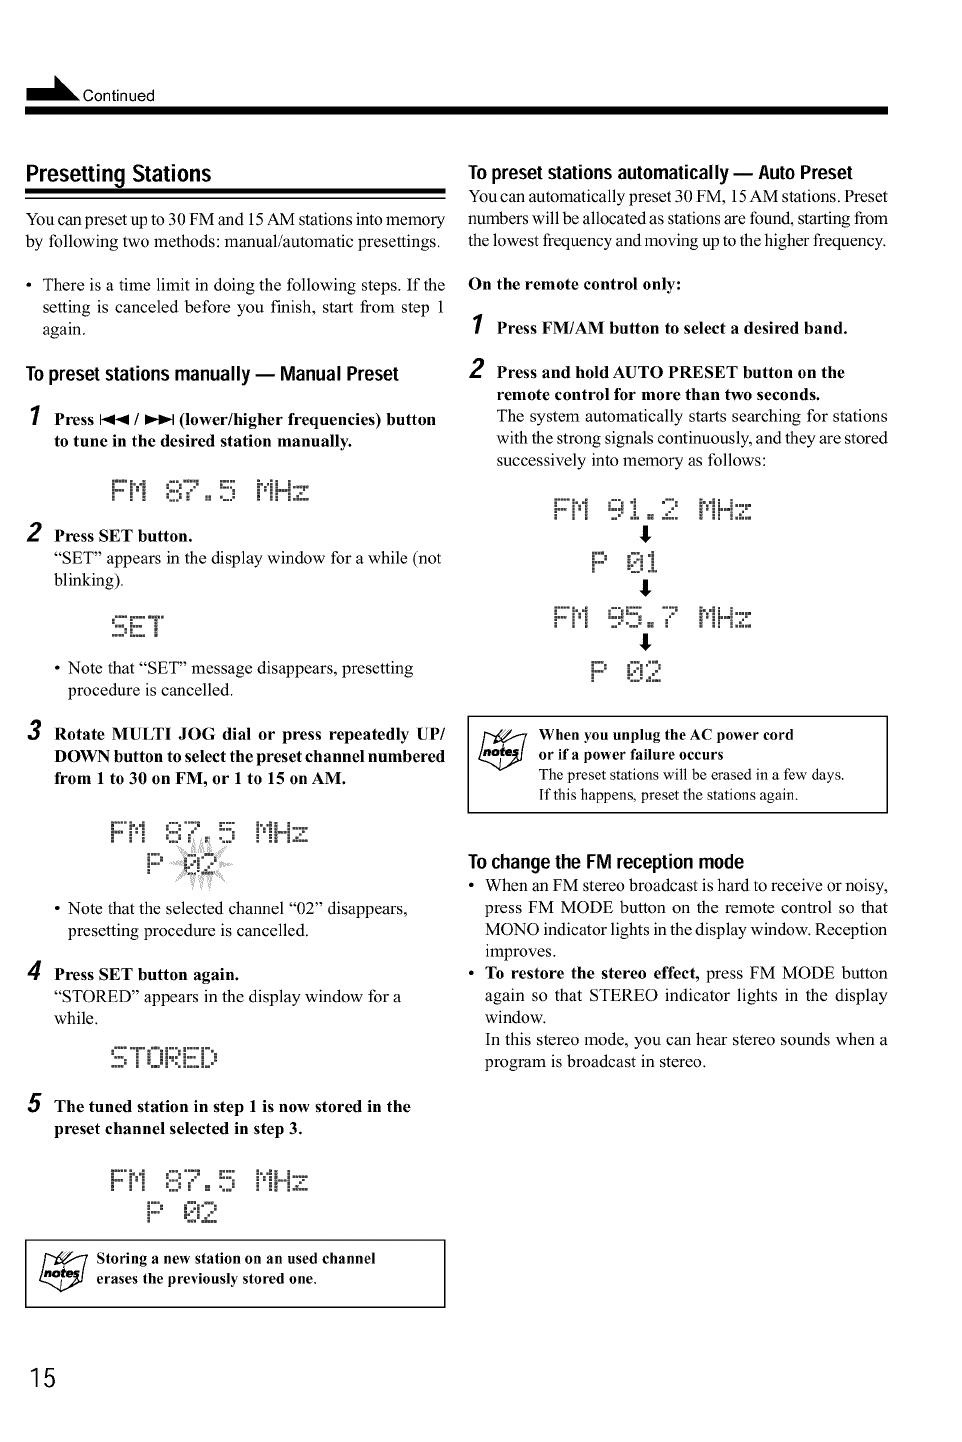
Topresetstationsmanually-- Manual Preset
1Press _41 /_(lower/higher frequencies) button
to tune in the desired station manually.
2
7M 87' °=......0HH:;;::
Press SET button.
"SET" appears in the display window for a while (not
blinking).
===- i .........
3
• Note that "SET" message disappears, presetting
procedure is cancelled.
Rotate MULTI JOG dial or press repeatedly UP/
DOWN button to select the preset channel numbered
from 1 to 30 on FM, or 1 to 15 on AM.
4
• Note that the selected channel "02" disappears,
presetting procedure is cancelled.
Press SET button again.
"STORED" appears in the display window for a
while
5The tuned station in step 1 is now stored in the
preset channel selected in step 3.
F::N 87°°°!15i°iH:i::
Topresetstationsautomatically-- Auto Preset
You can automatically preset 30 FM, 15 AM stations. Preset
numbers will be allocated as stations are found, starting from
the lowest frequency and moving up to the higher frequency.
On the remote control only:
1Press FM/AM button to select a desired band.
2Press and hold AUTO PRESET button on the
remote control for more than two seconds.
The system automatically starts searching for stations
with the strong signals continuously, and they are stored
successively into memory as follows:
i:::'M ....:=':"i "::
== _ = === =_= ===_.==:==
F=M
I.
F:) _::i"i
=:j &
I.
%5°°7° NH:;i::
I.
When you unplug the AC power cord
or if a power failure occurs
The preset stations will be erased in a few days.
If this happens, preset the stations again.
Tochangethe FM receptionmode
• When an FM stereo broadcast is hard to receive or noisy,
press FM MODE button on the remote control so that
MONO indicator lights in the display window. Reception
improves.
• To restore the stereo effect, press FM MODE button
again so that STEREO indicator lights in the display
window.
In this stereo mode, you can hear stereo sounds when a
program is broadcast in stereo.
_Storing a new station on an used channel
erases the previously stored one.
15
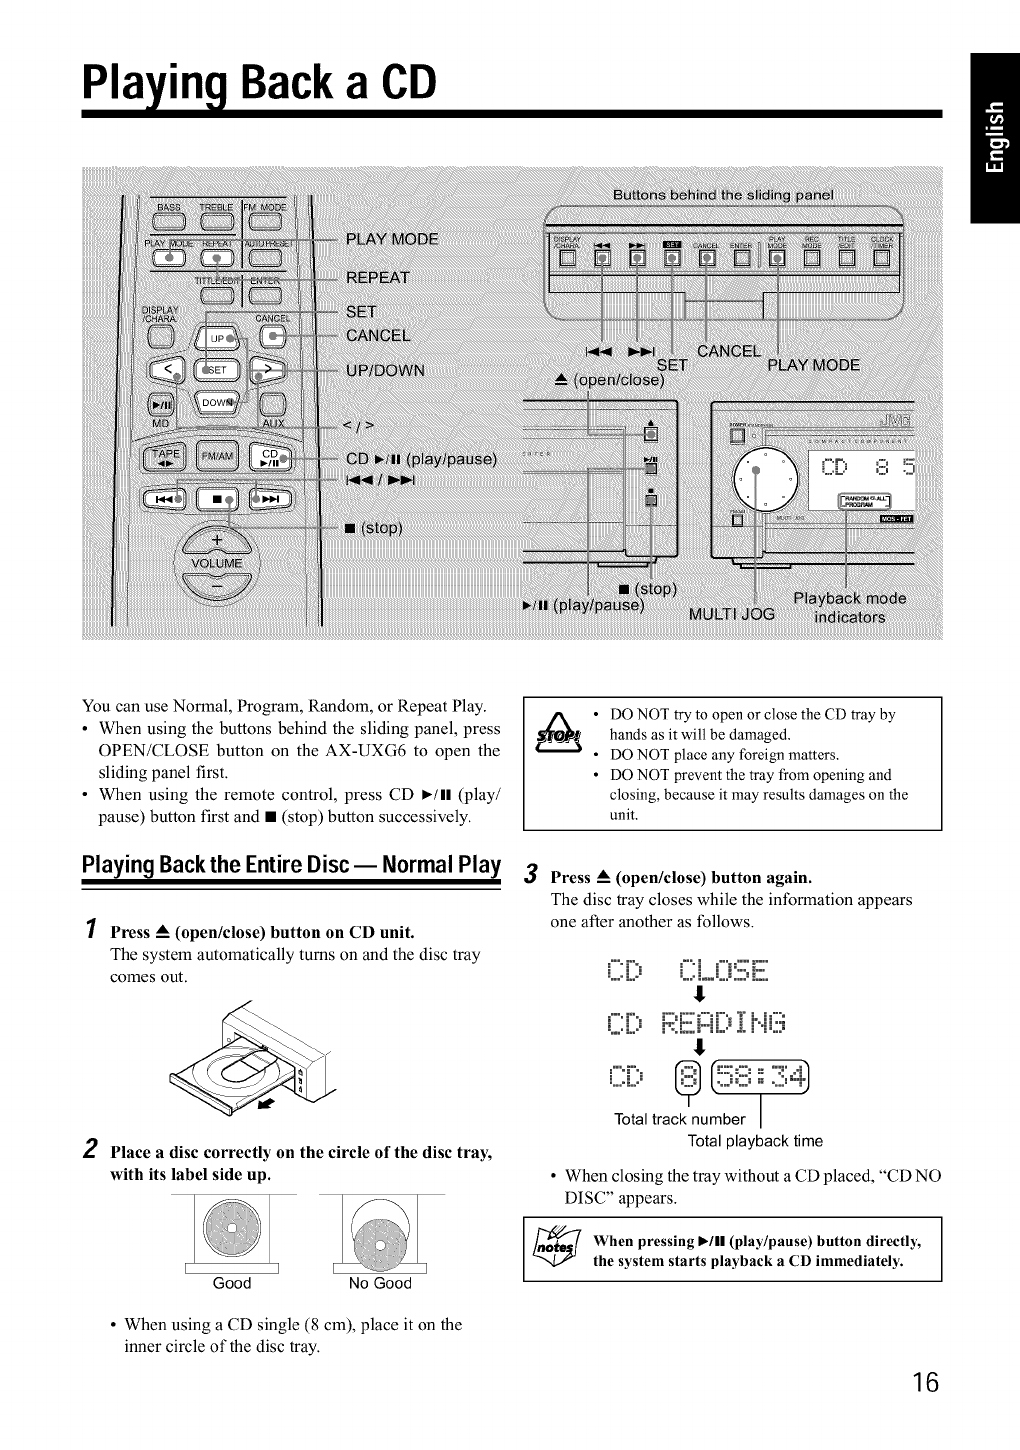
layin Backa CD
You can use Normal, Program, Random, or Repeat Play.
• When using the buttons behind the sliding panel, press
OPEN/CLOSE button on the AX-UXG6 to open the
sliding panel first.
• When using the remote control, press CD ,/ll (play/
pause) button first and • (stop) button successively.
Playing Backthe Entire Disc -- Normal Play
1Press _ (open/close) button on CD unit.
The system automatically turns on and the disc tray
comes out.
2Place a disc correctly on the circle of the disc tray,
with its label side up.
IGood No Good
• When using a CD single (8 cm), place it on the
inner circle of the disc tray.
DO NOT try to open or close the CD tray by
hands as it will be damaged.
o
• DO NOT place any foreign matters.
• DO NOT prevent the tray from opening and
closing, because it may results damages on the
unit.
3Press _(open/close) button again.
The disc tray closes while the information appears
one after another as follows.
:==%F_
C(::: F;;:iiii:(:::([;-i:Ni:iii
C[;: @ (!58: ::!!:4t
Total track number
Total playback time
• When closing the tray without a CD placed, "CD NO
DISC" appears.
When pressing I_/ll (play/pause) button directly,
the system starts playback a CD immediately.
16
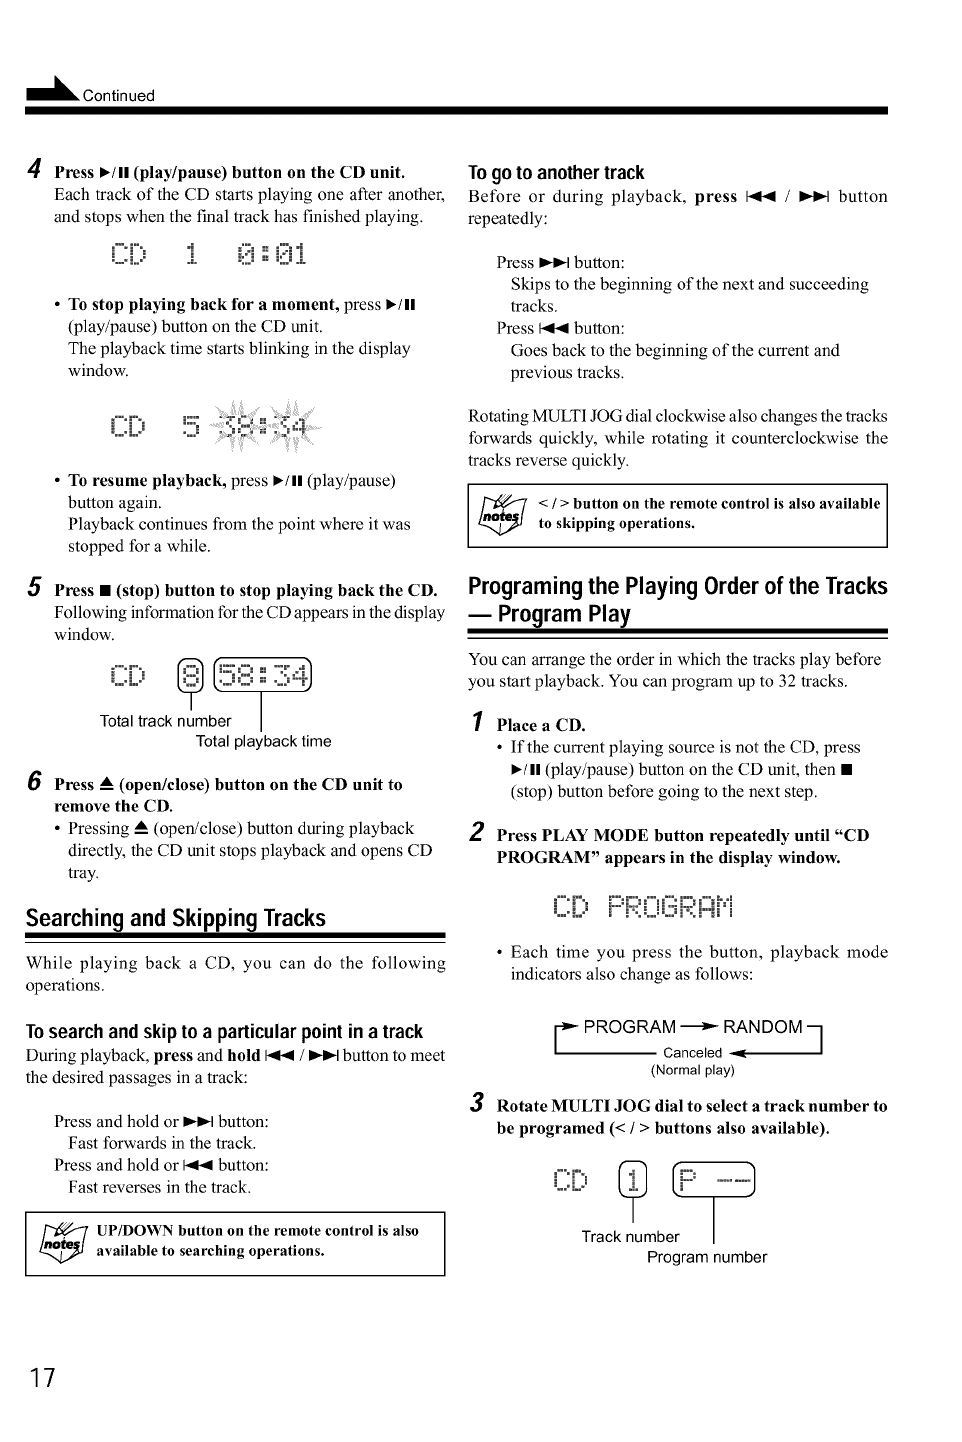
4Press _./11 (play/pause) button on the CD unit.
Each track of the CD starts playing one after another,
and stops when the final track has finished playing.
C[::0 i 0::0:[
5
6
• To stop playing back for a moment, press I*/11
(play/pause) button on the CD unit.
The playback time starts blinking in the display
window.
C[;' b :i i_i:.....
• To resume playback, press ,/ll (play/pause)
button again.
Playback continues from the point where it was
stopped for a while.
Press •(stop) button to stop playing back the CD.
Following information for the CD appears in the display
window.
C[;0 @ I°.5°0iii:°0:7;4t
Total track number
Total playback time
Press A(open/close) button on the CD unit to
remove the CD.
•Pressing _ (open/close) button during playback
directly, the CD unit stops playback and opens CD
tray.
Searching and Skipping Tracks
While playing back a CD, you can do the following
operations.
To search and skip to a particular point in a track
During playback, press and hold _1< /_ button to meet
the desired passages in a track:
Press and hold or _ button:
Fast forwards in the track.
Press and hold or _< button:
Fast reverses in the track.
_P/DOWN button on the remote control is also
available to searching operations.
Togotoanothertrack
Before or during playback, press _< /_ button
repeatedly:
Press _ button:
Skips to the beginning of the next and succeeding
tracks.
Press I_< button:
Goes back to the beginning of the current and
previous tracks.
Rotating MULTI JOG dial clockwise also changes the tracks
forwards quickly, while rotating it counterclockwise the
tracks reverse quickly.
</>button on the remote control is also available
to skipping operations.
ProgramingthePlayingOrder oftheTracks
-- Program Play
You can arrange the order in which the tracks play before
you start playback. You can program up to 32 tracks.
Place a CD.
•If the current playing source is not the CD, press
,/11 (play/pause) button on the CD unit, then •
(stop) button before going to the next step.
2Press PLAY MODE button repeatedly until "CD
PROGRAM" appears in the display window.
C[? i:::i:;X:?(iiiF;;:i:::iH
• Each time you press the button, playback mode
indicators also change as follows:
3
C PROGRAM _ RANDOM q
Canceled
(Normal play)
Rotate MULTI JOG dial to select a track number to
be programed (< /> buttons also available).
Program number
17
Continued I_
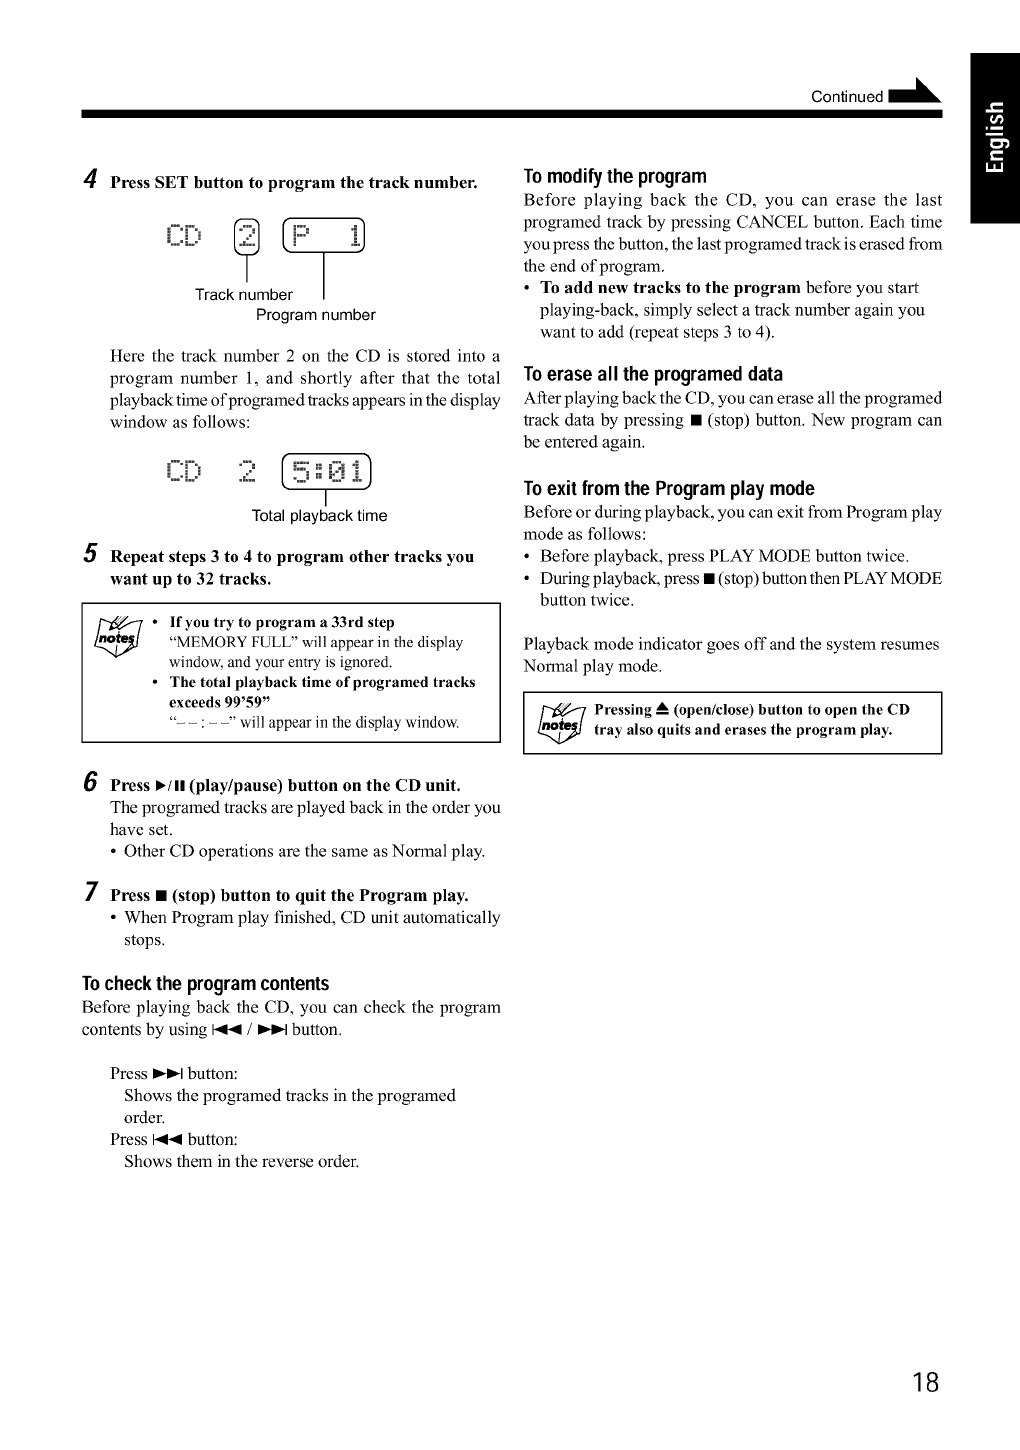
4Press SET button to program the track number.
Program number
Here the track number 2 on the CD is stored into a
program number 1, and shortly after that the total
playback time ofprogramed tracks appears in the display
window as follows:
E= °L°_ :2 (5 0 :).)
I
Total playback time
5Repeat steps 3 to 4to program other tracks you
want up to 32 tracks.
If you try to program a 33rd step
"MEMORY FULL" will appear in the display
window, and your entry is ignored.
The total playback time of programed tracks
exceeds 99'59"
" : :' will appear in the display window.
6Press ,/11 (play/pause) button on the CD unit.
The programed tracks are played back in the order you
have set.
•Other CD operations are the same as Normal play.
7Press •(stop) button to quit the Program play.
• When Program play finished, CD unit automatically
stops.
Tocheckthe programcontents
Before playing back the CD, you can check the program
contents by using I_1 /_ button.
Press _ button:
Shows the programed tracks in the programed
order.
Press 141_1button:
Shows them in the reverse order.
Tomodifythe program
Before playing back the CD, you can erase the last
programed track by pressing CANCEL button. Each time
you press the button, the last programed track is erased from
the end of program.
•To add new tracks to the program before you start
playing-back, simply select a track number again you
want to add (repeat steps 3 to 4).
Toerase all the programeddata
After playing back the CD, you can erase all the programed
track data by pressing • (stop) button. New program can
be entered again.
Toexit from the Programplay mode
Before or during playback, you can exit from Program play
mode as follows:
• Before playback, press PLAY MODE button twice.
• During playback, press • (stop) button then PLAY MODE
button twice.
Playback mode indicator goes off and the system resumes
Normal play mode.
_ressing _(open/close) button to open the CDtray also quits and erases the program play.
18
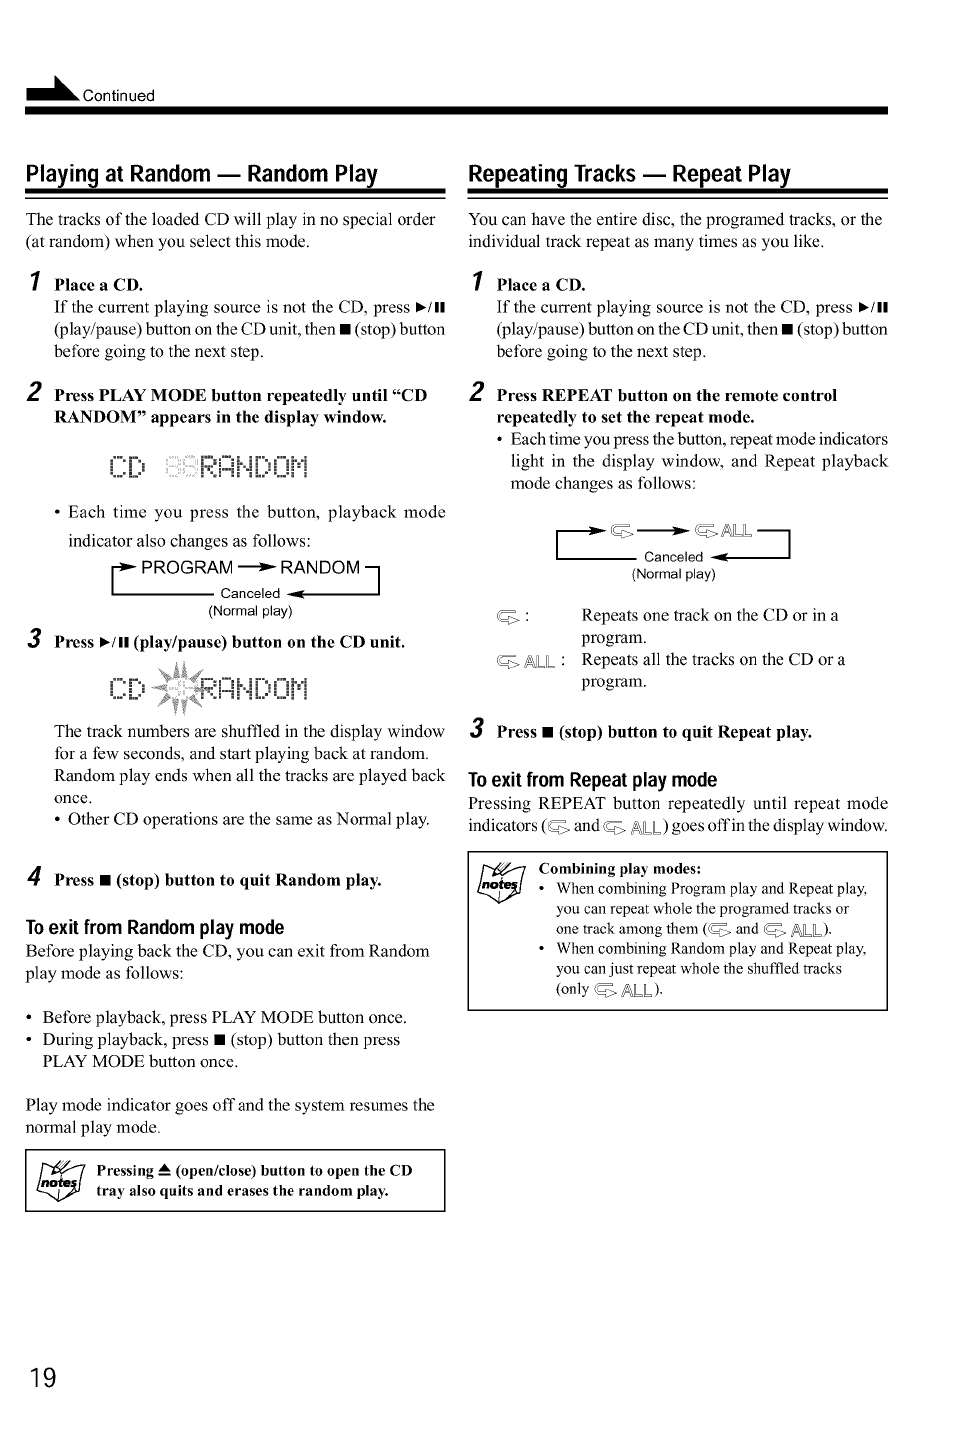
Playing at Random -- Random Play
The tracks of the loaded CD will play in no special order
(at random) when you select this mode.
1Place aCD.
If the current playing source is not the CD, press !,,./ll
(play/pause) button on the CD unit, then • (stop) button
before going to the next step.
2Press PLAY MODE button repeatedly until "CD
RANDOM" appears in the display window.
I=% .I='%
3
• Each time you press the button, playback mode
indicator also changes as follows:
r- PROGRAM -_- RANDOM q
Canceled
(Normal play)
Press I_/11(play/pause) button on the CD unit.
i;;¢ ....
i''i"i "<"_' _'-'='i,-,i",,ii !i ii"i
The track numbers are shuffled in the display window
for a few seconds, and start playing back at random.
Random play ends when all the tracks are played back
once.
• Other CD operations are the same as Normal play.
4Press •(stop) button to quit Random play.
To exit from Random play mode
Before playing back the CD, you can exit from Random
play mode as follows:
•Before playback, press PLAY MODE button once.
•During playback, press • (stop) button then press
PLAY MODE button once.
Play mode indicator goes off and the system resumes the
normal play mode.
Pressing _&(open/close) button to open the CD
tray also quits and erases the random play.
Repeating Tracks -- Repeat Play
You can have the entire disc, the programed tracks, or the
individual track repeat as many times as you like.
Place a CD.
If the current playing source is not the CD, press ,/11
(play/pause) button on the CD unit, then • (stop) button
before going to the next step.
2Press REPEAT button on the remote control
repeatedly to set the repeat mode.
• Each time you press the button, repeat mode indicators
light in the display window, and Repeat playback
mode changes as follows:
----_ _=>--------_ _=>ALL ---]
Canceled <
(Normal play)
@ : Repeats one track on the CD or in a
program.
_> ALL : Repeats all the tracks on the CD or a
program.
3Press •(stop) button to quit Repeat play.
Toexit from Repeat play mode
Pressing REPEAT button repeatedly until repeat mode
indicators (@ and @ ALL) goes off in the display window.
Combining play modes:
•When combining Program play and Repeat play,
you can repeat whole the programed tracks or
one track among them (_:_>and @ ALL).
• When combining Random play and Repeat play,
you can just repeat whole the shuffled tracks
(only @ ALL).
19
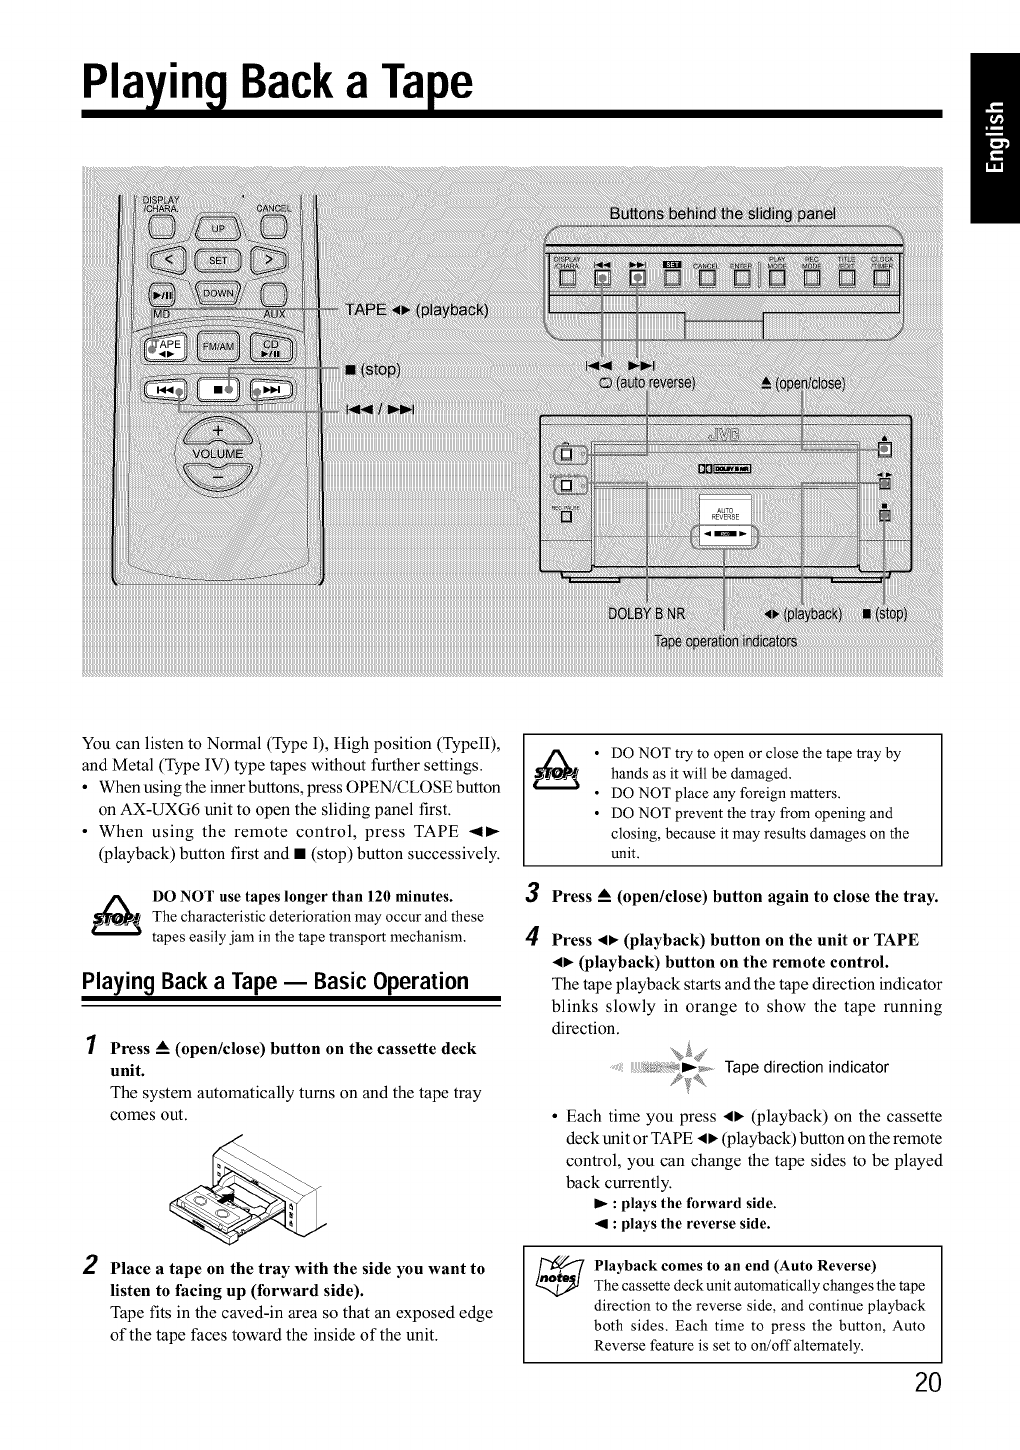
Pla in a Ta e
You can listen to Normal (Type I), High position (TypelI),
and Metal (Type IV) type tapes without further settings.
• When using the inner buttons, press OPEN/CLOSE button
on AX-UXG6 unit to open the sliding panel first.
• When using the remote control, press TAPE -ql_
(playback) button first and • (stop) button successively.
DO NOT use tapes longer than 120 minutes.
The characteristic deterioration may occur and these
tapes easily jam in the tape transport mechanism.
Playing Back a Tape -- Basic Operation
Press A(open/close) button on the cassette deck
unit.
The system automatically turns on and the tape tray
comes out.
2Place a tape on the tray with the side you want to
listen to facing up (forward side).
Tape fits in the caved-in area so that an exposed edge
of the tape faces toward the inside of the unit.
• DO NOT try to open or close the tape tray byhands as it will be damaged.
• DO NOT place any foreign matters.
• DO NOT prevent the tray from opening and
closing, because it may results damages on the
unit.
3Press A(open/close) button again to close the tray.
4Press 4, (playback) button on the unit or TAPE
_, (playback) button on the remote control.
The tape playback starts and the tape direction indicator
blinks slowly in orange to show the tape running
direction.
...... Tape direction indicator
•Each time you press _1_ (playback) on the cassette
deck unit or TAPE 41_ (playback) button on the remote
control, you can change the tape sides to be played
back currently.
I_ :plays the tbrward side.
_1 : plays the reverse side.
_layback comes to an end (Auto Reverse)
The cassette deck unit automatically changes the tape
direction to the reverse side, and continue playback
both sides. Each time to press the button, Auto
Reverse feature is set to on!off alternately.
2O
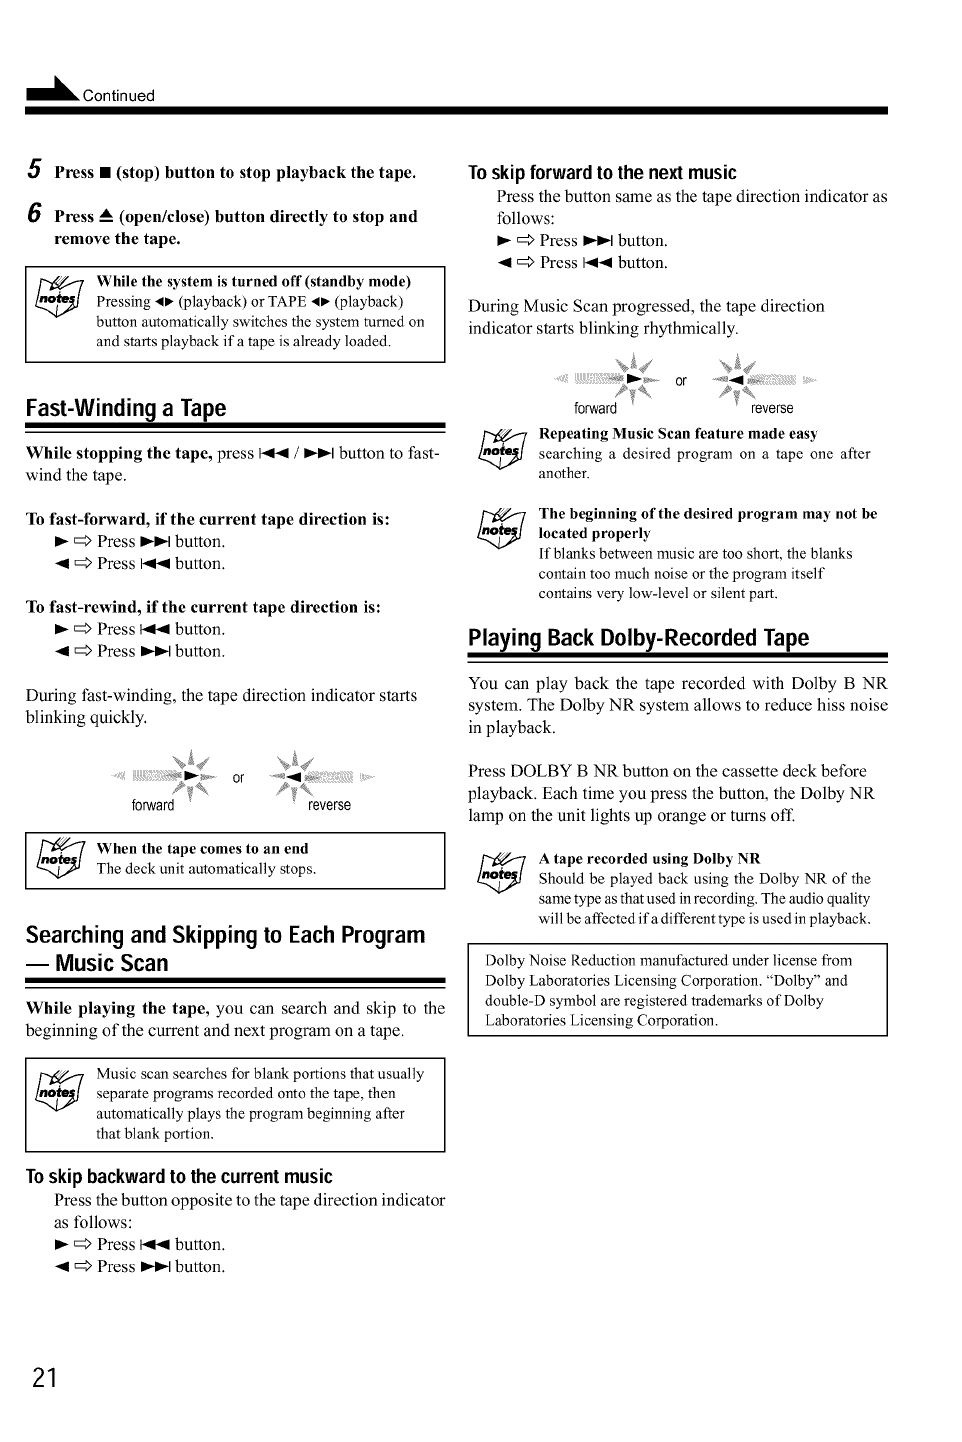
5Press •(stop) button to stop playback the tape.
6Press A(open/close) button directly to stop and
remove the tape.
While the system is turned off(standby mode)Pressing ,, (playback) or TAPE ,, (playback)
button automatically switches the system turned on
and starts playback ifa tape is already loaded.
Fast-Windinga Tape
While stopping the tape, press I-q141/_ button to fast-
wind the tape.
To fast-forward, if the current tape direction is:
I_ =_ Press I_1_1button.
-ql =_ Press I-qn_ button.
To fast-rewind, if the current tape direction is:
I_ =_ Press 1_41 button.
-ql =_ Press _ button.
During fast-winding, the tape direction indicator starts
blinking quickly.
...... I_ ..... or ....._:_ .........
forwar % />%di_ reverse
When the tape comes to an end
The deck unit automatically stops.
Searching and Skipping to Each Program
-- Music Scan
While playing the tape, you can search and skip to the
beginning of the current and next program on a tape.
Music scan searches for blank portions that usually
separate programs recorded onto the tape, then
automatically plays the program beginning after
that blank portion.
Toskip backwardto the currentmusic
Press the button opposite to the tape direction indicator
as follows:
I_ =_ Press 1_41 button.
-91=_ Press _ button.
Toskip forward to the next music
Press the button same as the tape direction indicator as
follows:
I_ =_ Press I_I_1 button.
-91=_ Press I_l button.
During Music Scan progressed, the tape direction
indicator starts blinking rhythmically.
or
forward /_ reverse
Repeating Music Scan feature made easysearching a desired program on a tape one after
another.
The beginning of the desired program may not be
located properly
If blanks between music are too short, the blanks
contain too much noise or the program itself
contains very low-level or silent part.
Playing Back Dolby-Recorded Tape
You can play back the tape recorded with Dolby B NR
system. The Dolby NR system allows to reduce hiss noise
in playback.
Press DOLBY B NR button on the cassette deck before
playback. Each time you press the button, the Dolby NR
lamp on the unit lights up orange or turns off.
Atape recorded using Dolby NR
Should be played back using the Dolby NR of the
same type as that used in recording. The audio quality
will be affected ifa different type is used in playback.
Dolby Noise Reduction manufactured under license from
Dolby Laboratories Licensing Corporation. "Dolby" and
double-D symbol are registered trademarks of Dolby
Laboratories Licensing Corporation.
21
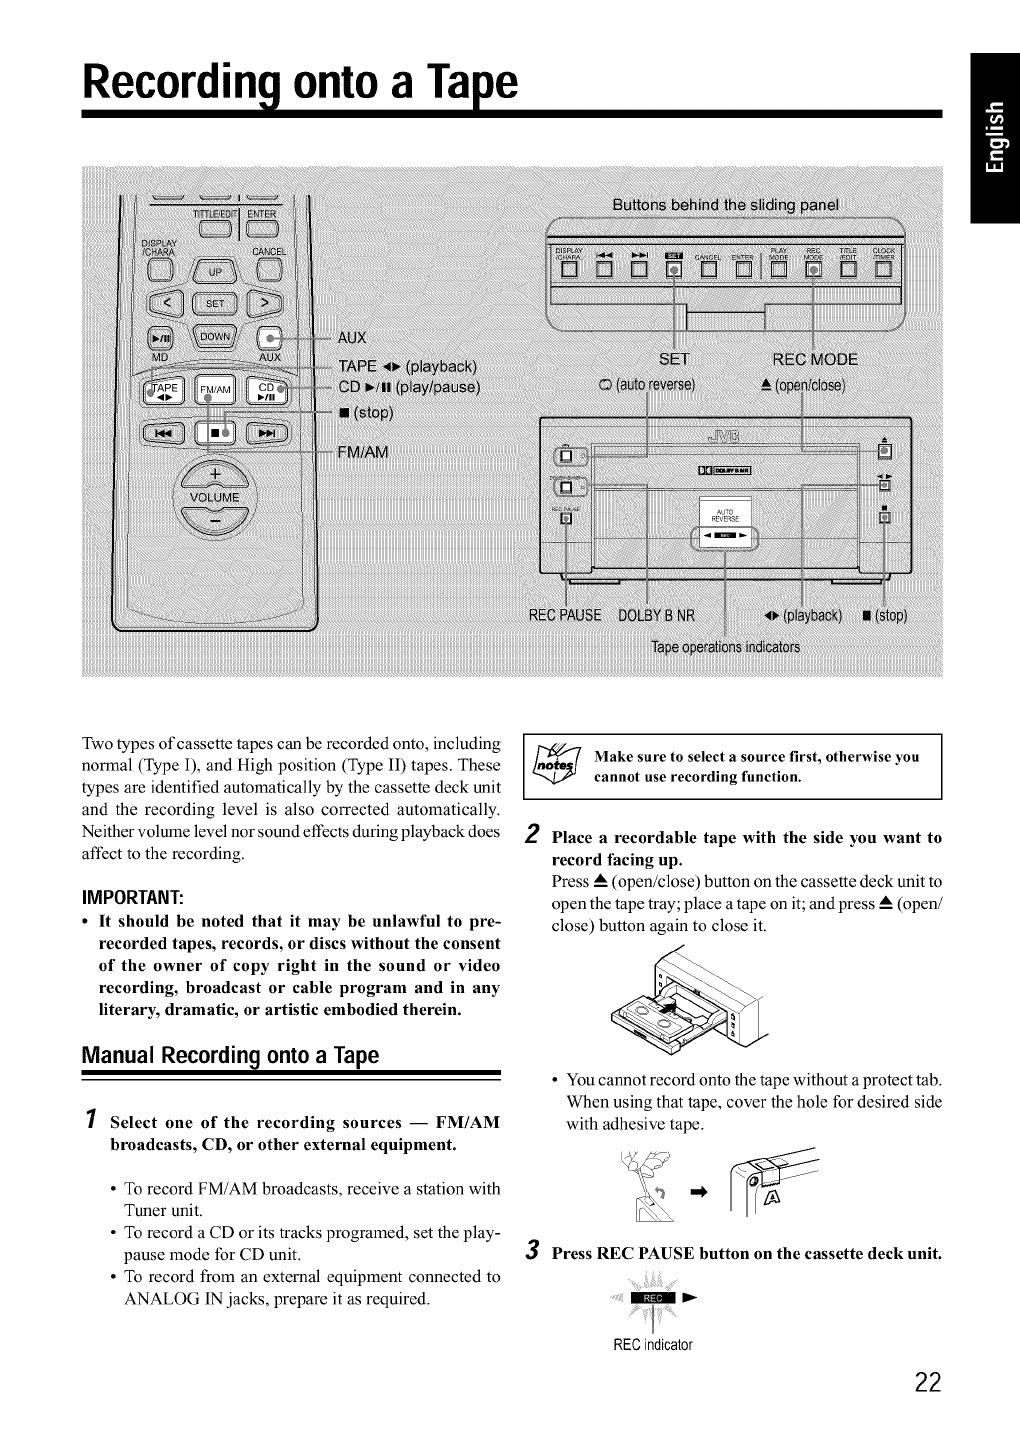
Recording!ontoa Tape
Two types of cassette tapes can be recorded onto, including
normal (Type I), and High position (Type II) tapes. These
types are identified automatically by the cassette deck unit
and the recording level is also corrected automatically.
Neither volume level nor sound effects during playback does
affect to the recording.
IMPORTANT:
• It should be noted that it may be unlawful to pre-
recorded tapes, records, or discs without the consent
of the owner of copy right in the sound or video
recording, broadcast or cable program and in any
literary, dramatic, or artistic embodied therein.
Manual Recording onto a Tape
Select one of the recording sources -- FM/AM
broadcasts, CD, or other external equipment.
• To record FM/AM broadcasts, receive a station with
Tuner unit.
• To record a CD or its tracks programed, set the play-
pause mode for CD unit.
• To record from an external equipment connected to
ANALOG IN jacks, prepare it as required.
Make sure to select a source first, otherwise you
cannot use recording function.
2Place a recordable tape with the side you want to
record facing up.
Press A (open/close) button on the cassette deck unit to
open the tape tray; place a tape on it; and press A (open/
close) button again to close it.
• You cannot record onto the tape without a protect tab.
When using that tape, cover the hole for desired side
with adhesive tape.
3Press REC PAUSE button on the cassette deck unit.
.... _ I_
RECindicator
22
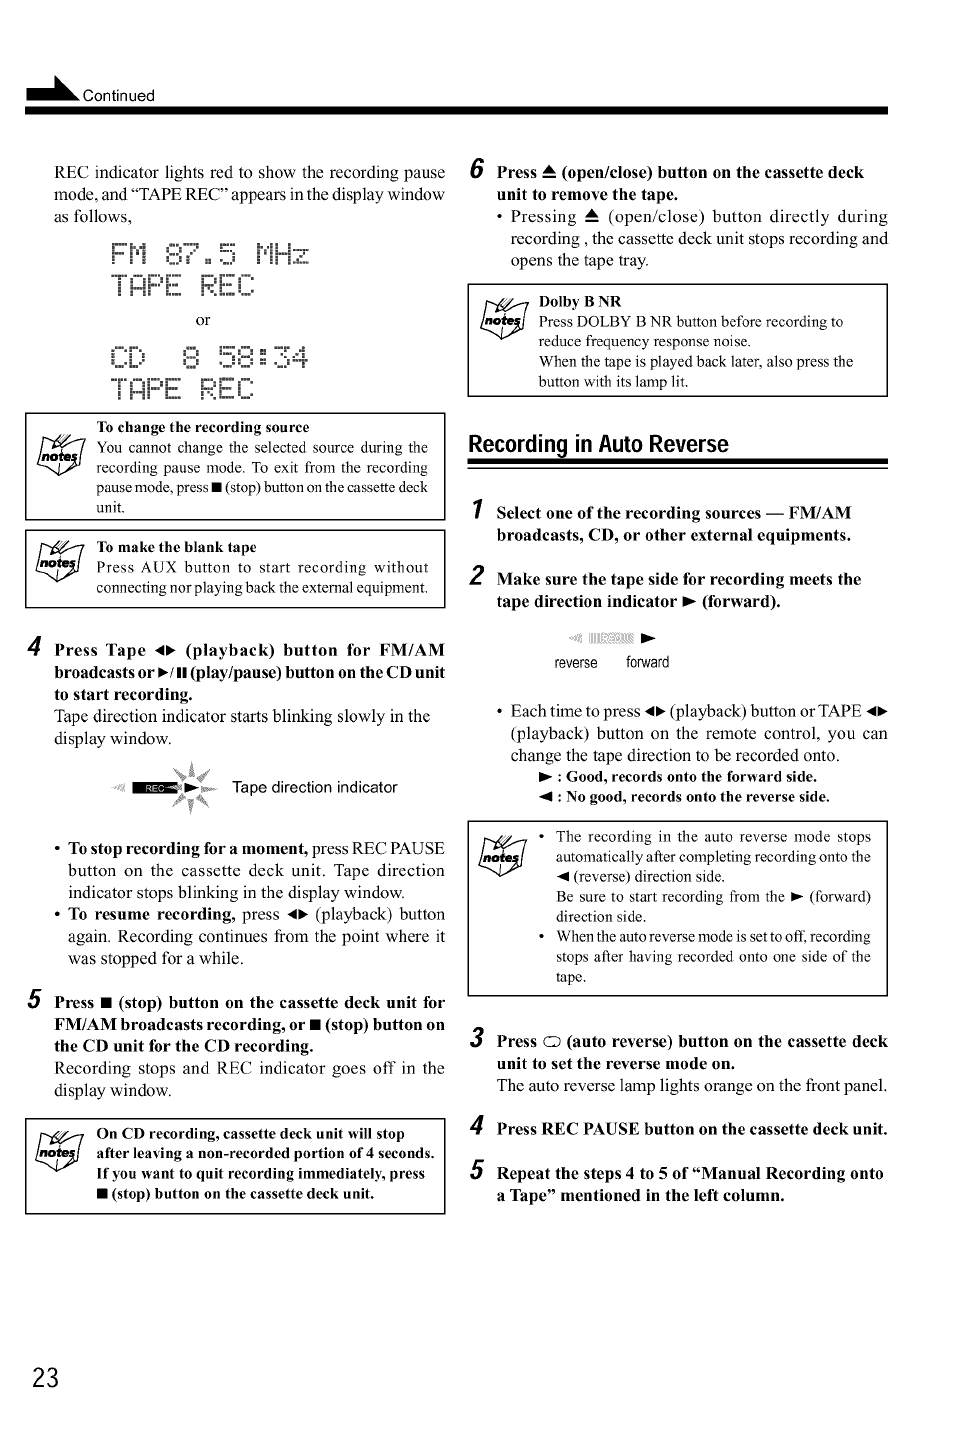
REC indicator lights red to show the recording pause
mode, and "TAPE REC" appears in the display window
as follows,
F::H 87......,,....°Hi--i:;i°.:
or
i'"'F': O i::::0=, ,, ":°.'.4
To change the recording source
You cannot change the selected source during the
recording pause mode. To exit from the recording
pause mode, press • (stop) button on the cassette deck
unit.
To make the blank tapePress AUX button to start recording without
connecting nor playing back the external equipment.
4
5
Press Tape _1• (playback) button for FM/AM
broadcasts or •/II (play/pause) button on the CD unit
to start recording.
Tape direction indicator starts blinking slowly in the
display window.
........la'-z_ _ ...... Tape direction indicator
g
•To stop recording for a moment, press REC PAUSE
button on the cassette deck unit. Tape direction
indicator stops blinking in the display window.
•To resume recording, press 41• (playback) button
again. Recording continues from the point where it
was stopped for awhile.
Press • (stop) button on the cassette deck unit for
FM/AM broadcasts recording, or •(stop) button on
the CD unit for the CD recording.
Recording stops and REC indicator goes off" in the
display window.
On CD recording, cassette deck unit will stop
after leaving a non-recorded portion of 4 seconds.
If you want to quit recording immediately, press
•(stop) button on the cassette deck unit.
6Press A(open/close) button on the cassette deck
unit to remove the tape.
•Pressing -- (open/close) button directly during
recording, the cassette deck unit stops recording and
opens the tape tray.
Dolby B NR
Press DOLBY BNR button before recording to
reduce frequency response noise.
When the tape is played back later, also press the
button with its lamp lit.
Recording in Auto Reverse
2
Select one of the recording sources -- FM/AM
broadcasts, CD, or other external equipments.
Make sure the tape side for recording meets the
tape direction indicator _(forward).
reverse forward
• Each time to press 41• (playback) button or TAPE 41•
(playback) button on the remote control, you can
change the tape direction to be recorded onto.
I_ : Good, records onto the forward side.
_1 : No good, records onto the reverse side.
The recording in the auto reverse mode stops
automatically after completing recording onto the
-,9(reverse) direction side.
Be sure to start recording from the _ (forward)
direction side.
When the auto reverse mode is set to off, recording
stops after having recorded onto one side of the
tape.
3
4
5
Press Q(auto reverse) button on the cassette deck
unit to set the reverse mode on.
The auto reverse lamp lights orange on the front panel.
Press REC PAUSE button on the cassette deck unit.
Repeat the steps 4 to 5 of "Manual Recording onto
a Tape" mentioned in the left column.
23
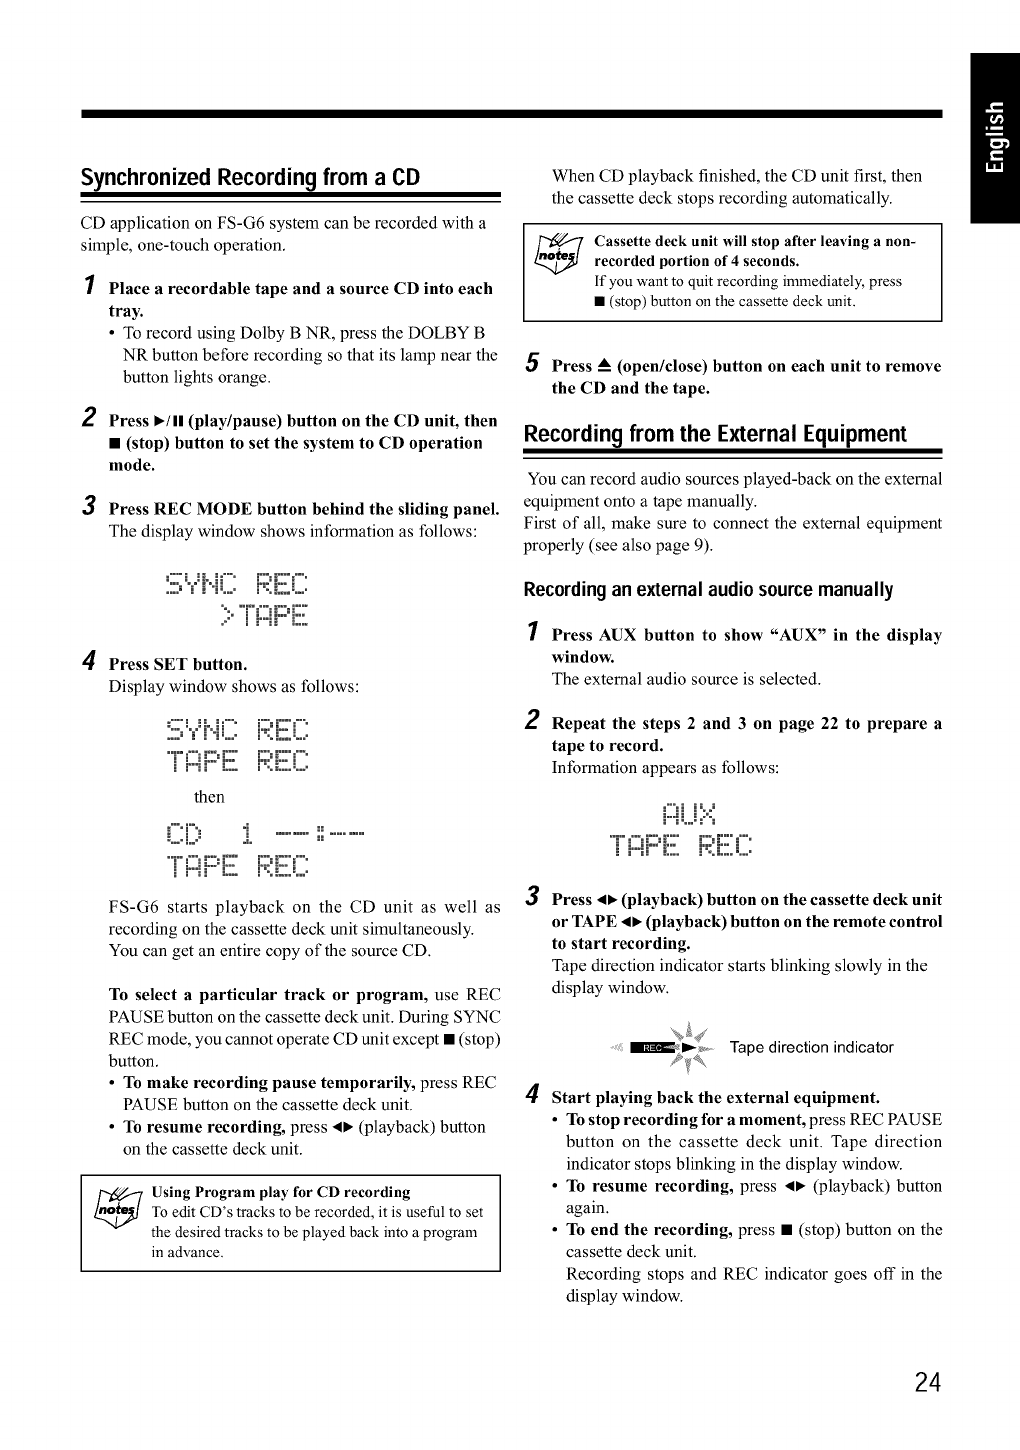
Synchronized Recording from a CD
CD application on FS-G6 system can be recorded with a
simple, one-touch operation.
2
Place a recordable tape and a source CD into each
tray.
• To record using Dolby B NR, press the DOLBY B
NR button before recording so that its lamp near the
button lights orange.
Press ,/ll (play/pause) button on the CD unit, then
•(stop) button to set the system to CD operation
mode.
3Press REC MODE button behind the sliding panel.
The display window shows information as follows:
4
i°°°"| Ho _°°°o i'°'_i°'°'_ °'°o
.:::_Y F'i:.... P:.E.:....
;:"Ti:::iF::°E
Press SET button.
Display window shows as follows:
::::":..: _-.P"" i:::,E °:'"
.... _ i :"1:ooo- i%'=,°,°:.o •
[i:::iF::°ER[ii:C
then
.-°'o1°% 4====
"o.oL°" E_B
.......... ..........
II
When CD playback finished, the CD unit first, then
the cassette deck stops recording automatically.
Cassette deck unit will stop alter leaving a non-recorded portion of 4 seconds.
If you want to quit recording immediately, press
• (stop) button on the cassette deck unit.
5Press A(open/close) button on each unit to remove
the CD and the tape.
Recording from the External Equipment
You can record audio sources played-back on the external
equipment onto a tape manually.
First of all, make sure to connect the external equipment
properly (see also page 9).
Recordingan external audiosource manually
1Press AUX button to show "AUX" in the display
window.
The external audio source is selected.
2Repeat the steps 2 and 3 on page 22 to prepare a
tape to record.
Information appears as follows:
_:::iii°:.:°
i ===========
FS-G6 starts playback on the CD unit as well as
recording on the cassette deck unit simultaneously.
You can get an entire copy of the source CD.
To select a particular track or program, use REC
PAUSE button on the cassette deck unit. During SYNC
REC mode, you cannot operate CD unit except • (stop)
button.
• To make recording pause temporarily, press REC
PAUSE button on the cassette deck unit.
• To resume recording, press 41, (playback) button
on the cassette deck unit.
_sing Program play for CD recording
To edit CD's tracks to be recorded, it is useful to set
the desired tracks to be played back into a program
in advance.
3Press 4_ (playback) button on the cassette deck unit
or TAPE 4_ (playback) button on the remote control
to start recording.
Tape direction indicator starts blinking slowly in the
display window.
4
......mr-z_,!l_,_,, Tape direction indicator
Start playing back the external equipment.
•To stop recording for a moment, press REC PAUSE
button on the cassette deck unit. Tape direction
indicator stops blinking in the display window.
• To resume recording, press 41_ (playback) button
again.
• To end the recording, press • (stop) button on the
cassette deck unit.
Recording stops and REC indicator goes off in the
display window.
24
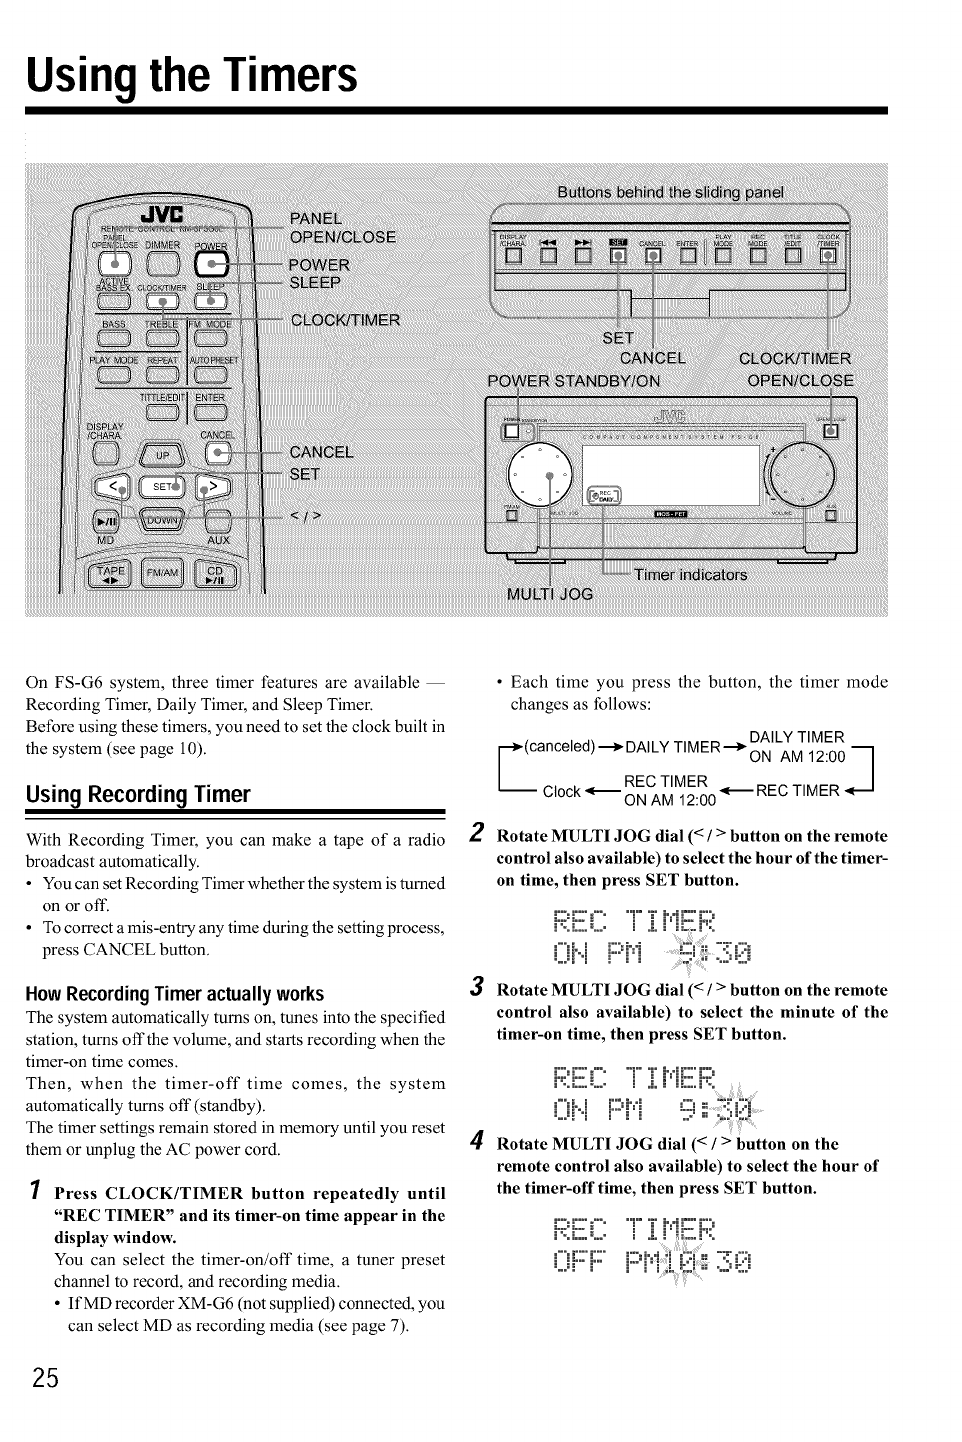
Using the Timers
On FS-G6 system, three timer features are available --
Recording Timer, Daily Timer, and Sleep Timer.
Before using these timers, you need to set the clock built in
the system (see page 10).
Using Recording Timer
With Recording Timer, you can make a tape of a radio
broadcast automatically.
• You can set Recording Timer whether the system is turned
on or off.
• To correct a mis-entry any time during the setting process,
press CANCEL button.
How Recording Timer actually works
The system automatically turns on, tunes into the specified
station, turns off the volume, and starts recording when the
timer-on time comes.
Then, when the timer-off time comes, the system
automatically turns off (standby).
The timer settings remain stored in memory until you reset
them or unplug the AC power cord.
1Press CLOCK/TIMER button repeatedly until
"REC TIMER" and its timer-on time appear in the
display window.
You can select the timer-on/off time, a tuner preset
channel to record, and recording media.
• IfMD recorder XM-G6 (not supplied) connected, you
can select MD as recording media (see page 7).
2
• Each time you press the button, the timer mode
changes as follows:
REC TIMER
Ct°ck'_'_ ON AM 12 00 "_'_ REC TIMER
Rotate MULTI JOG dial (< />button on the remote
control also available) to select the hour of the timer-
on time, then press SET button.
3
4
m:::mi,ii:::r°ii!iii!iiiilmiiii!!i!!¸¸¸¸¸::I!:
Rotate MULTI JOG dial (< />button on the remote
control also available) to select the minute of the
timer-on time, then press SET button.
i:;?iiii:(2 7 :[i'ii!!!:i::?
!:)!,i !:::'Fi ::::, ....
Rotate MULTI JOG dial (< />button on the
remote control also available) to select the hour of
the timer-off time, then press SET button.
m:::mi:::i:::i:::Miiliiiiii!!iii! ::i!:m;!im
25
Continued II_
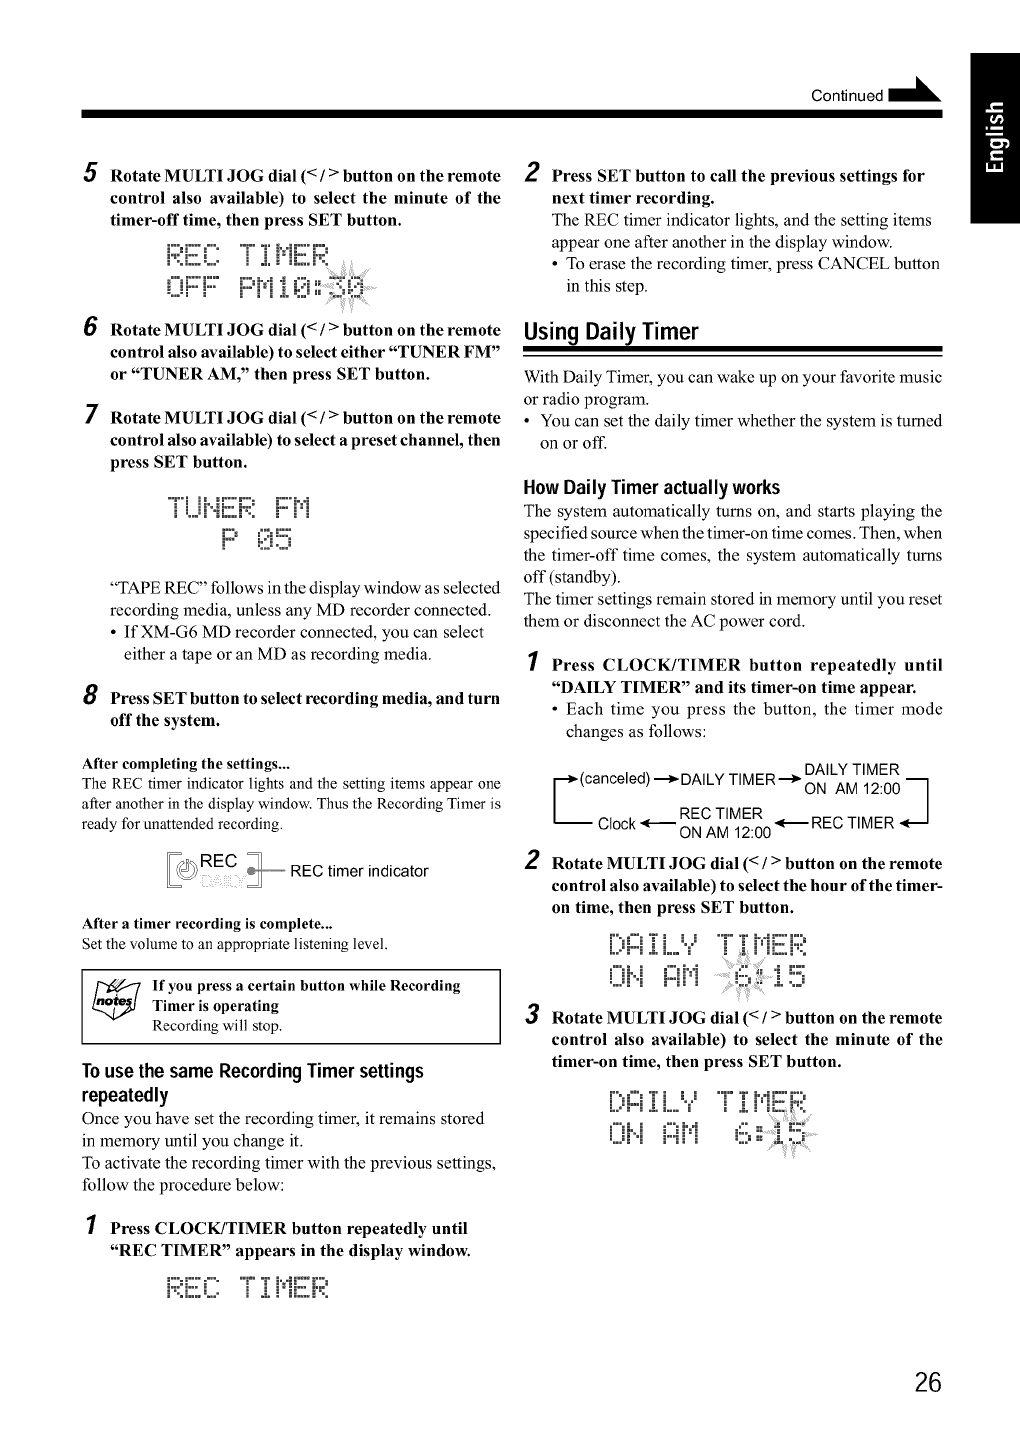
5Rotate MULTI JOG dial (< />button on the remote
control also available) to select the minute of the
timer-off time, then press SET button.
F:.EC .....i:MEF:....
OFFFr:iJ i>;i.....
6Rotate MULTI JOG dial (< !>button on the remote
control also available) to select either "TUNER FM"
or "TUNER AM," then press SET button.
7Rotate MULTI JOG dial (< !>button on the remote
control also available) to select a preset channel, then
press SET button.
"Fi H..H:::'E:: i::'i':'i
J _..J" "D',oooi% E i i
!:::'05
"TAPE REC" follows in the display window as selected
recording media, unless any MD recorder connected.
• IfXM-G6 MD recorder connected, you can select
either a tape or an MD as recording media.
8Press SET button to select recording media, and turn
off the system.
Alter completing the settings...
The REC timer indicator lights and the setting items appear one
after another in the display window. Thus the Recording Timer is
ready for unattended recording.
_@REC _ ,REC t mer indicator
Alter a timer recording is complete...
Set the volume to an appropriate listening level.
If you press a certain button while RecordingTimer is operating
Recording will stop.
Touse the same RecordingTimer settings
repeatedly
Onceyou have set the recording timer, it remains stored
inmemory until you change it.
Toactivate the recording timer with the previous settings,
follow the procedure below:
1Press CLOCK/TIMER button repeatedly until
"REC TIMER" appears in the display window.
2Press SET button to call the previous settings for
next timer recording.
The REC timer indicator lights, and the setting items
appear one after another in the display window.
• To erase the recording timer, press CANCEL button
in this step.
UsingDaily Timer
With Daily Timer, you can wake up on your favorite music
or radio program.
• You can set the daily timer whether the system is turned
on or off.
HowDaily Timer actuallyworks
The system automatically turns on, and starts playing the
specified source when the timer-on time comes. Then, when
the timer-off time comes, the system automatically turns
off (standby).
The timer settings remain stored in memory until you reset
them or disconnect the AC power cord.
Press CLOCK/TIMER button repeatedly until
"DAILY TIMER" and its timer-on time appear.
• Each time you press the button, the timer mode
changes as follows:
(canceled) _DAILY TIMER_ oAILAYMTI1MERq
REC TIMER
Clock __l ON AM 12 00 _'_ REC TIMER
2Rotate MULTI JOG dial (< /> button on the remote
control also available) to select the hour of the timer-
on time, then press SET button.
3Rotate MULTI JOG dial (< />button on the remote
control also available) to select the minute of the
timer-on time, then press SET button.
26
4
5
6
7
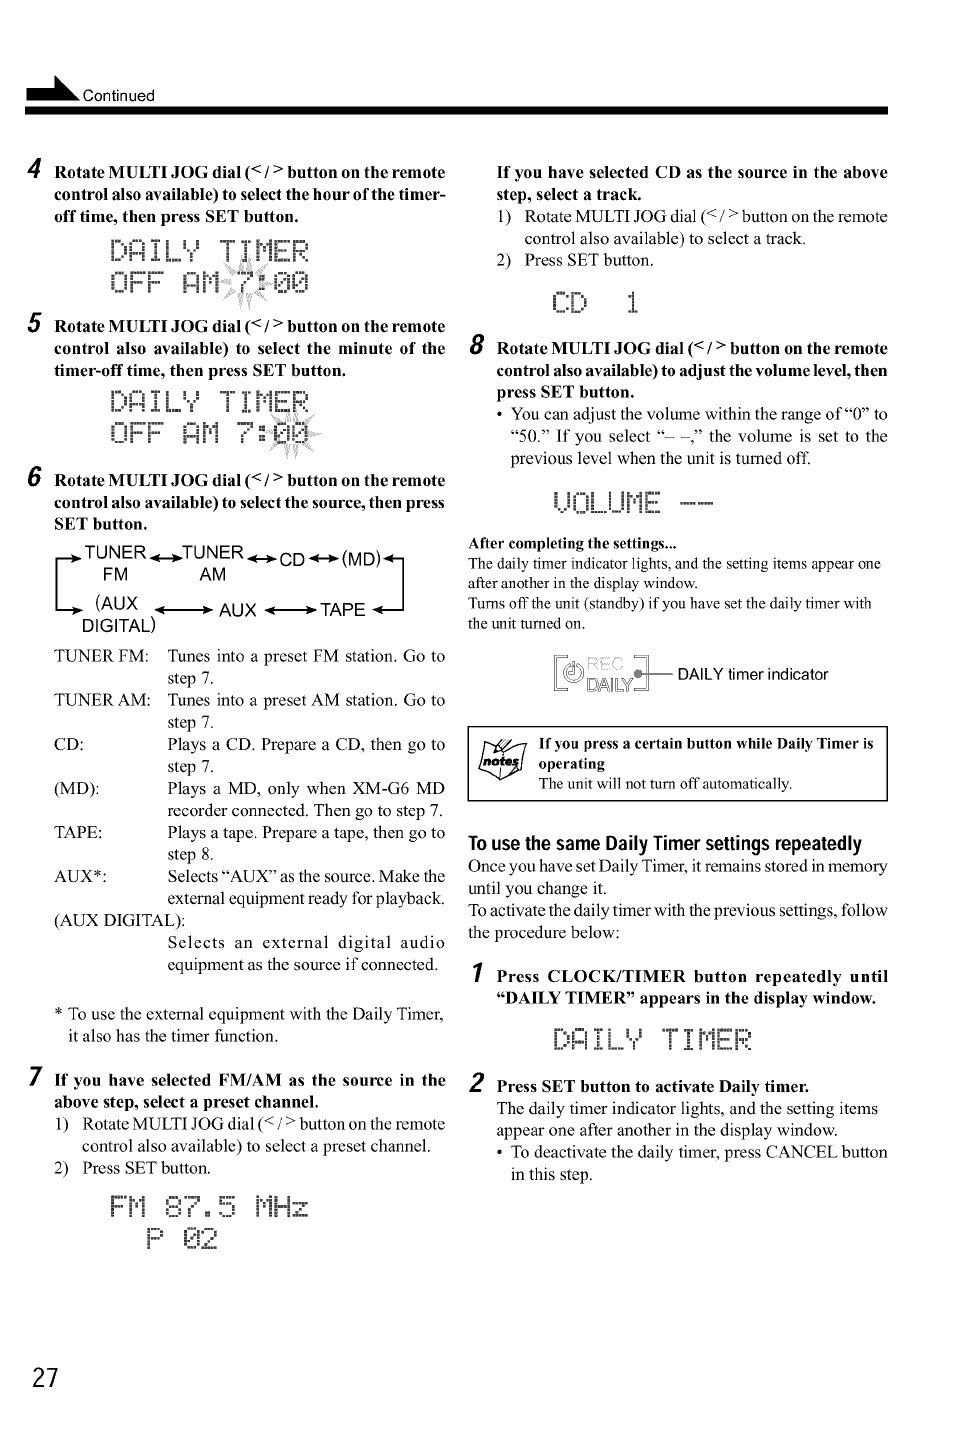
Rotate MULTI JOG dial (< !>button on the remote
control also available) to select the hour of the timer-
off time, then press SET button.
Rotate MULTI JOG dial (< !>button on the remote
control also available) to select the minute of the
timer-off time, then press SET button.
[;,i=iZL'? q i HEF?
:'",_:::_::::: h._ ";:'_ ....
:...:: : .-.-.,: : ,.. ....
Rotate MULTI JOG dial (< />button on the remote
control also available) to select the source, then press
SET button.
TUNER.__TU NER _ CD _ (MD)
FM AM '/q
(AUX _ AUX _TAPE
DIGITAL)
TUNER FM: Tunes into a preset FM station. Go to
step 7.
TUNER AM: Tunes into a preset AM station. Go to
step 7.
CE): Plays a CE). Prepare a CE), then go to
step 7.
(ME)): Plays a ME), only when XM-G6 ME)
recorder connected. Then go to step 7.
TAPE: Plays a tape. Prepare a tape, then go to
step 8.
AUX*: Selects "AUX" as the source. Make the
external equipment ready for playback.
(AUX DIGITAL):
Selects an external digital audio
equipment as the source if connected.
* To use the external equipment with the Daily Timer,
it also has the timer function.
If you have selected FM/AM as the source in the
above step, select a preset channel.
1) Rotate MULTI JOG dial (< /> button on the remote
control also available) to select a preset channel.
2) Press SET button.
F::'H':iii':?,,'.:5 i:iH:z
F::'(?.12
If you have selected CD as the source in the above
step, select a track.
1) Rotate MULTI JOG dial (< /> button on the remote
control also available) to select a track.
2) Press SET button.
,....L..' :[
8Rotate MULTI JOG dial (< />button on the remote
control also available) to adjust the volume level, then
press SET button.
•You can adjust the volume within the range of"0" to
"50." If you select "- -," the volume is set to the
previous level when the unit is turned off.
,o o,i,j." ....... .": 1:....
After completing the settings...
The daily timer indicator lights, and the setting items appear one
after another in the display window.
Turns off"the unit (standby) if you have set the daily timer with
the unit turned on.
DALLY timer indicator
If you press a certain button while Daily Timer is
operating
The unit will not turn off automatically.
Touse the same Daily Timer settingsrepeatedly
Once you have set Daily Timer, it remains stored in memory
until you change it.
To activate the daily timer with the previous settings, follow
the procedure below:
1Press CLOCK/TIMER button repeatedly until
"DAILY TIMER" appears in the display window.
[;,!::I:[L'?.....i!,iE:i;i:
2Press SET button to activate Daily timer.
The daily timer indicator lights, and the setting items
appear one after another in the display window.
• To deactivate the daily timer, press CANCEL button
in this step.
27
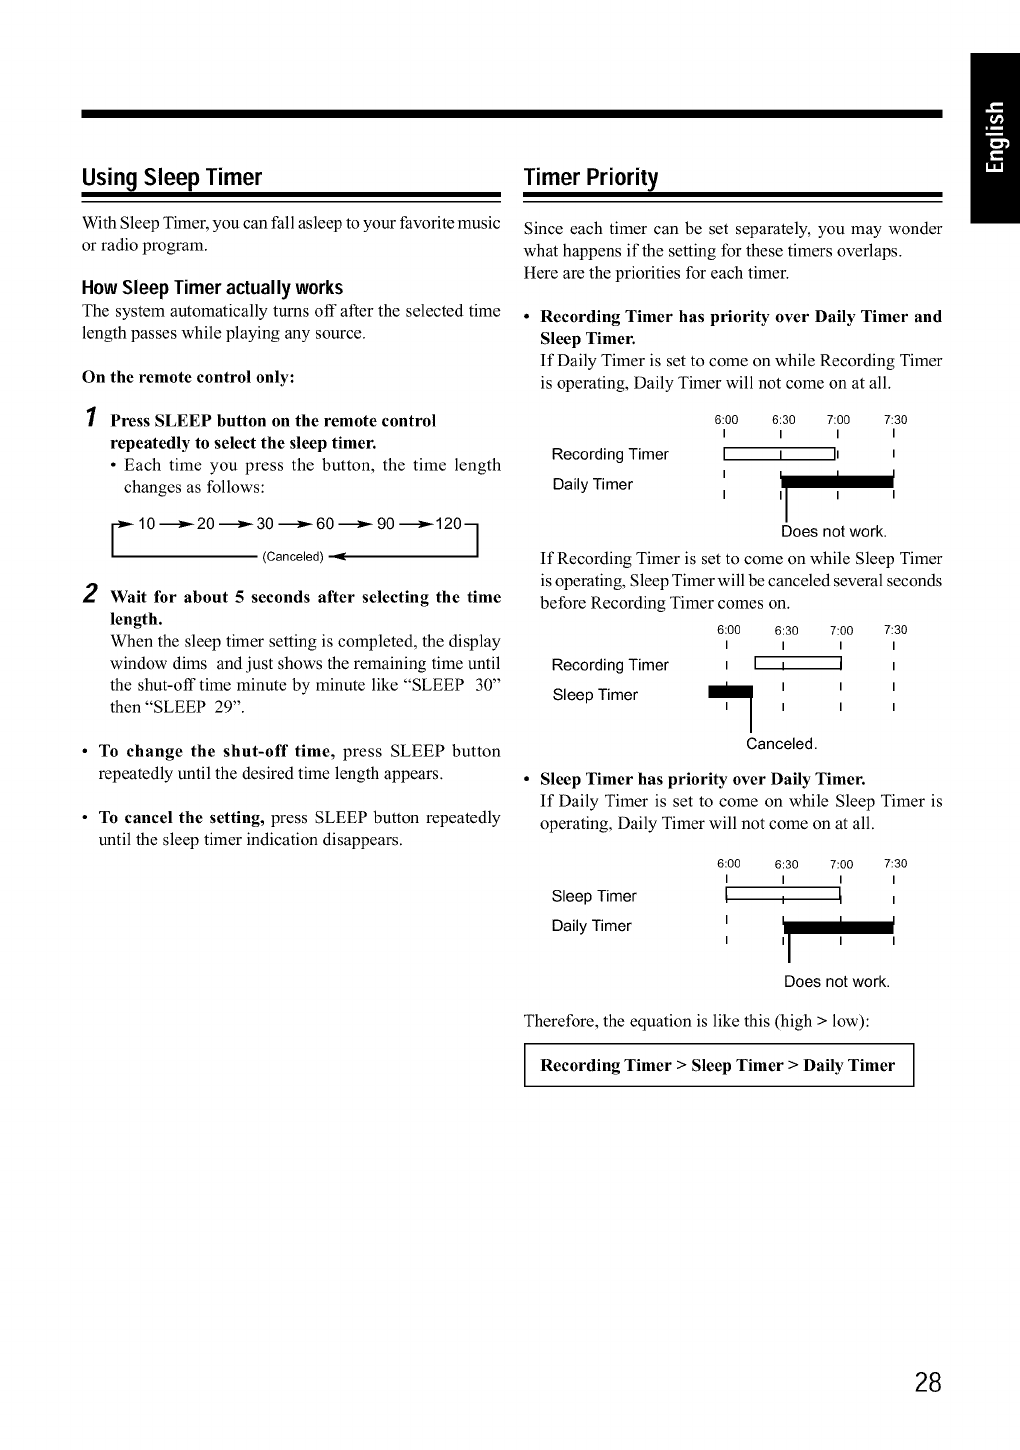
UsingSleepTimer
With Sleep Timer, you can fall asleep to your favorite music
or radio program.
How Sleep Timer actually works
The system automatically turns off"after the selected time
length passes while playing any source.
On the remote control only:
Press SLEEP button on the remote control
repeatedly to select the sleep timer.
• Each time you press the button, the time length
changes as follows:
r l0 -_- 20 -_30 -_60 -_ 90 -_ 120 q
(Canceled)
2Wait for about 5 seconds after selecting the time
length.
When the sleep timer setting is completed, the display
window dims and just shows the remaining time until
the shut-off time minute by minute like "SLEEP 30"
then "SLEEP 29".
•To change the shut-off time, press SLEEP button
repeatedly until the desired time length appears.
• To cancel the setting, press SLEEP button repeatedly
until the sleep timer indication disappears.
Timer Priority
Since each timer can be set separately, you may wonder
what happens if the setting for these timers overlaps.
Here are the priorities for each timer.
•Recording Timer has priority over Daily Timer and
Sleep Timer.
If Daily Timer is set to come on while Recording Timer
is operating, Daily Timer will not come on at all.
6:00 6:30 7:00 7:30
I I I I
Recording Timer I I 11 i
I
Daily Timer i
Does not work.
If Recording Timer is set to come on while Sleep Timer
is operating, Sleep Timer will be canceled several seconds
before Recording Timer comes on.
6:00 6:30 7:OO 7:30
I I I I
Recording Timer _ I _ I
I I I
Sleep Timer I I I
Canceled.
Sleep Timer has priority over Daily Timer.
If Daily Timer is set to come on while Sleep Timer is
operating, Daily Timer will not come on at all.
6:00 6:30 7:00 7:30
I I I I
Sleep Timer [I 1 I
Daily Timer i
I
Does not work.
Therefore, the equation is like this (high > low):
Recording Timer > Sleep Timer > Daily Timer
28
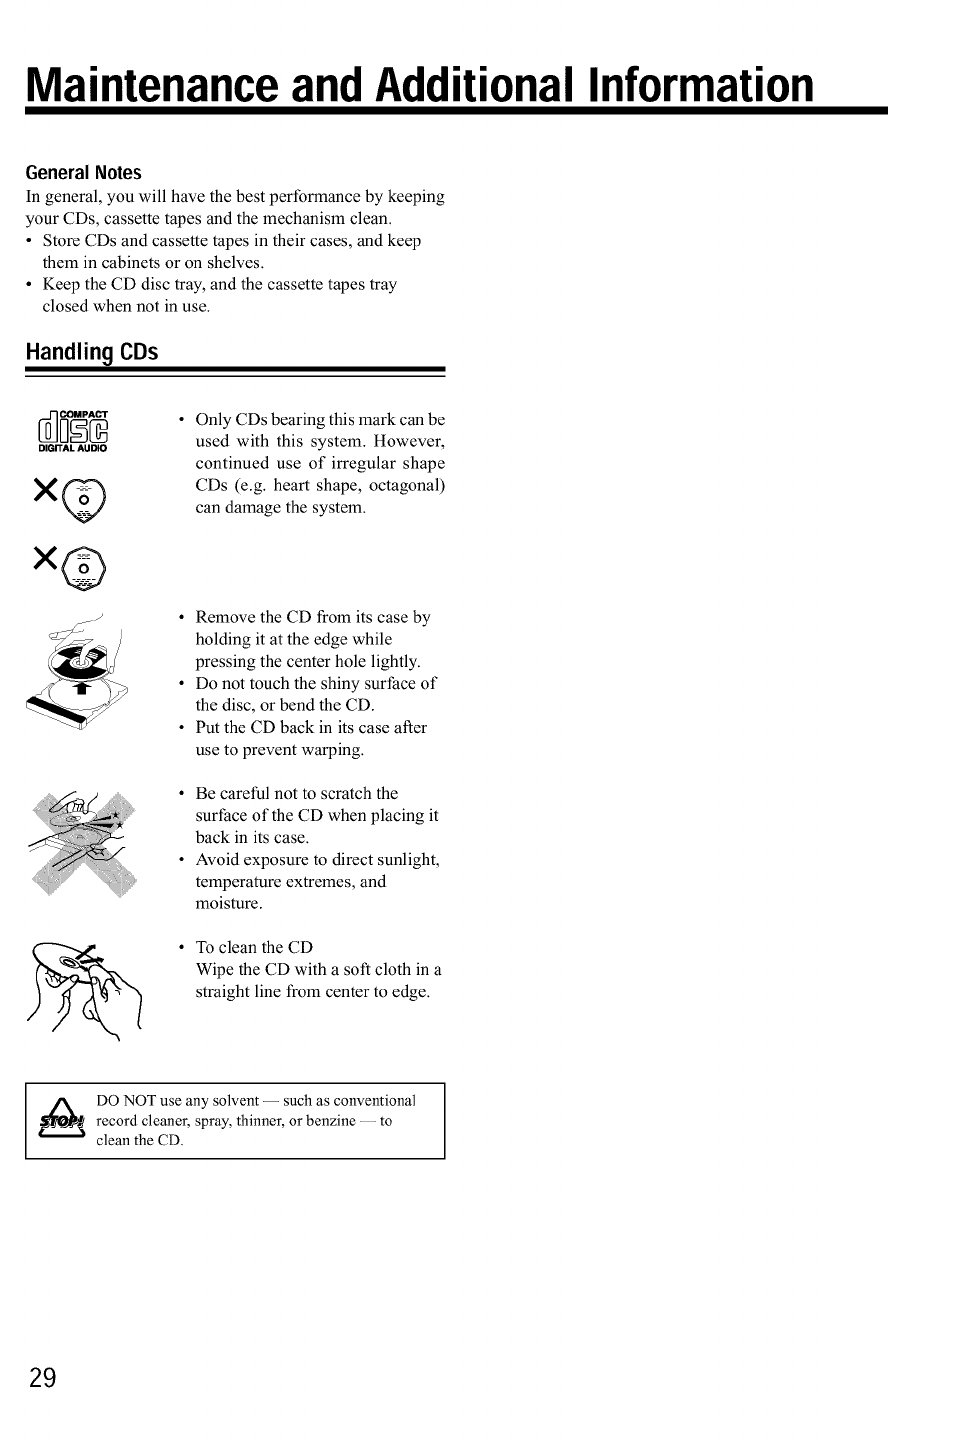
MaintenanceandAdditionalInformation
General Notes
In general, you will have the best performance by keeping
your CDs, cassette tapes and the mechanism clean.
• Store CDs and cassette tapes in their cases, and keep
them in cabinets or on shelves.
• Keep the CD disc tray, and the cassette tapes tray
closed when not in use.
Handling CDs
c00° ;} •
DIGITAL AUDIO
×@
×@
Only CDs bearing this mark can be
used with this system. However,
continued use of irregular shape
CDs (e.g. heart shape, octagonal)
can damage the system.
Remove the CD from its case by
holding it at the edge while
pressing the center hole lightly.
Do not touch the shiny surface of
the disc, or bend the CD.
Put the CD back in its case after
use to prevent warping.
•Be careful not to scratch the
surface of the CD when placing it
back in its case.
• Avoid exposure to direct sunlight,
temperature extremes, and
moisture.
To clean the CD
Wipe the CD with a soft cloth in a
straight line from center to edge.
DO NOT use any solvent -- such as conventionalrecord cleaner, spray, thinner, or benzine -- to
clean the CD.
29
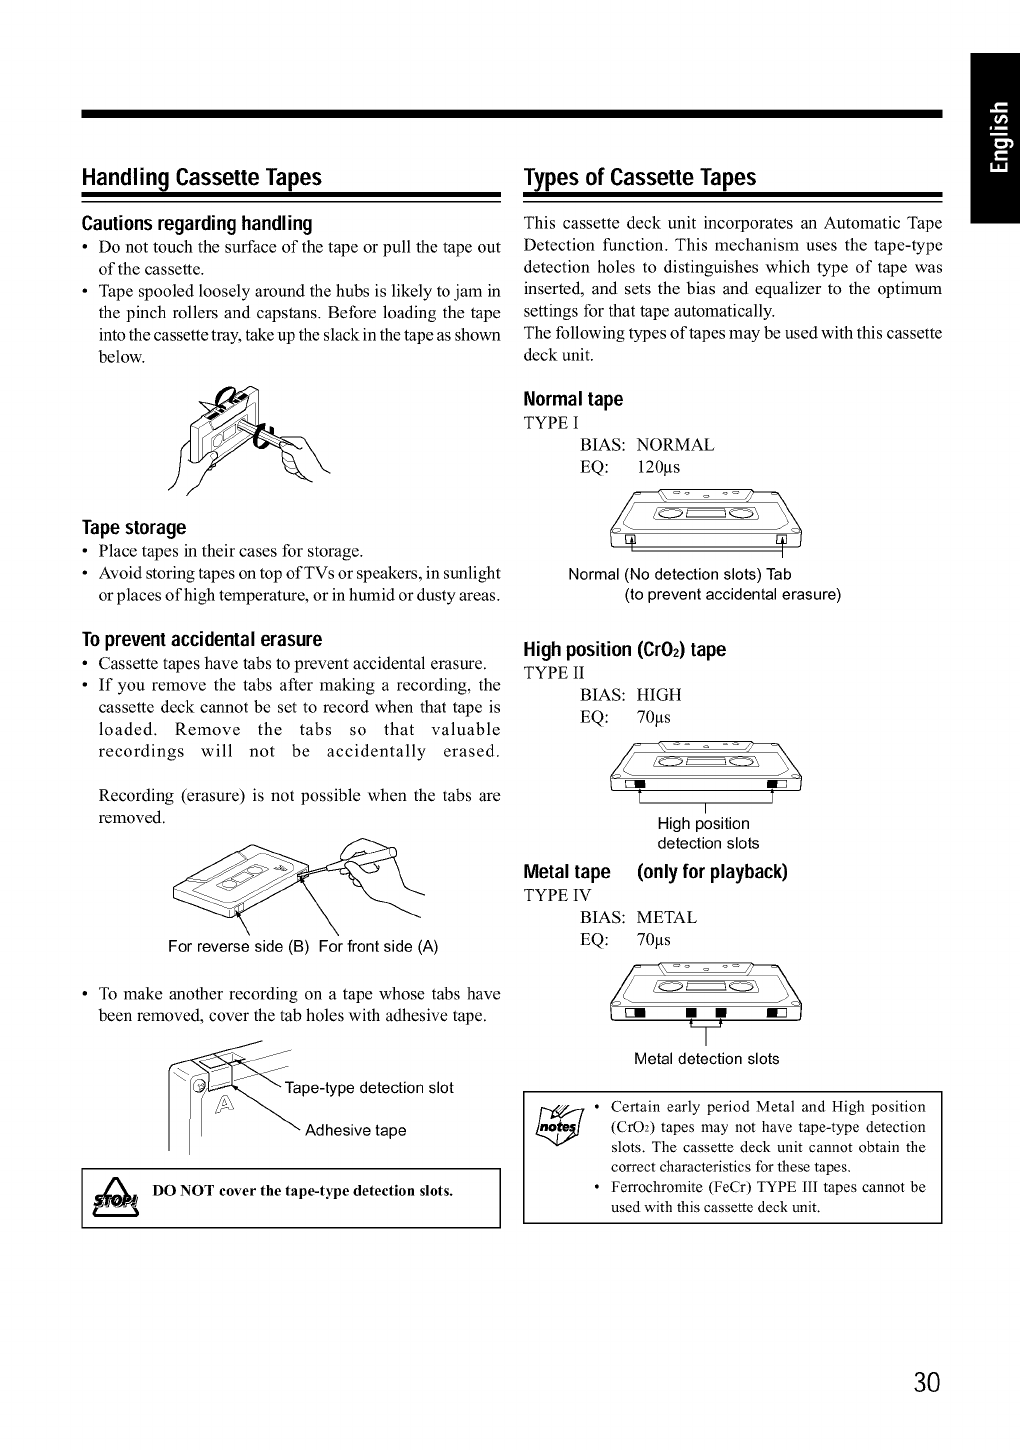
Handling Cassette Tapes
Cautions regarding handling
•Do not touch the surface of the tape or pull the tape out
of the cassette.
• Tape spooled loosely around the hubs is likely to jam in
the pinch rollers and capstans. Before loading the tape
into the cassette tray, take up the slack in the tape as shown
below.
TypesofCassetteTapes
This cassette deck unit incorporates an Automatic Tape
Detection function. This mechanism uses the tape-type
detection holes to distinguishes which type of tape was
inserted, and sets the bias and equalizer to the optimum
settings for that tape automatically.
The following types of tapes may be used with this cassette
deck unit.
Tapestorage
• Place tapes in their cases for storage.
• Avoid storing tapes on top of TVs or speakers, in sunlight
or places of high temperature, or in humid or dusty areas.
Normal tape
TYPE I
BIAS: NORMAL
EQ: 120gs
Normal (No detection slots) Tab
(to prevent accidental erasure)
To prevent accidental erasure Highposition(Cr02)tape
• Cassette tapes have tabs to prevent accidental erasure. TYPE II
• If you remove the tabs after making a recording, the BIAS: HIGH
cassette deck cannot be set to record when that tape is EQ: 70gs
loaded. Remove the tabs so that valuable
recordings will not be accidentally erased.
Recording (erasure) is not possible when the tabs are
removed.
For reverse side (B) For front side (A)
Metal tape
TYPE IV
BIAS:
EQ:
tI
High position
detection slots
(onlyfor playback)
METAL
70gs
• To make another recording on a tape whose tabs have
been removed, cover the tab holes with adhesive tape.
pe-type detection slot
Adhesive tape
DO NOT cover the tape-type detection slots.
Metal detection slots
Certain early period Metal and High position
(CrO2) tapes may not have tape-type detection
slots. The cassette deck unit cannot obtain the
correct characteristics for these tapes.
Ferrochromite (FeCr) TYPE llI tapes cannot be
used with this cassette deck unit.
3O
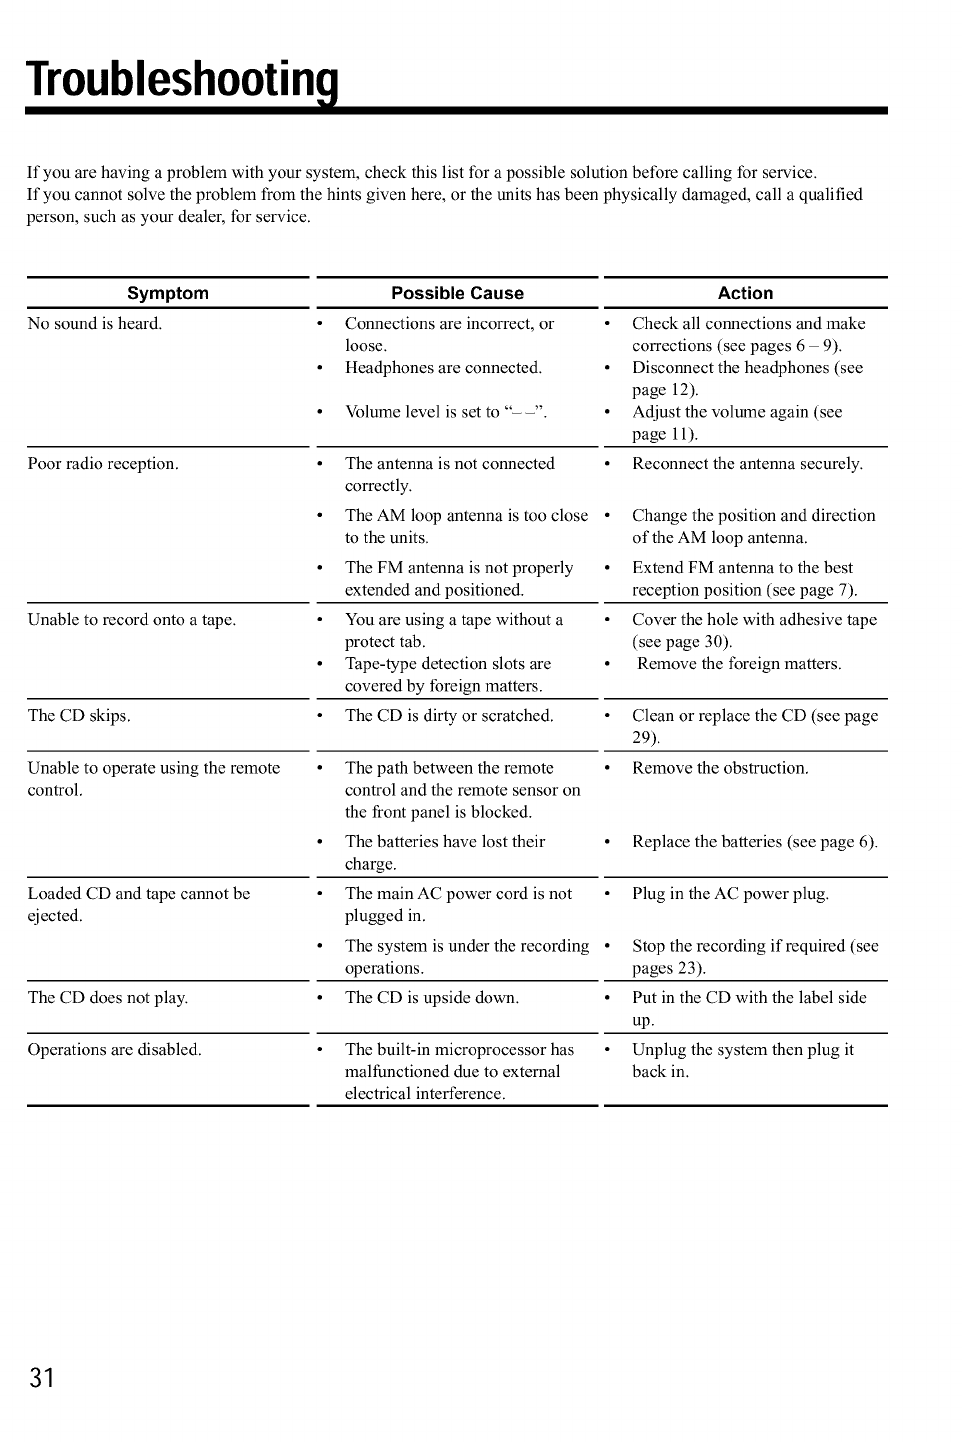
Troubleshootin9
If you are having a problem with your system, check this list for a possible solution before calling for service.
If you cannot solve the problem from the hints given here, or the units has been physically damaged, call a qualified
person, such as your dealer, for service.
Symptom Possible Cause Action
No sound is heard. •Connections are incorrect, or •Check all connections and make
loose, corrections (see pages 6 - 9).
•Headphones are connected. • Disconnect the headphones (see
page 12).
Adjust the volume again (see
page 11).
Reconnect the antenna securely.Poor radio reception.
• Volume level is set to "--". •
• The antenna is not connected •
correctly.
• The AM loop antenna is too close •
to the units.
Change the position and direction
of the AM loop antenna.
• The FM antenna is not properly • Extend FM antenna to the best
extended and positioned, reception position (see page 7).
Unable to record onto a tape. • You are using a tape without a • Cover the hole with adhesive tape
protect tab. (see page 30).
• Tape-type detection slots are • Remove the foreign matters.
covered by foreign matters.
The CD skips, • The CD is dirty or scratched, • Clean or replace the CD (see page
29).
Unable to operate using the remote • The path between the remote • Remove the obstruction.
control, control and the remote sensor on
the front panel is blocked.
• The batteries have lost their • Replace the batteries (see page 6).
charge.
Loaded CD and tape cannot be • The main AC power cord is not • Plug in the AC power plug.
ejected, plugged in.
• The system is under the recording • Stop the recording if required (see
operations, pages 23).
The CD does not play. • The CD is upside down. • Put in the CD with the label side
up.
Operations are disabled. • The built-in microprocessor has • Unplug the system then plug it
malfunctioned due to external back in.
electrical interference.
31
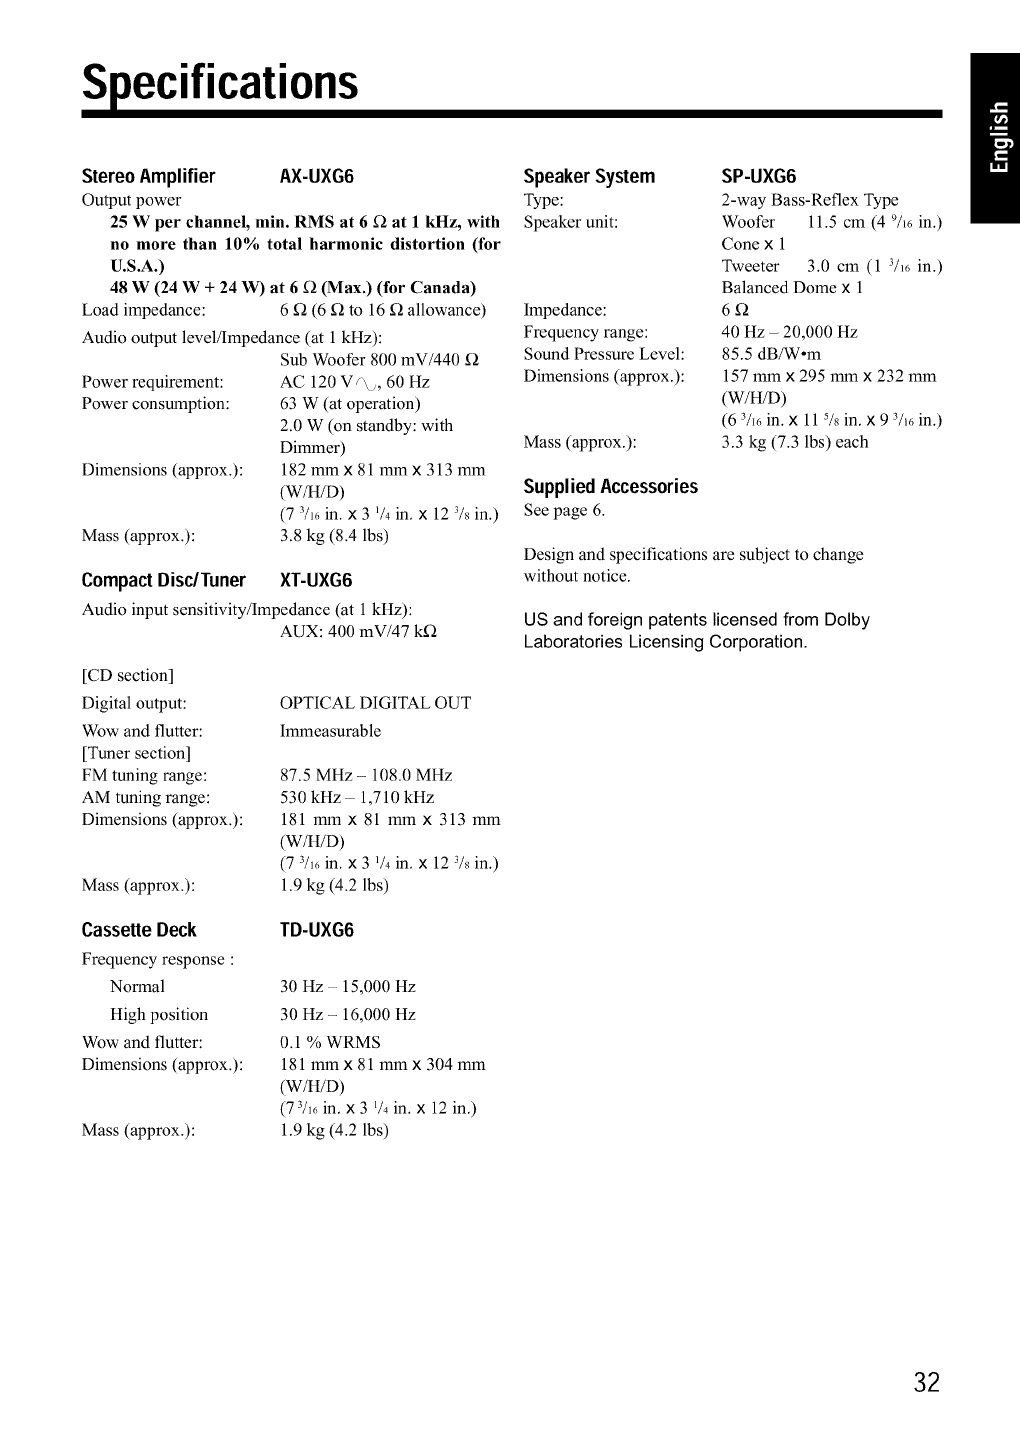
Specifications
Stereo Amplifier AX-UXG6
Output power
25 W per channel, min. RMS at 6 _at 1 kHz, with
no more than 10% total harmonic distortion (for
U.S.A.)
48 W (24 W + 24 W) at 6 f_ (Max.) (for Canada)
Load impedance: 6 Q (6 Q to 16 Q allowance)
Audio output level/Impedance (at 1 kHz):
Sub Woofer 800 mV/440 [_
Power requirement: AC 120 Vr_, 60 Hz
Power consumption: 63 W (at operation)
2.0 W (on standby: with
Dimmer)
Dimensions (approx.): 182 mm x 81 mm x 313 mm
(W/H/D)
(7 3/1(,in. x 3 1/4in. x 12 3/8in.)
Mass (approx.): 3.8 kg (8.4 lbs)
Compact Disc/Tuner XT-UXG6
Audio input sensitivity/Impedance (at 1 kHz):
AUX: 400 mV/47 kf_
[CD section]
Digital output:
Wow and flutter:
[Tuner section]
FM tuning range:
AM tuning range:
Dimensions (approx.):
Mass (approx.):
OPTICAL DIGITAL OUT
Immeasurable
87.5 MHz - 108.0 MHz
530 kHz - 1,710 kHz
181 mm x 81 mm x 313 mm
(W/H/D)
(7 3/16in. x 3 1/4in. x 12 3/8in.)
1.9 kg (4.2 lbs)
Cassette Deck
Frequency response :
Normal
High position
Wow and flutter:
Dimensions (approx.):
Mass (approx.):
TD-UXG6
30 Hz - 15,000 Hz
30 Hz - 16,000 Hz
0.1% WRMS
181 mm x 81 mm x 304 mm
(W/H/D)
(7 3/16in. x 3 1/4 in. x 12 in.)
1.9 kg (4.2 lbs)
Speaker System
Type:
Speaker unit:
Impedance:
Frequency range:
Sound Pressure Level:
Dimensions (approx.):
Mass (approx.):
SP-UXG6
2-way Bass-Reflex Type
Woofer 11.5 cm (4 9/16in.)
Cone x 1
Tweeter 3.0 cm (1 3k6 in.)
Balanced Dome x 1
6f_
40 Hz - 20,000 Hz
85.5 dB/Wom
157 mm x 295 mm x 232 mm
(W/H/D)
(6 3/16in. x 11% in. x 9 3/16in.)
3.3 kg (7.3 lbs) each
SuppliedAccessories
Seepage 6.
Design and specifications are subject to change
without notice.
US and foreign patents licensed from Dolby
Laboratories Licensing Corporation.
32
OU ,T JVC SE VCE
HOW TO LOCATE YOUR JVC SERVICE CENTER
TOLL FREE : 1-800-537-5722
http://www.jvcservice.com
Dear customer:
In order to receive the most satisfaction from your purchase, read the instruction booklet before operating the unit. In the event that repair
is necessary, or for the address nearest your location, please refer to the factory service center list below or within the Continental
United States, Call 1-800-537-5722 for your authorized servicer. Remember to retain your Bill of Sale for Warranty Service.
--JVC
10 New Maple Avenue
Pine Brook, NJ 07058-9641
(973) 396-1000
5665 Corporate Avenue
Cypress, CA 90630-0024
(714) 229-8011
13 Cummings Park
Woburn, MA 01801
(781) 376-9100
JVC SERVICE & ENGINEERING
COMPANY OF AMERICA
DIVISION OF JVC AMERICAS CORP.
FACTORY SERVICE CENTER LOCATIONS
1500 Lakes Parkway
Lawrenceville, GA 30243-5857
(770) 339-2582
2969 Mapunapuna Place
Honolulu, HI 96819-2040
(808) 833-5828
8192 State Road 84
Davie, FL 33324
(954) 472-1960
705 Enterprise Street
Aurora, IL 60504-8149
(630) 851-7855
10700 Hammerly, Suite 110
Houston, TX 77043
(713) 935-9331
890 Dubuque Avenue
South San Francisco CA 94080-1804
(650) 871-2666
Sophisticated electronic products may require occasional service, Just as quality is a keyword in the engineenng and production of
the wide array of JVC products, service is the key to maintaining the high level of performance for which JVC is world famous, The
JVC service and engineering organization stands behind our products,
NATIONAL HEADQUARTERS
JVC SERVICE & ENGINEERING COMPANY OF AMERICA
DIVISION OF JVC AMERICAS CORP.
1700 Valley Road
Wayne, NJ 07470
If you ship the product •• •
Pack your JVC un# in the original carton or one of equivalent
size and strength, Enclose, with the unit, a letter stating the
problem or symptom that exists and also a copy of the
receipt or bill of sale you received when you purchased your
JVC unit. Print your home return address on the outside
and the inside of the carton, Send to the appropriate JVC
Factory Service Center as listed above,
Don't service it yourself.
CAUTION
To prevent electrical shock, do not open the cabinet. No user
serviceable parts inside,
Refer servicing to qualified service personnel
--ACCESSORIES
To purchase accessories for your JVC product, you may contact your local JVC Dealer.
Or from the 48 Continental United States call toll free : 800-882-2345
(1099)
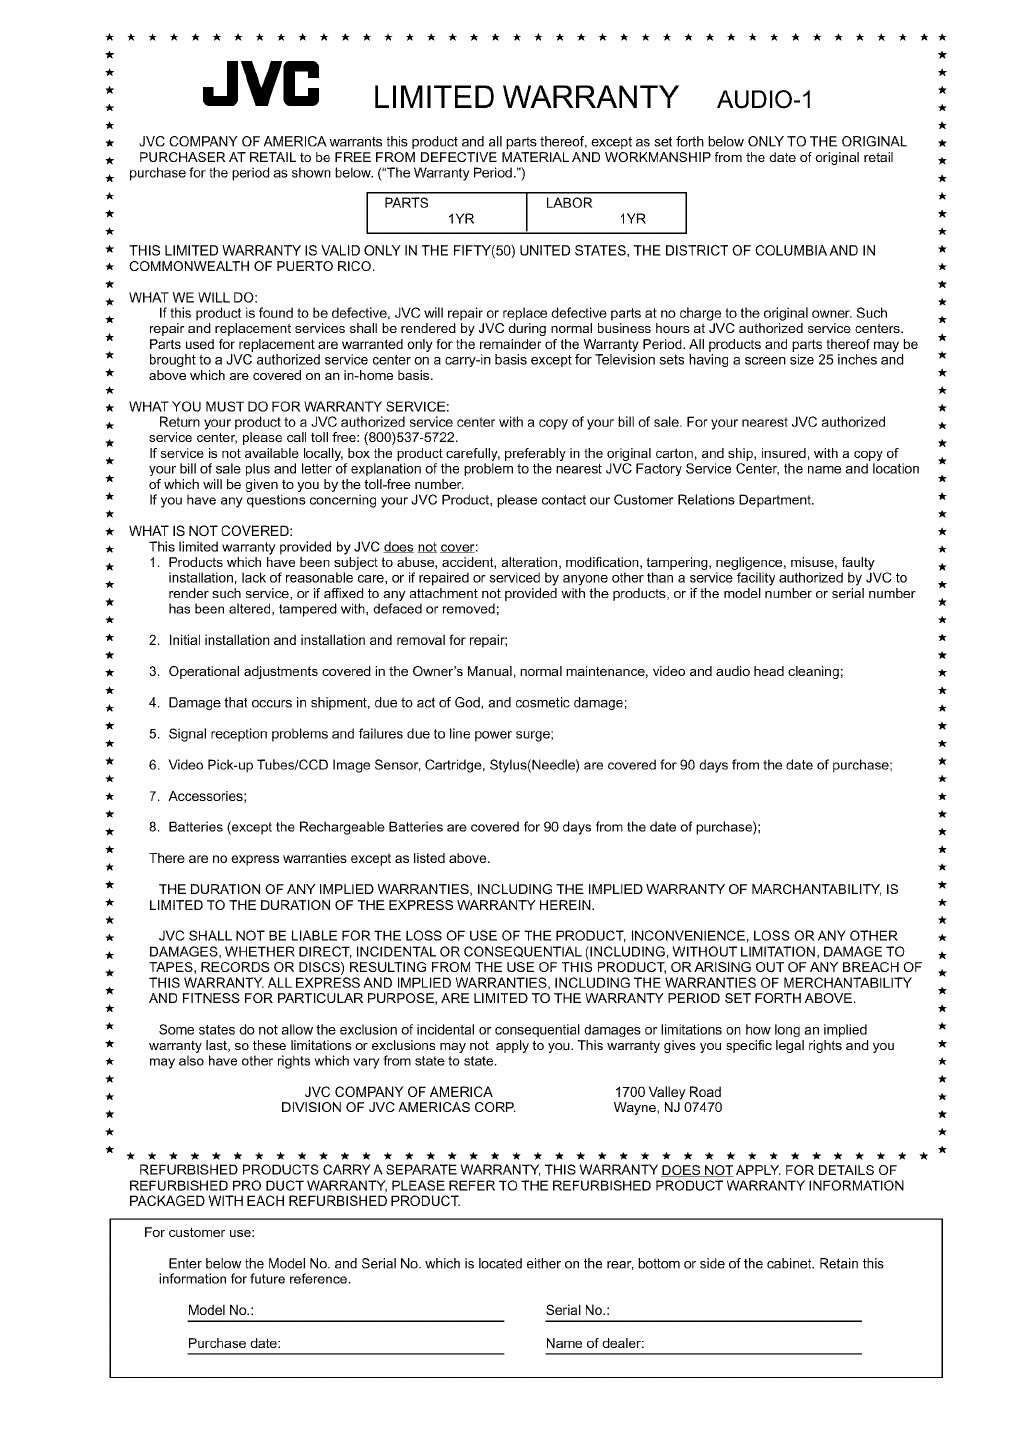
"k
-k
-k
"k
JVC LIMITED WARRANTY AUDIO-1
JVC COMPANY OF AMERICA warrants this product and all parts thereof, except as set forth below ONLY TO THE ORIGINAL
PURCHASER AT RETAIL to be FREE FROM DEFECTIVE MATERIAL AND WORKMANSHIP from the date of original retail
purchase for the period as shown below. ("The Warranty Period.")
PARTS LABOR
1YR 1YR
THIS LIMITED WARRANTY IS VALID ONLY IN THE FIFTY(50) UNITED STATES, THE DISTRICT OF COLUMBtAAND IN
COMMONWEALTH OF PUERTO RICO.
WHAT WE WILL DO:
If this product is found to be defective, JVC will repair or replace defective parts at no charge to the original owner. Such
repair and replacement services shall be rendered by JVC during normal business hours at JVC authorized service centers.
Parts used for replacement are warranted only for the remainder of the Warranty Period. All products and parts thereof may be
brought to a JVC authorized service center on a carry-in basis except for Television sets having a screen size 25 inches and
above which are covered on an in-home basis.
WHAT YOU MUST DO FOR WARRANTY SERVICE:
Return your product to a JVC authorized service center with a copy of your bill of sale. For your nearest JVC authorized
service center, please call toll free: (800)537-5722.
If service is not available locally, box the product carefully, preferably in the original carton, and ship, insured, with a copy of
your bill of sale plus and letter of explanation of the problem to the nearest JVC Factory Service Center, the name and location
of which will be given to you by the toll-free number.
If you have any questions concerning your JVC Product, please contact our Customer Relations Department.
WHAT IS NOT COVERED:
This limited warranty provided by JVC does not cover:
1. Products which have been subject to abuse, accident, alteration, modification, tampering, negligence, misuse, faulty
installation, lack of reasonable care, or if repaired or serviced by anyone other than a service facility authorized by JVC to
render such service, or if affixed to any attachment not provided with the products, or if the model number or serial number
has been altered, tampered with, defaced or removed;
2. Initial installation and installation and removal for repair;
3. Operational adjustments covered in the Owner's Manual, normal maintenance, video and audio head cleaning;
4. Damage that occurs in shipment, due to act of God, and cosmetic damage;
5. Signal reception problems and failures due to line power surge;
6. Video Pick-up Tubes/CCD Image Sensor, Cartridge, Stylus(Needle) are covered for 90 days from the date of purchase;
7. Accessories;
8. Batteries (except the Rechargeable Batteries are covered for 90 days from the date of purchase);
There are no express warranties except as listed above.
THE DURATION OFANY IMPLIED WARRANTIES, INCLUDING THE IMPLIED WARRANTY OF MARCHANTABtLITY, IS
LIMITED TO THE DURATION OF THE EXPRESS WARRANTY HEREIN.
JVC SHALL NOT BE LIABLE FOR THE LOSS OF USE OF THE PRODUCT, INCONVENIENCE, LOSS OR ANY OTHER
DAMAGES, WHETHER DIRECT, INCIDENTAL OR CONSEQUENTIAL (INCLUDING, WITHOUT LIMITATION, DAMAGE TO
-k
-k
-k
-k
-k
-k
-k
-k
-k
TAPES, RECORDS OR DISCS) RESULTING FROM THE USE OF THIS PRODUCT, OR ARISING OUT OF ANY BREACH OF .
THIS WARRANTY. ALL EXPRESS AND IMPLIED WARRANTIES, INCLUDING THE WARRANTIES OF MERCHANTABILITY
AND FITNESS FOR PARTICULAR PURPOSE, ARE LIMITED TO THE WARRANTY PERIOD SET FORTH ABOVE.
Some states do not allow the exclusion of incidental or consequential damages or limitations on how long an implied
warranty last, so these limitations or exclusions may not apply to you. This warranty gives you specific legal rights and you
may also have other rights which vary from state to state.
JVC COMPANY OF AMERICA
DIVISION OF JVC AMERICAS CORE 1700 Valley Road
Wayne, NJ 07470
REFURBISHED PRODUCTS CARRY A SEPARATE WARRANTY, THIS WARRANTY DOES NOT APPLY. FOR DETAILS OF
REFURBISHED PRO DUCT WARRANTY, PLEASE REFER TO THE REFURBISHED PRODUCT WARRANTY INFORMATION
PACKAGED WITH EACH REFURBISHED PRODUCT.
-k
For customer use:
Enter below the Model No. and Serial No. which is located either on the rear, bottom or side of the cabinet. Retain this
information for future reference.
Model No.: Serial No.:
Purchase date: Name of dealer:
JVC
VICTOR COMPANY OF JAPAN, LIMITED
_z_ EN, FR (_) 0200JTMMDWJSC
