JVC GR D33US User Manual DIGITAL VIDEO CAMERA Manuals And Guides L0402226
JVC Digital Camcorder Manual L0402226 JVC Digital Camcorder Owner's Manual, JVC Digital Camcorder installation guides
User Manual: JVC GR-D33US GR-D33US JVC DIGITAL VIDEO CAMERA - Manuals and Guides View the owners manual for your JVC DIGITAL VIDEO CAMERA #GRD33US. Home:Electronics Parts:Jvc Parts:Jvc DIGITAL VIDEO CAMERA Manual
Open the PDF directly: View PDF ![]() .
.
Page Count: 56
Dear Customer,
Thank you for purchasing this digital
video camera. Before use, please read
the safety information and precautions
contsined in the pages 2 -3 to ensure
safe use of this product.
ENGLISH
DIGITAL VIDEO CAMERA
GR-D93
GR-D73
GR-D33
Please visit our Homepage on the World Wide Web for
Digital Video Camera:
= oo-o =F._d
For Accessories:
GETTINGSTARTED 5
VIDEORECORDING&
PLAYBACK11
DIGITALSTILLCAMERA
(D.S.C.) RECORDING&
PLAYBACK(GR-D93/D73
only)18
ADVANCEDFEATURES25
oJ • _ O
Mini_NTS c
DIGITAL
_ III (://k:q"
The camcorder illustrations appearing in this
instruction manual are of the GR-D93.
The D.S.C. (Digital Still Camera) features
are available on GR-D93 and GR-D73.
REFERENCES38
TERMS 54
For Customer Use:
Enter below the Model No. and Serial
No. which is located on the bottom of
the camcorder. Retain this information
for future reference.
Model NO.
Serial NO.
INSTRUCTIONS
LYTt t 96-001C
2 EN
SAFETYPRECAUTIONS
CAUTION: TO REDUCE THE RISK OF ELECTRIC SHOCK
DO NOT R EMOVE COVER (OR BACK).
NO USER_SERV_CEABLE PARTS _NStDE
REFER SERVICING TO QUALiFiED SERVICE PERSONNEL.
The lightening flash with arrowt_ead symbol w_hJn an
equilateral triangle, is intended to ale_t the user to the
pngsence of uninsu_ated _dangeroos voltage" w_hin the
product's enclcsure that may be Of sufficient magn_ude
to const_ute a nsk of e_ect tic shock to peP_ons
The exclamation point w_hJn an equilateral triangle is
intended to alert the user to the presence of important
operating and maintenance (servicing) instrdctions in
the literature accompanying the appliance¸
WARNING: TO PREVENT FIRE OR SHOCK HAZARD,
DO NOT EXPOSE THIS UNIT TO RAIN OR MOISTURE.
NOTES:
• The rating plate (serial number plata) and safety caution
are on the bottom and/or the back of the main unit.
• The rating information and salty caution of the AC
Adapter are on its upper and lower sides.
CAUTIONS:
• This camcorder is designed to be used with NTSC-type
color television signals. It cannot be used for playback
with a television of a different standard. However, live
recording and LCD monitadviewfioder playback are
possible anywhere.
• Use the JVC BN-V408U/V416U/V428U battery packs
and, to recharge them or supply power to the camcorder
from an AC outlet, use the provided multi-voltage AC
Adapter. (An appropriate conversion adapter may be
necessary to accommodate different designs of AC
outlets in different countries.)
Caution on Replaceable lithium battery
The battery used in this device may present a fire or
chemical burn hazard ff mistreated.
Do not recharge, disassemble, heat above t00°C (212°F)
or incinerate.
Replace battery with Panasonic (Matsushita Electric),
Sanyo, Sony or Maxelt CR2025.
Danger of explosion or Risk of fire if the battery is
incorrectly replaced.
Dispose of used battery promptly.
Keep away from children.
Do not disassemble and do not dispose of in fire.
I This product has a fluorescent lamp that contains a small
amount of mercury. Disposal of these materials may be
regulated in your community due to environmental
considerations.
For disposal or recycling information please contact your
local authorities, or the Elect ronics Industries Alliance:
<http:llwww.eiae.org>
When the equipment is installed in a cabinet or on a shelf,
make sure that it has sufficient space on al! sides to allow
for ventilation (t0 cm (3-t 5/t6") or more on both sides, on
top and at the rear).
Do not block the ventilation holes.
(If the ventilation holes are blocked by a newspaper, or
cloth etc. the heat may not be able to get out.)
No naked flame sources, such as lighted candles, should
be placed on the apparatus.
When discarding batteries, environmental problems must
be considered and the local rules or Iaws governing the
disposal of these batteries must be fctfowed strictly.
The apparatus sbell not be exposed to ddpping or
splashing.
Do not use this equipment in a bathroom or places with
water.
Also do not place any containers fltled with water or liquids
(such as cosmetics or medicines, ffower vases, potted
plants, cups etc.) on top of this unit.
(If water or liquid is allowed to enter this equipment, fire or
electric shock may be caused.)
Do not point the lens or the viewfinder directly into the sun.
This can cause eye injuries, as well as lead to the
malfunctioning of intamal circuitry. There is also a risk of
fire or electric shock.
CAUTIONI
The following notes concern possible physical damage to
the camcorder and to the user.
When carrying, be sure to always securely attach and use
the provided strap. Carrying or holding the camcorder by
the viewfinder and/or the LCD monitor can result in
dropping the unit, or in a malfunction.
Take care not to get your finger caught in the cassette
holder cover. Do not let children operate the camcorder, as
they are particuledy susceptible to this type of injury.
Do not use a tripod on unsteady or untevel surfaces. It
could tip over, causing serious damage to the camcorder.
CAUTIONI
Connecting cables (AedidiVideo, S-Video, etc.) to the
camcorder and leaving it on top of the TV is not
recommended, as tripping on the cables will cause the
camcorder to tall, resulting in damage.
IMPORTANTSAFTYINSTRUCTIONS
1. Read these instructions.
2. Keep these instructions.
3. Heed alI warnings.
4. Follow all instructions.
5. Do not use this apparatus near water.
6. Clean only with dry cloth.
7. Do not block any ventilation openings. Install in
accordance with the manufacturer's instructions.
8. Do not install near any heat sources such as radiators,
heat registers, stoves, or other apparatus (including
amp_iffars) that produce heat.
9. OnIy use attachments/accessories specified by the
manufacturer.
10. Use only with the cart, stand,
tripod, bracket, or table
specified by the manufacturer,
or sold with the apparatus.
When a cart is used, use
caution when moving the cart/
apparatus combination to
avoid injury from tip-over.
11. Unplug this apparatus during
lightning storms or when
unused for long periods of time.
12. Refer all servicing to qualgfad service personnel.
Servicing is required when the apparatus has been
damaged in any way, such as powePsupply cord or plug
is damaged, liquid has been spilled or objects have fallen
into the apparatus, the apparatus has been exposed to
rain or moisture, does not operate normally, or has been
dropped.
EN3
Mini NTS c
MultiMediaCard
This camcorder is designed exclusively for the digital video
cassette, SD Memory Card and MultiMediaCard. Only
cassettes marked "_D_ T" and memory cards* marked
"5_31k" or "MlfltiMediaCard" can be used with this unit.
Before recording an important scene...
...make sure you only use cassettes with the Mini DV mark
...make sure you only use memory cards* with the mark
S_ or IFhlltllVledlaCard.
...remember that this camcorder is not compatible with other
digitaI video formats.
...remember that this camcorder is intended for private
consumer use only. Any commercial use without proper
permission is prohibited. (Even if you record an event such as
a show, performance or exhibition for personaI enjoyment, it
is strong{y recommended that you obtain permission
beforehand.)
* Memory cards can be used with GR-D93 and GR-D73
only.
4 EN CONTENTS
GETTINGSTARTED S ADVANCEDFEATURES 25
ProvidedAccessories .................................................... 5
Power ............................................................................. 6
Grip Adjustment ............................................................. 7
Operation Mode ............................................................. 8
Date/Time Settings ........................................................ 8
Viewfinder Adjustment ................................................... 9
Brightness Adjustment Of The Display .......................... 9
Tripod Mounting ............................................................. 9
Loading/Unloading A Cassette .................................... 10
Loading/Unloading A Memory Card (GR-D93/73 only) ,-.- 10
11VIDEORECORDING& PLAYBACK
VIDEORECORDING..................................................... ! !
Basic Recording ........................................................... 11
LCD Monitor And Viewfinder ........................................ 12
Tape Remaining Time .................................................. 12
Zooming ....................................................................... 12
Journalistic Shooting .................................................... 13
Self Recording ............................................................. 13
Time Code ................................................................... 13
Recording From The Middle Of A Tape ....................... 13
VIDEOPLAYBACK......................................................... 14
Norma! Playback .......................................................... 14
SflII Playback ................................................................ 14
Shuttle Search ............................................................. 14
Blank Search ................................................................ 14
PlaybackUsing The Remote Control (GR-D93/73 only) .. t5
Connections To A TV Or VCR ..................................... 17
DIGITALSTILLCAMERA(D.S.C.)RECORDING&
PLAYBACK(GR-D93/D73only) 18
D.S.C.RECORDING(GR-D93/D73 only) ......................... 18
Basic Shooting (D.S.C. Snapshot) ............................... 18
Dubbing Still images Recorded On A Tape To A Memory
Card ......................................................................... 19
D.S.C.PLAYBACK(GR-D93/D73 only) ............................ 20
Normal Playback Of images ........................................ 20
Auto Playback Of images ............................................ 20
Index Playback Of Files ............................................... 20
Viewing File Information ............................................... 21
Removing On-Screen Display ...................................... 21
ADDITIONALFEATURESFORD.S.C.(GR-D93/D73 only) ...22
Protecting Files ............................................................ 22
Deleting Files ............................................................... 22
Setting Print Information (DPOF Setting) ..................... 23
Resetting The File Name ............................................. 24
Initializing A Memory Card ........................................... 24
MENUSFORDETAILEDADJUSTMENT.............................. 25
Changing The Menu Settings ...................................... 25
Recording Menus ........................................................ 26
Playback Menus .......................................................... 28
FEATURESFORRECORDING......................................... 29
White LED Light .......................................................... 29
Night Alive ................................................................... 29
Wipe Or Fader Effects ................................................. 30
Program AE With Special Effects ................................ 30
Snapshot (For Video Recording) ................................. 31
Auto Focus .................................................................. 31
Manual Focus .............................................................. 32
Exposure Control ......................................................... 32
Iris Lock ....................................................................... 32
Backlight Compensation .............................................. 33
White Balance Adjustment .......................................... 33
Manual White Balance Adjustment ............................. 33
EDITING...................................................................... 34
Dubbing To Or From A VCR ....................................... 34
Dubbing To A Video Unit Equipped With A DV Connector
(Digital Dubbing) ...................................................... 35
Connection To A Personal Computer .......................... 36
Audio Dubbing (GR-D93/73 only) ................................ 37
Insert Editing (GR-D93/73 only) .................................. 37
REFERENCES 38
ADDITIONALINFORMATION..........................................38
TROUBLESHOOTING.....................................................40
CAUTIONS..................................................................45
USERMAINTENANCE......................................................48
SPECIFICATIONS............................................................49
INDEX..........................................................................50
TERMS 54

I ProvidedAccessories
or
GETTING STARTED EN 5
HowToAttachTheLeasCap
To protect the lens, attach the provided lens cap to the
carncorder as shown in the illustration.
NOTE:
TOconfirm the lens cap is on correctly make sure the cap is
flush to the camcorder.
® ®
® ®
® ® @
AC Adapter AP-V14U or AP-V15U
@>Battery Pack BN-V408U-8
® AudioNideo Cable (03.5 mini-plug to RCA plug)
® Core Filter (for US8 Cable (provided with GR-D93/73
only) and optional S-Video Cable. _" pg. 6 for
attachment)
_ Shoulder Strap (See the right column for attachment)
® CD-ROM
_7>Memory Card 8 MB (GR-D93/73 only) (Already
inserted in the carncorder)
® Remote Control Unit RM-V718U (GR-D93/73 only)
_ Lithium Battery CR2025" (GR-D93/73 on_y)
(for remote control unit)
L_ USB Cable (GR-D93/73 only)
Lens Cap (See the right column for attachment)
* A lithium battery is pre-installed in the Remote Control Unit
at time of shipme_ (with insulation sheet). To use the
Remote Control Unit, remove the insulation sheet.
NOTES:
• In order to maintain optimum performance of the
camcorder, provided cables may be equipped with one or
more core filter. If a cable has only one core fitter, the end
that is closest to the filter should be connected to the
camcorder.
• Make sure to use the provided cables for connections. Do
not use any other cables.
Place here during shooting.
HowToAttachTheShoulderStrap
Follow the illustration.
1Thread the strap through the eyelet.
Fold it back and thread it through the strap guide and
the buckle.
• To adiust the length of the strap, loosen and then tighten
the strap in the buckle.
Slide the strap guide fully towards the eyelet.
Strap guide
Buckle
Eyelet
6EN GETTINGSTARTED
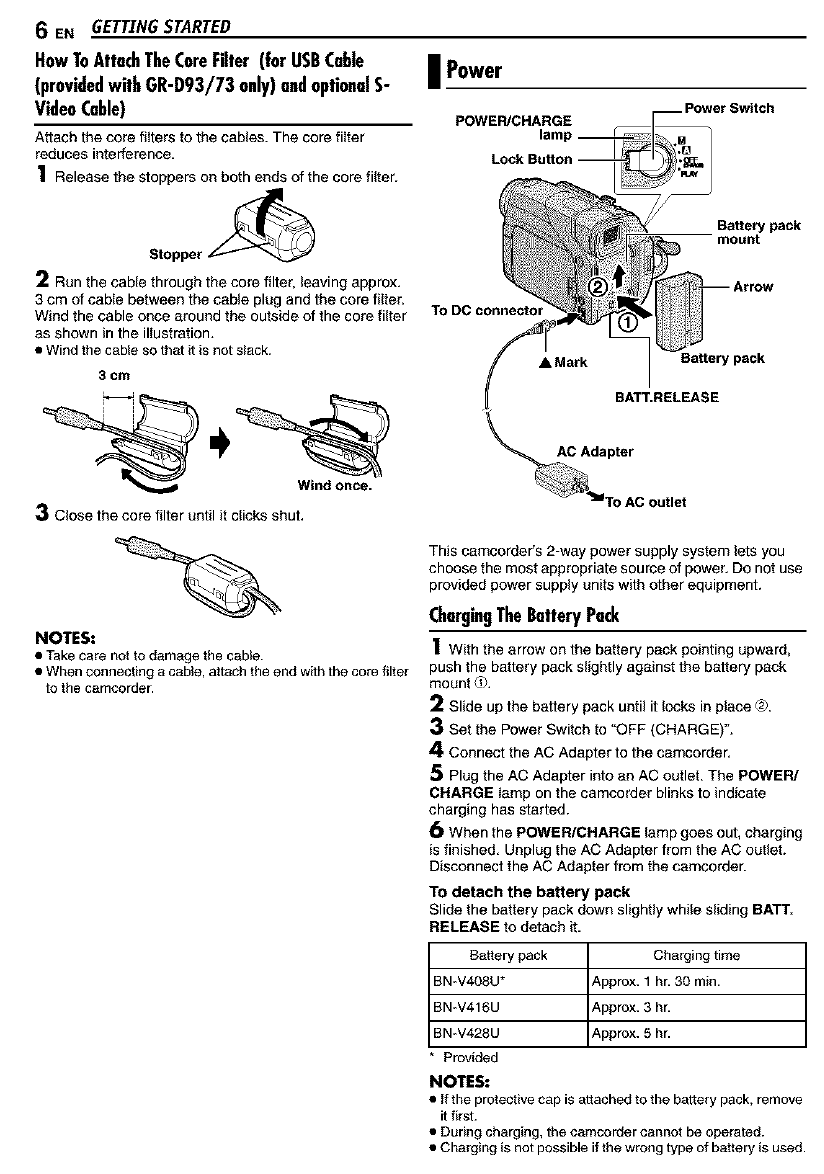
HowToAttachTheCoreFilter (forUSBCable I Power
(providedwithGR-093/73 only)andoptionalS-
VideoCable)
Attach the core fi_ters to the cables. The core fi_ter
reduces interference.
1Release the stoppers on both ends of the core filter.
Stopper ,_
2Run the cable through the core filter, leaving approx.
3 cm of cable between the cable plug and the core filter.
Wind the cable once around the outside of the core filter
as shown inthe illustration.
•Windthe csble so that it is not slack.
3 cm
3Close the core filter until it clicks shut.
NOTES:
• Take care not to damage the cable.
• When connecting a cable, attach the end with the core tilter
to the csmcorder.
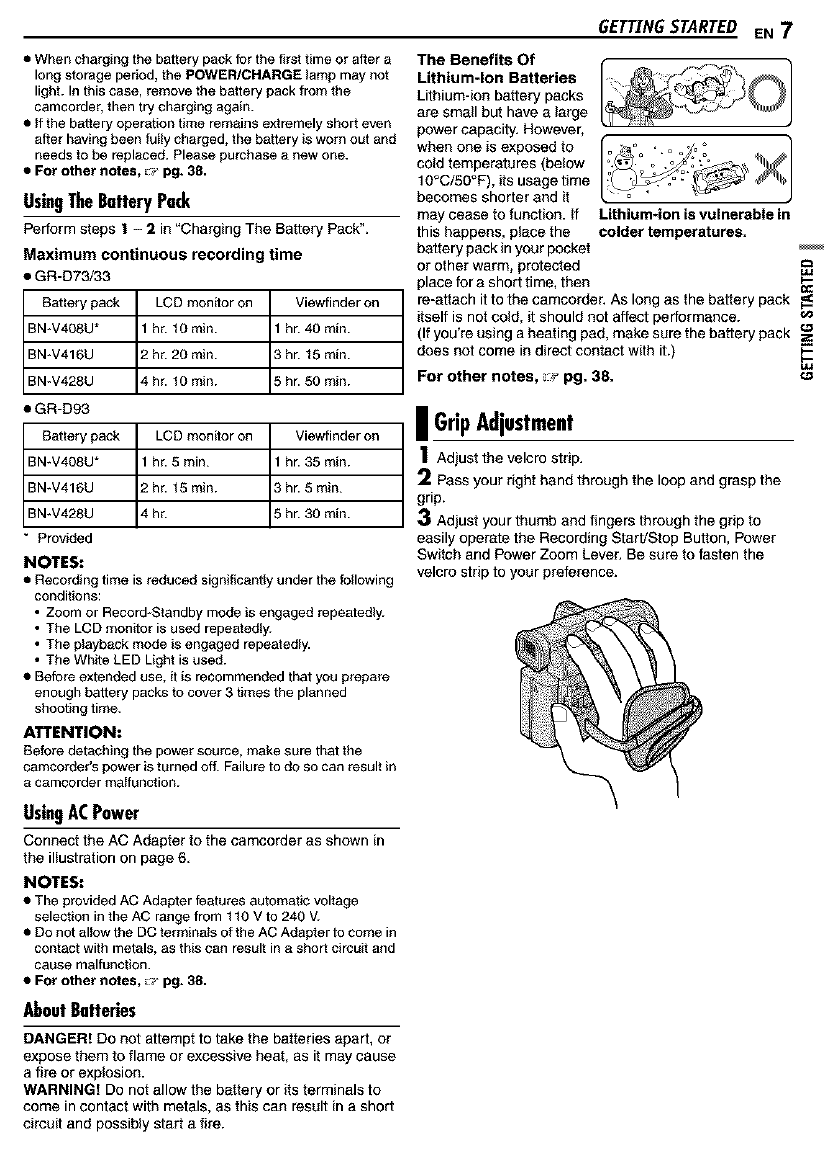
POWER/CHARGE
BaRery pack
mount
To DC connector
Battery pack
BATT.RELEASE
AC Adapter
This camcorder's 2-way power supply system lets you
choose the most appropriate source of power. Do not use
provided power supply units with other equipment.
ChargingTheBatteryPack
1With the arrow on the battery pack pointing upward,
push the battery pack slightly against the battery pack
mount _.
2Slide up the battery pack until it locks in place ®.
3Set the Power Switch to "OFF (CHARGE)".
4Connect the AC Adapter to the camcorder.
5Plug the AC Adapter into an AC outlet.The POWER/
CHARGE _ampon the camcorder blinks to indicate
charging has started.
6When the POWER/CHARGE lamp goes out, charging
is finished. Unplug the AC Adapter from the AC outlet.
Disconnect the AC Adapter from the camcorder.
To detach the battery pack
Slide the battery pack down slightly while sliding BATT.
RELEASE to detach it.
Battery pack Charging time
BN-V408U* _,pprox. 1 hr. 30 min.
BN_V416U _,pprox. 3 h_
BN_V428U _,pprox. 5 h_
*Provided
NOTES:
• If the protective cap is attached to the battery pack, remove
it first.
• During charging, the camcorder cannot be operated.
• Charging is not possible if the wrong type of battery is used.
• When charging the battery pack for the first time or after a
long storage period, the POWER/CHARGE _amp may not
light. In this case, remove the battery pack from the
camcorder, then try charging again.
• tt the battery operation time remains extremely short even
after having been fuIly charged, the battery is worn out and
needs to be replaced. Please purchase a new one.
•For other notes, ::_ pg. 38.
UsingTheBatteryPack
Perform steps ! - 2 in "Charging The Battery Pack _.
Maximum continuous recording time
•GR-D73/33
Battery pack LCD monitor on Viewfinder on
BN-V408U* 1 hr. t 0 rain. 1 hr. 40 rain.
BN-V416U 2 hr. 20 rain. 3 hr. 15 rain.
BN-V428U 4 hr. t0 rain. 5 hr. 50 rain.
• GR-D93
Battery pack LCD monitor on Viewfinder on
BN-V408U* 1 hr. 5 rain. 1 hr. 35 rain.
BN-V416U 2 hr. 15 rain. 3 hr. 5 rain.
BN-V428U 4 hr. 5 hr. 30 rain.
* Provided
NOTES:
• Recording time is reduced significantly under the following
conditions:
• Zoom or Recor&Standby mode is engaged repeatedly.
• The LCD monitor is used repeatedly.
• The playback mode is engaged repeatedly.
• The White LED Light is used.
• Before extended use, it is recommended that you prepare
enough battery packs to cover 3 times the planned
shooting time.
ATTENTION:
Before detaching the power source, make sure that the
camcorder's power is turned offi Failure to do so can result in
a camcorder malfunction.
UsingACPower
Connect the AC Adapter to the camcorder as shown in
the illustration on page 6,
NOTES:
• The provided AC Adapter features automatic voltage
selection in the AC range from t t0 V to 240 V.
• Do not allow the DC terrainats of the AC Adapter to come in
contact with metals, as this can result in a short circuit and
cause malfunction.
•For other notes, _:_pg. 38.
AboutBatte_es
DANGER! Do not attempt to take the batteries apart, or
expose them to flame or excessive heat, as it may cause
a fire or explosion.
WARNING! Do not allow the battery or itsterminals to
come in contact with metals, as this can result in a short
circuit and possibly start a fire.
GETTINGSTARTED EN 7
The Benefits Of
Lithium-Ion Batteries
Lithium-fon battery packs
are small but have a large
power capacity. However,
when one is exposed to
cold temperatures (below
10°C/50°F), its usage time
becomes shorter and it
may cease to function. If Lithium4on is vulnerable in
this happens, place the colder temperatures.
battery packinyour pocket
or other warm, protected
place for a short time, then
re-attach it to the camcorder. AS long as the battery pack
itself is not cold, it should not affect performance.
(If you're using a heating pad, make sure the battery pack
does not come in direct contact with it.)
For other notes, _pg. 38. "_
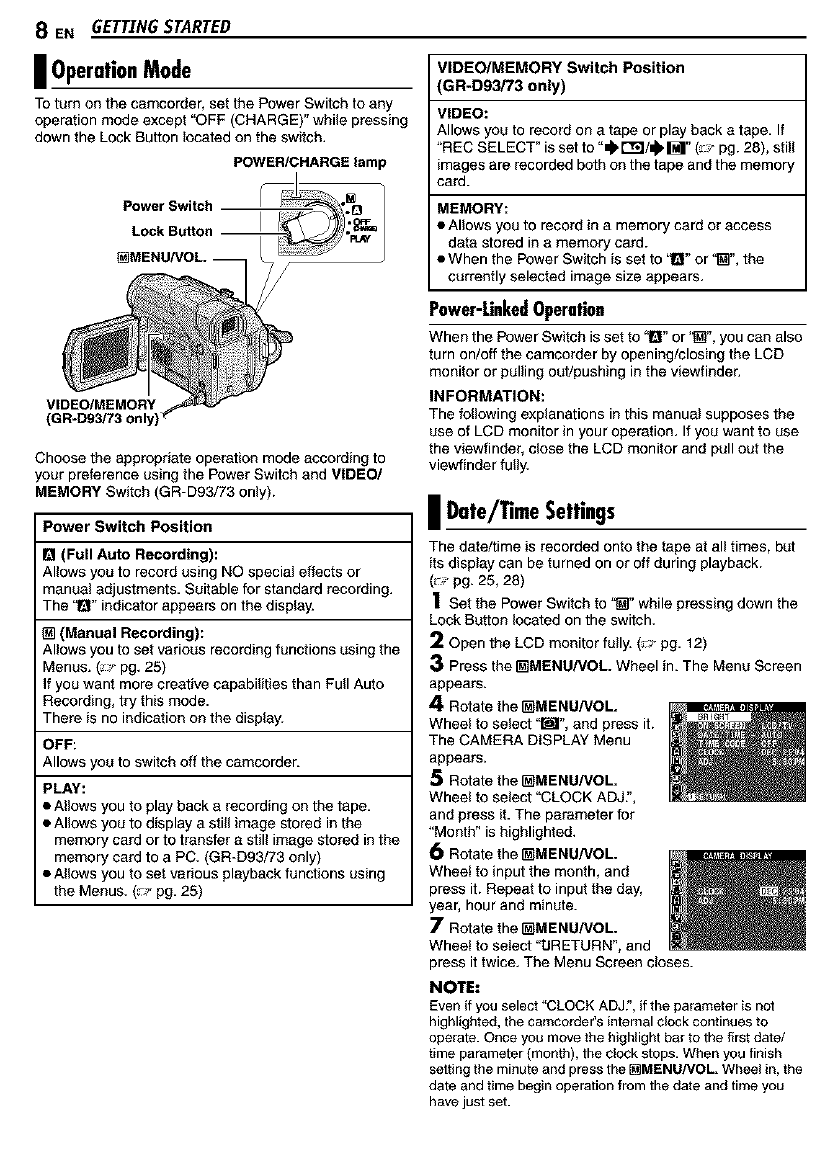
|GripAdjustment
1Adjust the velcro strip.
2Pass your right hand through the loop and grasp the
grip.
3Adjust your thumb and fingers through the grip to
easily operate the Recording Start/Stop Button, Power
Switch and Power Zoom Lever. Be sure to fasten the
velcro strip to your preference.
8 EN GETTINGSTARTED
I OperationMode
To turn on the camcorder, set the Power Switch to any
operationmode except "OFF (CHARGE)" while pressing
down the Lock Button located on the switch.
POWER/CHARGE lamp
Power Switch
Lock Button
VIDEO/MEMORY
Choose the appropriate operation mode according to
your preference using the Power Switch and VIDEO/
MEMORY Switch (GR-D93/73 only).
Power Switch Position
I_1(Full Auto Recording):
Allows you to record using NO special effects or
manual adjustments, Suitable for standard recording.
The "1_" indicator appears on the display.
(Manual Recording):
Allows you to set various recording functions using the
Menus. (_,,-pg. 25)
If you want more creative capabilities than Full Auto
Recording, try this mode.
There is no indication on the display.
OFF:
Allows you to switch off the camcorder.
PLAY:
•Allows you to playback a recording on the tape,
• Allows you to display a still image stored in the
memory card or to transfer a still image stored in the
memory card to a PC. (GR-D93/73 only)
• Allows you to set various playback functions using
the Menus. (_p pg, 25)
VIDEO/MEMORY Switch Position
GR-D93i73 only)
VIDEO:
Allows you to record on a tape or play back a tape, If
'REC SELECT" is set to "_ t'_l/_ M" (_,J-pg. 28), still
images are recorded bothon the tape and the memory
card.
MEMORY:
• Allows you to record in a memory card or access
data stored in a memory card.
• When the Power Switch is set to !_" or'_", the
currently selected image size appears,
Power-LinkedOperation
When the Power Switch is set to "l_" or'_", you can also
turn on/off the camcorder by opening/closing the LCD
monitor or pullingout/pushing in the viewfinder.
INFORMATION:
The following explanations in this manual supposes the
use of LCD monitor in your operation, If you want to use
the viewfinder, close the LCD monitor and pull out the
viewfinder fully.
|Date/TimeSettings
The date/time is recorded onto the tape at all times, but
its display can be turned on or off during playback.
(_p pg. 25, 28)
1Set the Power Switch to '_" while pressing down the
Lock Button located on the switch.
2Open the LCD monitor fully. (_J pg, 12)
3Press the _MENU/VOL. Wheel in. The Menu Screen
appears.
4Rotate the _MENU/VOL.
Wheel to select '_", and press it.
The CAMERA DISPLAY Menu
appears.
5Rotate the _MENU/VOL.
Wheel to select '=CLOCK ADJ,',
and press it. The parameter for
'Month" is highlighted.
6Rotate the _MENU/VOL.
Wheel to input the month, and
press it. Repeat to input the day,
year, hour and minute.
7Rotate the _MENU/VOL.
Wheel to select "tJRETURN", and
press it twice. The Menu Screen closes.
NOTE:
Even if you select "CLOCK ADJ?,if the parameteris not
highlighted,the camcorder's internal clock continues to
operate. Once you movethe highlightbar to the firstdate/
time parameter (month), the clock stops. When you finish
setting the minute and press the [_MENU/VOL. Wheel in, the
date and timebegin operation from the date and time you
havejust set.
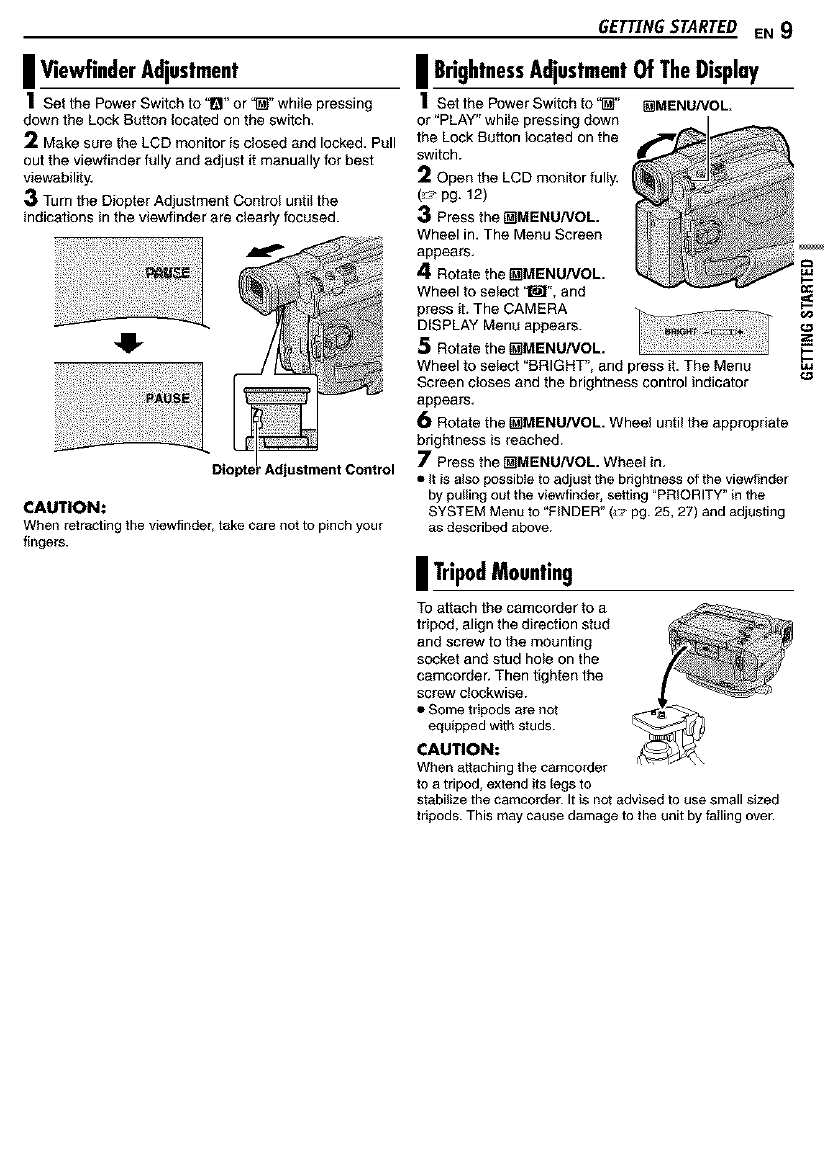
I ViewfinderAdjustment
1Set the Power Switch to 1_1"or '_' while pressing
down the Lock Button located on the switch,
2Make sure the LCD monitor is closed and locked, Pull
out the viewfinder fully and adjust it manually for best
viewability,
3Turn the Diopter Adjustment Control until the
indications in the viewfinder are clearly focused.
41-
'Adjustment Control
CAUTION:
When retractingthe viewfinder, take care not to pinch your
fingers.
GETTINGSTARTED EN 9
|BrightnessAdjustmentOfTheDisplay
1setthePowerSw_fchfo"_" []MENUNOL.
or "PLAY" whffe pressing down
the Lock Button located on the
switch.
2Open the LCD monitor fuffy,
(_,,-pg. 12)
3 Press the t_MENU/VOL
Wheel in, The Menu Screen
appears,
4Rotate the t_MENU/VOL.
Wheel to select '_', and
press it. The CAMERA
DISPLAY Menu appears.
5Rotate the t_MENU/VOL.
Wheel to select "BRIGHT", and press it. The Menu
Screen closes and the brightness control indicator
appears,
6 Rotate the _MENU/VOL. Wheel until the appropriate
brightness is reached.
7 Press the _MENU/VOL. Wheel in,
• It is also possibleto adjustthe brightness of the viewfinder
by pullingout the viewfinder, setting "PRIORITY" in the
SYSTEM Menu to "FINDER"(,,_'pg. 25, 27) and adjusting
as described above.
|TripodMounting
To attach the camcorder to a
tripod, align the direction stud
and screw to the mounting
socket and stud hole on the
camcorder. Then tighten the
screw clockwise.
• Some tripods are not
equipped with studs.
CAUTION:
When attaching the camcorder
to a tripod, extend its legs to
stabilize the camcorder. It is not advised to use small sized
tripods. This may cause damage to the unit by failing over.
10 ENGETTINGSTARTED
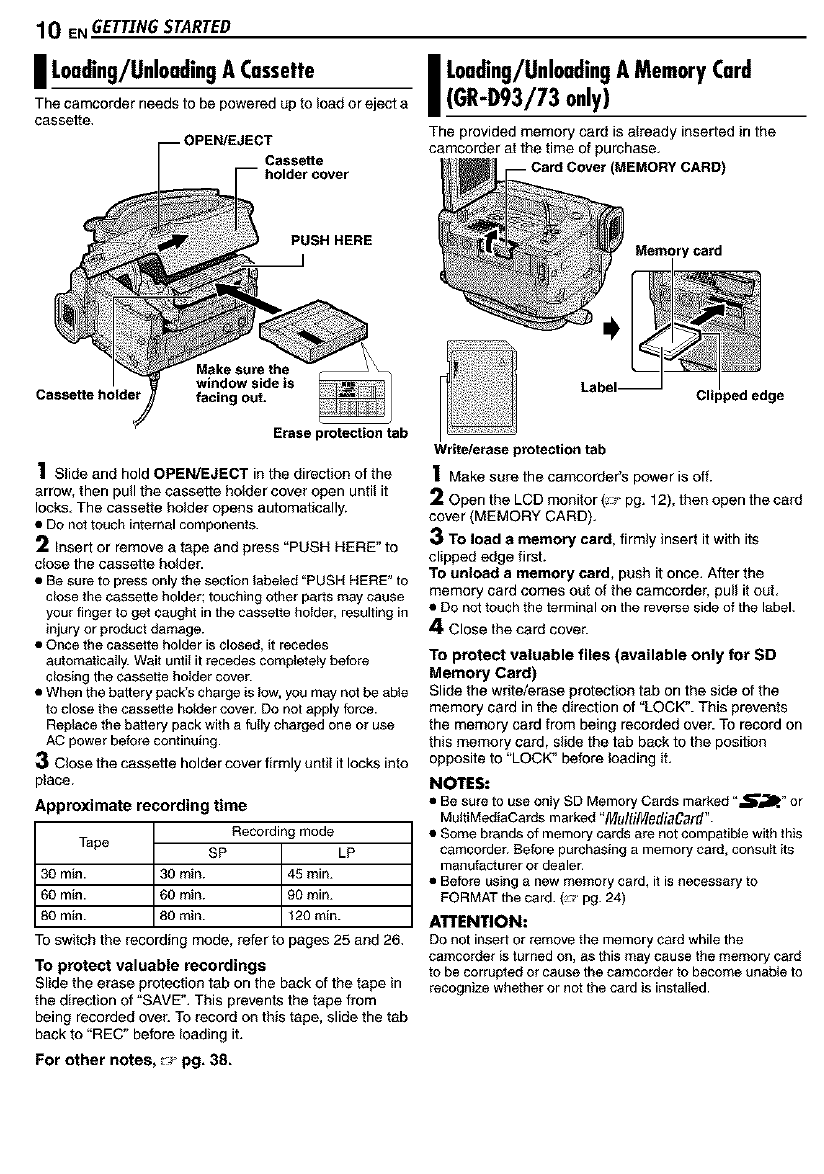
I Loading/UnloadingA Cassette
The camcorder needs to be powered up to load or eject a
cassette.
_--O PEN/EJEC_oalSd%erttcever
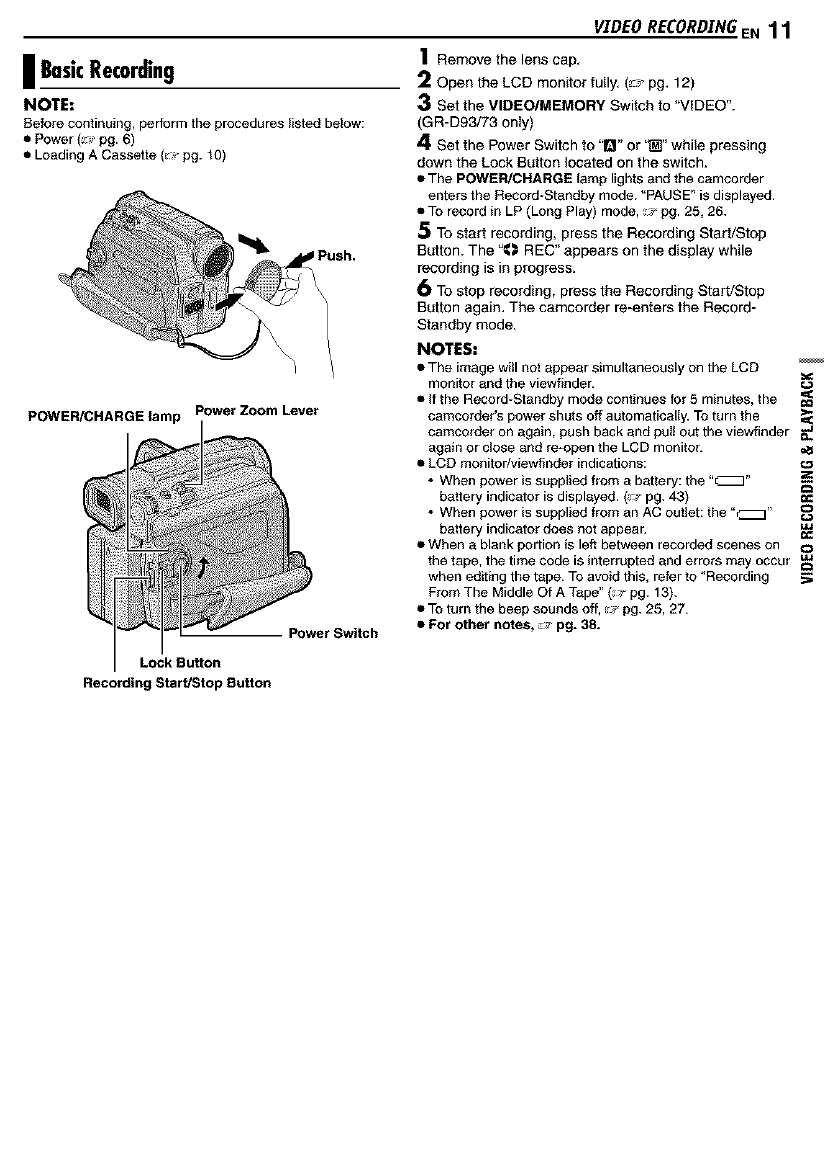
I Loading/UnloadingA MemoryCard
(GR-D93/73only)
The provided memory cam is already inserted in the
camcorder at the time of purchase.
(MEMORY CARD)
PUSH HERE
Make sure the
window side is
Cassette holder facing out.
Erase protection tab
1Slide and hold OPEN/EJECT in the direction of the
arrow, then pull the cassette holder cover open until it
locks. The cassette holder opens automatically.
• Do not touch internal components.
2Insert or remove a tape and press "PUSH HERE" to
dose the cassette holder.
• Be sure to press only the section labeled "PUSH HERE" to
cfose the cassette holder; touching other parts may cause
your finger to get caught in the cassette holder, resulting in
injury or product damage.
• else the cassette holder is closed, it recedes
automat foaIly. Wait until it recedes completely before
dosing the cassette holder cover.
• When the battery pack's charge is low, you may not be able
to close the cassette holder cover. Do not apply force.
Replace the battery pack with a folly charged one or use
AC power before continuing.
3Close the cassette holder cover firmly until it locks into
place.
Approximate recording time
Tape
30 min.
60 min.
80 min.
Receding mode
SP LP
30min. 45 min.
60min. 90 min.
80min. t20min.
To switch the recording mode, refer to pages 25 and 26.
To protect valuable recordings
Slide the erase protection tab on the back of the tape in
the direction of 'SAVE". This prevents the tape from
being recorded over. To record on this tape, slide the tab
back to "REC" before Iosding it.
For other notes, _pg. 38.
rcard
Write/erase protection tab
1 Make sure the camcorder's power is off.
2Open the LCD monitor (_:;_pg. 12), then open the card
cover (MEMORY CARD),
3 To load a memory card, firmly insert itwith its
cl{ppededge first.
To unload a memory card, push it once. After the
memory card comes out of the camcorder, pull itout,
• Do nottouch the terminal on the reverse side of the label.
4Close the card cover.
To protect valuable files (available only for SD
Memory Card)
Slide the write/erase protectiontab on the side of the
memory card in the direction of "LOCK". This prevents
the memory card from being recorded over. To record on
this memory card, slide the tab back to the position
opposite to "LOCK" before Iosding it.
NOTES:
• Be sure to use onIy SD Memory Cards marked "S_lle" or
MuitiMediaCards marked "MultiMediaCard".
• Some brands of memory cards are not compatible with this
camcorder. Before purchasing a memory card, consult its
manufactureror dealer.
• Before using a new memory card, itis necessary to
FORMATthe card. (_' pg. 24)
ATTENTION:
DOnot insert or remove the memory card while the
camcorder is turnedon, as this maycause ttle memory card
to be corrupted or cause the camcorder tobecome unable to
recognize whether or not the card is installed.
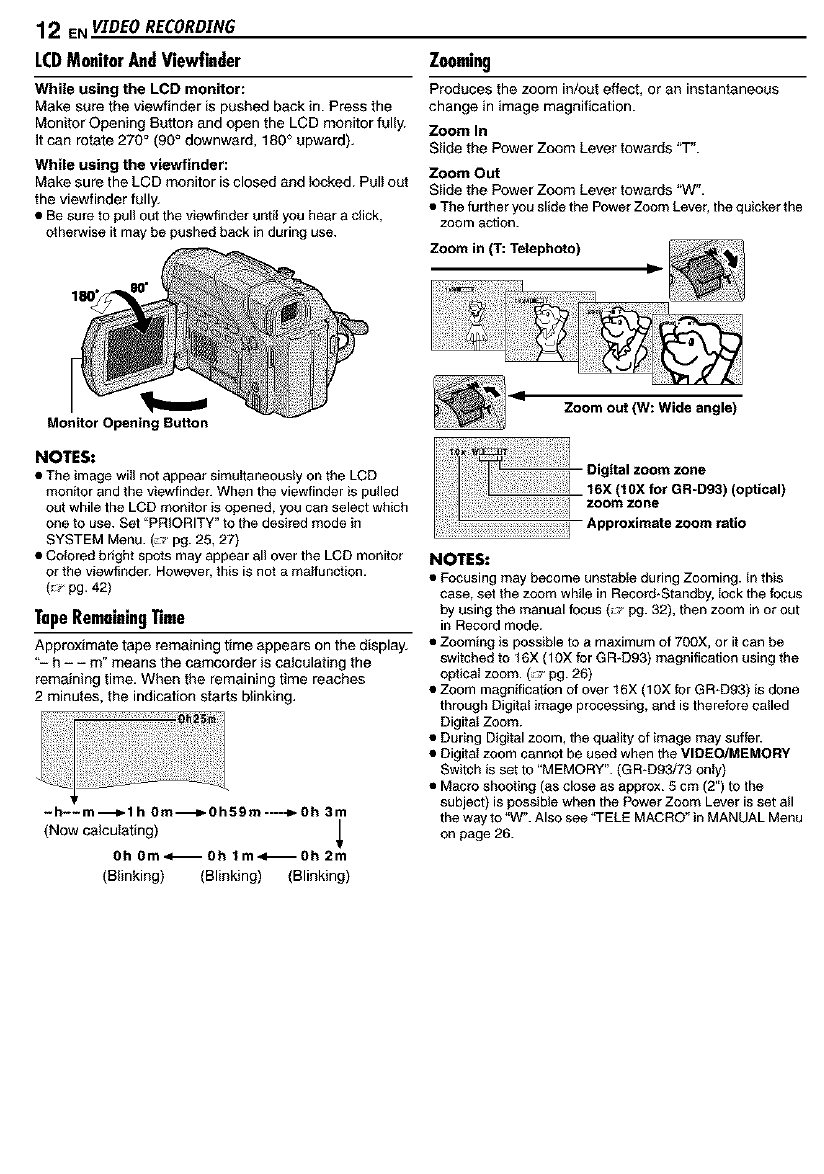
I BasicRecording
NOTE:
Before continuing, perform the procedures listed below:
• Power (!_ pg. 6)
• Leading A Cassette (_:_pg. t0)
POWER/CHARGE lamp Power Zoom Lever
Power Switch
VIDEO RECORD.[NGE N11
1Remove the lens cap.
2Open the LCD monitor fully. (_:_ pg. 12)
3Set the VIDEO/MEMORY Switch to "VIDEO".
(GR-D93/73 only)
4Set the Power Switch to '1_1" or "_" while pressing
down the Lock Button located on the switch.
• The POWER/CHARGE lamp lights and the camcorder
enters the Record*Standby mode. "PAUSE" is displayed.
• To record in LP (Long Play) mode, _ pg. 25, 26.
5To start recording, press the Recording Start/Stop
Button. The "_ REC" appears on the display while
recording is in progress.
6To stop recording, press the Recording Start/Stop
Button again. The camcorder re-enters the Record-
Standby mode.
NOTES:
• The image witl not appear simultaneously on the LCD
monitor and the viewfinder.
• If the Record_Standby mode continues for 5 minutes, the _=_
camcorder's power shuts off automatically. To turn the
camcorder on again, push back and pul! out the viewfinder _e.
again or close and re-open the LCD monitor.
• LCD monitor/viewfinder indications: c._
•When power is supplied from a battery: the "_" o
battery indicator is displayed. (_,_.pg. 43) ¢_
• When power is supplied from an AC outlet: the "_"
battery indicator does not appear.
• When a blank portion is left between recorded scenes on o
the tape, the time code is interrupted and errors may occur
when editing the tape. To avoid this, refer to "Recording ._
From The Middle Of A Tape" (_ pg. 13).
• To turn the beep sounds off, _ pg. 25, 27.
•For other notes, :.,' pg. 38.
Lock Button
Recording Start/Stop Button
12 ENVIDEORECORDING
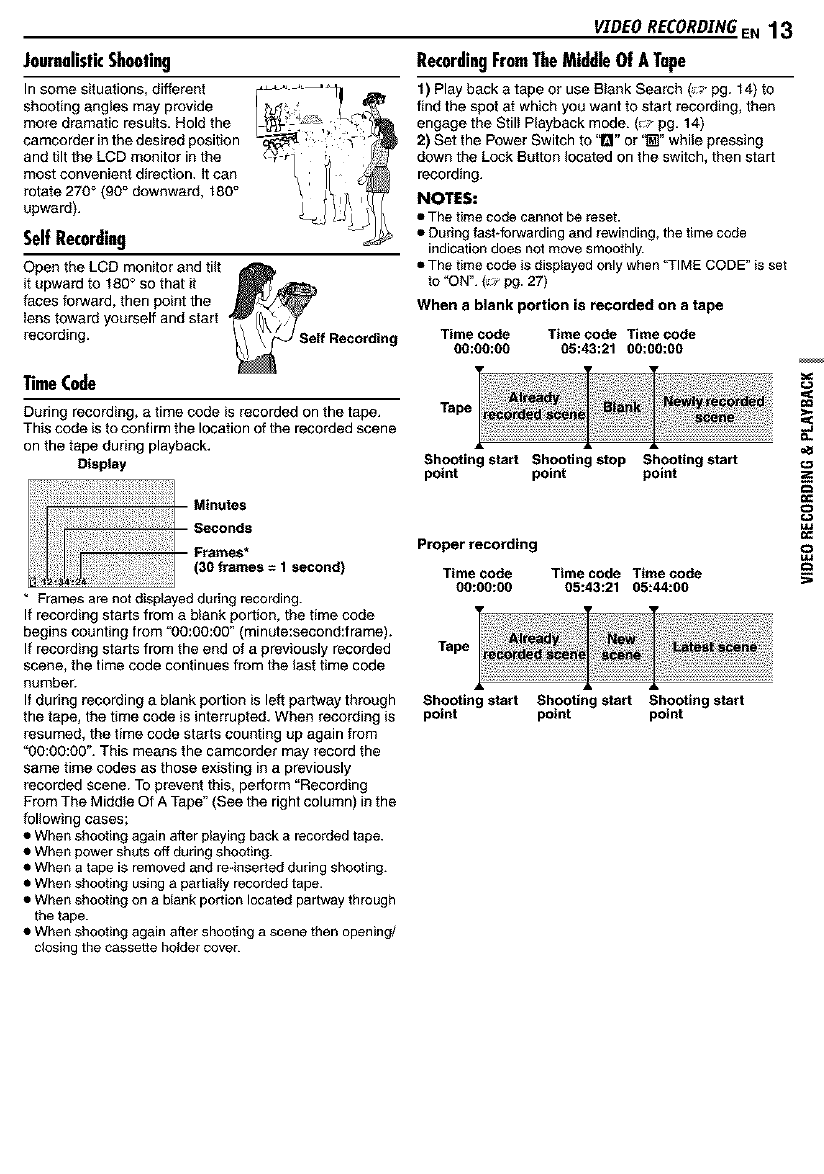
LCDMonitorAndViewfinder
While using the LCD monitor:
Make sure the viewf{nder is pushed back in. Press the
Monitor Opening Button and open the LCD monitor fully.
It can rotate 270°(90°downward, 180° upward).
While using the viewfinder:
Make sure the LCD monitor is closed and locked. Pull out
the viewfinder fully.
• Be sure to pul) out the viewfinder until you heara click,
otherwise it may be pushed back in during use.
Zooming
Produces the zoom in/out effect, or an instantaneous
change in image magnification.
Zoom In
Slide the Power Zoom Lever towards "T".
Zoom Out
S_ide the Power Zoom Lever towards "W".
• The further you slide the Power Zoom Lever, the quicker the
zoom action.
Zoom in (1": Telephoto)
Monitor Opening Button
NOTES:
•The image wii) not appear simuItaneousiy on the LCD
monitor and the viewfinder. When the viewfinder is pulled
out while the LCD monitor is opened, you can select which
one to use. Set "PRIORITY" to the desired mode in
SYSTEM Menu. (_' pg. 25, 27)
• Colored bright spots may appear all over the LCD monitor
or the viewfinder. However, this is not a maffu)_ction.
(_ pg. 42)
TapeRemainingTime
Approximate tape remaining time appears on the d{splay.
"- h - - m" means the camcorder is calculating the
remaining time. When the remaining time reaches
2 minutes, the indication starts blinking.
-h--m---_l h 0m-_0h59m----_- Oh 3m
(Now cafou_ating)
Oh 0m<_0h lm41_Oh 2m
(Blinking) (Blinking) (Blinking)
IZoom out (W: Wide angle)
I106:(mlOXfeOt GR-D93)(optical)
o0,t..oo..ooo
Approximate zoom ratio
NOTES:
• Focusing may become unstabIe during Zooming. In this
case, set the zoom wMle in Record*Standby, fock the focus
by using the manual focus (_ pg. 32), then zoom in or out
in Record mode.
• Zooming is possible to a maximum of 700X, or it can be
switched to 16X (10X for GR-D93) magnification using the
optical zoom. (,_ pg. 26)
• Zoom magnification of over 16X (10X for GR-D93) is done
through Digital image processing, and is therefore called
DigitaI Zoom.
• During Digital zoom, the quality of image may suffer.
• Digital zoom cannot be used when the VIDEO/MEMORY
Switch is set to "MEMORY". (GR-D93/73 only)
• Macro shooting (as close as approx. 5 cm (2") to the
subject) is possible when the Power Zoom Lever is set all
the way to "W". Also see _i-ELE MACRO" in MANUAL Menu
on page 26.
JournalisticShooting
In some situations, different
shooting angles may provide
more dramatic results. Hold the
camcorder in the desired position
and tilt the LCD monitor in the
most convenient direction. It can
rotate 270 ° (90° downward, 180°
upward).
SelfRecording
Open the LCD monitor and tilt
it upward to 180° so that it _'_
faces forward, then point the
lens toward yourself and start
recording. If Recording
TimeCode
During recording, a time code is recorded on the tape.
This code is to confirm the location of the recorded scene
on the tape during playback.
Display
* Framesare not displayed during recording.
If recording starts from a blank portion, the time code
begins counting from "00:00:00" (minute:second:frame).
If recording starts from the end of a previouslyrecorded
scene, the time code continues from the last time code
number.
If during recording a blank portionis left partway through
the tape, the time code is interrupted. When recording is
resumed, the time code starts counting up again from
"00:00:00". This means the camcorder may record the
same time codes as those existing in a previously
recorded scene. To prevent this, perform "Recording
From The Middle Of A Tape" (See the right column) in the
following cases;
•When shooting again after playingback a recorded tape.
• When powershuts off during shooting.
• When a tape is removed and re-inserted during shooting.
• When shooting using a partiallyrecorded tape.
• When shooting on a blank portion located partway through
the tape.
• When shooting again after shooting a scene then opening/
closing the cassette holdercover.
VIDEO RECORDING,EN 13
RecordingFromTheMiddleOfATape
1) Play back a tape or use Blank Search (_J'pg. 14) to
find the spot at which you want to start recording, then
engage the Still Playback mode. (_J pg. 14)
2) Set the Power Switch to '1_1"or "_" while pressing
down the Lock Button located on the switch, then start
recording.
NOTES:
• The time code cannot be reset.
• Curing fast*forwarding and rewinding, the time code
indication does not move smoothly.
• The time code is displayed only when 'q-IME CODE" is set
to "ON". (_ pg. 27)
When a blank portion is recorded on a tape
Time code Time code Time code
go:go:go 05:43:21 OO:OO:OO
Tape
Shooting start Shooting stop Shooting start
point point point
Proper recording
Time code Time code Time code
00:00:00 05:43:21 05:44:00
Tape
Shooting start Shooting start Shooting start
point point point
14 EN VIDEO PLAYBACK
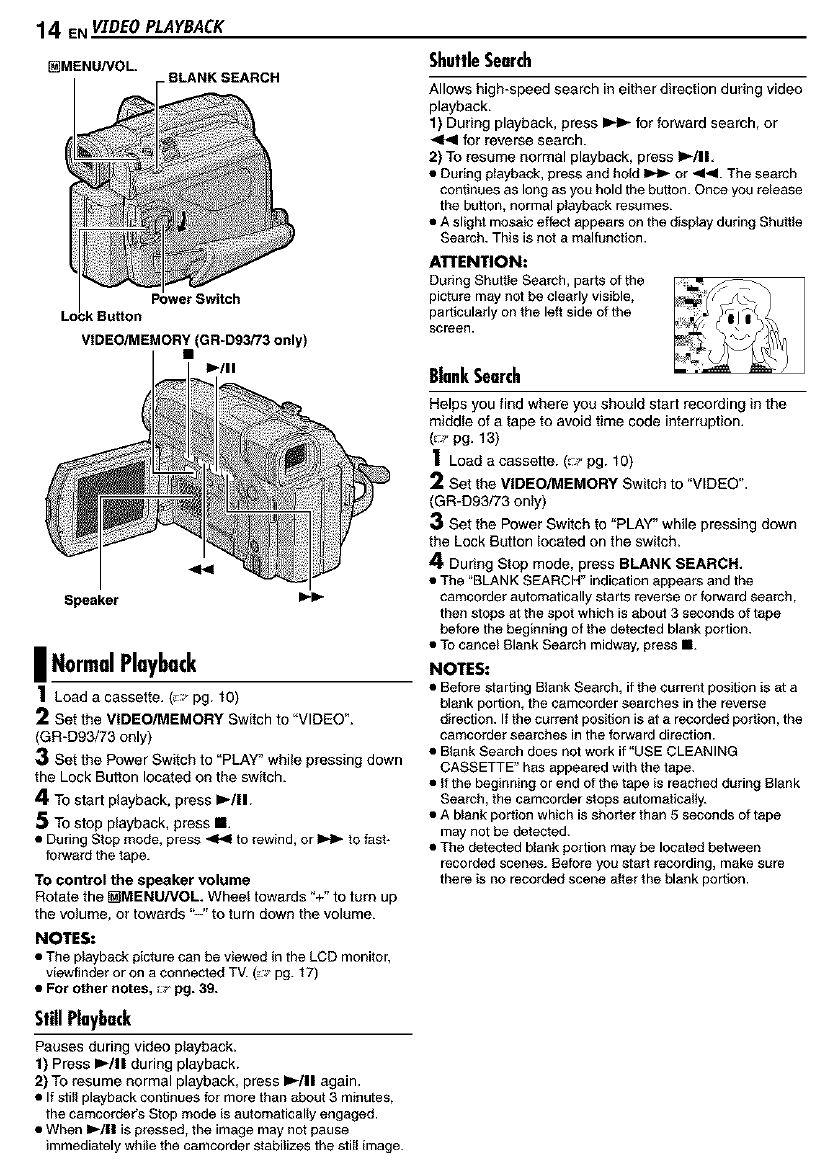
[_MENU/VOL .BLANK SEARCH
Power Switch
VIDEO/MEMORY (GR-D93/73 only)
I_/11
|NormalPlayback
1Load a cassette. (_:_pg. 10)
2Set the VIDEO/MEMORY Switch to "VIDEO".
(GR-D93/73 only)
3Set the Power Switch to "PLAY" while pressing down
the Lock Button located on the switch.
4To start playback, press i,-/ll.
5To stop playback, press II.
• During Stop mode, press _ to rewind, or _ to fast-
forwardthe tape.
To control the speaker volume
Rotate the _MENU/VOL Wheel towards "+" to turn up
the volume, or towards "-" to turn down the volume.
NOTES:
• The playback picture can be viewed in the LCD monitor,
viewfinder or on a connected TV. (_._'pg. 17)
•For other notes, :;_ pg. 39.
StillPlayback
Pauses during video playback.
1) Press )/11 during playback.
2) To resume normal playback, press )/11 again.
• If still playback continues for more than about 3 minutes,
the camcorder's Stop mode is automatically engaged.
• When II_/I I is pressed, the image may not pause
immediately while the camcorder stabilizes the still image.
ShutfleSearch
Allows high-speed search in either direction during video
playback.
1) During playback, press _ for forward search, or
<1<1for reverse search.
2) To resume normal playback, press l='-III.
• During playback,pressand hold _ or <1<1.The search
continues as longas you holdthe button. Once you release
the button, normal playback resumes.
• A slight mosaic effectappears on the display during Shuttle
Search. This is not a malfunction.
ATTENTION:
During Shuttle Search, parts of the
picture may not be clearly visible,
particularly on the left side of the
screen.
BlankSearch
Helps you find where you should start recording in the
middle of a tape to avoid time code interruption.
(_p pg. 13)
1Load a cassette. (=p pg. 10)
2Set the VIDEO/MEMORY Switch to "VIDEO".
(GR-D93/73 only)
3Set the Power Switch to "PLAY" while pressing down
the Lock Button located on the switch.
4During Stop mode, press BLANK SEARCH,
• The "BLANK SEARCH" indication appears and the
camcorder automatically starts reverse or forward search,
then stops at the spot which is about 3 seconds of tape
before the beginning of the detected blank portion.
•To cancel Blank Search midway, press •.
NOTES:
• Before starting Blank Search, if the current position is at a
blank portion, the camcorder searches in the reverse
direction. If the current position is at a recorded portion, the
camcorder searches in the forward direction.
• Blank Search does not work if "USE CLEANING
CASSETTE" has appeared with the tape.
• If the beginning or end of the tape is reached during Blank
Search, the camcorder stops automatically.
• A blank portion which is shorter than 5 seconds of tape
may not be detected.
• The detected blank portion may be located between
recorded scenes. Before you start recording, make sure
there is no recorded scene after the blank portion.
PlaybackUs;rigTheRemoteControl
(GR-D93/73only)
The FuIFFun_.,_ionRamo'ie Control Unit saraoperate this
carncorderfrom a biers,nee as well as the be,sic
operations (Playb_k, Stop, Pause, Pa_4-For,verd an_
Rewind) of your VCR. It also makes ab_itional playb_k
functions possible. (_ pg. 16)
InstallingTheBaltery
BeamE|fe¢liveAinu
{indooruse)
VIDEOPLAYBACKEN15
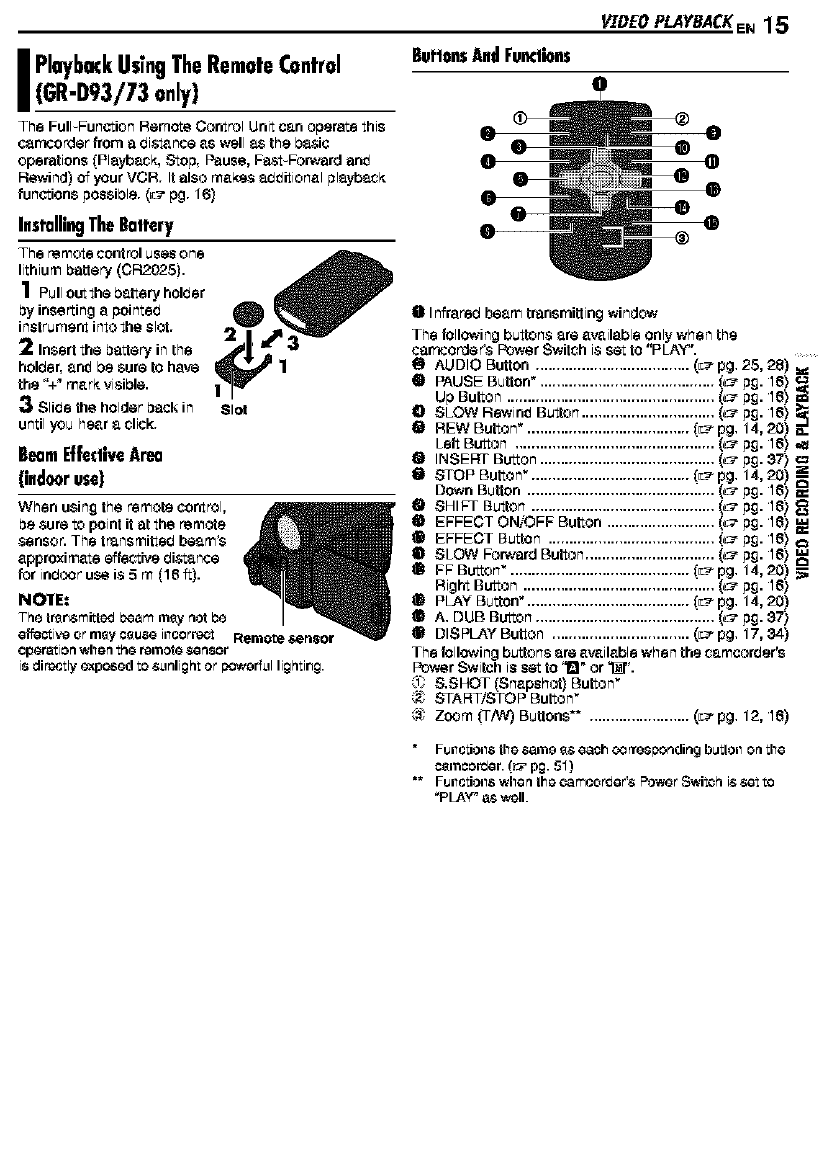
Bul'|onsAndFum|ions
eInfrared beam transmittingwindow
The followingbuttonsareavailableonlywhen the
car'_corda_Power Switchi$setto"PLAY".
O AUDIO Button ..................................... (L_pg. 25, 28)
•PAUSE Button*. ......................................... [_" p£. 16)
Up Button .................................................. (_" p£. 16)
OSLOW Rewind Button ................................ (_- p£. 16)
tii REWButton ....................................... _ pg. 14,20) _.
Left Button ................................................ _- p£. 16) ,,_
Q INSERT Button .......................................... (_" p£. 37)
ll} STOPButton ...................................... _ pg. 14,20) _
Down Button ............................................. _" p£. 16)
_1 SHIFT Button ............................................ (_" p£. 16)
EFFECT OWOFF Button .......................... (_" p£. 16)
EFFECT Button ........................................ [_" p£. 16)
SLOW ForWard Button ............................... (_" p£. 16)
FF Button ........................................... _ pg. 14, 20)
Right Button .............................................. _" p£. 16)
PLAY Button'. ...................................... [L_ pg. 14, 20)
A. DUB Button ...................................... _....(c_ p£. 37)
DISPLAY Button ................................. (_'_pg. 17, 34)
The followingbuttons are available when the camcorber's
Power Switch is set to '1" or _".
0 &SHOT [Snapshot) Button"
(,_ START/STOP Button
_ Zoom 0-A_/)Buttons _ ........................ (_pg. 12, 16)
• Fu_lctio_ls the same _s each _rrosponding b_tlo_l on the
cemcor_er. (_ pg. 51)
** Fu_ctio_s when the ¢amcor_er'_ Powor Switch i_ r,et to
_PLAY" as well.

16 EN v_rDEo PLAYBACK
SLOW Rewind
ELaton
Left Button
DownButton
or STOP
SHIFT
1Button
or PAUSE
BLrUton
-Right Button
-PLAY
Slow-MotionPlayback
Allows slow speed search in either difaction during video
playback[.
During normal video playback, press SLOW (_11 or lip)
more than approx. 2 seconds.
•After approx. 5 minLtLes (1 minLtLefor GR-Dg,3) Capprox. 20
secor_ds with an 80-minute c_t.*sette_ill Slow Rewiredor
_ep rex. 5minutes in Slow Fon_rd, nermal playback
resulTl_.
•Te pause Slew-Motion playback, press PAUSE (11).
•Te Stop Slow-Motion playback, press PLAY (1_.
NOTES:
•YOU c_ll _180 ellgage Slew- h,1ctior_ Playback from $Ull
Playback by premising SLOW ('41 or lb.) more than approx.
2 se_nd8.
•Durir_g Slow=Motioq Pl_ybacl_ due to digital image
pro_ossing, the picture nl_y take oil _ mos_i_ effect.
•After SLOW (,41or I1_)is pressed and held, the still image
may Pe displayed for a few se_:_nd$, followed Py e blue
8creel1 for a _w S#n_. This is rlet 8 mal_llctiorl.
There may I_ea small martjir_ between the slow-motion
playback start poiot yo_nchose arid the actual start point for
Slow-Motion Playback.
Durir_g Slow-Motion Playback, there will be dicturPar_¢os ir_
video and the picture m_y seem unctaPle, especially with
Steady imsgos. This is not a i'llslfLlnctierl.
Frame-By-FramePlayback
Allows f_e-by f_me s_arsh during video playbasit.
During normal or _ill playbecit, press SLOW ilIPl
repeatedly for forward or SLOW (41) repeatedly for
reverse. Each time SLOW (41 or I1_) is pressed, the
frame is played back.
2) At the point you want to zoom in,press
the Zoom Button _r).
•Tozoom eL,t, pressthe Zeom E_nttar_(W).
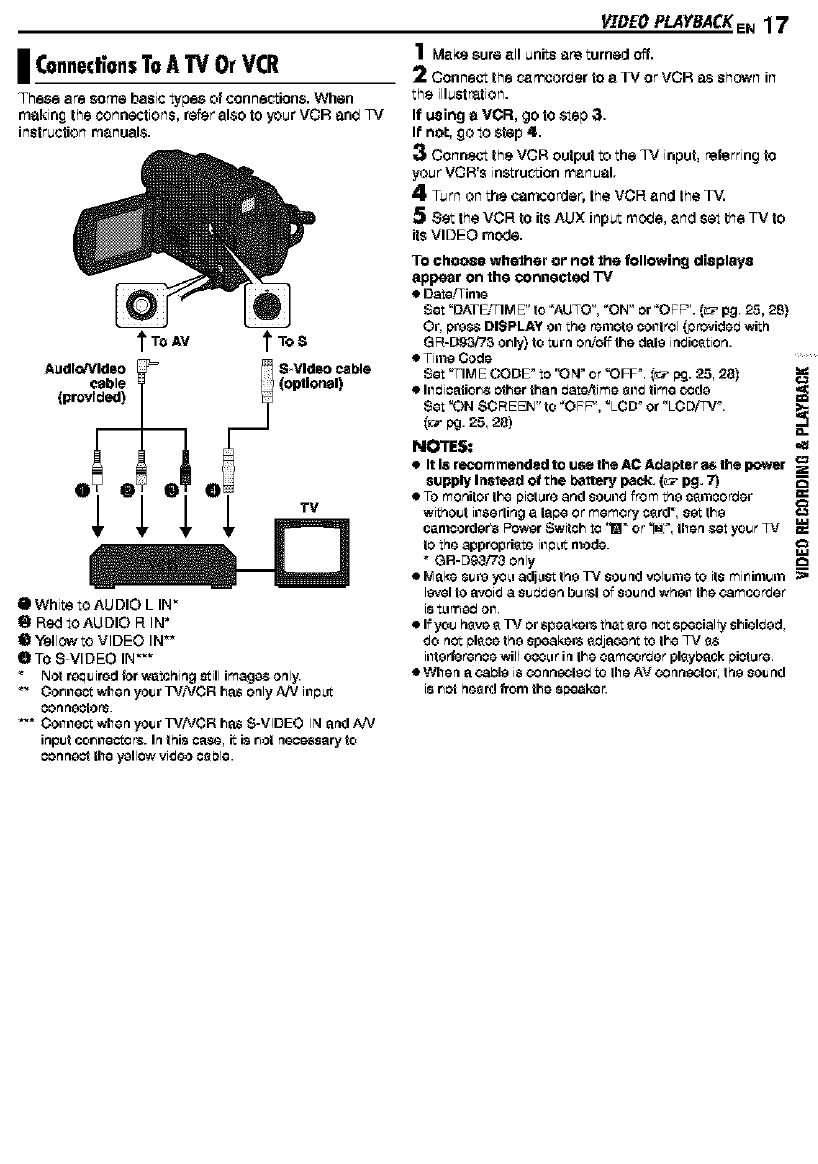
I ConnedionsTo A TV Or VCR
These are some basic types of con ne_fon& When
making the connections, rear also to your VCR an_ IV
Jnstructfon m_nual$.
Audio/Video
cable
(provided)
OWhite to AUDIO L IN"
g ROd toAUDIO R IN _
I1_Yellow to VIDEO IN _
OTo S VIDEO IN""
Not r_qu ired for washing still images only.
_" Cor_nest when your I_/VCR has only AN inp_it
con hectors.
"_* Collllest when your TViVCR has S-VIDEO IN and AN
input cor_nestor& In this case, it is r_ot neom;sary to
oonnect the yctlow video c_ble.
V'[BEO PLAYBACK EN 17
1 Meke sure ell units ere turned off,
2Connect the r._recorder to a TV orVCR as shown in
the illustration.
If using o VCR, go to step ;3.
It'no:, go to step 4,.
3Connect the VCR output to the TV input, referring to
your VOWs instructionmenuel.
4Turn on the cerncorder,the VOR end the TV.
5Set the VOR to its AUX input mo_e, end set the TV to
its VIDEO mode.
TO choose whelher or not the following displays
appear on the connected "IV
• Dete!Time
Set _DATEJTIM E" to _AUTO", _Or-4"or _OFP'. (_ pg. 25, 28)
Or, pres,s DISPLAY on the remote control (provided with
GR-Dg&,'73 or_ly)to turn on/off the date ipeicetion.
•Time Code
Set "TIME CODF to "ON _or "OFP. _:_ _j. 25, 28)
•Illdioatiorl$ other than dateAime 811dtime o3de
Set "ON SC R E Et-4"to "OFP', "LCD _ or "LC D,rFV_.
NOTES:
• It Is recommended to use the AC AcCepter _the power
supply Instead of the baftery pack. {_ pg. 7)
•TO monitor the picture and sound from the c_rnoorder
without inserling a lape or memory c_rd', set the
cenlcorder's P0wer Switch to 'W_0r "_M:_, then set y'ot_r _V
to the appropriate illp_it mode.
G R-D9,3/'/3 only c3
ol'_lakesuieyo_adj_sttheWsoundvolul'neto its mir_inlt_rn _-,
level to a_id a st_dden bu_st of SOUnd whet1 the oamcorder
i8 t_gr_ed oil.
• If you hsve 8 I_/or Speaker8 thet 8re not specially shielded,
do net F_leoethe speakers edjacer_ to the _V es
illterforenoe will ooo_grin the camoorder plsyback F_ict_re.
• When a oa_le is 03 nneoled to the AV O3nneofor, the SOUnd
i8 r_ct peerd f_om the speaker.
18 END,$.C,RE¢ORDI_#G(GR-D93/'D73only)
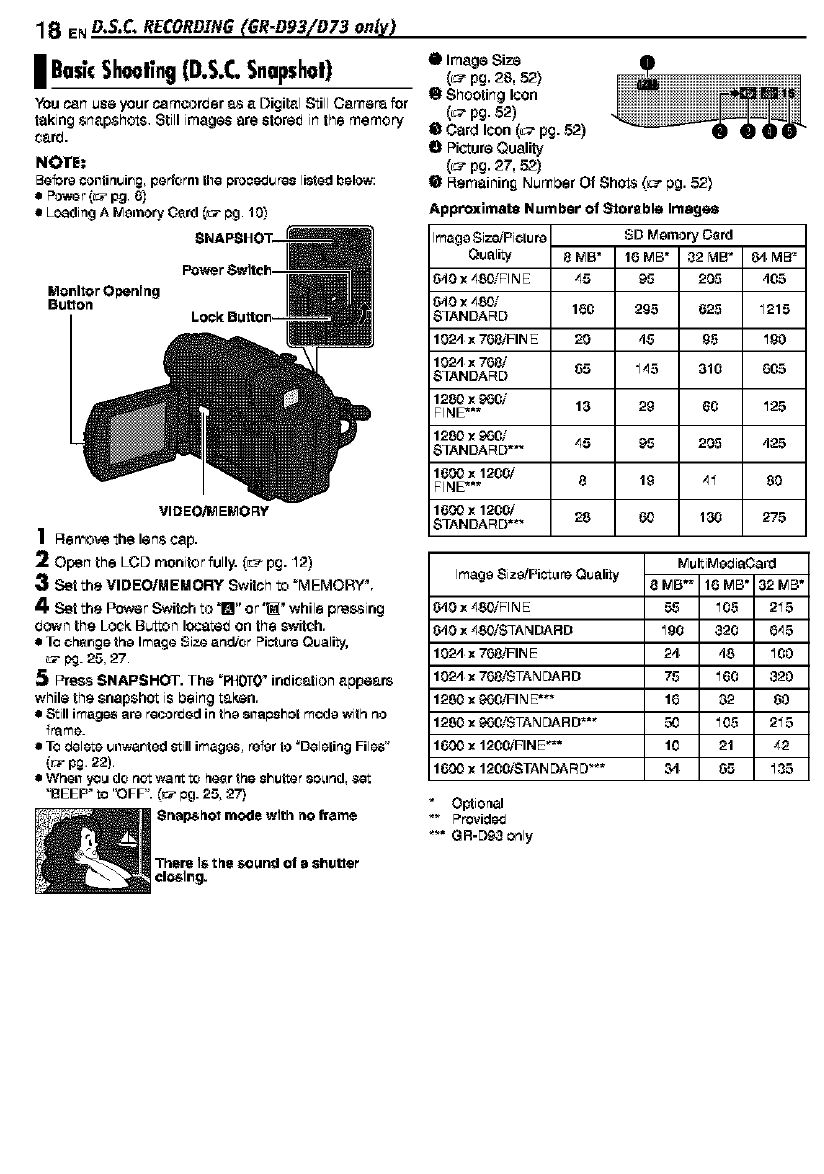
I BasicShooting(D.S.C.Snapshot)
You Pan usa your camsorber _s a Digi_l Still Camar_ for
taking snap.shots, Still _magas are stored inthe memor_
card.
NOTE:
Beforeoolltinuir_g,performtile prooeduros li_ed below:
Power (r_ pg 6)
•Loadirlg AMemory O_rd _:_ pg. 10_
Monitor Opentng
Bu_ort
VID EO/I_IEMO RY
There tsthe sound of ashutter
closing.
App_imate Number of Storable Images
Image Sizo/PictiJ re SD Memory O_rd
Quali_ 8 MB* 16 MB* 32 MB" 64 MB=
640 x _SOiFI N E _5 _._ 20,._ 4(35
_0 x,180/
SXANDARD 160 295 6_o5 "f215
10_o4x 768iFI_E 20 4,_ 95 _90
1024 x 760/
SXANDARD 65 "f,15 310 605
1280 x _6_
FINE=.= 13 29 60 _25
1280 x _6_
160_ x 1200/
FINE=.= 8 19 ,1"f 80
160_ x 1200/
SXANDARD._, 28 60 13(3 275
MiJItiMerJiaCard
Image Size/Pier,ire Quality 8MB *= 16MB* 3_°MB*
640 x _SOiFI N E 55 _05 2"f5
640 x _SOiS_ANDARD _90 320 6,15
10_o4x 768iFI_E 24 ,18 _00
10_o4x 760/STAN DARD 75 _60 320
1280x_60iFINE *_" 16 _60
1280 x _60/STAN DARD =*_ "30 _05 2"f5
160_ x 1200/1:1N E_=* 10 21 ,12
160_ x 1200/STA_ DARD _= ._.'l 65 _5
Optional
_" Providc_J
_'* GR-D93 only
DubbingStillImagesRecordedOnATope
ToAMemoryCord
Still images c_n L_ _ubbad f_rn _ t_pe to amemory
oar_,
1Load a cassette. (L-_ pg. 10)
2Load a memory oard. $_- pg. 10)
Sat the VIDEOIMEMORY Switch to "VIDEO".
4Sat the Power Switch to 'PLAY" while pressing down
the Lock. Button located on the By,itch.
5Sat "r_ Wb_ COPY" to "ON". (L"_ pg. 25, 28)
6Press I_/ll to start playback.
7At the point you w_nt to dub, press I,-/ll ._g_in to
engage Still Pl._yb._ck.
8TO dub the image, press SNAPSHOT.
•Ths "WP[]" ir_rJica_ion_ppears rJ_lring dubbing.
• Ths selected image is _tored in ths memory oard.
NOIES:
•If SNAPSHOT i_ p_Bs_ ir_si_p 8whGn _ mGmory Card is
not IoadGd, ths nlG_._z_g__COPYING FAILED" is di6pl_y_d.
•If an imagG r_¢ordc_J on th_ _ap_ _sing "_11DE MODE"
_:_ pg. 26_ i_ dl__hs_ to a msmoF:/0._, thG WIDE iI]orJG
idG_tifyJr_g_igr_l i_ ilot dubbG_ with it.
•TO u$o F_lt_yback $_i(tl sf{_)¢'_ with avideo imag_ yo_
wi_h to dub, pGrf_rnl up to stop eu_iilg th_ romots 03ntrol
(p_vJ_od). _c_ pg. 16)
• Imagc_sarG ¢J_lbb_vJ ir_640 x,180 pix_ls.
D,$.£, RECORDING(GR-D93/B73 only) EN 19
f,_
ej
¢fa
.-i
F--
¢fa
.-i
m
20 ENg'&¢" PLAYBACK(GR-DgS/D73On!y)
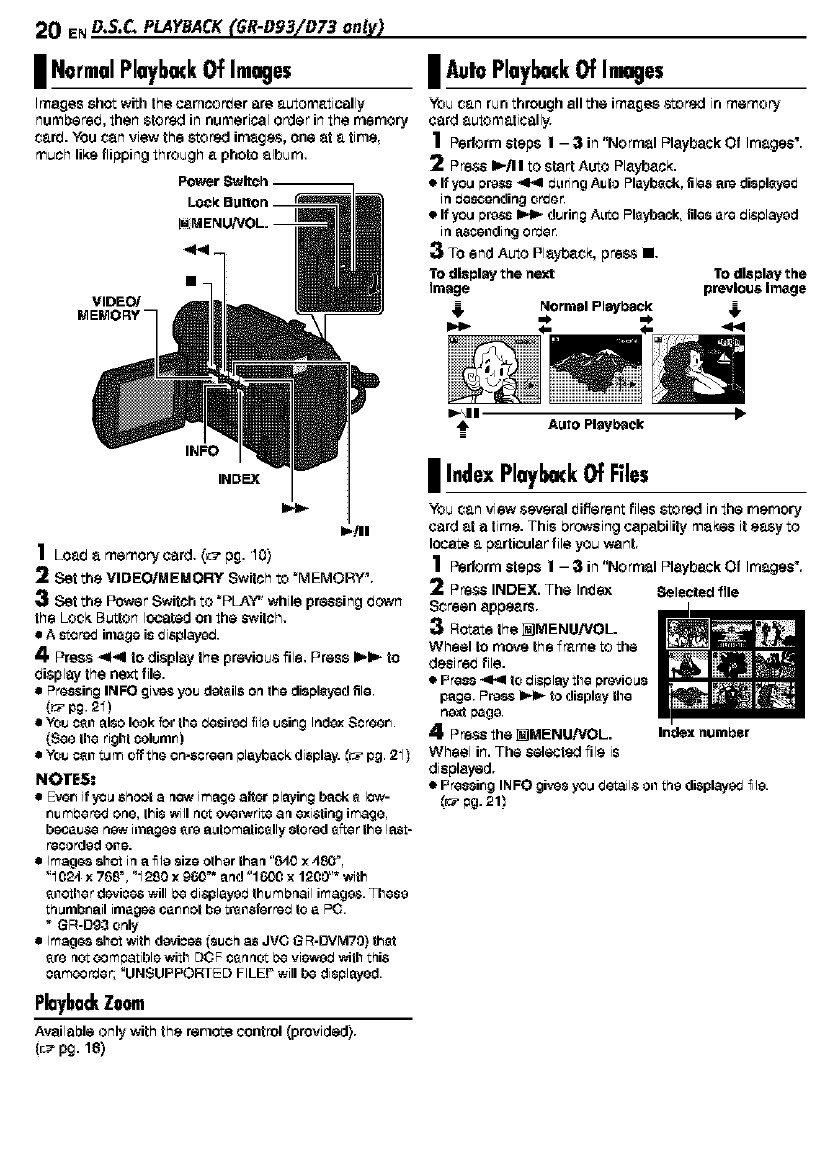
INormalPlaybackOf Images
Images shut with the Cemco_er are automatically
numbered, then stored in numerical a_er in the memory
Card. You Can view the stored irn_g_s, one _t a time,
much like flipping though a photo album.
PowerSwkch
VIDEO#
INFO
INDEX
e,._ll
1Laa0 a memorycard, (u:7 p£. 10)
2Set the VIDEO/MEMORY Switch to "MEMORY _.
3Set the Power Switch to "PLAY" while pressing down
the LOCK Button Iocuted on the switch,
•Astored image is displayed.
4. Press _d41 to display the previous file, Press _1_ to
display the next file.
• Pressing INFO give_ you details on the displeyed file.
(r_pg 21)
•You cen also look for the desired fil_ using Ind_ Screen.
(See the right column)
• You c_n tum off the on-screen playback display. €_ pg. 2_ )
NOTES:
•E_n if you shoot a now image alter playing back _ Iow-
nurebated one, this will not overwrite an existing image,
beasut._ new images _re a_domatic_lly stored _fter the last-
recorded oile.
•Images shot in a fil_ size oth_r than "640 x480 _,
_ 024 x 768% "_280 x9"60_* and "1600 x 1200"* with
8nether device6 will be displayed thumDnail images. These
thumbnail images cannst be trensierred to a PC.
" GR-Dg3 only
•Images shot with d_wfo_s (such as JVC G R-DVMT0) thst
8re not o3mpatible with DCF cermet ba viewed with this
oamo3rder; _UNSUPPORffED FILE!" will be displayed.
Ploybo&Zoom
Available only with the remute control (provided).
(L_ pg. lit)
I,-\ll
tAuto Playback
D.$,C. PL4YgACK(GR-Bg3/B73 only) EN 21
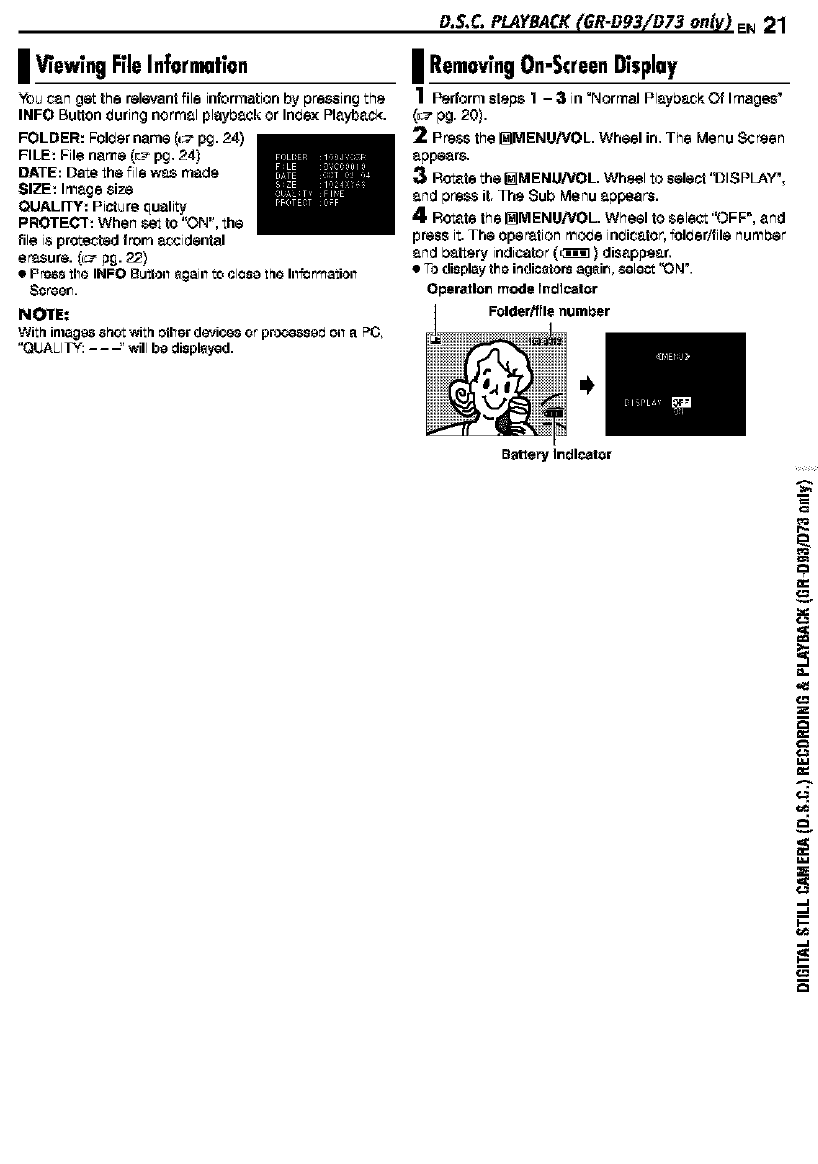
I Remov;ngOn-ScreenD;splay
1 Perform steps 1 - 3 in "Normal Playb_k Of Images"
(_ pgr 20).
2F_ss tha I_IMENU!VOL. Wheel in. The Menu Screen
appears.
3ROtatethe _MENUiVOL. Wheel to select "DISPLAY',
and press it. The Sub Menu appears.
4ROtate the I_IMENU!VOL. Wheel to select "OFF _,and
press it. The operation rn_e indica|ar, folder/file number
and battery indicator ([3D_]) disappear.
•To display the indicf4ors agf_in,SeleCt'_)N'.
Operatto_ mode rndlcalor
NOTE:
With inlege8 shot with other devices or processerJ oil _l PO,
"QUALITY: - - -_' will be displf_yGd.
Battery 1_dlcator
r..
n:
be=
E
a
n:
n:
_C
l,-
m
a
22 E, ADmTZONAL FEATUR_ FORD.S.¢. {GR-D93/D73 only)
ProtectingFiles
The Protect mode helps prevent the _ideatel erasure
of files.
1Leadamemer_sard,(_.pg.10)
2 Set the VIDEOIMEMORY Switchto "MEMORY'.
3Set the PowerSwitch to "PLAY" while pressingdown
the Lock Button located on the switch.
•A Ctore_Jfileis displayS.
4. Press the [] MENU,-'VOL.Wheel in. The Menu Screen
appears,
5Make sure 'PROTECT" is
selec-red, and press the _MENUi
VOL. Wheel in. The Sub Menu
appears.
ToRemoveProte¢lion
Before doing the following, perform steps 1 - 5in
"Protecting Files".
TO remove protection from the currently displayed
file
6 Rotate the _MENU/VOL. Wheel to select
_URRENT", and press it.The PROTECT screen
appears,
7Press _tl-tl or _ to select the _esired file.
Rotate the [] MEN U,-'VOL.Wheel to select
"EXECUTE", and p_ss it.
•TOcancel selection, $eleot "RETURN".
•Repeat steps 7anrJefor all filesy,3_want to remove
protectiem
TO remove protection from ell files stored in the
memory card
6Ro_te the _MENU!VOL. Wheel to select
"CANO.ALU', and press it.The PROTECT screen
appears.
7Ro_te the _MENU!VOL. Wheel to select
"EXECUTE", and press it.
•TOcancel selection, $elect "RETLIRN_.
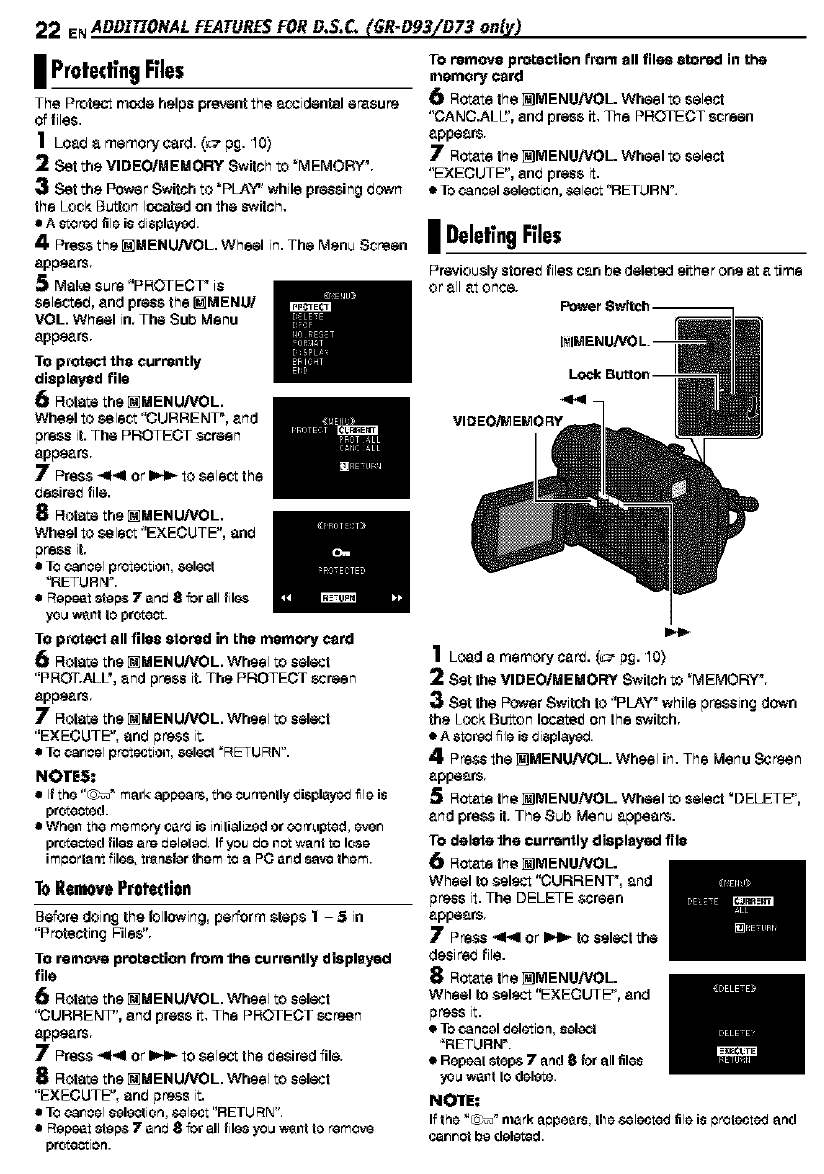
|DeletingFries
VIDEO/MEMORY
ADDITIONAL FEATURESFORD,&C. (GR-D93/D73 only) EN 23
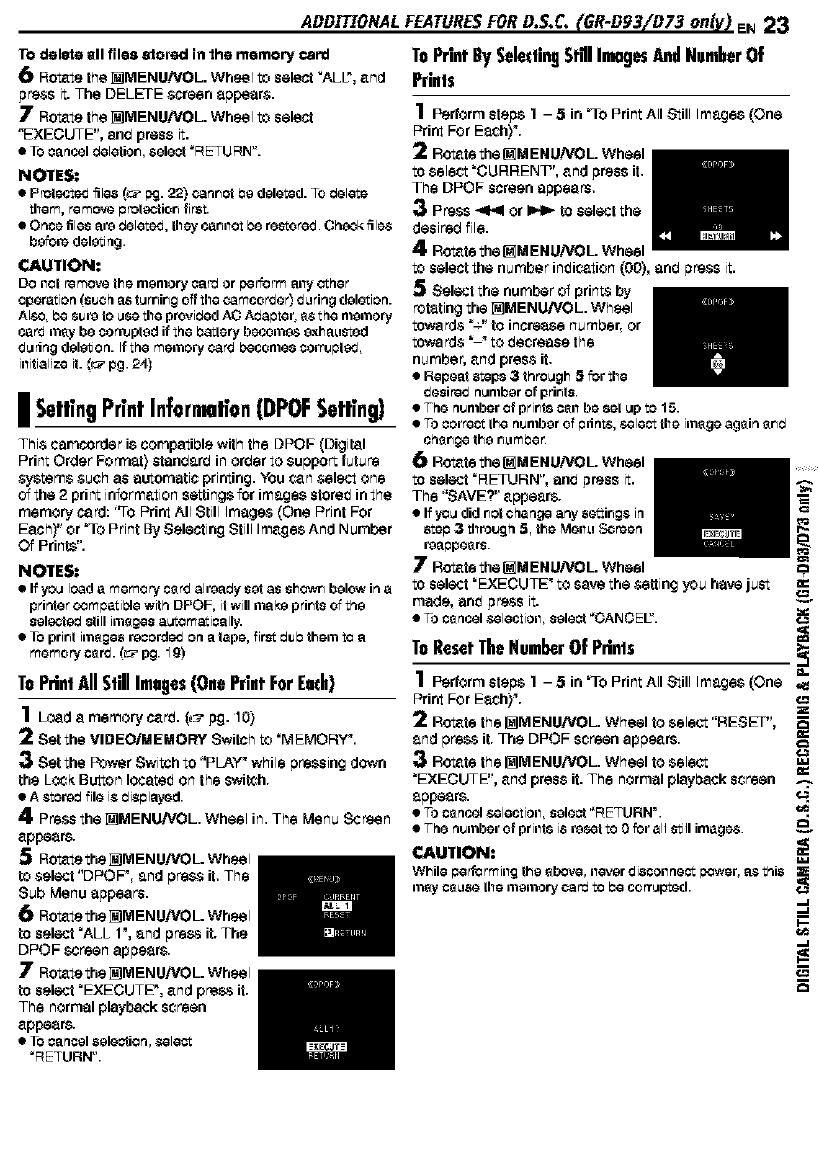
TO delete ell files _tered in lhe memory card
Ro_te the _MENU!VOL. Wheel to select "ALl", and
press it. The DELETE screen appea_.
7Ro_te the _MENU!VOL. Wheel _ select
"EXECUTE", end press it.
•To Cancel _elotion, select _RETURN".
NOTES:
•Protected files (_:__J. 22) Cannot P_ d_leted. TOrJelote
them, remove proteclion first.
•Once files are rJelot_, they cannot Pe restored. Check. fil_
b_rs deloting.
CAUTION:
DO ilot remove the memory card or perform ally other
operation (such as turr_ingoff the ¢amcorder_ during deletion.
AI$O, Pe 81Jre to use the provirJedAO AcJapter, _s the nlernory
card m_y be corruptsd if the Pattery becom&s &,_ha_lsted
during deletion. If the memory card peoonle8 oorrt_pted,
illitialize it. CcGrpg. 24_
ISettingPrintInformation(DPOFSetting)
This carncarder is compatiblewith the DPOF (Digital
Print Order Format) standard in order to support future
systems such as automatic printing.You can select one
of the 2 print i_ormation settings for images storedin the
memory card: "To Print All Still Irnaga,s(One Print For
Each)" or TO Print BySelecting Still Images And Number
Of Prints".
NOTES:
• If you load a memory c_rd alrearJy set as shown below irl a
printer _:)mpati_e with DPOF, it will make prints of the
selectsrJ still imf_ges a_omati_ally.
•TO print _rn_ges recorded on a tape, fir_-t rJ_p them to a
memory c_rd. (_ pg. 19)
ToPrinlAll StillImages(OnePrintForEach)
1Load a memory card. (L_-p£. 10)
2set the VIDEO/MEMORY Switch to "MEMERY'.
3 Set the Power Switch to "PLAY" while pressing down
the LOCKButton located on the 8'##i_hr
•A StOrerJfile isrJisplay_d.
4Press the _MENU,-'VOL. Wheel in. The Menu Screen
appears.
5Rotate tbe _MENU!VOL. Wheel
to select "DPO F', and press it,The
Sub Menu appears.
6Rotate the _MENU!VOL. Wheel
to select "ALL 1", and press itr The
DPOF screen appears.
7Rotate the _MENU!VOL. Wheel
to select "EXECUTE", and press itr
The normal playbackscreen
appears.
•TOCancelselection, select
_RETURN".
ToPrintBySeledlngStl ImagesAndNumberOf
Prinls
ToResetTheNumberOf Pdnls
1Per6"Jrmsteps 1 - 5 in TO PrintAll Still Images (One
Print For E_h)'.
2Rot_ts the I_IMENU!VOL Wheel to select "RESET", _,
and press itrThe DPOF screen appeers.
3Rot_ts the I_IMENU!VOL Wheel to select
"EXECUTE", and press it. The normal playback screen
appears.
•TOc_ncelselection, select "RETURN_.
•The number ot printsis reset to 0 for alJstill image& _._
CAU'IrlONt
While pe _ormill_ the _bove, ile,..erdiscollnestpower, as this
m_yc_L_sethe memorycard to Pecorrupted. ,_
,-I
I.-
,-I
i
24 E, ADmTZONALFEATUR_ FOR D.S.¢. (6R-D93/D73 only)
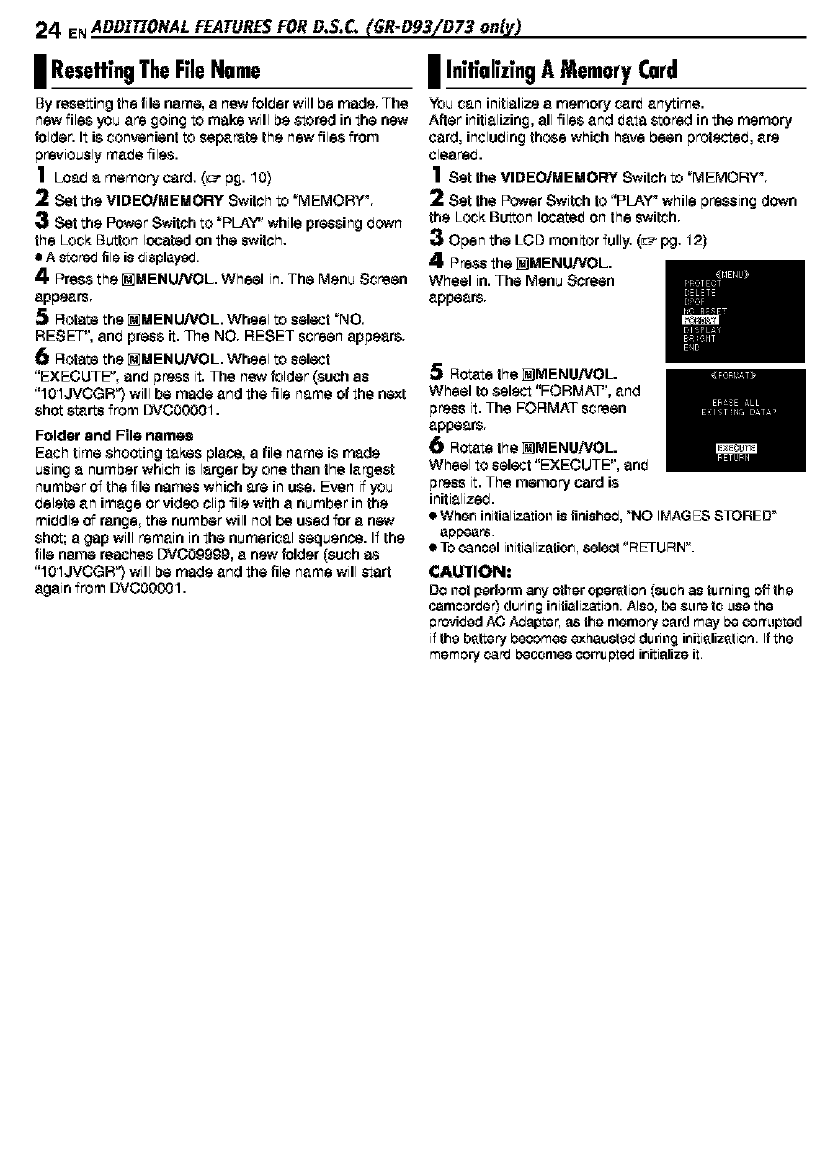
I ResettingTheRle Name
By resetting the file name, a new folder willbe made. The
mewfiles you are going to make will be stored in the new
faldec It is comvenient to cepa rate the mewfiles from
previouslymade fils_s.
1Lesds memorysard. (u:7pg. 10)
2 Set the VIDEOIMEMORY Switchto "MEMORY'.
3Set the PowerSwitch to "PLAY" while pressimgdown
the Lock Button leoated on the switch.
A etare_Jfileis displayS.
4' Press the []MENU/VOL. Wheel in. The Menu Screen
appears.
5Rotate the [] MEN U,-'VOL.Wheel to select "NO.
RESET", and press it.The NO. RESET screen appear&
6Rotate the _ MEN U,-'VOL.Wheel to select
"EXECUTE", and gr_ss it.The new folder (such as
"101JVOGR"} will be made and the file m_ma of the next
shot steres from DVCO0001.
Folder and File names
Each time $ho_timg t_kes place, a file name is re&de
using _ numbar which is I_rger by ona than fha largast
number Of the file names which _ra in use. Even if you
delate an image or video clip ilia with a numbar in tha
rniddla Of range, the number will n_ be used for a new
shot; a gap will remain in the numerical sequance. If tha
file name reaches DV009999, a new folder (such as
"101JVOGR"} will be made and the file name will start
again fr_m DVC00001.
MENUSFORDETAILEDAD,TUSTMENTEN25
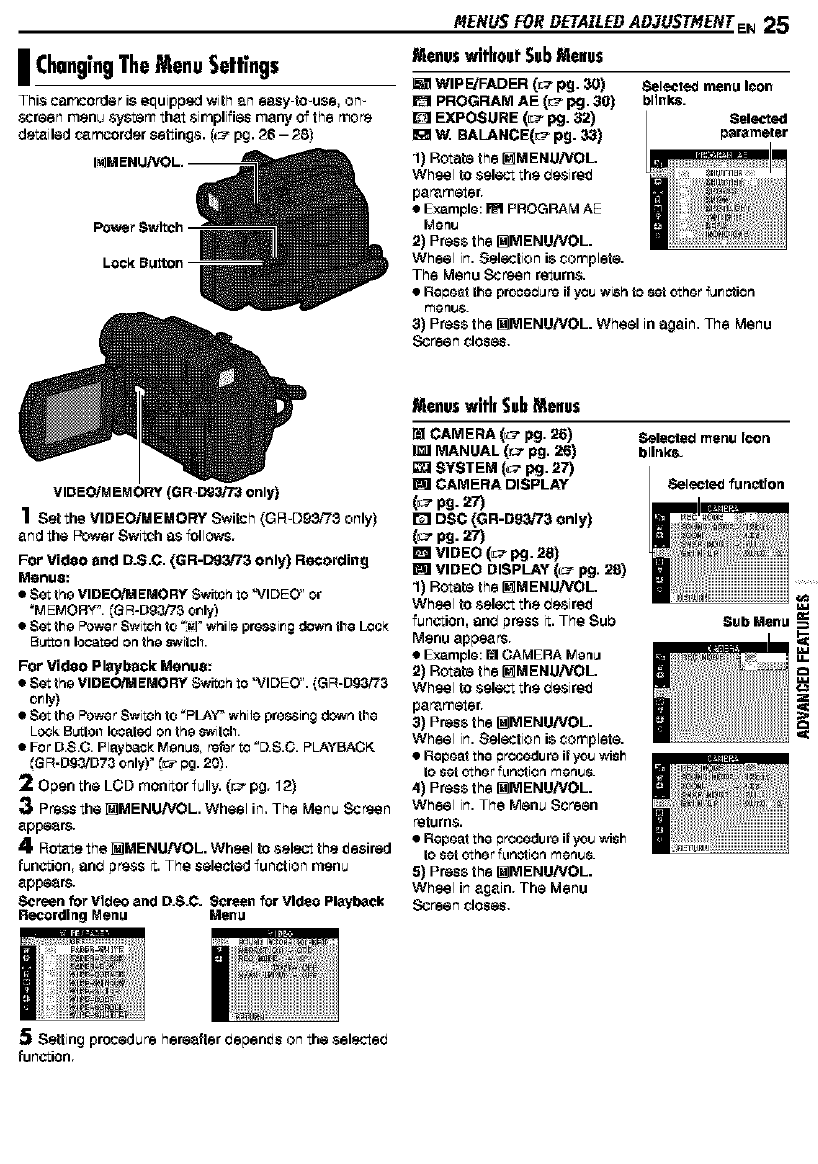
I ChangingTheMenuSettings
This carccorde r i8 equippedwith _m easy to-use, on-
screen menu system that simplifies many of the more
dateiled t._ recorder settings. #_- pg. 26 - 28)
Menuswithout$ubMeuus
VIDEO/MEMORY (GR_Dg3i73only)
1sat the VIDEO/NENORY Switch (GR-Dg&r73 only
and the Power Swit#h _,sfollows.
For Video and D.S.C. (GR-D93/73 only) Recording
Menua:
•Set the VIDEO/MEMORY Switch to "VIDEO" or
_MEMORY". (G R-Dg_i73 or_ly)
•Set th_ Power Switch to _:_]"while pressir_g down the Lock
BL_tteqIscate_Jor=th_ switch.
For Video Playback Menus:
•Set theVIDEO/MEMORY Switch to "VIDEO". (GR-D93/_3
or_ly)
•Set th_ Power Switch to _PLAY_ whilepres_ir_gdownthe
LOCKELationIocate_Onthe switch.
•For D.S.C.Playl;eckM_n_8, Purerto "D.S.C.PLAYBACK
(GR-Dg_D7_ only)" €_:_pg. 20_.
2Open the LCD monitor fully, (r__pg, 12)
Press the _MENU/VOL. Wheel in,The Menu Screen
appear&
4Ratete the _MENU/VOL. Wheel to select the _eeired
function, and p_ss it. The selected function menu
appear&
Screen for video and D.8.C. Screen for Video Playback
Recording Menu Menu
MenuswithSubMenus
CAMERA (_ pg. 26)
I_ MANUAL (_ pg. 26)
SYSTEM (L:_pg. 27)
CAMERA DISPLAY
i%1DSC (GR-D93/73 only)
VIDEO (L_ pg. 28)
VIDEO DISPLAY (L_ pg. 28)
1) Rotate the _MEHUiVOL.
Wheel to select the d_sire_
function, and press it.The Sub
Menu appeers.
•Example:_ CAMERA Mequ
2) Rotate the _MEHUiVOL.
Wheel to select the ds_sire_
parameter,
3) Press the I_IMENU!VOL.
Wheel in. Selection is complete.
• Repeatthe procedure it youwish
to setether {_n_tion menus.
4) Press the I_IMENU!VOL.
wheel in. The Menu Screen
returns.
• Repeatthe procedure it youwish
to setether {_notion menus.
5) Press the I_IMENU!VOL.
Wheel in again. The Menu
Screen closes,
Selected menu Icon
blinks.
5 Setting procedure hereafter depends on the selected
function,
2_ ENMENUSFOR DETAILEDADJUSTMENT
I RecordingMenus
[] CAMERA
The "_" settings are effective when the Power Switch i$
set to both '1" and _'r However, the menu Settings can
be changed only when the Power Switch is _ _ _".
[ ] = Factory_preset
[SP]: TO record in the SP (Standard Play) mode
LP: Long Play--more ecoeommcel, providing 1.5 times
the recording time.
NOTESt
IALibis D_lbbir_g (_ pg. _'F) and Iqsort EcJiting _:_ pg. _'F) ar_
possiblo or_ t_zp08 recordediq tho SP roods. _GR-Dg_'7,3
only]
ItthO _rding taboo is_itoh_.l,the pl_ok piotu_ will
be blurrodattho _i=hing point.
IIt is rooommondod that tap_ rocordo0 in the LP mocks on
this ¢,amco _e r be play¢_ beck on this c_rnoordsr.
m Duringpl_aok of a taps rooo_od on _nothoro_l_ rdor,
blocks of noiso may _lppo_lr or there i'n_y bo momer_ary
payless in the so_md.
[_._,,]
[12 bit]: Enables video recording of stereo sound on four
Separate channels, and is recommen_ab _'oruse when
performing Audio Dubbing. (Equivalent to the 32 kHz
mobe of previous mo_als)
16 bit: Enables video re_:ording_ stereo sound on two
separate channels. (Equivalent _ the 48 kHz mo_e of
previous mo_als)
I!_lII]lll
16X (G R-DT_), 1OX (GR D93): When set to "16X"
("10__for GR Dg3) while using 0igital zoom, the zoom
magnification will reset to t6X ("10×" for CR Dg3) since
bigitel zoom will be biserlgageb.
[40xr: Allows you to usa the Digital Zoom. By digitally
procesaing and magni_ing images, zooming is possible
from 16X (t0X for GR-Dg6) (the optical zoom limit), to a
maximum of 40X _igital magnification.
7O0X":Allows you to use the Digital Zoom. By digitally
procesaing and magni_ing images, zooming is possible
from 16X (t0X for GR-Dg6) (the optical zoom limit), to a
maximum of 700X digital magnification.
* Available only whon tho VIDEO!MEMORYSwkoh is _,atto
'_ID EO". (OR-D93/73 only_
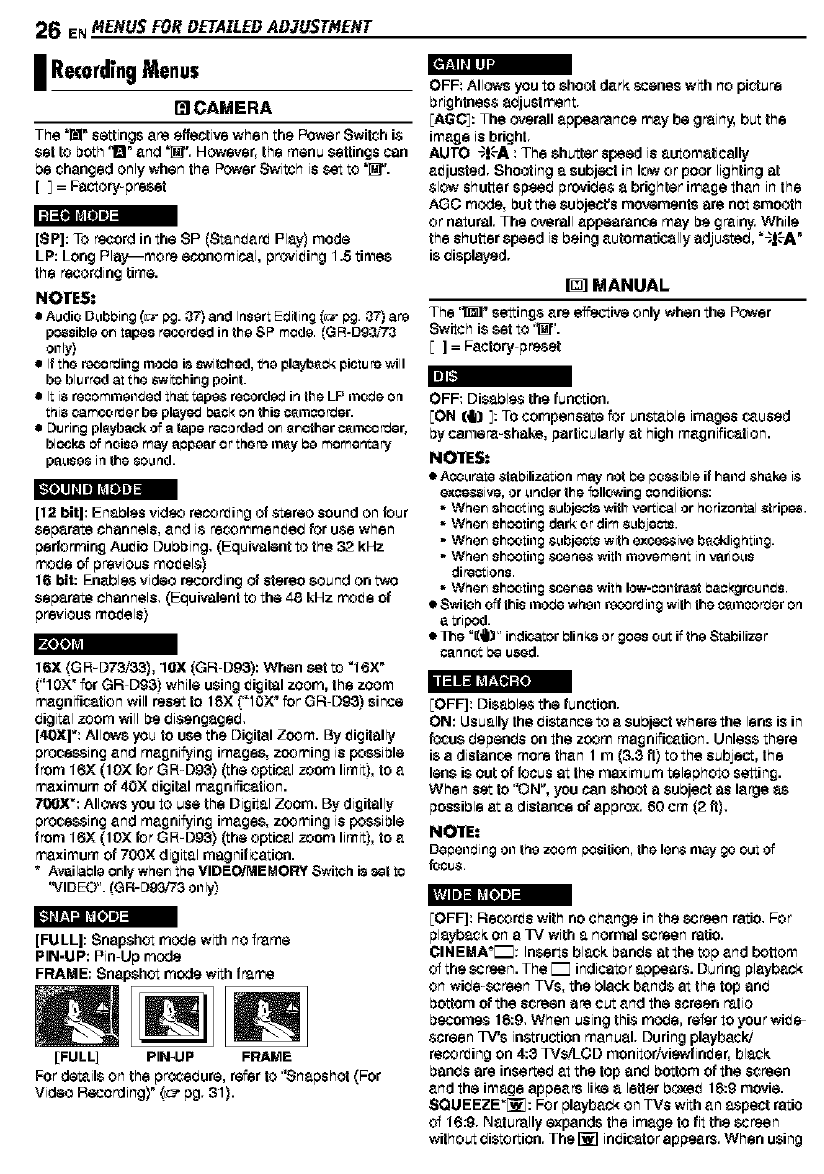
[FULL]: Snapshot mo_e with no frame
PIN-UP: Pin Up mode
FRAME: Snapshot mode with frame
[FULL] PIN-UP FRAME
For details on the prcoebure, rafterto 'Snapshot (Far
Video Recording)" (_ pg. 31).
OFF: Allows you to shoot dark scenes with no picture
brightness adjustment.
[AGC]: The overall appearance may be grainy, but the
image is bright.
AUTO "t_-A : The shutter speed is automatically
aitjustad.Shootinga subjectinloworpoor lighting at
slow shutter spesb provibes a brighter image than inthe
AGO mode, but the subject's movements are not Smooth
or natural. The overall appearance may be grainy. While
the shutter speed is being automatically adjured, "_I$A"
is displayed.
_] MANUAL
The '_ settings are s'ffeotiveonly when the Power
Switch is set to '_".
[]= Factory preset
OFF: Disables thefunction.
[ON (il] ]: TOcompensate f_Jrunstable imagescaused
by camera=shake, particularly at high magnification.
NO_rES.*
•._c_lrate _t_lbilizetioqm_lynot De bos_ibls if h_ild_hake i_
ex_e_ivs, or_lndsrthe foIlowir_goonditior_:
•Wher_8hootiilg subject8 with,,.,8i_ioaI orhorizontal _tripes.
• Wher_shootir_gd_lrkor dim_lbject_.
• Whor_shc_tiilg _;_bjoc_ withoxcot;sivobf_d_lightillg.
• When shooting t,,,cene_ withmovementin ,,_rio_ls
directions.
• Wher_sh0_tiilg scarce8withIow-ooiltrectbaokgrot_ilds.
•$witoh off thisi'norJewhsil reo3rdiilg withthec_i'n0ordsron
•_zlrs_," irldi_tor bli rl_ or _o_s OL_ i{ th_ _C_ttiliz_ r
[OFF]: Disablersthe funs-cion.
ON: Usually the biste nee to a Subject where the lens is in
_'_USbapenbson thezoom magnification.Unlessthere
is a distance more than 1 m (3.3 ft) to the subjest, the
lens is OUtof focus at the maximum telephoto setting.
When set to '_N", you can shoot a subject as large as
possible at a distance of approx. 60 cm (2 ft).
NO_rE:
DebeilcJir_goilthe zoompositiorh the ler_ nley go out of
EOFF]: Records with no change inthe screen ratio.For
playbesK Ona IV with a normal screen ratio.
¢INEMA*r_: Inserts blesk banbs at the top and bottom
of the screen. The r_ indicator appears. During playt_ck
on wibe scraan TVs, the black bands at thetop anb
bottom of the screen are cut and the screen ratio
besomes 16:9. When using this mo_e, refer to your wiite
screen TV's ies_rustion manual. During playback/
recording on 4:8 1VsiLCD monitoriviewfinit er, blesk
banbs are incerteb at the top anb bottom of the screen
and the image appears like a letter boxait 16:9 movie.
SQUEEZE_[_: For playback on TVs with an 8.speot ratio
Of 16:9. Naturally expands the image to fit the screen
withoutbistortton. The I_] inbicatarapoesrs. When using
MENUSFORDETAILEDAD,TUSTMENTEN27
this mode, rarer to your wide-ecraen TV's instruction
manual. During playback/recording on 4:3 TVSiLOD
monito rh.,iewfinda r, the image is elongated vertically.
" Available only when the VIDEO,_IEMORY Switch is set to
"VIDEO". (GR-Dg,3i7G only)
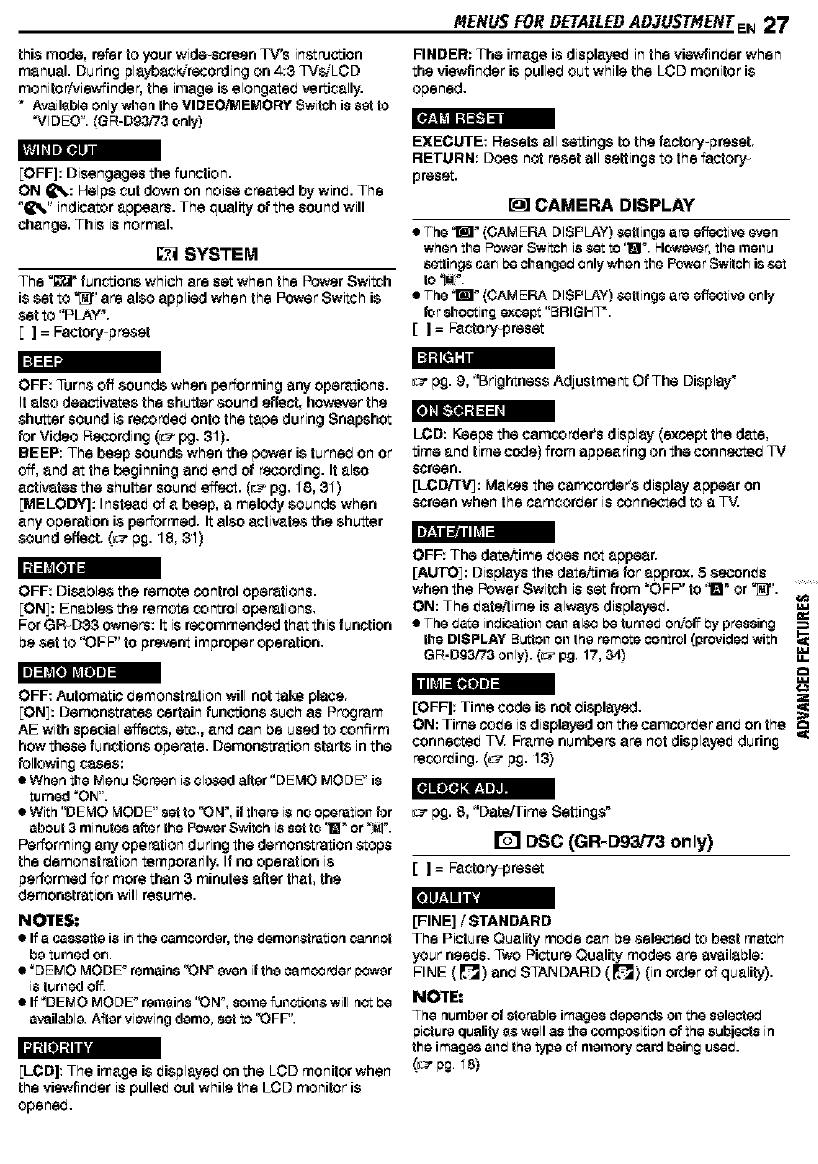
[OFF]: Disengages the function.
ON _,: Helps cut down on noise created by wind. The
"_%" indicator appears. The quality of the sound will
change. This is normal.
SYSTEM
The _" fuec'cions which are set when the Power Switch
is set to _" are also applied when the Power Switch is
set to "PLAY'.
[] = Factory preset
FINDER: The image 1$displayeit inthe viewlinber when
the viewfindar is pulledout while the LOD monitor is
opened.
EXECUTE: Resets all settings to the factory-preset.
RETURN: Does not reset all settingsto the factory
preset.
CAMERA DISPLAY
•The I _ (CAM ERA DISPLAY) $elting8 are effecti_ _#en
when the Power Switch 18_t to '_F. Howe_r, the men_
8etling8 can be oh_lnged only when the _e rSwitch i8 set
to _.
•The I _ (CAM ERA DISPLAY) $elting8 are effective only
for 8hcoting except "BRIGHT'.
[]=Factory-preset
OFF: Turns off sounds when performing any operations.
It also deactivatesthe shutter sound effect, howeverthe
shutter soundi8 recorded ontothe tape during Snapshot
for Video Recording (__7pg. 31).
BEEP: The beap sounds when the power is turned on or
c'4f,and at the beginning and and of recording. It also
activ&tas the shutter counit effect. (___pg. 18, 31)
[MELODY]: Instasit of a baap, a melody sounds when
any operation is peter mad. It also ectivats_sthe shutter
sound effect. (_ pg. 18, 31) _1 Illlil =i
OFF: DJS_dl6s tha remote control operations.
[ON]: Enadl6s the remote control op,_rations,
For QR_DSS owner8: It is recommendad that this function
ba set to "OFF" to preve_ improper operation,
OFF: Automatic bemonst ration will not talee place.
EON]:Demonstrates certain functions such as Program
AE with special effect,s, etc., and can de used to confirm
how these functionsoperate. Demonstration starts in the
following cases:
• Whenthe Men_ Scan i_clo$edaltar "DEMO MODE" is
turned "el-4".
With "DEMO MODE"set to '_N', it there i_ no o#erationfor
about 3minutesafterthe Power SwiSh is set to '_" or ":_!'.
Performing any operation du ring the demoaslration stops
the demonstration temporarily. If no operation i8
performed for morethan 3 minutes affer that, the
demonstration will resume. Ill-,! i i i'i
NOTES:
• If a ca88etle is ir_the camcorder, the demor_tretion o_nr_et
be turned on.
_DEMO MODF remain8 '_N _wen it the _amo3 _Jer F>3wer
i8 turned off
If _DEk_O MODF r_mt_in8 '_N _, some f_ll_ioll_ will nct 13e
available. Afler viewing denlo, set to '_FF".
li] It I I'1
[LCD]: The image is itisplayed on the LOD monitor when
the viawfindar is pullait out while the LCD monitor is
opened.
pg. 9, "BrightnessAdJustment Of The Display"
LCD: Keeps the oemcorder's display (except the date,
time anit time code) from appeanng on the connected TV
screen.
[LCDiTV]: Ma_s the camcorder's display appear on
screen when the camcorder is cannscted to a TV.
OFF: The data/time itoes not appear.
[AUTO]: Displays the date/time for approx. S $econit s
when the Power Switch is setfrom "OFP' to '1" or _".
ON: The itatailima is always displayoit.
•The date ir_dio_tiollCall also I_et_riled Or_O__y pressing
the DISPLAY BL_ttOnOnthe remote control(providedwith
GR-D93/73 only).(_ pg. 17, ;34)
2
[OFF]: Time code is not displayed.
ON: Time coite is displayed on the oemcordar and on the
connec-reitTV. Frame numbers are not displayait during '_
recording. (_ pg. 13)
pg. 8, "Data/Time Settings"
rs'l DSC (GR-Dg3,t73 only)
[ ] = Factor_!-preset
[FINE] /STANDARD
The Picture Quality mode can be selected to best match
your needs. Two Picture Quality modes are available:
FINE (r4_) and STANDARD (E'_) (in order of quality).
NOTE:
The n_nlber ot etoreble image8depentt80il the selected
F_ietur_q_alityt_ well _ the compositionof the 8_bje_ts in
the image8alld the type o{ memory_ard beir_g_._d.
(_g. _8)
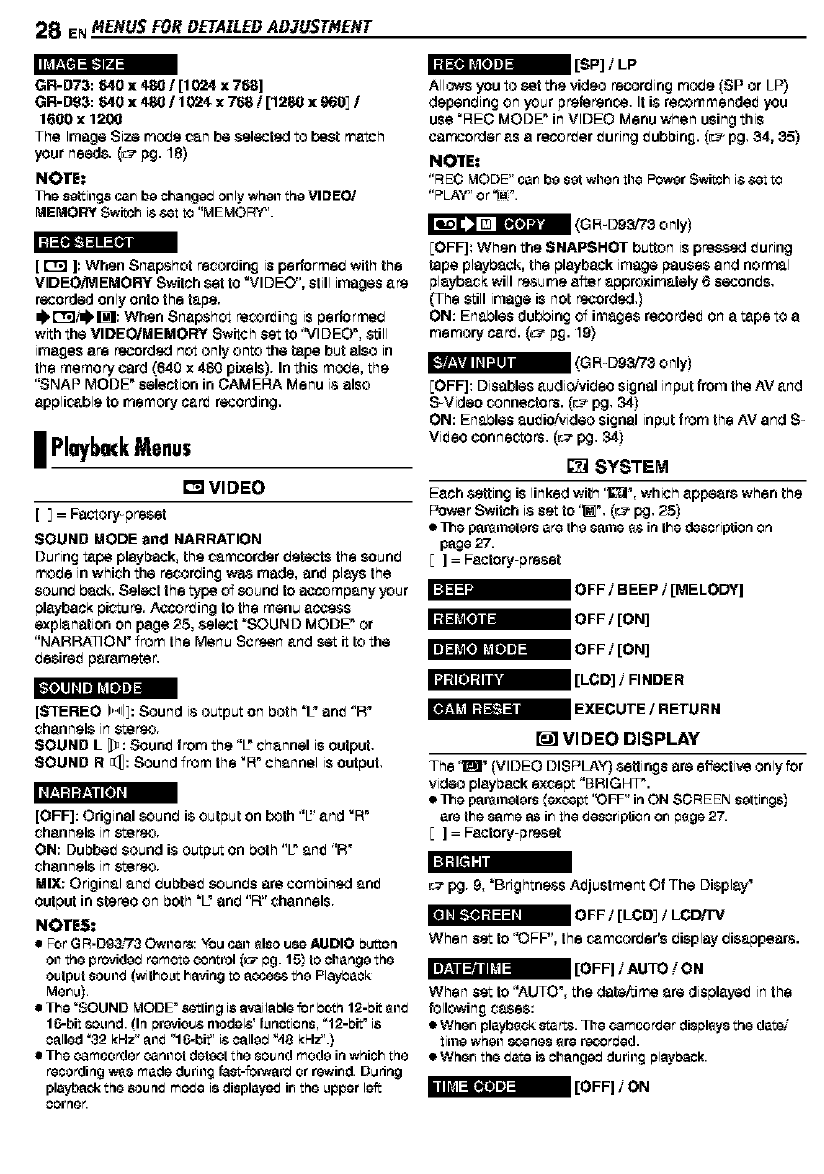
28 ENMENUSFOR DETAILEDADJUSTMENT
GR-D73:640 x 4801 [10f2Ax 768]
GR-D93:640 x 480110f24, x 766 /[1280 x 9601I
1600 x 1200
The Image Size rno_e can be selected to best match
your needs. (_ pg. 18)
NOTE.*
The settillg8 c_rl be changed billy whell the VIDEO/
MEMORY Switch is€,_tto "MEMORY".
[_]: When Snap.shot recorbing is pedormeb with the
VIDEOff,/IEMORY Switchset to WIDEO", still images are
recordedonly onto the tape.
ql,r"r;li_: When Snapshot recording is performed
withthe VIDEO/MEMORY Switch set to %tlDEO", srdll
=magesare recorded not only onto the tape but also in
the rnernor_ card (640 x 480 pisels). Inthis mo_e, the
"SNAP MODE" selection in CAMERA Menu is also
applicable to memory c_rd recording.
I PlaybackMenus
tm VIDEO
[_= Factory preset
SOUND MODE and NARRATION
During t_pe playback,the camcorder betacts the counb
made inwhich the recorbin£ w_a made, enit plays the
sounb Pack. Select the type of counb to accompany your
playbackpie-cure.According to the menu acse_ss
explanation on page 25, select "SOUND MODE" or
"NARRATION" from the Menu Screen and set it to the
basireit parameter,
Allows you to set the video recorbing rno_e (SP or LP)
depenbing on your preference. It is recommendeit you
use "HEO MODE" inVIDEO Menu when usingthis
cerncorderas a recorder ituring ituboing. (__=_pg. 34, 35)
No'IrE:
"REC MODE"car_be set whenthe Power Switch is $et to
,'pLAV',e r "IMI_"
(G R_Dg3_3 only
EOFF]: When the SNAPSHOT button is p re_-sedituring
tape playback,the playbackimage pauses and normal
playb_k will r_surne after approximately 6 seconbs.
(The still image is not recorded.)
ON: Enables dubbing of images recordeiton a t_pe to a
memory c_rd. (L_-p£. 19)
[OFF]: Disables audio/video signal inputfrom the AV and
S Video connectors. (_-_pg. 34)
ON: Enables auit io/video signal input fr0rn the AV and S_
Viit eo connectors. (_ pg. 34)
I_ SYSTEM
Each setting is linked with'I#_', which appears when the
Power Switch i$ set to "_". (_ pg. 25)
•Ills part_Lrnetersarethe same _$ inthe description on
page 27.
[] = Factory preset
[STEREO 11_,,.4q:Sound is output on both %"enit "R"
channels in stereo.
SOUND L [_: Sounit from the "/" channel is output.
SOUND R_: Sound from the _R"channel is output.
[OFF]: Original counb is output on both "E' and _R"
channels in stereo.
OR: Dubbeit sound i$ output on both "/" anit "R"
channels in stereo.
MIX: Original anit bubbeit counbs ere combined anit
output in stereo on both "L" end "R" channels.
NOTES.*
For GR-Dg;_'i'_ Owlle re:YOLJcell _lso use l_t DIe bL_Oq
Onthe pro'4ded remote _etrol _:_ _g. 15_to changethe
olJtplJtsolJod (withoet havingto access the Flayl3eok
Mer_u).
•The _SOUNDMODE"8_ir_g i8available for 13oth12-bit_od
called _2 kHz" aod "16-bit" is oalle__4BkHz_'.}
•The ¢amcorder oarlllet dsteetthe 8olJqd mode ir_whichthe
recoiling w_smade during_as_-_oP_var_or r_wir_d.D_dng
playbackthe sound mode i8 displayodir_the upperleft
oorrlGr.
I_ VIDEO DISPLAY
The '_" (VIDEO DISPLAY) settings ere effectise onlyfor
video playbackexcept 'BRIGHT".
•Ills parernetors(_x_pt "OFF" inON SCREEN settir_gs)
are the same as ir_the description er_#ege 27.
[ ] = Factory p_set
_r 9, "BrightaSSS Aitjustment Of The Display"
OFF /[LCD_ /LCD/P#
When set to "OFF", the ¢_mcorber's display disappears.
When set to "AUTO', the data/time are displayeit in the
following cases:
• Wher_ playb_ck start& The ¢amcorder displays the date/
time whell 8Cer3GS_rs re_3rtJed.
• Wher_ the date is char=gad during playl:_ack.
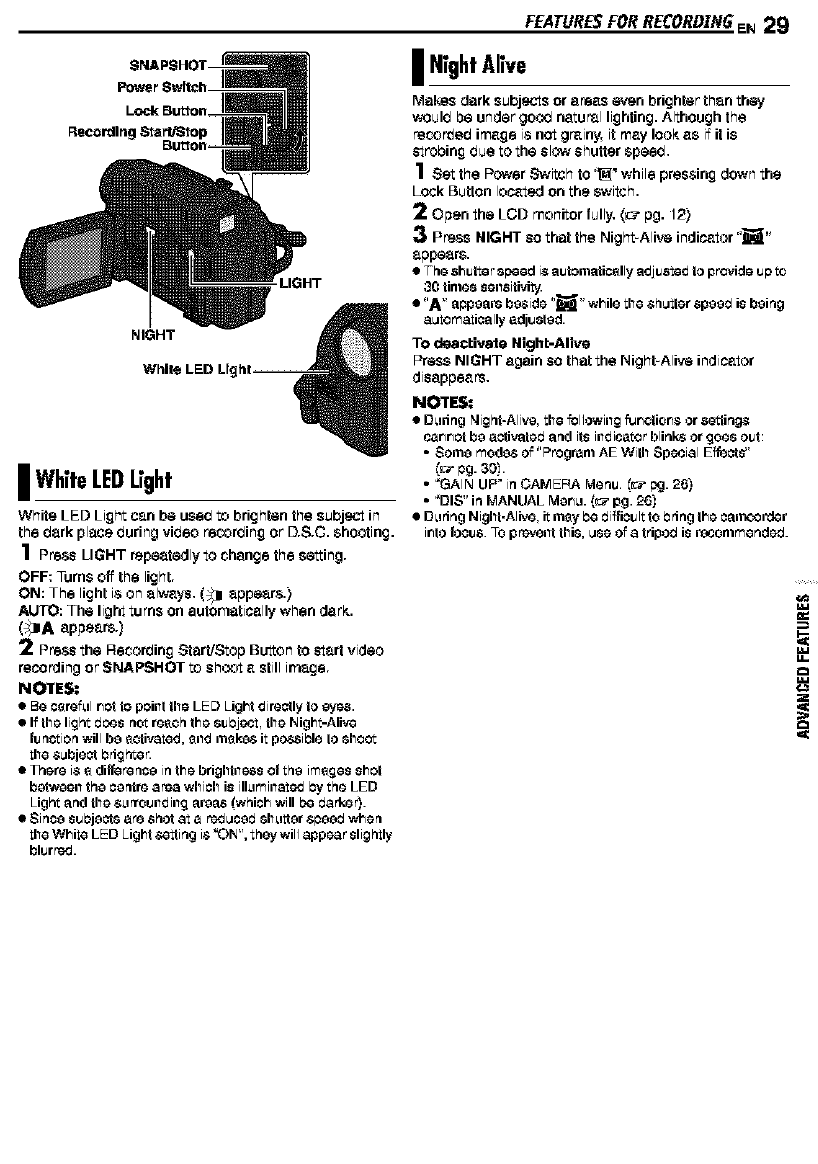
_Bu_oR
Re¢ordln_
LIGHT
NIGHT
WNil
I WhiteLEDLight
White LED Light can be used to brighten the subject in
the dark place during video recording or D.&C. shooting.
1Press LIGHT repaatadlytochenge the saIting.
OFF: Turns off the light.
ON: The light i$ on always, (_]1 appears.)
AUTO: The light turns on eutornatic_llywhen dark.
(_}A appears.)
2Press the Recording Start/Stop Button to start video
recording or SNAPSHOT to shoot a stillimage.
No'IrES:
•Be c_re{_tlr_ctto poilltthe LED Lightdirectly togy6_s.
• Ifthe lightdc_s riot re_ch the 8zJbj_t, the hJight-Alive
tu _ctio_ willbo _cti_ted, _lld iI1_1_ itpoc_sihie to 8ho¢:_
the subject bdghte_
•There is _ di_re rlcg in the brighh16_ssot thg images shot
b_tw_silthg ogrltre ar¢_ whioh is ill_tmiilatc_Jby the LED
Light _lrldthe s_trrot_ildiilg _u'g_ls_whichwillI:_ darkor).
•$inc_ st_bigotsere shotat e rc_Jucgd$1%tttgrsbggdwhsrl
the WhiteLED Light€,_ting is*OhJ",they wJlJapp_r slightly
blur_.
FEATURESFORRECORDZN6EN 29
I NightAlive
Makes dark subjects or areas even brighter than they
v_uld be under go_ natural lighting.Although the
recorded image is not grainy, it may look as i_it is
stroding due to the slow shutter speed,
1Set the Power Switch to '_ while pressing dow_ the
Lock Button Io¢_t_1 on the switch.
2Open the LCD monitorfully, (_ pg. 12)
P_SS HIGHT so that the Night Alive indicator "_"
appears.
•The shulte rsp_ed is automatically adjustedto pr_ide ub to
30 limossensiti_i_
•"A" abpoarsb_side"_" whilothe shutler spood is doing
automatically adjuctod.
TO deactivate Nigh_-Alive
Press NIGHT again so that the Night Alive indicator
disappears,
NOTES:
• D_tdngNight-Ali,,'_,the _lJowillg _r_ctior_sors6_tirig$
c_r_r_ctbo activated _r_dits illdicator blinksor goo$ out:
• $orno mod_s of "Progrenl AE With $p_ial E_ct 8"
_:_ bg- 30Y
•"GAIN UP" in CAMEFb%Menu. _r_ pg.26)
•"DIS" in MANUAL Mgr_u.(:_ pg.26)
•During Night-Alivo,it m_y be diffiouItto bring the oamo3rd_r
ihto rogue.3-0pr_voiltthis,useOfatripodis recommended.
,=¢
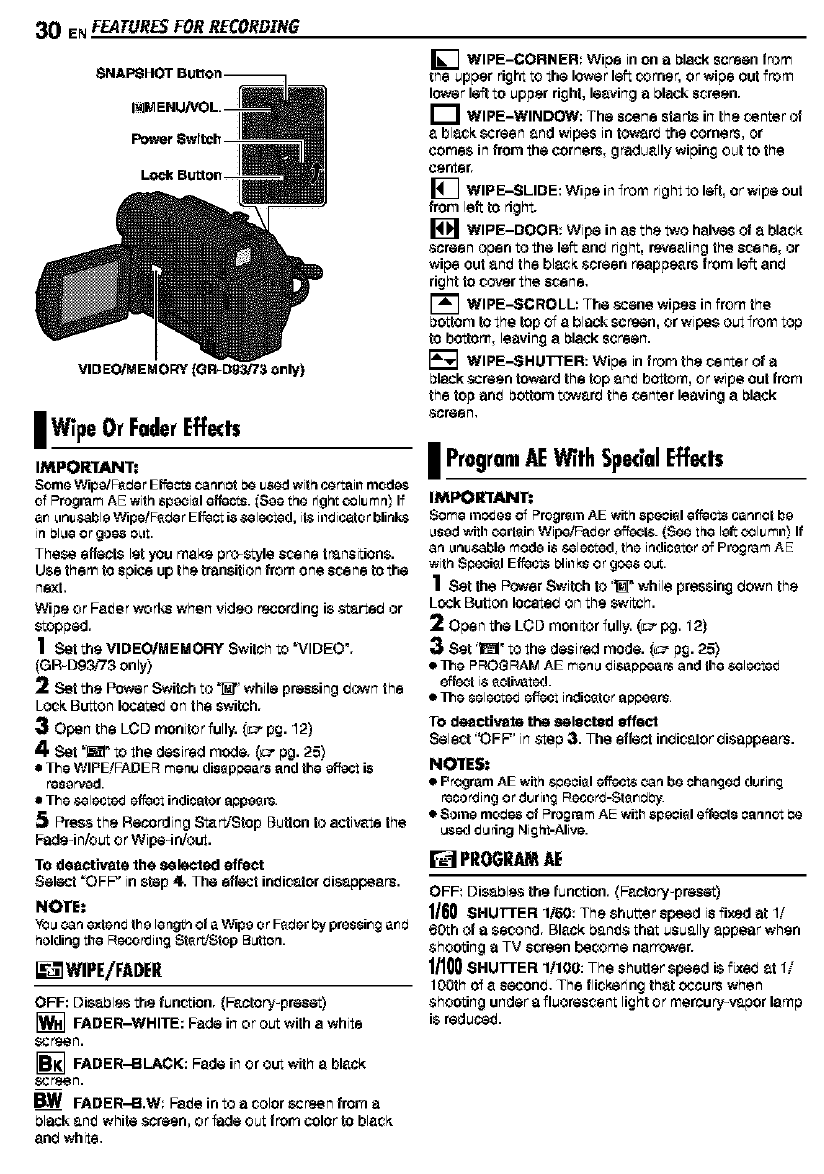
30 ENFEaTUReS FOR RECORDING
VIDEO/MEMORY {GR_D93/73 only)
Jwipe OrFaderEffects
IMPOR'I[ANT:
Some Wipe/F_rJerEffects Cannotbeusedwithcattail1nlod_s
OfProgram AE with 8peoi_le[feot8. _S_ethe right o31_mn_If
en _lrJu,_tl_leWipe/F_rJer EfeG_ti8selected, il_ illdicetor blirik8
in bibleor gee8 e_lt.
These effects let you make pro style scene trensition&
Use them to spice up the transition from one scene to the
next,
Wipe or Fe_er workswhen video recording is s_arteb or
stopped.
1SettheVIDEO/MEMORYSwitchto_VlDEO ",
(GR D93_73 only)
2 Set the Power Switch to _" while pressing hewn the
Lock Button Iscete_ on the switeff.
3Open the LCD monitor fully, i___pg. 12)
4. Set "_" to the desired mode. (_ pg. 25)
•The WIPE!FADER menu disappears and the effect is
reserved.
•The selected effectindicator appeers.
5Press the Recording Start/Stop Button to activate the
Fade-in/out or Wipe4rdout.
TO deactivate the selected effect
Select =OFP' instep 4. The effect in_icatsr bisappeers.
NOTE:
YO_can extendthe lengtr_of a Wipe orF_rJerby pressinganrJ
_olding the Recor_JingStert/Stop B_ten.
_'fl WIPE/FADER
OFF: Disables the funs-don. (Factory-praset)
FADER-WHITE: Fade inor out with ewhite
ecrs_n.
_] FADER-BLACK: Fade in or out with eblack
ecrs_n.
FADER-B.W: Fe_e into a color screen from a
blackan_ white screen, or fade out fromcolor to black
enb white.
[] WIPE-CORNER: Wipe inon a black screen from
the upper right to the lower left corner, or wipe out from
lower leftto upper right, leaving a black screen.
I_1 WIPE-WINDOW: The scene starts inthe center of
abl_k screen and wipes in tow_rb the corners, or
comes in from the corners, gradually wipingout to the
center.
[] WIPE-SLIDE: Wipe infr0rn right to left,or wipe out
from left to right.
WIPE-DOOR: Wipe in as the two halves of a black
screen open to the left enb right, revealing the scene, or
wipe out an_ the bl_k screen reappears from left enb
right to cover the scene.
[] WIPE--SCROLL: The scene wipes in from the
bottom to the top of e black screen, or w,pea out fr0rn top
to bottom, leaving e black screen.
[_ WIPE--SHUTTER: Wipe infrom the center of a
black screen towardthe top an_ bottom, or w=peout from
the top an_ bottom towarb the center leaving e black
screen.
i ProgramAEWithSpecialEffects
IMPORTANT:
Some medesof ProgremAE with 8peoiel effects cennot be
i8ed wi h oeriein Wipe!Fader eff_ot& (See he lefto31_mll_ If
an _lnu,sabl_mod_ i8 selected, the indicator of Program A_
with S#eoiel Effects _lillks or goes oLJt.
1set the Power Switch ts _" while pressing hewn the
Lock Button Ioseteb on the switch.
2Open the LCD monitor fully. (___pg. 12)
Set '11__to the desired mode. (_ pg. 25)
•I_e PROGRAMAE menu disappears and the selected
effect i_activated.
•I_e selected effect indicator apeeers.
TO deactivate the selected effect
Select '_FP' in step ;3. The effect inbicator bisappears.
NO'IrES,
•Program AE withspeoisI effects can be changedduring
recoreingor duringRecore-StenrJ_y.
•$orn8 nlorJe8of ProgramAE withspeoisIeffects cannot_e
_ed d_ring Nigf_t-Alive.
_PROGRAMAE
OFF: Disables the funs-don. (Factory-praset)
1160SHUTTER 1/60: The shutter speed is fixed at 1/
6_h of a second. Black bangs that usually appear when
shooting a TV screen become narrower.
1/100 SHUTTER 1/100: The shutter speed is fiseb at 1-
tOOthof asecond, The flickeringthat occurswhen
shooting under a fluorescent light or mercury-vapor lamp
is reduse_.
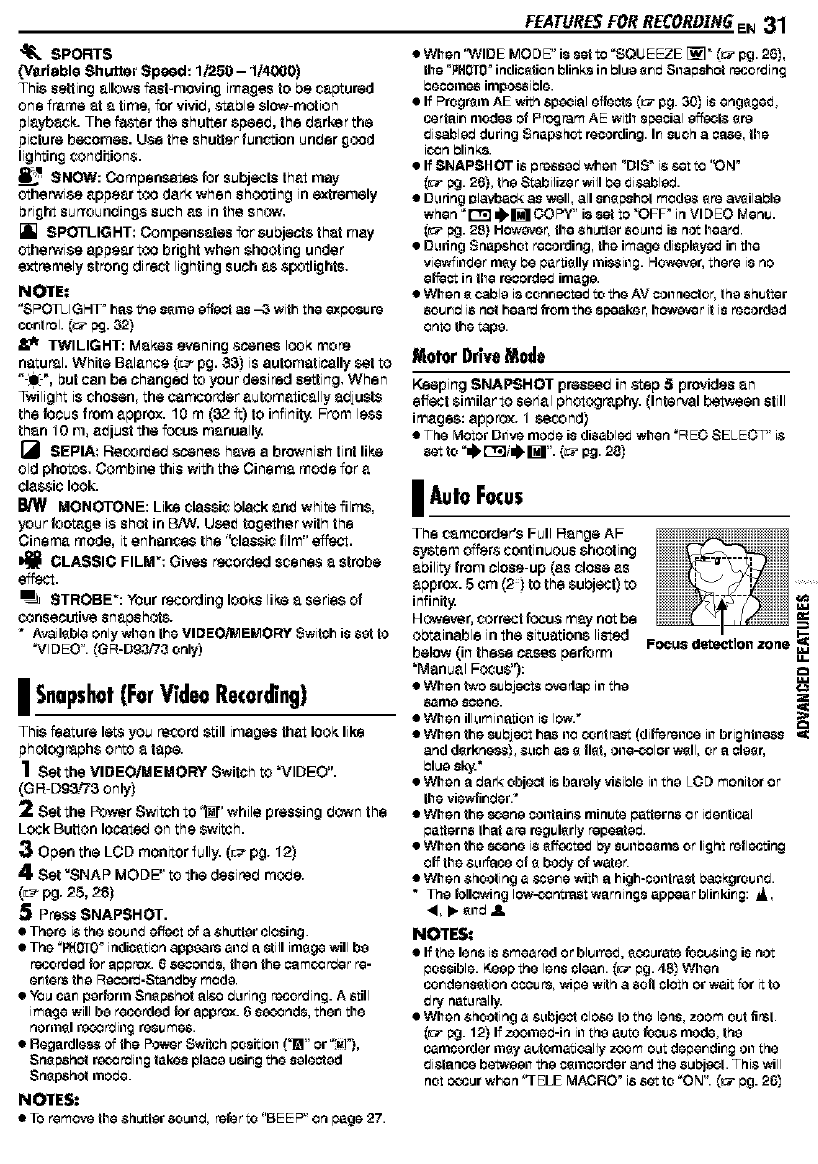
"_ SPORTS
0/erieble Shutter Speed: 1/'250 - 1/4000)
This setting allows fast-moving imagesto be captured
one frame at a time, for vivib, s_ble slow motion
playboY. The f'astsr the shutter sgeeb, the barker the
picture becomes. Use the shutterfunction unbar good
lightingconditions.
SHOW: Compensates for subjects that may
otherwise appear too dark when shooting inextremely
bright surroundings such as in the snow,
[] SPOTLIGHT: Compensates for subjects that may
otherwise appear too brightwhen shooting under
extremely strong direct lighting such as spotlights,
NO_E,*
"SPOTLIGHF hasthe s_me effectas _3 with the exposure
cootrol. (_ _j. 32)
,_ TWILIGHT: Makes evening scenes look more
eetur_l. White Balance (r__pg. 33) is automatically set to
"_.", but can be changsb to your desired setting. When
Twilight is chosen, the cemcorder automatically abjusts
the focus from approx. 10 m(32 ft) to infinity.FrDmI_ss
than 10 m, aftjust the f_cus manually.
[_ SEPIA: Recorded scenes have abrownish tint like
old photos. Combine this with the Cinema molts for a
classiclook.
MONOTONE: Like classic black anit white films,
your foot_ge is shot in BiW. Uceit together with the
Cinema mode, it enhances the "classic film" 6'ffect.
CLASSIC FILM": Gives recorded scenes a strobe
effect.
STROBE": Your recording looks like a series of
consecutivesnapshots.
*AvailableonlywhentheVIDEO/MEMORY Switch is sot to
"VIDEO". (GR-Dg3/73 only)
I Snapshot(ForVideoRocord ng)
This _eture lets you re_r_ still imeges that look like
gh_mphs on_ a tege.
1Set the VIDEOIMEMORY Switch to "VIDEO".
(GR DS_?3 only)
2Setthe Power Switch to _" while pressing down the
Lock Button located on the switch.
Open the LGD monitor fully. (r__pg. 12)
4Set _SNAP MODE" to the desireb mo_8.
(r_-_pg. 25, 28)
Press SNAPSHOT.
•There is the SOUlld effect Of a Shutter closing.
•The "PHOT0_ indication appears anrJ astill image will be
recorded {or Stpprex. 6 8GOOIIdS,then the oam_rrJer re-
octets the RecorrJ-Standl:_j mode.
•YO_ car_ perforill Sn_pehot alr_ rJ_tring recording. A still
image will be recorded fer approx. 6 s_nd8, ther_ the
norrn_l rob3 _iilg resumes.
• Regardles_ of the Power SwiSh positioil (']_" or "_!"),
Sn_pehct r_o_ing takes place usir_g the selected
Snapshot i'nocJe.
NO'IrES:
•TO remove the Shutter 8o_ird, refer to "BE E P" on page 27.
FEATURESFORRECORDIR6EN 31
• When 'WIDE MODE" i8 set to "SQUEEZE [_]" _[_"pg. 26),
the "_H010° indicotion blinks in Plug erwJ Snapehct recording
PGCOllle8 impot_siPle.
•If Program AE with special effects _[_"pg. 30) is engaged,
certair_ modes of Program AE with special effecLs 8re
disabled during Snapshet recording. Ir_such abase, the
i_n Plinks.
• If SNAPSHOT is pressed when "DIS" is set to '_N _
(_:_pg. 26), the Stabilize r will Pe dir,abled.
•D_ring r_laybaok as well, all sr_spehot mod&s 8re aveilaPle
when "It_r;1 z),_ COPY" i8 set to "QFP in Vl DEC Menu.
(_:_pg. 2_) HOwever, the ShLxtler 80_,111_is not heard.
• D_dng Snapshot recording, the image diapleyed ir_ the
view{illder nlsy be per tisIly illis_illg. Howe,zsr, there is no
effect in the reoord_vJ image.
• When 8cable is contracted to the AV COilhector, the shutter
sourwJ is not hearrJ from the speaker, hcweve r it is recorded
onto the tape.
Motor DriveMode
Keeping SNAPSHOT pressed in step 5provides an
effect similar to serial photography. (Interval belween still
images: appr,'_. 1 second)
•The Motor Drivemo_e is disabledwhen "REO SELEOqTM is
lAura Focus
The camoorder's Full Range AF
System _'4f_rs continuous shooting
ability from close up (as close as
approx. S cm (_) to the subject) to
infinity.
However, correct fcous may n_ be
obtainable in the situations listed
below (in these cases perform
"Manual Focus'):
• When two su Pj_et_ c,¢edap 111the
same sosnG.
• When ill_lmillatioll is low.*
FOCUS detection zone M,I
U.
• When the 8u Pjeet has ilo coot rest (differeilce it1brig hllless ,_
and d_rknes_, S_lch as _ riot, oile-o31or w311,or _1clear,
• When _1rJ_lrk object is b_lrcty visiPie it1the LOD monitor or
ths viswli_rJsr.*
• When the t_¢ene coilt_li_s minute petisrns or ideotical
patisrils thor are regularly repeoterJ.
• When the t_¢ene is _ff_cted by suilPe_nls or light retleeting
o{f ths S_lriltce Of _ borJyOf wate_
• When Shooting a SCe_s with _1high-coot rect I:_kgrouild.
•The following Iow-<_ntrast warnings appear blinking: _,
<, •sn_ 41.
NOTES:
• If the lens is smeared or blurred, _¢curate _cusiil_ is not
possible. K_ap the lens clear_. (_:_pg. 483 When
cor_densotion ocoure, wipe with a sofl cloth or wait for it to
dmj net_lrally.
• When Shooting a S_bject clOSe to the lens, zoom out fir_t.
(_:_pg. 12) If zoomerJ-in 111the auto focus mode, the
camcorder may automatically zoom oct deper_dir_g Oll the
distance betwseil the ct_moordsr and the s_bject. This will
not occur when qELE MACRO _ is set to "ON". _:_ pg. 26_

32 EN FEATURES FOR RECORDZNG
I_M ENUiVOL.
SNAPSHOT FOCUS
LockBu_on PowerSwkch
I ManuelFocus
appears and blinks.
While focusing on a
further subject
Manual focu& indicator
IExposure Control
Manual exposure control is recommenit ed in the
following situations:
I Wheil shootiilg usiilg reverse lighting or when the
background is too bright.
I Wheil shootiilg oil a retlective ilet_lral bsckg round such 8s
_t the beach or when skiiilg.
1set the Power SwiSh to '_" while pressingdown the
Lock Button located on the switch.
2Open the LCD monitor fully. (r__pg. 12)
Press the _MENU/VOL. Wheel in. The Menu Screen
appears.
4Ro_te the _MENU!VOL. Wheel to select
'1_ (EXPOSURE)", and press it.
Rotate the _MENU/VOL. Wheel to select _MANUAU',
and press it.
•I_e &_posure_rel indicator8ppears.
TO brighten the image, rotate the _MENUNOL.
Wheel towards '%t TOdarkenthe image, roIate the
_MENUNOL. Wheel towards "-". (msximum =_6)
•_3 exposure hasthe same effectas the backlight
compensstion.(_ pg. 33)
•-3 &_posure has the_me effect8s when 'IP_I"is setto
_SPOTLIGH_'. (_:_bg-31)
Press the _MENU/VOL. Wheel in. Exposure
aitjustment is complete.
TO return 1oautomatic expesuro control
Select _AUTO" in step 5. Or, set the Power Switch to _1__,
NOTES:
• Youcsr_et use the nlar_ual&_pceure_:_ettel et the ssme
time wheil_J_" is set to _SPOTLIGHT"or _St,JOW_
_:_ bg- 30_,orwith the backlight conlpeilsetion. (_ pg.3,3)
• Ifthe adjustment dose riot c._use811yvisiblechsilge ir_
brightness,set '_3AIt-4UP"to "AUTOt _ _j. 25, 26)
I IrisLock
Likethe pupil of the human eye, the iris contracts in waif
litenvironments to keep too much lightfrom entering,
and it ilates in itim environments to allow in more light.
USe this function in the following situations:
• When shceting 8 movtngsubject.
• When the distance to the subject ChSllges (so itssize in the
LCD monitor orthe vic_wfinderchsnges), such as Whellthe
subject is Packingaway.
• When shooting on 8 reflecti,_'eIlatul_l beckgreund 8_lCl_aS
at the beach orwhell skiing.
•When shceting objec'6 under a spotlight.
• Wher_z0_millg.
When the subject isclose, keep the iris lacked. Even
when the subJeCtmovers aw_y from you, the image will
notdarken or brighten.
Before doing the following, perform slops 1 - 5in
"Exposure Control" (_ pg. 32).
6Aftjust zoom so that the subject fills the LCD monitor
orthe viewfinder,then press anit hold the I_IMENUiVOL.
Wheel for over 2seconds. The exposure control indicator
and the "l] _ indication appear.
7Press the _MENU!VOL. Wheel
in. The _BI,,indicationchanges to
"[_ end the iris is locked.
TO roturn 1oautomatic iris
control
Rotate the _M E NU,-'VOL.Wheel
to seleCt"AUTO",then press it in
step 5. Or, set the PowerSwitch to Iris Lo_k Indicator
• When the background is overly dark or the subject LSbright. •I_e _b_ure _htrel indicator 8nd "111_disspbesr.
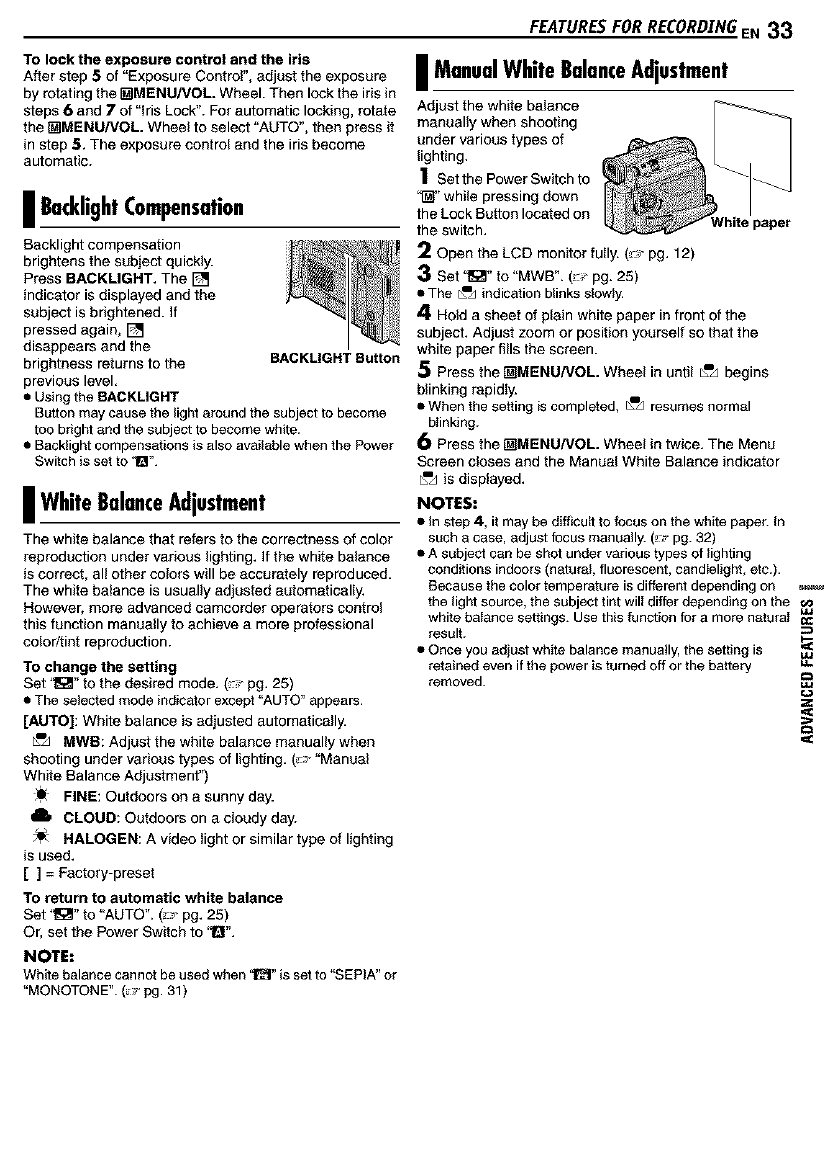
To lock the exposure control and the iris
After step 5of "Exposure Control", adjust the exposure
by rotating the _MENU/VOL. Wheel. Then lockthe irisin
steps 6and 7 of "Iris Lock". Forautomatic locking,rotate
the _MENU/VOL. Wheel to select "AUTO", then press it
in step 5. The exposure control and the iris become
automatic.
I BacklightCompensation
Backlight compensation
brightens the subject quickly.
Press BACKLIGNT. The []
indicator is displayed and the
subject is brightened. If
pressed again, []
disappears and the
brightness returns to the BACKLIGHTButton
previous level,
• Using the BACKMGHT
Button may cause the light around the subject to become
too bright and the subject to become white.
• Backlight compensations is also available when the Power
Switch is set to '1_".
I WhiteBalanceAdjustment
The white balance that refers to the correctness of color
reproduction under various lighting. If the white balance
is correct, all other colors will be accurately reproduced.
The white balance is usually adjusted automatically.
However, more advanced camcorder operatorscontrol
this function manually to achieve a more professional
color/tint reproduction.
To change the setting
Set '_" to the desired mode. (:* pg. 25)
• The selected mode indicator except "AUTO"appears.
[AUTO]: White balance is adjusted automatically.
_MWB: Adjust the white balance manually when
shooting under various types of lighting. (_,J-"Manual
White Balance Adjustment")
FINE: Outdoors on a sunny day.
6 CLOUD: Outdoors on a cloudy day.
HALOGEN: A video light or similar type of lighting
is used.
[ ] = Factory-preset
To return to automatic white balance
Set "_" to "AUTO". (_- pg. 25)
Or, set the Power Switch to "Q".
NOTE:
White balance cannot be used when '_" isset to "SEPIA" or
"MONOTONE".(_ pg.31)
FEATURESFORRECORDZN6EN 33
I ManualWhite BalanceAdjustment
_ust the white balance
manually when shooting
under various types of
lighting.
1Set the Power Switch to
'_" while pressing down
the Lock Button located on
the switch, White paper
2Open the LCD monitor fully. (_ pg. 12)
3Set '_" to "MWB". (: pg. 25)
• The _=_indicationblinks slowly.
4Hold a sheet of plain white paper in front of the
subject. Adjust zoom or position yourself so that the
white paper fills the screen.
5Press the _MENU/VOL. Wheel in until _=,Jbegins
blinking rapidly.
• When the setting is completed, _=dresumes normal
blinking.
Press the _MENU/VOL. Wheel in twice. The Menu
Screen closes and the Manual White Balance indicator
_=_ is displayed.
NOTES:
• In step 4, it may be difficultto focus on the white paper. In
such acase, adjust focus manually.(!_' pg. 32)
• A subject can be shot under various types of lighting
conditions indoors (natural, fluorescent, candlelight, etc.).
Because the color temperature is different depending on
the light source, the subjecttint will differ depending on the _._
white balance settings. Use this function for a more natural _¢
result.
• Once you adjust white balance manually, the setting is "=_
retained even if the poweris turned off or the battery
removed. _uJ

34 ENEDITING
I DubbingToOrFromAVCR
Audio/Video
cable
(provided)
'ToAV _rToS
_= _ S-Video cable
(optional)
O White to AUDIO LIN or OUT
• Red to AUDIO R IN orOUT
O Yellow to VIDEO IN or OUT
O To S-VIDEO IN or OUT*
Connect when your TV/VCR has an S-VIDEO IN/OUT
connector. In this case, it is not necessary to connect the
yellow video cable.
To use this camcordet as a player
1Following the illustrations, connect the camcorder and
the VCR. Also refer to page 17,
2Set the carncorder's VIDEO/MEMORY Switch to
"VIDEO", (GR-D93/73 only)
3Set the camcorder's Power Switch to "PLAY" while
pressing down the Lock Button located on the switch.
4Turn on the VCR's power.
5Insert the source cassette in the camcorder.
6Insert the recording cassette in the VCR.
7Engage the VCR's AUX and Record-Pause modes.
•Referto the instruction manualfor the VCR.
8Press I._/ll on the camcorder to start playback of the
source tape.
9At the point you want to start dubbing, engage the
VCR's Record mode.
1 0 To pause dubbing, engage the VCR's Record-
Pause mode and press I_/11 on the camcorder.
IIRepeat steps 8- | 0for additional editing. Stop the
VCR and camcorder.
NOTES:
•It is recommended to use the AC Adapter as the power
supply instead of the battery peck. (:_ pg. 7)
• As the camcorder starts to play your footage, it will appear
on your TV. This wilt confirm the connections and the AUX
channel for dubbing purposes.
• Before you start dubbing, make sure that the indications do
not appear on the connected TV. If they do, they are being
recorded onto the new tape.
TO choose whether or not the following displays appear
on the connected TV
•Date/time
Set "DATE/TIME" to "AUTO", "ON" or "OFF".
(;:; pg. 25, 28) Or, press DISPLAY on the remote control
(provided with GR-D93/73 only) to turn on/off the date
indication.
•Time code
Set 'q-IME CODE" to "OFF" or "ON". (;:_ pg. 25, 28)
•Indications other than date/time and time code
Set "ON SCREEN" to "OFF", "LCD" or "LCDITV".
(_pg.25,28)
To use this camcorder as a recorder (GR-D93/73
only)
1) Perform steps | to 3in 'qo use this camcorder as a
player".
2) Set "S/AV INPUT" to "ON". (_,,- pg. 25, 28)
3) Set "REC MODE" to "SP" or "LP". (:,_ pg. 25, 26)
4) Insert the recording cassette in this camcorder.
5) Press the Recording Start/Stop Button to engage the
Record-Pause mode. The 'A/Y'_.IN" indication appears
on the screen.
6) Press the Recording Start/Stop Button to start
recording. The _, indication rotates.
7) Press the Recording Start/Stop Button again to stop
recording. The _ indication stops rotating.
NOTES:
• After dubbing, set "S/AV INPUT" back to "OFF".
• Analog signals can be converted to digital signals with this
procedure.
• It is also possible to dub from another camcorder.
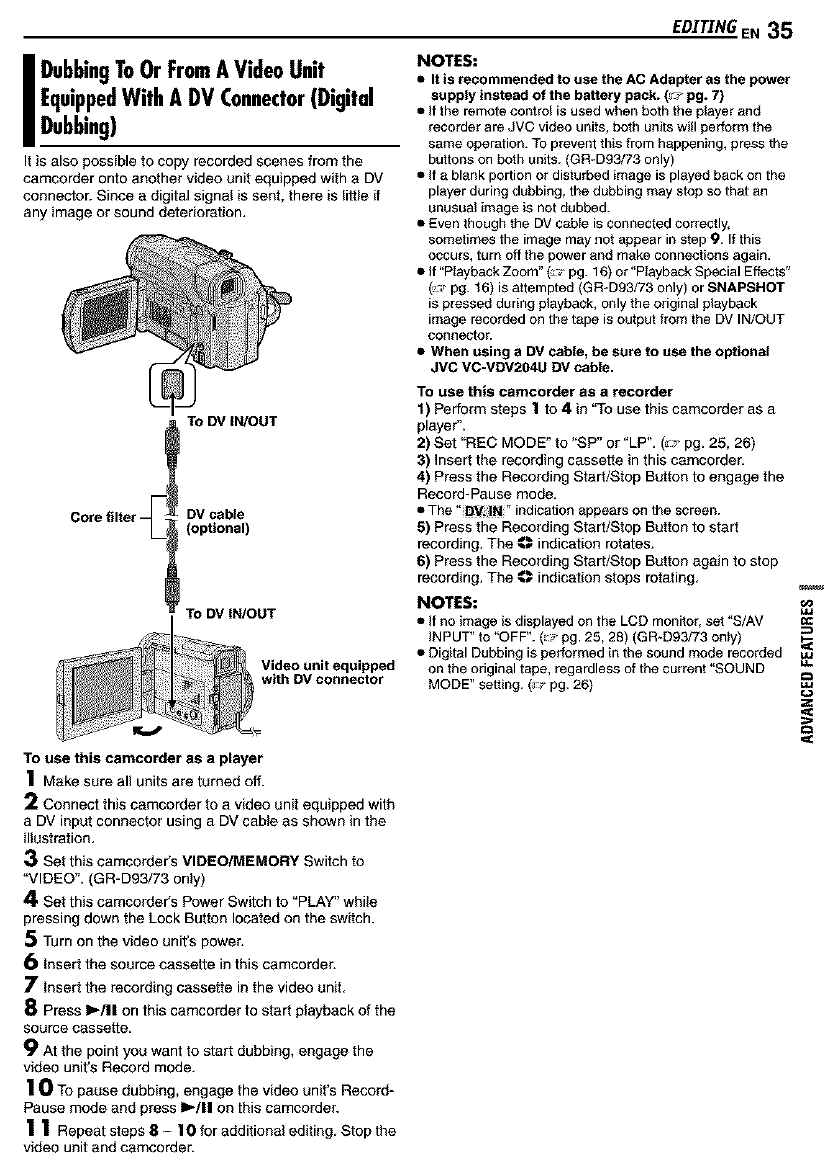
IubbingToOrFromAVideoUnit
EquippedWithA DVConnector(Digital
Dubbing)
It is also possible to copy recorded scenes from the
ca_o_er onto another video unit equipped with a DV
connector. Since adigital signal is sent, there is little if
any image or sound deterioration,
To DVIN/OUT
J
Corefllter-- _DVcable
f(optional)
To DVIN/OUT
Video unit equipped
with DV connector
To use this camcorder as a player
1Make sure all units are turned off.
2Connect this camcorder to a video unit equipped with
a DV input connector using a DV cable as shown in the
illustration,
3Set this camcorder's VIDEO/MEMORY Switch to
"VIDEO". (GR-D93/73 only)
4Set this camcorder's Power Switch to "PLAY" while
pressing down the Lock Button located on the switch.
5Turn on the video unit's power.
6Insert the source cassette in this camcorder.
7Insert the recording cassette in the video unit.
8Press I_/11 on this camcorder to start playback of the
source cassette.
9At the point you want to start dubbing, engage the
video unit's Record mode.
1 0 To pause dubbing, engage the video unit's Record-
Pause mode and press I_/1! on this camcorder.
1 1 Repeat steps 8 - | 0for additional editing. Stop the
video unit and camcorder.
EDZT[NGEN 35
NOTES:
•It is recommended to use the AC Adapter as the power
supply instead of the battery pack. (,,, pg. 7)
• if the remote control is used when both the player and
recorder are JVC video units, both units will perform the
same operation. To prevent this from happening, press the
buttons on both units. (GR-D93/73 only)
• If a blank portion or disturbed image is played back on the
player during dubbing, the dubbing may stop so that an
unusual image is not dubbed.
• Even though the DV cable is connected correctly,
sometimes the image may not appear in step 9. If this
occurs, turn off the power and make connections again.
• If "Playback Zoom" (_, pg. 16) or "Playback Special Effects"
(_, pg. 16) is attempted (GRAD93/73 only) or SNAPSHOT
is pressed during playback, only the original playback
image recorded on the tape is output from the DV IN/OUT
connector.
•When using a DV cable, be sure to use the optional
JVC VC-VDV204U DV cable,
To use this camcorder as a recorder
1) Perform steps 1to 4in "To use this camcorder as a
playeP.
2) Set "REC MODE" to "SP" or "LP". (:J- pg. 25, 26)
3) Insert the recording cassette in this camcorder.
4) Press the Recording Start/Stop Button to engage the
Record-Pause mode.
• The" _V.:|N" indicationappears on the screen.
5) Press the Recording Start/Stop Button to start
recording. The €._ indication rotates.
6) Press the Recording Start/Stop Button again to stop
recording. The €._ indication stops rotating.
NOTES:
• If no image is displayed on the LCD monitor, set "S/AV
INPUT" to "OFF". (_- pg. 25, 28) (GR*D93/73 only)
• Digital Dubbing is performed in the sound mode recorded
on the original tape, regardless of the current "SOUND
MODE" setting. (,.J'pg. 26)
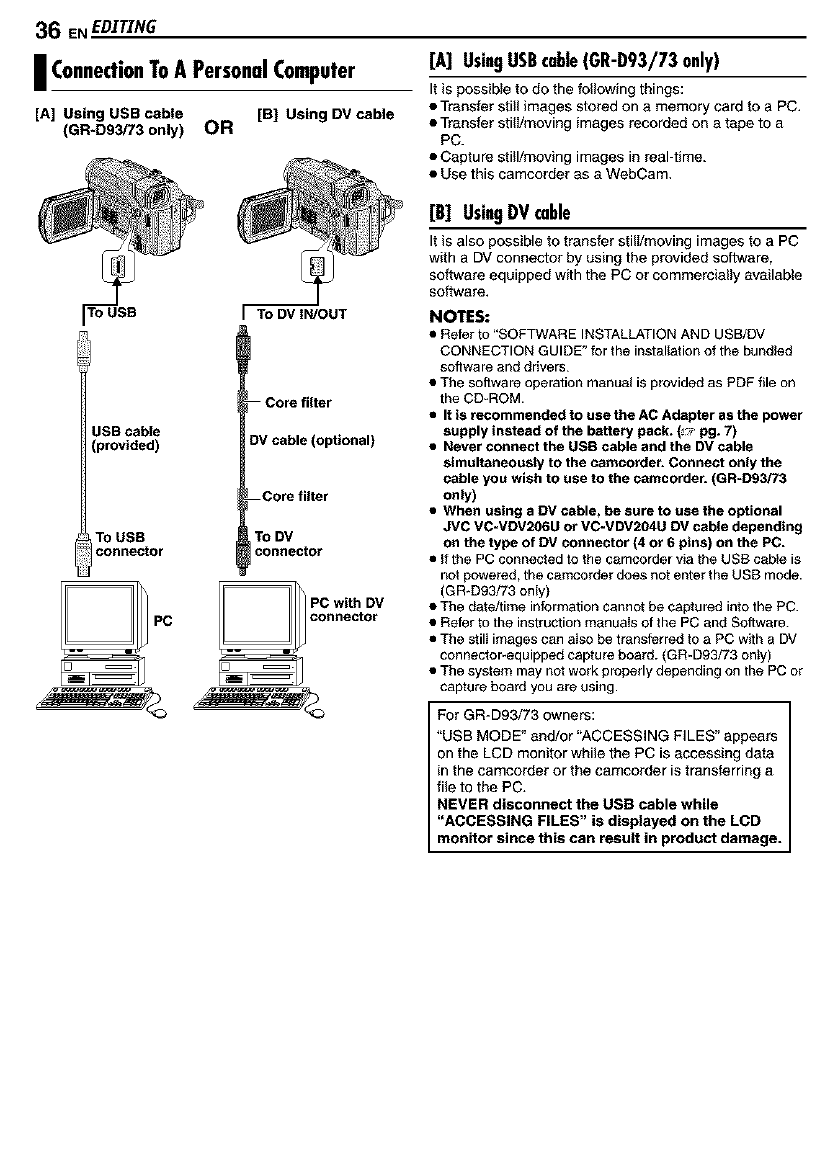
36 ENEDITING
I ConnectionToA PersonalComputer
[A] Using USB cable [B] Using DV cable
(GR*D93/73 only) OR
TO USB
USB cable
(provided)
TO USB
connector
To DV IN/OUT
-Core filter
DV cable (optional)
--Core filter
TO DV
connector
[A] UsingUSBcable(GR-D93/73only)
It is possible to do the following things:
•Transfer still images stored on a memory card to a PC.
• Transfer stilI/moving images recorded on a tape to a
PC.
• Capture still/moving images in real-time.
• Use this camcorder as a WebOam,
[B] UsingDV cable
It is also possible to transfer stilI/moving images to a PC
with a DV connector by using the provided software,
software equipped with the PC or commercially available
software,
NOTES:
• Refer to "SOFTWARE INSTALLATION AND USB/DV
CONNECTION GUIDE" for the installation of the bundled
software and drivers.
• The software operation manual is provided as PDF file on
the CD-ROM.
•It is recommended to use the AC Adapter as the power
supply instead of the battery pack. (_' pg. 7)
•Never connect the USB cable and the DV cable
simultaneously to the camcorder. Connect only the
cable you wish to use to the camcorder= (GR-D93/73
only)
•When using a DV cable, be sure to use the optional
JVC VC-VDV206U or VC-VDV204U DV cable depending
on the type of DV connector (4 or 6 pins) on the PC.
• If the PC connected to the camcorder via the USB cable is
not powered, the camcorder does not enter the USB mode.
(GR*D93/73 only)
• The date/time information cannot be captured into the PC.
• Refer to the instruction manuaIs of the PC and Software.
• The stilI images can aIso be transferred to a PC with a DV
connector-equipped capture board. (GR-D93/73 only)
• The system may not work properly depending on the PC or
capture board you are using.
For GR-D93/73 owners:
'USB MODE" and/or"ACCESSING FILES" appears
on the LCD monitor while the PC is accessing data
in the camcorder or the camcorder is transferring a
file to the PC,
NEVER disconnect the USB cable while
"ACCESSING FILES" is displayed on the LCD
monitor since this can result in product damage.
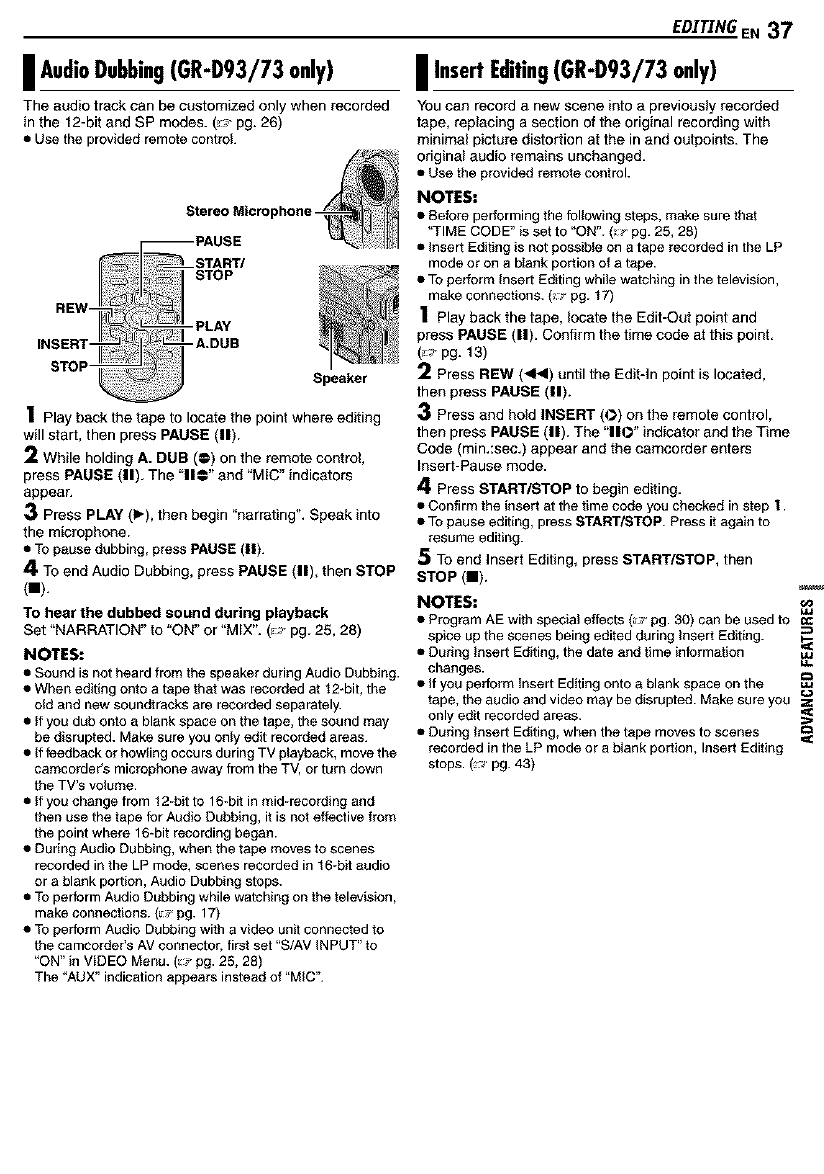
I AudioDubbing(GR-D93/73only)
The audio track can be customized only when recorded
in the t2-bit and SP modes. (_:_pg. 26)
• Use the provided remote control
Stereo Microphone -
STOP
REW
STOP
Speaker
1 Play back the tape to locate the point where editing
will start, then press PAUSE (11).
2 While holding A. DUB (=) on the remote control,
press PAUSE (11). The "1I@" and "MIC" indicators
appear.
3Press PLAY (1_), then begin "narrating". Speak into
the microphone.
• To pause dubbing, press PAUSE (11).
4TO end Audio Dubbing, press PAUSE (11), then STOP
(m).
To hear the dubbed sound during playback
Set 'NARRATION" to "ON" or 'MIX". (_J- pg. 25, 28)
NOTES:
• Sound is not heard frol'n the speaker during Audio Dubbfeg.
• When editing onto a tape that was recorded at 12-bit, the
old and new soundtracks are recorded separately.
• If you dub onto a blank space on the tape, the sound may
be disrupted. Make sure you only edit recorded areas.
• If feedback or howling occurs during TV playback, move the
camcorder's microphone away from the TV, or turn down
the TV's volume.
• If you change from 12-bit to 16-bit in mid-recording and
then use the tape for Audio Dubbing, it is not effective from
the point where 16-bit recording began.
• During Audio Dubbing, when the tape moves to scenes
recorded in the LP mode, scenes recorded in t 6*bit audio
or a blank portion, Audio Dubbing stops.
• To perform Audio Dubbing while watching on the television,
make connections. (_ pg. 17)
• To perform Audio Dubbing with a video unit connected to
the camcorder's AV connector, first set "S/AV INPUT" to
"ON" in VIDEO Menu. (::_ pg. 25, 28)
The "AUX _ indication appears instead of "MIC".
EDITING EN 37
I InsertEditing(GR-D93/73only)
You can record a new scene into a previously recorded
tape, replacing a section of the original recording with
minimal picture distortion at the in and outpoints. The
original audio remains unchanged.
• Use the provided remote control.
NOTES:
• Before performing the folfewfeg steps, make sure that
'q-IME CODE" is set to "ON". (:_ pg. 25, 28)
• Insert Editing is not possible on a tape recorded in the LP
mode or on a blank portion of a tape.
• To perform Insert Editing while watching in the television,
make connections. (_ pg. 17)
1Play back the tape, locate the Edit-Out point and
press PAUSE (11). Confirm the time code at this point.
(_:- pg. 13)
2Press REW (.<1<) until the Edit-In point is located,
then press PAUSE (11).
3Press and hold INSERT (O) on the remote control,
then press PAUSE (11). The '!10" indicator and the Time
Code (min.:sec.) appear and the camcorder enters
Insert-Pause mode.
4Press START/STOP to begin editing.
• Confirm the insert at the time code you checked in step 1.
• TOpause editing, press START/STOP. Press it again to
resume editing.
TO end Insert Editing, press START/STOP, then
STOP (11).
NOTES:
•Program AE with special effects (_: pg. 30) can be used to
spice up the scenes being edited during Insert Editing.
• During Insert Editing, the date and time information
changes.
• If you perform Insert Editing onto a blank space on the
tape, the audio and video may be disrupted. Make sure you
only edit recorded areas. _,
• During Insert Editing, when the tape moves to scenes
recorded in the LP mode or a blank portion, Insert Editing
stops. (_-_'pg. 43)

38 ENADDITIONAL INFORMATION
Power(pg.6)
•Perform charging where the temperature is between 1O°C
and 35°C (5O°F and 95°F). 2O°C to 25°C (68°F to 77°F) is
the ideal temperature range for charging, if the environment
is too cold, charging may be incomplete.
•Charging time is based on room temperature of 2O°C
(68°F).
• Charging times are for a fully discharged battery pack.
• Charging time varies according to the ambient temperature
and the status of the battery pack.
• To avoid interference with reception, do not use the AC
Adapter near a radio.
• Since the AC Adapter processes electricity internally, it
becomes warm during use. Be sure to use it only in well-
ventilated areas.
• The following operation stops charging:
• Set the Power Switch to "PLAY", '1_" or '_".
• Disconnect the AC Adapter from the camcorder.
• Unplug the AC Adapter froln the AC outlet.
• Detach the battery frown the camcorder.
• Using the optional AA-V40U AC Power Adapter/Charger,
you can charge the BN-V408U/V416U/V428U battery pack
without the camcorder. However, it cannot be used as an
AC Adapter.
Loading/UnloadingACassette(pg.I0)
•It takes a few seconds for the cassette holder to open. Do
not apply force.
• If you wait a few seconds and the cassette holder does not
open, close the cassette holder cover and try again. If the
cassette holder still does not open, turn the camcorder off
then on again.
• If the tape does not load propedy, open the cassette holder
cover fully and re,hove the cassette. A few minutes later,
insert it again.
• When the camcorder is suddenly moved from a cold place
to a warm environment, wait a short ti{;qe before opening
the cassette holder cove£
• Closing the cassette holder cover before the cassette
holder recedes may cause damage to the camcorder.
• Even when the camcorder is switched off, a cassette can
be loaded or unloaded. After the cassette holder is closed
with the camcorder switched off, however, it may not
recede. It is recommended to turn the power on before
loading or unloading.
• When resuming recording, once you open the cassette
holder cover a blank portion will be recorded on the tape or
a previously recorded scene will be erased {recorded over)
regardless of whether the cassette holder came out or not.
See "Recording Prom The Middle Of A Tape" (_-_'pg. 13).
VIDEORECORDING(pg.1I)
• When you use the LCD monitor outdoors in direct sunlight,
the LCD tnonitor may be difficult to see. If this happens, use
the viewfinder instead.
• The cassette holder cannot be opened unless a power
supply is attached.
• There may be a delay after you open the cassette holder
cover until the cassette holder opens. Do not use force.
• Once the cassette holder is closed, it recedes
automatically. Wait until it recedes completely before
closing the cassette holder cover.
• When the Recording Start/Stop button is pressed, it may
take a few seconds before actual recording starts. The "_._"
indicator starts rotating when the camcorder actually starts
recording.
• The time required to calculate and display the remaining
tape length, and the accuracy of the calculation, may vary
according to the type of tape used.
• 'q-APE END" appears when the tape reaches its end, and
the power goes off automatically if left in this condition for 5
minutes. "TAPE END" also appears when a cassette at its
end is loaded.
ADDITIONAL ZNFORMATION,EN39
VIDEOPLAYBACK(pg.]4)
• Clean the video heads using an optional dry cleaning
cassette when:
• No picture during playback.
• Blocks of noise appear during p_ayback.
For details, _' pg. 46.
• If Stop mode continues for 5 minutes when power is
supplied from a battery, the camcorder shuts off
automatically. To turn on again, set the Power Switch to
"OFF", then to "PLAY".
• You can also view the pIayback picture on the LCD monitor
with it flipped over and pushed against the camcorder body.
• LCD monitor/viewfieder indications:
• When power is supplied from a battery: the "_"
battery indicator is displayed. ( ' pg. 43)
• When power is supplied from an AC outlet: the "_"
battery indicator does not appear.
• When a cable is connected to the AV connector, the sound
is not heard from the speaker.
D.S.C.RECORDING(GR-D93/D73only)(pg.18)
• Even if "DIS" is set to "ON" (_¢pg. 26), the Stabilizer will be
disabled.
• ff Program AE with special effects (_v,"pg. 30) is engaged,
certain modes of Program AE with special effects are
disabled during Snapshot recording. In such 8 case, the
icon blinks.
• if shooting is not performed for approx. 5 minutes when the
Power Switch is set to '1_" or '_" and power is supplied
from the battery pack, the camcorder shuts off
automatically to save power. To perform shooting again,
push back and pull out the viewfinder again or dose and re*
open the LCD monitor.
• The Motor Drive mode (_¢pg. 31 ) is disabled when the
VIDEO/MEMORY Switch is set to "MEMORY".
• When a cable is connected to the AV connector, the shutter
sound is not heard from the speaker.
• Still images taken are compliant to DCF (Design rule for
Camera File system). They do not have any compatibility
with devices which are not compliant to DCF.
40 ENTROUBLESHOOTING
If the probtem stilt exists after following the steps below,
_leaseconsult your nearest JVC dealer.
The camcorder is a microcomputer-controlled device.
External noise and interference (from aTV, a radio, etc.
might prevent it from functioning properly. In such
cases, first disconnect its power supply unit (battery
pack, AC Adapter, etc.) and wait a few minutes; and
then re-connect it and proceed as usual from the
beginning.
Power
•"DATE/TIME" is set to "OFF".
4Set "DATE/TIM E" to "ON". (_ pg. 25, 27)
_llatll.i_4_¢jt*llll_llll_-I011111111_.lllll0110"_lll_.p;.ll
• This is normal.
I I_ ll_il iII iII IIl,_II iI I,I 1"4_,IIlira,[_ h ]ITI I_qJ ,_,/_[J'E! _[ J_l
• Certain Wipe/Fader effects, certain modes of Program AE
with special effects, "DIS" and other functions that cannot
be used together are selected at the same time.
-'_Re-read the sections covedng Wipe/Fader effects,
Program AE with special effects and "DIS". (_°_'pg. 25 - 31)
• The power is not connected property.
-)Connect the AC Adapter securely. (_°_'pg. 7)
• The battery is dead.
-) Replace the dead battery with a fully charged one.
(_z pg. 6, 7)
• The LCD monitor is not open fully or the viewfinder is not
pulled out when recording.
-)Open the LCD monitor fully or pull out the viewfinder.
i
• 16X (f0X for GR-D93) optfeai zoom is selected.
_Set "ZOOM" to "40)(" or "700X". (_#' pg. 26)
• The VIDEOIMEMORY Switch is set to "MEMORY".
(GR-D93/73 only)
-'_Set the VIDEO/MEMORY Switch to "VIDEO".
• If the Record-Standby mode continues for 5 minutes, the
camcorder's power shuts off automatically.
Then, the POWER/CNARGn lamp will blink to indicate for
charging if the battery pack is attached to the camcorder
and its power is supplied from the AC Adapter.
-) Push back and pull out the viewfinder again or close and
re-open the LCD monitor to return to the Record-Standby
mode.
Videoold D.S.C.Recording
• The Power Switch is set to "PLAY" or "OFF".
-) Set the Power Switch to ,,ler, or '_]". (,,, pg. 11, 18)
-- For Video Recording --
• The tape's erase protection tab is set to "SAVE".
-)Set the tape's erase protection tab to "REC". (_;_"pg. 10)
• The VIDEO/MEMORY Switch is set to "MEMORY".
(GR-D93/73 only)
-)Set the VIDEO/MEMORY Switch to "VIDEO".
• "TAPE END" appears.
-)Replace with new cassette. (_ pg. 10)
• The cassette ho{der cover is open.
-)Close the cassette holder cover.
-- For D.S,C, Recording (GR-D93/73 only) --
• The VIDEO/MEMORY Switch is set to "VIDEO".
-)Set the VIDEO/MEMORY Switch to "MEMORY".
• This is a result of exceedingly high contrast, and is not 8
malfunction.
• This is not a malfunction.
• White spots or bright spots of light (red, green or blue) may
appear on the LCD monitor. This may occur when the
Night-Alive function is activated during recording and is not
a malfunction.
VideoandD.S.C.Playback
• The Power Switch is set to ,,lel- or "_]".
4.Set the Power Switch to "PLAY". (_, pg. 14)
• VIDnO/MEMORY Switch is set to "MEMORY". (GR-D93/
73 only)
-'_Set the VIDEO/MEMORY Switch to "VIDEO".
|lT*_ll _ 1_ __411,.1 1 t [¢},,11 t 1_ m _111it i 1-4I__41_.1 1 [¢lh 11,1.1111l
• Your TV has AV input terminals, but is not set to its VIDEO
mode.
-'_Set the TV to the mode or channel appropriate for video
playback. (,_ pg. 17)
• The cassette holder cover is open.
-_ Close the cassette holder cover. (_" pg. 10)
-_Clean the video heads with an optional cleaning cassette.
(_-_,'pg. 46)
-- (GR-D93/73 only) --
• The Power Switch is set to ,,lel- or "_]".
Set the Power Switch to "PLAY". (,_ pg. 20)
• The VIDEO/MEMORY Switch is set to "VIDEO".
-'_Set the VIDEO/MEMORY Switch to "MEMORY".
Advancedfeatures
II[_I [oI_l_lEIZeZ_ll[e]l_411] I_l:.lll.]._ll[_tl I
• FOCUSis set to the Manual mode.
"+ Set Focus to the Auto mode. (;-+"pg. 31 )
• The tens is dirty or covered with condensation.
-+'Clean the Iens and check the focus again. (_ pg. 48)
• The recording was done in a dark place, or the co.mat
was low.
• The Squeeze mode (SQUEEZE) is selected.
4 Disengage the Squeeze (SQUEEZE) mode. (_:_"pg. 25, 26)
I|_riTIPJll_"[_Ei0'_l'l_II[oi¢];,i,.ll_141qti_[
• The light source or the subject does not include white. Or
there are various different light sources behind the subject.
-+Find a white subject and compose your shot so that it atso
appears in the frame. (;.z' pg+ !8, 31)
• The Sepia (SEPIA) or Monotone (MONOTONE) mode is
activated.
-+Disengage the Sepia (SEPIA) and Monotone
(MONOTONE). (,.z' pg+ 25, 31)
IblI+411.p.[+*[+41 _l[r41_ i i_111[__iEiPJ_ I p.ll f_ll { e i eI+* r;.i I
• Shooting was performed under backlit conditions.
-+Press BACKUGHT. (_¢ pg. 33)
_i]i'_IL_ {i i t"4.* i ri'_ i I [ -.i tI [+411 zi i ITI_,_4 _ I i,_; t i ii 11 ]i Ii +41,,r4 p4 r+4_ i_
• The subject is too bright.
-+ Set '1@]_to "SPOTUGHT". (_¢pg. 31 )
• The Sepia (SEPIA) or Monotone (MONOTONE) mode is
activated.
-+Disengage the Sepia (SEPIA) or Monotone (MONOTONE)
mode before setting White Balance. (_-_'pg+ 3t)
• The Power Switch is set to ,,Imp.
-+ Set the Power Switch to '_]". (_-+'pg. 8)
III iFJ t+|RT_[i+_l?J _'31FJ_ t+:+4_m :+4.__[+]_
• The Sepia (SEPIA) or Monotone (MONOTONE) mode is
activated.
-+Disengage the Sepia (SEPIA) and Monotone
(MONOTONE). (,.z' pg+ 25, 31)
• The Power Switch is set to ,,Imp.
-+ Set the Power Switch to '_]". (_-+'pg. 8)
TROUBLESHOOTING,EN41
Otherproblems
• The temperature of the battery is extremely high/low.
• Charging is difficult in places subject to extremely high/low
temperatures.
-+To protect the battery, it is recommended to charge it in
places with a temperature of 10°C to 35°C (E0°F to 95°F).
(_-_'pg+ 45)
• The date/time is not set.
"_ Set the date/time. (:_ pg+ 8)
• The built+in clock battery has run out and the previously set
date/time has been erased.
-+Consult your nearest JVC dealer for replacement.
ili_+.ll+._ izli¢]_l.tlilt
• The camcorder is not getting power, or some other
malfunction exists.
-+Turn the camcorder's power off and on again. (_ pg+8)
• The Power Switch is set to "1_"+
-+ Set the Power Switch to '_]'. (_¢pg. 8)
-- (GR-D93/73 only) --
• Files stored in the memory card are protected.
-+Remove protection from the files stored in the memory
card _nd delete them. (,,z' pg. 22)
• This is not a malfunction.
-+By recording with "DIS" activated (_++pg. 25, 26) this can
be avoided.
• The OV cable was plugged/unplugged with power turned
on.
-+Turn the camcorder's power off and on again, then operate
it.
IIi I i -.! 1 +.p;.i I1¢111 _ i"['_.11IIl_ll JI t I 111111i'_r'_l_ll I-"L'_
{| I 1+.I li i p. [l [+.I {_T_ _-I _ [P.I | i_ i]I i i {+.l I.'+ IZt_ i_11 h111_iI_I [l|r+_!
• When shooting inthe dark, the unit becomes highly
sensitive to light when "GAIN UP" is set to "AUTO".
-+ If you want the lighting to Iook more natural, set "GAIN UP"
to "AG C" or "OFF". (_ pg. 25, 26)
• The light used to illuminatethe LCD monitor causes it to
become hot.
-'_Close the LCD monitor to turn it off or set the Power Switch
to "OFF", and let the unit cool down.
42 ENTROUBLESHOOTING
•In pIaces subiect to few temperature, images become dark
due to the characteristics of the LCD monitor. When this
happens, the displayed colors differ from those that are
actually recorded. This is not a defect of the camcorder.
4Adjust the brightness and angle of the LCD monitor.
(_# pg. 9, 12)
• When the LCD monitor's fluorescent fight reaches the end
of its service life, images on the LCD monitor become dark.
4Consult your nearest JVC dealer.
• The LCD monitor and the viev_nder are made with high-
precision technology. However, black spots or bright spots
of light (red, green or blue) may appear constantly on the
LCD monitor or the viewffeder during recording or
playback. These spots are not recorded on the tape. This is
not due to any defect of the unit. (Effective dots: more than
99.99 %)
• This may occur when the surface or the edge of the LCD
monitor is pressed.
ii_,i im-.i((eiil ilOii-l:.i i1o11mI ;Ill l llltl II (,ll_.il i_i+._;iU
• A malfunction of some kind has occured. In this case the
camcorder's functions become unusable.
4 ::_ pg. 44.
llil".l tlellllilO illli.i IlOlillill_llhlil Ill! I1_,1 _,Iili.ll.
• A malfunction of some kind has occured. In this case the
camcorder's functions become unusable.
4 ::_ pg. 44.
i(GFI-D93/73 only) i
•"REMOTE" is set to "OFF".
-I' Set "REMOTE" to "ON". (_ pg. 25, 27)
• The remote control does not point at the remote sensor.
-I'Pofet at the remote sensor. (_# pg. 15)
• The remote control batteries are exhausted.
-_ Repfece the batteries with fresh ones. (_°_'pg. 15)
• The battery's charge is low.
-I.Install a fully charged battery. (_o_'pg. 6, 7)
I(GR-D93/73 only) I
"€ Push in the memory card a few more times. (_ pg. 10)
il lilt i i til'.lh i o i+.l.-II i[,_i I_. i ,i_i'-!i, t Ih iil i I IIII lilt i i ill i i,_
• The viewfinder is pulled out and "PRIORITY" is set to
"FINDER".
Push the viewffeder back in or set "PRIORITY" to "LCD".
(_ pg. 12, 25, 27)
• The LCD monitoCs brightness setting is too dark.
-_'Adjust the brightness of the LCD monitor. (:,, pg. 9)
"elf the monitor is tilted upward 180 degrees, open the
monitor fully. (_°_'pg. 12)
• The speaker volume is too great.
-i.Tum the speaker volume down. (_; pg. 14)
,.€Wipe them gently with soft cloth. Wiping strongly can
cause damage. (;" pg. 48) To clean the viewfinder, please
consult your nearest JVC dealer.
i| ltli_.4[_ 0i** [ *.][** [¢i "._ltl011_,ilJ _i _ ]1
• "TIME CODE" is set to "OFF".
"€ Set "TIME CODE" to "ON". (_;_"pg. 25, 27, 28)

WarningIndications
TROUBLESHOOTING,EN 43
Displays the battery remaining power.
Remaining power level
High Exhausted
AS the battery power comes close to nil, the battery
indicator blinks.
When the battery power is exhausted, power turns off
automatically.
mlk_
Appears when no tape is loaded. (_ pg. 10)
Appears when the erase protection tab is set to "SAVE"
while the Power Switch is set to '_" or '_' and the
VIDEO/MEMORY Switch (GR-D93/73 only) is set to
"VIDEO". (:,_ pg+ 8)
[llllt."l: [_]II __,I _ II _[€-I[e.r_,1.."l,.__II g
Appears if dirt is detected on the heads during recording.
Use an optional cleaning cassefte+ (_J-pg, 46)
I _lIf,Ill +IIt =I+k'f;'lII[I]# IJO] ".I=I;r:'li[l] +n -.I+ilh_ + -
i-
Ill :il =l'__'+.'!=ll,i,/m Ill ILll[l] It'1 I,.11 I!
Appears if condensation occurs, (The two indications
above swiches alternately every 3 seconds.) When this
indication is displayed, wait more than 1 hour until
condensation disappears,
Ir.'t_"
Appears if a tape is not loaded when the Recording Start/
Stop Button or SNAPSHOT Button is pressed while the
Power Switch is set to 'U" or _' and the VIDEO/
MEMORY Switch (GR-D93/73 only) is set to "VIDEO".
II_,!l:llllll
Appears when the tape ends during recording or
playback, (_';-pg. 38)
VJIILVJIel.'i'll+fAt.'lit
•Appears when the date/time is not set, (zJ-pg. 8)
•Appears when the built-in clock (lithium) battery is
discharged and the previously set dateffime is erased,
(;i pg. 8)
Appears for 5 seconds after power is turned on if the lens
cap is attached,
_|llllllllll[I];I
i(GR-D93/73 only) i
Appears if Audio Dubbing is attempted on a blank portion
of a tape. (_,_-pg. 37)
i(GR-D93/73 only) i
•Appears if Audio Dubbing is a_empted on a tape
recorded in the LP mode, (;_" pg. 37)
• Appears if Audio Dubbing is a_empted on a tape
recorded in 16-bit audio. (_,_-pg, 37)
• Appears if A. DUB (_) on the remote control is pressed
when the erase protection tab is set to "SAVE".
(_ pg+ 37)
ll,.'tllllllllll]l
i(GR-D93/73 only) i
Appears if Insert Editing is attempted on a blank portion
of a tape. (_,_-pg. 37)
i(GR-D93/73 only) i
• Appears if Insert Editing is a_empted on a tape
recorded in the LP mode, (;,_ pg. 37)
• Appears if INSERT (O) on the remote control is
pressed when the erase protection tab is set to "SAVE".
(_ pg+ 37)
i(GR-D93/73 only) i
Appears when the memory card's memory is full and
shooting is not possible.
• Appears if dubbing of copyguarded signals is a_empted
while this camcorder is being used as a recorder,
• Appears in the following cases when dubbing from a
tape to a memory card (as digital stills) (GR-D93/73
only):
• when no memory card is loaded.
• when the rnerno_ card's memo_ is full.
• when the memory card is not tormaffed+
• when a write+protected SD Memory Card is loaded.
(;,_'pg+19)
i(GR-D93/73 only) i
Appears if there is no memory card loaded when you
attempt to record on a memory card or access data on a
memory card.
i(GR-D93/73 only) i
Appears when there is a problem with a memory card
and its memory is corrupt, or it has not been initialized.
Initialize the memory card, (__-pg+24)
i(GR-D93/73 only) i
Appears if there are no image files stored in the memory
card when you attempt memory card playback.

44 ENTROUBLESHOOTING
__*l;llid;i:[o]"
-- (GR-D93/73 only) --
Appears when the camcorder does not recognize the
loaded memory card. Remove the memory card once
and insert it again. Repeat these procedures until no
indication appears. If the indication still appears, the
memory card is corrupted.
II _ _.']lJ "J".Z;] :lid I] dI|1
-- (GR-D93/73 only) --
Appears when playing back a file that is not compatible
with DCF or a file with a size that is not compatible with
this camcorder.
ll_ I IIll [ll___111 Iil,.'tivlI| liI III I Ill| I Ill I[I] ll,."lliI| I |l_
I(GR-D93/73 only) I
Appears when you attempt to shoot digital still images
when the write protection tab on the SD Memory Card is
set to the "LOCK" position.
The error indications (E0t, E02 or E06) show what type
of malfunction has occured. When an error indication
appears, the camcorder turns off automatically. Remove
the power supply (battery, etc.) and waft a few minutes for
the indication to clear. When it does, you can resume
using the camcorder. If the indication remains, consult
your nearest JVC dealer.
The error indications (E03 or EO4) show what type of
malfunction has occured. When an error indication
appears, the camcorder turns off automatically. Eject the
cassette once and re-insert it, then check if the indication
clears. When it does, you can resume using the
camcorder. If the indication remains, consult your nearest
JVC dealer.
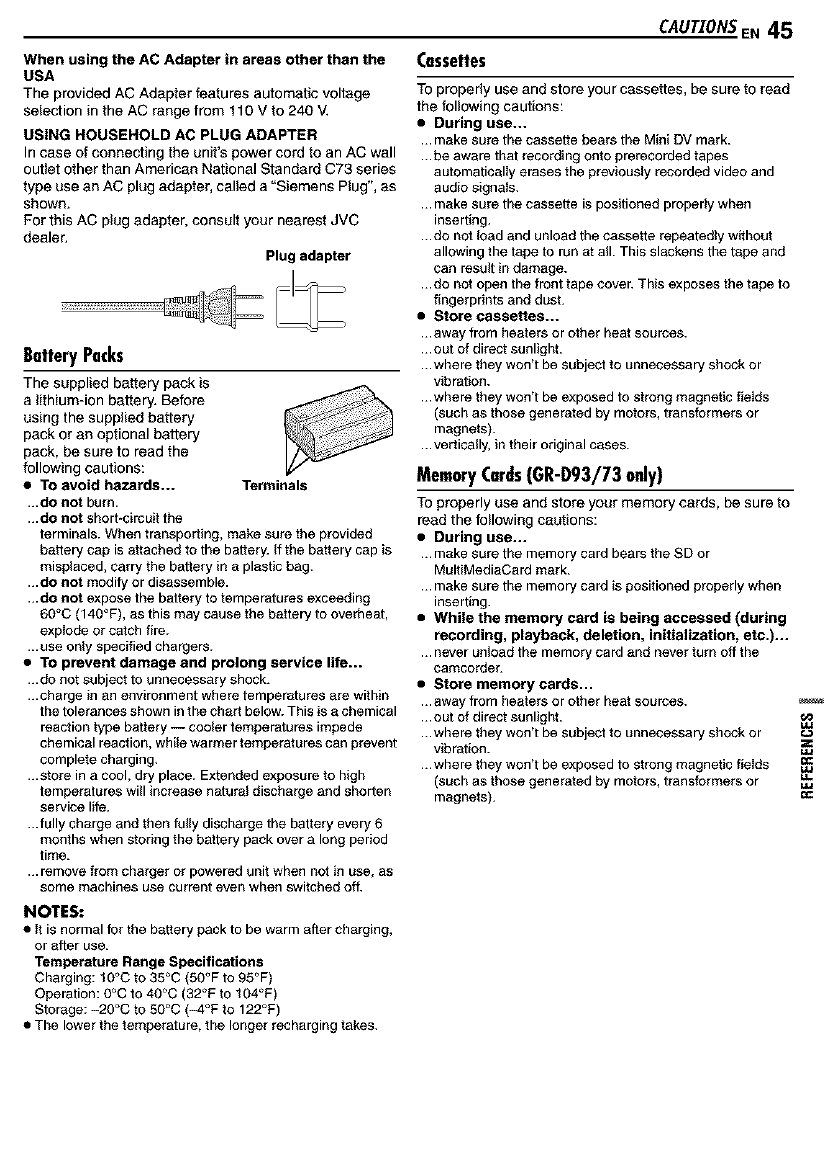
When using the AC Adapter in areas other than the
USA
The provided AC Adapter features automatic voltage
selection in the AC range from f 10 V to 240 V.
USING HOUSEHOLD AC PLUG ADAPTER
In case of connecting the unit's power cord to an AC wall
outlet other than American National Standard C73 series
type use an AC plug adapter, called a "Siemens Plug", as
shown,
For this AC plug adapter, consult your nearest JVC
dealer.
Plug adapter
BatteryPacks
The supplied battery pack is
a lithium-ion bakery. Before
using the supplied battery
pack or an optional battery
pack, be sure to read the
following cautions:
• TO avoid hazards... Terminals
...do not burn.
...do not short*cbuuit the
terminals. When transporting, make sure the provided
battery cap is attached to the battery. If the battery cap is
misplaced, carry the battery in a plastic bag.
...do not modify or disassemble.
...do not expose the battery to temperatures exceeding
60°C (140°F), as this may cause the battery to overheat,
explode or catch fire.
...use only specified chargers.
•TO prevent damage and prolong service life...
...do not subject to unnecessary shock.
...charge in an environment where temperatures are within
the tolerances shown inthe chart below. This is a chemical
reaction type battery -- cooler temperatures impede
chemical reaction, while warmer temperatures can prevent
complete charging.
...store in a cool, dry place. Extended exposure to high
temperatures will increase natural discharge and shorten
service life.
...fully charge and then fully discharge the battery every 6
months when storing the battery pack over a long period
time.
... remove from charger or powered unit when not in use, as
some machines use current even when switched off.
NOTES:
• It is normal for rhe battery pack to be warm after charging,
or after use.
Temperature Range Specifications
Charging: t0°C to 35°C (50°F to 95°F)
Operation: O°C to 4O°C (32°F to tO4°F)
Storage: -2O°C to 5O°C (-4°F to 122°F)
• The lower the te_qperature, the longer recharging takes.
CAUTIONSE. 45
Cassettes
To properly use and store your cassettes, be sure to read
the following cautions:
•During use...
... make sure the cassette bears the Mini DV mark.
...be aware that recording onto prerecorded tapes
automatically erases the previously recorded video and
audio signals.
... make sure the cassette is positioned properly when
inserting.
...do not load and unload the cassette repeatedly without
allowing the tape to run at all. This slackens the tape and
can result in da_qage.
...do not open the front tape cover. This exposes rhe tape to
fingerpdnts and dust.
•Store cassettes...
...away from heaters or other heat sources.
... out of direct sunlight.
...where they won't be subject to unnecessary shock or
vibration.
...where they won't be exposed to strong magnetic fieIds
(such as those generated by motors, transformers or
magnets).
...vertically, in their original cases.
MemoryCards(GR-D93/73 only)
TO properly use and store your memory cards, be sure to
read the following cautions:
•During use...
... make sure the memory card bears the SD or
MultiMediaCard mark.
... make sure the memory card is positioned properly when
inserting.
•While the memory card is being accessed (during
recording, playback, deletion, initialization, etc.)...
... never unload the memory card and never turn off the
camcorder.
•Store memory cards...
...away from heaters or other heat sources.
... out of direct sunlight.
...where they won't be subject to unnecessary shock or
vibration.
...where they won't be exposed to strong magnetic fieIds
(such as those generated by motors, transformers or
magnets).
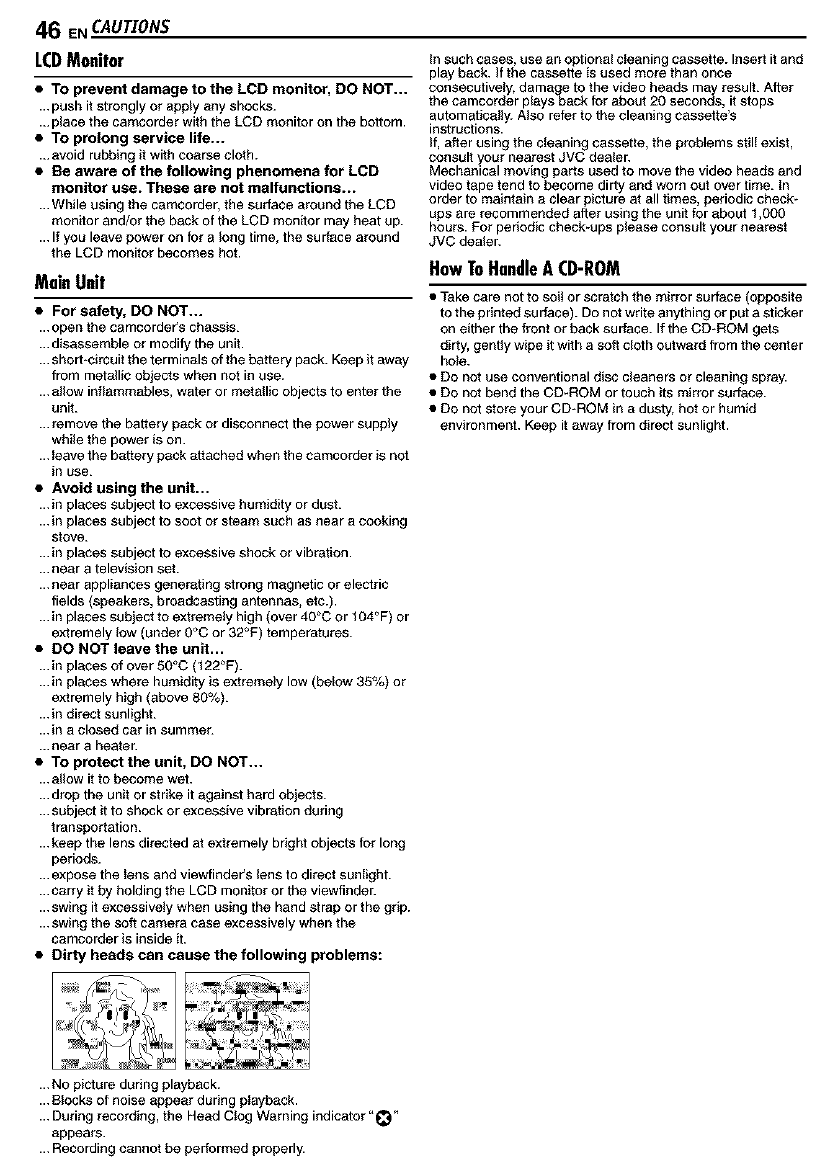
46 ENCAUTIONS
LCDMonitor
•TO prevent damage to the LeD monitor, DO NOT...
...push it strongly or apply any shocks.
,..place the camcorder with the LCD monitor on the bottom,
•TO prolong service life...
,..avoid rubbing it with coarse cloth.
•Be aware of the following phenomena for LCD
monitor use. These are not malfunctions...
...While using the camcorder, the surface around the LeD
monitor and/or the back of the LeD monitor may heat up.
...If you leave power on for a feng time, the surface around
the LCD monitor becomes hot.
MainUnit
•For safety, DO NOT...
...open the camcordeCs chassis.
...disassemble or modify the unit.
... short+circuit the terminals of the battery pack. Keep it away
from metallic objects when not in use.
... alfew inflammables, water or metallic objects to enter the
unit.
...remove the battery pack or disconnect the power supply
while the power is on.
...leave the battery pack attached when the camcorder is not
ir_ use.
•Avoid using the unit...
...in places subject to excessive humidity or dust.
...in places subject to soot or steam such as near a cooking
stove.
...in places subject to excessive shock or vibration.
... near a television set.
... near appliances generating strong magnetic or electric
fields (speakers, broadcasting antennas, etc.).
...in places subject to extremely high (over 40°C or t 04°F) or
extremely low (under 0°C or 32°F) temperatures.
•DO NOT leave the unit...
...in places of over 50°C (t 22°F).
...in places where humidity is extremely low (below 35%) or
extremely high (above 80%).
...in direct sunlight.
...in a closed car in summer.
...near a heater.
• TO protect the unit, DO NOT...
... alfew it to become wet.
...drop the unit or strike it against hard objects.
...subject it to shock or excessive vibration during
transportation.
...keep the lens directed at extremely bdght objects for long
periods.
...expose the Iens and viewfindefs fens to direct sunlighb
...carry it by holding the LCD monitor or the viewfieder.
... swing it excessively when using the hand strap or the grip.
...swing the soft camera case excessively when the
camcorder is inside it.
•Dirty heads can cause the following problems:
in such cases, use an optional cfeaning Cassette. Insert it and
play back. If the cassette is used more than once
consecutively, damage to the video heads may result. After
the camcorder plays back for about 20 seconds, it stops
autometicall_ Also refer to the cleaning cassette's
instructions.
If, after using the cfeaning cassette, the problems stilI exist,
consult your nearest JVC deafe_
Mechanical moving parts used to move the video heads and
video tape tend to become dirty and worn out over time. _n
order to maintain a clear picture at all times, periodic check-
ups are recommended after using the unit for about t,OOO
hours. For periodic check+ups please consult your nearest
JVC dealer.
HowToHandleACD-ROM
• Take care not to soil or scratch the mirror surface (opposite
to the printed surface). Do net write anything or put a sticker
on either the front or back surface. If the CD+ROM gets
dirty, gentfy wipe it with a soft cleth outward from the center
ho_e.
• Do net use conventional disc cfeaners or cleaning spray.
• Do net bend the CD-ROM or touch its mirror surface.
• Do net store your CD+ROM in a dusty, hot or humid
environme_. Keep it away from direct sunlight.
...No picture dedng playback.
... Blocks of noise appear during pIayback.
... During recording, the Head Clog Warning indicator '+_
appears.
... Recording cannot be performed properly.

CAUTIONSEN 47
About moisture condensation
•You have observed that pouring a cold liquid into a glass
will cause drops of water to form on the glass' outer
surface. This same phenomenon occurs on the head
drum of a camcorder when it is moved from a COOlplace
to a warm place, after heating a cold room, under
extremeIy humid conditions or in a place directly
subjected to the cool air from an air conditione_
• Moisture on the head drum can cause severe damage to
the video tape, and can led to internal damage to the
camcorder itse}f.
Serious malfunctionin_l
IIf_a_ fu;t(tilyni_gc°CCUru_t; t°°uPrlu2nlgjIh_ _taler I
The camcorder is a microcomputer-control}eq device.
Externa} noise and interference (from a TV, a radio,
etc.) might prevent it from functioning properly. In such
cases, first disconnect its power supply unit (battery
Ipack, AC Adapter, etc.) and wait a few minutes and
then re-connect it and proceed as usual from the
Ibeginning.
Declaration of Conformity
Model Number GR-D93U/D73U/D33U
Trade Name JVC
Responsible party JVC AMERICAS CORR
Address 1700 Valley Road Wayne,
N. J. 07470
Telephone Number 973-317-5000
This device complies with Part 15 of FCC Rules.
Operation is subject to the following two conditions: (1)
This device may not cause harmful interference, and
(2) this device must accept any interference received,
inc{udinginterferencethat may cause undesired
operation.
Change or modifications not approved by the party
responsible for compliance could void the user's
authority to operate the equipment. This equipment
has been tested and found to comply with the limits for
a Class B digital device, pursuant to Part 15 of the
FCC Rules. These _imitsare designed to provide
reasonable protection against harmfu_ interference in a
residential installation.This equipment generates,
uses, and can radiate radio frequency energy and, if
not installedand used in accordance with the
instructions,may cause harmful interference to radio
communications. However, there is no guarantee that
interference will not occur in a particular installation. If
this equipment does cause harmfu{ interference to
radio or television reception, which can be determined
by turning the equipment off and on, the user is
encouraged to try to correct the interference by one or
more of the following measures:
Reorient or relocate the receiving antenna.
Increase the separation between the equipment and
receiver.
Connect the equipment into an outlet on a circuit
different from that to which the receiver is connected.
Consult the dealer or an experienced radio/TV
technician for help.
This Class B digital apparatus complies with Canadian
ICES-003+
Cet appareil numerique de la classe Best conforme &
la norme NM8-003 du Canada.
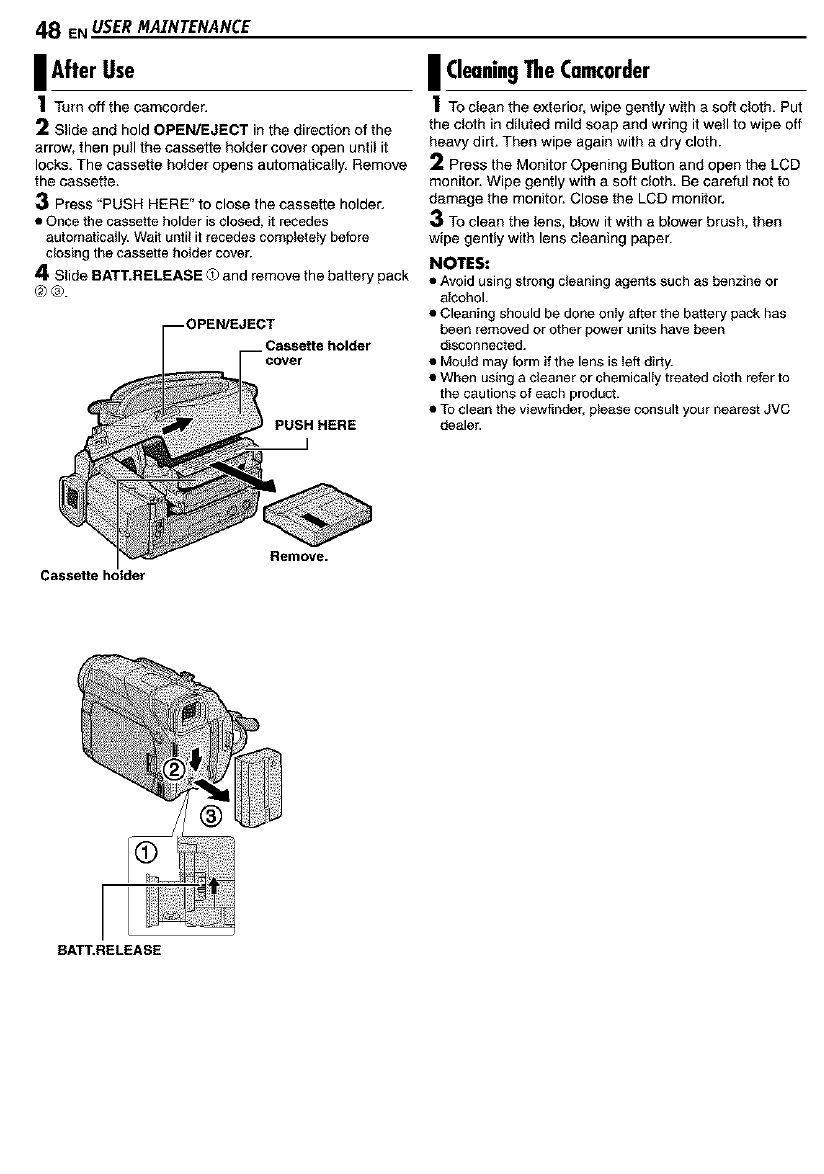
48 ENUSERMAINTENANCE
IAfter Use
1t.rno, the camcorder.
2Slide and hold OPEN/EJECT in the direction of the
arrow, then pull the cassette holder cover open until it
locks. The cassette holder opens automatically. Remove
the cassette.
3Press "PUSH HERE" to close the cassette holder.
• Ol_e the cassette holder is closed, it recedes
automatically.Wait until it recedes completely before
closing the cassette holder cover.
4Slide BATT.RELEASE <_and remove the battery pack
__ Cassette holder
cover
PUSH HERE
I CleaningTheCamcorder
1Too_eantheexterior,wipegently with a soft cloth. Put
the cloth in diluted mild soap and wring it well to wipe off
heavy dirt. Then wipe again with a dry cloth.
2Press the Monitor Opening Button and open the LCD
monitor. Wipe gently with a soft cloth. Be careful not to
damage the monitor. Close the LCD monitor.
3To clean the lens, blow it with a blower brush, then
wipe gently with lens cleaning paper.
NOTES:
• Avoid using strong cleaning agents such as benzine or
alcohol.
• Cleaning should be done only after the battery packhas
been removed or otherpowerunits havebeen
disconnected.
• Mould mayform ifthe lens is left dirty.
• When using a cleaner or chemically treated cloth refer to
the cautions of each product.
•TOclean the viewfinder, please consult your nearest JVC
dealer.
CasseRe holder
Remove.
RATT.RELEASE
Camcorder
_lt dL_ liar.
Power supply
DC 11.0 V (Using AC Adapter)
DC 7.2 V (Using battery pack)
Power consumption
Approx. 3.3 W (GR-D73/33). Approx. 3.5 W (GR-D93)
(LCD monitor off, viewfinder on)
Approx. 4.6 W (GR-D73/33), Approx. 4.8 W (GR-D93)
(LCD monitor on, viewfinder off)
Approx. 8.6 W (Maximum)
Dimensions (W x H x D)
71 mmx91 mmx 118 mm
(2-13/16" x 3-5/8" x 4-11/16") (with the LCD monitor
closed and the viewfinder pushed back in)
Weight
Approx. 500 g (1.1 Ibs)
(without cassette and battery)
Approx. 590 g (t.3 Ibs)
(incl. cassette and battery)
Operating temperature
0°C to 4O°C (32°F to 104°F)
Operating humidity
35% to 80%
Storage temperature
-2O°C to 5o°c (-4°F to 122°F)
Pickup
1/6" CCD (GR-D73/33). 1/4" COD (GR-D93)
Lens
F1.6, f = 2.7 mm to 43.2 mm, 16:1 power zoom lens
(GR-D73/33), F 1.8, f = 3.8 mm to 38.0 mm, 10:1 power
zoom lens (GR-D93)
Filter diameter
e30.5 mm
LCD monitor
2.37" diagonally measured, LCD panel/TFT active matrix
system
Viewfinder
Electronic viewfinder with0.24" colorLCD
Speaker
Monaural
White LED Light
Effective distance: 1.5 m
SPECIFICATIONSEN 49
Format
DV format (SD mode)
Signal format
NTSC standard
Recording/Playback format
Video: Digital component recording
Audio: PCM digital recording, 32 kHz 4-channel (12-bit),
48 kHz 2-channel (t6-bit)
Cassette
Mini DV cassette
Tape speed
SP: 18.8 ram/s, LP: t2.5 mm/s
Maximum recording time (using 80 min. cassette)
SP: 80 min. LP: 120 rain.
Storage media
SD Memory Card/MultiMediaCard
Compression system
Still image: JPEG (compatible)
File size
Still image:
2modes (1024 x 768 pixels/640 x 450 pixels)(GR-D73)
4modes (1600 x 1200 pixels/1280 x 960 pixels/
1024 x788 pixels/640 x 480 pixels) (GR-D93)
Picture quality
2modes (FINE/STANDARD)
Approximate number of storable images
_J-pg. 18
S
S-Video input (GR-D93/73 only):
Y: 0.8 V to t .2 V (p-p), 75 _, analog
C: 0.2 V to 0.4 V (p-p), 75 _),analog
S-Video output:
Y: 1.0 V (p-p), 75 _),analog
C: 0.29 V (p-p), 75 _),analog
AV
Video input (GR-D93/73 only): 0.8 V to 1.2 V (p-p), 75 _,
analog
Video output: 1.0 V (p-p), 75 _, analog _:
Audio input (GR-D93/73 only): 300 mV (rms), 50 k£_,
analog, stereo
Audio output: 300 mV (rms), 1 k£_,analog, stereo
DV
Input/output: 4-pin, IEEE 1394 compliant
USB (GR-D93/73 only)
5-pin
ACAdapter
Power requirement
AC 1t0 V to 240 V%, 50 Hz/80 Hz
Output
DC tl V_-__, 1A
Specifications shown are for SP mode unless otherwise
indicated. E & O.E. Design and specifications subject to
change without notice.
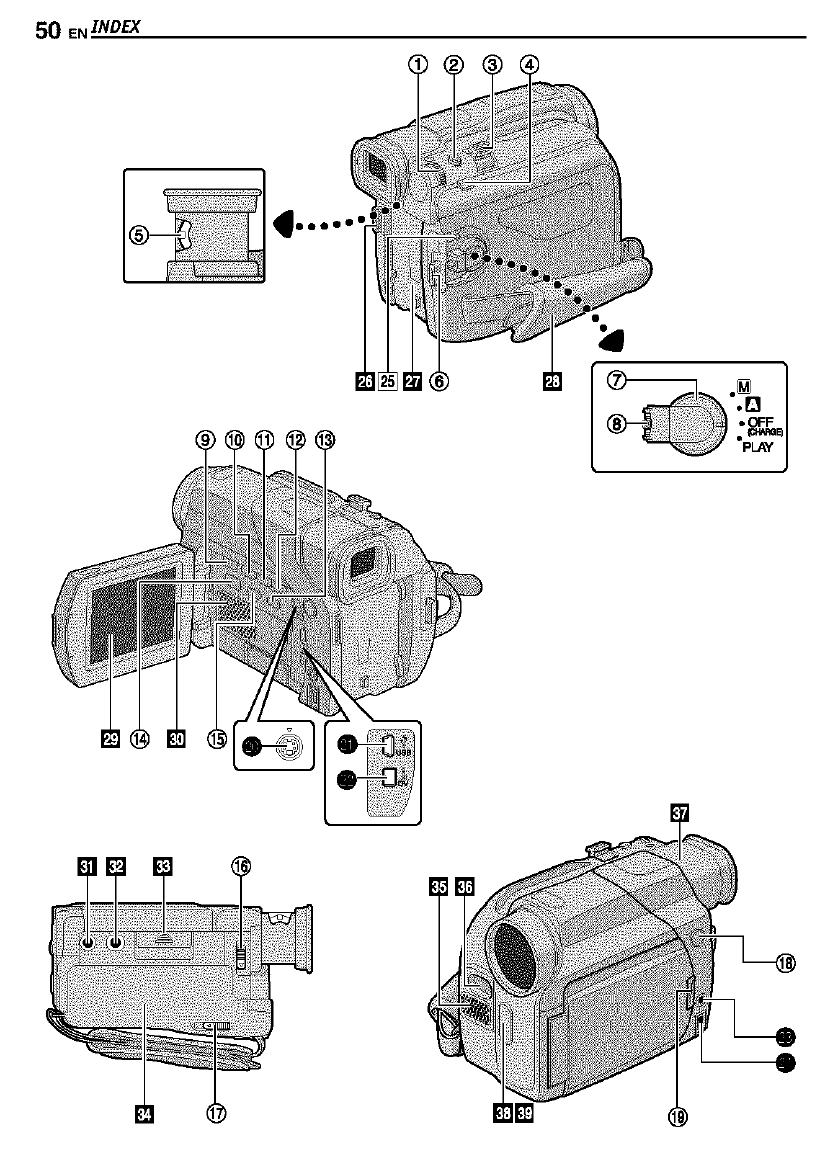
50 EN [-NDEX
......
--0
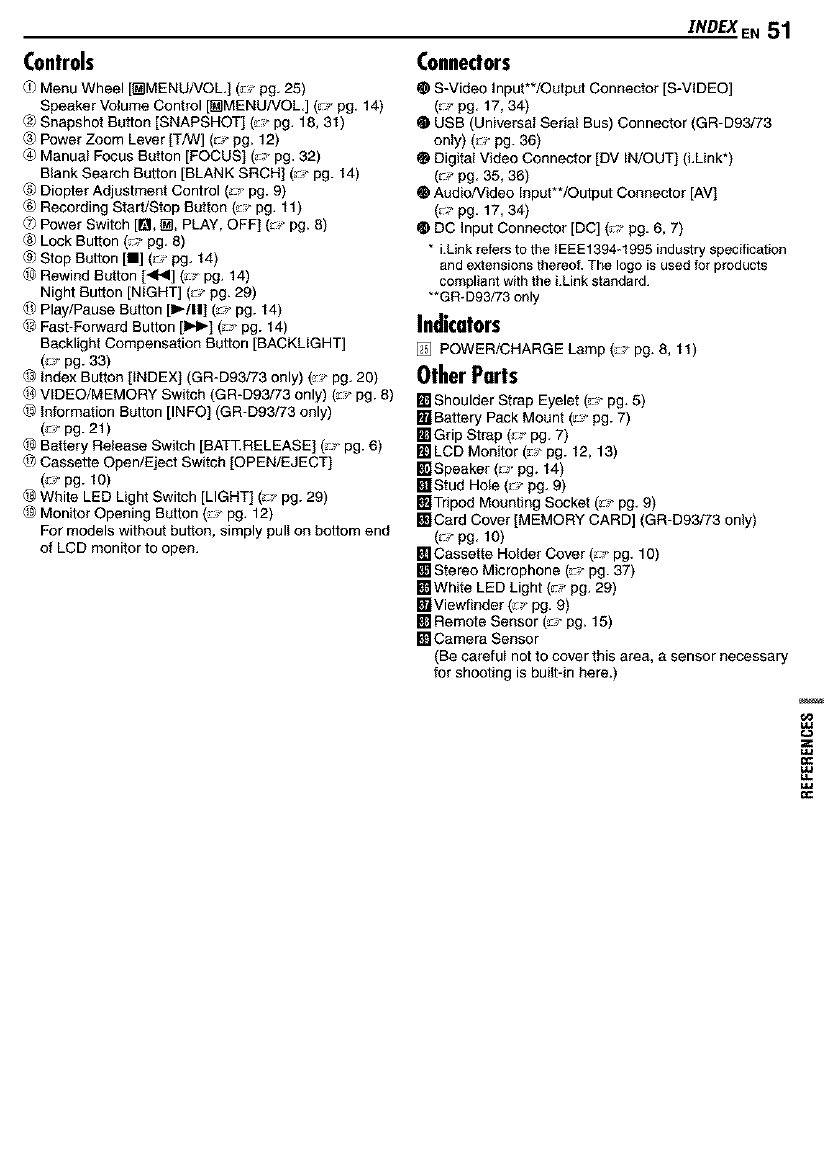
NDEXEN51
Controls
_ Menu Wheel [_MENU/VOL.] (_ pg. 25)
Speaker Volume Control [_MENU/VOL.] (rr pg. 14)
@>Snapshot Button [SNAPSHOT] (_,,-pg. 18, 31)
Power Zoom Lever IT/W] (rr pg. 12)
Manual Focus Button [FOCUS] (_,- pg. 32)
Blank Search Button [BLANK SRCH] (_,-pg. 14)
_ Diopter Adjustment Control (__-pg. 9)
® Recording Start/Stop Button (_,,-pg. 11)
_7>Power Switch [1_1_, PLAY, OFF] (: ;_pg. 8)
Lock Button (rr pg. 8)
_ Stop Button [I] (rr pg. 14)
L_ Rewind Button [414] (:_ pg. 14)
Night Button [NIGHT] (rr pg. 29)
Play/Pause Button [1_/11](_,ppg. 14)
_$ Fast-Forward Button [1_1_](_J-pg. 14)
Backlight Compensation Button [BACKLIGHT]
(;J' pg. 33)
_$ Index Button [INDEX] (GR-D93/73 only) (_,J-pg. 20)
_ VIDEO/MEMORY Switch (GR-D93/73 only) (_,,-pg. 8)
_$ Information Button [INFO] (GR-D93/73 only)
(; J'pg.21)
_$ Battery Release Switch [BATT.RELEASE] (_- pg. 6)
_5 Cassette Open/Eject Switch [OPEN/EJECT]
(;J' pg. 10)
White LED Light Switch [LIGHT] (_,- pg. 29)
Monitor Opening Button (: ,_pg. 12)
For models without button, simply pull on bottom end
of LCD monitor to open.
Connectors
• S-Video Input**/Output Connector [S-VIDEO]
(;_r pg. 17, 34)
• USB (Universal Serial Bus) Connector (GR-D93/73
only) (r J-pg. 36)
• Digital Video Connector [DV IN/OUT] (LUnk*)
(rr pg. 35, 36)
@ Audio/Video Input**/Output Connector [AV]
(;_r pg. 17, 34)
• DC input Connector [DC] (r_ pg. 6, 7)
• i.Link refers to the IEEE1394*t995 industry specification
and extensions thereof.The logo is used for products
compliant with thei.Link standard.
•*GR-D93/73 only
Indicators
[] POWER/CHARGE Lamp (: ;_pg. 8, 11)
OtherParts
[] Shoulder Strap Eyelet (_- pg. 5)
[]Battery Pack Mount (.'_"pg. 7)
[]Grip Strap (_';-pg. 7)
[]LCD Monitor (_ pg. 12, 13)
Itr_Speaker (r__pg. 14)
[]Stud Hole (rr pg. 9)
[]Tripod Mounting Socket (_- pg. 9)
[]Card Cover [MEMORY CARD] (GR-D93/73 only)
(rr pg. 10)
[] Cassette Holder Cover (.,,- pg. 10)
[] Stereo Microphone (_- pg. 37)
[]White LED Light (r_ pg. 29)
k"BViewfinder(_,_-pg. 9)
[] Remote Sensor (_,_-pg. 15)
[]Camera Sensor
(Be careful not to cover this area, a sensor necessary
for shooting is built-in here.)
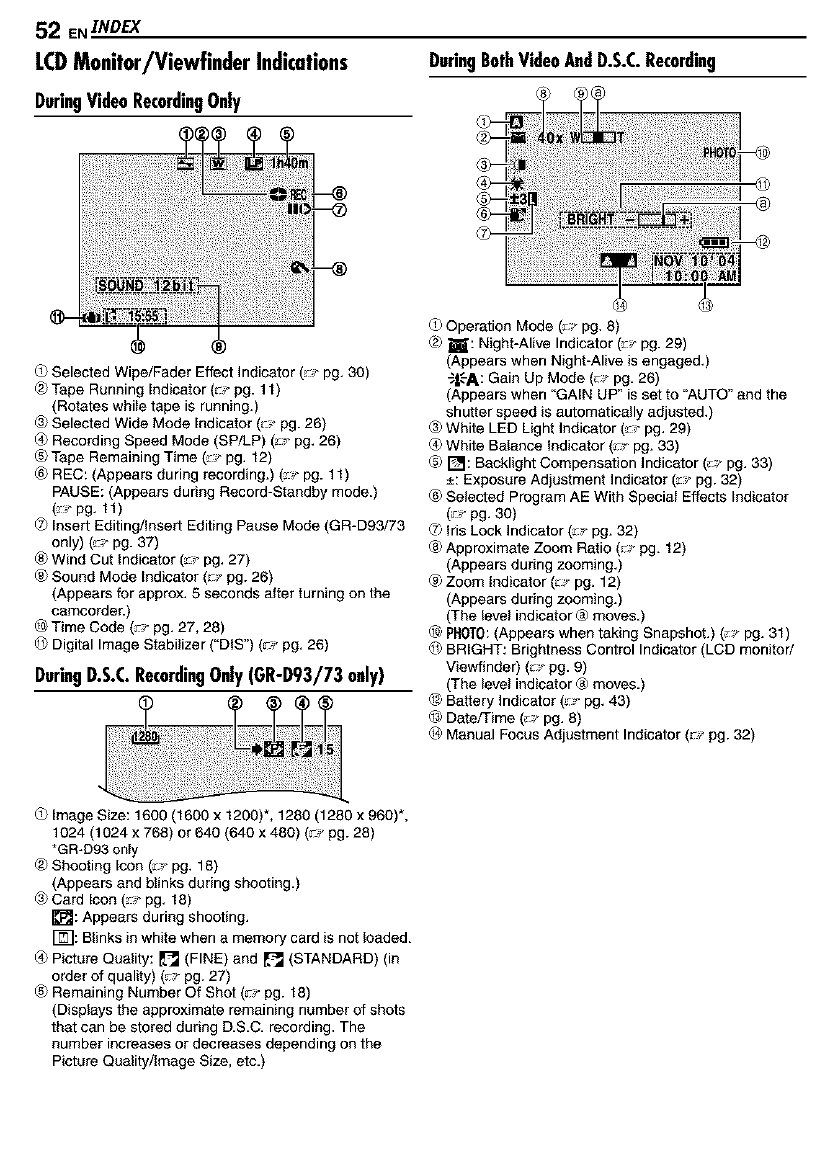
52 ENINDEX
LCDMonitor/Viewfinder Indications
DuringVideoRecordingOnly
DuringBothVideoAndD.S.C.Recording
Selected Wipe/Fader Effect Indicator (_,r pg. 30)
(_ Tape Running Indicator (_J-pg. 1 t )
(Rotates while tape is running.)
_ Selected Wide Mode Indicator (: ;"pg. 26)
_ Recording Speed Mode (SP/LP) (_,,-pg. 26)
_} Tape Remaining Time (.,,- pg. 12)
_ REC: (Appears during recording.) (_,r pg. 11)
PAUSE: (Appears during Record-Staodby mode.)
(_,,-pg. 11)
O Insert Editing/Insert Editing Pause Mode (GR-D93/73
only) (_,r pg. 37)
_ Wind Cut indicator (_,,-pg. 27)
® Sound Mode Indicator (_r pg. 26)
(Appears for approx. 5 seconds after turning on the
camcorder.)
@Time Code (_J-pg. 27, 28)
O Digital Image Stabilizer ("DIS") (_r pg. 26)
DuringD.S.C.RecordingOnly(GR-D93/73only)
Operation Mode (_- pg. 8)
@)H: Night-Alive Indicator (_,r pg. 29)
(Appears when Night-Alive is engaged.)
_|-'-A: Gain Up Mode (: ;. pg. 26)
(Appears when "GAIN UP" is set to "AUTO" and the
shutter speed is automatically adjusted.)
® White LED Light Indicator (_,,-pg. 29)
White Balance Indicator (:-,_pg. 33)
_) F_I: Backlight Compensation Indicator (.,r pg. 33)
±: Exposure Adjustment Indicator (_,J-pg. 32)
® Selected Program AE With Special Effects Indicator
(;; pg. 30)
_7)Iris Lock Indicator (_,,-pg. 32)
Approximate Zoom Ratio (_r pg. 12)
(Appears during zooming.)
_) Zoom Indicator (: ;. pg. 12)
(Appears during zooming.)
(The level indicator ® moves.)
L_ PHOTO:(Appears when taking Snapshot.) (_,,-pg. 31)
BRIGHT: Brightness Control Indicator (LCD monitod
Viewfinder) (: ;. pg. 9)
(The level indicator ® moves.)
_$ Battery Indicator (;!. pg. 43)
_$ Date/Time (_,r pg. 8)
_4)Manual Focus Adjustment Indicator (_r pg. 32)
Image Size: 1600 (1600 x 1200)*, 1280 (1280 x 960)*,
1024 (1024 x 766) or 640 (640 x 480) (;-r pg. 28)
*GR-D93 onIy
(_ Shooting Icon (_,r pg. 18)
(Appears and blinks during shooting.)
_ Card Icon (_,rpg. 18)
rJ_: Appears during shooting.
F_I: Blinks inwhite when a memory card is not loaded.
_ Picture Quality: _=_ (FINE) and _ (STANDARD) (in
order of quality) (_J-pg. 27)
_} Remaining Number Of Shot (_J-pg. 18)
(Displays the approximate remaining number of shots
that can be stored during D.S.C. recording. The
number increases or decreases depending on the
Picture Quality/Image Size, etc.)
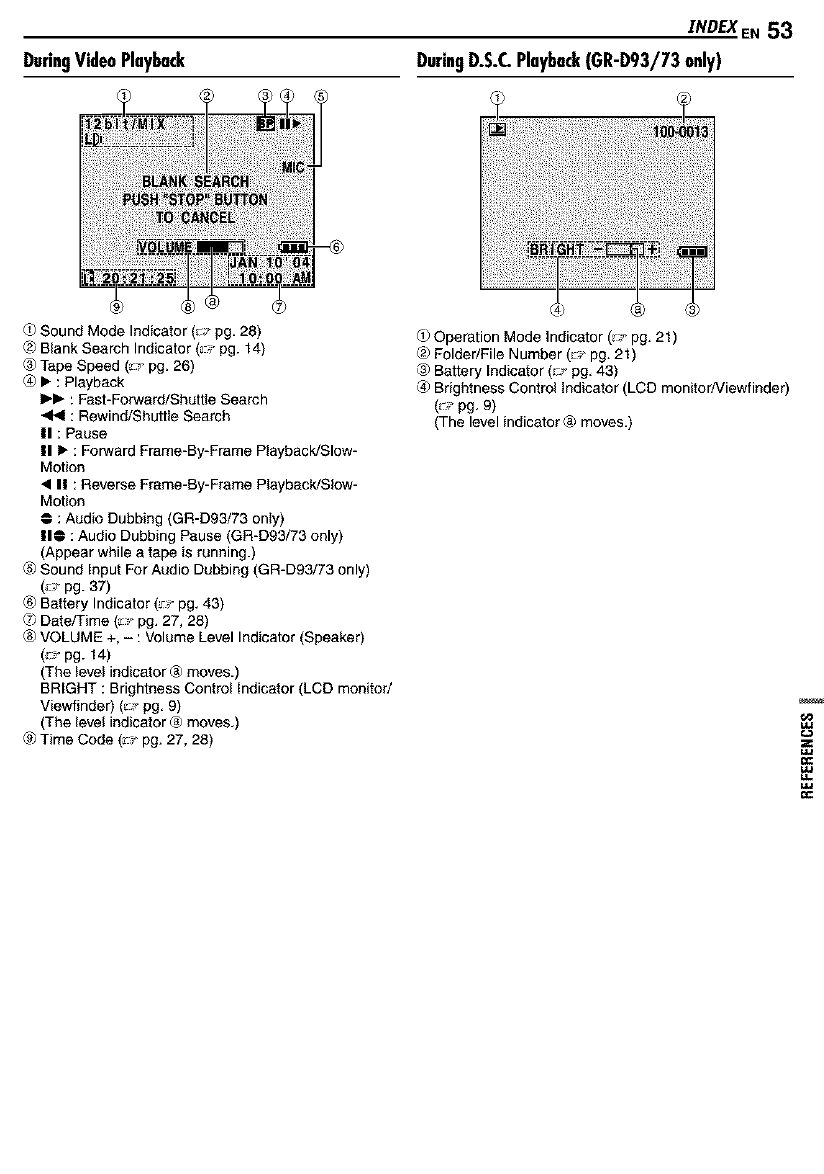
DuringVideoPlayback
INDEXEN53
DuringD.S.C.Playback(GR-D93/73only)
®
Sound Mode Indicator (:-i,'pg. 28)
@)Blank Search Indicator (_ pg. 14)
® Tape Speed (_-:_pg. 26)
• : Playback
I_- : Fast-Forward/Shuttle Search
4_1 : Rewind/Shuttle Search
II : Pause
II • : Forward Frame-By-Frame Playback/Slow-
Motion
• II : Reverse Frame-By-Frame Playback/Slow-
Motion
: Audio Dubbing (GR-D93/73 only)
I1_ :Audio Dubbing Pause (GR-D93/73 only)
(Appear while a tape is running.)
_) Sound Input For Audio Dubbing (GR-D93/73 only)
(_J'pg. 37)
® Battery Indicator (,;- pg, 43)
_7)Date/Time (+,J-pg. 27, 28)
VOLUME +, - : Volume Level Indicator (Speaker)
(;;- pg. t 4)
(The level indicator ® moves,)
BRIGHT : Brightness Control Indicator (LCD monitor/
Viewfinder) (_" pg, 9)
(The level indicator ® moves,)
_) Time Code (:,_ pg. 27, 28)
Operation Mode Indicator (2,- pg. 21)
Folder/File Number (;_ pg. 21)
® Battery Indicator (_J pg, 43)
® Brightness Control Indicator (LCD monitor/Viewfinder)
(_p pg, 9)
(The level indicator ® moves,)
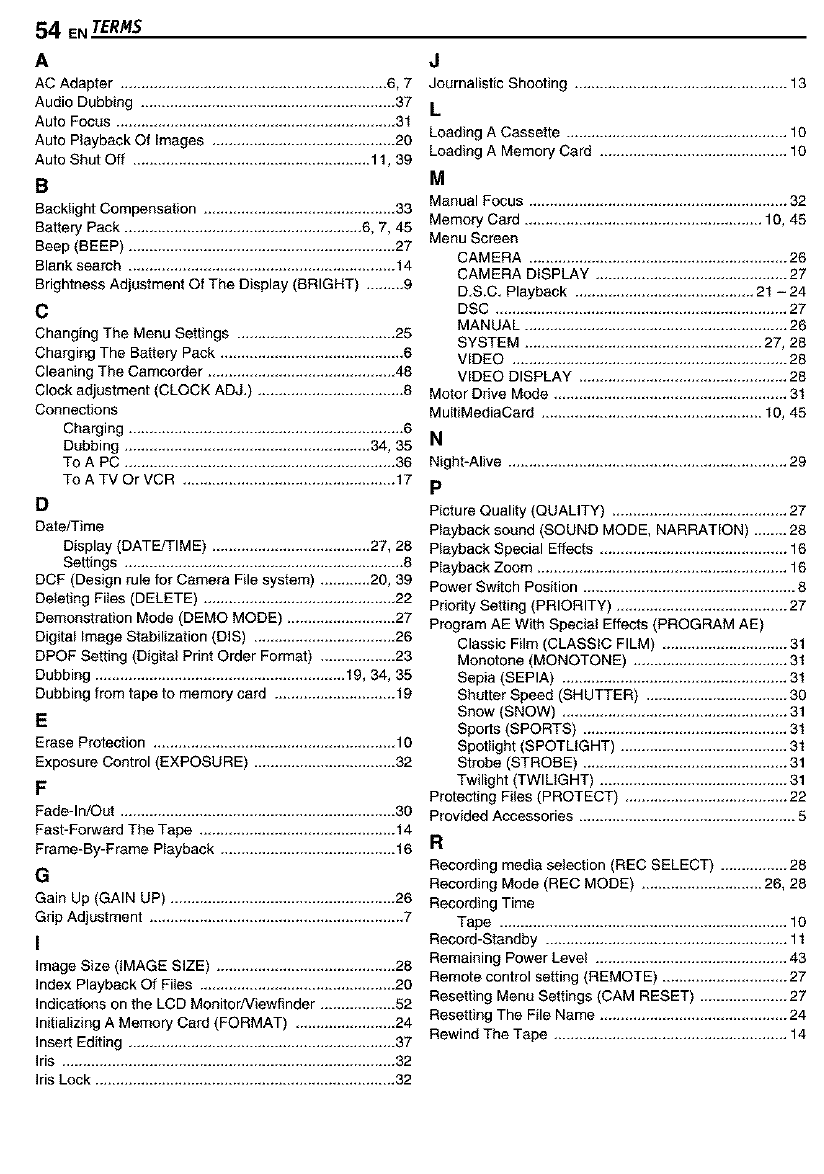
54 ENTERMS
A
AC Adapter ................................................................ 6, 7
Audio Dubbing ............................................................. 37
Auto Focus ................................................................... 31
Auto Playback Of Images ............................................ 20
Auto Shut Off ......................................................... 11, 39
B
Backlight Compensation .............................................. 33
Battery Pack ......................................................... 6, 7, 45
Beep (BEEP) ................................................................ 27
Blank search ................................................................ 14
Brightness Adjustment Of The Display (BRIGHT) .........9
C
Changing The Menu Settings ...................................... 25
Charging The Battery Pack ............................................ 6
Cleaning The Camcorder ............................................. 48
Clock adjustment (CLOCK ADJ.) ................................... 8
Connections
Charging .................................................................. 6
Dubbing ........................................................... 34, 35
To A PC ................................................................. 36
To A TV Or VCR ................................................... 17
D
Date/Time
Display (DATE/TIME) ...................................... 27, 28
Settings ................................................................... 8
DCF (Design rule for Camera File system) ............ 20, 39
Deleting Files (DELETE) .............................................. 22
Demonstration Mode (DEMO MODE) .......................... 27
Digital Image Stabilization (DIS) .................................. 26
DPOF Setting (Digital Print Order Format) .................. 23
Dubbing ............................................................ 19, 34, 35
Dubbing from tape to memory card ............................. 19
E
Erase Protection .......................................................... 10
Exposure Control (EXPOSURE) .................................. 32
F
Fade-In/Out .................................................................. 30
Fast-Forward The Tape ............................................... 14
Frame-By-Frame Playback .......................................... 16
G
Gain Up (GAIN UP) ...................................................... 26
Grip Adjustment ............................................................. 7
I
Image Size (IMAGE SIZE) ........................................... 28
Index Playback Of Files ............................................... 20
Indications on the LCD Monitor/Viewfinder .................. 52
Initializing A Memory Card (FORMAT) ........................ 24
Insert Editing ................................................................ 37
Iris ................................................................................ 32
Iris Lock ........................................................................ 32
J
Journalistic Shooting ................................................... 13
L
Loading A Cassette ..................................................... 10
Loading A Memory Card ............................................. 10
M
Manual Focus .............................................................. 32
Memory Card ......................................................... 10, 45
Menu Screen
CAMERA .............................................................. 26
CAMERA DISPLAY .............................................. 27
D.S.C. Playback ........................................... 21 - 24
DSC ...................................................................... 27
MANUAL ............................................................... 26
SYSTEM ......................................................... 27, 28
VIDEO .................................................................. 28
VIDEO DISPLAY .................................................. 28
Motor Drive Mode ........................................................ 31
MultiMediaCard ..................................................... 10, 45
N
Night-Alive ................................................................... 29
P
Picture Quality (QUALITY) .......................................... 27
Playback sound (SOUND MODE, NARRATION) ........ 28
Playback Special Effects ............................................. 16
Playback Zoom ............................................................ 16
Power Switch Position ................................................... 8
Priority Setting (PRIORITY) ......................................... 27
Program AE With Special Effects (PROGRAM AE)
Classic Film (CLASSIC FILM) .............................. 31
Monotone (MONOTONE) ..................................... 31
Sepia (SEPIA) ...................................................... 31
Shutter Speed (SHUTTER) .................................. 30
Snow (SNOW) ...................................................... 31
Sports (SPORTS) ................................................. 31
Spotlight (SPOTLIGHT) ........................................ 31
Strobe (STROBE) ................................................. 31
Twilight (TWILIGHT) ............................................. 31
Protecting Files (PROTECT) ....................................... 22
Provided Accessories .................................................... 5
I:1
Recording media selection {REC SELECT) ................ 28
Recording Mode (REC MODE) ............................. 26, 28
Recording Time
Tape ..................................................................... 10
Record-Standby .......................................................... 11
Remaining Power Level .............................................. 43
Remote control setting (REMOTE) .............................. 27
Resetting Menu Settings (CAM RESET) ..................... 27
Resetting The File Name ............................................. 24
Rewind The Tape ........................................................ 14
S
SD Memory Card ................................................... 10, 45
Self Recording ............................................................. 13
Shuttle Search ............................................................. 14
Slow-Motion Playback ................................................. 16
Snapshot ............................................................... 18, 31
Snapshot Mode (SNAP MODE) ................................... 26
Sound Mode (SOUND MODE) .............................. 26, 28
Speaker Volume .......................................................... 14
Specifications ............................................................... 49
Stil_ Playback ............................................................... 14
S-Video/AV input (S/AV INPUT) ...................... 28, 34, 35
T
Telephoto setting (TELE MACRO) .............................. 26
Time Code (TIME CODE) ...................................... 13, 27
Tripod Mounting ............................................................. 9
u
Unloading A Cassette .................................................. 10
Unloading A Memory Card .......................................... 10
V
VIDEO/MEMORY Switch Position ................................. 8
Viewfinder Adjustment ................................................... 9
W
White Balance (W.BALANCE) ..................................... 33
White LED Light ........................................................... 29
Wide Mode (WIDE MODE)
Cinema (CINEMA) ................................................ 26
Squeeze (SQUEEZE) ........................................... 26
Wipe In/Out .................................................................. 30
Z
Zooming (ZOOM) ................................................... 12, 26
TERMSEN 55

QQ_
666
vI_r0R C0MRqNY 0F JAPANp LIMnI_D
Printed in Malaysia
COPYRIGHT@ 2003 VICTOR COMPANY OF JAPAN, LTD. r_l 1203-POdD-PJ
