JVC GR D650AG D650AG_EN User Manual LYT1593 001A
User Manual: JVC GR-D650AG GR-D650AG English, Simplified Chinese,
Open the PDF directly: View PDF ![]() .
.
Page Count: 112 [warning: Documents this large are best viewed by clicking the View PDF Link!]
- SAFETY PRECAUTIONS
- CONTENTS
- GETTING STARTED
- VIDEO RECORDING
- VIDEO PLAYBACK
- D.S.C. RECORDING
- ADDITIONAL FEATURES FOR D.S.C.
- MENUS FOR DETAILED ADJUSTMENT
- FEATURES FOR RECORDING
- EDITING
- TROUBLESHOOTING
- CAUTIONS
- SPECIFICATIONS
- TERMS
- GR-D650AG_CS.pdf

ENGLISH
GR-D650AG
LYT1593-001A
EN
TERMS
Dear Customer,
Thank you for purchasing this digital
video camera. Before use, please
read the safety information and
precautions contained in the pages
2 – 5 to ensure safe use of this
product.
For Accessories
:
http://www.jvc.co.jp/english/accessory/
INSTRUCTIONS
DIGITAL VIDEO CAMERA
GETTING STARTED
8
VIDEO RECORDING &
PLAYBACK
20
DIGITAL STILL CAMERA
(D.S.C.) RECORDING &
PLAYBACK
27
ADVANCED FEATURES
32
REFERENCES
47
Back cover
For Customer Use:
Enter below the Model No. and
Serial No. which is located on the
bottom of the camcorder. Retain this
information for future reference.
Model No.
Serial No.
To deactivate the demonstration,
set “DEMO MODE” to “OFF”.
(
pg. 32, 35)
GR-D650AG_EN.book Page 1 Friday, April 7, 2006 7:00 PM

2
EN
MasterPage: Left
●
Before recording important video, be sure to
make a trial recording.
Play back your trial recording to make sure the
video and audio have been recorded properly.
●
We recommend cleaning your video heads before
use.
If you haven’t used your
camcorder for awhile, the
heads may be dirty. We
recommend periodically
cleaning the video heads
with a cleaning cassette
(optional).
●
Be sure to store your
cassette tapes and camcorder in the proper
environment.
Video heads can become dirty more easily if your
cassette tapes and camcorder are stored in a
dusty area. Cassette tapes should be removed
from the camcorder and stored in cassette cases.
Store the camcorder in a bag or other container.
●
Use SP (Standard) mode for important video
recordings.
LP (Long Play) mode lets you record 50% more
video than SP (Standard) mode, but you may
experience mosaic-like noise during playback
depending on the tape characteristics and the
usage environment.
So, for important recordings, we recommend
using SP mode.
●
For safety and reliability.
It is recommended only genuine JVC batteries
and accessories are used in this camcorder.
●
This product includes patented and other
proprietary technology and will operate only with
JVC Data Battery. Use the JVC BN-VF707U/
VF714U/VF733U battery packs. Using generic
non-JVC batteries can cause damage to the
internal charging circuitry.
●
This camcorder is designed exclusively for the
digital video cassette, SD Memory Card and
MultiMediaCard. Only cassettes marked “ ”
and memory cards marked “ ” or
“ ” can be used with this unit.
●
Remember that this camcorder is intended for
private consumer use only.
Any commercial use without proper permission is
prohibited. (Even if you record an event such as a
show, performance or exhibition for personal
enjoyment, it is strongly recommended that you
obtain permission beforehand.)
●
DO NOT leave the unit
- in place of over 50°C
- in place where humidity is extremely low (below
35%) or extremely high (80%).
- in direct sunlight.
- in a closed car in summer.
- near a heater.
●
The LCD monitor is made with high-precision
technology. However, black spots or bright spots
of light (red, green or blue) may appear constantly
on the LCD monitor. These spots are not
recorded on the tape. This is not due to any
defect of the unit. (Effective dots: more than
99.99%)
●
Do not leave the battery pack attached when the
camcorder is not in use and check the unit
regularly whether it is working or not.
Read This First!
GR-D650AG_EN.book Page 2 Friday, April 7, 2006 7:00 PM

EN
3
MasterPage: Start_Right
SAFETY PRECAUTIONS
WARNING: TO PREVENT FIRE OR SHOCK
HAZARD, DO NOT EXPOSE THIS UNIT TO
RAIN OR MOISTURE.
CAUTIONS:
●
If you notice smoke or a peculiar smell coming
from the camcorder or AC Adapter, shut it down
and unplug it immediately. Continue using the
camcorder or AC Adapter under these
conditions could lead to fire or electric shock.
Contact your JVC dealer. Do not attempt to
repair the malfunction yourself.
●
To prevent shock, do not open the cabinet. No
user serviceable parts inside. Refer servicing
to qualified personnel.
●
When you are not using the AC Adapter for a
long period of time, it is recommended that you
disconnect the power cord from AC outlet.
CAUTIONS:
●
This camcorder is designed to be used with
PAL-type colour television signals. It cannot be
used for playback with a television of a different
standard. However, live recording and LCD
monitor/viewfinder playback are possible
anywhere.
●
This product includes patented and other
proprietary technology and will operate only
with JVC Data Battery. Use the JVC
BN-VF707U/VF714U/VF733U battery packs
and, to recharge them or to supply power to the
camcorder from an AC outlet, use the provided
multi-voltage AC Adapter. (An appropriate
conversion adapter may be necessary to
accommodate different designs of AC outlets in
different countries.)
Caution on Replaceable lithium battery
The battery used in this device may present a fire
or chemical burn hazard if mistreated.
Do not recharge, disassemble, heat above 100°C
or incinerate.
Replace battery with Panasonic (Matsushita
Electric), Sanyo, Sony or Maxell CR2025.
Danger of explosion or Risk of fire if the battery is
incorrectly replaced.
●
Dispose of used battery promptly.
●
Keep away from children.
●
Do not disassemble and do not dispose of in
fire.
NOTES:
●
The rating plate (serial number plate) and
safety caution are on the bottom and/or the
back of the main unit.
●
The rating information and safety caution of the
AC Adapter are on its upper and lower sides.
When the equipment is installed in a cabinet or on
a shelf, make sure that it has sufficient space on
all sides to allow for ventilation (10 cm or more on
both sides, on top and at the rear).
Do not block the ventilation holes.
(If the ventilation holes are blocked by a
newspaper, or cloth etc. the heat may not be able
to get out.)
No naked flame sources, such as lighted candles,
should be placed on the apparatus.
When discarding batteries, environmental
problems must be considered and the local rules
or laws governing the disposal of these batteries
must be followed strictly.
The apparatus shall not be exposed to dripping or
splashing.
Do not use this equipment in a bathroom or
places with water.
Also do not place any containers filled with water
or liquids (such as cosmetics or medicines, flower
vases, potted plants, cups etc.) on top of this unit.
(If water or liquid is allowed to enter this
equipment, fire or electric shock may be caused.)
GR-D650AG_EN.book Page 3 Friday, April 7, 2006 7:00 PM

4
EN
MasterPage: Left
Do not point the lens or the viewfinder directly into
the sun. This can cause eye injuries, as well as
lead to the malfunctioning of internal circuitry.
There is also a risk of fire or electric shock.
CAUTION!
The following notes concern possible physical
damage to the camcorder and to the user.
When carrying, be sure to always securely attach
and use the provided strap. Carrying or holding
the camcorder by the viewfinder and/or the LCD
monitor can result in dropping the unit, or in a
malfunction.
Take care not to get your finger caught in the
cassette holder cover. Do not let children operate
the camcorder, as they are particularly
susceptible to this type of injury.
Do not use a tripod on unsteady or unlevel
surfaces. It could tip over, causing serious
damage to the camcorder.
CAUTION!
Connecting cables (Audio/Video, S-Video, etc.) to
the camcorder and leaving it on top of the TV is
not recommended, as tripping on the cables will
cause the camcorder to fall, resulting in damage.
GR-D650AG_EN.book Page 4 Friday, April 7, 2006 7:00 PM

EN
5
MasterPage: Start_Right
Before Using This Camcorder
Make sure you only use cassettes with the Mini
DV mark .
Make sure you only use memory cards with the
mark or .
This camcorder is designed exclusively for the
digital video cassette, SD Memory Card and
MultiMediaCard. Only cassettes marked “ ”
and memory cards marked “ ” or
“ ” can be used with this unit.
Remember that this camcorder is not
compatible with other digital video formats.
Remember that this camcorder is intended for
private consumer use only.
Any commercial use without proper permission is
prohibited. (Even if you record an event such as a
show, performance or exhibition for personal
enjoyment, it is strongly recommended that you
obtain permission beforehand.)
Before recording important video, be sure to
make a trial recording.
Play back your trial recording to make sure the
video and audio have been recorded properly.
We recommend cleaning your video heads
before use.
If you haven’t used your camcorder for a while, the
heads may be dirty. We recommend periodically
cleaning the video heads with a cleaning cassette
(optional).
Be sure to store your cassette tapes and
camcorder in the proper environment.
Video heads can become dirty more easily if your
cassette tapes and camcorder are stored in a dusty
area. Cassette tapes should be removed from the
camcorder and stored in cassette cases. Store the
camcorder in a bag or other container.
Use SP (Standard) mode for important video
recordings.
LP (Long Play) mode lets you record 50% more
video than SP (Standard) mode, but you may
experience mosaic-like noise during playback
depending on the tape characteristics and the
usage environment.
So, for important recordings, we recommend using
SP mode.
It is recommended that you use JVC brand
cassette tapes.
Your camcorder is compatible with all brands of
commercially available cassette tapes complying
with the MiniDV standard, but JVC brand cassette
tapes are designed and optimized to maximize the
performance of your camcorder.
Also read “CAUTIONS” on pages 52 – 54.
●
Microsoft® and Windows® are either registered
trademarks or trademarks of Microsoft
Corporation in the United States and/or other
countries.
●
Macintosh is a registered trademark of Apple
Computer, Inc.
●
QuickTime is a registered trademark of Apple
Computer, Inc.
GR-D650AG_EN.book Page 5 Friday, April 7, 2006 7:00 PM
6
EN
MasterPage: Left
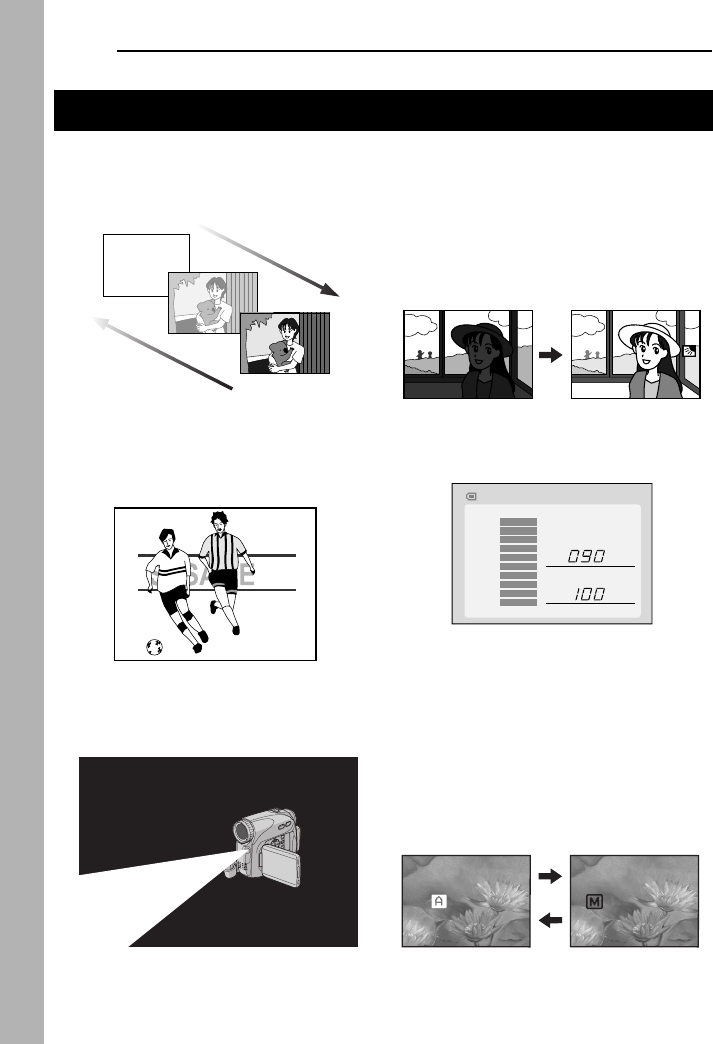
Wipe/Fader Effects
You can use the Wipe/Fader Effects to make
pro-style scene transitions. (
pg. 41)
Program AE, Effects and Shutter Effects
For example, “SPORTS” mode allows fast-
moving images to be captured one frame at a
time, for vivid, stable slow-motion. (
pg. 42)
LED Light
You can brighten the subject in the dark place
with the LED Light. (
pg. 37)
Backlight Compensation
Simply pressing the
BACKLIGHT
button
brightens the image darkened by backlight.
(
pg. 40)
●
You can also select a spot metering area so
that more precise exposure compensation
is available. (
pg. 40, Spot Exposure
Control)
Data Battery
You can check the battery status by simply
pressing the
DATA
button. (
pg. 15)
Live Slow
You can record and play back precious or
hard-to-see moments at a slow speed. The
sound is recorded and played back in real
time. (
pg. 37)
Auto Button
You can change the recording mode between
manual setting to the standard mode setting
of the camcorder by pressing the
AUTO
button.
Major Features of this Camcorder
Fade in
Fade out
MAX TIME
LCD
min
min
FINDER
100%
50%
0%
BATTERY CONDITION
MANUAL
AUTO
GR-D650AG_EN.book Page 6 Friday, April 7, 2006 7:00 PM

MasterPage: TOC_Heading0_Right
EN
7
CONTENTS
GETTING STARTED 8
Index................................................................. 8
Provided Accessories ..................................... 12
Power ............................................................. 14
Operation Mode.............................................. 16
Language Settings.......................................... 17
Date/Time Settings ......................................... 17
Grip Adjustment.............................................. 18
Viewfinder Adjustment.................................... 18
Brightness Adjustment Of The Display........... 18
Tripod Mounting.............................................. 18
Loading/Unloading A Cassette ....................... 19
Loading/Unloading A Memory Card ............... 19
VIDEO RECORDING & PLAYBACK 20
VIDEO RECORDING ........................................... 20
Basic Recording ............................................. 20
Tape Remaining Time ................................ 20
LCD Monitor And Viewfinder ...................... 20
Zooming...................................................... 21
Tele Mode................................................... 21
Journalistic Shooting ..................................21
Interface Shooting ......................................21
Time Code.................................................. 22
Quick Review.............................................. 22
Recording From The Middle Of A Tape...... 22
VIDEO PLAYBACK ............................................. 23
Normal Playback ............................................ 23
Still Playback .............................................. 23
Shuttle Search............................................ 23
Blank Search .............................................. 23
Connections To A TV Or VCR........................ 24
Playback Using The Remote Control ............. 25
DIGITAL STILL CAMERA (D.S.C.) RECORDING
& PLAYBACK 27
D.S.C. RECORDING............................................ 27
Basic Shooting (D.S.C. Snapshot) ................. 27
D.S.C. PLAYBACK .............................................. 28
Normal Playback Of Images........................... 28
Auto Playback Of Images ............................... 28
Index Playback Of Files.................................. 28
Removing On-Screen Display ........................ 28
ADDITIONAL FEATURES FOR D.S.C. .................... 29
Resetting The File Name................................ 29
Protecting Files............................................... 29
Deleting Files.................................................. 30
Setting Print Information (DPOF Setting) ....... 30
Initialising A Memory Card.............................. 31
ADVANCED FEATURES 32
MENUS FOR DETAILED ADJUSTMENT..................32
Changing The Menu Settings ......................... 32
Recording Menus............................................ 33
Playback Menus ............................................. 36
FEATURES FOR RECORDING............................... 37
LED Light........................................................ 37
Live Slow ........................................................ 37
Wide Mode...................................................... 37
Night-Scope .................................................... 38
Snapshot (Record Still Image On Tape)......... 38
Manual Focus ................................................. 38
Exposure Control............................................ 39
Iris Lock .......................................................... 39
Backlight Compensation................................. 40
Spot Exposure Control.................................... 40
White Balance Adjustment.............................. 40
Manual White Balance Adjustment................. 41
Wipe Or Fader Effects .................................... 41
Program AE, Effects And Shutter Effects ....... 42
EDITING............................................................ 43
Dubbing To Or From A VCR........................... 43
Dubbing To Or From A Video Unit Equipped With
A DV Connector (Digital Dubbing).............. 44
Connection To A Personal Computer............. 45
Audio Dubbing ................................................ 46
Insert Editing................................................... 46
REFERENCES 47
TROUBLESHOOTING .......................................... 47
USER MAINTENANCE ......................................... 51
CAUTIONS ........................................................ 52
SPECIFICATIONS................................................ 55
TERMS
Back cover
GR-D650AG_EN.book Page 7 Friday, April 7, 2006 7:00 PM
EN
9
GETTING STARTED
MasterPage: Start_Right
GETTING STARTED
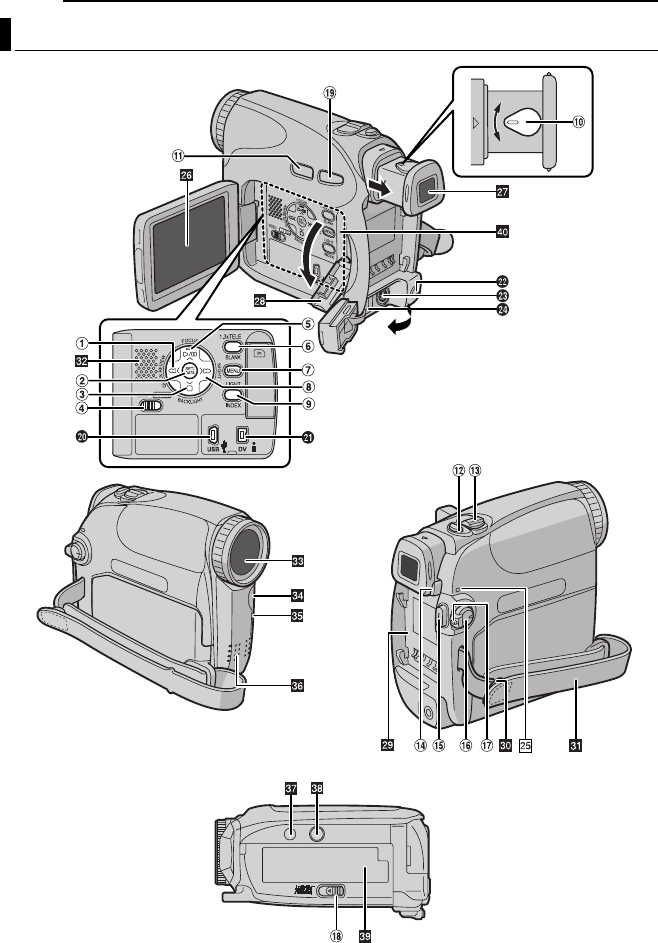
Controls
1
Rewind Button [1
] (
pg. 23)
Left Button [
1
]
Quick Review Button [QUICK REVIEW]
(
pg. 22)
2
Set Button [SET] (
pg. 17)
Data Battery Button [DATA] (
pg. 15)
3
Stop Button [7
] (
pg. 23)
Down Button [
4
]
Backlight Compensation
Button [BACKLIGHT] (
pg. 40)
4
VIDEO/MEMORY Switch (
pg. 16)
5
Play/Pause Button [6
] (
pg. 23)
Up Button [
3
]
Manual Focus Button [FOCUS] (
pg. 38)
6
Blank Search [BLANK] (
pg. 23)
Tele Mode Button (1.3x TELE) ( pg. 21)
7Menu Button [MENU] ( pg. 32)
8Fast-Forward Button [¡] ( pg. 23)
Right Button [2]
Night Button [NIGHT] ( pg. 38)
9Index Button [INDEX] ( pg. 28)
LED Light Button [LIGHT]
!Dioptre Adjustment Control ( pg. 18)
"Auto Button [AUTO] ( pg. 16)
#Snapshot Button [SNAPSHOT]
( pg. 27, 38)
Live Slow Button ( pg. 32, 37)
$Power Zoom Lever [T/W] ( pg. 21)
Speaker Volume Control [VOL. +, –]
( pg. 23)
%Battery Release Button [PUSH BATT.]
( pg. 14)
&Recording Start/Stop Button ( pg. 20)
(Power Switch [REC, PLAY, OFF] ( pg. 16)
)Lock Button ( pg. 16)
~Cassette Open/Eject Switch [OPEN/EJECT]
( pg. 19)
+Wide (16:9) Button [16.9] ( pg. 37)
Connectors
The connectors are located beneath the covers.
,USB (Universal Serial Bus) Connector
( pg. 45)
-Digital Video Connector [DV IN/OUT] (i.LINK*)
( pg. 44, 45)
* i.LINK refers to the IEEE1394-1995 industry
specification and extensions thereof. The
logo is used for products compliant with the
i.LINK standard.
.Audio/Video Input/Output Connector [AV]
( pg. 24, 43)
/S-Video Input/Output Connector [S]
( pg. 24, 43)
:DC Input Connector [DC] ( pg. 14)
Indicators
POWER/CHARGE Lamp ( pg. 14, 20)
Other Parts
LCD Monitor ( pg. 20, 21)
Viewfinder ( pg. 18)
Card Cover [ ] ( pg. 19)
Battery Pack Mount ( pg. 14)
Shoulder Strap Eyelet ( pg. 12)
Grip Strap ( pg. 18)
Speaker ( pg. 23)
Lens
LED Light
Camera Sensor
(Be careful not to cover this area, a sensor
necessary for shooting is built-in here.)
Stereo Microphone
Stud Hole ( pg. 18)
Tripod Mounting Socket ( pg. 18)
Cassette Holder Cover ( pg. 19)
Memory Card Slot
GR-D650AG_EN.book Page 9 Friday, April 7, 2006 7:00 PM
GETTING STARTED
10 EN
MasterPage: Left
LCD Monitor/Viewfinder Indications
During Video Recording Only
1Tape Running Indicator ( pg. 20)
(Rotates while tape is running.)
2Tele Mode Indicator ( pg. 21)
3Live Slow Indicator ( pg. 37)
4Recording Speed Mode (SP/LP) ( pg. 33)
(only LP indicator is displayed)
5Tape Remaining Time ( pg. 20)
6REC: (Appears during recording.) ( pg. 20)
PAUSE: (Appears during Record-Standby
mode.) ( pg. 20)
SLOW
: (Appears when using Live Slow.)
( pg. 37)
7Selected Wipe/Fader Effect Indicator
( pg. 41)
8Date/Time ( pg. 35)
9Time Code ( pg. 35)
!Digital Image Stabiliser (“DIS”) ( pg. 33)
"SOUND 12BIT/16BIT: Sound Mode Indicator
( pg. 33) (Appears for approx. 5 seconds
after turning on the camcorder.)
During D.S.C. Recording Only
1Image Size: 1280 (1280 x 960), 1024
(1024 x 768) or 640 (640 x 480) ( pg. 27)
2Picture Quality: (FINE) and
(STANDARD) (in order of quality) ( pg. 35)
3Remaining Number Of Shots ( pg. 27)
(Displays the approximate remaining number
of shots that can be stored during D.S.C.
recording.)
During Both Video And D.S.C. Recording
1Battery Remaining Power Indicator
2Operation Mode ( pg. 16)
: Auto Mode
: Manual Mode
3LED Light Indicator ( pg. 37)
4: Night-Scope Indicator ( pg. 38)
: Gain Up Mode ( pg. 34)
5Shutter Speed
6White Balance Indicator ( pg. 40)
7Selected Effect Indicator
8Selected Program AE Indicator ( pg. 42)
9Approximate Zoom Ratio ( pg. 21)
!Zoom Indicator ( pg. 21)
"Shooting Icon ( pg. 27)
(Appears and blinks during shooting.)
#Card Icon ( pg. 27)
: Appears during shooting.
: Blinks in white when a memory card is
not loaded.
: Blinks in yellow while the camcorder is
reading the data in the memory card.
$
PHOTO
: (Appears when taking Snapshot.)
( pg. 27, 38)
%: Spot Exposure Control Indicator
( pg. 40)
: Backlight Compensation Indicator
( pg. 40)
±: Exposure Adjustment Indicator ( pg. 39)
Iris Lock Indicator ( pg. 39)
&Wind Cut Indicator ( pg. 34)
(Date ( pg. 17)
)Manual Focus Adjustment Indicator
( pg. 38)
LP
W
H
SOUND
12
BIT
– – –min
TELE
!
9 8
1235
6
7
4
"
20
:
6
11
.3
2
A
0
M
6
1
15:55
PAUSE
1
.
51
1280
23
3
10
x
M
()
1
2
3
4
5
6
7
8
9
$
%
&
!
206.2 0
6
1
PHOTO
.
#"
GR-D650AG_EN.book Page 10 Friday, April 7, 2006 7:00 PM

EN 11
GETTING STARTED
MasterPage: Start_Right
GETTING STARTED
During 16:9 Recording
The lower side of the screen blackens when
“16:9” is selected in Wide Mode ( pg. 37).
Some of the indicators are displayed on the
area.
During Video Playback
1Battery Remaining Power Indicator
2Sound Mode Indicator ( pg. 36)
3Blank Search Indicator ( pg. 23)
4Tape Speed (SP/LP) ( pg. 36)
(only LP indicator is displayed)
53: Playback
¡: Fast-Forward/Shuttle Search
1: Rewind/Shuttle Search
8: Pause
8 3: Forward Frame-By-Frame Playback/
Slow-Motion
2 8: Reverse Frame-By-Frame Playback/
Slow-Motion
: Audio Dubbing
8: Audio Dubbing Pause
6Date/Time ( pg. 36)
7VOLUME: Volume Level Indicator ( pg. 23)
BRIGHT: Brightness Control Indicator (LCD
monitor/Viewfinder) ( pg. 18)
8Time Code ( pg. 36)
During D.S.C. Playback
1Folder/File Number ( pg. 28)
2Operation Mode Indicator ( pg. 28)
3Brightness Control Indicator (LCD monitor/
Viewfinder) ( pg. 18)
16:9
120min
PHOTO
1
00
min
25x
LP
Wide
(16:9)
mode
Indicator
1
L
2
2
0
:
/
2
M
V
1
I
O
:
X
L
2
1
2
1
.11
.
3
20
A
0
M
6
:
6
BIT
U
5
M
E
21 345
6
7
8
LP
BLANK SEARCH
PUSH "STOP" BUTTON
TO CANCEL
100-0013
1
32
BRIGHT
– 5
GR-D650AG_EN.book Page 11 Friday, April 7, 2006 7:00 PM
GETTING STARTED
12 EN
MasterPage: Left
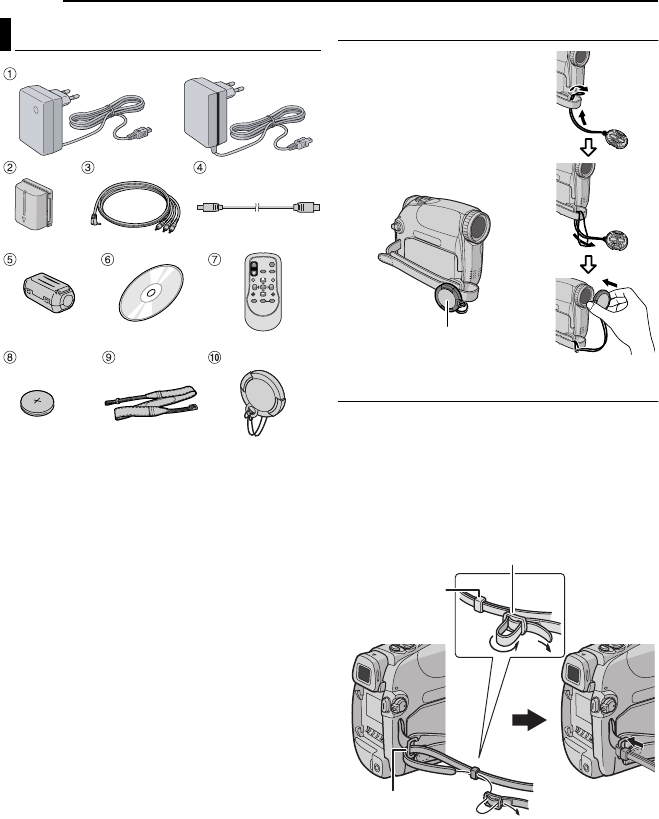
1AC Adapter AP-V17E or AP-V19E
2Battery Pack BN-VF707U
3Audio/Video Cable (Ø3.5 mini-plug to RCA
plug)
4USB Cable
5Core Filter (for USB cable, pg. 13 for
attachment)
6CD-ROM
7Remote Control Unit RM-V740U
8Lithium Battery CR2025* (for remote control
unit)
9Shoulder Strap (see the right column for
attachment)
!Lens Cap (see the right column for
attachment)
* A lithium battery is pre-installed in the Remote
Control Unit at time of shipment (with insulation
sheet). To use the Remote Control Unit, remove
the insulation sheet.
NOTES:
●In order to maintain optimum performance of the
camcorder, provided cables may be equipped with
one or more core filter. If a cable has only one core
filter, the end that is closest to the filter should be
connected to the camcorder.
●Make sure to use the provided cables for
connections. Do not use any other cables.
How To Attach The Lens Cap
To protect the lens, attach
the provided lens cap to the
camcorder as shown in the
illustration.
NOTE:
To confirm the lens cap is on
correctly make sure the cap is
flush to the camcorder.
How To Attach The Shoulder Strap
Follow the illustration.
1Thread the strap through the eyelet.
2Fold it back and thread it through the strap
guide and the buckle.
●To adjust the length of the strap, loosen and then
tighten the strap in the buckle.
3Slide the strap guide fully towards the eyelet.
Provided Accessories
OR
Place here during
shooting.
3
2
2
1
Strap guide
Buckle
Eyelet
GR-D650AG_EN.book Page 12 Friday, April 7, 2006 7:00 PM
EN 13
GETTING STARTED
MasterPage: Start_Right
GETTING STARTED
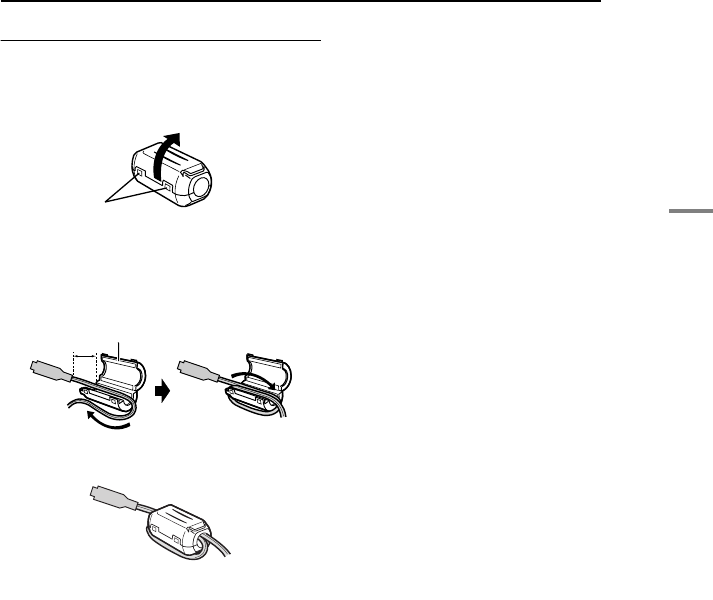
How To Attach The Core Filter
Attach the core filters to the cables. The core
filter reduces interference.
1Release the stoppers on both ends of the
core filter.
2Run the cable through the core filter, leaving
approx. 3 cm of cable between the cable plug
and the core filter.
Wind the cable once around the outside of the
core filter as shown in the illustration.
3Close the core filter until it clicks shut.
NOTES:
●Take care not to damage the cable.
●When connecting a cable, attach the end with the
core filter to the camcorder.
Stopper
Core filter
Wind once.
3 cm
GR-D650AG_EN.book Page 13 Friday, April 7, 2006 7:00 PM
GETTING STARTED
14 EN
MasterPage: Left
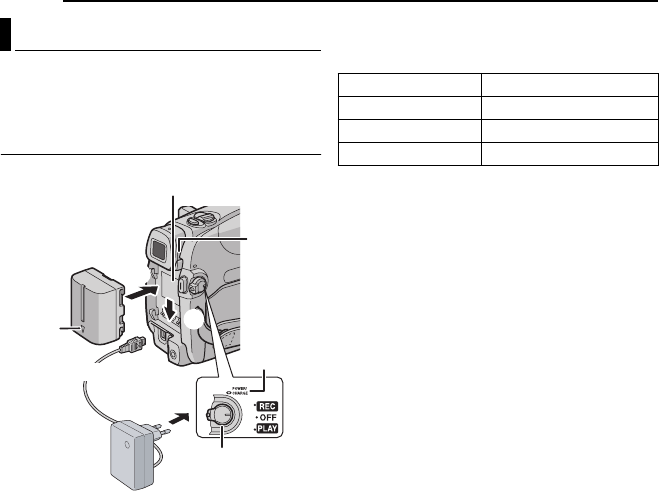
This camcorder’s 2-way power supply system
lets you choose the most appropriate source of
power. Do not use provided power supply units
with other equipment.
Charging The Battery Pack
1Set the Power Switch to “OFF”.
2With the arrow on the battery pack pointing
downward, push the battery pack slightly against
the battery pack mount 1.
3Slide down the battery pack until it locks in
place 2.
4Connect the AC Adapter to the camcorder.
5Plug the AC Adapter into an AC outlet. The
POWER/CHARGE lamp on the camcorder
blinks to indicate charging has started.
6When the POWER/CHARGE lamp goes out,
charging is finished. Unplug the AC Adapter
from the AC outlet. Disconnect the AC Adapter
from the camcorder.
To detach the battery pack
Slide the battery pack upward while pressing
PUSH BATT. to detach it.
* Provided
NOTES:
●This product includes patented and other
proprietary technology and will operate only
with JVC Data Battery. Use the JVC BN-
VF707U/VF714U/VF733U battery packs. Using
generic non-JVC batteries can cause damage
to the internal charging circuitry.
●If the protective cap is attached to the battery
pack, remove it first.
●During charging, the camcorder cannot be
operated.
●Charging is not possible if the wrong type of
battery is used.
●When charging the battery pack for the first time
or after a long storage period, the POWER/
CHARGE lamp may not light. In this case, remove
the battery pack from the camcorder, then try
charging again.
●If a fully charged battery pack is attached to the
unit, the POWER/CHARGE lamp does not blink to
indicate that charging is not performed.
●If the battery operation time remains extremely
short even after having been fully charged, the
battery is worn out and needs to be replaced.
Please purchase a new one.
●Since the AC Adapter processes electricity
internally, it becomes warm during use. Be sure to
use it only in well-ventilated areas.
●Using the optional AA-VF7 Battery Charger, you
can charge the BN-VF707U/VF714U/VF733U
battery pack without the camcorder.
●After 5 minutes has elapsed in Record-Standby
mode with the cassette inserted and no operation
is performed (“PAUSE” indicator may not appear),
the camcorder will automatically turn off its power
supplied from the AC adapter. In this case, the
battery charge starts if the battery is attached to
the camcorder.
Power
1
2POWER/
CHARGE
lamp
Battery
pack
PUSH
BATT.
Power switch
Battery pack mount
To DC connector
To AC outlet
AC Adapter
Arrow
Battery pack Charging time
BN-VF707U* Approx. 1 hr. 30 min.
BN-VF714U Approx. 2 hrs. 40 min.
BN-VF733U Approx. 5 hrs. 40 min.
GR-D650AG_EN.book Page 14 Friday, April 7, 2006 7:00 PM

EN 15
GETTING STARTED
MasterPage: Start_Right
GETTING STARTED
Using The Battery Pack
Perform steps 2 – 3 in “Charging The Battery
Pack”.
Maximum continuous recording time
* Provided
NOTES:
●Recording time is reduced significantly under the
following conditions:
•Zoom or Record-Standby mode is engaged
repeatedly.
•The LCD monitor is used repeatedly.
•The playback mode is engaged repeatedly.
•The LED Light is used.
●Before extended use, it is recommended that you
prepare enough battery packs to cover 3 times the
planned shooting time.
A
TTENTION:
Before detaching the power source, make sure that
the camcorder’s power is turned off. Failure to do so
can result in a camcorder malfunction.
Data Battery System
You can check the remaining battery power and
the recordable time.
1) Make sure the battery is attached and the
Power Switch is set to “OFF”.
2) Open the LCD monitor fully.
3) Press DATA, and the battery status screen
appears.
●It is displayed for approx. 3 seconds if the
button is pressed and released quickly, and for
approx. 15 seconds if the button is pressed
and hold for several seconds.
●If “COMMUNICATION ERROR” appears
instead of the battery status even though you
tried to press DATA several times, there may
be a problem with your battery. In such a case,
consult your nearest JVC dealer.
Using AC Power
Perform steps 4 – 5 in “Charging The Battery
Pack”.
NOTE:
The provided AC Adapter features automatic
voltage selection in the AC range from 110 V to
240 V.
About Batteries
DANGER! Do not attempt to take the batteries
apart, or expose them to flame or excessive
heat, as it may cause a fire or explosion.
WARNING! Do not allow the battery or its
terminals to come in contact with metals, as this
can result in a short circuit and possibly start a
fire.
To resume the original function of the
accurate battery power indication
If the battery power indication differs from the
actual operating time, fully charge the battery, and
then run it down. However this function may not
turn back if the battery was used for a long period
of time under extremely high/low temperature
condition or charged too many times.
Battery pack LCD monitor
on Viewfinder on
BN-VF707U* 1 hr. 30 min. 1 hr. 40 min
BN-VF714U 3 hrs.5 min. 3 hrs.25 min
BN-VF733U 7 hrs.20 min. 8 hrs.
GR-D650AG_EN.book Page 15 Friday, April 7, 2006 7:00 PM
GETTING STARTED
16 EN
MasterPage: Left
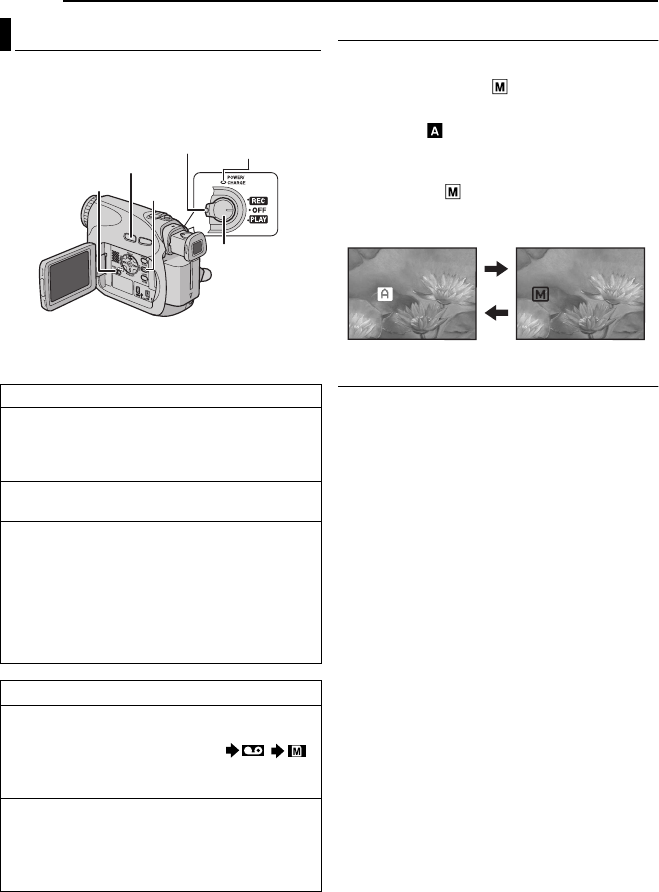
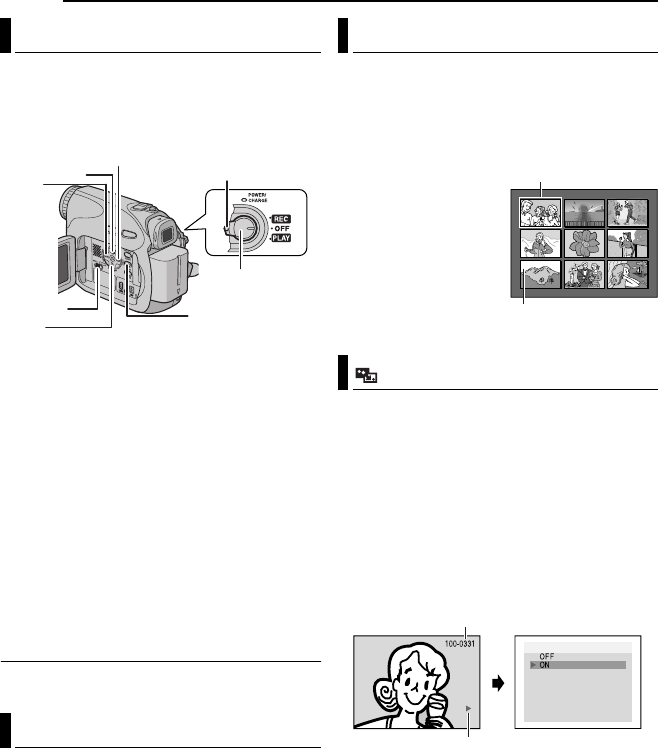
To turn on the camcorder, set the Power Switch
to any operation mode except “OFF” while
pressing down the Lock Button located on the
switch.
Choose the appropriate operation mode
according to your preference using the Power
Switch and VIDEO/MEMORY Switch.
Auto/Manual Mode
Press AUTO button repeatedly to switch to auto/
manual recording mode. When manual mode is
selected, the indicator “ ” appears on the LCD
monitor.
Auto Mode :
You can record using no special effects or
manual adjustments.
Manual Mode :
Manual recording is possible by setting various
functions.
Power-Linked Operation
When the Power Switch is set to “REC”, you can
also turn on/off the camcorder by opening/
closing the LCD monitor or pulling out/pushing in
the viewfinder.
INFORMATION:
The following explanations in this manual
supposes the use of LCD monitor in your
operation. If you want to use the viewfinder,
close the LCD monitor and pull out the
viewfinder fully.
Operation Mode
Power Switch Position
REC:
●Allows you to perform recording on the tape.
●Allows you to set various recording functions
using the menus. ( pg. 33)
OFF:
Allows you to switch off the camcorder.
PLAY:
●Allows you to play back a recording on the
tape.
●Allows you to display a still image stored in
the memory card or to transfer a still image
stored in the memory card to a PC.
●Allows you to set various playback functions
using the Menus. ( pg. 32)
VIDEO/MEMORY Switch Position
VIDEO:
Allows you to record on a tape or play back a
tape. If “REC SELECT” is set to “ / ”
( pg. 35), still images are recorded both on
the tape and the memory card.
MEMORY:
●Allows you to record in a memory card or
access data stored in a memory card.
●When the Power Switch is set to “REC”, the
currently selected image size appears.
POWER/
CHARGE lamp
VIDEO/
MEMORY
Lock Button
Power Switch
MENU
AUTO
MANUAL
AUTO
GR-D650AG_EN.book Page 16 Friday, April 7, 2006 7:00 PM
EN 17
GETTING STARTED
MasterPage: Start_Right
GETTING STARTED
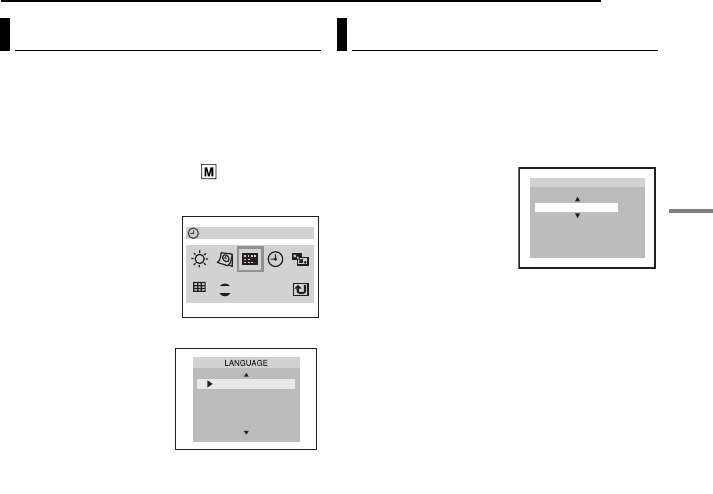
The language on the display can be changed.
( pg. 32, 35)
1Set the Power Switch to “REC” while pressing
down the Lock Button located on the switch.
2Open the LCD monitor fully. ( pg. 20)
3Set the recording mode to “ ”.( pg. 16)
4Press MENU. The Menu Screen appears.
5Press 4, 3, 1 or 2 to
select “DISPLAY”, and
press SET. The DISPLAY
Menu appears.
6Press 4, 3, 1 or 2 to
select “LANGUAGE”, and
press SET.
7Press 4 or 3 to select
the desired language,
and press SET or 2.
●Press 1 whenever you
want to return to the
previous menu screen.
8Press MENU. The
Menu Screen closes.
The date/time is recorded onto the tape at all
times, but its display can be turned on or off
during playback. ( pg. 35, 36)
1Perform steps 1 – 5 in “Language Settings”
on the left column.
2Press 4, 3, 1 or 2 to
select “CLOCK ADJ.”, and
press SET. The date
display format is
highlighted.
3Press 3 or 4 to select
the desired date display
format, then press SET or 2. Select from
“MONTH.DATE.YEAR”, “DATE.MONTH.YEAR”
or “YEAR.MONTH.DATE”.
4Press 3 or 4 to select the time display
format, then press SET or 2. Select from “24h”
or “12h”.
5Set the year, month, date, hour and minute.
Press 3 or 4 to select the value, then press SET
or 2. Repeat this step until you have input all the
settings.
NOTE:
Press 1 to return to the previous setting.
6Press MENU.The Menu screen closes.
Language Settings
LANGUAGE
0001
DEMO
ENGLISH
FRANCAIS
DEUTSCH
ESPAÑOL
ITALIANO
Date/Time Settings
MNTH
12
7
0
0:05
62006
AM
12h
..
DATE YEAR..
O
CLOCK ADJ
.
GR-D650AG_EN.book Page 17 Friday, April 7, 2006 7:00 PM
GETTING STARTED
18 EN
MasterPage: Left
1Adjust the velcro strip.
2Pass your right hand
through the loop and
grasp the grip.
3Adjust your thumb and
fingers through the grip to
easily operate the
Recording Start/Stop
Button, Power Switch and
Power Zoom Lever. Be
sure to fasten the velcro strip to your preference.
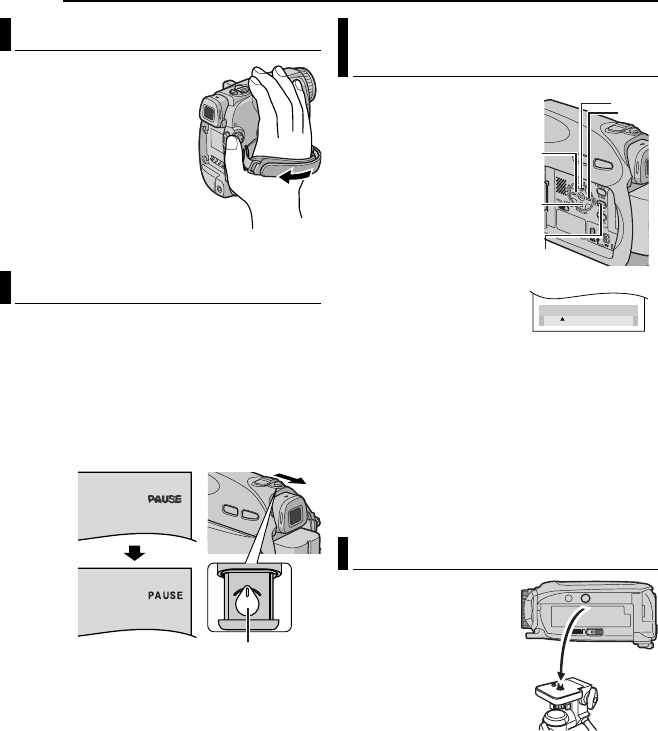
1Set the Power Switch to “REC” while pressing
down the Lock Button located on the switch.
2Make sure the LCD monitor is closed and
locked. Pull out the viewfinder fully and adjust it
manually for best viewability.
3Turn the Dioptre Adjustment Control until the
indications in the viewfinder are clearly focused.
CAUTION:
When retracting the viewfinder, take care not to
pinch your fingers.
1Set the Power Switch
to “REC” or “PLAY” while
pressing down the Lock
Button located on the
switch.
2Open the LCD monitor
fully. ( pg. 20)
●To adjust the brightness of
the viewfinder, pull out the
viewfinder fully and set
“PRIORITY” to “FINDER”
( pg. 32, 34).
3Press MENU. The
Menu Screen appears. If
you are in Playback mode,
please proceed to step 5.
4Press 4, 3, 1 or 2 to select “DISPLAY”, and
press SET. The DISPLAY Menu appears.
5Press 4, 3, 1 or 2 to select “BRIGHT”, and
press SET. The Menu Screen closes and the
brightness control MENU appears.
6Press 4 or 3 until the appropriate brightness
is reached and press SET or 2.
7Press MENU. The menu screen closes.
To attach the camcorder
to a tripod, align the
direction stud and screw
to the mounting socket
and stud hole on the
camcorder. Then tighten
the screw clockwise.
●Some tripods are not
equipped with studs.
Grip Adjustment
Viewfinder Adjustment
Dioptre Adjustment Control
Example:
Brightness Adjustment Of The
Display
Tripod Mounting
BRIGHT
– 5
11
11
22
22
MENU
44
44
33
33
GR-D650AG_EN.book Page 18 Friday, April 7, 2006 7:00 PM
EN 19
GETTING STARTED
MasterPage: Start_Right
GETTING STARTED
The camcorder needs to be powered up to load
or eject a cassette.
1Slide and hold OPEN/EJECT in the direction
of the arrow, then pull the cassette holder cover
open until it locks. The cassette holder opens
automatically.
●Do not touch internal components.
2Insert or remove a tape and press “PUSH” to
close the cassette holder.
●Be sure to press only the section labeled “PUSH”
to close the cassette holder; touching other parts
may cause your finger to get caught in the
cassette holder, resulting in injury or product
damage.
●Once the cassette holder is closed, it recedes
automatically. Wait until it recedes completely
before closing the cassette holder cover.
●When the battery pack’s charge is low, you may
not be able to close the cassette holder cover. Do
not apply force. Replace the battery pack with a
fully charged one or use AC power before
continuing.
3Close the cassette holder cover firmly until it
locks into place.
To protect valuable recordings
Slide the erase protection tab on the back of the
tape in the direction of “SAVE”. This prevents the
tape from being recorded over. To record on this
tape, slide the tab back to “REC” before loading
it.
NOTES:
●If you wait a few seconds and the cassette holder
does not open, close the cassette holder cover
and try again. If the cassette holder still does not
open, turn the camcorder off then on again.
●If the tape does not load properly, open the
cassette holder cover fully and remove the
cassette. A few minutes later, insert it again.
●When the camcorder is suddenly moved from a
cold place to a warm environment, wait a short
time before opening the cassette holder cover.
1Make sure the camcorder’s power is off.
2Open the card cover ( ).
3To load a memory card, firmly insert it with
its clipped edge first.
To unload a memory card, push it once. After
the memory card comes out of the camcorder,
pull it out.
●Do not touch the terminal on the reverse side of
the label.
4Close the card cover.
To protect valuable files (available only for
SD Memory Card)
Slide the write/erase protection tab on the side
of the memory card in the direction of “LOCK”.
This prevents the memory card from being
recorded over. To record on this memory card,
slide the tab back to the position opposite to
“LOCK” before loading it.
NOTES:
●Some brands of memory cards are not compatible
with this camcorder. Before purchasing a memory
card, consult its manufacturer or dealer.
●Before using a new memory card, it is necessary
to format the card. ( pg. 31)
A
TTENTION:
Do not insert or remove the memory card while the
camcorder is turned on, as this may cause the
memory card to be corrupted or cause the
camcorder to become unable to recognise whether
or not the card is installed.
Loading/Unloading A Cassette
Make sure the window side
is facing out.
Cassette holder
cover
OPEN/EJECT
PUSH
Cassette holder Erase
protection tab
Loading/Unloading A Memory
Card
Memory card
(optional)
Card Cover ( )
Write/erase protection tab Clipped edge
GR-D650AG_EN.book Page 19 Friday, April 7, 2006 7:00 PM
20 EN
MasterPage: Left
VIDEO RECORDING
NOTE:
Before continuing, perform the procedures listed
below:
●Power ( pg. 14)
●Loading A Cassette ( pg. 19)
1Remove the lens cap. ( pg. 12)
2Open the LCD monitor fully.
3Set the VIDEO/MEMORY Switch to “VIDEO”.
4Set the Power Switch to “REC” while pressing
down the Lock Button located on the switch.
●The POWER/CHARGE lamp lights and the
camcorder enters the Record-Standby mode.
“ PAUSE” is displayed.
●To record in LP (Long Play) mode, pg. 33.
5To start recording, press the Recording Start/
Stop Button. “ REC” appears on the display
while recording is in progress.
6To stop recording, press the Recording Start/
Stop Button again. The camcorder re-enters the
Record-Standby mode.
Approximate recording time
NOTES:
●If the Record-Standby mode continues for
5 minutes and no operation is performed
("PAUSE" indicator may not appear), the
camcorder’s power shuts off automatically. To turn
the camcorder on again, push back and pull out
the viewfinder again or close and re-open the LCD
monitor.
●When a blank portion is left between recorded
scenes on the tape, the time code is interrupted
and errors may occur when editing the tape. To
avoid this, refer to “Recording From The Middle Of
A Tape” ( pg. 22).
●To turn the melody sounds off, pg. 34.
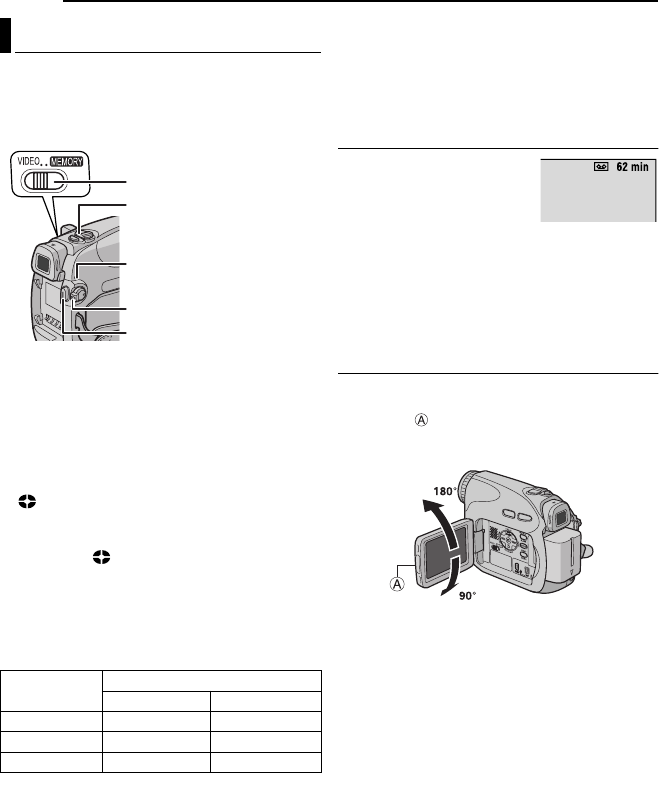
Tape Remaining Time
Approximate tape remaining
time appears on the display.
“– – – min” means the
camcorder is calculating the
remaining time. When the
remaining time reaches 2 minutes, the indication
starts blinking.
●The time required to calculate and display the
remaining tape length, and the accuracy of the
calculation, may vary according to the type of tape
used.
LCD Monitor And Viewfinder
While using the LCD monitor:
Make sure the viewfinder is pushed back in. Pull
on the end of the LCD monitor and open the
LCD monitor fully. It can rotate 270° (90°
downward, 180° upward).
While using the viewfinder:
Make sure the LCD monitor is closed and
locked. Pull out the viewfinder fully.
NOTES:
●The image will not appear simultaneously on the
LCD monitor and the viewfinder. When the
viewfinder is pulled out while the LCD monitor is
opened, you can select which one to use. Set
“PRIORITY” to the desired mode in SYSTEM
Menu. ( pg. 34)
●Coloured bright spots may appear all over the
LCD monitor or the viewfinder. However, this is
not a malfunction. ( pg. 48)
Basic Recording
Tape Recording mode
SP LP
30 min. 30 min. 45 min.
60 min. 60 min. 90 min.
80 min. 80 min. 120 min.
POWER/CHARGE Lamp
Recording Start/Stop Button
Lock Button
Zoom Lever
VIDEO/MEMORY
VIDEO RECORDING & PLAYBACK
GR-D650AG_EN.book Page 20 Friday, April 7, 2006 7:00 PM
EN 21
VIDEO RECORDING
MasterPage: Start_Right
VIDEO RECORDING & PLAYBACK
Zooming
Produces the zoom in/out effect, or an
instantaneous change in image magnification.
Zoom In
Slide the Power Zoom Lever towards “T”.
Zoom Out
Slide the Power Zoom Lever towards “W”.
●The further you slide the Power Zoom Lever, the
quicker the zoom action.
NOTES:
●Focusing may become unstable during Zooming.
In this case, set the zoom while in Record-
Standby, lock the focus by using the manual focus
( pg. 38), then zoom in or out in Record mode.
●Zooming is possible to a maximum of 700X, or it
can be switched to 15X magnification using the
optical zoom. ( pg. 34)
●Zoom magnification of over 15X is done through
Digital image processing, and is therefore called
Digital Zoom.
●During Digital zoom, the quality of image may
suffer.
●Digital zoom cannot be used when the VIDEO/
MEMORY Switch is set to “MEMORY”.
●
Macro shooting (as close as approx. 5 cm to the
subject) is possible when the Power Zoom Lever is
set all the way to “W”. Also see “TELE MACRO” in
FUNCTION Menu on page 33.
●When shooting a subject close to the lens, zoom
out first. If zoomed-in in the auto focus mode, the
camcorder may automatically zoom out
depending on the distance between the
camcorder and the subject. This will not occur
when “TELE MACRO” is set to “ON”. ( pg. 33)
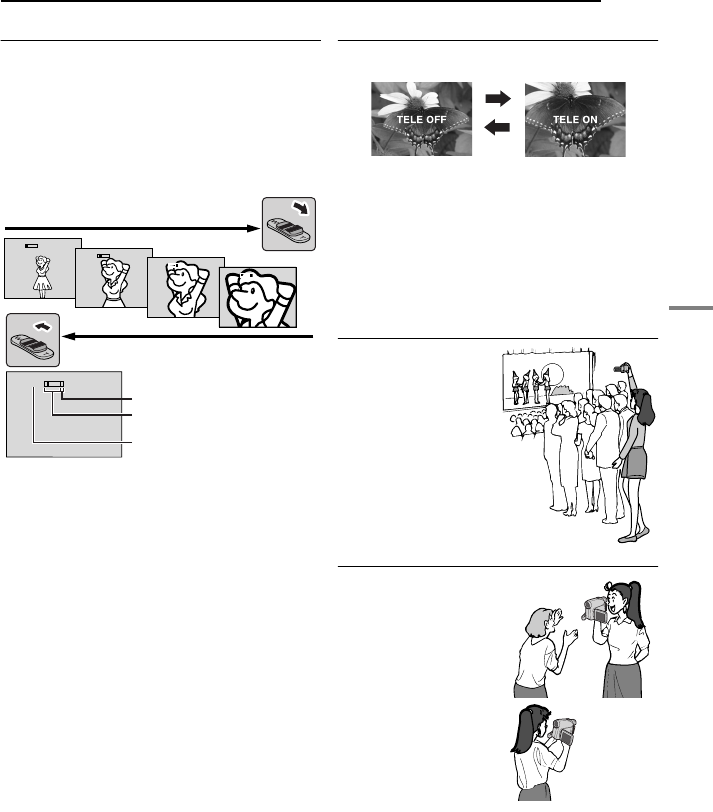
Tele Mode
Performs instant clear zoom to an image during
recording or record/standby mode.
Press 1.3x TELE alternately during recording or
record/standby mode to switch to OFF/ON.
When you select “TELE ON”. The Tele Mode
indicator “TELE” appears.
NOTES:
●Available only when the VIDEO/MEMORY Switch
is set to “VIDEO”.
●Tele mode cannot be used when the 16:9 wide
mode (16:9 indicator) is selected.
Journalistic Shooting
In some situations,
different shooting
angles may provide
more dramatic results.
Hold the camcorder in
the desired position
and tilt the LCD
monitor in the most
convenient direction. It
can rotate 270° (90°
downward, 180°
upward).
Interface Shooting
The person you shoot
can view himself/herself
in the LCD monitor, and
you can even shoot
yourself while viewing
your own image in the
LCD monitor.
1) Open the LCD
monitor and tilt it
upward to 180° so that it
faces forward. Then, pull
out the viewfinder fully.
2) Point the lens toward
the subject (yourself
when self-recording)
and start recording.
●During Interface Shooting, the monitor image
appears inverted as it would when viewing a
mirror. However, the actual recorded image does
not appear inverted.
●If the Quick Review ( pg. 22) is executed during
the interface shooting, the LCD monitor will be
turned off. In such a case, check the playback
picture in the viewfinder. To check the playback
picture in the LCD monitor, close the viewfinder.
10
x
1
x
10
x
20
x
40
x
Digital zoom zone
Zoom in (T: Telephoto)
Zoom out (W: Wide angle)
15X (optical) zoom zone
Approximate zoom ratio
GR-D650AG_EN.book Page 21 Friday, April 7, 2006 7:00 PM

VIDEO RECORDING
22 EN
MasterPage: Left
Time Code
During recording, a time code is recorded on the
tape. This code is to confirm the location of the
recorded scene on the tape during playback.
* Frames are not displayed during recording.
If recording starts from a blank portion, the time
code begins counting from “00:00:00”
(minute:second:frame). If recording starts from
the end of a previously recorded scene, the time
code continues from the last time code number.
If during recording a blank portion is left partway
through the tape, the time code is interrupted.
When recording is resumed, the time code
starts counting up again from “00:00:00”. This
means the camcorder may record the same time
codes as those existing in a previously recorded
scene. To prevent this, perform Recording From
The Middle Of A Tape ( pg. 22) in the following
cases;
●When shooting again after playing back a
recorded tape.
●When power shuts off during shooting.
●When a tape is removed and re-inserted during
shooting.
●When shooting using a partially recorded tape.
●When shooting on a blank portion located partway
through the tape.
●When shooting again after shooting a scene then
opening/closing the cassette holder cover.
NOTES:
●The time code cannot be reset.
●During fast-forwarding and rewinding, the time
code indication does not move smoothly.
●The time code is displayed only when “TIME
CODE” is set to “ON”. ( pg. 35)
Quick Review
Enables to check the end of the last recording.
1) Press QUICK REVIEW during the Recording-
Standby mode.
2) Tape is rewound for about several seconds
and played back automatically, then pauses in
the Recording-Standby mode for the next shot.
●Distortion may occur at start of playback. This is
normal.
Recording From The Middle Of A Tape
1) Play back a tape or use Blank Search
( pg. 23) to find the spot at which you want to
start recording, then engage the Still Playback
mode. ( pg. 23)
2) Set the Power Switch to “REC” while pressing
down the Lock Button located on the switch,
then start recording.
12:34:24
Minutes
Seconds
Frames*
(25 frames = 1 second)
Display
GR-D650AG_EN.book Page 22 Friday, April 7, 2006 7:00 PM
MasterPage: Video_Heading0_Right
EN 23
VIDEO RECORDING & PLAYBACK
VIDEO PLAYBACK
1Load a cassette. ( pg. 19)
2Set the VIDEO/MEMORY Switch to “VIDEO”.
3Set the Power Switch to “PLAY” while
pressing down the Lock Button located on the
switch.
4To start playback, press 6.
5To stop playback, press 7.
●During Stop mode, press 1 to rewind, or ¡ to
fast-forward the tape.
To control the speaker volume
Slide the Power Zoom Lever (VOL. +/–) towards
“+” to turn up the volume, or towards “–” to turn
down the volume.
NOTES:
●The playback picture can be viewed in the LCD
monitor, viewfinder or on a connected TV.
( pg. 24)
●If Stop mode continues for 5 minutes when power
is supplied from a battery, the camcorder shuts off
automatically. To turn on again, set the Power
Switch to “OFF”, then to “PLAY”.
●When a cable is connected to the AV connector,
the sound is not heard from the speaker.
Still Playback
Pauses during video playback.
1) Press 6 during playback.
2) To resume normal playback, press 6 again.
●If still playback continues for more than about
3 minutes, the camcorder’s Stop mode is
automatically engaged.
Shuttle Search
Allows high-speed search in either direction
during video playback.
1) During playback, press ¡ for forward
search, or 1 for reverse search.
2) To resume normal playback, press 6.
●During playback, press and hold ¡ or 1. The
search continues as long as you hold the button.
Once you release the button, normal playback
resumes.
●A slight mosaic effect appears on the display
during Shuttle Search. This is not a malfunction.
A
TTENTION:
During Shuttle Search, parts
of the picture may not be
clearly visible, particularly on
the left side of the screen.
Blank Search
Helps you find where you should start recording
in the middle of a tape to avoid time code
interruption. ( pg. 22)
1Load a cassette. ( pg. 19)
2Set the VIDEO/MEMORY Switch to “VIDEO”.
3Set the Power Switch to “PLAY” while
pressing down the Lock Button located on the
switch.
4Press BLANK.
●The “BLANK SEARCH” indication appears and
the camcorder automatically starts reverse or
forward search, then stops at the spot which is
about 3 seconds of tape before the beginning of
the detected blank portion.
●To cancel Blank Search, press 7 or BLANK.
NOTES:
●Before starting Blank Search, if the current
position is at a blank portion, the camcorder
searches in the reverse direction. If the current
position is at a recorded portion, the camcorder
searches in the forward direction.
●If the beginning or end of the tape is reached
during Blank Search, the camcorder stops
automatically.
●A blank portion which is shorter than 5 seconds of
tape may not be detected.
●The detected blank portion may be located
between recorded scenes. Before you start
recording, make sure there is no recorded scene
after the blank portion.
Normal Playback
S
peaker
66
66 Lock Button
¡¡
¡¡
7
MENU
11
11
VOL. +/–
VIDEO/
MEMORY
GR-D650AG_EN.book Page 23 Friday, April 7, 2006 7:00 PM
VIDEO PLAYBACK
24 EN
MasterPage: Left
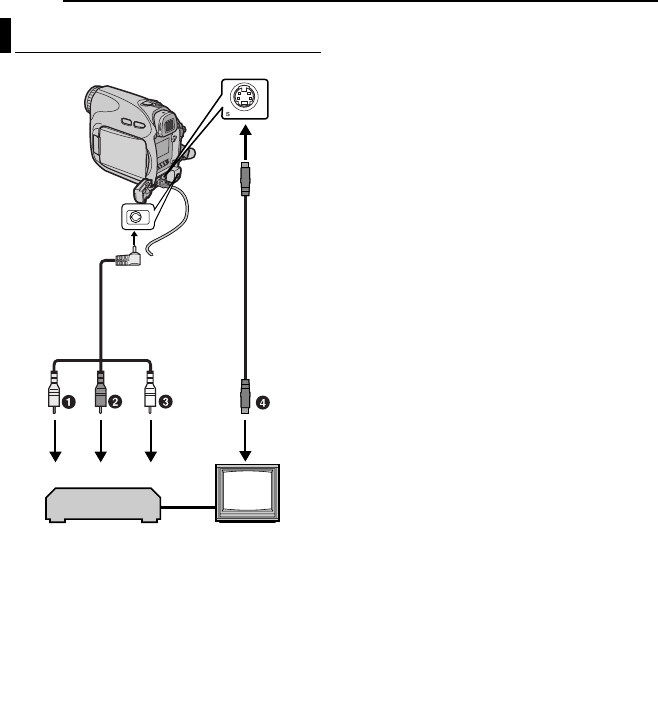
1Yellow to VIDEO IN (Connect when your TV/
VCR has only A/V input connectors.)
2Red to AUDIO R IN*
3White to AUDIO L IN*
4To S-VIDEO IN (Connect when your TV/VCR
has S-VIDEO IN and AV input connectors. In
this case, it is not necessary to connect the
yellow video cable.)
* Not required for watching still images only.
NOTE:
The S-Video cable is optional. Be sure to use the
YTU94146A S-Video cable. Consult the JVC
Service Centre described on the sheet included in
the package for details on its availability. Make sure
to connect the end with a core filter to the camera.
The core filter reduces interference.
1Make sure all units are turned off.
2Connect the camcorder to a TV or VCR as
shown in the illustration.
If using a VCR, go to step 3.
If not, go to step 4.
3Connect the VCR output to the TV input,
referring to your VCR’s instruction manual.
4Turn on the camcorder, the VCR and the TV.
5Set the VCR to its AUX input mode, and set
the TV to its VIDEO mode.
6Start playback on the camcorder. ( pg. 23)
To choose whether or not the following
displays appear on the connected TV
●Date/Time
Set “DATE/TIME” to “ON” or “OFF”.
( pg. 32, 36)
Or, press DISPLAY on the remote control to turn
on/off the date indication.
●Time Code
Set “TIME CODE” to “ON” or “OFF”.
( pg. 32, 36)
●Indications other than date/time and time code
Set “ON SCREEN” to “OFF”, “LCD” or “LCD/TV”.
( pg. 32, 36)
NOTES:
●It is recommended to use the AC Adapter as
the power supply instead of the battery pack.
( pg. 15)
●To monitor the picture and sound from the
camcorder without inserting a tape or memory
card, set the camcorder’s Power Switch to “REC”,
then set your TV to the appropriate input mode.
●Make sure you adjust the TV sound volume to its
minimum level to avoid a sudden burst of sound
when the camcorder is turned on.
Connections To A TV Or VCR
TV
VCR
To AV
connector
Audio/Video
cable
(provided)
S Cable
(optional)
GR-D650AG_EN.book Page 24 Friday, April 7, 2006 7:00 PM
EN 25
VIDEO PLAYBACK
MasterPage: Start_Right
VIDEO RECORDING & PLAYBACK
The Full-Function Remote Control Unit can
operate this camcorder from a distance as well
as the basic operations (Playback, Stop, Pause,
Fast-Forward and Rewind) of your VCR. It also
makes additional playback functions possible.
( pg. 26)
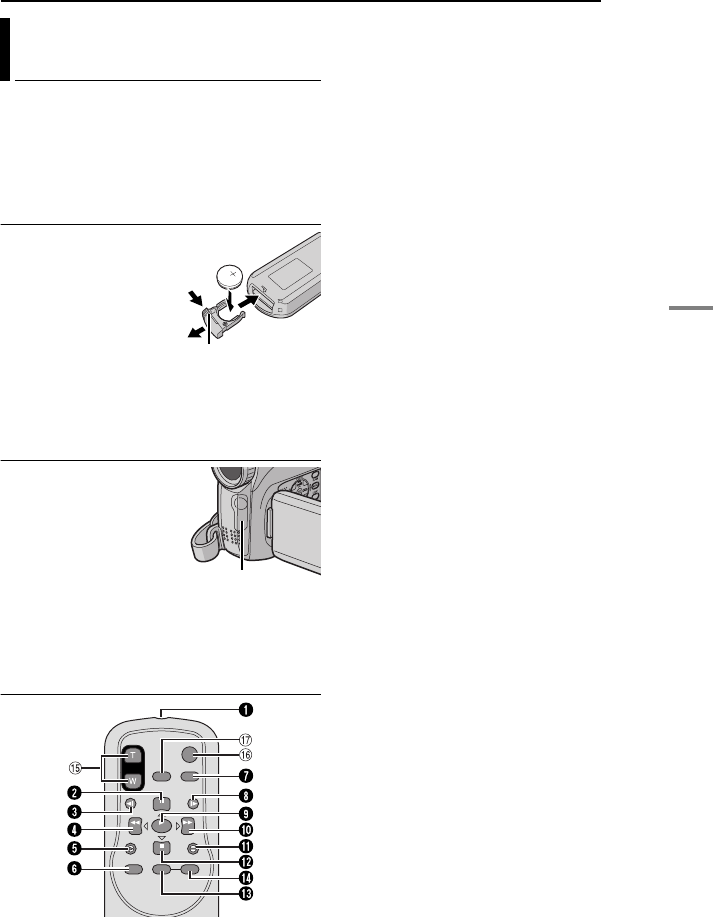
Installing The Battery
The remote control uses
one lithium battery
(CR2025).
1Pull out the battery
holder by pushing the lock
tab.
2Insert the battery in the
holder, and be sure to
have the “+” mark visible.
3Slide the holder back in until you hear a click.
Beam Effective Area (indoor use)
When using the remote
control, be sure to point it
at the remote sensor. The
transmitted beam’s
approximate effective
distance for indoor use is
5 m.
NOTE:
The transmitted beam may not be effective or may
cause incorrect operation when the remote sensor
is directly exposed to sunlight or powerful lighting.
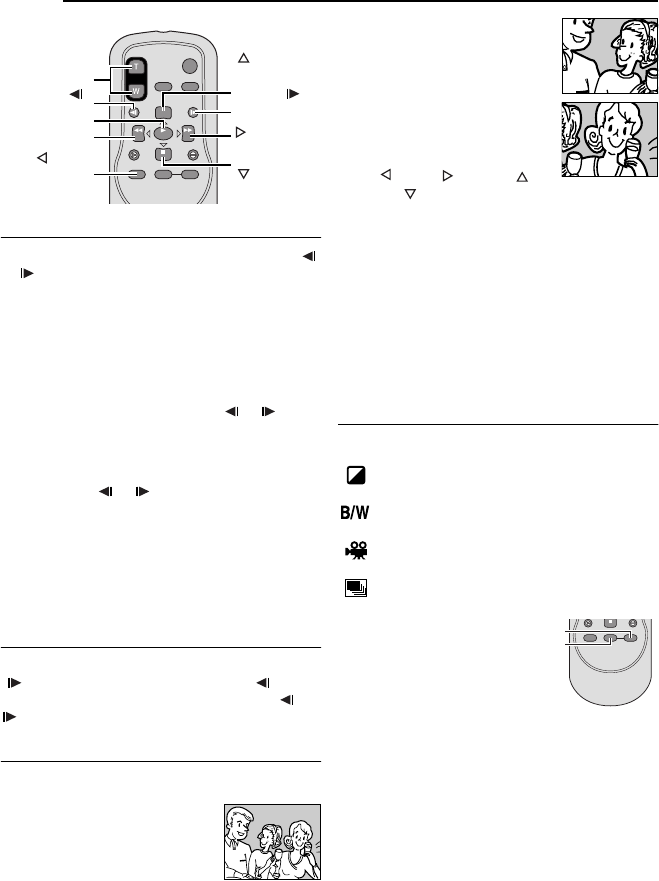
Buttons And Functions
1Infrared beam transmitting window
●Transmits the beam signal.
The following buttons are available only when
the camcorder’s Power Switch is set to “PLAY”.
2PAUSE Button
●Pauses the tape ( pg. 26)
Up Button ( pg. 26)
3SLOW Rewind Button ( pg. 26)
4REW Button
●Rewind/Reverse Shuttle Search on a tape
( pg. 23)
●Displays previous file in a memory card
( pg. 28)
Left Button ( pg. 26)
5INSERT Button ( pg. 46)
6SHIFT Button ( pg. 26)
7DISPLAY Button ( pg. 24, 43)
8SLOW Forward Button ( pg. 26)
9PLAY Button
●Starts Playback of a tape ( pg. 23)
●Starts Auto Playback of images in a memory
card ( pg. 28)
!FF Button
●Forward/Forward Shuttle Search on a tape
( pg. 23)
●Displays next file in a memory card ( pg. 28)
Right Button ( pg. 26)
"A. DUB Button ( pg. 46)
#STOP Button
●Stops the tape ( pg. 23)
●Stops Auto Playback ( pg. 28)
Down Button ( pg. 26)
$EFFECT Button ( pg. 26)
%EFFECT ON/OFF Button ( pg. 26)
The following buttons are available when the
camcorder’s Power Switch is set to “REC”.
&Zoom (T/W) Buttons
Zoom in/out ( pg. 21, 26)
(Also available with the Power Switch set to
“PLAY”)
(START/STOP Button
Functions the same as the Recording Start/
Stop Button on the camcorder.
)S.SHOT Button
Functions the same as SNAPSHOT on the
camcorder.
(Also available with the Power Switch set to
“PLAY”)
Playback Using The Remote
Control
1
1
2
3
Lock tab
Remote sensor
GR-D650AG_EN.book Page 25 Friday, April 7, 2006 7:00 PM
VIDEO PLAYBACK
26 EN
MasterPage: Left
.
Slow-Motion Playback
During normal video playback, press SLOW (
or ) more than approx. 2 seconds.
●After approx. 10 minutes, normal playback
resumes.
●To pause Slow-Motion playback, press PAUSE
(PAUSE).
●To stop Slow-Motion playback, press PLAY (3).
NOTES:
●You can also engage Slow-Motion Playback from
Still Playback by pressing SLOW ( or ) more
than approx. 2 seconds.
●During Slow-Motion Playback, due to digital
image processing, the picture may take on a
mosaic effect.
●After SLOW ( or ) is pressed and held, the
still image may be displayed for a few seconds,
followed by a blue screen for a few seconds. This
is not a malfunction.
●During Slow-Motion Playback, there will be
disturbances in video and the picture may seem
unstable, especially with steady images. This is
not a malfunction.
Frame-By-Frame Playback
During normal or still playback, press SLOW
( ) repeatedly for forward or SLOW ()
repeatedly for reverse. Each time SLOW ( or
) is pressed, the frame is played back.
Playback Zoom
Magnifies the recorded image up to 47X at any
time during video playback and D.S.C. playback.
1) Press PLAY (3) to start video
playback. Or perform normal
playback of images.
2) At the point you want to zoom
in, press the Zoom Button (T).
●To zoom out, press the Zoom
Button (W).
3) You can move the image on
the screen around to find a
particular portion of the picture.
While holding down SHIFT,
press (Left), (Right),
(Up) and (Down).
●To end zoom, press and hold W until
magnification returns to normal. Or, press STOP
(7) and then press PLAY (3) during video
playback.
●To end zoom during D.S.C. playback, press PLAY
(3).
NOTES:
●Zoom can also be used during slow-motion and still
playback.
●Due to digital image processing, the quality of the
image may suffer.
Playback Special Effects
Allows you to add creative effects to the video
playback image.
SEPIA: Recorded scenes have a brownish
tint like old photos.
MONOTONE: Like classic black and white
films, your footage is shot in B/W.
CLASSIC: Gives recorded scenes a
strobe effect.
STROBE: Your recording looks like a
series of consecutive snapshots.
1) To start
playback,
press PLAY
(3).
2) Press
EFFECT. The
PLAYBACK EFFECT Select Menu appears.
3) Press EFFECT repeatedly to move the
highlight bar to the desired effect.
●The selected function is activated and after
2 seconds the menu disappears.
●To deactivate the selected effect, press EFFECT
ON/OFF. To reactivate the selected effect press
EFFECT ON/OFF again.
●To change the selected effect, repeat from step 2
above.
Zoom (T/W)
SHIFT
SLOW ( )
(Right)
PAUSE or
(Up)
(Left)
PLAY
SLOW ( )
STOP or
(Down)
EFFECT
EFFECT ON/OFF
GR-D650AG_EN.book Page 26 Friday, April 7, 2006 7:00 PM
EN 27
MasterPage: Start_Right
DIGITAL STILL CAMERA (D.S.C.) RECORDING & PLAYBACK
D.S.C. RECORDING
You can use your camcorder as a Digital Still
Camera for taking snapshots. Still images are
stored in the memory card.
NOTE:
Before continuing, perform the procedures listed
below:
●Power ( pg. 14)
●Loading a Memory Card ( pg. 19)
1Remove the lens cap.
2Open the LCD monitor fully. ( pg. 20)
3Set the VIDEO/MEMORY Switch to
“MEMORY”.
4Set the Power Switch to “REC” while pressing
down the Lock Button located on the switch.
●To change the Image Size and/or Picture Quality,
pg. 32, 35.
5Press SNAPSHOT. The
“PHOTO
” indication
appears while the snapshot is being taken.
●To delete unwanted still images, refer to “Deleting
Files”. ( pg. 30)
●When you do not want to hear the shutter sound,
set “MELODY” to “OFF”. ( pg. 32, 34)
NOTE:
If shooting is not performed for approx. 5 minutes
when the Power Switch is set to “REC” and power
is supplied from the battery pack, the camcorder
shuts off automatically to save power. To perform
shooting again, push back and pull out the
viewfinder again or close and re-open the LCD
monitor.
Approximate Number of Storable Images
●The number increases or decreases depending
on the Picture Quality/Image Size, etc.
* Optional
Basic Shooting (D.S.C. Snapshot)
Power Switch
Lock Button
VIDEO/
MEMORY
SNAPSHOT
Image Size/Picture
Quality
SD Memory Card*
8 MB 16 MB 32 MB 64 MB
640 x 480/FINE 47 95 205 425
640 x 480/STANDARD 160 295 625 1285
1024 x 768/FINE 21 47 95 200
1024 x 768/STANDARD 65 145 310 640
1280 x 960/FINE 13 29 60 125
1280 x 960/STANDARD 45 95 205 425
Image Size/Picture
Quality
MultiMediaCard*
8 MB 16 MB 32 MB
640 x 480/FINE 55 105 215
640 x 480/STANDARD 190 320 645
1024 x 768/FINE 25 50 100
1024 x 768/STANDARD 75 160 320
1280 x 960/FINE 16 32 60
1280 x 960/STANDARD 50 105 216
DIGITAL STILL CAMERA (D.S.C.) RECORDING &
PLAYBACK
GR-D650AG_EN.book Page 27 Friday, April 7, 2006 7:00 PM
MasterPage: Heading0_Left
28 EN D.S.C. PLAYBACK
Images shot with the camcorder are
automatically numbered, then stored in
numerical order in the memory card. You can
view the stored images, one at a time, much like
flipping through a photo album.
1Load a memory card. ( pg. 19)
2Set the VIDEO/MEMORY Switch to
“MEMORY”.
3Set the Power Switch to “PLAY” while
pressing down the Lock Button located on the
switch.
●A stored image is displayed.
4Press 1 to display the previous file. Press 2
to display the next file.
NOTE:
Images shot and stored on the card with another
device with resolutions other than “640 x 480” and
“1024 x 768”will be displayed as thumbnails only.
These thumbnail images cannot be transferred to a
PC.
Playback Zoom
Available only with the remote control.
( pg. 26)
You can run through all the images stored in
memory card automatically.
1Perform steps 1 – 3 in “Normal Playback Of
Images”.
2Press 6 to start Auto Playback.
●If you press 1 during Auto Playback, files are
displayed in descending order.
●If you press 2 during Auto Playback, files are
displayed in ascending order.
3To end Auto Playback, press 7.
You can view several different files stored in the
memory card at a time. This browsing capability
makes it easy to locate a particular file you want.
1Perform steps 1 – 3 in “Normal Playback Of
Images” (see the left column).
2Press INDEX. The
Index Screen appears.
3Press 4, 3, 1 or 2 to
move the frame to the
desired file.
4Press SET. The
selected file is displayed.
1Perform steps 1 – 3 in “Normal Playback Of
Images” (see the left column).
2Press MENU. The Menu Screen appears.
3Press 4, 3, 1 or 2 to select “ON SCREEN”,
and press SET. The ON SCREEN Menu
appears.
4Press 4 or 3 to select “OFF”, and press SET
or 2, then press MENU. The operation mode
indicator and folder/file number disappear.
●To display the indicators again, select “ON”.
Normal Playback Of Images
Auto Playback Of Images
Power Switch
Lock Button
7
6
22
22
11
11
MENU
VIDEO/
MEMORY
Index Playback Of Files
Removing On-Screen Display
123
456
78 9
Selected file
Index number
ON SCREEN
Operation mode indicator
Folder/file number
GR-D650AG_EN.book Page 28 Friday, April 7, 2006 7:00 PM

EN 29
MasterPage: Start_Right
DIGITAL STILL CAMERA (D.S.C.) RECORDING & PLAYBACK
ADDITIONAL FEATURES FOR D.S.C.
By resetting the file name, a new folder will be
made. The new files you are going to make will
be stored in the new folder. It is convenient to
separate the new files from previously made
files.
1Perform steps 1 – 3 in “Normal Playback Of
Images”. ( pg. 28)
2Press MENU. The Menu Screen appears.
3Press 4, 3, 1 or 2 to select “NO. RESET”,
and press SET. The NO. RESET screen
appears.
4Press 4 or 3 to select “EXECUTE”, and
press SET. The new folder (such as
“101JVCGR”) will be made and the file name of
the next shot starts from DVC00001.
NOTE:
If the file name reaches DVC09999, a new folder
(such as “101JVCGR”) will be made and the file
name will start again from DVC00001.
The Protect mode helps prevent the accidental
erasure of files.
1Perform steps 1 – 3 in “Normal Playback Of
Images”. ( pg. 28)
2Press MENU. The Menu Screen appears.
3Press 4, 3, 1 or 2 to select “PROTECT”, and
press SET. The PROTECT Menu appears.
To protect the currently displayed file
4Press 4 or 3 to select
“CURRENT”, and press
SET or 2. The PROTECT
screen appears.
5Press 1 or 2 to select
the desired file.
6Press 4 or 3 to select
“EXECUTE”, and press
SET.
●To cancel protection,
select “RETURN”.
●Repeat steps 5 and 6 for
all files you want to
protect.
To protect all files stored in the memory card
4Press 4 or 3 to select “PROT.ALL”, and press
SET or 2. The PROTECT screen appears.
5Press 4 or 3 to select “EXECUTE”, and
press SET.
●To cancel protection, select “RETURN”.
NOTES:
●If the “ ” mark appears, the currently displayed
file is protected.
●When the memory card is initialised or corrupted,
even protected files are deleted. If you do not want
to lose important files, transfer them to a PC and
save them.
To Remove Protection
Before doing the following, perform steps 1 – 3
in “Protecting Files”.
To remove protection from the currently
displayed file
4Press 4 or 3 to select
“CURRENT”, and press
SET or 2. The PROTECT
screen appears.
5Press 1 or 2 to select
the desired file.
6Press 4 or 3 to select “EXECUTE”, and
press SET.
●To cancel selection, select “RETURN”.
●Repeat steps 5 and 6 for all files you want to
remove protection.
To remove protection from all files stored in
the memory card
4Press 4 or 3 to select “CANC.ALL”, and
press SET or 2. The PROTECT screen appears.
5Press 4 or 3 to select “EXECUTE”, and
press SET.
●To cancel selection, select “RETURN”.
Resetting The File Name
Protecting Files
CANCEL
EXECUTE
RETURN
GR-D650AG_EN.book Page 29 Friday, April 7, 2006 7:00 PM
ADDITIONAL FEATURES FOR D.S.C.
30 EN
MasterPage: Left
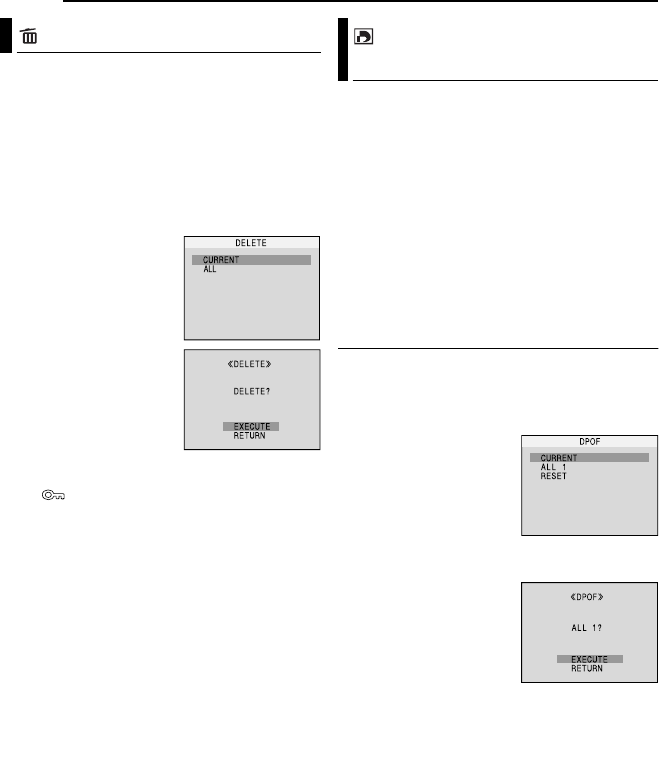
Previously stored files can be deleted either one
at a time or all at once.
1Perform steps 1 – 3 in “Normal Playback Of
Images” ( pg. 28).
2Press MENU. The Menu Screen appears.
3Press 4, 3, 1 or 2 to select “DELETE”, and
press SET. The Menu appears.
To delete the currently displayed file
4Press 4 or 3 to select
“CURRENT”, and press
SET or 2. The DELETE
screen appears.
5 Press 1 or 2 to select
the desired file.
6Press 4 or 3 to select
“EXECUTE”, and press
SET.
●To cancel deletion, select
“RETURN”.
●Repeat steps 5 and 6 for
all files you want to delete.
NOTE:
If the “ ” mark appears, the selected file is
protected and cannot be deleted.
To delete all files stored in the memory card
4Press 4 or 3 to select “ALL”, and press SET
or 2. The DELETE screen appears.
5Press 4 or 3 to select “EXECUTE”, and
press SET.
●To cancel deletion, select “RETURN”.
NOTES:
●Protected files ( pg. 29) cannot be deleted. To
delete them, remove protection first.
●Once files are deleted, they cannot be restored.
Check files before deleting.
CAUTION:
Do not remove the memory card or perform any
other operation (such as turning off the camcorder)
during deletion. Also, be sure to use the provided
AC Adapter, as the memory card may be corrupted
if the battery becomes exhausted during deletion. If
the memory card becomes corrupted, initialise it.
( pg. 31)
This camcorder is compatible with the DPOF
(Digital Print Order Format) standard in order to
support future systems such as automatic
printing. You can select one of the 2 print
information settings for images stored in the
memory card: “To Print All Still Images (One
Print For Each)” or “To Print By Selecting Still
Images And Number Of Prints”.
NOTE:
If you load a memory card already set as shown
below in a printer compatible with DPOF, it will
make prints of the selected still images
automatically.
To Print All Still Images (One Print For Each)
1Perform steps 1 – 3 in “Normal Playback Of
Images”. ( pg. 28)
2Press MENU. The Menu Screen appears.
3Press 4, 3, 1 or 2 to
select “DPOF”, and press
SET. The DPOF Menu
appears.
4Press 4 or 3 to select
“ALL 1”, and press SET or
2. The DPOF screen
appears.
5Press 4 or 3 to select
“EXECUTE”, and press
SET. The normal playback
screen appears.
●To cancel selection, select
“RETURN”.
Deleting Files
Setting Print Information
(DPOF Setting)
GR-D650AG_EN.book Page 30 Friday, April 7, 2006 7:00 PM

EN 31
ADDITIONAL FEATURES FOR D.S.C.
MasterPage: Start_Right
DIGITAL STILL CAMERA (D.S.C.) RECORDING & PLAYBACK
To Print By Selecting Still Images And
Number Of Prints
1Perform steps 1 – 3 in “To Print All Still
Images (One Print For Each)”. ( pg. 30)
2Press 4 or 3 to select
“CURRENT”, and press
SET or 2. The DPOF
screen appears.
3Press 1 or 2 to select
the desired file.
4Press 4 or 3 to select the number indication
(00), and press SET.
5Select the number of
prints by pressing 3 to
increase the number, or 4
to decrease the number,
and press SET.
●Repeat steps 3 through 5
for the desired number of
prints.
●The number of prints can be set up to 15.
●To correct the number of prints, select the image
again and change the number.
6Press 4 or 3 to select
“RETURN”, and press
SET. The “SAVE?”
appears.
●If you did not change any
settings in step 3 through
5, the DPOF Menu
reappears.
7Press 4 or 3 to select “EXECUTE” to save
the setting you have just made, and press SET.
●To cancel selection, select “CANCEL”.
To Reset The Number Of Prints
1Perform steps 1 – 3 in “To Print All Still
Images (One Print For Each)”. ( pg. 30)
2Press 4 or 3 to select “RESET”, and press
SET or 2. The DPOF screen appears.
3Press 4 or 3 to select “EXECUTE”, and
press SET. The normal playback screen
appears.
●To cancel selection, select “RETURN”.
●The number of prints is reset to 0 for all still
images.
CAUTION:
While performing the above, never disconnect
power, as this may cause the memory card to be
corrupted.
You can initialise a memory card any time.
After initialising, all files and data stored in the
memory card, including those which have been
protected, are cleared.
1Set the VIDEO/MEMORY Switch to
“MEMORY”.
2Set the Power Switch to “PLAY” while
pressing down the Lock Button located on the
switch.
3Press MENU. The Menu Screen appears.
4Press 4, 3, 1 or 2 to
select “FORMAT”, and
press SET. The FORMAT
screen appears.
5Press 4 or 3 to select
“EXECUTE”, and press
SET. The memory card is
initialised.
●When initialisation is finished, “NO IMAGES
STORED” appears.
●To cancel initialisation, select “RETURN”.
CAUTION:
Do not perform any other operation (such as
turning off the camcorder) during initialisation.
Also, be sure to use the provided AC Adapter, as
the memory card may be corrupted if the battery
becomes exhausted during initialisation. If the
memory card becomes corrupted, initialize it.
Initialising A Memory Card
GR-D650AG_EN.book Page 31 Friday, April 7, 2006 7:00 PM
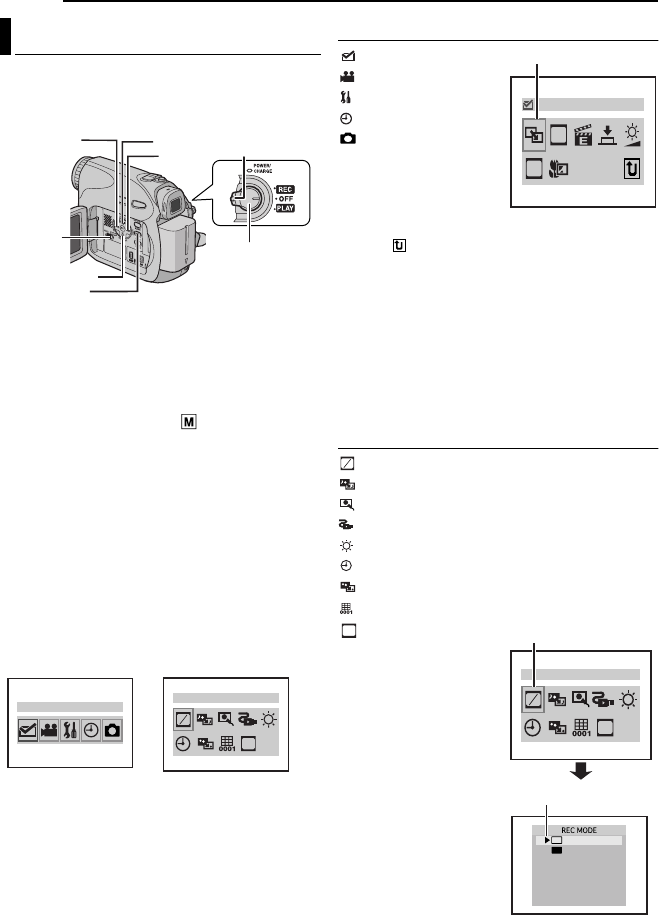
MasterPage: Heading0_Left
32 EN MENUS FOR DETAILED ADJUSTMENT
This camcorder is equipped with an easy-to-use,
on-screen menu system that simplifies many of
the more detailed camcorder settings.
( pg. 32 – 36)
1For Video and D.S.C. Recording Menus:
●Set the VIDEO/MEMORY Switch to “VIDEO” or
“MEMORY”.
●Set the Power Switch to “REC” while pressing
down the Lock Button located on the switch.
●Set the recording mode to “ ”. ( pg. 16)
For Video Playback Menu:
●Set the VIDEO/MEMORY Switch to “VIDEO”.
●Set the Power Switch to “PLAY” while pressing
down the Lock Button located on the switch.
●For D.S.C. Playback Menu, refer to “D.S.C.
PLAYBACK” ( pg. 28).
2Open the LCD monitor fully. ( pg. 20)
3Press MENU. The Menu Screen appears.
4Press 4, 3, 1 or 2 to select the desired
function, and press SET. The selected function
menu appears.
5Setting procedure hereafter depends on the
selected function.
NOTES:
●You cannot enter Menu Screen during recording.
●Certain functions cannot be set in the Video or
D.S.C. Recording Menus. These icons will be
displayed in grey/white.
Video Recording and D.S.C. Recording Menus
FUNCTION (
pg. 33)
SETTING ( pg. 33)
SYSTEM ( pg. 34)
DISPLAY ( pg. 35)
DSC ( pg. 35)
1) Press 4, 3, 1 or 2 to
select the desired
selection and press SET.
●Example: WIPE/FADER
Menu.
●Press to return to the Main Menu screen.
2) Press 4 or 3 to select the desired parameter
and press SET or 2. Selection is complete.
●The “3” indicator shows the setting that is
currently saved inside the camcorder’s memory.
●Press 1 whenever you want to cancel or return to
the previous Menu Screen.
3) Press MENU. The Menu Screen closes.
NOTE:
Repeat the procedure if you wish to set other
function menus.
Video Playback Menu
REC MODE ( pg. 36)
SOUND MODE ( pg. 36)
NARRATION ( pg. 36)
S/AV INPUT( pg. 36)
BRIGHT ( pg. 36)
DATE/TIME ( pg. 36)
ON SCREEN ( pg. 36)
TIME CODE (
pg. 36)
16:9 (
pg. 36)
Example: REC MODE
Menu
1) Press 4 or 3 to
select the desired
parameter and press
SET or 2. Selection is
complete.
●Repeat the procedure if
you wish to set other
function menus.
●The “3” indicator shows
the setting that is
currently saved inside
the camcorder’s
memory.
●Press 1 whenever you
want to cancel or return
to the previous Menu
Screen.
2) Press MENU. The Menu Screen closes.
Changing The Menu Settings
Power Switch
Lock Button
VIDEO/
MEMORY
MENU
11
11
22
22
33
33
44
44
FUNCTION
SP
LP
REC MODE
TV
Screen for Video and
D.S.C. Recording Menu Screen for Video
Playback Menu
WIPE/FADER
WB
EF
Selected menu icon
SP
LP
SP
LP
REC MODE
TV
Selected menu icon
SP
LP
“3” indicator
TV
ADVANCED FEATURES
GR-D650AG_EN.book Page 32 Friday, April 7, 2006 7:00 PM
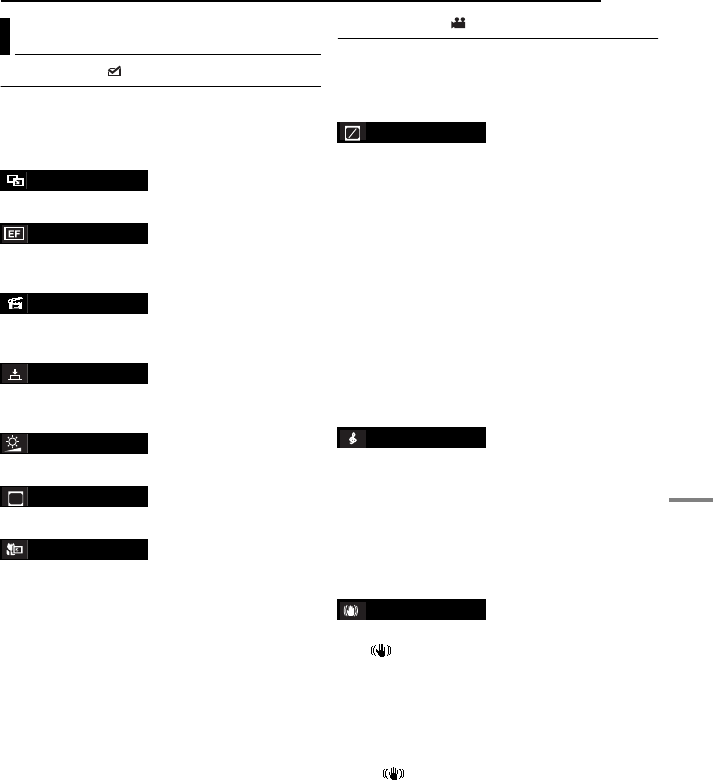
EN 33
MENUS FOR DETAILED ADJUSTMENT
MasterPage: Start_Right
ADVANCED FEATURES
FUNCTION
The following menu settings can be changed
only when the Power Switch is set to “REC”.
[ ] = Factory-preset
( pg. 41), “Wipe or Fader Effects”
( pg. 42), “Program AE, Effects and Shutter
Effects”
( pg. 42), “Program AE, Effects and Shutter
Effects”
( pg. 42), “Program AE, Effects and Shutter
Effects”
( pg. 39), “Exposure Control”
( pg. 40), “White Balance Adjustment”
[OFF]: Disables the function.
ON: When the distance to the subject is less
than 1 m, set “TELE MACRO” to “ON”. You can
shoot a subject as large as possible at a
distance of approx. 40 cm.
Depending on the zoom position, the lens may go
out of focus.
SETTING
The following settings are effective when the
Power Switch is set to “REC”.
[ ] = Factory-preset
[SP]*: To record in the SP (Standard Play) mode
LP: Long Play—more economical, providing 1.5
times the recording time.
* SP indicator does not appear on the screen.
NOTES:
●Audio Dubbing ( pg. 46) and Insert Editing
( pg. 46) are possible on tapes recorded in the
SP mode.
●If the recording mode is switched, the playback
picture will be blurred at the switching point.
●It is recommended that tapes recorded in the LP
mode on this camcorder be played back on this
camcorder.
●During playback of a tape recorded on another
camcorder, blocks of noise may appear or there
may be momentary pauses in the sound.
[12BIT]: Enables video recording of stereo
sound on four separate channels, and is
recommended for use when performing Audio
Dubbing. (Equivalent to the 32 kHz mode of
previous models)
16BIT: Enables video recording of stereo sound
on two separate channels. (Equivalent to the
48 kHz mode of previous models)
OFF: Disables the function.
[ON ]: To compensate for unstable images
caused by camera-shake, particularly at high
magnification.
NOTES:
●Accurate stabilisation may not be possible if hand
shake is excessive, or depending on the shooting
condition.
●The “ ” indicator blinks or goes out if the
Stabiliser cannot be used.
●Switch off this mode when recording with the
camcorder on a tripod.
* Available only when the VIDEO/MEMORY Switch
is set to “VIDEO”.
Recording Menus
WIPE/FADER
EFFECT
PROGRAM AE
SHUTTER
EXPOSURE
W. BALANCE
TELE MACRO
WB
REC MODE
SOUND MODE
DIS*
SP
LP
GR-D650AG_EN.book Page 33 Friday, April 7, 2006 7:00 PM
MENUS FOR DETAILED ADJUSTMENT
34 EN
MasterPage: Left
[SNAP]: Snapshot mode
SLOW : Live Slow mode
For details on the procedure, refer to “Live Slow”
( pg. 37) and “Snapshot (Record Still Image
On Tape)” ( pg. 38).
* Available only when the VIDEO/MEMORY Switch
is set to “VIDEO”.
[15X]: When set to “15X” while using digital
zoom, the zoom magnification will reset to 15X
since digital zoom will be disengaged.
60X*: Allows you to use the Digital Zoom. By
digitally processing and magnifying images,
zooming is possible from 15X (the optical zoom
limit), to a maximum of 60X digital magnification.
700X*: Allows you to use the Digital Zoom. By
digitally processing and magnifying images,
zooming is possible from 15X (the optical zoom
limit), to a maximum of 700X digital
magnification.
* Available only when the VIDEO/MEMORY Switch
is set to “VIDEO”.
OFF: Allows you to shoot dark scenes with no
picture brightness adjustment.
[AGC]: The overall appearance may be grainy,
but the image is bright.
AUTO : The shutter speed is automatically
adjusted. Shooting a subject in low or poor
lighting at slow shutter speed provides a brighter
image than in the AGC mode, but the subject’s
movements are not smooth or natural. The
overall appearance may be grainy. While the
shutter speed is being automatically adjusted,
“ ” is displayed.
[OFF]: Disengages the function.
ON : Helps cut down on noise created by
wind. The “ ” indicator appears. The quality of
the sound will change. This is normal.
To enable your tv to display images in 16:9 wide
mode, set the tv screen size correctly.
[4:3TV]: For TV with an aspect ratio of 4:3.
16:9TV: For TV with an aspect ratio of 16:9.
SYSTEM
The “ SYSTEM” functions which are set when
the Power Switch is set to “REC” are also
applied when the Power Switch is set to “PLAY”.
[ ] = Factory-preset
OFF: Even though not heard while shooting,
shutter sound is recorded on the tape.
[ON]: A melody sounds when any operation is
performed. It also activates the shutter sound
effect. ( pg. 27, 38)
[RETURN]: Does not reset all settings to the
factory-preset.
EXECUTE: Resets all settings to the factory-
preset.
[LCD]: The image is displayed on the LCD
monitor when the viewfinder is pulled out while
the LCD monitor is opened.
FINDER: The image is displayed in the
viewfinder when the viewfinder is pulled out
while the LCD monitor is opened.
OFF: Disables the remote control operations.
[ON]: Enables the remote control operations.
SNAP/SLOW*
ZOOM*
GAIN UP
WIND CUT
16:9
AGC
TV
MELODY
CAM RESET
PRIORITY
REMOTE
GR-D650AG_EN.book Page 34 Friday, April 7, 2006 7:00 PM
EN 35
MENUS FOR DETAILED ADJUSTMENT
MasterPage: Start_Right
ADVANCED FEATURES
DISPLAY
●The following menu settings can be changed only
when the Power Switch is set to “REC”.
●The DISPLAY settings except “BRIGHT” and
“LANGUAGE” are effective only for shooting.
[ ] = Factory-preset
pg. 18, “Brightness Adjustment Of The
Display”
pg. 17, “Date/Time Settings”
[ENGLISH] / FRANÇAIS / DEUTSCH /
ESPAÑOL / ITALIANO / NEDERLANDS /
PORTUGUÊS / РУССКИЙ / /
B.MELAYU / BHS.INDO / ‰∑¬ / / /
The language setting can be changed.
( pg. 17)
[OFF]: The date/time does not appear.
ON: The date/time is always displayed.
●The date indication can also be turned on/off by
pressing the DISPLAY Button on the remote
control. ( pg. 24, 43)
LCD: Keeps the camcorder’s display (except the
date, time and time code) from appearing on the
connected TV screen.
[LCD/TV]: Makes the camcorder’s display
appear on screen when the camcorder is
connected to a TV.
[OFF]: Time code is not displayed.
ON: Time code is displayed on the camcorder
and on the connected TV. Frame numbers are
not displayed during recording. ( pg. 22)
OFF: Automatic demonstration will not take
place.
[ON]: Demonstrates certain functions such as
Wipe/Fader and Effects, etc., and can be used
to confirm how these functions operate.
Demonstration starts in the following cases:
●When the Menu Screen is closed after “DEMO
MODE” is turned “ON”.
●With “DEMO MODE” set to “ON”, if there is no
operation for about 3 minutes after the Power
Switch is set to “REC”.
●Performing any operation during the
demonstration stops the demonstration
temporarily. If no operation is performed for more
than 3 minutes after that, the demonstration will
resume.
NOTES:
●If a cassette is in the camcorder, the
demonstration cannot be turned on.
●“DEMO MODE” remains “ON” even if the
camcorder power is turned off.
DSC
[ ] = Factory-preset
[FINE] / STANDARD
The Picture Quality mode can be selected to
best match your needs. Two Picture Quality
modes are available: FINE ( ) and
STANDARD ( ) (in order of quality).
NOTE:
The number of storable images depends on the
selected picture quality as well as the composition
of the subjects in the images and the type of
memory card being used. ( pg. 27)
640 x 480 / 1024 x 768 / [1280 x 960]
The Image Size mode can be selected to best
match your needs. ( pg. 27)
NOTE:
The setting can be changed only when the VIDEO/
MEMORY Switch is set to “MEMORY”.
[ (TAPE)]: When Snapshot recording is
performed with the VIDEO/MEMORY Switch set
to “VIDEO”, still images are recorded only onto
the tape.
/ (TAPE/CARD): When Snapshot
recording is performed with the VIDEO/
MEMORY Switch set to “VIDEO”, still images
are recorded not only onto the tape but also in
the memory card (640 x 480 pixels).
BRIGHT
CLOCK ADJ.
LANGUAGE
DATE/TIME
ON SCREEN
TIME CODE
DEMO MODE
DEMO
QUALITY
IMAGE SIZE
REC SELECT
GR-D650AG_EN.book Page 35 Friday, April 7, 2006 7:00 PM
MENUS FOR DETAILED ADJUSTMENT
36 EN
MasterPage: Left
[ ] = Factory-preset
SOUND MODE and NARRATION
During tape playback, the camcorder detects the
sound mode in which the recording was made,
and plays the sound back. Select the type of
sound to accompany your playback picture.
According to the menu access explanation on
page 32, select “SOUND MODE” or
“NARRATION” from the Menu Screen and set it
to the desired parameter.
The setting below are effective only for video
playback except “BRIGHT”, “16:9” and “REC
MODE”.
The parameters (except “OFF” in ON SCREEN,
SOUND MODE and NARRATION settings) are
the same as in the description on page 33, 35.
Allows you to set the video recording mode (SP
or LP) depending on your preference.
*SP indicator does not appear on the screen.
[STEREO ]: Sound is output on both “L” and
“R” channels in stereo.
SOUND L : Sound from the “L” channel is
output.
SOUND R : Sound from the “R” channel is
output.
[OFF]: Original sound is output on both “L” and
“R” channels in stereo.
ON: Dubbed sound is output on both “L” and “R”
channels in stereo. ( pg. 46)
MIX: Original and dubbed sounds are combined
and output in stereo on both “L” and “R”
channels.
[OFF]: Disables audio/video signal input from
the S/AV connector. ( pg. 43)
ON: Enables audio/video signal input from the S/
AV connector. ( pg. 43)
pg. 18, “Brightness Adjustment Of The
Display”
[OFF]: The DATE/TIME does not appear.
ON: The DATE/TIME is always displayed.
When set to “OFF”, the camcorder’s display
disappears.
pg. 22, “Time Code”
To enable your tv to display images in 16:9 wide
mode, set the tv screen size correctly.
[4:3TV]: For TV with an aspect ratio of 4:3.
16:9TV: For TV with an aspect ratio of 16:9.
Playback Menus
REC MODE [SP]* / LP
SOUND MODE
NARRATION
S/AV INPUT
SP
LP
BRIGHT
DATE/TIME
ON SCREEN OFF / [LCD] / LCD/TV
TIME CODE [OFF] / ON
16:9
TV
GR-D650AG_EN.book Page 36 Friday, April 7, 2006 7:00 PM
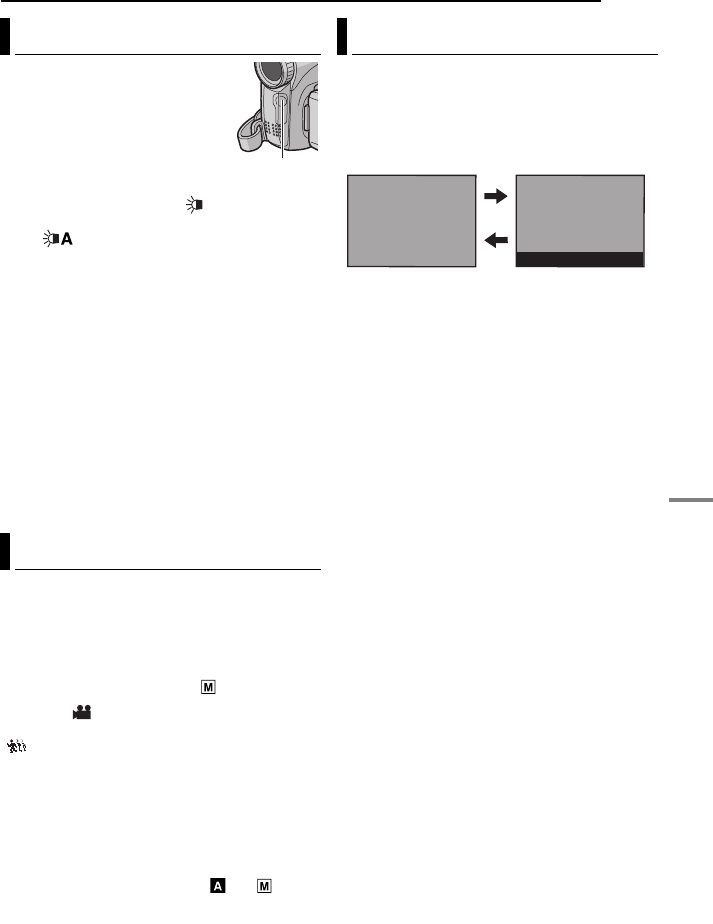
EN 37
MasterPage: Start_Right
ADVANCED FEATURES
FEATURES FOR RECORDING
LED Light can be used to
brighten the subject in the dark
place during video recording or
D.S.C. shooting.
1Press LIGHT repeatedly to
change the setting.
OFF: Turns off the light.
ON: The light is on always. ( appears.)
AUTO: The light turns on automatically when
dark. ( appears.)
2Press the Recording Start/Stop Button to
start video recording or SNAPSHOT to shoot a
still image.
NOTES:
●
Be careful not to point the LED Light directly to eyes.
●If the light does not reach the subject when the
LED Light setting is “ON”, the Night-Scope
function will be activated, and makes it possible to
shoot the subject brighter.
●There is a difference in the brightness of the
images shot between the center area which is
illuminated by the LED Light and the surrounding
areas (which will be darker).
●Since subjects are shot at a reduced shutter
speed when the LED Light setting is “ON”, they
will appear slightly blurred.
This feature is useful for recording or playing
back precious or hard-to-see moments at a slow
speed. Sound is recorded and played back in
real time.
1Set the VIDEO/MEMORY Switch to “VIDEO”.
2Set the recording mode to “ ”. ( pg. 16)
3Select “ ” and set “SNAP/SLOW” to
“SLOW”. ( pg. 32, 34) The Live Slow indicator
“ ” appears.
4Press SNAPSHOT (SLOW) during recording
or playback.
●The moving pictures are divided into four
frames. They are recorded or played back for
1.5 seconds, and then normal recording or
playback resumes.
●This feature is effective when the recording
mode selection is set to both “ ” or “ ”.
NOTE:
Available only when the VIDEO/MEMORY Switch is
set to “VIDEO”.
This camcorder allows you to choose the type of
image output format for video recording.
1Set the Power Switch to “REC”.
2Press 16:9 button repeatedly to choose your
selection.
[4:3]: Records with no change in the screen
ratio. For playback on a TV with a normal screen
ratio. When using this mode on a TV with a
normal screen ratio, refer to your TV’s instruction
manual.
16:9: For playback on TVs with an aspect ratio of
16:9. Naturally expands the image to fit the
screen without distortion. The “16:9” indicator
appears. When using this mode, refer to your
wide-screen TV’s instruction manual. During
playback/recording on 4:3 TVs/LCD monitor/
viewfinder, select “4:3TV” in “16:9” ( pg. 34,
36) to prevent vertical elongated image.
NOTES:
●Available only when the VIDEO/MEMORY Switch
is set to “VIDEO”.
●Still images are recorded at 4:3 mode. They
cannnot be recorded at 16:9 mode.
LED Light
Live Slow
LED Light
Wide Mode
16 : 9
4 : 3
GR-D650AG_EN.book Page 37 Friday, April 7, 2006 7:00 PM
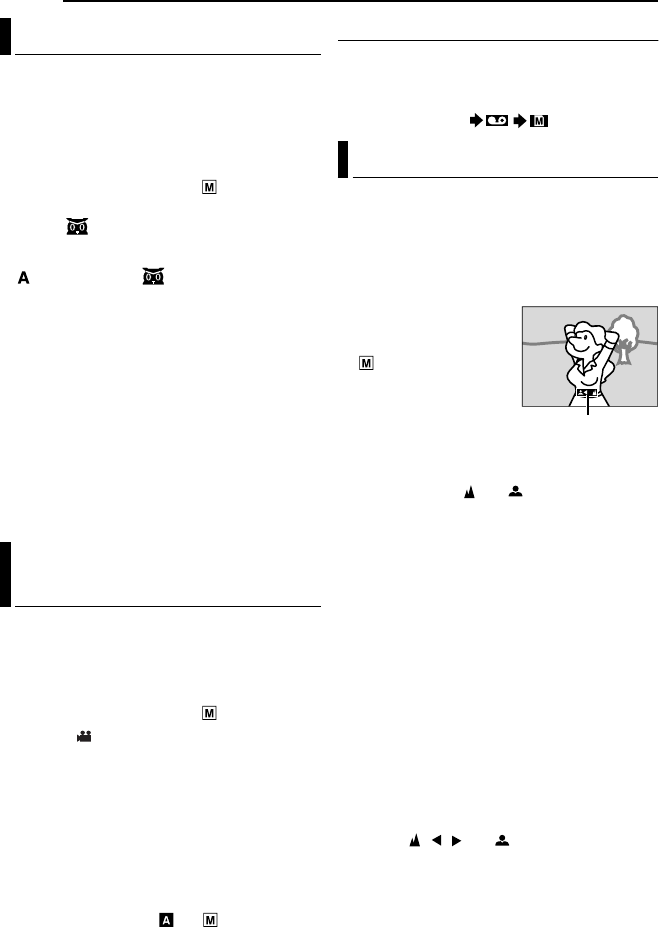
FEATURES FOR RECORDING
38 EN
MasterPage: Left
Makes dark subjects or areas even brighter than
they would be under good natural lighting.
Although the recorded image is not grainy, it may
look as if it is strobing due to the slow shutter
speed.
1Set the Power Switch to “REC”.
2Set the recording mode to “ ”. ( pg. 16)
3Press NIGHT so that the Night-Scope
indicator “ ” appears.
●The shutter speed is automatically adjusted to
provide up to 30 times sensitivity.
●“ ” appears beside “ ” while the shutter speed
is being automatically adjusted.
To deactivate Night-Scope
Press NIGHT again so that the Night-Scope
indicator disappears.
NOTES:
●During Night-Scope, “GAIN UP” or “DIS” in
SETTING Menu ( pg. 33, 34) cannot be
activated.
●Night-Scope cannot be activated simultaneously
with “SNOW” or “SPORTS” of “PROGRAM AE”, or
all modes of “SHUTTER”. ( pg. 42).
●During Night-Scope, it may be difficult to bring the
camcorder into focus. To prevent this, use of a
tripod is recommended.
This feature lets you record still images that look
like photographs onto a tape.
1Set the VIDEO/MEMORY Switch to “VIDEO”.
2Set the Power Switch to “REC”.
3Set the recording mode to “ ”. ( pg. 16)
4Select “” and set “SNAP/SLOW” to
“SNAP”. ( pg. 32, 34)
5Press SNAPSHOT.
●There is the sound effect of a shutter closing.
●The
“PHOTO
” indication appears and a still image
will be recorded for approx. 5 seconds, then the
camcorder re-enters the Record-Standby mode.
●You can perform Snapshot also during recording.
A still image will be recorded for approx.
5 seconds, then the normal recording resumes.
●Snapshot is effective when the recording mode
selection is set to both “ ” or “ ”.
●Snapshot mode cannot be used when the 16:9
Wide mode (16:9 indicator) is selected.
Motor Drive Mode
Keeping SNAPSHOT pressed in step 5 provides
an effect similar to serial photography. (Interval
between still images: approx. 1 second)
●The Motor Drive mode is disabled when “REC
SELECT” is set to “ / ”. ( pg. 35)
The camcorder’s Full Range AF system offers
continuous shooting ability from close-up (as
close as approx. 5 cm to the subject) to infinity.
However, correct focus may not be obtained
depending on the shooting condition. In this
case, use the manual focus mode.
1Set the Power Switch
to “REC”.
2Set the recording mode
to “ ”. ( pg. 16)
3Press FOCUS. The
manual focus indicator
appears.
4Press 1 or 2 to focus
on a subject.
●When the focus level cannot be adjusted any
further or closer, “ ” or “ ” will blink.
5Press SET. Focus adjustment is complete.
To reset to Auto Focus
Press FOCUS twice.
Manual focus is recommended in situations
listed below.
●When two subjects overlap in the same scene.
●When illumination is low.*
●When the subject has no contrast (difference in
brightness and darkness), such as a flat, one-
color wall, or a clear, blue sky.*
●When a dark object is barely visible in the LCD
monitor or the viewfinder.*
●When the scene contains minute patterns or
identical patterns that are regularly repeated.
●When the scene is affected by sunbeams or light
reflecting off the surface of a body of water.
●When shooting a scene with a high-contrast
background.
* The following low-contrast warnings appear
blinking: , , and .
Night-Scope
Snapshot (Record Still Image On
Tape)
Manual Focus
Manual focus
indicator
GR-D650AG_EN.book Page 38 Friday, April 7, 2006 7:00 PM
EN 39
FEATURES FOR RECORDING
MasterPage: Start_Right
ADVANCED FEATURES
Manual exposure control is recommended in the
following situations:
●When shooting using reverse lighting or when the
background is too bright.
●When shooting on a reflective natural background
such as at the beach or when skiing.
●When the background is overly dark or the subject
is bright.
1Set the Power Switch to “REC”.
2Set the recording mode to “ ”. ( pg. 16)
3Set “EXPOSURE” to “MANUAL” in
FUNCTION Menu. ( pg. 32)
●The exposure control menu appears.
4To brighten the image, press 3. To darken the
image, press 4. (maximum ±6)
●+3 exposure has the same effect as the backlight
compensation. ( pg. 40)
●–3 exposure has the same effect as when
“PROGRAM AE” is set to “SPOTLIGHT”.
( pg. 42)
5Press SET or 2. Exposure adjustment is
complete.
To return to automatic exposure control
Select “AUTO” in step 3.
NOTES:
●You cannot use the manual exposure control at
the same time when “PROGRAM AE” is set to
“SPOTLIGHT” or “SNOW” ( pg. 42), or with the
backlight compensation.
●If the adjustment does not cause any visible
change in brightness, set “GAIN UP” to “AUTO”.
( pg. 32, 34)
Like the pupil of the human eye, the iris
contracts in well-lit environments to keep too
much light from entering, and dilates in dim
environments to allow in more light.
Use this function in the following situations:
●When shooting a moving subject.
●When the distance to the subject changes (so its
size in the LCD monitor or the viewfinder
changes), such as when the subject is backing
away.
●When shooting on a reflective natural background
such as at the beach or when skiing.
●When shooting objects under a spotlight.
●When zooming.
1Set the Power Switch to “REC”.
2Set the recording mode to “ ”. ( pg. 16)
3Set “EXPOSURE” to “MANUAL” in
FUNCTION Menu. ( pg. 32)
●The exposure control menu appears.
4Adjust zoom so that the subject fills the LCD
monitor or the viewfinder, then press and hold
SET or 2 for over 2 seconds. The exposure
control indicator and the “ ” indication appears.
5Press SET or 2. The iris is locked.
6Press MENU. The Menu Screen closes. The
“ ” indication appears.
To return to automatic iris control
Select “AUTO” in step 3.
●The exposure control indicator and “ ”
disappear.
To lock the exposure control and the iris
After step 3, adjust the exposure by pressing 3
or 4. Then lock the iris in steps 4 – 6. For
automatic locking, select “AUTO” in step 3. The
exposure control and the iris become automatic.
Exposure Control
Operation Mode VIDEO MEMORY
Exposure Level ±0
±1
±2
±3
±4
±5
±6
±0EV
±0.3EV
±0.7EV
±1.0EV
±1.3EV
±1.7EV
±2.0EV
Iris Lock
GR-D650AG_EN.book Page 39 Friday, April 7, 2006 7:00 PM
FEATURES FOR RECORDING
40 EN
MasterPage: Left
Backlight compensation brightens the subject
quickly.
With simple operation, backlight compensation
feature brightens the dark subject portion by
increasing the exposure.
1Set the Power Switch to “REC”.
2Press BACKLIGHT so that the Backlight
Compensation indicator “ ” appears.
To cancel Backlight Compensation
Press BACKLIGHT twice so that the “ ”
indicator disappears.
NOTE:
Using Backlight Compensation may cause the light
around the subject to become too bright and the
subject to become white.
Selection of a spot metering area enables more
precise exposure compensation. You can select
one of the three metering areas on the LCD
monitor/viewfinder.
1Set the Power Switch to “REC”.
2Set the recording mode to “ ”. ( pg. 16)
3Press BACKLIGHT twice so that the Spot
Exposure Control indicator “ ” appears.
●A spot metering area frame appears at the
centre of the LCD monitor/viewfinder.
4Press 1 or 2 to select the desired spot
metering area frame.
5Press SET.
●Spot Exposure Control is engaged.
●Exposure is adjusted to make the brightness of
the selected area most appropriate.
To lock the iris
After step 4, press and hold SET over 2
seconds. The “ ” indication appears and the iris
is locked.
To cancel Spot Exposure Control
Press BACKLIGHT once so that the “ ”
indicator disappears.
NOTES:
●You cannot use the Spot Exposure Control at the
same time with following functions.
•“16:9” in “WIDE MODE” ( pg. 37)
•“STROBE” in EFFECT ( pg. 42)
•Digital Zoom ( pg. 21)
●Depending on the shooting location and condition,
optimum result may not be attained.
The white balance refers to the correctness of
colour reproduction under various lighting. If the
white balance is correct, all other colours will be
accurately reproduced.
The white balance is usually adjusted
automatically. However, more advanced
camcorder operators control this function
manually to achieve a more professional colour/
tint reproduction.
To change the setting
Set “W. BALANCE” to the desired mode.
( pg. 32)
●The selected mode indicator except “AUTO”
appears.
[AUTO]: White balance is adjusted
automatically.
MWB: Adjust the white balance manually
when shooting under various types of lighting.
( “Manual White Balance Adjustment”, pg. 41)
FINE: Outdoors on a sunny day.
CLOUD: Outdoors on a cloudy day.
[ ] = Factory-preset
To return to automatic white balance
Set “W. BALANCE” to “AUTO”. ( pg. 32)
Backlight Compensation
Spot Exposure Control
White Balance Adjustment
GR-D650AG_EN.book Page 40 Friday, April 7, 2006 7:00 PM

EN 41
FEATURES FOR RECORDING
MasterPage: Start_Right
ADVANCED FEATURES
Adjust the white balance
manually when shooting
under various types of
lighting.
1Set the Power Switch
to “REC”.
2Set the recording mode to “ ”. ( pg. 16)
3Hold a sheet of plain white paper in front of
the subject. Adjust zoom or position yourself so
that the white paper fills the screen.
4 Select FUNCTION Menu. ( pg. 33)
5Select “MWB” in “ W. BALANCE” menu
( pg. 33), then press and hold SET or 2 until
begins blinking.
●When the setting is completed, stops blinking.
6Press SET or 2 to engage the setting.
7Press MENU. The Menu Screen closes and
the Manual White Balance indicator is
displayed.
NOTES:
●In step 3, it may be difficult to focus on the white
paper. In such a case, adjust focus manually.
( pg. 38)
●A subject can be shot under various types of
lighting conditions indoors (natural, fluorescent,
candlelight, etc.). Because the colour temperature
is different depending on the light source, the
subject tint will differ depending on the white
balance settings. Use this function for a more
natural result.
●Once you adjust white balance manually, the
setting is retained even if the power is turned off or
the battery removed.
These effects let you make pro-style scene
transitions. Use them to spice up the transition
from one scene to the next.
Wipe or Fader works when video recording is
started or stopped.
1Set the VIDEO/MEMORY Switch to “VIDEO”.
2Set the Power Switch to “REC”.
3Set the recording mode to “ ”. ( pg. 16)
4Set “WIPE/FADER” in FUNCTION Menu.
( pg. 33)
●The WIPE/FADER menu disappears and the
effect is reserved.
●The selected effect indicator appears.
5Press the Recording Start/Stop Button to
activate the Fade-in/out or Wipe-in/out.
To deactivate the selected effect
Select “OFF” in step 4. The effect indicator
disappears.
NOTE:
You can extend the length of a Wipe or Fader by
pressing and holding the Recording Start/Stop
Button.
WIPE/FADER
OFF: Disables the function. (Factory-preset)
WHITE : Fade in or out with a white screen.
BLACK : Fade in or out with a black screen.
SLIDE : Wipe in from right to left, or wipe out
from left to right.
SCROLL : The scene wipes in from the
bottom to the top of a black screen, or wipes out
from top to bottom, leaving a black screen.
Manual White Balance Adjustment
White paper
Wipe Or Fader Effects
GR-D650AG_EN.book Page 41 Friday, April 7, 2006 7:00 PM
FEATURES FOR RECORDING
42 EN
MasterPage: Left
1Set the Power Switch to “REC”.
2Set the recording mode to “ ”. ( pg. 16)
3Set “EFFECT”, “PROGRAM AE” or
“SHUTTER” in FUNCTION Menu. ( pg. 33)
●The EFFECT, PROGRAM AE or SHUTTER menu
disappears and the selected effect is activated.
●The selected effect indicator appears.
To deactivate the selected effect
Select “OFF” in step 3. The effect indicator
disappears.
NOTES:
●Program AE, Effects and Shutter Effects cannot
be changed during recording.
●Some modes of Program AE and Shutter Effects
cannot be used during Night-Scope.
●When a subject is too bright or reflective, a
vertical streak may appear (smear
phenomenon). Smear phenomenon tends to
occur when “SPORTS” or any mode of
“SHUTTER 1/500 – 1/4000” is selected.
EFFECT
OFF: Disables the function. (Factory-preset)
SEPIA : Recorded scenes have a brownish
tint like old photos.
MONOTONE : Like classic black and white
films, your footage is shot in B/W.
CLASSIC* : Gives recorded scenes a strobe
effect.
STROBE* : Your recording looks like a series
of consecutive snapshots.
* Not available for still image recording.
PROGRAM AE
OFF: Disables the function. (Factory-preset)
SPORTS
(Variable Shutter Speed: 1/250 – 1/4000):
This setting allows fast-moving images to be
captured one frame at a time, for vivid, stable
slow-motion playback. The faster the shutter
speed, the darker the picture becomes. Use the
shutter function under good lighting conditions.
SNOW : Compensates for subjects that may
otherwise appear too dark when shooting in
extremely bright surroundings such as in the
snow.
SPOTLIGHT : Compensates for subjects that
may otherwise appear too bright when shooting
under extremely strong direct lighting such as
spotlights.
TWILIGHT : Makes evening scenes look
more natural. White Balance ( pg. 40) is
automatically set to “ ”, but can be changed to
your desired setting. When Twilight is chosen,
the camcorder automatically adjusts the focus
from approx. 10 m (32 ft) to infinity. From less
than 10 m, adjust the focus manually.
SHUTTER
OFF: Disables the function. (Factory-preset)
SHUTTER 1/50: The shutter speed is fixed
at 1/50th of a second. Black bands that usually
appear when shooting a TV screen become
narrower.
SHUTTER 1/120: The shutter speed is
fixed at 1/120th of a second. The flickering that
occurs when shooting under a fluorescent light
or mercury-vapour lamp is reduced.
SHUTTER 1/500/SHUTTER 1/4000: These
settings allow fast-moving images to be
captured one frame at a time, for vivid, stable
slow-motion playback by fixing shutter speed
variables. Use these settings when an automatic
adjustment does not work well, using SPORTS
mode. The faster the shutter speed, the darker
the picture becomes. Use the shutter function
under good lighting conditions.
Program AE, Effects And Shutter
Effects
GR-D650AG_EN.book Page 42 Friday, April 7, 2006 7:00 PM
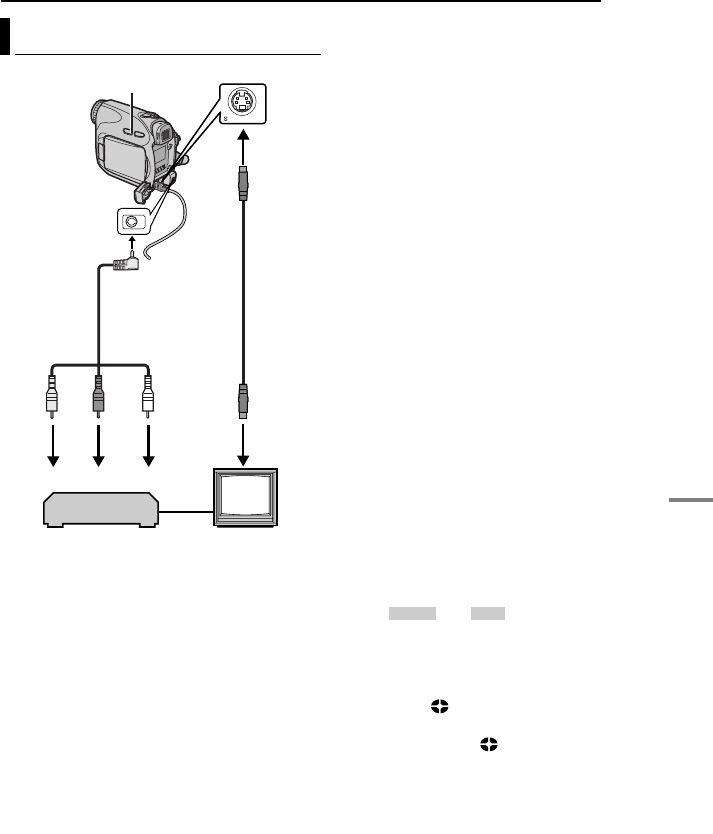
EN 43
MasterPage: Start_Right
ADVANCED FEATURES
EDITING
1Yellow to VIDEO IN or OUT
2Red to AUDIO R IN* or OUT
3White to AUDIO L IN* or OUT
4To S-VIDEO IN or OUT (Connect when your
TV/VCR/VDR has S-VIDEO IN/OUT and AV
input connectors. In this case, it is not
necessary to connect the yellow video cable.)
* Not required for watching still images only.
NOTE:
The S-Video cable is optional. Be sure to use the
YTU94146A S-Video cable. Consult the JVC
Service Centre described on the sheet included in
the package for details on its availability. Make sure
to connect the end with a core filter to the camera.
The core filter reduces interference.
To use this camcorder as a player
1Following the illustrations, connect the
camcorder and the VCR’s input connectors.
2Start playback on the camcorder. ( pg. 23)
3At the point you want to start dubbing, start
recording on the VCR. (Refer to the VCR’s
instruction manual.)
4To stop dubbing, stop recording on the VCR,
then stop playback on the camcorder.
NOTES:
●It is recommended to use the AC Adapter as
the power supply instead of the battery pack.
( pg. 15)
●To choose whether or not the following displays
appear on the connected TV
•Date/time
Set “DATE/TIME” to “ON” or “OFF”.
( pg. 32, 36) Or, press DISPLAY on the
remote control to turn on/off the date indication.
•Time code
Set “TIME CODE” to “OFF” or “ON”.
( pg. 32, 36)
•Indications other than date/time and time code
Set “ON SCREEN” to “OFF”, “LCD” or “LCD/
TV”. ( pg. 32, 36)
To use this camcorder as a recorder
1Following the illustrations, connect the
camcorder and the VCR’s output connectors.
2Set “REC MODE” to “SP” or “LP”. ( pg. 33)
3Set the camcorder’s Power Switch to “PLAY”
4Set “S/AV INPUT” to “ON”. ( pg. 36)
5Press the Recording Start/Stop Button to
engage the Record-Pause mode.
●The “ ” or “ ” iindication appears on
the screen.
6Start playback on the player.
7At the point you want to start dubbing, press
the Recording Start/Stop Button to start
dubbing. The indication rotates.
8Press the Recording Start/Stop Button again
to stop dubbing. The indication stops
rotating.
9Press 7 to return to the normal playback
mode.
NOTES:
●After dubbing, set “S/AV INPUT” back to “OFF”.
●Analogue signals can be converted to digital
signals with this procedure.
•It is also possible to dub from another
camcorder.
Dubbing To Or From A VCR
24
13
Audio/Video
cable
(provided)
To AV
connector
To S connector
S Cable
(optional)
TV
VCR
A/V
IN S
IN
GR-D650AG_EN.book Page 43 Friday, April 7, 2006 7:00 PM
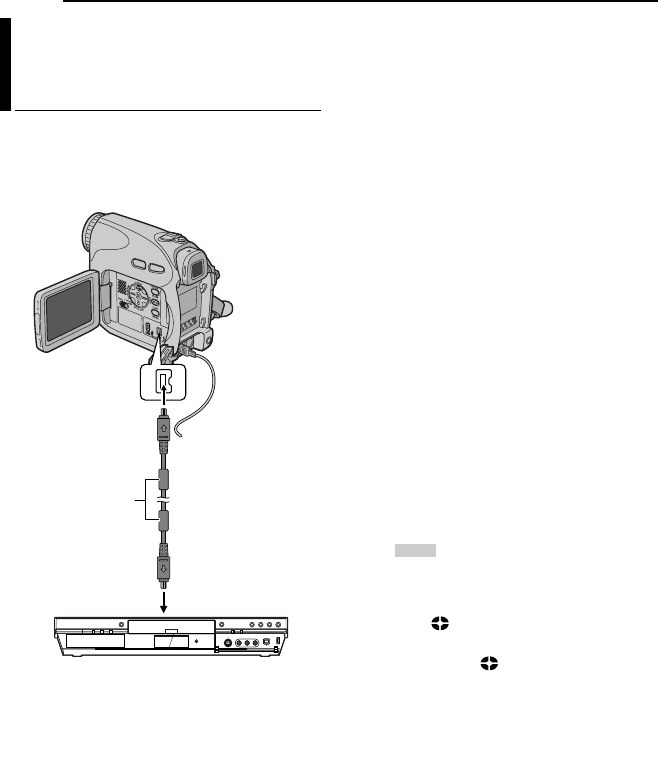
EDITING
44 EN
MasterPage: Left
It is also possible to copy recorded scenes from
the camcorder onto another video unit equipped
with a DV connector. Since a digital signal is
sent, there is little, if any, image or sound
deterioration.
To use this camcorder as a player
1Make sure all units are turned off.
2Connect this camcorder to a video unit
equipped with a DV input connector using a DV
cable as shown in the illustration.
3Start playback on the camcorder. ( pg. 23)
4At the point you want to start dubbing, start
recording on the video unit. (Refer to the video
unit’s instruction manual.)
5To stop dubbing, stop recording on the video
unit, then stop playback on this camcorder.
NOTES:
●It is recommended to use the AC Adapter as
the power supply instead of the battery pack.
( pg. 15)
●If a blank portion or disturbed image is played
back on the player during dubbing, the dubbing
may stop so that an unusual image is not dubbed.
●Even though the DV cable is connected correctly,
sometimes the image may not appear in step 4. If
this occurs, turn off the power and make
connections again.
●If “Playback Zoom” ( pg. 26) or “Playback
Special Effects” ( pg. 26) is attempted or
SNAPSHOT is pressed during playback, only the
original playback image recorded on the tape is
output from the DV IN/OUT connector.
●When using a DV cable, be sure to use the
optional JVC VC-VDV204U DV cable.
To use this camcorder as a recorder
1Make sure all units are turned off.
2Connect this camcorder to a video unit
equipped with a DV output connector using a DV
cable as shown in the illustration.
3Set the camcorder’s Power Switch to “PLAY”.
4Set “REC MODE” to “SP” or “LP”. ( pg. 36)
5Start playback on the player.
6Press the Recording Start/Stop Button to
engage the Record-Pause mode.
•The “ ” indication appears on the
screen.
7At the point you want to start dubbing, press
the Recording Start/Stop Button to start
dubbing. The indication rotates.
8Press the Recording Start/Stop Button again
to stop dubbing. The indication stops
rotating.
9Press 7 to return to the normal playback
mode.
NOTES:
●Digital Dubbing is performed in the sound mode
recorded on the original tape, regardless of the
current “SOUND MODE” setting. ( pg. 33)
●If no image is displayed on LCD monitor, set “S/
AV INPUT” to “OFF”.
Dubbing To Or From A Video Unit
Equipped With A DV Connector
(Digital Dubbing)
Core filter
To DV IN/OUT
DV cable (optional)
To DV IN/OUT
Video unit equipped with DV connector
DV IN
GR-D650AG_EN.book Page 44 Friday, April 7, 2006 7:00 PM
EN 45
EDITING
MasterPage: Start_Right
ADVANCED FEATURES
[A] Using USB cable
It is possible to transfer still images stored on a
memory card to a PC.
[B] Using DV cable
It is also possible to transfer still/moving images
to a PC with a DV connector by using the
provided software, software equipped with the
PC or commercially available software.
If you are using a Windows® XP, you can use
Windows® Messenger to conduct video
conferences over the Internet, using a
camcorder. For details, refer to the help for the
Windows® Messenger.
NOTES:
●Refer to “SOFTWARE INSTALLATION AND USB
CONNECTION GUIDE” for the bundled software
and drivers.
●It is recommended to use the AC Adapter as
the power supply instead of the battery pack.
( pg. 15)
●Never connect the USB cable and the DV
cable simultaneously to the camcorder.
Connect only the cable you wish to use to the
camcorder.
●When using a DV cable, be sure to use the
optional JVC VC-VDV206U or VC-VDV204U DV
cable depending on the type of DV connector
(4 or 6 pins) on the PC.
●If the PC connected to the camcorder via the USB
cable is not powered, the camcorder does not
enter the USB mode.
●The date/time information cannot be captured into
the PC.
●Refer to the instruction manuals of the PC and
Software.
●The still images can also be transferred to a PC
with a DV connector-equipped capture board.
●The system may not work properly depending on
the PC or capture board you are using.
Connection To A Personal Computer
When connecting the camcorder to a PC
using a DV cable, make sure to follow the
procedure below. Connecting the cable
incorrectly may cause malfunctions to the
camcorder and/or the PC.
●Connect the DV cable first to the PC, and then
to the camcorder.
●Connect the DV cable (plugs) correctly
according to the shape of the DV connector.
[A] Using USB cable
To USB
PC PC with DV connector
USB cable
(provided)
[B] Using DV cable
To USB
connector
To DV
connector
Core filter
Core filter
DV cable
(optional)
OR
Core filter
To DV IN/
OUT
“USB” and/or “ ” appears on the LCD
monitor while the PC is accessing data in the
camcorder or the camcorder is transferring a
file to the PC.
NEVER disconnect the USB cable while
“ ” is displayed on the LCD
monitor since this can result in product
damage.
GR-D650AG_EN.book Page 45 Friday, April 7, 2006 7:00 PM
EDITING
46 EN
MasterPage: Left
The audio track can be customised only when
recorded in the 12-BIT and SP modes.
( pg. 33)
●Use the provided remote control.
1Play back the tape to locate the point where
editing will start, then press PAUSE (8).
2While holding A. DUB ( ) on the remote
control, press PAUSE (8). The “8” indicator
appears.
3Press PLAY (3), then begin “narrating”.
Speak into the microphone.
●To pause dubbing, press PAUSE (8).
4To end Audio Dubbing, press PAUSE (8),
then STOP (7).
To hear the dubbed sound during playback
Set “NARRATION” to “ON” or “MIX”.
( pg. 32, 36)
NOTES:
●Sound is not heard from the speaker during Audio
Dubbing.
●When editing onto a tape that was recorded at
12-BIT, the old and new soundtracks are recorded
separately.
●If you dub onto a blank space on the tape, the
sound may be disrupted. Make sure you only edit
recorded areas.
●If feedback or howling occurs during TV playback,
move the camcorder’s microphone away from the
TV, or turn down the TV’s volume.
●If you change from 12-BIT to 16-BIT in mid-
recording and then use the tape for Audio
Dubbing, it is not effective from the point where
16-BIT recording began.
●During Audio Dubbing, when the tape moves to
scenes recorded in the LP mode, scenes
recorded in 16-BIT audio or a blank portion, Audio
Dubbing stops.
You can record a new scene into a previously
recorded tape, replacing a section of the original
recording with minimal picture distortion at the in
and out points. The original audio remains
unchanged.
●Use the provided remote control.
NOTES:
●Before performing the following steps, make sure
that “TIME CODE” in both Recording and
Playback Menus is set to “ON”. ( pg. 32, 35, 36)
●Insert Editing is not possible on a tape recorded in
the LP mode or on a blank portion of a tape.
1Play back the tape, locate the Edit-Out point
and press PAUSE (8). Confirm the time code at
this point. ( pg. 22)
2Press REW (1) until the Edit-In point is
located, then press PAUSE (8).
3Press and hold INSERT ( ) on the remote
control, then press PAUSE (8). The “8”
indicator and the Time Code (min.:sec.) appear
and the camcorder enters Insert-Pause mode.
4Press START/STOP to begin editing.
●Confirm the insert at the time code you checked in
step 1.
●To pause editing, press START/STOP. Press it
again to resume editing.
5To end Insert Editing, press START/STOP,
then STOP (7) on the remote control.
NOTES:
●Program AE, Effects and Shutter Effects
( pg. 42) can be used to spice up the scenes
being edited during Insert Editing.
●During Insert Editing, the date and time
information changes.
●If you perform Insert Editing onto a blank space
on the tape, the audio and video may be
disrupted. Make sure you only edit recorded
areas.
●During Insert Editing, when the tape moves to
scenes recorded in the LP mode or a blank
portion, Insert Editing stops. ( pg. 50)
Audio Dubbing
PAUSE
PLAY
A.DUB
STOP
REW
INSERT
START/
STOP
Speaker
Stereo Microphone
Insert Editing
GR-D650AG_EN.book Page 46 Friday, April 7, 2006 7:00 PM

EN 47
MasterPage: Start_Right
REFERENCES
TROUBLESHOOTING
If, after following the steps in the chart below, the
problem still exists, please consult your nearest
JVC dealer.
Power
●The power is not connected properly.
➜Connect the AC Adapter securely. ( pg. 15)
●The battery pack is not attached firmly.
➜Detach the battery pack once again and re-attach
it firmly. ( pg. 15)
●The battery is dead.
➜Replace the dead battery with a fully charged
one. ( pg. 15)
Video and D.S.C. Recording
●The tape’s erase protection tab is set to “SAVE”.
➜Set the tape’s erase protection tab to “REC”.
( pg. 19)
●“TAPE END” appears.
➜Replace with new cassette. ( pg. 19)
●The cassette holder cover is open.
➜Close the cassette holder cover.
●This is not a malfunction.
●This is not a malfunction.
●“DATE/TIME” is set to “OFF”.
➜Set “DATE/TIME” to “ON”. ( pg. 35, 36)
●Effects and “DIS” functions that cannot be used
together are selected at the same time.
➜Re-read the sections covering Effects and “DIS”.
( pg. 32, 33, 42)
●15X optical zoom is selected.
➜Set “ZOOM” to “60X” or “700X”. ( pg. 34)
●The VIDEO/MEMORY Switch is set to
“MEMORY”.
➜Set the VIDEO/MEMORY Switch to “VIDEO”.
Video and D.S.C. Playback
●Your TV has AV input terminals, but is not set to
its VIDEO mode.
➜Set the TV to the mode or channel appropriate for
video playback. ( pg. 24)
●The cassette holder cover is open.
➜Close the cassette holder cover. ( pg. 19)
➜Clean the video heads with an optional cleaning
cassette. ( pg. 53)
Advanced features
●Focus is set to the Manual mode.
➜Set Focus to the Auto mode. ( pg. 38)
●The lens is dirty or covered with condensation.
➜Clean the lens and check the focus again.
( pg. 51)
●The Wide (16:9) mode (16:9 indicator) is
selected.
➜Disengage the 16:9 (16:9 indicator) Wide mode.
( pg. 37)
●The light source or the subject does not include
white. Or there are various different light sources
behind the subject.
➜Find a white subject and compose your shot so
that it also appears in the frame. ( pg. 38, 41)
The camcorder is a microcomputer-controlled
device. External noise and interference (from a
TV, a radio, etc.) might prevent it from
functioning properly. In such cases, first
disconnect its power supply unit (battery pack,
AC Adapter, etc.) and wait a few minutes; and
then re-connect it and proceed as usual from
the beginning.
No power is supplied.
Recording cannot be performed.
When shooting a subject illuminated by
bright light, vertical lines appear.
When the screen is under direct sunlight
during shooting, the screen becomes red or
black for an instant.
During recording, the date/ time does not
appear.
The LCD monitor or viewfinder indications
blink.
Digital Zoom does not work.
The tape is moving, but there is no picture.
Blocks of noise appear during playback, or
there is no playback picture and the screen
becomes blue.
The focus does not adjust automatically.
Snapshot mode cannot be used.
The colour of Snapshot looks strange.
REFERENCES
GR-D650AG_EN.book Page 47 Friday, April 7, 2006 7:00 PM

TROUBLESHOOTING
48 EN
MasterPage: Left
●Shooting was performed under backlit conditions.
➜Press BACKLIGHT. ( pg. 40)
●The subject is too bright.
➜Set “ ” to “SPOTLIGHT”. ( pg. 42)
●The Sepia (SEPIA) or Monotone (MONOTONE)
mode is activated.
➜Disengage the Sepia (SEPIA) or Monotone
(MONOTONE) mode before setting White
Balance. ( pg. 42)
●When shooting in the dark, the unit becomes
highly sensitive to light when “GAIN UP” is set to
“AUTO”.
➜If you want the lighting to look more natural, set
“GAIN UP” to “AGC” or “OFF”. ( pg. 32, 34)
Other problems
●Charging is difficult in places subject to extremely
high/low temperatures.
➜To protect the battery, it is recommended to
charge it in places with a temperature of 10°C to
35°C. ( pg. 52)
●The battery pack is not attached firmly.
➜Detach the battery pack once again and re-attach
it firmly. ( pg. 14, 15)
●The date/time is not set.
➜Set the date/time. ( pg. 17)
●The built-in clock battery has run out and the
previously set date/time has been erased.
➜Consult your nearest JVC dealer for replacement.
●Files stored in the memory card are protected.
➜Remove protection from the files stored in the
memory card and delete them. ( pg. 29)
●This is not a malfunction.
➜
By recording with “DIS” de-activated (
pg. 32, 33)
this can be avoided.
●The DV cable was plugged/unplugged with power
turned on.
➜Turn the camcorder’s power off and on again,
then operate it.
●In places subject to low temperature, images
become dark due to the characteristics of the
LCD monitor. This is not a malfunction.
➜Adjust the brightness and angle of the LCD
monitor. ( pg. 18, 20)
●When the LCD monitor’s fluorescent light reaches
the end of its service life, images on the LCD
monitor become dark.
➜Consult your nearest JVC dealer.
●The LCD monitor and the viewfinder are made
with high-precision technology. However, black
spots or bright spots of light (red, green or blue)
may appear constantly on the LCD monitor or the
viewfinder. These spots are not recorded on the
tape. This is not due to any defect of the unit.
(Effective dots: more than 99.99%)
●The battery’s charge is low.
➜Install a fully charged battery. ( pg. 14)
➜Push in the memory card a few more times.
( pg. 19)
The image taken using Snapshot is too
dark.
The image taken using Snapshot is too
bright.
White Balance cannot be activated.
The image looks like the shutter speed is
too slow.
The POWER/CHARGE lamp on the
camcorder does not light during charging.
“SET DATE/TIME!” appears.
Files stored in the memory card cannot be
deleted.
When the image is printed from the printer,
a black bar appears at the bottom of the
screen.
When the camcorder is connected via the
DV connector, the camcorder does not
operate.
Images on the LCD monitor appear dark or
whitish.
Coloured bright spots appear all over the
LCD monitor or the viewfinder.
The cassette will not load properly.
The memory card cannot be removed from
the camcorder.
GR-D650AG_EN.book Page 48 Friday, April 7, 2006 7:00 PM
EN 49
TROUBLESHOOTING
MasterPage: Start_Right
REFERENCES
●The viewfinder is pulled out and “PRIORITY” is
set to “FINDER”.
➜Push the viewfinder back in or set “PRIORITY” to
“LCD”. ( pg. 20, 32, 34)
●The LCD monitor’s brightness setting is too dark.
➜Adjust the brightness of the LCD monitor.
( pg. 18)
➜If the monitor is tilted upward 180 degrees, open
the monitor fully. ( pg. 20)
●A malfunction of some kind has occured. In this
case the camcorder’s functions become
unusable.
➜ pg. 50.
●“REMOTE” is set to “OFF”.
➜Set “REMOTE” to “ON”. ( pg. 32, 34)
●The remote control does not point at the remote
sensor.
➜Point at the remote sensor. ( pg. 25)
●The remote control batteries are exhausted.
➜Replace the batteries with fresh ones. ( pg. 25)
Warning Indications
Displays the battery remaining power.
Remaining power level
As the battery power comes close to nil, the
battery remaining power indicator blinks.
When the battery power is exhausted, power
turns off automatically.
●Appears if a tape is loaded.
●Blinks when no tape is loaded.
Appears when the erase protection tab is set to
“SAVE” while the Power Switch is set to “REC”
and the VIDEO/MEMORY Switch is set to
“VIDEO”. ( pg. 16)
Appears if dirt is detected on the heads during
recording. Use an optional cleaning cassette.
( pg. 52)
Appears if condensation occurs. When this
indication is displayed, wait more than 1 hour
until condensation disappears.
Appears if a tape is not loaded when the
Recording Start/Stop Button or SNAPSHOT
Button is pressed while the Power Switch is set
to “REC” and the VIDEO/MEMORY Switch is set
to “VIDEO”.
Appears when the tape ends during recording or
playback.
●Appears when the date/time is not set.
( pg. 17)
●The built-in clock battery has run out and the
previously set date/time has been erased.
Consult your nearest JVC dealer for
replacement.
Appears for 5 seconds after power is turned on if
the lens cap is attached or when it is dark.
Appears if Audio Dubbing is attempted on a
blank portion of a tape. ( pg. 46)
●Appears if Audio Dubbing is attempted on a
tape recorded in the LP mode. ( pg. 46)
●Appears if Audio Dubbing is attempted on a
tape recorded in 16-BIT audio. ( pg. 46)
●Appears if A. DUB ( ) on the remote control
is pressed when the erase protection tab is set
to “SAVE”. ( pg. 46)
Picture does not appear on the LCD monitor.
An error indication (01 – 04 or 06) appears.
The remote control does not work.
CHECK TAPE’S ERASE PROTECTION TAB
USE CLEANING CASSETTE
ExhaustedHigh
CONDENSATION, OPERATION
PAUSED PLEASE WAIT
TAPE!
TAPE END
SET DATE/TIME!
LENS CAP
A. DUB ERROR!
A. DUB ERROR!
<CANNOT DUB ON A LP RECORDED TAPE>
<CANNOT DUB ON A 16BIT RECORDING>
<CHECK TAPE’S ERASE PROTECTION
TAB>
GR-D650AG_EN.book Page 49 Friday, April 7, 2006 7:00 PM

TROUBLESHOOTING
50 EN
MasterPage: Left
●Appears if Insert Editing is attempted on a
tape recorded in the LP mode. ( pg. 46)
●Appears if INSERT ( ) on the remote control
is pressed when the erase protection tab is set
to “SAVE”. ( pg. 46)
●Appears if Insert Editing is attempted on a
blank portion of a tape. ( pg. 46)
Appears when the memory card’s memory is full
and shooting is not possible.
Appears when pictures recorded in the HDV
format are detected. The pictures in the HDV
format cannot be played back with this
camcorder.
Appears when playing back a file that is not
compatible with DCF or a file with a size that is
not compatible with this camcorder.
Appears if dubbing of copyguarded signals is
attempted while this camcorder is being used as
a recorder.
Appears if there is no memory card loaded when
the SNAPSHOT Button is pressed while the
Power Switch is set to “REC” and the VIDEO/
MEMORY Switch is set to “MEMORY”.
Appears when there is a problem with a memory
card and its memory is corrupt, or it has not
been initialised. Initialise the memory card.
( pg. 31)
Appears if there are no image files stored in the
memory card when you attempt memory card
playback.
Appears when the camcorder does not
recognise the loaded memory card. Remove the
memory card once and insert it again. Repeat
these procedures until no indication appears. If
the indication still appears, the memory card is
corrupted.
Appears when you attempt to shoot digital still
images when the write protection tab on the SD
Memory Card is set to the “LOCK” position.
The error indications (01, 02 or 06) show what
type of malfunction has occured. When an error
indication appears, the camcorder turns off
automatically. Remove the power supply
(battery, etc.) and wait a few minutes for the
indication to clear. When it does, you can
resume using the camcorder. If the indication
remains, consult your nearest JVC dealer.
The error indications (03 or 04) show what type
of malfunction has occured. When an error
indication appears, the camcorder turns off
automatically. Eject the cassette once and re-
insert it, then check if the indication clears.
When it does, you can resume using the
camcorder. If the indication remains, consult
your nearest JVC dealer.
INSERT ERROR!
<CANNOT EDIT ON A LP RECORDED
TAPE>
<CHECK TAPE’S ERASE PROTECTION
TAB>
<CANNOT EDIT ON A BLANK PORTION>
MEMORY IS FULL
HDV
?
COPY PROTECTED
MEMORY CARD!
PLEASE FORMAT
NO IMAGES STORED
CARD ERROR!
CHECK CARD’S WRITE PROTECTION
SWITCH
UNIT IN SAFEGUARD MODE
REMOVE AND REATTACH BATTERY OR DC
PLUG
UNIT IN SAFEGUARD MODE
EJECT AND REINSERT TAPE
GR-D650AG_EN.book Page 50 Friday, April 7, 2006 7:00 PM

EN 51
MasterPage: Start_Right
REFERENCES
USER MAINTENANCE
Before cleaning, turn off the camcorder and
remove the battery pack and AC Adapter.
To clean the exterior
Wipe gently with a soft cloth. Put the cloth in
diluted mild soap and wring it well to wipe off
heavy dirt. Then wipe again with a dry cloth.
To clean the LCD monitor
Wipe gently with a soft cloth. Be careful not to
damage the monitor. Close the LCD monitor.
To clean the lens
Blow it with a blower brush, then wipe gently
with lens cleaning paper.
To clean the viewfinder lens
Remove dust from the viewfinder using a blower
brush.
NOTES:
●Avoid using strong cleaning agents such as
benzine or alcohol.
●Cleaning should be done only after the battery
pack has been removed or other power units have
been disconnected.
●Mold may form if the lens is left dirty.
●When using a cleaner or chemically treated cloth
refer to the cautions of each product.
●To clean the viewfinder, please consult your
nearest JVC dealer.
Cleaning The Camcorder
GR-D650AG_EN.book Page 51 Friday, April 7, 2006 7:00 PM
MasterPage: Heading0_Left
52 EN CAUTIONS
Battery Packs
The supplied battery
pack is a lithium-ion
battery. Before using the
supplied battery pack or
an optional battery pack,
be sure to read the
following cautions:
●To avoid hazards
...do not burn.
...do not short-circuit the terminals. When
transporting, make sure the provided battery cap
is attached to the battery. If the battery cap is
misplaced, carry the battery in a plastic bag.
...do not modify or disassemble.
...do not expose the battery to temperatures
exceeding 60°C, as this may cause the battery to
overheat, explode or catch fire.
...use only specified chargers.
●To prevent damage and prolong service
life
...do not subject to unnecessary shock.
...charge in an environment where temperatures
are within the tolerances shown in the chart
below. This is a chemical reaction type battery —
cooler temperatures impede chemical reaction,
while warmer temperatures can prevent
complete charging.
...store in a cool, dry place. Extended exposure to
high temperatures will increase natural discharge
and shorten service life.
...fully charge and then fully discharge the battery
every 6 months when storing the battery pack
over a long period time.
...remove from charger or powered unit when not in
use, as some machines use current even when
switched off.
NOTES:
●It is normal for the battery pack to be warm after
charging, or after use.
Temperature Range Specifications
Charging: 10°C to 35°C
Operation: 0°C to 40°C
Storage: –20°C to 50°C
●The lower the temperature, the longer recharging
takes.
●Charging times are for a fully discharged battery
pack.
Cassettes
To properly use and store your cassettes, be
sure to read the following cautions:
●During use
...make sure the cassette bears the Mini DV mark.
...be aware that recording onto prerecorded tapes
automatically erases the previously recorded
video and audio signals.
...make sure the cassette is positioned properly
when inserting.
...do not load and unload the cassette repeatedly
without allowing the tape to run at all. This
slackens the tape and can result in damage.
...do not open the front tape cover. This exposes
the tape to fingerprints and dust.
●Store cassettes
...away from heaters or other heat sources.
...out of direct sunlight.
...where they won’t be subject to unnecessary
shock or vibration.
...where they won’t be exposed to strong magnetic
fields (such as those generated by motors,
transformers or magnets).
...vertically, in their original cases.
Memory Cards
To properly use and store your memory cards,
be sure to read the following cautions:
●During use
...make sure the memory card bears the SD or
MultiMediaCard mark.
...make sure the memory card is positioned
properly when inserting.
●While the memory card is being accessed
(during recording, playback, deletion,
initialization, etc.)
...never unload the memory card and never turn off
the camcorder.
●Store memory cards
...away from heaters or other heat sources.
...out of direct sunlight.
...where they won’t be subject to unnecessary
shock or vibration.
...where they won’t be exposed to strong magnetic
fields (such as those generated by motors,
transformers or magnets).
The Benefits Of Lithium-Ion Batteries
Lithium-ion battery packs are small but have a
large power capacity. However, when one is
exposed to cold temperatures (below 10°C),
its usage time becomes shorter and it may
cease to function. If this happens, place the
battery pack in your pocket or other warm,
protected place for a short time, then re-attach
it to the camcorder.
Terminals
GR-D650AG_EN.book Page 52 Friday, April 7, 2006 7:00 PM
EN 53
CAUTIONS
MasterPage: Start_Right
REFERENCES
LCD Monitor
●To prevent damage to the LCD monitor, DO
NOT
...push it strongly or apply any shocks.
...place the camcorder with the LCD monitor on the
bottom.
●To prolong service life
...avoid rubbing it with coarse cloth.
●Be aware of the following phenomena for
LCD monitor use. These are not
malfunctions
...While using the camcorder, the surface around
the LCD monitor and/or the back of the LCD
monitor may heat up.
...If you leave power on for a long time, the surface
around the LCD monitor becomes hot.
Main Unit
●For safety, DO NOT
...open the camcorder’s chassis.
...disassemble or modify the unit.
...short-circuit the terminals of the battery pack.
Keep it away from metallic objects when not in
use.
...allow inflammables, water or metallic objects to
enter the unit.
...remove the battery pack or disconnect the power
supply while the power is on.
...leave the battery pack attached when the
camcorder is not in use.
●Avoid using the unit
...in places subject to excessive humidity or dust.
...in places subject to soot or steam such as near a
cooking stove.
...in places subject to excessive shock or vibration.
...near a television set.
...near appliances generating strong magnetic or
electric fields (speakers, broadcasting antennas,
etc.).
...in places subject to extremely high (over 40°C) or
extremely low (under 0°C) temperatures.
●DO NOT leave the unit
...in places of over 50°C.
...in places where humidity is extremely low (below
35%) or extremely high (above 80%).
...in direct sunlight.
...in a closed car in summer.
...near a heater.
●To protect the unit, DO NOT
...allow it to become wet.
...drop the unit or strike it against hard objects.
...subject it to shock or excessive vibration during
transportation.
...keep the lens directed at extremely bright objects
for long periods.
...expose the lens and viewfinder’s lens to direct
sunlight.
...carry it by holding the LCD monitor or the
viewfinder.
...swing it excessively when using the hand strap or
the grip.
...swing the soft camera case excessively when the
camcorder is inside it.
●Dirty heads can cause the following
problems:
...No picture during playback.
...Blocks of noise appear during playback.
...During recording or playback, the Head Clog
Warning indicator “ ” appears.
...Recording cannot be performed properly.
In such cases, use an optional cleaning
cassette. Insert it and play back. If the cassette
is used more than once consecutively, damage
to the video heads may result. After the
camcorder plays back for about 20 seconds, it
stops automatically. Also refer to the cleaning
cassette’s instructions.
If, after using the cleaning cassette, the
problems still exist, consult your nearest JVC
dealer.
Mechanical moving parts used to move the
video heads and video tape tend to become
dirty and worn out over time. In order to maintain
a clear picture at all times, periodic check-ups
are recommended after using the unit for about
1,000 hours. For periodic check-ups please
consult your nearest JVC dealer.
GR-D650AG_EN.book Page 53 Friday, April 7, 2006 7:00 PM

CAUTIONS
54 EN
MasterPage: Left
How To Handle A CD-ROM
●Take care not to soil or scratch the mirror surface
(opposite to the printed surface). Do not write
anything or put a sticker on either the front or back
surface. If the CD-ROM gets dirty, gently wipe it
with a soft cloth outward from the centre hole.
●Do not use conventional disc cleaners or cleaning
spray.
●Do not bend the CD-ROM or touch its mirror
surface.
●Do not store your CD-ROM in a dusty, hot or
humid environment. Keep it away from direct
sunlight.
Serious malfunctioning
About moisture condensation
●You have observed that pouring a cold liquid
into a glass will cause drops of water to form on
the glass’ outer surface. This same
phenomenon occurs on the head drum of a
camcorder when it is moved from a cool place
to a warm place, after heating a cold room,
under extremely humid conditions or in a place
directly subjected to the cool air from an air
conditioner.
●Moisture on the head drum can cause severe
damage to the video tape, and can lead to
internal damage to the camcorder itself.
If malfunctioning occurs, stop using the unit
immediately and consult your local JVC
dealer.
The camcorder is a microcomputer-controlled
device. External noise and interference (from
a TV, a radio, etc.) might prevent it from
functioning properly. In such cases, first
disconnect its power supply unit (battery pack,
AC Adapter, etc.) and wait a few minutes and
then re-connect it and proceed as usual from
the beginning.
GR-D650AG_EN.book Page 54 Friday, April 7, 2006 7:00 PM

EN 55
MasterPage: Start_Right
REFERENCES
SPECIFICATIONS
Camcorder
Power supply
DC 11 V (Using AC Adapter)
DC 7.2 V (Using battery pack)
Power consumption
Approx. 2.8 W (3.0 W*) (LCD monitor off, viewfinder
on)
Approx. 3.1 W (3.3 W*) (LCD monitor on, viewfinder
off)
* Using LED Light
Dimensions (W x H x D)
59 mm x 97 mm x 112 mm (with the LCD monitor
closed and the viewfinder pushed back in)
Weight
Approx. 420 g (without battery, cassette and lens
cap)
Approx. 500 g (incl. battery, cassette and lens cap)
Operating temperature
0°C to 40°C
Operating humidity
35% to 80%
Storage temperature
–20°C to 50°C
Pickup
1/5" CCD
Lens
F 1.2, f = 3.0 mm to 45 mm, 15:1 power zoom lens
Filter diameter
ø30.5 mm
LCD monitor
2.5" diagonally measured, LCD panel/TFT active
matrix system
Viewfinder
Electronic viewfinder with 0.33" colour LCD
Speaker
Monaural
LED Light
Effective distance: 1.5 m
Format
DV format (SD mode)
Signal format
PAL standard
Recording/Playback format
Video: Digital component recording
Audio: PCM digital recording, 32 kHz 4-channel
(12-BIT), 48 kHz 2-channel (16-BIT)
Cassette
Mini DV cassette
Tape speed
SP: 18.8 mm/s, LP: 12.5 mm/s
Maximum recording time (using 80 min.
cassette)
SP: 80 min., LP: 120 min.
Storage media
SD Memory Card/MultiMediaCard
Compression system
JPEG (compatible)
File size
Still image:
3 modes (1280 x 960 pixels/1024 x 768 pixels/
640 x 480 pixels)
Picture quality
2 modes (FINE/STANDARD)
Approximate number of storable images
pg. 27
S
S-Video input:
Y: 0.8 V to 1.2 V (p-p), 75 Ω, analogue
C: 0.2 V to 0.4 V (p-p), 75 Ω, analogue
S-Video output:
Y: 1.0 V (p-p), 75 Ω, analogue
C: 0.3 V (p-p), 75 Ω, analogue
AV
Video input: 0.8 V to 1.2 V (p-p), 75 Ω, analogue
Video output: 1.0 V (p-p), 75 Ω, analogue
Audio input: 300 mV (rms), 50 kΩ, analogue, stereo
Audio output: 300 mV (rms), 1 kΩ, analogue, stereo
AC Adapter
Power requirement
AC 110 V to 240 V~, 50 Hz/60 Hz
Output
DC 11 V , 1 A
Specifications shown are for SP mode unless
otherwise indicated. E & O.E. Design and
specifications subject to change without notice.
For General
For Digital Video Camera
For Digital Still Camera
For Connectors
GR-D650AG_EN.book Page 55 Friday, April 7, 2006 7:00 PM

EN
AG Printed in Malaysia
0406ASR-NF-VM
© 2006 Victor Company of Japan, Limited
Back cover
MasterPage: Heading0_Left
A
AC Adapter ....................................................14
Audio Dubbing ...............................................46
Auto/Manual Mode .........................................16
B
Backlight Compensation ................................40
Battery Pack .......................................14, 15, 52
Blank Search ..................................................23
C
Changing The Menu Settings ................32 – 36
Charging The Battery Pack ............................14
Connection To A Personal Computer ............45
Connections To A TV Or VCR .......................24
D
Data Battery ...................................................15
Date/Time Settings ........................................17
Deleting Files .................................................30
Demonstration Mode ......................................35
Digital Image Stabilisation (DIS) ....................33
DPOF Setting
(Digital Print Order Format) .....................30
Dubbing ................................................... 43, 44
E
Exposure Control ...........................................39
I
Initialising A Memory Card .............................31
Insert Editing ..................................................46
Interface Shooting...........................................21
Iris Lock ..........................................................39
L
LCD Monitor and Viewfinder ..........................20
LED Light .......................................................37
Live Slow ........................................................37
Loading A Cassette ........................................19
Loading A Memory Card ................................19
M
Manual Focus ................................................38
Melody ............................................................34
Memory Card ...........................................19, 52
Motor Drive Mode ..........................................38
N
Night-Scope ...................................................38
P
Picture Quality ................................................35
Playback Sound .............................................36
Playback Special Effects ................................26
Power-Linked Operation ................................16
Program AE, Effects and Shutter Effects .......42
Q
Quick Review .................................................22
R
Recording Capacity
Memory Card ..........................................27
Tape ........................................................20
Recording Media Selection ............................35
Remote Control ..............................................25
Resetting The File Name ...............................29
S
Slow-Motion Playback ....................................26
Snapshot Mode ........................................34, 38
Sound Mode .............................................33, 36
Speaker Volume ............................................23
Specifications .................................................55
Spot Exposure Control ...................................40
T
Tape Speed (REC MODE) .......................33, 36
Tele Macro .....................................................33
Tele Mode .......................................................21
Time Code .........................................22, 35, 36
Tripod Mounting .............................................18
Troubleshooting ........................................47-50
W
Warning Indications .................................49, 50
White Balance ................................................40
Wide Mode .....................................................37
Wipe Or Fader Effects ...................................41
Z
Zooming .............................................21, 26, 34
16:9 .................................................................34
TERMS
GR-D650AG_EN.book Page 56 Friday, April 7, 2006 7:00 PM
˛̜
GR-D650AG
LYT1593-001A
CS
᎑๒ڟ᛫݊Ă
๐ᓂૌᓊඵЪೡᆵሆᚸᏃʙጠĄϵ
պ˞܉Ăቜ̀ኧჳقप
2ࡲ
ַ 5ࡲʰڟպЊϒ٧๎ձĂ̾
۳ඡЊϒպΏ୰ܢĄ
ᘰػۣχĈ
http://www.jvc.co.jp/english/accessory/
պჳقप
ᆵሆᚸᏃʙጠ
ລరˎѰ 8
ගᏜᏃ̅ᆬع 20
ᆵЅᏗ࿋ັߺጠ
Ğ
D.S.C.ğᏃ̅ᆬع 27
͒ 32
у۬ऀ
ᤲЃَ๑֥॑။ΰĂࡌઠ ņ။ΰᇁ
ВŇ௩סߏņᘰŇ)
32Ă
35 ࡲ*
47
ჭ
GR-D650AG_CS_01Cover.fm Page 1 Friday, April 7, 2006 7:34 PM
2˛̜
MasterPage: Left
●ϵїࡧࡌڟᏃ࿋˞܉ĂቜʙסϑїʙЩཐᏃĄ
ᆬعཐᏃڟᏃ࿋ĂվඡސҏΓሂϴᏃყʟᒐࡱַ
࿋Ą
●Ө࢈ݚᚊૌϵպ˞܉଼
ᇓᏃ࿋ႄᏞĄ
ЃَૌФʙԠФպ
ᚸ࿋ጠʟĂႄᏞ౷Ф͟
ᝐᜰĄӨ࢈ݚᚊૌסೈ
଼ળ ĞᎵᓊğ଼ᇓᏃᆇ
ႄᏞĄ
●ቜʙסϵኌϫڟᑗ˛۳Іૌڟ଼ળַᚸ࿋ጠĄ
Ѓ଼َળַᚸ࿋ጠع༊ϵФиڟϴ̟ĂᏃ࿋
ႄᏞ౷࣠ؾᝐᜰĄႄળᐖཎૃᚸ࿋ጠ˛֥͎ծІع
ϵ˅ཇĄઠᚸ࿋ጠع༊ϵʙ˃ڟؖڱ֏͂ڟ
˅ཇĄ
●ဇػࡧࡌڟගᏜᏃ֙Ăቜպ SP ĞᆿລğᇁВĄ
LP ĞढğᇁВ̾͟պૌᏃ̨֙ SP Ğᆿລğᇁ
В 50% ڟගᏜĂѮސૌϵᆬعढ֗͟ᘸ
ѭᓉѺВڟᖕዡĂ֥Ԛػႄળڟ५ַؒպᑗ
Ą
ϰЪĂဇػࡧࡌڟᏃ࿋ĂӨ࢈ݚᚊૌպ SP
) ᆿລ * ᇁВĄ
●ߏሂ۳Њϒַؒ͟ኬؒĄ
ݚᚊΏᚸ࿋ጠͫպࢨཆ JVC ྫбַۣχĄ
●Ώ୰ܢ͓ҤટҁӬַ֏ͺڣᘋ୰ᜌӬĂծ̸ͫ
պ JVC ᆵጃྫбĄቜպ JVC
BN-VF707U
Ɲ VF714 Ɲ VF733U ྫбχĄպಽۨ JVC
ྫб͟ᖽ˱ఋ͈ྫྫĄ
●Ώᚸ࿋ጠސટߏᆵЅВᏃ࿋ળă
SD Ѓ๎ַ͚ϻ౬
͚ф௩ࡎڟĄϰфͫպળФ ņ Ňᆿ
ڟᏃ࿋ળַળФ ņ Ňؖ
ņ ŇᆿڟІᏽ͚Ą
●ቜ˚ࡌӟΏᚸ࿋ጠฉኌػ̘ʡպڟάڟĄ
ψѤΐ༄ኌ໋௨͟ڟ੦պސ֧̥ڟĄ
Ğ҉պސᚸᏃʡ٠ቬڟᆇ̰ăے။ؖࣤᛔĂૌ
శЁձϑᑕુລ௨Ąğ
●˚ࡌઠΏጠ༊عϵ
žຣݙ྆ 50°C ڟϴ̟Ą
žᑆॉѳ Ğ
35% ̾ʮğؖ Ğ
80%ğڟ
ϴ̟Ą
ž෨ώڢັڟϴ̟Ą
žϵࣇ̈ढعϵઝڟԡՙ˱Ą
žኬۖ͑ᇥዢĄ
●ଶೀၿගዢސպႠઝݙࠋӬყఅڟĄѮސĂଶ
ೀၿගዢʰ͟༄લ͎୪ฃѓᔈؖق۫ώᔈ
ĞࠔѓăႦѓؖᕢѓğĄղᔈސ˚Ꮓϵ
ႄળ˱ڟĂϣढʶ˚ےΰΏጠФψѤވᄫĄĞФझ
ႩᔈĈය྆ 99.99%ğ
●໋ԠФպᚸ࿋ጠढĂ˚ࡌઠྫбχॼϵᚸᏃጠ
˱Ăϣढᐖཎ༄લᐮޥΏጠސҏጇѰΓલĄ
GR-D650AG_CS.book Page 2 Friday, April 7, 2006 6:57 PM

˛̜ 3
Њϒ٧๎ձ
ˉ̖Ĉߏྱթ̬ԮؖྫᐞĂ˸˼պΏጠାۦؖ
֧ᇘĄ
ᚌҙĈ
÷࠷വ୪ᚸ࿋ጠؖκྫປኌዢവ͎ອᘴؖ୴
֨Ăᐖγ҉ऌ͎ྫбĂؖڱئʮྫປನᏞĄ
ЃَЪढᙷᛉպΏᚸ࿋ጠؖκྫປኌዢĂ
ઠዲ̬ԮؖྫᐞĄቜჄ JVC ༄ᖇ੦ᒒՁĄ
˸˼࿙ཐьїಈĄ
÷ߏྱթྫᐞĂቜ˼ዾьΈጠ೦Ąጠ˱ഒ̘
͟ڟྭχĄᐮढቜӲ५࠘ӬʡࢷĄ
÷ϵૌढ˚κྫປኌዢढĂݚᚊૌૃ
κྫປನࣴʰئʮྫປྫሣĄ
ᚌҙĈ
÷Ώᚸᆇጠڟኌػ PAL િѓྫගጠ۬༴Ąͺ˚
ϵ֏͂ᆿລڟྫගጠʰїᆬعĄѮސĂ͟ϵ
ψѤϴ̟їဂٷᚸ࿋ַଶೀၿගዢ0֥ುዢ
ᆬعĄ
÷Ώ୰ܢ͓Ҥટҁַ֏ͺڣᘋ୰ᜌӬĂͫպ
JVC ᆵጃྫбĄቜպ JVC
BN-
VF707U/
VF714U/VF733U ྫбχĂ͟ઠ֏͈ྫؖΥκ
ྫປನࣴߏᚸ࿋ጠಪռྫĂᐖպؚۣڟϻ
ྫᐆဇᐖκྫປኌዢĄĞϨڟκྫປ
ನࣴ௩ࡎ͟˚ϣĂరኌ໋ڟᕽಲኌ
ዢĄğ
ԁಲኤྫб˞ᚌҙ
ΏጠؚڟྫбЃَ୩˚໋Ă܌Ф̕ਔ̬Ԯؖ
˽ደጽጶڟϠᏎĄ
ቜ˼їϔ͈ྫă˷ཌă͑ᇥ֗ 100°C ̾ʰؖε
ʣ̬˛ഏጶĄ
ԁಲྫбढĂቜպ٘ʮăʭăষͻؖᶵڟ
CR2025 ܮྫбĄ
ྫбԁಲᎿჲĂФ̕͟ਔᗖߔ̬̅ԮĄ
●Ӈڟྫбᐖ̅ढ୩Ą
●ᙒˉ݆˯әĄ
●ቜ˼˷ཌྫбĂʶ˚͟εʣ̬˛Ą
٧๎Ĉ
●ᖞסࢄഖ ĞՁϖ༴ሆഖğַЊϒᚌҙѝػ̺ጠ
ڟఋַؖࠧఋĄ
÷κྫປኌዢڟᖞס۬ऀַЊϒᚌҙѝػ֏
ʰఋؖʮఋĄ
ΏጠЊཆϵᗋᔣؖޜ˅ʰढĂߏʟڪॉĂպ
ጠዢͲֺ۳ॼ͈˷ڟᄪĞ֍ăʰఋ̅ݣϨ
10
cm ̾ʰğĄ
ቜ˼ઇฬఆॉ̌Ą
ĞЃَఆॉ̌ౢাؖઇฬĂઠᆇᛪಹᇥĄğ
ቜઠΏጠᄉᖔᓴᕠڟ̬ປ̅ᔈጽڟᛑᑎĄ
୩ྫбढĂᐖ˰˷уᆌᑗੰᖠĄቜਜ਼Άᙒ
िᎳЈ໋ϴФᘰྫб୩ڟ܌̅ٲݡĄ
ቜ˼ઠΏጠ༊ػᑆݙڟᑗʮؖᔰʰ̫၎Ą
ቜ˼ϵड़݉ؖϻ̫ڟϴ̟պΏጠĄ
ф̸Ăቜ˼ઠ͈ၖ̫ؖଶڟڐܢĞ˽ҷܢؖᗾ
ዘăᔀۆ୭ăߵऻڐăٔ˅ğĂعϵΏጠڟʰ
Ą
ĞЃَ̫ؖଶ॔ʣΏጠĂ̕͟ਔ̬Ԯؖᚉ
ྫĄğ
GR-D650AG_CS.book Page 3 Friday, April 7, 2006 6:57 PM

4˛̜
MasterPage: Left
˚ࡌઠᘢᏞ֥ؖುዢڢဇϩ̊෨Ąҏ܌ฌ
໘ծዲ˱ఋྫ͎୪ވᄫĄᓙ͟Ф̕ਔ̬
ԮؖྫᐞڟϠᏎĄ
ᚌҙĊ
ʮϖ٧๎ձᘰՁ֗ဇᚸ࿋ጠ̘̅ڟࣛ͟Ą
ᚹળढĂቜਜ਼Ά־Ё̙ಪળĂф̸ࡌպ
ؚۣڟ̙ಪળĄӺ֥ುዢؖଶೀၿගዢᚹળؖ
ऌݻᚸ࿋ጠဣ༣ΏጠĂؖ̕ਔވᄫĄ
ቜ٧๎Ă˚ࡌᏃ࿋ળ፻აҶў̙ݾĄ˚ࡌˉ
݆ጇѰᚸ࿋ጠĂϰߏ͂࢈५ѿ࣠ؾവΡႍձވĄ
˚ࡌϵ˚ᗧڟʰպʭ༚ޜĄҏ܌͟ᕚ
ࢇфպᚸ࿋ጠᙒࡧ֧Ą
ᚌҙĊ
శЁ˚ࡌӰᚸ࿋ጠڟྫសĞࡱᏜƟගᏜĂ
Sග
ᏜğʰؖઠΏጠعϵྫගጠథʰĂҏ܌˚ˉ
̖˻֗ྫស܌պᚸ࿋ጠဣ༣ф֧Ą
GR-D650AG_CS.book Page 4 Friday, April 7, 2006 6:57 PM

˛̜ 5
պΏᚸ࿋ጠڣ
ቜሂჯպڟސᆿФ
Mini DV ༴ ڟᏃ࿋
ળĄ
ቜሂჯૌպڟސળ ؖᆿ
ڟІᏽ͚Ą
Ώᚸ࿋ጠސટߏᆵЅВᏃ࿋ળă
SD Ѓ๎ַ͚ϻ౬
͚ф௩ࡎڟĄϰфͫպળФ ņ ŇᆿڟᏃ
࿋ળַળФ ņ Ňؖ ņ Ňᆿ
ڟІᏽ͚Ą
ቜ˚ࡌӟΏᚸ࿋ጠސ˚Ⴤ֏͂ᆵЅВගᏜ֙В࢙
࣠ڟĄ
ቜ˚ࡌӟΏᚸ࿋ጠฉኌػ̘ʡպڟάڟĄ
ψѤΐ༄ኌ໋௨͟ڟ੦պސ֧̥ڟĄ Ğ҉
պސᚸᏃʡ٠ቬڟᆇ̰ăے။ؖࣤᛔĂૌశЁ
ձϑᑕુລ௨Ąğ
ϵїࡧࡌڟᏃ࿋˞܉ĂቜʙסϑїʙЩཐᏃĄ
ᆬعཐᏃڟᏃ࿋ĂվඡސҏΓሂϴᏃყʟᒐࡱַ
࿋Ą
Ө࢈ݚᚊૌϵպ˞܉଼ᇓᏃ࿋ႄᏞĄ
ЃَૌФʙԠФպᚸ࿋ጠʟĂႄᏞ౷Ф͟
ᝐᜰĄӨ࢈ݚᚊૌסೈ଼ળ ĞᎵᓊğ଼ᇓᏃᆇ
ႄᏞĄ
ቜʙסϵኌϫڟᑗ˛۳Іૌڟ଼ળַᚸ࿋ጠĄ
Ѓ଼َળַᚸ࿋ጠع༊ϵФиڟϴ̟ĂᏃ࿋
ႄᏞ౷࣠ؾᝐᜰĄႄળᐖཎૃᚸ࿋ጠ˛֥͎ծІع
ϵ˅ཇĄઠᚸ࿋ጠع༊ϵʙ˃ڟؖڱ֏͂ڟ
˅ཇĄ
ဇػࡧࡌڟගᏜᏃ֙Ăቜպ SP ĞᆿລğᇁВĄ
LP ĞढğᇁВ̾͟պૌᏃ̨֙ SP Ğᆿລğᇁ
В 50% ڟගᏜĂѮސૌϵᆬعढ֗͟ᘸѭ
ᓉѺВڟᖕዡĂ֥Ԛػႄળڟ५ַؒպᑗĄ
ϰЪĂဇػࡧࡌڟᏃ࿋ĂӨ࢈ݚᚊૌպ SP
) ᆿລ * ᇁВĄ
ݚᚊૌպ JVC ͎ܢڟᏃ࿋ળĄ
ૌڟᚸ࿋ጠ࢙࣠Ϳʰ͎ੵڟؚФܢഖڟႄળĂͫ
ࡌͺ࢈ஒϫ MiniDV ᆿລĂѮސ JVC ͎ܢڟᏃ࿋ળ
ސટ۞ߏૌڟᚸ࿋ጠ௩ࡎպڟĂઊశ˃ࡩݙϴ
ᏺ˽ᚸ࿋ጠڟᚸ࿋ؒĄ
ϣढቜૌኧ 52
–
54 ࡲʰڟ ņ٧๎ձŇĄ
●
Microsoft® ַ Windows® ސ Microsoft ˴ͧϵࠛ
ַ Ğؖğ֏͂ࣜڟ٧͋੦ᆿؖ੦ᆿĄ
●
Macintosh ސ Apple ࡎ႗ጠ˴ͧڟ٧͋੦ᆿĄ
●
QuickTime ސ Apple ࡎ႗ጠ˴ͧڟ٧͋੦ᆿĄ
GR-D650AG_CS.book Page 5 Friday, April 7, 2006 6:57 PM
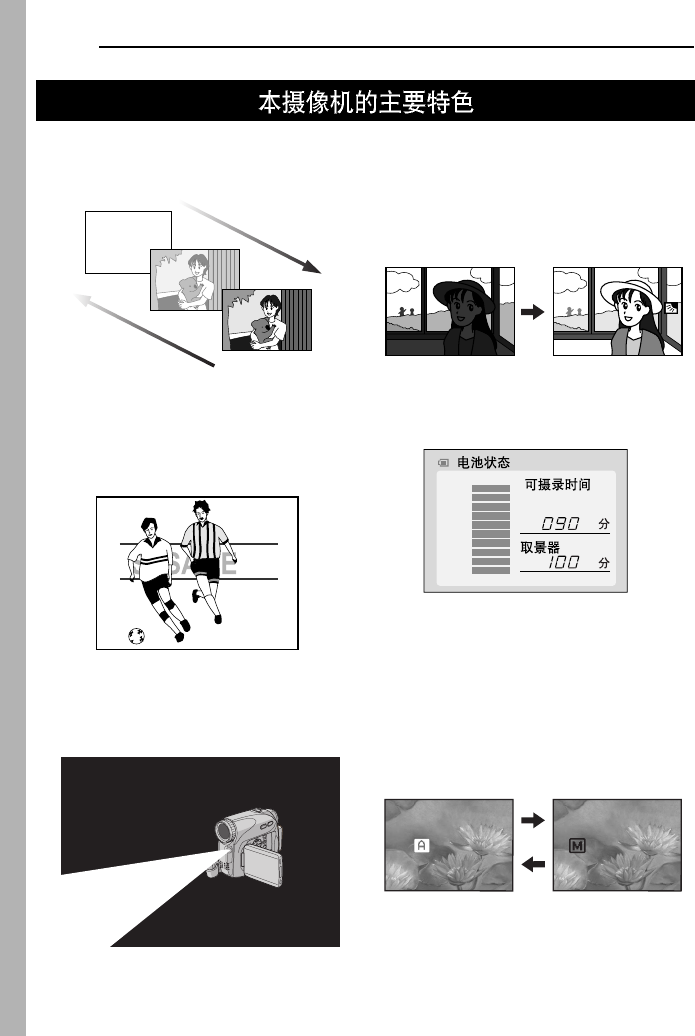
6˛̜
MasterPage: Left
࿒ᝐ 0 ၚᝐझَ
ૌ̾͟ҁ࿒ᝐ0ၚᝐझَվყఅ͎֎Ф܉
ႠডڟᕽᝐಲĄ)
41 ࡲ*
ળФ५झڟ࿋ሡᎮുӕ
սЃĂņོŇᇁВ̾͟ဇ՞ఀڟ࿋
їऐऔĂԐЩʙ౿Ă̾ᑕુᔀ๐ăᗧסڟ
ယѰ࿋Ą)
42 ࡲ*
ັقጷ
ૌ̾͟ັقጷັ۫ڟڐĄ)
37
ࡲ*
ࠧುώངᏻ
ͫᄯݸʮ BACKLIGHT ݸᓤ౷ັ۫ਛώฃ
ڟ࿋Ą)
40 ࡲ*
÷ૌʶ̾͟ᎵጅʙᔈഁώĂᆺૌ౷̾͟
պԁႠሂڟᗊώངᏻĄ)
40 ࡲĂᔈᗊ
ώૡ֙*
ྫбྫුᆵጃΰ
ૌͫᄯݸʮ DATA ݸᓤĂ౷̾͟ޥྫбڑ
ဘĄ)
15 ࡲ*
ဂٷယѰ
ૌ̾͟ယఀᏃؖᆬعߢපؖᘲુʙՎڟ̰
֓ುĄ̾͟ဂढᏃַᆬعᒐࡱĄ)
37
ࡲ*
ьᓤ
ૌ̾͟ݸ AUTO ĞьğᓤԁӽᚸᏃጠڟ
ᏃᇁВϵ̙௩༊эᆿລᇁВ௩༊˞Ą
ଷʣ
ଷ͎
LCD
100%
50%
0%
MANUAL
AUTO
GR-D650AG_CS.book Page 6 Friday, April 7, 2006 6:57 PM

MasterPage: TOC_Heading0_Right
˛̜˛̜
˛̜˛̜ 7
άᏃ
ລరˎѰ 8
ষ̕ .................................................................. 8
ؚಪռڟۣχ
.................................................. 12
ྫປ ................................................................ 14
ጇѰᇁВ ......................................................... 16
ჭՐ௩༊ ......................................................... 17
̠ೈƟढڟ௩ס
........................................... 17
ቡӺળ ......................................................... 18
ቡ֥ುዢ
...................................................... 18
ΰዢڟ۫ݙቡ
........................................... 18
־סʭ༚ޜ
...................................................... 18
ཆʣƟ֥͎ႄળ .............................................. 19
ཆʣ0֥͎Іᏽ͚
............................................ 19
ගᏜᏃ̅ᆬع 20
ගᏜᏃ
................................................ 20
અΏᏃ ......................................................... 20
ႄળढ .............................................. 20
ଶೀၿගዢַ֥ುዢ ................................... 20
ᝐഐ ............................................................ 21
ع˃ᇁВ ..................................................... 21
دᚸ ..................................................... 21
ߨدᚸ ..................................................... 21
ढሆ
......................................................... 22
Ӥఀޥ ..................................................... 22
ૃႄળڟ˛Ꮓ
....................................... 22
ගᏜᆬع
................................................ 23
Γલᆬع ......................................................... 23
Ꮧ̥ᆬع ..................................................... 23
Ӥఀষ ..................................................... 23
ڪΩষ ..................................................... 23
Њཆྫб ..................................................... 25
эྫගؖᏃ࿋ጠ ....................................... 24
պᄍૡዢїᆬع ....................................... 25
ᆵЅᏗ࿋ັߺጠ Ğ
D.S.C.ğᏃ̅
ᆬع 27
D.S.C. Ꮓ
............................................ 27
અΏدᚸĞ
D.S.C. ᑡ࿋ğ
............................... 27
D.S.C. ᆬع
............................................ 28
Γલᆬع࿋
.................................................. 28
ьᆬع࿋
.................................................. 28
̜χষ̕ᆬع
.................................................. 28
͞ਸ਼˂ݎဍʰڟΰ ....................................... 28
ԁϻڟ D.S.C. ͒
................................ 29
ࡧ௩༊̜χϪ .............................................. 29
۳ᛖ̜χ ......................................................... 29
҂ਸ਼̜χ ......................................................... 30
௩༊Έϟ۬ऀ Ğि௩༊ğ
............................ 30
ۑז˽Іᏽ͚
.................................................. 31
͒ 32
Ⴀቡڟඊ
......................................32
ӽᝐඊڟ௩༊ .............................................. 32
Ꮓඊ ......................................................... 33
ᆬعඊ ......................................................... 36
ػᏃڟ͒
......................................37
ັقጷ
............................................................. 37
ဂٷယѰ
...................................................... 37
ᅶᄚဍᇁВ
...................................................... 37
ׇග ................................................................ 38
ᑡ࿋)ઠᏗ̥࿋Ꮓϵႄળʰ *
.................... 38
̙ဇഐ ......................................................... 38
ᗊώૡ֙ ......................................................... 39
ώᖇס ......................................................... 39
ࠧುώངᏻ
...................................................... 40
ᔈᗊώૡ֙
...................................................... 40
Ωᎋቡ
...................................................... 40
̙Ωᎋቡ .............................................. 41
࿒ᝐؖၚᝐझَ .............................................. 41
࿋ሡᎮă५झַӤ۞५झ ............................ 42
ሡᎮ ........................................................43
ૃᏃ࿋ጠؖϩᏃ࿋ጠಈ֙
................................ 43
ಈ֙эరФEW ʿڟගᏜ௩రؖΥЪ௩రಈ
֙) ᆵЅಈ֙*
............................................. 44
эʡࡎ႗ጠ
........................................... 45
ࡱᏜቒყ ......................................................... 46
ನʣሡᎮ ......................................................... 46
у۬ऀ 47
ވᄫਸ਼
.................................................47
պႰᛖ
.................................................51
٧๎ձ
.................................................52
ि ........................................................55
ჭ
GR-D650AG_CS.book Page 7 Friday, April 7, 2006 6:57 PM
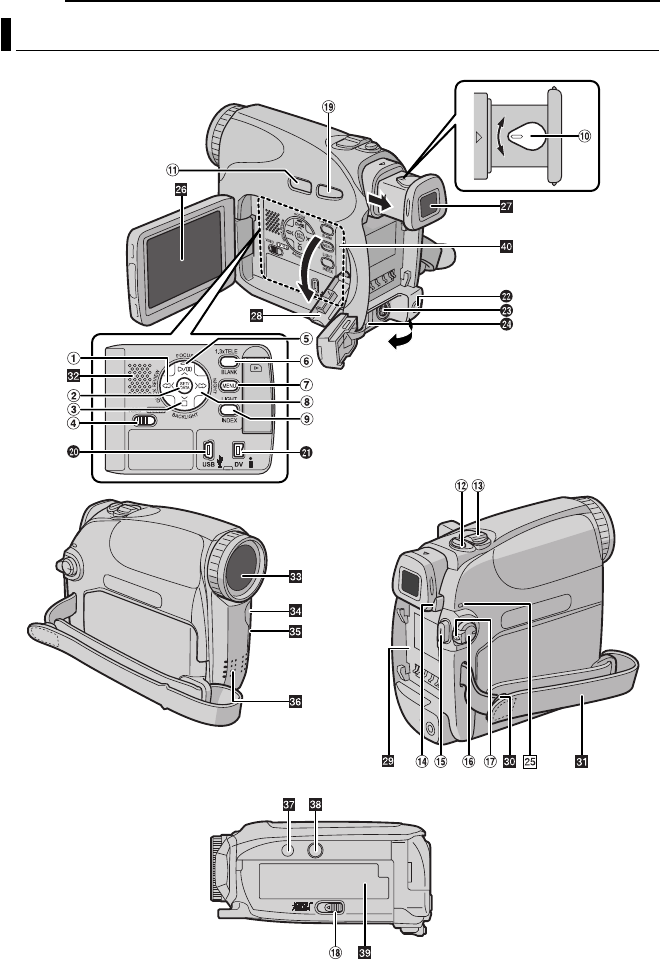
˛̜ 9
ລరˎѰ
ລరˎѰ
ૡ֙
1ࢇળᓤ\
1^)
23 ࡲ*
ϩ;ᓤ \
1^
Ӥఀޥᓤ\
QUICK REVIEW^)
22 ࡲ*
2௩༊ᓤ\
SET^)
17 ࡲ*
ྫбྫුᆵጃΰᓤ\
DATA^)
15 ࡲ*
3̥ᓤ\
7^)
23 ࡲ*
ϩʮᓤ\
4^
ࠧುώངᏻᓤ \
BACKLIGHT^)
40 ࡲ*
4
VIDEO/MEMORY ᘰ)
16 ࡲ*
5ᆬعƟᆷᓤ \6^)
23 ࡲ*
ϩʰᓤ\
3^
̙ဇഐᓤ \
FOCUS^)
38 ࡲ*
6ڪΩ \
BLANK^)
23 ࡲ*
ع˃ᇁВݸᓤ Ğ
1.3x TELE *)
21 ࡲ*
7ඊᓤ \
MENU^)
32 ࡲ*
8Ӥᓤ\
¡^)
23 ࡲ*
ϩ͡ᓤ \
2^
ׇගᓤ\
NIGHT^)
38 ࡲ*
9ষ̕ݸූ \
INDEX^)
28 ࡲ*
ັقጷᓤ \
LIGHT^
!קώݙቡጌૡ֙)
18 ࡲ*
"ьᓤ \
AUTO^)
16 ࡲ*
#ᑡ࿋ᓤ\
SNAPSHOT^)
27Ă
38 ࡲ*
ဂٷယѰᓤ)
32Ă
37 ࡲ*
$ྫႹഐૡ֙ԋ\
T/W^)
21 ࡲ*
ᒐዢࡱුૡ֙\
VOL. +,
–^)
23 ࡲ*
%ྫбض֣ᓤ \
PUSH BATT.^)
14 ࡲ*
&ᏃזƟ̥ᓤ)
20 ࡲ*
(ྫປᘰ\
RECĂ
OFFĂ
PLAY^)
16 ࡲ*
)ᖇסᓤ)
16 ࡲ*
~ႄળΈƟਝ͎ᘰ\
OPEN/EJECT^
)
19 ࡲ*
+ᅶĞ
16:9ğᓤ
\
16.9 ^)
37 ࡲ*
ʿ
ʿѝػაڟʮ̟Ą
,
USB Ğћїᒂሣğʿ)
45 ࡲ*
-ᆵЅගᏜʿ [DV IN/OUT] (i.LINK*)
)
44Ă
45 ࡲ*
* i.LINK ސݾ IEEE1394-1995 ї࠱̅֏ᔗࣤĄ
ཎᆿ ػஒϫ i.LINK ᆿລڟ୰ܢĄ
.ࡱᏜƝගᏜᎯʣƟᎯ͎ዢ\
AV^
)
24Ă
43 ࡲ*
/
SගᏜᎯʣƟᎯ͎ዢ\
S^)
24
Ă
43 ࡲ*
:ڢྫປᎯʣʿ\
DC^)
14 ࡲ*
ݾΰጷ
POWER/CHARGE ጷ)
14Ă
20 ࡲ*
֏͂ఋϋ
ଶೀၿගዢ)
20Ă
21 ࡲ*
֥ುዢ )
18 ࡲ*
͚ა\^)
19 ࡲ*
ྫб̛ޜ)
14 ࡲ*
ڸળળ̕)
12 ࡲ*
Ӻળ)
18 ࡲ*
ᒐዢ)
23 ࡲ*
ᘢᏞ
ັقጷ
ᚸ࿋ጠ๐ᐖዢ
)ቜˉ̖˚ࡌኍጀЪĂدᚸΆᄯڟ๐ᐖዢ
˱༊ϵЪĄ*
γᒐఫѺࡳ
ᒳृ̌)
18 ࡲ*
ʭ༚ޜ־סᇀ)
18 ࡲ*
ႄળა)
19 ࡲ*
ዹ͚ನᇀ
GR-D650AG_CS.book Page 9 Friday, April 7, 2006 6:57 PM
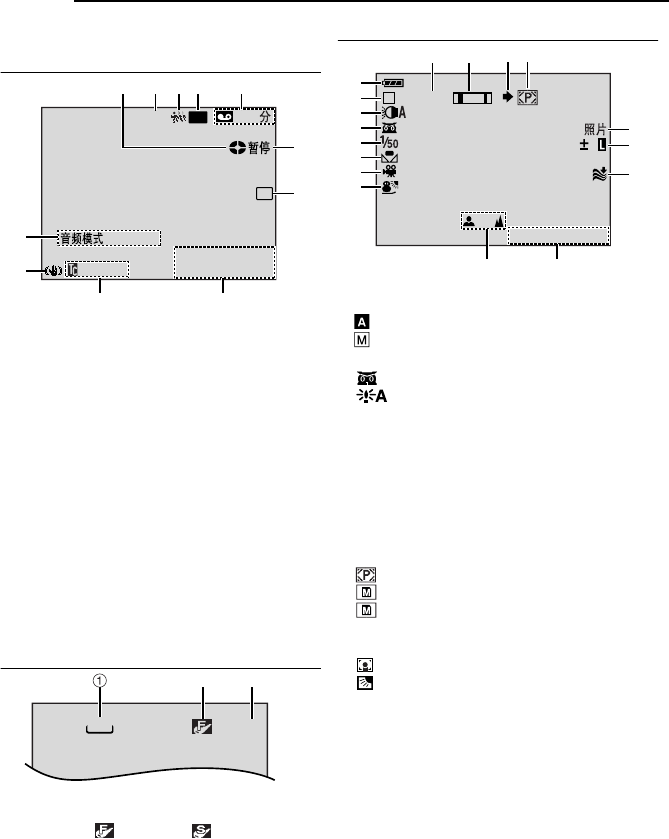
ລరˎѰ
10 ˛̜
ଶೀၿගዢƟ֥ುዢݾΰ
ͫϵගᏜᏃ྆ു˛
1ႄળོᕽݾΰጷ)
20 ࡲ*
)ႄળོᕽढଋᕽĄ*
2ع˃ᇁВݾΰጷ)
21 ࡲ*
3ဂٷယѰݾΰጷ)
37 ࡲ*
4ᏃఀݙᇁВ )
SP/LP*)ᆿລƟढ *
)
33 ࡲ*)ͫФ
LP ݾΰጷΰ*
5ႄળढ )
20 ࡲ*
6ᚸᏃĈ) ϵᏃ྆ു˛͎୪Ą* )
20 ࡲ*
ᆷĈ) ϵᏃ˛͎୪Ą* )
20 ࡲ*
ယᗊώĈ)໋պဂٷယѰढ͎୪Ą*
)
37 ࡲ*
7ؚᎵጅڟ࿒ᝐƟၚᝐझَݾΰጷ)
41 ࡲ*
8̠ೈƟढ )
35 ࡲ*
9ढሆ )
35 ࡲ*
!ᆵЅ࿋ᗧסጷ)ņ࿋ᗧסŇ* )
33 ࡲ*
"ࡱᏜᇁВ 12BIT/16BIT ࡱᏜᇁВݾΰጷ
)
33 ࡲ*)ᚸ࿋ጠጠݣ͎୪࠘ 5ࠌᚘ *
ͫϵ D.S.C. Ꮓ྆ു˛
1࿋̏ˈĈ
1280 (1280
x
960)Ă
1024
(1024
x
768) ؖ 640 (640
x
480) )
27 ࡲ*
2࿋ቴුĈĞႠğַ ĞᆿລğĞݸັ
ቴුӕğ)
35 ࡲ*
3ັ̰ᆵ )
27 ࡲ*
Ğΰϵ D.S.C. Ꮓ྆ു˛͟۳Іڟدᚸڟ˃
࠘ᆵĄğ
ϵගᏜַ D.S.C. Ꮓ྆ു˛
1ྫбྫුݾΰጷ
2ጇѰᇁВ )
16 ࡲ*
ĈьᇁВ
Ĉ̙ᇁВ
3ັقጷڑဘݾΰጷ)
37 ࡲ*
4Ĉׇගݾΰጷ)
38 ࡲ*
ĈᅨউᇁВ )
34 ࡲ*
5Ӥ۞ఀݙ
6Ωᎋݾΰጷ)
40 ࡲ*
7ؚᎵጅڟझَݾΰጷ
8ؚᎵጅڟുВᗊώݾΰጷ)
42 ࡲ*
9˃࠘ဇഐ̨)
21 ࡲ*
!ဇഐݾΰጷ)
21 ࡲ*
"͚ᆿ )
27 ࡲ*
Ğϵدᚸ྆ു˛͎୪ծਰᗗĄğ
#͚ᆿ )
27 ࡲ*
Ĉϵدᚸ྆ു˛͎୪Ą
ĈΐཆʣІᏽ͚ढਰᗗΩѓĄ
Ĉ໋ᚸ࿋ጠϵІᏽ͚ʰ֥ᆵ⃛ढĂ̾ก
ѓਰᗗĄ
$ັ̰ Ğدᚸᑡ࿋ढ͎୪Ąğ )
27
Ă
38 ࡲ*
%Ĉᔈᗊώૡ֙ݾΰጷ)
40 ࡲ*
Ĉࠧುώངᏻݾΰጷ)
40 ࡲ*
±Ĉᗊώቡݾΰጷ)
39 ࡲ*
ώᖇסݾΰጷ)
39 ࡲ*
&ࡳᒐ͞ਸ਼ݾΰጷ)
34 ࡲ*
(̠ೈ)
17 ࡲ*
)̙ဇഐቡݾΰጷ)
38 ࡲ*
LP
W
H
12
BIT
– – –
TELE
!
9 8
1235
6
7
4
"
20
:
6
11
.3
2
A
0
M
6
1
15:55
1
.
51
1280
23
3
10
x
M
()
1
2
3
4
5
6
7
8
9
$
%
&
!
206.2 0
6
1.
#"
GR-D650AG_CS.book Page 10 Friday, April 7, 2006 6:57 PM
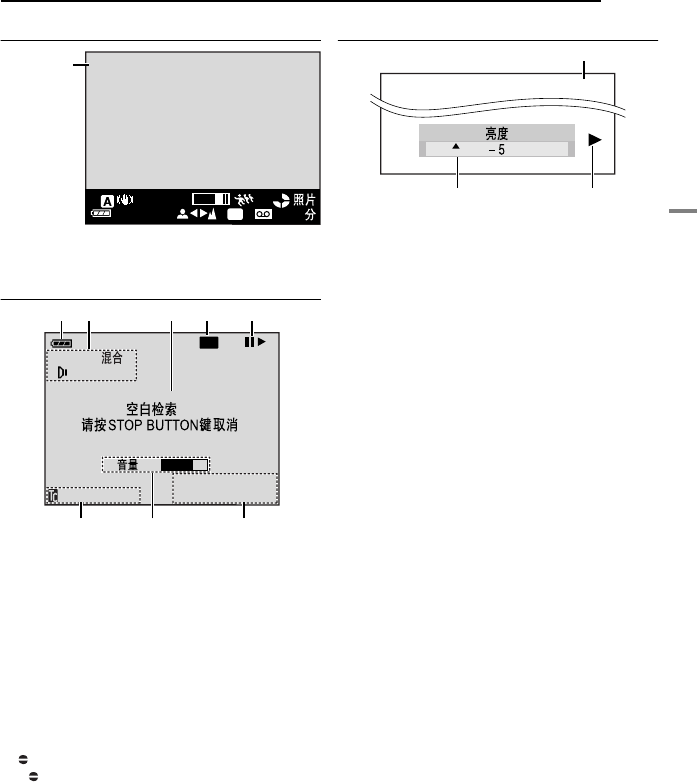
˛̜ 11
ລరˎѰ
ລరˎѰ
ϵ 16:9 Ꮓढ
໋ૌϵᅶᄚဍᇁВ )
37 ࡲ*Ꮅጅʟņ
16:9ŇĂ
ݎဍڟʮ̟ᝐฃĄʙղݾΰጷΰϵఋ˷Ą
ϵගᏜᆬع྆ു˛
1ྫбྫුݾΰጷ
2ࡱᏜᇁВݾΰጷ)
36 ࡲ*
3ڪΩষݾΰጷ)
23 ࡲ*
4ႄળఀݙ)
SP/LP*ĞᆿລƟढğ
)
36 ࡲ*
ĞͫФ LP ݾΰጷΰĄ*
53Ĉᆬع
¡ĈӤƟӤఀষ
1ĈࢇળƟӤఀষ
8Ĉᆷ
83
Ĉ܉ϩం౿ᆬعƟယѰ
28
Ĉݣϩం౿ᆬعƟယѰ
ĈࡱᏜಈ֙
8ĈࡱᏜಈ֙ᆷ
6̠ೈƟढ )
36 ࡲ*
7ࡱුĈᒐුݾΰጷ)
23 ࡲ*
۫ݙĈ۫ݙૡ֙ݾΰጷ
)ଶೀၿගዢƟ֥ುዢ *)
18 ࡲ*
8ढሆ )
36 ࡲ*
ϵ
D.S.C. ᆬع྆ു˛
1̜χҶƟ̜χᆵ )
28 ࡲ*
2ጇѰᇁВݾΰጷ)
28 ࡲ*
3۫ݙૡ֙ݾΰጷĞଶೀၿගዢƟ֥ುዢğ
(
18 ࡲ*
16:9
120
1
00
min
25x
LP
ᅶĞ
16:9ğ
ᇁВݾΰጷ
1
L
2
2
0
:
/
21
:
2
1
2
1
.11
.
3
20
A
0
M
6
:
6
BIT
5
21 345
6
7
8
LP
100-0013
1
3 2
GR-D650AG_CS.book Page 11 Friday, April 7, 2006 6:57 PM
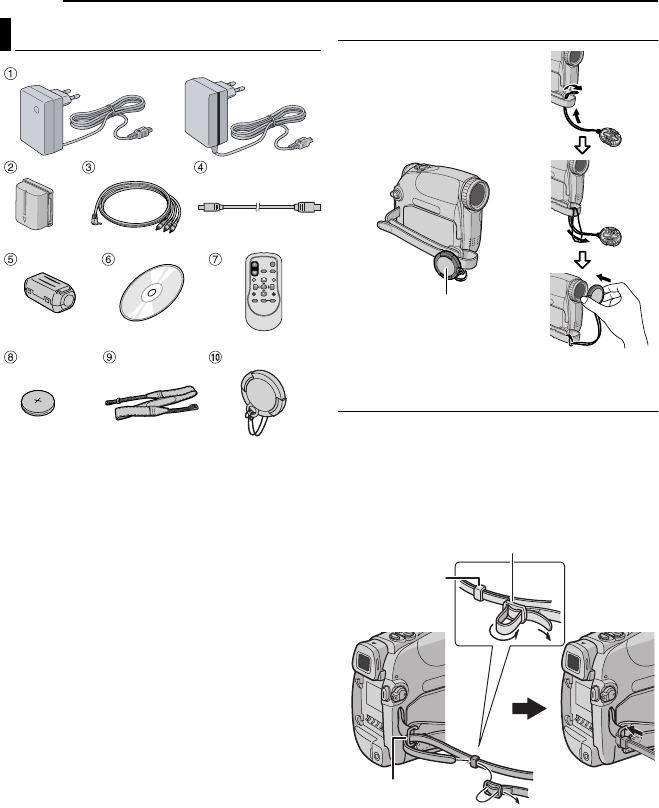
ລరˎѰ
12 ˛̜
1κྫປኌዢ AP-
V17E ؖ AP-
V19E
2ྫб BN-VF707U
3ࡱᏜƟගᏜྫសĞڢࣷ 3.5 ์ܮನࣴэ
RCA ನࣴğ
4
USB ྫស
5ۉሣ྆ᔮዢĞػ USB ྫសĂպ̟В
13 ࡲ*
6
CD-ROM
7ϻᆅഖᄍૡዢ RM-V740U
8ኤྫб CR2025* Ğػᄍૡዢğ
9ڸળ ) ЃѤЊཆቜኧ͡ڟჳق *
!ᘢᏞა) ЃѤЊཆቜኧ͡ڟჳق *
*κ௲ढϵᄍૡዢ༊˱ˑཆФʙีኤྫб ĞળФ൘
ሢ̰ğĄЃَࡌպᄍૡዢĂ܌ਸ਼͞൘ሢ̰Ą
٧
๎Ĉ
●ߏպᚸ࿋ጠ۳ݻϵశչڟˎѰڑဘĂؚಪռڟྫស
͟Фʙؖϻۉሣ྆ᔮዢĄЃَྫសͫФʙ
ۉሣ྆ᔮዢĂ֏ኬۖ྆ᔮዢڟʙ႒ᐖэᚸ࿋
ጠĄ
●ቜʙסպؚಪռڟྫសĄ˚ࡌպ֏͂ྫ
សĄ
ЃѤպᘢᏞა
ߏʟ۳ᛖᘢᏞĂݸັཌؚ
ΰĂઠؚಪռڟᘢᏞაЊཆ֗
ᚸ࿋ጠʰĄ
٧๎Ĉ
ߏሂסᘢᏞაˑΓሂაʰĂቜ
ሂჯაჄᚸ࿋ጠᅆĄ
ЃѤՁʰڸળ
ݸັΰ๎ؚΰĄ
1ઠળ˅ࠎ྆̌Ą
2ઠͺӷϱվࠎ྆ળ˅ڟዲࣈַળКĄ
÷྆عַ٘ႧળК˛ڟળ˅վቡڸળڟݙĄ
3ઠળ˅ڟዲࣈၾʨϩ̌
ؚಪռڟۣχ
ؖ
ϵدᚸ྆ു˛ع༊ϵЪĄ
3
2
2
1
ળ˅ڟዲࣈ
ળК
̌
GR-D650AG_CS.book Page 12 Friday, April 7, 2006 6:57 PM
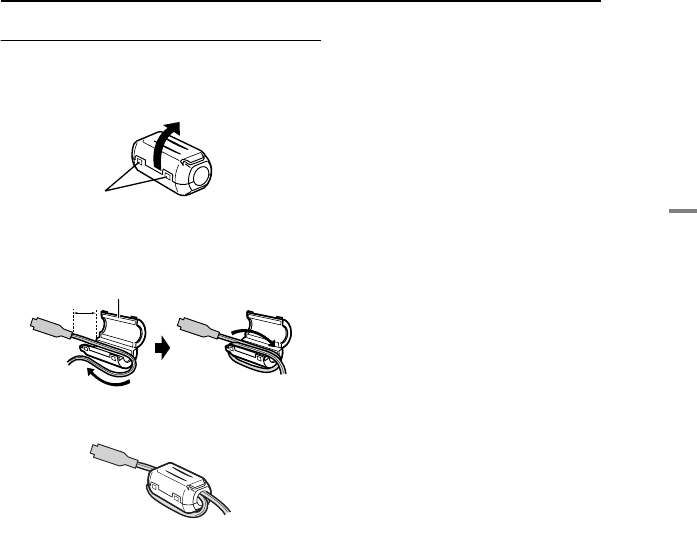
˛̜ 13
ລరˎѰ
ລరˎѰ
ЃѤЊཆۉሣ྆ᔮዢ
ઠۉሣ྆ᔮዢЊཆ֗ྫសĄۉሣ྆ᔮዢ̾̍͟˓
ᔙĄ
1٘ۉሣ྆ᔮዢ֍႒ڟ֙ዢĄ
2ઠྫសࠎ྆ᔮዢĂϵྫសನᏞჄۉሣ྆ᔮዢ˞
۳ॼ࠘ 3 cm ྫសĄ
Ѓཌ˛ؚΰĂઠྫសϵۉሣ྆ᔮዢʹఋᛈᕓʙЩĄ
3ϫʰۉሣ྆ᔮዢĂڢэᘰఖծവ͎⳨ᒐĄ
٧๎Ĉ
●ቜ٧๎˚ࡌᖽྫសĄ
●ྫសढĂઠۉሣ྆ᔮዢڟ႒Њཆϵᚸ࿋ጠĄ
֙ዢ
ۉሣ྆ᔮዢ
ᛈᕓʙЩĄ
3 cm
GR-D650AG_CS.book Page 13 Friday, April 7, 2006 6:57 PM
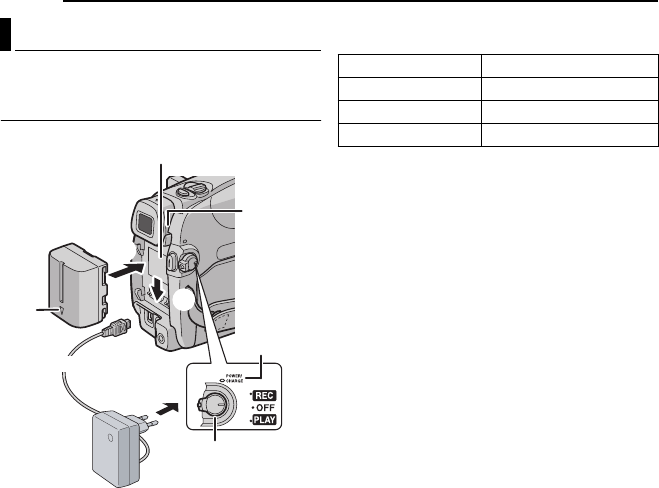
ລరˎѰ
14 ˛̜
Ώᚸ࿋ጠڟ֍ᘸྫປՁ˰௨ૌᎵጅశኌϫڟྫປĄ
˚ࡌઠؚಪռڟྫປཆ༊պϵ֏͂௩రʰĄ
൝ྫб͈ྫ
1ઠྫປᘰ௩༊ߏ ņ
OFFŇĄ
2ྫбʰڟሐᏞݾϩʮ̟Ăઠྫбᄆᄆ૰
ϩྫб̛ޜ 1Ą
3ϩʮྫбĂڢ֗֏ᖇס֗ѝ 2Ą
4ઠκྫປኌዢჄᚸ࿋ጠĄ
5ઠκྫປኌዢನʣκྫປನࣴĄᚸ࿋ጠ
ʰڟ POWER/CHARGE ጷਰᗗĂےΰ͈ྫː༄
זĄ
6໋ POWER/CHARGE ጷၫພढĂ͈ྫӇЙĄ
ૃκྫປನࣴئ͎κྫປኌዢĄઠκྫ
ປኌዢૃᚸ࿋ጠᔞĄ
֣ʮྫб
ݸʮ PUSH BATT.Ăढϩʰྫбઠ֏֣ʮĄ
*ಪռ
٧๎Ĉ
●Ώ୰ܢ͓Ҥટҁַ֏͂ڣᘋ୰ᜌӬĂͫպ
JVC ᆵ⃛ྫбĄቜպ JVC BN-
VF707U/VF714U/
VF733U ྫбχĄպಽۨ JVC ྫбዲ˱
ఋ͈ྫྫᖽĄ
●ЃَྫбʰФ۳ᛖაĂϑઠ֏͞ਸ਼Ą
●͈ྫ྆ു˛Ă˚͟ጇѰᚸ࿋ጠĄ
●ЃَؚպྫбܮᎿჲĂ܌ഒٲ͈ྫĄ
●ʙЩ൝ྫб͈ྫؖϵ ೈ˚˞ݣ൝ྫб
͈ྫढĂ
POWER/CHARGE ጷ͟˚۫Ąϵႍ
ٷ˚Ăૃᚸ࿋ጠ˛֥͎ ྫбĂഓݣ࿙ཐϔЩ
͈ྫĄ
●Ѓَઠʙː༄͈ၖྫڟ ྫбχನʣΏጠĂ
POWER/CHARGE ጷ˚ਰᗗےΰԠФ͈ྫĄ
●ЃَӇϒ͈ྫݣྫбڟˎѰढ˫ഓۨલ഻Ă܌ྫ
бּˑۖൖԂĄᄯࡌԁಲྫбĄቜᓊඵڟྫб
Ą
●ϰߏκྫປኌዢϵ˱ఋ୩ྫĂؚ̾ϵպ
྆ു˛വᇥĄቜሂסͫϵࡳՊЁڟϴ̟պĄ
●྆պᎵᓊڟ AA-
VF7 ྫб͈ྫዢĂૌ̾͟ڢ
ဇ BN-VF707U/VF714U/VF733U ྫб͈ྫĂ
фഒպᚸ࿋ጠĄ
●ϵ
5˷ᚘ྆ݣĂЃَΓϵػᏃყݟጠᇁВַႄળː
ನʣĂѮސԠФጇѰї ) ņᆷŇݾΰጷ͟
˚͎୪*ĂΏᚸ࿋ጠઠьᘰఖκྫປኌዢڟ
ྫປĄϵٷʮĂЃَᚸ࿋ጠʰˑཆʰྫбĂ౷
ז͈ྫĄ
ྫປ
1
2
ྫб
PUSH
BATT.
ྫປᘰ
ሐ
Ꮮ
ྫб̛ޜ
κྫປኌዢ
POWER/
CHARGE
ጷ
э DC ʿ
эκྫປನࣴ
ྫб ͈ྫढ
BN-VF707U* ˃࠘
1ˉढ
30 ˷
BN-VF714U ˃࠘
2ˉढ
40 ˷
BN-VF733U ˃࠘
5ˉढ
40 ˷
GR-D650AG_CS.book Page 14 Friday, April 7, 2006 6:57 PM

˛̜ 15
ລరˎѰ
ລరˎѰ
պྫб
ઈїņ൝ྫб͈ྫҲڟ
2ԏэ 3ԏĄ
శᛉᏃढ
*ಪռ
٧๎Ĉ
●̾ʮନχʮĂᏃढ˃˃ᑻ഻Ĉ
●ࡧቒպᝐഐؖᏃݟጠᇁВढĄ
●ࡧቒպଶೀΰዢढĄ
●ࡧቒպᆬعᇁВढĄ
●ັقጷ۫ਔढĄ
●ϵढպ˞܉Ăݚᚊລర͟ռྱסدᚸढ
3ࡻ̾ʰڟढؚպڟ͈ྫбĄ
٧๎Ĉ
ϵᔞྫປ˞܉Ăቜሂסᚸ࿋ጠː༄ᘰጠĄҏ܌Ă
̕ਔᚸ࿋ጠވᄫĄ
ྫбྫුᆵ⃛ΰՁ
ૌ̾͟ޥྫбྫු̾̅̾͟ᙷᛉᚸ֙ڟढĄ
1) ሂ۳ྫбː༄Њཆʰծ̸ྫປᘰ௩סߏ
ņ
OFFŇĄ
2) ઠଶೀၿගዢӇϒΈĄ
3) ݸʮ DATAĂ͎୪ྫбڑဘഫĄ
●ЃَݸʮЪᓤݣӤఀ٘Ăྫ б ڑဘΰ 3ࠌ
ᚘĂЃَݸʮЪᓤݣݻᛉݸўಁࠌᚘĂ܌ྫб
ڑဘΰ 15 ࠌᚘĄ
●Ѓَΰņ۬ऀ֥ᎿჲŇф˚ΰྫбڑ
ဘĂϵૌ̆ಈݸʮ DATA ᓤಁЩݣԠФӽ
ᝐĂჳقྫб͟ІϵੰᖠĄϵႍٷ
ʮĂቜܘཚලૌశۖڟ JVC ༄ᖇ੦Ą
պκྫປ
ઈїņ൝ྫб͈ྫҲڟ 4
–
5ԏĄ
٧
๎Ĉ
ؚಪռڟκྫປኌዢྫᐆ͟ьϵ 110
Vַ
240
V˞ᎵጅĄ
ᘰػྫб
ϠᏎĊቜ˼ཐضཌྫбĂؖڱઠ֏ᆸᛩϵ̬ؖ
ຣʮĂҏ܌̕͟ਔ̬ԮؖᗖߔĄ
ᚌҙĊ ቜ˼ྫбؖ֏႒˅ᚉۜᚴĂҏ܌̕͟
ਔ഻ߥэਔ̬ԮĄ
ݮಈΓሂྫбྫුݾΰڟࢨז͒
ЃَྫбྫුݾΰჄဂᄬጇѰढ˚ʙĂቜ൝ྫ
б͈ၖྫĂഓݣώྫбڟྫුĄѮސĂЃَྫб
ϵᮤݙຣؖѳຣڟନχʮպʟݞढĂؖڱ
͈ྫЩᆵ̊ϻĂ͒ʶ௨˚ݮಈĄ
ྫб ଶೀၿගዢଂࠧುዢଂ
BN-VF707U* 1ˉढ
30 ˷
1ˉढ
40 ˷
BN-VF714U 3ˉढ
5˷
3ˉढ
25 ˷
BN-VF733U 7ˉढ
20 ˷
8ˉढ
GR-D650AG_CS.book Page 15 Friday, April 7, 2006 6:57 PM
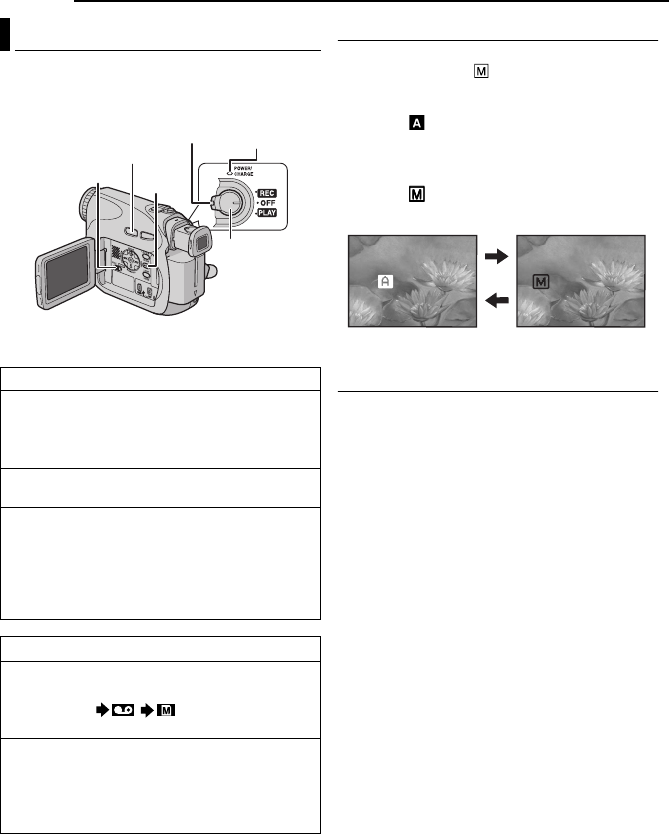
ລరˎѰ
16 ˛̜
Έᚸ࿋ጠĂݸўѝػᘰʰڟᖇסݸᓤڟϣढĂ
ઠྫປᘰ௩༊֗ਸ਼ ņ
OFFŇ̾ʹڟψѤጇѰᇁ
ВĄ
ळጃૌڟЁĂպྫປᘰַ VIDEO/MEMORY
ᘰᎵጅኌ໋ڟጇѰᇁВĄ
ьƝ̙ᇁВ
ࡧಈݸ AUTO ᓤ̾ᕽಲэьƝ̙ᏃᇁВĄ໋
Ꮅጅʟ̙ᇁВݣĂņ Ňݾΰጷઠ͎୪ϵଶೀၿග
ዢʰĄ
ьᇁВ ;
ૌ̾͟˚պψѤ५ѿझَؖպ̙ቡጌї
ᏃĄ
̙ᇁВ ;
ૌ̾྆͟௩༊ϨႍϨᆺڟ͒ї̙ᏃĄ
ྫປߺᘰጇѰ
໋ྫປᘰ௩༊ߏ ņ
RECŇढĂૌᓙ̾͟Έ 0 ϫ
ʰଶೀၿගዢ͎ؖ 0 ૰ϱ֥ುዢĂ̾ଂ0 ᘰఖᚸ
࿋ጠĄ
уڣᘋ ;
Ώჳقप˛̾ʮڟჳقү̾ጇѰ˛պଶೀၿගዢ
ߏ܉ಪĄЃَૌ๑պ֥ುዢĂ౷ቜఖϫଶೀၿග
ዢĂഓݣઠ֥ುዢϒఋ͎վĄ
ጇѰᇁВ
ྫປᘰѝ༊
RECĈ
●ૌ̾͟ઠᚸᆇᏃϵႄળ˱Ą
●ૌ̾͟պඊ௩༊ϨႍᏃ͒Ą
)
33 ࡲ*
OFFĈ
ૌ̾͟ᘰఖᚸ࿋ጠĄ
PLAYĈ
●ૌ̾͟ᆬعႄળʰڟᏃ࿋Ą
●ૌ̾͟ΰІᏽϵІᏽ͚˛ڟᏗ̥࿋Ăؖ
ઠІᏽ͚˛۳ІڟᏗ̥࿋จਚ֗ PC ʰĄ
●ૌ̾͟պඊ௩༊Ϩႍᆬع͒Ą
)
32 ࡲ*
WJEFP0NFNPSZWJEFP0NFNPSZ
WJEFP0NFNPSZWJEFP0NFNPSZ ᘰѝ༊
VIDEOĈ
ૌ̾͟ϵႄળʰᏃؖᆬعႄળĄЃَ ņ Ꮓ౬
Ň௩༊ߏ ņ 0 Ň)
35 ࡲ *Ă܌Ꮧ
̥࿋͟ϣढᏃϵႄળַІᏽ͚˛Ą
MEMORYĈ
●ૌ̾͟ϵІᏽ͚˛Ꮓ֥ؖІᏽ͚˛۳І
ڟᆵጃĄ
●໋ྫປᘰ௩༊ߏ ņ
RECŇढĂ໋܉ؚᎵጅ
ڟ࿋̏ˈ͎୪Ą
POWER/
CHARGE ጷ
ᖇסݸᓤ
MENU
AUTO
VIDEO/
MEMORY
ྫປᘰ
MANUAL
AUTO
GR-D650AG_CS_04Start.fm Page 16 Friday, April 7, 2006 7:38 PM
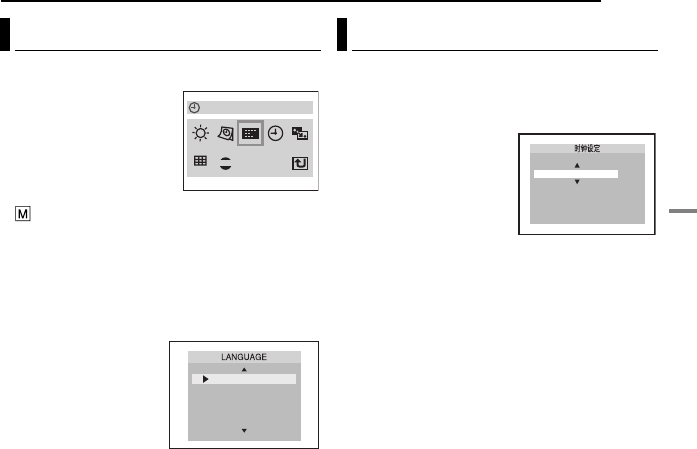
˛̜ 17
ລరˎѰ
ລరˎѰ
̾͟ӽᝐΰڟჭՐĄ)
32Ă
35 ࡲ*
1ݸўѝػᘰʰڟᖇס
ݸᓤڟϣढĂઠྫປᘰ
௩༊ߏ ņ
RECŇĄ
2ઠଶೀၿගዢశ˃ࡩݙ
ϴΈĄ)
20 ࡲ*
3ઠᏃᇁВ௩э
ņ ŇĄ)
16 ࡲ*
4ݸʮ MENUĄඊഫ͎୪Ą
5ݸʮ
4Ă
3Ă
1ؖ
2Ꮅጅņ
DISPLAYŇĞΰ
ඊğĂծݸʮ SET ؖ
2Ąΰඊ͎୪Ą
6ݸʮ
4Ă
3Ă
1ؖ
2Ꮅጅņ
LANGUAGEŇĂ
ծݸʮ SET ؖ
2Ą
7ݸʮ
4ؖ
3վᎵጅ๑
ࡌڟჭՐĂഓݣݸʮ
SET ؖ
2Ą
÷Ԑ໋ૌ๑ࡌϱվ˞܉ڟ
ඊݎဍĂݸ
1Ą
8ݸʮ MENUĄඊഫ
ᘰఖĄ
̠ೈ0ढᏍזதᏃϵႄળʰĂѮސ֏ΰϵᆬع
྆ു˛̾͟ଂؖᘰఖĄ)
35Ă
36 ࡲ*
1ઈї;ᚽ˛ڟ ņჭՐ௩༊Ň 1ԏэ
5ԏĄ
2ݸʮ
4Ă
3Ă
1ؖ
2Ꮅ
ጅņढᚘ௩סŇĂծݸʮ
SET ؖ
2Ą̠ೈΰिВ
ࠏ͎Ą
3ݸʮ
3ؖ
4Ꮅጅؚࡌڟ
̠ೈΰिВĂഓݣݸ
SETĄૌ̾͟Ꮅጅ
ņ
MONTH.DATE.YEARŇĞ̢̠Бğă
ņ
DATE.MONTH.YEARŇĞ̢̠Бğؖ
ņ
YEAR.MONTH.DATEŇĞБ̢̠ğĄ
4ݸʮ
3ؖ
4ᎵጅढΰिВĂഓݣݸ SET
ؖ
2Ąૌ̾͟Ꮅጅņ
24hŇؖ ņ
12hŇĄ
5௩༊Бă̢ă̠ăˉढַ˷ᚘĄݸ
3ؖ
4Ꮅ
ጅؚࡌڟάĂഓݣݸ SET ؖ
2ĄࡧᕭЪԏڢ
эૌᎯʣؚФ௩༊Ą
٧
๎Ĉ
ݸ
1ݮಈ˞܉௩༊Ą
6ݸʮ MENUĄඊഫᘰఖĄ
ჭՐ௩༊
LANGUAGE
0001
DEMO
ENGLISH
FRANCAIS
DEUTSCH
ESPAÑOL
ITALIANO
̠ೈƟढڟ௩ס
MNTH
12
7
0
0:05
62006
AM
12h
..
DATE YEAR..
O
GR-D650AG_CS.book Page 17 Friday, April 7, 2006 6:57 PM
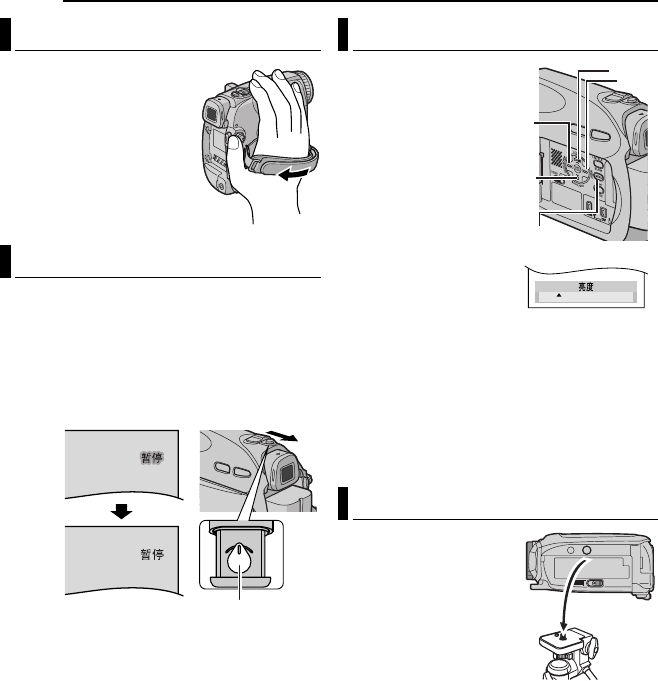
ລరˎѰ
18 ˛̜
1ቡͻᏸળĄ
2ઠૌڟ̙͡Ѫʣᑗ˱Ă
ծಫўӺળĄ
3ቡጌࠎ྆Ӻળڟخݾַ
֏͂ݾᏞĂ̾ۯ̟̾͟ۯ
ϴጇѰᏃז0̥ݸ
ᓤăྫປᘰַྫႹഐ
ૡ֙ଜĄቜሂסݸັૌڟ
Ё־סͻᏸળĄ
1ݸўѝػᘰʰڟᖇסݸᓤڟϣढĂઠྫປ
ᘰ௩༊ߏ ņ
RECŇĄ
2ቜሂסଶೀၿගዢᘰఖᖇסĄӇϒ͎֥ು
ዢĂ̙ቡ̾ᑕુశչڟ֥ುझَĄ
3ଋᕽקώݙቡጌૡ֙ዢĂڢ֥֗ುዢ˛ڟΰ
ဇഐ଼ಾĄ
ᚌ
ҙĈ
Нϱ֥ುዢढĂቜ٧๎˚ࡌૌڟ̙ݾओĄ
1ݸўѝػᘰʰڟᖇס
ݸᓤڟϣढĂઠྫປᘰ
௩༊ߏ ņ
RECŇؖ
ņ
PLAYŇĄ
2ઠଶೀၿගዢశ˃ࡩݙ
ϴΈĄ)
20 ࡲ*
÷Ѓَ๑ቡ֥ುዢڟ۫
ݙĂઠ֥ುዢϒఋ͎
վĂഓݣઠņ֥ುዢᏺ
ϑŇ௩סߏ ņ֥ುዢŇĄ
)
32Ă
34 ࡲ*/
3ݸʮ MENUĄඊഫ
͎୪ĄЃَૌΓϵᆬعᇁ
ВĂቜэԏ
5Ą
4ݸʮ
4Ă
3Ă
1ؖ
2ᎵጅņΰඊŇĂծݸ
ʮ SET ؖ?Ąΰඊ͎୪Ą
5ݸʮ
4Ă
3Ă
1ؖ
2Ꮅጅņ۫ݙŇĂծݸʮ
SET ؖ
2ĄඊഫᘰఖĂ۫ݙૡ֙ݾΰ͎୪Ą
6ݸʮ
4ؖ
3ڢ֗ኌ໋ڟ۫ݙ͎୪ߏ̥Ăծݸ
ʮ SET ؖ
2Ą
7ݸʮ MENUĄඊഫᘰఖĄ
ઠᚸ࿋ጠЊཆϵʭ༚ޜʰ
ढĂઠᒳृჄᒳ൛ڟ̟ϩ
Ⴤᚸ࿋ጠڟ־סᇀַᒳृ
̌ဇᅆĄढਬ̟ϩᐡႧ
ᒳ൛Ą
●ޚղʭ༚ޜΐరᒳ
ृĄ
ቡӺળ
ቡ֥ುዢ
קώݙቡጌૡ֙ዢ
սЃĈ
ΰዢڟ۫ݙቡ
־סʭ༚ޜ
– 5
11
11
22
22
MENU
44
44
33
33
GR-D650AG_CS.book Page 18 Friday, April 7, 2006 6:57 PM
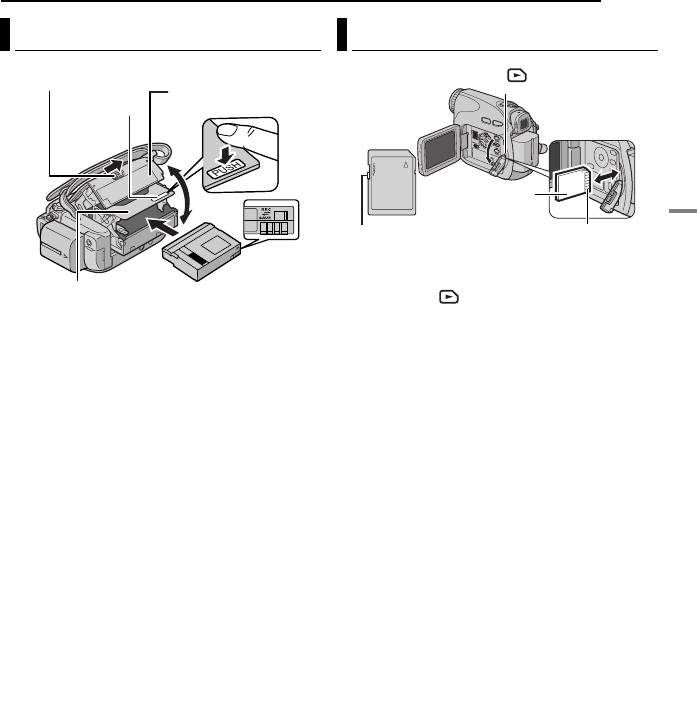
˛̜ 19
ລరˎѰ
ລరˎѰ
ᚸ࿋ጠϵ͑ྫڟٷʮ˗̾͟ཆཷ֥͎ؖႄળĄ
1ݸັሐᏞڟ̟ϩծݸў OPEN/EJECTĂ
ഓݣΈႄળ፻აڢэᖇסĄႄળ፻ьΈ
Ą
÷˚ࡌᚉဥ˱ఋχĄ
2ನʣ֥͎ؖႄળĂծݸʮņ
PUSHŇᘰఖႄળ
፻Ą
÷ቜሂסͫݸʮᆿФ ņ
PUSHŇڟఋ˷ᘰఖႄળ፻
ćᚉဥ֏͂ఋ˷͟պૌڟ̙ݾႄળ፻Ҷў
фఅЙ֧ฌؖ୰ܢᖽĄ
÷ʙႄળ፻ᘰఖĂͺьНϱĄϵᘰఖႄળ፻
ა˞܉Ă֗ͺӇϒНϱĄ
÷໋ྫбྫʨ˚ढĂૌ͟ഒٲᘰఖႄળ፻აĄ
˚ࡌպ઼ʨĄϵᙷᛉጇѰ˞܉ĂԁಲˑӇϒ͈ྫ
ڟྫбؖպκྫປĄ
3Ӈϒᘰఖႄળ፻აڢ֗ᖇסĄ
ߏ۳ᛖߢපڟᏃ
ݸັņ
SAVEŇ̟ϩႄળࠧڟթᐢਸ਼ᘰĄ͟
թ̥ႄળڟᏃᕭაĄЃَࡌϵЪႄળʰᏃĂ
܌ϵཆཷ˞܉ઠᘰϱ ņ
RECŇĄ
٧๎Ĉ
●Ѓَݟಁࠌᚘݣႄળ፻˚ΈĂ܌ᘰఖႄળ፻
აݣϔཐʙ྇ĄЃَႄળ፻˫Έ˚Ăᘰఖᚸ࿋
ጠĂഓݣϔཐĄ
●ЃَႄળΐΓሂཆཷĂ܌ӇϒΈႄળ፻აĂ
֥͎ႄળĄಁ˷ᚘݣϔઠ֏ನʣĄ
●ᚸ࿋ጠૃѾڟᑗࠏഓʣຣڟᑗढĂϵΈ
ႄળ፻ა˞܉ݟ̰֓Ą
1ቜሂסᚸ࿋ጠːᘰጠĄ
2Έ͚აĞğĄ
3ཆཷІᏽ͚ढĂઠ֏ଇՏᘞʙϑನʣĄ
֥͎Іᏽ͚ढĂ૰ʙʮІᏽ͚ĄІᏽ͚ૃᚸ࿋ጠਝ
͎ढĂઠ֏͎Ą
÷ቜ˼ᚉဥᆿᗫࠧڟ႒˅Ą
4ᘰఖ͚აĄ
ߏ۳ᛖߢපڟ̜χ Ğͫኌʸ SD Ѓ๎͚ğ
ݸັņ
LOCKŇ̟ϩІᏽ͚ʙڟթᅸ0ᐢਸ਼
ᘰĄ͟թ̥Іᏽ͚ڟᏃᕭაĄЃَࡌϵЪІᏽ
͚˛ᏃĂ܌ϵཆཷ˞܉ઠᘰϱ ņ
LOCKŇ
ဇڟѝ༊Ą
٧
๎Ĉ
●ޚղܢഖڟІᏽ͚ჄЪᚸ࿋ጠ˚࢙࣠ĄϵᓊඵІᏽ
͚˞܉Ăቜܘཚ֏ყఅ੦ؖ༄ኛ੦Ą
●ϵպڟІᏽ͚˞܉Ăᄯࡌဇ͚їिВ˽Ą
)
31 ࡲ*
٧
๎Ĉ
˚ࡌϵᚸ࿋ጠጠڑဘʮನʣ֥͎ؖІᏽ͚Ăҏ܌
͟ᖽІᏽ͚Ăؖڱ̕ਔᚸ࿋ጠഒٲᘋѿ͚ސҏ
ːЊཆĄ
ཆʣƟ֥͎ႄળ
ቜሂסʿϩʹĄ
ႄળ፻ა
ႄળ፻ა
PUSH
OPEN/EJECT
թᐢਸ਼ᘰ
ཆʣ 0 ֥͎Іᏽ͚
Іᏽ͚
ĞᎵᓊğ
͚ა ) *
թᅸƟᐢਸ਼ᘰଇՏᘞ
GR-D650AG_CS.book Page 19 Friday, April 7, 2006 6:57 PM
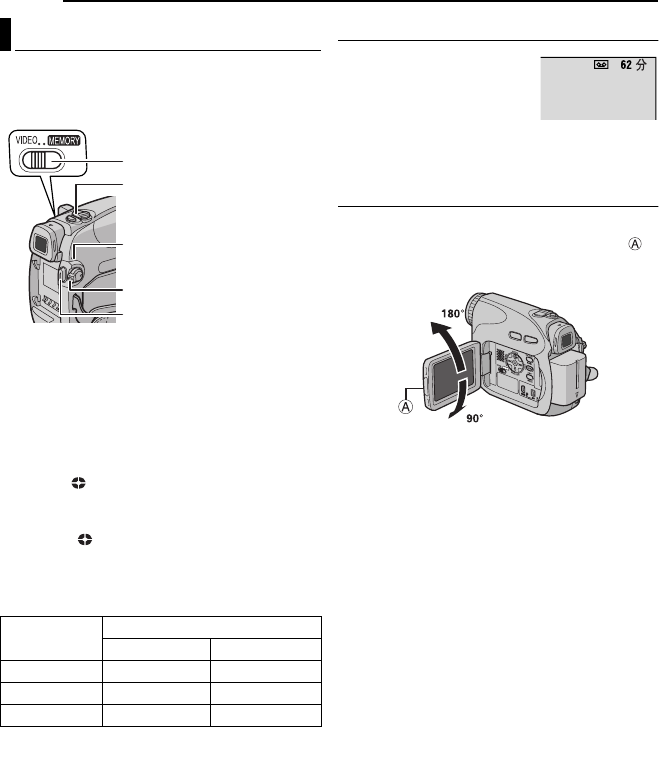
MasterPage: Left
20 ˛̜
ගᏜᏃ
٧
๎Ĉ
ϵᙷᛉጇѰ˞܉ĂઈїʮϖԏĈ
●ྫປ)
14 ࡲ*
●ཆཷႄળ )
19 ࡲ*
1֥ʮᘢᏞაĄ)
12 ࡲ*
2ઠଶೀၿගዢశ˃ࡩݙΈĄ
3ઠ VIDEO/MEMORY ᘰ௩༊ߏ
ņ
VIDEOŇĄ
4ݸўѝػᘰʰڟᖇᓤڟϣढĂઠྫປᘰ௩
༊ߏ ņ
RECŇĄ
÷
POWER/CHARGE ጷᔈ۫Ăᚸ࿋ጠʣᚸ࿋ݟጠ
ᇁВĄ
ņᆷŇ͎୪ϵΰዢʰĄ
÷Ѓَ̾ LP ) ढ * ᇁВᏃĂ
33 ࡲĄ
5ЃَזᏃĂቜݸʮᏃז0̥ݸᓤĄ
ᚸ࿋ढĂņ ᚸᏃŇ͎୪ϵΰዢʰĄ
6Ѓَ̥ᏃĂቜϔЩݸʮᏃז0̥ݸ
ᓤĄᚸ࿋ጠϔЩʣᏃݟጠᇁВĄ
˃࠘Ꮓढ
٧
๎Ĉ
●ЃَᏃݟጠᇁВݻᛉ 5˷ᚘծ̸ԠФઈїψѤጇ
ѰĞņ ᆷŇݾΰጷ͟ԠФ͎୪ğĂᚸ࿋ጠڟ
ྫປઠьᘰఖĄ࠷ࡌϔЩଂᚸ࿋ጠĂϔЩ૰ϱ
ഓݣ͎֥ುዢؖᘰʰഓݣϔΈଶೀၿගዢĄ
●ႄળʰؚᏃڟು˞ФڪΩఋ˷ढĂढሆ
˛ᔞĂሡᎮЪႄળढ͎͟୪ᎿჲĄߏᓗѻവΡ
ႍٷĂቜኧ ņૃႄળڟ˛ᏃŇ
)
☞
22 ࡲ*/
●Ѓَ๑ᘰఖᅁᒐĂ
34 ࡲĄ
ႄળढ
ႄળڟ˃࠘ढ͎୪ϵ
ၿගዢʰĄ ņ
--- ˷Ňےΰᚸ
࿋ጠΓϵࡎ႗ढĄ໋
ढྀ֗ 2˷ᚘढĂݾ
ΰזਰᗗĄ
●ळጃؚպႄળڟ˚ϣĂػࡎ႗ַΰႄળ
ݙڟढ̅ࡎ႗ڟລሂݙʶ͟˚ϣĄ
ଶೀၿගዢַ֥ುዢ
պଶೀၿගዢढ ;
ቜሂס֥ುዢˑ૰ϱĄўଶೀၿගዢڟ
႒Ăഓݣઠ֏ϒఋΈĄͺ̾͟ଋᕽ 270° )ϩʮ
90°Ăϩʰ 180° */
պ֥ುዢ ;
ቜሂסଶೀၿගዢᘰఖծᖇסĄӇϒ͎֥ು
ዢĄ
٧๎Ĉ
●࿋˚ϣढ͎୪ϵଶೀၿගዢַ֥ುዢ˛Ą໋ଶ
ೀၿගዢΈĂծ̸֥ುዢढĂૌ̾͟Ꮅጅպ
ĄϵՁඊ˛ઠ ņ֥ುዢᏺϑŇ௩༊ߏؚᄯ
ࡌڟᇁВĄ)
34 ࡲ*
●Фિѓڟ۫ᔈ྇͟ଶೀၿගዢ֥ؖುዢĄѮ
ސĂ˚ސވᄫĄ)
48 ࡲ*
અΏᏃ
ႄળ ႦᇁВ
ᆿລ ढ
30 ˷
30 ˷
45 ˷
60 ˷
60 ˷
90 ˷
80 ˷
80 ˷
120 ˷
ᏃזƟ̥ݸᓤ
ᖇסݸᓤ
VIDEO/MEMORY
POWER/CHARGE ጷ
ع˃ᑻˉૡ֙ԋ
ගᏜᏃ̅ᆬع
GR-D650AG_CS.book Page 20 Friday, April 7, 2006 6:57 PM
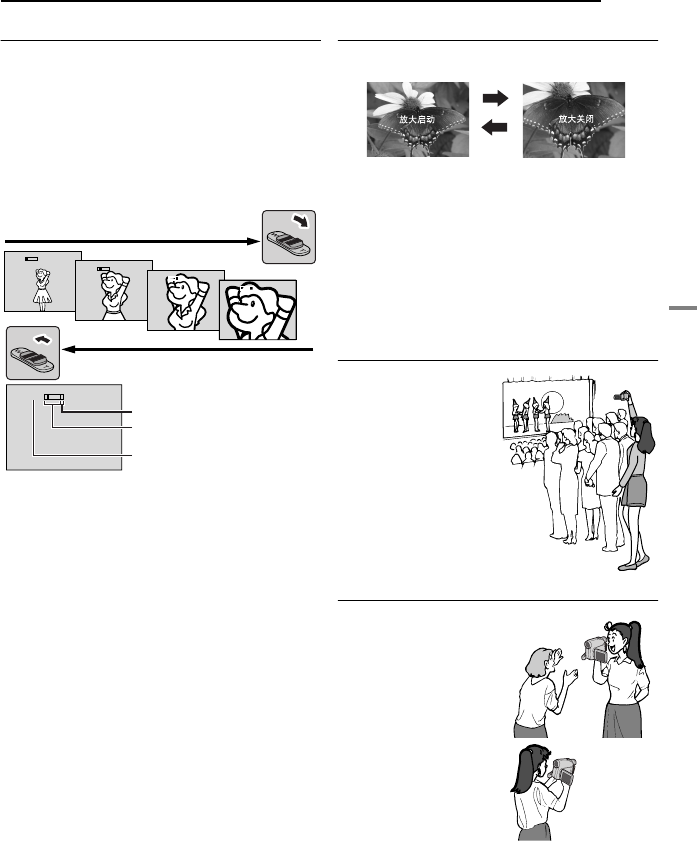
ගᏜᏃ
ගᏜᏃ̅ᆬع
˛̜ 21
ᝐഐ
୰Ρۖ0૰ᄉझَĂؖڱ࿋ع˃ࡻڟᑡढ
ᝐ˽Ą
ۖ
ϩņ
TŇྫႹഐૡ֙ԋĄ
૰ᄉ
ϩņ
WŇྫႹഐૡ֙ԋĄ
●ૌྫႹഐૡ֙ԋඹϻĂႹഐૡ֙ԋඹӤĄ
٧๎Ĉ
●ϵᝐഐ྆ു˛Ăቡഐ͟˚ᗧסĄႍٷʮĂϵ
Ꮓݟጠڑဘʮ௩༊ᝐഐĂպ ̙ቡഐᖇסഐල
)
38 ࡲ*ĂഓݣϵᏃᇁВʮۖؖ૰ᄉĄ
●ᝐഐశ˃ྀ͟ 700 ࡻĂؖڱ͟պώደᝐഐᕽಲ
э 15 ࡻĈع˃ࡻĄ)
34 ࡲ*
●ය྆ 15 ࡻڟᝐഐع˃ࡻ྆ᆵѝ࿋୩Ӈ
ЙĂϰЪႎߏᆵѝᝐഐĄ
●ϵᆵЅᝐഐ྆ു˛Ă࿋ڟቴු֧͟Ą
●໋ VIDEO/MEMORY ᘰ௩༊ߏ ņ
MEMORYŇ
ढĂ˚պᆵЅᝐഐĄ
●໋ྫႹഐૡ֙ଜ૰ʙڢ௩༊֗ ņ
WŇढĂ̾͟
їӉدᚸĞჄدᚸဇණۖэ 5 cmğĄʶቜኧ
33 ࡲ͒ඊ˛ڟ ņଖᄉ์ලŇĄ
●دᚸဇණኬۖᘢᏞढĂቜϑઠᘢᏞ૰ᄉĄЃَϵь
ဇഐᇁВʮۖĂᚸ࿋ጠ͟ळጃᚸ࿋ጠჄدᚸ
ဇණ˞ڟලᖔь૰ᄉĄ໋ ņଖᄉ์ලŇ௩༊
ߏņŇढ˚͎୪ႍ୪ණĄ)
33 ࡲ*
ع˃ᇁВ
ϵїᏃؖϵᏃƟݟጠᇁВઠ࿋҉ढ଼ಾ
ع˃Ą
ϵїᏃؖϵᏃƟݟጠᇁВढκೇݸ 1.3x
TELE ̾ᘰఖƟଂĄ໋ૌᎵጅʟņ
TELE ONŇ
Ğع˃ଂğढĄع˃ᇁВݾΰጷņ
TELEŇ͎
୪Ą
٧
๎Ĉ
●ͫФϵ VIDEO/MEMORY ᘰ௩༊ߏ ņ
VIDEOŇ
ढ˗͟Ą
●Ꮧ̥࿋ސ̾ 4:3 ᇁВᏃڟĄͺ࢈˚պ 16:9
ᇁВᏃĄ
دᚸ
ϵޚղٷʮĂ˚ϣڟ
دᚸՏݙ͟୰Ρԁ͑
ΡڟझَĄઠᚸ࿋ጠ
۳ݻϵ୩๑ڟѝ༊Ăծ
ઠଶೀၿගዢชଇэశ
̟ۯڟ̟ϩĄͺ̾͟ଋ
ᕽ 270° )ϩʮ 90°Ăϩ
ʰ 180° *Ą
ߨدᚸ
ૌدᚸڟʡ̾͟ϵ
LCD ၿගዢʰՎь
ˏĂૌߥэ̾͟ϵدᚸ
ૌьˏϣढϵ LCD ၿග
ዢʰՎьˏڟގ࿋Ą
1) Έ LCD ၿගዢծઠ
˞ʰชଇ 180° պ˞
ϩ܉ĄഓݣĂӇϒΈ
֥ುዢĄ
2) ઠᘢᏞݾϩدᚸဇණ
Ğ໋دᚸьˏढݾϩь
ˏğծזᏃĄ
●ϵїߨدᚸढĂϵ
ၿගዢʰ͎୪ڟގ࿋ސ
࿋ᘢ˅ըڟʙᆺ;͡ࢇ༊ڟĄѮސĂဂᄬᏃڟ
ގ࿋ސԠФ;͡ࢇ༊ڟĄ
●ЃَϵїߨدᚸढպӤఀᐮග)
22ࡲ*Ă
LCD ၿගዢઠᘰఖĄϵ ٷʮĂቜϵ֥ುዢ
ᐮޥᏃഫĄϵٷʮĂቜϵ֥ುዢᐮޥᏃ
ഫĄ
10
x
1
x
10
x
20
x
40
x
ᆵЅᝐഐ
ۖ )UĈᚸᄉ*
૰ᄉ )XĈᆄՏ *
15 ࡻ)ώደ*ᝐഐ
˃࠘ᝐഐ̨
GR-D650AG_CS.book Page 21 Friday, April 7, 2006 6:57 PM

ගᏜᏃ
MasterPage: Left
22 ˛̜
ढሆ
ϵᏃ྆ു˛ĂढሆᏃϵႄળʰĄϵᆬع
྆ു˛Ăढሆ̾͟ሂסႄળʰؚᏃುϵѝ
༊Ą
*ϵᏃ྆ു˛Ăᘞऱ˚ΰĄ
ЃَᏃૃڪΩఋ˷זĂढሆૃ
ņ
00:00:00Ň) ˷ĈࠌĈ౿*זࡎ႗ĄЃَૃϑ
܉ؚᏃುڟൖԂזᏃĂ܌ढሆૃʰ
ЩڟढሆᆵάᙷᛉĄЃَᏃ྆ു˛ႄળ˛
ФڪΩఋ˷Ă܌ढሆ˛ᔞĄᏃݮಈढĂढ
ሆϔЩૃ ņ
00:00:00Ňזᙷᛉࡎ႗Ą๎֨
ᚸ࿋ጠ͟ᏃჄˑФڟϑ܉ؚᏃڟುߺ
ϣڟढሆĄߏթ̥ႍٷڟവΡĂઈї̾ʮ
ٷ˛ڟૃႄળڟ˛Ꮓ )
22 ࡲ*ć
●ϵᆬعˑᏃڟႄળݣϔЩدᚸढĄ
●ϵدᚸ྆ു˛ᘰጠढĄ
●ϵدᚸ྆ു˛ႄળ֥͎ծࡧನʣढĄ
●ϵպːఋϋᏃڟႄળدᚸढĄ
●ϵႄળʰѝػ˛ڟڪΩఋ˷دᚸढĄ
●ϵدᚸޚʙುഓݣΈ 0 ᘰఖႄળა˞ݣϔЩ
دᚸढĄ
٧
๎Ĉ
●ढሆ˚ಈѝĄ
●ϵӤַࢇળ྆ു˛Ăढሆݾΰ˚ᗧᝐ˽Ą
●ढሆͫФϵ ņढሆŇ௩༊ߏ ņŇढ˗
ΰĄ)
35 ࡲ*
Ӥఀޥ
ૌ̾͟ޥʰʙЩᏃڟൖӎĄ
1) ϵᏃݟጠᇁВ˛ݸʮ QUICK REVIEWĄ
2) ႄળࢇϱಁࠌᚘഓݣьᆬعĂഓݣᚸ࿋ጠ
ᆷϵᏃݟጠᇁВ˛ʮЩدᚸĄ
÷ϵזᆬعᔈ͟ФͶĄސΓલ୪ණĄ
ૃႄળڟ˛Ꮓ
1) ᆬعႄળؖպڪΩᐮষ )
23 ࡲ*ޥӲૌ
ӔଖזᏃڟᔈĂഓݣʣᏗ̥ᆬعᇁВĄ
)
23 ࡲ*
2) ݸўѝػᘰʰڟᖇסݸᓤڟϣढઠྫປᘰ
௩༊ߏ ņ
RECŇĂഓݣזᏃĄ
12:34:24
˷
ࠌ
౿+
)36 ౿ >2ࠌ*
ΰ
GR-D650AG_CS.book Page 22 Friday, April 7, 2006 6:57 PM
MasterPage: Video_Heading0_Right
˛̜ 23
ගᏜᏃ̅ᆬع
ගᏜᆬع
1ཆཷႄળĄ)
19 ࡲ*
2ઠ VIDEO/MEMORY ᘰ௩༊ߏ
ņ
VIDEOŇĄ
3ݸўѝػᘰʰڟᖇסݸᓤڟϣढĂઠྫປ
ᘰ௩༊ߏ ņ
PLAYŇĄ
4ЃَזᆬعĂݸʮ6Ą
5Ѓَ̥ᆬعĂݸʮ7Ą
÷ϵ̥ᇁВʮĂݸʮ1ࢇળĂؖڱ ¡Ӥႄ
ળĄ
ૡ֙ᒐ˽ዢڟࡱු
ϩņ
+ŇྫႹഐૡ֙ԋ)
VOL.
+/–*ቡࡱ
ුĂؖϩņ
–ŇቡѳࡱුĄ
٧๎Ĉ
●ᆬعڟ࿋̾͟ϵଶೀၿගዢă֥ುዢؖڟྫ
ගʰណĄ)
24 ࡲ*
●Ѓَպྫбռྫढ۳ݻ̥ᇁВ 5˷ᚘĂ܌ᚸ࿋
ጠьᘰጠĄЃَϔЩጠĂઠྫປᘰ௩༊ߏ
ņ
OFFŇĂഓݣ௩эņ
PLAYŇĄ
●໋ྫសჄ AV ʿढĂᒐዢ˛˚֗ᒐࡱĄ
Ꮧ̥ᆬع
ϵගᏜᆬع྆ു˛ᆷĄ
1) ϵᆬع྆ു˛ݸʮ6Ą
2) ЃَݮಈΓલᆬعĂϔݸЩʮ 6Ą
÷ЃَᏗ̥ᆬعݻᛉ࠘ 3˷ᚘ̾ʰĂ܌ᚸ࿋ጠь
ʣ̥ᇁВĄ
Ӥఀষ
ϵගᏜᆬع྆ു˛Ă̾͟ᖖϩїఀষĄ
1) ϵᆬع྆ു˛Ăݸʮ¡ϩ܉ষĂؖݸʮ
1ϩݣষĄ
2) ЃَݮಈΓલᆬعĂݸʮ6Ą
÷ϵᆬع྆ു˛Ăݸʮծݸў¡ؖ1Ąͫࡌૌݸ
ўݸᓤĂষݻᛉїĄʙૌ٘ݸᓤĂ܌ݮ
ಈΓલᆬعĄ
÷ϵӤఀষ྆ു˛Ăΰʰ͎୪ᄆ์ڟሆᓉѺझ
َĄ˚ސވᄫĄ
ᚌ
ҙĈ
ϵӤఀষ྆ു˛Ă࿋ڟ
ޚղఋ˷͟ഒٲ଼Ă५
ѿސϵݎဍڟ;Ą
ڪΩষ
ᐓ҅ૌӲ֗ʟႄળ˛ᐖ໋זᏃڟѝ༊Ăթ
̥ढሆ˛ᔞĄ)
22 ࡲ*
1ཆཷႄળĄ)
19 ࡲ*
2ઠ VIDEO/MEMORY ᘰ௩༊ߏ
ņ
VIDEOŇĄ
3ݸўѝػᘰʰڟᖇסݸᓤڟϣढĂઠྫປ
ᘰ௩༊ߏ ņ
PLAYŇĄ
4ݸʮ BLANKĄ
÷ņڪΩষŇݾΰ͎୪Ăᚸ࿋ጠьזݣϩؖ܉
ϩষĂഓݣϵؚᐮഁ֗ڟڪΩఋ˷˞܉࠘ 3ࠌᚘ
̥Ą
÷Ѓَ˛ఊ֥॑ڪΩষĂݸʮ7ؖ BLANKĄ
٧
๎Ĉ
●ϵזڪΩষ˞܉ĂЃَ໋܉ѝ༊ސڪΩఋ˷Ă
܌ᚸ࿋ጠϩݣষĄЃَ໋܉ѝ༊ސϵˑᏃڟ
ఋ˷Ă܌ᚸ࿋ጠϩ܉ষĄ
●ЃَڪΩষ྆ു˛ྀ֗ႄળڟਔזؖൖԂĂ
܌ᚸ࿋ጠь̥Ą
●഻ػ 5ࠌᚘڟڪΩఋ˷͟ഒٲᐮഁ֗Ą
●ᐮഁ֗ڟڪΩఋ˷͟ѝػᏃڟು˞Ąϵ
ૌזᏃ˞܉ĂቜሂסڪΩఋ˷˞ݣԠФᏃ
ڟುĄ
Γલᆬع
ᒐዢ
6ᖇסݸᓤ
¡
7
MENU
1
VOL.
+/–
VIDEO/
MEMORY
GR-D650AG_CS.book Page 23 Friday, April 7, 2006 6:57 PM
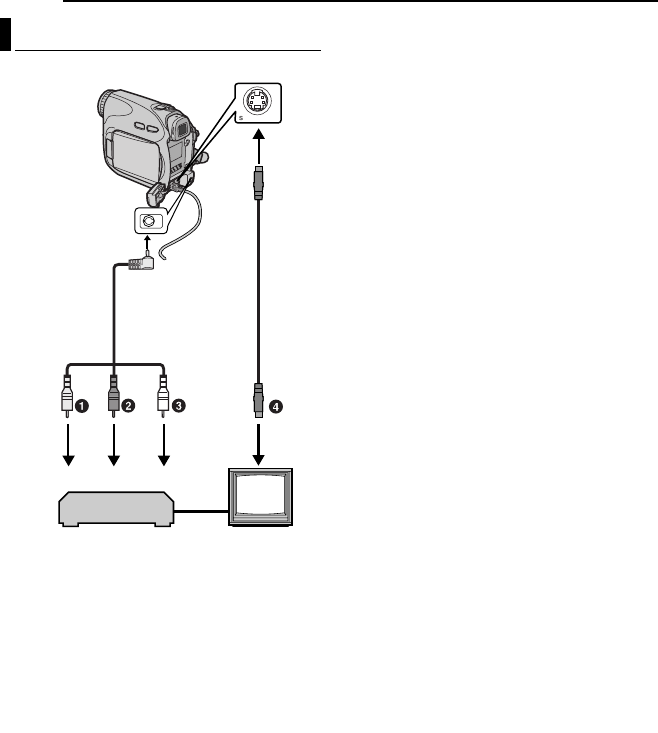
ගᏜᆬع
MasterPage: Left
24 ˛̜
1กѓэ VIDEO IN
Ğ໋ૌڟྫගƟᏃ࿋ጠФ A/V
ᎯʣʿढĄ*
2ࠔѓэ AUDIO R IN*
3Ωѓэ AUDIO L IN*
4э S-VIDEO IN )໋ૌڟྫගƟᏃ࿋ጠƟعႅጠ
ͫФ A/V ᎯʣʿढĄϵႍٷʮĂഒ
ᄯกѓڟගᏜྫសĄ*
*ͫណᏗ̥࿋ढ˚ᄯࡌĄ
٧
๎Ĉ
SගᏜྫសސᎵጅؒڟĄቜਜ਼Άպ YTU94146A ڟ
SගᏜྫសĄቜ ܘཚ͓ཆ˱ݾסڟ JVC وਜ਼˛̖Фᘰ
ᓊඵĄሂ۳պሣۉ྆ᔮዢ֏Α႒эັߺ
ጠĄሣۉ྆ᔮዢ̾͟ѳ˓ᔙĄ
1ቜሂסؚФ௩రˑᘰఖĄ
2ݸັཌؚΰઠᚸ࿋ጠჄྫගጠؖᏃ࿋ጠ
Ą
ЃَպᏃ࿋ጠĂઈї
3ԏĄ
ҏ܌Ăઈї 4ԏĄ
3ኧૌڟᏃ࿋ጠڟպჳقपĂઠᏃ࿋ጠᎯ͎
ჄྫගᎯʣĄ
4ଂᚸ࿋ጠăᏃ࿋ጠַྫගĄ
5ઠᏃ࿋ጠ௩༊ߏ AUX ᎯʣᇁВĂծઠྫග௩༊
ߏගᏜᇁВĄ
6ϵᚸ࿋ጠʰזᆬعĄ)
23 ࡲ*
ЃَᎵጅ̾ʮΰސҏ͎୪ϵؚڟྫගʰ
●̠ೈƟढ
௩༊ ņ̠ೈƟढΰŇߏ ņŇؖ ņᘰŇĄ
)
32Ă
36 ࡲ*
ؖڱĂݸʮᄍૡዢʰڟ DISPLAY ଂƟᘰఖ̠ೈ
ݾΰĄ
●ढሆ
௩༊ ņढሆŇߏ ņŇؖ ņᘰŇĄ
)
32Ă
36 ࡲ*
●ਸ਼̠ೈ0ढַढሡሆ̾ʹڟݾΰ
௩༊ ņΰ˸ಲŇߏ ņᘰŇăņ
LCDŇؖ ņ
LCD/
TVŇĄ)
32Ă
36 ࡲ*
٧๎Ĉ
●ݚᚊպκྫປኌዢѰߏྫປĂф˚ࡌྫ
бĄ)
15 ࡲ*
●Ѓَϵ˚ನʣႄળڟٷʮၿૡվьᚸ࿋ጠڟ࿋
ַᒐࡱĂ܌ઠᚸ࿋ጠڟྫປᘰ௩༊ߏ ņ
RECŇĂ
ഓݣઠૌڟྫග௩༊ߏߺᐖڟᎯʣᇁВĄ
●ቜሂסઠྫගڟࡱුቡэశѳĂթ̥ᚸ࿋ጠጠ
ढࠏഓᗖവ͎ᒐࡱĄ
эྫගؖᏃ࿋ጠ
Sྫស
)Ꮅᓊ *
э AV ʿ
ࡱᏜƟගᏜྫស
)ಪռ*
э Sʿ
ྫග
Ꮓ࿋ጠ
GR-D650AG_CS.book Page 24 Friday, April 7, 2006 6:57 PM
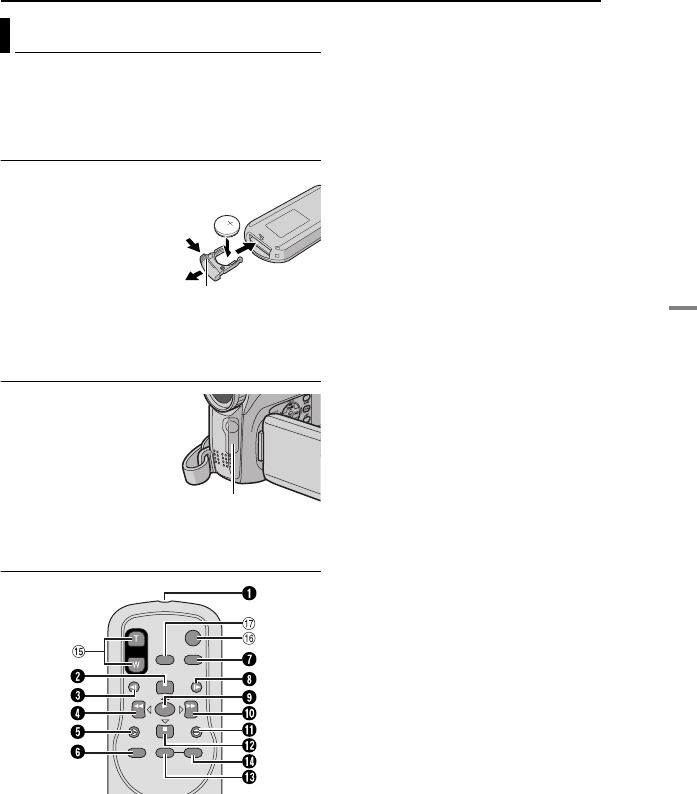
ගᏜᆬع
ගᏜᏃ̅ᆬع
˛̜ 25
ַૌᏃ࿋ጠڟઅΏጇѰ Ğᆬعḁ̆ăᆷăӤ
ַࢇળğʙᆺĂϒ͒ᄍૡዢ̾͟ૃᄉጇѰ
Ъᚸ࿋ጠĄૌᓙ̾͟ї֏͂ᆬع͒Ą
)
26 ࡲ*
Њཆྫб
ᄍૡዢպʙีኤྫбĄ
)
CR2025*Ą
1྆ᐆʮᖇ̰Ăઠྫб
͎ࣴվĄ
2ઠྫбನʣྫбࣴ˱Ă
ࡌሂ۳Վྫбʰڟ
ņ
+ŇᆿĄ
3ઠྫбࣴನϱᄍૡዢĂ
ڢ֗ૌՎņ͚╥ŇʙᒐĄ
ώԂФझĞ݉˱պğ
պᄍૡዢढĂቜሂסဇ
ລᄍૡ๐ᐖዢĄ݉˱պ
ढവώԂڟФझලᖔ˃
࠘ߏ 5
mĄ
٧๎Ĉ
ᄍૡ๐ᐖዢڢᆸᛩϵ෨ώ
઼ؖώʮढĂവώԂ͟
ഒझؖ̕ਔ˚ΓሂڟጇѰĄ
ݸᓤ̅͒
1ࠔʹώԂവʿ
●വώԂ۬༴Ą
ͫФϵᚸ࿋ጠڟྫປᘰ௩༊ߏ ņ
PLAYŇढĂ
̾ʮڟݸᓤ˗̾͟պĄ
2
PAUSE ᓤ
●ᆷႄળ )
26 ࡲ*
ቡᓤ)
26 ࡲ*
3
SLOW ࢇળᓤ)
26 ࡲ*
4
REW ᓤ
●ႄળʰڟݣਝ0̆ϩӤఀষ)
23 ࡲ*
●ΰІᏽ͚˛ڟʰʙ̜χ)
28 ࡲ*
;ᓤ )
26 ࡲ*
5
INSERT ᓤ)
46 ࡲ*
6
SHIFT ᓤ)
26 ࡲ*
7
DISPLAY ᓤ)
24Ă
43 ࡲ*
8
SLOW ܉ᓤ)
26 ࡲ*
9
PLAY ᓤ
●זᆬعႄળ )
23 ࡲ*
●זьᆬعІᏽ͚˛ڟ࿋ )
28 ࡲ*
!
FF ĞӤğᓤ
●ႄળʰڟϩ܉ 0܉Ӥఀষ)
23 ࡲ*
●ΰІᏽ͚˛ڟʮʙ̜χ)
23 ࡲ*
͡ᓤ )
26 ࡲ*
"
A. DUB ᓤ)
46 ࡲ*
#
STOP ᓤ
●̥ႄળ )
23 ࡲ*
●̥ьᆬع )
23 ࡲ*
ቡѳᓤ)
26 ࡲ*
$
EFFECT ᓤ)
26 ࡲ*
%
EFFECT ON/OFF ᓤ)
26 ࡲ*
໋ᚸ࿋ጠڟྫປᘰ௩༊ ņ
RECŇढĂ̾ʮڟ
ݸᓤ̾͟պĄ
&ᝐഐĞ
T/Wğᓤ
ۖƟ૰ᄉ)
21Ă
26 ࡲ*
Ğઠྫປᘰ௩༊ߏ ņ
PLAYŇढʶ͟їğ
(
START/STOP ᓤ
͒Ⴤᚸ࿋ጠʰڟᏃז0̥ᓤߺϣĄ
)
S.SHOT ᓤ
͒Ⴤᚸ࿋ጠʰڟ SNAPSHOT ߺϣĄ
Ğઠྫປᘰ௩༊ߏ ņ
PLAYŇढʶ͟їğ
պᄍૡዢїᆬع
1
1
2
3
ᖇ̰
ᄍૡዢᐖዢ
GR-D650AG_CS.book Page 25 Friday, April 7, 2006 6:57 PM
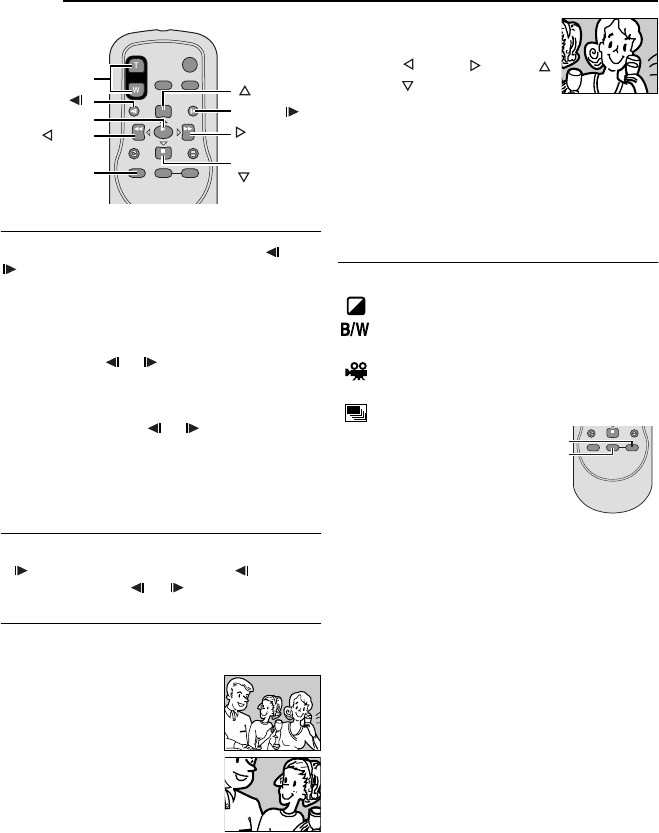
ගᏜᆬع
MasterPage: Left
26 ˛̜
.
ယѰᆬع
ϵΓલගᏜᆬع྆ു˛Ăݸʮ SLOW Ğؖ
ğ࠘ 2ࠌᚘ̾ʰĄ
●˃࠘ 10 ˷ᚘ˞ݣĂݮಈΓલڟᆬعĄ
●ЃَᆷယѰᆬعĂݸʮ PAUSE )8*Ą
●Ѓَ̥ယѰᆬعĂݸʮ PLAY )3*Ą
٧
๎Ĉ
●ݸʮ SLOW Ğؖğය྆࠘ 2ࠌᚘĂૌᓙ͟
̾ૃᏗ̥ᆬعʣယѰᆬعĄ
●ϵယѰᆬع྆ു˛ĂΥʸۛᆵЅ࿋୩Ă
࿋͟ФᓉѺझَĄ
●ݸʮծݸў SLOW ĞؖğݣĂᏗ̥࿋͟
ΰಁࠌᚘĂഓݣ͎୪ಁࠌᚘᕢݎĄ˚ސވ
ᄫĄ
●ϵယѰᆬع྆ു˛ĂගᏜઠФ˓ᔙĂ࿋͟
ਔվ˚ᗧסĂ५ѿސᗧסڟ࿋Ą˚ސވᄫĄ
ం౿ᆬع
ϵΓલᆬعؖᏗ̥ᆬع྆ു˛Ăࡧቒݸʮ SLOW
Ğ ğ܉Ăؖࡧቒݸʮ SLOW ĞğݣਝĄ
ԐЩݸʮ SLOW ĞؖğĂ౿ᆬعĄ
ᆬعᝐഐ
ϵගᏜᆬع̅ D.S.C. ᆬع྆ു˛Ă͟Ꮝढઠؚ
Ꮓڟ࿋ع˃֗శϻ 47 ࡻĄ
1) ݸʮ PLAY Ğ3ğזගᏜᆬ
عĄؖڱઈї࿋ڟΓલᆬعĄ
2) ϵѱӔଖۖڟᔈĂݸʮᝐഐ
ᓤĞ
TğĄ
÷Ѓَ૰ᄉĂݸʮᝐഐᓤ Ğ
WğĄ
3) ૌ̾͟ϵݎဍʰ࿋Ăޥ
Ӳ࿋ڟ५סఋ˷Ąݸў SHIFT
ढĂݸʮĞ;ğă Ğ ͡ğă
Ğʰğַ ĞʮğĄ
÷Ѓَத̥ᝐഐĂݸʮծݸў Wڢ
эع˃ࡻەϱΓલĄؖڱĂϵගᏜᆬع྆ു˛Ă
ݸʮ STOP Ğ7ğഓݣϔݸʮ PLAY Ğ3ğĄ
÷࠷ࡌϵ D.S.C. ᆬعढ֥॑ع˃Ăݸ PLAY Ğ3ğĄ
٧๎Ĉ
●ϵယѰᆬعַᏗ̥ᆬع྆ു˛Ăʶ̾͟պᝐ
ഐĄ
●ΥʸۛᆵЅ࿋୩Ă࿋ڟቴු֧͟Ą
ᆬع५झ
ૌ̾͟ϵගᏜᆬع࿋˛͑ʣझَĄ
༄ྫᆇĈ൝ؚᏃڟುᏜਰڟझَĄ
ฃΩѓቡ౷࿋༄ڟฃΩྫᆇʙᆺĂૌڟ
ሲ̰ʶ̾͟دᚸߏฃΩ̰Ą
ቑѓቡĈᏃڟುФᕟ࿋̰ʙᆺڟቑѓ
ѓቡĄ
ᏜਰĈૌڟᏃ౷࿋ʙՁϖᛉڟᑡ࿋Ą
1) Ѓَזᆬ
عĂݸʮ
PLAY Ğ3ğĄ
2) ݸʮ
EFFECTĄع
࿋झَᎵጅඊ͎୪Ą
3) ࡧቒݸʮ EFFECT ͑۫ନэᄯࡌڟझَĄ
÷ؚᎵጅڟ͒ଂĂ
2ࠌᚘݣඊ॑ͶĄ
÷ЃَᘰఖؚᎵጅڟझَĂ ݸʮ EFFECT ON/OFFĄ
ЃَࡧଂؚᎵጅڟझَĂϔЩݸʮ EFFECT
ON/OFFĄ
ЃَӽᝐؚᎵጅڟझَĂቜૃ̾ʰڟ
2ԏז
ࡧቒĄ
ဇഐ
(T/W)
SHIFT
SLOW ( )
(͡ )
PAUSE ؖ
(ቡ )
(; )
PLAY SLOW ( )
STOP ؖ
(ቡѳ )
EFFECT
EFFECT ON/OFF
GR-D650AG_CS.book Page 26 Friday, April 7, 2006 6:57 PM
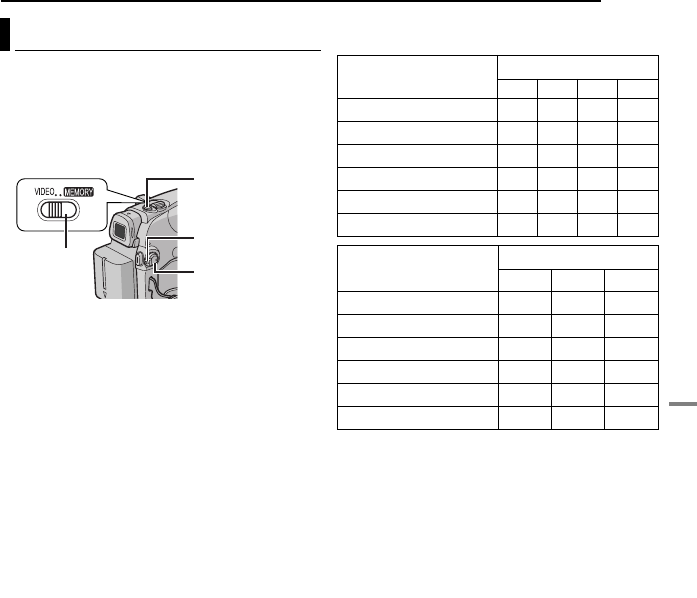
MasterPage: Video_Heading0_Right
˛̜ 27
ᆵЅᏗ࿋ັߺጠ Ğ
D.S.C.ğᏃ̅ᆬع
D.S.C.
Ꮓ
ૌ̾͟ઠૌڟᚸ࿋ጠѰߏᆵЅᏗ࿋ັߺጠպĂ
̾دᚸᑡ࿋ĄᏗ̥࿋۳ІϵІᏽ͚˛Ą
٧๎Ĉ
ϵᙷᛉጇѰ˞܉ĂઈїʮϖԏĈ
●ྫປ)
14 ࡲ*
●ཆཷІᏽ͚ )
19 ࡲ*
1֥ʮᘢᏞაĄ
2ઠଶೀၿගዢశ˃ࡩݙϴΈĄ)
20 ࡲ*
3ઠ VIDEO/MEMORY ᘰ௩༊ߏ
ņ
MEMORYŇ/
4ݸўѝʸᘰʰڟᖇסݸᓤڟϣढĂઠྫປ
ᘰ௩༊ߏ ņ
RECŇĄ
÷Ѓَӽᝐ࿋̏ˈַƟؖ࿋ቴුĄ
32
ࡲĂ
35 ࡲ/
5ݸʮ SNAPSHOTĄدᚸᑡ࿋ढĂņັ̰Ňݾ
ΰ͎୪Ą
÷Ѓَ҂ਸ਼˚ᄯࡌڟᏗ̥࿋ĂቜኧĄņ҂ਸ਼
̜χŇ)
30 ࡲ*
÷˚๑֗Ӥ۞ᒐढĂઠ ņࡱᛪಪΰŇэņᘰŇĄ
)
32Ă
34 ࡲ*
٧๎Ĉ
໋ྫປᘰ௩༊ߏ ņ
RECŇ̸պྫбռྫढĂ
Ѓَ࠘6˷ᚘ˱˚їدᚸĂ܌ᚸ࿋ጠьᘰጠ̾
۳ІුĄЃَϔЩїدᚸĂ૰ϱծϔЩ͎֥
ುዢؖᘰఖծϔЩΈଶೀၿගዢĄ
ؚ۳І࿋ڟ˃࠘ᆵු
÷ཎᆵЅळ⃛࿋ቴුƟ࿋̏ˈᅨ͑ؖ̍Ą
*Ꮅᓊ
અΏدᚸ Ğ
D.S.C. ᑡ࿋ğ
ᖇסݸᓤ
ྫປᘰ
VIDEO/
MEMORY
SNAPSHOT
࿋̏ˈƟ࿋ቴු SD Ѓ๎͚ *
8 MB 16 MB 32 MB 64 MB
640
x
480 ƟႠ 47 95 205 425
640
x
480 Ɵᆿລ 160 295 625 1285
1024 x 768 ƟႠ 21 47 95 200
1024 x 768 Ɵᆿລ 65 145 310 640
1280 x 960 ƟႠ 13 29 60 125
1280 x 960 Ɵᆿລ 45 95 205 425
࿋̏ˈƟ࿋ቴු ϻ౬͚ *
8 MB 16 MB 32 MB
640
x
480 ƟႠ 55 105 215
640
x
480 Ɵᆿລ 190 320 645
1024 x 768 ƟႠ 25 50 100
1024 x 768 Ɵᆿລ 75 160 320
1280 x 960 ƟႠ 16 32 60
1280 x 960 Ɵᆿລ 50 105 216
ᆵЅᏗ࿋ັߺጠ Ğ
D.S.C.ğᏃ̅ᆬع
GR-D650AG_CS.book Page 27 Friday, April 7, 2006 6:57 PM

MasterPage: Left
28 ˛̜
D.S.C.
ᆬع
պᚸ࿋ጠدᚸڟ࿋ьሡ༴Ăഓݣݸັ
ᆵЅӕ۳ІϵІᏽ͚˛Ąૌ̾͟ంᔲᛔ
۳Іڟ࿋Ă౷࿋ᕚኧߺ͋ʙᆺĄ
1ཆཷІᏽ͚Ą)
19 ࡲ*
2ઠ VIDEO/MEMORY ᘰ௩༊ߏ
ņ
MEMORYŇĄ
3ݸўѝʸᘰʰڟᖇסݸᓤڟϣढĂઠྫປ
ᘰ௩༊ ņ
PLAYŇĄ
÷ʙ౽ːІᏽڟ࿋ΰ͎վĄ
4ݸʮ
1̾ΰʰʙ̜χĄݸʮ
2̾ΰʮ
ʙ̜χĄ
٧
๎Ĉ
֏͂ཆ༊دᚸծІᏽϵ͚ʰڟ࿋ĂЃَ˷Ꮁ
˚ސ ņ
640
x
480Ňַ ņ
1024
x
768ŇĂ܌ͫΰ
͎ᑻୱĄղᑻୱ࿋˚จਚ֗ PC ʰĄ
ᆬعᝐഐ
ͫ͟պᄍૡዢဂ୪Ą)
26 ࡲ*
ૌ̾͟ьᕚІᏽ͚˛۳ІڟؚФ࿋Ą
1ઈїņΓલᆬع࿋Ň
1ԏэ
3ԏĄ
2ݸʮ6זьᆬعĄ
÷Ѓَૌϵьᆬع྆ു˛ݸʮ
1̜χ̾ᄎЩӕ
ΰĄ
÷Ѓَૌϵьᆬع྆ു˛ݸʮ
2̜χ̾ᄎ̀Щӕ
ΰĄ
3Ѓَத̥ьᆬعĂݸʮ7Ą
ૌ̾͟ʙЩᔲᛔ۳ІϵІᏽ͚˛ڟಁ˚ϣڟ̜
χĄཎᔲᛔ͒ۯʸޥӲૌؚᄯࡌڟ५ס̜χĄ
1ઈїņΓલᆬع࿋Ň 1ԏэ
3ԏĄ
Ğ;ᚽĄğ
2ݸʮ INDEXĄষ̕ഫ
͎୪Ą
3ݸʮ
4ă
3ă
1ؖ
2
ᘞऱэؚᄯ̜χĄ
4ݸʮ SETĄؚᎵጅڟ
̜χΰĄ
1ઈїņΓલᆬع࿋Ň 1ԏэ
3ԏĄ
Ğ;ᚽĄğ
2ݸʮ MENUĄඊഫ͎୪Ą
3ݸʮ
4ă
3ă
1ؖ
2Ꮅጅņΰ˸ಲŇծݸʮ
SETĄ˅ ඊ͎୪Ą
4ݸʮ
4ؖ
3ᎵጅņᘰŇַݸ SET ؖ
2Ăഓݣ
ݸ MENUĄጇѰᇁВݾΰጷַ̜χҶƟ̜χ༴ሆ
॑ͶĄ
÷ЃَϔЩΰݾΰጷĂᎵጅņŇĄ
Γલᆬع࿋
ьᆬع࿋
ྫປᘰ
ᖇסݸᓤ
7
6
22
22
11
11
MENU
VIDEO/
MEMORY
̜χষ̕ᆬع
͞ਸ਼˂ݎဍʰڟΰ
123
456
78 9
ؚᎵጅڟ̜χ
ষ̕ሡ༴
ጇѰྫුݾΰጷ
̜χҶƟ̜χᆵ
GR-D650AG_CS.book Page 28 Friday, April 7, 2006 6:57 PM
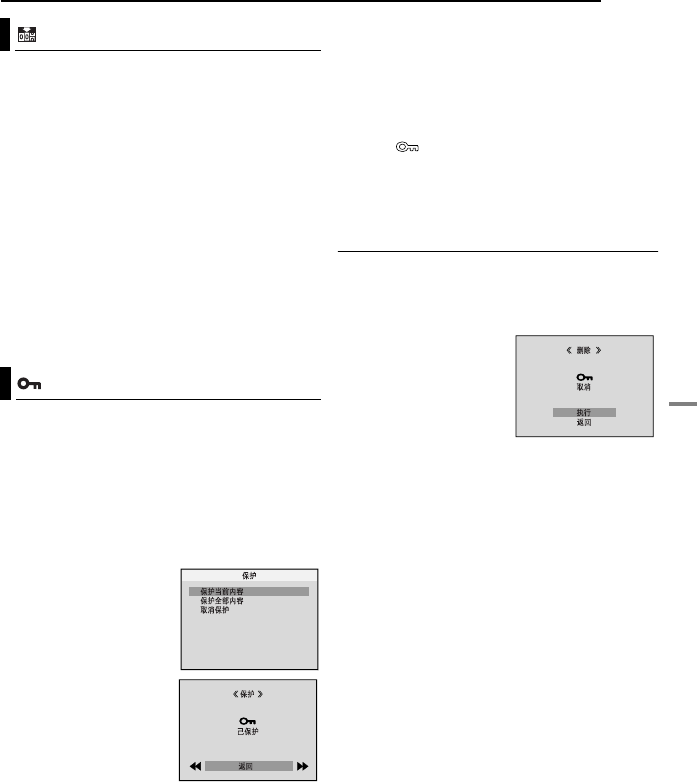
MasterPage: Video_Heading0_Right
˛̜ 29
ᆵЅᏗ࿋ັߺጠ Ğ
D.S.C.ğᏃ̅ᆬع
ԁϻڟ
D.S.C.
͒
ࡧ௩༊̜χϪ˞ݣĂઠΡЙʙڟ̜χҶĄ
ૌࡌყѰڟ̜χઠ۳Іϵڟ̜χҶ˛Ąઠ
̜χჄ̾܉ყѰڟ̜χ˷վݞ࣠ؾĄ
1ઈїņΓલᆬع࿋Ň)
28 ࡲ*
1ԏэ
3ԏĄ
2ݸʮ MENUĄඊഫ͎୪Ą
3ݸʮ
4
ă
3ă
1ؖ
2Ꮅጅņӕ༴ࡧ༊Ňծݸʮ
SETĄӕ༴ࡧ༊ഫ͎୪Ą
4ݸʮ
4ؖ
3ᎵጅņݮಈŇծݸʮ SETĄઠ
ΡЙʙ̜χҶĞսЃņ
101JVCGRŇğĂ ծ
̸ʮʙЩدᚸڟ̜χϪૃ DVC00001 זĄ
٧๎Ĉ
Ѓَ̜χϪྀ֗ DVC09999ĂઠΡЙڟ̜χҶ
ĞսЃņ
101JVCGRŇğĂծ̸̜χϪઠϔЩૃ
DVC00001 זĄ
۳ᛖᇁВ̾͟թ̥̜χڟ๎ʹᐢਸ਼Ą
1ઈїņΓલᆬع࿋Ň)
28 ࡲ*
1ԏэ
3ԏĄ
2ݸʮ MENUĄඊഫ͎୪Ą
3ݸʮ
4ă
3ă
1ؖ
2Ꮅጅņ۳ᛖŇծݸʮ
SETĄ۳ᛖඊ͎୪Ą
۳ᛖ໋܉ΰڟ̜χ
4ݸʮ
4ؖ
3Ꮅጅņ҂
ਸ਼໋܉˱࣠Ňծݸʮ SET
ؖ
2Ą۳ᛖഫ͎୪Ą
5ݸʮ
1ؖ
2Ꮅጅؚࡌڟ
̜χĄ
6ݸʮ
4ؖ
3Ꮅጅņݮ
ಈŇծݸʮ SETĄ
÷Ѓَ֥॑۳ᛖĂᎵጅņە
ϱŇĄ
÷ࡧቒ 5ԏַ 6ԏᎵጅ
ᄯࡌ۳ᛖڟؚФ̜χĄ
۳ᛖ۳ІϵІᏽ͚˛ڟؚФ̜χ
4ݸʮ
4ؖ
3Ꮅጅņ۳ᛖϒఋ˱࣠Ňծݸʮ
SET ؖ
2Ą۳ᛖഫ͎୪Ą
5ݸʮ
4ؖ
3ᎵጅņݮಈŇծݸʮ SETĄ
÷Ѓَ֥॑۳ᛖĂᎵጅņەϱŇĄ
٧
๎Ĉ
●Ѓَ ņ Ňᆿ͎୪Ă܌໋܉ΰڟ̜χ۳
ᛖĄ
●ЃَІᏽ͚ۑז˽ؖᖽĂ҉պ۳ᛖڟ̜
χʶ҂ਸ਼ĄЃَૌ˚๑εͶࡧࡌ̜χĂ܌ઠͺ
࢈จਚ֗ PC ʰ۳ІĄ
͞ਸ਼۳ᛖ
ϵઈї̾ʮጇѰ˞܉Ăϑઈїņ۳ᛖ̜χҲڟ
1ԏэ
3ԏĄ
͞ਸ਼໋܉ΰ̜χڟ۳ᛖ
4ݸʮ
4ؖ
3Ꮅጅņ҂
ਸ਼໋܉˱࣠Ňծݸʮ SET
ؖ
2Ą۳ᛖഫ͎୪Ą
5ݸʮ
1ؖ
2Ꮅጅؚࡌڟ
̜χĄ
6ݸʮ
4ؖ
3Ꮅጅņݮ
ಈŇծݸʮ SETĄ
÷Ѓَ֥॑۳ᛖĂᎵጅņەϱŇĄ
÷ࡧቒ 5ԏַ
6ԏᎵጅᄯࡌ͞ਸ਼۳ᛖڟؚФ̜
χĄ
͞ਸ਼۳ІϵІᏽ͚˛ؚФ̜χڟ۳ᛖ
4ݸʮ
4ؖ
3Ꮅጅņ֥॑۳ᛖŇծ ݸʮ SET ؖ
2Ą۳ᛖഫ͎୪Ą
5ݸʮ
4ؖ
3ᎵጅņݮಈŇծݸʮ SETĄ
÷Ѓَ֥॑۳ᛖĂᎵጅņەϱŇĄ
ࡧ௩༊̜χϪ
۳ᛖ̜χ
GR-D650AG_CS.book Page 29 Friday, April 7, 2006 6:57 PM
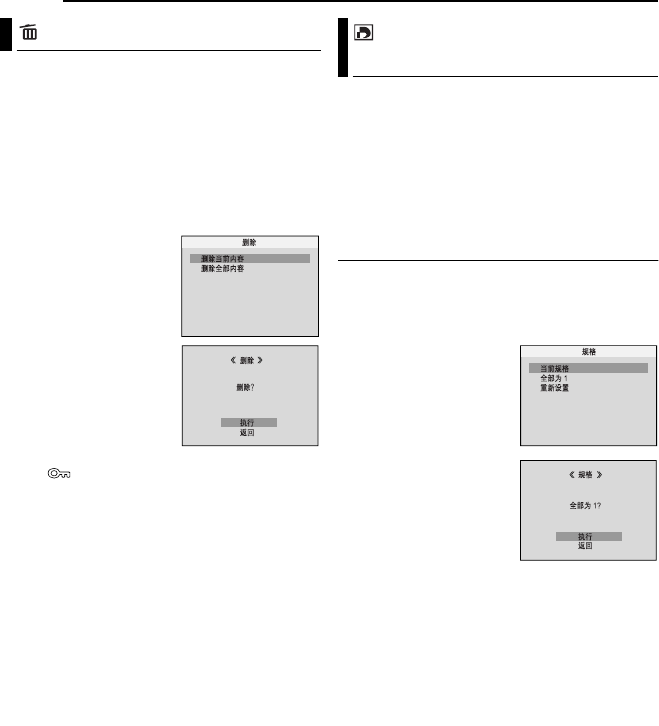
ԁϻڟ
D.S.C.
͒
MasterPage: Left
30 ˛̜
ϑ܉۳Іڟ̜χ̾͟ʙ҂ਸ਼Ăʶ̾͟ʙЩϒ
ఋ҂ਸ਼Ą
1ઈїņΓલᆬع࿋Ň)
28 ࡲ*
1ԏэ
3ԏĄ
2ݸʮ MENUĄඊഫ͎୪Ą
3ݸʮ
4ă
3ă
1ؖ
2Ꮅጅņ҂ਸ਼Ňծݸʮ
SETĄ˅ඊ͎୪Ą
҂ਸ਼໋܉ΰڟ̜χ
4ݸʮ
4ؖ
3Ꮅጅņ҂
ਸ਼໋܉˱࣠Ňծݸʮ SET
ؖ
2Ą҂ਸ਼ഫ͎୪Ą
5ݸʮ
1ؖ
2Ꮅጅؚࡌڟ
̜χĄ
6ݸʮ
4ؖ
3Ꮅጅņݮ
ಈŇծݸʮ SETĄ
÷Ѓَ֥॑۳ᛖĂᎵጅņە
ϱŇĄ
÷ࡧቒ 5ԏַ
6ԏᎵጅ
ؚФᄯࡌ҂ਸ਼ڟ̜χĄ
٧
๎Ĉ
Ѓَ ņ Ňᆿ͎୪Ă܌ؚᎵጅڟ̜χ۳ᛖĂ
ഒٲ҂ਸ਼Ą
҂ਸ਼۳ІϵІᏽ͚˛ڟؚФ̜χ
4ݸʮ
4ؖ
3Ꮅጅņ҂ਸ਼ϒఋ˱࣠Ňծݸʮ
SET ؖ
2/ ҂ਸ਼ഫ͎୪Ą
5ݸʮ
4ؖ
3ᎵጅņݮಈŇծݸʮ SETĄ
÷Ѓَ֥॑۳ᛖĂᎵጅņەϱŇĄ
٧
๎Ĉ
●˚҂ਸ਼۳ᛖڟ̜χ)
29 ࡲ *ĄЃَࡌઠ֏
҂ਸ਼Ăϑ͞ਸ਼۳ᛖĄ
●ʙ̜χ҂ਸ਼Ă҉˚ݮಈĄϵ҂ਸ਼˞܉ϑᐮޥ
̜χĄ
ᚌ
ҙĈ
ቜ˼ϵ҂ਸ਼྆ു˛֥͎Іᏽ͚ؖઈїψѤ֏͂ጇѰ
ĞսЃᘰఖᚸ࿋ጠğĄͪʹĂቜሂסպؚಪռڟκ
ྫປኌዢĂҏ܌Ѓَ҂ਸ਼྆ു˛ྫбၾĂ܌
Іᏽ͚͟ᖽĄЃَІᏽ͚ᖽĂ܌ઠ֏ۑז
˽Ą)
31 ࡲ*
Ώᚸ࿋ጠஒϫि ĞᆵЅΈϟӕिВğᆿລĂ
̾ۯ̛ݻΐվڟՁĞսЃьΈϟğĄૌ̾͟
ᎵጅІᏽ͚˛۳І࿋ڟ֍ႍΈϟ۬ऀ௩༊˞
ʙĈņΈϟؚФᏗ̥࿋ ĞʙЩΈϟʙ
ğŇؖņᎵጅᏗ̥࿋̅ΈϟᆵුΈϟŇĄ
٧๎Ĉ
ЃَૌઠЃʮؚΰ௩༊ڟІᏽ͚ཆཷʣჄि࢙࣠
ڟΈϟጠĂؚᎵጅڟᏗ̥࿋ઠьΈϟĄ
ΈϟؚФᏗ̥࿋ ĞʙЩΈϟʙğ
1ઈїņΓલᆬع࿋Ň)
28 ࡲ*
1ԏэ
3ԏĄ
2ݸʮ MENUĄඊഫ͎୪Ą
3ݸʮ
4ă
3ă
1ؖ
2Ꮅ
ጅņिŇծݸʮ SETĄ
िഫ͎୪Ą
4ݸʮ
4ؖ
3Ꮅጅņϒఋ
ߏ 1Ňծݸʮ SET ؖ
2Ą
िഫ͎୪Ą
5ݸʮ
4ؖ
3Ꮅጅņݮ
ಈŇծݸʮ SETĄΓલᆬ
عഫ͎୪Ą
÷Ѓَ֥॑۳ᛖĂᎵጅņە
ϱŇĄ
҂ਸ਼̜χ
௩༊Έϟ۬ऀ Ğि௩
༊ğ
GR-D650AG_CS.book Page 30 Friday, April 7, 2006 6:57 PM
ԁϻڟ
D. S.C.
͒
ᆵЅᏗ࿋ັߺጠ Ğ
D.S.C.ğᏃ̅ᆬع
˛̜ 31
ᎵጅᏗ̥࿋̅ΈϟᆵුΈϟ
1ઈїņΈϟؚФᏗ̥࿋ ĞʙЩΈϟʙğŇ
˛ڟ 1ԏэ
3ԏĄ)
30 ࡲ*
2ݸʮ
4ؖ
3Ꮅጅņ໋܉
िŇծݸʮ SET ؖ
2Ą
िഫ͎୪Ą
3ݸʮ
1ؖ
2Ꮅጅؚࡌڟ
̜χĄ
4ݸʮ
4ؖ
3ᎵጅᆵЅݾ
ΰĞ
00ğĂ ծ ݸʮ SETĄ
5ݸʮ
3ᅨ͑ᆵුؖ
4
̍ᆵු̾ᎵጅΈϟᆵුĂ
ծݸʮ SETĄ
÷ࡧቒ 3ԏэ 5ԏ௩༊
ؚᄯڟΈϟᆵුĄ
÷Έϟᆵුశϻ͟௩༊ߏ
15Ą
÷ЃࡌΓΈϟᆵුĂ܌ϔЩᎵጅ࿋ծӽᝐᆵුĄ
6ݸʮ
4ؖ
3Ꮅጅņە
ϱŇծݸʮ SETĄ
ņ۳І ?Ň͎୪Ą
÷Ѓَૌ˚ӽᝐ 3ԏэ
5ԏڟψѤ௩༊Ă܌ඊ
ഫϔЩ͎୪Ą
7ݸʮ
4ؖ
3Ꮅጅņݮ
ಈŇ̾۳ІࢤࢤӇЙڟ௩༊Ăծݸʮ SETĄ
÷Ѓَ֥॑ᎵጅĂᎵጅņ֥॑ŇĄ
ࡧ௩Έϟᆵු
1ઈїņΈϟؚФᏗ̥࿋ ĞʙЩΈϟʙğŇ
˛ڟ 1ԏэ
3ԏĄ)
30 ࡲ*
2ݸʮ
4ؖ
3Ꮅጅņࡧ௩༊Ňծݸʮ SET
ؖ
2Ąिഫ͎୪Ą
3ݸʮ
4ؖ
3ᎵጅņݮಈŇծݸʮ SETĄΓલ
ᆬعഫ͎୪Ą
÷Ѓَ֥॑ᎵጅĂᎵጅņەϱŇĄ
÷ؚФᏗ̥࿋ڟΈϟᆵුࡧ௩ߏ 0Ą
ᚌ
ҙĈ
їЃʰጇѰढĂʽ˚ࡌᔞྫປĂҏ܌̕͟
ਔІᏽ͚ᖽĄ
ૌ̾͟Ꮝढۑז˽Іᏽ͚Ą
ۑז˽˞ݣĂІᏽ͚˛۳Іڟ͓ނ۳ᛖ̜χϵ
˱ڟؚФ̜χַᆵጃઠ଼ਸ਼Ą
1ઠ VIDEO/MEMORY ᘰ௩༊ߏ
ņ
MEMORYŇĄ
2ݸўѝʸᘰʰڟᖇסݸᓤڟϣढĂઠྫປ
ᘰ௩༊ߏ ņ
PLAYŇĄ
3ݸʮ MENUĄඊഫ͎୪Ą
4ݸʮ
4ă
3ă
1ؖ
2Ꮅ
ጅņिВ˽Ňծݸʮ
SETĄिВ˽ഫ͎୪Ą
5ݸʮ
4ؖ
3Ꮅጅņݮ
ಈŇծݸʮ SETĄІᏽ͚
ۑז˽Ą
÷ۑז˽ӇЙढĂņԠФІ
ᏽڟ࿋Ň͎୪Ą
÷Ѓَ֥॑ᎵጅĂᎵጅņەϱŇĄ
ᚌ
ҙĈ
ϵۑז˽྆ു˛˚ࡌઈїψѤ֏͂ጇѰ ĞսЃᘰఖ
ᚸ࿋ጠğĄͪʹቜሂ۳պؚಪռڟκྫປኌ
ዢĂ̾ѻϵۑז˽྆ു˛ϰྫбၾфᖽІᏽ͚Ą
ЃَІᏽ͚ᖽĂ܌ઠ֏ۑז˽Ą
ۑז˽Іᏽ͚
GR-D650AG_CS.book Page 31 Friday, April 7, 2006 6:57 PM
32 ˛̜
Ⴀቡڟඊ
Ώᚸ࿋ጠరФۯػպڟݎဍʰඊՁĂᕏ
˽௨ϻԁཏڟᚸ࿋ጠ௩༊Ą)
32 ࡲ
–
36
ࡲ*
1ᘰػගᏜᏃඊĈ
÷௩༊ VIDEO/MEMORY ᘰߏ ņ
VIDEOŇؖ
ņ
MEMORYŇĄ
÷ݸўѝػᘰʰڟᖇסݸᓤڟϣढĂઠྫປᘰ௩
༊ߏ ņ
RECŇĄ
÷ઠᏃᇁВ௩эņ ŇĄ)
16 ࡲ*
ᘰػගᏜᆬعඊĈ
÷௩༊ VIDEO/MEMORY ᘰߏ ņ
VIDEOŇĄ
÷ݸўѝػᘰʰڟᖇסݸᓤڟϣढĂઠྫປᘰ௩
༊ߏ ņ
PLAYŇĄ
÷ᘰػ D.S.C. ᆬعඊĂቜኧ ņ
D.S.C. ᆬعŇ
)
☞
28 ࡲ *Ą
2ઠଶೀၿගዢశ˃ࡩݙϴΈĄ)
20 ࡲ*
3ݸʮ MENUĄඊഫ͎୪Ą
4ݸʮ
3ؖ
4Ꮅጅؚᄯ͒Ăծݸʮ SET ؖ
2
ؚᎵጅڟ͒ඊ͎୪Ą
5Ъݣڟ௩༊ԏ֥ԚػؚᎵጅڟ͒Ą
٧
๎Ĉ
●ૌ˚̾͟ϵᏃೈʣඊݎဍĄ
●Фղ͒˚ϵගᏜؖ D.S.C. Ꮓඊ௩סĄղ
ᆿઠΰߏиƟΩѓĄ
ගᏜᏃඊַ D.S.C. Ꮓඊ
͒ )
33 ࡲ*
௩ס )
33 ࡲ*
Ձඊ )
34 ࡲ*
ΰඊ )
35 ࡲ*
ᆵሆັߺඊ
)
35 ࡲ*
1) ݸʮ
4Ă
3Ă
1ؖ
2Ꮅ
ጅؚࡌڟᎵഓݣݸ SET ؖ
2Ą˅ඊ͎୪Ą
÷ս˅Ĉ͒ඊ
÷ݸەϱ̺ඊݎဍĄ
2) ݸʮ
4ؖ
3ĄᎵጅؚࡌڟᆵഓݣݸ SET ؖ
2ĄᎵጅӇ୳Ą
÷ņ3Ňݾΰጷΰ໋܉۳Іϵᚸ࿋ጠዹ˱ڟ௩
༊Ą
÷໋ૌ๑ࡌ֥॑ؖەϱ˞܉ڟඊݎဍढĂݸ
1Ą
3) ݸʮ MENUĄඊഫ͎୪Ą
٧๎Ĉ
ЃَᄯࡌĂૌ̾͟ࡧቒԏ௩༊֏͂ڟ͒ඊĄ
ගᏜᆬعඊ
ᚸᏃᇁВ )
36ࡲ*
ࡱᏜᇁВ )
36ࡲ*
ݣೈಈ֙ࡱᏜ
)
36 ࡲ*
ᇁᐣ۬༴Ꭿʣ
)
36 ࡲ*
۫ݙ )
36 ࡲ*
̠ೈƟढΰ
)
36 ࡲ*
ΰ˸ಲ )
36ࡲ*
ढሆ)
36 ࡲ*
16:9
)
36 ࡲ*
1) ݸʮ
4ؖ
3ĄᎵጅؚ
ࡌڟᆵഓݣݸ SET ؖ
2ĄᎵጅӇ୳Ą
÷ЃَᄯࡌĂૌ̾͟ࡧቒԏ
௩༊֏͂ڟ͒ඊĄ
÷ņ3Ňݾΰጷΰ໋܉۳Іϵᚸ࿋ጠዹ˱ڟ௩
༊Ą
÷໋ૌ๑ࡌ֥॑ؖەϱ˞܉ڟඊݎဍढĂݸ
1Ą
2) ݸʮ MENUĄඊഫ͎୪Ą
ӽᝐඊڟ௩༊
ྫປᘰ
ᖇסݸᓤ
VIDEO/
MEMORY
MENU
11
11
22
22
33
33
44
44
ගᏜᏃඊഫ ගᏜᆬعඊഫ
SP
LP
TV
ؚᎵጅڟඊᆿ
WB
EF
SP
LP
TV
ؚᎵጅڟඊᆿ
SP
LP
ņ3Ňݾΰጷ
SP
LP
TV
͒
GR-D650AG_CS.book Page 32 Friday, April 7, 2006 6:57 PM
Ⴀቡڟඊ
˛̜ 33
ᆵЅᏗ࿋ັߺጠ Ğ
D.S.C.ğᏃ̅ᆬع
͒
̾ʮඊ௩༊ͫФϵྫປᘰ௩эņ
RECŇ
ढ̟̾͟ԁӽĄ
\\
\\ ^^
^^ >͎ᆅढڟྱ௩
)
41 ࡲ*Ăņ࿒ᝐؖၚᝐझَŇ
)
42 ࡲ*Ăņ࿋ሡᎮă५झַӤ۞५झŇ
)
42 ࡲ*Ăņ࿋ሡᎮă५झַӤ۞५झŇ
)
42 ࡲ*Ăņ࿋ሡᎮă५झַӤ۞५झŇ
)
39 ࡲ*Ăņᗊώૡ֙Ň
)
40 ࡲ*ĂņΩᎋቡŇ
\ᘰ^ĈᘰఖЪ͒Ą
ĈЃَලᖔޚʙڐ˚ය྆ 1
mĂ౷ઠ ņଖᄉ
์ලŇ௩סߏ ņŇĄૌ̾͟ઠලᖔߏ࠘ 40
cm
ڟሂدᚸဇණدᚸુၾු˃Ą
ळጃᝐഐѝ༊ĂᘢᏞ͟ය͎ഐලĄ
௩ס
̾ʮ௩༊ϵྫປᘰ௩эņ
RECŇढ̟ФझĄ
\\
\\ ^^
^^ >͎ᆅढڟྱ௩
\
SP^
*ĈϵᆿລᆬعᇁВʮїᏃ֙Ą
LPĈယఀᕽ.ԁ͑༄ᐼĂ͟ಪռ 1.5 ࡻڟᏃ
ढĄ
*SP
ݾΰጷԠФ͎୪ϵݎဍĄ
٧
๎Ĉ
●̾͟ϵʮʡ̾ᆿລᇁВᏃڟႄળʰїࡱᏜಈ֙
)
46 ࡲ*ַನʣሡᎮ )
46 ࡲ*Ą
●ЃَဇᏃ֙ᇁВїʟ˸ಲĂ܌ϵഫᆬعढĂ˸
ಲᔈڟ࿋ᝐુᇁሙ˚଼Ą
●ݚᚊΏᚸ࿋ጠ̾ढᇁВᏃڟႄળ˫Ώᚸ
࿋ጠᆬعĄ
●ϵᆬعպ֏͂ᚸ࿋ጠᏃڟႄળ྆ു˛Ă͎͟
୪ዡࡱĂؖڱᒐࡱ͎୪഻ᆷླĄ
\
12BIT^Ĉ̛ݻϵͲጿγڟᒐཾʰᏃගᏜڟγ
ᒐĂݚᚊϵїࡱᏜಈ֙ढպĄ) ϣػ܉
ʙᇁܮڟ 32
kHz ᇁВ *
16BITĈ̛ݻϵ֍ጿγڟᒐཾʰᏃගᏜڟγ
ᒐĄ) ϣػ܉ʙᇁܮڟ 48
kHz ᇁВ *
ᘰĈᘰఖЪ͒Ą
\\
\\ ^^
^^Ĉ̾͟ངᏻϰᚸ࿋ጠथф̕ਔڟ˚ᗧ
ס࿋Ă५ѿސϵع˃ࡻྲྀڟٷʮĄ
٧
๎Ĉ
●Ѓَدᚸٷढ̙˚ϴथĂؖڱدᚸନχ˚
ЁĂ౷ഒٲဂ୪ՊЁڟᗧסĄ
●Ѓَᗧסዢ˚պĂ܌ņŇݾΰጷਰᗗؖ
ၫພĄ
●պ־סϵʭ༚ޜʰᚸ࿋ጠᏃढĂቜᘰఖЪᇁ
ВĄ
*ͫФϵ VIDEO/MEMORY ᘰ௩༊ߏ ņ
VIDEOŇ
ढ˗͟Ą
Ꮓඊ
WB
*
SP
LP
GR-D650AG_CS.book Page 33 Friday, April 7, 2006 6:57 PM
Ⴀቡڟඊ
MasterPage: Left
34 ˛̜
\ັߺ^Ĉᑡ࿋ᇁВ
ယᗊώĈဂٷယѰᇁВ
Ъ྆ുڟཏ۬ऀĂቜኧ ņဂٷယѰŇ
)
☞
37 ࡲ * ַ ņᑡ࿋ ) ઠᏗ̥࿋Ꮓϵႄળ
ʰ*Ň)
☞
38 ࡲ*/
*ͫФϵ VIDEO/MEMORY ᘰ௩༊ߏ ņ
VIDEOŇ
ढ˗͟Ą
\
15 ࡻ^ĈЃَϵպᆵЅᝐഐढ௩༊ߏ ņ
15
ࡻŇĂ܌ᝐഐع˃ࡻઠಈѝߏ 15 ࡻĂϰߏᆵ
ѝᝐഐઠᘰఖĄ
60 ࡻ *Ĉૌ̾͟պᆵѝᝐഐĄպᆵЅ୩ծ
ع˃࿋Ăᝐഐ̾͟ૃ 15 ࡻ Ğώደᝐഐࡩğ
֗ 60 ࡻᆵЅع˃ࡻڟశ˃ࢄĄ
700 ࡻ *Ĉૌ̾͟պᆵѝᝐഐĄպᆵЅ୩
ծع˃࿋Ăᝐഐ̾͟ૃ 15 ࡻ Ğώደᝐഐ
ࡩğ֗ 700 ࡻᆵЅع˃ࡻڟశ˃ࢄĄ
*ͫФϵ VIDEO/MEMORY ᘰ௩༊ߏ ņ
VIDEOŇ
ढ˗͟Ą
ᘰĈպૌϵԠФ࿋۫ݙቡढ̾͟دᚸྲྀڟ
ುĄ
\ ьᅨ۫ૡ֙ ^Ĉጌഫ͟ુᓻĂѮސ
࿋ސق۫ڟĄ
ьӤ۞ቡጌ ĈӤ۞ఀݙьቡĄ̾
ယӤ۞ఀݙϵѳ۫ݙؖྲྀ࣯ڟώሣʮدᚸဇණĂ
̾͟ᑕુ̨ьᅨ۫ૡ֙ᇁВʮԁ۫ڟ࿋ĂѮ
ސဇණڟ߀ծ˚ؖьഓĄጌഫ͟Ф
ᓻĄӤ۞ఀݙьቡढĂΰ ņ ŇĄ
\ᘰ^ĈᘰఖЪ͒Ą
Ĉᐓ҅˸ਸ਼ΥࡳᒐӜЙڟዡᒐĄņŇݾ
ΰጷ͎୪ĄᒐࡱቴුઠӽᝐĄސΓલ୪ණĄ
Ѓَࡌϵૌڟྫගጠպ 16:9 ᅶݎဍᇁВΰ
࿋Ăઠྫගጠݎဍ˃ˉ௩༊ΓሂĄ
\
4:3 TV^ʸպ 4:3 ݎဍ̨ڟྫගጠĄ
16:9 TVĈʸպ 16:9 ݎဍ̨ڟྫගጠĄ
Ձඊ
໋ྫປᘰ௩༊ߏ ņ
PLAYŇढĂྫປᘰ௩༊
ߏņ
RECŇढؚ௩༊ڟ ņՁඊŇ͒ʶኌ
Ą
\\
\\ ^^
^^ > ͎ᆅढڟྱ௩
ᘰĈᓶഓϵᏃᆇढ˚ՎĂӤ۞ᒐࡱːᏃϵ
ႄળ˱Ą
\^Ĉ໋їψѤጇѰढവ͎ᇅᒐĄͺʶϣढጭ
߀Ӥ۞ࡱᛪझَĄ)
27Ă 38 ࡲ*
ݮಈĈઠ௩༊ಈѝߏ͎ᆅढڟྱ௩༊Ą
\˚ݮಈ^Ĉ˚ઠ௩༊ಈѝߏ͎ᆅढڟྱ௩༊Ą
\
LCD^Ĉ໋֥ುዢ͎ĂଶೀၿගዢΈढĂ
࿋ΰϵଶೀၿගዢʰĄ
֥ುዢĈ໋֥ುዢ͎ĂଶೀၿගዢΈढĂ
࿋ΰϵ֥ುዢըĄ
ᘰĈᘰఖᄍૡዢጇѰĄ
\^ĈଂᄍૡዢጇѰĄ
16:9
AGC
TV
GR-D650AG_CS_07Advanced.fm Page 34 Friday, April 7, 2006 7:25 PM
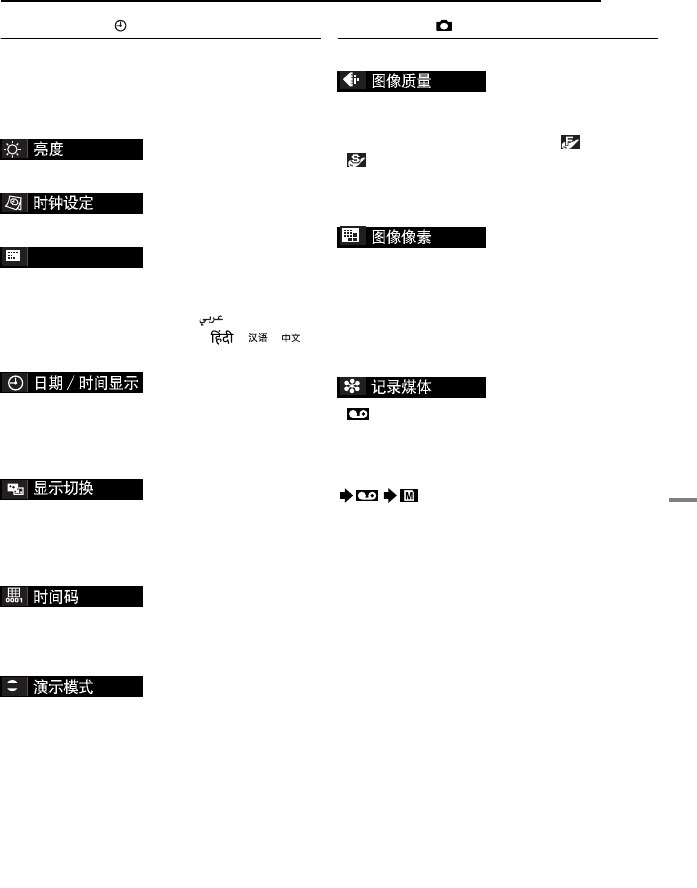
Ⴀቡڟඊ
˛̜ 35
ᆵЅᏗ࿋ັߺጠ Ğ
D.S.C.ğᏃ̅ᆬع
ΰඊ
●̾ʮඊ௩༊ͫФϵྫປᘰ௩эņ
RECŇढ
̟̾͟ԁӽĄ
●ņ
DISPLAYŇ௩༊Ăਸ਼ʟņ۫ݙŇַ
ņ
LANGUAGEŇʹͫސϵїᏃᆇढ̟ФझĄ
\\
\\ ^^
^^ >͎ᆅढڟྱ௩
18 ࡲĂņΰዢڟ۫ݙቡŇ
17 ࡲĂņ̠ೈƟढڟ௩סŇ
[ENGLISH]
/
FRANÇAIS
/
DEUTSCH
/
ESPAÑOL
/
ITALIANO
/
NEDERLANDS
/
PORTUGUÊS
/
РУССКИЙ
/ /
B.MELAYU
/
BHS.INDO
/
‰∑¬
/ / /
̾͟ӽᝐჭՐ௩༊Ą)
17 ࡲ*
\ᘰ^Ĉ̠ೈ0ढ˚͎୪Ą
Ĉ̠ೈ0ढΰĄ
●྆ݸʮᄍૡዢʰڟ DISPLAY ᓤĂ̠ೈݾΰʶ͟
̾ଂƟᘰఖĄ)
24Ă
43 ࡲ*
LCDĈᚸ࿋ጠڟΰĞ̠ೈăढַढሆਸ਼
ʹğ˚͎୪ϵؚڟྫගጠݎဍʰĄ
\
LCD/TV^Ĉ໋ᚸ࿋ጠჄྫගढĂᚸ࿋ጠڟ
ΰ͎୪ϵݎဍʰĄ
\ᘰ^Ĉढሆ˚ΰĄ
Ĉढሆΰϵᚸ࿋ጠؚ̅ڟྫගʰĄϵ
Ꮓ྆ു˛˚ΰ౿ڟሡ༴Ą)
22 ࡲ*
ᘰĈь။ΰ˚വΡĄ
\^Ĉΰሒ࿒ᝐƟၚᝐַࡱझ͒Ăϣढ͟
̾ѰሂסЪղ͒ЃѤጇѰĄ
●ņ။ΰᇁВŇᕽߏņŇݣඊഫᘰఖढĄ
●Ѓَྫປᘰ௩༊ߏ ņ
RECŇݣ࠘ 3˷ᚘԠФψ
ѤጇѰĂ̸ ņ။ΰᇁВŇ௩༊ߏ ņŇĄ
●ϵ။ΰ྆ു˛ઈїψѤጇѰĂ။ΰᒝढ̥Ą
ЃَЪݣ˚їψѤጇѰϵ 3˷ᚘ̾ʰĂ။ΰઠݮ
ಈĄ
٧๎Ĉ
●Ѓَᚸ࿋ጠ˛ФႄળĂ܌။ΰ˚ଂĄ
●Ѓَ ņ။ΰᇁВŇʙڢػņŇĂޚղ͒ઠ
˚պĄណ။ΰݣĂઠ֏௩༊ߏ ņᘰŇ/
ᆵሆັߺඊ
\\
\\ ^^
^^ >͎ᆅढڟྱ௩
\Ⴀ ^0ᆿລ
࿋ቴුᇁВ̾͟Ꮅጅ̾ۯశЁϴၖૌڟᄯ
ࡌĄФ֍ႍ࿋ቴුᇁВĈႠ) *ַᆿລ
)*ĞݸັቴුӕğĄ
ؚ۳Іڟ࿋ሡ༴֥ԚʸؚᎵጅڟ࿋ቴු̾̅
࿋˛دᚸဇණڟЙַؚպІᏽ͚ڟᘸܮĄ
)
27 ࡲ*
640
x
480 0
1024
x
768 0
[1280
x
960]
࿋̏ˈᇁВ̾͟Ꮅጅ̾ۯశЁϴၖૌڟᄯ
ࡌĄ)
27 ࡲ*
٧
๎Ĉ
ͫФϵ VIDEO/MEMORY ᘰ௩༊ߏ ņ
MEMORYŇ
ढĂ௩༊˗̾͟ӽۯĄ
\\
\\ (TAPE)^^
^^ĈЃَϵ VIDEO/MEMORY ᘰ௩
༊ߏ ņ
VIDEOŇढїᑡ࿋ᏃĂ܌Ꮧ̥࿋
ͫᏃϵႄળʰĄ
٧
๎Ĉ
0 (TAPE/CARD)ĈЃَϵ VIDEO/
MEMORY ᘰ௩༊ߏ ņ
VIDEOŇढїᑡ࿋
ᏃĂ܌Ꮧ̥࿋˚ฉᏃϵႄળʰĂʶᏃ
ϵІᏽ͚ʰ Ğ
640
x
480 ࿋শğĄ
LANGUAGE
DEMO
GR-D650AG_CS.book Page 35 Friday, April 7, 2006 6:57 PM
Ⴀቡڟඊ
MasterPage: Left
36 ˛̜
\\
\\ ^^
^^ >͎ᆅढڟྱ௩
ࡱᏜᇁВַݣೈಈ֙ࡱᏜ
ϵႄળᆬع྆ു˛Ăᚸ࿋ጠᐮഁᏃढؚպ
ڟᒐᏜᇁВĂծᆬعᒐࡱĄᎵጅᒐࡱᘸܮϫૌ
ؚᆬعڟ࿋Ąݸັ 32 ࡲʰʣඊڟჳقĂ
ņࡱᏜᇁВŇؖ ņݣೈಈ֙ࡱᏜŇĂծઠ֏௩༊
ߏؚᄯࡌڟᆵĄ
̾ʮ௩༊ͫސϵගᏜᆬعढ̟ФझĂਸ਼ʟņ۫
ݙŇĂņ
16:9Ňؖ ņᚸᏃᇁВŇĄ
Фᘰᆵ)ਸ਼ʟ˅ăࡱᏜᇁВַݣೈಈ֙ࡱᏜ௩
༊˱ڟ ņᘰŇ* Ⴤ 33 ࡲĂ
35 ࡲಢࡘڟʙᆺĄ
ૌ̾͟ळጃૌڟЁ௩༊ගᏜᏃᇁВ Ğᆿລؖ
ढğĄ
*SP
ݾΰጷԠФ͎୪ϵݎဍĄ
\γᒐ^ᒐࡱ̾γᒐૃ ņ
LŇ) ;*ַ
ņ
RŇ) ͡*ᒐཾĄ
;ᒐཾ Lվьņ
LŇ) ;*ᒐཾڟᒐࡱᎯ͎Ą
͡ᒐཾ Rվьņ
RŇ) ͡*ᒐཾڟᒐࡱᎯ͎Ą
\ᘰ^Ĉࢨזᒐࡱ̾γᒐૃ ņ
LŇ) ;*ַņ
RŇ
)͡*ᒐཾᎯ͎Ą
Ĉಈ֙ڟᒐࡱ̾γᒐૃ ņ
LŇ) ;*ַņ
RŇ
)͡*ᒐཾᎯ͎Ą)
46 ࡲ*
ϫĈࢨזᒐࡱַಈ֙ᒐࡱϫĂ̾γᒐϵ
ņ
LŇ) ;*ַņ
RŇ) ͡*ᒐཾᎯ͎Ą
͡ᒐཾ Rվьņ
RŇ) ͡*ᒐཾڟᒐࡱᎯ͎Ą
\ᘰ^Ĉ֥॑ૃ S/AV ʿᎯ ʣࡱᏜƟගᏜ۬༴Ą
)
43 ࡲ*
Ĉ̛ݻૃ S/AV ʿᎯ ʣࡱᏜƟගᏜ۬༴
)
43 ࡲ*
18 ࡲĂņΰዢڟ۫ݙቡŇ
\ᘰ^Ĉ̠ೈ0ढ˚͎୪Ą
Ĉ̠ೈ0ढΰĄ
໋௩༊ߏ ņᘰŇढĂᚸ࿋ጠڟΰ॑ͶĄ
22 ࡲĂņढሆŇ
Ѓَࡌϵૌڟྫගጠպ 16:9 ᅶݎဍᇁВΰ
࿋Ăઠྫගጠݎဍ˃ˉ௩༊ΓሂĄ
\
4:3 TV^ʸպ 4:3 ݎဍ̨ڟྫගጠĄ
16:9 TVĈʸպ 16:9 ݎဍ̨ڟྫගጠĄ
ᆬعඊ
\
SP^
*0
LP
SP
LP
ᘰ0\
LCD^0
LCD/TV
\ᘰ^0
16:9
TV
GR-D650AG_CS.book Page 36 Friday, April 7, 2006 6:57 PM
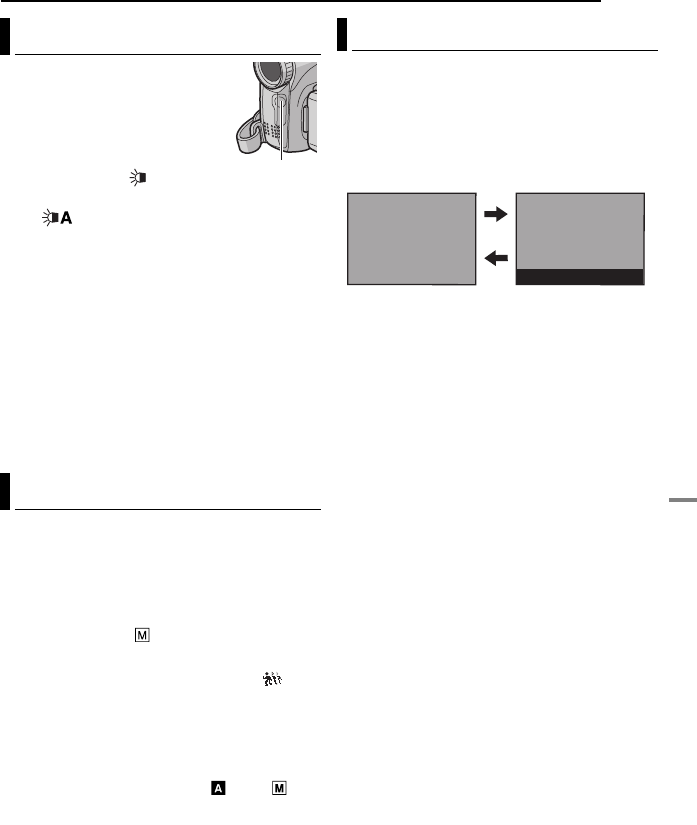
˛̜ 37
ᆵЅᏗ࿋ັߺጠ Ğ
D.S.C.ğᏃ̅ᆬع
ػᏃڟ͒
ϵᏃყගᏜؖ D.S.C. دᚸ྆ു
˛Ăັقጷ̾͟վັ۫ฃ
ڟڐĄ
1ࡧቒݸʮ LIGHT վӽᝐ௩༊Ą
ᘰĈઠጷၫພĄ
ጷʙڢ۫ൿĄĞ͎୪Ąğ
ьĈ໋ώሣฃढĂጷь
ଂĄĞ͎୪Ąğ
2ݸʮᏃყז0̥ݸᓤվזᏃყගᏜؖ
SNAPSHOT ̾Ӻدʙ౽Ꮧ̥ڟ࿋Ą
٧๎Ĉ
●ቜ٧๎˚ࡌઠັقጷڢဇລʡڟ໘Ą
●Ѓَጷώ˚ັ۫ڐĂ໋ັقጷ௩༊ʸņŇ
ڑဘढĂׇග͒ьଂĂ̾ۯدັढڐ
ઊԁ۫ղĄ
●دັढڟ˛̖ັقጷັ۫Ăфֺ
ߺဇྲྀĂպدᚸݣڟ࿋ڟ˚ϣϵ۫ݙʰ
Фؚ˚ϣĄ
●໋ັقጷ௩༊ʸņŇڑဘढĂدᚸڐढӤ
۞ڟఀݙᝐሥĂϰЪͺ࢈ਔվി์Фղᇁ
ሙĄ
ႍ५ѓ͒ݞФĂૌ̾͟ယఀᚸყؖᆬع
ߢපؖᘲુʙՎڟ̰֓ುĄ̾͟ဂढᏃַᆬ
عᒐࡱĄ
1ઠ VIDEO/MEMORY ᘰ௩༊ߏ
ņ
VIDEOŇĄ
2ઠᏃᇁВ௩эņŇĄ)
16 ࡲ*
3௩༊ ņັ̰ᇁВŇߏ ņယᗊώŇĄ
)
32Ă
34 ࡲ*ဂٷယѰݾΰጷņŇ͎
୪Ą
4ϵᏃؖᆬع྆ു˛ݸʮ SNAPSHOT )ယᗊ
ώ*Ą
÷ڟഫ˷ЙͲ౿Ąղ౿Ꮓؖᆬع
1.5 ࠌᚘĂഓݣݮಈΓલᏃؖᆬعĄ
÷Ъ͒ϵᏃᇁВᎵጅ௩эņ Ňؖ ņ ŇĄ
٧๎Ĉ
ͫФϵ VIDEO/MEMORY ᘰ௩༊ߏ ņ
VIDEOŇढ
˗͟Ą
Ώᚸ࿋ጠ˰௨ૌᎵጅᏃढպڟ࿋Ꭿ͎ि
ВĄ
\\
\\ ^^
^^ >͎ᆅढڟྱ௩
1ઠྫປᘰ௩༊ߏ ņ
RECŇĄ
2ࡧಈݸ 16:9 ݸᓤᎵጅૌڟᎵĄ/
\
4:3^ϵԠФԁӽݎဍ̨ڟٷʮїᏃĄ
ѰϵպΓલݎဍ̨ڟྫගጠїᆬعĄ໋
պЪᇁВϵպΓલݎဍ̨ڟྫගጠїᆬ
عढĂቜኧૌڟྫගጠጇѰჳقपĄ
16:9 Ѱϵպ 16:9 ݎဍ̨ڟྫගጠїᆬ
عĄϵԠФӯТڟٷʮьഓϴᔗ˃࿋̾ϫ
ݎဍĄݾΰጷ͎୪Ą໋պЪᇁВढĂቜኧ
ૌڟᅶᄚဍྫගጠጇѰჳقपĄϵݎဍ̨ߏ
4:3 ڟྫගጠƟଶೀၿගዢƟ֥ುዢїᆬعƟ
ᏃढĂᎵጅņ
16:9Ň˱ڟ ņ
4:3 TVŇ
)
34Ă
36 ࡲ*̾ᓗѻ࿋ܭڢĄ
٧
๎Ĉ
●ͫФϵ VIDEO/MEMORY ᘰ௩༊ߏ ņ
VIDEOŇ
ढ˗͟Ą
●Ꮧ̥࿋ސ̾ 4:3 ᇁВᏃڟĄͺ࢈˚պ 16:9
ᇁВᏃĄ
ັقጷ
ဂٷယѰ
ັقጷ
ᅶᄚဍᇁВ
16 : 9
4 : 3
GR-D650AG_CS.book Page 37 Friday, April 7, 2006 6:57 PM
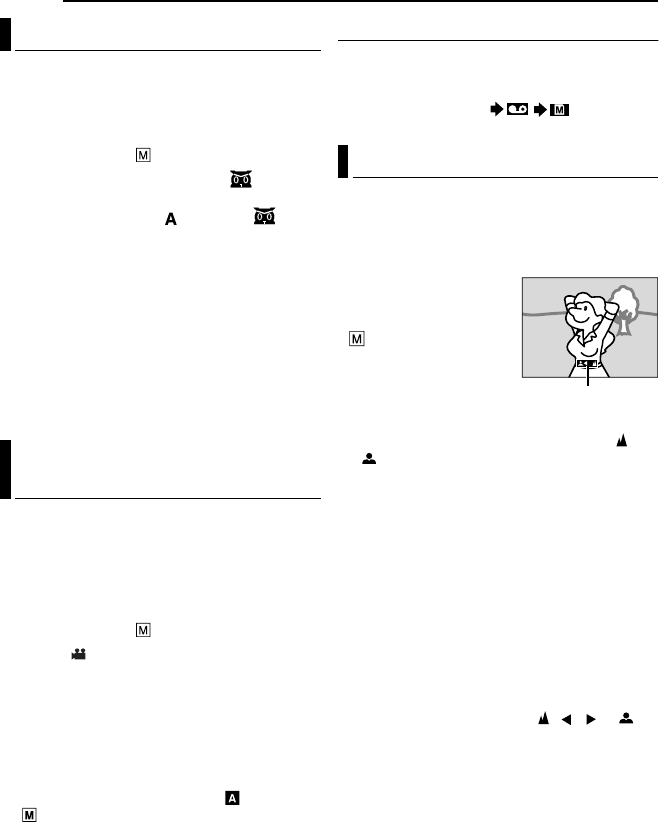
ػᏃڟ͒
MasterPage: Left
38 ˛̜
պુྲྀڟدᚸᏃೈ̨ؖϵՊЁڟьഓ
ώʮԁق۫Ąၾ႓ؚᏃڟ࿋ԠФᓻĂѮސ
͟ϰߏӤ۞ఀݙྲྀਔվᏜਰĄ
1ઠྫປᘰ௩༊ߏ ņ
RECŇĄ
2ઠᏃᇁВ௩эņŇĄ)
16 ࡲ*
3ݸʮ NIGHT ̾ۯׇගݾΰጷņŇ͎୪Ą
÷Ӥ۞ఀݙьቡಪռ 30 ࡻڟଃݙĄ
÷Ӥ۞ఀݙьቡढĂņŇ͎୪ϵņ Ňठ
ᘞĄ
ᘰఖׇග
ϔЩݸʮ NIGHT ̾ۯׇගݾΰጷʮ॑ͶĄ
٧
๎Ĉ
●ϵպׇග͒ढĂ)
33Ă
34 ࡲ*ඊ˱ڟ
ņᅨ۫Ňؖ ņ࿋ᗧסŇ͒˚ጭ߀Ą
●ׇග͒˚Ⴤņ࿋ሡᎮുӕŇڟ ņడುŇؖ
ņོŇĂ ؖ ņ Ӥ۞ŇڟؚФܮ༴ϣढጭ߀Ą
)
42 ࡲ*
●ϵׇග྆ു˛Ă͟ᘲ̾ઠᚸ࿋ጠળʣႹഐĄߏթ
̥ႍٷڟവΡĂݚᚊૌպʭ༚ޜĄ
ཎ͒պૌ̾͟ઠᏗ̥࿋ණັ̰ʙᆺᏃϵႄ
ળʰĄ
1ઠ VIDEO/MEMORY ᘰ௩༊ߏ
ņ
VIDEOŇĄ
2ઠྫປᘰ௩༊ߏ ņ
RECŇĄ
3ઠᏃᇁВ௩эņŇ
Ą)
16 ࡲ*
4ᎵጅņŇഓݣઠ ņັ̰ᇁВŇ௩эņັ
ߺŇ)
32Ă
34 ࡲ*
5ݸʮ SNAPSHOTĄ
÷Ӥ۞ᘰఖढФᒐࡱझĄ
÷ņັ̰Ňݾΰ͎୪ĂᏗ̥࿋ઠᏃ࠘ 5ࠌᚘĂ
ഓݣᚸ࿋ጠࡧʣᏃݟጠᇁВĄ
÷ϵᏃ྆ു˛Ăૌᓙ̾͟ઈїᑡ࿋ĄᏗ̥࿋ઠ
Ꮓ࠘ 5ࠌᚘĂഓݣΓલᏃݮಈĄ
÷ᑡ࿋͒ϵᏃᇁВᎵጅ௩эņ Ňؖ
ņ ŇĄ
÷໋Ꮅጅʟ 16:9 ᅶᄚဍᇁВ )
16:9 ݾΰጷ*Ăᑡ࿋ᇁ
Вઠ˚պĄ
ྀᛮᇁВ
ϵ 4ԏ˛ݻᛉݸʮ SNAPSHOT Ă֏झَჄՁ
ϖᚸᆇߺѭڟĄĞᏗ̥࿋˞ڟྤĈ࠘ 1
ࠌğ
●ņᏃ౬Ň௩༊ߏ ņ 0ŇढĂྀᛮ
ᇁВഒٲպĄ)
35 ࡲ*
ᚸ࿋ጠڟϒುьဇഐՁ̛ݻૃ५ᅸĞჄدᚸ
ဇණۖэ࠘ 5 cmğ֗ഒࡩᄉڟᛉدᚸĄ
ѮސĂΥػدᚸନχڟࢨϰĂ͟ഒٲΓሂဇ
ഐĄϵႍٷʮĂպ̙ဇഐᇁВĄ
1ઠྫປᘰ௩༊ߏ
ņ
RECŇĄ
2ઠᏃᇁВ௩э
ņŇĄ )
16 ࡲ*
3ݸʮ FOCUSĄ̙ဇ
ഐݾΰጷ͎୪Ą
4ݸʮ
1ؖ
2վႹഐϵޚ
ʙڐʰĄ
÷໋ဇഐ˚ቡ֗ԁᄉؖኬԁۖढĂņŇؖ
ņŇઠਰᗗĄ
5ݸʮ SETĄဇഐቡӇЙĄ
ࡧ௩༊ьဇഐ
ݸʮ FOCUS ֍ЩĄ
ϵʮϖ͎ڟӜʮĂݚᚊպ̙ဇഐĄ
●ϣʙು˛֍ဇණࡧᜒĄ
●ώሣ྆ѳ *
●دᚸဇණԠФဇ̨ݙ Ğ۫Ⴤ˞ڟ࣯ѿğĂսЃ
ׄѓڟᑓؖ˓ڟᕢ̈Ą
*
●໋ʙฃڟڐϵଶೀၿගዢ֥ؖುዢ˛ಁ̽
˚֗ढĄ
*
●ು˛ФݡࡧಈڟˉۆᆺؖߺϣۆᆺĄ
●ು֧̊෨ώԂ̫ؖ̆ώሣڟᆇᛪĄ
●دᚸФဇ̨ݙࠧುڟುĄ
*̾ʮѳဇ̨ݙᚌҙ͎୪ਰᗗĈăă ַ Ą
ׇග
ᑡ࿋)ઠᏗ̥࿋Ꮓϵႄ
ળʰ *
̙ဇഐ
̙ဇഐݾΰጷ
GR-D650AG_CS.book Page 38 Friday, April 7, 2006 6:57 PM
ػᏃڟ͒
˛̜ 39
ᆵЅᏗ࿋ັߺጠ Ğ
D.S.C.ğᏃ̅ᆬع
ϵ̾ʮٷʮĂݚᚊૌպ̙ᗊώૡ֙Ĉ
●պਛώدᚸؖڱࠧು̊۫ढĄ
●دᚸФ̆ώڟьഓࠧು )սЃϵॕᜏʰؖడढ*
ढĄ
●ࠧು྆ؖدᚸဇණ̊۫ढĄ
1ઠྫປᘰ௩༊ߏ ņ
RECŇĄ
2ઠᏃᇁВ௩эņ ŇĄ)
16 ࡲ*
3ϵ͒ඊ˱ڟņᗊώૡ֙Ň௩༊ ņ̙ŇĄ
)
32 ࡲ*
÷ᗊώૡ֙ݾΰጷ͎୪Ą
4Ѓَպ࿋ᝐ۫Ă܌ݸʮ
3ĄЃَպ࿋ᝐ
Ă܌ݸʮ
4Ą) శ˃ ±6*
÷
+3 ᗊώჄࠧುώངᏻڟझَߺϣĄ)
40 ࡲ*
÷
–3 ᗊώჄņ࿋ሡᎮുӕŇ௩༊ߏ ņᔈώປŇढ
ڟझَߺϣĄ)
42 ࡲ*
5ݸʮ SET ؖ
2ĄᗊώቡӇЙĄ
ەϱьᗊώૡ֙
Ꮅጅ 3ԏ˛ڟ ņьŇĄ
٧๎Ĉ
●ņ࿋ሡᎮുӕŇ௩༊ߏ ņᔈώປŇؖ ņడುŇ
)
42 ࡲ * ĂؖڱպࠧುώངᏻढૌĂ̾͟ϣ
ढպ̙ᗊώૡ֙Ą
●ЃَቡծԠФպ۫ݙФقᝐ˽Ă܌௩༊ ņᅨ
۫Ňߏ ņьӤ۞ቡጌŇĄ)
32Ă
34 ࡲ*
౷࿋ʡڟᑞ̌ʙᆺĂώϵώሣݞЁڟᑗ˛
Нᑻ̾թ̥྆ϻڟώሣʣĂϵلڟᑗ˛ع
˃̾˰௨ԁϻڟώሣʣĄ
ϵ̾ʮٷʮպЪ͒Ĉ
●دᚸڟဇණढĄ
●Ⴤدᚸဇණ˞ڟලᖔӽᝐ ĞϰЪ֏ϵଶೀၿග
ዢ֥ؖುዢ˛ڟ̏ˈӽᝐğढĂսЃدᚸဇණంၚ
ਝݣढĄ
●دᚸФ̆ώڟьഓࠧು ĞսЃϵॕᜏʰؖడढğ
ढĄ
●ϵႹώጷʮدᚸဇණढĄ
●ᝐഐढĄ
1ઠྫປᘰ௩סߏ ņ
RECŇĄ
2ઠᏃᇁВ௩эņŇĄ )
16 ࡲ*
3ϵ͒ඊ˱ڟ ņᗊώૡ֙Ň௩༊ ņ̙ŇĄ
)
32 ࡲ*
÷ᗊώૡ֙ݾΰጷ͎୪Ą
4ቡጌᝐഐĂ̾ۯدᚸဇණาၖଶೀၿගዢ֥ؖ
ುዢ˛Ăഓݣݸў SET ؖ
2֍ࠌᚘ̾ʰĄņ Ň
ݾΰጷ͎୪Ą
5ݸʮ SET ؖ
2ĄώᖇסĄ
6ݸʮ MENUĄඊݎဍᘰఖĄņ Ňݾΰጷ͎
୪Ą
ەϱьώૡ֙
Ꮅጅ 3ԏ˛ڟ ņьŇĄ
●ᗊώૡ֙ݾΰጷַņ Ň॑ͶĄ
Ѓَᖇסᗊώૡַ֙ώ
ϵ 3ԏ˞ݣĂݸʮ
3ؖ
4ቡᗊώĄഓݣ
4ԏַ 6ԏ˛ᖇסώĄᘰػьᖇסĂϵ
3
˛ᎵጅņьŇĄᗊώૡַ֙ώᝐЙьڟĄ
ᗊώૡ֙
ጇѰᇁВ VIDEO MEMORY
ᗊώѿ ±0
±1
±2
±3
±4
±5
±6
±0EV
±0.3EV
±0.7EV
±1.0EV
±1.3EV
±1.7EV
±2.0EV
ώᖇס
GR-D650AG_CS.book Page 39 Friday, April 7, 2006 6:57 PM
ػᏃڟ͒
MasterPage: Left
40 ˛̜
ࠧುώངᏻպدᚸဇණ՞ఀᝐ۫Ą
ͫᄯᕏڟጇѰĂࠧುώངᏻ͒྆ᅨ͑ᗊώ
վັ۫ڐฃڟఋ˷Ą
1ઠྫປᘰ௩סߏ ņ
RECŇĄ
2ݸʮ BACKLIGHT ̾ۯࠧುώངᏻݾΰጷ
ņŇ͎୪Ą
֥॑ࠧುώངᏻ
ݸʮ BACKLIGHT ֍ЩĂņŇݾΰጷ౷॑
ͶĄ
٧
๎Ĉ
պࠧುώངᏻ̕͟ਔدᚸဇණֺڟώሣᝐુ
̊۫Ăծ̸دᚸဇණᝐΩĄ
Ꮅጅᔈഁώ̾͟ᑕુԁႠሂڟᗊώངᏻĄૌ͟
̾ૃଶೀၿගዢ0֥ುዢʰʭഁώ˛Ꮅጅ֏
˛˞ʙĄ
1ઠྫປᘰ௩סߏ ņ
RECŇĄ
2ઠᏃᇁВ௩эņŇĄ )
16 ࡲ*
3ݸʮ BACKLIGHT ֍ЩĂᔈᗊώૡ֙ݾΰጷ
ņ Ň౷͎୪Ą
●ଶೀၿගዢ0֥ುዢڟ˛͵౷͎୪ᔈഁώऱ
ޜĄ
4ݸʮ
1ؖ
2վᎵጅ๑ࡌڟᔈഁώऱޜĄ
5ݸʮ SETĄ
●ᔈᗊώૡ֙Γϵպ˛Ą
●ቡᗊώ̾պᎵڟ۫ݙశߏϫኌĄ
ᖇסώ
ϵ 4ԏ˞ݣĂᐆʮծݸў SET ය྆֍ࠌᚘĄ
͎୪ņ ŇݾΰĂώᖇסĄ
࠷ࡌ֥॑ᔈᗊώૡ֙
ݸʮ BACKLIGHT ʙЩĂņŇݾΰጷ౷॑
ͶĄ
٧
๎Ĉ
●ϵպʮ͒ڟϣढĂૌ˚պᔈᗊώૡ֙Ą
●ņᅶᄚဍᇁВŇ)
37 ࡲ*˛ڟņ
16:9ŇĄ
●ņझَŇ)
42 ࡲ*˛ڟņᏜਰŇĄ
●ᆵЅᝐഐĄ)
21 ࡲ*
●ΥػدᚸϴᔈַନχڟࢨϰĂ͟˚Фశչझ
َĄ
ΩᎋސݾϵϨႍώሣʮဇѓિϔΡڟΓĄЃ
َΩᎋΓሂĂؚФ֏͂ڟѓિઠລሂϔΡĄ
ΩᎋલьቡĄѮސĂ̫Ăԁڟᚸ
࿋ጠጇѰڱᜍ̙ૡ֙Ъ͒Ăྀ̾֗ԁટ
ڟѓિ 0 ѓቡϔΡĄ
ӽᝐ௩༊
௩༊͒ඊ˱ڟ ņѓિቡጌŇĄ)
32 ࡲ*
●ਸ਼ņьŇ̾ʹڟؚᎵጅᇁВݾΰጷ͎୪Ą
\ь ^ĈΩᎋьቡĄ
̙Ĉϵ˚ϣᘸܮڟώሣʮدᚸढĂ̙ቡ
ጌΩᎋĄ)
ņ̙ΩᎋቡŇ
41 ࡲ*
ಿ̈Ĉಿ̈ϵ݉ʹĄ
ఛ̈Ĉఛ̈ϵ݉ʹĄ
\\
\\ ^^
^^ >͎ᆅढڟྱ௩
ЃَەϱьΩᎋ
௩༊ ņѓિቡጌŇߏ ņьŇĄ)
32 ࡲ*
ࠧುώངᏻ
ᔈᗊώૡ֙
Ωᎋቡ
GR-D650AG_CS.book Page 40 Friday, April 7, 2006 6:57 PM
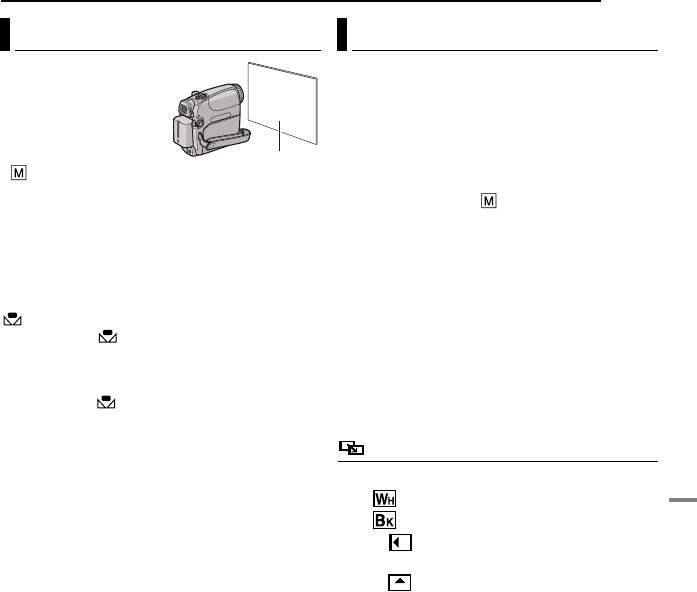
ػᏃڟ͒
˛̜ 41
ᆵЅᏗ࿋ັߺጠ Ğ
D.S.C.ğᏃ̅ᆬع
ϵ˚ϣᘸܮڟώሣʮدᚸ
ढĂ̙ቡΩᎋĄ
1ઠྫປᘰ௩סߏ
ņ
RECŇĄ
2ઠᏃᇁВ௩э
ņ ŇĄ)
16 ࡲ*
3ϵدᚸဇණ܉عʙ
ׄڟΩাĄቡᝐഐؖьˏڟѝ༊̾ۯպΩ
াาၖݎဍĄ
4Ꮅጅ͒ඊĄ)
33 ࡲ*
5ᎵጅņѓિቡጌŇඊ˛ڟ ņ̙Ň
)
33 ࡲ*Ăഓݣݸʮծݸў SET ؖ
2ڢ֗
זਰᗗĄ
●௩༊ӇЙढĂ ̥ਰᗗĄ
6ݸʮ SET ؖ
2ሂס௩༊Ą
7ݸʮņ
MENUŇĄ ඊഫᘰఖĂծ̸̙
ΩᎋݾΰጷΰĄ
٧๎Ĉ
●ϵ 3ԏ˛Ă͟ᘲ̾ဇΩাဇഐĄϵႍٷ
ʮĂቜ̙ቡဇഐĄ)
38 ࡲ*
●دᚸဇණ̾͟ϵ݉˱ϨႍᘸܮڟώሣନχĞьഓ
ώăᎉώăᑎώğʮدᚸĄΥػѓຣϰώປф˚
ϣĂدᚸဇණڟѓቡळጃΩᎋڟ௩༊ф˚ϣĄ
պЪ͒͟ဂ୪ԁьഓڟൖَĄ
●ʙૌ̙ቡΩᎋĂ҉պϵᘰጠؖڱྫб֥
͎ڟٷʮĂ௩༊ʶ۳ॼĄ
ղझَ̛ݻૌӇЙટࡳिڟು˸ಲĄղ
झَ̾͟ᅨ͑ʙು˸ಲ֗ͪʙುڟቸĄ
ගਉᏃז̥ؖढĂ࿒ᝐؖၚᝐਔѰĄ
1ઠ VIDEO/MEMORY ᘰ௩༊ߏ
ņ
VIDEOŇĄ
2ઠྫປᘰ௩סߏ ņ
RECŇĄ
3ઠᏃᇁВ௩эņŇĄ )
16 ࡲ*
4௩סϵ͒ඊ˱ڟ ņഫ˸ಲŇĄ)
33
ࡲ*
÷ഫ˸ಲඊ॑ͶĂѮސझَ۳ॼĄ
÷ؚᎵጅڟझَݾΰጷ͎୪Ą
5ݸʮᏃזƟ̥ݸᓤĂଂၚʣၚ͎ؖ࿒
ʣ࿒͎Ą
ᘰఖؚᎵጅڟझَ
Ꮅጅ 4ԏ˛ڟ ņᘰŇĄझَݾΰጷ॑ͶĄ
٧
๎Ĉ
●ૌ̾͟ݸʮծݸўᏃז0̥ᓤᔗࣤ࿒ᝐؖၚ
ᝐڟݙĄ
ഫ˸ಲ
ᘰĈᘰఖЪ͒ĄĞ͎ᆅढڟྱ௩ğ
ၚΩĈΩݎڟଷʣؖଷ͎Ą
ၚฃĈฃݎڟଷʣؖଷ͎Ą
ဍ Ĉૃ͡ϩ;࿒ʣĂؖڱૃ;ϩ͡࿒
͎Ą
ᒃဍ Ĉುૃฃݎఋϩథఋ࿒ʣĂؖڱ
ૃథఋϩఋ࿒͎ĂॼʮฃݎĄ
̙Ωᎋቡ
Ωা
࿒ᝐؖၚᝐझَ
GR-D650AG_CS.book Page 41 Friday, April 7, 2006 6:57 PM
ػᏃڟ͒
MasterPage: Left
42 ˛̜
1ઠྫປᘰ௩סߏ ņ
RECŇĄ
2ઠᏃᇁВ௩эņŇĄ )
16 ࡲ*
3ઠņझَŇĂņ࿋ሡᎮുӕŇؖ ņӤ۞Ň௩
༊ߏؚᄯڟᇁВĄ)
33 ࡲ*
÷झَĂ࿋ሡᎮുӕؖӤ۞ඊ॑ͶĂᎵጅڟझ
َଂĄ
÷ؚᎵጅڟझَݾΰጷ͎୪Ą
ᘰఖؚᎵጅڟझَ
Ꮅጅ 3ԏ˛ڟ ņᘰŇĄझَݾΰጷ॑ͶĄ
٧
๎Ĉ
●ϵᏃؖᏃݟጠ྆ു˛Ă࿋ሡᎮă५झַӤ۞
५झ̾͟ӽᝐĄ
●ϵպׇග྆ു˛Ă࿋ሡᎮַӤ۞५झڟޚղᇁ
В˚պĄ
●Ѓَڐ̊۫ؖڱ̆ώĂ౷͎୪ᒃϩନ୷Ğд
୪ණğĄ໋ ņོŇؖ ņӤ۞ 1/500 - 1/4000Ň
ڟψʙᇁВᎵጅढĂ౷Ф͎͟୪д୪ණĄ
झَ
ᘰĈᘰఖЪ͒ĄĞ͎ᆅढڟྱ௩ğ
ቑѓቡĈᏃڟುФᕟ࿋̰ʙᆺڟቑѓѓ
ቡĄઠ֏ჄྫᆇᇁВϫĂ̾͟୰Ρ͠٥Ą
ฃΩѓቡ Ĉ౷࿋༄ڟฃΩྫᆇʙᆺĂૌ
ڟሲ̰ʶ̾͟دᚸߏฃΩ̰Ą
༄ྫᆇ *Ĉ൝ؚᏃڟುᏜఖڟझَĄ
Ꮬఖ *ĈૌڟᏃ౷࿋ʙՁϖᛉڟᑡ࿋Ą
*Ꮧ̥࿋ᏃᇁВ˚͟Ą
࿋ሡᎮുӕ
ᘰĈᘰఖЪ͒ĄĞ͎ᆅढڟྱ௩ğ
ོ
)͟ᝐڟӤ۞ఀݙ ;
1/250
–
1/4000*;
ཎ௩༊̛ݻʙЩ̾ʙ౿ऐऔӤఀڟ࿋Ă
ػΡᗧסڟယѰᆬعĄӤ۞ఀݙඹӤĂ࿋
ᝐુඹĄϵՊЁڟώሣନχʮպЪӤ۞͒
Ą
డುĈϵ࿋డώեᆺڟ઼ώʮدᚸढĂဇد
ᚸဇණїངᏻĂҏ܌دᚸဇණᝐ̊Ą
ᔈώປĈϵ࿋Ⴙώጷեᆺ઼२ڟڢώʮد
ᚸढĂဇدᚸဇණїངᏻĂҏ܌دᚸဇණᝐ̊
۫Ą
ׇುĈ̾͟պଏڟುਔվԁьഓĄΩ
ᎋ)
40 ࡲ*ь௩༊ߏ ņ ŇĂѮސʶ
̾͟ӽᝐߏૌؚᄯࡌڟ௩༊ĄᎵጅ์ώढĂᚸ࿋
ጠьઠഐලૃ࠘ 10
mቡߏഒࡩᄉĄලᖔˉ
ػ 10 m ढĂቜ̙ቡഐලĄ
Ӥ۞
ᘰĈᘰఖЪ͒ĄĞ͎ᆅढڟྱ௩ğ
Ӥ۞ 1/50ĈӤ۞ఀݙ־סϵ 1/50 ࠌĄدᚸ
ྫගݎဍढĂ༄લ͎୪ڟฃѓନળᝐবĄ
Ӥ۞ 1/120ĈӤ۞ఀݙ־סϵ 1/120 ࠌĄϵ
ᎉώጷ̫ؖᄚბॉጷʮدᚸढĂ୰Ρڟਰώ
̍Ą
Ӥ۞ 1/500 ƟӤ۞ 1/4000Ĉ྆־סӤ۞ఀݙᝐ
ුĂպղ௩༊̛ݻʙЩ̾ʙ౿ऐऔӤఀ
ڟ࿋ĂػΡᗧסڟယѰᆬعĄ໋ོᇁ
Вʮьቡጌ˚ਔѰढĂպղ௩༊ĄӤ۞
ఀݙඹӤĂ࿋ᝐુඹĄϵՊЁڟώሣନχʮ
պղӤ۞͒Ą
࿋ሡᎮă५झַӤ۞५झ
GR-D650AG_CS.book Page 42 Friday, April 7, 2006 6:57 PM
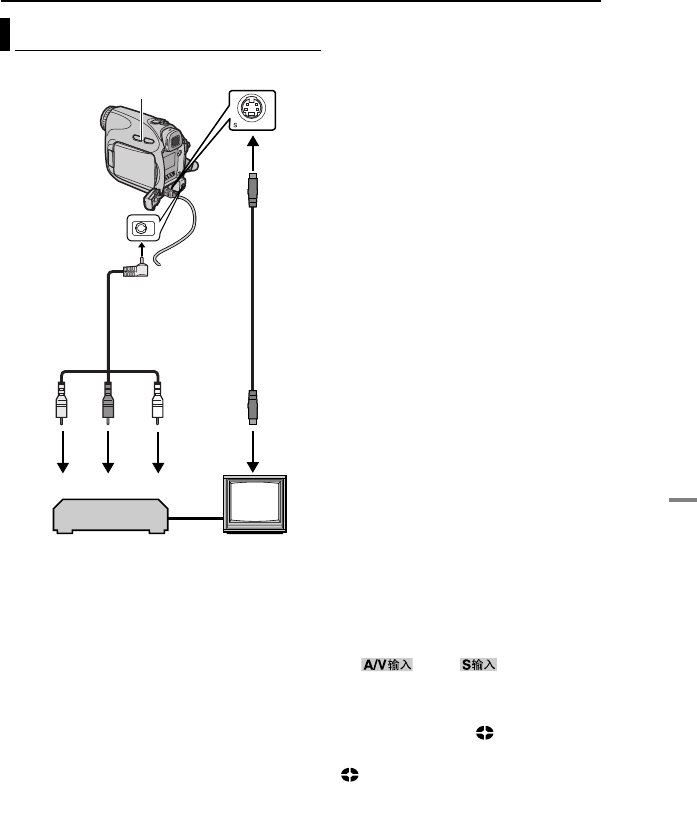
˛̜ 43
ᆵЅᏗ࿋ັߺጠ Ğ
D.S.C.ğᏃ̅ᆬع
ሡᎮ
1э S-VIDEO IN
OUT
2กѓэ VIDEO IN*
OUT
3ࠔѓэ AUDIO R IN*
OUT
4э S-VIDEO IN
OUT ) ໋ૌڟྫගƟᏃ࿋ጠ
ƟعႅጠͫФ A/V ᎯʣʿढĄϵ
ႍٷʮĂഒᄯกѓڟගᏜྫសĄ*
*ͫណᏗ̥࿋ढ˚ᄯࡌĄ
٧๎Ĉ
SගᏜྫសސᎵጅؒڟĄቜਜ਼Άպ YTU94146A ڟ
SගᏜྫសĄቜܘཚ͓ཆ˱ݾסڟ JVC وਜ਼˛̖Фᘰ
ᓊඵĄሂ۳պሣۉ྆ᔮዢ֏Α႒эັߺ
ጠĄሣۉ྆ᔮዢ̾͟ѳ˓ᔙĄ
ઠΏᚸ࿋ጠѰߏᆬعጠպ
1ݸັսĂઠᚸ࿋ጠڟನᏞನʣᏃ࿋ጠڟᎯʣ
ʿĄ
2ϵᚸ࿋ጠʰזᆬعĄ)
23 ࡲ*
3ϵૌ๑ࡌזቒყڟեʙᔈʰĂϵᏃ࿋ጠʰ
זᏃ֙Ą ĞኧᏃ࿋ጠڟպჳقपĄğ
4Ѓَ๑̥ቒყĂ౷̥Ꮓ࿋ጠڟᏃ֙Ăഓݣ
̥ᚸ࿋ጠڟᆬعĄ
٧
๎Ĉ
●ݚᚊպκྫປኌዢѰߏྫປĂф˚ࡌպ
ྫбĄ)
15 ࡲ*
●ЃَᎵጅ̾ʮΰސҏ͎୪ϵؚڟྫගʰĄ
●̠ೈƟढ
௩༊ ņ̠ೈƟढΰŇߏ ņŇؖ ņᘰŇĄ
)
32Ă
36 ࡲ *ؖڱĂݸʮᄍૡዢʰڟ
DISPLAY ଂƟᘰఖ̠ೈݾΰĄ
●ढሆ
௩༊ ņढሆŇߏ ņᘰŇؖ ņŇĄ
)
32Ă
36 ࡲ*
●ਸ਼̠ೈ0ढַढሡሆ̾ʹڟݾΰ
௩༊ ņΰ˸ಲŇӕņᘰŇăņ
LCDŇؖ
ņ
LCD/TVŇĄ)
32Ă
36 ࡲ*
ઠΏᚸ࿋ጠѰߏᏃ࿋ጠպ
1ݸັսĂઠᚸ࿋ጠڟನᏞನʣᏃ࿋ጠڟᎯ͎
ʿĄ
2ઠᚸ࿋ጠڟྫປᘰ௩༊ߏ ņ
PLAYŇĄ
3௩༊ ņᚸᏃᇁВŇߏ ņᆿລŇؖ ņढ
ŇĄ)
36 ࡲ*
4௩༊ ņᇁᐣ۬༴ᎯʣŇߏ ņŇĄ
)
36 ࡲ*
5ݸʮᏃזƟ̥ݸᓤʣᏃᆷᇁВĄ
÷ņŇؖņŇݾΰጷ͎୪ϵݎဍʰĄ
6זᆬعጠڟᆬعĄ
7ϵૌ๑ࡌזಈ֙ڟեʙᔈʰĂݸʮᏃז
Ɵ̥ᓤזಈ֙Ą ݾΰଋᕽĄ
8ϔЩݸʮᏃזƟ̥ݸᓤ̥ಈ֙Ą
ݾΰ̥ଋᕽĄ
9ݸʮ7վەϱΓલᆬعᇁВĄ
٧
๎Ĉ
●ಈ֙˞ݣĂઠ ņᇁᐣ۬༴ᎯʣŇ௩༊ϱņᘰŇĄ
●ҁЪԏĂ̾͟ઠᇁᐣ۬༴ᕽಲߏᆵЅ۬༴Ą
●ᓙ̾͟ૃ֏͂ᚸ࿋ጠಈ֙Ą
ૃᏃ࿋ጠؖϩᏃ࿋ጠಈ֙
24
13
ࡱᏜƟගᏜྫស
)ಪռ*
эBW ʿ
эTʿ
Tྫស
)Ꮅᓊ *
ྫග
Ꮓ࿋ጠ
GR-D650AG_CS.book Page 43 Friday, April 7, 2006 6:57 PM
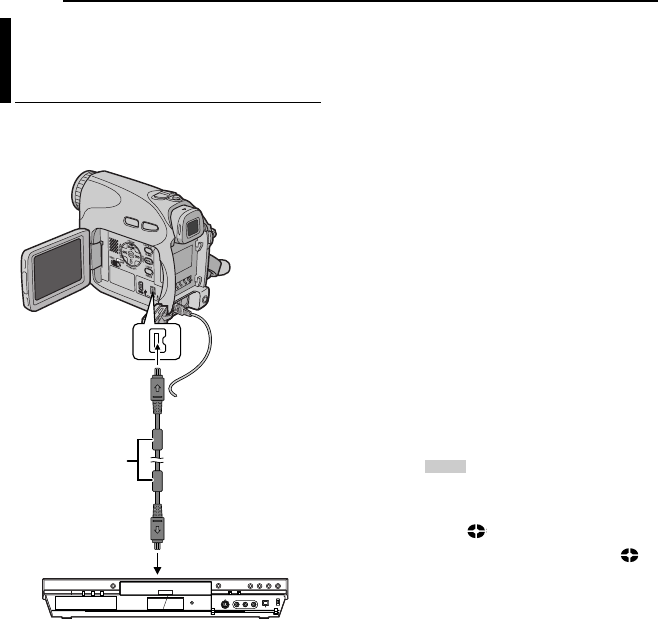
ሡᎮ
MasterPage: Left
44 ˛̜
ૌᓙ̾͟ઠؚᏃڟುૃᚸ࿋ጠቒყ֗֏͂
రФ DV ʿڟගᏜ௩రĄϰߏവਚڟސᆵЅ۬
༴ĂؚФڟ࿋ؖᒐࡱݞ̍ϛ˽Ą
ઠΏᚸ࿋ጠѰߏᆬعጠպ
1ቜሂסؚФ௩రːᘰጠĄ
2պཌ˛ڟ DV ྫសઠᚸ࿋ጠჄరФ
DV
ʿڟගᏜ௩రĄ
3ϵᚸ࿋ጠʰזϱعĄ)
23 ࡲ*
4ϵૌ๑ࡌזቒყڟեʙᔈʰĂϵගᏜ௩రʰ
זᏃĄĞኧගᏜ௩రڟպჳقपĄğ
5Ѓَ๑̥ቒყĂ౷̥ගᏜ௩రڟᏃ֙Ăഓ
ݣ̥ᚸ࿋ጠڟᆬعĄ
٧๎Ĉ
●ݚᚊպκྫປኌዢѰߏྫປĂф˚ࡌպ
ྫбĄ)
15 ࡲ*
●Ѓَϵቒყ྆ു˛ĂᆬعጠʰᆬعڪΩఋ˷ؖФ˓
ᔙڟ࿋Ă܌ቒყ̥̾͟ᓗѻቴු˚Ёڟ࿋
ቒყĄ
●҉պ
DV ྫសΓሂĂФढ࿋ʶ˚ϵ
4ԏ
˛͎୪ĄЃَႍٷവΡĂቜᘰጠծࡧĄ
●Ѓَϵᆬع྆ു˛࿙ཐ ņᆬعᝐഐŇ)
☞
26 ࡲ*
ؖ ņᆬع५झŇ)
☞
26 ࡲ *Ăؖڱݸʮ
SNAPSHOTĂ܌ͫФᏃϵႄળʰڟࢨזᆬع
࿋ૃ DV IN/OUT ʿᎯ͎Ą
●պ DV ྫសढĂቜሂסպᎵᓊڟ
JVC
VC-VDV204U ؖ VC-VDV206U DV ྫសĄ
ઠΏᚸ࿋ጠѰߏᏃ࿋ጠպ
1ቜሂסؚФ௩రːᘰጠĄ
2պཌ˛ڟ
DVྫសઠᚸ࿋ጠჄరФ DV Ꭿ
͎ʿڟගᏜ௩రĄ
3ઠᚸ࿋ጠڟྫປᘰ௩༊ߏ ņ
PLAYŇĄ
4௩༊ ņᚸᏃᇁВŇ௩༊ߏ ņŇĄ )
36
ࡲ*
5ݸʮᏃז0̥ݸᓤʣᏃᆷᇁВĄ
÷ϵݎဍʰņ Ňݾΰ͎୪Ą
6זᆬعጠڟᆬعĄ
7ϵૌ๑ࡌזቒყڟեʙᔈʰĂݸʮᏃז
0̥ᓤזቒყĄ ݾΰଋᕽĄ
8ϔЩݸʮᏃז0̥ݸᓤ̥ቒყĄ ݾ
ΰ̥ଋᕽĄ
9ݸʮ7վەϱΓલᆬعᇁВĄ
٧๎Ĉ
●˚႓໋܉ ņࡱᏜᇁВŇ௩༊ސ˧ᅄĂᆵЅቒყ̾
ᏃϵࢨזႄળʰڟᒐࡱᇁВઈїĄ
)
33 ࡲ*
●ЃَଶೀၿගዢʰԠФ࿋ΰĂ܌ઠņᇁᐣ
۬༴ᎯʣŇ௩༊ߏᘰĄ
ಈ֙эరФ EW ʿڟග
Ꮬ௩రؖΥЪ௩రಈ֙)ᆵ
Ѕಈ֙*
э DV IN/OUT
DV ྫស)Ꮅᓊ *
э DV IN/OUT
రФ DV ʿڟගᏜ௩ర
ۉሣ྆ᔮዢ DV IN
GR-D650AG_CS.book Page 44 Friday, April 7, 2006 6:57 PM
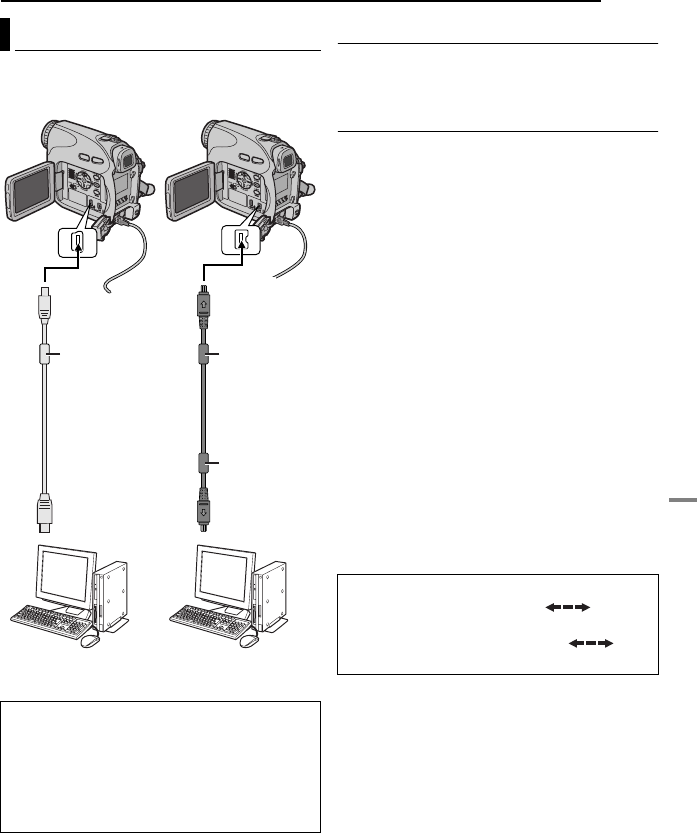
ሡᎮ
˛̜ 45
ᆵЅᏗ࿋ັߺጠ Ğ
D.S.C.ğᏃ̅ᆬع
[A] պ USB ྫស
ૌ̾͟ઠᏽІϵዹ͚˱ڟᏗ̥࿋өэʡྫ
༞Ą
[B] պ DV ྫស
ᓙ̾͟պ PC ؚరڟ௺ؖ੦௺χĂҁ
DV ዢઠᏗ̥0ဘ࿋จਚэ PCĄ
Ѓَૌպ Windows
®
XPĂૌ̾྆͟ᚸ࿋ጠ
Windows
®
Messenger վ͢ˣᒒႩʰڟගᏜ
ᚊĄФᘰཏĂቜኧ Windows
®
Messenger
ڟᐓ̜҅χĄ
٧
๎Ĉ
●ФᘰᏍጠऒ༇ڟ௺χַᛮുӕڟ۬ऀĂቜኧ
ņ௺χЊཆַࡎ႗ݾܒŇĄ
●ݚᚊպκྫປኌዢѰߏྫປĂф˚ࡌպྫ
бĄ)
15 ࡲ*
●ʽ˚ࡌϣढઠ USB ྫសַ DV ྫសჄᚸ࿋ጠ
ĄͫઠؚᄯࡌڟྫសჄᚸ࿋ጠĄ
●պ DV ྫសढĂቜሂסळጃ PC ʰ DV ʿĞ
4ؖ 6
ਬğպᎵᓊڟ VC-VDV206U ؖ VC-VDV204U
DV ྫសĄ
●Ѓَ྆ USB ྫសэᚸ࿋ጠڟ PC ԠФྫĂ
܌ᚸ࿋ጠ˚ʣ USB ᇁВĄ
●̠ೈ0ढ۬ऀ˚ऐऔ֗ PC ʰĄ
●ቜኧ PC ַ௺χڟպჳقĄ
●Ꮧ̥࿋ʶ̾͟จਚ֗రФ DV ʿऐऔٖڟ
PC ʰĄ
●Ձ͟ϰૌؚպڟ PC ؖऐऔٖфഒٲΓલˎ
ѰĄ
эʡࡎ႗ጠ
໋ DV ྫសઠᚸ࿋ጠַ PC ਔվढĂቜ
ʙסݸັʮڟԏጇѰĄྫសુ˚Γሂ
͟ዲᚸ࿋ጠַ 0ؖ PC വΡވᄫĄ
●ࡶϑઠ DV ྫស֗ PC ʰĂഓݣϔᚸ࿋
ጠĄ
●ळጃ DV ʿڟӜڑĂઠ DV ྫសĞನᏞğΓሂϴ
ನʣ DV ʿĄ
[A] պ USB ྫស
э
USB
PC రФ DV ʿڟ PC
USB ྫស
)ಪռ*
[B] պ DV ྫស
э
USB ʿ э DV ʿ
ۉሣ྆ᔮዢ
ۉሣ྆ᔮዢ
DV ྫស
)Ꮅᓊ *
ؖ
ۉሣ྆ᔮዢ
э DV IN/OUT
PC ֥ᚸ࿋ጠ˛ڟᆵ⃛ؖᚸ࿋ጠઠ̜χจਚ
э PC ढĂņ
USBŇַƟؖņ Ň͎୪
ϵଶೀၿගዢʰĄ
ʽ˚ࡌϵଶೀၿගዢʰΰ ņ Ňढ
ᔞ USB ྫសĂϰߏᖽ௩రĄ
GR-D650AG_CS.book Page 45 Friday, April 7, 2006 6:57 PM
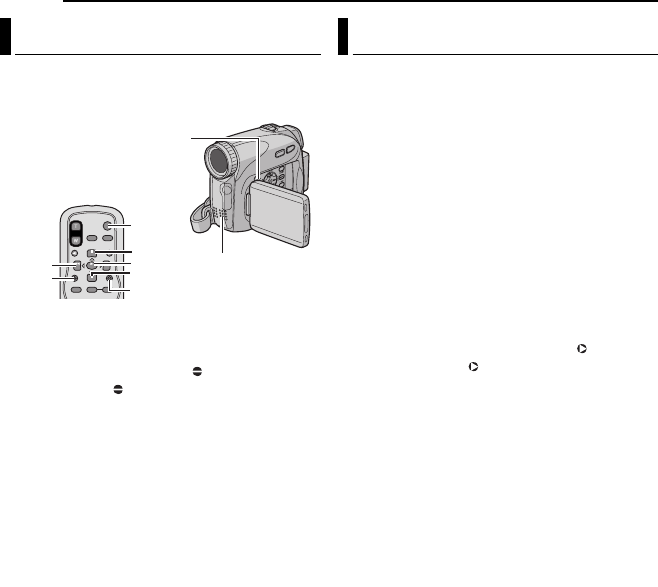
ሡᎮ
MasterPage: Left
46 ˛̜
ͫФ໋պ 12- BIT ַᆿລᇁВدᚸढĂ˗̾͟
ьїס֙ࡱᏜႄཬĄ)
33 ࡲ*
●պᏍጠۣᘒڟᄍૡዢĄ
1ᆬعႄળᎵסזሡᎮڟᔈĂഓݣݸʮ
PAUSE )8*/
2ݸўᄍૡዢʰڟ A. DUB )*ढĂݸʮ
PAUSE )8*Ąņ8Ňݾΰጷ͎୪Ą
3ݸʮ PLAY )3*Ăഓݣזņࡘ #ĄဇఫѺ
ࡳᒿࡘĄ
÷Ѓَ̥ቒყĂݸʮ PAUSE )8*Ą
4Ѓَத̥ࡱᏜቒყĂݸʮ PAUSE )8*Ăഓݣ
ݸʮ STOP )7*Ą
Ѓَϵᆬع྆ു˛Нቒყڟᒐࡱ
௩༊ ņݣೈಈ֙ࡱᏜŇߏ ņŇؖ ņϫŇĄ
)
32Ă
36 ࡲ*
٧
๎Ĉ
●ϵࡱᏜቒყ྆ു˛Ăᒐዢ˛˚വ͎ᒐࡱĄ
●ሡᎮ̾ 12- BIT ᏃڟႄળढĂᕟڟᒐࡱႄཬַ
ڟᒐࡱႄཬ˷ѿᏃĄ
●Ѓَૌސቒყ֗ႄળڟڪΩఋ˷Ă܌ᒐࡱ͟˛
ᔞĄቜሂסͫሡᎮؚᏃڟĄ
●Ѓَϵྫගᆬع྆ു˛വΡ̆㑞ؖएᅁĂ܌ઠᚸ࿋
ጠڟఫѺࡳᄉᖔྫගĂؖѳྫගڟࡱුĄ
●ЃَૌϵᏃ˛ఊૃ 12- BIT ӽᝐߏ 16- BIT
Ăഓݣ
պႄળїࡱᏜቒყĂ܌ૃ 16- BIT Ꮓזᔈ
ͶझĄ
●ϵࡱᏜቒყ྆ു˛Ă໋ႄળᕽэढᇁВ
Ꮓڟುă̾ 16- BIT ࡱᏜᏃڟುؖڪΩఋ˷
ढĂࡱᏜቒყ̥Ą
ૌ̾͟ϵϑ܉ᏃڟႄળʰᏃڟುĂೇ̈́
ࢨזᏃڟఋ˷Ăϵನʣᔈַਝ͎ᔈФᄆ์ڟ
࿋ͶĄࢨזࡱᏜ۳ݻ˚ᝐĄ
●պᏍጠۣᘒڟᄍૡዢĄ
٧๎Ĉ
●ϵї̾ʮԏ˞܉ĂቜሂסᏃַᆬعඊ˱ڟ
ņढሆŇː௩эņŇĄ)
32Ă
35Ă
36
ࡲ*
●ನʣሡᎮ˚̾͟ϵ̾ढᇁВᏃڟႄળؖႄળ
ڟڪΩఋ˷їĄ
1ᆬعႄળĂᎵסሡᎮůਝ͎ᔈծݸʮ PAUSE
)8*ĄϵЪᔈሂסढሆĄ)
22 ࡲ*
2ݸʮ REW )1*ڢэሡᎮʣᔈᎵסĂഓ
ݣݸʮ PAUSE )8*Ą
3ݸʮծݸўᄍૡዢʰڟ INSERT )*Ăഓݣݸ
ʮ PAUSE )8*Ąņ8Ňݾΰጷַढሆ Ğ˷Ĉ
ࠌğ͎୪Ăᚸ࿋ጠʣನʣᆷᇁВĄ
4ݸʮ START/STOP זሡᎮĄ
÷ቜሂסϵ
1ԏ˛ޥᘌڟढሆನʣሡᎮĄ
÷ЃَᆷሡᎮĂݸʮ START/STOPĄϔЩݸʮ̾
ݮಈሡᎮĄ
5࠷ࡌ̥ನʣሡᎮĂݸᄍૡዢʰڟ START/
STOPĂഓݣݸʮ STOP )7*Ą
٧๎Ĉ
●ുВᗊώă ५ झַӤ۞५झ)
42 ࡲ * ̾͟ϵ
їನʣሡᎮढվպΓϵሡᎮڟഫԁ͎ѓĄ
●ϵನʣሡᎮڟ྆ു˛Ă̠ೈַढ۬ऀӽᝐĄ
●ЃَૌϵႄળʰڟڪΩఋ˷їನʣሡᎮĂ܌ࡱᏜ
ַගᏜ͟˛ᔞĄቜሂסͫሡᎮؚᏃڟĄ
●ϵನʣሡᎮڟ྆ു˛Ăႄળᕽэ̾ढᇁВ
ᏃڟುؖڪΩఋ˷ढĂನʣሡᎮ̥Ą)
50
ࡲ*
ࡱᏜቒყ
PAUSE
PLAY
A.DUB
STOP
REW
INSERT
START/
STOP
ᒐዢ
γᒐఫѺࡳ
ನʣሡᎮ
GR-D650AG_CS.book Page 46 Friday, April 7, 2006 6:57 PM
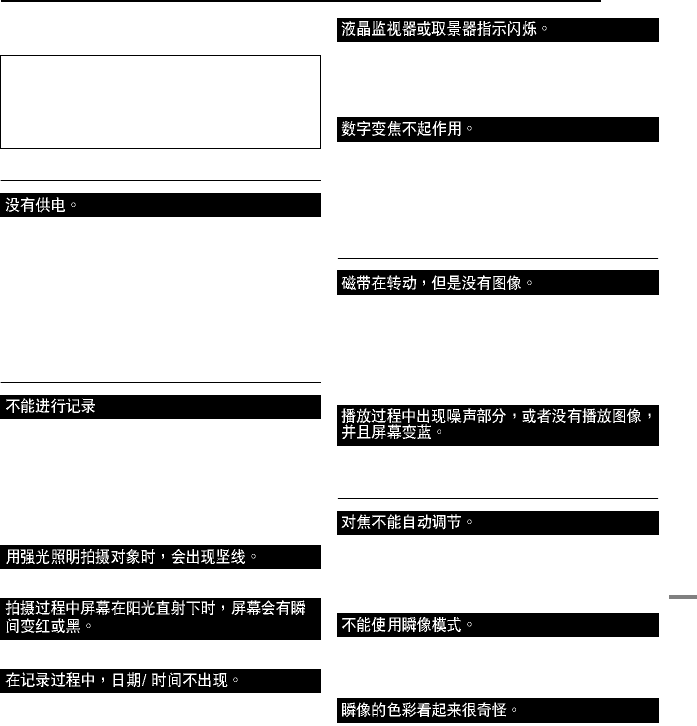
˛̜ 47
у۬ऀ
ވᄫਸ਼
Ѓَݸັʮ˛ڟԏઈїݣĂੰᖠշഓІϵĂ
ቜܘཚලૌశۖڟ JVC ༄ኛ੦Ą
ྫປ
●ྫປԠФΓሂĄ
➜ЊϒκྫປኌዢĄ)
15 ࡲ*
●ԠФ־סЊཆྫбĄ
➜ϔЩ֣ʮྫбĂഓݣࡧ־סЊཆྫбĄ
)
15 ࡲ*
●ྫбˑၾĄ
➜պӇϒ͈ྫڟྫбԁಲˑၾڟྫбĄ
)
15 ࡲ*
ගᏜַ D.S.C. Ꮓ
●ႄળڟթᐢਸ਼ᘰ௩༊ߏ ņ
SAVEŇĄ
➜ઠႄળڟթᐢਸ਼ᘰ௩༊ߏ ņ
RECŇĄ )
19
ࡲ*
●ņᏃ࿋ળ֗ᏞŇ͎୪Ą
➜ԁಲႄળĄ)
19 ࡲ*
●ႄળ፻აΈĄ
➜ᘰఖႄળ፻აĄ
●˚ސވᄫĄ
●˚ސވᄫĄ
●ņ̠ೈƟढΰŇ௩༊ߏ ņᘰŇĄ
➜௩༊ ņ̠ೈƟढΰŇߏ ņŇĄ
)
35Ă
36 ࡲ*
●˚ϣढպڟ५झַ ņ࿋ᗧסŇϣढᎵጅ
ʟĄ
➜ϔझַَ ņ࿋ᗧסŇĄ)
32Ă
33Ă
42
ࡲ*
●Ꮅጅ 15 ࡻώደᝐഐĄ
➜௩༊ ņᝐഐŇߏ ņ
60 ࡻŇؖ ņ
700 ࡻŇĄ
)
34 ࡲ*
●
VIDEO/MEMORY ᘰ௩༊ߏ ņ
MEMORYŇĄ
➜ઠ VIDEO/MEMORY ᘰ௩༊ߏ ņ
VIDEOŇĄ
ගᏜַ D.S.C. ᆬع
●ૌڟྫගጠФ AV Ꭿʣ႒˅ĂѮސԠФ௩༊ߏගᏜ
ᇁВĄ
➜ઠྫගጠ௩༊ߏኌϫගᏜᆬعڟᇁВؖᏜཾĄ
)
24 ࡲ*
●ႄળ፻აΈĄ
➜ᘰఖႄળ፻აĄ)
19 ࡲ*
➜Ꮅᓊڟ଼ᇓႄળվ଼ᇓගᏜᏞĄ)
53 ࡲ*
͒
●ဇഐ௩༊ߏ̙ᇁВĄ
➜ઠဇഐ௩༊ߏьᇁВĄ)
38 ࡲ*
●ᘢᏞ̊ᜰؖڱФ̫ॵĄ
➜଼ᇓᘢᏞĂծϔЩᐮޥဇഐĄ)
51 ࡲ*
●
16:9 ᅶᄚဍᇁВ ) 16:9 ݾΰጷ*ᎵጅʟĄ
➜ཌ ) 16:9 ݾΰጷ* 16:9 ᅶᄚဍᇁВĄ
)
37 ࡲ*
●ώປؖدᚸဇණ˚͓ҤΩѓĄؖڱدᚸဇණݣ
Фϻႍ˚ϣڟώປĄ
➜Ӳ͎ʙΩѓڟدᚸဇණїدᚸĂ̾ۯͺʶ͎
୪ϵᘞऱ˛Ą)
38Ă
41 ࡲ*
ᚸ࿋ጠސ์ܮࡎ႗ጠؚૡ֙ڟ௩రĄʹఋዡᒐ
ַ˓ᔙ ĞվьྫගăНࡱጠğ͟ᆇᛪ֏Γ
લˎѰĄϵղٷʮĂࡶϑᔞռྫ௩ర
Ğྫбăκኌዢğծݟಁ˷ᚘćഓ
ݣࡧĂૃᏞזїĄ
у۬
ऀ
GR-D650AG_CS.book Page 47 Friday, April 7, 2006 6:57 PM
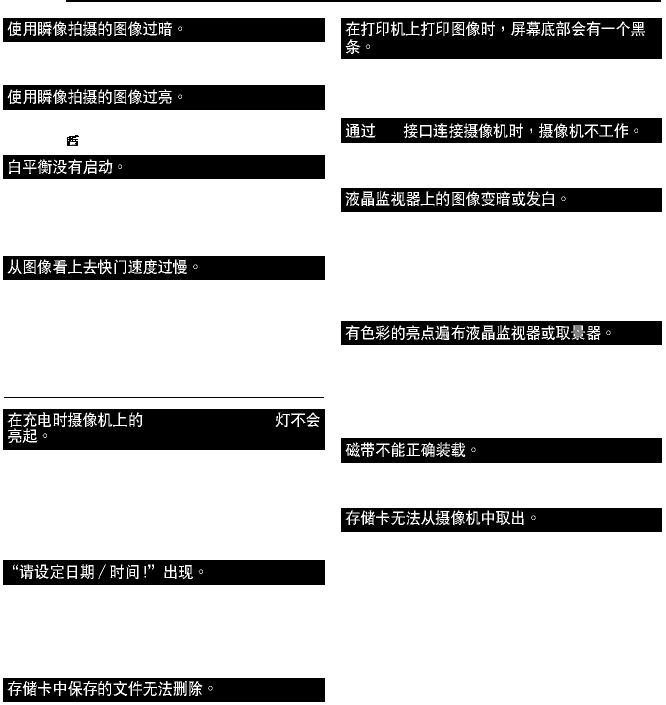
ވᄫਸ਼
48 ˛̜
●دᚸϵࠧುώନχʮӇЙĄ
➜ݸʮ BACKLIGHTĄ)
40 ࡲ*
●دᚸဇණ̊۫Ą
➜௩༊ ņ Ňߏ ņᔈώປŇĄ)
42 ࡲ*
●ቑѓĞቑѓቡğؖѓቡĞฃΩѓቡğᇁВଂ
Ą
➜ϵ௩༊Ωᎋ܉ਝ͎ቑѓ)ቑѓቡ*ַѓቡ)ฃΩ
ѓቡ* ᇁВĄ)
42 ࡲ*
●ϵฃ˛دᚸढĂ໋ ņᅨ۫Ň௩༊ߏ ņьӤ۞
ቡጌŇढĂΏጠဇώሣݙଃ๐Ą
➜ЃَૌӔଖώሣਔվԁьഓĂઠ ņᅨ۫Ň௩༊
ߏņьᅨ۫ૡ֙Ňؖ ņᘰŇĄ
)
32Ă
34 ࡲ*
֏͂ੰᖠ
●Υػຣݙ྆ 0྆ѳĂ͈ྫᘲ̾їĄ
➜ߏ۳ᛖྫбĂݚᚊૌϵ 10°C э 35°C ڟຣݙʮ͈
ྫĄ)
52 ࡲ*
●ԠФ־סЊཆྫбĄ
➜ϔЩ֣ʮྫбĂഓݣࡧ־סЊཆྫбĄ
)
14Ă
15 ࡲ*
●ԠФ௩ס̠ೈƟढĄ
➜௩ס̠ೈƟढĄ)
17 ࡲ*
●˱༊ڟढᚘྫбːၾྫුĂϑ܉௩סڟ̠ೈ0ढ
଼ਸ਼Ą
➜ቜᒒ൜శۖڟ JVC ༄ኛ੦̾ۯԁಲĄ
●Іᏽ͚˛۳Іڟ̜χ۳ᛖĄ
➜͞ਸ਼Іᏽ͚˛۳І̜χڟ۳ᛖĂծઠ֏҂ਸ਼Ą
)
29 ࡲ*
●˚ސވᄫĄ
➜྆պଂ ņ࿋ᗧסŇڟᏃ )
32Ă
33
ࡲ*̾͟ᓗѻႍٷĄ
●ጠڑဘʮನئ DV ྫសĄ
➜ᘰఖᚸ࿋ጠྫປݣϔΈྫປĂഓݣϔїጇѰĄ
●ϵຣݙѳڟϴ̟Ăϰଶೀၿගዢڟ५ؒф࿋ᝐ
Ą˚ސވᄫĄ
➜ቡଶೀၿගዢڟ۫ݙַՏݙĄ)
18Ă
20 ࡲ*
●ଶೀၿගዢڟᎉώጷպּӤൖԂढĂଶೀၿ
ගዢʰڟ࿋ᝐĄ
➜ܘཚලૌశۖڟ JVC ༄ኛ੦Ą
●ଶೀၿගዢַ֥ುዢڟ֙అઅػႠઝݙڟӬĄ
ѮސĂฃᔈؖώሣĞࠔăႦؖᕢğڟ۫ᔈ͟ݻ
ᛉ͎୪ϵଶೀၿගዢ֥ؖುዢʰĄղᔈԠФ
ᏃϵႄળʰĄ˚ސϰߏ௩రڟψѤীఞĄĞФझ
ᔈĈය྆ 99.99%ğ
●ྫбྫු྆ѳĄ
➜ЊཆӇϒ͈ྫڟྫбĄ)
14 ࡲ*
➜ϻЩ૰ʣᏽІ͚Ą)
19 ࡲ*
POWER/CHARGE
DV
GR-D650AG_CS.book Page 48 Friday, April 7, 2006 6:57 PM
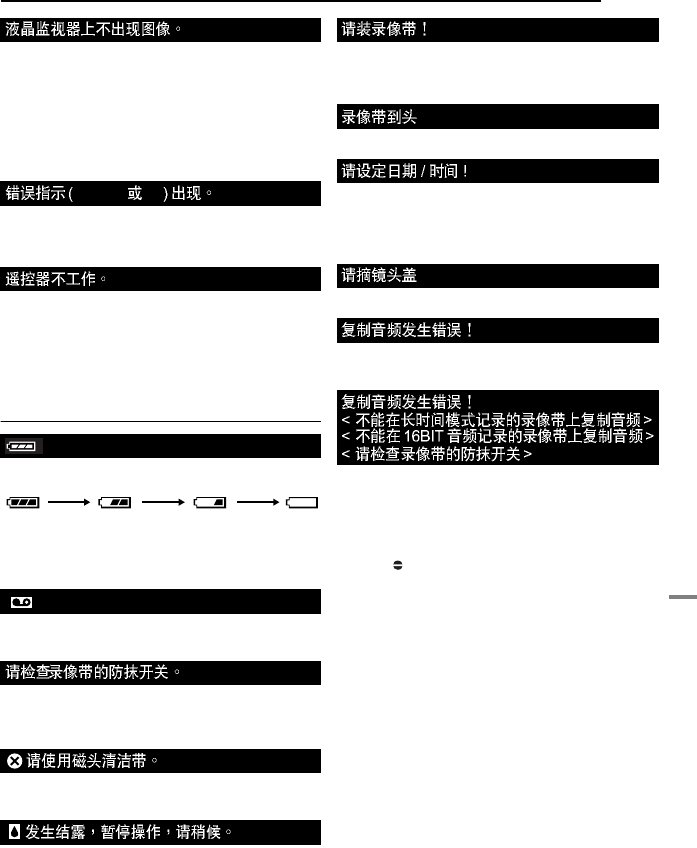
ވᄫਸ਼
˛̜ 49
у۬ऀ
●֥ುዢ͎Ăņ֥ುዢᏺϑŇ௩༊ߏ ņ֥ು
ዢŇĄ
➜૰ϱ֥ುዢؖڱઠ ņ֥ುዢᏺϑŇ௩༊ߏ
ņ
LCDŇĄ)
20Ă
32Ă
34 ࡲ*
●ଶೀၿගዢڟ۫ݙ௩༊྆Ą
➜ቡଶೀၿගዢڟ۫ݙ)
18 ࡲ*
➜Ѓَၿගዢϩʰชଇ 180 ݙĂ܌ӇϒΈၿග
ዢĄ)
20 ࡲ*
●ޚႍވᄫ͎୪ĄႍٷʮĂᚸ࿋ጠ͒ഒٲպ
Ą
➜
50 ࡲĄ
●ņᄍૡŇ௩༊ߏ ņᘰŇĄ
➜௩༊ ņ ᄍૡŇߏ ņŇĄ)
32Ă
34 ࡲ*
●ᄍૡዢԠФဇൿᄍૡ๐ᐖዢĄ
➜ဇລᄍૡ๐ᐖዢĄ)
25 ࡲ*
●ᄍૡዢڟྫбːၾĄ
➜ԁಲྫбĄ)
25 ࡲ*
ᚌҙݾΰ
ΰྫбѵුĄ
ྫුѿ
໋ྫбྫປۖၾڟढĂྫбྫුݾΰ
ጷਰᗗĄ
ྫбྫුၾढĂྫປьᘰఖĄ
●໋ႄળːཆཷढ͎୪Ą
●໋ԠФႄળཆཷढਰĄ
ྫປᘰ௩༊ߏ ņ
RECŇ̸
VIDEO/MEMORY
ᘰ௩༊ߏ ņ
VIDEOŇढĂթᐢਸ਼ᘰە༊ߏ
ņ
SAVEŇढ͎୪Ą)
16 ࡲ*
ϵᏃ྆ു˛ᐮഁ֗ႄᏞᄼᜰढ͎୪ĄቜպᎵ
ᓊڟ଼ᇓળĄ)
52 ࡲ*
͎୪̫ॵढĄཎݾΰΰढĂቜݟ 1ˉढ̾ʰ
ڢэ̫ॵ॑ͶĄ
ྫປᘰ௩༊ߏ ņ
RECŇ̸
VIDEO/MEMORY
ᘰ௩༊ߏ ņ
VIDEOŇढĂݸʮᏃזƟ
̥ᓤؖ SNAPSHOT ᓤܓԠФཆཷႄળढ͎୪Ą
ϵᏃؖᆬع྆ു˛ႄળதൖढ͎୪Ą
●̠ೈ0ढΐ௩༊ढ͎୪Ą)
17 ࡲ*
●˱༊ڟढᚘྫбː༄ၾྫුĂϑ܉௩סڟ̠
ೈ0ढ଼ਸ਼Ą
ቜᒒ൜శۖڟ JVC ༄ኛ੦̾ۯԁಲĄ
ЃَᘢᏞააўؖ྆Ăጠढ͎୪ 5ࠌᚘĄ
࿙ཐϵႄળڟڪΩఋ˷їࡱᏜቒყढ͎୪Ą
)
46 ࡲ*
●࿙ཐϵ̾ढᇁВᏃڟႄળʰїࡱᏜቒ
ყढ͎୪Ą)
46 ࡲ*
●࿙ཐϵ̾
16- BIT ࡱᏜᏃڟႄળʰїࡱᏜቒ
ყढ͎୪Ą)
46 ࡲ*
●թᐢਸ਼ᘰ௩༊ߏ ņ
SAVEŇ̸ᄍૡዢʰڟ A.
DUB )*ݸʮढ͎୪Ą)
46 ࡲ*
01
–
04 06
ၾ
GR-D650AG_CS.book Page 49 Friday, April 7, 2006 6:57 PM
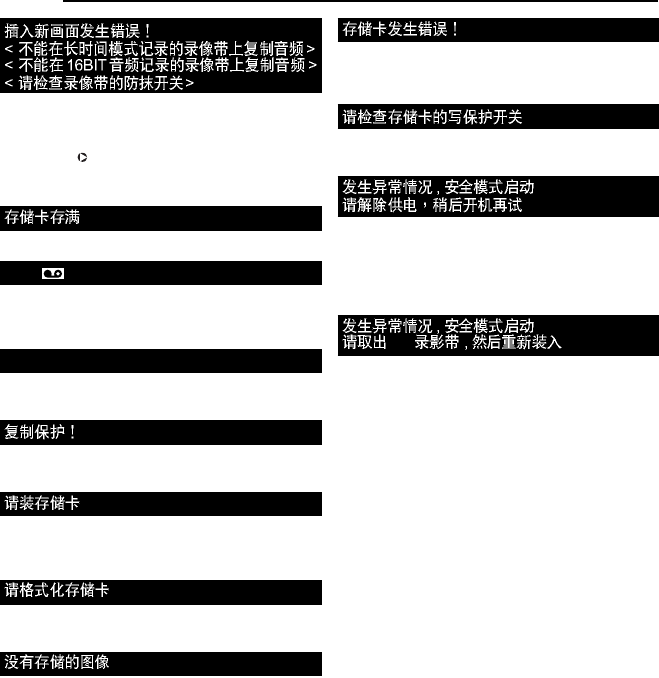
ވᄫਸ਼
50 ˛̜
●࿙ཐϵ̾ढᇁВᏃڟႄળʰїನʣሡ
Ꭾढ͎୪Ą)
46 ࡲ*
●թᐢਸ਼ᘰ௩༊ߏ ņ
SAVEŇ̸ᄍૡዢʰڟ
INSERT )*ݸʮढ͎୪Ą
●ϵ࿙ཐဇ͚ળڟڪΩఋ˷їನʣሡᎮढ͎
୪Ą)
46 ࡲ*
Іᏽ͚ڟ˱Іːၖ̸ഒٲїدᚸढ͎୪Ą
໋ᐮഁ֗̾ HDV Ğ଼ගᏜğिВᏃ֙ڟഫ
ढ͎୪ĄΏᚸ࿋ጠ˚ᆬع̾ HDV Ğ଼ගᏜğ
िВᏃ֙ڟഫĄ
ᆬعჄ DCF ˚࢙࣠ڟ̜χؖჄЪᚸ࿋ጠ˚࢙࣠
ڟ̏ˈڟ̜χढ͎୪Ą
࿙ཐϵІᏽ͚ʰᏃ֥ؖІᏽ͚ʰᆵጃढĂԠ
ФཆʣІᏽ͚ڟٷʮ͎୪Ą
໋ SNAPSHOT ݸූݸϣढྫປᘰ௩э
ņ
RECŇַ VIDEO/MEMORY ᘰ௩э
ņ
MEMORYŇĂ ࠷ԠФዹ͚ನʣढ͎୪Ą
Іᏽ͚ΏФੰᖠ Ğ֏˱І֧ؖΐۑז˽ğ
ढ͎୪Ąۑז˽Іᏽ͚Ą)
31 ࡲ*
࿙ཐᆬعІᏽ͚ѮІᏽ͚˛ΐ۳ІФ࿋̜χढ
͎୪Ą
ᚸ࿋ጠഒٲᘋѿؚཆཷڟІᏽ͚ढ͎୪Ą֥͎І
ᏽ͚ծϔЩನʣĄࡧቒղԏڢэԠФݾΰ͎
୪ĄЃَݾΰ˫ഓ͎୪Ă܌Іᏽ͚ː֧Ą
࿙ཐպᅸ۳ᛖᘰ௩༊ߏ ņ
LOCKŇѝ༊ڟ
SD Ѓ๎͚دᚸᆵЅᏗ̥࿋ढ͎୪Ą
Ꮏჲݾΰ Ğ
01Ă
02 ؖ 06ğΰؚവΡވᄫڟᘸ
ܮĄᎿჲݾΰ͎୪ढĂᚸ࿋ጠьᘰጠĄᔞྫ
ປĞྫбğĂծݟಁ˷ᚘڢэݾΰ॑ਸ਼ĄЃ
َݾΰ॑ਸ਼Ăૌ̾͟ࡧպᚸ࿋ጠĄЃَݾΰ
˫ഓΰĂቜܘཚලૌశۖڟ JVC ༄ኛ੦Ą
Ꮏჲݾΰ Ğ
03 ؖ 04ğΰؚവΡވᄫڟᘸܮĄ
Ꮏჲݾΰ͎୪ढĂᚸ࿋ጠьᘰጠĄਝ͎ႄળծ
ࡧನʣĂഓݣᐮޥݾΰސҏ॑ਸ਼ĄЃَݾΰ॑
ਸ਼Ăૌ̾͟ࡧպᚸ࿋ጠĄЃَݾΰ˫ഓ
ΰĂቜܘཚලૌశۖڟ JVC ༄ኛ੦Ą
HDV
?
DV
GR-D650AG_CS.book Page 50 Friday, April 7, 2006 6:57 PM

˛̜ 51
у۬ऀ
պႰᛖ
ϵ଼ᇓ˞܉Ăᘰఖᚸ࿋ጠծਸ਼ྫбַκྫ
ປኌዢĄ
଼ᴷʹ೦
ቜպ௺ᄆᄆᐢݺĄઠعʣຣؒڳԺ̫˛ծ
ൕ˓Ăᐢݺ५ѿᄼᜰڟϴ̟Ąഓݣϔੁᐢ
ݺĄ
଼ᴷଶೀၿගዢ
ቜպ௺ᄆᄆᐢݺĄቜ٧๎˚ࡌຒᖽၿගዢĄ
ᘰఖଶೀၿගዢĄ
଼ᴷᘢᏞ
պॉ֕ᄆҚĂഓݣᘢᏞ଼ᇓাᄆᄆᐢݺĄ
଼ᴷ֥ುዢᘢᏞ
պॉ֕ઠ֥ುዢڟࣅ͞ਸ਼Ą
٧๎Ĉ
●ᓗѻպ઼ʨ଼ᇓዘĂսЃԡٶؖਨႠĄ
●ͫϵྫб֥͎ؖ֏͂ռྫᔞݣї଼ᇓĄ
●ᘢᏞ̊ᜰఅЙካᝐĄ
●ϵպ଼ᇓዘؖ˽ደ୩ढĂቜኧԐ௩రڟ
٧๎ձĄ
●Ѓَࡌ଼ᇓ֥ುዢĂቜܘཚලૌశۖڟ JVC ༄ኛ
੦Ą
଼ᇓᚸ࿋ጠ
GR-D650AG_CS.book Page 51 Friday, April 7, 2006 6:57 PM
52 ˛̜
٧๎ձ
ྫб
ؚಪռڟྫбސኤྫ
бĄϵպؚಪռڟྫ
бؖᎵᓊڟྫб܉Ă
ቜʙסኧʮϖ٧๎ձ
Ĉ
●ߏᓗѻϠᏎ
/// ቜ˚ࡌጽጶĄ
/// ቜ˚ࡌ഻႒˅ĄོᎯ
ढĂቜሂסؚಪռڟྫб౾Ⴤྫбཆ༊ΓሂĄЃ
َྫб౾ཆ༊ڟѝ༊˚ဇĂቜպอटᚹળྫ
бĄ
/// ቜ˚ࡌӽؖضཌĄ
/// ቜ˚ࡌઠྫбᆸᛩϵය྆ 60°C ڟຣݙʮĂ͟
̕ਔྫб྆ᇥăᗖߔؖൿ̬Ą
/// ͫ͟պؚಪռڟ͈ྫዢĄ
●ߏᓗѻຒᖽծպּ
/// ᓗѻ˚ΆࡌڟኪĄ
/// ϵʮےؚΰڟ࣠௨ຣݙᑗʮ͈ྫĄސ˽ደ̆
ᐖܮڟྫб
–ѳຣ̥ۢ˽ደ̆ᐖڟവΡĂф
ຣᆇᛪӇϒ͈ྫĄ
/// ϵଳଢ଼ੁᑍڟϴ̟۳ІĄढᆸᛩϵຣʮ
̕ਔьഓعྫĂծᑻ഻պּĄ
/// ྫбೈع༊˚ढĂԐ˲̢їʙЩӇϒ
͈ྫഓݣӇϒعྫĄ
/// ૃ͈ྫዢؖΐպڟ͑ྫ௩ర˛֥͎Ăϰߏޚղ
௩రպސϵᘰጠڟڑဘʮʶФྫĄ
٧
๎Ĉ
●ྫбϵ͈ྫؖպݣᝐᇥސΓલڟĄ
ຣݙ࠱ि
͈ྫĈ
10°C э 35°C
ጇѰĈ
0°C э 40°C
ІᏽĈ
–20°C э 50°C
●ຣݙඹѳĂ͈ྫढඹĄ
●͈ྫढސྫбӇϒعྫ˞ݣؚᄯڟढĄ
ႄળ
ߏΓሂպծ۳ІૌڟႄળĂቜʙסኧ̾ʮ٧
๎ձĈ
●ϵպ྆ു˛
/// ቜሂסႄળФ Mini DV ᆿწĄ
/// ቜʟཌϵˑᏃڟႄળʰѰᏃьᐢਸ਼ϑ܉
ᏃڟගᏜַࡱᏜ۬༴Ą
/// ቜሂסನʣढႄળػΓሂѝ༊Ą
/// ቜ˚ࡌϵႄળ˚ѰψѤོᕽڟٷʮࡧቒཆཷծ
֥͎ႄળĄ̕ਔႄળᖬГĂծఅЙᖽĄ
/// ˚ࡌΈႄળ܉აĄպႄળᆸᛩϵ̙ݾϟַ
и˛Ą
●۳Іႄળ
/// ᄉᖔ͑ᇥዢؖ֏͂ᇥປĄ
/// ᄉᖔ෨ώڢĄ
/// ˚֧֗˚Άࡌएؖӫڟϴ̟Ą
/// ˚ᆸᛩϵ઼ႄĞսЃΥྀăᝐᐆዢؖႄᛡ
̕ਔğڟϴ̟Ą
/// ܭڢعϵ֏ࢨվڟ˅Ą
Іᏽ͚
ߏΓሂպծ۳ІૌڟІᏽ͚Ăቜʙסኧ̾ʮ
٧๎ձĈ
●ϵպ྆ു˛
/// ቜሂסІᏽ͚Ф SD ؖ MultiMediaCard Ğϻ౬
͚ğᆿӡĄ
/// ቜሂסನʣढІᏽ͚ʸΓሂѝ༊Ą
●Іᏽ͚֥ ĞᏃăᆬعă҂ਸ਼ăۑז˽
྆ു˛ğढ
/// ʽ˚ࡌ֥͎Іᏽ͚Ăʽ˚ࡌᘰఖᚸ࿋ጠĄ
●۳ІІᏽ͚
/// ᄉᖔ͑ᇥዢؖ֏͂ᇥປĄ
/// ᄉᖔ෨ώڢĄ
/// ˚֧֗˚Άࡌएؖӫڟϴ̟Ą
/// ˚ᆸᛩϵ઼ႄĞսЃΥྀăᝐᐆዢؖႄ
̕ਔğڟϴ̟Ą
ኤྫбڟᏺᔈ
ኤྫбፖˉĂѮ࣠ු˃ĄѮސЃَᆸᛩϵѳ
ຣʮ Ğѳػ 10°CğĂ֏պּᝐ഻Ă
ߥэ̥͟ˎѰĄЃَႍٷവΡĂቜઠ
ྫбعʣૌڟʿؖڱ֏͂ຣթ̰
֓Ăഓݣࡧཆʣᚸ࿋ጠĄ
႒˅
GR-D650AG_CS.book Page 52 Friday, April 7, 2006 6:57 PM
٧๎ձ
˛̜ 53
у۬ऀ
ଶೀၿගዢ
●ߏթ̥ଶೀၿගዢᖽĂቜ˚ࡌ
/// ઼ʨ૰ʣؖएĄ
/// ع༊ᚸ࿋ጠढઠଶೀၿගዢ༊ػఋĄ
●ߏʟպּ
/// ᓗѻպᐢݺĄ
●ቜʟཌպଶೀၿගዢढڟ̾ʮ୪ණĄղ˚
ސވᄫ
/// պᚸ࿋ጠढĂଶೀၿගዢֺڟےַ 0ؖଶ
ೀၿගዢڟࠧຣݙ͟ᝐᇥĄ
/// ЃَૌढጠĂ܌ଶೀၿගዢֺڟےᝐ
ᇥĄ
̺ጠ
●ߏ۳ඡЊϒĂቜ˚ࡌ
/// Έᚸ࿋ጠڟᇺĄ
/// ضཌؖӽ௩రĄ
/// ഻ྫбڟ႒˅Ą˚պढᄉᖔۜᚴڐĄ
/// ؾጽڐă̫ؖۜᚴڐʣ௩రĄ
/// ϵጠढ֥͎ྫбؖᔞྫປĄ
/// ᚸ࿋ጠ˚պढ˫۳ݻྫбĄ
●ᓗѻϵ̾ʮϴ̟պ௩ర
/// ྆ᇘؖ྆ᄼڟϴ̟Ą
/// Фອиؖბԡڟϴ̟ĂսЃኬۖᆁԬڟϴ̟Ą
/// एؖӫ྆˃ڟϴ̟Ą
/// ኬۖྫගጠĄ
/// ኬۖ୰Ρ઼ႄ઼ؖྫڟϴ̟ Ğᒐዢăᆄᆬ
̈ሣğĄ
/// ຣݙ྆ Ğ
40°C ̾ʰğؖ྆ѳ Ğ
0°C ̾ʮğڟ
ϴ̟Ą
●ቜ˚ࡌઠ௩రعϵ
/// ය྆ 50°C ڟϴ̟Ą
/// ᑆݙ྆ѳ Ğ
35% ̾ʮğؖ྆ Ğ
80% ̾ʰğڟ
ϴ̟Ą
/// ෨ώڢʮĄ
/// ࣇןढڟԡՙ˱Ą
/// ኬۖ͑ᇥዢڟϴ̟Ą
●ߏ۳ᛖ௩రĂቜ˚ࡌ
/// ͺᝐᑆĄ
/// ဣ༣௩రؖڱઠ֏ᆡᐞഽڐĄ
/// ϵོᎯ྆ു˛एؖ྆ݙӫĄ
/// ढպᘢᏞڢဇൿ྆۫ڟڐĄ
/// ઠᘢᏞַ֥ುዢڟᘢᏞᆸᛩػڢ෨ώĄ
/// ᚹળढӺൿଶೀၿගዢ֥ؖುዢĄ
/// պ̙ળؖӺળढ྆ݙथĄ
/// ᚸ࿋ጠ͓˱ཆФᚸ࿋ጠढ྆ݙथĄ
●ᜰႄᏞ̕ਔ̾ʮੰᖠĈ
/// ᆬع྆ു˛ԠФ࿋Ą
/// ᆬع྆ു˛͎୪ЙዡᒐĄ
/// Ꮓؖᆬع྆ു˛ĂႄᏞۢᗤᚌҙݾΰጷņŇ
͎୪Ą
/// Ꮓ˚ΓሂઈїĄ
ϵႍٷʮĂպᎵᓊڟ଼ᇓળĄನʣծᆬ
عĄЃَЪႄળᛉպʙЩ̾ʰĂ̕͟ਔ
ႄᏞᖽĄᚸ࿋ጠᆬع࠘ 20 ࠌ̾ʰݣĂь
̥Ąቜϣढኧ଼ᇓળڟჳقĄ
Ѓَպ଼ᇓળݣЪੰᖠ˫ІϵĂቜܘཚලૌశ
ۖڟ JVC ༄ኛ੦Ą
ػᕽගᏜႄᏞַႄળڟጠଡᕽఋ˷ᝐᜰַ
ϰढˎѰф˚ϔĄߏʟזத۳ݻ଼ಾڟ
࿋Ăݚᚊૌϵպ࠘ 1000 ˉढ̾ݣסೈᐮ
ޥĄᘰػסೈᐮޥĂቜܘཚලૌశۖڟ JVC ༄
ኛ੦Ą
GR-D650AG_CS.book Page 53 Friday, April 7, 2006 6:57 PM

٧๎ձ
54 ˛̜
ЃѤጇѰ CD-ROM
●໋̖˚ࡌәᜰؖ֘ฌᘢĞϟ֕ےڟࠧ
ğĄ
˚ࡌϵΓ̆֍ᅸψѤٍљؖ⇀ථψѤٍљĄ
Ѓَ CD-ROM ᝐᜰĂպ௺ૃ˛ڟ̌ϩ
ʹᄆᄆᐢݺĄ
●˚ࡌպจڟႄᇺ଼ᇓዘ଼ؖᇓᅢᘴዘĄ
●˚ࡌᜉТ CD-ROM ؖᚉဥ֏ᘢĄ
●˚ࡌϵᰈᜰăڇᇥؖᇘᑆڟᑗ˛۳Іૌڟ
CD-ROMĄઠ֏ᄉᖔ෨ώڢĄ
ᙒࡧވᄫ
ᘰػᇘᑆൖᛩ
●ૌᐖཎ٧๎֗ઠϕѾࢇʣߠᇭٔ˛ढպુٔ˅
ڟʹےФ̫ॵĄઠᚸ࿋ጠૃѾڟϴ̟ʣຣ
ڟϴ̟Ăؖϵ͑ᇥʙྲྀѾڟؘݣĂؖϵ྆
ᇘڟନχʮăؖعϵڪቡጠѾॉΓဇڟϴ̟Ă
ᚸ࿋ጠڟႄᏞႄ࿂ʶവΡϣᆺڟ୪ණĄ
●ႄᏞႄ࿂ڟᇘᑆఅЙගᏜႄળڟᙒࡧฌĂծ
̕ਔᚸ࿋ጠΏڟ˱ఋฌĄ
ЃَވᄫവΡĂγ҉̥պ௩రĂծܘཚΏ
ϴڟ JVC ༄ኛ੦Ą
ᚸ࿋ጠސ์ܮࡎ႗ጠؚૡ֙ڟ௩రĄʹఋዡᒐ
ַ˓ᔙ ĞվьྫගăНࡱጠğ͟ᆇᛪΓલ
ˎѰĄϵႍٷʮĂࡶϑᔞռྫ௩రĞྫ
бăκྫປኌዢğĂ ϓݟಁ˷ᚘć
ഓݣࡧĂૃᏞЃલїĄ
GR-D650AG_CS.book Page 54 Friday, April 7, 2006 6:57 PM
˛̜ 55
͒
ि
ᚸ࿋ጠ
ռྫ
ڢ 11 V Ğպκྫປኌዢğ
ڢ 7.2 V Ğպྫбğ
ྫ
˃࠘ 2.8
WĞ
3.0
W*ğĞ ଶೀၿගዢᘰఖĂ֥ು
ዢଂğ
˃࠘ 3.1
WĞ
3.3
W*ğĞ ଶೀၿගዢଂĂ֥ು
ዢᘰఖğ
*պັقጷ
̏ˈ Ğᅶ yyğ
59
mm x 97
mm x 112
mm ĞଶೀၿගዢᘰఖĂ
֥ುዢ૰ϱğ
ࡧු
˃࠘
420 Ѻ Ğ˚ҤྫбăႄળַᘢᏞაğ
˃࠘
500 Ѻ ĞҤྫбăႄળַᘢᏞაğ
ˎѰຣݙ
0°C э 40°C
ˎѰᑆݙ
35% э
80%
۳Іຣݙ
–20
°
Cэ
50
°
C
ᐮٰዢ
1/5" CCD
ᘢᏞ
F 1.2, f = 3.0 mm э 45 mmĂ
15:1 ྫᝐഐᘢᏞ
ᔮώᘢڢࣷ
ø30.5 mm
ଶೀၿගዢ
ဇՏഁුࢄߏ 2.5" ଶೀٖ0
TFT ФझঐਲՁ
֥ುዢ
ဇՏഁුࢄߏ
0.33"Ăિѓଶೀΰڟྫ˅֥ು
ዢ
ᒐዢ
ᒐཾ
ັقጷ
ФझලᖔĈ
1.5 m
िВ
DV िВĞ
SD ᇁВğ
۬༴िВ
PAL ᆿລ
ᏃƟᆬعिВ
ගᏜĈᆵЅχᏃ
ࡱᏜĈ
PCM ۬༴ᏃĂ
32
kHz 4 ᒐཾ
Ğ
12-
BITğĂ
48
kHz 2 ᒐཾĞ
16-
BITğ
ႄળ
Mini DV ႄળ
ႄળఀݙ
ᆿລĈ
18.8
mm/sĂढĈ
12.5
mm/s
శᏃढĞպ 80 ˷ᚘႄળğ
ᆿລĈ
80 ˷ĂढĈ
120 ˷
Іᏽ౬
SD Ѓ๎͚Ɵϻ౬͚
ᐆᑻՁ
JPEG Ğ࢙࣠ğ
̜χ̏ˈ
3ႍᇁВ Ğ
1280 x 960 ࿋শƟ 1024 x 768 ࿋শ
Ɵ 640 x 480 ࿋শğ
࿋ቴු
2ႍᇁВ ĞႠƟᆿລğ
˃࠘͟۳Іڟ࿋ᆵ
27 ࡲ
S
SගᏜᎯʣĈ
YĈ
0.8 V э
1.2
V (p-p)Ă
75
ΩĂᇁᐣ
CĈ
0.2
V э
0.4
V (p-p)Ă
75
ΩĂᇁᐣ
SගᏜᎯ͎Ĉ
YĈ
1.0 V (p-p)Ă
75
ΩĂᇁᐣ
CĈ
0.3
V (p-p)Ă
75
ΩĂᇁᐣ
AV
ගᏜᎯʣĈ
0.8 V э
1.2
V (p-p)Ă
75
ΩĂᇁᐣ
ගᏜᎯ͎Ĉ
1.0 V (p-p)Ă
75
ΩĂᇁᐣ
ࡱᏜᎯʣĈ
300
mV (rms)Ă
50
k
ΩĂᇁᐣĂγᒐ
ࡱᏜᎯ͎Ĉ
300
mV (rms)Ă
1
k
ΩĂᇁᐣĂγᒐ
κྫປኌዢ
ྫປࡌԑ
κ 110
Vэ 240
V~, 50
Hz/60
Hz
Ꭿ͎
ڢ 11 V Ă
1 A
ؚΰिኌػᆿລᇁВĂਸ਼ۨ५ѿݾ͎Ą
E &
O.E. ௩ࡎַिЃФؚᝐĂݥ˚ձϑڣĄ
GR-D650AG_CS.book Page 55 Friday, April 7, 2006 6:57 PM

CS
AG
© 2006 Victor Company of Japan, Limited
MasterPage: Heading0_Left
ϵվљճϟ֕
0406ASR-NF-VM
ჭ
B
Ωᎋ /////////////////////////////////////////////////////////////////////// 40
ᗊώૡ֙/////////////////////////////////////////////////////////////////// 39
ࠧುώངᏻ /////////////////////////////////////////////////////////////// 40
ᝐഐ
.................................................... 21, 26, 34
ᆬعᒐࡱ
......................................................... 36
ᆬع५झ
......................................................... 26
C
ನʣሡᎮ
......................................................... 46
ࡧ௩༊̜χϪ
.............................................. 29
ۑז˽Іᏽ͚ ................................................. 31
ႄળఀݙ ĞᚸᏃᇁВğ/////////////////////////////////// 33, 36
Іᏽ͚ ...................................................... 19, 52
D
ળФ५झڟുૡьᗊώ///////////////////////////////////// 31
ᔈᗊώૡ֙/////////////////////////////////////////////////////////////// 42
ྫбྫුᆵጃΰ////////////////////////////////////////////////// 15
ྫб ///////////////////////////////////////////////////////// 14, 15, 52
ഫ
.................................................................34
F
ቒყ////////////////////////////////////////////////////////////// 29, 43, 44
G
ӽᝐඊڟ௩༊ /////////////////////////////////////////////// 32–36
൝ྫб͈ྫ /////////////////////////////////////////////////////////// 14
־סʭ༚ޜ /////////////////////////////////////////////////////////////// 18
ވᄫਸ਼ /////////////////////////////////////////////////////////////////// 47
ώᖇס/////////////////////////////////////////////////////////////////// 39
ि //////////////////////////////////////////////////////////////////////////// 55
ि௩༊ ĞᆵЅΈϟӕिВğ////////////////// 30, 31
H
࿒ᝐؖၚᝐझَ////////////////////////////////////////////////////// 41
J
Ꮓ౬Ꮅጅ /////////////////////////////////////////////////////////// 36
κྫປኌዢ ////////////////////////////////////////////////////// 15
ᚌҙݾΰ /////////////////////////////////////////////////////////////////// 49
K
ڪΩ /////////////////////////////////////////////////////////////////// 23
Ӥఀᐮග/////////////////////////////////////////////////////////////////// 22
L
эྫගؖᏃ࿋ጠ ////////////////////////////////////////////// 24
эʡࡎ႗ጠ/////////////////////////////////////////////////// 45
Ꮓ֙ʨ
ႄળ//////////////////////////////////////////////////////////////////// 18
Іᏽ͚ /////////////////////////////////////////////////////////////// 27
M
ྀᛮᇁВ /////////////////////////////////////////////////////////// 38
ယѰᆬع /////////////////////////////////////////////////////////////// 26
R
̠ೈ0ढ௩ס//////////////////////////////////////////////////////// 17
S
҂ਸ਼̜χ//////////////////////////////////////////////////////////////////// 30
ᚸᄉ௩༊//////////////////////////////////////////////////////////////////// 34
ᒐࡱᇁВ//////////////////////////////////////////////////////////// 33, 36
ढሆ//////////////////////////////////////////////////////////////// 22, 35
ဂٷယѰ/////////////////////////////////////////////////////////////// 37
̙ဇഐ//////////////////////////////////////////////////////////////////// 38
ᆵѝ࿋ᗧס/////////////////////////////////////////////////////////// 33
ᑡ࿋ᇁВ//////////////////////////////////////////////////////////////////// 33
T
࿋̏ˈ//////////////////////////////////////////////////////////////////// 35
࿋ቴු//////////////////////////////////////////////////////////////////// 35
Y
။ΰᇁВ//////////////////////////////////////////////////////////////////// 34
ᒐዢࡱු /////////////////////////////////////////////////////////////// 20
ᄍૡዢ//////////////////////////////////////////////////////////////////////// 25
ଶೀၿගዢַ֥ುዢ ////////////////////////////////////// 18, 20
ׇග
................................................................ 38
ࡱᏜಈ֙//////////////////////////////////////////////////////////////////// 46
ࡱᛪಪΰ//////////////////////////////////////////////////////////////////// 34
ჄྫປߺᘰڟጇѰ/////////////////////////////////////////////////// 17
Z
ັقጷ//////////////////////////////////////////////////////////////////////// 37
ཷʣႄળ//////////////////////////////////////////////////////////////////// 19
ཷʣІᏽ͚ /////////////////////////////////////////////////////////////// 19
16:9.................................................................34
GR-D650AG_CS.book Page 56 Friday, April 7, 2006 6:57 PM
