JVC GR DVL9700EK DVL9700/9800EK,9800EA User Manual LYT0515 001A
User Manual: JVC GR-DVL9700EK GR-DVL9700EK nglish, Separatevolume1
Open the PDF directly: View PDF ![]() .
.
Page Count: 24

INSTRUCTIONS
MultiMediaNavigator
BEFORE OPERATION
LYT0515-001A
For Windows®
ENGLISH
EN

2 EN
JVC SOFTWARE LICENSE AGREEMENT
TO CUSTOMERS:
MAKE SURE TO READ THIS CAREFULLY BEFORE OPENING THE SEALED SOFTWARE
PACKETS
Thank you for purchasing our product. In order to start using the software program en-
closed, you are required to accept the terms and conditions of the agreement as pro-
vided below.
Software License Agreement
This is a legal agreement between you (either an individual or an entity) and Victor Company
of Japan, Limited (JVC). By opening the sealed software packages and/or by using the Pro-
gram, you are agreeing to be bound by the terms of this Agreement. Should you not agree to
the terms hereof, return the unopened software packets and the accompanying items to the
place where you obtained them.
1. GRANT OF LICENSE
This License Agreement (Agreement) permits you to use the software program (Program)
enclosed in this package and/or the accompanying written material (e. g. printed manuals).
Although you are also granted license to load the Program into temporary memory (i. e. RAM)
or install the Program once into permanent memory (e. g. hard disk, CD-R, or other storage
device) of one (1) computer system, you are strictly prohibited to install the Program on a
network server for the sole purpose of internal distribution.
2. COPYRIGHT
Notwithstanding the provision of Article 1 hereof, any copyright in the Program is owned ex-
clusively by JVC and is protected by the Japanese copyright law, copyright laws of other
countries, as applicable, and relevant provisions under international treaties including the
Berne Convention for the Protection of Literary and Artistic Works, as amended, and the
Universal Copyright Convention, as amended. Therefore, you must treat the Program like any
other copyrighted material except that you may either (a) make one (1) copy of the Program
solely for your personal backup or archival purposes, or (b) transfer the Program to a single
hard disk, provided that you keep the original solely for your personal backup or archival
purposes.
3. RESTRICTION ON THE PROGRAM
You may not reverse engineer, decompile, disassemble, revise or modify the Program, except
to the extent that such restriction is expressly prohibited by applicable law. JVC and its dis-
tributors and dealers shall not be liable for any claims or defects etc. arising out of or in
connection with such prohibited activities as indicated in this Agreement.
4. OTHER RESTRICTIONS
You may not rent, lease or transfer the Program to any third party nor let such a party use the
Program.
IMPORTANT

EN 3
5. LIMITED WARRANTY
JVC warrants that any media in which the Program is embodied (e.g. floppy discs, CD-ROM,
etc.) are free from any defects in materials and workmanship for a period of thirty (30) days
from the date of your purchase and that any hardware accompanying the Program is also free
from defects to the extent provided in the attached Warranty Form. JVC’s entire liability and
your exclusive remedy in connection with the Program shall be, at JVC’s option, either (a)
return of the price paid, or (b) replacement of defective Program media.
6. DISCLAIMER OF WARRANTIES
EXCEPT FOR THE EXPRESS WARRANTIES STATED HEREIN AND TO THE EXTENT PER-
MITTED BY APPLICABLE LAW, JVC AND ITS SUPPLIERS DISCLAIM ANY OTHER WAR-
RANTIES, EITHER EXPRESS OR IMPLIED, INCLUDING BUT NOT LIMITED TO IMPLIED
WARRANTIES OF MERCHANTABILITY AND FITNESS FOR A PARTICULAR PURPOSE IN
REGARD TO THE PROGRAM AND THE ACCOMPANYING PRINTED MATERIALS.
7. LIMITED LIABILITY
TO THE EXTENT PERMITTED BY APPLICABLE LAW, IN NO EVENT SHALL JVC AND ITS
SUPPLIERS BE LIABLE FOR ANY INDIRECT, SPECIAL, INCIDENTAL OR CONSEQUEN-
TIAL DAMAGES WHATSOEVER, REGARDLESS OF THE FORM OF ACTION WHETHER
IN CONTRACT, TORT, STRICT PRODUCT LIABILITY OR OTHERWISE (INCLUDING BUT
NOT LIMITED TO DAMAGES FOR LOSS OF PROFITS, BUSINESS INTERRUPTION, LOSS
OF BUSINESS INFORMATION OR ANY OTHER PECUNIARY LOSS) ARISING OUT OF OR
IN CONNECTION WITH THE USE OF OR INABILITY TO USE THE PROGRAM, EVEN IF
JVC HAS BEEN ADVISED OF THE POSSIBILITY OF SUCH DAMAGES.
Victor Company of Japan, Limited
4 EN
CONTENTS
GETTING STARTED 5 – 6
What is MultiMediaNavigator?
..................................................... 5
What is JLIP?
........................................................................... 5
Major Features
......................................................................... 5
Operating Environment
............................................................... 6
INSTALLATION 7
CONNECTIONS 8 – 9
MultiMediaNavigator WINDOW DISPLAY 10
CREATING TITLE/FRAME IMAGES 11
MODIFYING TITLE/FRAME IMAGES 12
TRANSFERRING TITLE/FRAME IMAGES 13
NOTICE FOR USERS 14
Presto! Mr. Photo Gold 15 – 20
CAUTION:
●Operate this equipment according to the operating procedures described in this manual.
●Use only the provided CD-ROM. Never use any other CD-ROM to run this software.
●Do not attempt to modify this software.
●Changes or modifications not approved by JVC could void user’s authority to operate the
equipment.
How to handle a CD-ROM
●Take care not to soil or scratch the mirror surface (opposite to the printed surface). Do
not write anything or put a sticker on either the front or back surface. If the CD-ROM gets
dirty, gently wipe it with a soft cloth outward from the center hole using a circular
motion.
●Do not use conventional disc cleaners or cleaning spray.
●Do not bend the CD-ROM or touch its mirror surface.
●Do not store your CD-ROM in a dusty, hot or humid environment. Keep it away from
direct sunlight.

EN 5
GETTING STARTED
What is MultiMediaNavigator?
MultiMediaNavigator is a set of application software that gives you creative control over
recordings made with a video source unit. Using this software, you can transfer still images
from the video source unit to a PC for editing, as well as control the video source unit from the
PC. What’s more, you can also create your own Title/Frame Images on the PC, then transfer
them to the video source unit that is packaged with this software.
What is JLIP?
JLIP* stands for Joint Level Interface Protocol, a new communication protocol which allows AV
units equipped with a JLIP terminal to be controlled by a personal computer.
* is a registered trademark of JVC.
Major features
nPicture Navigator
Picture Navigator allows you to transfer still images between a video source unit and a PC via
the RS-232C serial port. Captured images will be 640 x 480 pixels with 16.7 million colors.
nJLIP Video Capture
JLIP Video Capture allows you to capture still images from a video source unit to a PC via the
RS-232C serial port.
nJLIP Video Producer
JLIP Video Producer allows you to control a video source unit from a PC. You can copy scenes
from the video source unit to a VCR by setting In/Out points.
nTitle Creator
You can create or modify your own Title/Frame Images on a PC and transfer them to the video
source unit that is packaged with this software.

6 EN
Operating Environment
qPersonal Computer with Microsoft® Windows® 95/Windows® 98
qCPU : Intel® Pentium® or higher processor
qMinimum RAM requirement : 32 MB
qAvailable Hard Disk space;
MultiMediaNavigator : 20 MB or more
Mr. Photo Gold : up to 140 MB or more
(You can select which applications from Mr. Photo Gold you wish to install.)
qColor display capable of at least 65,536 colors
Recommended 1024 x 768, 16.7 million colors
q1 free serial transmission port, compatible with 9600 bps or higher transmission rate,
connectable to RS-232C with 9 pin serial connector
(Recommended compatible with UART 16550A)
qMouse (Windows® compatible)
qCD-ROM drive
NOTE
An optional 9 pin serial conversion adapter is required for computers using a serial commu-
nication port other than a standard 9 pin.
* Intel® and Pentium® are either registered trademarks or trademarks of Intel Corporation.
* Microsoft® and Windows® are either registered trademarks or trademarks of Microsoft
Corporation in the United States and/or other countries.
* Other product and company names included in this instruction manual are
trademarks and/or registered trademarks of their respective holders.
GETTING STARTED (cont.)
EN 7
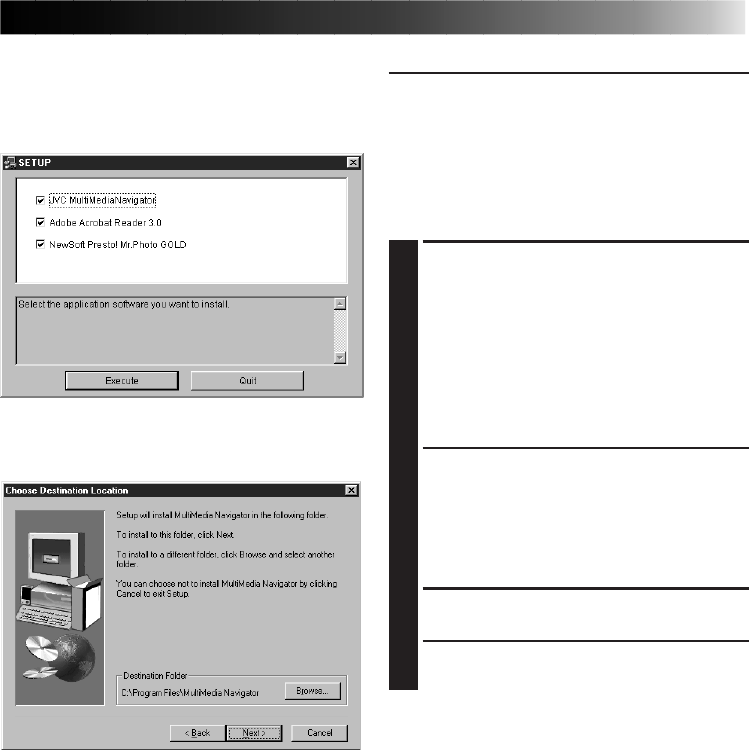
INSTALLATION
1
Insert the supplied CD-ROM disc into
the CD-ROM drive.
• The SETUP window should appear
after a few moments.
• Perform the following operation if the
setup window does not appear.
1 Double click My Computer.
2 Double click the CD-ROM icon.
3 Go to Step 2.
2
Click Execute on the SETUP window.
• If the application has already been
installed, click on those application
items which do not need to be
installed to remove the check mark
displayed.
3
Follow the on-screen instructions.
4
Click Quit on the SETUP window when
installation is complete.
INSTALLATION
For details on the basic operations of
Windows® 95/98, please see your Windows®
95/98 or PC instruction manual.
Starting Windows® 95/98
• Quit any other software you are
using. (Check that there are no other
application icons on the task bar.)
8 EN
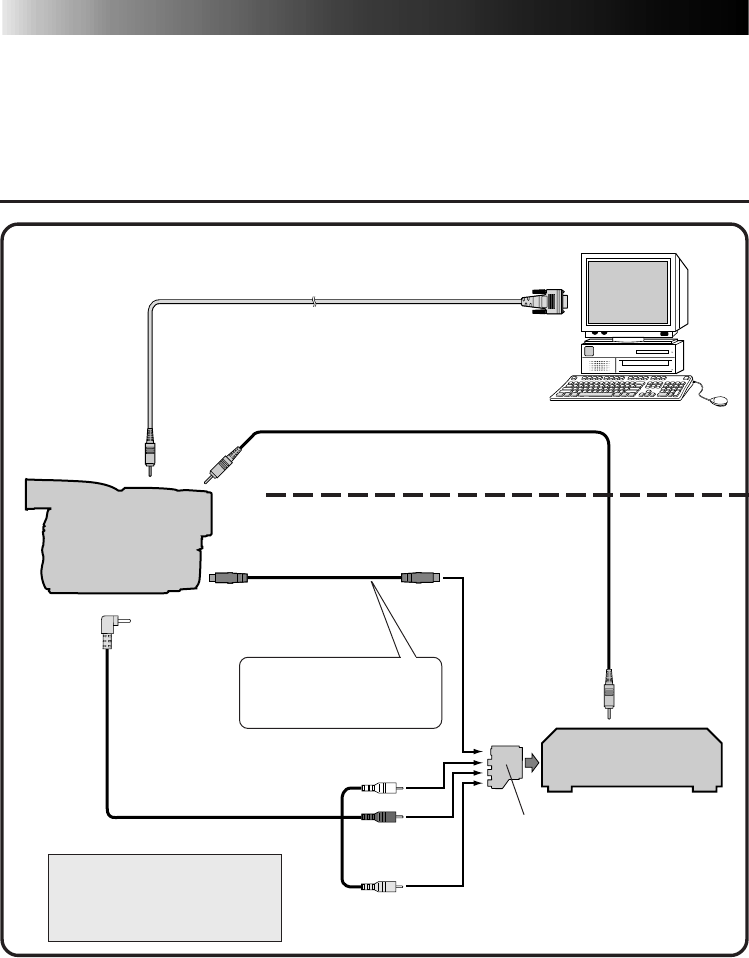
CONNECTIONS
WHEN CONNECTED TO A VCR EQUIPPED WITH A JLIP JACK
nTo assure safety, make sure all units are turned off before making any connections.
nWe recommend that you use the AC Power Adapter/Charger.
nWhen connecting the provided cables, be sure to plug the connectors equipped with core
filters into the video camera.
nDo not make any connections to the video camera’s DV OUT connector.
When JLIP Video Producer is used:
When JLIP Video Capture is used:
To PC jack
To S OUT jack
S-VIDEO cable
AUDIO/VIDEO cable
To S-VIDEO
input jack
To JLIP jack
JLIP cable
To JLIP jack
PC connection cable
PC
To COM port
(RS-232C)
Video Camera
VCR
(Recording deck)
White to
AUDIO L
Red to
AUDIO R
Yellow to
VIDEO
Connect this if the video
source unit has an S-Video
input jack.
NOTE:
The JLIP cable can only be
used with JVC VCRs equipped
with a JLIP jack.
If your VCR has a SCART
connector, use the cable
adapter.
To AV jack
EN 9
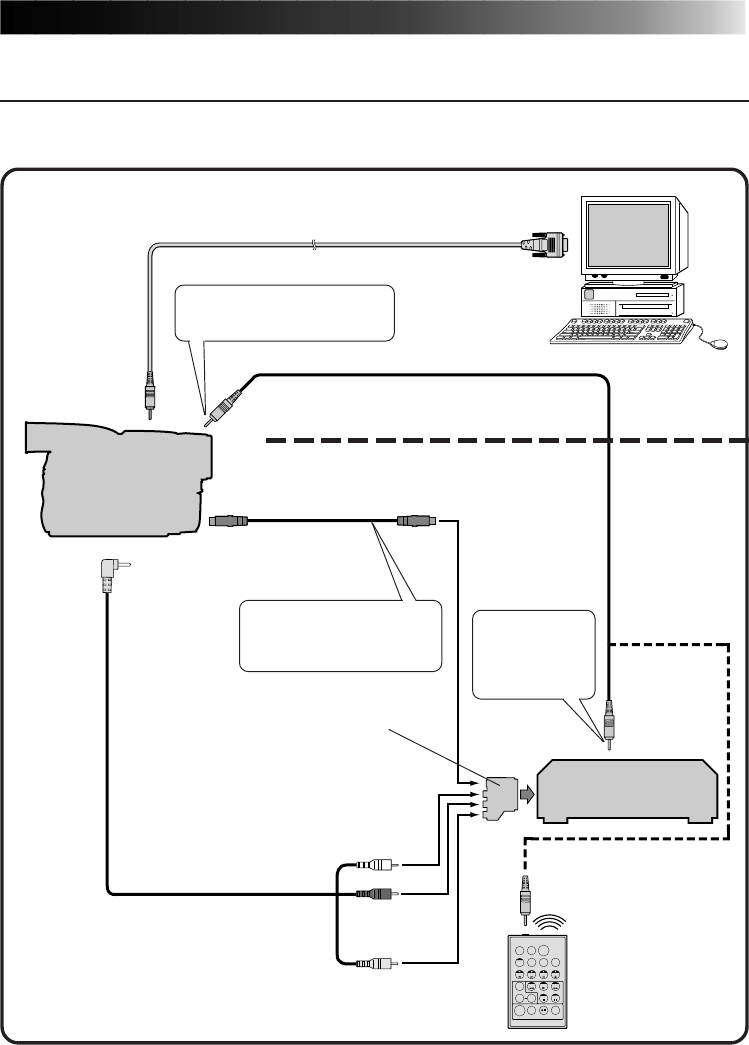
WHEN CONNECTED TO A VCR NOT EQUIPPED WITH A
JLIP JACK
When using a VCR not equipped with a JLIP jack, set your VCR brand using the remote control
unit provided with the video camera, then perform editing using the remote control.
TW
When JLIP Video Producer is used:
When JLIP Video Capture is used:
To PC jack
To S OUT jack
S-VIDEO cable
AUDIO/VIDEO cable
To S-VIDEO
input jack Editing cable
To JLIP jack
PC connection cable
PC
To COM port
(RS-232C)
Video Camera
White to
AUDIO L
Red to
AUDIO R
Yellow to
VIDEO
Connect this if the video
source unit has an S-Video
input jack.
VCR
(Recording deck)
Connect here if the
recording deck doesn’t
have a remote pause jack.
Remote control unit
To remote
pause jack
Use the plug which has three
yellow rings around the pin.
Use the plug
which has one
black ring
around the pin.
If your VCR has a SCART
connector, use the cable
adapter.
To AV jack

10 EN
MultiMediaNavigator WINDOW DISPLAY
1Starts up Picture Navigator.
2Starts up JLIP Video Capture.
3Starts up JLIP Video Producer.
4Displays the name of the selected application.
5Creates new Title/Frame Images.
6Modifies Title/Frame Images.
7Transfers Title/Frame Images to a video source unit.
8Displays information about the selected application.
9Closes MultiMediaNavigator.
HOW TO START UP MultiMediaNavigator
1
Turn on the PC.
2
Select Start — Program —
MultiMediaNavigator.
3
MultiMediaNavigator starts up.
HOW TO CLOSE MultiMediaNavigator
Click Quit in the MultiMediaNavigator window.
23
4
56 78
9
1
EN 11
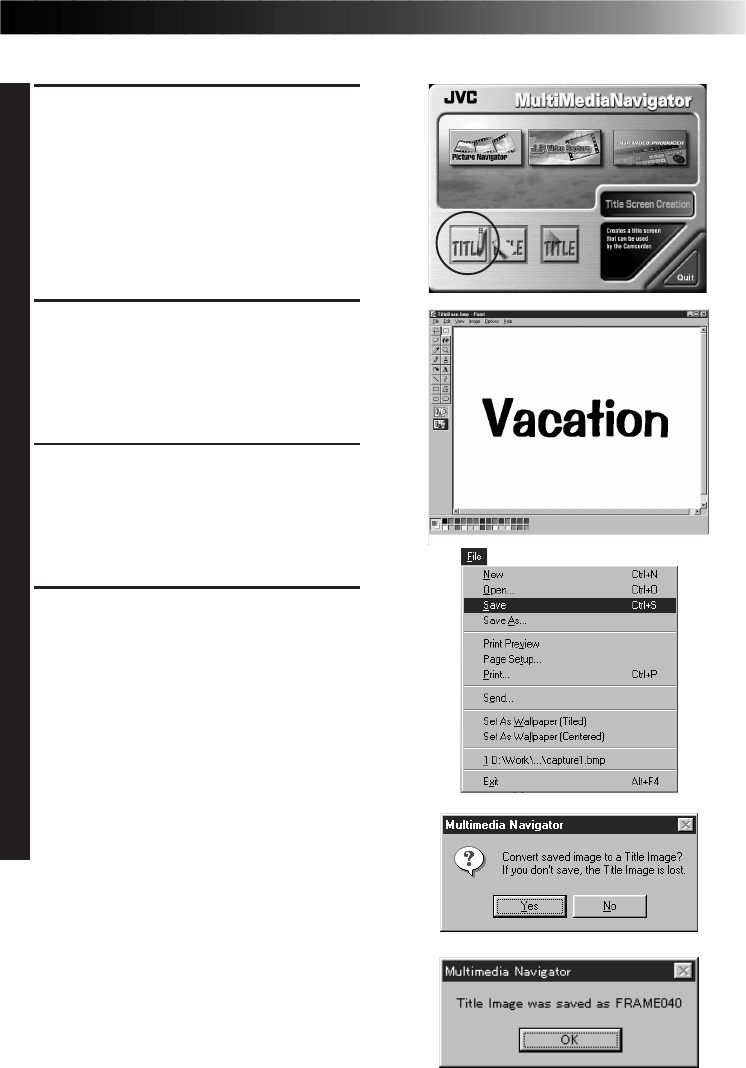
CREATING TITLE/FRAME IMAGES
You can create your own Title/Frame Images to transfer to a video source unit.
1
Click on the Title Screen Creation icon
in the MultiMediaNavigator window.
• An image editor application that
supports the BMP format starts up.
• If you wish to link to a different image
editor application, refer to Help in
Windows®.
2
Create your own Title/Frame Image.
• For more details, refer to the image
editor application’s instruction
manual.
3
Select File — Save.
• If you select File — Save As, you will
not be able to transfer the Title/Frame
Image to the video source unit.
4
Select File — Exit.
• When the message “Convert saved
image to a Title Image? If you don’t
save, the Title Image is lost.” appears,
click Yes.
•␣ When the message “Title Image was
saved as FRAME (number)” appears,
click OK.
The image is saved in a file format (JPEG)
that can be transferred to the video
source unit.
12 EN
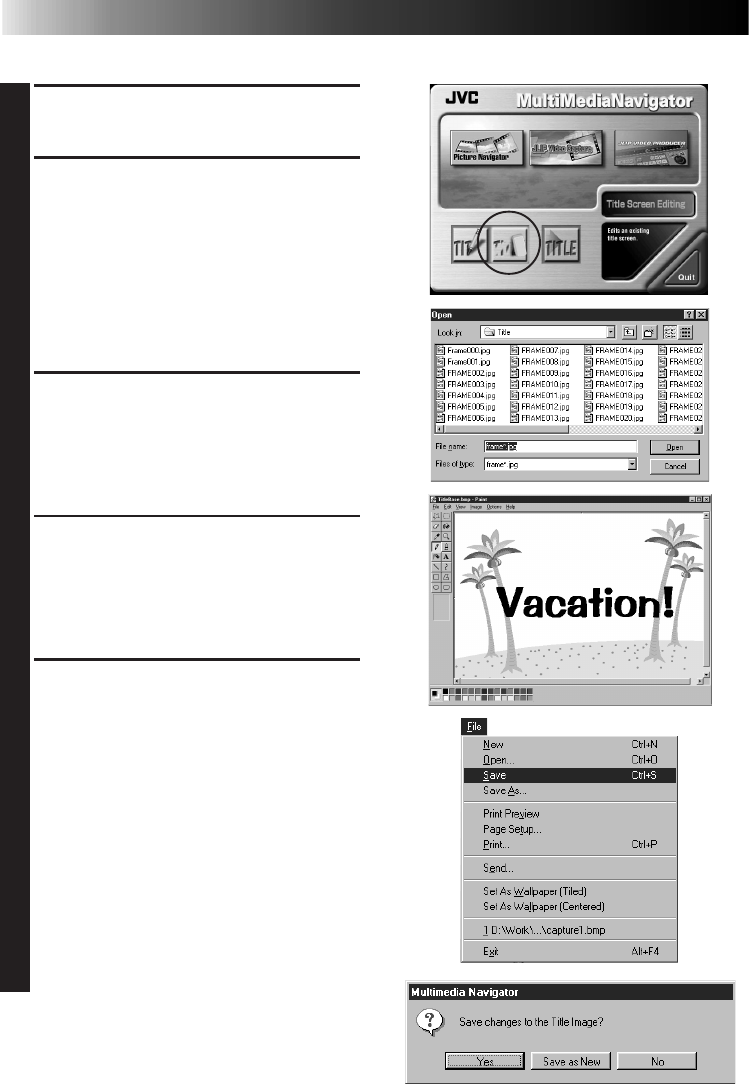
You can modify Title/Frame Images you’ve already created.
1
Click on the Title Screen Editing icon in
the MultiMediaNavigator window.
2
Select the Title/Frame Image file you
wish to modify and click OK.
• An image editor application that
supports the BMP format starts up.
• If you wish to link to a different image
editor application, refer to Help in
Windows®.
3
Modify your Title/Frame Image.
• For more details, refer to the image
editor application’s instruction
manual.
4
Select File — Save.
• If you select File — Save As, you will
not be able to transfer the Title/Frame
Image to the video source unit.
5
Select File — Exit.
• When the message “Save changes to
the Title Image?” appears, click Yes if
you wish to use the same file name.
• If you wish to use a different file
name, click Save as New.
• If you with to cancel, click No.
• When the message “Title Image was
saved as FRAME (number)” appears,
click OK.
The image is saved in a file format (JPEG)
that can be transferred to the video
source unit.
MODIFYING TITLE/FRAME IMAGES
EN 13
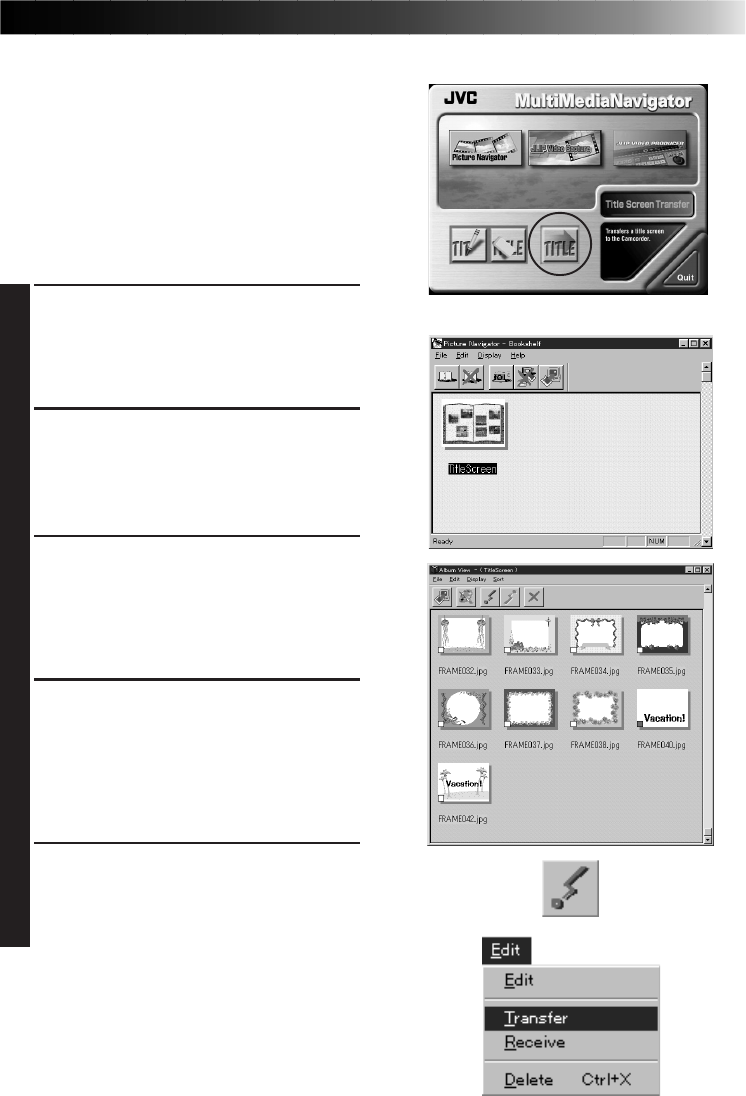
You can transfer Title/Frame Images you created on the PC to the video source unit
that is packaged with MultiMediaNavigator.
TRANSFERRING TITLE/FRAME IMAGES
1
Click the Title Screen Transfer icon in
the MultiMediaNavigator window.
• Picture Navigator starts up.
2
Double-click the TitleScreen album.
• A list of all the Title/Frame Images
appears in the window.
3
Select the Title/Frame Image you wish to
transfer.
• The check box in the lower left corner
of the index image changes color.
4
Click the Transfer icon or select Edit —
Transfer.
• The Title/Frame Image is transferred to
the video source unit and stored in the
MultiMediaCard.
5
Add the Title/Frame Image to a still
image in the video source unit.
(For more details, refer to the video
source unit’s instruction manual.)
Preparation
1. Insert a MultiMediaCard into the video
source unit.
2. Set your video source unit to the PLAY
or PLAY/PC position.
(For more details, refer to the video
source unit’s instruction manual.)

14 EN
NOTICE FOR USERS
Use of this software is authorized according to the terms of the software license.
When contacting the nearest JVC office or agency in your country about this software
(refer to the JVC Worldwide Service Network at http://www.jvc-victor.co.jp/english/
worldmap/index-e.html), please fill out the following and have the appropriate
information ready.
Product Name
Model
Problem
Error Message
Manufacturer
Model Desktop Laptop
CPU
OS
Memory MB
Available Hard Disk Space MB
Please note that it may take some time to respond to your questions, depending on
their subject matter.
JVC cannot answer questions regarding basic operation of your PC, or questions
regarding specifications or performance of the OS, other applications or drivers.
PC
EN 15
Mr. Photo Gold:
Presto! Mr. Photo
Presto! PhotoAlbum
Presto! ImageFolio
For Windows
Copyright © 1997-1999, NewSoft Technology Corp. All Rights Reserved.
* Please consult your nearest NewSoft service center for technical support. (see
next page)

16 EN
Technical Support
NewSoft international service centre:
U.S.A: 4113 Clipper Court, Fremont, CA 94538, USA
Tel: 1-510-445-8600 Fax: 1-510-445-8601
Technical Support Hot Line: 1-510-445-8616
E-mail: tech@newsoftinc.com
http://www.newsoftinc.com
Taiwan: 3F, No.19-3, SanChong Rd., NanKang, Taipei, Taiwan, R.O.C.
Tel: 886-2-2655-1234 Fax: 886-2-2655-1100
Technical Support Hot Line: 886-2-2655-2266
E-mail: support@newsoft.com.tw
http://www.newsoft.com.tw
Japan: 6-21-3 Shinbashi Minato-Ku, Tokyo 105-0004 Japan
Tel: 81-3-5472-7008 Fax: 81-3-5472-7009
E-mail: support@newsoft.co.jp
http://www.newsoft.co.jp
U.K.: The Software Centre, East Way,
East Mill Industrial Estate, Ivybridge
Devon, PL21 9PE, United Kingdom
Tel: 44-01752-201148 Fax: 44-01752-894833
France: Info Trade Centre
d’activités de I’Ourcq 45,
rue Delizy 93692 Pantin, France
Tel: 33-1-4810-7585 Fax: 33-1-4810-7555

EN 17
Presto! Mr. Photo
Mr. Photo stores and catalogues all of your valuable photos. You can sort photos and
film “rolls” by date and title, or search by keyword, date, and other image properties.
Then drag-and-drop photos to the Application Bar to create photo masterpieces using
ready-made templates or design electronic photo albums. Click the Slide Show icon
to view selected photos in a “roll” of film, or drag-and-drop a photo to the E-mail
icon to send it to family and friends.
Features
●
Acquire photos from digital cameras, scanners, floppy disks, PhotoCDs, and the Internet.
●Catalogue photos in “rolls” of film that you can customize and rearrange.
●
Enhance photos instantly (remove red-eye, adjust brightness/contract, blur/sharpen).
●
Drag-and-drop photos to print, e-mail, create HTML slide shows, or post on the Internet.
●Drag-and-drop photos to other applications for further editing or creative projects.
●Save photos as a screen saver or as wallpaper.
●Print stickers, labels, and photo catalogues.
●Support for EXIF 1.0, 2.0, 2.1, and 2.1(R98) file formats.
●Display and play attached audio files.
●EXIF page photo property
Examine information for EXIF files: shooting time, exposure time, etc.
●Easy access to other applications
Communicate with other applications without leaving Mr. Photo.
●Presto! PhotoComposer
Combine photos. Put people and scenery together to create brand new masterpieces.
●Presto! Panorama
Visit a museum, walk through real estate, go sightseeing at a famous landmark —
all inside a panorama from photos you personally stitch together.
●Presto! PrintFun
Single or batch printing for stickers, labels, photo catalogs -- on custom sized paper.
System Requirements
●Digital Camera plus digital camera software.
●Scanner, if you intend to scan photos.
●A PC with at least a 486 microprocessor (a Pentium processor is recommended)
and 16 MB RAM.
●Recommend at least 30 MB of hard disk space available after installation. Mr.
Photo will need this space to work in.
●A CD-ROM drive to load Mr. Photo.
●Super VGA display card.
NOTE:
The Mr. Photo Gold software can only be used with JVC digital video cameras in
conjunction with the JLIP Video Capture software.

18 EN
Presto! PhotoAlbum
Presto! PhotoAlbum helps you create electronic photo albums that keep your memo-
ries alive forever. Just drag-and-drop photos, frames, clip art, textures, and special
effects. You can also personalize your albums with voice-overs and sound effects,
then produce album slide shows to post to the Internet or send completed albums by
e-mail.
Features
●Scan or import your photos from digital cameras and scanners.
●Auto color correction for input photos.
●Drag-and-drop easy-editing operation.
●Photo Browser with thumbnail views of photos.
●Share albums with an Internet Browser.
●Library of over 500 pieces of clip art for decoration.
●Sound attachment with albums, pages and photos.
●Independent album playback support.
●Supports popular file formats: TIF, PCX, BMP, TGA, JPG, PCD, WMF, FPX, PNG,
etc.
System Requirements
●An IBM PC 486, Pentium or compatible computer.
●A CD-ROM drive.
●A hard disk drive with at least 50 MB space available to hold and run the program
effectively.
●At least 16 MB of RAM (preferably 32 MB).
●MS Windows 95, 98 or Windows NT 4.0.
Recommended System Requirements
●A sound card with a microphone.
●A color printer.
●A network browser such as Internet Explorer 3.0 or Netscape Navigator 3.0, or
later.

EN 19
Presto! ImageFolio
ImageFolio is a comprehensive multimedia image processing program running under
MS Windows 95, 98 or Windows NT. It enables you to process in detail on your
computer screen scanned images such as photographs, graphics and drawings, as
well as images captured from video devices such as a VCR, a laser disc, a digital
camera, a video capture box, etc.
You can create new images by using the powerful tools included in the software. Its
sophisticated set of image editing tools enables you to quickly sketch an image
canvas in order to create a new image, or to enhance pre-existing ones. With this
software, your imagination is your only limit!
Features
Image Input
●Captures images from flatbed/hand scanner, digital camera, capture box, etc.
●Auto & Semi-auto image stitching for inputting large-sized images.
●Loading/saving images with various popular file formats such as TIF, PCX, BMP,
TGA, JPG, PCD, WMF, PNG, etc.
●New Flash Pix format support.
Image Output
●Print color-adjustment variations for examining the printing effect before actual
printing.
●OLE 2.0 support for stand-alone editing mode.
●Easy artwork design for home page production and HTML applications.
Image Editing and Processing
●Multiple-layer single document for complicated object organization.
●Drag-and-drop floating images among documents (moving a selected area to new
or other canvases).
●Precise color selection by setting color channels or choosing from a palette.
●Complete drawing and painting set of tools to work on images such as line, paint-
brush, airbrush, color gradation, eraser, zoom, text, eyedropper, free-hand rotate,
hue/saturation brush, brightness/darkness brush, blur/sharpen brush, image hose,
etc.
●Definable image hose tool for quick insertion of image set on canvas.
●Anti-alias feature with all graphic tools to enhance the drawing effect.
●Full selection tools for easy masking of irregularities in objects.
●Creating magic 3D effects with definable light source for selected objects with one
touch.

20 EN
●Generating object shadows in selectable light directions with one touch.
●Elegant templates provided for easy applications of daily-life photo usage.
●Image fine-tuning functions to adjust brightness, contrast, hue, saturation, tone
distribution (equalization) and so on.
●Multiple filters to produce special effects such as smooth, sharpen, edge detection,
emboss and mosaic.
●Effect browser providing previews in actual size of image, processed with all the
fine-tuning functions and filters.
●16- and 32- bit Adobe™ plug-in filter interface support.
System Requirements
The following hardware devices and software are required to run the software:
●An IBM PC 486, Pentium or compatible computer.
●One CD-ROM drive.
●One hard disk drive with at least 60 MB space available to hold and run the
program effectively.
●At least 8 MB of RAM (preferably 16 MB).
●MS Windows 95, 98 or Windows NT.
To make fully efficient use of the program, the following additional hardware and
software elements are highly recommended:
●50 MB or more of virtual memory.
●A color printer supported by MS Windows 95.
Presto! ImageFolio (cont.)

EN 21
MEMO

22 EN
MEMO

EN 23
MEMO

COPYRIGHT© 2000 VICTOR COMPANY OF JAPAN, LTD.
VICTOR COMPANY OF JAPAN, LIMITED
EK/EA Printed in Japan
0200MNV
*
ID
*
VP
BEFORE OPERATION
EN
