JVC GR DVM50 User Manual DIGITAL VIDEO CAMERA Manuals And Guides L0107004
JVC Digital Camcorder Manual L0107004 JVC Digital Camcorder Owner's Manual, JVC Digital Camcorder installation guides
User Manual: JVC GR-DVM50 GR-DVM50 JVC DIGITAL VIDEO CAMERA - Manuals and Guides View the owners manual for your JVC DIGITAL VIDEO CAMERA #GRDVM50. Home:Electronics Parts:Jvc Parts:Jvc DIGITAL VIDEO CAMERA Manual
Open the PDF directly: View PDF ![]() .
.
Page Count: 80
JVC /11111/////
DIGITAL VIDEO CAMERA
GR-DVM50 ENGLISH
Please visit our CyberCam Homepage on the
World Wide Web and answer our Consumer
Survey (in English only):
L_ITJWIA_;AyAyALTLo,_TJ[_ (t) li{e{t)li!IT_ _ _r '_o[@[_:_li11_i_!
Mini_lr NTSC
INSTRUCTIONS
For Customer Use:
EnteEbelow [he Modal No. and Sedal
No. which is located on the bottom of
cabinet. Retain thi_ information for
tu[ure reteF_Rc_
Model No.
Serial No.
LYT0372-001 B
• 1
Dear Customer,
Thank you fol pulchasing this digital video camera.
Befole use, pleaseread the sal_ty infomlation dnd
precautions contained in the following )agesto
ensule safe useof this p_oduct.
Using This Instruction Manual
•All majol sections and subsections are listed in the
Table Of Contents {_° pg. 7).
• Notes appear afte_ most subsections. Be sure to read
these as well.
•Bdsic and adw_nced teature_A_peration are separated
for easier reference.
It is recommended that you...
..... lefel to the Index (_ _r pgs. 69 74) and familiarize
yourself with button locations, etc. bef¢_re use.
..... read thoroughly the Safety Precautions and Safety
Instructions that idlow. They contain extremely
impoltant infom_ation regarding the sale use of this
product.
You are recommended to carefufly read the cautions
on pages 75 through 77 before use.
WARNING:
TO PREVENT FIRE OR SHOCK
HAZARD, DO NOT EXPOSE
THIS UNIT TO RAIN OR
MOISTURE.
Warning on lithium cell battery
(for remote control unit)
The battery used in this device may present a fire
or chemical bum hazald if mistreated, Do not
recharge, disassemble, heat above 100°C (212°F)
or h/ch/e tale,
Replace the battery with Maxell, Panasonic
(Matsushita Electric), Sanyo or Sony CR2025; use
of another battery may present a usk of fire or
explosion.
• Dispose of used battery pronlptly.
• Keep away from children,
• Do not disassemble and do not dispose of in
file.
SAFETY
PRECAUTIONS
The lightning flash with arrowhead symbol, w:thin an
equilateral triangle, is intended to alert the user to the
_resence of uninsulated "dangerous voltage" within the
product's enclosure that may be of sufficient magnitude
to constitute a risk of electric shock to persons¸
The e×damatioq point w_th[n an equilateral triangle is
intended to alert file user to the presence of important
operating and maintenance (servicing) instruct]o_Ts in
the titerature accompanying the appliance
The AA V50U AC Power Adaptel/Charger should be
used with:
AC 120 V,_,,, 60 Hz in the USA and Canada,
ACt t 0 240 V_,_, 50/60 Hz in other countries.
CAUTION (applies to the AA-VSOU)
TO PREVENT ELECTRIC SHOCK MATCH WIDE
BLADE OF PLUG TO WIDE SLOT, FULLY INSERT.
ATTENTION (s'applique _I'AA-VgOU)
POUR EVITER LES CHOCB EEEETRIQUES_
INTRODUIRE LA LAME LA PLUS LARGE DE LA
FICHE DANS LA BORNE CORRESPONDANTE DE
LA PRISE ET POUSSER JUSQU'AU FOND.
NOTES:
•The rating plate (serial nunlber plat_) and safely
caution are on the bc_ttc_nland/or the back of
the main unit.
•The ratfn_ plate (serLil nunlber plate) of the AC
Power Adapter/Charger is on its bottom.
•The rating plate (serial nunlber plate) of Ihe
Docking Stalion is on its bottom.
This Class B digital apparatus complies with
Canadian K ES-003.
Cet ap)aleit num@ique de la classe Best
conforme _t la nolme NMB-003 du Canada.
This camcorder is designed to be used with
NTSC-type color television signals. It cannot be
used for playback with a television of a different
standald. Howevel, live lecording and LCD
monitol7 viewfindel playback are possible
anywhere. Use the BN-V507U/V514U battery
packs and, to recharge them, the provided multi-
voltage AC Power Adapter/Charger. (An
appropuate conversion adapter may be
necessaWto accommodate different designs of
AC outlets in diffe,ent countries,)
IMPORTANTPRODUCT
SAFETYINSTRUCTIONS
EI_L[IIL2[I erler_4_, L5111 IJ_IFUrTI1 rllSiIlb LI',_TUI TLJFI_IIUrl',
BLI[ IIIIIJruIJ_r LP,_ L_rl I_',Lllt Irl IJu[_rl[Idl _I_L[IIL_I
_hoLlx Ol _rl_ lldz_ffd_ Ttli_ prUdLl( L ha_ b_ell
_rlL_ir1_ru_ drld rlldrlLIL4Ltur_d [0 _4-,'_Lrr_ \LILII
IJ_p,Orldl ",dl_[ _, Irl urd_r riot [o d_2l[ [[1_ BLIII[-H)
ATTENTION:
R,lluv, and ohe\ .ill k\dTrIH1_', 2111(Ill]_[rLIk[ILlrl'_
rILlrk_Ll orl _,OLII prudLIL[ _4FI(l IL_ O[J_rd[IrlL_ Irl_[rLIL-
UIJ_r_t[Irl_ Irl_hULtlOrl_ b_lOl_ X,OLI O[J_rdt_ [liP,
IJrodLICt 3rid k_p I111_ nldqLL4l IL;r ILI[LII_ i_l_r_ll_
INSTALLATION
1. Grounding or Polarization
F" ""_[ r,ul[le[ ,,hh Hrlc ,, a_ Thl_ I_.I _d[_['_ r_dtLI[_
II NULl dr_ url_d,l_ [,_ _rl_I tll_ pI_L _ulh mh, _1,_
rdll [u tl[ U ,ll[J_ \,*LIr d_'F[llLIdh [U I_'F,F_I_ _ \r ,LJI
th_ F,olm,z_d plu_
m_, pm Thin F,lu_ v, ,11.nh nl mI_, a _h,urldm_ him÷
IT _IJLI dr_ LlrLd,l_ [,_ I[1_1[ Ih_ pluL nit ,II,_ hutl_[
_h_LlrlLhh_ [\p_ F_IU_
2. Power Sources
)p_ra[_- ',uur F,rOdLIL[ Hhh _roI/i Ill_ [_lr_ r,J F,, ,_ _-1
prr.dLh Ir_ l[1[_hd_cl [,_ HJr_rd[_ trrdll b_itl_r\ l},_r ,_1
3. Overloading
4. Power Cord Protection
P,,v,_r _Ul,l,h _, ,[d- ql,,uld I,_ routed -,, that the\ dr_
5. Ventilation
-%Jr .1". dllL_ ,,irenrnk_ in _l_eLdblrl_[ Jr_ prr .' I_d Tur
• Dr. rIH[ bl ._k tll: ,,ir_rlrrl_- b\ i,IJ( H,_: file I,rr .du_I. 41 _
• D . rIH[ pldkc IIl_" I_IH(JLIC[ rll _1 IiLIIr[ rrl ii1_[ illdhun _Llkh
prr.' rd_d r,r [h_ III_?[ILJI.IC[LJ[_[ •I[I-[[LIL[i,fll_ hd _ I1_[1
_dh_r_d lu
6. Wall or Ceiling Mounting
The prr ,du, t-Ilr .uk_ b_ muun[_cl 1_ a '.,11 ,,[ _-ihrlL ,_rlh
d_ r_ud%l%_lld_l I_\ Ih_ r/hlhUklktUl_l
ANTENNA INSTALLATION
INSTRUCTIONS
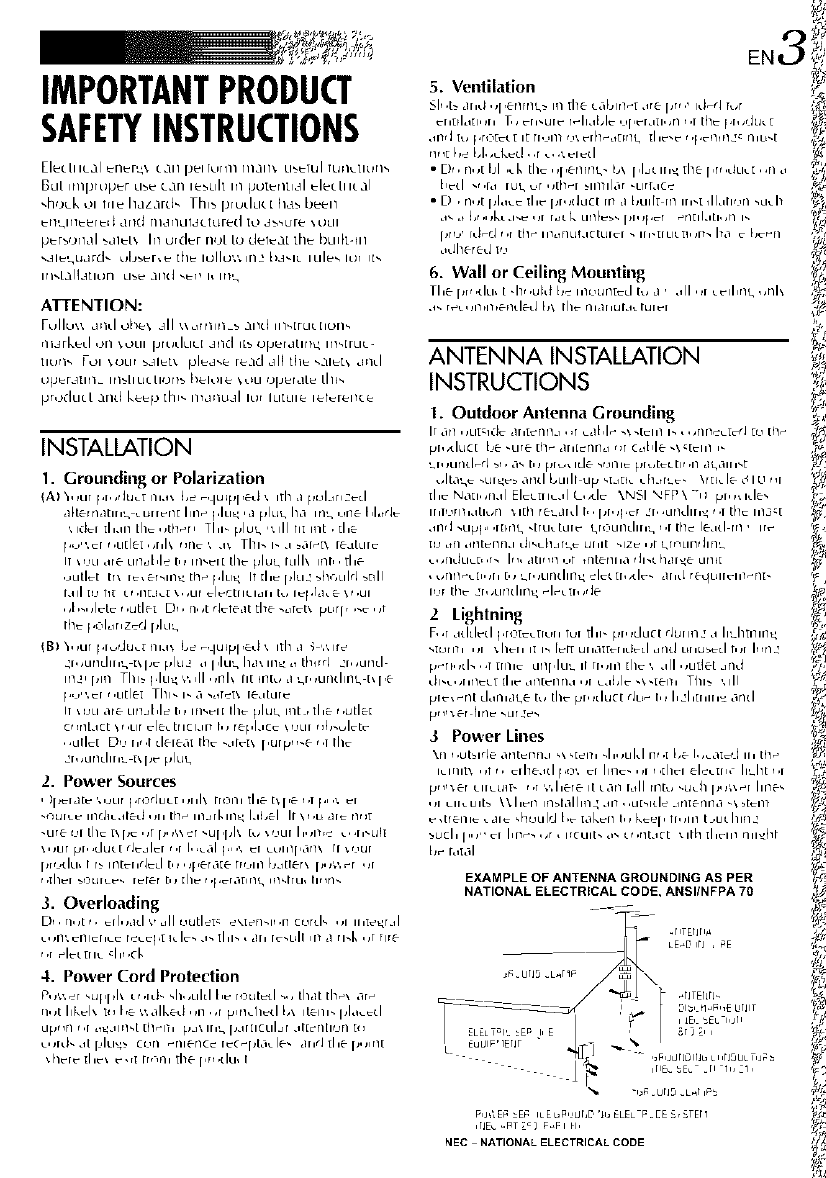
1. Outdoor Antenna Grounding
Ilia- Nd[i,,rlal EI_LnILJI L,,d_ \NSI NFP\ _ii p[i,,ide,
I[IJtJ[l_l.ltlu[I _,l[h reLahl t,, pl,_F,_r _1, ,Llrldlll_ r,l [h_ Ii]_'1_[
.lllrJ _LIFJF,, ,I[HI_ _[FLI_tLI[_ _rOLIIILIIII_ r,r [hd le.Kl rrl , ir_
IUr [h_ 2l,_Llrldll1_ _l_[[,_rJe
2 Lightning
F, ,r added F,rot_ruh lu_ _1,_-ph,Llucl rJu_m_'.I ILh_nm_
_[url_i id _11_11 I[ I_ r_-r[LJlldT[_lI_CI _ffld UllU_d ti_[ IHr1_'
F_F_I_LI_ ,,[ [rl/l_ LlrlIIILIL II l[,flll [11_ _ Jll i_Ll[let __rld
pl_ _rlt Lldnkl_ [_, tll_ ph_lluc[ rJu_ IH h _'hunh_ _rld
3Power Lines
FJtll_,_[LIILLJ_[_t,r v,here it tdn I_dl rnt_, -u_h p,_x_r Ill_
'_1 LII_LIIt _' \\Ii_n n/",l_dln/_' Jn ,,LI[_I(I_ _ffl[&rllld _\ _[EII_
EXAMPLE OF ANTENNA GROUNDING AS PER
NATIONAL ELECTRICAL CODE, ANSIINFPA 70
PIJCLE6 :EF_ ILEDFIIjUr,D '_bELEL F=EES,STErl
NEC NATIONAL ELECTRICAL CODE
USE
1. Accessories
To avoid personal injury:
•Do not place this product on an unstable cart,
stand, tripod, bracket ol tabte. It may fall, causing
serious injury to a chiM or adult, and sedous
damage to the producL
• Use only with a cart, stand, tripod, bracket, ol table
recommended by the manufacturer or sold with the
product.
• Use a mounting accessory recommended by the
i_anLffdcturer and follow the malmufactuler's
instructions lor any mounting of timeproduct.
• Do not try to ro[[ a cart with small castels across
thresholds or deep pile carpets.
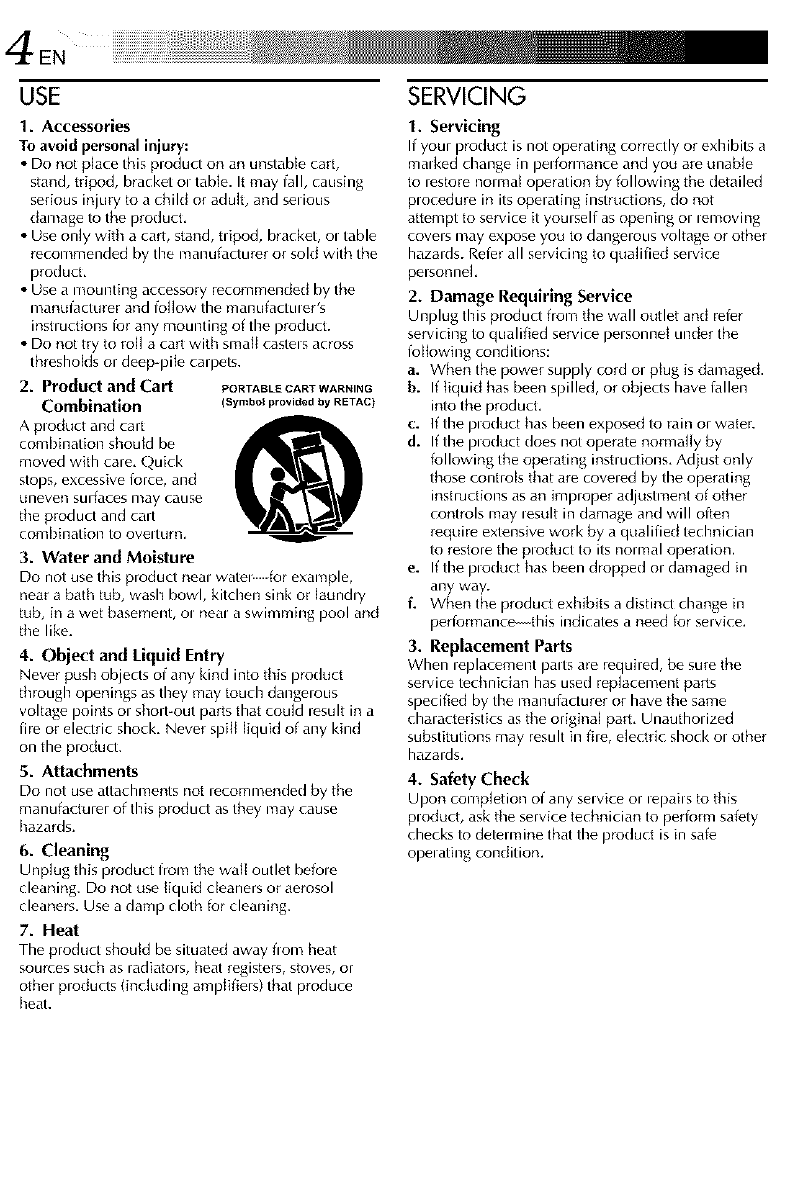
2. Product and Cart PORTABLECARTWARNING
Combination (Symbol provided by RETAC}
A pmctuct and cart
combhmation shouM be
moved with care. Quick
stops, excessive Iorce, and
uneven sulfaces may cause
the product and cart
combilmation to ovelturn,
3. Water and Moisture
Do not use this product neal example,
near a bath tub, wash bowl, kitchen sink or laun&y
tub, in a wet basement, ol heal a swimming pool and
the like.
4. Object and Liquid Entry
Never push objects of any kind into this product
through openings as they may touch dangerous
voltage points ol short-out parts that could result in a
fire or electric shock. Never spill liquid of any kind
on the product.
5. Attachments
Do not use attachments not recommended by the
manufacturer of this product as they may cause
hazards.
6. Cleaning
Unplug this product from the walt outlet befole
cleaning. Do not use liquid cleaners or aerosol
cleaners, Use a damp cloth for cleaning.
7. Heat
The product should be situated away flom heat
sources such as rad[atols, heat registers, stoves, or
other products (incktding amplifiers) that produce
heat.
SERVICING
1. Servicing
If your product is not operating correctly or exhibits a
malked change in performance and you are unable
to lestore normal operation by following tile detailed
procedure in its operating instructions, do not
attempt to service it youlself as opening ol lemoving
covers may expose you to dangerous voltage or other
hazards. Reier all servicing to qualified service
personnel,
2. Damage Requiring Service
Unplug this product from tile wall outlet and rel_r
servicing to qualified service pelsonnet under the
following conditions:
a. when the power supply cord or plug is damaged.
b. If tiquid has been spilled, or objects have lallen
into the product,
c. If the product has been exposed to rain or water.
d. If timeproduct does not operate normally by
following the operating instructions, Adjust only
those controls that are coveled by the operating
instructions as an imploper adjustment of other
controls may lesult in damage and will often
require extensive work by a qualified technician
to restore the ploduct to its normal operation.
e. If the product has been dropped or damaged in
any way.
f. When the product exhibits a distinct change in
pedormance this indicates a need for service.
3. Replacement Parts
When leplacement palts are required, be sure the
service technician has used replacement parts
specified by the manulacturer or have tile same
characteristics as tile original part, Unauthorized
substitutions may result in file electric shock ol other
hazards.
4. Safety Check
Upon completion of any selwce or lepails to this
product, ask tile service technician to perlorm safety
checks to determine that the product is in safe
opel ating condition.
¸ E.5
SAFETYPRECAUTIONS
Do not point timelens or tile viewfinder direoly into
the sun, This can cause eye injuries, as welt as lead
to the maliunctioning of internal circuitry, There is
also a risk of fhe or electric shock.
CAUTION! Tile following notes conceln possible
physical damage to tile camcorder and to the user.
Whelm carrying, be sure to always attach and use
the provided hand strap, Hold the camcorder firmly
in yoLu hand, with tile stlap securely around youl
wrist. Carrying or holding the camcordel by the
viewfinder and/or the LCD monitol can result in
dropping the unit, or in a malfunction.
Take care not to get your finger caught in the cassette
cover. Do not let children operate the camcolder, as
they are particularly susceptible to this type of injury,
Do not use a tripod on unsteady or unlevel surfaces.
It could tip over, causing serious damage to the
camcorder.
CAUTION! Attaching the camcordel to the Docking
Station with cables (Audio/Video, S-Video, Editing,
DC, etc.) connected, then leaving it on top of the TV
is not lecommended, as tripping on the cables will
cause the camcorder to fall, resulting in damage.
Mini NTSC
•This camcorder is designed exclusively for
the di gitalu_video:,cassette. Onl.y cassettes..
marked I]_ can be used with this unit.
Before recordh_g an important scene...
.... make sure you only use cassettes with the Mini
DV mark MHI]_r,
.... r_member that this camcordel is not compatible
with othel digital video fom_ats,
.... r_member that this camcordel is intended fol
private consumer use only, Any commercial use
without proper permission is prohibited, (Even iF
you recold an event such as a show, periorm-
ance or exhibition [ol pelsonal enjoyment, it is
strongly recommended that you obtain permis-
sion beiorehand,)
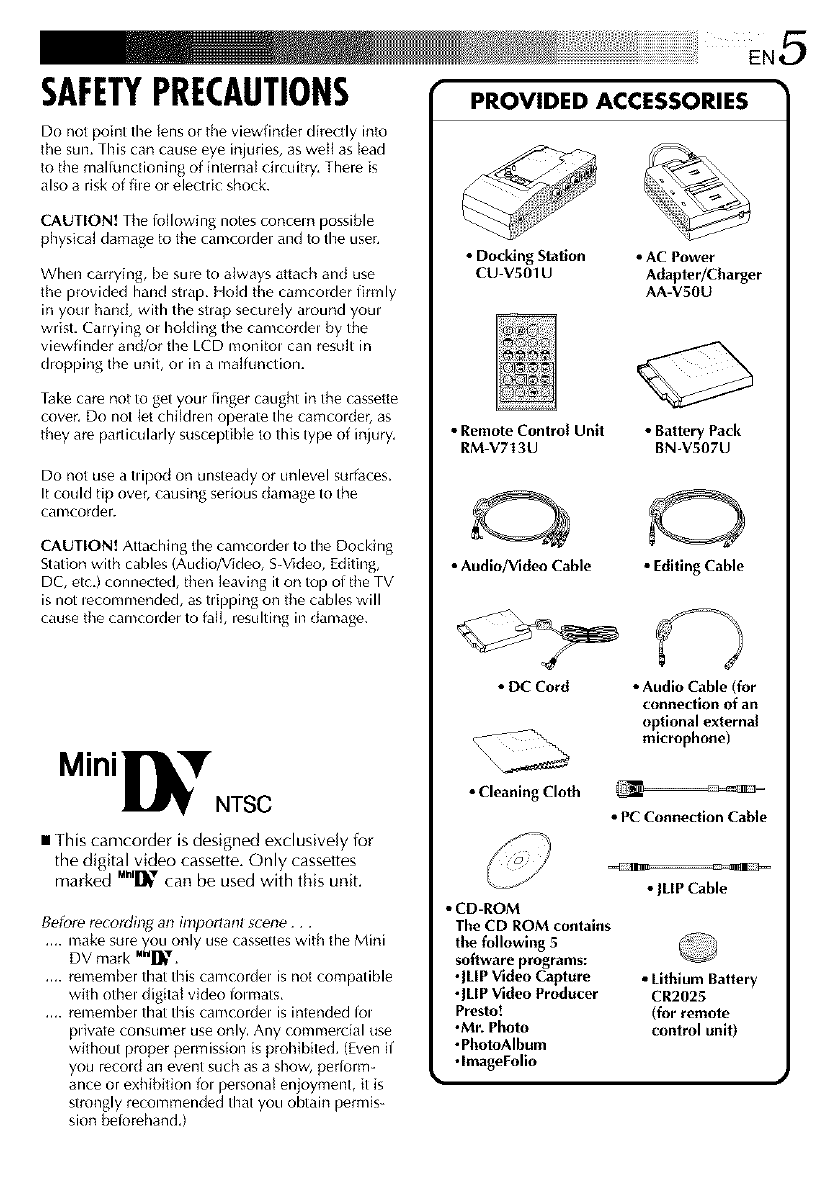
PROVIDED ACCESSORIES
• Docking Station • AC Power
CU-V501 U Adapter/Charger
AA-V50U
•Remote Control Unit • Battery Pack
RM-V713U BN-VSO7U
•Audio/Video Cable •Editing Cable
•DC Cord •Audio Cable (for
connection of an
optional externaJ
microphone)
•Cleaning Cloth
• PC Connection Cable
•ILIP Cable
•CD-ROM
The CD ROM contains
the following 5
software programs:
•JLIPVideo Capture •Lithium Battery
•JLIPVideo Producer CR2025
Presto! (for remote
•Mr. Photo control unit)
•PhotoAIbum
•ImageFolio J
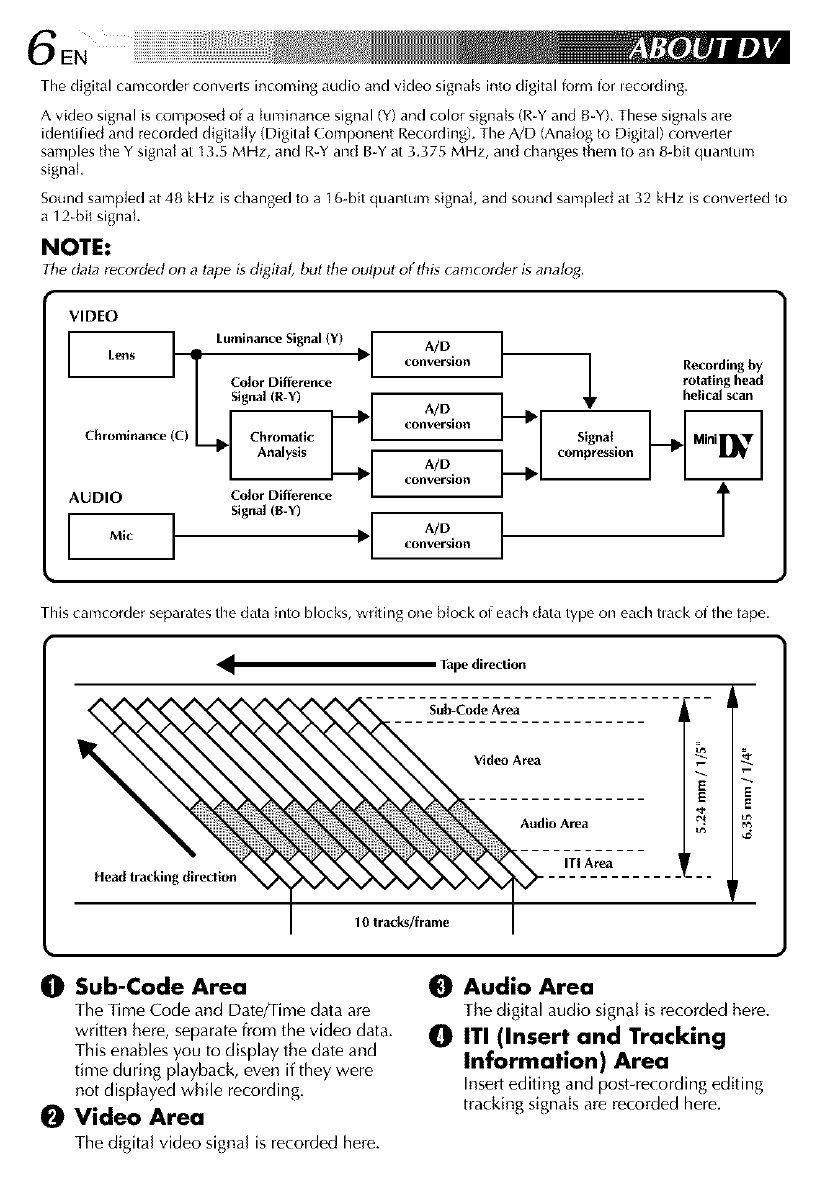
The digital camcorder converts incoming audio and video signals into digital form for lecolding.
A video signal is composed of a Mminance signal (Y) and color signals (R-Y and B-Y). These signals are
identified and recorded digitally (Digital Component Recording). The A/D (Analog to Digital) converter
samples tile Y signal at 13.5 MHz, and R-Y and B-Y at 3.375 MHz, and changes them to an 8-bit quantum
signal.
Sound sampled at 48 kHz is changed to a 16-bit quantum signal, and sound sampled at 32 kHz is converted to
a 12-bit signal
NOTE:
The data recc_rdedon a lape isdigilal, but the output of this camcorder is analog.
VIDEO
[ ] LuminanceSignal(Y) J A/Dt.
Lens I_ _ conversion Recordingby
LF A/D _ ]__D r°ta|irtghea_-- scan
-- - S_gln°arl_)l_-ff_)re nc e " helical
convergior_
A,D
Chromlnance (C) Chromatic Signa[
Analysis compression
conversion
AUDIO Color Difference
Signal (RY) /
con'gersior_
This camcorder separates the data into blocks, writing one block of each data type on each tlack of the tape.
,I Tape dkectlon
Head tracking dir e_iol
Sub-CodeArea ik
Video Area _
Audio Area _
ITI Area 1
1Olracks/frame
la) Sub-Code Area
The Time Code and Date/Time data are
written here, separate from the video data.
This enables you to display the date and
time during playback, even if they were
not displayed while recording.
0Video Area
The digital video signal is recorded here.
0Audio Area
The digital audio signal is recorded here.
t01 ITI (Insert and Tracking
Information) Area
Insert editing and post_recording editing
tracking signals are recorded here.
Power ......................................................................................................................... 8
Date/Time Settings ....................................................................................................... 10
Loadiag/UnloadlaBA Cassette .......................................................................................... 11
Recordla9Mode Setting .................................................................................................. 12
Grip Adjustment ........................................................................................................... 13
Viewfiader Adjustment................................................................................................... 13
TripodMounting ........................................................................................................... 14
Operation Mode ........................................................................................................... 15
BasicRecording............................................................................................................ 16
AdvancedFeatures........................................................................................................ 22
r_A|YI_Te_I PP_BI _]
BasicPlayback............................................................................................................. 42
AdvancedFeatures........................................................................................................ 44
BasicConnections.......................................................................................................... 46
AdvancedConnections.................................................................................................... 48
TapeDubbing............................................................................................................... 50
DigitalDubbing............................................................................................................ 51
RandomAssembleEditing................................................................................................ 56
ForMoreAccurateEditla9 ............................................................................................... 60
AudioDabbla9 ............................................................................................................. 62
DockingStation............................................................................................................ 69
Controls,ConnectorsAndIndicators.................................................................................... 70
Indications.................................................................................................................. 72
Terms........................................................................................................................ 74
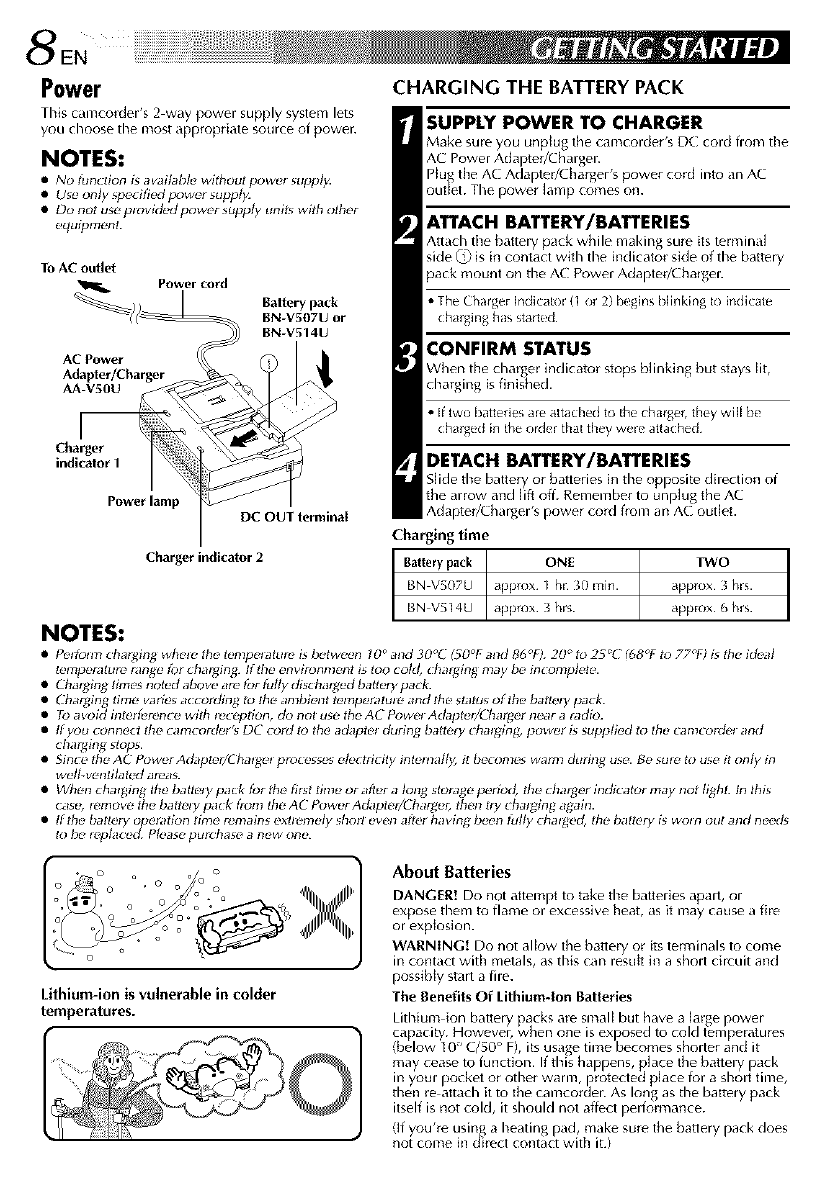
Power
This camcotdeFs 2 way powel supply system lets
you choose the most appropriate source of power.
NOTES:
•No tLm_ion is avaibbfu withoutpowe_ Sul,p_
• Use only _poc_ed/_wer su_/y.
• Do not usep_vldedpowersupply units with other
equipmc'n[.
To AC outlet
_. Power cord
_/ Battery pack
AC Power __
Adapter/Charger
Power lamp DC OUT terminal
Charger indicator 2
CHARGING THE BATTERY PACK
SUPPLY POWER TO CHARGER
Make sure you unplug the camcordeFs DC cord from the
AC Power Adapted/Charger.
Hug the AC Adapte_JCharger's power cord into an AC
outlet. The powe_ lamp comes on.
ATTACH BATTERY/BATTERIES
Attach the battely pack while making sure its temlin,d
side @is in contact with the indicator side of the battely
pack mount on the AC Power Adapte_/Cha_gen
• The Charger [ndicato111 or 2) begins blinking to indkate
( barging has started
CONFIRM STATUS
When the charger indicator stops blinking but stays lit,
charging is finished.
• 11two batteries a_e attached to the charger, they wiH be
(barged in the order that they were attached
DETACH BATTERY/BATTERIES
Slide the battery or batteries in the opposite dilection of
the auow and lift off. Remembe_ to unplug the AC
Adapte_/Chdlgel's powe_ co_d flora dn AC outlet.
Charging time
Battery pack _ ONE TWO
BN V507U Japprox ] hr _0 rain. approx _ hrs.
BN V514U approx _ hrs. approx t_hrs.
NOTES:
• Pr_tom_ ch_gint4 whc'_c'thr_tempc,_atu_r_g between 1O" and 30°C (50% and 86 °F). 20 °to 25 °(" (_8°f _u 77%) is the ideal
l_,mperalure range _r cha_ging. It thr, m_vlronmc'nt g too cold, d_a_gthg map be in_mplc'lc'.
•_a_ging th_es noted above are _ fully discharged batterp paclc
• ('harg_ng {ime va_s a(x_rding to the amblen{ tenlperatul_ and the s_tus of the battely pack.
• Fo avoid thl_rfurence wi[l_ lecepfion, du nol u_c' the AC Powel Adap{r_l/Ch_rger near a ladio.
•ffyou connect _e _x_mcorder% DC _rd _ {he a_ptel dtiHng ha{rely _halgln_ power is supplied to the _lnlcordel and
cha;gthg slops.
•Since the AC"Power Adapl_r/(halgc'l prol_s_es c,le_tricilp inlr_mHIy, it b_x)mes warm during use. By suit' lo u_c' it only in
weJl-vc'nliJat_) areas.
•Whc'n cha_g_ng the, baize'O,pa_k for the, thst th_ or afler a long stoppage'pvriod, the, d_a_D,r thdicato_ may not lighl. In this
_asr_ _c'movc' thr_baltm7 pack f_m the AC Power Adaplc'_/Chargvr, thc'n [_y _ha_g_ngagain.
•ffthr_batl_ry o_ratlun tim_ remains exllc,mvly short r_vc,nallot having bc_n tufty chalged, the baHery is woln out and nc_d_
tO b_' iep/_ r_d. p/_!a_, puF_ h ]_! anr_w onr_
Lithium-ion is vulnerable in colder
temperatures.
About Batteries
DANGER! Do not attempt to take the batteries apart, or
expose them to flame or excessive heat, as it may cause a fire
or explosion.
WARNING! Do not allow the ballery or its terminals to come
in contact with metals, as this can restlh hi a short circuit and
possibly start a fire.
The Benefits Of Lithium-Ion Batterles
Lithium ion battery packs are small but have a large power
capacity. However, when one is exposed to toM temperatures
_below 10 ° C/50 F), its usage time becomes shorter and it
may cease to function. If this happens, place the battery pack
in your _ocket or other warm, protected place for a short time,
then re attach it to the camcorder. As long as the battery pack
itself is not cold, it shouM not affect performance.
f
df you're usin_ a heating pad, make sure the battery pack does
not come in dkect contact with it.)
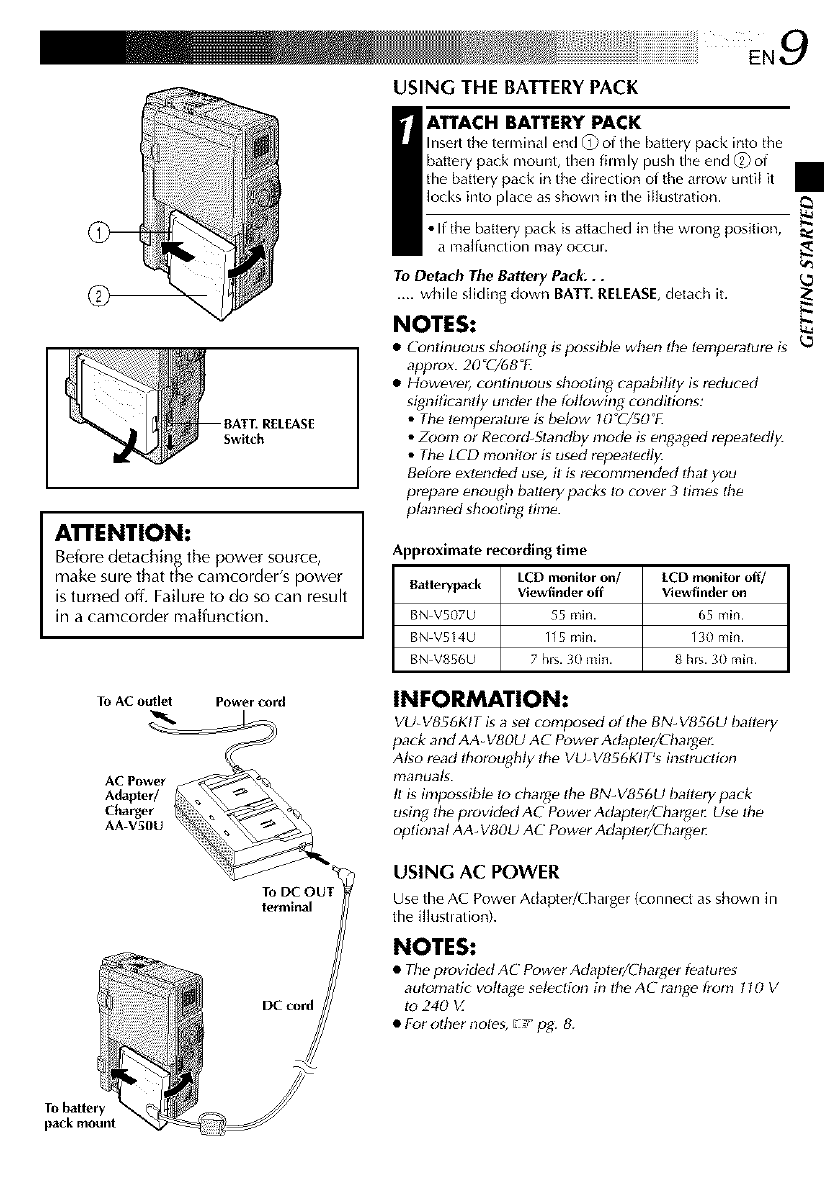
-- ATT. RELEASE
Switch
AI"rENTION:
Before detaching the power source,
make sure that the camcorder's power
is turned off. Failure to do so carl result
in a camcorder maffunction.
To AC outlel Power cord
AC Power
Adapter/
Charger
AA-V50U
EN9
USING THE BATTERY PACK
_TTACH BATTERY PACK
Insertthe tem_inal end _ of file battery pack into the
battery pack mount, then fimlly push the end _2)of
tile battery pack in the direction of the arrow until it
locks into place as shown in the illustration.
•If the battery pack is attached in the wrong position,
a maffunction may occur.
To Detach The Battery Pack;..
.... while s[kling down BATT. RELEASE,detach it,
NOTES:
•Continuous shooting is possible when lhe lemperature is to
approx. 20°C/68 T.
• However, continuous shooting capability is reduced
significantly under tile lbttowing conditions:
•The temperature is below 10°C/50°£
•Zoom or Record-Standby mode is engaged repeatedly.
•The LCD monitor is used repeatedly.
Before extended use, it is reconlnlended lhal you
prepare enough battery packs to cover 3 times the
planned shooting lime.
Approximate recording time
Ratlerypack LCD monitor on/
Viewfinder off
BN V507U 55 rain.
BN V514U 115 rain.
BN V856U 7 hrs. _0 rain.
LCD monitor off/
Viewfinder on
65 rain
130 rain.
8 hrs. 30 rain.
INFORMATION:
VU- V855KIT is a set composed of the BN_V856U ballery
pack and AA_ V80U AC Power Adapter/Charge_
Ago read flmroughty the VU_V856KIT's instruction
manuals.
It is impossibt# to charge the BN-V856U ballery pack
using the provided AC Power Adapter/Charge_ Use the
optional AA- V80U AC Power Adapter/Chargec
USING AC POWER
Use the AC Power Adapter/Chalger (connect as shown in
the illust, ation).
NOTES:
• Tile provided A_'"Power Adapter/Charger features
automatic voltage selection in the AC range fron! t 10 V
to 240 V.
• For other notes, E! pg. 8.
To battery
pack mount
]OEN
er lamp
MENU/SET Dial Power Switch
Display
R,_ording Menu
Mode Menu
Date/11meSettings
Date and time will automatically be recorded on tape at
aletimes. It is your choi(e to display it or not during
playback (_7 pg. 45).
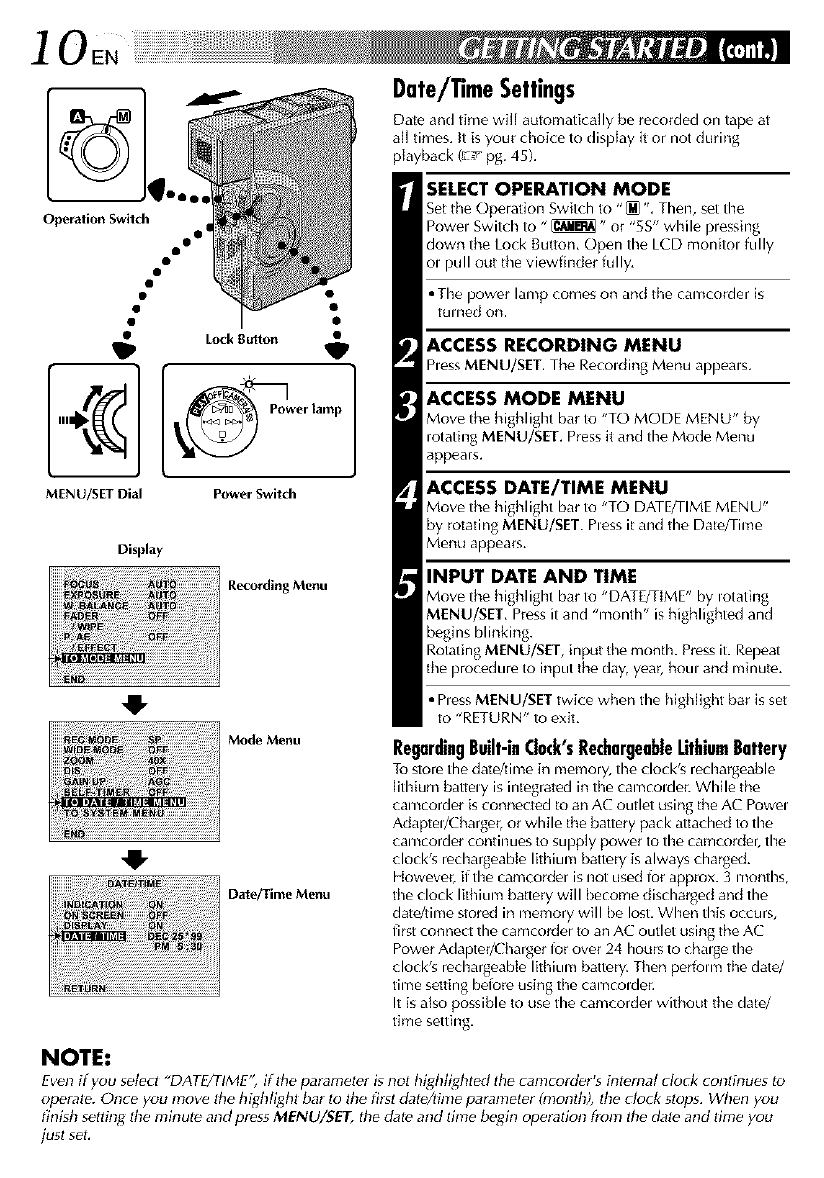
SELECT OPERATION MODE
Set the Operation Switch to "[M ", Then, set the
Powel Switch to "_" or "5S" while plessing
down the Lock Button, ()pen the LCD monitol fully
ol pull out the viewfinder fully,
• The power lamp comes on and the camcorder is
turned On.
ACCESS RECORDING MENU
hess MENU/SET. The Recolding Menu appeals.
ACCESS MODE MENU
Move the highlight bar to "TO MODE MENU" by
rotating MENU/SET. Press it and the Mode Menu
appears.
ACCESS DATE/TIME MENU
Move the highlight bar to "TO DATE/TIME MENU"
by rotating MENU/SET. hess it and the Date/Time
Menu appears.
INPUT DATE AND TIME
Move the highlight bar to "DAT_IME" by ,otating
MENU/SET, Press it and "month" is highlighted and
begins blinking.
Rotating MENU/SET, input the month. Press it. Repeat
the procedure to input the (lay, year, houl and minute.
• hess MENU/SET twice when the highlight bar is set
to "RETURN" to exit,
RegardingBuilt-inClock'sRechargeableUthiumBattery
Tostore the date/time in memory, the clock's rechargeable
lithium battely is integrated in the camcolder. While the
camcorder isconnected to an AC outlet using the AC Powel
Adaptel/Charger, or while the battery pack attached to the
camcorder continues to supply power to the camcorder, the
clock's rechargeabte lithium battery is always charge(L
However, if the camcorder is not used for approx. 3 months,
the clock lithium battery will become discharged and the
date/time stored in memory will be lost, When this occurs,
first connect the camcorder to an AC outlet using the AC
Power Adapter/Charger for over 24 hours to chaise the
clock's rechargeable lithium battery. Then peffoml the date/
time setting before using the camco_der.
It isalso possible to use the camcordel without the (late/
time setting.
NOTE:
Even if you select "DATE/TIME" if Ihe paramel_r is not highlighted the camcordPr'_ internal clock rontinues to
operate. Once you move fhe highlight bar to the first data/time parameter finonfit), file dock stops. When you
finish setting tile minute and press MENU/SET, the date and Ifme b_gfn operalfon from the dal_ and If me you
just set.
E,1 1
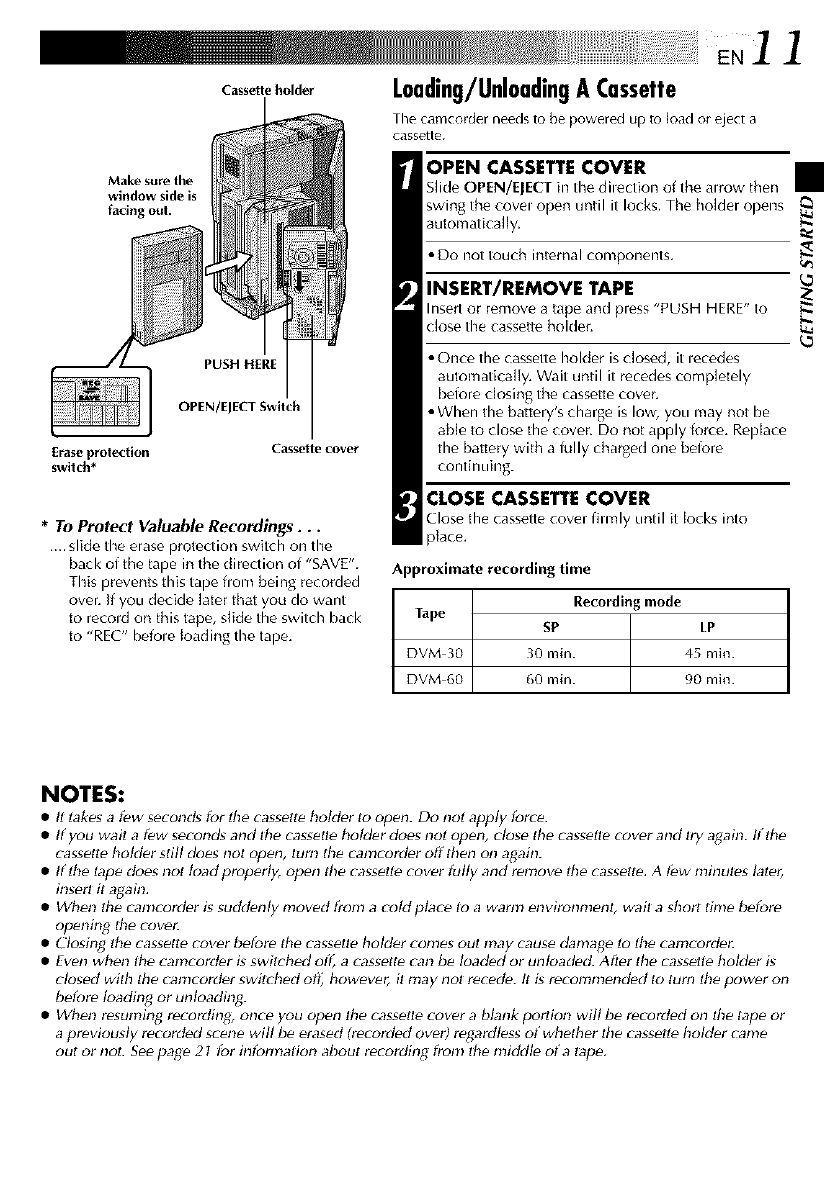
Ca se,,e.o,de L0ading/Unl0adingA Cassette
The camco_del needs to be poweled up to load or eject a
cassette.
PUSH HERE
OPEN/EJECT Swilch
Erase protection
switch *
Cassette cover
Make sure the
window side is
facing out.
*To Protect Valuable Recordings...
.... slide the erase protection switch on time
back of the tape in the direction of "SAVE".
This prevents this tape flom being recorded
over. If you decide later that you do want
to retold on this tape, slide the switch back
to "REC" befole loading the tape.
OPEN CASSETTE COVER
S]ide OPEN/EJECT in timedilection ot the alrow then
swing the covel open until it locks. The homer opens
automatically. _.
• DO Not touch internal con_pol2el2tS,
INSERT/REMOVE TAPE
Insert or remove a tape and press "PUSH HERE" to
close the cassette holder, u._
k_
• Once the cassette hoMer is closed, it lecedes
automatically. Wait until it recedes completely
before closing the cassette cover.
• When the battery's charge is low, you may not be
able to close the cover. Do not apply force. Replace
the battery with a lully charged one before
continuing.
CLOSE CASSETTE COVER
Close the cassette cover firmly until it locks into
place.
Approximate recording time
Recording mode
Tape SP LP
DVM 30 30 min. 45 min.
DVM 60 60 min. 90 min.
NOTES:
•It takes afew seconds for the cassett_ holder to open. Do not apply force.
• If you wail afew seconds and Ihe cassetle holder does not open, close tile casselte cover and Iry again. If the
cassette holder still does not open, turn the camcorder off then on again.
• If the lape does not toad properly, open tile cassell_ cover fully and remove the cassette. A t_w minutes laler,
insert it again.
• When the camcorder is suddenly moved fronl a coldptace lo a wann environment; wait a short time b_fore
openin_ the covell
• Closing the cassette cover before the cassette holder comes out may cause damage lo tile camcorde_
• Even when tile camcorder is switched off, a cassett_ can be loaded or unloade_L After tile ca_selte holder is
dosed with tile canlcorder switched oft_ however, it may nol recede. It is recomn!ended to turn tile power on
betbre loading or unloading.
• When resuming recording, once you open lhe cassette cover a blank porlion will be recorded on Ihe tape or
a previously recorded scene will be erased (recorded over) regardless of whether tile casselte holder came
out or noL Seepage 21 for intbrmatkm about recording from the middle of a tape.
] 2EN
er lamp
MENU/SET Dial Power Switch
Display
R,_ording Menu
Mode Menu
RecordingModeSetting
Set depending on youl prefelence.
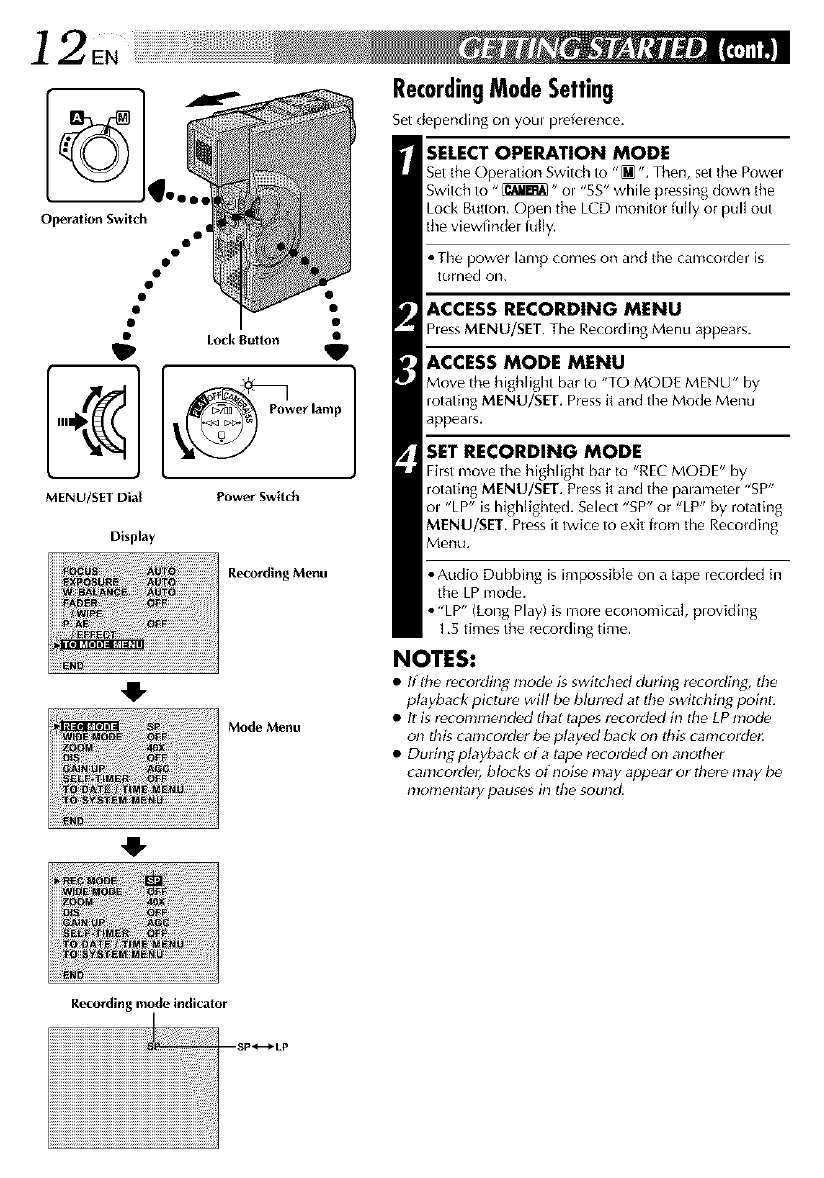
SELECT OPERATION MODE
Set the Operation Switch to "_ ". Then, set the Powel
Switch to "_" ol "5S" while pressing down tile
Lock Button, Open the LCD monitor fully or pull out
the viewfinder fully.
• The power lamp comes on and the camcorder is
turned o11.
ACCESS RECORDING MENU
hess MENU/SET. The Recording Menu appears.
ACCESS MODE MENU
Move the highlight bar to "TO MODE MENU" by
rotating MENU/SET. Press it and the Mode Menu
appears.
SET RECORDING MODE
First move the highlight bar to "RE{" MODE" by
rotating MENU/SET, Press it and the palametel "SP'
ol "LP" is highlighted. Select "SP" or "LP" by rotating
MENU/SET, Press it twice to exit from the Recording
Menu,
• Audio Dubbing is impossible on a tape recorded h_
the LP mode.
• "LP" (Long Play) is more economical, providing
1,5 times the recording time.
NOTES:
•Iflhe recording n!ode is switched during recoMh_g, lhe
playback picture will be blurred at lbe switd_ing point:
• It is recommended that tapes recorded in the LP mode
on tbis camcorder be played back on lhis canlcorder.
• During playback of a tape recorded on another
camcorder, blocks of noise may appear or there may l;e
n!onlenlar)/ pauses in lhe sound.
Recording mode indicator
EN13
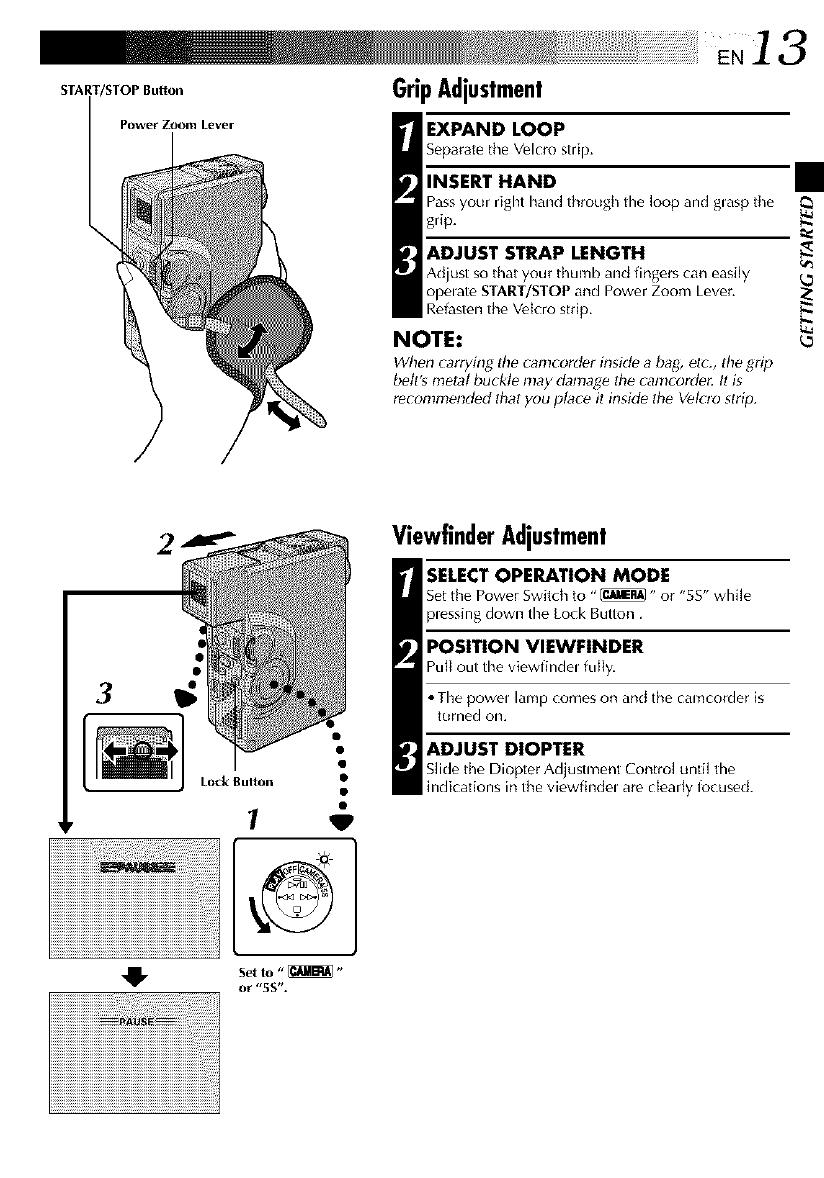
START/STOP Button GripAdjustment
EXPAND LOOP
Separate the Velcro strip.
INSERT HAND
Passyour right hand through tile loop and glasp the
grip.
Power Zoom Lever
ADJUST STRAP LENGTH
Adjust so that your thumb and fingers can easily
opoate START/STOP and Power Zoom Lever.
Refasten the Vdcro strip,
NOTE:
When carrying the camcord_r insMe a bag, etc., the grip
l;_tt's metal buckle may damage the camcorde_ It is
reconlmend_d that you place it inside the V_luo strip.
k_
ViewfinderAdjustment
SELECT OPERATION MODE
Set the Power Switch to "_" or "5S" while
p,essing down the Lock Button.
POSITION VIEWFINDER
Pull out the viewfindo fully.
• The polo lamp comes on and the camcorder is
tLirned o11,
ADJUST DIOPTER
Slide the Diopter Adjustment Control until the
indications in the viewfindo are clearly focused.
14 .
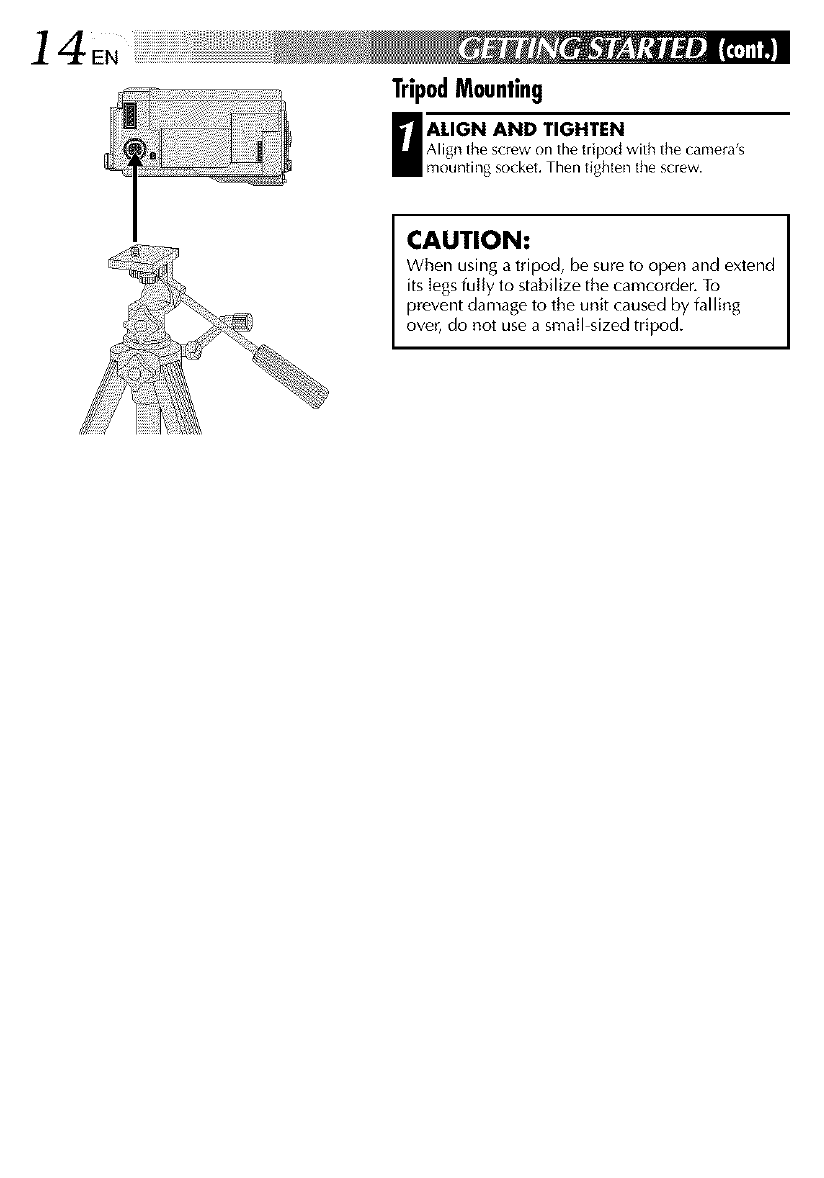
TripodMounting
DLIGN AND TIGHTEN
Alignthe screw on tile tripod with the camera's
mounting socket. Then tighten the screw.
CAUTION:
When using a tripod, be sure to open and extend
its Iegsfully to stabilize the camcorder. To
prevent damage to the unit caused by falling
over, do not use a smaII sized tripod.
N15
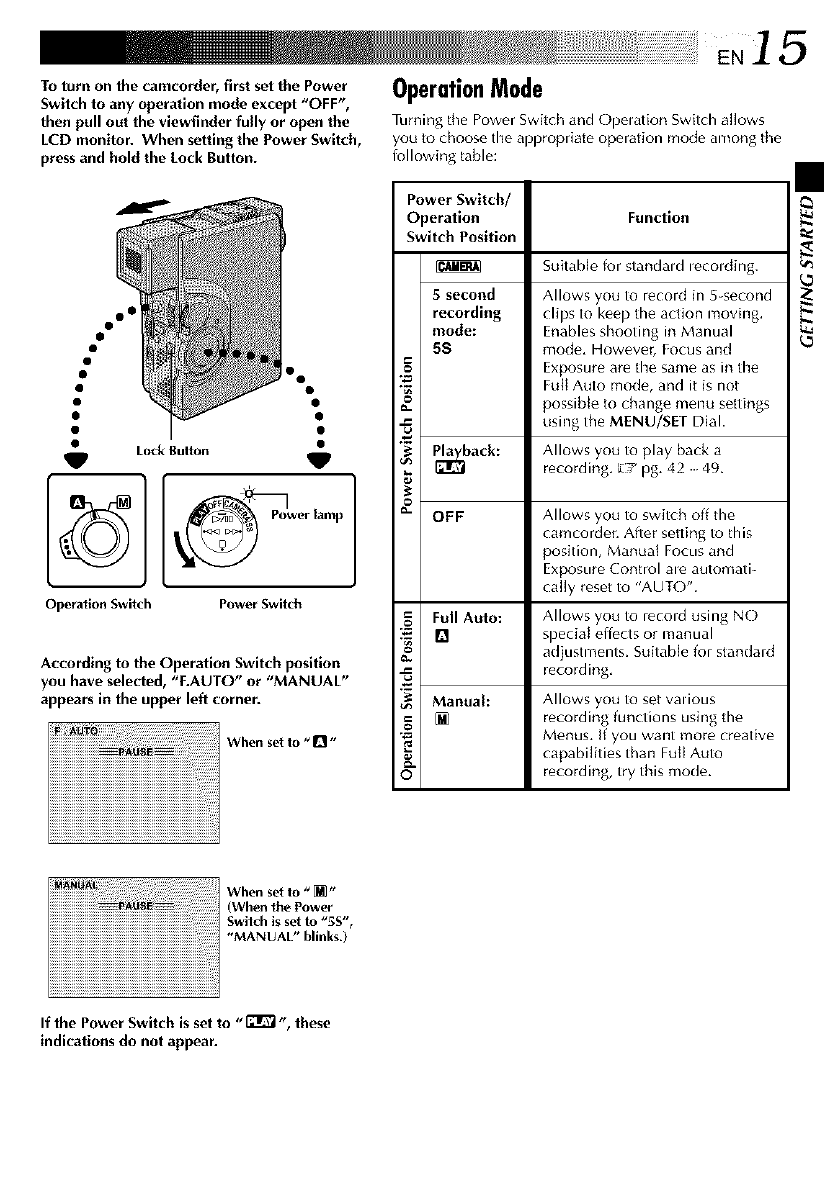
To turn on the camcorder, first set the Power
Switch to any operation mode except "OFF",
then pull out the viewfinder fully or open the
LCD monitor. When setting the Power Switch,
press and hold the Lock Button.
OperationMode
Turning the Power Swit(h and Opelation Switch allows
you to choose the appropriate operation mode among the
following table:
•LockBulton
V
Operation Switch
Do
5P
er lamp
Power Switch
According to the Operation Switch position
you have selected, "F.AUTO" or "MANUAL"
appears in the upper left corner.
When set to "D"
Power Switch/
Operation Function
Switch Position
Suitable for standald lecolding.
5 second Allows you to record in 5 second
recording clips to keeI) the action moving.
mode: Enables shooting in Manual
55 mode, However, Focus and
Exposure are the same as in the
_ FutI Auto mode, and it is not
possiMe to change menu settings
•.= using the MENU/SET Dial.
_oack: Allows you to play back a
recording, ;/pg, 42 49.
_" OFF Allows you to switch off the
camcorder. After setting to this
position, Manual Focus and
Exposure (ontrol ale automati-
cally reset to "AUTO".
Full Auto: Allows you to record using NO
_= 13 speciat effects or manual
"_ adjustments. Suitable for standald
recording,
Manual: Allows you to set vauous
_ recording functions using the
Menus, If you want more creative
_. capabilities than Fult Auto
© recording, try this mode.
When,whoo,.o o.er
Swilch is set to _'5S" t
"MANUAL" blinks.)
If the Power Switch is set to _, these
indications do not appear.

] 6EN
NOTE:
You should already have per_mled tile procedures listed
below. If not, do so before continuing.
•Power (_-s pg, 8)
• Recording Mode S_l_ing ([_7 pg. 72)
•Grip Adjustnlenl (_._ pg, 17)
• Viewfind_r Adjustment (El pg. 17)
IOAD A CASSETTE
Slide OPEN/EJECT in the direction of the anow then
swing the covel open until it locks, The holdel opens
automatica][y.
Insert a tape and press "PUSH HERE" to close the
cassette holder.
•Once the cassette holder is closed, it lecedes
automatically. Wait until it recedes completely
before closing the cassette covel.
START/STOP Button
Powerlamp
Operaliel Switch Power Switch
Tally[amp
(lightswhile
recording is
in progress)
I
ShootingWhileWatchingTheViewfinder
ENTER RECORD-STANDBY MODE
Make sure the LCD monitor is dosed and Io(ked. Set
the Opeiation Switch to "_" or "_". Then, set the
Powel Switch to " _ " while pressing down the
Lock Button. Pull out the viewfinder fully.
• The tens covel opens, the powel lamp lights and the
camcorder enters the Record-Standby mode.
• The scene you are aimed at appeals on the
viewfinder screen, with the wold "PAUSE"
supeumposed upon it.
START SHOOTING
hess START/STOP.
' _i_.' appears in the viewfindel while lecording is
in progless,
EN1T
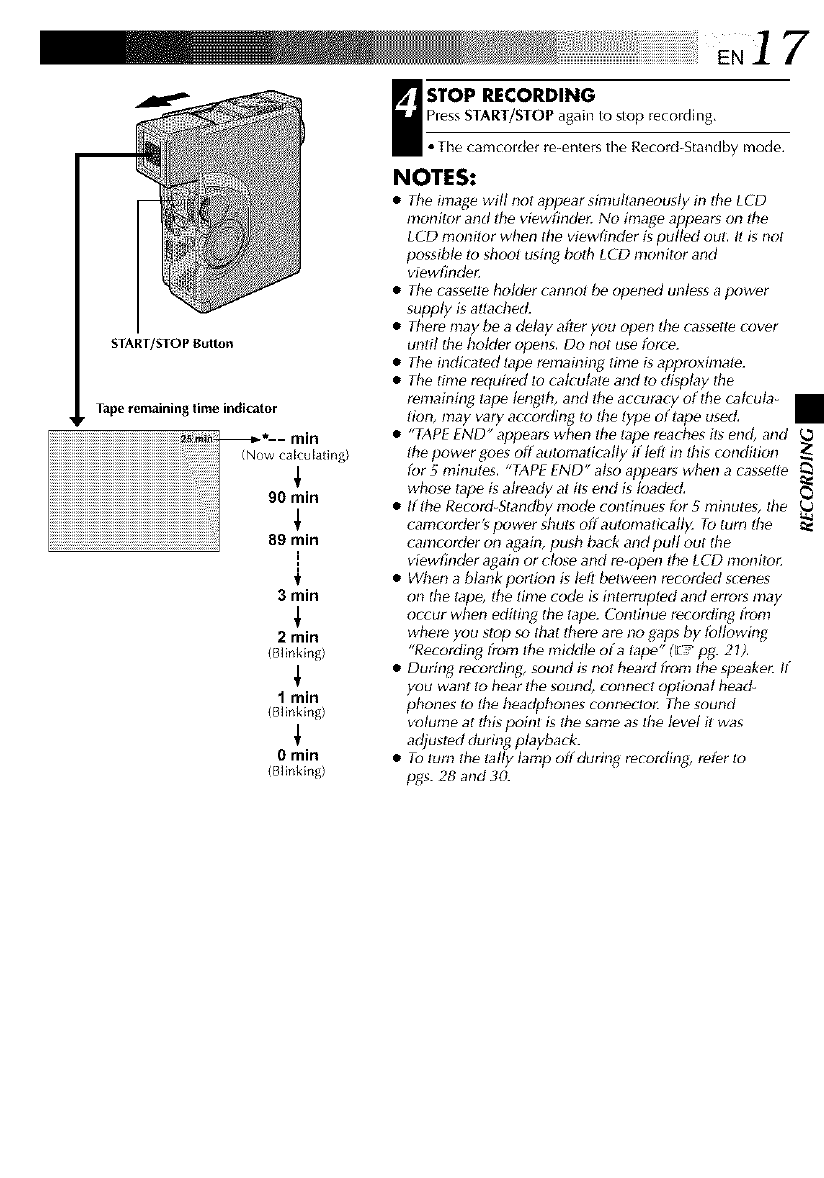
START/STOP Button
Tape remaining lime indicator
[
3 min
2min
/Blir_king)
I rain
(Blinking)
1
0rain
(Blinking)
g STOP RECORDING
hess START/STOP agah_to stop recordh/g,
•The camcolder re-enters the Record-Standby mode,
NOTES:
•The image will not appear simuhaneousty in the LCD
nlonitor and lhe viewfinder No inlage appears on lhe
LCD monitor when tile vi_wfinder ispug_d out: It is not
possibl_ lo shoot usitlg both LCD monitor and
viewfind_r
• The casselle holder cannot be opened unless a power
supply is allached.
• There may _a d_lay after you open lhe cassett_ cover
until the holder opens, Do not use force.
• The indicated lape remah_ing time g approximale.
• The time required lo calculate and to display the
remaining tape lenglh, and the accuracy of the catcuta-
lion, may vary according lo lhe lype of lape used,
TAPEEND appears when he ape reaches is end, and
lhe power goes off automatically if left in lhis condition
for 5 minutes, "TAPE END" at_o appears when a ca_selle
whose tape is already at its end is load_d,
• Iflhe Record-Standby mod_ continues for 5 minutes, tile
camcorder_ power shuts off autonlafically. To turn lhe
canlcorder on again, push ba_-kand pull out the
vi_wfind_r again or close and re-open lhe LCD n!onilor
• When a blank portion is left between recorded scenes
on the tap_, lhe time cod_ is interrupled and errors may
occur when editing the tape. Continue recording from
where you stop so that there are no gaps by fogowing
"Recording from the middle of a lape " (_ ?pg. 21),
• During recording, sound is not heard from tile speaker If
you want to hear the sound, connect optional head-
phones lo tile headphones connector The sound
w>lunle at thg poinl is the same as lhe level it was
adjusted during playback.
• Tolurn the tagy lamp offduring recording) refer Io
pgs. 28 and 3(L
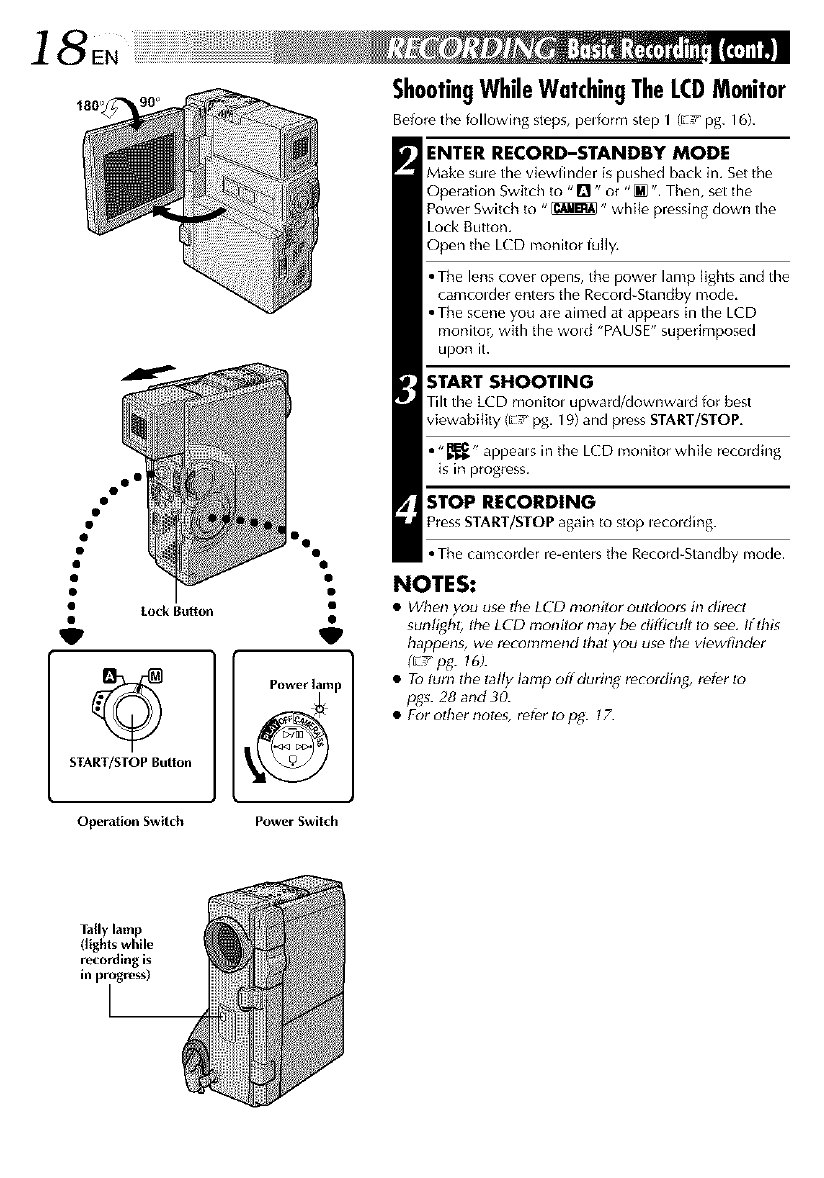
ShootingWhileWatchingTheLCDMonitor
Before the following steps, perform step 1 (L-! pg. 16).
ENTER RECORD-STANDBY MODE
Make sule the viewfinder is pushed back in, Set the
Operation Switch to "Q" or "[] ". Then, set tile
Power Switch to "_" while pressing down the
Lock Button,
Open tile LCD monitor fully,
• The lens cover opens, the power lamp lights and the
camcolder enters the Recold-Standby mode,
• The scene you are aimed at appears in the LCD
monitor, with the wold "PAUSE" superimposed
upon it.
START SHOOTING
Tilt the LCD monitol upward/downwind for best
viewabitity (L-! pg, 19) and press START/STOP,
• "_" appems in the LCD monitor while recording
is in progress.
START/STOP Button
STOP RECORDING
Press START/STOP again to stop lecolding.
D
•• The camcorder re-enters the Record4tandby mode.
•NOTES:
• • When you use the LED monitor outdoors in direct
sunlight; the LCD nlonitor may be difficult to see. If this
Powerlamp
happens, we recolnnlend Ihal you use the viewfind_r
([:7 pg. 16).
•Toturn the tally lamp offduring recording, refer Io
pgs. 28 and30.
•For olher notes, refPr to pg. t 7.
Operation Switch Power Switch
Tally lamp
(lights while
r_.-cordingis
inprogress)
I
E,]9
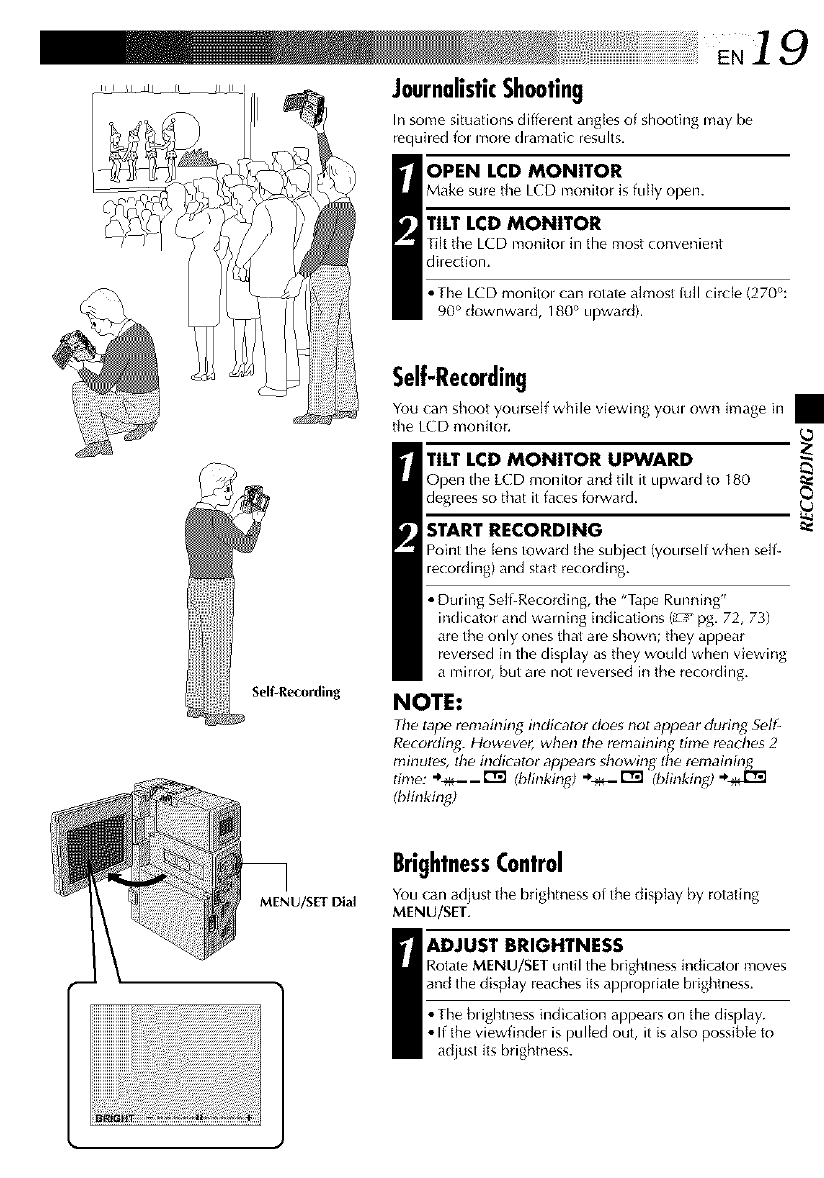
JournalisticShooting
In some situations diffelent angles of shooting may be
required fol more dramatic results,
OPEN LCD MONITOR
Make sure the LCD monik_r is fully ol)en.
TILT LCD MONITOR
Tilt the LCD monik_r in the most convenient
direction.
• The LCD monilol can iotate almost full circle (270°:
90 ° downward, 180 ° upward).
Self-Recording
You can shoot yourself while viewing youl own linage in
the LCD monitor.
TILT LCD MONITOR UPWARD
Open the L(D monitor and tilt it upward k_ 180
degrees so that it faces forward,
START RECORDING m:
Point timetens toward the subject (you. self when serf-
recording) and start recording.
Self-Recording
MENU/SIT Dial
• During Serf-Recording, the "Tape Running"
indicator and warning indications (_ pg, 72, 73)
are the only ones that are shown; they appear
reversed in the display as they would when viewing
a mirrob but are not leversed in the recoreling,
NOTE:
Tile tape remaining indicator _es not appear during Self-
Recordh_g. However, when tile remaining time reaches 2
minutes, Ihe indicator appears showing lhe remainin_
time: ._,:___r_ (blinking_ "_: I'_ (btinking_ "_
(blinking)
BrightnessControl
You can adjust the brightness of the display by rotating
MENU/SET,
_DJUST BRIGHTNESS
Rotate MENU/SET until the blightness indicatol moves
and the display reaches its applopriate blightness.
• Timeblightness indication appeals on the display.
• If the viewfinder is pulled out, it is also possible to
adjust its brightness.
2 0
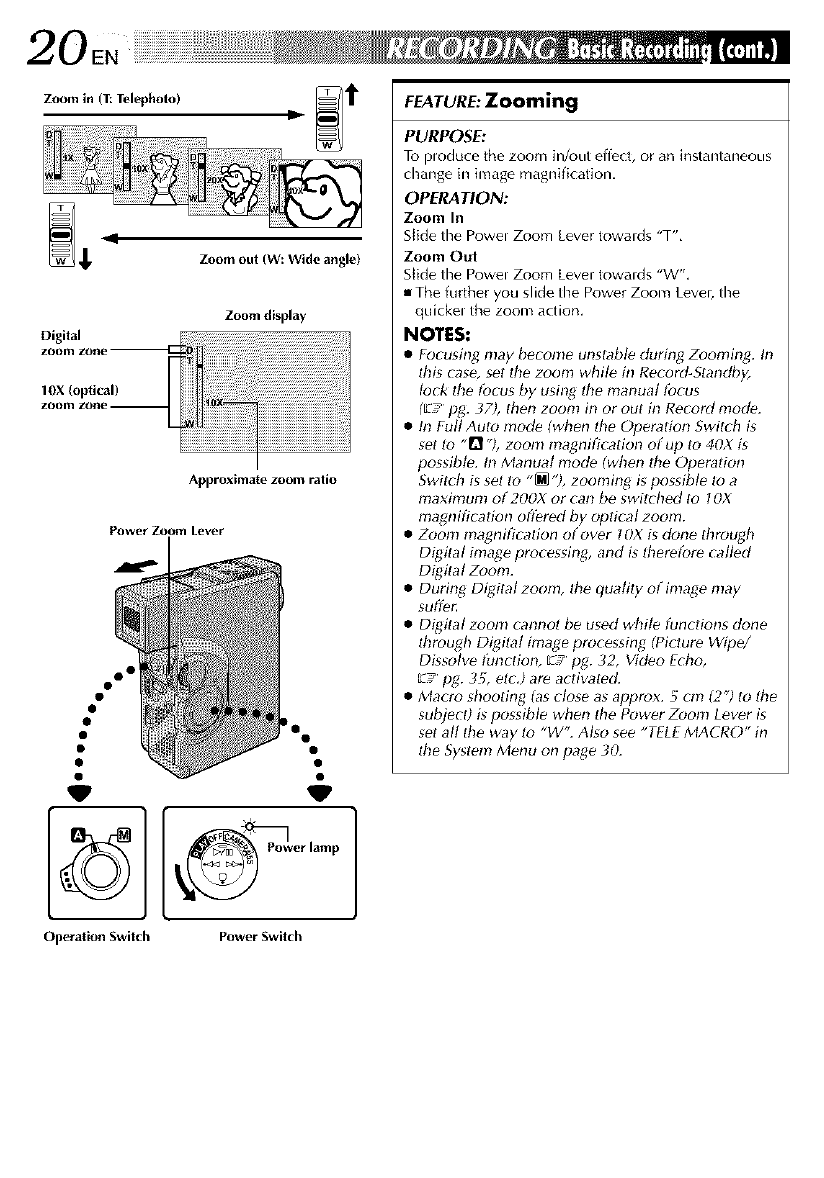
Zoom display
Digital
IOX (optical)
Approximate zoom ralio
Power Zoom Lever
.!
L
Operation Switch Power Switch
FEATURE: Zooming
PURPOSE:
To p,oduce the zoom in/out effect, or an instantaneous
change in image magnification.
OPERATION:
Zoom In
Slide the Powe, Zoom Lever towards "T",
Zoom Out
Siide the Powe, Zoom Lever towards "W",
• The further you slide the Power Zoom Lever, the
quickel the zoom action.
NOTES:
•Focusing may become unstabl_ during Zooming. In
Ibis case, set tile zoom whil_ in Record-Standby,
lock tile tbcus by using tile manual tbcus
([:_ pg: 37), then zoom in or out in Record mode.
• In Full Auto nlod_ (when d_eOperatfon Switch is
set to "Q %zoom magnification of up to 40X is
possible. In Manual mod_ (when the Operation
Switch is set to "_ %zooming is possible to a
maximunl of 200X or can be switched to 10X
magnification oft_red by optfcal zoom.
• Zoom magnification of over IOX is done througb
Digital image processing, and is d_ei_fore called
Digital Zoom.
• During Digital zoonl, the quality of inlage may
suffeL
• Digital zoom cannot be used while fundions done
Ihrough Digital image processing (Picture Wipe/
Dgsolve tbnction, _-y' pg. 32, Video E(ho,
'£: pg. 3_, elf,) are activate_L
• Macro shooting (as close as approx. 5 cm (2") to die
subject) g possible when tile Power Zoom Lever is
set all the way to "W". Also see "TELE MACRO" in
Ihe System Menu on page 30.
EN2]
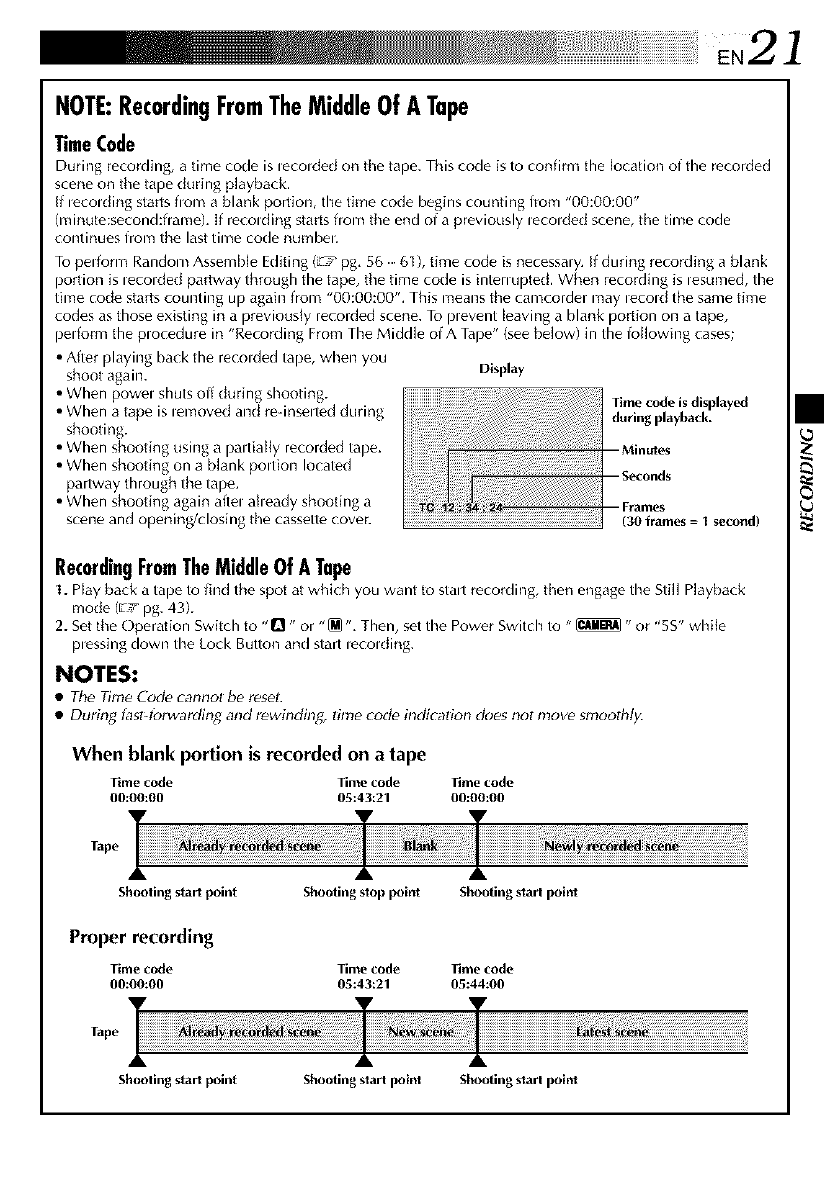
NOTE:RecordingFromTheMiddleOf A Tape
TimeCode
During recording, a time code is lecolded on the tape. This code isto confiml the location of the recorded
scene on the tape during playback.
If lecolding starts flom a blank portion, the thne code begins counting irom "00:00:00"
(min_.tte:second:frameL If recolding starts from the end of a previously lecolded scene, the time code
continues from the lasttime code numbel.
To perform Random Assemble Editing (L'T pg. 56 61), time code is necessary. If during recording a blank
portion is lecolded partway through the tape, tile time code is inten upted. When recording is lesumed, the
time code starts counting up again from "00:00:00'% This means tile camcorder may lecold the same time
codes as those existing in a previously recorded scene. To plevent leaving a blank portion on a tape,
perform the plocedure in "Recording From The Middle of A Tape" (see below) in the following cases;
• After playing back the recolded tape, when you
shoot again. Display
• When powel shuts off during shooting. Time codeisdisplayed
• When a tape is lemoved and re-inselted during during playback.
shooting.
• When shooting using a paltially recorded tape.
• When shooting on a blank poltion located
partway through the tape.
• When shooting again aftel aheady shooting a
scene and opening/closing the cassette cover. (30 frames= 1 second)
Recordingh0mTheMiddleOf ATape
1. Play back a tape to find the spot at whkh you want to stalt r_cording, then engage the Still Playback
mode (E7 pg. 43).
2. Set the Operation Switch to ,,rl ,, or "[_ '%Then, set the Power Switch to "_" or "5S" while
plessing down the Lock Button and start lecolding.
NOTES:
•The Time Code cannot be reseL
•During fast4brwarding and rewinding, time code indication does not move smoothly.
When blank portion is recorded on atape
Time code Time code Time code
00:00:00 05:43:21 00:00:00
Tape
Shootingstartpoint Shootingstoppoint Shootingstartpoint
Proper recording
Time code Time code Time code
00:00:00 05:43:21 05:44:00
Tape
A A
Shootingstartpoint Shootingstartpoint Shootingstartpoint
22EN
MENU/SET Dial
LockButton
er lamp
Power Switch
Disp]ay
41-
4!-
Mode Menu
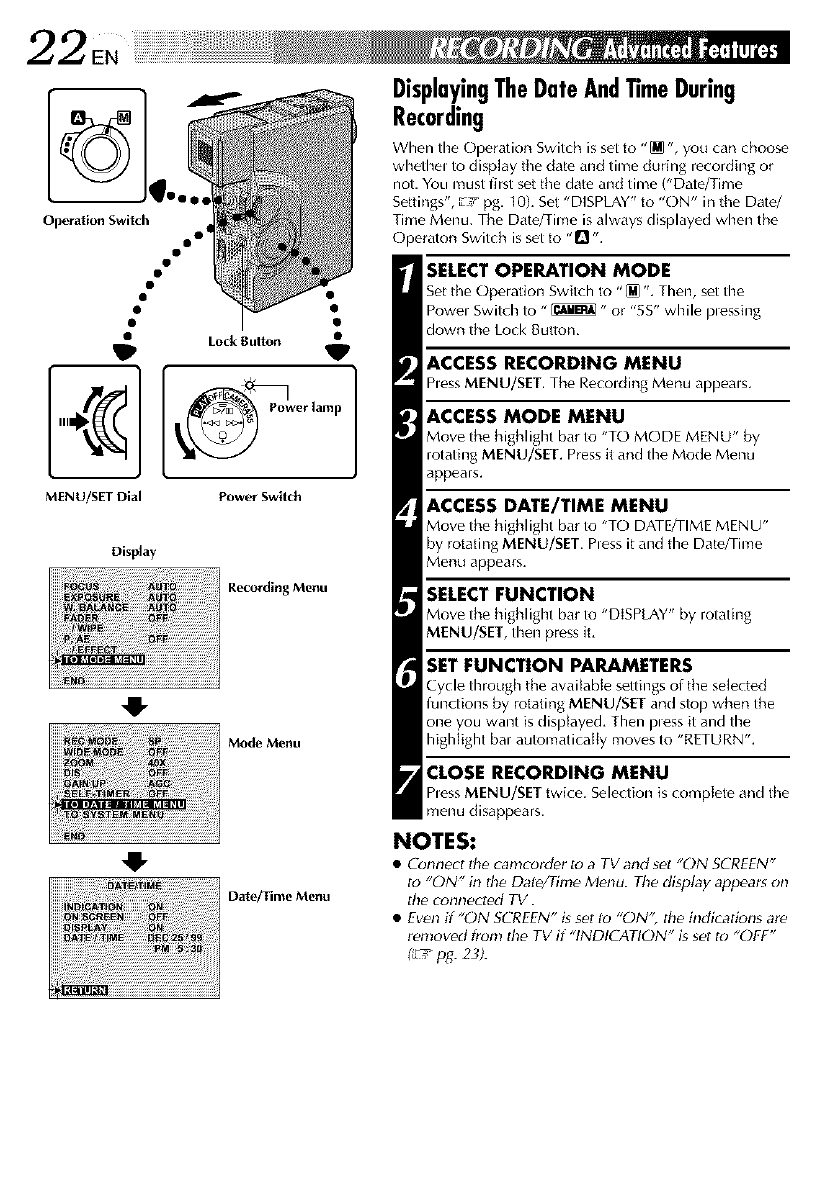
DisplayingTheDateAnd.timeDuring
Recording
When the Operation Switch is se[ to "[] ", you can choose
whethel to display the date and time during recording or
not. You must first set the date and time ("Date/Time
Settings", _,_'pg, 10). Set "DISPLAY" to "ON" in the Date/
Time Menu. The Date/Time is always displayed when the
Operaton Switch is set to "rl ,,.
SELECT OPERATION MODE
Set the Operation Switch to "_ ", Then, set the
Powel Switch to "_" or "5S" while plessing
down the Lock Button,
ACCESS RECORDING MENU
hess MENU/SET. The Recolding Menu appeals.
ACCESS MODE MENU
Move the highlight bar to "TO MODE MENU" by
rotating MENU/SET. Press it and the Mode Menu
appears.
ACCESS DATE/TIME MENU
Move the highlight bar to "TO DATE/TIME MENU"
by rotating MENU/SET. hess it and the Date/Time
Menu appears.
SELECTFUNCTION
Move the highlight bar to "DISPLAY" by rotating
MENU/SET, then press it.
SET FUNCTION PARAMETERS
Cycle through the awdlable settings of the se]ected
ful_ctions by rotating MENU/SET and stop when the
one you want is dispDyed. Then pless it and the
highlight bar autolnaticaliy moves to "RETURN".
CLOSE RECORDING MENU
hess MENU/SET twke. Selection is compiete and the
menu disappears.
NOTES:
•Connect the camcorder to a TV and set "ON SCREEN"
to "ON" in the Da_e_ime M_nu. Tile display appears on
the connected TV.
• Even if "ON SCREEN" gsel to "ON'; tile indications are
renloved fren! the TV if "INDICATION" isset to "OFF"
_p_: 23).
liiiiiliiii i!:lii!ii:!iii!iiiiil iiliiiil !iiiii!i!!i !¸E,23
Operation Switch
O0 01
MENU/SET Dial Power Switch
1
Display
[[[[[[
recording Menu
!J
Mode Menu
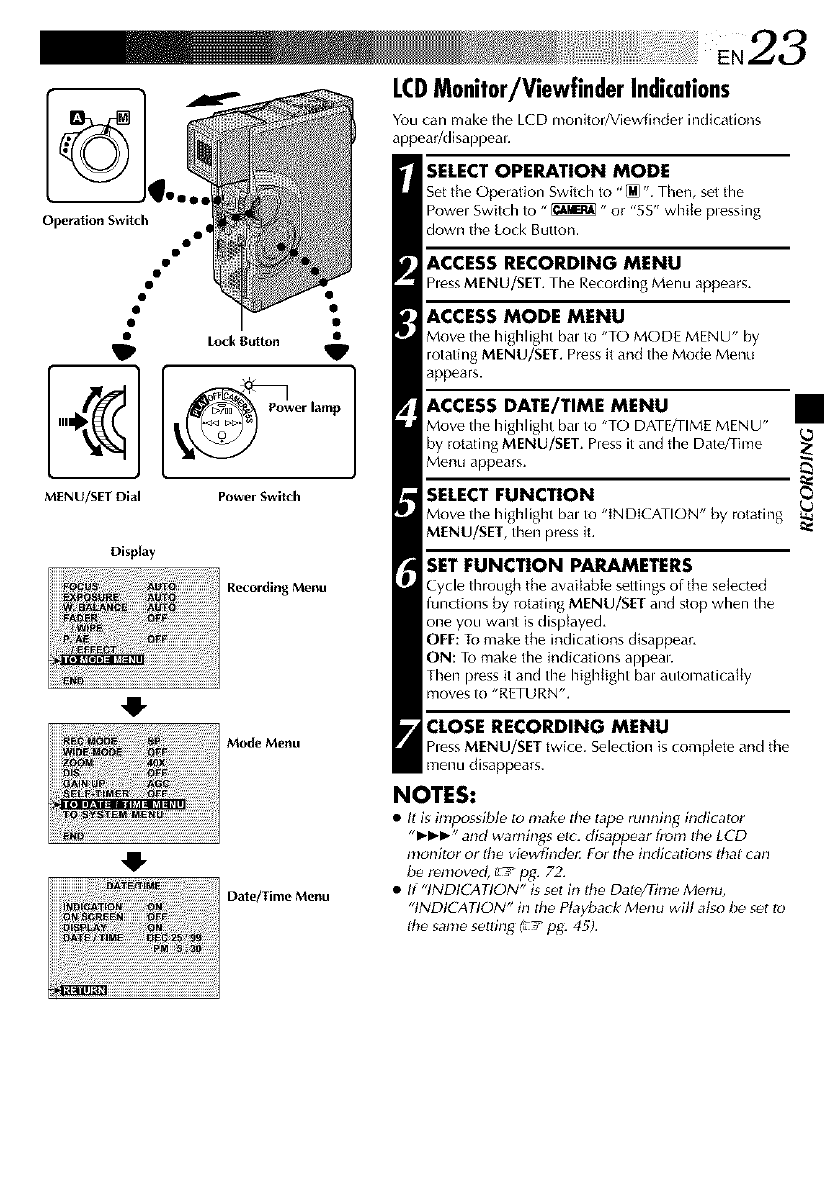
LCDMonitor/ViewfinderIndications
You car/make file LCD monitor/Viewfinder indications
appear/disappeal.
SELECT OPERATION MODE
Set the Operation Switch to "[M ". Then, set the
Powel Switch to " _ " or "5S" while plessing
down the Lock Button,
ACCESS RECORDING MENU
hess MENU/SET. The Recording Menu appears.
ACCESS MODE MENU
Move the highlight bal to "TO MODE MENU" by
rotating MENU/SET. Press it and the Mode Menu
appears.
ACCESS DATE/TIME MENU
Move the highlight bal to "TO DATE/TIME MENU"
by rotating MENU/SET. Press it and the Date/Time
Menu appears.
SELECT FUNCTION
Move the highlight bal to "INDICATION" by rotating
MENU/SET, then press it,
SET FUNCTION PARAMETERS
Cycle through the aw_i_able settings of the selected
functions by rotating MENU/SET and stop when the
one you want is dispDyed.
OFF: To make the indications disappear.
ON: To make the indications appeal.
Then press it and the highlight bal automatically
moves to "RETURN".
CLOSE RECORDING MENU
hess MENU/SET twice. Selection is complete and the
menu disappears.
Date/Time Menu
NOTES:
•It is impossible to make the tape running indirator
"P*_" and wami_gs el_. disappear from the LCD
nlonitor or lhe vi_wfinde_ For tile indications lhat can
be renlowd, c'T_p_: 72.
• If "INDICATION" is set in lhe Dale/Time Menu,
"INDICATION" in tile Playback Menu will also be set to
lhe same setth_ (_/p_. 45).
Operation Switch
_)- start/stop Button
.A
1 o
Lock Button
SNAPSHOT Button
I
Display
PowerSwitch
Power lamp
_After 5 sec.
R,_ord-Standby
Ii
Dissolvesduring 5 s,wondrecording mode
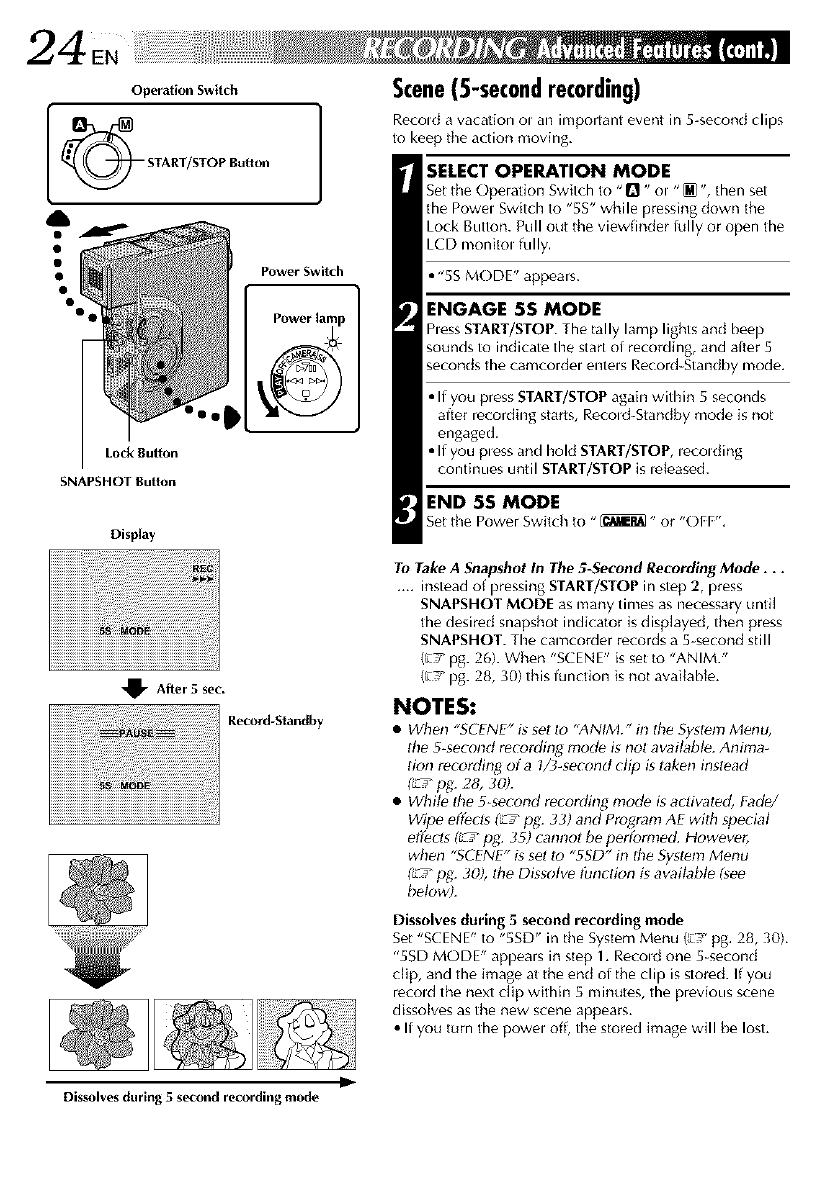
Scene(5-secondrecording)
Recold a vacation ol an important event in 5 second clips
to keep the action moving.
SELECT OPERATION MODE
Set the Operation Switch to "Q" ol "_", then set
the Powel Switch to "55" while pressing down the
Lock Button. Pull out the viewfinder lully or open the
LCD monitol fully.
• "5S MODE" appears.
ENGAGE 5S MODE
hess START/STOP. The tally lamp lights and beep
sounds to indicate the start of recording, and alter 5
seconds the camcordel entels Record-Standby mode,
•If you press START/STOP again within 5 seconds
after recording starts, Retold-Standby mode is not
engaged.
•If you pless and hoM START/STOP, lecolding
continues until START/STOP is leleased.
END SS MODE
Set the Power Switch to "_" or "OFF".
To Take A Snapshot In The 5-Second Recording Mode...
.... instead of pressing START/STOP in step 2, press
SNAPSHOT MODE as nlany times as necessary until
the desired snapshot indicator is displayed, then press
SNAPSHOT. The camcorder records a 5 second still
(E! pg. 26). When "SCENE" is set to "ANIfvk"
(L:__pg. 28, 30) this function is not available.
NOTES:
•When "SCENE" g set to "ANIM." in the System Menu,
the 5-second recording mod_ is not available. Anima_
tion recording of a l/J-second clip is laken instead
_fag.28, 30).
• While the 5-second recording mode is activated, Fade/
Wipe effects _fag. 33) and Program AE with special
effects _lag. 35) cannot be performe_L However,
when "SCENE" g set to "5SD" in the System Menu
(_ fag. 30), lhe Dissolve tPnction is avaiLibte (_ee
betow£
Dissolves during 5 second recording mode
Set "SCENE" to "5SD" in the System Menu (_ pg. 28, 30).
"5SD MODE" appears in step 1. Retold one 5-second
clip, and the image at the end of the clip is stored. If you
recold the next clip within 5 nlinutes, the previous scene
dissolves as the new scene appears.
• If you turn the powel off, the stored image will be lost.
EN2 5
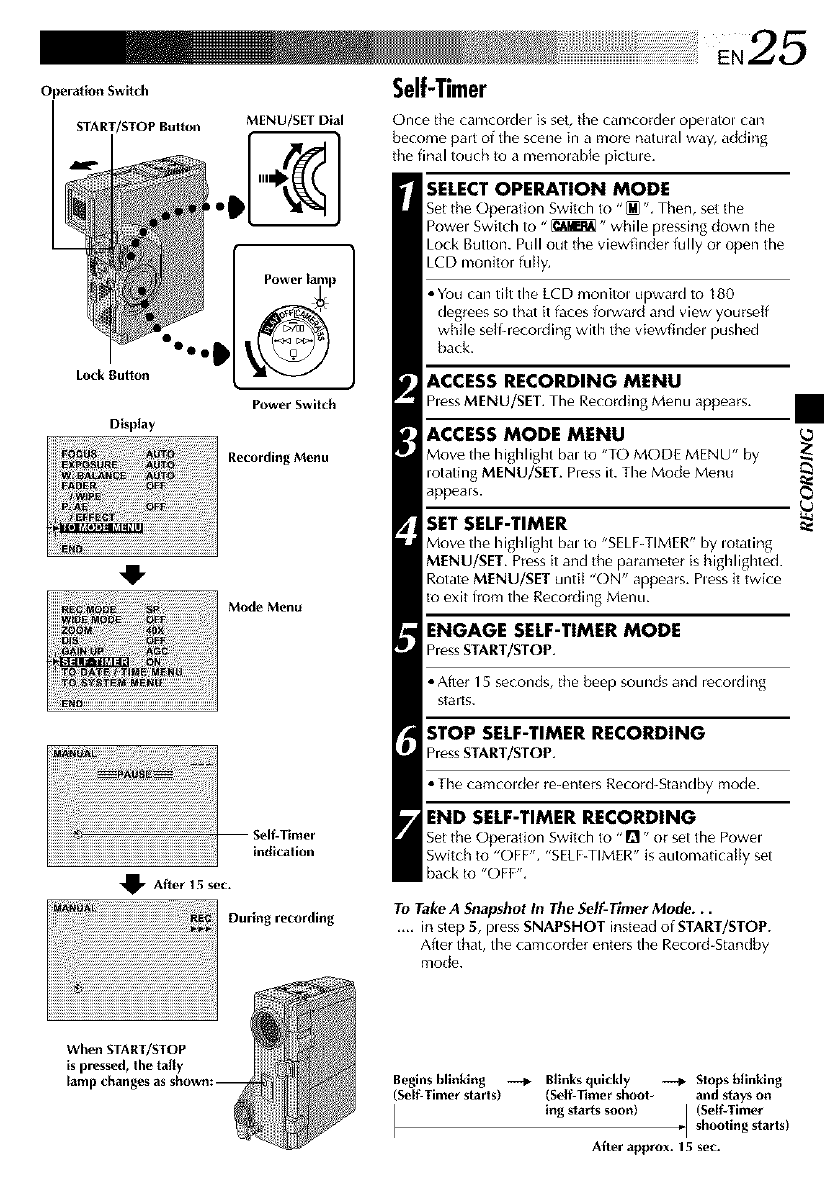
Operation Switch Self-Timer
START/STOPButton MENU/SETDial Once the camcorder is see the camcorder opelatOl calm
become part of tile scene in a more natural way, adding
the final touch to a memolable pictule.
Lock Button
Display
Power Switch
Recording Menu
Mode Menu
41-
Self-Timer
indication
_After 15 sec.
During recording
SELECT OPERATION MODE
Set the Operation Switch to "[M ". Then, set the
Powel Switch to "_" while pressing down the
Lock Button. Pull out the viewfinder fully or open the
LCD monitor fully.
•You can tilt timeLCD monitol upward to 180
degrees so that it faces folward and view yourself
while self-recording with the viewfindel pushed
back.
ACCESS RECORDING MENU
Pless MENU/SET. The Recording Menu appears.
ACCESS MODE MENU
Move timehighlight bal to "TO MODE MENU" by
rotating MENU/SET. Press it. The Mode Menu
appears.
SET SELF-TIMER
Move the highlight bal to "SELF-TIMER" by rotating
MENU/SET. Press it and the parameter is highlighted.
Rotate MENU/SET until "ON" appears, hess it twice
to exit from the Recording Menu.
ENGAGE SELF-TIMER MODE
PressSTART/STOP,
• After 15 seconds, the beep sounds and recold ing
starts.
STOP SELF-TIMER RECORDING
PressSTART/STOP.
• The camcolder re-enters Record-Standby mode.
END SELF-TIMER RECORDING
Set the Operation Switch to "O" or set the Powel
Switch to "OFF". "SELF-TIMER" is automatically set
back to "OFF".
To Take A Snapshot In The Self-Timer Mode...
.... in step 5, pless SNAPSHOT instead of START/STOP.
After that, the camcorder enters the Recoid-Standby
mo(le.
When STArT/STOP
is pressed, the taffy Beginsbllnklng --_ Blinksquickly _Stopsblinking
(SeK-Timer starts) (Se[f-T]mershoot- and staysoft
ingstarts sooN} I(Self-Timer
b[ shooting starts)
After approx.15 sec.
en ................................................................................ii
Operation Switch
Power[amp 1_I•I LockButton
SNAPSHOT Burton
Display
++I
Snapshot mode
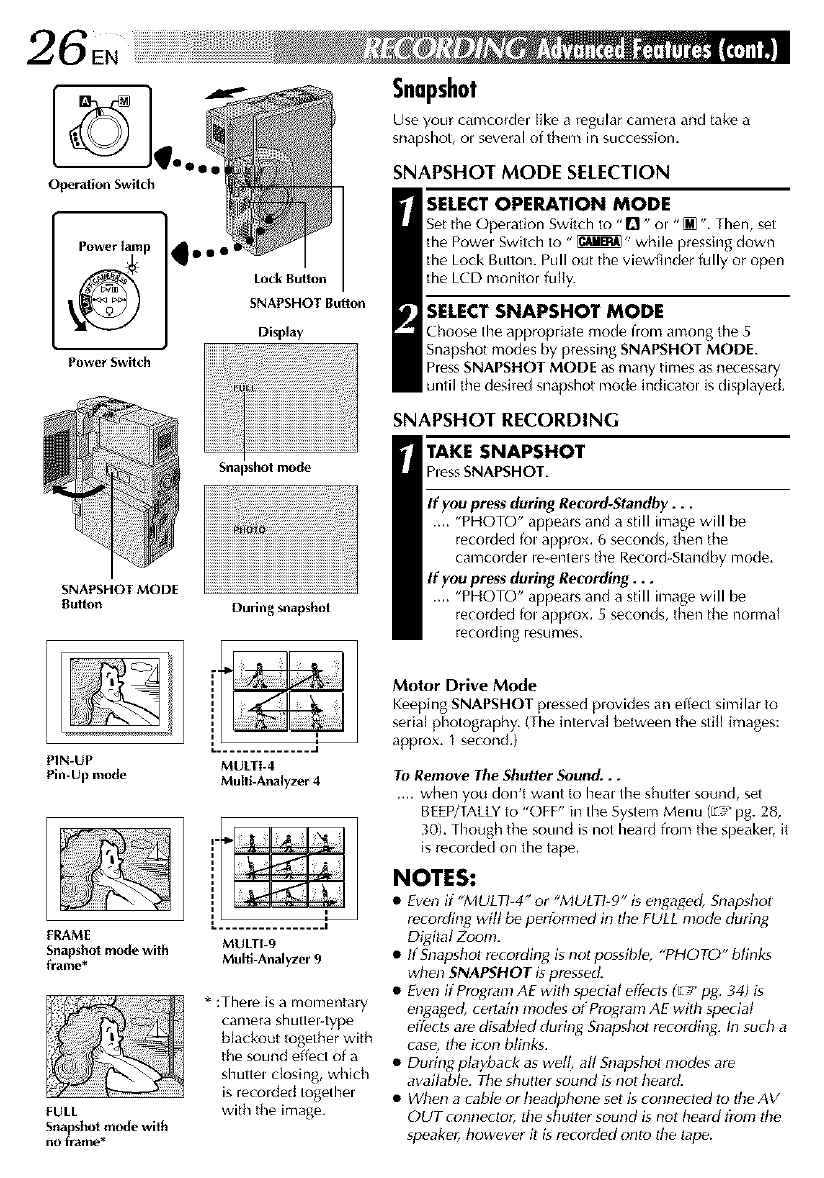
SNAPSHOT MODE
Button
PIN-UP
Pin-Up mode
During snapshot
L.............. .1
MULTI-4
Multi-Analyzer4
.+
L ................ I
FRAME
Snapshot mode with MULTI-9
frame* Multi-Analyzer 9
FULL
Snapshot mode with
no frame*
* :There is a momentary
camera shuttel-type
b[ackout together with
tile sound effect of a
shuttel dosing, wNch
is recolded togethel
with the image,
Snapshot
Use your camcorder like a regular camera and take a
snapshot, OI several of then_ ill succession.
SNAPSHOT MODE SI:LECTION
SELECT OPERATION MODE
Set the Operation Switch to "Q" ol "_", Then, set
the Powel Switch to "_" while pressing down
the Lock Button. Pull out the viewfinder fully or open
the LCD monitor fully.
SELECT SNAPSHOT MODE
Choose timeappropriate mode from among the 5
Snapshot modes by pressing SNAPSHOT MODE.
PressSNAPSHOT MODE as many times as necessary
until the desired snapshot mode indicatol isdisplayed+
SNAPSHOT RECORDING
TAKE SNAPSHOT
hessSNAPSHOT.
If you press during Record-Standby...
.... "PHOTO" appears and a still imag_ will be
recorded fol approx. 6 seconds, then the
camcorder le-entels the Record+Standby mode+
If you press during Recording.. •
.... "PHOTO" appears and a still imag_ will be
recorded fol approx. 5 seconds, then the normal
recording resumes+
Motor Drive Mode
Keeping SNAPSHOT plessed plovides an effect similar to
serial photography, (The interval between the still images:
approx, I second.)
To Remove The Shutter Sound•..
.... when you don't want to heal timeshutter sound, set
BEEP/TALLYto "OFF '+in the System Menu (Ev+pg. 28,
30)+Though the sound is not heard flora the speaker, it
is rocorded on the tape.
NOTES:
•Even if '_ULT]+4" or "MULTt-9" is engaged, Snapshot
r++cording wilt h_ perlbrmed in +tte FULL mode+during
Digilal Zoom.
• IfSnapshol recording is nol possibl_, "PHOTO" blinks
whf+n SNAPSHOT is pressed.
• Even if Program AE with special ef#+cts(F_/pg, 34) i+
engaged, cerlain mod++sof Proglanl AE with special
effects are disabt_d during Snapsbot recording. In sucb a
case,,the i_on blinks.
• During ptaybark as well, all Snapshot mod#s are
available. The shutter sound gnol heard.
• When a cabl# or headphone set is connected to the AV
OUT connector, tile shuller sound is not heard from lhe
_peaker, however it isrecorded onlo lhe tape.
iiii ¸E,2Z
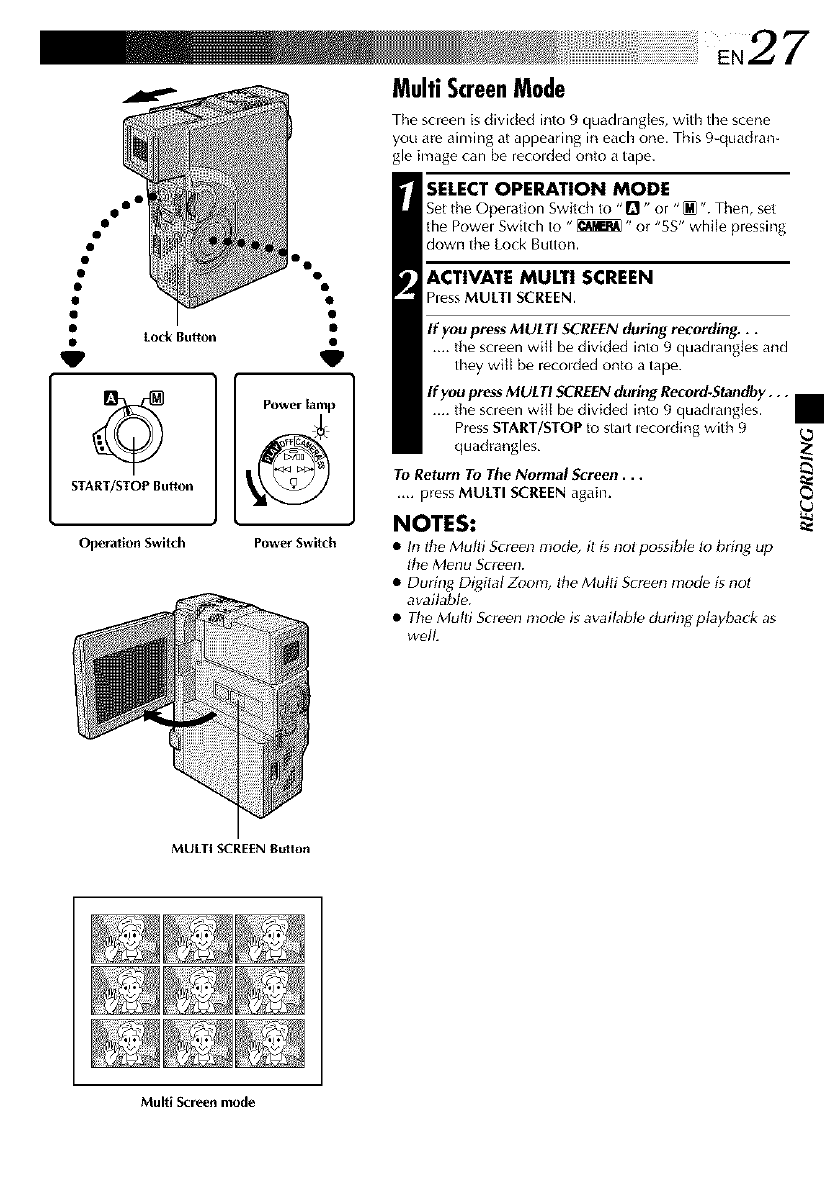
MultiScreenMode
The screen isdivided into 9 quadrangles, with tile scene
you are aiming at appearing in each one. This 9-quadran-
gle by,age can be recolded onto a tape.
SELECT OPERATION MODE
•••Set the Operation Swit( h to "Q" or "[M ". Then, set
• tile Powel Switch to " _" or "5S" while pressing
• down the Lock Button.
• Ii•
•e ACTIVATE MULTI SCREEN
• hess MULTI SCREEN.
•If you press MULTI SCREEN during recording...
• Lock Button .... the screen will be divided into 9 quadlangles and
they will be recolded ont(_ a tape.
If you pressMULTI SCREENduring Record-Standby...
Power lamp .... the screen Wi_[ be divided into 9 quadlang_es.
_, Press START/STOP to stalt lecolding with 9
_11_ quadrangles,
To Return To The Normal Screen...
START/STOP BuS'ton .... press MULTI SCREEN again.
NOTES:
Operation Switch PowerSwitch •In the Mull_ Screc,n _tlod_, it is n_Jtpossibl_ lo bring up
lhe Menu Screen.
•During Digital Zoom, the Multi Screen nlode is not
aw]ilable.
•The Multi Screen nlod_ is available during playback as
well
MULTI SCREEN Butlon
Multi Screen mode
OperationSwitch
Powerlamp
LockButton I _
Display Power Switch
Recording Menu
Mode Menu
Date/Time Menu
System Menu
Normal Screen
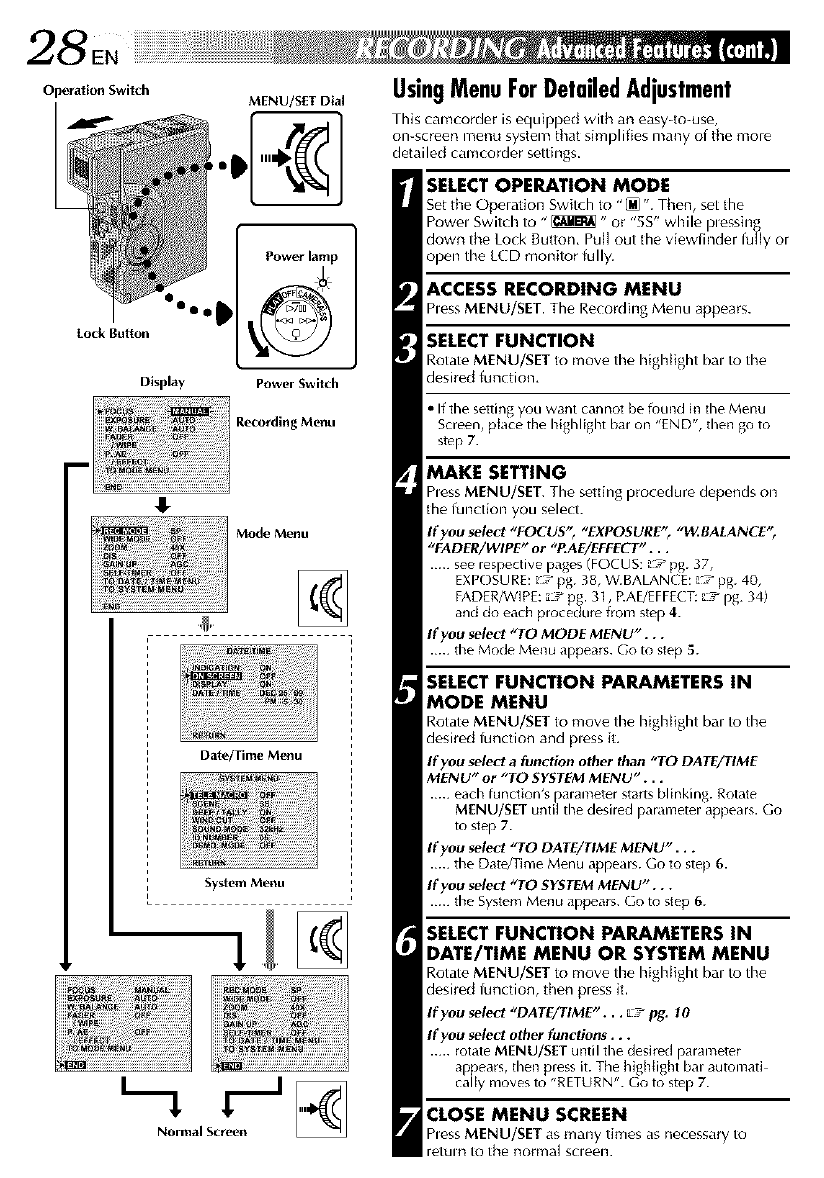
UsingMenuForDetailedAdjustment
This camcorder is equdl)l)ed with an easy-to-use,
on-screen menu system that simplifies many of the more
detailed camcorder settings.
SELECT OPERATION MODE
Set the Operation Switch to "_ ". Then, set tile
Powel Switch to "_" or "5S" while plessing
down the Lock Button, Pull out the viewfinder fully or
open the LCD monitor fully.
ACCESS RECORDING MENU
hess MENU/SET. The Recording Menu appears.
SELECT FUNCTION
Rotate MENU/SET to move the highlight ba, to the
desired function,
• If the setting you want cannot be found in the Menu
Screen, place the highlight bar on "END", then go to
step 7.
MAKE SETTING
hess MENU/SET. The setting procedure depends on
the function you select.
If you select "FOCUS'; "EXPOSURE" "_ZBALANCE"
"FADER/WIPE" or "P.AE/EFFECT". . .
..... see lespective pages (FOCUS: __ pg. 37,
EXPOSURE: _':_ pg. 38, W.BALANCE: _':_ pg. 40,
FADER/WIPE: _:," pg. 31, RAE/EFFECT: :7 pg. 34)
and do each procedure from step 4.
If you select "TO MODE MENU"...
..... the Mode Menu appears. Go to step 5.
SELECT FUNCTION PARAMETERS IN
MODE MENU
Rotate MENU/SET to move tile highlight bal to tile
desired function and pless it,
If you select a function other than "TO DATE/TIME
MENU" or "TO SYSTEM MENU"...
..... edch function's pa_amete_ starts blinking. Rotate
MENU/SET until the desired parameter appears. Go
to step 7.
If you select "TO DATE/TIME MENU"...
..... the Date/Tram Menu appe,us. Go to step 6.
If you select "TO SYSTEM MENU"...
..... the System Menu appears. Go to step 6.
SELECT FUNCTION PARAMETERS IN
DATE/TIME MENU OR SYSTEM MENU
Rotate MENU/SET to move tile highlight ba, to the
desired function, then press it.
If you select "DATE/TIME"... _'7 pg. 10
If you select other functions...
Iotdte MENU/SET until the desiled palameter
appeals, then pless it. The highlight bal automati
cally moves to "RETURN". Go to step 7.
CLOSE MENU SCREEN
hess MENU/SET as many times as ne(essary to
re[uin to the norf_)al scleeN.
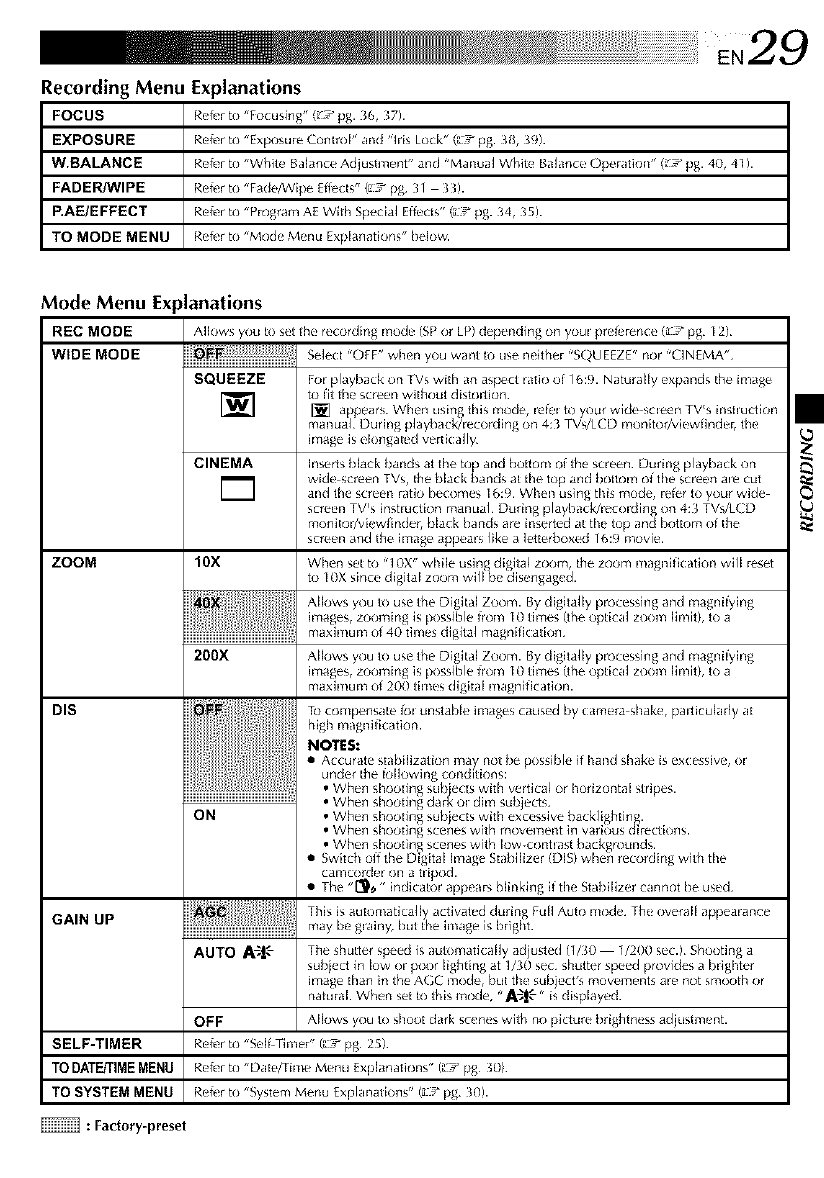
Recording Menu
FOCUS
EXPOSURE
W.BALANCE
FADER/WIPE
P.AE/EFFECT
TO MODE MENU
,29
Explanations
Refer to "Focusing" (_7 pg. _(_,_7).
Refer to "Exposure ControF and "iris Lock" (_7 pg. _8, _9).
Refer to "White Bahmce AdjustmL_nt" and "Manual White Bahmce Operation" (_7 pg. 40, 41 ).
Refer to "Fade/Wipe Effects" (_:7 pg _1 3_).
Refer to "Program AE With Special Effects" (_:/pg. 34, _5).
Refer to "Mod_ M_rlu Exp[arlatlorls" he[ow.
Mode Menu Ex
REC MODE
WIDE MODE
ZOOM
DIS
GAIN UP
SELF-TIMER
TO DATEfflME MENU
TO SYSTEM MENU
danations
Allows you to set [he recording mock_ (SP or LP) depending on you prelL_r_r_ce (_ /pg. 12)
Select "OFF" when you want to use neither "SQUEEZe" n_r "CINEMA"
For playback on TVs with ,m aspect ratio ot 16:9. Naturally expands die image
to lit the screen without distortkm
OF_
SQUEEZE
[]
CINEMA
IOX
200X
ON
hnage is ek)ngated vertk:ally
inserts black bands at [he top and bottom of the screen¸ During playback on
wide screen TVs, the black bands at the top and bottom of the screen are cut
and [he screen ratio becomes 16:9 When using this mode, refer to your wide
screen TVls instEuction manual During playback/recording on 4:3 TV_/LCD
monitor/vlewfinder, black bands are inserted at the top and bottom of the
screen and the image appears like a letterboxed 16:9 movie,
Alfews you to use the Digital Zoom. By digitally processing and magnifying
images, zooming is possible 1horn10 times (the optical zoom limit), to a
maximum of 4(3 times dlgltal magniflc atkm
Allows you to use the Digital Zoom, By digitally processlng and magniiylng
images, zooming is possible from 10 times (the optical zoom limit), to a
maximum of 200 times dlgital magnification,
To corn _en£ate fel unstable images caused by camera shake, particularly at
high magnilk:ation,
NOTES:
•Accurate stabilizatkm may not he po_slble if hand shake is excessiw,, ()l
under the fe[k)wing condltion_:
•Whet1 shootiilg su[Pects with vertical or horizontal str] _es.
• When shooting dar/< oEdim subjects.
camcorder on a tri/od.
• The "[_" indicatol app_ ars )linking il t it Sta )i iz_r cannot )e used
AUTO A-;_"- The shutter speed is automatica[ly adjusted (1/3(3 1/200 see.) Shooting a
subject in k)w ()l poor lighting at 1/30 sec shutter speed provides a brighter
image than in the AGC mode, but the subject's movements are not smooth or
natural When set to this mode, "A-_|$" is displayed
OFF AIfews you to shoot dark scenes with no picture brightness adjustment.
Reter to "SelfiTkner" (_'7 pg 25)
Reter to "Date/Time Menu Explanations" (_-7 pg 301
Reter to "System Menu Explanatk)ns" (a/pg. 30).
: Factory-preset

3O
Date/Time Menu Explanations
INDICATION
OFF
ON SCREEN
ON
DISPLAY
DATE/TIME
Makes aH the indications appear in the camco_der (_-7 pg. 23h
Keeps all the indications {except the tape running indicator, warnings,
etc.) from appearing in the camcorder (_7 pg. 23).
Keeps the camcorder's display from appearing on the connected TV
screen.
Makes the camcordel's disptay appear on screen when the camcorder is
connected to a TV.
Makes the date/time settings appear in the camcorder (:-7 pg. 22).
OFF Keeps the date/time settings from appearing in the camcorder.
Allows you to set the current date and time (t-7 pg. 1Oh
System Menu Explanations
TELE MACRO
SCENE
SEEP/TALLY
ON
[[[ili_iii!i_!iiii!iiiiiiiiiiiiiiiiiiiiiiiiiiiiiiiiiii
5SD
ANIM.
iiiiiii ;iiiili:iii
OFF
Usually the distance to a sub ect where the lens is in focus depends on the
zoom magnification. Untess there is a distance more than Im (3.3 ft.) to
the sub ecb the lens is out of focus at the maximum telephoto setting.
When set to "ON", you can shoot a subject as arge as possib e at a
distance of ap _rox. 60 cm (2 ft.).
• Depending on the zoom position, the lens may go out of focus.
/pg. 24.
/pg. 24.
Allows you to record a I/3 second dip. By using an inanimate object and
changing its position between shots, you can record the subject as though
it is moving (:-7 pg. 24).
The tally lamp comes on to signal the start of recording.
The beep sounds when the power is turned on or off, and at the beginning
and end of recording. Also to actiw]te the shuttet sound effect (_7 pg. 26h
WIND CUT
SOUND MODE
IDNUMBER
DEMO. MODE
ON
48 kHz
The tally lamp remains off at all times.
Even though not heard while shooting, shuttei sound is recorded on the
tape.
Disengages the tunction which cuts down on noise created by wind.
Hel[Ls_scut down on noise created by wind.
• "_" appears.
• The quality of the sound will change. This is normal
Enables recording of stereo sound on four separate channels, and is
recommended for use when performing audio dubbing.
Enables recording of stereo sound on two separate channels.
This number is necessary when connecting the camcorder to a device such as a computer
using the J terminal (JLiP). The numbers range from 01 to 99. Factory setting is 06.
Automatic demonstration will not take place.
ON Demonstrates certain functions such as Program AE with special effects,
etc., and can be used to confirm how these tunctions operate. When
"DEMO. MODE" is set to "ON" and the Recording Menu is closed,
del]lOnstration st_rts.
NOTES:
•Ifa tape i_ in the camcorde_; the d_monstration cannot b_ turned on.
• By turning offthe camcorder_ "DEMO. ME)DE" is set to "OFF"
automatically.
:Factory-preset
N31
START/STOP
Button
Operation Switch
Power Switch MENU/SET Dial
Display
Recording Menu
,IF
FADER/WIPEMenu
[Ex.: _ FADER-WHITE]
Fade-in Ii,
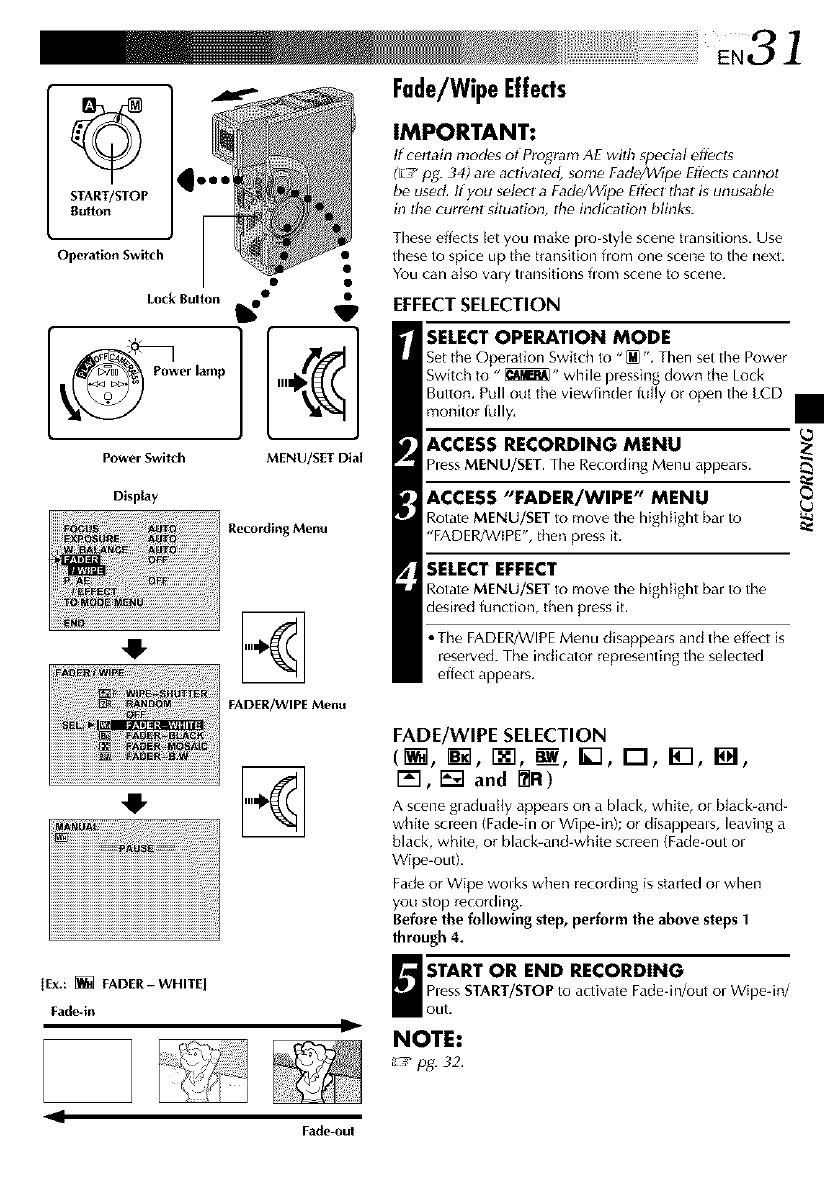
Fade/WipeEffects
IMPORTANT:
If certain mod_s of Program AE with special effects
(_-/pg. 34) are activated, some Fade/Wipe Eflbcts cannot
be used, If you select a Fade/kVipe Effect that is unusable
in lhe current situation, tile indication blinks.
These effects let you make plo-styJe scene transitions. Use
these to spice tip the transition from one scene to the next,
You can also valy tlansitions flora scene to scene,
EFFECT SELECTION
SELECT OPERATION MODE
Set the Operation Switch to "[M ", Then set the Power
Switch to "_" while plessing down the Lock
Button. Pull out the viewfinder fully or open the LCD
monitor fully,
ACCESS RECORDING MENU
hess MENU/SET. The Recording Menu appears.
ACCESS "FADER/WIPE" MENU
RotateMENU/SETto movethe highlight barto
"FADER/WIPE",then pressit,
SELECT EFFECT
RotateMENU/SETto movethe highlight barto the
desiredfunction, then pressit.
• The FADEK/WIPE Menu disappears and the effect is
reserved. The indicator representing the selected
effect appears,
FADE/WIPE SELECTION
(_1, I_, I_, _, I_q, I--I, I_1, I_1,
I'_, [] and I_R)
A scene gradually appears on a black, white, or b]ack-and-
white screen {Fade-in or Wipe-in); or disappeals, leaving a
black, white, or black-and-white screen (Fade-out ol
Wipe out).
Fade or Wipe wolks when recording is started or when
you stop recording.
Before the following step, perform the above steps 1
through 4.
START OR END RECORDING
hess START/STOP to activate Fade-in/out or Wipeqn/
out.
NOTE:
L'__ pg. 32.
11 Fade-out
!i!i!i!i!i!i!i!i!i!i!i!i!i!i!i!i!i!i!i!i!i!i!i!_:i!!_!_iHi_;_i¸ _•
Previoug scene end
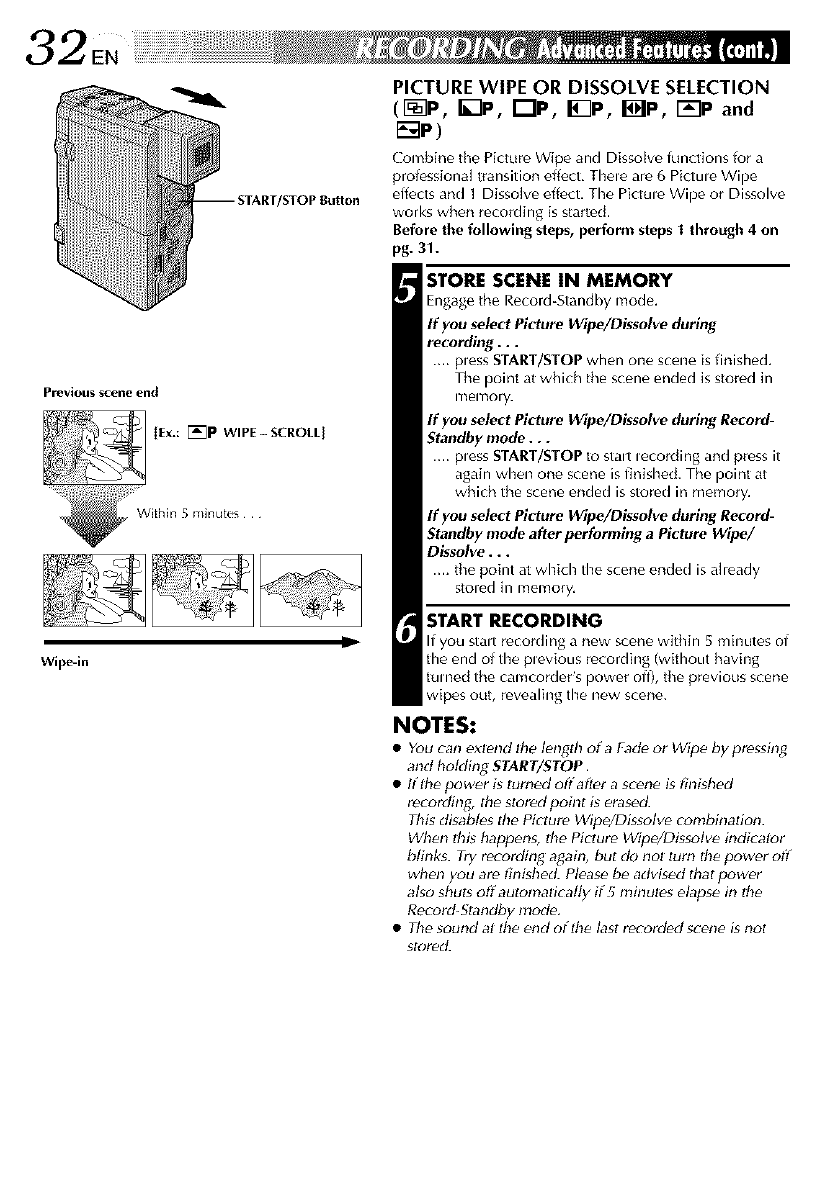
PICTURE WIPE OR DISSOLVE SELECTION
(F_lP, I_p, r-lp, I_lp, IolP, r_-'lp and
_--_p)
Combine the Picture Wipe and Dissolve ffm(tions for a
professional transition effect, Thele are 6 Pictule Wipe
effects and ] Dissolve effect, The Pictule Wipe or Dissolve
works when recording is started,
Before the following steps, perform steps 1 through 4 on
pg. 31.
STORE SCENE IN MEMORY
Engag_ the Record-Standby mode,
If you select Picture Wipe/Dissolve during
recording...
.... pless START/STOP when one scene is finished,
The point at which the scene ended is stored in
n_en_ory.
ff you select Picture Wipe/Dissolve during Record-
Standby mode...
.... pless START/STOP to stalt lecording and press it
again when one scene is finished. The point at
which the scene ended is store(] in memory,
ff you select Picture Wipe/Dissolve during Record-
Standby mode after performing a Picture Wipe/
Dissolve...
.... the point at which the scene ended is already
stored in memory.
Wipe-in
RECORDING
r_cording a new scene within 5 minutes of
the end of the plevious recording (without having
turned the camcorder's power off), the previous scene
wipes out, revealing the new scene.
NOTES:
•You can extend lhe length of a FadP or Wipe by pressing
and holding START/STOP,
•Iflhe power is turned offaflPr a scene is finished
recording, the stored point is erased.
This disables the Picture Wipe/Dissolve combinaI_on.
When this happens, the Picture Wipe/Dissolve indicalor
blinks. Try recording again, but dc_nol turn the power off
when you are t_nishe_LPlease be advised that power
also shuts off automaI_catty if5 minutes elapse in the
Record- Standby mode,
• The sound at lhe end oflhe lastrecorded scene isnot
store_L
iiiiiii:!E,33
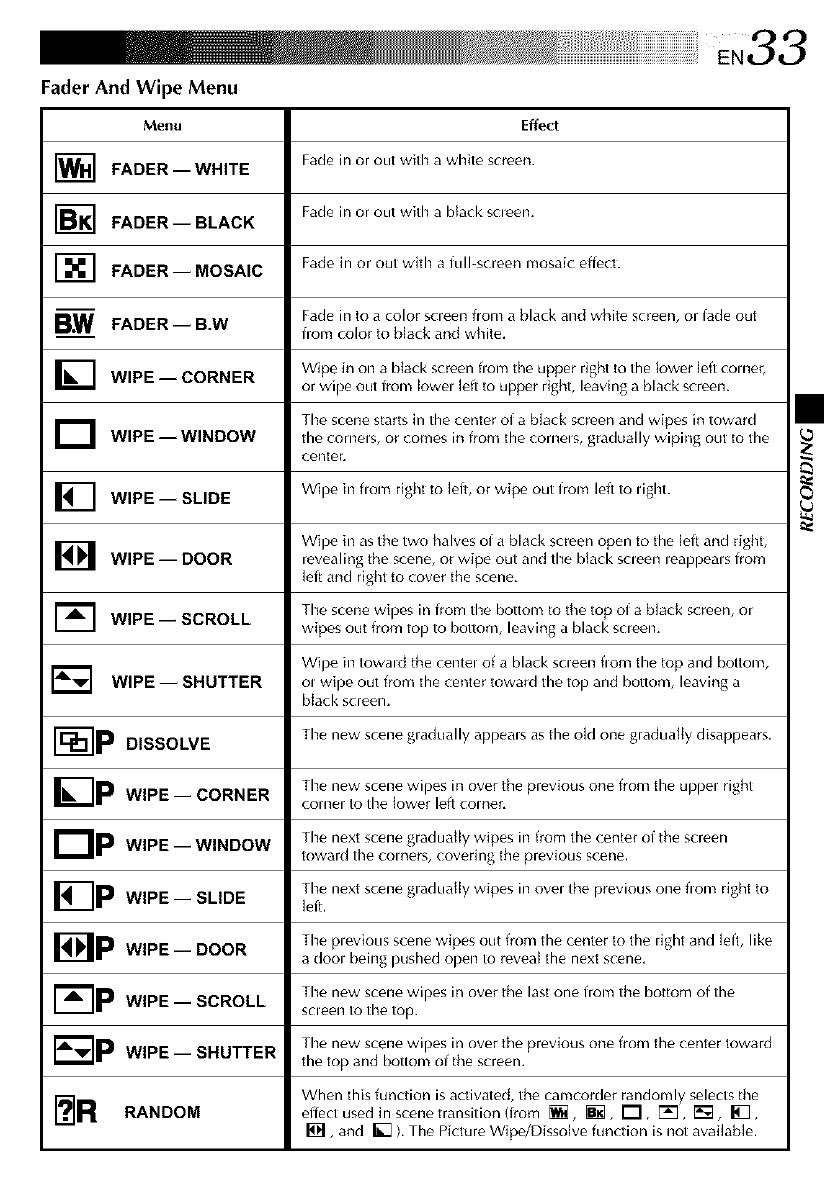
Fader And Wipe Menu
MeNu
FADER--WHITE
]FADER-- BLACK
[-_ FADER -- MOSAIC
B.W FADER--B.W
]WIPE-- CORNER
DWIPE--WINDOW
_] WIPE-- SLIDE
WIPE -- DOOR
]WIPE-- SCROLL
Effect
Fade in or out with a white screen.
Fade in or out with a black scleem
Fade in or out with a full-screen mosaic efle(t.
Fade in to a color scleen from a black and white screen, or fade out
from color to black and white.
Wipe in on a btack screen flora the upper right to the lower left comer,
or wipe out from Iowel left to upper right, leaving a black screen.
Time scene starts in the center of a b[ack screen and wipes in toward
the cornels, or comes in from the cornels, gradually wiping out to the
center_
Wipe in flom right to left, or wipe out from left to Hght.
Wipe in as the two halves of a black screen open to the leit and right,
revealing the scene, or wipe out and the black scleen leappeals lrom
leit and right to cover the scene,
The scene wipes in lrom the bottom to the top of a black s(reen, or
wipes out from top to bottom, leaving a black scleen,
Wipe in towald the centel of a black scleen tom the top and bottom,
WIPE -- SHUTTER ol wipe out from the (enter toward the top and bottom, leaving a
black screen.
DISSOLVE The new scene gl adually apl)eals as the °ld °he graduallY disappears"
The new scene wipes in over the previous one from the uppel right
]p WIPE -- CORNER cornel to the lower left comer,
Dp The next scene gradually wipes in from the center of the screen
WIPE WINDOW •toward the coiners, covering the previous scene, I
I'_IP Timenext scene gradually wipes ill ovel the previous one flora right to
WiPE -- SLIDE left.
The plevious scene wipes out from the center to the right and left, like
I_P -- a dool being pushed open to reveal the next scene,
WIPE DOOR
The new scene wil)es in over the last one from the botk_m of the
]P -scleen to the top.
WIPE SCROLL
Timenew scene wipes in over the previous one from the center toward
r= P -the top and bottom of the screen.
WIPE SHUTTER
When this function is activated, the camcorder randomly selects the
RANDOM effect used in scene transition (from _, _], r-I, [_E_,r_-M, I_,
[_, and I_ ), The Picture Wipe/Dissolve function is not available.
MENU/SET Dial Power Switch
]
Display
4
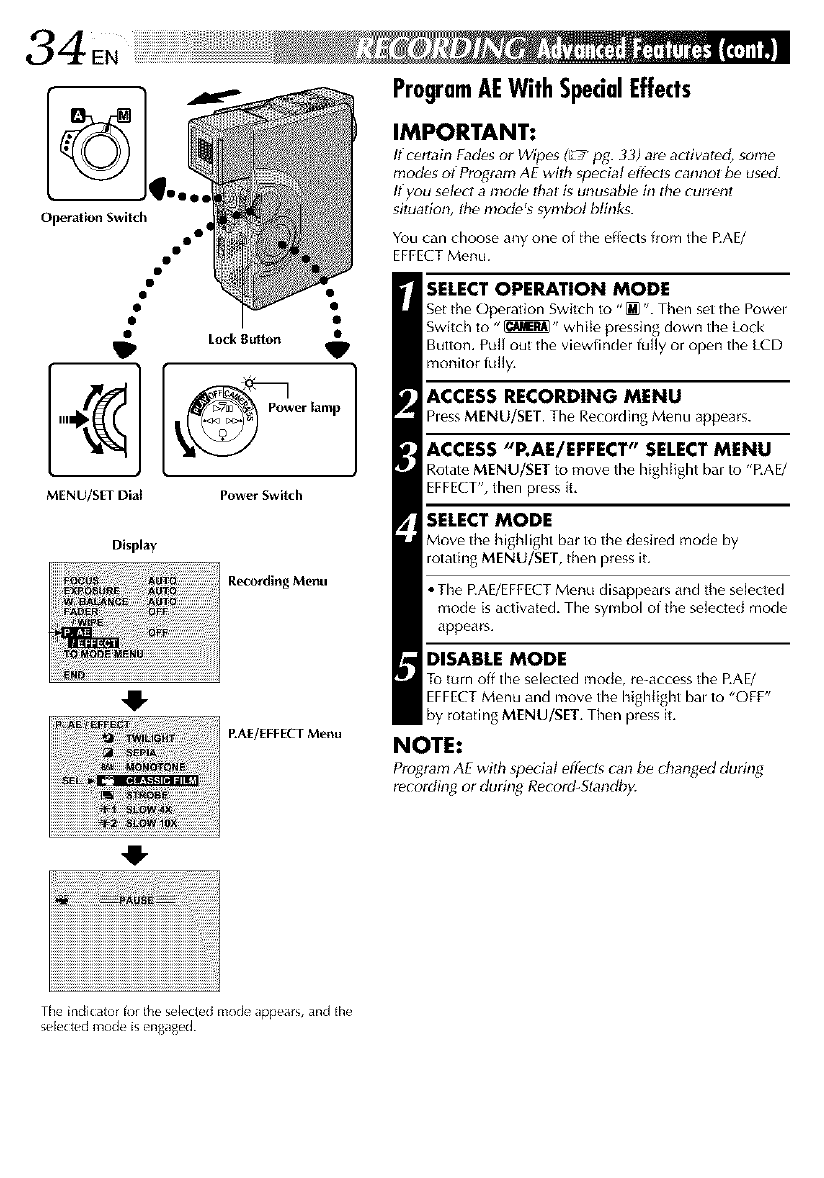
ProgramAEWithSpecialEffects
IMPORTANT:
If certain Fad_s or Wipes _fag.33) are activated, some
mod_s of Program AE wilh special effects _annot be used.
If you select a modP thai is unusable in the currenl
sil_aI_on, lhe nlode_s symbol blinks.
You can choose any one of the effects from the EAE/
EFFECTMenu.
SELECT OPERATION MODE
Set the Operation Switch to "[] ". Then set the Powel
Switch to "_" while pressing down the Lock
Button. Pull out the viewfinder fully or open the LCD
monitor frilly.
ACCESS RECORDING MENU
hess MENU/SET. The Recording Menu appears.
ACCESS "P.AE/EFFECT" SELECT MENU
Rotate MENU/SET to move the highlight ba, to "P.AE/
EFFECT", then pless it.
SELECT MODE
Move the highlight bar to the desired mode by
rotating MENU/SET, then press it
•The P.AE/EFFECTMenu disappeals and the selected
mode is activated. The symbol of the selected mode
appears.
DISABLE MODE
To t_irn off the selected mode, re-access the P.AE/
EFFECTMenu and move the highlight bal to "OFF"
by rotating MENU/SET. Then press it.
NOTE:
Proglam AE with _peciat eff_cls can b_ chan_ed durin_
recording or during Record- Slandby.
,IF
The indicator ior the selected mode appears, and the
selected mode is engaged.
E,35
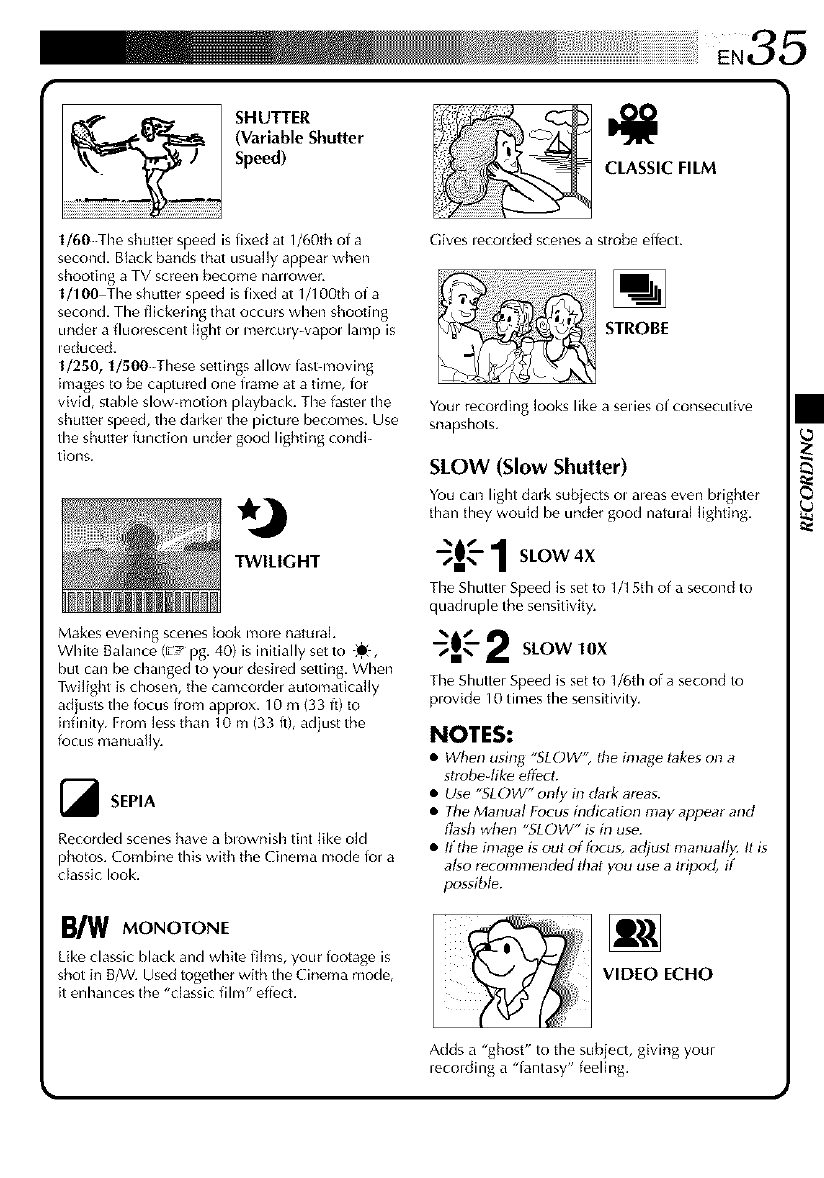
SHUTTER
(Variable Shutter
Speed)
1/60 The shutter speed is fixed at 1/60th of a
second, Black bands that usually appear when
shooting a TV screen become nanower,
1/100The shutter speed is fixed at 1/100th of a
second, The flickering that occurs when shooting
under a fluorescent light or mer(ury vapol lamp is
leduced.
1/250, 1/500 These settings allow last-moving
images to be captured one frame at a time, lor
vivid, stable slow-motion playback. The fastel the
shutter speed, the dmkel the picture becomes, Use
the shutter function under good lighting condi-
tions,
TWILIGHT
Makes evening scenes look more natural,
White Balance ([:7 pg. 40) is initially set to D_,
but can be changed to your desired setting. When
Twilight is chosen, the camcorder automatically
adjusts the focus lrom applox. 10 m (33 if) to
infinity. From less than 10 m (33 if), adjust the
focus manually.
[_ SEPIA
Recorded scenes have a b,ownish tint like old
photos. Combine this with the Cinema mode for a
classic look.
B_ MONOTONE
Like classic black and white films, your footage is
shot in B/W+Used together with the ( inema mode,
it enhances the 'dassicfilm effect.
CLASSIC FILM
Gives lecolded scenes a strobe efl_ct+
STROBE
Your recording looks like a sedes of consecutive
snapshots.
SLOW (Slow Shutter)
You can light dalk subjects ol meas even brighter
than they would be under good natural lighting,
"!÷1SLOW4X
Tire Shutter Speed is set to 1/1Sth of a second to
quadruple the sensitivity.
"+..'-2sLow,0x
Tire Shutter Speed is set to 1/6th of a second to
plovide 10 times the sensitivity.
NOTES:
• When usit_ "SLOW", the h_a_e _kes on a
strobe-like effect.
•U_e "SLOW" only in dark areas.
•Tile Manual F_cus indication may appear and
flash when "SLOW" is in use.
•If the image is out of focus, adjusl manually. It is
al_o recommended that you use a Iripod, if
possible.
VIDEO ECHO
Adds a "ghost" to the subject, giving your
recording a "fantasy" feeling.
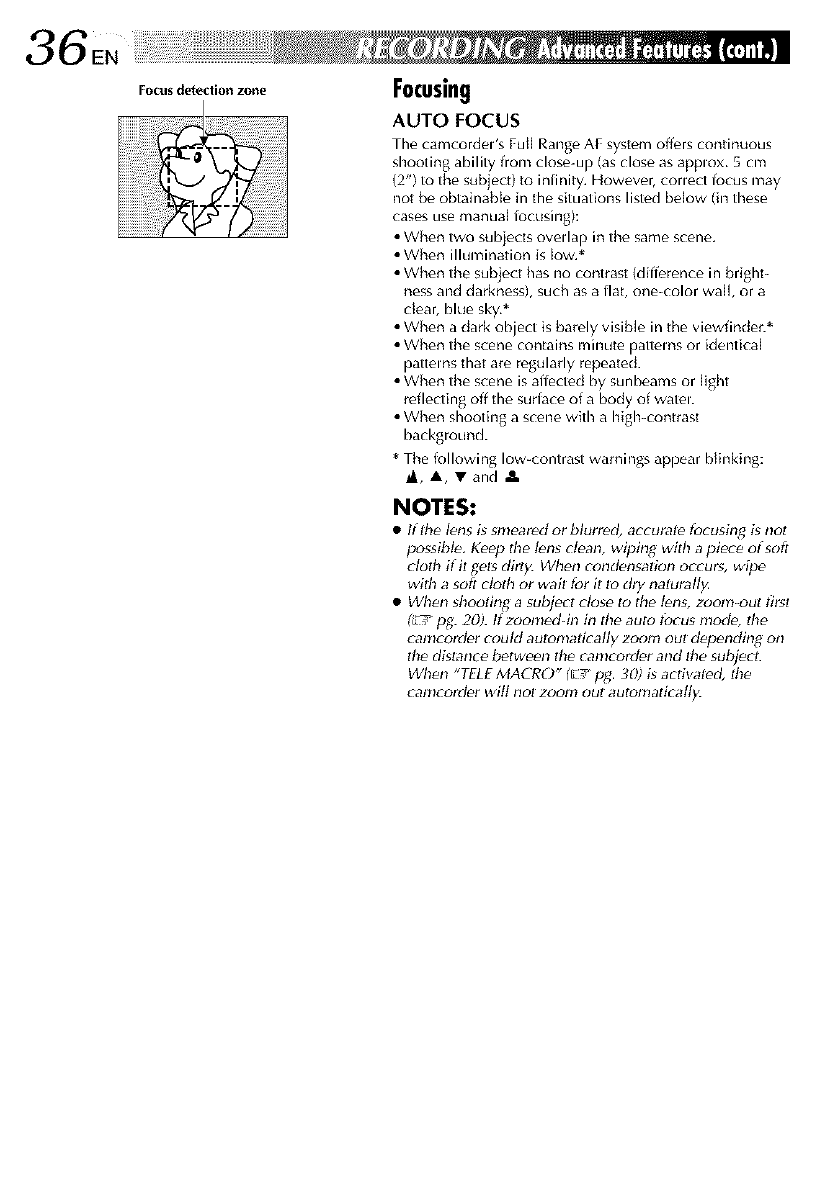
FOCUS deteclion zone Focusing
AUTO FOCUS
Tile cam_ordel's Full Range AF system offers continuous
shooting ability from close-up (as close as applox. 5 cm
(2") to the subiect) to infinity. However, conect focus may
not be obtainable in the situations listed below (in these
cases use manual iocusing):
• When two subjects ovedap in the same scene.
• When illumination is low.*
• When the subject has no contrast (difference in bright-
hess and darkness), such as a flat, one-color wall, or a
clear, blue sky,*
• When a dark object is barely visible in the viewfinder.*
• When the scene contains minute patterns or identical
patterns that are regularly repeated.
• When the scene is affected by sunbeams or light
reflecting off the sudace of a body of watel.
• When shooting a scene with a high-contrast
background.
* The following low-contrast warnings appear blinking:
@,A, Vand A.
NOTES:
•If_e lens is smeared or blurred, actuate _cusing is nol
possibt_. Kepp the l_ns clean, wiping with a piece of sc_ft
cloth if it gets dirty. When condensation occurs, wipe
with a soft cloth or wait for it to dry naturall_4
• When shooting a subject ck;se to the t_ns, zoom-out first
_pg. 20). tf zoomed-in in tile auto tbcus mode, the
camcorder could autonlatically zoom out depending on
the dgtance l_tween the camcorder and the subj_rt.
When "TELEMACRO" (_-/pg, 30) gactfvated, tile
camcorder wilt nol zoom out automatically.
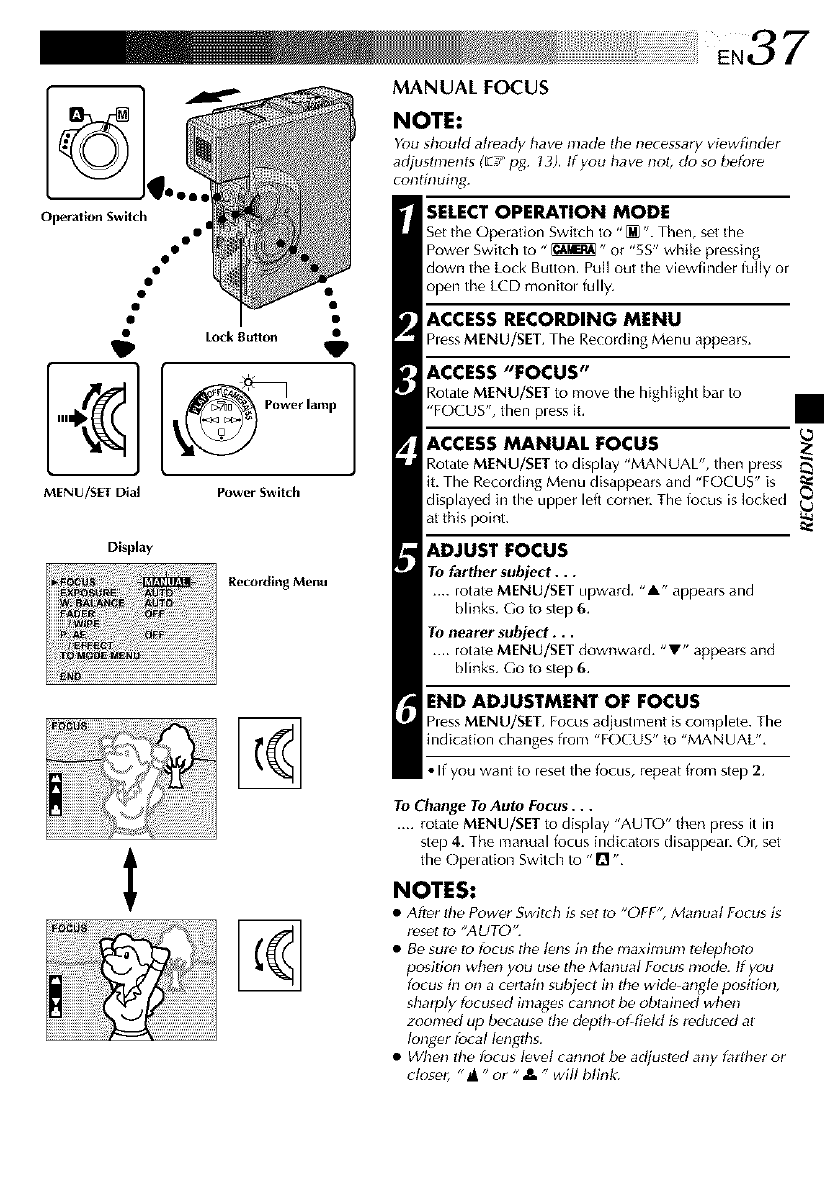
Operation Switch
MANUAL FOCUS
NOTE:
Display
Recording Menu
You shouM already have mad_ tile necessary vi_wfinder
adjustments (E,r pg. t3), tf you have not; do so before
continuing:
SELECT OPERATION MODE
Set the Operation Switch to "[] ". Then, sot tile
Powel Switch to " _" or "5S" while plessing
down the Lock Button. Pull out the viewfinder fully or
open the LCD monitol fully.
ACCESS RECORDING MENU
hess MENU/SET. The Recording Menu appears.
ACCESS "FOCUS"
RotateMENU/SETto movethe highlight barto
"FOCUS",then pressit.
ACCESS MANUAL FOCUS
RotateMENU/SETto display "MANUAL", then press
it, The Recolding Menudisappearsand "FOCUS" is
displayedin the upper left corner,The focusislocked
at this point, t_
ADJUST FOCUS
To farther subject...
.... rotate MENU/SET upward. "&" appears and
blinks. Go to step 6.
To nearer subject...
.... rotate MENU/SET downward, "V" appears and
blinks. Go to step 6.
I the Opelation Switch to "[] ",
NOTES:
•After tile Power Switch is set to "OFF'; Manual Focus is
reset to "AUTO".
• Be sure to focus the lens in the maximunl telephoto
position when you use the Manual Focus mode. tf you
focus in on a certain subject in the wide-angle position,
sharply focused inlages cannot be obtained when
zoomed up because the depth-of-fieM g reduced at
longer focal I_ngths.
• When tile focus I_vet cannot be adjusted any £1rtbel or
closer, "_ "or " Jk " will blink:
To Change To Auto Focus...
.... rotate MENU/SET to display "AUTO" then press it in
step 4. The manual focus indicatols disappeal, Ob set
END ADJUSTMENT OF FOCUS
hess MENU/SET. Focus adjustment is complete. The
indication changes flora "FOCUS" to "MANUAL".
• If you want to reset the locus, repeat from step 2.
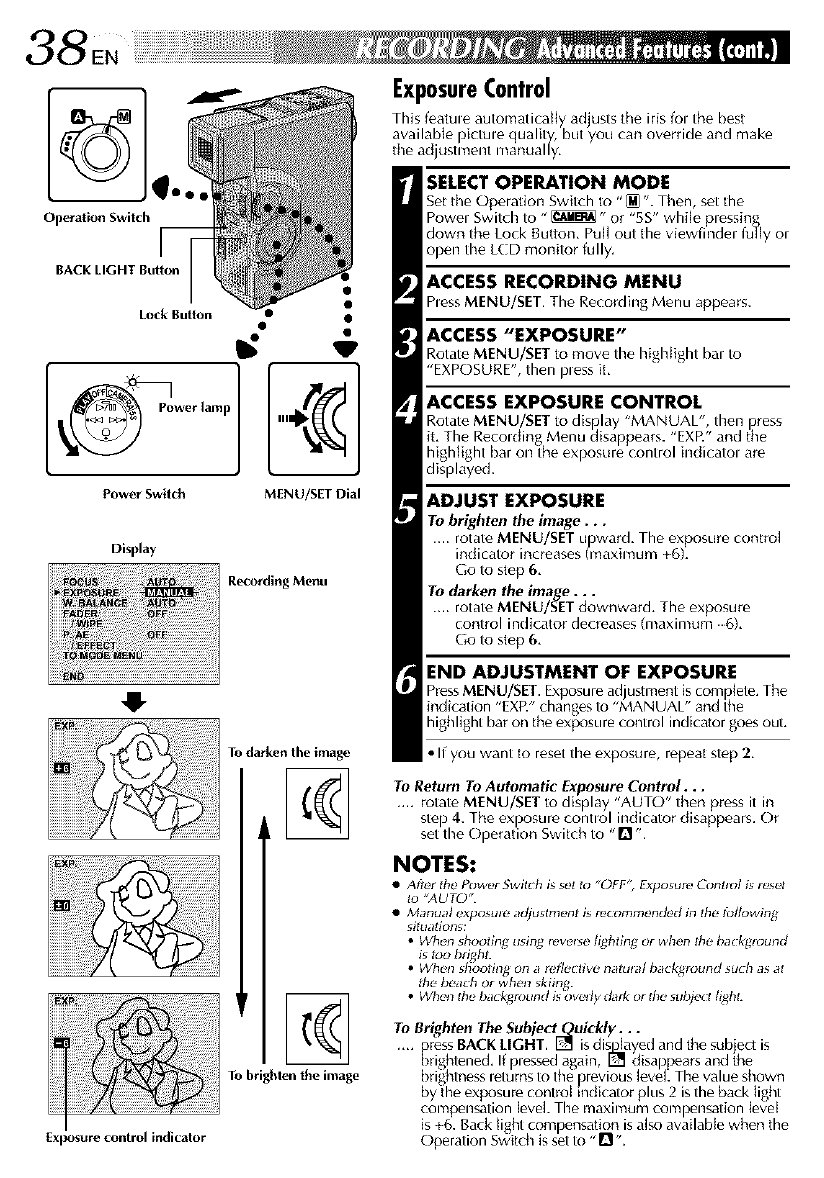
OperationSwitch
BACK LIGHT Button
Power Switch MENU/SET Dial
Display
Recording Menu
41-
Exposure controlindicalor
To darken the image
%
%
To brightenthe image
ExposureControl
This featule automatically ad usts the iris fol the best
available )ictule quality, but you can override and make
the a_justment manua ly.
SELECT OPERATION MODE
Set tile Operation, Switch !o "_ ".,Then, set the
Powel Switch to ' _ or 5S' while pressing
down the Lock Button. Puff out the viewfinder fully or
open the LCD monitor fully.
ACCESS RECORDING MENU
hess MENU/SET. The Recording Menu appears.
ACCESS "EXPOSURE"
Rotate MENU/SET to move the highlight ba, to
"EXPOSURE", then pless it.
ACCESS EXPOSURE CONTROL
Rotate MENU/SET to display "MANUAL', then press
The Recolding Menu disappears. ' EXW and the
lar on the exposure control indicatol are
ADJUST EXPOSURE
To brighten the image...
.... rotate MENU/SET upward. The exposure control
indicator increases (maximum +6).
Go to step 6.
To darken the image...
.... rotate MENU/SET downward, The exposure
Control indicator decreases (maximum 6).
Go to step 6,
END ADJUSTMENT OF EXPOSURE
Press MENU/SET. Exposure ac,ljustment is complete. The
indication ' EXR changes to 'MANUAL ' and the
highlight bar on the exposure control indicator goesout.
• If you want to reset the exposure, repeat step 2.
To Return To Automatic Exposure Control...
.... rotate MENU/SET to display 'AUTO' then press it in
ste) 4. The ex)osure contlol indicator disappears. Or
set tie Operation Switch to "l_".
NOTES:
After lhe Power Swilch is sel fo "OFF _Exposuro Contlot is lesel
lo '_AUTO _'.
Manualexposurea¢_uslmenlisrecommendedin the _Jlowing
siluations:
•Wh.n shoollng using._w,_e [ighlln[qor wh_,nthe hackg_ound
is too brighl.
•_/hen shooHng on a _fleclive nalulal I_ac_lound such as at
the beaLhor when skiing.
• When the background isoverly dark or the subject light.
To Brighten The Subject_uickly. . .
.... pressBACKLIGHT, _ isdis0layed and the subject is
brightened. If plessed again, [] disappears and the
[)rightness leturns to the previous level. The value shown
by the exposure control indicator plus 2 isthe back light
compensation level. The maximum compensation level
is +6. Back light compensation is also available when the
Operation Switch is set to "n,,
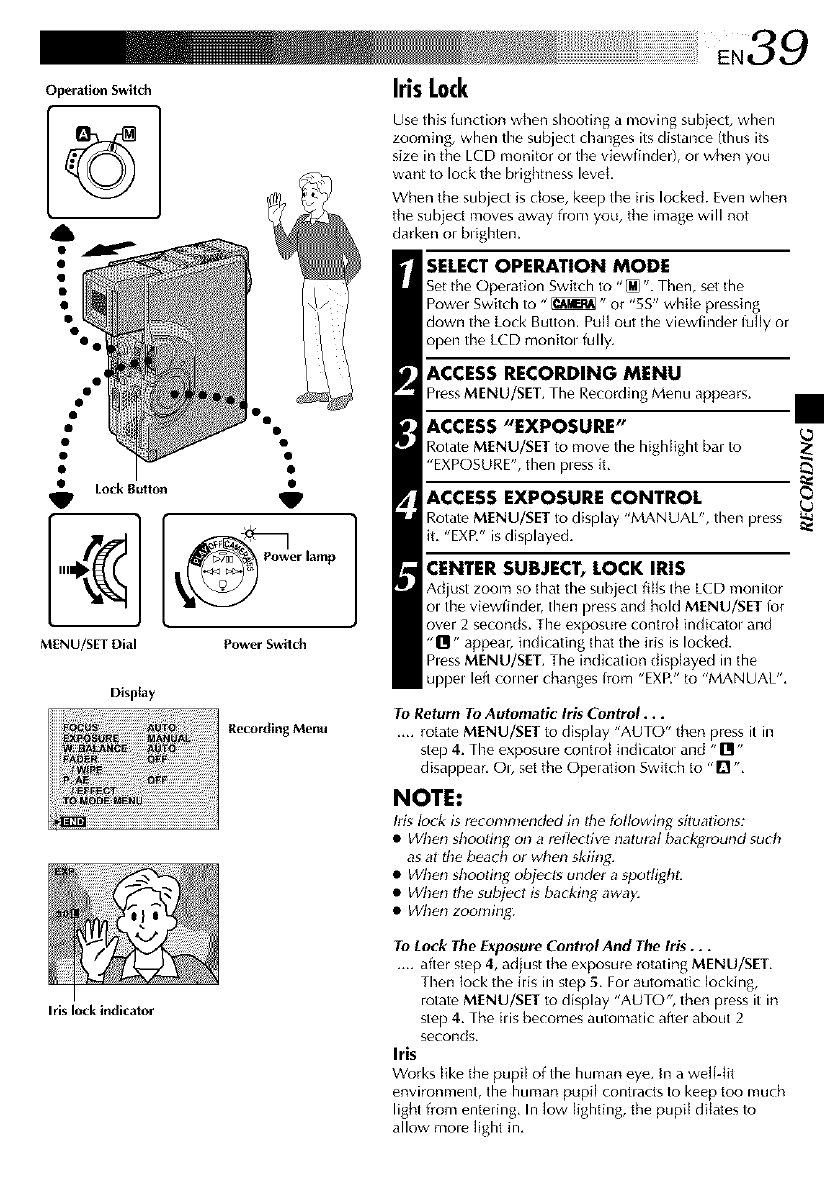
EN39
MENU/SET Dial Power Switch
Display
Recording Menu
Iris lock indicator
]
IrisLock
Use this function when shooting a moving subject, when
zooming, when the subject changes its distance (thus its
size in the LCD monitor ol the viewfinder), ol when you
want to lock the brightness level.
When tile subject is close, keep the ins locked. Even when
the subject moves away fiom you, the image will not
darken or brighten.
SELECT OPERATION MODE
Set the Operation Switch to "[M ". Then, set the
Powel Switch to " _" or "5S" white plessing
down the Lock Button. Pull out the viewfinder fully or
open the LCD monitol fully.
ACCESS RECORDING MENU
hess MENU/SET. The Recording Menu appears.
ACCESS "EXPOSURE"
Rotate MENU/SET to move the highlight bar to
"EXPOSURE", then pless it.
ACCESS EXPOSURE CONTROL
Rotate MENU/SET to display "MANUAL", then press
it. "EXR" is displayed.
CENTER SUBJECT, LOCK IRIS
Adjust zoom so that the subject fills the LCD monitor
ol the viewfinder, then pressand hold MENU/SET lot
over 2 seconds. The exposure control indicatol and
"[_" appear, indicating that the iris is locked.
hess MENU/SET, The indication disp[ayed in the
uppel left cornel changes from "EXR" to "MANUAL".
To Return To Automatic Iris Control...
.... rotate MENU/SET to display "AUTO" then press it in
step 4. The exposure control indicatol and "[!1"
disappear. Oi, set the Operation Switch to "D ".
NOTE:
Iris lock is re_onlnlended in lhe following situations:
•When shooting on a reflective natural background 5ucb
as at the beach or wben skiing:
• When shooting obj_cls under a spotlighl.
• When the subject gbacking away.
• When zooming:
To Lock The ExposureControl And The Iris...
.... after step 4, adjust the exposure rotating MENU/SET.
Then lock the iris in step 5. For automatic locking,
rotate MENU/SET to display "AUTO" then press it in
step 4. The ilis becomes automatic aftel about 2
seconds.
Iris
Works like the pupil of the human eye. in a well-tit
environment, the human pupil contracts to keep too much
light from entering, In low lighting, the pupil dilates to
allow more light in,
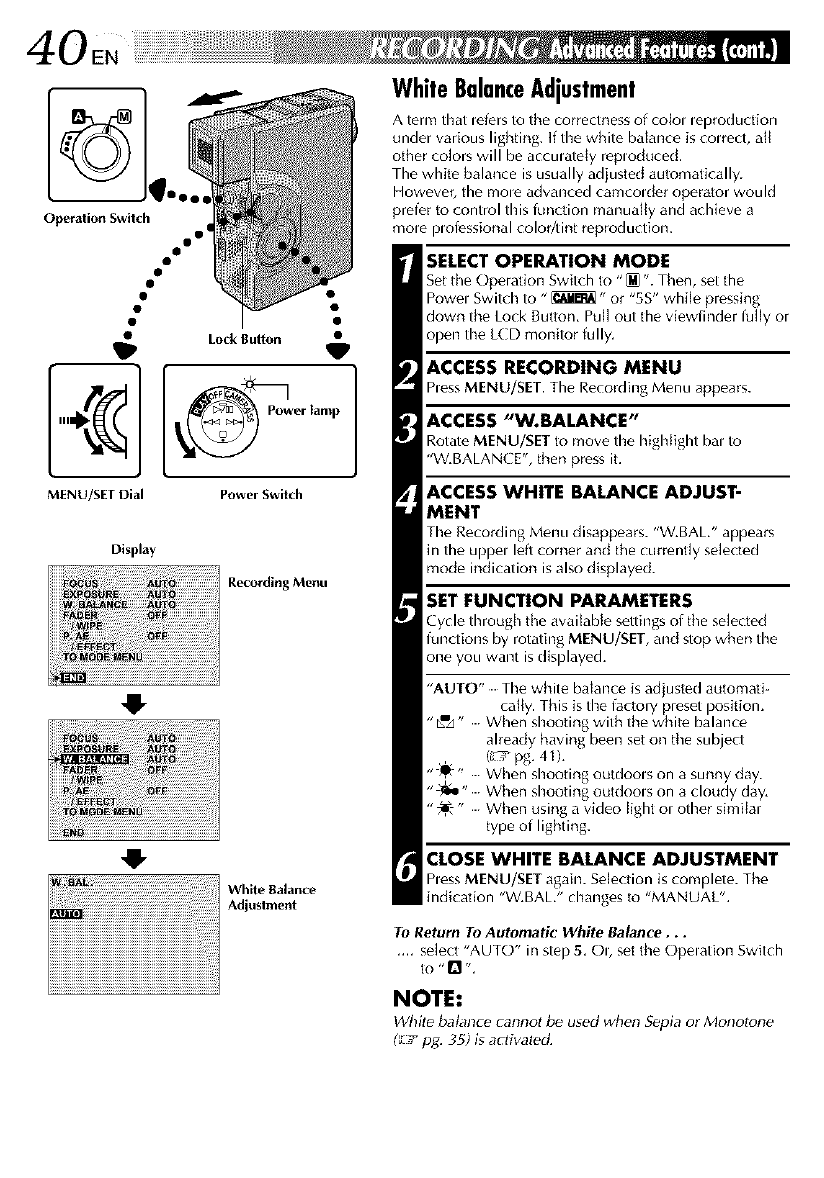
40EN
V
owerlamp
Display
R,_ording Menu
White Balance
Adjustment
WhiteBalanceAdjustment
A term that _efersto the correctness of colo_ _eproducfion
under various lighting. If timewhite balance is colrect, all
other colors will be acculatety reploduced.
The white balance is usually adjusted automatically.
However, the inole advanced camcolder operator would
prefer to control this function manually and achieve a
mole plol_ssional color/tint reproduction.
SELECT OPERATION MODE
Set the Operation Switch to "(M" Then, set the
Powel Switch to "_" or "5S" while pressing
down the Lock Butkm, Pull out the viewfinder fully or
open the LCD monitor fully.
ACCESS RECORDING MENU
hess MENU/SET. The Recording Menu appears.
ACCESS "W.BALANCE"
Rotate MENU/SET to move timehighlight bal to
"W BALANE E", then press it
ACCESS WHITE BALANCE ADJUST-
MENT
TimeRecording Menu disappears. "W.BAL," appears
in the uppel left comer and the currently selected
mode indication is also displayed.
SET FUNCTION PARAMETERS
Cycle through the available settings of the selected
functions by rotating MENU/SET, and stop when the
one you want isdisplayed,
"AUTO" Timewhite balance is adjusted automati-
cally, This is the factory preset positiom
"E"_" When shooting with the white balance
already having been set on the subject
(L'Tpg 41)
_.O 5
'l_" When shooting outdools on a sunny day.
""J_" When shooting outdools on a cloudy day,
"_. " When using a video light ol other similar
type of lighting.
CLOSE WHITE BALANCE ADJUSTMENT
hess MENU/SET again. Selection is complete. The
indication "W, BAL/' changes to "MANUAL".
To Return To Automatic White Balance...
.... selea "AUTO" in step 5, ()l, set the Opelation Switch
to "_ ".
NOTE:
White balance cannot b_ used when S_pia or Monolone
(_ /p_. 35) is actfvale_L
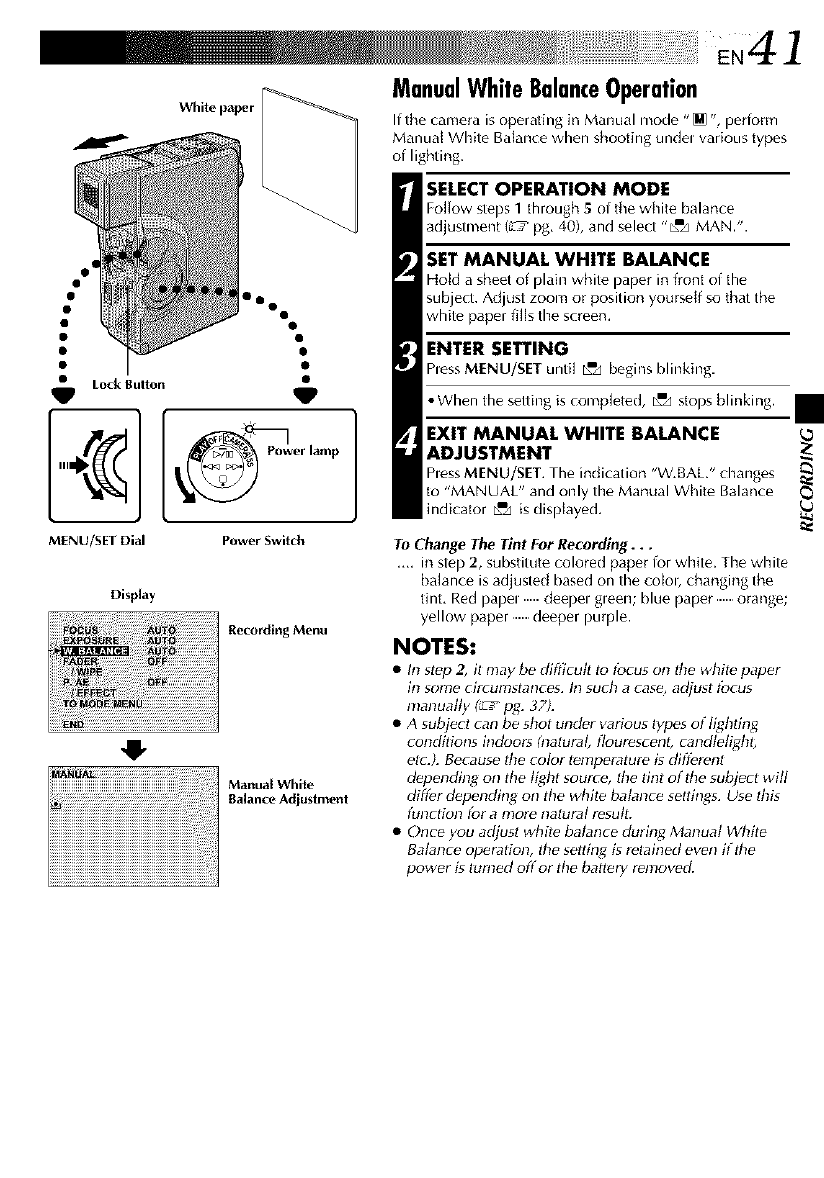
EN41
White paper ManualWhiteBalanceOperation
If the camera is operating in Manual mode "[] ", perform
Manual White Balance when shooting undel various types
of lighting.
Display
V
er lamp
Power Switch
Recording Menu
Manual White
Balance Adjustment
SELECT OPERATION MODE
Fo][ow steps 1 through 5of the white balance
adjustment (L'h_pg. 40), and select "_zJ MAN.'.
SET MANUAL WHITE BALANCE
Hold a sheet of plain white paper in front of the
subject. Adjust zoom or position yourself so that the
white paper fills the screen,
ENTER SETTING
hess MENU/SET until _"_ begins blinking.
•When the setting is completed, _"d stops blinking.
EXIT MANUAL WHITE BALANCE 9
ADJUSTMENT
hess MENU/SET. The indication "W.BAL." changes
to "MANUAL" and only the Manual White Balance
indicator _'zJis displayed.
To Change The Tint For Recording...
.... in step 2, substitute colored paper for white. The white
balance is adjusted based on the coiob changing the
tint. Red papel deepel gleen; blue paper orang_;
yellow paper deeper purple.
NOTES:
•In stpp 2, it may be difgcutt to tbcus on the white paper
in SOtTte CiFCUtTtstd[Ices. Ill su6h a case, adjusl t_)ciJs
manually _pg_ 37).
• A subjecl can be shot under various types of fighting
_onditions indoors (natural, flourescent, candlelight,
e_c.). Because _e color t_n_e_ture is different
d.pending on the light source, the finl of the subject will
differ depending on the white _nce settings. Use _is
function fOF aftlOfe llatural reSUlt.
• Once you adjust while balance during Manual White
Balance operation, the setting is retained even if the
power is t.rned off or the battery removed.
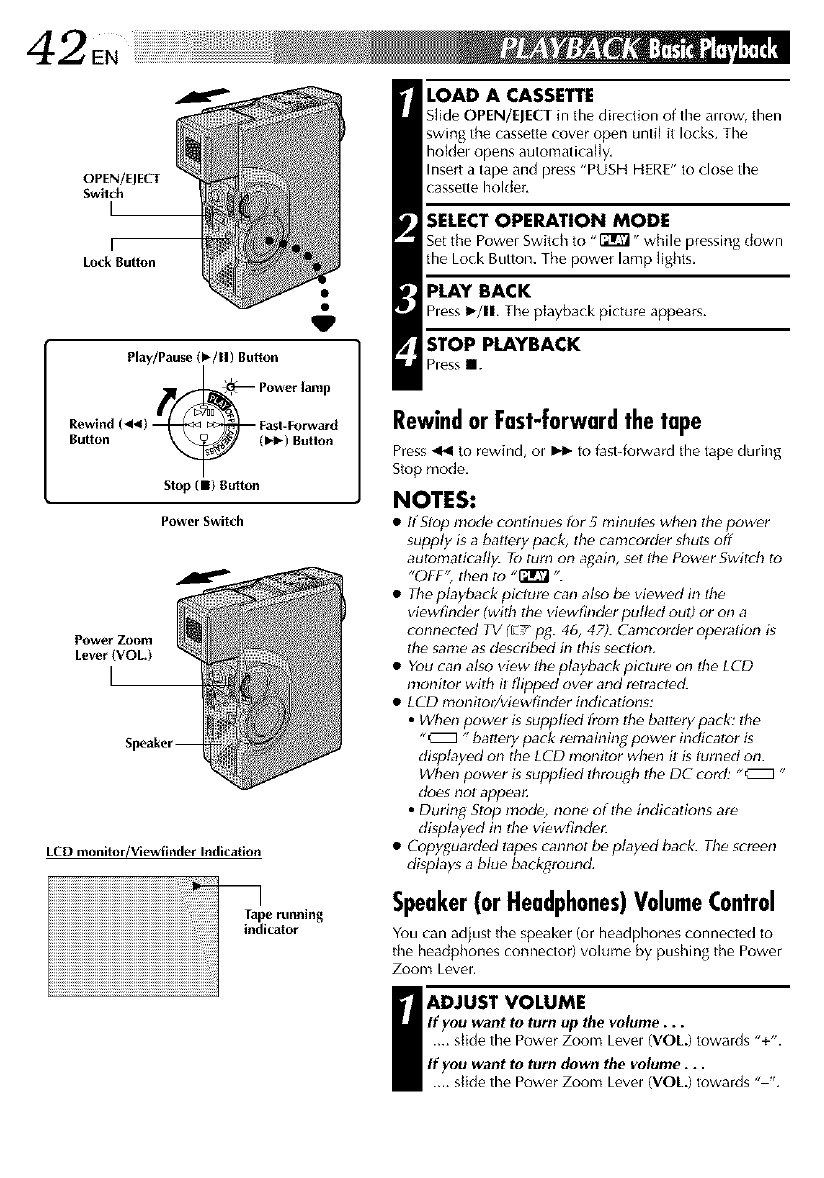
4-2EN
OPEN/EJECT
Switch
L
r
Lock Button
Play/Pause (_'/11) Button
Button ( I_1_) Button
Slop (11) Button
Power Switch
Power" Zoom
Lever (VOL)
k
LCD monitor/Viewfinder Indication
LOAD A CASSETTE
Slide OPEN/EJECT in tile dkection of the anow, then
swing the cassette cover open until it locks. The
hoMel opens automatically.
Insert a tape and press "PUSH HERE" to close the
cassette holder,
SELECT OPERATION MODE
Settile PowerSwitch to "_" while pressingdown
the Lock Button.The power lamp lights.
PLAY BACK
hess I_/11,Theplayback picture appears.
STOP PLAYBACK
hess II.
RewindorFast-forwardthetape
Press _ Lorewind, ol _ to fast-forward tile tape durh_g
Stop mode.
NOTES:
•If Slop mode conlinues for 5 minutes when the power
supply is a batlery pack, the camcorder shuts off
automatically. To turn on again, set tile Power Swit{h to
"OFF" then to .r]T_ ...
•Theplayback picture can also b_ viewed in the
viewfind_r (with the viewfind_r putl_d out) or on a
connected 73/(L/pg. 46, 47). C_nlcorder operatkm g
the sanle as described in this se¢lion,
•You can also view the playback picture on the LCD
monitor wilh il flipped over and retracted.
•LCD monitor/vi_wfinder indications:
•When power gsuppti_d from the baltery pack: the
" _ " battery pack remaining power indicator is
displayed on the LCD monitor when it is tumid on.
When power is suppti_d through the DC cord: "_ "
does not appea_
• During Stop nlod_, none of the indications are
displayed in the vi_wfinde_
•Copyguarded tapes cannot be ptay_d back. The screen
displays a blue background.
Speaker(orHeadphones)VolumeControl
You can adjust the speaker (or headphones conne(ted to
the headphones connector) volume by pushing the Power
Zoom Level.
I ADJUST VOLUME
If you want to turn up the volume...
.... slide the Power Zoom Level (VOL) towards "+".
If you want to turn down the volume...
.... slk]e the Power Zoom Level (VOL) towards "-",
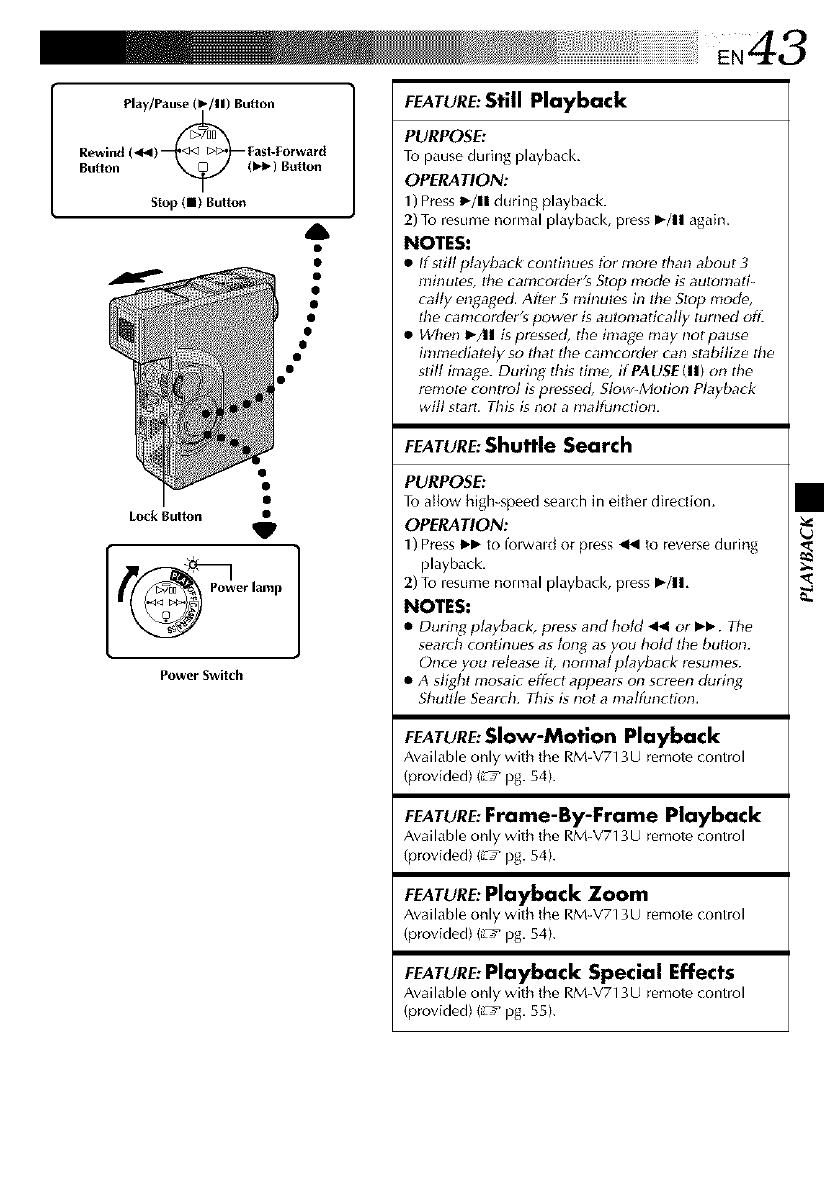
Play/Pause(1_/11)Button
Rewind (_) _Fasl-Forward
Button (I_1_) Button
Stop(11)BultOn
A
Lock Rulton •
V
Power Switch
EN43
FEATURE:StillPlayback
PURPOSE:
To pause dulh_g playback,
OPERATION:
1) Press I_/11 during playback.
2) To resume normal playback, press Ib/ll agah_.
NOTES:
•Ifsdll ptayhack continues tbr more than about 3
nlinutes, the camcordeKs Stop mod_ is autonlati_
cagy engaged. Afl_r 5 minutes in the Stop mode,
lhe camcorder's power is automatically turned off.
• When I_/11 is presse_L the image may not pause
immediatHy so lhat lhe camcorder can stabilize tile
still image. During this time, if PAUSE(11) on the
remote conlrol is pressed, Slow-Motion Playback
will start. This is not a malfunction.
FEATURE:Shuttle Search
PURPOSE:
To allow high-speed sealch in either direction.
OPERATION:
1) Press I_- to forwald or press 4_1to reverse during
playback.
2) To resume normal playback, press _-/11,
NOTES:
• Durh_g p_yhack, press and hold 4_1 or I_1_.The
search continues as tong as you hold the button.
Once you release it, normal pLlyback resunles.
• A slight mosaic effect appears on screen during
Shuttle Search. Thg is not a nlalfunction.
FEATURE:Slow-Motion Playback
Available only with the RM-V713U remote (ontrol
(provided) (L'2_pg. 54).
FEATURE:Frame-By-Frame Playback
Available only with the RM-V713U remote (ontrol
(provided) (L'2_pg. 54).
FEATURE:Playback Zoom
Available only with the RM-V713U remote (ontrol
(provided) (L'2_pg. 54).
FEATURE:Playback Special Effects
Available only with the RM-V713U remote (ontrol
(provided) (L'2_pg. 55).
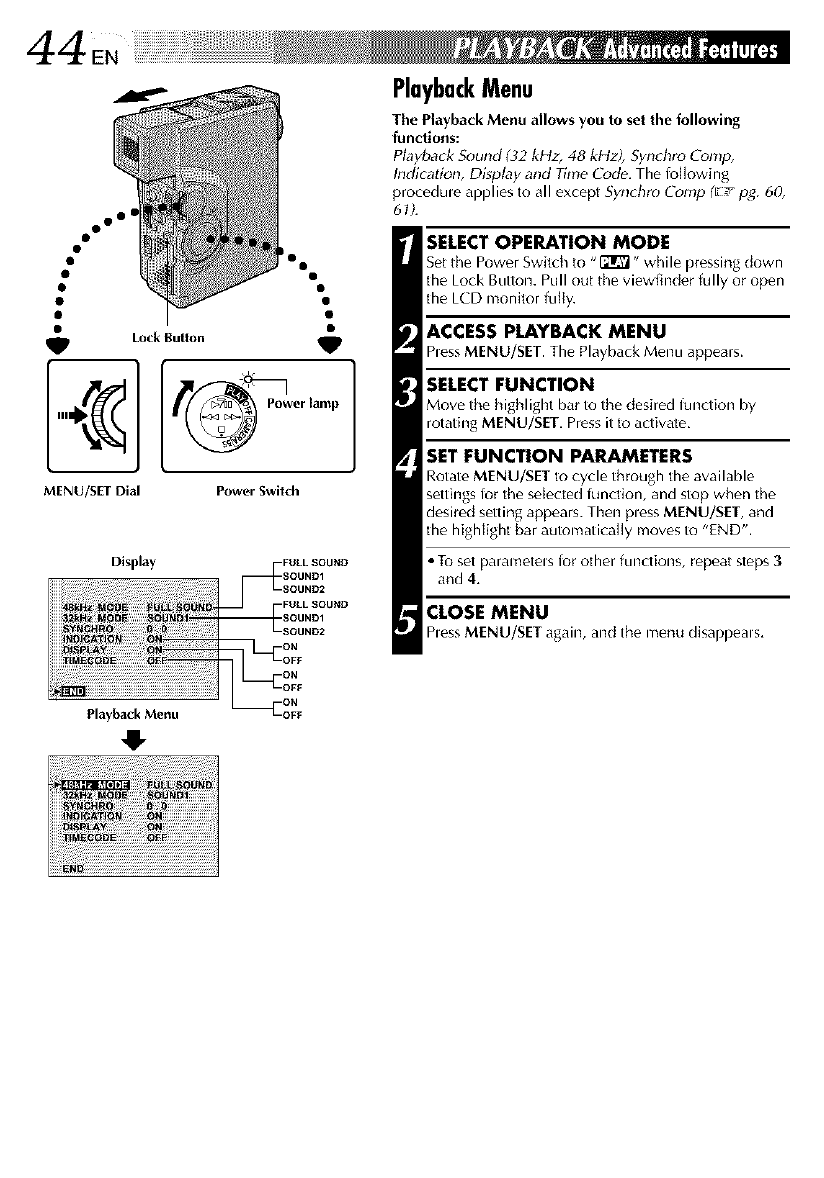
]
MENU/SET Dial Power Switch
Display
PlaybackMenu
The Playback Menu allows you to set the following
fundions:
P_ _und (32 kHz, 48 kHz), _ro Comp,
Indication, Display and Time Cod_. The lol[owing
procedme applies to all except Syndllo Comp (E,_'pg. 60,
61).
SELECT OPERATION MODE
Set the Power Switch tu ,,r:Jl_ - while pressing down
the Lock Button. Pull out the viewfinder fully or open
the LCD monitor fully.
ACCESS PLAYBACK MENU
hess MENU/SET. The Playback Menu appears.
SELECT FUNCTION
Move the highlight bar to the desired function by
rotating MENU/SET. Press it to activate,
SET FUNCTION PARAMETERS
Rotate MENU/SET to cycle through the awdlable
settings lor the selected ffm(tion, and stop when the
desired setting appears. Then pless MENU/SET, and
the highlight bar automatically moves to "END".
• To set parametels lot other functions, repeat steps 3
and 4,
CLOSE MENU
hess MENU/SET again, and the menu disappeais,
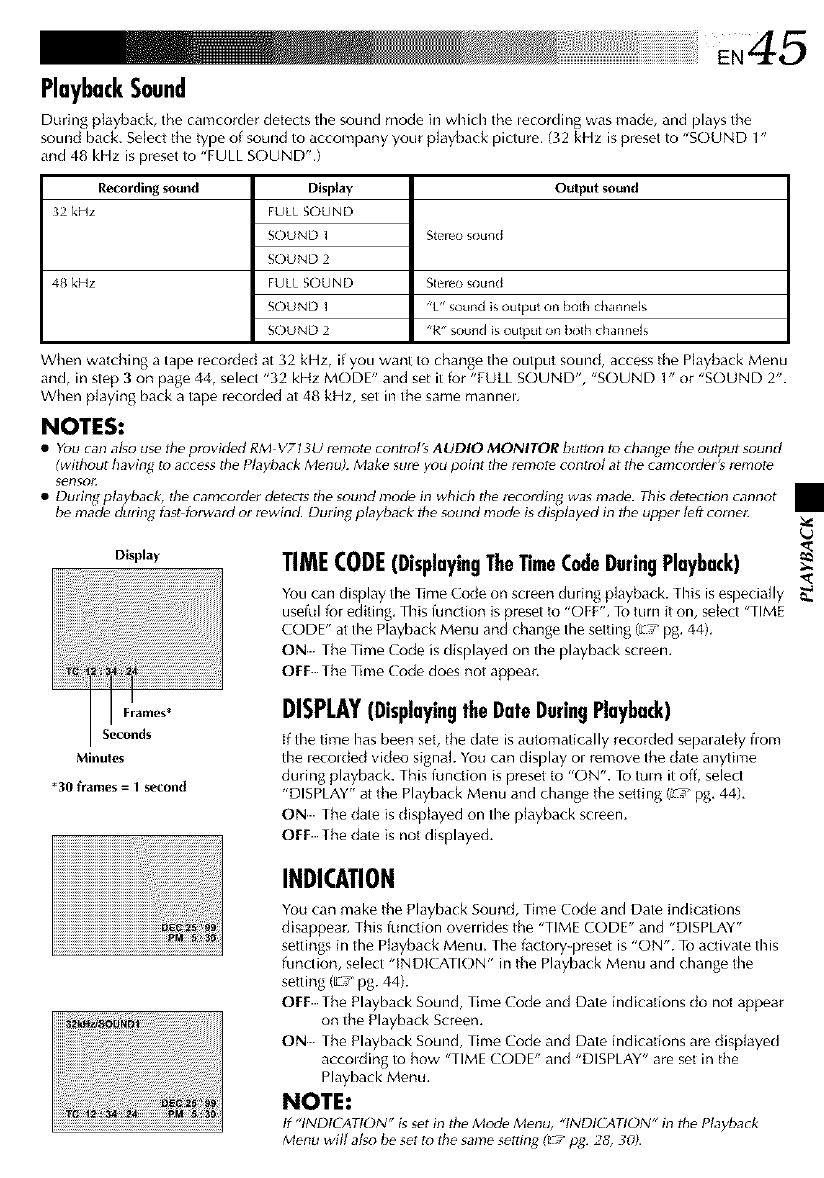
EN45
PlaybackSound
During playback, the camcorder detects tile sound mode in which the lecording was made, and plays the
sound back. Select tile type of sound to accompany your playback picture. (32 kHz is preset to "SOUND 1"
and 48 kHz is preset to "FULL SOUND".)
Recording sound
32 kHz
48kHz
Display
FULL SOUND
SOUND 1
SOUND 2
FULL SOUND
SOUND 1
SOUND 2
Output sound
Sk, reo soufKJ
Sk_reo soufKJ
"k" goLInd is output on both channels
"R _' soLll]d is output oil both channels
5 3
When watching a tape lecorded at 32 kHz, if you want to change timeoutput sound, access the Playback Menu
and, in step 3 on page 44, select "32 kHz ME)DE" and set it for "FULL SOUND", "SOUND 1" or "SOUND 2".
When playing back a tape recorded at 48 kHz, set in the same manneL
NOTES:
•Yuu can also usethe p_ovid_d RM V713U remote control's AUDIO MONITOR burton to change the output sound
(without having to accessthe Playback Menu). Make sure you point the remot_ control at the camcoldet_ _emot_
se[1sO_
• During playback, the camcorder detects the sound mod_ in which the recording was made. Thisdetection cannot
be made dudng filst fc_twatdot rewind. Dining playback the sound mod_ is displayed in the uppe_left come_
Display
I'
Frar_les*
Seconds
Minules
*30 frames = 1 second
TIMECODE(DisplayingThe TimeCodeDuringPlayback) _
You can display the Time Code on scleen during pk_yback. This is especially _.
usefftl for editing, This ffmclion is preset to "OFF". To turn it on, select "TIME
CODE" atthe Playback Menu and change the setting ('_7 pg. 44).
ON The Time Code is displayed on the playback soeen.
OFF The Time Code does not appear.
DISPLAY(DisplayingtheDateDuringPlayback)
If the time has been set, the dat_ is automatkally recorded sepalatdy from
timelecolded video signal. You can display ol remove the date anytime
during playback. This function is preset to "ON". To turn it off, select
"DISPLAY" at ttle Playback Menu and change the s_tting (L_ pg, 44),
ON The date is displayed on timeplayback screem
OFF The date is not displayed.
INDICATION
You can make the Playback Sound, Time Code and Date indications
disappear. This lunction overrides the "TIME CODE" and "DISPLAY"
settings in the Playback Menu. The (actory-preset is "ON". To activate this
function, select "INDICATION" in the Playback Menu and change the
setting (E! pg. 44).
OFF The Playback Sound, Time Code and Date indications do not appear
on the Playback Screen.
ON The Playback Sound, Time Code and Date indications are displayed
accolding to how "TIME CODE" and "DISPLAY" are set in the
Playback Menu.
NOTE:
If "INDICATION" isset in the Mode Menu, "tNDICF_TtON"in the Playback
Menu will also be set to the samesetting (_'7 pg. 28, 30).
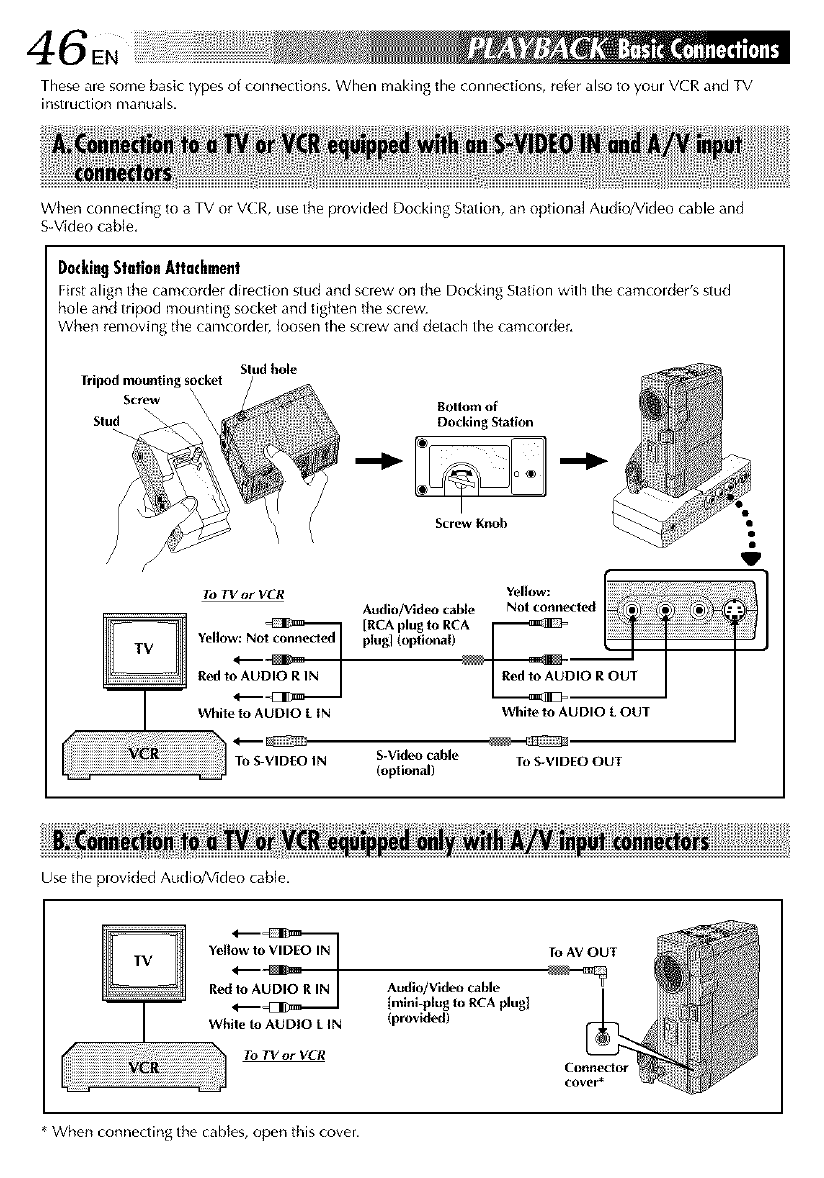
These are some basic types of connections, When making the connections, refer also to youl VCR and TV
instl uction manuals.
When connecting to a TV or VCR, use the provided Docking Station, an optional Audio/Video cable and
S-Video cable,
DockingStation Attachment
Fhst align the camcorder direction stud and screw on the Docking Station with the camcolder's stud
hole and tripod mounting socket a_ld tighten the screw.
When removing the camcorder, _oosen the sclew and detach the camcolder,
Tripodmountings
Screw
Stud
/
Stud hole
Bottom of
Docking Station
I
ScrewKnob
To TV or VCR
white to AUDIO L IN
To S-VIDEO IN
Use the plovided ALidio/VMeo cable,
Audio/Vldeocable
[RCAplugto RCA r
plug](optional)
J
Red to AUDIO R OUT
White to AUDIO LOUT
1
S-Video cable To S-VIDEO OUT
(optional)
Yellow to VIDEO IN
Red
Whiteto AUDIO LIN
To TV or VCR
Audio/Videocable
[mlni-p[ug to RCA plugJ
(provided)
To AV OUT
ConNe_o_
cover*
* When connecting the cables, open this cover.
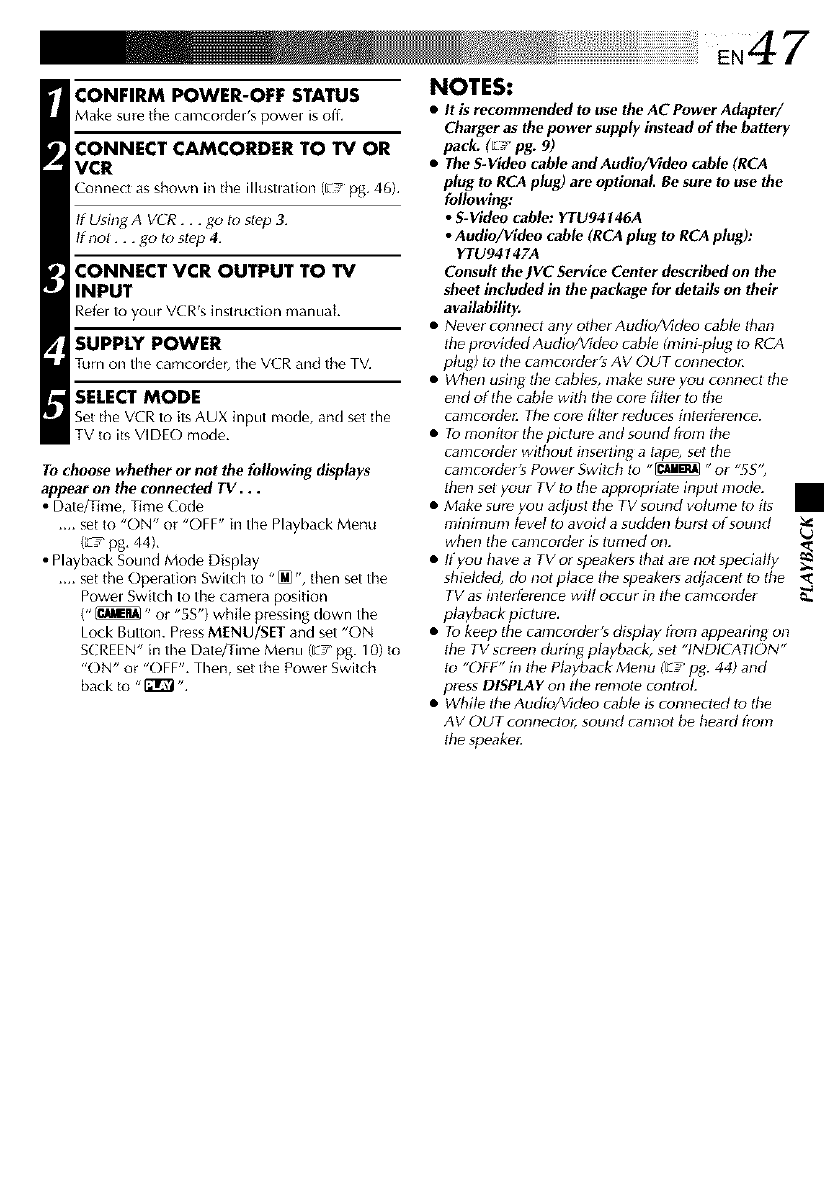
4 7
CONFIRM POWER-OFF STATUS
Make sure the camcorder's powel is off,
CONNECT CAMCORDER TO 'IV OR
VCR
Conne(t as shown in the illustlation (EF pg. 46).
If Using A VCR . . . go to step 3.
tf not ...go to stop 4.
CONNECT VCR OUTPUT TO 'IV
INPUT
Refer to your VCR's instruction manual
SUPP[T POWER
Turn on the camcolder, the VCR and the TV.
SELECT MODE
Set the VCR to its AUX input mode, and set the
TV to its VIDE() mode.
To choose whether or not the following displays
appear on the connected TV. . .
• Date_ime, Time Code
.... set to "ON" or "OFF" in the Playback Menu
(_ pg, 44),
• Playback Sound Mode Display
.... set the Operation Switch to "_", then set the
Powe_ Switch to the camera position
(" _" or "5S") while pressing down the
Lock Button. Press MENU/SET and set "ON
S( REEN" in the Date/Time Menu (E! pg. 10) to
"ON" or "OFF". Then, set the Power Switch
back to "_ ".
NOTES:
•It is recommended to use the AC Power Adapter/
Charger as the power supply instead of the battery
pack; (E v_pg. 9)
•The S-Video cable and Audio/Video cable (RCA
plug to RCAplug) are optional. Be sure to use the
following:
•S-Video cable: YTU94146A
•Audio/Video cable (RCA plug to RCA plug):
YTU94147A
Consult the JVC Service Center described on the
sheet included h_the package for details on their
availability.
• Never connect any otber Audio/Vkt_o cable filan
tile provided Audio/Video cabl_ (mini_ptug to RCA
plug) to tile canlcorder's A V OUT connectolt
• When using the cables, make sure you connect ltle
_nd of the cable witb tbe core filter k) the
camcorde_ Tbe corP tilter reduces interfPrence.
• To monitor tile picture and sound from the
canlcordPr without inserling atap_, set tile
canlcorder's Power Switch to "_ "or "SS"
then set your TV to the appropriate input mode.
• Make surP you adjust the TV sound volume to its
minimum level to avoid a sudden burst of sound ,_,
when the camcorder is turned on.
• Ityou have a TV or speakers that are not specially
shiekfed, do not ptace the speakers adjacent to d_e
TV as interfPrence will occur in tbe camcorder _.
playback pirlure.
• To kePp the camcorder's display t?om appearing on
tile TV screen during playback, set "INDICATION"
to "OFF" in the Playback Menu (F_.,pg. 44) and
press DISPLAY on the remole conlroL
• While the Audio/Wd_o cable is connected to tbe
AV OUT connector, sound cannot be heard #ore
the speake_
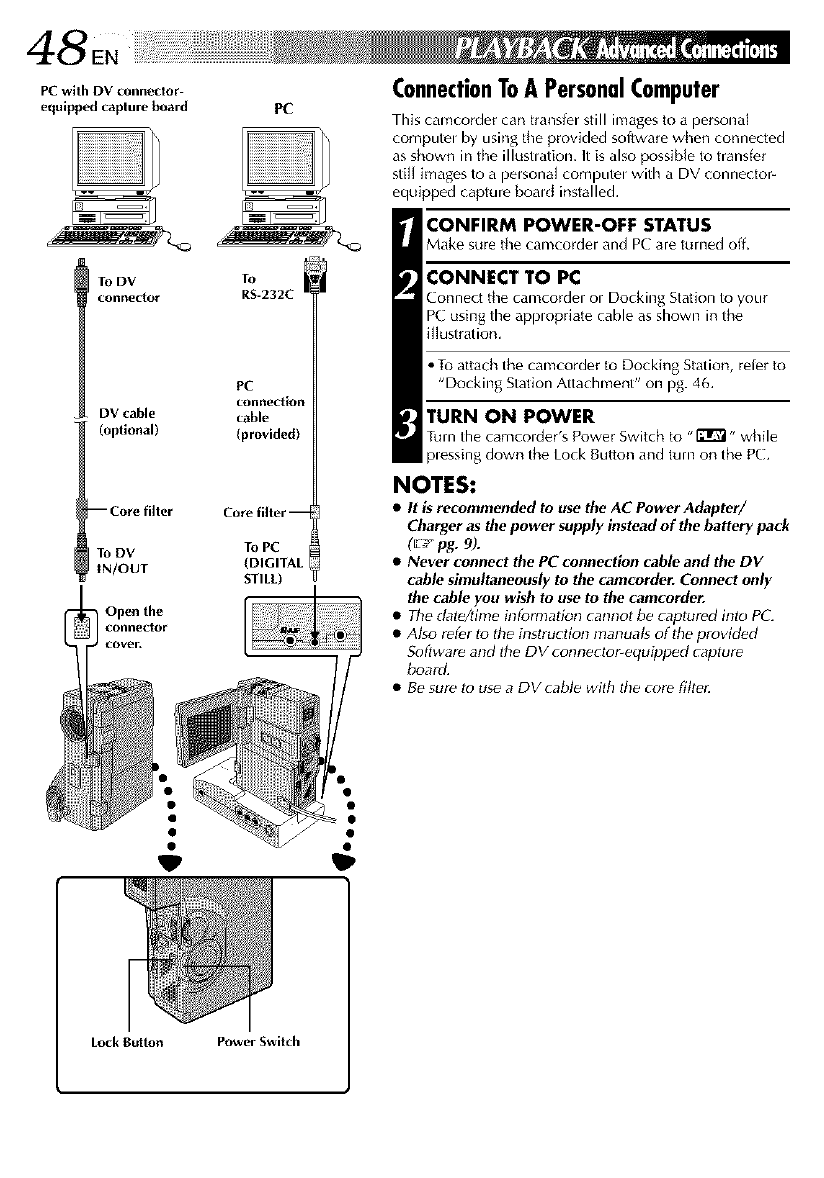
PC with DV connector-
equlpp,n] capture board
DV cable
(optional)
--Corefilter
ToDV
tN/OUT
Open the
CoNnector
PC
To
RS-232C
PC
conne(tiol
cable
(provided)
Corefilter--
To PC
(DIGITAL
STILL)
ConnectionToA PersonalComputer
This camcorder can transfer still images t(_a persona_
computel by using the provided software when connected
as shown in the illustlation. It is also possible to transfer
still images to a pelsonal computel with a DV connector-
equipped capture boald installed,
CONFIRM POWER-OFF STATUS
Make sure the camcorder and PC are turned off.
CONNECT 1"O PC
Connect the camcorder ol Docking Station to your
PC using the applopriate cable as shown in the
illustration.
• Tu attach the camcorder to Docking Station, rel_r to
"Docking Station Attachment" on pg. 46,
TURN ON POWER
Turn the camcolder's Power Switch to "_" while
plessing down the Lock Butk)n and turn on the PC.
NOTES:
•It is recommended to use the AC PowerAdapter/
Charger as the power supply instead of the battery pack
(Ef_ pg. 9).
•Never connect the PC connection cable and the DV
cable simultaneously to the camcorder. Conned only
the cable you wish to use to the camcorder.
• Tbe dat_/tinle information cannot be caplured into PC.
• Al_o refer to the h_struclionnlanuat_ oflbe provided
Software and tbe DV connector-equipped capture
board.
• Be sure lo use a DV cable with lhe core fitte_
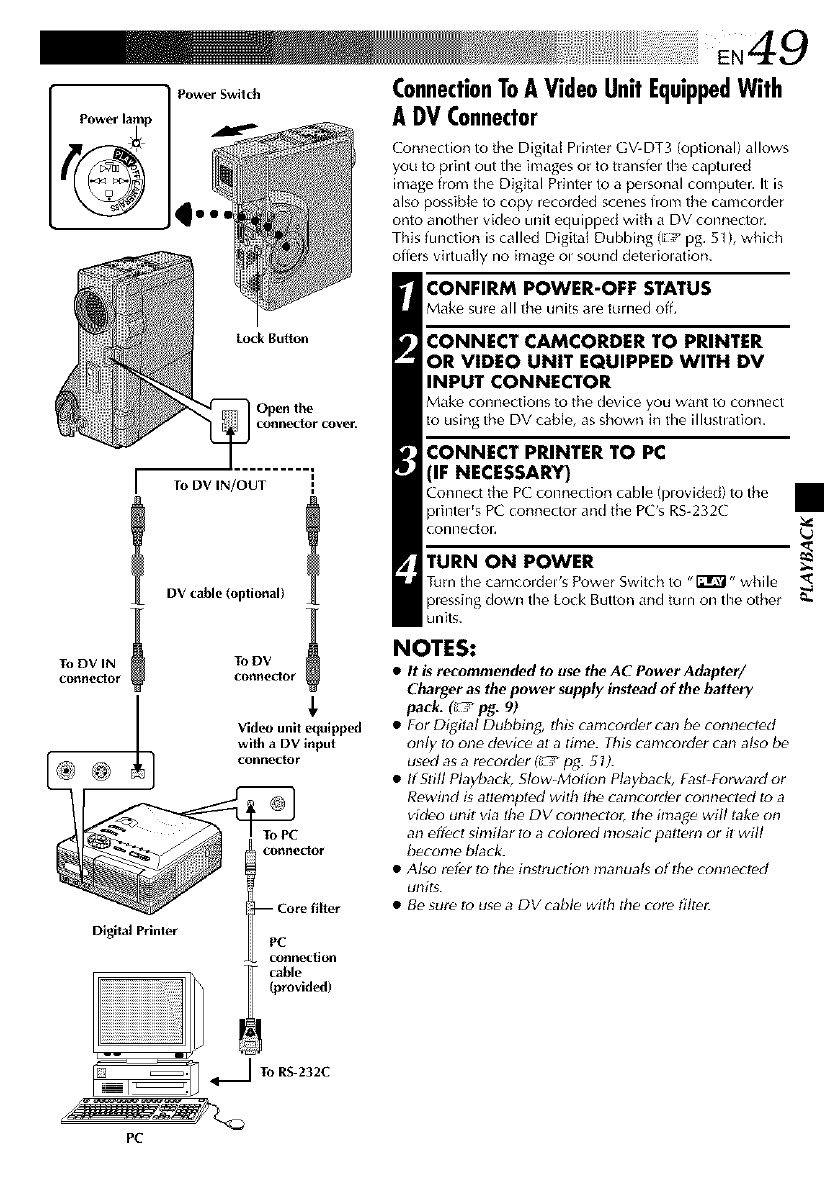
Lock Button
Open the
coNnectorcover,
PowerSwilch
TO DV IN/OUT i
DV cable(optional)
ToDV IN ToDV
ConNet_o_" Co_Net_o_"
Videounit equipp,_l
with a DV input
_connector
Digital Printer
ConnectionToAVideoUnitEquippedWith
A DVConnector
Connection to the Digital Plinter GVDT3 (optional) allows
you to print out the images or to transf_l the captuled
image from the Digital Printer to a personal computer. It is
also possiNe to copy recolded scenes from the camcorder
onto another video unit equipped with a DV connector,
This function is called Digitat Dubbing (E_ pg. 51), which
offers virtually no image ol sound deteriolation.
CONFIRM POWER-OFF STATUS
Make sure all the units are turned off.
CONNECT CAMCORDER TO PRINTER
OR VIDEO UNIT EQUIPPED WITH DV
INPUT CONNECTOR
Make COllrlectiol3s to the device you want to con_lect
to using the DV cable, as shown in the illustlation.
CONNECT PRINTER TO PC
(IF NECESSARY)
Connect the PC connection cable (plovided) to the
plintel_s PC connector and the PC's RS-232C
COnl3eC[OI.
TURN ON POWER
Turn the camcordel's Power Switch to "_" while '_
plessing down the Lock Button and t_irn on the other
units.
NOTES:
•It is recommended to use the AC Power Adapter/
Charger as the power supply instead of the battery
pack. _pg. 9)
• For Digital Dubbh_g, thg canlcorder _an be _onnec_ed
only to one d_vice al a time. This canlcorder can al_o be
used as a recorder (_p_: 51).
• If Still Playback_ Slow-Motion Playback, Fast-Forward or
Rewind is attempted wilh tile camcorder connected to a
video unit via the DV connectc_r, the hnage will lake on
an effect similar {Da cok;r_d mosaic paltem or it will
beconle blark.
• Also r_f_r to the instruction manual_ oflhe connected
units.
• Be sure Io use a DV cable with tile core fitt_
PC
Connection
cable
(provided)
I To R_232C
PC
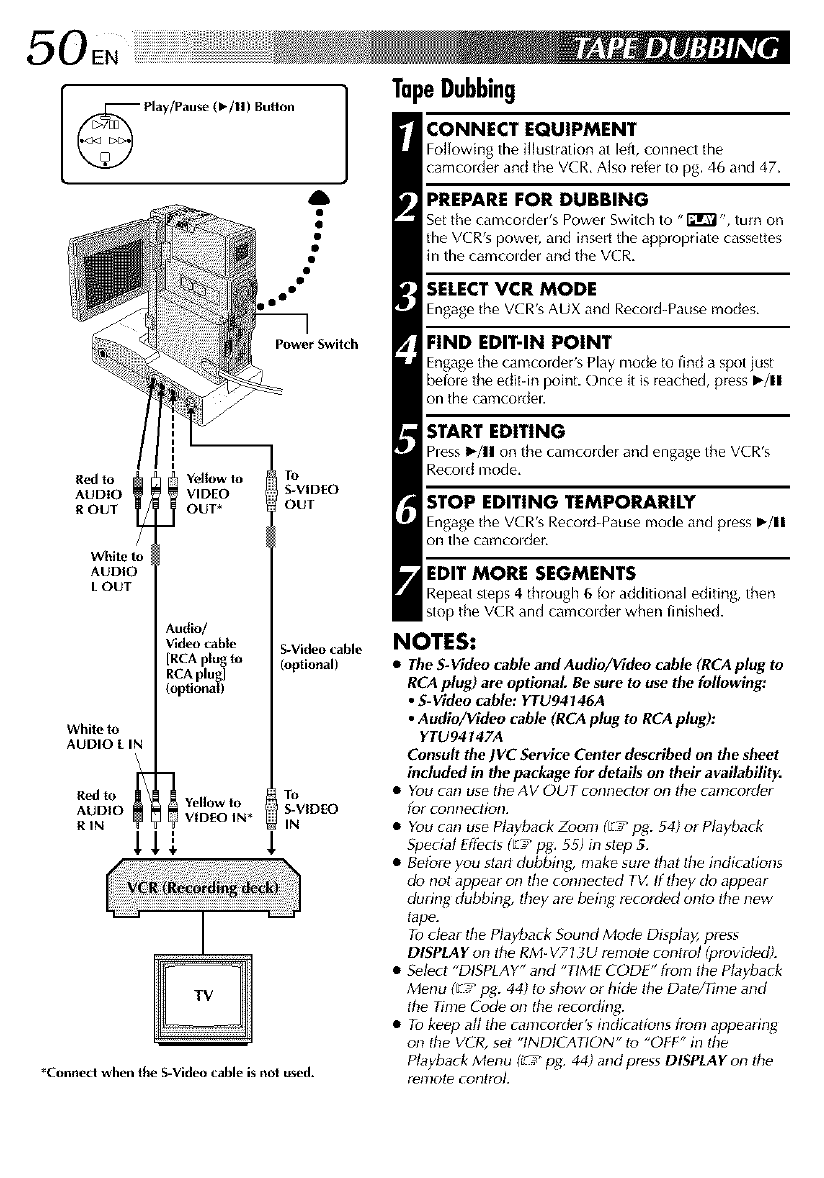
50EN J
Red to
AUDIO
ROUT
While to
AUDIO
LOUT
Whiteto
AUDIO L IN
\
Redto _-
AUDIO
RIN 1
Yellow to
VIDEO
OUT*
Audlo/
Video cable
[RCA plug to
RCA plug]
(optional)
Yellowto
VIDEO IN*
I
m I
Power Switch
To
iS-VIDEO
OUT
S-Video cable
(optional)
*Connect when the S-Vid,_ cable is not used.
To
S-VIDEO
IN
TapeDubbing
CONNECT EQUIPMENT
Folk)wing the illustration at left, connect the
camcolder and the VCR. Also refer to pg. 46 and 47.
PREPAREFOR DUBBING
Set the camcorder's Powel Switch to "_", turn on
the VCR's power, and insert the appropriate cassettes
in the camcoldel and the VCR.
SELECT VCR MODE
Engage the VCR's AUX and Recold-Pause modes.
FIND EDIT-IN POINT
Engagethe camcorder's Play mode to find a spot j_st
beiole the edit-in point. Once it is rea(hed, press F/II
on the cam(ordel.
START EDITING
hess I_/11 on the camcorder and engage the VCR's
Recold mode,
STOP EDITING TEMPORARILY
Engage the VCR's Record-Pause iYlode and press F/II
ON the ca_';/COlder,
EDIT MORE SEGMENTS
Repeat steps 4 through 6 for additional editing, then
stop the VCR and camcolder when finished.
NOTES:
•The S-Video cable and Audio/Video cable (RCAplug to
RCA plug) are optional. Be sure to use the following:
•S-Video cable: YTU94146A
• Audio/Video cable (RCA plug to RCAplug):
YTU94147A
Consult the ]VC Service Center described on the sheet
included in the package for details on their availability.
•You carl use the AV OUT connector on lhe camcorder
for connectiofL
•Youcan use Playback Zoom (E7 pg. 54) or Playback
Special Effects (_-:pg. 5_) in step 5.
• Belbre you slarl dubbing, make sure lhat the indications
do not appear on the connected TV If lhey do appear
durin_ dubbing, lhey are being recorded onto the new
tape.
To_lear the Playback Sound Mode Display, press
DISPLAY on the RM- V713U remote control (provided).
• Select "DISPLAY" and "TIME CODE" from the Playback
Menu ([E_'_pg. 44) to show or hide the Date/Time and
the Time Cod_ on the recording:
• Tokeep all tile canlcorder's indications from appearing
on the VCR, sel "INDICATION" to "OFF" in Ihe
Playback Menu _fag.44) arid pre_s DISPLAY on lhe
r,'_lT!ole controk
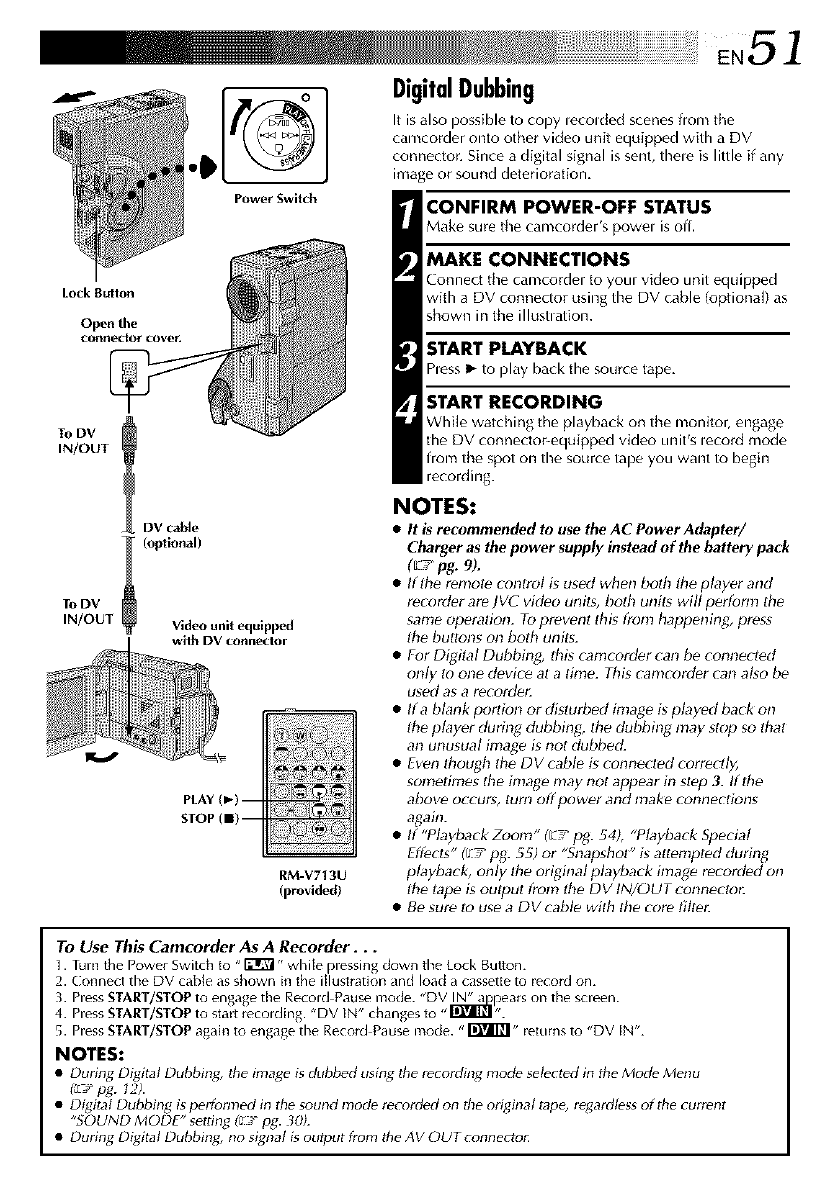
N51
Power Switch
DigitalDubbing
It isalso possible to copy lecolded scenes from the
camcorder onto other video unit equipped with a DV
connectur. Since a digital signal is sent, thele is little if any
image or sound deterioration,
CONFIRM POWER-OFF STATUS
Make sure the camcorder's powel is off.
MAKE CONNECTIONS
Connect tile camcorder to you. video unit equipped
with a DV connector using the DV cable (optional) as
shown in the illustlation.
r"K
back the souse tape,
To DV
IN/OUT
To DV
IN/OUT
RM-V7t3U
(provided)
START RECORDING
While watching the playback on the monitor, engage
tile DV connector-equipped video unit's lecord mode
from the spot on the source tape you want to begin
recording.
NOTES:
•It is recommended to use the AC Power Adapter/
Charger as the power supply instead of the battery pack
(L/pg. 9).
• If the renlot_ contro) is used when both the p)ay_r and
recorder are JVC video units, both units will perform the
sanle operation. To prevent this fron! happening, press
the buttons on boll_ units.
• For Digital Dubbing, this canlcorder can be connecied
on)y to one device at a time. This canlcorder can a)so be
usod as a recordelc
• If a bkmk portion or disturbed image is p)ayed back on
the p)ayar during dubbing, the dubbing nlay stop so that
an unusual image is not dubbed.
• Even though the DV came is connected corre_dy,
sometimes the image may not appear in stop 3. If the
above oCCUrs_ turn off power and make Col_nections
again.
• If "P)ayback Zoom" (_-; pg. 54), "Playback Specia)
Effects" (7/pg. 55) or "Snapshot" is attempled during
playback, only the original p)ayback image recorded on
the tape is output I?om the DV IN/OUT connecto_
• Be sure to use a DV cable with the core fitt_
To Use This Camcorder As A Recorder...
1. Turn the Powe_ Switch to "_" while plessing down the Lock Button.
2. Connect the DV cable as shown in the illustration and load a cassette to _ecord on.
3. Pless START/STOP to engage the Recold Pause mode. "DV I_pears on the scleen.
4. Pless START/STOP to stair recolding. "DV IN" changes to "_".
5. Press START/STOP again to engage the Record Pause mode. "_" returns to "DV IN".
NOTES:
• During Digital Dubbing, the image i_ dubbed using the recording mod_ selectee) in the Mode Menu
(_-Y pg. 12).
• Digital Dubbing is perforated in the sound mod# recorded on the ot_ina) tap_, regatdless of the current
"SOUND MODE" settin[_ (_"T pg. 30).
• During Digital Dubbing, no signal i_ output frum the AV OUT connectu_:
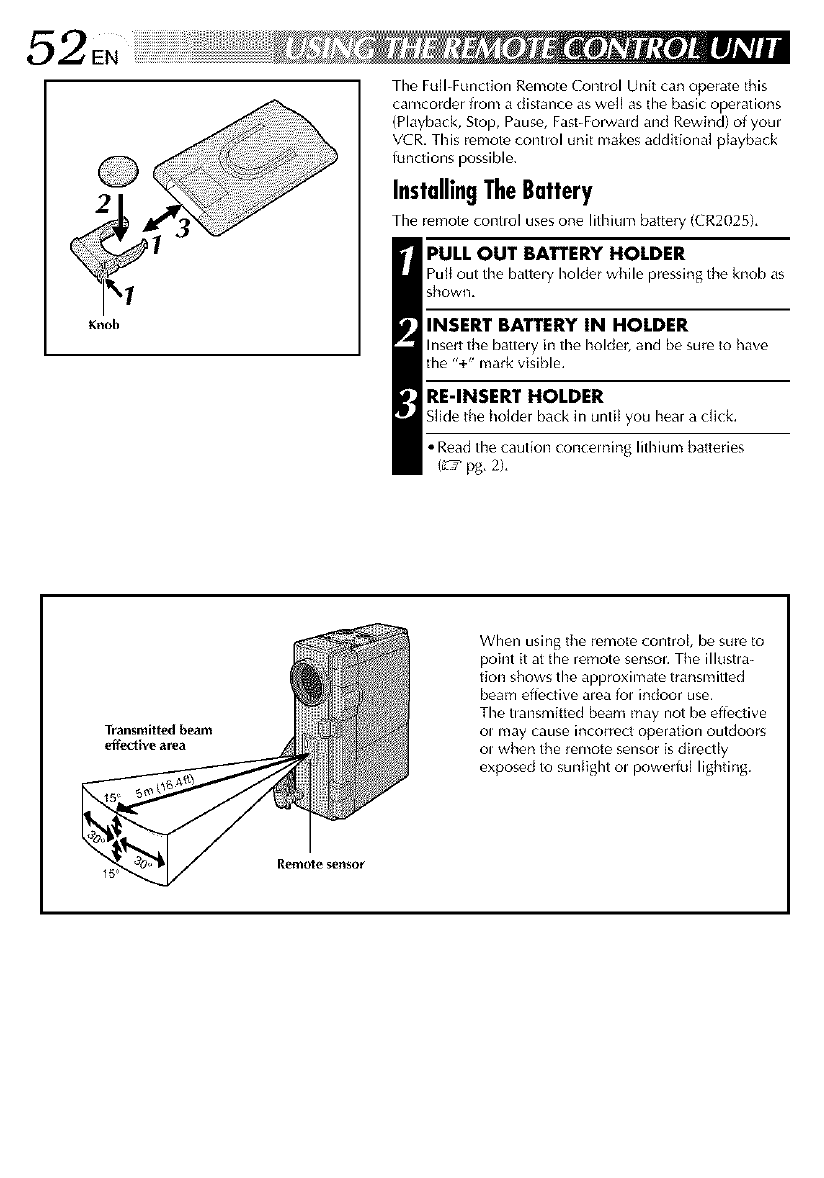
5 2, E. ¸''i'"'""
Knob
The Full-Function Remote Control Unit can operate this
camcorder from a distance as well as the basic operations
(Playback, Stop, Pause, Fast-Forwald and Rewind) of youl
VCR. This remote contlol unit makes additional playback
lunctions possible.
InstallingTheBattery
The remote contlol uses one lithium battery (CR2025),
PULL OUT BATTERY HOLDER
Pull out the battely holder while pressing the knob as
shown,
INSERT BATTERY IN HOLDER
Insert the battely in the holder, and be sure to have
the "+" mark visible.
RE-INSERT HOLDER
Slide the homer back in until you hear a click.
• Read the caution concerning lithium batteries
(L'T pg, 2),
Transmitted beam
effective ar_a
When using the remote control, be sure to
point it at the remote sensol. The illustla-
tion shows the approximate transmitted
beam effective alea fol indoor use.
The tlansmitted beam may not be effective
Ol may cause incorrect operation outdoors
ol when the remote sensor is dhect[y
exposed to sunlight ol poweriul lighting.
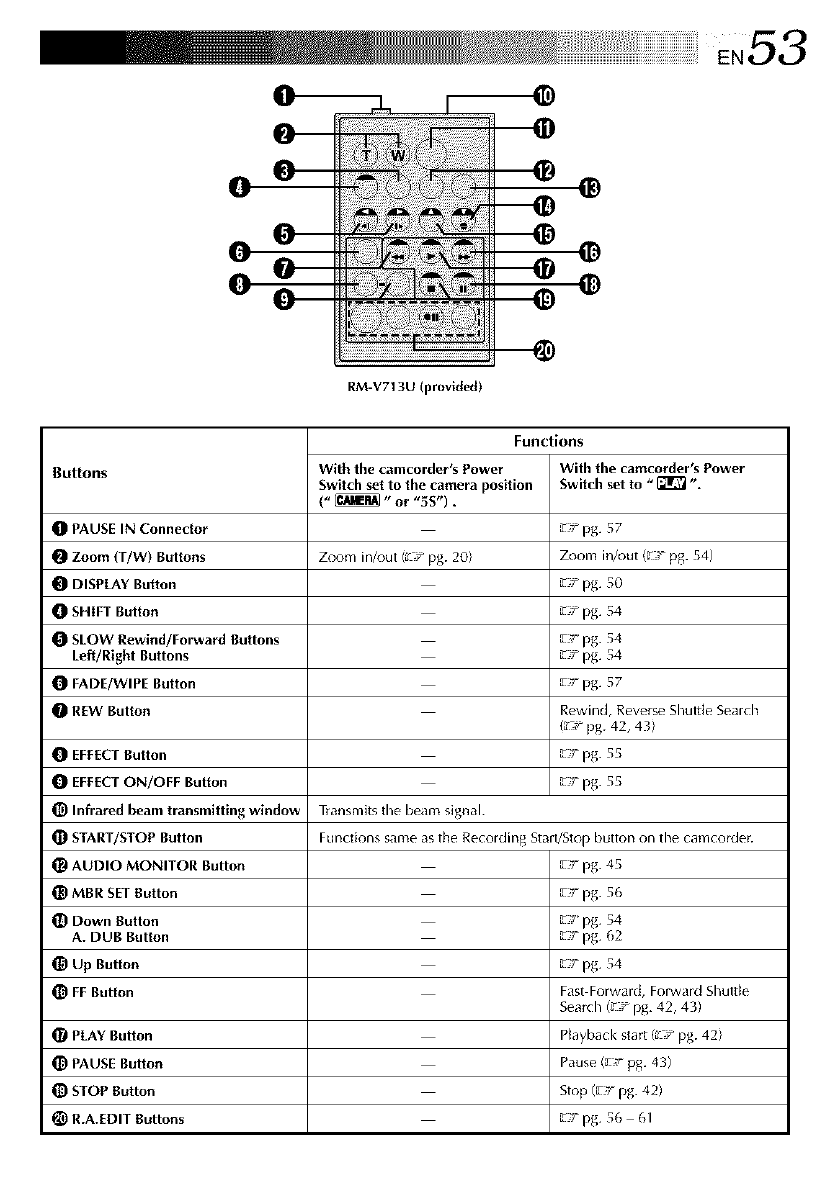
,:,53
.@
RM-V713U (provid,_J)
Buttons with the camcorder'sPower
Switchsetto the camera position
(" _" or "5S").
Zoom in/_ut/_ _ pg. 20)
Functions
With the camcorder's Power
Switch set to "_ ".
OPAUSE IN Connector _ T pg. 57
Zoom (T/W) Buttons 7c_om in/out (Lr T pg. 54)
ODISPEAY Button _ T pg. 50
O SHIFT Button _ T pg. 54
OSLOW Rewind/Forward Buttons _ :_ pg. 54
Left!Right Buttons _ T pg. 54
O FADE/WIPE Button _ T pg. 57
OREW Button R_wind, Reverse Shuttle Search
(_ _ pg. 42, 43)
O EFFECT Button _ T pg. 55
O EFFECT ON/OFF Button _ T pg. 55
_) Infrared beam transmitting window _ansmits the beam signal.
_) START/STOP Button Fundions same as the Recording Start/Stop button on the camcode_
_) AUDIO MONITOR Button _ T pg. 45
_) MBR SET Button _ T pg. 56
Down Button _ _' pg. 54
A. DUB Button _ T pg. 62
Up Button _ T pg. 54
FF Button Fast Forward, Forward Shuttle
Search/_ r T pg. 42, 43)
PEAY Button Playback start/_ _ pg. 42)
PAUSE Button Pause (_rT pg. 43)
STOP Button Stop (_rT pg. 42)
_) R.A.EDIT Buttons _ T pg. 56 61
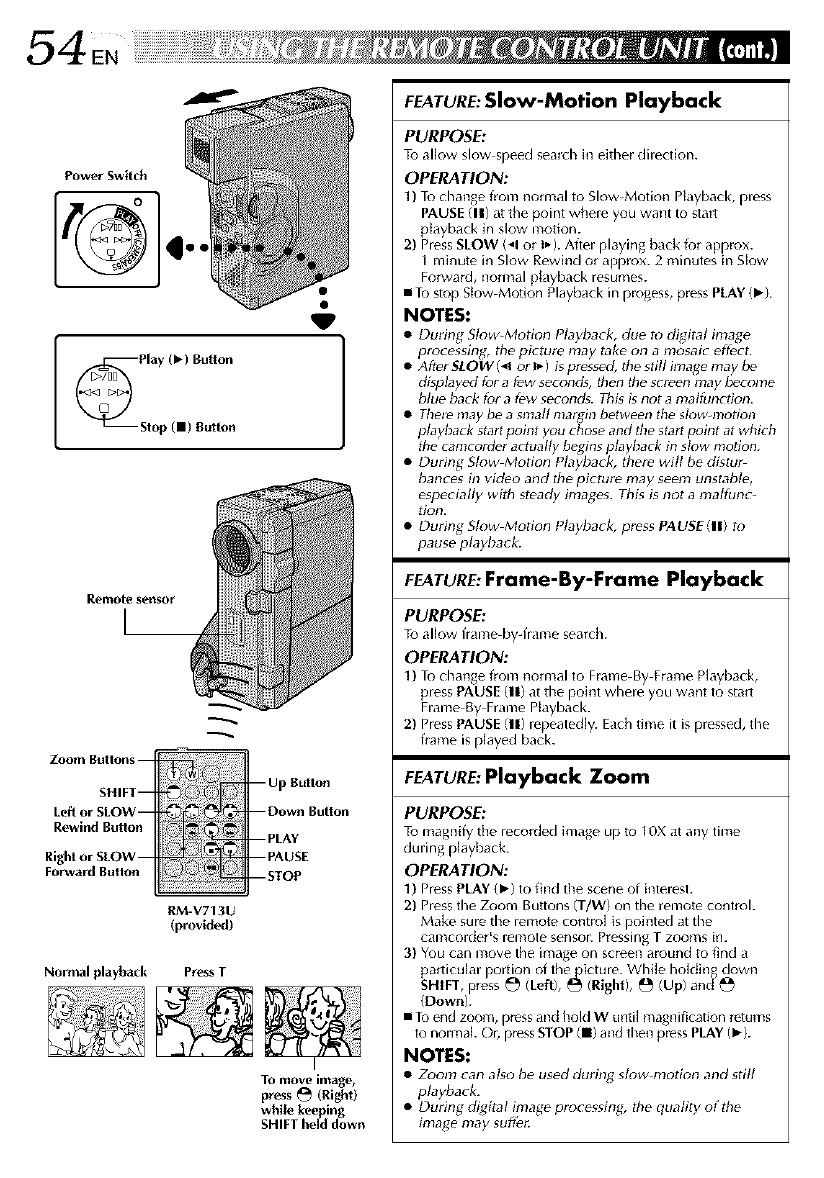
VI
Zoom Rutlong-
SHIFT--
Left or SLOW--
Rewind Butlon
Right or SLOW
Forward Butlon
-- Up Button
mDown Button
--PLAY
PAUSE
--STOP
RM_V7t 3U
(provided)
Normal playback Press T
To move image,
press _ (right)
while k,_ ing
SHIFT he_d down
FEATURE:Slow-Motion Playback
PURPOSE:
Tv allow slow speed sea_cl_ in eithe_ dilection.
OPERATION:
1)To change lion1 nomlal to Slow Motion Playback, pless
PAUSE Ill) at the point whele you want to sta_t
playback in slow motion.
2) Pless SLOW (_1 or I_). Aftel playing back for aH-_lox.
I minute in Slow Rewind or approx. 2 minutes in Skew
Folwald, normal playback lesumes.
•To stop Stow Motion Pldyback in progess, press PLAY {_-).
NOTES:
•During SlowMotion Playback, clue to digital image
processing, the picture may take on a mosaic eft_ct.
•After SLOW (_1 or I_') is pressed, the still image may t)e
displayed for a t_w seconds, then the screen may become
blue back fur a few seconcg. This is not a malfunction.
•Thele may be a small nlai]_in between the slowd?_otlon
playback start point you chose and the start point at which
the camcorder actually begins playback in slow mopon.
•During Slow Motion Playback, there will be dlstur
bances in video and the picture may seem unstable,
especially with steady images. Thi_ is not a malfunc_
lion.
•During SIowMotion Playback, press PAUSE (11) to
pause playback.
FEATURE:Frame-By-Frame Playback
PURPOSE:
To allow flame by-hame search.
OPERATION:
1)To change flom nomlal to Frame By Frame Playback,
pless PAUSE (11) at the point whe)e you want to staFL
Flame By Flame Playback.
2) Pless PAUSE (11))epedtedly. Each time it is p)essed, the
frame is played back.
FEATURE:Playback Zoom
PURPOSE:
To magnify the )eco_ded image up to 10X at any time
du)ing playback.
OPERATION:
1) [fless PLAY {Ib) to find the scene of inte)est.
2) Press the Zoom Buttons if/W) on the remote control.
Make sure the remote control is pointed at the
camcordel's lemote sengoL Pressing Tzooms in.
3) You can move the image on screen around to find a
particular portion of thetp icture. While hoktin, downg
SHIFT, press _ (Left), _ (Right), _:_ (Up) and_n_
{Down).
• To end zoom, ptess and hold W until magnification returns
to normal. Oi3 ptess STOP (11)and then press PLAY (Ib).
NOTES:
•Zoom can also be used dudng slow motion and still
playback.
•During digital image processing, the quality of the
image may sufGr:
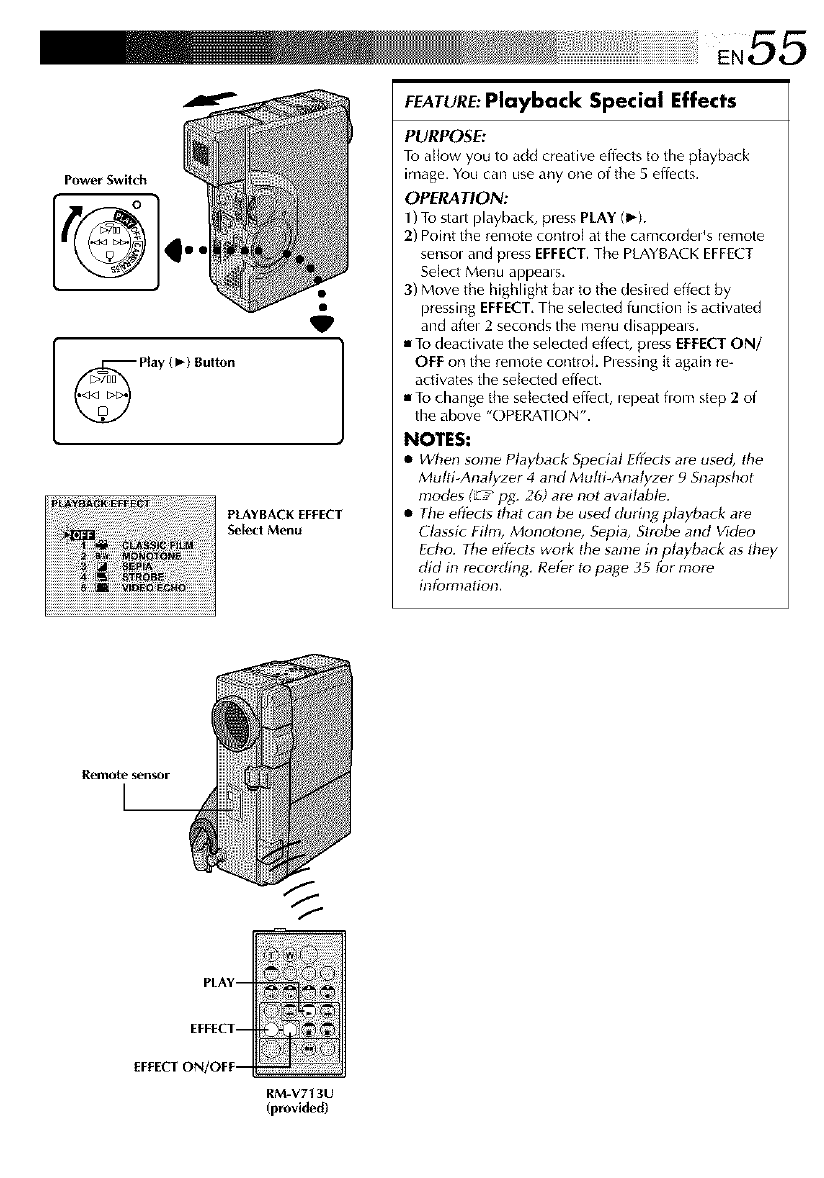
EN55
PowerSwitch
]
PLAYBACK EFFECT
Select Menu
FEATURE:Playback Special Effects
PURPOSE:
To allow you to add creative effects to tile playback
image. You can use any one of tile 5 effects.
OPERATION:
1) To stalt playback, press PLAY (1_).
2) Point the remote control at the camcorde_'s remote
sensol and press EFFECT.The PLAYBACK EFFECT
Select Menu appeals.
3) Move tile highlight bar to tile desiled effect by
pressing EFFECT.The selected function is activated
and aftel 2 seconds the metal disappeals.
• To deactivate the selected effect, press EFFECTON/
OFF on the remote control hessing it again re-
activates the selected effect.
• To change the selected effect, lepeat from step 2 of
the above "OPERATION".
NOTES:
•When some Playback Special Effects are used, tile
Multi Anatyzer 4 and Mulfi_Anatyzer 9 Snapshot
mod_s (e.'_¢pg. 26) are not available.
• Tile eflg'cls Ihat can be used durin_ playbark are
Classic Film, Monotone, Sepia, Strobe and Video
Echo. The effecls work the same in playback as lbey
did in recording. Refer to page 35 for more
information,
PLAY--
EFFECT-- _
EFFECTON/OFF-- ...........................
RM-V713U
(provided)
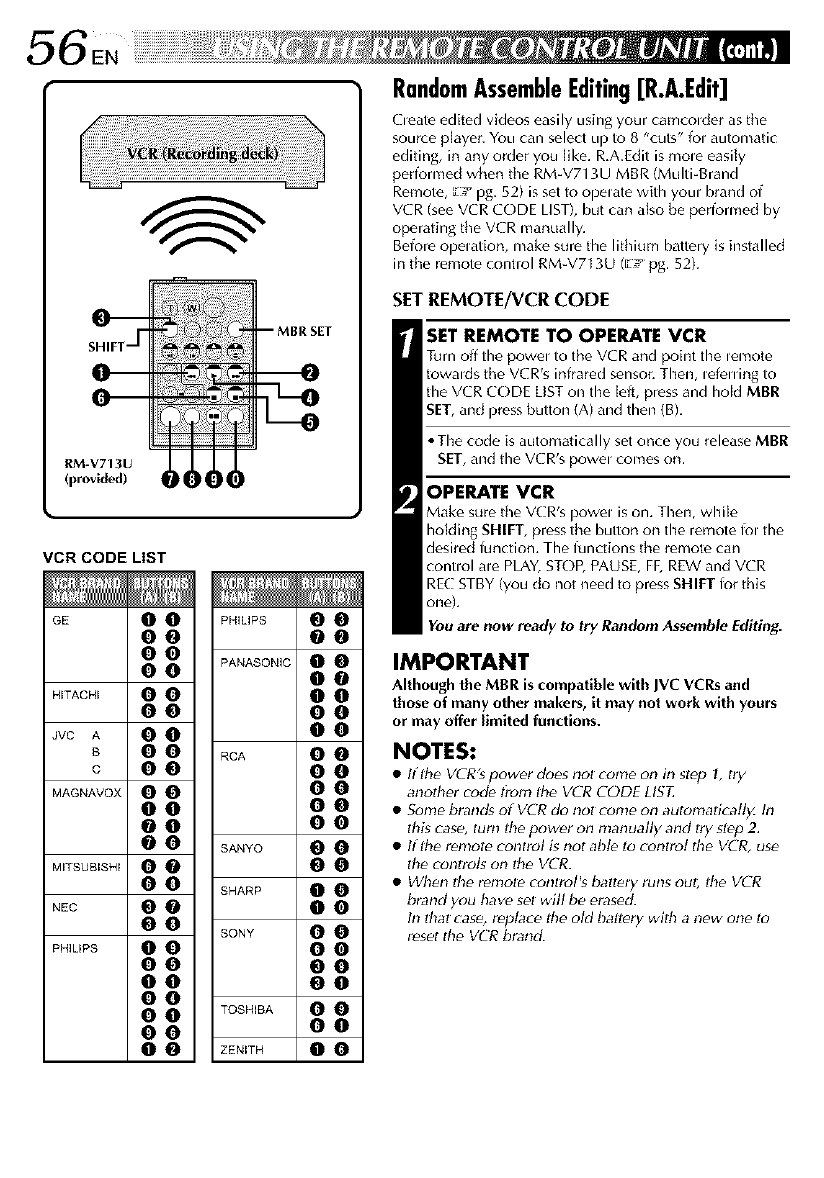
s.,.-r
VCR CODE LIST
GE
HiTACHi
JVC A
B
C
MAGNAVOX
MITSUBISHI
NEC
PHILIPS
00 PHluPs 00
O0 O0
O0
0 0 PANASONIC 0 0
O0
O0 O0
O0 O0
00 O0
00 RCA 0 O
O0 00
O0 O0
O0 O0
O0 O0
0 0 SANYO 0 0
O0 O0
00 SHARp 00
O0 O0
O0 SONY 0 0
00 O0
O0 00
O0 O0
O0
00 TOSHIBA 00
O0 O0
0 0 ZENITH 0 0
RandomAssembleEditing[R.A.Edit]
Qeate edited videos easily using your camcolder as tile
source player. You can select Lip to 8 "cuts" foI automatic
editing, in any order you like. R,A.Edit is mole easily
perfornled when tile RM-V713U MBR (Multi-Brand
Remote, _-/pg. 52) is set to opelate with youl brand of
VCR (see VCR CODE LIST), but can also be performed by
operating tile VCR manually.
Before opelation, make sure the lithium battery is installed
in the remote control RM-V713U ([:7 pg, 52),
SET REMOTE/VCR CODE
SET REMOTE TO OPERATE VCR
Turn off the powel to the VCR and point the lemote
towalds the VCR's infrared senson Then, lel_u ins to
the VCR CODE LIST on the [eft, press and hold MBR
gET, and press button (A) and then (B),
• The code is automatically set once you release MBR
SET, and the VCR's powel comes on.
OPERATE VCR
Make sure the VCR's powel is on, Then, while
holding SHIFT, pressthe button on the remote fol the
desired lunction, The functions the remote can
control ale PLAY,STOP, PAUSE, FF, REW and VCR
RE(: STBY (you do not need to press SHIFT lur tills
ore),
Youare now ready to try Random Assemble Editing.
IMPORTANT
Although the MBR is compatible with JVC VCRs and
those of many other makers, it may not work with yours
or may offer limited functions.
NOTES:
•Iflt_e VCR's power does not come on in step 1, try
another code trom lhe VCR CODE LISI,
• Some brands of VCR do not come on automatically, hi
thg case, turn lt_epower on manually and Iry slep 2.
• Iflt_e remote control is not ahle lo control the VCR, use
the controls on the VCR.
• When the remote conlrol's battery runs out, lhe VCR
brand you have set will be erase_L
In that case, replace ltle old t)allery with a new one lo
reset the VCR hrand.
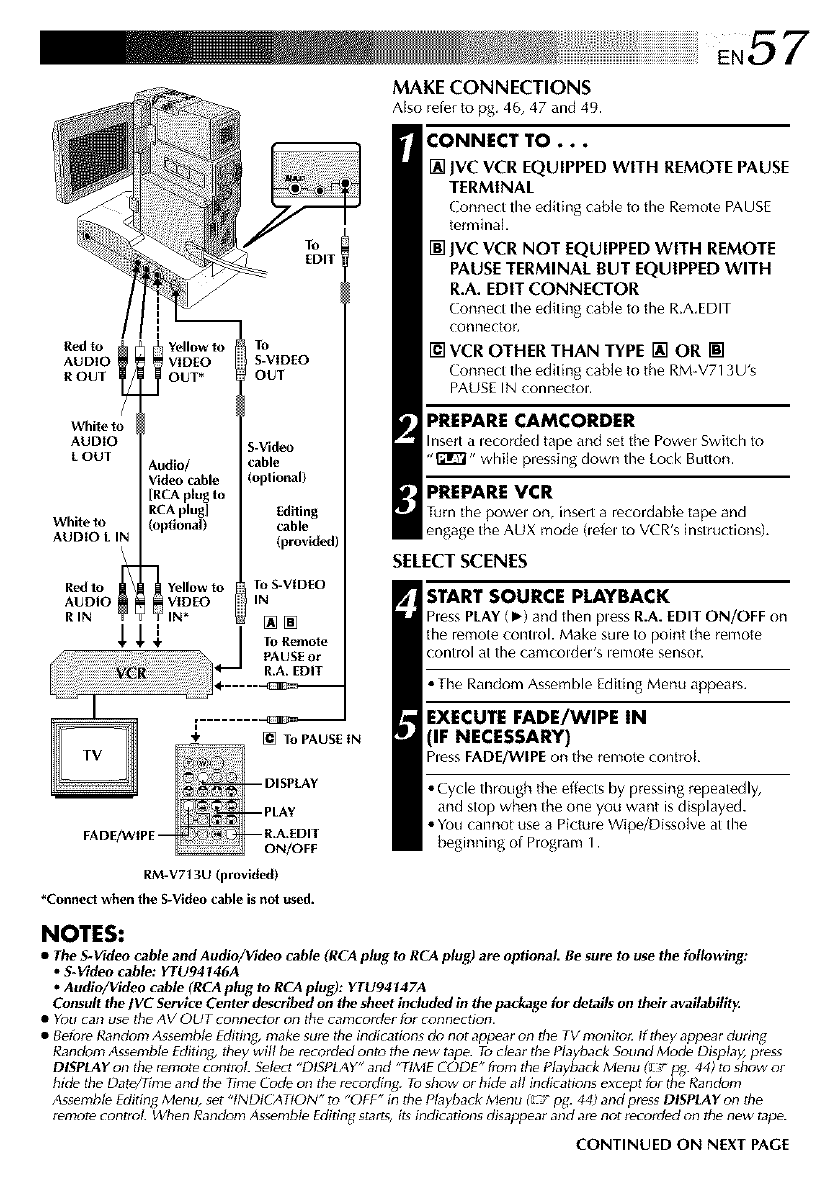
EN5 7
MAKE CONNECTIONS
Atso refer to pg. 46, 47 and 49.
IYellow to
red to I _ VIDEOAUDIO
.OUTtjOUT,
White to
AUDIO
LOUT _udio/
Video cable
[RCA plug to
RCA plug]
White to (optional)
AUDIO L IN
Red to _-_ Yellow to
AUDIO VIDEO
R IN IN*
EDIT
To
S-VIDEO
OUT
S-Video
cable
(oplional)
Editing
cable
(provided)
To S-VIDEO
IN
[][]
To Remote
CONNECT TO...
[] IVC VCR EQUIPPED WITH REMOTE PAUSE
TERMINAL
( onnect the edith_g cable to the Remote PAUSE
terminal.
[] JVCVCR NOT EQUIPPED WITH REMOTE
PAUSE TERMINAL BUT EQUIPPED WITH
R.A. EDIT CONNECTOR
Connect the editing cable to the R.A.EDIT
cot) nector_
[] VCR OTHER THAN TYPE [] OR []
Connect the editing cable to the RM-V713U's
PAUSE IN connectol.
PREPARE CAMCORDER
Insert a lecorded tape and set the Power Switch to
"f_'?'l" while pressing down the Lock Button.
PREPARE VCR
Turn the powel on, insert a recordabte tape and
engage the AUX mode 0efel to VCR's instructionsL
SELECT SCENES
START SOURCE PLAYBACK
hess PLAY (_-) and then pless R.A. EDIT ON/OFF on
the remote contlol. Make sule to point the remote
control at the camcoldel's lemote sensor.
• The Random Assemble Editing Menu appears.
EXECUTE FADE/WIPE IN
IF NECESSARY)
WIPE on the remote control
• Cycle through the effects by pressing r_peatedly,
and stop when the one you want is displayed.
• You cannot use a Picture Wipe/Dissolve at the
beginning of Program 1.
RM-V713U (provided)
*Connect when the S-Videnocable is not used.
NOTES:
•The S-Video cable and Audio/Video cable (RCA plug to RCA plug) are optional. Be sure to use the following:
•S-Video cable: YTU94146A
•Audio/Video cable (RCA plug to RCA plu_: YTU94147A
Consult the JVC Service Center described on the sheet included in the package for details on their availability
•Y_u can use the AV OUT connectc)_ on the camcorde_ tv_ connection.
•Bef(Jre Random Assemble Editing_ make sure the il_d_cat_ons do not appear on the TV n_onitot: tf they appear dulling
Randon_ Assembl_ Editlng_ they will be Iecorded onto the new tape. To cleat the Playback Sound Mode Display, pless
DISPLAY on the Iemote control. Select DtS! LAY" and "TIME F ODE " trom the flayback Menu (_ _. 44) to show ot
hide the Dat_ime and the Fime ('ode on the Iecordlng. _ show ot hld# all indications except fc;r the Random
Assemb/# Editing Menu, set "tNDtCAT/ON" to "OFF" in the Playback Menu (L_:r pg. 44) and press DISPLAY on the
remote control. When Random Assemble Editing starts, its indications disappea_ and are not recorded on the new tape.
CONTINUED ON NEXT PAGE
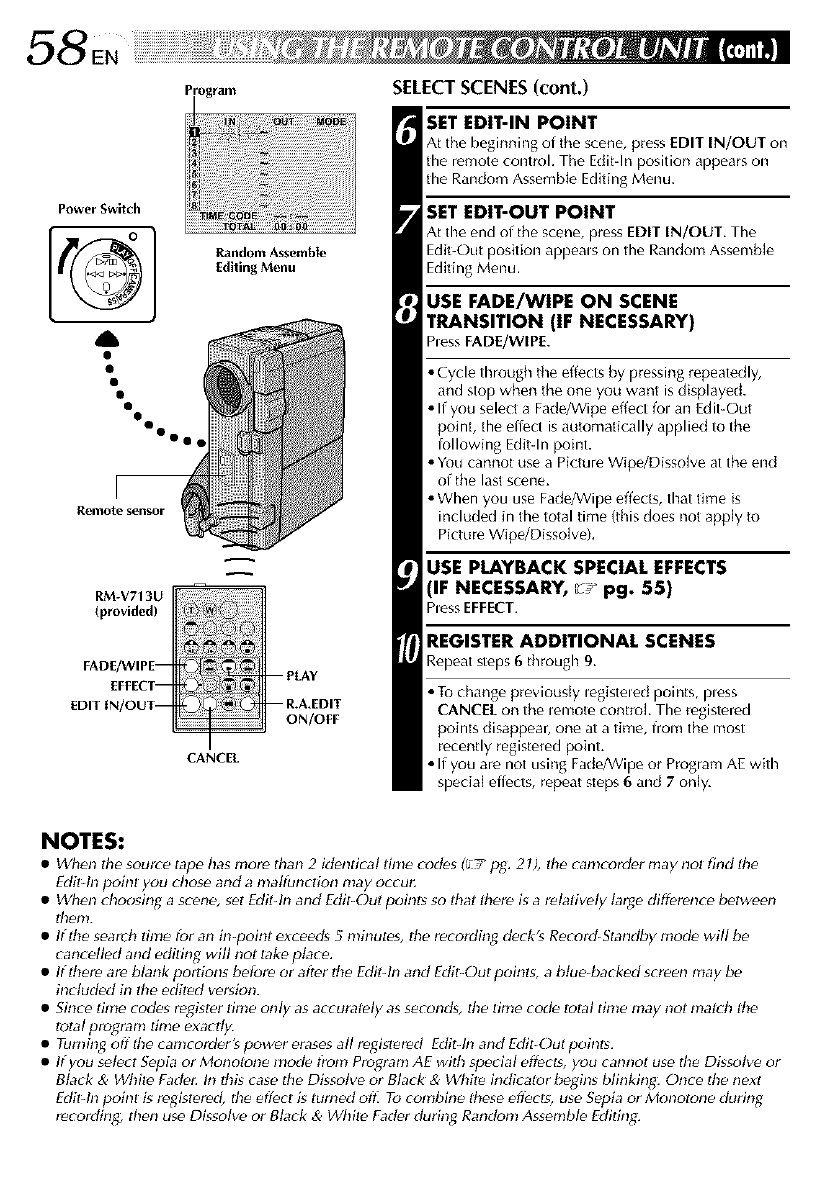
PowerSwitch
®
RM-V713U
(provided)
FADE/WIPE-
EFFECT-
EDIT IN/OUT--
random Assemble
Editing Menu
--PLAY
-- R.A.EDIT
ON/OFF
CANCEL
SELECTSCENES(cont.)
pOINT
of the scene, press EDIT IN/OUT on
tile remote control. The Edk-ln position appears on
the Random Assemble Editing Menu.
;IT EDIT-OUT POINT
_.tthe end of the scene, press EDIT IN/OUT. Tile
Edit-Out position appeals on the Random Assemble
Editing Menu.
USE FADE/WIPE ON SCENE
TRANSITION (IF NECESSARY)
hess FADE/WIPE.
•Cycle through the effects by pressing r_peatedly,
and stop when the one you want is displayed.
• If you select a Fade/Wipe effect tol an Edit-Out
point, the effect is automatically applied to the
lollowing Edit-In point.
• You cannot use a Picture Wip_/Disso[ve at the end
of the last scene.
• When you use Fade/Wipe effects, that time is
included in the total time (this does not apply to
Picture Wipe/Dissolve).
USE PLAYBACK SPECIAL EFFECTS
IF NECESSARY, _" pg. 55)
'lessEFFECT.
REGISTER ADDITIONAL SCENES
Repeatsteps6 through9.
• To chang_ previously legisteled points, pless
CANCEL on the lemote control The registered
points disappear, one at a time, from the most
recently registered point.
• If you are not using Fade/Wipe or Program AE with
specia[ effects, repeat steps 6 and 7 only.
NOTES:
•Wben the source tape has more than 2 identical time cod_s (_/pg. 27), tbe canlcorder nlay nol find lhe
Editqn poinl you chose and a malfunction may occu_
• Wben cboosing ascen_, set Edit4n and Edit_Out points so that there is a relatively large difference between
them.
• If the search time for an in-point exceeds 5 minutes, the recording d_ck's R_cord-Standby mod_ will be
cancelled and editing will not take place.
• If there are blank pordons before or after the Fdit-ln and Edit_Out points, a blue-backed screen may be
included in the edited version.
• Since time cod_s re_gter Iinle only as accurately as seconds, the lime cod_ Iolal time may not match ttte
total program time exactly.
• Turning off the camcorder's power erases all registered Editqn and Edit-Out points.
• If you select Sepia or Monotone mode t?om Program AE with special effecb, you cannot use the Dgsolve or
Black & White Fadeg In thg case tile Dissolve or Black & Wbite indicator b_gins blinking: Once Ihe next
Editqn pc_inl is registered, the effect is tumid oft_ To combine these eft_cls, use Sepia or Monotone during
r_cording, then use Dissolve or Bla_k & White Fader during Random Assemble Edidng:

EN59
AUTOMATIC EDITING TO VCR
[
START/STOP
Button
Pause (11) Button
Stop(11)BultOn
Randon] Assemble
Editing Menu
PREPARE SOURCE TAPE
Rewind the tape hmthe camcolder to the beginning of
tile scene you want to edit and press PAUSE(11),
ENGAGE VCR'S RECORD-PAUSE MODE
Point timelemote control towards the VCR's remote
sensor and pless VCR RECSTBY (Q II), or manually
engage the VCR's Recold-Pause mode.
START EDITING
hess START/STOP on the camcorder. Editing
proceeds as proglamed, right through to the end of
the last registeled scene.
• hessing START/STOP on the remote control does
not start editing,
• When dubbing is complete, the camcordel entels
the Pause mode, and the recording deck enters its
Record-Standby mode.
• If you do not register an Edit-Out point, timetape wile
be dubbed all the way to the end automatically,
STOP EDITING
Engage the Stop modes for the camcorder and the
VCR.
To make the R,A. Edit counter display disappeab press
R.A. EDIT ON/OFF on the remote control.
NOTES:
•Pressing R.A. EDIT ON/OFF on the remole conlrol
rl_ars all settings regisl_red during Random A_sembte
Edi_h_g.
• When the editing cabl. is _onnec[ed lo [he Pause
l_rminat during dubbing, mak_ sure the remol_ conlrol
is pointed at the VCR's sensor, and Ihat the path between
lhe two is unobstructed.
• Random A_sembte Editing may not function properly
when using a tape including several duplicated Time
Cod_s _pg: 21).
A
RM-V713U
(provided)
FADE/WIPE-
EFFECT- --PAUSE
EDIT IN/OUT-- -- R.A. EDIT
ON/OFF
CANCEL VCR REC
STBY
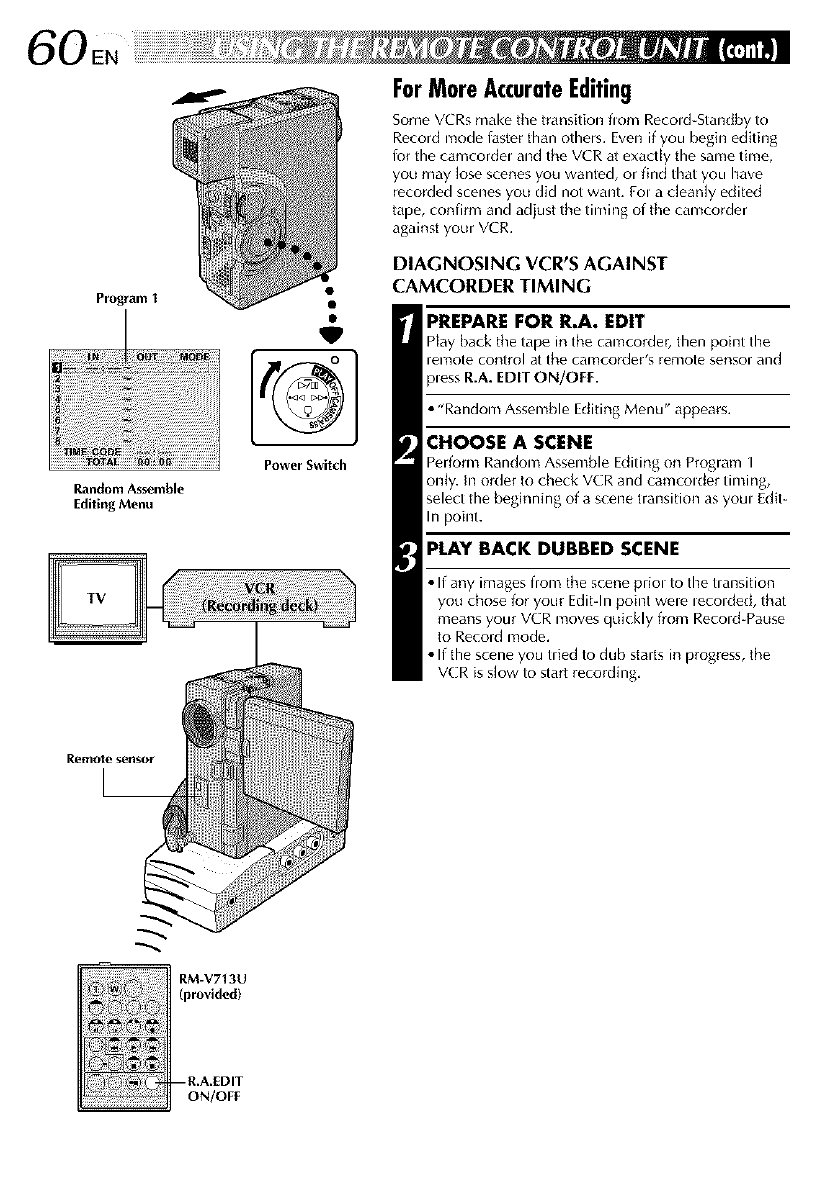
Program1
Random Assemble
EditlngMenu
ForMoreAccurateEditing
Some VCRs make the transition flom Recold-Standby to
Record mode Iaster than others. Even if you begin editing
lot the camcordel and the VCR at exactly the same time,
you may lose scenes you wanted, or find that you have
recorded scenes you did not wanL Fol a c[ean[y edited
tape, confirm and adjust the timing of the camcorder
against your VCR.
DIAGNOSING VCR'S AGAINST
CAMCORDER TIMING
PREPAREFOR R.A. EDIT
Hay back the tape in the camcorder, then point time
remote control at the camcorder's remote sensor and
pless R.A. EDIT ON/OFF.
• "Random Assemble Editing Menu" appears.
CHOOSE ASCENE
Perform Random Assemble Editing on Program 1
only. In order to check VCR and camcolder timing,
select the beginning of a scene transition as youl Edit-
In point.
PlAY BACK DUBBED SCENE
• If any imag_s from the scene priol to timetlansition
you chose for your Edit-In point wele lecolded, that
means your VCR moves quickly from Recold-Pause
to Record mode.
• If the scene you tlied to dub starts in progress, the
VCR is slow to start recording,
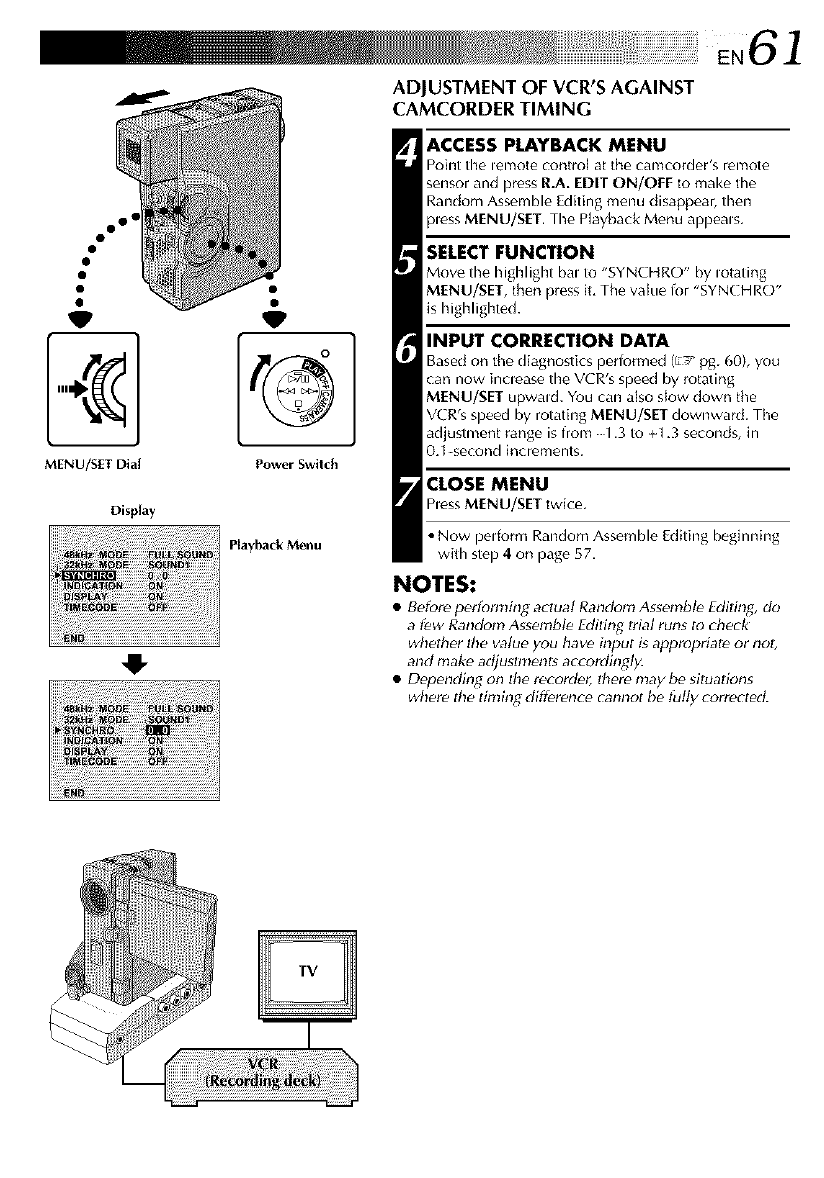
ADJUSTMENT OF VCR'S AGAINST
CAMCORDER TIMING
E,61
MENU/SET Dial Power Swilch
Display
Playback Menu
ACCESS PLAYBACK MENU
Point timelemote control at the camcorder's remote
sensor and press R.A. EDIT ON/OFF to make file
Random Assemble [diting menu disappear, then
.pressMENU/SET. The elay_ack Menu appeals.
SELECT FUNCTION
Mow the highlight bal to "SYNCHRO" by iotating
MENU/SET, then press it, The value _r %YNCHRO"
is highlighted.
INPUT CORRECTION DATA
Based o_ the dJag_ostks perJommd/_, _pg. &0), you
can now inclease timeVCR's speed by rotating
M[NU!SET upwald. You can also slow down tile
VCR's speed by rotating MENU/SET downward. Tile
adjustrl_ent range is from .3 to +1,3 seconds, Jn
0,1-second increments.
CLOSE MENU
hess MENU/SET twke.
•Now perform Random Assemble Editing beginning
with step 4 on page 57.
NOTES:
•Befor_ performing actual Random Assembl_ Fdiling, do
a fPw Random AssemblP Fdiling trial runs to check
whether Ihe value you haw h_put is appropriate or nol_
and make adjustments ac<ordingly.
•Depending on the recorder, there nlay be situations
where tile tinling difference cannot be tutty corrected.

iLLLLLLLIili%IIIIIIIII!ii!i_,iiiii'!i:!i't_!i!/ii_"_ f_ L ; _
EN iiiiiiiiiiiiiiiiiiiiiiiiiiiiiiiiiiiiiilLiii!!!iii ¸
Display
Lock Button
Audio Dub Standby mode
®
Power Switch
Stereo microphone
Remote sensor
AudioDubbing
The audio track can be customized only when recorded
on the 32 kHz mode (E_ pg. 30).
NOTES:
•Audio Dubbing is notposslble on a tape recorded at
48 kHz, on a tape recorded in the LP mode or on a blank
portion of a tape.
• Tu perfurm Audio Dubbing whil_ watching in the tH_vision,
make conn_tions (_"7 f_- 46).
FIND EDIT-IN POINT
Hay back the tape to locate the point where editing
will stalt, then press PAUSE (11).
ENGAGE AUDIO DUB STANDBY
Whi{e homing A.DUB (_) on the remote control,
pless PAUSE (11). "11{" appeals.
BEGIN DUBBING
hess PLAY (1_), then begin "nal rating",
•Speak intu the microphone.
PAUSE DURING DUBBING
hess PAUSE (11).
STOP DUBBING
hess STOP (II),
AVOUT
(headphones)
connector
Located
beneath
the cove_
AUDIO
RM-V713U
(provided)
External
microphone
inpulconnector
NOTES:
• Audio dubbing is also possible using an optional microphone,
which should be connected to the provided Audio cable, with
the Audio E_ble connected to the external microphone input
conne_Yor (MI_ on the Docking Station. The provided Audio
cable reduces Mterference.
•Wbih, an opGonal mi_ ropbone g conne_ ted, th. buill=in
mk rophon, g dgabled.
•Wben edith]g onto a tap_,th# was _ecorded at 32 kHz, the uhl
and new suundtracks are It!col dJd seJaraleJy.
•Fose ucl I]e c_shec sound Iorp _ybalk, press AUDIO
MONITOR uu lh_ lemoti_ conlrol.
•ff;,ou dub onlo a blank sl_c_, on the tap_, lbi' sound m_y be
di_mpl_d. Mak_ sure you only t_lit I_cordt_t areas.
•ffmudback or howling occu_ dudng TV Mayback, move the
(amco_der's mi_ rophon. _way hom th. TV, or turn duwn th.
TWs wIume.
•Sound gnol heard flom lh. speaker dudng A udio Dubbing. Tt_
h_ar sound, connecl uptional headpboues to lh_ AV OUT
_dpboues) _zmnecto_:
•ffyou cbange Irom 32 kLtz [o 48 kLtz in mid_m_o_ding and th.n
u_e the tape fur Audio Dubbing_ il is no[ .ge_ tiw' from the point
where 48 kLtz mco_din R began.
•Dul h]g Audio Dubbing, when lh. lape n]oves _o s_ene_ lecordc_t
in tb_, LP mode', sc_-,nesre_ o_d_,dal 48 kHz o_ a blank po_6on,
Audio Dubbing slops and "ERROR! REFERMANUAL" appeam.
R_ording sound
L2 kHz
Display
FULL SOUND
SOUND 2
SOUND ]
Output sound
Origlna[ and new tlacks are combined and output in stere()
New track is output on both "L" and "R" chan_e]s i[1 stere()¸
Original track is output on both %" and "R" channels in stereo¸
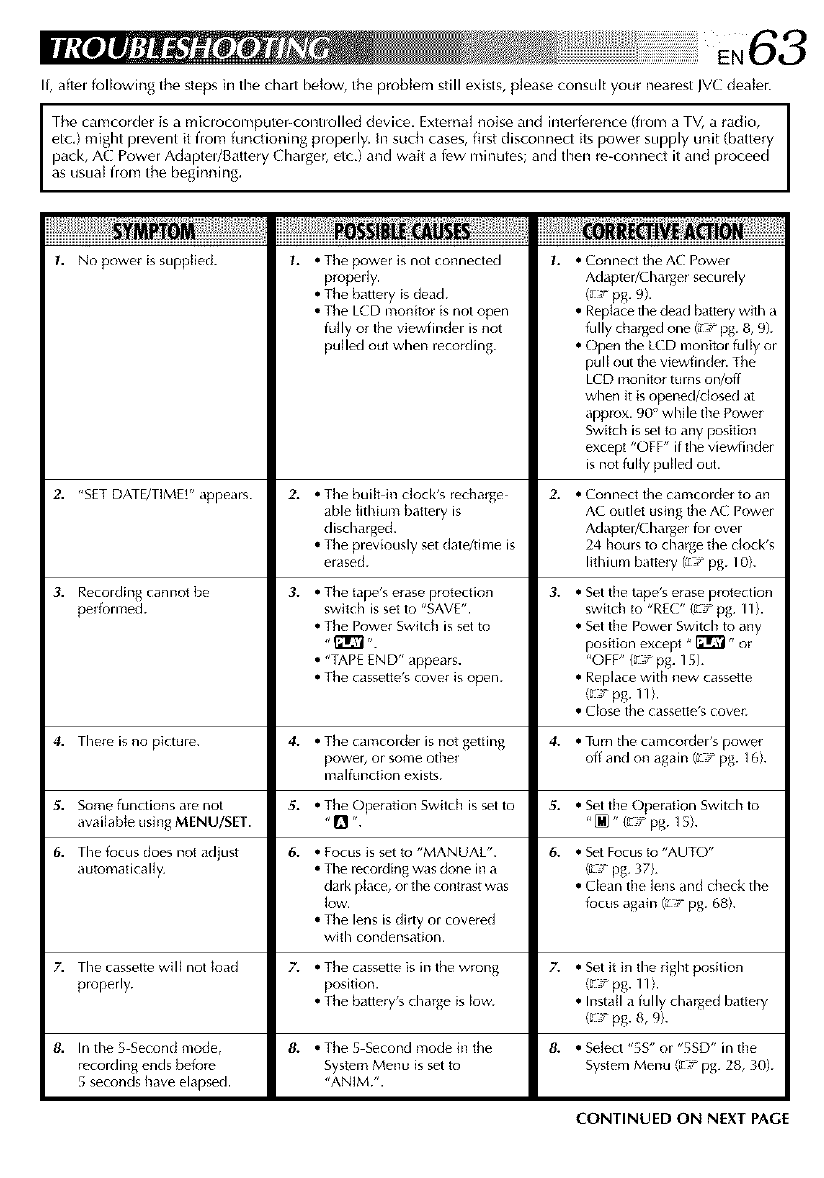
E,63
li, affel following the steps in the chart below, the problem still exists, please consult your nearest JVC dealer.
I The camcorder is a miclocomputer-conuolled device. External noise and intelfelence (flom a TV, a radio,
etc.) might plevent it from functioning properly. In such cases, filst disconnect its power supply unit (battery
)ace AC Power Ada)teffBattery Charger, etc.) and wait a l_w minutes; and then re-connect it and proceed
as usua lrom the beginning.
1. No power is supplied. 1. • The power is not connected 1. • Connect the AC Power
propedy.
•The battery is dead.
•The LCD monitor is not open
fully or the viewfinder is not
pulled out when recolding.
Adaptel/Chalgel securely
(L_:r pg. 9).
•Replace the dead battery with a
fully chalg_d one (_F pg. 8, 9).
• Open the LCD monitor fully or
pull out the viewfinder. The
LCD monitor turns on/off
when it is opened/dosed at
approx. 90 _'while the Power
Switd_ is set to any position
except "OFF" if the viewfinder
is not fully pulled out.
2. "SET DATE/TIME!" appears. 2. • The built in clock's rechalge 2. • Connect the camcorder to an
able fithium battery is AC outlet using the AC Power
discharged. Adaptel/Chal:gel k_r over
• The previously set date/time is 24 hours to charge the clock's
erased, lithium batter,/(_ F pg. I 0).
3. Recording cannot be 3. • The tape's erase protection 3. • Set the tape's erase plotection
performed, switch is sat to "SAVE". switch to "REC" I_: r pg. 11}.
• The Power Switch is set to • Set the Power Switch to any
"_ ". position except "_" or
• "TAPE END" appears. "OFF" (_ Tpg. 15).
• The cassette's cover is open. • Replace with new cassetle
(c_:r pg. 11h
• Close the cassette's covel.
4. There is no picture. 4. •Thecamcorderisnotgetfing 4. •Turnthecamcorder'spower
powel; or some othe_ off and on again (_ F pg. 16h
malfundion exists.
5. Some functions are not 5. • The Operation Switch is set to 5. • Set the Operation Switch to
available using MENU/SET. "Q ". "[] " {_ Tpg. 15b
6. The focus does not adjust 6. • Focus is set to "MAN UAL". 6. • Set Focus to "AUTO"
automatically. • The recolding was done in a (_ Tpg. 37}.
clark place, or the contrast was • Clean the lens and check the
low. focus again (_ F pg. 68).
•The lens is dirty or covered
with condensation.
7. The cassette will not load 7. • The cassette is in the wrong 7. • Set it in the right position
properly, position. (a Tpg. 11).
• The batlely's charge is low. • Install a fully charged battely
(_ Tpg. 8, 9).
8. In the 5 Second mode, & • The 5 Second mode in the & • Select "5S" or "5SD" in the
recording ends before System Menu is set to System Menu (_ Tpg. 28, "_0).
5 seconds have elapsed. "ANIM.".
CONTINUED ON NEXT PAGE
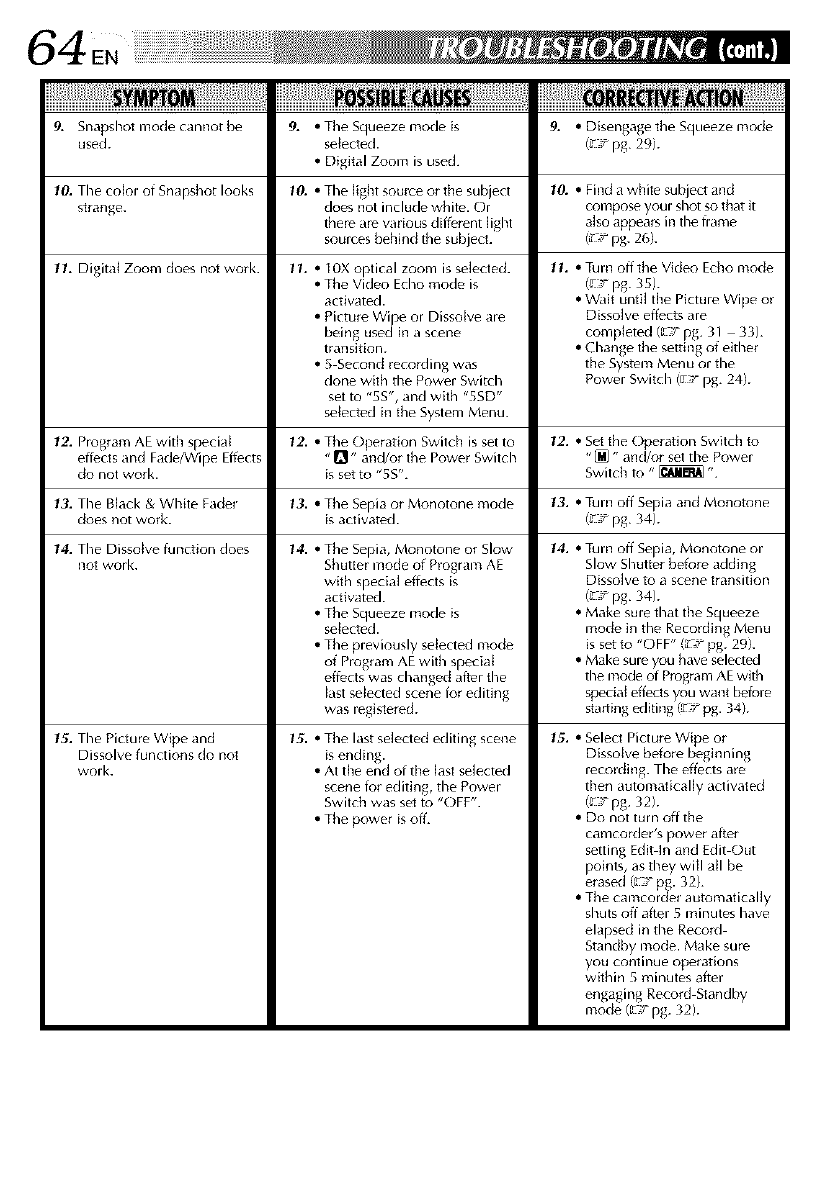
iii}iilliiiillliiiiiiiiiiiiiiiil iiiiiiiliiiiiliiiiiiiiii!lllil
9. Snapshot mode cannot be
used.
10. The color of Snapshot looks
strange.
11. Digita{ Zoom does not work.
12. Program AE with specia{
effects and Fade/Wipe Effects
do not work.
13. The Black & White Fade_
does not work.
14. The Dissolve function does
not wolk.
15. The Picture Wipe and
Dissolve functions do not
work.
9. • The Squeeze mode is
selected.
• Digital Zoom is used.
10. • The light soutre or the subject
does not include white. Or
there am various different light
sources behind the subject.
!1, • ]0X optical zoom is selected.
• The Video Echo mode is
acRvated.
• Picture Wipe or Dissolve are
being used in a scene
transition.
• 5 Second recolding was
done with the Power Switch
set to "5S", and with "5SD"
selected in the System Menu.
12. • The Operation Switch is set to
"_" and/or the Power Switch
is set to "5S".
13. • The Sepia or Monotone mode
is activated.
14. • The Sepia, Monotone or Slow
Shutter mode of Program AE
with special effects is
activated.
• The Squeeze mode is
selected.
• The previously selected mode
of Program AE with special
effects was changed after the
last seJected scene for editing
was registered.
15". • The last selected editing scene
is ending.
• At the end of the last selected
scene k_r editing, the Power
Switch was set to "OFF".
• The power is off.
9. •Disengage the Squeeze mode
(_T pg. 29).
10. • Find a white subject and
compose your shot so that it
also appea_s in the flame
g F pg. 26).
11. • Turn off the Video Echo mode
b_:rpg. 35).
• Wait unR] the Picture Wipe or
Dissolve effects are
completed (C_Tpg. 31 33).
• ( hange the setting of either
the System Menu or the
Power Switch (gTpg. 24).
12. • Set the Operation Switch to
"_ " and/or set the Power
Switch to "_ ".
13. • Turn off Sepia and Monotone
(_T pg. 34).
14. • Turn off Sepia, Monotone or
Slow Shutter before adding
Dissolve to a scenetransition
b_T pg. 34).
• Make sure that the Squeeze
mode in the Recording Menu
is setto "OFF" (_T pg. 29k
• Make sure you have selected
the mode of Program AEwith
speciat effects you want before
starling editing (_Tpg. 34).
15. •Seled Picture Wipe or
Dissolve before beginning
recording. The effects are
then automatically activated
(g Tpg. 32).
• Do not turn offthe
camcoldeI's power a_ter
setting Edi>h_ and Edit Out
points, as they will atl be
erased (L_Tpg. 32).
• The camcordel automatically
shuts off after 5 minutes have
elapsed in the Record
St,mdby mode. Make sure
you continue operations
within 5 minutes after
engaging Record Standby
mode (L_Tpg. 32).
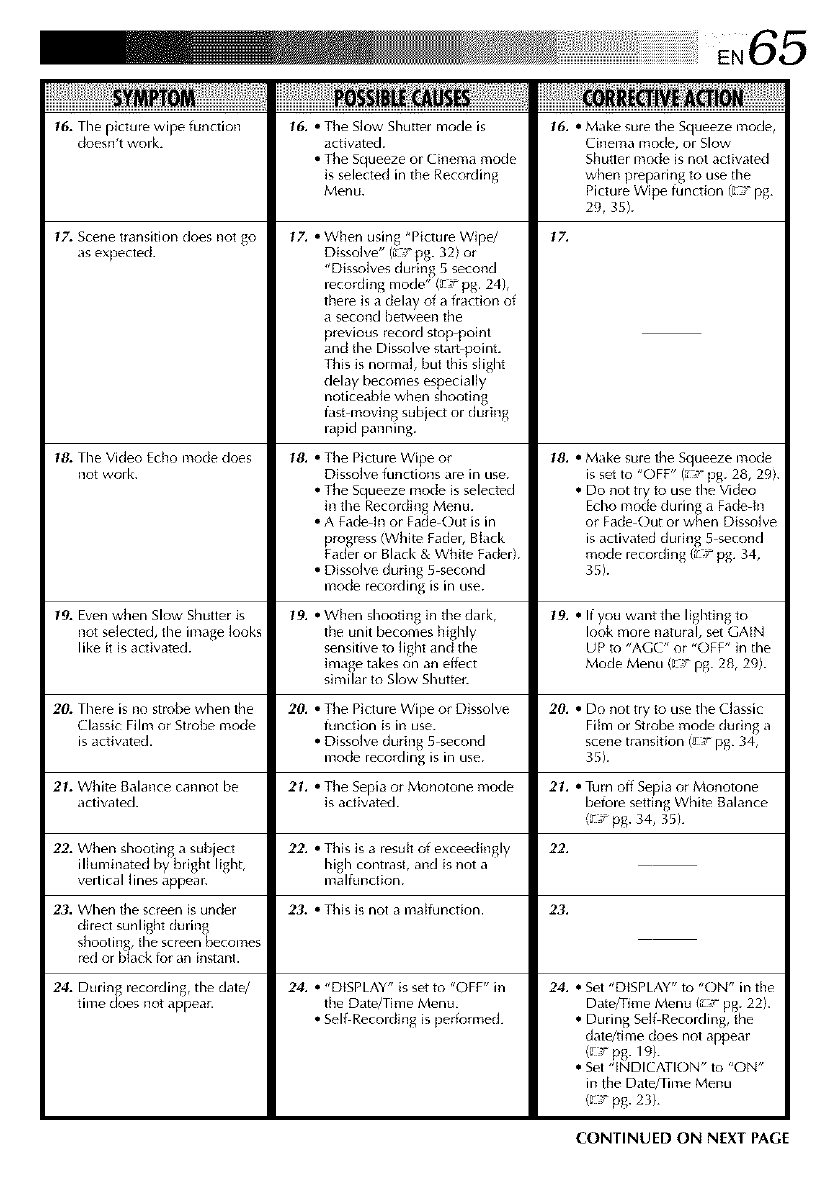
EN65
iiiiiilliiiillliiiiiiiiiiiiiiiii i!i!iiiiilii!li!i iiiilii!iiiiiiiiiiiii i iiii ii iiiiiiii I iii ii i iiiii! ii!i! iiii!Lji i iiii ii i@ i iiiiiiii!Ijllii!ij!i!i!!ii
16. The picture wipe function 16. • The Slow Shutter mode is 16. • Make sure the Squeeze mode,
doesn't work. activated. Cinema mode, or Slow
•The Squeeze or Cinema mode Shutter mode is not activated
is selected in the Recording when preparing to use the
Menu. Picture Wipe function (_ T pg.
29, 35).
17. Scene transition does not go 17.
as expecled.
17. •When using "Picture Wipe/
DissoJve" (_ _°pg. 32) or
"DissoJves during 5 second
recording mode" (_r pg. 24),
there is a delay of a fraction of
a second bewveen the
previous record stop point
and the Dissolve start point.
This is norma], but this s]ight
delay becomes especial]y
noticeable when shooting
fast moving subject or during
rapid panning.
l& The Video Echo mode does 18. • The Picture Wipe or 18. • Make sure the Squeeze mode
not work. Dissolve functions are in use. is set to "OFF" (_ 7° pg. 28, 29}.
•The Squeeze mode is selected •Do not try to use the Video
in the Recording Menu. Echo mode during_ a Fade In
•A Fade in or Fade Out is in or Fade Out or when Dissolve
_rogress (White Fader, Black is activated during 5 second
Fac er or Black & White Fac er). mode recording (_F pg. 34,
•Dissolve during 5 second 35).
mode recording is in use.
19. Even when Slow Shutter is 19. • When shoothlg in the dark, 19. • If you want the lighting to
not selected, the image looks the unit becomes highly look more natural, set GAIN
like it is activated, sensitive to light and the UP to "AGC" or "OFF" in the
image takes on an effect Mode Menu (_ T pg. 28, 29).
similar to Slow Shutter.
2& There is no strobe when the 20. •The Picture Wipe or Dissolve 20. •Do not try to use the Classic
Classic Film or Strobe mode function is in use. Film or Strobe mode during a
is activated. •Dissolve during 5 second scene transition (_ T pg. 34,
mode recording is in use. 35).
21. White Balance cannot be 21. •The Sepia or Monotone mode 21. •Turn off Sepia or Monotone
activated, is activated, before setting White Balance
(_ 7 pg. 34, 35).
22. When shooting a subject 22. •This is a resutt of exceedingly 22.
illuminated by bright light, high contrast, and is not a
vertical lines appeal_ malfunction.
23. When the screen is under
direct sunlight during
shooting, the screen becomes
red or b_ack for an instant.
24. During recording, the date/
time does not appear.
23. •This is not a malfunction.
24. •"DISPLAY" is setto "OFF" in
the Date/Time Menu.
•Self Recording is performed.
23.
24. • Set "DISPLAY" to "ON" in the
Date/Time Menu {_ _- pg. 22).
•During Sel_Recording, the
date/time does not appear
(_ 7 pg. 193.
•Set "INDICATION" to "ON"
in the Date/Time Menu
(_ T pg. 23).
CONTINUED ON N[XT PAGE
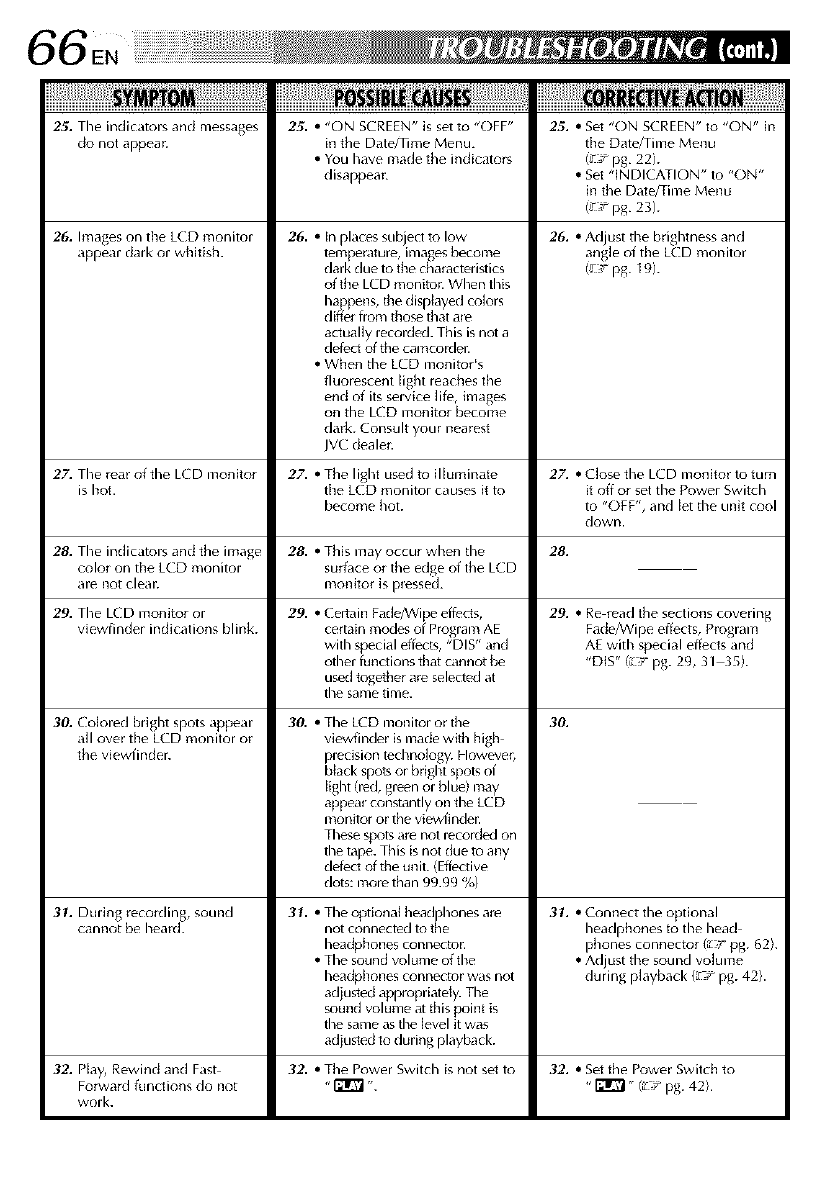
iiiiii#llliiiiiiiiiiiiiiii; iiliiiiliiiiiliiiiiliiiiiliiiiliiiiiiilliiiillliiiiiiiiiii !ii#!llliiiiiiiiiiLJili#llliiiiO R ilii J!i!i!iiiiiiii!i!iJiJ
25. The indicators and messages 25. • "ON SCREEN" is set to "OFF" 25. • Set "(3N SCREEN" to "ON" in
do not appea_ in the Date/Time Menu. the Date/Time Menu
•You have made the indicators (_;r pg. 22).
disappeal: • Set "INDICATI()N" to "ON"
in the Date/Time Menu
(g ;. pg. 23).
26. Images on the L(D monitor
appear dark or whitish.
26. •In places subject to low
tempelature, images become
clark due to the characteristics
of the LCD monitun When this
happens, the displayed colors
differ from those that a_e
actually recorded. This is not a
defect of the camcorJel:
• When the LCD monitor's
fluorescent light reaches the
end of its service life, images
on the LCD monitor become
dark. Consult your nearest
JVC dealer.
26. • Ad ust the brightness and
ang e of t le LCD monitor
(_r;rpg. ] 9).
27. The rear of the LCD monitor 27. • The light used to illuminate 27. • Close the LCD monitor to turn
is hot. the LCD monitor causes it to it off or set the Power Switch
become hot. to "OFF", and let the unit cool
down.
28. The indicators and the image 28.
color on the LCD monitor
are not cleal_
29. The LCD monitor or
viewfinder indications blink.
30. Colored bright spots appear
all over the LCD monitor or
the viewfincJer.
31. During recording, sound
cannot be heard.
28. •This may occul when the
surface or the edge of the LED
monitor is plessed.
29. •Certain Fade/Wi )e effects,
certain medes o Program AE
with special effects, "DIS" and
other ffmctions that cannot be
used together ate selected at
the same time.
3& •The LCD monitur or the
viewfinder is made with high
precision technology. However,
black spots or bright spots of
light {red, green or blue) may
appea_ constantly on the LCD
monitor or the viewfindel:
These spots am not recorded on
the tape. This is not due tu any
defect of the unit. (Effective
dots: more than 99.99 %)
31. •The optional headphones ale
not connected to the
headphones connectun
• The sound volume of the
headphones connectur was not
adjusted applopriately. The
sound volume at this point is
the same as the level it was
adjusted to during playback.
32. •The Power Switch is not set to
32. Play, Rewind and Fast
Forward functions do not
work.
29. • Re read the sections covering
Fade/Wipe effects, Program
AE with special effects and
"DIS" (_r pg. 29, 31 35).
30.
31. •Connect the optional
headphones to the head
phones connec_r {_ pg. 62).
• Adjust the sound volume
during playback (t _r pg. 42).
32. •Set the Power Switch to
"_" (_F pg. 42).
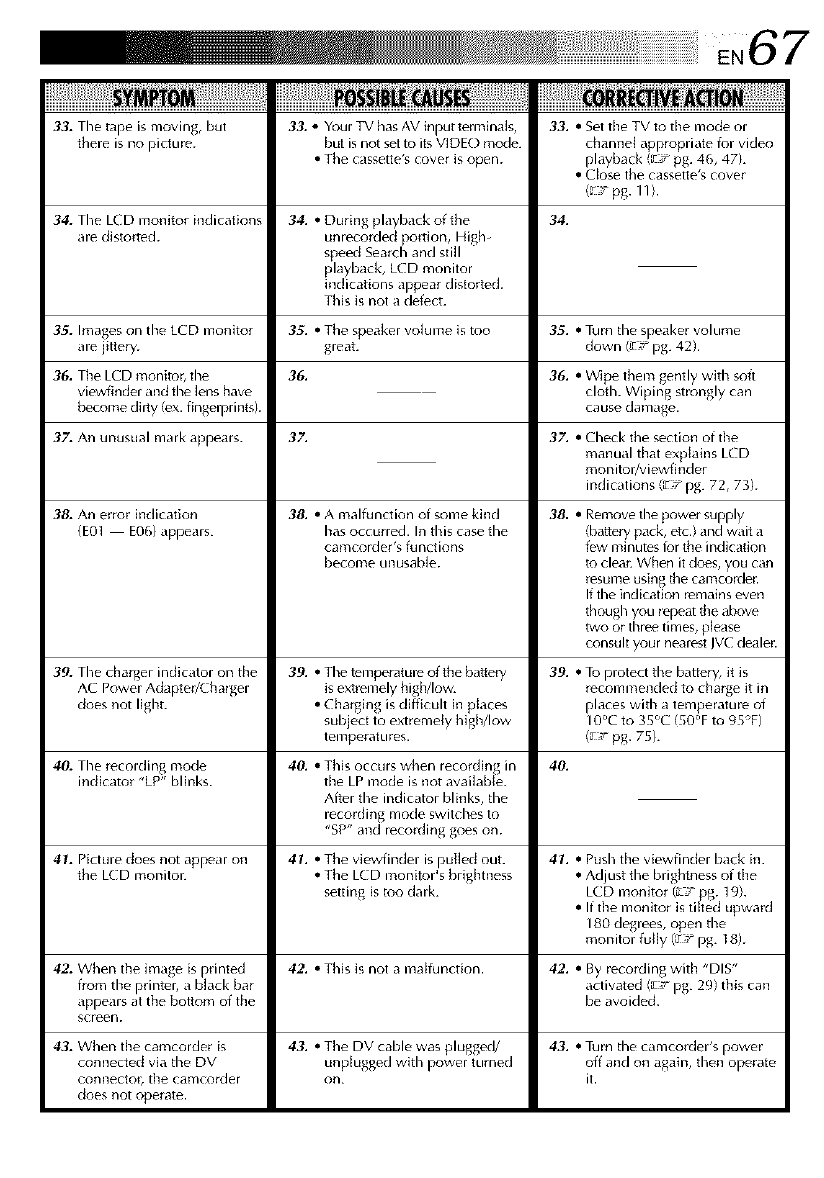
E,67
33. The tape is moving, but 33. *Y_ur TV has AV input terminals, 33. •Set the TV to the mode or
there is no picture, but is not set to its VIDE() mc_le, channel appropriate k_r video
• Tile cassette's cover is open. playback (Lr_"pg. 46, 47).
• Close the cassette's covel
(F 7 pg. 11}.
34. The LCD monitor indications 34.
are distorted. 34. •During playback of the
unrecorded portion, High-
speed Search and still
playback, LCD monitor
indications appear distorted.
This is not a defect.
35. Images on the LCD monitor 35. • The speaker volume is too 35. • Turn the speaker volume
are jitters/, great, down (_r_r pg. 42).
36.
36. The LCD monitoB the
viewfinder and the lens have
become dirty (ex. fingerprints).
37. An unusual mark appears.
38. An error indication
(E01 E06) appears.
37.
38. • A malfunction of some kind
has occurred. In this case the
camcolde_'s functions
become unusable.
36. • Wipe them gently with soft
cloth. Wiping strongly can
cause damage.
37. •Check the section of the
manual that explains LCD
monitor/viewfinder
indications (L_:r pg. 72, 73).
38. •Remove the power supply
(batteiy pack, etc.) and wait a
few minutes ior the indication
to clear. When it does, you can
resume using the camcorde_.
If the indication remains even
though you lepeat the above
two or three times, please
c_nsuh your nearest JVC deale_.
41. Picture does not appear on 41. • The viewfinder is pulled out. 41. • Push the viewfinder back in.
the LCD moniton • The LCD monitor's brightness • Adjust the brightness of the
setting is too dark. LCD monitor (_° _g. 19k
• If the monitor is ti tec upwarc
180 degrees, open the
monitor fully (L_;r pg. 18).
42. When the image is printed 42. • This is not a maHunction. 42. • By recolding with "DIS"
from the printel_ a black bar activated (_2_pg. 29) this can
appears at the bottom of the be avoided.
screen.
43. • The DV cable was plugged/ 43. • Turn the camcorder's power
unplugged with power turned off and on again, then operate
on. iL
43. When the camcorder is
connected via the DV
connector, the camco_der
does not operate.
40. • This occurs when recording in
the LP mode is not available.
After the indicator blinks, the
recording mode switches to
"SP" and recording goes on.
39. The chalger indicator on the 39. • The temperature of the bar,ely 39. • T_ protect the battely, it is
AC Power Adapter/( hanger is extremely high/low, recommended to charge it in
does not light. • Charging is difficult in places places with a temperature of
subject to extremely high/low I0°C to 35°C {50'F to 95°F)
temperatures. (FTr pg. 75h
40. The recording mode 40.
indicator "LP" blinks.

Gap
%.._[
OPEN/EJECTSwitch
AfterUse
Turn off the camcolder.
Slide down OPEN/EJECT in tile direction of tile
anow, then swing the cover open until it locks. The
cassette holder opens automatically. Remove the
cassette.
hess "PUSH HERE" to close the cassette cover.
Slide down BATT. RELEASEand remove the battery
pack,
CleaningTheCamcorder
with a soft cloth.
• Put ck)th in diluted mild soap and wring it well to
wipe off heavy dirt. Then wipe again with a dry
cloth,
CLEAN LCD MONITOR
Wipe gently with the plovided cleaning cloth ol a
commercially available soft cloth. Be caleful not to
damage the monitor, Close the LCD monitor.
CLEAN LENS
Blow it with a blower brush, then wipe gently with
lens cleaning papel.
PULL OUT VIEWFINDER FULLY
CLEAN VIEWFINDER
SJidethe cover in the direction of the arrow O, Insert
a lens blower or a soft cloth into timegap at the
bottom of the viewfinder and clean the interior of the
viewfinder with it 0.
BATT. RELEASE
Switch
Blower brush
PUSH VIEWFINDER BACK IN
Close the cover until it locks in p_ace, Tilt time
viewfinder horizontally, and push it back im
NOTES:
•Avoid using strong cleaning agent_ such as t_nzine or alcohol.
•(leaning should t;_ ck)ne only after tile battery pack has been removed or other pc)wer unil_ have been
disconnected.
• Mold may for!! if the l_ns is left dirty,
• When using a cleaner or chenlicatty treated ckJth refer to the cautions of each product.
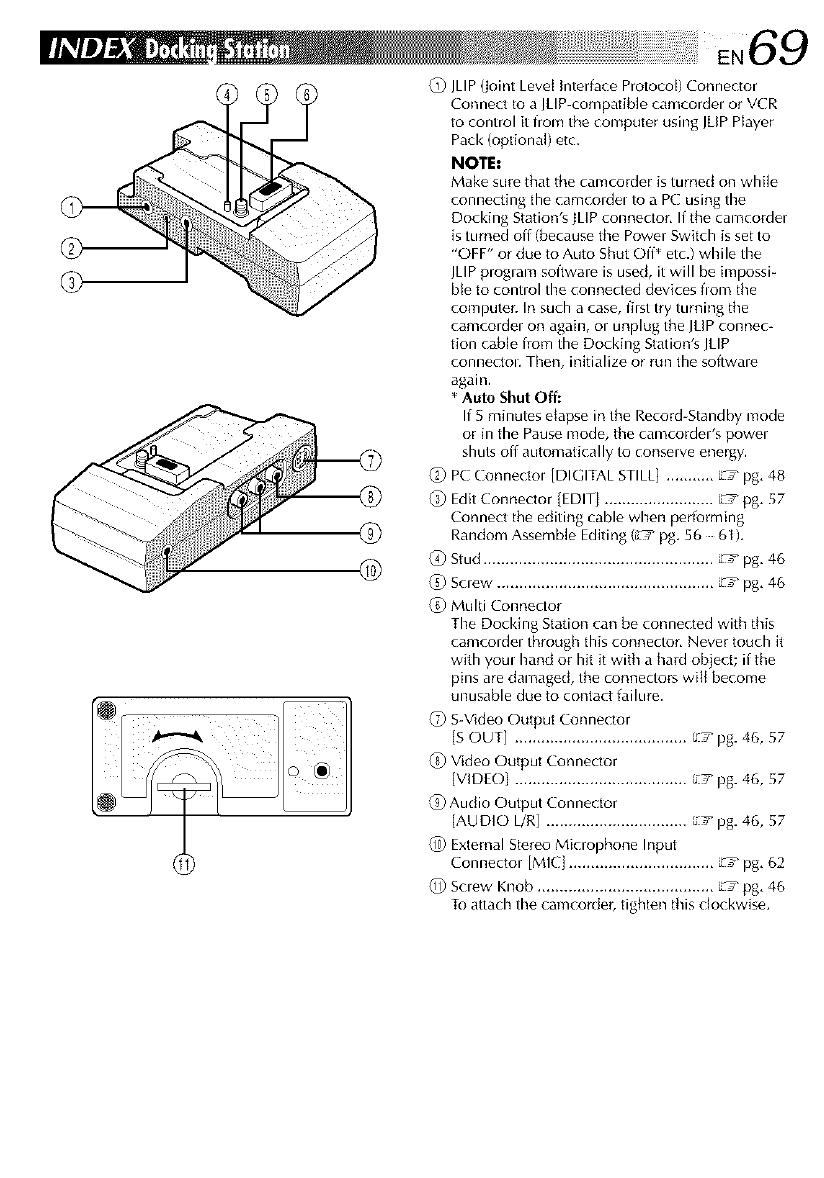
EN69
®
_) JLIP(Joint Levet interface Protocol) ConnecJor
Connect to a JLIP-compafible camcordel or VCR
to control it from the computer using JLIP Hayer
Pack (optional) etc.
NOTE:
Make sure that the camcorder is turned on while
connecting tile cam(ordel to a PC using the
Docking Station's JLIP connector, If the camcorder
is turned ofi (because the Power Switch is set to
"OFF" or due to Auto Shut Off* etc.) while the
JLIPproglam software is used, it will be impossi-
bte to control the connected devices from tile
computer. In such a case, first try turning tile
camcordel on again, ol unplug the JLIPconnec-
tion cable from the Docking Station's JLIP
connectol, Then, initialize or run the softwale
again.
*Auto Shut Off:
If 5 minutes eiapse in the Record Standby mode
or in the Pause mode, tile camcorder's powel
shuts off automatically to conserve energy.
PC Conne(tol {DIGITAL STILL] ........... L_ pg, 48
_) Edit Connector {EDIT] ......................... L_'Tpg, 57
Connect tile editing cable when performing
Random Assemb[e Editing (L_ pg, 56 6_),
(4) Stud .................................................... L'q_pg, 46
_) Saew ................................................. L'q_pg, 46
_) Multi Connector
The Docking Station ca_l be connecled with this
camcordel through this connector, Never touch it
with youl hand or hit it with a hard object; if the
pins are damaged, the connectors will become
unusable clue to contact failure.
{Z) S-Video Output ConnecIor
[S OUT] ....................................... _/pg. 46, 57
(_ Video Output Connector
[VIDEOI ....................................... _,_'pg. 46, 57
Audio Output Connector
[AUDIO L/R] ................................ _,_'pg. 46, 57
_)) External Stereo Microphone Input
Connector [MIE] ................................. L_'q_pg, 62
Saew Knob ........................................ L_ pg, 46
To attach the camcorder, tighten this clockwise.
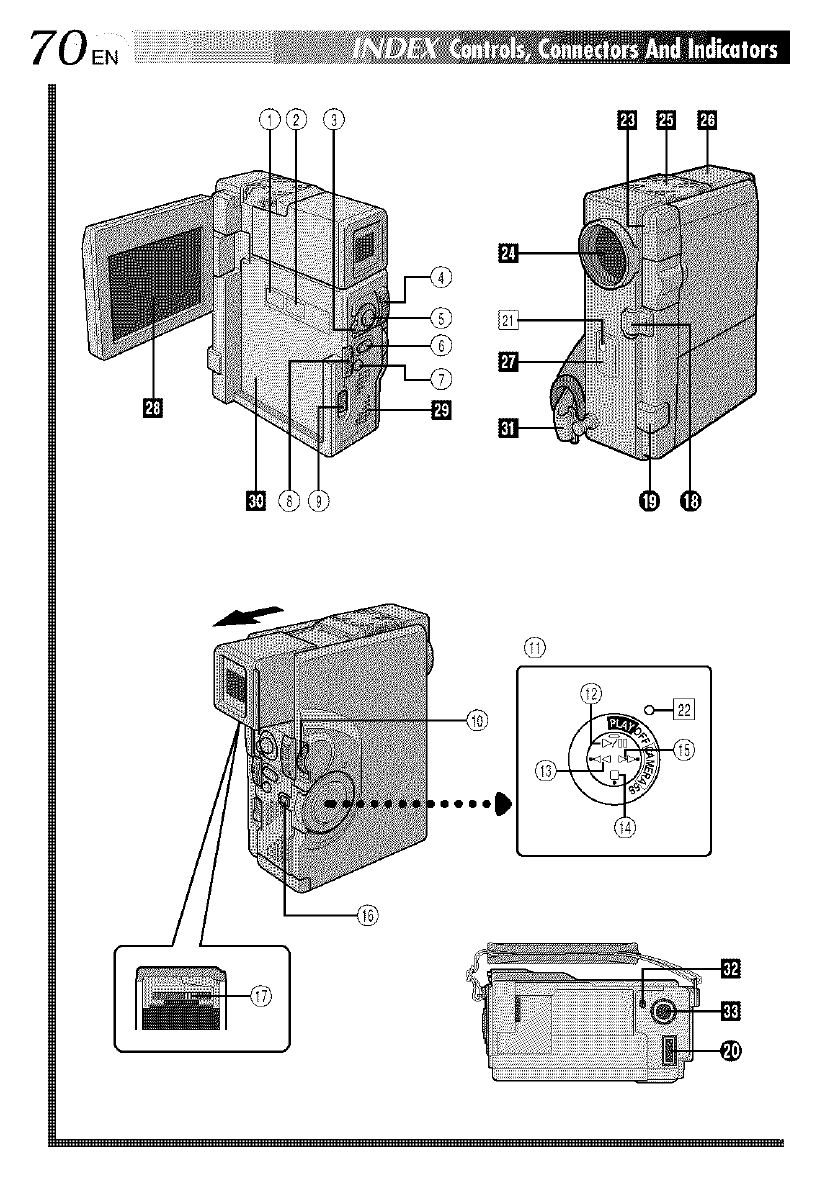
70EN
[
®
EN71
Controls Connectors
(_0 Snapshot Mode Button
[SNAPSHOT MODE] .......................... _,_' pg, 26
(_) Multi Screen Button
[MULTI SCREEN] ................................ _ pg, 27
_) OperaBon Switch [D, [] ] ................. _,_' pg, 15
_) • Power Zoom Level iT/W} ................. _,_' pg. 20
• Speaker/Headphone Volume
Control [VOL,} ................................. _ pg. 42
(_) START/STOP Button ............................ _,_' pg, 16
_) Snapshot Button [SNAPSHOT] ............ _ pg. 26
(_) Back Light Button [BACK LIGHT] ........ _7 pg, 38
(_) OPEN/EJECT Switch ............................ _,_' pg. 11
(_ Battery Release Switch
[BATT. RELEASE]................................. _F pg. 9
(_ •MENU/SET Dial [% PUSH] --, L'_ pg. 10, 28
•LCD Monitor/Viewfindel Brightness
Control ............................................ _ _ pg. 19
(_ Power Switch ..................................... _,;' pg, 15
Play/Pause Button lib/Ill ..................... _f_ pg, 42
Rewind Button [4141}........................... _F pg. 42
@ Stop Button [11 .................................. _/pg. 42
(_ Fast-Forwald Button 11_1_1................... E__ pg. 42
Lock Button ........................................ E_ pg. 15
(_7}Dioptel Adjustment Control ................ _,r pg. 13
Tile connectols _) to _) ale located beneath the cover,
{I) Digital Video Connector
[DV IN/OUT] (i.link*) ................... m,' pg. 49, 51
* i.Link refel s to the IEEE1394-1995 industry
speofica ion and ex enslons hereof. The _, [ogo
is used for products compliant with the LLink
standard.
{D ° Audio/Video Output Connector
[AV OUT] ........................................ L'h_pg, 46
• Headphones Connector [_-] ] ............ L'h_pg, 62
_) Mufti Connector
When attached m die Docking Station, this part is
connected,
Indicators
21] Ta[ty Lamp .......................................... L'_ pg. 16
[221Power Lamp ....................................... L'h_pg, 16
Other Parts
[] Camera Sensol
Be careful not to cover this area; a sensol
necessary for shooting is built-in hele.
[] Lens ([over
Opens when the viewfinder is pulled out or the
LCD monitor is opened lully,
[] Steleo Microphone ............................. L'T pg, 62
[] Viewfinder .......................................... L'T pg, 13
[] Remote Sensol .................................... L_ pg, 52
[] LCD Monitor ...................................... L_ pg, 19
[] Speaker .............................................. L'_ pg, 42
[] Battery Pack Mount ............................ _'_ pg, 9
[] Gdp Strap ........................................... _'_ pg, 13
[] Stud Hole ........................................... ¢_ pg, 46
[] Tripod Mounting Socket ................ _,_'pg. 14, 46
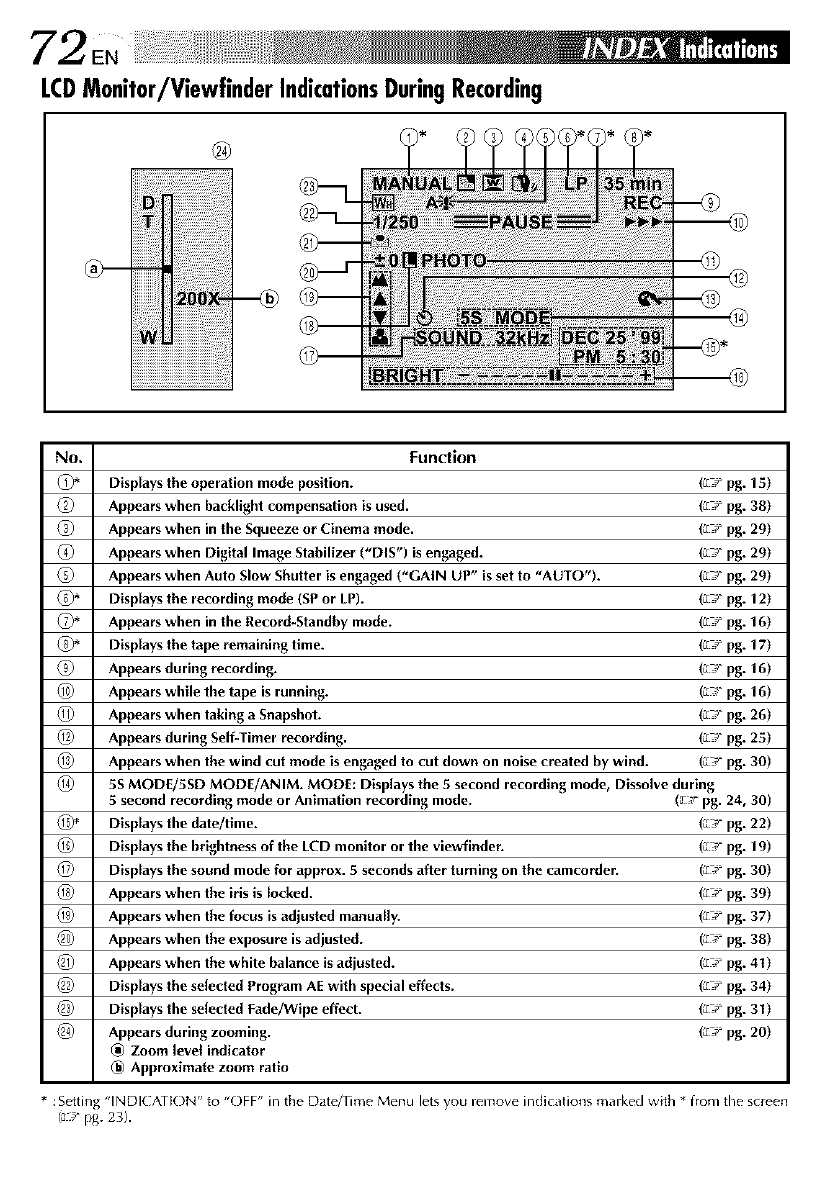
Z2 EN
LCDMonitor/ViewfinderIndicationsDuringRecording
iiiiiiii_;_iil;!_iiiii!i:ii:ii:ii:ii:ii:ii:ii:ii:ii:ii:ii:ii:ii:ii:il
iiiiiiiiiiiiiiiiiiiiiiiiiiiiiiiiiiiiiiiiiiiiiiiiiiiiiiiiiiiiiiiiiiiiiiiiiiiiL
No. Function
(1)* Displays the operation mode position. (_ Fpg. 15)
Appears when backlight compensation is used. (_ Fpg. 38)
Appears when in the Squeeze or Cinema mode. (_ Fpg. 29)
Appears when Digital Image Stabilizer ("DIS") is engaged. (_ Fpg. 29)
(5) Appears when Auto Slow Shutter is engaged ("GAIN UP" is set to "AUTO"). (_ Fpg. 29)
_* Displays the recording mode (SP or LP). (_ Fpg. 12)
_* Appears when in the Record-Standby mode. (_ Fpg. 16)
_* Displays the tape remaining time. (_ Fpg. 17)
Appears during recording. (_ Fpg. 16)
Appears while the tape is running. (_?- pg. 16)
@Appears when taking aSnapshot. (_ Fpg. 26)
Appears during Self-Timer recording. (_ Fpg. 25)
@Appears when the wind cut mode is engaged to cut down on noise created by wind. (_ Fpg. 30)
@5S MODE/5SD MODE/ANIM. MODE: Displays the 5 second recording mode, Dissolve during
5second recording mode or Animation recording mode. (_ T, pg. 24, 30)
@* Displays the date/tlme. (_ Fpg. 22)
Displays the brightness of the LCD monitor or the viewfinder. (_ Fpg. 19)
Displays the sound mode for approx. 5 seconds after turning on the camcorder. (_- pg. 30)
Appears when the iris is locked. (_ Fpg. 39)
Appears when the focus is adjusted manually. (_ Fpg. 37)
Appears when the exposure is adjusted. (_- pg. 38)
Appears when the white balance is adjusted. (_- pg. 41 )
Displays the selected Program AE with special effects. (_ Fpg. 34)
Displays the selected Fade/Wipe effect. (_ Fpg. 31 )
Appears during zooming. (_ Fpg. 20)
(_ Zoom level indicator
(_ Approximate zoom ratio
* :Setting "INDICATION" to "OFF" in the Date/Time Menu lets you remove indications marked with * from the screen
(a,* pg. 23}.
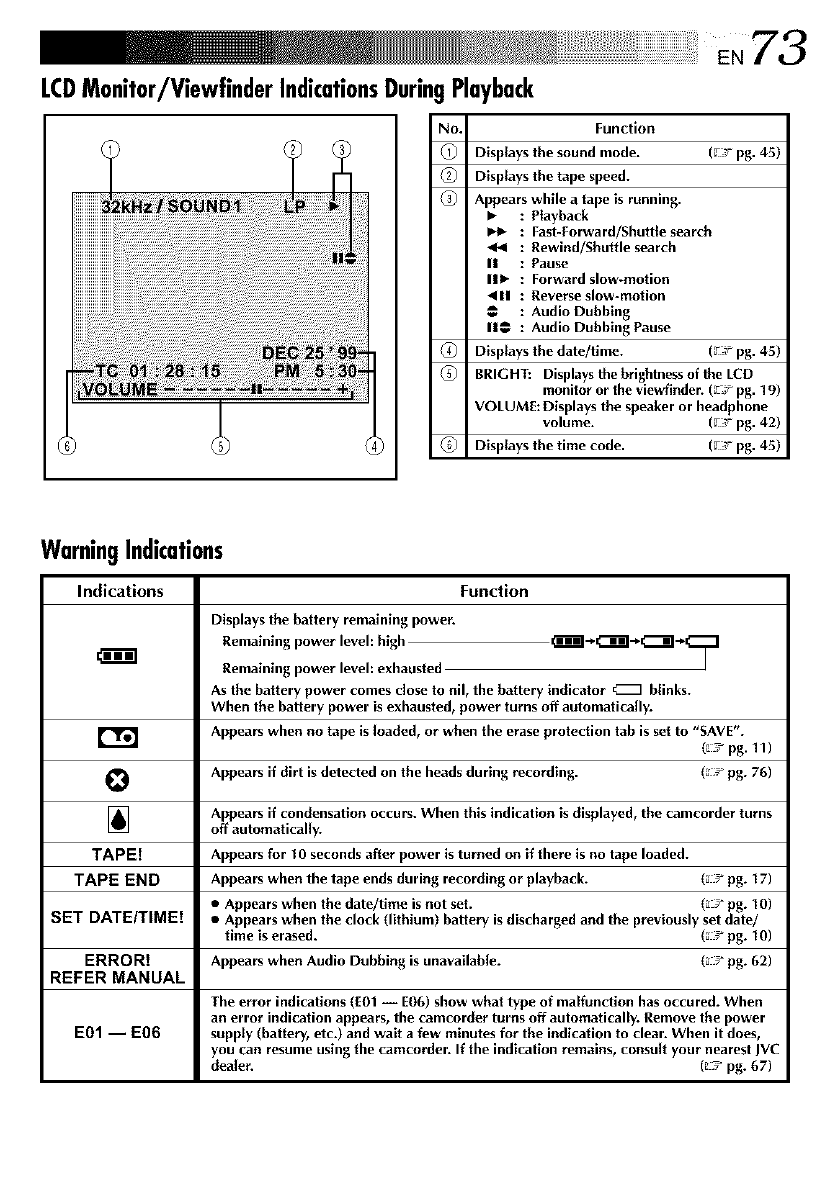
73
LCDMonitor/ViewfinderIndicationsDuringPlayback
No. Function
_1_ Displays the sound mode. (a ;, pg. 45)
Displays the tape speed.
_3_ Appears while a tape is running.
•:Playback
: Fast-Forward/Shuttle search
:Rewind/Shuttle search
II : Pause
II• : Forward slow-motion
,11 :Reverse slow-motion
: Audio Dubbing
I1_ : Audio Dubbing Pause
Displays the date/tlme. (a Tpg. 45)
BRIGHT: Displays the brightness of the LCD
monitor or the viewllnder. (F;_ pg. 19)
VOLUME: Displays the speaker or headphone
volume. (a Tpg. 42)
Displays the time code. (a Tpg. 45)
WarningIndications
Indications Function
Displays the battery remaining power.
Remaining power level: high
Remaining power level: exhausted
As the battery power comes dose to nil, the battery indicator _ btinks.
When the battery power is exhausted, power turns off automatically.
Appears when no tape is loaded, or when the erase protection tab is set to "SAVE".
(_7 pg. 11)
Appears if dirt is detected on the heads during recording. (a F pg. 76)
O
]Appears if condensation occurs. When this indication is displayed, the camcorder turns
off automatically.
TAPE! Appears for 10 seconds after power is turned on if there is no tape loaded.
TAPE END Appears when the tape ends during recording or playback. (_:F pg. 17)
•Appears when the date/tlme is not set. (aJ pg. 10)
SET DATE/TIME! •Appears when the clock (lithium) battery is discharged and the previously set date/
time is erased. (_:F pg. 10)
ERROR! Appears when Audio Dubbing is unavailable. (_:F pg. 62)
REFER MANUAL
The error indications (E01 -- EO6) show what type of malfunction has occured. When
an error indication appears, the camcorder turns off automatically. Remove the power
E01 -- E06 supply (battery, etc.) and wait a few minutes for the indication to clear. When it does,
you can resume using the camcorder. If the indication remains, consult your nearest JVC
dealer. (_:7 pg. 67)
A M
AC Power Adapter/Charger ..................... _.' pg. B, 9
Animation ................................................ [[Y pg. 30
Audio Dubbing ........................................ _Y pg. 62
Auto Focus ............................................... _._ pg. 36
Auto Shut off ....................................... _ pg. 17, 42
B
Back Light Compensation ......................... EY pg. 38
Battery Low .............................................. _' pg. 73
Battery Pack ..................................... L%'_pg. B, 9, 75
Beep/Talty ................................................ _Y pg. 30
Bdghten The LCD Monitor ........................ EY pg. 19
Built-in Clock's Lithium BatteW................. _Y pg. 10
C
Charge Tile Battery Pack ............................. _ pg. 8
Cinema .................................................... EY pg. 29
Classic Film .............................................. EY pg. 35
Clean The Camcorder ............................... E., pg. 68
Connections ............................ L'h_pg. 9, 46 51, 57
D
Darken The LCD Monitol ......................... E., pg. 19
Data/Time Display .............................. _ pg. 22, 45
Date/Hme Settings .................................... _Y pg. 10
Demonstration Mode ................................ _Y pg. 30
Digital Dubbing ........................................ EY pg. 51
Digital Zoom ...................................... L'__'_pg. 20, 29
DIS (Digital Image Stabilizer) .................... '_Y pg. 29
Diopter Adjustment .................................. _Y pg. 13
Dissolve Dudng 5-second Recording
Mode ..................................................... _Y pg. 24
Dubbing ................................................... _Y pg. 50
E
Erase Protection ........................................ _ pg. 11
Exposule Control ...................................... _Y pg. 38
F
Fadeqn/Out .............................................. EY pg. 31
Fast-Forward The Tape .............................. '_Y pg. 42
5-second recording mode ......................... _Y pg. 24
G
Gain U ...................................................
A;Pustmentdj....................................... '_Y pg" 29
Grip _Y pg. 13
I
Iris ............................................................ _Ypg. 39
Iris Lock ................................................... _Y pg. 39
I
Ioumalistic Shooting ................................. _Y pg. 19
L
LCD monitor/Viewfinder Indications .., L'h_pg. 72, 73
Load ATape ............................................. L'h_pg. 11
Manual Focus ........................................... '_Y pg, 37
Mode Menu ............................................. [Ey pg, 29
Monotone ................................................ _Y pg, 35
Motor Drive Mode .................................... FLYpg, 26
Mu]tli Screen Mode .................................. EY pg, 27
O
E)peraBon Switch Position ........................ _Y pg, 15
P
Picture Wipe/Dissolve ............................... EY pg, 32
Playback Menu ........................................ EY pg, 44
Playback Special Effects ............................ _Y pg, 55
Playback Zoom ........................................ EY pg, 54
Power Switch Position .............................. EY pg, 15
Piogram AE With Special Effects................ _Y pg, 34
Piovided Accessolies .................................. _Y pg, 5
R
Random AssemNe Editing ................. _Y pg, 56 - 61
Record-Standby ........................................ '_s pg, 16
Recording Format ....................................... E_ pg. 6
Recording Menu ....................................... EY pg, 29
Recording Mode ....................................... EY pg, 12
Remote Control ........................................ EY pg, 52
Rewind The Tape ...................................... _Y pg, 42
S
Serf-Recording .......................................... EY pg, 19
Seff-Timel. ................................................ _Y pg, 25
Sepia ........................................................ _Y pg, 35
Set Remote Contml/VCR Code .................. _Y pg, 56
Shuttle Search ........................................... _Y pg, 43
Shutter Speed ........................................... _Y pg, 35
Slow-Motion Ptayback .............................. _Y pg, 54
Stow Shutter ............................................. EY pg, 35
Snapshot Mode ........................................ EY pg, 26
Sound Mode ............................................. _'_ pg. 45
Specifications ..................................... _,_'pg. 78, 79
Squeeze ................................................... EY pg, 29
Still Playback ............................................ _Y pg, 43
Strobe ...................................................... _Y pg, 35
System Menu ............................................ _Y pg, 30
T
T_le Macro ............................................... _Y pg. 30
Time Code ............................................ '_s pg, 6, 2t
Tripod Mounting ....................................... _Y pg, 14
Twilight .................................................... _Y pg, 35
U
Unload A Tape ......................................... _Y pg. 11
V
Video Echo ............................................... _Y pg, 35
W
White Balance .................................... _ pg. 40, 41
Wide Mode .............................................. 'zy pg, 29
Wind Cut ................................................. _Y pg, 30
Wipe In/Out ............................................. _Y pg, 31
Z
Zooming .................................................. _Y pg, 20
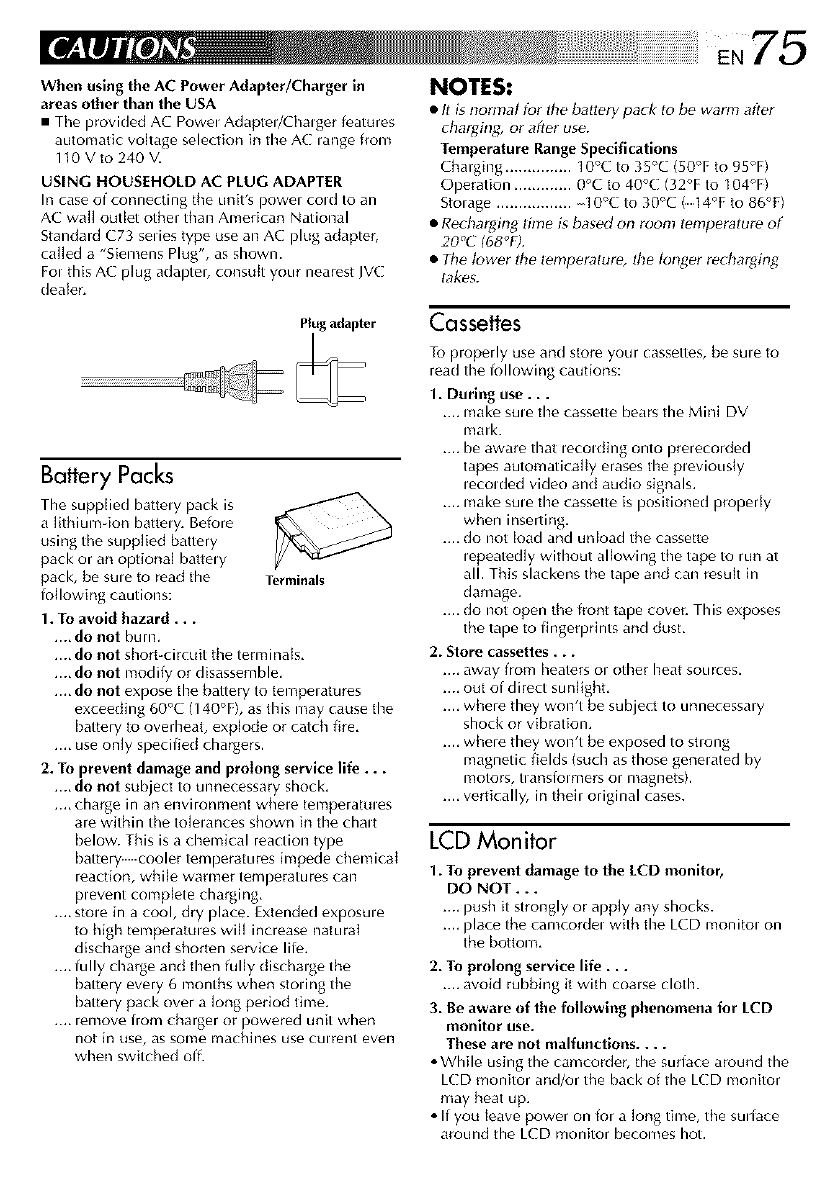
When using the AC Power Adapter/Charger in
areas other than the USA
• The provided AC Powel Adaptel/Chalger features
automatic voltage seledion in the AC lange from
110 V to 240 V.
USING HOUSEHOLD AC PLUG ADAPTER
In case of connecting the unit's powel cold to an
A( wall outlet other than American National
Standard C73 sedes type use an AC plug adapter,
called a "Siemens Plug", as shown.
Fol this AC plug adapter, consult your nearest JVC
dealer.
Battery Packs
The supplied batte Wpack is
a lithiumqon batte W. Before
using the supplied battery
pack or an optional batteW
pack, be sule to read the Terminals
lollowing cautions:
1. To avoid hazard...
.... do not bum,
.... do not short-circuit the terminats,
.... do not modify or disassemble.
.... do not expose the battery to tempelatures
exceeding 60°C (140°F), as this may cause the
battery to overheat, explode or catch fire,
.... use only specified chargers.
2. To prevent damage and prolong service life...
.... do not subject to unnecessary shock,
.... charge in an environment whele temperatules
are within the tolelances shown in timechalt
below. This is a chemical reaction type
battery cooler temperatures impede chenlicat
reaction, whi[e warnler temperatures calm
plevent complete charging,
.... stole in a cool, dry place. Extended exposule
to high temperatmes will increase naturat
discharge and shorten service liie.
.... fully charge and then fully dischalge the
battery every 6 nlonths when stoHng the
battery pack over a long period time,
.... remove from charger or powered unit when
not in use, as some machines use culrent even
when switched off.
NOTES:
•It is nornlal for the batlery pack to t_ warm after
charging_ or after use.
Temperature Range Specifications
Charging ............... 10°C to 35°C (50°F to 95°F)
Operation ............. 0°C to 40°C (32°F to 104°F)
Stolage ................. 10°C to 30°C (14°F to 86°F)
•Re_bar_ing dine is based on roonl tenlperature of
20% (68%).
•Tile lower d}e Ienlperature, d}e lonf_er recharging
takes.
Cassettes
To properly use and store your cassettes, be sule to
read the following cautions:
1. During use...
.... make sule timecassette bears the Mini DV
nlark.
.... be aware that lecolding onto prerecorded
tapes automatically erases the pleviously
lecolded video and audio signals.
.... make sule the cassette is positioned properly
when inserting.
.... do not load and unload the cassette
lepeatedly without allowing the tape to run at
all. This slackens the tape and can resuff in
damage.
.... do not open the front tape cover. This exposes
the tape to fingerprints and dust,
2. Store cassettes...
.... away from heaters Ol other heat sources.
.... out of direct sunlighh
.... where they won't be subje(t to unnecessary
shock or vibration.
.... where they won't be exposed to strong
magnetic fields (such as those genelated by
nlotors, tlansiolmers or magnets).
.... vertically, in theil original cases.
LCD Monitor
1. To prevent damage to the LCD monitor,
DO NOT...
.... push it strongly or apply any shocks.
.... place the camcordel with the LCD monitol on
the bottom,
2. To prolong service life...
.... avoid rubbing it with coalse cloth.
3. Be aware of the following phenomena for LCD
monitor use.
These are not malfunctions ....
• While using the camcorder, the surface around the
LCD monitor and/or the back of the LCD monitor
may heat tip.
• If you leave power on for a long time, the su0ace
around the LCD monitor becomes hot,
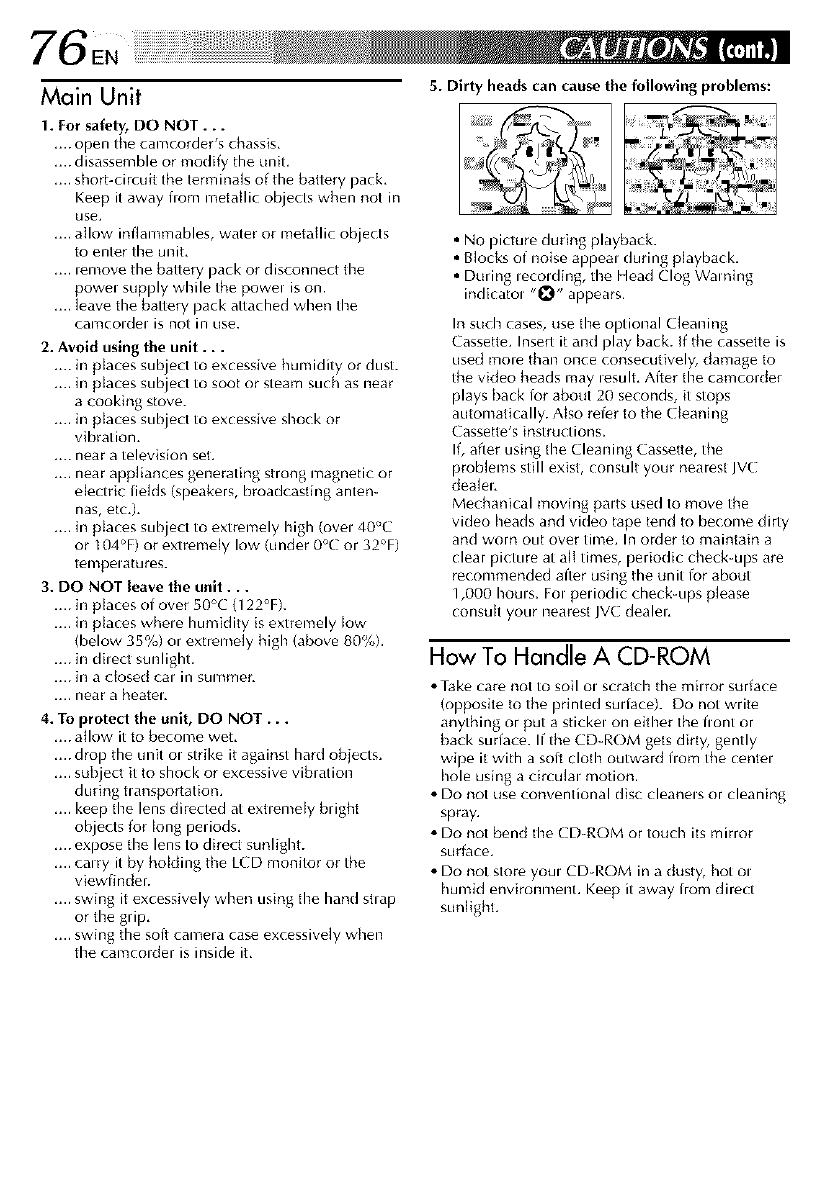
Main Unit
1. For safety, DO NOT...
.... open the camcorder's chassis,
.... disassemble or modify the unit,
.... short-circuk the terminals of the battery pack,
Keep it away from metallic objects when not in
use.
.... allow inflammables, water or metallic objects
to enter the unit,
.... remove the battery pack or disconnect the
powel supply while the powel is on.
.... leave the battery pack attached when the
canicoldel is not in use.
2. Avoid using the unit...
.... in places subject to excessive hunlidity or dust.
.... in places subject to soot or steam such as near
acooking stove.
.... in places subject to excessive shock or
vibration.
.... near a television set,
.... near appliances generating strong magnetic or
electric fields (speakers, broadcasting anten-
nas, etc,h
.... in places subject to extrenlely high (ovel 40°C
or ] 04°F) or extremely low (under 0°C or 32°F)
tempel atures.
3. DO NOT leave the unit...
.... in places of over 50°C (122°F).
.... in places whele humidity is extremely low
(below 35%) or extremely high (above 80%),
.... in dilect sunlight.
.... in a dosed cal in sumll/er,
.... near a heatel,
4. To protect the unit, DO NOT...
.... allow it to become wet,
.... drop the unit ol strike it against hard objects.
.... subject it to shock or excessive vibration
during tlansportation,
.... keep the lens directed at extremely bright
objects for long periods,
.... expose the lens to direct sunlight.
.... calry it by homing the LCD monitor or the
viewfinder.
.... swing it excessively when using the hand strap
or the grip,
.... swing the solt camera case excessively when
the camcorder is inside it,
5. Dirty heads can cause the following problems:
• No picture during playback.
• Blocks of noise appeal during playback,
• During lecolding, the Head Clog Warning
indicatol "_" appears.
In such cases, use the optional Cleaning
Cassette. Insert it and play back. if the cassette is
used more than once consecutively, damage to
the video heads nlay lesult, After the camcorder
plays back lot about 20 seconds, it stops
automatically. Also refer to the Cleaning
Cassette's instructions.
If, after using the Cleaning Cassette, the
problems still exist, consult your nearest JVC
dealel,
Mechanical moving palts used to move the
video heads and video tape tend to become dirty
and worn out over time. In order to maintain a
clear picture at a[t times, periodic check-ups are
recommended after using the unit for about
1,000 houls, Fol pedodic check-ups please
consult your nearest JVC dealeL
How To Handle A CD-ROM
• Take care not to soil ol scratch the milror surface
(opposite to the printed su0ace). Do not write
anything or put a stickel on either the fiont or
back surface. If the CD-ROM gets dirty, gently
wipe it with a sob cloth outward flora the centel
hole using a circulal motion.
• Do not use conventional disc cleanels or cleaning
spray.
• Do not bend the CDROM or touch its mirror
surface,
• Do not store youl CD-ROM in a dusty, hot ol
humid environment. Keep it away from direct
sunlight,
EN77
Declaration of Conformity
Model Number : CU-V50] U
Trade Name : JVC
Responsible party :USJVC CORP,
Address : 1700 Valley Road Wayne,
N. L 07470
Telephone Number : 973-3155000
This device complies with Part 15 of FCC Rules.
Opelation is subject to the iollowing two
conditions:
(1) This device may not cause harmful
intelference, and (2) this device must accept
any interference received, including interfer-
ence that may cause undesired operation,
Change or modifications not approved by the
party responsible for compliance couM void the
user's authority to operate the equipment. This
equipment has been tested and found to
comply with the limits for a Class B digital
device, pursuant to Part 15 of the FCC Rules.
These limits ale designed to provide reasonable
)rotection against harmful interference in a
lesidentia[ installation, This equipment
generates, uses, and can radiate ladio frequency
energy and, if not installed and used in
accordance with the instructions, may cause
hamliu[ interierence to radio conlmunications,
However, the_e is no guarantee that interference
will not occul in a particular installation. If this
equipment does cause harmful inte0erence to
ladio ol television reception, which can be
determined by turning the equipment off and
on, the USelis encomaged to tly to colrect the
interference by one or more of the lollowing
iTleasttres:
Reorient or relocate the receiving antenna.
Increase the sepalafion between the equip-
merit and leceiver.
Connect the equipment into an outlet on a
chcuit diffelent from that to which the
receivel is connected.
Consult the dealer or an experienced radio/
IV technician iol help.
About moisture condensation...
• You have obsewed that pouring a coM liquid
into a glass witl cause drops of water to form
on the glass' outer surface. This same
phenomenon occurs on the head drum of a
camcorder when it is moved from a coot
place to a warm place, after heating acoM
loom, under extremely humid conditions or
in a place directly subjected to the cool air
from an air conditioner.
• Moisture on the head drum Calmcause sevele
damage to the video tape, and can lead to
intema[ damage to the camcorder itself.
Serious malfunctioning
If nlalfunctioning occurs, stop using the unit
immediately and consutt your local JVC dealer,
The camcorder is a microcomputel-controlled
device. External noise and interierence (from a
TV, a radio, etc.) might prevent it from function-
ing properly. In such cases, first disconnect its
power supply unit (battery pack, AC Powel
Adapter/gattely Chalger, etc.) and wait a lew
minutes and then le-connect it and proceed as
usuat from timebeginning.
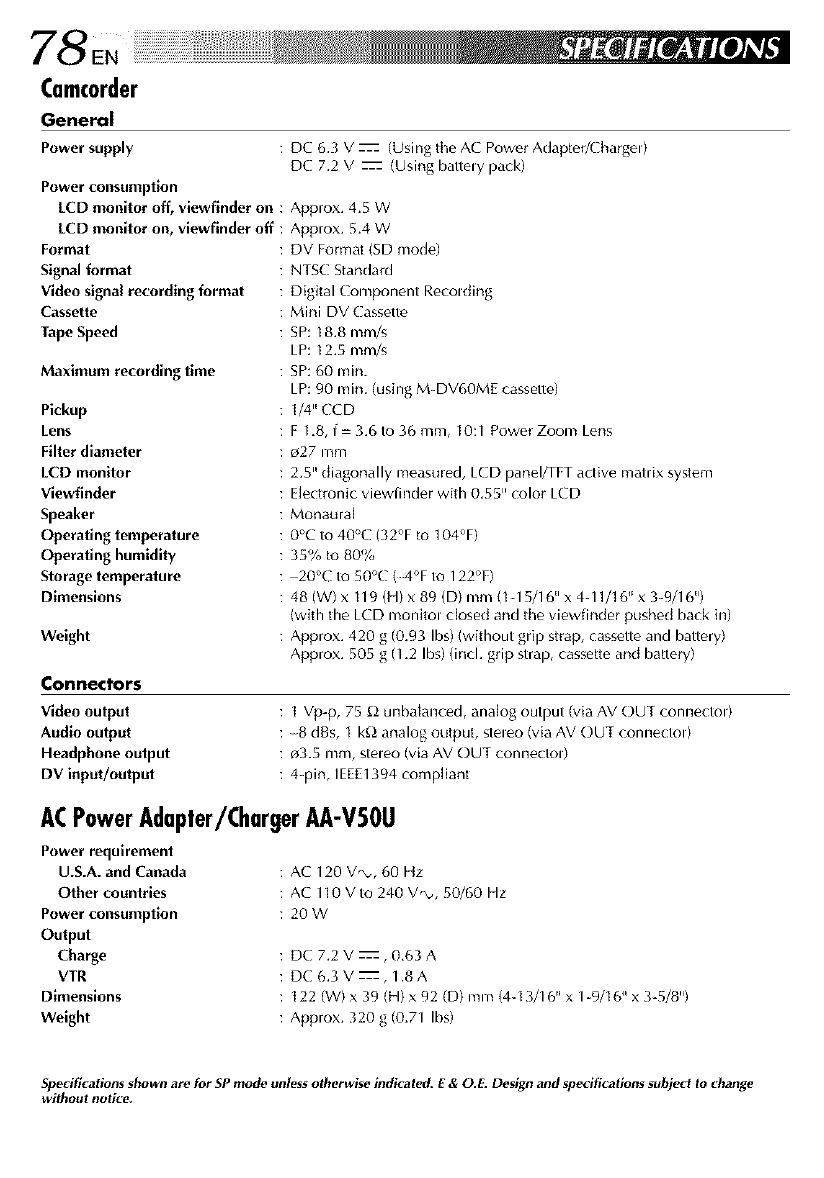
Camcorder
General
Power supply : DC 6,3 V z (Using tile AC Power Adapter/E-hargel)
DC 7.2 V _ (Using battely pack)
Power consumption
LCD monitor off, viewflnder on :
LCD monitor on, viewfinder off :
Format
Signal format
Video slgnal recording format
Cassette
Tape Speed
Maximum recording time
Pickup
Lens
Filter diameter
LCD monitor
Viewfinder
Speaker
Operating temperature
Operating humidity
Storage temperature
Dimensions
Weight
Approx. 4.5 W
Approx. 5.4 W
: DV Format (5D mode)
: NTSC Standard
: Digital Component Recolding
Mini DV Cassette
SP: 18.8 mm/s
LP: 12.5 mm/s
SP:60 rain.
LP: 90 nlin. (using M-DV60ME cassette)
t/4" CCD
F 1.8, f- 3.6 to 36 mm, 10:1 Power Zoom Lens
_27 mm
2.5" diagonally measured, LCD panel/TFT active matrix system
Electronic viewfinder with 0.55" color LCD
Monaural
0°C to 40°C (32°F to 104°F)
35% to 80%
20°( to 50°C (4°F to 122°F)
48 (W) x 119 (H) x 89 (D)mm (1-15/16"x 4-11/16_'x 3-9/16")
(with the LCD monitol dosed and the viewfinder pushed back in)
Approx. 420 g (0.93 Ibs) (without grip strap, cassette and battery)
Approx. 505 g (1.2 Ibs) (incl. grip strap, cassette and battery)
Connectors
Video output
Audio output
Headphone output
DV input/output
t Vp-p, 75 £_unbalanced, analog output (via AV OUT connectol)
8 dBs, 1 k£_analog output, steleo (via AV OUT connectol)
_;3.5 ram, stereo (via AV OUT connector)
4-pin, IEEE1394 compliant
ACPowerAdapter/ChargerAA-V50U
Power requirement
U.S.A. and Canada
Other countries
Power consumption
Output
Charge
VTR
Dimensions
Weight
AC 120 VQ,, 60 Hz
AC 110 V to 240 V,_,, 50/60 Hz
2OW
DC 7.2 V _, 0.63 A
DC 6.3 V z, 1.8A
t 22 (W) x 39 (H) x 92 (D) mm (4-13/16" x 1-9/16 _ x 3-5/8")
Approx. 320 g (0.71 Ibs)
Specifications shown are for SP mode unless otherwise indicated. E & O.E. Design and specifications subject to change
without notice.

EN79
DockingStation
General
Dimensions 115 mm (W) x 31 mm (H) x 55 mm (D) (4-9/16" x 1-1/4" x 2-3/16")
Weight Approx. 90 g (0,2 Ibs)
ConnectoF5
S-Video
Video
Audio
JLIP
Editing
PC
External microphone input
Y: 1Vp-p, 75 _, analog output
C: 0.29 Vp-p, 75 _2, analog output
1Vp-p, 75 _2, analog output
.....8 dBs, 1 k£_,anaiog output
03,5 mm, 4-pole, mini-head jack (compatible with RC-5325 plug)
03,5 mm diameter, 2-pole
02,5 mm, 3-pole
.....68 dBs, high impedance unbalanced with o3,5 mm (stoeo)
E & O.E. Design and specifications subject to change without notice.

t,,,tl
JVC
VICTOR COMPANY OF 3APAN, LIMITED
COPYRIGHT(# 1999 VICTOR COMPANY OF JAPAN, LTD. Printed in Japan _'A
[] _0299HOVSUNSYp Hh
