JVC GR DVM70 User Manual DIGITAL VIDEO CAMERA Manuals And Guides L0604369
JVC Digital Camcorder Manual L0604369 JVC Digital Camcorder Owner's Manual, JVC Digital Camcorder installation guides
User Manual: JVC GR-DVM70 GR-DVM70 JVC DIGITAL VIDEO CAMERA - Manuals and Guides View the owners manual for your JVC DIGITAL VIDEO CAMERA #GRDVM70. Home:Electronics Parts:Jvc Parts:Jvc DIGITAL VIDEO CAMERA Manual
Open the PDF directly: View PDF ![]() .
.
Page Count: 112 [warning: Documents this large are best viewed by clicking the View PDF Link!]
JVC
DIGITAL VIDEO CAMERA
GR-DVM70 ENGLISH
Please visit our CyberCam Homepage on the
World Wide Web and answer our Consumer
Survey (in English only):
Mini
NTSC
INSTRUCTIONS
For Customer Use:
Enter below the Model No. and Serial
No. which is located Oll the bottoln ot
cabinet. Retain this information for
tuture refelellce.
Model No,
Serial No,
LYT0384-001A
Dear Customer,
Thank you for purchasing this digital video camera.
Before use, please read the safety information and
precautions contained in the following pages to
ensure safe use of this product.
Using This Instruction Manual
o All major sections and subsections are listed in the
Table Of Contents (L_" pg. 8).
,_ Notes appear after most subsections. Be sure to read
these as well.
,_ Basic and advanced features/operation are separated
for easier reference.
It is recommended that you...
..... refer to the Index (L_" pgs. 99 106) and familiarize
yourself with button locations, etc. before use.
..... read thoroughly the Safety Precautions and Safety
Instructions that follow. They contain extremely
irnportant information regarding the safe use of this
product.
You are recommended to carefully read the cautions
on pages 107 through 109 before use.
SAFETY
PRECAUTIONS
CAUTION: TO REDUCE THE RISK OF ELECTRIC SHOCK,
DO NOT REMOVE COVER (OR SACK).
NO USER-SERVICEABLE PARTS INSIDE
REFER SERVICING TO QUALIFIED SERVICE PERSONNEL.
The lightning flash with arrowhead symbol, within an
equilateral triangle, is intended to alert the user to the
presence of uninsulated "dangerous voltage" within the
product's enclosure that may be of sufficient magnitude
to constitute a risk of electric shock to persons¸
The exclamation point within an equilateral triangle is
intended to alert the user to the presence of important
operabng and maintenance (servicing) instructions in
the literature accompanying the appliance.
The AA-V50U AC Power Adapter/Charger should be
used with:
AC 120 V,_,, 60 Hz in the USA and Canada,
AC 1I 0 240 V,_, 50/60 Hz in other countries.
CAUTION (applies to the AA-VSOU)
TO PREVENT ELECTRIC SHOCK MATCH WIDE
BLADE OF PLUG TO WIDE SLOT, FULLY INSERT.
ATTENTION (s'applique & I'AA-VSOU)
POUR EVITER LESCHOCS ELECTRIQUES,
INTRODUIRE LA LAME LA PLUS LARGE DE LA
FICHE DANS LA BORNE CORRESPONDANTE DE
LA PRISE ET POUSSER IUSQU'AU FOND.
WARNING:
TO PREVENT FIRE OR SHOCK
HAZARD, DO NOT EXPOSE
THIS UNIT TO RAIN OR
MOISTURE.
Warning on lithium cell battery
(for remote control unit)
The battery used in this device may present a fire
or chemical burn hazard if mistreated. Do not
recharge, disassemble, heat above 100'((212'F)
or incinerate.
Replace the battery with Maxell, Panasonic
(Matsushita Electric), Sanyo or Sony CR2025; use
of another battery may present a risk of fire or
explosion.
[] Dispose of used battery promptly.
[] I<eep away from children.
[] Do not disasseFnble and do not dispose of in
fire.
NOTES:
[] The rating plate (_erial number plate) and satety
cautiorl are on the bott_;m arid/or the back of
the main unit.
[] The rating plate &erial number plate) ot the AC
Power Adapter/dhary, er is on its bottom.
[] The rating plate (serial number plate) of the
Docking Station is on its bottom.
This Class B digital apparatus cornplies with
(anadian I( ES-00 }.
(et appareil num6rique de la classe Best
conforme 21la norme NMB4)03 du ( anada.
This camcorder is designed to be used with
NTS( -type color television signals. It cannot be
used for playbacl< with a television of a different
standarcl. However, live recording and LCD
monitor/viewfinder playbacl< are possible
anywhere. Use the BN-VS07U/V51 4U battery
pacl<s and, to recharge them, the provided multi-
voltage AC Power Adapter/Charger. (An
appropriate conversion adapter may be
necessary to accommodate different designs of
AC outlets in different countries.)
z
IMPORTANTPRODUCT
SAFETYINSTRUCTIONS
Electrical energy caR1perform many usefnl function4,
But improper use can result in potential electrical
shock or fire hazards. This product has been
engineered and manufactured to assure your
personal safety. In order not to defeat the buihdn
safeguards, observe the following basic rules for its
installation, use and servicing.
ATTENTION:
FolI_vv and obey all warnings and instructions
marl<ed on your product and its operating instruc-
tions. For your safety, [)lease read all the safety arrd
operating h_structions before you operate this
product and I<eep this manual for future reference.
INSTALLATION
I. Grounding or Polarization
(A) Your product may be equipped with a )olarized
alternathlg-current Ihle plug (a plug having one blade
wider than the other). This plug will fit into} the
power outlet only one way. This is a safety feature.
if you are unable to insert the plug fully into the
outlet, try reversing the plug. if the pk_g should still
fail to fit, contact your electrician to replace your
obsolete outlet. Do not defeat the safety purpose of
the polarized plug.
(B) Your product may be equipped with a 3-wire
grounding-type i:llug, a I:llug having a third (ground-
it, g} pin. This ):lklg will ol4y fit into a grounding-type
power outlet. This is a safety feature.
if you are unable to insert the plug into die outlet,
contact your electrician to replace your obsolete
outlet. Do not defeat tbe safety purpose of the
grounding4ype plug.
2. Power Sources
_.)l-ierate your i-iroduct only from the type of power
source indicated on the marking label. If you are not
sure of the type of power supply to your home, consult
your product dealer or local power company. If your
product is intended to operate from battery power, or
other sources, refer to the operating instructions.
3. Overloading
Do not overload wall uutlets, extension cords, or integral
convenience receptacles as this can result in a risk of fire
or electric shock.
4. Power Cord Protection
Power supply cords should be routed so that they are
not likely to be walked on or pinched by items placed
upon or against them, paying particular attention to
cords at plugs, convenience receptacles, and the point
where they exit from the product.
5. Ventilation
Slots and openings h) the cabinet are provided for
vei_tilatioi_. To ensure reliable operation of the product
and to protect it from overheating, these openings must
not be blocked or covered.
Do not block the openings by placing the product on a
bed, sofa, rug or other similar surface.
o Do not place the product in a built-in installation such
as a bookcase or rack unless proper ventilation is
provided or the manufacturer's instructions have been
adhered to.
6. Wall or Ceiling Mounting
The product should be mounted to a wall or ceiling only
as recommended by the manufacturer.
ANTENNA INSTALLATION
INSTRUCTIONS
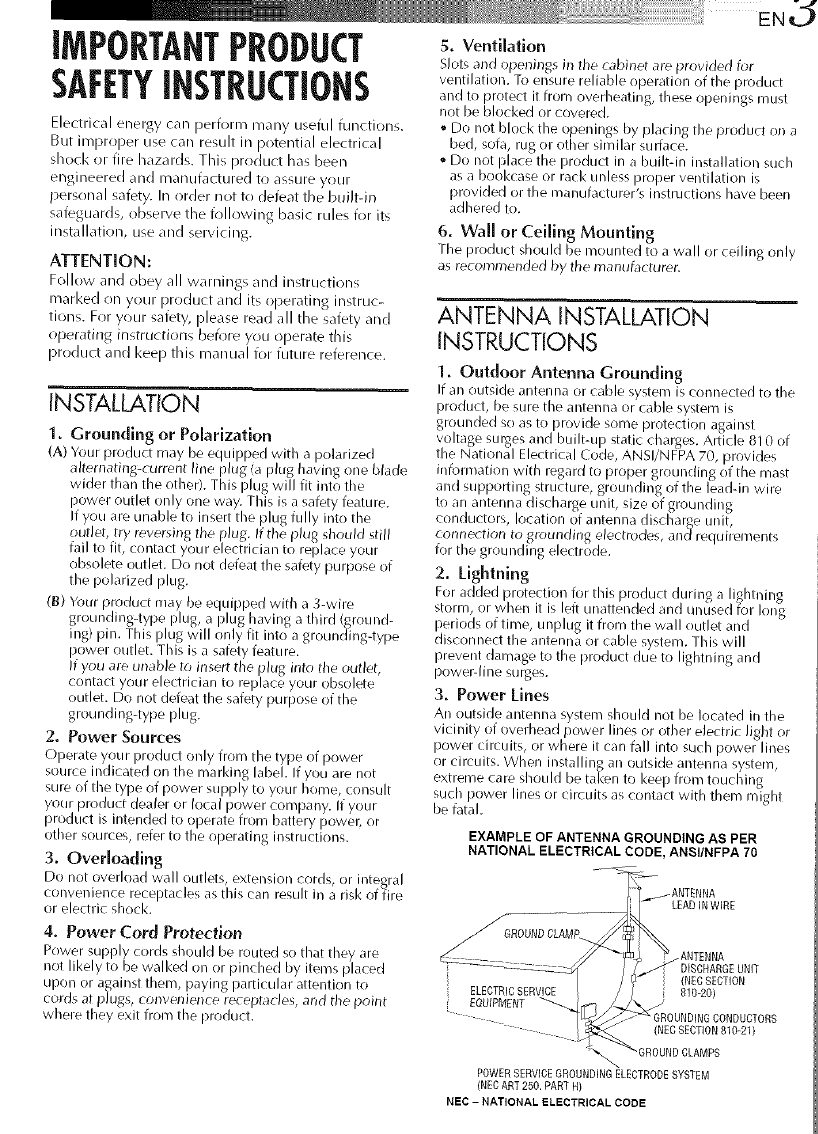
1. Outdoor Antenna Grounding
If an oLitside anterma or cable system is connected to the
r)roduct, be sure the antenna or cable system is
grounded so as to provide some protection against
voltage surges and built-up static charges. Article 81 0 of
the National Electrical Code, ANSI/NFPA 70, provides
infom_ation with regard to proper grounding of the mast
and supporting structure, grounding of the lead-in wire
to an antenna discharge unit, size of grounding
conductors, k_cation of antenna discharge unit,
conn_tion tO grounding electrodes, and requirements
for the grounding electrode.
2. Lightning
For added protection for this product during a lightning
storm, or when it is left unattended and Ul)used for long
periods of time, unplug it from the wall outlet and
discormect the antenna or cable system. "fhis wi}}
prevent damage to the product due to lightning and
power-fine surges.
g. Power Lines
An outside anteima system should not be located in the
vicinity of overhead power lines or other electric light or
power circuits, or where it can fall into such power lines
or circuits. When installing an outside antenna system,
extreme care should be taken to keep from touching
such power lines or circuits as contact with them might
be fatal.
EXAMPLE OF ANTENNA GROUNDING AS PER
NATIONAL ELECTRICAL CODE, ANSI/NFPA 70
LEADiNWiRE
.ANTENNA
DISCHARGEUNiT
(NECSECTION
810-20}
(NECSECTION810-21)
POWERSERVICEGROUNDINGELECTRODESYSTEM
(NEDART250. PARTH)
NEC -NATIONAL ELECTRICAL CODE
USE
1. Accessories
To avoid personal injury:
• Do not place this product on an unstable cart,
stand, tripod, bracket or table. It may fldl, causing
serious injury to a child or adult, and serious
damage to the product.
• Use only with a cart, stand, tripod, bracket, or table
recommended by the manm\_cturer or sold with the
product.
° Use a mounting accessory recommended by the
manufacturer and follow the manufl_cturer's
instructions for any mounting of the product.
°Do not try to roll a cart with small casters across
thresholds or deep-pile carpets.
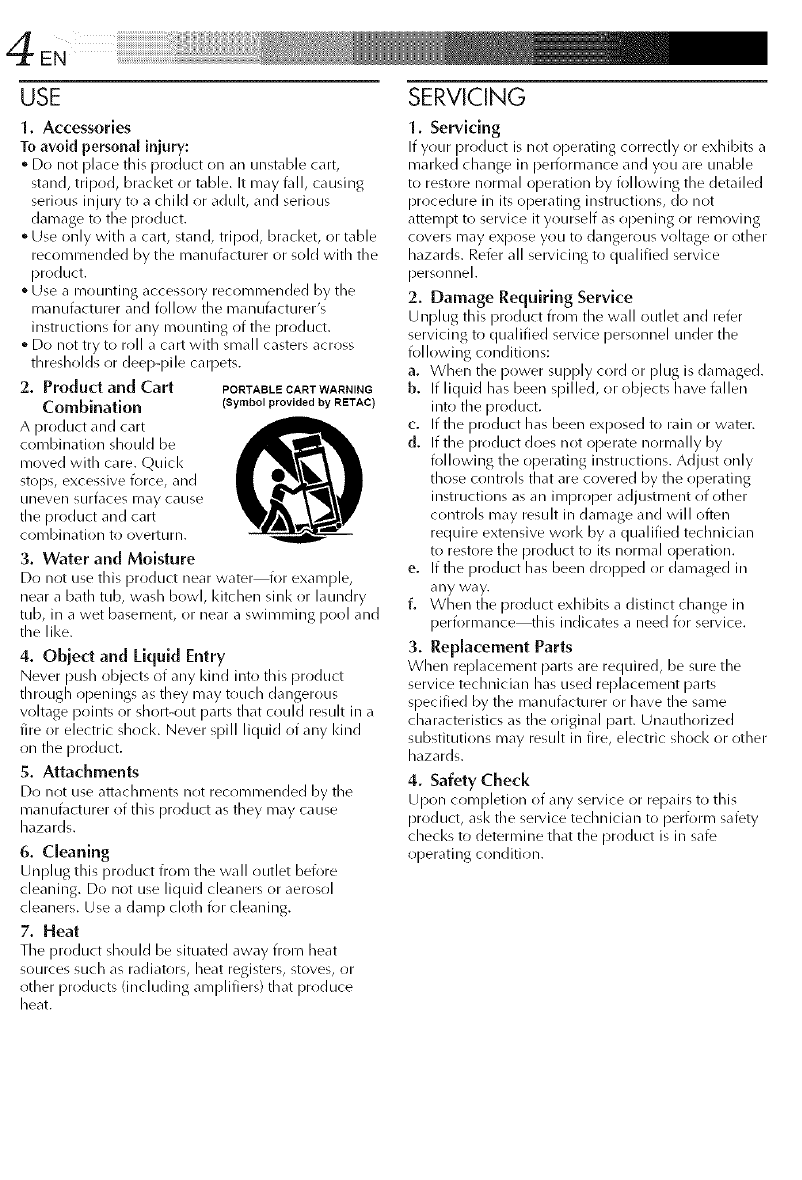
2, Product and Cart PORTABLECARTWARNING
Combluatlou (Symbol provided by RETAC)
A product and cart
combination should be D
moved with care. Quick
stops, excessive force, and
/ineven surfaces may cause
the product and cart
cornbination to overturn.
3. Water and Moisture
Do not use this product near water'or example,
near a bath tub, wash bowl, Idtchen sink or laundry
tub, in a wet basement, or near a swimming pool and
the like.
4. Object and Liquid Entry
Never push objects of any Idnd into this product
through openings as they may touch dangerous
w>ltage points or short-out [)arts that could result in a
fire or electric shocl<. Never spill liquid of any Idnd
on the product.
5. Attachments
Do not use attachments not recommended by tile
manut_lcturer of this product as they may cause
hazards.
6. Cleauiug
Unplug this product from the wa II outlet bei_)re
cleaning. Do not use liquid cleaners or aerosol
cleaners. Use a damp cloth k_r cleaning.
7, Heat
Tile product should be situated away from heat
sources such as radiators, heat registers, stoves, or
other products (including amplifiers) that produce
heat.
SERVICING
I. Servicing
If your product is not operating correctly or exhibits a
marl<ed change inperformance and you are unable
to restore normal operation by following the detailed
procedure in its operating instructions, do not
attempt to service it yourself as opening or removing
covers may expose you to dangerous vohage or other
hazards. Refer all servicing to qualified service
persollnel.
2. Damage Requiring Service
Unplug this product from the wall outlet and refer
servicing to qualified service personnel under the
following conditions:
a. When the power supply cord or plug is damaged.
b. If liquid has been spilled, or objects have fldlen
into the product.
c. If the product has been exposed to rain or water.
d. If the product does not operate normally by
followi ng the operating instructions. Adjust only
those controls that are covered by the operating
instructions as an improper adjustment of other
controls may resuh in damage and will often
require extensive worl< by a qualified technician
to restore the product to its normal operation.
e. If the product has been dropped or damaged in
any way.
f. When the product exhibits a distinct change in
performance_his indicates a need for service.
3. Replacement Parts
When replacement parts are required, be sure the
service technician has used replacement parts
specified by the manufacturer or have the same
characteristics as the original part. Unauthorized
substitutions may resuh in fire, electric shocl< or other
hazards.
4. Safety Check
Upon completion of any service or repairs to this
product, ask the service technician to perform safety
checl<s to determine that the product is in safe
operating condition.
¸¸ EN5
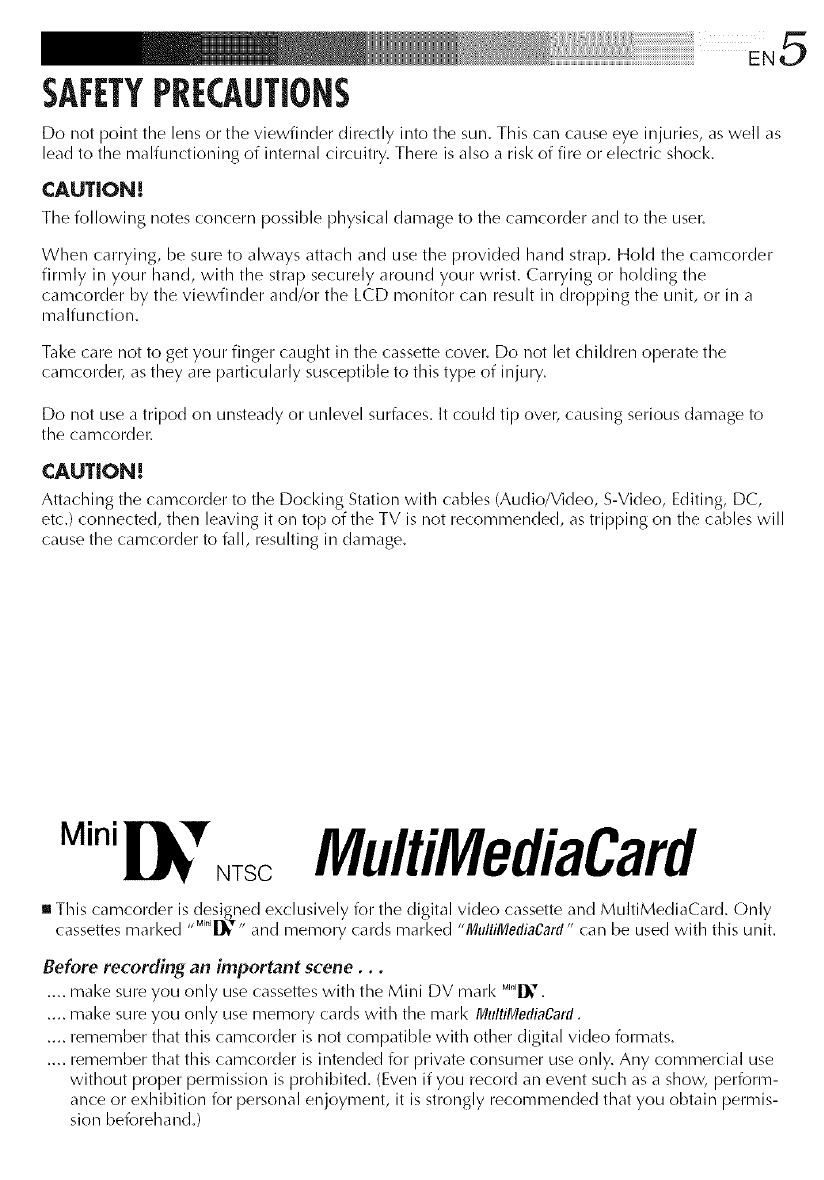
SAFETYPRECAUTIONS
Do not point the lens or the viewfinder directly into the sun. This can cause eye injuries, as well as
lead to the malfunctioning of internal circuitry. There is also a risk of fire or electric shock.
CAUTION[
The following notes concern possible physical damage to the camcorder and to the user.
When carrying, be sure to always attach and use the provided hand strap. Hold the camcorder
firmly in your hand, with the strap securely around your wrist. Carrying or holding the
camcorder by the viewfinder and/or the LCD monitor call result ill dropping the unit, or in a
malfunction.
Take care not to get your finger caught in the cassette cover. Do not let children operate the
camcordeb as they are particularly susceptible to this type of injury.
Do not use a tripod on unsteady or unlevel surfaces. It could tip over, causing serious damage to
the camcorder.
CAUTION[
Attaching the camcorder to the Docking Station with cables (Audio/Video, S-Video, Editing, DC,
etc.) connected, then leaving it on top of the TV is not recommended, as tripping on the cables will
cause the camcorder to fall, resulting in damage.
Mini
NTSC MultiMediaCard
Ill This camcorder is designed exclusively for the digital video cassette and MultiMediaCard. Only
cassettes marked //Mi"i_" and memory cards marked "MulliMediaCard" can be used with this unit.
Before recording an important scene...
.... make sure you only use cassettes with the Mini DV marl< _I_'.
.... make sure you only use memory cards with the mark MultiMetliaCard.
.... remember that this camcorder is not compatible with other digital video formats.
.... remember that this camcorder is intended for private consumer use only. Any commercial use
without proper permission is prohibited. (Even if you record an event such as a show, perform-
ance or exhibition for personal enjoyment, it is strongly recommended that you obtain permis-
sion beforehand.)
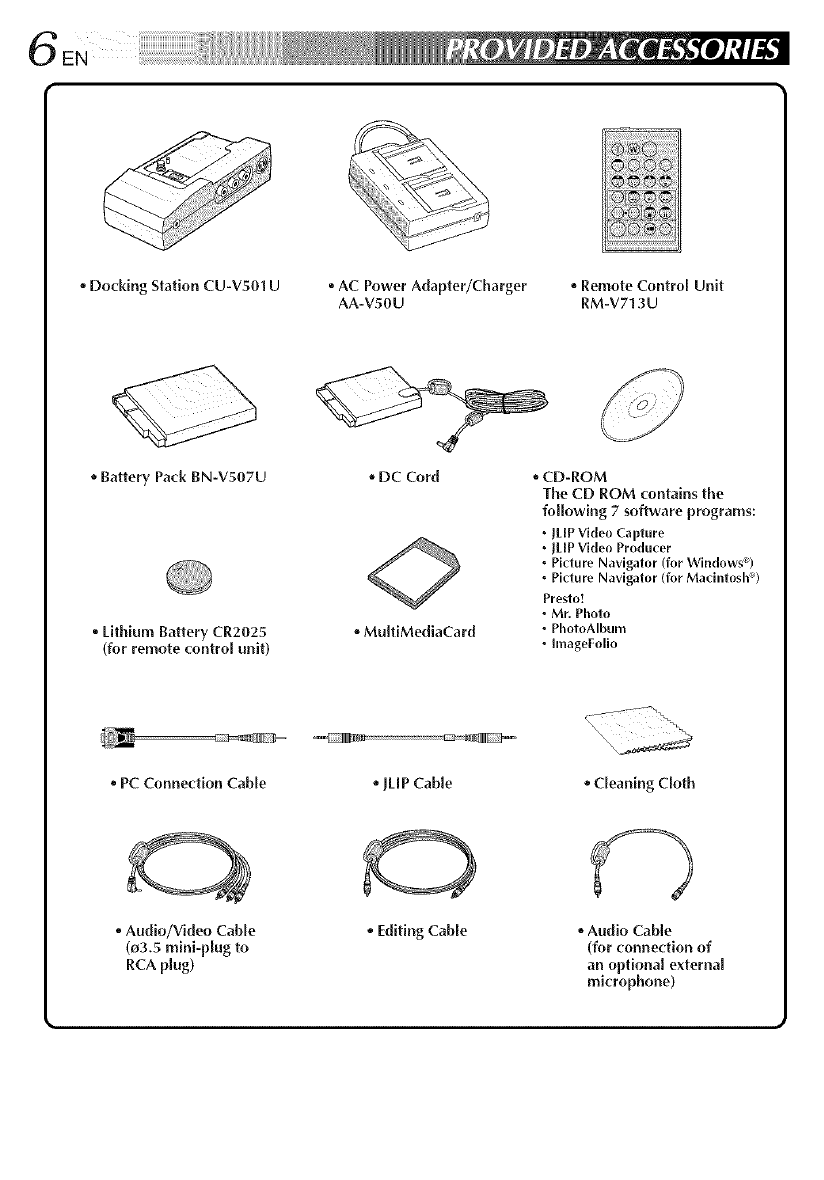
• Docking Station CU-V501 U • AC Power Adapter/Charger *Remote Control Unit
AA-VSOU IRM-V713U
o Battery Pack BN-VS07U
*Lithium Battery CR2025
(for remote control unit)
DC Cord
MultiMediaCard
QCD-ROM
The CD ROM contains the
following 7 software programs:
JLIP Video Capture
JLIP Video Producer
Picture Navigator (for Windows_9
Picture Navigator (for Macintosh _)
Presto!
Mr. Photo
PhotoAIbum
[mageFollo
o PC Connection Cable
• Audio/Video Cable
(o3.5 mini-plug to
RCA plug)
oJLIP Cable
• Editing Cable
o Cleaning Cloth
Audio Cable
(for connection of
an optional external
microphone)
¸¸¸ ENZ
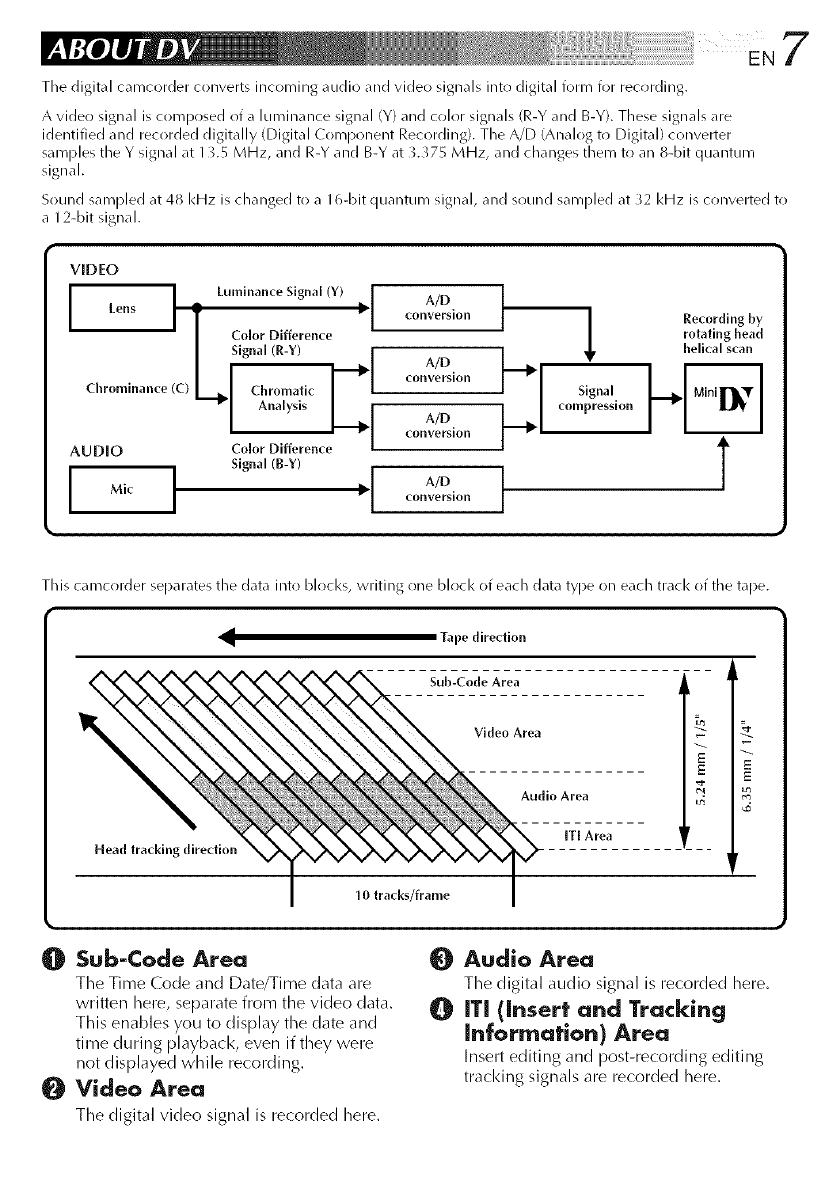
The digital camcorder converts incoming audio and video signals into digital form for recording.
A video signal is comprised of a luminance signal (Y) and color signals (R-Y and B-Y). These signals are
identified and recorded digitally (Digital Component Recording). The A/D (Analog to Digital) converter
samples the Y signal at 13.5 MHz, and R-Y and B-Y at 3.375 MHz, and changes them to an 8-bit quantum
signal.
Sound sarnl)led at 48 kHz is changed to a 16-bit quantum signal, and sound sampled at ;2 kHz is converted to
a 12-bit signal.
VIDEO
JLens 'Lunlhlam-e Signal (Y) , A/D [
converslon
AUDIO Co or D florence
Signal
_ompresslon
Recording by
rotating head
helical s_-an
T
This camcorder separates the data into blocks, writing one block of each data type on each track of the tape.
Tape direcUon
Head tracking directie_
I0 tracks/frame
Sub-Code Area
Video Area
Audio Area
IT[ Area
m
E
¢t mzs
,.D
w
Sub-Code Area
The Time Code and Date/Time data are
written here, separate from the video data.
This enables you to display the date arid
time during playback, even if they were
not displayed while recording.
Video Area
The digital video signal is recorded here,
Audio Area
The digital audio signal is recorded here.
ITi (Insert and Tracking
Information) Area
Insert editing and post-recording editing
tracl<ing signals are recorded here.
\EN 9
DubbingImges/Sounds RecordedOnA TapeToAnotherTape....................................... 74
DigitalDubbingOf RecordedImages/SoundsBetweenTapes........................................ 75
DubbingImugesStoredIn A MuhiMediuCardToA Tape............................................... 76
DubbingImugesRecordedOnA TapeToA MelfiMediuCard........................................... 77
CopyingImugesUsingInfrared(ommunkafio. [IrTrun-P]................................. 78
RandomAssemMeEdifin9 .................................................................................. 84
ForMoreAccurufeEdifin9 .................................................................................. 88
AudioDubbing................................................................................................ 90
InifiaJffingA MuJfiMediuCard.............................................................................. 91
DockingSlafio......................................................................................... 99
(enffeJs,(onnecforsAndJ_k_fors .................................................................... ]O0
Indk_fio_s............................................................................................ 102
Terms........................................................................................................ 106
10E.
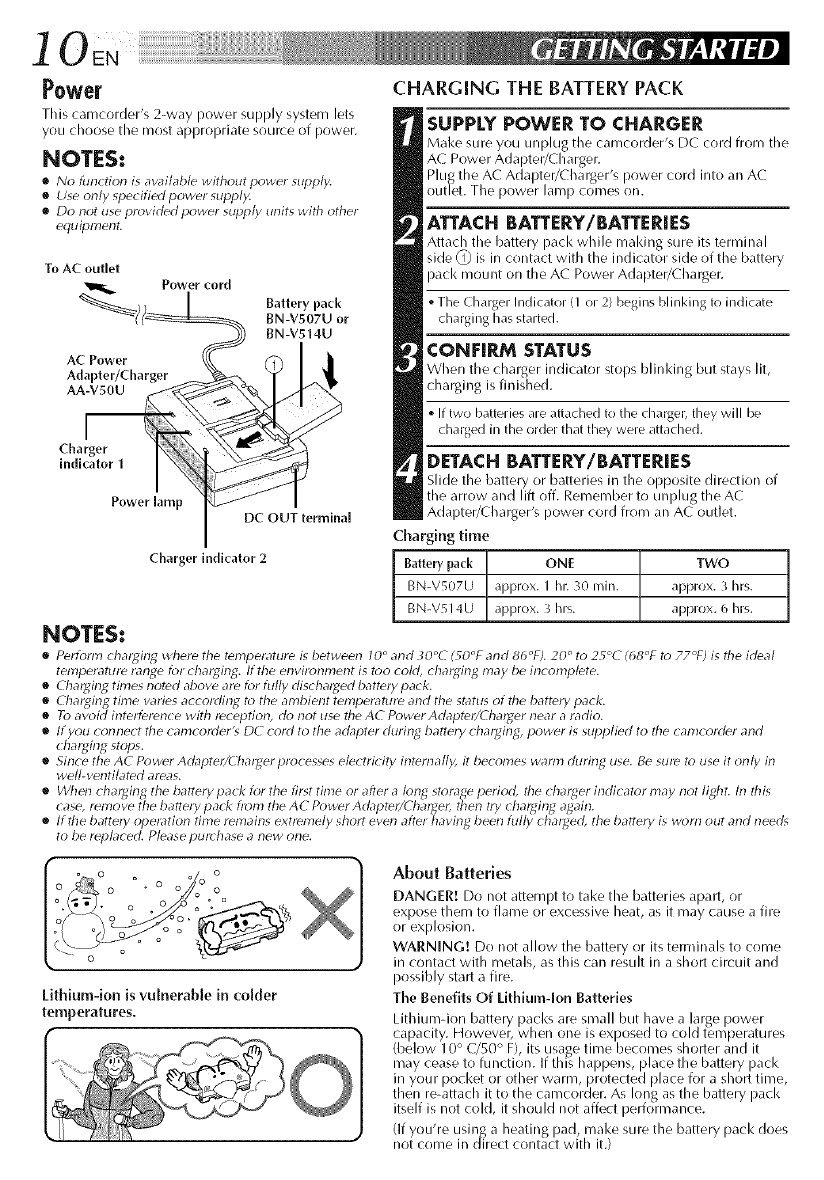
Power
This camcorder's 2-way power supply system lets
you choose the most appropriate source of power.
NOTES:
•No function is available without power supply.
•Use only specified power supply.
•Do not use provided power supply units with other
equipmellt.
To AC outlet
Power cord
_) )__ Battery pack
BN-V5t4U
_/_ BN-VS07U or
AC Power _
Adapter/Charger
AA
Cha
indi Power lamp DC OUT terminal
Chargerindicator2
NOTES:
CHARGING THE BATTERYPACK
SUPPLY POWER TO CHARGER
Mal<e sure you unplug the camcorder's DC cord from the
AC Power Adapter/Charger.
Plu_ the AC Adapter/Charger's power cord into an AC
outlet. The power lal-i_p comes on.
ATTACH BATTERY/BATTERIES
Attach the battery pack while making sure its terminal
side _] is in contact with the indicator side of the battery
pack mount on the AC Power Adapter/Lharger.
oThe Charger hldicator 41 or 2} hegins Minking to indicate
charging has started.
CONFIRM STATUS
When the charger indicator stops I_linl<ing but stays lit,
charging is finished.
•If two batteries are attached to the charger, they will be
charged in the order that they were attached.
DETACH BATTERY/BATTERIES
Slide the battery or batteries in the opposite direction of
the arrow and lift off. Remember to unplug the AC
Adapter/Charger's power cord from an AC outlet.
Charging time
Battery pack ONE TWO
BN-VS07U approx. I hr. 30 nlin. approx. 3 hrs.
BN-V514U approx. 3 hrs. approx. 6 hrs.
•Perform chal_ing where the temperature is between 10 °and _0°C (TO°F and 86°F). 20 °to 25°47 (68°F to 77°F) is the ideal
temperature range for chal_ing, ff the environment is too cold, chal_ing may be in( onlplete.
•Chal_in_ times noted above are for fully dischal_ed bat/el 7pack.
•Chal:ging time varies according to the ambient temperature and the status of the battery pack.
•To avoid interference with reception, do not use tile AC Power Adapteli4 7_al_er near a radio.
•If you connect tile camcolder'_ D4 cold to the adapter during battel 7 chal_ing, power is supplied to tile camcorder and
cha;:_ing stops.
•Since the AC Power Adaptelid_lal_er processes electricity internally, it becomes warnl during use. Be sure to use it only in
well-ventilated areas.
•When chal_ing the battel 7pack for the first time or after a/on_ storag, eperiod, the chal_er indicator may not lighL In this
case, remove the battel 7pad< from the A4 Power Acbptelid'hal_el, then tl7chal_in_ a_ain.
•If the bat/ely opel_tion time remains extremely short even after having been fully chal_ed, the battel 7is worn out and need_
to be replaced. Please purchase anew one.
Lithium-ion is vuJnerabJe in comer
temperatures.
About Batteries
DANGER/ Do not attempt to take the batteries apart, or
expose them to flame or excessive heat, as it may cause a fire
or exl;losion.
WARNING! Do not allow the battery or its terminals to come
in contact with metals, as this can result in a short circuit and
rlossibly start a fire.
The Benefits Of Lithium-Ion Batteries
Litlqum-ion battery packs are small but have a large power
capacity, f towever, when one is exposed to cold temperatures
(below 1 0 ° C/50 ° F), its usage time becomes shorter and it
may cease to function. If this happens, place the battery pack
in your pocket or other warm, protected )lace for a short time,
then re-attach it to the camcorder. As long as the battery )ack
itself is not cold, it should not affect performance.
(If you're usin_ a heating lad, make sure the battery pack does
not come in direct contact with it.)
ENI 1
ATTENTION:
Before detadling the power source,
make sure that the camcorder's power
is turned off. Failure to do so can result
in a camcorder malfunction.
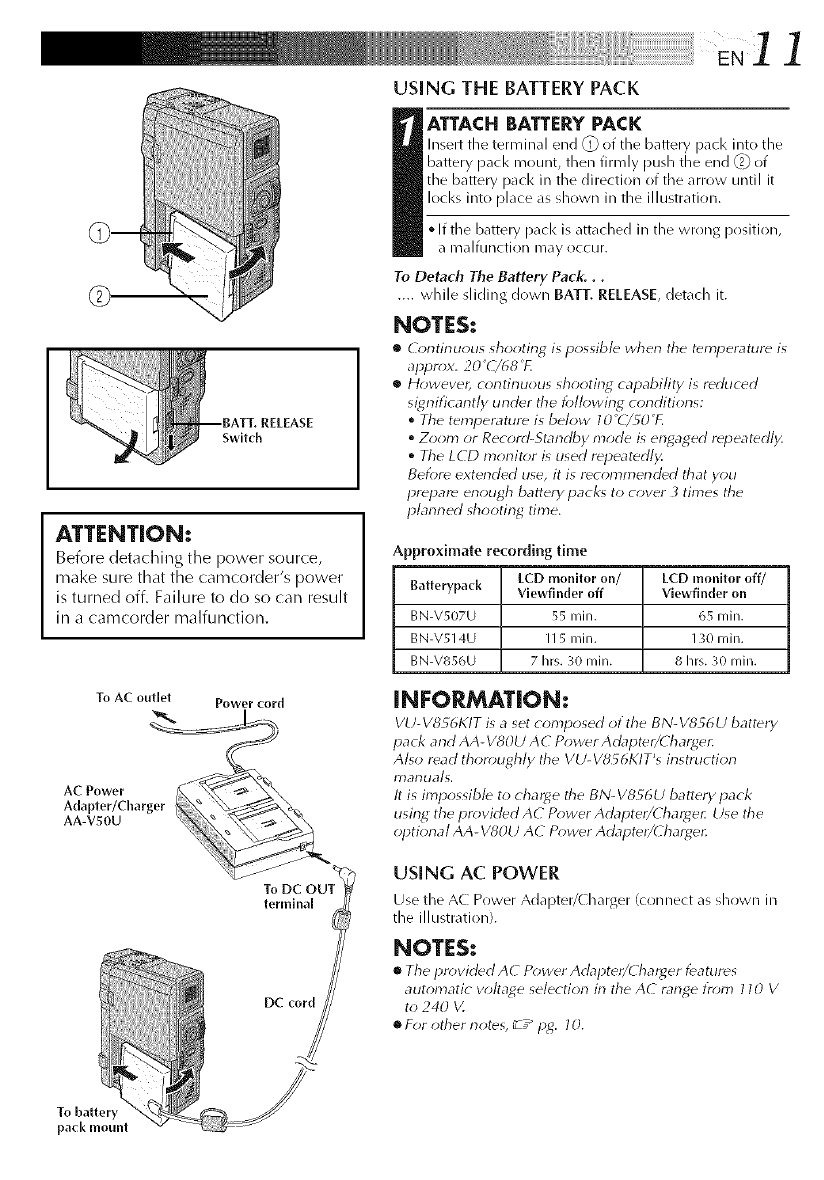
USING TIlE BATTERY PACK
ATTACH BATTERY PACK
Insert tile terminal end _ of tile battery pack Jilt() tile
battery pack mount, then firmly push the end _2_of
the battery pacl< in the direction of the arrow until it
locks into place as shown in the illustration.
° If the battery pacl< is attached in the wrong position,
a malfunction may occur.
To Detach The Battery Pack,..
.... while sliding down BAT]-. RELEASE, detach it.
NOTES:
•Continu_xls shooting is p_ssibl_ when the t_mperatur_ is
appr_x, 20 _(/68 _1.
•However, c_mtinuous shooting capability is reduced
sigrlificarttly under the f_>lh>wing conditiorls:
°The temperature is below l O°(7_O_F.
°Zoom or Record-Standby mode is engaged repeatedly.
°The LCD monitor is used repeatedl)<
Before extended use, it is recommended that you
prepare enough battery pacl<_ to cover _times the
planned shooting time,
Approximate recording time
Batterypack [CD monltor on/
Viewfinder off
BN-V507U 55 rain.
BN-V514U I 15 rain.
BN-Vt156U 7 hrs. 30 rain.
LCD monitor off/
Viewfinder on
65 rain.
130 rain.
8 hrs. 30 Illill.
To AC outlet
AC Power
Adapter/Charger
AA-V_OU
Power cord
terminal
DC cord
INFORMATION:
VU-V8S6I<IT is a set composed _i the BN-V8_6 U battery
pack and AA- V80U A C Power Adapter/(harger.
Also read thor_mghly the VU- VSF6KIT's instruction
I7)al-luals,
It is impossible to charge the BN- V856U battery pack
using the pr_)vided AC P_>wer Adapter/(harge_ Use the
optiona I AA- V80U AC P¢;wer Adaptdt/Charger.
USING AC POWER
Use the AC Power Adal>ter/( harger (connect as shown ill
the illustration).
NOTES:
•The proviclecl AC Power Adapter/Charger i_atures
automatic vohage selection in the AC range tr_m) 110 V
to 240 V.
•For other notes, _ z_pg. 10.
To battery
pack mount
12, EN¸¸iii__i__i__i__i__i__i__i__i__i__i__i__i__i__i__i__i__i__i__i__i__i__i__i__i__i__i__i__i___i__i__i!_!_ii!i!iiii_i__iiiii_!!_!i!!i!!!!!!!!__
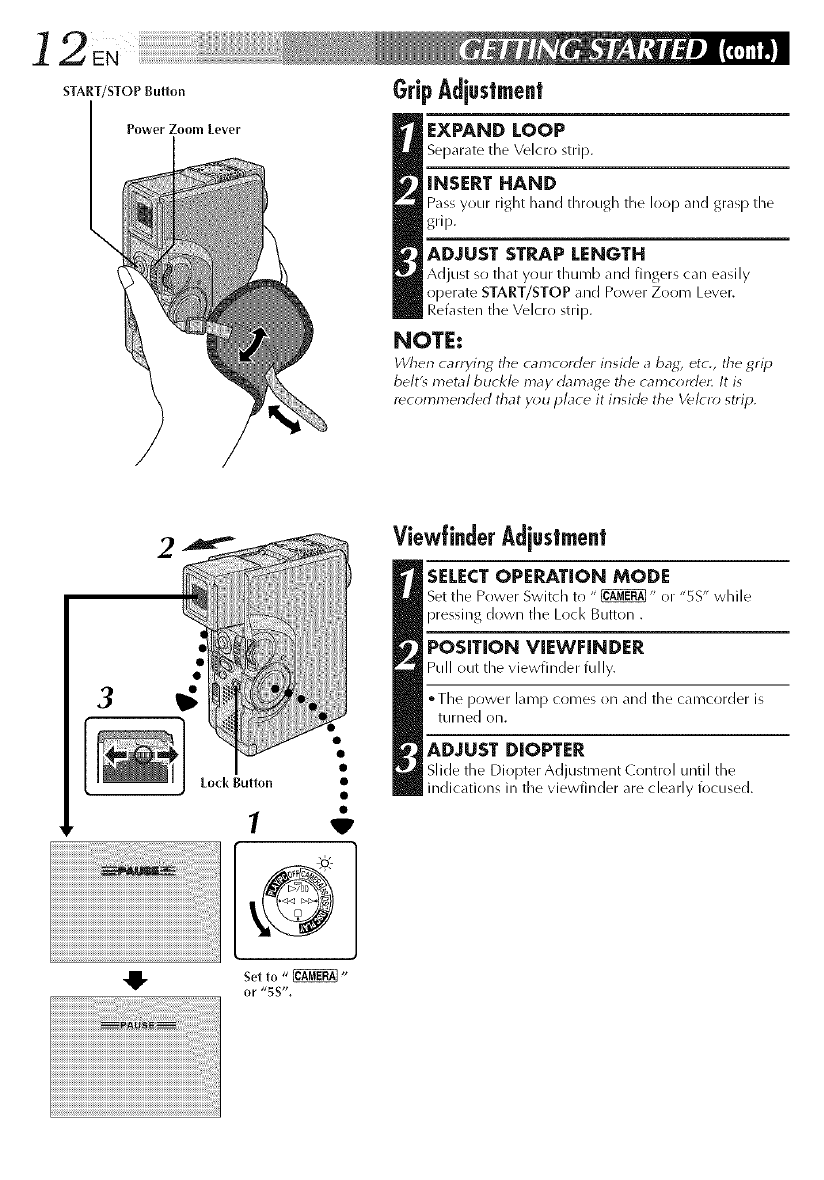
sTA.T/sToP_.tto. GripAdiustmnt
Power Zooln Lever EXPAND LOOP
Separate tile Velcro strip.
INSERT HAND
Pass your right hand through tile loop and grasp tile
grip.
ADJUST STRAP LENGTH
Adjust so that your thumb and fingers can easily
operate START/STOP and Power Zoom Lever.
Refasten the Velcro strip.
NOTE:
When carrying the camcorder inside a bag, etc., the grip
belt'_ metal buc/</_ may damage tile camc(_rde_ It is
recommended that y_;u place it inside the V_l_ r_; strip.
2ViewfinderAd[ustmnt
SELECT OPERATION MODE
Set the Power Switch to " _" or "5S" while
pressing down tile Loci< Button .
POSITION VIEWFINDER
Pull out tile v iewfinder fully.
• Tile power lamp comes on and tile camcorder is
turned on.
ADJUST DIOPTER
Slide tile Dioj)ter A(]jtlstment (]ontroJ until tile
indications ill the viewfinder are clearly focused.
• 1. Set to "_"
or "5S _',
13
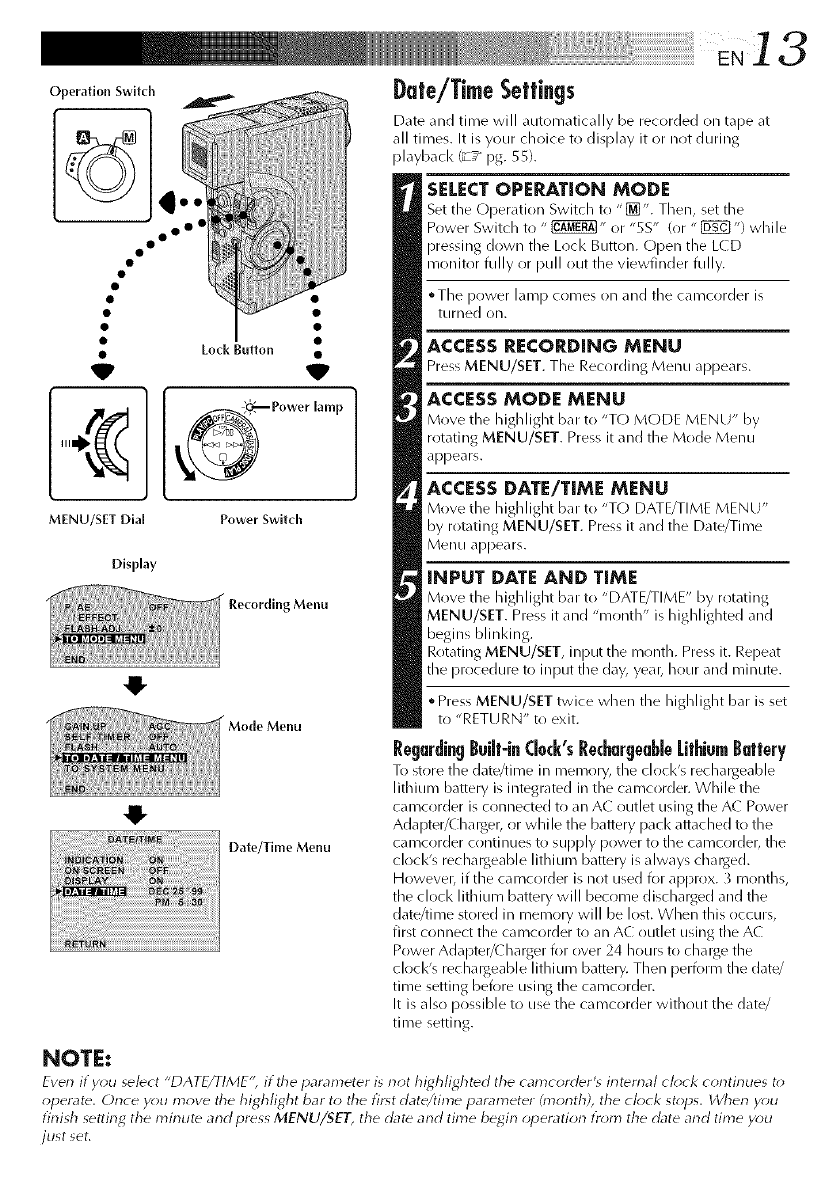
Operation Switch Date/Time Settings
Date and time will _utomatically be recorded on tape at
all times. It is your choice to display it or not during
playback (_T_ pg. SSL
oo o°
MENU/SET Dial
Display
Lock Button •
Power 5wltch
Menu
Menu
Date/Time Menu
SELECT OPERATION MODE
Set the Operation Switch to "_]". Then, set the
Power Switch to " _" or "SS" (or " [_ ") while
pressing down the Loci< Button. Open the L(D
monitor fully or pull ()Lit the viewfinder fully.
•The power Lunp comes on _md the camcorder is
turned on.
ACCESS RECORDING MENU
Press MENU/SET. The Recording Menu appears.
ACCESS MODE MENU
Move the highlight bat to "T() MODE MENU" by
rotating MENU/SET. Press it and the Mode Menu
appears.
ACCESS DATE/TIME MENU
Move the highlight bar to "T() DATE/TIME MENU"
by rotating MENU/SET. Press it and the Date/Time
Menu appears.
INPUT DATE AND TIME
Move the highlight bat to "DATE/TIME" by rotating
MENU/SET. Press it and "month" is highlighted and
begins blinldng.
Rotating MENU/SET, input the month. Press it. Repeat
tile procedure to input tile day, yeab hour and minute.
•Press MENU/SET twice wlnen the highlight bar is set
to "RETURN" to exit.
RegardingBuilt-in(bck's Re&arueabbLithiumBatt0ry
To store the date/time in memory, the clock's reck_rgeable
lithium battery is integrated in the camcorder. While the
camcorder is connected to an AC outlet using the AC Power
Adapter/Charger, or while the battery pack attached to the
camcorder continues to supply power to the camcorder, the
clocl<'s rechalgeable lithiucn battery is always chalged.
However, if the carncorder is not used for approx. 3 mr)nths,
the clock lithium battery will become discharged and the
date/time stored in cnecnory will be lost. When this occurs,
first connect the carncorder to an AC outlet using the A(
Power Adapter/( harger for over 24 hours to chalge the
clock's rechalgeable lithiucn battery. Then perform the date/
time setting before using the camcorder.
It is also possible to use the camcorder without the date/
time setting.
NOTE:
Even if you select "DATE/TIME'; if the parameter is not highlighted tile camcorder's internal oh)ok continues t_)
operate. Once y_)u move tile highlight bar to the first date/time i_arameter (month), the ch)ck st_;ps. When y_)u
finish settirlg the mirlute and press MENU/SET, the date and time be_irl _;peration tr_;m the date and time y_)u
just set,
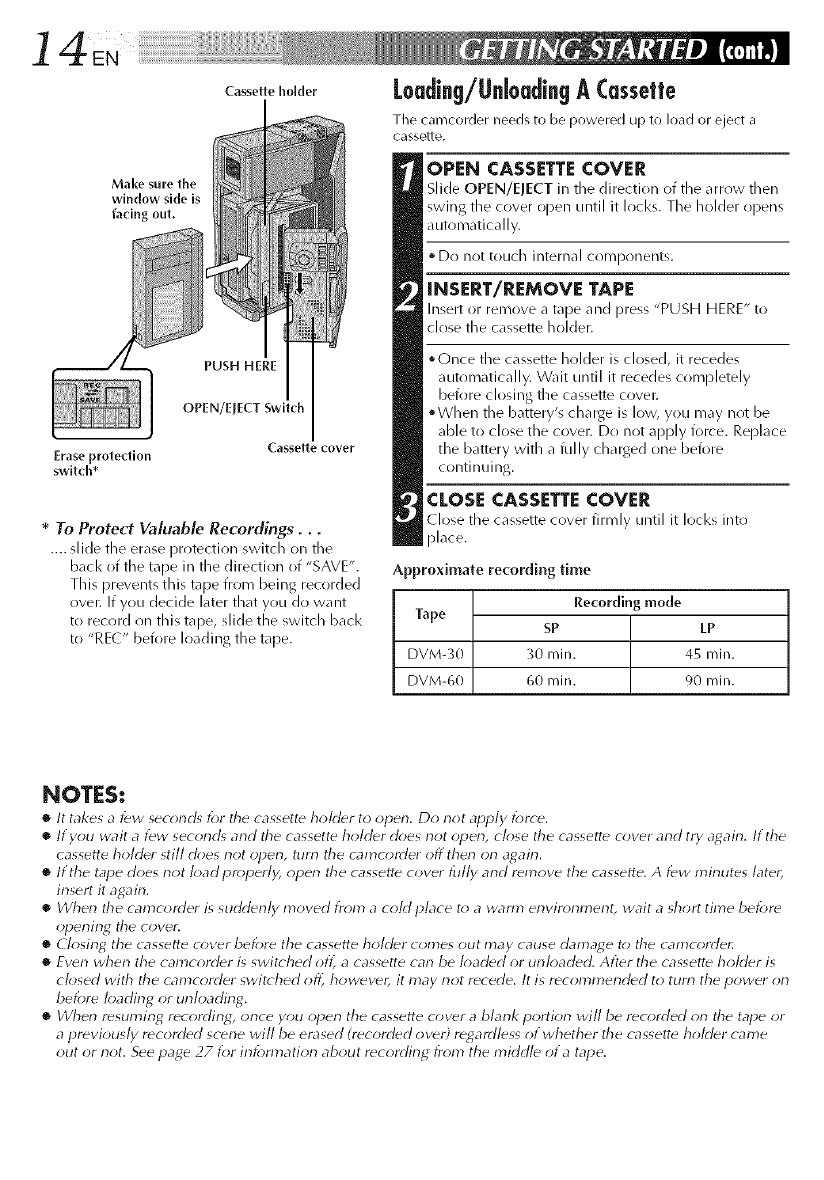
C+settoho+der Loading/llnioadingACassette
Erase protection
switch*
PUSH HERE
OPEN/ErECT Switch
Casse_e cover
Make sure the
window side is
facing out.
*To Protect Valuable Recordings,..
.... slide tile erase prr)tection switch on the
back of the tape in the direction of "SAVE".
This prevents this tape from being recorded
over. If you decide later that you do want
to recrlrd on this tape, slide the switch back
to "RE(" before loading the tape.
The camcorder needs to be powered up to load or eject a
cassette.
OPEN CASSETTECOVER
Slide OPEN/EJECT in tile direction (>tthe arrow then
swing the cover open until it locks. The holder opens
automatically.
• Dr) not touch internal components.
INSERT/REMOVE TAPE
Insert or remove a tape and press "PUSH HERE" to
close the cassette holder.
• Once the cassette holder is closed, it recedes
automatically. Wait until it recedes completely
before closing the cassette covet:
oWhen tile battery's charge is low, you may not be
able to close the cover. Do not apply force. Replace
the battery with a fully charged one before
continuing.
CLOSE CASSETTECOVER
(lose tile cassette cover firmly uittJJ it locks into
place.
Approximate recording time
Recording
Tape SP
mode
LP
DVM-30 30 rain. 45 rain.
DVM-60 60 rnin. 90 rnin.
NOTES:
•It takes a f_w second_ lbr tile cassette holder to open. Do not apply force.
•If you wait a few second_ arid the cassette holder does riot operl, close tile cassette cover and try a_ain. If the
cassette hohler still does not operl, turn tile camcorder off therl orl agairl.
•If the tape does not Ioadproperly, open the cassette cover fully and remove the cassette. A few minutes later,
insert it again.
•When the camcorder is suddenk/moved from acohl place to awarm environment, wait a short time before
opening the cover.
•(losing the cassette c over bel_re the cassette holder comes out may cause damage to the camcorde_:
•Even wherl the camcorder is switched ofl_ a cassette can be loaded or urlloaded. After tile cassett_ holder is
closed with tile camcorder switched ofl_ however, it may not recede. It is recommended to turn the power orl
bek>re Ioadirlg or unloading.
•_Vherl resuming recording_ once yOtl oper} the cassette cover a blarlk portion will be recorded on tile tape or
a previously recorded scene +viii be erased (recorded over) regardless of whether tile cassette holder came
out or not. See page 27 lbr inlbnnation about recordirlg from the middle of a tape.
EN]5
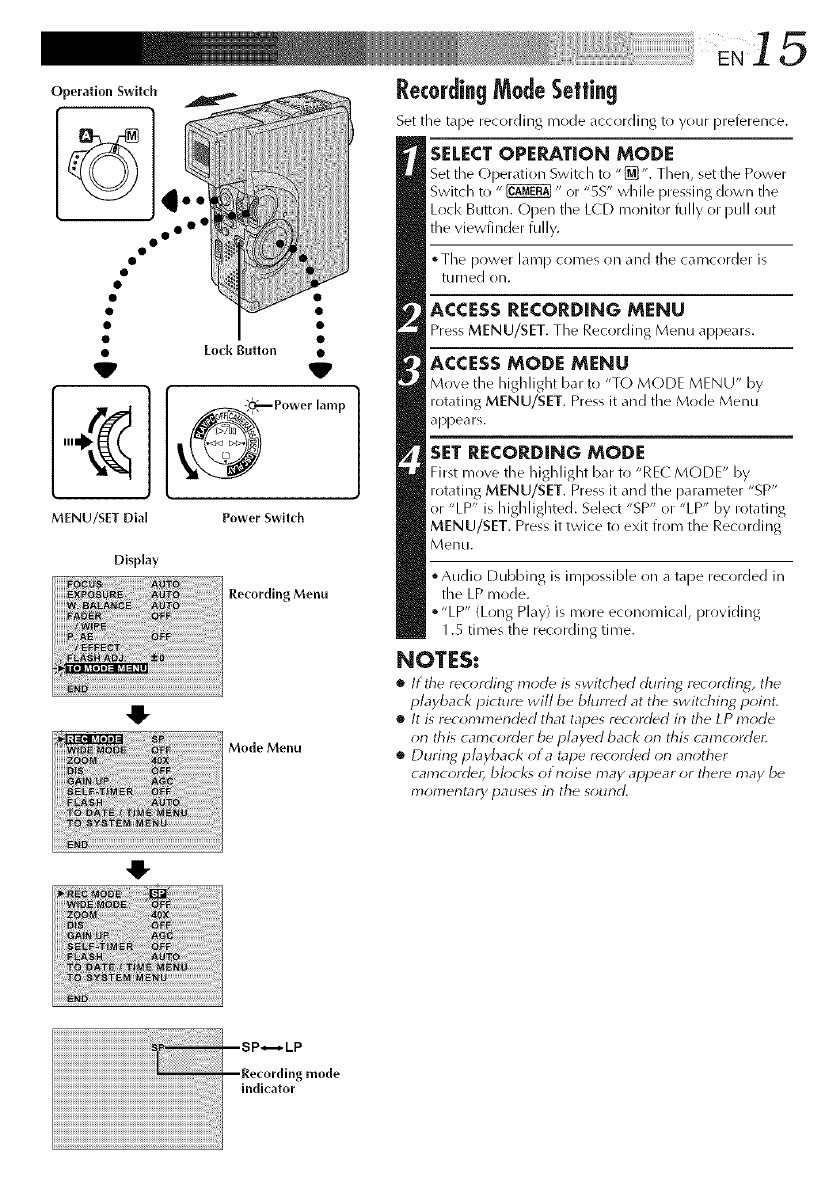
RecordingModeSettin9
Set the tape recording mode accr)rding to your preterence.
Operation Switch
• Lock Button •
V _
_Power lamp
MENU/SIT Dial Power Swltch
Recording Menu
Mode Menu
Display
4!-
4!-
SELECTOPERATION MODE
Set the Operation Switch to "[]". Then, set the Power
Switch to "_" or "5S" while pressing down the
Lock Button. Open the L(D monitor fully or pull out
the viewfinder fully.
°The power lamp comes on and the camcr)rder is
tLirned on.
ACCESS RECORDING MENU
Press MENU/SET. The Recording Menu appears.
ACCESSMODE MENU
Move the highlight bar to "T() MODE MENU" by
rotating MENU/SET. Press it and the Mode Menu
appears.
SET RECORDING MODE
First move the highlight bar tl) "REL MODE" by
rotating MENU/SET. Press it and the parameter "SP"
or "LP" is highlighted. Select "SP" or "LP" by rotating
MENU/SET. Press it twice to exit from the Recording
Menu.
• Audio Dubbing is impossible on a tape recorded in
the LP mode.
o"LP" (Long Play) is more economical, providing
1.S times the recording time.
NOTES:
•It the recording mode is switched clurin_ r_cording, the
playback picture will be blurred at the switching poirlt,
•It is recommer_d_d that tapes r_corded in the LP mode
on this camcord_r be played back on this camcorder.
•During pbyback of a tape recorded on another
camcord_, bk)ck_ otnoise may appear or ther_ may be
17}olT_eF}tarypauses in the sound,
]6E.
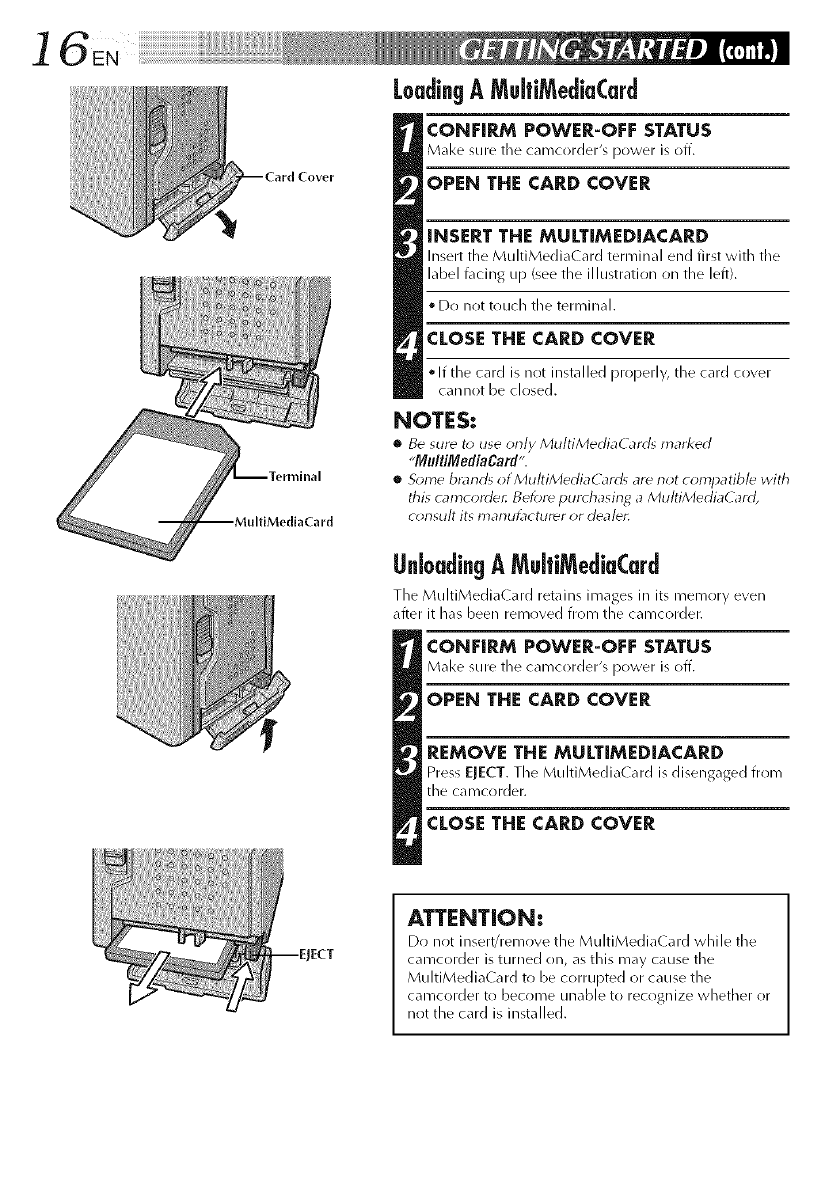
LoadingAMuifiMediaCard
CONFIRM POWER-OFF STATUS
Make sure tile camcorder's power is off.
OPEN THE CARD COVER
iNSERT THE MULTiMEDIACARD
Insert the MultiMedia( ard terminal end first with tile
label t\lcing up (see the illustration on the left).
• Do not touch the terminal.
CLOSE THE CARD COVER
If the card is nrlt installed properly, the card cover
cannot be closed.
NOTES:
•Be sur_ to use only MultiMediaCard_ marl_ed
"MultiMediaCard'.
•Some bmnrg ofMu/tiMedJiaCarJ_ ard not con'}patib/e with
this camcorde,: Bef_)r(_pur_ hasing aMultiMediaG_rd,
CI_F}SH/tits tY}aF}U_lCtHr_r OFd]da/dll
Unl0adin9 A MultiMediaCard
The MultJMedJa(ard retains images in its memrlry even
after it has been removed from the camcorder.
CONFIRM POWER-OFF STATUS
Make sure the camcorder's power is off.
OPEN THE CARD COVER
REMOVE THE MULTiMEDiACARD
Press ELECT. The MultiMedia( ard is disengaged from
the camcorder.
CLOSE THE CARD COVER
Operation Switch
° oo°
• [ock Button •
v V
MENU/SET Dial Power Switch
Display
Recording Menu
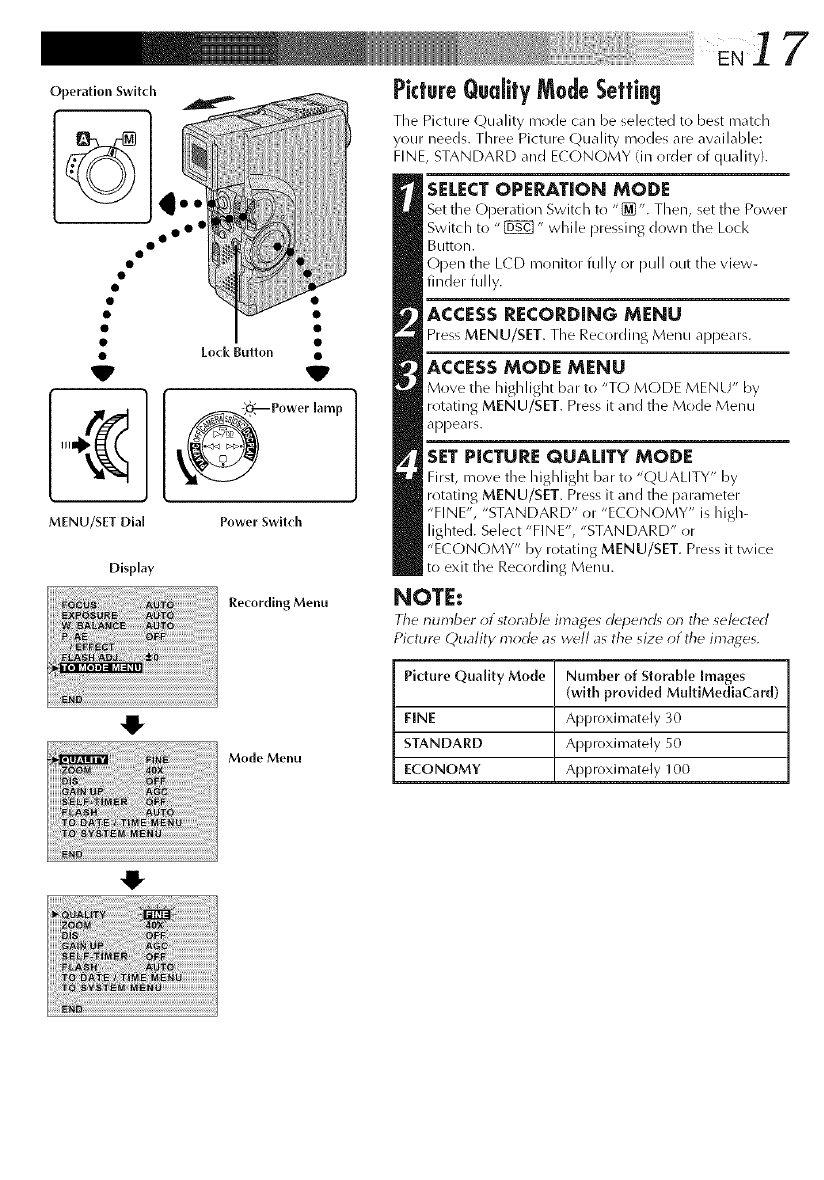
PictureQuality ModeSetting
The Picture Quality mrlde can be selected to best m_tch
your needs. Three Picture Quality iT/odes are awilable:
FINE, STANDARD and ECONOMY (in order of quality).
SELECTOPEP_TION MODE
Set the Operation Switch t_) "[]'. Then, set tile Power
Switch to "_" while pressing dr)wn the Lock
Button.
(-)pen the L(D monitor fully or pull out the view-
finder fully.
ACCESS RECORDING MENU
Press MENU/SET. The Recording Menu appears.
ACCESSMODE MENU
M_ve tl_e I_igl_light b_r to "TO MODE MENU" by
rotating MENU/SET. Press it and the Mode Menu
appears.
SET PICTURE QUALITY MODE
First, move tile highlight bar to "(2U ALITY" by
rotating MENU/SET. Press it and the parameter
"FINE", "STANDARD" or "ECONOMY" is high-
lighted. Select "FINE", "STANDARD" or
"E( ON(-)MY" by rotating MENU/SET. Press it twice
to exit the Recording Menu.
NOTE:
Tile number of storable images d_pend_ on tile selected
Picture E_)uality morl_ as well as the size of the images.
,g,
,IF
Mode Menu
Picture Quality Mode Number of Storable Images
(with provided MultiMediaCard)
FINE Approximately 30
STANDARD Approximately 50
ECONOMY Approximately 100
18 N
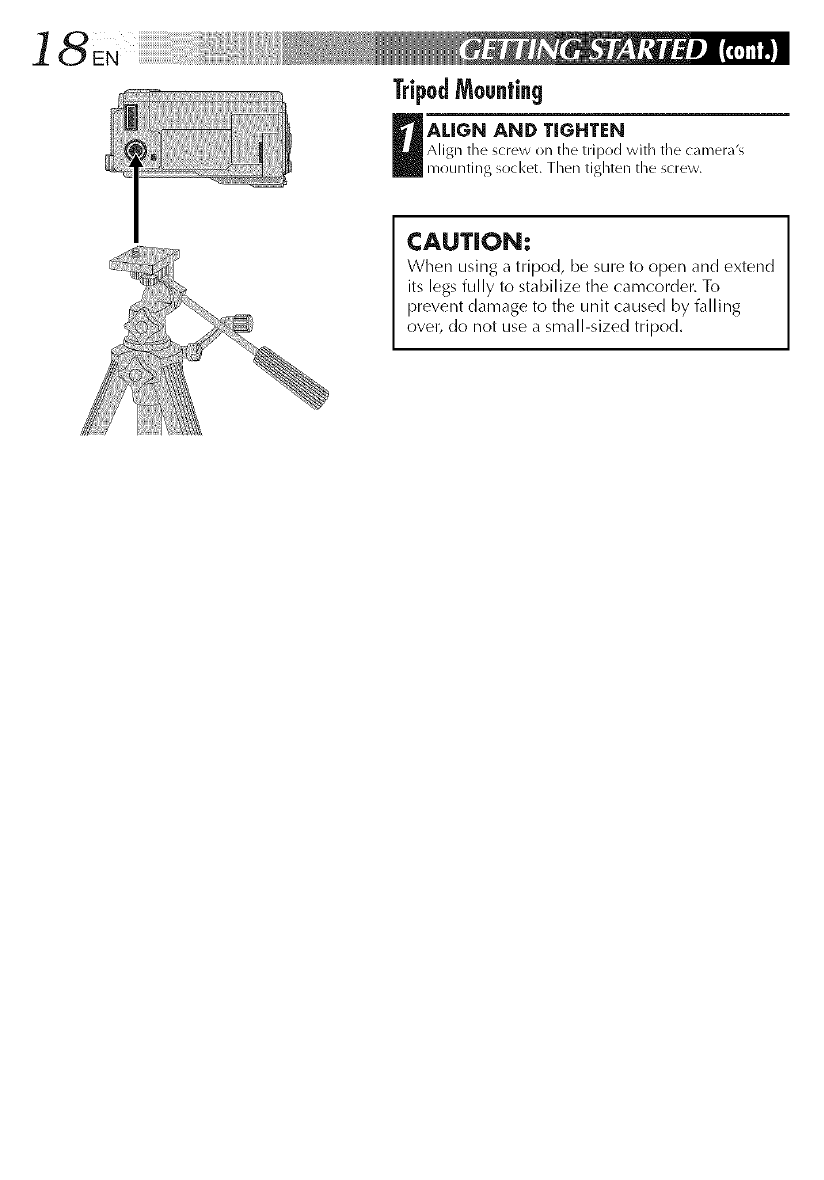
TripodMounting
D Align the _cmw _llAL[G[_l_/<_kll/til/g_ocl<et.Th_nAN[D T[GHTIFNthetrip°dtightenWithtilecamer_l'_tl.ie _cr_w.
CAUTION:
When using a tripod, be sure to open and extend
its legs fully to stabilize the camcordel: To
prevent damage to the unit caused by falling
ovel? do not use a small-sized tripod.
'_ ' _ _i_,iiiiii/i/i/i/i/i/i/i/iiiiiiiiiiiiiiiiiiiiiiiiiiiiiiiiiiii!ii
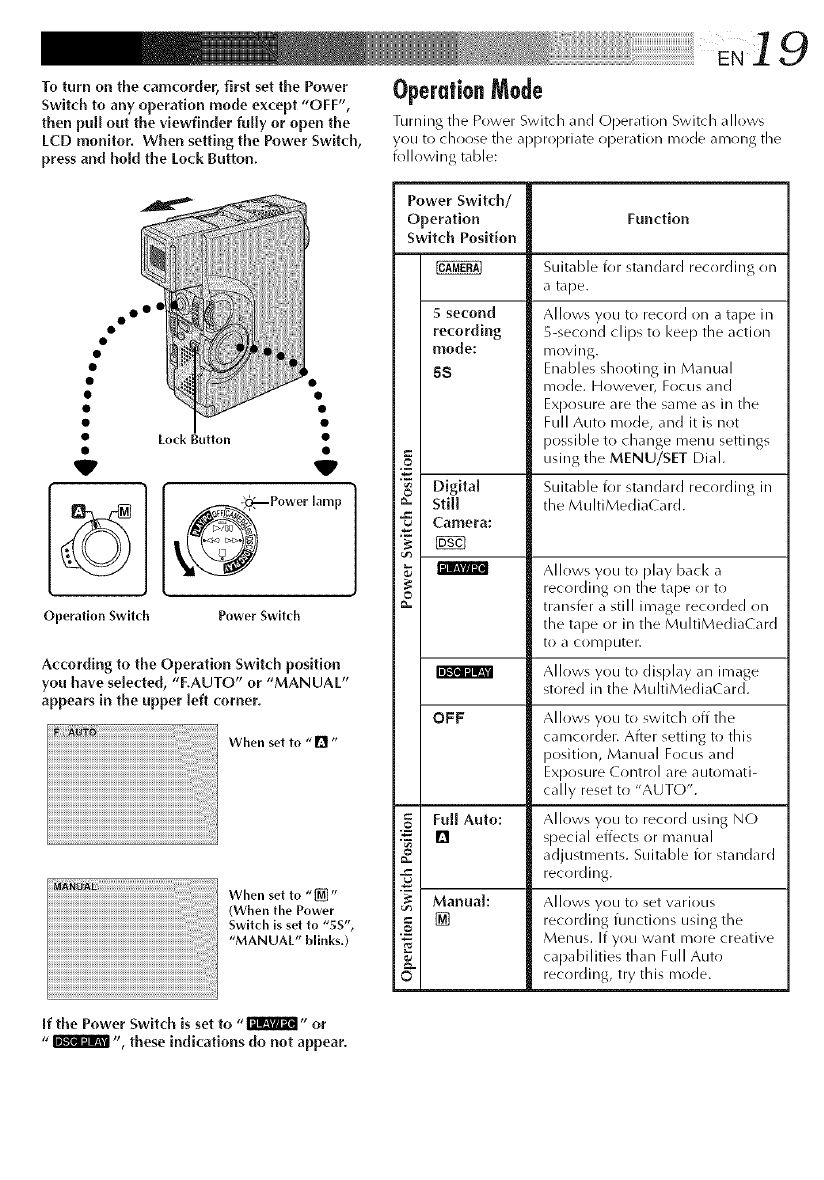
To turn on the camcorder, first set the Power Operation Mode
Switch to any operation mode except "OFF",
then pull out the viewfinder fully or open the Turning tile Power Switch dnd Operdtion Switch dlIows
LCD monitor. When setting the Power Switch, you to chor)se tile appropriate operation mode among the
press and hold the Lock Button. following table:
oo o4
V
Lock Button
V
_Power lamp
Operation Switch Power Switch
According to the Operation Switch position
you have selected, "F.AUTO" or "MANUAL"
appears in the upper [eft comer.
When etto0
When,otto[]
(When tile Power
Switch is setto "SS",
"MANUAL" blinks,)
if the Power Switch is set to ,, r_l_A'_ ,, or
"_ ", these indications do not appear.
Power Switch/
Operation Function
Switch Position
5second
recording
mode:
68
Suitable for standard recording on
a tape.
Allows you to record on a tape in
5-second clips to I<eep the action
mrlving.
Enables shooting in Manual
mode. However, Focus rind
Exposure are the same as in the
Full Auto mode, and it is not
possible to change menu settings
using the MENU/SET Dial.
Suitable fill standard recording in
the MultiMediaCard.
©
"g Digital
_- Still
Camera:
Allows you to play bacl< a
recording on the tape or to
o
_- trdnsfer d still imdge recorded on
the tape or in the MuhiMedia( ard
to aCOl_/[)uter.
Allows you to display an image
stored ill the MultiMedia( ard.
OFF Allows you to switch off the
camcorder. After setting• to this
position, Manual Focus and
Exposure ( ontrol are automati-
cally reset to "AUTO".
_= Full Auto: Allows you to record using N(-)
"_ [] special effects or manual
adjustments. Suitable for standard
recording.
Manual: Allows you to set various
[] recr)rding functions using the
"_ Menus. If yOtl want i]lr)re creative
_. capabilities than Full Auto
© recr)rding, try this mode.
START/STOP
Button
OPEN/EJECT Switch •
Lock Button •
V
_ Power lamp
Power Switch
Tally lamp
(lights while
recording is
in pr
NOTE:
Y_u sh_uld alr_arly have perk_rmed the i_roceclur_s list_cl
below. It not, do so befor_ c_*ntinuing,
•P_>wer (_ /pg, I0)
•(;rip Adjustment (m /lag. 12)
•Wewfind_rAdjustn_er_t (_ /Hg. 12)
•Recording Mode Seltin_ (_Z_pg,: I_)
I OAD A CASSETTE
Slide OPEN/ElECT in the direction of the arrow then
swing the cover open until it locks. The holder opens
automatically.
Insert a tape and press "PUSH HERE" to close the
cassette holder.
• Once the cassette holder is closed, it recedes
automatically. Wait until it recedes completely
before closing the cassette cover.
ShootingWhileWatchingTheViewfinder
ENTER RECORD-STANDBY MODE
Make sure the L(D monitor is closed and locked. Set
the Operation Switch to "n " or "[_". Then, set the
Power Switch to "_" while pressing down the
Lock Button. Pull out the viewfinder fully.
°The lens cover opens, the power lamp lights and the
camcorder enters the Record-Standby mode.
• The scene you are aimed at appears on the
viewfinder screen, with the word "PAUSE"
superimposed upon it.
START SHOOTING
Press START/STOP.
" " I-I-I-REC,, api)ears in the viewfinder while recording is
in progress.
START/STOP Button
Tape remaining time indicator
I
f
3 min
!
2 min
(Blinking)
1 min
(Blinking/
!
0min
/Blinking/
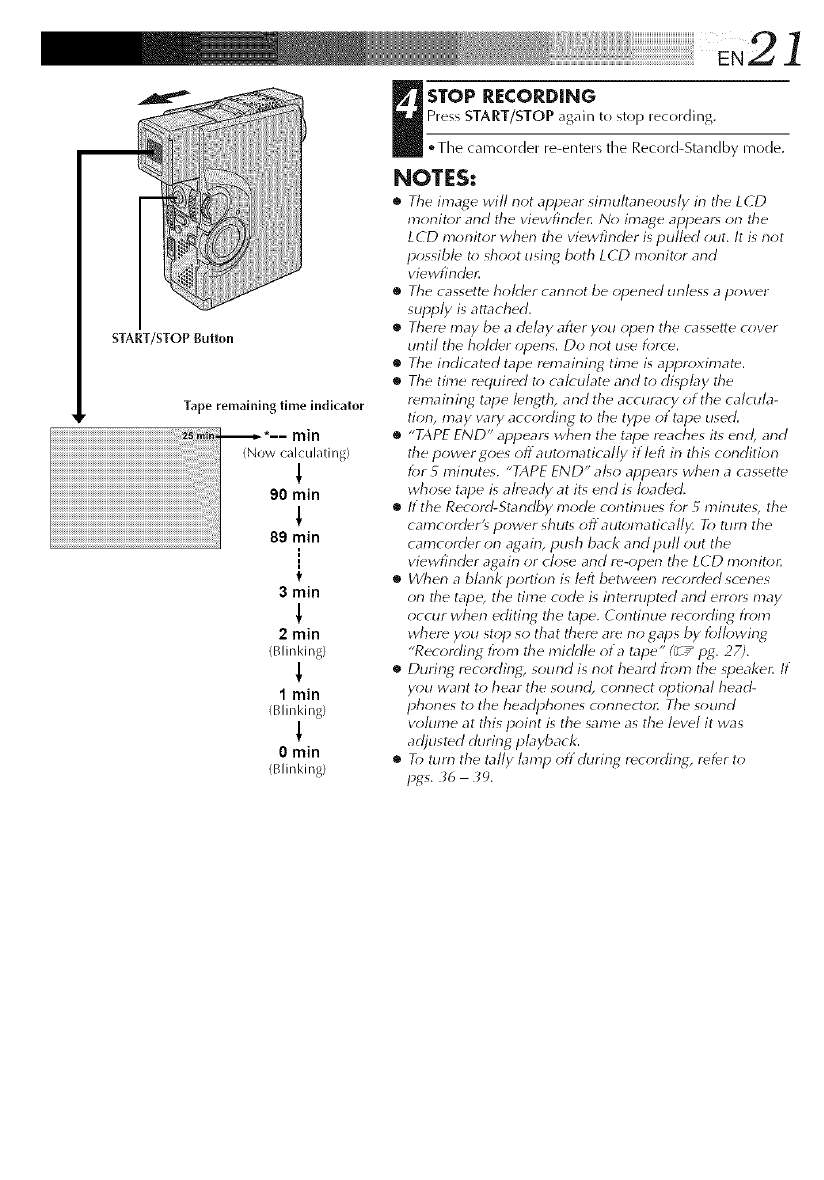
STOP RECORDING
Press START/STOP again to stop recording.
• The camcorder re-enters the Record-Standby male.
NOTES:
•The image will not appear simultane(_usly in the LCD
monit_r and the viewfinde_ No image appear_ on the
LCD monitor when the viewfincbr is pulled out. It is riot
possible to shoot usin_ both LCD monitor and
viewfirlde_
•The cassette holder carlrlot be opened unless apower
supply is attached.
•There may be a d_by after y_*u _*pen the cassette cover
urltil the holder (*pens. Do not use force.
•_ The indicated tape remaining time is approximate.
•The time required t_*cakulate arid to dispby the
remaining tape length, and the accuracy ot the calcula-
tiorl, may vary accordirlg to the type ot tape used.
•"TAPE END" appear_ when the tape reaches its end, arid
the power goes off automatical/y if left in this condition
for 5 mir_utes. "TAPE END" al_o appear_ wher_ a cassette
whose tape is already at its erld is k_aded.
•If the Record-Starlrlby mode corltirlues for 5 mirlutes, the
camcorder'_ power shuts off automatically. To turn the
camcorder on again, push back and pull out the
viewfincter again or close and re-open the LCD monito_
•When a blank portion is loft between recorded scenes
on the tape, the time c_;de is interrupted and em;r_ may
occur when editing the tape. Corltinue recording from
where you stop so that there are no gaps by following
"Recording t?om the mirldle ota tape" (_Z _P_4.27).
•During, recording, sourld is not heard from the _peaker. If
you warlt to hear the sound, connect optiorlal heat%
phones to the headphones connectoll The sotll-}d
volume at this point is the same as the level it was
adjusted during playback.
•_ To turn the tally lamp offduring recording; refer to
pgs. _6 30.
180
Operation Swltcll
START/STOP Button
Lock Button •
Power Switch _1_
_Power lamp
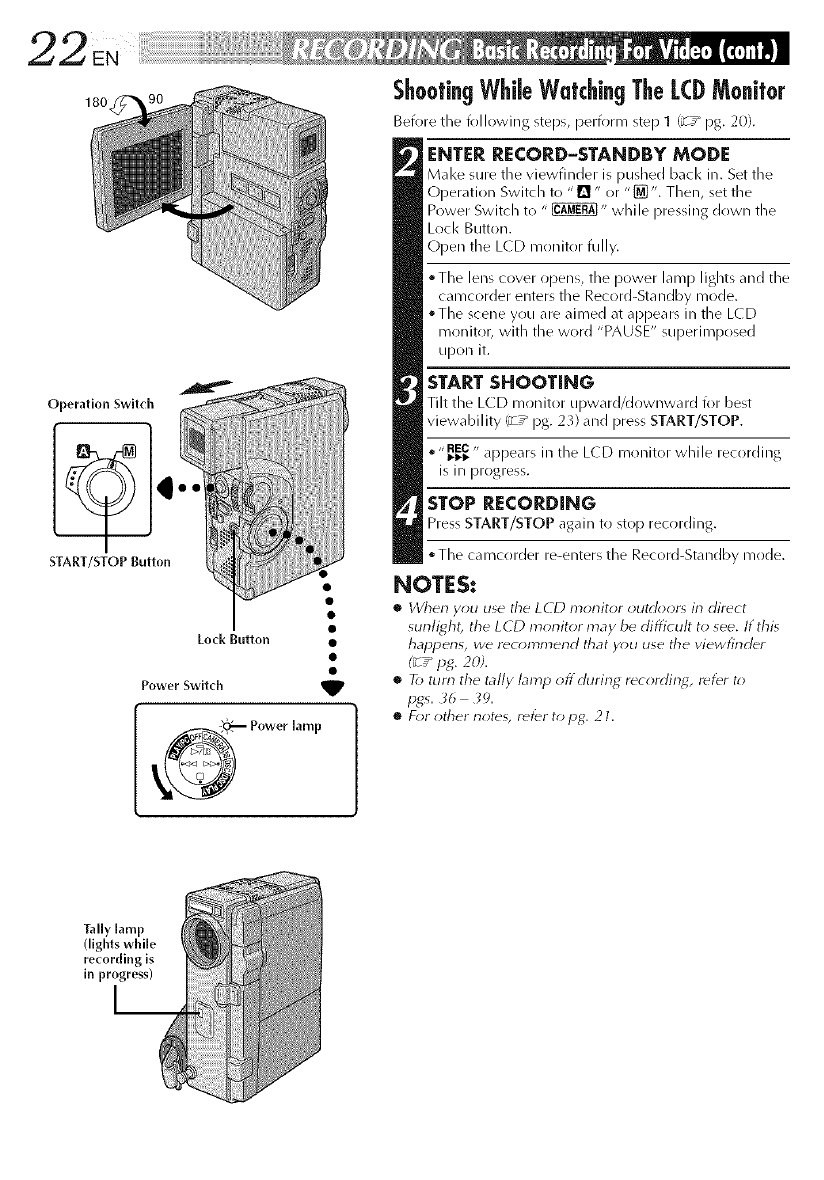
ShootingWhileWalchingTheL(DMonilor
Before the follo'Mng steps, perform step 1 (_T_ pg. 20).
ENTER RECORD-STANDBY MODE
Make sure the vJewfinder is pushed back in. Set the
Operation Switch to "D" or "[_". Then, set the
Power Switch to " _" while pressing down the
Lock Button.
Open the L(D monitor fully.
• The lens cover opens, the power lamp lights and the
camcorder enters the Record-Standby mode.
• The scene you are aimed at appears ill the LCD
monitor, with the word "PAUSE" superimposed
upon it.
START SHOOTING
Tilt the LC D mon kor upward/downward for best
viewability (_T* pg. 23) and press START/STOP.
,,,REC_._,, appears ill the LCD monitor while recording
is in progress.
STOP RECORDING
Press START/STOP again to stop recording.
•The camcorder re-enters the Record-Standby mode.
NOTES:
•When you use the LCD monitor outdoor_ in direct
sunlight, the LCD monitor may be difficult to see. If this
happens, we rec_)mmend that y_>u use the viewfinder
(_ /pg. 2dA
•_tutti the ta//y laml_ offduring recording, refer t_)
•F_;r other note_, ret_r to pg. 21.
Tally lamp
(lights while
recording is
in progress)
[__
Self-Recordlng
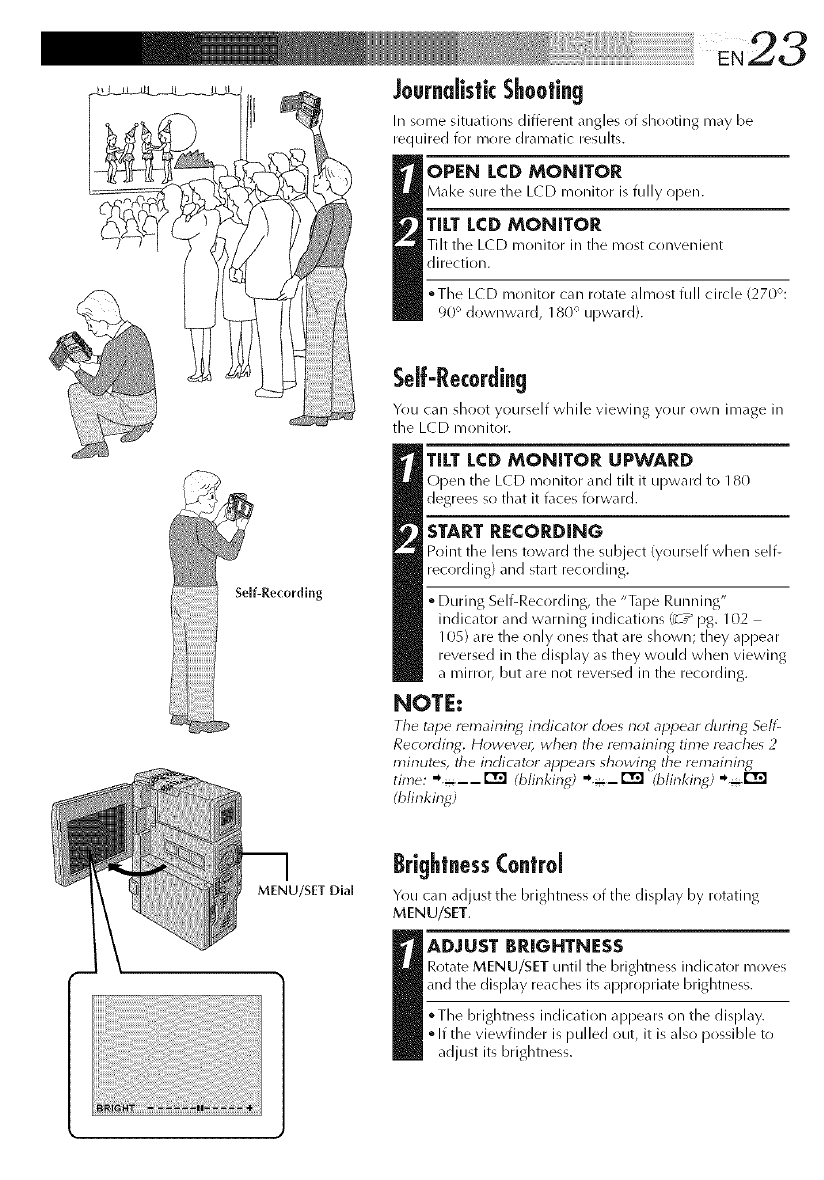
JournalisticShooting
In some situations different angles of shooUng may be
required for more dramatic results.
OPEN LCD MONITOR
Make sure the L(D monitor is fully open.
Tff.TLCD MONITOR
Tilt the L( D monitor in the most convenient
direction.
• The L( D monitor can rotate almost full circle 127(Y-':
90 _downward, 180-' upward).
Self-Recording
Yrlu can shoot yourself while vJewJl/g yrlur OWl/ Jrnage in
the L(D monitor.
TILT LCD MONITOR UPWARD
Open the L(D monitor and tilt it upward to 180
degrees so that it faces forward.
START RECORDING
Point the lens toward the subject (yourself when self-
recording) and start recording.
• During Self-Recording, the "Tape Running"
indicator and warning indications (_T* pg. 102
105) are the only tines that are shown; they appear
reversed in the display as they would when viewing
a mirror, but are not reversed in the recording.
NOTE:
The tape remaining inclicat_:r does not ,rpl_ear rhlring S_IIL
Recording. However, wherl the remairling time reaches 2
17tir}utd% the indicator appears showin_ the remainin_
time: '*÷--r_ (blinking) '*÷-r_ (blinkinE) ,, ÷r_
(blinkinE)
m I
MENU/SET Dial
BrightnessControl
You can adjust the brightness of the display by rotating
MENU/SET.
_DJUST BRIGHTNESS
Rotate MENU/SET until the brightness indicator moves
and the display reaches its al_propriate brightness.
°The brightness indication appears on the display.
• If the viewfinder is pulled out, it is also possible to
adjust its brightness.
VPHOTO (SNAPSHOT) Button V
Power lamp
Operation Swltch Power Switch
,Flash
Sensor
SNAPSHOT
MODE Button
BasicShooting(Snapshot)
You car/ use your camcorder as a Digital Still Camera
(D.S.(.) for taldng snapdlots. Still images shot in tile D.S.(.
n/r)de (when tile Power Switch is set to "_ ") are
recorded in the MultiMediaCard.
NOTE:
You should already haw perf_>nned tile procedures listed
below. If you haven't, do so bef+_re c+_ntinuing.
•Power (_ /pg. 1_))
•(;ripAdjl_stment (_ /pg. 12)
•ViewfinrlerArljustmer_t (_ /pg. 12)
•Loading A MultiMedia G_rd (_/pg. 16)
•Picture Quality Mode Settin_ (_/pg: 17)
SNAPSHOT MODE SELECTION
SELECT OPERATION MODE
Set tile Operation Switch to "[]" or "_'. Then, set
tile Power Switch to " _" while pressing down tile
Lock Button, Open the LCD monitor fully or pull out
the viewfinder fully.
SELECT SNAPSHOT MODE
( hoose tile appropriate mode from among tile 5
snapshot modes available (_ /pg. 25) by pressing
SNAPSHOT MODE.
Press SNAPSHOT MODE as many times as necessary
until tile desired snapshot mode indicator is dis-
played.
SNAPSHOT RECORDING
TAKE SNAPSHOT
Press PHOTO (SNAPSHOT). Tile image is recorded
in tile MultiMediaCard.
• When tile "_' " flash ready indicator is displayed,
tile flash fires.
DkpJay --Number of shots taken
Displays the number of images that have already been shot.
_I Ltotai number of shots
I ] Displays the approximate total number (if shots that can be stored, including those already
I ] taken. The nunlher increases or decreases depending on the shots stored, the Picture Quality
] I mode, etc.
_Card icon
Snapshot mode AppeaP_ when a MultiMediaCard is loaded.
Blinks when a MultiMedia(ard is not loaded.
--Shooting icon
Appears and hlinl<s during shooting.
Picture Quality mode
Displays the Picture Quality nlode of the stored image. There are 3 nlodes available:
FINE, STANDARD and ECONOMY (in order of quahty).
iiiiiiiiiiiii?+!_+_+_li_!_!_!_!_!ii!_iiii_i_i_ii_ii_i_i_iiiiiiiiiiiiiiiiiiiiiiiiiiiiiiiiiiiiiiiiiiiiiiiiiiiiiiiiiiiiiiiiiiiiiiiiiiiiiiiiiiiiiiiiiiiiiiiiiii_!!ii

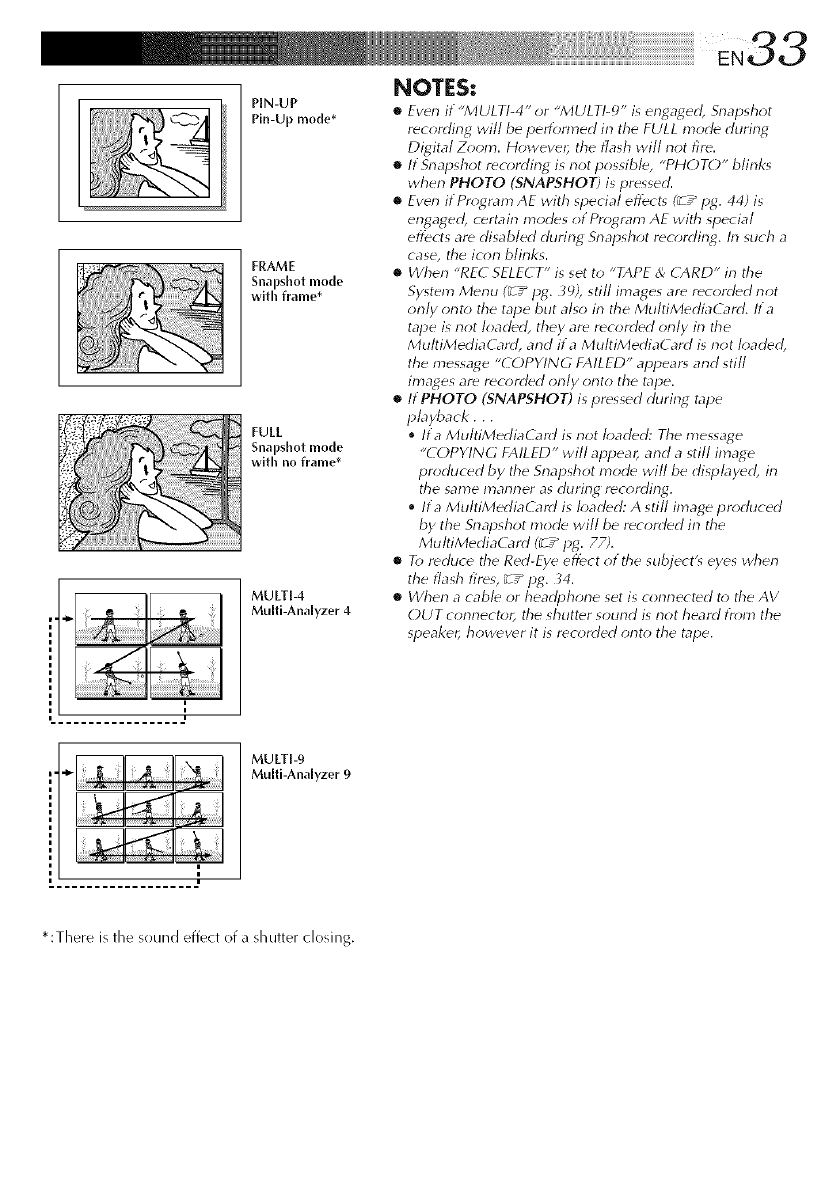
PIN-UP
Pin-Up mode*
FRAME
snapshot mode
with frame*
FULL
snapshot mode
with no frame*
MULTI-4
Multi-Analyzer 4
To Record An Image With A Title/Frame...
.... refer to "Superii_posing A Title/Frame" (_T_ pg. 69).
To Remove The Shutter Sound...
.... when you don't want to hear tile shutter sound, set
BEEP/TALLY to "OFF" in the System Menu
(_ ,_ pg. _6 39). Tile sound is no longer hard from tile
speaker.
NOTES:
•Even if "MULTI-4" or "MULTI-_" is eny, a_ed, Snapsh_4
recording will be pertbrmed irl the FULL mode durin_
Digital Z_;om. However, the flash will riot fire.
•If Snapshot r¢cording is not possible, "PHOTO" blinks
when PHOTO (SNAPSHOT) is pressed.
•Ewn ifPr_;'4ram AE with special eflZct_ (_z _pg. 44, 4_; is
engaged, certairl modes of Pr_;gram AE with special
effects are disabled during Snapshot recording. In such a
case, the icon blinks.
•If shooting is riot per_>rmed f_;r approx. 5 minutes when
tile Power Switch is set t_; "_]" arid power is slqJplied
fr_;m tile battery pack, the camcord_r shuts off aut_;mati-
call}, to save powec To perform shooting, agairl, close the
LCD monitor and r_-open it. When usin_ tile viewfind_r,
push back it in and pull it (>tit again,
•Motor Drive Mode (_ ,_pg. 32) is disabled when the
Power Switch is set to "[_ ".
•R> reduce tile Red-Eve effect of the subject's eyes when
tile flash fires, _ T" pg. _4.
• When a cable or headphone set is connected to the AV
OUT conrlector, tile shutter sound is not heard t}_;m the
speaker.
MULTI-9
Multi-Analyzer 9
* :There is the sound of a shutter closing.
I
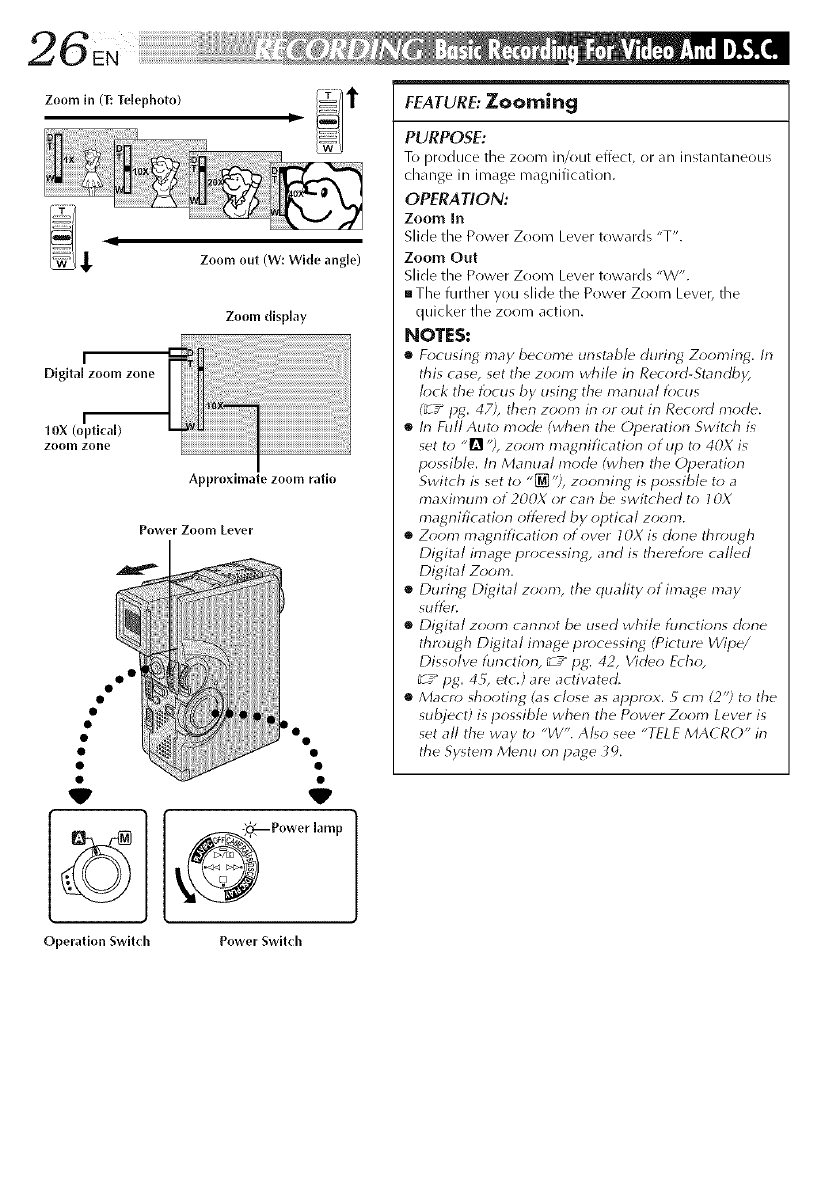
Digital zoom zone
I
10X (optical)
zoom zone
Zoom display
Approximate zoom ratio
Power Zoonl Level"
V V
0._ Power lamp
Operation Switch Power Switch
FEATURE: Zooming
PURPOSE:
To produce the zoom in/out effect, or an instantaneous
change in image magnification.
OPERATION:
Zoom In
Slide the Power Zoom Lever towards "T".
Zoom Out
Slide the Power Zoom Lever towards "W".
mThe further you slide the Power Zoom Lever, the
quicker the zoom action.
NOTES:
•Focusing may bec_m_e unstable during Zooming. In
this case, set the zoom while in Record-Standb);
lock the focus by using the marlual focus
?_z" pg. 47), therl zoom irl or ()tit irl Record mode.
•In Full Auto) mode (when the Operation Switch is
set to ,,1_ ?, zoom magnification of up t_>40X is
possible. In Marnlal mode (when the Operation
Switch is set to "[_ ?, zooming is possible to a
maximum of 200X or can be switched to 10X
magrlification offered by optical zoom.
•Z_)om inagnification otover IOX is done thr_a_gh
Digital image processing, and is &eretbre called
Digital Z_*om.
•During Digital zoom, the quality of image may
Slll}_l',
•Digital zoom cannot be used while klnctions done
&rotgh Digital image pr_>cessing (Picture Wipe/
Dissolve function, _7 _ lag: 42, Video E_h_*,
_7_ lag. 45, etc.) are activated.
•Macro shooting (as close as appr_>x. 5cm (2? to the
subject) is possible when the Power Z<>om Lever is
set all the way t_> "W'. Al_o see "TELE MACRO" in
the System Menu orl page _,L
? i? iiiiiiiiiiiiiiiiiiiiiiiiiiiiiiiiiiiiiiiiiiiiii!i ii¸' EN2 7
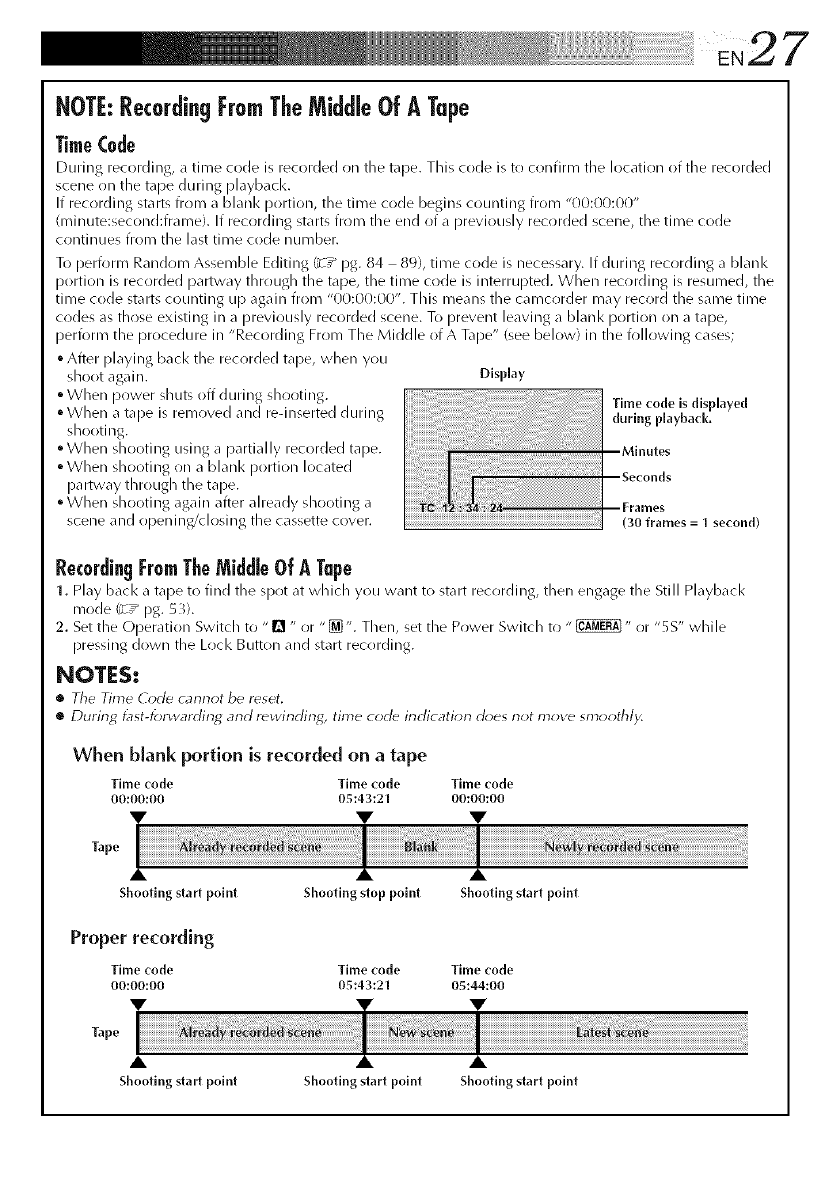
NOTE:RecordingFromTheMiddle Of ATape
TimeC0de
During recording, a time code is recorded on the tape. This code is to confirm tile location of tile recorded
scene on the tape durillg playback,
If recording starts from a blanl< portion, the time code begins counting from "00:00:00"
(rninute:second:frame). If recording starts from the end of a previously recorded scene, the time code
continues from the last time code number.
To perforiT_ Rar/drlm Assemble Editing (_ ,* pg. 84 89), time code is necessary. If during recording a blanl<
portion is recorded partway through the tape, the tirne code is illterrupted. When recording is resumed, the
time code starts counting up again from "00:00:00". This rneans the carncorder rnay record the sarne time
codes as those existing in a previously recorded scene. To prevent leaving a blanl< portion OI3a tape,
perforrn the procedure in "Recording From The Middle of A Tape" (see below) in the following cases;
"Afterplaying back the recorded tape, when you
shootagain.
° When power silt.its off during shooting.
° When a tape is removed and redllserted during
shooting.
°When shooting using a partially recorded tape.
• When shooting on a blanl< portion located
partway through the tape.
° When shooting again after already shooting a
scene and opening/dosing the cassette cover.
Display
Time code is displayed
during playbacl(,
(30 frames =I second)
Re(0rdiagFromTheMiddleOfA Tape
1. Play bacl< a tape to find the spot at which you want to start recordillg, then engage the Still Playbacl<
mode (_ ,_ pg. 5_).
2. Set the Operation Switch to "[] " or "[_". Then, set the Power Switch to "_" or "5 S" while
pressing down the Lock Button and start recording.
NOT[S t
G, Tile Time (ode carlrlot be reset,
•Durirlg l_lst-forwarding, arid rewindirlg, time code irldication d_;es riot move smoothl)<
When blank portion is recorded on a tape
Time code Time _ode Time code
00:00:00 05:43:21 00:00:00
V V
Tape
Shooting start point Shooting stop point Shooting start point
Proper recording
Tirne code Tirne code Time code
00:00100 05143:21 05144:00
Tape
A
Shooting st;u1 point Shooting start point Shooting start point
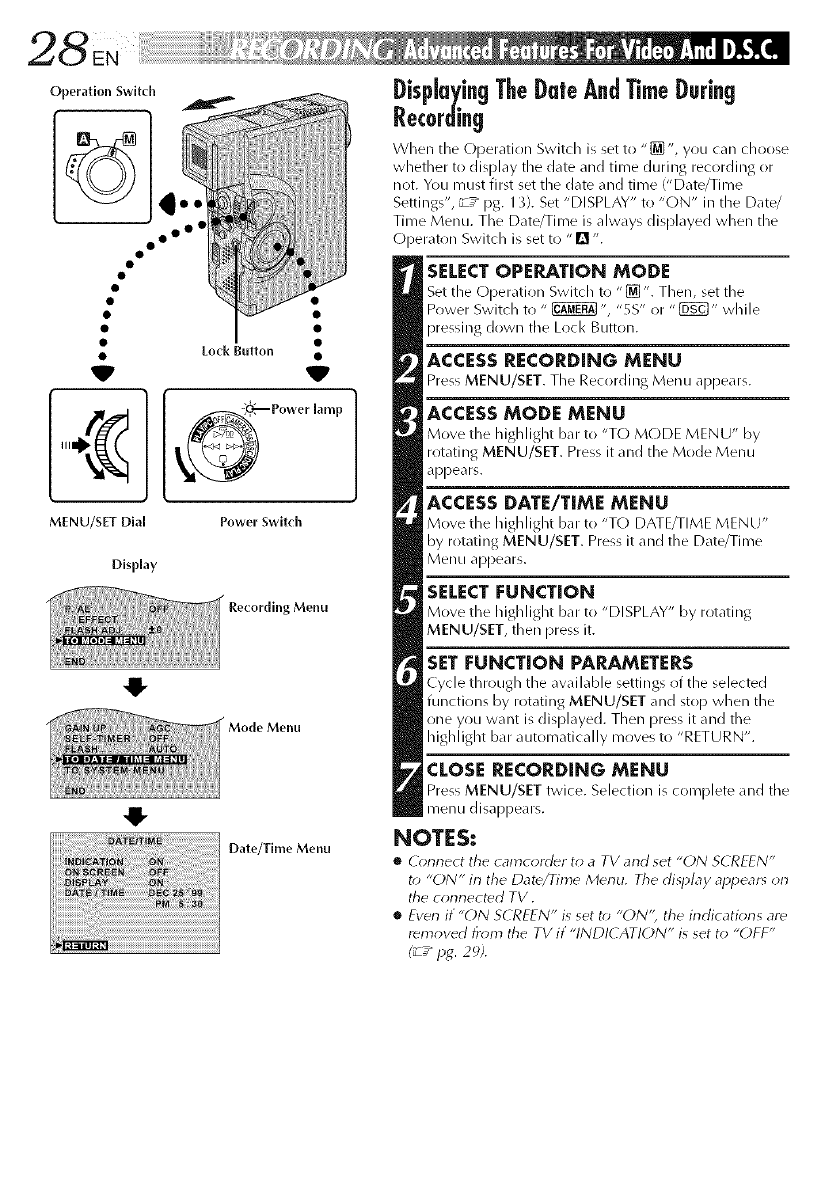
Operation Switch
oo o°
V
MENU/SET Dial
Display
O
Lock Button •
V
I Power' mP
Power Switch
Menu
Menu
Date/Time Menu
Disp[a irgTheDateArd TimeD.rirg
Recording
When the Opera,titan Switd/is set to "[]', you can choose
whether to display the d_lte and time during recordil3g or
not. You must first set the date and time ("Date/Time
Settings", _-z_ pg. 1/). Set "DISPLAY" to "ON" in the Date/
Time Menu. The Date/Time is always displayed when the
Operaton Switch is set to "!_ ".
SELECTOPERATION MODE
Set the O[_er_tion Switch to "[] ". Then, set the
Power Switch to " _ ", "5S" or "[_" while
pressing down the Loci< Button.
ACCESS RECORDING MENU
Press MENU/SET. The Recording Menu appe_us.
ACCESSMODE MENU
Move the highlight I)_r to "TO MODE MENU" by
rotating MENU/SET. Press it and the Mode Menu
appears.
ACCESS DATE/TIME MENU
Move the highlight b_lr to "TL) DATE/TIME MENU"
by rotating MENU/SET. Press it and the Date/Time
Menu appears.
SELECT |:UNCTION
Move the highlight b_r to "DISPLAY" by r_t_ting
MENU/SET, then Dress it.
SET FUNCTION PARAMETERS
Cycle through the _v_ilable settings _f '.he selected
functions by rot_ting MENU/SET _md stop when '.he
_ne you w_mt is displayed. Then press it _md the
highlight bar automatically moves to "RETURN".
CLOSE RECORDING MENU
Press MENU/SET twice. Selection is complete _lld tile
menu disappears.
NOTES:
•O;nnect tile camcorder to a TV and set "ON S(REFN"
t_) "ON" in the Date/Time Menu. Tile display appears on
tile corlrlect_d TV.
•Even if "ON SCREI-N" is set t_) "ON", the indicatior_s are
removed fr_)m the TV if "INDI( ATION" is set to "OFF"
Operation Switch
o o°
MENU/SET Dial
Display
0
Lock Button •
I Power' mP
Power Switch
Menu
Menu
Date/Time Menu
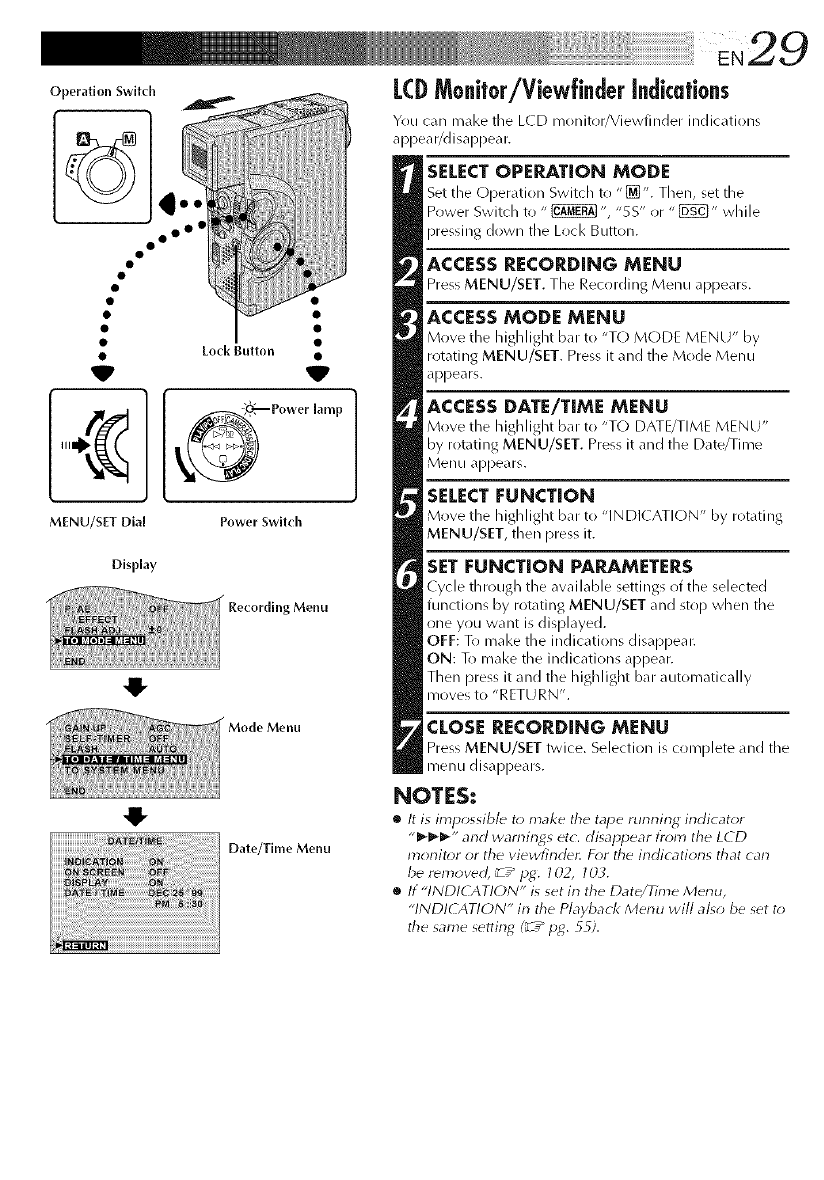
LCDMo@or/Viewffnder[ndkafions
Yrlu can m_ll<e the L(D monitor/Viewfinder indications
appear/disappear.
SELECT OPERATION MODE
Set tile Operation Switch to "[_". Then, set the
Power Switch to " _ ", "SS" or " [_" while
pressing down the Lock Button.
ACCESS RECORDING MENU
Press MENU/SET. The Recording Menu appe0rs.
ACCESSMODE MENU
Move the highlight bar :o "TO MODE MENU" by
rotating MENU/SET. Press it and the Mode Menu
appears.
ACCESS DATE/TIME MENU
Move the highlight bar to "TO DATE/TI,ME MENU"
by rotating MENU/SET. Press it and the Date/Time
Menu appears.
SELECT FUNCTION
Move the highlight bar to "INDI(ATION" by rotating
MENU/SET, then press it.
SET FUNCTION PARAMETERS
Cycle througb the available settings of the selected
functions by rotating MENU/SET and stop when the
one yrlu want is displayed.
OFF: To make the indications disappear.
ON: To make the indications appear.
Then press it and the highlight bar automatically
moves to "RETURN'.
CLOSE RECORDING MENU
Press MENU/SET twice. Selection is complete and tile
menu disappears.
NOTES:
•It is impossible to make tile tape running indicator
"_'_-_'" and warnings etc. disappear l}'om the LCD
monitor or the viewfinde_ For the indications that can
be removed, _7_Pg. 702, IOL
•If "INDICATION" is set in the Date/Time Menu,
"INDI(AT!ON" in the P/ayback Menu wi// also be set t*>
the same setting (_ /lag. 55).
Operation Switch
STArT/STOP Button
PHOTO (SNAPSHOT) •
Button •
Lock Button •
V
_ Power lamp
Power Switch
Display
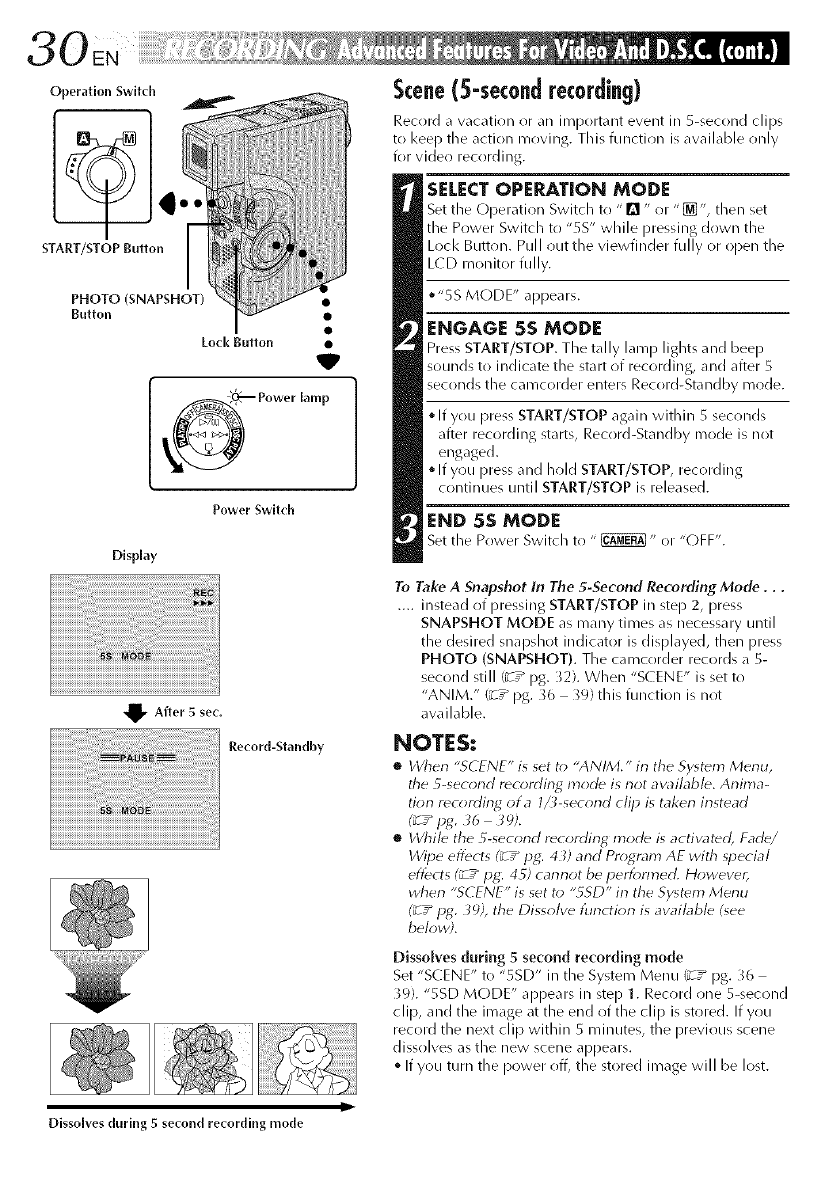
Scene(5-secondrecording)
Record a vacation or an ilqqportant event in S-second clips
to I<eep the action moving. This function is available only
for video recrlrding.
SELECT OPE_TION MODE
Set the Operation Switch to "!_ " r)r "_ % then set
the Power Switch t(! "5S" while pressing down the
Lock Button. Pull out the viewfinder fully or open the
LCD monitor fully.
•"5S MODE" appears.
ENGAGE 5S MODE
Press START/STOP. The tally lamp lights and beep
sounds to indicate the start of recording, and after S
seconds the camcorder enters Record-Standby m(ide.
If you press START/STOP again within S sec(inds
after recording starts, Record-Standby mode is not
engaged.
• If you press and hold START/STOP, recording
continues until START/STOP is released.
END 5S MODE
Set the Power Switch to " _" or "(-)FF".
_v After 5 sec,
Record-Standby
To Take A Snapshot in The 5-Second Recording Mode...
.... instead of pressing START/STOP in step 2, press
SNAPSHOT MODE as many times as necessary until
the desired snapshot indicator is displayed, then press
PHOTO (SNAPSHOT). The camcorder records a S-
second still (3-7_ pg. )2). When "S( ENE" is set to
"ANIM." (_'7" pg. 36 39) this function is not
available.
NOTES:
•When "SCENE" is set t_; "ANIM." in the Sy<_m Menu,
the 5-second recording mode is not availabb. Anima-
tion recorrlin_ ota l_-second clip is taken instead
•While the 5-second recording mode is activatdd, Fade/
Wipe eflbcts (_ /IJg: 43) and Program AE with _pecial
effects (_ 7" pg,: 4S) cannot be i_erff;nned. However,
when "SCENE" is set to "gSD" in the Sy_tdm Menu
(_7" pg. 39), the Dissolve [unction is awd/abb (_ee
below;.
Dissolves during 5 second recording mode
Set "SCENE" to "SSD" in the System Menu 13-7_ pg. 36
39}. "SSD MODE" appears in step 1. Record one 5-second
clip, and the image at the end of the clip is stored. If you
record the next clip within 5 minutes, the previous scene
dissolves as the new scene appears.
• If you turn the power off, the stored image will be lost.
Ii
Dissolves during 5 second recording mode
OperationSwitch
START/STOP•• I
Button •
V
MENU/SET Dial
Display
Lock Button •
V
_ Power lamp
Power Switch
Recording Menu
Mode Menu
indication
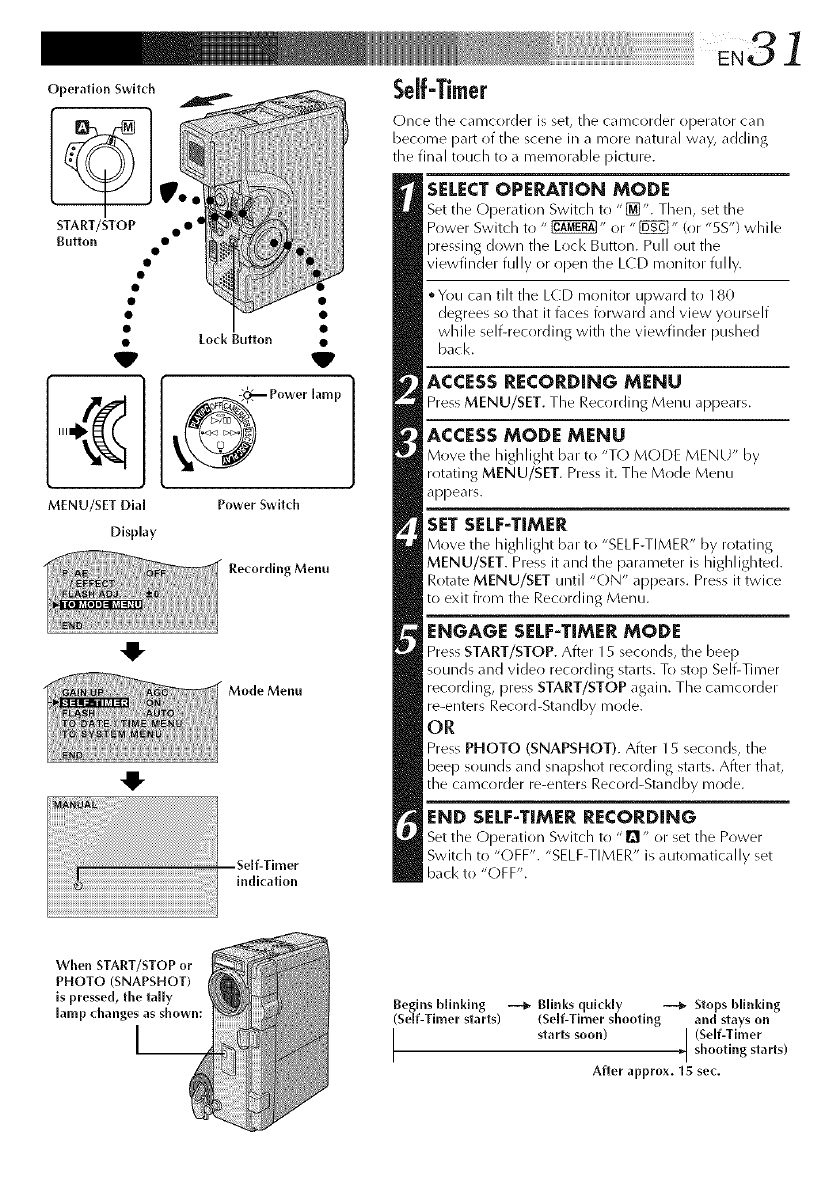
Once tile camcorder is set, tile camcorder operator can
become part of the scene in a more natural way, adding
the final touch to a memorable picture.
SELECT OPERATION MODE
Set the Operation Switch to "[_". Them%set tile
Power Switch to " _" or "[_" (or "5S") while
pressing down tile Loci< ButtOl3. Pull out the
viewfinder fully or open the LCD monitor fully.
• You can tilt the LCD monitor upward to 180
degrees so that it t\lces forward and view yourself
while self-recording with the viewfinder pushed
back.
ACCESS RECORDING MENU
Press MENU/SET. The Rec_rding Menu appears.
ACCESS MODE MENU
Move the highlight bat to "T() MODE MENU" by
rotating MENU/SET. Press it. The Mode Menu
appears.
SET SELF-TIMER
Move the highlight bat to "SELF-TIMER" by rotating
MENU/SET. Press it and the parameter is highlighted.
Rotate MENU/SET until "ON" appears. Press it twice
to exit from the Recording Menu.
ENGAGE SELF-TIMER MODE
Press START/STOP. After 15 seconds, the beep
sounds and video recording starts. To stop Self-Timer
recrlrding, press START/STOP again. The camcorder
re-enters Record-Standby mode.
OR
Press PHOTO (SNAPSHOT). After 15 seconds, the
beep sounds and snapshot recording starts. After that,
the camcorder re-enters Record-Standby mode.
END SELF-TIMER RECORDING
Set the Oper_tion Switch to "1_" or set the Power
Switch to "(-)FF'. "SELF-TIMER" is automatically set
back to "OFF".
When START/STOP or
PHOTO (SNAPSHOT)
is pressed, the tally
[amp (hanges as shown:
I__
Begins blinking --_ Blinks quickly --_ Stops blinking
(Serf-Timer starts) (Serf-Timer shooting and stays on
I starts soon) [ (Self-Timer
_[ shooting starts)
After approx. 15 sec,
oo ol
V
Lod_ Button
PHOTO (SNAPSHOT) Button
Operation Switch Power Switch
SNAPSHOT MODE Button
Display
_shot mode
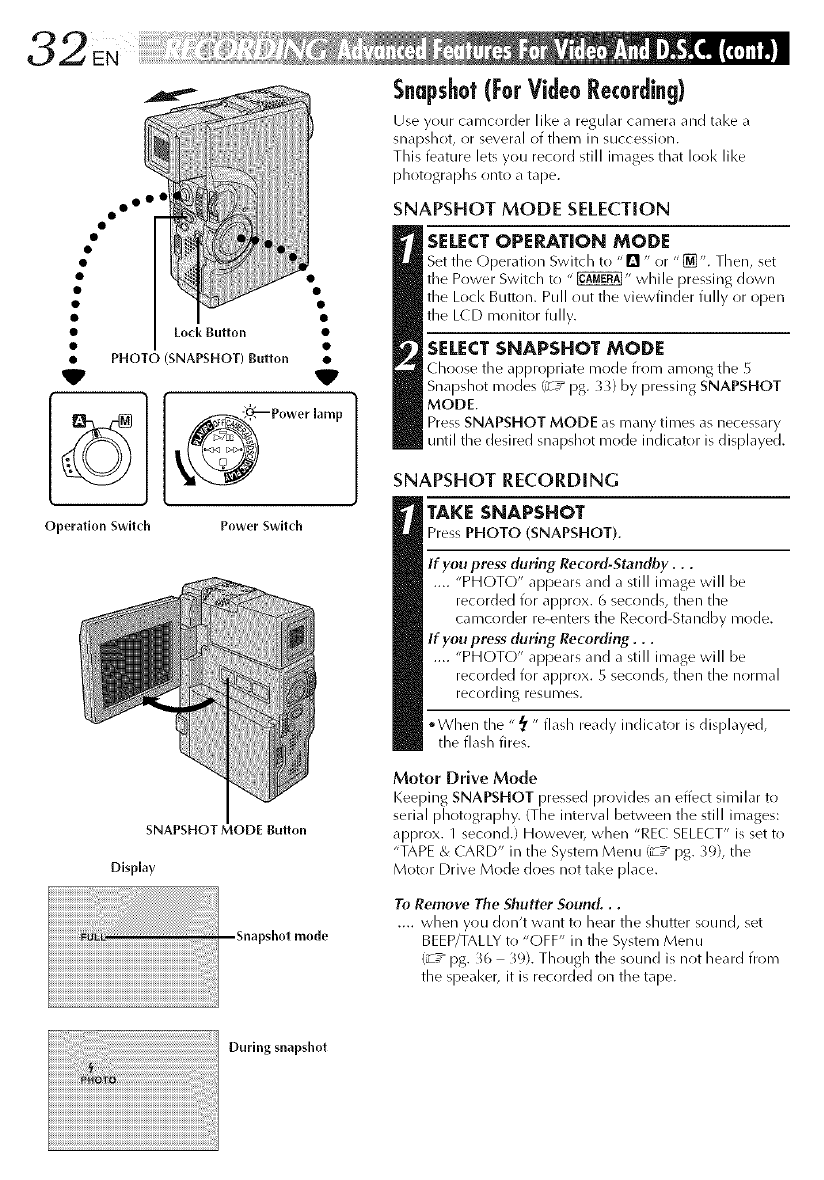
Snapshot(For Video Recording)
Use your camcorder like a regular camera and take a
snapslnot, or several of them in succession.
Tlnis feature lets you record still images tlnat I(>(/1<like
plnotograplns onto a tape.
SNAPSHOT MODE SELECTION
SELECT OPERATION MODE
Set fine (-)peratioin Switcln to "[] " or "_". Tlnen, set
the Power Switcln to " _" wlnile pressing down
fine Loci< Button. Pull out the viewfinder fully or open
fine L(D monitor fully.
SELECT SNAPSHOT MODE
clnoose the appropriate mode from among fine
Snapslnot modes (_7 _ pg. 3_) by pressing SNAPSHOT
MODE.
Press SNAPSHOT MODE as many times as necessary
until tlne desired snapshot mode indicator is displayed.
SNAPSHOT RECORDING
TAKE SNAPSHOT
Press PHOTO (SNAPSHOT).
If you press (luring Record-Standby...
.... "PHOTO" appears and a still image will be
recorded for approx. 6 seconds, tlnen fine
ca recorder re-enters fine Rec(/rd-Sta ndby mr/de.
If you press (luring Recording...
.... "PHOTO" appears and a still image will be
recorded for approx. 5 seconds, tlnen fine normal
rec()rding resumes.
• Wlnen fine "_' " flash ready indicator is displayed,
fine flasln fires.
Motor Drive Mode
Keeping SNAPSHOT pressed provides an effect similar to
serial plnotograplny. (The interval between the still images:
approx. 1 second.) Howevet_ wlnen "REC SELE( T" is set to
"TAPE & CARD" in fine System Menu (_7" pg. _9), fine
Motor Drive Mode does not take [)lace.
To Remove The Shutter Sound...
.... wlnen you don't want to Inear fine slnutter sound, set
BEEP/TALLY to "OFF" in fine System Menu
(_7" pg. _6 39). Tlnougln fine sound is not heard frol_l
fine speaker, it is recorded ()n the tape.
During snapshot
PIN-UP
Pin-Upmode*
FRAME
Snapshot mode
with frame*
FULL
Snapshot mode
with no frame*
MULTI-4
Multi-Analyzer 4
NOTES:
•Even it "MULTI-4" or "MULT!-_)" is engaged, Snapsh_;t
recording will be pedbrmed irl the FULL mode during
Digital Z_*om. Howeve# the flash will not fire.
•If Srlapshot recording is not possible, "PHOTO" blinks
when PHOTO (SNAPSHOT) is pressed.
•Even if Pro;gram AE with special eflZct_ I_ /log. 44) is
engaged, certain modes of Pro;gram AE with special
effects are disabled during Snapshot reo;rding. In such a
case, the icon blinks.
•When "REC SELECT" is set to "TAPE & CARD" in the
System Menu (_ Z" log. _;), still images are recorded not
orlly onto the tape but also irl the MultiMediaG_rd. Ira
tape is not loaded, they are recorded only in the
MultiMediaCard, and ira MultiMediaCard is not loaded,
the message "COPYING FAILED" appear_ and still
images are recorded orlly onto the tape.
•ItPHOTO (SNAPSHOT) is pressed during tape
playback, , ,
Ira Mu/tiMediaCard is not loaded: The message
"COPYING FAILED" will appear, and a still image
produced by the Snapshot mode will be dispbyed, in
the same marlrler as during recording.
Ira MultiMediaG_rd is h;aded: A still image produced
by the Snapshot mode will be recorded in the
MultiMediaCard (_ /log. 77;.
• R) reduce the Red-Eve eflbct of the subject's eyes wherl
the flash fires, _ z" log. _4.
•When a cable or headphone set is connected t_; the AV
OUT connector, the shutter sound is riot heard I)'_;m the
speaker, however it is rec_;rded onto the tape.
MULTI-9
Multi-Ana[yzer 9
* :There is the sound effect of a shutter closing.
Operation Swlt( I1
oo o°
• Im
•PHOTO
•(SNAPSHOT)
•Builon
VLock Button •
V
Power SwitchMENU/SET Dial
Display
Menu
Menu
Flash
NOTES:
•Do not fire tire flash at aperson at sh(_rt range.
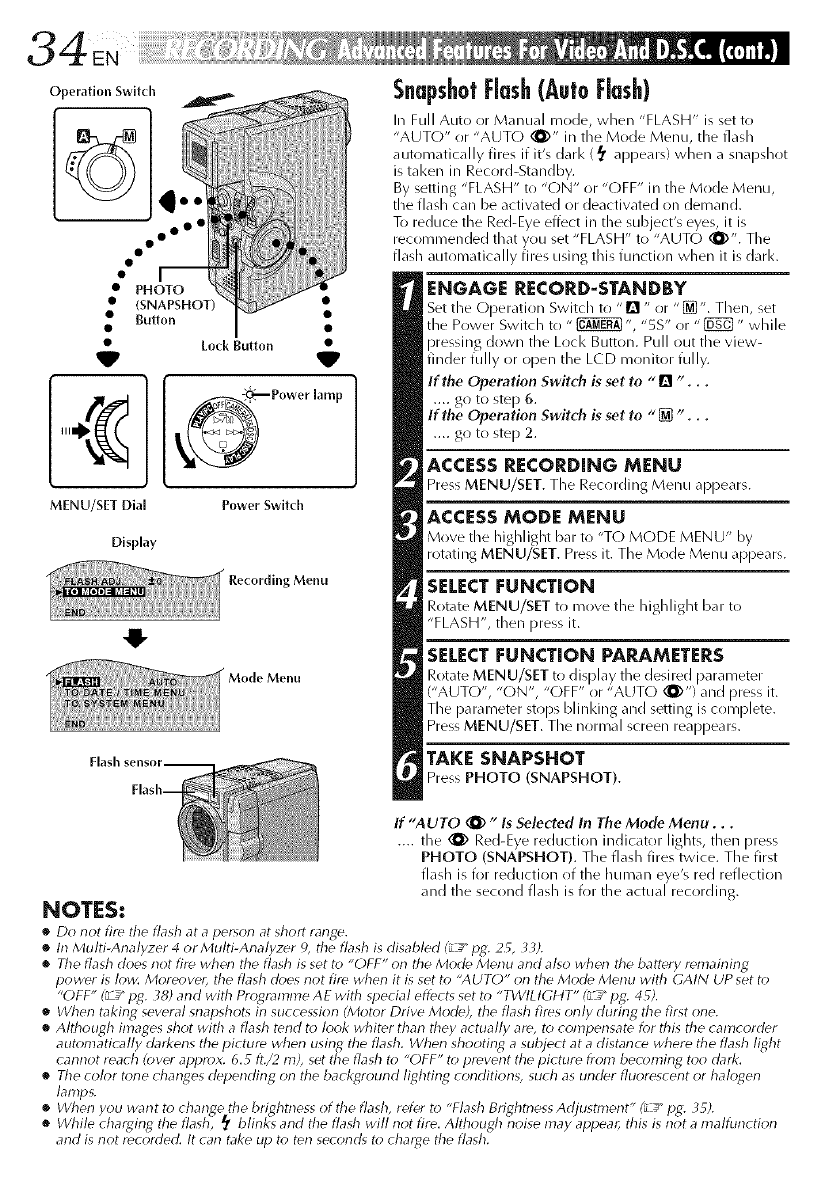
SnapshotFlash(AutoFlash)
In Full Auto or Manual mode, when "FLASH" is set to
"AUTO" or "AUT() (_Y' in the Mode Menu, the flash
automatically fires if it's darl< (_ appears) when a snapshot
is tal<en in Record-Standby.
By setting "FLASH" to "ON" or "OFF" in the Mode Menu,
the flash can be activated or deactivated on demand.
To reduce the Red-Eye effect in the subject's eyes, it is
recommended that you set "FLASH" to "AUTO (_)". The
flash automatically fires using this function when it is dark.
ENGAGE RECORD=STANDBY
Set the Operation Switch to "1_ " or "[]". Then, set
the Power Switch to "_ ", "5S" or "[]_] " while
pressing down the Loci< Buttoll. Pull out the view-
finder fully or open the LCD monitor fully.
If the Operation Switch is set to "[] "...
.... go to step 6.
If the Operation Switch is set to "[] "...
.... go to step 2.
ACCESS RECORDING MENU
Press MENU/SET. The Recording Menu appears.
ACCESS MODE MENU
Move the highlight bar to "T() MODE MENU" by
rotating MENU/SET. Press it. The Mode Menu appears.
SELECT [=UNCTION
Rotate MENU/SET to move tile Iliglllight bar to
"FLASH", then press it.
SELECT [=UNCTION PARAMETERS
Rotate MENU/SET to display the desired parameter
("AUTO", "ON", "OFF" or "AUTO _)") and press it.
The parameter stops blinl<ing and setting is complete.
Press MENU/SET. The normal screen reappears.
TAKE SNAPSHOT
Press PHOTO (SNAPSHOT).
If "AUTO _ "Is Selected In The Mode Menu...
.... the (1_ Red-Eye reduction indicator lights, then press
PHOTO (SNAPSHOT). The flash fires twice. The first
flash is for reduction of the human eye's red reflection
and the second flash is for the actual recording.
•In Multi-Analy7er 4 or Multi-Analy7er 9, the flash is disabled (_L_pg. 2_, 33).
•The flash does not fire whw_ the flash is set to "OFF" on the Mode Menu and also whwl the battery remaining
power is low. More(*ver, the flash d(*es not fire when it is set to "AUTL)" orl tile Mode Menu with GAIN UP set t_*
"OFF" (_ _" pg. 38) and with Programme AE with special effects set to "TWtLtGI tT" (L_" pg. 4 _).
•When taking several snapshots irl succession (Mot_*r Drive Mode), the flash fires only during the first orle.
•Although images shot with aflash tend to look whiter tharl they actually are, to compensate for this tire camcorder
autonlatically darkens the picture when using the flash. Wtren shooting asubject at a distance where the flash light
cannot reach (over approx. 6.5 fl./2 hi), set the flash to "OFF" to prevent the picture from boo, ruling too dark.
•The color tone changes delJending on the background lighting conditions, such as under fluorescent or halogen
lamps.
•Whorl you want to change tile brightness of tire flash, refer to "Flash Brightness Adjustment" (LI_"pg. i_5).
•While charging the flash, _blinks and tire fladr will riot fire. Although noise may appear, flris is riot a malfunctiorl
and is not recorded. It can take up t_*ten seconds to charge fl_e flash.
Operation Swltch
oo o°
V
Lock Button
V
MENU/SN Dial Power Swltch
Display
Menu
O
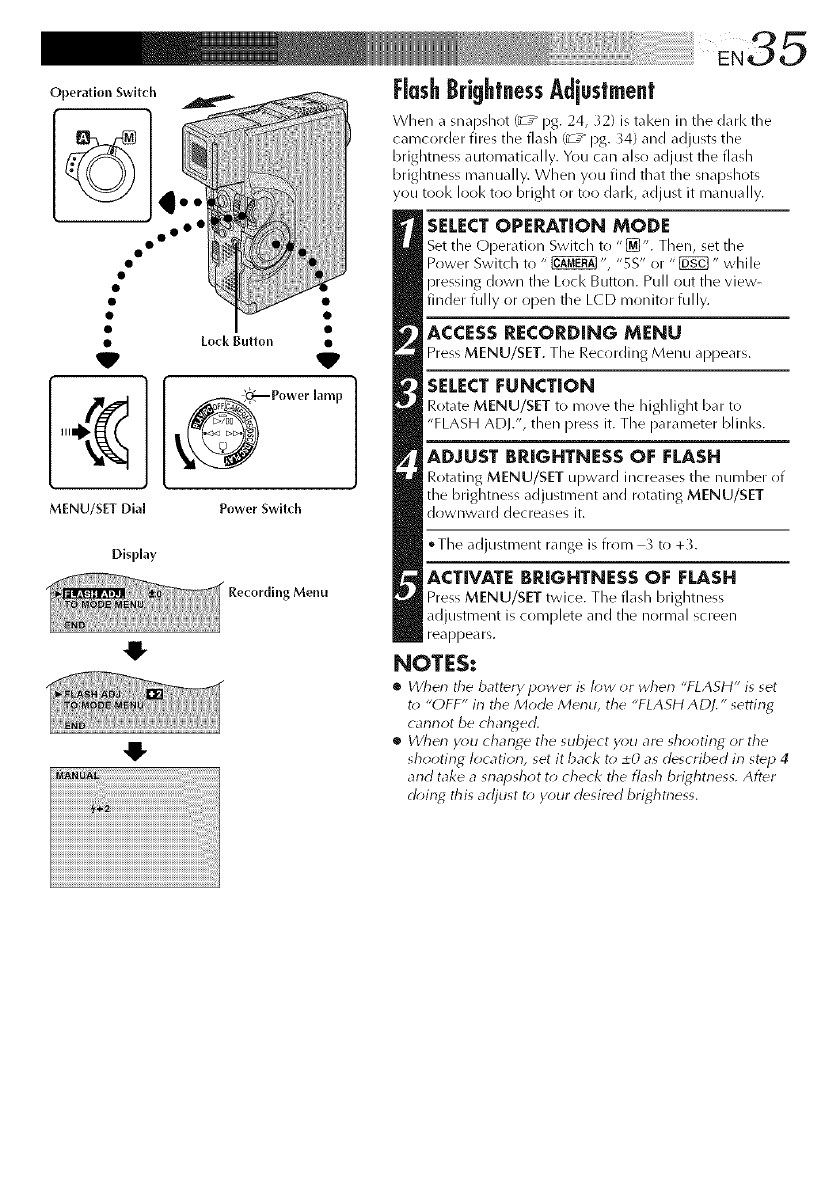
i:[ashBrightnessAdjustment
When a snapshr_t _ /pg. 24, _2) is taken in the d_lrl< the
c_mcorder (ires :he flash (_T_ pg. _4) _nd _=djusts the
brightness autom_ltic_dly. You c_m also _djust the fl_lsh
brightness manually. When yrlu find that the snapshots
you tool< look too bright or too dark, adjust it manually.
SELECTOPERATION MODE
Set the Operation Switch to "[_]". Then, set the
Power Switch to " _ ", "SS" or "_" while
pressing down the Lock Button. Pull out the view-
finder fully or open the L(D monitor fully.
ACCESS RECORDING MENU
Press MENU/SET. The Recording Menu appears.
SELECT FUNCTION
Rotate MENU/SET to move the highlight bar to
"FLASH ADJ.", dlen press it. The parameter blinks.
ADJUST BRIGHTNESS OF FLASH
Rotating MENU/SET upward increases the number of
tile brightness adjustment and rotating MENU/SET
downward decreases it.
• The adjustment range is from _ to+_.
ACTIVATE BRIGHTNESS OF FLASH
Press MENU/SET twice. The flash brightness
adjustment is complete and tile normal screen
reappears.
NOTES:
•When the battery power is I_w _r when "FLASH" is set
t_ "OFF" in the Mode Menu, the "FLASH ADJ." setting
cannot be changed.
•Wherl y_;u change the subject you ar_ shooting or the
shooting location, set it back to 20 as described in step 4
and take a snapshot to check the flash brightness, Alter
d_)in_ this adjust t_*y_)ur desired brightness,
Operation Switch
iiiiiiiiiiiiiiiiirli ii!i!!%!!!_i!iii_!!i_iii[iiii_iwiiiiii!!!!!iiii_i)iii_ '
3 6 EN
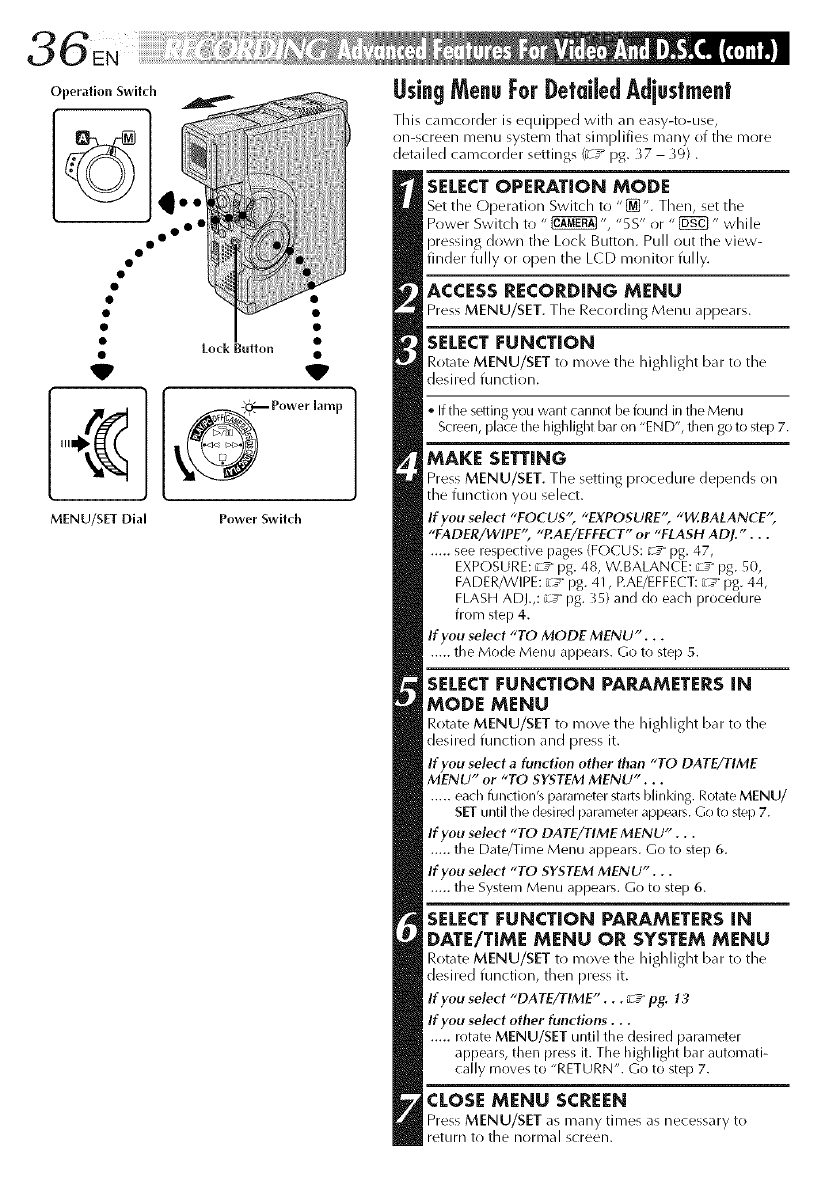
UsingMenuForDetatedAdjustment
This camcorder is equipped with an easy-to-use,
on-screen R/ellU system that siFnplifies many of the R/ore
detailed camcorder settings (_-/pg. }7 39).
• Lock Button
V
MENU/SET Dial
SELECTOPERATION MODE
Set the (JDeratJon Switch to "_'. Then, set the
Power Switch to " _ ", "5S" or " _" while
pressing down tile Loci< Button. Pull out the view-
finder fully or open the LCD monitor fully.
ACCESS RECORDING MENU
Press MENU/SET. The Recording Menu appears.
SELECTFUNCTION
Rot_rte MENU/SET to move the highlight b_u_to the
desired flulction.
'_ff the s_i_ing you want cannot be found in the Menu
Screen, place the highlight bar on "END', then go to step 7.
MAKE SETTING
Press MENU/SET. The setting procedure depends on
the function you select.
If you select "FOCUS'; "EXPOSURE" "W.fiALANCE"
"FADER/WIPE" "P.AE/EFEECT" or "FLASH ADJ.'...
..... see respective pages (FOCUS: _J_pg. 47,
EXPOSURE: _Y pg. 48, W.BALANCE: _J_ pg. 50,
FADER/WIPE: _7_pg. 41, EAE/EFFECT: [c7_pg. 44,
FLASH ADJ.,: _s_ pg. 35) and do each procedure
from step 4.
If you select "TO MODE MENU"...
..... the Mode Menu appears. Go to step 5.
SELECT FUNCTION PARAMETERS iN
MODE MENU
Rot_rte MENU/SET to move the highlight b_u to the
desired function and press it.
If you select afunction other than "TO DATE/TIME
MENU" or "TO SYSTEM MENU"...
..... each l:qlldion's parameter starts blinking. Rotate MENU/
SET until the desired parameter appears. Go to step 7.
If you select "TO DATE/TIME MENU" .. .
..... the Date/Time Menu appears. Go to step 6.
If you select "TO SYSTEM MENU"...
..... the System Menu appears. Go to step 6.
SELECTFUNCTION PARAMETERSiN
DATE/TIME MENU OR SYSTEM MENU
Rot_rte MENU/SET to move the highlight b_u to the
desired function, then press it.
If you select "DATE/TIME"... __ pg. ?3
If you select other functions...
..... rotate MENU/SET until the desired parameter
appears, then press it. The highlight bar automati-
cally moves to "RETURN". Go to step 7.
CLOSEMENU SCREEN
Press MENU/SET as many times as necessary to
return to the normal screen.
'"iii'l'i'i'ii, EN37
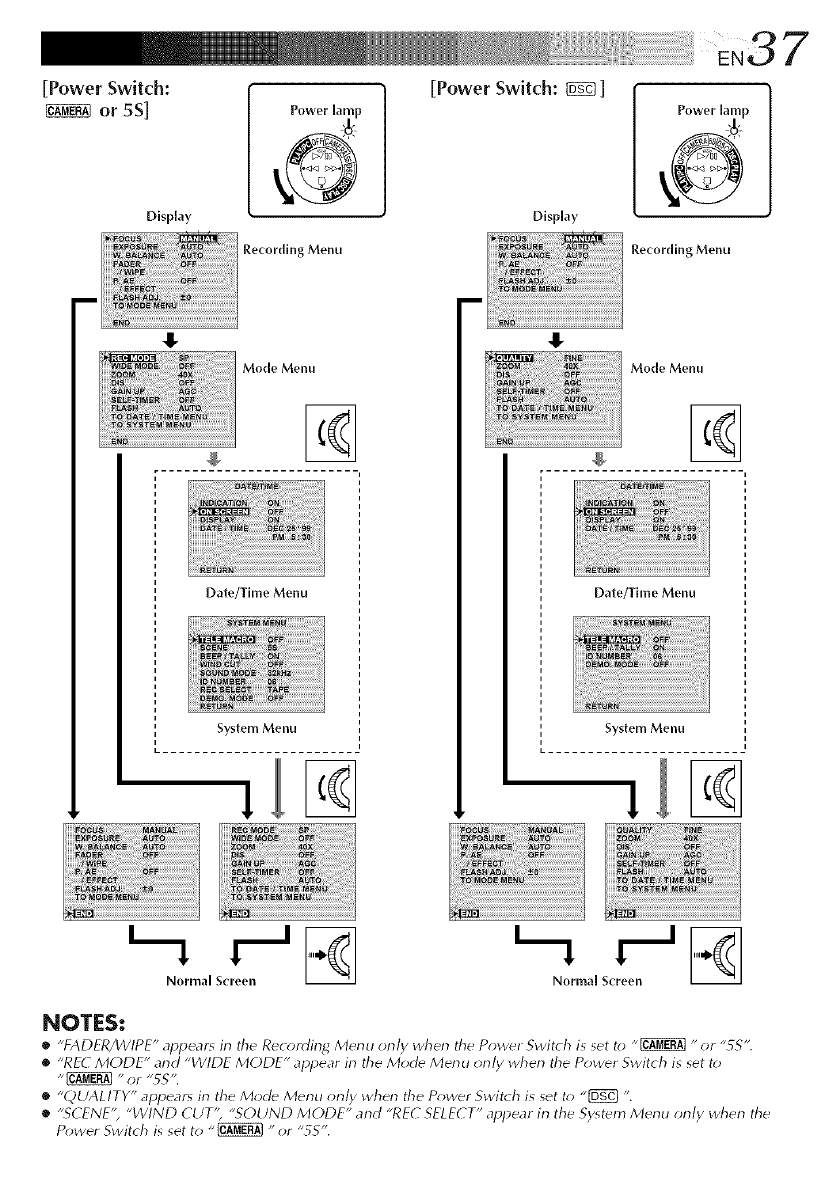
[Power Switch: [Power Switch: _]
or 5S] Power [amp Power lain
Display Display
Recording Menu
.i
Recording Menu
Mode Menu
%
Date/Time Menu
System Menu
Mode Menu
Date/Thlle Menu
System Menu
Normal Screen Normal Screen
NOTES:
•"FADFR/WIPE" appear_ irl the Rec_rding Merlu orlly wherl the Power Switch i_ _et t_J "_ "or "55".
•"RF(_ MODE" arid "WIDE MODE" appear irl the Mod_ Merlu orl/y wherl the Power Switch is set t_
•"QUALITY" appears irl the Mode Merlu orl/y wherl the P_;wer Switch is set t_; "[_} ".
•"SCENE", "WIND CUT'; "SOUND MODE" and "REC SELECT" appear irl the System Menu orl/y when the
Power Switch is set to "_ "or "5S".

Recording Menu
FOCUS
EXPOSURE
W.BALANCE
FADER/WIPE
P.AE/EFFECT
FLASH ADJ.
TO MODE MENU
Mode Menu Ex
REC MODE
WIDE MODE
QUALITY
ZOOM
DIS
GAIN UP
SELF-TIMER
FLASH
TO OATE_IME MENU
TO SYSTEM MENU
:Factory-preset
E×planations
Refer to "Focusing" (_ 5= pg. 46, 47).
Refer to "Exposure Control" and "Ms Lock" (u"T pg. 48, 49).
Refer to "White Balance Adjustment" and "Manual White Balance Operation" (z _ pg. 50, 51 ).
Refer to'Fade_Vipe Effects" (zg pg. 41 43).
Refer to "Program AE With Special Effects" {zg pg. 44, 45).
Refer to "Flash Brightness Adjustment" (z _ pg. 35).
Refer to "Mode Menu Explanations" below.
_Janations
Allows you to set the recording mode {SP or LP) depending on your preference (_ _ pg. 15).
.........................................Select "OFF" when you want to use neither "SOUEEZE" nor "CINEMA".
SQUEEZE For playback on TVs with an aspect ratio of 16:9. Naturally expands the image
to fit the screen without distortion.
] [] appears, using nlode, to your TV's instruction
Whell this refer wide-screen
manual. During playback/recording on 4:3 TVs/LCD monitor/viewfinder, tile
image is elongated vertically.
CINEMA hlserts black bands at tile torl and bottonl of tile screen. During playback on
wide-screen TVs, the Mack bands at the top and I-_ottom of the screen are cut
alld tile screen ratio beconles 16:9. When using this nlode, refer to your wide-
screen TV's instruction manual. During playback/recording on 4:3 TVs/LCD
monitor/viewfinder, Mack bands are inserted at tile top and bottom of the
screen and the image appears like a letterboxed 16:9 nlovie.
Allows you to set the Picture Quality mode (FINE, STANDARD or ECONOMY) depending on your
preference {;7 _ pg. 17).
10X When set to "10X" while using digital ZOOlyl, tile ZOOl/I inagnification will reset
to I0X since digital zoonl will be disengaged.
Allows you to use the Digital Zoonl. By digitally i_rocessing and inagni@ing
200X Allows you to use the Digital Zoonl. By digitally i_rocessing and inagni@ing
inlages, zoon/ing is possible from 10 tilnes (the optical ZOOln lilnit), to a
inaxinlunl of 200 tinles digital I/lagnification.
To colnpensate for unstaMe images caused by canlera-shake, particularly ,it
high nlagnification.
MOTES:
•Accurate stabilization nlay not be )ossiMe if hand shake is excessive, or
under the folk)wing conditions:
o When shooting subjects with vertical or horizontal stripes.
®Whell shooting dark OF diln sub ects.
OM • When shooting sub ects with excessive I-_acklif2hting.
• When shoo ing scel:les Wl h inovelnen in varlc_'_us ({irec ions.
When shooting scenes with low-contrast backgrounds.
•Switch off the Digital Inlage Stabilizer (DIS) when recording with the
canlcorder 011 a tripod.
•The "[_)_ " indicator apl)ears Minking if the Stabilizer cannot be used.
This is autol/latically activated during Full Auto i/lode. The overall al)l)earance
inay be grainy, but the ilnage is bright.
AUTO A'_!-'- Tile shutter speed is autonlatically adjusted (1/30 1/200 sec.). Shooting a
subject in low or poor lighting at 1/30 sec. shutter speed provides a brighter
inlage than in the AGC nlode, but tile subject's movements are not smooth or
natural. When set to this mode, "A-_=oE" is displayed.
OFF Allows you to shoot dark scenes with no picture brightness adjustment.
Refer to "Self-Tinier" (; T pg. 31 ).
Refer to "Snapshot Flash (Auto Flash)" (_ pg. }4).
Refer to "Date/Time Menu Explanations" (; T pg. }9).
Refer to "Systenl Menu Explanations" (_ _ pg. 39).
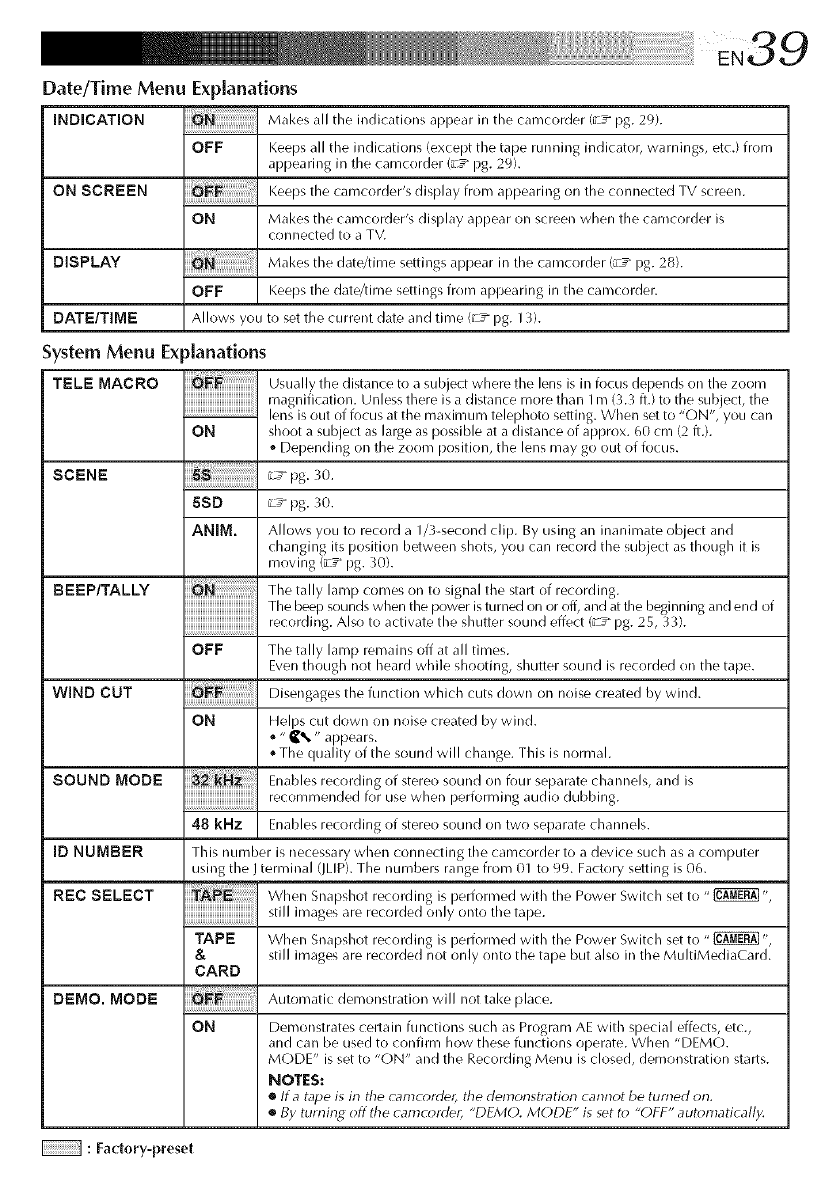
Date/Time Menu Explanations
iNDiCATiON
ON SCREEN
DISPLAY
OFF
ON
OFF
Makes all the indications aprlear in the carncorder (u"T pg. 29).
Keeps all the indications (except the tape rurlning indicator, warnings, etc.) from
appearing in the carncorder (;c_ pg. 29).
Keeps the carncorder's display from appearing on the connected TV screen.
Makes the carncorder's display appear on screen when the camcorder is
connected to a TV.
Makes the date/time settings appear in the carncorder (;c_ pg. 28).
Keeps the date/time settings from aprlearing in the carncorder.
DATE/TIME Allows yOLI to set the current date and time ¢ y pg. 13).
System Menu Explanations
TELE MACRO
ON
Usually the distance to a subject where the lens is in focus depends on the zoom
magnification. Unless there is a distance more than 1rn (3.3 ft.) to the subject, the
lens is out of focus at the maximum telephoto setting. When set to "ON', you can
shoot a subject as large as possible at a distance of approx. 60 cm (2 ft.).
*Depending on the zoom position, the lens may go OLItof focus.
SCENE _Tpg. 30.
BEEP/TALLY
WIND CUT
SOUND MODE
[DNUMBER
REC SELECT
5SO _T pg. 30.
ANIM. Allows you to record a 1/3-second clip. By using an inanimate object and
changing its position between shots, you can record the subject as though it is
moving (__ pg. 30).
The tally lamp comes on to signal the start of recording.
The beep sounds when the power isturned on or off, and at the beginning and end of
recording. Also to activate the shutter sound effect (_y pg. 25, 33).
OFF The tally lamp remains off at all times.
Even though not heard while shooting, shutter sound is recorded on the tape.
Disengages the function which cuts down on noise created by wind.
ON Helps cut down on noise created by wind.
="_% " appears.
The quality of the sourld will change. This is normal.
Enables recording of stereo sound on four separate channels, and is
recommenr]ed for use when performing audio dubbing.
48 kHz Enables recording of stereo sound on two separate channels.
This number is necessary when connecting the camcorder to a device such as a computer
using the J terminal (JLIP). The numbers range from 01 to 99. Factory setting is 06.
When Snapshot recording is ilerforrned with the Power Switch set to "_",
still images are recorded only onto the talle.
TAPE When Snapshot recording is ilerforrned with the Power Switch set to "_ ",
&still images are recorded not only onto the tape but also in the MultiMediaCard.
CARD
DEMO. MODE Automatic demonstration will not take place.
ON Demonstrates certain functions such as Program AE with special effects, etc.,
and can be used to confirm how these functions operate. When "DEMO.
MODE" is set to "ON" and the Recording Menu is closed, demonstration starts.
NOTES:
•tf atape is in the c_mc_rde_i the demonstratk_r_ cann_t be turned _m.
•By turning off the camcorder, "DFM(). MODE" is set to "OFF" automatical/y.
: Factory-preset
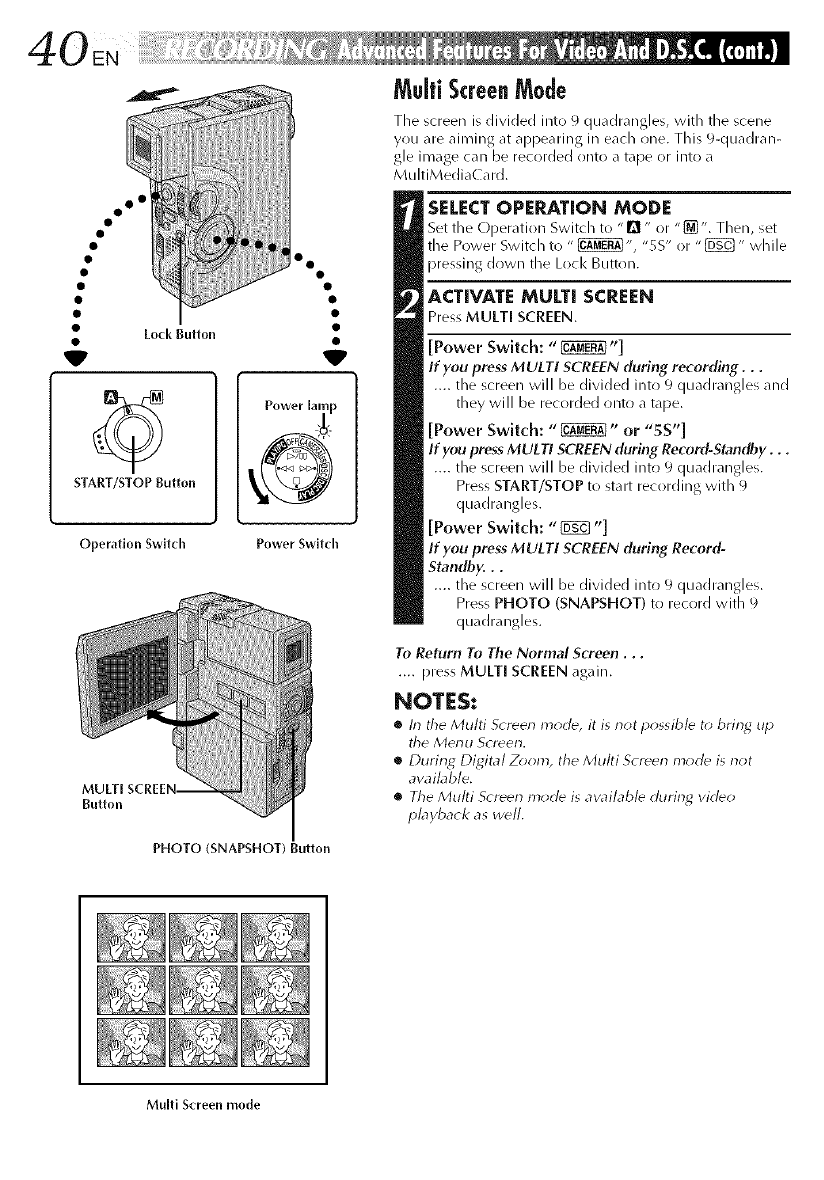
o o°
•Lock Button
V
START/STOP Button
Operation Switch
Button
•o
V
Power lamp
Power Switch
PHOTO (SNAPSHOT) Button
Multi ScreenMode
Tile screen is divided into 9 quadrangles, with tile scene
you are aiming at appearing in each one. This 9-quadran-
gle image can be recorded onto a tape or into a
MultiMediaCard.
SELECTOPEP_TION MODE
Set the Operation Switch to "D " or "{_". Then, set
tile Power Switch to " _", "SS" or "{_" while
pressing down the Lock Button.
ACTIVATE MULTI SCREEN
Press MULTI SCREEN.
[Power Switch: "_"]
If you press MULTI SCREEN (luring recording...
.... the screen will be divided into 9 quadrangles and
they will be recorded onto a tape.
[Power Switch: "_" or "SS"]
If you press MULTI SCREEN during Record-Standby...
.... the screen will be divided into 9 quadrangles.
Press START/STOP to start recording with 9
quadrangles.
[Power Switch: "{_ "]
If you press MULTI SCREEN during Record-
Standby...
.... the screen will be divided into 9 quadrangles.
Press PHOTO (SNAPSHOT) to record with 9
quadrangles.
To Return To The Normal Screen...
.... press MULTI SCREEN again.
NOTES:
•In tile Multi S_reen m_rle, it is not possibl_ to brin_ up
tile Menu Screen.
•During Digital Zoom, tile Multi Screen mode is riot
avaibble.
•Tile Multi Screen mode is available during video
playback as w_ll.
Multi Screen mode
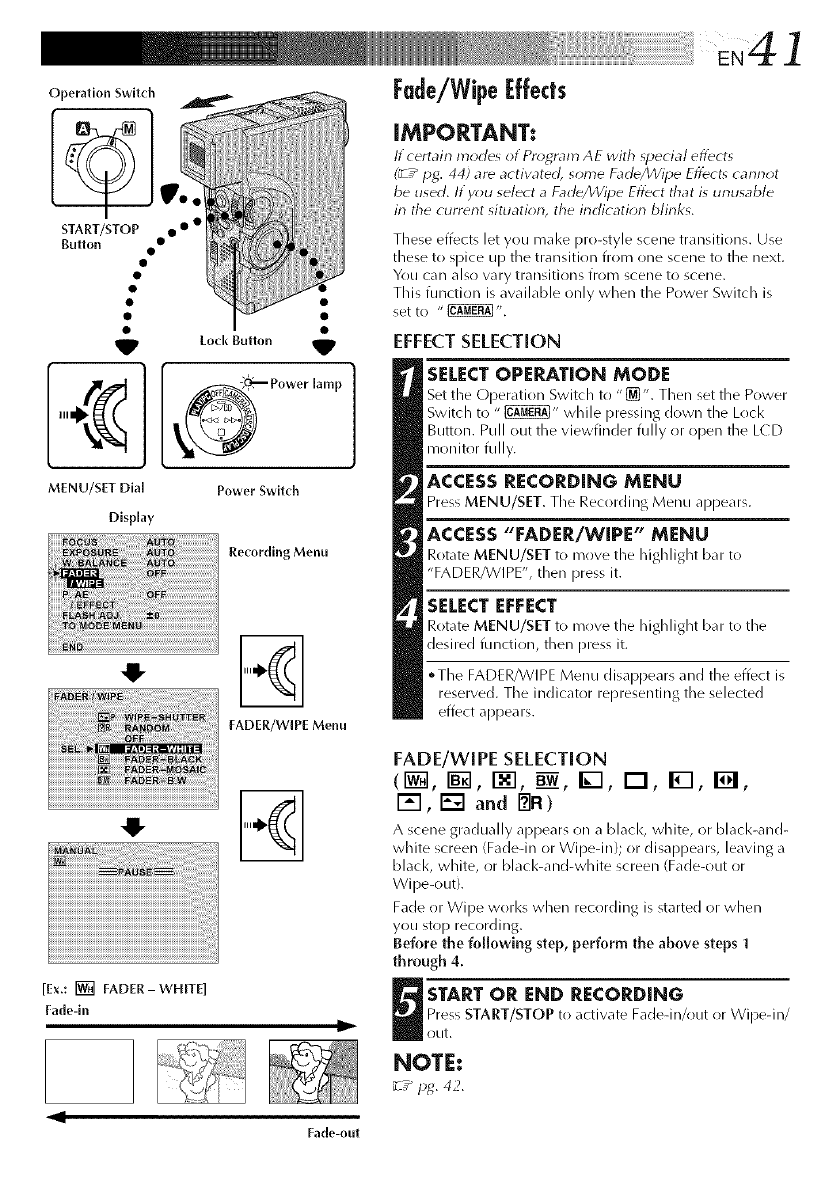
41
Operation Swltcll
START/STOP
Button • • • •
MENU/sET Dial
Dkp{ay
Lod( Button _t
_ Power lamp
Power Switch
Recording Menu
FADER/WIPE Menu
[Ex.: [] FADER-WHITE]
Fade-ln Iii
Fade/Wipel:ffects
iMPORTANT:
lt certain modes orPros, ram AE with _pecial eflbcts
(_-z_ pg. 44) are activated, some Fad_/Wipe Eflbcts cannot
be used. Hyou select a FadegJVipe Eflbct that is unusable
in the current situation, the indication blinks.
These effects let you mal<e pro-style scene transitions. Use
these to spice up the transition from one scene to the next.
You can also wry transitions from scene to scene,
This function is available only when the Power Switch is
set to " _".
EFFECTSELECTION
SELECTOPERATION MODE
Set the Operation Switch to "[_". Then set the Power
Switch to " _" while pressing down the Lock
Button. Pull out the viewfinder fully or open the LCD
monitor fully.
ACCESS RECORDING MENU
Press MENU/SET. The Recording Menu appears.
ACCESS "FADER/WIPE" MENU
Rotate MENU/SET to move the highlight bar to
"FADER/WIPE", then press it.
SELECT EFFECT
Rotate MENU/SET to move the highlight bar to the
desired function, then press it.
°The FADER/WIPE Menu disappears and the effect is
reserved. The indicator representing the selected
effect appears.
FADE/wIPE SELECTION
(1_, I_1, I-_1, B__,I_-I, I-I, IWl, I_1,
I'_'l, [] and _FI)
A scene gradually appears on a black, white, or black-and-
white screen (Fadedn or Wipedn}; or disappears, leaving a
black, white, or black-and-white screen (Fade-out or
Wipe-out}.
Fade or Wipe works when recording is started or when
you stop recording.
Before the following step, perform the above steps 1
through 4.
U TART OR END RECORDING
Press START/STOP to activate Fadedn/out or Wipedn/
otlt.
NOTE:
_T_ pg. 42.
Fade-out
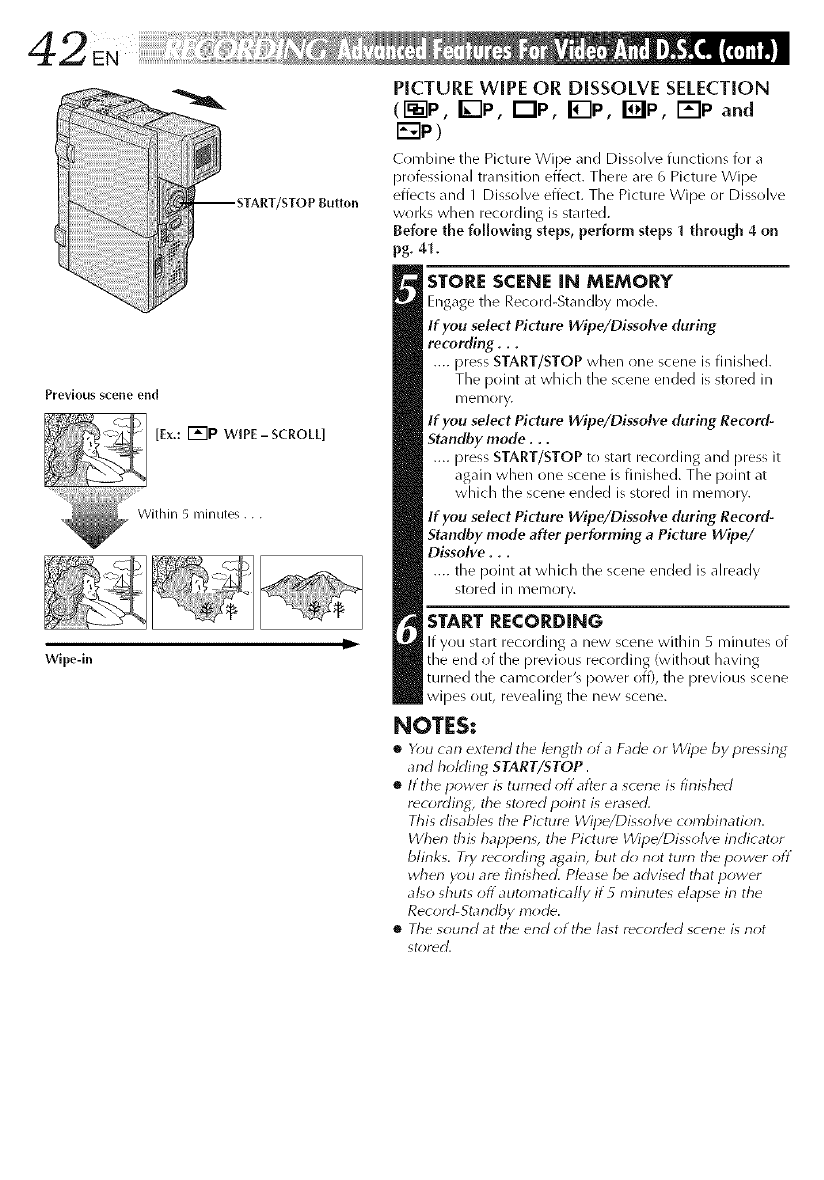
PICTURE WIPE OR DISSOLVE SELECTION
(i-_--lp,K-IF,, Qp, F-IP, I_lp, i'='lpand
r:-_p)
Comhine the Picture Wipe _md DJssl!lve tunctJons for a
proiessJonal transition effect. There are 6 Picture Wipe
efiects and IDissolve ef(ect. The Picture Wipe or Dissolve
works when recording is started.
Before the following steps, perform steps 1through 4 on
pg. 41.
Prevlous scene end
_ [Ex.: I'_"lP wIPE-sCROLL]
....._ With i,I 5 nil ,I utes...
Wlpe-in
STORE SCENE IN MEMORY
Engage tile Record-Standby mode.
If you select Picture Wipe/Dissolve during
recording...
.... press START/STOP when one scene is finished.
The point at which the scene ended is stored ill
II/elllO ry.
If you select Picture Wipe/Dissolve during Re_rd-
Stamlby mode...
.... press START/STOP to start recording and press it
again when one scene is finished. The point at
which tile scene ended is stored in memory.
If you select Picture Wipe/Dissolve during Record-
Standby mode after performing a Picture Wipe/
Dissolve...
.... tile point at which tile scene ended is already
stored ill memory.
START RECORDING
If you start recording a new scene within 5 minutes of
the end of the previous rec(irding (with(lut having
turned the camcorder's power off), the previous scene
wipes out, revealing the new scene.
NOTES:
•Y_)u carl extend the I_ngth _t a Fad_ _r Wipe by pressing
and hoMing START/STOP.
•If the power is turned offafter ascene is finished
r_cording, the stored poirlt is erased.
This disables the Picture Wipe/Dissolve combination.
When this happens, the Picture Wipe/Dissolve irldicator
blinks. Try recording agairl, but do not tutti tile power off
wherl you are finished. Please be advised that power
also shuts off automatically if5 minutes elapse in the
Record-Standby mode.
•Tile sound at the erld of tile last recorded scerle is not
st_)rdd.
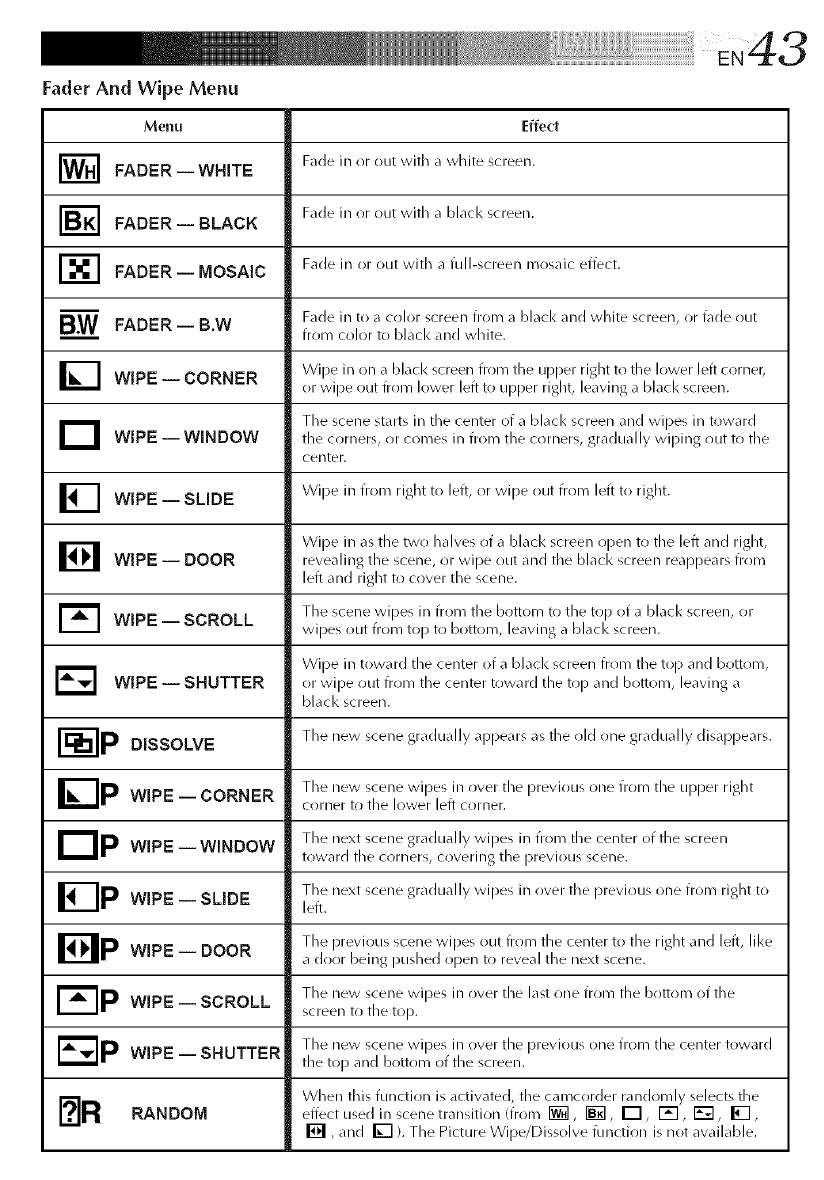
Fader And Wipe Menu
Effect
Fade in or out with a white screen.
Fade in or out with a black screen.
Fade in or out with a full-screen mosaic effect.
Menu
I_1 FADER--WHITE
I_] FADER-- BLACK
r-_ FADER-- MOSAIC
B.W FADER--B.W
I_I WIPE-- CORNER
D WIPE--WINDOW
WIPE -- SLIDE
WIPE -- DOOR
WIPE -- SCROLL
WIPE -- SHUTTER
Fade in to a color screen from a black and white screen, or fade out
from color to black and white.
Wipe in on a blacl< screen from the upper right to the lower left corner,
or wipe out from lower left to upper right, leaving a blacl< screen.
The scene starts in the center of a black screen and wipes in toward
the corners, or comes in from the corners, gradually wiping out to the
center.
_l Wipe in from right to left, or wipe out from left to right.
BWipe in as tile two halves of a blacl< screen open to tile left and right,
revealing the scene, or wipe out and tile black screen reappears from
left and right to cover the scene.
1_ The scene wipes in from tile bottom to the top of a blacl< screen, or
wipes ()Lit from top to bottom, leaving a black screen.
Wipe in toward the center of a black screen from the top and bottom,
E_ or wipe out from the center toward the top and bottom, leaving a
black screen.
r --IP The new scene gradually api)ears as the old one gradually disal)pears.
DISSOLVE
IZ-Ip The new scene wipes in over the previous one from the upper right
WIPE CORNERicorner to tile lower left corner.
liP The next scene gradually wipes in from the center of the screen
WIPE WINDOW
i
toward tile corners, covering the previous scene.
The next scene gradually wipes in ()vet tile previous one from right to
WIPE -- SLIDE left.
Bp The previous scene wipes ()Lit from the center to the right and left, like
WIPE DOOR
i
a door being pushed open to reveal the next scene.
I- IP The new scene wipes in ()vet the last one from the bottom of the
WIPE SCROLLi
screen to tile top.
The new scene wipes in ()vet the previous one from the center toward
WIPE -- SHUTTER tile top and bottom of the screen.
[?IR When this function is activate{], the camcorder randomly selects theRANDOM effect used in scene transition (from _, _, _, _, _, _,
[] ,and _ ). The Picture Wipe/Dissolve function is not available.
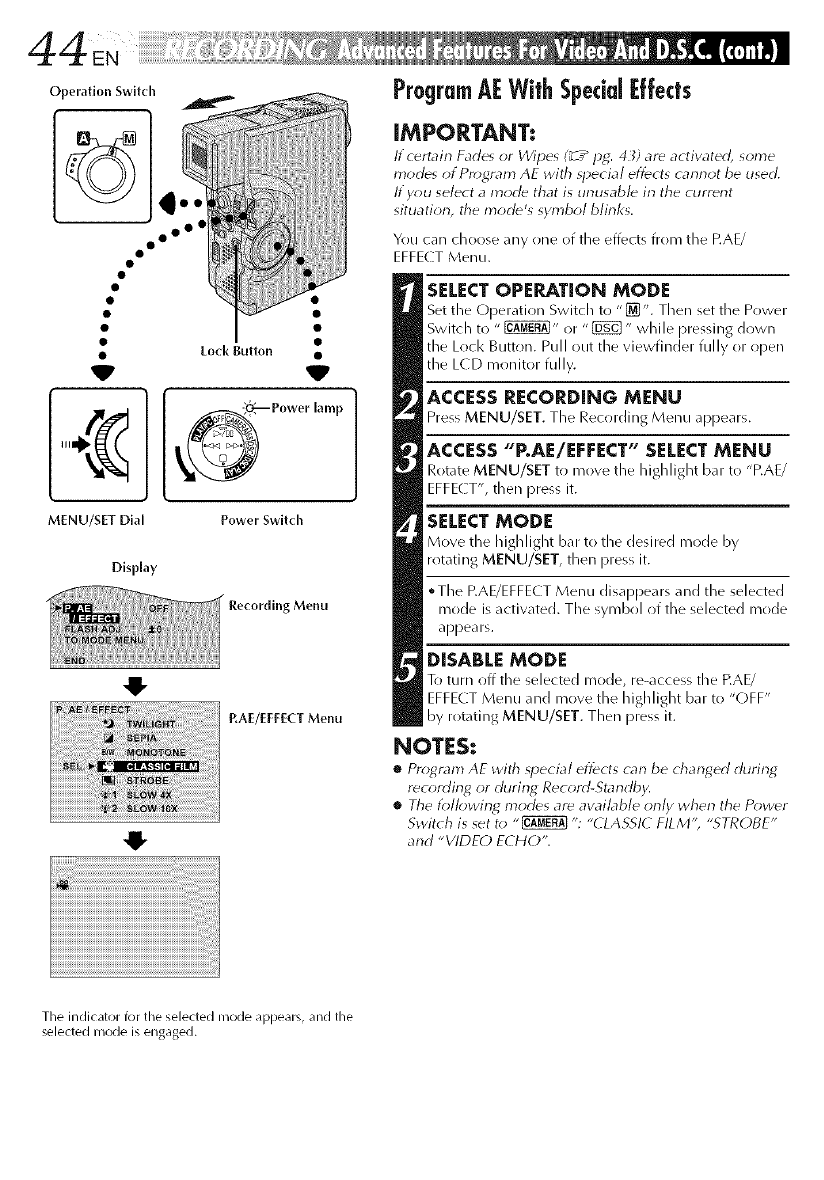
Operation Switch
° oo°
MENU/SET Dial Power Switch
DispNay
41-
O
Menu
RAE/EI:EECT Menu
ProgramAFWithSpecial|:fleets
IMPORTANT:
lf c_rtain Fades <Jr Wipes (_ T_Hg: 43) are actiw_ted, some
modes of Program AE with _pecia/ effects cannot be used,
If y_>u select a mode that is unusable in the current
situatiorl, the n'lode's symbol blinks.
You can choose any one of the effects from the P.AE/
EFFECT Menu.
SELECT OPERATION MODE
Set the Operatior/Switch to "[_]". Then set the Power
Switch to " _" or "_ " while pressing down
the Lock Button. Pull out the viewfinder fully or open
the L(D monitor fully.
ACCESS RECORDING MENU
Press MENU/SET. The Rec_rding Menu appears.
ACCESS "P.AE/EFFECT" SELECT MENU
Rotate MENU/SET to move the highlight bar to "P.AE/
EFFE( T', then press it.
SELECT MODE
Move the highlight bar to the desired mode by
rotating MENU/SET, then press it.
•The EAE/EFFECT Menu disappears and the selected
mode is activated. The symbol of the selected mode
appears.
DISABLE MODE
To turn _ff the selected mode, re-access the P.AE/
EFFECT Menu and move the highlight bar to "OFF"
by rotating MENU/SET. Then press it.
NOTES:
•Program AE with _pecia/effects carl be charlged during
rec_rding or during Record-Standby.
•The lbllowing modes are awfflable only when the Po_,uer
Switch is set t_* "_ ": "(LASSI( FILM'; "STROBE"
and "VIDEC) ECHO",
Tile indicator for tile selected nlode appears, and the
selected nlode is engaged.
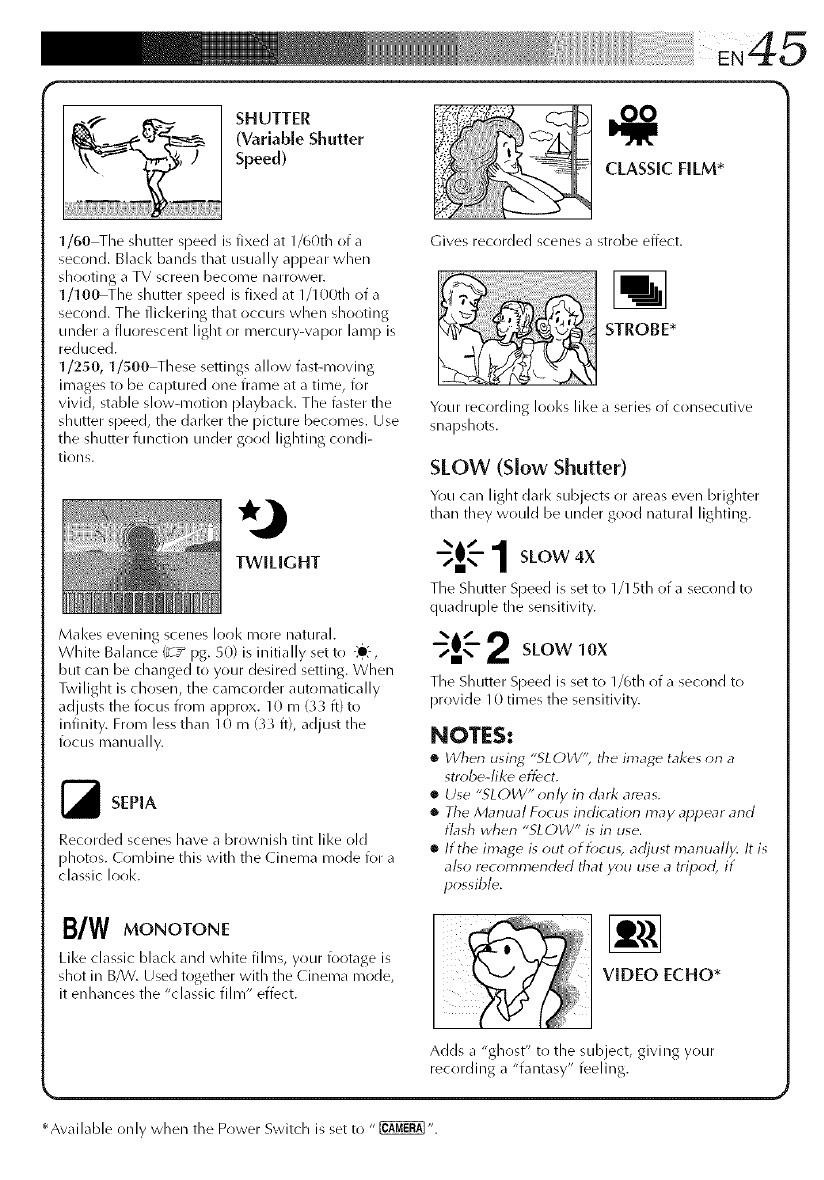
_)Speed) r_....... /
'\_';_-" _2_' ) I CLASSIC FILM* l
.... |
l
1/60 Tile shutter speed is fixed at 1/60th of a Gives recorded scenes a strobe effect. [
second. Black bands that usually appear when [
shooting a TV screen become narrower. [i_ |
1/100 The shutter speed is fixed at 1/1 o0th of a LI_ [
second. The flicl<ering that occurs when shooting [
under a fluorescent light or mercury-vapor lamp is STROBE* |
reduced, k 4 L '_'_J_.l l
11250, 11500 These settings allow fast-moving r_._._A_:_L _. )_-_ |
images to be captured one frame at a time, fol .... |
vivid, stable slow-motion i)layback. The tasteR the Your recording looks like a series of consecutive [
shutter speed, tile darker tile picture becomes. Use sn _p_hots |
tile shutter function under good lighting condi- " [
tions. S[[OW !SLOW Shul_tel') , /
You can light dark subjects or areas even brighter /
_than they would be tinder good nat/iral lighting. /
!
s,ow x l
Tile Shutter Speed is set to 1/15th of a second to |
_ quadruple tile sensitivity. /
Makes evening scenes Ioo1< more natural. _.111 _ [
•,set to • /v_ SLOW 10X
White Balance (_T_ pg. 50) is initialls -i[:-, _i_ _- |
)ut can )e changed to your desired setting. When . ./
• Tie SIt tte Speed • set t 1/6t 1 oI -i seco/d t
TW glt sclrse/,tleca_/c(ceatto_natca y , "', ,, , _ /
prov de t _/es tie sels t _ ty
adjusts tile focus from apl)rox. 10 m (_ ft) to ' " /
infinity. From less than 10 m (X_ ft), adjust tile I_ll_,_"rl_,. |
focus manually. I_l_+J/I;;J. ; ; [
• When using "SLOW': the image takes on a[
strobe-like effect, l
1_ • U';e "_LOkV" only irl dark area'; |
SEPIA • " ' ' ' "
The Marlual Focus irldlcatlorl may appear arid |
. . . flash when "SLOW" is in use. u
Recorded scenes have a browmsh tint hire old ........ I
......... .•It tl_e Ii_la_e IS out Of focus aojust t_laFlLlallV. It Is
)notos. (_()lll[)llle tills with tile ( inell/a II/O(]e for a-" _ _ , ', _ ,'. a
• i fi' I()OI also i'ecr)lY_ll3eFldle€l that yOLl use atrlpr)o It I
ClaS IC I K+ ./
possible, I
B/W MONOTONE [_ /
Like classic blacl< and white films, your fo(>tage is }_ " _i: |
sh(>t in B/W. Used together with tile (inema mr>de, I d KI: I wDEo ECHO* l
it enhances tile "classic film" effect. /
l
Adds a "ghost" to tile subject, giving y(>ur |
recordiilg a "fantasy" feeling. /
2
*Available (>nly when tile Power Switch is set t(> " _".
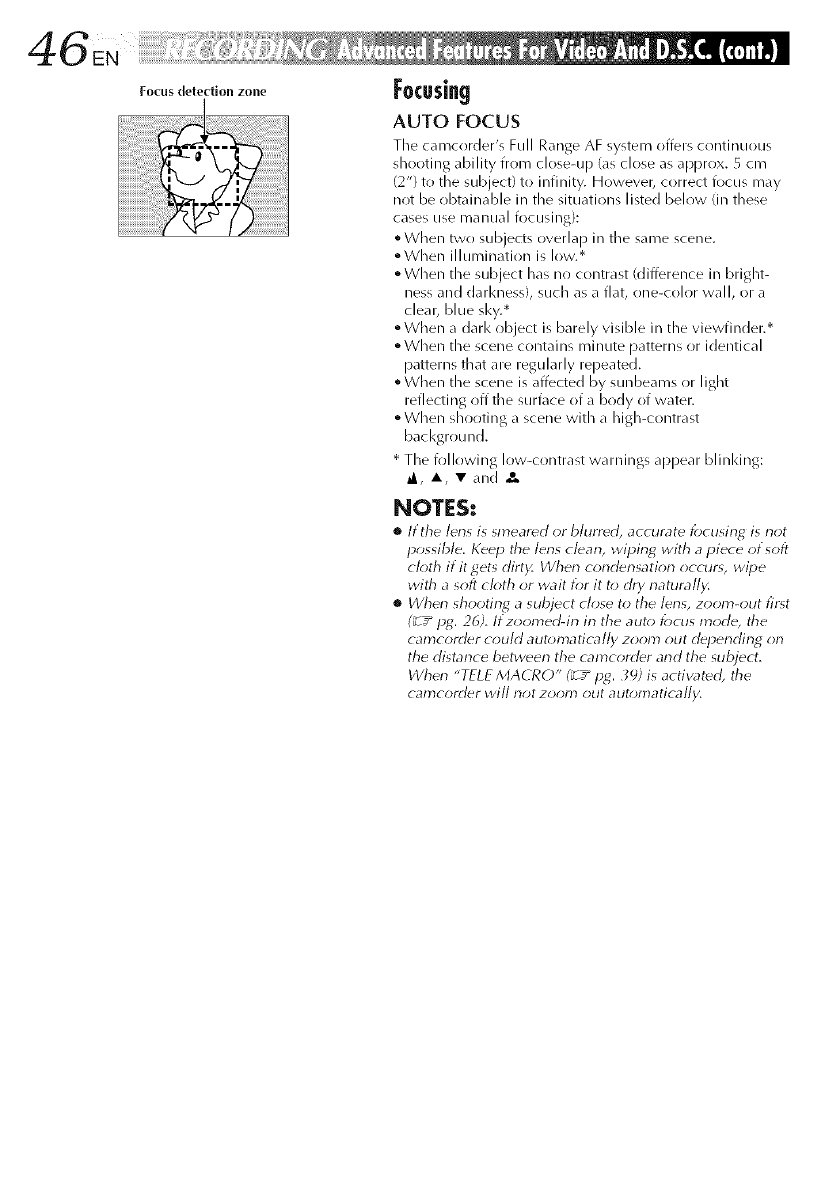
Focus detection zone Focusing
AUTO FOCUS
The Cal'Ncorder's Full Range AF system offers continuous
shooting ability from close-up (as close as approx. 5 cm
(2") to the subject) to infinity. However, correct focus may
not be obtainable in the situations listed below (in these
cases use manual focusing):
• When two subjects overlap in the same scene.
°When illumination is low.*
• When the subject has no contrast (difference in bright-
hess and darl<ness), such as a flat, one-color wall, or a
clear, blue sky.*
• When a darl< object is barely visible in the viewfinder.*
• When the scene contains minute patterns or identical
patterns that are regularly repeated.
• When the scene is affected by sunbeams or light
reflecting off the surface of a body of water.
• When shooting a scene with a high-contrast
background.
• The following low-contrast warnings appear blinl<ing:
a_, A•and
NOTES:
•ltthe lerls is smeared _r blurred, accurate focusing is not
possible. Keep the lerls clean, wiping with apiece of soft
ck_th if it gets dirt)< When condensatior_ occurs, wipe
with asoft cloth or wait for it to dry natumll_
•When shooting a subject close to the lens, zoom-out first
(_ 7_ pg. 26). If zoomed-irl in the auto/_)cus mode, the
camcorder could aut_;matically zoom out deperlding on
the distarlce between the camcorder arid the subject.
Wher_ "TELE MACRO" (_ /pg. _9; is activated, the
camconler will riot zoom ()tit aut_;matically.
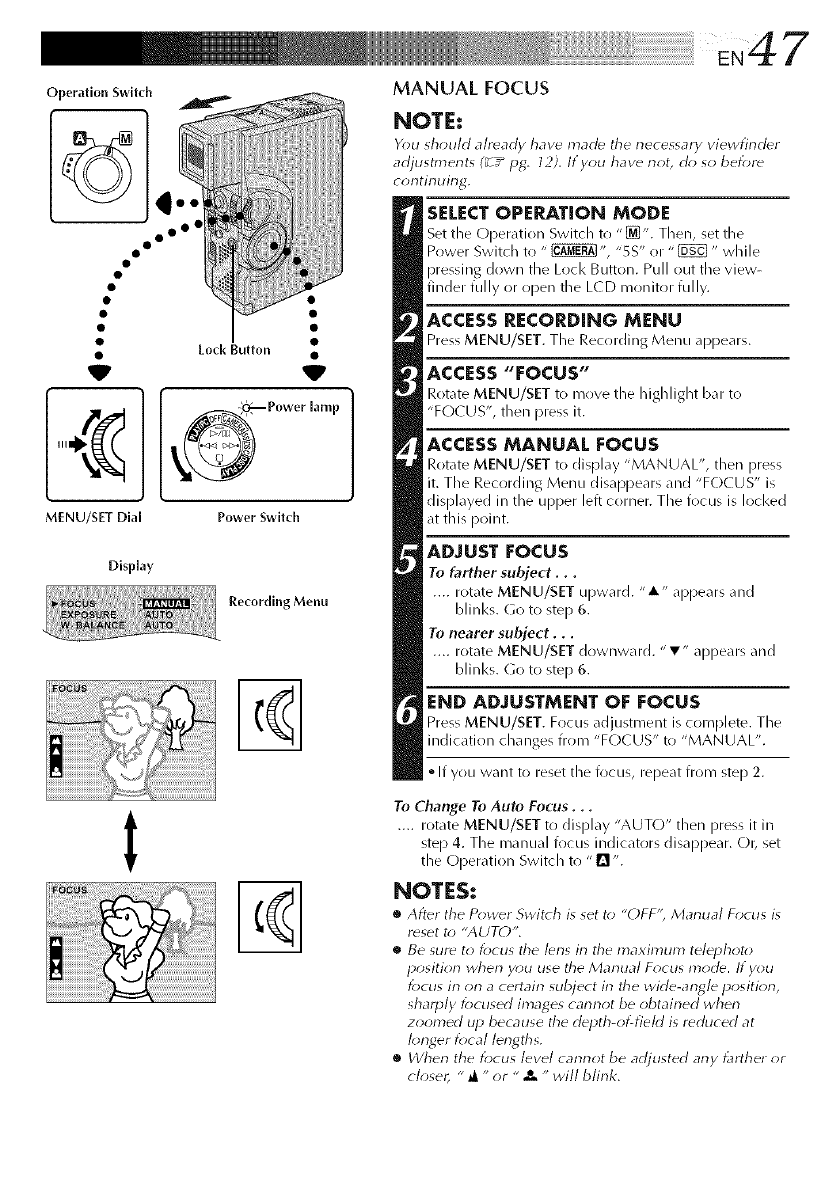
iii ! i ii ii ii ii ii ii ii ii ii ii ii ii ii ii ii ii ii ii ii ii ii ii ii ii ii ii ii ii ii ! !iiEN 4 7
Operation Switch
oo o°
V
MENU/SET Dial
Display
MANUAL FOCUS
Power [amp
Power Switch
Recording Menu
%
NOTE:
Y_)u _h_mld alr_ndy have mad_ the necessary viewfind_r
adjustmerlts (_/ iJ_, 12), If you have riot, cl_; so bef_*re
continuing,
SELECT OPERATION MODE
Set the C_per,_tion Switch to "_". Then, set Lhe
Power Switdl to " _ ", "5S" or "_" while
pressing down the Loci< Button. Pull out tile view-
finder fully or open the L(D monitor fully.
ACCESS RECORDING MENU
Press MENU/SET. The Recording Menu appears.
ACCESS "FOCUS"
Rotate MENU/SET to move the highlight bar to
"FO( US', then press it.
ACCESSMANUAL FOCUS
Rotate MENU/SET to display "MANUAL", then press
it. The Recording Menu disappears and "FOCUS" is
displayed in the upper left corner. The focus is locked
at this point.
ADJUST FOCUS
To farther subject...
.... rotate MENU/SET upward. "A" appears and
blinks. Go to step 6.
To nearer subject...
.... rotate MENU/SET downward. "T" appears and
blinks. Go to step 6.
END ADJUSTMENT OF FOCUS
Press MENU/SET. Focus _djustment is complete. The
indication changes from "FC)CUS" to "MANUAL".
•If you want to reset the focus, repeat from step 2.
t%
To Change To Auto Focus...
.... rotate MENU/SET to display "AUTO" then pro% it in
step 4. The manual focus indicators disappear. O1_ set
the Operation Switch to "1_ ".
NOTES:
•After tile P_)w_r Switch is set t_) "()FF'; Manual F_cus is
reset t_) "AUTO",
•Be sure to locus tile I_ns in the maximum telephoto
position when y_)u use the Manual F_*cus mode. If you
f_)cus irl orl a certairl subject irl the wide-angle positiorl,
sharply f_)cused images carlrlot be obtairled whorl
zoomed up because tile depth-of-field is reduced at
I_;nger f_cal lengths.
•When the focus level carlnot be adjusted any _lrther or
closer, "_ "or " x-will blink.
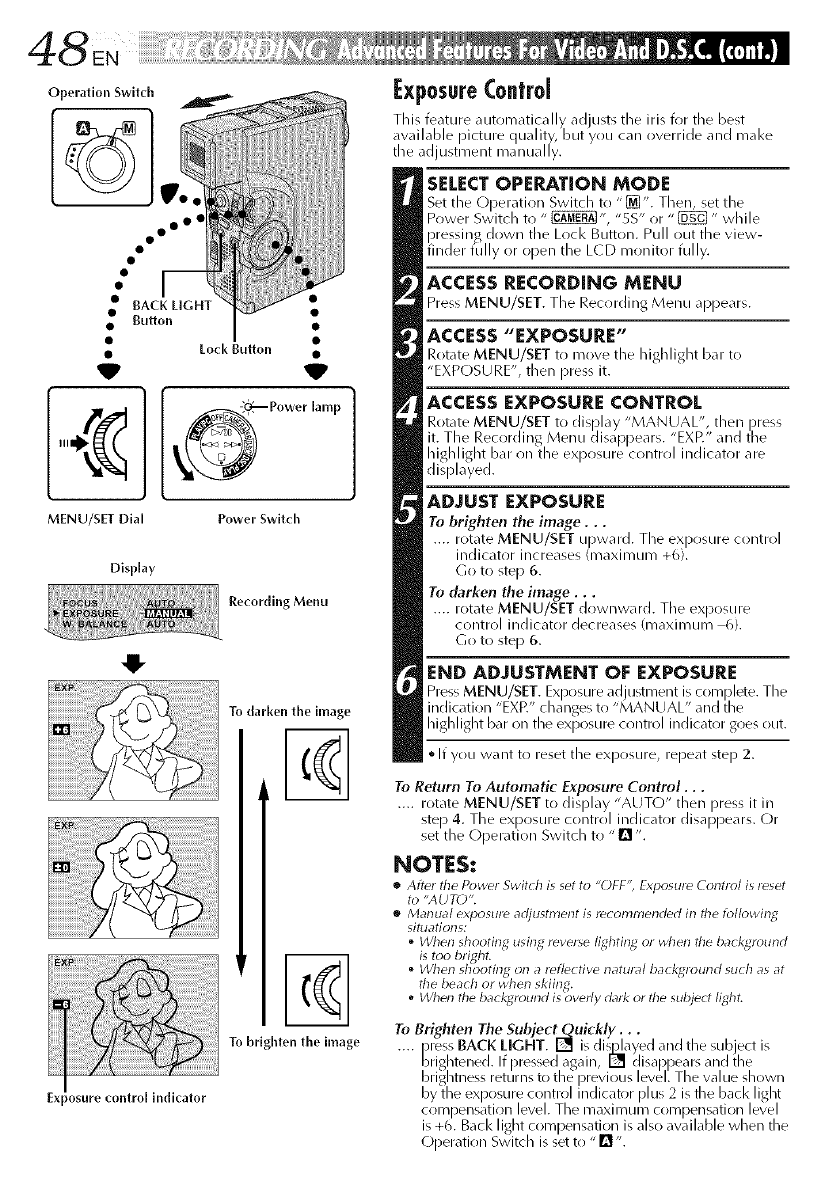
Operation Switch
000 Oe
MENU/SET Dial
Display
_posure control indicator
o_ Power lamp
Power Switch
Recording Menu
To darken the image
%
%
To bdghten the image
l:xposureControl
This feature automatically ad usts tile iris for the best
available )icture c uality, but you can override and mal<e
t Le adjustment manua ly.
SELECTOPERATION MODE
Set the ODeratirln Switch to "[]". Then, set the
Power Switch to " _", "5S" or "_" while
)ressing down tile Lock Button. Pull out the view-
fincerfu yoropentleL(Dmonitorfu y.
ACCESS RECORDING MENU
Press MENU/SET. The Recording Menu appears.
ACCESS "EXPOSURE"
Rotate MENU/SET to move the highlight bar to
"EXPOSU RE", then Dress it.
ACCESS EXPOSURE CONTROL
Rotate MENU/SET to display "MANUAL", then press
it. The Recording Menu disa ))ears. "EXP." and tile
highlight bar on the ex )osure control indicator are
displayed.
ADJUST EXPOSURE
Tu brighten the image...
.... rotate MENU/SET upward. The ex )osure control
inc icator increases (maximum +6.
(3o to ste D 6.
To darken the image...
.... rotate MENU/SET downward. TILe exl)osure
control indicator decreases (maximum 6).
Go to ste D 6.
END ADJUSTMENT OF EXPOSURE
Press MENU/SET. Ex _osure adjustment is corn )lete. TILe
incication "EXP." clanges to "MANUAL" ant t2e
highlight bar on the exposure control indicator goes out.
• If you want to reset the exposure, repeat step 2.
To Return To Automatic Exposure Control...
.... rotate MENU/SET to display "AUTO" then press it in
ste) 4. The ex )r)sure contrr)l indicator disa ))ears. (-)r
set tie Oi)eration Switcl to "[] ".
NOTES:
•After the Power Switch is set to "OFF", Exposure Control is reset
to "AUTO".
•Manual exlaosure adjustment is recommended in the followin_d
situatiolls:
•When shooting using reverse lighting or when tile background
is too bright.
When shooting on a reflective natural ba( kground su( h as at
the beach or when skiing.
oWhen tile background is overly dark or the subjec! light.
To Brighten The Subjec
.... _ress BACK LIGHT. and the subject is
brightened. If pressed again, _ (llsappears and the
bnghtness returns to the i)revlous level. The value shown
by the ex )osure control indicator )lus 2 is the bacl< light
corn )ensation level. The maximum corn )ensation level
is +6. Back light corn )ensation is also available when the
(-)peratir)n Switch is set to "[]".
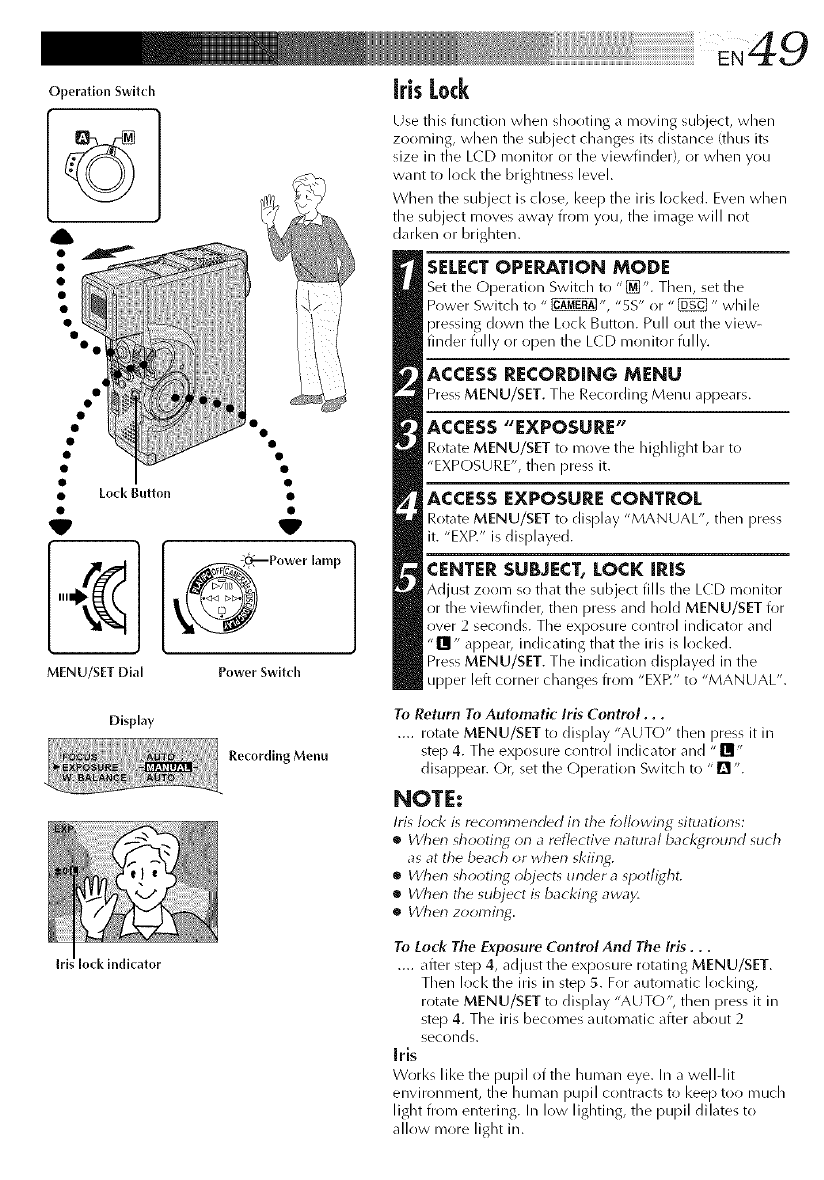
OperationSwitch
MENU/SET Dial
Display
lock indicator
Power Switch
Recording Menu
iris Lock
Use this function when shooting a moving subject, when
zooming, when the subject changes its distance (thus its
size in the LCD monitor or the viewfinder), or when you
want to lock the brightness level.
When the subject is close, keep the iris locked. Even when
the subject moves away from you, the image will not
darken or brighten.
SELECT OPERATION MODE
Set the Operation Switch to "[_". Then, set the
Power Switch to " _", "5S" or "_" while
pressing down the Lock Button. Pull out the view-
finder fully or open the L(D monitor fully.
ACCESS RECORDING MENU
Press MENU/SET. The Recording Menu appears.
ACCESS "EXPOSURE"
Rotate MENU/SET to move the highlight bar to
"EXPOSURE", then press it.
ACCESS EXPOSURE CONTROL
Rotate MENU/SET to display "MANUAL", then press
it. "EXff" is displayed.
CENTER SUBJECT, LOCK IRiS
Adjust zoom so that the subject fills the LCD monitor
or the viewfinder, then press and hold MENU/SET for
over 2 seconds. The exposure control indicator and
"Ill" appear, indicating that the Ms is locked.
Press MENU/SET. The indication displayed in the
upper left corner changes from "EXP." to "MANUAL".
To Return To Automatic Iris Control...
.... rotate MENU/SET to display "AUTO" then press it in
step 4. The exposure contrr!l indicator and "II;
disappear. Or, set the (-)peration Switch to "n ".
NOTE:
Iris lock is r_commend_d in tile lbll_wing situations:
•Wherl shooting orl areflective rlatural bacl<gr_)und such
as at the beach or wherl skiing.
•When shooting object_ under a spotlight,
•Wher_ the subject is backin_ away,
•When zooming.
To Lock The Ex,posure Control And The Iris...
.... after step 4, adjust the exposure rotating MENU/SET.
Then lock the iris in step 5. For automatic loci<ins,
rotate MENU/SET to display "AUTO", then press it in
step 4. The iris becomes automatic after about 2
seconds.
Iris
Works like the pupil of the human eye. In a well-lit
environment, the human pupil contracts to keep too much
light from entering. In low lighting, the pupil dilates to
allow more light in.

Operation Switch
° oo°
W
MENU/SET Dial
Display
Recording Menu
White Balance
Adjustment
WhiteBalanceAdjustment
A term that refers to tile correctness of color reproduction
under varirlus lighting. If tile white balance is correct, all
other colors will be accurately reproduced.
The white balance is usually adjusted automatically.
Howevel; the more advanced camcorder operator would
prefer to control this function manually and achieve a
more professional color/tint reproduction.
SELECTOPERATION MODE
Set the L)[)eratirlr/ Switch to "_". Then, set the
Power Switch to " _", "5S" or "[E_" while
pressing down the Lock Button. Pull out the view-
finder fully or open the L(D monitor fully.
ACCESS RECORDING MENU
Press MENU/SET. The Recording Menu appears.
ACCESS "W.BALANCE"
Rotate MENU/SET to move the highlight bar to
"W.BALAN(E", then press it.
ACCESS WHITE BALANCE ADJUST-
MENT
The Recording Menu disappears. "W.BAL." appears
in the upper left corner and the currently selected
mode indication is also displayed.
SET FUNCTION PARAMETERS
Cycle through the available settings of the selected
functirlns by rotating MENU/SET, and stop when tile
one you want is displayed.
"AUTO" The white balance is adjusted automati-
cally. This is the factory preset position.
"bmzJ" When shooting with the white balance
already having been set on the subject
(_7_ pg. 51 ).
"-:e?, When shooting outdoors on a sunny day.
";,r_" When shooting outdoors on a cloudy day.
" When using a video light or other similar
type of lighting.
CLOSE WHITE BALANCE ADJUSTMENT
Press MENU/SET again. Selection is c(implete. The
indication "W.BAL." changes to "MANUAL".
To Return To Automatic White Balance...
.... select "AUTO" in step 5. C)r, set tile Operation Switch
to "[] ".
NOTE:
White balance cannot be used wherl Sepia or Morlot_ne
(_7" pg: 49; is activated.
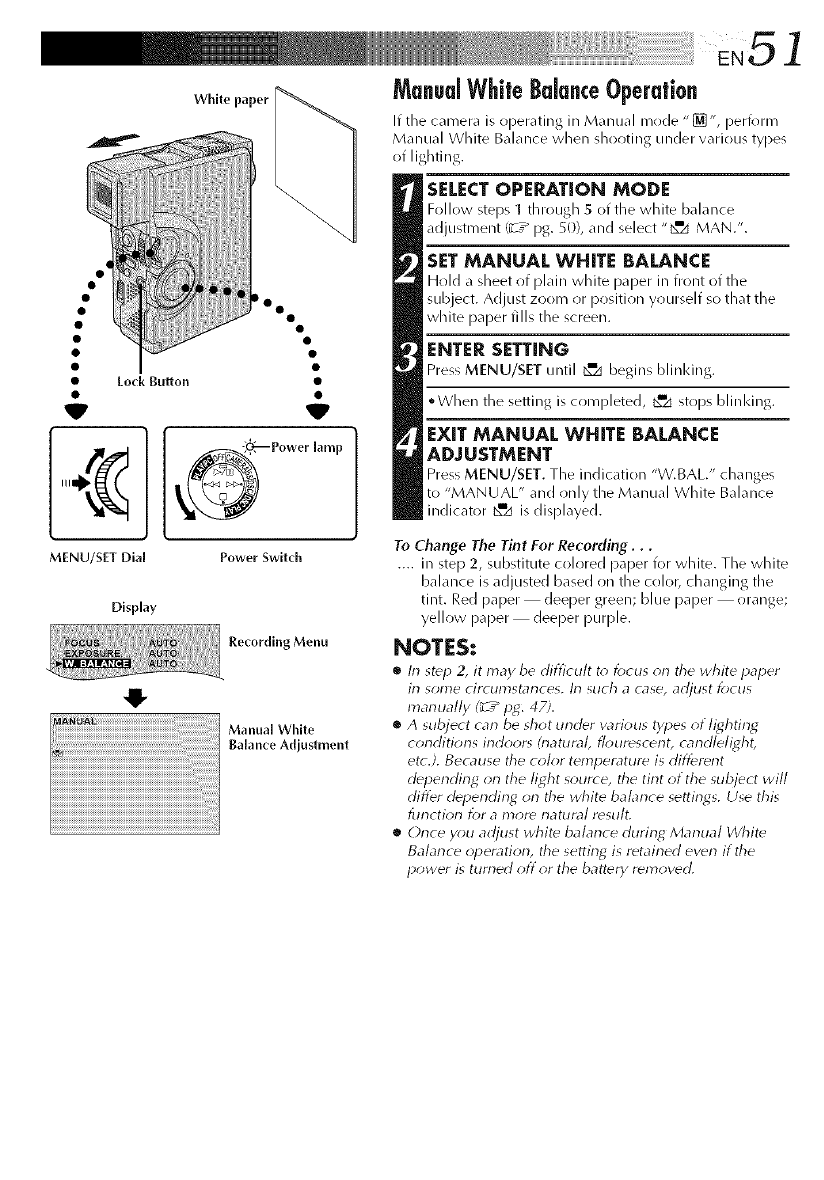
EN51
Wh.o,apor ManualWhiteBalanceOperation
If the camera is operating in Manual mode'[]', perform
Manual White Balance when shooting under various types
of lighting.
Eock Bu_on
o o
V
lamp
SELECT OPERATION MODE
Follow steps 1 through 5 of the white balance
adjustment (_-T_ pg. 5(I), and select "_x_ MAN.".
SET MANUAL WHITE BALANCE
Hold _ sheet o( plain white paper in front of the
subject. Adjust zoom or position yourself so that the
white paper fills the screen.
ENTER SETTING
Press MENU/SET until _d begins blinking.
°When the setiing is completed, _zi stops blilq<ing.
EXIT MANUAL WHITE BALANCE
ADJUSTMENT
Press MENU/SET. The indication "V.BAL/' ch_mges
to "MANUAL" _nd only the Manual White B_dance
indicator _=z_ is displayed.
MENU/SET Dial
Display
Power Switch
Recording Menu
Manual White
Balance Adjustment
To Change The Tint For Recording...
.... in step 2, substitute colored paper for white. The white
balance is adjusted based on the color, changing the
tint. Red paper deeper green; blue paper orange;
yellow paper deeper purple.
NOTES:
•In st_p 2, it may be difficult to lbcus on the white paper
irl some circumstances, lrl such a case, adjust focus
marlually (_ /pg. 47).
•Asubject can be shot under various types of lighting
conditions irldoor_ &latural, flourescerlt, carldlelight,
etc.). Because the color temperature is different
depending on the light source, the tirlt of the subject will
differ depending orl the white balarlce settings. Use this
tur_ctior_ tot a I)3Or_ I-_attlr,_/ r_stllt_
•Orlce you adjust white balarlce during Marlual White
Balan_ eopera tiorl, the setting is retained even if the
power is turned off or the battery removed.
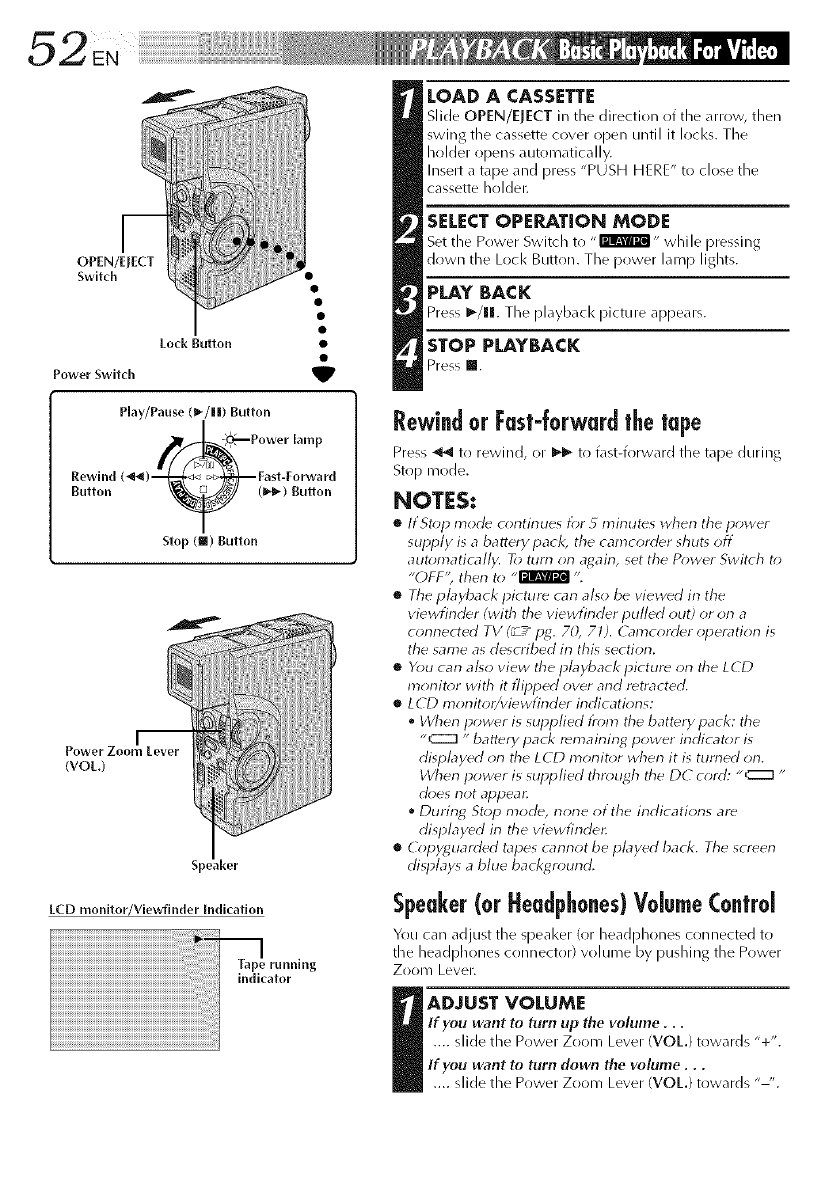
m
OPEN/ErECT
Switch
Lo_k Button •
Power Switch _lP
Rewind
Button
Play/Pause (_-/||) Button
_ (_,_) gulton
Stop (m) Button
jm
Power Zoom Lever
(VOt.)
Speaker
ECD monilor/Viewfinder Indicallon
LOAD A CASSETTE
Slide OPEN/ElECT ill tile direction of tlqe <iHOW, then
swing the cassette cover open until it locks. The
holder opens automatically.
Insert a tape and press "PUSH HERE" to close the
cassette hrflder.
SELECT OPERATION MODE
Set the Power Swkch to -rmm_l- while pressing
down the Loci< BurLon. The power lamp lights,
PLAY BACK
Press I_/ll. The pl<@)acl< picture appedrs.
STOP PLAYBACK
Press I!.
Rewindor Fast-forwardthetape
Press _ to rewind, or _ to l\lst-forward the tdpe during
Stop mode.
NOTES:
•If Stop mode continues D;r 5minutes when the power
supply is a battery pack, the camcorder shut_ off
automatically. To ttlrrl on agairl, set the Power Swit( h to
"OFF'; then to ,,l_llg_t_ "L
•The pbyback picture carl also be viewed irl the
viewfinder (with tile viewfirlder pulled out) or on a
conrlected TV (_ /pg. 70, 71 ). G_mcor_ler opera tion is
the same as desoibed irl this section.
•You can a/_o view the pbyback picture on the LCD
monit_;r with it flipped over and retracted.
•LCD monitor/viewfinder indications:
*When power is supplied t?om the batterypack: the
"C:Z] "battery pack remaining power indicator is
displayed on the LCD monit_;r when it is turned orl.
When power is supplied thn*ugh the DC cord: "C::_ "
cl<;es not appear.
During Stop mode, rlone of the indications are
displayed irl the vievvfindec
•(2_pyguarded tapes carlrlot be played back. Tile screen
displays a blue backt4n*und.
Speaker(orHeadphones)Volume(o.trol
You can adjust the q_eaker (or headphones connected to
the heal@hones crmneelor) volume by pushing the Power
ZooI3/ Lever.
IADJUST VOLUME
If you want to torn up the volume...
.... slide the Power Zoom Level (VOL) towards "+".
If you want to torn down the volume...
.... slide the Power Zoom Lever WOE) towards "-'.
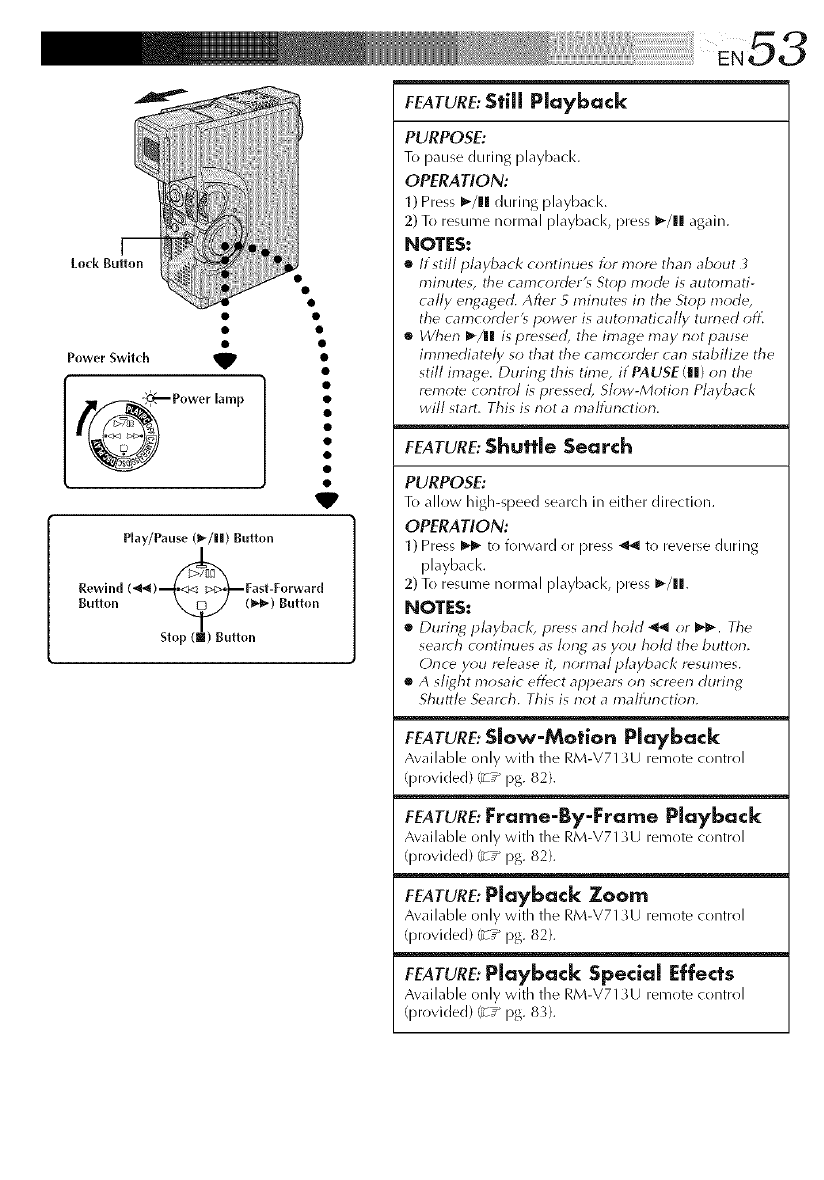
Power Switch _
Play/Pause (l_/lll) Button
Rewlnd (_) _Fast-Forward
Button Slo_uH::. )Butt,),,
FEATURE:Still Playback
PURPOSE:
To pause during playbacl<.
OPERATION:
1) Press I_/lll during playback.
2) To resume normal playbacl<, press I_/11 again.
NOTES:
•If still playback continues for more tharl about
minutes, tile can?corder'_ St_;p mode is auton?ati-
tally engaged. After 5n?irlutes irl the Stop mode,
the can?corder'_ power is auton?atica//y tun?ed off.
•When _/l| is pressed, the linage may not pause
immediately so that the camcorder can stabilize the
still image. During this time, if PAUSE (Ill) on the
remote control is pressed, Slow-Motion Playback
will start. This is not an?alfin?ction.
FEATURE:Shuttle Search
PURPOSE:
To allow high-speed search in either direction.
OPERATION:
1) Press l_l_ to forward or press _11 to reverse during
playback.
2) To resume normal playback, press I_/ll.
NOTES:
•During playback, press and hoM _ or _'_'. Tile
search c<)ntinues as long as you hold the button.
Once y_u release it, normal playback resumes.
•A slight mosaic effect appears on screen during
Shuttle Search. This is not an_alfunction.
FEATURE: Slow-Motion Playback
Awfilable only with the RM-V713U remote control
(provided) _T _ pg. 82).
FEATURE: Frame-By-Frame Playback
Available only with the RM-V713U remote control
(provided) _z _ pg. 82).
FEATURE:Playback Zoom
Available only with the RM-V713U remote control
(provided) (_-:_ pg. 82).
FEATURE:Playback Special Effects
Awfilable only with the RM-V713U remote control
(provided) (_-:_ pg. 8_).
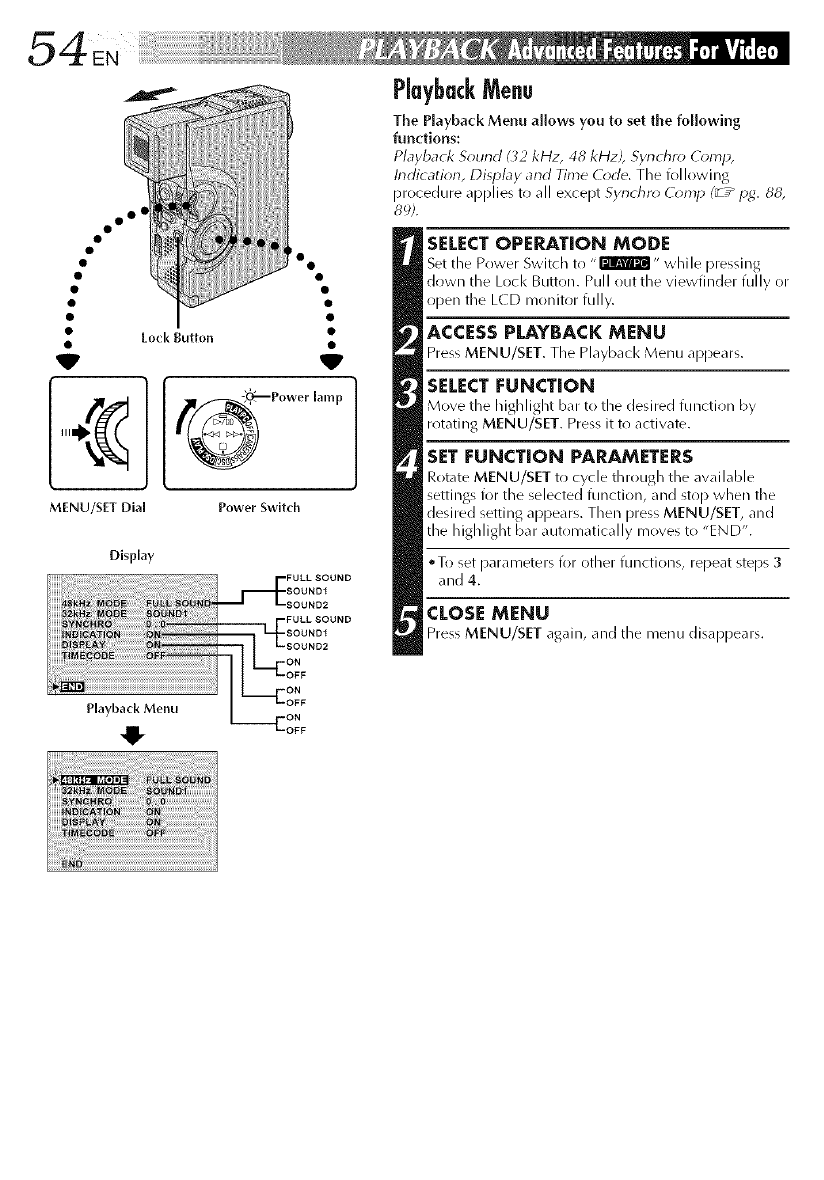
oo oe
V
Lock Button
° o
MENU/SN Dial Power Switch
Display
V
lamp
PlaybackMenu
The Playback Menu allows you to set the following
functions:
Playback S_und ( _2 kHz, 48 kHzJ, Synchrr_ ComH,
Indicatk_n, Display and Time C_de. The following
procedure applies to all except Synchn* (_*lnlJ (_ ,_H_4.88,
8_;).
SELECT OPEP_TION MODE
Set tile Power Switch to ,,@lrRF_I" while pressing
down tile Lock Button. Pull out the vJewfJllder fully or
iiDe[l tile L(D n/onitor fully.
ACCESS PLAYBACK MENU
Press MENU/SET. The Playbacl< Menu appears.
SELECT FUNCTION
Move the highlight b_. to the desired function by
rotating MENU/SET. Press it to activate.
SET FUNCTION PARAMETERS
Rot_te MENU/SET to cycle through the awfilable
settings for the selected function, and stop when tile
desired setting appears. Then press MENU/SET, and
the highlight bar automatically moves to "END".
•To set Darameters for other functi(>ns, repeat steps 3
and 4.
CLOSI: MENU
Press MENU/SET again, and the menu disappears.
PlaybackSound
During playbacl<, the camcorder detect the sound mode in which tile recording was made, and plays tile
sound back. Select the type of sound to accompany your playbacl< picture. (_2 kHz is preset to "SOUND 1"
and 48 kHz is [)reset to "FULL SOUND".)
Re_-ordlng sound Disphy
32 kHz FULL SOUND
SOUND 1
SOL)ND 2
48 kHz FULL SOUND
SOUND 1
SOL)ND 2
Output sound
Stereo sound
Stereo sound
"L" sound is output Oll both chanllels
"R" sound is output on both channels
When watching a tape recorded at 32 kHz, if you want to change the output sound, access the Playback Menu
and, in step 3 on [)age 54, select "32 kHz MODE" and set it for "FULL SOUND", "SOUND I" or "SOUND 2".
When playing back a tape recorded at 48 kHz, set in the same manner.
NOTES:
•You carl also use the provided R/vi-V713U remote c_ntrol's AUDIO MONITOR tauttor_ to change the output s(_unrt
(without having to across the Playback Merlu). Make sure you point the remote corltrol at the camcorder's remote
ser]so!;
•Durir Nplayback, the camcorder detects No sound mode irl which No recording was made. This detection canrlot
be made during bst-forward or rewind. During playbad( the sound mode is displayed in the upper left cornel;
Display
iiiiiiii+_i_iiiiiii_+_i!iii_i_¸_iliii!Ii_+i[i[i[i[i[i[i[i[i[i[i[i[i[i[i[i[i[i[i[i[iiliili!i
Minutes
*30 frames = 1 second
TIMI: CODE(DisplayingTheTimeCodeDuringPlayback)
You can display the Time (ode on screen during playbacl<. This is especially
useful for editing. This function is preset to "OFF". To turn it on, select "TIME
(](-)DE" at the Playback Menu and change the setting _ /pg. 54).
ON The Time (ode is displayed on the playbacl< screen.
OFF The Time (ode does not appear.
DISPLAY(Displaying|'beDateDaringPlayback)
If tile time has been set, the date is automatically recorded separately from
tlne recorded video signal. You car/display or remove the date anytime
during playbacl<. Tlnis function is [)reset to "ON". To turn it off, select
"DISPLAY" at the Playback Menu and change the setting _ /pg. 54).
ON The date is displayed on the playbacl< screen.
OFF The date is not displayed.
INDICATION
You can mal<e the Playbacl< Sound, Time Code and Date indications
disappear. This function overrides the "TIME (ODE" and "DISPLAY"
settings in the Playback Menu. The factory-preset is "C)N". To turn it off,
select "INDI( ATION" in the Playback Menu and change the setting
_/pg. 54).
OFF The Playback Sound, Time Code and Date indications do not appear
on the Playback Screen.
ON The Playback Sound, Time (ode and Date indications are displayed
according to how "TIME (ODE" and "DISPLAY" are set in the
Playback Menu.
NOTE:
If "INDICATION" is set irl the Mode M_nu, "INDICATION" in the Playback
Menu will also be set to the same setting I_[.--"pg. 36 39).
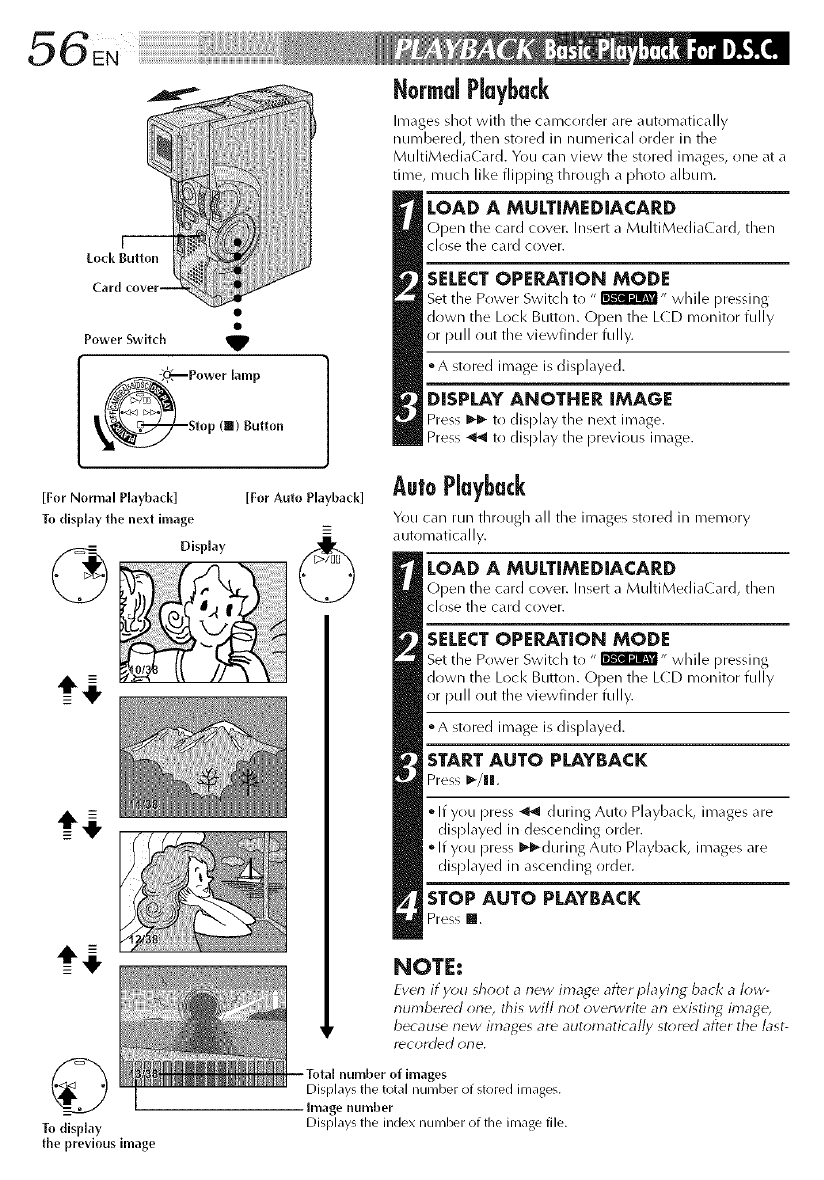
,_56
NormalPlayback
Images shot with file camcorder are automatically
numbered, then stored in numerical order in the
MultiMediaCard. You can view tile stored images, one at a
time, much like flipping through a photo album.
I--
Lock Button
Power Switch _,
Power lamp
Stop (ll) Button
LOAD A MULT[MEDIACARD
Open the card cover. Insert a MultiMediaCard, then
close the card cover.
SELECTOPERATION MODE
Set the Power Switch to " I'i!Wl'J_,, while pressing
down the Lock Button. Open the LCD monitor fully
or pull out the viewfinder fully.
° A stored image is displayed.
DISPLAY ANOTHER IMAGE
Press _I_-to display the next image.
Press _ tr) display tlle previous image.
[For Normal Playback] [For Auto Playback]
To disp[ay the next image _=
Display
©
To display
the previous image
AutoPlayback
You can run through all the images stored ill memory
automatically.
LOAD A MULTIMEDiACARD
Open the card cover. Insert a MultiMediaCard, then
close the card cover.
SELECT OPERATION MODE
Set the Power Switch to "lik'_r_R_- while pressing
down the Lock Button. Open the LCD monitor fully
or pull out the viewfinder fully.
° A stored image is displayed.
STARTAUTO PLAYBACK
Press _-/lIl[.
* If you press _ during Auto Playback, images are
displayed in descending order.
* If you press I_-during Auto Playback, images are
displayed in ascending order.
STOP AUTO PLAYBACK
Press m.
NOTE:
Even if you sh_*ot a new image after playing back a low-
numbered one, this will not overwrite an existing image,
because new images are automatically st,;red after the last-
Y_COI'(]d€] ol-le,
Total number of images
Displays tile total number of stored images.
Image number
Displays the index number of the inlage file.
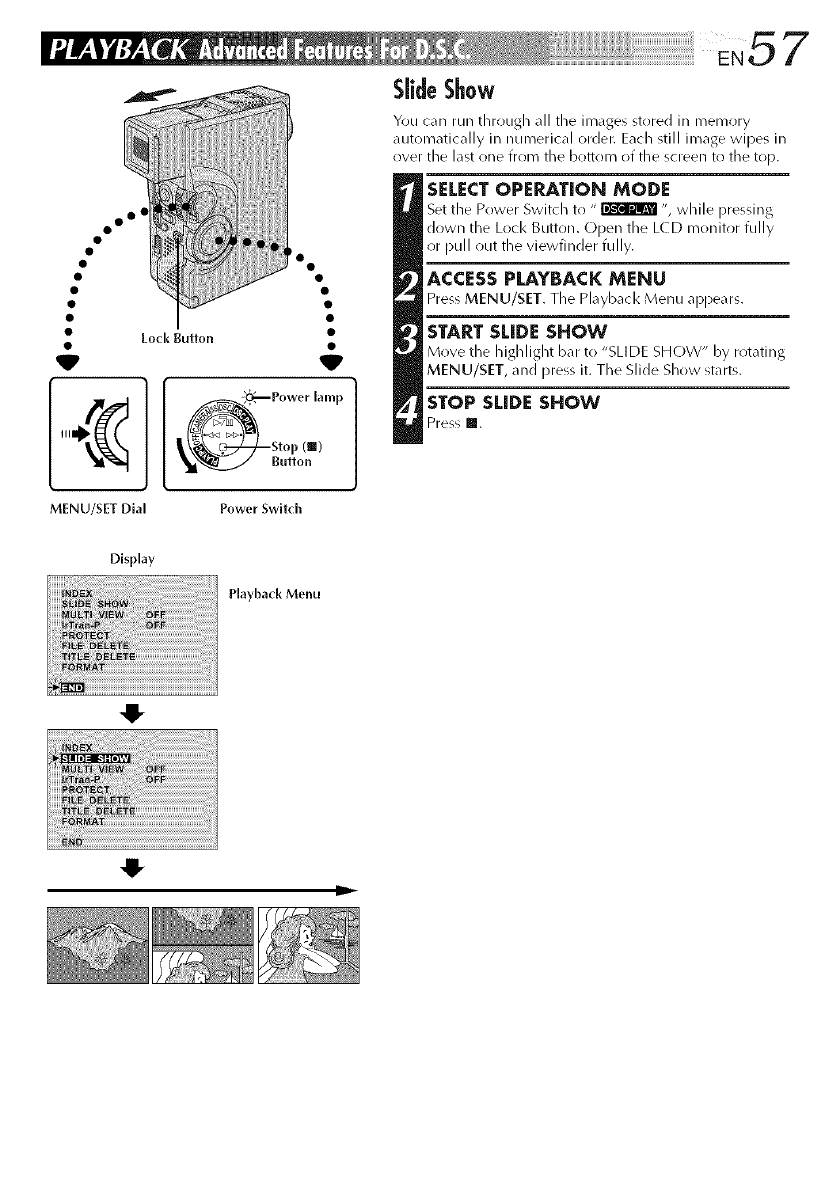
oo O!
Power lamp
Stop (|)
Button
You can run through all tile images stored in memory
automatically in numerical order. Each still image wipes in
over the last one from the bottom of the screen to the top.
SELECTOPERATION MODE
Set the Power Switch to " _ ", while pressing
down the Loci< Button. Open the LCD monitor fully
or pull out the viewfinder fully.
ACCESS PLAYBACK MENU
Press MENU/SET. The Playbacl< Menu appears.
START SLIDE SHOW
Move the h ighlight bar to "SLl DE SHOW" by rot_fi ng
MENU/SET, and press it. The Slide Show starts.
STOP SLIDE SHOW
Press m.
MENU/SET Dial Power Swltch
O
-IF
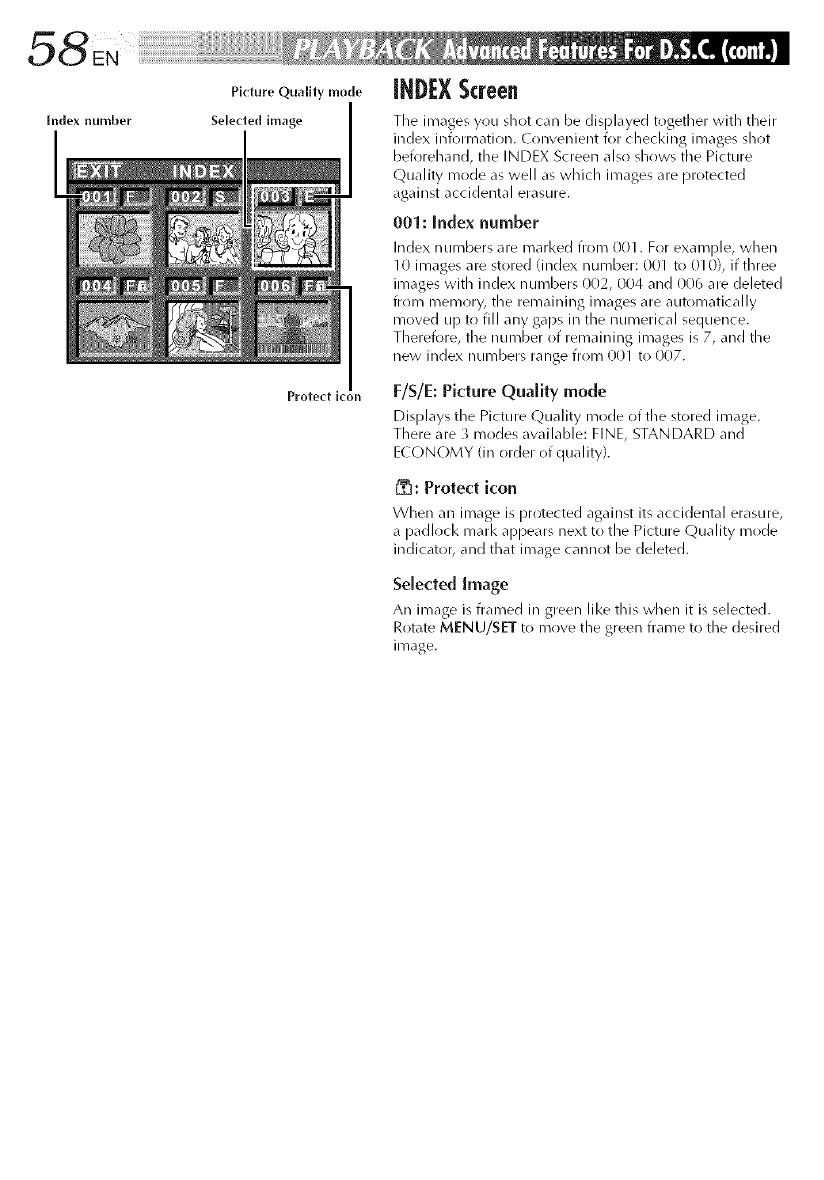
Picture Quality mode
Selected image
Protect ic
[HDl:X Screen
The images you shot can be displayed together with their
index information. Convenient for checking images shot
beforehand, the INDEX Screen also sh(iws the Picture
Quality mode as well as which images are protected
against accidental erasure.
001: [ndex number
Index numbers are marked from 001. For example, when
10 images are stored (index number: 001 to 010), if three
images with index numbers 002, 004 and 006 are deleted
from memory, the remaining images are automatically
moved up to fill any gaps in the numerical sequence.
Therel()re, the number of remaining images is 7, and the
new index numbers range froi33 001 to 007.
F/S/E: Picture Quality mode
Displays the Picture Quality mode of the stored image.
There are 3 modes available: FINE, STANDARD and
ECONOMY (in order of quality).
: Protect icon
When an image is protected against its accidental erasure,
a padlock marl< appears next to the Picture Quality mode
indicator, and that image cannot be deleted.
Selected Image
An image is framed in green like this when it is selected.
Rotate MENU/SET to move the green frame to the desired
image.
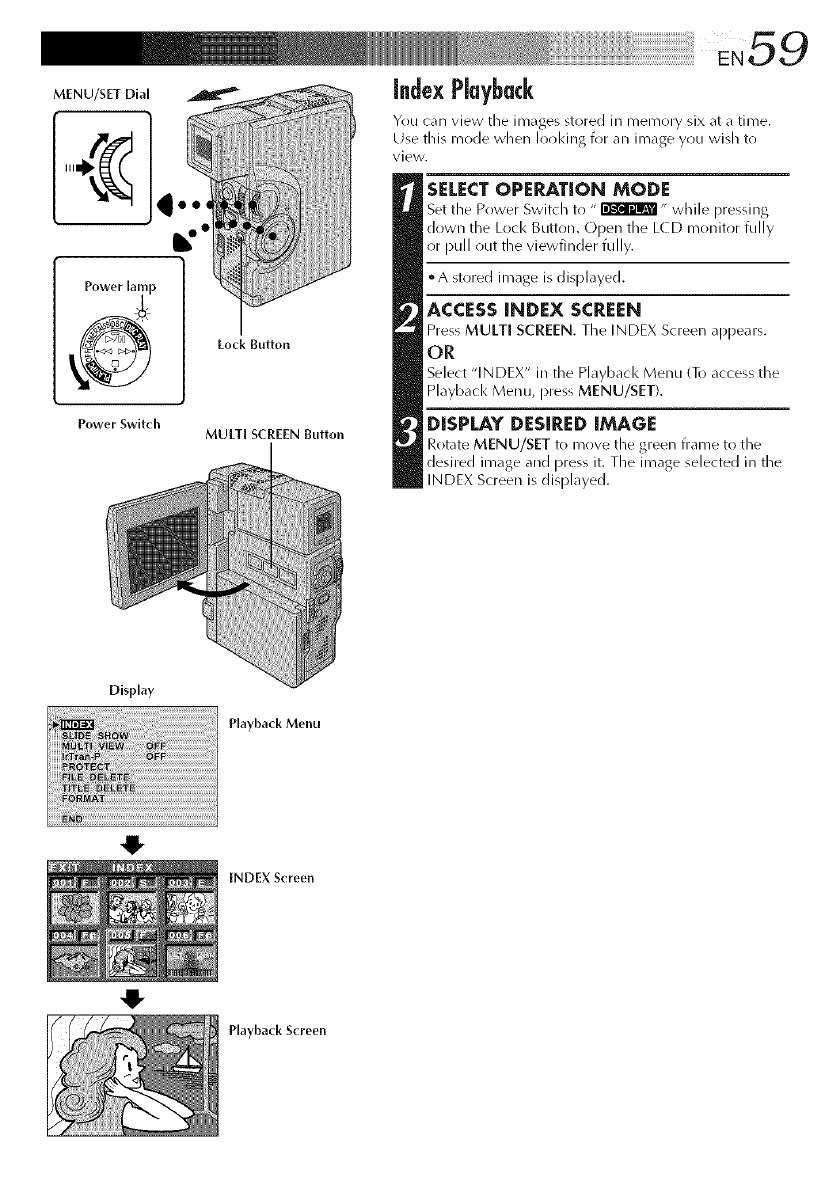
MENU/SET Dial
Power lamp
Power Switch
Lock Button
MULTI SCREEN Button
index Playback
Yr)u can view tile images stored in memory six at a time.
Use this mode when lot)king for an image you wish to
view.
SELECT OPERATION MODE
Set tile Power Switch to " _" while pressing
down the Loci< Button. Open the LCD monitor fully
or pull out the viewfinder fully.
• A stored image is displayed.
ACCESS INDEX SCREEN
Press MULTI SCREEN. Tile INDEX Screen appears.
OR
Select "INDEX" in the Playback Menu To access the
Playback Menu, press MENU/SET).
DISPLAY DESIRED IMAGE
Rotate MENU/SET to mr)re tile green trame t(/tile
desired image and press it. The image selected in the
INDEX Screen is displayed.
Display
Playback Menu
O
4!,
INDEX Screen
Playback Screen
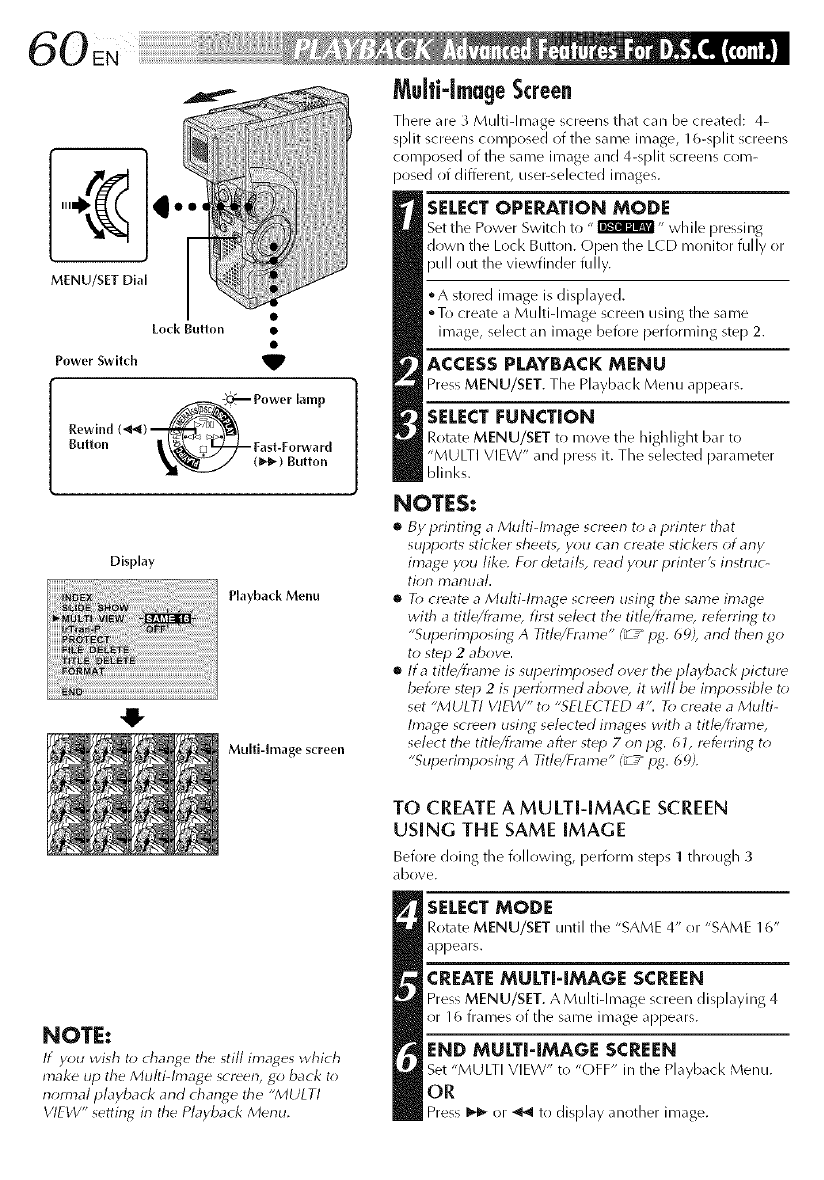
¢1'
MENU/SET Dial
Lock Button •
Power Switch
Button
Multi-imageScreen
There are 3 MultJdmage screens that can be created: 4-
split screens composed ot the same image, 16-split screens
composed of the same image and 4-split screens crlm-
posed of different, user-selected images.
SELECTOPERATION MODE
Set the Power Switch to "_" while pressing
down the Loci< Button. Open the L(D monitor fully or
pull out the viewfinder fully,
• A stored image is displayed.
oTo create a Multi-Image screen using the same
image, select an image before performing step 2.
ACCESS PLAYBACK MENU
Press MENU/SET. The Playback Menu appears.
SELECT FUNCTION
Rotate MENU/SET to move the highlight bar to
"MULTI VIEW" and press it. The selected parameter
blinl<s.
Display
Playback Menu
Multi-Image screen
NOTES,*
•By i_rintir_g aMulti-Image screen to aprinter that
supports sticker sheet_, you can create sticker_ of any
image y_;u like. For detail_, read your printer'_ instruc-
tion manual.
•T_; create a Multi-Image screen using the same image
with a title/frame, first select the title/frame, referring to
"Sul_erimposing A Title/Frame" (_ /pg. 6 c_),and therl go
to step 2above.
•lta title/frame is superimposed owr the playback picture
beibre step 2 is peribm_ed above, it will be impossible to
set "MULTI VIEW" to "SELECTED 4". To create aMulti-
Image screen using selected images with atitle/frame,
select the titb/fmme after step 7on pg. 61, referring to
"Sul_erimposing A Title/Frame" I_ /p_. 69).
NOTE:
If you wish to d_ant4e the still imat4es which
make up the Multi-Image screen, go back to
normal playbacl< and change the "MULTI
VIEW" setting in the Playback Merlu.
TO CREATE A MULTI-IMAGE SCREEN
USING THE SAME IMAGE
Before doing the following, perforl_/steps 1 tJlrr!tlgh 3
dbove.
SELECT MODE
Rotate MENU/SET until the "SAME 4" or "SAME 16"
appears.
CREATE MULTI-IMAGE SCREEN
Press MENU/SET. A Multi-Image screen displaying 4
or 16 frames of the same image appears.
END MULTI-IMAGE SCREEN
Set "MULTI VIEW" to "OFF" in the Playbacl< Menu.
OR
Press I_- or _ to display another image.
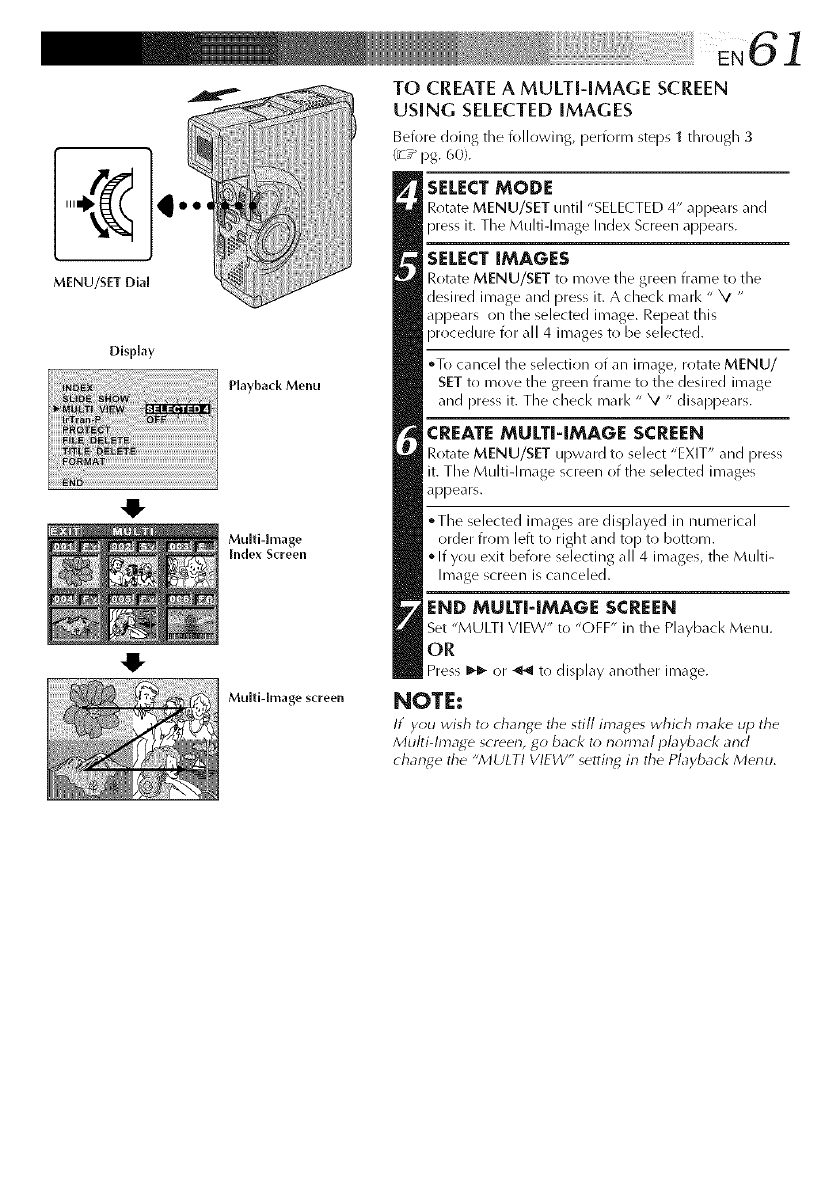
¸¸¸EN6 ]
MENU/SET Dial
DisPlay
Playback Menu
Multi-image
Index Screen
Multi-image screen
TO CREATE A MULTI-IMAGE SCREEN
USING SELECTEDiMAGES
Before doing the following, perform steps 1 through 3
(_7_pg. 60).
SELECTMODE
Rotate MENU/SET until "SELE( TED 4" appears and
press it. The Multiqmage Index Screen appears.
SELECTiMAGES
Rotate MENU/SET to mr)ve the green flame to the
desired image and press it. A check marl< " XI "
appears on the selected image. Repeat this
procedure for all 4 images to be selected.
oTo cancel the selection of an image, rotate MENU/
SET to move the green frame to the desired image
and press it. The check marl< " XI " disappears.
CREATEMULTi-iMAGE SCREEN
Rotate MENU/SET upward to select "EXIT" and press
it. The Multi-Image screen of the selected images
appears.
°The selected images are displayed in numerical
order from left to right and top to bottom.
• If you exit before selecting all 4 images, the Multi-
Image screen is canceled.
END MULTI-IMAGE SCREEN
Set "MULTI VIEW" to "OFF" in tile Piggyback Menu.
OR
Press _ or _ to display another im_ge.
NOTE:
If you wish to change the still images which make up tile
Multi-Image screen, go back t_>normal playback and
chan_e the "MULTI VIEW" setting in the Playback Menu.
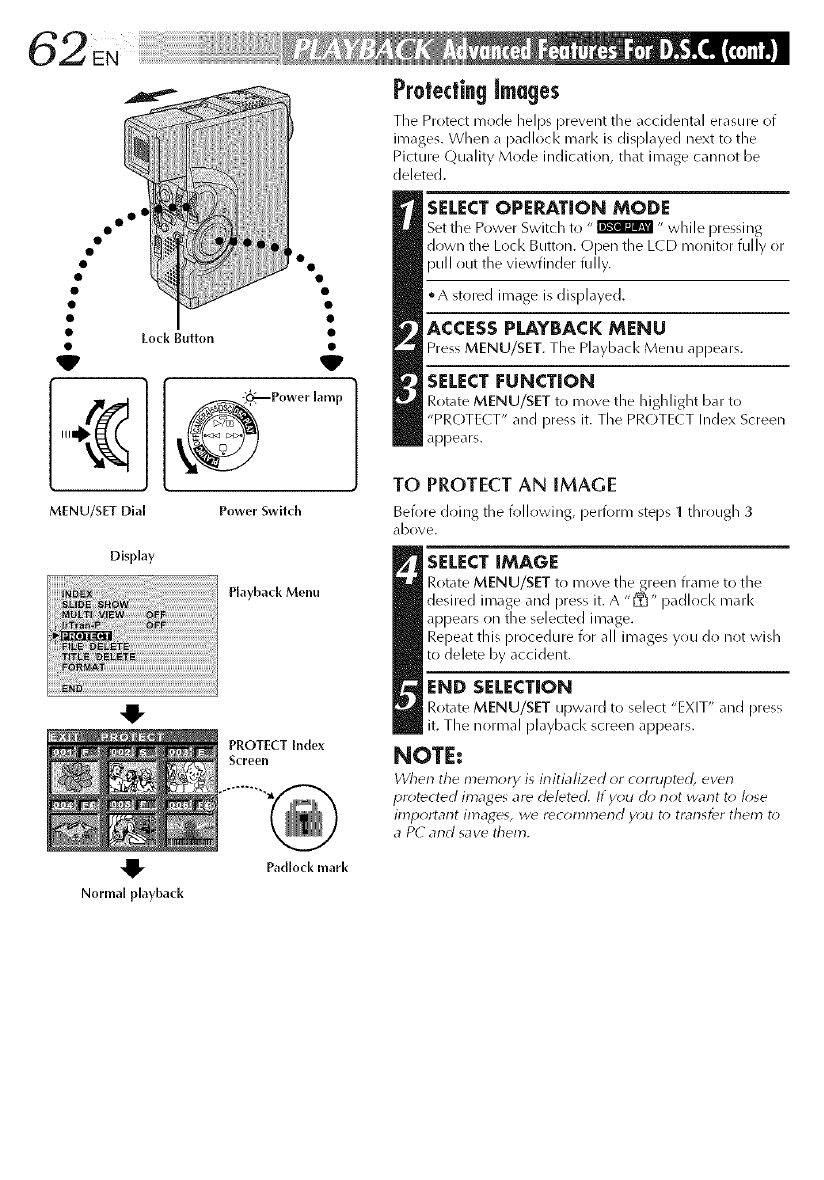
oo 0°
° o
V
o._Power [amp
MENU/SET Dial Power Switch
Display
Playback Menu
Normal playback
Padlock marl(
ProtectingImages
The Protect mode helps prevent the accidental erasure of
images. When a padlock marl< is displayed next to the
Picture Quality Mode indication, that image cannot be
deleted.
SELECTOPERATION MODE
Set the Power Switch to "_ " while pressing
down the Lock Button. C)pen the L(D monitor fully or
pull out the viewfinder fully.
• A stored image is displayed.
ACCESS PLAYBACK MENU
Press MENU/SET. The Playback Menu appears.
SELECT FUNCTION
Rotate MENU/SET to move the highlight bar to
"PROTE( T" and pres_ it. The PROTE( T Index Screen
appears.
TO PROTECT AN IMAGE
Before doing the following, perform steps 1through 3
(IbOVe.
SELECT IMAGE
Rotate MENU/SET to move the green frame to the
desired inlage and Dress it. A "[_" padlock marl<
appears on the selected image.
Repeat this procedure for all images you do not wish
to delete by accident.
END SELECTION
Rotate MENU/SET upward to select "EXIT" and press
it. The normal playback screen appears.
NOTE:
When the memo_ i_ initialized or c_;rrup_ ewn
pr_)tected images ar_ deleted. If y_u oh) not want t_) k)se
iml_ortarlt images, wd rdc_)mn_erld y_)u t_; trarlsfdr them t_;
a PC and save them.
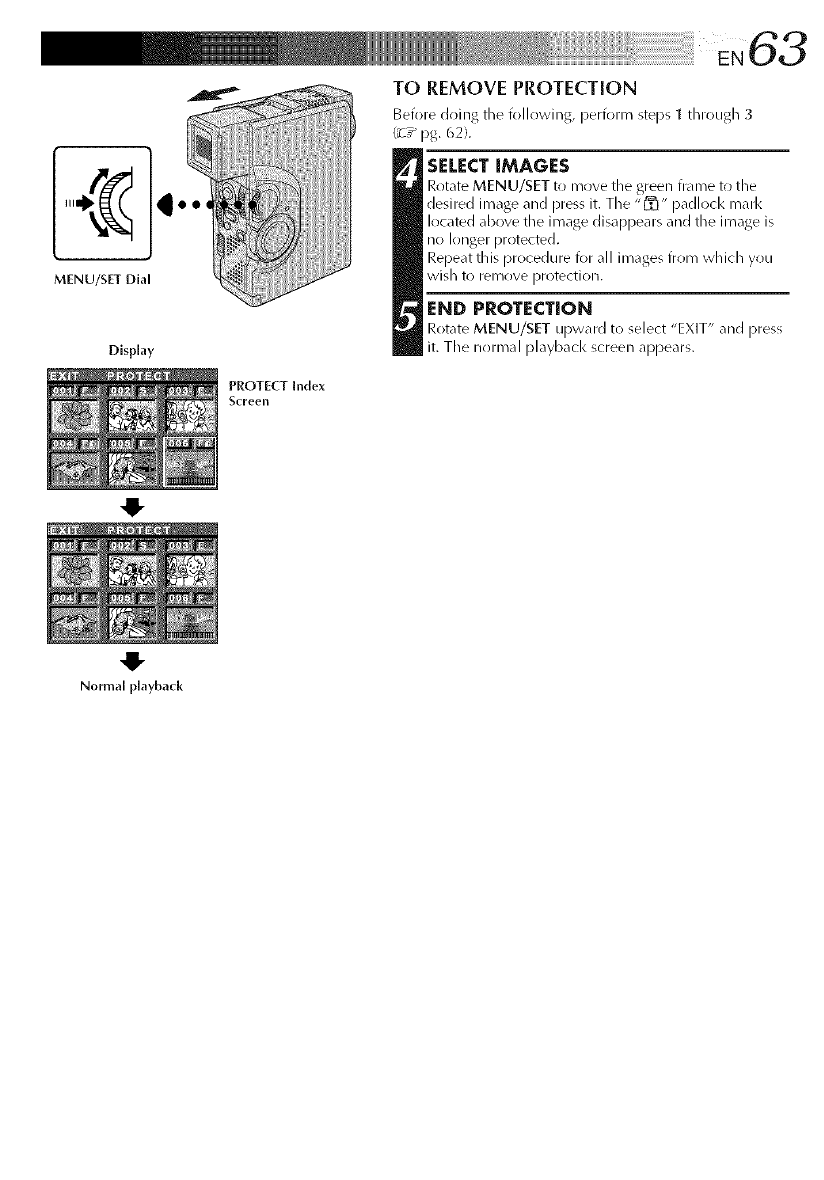
t
MENU/SET Dial
Display
Normal playback
PROTECT [nde×
Screell
TO REMOVE PROTECTION
Before doing the following, perform steps 1 dlrough 3
(_T_ pg. 62}.
SELECT IMAGES
Rotate MENU/SET t_ move tile green frame to tile
desired image and press it. The "1_" padlocl< marl<
located above the image disappears and the image is
no longer protected.
Repeat this procedure I(>r all images from which you
wish to iemove protection.
END PROTECTION
RotateMENU/SETupwardto select"EXIT" andpress
it. The normal playbackscreenappears.
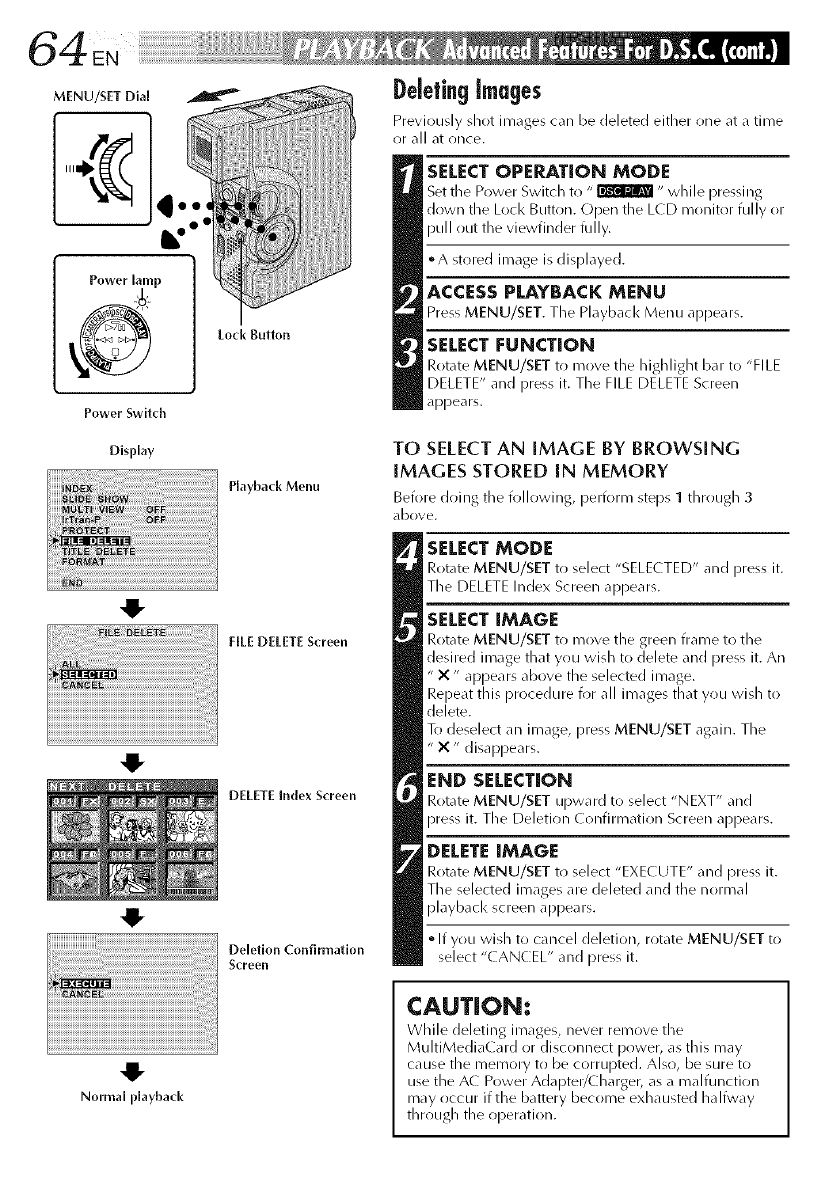
MENU/SET Dial
Power Switch
DeletingImages
Previously shot images can be deleted either one at a time
or all at once.
SELECT OPERATION MODE
Set tile Power Switch to "_ " while pressing
down the Lock Button. Open the LCD monitor fully or
pull out the viewfinder fully.
• A stored image is displayed.
ACCESS PLAYBACK MENU
Press MENU/SET. The Playback Menu appears.
SELECT [:UNCTION
Rotate MENU/SET to move the highlight bar to "FILE
DELETE" and press it. The FILE DELETE Screen
appears.
Display
Playback Menu
4!-
FILE DELETEScreen
_iili iiiiiiiiiiiiiiiiiiiiiiiiiiiiiiiiiiiiiiiiiiiiiiiii!liiiiii_i_ii
4!-
DELETE Index Screen
Deletion Confirmation
Screen
TO SELECTAN IMAGE BY BROWSING
IMAGES STORED IN MEMORY
Before doing the following, perform steps 1through 3
dbove.
SELECT MODE
Rotate MENU/SET to select "SELE(TED" and press it.
The DELETE Index Screen appears.
SELECT IMAGE
Rotate MENU/SET to move the green frame to the
desired image that you wish to delete and press it. An
" X" appears above the selected image.
Repeat this procedure for all images that you widl to
delete.
To deselect an image, press MENU/SET again. The
"X" disappears.
END SELECTION
Rotate MENU/SET upward to select "NEXT" and
press it. The Deletion Confirmation Screen appears.
DELETE IMAGE
Rotate MENU/SET to select "EXECUTE" and press it.
The selected images are deleted and the normal
playbacl< screen appears.
•If you widl to cancel deletion, rotate MENU/SET to
select "CANCEL" and press it.
41"
Normal playback
CAUTION:
While deleting im_ges, never remove the
MultiMedia(ard or disconnect power, as this may
cause the memory to be corrupted. Also, be sure to
use the A( Power Adapter/Charger, as a malfunction
may occur if the battery become exhausted halfway
through the operation.
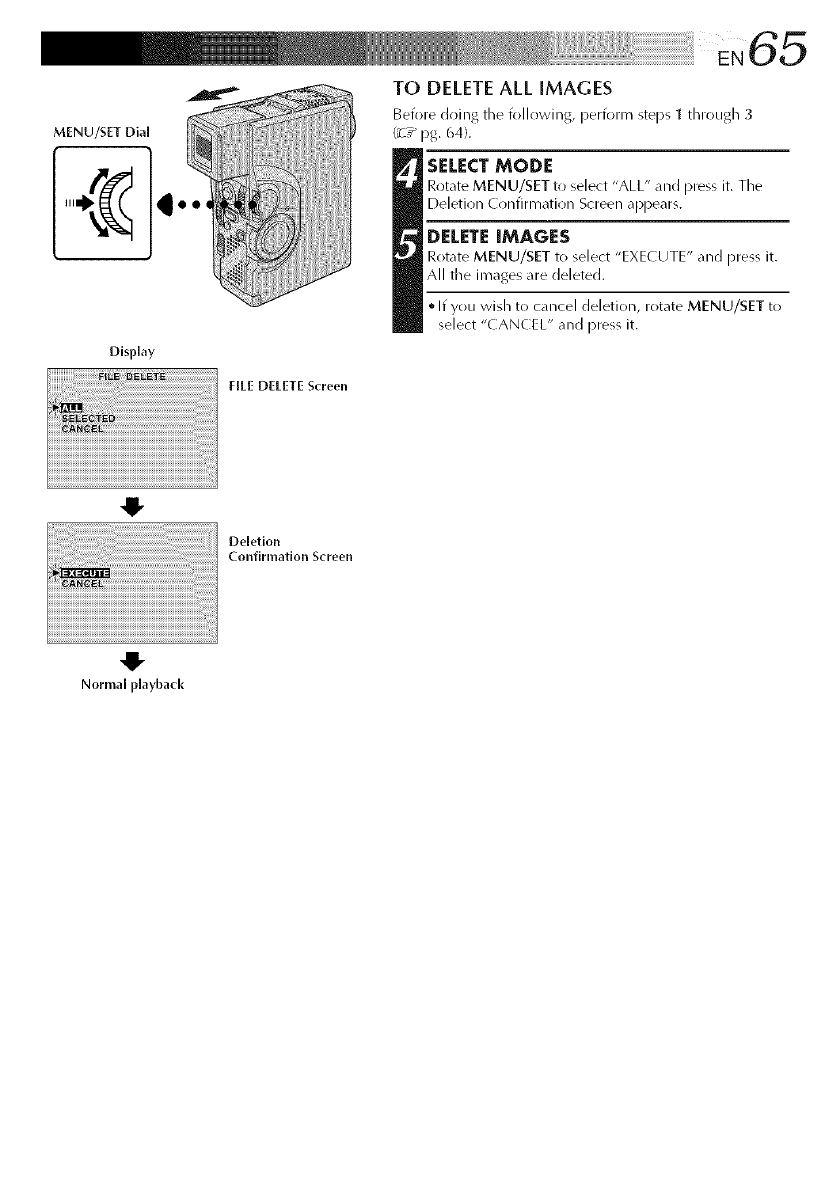
MENU/SET Dia[
Disphy
NEE DELETE Screen
TO DELETEALL iMAGES
Beiore doing the iollowing, periorm steps 1 through 3
(:7 _ pg. 64).
SELECT MODE
Rotate MENU/SET to select "ALL" and press it. Tile
Deletion Confirmation Screen appears.
DELETE IMAGES
Rotate MENU/SET to select "EXECUTE" and press it.
All the im_ges _re deleted.
• If you wish to cancel deletion, rotate MENU/SET to
select "CANCEL" and press it.
iiiii¸¸¸!;¸;¸;¸;¸;¸;¸;¸¸¸¸¸11i i i _ iili
I !i!i!oe,o,lo°
Confirmation Screen
iiiiiiii
Normal playback
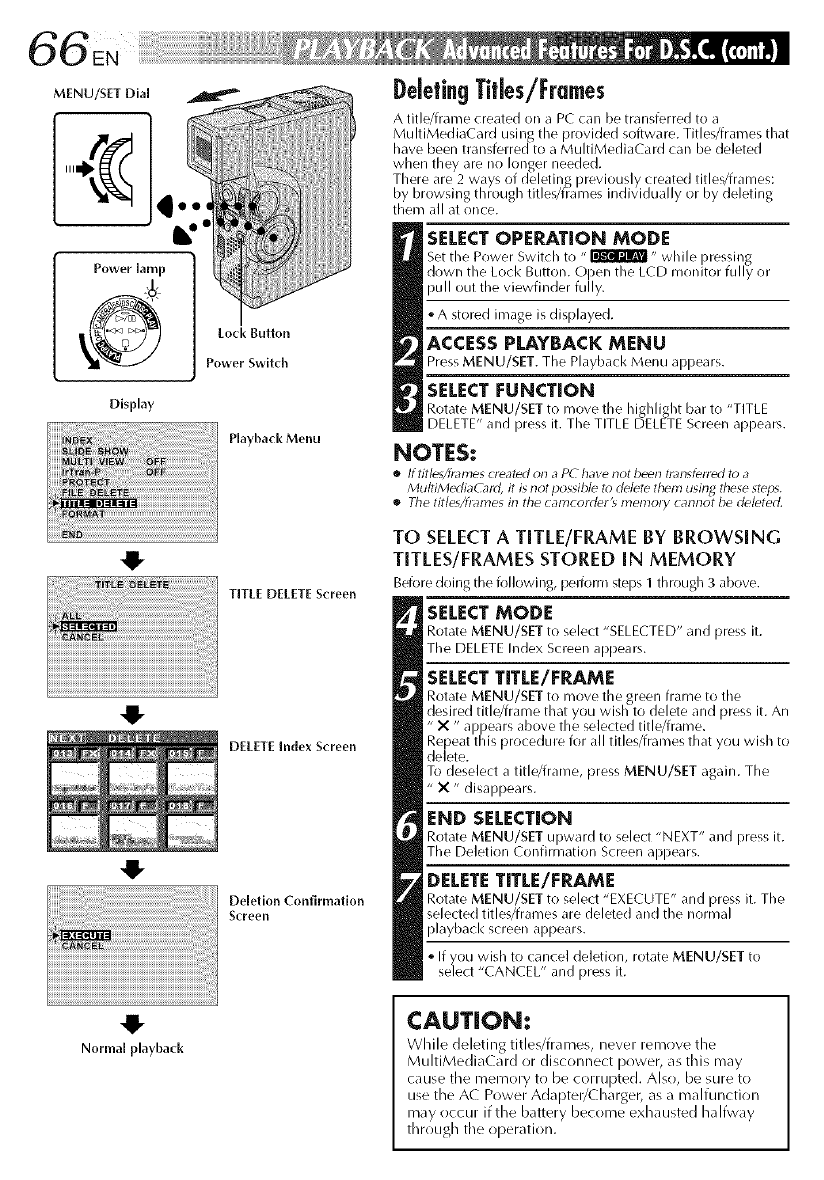
Display
PlaybackMenu
TITLE DELETE Screen
DELETE Index Screen
Deletion Confinnatlon
Screen
Normal playback
DeletingTitles/Frames
A title/frame created on a PC can be transferred to a
MultiMediaCard using the provided software. Titles/frames that
have been transferred to a MultiMedi,iC,ird can be deleted
when they are no longer needed.
There are 2 ways of deletinR previously created titles/frames:
by browsing through titles/frames individually or by deleting
them all at once.
SELECT OPERATION MODE
Set the Power Switch to "_" wMe ]ressing
down tie Loc< Button. Open t_e LCD monitor fu y or
pull out the viewfinder fully.
oA stored image is displayed.
ACCESS PLAYBACK MENU
Press MENU/SET. The Playb;_cl< Menu al-)pears.
SELECT FUNCTION
Rotate MENU/SET to move the highlight bar to "TITLE
DELETE" and press it. The TITLE DELETE Screen appears.
NOTES:
•Iftitle_/h_21nescreated on a PC have not been tl_llsferled to a
MultiMertiaC_ld, it is not possible to delete them usin_ these steps.
•The titleXfn_l'nes in the camcorder_ menlory cannot be deleted.
TO SELECTA TITLE/FRAME BY BROWSING
TITLES/FRAMES STORED IN MEMORY
Before doirlg the following, pelforr'n steps I through 3 above.
SELECT MODE
Rotate MENU/SET to select "SELECTED" and press it.
The DELETE Index Screen appears.
SELECT TITLE/FRAME
Rotate MENU/SET to move the green frame to the
desired title/frame that you wish to delete and )ress it. An
"X " a __ears above the selected title/frame.
Repeat t/is proce( ure for a tit es/frames t/at you wis _to
delete.
To deselect a title/frame, press MENU/SET again. The
"X" disappears.
END SELECTION
Rotate MENU/SET upward to select "NEXT" and press it.
The Deletion Confirmation Screen appears.
DELETE TITLE/FRAME
Rotate MENU/SET to select "EXECUTE" and press it. The
selected titles/frames are deleted and the normal
playback screen appears.
If you wish to cancel deletion, rotate MENU/SET to
select "CANCEL" and press it.
CAUTION:
While deleting title_/fr_u_es, never remove the
MultiMedia(ard or disconnect power, _s this may
cause the memory to be corrupted. Also, be sure to
use the A( Power Adapter/(_harger, as a malfunction
may occur if the battery become exhausted halfway
through the operation.
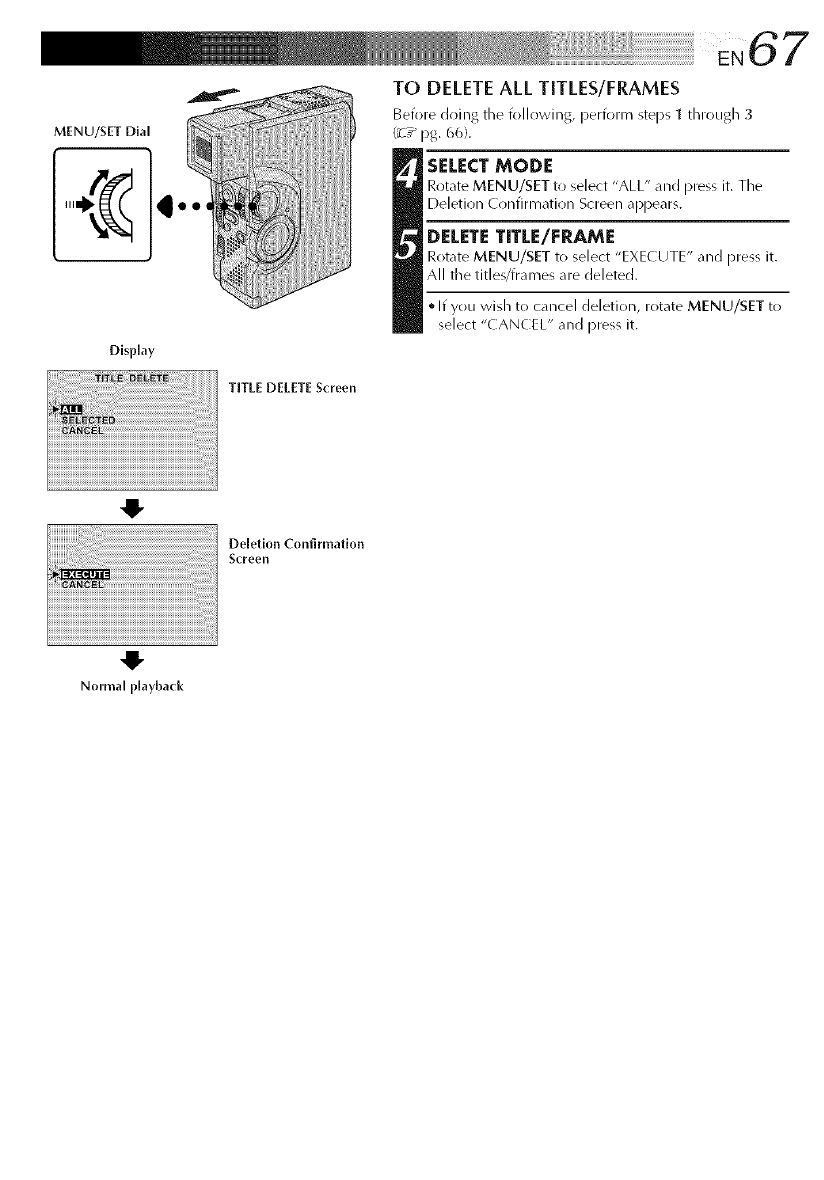
6 7
MENU/SET Dial
TO DELETEALL TITLES/FRAMES
Before doing tile following, perform steps 1 through 3
(_7_ 13g. 6(_).
tELECT MODE
Rotate MENU/SET to select "ALL" and press it. Tile
Deletion Confirmation Screen a[313ears.
DELETE TITLE/FRAME
Rot_lte MENU/SET to select "EXECUTE" and press it.
All the titles/frames are cJeletecJ.
• If you wish to cancel deletion, rotate MENU/SET to
select "CANCEL" and press it.
Display
TITLE DELETE Screen
41-
Deletion Confirmation
ScFeen
Normal playback
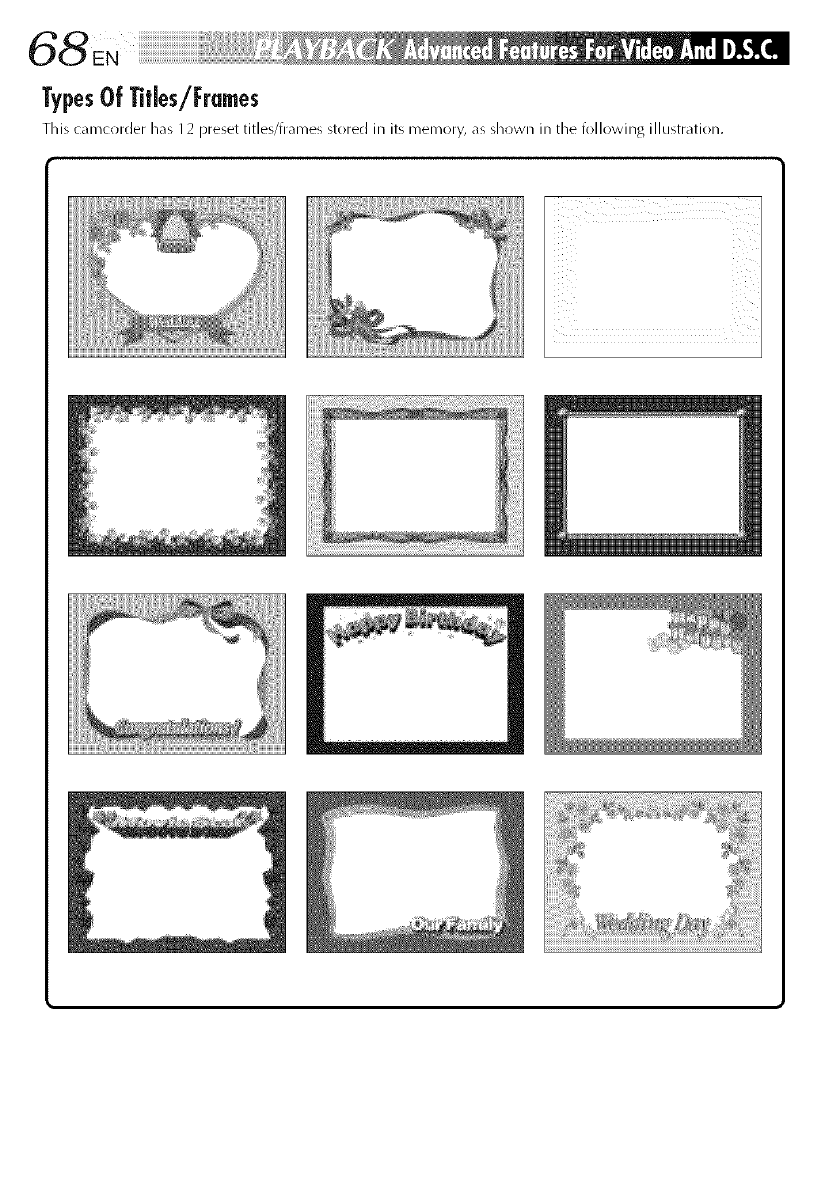
TypesOf Titles/Frmes
This camc_rder has 12 preset Utles/trarnesstored in Jt_memory, _lsshown in the followJn_ Jllus'Lra'LJon.
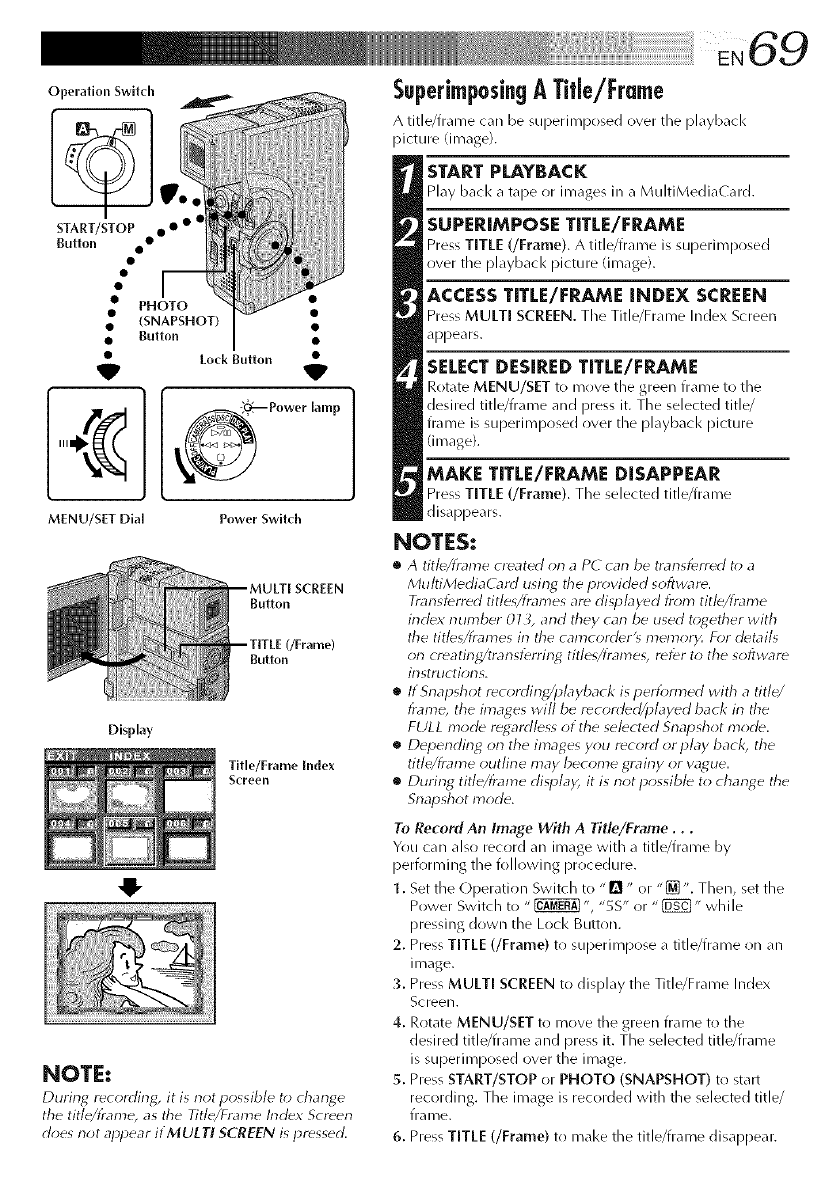
Operation Swltch
START/STOP oO • • •
Button
• PHOTO
• (SNAPSHOT)
• Button
•Lock Button
VV
O_ Power lamp
MENU/SET Dial Power Swltch
SCREEN
Button
(/Frame)
Button
Display
Title/Frame index
Screen
NOTE:
During recording, it is t-l_4possible to change
the title/t;'ame, as &e Title/Frame Index Screen
does not apHear itMULTI SCREEN is pressed.
Superimposingk TMe/Frme
A title/irame can be Sul)erimposed over the playback
picture (image).
START PLAYBACK
Play back a tape or images in a MultiMediaCard.
SUPERIMPOSE TITLE/FRAME
Press TITLE (/Frame). A title/frame is superimposed
over the playback picture (image).
ACCESS TITLE/FRAME iNDEX SCREEN
Press MULTi SCREEN. Tile Title/Frame Index Screen
appears.
SELECT DESIRED TITLE/FRAME
Rotate MENU/SET to move the green frame to the
desired title/frame and press it. The selected title/
frame is superil_/prlsed over the playback picture
(image).
MAKE TITLE/FRAME DISAPPEAR
Press TITLE (/Frame). The selected title/frame
disappears.
NOTES:
•A titb/fmn_e created on aPC can be transferred t<>a
MultiMedia( _rrd using the provMed software.
Transferred title_/frames are displayed from title/frame
index number 013, and they can be used together with
the titles/frames in the camcorder's memor>4 For details
on creatirlg/translbrring, titles/frames, refer to the software
instructions.
•If Snapshot recording/pbyback is pertbrmed with a title
frame, the images will be recorded/played back in the
FULL mode regordless ot the selected Snapshot mode.
•Deperlding on the images you record or play back, the
title/frame outline may become grainy or wrgue.
•During title/trame displa); it is not possible to change the
Snapshot mode.
To Record An Image With A Title/Frame...
You car/also record an image with a title/frame by
performing the following procedure.
1. Set the Operation Switch to "Q" or "_ ". Then, set the
Power Switch to " _ ", "5S" or "_" while
pressing down the Loci< Button.
2. Press TITLE (/Frame) to superimpose a title/frame on an
image.
3. Press MULTI SCREEN to display the Title/Frame Index
Screen.
4. Rotate MENU/SET to move the green frame to the
desired title/frame and press it. The selected title/frame
is superimposed over the image.
5. Press START/STOP or PHOTO (SNAPSHOT) to start
recording. The image is recorded with the selected title/
ira me.
6. Press TITLE (/Frame) to mal<e the title/frame disappear.
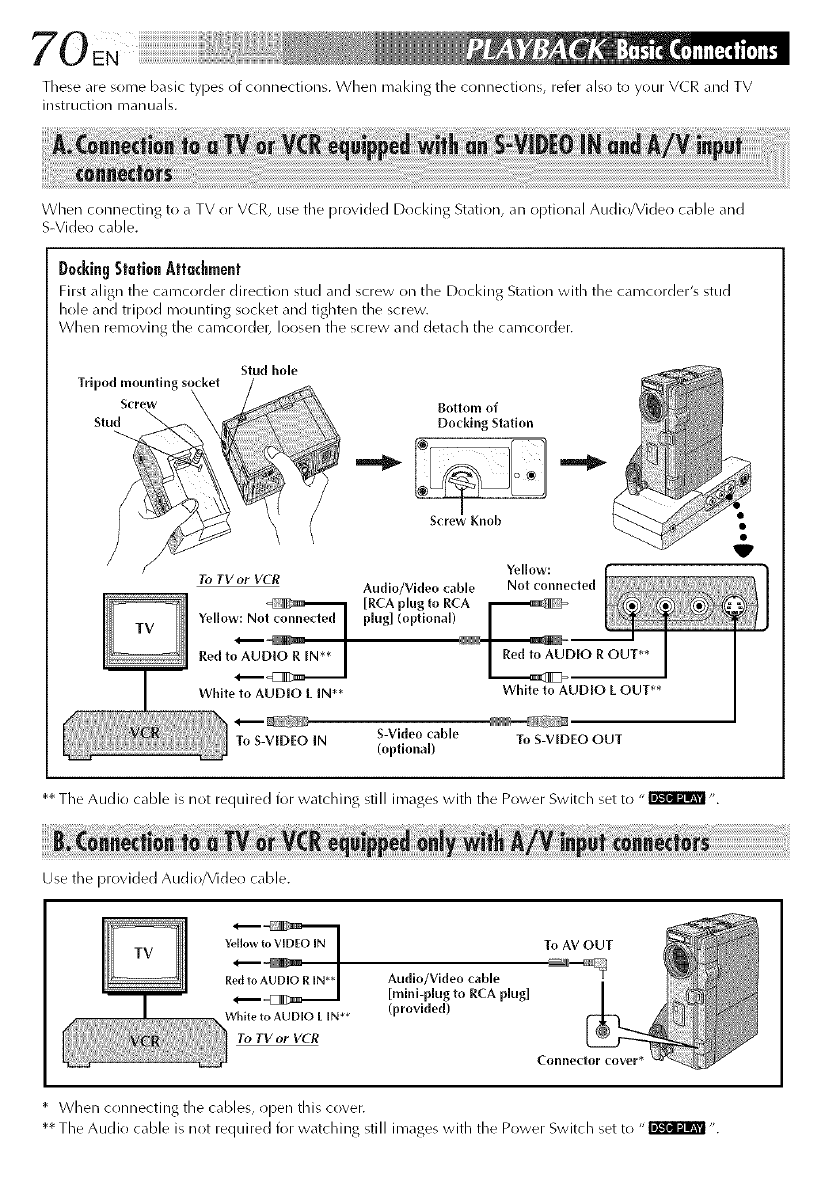
70
These are some basic types of connections. When mal<i,tg the connections, refer also tt:l your VCR and TV
instruction manuals,
When connecting to a TV or VCR, use the provided Docking Station, an Ol)tional Audio/Video cable and
S-Video cable.
D0¢kingStationAttachment
First align the camct)rder direction stud and screw on the Docking Station with the camcorder's stud
hole and tripod mountJllg socket _nd tighten the screw
When removing the camcordel_ loosen the screw and det_cll the camcorder.
Tripod ,_nwiing socke_
Stu_
f
Stud hole
Bottom of
Doddng Station
I
Screw Knob
Yellow:
To TV or VCR Audio/Video cable Not connected
Yellow: No plug] (optlona[)
Red toAU_ D,OR OUT**
L _2
White to AUDIO LIN** White to AUD[O L OUT**
To S-VEDEO IN S-Video cable To S-VIDEO OUT
(optional)
** The Audio cable is not required for watching still images with the Power Switch set to "_ ".
Use the provided Audio/Video cable.
Yellowto VIDEOIN
RAudlo/Video cable
[mini-p[ug to RCA p[ug]
White to AUDIO L IN** (provided)
To TV or VCR
* When connecting the cables, open this cover.
** The Audio cable is not required for watching still images with the Power Switch set to "_ ".
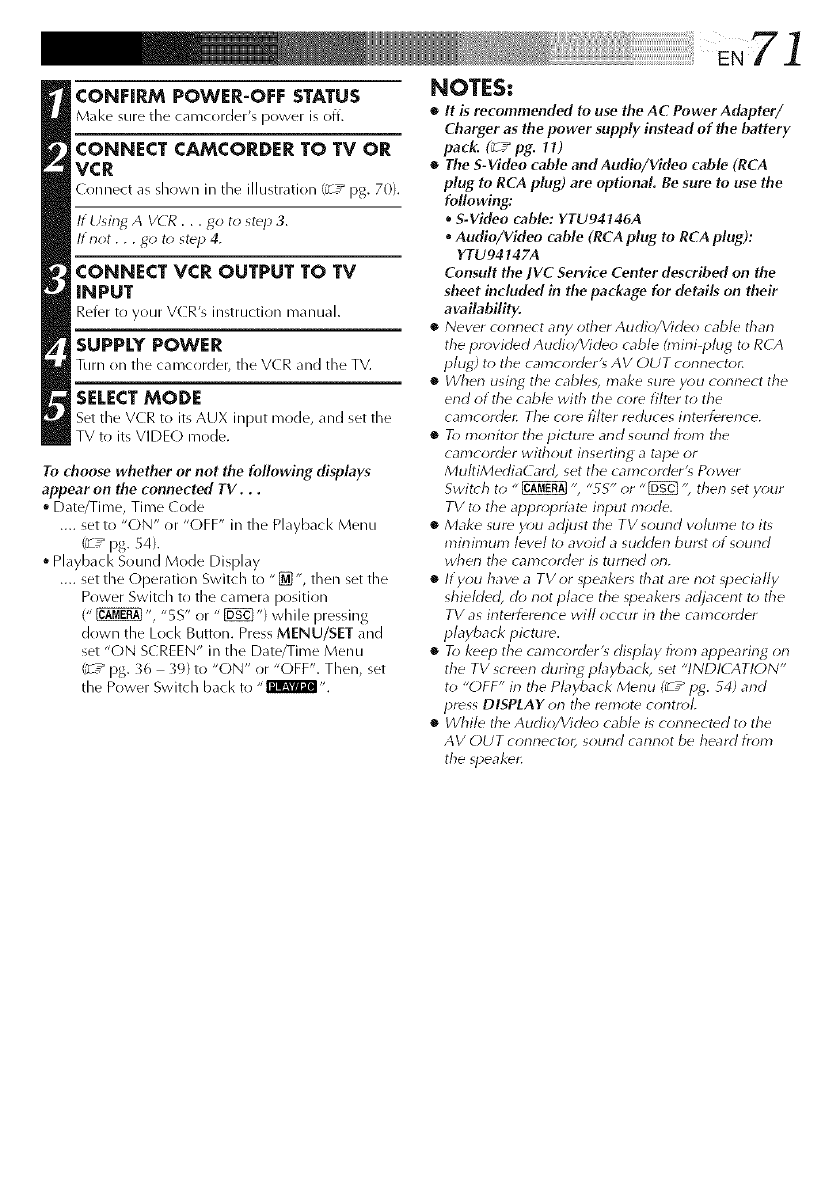
71
CONFIRM POWER-OFF STATUS
Make sure the camcorder's power is off.
CONNECT CAMCORDER TO TV OR
VCR
( onnect as shown in tile illustration (g7 pg. 70).
If Using A VCR ...go to step 3.
lt not . . . go t_) step 4.
CONNECT VCR OUTPUT TO TV
INPUT
Refer to your V(R's instruction manual.
SUPPLY POWER
Turn on tile camcorder, tile V(R and the TV.
SELECT MODE
Set the VCR t(> its AUX input mr)de, and set the
TV to its VIDEO mode.
To choose whether or not the following displays
appear on the connected TV. . .
Date/Time, Time (ode
.... set to "ON" or "OFF" in the Playback Menu
C_/pg. B4).
• Playback Sound Mode Display
.... set the (-)peration Switch to "[]", then set the
Power Switch to the camera position
(" _ ", "5 S" or " _") while pressing
down the Loci< Button. Press MENU/SET and
set "ON SCREEN" in the Date/Time Menu
('_/pg. }6 3% to "ON" or "OFF". Then, set
the Power Switch bacl< to "I'llml_l,'.
NOTES:
•It is recommended to use the AC Power Adapter/
Charger as the power supply instead of the battery
pack. (_ /pg. It)
•The S-Video cable and Audio/Vkleo cable (RCA
plug to RCA plug) are optional. Be sure to use the
following:
.S-Video cable: YTU94146A
Audio/Vkteo cable (RCA plug to RCA plug):
YTU94147A
Consult the ]VC Service Center described on the
sheet included in the package for details on their
availability.
•Never connect any other Audio/Video cable tharl
the provided Audio/Virleo cable hnirli-plug to R( A
phlg) to the camcorder'_ AV OUT connector.
•When using the cable_, make sure you connect the
end of the cable with the core filter to the
camcordec The core filter reduces interference.
•T_>monitor the picture and sound from tile
calYIcorcler without inserting a tape or
MultiMediaCard, set the camcorder's Power
Switch to "_ ", "_S" or "[_ "; then set your
TV to the appropriate input mode.
•Make sure you adjust tile TV sourld volume to its
mirlin_un_ level to avoid a sudden burnt of sourld
wherl tile camcorrler is turned on.
•If you have aTVor speakem that are not _pecially
shieMed, do not place the _peakem adjacent to the
TV as interference will occur in tile camcorrler
playbacl< picture.
•To I<eep the camcorder% display from appearing on
the TV screen during pL_ybacl<, set "INDICATION"
to "OFF" in the Playback Menu (_ /pg. _4) and
press DISPLAY orl tile remote control.
•While the Audio/Video cable is connected to the
AV OUT connect_r, sourld cannot be heard from
the _peaket:
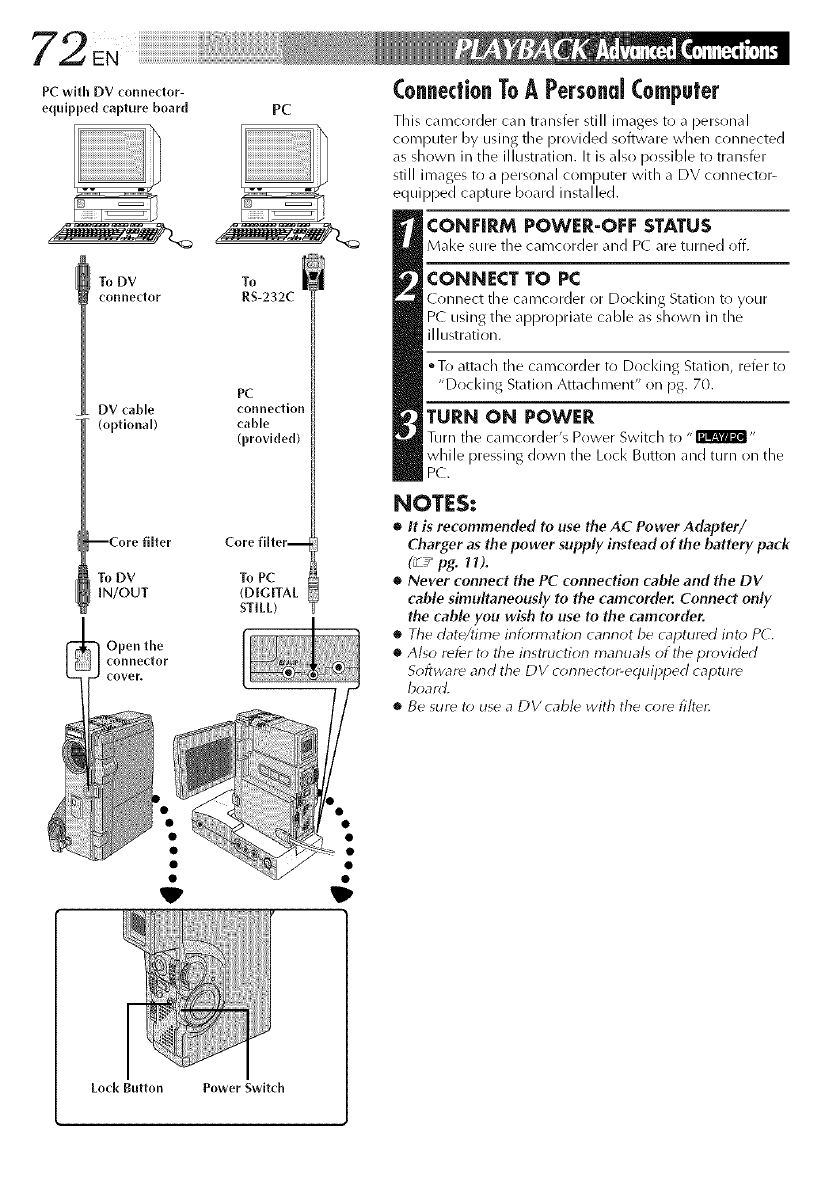
PCwithDVconnedor-
equippedcapture board PC
To DV To
connector RS-232C
PC
DV cable connectiol
(optional) cable
(provided)
Core filter--
To DV To PC
IN/OUT (DIGITAL
STILL)
Open the
connector
ConnectionToAPersonal (0mpu|er
This camcorder can transfer still images to apersonal
computer by using the provided software when connected
as shown in die illustration. It is also possible to transfer
still images to a personal computer with a DV connector-
equipped capture board installed.
CONEIRM POWER-OFF STATUS
M_l<e sure the camcorder _md P( are turned off.
CONNECT TO PC
( onnect :he camcorder or Docking Station to your
PC" using the appropriate cable as shown in the
illustration.
oTo attach the camcorder to Docking Station, refer to
"Docking Station Attachment" on pg. 70.
TURN ON POWER
Turn tile camcorder's Power Switch to "I'llml'_l,,
while pressing down the Loci< Button and turn on the
PC.
NOTES:
•It is recommended to use the AC Power Adapter/
Charger as the power supply instead of the battery pack
(_ /pg. 11).
•Never connect the PC connection cable and the DV
c_ble simultaneously to the camcorder. Connect only
the cable you wish to use to the camcorder.
oThe date/time irllbnnatiorl carlrlot be captured into PC.
•Also refer to the instruction manuals of tile provided
Sofb, vard and the DV connector-equipped capture
board.
•Be sur_ t_) use a DVcable with the core filter.

Power SwitcJl
Power lamp
i!i!ii!ii_ii_i!:!i!i!i!i
Loci( Button
Open the
connectorcover.
l•
To DV IN/OUT [
DV cable (optional)
To DV IN
_onneftor
DigltM Printer
To DV
connector
Video unit equipped
with a DV input
connector
To PC connector
--Core filter
PC connection
cable (provkled)
ConnectionToAVideo Unit [quippedWith
A DV Connector
Connection to the Digital Printer GV-DT3 (optional) allows
you to print ()Lit the images or to transfer the captured
image from the Digital Printer to a personal computer. It is
also possible to c(!py recorded scenes fr(im the camcorder
onto another video unit equipped with a DV connector.
This function is called Digital Dubbing (_-7_ pg. 75), which
offers virtually no image or sound deterioration.
CONFIRM POWER-OFF STATUS
M_l<esure_11the unit__re turned off,
CONNECT CAMCORDER TO PRINTER
OR VIDEO UNIT EQUIPPED WITH DV
INPUT CONNECTOR
Make o)nnectJons to the device you want to connect
to using the DV cable, a_ _hown in the illustration.
CONNECT PRINTER TO PC
(IF NECESSARY)
Connect tile P( connection ¢_d_le (provided) to the
printer's P( connector and the P('s R5-2";2(
CORllL_CtOF.
TURN ON POWER
Turn the camcorder's Power Switch to "I'mm_@l-
while pressing down the Lock Button and turn on the
other units.
NOTES:
•It is recommended to use the AC Power Adapter/
Charger as the power supply instead of the battery
pack. (_ /pg. It)
•For Digital Dubbing, &is camcorder carl be conrlected
only t_*one ddvice at a time. This camcorddr carl al_o be
used as a recorddr (_ T_IJg. 7_).
•If Still Playback, Slow-Motion Pbyback, Fast-D_rward or
Rewind is attempted with tile camcorder corlnected to a
video unit via the DV connector, tile image will take on
an effect similar t_>ac_;Iordd mosaic pattern or it will
become black.
•Also refer t_>the instruction marlual_ otthe connected
unit<
•Be 5Urd to use a DVcabld with the c_;re filtdt:
ITo RS-232C
t
j
PC
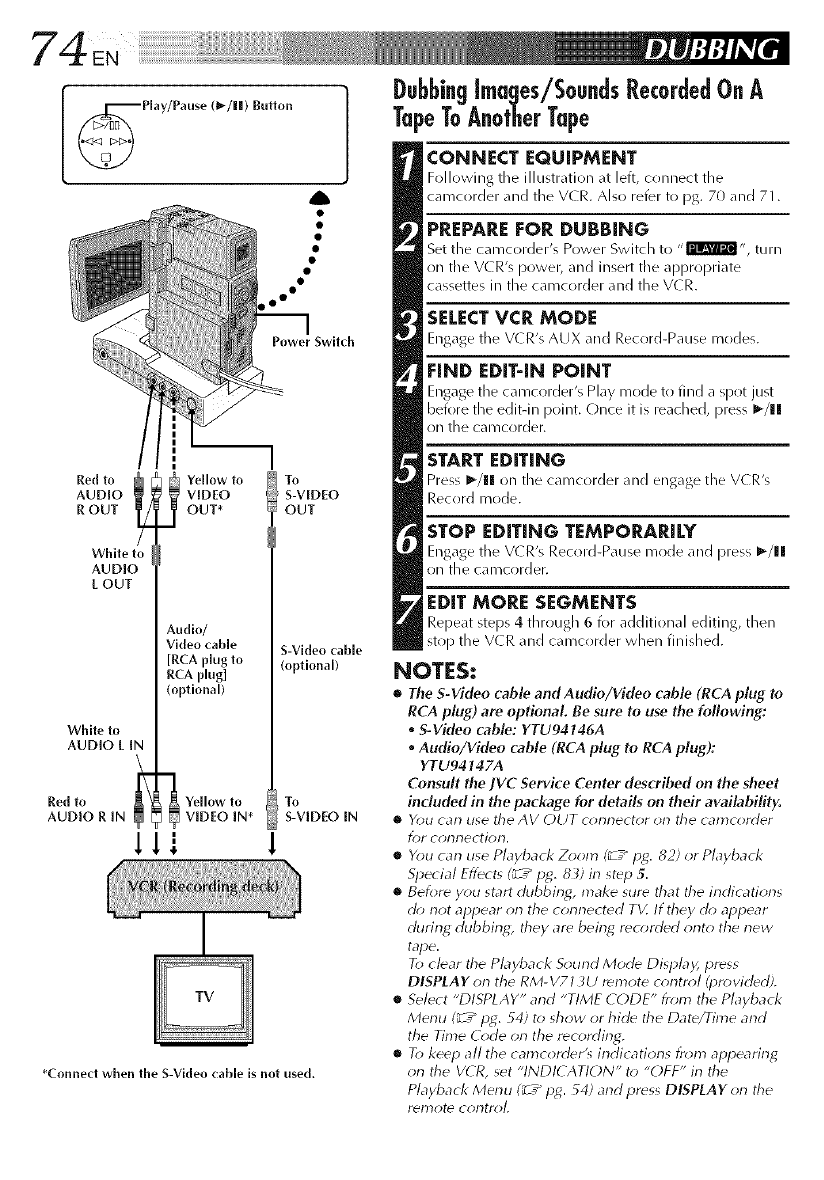
_Hay/Pause (_/11)
Button
I!
Re([ to _ I I Yellow to
AUDIO _ _ VIDEO
R OUT t OUT*
/
White to
AUDIO
L OUT
Audio/
Video cable
[RCA plug to
RCA plug]
(optional)
White to
AUDIO L IN
Red to i t Yellow to
AUDIO R IN VIDEO IN*
I
Power Switch
To
S-VIDEO
OUT
S-Video cable
(optional)
To
S-VIDEO iN
*Connect when the S-Video cable is not used.
Dubbingimges/Sounds RecordedO, A
TapeToAnotherTape
CONNECT EQUIPMENT
Following tile illustration at left, connect the
camcorder and tile V(R. Also refer to pg. 70 and 71.
PREPARE FOR DUBBING
Set the camcorder's Power Switch to ,, rllm_l,,, turn
on the VCR's power, and insert the appropriate
cassettes in the camcorder and the VCR.
SELECT VCR MODE
Engage tile V(R's AUX and Record-Pause modes.
FIND EDIT-IN POINT
Engage tile camcorder's Play mode to find a spot just
before the edit-in point. Once it is reached, press _/gl
on the camcorder.
START EDITING
Press 1_/111on the camcorder _md engage the V(R's
Record mode.
STOP EDITING TEMPORARILY
Engage tile V(R's Record-Pause mr)de and press I_/11
on the carocorder.
EDIT MORE SEGMENTS
Repeat steps 4 through 6 for additional editing, then
st()[) the V(R and carocorder when finished.
NOTES:
•The S-Video cable andAudio/Video cable (RCA plug to
RCA plug) are optional Be sure to use the following:
•S-Vkleo cable: YTU94146A
•Audio/VMeo cable (RCA plug to RCA plug):
YTU94147A
Consult the IV(?. Service Center described on the sheet
induded in the package for details on their availability.
•You carl use the AV OUT omnector orl the camcorder
for corlnectiorl.
•You can use Playback Zoom (_ /pg. 82) or Playback
Special Eflect_ (_7_ pg. 8_) in step 5.
•Before you start dubbing, make sure that the indications
d_; not appear on the connected T_Z If they cl(_ appear
during dubbing; they are bein_ recorded orlto the new
tape.
To clear the Playback S_mnd Mode Display, press
DISPLAY on the RM-V713U remote c_;ntrol (provirledA
•Select "DISPLAY" and "TIME CODE" fr_m't the Playback
Merlu (_ T" pg,. 54) t() show or hide the Date/Time arid
the Time (()de on tile recoMing.
• R> keep all the camcorrter's irldic atiorls fr_m_ appearirlg
on the V( R, set "INDK ANON" to "OFF" in the
Playback Menu (_ 7_ p_. _4) and press DIfPLAY on the
Yel]3ote coDtroL
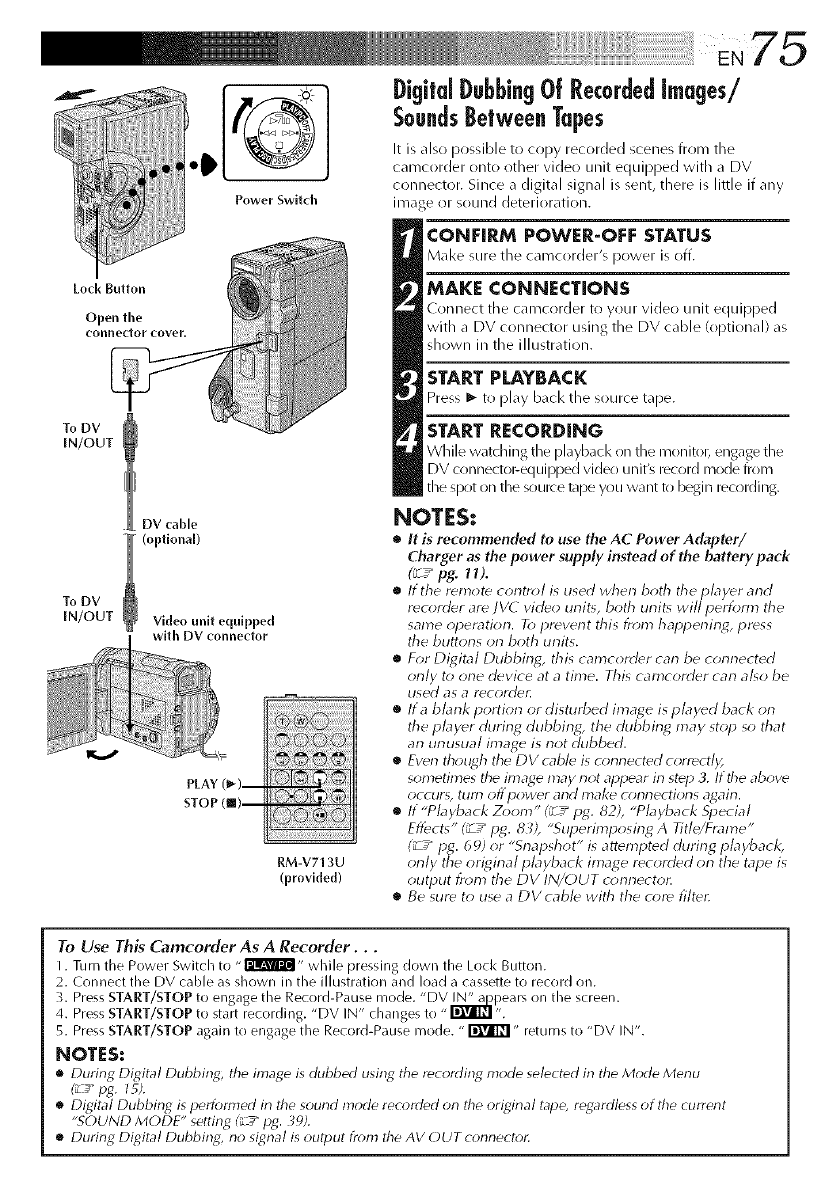
Lock Button
Open the
connector covef,
To DV
IN/OUT
DV cable
(optional)
To DV
IN/OUT
Power Switch
Video unit equipped
with DV connector
PLAY
STOP
RM-V71 3U
(provided)
Digi|dDubbingOf RecordedImages/
Soundsllelwee. Tapes
It is also possible to copy recorded scenes from the
camcorder onto other video unit equipped with a DV
connector. Since a digital signal is senL there is little if any
image or sound deteriorati(/n.
CONFIRM POWER-OFF STATUS
Make sure tile camcorder's power is off.
MAKE CONNECTIONS
Connect tile camcorder to your video unit equipped
with a DV connector using the DV cable (optional) as
shown in the illustration.
START PLAYBACK
Press _- to play back tile source tape.
START RECORDING
WMe w_tching the pl_ybacl<on the monito_ engagethe
DV connectol_equipped video unit'_ record mode from
tile spot on tile source tape you want k_ begin recording.
NOTES:
•It is recommended to use the AC Power Adapter/
Charger as the power supply instead of the battery pack
(_ /pg. 11%
•It the remote corltr_l is used lvherl both tile player arid
recorder are ]V(7 video unit% both unit_ will perfom_ tile
same operation. To preverlt this from happening4,press
tile butt<ms on both units.
•For Digital Dubbing, this camcorder cat-}be connected
only t_ one device at a time. This camcorder cat-}a[_o be
used as a Y(_coYddL
•Ita blank portion or disturbed image isplayed back on
the player during dubbing, the dubbing 17laystop so that
an unusual image is not dubbed.
•Eventhough tile DV cable is connected c_;rrectl);
son_etimes the image may not appear in step 3. If tile above
occur% till'f} Off pOWdr arid IDake cl_t-ll-lectiot-15 a_ait-L
•If "Pbyback Zoom" (_7_pg. 82), "Pbyback 5i_ecial
Effects" (_/pg. 83), "Superimposir_g A Title/Frame"
(_/pg. 69) or "Snapshot" is attempted during playback,
only the original playback image recorded on the tape is
output from the DV IN/OUT conrlector.
•Be sure to use aDVcabb with the core filter.
To Use This Camcorder As A Recorder...
I. Turn tile Power Switch to - I'Jil@'i- while pressing down tile Lock Button.
2. Connect tile DV cable as shown ill tile illustration and load a cassette to record on.
3. Press START/STOP to engage tile Reeord4_ause mode. "DV _pears on tile screen.
4. Press START/STOP to start recording. "DV IN" changes to "_ ".
5. Press START/STOPagain to engage tile Record-Pause mode. "_" returns to "DV IN".
NOTES:
•During Digital Dubbing_ tile image is dubbed using tile recording mode selected in tile Mode Menu
(_ pg. 15).
•Digital Dubbiog is performed in tile sound mode recorded orl tile original tape, regardless of tile current
"SOUND MODE" setting (__"pg. 39).
•During Digital Dubbing, rio signal is output from tile AV OUT corlrlectot:
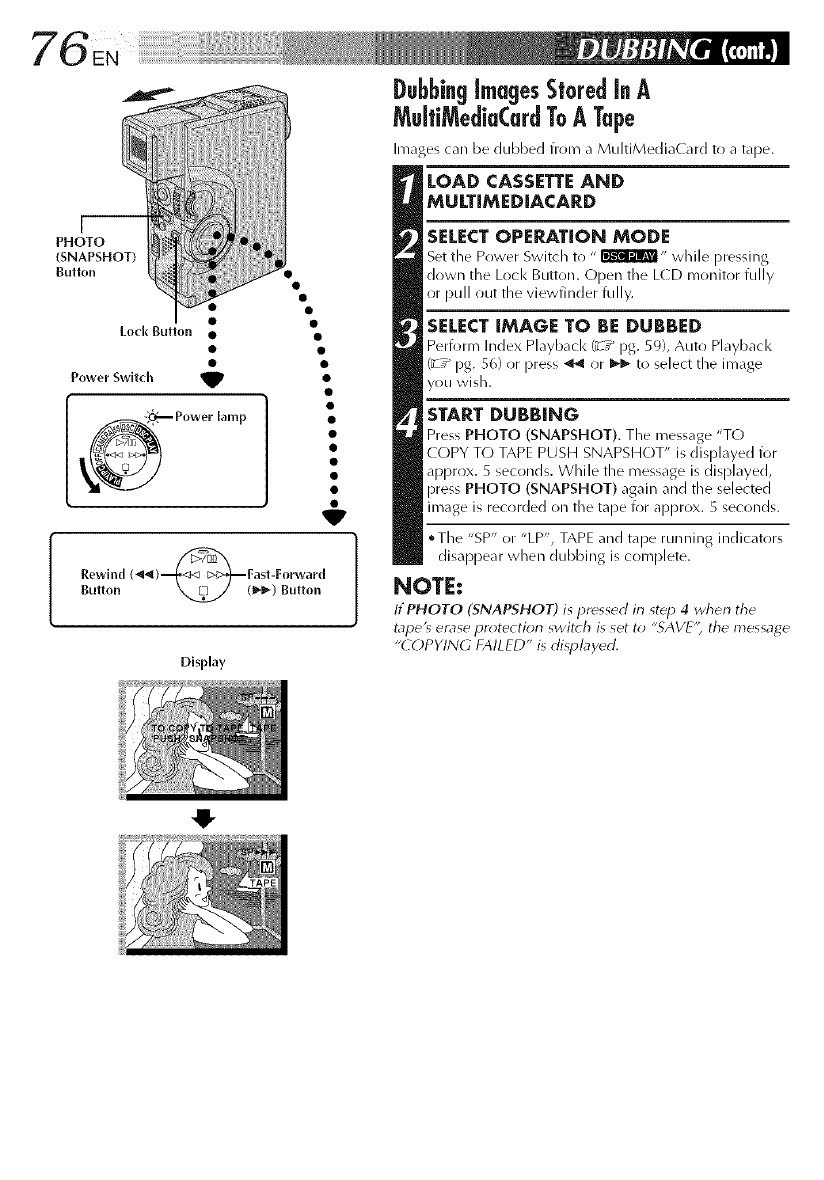
_ Power lamp
Rewind (_)_Fast-Forward
Bulton _(1_) Button
Display
O
SELECTOPERATION MODE
Set tile Prlwer Switch to " _" while pressing
down the Lock Button. Open the L(D monitor fully
or pull out the viewfinder fully.
SELECT IMAGE TO BE DUBBED
Perfi_rm Index Playback t_ /pg. 59), Auto Pl_lybacl<
_'_ /pg. 56) or press _ or I_1_ to select the image
you wish.
START DUBBING
Press PHOTO (SNAPSHOT). The message "TO
COPY T() TAPE PUSH SNAPSHOT" is displayed for
apprrlx. 5 seconds. While the message is displayed,
pres_ PHOTO (SNAPSHOT) again and the selected
image is recorded on the tape for approx. 5 seconds.
oTl/e "SP" or "LP', TAPE and tape runnlinlg indicators
disappear when dubbing is complete.
NOTE:
ItPHOTO (SNAPSHOT) is pressed in st_p 4 when tile
tape'_ erase pr_4ection switch is set to "SAVE'; the message
"COPYING FAILED" is displayed.
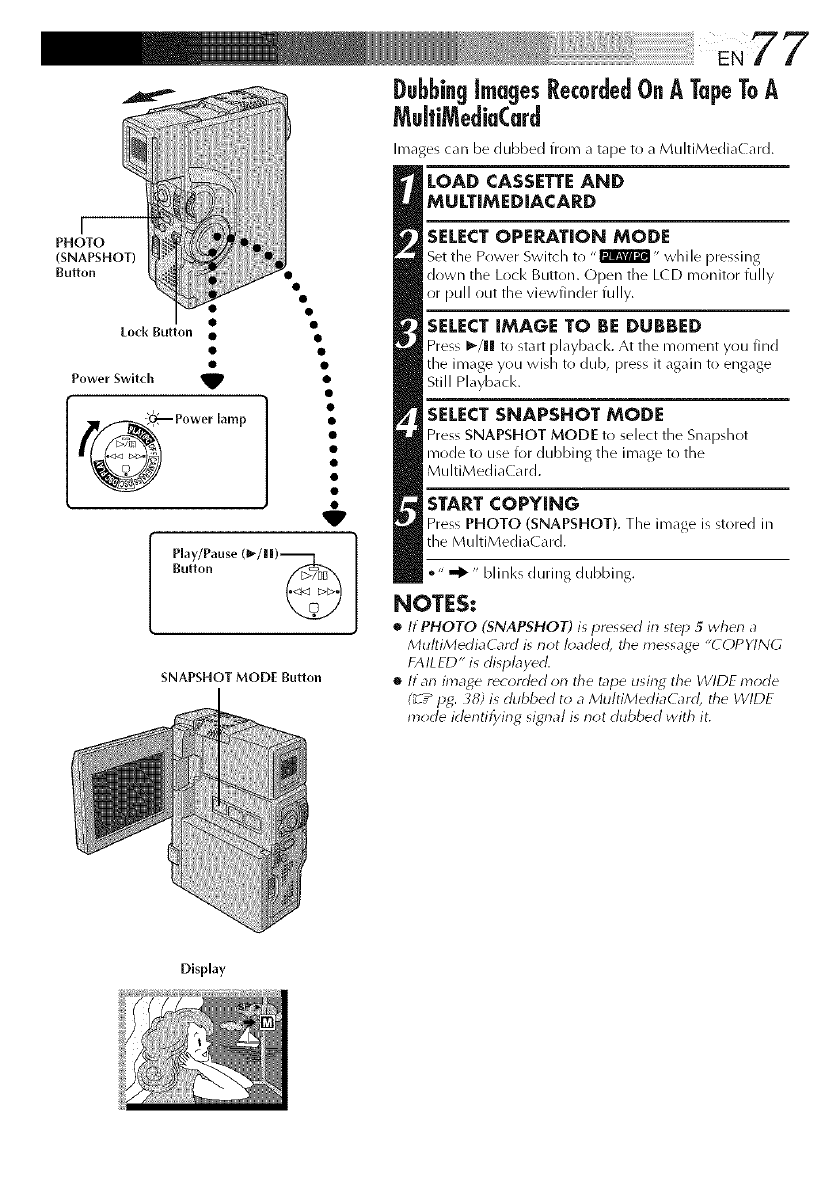
Lock Button
j__
PHOTO
(SNAPSHOT)
Bu_on
V
Power Switch _t
_ Power lamp
Play/Pause (_-/ll|)-_ 1
Button
SNAPSHOT MODE Button
Images can be dubbed from a tape to a MultiMedia( ard.
LOAD CASSETTE AND
MULTiMED[ACARD
SELECTOPERATION MODE
Set tile Power Switch to ,,F2_Wa_I" while pressing
down the Lock Button. Open the LCD monitr)r fully
or pull out the viewfinder fully.
SELECT iMAGE TO BE DUBBED
Press I_/1! to start pl_yb_cl<. At the moment you find
the image you wish t() dub, press it again to engage
Still Playback.
SELECT SNAPSHOT MODE
Press SNAPSHOT MODE to select the Sn_lpdlot
mode to use for dubbing the image to the
MultiMediaCard.
START COPYING
Press PHOTO (SNAPSHOT). The im_ge is stored in
the MultiMedia( ard.
•" _" bli nks during dubbing.
NOTES:
•ItPHOTO (SNAPSHOT) is pressed in st_p 5wherl a
MultiMediaCard is riot I_;aded, the message "COPYING
FAILED" is dispbydd.
•ltan image r_corded on the tape using the WIDE mode
(_ z_ pg. _8) is dubbed to a MultiMediaG_rd, the WIDE
mode irl_ntifying signal is riot dubbed with it.
Display
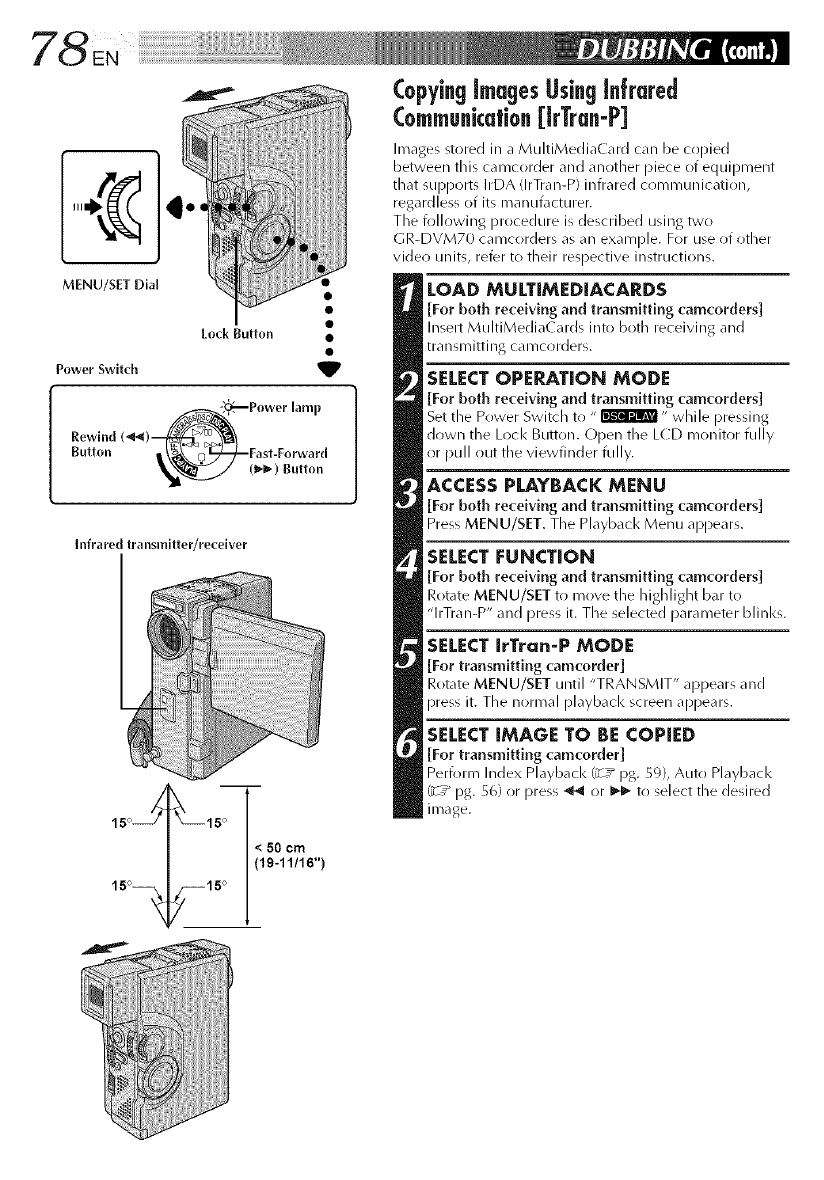
II1¢
MENU/SET Dial
Power Switch
Power lamp
rewind(_/--___i_a!
Button I \_ _ I_--/"-Fast-E°rward
_ 1_/Button
Infrared transmltter/recelver
CopyingimagesUsinginfrared
Communication[kTran-P]
Images stored in a MultiMediaCard can be coDied
between this camcorder and another piece of equipment
that supports IrDA (IrTran-P) infrared communication,
regardless of its manufacturer.
The following procedure is described using two
GR-DVM70 camcorders as an example. For use of other
rider! units, refer to their respective instructions.
LOAD MULTIMEDIACARDS
[For both receiving am| transmitting camcorders]
Insert MultiMedia( ards into both receiving and
transmitting camcorders.
SELECT OPERATION MODE
[For both re('eiving and transmitting ('am('orders]
Set the Prlwer Switch to " _" while pressing
down the Lock Button. Open the LCD monitor fully
or pull out the viewfinder fully.
ACCESS PLAYBACK MENU
[For both receiving and transmitting tatar'orders]
Press MENU/SET. The Playback Menu al_pears.
SELECT [:UNCTION
[For both receiving am| transmitting camcorders]
Rotate MENU/SET to move the highlight bar to
"lrTran-P" and press it. The selected parameter blinks.
SELECT IrTran-P MODE
[For transmitting camcorder]
Rotate MENU/SET until "TRANSMIT" appears and
press it. The normal playback screen appears.
SELECT IMAGE TO BE COPIED
[For transmitting camcorder] ,
Perform Index Playback (_T_ pg. 59), Auto Playback
(Y-T_ pg. 56) or press _ or I_ tr) select the desired
image.
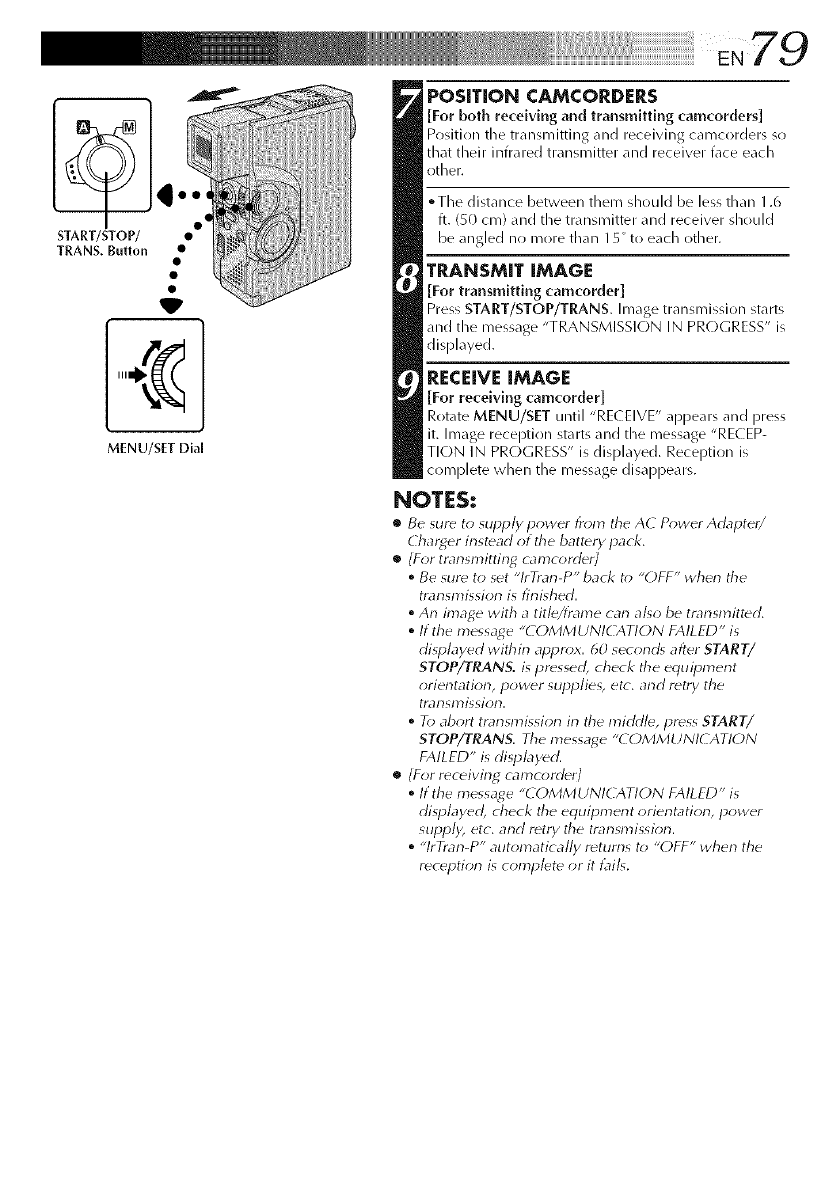
f
TRANS, Button •
MENU/SET DiM
POSITION CAMCORDERS
[For both receiving and transmitting camcorders]
Position tile transnlitting and receiving callicorders so
that their infrared transmitter and receiver face each
other.
• Tile distance between them should be less than 1.6
ft. (SO cn/) and the transmitter and receiver should
be a/g ed lo more than I 5" to each other.
TRANSMIT IMAGE
[For transmitting camcorder]
Press START/STOP/TRANS. Image transmission starts
and the nlessage "TRANSMISSION IN PROGRESS" is
displayed.
RECEIVE IMAGE
[For receiving camcorder]
Rotate MENU/SET until "RE( EIVE" appears and press
it. Image reception starts and the nlessage "RECEP-
TION IN PROGRESS" is displayed. Reception is
complete when the message disappears.
NOTES:
•Be sure to supply power from tile A( P_wer Adapter/
Char_er instead ot tile batter), pack.
•_ /For trar_sn_itting camcorder/
•Be sure to set "lrTrar_-P" back to "OFF" when the
transmission is finished.
•An image with a title/frame carl also be transmitted.
•If the message "COMMUNICATION FAILED" is
displayed within appr_*x. 60 second_ after START/
STOP/TRANS. is pressed, check the equil_ment
orientatiorb power slqJplies, etc. and retry the
trarlsl)3issiorL
•To abort transmission in the mirkl/e, press START/
STOP/TRANS. Tile message "COMMUNI( ATION
FAILED" is displayed.
•/For receiving camcorder/
•If the message "COMMUNICATION FAILED" is
disl_layecl , check the equipment orierltatiorl, power
supply etc. arid retry the transmissiorr
•"lrTrarl-P" automatically returns to "OFF" when the
reception is complete or it t]lil<
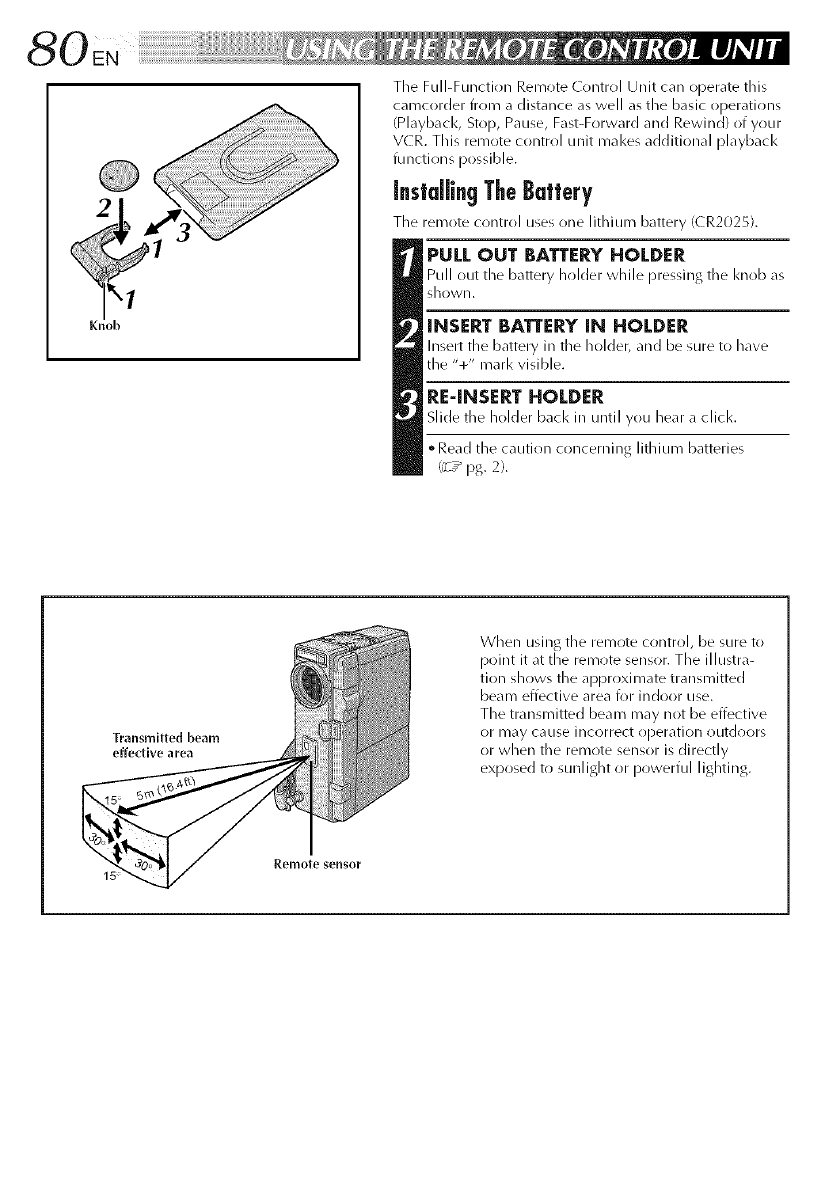
[::N _i_i_i_i_i_i_i_i_i_i_i_i_il_l_l_l_l_l_l_l_l_lllllllll!!!!!!li_iiiiiiiiiiiiiiiiiiiiiiiiiiiiiiiiiiiiiiiiiiiiiiiii_ii
The Full-Function Remote Control Unit can operate this
camcorder from a distance as well as tile basic operations
(Playback, Stop, Pause, Fast-Forward and Rewind) of your
VCR. This remote control unit mal<es additional playback
functions possible.
Installing TheBattery
The remote control uses one lithium battery (CR2025).
PULL OUT BATTERY HOLDER
Pull out the battery holder while pressing tile knob as
sho'vVll.
INSERT BATTERY IN HOLDER
Insert the battery in tile holder, and be sure to have
the "+" marl< visible.
RE-INSERT HOLDER
Slide tile holder bacl< in until you hear a click.
• Read the caution concerniilg lithium batteries
(_7 _ pg. 2).
Transmitted beam
effective area
When using tile remote control, be sure to
point it at the remote sensor. The illustra-
tion shows the approximate transmitted
beam effective area for indoor use.
The transmitted beam may not be effective
or may CaLISe incorrect operation outdoors
or when tile remote sensor is directly
exposed to sunlight or powerful lighting.
Remote sensor
15 _¸

EN8 /
0@
RM-V713U
(provide{[)
Buttons
_[_ PAUSE IN Connector
O Zoom (T/W) Buttons Zooln in/out (_- pg. 26)
DISPLAY Button
SHIFT Button
O SLOW Rewind/Forward Buttons
Left/Right Buttons
FADE/WIPE Button
O REW Button
EFFECTButton
EFFECTON/OFF Button
_) Infrared beam transmitting window Transmits the beam signal.
Functions
With the camcorder's Power With the camcorder's Power Switch
Switch set to the camera position set to "_" or "_ %
(" _ ", "sS" or _ ").
_c7"pg. 85
Zoom in/out (a_7"pg. 82)
_c_" pg. 74
_c7"pg. 82
_c7"pg. 82
_c_" pg. 82
_c_" pg. 85
• Rewind/Reverse Shuttle Search on
a ta3e (u"J" )g. 52, 53)
,, Dis)lays 3revious inlage in a
Mu t Med aCard _" pg. 56
_c7"pg. 83
_c3" pg. 83
_[_ START/STOP Button Functions same as START/STOP on tile canlcorder.
AUDIO MONITOR Button _cy" pg. 55
_) MBR SET Button _c7"pg. 84
Down Button _c7"pg. 82
A. DUB Button _c_"pg. 90
Up Button _c_"pg. 82
q[_ FF Button • ForwarWForward Shuttle Search
on a tape (a_y pg. 52, 53)
• Displays next inlage in a
MultiMedia( ard (a__ pg. 56)
PLAY Button • Starts Playback of a tal_ (a_3 pg. 52)
• Starts Auto Playback of a
MultiMediaCard/a_ g pg. 56)
_) PAUSE Button Pauses the tape (_T pg. 53)
STOP Button • Sto)s tile ta 3e (i T pg. 52)
• Stol_ Auto P ayback or S i( e S_ow
{_7" pg. 56, 57)
_) R.A.EDIT Buttons L_" pg. 84 89
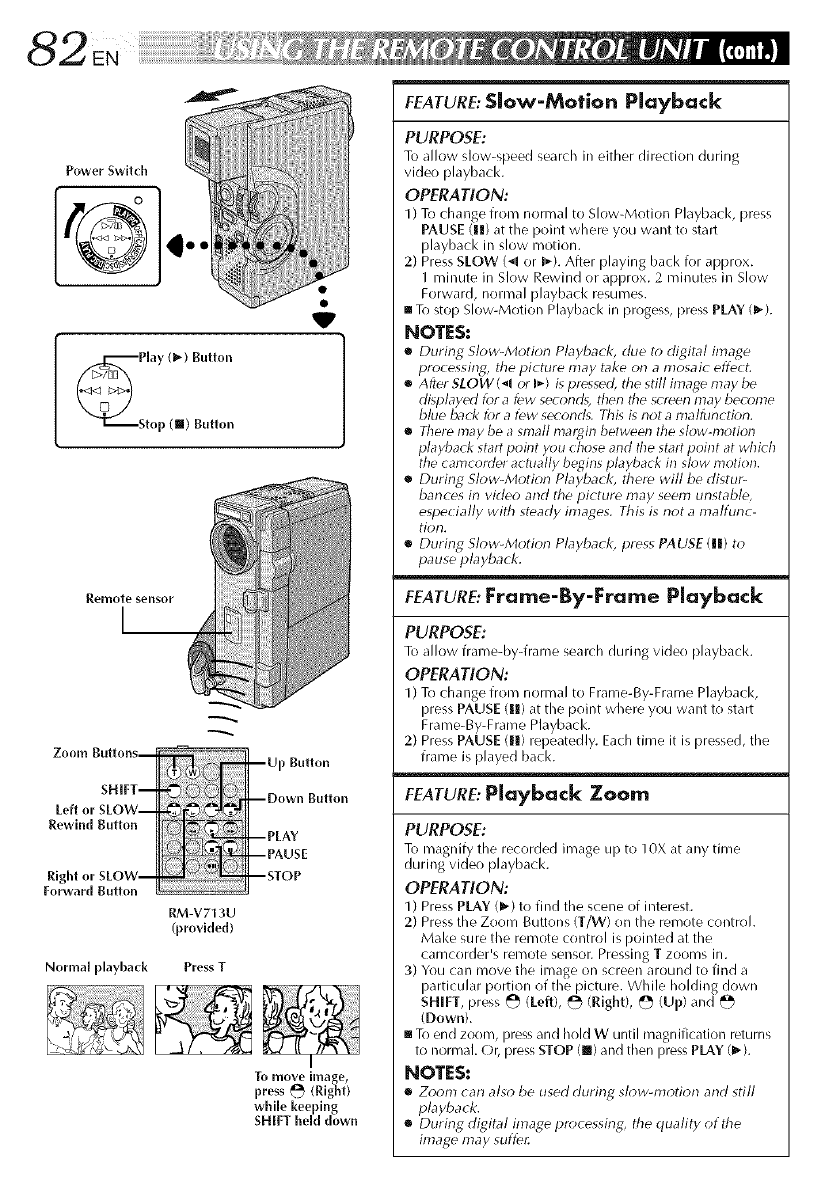
Power Switch
V
Remote sensor
I
Zo o11_1 BUttOnS--
SHIFT--
Left or SLOW--
Rewind Button
Right or SLOW--
Forward Button
Normal playback
RM-V713U
(provided)
Press T
--Up Button
--Down Button
--PLAY
PAUSE
--STOP
I
To move image,
press k'_ (Right)
while keeping
SHIFT hem down
FEATURE:Slow-Motion Playback
PURPOSE:
To allow slow-speed search in either direction during
video playback.
OPERATION:
1) To d/ange from normal to Slow-Motion Playbadq press
PAUSE (H) at the point where you want to start
playbacl< in slow motion.
2) Press SLOW (-_l or _*_).After playing back for approx.
1 minute in Slow Rewind or approx. 2 rninutes in Slow
Forward, normal playback resumes.
[] To stop Slow-Motion Playback in progess, press PLAY (1_).
NOTES:
[] During Slow-Motk_r_ Playback, due to digital inlage
pro( essing, the picture may take on a mosaic effe(t.
[] After SLOW (_l or _ ) is pressed, the still image may be
displayed for a few seconds, then the screen may become
blue back for a few seconds. Tills is riot a malflJnction.
[] There may be a small margin between the slow-motion
playback start point you chose and the start point at which
tile camcorder actually begins playback in slow motion.
[] During Slow-Motion Playback, there will be distur-
bances in video and the picture nlay seem unstable,
especially with steady images. This is not a malfunc-
tion.
[] Durirlg Slow-Motion Playback, press PAUSE (111)to
pause playback.
FEATURE: Frame-By-Frame Playback
PURPOSE:
To allow frame-by-frame search during video playback.
OPERATION:
1) To change from normal to Frame-By-Frame Playback,
press PAUSE (l[) at the point where you want to start
Frame-By-Frame Playback.
2) Press PAUSE (1|) repeatedly. Each time it is pressed, the
frame is played back.
FEATURE: Playback Zoom
PURPOSE:
To magnify the recorded image up to 10X at any time
during video playback.
OPERATION:
1) Press PLAY (_') to find the scene of interest.
2) Press the Zoom Buttons (T/W) on the remote control.
Make sure the remote control is pointed at the
camcorder's remote SeDsor. Pressing Tzooms in.
3) You can move the image on screen around to find a
particular portion of the picture. While holding down
SHIFT, press _ (left), _ (Right), _ (Up) and b'_
(Down).
[] To end zoom, press and hold W until magnification returns
to normal. Or, press STOP (l!!) and then press PLAY (1_).
NOTES:
[] Zoom carl also be used during slow-motior_ and still
playb,lck.
[] During digital image processing, the quality of the
image may suffe_
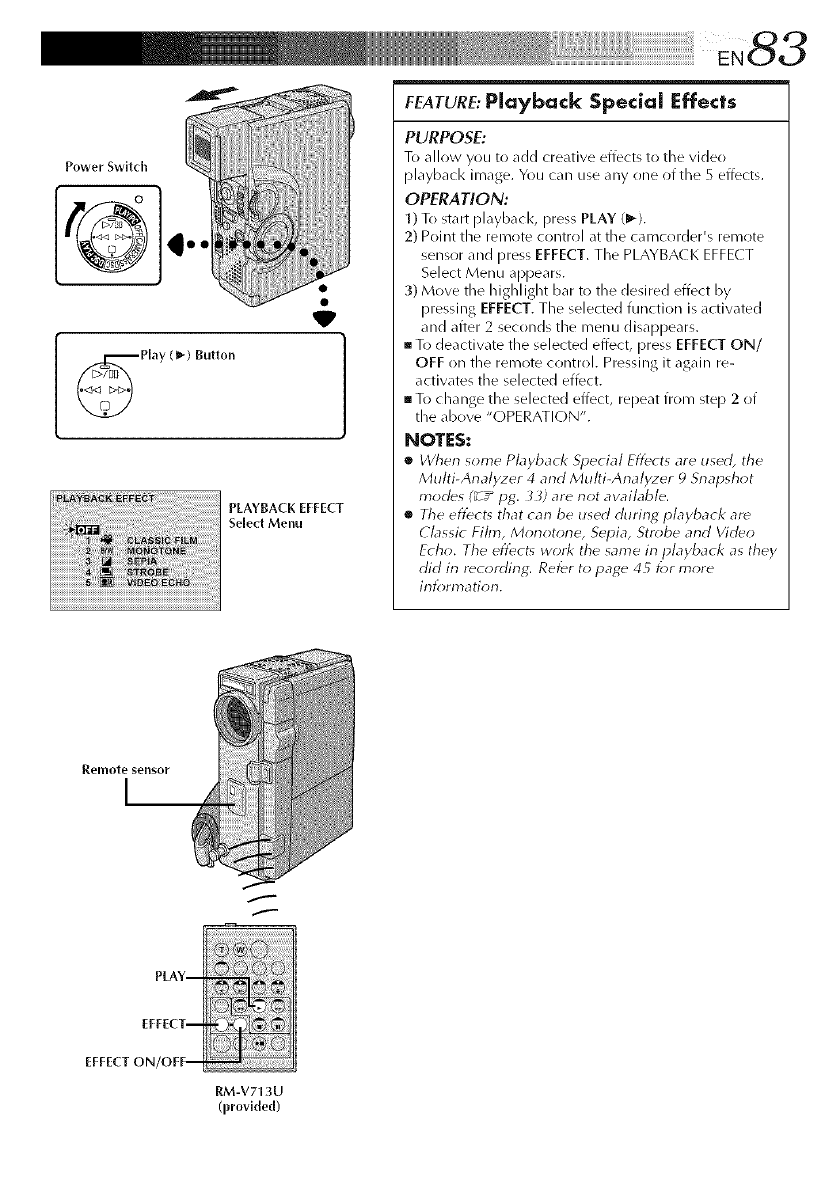
Power Switch ...
Play (_) Button
PLAYBACK EFFECT
Select Menu
FEATURE:Playback Special Effects
PURPOSE:
To allow you to add creative effects to the video
playback image. You can use any one of the 5 effects.
OPERATION:
1) To start playback, press PLAY (1_).
2) Point the remote control at the camcorder's remote
sensor and press EFFECT. The PLAYBA( K EFFE(T
Select Menu appears.
3) Move the highlight bar to the desired effect by
pressing EFFECT. The selected function is activated
and after 2 seconds the menu disappears.
To deactivate the selected effect, press EFFECT ON/
OFF on the remote control. Pressing it again re-
activates the selected effect.
To change the selected effect, repeat from step 2 of
the above "OPERATION".
NOTES:
•Wherl some Playback Special Effects are used, the
Multi-Analyzer 4 and Multi-Analyzer _)Snapshot
modes (_ -" pg. 33) are riot awfflable.
•The efl_ct_ that can be used during playback are
Classic Film, Morlotorle, Sepia, Strobe arid Video
Echo. The effects work the same in playback as they
did in recording: Ref¢r to page 45 _;r more
information.
ff
PLAY--
EFFECT--
EFFECT ON/OFF--
RM-V713U
(provMed)
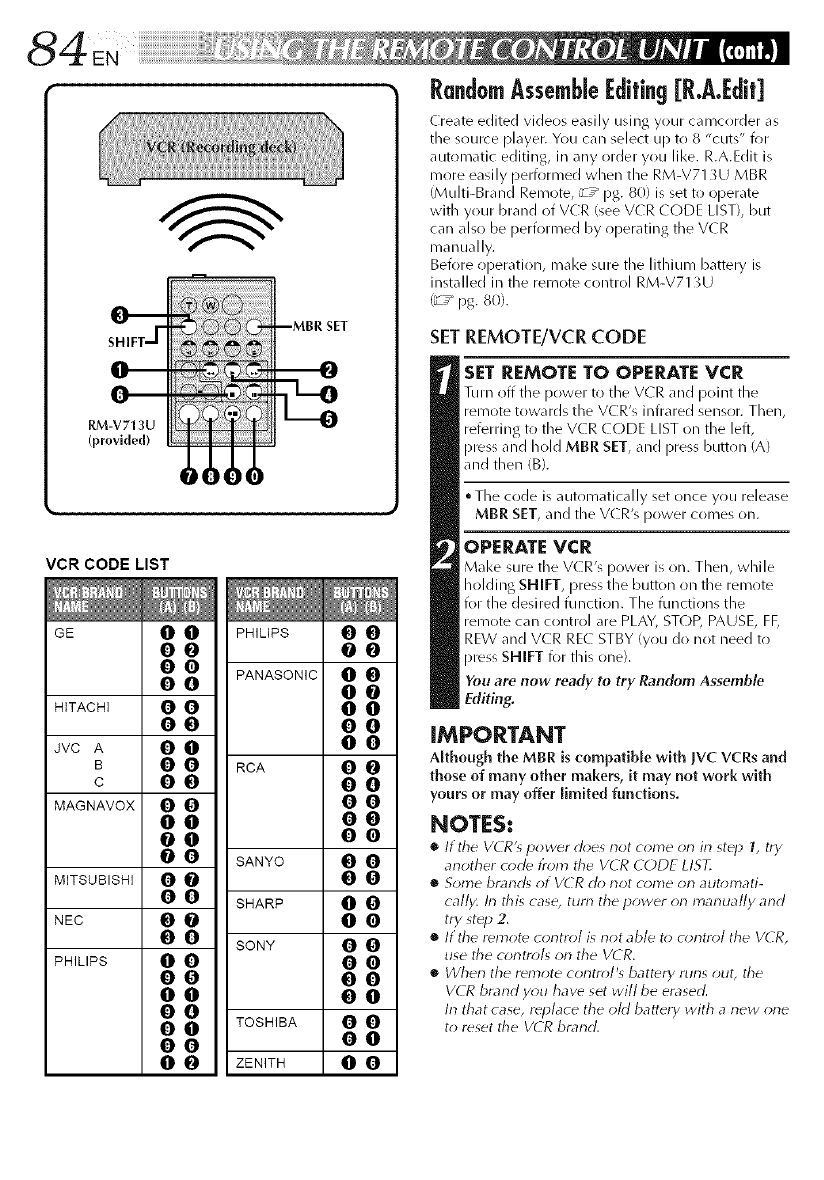
RM-V7t 3U
(provided)
I _0! I
VCR CODE LIST
GE 0 0 PHILIPS 0 0
O0 O0
00PANASONIC 0 0
O0 O0
HITACHI 0 0 0 0
O0 O0
Jvc A 0 0 0 0
B0 0 RCA 0 0
cO0 O0
MAGNAVOX 0 0 0 0
O0 O0
O0 O0
0 0 SANYO 0 0
MITSUBISHI 0 0 0 0
0 0 SHARP 0 0
NEC 0 0 0 0
0 0 SONY 0 0
PHILIPS 0 0 0 0
O0 O0
O0 O0
O0
0 0 TOSHIBA 0 0
O0 O0
0 0 ZENITH 0 0
RandomAssemble[idifing [R.A.[dit]
Create edited videos easily using your camcorder as
the source ))layer. You can select up to 8 "cuts" for
automatic editing, in any order you like. R.A.Edit is
more easily performed when the RM-V71 _U MBR
(Muhi-Brand Remote, _T _ pg. 80) is set to operate
with your brand of VCR (see VCR (ODE LIST), but
car/also be performed by operating the VCR
manually.
Before operation, mal<e sure the lithium battery is
installed in the remote control RM-V71 gU
('_ ,_ pg. 80).
SETREMOTE/VcR cODE
SET REMOTE TO OPERATEVCR
Turn off tile power to the VCR and point the
remote towards the VCR's infrared sensor. Then,
referring to the V(R CODE LIST on the left,
press and hold MBR SET, and Press button (A)
and then (B).
• The code is automatically set once you release
MBR SET, and the V(R's power comes on.
OPERATE VCR
Make sure tile V(R's power is on. Then, while
holding SHIFT, press the button on the remote
for the desired function. The functions the
remote can control are PLAY, STOP, PAUSE, FF,
REW and VCR RE(- STBY (you do not need to
press SHIFT for this one).
You are now ready to try Random Assemble
Editing.
IMPORTANT
Although the MBR is compatible with JVC VCRs and
those of many other makers, it may not work with
yours or may offer limited functions.
NOTES:
•It the VCR'_ power does not come on in st_p 1, try
another code trom tile VCR (:ODE LIST,
•Some brancg ot VCR ch_not come on automati-
cally, In this case, turn the power on manually and
try st_p 2,
•If the remot_ contrail is not able t_; o;ntrol the V¢R,
use the controls on the VCR,
• _Vherl the rdmote corltrol's battery furls out, the
VCR brand y_*u havd set will be erased.
In that case, rdplace the oM battery with anew one
to reset tile V(R brand.

To EDIT
Red to
AUDIO
R OUT
White to
AUDIO
L OUT
White to
AUDIO L IN
Red to
AUDIO
RIN
I
I Yellow to To
VIDEO S-VIDEO
OUT* OUT
S-Video
Audio/ cable
Video cable (optional)
[RCA plug to
RCA plug] Editing
(optional) cable
(provided/
To S-VIDEO
IN
To Remote
PAUSE or
R.A. EDIT
÷ .....
+[] To PAUSE IN
FADE ON/OFF
RM-V713U (provided)
* Connect when the S-Video cable is not use{b
MAKE CONNECTIONS
Also refer to pg. 70 and 71.
CONNECT TO...
[] jvC VCR EQUIPPED WITH REMOTE PAUSE
TERMINAL
( onnect tile editing cable to tile Remote PAUSE
teriT_inal.
[] IVC VCR NOT EQUIPPED WITH REMOTE
PAUSE TERMINAl_ BUT EQUIPPED WITH
R.A. EDIT CONNECTOR
Connect the editing cable to tile R.A.EDIT
connector.
[] VCR OTHER THAN TYPE [] OR []
( onnect the editing cable to tile RM-V713U's
PAUSE IN connector.
PREPARECAMCORDER
Insert a recorded tape and set the Power Switch to
"rB&Tm,, while pressing down the Lock Button.
PREPAREVCR
Turn the power on, insert a recordable tape and
engage the AUX mode (refer to V(ZR's instructions).
SELECTSCENES
START SOURCE PLAYBACK
Press PLAY (1_) and then press R.A. EDIT ON/OFF on
the remote control. Make sure to point the remote
control at the camcorder's remote sensor.
°The Random Assemble Editing Menu appears.
EXECUTE FADE/WIPE IN
(IF NE¢ESSAERY)
Pre_ FADE/WIPE n the remote control,
°Cycle through the effects by pressing repeatedly,
and stop when the one you want is displayed.
• You cannot use a Picture Wipe/Dissolve at the
beginning of Program 1.
NOTES:
•The S-Video cable and Audio/Video cable (RCA plug to RCA plug) are optional. Be .sure to use the following:
• S-Video cable: YTU94146A
•Audio/Video cable (RCA plug to RCA plug): YTU94747A
Consult the JVC Service Center described on the sheet included in the package for details on their availability.
•YOU Car} []SO tho AV OUT COf_T_tOF Of} tbo can]corder for coi_i_ectioil.
•Before Random Assemble Editing, make sure the indications ck_not appear on the TV monito_ If they appear during
Random Assemble Editing, they will be recorded onto the new tape. To clear the Pbyback Sound Mode Display, press
DISPLAY on tile remote control Select "DISPLAY" and "TIME CODE" from the Playback Menu I_ _" pg. 54) to show or
hide tile Date/Time and the Time Code on the rec_)rding. To show or hide all indicatk_ns except for the Rand_m_
Assemble Editing Menu, set "INDICATION" to "OFF" in the Playback Menu (_" pg. 54) and press DISPLAY on the
remote c_*ntrol. Wllen Rand_*m Assemble Fditing, starts, its indicatk*ns disappear and are not rec_)rded on the new tape.
CONTINUED ON NEXT PAGE
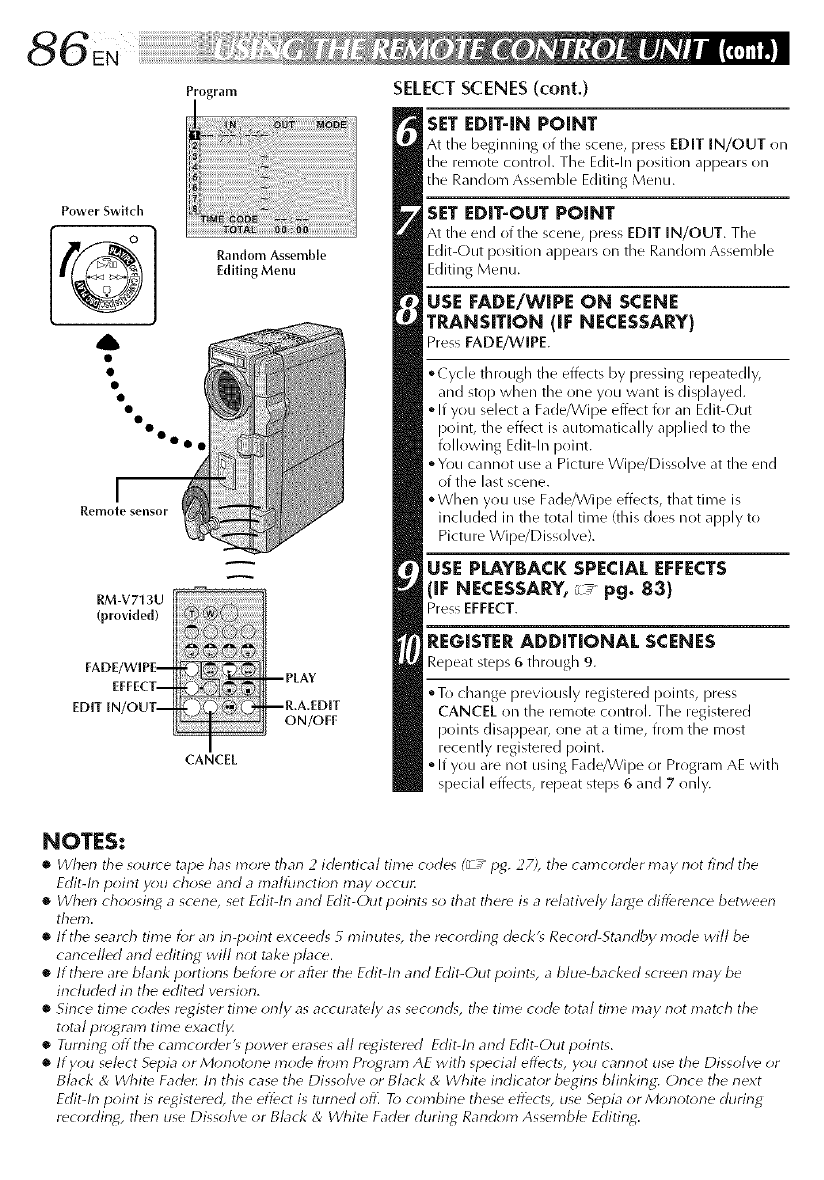
Power Switch
M
__
Remote sensor
Random Assemble
Editing Menu
RM-V713U
(provided)
FADE/WiPE-
EFFECT-
EDiT iN/OUT--
A
q
©_
CANCEL
-- PLAY
--R,A£DiT
ON/OFF
SELECTSCENES(cont.)
SET EDIT-IN POINT
At tile beginning of tile scene, press EDIT IN/OUT on
tile remote control. Tile Edit-In position appears on
the Random Assemble Editing Menu.
SET EDIT-OUT POINT
At tile end of the scene, press EDIT IN/OUT. Tile
Edit-Out position appears on tile Random Assemble
Editing Menu.
USE FADE/WIPE ON SCENE
TP,J_NSITION (iF NECESSARY)
Press FADE/WIPE.
°Cycle through tile effects by pressing repeatedly,
and stop when the one you want is displayed.
•If you select a Fade/Wipe effect for an Edit-Out
point, the effect is automatically applied to the
following Edit-In point.
•Y(lu cannot use a Picture Wipe/Dissolve at the end
of the last scene.
°When y(lu use Fade/Wipe effects, that time is
included in tile total time (this does not apply to
Picture Wipe/Dissolve).
USE PLAYBACK SPECIAL EFFECTS
(IF NECESSARY,r_ pg. 83)
Pres EFFECT.
REGISTER ADDITIONAL SCENES
Repeat steps 6 through 9.
oTo change previously registered points, press
CANCEL on the remote control. The registered
points disappear, one at a time, from the roost
recently registered point.
•If you are not using Fade/Wipe or Program AE with
special effects, repeat steps 6 and 7 only.
NOTES:
•dherl the s(mrce tape has more tharl 2 identical time o;des (_z" ijg. 27), the camcorder may not find the
Edit-lrl poirlt you chose arid amallbrlction may occu_
•When choosing a scene, set Edit-lrl and Edit-Outpoirlts so that there is arelatively large difference between
them.
•If the seato h time for an in-point exceeds 5 minuteg the recording deck'_ Record-Standby mode will be
cancelled arid editing will not take place.
•If there are blarlk portions beJ;re or after the Edit-lrl and Edit-Out point_, a blue-backed screen may be
included in the edited version.
•Sirlce time codes register time orlly as accurately as second% the time code total time may riot match the
total pro;gram time exactl_
• Riming offthe camcorder'_ power erases all registered Edit-h-1 and Edit-Out poirlt_.
•If you select Sepia or Monotone mode from Program AE with special effects, y_m cannot use the Dissolve or
Black & Whit_ Fade_ In this case the Dissolve or Black & White indicator begins blinking: Once the next
Edit-In poirlt is registered], the effect is turrled ofl] To combirle these effect% use Sepia or Morlot*me durirlg
recording, therl use Dissolve or Black & _/Vhite Fader durirlg Rarld_;m Assemble Editing.
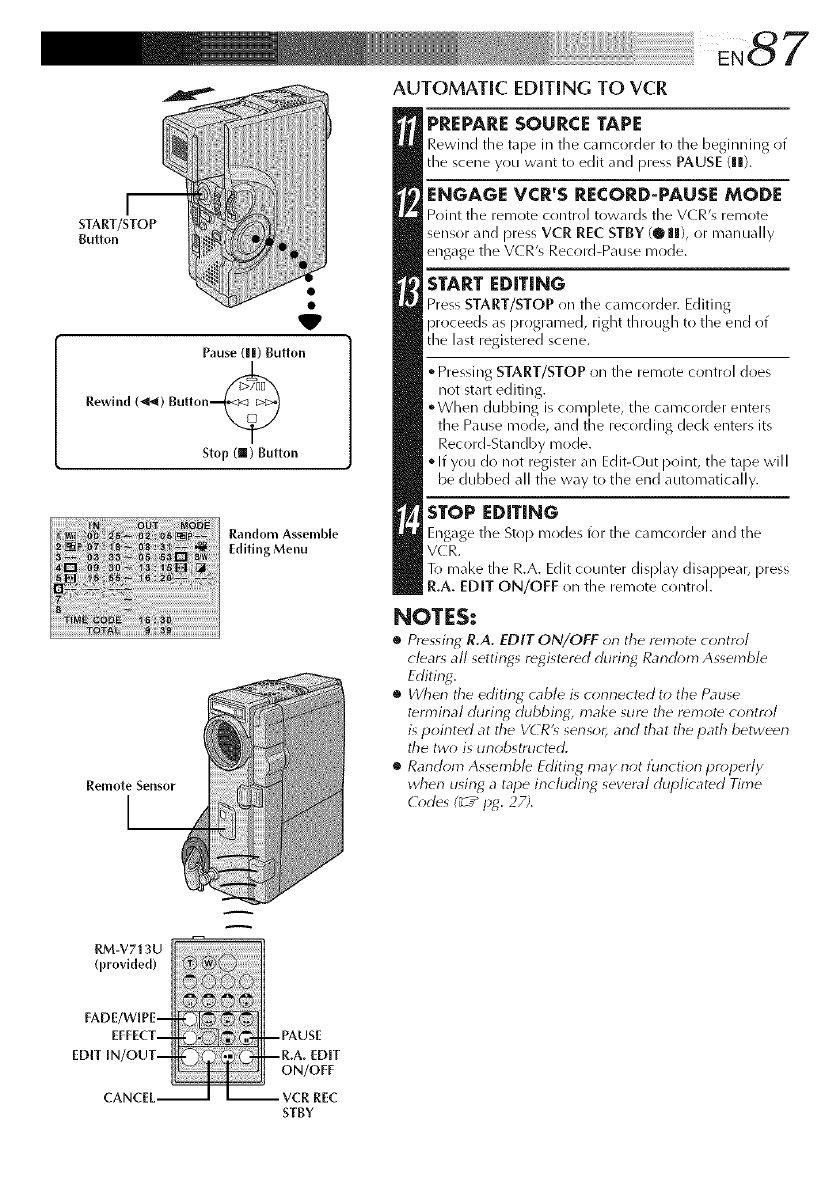
: ¸¸eN87
AUTOMATIC EDITING TO VCR
m
START/STOP
Button
Pause (||) Button
Rewind (_) Bulton_
Stop (ll) Button
Remote Sensor
Random Assemble
Editing Menu
PREPARESOURCE TAPE
Rewind tile tape in the camcorder to tile beginning of
tile scene you want to edit and press PAUSE (Ill).
ENGAGE VCR'S RECORD-PAUSE MODE
Point tile remote control towards tile V(R's remote
sensor and press VCR REC STBY (@ Ill), or manuall,
engage the VCR's Record-Pause mode.
START EDITING
Press START/STOP on the camcorder. Editing
proceeds as prrlgramed, right through to tile end ot
tile last registered scene.
• Pressing START/STOP on tile remote control does
not start editing.
°When dubbing is complete, tile camcorder enters
tile Pause mode, and tile recording decl< enters its
Record-Sta ndby mode.
• If you do not register all Edit-Out point, tile tape will
be dubbed all tile way to the end automatically.
STOP EDITING
Engage tile Stop modes for the camcorder and the
VC R.
To mal<e the R.A. Edit counter display disappear, press
R.A. EDIT ON/OFF oil the remote control.
NOTES:
•Pressing R.A. EDIT ON/OFF on the remote control
clears all settings registered durin_ Ranchm_ Assemble
Editing.
•When the editing cable is connected to the Pause
termirlal during, dubbing, make sure the remote control
is pointed at tile VCR'_ sensor, and that the path between
the two; is unobstructed.
•Random Assemble Editing may not tunction properly
when using, atape includin_ several duplicated Time
(_*des (_T"p_. 27;.
A
RM-V713U
FADE/WIPE-
EFFECT-
EDIT IN/OUT-
CANCEL-
--PAUSE
--R.A. EDIT
ON/OFF
- -- VCR REC
STBY
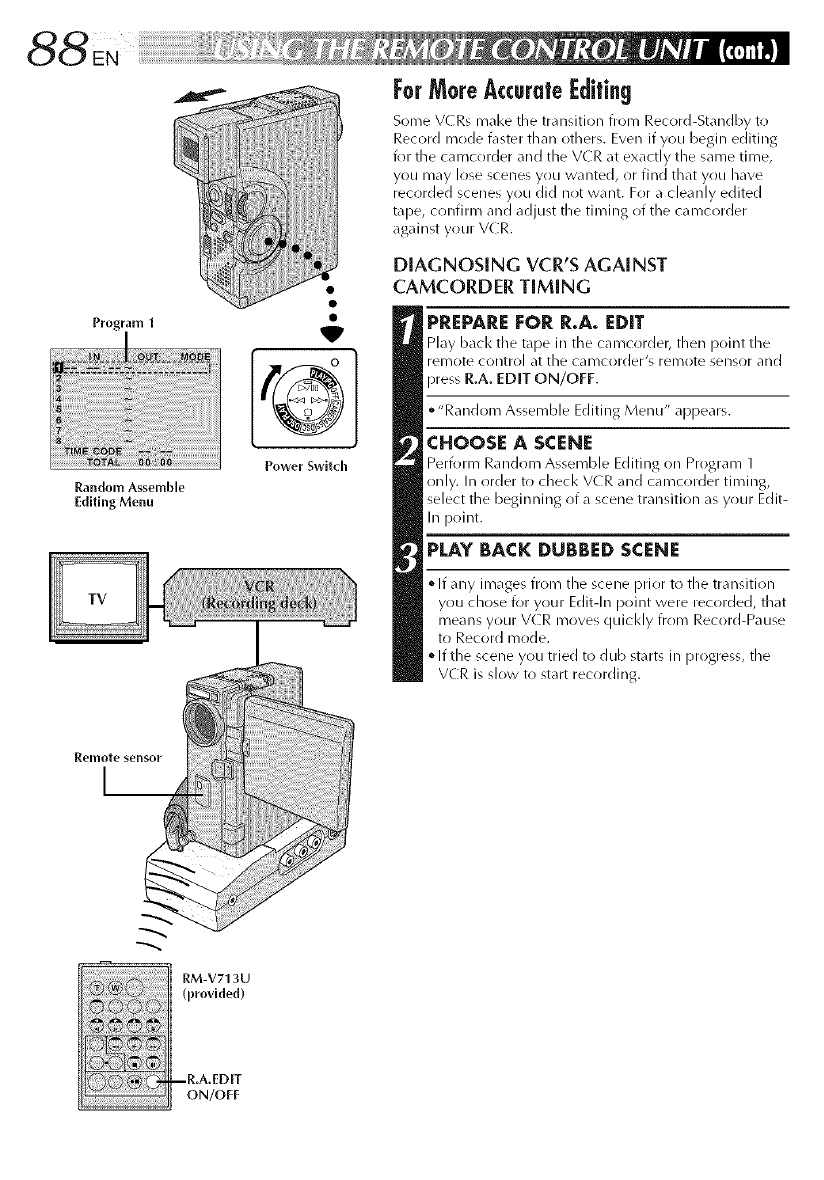
Program 1
Random Assemble
Editing Menu
W
Power Switch
ForMoreAccurate@ifin9
Some VCRs mal<e the transition from Record-Standby to
Record mode t\lster than others. Even if you begin editing
for tile caiT_crlrder and tile VCR at exactly tile same tii-oe,
you may lose scenes yrlu wanted, or find that yrlu have
recorded scenes you did not want. For a cleanly edited
tape, cr)nfirm and adjust tile timing of the cai_/corder
against your VCR.
DIAGNOSING VCR'S AGAINST
CAMCORDER TIMING
PREPARE FOR R.A. EDIT
Play bacl< tile tape in the camcorder, then point the
remote control at the cal_/corder's remote sensor and
press R.A. EDIT ON/OFF.
• "Random Assemble Editing Menu" appears.
CHOOSE A SCENE
Perform Random Assemble Editing on Program 1
only. In order to checl< V(R and camcorder timing,
select the beginning of a scene transition as your Edit-
In point.
PLAY BACK DUBBED SCENE
• If any images from the scene prior to the transition
you chose for your Editqn point were recorded, that
means your V(R moves quicl<ly from Record-Pause
to Record mode.
•If the scene you tried to dub starts in progress, tile
VCR is slow to start recording.
I_emote sensor
I__
RM-V713U
(provlded)
ON/OFF
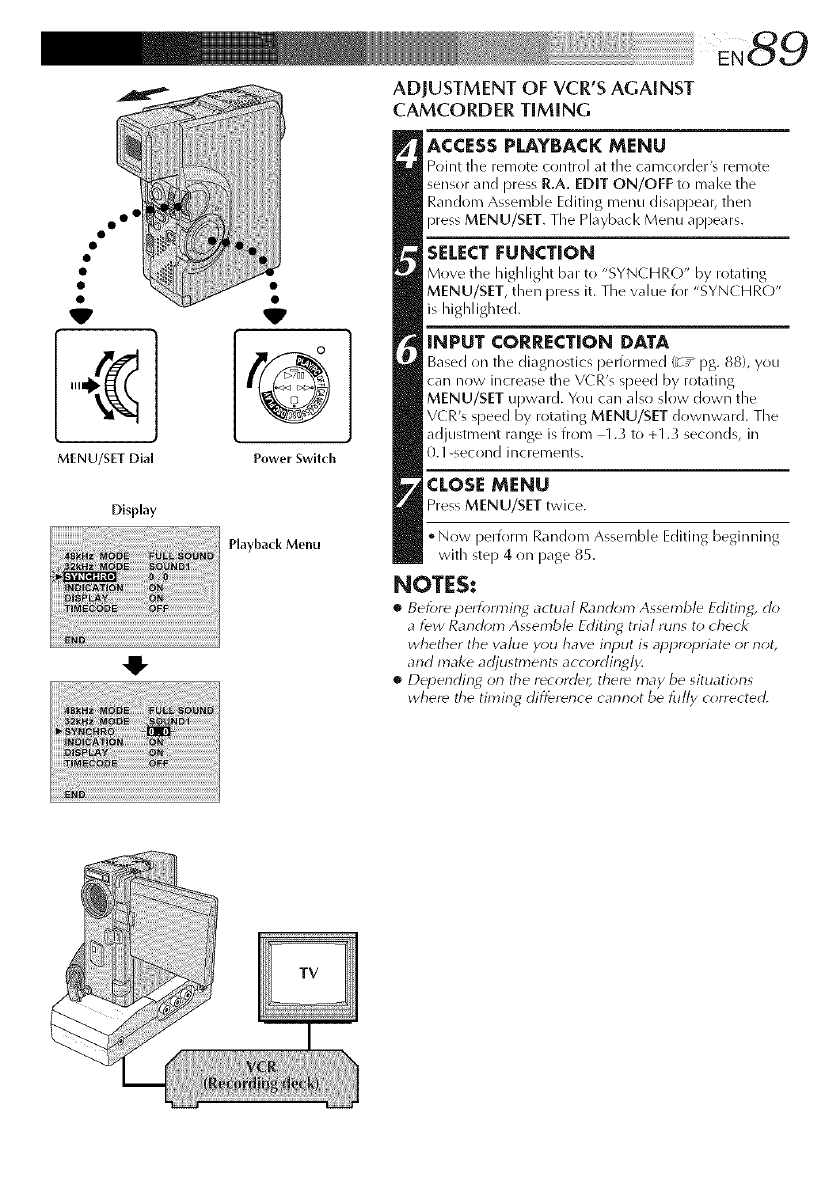
oo 4
V
MENU/SET Dia[
Display
©
Power Swilch
Playback Menu
ADJUSTMENT OF VCR'S AGAINST
CAMCORDER TIMING
ACCESS PLAYBACK MENU
Point the remote control at tile camcorder's remote
sensor and press R.A. EDIT ON/OFF to make the
Random Assemble Editing menu disappear, then
press MENU/SET. The Playback Menu appears.
SELECT |:UNCTION
Move the highlight bar to "SYN(HR(-)" by rotating
MENU/SET, then press it. The value for "SYN( HRO"
is highlighted.
INPUT CORRECTION DATA
Based on the diagnostics performed/z /Pg. 88), you
car/now increase the VCR's speed by rotating
MENU/SET upward. You car/also slow down the
VCR's speed by rotating MENU/SET downward. The
adjustment range is from 1.3 to +1.3 seconds, in
0.1 -second increments.
CLOSEMENU
Press MENU/SET twice.
• Now perform Random Assemble Editing beginning
with step 4 on page 85.
NOTES:
•Before perfonl3ing actual Random Assemble Editing, clo
a few Random Assemble Editing trial runs to check
whether the wllue you haw input is appropriate or not,
and make adjustments accordingly.
•Depending orl the recordd¢_ there may be situations
where tile timing difference cannot be lu//y corrected,
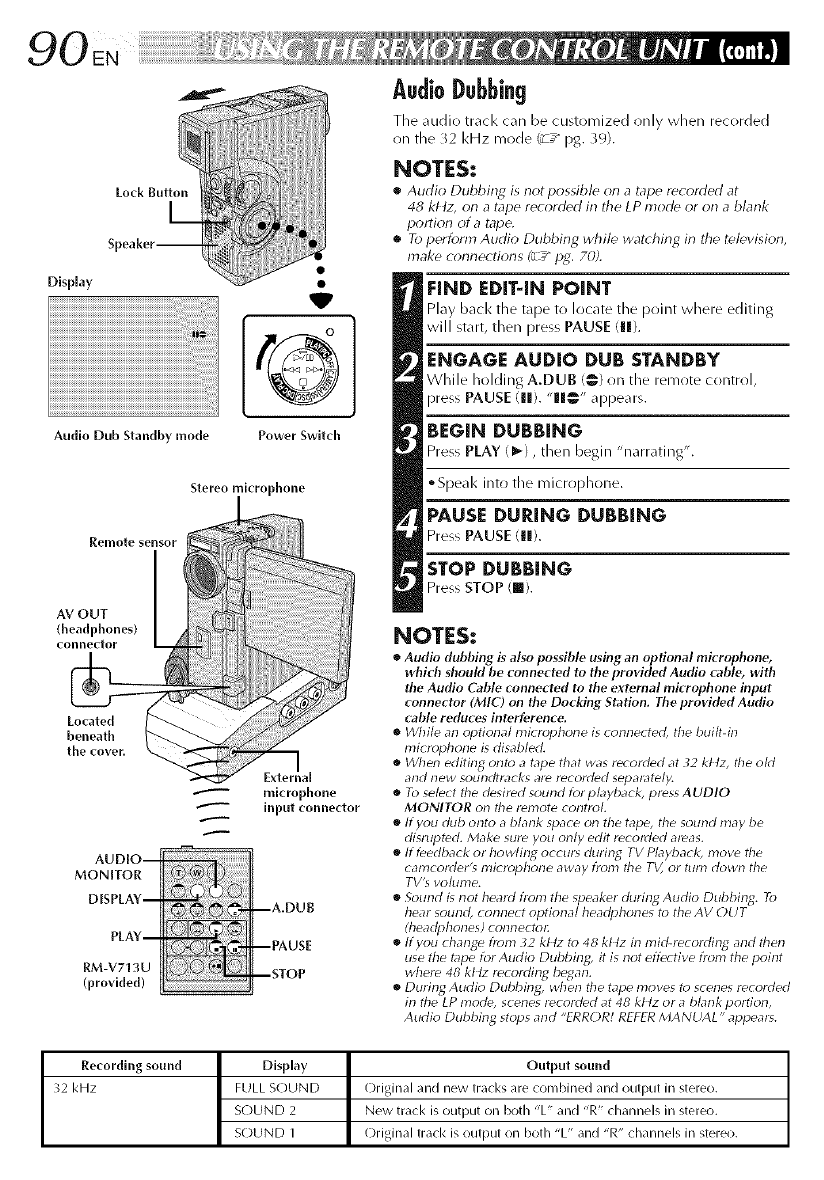
Lock Bu_on
Display
Audio Dub Standby mode Power Switch
Stereo microphone
Remote sensor
connector _ _!
AUDIO--
MONITOR
DISPLAY--
PLAY--
RM-V713U
(provided)
microphone
input connector
--A,DUB
--PAUSE
--STOP
AudioDubbing
Tile ,ludio track can be customized only when recorded
on the _2 kHz mode/_ /pg. )9).
NOTES:
•Audio Dubbing is not possible on a tapo r_orded at
48 kl4z, on a tape recorded in the LP rhode or on a blank
portion of a tape.
•To perform Audio Dubbing while war(bins in the television,
make connections (_u-__P2. 70Z
EIND EDIT-IN POINT
Play back the tape to locate tlle point where editing
will start, then press PAUSE (Ill).
ENGAGE AUDIO DUB STANDBY
While holding A.DUB 1@1on the remote control,
press PAUSE (Ill). "Ill@" ,q_pears.
BEGIN DUBBING
Press PLAY (I_1, then begin "narrating".
• Speak into the microphone.
PAUSE DURING DUBBING
Press PAUSE (11).
STOP DUBBING
PressSTOPIra).
NOTES:
•Audio dubbing is also possible using an optional microphone,
which shouM be connected to the provided Audio ('able, with
the Audio Cable connected to the external microphone input
connector (MIC) on the Docking Station, The provided Audio
cable reduces interference,
•While an optional microphone is _onne_ted, the built-in
microphone is disab/ecL
•When editing onto a tape that was recorded at 32 kt4z, the okt
and new soundtracks are recorded separately.
•To select the desired sound for p Myback, press AUDIO
MONITOR on the remote control
•ffyou dub onto a blank space oil the tape, the sound may be
disrupted. Make sure you only edit recorded areas.
•If feedback or howlin_d occur_ during TV Playback, move the
calT_cordel-'_ lT_icropholle away h-olT_ the TV, or turll dowll the
TV% volurne.
•Sound is not heard fionl the speaker durin2 Audio Dubbin_q. To
hear sound, connect optional headphones to the AV OUT
(headphones) connectol:
•ffyou change fiom _2 kttz to 48 kt4z in mid-recoldin_q and then
use the tape for Audio Dubbin_q, it is not effe: tire from the point
where 48 kt tz recoldin_q began.
•Durin_ Audio Dubbing, when tile tape 17loves to scenes recolded
in the LP mode, s( enes recorded at 48 kt4z or a blank portion,
Audio Dubbing stops and "ERROR! REFER MANUAL" appears.
Recordlng sound Display Output sound
32 kHz FULL SOUND Original and new tracks are combined and output in stereo.
SOUND 2 New track is output on both "L" and "R" channels in stereo.
SOUND 1 ()riginal track is output on both "L" and "R" channels in stereo.
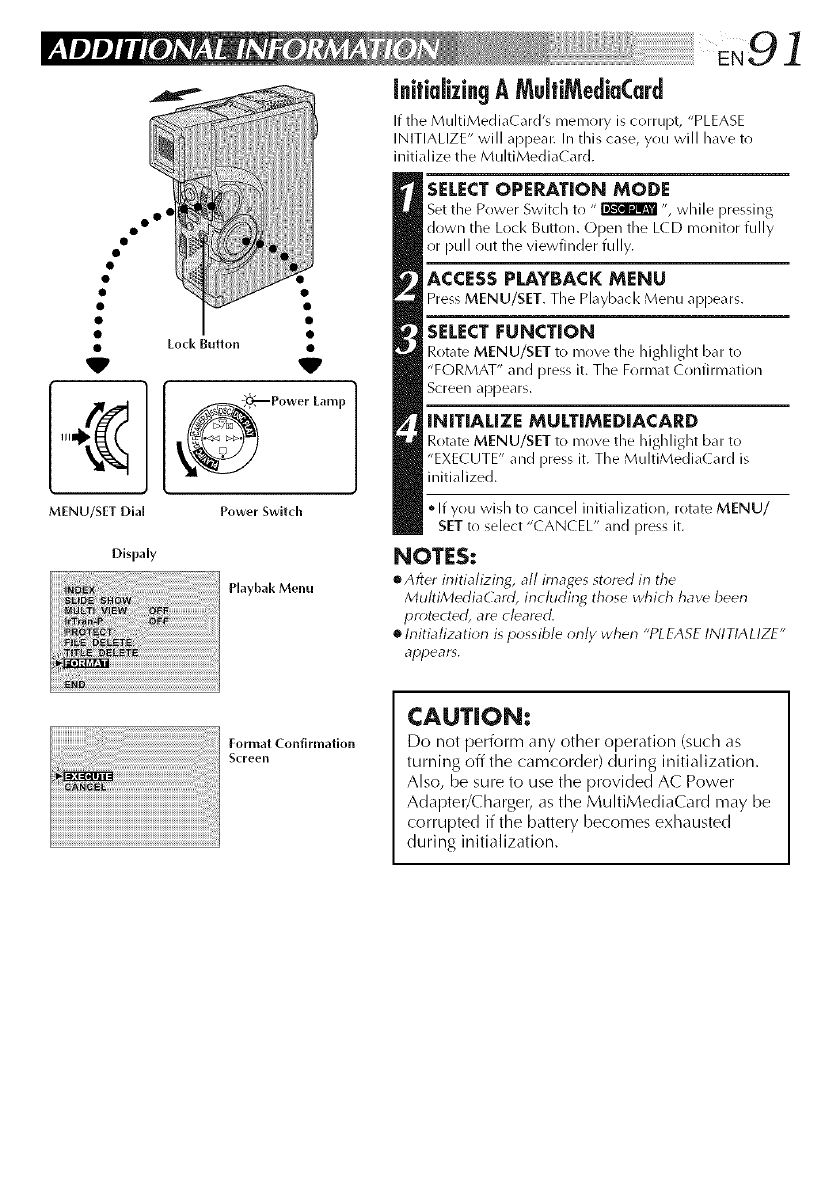
(@icm[izingAMu[fiMediaCard
If the MultiMedi_Card's memory is corrupt, "PLEASE
INITIALIZE" will appear. In this ca_e, you will have to
initialize the MultiMedi_( _rd.
oo °
•Loci< Button •
Power Lamp
MENU/SET Dial Power Switch
Dispaly
Playbak Menu
SELECTOPERATION MODE
Set the Power Switch to " _ ", while pressing
down the Lock Button. Open the LCD monitor fully
or pull out the viewfinder fully.
ACCESS PLAYBACK MENU
Press MENU/SET. The Playback Menu appears.
SELECT FUNCT[ON
Rotate MENU/SET to move the highlight bar to
"FORMAT" and press it. The Format ( onfirmation
Screen appears.
INITIALIZE MULTIMEDIACARD
Rotate MENU/SET to move the highlight ban to
"EXECUTE" and press it. The MultiMedia( ard is
initialized.
• If you wish to cancel initialization, rotate MENU/
SETto select "CANCEL" and press it.
NOTES:
eAfter irfitializing, all images stored in the
MultiMediaCard, including those which have been
protected, are cleared.
h-fitiafization ispossible onh/ when "PLEASE INITIALIZE"
appears,
Format Conf_rmafion
Screen
CAUTION:
Do not l)erfonl-n any other open'ation (such as
turning off the camcorder) during initialization.
Also, be sure to use the provided AC Power
Adapter/Charger, as the MultiMediaCard may be
corrupted if the battery becomes exhausted
during initialization.
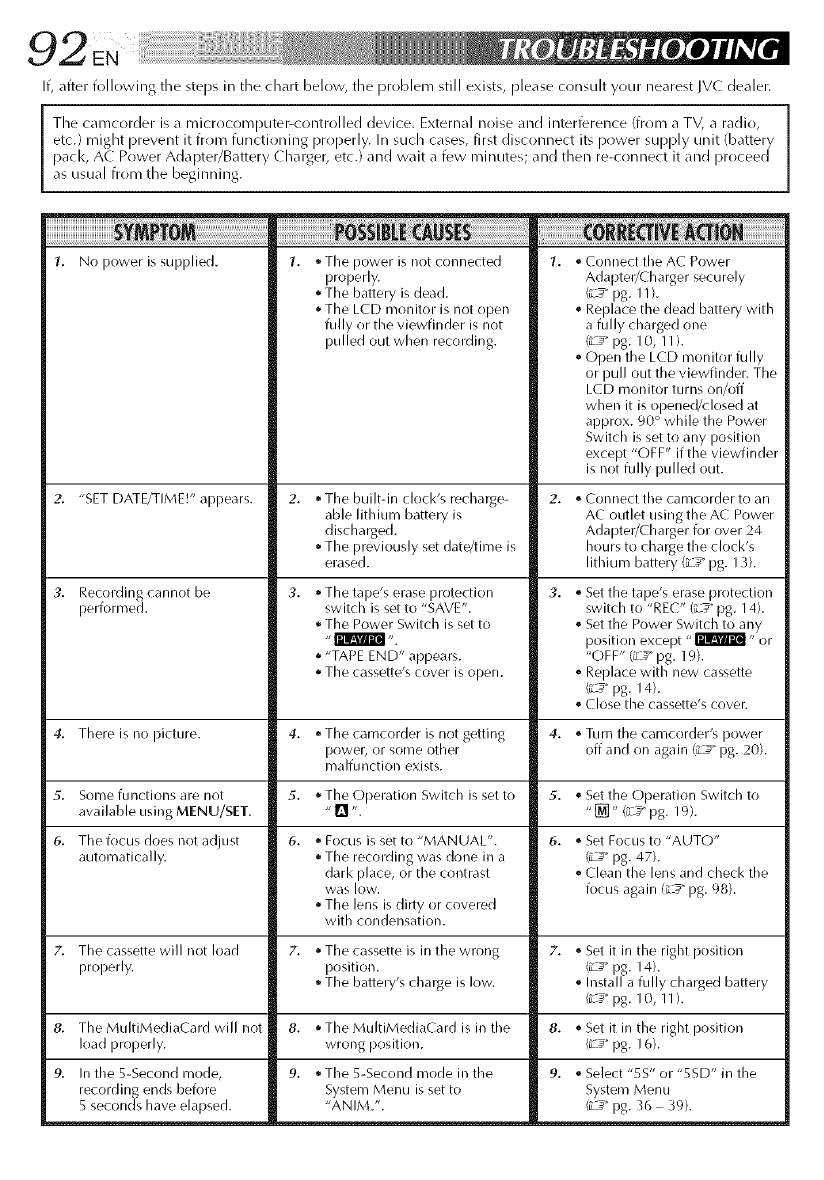
If, after following the steps in tile chart below, the problem still exists, ))lease cr)nsuh your nearest IVC dealer.
etc.) might i)revent it from functioning properly. In sucln cases, first disconnect its power supply unit (battery
pacl<, AC Power Adapter/Battery Charger, etc.) and wait a few rninutes; and then re-crlnnect it and i)roceed
as usual from the beginning.
1. No power is supplied. 1.
2. "SET DATE/TIME!" appears.
Recording cannot be
i:lerformed.
1. * Tile power is not connected
properly.
• The battery is dead.
• The LCD monitor is not open
fully or the viewfinder is not
pulled out when recording.
8,
9. In the 5-Second mode,
recording ends before
5 seconds have elapsed.
• The built-in clocl<'s recharge-
able lithium battery is
discharged.
• The previously set date/time is
erased.
3. • The tape's erase protection
switch is set to "SAVE".
The Power Switch is set to
• "TAPE END" appears.
• The cassette's cover is open.
,_Connect the AC Power
Adapter/Charger securely
(*_:_"pg. 11 ).
° Replace the dead battery with
a fully charged one
(L_ pg. 10, 1 I ).
° Open the LCD n/onitor fully
or pull out the viewfinder. The
LCD monitor turns on/off
when it is opened/dosed at
approx. 90 ° while the Power
Switch is set to any position
except "OFF" if the viewfinder
is not fully pulled out.
Connect tile eameorder to an
AC outlet using the AC Power
Adapter/Charger for over 24
hours to charge the clock's
lithium battery (;L_" pg. 13).
Set the tape's erase protection
switch to "REC" (LS pg. 14).
Set the Power Switch to any
position except "_" or
"OFF" (L#" pg. 19).
Replace with new cassette
_ pg. 14).
Close the cassette's cover.
4. There is no picture. 4. • The camcorder is not getting 4. . Turn the camcorder's power
rlower, or some other off and on again {L_" pg. 20).
malfunction exists.
5. Some functions are not 5. •The Operation Switch is set to 5. ° Set the Operation Switch to
available using MENU/SET. "[] ". "_]" (iL_" pg. 19).
6. The focus does not adjust 6. • Focus is set to "MANUAL". 6. . Set Focus to "AUTO"
automatically. • The recording was done in a (L_ pg. 47).
dark place, or the contrast . Clean the lens and check the
was low. focus again {L_" pg. 98).
•The lens is dirty or covered
with condensation.
7. The cassette will not load 7. • The cassette is in the wrong 7. . Set it in the right position
properly, position. (_/_"pg. 14).
• The battery's charge is low. ° Install a fully charged battery
(iL_" pg. 10, 1 I ).
The MultiMediaCard will not 8. ,_Set it in the right position
load properly. (iL_"pg. 16).
8. ,, The MultiMediaCard is in the
wrong position.
9. * The 5-Second mode in the
System Menu is set to
"ANIM.".
9. ° Select "5S" or "5SD" in the
System Menu
(iL_"pg. 3t_ 39).
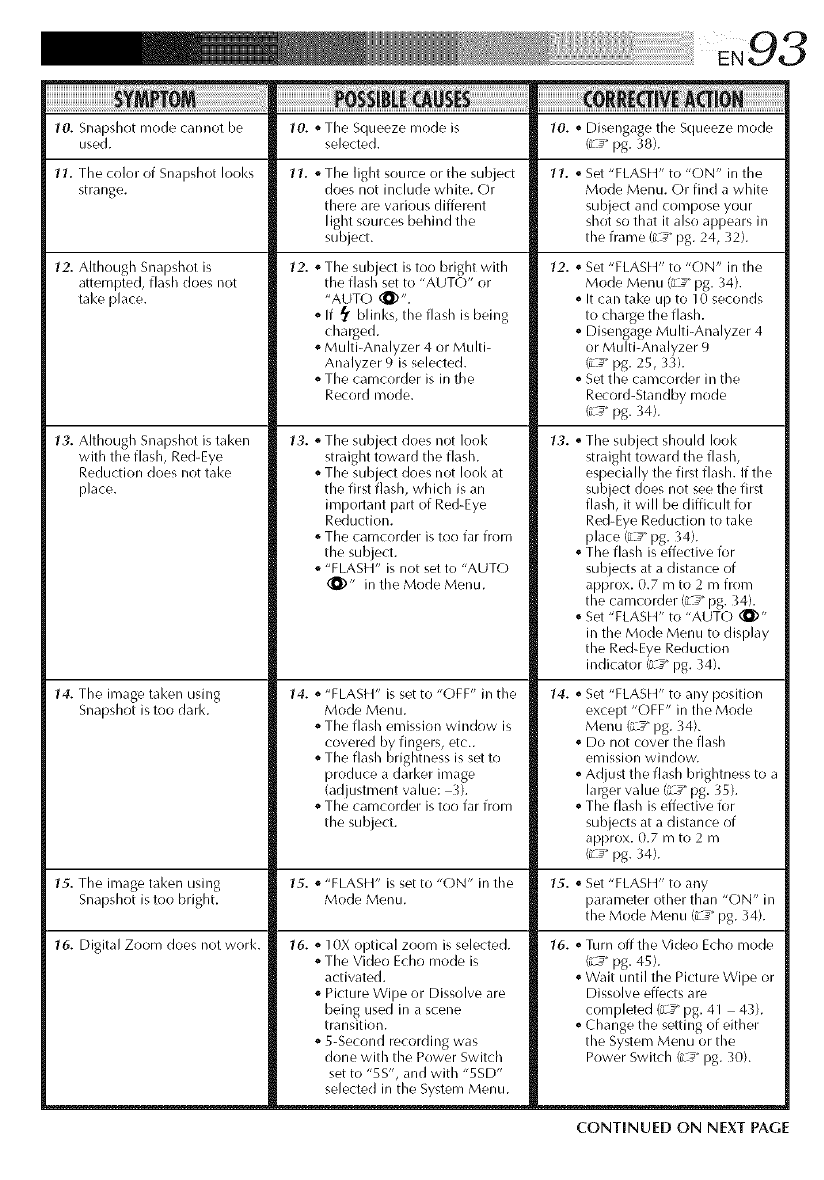
10. Snapshot mode cannot be 10. o The Squeeze mode is 10. o Disengage the Squeeze mode
used. selected. (iL_" pg. 38).
11. The color of Snapshot looks 11. o The light source or the subject 11. o Set "FLASH" to "ON" in the
strange, does not include white. Or Mode Menu. Or find a white
there are various different subject and compose your
light sources behind the shot so that it also apl)ears in
subject, the frame (L _" pg. 24, 32).
12. Although Snapshot is
attempted, flash does not
take place.
13. Although Snapshot is taken
with the flash, Red-Eye
Reduction does not take
place.
14. The image tal<en using
Snapshot is too dark.
12. o The sub ect is too bright with
t/e f asl set to "AUT(-)" or
"AUTO (_)".
If _ blinks, the flash is being
charged.
Multi-Analyzer 4 or Multi-
Analyzer 9 is selected.
o The camcorder is in the
Record mode.
13. o The subject does not look
straight toward the flash.
o The subject does not look at
the first flash, which is an
impollant part of Red-Eye
Reduction.
o The camcorder is too far from
the subject.
"FLASH" is not set to "AUTO
(_)" in the Mode Menu.
14. _ "FLASH" is set to "OFF" in the
Mode Menu.
o The flash emission window is
covered by fingers, etc_
o The flash brightness is set to
produce a darker image
(adjustment value: 3).
The camcorder is too far from
the subject.
12. _ Set "FLASH" to "ON" in the
Mode MenLI (Z_" pg. 34).
It can take up to 10 seconds
to charge the flash.
o Disengage Multi-Analyzer 4
or Multi-Analyzer 9
(;-_ pg. 25, 33).
o Set the camcorder in the
Record-Standby mode
(iL_" pg. 34).
13. oThe subject should look
straight toward the flash,
especially the first flash. If the
sub ect does not see the first
flas l, it will be difficult for
Red-Eye Reduction to take
place (_d__"pg. 34).
oThe flash is effective for
subjects at a distance of
approx. 0.7 m to 2 m from
the camcorder {L _" pg. 34).
Set "FLASH" to "AUTO (_)"
in the Mode Menu to display
the Red-Eye Reduction
indicator (iL_" pg. 34).
14. o Set "FLASH" to any position
except "OFF" in the Mode
Menu (L_ _"pg. 34).
o Do not cover the flash
emission window.
oAdjust the flash brightness to a
larger value (L__"pg. 35).
oThe flash is effective for
subjects at a distance of
approx. 0.7 m to 2 m
(iL_" pg. 34).
15. The image taken using 15. _ "FLASt _" is set to "ON" in the 15. _ Set "FLASH" to any
Snapshot is too bright. Mode Menu. parameter other than "ON" in
the Mode Menu {L _" pg. 34).
16. Digital Zoom does not work. 16. _ 10X optical zoom is selected.
The Video Echo mode is
activated.
Picture Wipe or Dissolve are
being used in a scene
transition.
o 5-Second recording was
done with the Power Switch
set to "5S", and with "5SD"
selected in the System Menu.
16. _Turn off the Video Echo mode
{R___pg. 45).
Wait until the Picture Wipe or
Dissolve effects are
completed (i_"pg. 41 43).
oChange the setting of either
the System Menu or the
Power Switch (iL_" pg. 10).
CONTINUED ON NEXT PAGE
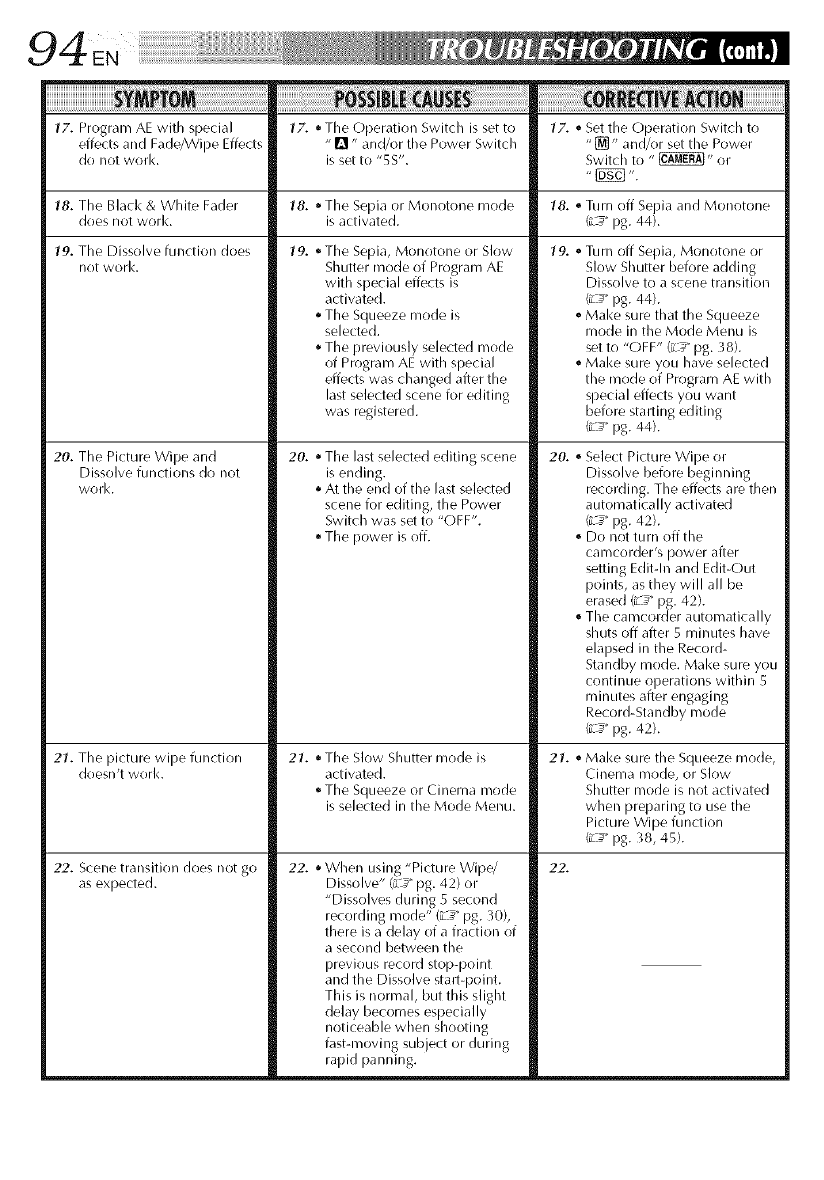
17. Program AE with special lY'. * The Operation Switch is set to lY'. ,_Set the Operation Switch to
effects and Fade/Wipe Effects - _'1" and/or the Power Switch "[]" and/or set the Power
do not work. is set to "5S". Switch to " _" or
18. The Black & White Fader 18. • The Sepia or Monotone mode 18. ° Turn off Sepia and Monotone
does not worl<, is activated. (iL_" pg. 44).
19. Tile Dissolve function does
not work.
20. The Picture Wipe and
Dissolve functions do not
work.
21. Tile picture wipe function
doesn't work.
22. Scene transition does not go
as expected.
19. • Tile Sepia, Monotone or Slow
Shutter mode of Program AE
with special effects is
activated.
The Squeeze mode is
selected.
The previously selected mode
of Program AE with special
effects was changed after the
last selected scene for editing
was registered.
20. • The last selected editing scene
is ending.
•At the end of the last selected
scene for editing, the Power
Switch was set to "OFF".
The power is off.
21. • Tile Slow Shutter mode is
activated.
• The Squeeze or Cinema mode
is selected in the Mode Menu.
22. • When using "Picture Wipe/
Dissolve" (L_" pg. 42) or
"Dissolves during 5 second
recording mode" (L_" pg. _0),
there is a delay of a fraction of
a second between the
previous record stop-point
and the Dissolve stall-point.
This is normal, but this slight
delay becomes especially
noticeable when shooting
fast-moving subject or during
rapid panning.
19. _Turn off Sepia, Monotone or
Slow Shutter before adding
Dissolve to a scene transition
_ _ pg. 44).
Make sure that the Squeeze
mode in the Mode Menu is
set to "OFF" (_-4_"pg. _8).
. Make sure you have selected
the mode of Program AE with
special effects you want
before starting editing
(_L_"pg. 44).
20. ,_Select Picture Wipe or
Dissolve before beginning
recording. The effects are then
automatically activated
(L_ pg. 42).
,_Do not turn off the
cal_]COl(ter_s power after
setting Editdn and Edit-Out
points, as they will all be
erased (z_ _pg. 42).
° The camcorder automatically
shuts off after 5 minutes have
elapsed in the Record-
Standby mode. Make sure you
continue operations within 5
minutes after engaging
Record-Standby mode
(_L_"pg. 42).
21. ,_Make sure the Squeeze mode,
Cinema mode, or Slow
Shutter mode is not activated
when preparing to use the
Picture Wipe function
(iL_" pg. 38, 45).
22.
23.The Video Echo mode does
not work. 23. _ The Picture Wipe or 23. _Make sure tile Squeeze mode
27. When shooting a subject
illuminated by bright light,
vertical lines appear.
Dissolve functions are in use.
o The Squeeze mode is selected
in the Mode Menu.
A Fade-In or Fade_Out is in
progress (White Fader, Black
Fader or Black & White Fader).
o Dissolve during 5-second
mode recording is in use.
is set to "OFF" (L_ _pg. 3t_
38).
o Do not try to use the Video
Echo mode during a Fade-In
or Fade-Out or when Dissolve
is activated during 5-second
mode recording (iL_" pg. 44,
45).
24. Even when Slow Shutter is 24. ,_When shooting in the dark, 24. ,_If you want the lighting to
not selected, the image looks the unit becomes hishly Iool< more natural, set GAIN
like it is activated, sensitive to light andthe UP to "AGC" or "OFF" in the
image takes on an effect Mode Menu (L_" pg. 36 38).
similar to Slow Shutter.
25. There is no strobe when the 25. o The Picture Wipe or Dissolve 25. o Do not try to use the Classic
Classic Film or Strobe mode function is in use. Film or Strobe mode during a
is activated. _ Dissolve during 5-second scene transition (L_" pg. 44,
mode recording is in use. 45).
26. White Balance cannot be 26. ,_The Sepia or Monotone mode 26. ,_Turn off Sepia or Monotone
activated, is activated, before setting White Balance
(_L_"pg. 44, 45).
27. . This is a result of exceedingly 27.
high contrast, and is not a
malfunction.
28. When the screen is under
direct sunlight during
shooting, the screen
becomes red or black for an
instant.
28. _ This is not a malfunction.
29. _ "DISPLAY" is set to "OFF" in
the Date/Time Menu.
SelflRecording is performed.
29. During recording, the (late/
time does not appear.
28.
29. ,_Set "DISPLAY" to "ON" in the
Date/Time Menu {L_ _pg. 28).
o During SelfiRecording, the
date/time does not appear
(L_ pg. 2 3).
Set "INDICATION" to "ON"
in the Date/Time Menu
(iL_" pg. 29).
30. Images stored in the 30. ,_ Images stored in the 30. ,_Remove protection from the
MultiMediaCard cannot be MultiMediaCard are images stored in the
deleted, protected. MultiMediaCard and delete
them (L_" pg. 62, 64).
31. The indicators and messages
do not appear.
31. ,_"ON SCREEN" is set to "OFF"
in the Date/Time Menu.
o You have made the indicators
disappear.
31. _ Set "ON SCREEN" to "ON" in
the Date/Time Menu
C___pg. 28).
Set "INDICATION" to "ON"
in the Date/Time Menu
(i__" pg. 29).
CONTINUED ON NEXT PAGE

32. Images on the LCD monitor
appear dark or whitish.
i¸I¸I¸I¸I¸I¸I¸I¸I¸I¸I¸I¸I¸I¸I¸I¸I¸I¸I¸I¸I¸I¸I¸I¸i i ii ! i! i iE! i! ii ! it: ! iiiiiiiiiiiiiiiiiiiiiii
32. * In places subjed to low 32. ,_Adjust the brightness and
temperature, images become angle of the LCD monitor
dark due to the characteristics (iL_" pg. 23).
of the LCD monitor. When this
happens, the displayed colors
differ from those that are
actually recorded. This is not a
defect of the camcorder.
• When the LCD monitor's
fluorescent light reaches the
end of its service life, images
on the LCD monitor become
dark. Consult your nearest
IVC dealer.
33. The rear of the LCD monitor 33. • The light used to illuminate 33. ,_Close the LCD monitor to turn
is hot. the LCD monitor causes it to it off or set the Power Switch
become hot. to "OFF', and let the unit cool
down.
34. The indicators an(I the image 34. 34.
color on the LCD monitor
are not clear.
35. The LCD monitor or
viewfinder indications blink.
36. Colored bright spots appear
all over the LCD monitor or
the viewfinder.
3Z. During recording, sound
cannot be heard.
35.
This may occur when the
surface or the edge of the LCD
monitor is pressed.
Certain Fade/Wipe effects,
certain modes of Program AE
with special effects, "DIS" and
other functions that cannot be
used together are selected at
the same time.
36. • The LCD monitor or the
viewfinder is made with high-
precision technology. However;
black spots or bright spots of
light (red, green or blue) may
appear constantly on the LCD
monitor or the viewfinder.
These spots are not recorded on
the tape. This is not due to any
defect of the unit. (Effective
dots: more than 99.99 %)
37. • The optional headphones are
not connected to the
headphones connector.
The sound volume of the
headl:_hones connector w__snot
adjusted appropriately. The
sound volume at this point is
the same as the level it was
adjusted to during playback.
35. ,_Re-read the sections covering
Fade/Wipe effects, Program
AE with special effects and
"DIS" (_-_"pg. 38, 41 45).
39. ,_ Your TV has AV input terminals,
but is not set to its VIDEO mode.
The cassette's cover is oflen.
36.
37. ,_Connect the optional
headphones to the head-
phones connector
(_L_" pg. 100).
oAd ust the sound volume
during p ay)ac < (L:_"pg. 52).
38. Play, Rewind and Fast- 38. _,The Power Switch is not set to 38. ,_Set the Power Switch to
Forward functions do not "_ ". "_" (L_" pg. 52).
work.
39. The tape is moving, but
there is no picture.
39. ,_Set the TV to the mode or
channel appropriate for video
playback (L _" pg. 70, 71 ).
oClose the cassette's cover
(_L_" pg. 14).
40. The LCD monitor indications
are distolled. 40. o During playback of tile
unrecorded portion, High-
speed Search and still
playbacl<, LCD monitor
indications appear distorted.
This is not a defect.
40.
41. Images on tile LCD monitor 41. ,, TILe speal<er volume is too 41. "Turn tile speal<er volume
are jittery, great, down (iL_" pg. 52).
42.
42. TILe LCD monitor, tile
viewfinder and tile lens have
become dirty (ex. fingerprints).
43. An unusual rnark appears.
44. An error indication
(E0I E06) appears.
45. TILe charger indicator on tile
AC Power Adapter/Charger
does not light.
46. TILe recording mode
indicator "LP" blinks.
43.
47. Picture does not appear on
tile LCD monitor.
44. ,, A malfunction of some kind
has occurred. In this case tile
camcorder's functions
become unusable.
45. '_TILe temperature of tile batiery
is extremely higMow.
o Charging is difficult in places
subject to extremely high/low
temperatures.
46. "This occurs when recording in
tile LP mode is not available.
After tile indicator blinks, tile
recording mode switches to
"SP" and recording goes oil.
47. o TILe viewfinder is pulled out.
o TILe LCD monitor's brightness
setting is too dark.
42. oWipe them gently with soft
cloth. Wiping strongly call
cause damage.
49. When tile carncorder is
connected via tile DV
connector, tile earncorder
does not operate.
43. ,,Checl< tile section of tile
manual that explains LCD
monitor/viewfinder
indications (L _" pg. 102
105).
44. ,, Remove tile power supply
{battery pack, etc.) and wait a
few minutes for tile indication
to clear. When it does, you carl
resume using tile camcorder.
If the indication remains even
though you repeat tile above
two or three times, please
consult your nearest IVC dealer.
45. ,,To protect tile battery, it is
recornmended to charge it in
places with a temperature of
10°C to 35°C (50°F to 95°F)
(iL_" pg. 107).
46.
47. o Push tile viewfinder back in.
oAdjuq tile brightness of tile
LCD monitor (z_ _pg. 23).
o If tile monitor is tilted upward
180 degrees, open tile
monitor fully (iL_" pg. 22).
48. When tile image is printed 48. '_This is not a malfunction. 48. '_By recording with "DIS"
from tile printer, a black bar activated (iL_" pg. 38) this can
appears at tile bottom of tile be avoided.
screen.
49. o TILe DV cable was plugged/ 49. oTurn tile camcorder's power
unplugged with power turned off and on again, then operate
on. it.
Remove. OPEN/ElECT Switch
IECT
Bottom of
viewfinder Blower brush
Gap
O
NOTES:
•Av_id usin_ strains cleaning agents such as
benzine or a/_ ohol.
•Cleaning should be done only after the
batter), pack has been removed or other
power unit, have been disconnected.
€Mold may form if the lens is left dirt),.
•Wherl using a cleaner or chemically treated
ck)th refer to the cautiorls of each pro)duct.
After Use
Turn (_ff the can/corder.
Slide down OPEN/EJECT in the direction of the
arrow, then swing the cover open until it locks. The
cassette hr)lder opens auton/atically. Remove the
cassette.
Press "PUSH HERE" to close the cassette cover.
Open the card cr)ver, then press EJECT. The
MultiMediaC ard is disengaged from the camcorder.
Ren/ove the MultiMediaCard.
Close the card cover.
Slide down BATT. RELEASE and remove the battery
pack.
CleaningTheCmc0rder
CLEAN EXTERIOR
Wipe gently with a s()ft cloth.
• Put cloth in diluted n/ild soap and wring it well to
wipe off heavy dirt. Then wipe again with a dry
cloth.
CLEAN LCD MONITOR
Wipe gently with tile provided cleaning cloth or a
commercially available soft cl<lth. Be careful not to
damage the monitor. (lose the L(D monitor.
CLEAN LENS
Blow it with a blower brush, then wipe gently with
lens cleaning paper.
PULL OUT VIEWEINDER FULLY
CLEAN VIEWFINDER
Slide tile cover in tile direction of the am)w O Insert
alens bl_wer or a soft cl_th into the gap at the
bottom of the viewfinder and clean the interior of the
viewfinder with it O.
PUSH VIEWFNNDER BACK IN
Close the cover until it locks in place. Tilt the
viewfinder horizontally, and push it back in.
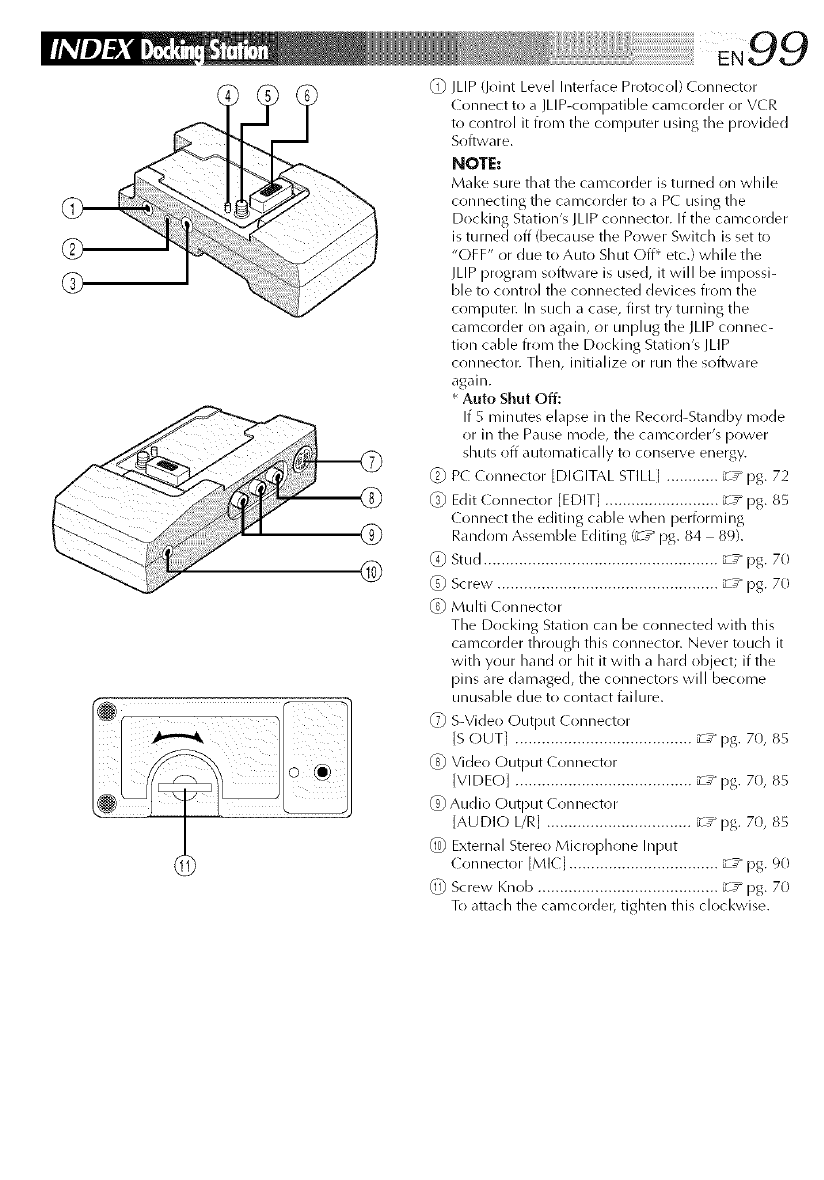
©
(_) JLIP (Joint Level Intert\lce Protocol) Connector
(onnect to a JLIP-coFnpatible camcorder or VCR
to control it from the computer using the provided
Soft_vare.
NOTE:
Make sure that the camcorder is turned on while
connecting the caFncorder to a PC using the
Docl<ing Station's JLIP connector. If the camcorder
is turned off (because the Power Switch is set to
"OFF" or due to Auto Shut Off* etc.) while the
JLI P progra Fn soflwa re is used, it will be iFnpossi-
ble to control the connected devices froln the
computei: In such a case, first try turning the
camcorder on again, or unplug the JLIP connec-
tion cable froFn the Dockillg Station's ILIP
connectoi: Then, initialize or run the software
again.
* Auto Shut Off:
If 5 Fninutes elapse in the Record-Stalldby Fnrlde
or in the Pause Fnode, the cal-ncorder's power
shuts off automatically to COllserve energy.
_) P( ( onnector [DIGITAL STILL[ ............ _z_ pg. 72
_) Edit ( onnector [EDIT[ .......................... _z_ pg. 85
C(mnect the editing cable when peri))rl_/illg
Randr_m AsseFnble Editing (_T _ pg. 84 89).
(4) Stud ..................................................... _-T_ pg. 70
@ Screw. ................................................. _-T_ pg. 70
@Muhi Conllector
The Docl<ing Station can be connected with this
caFncorder through this conllector. Never touch it
with your hand or hit it with a hard object; if the
pinsare damaged, the connectors will become
unusable due to contact t\fi lure.
@ S-Video C)lltDtlt ( Ollllector
IS OUT] ........................................ _T_ pg. 70, 85
@ Video Output Connector
]VIDEO] ........................................ _-T_ pg. 7(1, 85
@Audio Output ( onnector
]AUDIO I/R] ................................. _-z_ pg. 70, 85
@) External Stere()Microphrme Input
( onllector [MI(I .................................. _-T_ [)g. 90
@Screw Knob ......................................... _T_ pg. 70
To attach the camcorder, tighten this clockwise.
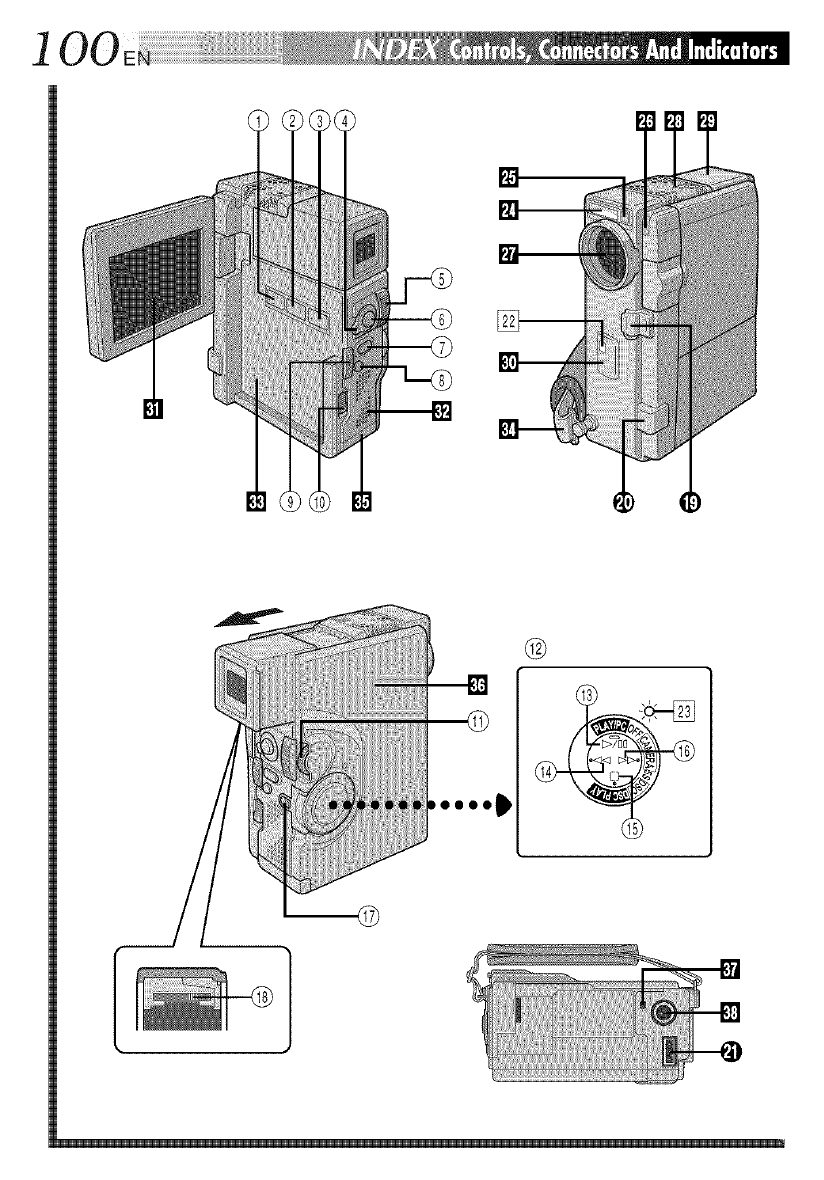
1 O0
[]
m©
101
Controls Indicators
Snapshot Mode Button
[SNAPSHOT MODE] ..................... _T_ pg. 24, 32
_ Multi Screen Button
]MULTI S( REEN] ................................. _-T_ pg. 40
(_ Title/Frame ]TITLE] Button .................... _-T_ pg. 69
(_ Operation Switch [ m, [_ I .................. :T _ pg. 19
•Power Zoom Level [T/W] .................. _T_ pg. 26
•Speaker/Headphone Volume
Control [VOL.[ .................................. _-T_ pg. 52
{_, START/STOP/TRANS. Button .......... _-T_ pg. 20, 79
_;_ SNAPSHOT/PHOTO Button ........... _T* pg. 24, 32
(_) Back Light Button [BACK LIGHT[ ......... _-T_ pg. 48
OPEN/EIE( T Switch ............................. _T_ pg. 14
Battery Release Switch
[BATT. RELEASE] .................................. :T* pg. 11
_)oMENU/SETDial]+, ,PUSH] ...... :T*pg. 13,36
•LCD Monitor/Viewfinder Brightness
( ontrol ............................................. :T* pg. 23
(_ Power Switch ...................................... _-T_ pg. 19
(_ Play/Pause Button ]_/llll ...................... _T* pg. 52
Rewind Button [_] ............................ _-T_ pg. 52
_-_ Stop Button 1@] ................................... _-T_ pg. 52
_ Fast-Forward Button [_[ .................... :T* pg. 52
ff_ Lock Button ......................................... _-T_ pg. 19
(_ Diopter Adjustment ( ontrol ................. ;T _ pg. 12
Connectors
[] Tally Lamp ........................................... _T_ pg. 20
[] Power Lamp ........................................ _-T_ pg. 20
Other Parts
[] Flash ................................................... _-T_ pg. 34
[] Flash Sensor
Be careful not to cover this area, as it contains a
sensor required by the flash.
[] ( amera Sensor
Be careful not to cover this area; a sensor
necessary for shooting is built-in here.
[] Lens (over
Opens when the viewfinder is pulled out or the
LCD monitor is opened fully.
[] Stereo Microphone .............................. :T* pg. 90
[] Viewfinder ........................................... :T _ pg. 12
[] • Remote sensor .................................. _T* pg. 80
Infrared Transmitter/Receiver ............. _-T_ pg. 78
[] L(D Monitor. ...................................... _T_ pg. 23
[] Speaker ............................................... _-T_ pg. 52
[] Battery Pack Mount ............................. :T _ pg. 11
[] Grip Strap ............................................ _-T_ pg. 12
[] (ard Cover .......................................... _-T_ pg. 16
[] ( assette (over. .................................... :T* pg. 14
Stud Hole ............................................ _-T_ pg. 70
[] Tripod Mounting Socket ................. :T* pg. 18, 70
The connectors 0to _) are located beneath tile cover.
O Digital Video ( onnector
[DV IN/()UT] (i.link*) .............. _-T_ pg. 72, 73, 75
* i.Link refers to the IEEE1 _94-1995 industry
specification and extensions thereof. The _ logo
is used for products compliant with the i.Link
sta nda rd.
(_) • Audio/Video Output ( onnector
]AV OUT] ......................................... _T_ pg. 7B
o Headphones Connector [_ ] ............. _-T_ pg. 90
Multi ( onnector
When attached to the Docldng Station, this part is
connected.

1
LCDMo.itor/Viewfi.der i.dicatio.s Duri.gVideoRecordi.gO.ly
* :Setting "INDICATION" to "OFF" in the Date/Time
Menu lets you remove indications marked with * from
the screen (z _" pg. 29).
No. Function
Appears when in the Squeeze or Cinema
mode. (iL_" pg. 38)
_2_* Appears when in the Record-Standby mode.
(z _ pg. 20)
_* Displays the recording mode (SP or [P).
(z_ pg. 15)
(_ Appears during recording. (_L_ pg. 20)
_* Displays the tape remaining time.
(L _ pg. 21 )
(_ Appears when the wind cut mode is engaged
to cut down on noise created by wind.
(L_" pg. 39)
_ Appears while the tape is runningii L 20)
pg.
(_ 5S MODE/5SD MODE/ANIM. MODE:
Displays the 5 second recording mode,
Dissolve during 5 second recording mode or
Animation recording mode. (L _" pg. 30, 39)
Displays the sound mode for approx. 5
seconds after turning on the camcorder.
(_ pg. 39)
(_0) Displays the selected Fade/Wipe effect.
(;L_ pg. 41 )
LCDMo@or/Viewfi.der i.dica|io.s Duri.gD.S.CRecordi.gO.ly
i
i' il illi
No. Function
Displays the Picture Quality mode of the
stored image. There are 3 modes available:
FINE, STANDARD and ECONOMY (in order
of quality). (L_" pg. 17, 24)
_ Displays the number of images that have
already been shot. (:d_" pg. 24)
(_ Displays the total number of shots that can
be stored, including those already taken.
(;_ pg. 24)
(_ ° Appears when a MultiMediaCard is loaded.
° Blinks when a MultiMediaCard is not
loaded. (;L__pg. 24)
_ Appears and blinks during shooting.
(L _ pg. 24)

LCDMonitor/Viewfinder indicationsDuringBothVideoAndD.S.C.Recording
®
_iii!iiiii¸_ili!i!:i¸IJiiiiiiiiiiiiiiiiiiiiii'ii_i!iiiiiiiiiiiiiiill
iiiiiiiiiiiiiiiiiiiiiiiiiiiiiiiiiiiiiiiiiiiiiiiiiiiiiiiiiiiiiiiiiiiiiiiiiiiiiiiiiiiiiiiiii
No. Function
(Z)* Displays the operation mode position. (_ _" pg. 19)
6) Appears when backlight compensation is used. (_-_" pg. 48)
(_) Appears when Auto Slow Shutter is engaged ("GAIN UP" is set to "AUTO"). (_-_" pg. 38)
(_ Appears when Digital Image Stabilizer ("DIS") is engaged. (_-7_"pg. 38)
6) Appears when "FLASH" is set to "AUTO (_)" in the Mode Menu. (_-_" pg. 34)
(_ Appears when the flash is ready. A number appears next to the indication after adjusting
the brightness of the flash. (iL__"pg. 34, 35)
(7) Appears when taking a Snapshot. (_-_" pg. 24, 32)
@ Appears during Self-Timer recording. (_-_" pg. 31)
(_) DispLays the brightness of the l-CD monitor or the viewfinder. (_-_" pg. 23)
@* Displays the date/time. (_-7_"pg. 13, 38)
(_) Appears when the iris is locked. (_-_" pg. 49)
@ Appears when the focus is adjusted manually. (_-7_"pg. 47)
@ Appears when the exposure is adjusted. (_-_" pg. 48)
1@ Appears when the white balance is adjusted. (_-7_"pg. 51)
_5) Displays the selected Program AE with specia[ effects. (_-_" pg. 44)
_6) Appears during zooming. (_-_" pg. 26)
@ Zoom [eve[ indicator
® Approximate zoom ratio
* : Setting "INDICATION" to "OFF" in the Date/Time Menu lets you remove indications marl<ed with * from the screen
(_s pg. 29).
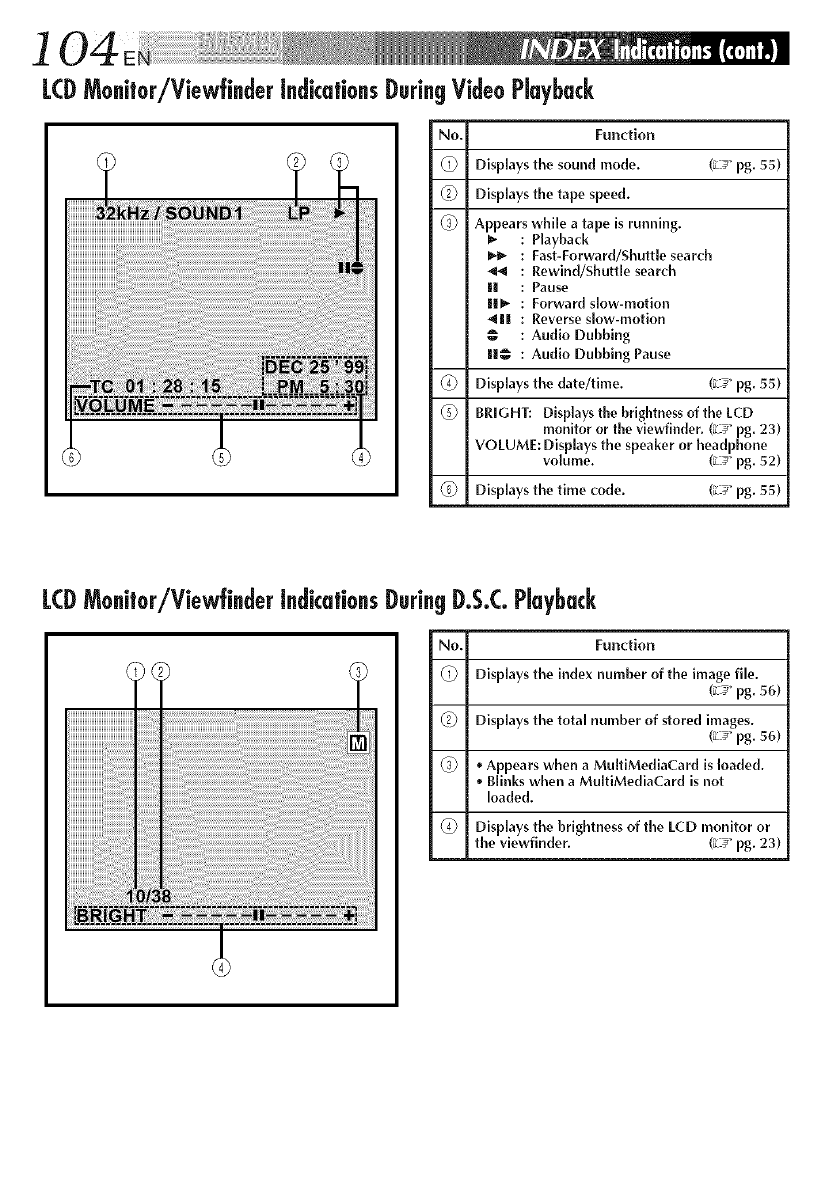
104
LCDMo@or/Viewfi.der [.dka|io.s Duri.g VideoPIaybuck
No. Function
(1) Displays the sound mode. (;_" pg. 55)
_) Displays the tape speed.
(Z) Appears while a tape is running.
: Playback
_*- : Fast-Forward/Shuttle search
: Rewind/Shuttle search
i[ : Pause
ii=,, : Forward slow-motion
_I! : Reverseslow-motion
@: Audio Dubbing
il@ : Audio Dubbing Pause
(_ Displays the date/time. (;_" pg. 55)
(_) BRIGHT: Displays the brightness of the LCD
monitor or the viewfinder. (_ pg. 23)
VOLUME: Displays the speaker or headphone
volume. (;_" pg. 52)
(_) Displays the time code. (_-_ pg. 55)
LCDMo@or/ViewfinderIndicationsDuringD.S.CPlayback
No. Function
(1) Displays the index number of the image file.
(;__ pg. 56)
_) Displays the total number of stored images.
(z _ pg. 56)
(Z) * Appears when a MulliMediaCard is loaded.
Blinks when a Mu[tiMediaCard is not
loaded.
(_ Displays the brightness of the LCD monitor or
the viewfinder. (_-_ pg. 23)
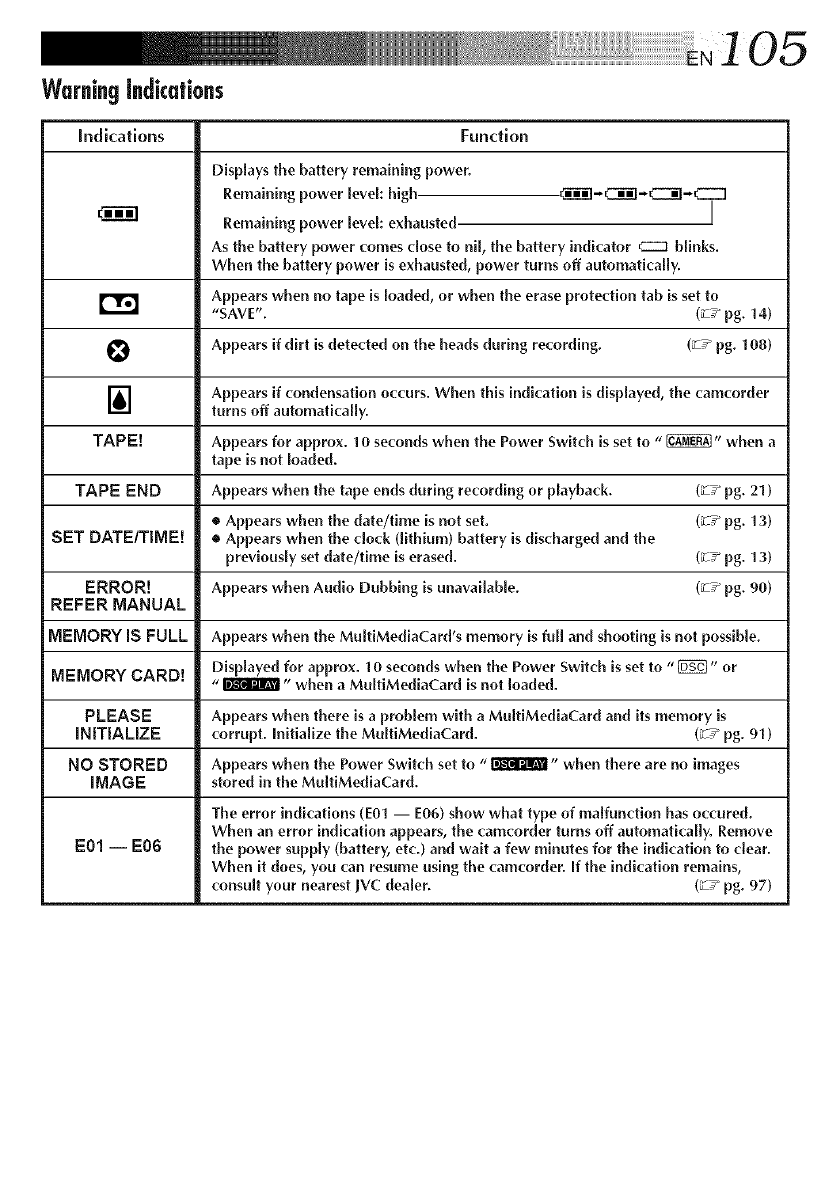
Warning indications
Indications Fundlon
Displays the battery remaining power.
Remaining power level: high. ._I'_I-C_]-_-CZZ3
Remaining power level: exhausted J
As the battery power comes close to nil, the battery indicator cz3 blinks.
When the battery power is exhausted, power turns off automatically.
Appears when no tape is loaded, or when the erase protection tab isset to
r'_ "SAVE". (ZT_ pg. 14)
O Appears if dirt is detected on the heads during recording. (_ T_ pg. 108)
] Appears if {'ondensation occurs. When this indication is displayed, the camcorder
turns off automatically.
TAPE[ Appears for approx. 10 seconds when the Power Switch is set to "_" when a
tape is not loaded.
TAPE END Appears when the tape ends during recording or playback. (_-T_ pg. 21)
• Appears when the date/time is not set. (_T_ pg. 13)
SET DATEITIME! • Appears when the clock (lithium) battery is discharged and the
previously set date/time is erased. (_-T_ pg. 13)
ERROR[ Appears when Audio Dubbing is unavailable. (_T_ pg. 90)
REFER MANUAL
MEMORY iS FULL Appears when the MuitiMed[aCard's memory is full and shooting is not possible.
Displayed for approx. 10 se{'onds when the Power Switch is set to "1_" or
MEMORY CARD[ "_" when a MultiMediaCard is not loaded.
PLEASE Appears when there is a problem with a MultiMediaCard and its memory is
INITIALIZE corrupt. Initialize the MultiMediaCard. (_T_ pg. 91)
NO STORED Appears when the Power Switch set to "_" when there are no images
IMAGE stored in the MultiMediaCard.
The error indications (E01 -- E06) show what type of malfunction has occured.
When an error indication appears, the {'amcorder turns off automath'ally. Remove
E01 -- E06 the power supply (battery, etc.) and wait a few minutes for the indi{'ation to dear.
When it does, you can resume using the camcorder. If the indication remains,
consult your nearest ]VC dealer. (_-T_ pg. 97)
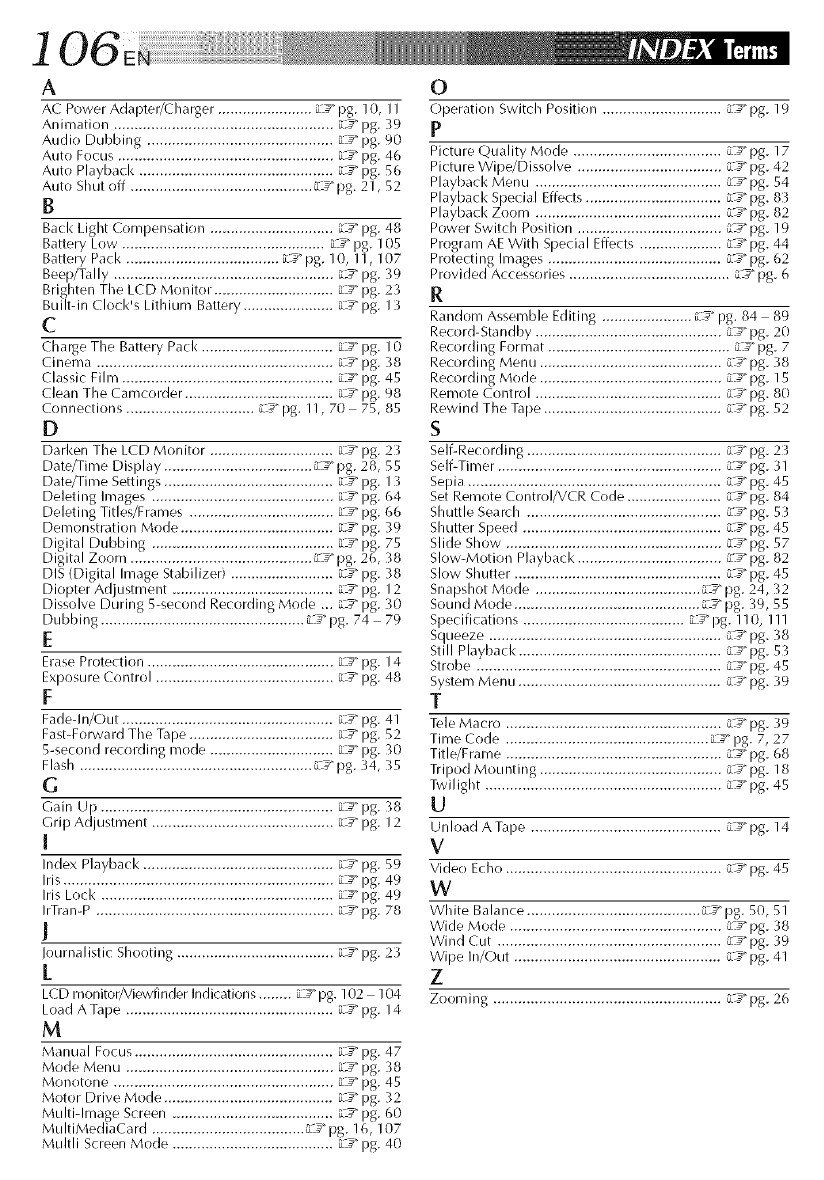
i 06
A
AC Power Adapter/Charger ....................... RF" pg. 10, 11
Anicnation ..................................................... R_3"pg. 39
Audio Dubbing ............................................. L3" pg. 90
Auto Focus .................................................... ['_3" pg. 46
Auto Playback ............................................... L3" pg. 56
Auto Shut off ............................................ L3" pg. 21, 52
B
Back Light Compensation .............................. iL3" pg. 48
Battery Low ................................................. L3" pg. 105
Battery Pack ..................................... RF"pg. 10, 11, 107
Beep/Tally ..................................................... LS pg. -39
Brighten The LCD Monitor. ............................ L:_" pg. 23
Built-in Clock's Lithium Battery ...................... L:_" pg. 13
C
Charge The Battery Pack ................................ L'_3" pg. 10
Cinema ......................................................... i'_3"pg. 38
Classic Film ................................................... LS pg. 45
Clean The Camcorder .................................... _" pg. 98
Connections ............................... LF" pg. 11, 70 75, 85
D
Darken The LCD Monitor .............................. L3" pg. 23
Date/Time Display .................................... LF" pg. 28, 55
Date/Time Settings ......................................... L3" pg. 13
Deleting Images ............................................ o_:_"pg. 64
Deleting Titles/Frames ................................... L3" pg. (,6
Demonstration Mode ..................................... LS pg. 39
Digital Dubbing ............................................ L:_" pg. 75
Digital Zoom ............................................ L'_3"pg. 2(,, 38
DIS (Digital Image Stabilizer) ......................... L:_" pg. 38
Diopter Ad ustment ....................................... L:_" pg. 12
Dissolve During 5-second Recording Mode ... L3" pg. 30
Dubbing ................................................. L3"pg. 74 79
E
Erase Protection ............................................. L3" pg. 14
Exposure Control ........................................... L3" pg. 48
F
Fade-In/Out ................................................... LS pg. 41
Fast-Forward The Tape ................................... __3"pg. 52
5-second recording mode .............................. L3" I:@ 30
Flash ........................................................ L3" pg. 34, 35
G
Gain Up ........................................................ LF" pg. 38
Grip Adjustment ............................................ L3" pg. 12
[
Index Playback .............................................. LF" pg. 59
Iris ................................................................. L3" pg. 49
Iris Lock ........................................................ L3" pg. 49
IrTran-P ......................................................... LF" pg. 78
!
Iournalistic Shooting ...................................... o_:_"pg. 23
1.
LCD monitor/Viewfinder Indications ........ L3" pg. 102 104
Load A Tape .................................................. LF" pg. 14
M
Manual Focus ................................................ L3" pg. 47
Mode Menu .................................................. L:F" pg. 38
Monotone ..................................................... _-3" pg. 45
Motor Drive Mode ......................................... L3" pg. 32
Multi-Image Screen ....................................... L3" pg. 60
MultiMediaCard ..................................... L:_"pg. 16, 107
Multli Screen Mode ....................................... oz_"pg. 40
O
Operation Switch Position ............................. LF" pg. 19
P
Picture Quality Mode .................................... L3" pg. 17
Picture Wipe/Dissolve ................................... LF" pg. 42
Playback Menu ............................................. LS pg. 54
Playback S )ecial Effects ................................. _-4_")g. 83
Playback Zoom ............................................. L'_3"pg. 82
Power Switch Position ................................... LS pg. 19
Program AE With Special Effects .................... L3" pg. 44
Protecting Images .......................................... L'_3"pg. 62
Provided Accessories ....................................... L4_"pg. 6
R
Random Assemble Editing ...................... LF'pg. 84 89
Record-Standby ............................................. L3" pg. 20
Recording Format ............................................ L 3" pg. 7
Recording Menu ............................................ i'_3"pg. 38
Recording Mode ............................................ L:_" pg. 15
Remote Control ............................................. __3" pg. 80
Rewind The Tape ........................................... LF" pg. 52
S
Self-Recording ............................................... L 3" pg. 23
Self-Timer ...................................................... LF" pg. 31
Sepia ............................................................. L3" pg. 45
Set Remote Control/VCR Code ....................... L3" pg. 84
Shuttle Seard/ ............................................... LF" pg. 53
Shutter Speed ................................................ LS pg. 45
Slide Show .................................................... L3" pg. 57
Slow-Motion Playback ................................... LF" pg. 82
Slow Shutter .................................................. L3" pg. 45
Snapshot Mode ........................................ __3" pg. 24, 32
Sound Mode ............................................. LF" pg. 39, 55
Specifications ....................................... L:_"pg. 110, Ill
Squeeze ........................................................ __3" pg. 38
Still Playback ................................................. c_3"pg. 53
Strobe ........................................................... Ls pg. 45
System Menu ................................................. L3" pg. 39
T
Tele Macro .................................................... L3" pg. 39
Time Code ................................................. __3"pg. 7, 27
Title/Frame .................................................... LF" pg. 68
Tripod Mounting ............................................ LS pg. 18
Twilight ......................................................... L3" pg. 45
U
Unload ATape .............................................. L3" pg. 14
V
Video Echo .................................................... L3" pg. 45
W
White Balance .......................................... LF" pg. 50, 51
Wide Mode ................................................... L3" pg. 38
Wind Cut ...................................................... L3" pg. 39
Wipe In/Out .................................................. LF" pg. 41
Z
Zooming ....................................................... L3" pg. 26
107
When using the AC Power Adapter/Charger in areas
other than the USA
[] The provided AC Power Adapter/(halger features
automatic voltage selection in the AC range from 1I 0
V to 24[) V.
USiNG HOUSEHOLD AC PLUG ADAPTER
In case of connecting the unit's power cord to an AC
wall outlet other than American National Standard C73
series type Elsean AC plug adapter, called a "Siemens
Plug", as shown.
For this AC plug adapter, consult your nearest JVC
dealer.
Plug adapter
Battery Packs
The supplied battery pack is a
lithium-ion battery. Before
using the supplied battery pack
or an optional battery pack, be
sure to read the following
cautions:
1. To avoid hazard...
... do not burn.
Terminals
... do not short-circuit the terminals.
... do not modify or disassemble.
... do not expose the battery to temperatures
exceeding 60°C (140°F), as this may cause the
battery to overheat, exl-_lode or catch fire.
... use only specified chargers.
2. To prevent damage and pro[ong service life...
... do not subject to unnecessary shock.
... charge in an el]vironl_ent where temperatures are
within the tolerances shown in the chart below.
This is a chemical reaction type batter_cooler
temperatures impede chemical reaction, while
warl_er temperatLires can prevent cocnplete
charging.
... store in a cool, dry place. Extended exposure to
high temperatures will increase natural discharge
and shorten service life.
... fully charge and then fully discharge the battery
every 6 months when storing the battery pack
over a long period time.
... remove from charger or powered LII]it when not Jr]
use, as some cnachines use cLirrent ever] when
switched off.
NOTES:
[] It is r]ormal f_?rthe battery pack to be warm after
chargirlg, or after use.
Temperature Range Specifications
Charging ................ 10°C to 35°C (50°F to 95°F)
Operation ............... 0°C to 40°C (32°F to 104°F)
Storage ................... 10°C to 30°C G14°F to 86°F)
[] Recharging time is based or] room temperature of
20°C (68°F).
[] The lower the temperature, the k?nger rechargirlg
takes.
Cassettes
To properly use and store your cassettes, be sure to read
the following cautions:
1. During use...
... make sure the cassette bears the Mini DV mark.
... be aware that recording onto prerecorded tapes
automatically erases the previously recorded
video and audio signals.
... make sure the cassette is positioned properly
when inselling.
... do not load and unload the cassette
repeatedly without allowing the tape to run at all.
This slackens the tape and can result in damage.
... do not opel] the front tape cover. This exposes the
tape to fingerprints and dust.
2. Store cassettes...
... away from heaters or other heat sources.
... out of direct sunlight.
... where they won't be subject to unnecessary shock
or vibration.
... where they won't be exposed to strong magnetic
fields (such as those generated by motors,
transformers or magnets).
... vertically, in their original cases.
MulfiMediaCards
To properly use and store your MultiMediaCards, be
sure to read the following cautions:
1. During use.,.
... make sure the MultiMediaCard bears the
MultiMediaCard mark.
... make sure the MultiMediaCard is positioned
properly when inserting.
2. While the MultiMediaCard is being accessed (during
recording, playback, deletion, initialization, etc.)...
... never unload the MultiMediaCard and never turn
off the camcorder.
3. Store MultiMediaCards...
... away from heaters or other heat sources.
... out of direct sunlight.
... where they won't be subject to unnecessary shock
or vibration.
... where they won't be exposed to strong magnetic
fields (such as those generated by motors,
transforcners or magnets).
LCD Monitor
1. To prevent damage to the LCD monitor, DO NOT...
... push it strongly or apply any shocks.
... place the camcorder with the LCD monitor on the
bottom.
2. To prolong service life...
... avoid rubbing it with coarse cloth.
3. Be aware of the following phenomena for LCD
monitor use.
These are not maffunctions ....
o While using the camcorder, the surface around the
LCD monitor and/or the back of the LCD monitor
may heat up.
o If you leave power on for a long time, the surface
around the LCD monitor becomes hot.
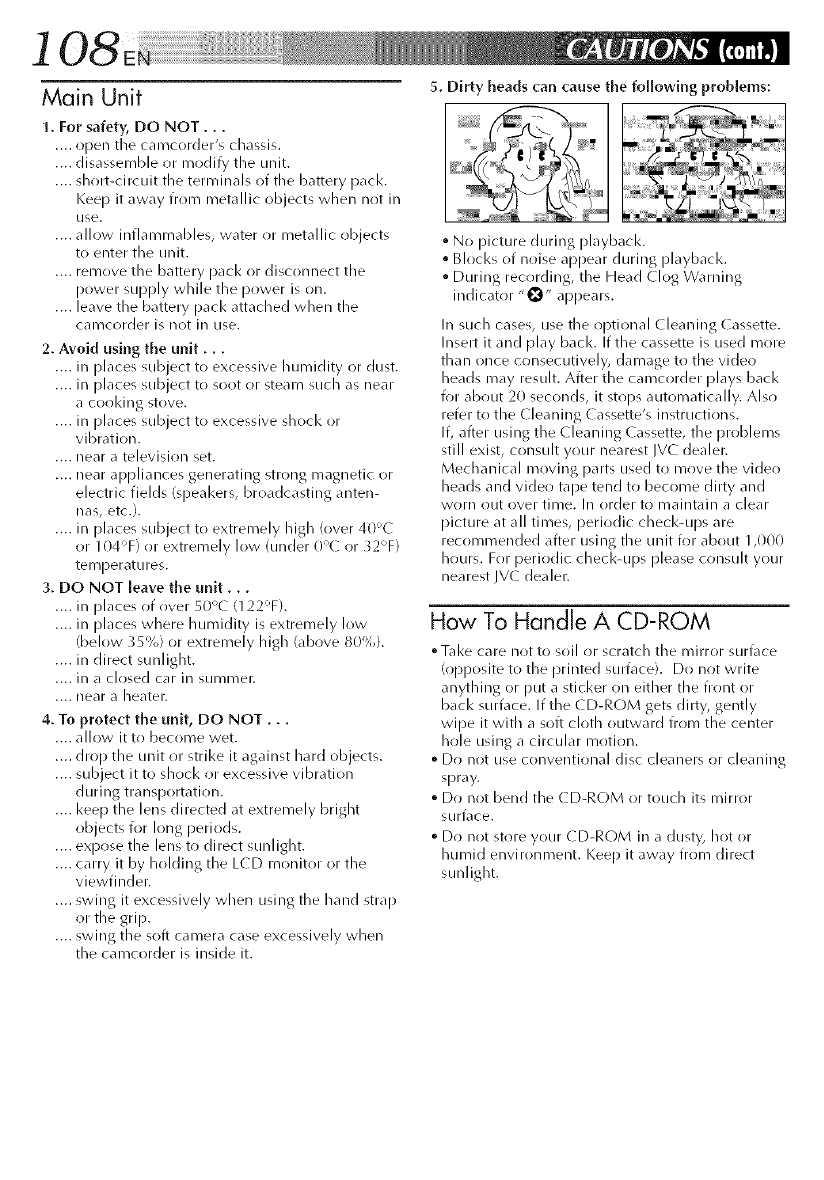
108
Main Unit 5. Dirty beads can cause the following problems:
1. For safety, DO NOT...
.... open tile camcorder's chassis.
.... disassemble or modify the unit.
.... sllort-circuit file terminals of the battery pack.
Keep it away from metallic objects when not in
use.
.... allow inflammables, water or metallic objects
to enter the unit.
.... remove the battery pacl< or disconnect tile
power supply while the power is on.
.... leave the battery pack attached when tile
camcorder is not in use.
2. Avoid using the unit...
.... in [)laces subject to excessive humidity or dust.
.... in [)laces subject to soot or steam such as near
a cooldng stove.
.... in [)laces subject to excessive shocl< or
vibration.
.... near a television set.
.... near appliances generating strong magnetic or
electric fields (speal<ers, broadcasting anten-
nas, etc.).
.... in [)laces subject to extremely high (over 40_C
or 104T) or extremely low (under 0°C or _2°F)
telTlperdttlres.
3. DO NOT leave the unit...
.... in [)laces of over 50% (122T).
.... in [)laces where humidity is extremely low
(below 35%) or extremely high (above 80%).
.... in direct sunlight.
.... in _1clr)sed cdr in SUl]/i]/er.
.... near a beater.
4. To protect the unit, DO NOT...
.... allow it to become wet.
.... drop the unit or strike it against hard objects.
.... subject it to shock or excessive vibration
during transportation.
.... I<eep the lens directed at extremely bright
objects for long periods.
.... expose the lens to direct sunlight.
.... carry it by holding the LCD monitor or the
viewfinder.
.... swing it excessively when using the hand strap
or the grip.
.... swing the soft camera case excessively when
the camcorder is inside it.
• No picture during playbacl<.
Blocks of noise appear during playbacl<.
• During recording, the Head Clog Warning
indicator "0" appears.
In such cases, use tile optional Cleaning Cassette.
Insert it and [)lay back. If the cassette is used more
than once c(insecutively, damage to the vide(!
beads may resuh. After the camcorder [)lays back
for about 20 seconds, it stops automatically. Also
refer to the (leaning ( assette's instructions.
If, after using the (leaning ( assette, tile problems
still exist, consult your nearest JVC dealer.
Mechanical moving parts used to move the vider!
beads and video tape tend to become dirty and
worn out over time. In order to maintaill a clear
picture at all times, periodic checl<-ups are
recommended after using the unit for about 1,000
Ilours. For periodic checl<-ups [)lease consult your
nearest JV( dealer.
How To Handle A CD-ROM
• Tal<e care not to soil or scratch tile mirror surface
(()[)[)()site to the printed sumface). Do not write
anything or put a sticker r)n either the front or
back surface. If the CD-RC)M gets dirty, gently
wipe it with a soft cloth outward from the center
hole using a circular i_/r)tir)n.
•Do not use conventional disc cleaners or cleaning
spray.
° Do not bend the CD-ROM or toucll its mirror
surface.
° Do not store your CD-ROM in a dusty, hot or
Ilumid environment. I<eep it away from direct
sunlight.
DeclarationofConformity
Mode[ Number : CU-VS01U
Trade Name : JVC
Responsible party : US JVC CORR
Address : 17(30 Valley Road Wayne,
N. I. 07470
Telephone Number : 973-315 5000
This device complies with Part 15 of FCC Rules.
Operation is subject to the following two
conditions:
(1) This device may not cause harmful
interference, and (2) this device must accept
any interference received, including interfer-
ence that may cause undesired operation.
Change (it modifications not approved by tile
party responsible for compliance could void the
user's authority to operate the equipment. This
equipment has been tested and found to
c(_mply with the limits for a ([lass B digital
device, pursuant to Part 15 of the FCC Rules.
These limits are designed to provide reasonable
protection against harmful interference in a
residential installation. This equipment
generates, uses, and car/radiate radio frequency
energy and, if not installed and used in
accordance with the instructions, may cause
harmful interference to radio communications.
However, there is no guarantee that interference
will not occur in a particular installation. If this
equipment does cause harmful interference to
radio or television reception, which car/be
determined by turning the equipment off and
on, the user is encouraged to try to correct tile
interference by one or more of tile following
i_/eastlres:
Reorient or relocate the receiving antenna.
Increase the separation between the equip-
merit and receiver.
Connect the equipment into an outlet on a
circuit different from that to which the
receiver is connected.
Consult the dealer or an experienced radio/
TV technician for help.
About moisture condensation...
• You have observed that pouring a cold liquid
into a glass will cause drops of water to form
on the glass' outer surface. This same
phenomenon occurs on the head drum of a
camcorder when it is moved from a cool
[)lace to a warm place, after heating a cold
room, under extremely humid conditions or
in a place directly subjected to the cool air
from an air conditioner.
• Moisture on tile head drum car/cause severe
damage to the vide() tape, and can lead to
internal damage to the camcorder itself.
Serious malfunctioning
If malfunctioning occurs, st()[) using tile unit
immediately and consuh your local JVC dealer.
Tile camcorder is a microcomputer-controlled
device. External noise and interference (from a
TV, a radio, etc.) might prevent it from function-
ing properly. Ill such cases, first disconnect its
power supply unit (battery pacl<, AC Power
AdaptetTBattery ( harger, etc.) and wait a few
minutes and then re-connect it and proceed as
usual from the beginning.
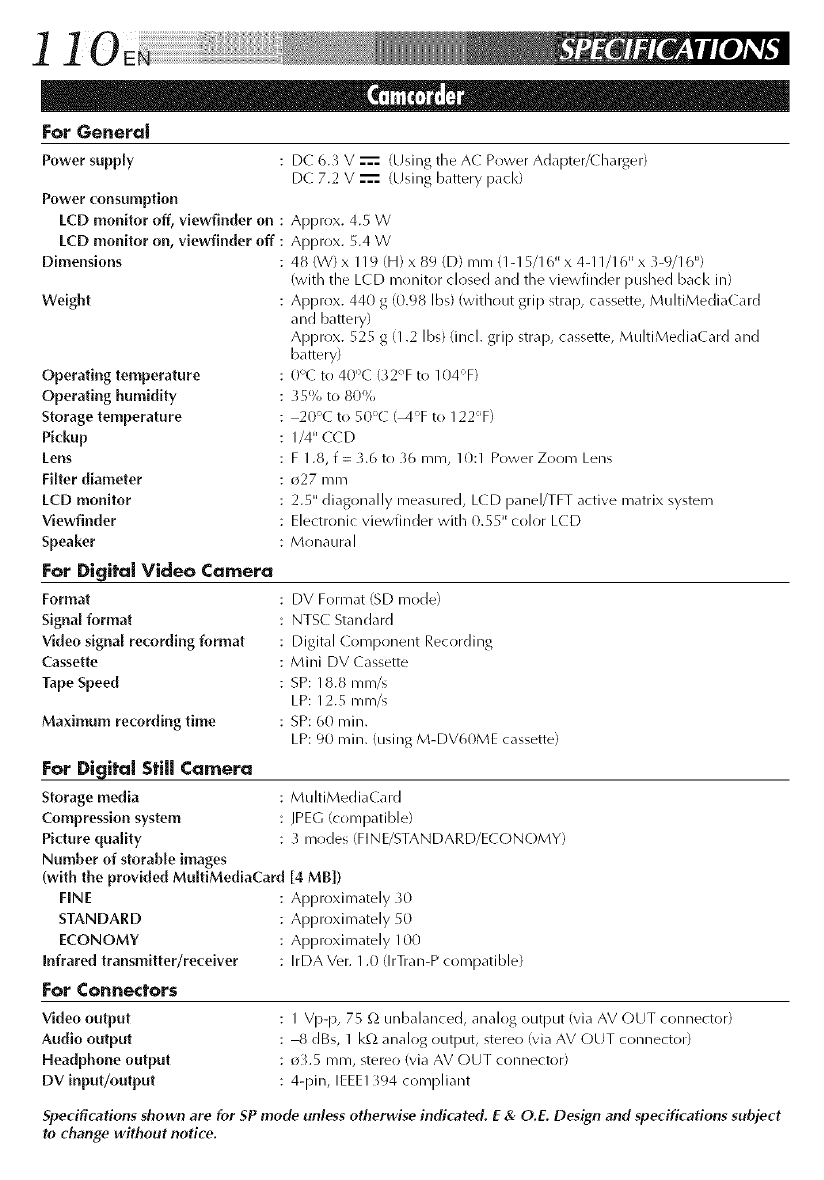
] ] Oe iiiilililililililililililililililililililililililililili:i?i!i!iiii!iii!i;'
For Genera[
Powersupply
Power consumption
LCD monitor off, viewfinder on :
LCD monitor on, viewfinder off :
Dimensions
Weight
Operating temperature
Operating humidity
Storage temperature
Pickup
Lens
Filter diameter
LCD monitor
Viewfinder
Speaker
For Digita[ Video Camera
Format
Signal format
Video signal recording format
Cassette
Tape Speed
Maximum recording time
For Digital Still Camera
Storage media
Compression system
Picture quaffty
Number of storable images
(with the provided Mu[tiMediaCard
FINE
STANDARD
ECONOMY
Infrared transmitter/receiver
For Connectors
Video output
Audio output
Headphone output
DV input/output
DE: 6.3 V _ (Using the AC Power Adapter/(harger)
DE: 7.2 V -'==-(Using battery pack)
Approx. 4.5 W
Approx. 5.4 W
48 (W) x 119 (H) x 89 (D) rnm (1-15/16" x 4-11/16" x 3-9/16")
(with the LCD monitor closed and the viewfinder pushed back in)
Approx. 440 g (0.98 Ibs) (without grip strap, cassette, MuhiMediaCard
and battery)
Approx. 525 g (1.2 Ibs) (incl. grip strap, cassette, MultiMedia( ard and
battery)
()'_( to 40°C (32% to 104_'F)
_5% to 80%
20°C to 50'C (_4°F to 122'F)
1/4" ((D
F 1.8, f = 3.6 to 36 ram, 10:1 Power Zoom Lens
o27 mrn
2.5" diagonally measured, L(D panel/TFT active matrix system
Electronic viewfinder with 0.55" color LCD
Monaural
DV Format (SD mode)
NTSC Standard
Digital ( ompr)nent Recording
Mini DV ( assette
SP: 18.8 mlTI/S
LP: 12.5 mm/s
SP: 60 rain.
LP: 90 rain. (using M-DV60ME cassette)
MultiMediaCard
JPEG (compatible)
3 modes (FINE/STANDARD/E(ONOMY)
[4 MB])
Approximately _0
Approximately 50
Approximately 100
IrDA Ver. 1.0 (IrTran-P compatible)
1 Vp-p, 75 g_ unbalanced, analog output (via AV OUT connector)
8 dBs, 1 kQ analog OLItpLIt, stere() (via AV (-)UT conllector)
o_.5 ram, stereo (via AV OUT connector)
4-pin, IEEE1 _94 compliant
Specifications shown are for SP mode unless otherwise indicated. E & O.E. Design and specifications subject
to change without notice.
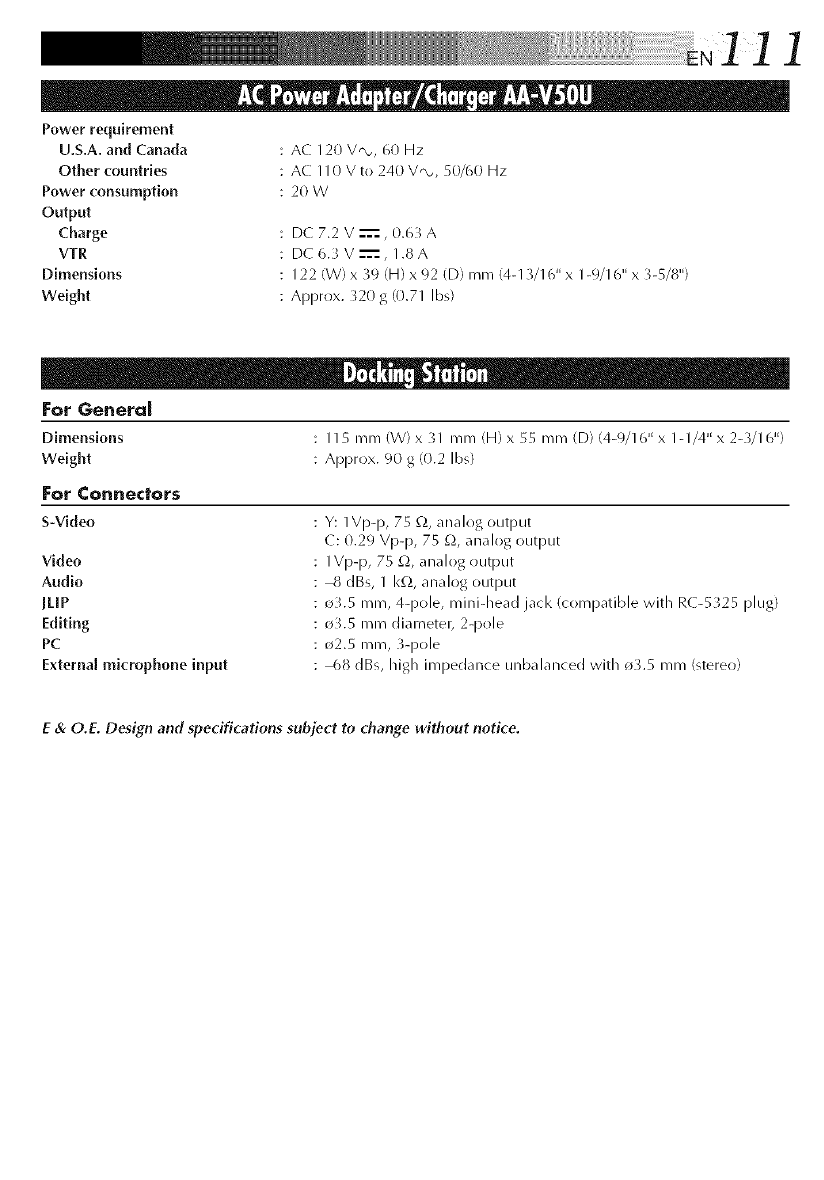
N] ] 1
Power requirement
U.S.A. and Canada
Other countries
Power consumption
Output
Charge
VTR
Dimensions
Weight
AC 120 V'N,, 60 Hz
AC 110 V to 240 V,_, 50/60 Hz
20W
DC 7.2 V ---'==,0.63 A
DC 6.3 V ---'==,1.8 A
122 (W) x 39 (H) x 92 (D) mm 14-13/16" x 1-9/I 6" x 3-5/8")
Approx. 320 g 10.71 Ibs)
[:or General
Dimensions I 15 IT/m (W) x _1 mm (H) x 55 mm (D) (4-9/16" x I- I/4" x 2-_/I 6")
Weight Approx. 90 g (0.2 Ibs)
For Connectors
S-Video
Video
Audio
jLiP
Editing
PC
Extema[ microphone input
Y: 1Vp-p, 75 _,2,analog output
C: 0.29 Vpp, 75 £2,analog output
1Vp-p, 75 £2,analog output
8 dBs, I I<£_,analog output
_.5 ram, 4-pole, mini-head jack (compatible with RC-5 _25 plug)
_.5 mm diameter, 2q)ole
_2.5 ram, 3-pole
68 dBs, high impedance unbalanced with ¢)3.5 mm (stereo)
E & O.E. Design and specifications subject to change without notice.

JVC
VICTOR COMPANY OF JAPAN, UMITED
COPYRIGHT© 1999 VICTOR COMPANY OF JAPAN. LTD. [_ Printed in Japan
_ 0299HOV_UN _YP
