JVC GZ HD10US M8H4 User Manual Other LYT1945 006A
GZ-HD10US GZ-HD10US LYT1945-006A English, PC Guide
User Manual: JVC GZ-HD10US other
Open the PDF directly: View PDF ![]() .
.
Page Count: 40
- For Windows® Users
- You Can Do This
- Software Installation
- Connecting the Camera to the PC
- File Backup on the PC
- File Backup on the PC from the Specified Media
- File Backup on the PC without Using Software
- Playing Back Files on the PC
- Creating a Video Disc (DIRECT DISC button)
- Creating a Video Disc (Using Software)
- Editing and Creating a Video Disc (Basic Editing)
- Editing and Creating a Video Disc (Advanced Editing)
- Editing and Saving a File (AVCHD)
- Playing Back on a DVD burner
- FAQ
- For Macintosh Users
- You Can Do This
- Connecting the Camera to the Macintosh
- File Backup on the Macintosh
- For All Users
- Folder Structure and Extensions (EVERIO_HDD)
- Folder Structure and Extensions (EVERIO_SD)
- Customer Support Information
- JVC Software License Agreement

1
HD HARD DISK CAMCORDER
Model GZ-HD10
PC OPERATION GUIDE
EN
For Windows® Users
You Can Do This ..................................3
Software Installation ...........................6
Connecting the Camera to the PC .....8
File Backup on the PC .........................9
File Backup on the PC from the
Specified Media ................................10
File Backup on the PC without Using
Software ............................................11
Playing Back Files on the PC ...........13
Creating a Video Disc
(DIRECT DISC button) .....................15
Creating a Video Disc
(Using Software) ..............................16
Editing and Creating a Video Disc
(Basic Editing) ..................................19
Editing and Creating a Video Disc
(Advanced Editing) ..........................23
Editing and Saving a File (AVCHD) ...25
Playing Back on a DVD burner ........28
FAQ .....................................................29
For Macintosh Users
You Can Do This ................................30
Connecting the Camera to the
Macintosh .........................................31
File Backup on the Macintosh ..........32
For All Users
Folder Structure and Extensions
(EVERIO_HDD) .................................34
Folder Structure and Extensions
(EVERIO_SD) ....................................35
Customer Support Information ........36
JVC Software License Agreement ...37

2
Preparation
◆For Windows users
•
Install the software included in the provided CD-ROM (p. 6).
• To create a Blu-ray disc
➡ Use a recordable Blu-ray disc drive.
• To create a high definition DVD (AVCHD disc) or a DVD video disc with standard picture quality
➡ Use a recordable DVD drive.
◆For Macintosh users
•
Use commercially available software to edit video or create a disc.
To play back a video disc
◆To play back a Blu-ray disc
➡ Use a commercially available Blu-ray disc player etc.
◆To play back an AVCHD video disc
➡ Use a DVD burner (CU-VD50, sold separately), commercially available device and software (the
supplied PowerDVD, etc.) that supports AVCHD format.
If you insert the disc into other device, you may not be able to remove it.
◆To play back a DVD video disc
➡ Use a commercially available DVD player etc.
(With some device, correct playback may not be possible.)
◆To play back a DVD created using a DVD burner (CU-VD50/CU-VD40, sold separately)
➡ To play back the disc, use a DVD burner. If you insert the disc into other device, you may not be able
to remove it.
Concerning operation, refer to the instruction manual supplied with the devices.
Caution
•
The i.LINK Connection cannot be used to import recorded files.
Use the USB Connection.
3
Windows® 1
You Can Do This
After recording video or still images, you can save them onto your computer and use the supplied
software to play back, edit or create discs.
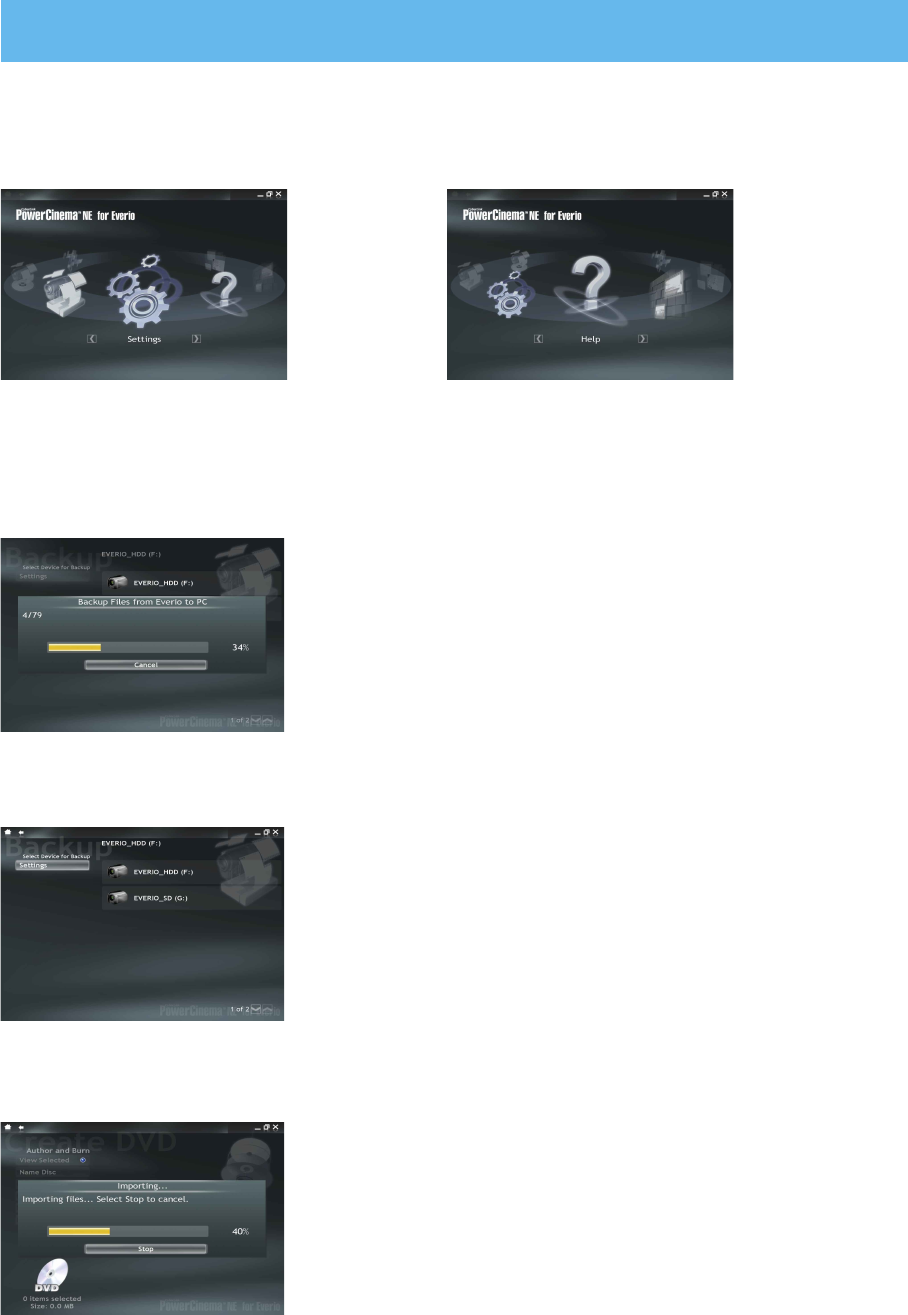
[Settings]
You can set each item in detail.
n Saving, playback, copying and editing is easy with PowerCinema
[Help]
You can view detailed instructions on the
Internet.
l DIRECT BACK UP: Easy save operation from your Everio
You can save the videos that you have recorded onto your
computer by pressing DIRECT BACK UP button.
l Backup: Save operation from your computer
You can select HDD of the camera or microSD card and save the
newly recorded videos onto your computer.
l DIRECT DISC: Saving on a DVD with an operation from your Everio
You can save the newly recorded videos on a DVD and create an
AVCHD disc by pressing DIRECT DISC button.
For Windows® Users
4
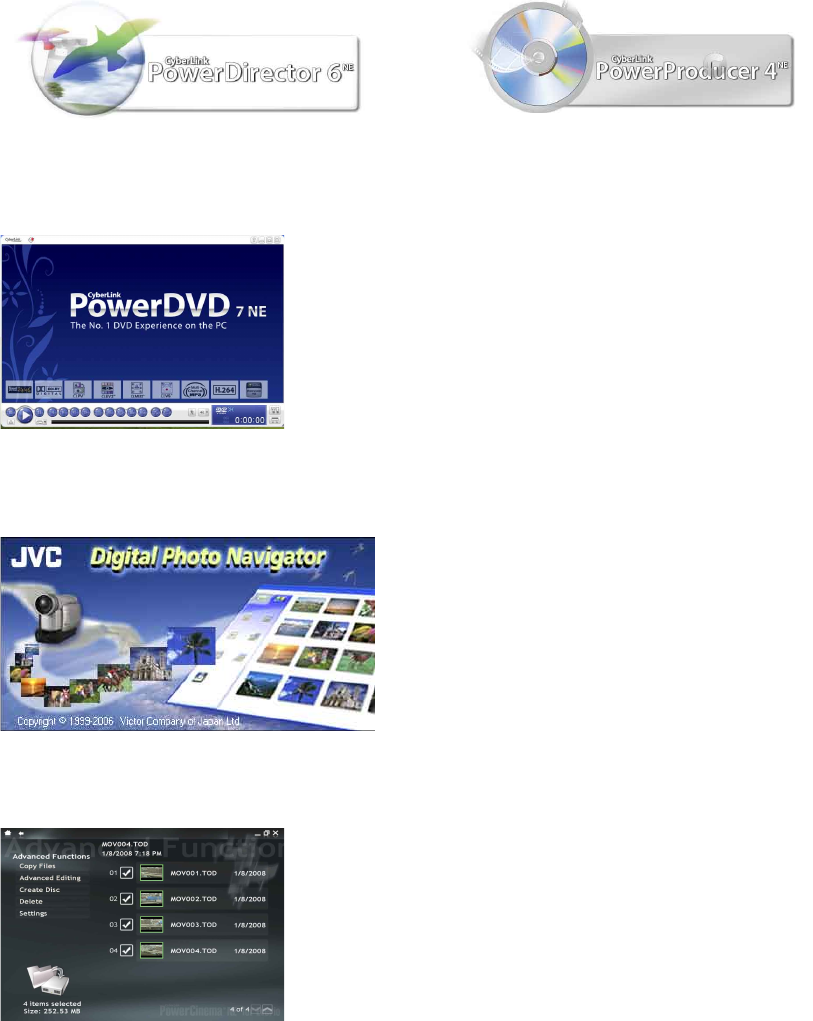
n Edit with PowerDirector! n Create a disc with PowerProducer!
n Make the most of your still images with Digital Photo Navigator!
<NOTES>
• If you are having trouble operating the supplied software, contact customer support (p. 36).
• For details on how to create a disc for videos that you have edited on your computer, see the
following web site:
http://www2.cli.co.jp/products/ne/
l [Advanced Functions] for creating discs or editing
[Copy Files]:
You can select and copy the desired video file.
[Advanced Editing]:
You can select the desired video file and edit it with
PowerDirector.
[Create Disc]:
You can select the desired video file and create a disc with
PowerProducer. You can also create Blu-ray discs.
[Delete]:
You can select and delete video files that you no longer require.
(You cannot delete files in the camera.)
n Playing back a disc with PowerDVD
You can play back DVD video discs and AVCHD discs that you have created.
You can play back AVCHD discs or DVD videos with standard
picture quality.
(You cannot play back Blu-ray discs.)

5
System Requirements
OS:
Either one of the following OS should be pre-installed (32-bit):
• Windows® XP Home Edition (SP2)
• Windows® XP Professional (SP2)
• Windows Vista® Home Basic
• Windows Vista® Home Premium
CPU:
• Intel® Pentium® 4, at least 3.2 GHz
• Intel® Pentium® M, at least 1.8 GHz
(Intel® CoreTM Duo, at least 1.66 GHz recommended)
(For editing video)
• Intel® CoreTM 2 Duo at least 2.4 GHz (Recommended for editing video in AVCHD format)
RAM:
• [XP] At least 1 GB
(2 GB or more recommended)
• [Vista] At least 2 GB
Free hard disk space:
• At least 750 MB for installation
• For creating Blu-ray disc, at least 30 GB
(60 GB or more recommended)
Connector:
USB 2.0 connector
Video card:
• Intel/nVidia/ATI MPEG-2 HD DxVA compatible card
• For AVCHD format: video RAM 256 MB or more recommended
• Use the latest driver.
Sound card:
Direct Sound compatible sound card
Display:
Must be capable of displaying at least 1024 x 768 (XGA) in high color 16 bit or higher
(1280 x 1024 (SXGA) or higher is recommended)
Supplied software
CyberLink BD Solution :
• PowerCinema NE for Everio
• PowerDirector 6 NE
• PowerProducer 4 NE
• PowerDVD 7 NE
Digital Photo Navigator :
• Digital Photo Navigator
<NOTE>
• Even if your system meets the recommended requirements above, you may still experience dropped
frames while playing back high definition video, or you may find that editing takes a long time. In
order to use these functions more smoothly, it is recommended that you use a higher performance
PC.
6
Windows® 2
Software Installation
Preparation:
• Quit any other software you are using.
(Check that there are no other application icons on the status bar.)
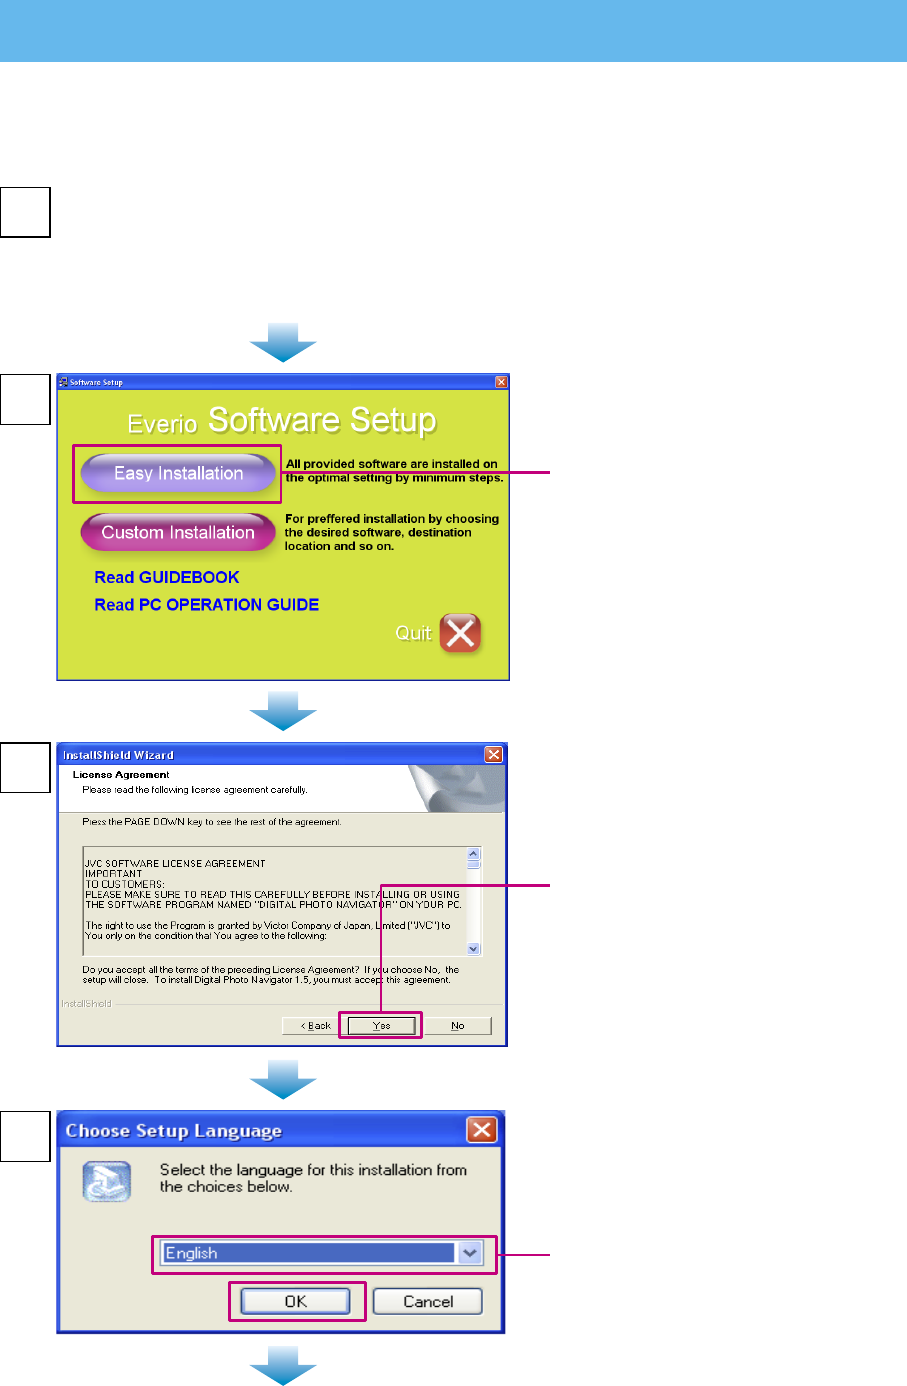
Load the provided CD-ROM into the PC.
l
After a moment, the [SETUP] screen appears. If the [SETUP] screen does not appear, double-
click the CD-ROM icon in [My Computer].
l
For Windows Vista®, click [Run INSTALL.EXE] on the [AutoPlay] screen, and then click
[Continue] on the [User Account Control] screen. [SETUP] screen appears.
2
1
Click [Easy Installation].
l
If you want to specify the type of
software to install or the installation
destination folder etc., select
[Custom Installation].
Follow the instructions on the screen
to install the software.
3
Click [Yes].
l Digital Photo Navigator
installation starts.
4
Select the desired language and
click [OK].
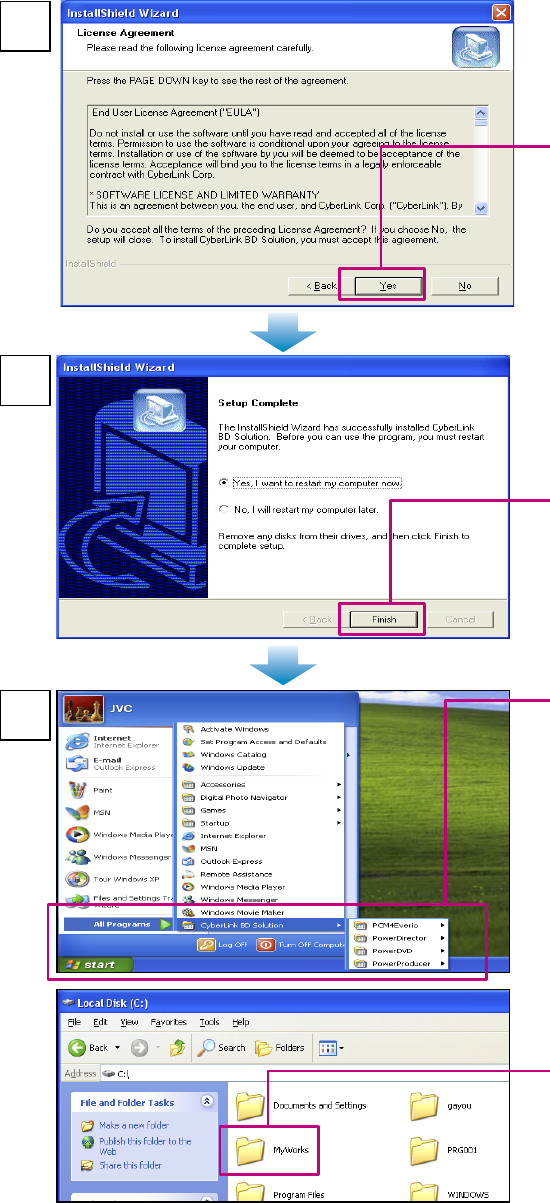
7
5
Click [Yes].
l CyberLink BD Solution
Installation starts
Click [Finish].
6
◆ When installation is completed
l The installed software is displayed
in [All Programs] – [CyberLink BD
Solution].
l For details on the supplied software,
see the software Instruction
Manuals, User's Guides, Help and
Readme.
The backup destination folder
[MyWorks] for files is created on the
hard disk drive that has the most free
space.
7
PowerCinema NE for Everio
PowerDirector 6 NE
PowerProducer 4 NE
PowerDVD 7 NE
<CAUTION>
•
Installing PowerDVD 7 NE will uninstall PowerDVD which supports Blu-ray Discs; therefore you cannot
play back Blu-ray Discs.
<NOTES>
• If you select [Easy Installation], icons are created on your desktop for Digital Photo Navigator,
PowerCinema and PowerDVD only.
• The above screens are for Windows® XP. For Windows Vista®, the screens are different.

8
Windows® 3
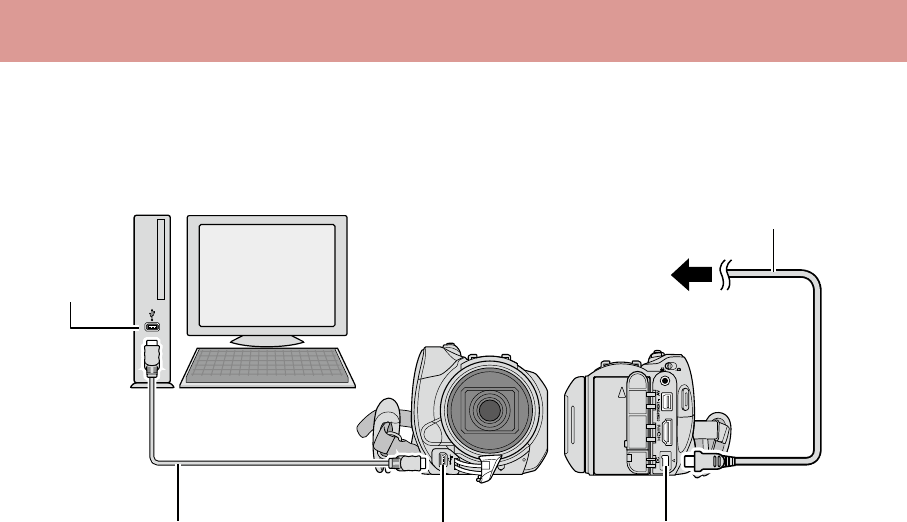
Connecting the Camera to the PC
Preparation:
• Close the LCD monitor to turn off the camera.
AC Adapter
DC Connector
To AC Outlet
USB Cable USB Connector
USB Connector
<NOTES>
• Never disconnect the USB cable while the access lamp on the camera lights or blinks.
• Do not turn off the camera when the USB cable is connected, to prevent malfunctions of the PC.
• Connect the camera directly to the PC, not through a hub.
• Do not use an extension USB cable.
• Do not delete, move, or rename the files and folders in the camera from the PC.
◆ When you have finished operation
Always follow the procedures below when disconnecting the camera, or turning off the camera/PC
power. Failing to do so may cause damage to the camera and PC.
1) Confirm that the access lamp on the camera does not light or blink. (If the access lamp lights or
blinks, wait until it is turned off before proceeding.)
2) Double-click the [Safely Remove Hardware] or [Unplug or Eject Hardware] icon in the status bar.
3) Select [USB Mass Storage Device] or [USB Disk], and then click [Stop].
4) Click [OK].
5) Disconnect the USB cable.
6) Turn off the camera and PC.
9
Windows® 4-1
File Backup on the PC
This method uses the software on the CD-ROM to back up files onto your PC.
Video files in the Everio HDD that have never been backed up onto the PC are automatically selected
and backed up.
Preparation:
• Install the software.
• Connect the camera to the PC.
Open the LCD monitor to turn on the camera.
3
1
• A dialog box is displayed on the PC
screen. However, you do not need
to use the dialog box. File copy
starts automatically.
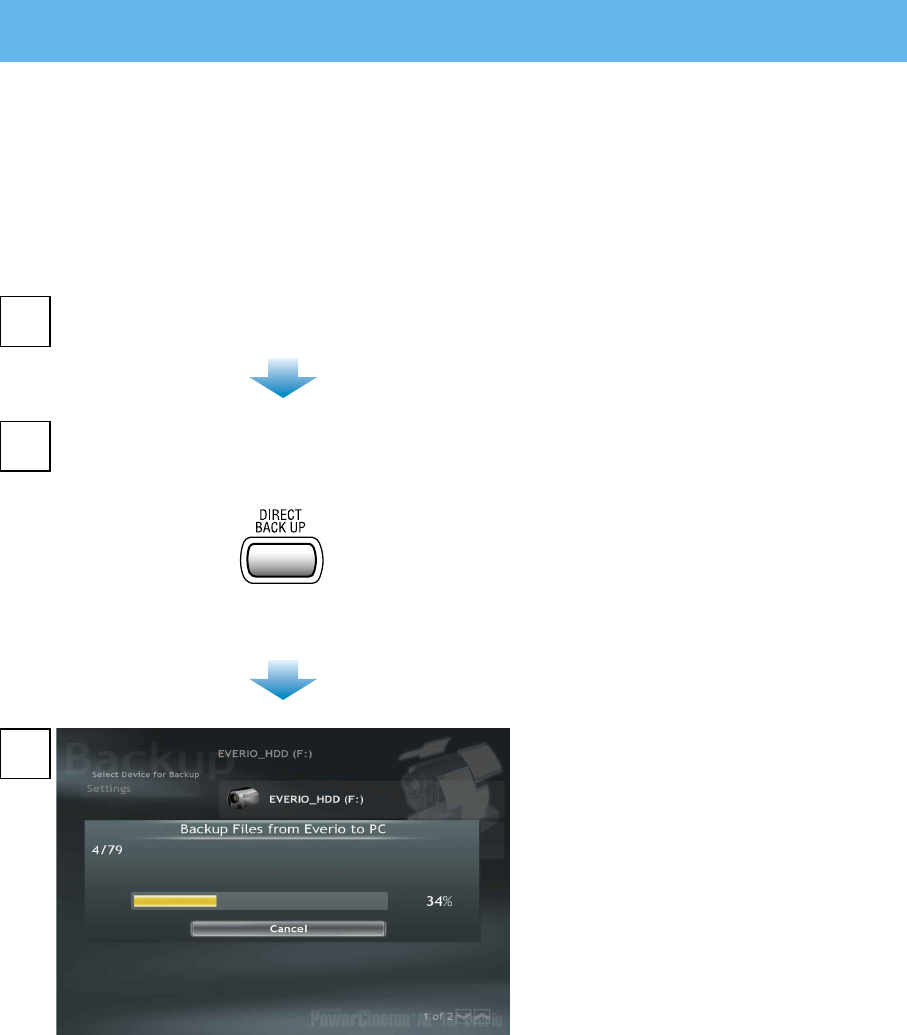
• When the progress bar disappears,
the process is complete.
<NOTE>
• When backup is performed,
[EverioBackup] folder is created in
the [MyWorks] folder, and the files
are backed up inside these folder.
On the camera,
press the DIRECT BACK UP button.
2
10
Windows® 4-2
File Backup on the PC from the Specified Media
You can select what to copy (HDD or microSD card) and save the files that are inside onto your
computer.
Preparation:
• Install the software.
• Connect the camera to the PC.
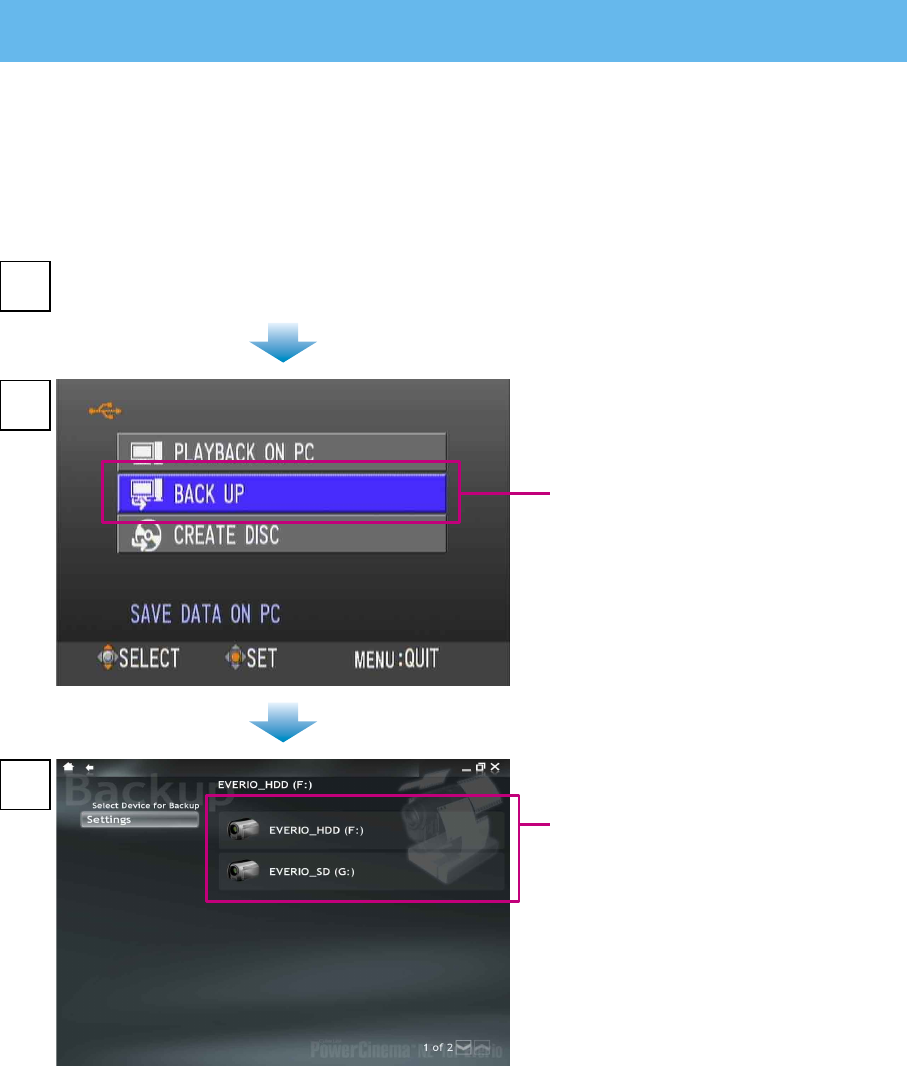
Open the LCD monitor to turn on the camera.
2
1
On the camera,
select [BACK UP].
3
On the PC,
click [EVERIO_HDD] or
[EVERIO_SD].
• When the progress bar disappears,
the process is complete.
<NOTE>
• You can also select [Backup] on the PowerCinema screen. In this case, first select [PLAYBACK ON
PC] on the camera.
11
Windows® 4-3
File Backup on the PC without Using Software
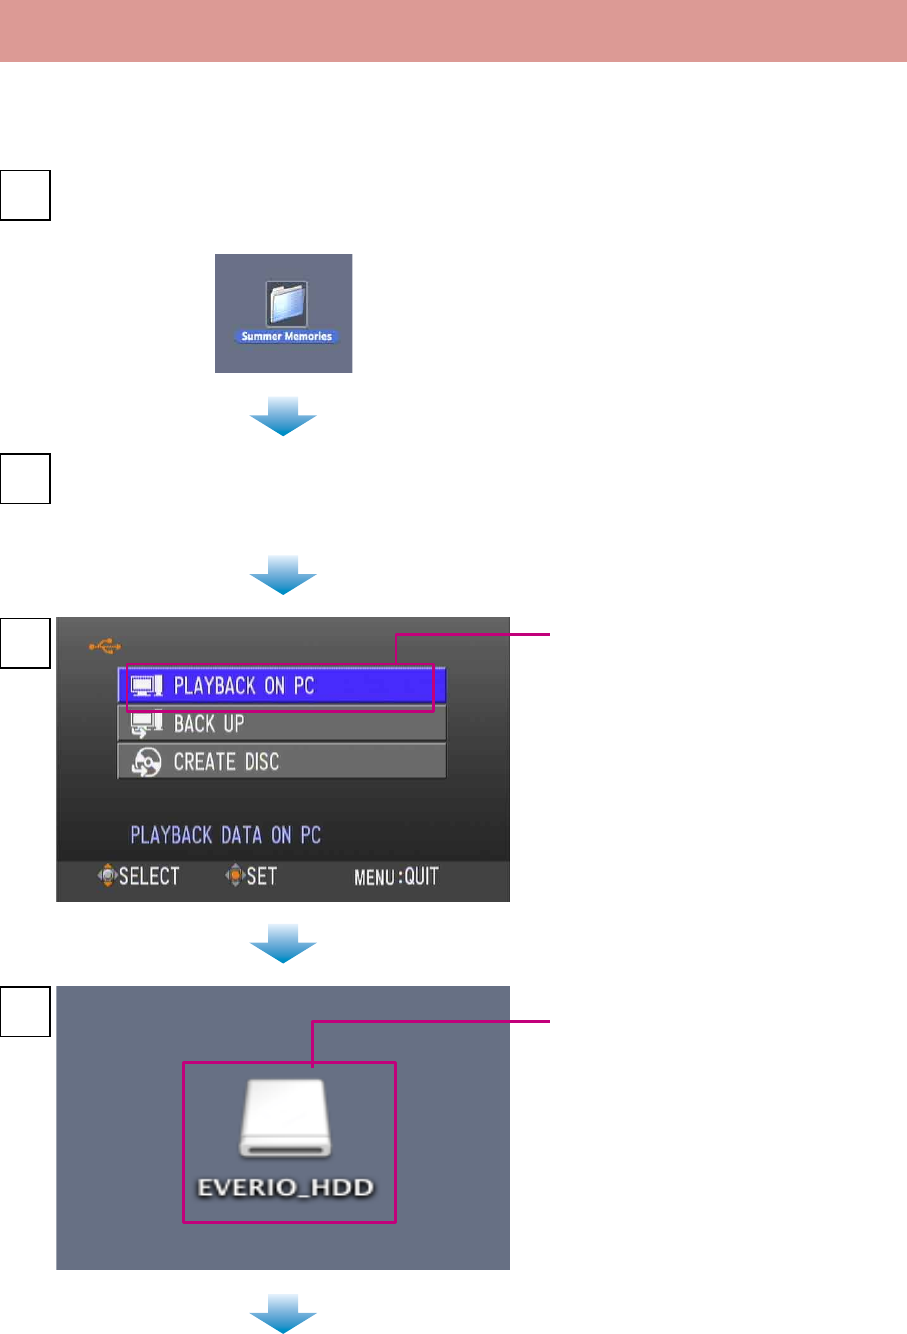
Preparation:
• Connect the camera to the PC.
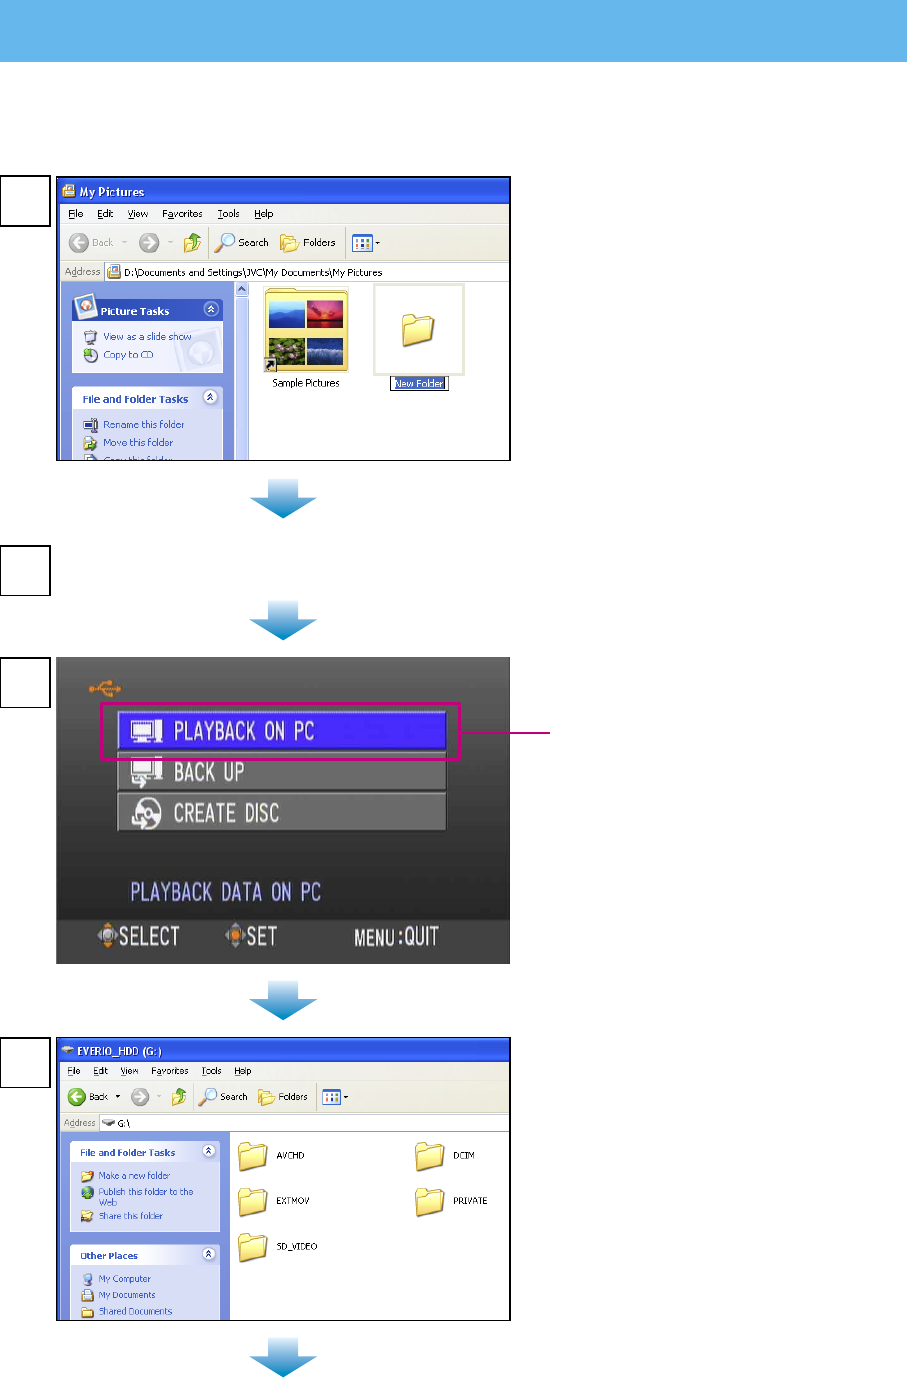
On the PC, create a folder to back
up files into.
2
1
Open the LCD monitor to turn on the camera.
3
On the camera,
select [PLAYBACK ON PC].
4On the PC,
Double-click [EVERIO_HDD] or
[EVERIO SD].
12
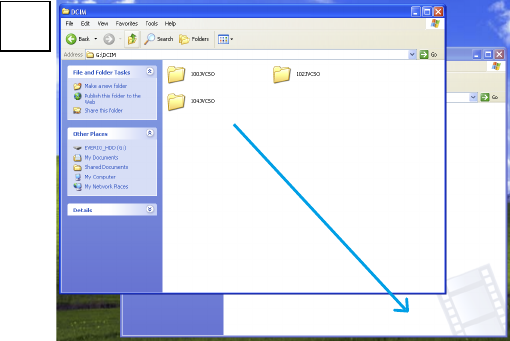
5Select the folder that you want to
back up, and drag & drop it into the
folder you created in step 1.
• AVCHD:
Folder that contains video files in
AVCHD format (gSh). If you want
to back up files, drag & drop the
folder.
• DCIM:
Folder that contains still image
files. If you want to back up files
individually, open this folder, and
drag & drop files such as
[PIC_0001.JPG] one by one.
<NOTES>
• For further details on the use of
folders, see pages 34-35.
• The above screens are for
Windows® XP. For Windows Vista®,
the screens are different.

13
Open the LCD monitor to turn on the camera.
2
1
On the camera,
select [PLAYBACK ON PC].
• A dialog box is displayed on the PC
screen. However, you do not need
to use the dialog box. PowerCinema
starts automatically.
3
Click [Browse Videos] (for video
playback) or [Browse Pictures] (for
still image playback).
4Click the media that contains
desired files.
Windows® 5
Playing Back Files on the PC
Preparation:
• Install the software.
• Connect the camera to the PC.
14
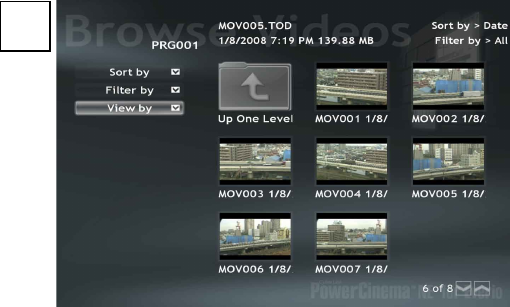
5Click the desired file.
If you click [Sort by]/[Filter by]/[View
by], searching options are displayed.
• [Sort by]:
The order of files is rearranged
according to item that you selected.
• [Filter by]:
Files are filtered according to the
item that you selected.
• [View by]:
You can change the number of
thumbnails on a screen.
For more information on detailed
operations of the software, refer to
their Read me or CyberLink web site.
15
Windows® 6-1
Creating a Video Disc (DIRECT DISC button)
1Press the DIRECT DISC button.
• PowerCinema starts.
2
3After the DVD writing finishes, exit PowerCinema and disconnect the camera.
You can use the DIRECT DISC button to save videos on a DVD. The videos in the Everio HDD that
you have not previously saved on a DVD with this operation are selected automatically and saved.
Preparation:
! Install the software.
# (Everio) Set the mode switch to !.
$ (Everio) Connect the camera to your computer and turn the power back on again (p. 8).
Set a new DVD.
Disc supported for creation Requirements
AVCHD Disc (High-definition) • Recordable DVD drive (and supported, recordable DVD media)
• Video in AVCHD format (gSh)
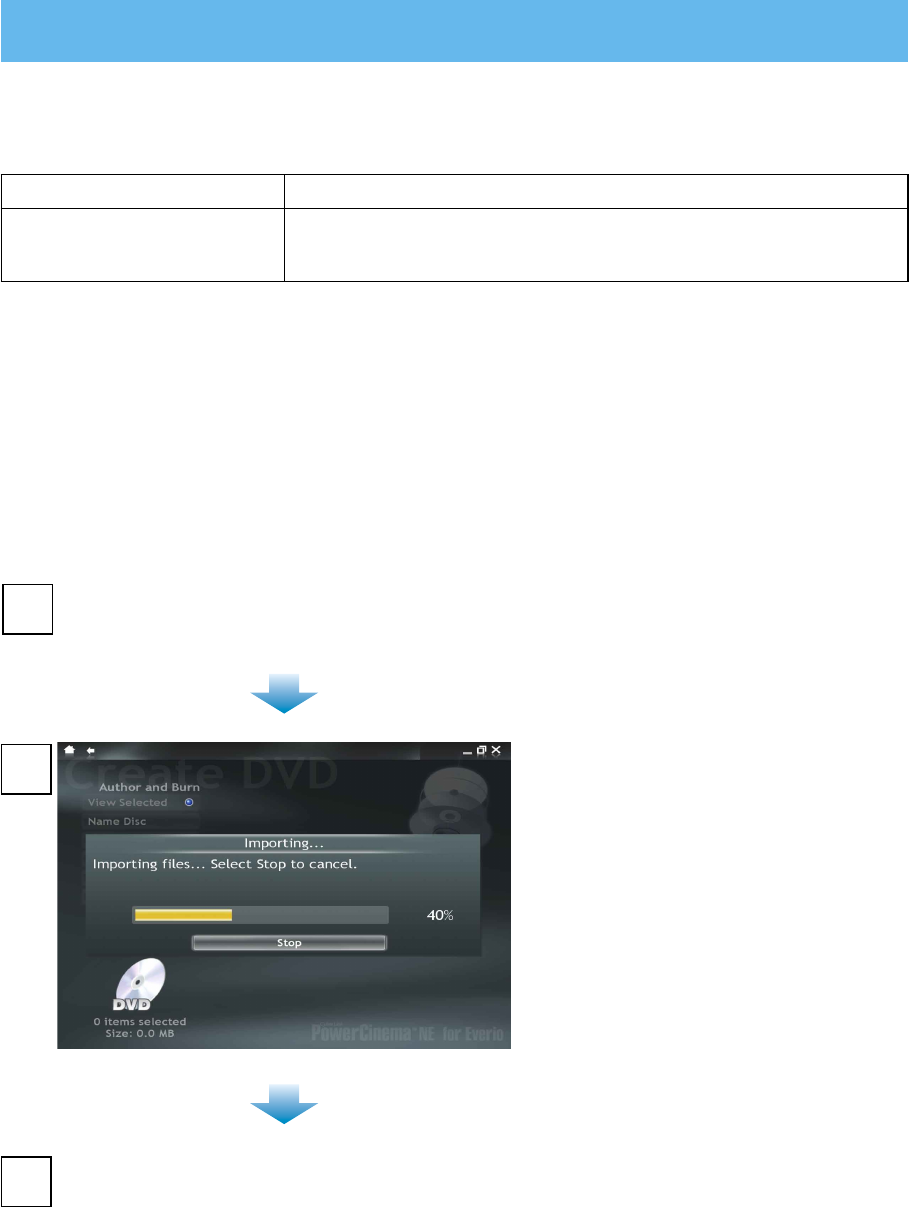
• A dialog box is displayed on the PC
screen. However, you do not need
to use the dialog box. File copy
starts automatically.
• When the progress bar disappears,
the process is complete.
16
Windows® 6-2
Creating a Video Disc (Using Software)
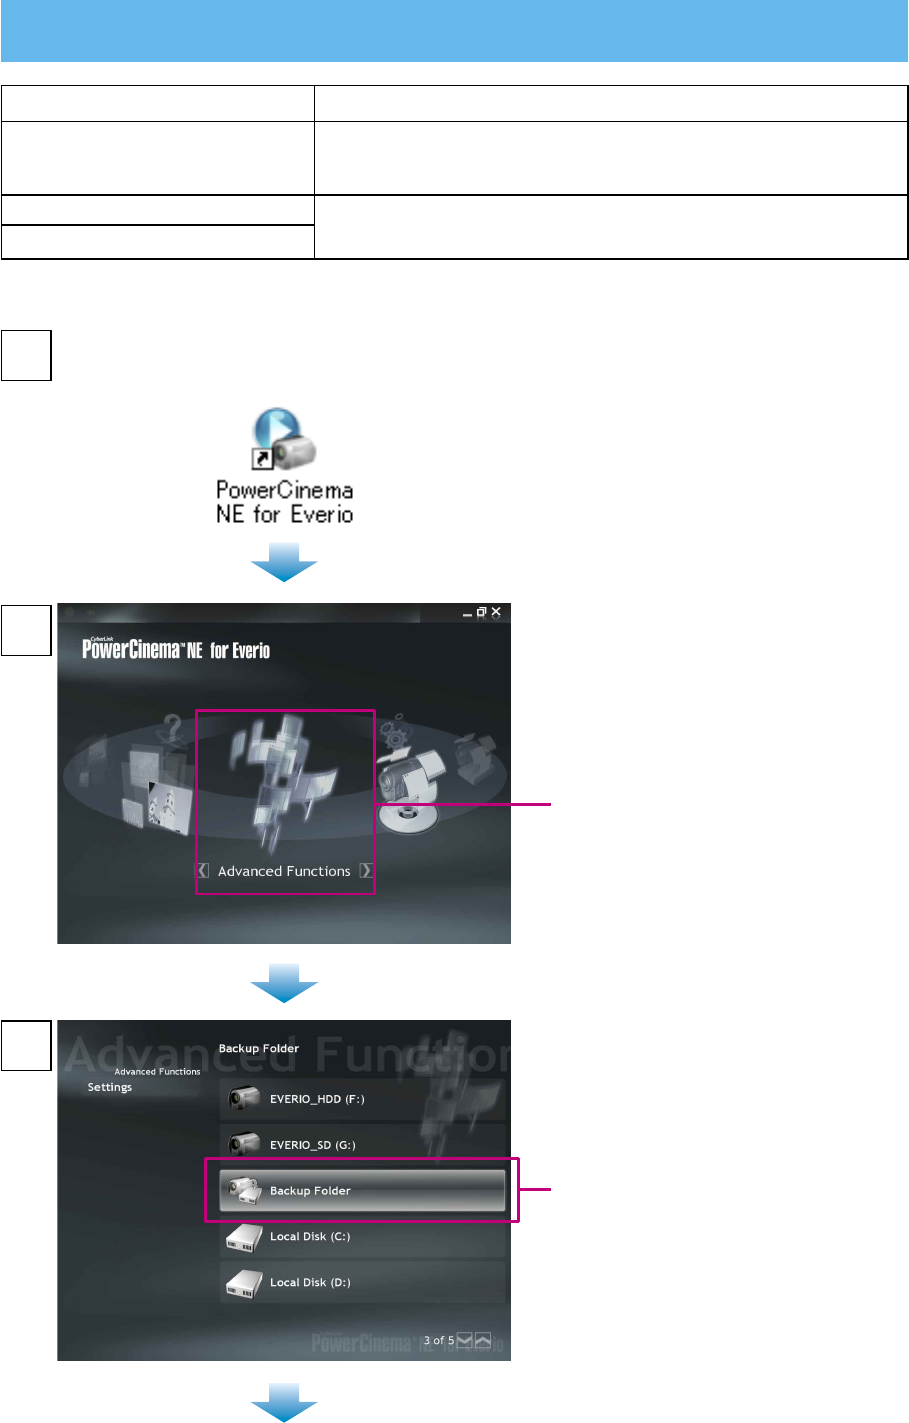
Click [Advanced Functions].
•
If you do not know which operation
to perform, click [Help]. To use
[Help], your computer needs to be
connected to the Internet.
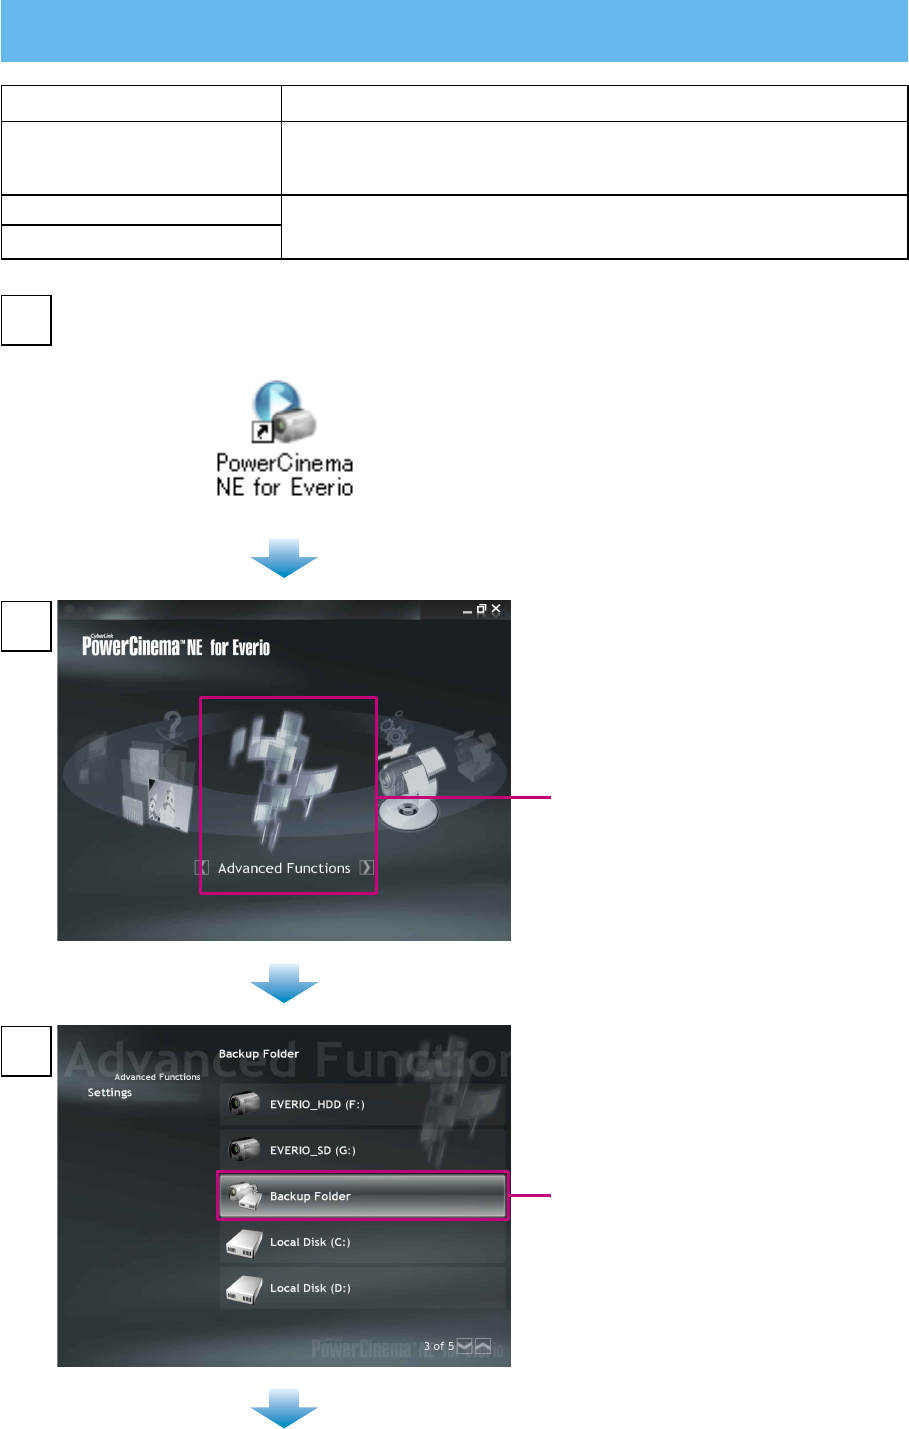
Double-click the PowerCinema icon.
• PowerCinema starts.
2
3
1
Click [Backup Folder].
Disc supported for creation Requirements
Blu-ray Disc (High-definition) l
Recordable Blu-ray disc drive (and supported, recordable Blu-
ray media)
l Video (all picture qualities)
AVCHD Disc (High-definition) l Recordable DVD drive (and supported, recordable DVD media)
l Video (all picture qualities)
DVD Disc (Standard Quality)
Preparation:
• Install the software.
17
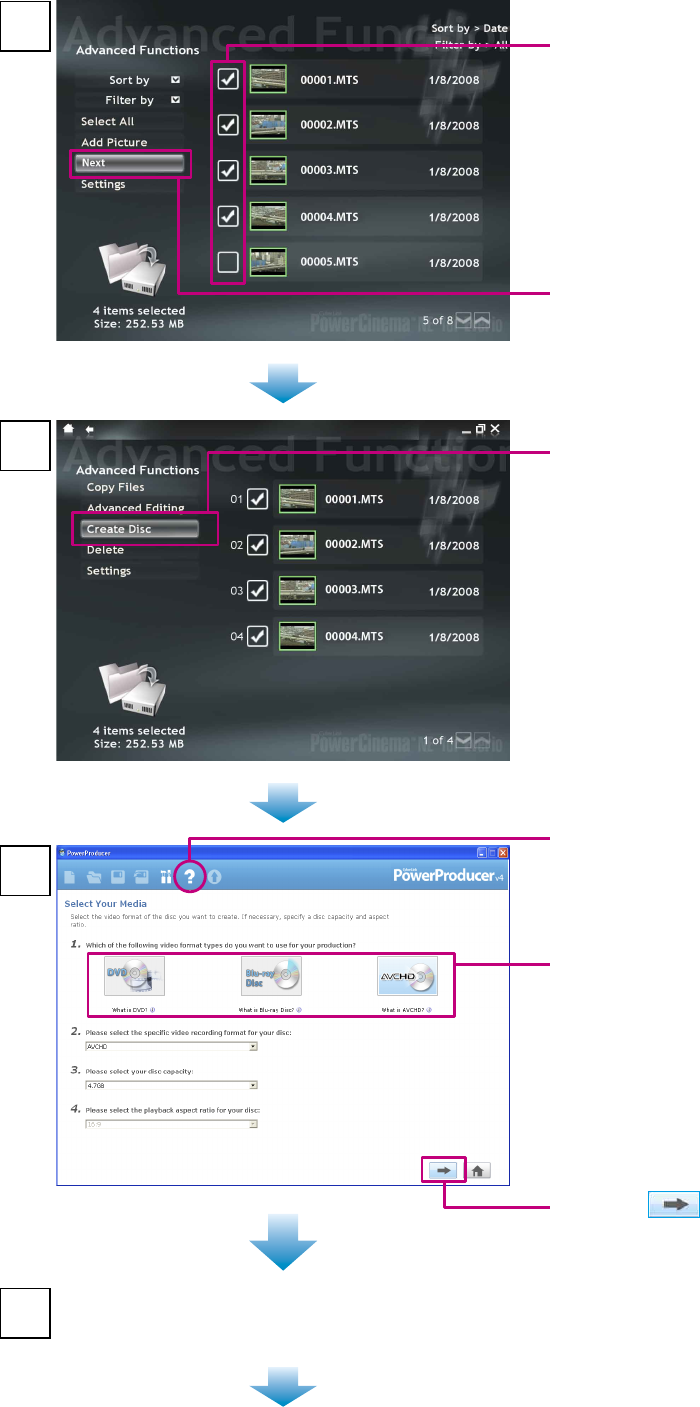
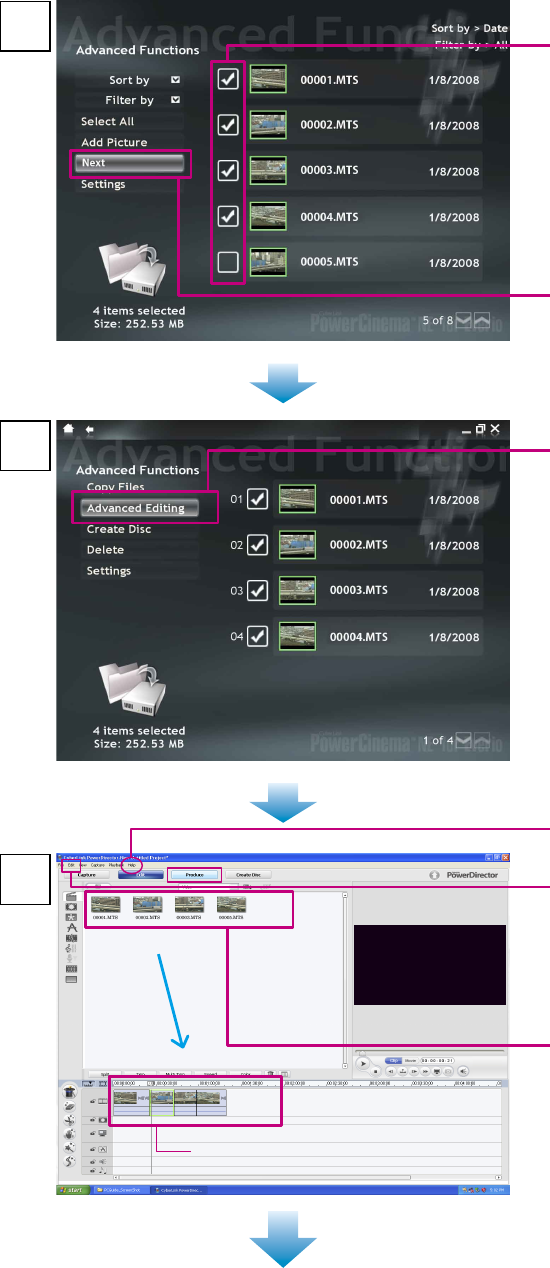
! Check the check box of the
desired file.
# Click [Next].
Click [Create Disc].
• PowerProducer starts.
4
5
6
7Check that the data has been completely imported
to PowerProducer and the screen in step 8 has been
displayed, and then exit PowerCinema.
! Select the disc that you want to
create.
• To create a Blu-ray Disc, click
[Blu-ray Disc].
• To create an AVCHD Disc, click
[AVCHD].
• To create a DVD video, click [DVD].
• If you do not know which
PowerProducer operation to perform
or function to use, click this.
# Click .
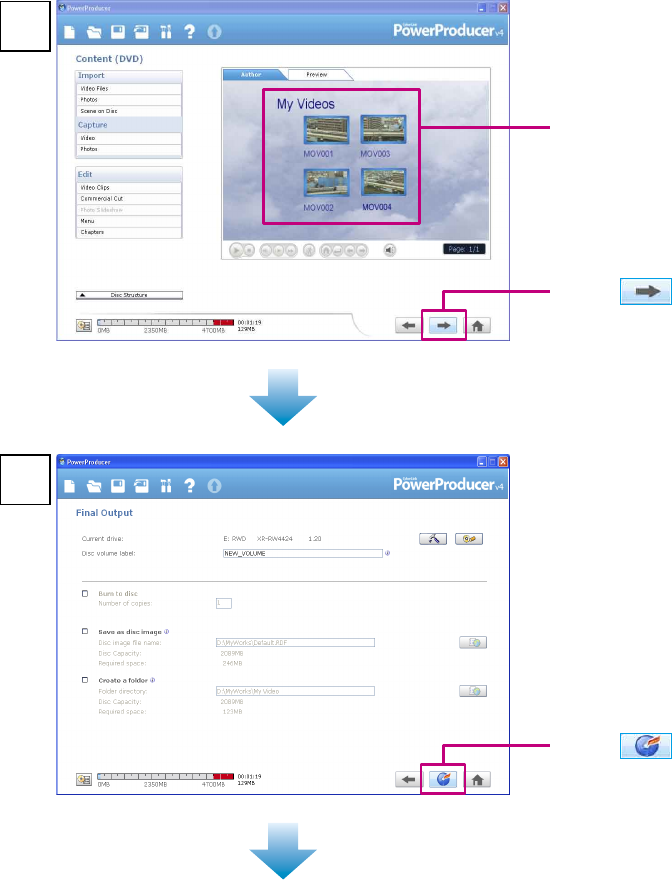
18
The disc creation starts.
◆To finish
➡Exit PowerProducer.
8
9
Registered file
• Four titles are created.
Click .
Click .
<NOTES>
•
Video conversion can take a long time when creating a DVD video. Video quality is also degraded.
• Video quality is degraded from high-definition to standard when creating a DVD.
•
Depending on the type of commercially available player or recorder, some discs created on a
computer may not play back correctly.
•
Depending on the type of computer, it may take more than 10 times the normal time taken to write a
video.
•
Depending on the type of computer, the computer may fail to erase recorded discs.
If this occurs, use [Disc Utilities] – [Erase a Disc] in PowerProducer to erase the discs before use.
•
Use the type of disc recommended by the drive manufacturer.
19
Windows® 7-1
Editing and Creating a Video Disc (Basic Editing)
Click [Advanced Functions].
•
If you do not know which operation
to perform, click [Help]. To use
[Help], your computer needs to be
connected to the Internet.
2
3
Double-click the PowerCinema icon.
• PowerCinema starts.
1
Click [Backup Folder].
Disc supported for creation Requirements
Blu-ray Disc (High-definition) l
Recordable Blu-ray drive (and supported, recordable Blu-ray
media)
l Video (all picture qualities)
AVCHD Disc (High-definition) l Recordable DVD drive (and supported, recordable DVD media)
l Video (all picture qualities)
DVD Disc (Standard Quality)
20
! Check the check box of the file
you want to edit.
# Click [Next].
Click [Advanced Editing].
• PowerDirector starts.
• Exit PowerCinema.
4
5
6
• Click [Help] if you do not know which
PowerDirector operation to use.
Track
! Check that [Aspect ratio] in the
[Edit] menu is [16:9].
• If you change the aspect ratio during
the editing, the editing will not be
saved.
# Select the thumbnails, and drop
them onto the video track.
• To perform advanced editing
➡(p. 23–24)
$ Click [Produce].
21
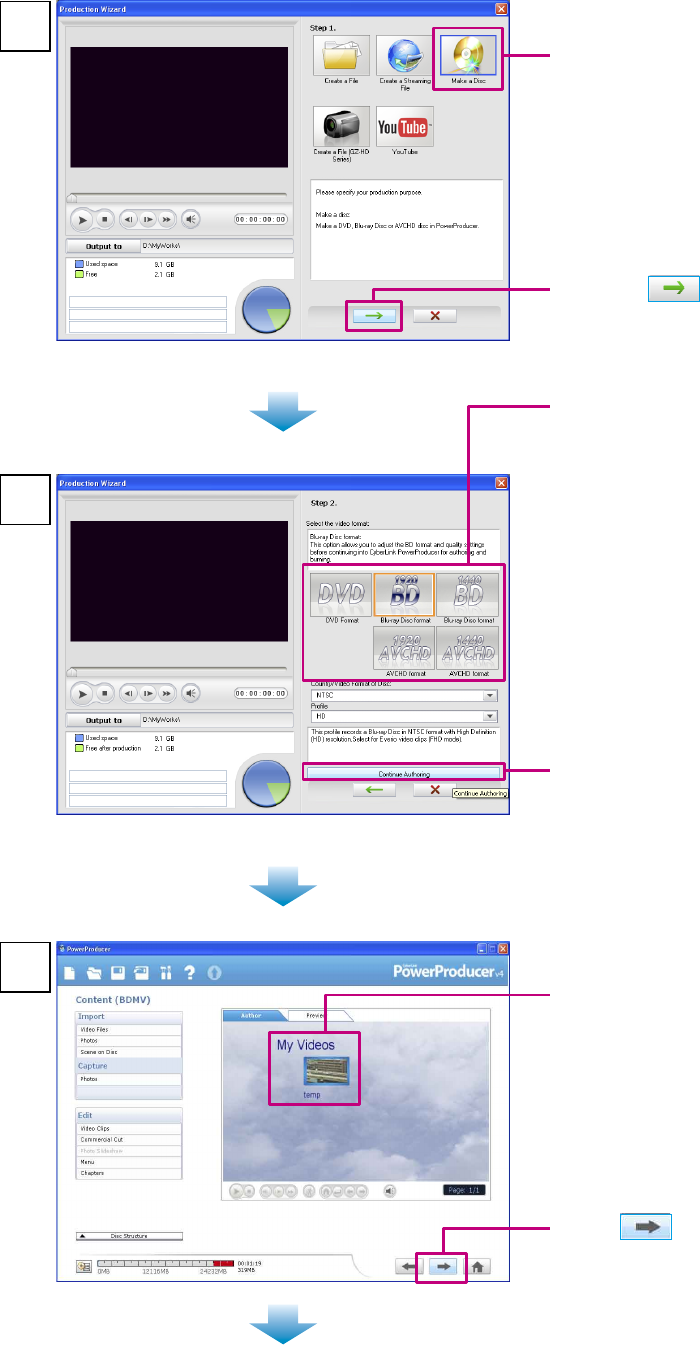
! Click [Make a Disc].
! Select the Video format.
• To create a Blu-ray disc
➡Click [1920 BD].
• To create an AVCHD disc
➡Click [1920 AVCHD].
• To create a DVD video disc
(standard picture quality)
➡Click [DVD].
7
8
# Click .
# Click [Continue Authoring].
• PowerProducer starts.
9
Registered file
• A title is created.
• To create a disc that has more than
2 titles
➡Click [Video Files] in the [Import]
menu to import the edit source file
you have saved (p. 25).
Click .

22
The disc creation starts.
◆To finish
➡Exit PowerProducer and PowerDirector.
10
Click .
<NOTES>
•
Video conversion can take a long time when creating a DVD video. Video quality is also degraded.
• Video quality is degraded from high-definition to standard when creating a DVD.
23
Windows® 7-2
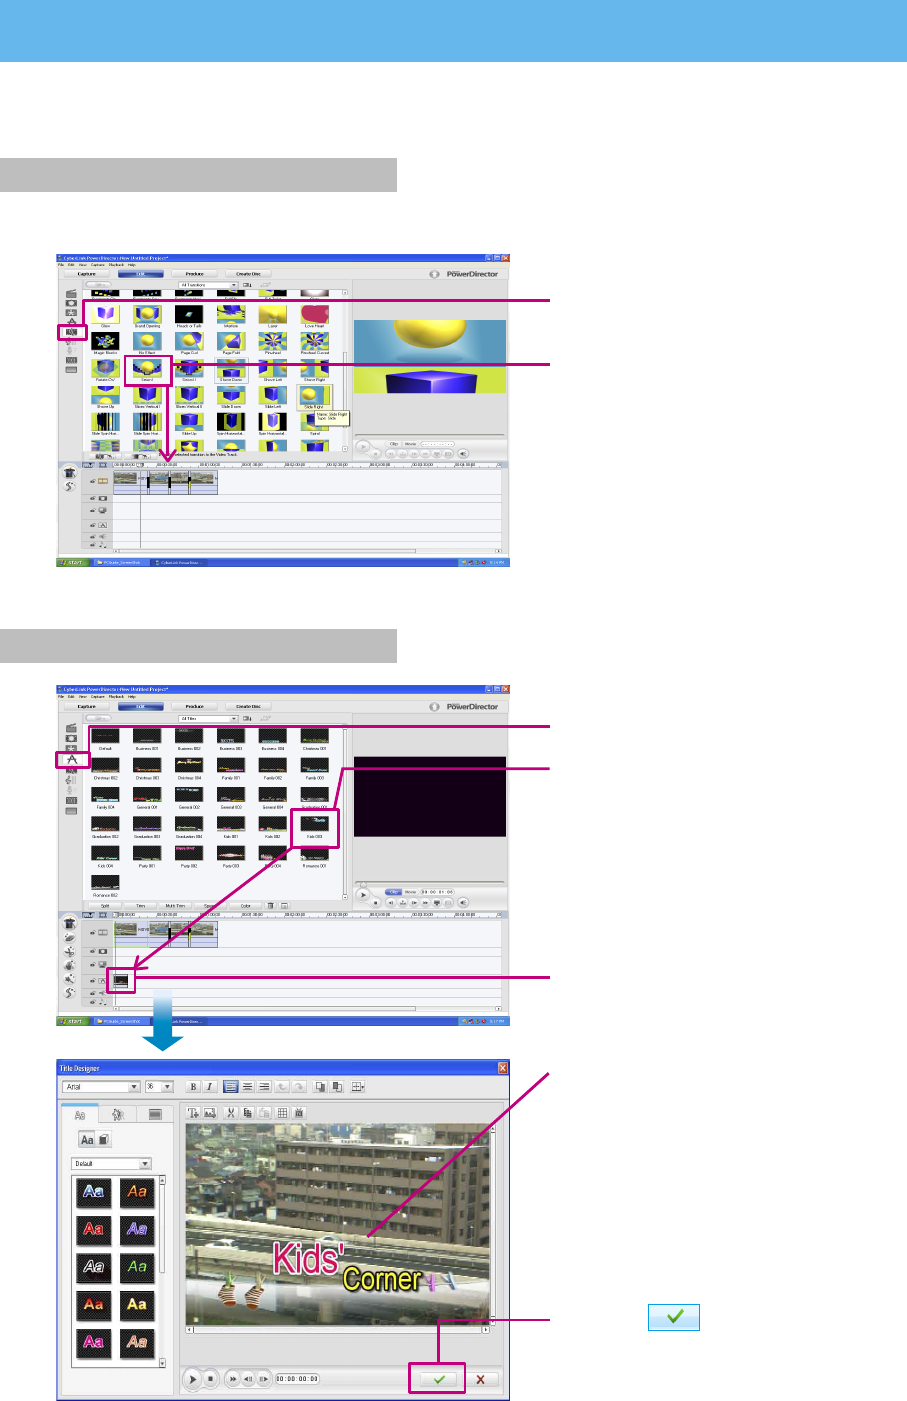
Editing and Creating a Video Disc (Advanced Editing)
You can use the wide range of functions in PowerDirector to perform full-scale editing of your videos.
Even with just a small amount of editing, you can completely change how your videos look.
Inserting Transitions (scene changes)
This function makes the transition of scenes appear natural.
! Display transitions.
# Select a transition, and drop it
between the files on the video
track.
Inserting Text into Your Video
! Display the title.
# Select the title, and drop it onto
the title track.
$ Double-click it.
% Double-click on the text, and
enter your own text.
•
Change the sample text.
• You can also set the color, size,
and movement of the text.
& Click .
24
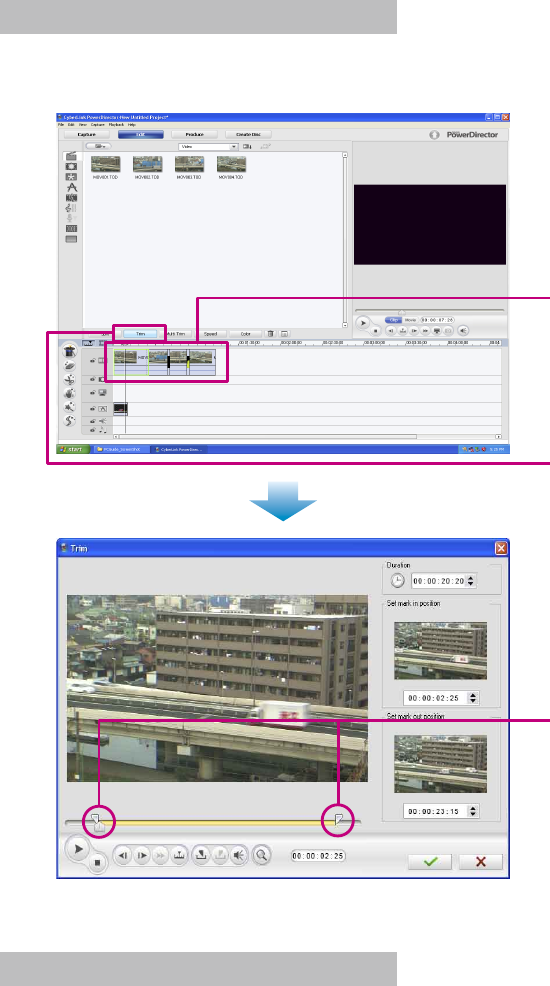
Trimming
If there are unwanted sections at the start or end of a scene (clip), you can delete those unwanted
sections.
! Select the video within the track.
# Click [Trim].
$ Drag to the start and end of the
clip.
• You can also set these points using
numerical values.
Other Functions
PowerDirector also features many other exciting functions.
For more information on operations of the software, see the the supplied User's Guide.
◆Adding Effects
➡Effects
◆Moving photographs within videos
➡PiP
◆Using a sound file as BGM
➡BGM
<NOTE>
• While editing, always remember to frequently save the changes using [Save] in the [File] menu.
25
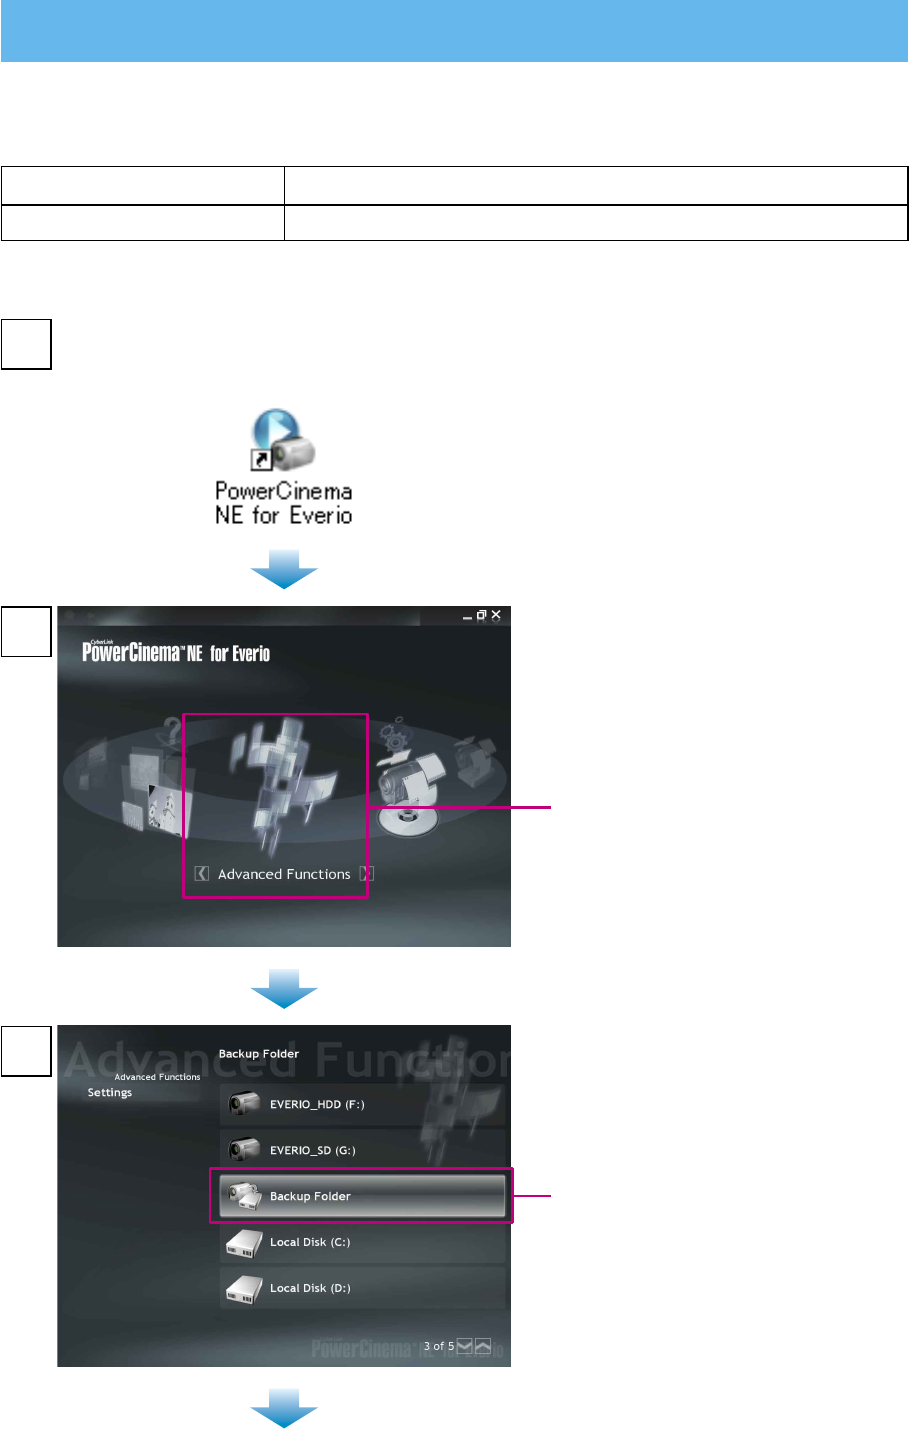
Double-click the PowerCinema icon.
• PowerCinema starts.
1
2
3
Click [Backup Folder].
Click [Advanced Functions].
•
If you do not know which operation
to perform, click [Help]. To use
[Help], your computer needs to be
connected to the Internet.
File supported for creation Requirements
Edit source file l
Video in AVCHD format (gSh)
Windows® 8
Editing and Saving a File (AVCHD)
You can edit and save video files in AVCHD format. Edited files can be also saved on a video disc
(p. 21).

26
! Check the check box of the file
you want to edit.
# Click [Next].
Click [Advanced Editing].
• PowerDirector starts.
4
5
6Check that the data has been completely imported to
PowerProducer, and exit PowerCinema.
7
Track
• Click [Help] if you do not know which
PowerDirector operation to use.
! Check that [Aspect ratio] in the
[Edit] menu is [16:9].
• If you change the aspect ratio during
the editing, the editing will not be
saved.
# Select the thumbnails, and drop
them onto the video track.
• To perform advanced editing
➡(p. 23–24)
$ Click [Produce].
27
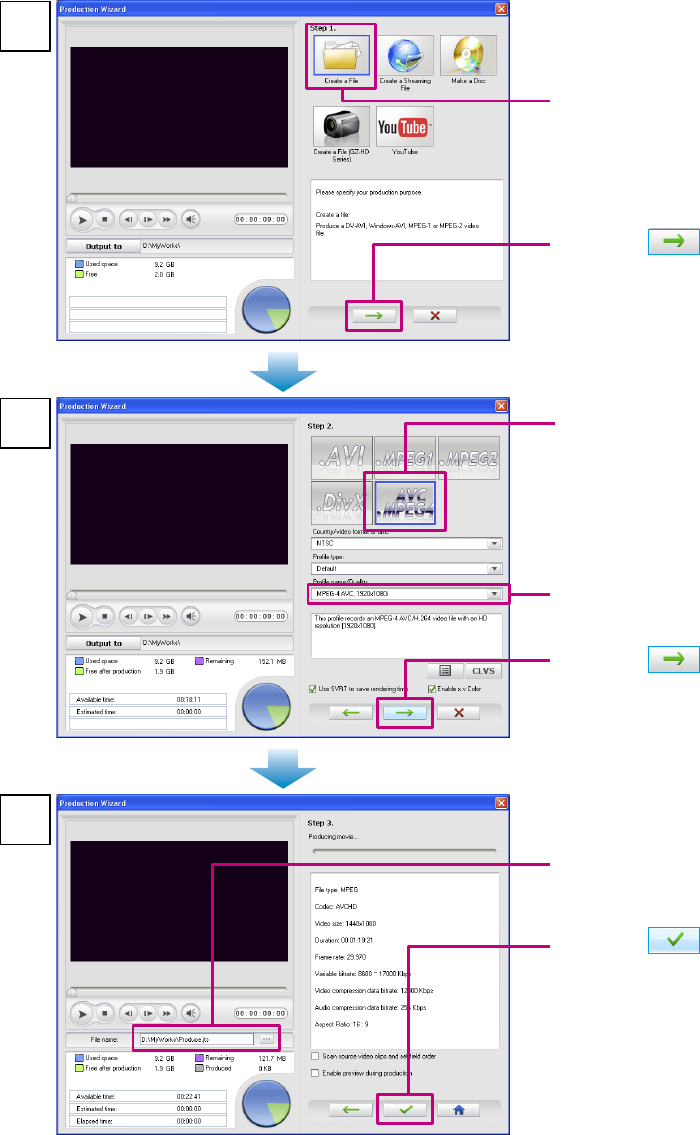
! Click [Create a File].
! Click [AVC.MPEG4].
8
9
10
! Check the file save destination
and file name.
# Click .
• The edit source file (file
extension .JTS) is saved.
• To use the edit source file
(file extension .JTS) when creating
a video disc, see step 9 on page 21.
# Click .
$ Click .
<NOTES>
• Depending on the performance and condition of your computer, the PowerDirector preview display
may not play back smoothly.
• The preview display is for checking the video while you are editing. Therefore, the picture quality is
lower than the actual video picture quality.
• Screens and descriptions in the PowerDirector help files match the packaged version of
PowerDirector. Therefore, some functions that do not operate in the version of PowerDirector
included with your Everio may be shown.
• The edit source file (file extension .JTS) can be used with PowerCinema, PowerDirector and
PowerProducer.
# Select
[MPEG-4 AVC, 1920x1080i].
28
If you have a DVD burner (sold separately) connected to your computer, you can save edit source
files (file extension .JTS) onto a disc. If you are using a DVD burner (CU-VD50/CU-VD40), you can
view files recorded onto discs on a TV by connecting the DVD burner to the TV. (You do not need to
connect your Everio.)
1Connect the DVD burner to your computer.
• For details, see the instruction manual of your DVD burner.
2Record the edit source files (file extension .JTS) onto a disc using the Power2Go 5.5Lite
software that came with your DVD burner (not included with the CU-VD3).
3Connect the DVD burner (CU-VD50/CU-VD40) to the TV, and play back the disc.
• For details, see the instruction manual of your DVD burner (CU-VD50/CU-VD40).
On the DVD burner CU-VD40 you can play back MPG files.
On the DVD burner CU-VD50 you can play back JTS files.
◆If you cannot record onto a DVD/cannot play back using the DVD burner
• If the file size is larger than 4 GB, reduce the length of the video so that the file size is smaller
than 4 GB.
• For JTS files, make sure [Create a File] is selected in step 8, and then [AVC.MPEG4] and
[MPEG-4 AVC, 1920x1080i] are selected in step 9 in the “Editing and Saving a File (AVCHD)”.
• DVD burner (CU-VD3) cannot be connected to a TV. If you are using a CU-VD3 burner,
connect it to your Everio for playback. You can also view files on the TV by connecting your
Everio to the TV.
Disc supported for creation Requirements
AVCHD disc
(High-definition)
l DVD burner (and supported, recordable DVD media)
l Edit source file (file extension .JTS) of video recorded in AVCHD
format(gSh)
Windows® 9
Playing Back on a DVD burner

29
Windows® 10
FAQ
If you are experiencing difficulties, please consult this section.
If you cannot find the solution here, please consult the User's Guides for each software package.
◆PowerCinema NE For Everio
Q: When playing back video files (file extension .JTS), frames are dropped and the sound cuts
out.
A: If thumbnails are not displayed, they are being created. If you play back files while thumbnails are
being created, frame dropping occur. Make sure your computer operating environment is compatible
with PowerCinema.
◆PowerDirector 6 NE
Q: When playing back video files (file extension .JTS) after editing, frames are dropped and the
sound cuts out.
A: When creating video files, make sure [Use SVRT to save rendering time] is unchecked in the screen
shown during step 9 of "Editing and Saving a File" (p. 27). But in this case, creating the JTS file can
take 10 times longer than when [Use SVRT to save rendering time] is checked. If you don’t have any
problems with playing back video files, check [Use SVRT to save rendering time].
Q: There are problems with the sound or image of edited (effects added) sections of video on the
created DVD video or Blu-ray disc.
A: If you selected [Make a Disc] in step 7 in the "Editing and Creating a Video Disc (Basic Editing)"
(p. 19), this problem may occur. Select [Create a File] instead and create a JTS file (p. 27). Next,
import this file using PowerProducer, and then create the disc.
◆PowerProducer 4 NE
Q: How many titles and chapters can be set for Blu-ray/AVCHD/DVD discs?
A: You can set 98 titles for one disc, and 99 chapters per title.
Q: I cannot import a video file that has a short recording time.
A: Files shorter than 2 seconds cannot be imported.
Q: I cannot import more than 100 video files.
A: For Blu-ray/AVCHD/DVD discs, you can only import up to 98 files.
If there are many video files to import, an error may be displayed. Reduce the number of files to be
imported at one time to below 50. If you do not need to arrange all of the files in the disc main menu as
titles, you can connect a number of video files together using PowerDirector to reduce the number of
files (number of titles).
Q: Thumbnails are not displayed.
A: If there are many titles, this problem may occur depending on your computer's operating environment.
However, this problem will not affect any discs that you create.
◆PowerDVD 7 NE
Q: Can I play back Blu-ray Discs?
A: No, you cannot. Please use your software which supports Blu-ray Disc. You can play back only
AVCHD discs and DVDs with PowerDVD 7 NE.
Q: I have PowerDVD which supports Blu-ray Discs. Do I still need to install PowerDVD 7 NE?
A: You need to install it for AVCHD disc play back.
However, installing PowerDVD 7 NE will uninstall PowerDVD which supports Blu-ray Discs; therefore
you cannot play back Blu-ray Discs. If you do not create AVCHD discs, installation is not required.
30
Macintosh 1
You Can Do This
After recording video or still images, you can connect the camera to your computer and use them with
Apple software.
n Editing video (AVCHD)
Hardware:
• Intel® processor (Intel® CoreTM Duo 1.66 GHz or more recommended.)
• USB 2.0 connector is required.
OS:
Mac OS X (10.4.4 to 10.4.11, 10.5.1 to 10.5.2)
RAM:
At least 1 GB
System Requirements
For Macintosh Users
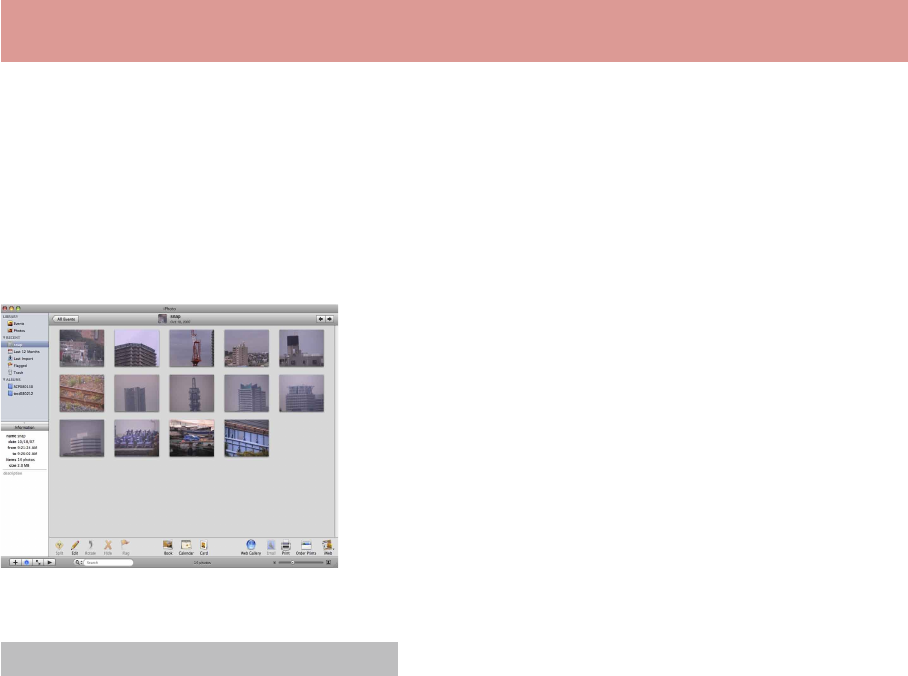
n Make the most of your still images with iPhoto!
If you use iPhoto, you can import still images into your
computer, view them in an album and print them out.
For further details about the operations, see the iPhoto Help.
Use a software from Apple or other commercially available software.
31
Macintosh 2
Connecting the Camera to the Macintosh
Preparation:
Close the LCD monitor to turn off the camera.
<NOTES>
• Never disconnect the USB cable while the access lamp on the camera lights or blinks.
• Do not turn off the camera when the USB cable is connected, to prevent malfunctions of the
computer.
• Connect the camera directly to the computer, not through a hub.
• Do not use an extension USB cable.
• Do not delete, move, or rename the files and folders in the camera from the computer.
◆ When you have finished operation
Always follow the procedures below when disconnecting the camera, or turning off the camera/
computer power.
Failing to do so may cause damage to the camera and computer.
1) Drag & drop the recording medium icon on the desktop into the [Trash] icon. If the confirmation
message appears, click [OK].
2) Confirm that the access lamp on the camera does not light or blink. If the access lamp lights or
blinks, wait until it is turned off before proceeding.
3) Disconnect the USB cable.
4) Turn off the camera and computer.
AC Adapter
DC Connector
To AC Outlet
USB Cable USB Connector
USB Connector
32
Macintosh 3
File Backup on the Macintosh
Preparation:
Connect the camera to the computer with the USB cable.
On the camera,
select [PLAYBACK ON PC].
3
4
On the computer, create a folder to back up files
into.
1
On the computer,
double-click [EVERIO_HDD] or
[EVERIO_SD].
Open the LCD monitor to turn on the camera.
2
33
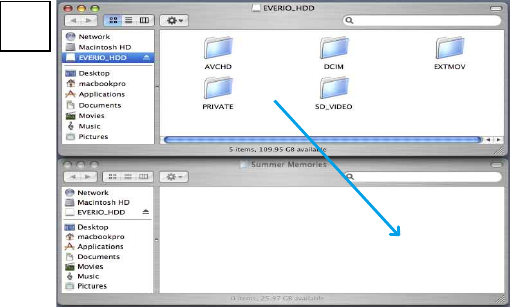
5Select the folder that you want to
back up, and drag & drop it into the
folder you created in step 1.
• AVCHD:
Folder that contains video files in
AVCHD format (gSh). If you want
to back up files, drag & drop the
folder.
• DCIM:
Folder that contains still image
files. If you want to back up files
individually, open this folder, and
drag & drop files such as
[PIC_0001.JPG] one by one.
<NOTES>
• For further details on the use of
folders, see page 34-35.
• You can also back up files with
iPhoto. For further datails, see [Help]
of iPhoto.

34
For All Users 1-1
Folder Structure and Extensions (EVERIO_HDD)
For All Users
X = number
Contains the still image folders.
Video file in AVCHD format (gSh)
[DEM_XXXX.MTS]
[MOV_XXXX.MTS]
[MOV_XXXX.MTS]
[XXXJVCSO]
[XXXJVCSO]
[PIC_XXXX.JPG]
[PIC_XXXX.JPG]
[XXXJVCSO]
[DCIM]
[EXTMOV]
[PRIVATE]
[AVCHD]
EVERIO_HDD
[BDMV]
[STREAM]
[XXXXX.MTS]
[XXXXX.MTS]
[BACKUP]
[CLIPINFO]
[PLAYLIST]
[INDEX.BDM]
[MOVIEOBJ.BDM]
Contains management information files of
event information and/or DVD creation for
the files taken with the camera.
Still image file
Demonstration files are saved. Video files
with defective management information
are also saved.

35
* Information such as the date and time of recording, recorded with the video file.
Extensions
Video files :“.MTS” : Video files in AVCHD format (gSh)
Still image files :“.jpg”
For Windows®, the file extension may not appear depending on the [FOLDER] option setting.
[DEM_XXXX.MTS]
[MOV_XXXX.MTS]
[MOV_XXXX.MTS]
[JVC]
[AVCHD]
[XXXJVCSO]
[XXXJVCSO]
[PIC_XXXX.JPG]
[PIC_XXXX.JPG]
[XXXJVCSO]
[DCIM]
[EXTMOV]
[PRIVATE]
EVERIO_SD
[BDMV]
[STREAM]
[XXXXX.MTS]
[XXXXX.MTS]
[BACKUP]
[CLIPINFO]
[PLAYLIST]
[INDEX.BDM]
[MOVIEOBJ.BDM]
Contains the still image folders.
Video file in AVCHD format (gSh)
Contains management information files of
event information and/or DVD creation for
the files taken with the camera.
Still image file
For All Users 1-2
Folder Structure and Extensions (EVERIO_SD)
Demonstration files are saved. Video files
with defective management information
are also saved.

36
For All Users 2
Customer Support Information
Contact us for information on the provided software
Use of this software is authorized according to the terms of the software license.
JVC
When contacting the nearest JVC office or agency in your country (refer to the JVC Worldwide Service
Network at http://www.jvc-victor.co.jp/english/worldmap/index-e.html) about this software, please have
the following information ready.
• Product Name
• Model
• Problem
• Error Message
• PC
Manufacturer
Model (Desktop/Laptop)
CPU
OS
Memory (MB)
Available Hard Disk Space (GB)
Please note that it may take some time to respond to your questions, depending on their subject
matter.
JVC cannot answer questions regarding basic operation of your PC, or questions regarding
specifications or performance of the OS, other applications or drivers.
CyberLink
Telephone/fax support
Location Language Office hours
(Mon. to Fri.) Phone # Fax #
Germany
English / German /
French / Spanish /
Italian
9:00 am to 5:00 pm +49-700-462-92375 +49-241-70525-25
Taiwan Mandarin 9:00 am to 6:00 pm +886-2-8667-1298
ext. 333 +886-2-8667-1300
Japan Japanese 10:00 am to 5:00 pm +81-3-3516-9555 –
Paid voice support
Location Language Lines are open
(Mon. to Fri.) URL
U.S.A. English 1:00 pm to 10:00 pm
CST
http://www.cyberlink.com/english/cs/
support/new_site/voice_support.jsp
Support web/e-mail
Language URL/e-mail address
English http://www.cyberlink.com/english/cs/support/new_site/
support_index.html
German / French / Spanish /
Italian goCyberlink@aixtema.de
Japanese http://jp.cyberlink.com/support/

37
IMPORTANT
TO CUSTOMERS: PLEASE MAKE SURE
TO READ THIS CAREFULLY BEFORE
INSTALLING OR USING THE SOFTWARE
PROGRAM NAMED “DIGITAL PHOTO
NAVIGATOR” (“Program”) ON YOUR PC.
The right to use the Program is granted by Victor
Company of Japan, Limited (“JVC”) to You only
on the condition that You agree to the following.
Should You not agree to the terms hereof, You
may not install or use the Program. HOWEVER,
INSTALLING OR USING THE PROGRAM
INDICATES YOUR ACCEPTANCE OF THESE
TERMS AND CONDITIONS.
1 COPYRIGHT; OWNERSHIP
You acknowledge that all copyrights and other
intellectual property rights in the Program are
owned by JVC and its licensor, and remain
vested in JVC and such licensor. The Program is
protected under the copyright law of Japan and
other countries, and related Conventions.
2 GRANT OF LICENSE
(1) Subject to the conditions of this Agreement,
JVC grants to You a non-exclusive right to
use the Program. You may install and use
the Program on a HDD or other storage
devices incorporated in Your PC.
(2) You may make one (1) copy of the Program
solely for your personal backup or archival
purposes.
3 RESTRICTION ON THE PROGRAM
(1) You may not reverse engineer, decompile,
disassemble, revise or modify the Program,
except to the extent that expressly permitted
by applicable law.
(2) You may not copy or use the Program, in
whole or in part, other than as expressly
specified in this Agreement.
(3) You have no right to grant a license to use
the Program, and may not distribute, rent,
lease or transfer the Program to any third
party or otherwise let them use the Program.
4 LIMITED WARRANTY
JVC warrants that any media in which the
Program is embodied are free from any
defects in materials and workmanship for a
period of thirty (30) days from the date of Your
purchasing any our products accompanying
the Program. JVC’s entire liability and your
exclusive remedy in connection with the
Program shall be replacement of such defective
media. EXCEPT FOR THE EXPRESS
WARRANTIES STATED HEREIN AND TO
THE EXTENT PERMITTED BY APPLICABLE
LAW, JVC AND ITS LICENSORS DISCLAIM
ANY OTHER WARRANTIES, EITHER
EXPRESS OR IMPLIED, INCLUDING BUT
NOT LIMITED TO IMPLIED WARRANTIES
OF MERCHANTABILITY AND FITNESS FOR
A PARTICULAR PURPOSE IN REGARD TO
THE PROGRAM AND THE ACCOMPANYING
PRINTED MATERIALS. SHOULD THERE BE
ANY PROBLEM ARISING FROM OR CAUSED
BY THE PROGRAM, YOU SHOULD SETTLE
ALL SUCH PROBLEM AT YOUR OWN COST
AND EXPENSE.
5 LIMITED LIABILITY
TO THE EXTENT PERMITTED BY
APPLICABLE LAW, IN NO EVENT SHALL
JVC AND ITS LICENSORS BE LIABLE FOR
ANY INDIRECT, SPECIAL, INCIDENTAL
OR CONSEQUENTIAL DAMAGES
WHATSOEVER, REGARDLESS OF THE
FORM OF ACTION WHETHER IN CONTRACT,
TORT OR OTHERWISE ARISING OUT OF
OR IN CONNECTION WITH THE USE OF
OR INABILITY TO USE THE PROGRAM,
EVEN IF JVC HAS BEEN ADVISED OF THE
POSSIBILITY OF SUCH DAMAGES. YOU
WILL INDEMNIFY AND HOLD HARMLESS
JVC FROM ANY LOSS, LIABILITY OR
COST ARISING OUT OF OR IN ANY WAY
CONNECTED TO CLAIMS FROM ANY THIRD
PARTY RELATING TO THE USE OF THE
PROGRAM.
For All Users 3
JVC Software License Agreement

38
6 TERM
This Agreement will become effective on the
date when You install and use the Program on
Your machine, and continue to be in effect until
the termination under the following provision.
Should You breach any provision of this
Agreement, JVC may terminate this Agreement
without giving any notice to You. In this event,
JVC may claim against You for any damages
caused by Your breach. Should this Agreement
be terminated, You must immediately destroy
the Program stored in Your machine (including
the erasing from any memory in Your PC), and
no longer own such Program.
7 EXPORT CONTROL
You agree that You will not ship, transfer or
export the Program or underlying information
and technology to any countries to which Japan
and other relevant countries have initiated an
embargo on such goods.
8 U.S. GOVERNMENT USER
If You are an agency of the United States of
America (the “Government”), You acknowledge
JVC’s representation that the Program is
a “Commercial Item” as defined in Federal
Acquisition Regulation (FAR) part 2.101 (g)
consisting unpublished “Commercial Computer
Software” as those items are used at FAR part
12.212 and is only licensed to You with the
same use rights JVC grants all commercial end
users pursuant to the terms of this Agreement.
9 GENERAL
(1) No modification, change, addition, deletion
or other alternation of or to this Agreement
will be valid unless reduced to writing and
signed by an authorized representative of
JVC.
(2) If any part of this Agreement is held
invalid by or in conflict with any law having
jurisdiction over this Agreement, the
remaining provisions will remain in full force
and effect.
(3) This Agreement shall be governed by and
interpreted under the laws of Japan. The
Tokyo District Court has jurisdiction over all
disputes which may arise with respect to the
execution, interpretation and performance of
this Agreement.
Victor Company of Japan, Limited
NOTE
If You acquired the Program in Germany, the
provisions of Sections 4 (Limited Warranty)
and 5 (Limited Liability) provided above will be
replaced with those of the German version of
this Agreement.
CAUTION:
• Operate this equipment according to the
operating procedures described in this manual.
• Use only the provided CD-ROM. Never use
any other CD-ROM to run this software.
• Do not attempt to modify this software.
• Changes or modifications not approved by
JVC could void user’s authority to operate the
equipment.
How to handle a CD-ROM
• Take care not to soil or scratch the mirror
surface (opposite to the printed surface). Do
not write anything or put a sticker on either
the front or back surface. If the CD-ROM
gets dirty, gently wipe it with a soft cloth
outward from the center hole.
• Do not use conventional disc cleaners or
cleaning spray.
• Do not bend the CD-ROM or touch its mirror
surface.
• Do not store your CD-ROM in a dusty, hot
or humid environment. Keep it away from
direct sunlight.
You can find the latest information (in English)
on the provided software program at our world
wide web server at http://www.jvc-
victor.co.jp/english/global-e.html

39
MEMO

40
© 2008 Victor Company of Japan, Limited 0608MNH-AL-OT
M8H4
