JVC GZ HD300BAH M9H4 User Manual HD300BAH, HD300RAH, HD300SAH, HD310BAH, HD320BAH LYT2061 002B M
GZ-HD300RAH GZ-HD300RAH LYT2061-002B-M English, Simplified Chinese,
GZ-HD300SAH GZ-HD300SAH LYT2061-002B-M English, Simplified Chinese,
GZ-HD310BAH GZ-HD310BAH LYT2061-002B-M English, Simplified Chinese,
GZ-HD320BAG GZ-HD320BAG, GZ-HD320BAH LYT2061-002B-M English, Simplified Chinese,
GZ-HD300BAG GZ-HD300BAG, GZ-HD320BAG LYT2061-002B-M English, Simplified Chinese,
User Manual: JVC GZ-HD300BAH GZ-HD300BAH, GZ-HD300RAH, GZ-HD300SAH, GZ-HD310BAH, GZ-HD320BAH English, Simplified Chinese,
Open the PDF directly: View PDF ![]() .
.
Page Count: 88

AG/AH
AH
AG/AH
Dear Customers
Thank you for purchasing this camcorder.
Before use, please read the safety
information and precautions contained
in pages 6 and 7 to ensure safe use of
this product.
尊敬的顾客
感谢您购买此款摄像机。在使用之前,
请仔细阅读说明书第 6 页和第 7 页上
的使用安全注意事项,以保证安全使用
本产品。
ENGLISH
中文
GZ-HD320
GZ-HD310
GZ-HD300
INSTRUCTIONS
使用说明
CAMCORDER
摄像机
CSEN
2EN
Easy Start Guide
CAUTION
• Be sure to use JVC battery packs. If you use any other battery packs besides
JVC battery packs, safety and performance can not be guaranteed.
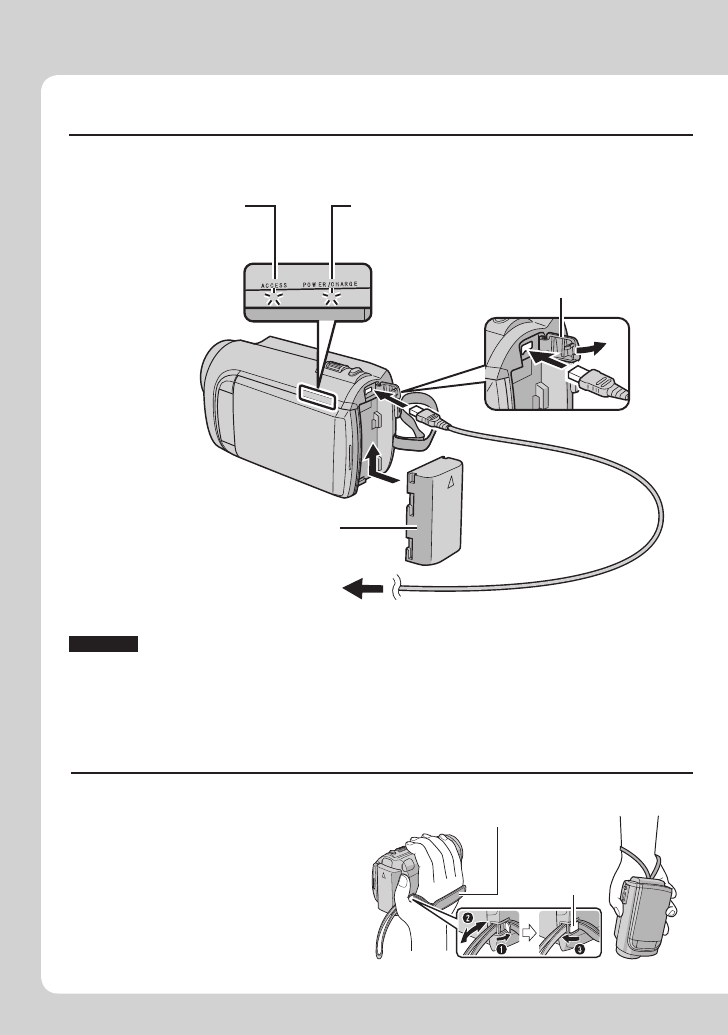
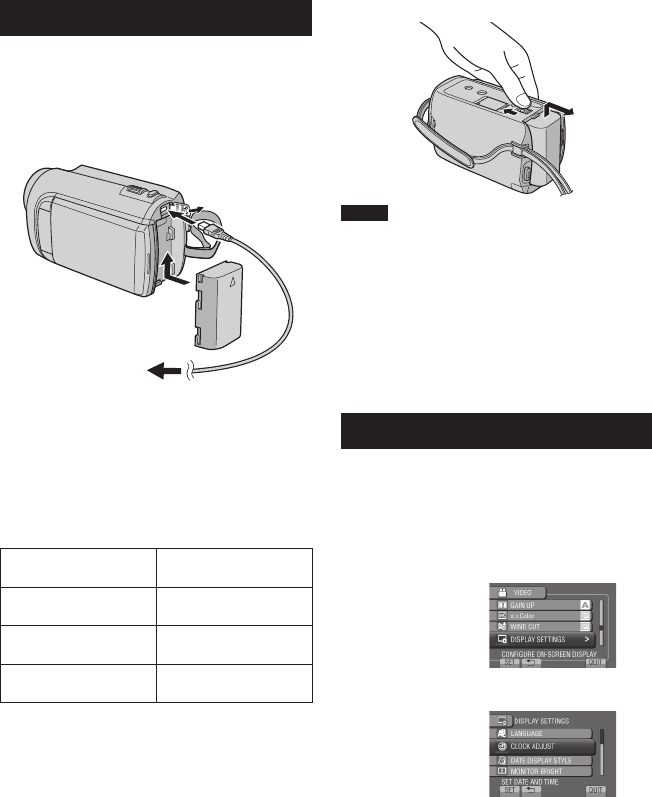
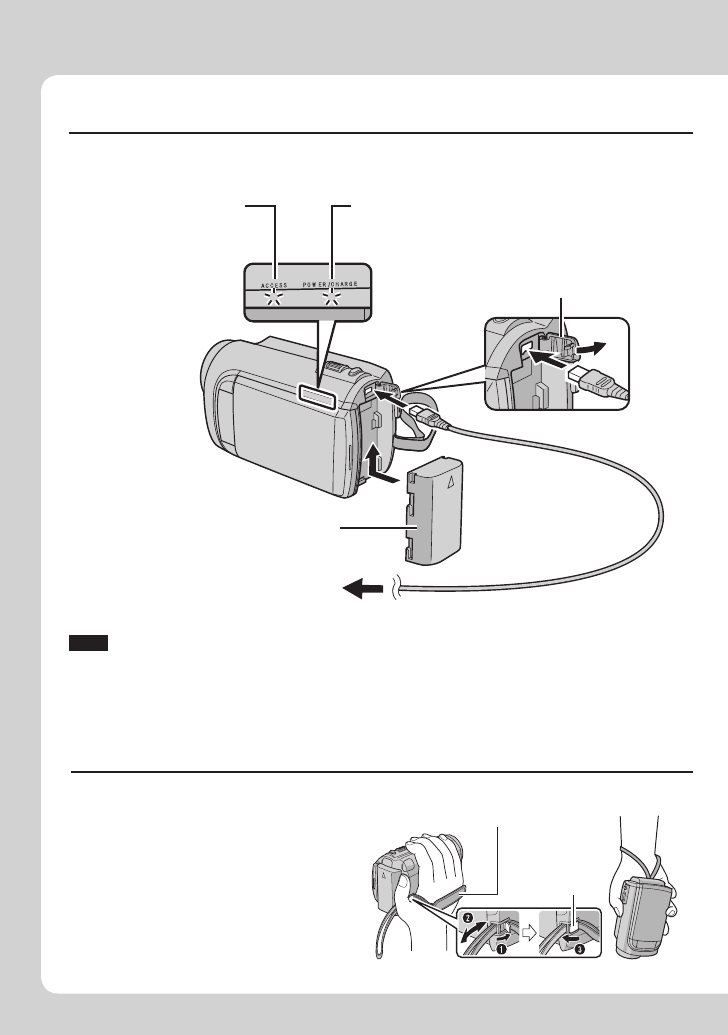
Charge the battery before recording
Turn off the camcorder and attach the battery pack.
Grip Adjustment
Adjust the strap and fasten.
• Fasten the strap when you grip the
camcorder.
• When carrying the camcorder,
please be careful not to drop it.
Grip Strap
Fasten
Power/charge lamp
blinks: Charging
goes out: Charging finished
Battery Pack
AC Adapter
To AC Outlet
(110V to 240V)
Open the cover
The battery pack is not
charged at the time of
purchase.
Access lamp
blinks: Accessing files
Do not remove the
AC adapter, the
battery pack or the
microSD card when
the lamp is blinking.
3
EN
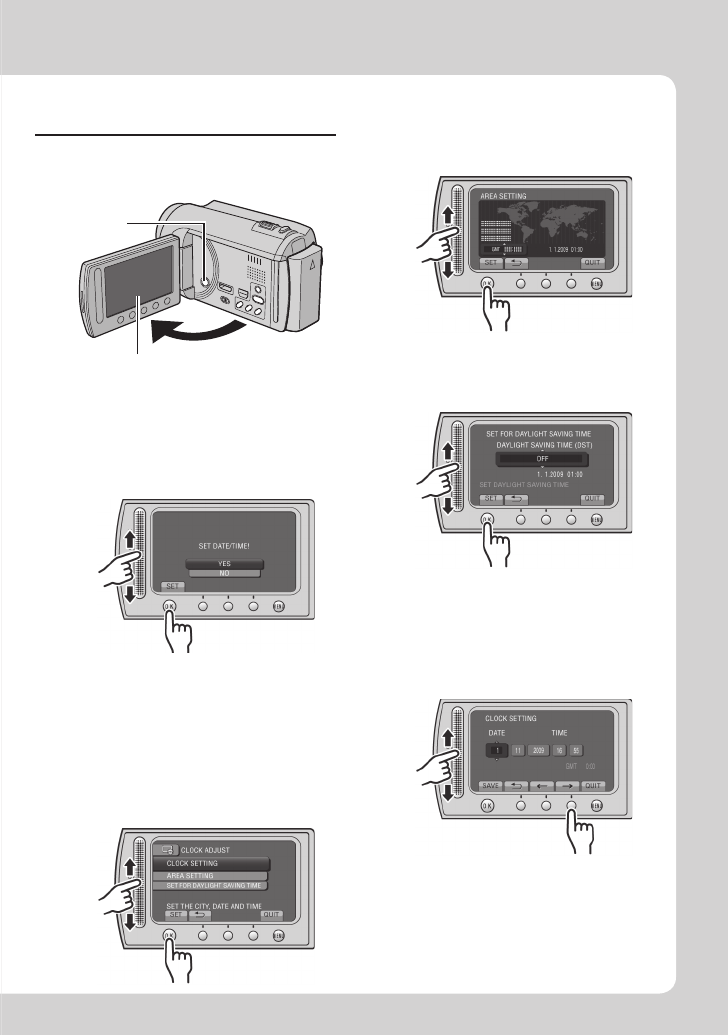
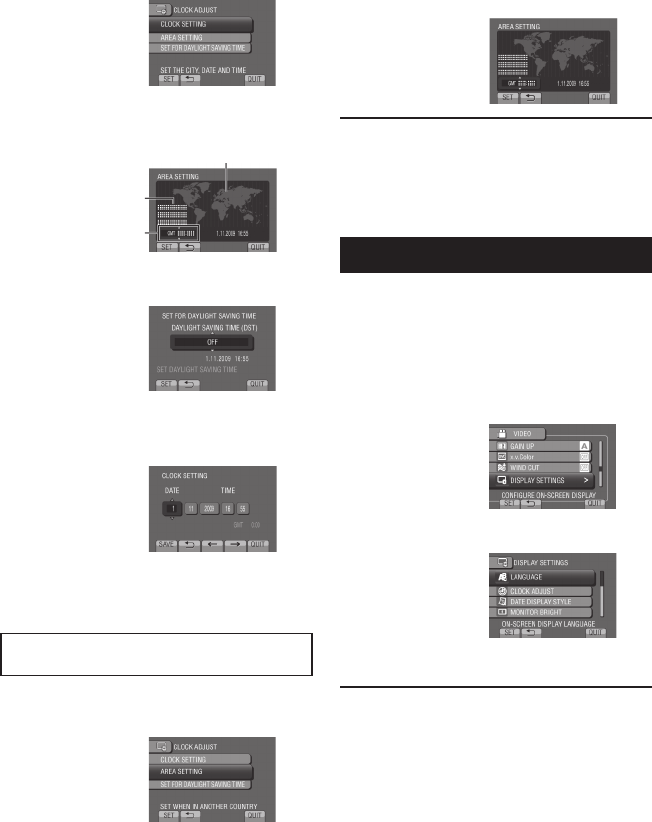
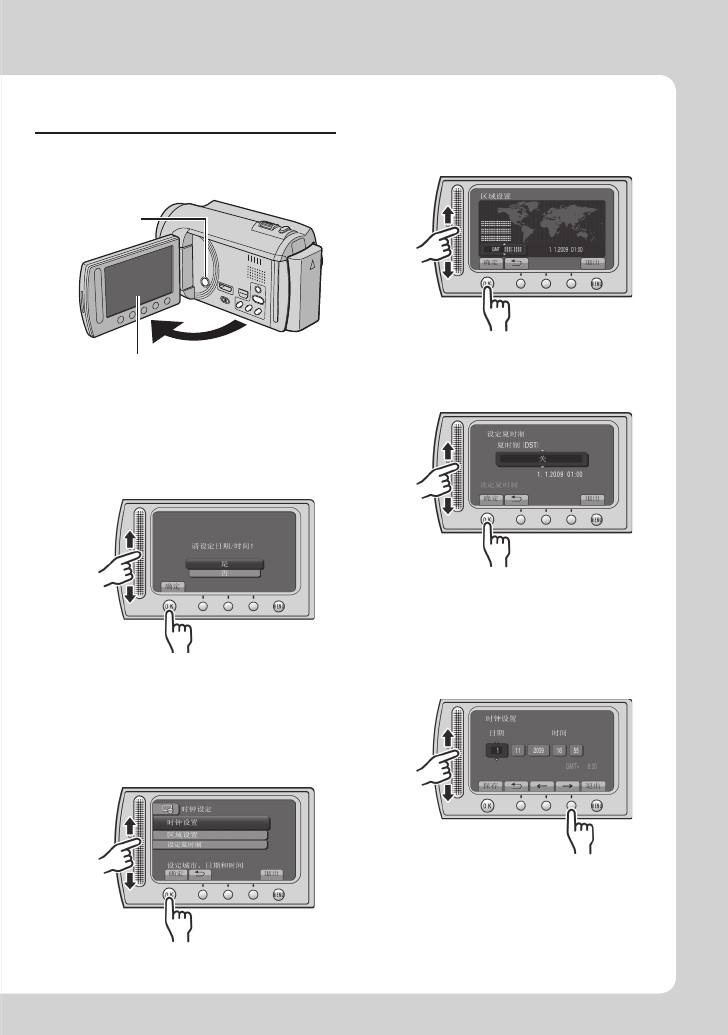
Date/Time Setting
QOpen the LCD monitor to
turn on the camcorder
Power button
LCD monitor
RSelect [YES] within
10 seconds
• When the message disappears, press the
power button for at least 2 seconds to turn
off the power, and then press it again for at
least 2 seconds.
• Touch the sensors with your finger. The
sensors do not function if you touch them
with your finger nail or with gloves on.
SSelect [CLOCK SETTING]
TSelect the city closest to
the area where you use
the camcorder
USelect [ON] if daylight
saving time is observed
VSet the date and time
Slide your finger up and down on the
sensor. Then touch OK.
Touch sensor: Sets the date and time
}: Moves the cursor to the right
OK: Clock starts
4EN
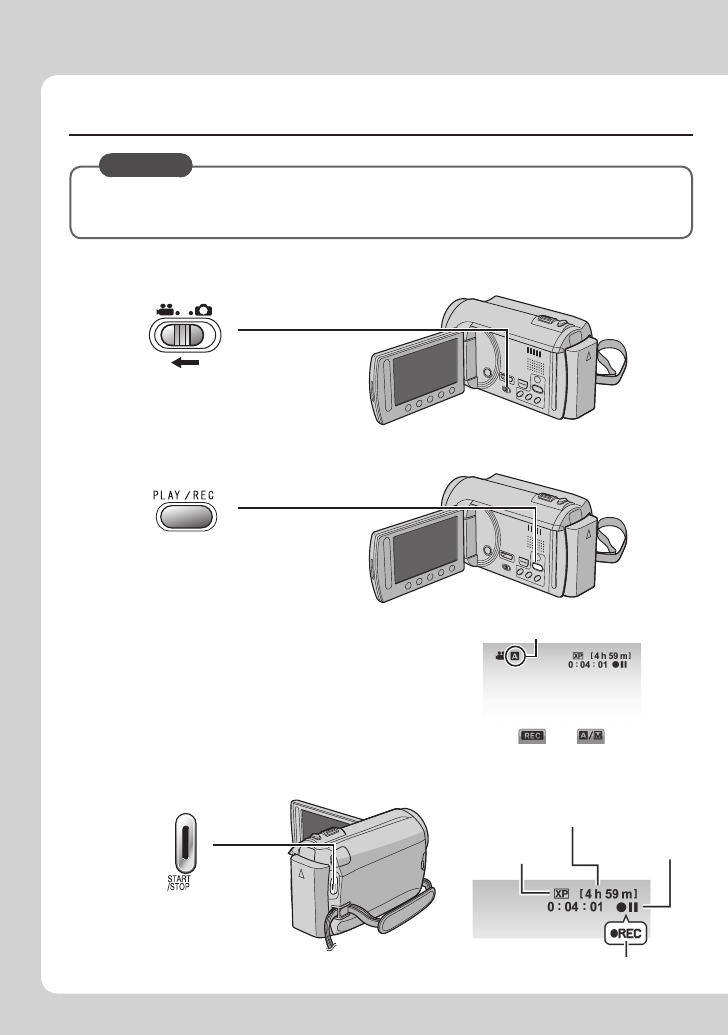
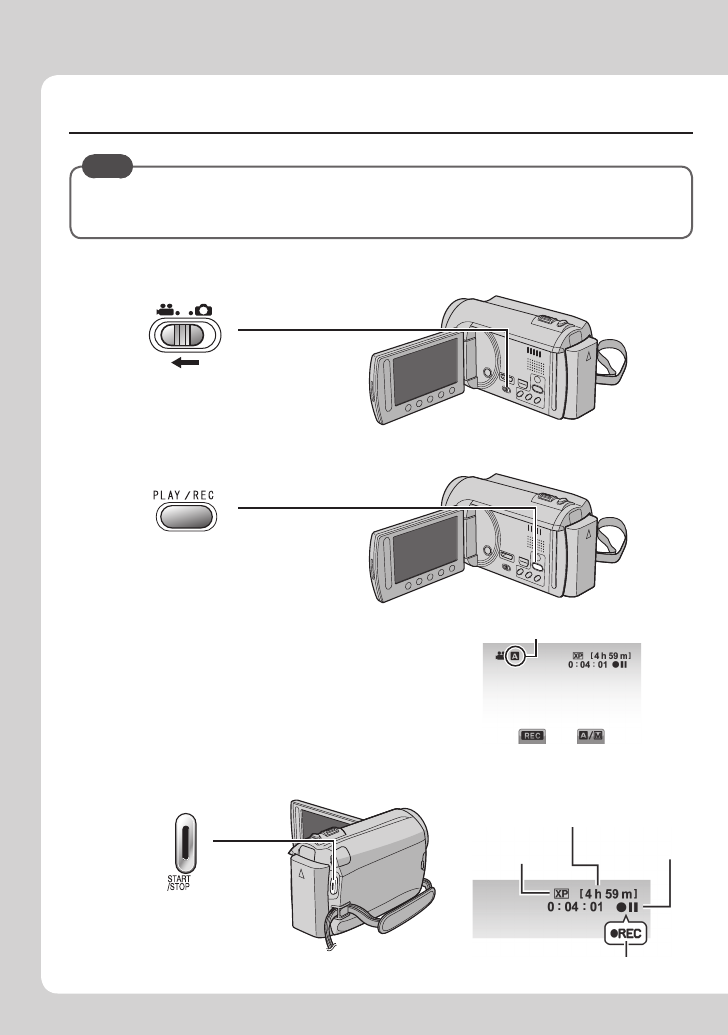
Video recording
CAUTION
Before recording an important scene, it is recommended to conduct a trial
recording.
SStart recording
Press the START/STOP
button to start recording,
and press it again to stop.
Remaining space on
the hard disk
Video Quality Record-standby
Recording
QSlide the mode switch to select ! (video) mode
RSelect recording mode (REC)
The mode changes when
you press the button.
The auto recording
indicator appears.
5
EN
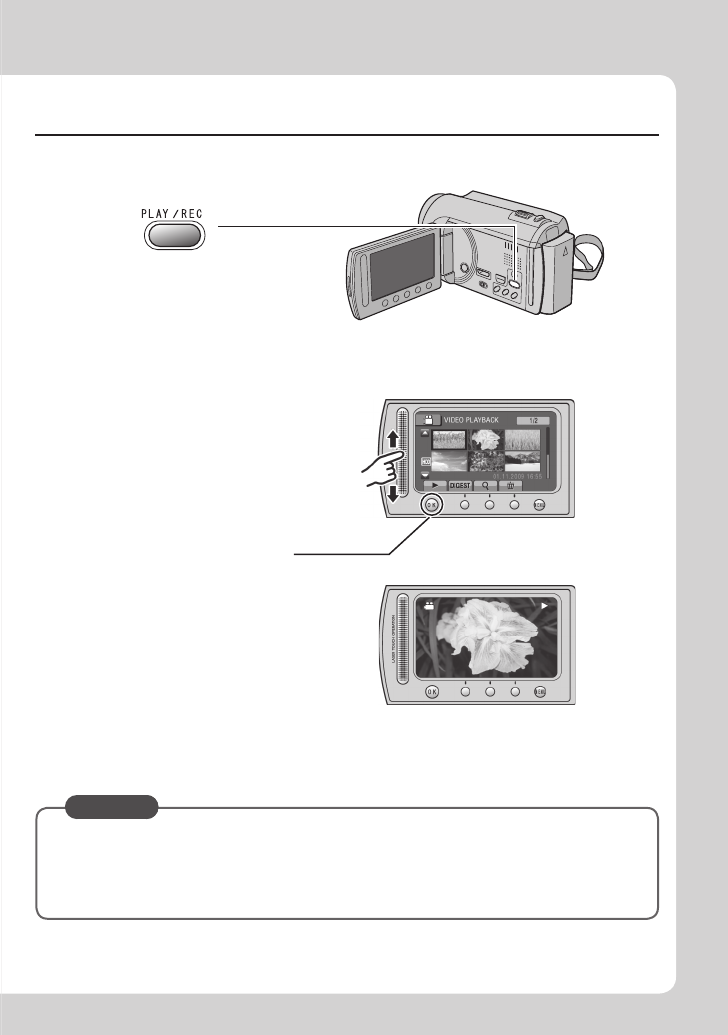
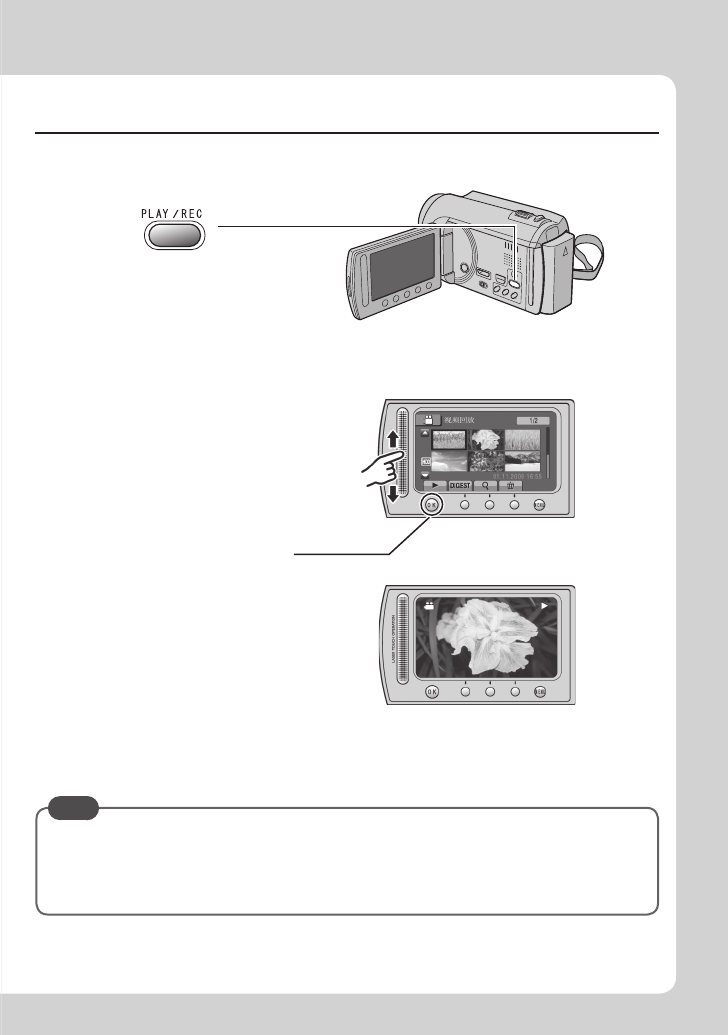
Playing back
To perform operations such as forward search or reverse search (Z p. 21)
To view files on TV (Z p. 24)
CAUTION
Do not forget to make copies after recording!
• To copy files onto discs (Z p. 27)
• To dub files to a VCR/DVD recorder (Z p. 29)
• To edit files on your computer (Z p. 30)
QSelect playback mode (PLAY)
The mode changes when
you press the button.
RSelect the desired file
Index screen
SSelect F (Touch OK)
Playback screen
6EN
Safety Precautions
WARNING: TO PREVENT FIRE OR SHOCK
HAZARD, DO NOT EXPOSE THIS UNIT TO
RAIN OR MOISTURE.
CAUTIONS:
• If you notice smoke or a peculiar smell coming
from the camcorder or AC Adapter, shut it down
and unplug it immediately. Continue using the
camcorder or AC Adapter under these conditions
could lead to fire or electric shock. Contact
your JVC dealer. Do not attempt to repair the
malfunction yourself.
• To prevent shock, do not open the cabinet. No
user serviceable parts inside. Refer servicing to
qualified personnel.
• When you are not using the AC adapter for a
long period of time, it is recommended that you
disconnect the power cord from AC outlet.
• In certain areas, use the conversion plug
depending on the type of your AC wall outlet.
NOTES:
• The rating plate and safety caution are on the
bottom and/or the back of the main unit.
•
The serial number plate is on the battery pack mount.
• The rating information and safety caution of the
AC adapter are on its upper and lower sides.
WARNING:
The battery pack, the camcorder with battery
installed, and the remote control with battery
installed should not be exposed to excessive heat
such as direct sunshine, fire or the like.
CAUTION:
The mains plug shall remain readily operable.
Caution on Replaceable lithium battery
The battery used in this device may present a fire
or chemical burn hazard if mistreated.
Do not recharge, disassemble, heat above 100°C
or incinerate.
Replace battery with Panasonic, Sanyo, Sony or
Maxell CR2025.
Danger of explosion or Risk of fire if the battery is
incorrectly replaced.
• Dispose of used battery promptly.
• Keep away from children.
• Do not disassemble and do not dispose of in fire.
When the equipment is installed in a cabinet or on
a shelf, make sure that it has sufficient space on all
sides to allow for ventilation (10 cm or more on both
sides, on top and at the rear).
Do not block the ventilation holes.
(If the ventilation holes are blocked by a newspaper,
or cloth etc. the heat may not be able to get out.)
No naked flame sources, such as lighted candles,
should be placed on the apparatus.
When discarding batteries, environmental problems must
be considered and the local rules or laws governing the
disposal of these batteries must be followed strictly.
The apparatus shall not be exposed to dripping or
splashing.
Do not use this equipment in a bathroom or places
with water.
Also do not place any containers filled with water
or liquids (such as cosmetics or medicines, flower
vases, potted plants, cups etc.) on top of this unit.
(If water or liquid is allowed to enter this equipment,
fire or electric shock may be caused.)
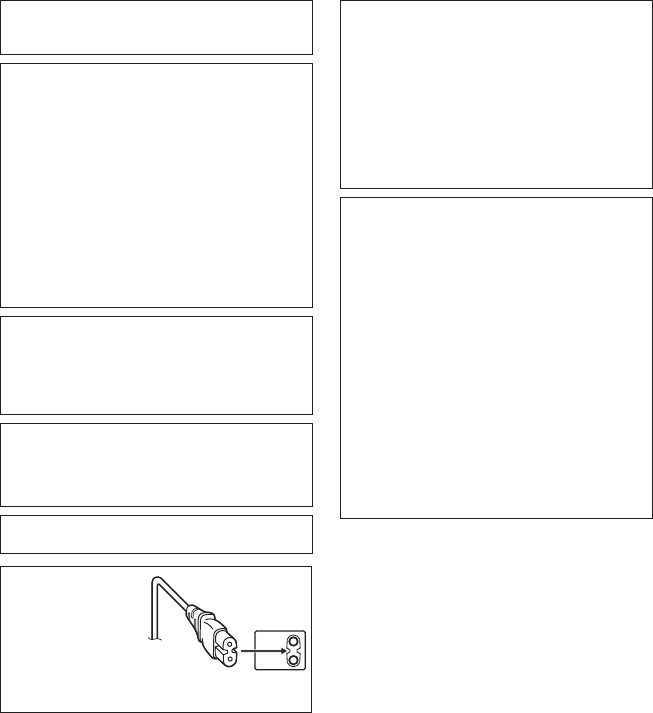
CAUTION:
To avoid electric shock
or damage to the unit,
first firmly insert the
small end of the power
cord into the AC Adapter
until it is no longer
wobbly, and then plug the larger end of the power cord
into an AC outlet.
7
EN
Remember that this camcorder is intended for
private consumer use only.
Any commercial use without proper permission
is prohibited. (Even if you record an event such
as a show, performance or exhibition for personal
enjoyment, it is strongly recommended that you
obtain permission beforehand.)
Trademarks
• “AVCHD” and the “AVCHD” logo are trademarks
of Panasonic Corporation and Sony Corporation.
• Manufactured under license from Dolby
Laboratories. Dolby and the double-D symbol are
trademarks of Dolby Laboratories.
• x.v.Colour™ is a trademark of
Sony Corporation.
• HDMI is a trademark of HDMI
Licensing, LLC.
• Windows® is either registered trademark or
trademark of Microsoft Corporation in the United
States and/or other countries.
• Macintosh is a registered trademark of Apple Inc.
• iTunes, iMovie, iPhoto are trademarks of Apple
Inc., registered in the U.S. and other countries.
• YouTube and the YouTube logo are trademarks
and/or registered trademarks of YouTube LLC.
• Other product and company names included in
this instruction manual are trademarks and/or
registered trademarks of their respective holders.
Do not point the lens directly into the sun. This can cause
eye injuries, as well as lead to the malfunctioning of internal
circuitry. There is also a risk of fire or electric shock.
CAUTION!
The following notes concern possible physical damage
to the camcorder and to the user.
Carrying or holding the camcorder by the LCD monitor
can result in dropping the unit, or in a malfunction.
Do not use a tripod on unsteady or unlevel surfaces. It
could tip over, causing serious damage to the camcorder.
CAUTION!
Connecting cables (Audio/Video, S-Video, etc.)
to the
camcorder and leaving it on top of the TV is not
recommended, as tripping on the cables will cause
the camcorder to fall, resulting in damage.
If this symbol is shown, it is only valid
in the European Union.

8EN
Contents
GETTING STARTED
Index ........................................................10
Indications on LCD Monitor ...................12
Accessories ............................................14
Preparing the Remote Control ...................... 14
Necessary Settings before Use .............15
Charging the Battery Pack ............................ 15
Date/Time Setting ......................................... 15
Language Setting ......................................... 16
Other Settings .........................................17
Using a microSD Card .................................. 17
RECORDING/PLAYBACK
Recording Files .......................................18
Video Recording ........................................... 18
Still Image Recording ................................... 19
Zooming ........................................................ 20
LED Light ...................................................... 20
Checking the Remaining Battery Power ....... 20
Checking the Remaining Space on the
Recording Media ......................................... 20
Playing Back Files ..................................21
Video Playback ............................................ 21
Still Image Playback ..................................... 22
Manual Recording ..................................23
Changing to Manual Recording Mode .......... 23
Manual Setting in Menu ................................ 23
USING WITH TV
Viewing Files on TV ................................24
Connection with TV....................................... 24
Playback Operation ...................................... 25
EDITING
Managing Files ........................................26
Capturing a Still Image from a Video ............ 26
Deleting Files ................................................ 26
COPYING
Copying Files ..........................................27
Using a BD/DVD Burner ............................... 27
Dubbing Files to a VCR/DVD Recorder ........ 29
PC OPERATION
Creating a Disc Using a PC ...................30
Using with a Portable Media Player ......35
Turning on the Export Mode ......................... 35
Changing the Export Setting ........................ 35
Transferring the Files to PC .......................... 35
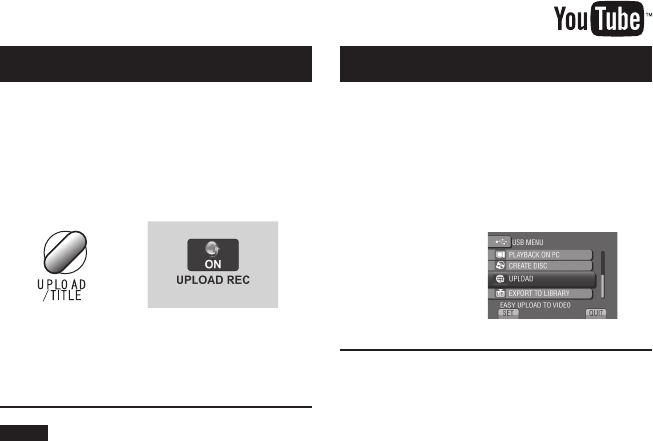
Uploading Files to Websites ..................36
Turning on the Upload Mode ........................ 36
Uploading Files ............................................. 36
FURTHER INFORMATION
Changing the Menu Settings .................37
Troubleshooting ......................................37
Warning Indications ...............................39
Specifications .........................................40
Cautions ..................................................42
Terms .......................................................44
9
EN
Read This First!
Make a backup of important recorded data
It is recommended to copy your important
recorded data to a DVD or other recording
media for storage. JVC will not be responsible
for any lost data.
Make a trial recording
Before the actual recording of important data,
make a trial recording and play back the
recorded data to check that the video and
sound have been recorded correctly.
Reset the camcorder if it does not operate
correctly
Close the LCD monitor and remove the power
supply (battery pack or AC adapter) from the
camcorder, then reattach it.
Precautions on handling batteries
• Be sure to use the JVC BN-VF808U/
VF815U/VF823U battery packs. This product
includes patented and other proprietary
technology and is made to be used with the
JVC battery and not with other batteries.
JVC cannot guarantee safety or
performance of this product when it is
operated by other batteries.
• If the camcorder is subjected to electrostatic
discharge, turn off the power before using it
again.
If a malfunction occurs, stop using the
camcorder immediately and consult your
nearest JVC dealer
• Recorded data may be erased while the
camcorder is being repaired or inspected.
Back up all data before requesting repairs or
inspections.
Because camcorders may be used
for demonstration in a shop, the
demonstration mode is set to on by default
To deactivate the demonstration mode, set
[DEMO MODE] to [OFF].
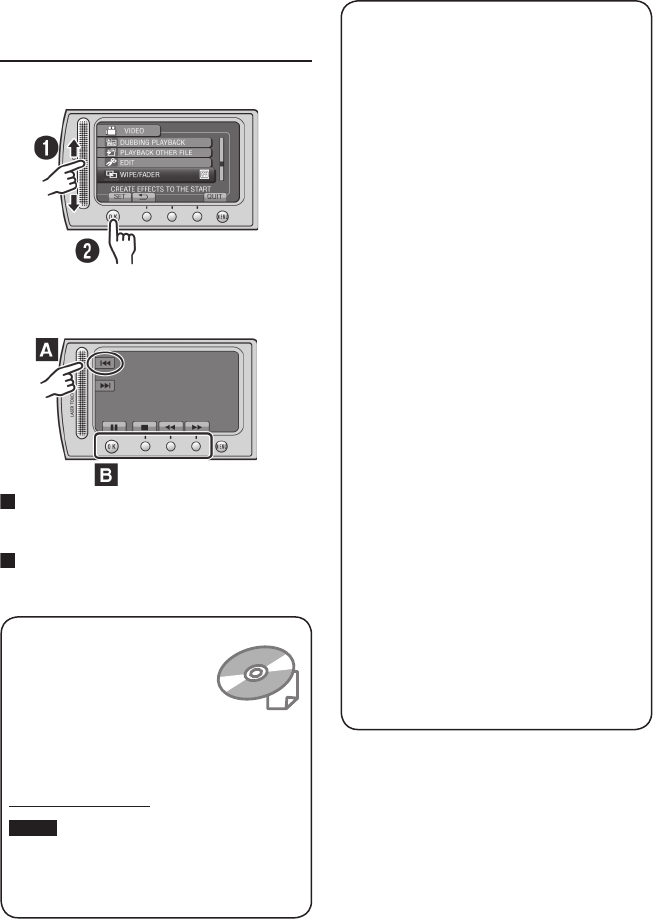
How to use the Touch
Sensor
After the menu is displayed on the LCD
monitor:
Q Slide your finger up and down on the
sensor.
R Select [SET]. (Touch OK.)
A
To select an on-screen button appearing
on the left side, touch the portion of the
sensor next to the on-screen button.
B
To select an on-screen button appearing
at the bottom of the screen, touch the
buttons underneath them.
Read these INSTRUCTIONS to enjoy your
CAMCORDER.
For more details on the operations,
refer to the GUIDEBOOK in the
supplied CD-ROM.
In order to view the GUIDEBOOK,
Adobe® Acrobat® ReaderTM or Adobe® Reader®
must be installed.
Adobe® Reader® can be loaded from Adobe’s
web site:
http://www.adobe.com/
NOTE
Select your desired language with a single
click.
The model name is indicated on the bottom of
your camcorder.
10 EN
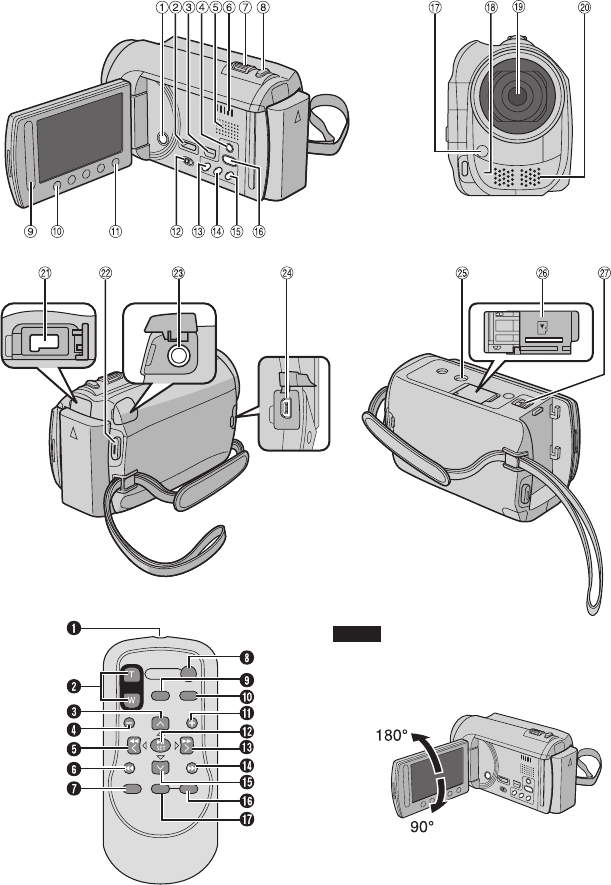
Index
NOTE
• Be careful not to cover 3, 4, 5, and 6
during shooting.
• The LCD monitor can rotate 270°.
GETTING STARTED
11
EN
Remote Control
Q Infrared Beam Transmitting Window
R ZOOM (T/W) Buttons (Zoom in/Out)
S Up Button
T Skip Backward Button
U Left Button
V Back Button
W PLAYLIST Button
X START/STOP Button
Y S.SHOT (SNAPSHOT) Button
Z INFO Button
a Skip Forward Button
b PLAY/PAUSE/SET Button
c Right Button
d Next Button
e Down Button
f INDEX Button*
g DISP Button
* Each time you press INDEX, the screen
switches as shown below:
! mode:
Index Screen « Group Index Screen
# mode:
Index Screen « Date Index Screen
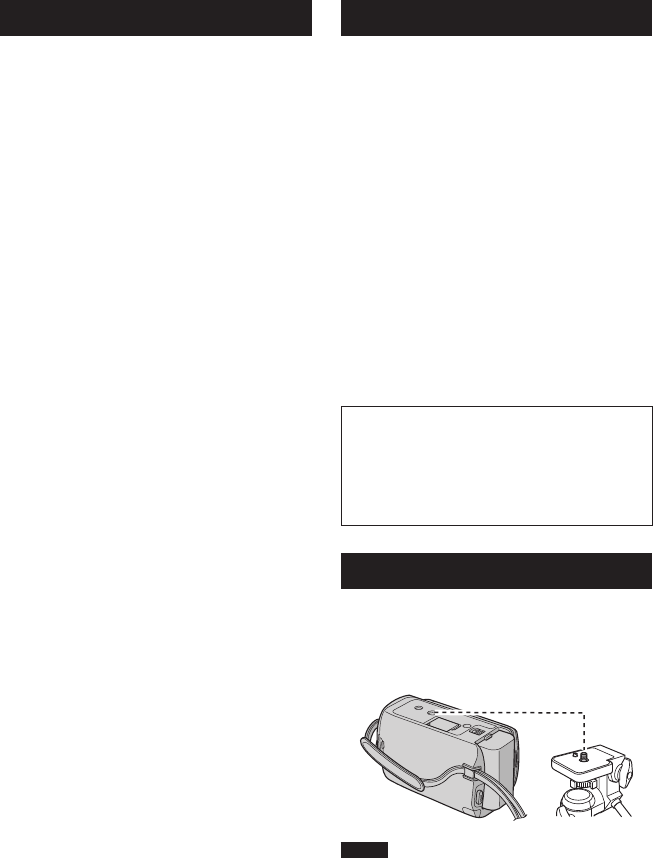
Tripod Mounting
Align the camcorder stud hole with the tripod
stud, and the mounting socket with the screw,
and then rotate the camcorder clockwise to
mount it to the tripod.
NOTE
Do not use a tripod on unsteady or unlevel
surfaces. It could tip over, causing serious
damage to the camcorder.
Camcorder
! Power Button
# HDMI Mini Connector (Z p. 24)
$ Component Connector (Z p. 24)
% DISPLAY Button (Z p. 13)
& Speaker
( Ventilation hole
) Zoom Lever (Z p. 20)
Speaker Volume Control
* SNAPSHOT Button (Z p. 19)
+ Touch Sensor
, OK Button
- MENU Button
. Mode Switch [!, #]
/ UPLOAD Button (Z p. 36)
TITLE Button
0 EXPORT Button (Z p. 35)
1 DIRECT DISC Button (Z p. 28)
INFO Button (Z p. 20)
2 PLAY/REC Button (Z p. 18, 19, 21, 22)
3 LED Light (Z p. 20)
4 Remote Sensor
5 Lens
6 Stereo Microphone
7 DC Connector
8 START/STOP Button (Z p. 18)
9 AV Connector (Z p. 25, 29)
: USB Connector (Z p. 27, 31)
; Tripod Mounting Socket
< microSD Card Slot
= Battery Release Button
12 EN
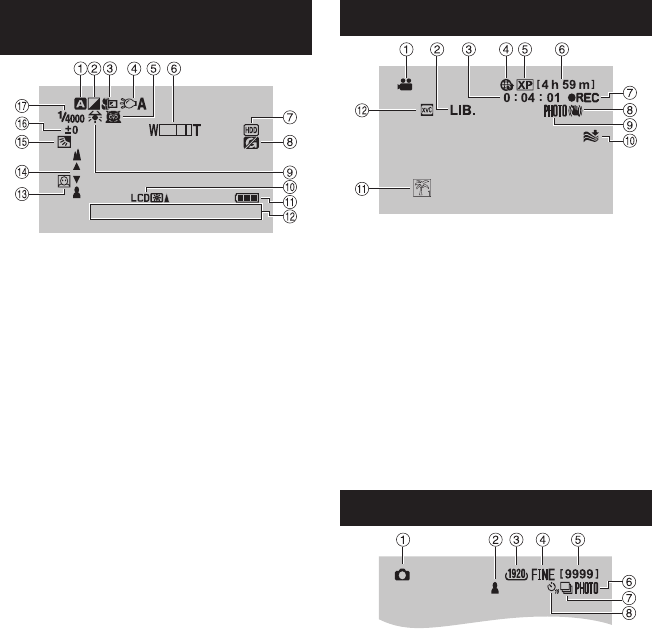
Indications on LCD Monitor
During both Video and Still Image
Recording
16:55
1. 11. 2009
! Selected Recording Mode Indicator
(Z p. 23)
@: Auto Mode
3: Manual Mode
# Effect Mode Indicator
$ Tele Macro Mode Indicator
% LED Light Indicator (Z p. 20)
& Scene Select Indicator
( Zoom Indicator (Z p. 20)
) Recording Medium Indicator
* Drop Detection Indicator (Appears when
[DROP DETECTION] is set to [OFF].)
+ White Balance Indicator
, Monitor Backlight Indicator
- Battery Indicator
. Date/Time (Z p. 15)
/ Face Detection Indicator (Z p. 18, 19)
0 Manual Focus Adjustment Indicator
1 Backlight Compensation Indicator
2 Brightness Control Indicator
.: Photometry Area Control Indicator
3 Shutter Speed
During Video Recording Only
! Mode Indicator
# EXPORT Mode Indicator (Z p. 35)
$ Counter
% Upload Mode Indicator (Z p. 36)
& Video Quality
( Remaining Time
) MREC: (Appears during recording.)
MQ
: (Appears during record-standby
mode.)
* Digital Image Stabilizer (DIS) Indicator
(Appears when [DIS] is set to [OFF].)
+ Shooting Indicator (Z p. 18)
, Wind Cut Indicator
- Event Indicator
. x.v.Colour™
During Still Image Recording Only
! Mode Indicator
# Focus Indicator (Z p. 19)
$ Image Size
% Image Quality:
FINE
(fine) or
STD
(standard)
& Remaining Number of Shots
( Shooting Indicator (Z p. 19)
) Shutter Mode Indicator
* Self-Timer Indicator
13
EN
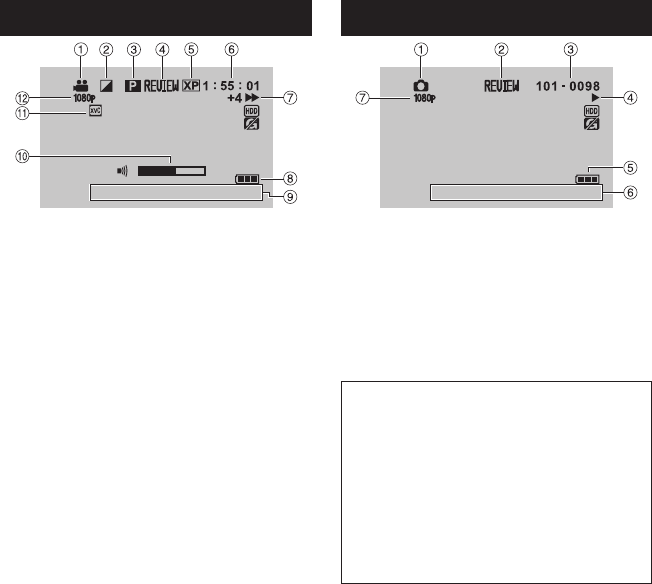
During Video Playback
8
16:55
1 . 1 1. 2009
! Mode Indicator
# Wipe/Fader Effect Indicator
$ Playlist Playback Indicator (Appears when
playing back a playlist.)
% Quick Review Indicator (Z p. 18)
& Video Quality
( Counter
) Playback Mode
F:Playback
Q:Pause
K:Forward Search
J:Reverse Search
QF: Forward Slow-Motion
PQ: Reverse Slow-Motion
(The number on the left shows speed.)
* Battery Indicator
+ Date/Time (Z p. 15)
, Volume Level Indicator
- x.v.Colour™
. Output with 1080p
During Still Image Playback
16:55
1. 11. 2009
! Mode Indicator
# Quick Review Indicator (Z p. 19)
$ Folder/File Number
% Slide Show Playback Indicator
& Battery Indicator
( Date/Time (Z p. 15)
) Output with 1080p
Switching indication modes on LCD
monitor
Each time you touch DISPLAY, indications
on LCD monitor switch as shown below:
In recording mode:
All indications/Indications for selected
functions
In playback mode:
All indications/Only date and time/No
indications
14 EN
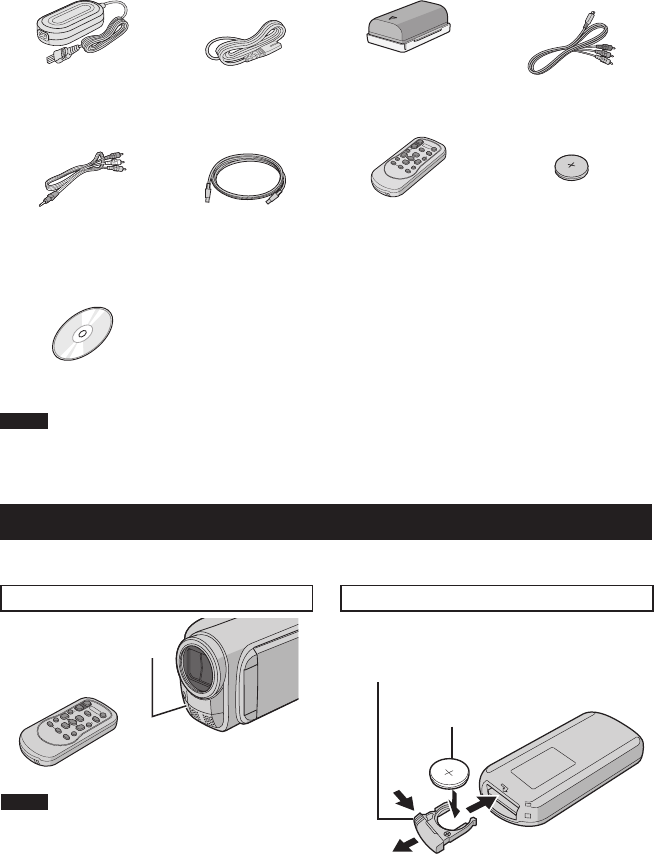
Accessories
Preparing the Remote Control
A battery is included inside the remote control at the time of purchase.
Remove the insulation sheet before use.
Beam Effective Area To Reinsert the Battery
NOTE
The transmitted beam may not be effective
or may cause incorrect operation when the
remote sensor is directly exposed to sunlight
or powerful lighting.
Pull out the battery holder by pressing the lock
tab.
Effective distance:
Max. 5 m
Remote Sensor
Lock Tab
Lithium Battery
(CR2025)
AP-V20M
BN-VF808U
AC Adapter Power Cord Battery Pack Component Cable
RM-V751U
CR2025
AV Cable USB Cable Remote Control Lithium Battery
Pre-installed in the
remote control.
CD-ROM
NOTE
Make sure to use the provided cables for connections. Do not use any other cables.
15
EN
Necessary Settings before Use
Charging the Battery Pack
1 Close the LCD monitor to turn off the
camcorder.
2 Attach the battery pack, then connect
the AC adapter.
• The power/charge lamp blinks to
indicate charging has started.
• When the lamp goes out, charging is
finished.
To check the remaining battery power
See page 20.
Battery pack Charging time
BN-VF808U
(Provided) 1 h 50 m
BN-VF815U 2 h 40 m
BN-VF823U 3 h 40 m
To detach the battery pack
NOTE
• You can also use the camcorder with just the
AC adapter.
• The actual recording time may shorten
depending on the recording environment,
such as when recording scenes with fast
moving subject.
• Please do not pull or bend the AC adapter
plug and cable. This may damage the AC
adapter.
Date/Time Setting
1 Open the LCD monitor to turn on the
camcorder.
2 Touch MENU.
3 Select [DISPLAY SETTINGS].
4 Select [CLOCK ADJUST].
AC Adapter
To AC Outlet
(110V to 240V)
16 EN
5 Select [CLOCK SETTING].
6 Select the city closest to the area
where you use the camcorder.
Selected area is highlighted
7 Select [ON] if daylight saving time is
observed.
8 Set the date and time.
Change the setting by using the touch
sensor and select [&] to set.
9 Select [SAVE].
To reset the setting, select [QUIT].
Setting the clock to local time when
traveling
After performing steps 1-4 (Z p. 15)
5 Select [AREA SETTING].
6 Select the city closest to the area you
are traveling.
To return to the previous screen
Select @.
To quit the screen
Select [QUIT].
Language Setting
The language on the display can be changed.
1 Open the LCD monitor to turn on the
camcorder.
2 Touch MENU.
3 Select [DISPLAY SETTINGS].
4 Select [LANGUAGE].
5 Select the desired language.
To return to the previous screen
Select @.
To quit the screen
Select [QUIT].
Principal city of the
selected area
Time difference to
GMT
Necessary Settings before Use (Continued)
17
EN
Other Settings
Using a microSD Card
The camcorder is programmed to record on
the built-in hard disk when it is shipped from
the factory. You can change the recording
medium to microSD card.
• Operations are confirmed on the following
microSD cards.
- Panasonic
- TOSHIBA
- SanDisk
- ATP
Video recording:
Class 4 or higher compatible microSDHC
card (4 GB to 8 GB)
For UXP mode, use Class 6 or higher.
Still image recording:
microSD card (256 MB to 2 GB) or
microSDHC card (4 GB to 8 GB)
• If other media are used, they may fail to
record data correctly, or they may lose data
that had already been recorded.
• MultiMediaCards are not supported.
• Video data may not be recorded onto the
microSD cards on which video data have
already been recorded using the devices
from other manufacturers.
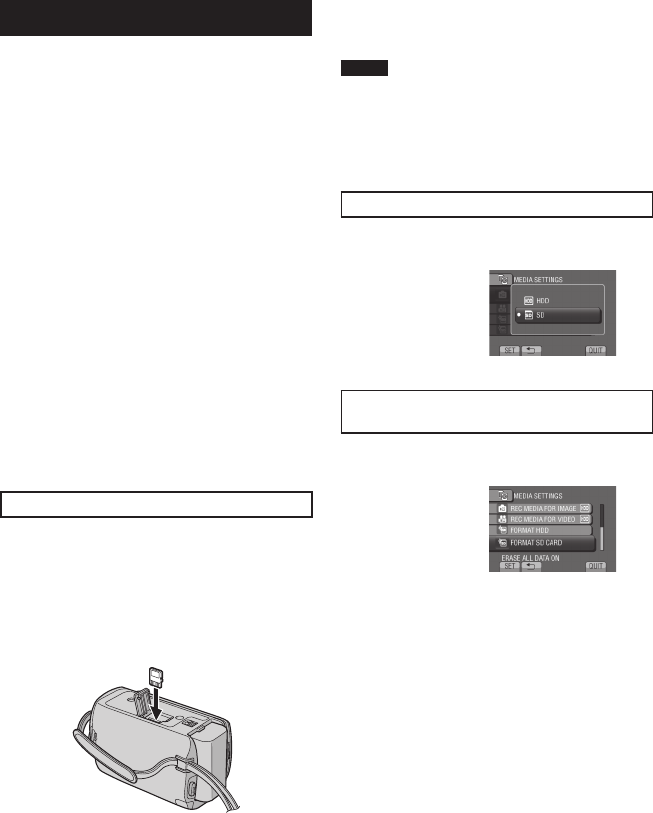
Insert a microSD card
Preparation:
Close the LCD monitor to turn off the
camcorder.
1 Open the microSD card cover.
2 Firmly insert the card with its clipped
edge first.
3 Close the microSD card cover.
To remove a microSD card
Push the microSD card once.
After the card comes out a little, pull it out.
NOTE
• Insert and remove the microSD card only
while the power is turned off. Otherwise, data
on the card may be corrupted.
• Do not touch the terminal on the reverse side
of the label.
Change the recording medium
Set [REC MEDIA FOR VIDEO] and [REC
MEDIA FOR IMAGE] to [SD].
Format a microSD card when using it for
the first time
Select [FORMAT SD CARD] to format the
card.
18 EN
SNAPSHOT
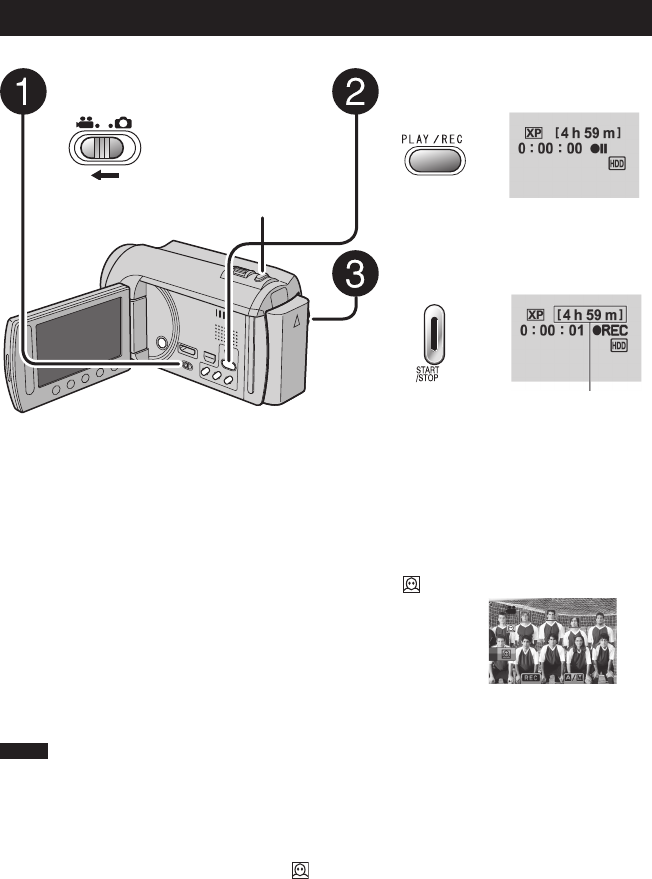
Video Recording
Recording Files
RECORDING/PLAYBACK
Press PLAY/REC to select the
recording mode.
Press START/STOP to start
recording.
You can also start/stop recording by
selecting [REC] on the LCD monitor.
(On-screen recording control)
To stop recording
Press START/STOP again.
To view the last recorded scene
Select A while recording is paused.
Selecting $ during playback deletes that
scene.
To record a still image during video
recording
Press SNAPSHOT.
Slide the mode switch to select
! (video) mode.
NOTE
• The video recording mode is automatically selected when you turn off the camcorder and then
turn on again.
• If the camcorder is not operated for 5 minutes while the power is on, it turns itself off
automatically to conserve power.
• Do not move or shake the camcorder suddenly during recording.
If you do so, the driving sound (hum) of the hard disk may be recorded.
• If the LCD monitor is turned upside down, is not displayed. Change the setting when the LCD
monitor is in the normal position.
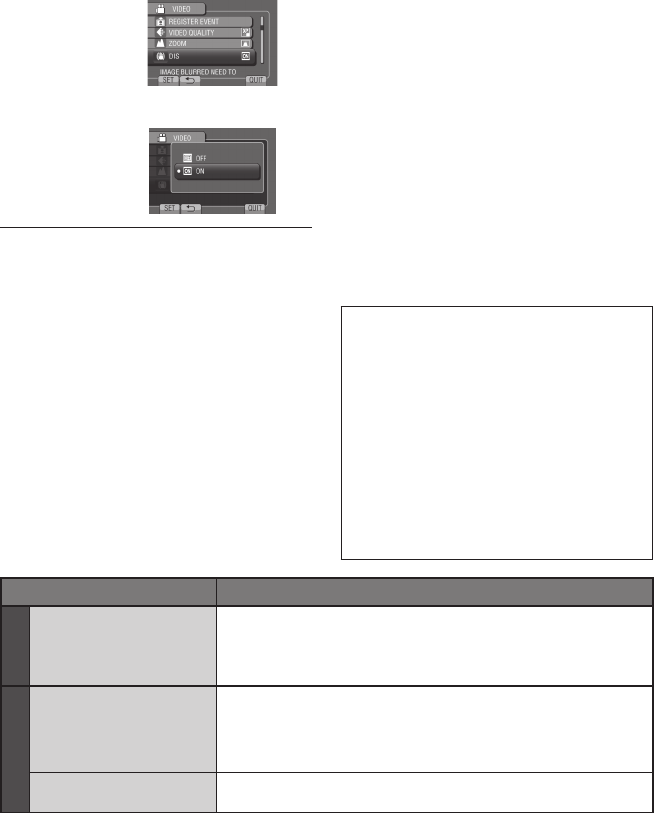
To change the video quality
Change the settings in [VIDEO QUALITY].
To turn on the face detection mode
Select .
Approximate remaining
time for recording
19
EN
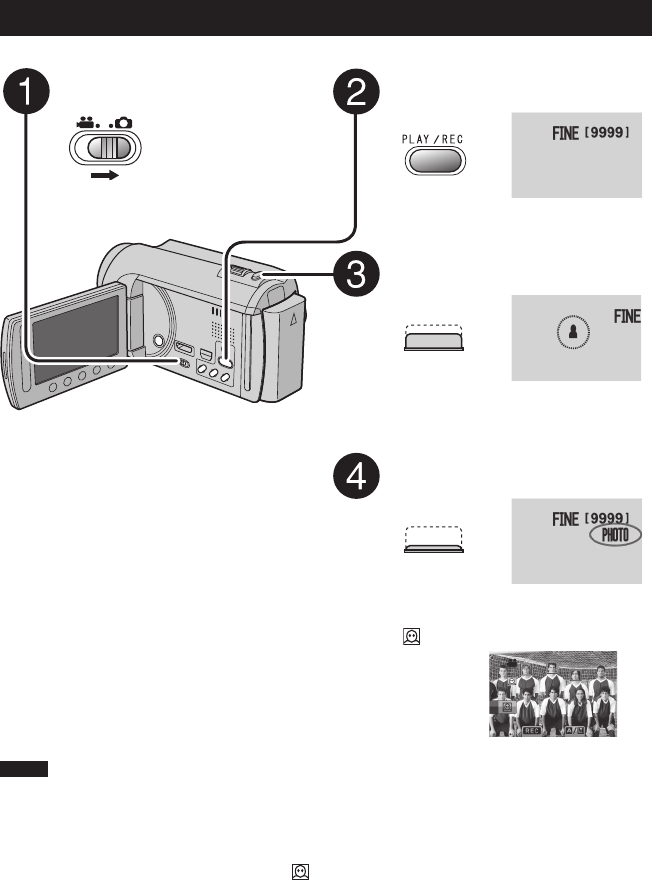
Slide the mode switch to select
# (still image) mode.
Press PLAY/REC to select the
recording mode.
Press and hold SNAPSHOT
halfway.
The ? indicator becomes green when
the captured image is focused.
Press SNAPSHOT fully to take a
still image.
NOTE
• DIS (Digital Image Stabilizer) does not function during still image recording.
• If the camcorder is not operated for 5 minutes while the power is on, it turns itself off
automatically to conserve power.
• The sides of still images recorded in 16:9 size may be cut off when printed. Check whether 16:9
size prints can be printed at your local print store.
• If the LCD monitor is turned upside down, is not displayed. Change the setting when the LCD
monitor is in the normal position.
Still Image Recording
To view the last recorded image
Select A after shooting.
Selecting $ during playback deletes that
image.
To change the image quality
Change the settings in [IMAGE QUALITY].
To change the image size
Change the settings in [IMAGE SIZE].
To record still images continuously
Set to [CONTINUOUS SHOOTING] in
[SHUTTER MODE].
To turn on the face detection mode
Select .
20 EN
Recording Files (Continued)
Zooming
Preparation:
• Select ! or # mode.
• Select the recording mode.
Zoom out Zoom in
W: Wide angle T: Telephoto
You can also zoom out/zoom in by selecting
[W] or [T] on the LCD monitor. (On-screen
zoom control)
Zoom ratio (factory-preset)
! mode # mode
[20X / OPTICAL] [20X / OPTICAL]
To change the maximum zoom ratio
(! mode only)
Change the settings in [ZOOM].
NOTE
Macro shooting is possible as close as approx.
5 cm to the subject when the zoom lever is set
all the way to W.
LED Light
Preparation:
• Select ! or # mode.
• Select the recording mode.
1 Touch MENU.
2 Select [LIGHT].
3 Select the desired setting.
ON
The LED light remains on
regardless of the surrounding
conditions.
AUTO
The LED light turns on
automatically when shooting in
insufficient light conditions.
OFF Deactivates this function.
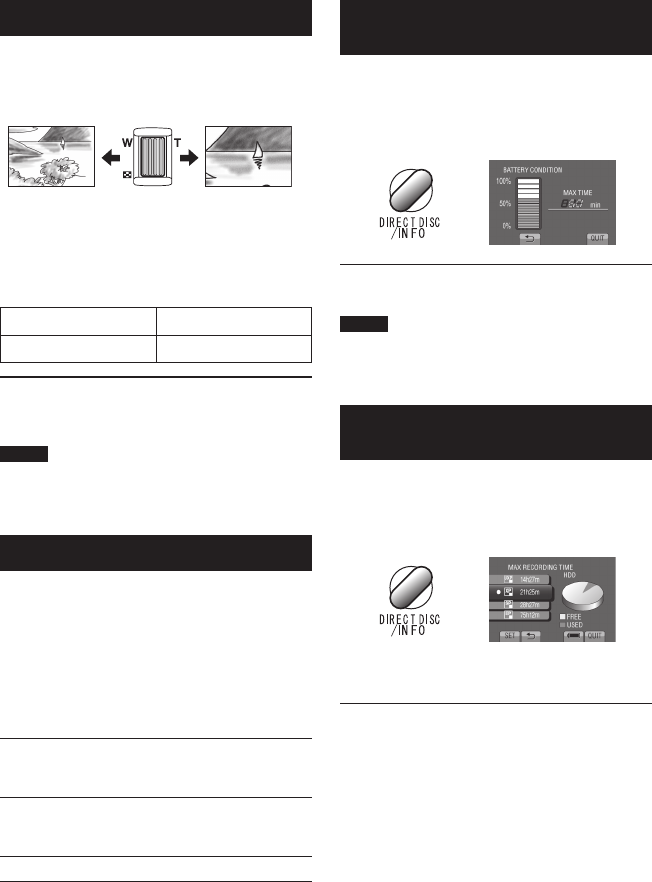
Checking the Remaining Battery
Power
! mode:
Press INFO twice or INFO and then select
;.
# mode:
Press INFO.
To quit the screen
Select [QUIT] or press INFO.
NOTE
The recordable time display should only be
used as a guide. It is displayed in 10 minute
units.
Checking the Remaining Space on
the Recording Media
Preparation:
• Select ! mode.
• Select the recording mode.
Press INFO.
The maximum recording time is displayed for
each video quality mode.
To change the video quality
1) Select the video quality.
2) Select [SET].
To quit the screen
Select [QUIT].
21
EN
— : Turn down the
volume
+ : Turn up the
volume
Speaker volume
Playing Back Files
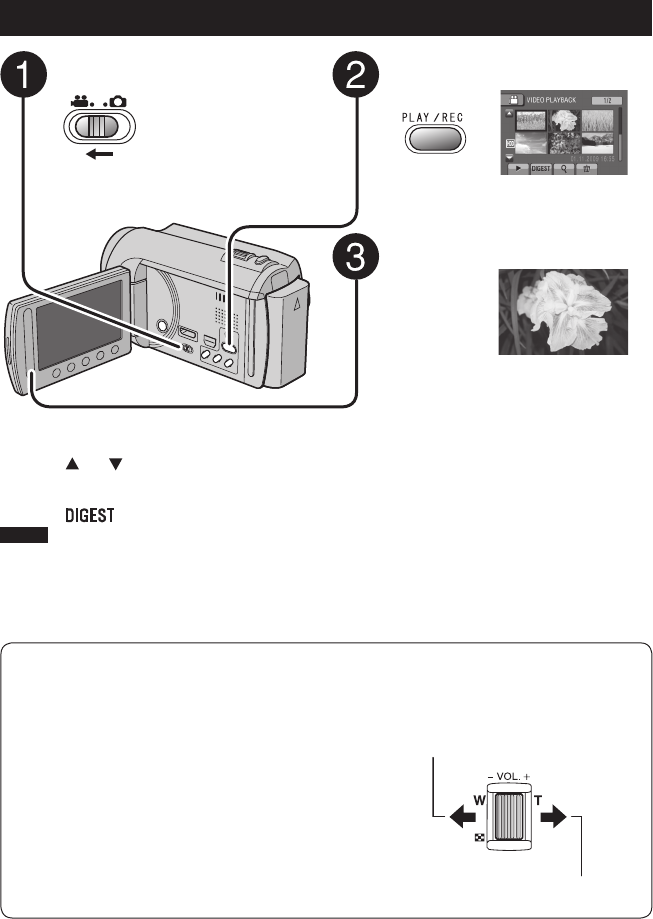
Video Playback
Slide the mode switch to select !
(video) mode.
Press PLAY/REC to select the
playback mode.
The index screen appears.
Select the desired file.
To move to the previous or next page
Touch [ ] or [ ] for over a second.
To play back a few seconds from the
beginning of each video
Touch [ ].
NOTE
• In some cases, parts of video other than the
beginning may be played back.
• Some video may not be played back at all.
To delete a video
Select $ when playback is stopped.
To change the number of thumbnails
(6 thumbnails/12 thumbnails)
Move the zoom lever to [W].
To zoom in the video during pause
(Remote Control Only)
Press T on the remote control.
• Press ¡, ¢, £, ¤ on the remote control to
move the zoom area.
• Press and hold W on the remote control to
cancel zoom in.
Operations during Video Playback
On-screen buttons
N : Return to the first scene of the file
O : Go to the first scene of the next file
L : Return to the index screen
J : Reverse search (during playback)
E : Frame-by-frame playback in reverse
direction (during pause)*
F : Playback
Q : Pause
K : Forward search (during playback)
G : Frame-by-frame playback in forward
direction (during pause)*
* Slow playback starts when you keep touching the
sensor button under E / G for a while.
22 EN
To move to the previous or next page
Touch [ ] or [ ] for over a second.
To delete a still image
Select $.
To change the number of thumbnails
(6 thumbnails/12 thumbnails)
Move the zoom lever to [W].
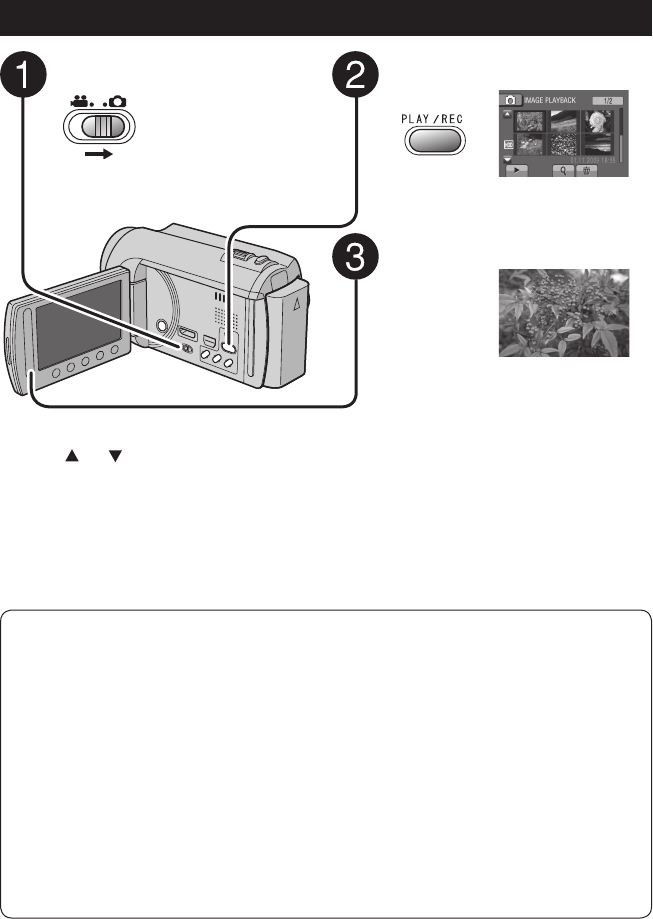
Press PLAY/REC to select the
playback mode.
The index screen appears.
Select the desired file.
Slide the mode switch to select #
(still image) mode.
To zoom in the image during playback
(Remote Control Only)
Press T on the remote control.
• Press ¡, ¢, £, ¤ on the remote control to
move the zoom area.
• Press and hold W on the remote control to
cancel zoom in.
Still Image Playback
Operations during Still Image Playback On-screen buttons
P : Change playback order of slide show in reverse direction
F : Change playback order of slide show in forward direction
L : Return to the index screen
N : Display the previous file
F : Start the slide show
Q : End the slide show
O : Display the next file
Playing Back Files (Continued)

23
EN
Manual recording mode enables you to set the
focus and screen brightness, etc. manually.
Changing to Manual Recording Mode
Preparation:
• Select ! or # mode.
• Select the recording mode.
Select [A/M] twice.
To return to the auto recording mode
Select [A/M] so that the @ indicator
appears.
Manual Setting in Menu
In the manual recording mode:
1 Touch MENU.
2 Select [MANUAL SETTING].
3 Select the desired menu.
4 Select the desired setting.
Depending on the kind of settings you
select, you can set the value by using the
touch sensor.
To return to the previous screen
Select @.
To quit the screen
Select [QUIT].
Manual Recording
24 EN
This camcorder is designed to be used with
high-definition or PAL-type color television
signals. It cannot be used with a television of a
different standard.
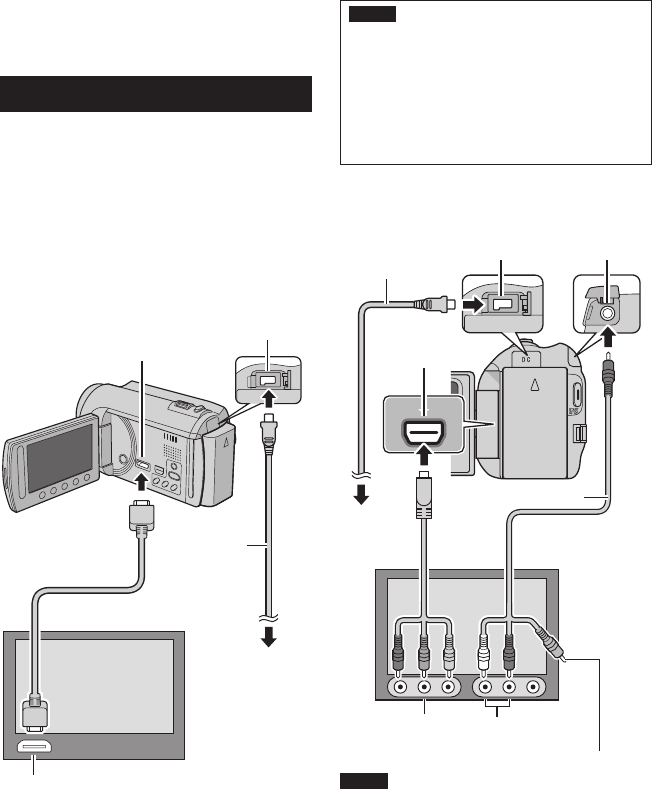
Connection with TV
You can output videos from the HDMI
connector, COMPONENT connector, or AV
connector. Select the connector that best suits
your television.
Preparation:
Turn off all units.
To connect using the HDMI mini
connector
We recommend using the Category 2 HDMI
cable (High Speed cable).
NOTE
• When connecting to the HDMI cable, the
image or sound may not appear on the TV
properly depending on the TV connected.
In such cases, perform the following
operations.
1) Disconnect the HDMI cable and
connect it again.
2) Turn off and on the camcorder again.
To connect using the COMPONENT
connector
COMPONENT
NOTE
Change the settings in [COMPONENT
OUTPUT] according to the connection.
Viewing Files on TV
USING WITH TV
HDMI Mini Connector
AC Adapter
DC Connector
HDMI Connector
HDMI Cable (optional)
(Mini to full-sized HDMI cable)
To AC Outlet
AC Adapter
DC Connector
Component Cable
To AC Outlet
AV Connector
COMPONENT
Connector
AV Cable
COMPONENT
Input Connector
Audio L/R Input
Connector
Video Connector is
not in use.
25
EN
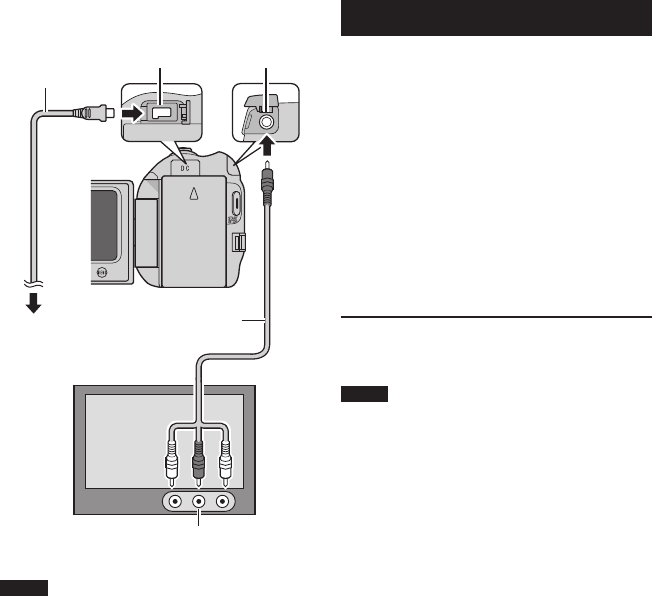
To connect using the AV connector
NOTE
Change the settings in [VIDEO OUTPUT] to
suit the screen size of your television.
Playback Operation
After the connection with TV is completed
1 Turn on the camcorder and the TV.
2 Set the TV to its VIDEO mode.
3 (Only when connecting the camcorder to
the VCR/DVD recorder)
Turn on the VCR/DVD recorder, and
set the VCR/DVD recorder to its AUX
input mode.
4 Start playback on the camcorder.
(Z p. 21, 22)
To display camcorder’s on-screen
display on TV
Set [DISPLAY ON TV] to [ON].
NOTE
When the video was recorded with
x.v.Colour™ set to [ON], change the
x.v.Colour™ setting on TV. For details, refer to
the TV’s instruction manual.
AV Cable
DC Connector
AC Adapter
To AC Outlet
AV Connector
AV Input Connector
26 EN
Managing Files
EDITING
CAUTION
Do not remove the recording medium or
perform any other operation (such as turning
off the power) while accessing files. Also,
be sure to use the provided AC adapter, as
the data on the recording medium may be
corrupted if the battery becomes exhausted
during operation. If the data on the recording
medium becomes corrupted, format the
recording medium to use the medium again.
Capturing a Still Image from a Video
You can capture the desired scene from a
recorded video, and store it as a still image.
Preparation:
• Select ! mode.
• Select the playback mode.
Press SNAPSHOT when playback is
paused.
NOTE
• Captured still images are stored at a
resolution of 1920 x 1080. The image can
be elongated in the horizontal or vertical
directions depending on the quality of the
source video file.
• The continuous shooting function cannot be
used to capture images.
• You cannot capture video during playback.
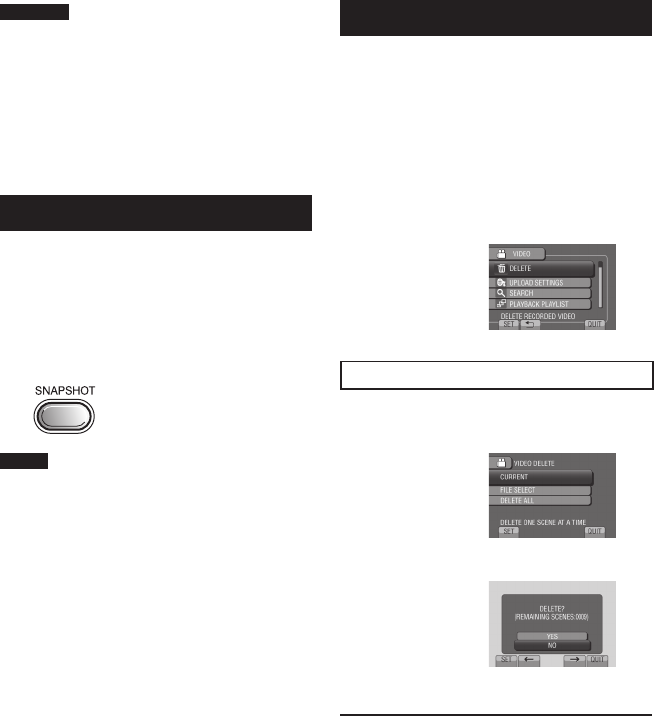
Deleting Files
• Protected files cannot be deleted. To delete
them, release the protection first.
• Once files are deleted, they cannot be
restored. Check files before deleting.
Preparation:
• Select ! or # mode.
• Select the playback mode.
1 Touch MENU.
2 Select [DELETE].
Deleting the Currently Displayed File
After performing steps 1-2
3 Select [CURRENT].
4 Select [YES].
You can select the previous or next file by
selecting % or &.
To quit the screen
Select [QUIT].
27
EN
Copying Files
COPYING
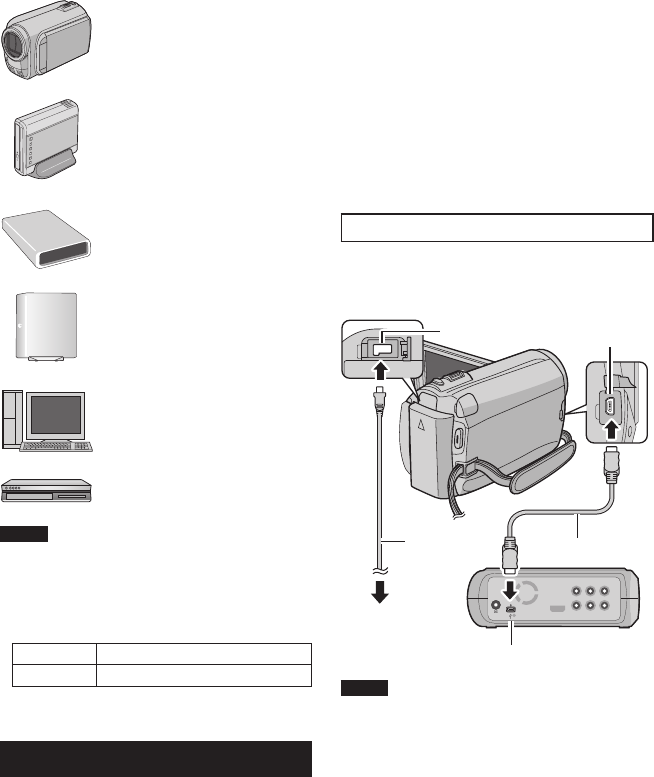
Types of Copying and Connectable Device
The Camcorder
You can copy files between the
HDD and microSD card with this
camcorder alone.
DVD Burner
CU-VD50/CU-VD3
You can copy files recorded on
this camcorder onto discs.
BD Burner
LaCie Model No. 301828
You can copy files recorded on
this camcorder onto discs.
USB External Hard Disk Drive
You can copy files recorded
on this camcorder onto a USB
external hard disk drive.
PC
You can copy files from the
camcorder to a disc using a PC.
VCR/DVD Recorder
You can dub video recorded on
this camcorder onto VCR/DVD
recorder.
NOTE
• It is recommended to use the JVC DVD burner
(CU-VD50/CU-VD3). When using CU-VD20 or
CU-VD40, the recording time may take approx.
2 times longer than the time that is described in
the instruction manual of DVD burner.
• Recommended USB external hard disk drive
Seagate FreeAgentTM Desk series
LaCie Design by Neil Poulton series
• USB external hard disk drive with the capacity
over 2 TB cannot be used.
Using a BD/DVD Burner
The files in the camcorder can be backed up to
a disc using a BD/DVD burner.
•
Use one of the following methods to view
the disc. (If you try to play back the disc with
incompatible player, the disc may not be ejected.)
- Playback the disc using the camcorder.
- Playback the disc using a BD/DVD burner.*
- Playback on a PC.*
- Playback the disc using a BD/DVD player
that supports BD-MV and AVCHD.*
* The DVD must first be finalized on the
camcorder.
• Other than the created BD/DVD using a
BD/DVD burner cannot be played.
• When connecting a DVD burner (CU-VD50)
to a TV, you can play back the created disc
without using the camcorder. When playing
back disconnect the USB cable.
Connection with a BD/DVD Burner
Preparation:
Turn on the camcorder first, then turn on the
BD/DVD burner.
NOTE
• Refer also to the optional BD/DVD burner’s
instruction manual.
• When connecting to a DVD burner, use the USB
cable that came with the DVD burner.
• When connecting to a BD burner, use a
USB cable with Mini-A(Male) to B(Male)
connectors. JVC’s QAM0852-001 (optional) is
recommended. Refer to page 34 for details.
DC Connector USB Connector
AC Adapter
To AC Outlet
USB Cable
BD/DVD Burner
USB Connector
28 EN
Backup All Files
Preparation:
• Select ! or # mode.
• Select HDD or microSD card.
• Connect the camcorder to the BD/DVD
burner.
• When using a BD burner, select [CHANGE
REC. MEDIA] and select the disc type.
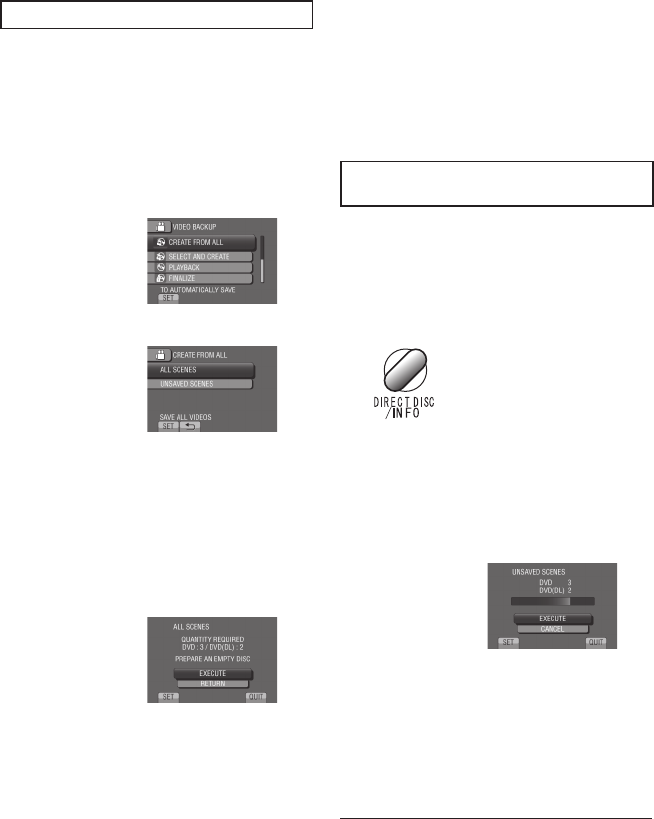
1 Select [CREATE FROM ALL] (!
mode) or [SAVE ALL] (# mode).
2 Select the desired menu.
• ! mode: [ALL SCENES]
# mode: [ALL IMAGES]
All files in the recording medium are
copied.
• ! mode: [UNSAVED SCENES]
# mode: [UNSAVED IMAGES]
Files that have never been copied are
automatically selected and copied.
3 Select [EXECUTE].
4 Select [YES] or [NO].
• [YES]: Displays the thumbnails by group.
• [NO]: Displays the thumbnails by date or
by playlist.
5 Select [EXECUTE].
• The files are copied on the disc. When
[COMPLETED] appears, touch OK.
• When [INSERT NEXT DISC PRESS
[STOP] TO EXIT CREATE] appears,
change the disc. Remaining files are
copied on the second disc.
• To cancel copying, select [STOP].
Copying Video Files that Have Never
Been Copied
Files that have never been copied to the discs
are automatically selected and copied.
1 Open the LCD monitor to turn on the
camcorder.
2 Press DIRECT DISC.
3 Select [YES] or [NO].
• [YES]: Displays the thumbnails by group.
• [NO]: Displays the thumbnails by date or
by playlist.
4 Select [EXECUTE].
• The disc begins to be created.
When [COMPLETED] appears, touch
OK.
• When [INSERT NEXT DISC PRESS
[STOP] TO EXIT CREATE] appears,
change the disc. Remaining files are
copied on the second disc.
• To cancel the disc creation, select
[CANCEL].
To quit the screen
1) Select [QUIT].
2) When [QUIT?] appears, select [YES].
Copying Files (Continued)
29
EN
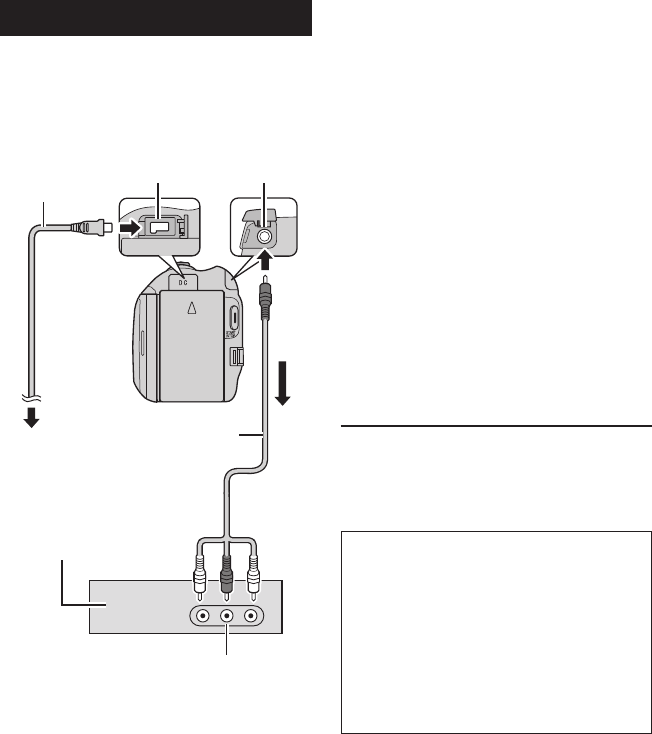
Dubbing Files to a VCR/DVD Recorder
Preparation:
• Create a playlist.
• Turn off all units.
To connect using the AV connectors
(analog dubbing)
1 Open the LCD monitor to turn on the
camcorder.
2 Set the VCR/DVD recorder to its AUX
input mode.
Check that the images from the camcorder
are input correctly to the VCR/DVD
recorder.
3 Play back playlists on the camcorder.
1) Touch MENU.
2) Select [DUBBING PLAYBACK].
3) Select the desired playlist.
4) Select [YES]. (A black screen is
displayed for 5 seconds at the first and
the last scene.)
4 At the point you want to start
dubbing, start recording on the VCR/
DVD recorder.
Refer to the VCR/DVD recorder’s
instruction manual.
To stop dubbing
Stop recording on the VCR/DVD recorder.
To hide the date or icons on the screen
Change the settings in [DISPLAY ON TV].
Switching indication modes on LCD
monitor
Each time you touch DISPLAY, indications
on LCD monitor switch as shown below:
In recording mode:
All indications/Indications for selected
functions
In playback mode:
All indications/Only date and time/No
indications
AV Cable
DC Connector
AC Adapter
To AC Outlet
AV Connector
VCR/DVD Recorder
AV Connector
(Input)
30 EN
Please read the “JVC Software License
Agreement” in the CD-ROM instruction before
you install software. You can copy the data
from the camcorder and create a disc using
a PC.
QInstalling the software to the PC
System Requirements
Windows Vista
OS: Windows Vista®
Home Basic (SP1)
Home Premium (SP1)
(32-bit, pre-installed)
CPU: Intel® CoreTM Duo, 1.66 GHz or higher
(Intel® CoreTM 2 Duo 2.13 GHz or higher
recommended.)
RAM: At least 2 GB
Windows XP
OS: Windows® XP
Home Edition (SP2/SP3)
Professional (SP2/SP3)
(pre-installed)
CPU: Intel® CoreTM Duo, 1.66 GHz or higher
(Intel® CoreTM 2 Duo 2.13 GHz or higher
recommended.)
RAM: At least 1 GB
To check the PC specification
Right-click on [Computer] (or [My
Computer]) in the [Start] menu and select
[Properties].
NOTE
• Make sure your PC has a recordable BD/
DVD drive.
• If your system does not meet the
requirements, it is recommended to copy
files using the BD/DVD burner. (Z p. 27)
• Macintosh users may use the software
included with their Macintosh (iMovie ’08,
iPhoto) to import files to their computer.
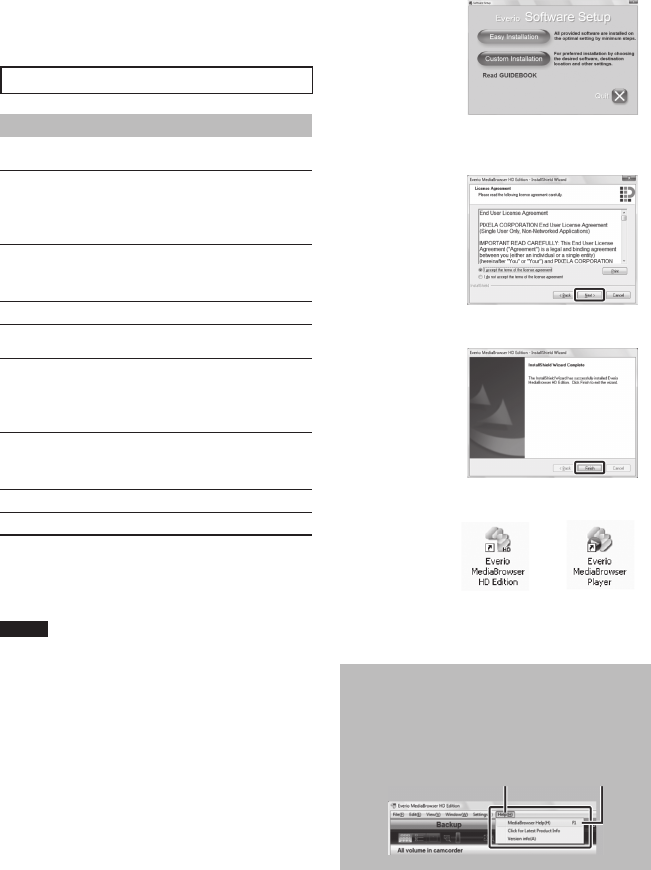
Preparation:
Load the provided CD-ROM into the PC.
In Windows Vista, the auto play dialog box
appears.
1 Click [Easy Installation].
Follow the on-screen instructions.
2 Click [Next].
3 Click [Finish].
Everio MediaBrowser icons are created on
the desktop.
Everio MediaBrowser Player is a software
that plays AVCHD discs on the PC.
(DVD discs cannot be played.)
To see the Instruction Guide for Everio
MediaBrowser
1) Double-click the icon of Everio
MediaBrowser.
2) Click [Help], and click [MediaBrowser Help].
Creating a Disc Using a PC
Click Click
PC OPERATION
31
EN
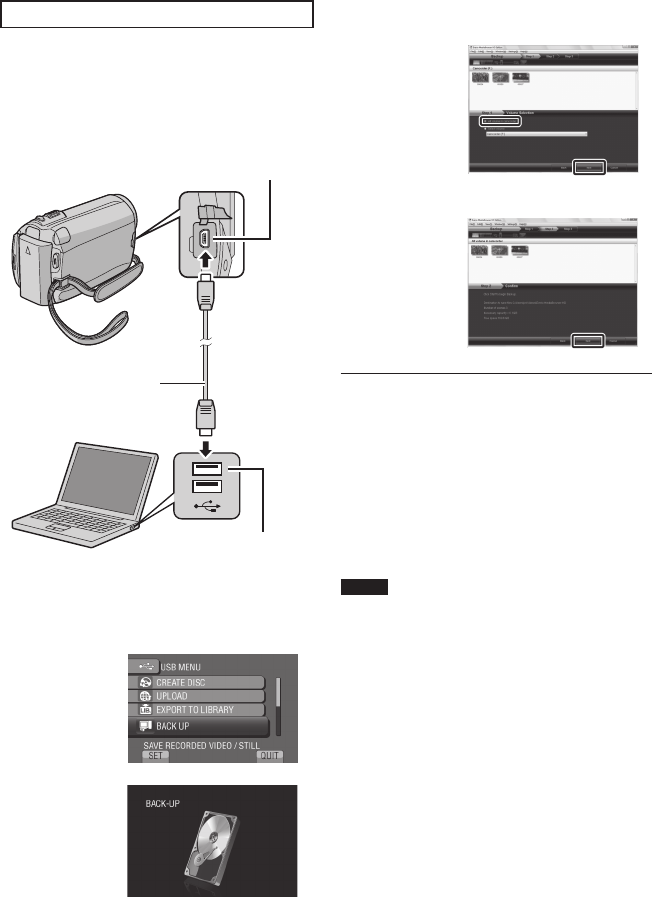
USB Connector
USB Cable
USB Connector
RMaking Backup on the PC
Preparation:
• Install the software to the PC.
• Make sure that enough free space is left in
the PC’s HDD.
• Close the LCD monitor to turn off the
camcorder.
1 Open the LCD monitor to turn on the
camcorder.
2 Select [BACK UP].
Everio MediaBrowser starts on the PC.
3 Click [All volume in camcorder] and
click [Next].
4 Click [Start].
Backup starts.
To disconnect the camcorder from the
PC
1) Right-click the icon (Safely Remove
Hardware) on the task bar and select
[Safely remove USB Mass Storage
Device].
2) Follow the on-screen instructions and
make sure that the device can be safely
removed.
3) Disconnect the USB cable and close the
LCD monitor.
NOTE
It takes time to back up many videos.
32 EN
SMaking User Lists to Arrange the
Files
You can make a user list of a certain subject
(such as Travel, Athletic meet) and put the files
related to the subject into the user list.
Preparation:
Make backup on the PC.
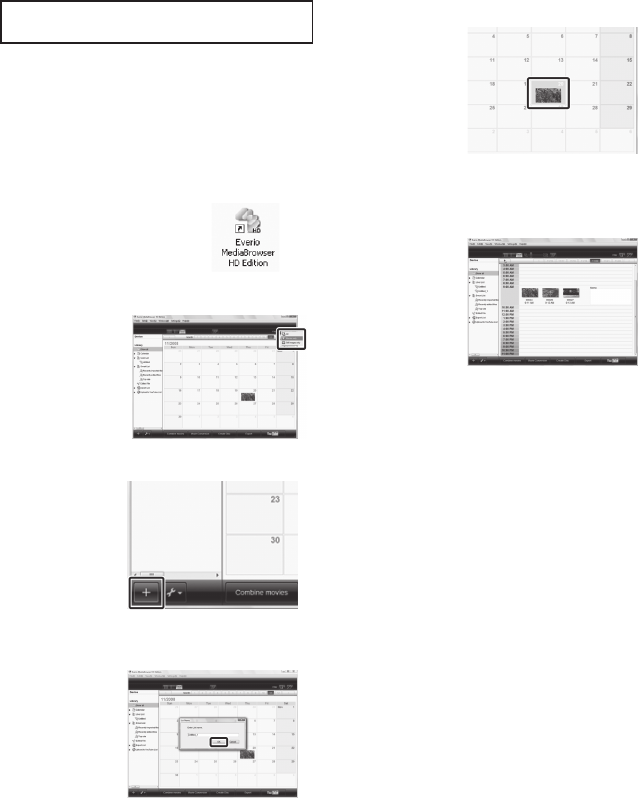
1 Double-click the icon to open the
calendar.
2 Select [Movies only].
3 Click [+].
4 Input the name of the new user list
and click [OK].
5 Click the recording date.
The files recorded on the day are displayed.
6 Drag the file and drop into the user
list.
To add other files into the user list, repeat
steps 5 and 6.
Creating a Disc Using a PC (Continued)
33
EN
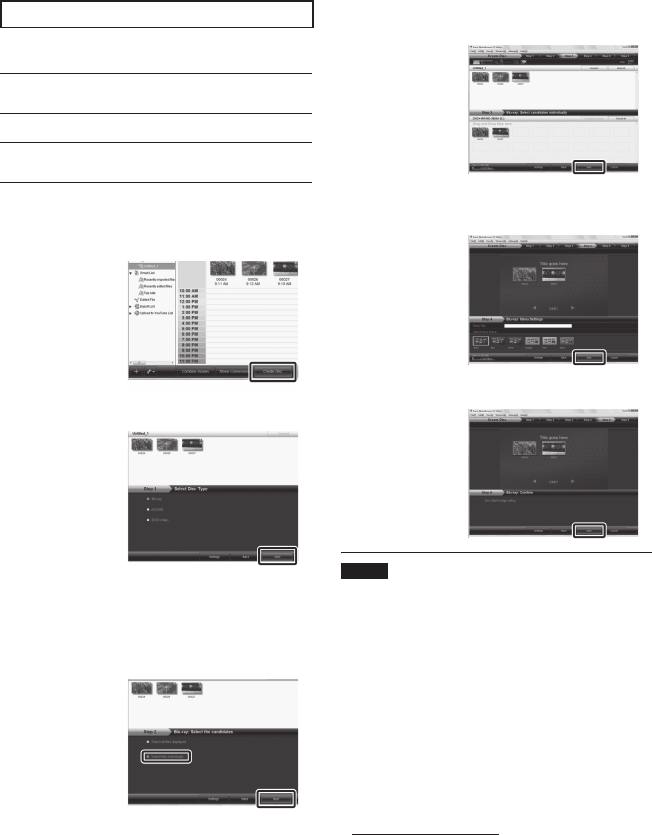
TCopying Files to a disc
Everio MediaBrowser supports 3 disc formats.
Select the one that suits your purpose.
DVD-Video
disc:
Suitable if you will give the disc
to your friends and relatives.
AVCHD disc: Suitable for high quality video.
BD: Suitable for high quality video
with long recording time.
1 Select the user list and click [Create
Disc].
2 Select the disc type and click [Next].
3 Click [Select files individually] and
click [Next].
To add all the files onto discs, click [Select
all files displayed], then go to step 5.
4 Drag the file, and drop into the part at
the bottom and click [Next].
5 Input the disc name, select the top
menu style and click [Next].
6 Click [Start].
NOTE
• When copying video recorded in UXP
recording mode to create an AVCHD disc,
the video needs to be converted to XP
recording mode before copying. Therefore,
it may take longer time than copying video
recorded in other modes.
• Use Everio MediaBrowser Player to playback
the disc. Refer to the help of the provided
Everio MediaBrowser software to operate.
• For detail on operating Everio MediaBrowser,
click [Help] and refer to [MediaBrowser Help].
• Adobe® Reader® must be installed to read
[MediaBrowser Help]. Adobe® Reader® can
be loaded from Adobe’s web site:
http://www.adobe.com
• For assistance in operating the provided
software, refer to the support information.
(Z p. 34)
34 EN
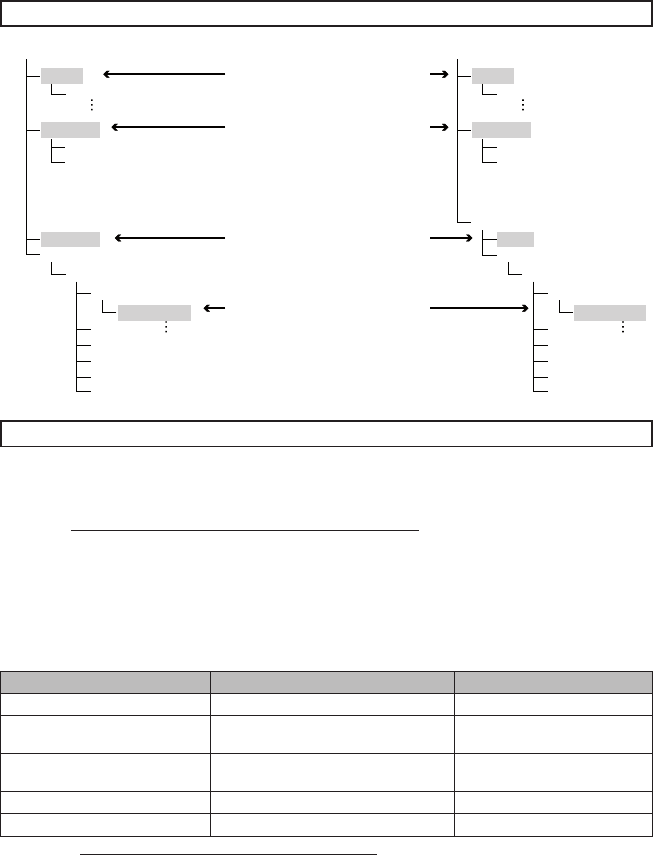
Folder Structure and Extensions
[DEM_XXXX.MTS]
[MOV_XXXX.MTS]
[XXXJVCSO]
[AVCHD]
[DCIM]
[EXTMOV]
[PRIVATE]
[BDMV]
[STREAM]
[XXXXX.MTS]
[BACKUP]
[CLIPINF]
[PLAYLIST]
[INDEX.BDM]
[MOVIEOBJ.BDM]
[DEM_XXXX.MTS]
[MOV_XXXX.MTS]
[JVC]
[XXXJVCSO]
[AVCHD]
[DCIM]
[EXTMOV]
[PRIVATE]
[BDMV]
[STREAM]
[XXXXX.MTS]
[BACKUP]
[CLIPINF]
[PLAYLIST]
[INDEX.BDM]
[MOVIEOBJ.BDM]
Customer Support Information
Use of this software is authorized according to the terms of the software license.
JVC
When contacting the nearest JVC office or agency in your country (refer to the JVC Worldwide Service
Network at http://www.jvc-victor.co.jp/english/worldmap/index-e.html) about this software, please have the
following information ready.
• Product Name, Model, Problem, Error Message
• PC (Manufacturer, Model (Desktop/Laptop), CPU, OS, Memory (MB), Available Hard Disk Space (GB))
Please note that it may take some time to respond to your questions, depending on their subject matter.
JVC cannot answer questions regarding basic operation of your PC, or questions regarding specifications
or performance of the OS, other applications or drivers.
Pixela
Region Language Phone #
USA and Canada English +1-800-458-4029 (toll-free)
Europe (UK, Germany, France,
and Spain) English/German/French/Spanish +800-1532-4865 (toll-free)
Other Countries in Europe English/German/French/Spanish/
Italian/Dutch +44-1489-564-764
Asia (Philippines) English +63-2-438-0090
China Chinese +86-21-5385-3786
Homepage: http://www.pixela.co.jp/oem/jvc/mediabrowser/e/
Please check our website for latest information and downloading.
Creating a Disc Using a PC (Continued)
X = number
Contains the still image folders.
Video file in AVCHD format
Video files with defective
management information are
saved.
Contains management information
files of event and/or disc creation
information for the files taken with
the camcorder.
EVERIO_HDD EVERIO_SD
35
EN
Using with a Portable Media Player
Turning on the Export Mode
You can easily transfer videos recorded in
export mode to iTunes®. All the files with the
export setting turned on are transferred to PC.
For details on transferring, refer to the
operation guide of MediaBrowser in the CD-
ROM.
Preparation:
• Select ! mode.
• Select the recording mode.
Press EXPORT twice.
To turn off the export mode
Press EXPORT twice.
Changing the Export Setting
You can set the recorded videos to the export
setting.
Preparation:
• Select ! mode.
• Select the playback mode.
1 Press EXPORT.
2 Select the file and set [ ].
To check the content of the file, select
[CHECK].
3 Select [DONE].
To cancel the export setting
Select the file and select [ ] again.
To quit the screen
1) Select [DONE].
2) Select [YES].
To confirm the export setting
Press EXPORT on the index screen.
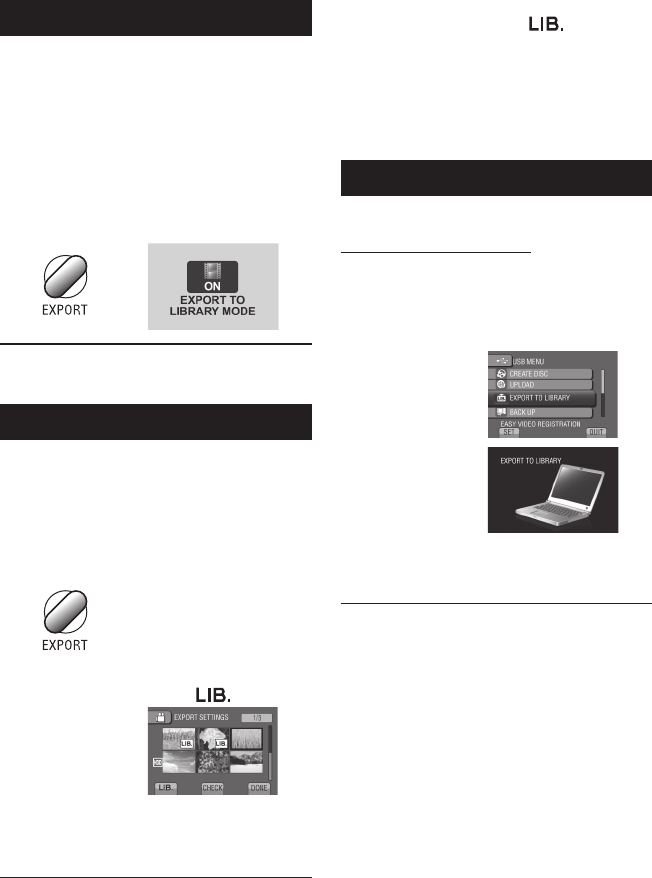
Transferring the Files to PC
Preparation:
Install iTunes® on a PC.
http://www.apple.com/itunes/
1 Connect the camcorder to the PC
with the USB cable.
2 Select [EXPORT TO LIBRARY].
All the files with the export setting turned
on are transferred to PC.
If you cannot export the file to iTunes®
Refer to “Q&A”, “Latest Information”,
“Download Information”, etc. in [Click for
Latest Product Info] in the help of the
provided Everio MediaBrowser software.
36 EN
Turning on the Upload Mode
You can upload the file to video sharing
websites (YouTube™) quickly after recording.
Preparation:
• Select ! mode.
• Select the recording mode.
Press UPLOAD twice.
If you record a file with the upload mode
set on, the recording stops automatically
10 minutes after the recording is started.
The remaining time is displayed on the
LCD monitor.
NOTE
The upload mode turns off each time recording
is finished.
Uploading Files to Websites
Uploading Files
For details on uploading files, refer to the
operation guide of MediaBrowser in the CD-
ROM.
1 Connect the camcorder to the PC
with the USB cable.
2 Select [UPLOAD].
If you cannot upload the file to
YouTube™
• You need your YouTube™ account to
upload files to YouTube™. Create your
account.
• Refer to “Q&A”, “Latest Information”,
“Download Information”, etc. in [Click for
Latest Product Info] in the help of the
provided Everio MediaBrowser software.
37
EN
1 Touch MENU.
2 Select the desired menu.
3 Select the desired setting.
Changing the Menu Settings
FURTHER INFORMATION
To return to the previous screen
Select @.
To quit the screen
Select [QUIT].
Troubleshooting
Trouble Action
Power
No power is supplied.
• Connect the AC adapter correctly.
• Recharge the battery pack.
Display
The remaining battery
display is not correct.
• Fully charge the battery pack, run it down, and then recharge it
again.
• If the camcorder is used for long periods of time in high or low
temperatures, or if the battery pack is repeatedly charged, the
amount of remaining battery may not be displayed correctly.
The LCD monitor is
difficult to see. • The LCD monitor may be difficult to see if used in bright areas
such as under direct sunlight.
Before requesting service, consult the
following chart. If the solutions indicated in the
chart do not solve the problem, consult your
nearest JVC dealer or JVC service center for
instructions.
Refer also to the FAQ of new products on
JVC’s website.
The following phenomena are not
malfunctions.
• The camcorder heats up when it is used for a
long time.
• The battery heats up during charging.
• When playing back a video, the image stops
momentarily or the sound is interrupted at
junctions between scenes.
• LCD monitor momentarily become red or
black when sunlight is recorded.
• Black spots, or red, green, or blue spots
appear on the LCD monitor.
(The LCD monitor contains 99.99% effective
pixels, but 0.01% of fewer pixels may be
ineffective.)

38 EN
Troubleshooting (Continued)
Trouble Action
Recording
Recording cannot be
performed. • Slide the mode switch to select the desired mode (! or #).
Vertical lines appear on
recorded images.
• Such a phenomenon occurs when shooting a subject illuminated
by bright light. This is not a malfunction.
Playback
Sound or video are
interrupted.
• Sometimes playback is interrupted at the connecting section
between two scenes. This is not a malfunction.
Cannot find a recorded
video.
• Select [PLAYBACK OTHER FILE] then search the video on the
index screen.
(Video files that have damaged management information can be
played back.)
• Cancel group display and date search functions.
• Change the setting in [REC MEDIA FOR VIDEO] or [REC MEDIA
FOR IMAGE]. (Files on other media are not displayed.)
Other problems
The camcorder operates
slowly when switching
between video mode
and still image mode,
or when switching the
power on or off.
• If there are many files (such as video) in the camcorder, it takes
time for the camcorder to respond. It is recommended that you
copy all files from the camcorder onto your computer, and erase
the files from the camcorder.
The lamp does not flash
during battery pack
charging.
• Check the remaining battery pack charge.
(When the battery pack is fully charged, the lamp does not flash.)
• When recharging in either a hot or cold environment, ensure that
battery is being charged within the permitted temperature range.
(If the battery pack is being recharged outside the permitted
temperature range, recharging may stop to protect the battery
pack.)
Cannot upload the file to
YouTube™
• Refer to “Q&A”, “Latest Information”, “Download Information”, etc.
in [Click for Latest Product Info] in the help of the provided Everio
MediaBrowser software.
Cannot export the file to
iTunes®
If a malfunction occurs in the HDD
!
Perform [FORMAT HDD]. (All data is deleted.)
# If this does not solve the problem, contact the JVC customer service for repairs.
To reset the camcorder when it does not operate normally
! Close the LCD monitor and remove the power supply (battery pack or AC adapter) from the
camcorder, then reattach it.
# Execute [FACTORY PRESET].

39
EN
Warning Indications
Indication Action
SET DATE/TIME! • Set the clock. If the message still appears after setting the
clock, the battery for the clock has been depleted. Consult your
nearest JVC dealer.
COMMUNICATING ERROR • Be sure to use JVC battery packs.
CANNOT USE IN
VIDEO MODE • Set [REC MEDIA FOR VIDEO] to [HDD].
• Replace the microSD card.
NOT FORMATTED • Select [OK] and select [YES] to perform formatting.
FORMAT ERROR! • Check the operating procedure, and perform once again.
• Turn off the camcorder, and turn it on again.
DATA DELETION ERROR
HDD ERROR! • Perform formatting. (All data is deleted.)
• Turn off the camcorder, and turn it on again.
MEMORY CARD ERROR!
• Perform formatting. (All data is deleted.)
• Remove and re-insert the microSD card. (MultiMediaCard
cannot be used.)
• Remove any dirt from the microSD card terminals.
• Insert the microSD card before switching the power on.
• Turn off the camcorder, and turn it on again.
CANNOT TAKE MORE STILL
IMAGES AT THE MOMENT
• Stop video recording, and then record a still image. (If an
microSD card is removed or inserted during video recording, a
still image cannot be recorded.)
DROP DETECTION WORKED AND
THE POWER IS TURNED OFF
• Set [REC MEDIA FOR VIDEO] to [SD], then record to a
microSD card.
• Turn off the camcorder and turn it on again.
• Prevent the camcorder from vibration and shock.
RECORDING CANCELLED
RECORDING FAILURE microSD card:
• Remove and re-insert the microSD card. (MultiMediaCard
cannot be used.)
• Remove any dirt from the microSD card terminals.
• Insert the microSD card before switching the power on.
HDD:
• Do not allow the camcorder to be subject to impact/vibrations.
PLAYBACK FAILED
40 EN
Specifications
General
Power supply
DC 11 V (Using AC adapter)
DC 7.2 V (Using battery pack)
Power consumption
Approx. 3.5 W*
* When the LED light is off and the monitor
backlight is set to [STANDARD] mode.
Dimensions (W x H x D)
53 mm x 68 mm x 113 mm
Weight
Approx. 325 g
Approx. 370 g (incl. battery pack)
Operating temperature
0°C to 40°C
Storage temperature
–20°C to 50°C
Operating humidity
35% to 80%
Camera/LCD monitor
Pickup
1/4.1" (3,050,000 pixels) progressive CMOS
Lens
F 1.9 to 3.2, f = 2.9 mm to 58.0 mm,
20:1 power zoom lens
Filter diameter
ø30.5 mm
LCD monitor
2.7" diagonally measured,
LCD panel/TFT active matrix system
LED Light
Within 1.5 m
(recommended shooting distance)
Connectors
AV output
Video output: 1.0 V (p-p), 75 W
Audio output: 300 mV (rms), 1 kW
HDMI
HDMI™ (V.1.3 with x.v.Colour™)
Component output
Y, Pb, Pr component output
Y: 1.0 V (p-p), 75 W
Pb/Pr: 700 mV (p-p), 75 W
USB
Mini USB type A and type B,
USB 2.0 compliant
AC Adapter
Power requirement
AC 110 V to 240 V$, 50 Hz/60 Hz
Output
DC 11 V
§
, 1 A
Remote Control
Power supply
DC 3 V
Battery life
Approx. 1 year
(depending on the frequency of use)
Operating distance
Within 5 m
Operating temperature
0°C to 40°C
Dimensions (W x H x D)
42 mm x 14.5 mm x 91 mm
Weight
Approx. 30 g
(incl. battery)
Still image
Format
JPEG
Image size
1920 x 1080
1440 x 1080
640 x 480
Image quality
FINE / STANDARD
Video
Signal format
1080/50i
Recording/Playback format
Video: MPEG-4 AVC/H.264
Audio: Dolby Digital (2ch)
Recording mode (video)
UXP: VBR, average of 24 Mbps
XP: VBR, average of 17 Mbps
SP: VBR, average of 12 Mbps
EP: VBR, average of 5 Mbps
Recording mode (audio)
48 kHz, 256 kbps
Design and specifications subject to change
without notice.
41
EN
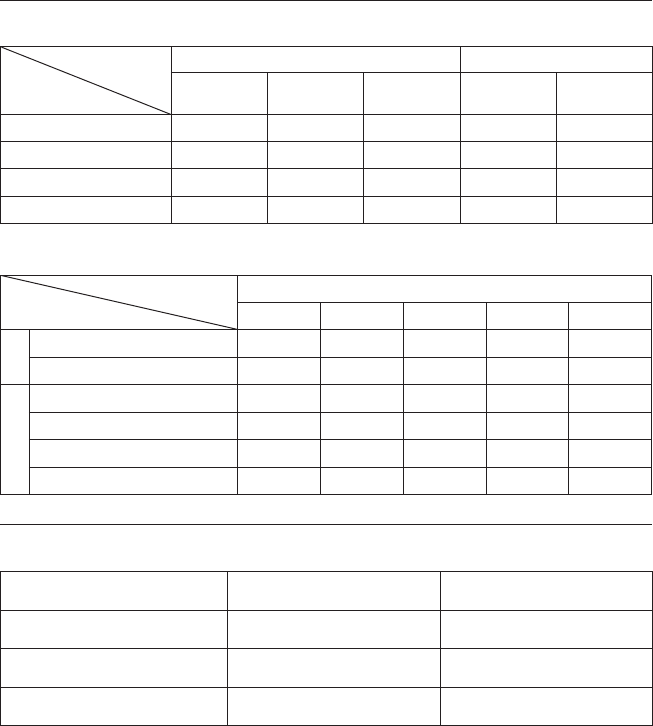
h: hour/m: minute
Approximate recordable time (for video)
Recording medium
Quality
HDD microSD Card
GZ-HD300
60 GB
GZ-HD310
80 GB
GZ-HD320
120 GB 4 GB 8 GB
UXP 5 h 30 m 7 h 20 m 11 h 20 m 40 m
XP 7 h 30 m 10 h 15 h 30 m 1 h 00 m
SP 10 h 14 h 21 h 44 m 1 h 28 m
EP 25 h 33 h 50 h 1 h 40 m 3 h 20 m
Approximate number of images (for still image)
The HDD can record up to 9999 still images in either mode.
Recording medium
Image size/Quality
microSD Card
512 MB 1 GB 2 GB 4 GB 8 GB
16:9
1920 x 1080 / FINE 510 1040 2100 4200 8420
1920 x 1080 / STANDARD 800 1630 3210 6410 9999
4:3
1440 x 1080 / FINE 680 1370 2770 5540 9999
1440 x 1080 / STANDARD 1060 2160 4360 8700 9999
640 x 480 / FINE 3320 6720 9999 9999 9999
640 x 480 / STANDARD 5980 9999 9999 9999 9999
h: hour/m: minute
Required charging/recording time (approx.)
Battery pack Charging time Recording time
BN-VF808U (Provided) 1 h 50 m 1 h 20 m*
BN-VF815U 2 h 40 m 2 h 50 m*
BN-VF823U 3 h 40 m 4 h 10 m*
* When the LED light is off and the monitor backlight is set to [STANDARD] mode.
42 EN
Cautions
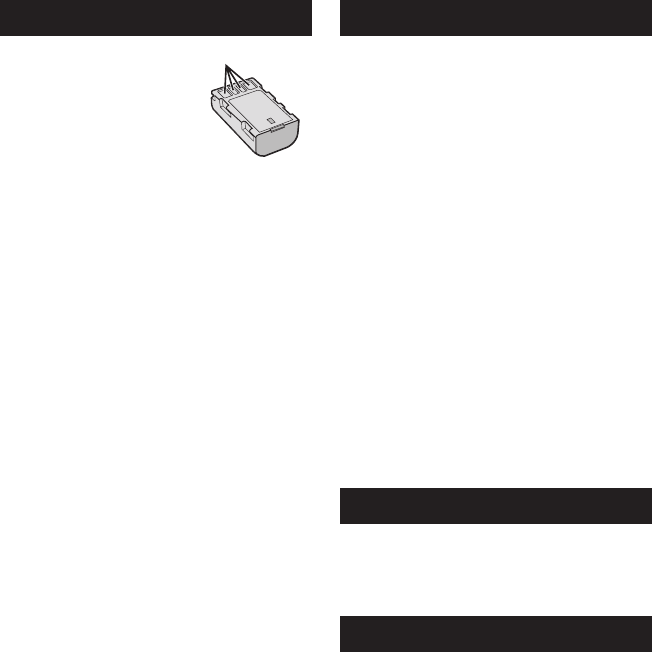
Battery Pack
The supplied battery pack is a
lithium-ion battery. Before using
the supplied battery pack or an
optional battery pack, be sure
to read the following cautions:
Terminals
• To avoid hazards
... do not burn.
... do not short-circuit the terminals. Keep it away
from metallic objects when not in use. When
transporting, make sure the provided battery
cap is attached to the battery. If the battery cap
is misplaced, carry the battery in a plastic bag.
... do not modify or disassemble.
... do not expose the battery to temperatures
exceeding 60°C, as this may cause the battery
to overheat, explode or catch fire.
... use only specified chargers.
• To prevent damage and prolong service life
... do not subject to unnecessary shock.
... charge within the temperature range of 10°C
to 35°C. Cooler temperatures require longer
charging time, or in some cases stop charging
at all. Warmer temperatures prevent complete
charging, or in some cases stop charging at all.
... store in a cool, dry place. Extended exposure
to high temperatures will increase natural
discharge and shorten service life.
... fully charge and then fully discharge the battery
every 6 months when storing the battery pack
over a long period of time.
... remove from charger or powered unit when not
in use, as some machines use current even
when switched off.
Recording Medium
• Be sure to follow the guidelines below
to prevent corruption or damage to your
recorded data.
• Do not bend or drop the recording medium,
or subject it to strong pressure, jolts or
vibrations.
•
Do not splash the recording medium with water.
• Do not use, replace, or store the recording
medium in locations that are exposed to
strong static electricity or electrical noise.
• Do not turn off the camcorder power or
remove the battery or AC adapter during
shooting, playback, or when otherwise
accessing the recording medium.
• Do not bring the recording medium near
objects that have a strong magnetic field or
that emit strong electromagnetic waves.
• Do not store the recording medium in locations
with high temperature or high humidity.
• Do not touch the metal parts.
• When formatting or erasing data using
the camcorder, only the file administration
information is changed. The data is not
completely erased from the hard disk. If you
want to completely erase all of the data,
we recommend either using commercially
available software that is specially designed for
that purpose, or by physically destroying the
camcorder with a hammer etc.
Hard Disk
• Do not use the unit where it is subject to
vibrations or loud sounds.
• If you move the unit suddenly, the drop
detection function may operate and the power
may be turned off.
LCD Monitor
• To prevent damage to the LCD monitor, DO
NOT
... push it strongly or apply any shocks.
... place the camcorder with LCD monitor on the
bottom.
• To prolong service life
... avoid rubbing it with coarse cloth.

43
EN
Main Unit
• For safety, DO NOT
... open the camcorder’s chassis.
... disassemble or modify the unit.
... allow inflammables, water or metallic objects to
enter the unit.
... remove the battery pack or disconnect the
power supply while the power is on.
... leave the battery pack attached when the
camcorder is not in use.
... place naked flame sources, such as lighted
candles, on the apparatus.
... expose the apparatus to dripping or splashing.
... leave dust or metal objects adhered to the
power plug or an AC wall outlet.
... insert any objects in the camcorder.
• Avoid using the unit
... in places subject to excessive humidity or dust.
... in places subject to soot or steam such as near
a cooking stove.
... in places subject to excessive shock or vibration.
... near a television set.
... near appliances generating strong magnetic
or electric fields (speakers, broadcasting
antennas, etc.).
... in places subject to extremely high (over 40°C)
or extremely low (under 0°C) temperatures.
... in places where air pressure is low (more than
3000 m above the sea level).
• DO NOT leave the unit
... in places of over 50°C.
... in places where humidity is extremely low
(below 35%) or extremely high (above 80%).
... in direct sunlight.
... in a closed car in summer.
... near a heater.
... in high places such as on a TV. Leaving the unit
in high places while a cable is connected may
result in a malfunction if the cable is caught and
the unit falls onto the floor.
• To protect the unit, DO NOT
... allow it to become wet.
... drop the unit or strike it against hard objects.
... subject it to shock or excessive vibration during
transportation.
... keep the lens directed at extremely bright
objects for long periods.
... expose the lens to direct sunlight.
... swing it excessively when using the hand strap.
... swing the soft camcorder case excessively
when the camcorder is inside it.
... place the camcorder in dusty or sandy areas,
such as on a beach.
• To prevent the unit from dropping,
• Fasten the grip belt securely.
• When using the camcorder with a tripod,
attach the camcorder to the tripod securely.
If the camcorder drops, you may be injured and
the camcorder may be damaged.
When a child uses the unit, there must be
parental guidance.
44 EN
A
AC Adapter ........................................................15
AV Connection .............................................25, 29
B
Battery Pack ................................................15, 42
BD/DVD Backup ................................................27
BD/DVD Burner .................................................27
C
CD-ROM ......................................................14, 30
Clock Adjust ......................................................15
Component Connection ....................................24
Copying Files .....................................................27
D
Date/Time Setting ...............................................3
Deleting Files ....................................................26
Digest Playback .................................................21
Dubbing Playback ..............................................29
E
Export to Library Mode ......................................35
F
Face Detection ............................................18, 19
H
Hard Disk ..........................................................42
HDMI .................................................................24
I
iTunes ................................................................35
L
Language Setting ..............................................16
LCD Monitor ................................................12, 42
LED Light ..........................................................20
M
Manual Recording .............................................23
Menu Settings ...................................................37
microSD Card ....................................................17
N
Number of Images .............................................41
O
On-screen recording control ..............................18
On-screen zoom control ....................................20
P
Playback Zoom ............................................21, 22
Portable Media Player .......................................35
Q
Quick Review ...............................................18, 19
R
Recordable Time ...............................................41
Recording Medium ............................................42
Remaining Battery Power ..................................20
Remaining Recording Time ...............................20
Remote Control ...........................................11, 14
S
Speaker Volume ................................................21
U
Uploading Files .................................................36
USB Cable ...................................................27, 31
V
Viewing Files on TV ...........................................24
Y
YouTube .............................................................36
Z
Zoom .................................................................20
Terms

MEMO
2CS
轻松入门指南
小心
•请务必使用JVC电池。如果使用JVC电池以外的任何其他电池,则无法保证安全和性
能。
记录之前对电池充电
关闭摄像机并安装电池。
手握调整
调整手带并扣紧。
•当握住摄像机时扣紧手带。
•携带摄像机时,小心不要摔落。
手带
扣紧
电源/充电指示灯
闪烁:正在充电
熄灭:充电完成
电池
交流电源适配器
至交流电源插座
(110V至240V)
打开盖子
购买时电池未充电。
存取指示灯
闪烁:正在存取文件
当指示灯闪烁时,不
要取下交流电源适配
器、电池或microSD
插卡。
3
CS
日期/时间设定
Q打开液晶监视器以开启摄
像机
电源键
液晶监视器
R在10秒钟内选择[是]
•当此信息消失时,按住电源键至少2秒钟
关闭电源,然后再按住该键至少2秒钟。
•请用手指触摸感应器。如果用指甲或戴手套
触摸,感应器不起作用。
S选择[时钟设置]
T选择离您使用摄像机最近的
城市
U如果夏日时有效,选择[开]
V设定日期和时间
用您的手指在感应器上滑动。然后触一
下OK。
触摸感应器:设定日期和时间
}:将光标移到右边
OK:时钟开始
4CS
视频记录
小心
记录重要场景之前,建议进行试录。
S开始记录
按START/STOP键
开始记录,再次按下
停止。
硬盘上的剩余空间
视频质量 记录-待机
记录
Q滑动模式开关以选择!(视频)模式
R选择记录模式(REC)
按该键时模式改变。
自动记录指示出现。
5
CS
播放
执行向前搜索或向后搜索等操作(Z第21页)
在电视机上观看文件(Z第24页)
小心
记录之后,请勿忘记进行备份!
•复制文件到光盘(Z第27页)
•复录文件到磁带录像机/DVD录像机(Z第29页)
•在电脑上编辑文件(Z第30页)
Q选择播放模式(PLAY)
按该键时模式改变。
R选择所需文件
索引画面
S选择F(触一下OK)
播放画面

6CS
SAFETY1
安全注意事项
更换锂电池之警告
本机所用的电池如果处理不当,则有引起火灾或化
学燃烧的危险。
请勿进行再充电、分解、加热到100℃以上或丢
入火中焚烧。
更换电池时,请使用Panasonic、三洋、索尼或万
胜的CR2025型电池。
电池更换错误,有可能引起爆炸及火灾。
用完的电池应及时处理。
严禁小孩玩弄。
请勿分解电池,也不可丢入火中。
•
•
•
将本机安装在橱柜或架子上时,为了空气流通,使
机器四周保留充分的间隙(两侧、上部及后面各
10cm以上)。
请勿堵塞透气孔。
(如果透气孔被报纸或布等堵塞,将影响散热。)
请将本机远离明火,如点燃的蜡烛等。
处理蓄电池时,应充分考虑环境问题。请务必严格
遵守当地有关蓄电池处理的规则及法律。
请勿将本机置于高湿度的环境下或溅上水滴。
请勿在浴室或多水的地方使用本机。
而且,请勿将充满水或液体的物品(化妆品及药
剂、鲜花瓶、盆栽植物、杯子等),放在本机的
上面。
(如果水或液体侵入本机,可能引起火灾或触电。)
小心:为预防火灾或电击,切勿使本机淋雨或受潮。
警告:
若发现摄像机或交流电源适配器发出烟雾或异
味,应立即关闭电源,或者拔下电源插头。如果
此时继续使用本摄像机或交流电源适配器,将会
导致火灾或电击。请与JVC经销商联系。切勿尝
试自行修复。
为预防电击,请勿擅自打开机壳。机内无用户可
修的零件。检修时请找特约技术人员。
在您长时间不用交流电源适配器时,建议您从交
流电源插座上拔下电源电线。
在某些地区,请根据交流电源墙壁插座的类型使
用转换插头。
•
•
•
•
注意:
额定值牌(系列号码牌)和安全警告位于主机的
底部和/或背面上。
序列号码牌在电池箱座上。
交流电源适配器的额定信息和安全警告位于其上
部和下部。
•
•
•
小心:
请勿将电池、装有电池的摄像机、以及装有电池的
遥控器暴露于直射阳光、火焰或类似高温环境下。
警告:
请将电源插头置于方便插拔的地方。
7
CS
SAFETY2
如果显示此符号,仅在欧盟国家有效。
警告:
为防电击或损坏本机,
先将电源电线的小头紧
紧插入交流电源适配器
直到不再松动,然后将
电源电线的大头插入交
流电源插座。
不要将镜头直接对向太阳。否则会损伤眼睛并导致
内部电路出现故障。还可能有引起火灾或电击的危
险。
警告!
下列注意事项关系到对摄像机及用户的可能损害。
抓着液晶监视器携带或拿持摄像机会摔落本机,或
引起故障。
不要在不平稳的平面上使用三脚架。否则可能翻倒
而使摄像机严重受损。
警告!
最好不要把摄像机接在电缆(音频/视频、S视频
等)上然后将本机放在电视机顶面上,否则不小心
勾到电缆则会使摄像机摔落而受损。
记住,本摄像机仅供用户个人使用。
任何未经许可的商业使用都是受禁止的。(即使是
摄录个人欣赏用的影片、表演或展览,您最好事先
获得准许。)
商标
“AVCHD”和“AVCHD”标记是Panasonic
Corporation和SonyCorporation的商标。
经DolbyLaboratories许可制造。“Dolby”和
双D标志是DolbyLaboratories的商标。
x.v.ColourTM是Sony
Corporation的商标。
HDMI是HDMILicensing,LLC.
的商标。
Windows®是MicrosoftCorporation在美国和
(或)其他国家的注册商标或商标。
Macintosh是AppleInc.的注册商标。
iTunes、iMovie,和iPhoto是AppleInc.在
美国和其他国家注册的商标。
YouTube和YouTube标志是YouTubeLLC的商
标和/或注册商标。
本使用说明书中的其他产品和公司名称是各所有
者的商标和(或)注册商标。
•
•
•
•
•
•
•
•
•

8CS
目录
准备工作
索引.................................10
液晶监视器上的指示...................12
附件.................................14
准备遥控器............................. 14
使用之前所需的设定...................15
对电池充电............................. 15
日期/时间设定......................... 15
语言设定............................... 16
其他设定.............................17
使用microSD插卡...................... 17
记录/播放
记录文件.............................18
视频记录............................... 18
静像记录............................... 19
变焦................................... 20
LED灯................................. 20
检查剩余电池电量....................... 20
检查记录媒体上的剩余空间............... 20
播放文件.............................21
视频播放.............................. 21
静像播放............................... 22
手动记录.............................23
切换到手动记录模式..................... 23
菜单中的手动设定....................... 23
与电视机一起使用
在电视机上观看文件...................24
连接电视机............................. 24
播放操作............................... 25
编辑
管理文件.............................26
从视频截取静像......................... 26
删除文件............................... 26
复制
复制文件.............................27
使用BD/DVD刻录机..................... 27
复录文件到磁带录像机/DVD录像机........ 29
电脑操作
使用电脑制作光盘.....................30
与便携式媒体播放器一起使用...........35
打开导出模式........................... 35
更改导出设定........................... 35
传送文件到电脑......................... 35
上载文件到网站.......................36
打开上载模式........................... 36
上载文件............................... 36
附加信息
更改菜单设定.........................37
故障排除.............................37
警告指示.............................39
规格.................................40
注意事项.............................42
术语.................................44
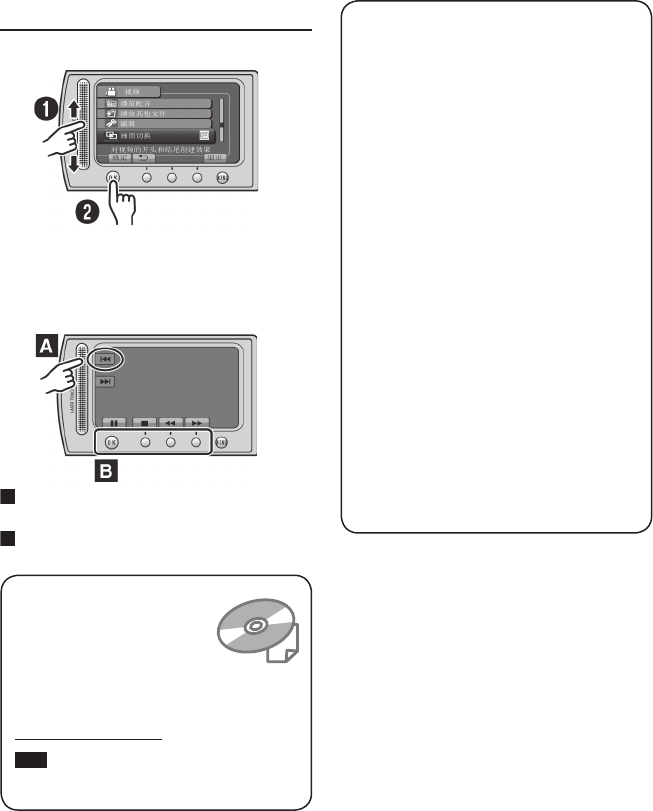
9
CS
请首先阅读本节!
备份重要的记录数据
建议将重要的记录数据复制到DVD或其他记录
媒体以保存。JVC对任何数据丢失概不负责。
进行试录
在进行重要数据的实际记录之前,请进行试录
并播放记录的数据,从而检查视频和声音是否
已经正确记录。
在摄像机工作异常的情况下将其重设
关闭液晶监视器并切断摄像机电源(电池或交
流电源适配器),然后重新接通。
有关使用电池的注意事项
•请务必使用JVCBN-VF808U/VF815U/VF823U电
池。本产品包含专利和其他专有技术,并设计
为只可使用JVC电池而不能使用其他电池。
用其他电池工作时,JVC不能保证本产品的
安全或性能。
•如果摄像机受到静电影响,请先关闭其电源
再使用。
如果发生故障,立即停止使用摄像机,并咨询
本地的JVC经销商。
•维修或检查摄像机时,所记录的数据可能会
被删除。在送修或检查之前,请备份好所有
数据。
由于摄像机可能会用于在商店进行演示,因此
默认状态下演示模式设为开启
要禁用演示模式,请将[演示模式]设为
[关]。
如何使用触摸感应器
在液晶监视器上显示菜单之后:
Q用您的手指在感应器上滑动。
R选择[确定]。(触一下OK。)
A
要选择左侧显示的屏幕按键,请触摸屏幕
按键旁边的感应器部分。
B
要选择屏幕底部显示的屏幕按键,请触摸
其下面的按键。
请阅读本使用说明书,享受摄像
机带来的乐趣。
有关详细操作,请参阅随附的
CD-ROM上的使用指南。
要查看使用指南,必须安
装Adobe®Acrobat®ReaderTM或Adobe®
Reader®。
Adobe
®
Reader
®
可从Adobe网站下载:
http://www.adobe.com/
注:
用单击方式选择您所需的语言。
型号名称标示在摄像机底部。
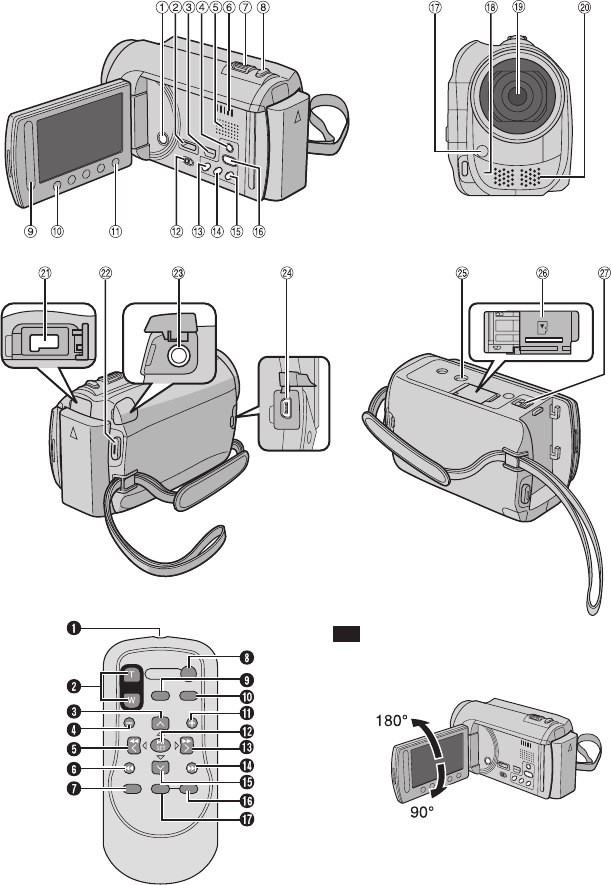
10 CS
索引
注
•拍摄时,请注意勿挡住3,4,5 和6。
•液晶监视器可以旋转270°。
准备工作
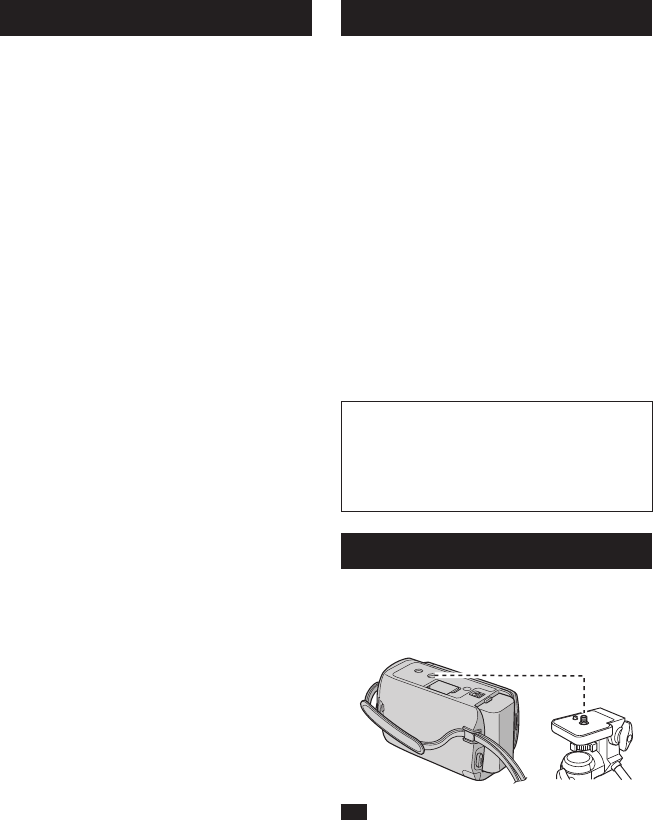
11
CS
遥控器
Q红外线光束发射窗
RZOOM(T/W)键(拉近/推远)
S调高键
T后跳键
U左按键
V后退键
WPLAYLIST键
XSTART/STOP键
YS.SHOT(SNAPSHOT)键
ZINFO键
a前跳键
bPLAY/PAUSE/SET键
c右按键
d下一步键
e调低键
fINDEX键*
gDISP键
*每按一下INDEX,屏幕将按如下切换:
!模式:
索引画面«组索引画面
#模式:
索引画面«日期索引画面
摄像机
!电源键
#HDMI小型接口(Z第24页)
$组件接口(Z第24页)
%DISPLAY键(Z第13页)
&扬声器
(通风孔
)变焦杆(Z第20页)
扬声器音量控制
*SNAPSHOT键(Z第19页)
+触摸感应器
,OK键
-MENU键
.模式开关[!,#]
/UPLOAD键(Z第36页)
TITLE键
0EXPORT键(Z第35页)
1DIRECTDISC键(Z第28页)
INFO键(Z第20页)
2PLAY/REC键(Z第18、19、21、22页)
3LED灯(Z第20页)
4遥控感应器
5镜头
6立体声麦克风
7直流电接口
8START/STOP键(Z第18页)
9AV接口(Z第25、29页)
:USB接口(Z第27、31页)
;三脚架固定槽
<microSD卡槽
=电池释放键
安装三脚架
对准摄像机销孔和三脚架方位销,以及固定槽
和螺丝,然后顺时针旋转摄像机,将其安装到
三脚架上。
注
请勿在不平稳的平面上使用三脚架。否则可能
翻倒而使摄像机严重受损。
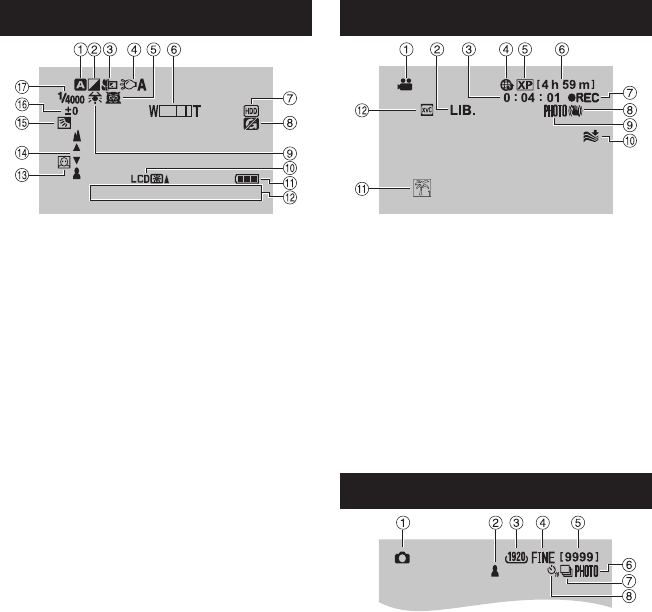
12 CS
液晶监视器上的指示
记录视频和静像时
16:55
1 . 1 1. 2009
!选定的记录模式指示(Z第23页)
@:自动模式
3:手动模式
#效果模式指示
$近拍模式指示
%LED灯指示(Z第20页)
&场景选择指示
(变焦指示(Z第20页)
)记录媒体指示
*防摔保护指示([防摔保护]设为[关]时出
现。)
+白平衡指示
,监视器背光指示
-电池指示
.日期/时间(Z第15页)
/人脸检测指示(Z第18、19页)
0手动聚焦调整指示
1背光补偿指示
2亮度控制指示
.:测光区域控制指示
3快门速度
仅在记录视频时
!模式指示
#EXPORT模式指示(Z第35页)
$计数器
%上载模式指示(Z第36页)
&视频质量
(剩余时间
)
MREC:(在记录时出现。)
MQ
:(在记录待机模式时出现。)
*手振补偿(DIS)指示([手动补偿]设为
[关]时出现。)
+拍摄指示(Z第18页)
,风声消除指示
-事件指示
.x.v.Colour™
仅在记录静像时
!模式指示
#聚焦指示(Z第19页)
$图像大小
%图像质量:
FINE
(精细)或
STD
(标准)
&剩余拍摄张数
(拍摄指示(Z第19页)
)快门模式指示
*自拍定时指示
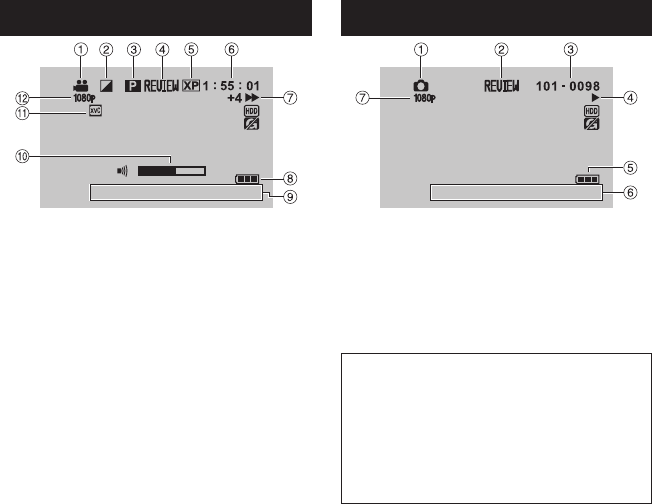
13
CS
在视频播放时
8
16:55
1 . 1 1. 2009
!模式指示
#画面切换效果指示
$播放列表播放指示(仅在播放播放列表时出
现。)
%快速查看指示(Z第18页)
&视频质量
(计数器
)播放模式
F:播放
Q:暂停
K:向前搜索
J:向后搜索
QF:向前慢放
PQ:向后慢放
(左边的数字显示速度。)
*电池指示
+日期/时间(Z第15页)
,音量指示
-x.v.Colour™
.1080p输出
在播放静像时
16:55
1 . 1 1. 2009
!模式指示
#快速查看指示(Z第19页)
$文件夹/文件号码
%幻灯片放映指示
&电池指示
(日期/时间(Z第15页)
)1080p输出
切换液晶监视器上指示模式
每触一下DISPLAY,液晶监视器上的指示将
按如下切换:
在记录模式中:
所有指示/所选功能的指示
在播放模式中:
所有指示/仅日期和时间/无指示
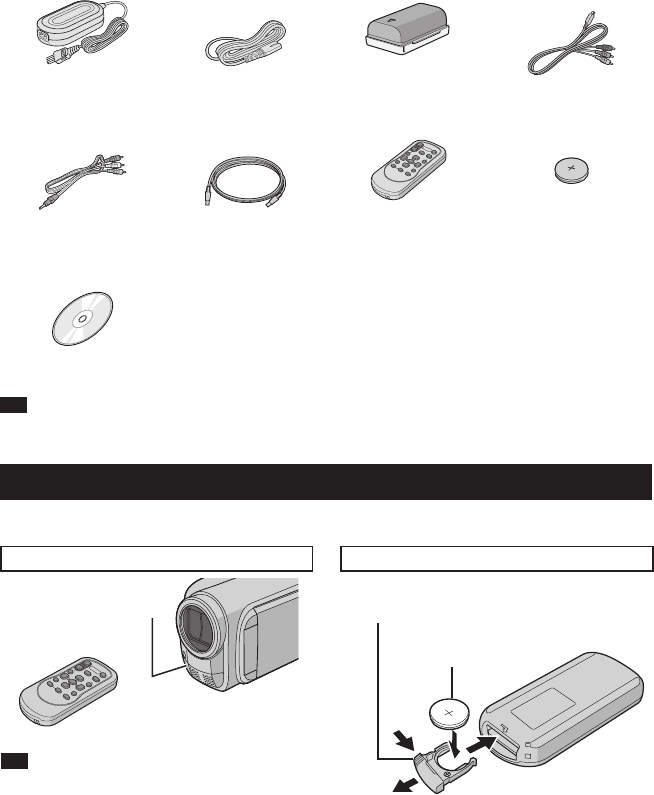
14 CS
附件
准备遥控器
购买时,遥控器内附电池。
使用之前,请取出绝缘片。
光束有效区 重新插入电池
注
当遥感器直接曝露于阳光或强光下时,发射光
束可能无效或者可能导致不正常操作。
按下锁定块,拉出电池支架。
有效距离:
最大5米
遥控感应器 锁定块
锂电池
(CR2025)
AP-V20M
BN-VF808U
交流电源适配器 电源线 电池 组件电缆
RM-V751U
CR2025
AV电缆 USB电缆 遥控器 锂电池
预安装于遥控器中。
CD-ROM
注
请务必使用附带的电缆来连接。切勿使用任何其他电缆。
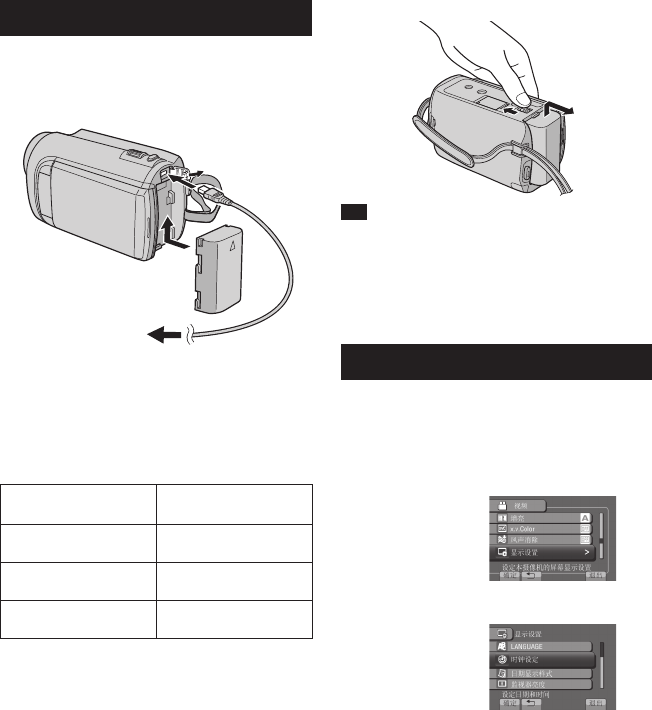
15
CS
使用之前所需的设定
对电池充电
1 关闭液晶监视器以关闭摄像机。
2 安装电池,然后连接交流电源适配器。
•电源/充电指示灯闪烁,指示开始充电。
•指示灯熄灭时,充电完成。
要检查剩余电池电量
请参阅第20页。
电池 充电时间
BN-VF808U
(配备) 1h50m
BN-VF815U 2h40m
BN-VF823U 3h40m
卸下电池
注
•您还可以仅通过交流电源适配器使用摄像机。
•取决于记录条件,实际记录时间可能缩短,例
如记录有快速移动对象的场景。
•请勿拉扯或弯曲交流电源适配器的插头和电
缆。否则可能会损坏交流电源适配器。
日期/时间设定
1 打开液晶监视器以开启摄像机。
2 触一下MENU。
3 选择[显示设置]。
4 选择[时钟设定]。
交流电源适配器
至交流电源插座
(110V至240V)
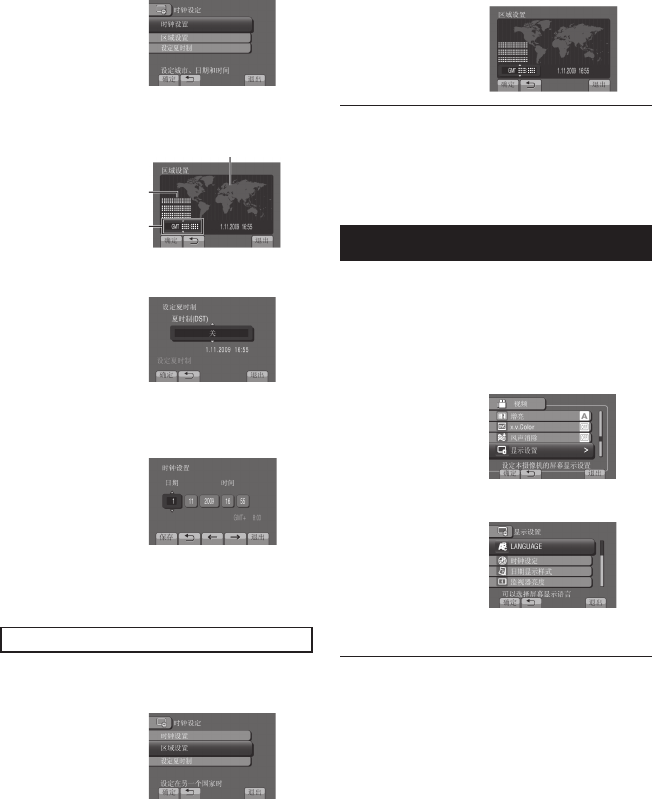
16 CS
5 选择[时钟设置]。
6 选择离您使用摄像机最近的城市。
所选地区将突出显示
所选地区的主要城市
与格林尼治标准时间
的时差
7 如果夏日时有效,选择[开]。
8 设定日期和时间。
使用触摸感应器改变设定,然后选择[&]
设定。
9 选择[保存]。
要重设设定,选择[退出]。
旅行时设定时钟为本地时间
执行步骤1-4 (Z第15页)后
5 选择[区域设置]。
6 选择离您旅行区域最近的城市。
返回前一个画面
选择@。
退出画面
选择[退出]。
语言设定
屏幕语言可以改变。
1 打开液晶监视器以开启摄像机。
2 触一下MENU。
3 选择[显示设置]。
4 选择[LANGUAGE]。
5 选择所需的语言。
返回前一个画面
选择@。
退出画面
选择[退出]。
使用之前所需的设定(续)
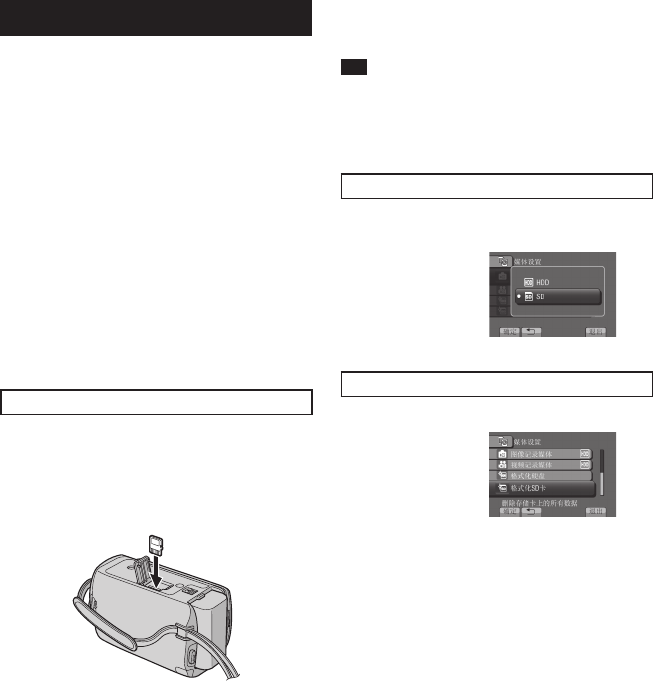
17
CS
其他设定
使用microSD插卡
本摄像机出厂预设为在内置硬盘上进行记录。
您可以将记录媒体改为microSD插卡。
•下列microSD插卡上的操作能够获得保证。
-Panasonic
-TOSHIBA
-SanDisk
-ATP
视频记录:
Class4或以上兼容microSDHC插卡(4GB
到8GB)
在UXP模式下,请使用6级以上。
静像记录:
microSD插卡(256MB至2GB)或
microSDHC插卡(4GB到8GB)
•如果使用其他媒体,则可能无法正确记录数
据,或可能丢失已经记录的数据。
•不支持多媒体卡。
•对于已经使用其它制造商生产的设备记录的视
频数据,不能记录在microSD卡上。
插入microSD插卡
准备事项:
关闭液晶监视器以关闭摄像机。
1 打开microSD插卡舱盖。
2 将插卡斜角边向下将其牢固插入。
3 关闭microSD插卡舱盖。
取出microSD插卡
压下microSD插卡一次。
插卡稍稍露出后,将其拉出。
注
•仅在电源关闭的情况下才能插入和取出
microSD插卡。否则,插卡上的数据可能会受
损。
•请勿触摸标签背面的端子。
改变记录媒体
将[视频记录媒体]和[图像记录媒体]设
为[SD]。
首次使用microSD插卡之前,请将其格式化
选择[格式化SD卡]来格式化插卡。
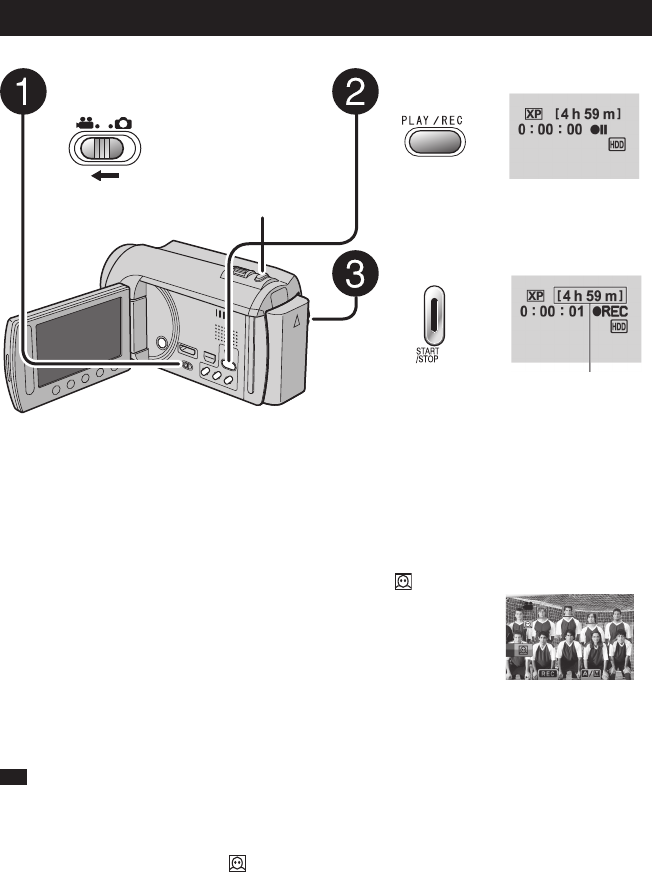
18 CS
SNAPSHOT
视频记录
记录文件
记录/播放
按PLAY/REC选择记录模式。
按START/STOP开始记录。
您还可以通过在液晶监视器上选择
[REC]来开始/停止记录。
(屏幕记录控制)
滑动模式开关以选择!(视频)
模式。
注
•当您关闭摄像机然后重新开启时,将自动选择视频记录模式。
•电源开启时,如果摄像机在5分钟内没有进行任何操作,则摄像机将自动关闭以省电。
•请勿在记录时突然移动或摇动摄像机。
否则,可能会记录硬盘运转的声音(嗡嗡声)。
•
如果液晶监视器倒置,将不显示 。当液晶监视器在正常位置时改变设定。
停止记录
再按一下START/STOP。
查看最后记录的场景
在暂停记录时选择A。
在播放时选择$删除该场景。
在视频记录时记录静像
按SNAPSHOT。
改变视频质量
在[视频质量]中改变设定。
开启人脸检测模式
选择 。
大致的记录剩余时间
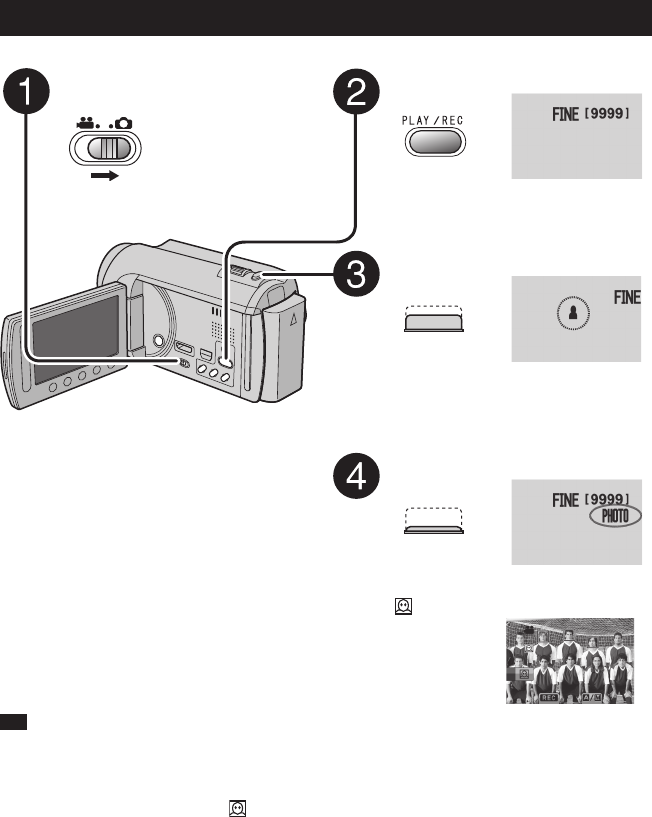
19
CS
改变视频质量
在[视频质量]中改变设定。
开启人脸检测模式
选择 。
滑动模式开关以选择#(静像)
模式。
按PLAY/REC选择记录模式。
半按住SNAPSHOT。
? 指示在聚焦拍摄的图像时变为绿
色。
完全按下SNAPSHOT拍摄静像。
注
•记录静像时,DIS(手振补偿)不起作用。
•电源开启时,如果摄像机在5分钟内没有进行任何操作,则摄像机将自动关闭以省电。
•进行打印时,以16:9尺寸记录的静像的边缘可能会被裁剪。请在当地打印商店确认是否可以进
行16:9尺寸的打印。
•
如果液晶监视器倒置,将不显示 。当液晶监视器在正常位置时改变设定。
静像记录
查看最后记录的图像
拍摄之后选择A。
在播放时选择$删除该图像。
改变图像质量
在[图形质量]中改变设定。
改变图像大小
改变[图像大小]中的设定。
要连续记录静像
设为[连拍]([快门模式]中)。
开启人脸检测模式
选择 。
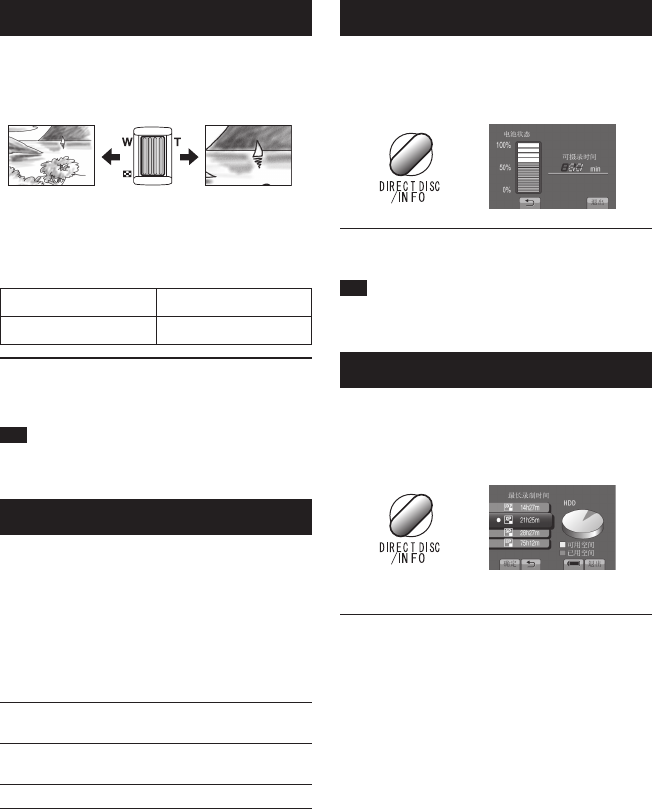
20 CS
记录文件 (续)
变焦
准备事项:
•选择!或#模式。
•选择记录模式。
推远 拉近
W:广角拍摄 T:远距拍摄
您还可以通过在液晶监视器上选择[W]或
[T]来拉近/推远。
变焦比(出厂预设)
!模式 #模式
[20X/光学] [20X/光学]
改变最大变焦比
(仅限!模式)
在[变焦]中改变设定。
注
将变焦杆完全设到W时,可以在距离被摄对象
约5厘米处近拍。
LED灯
准备事项:
•选择!或#模式。
•选择记录模式。
1 触一下MENU。
2 选择[光源]。
3 选择所需设定。
开无论周围光线条件如何,LED灯
光始终打开。
自动 在光线不足的情况下拍摄时,LED
灯光自动打开。
关取消此功能。
检查剩余电池电量
!模式:
按两下INFO或INFO,然后选择;。
#模式:
按INFO。
退出画面
选择[退出]或按INFO。
注
可记录时间显示仅用于参考。显示以10分钟为
单位。
检查记录媒体上的剩余空间
准备事项:
•选择!模式。
•选择记录模式。
按INFO。
显示各个视频质量模式的最长记录时间。
改变视频质量
1)选择视频质量。
2)选择[确定]。
退出画面
选择[退出]。
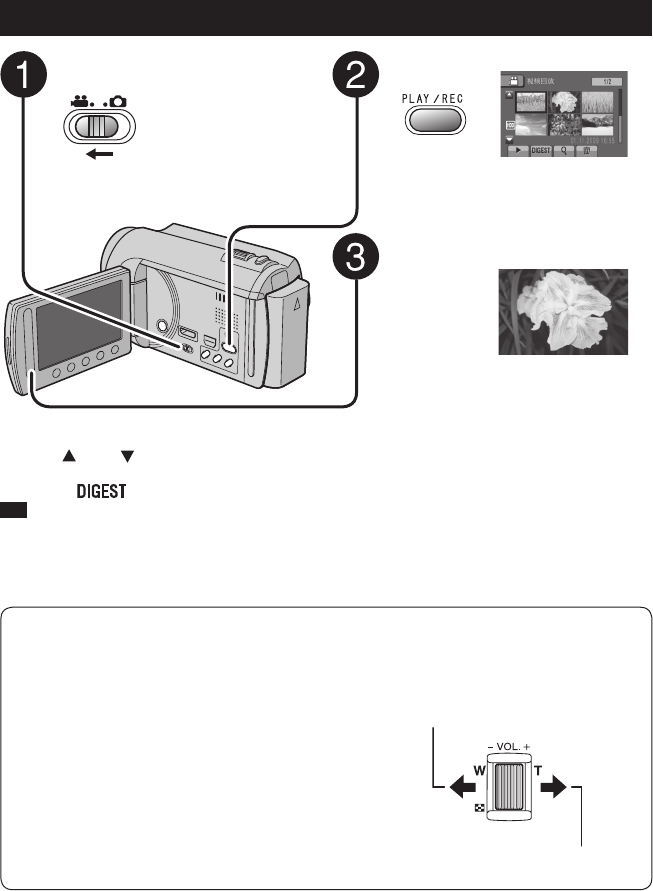
21
CS
—:调低音量
+:调高音量
扬声器音量
播放文件
视频播放
滑动模式开关以选择!(视频)
模式。
按PLAY/REC选择播放模式。
索引画面出现。
选择所需文件。
要移到上一页或下一页
触摸[ ]或[ ]超过1秒钟。
从每个视频开头播放几秒钟
触一下[ ]。
注
•某些情况下,还可能播放视频开头外的部分。
•有些视频可能根本无法播放。
删除视频
在播放停止时选择$。
改变缩略图数目
(6张缩略图/12张缩略图)
将变焦杆移到[W]。
暂停时放大视频(仅限远程控制)
按遥控器上的T。
•按遥控器上的¡、¢、£、¤移动变焦区
域。
•按遥控器上的W取消放大。
视频播放的屏幕按键操作
N: 返回文件的第一个场景
O: 进到下个文件的第一个场景
L: 返回索引画面
J: 向后搜索(播放时)
E: 逐帧向后播放(暂停期间)*
F: 播放
Q: 暂停
K: 向前搜索(播放时)
G: 逐帧向前播放(暂停期间)*
*当您保持触摸E/G下的感应按键一会儿时,
将开始慢放。
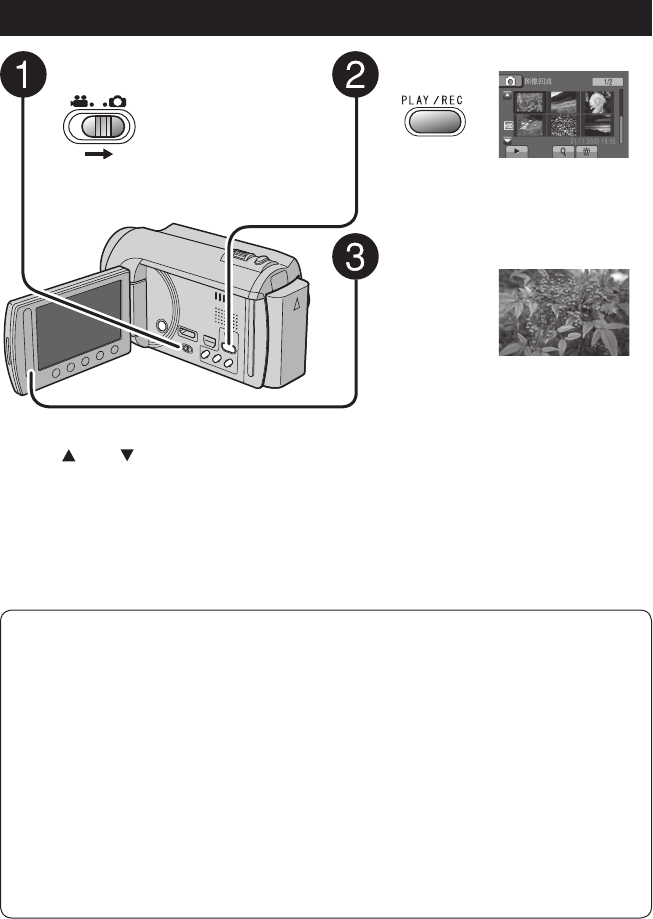
22 CS
要移到上一页或下一页
触摸[ ]或[ ]超过1秒钟。
删除静像
选择$。
改变缩略图数目
(6张缩略图/12张缩略图)
将变焦杆移到[W]。
按PLAY/REC选择播放模式。
索引画面出现。
选择所需文件。
滑动模式开关以选择#(静像)
模式。
暂停时放大图像(仅限远程控制)
按遥控器上的T。
•按遥控器上的¡、¢、£、¤移动变焦区
域。
•按遥控器上的W取消放大。
静像播放
静像播放的屏幕按键操作
P: 改变幻灯片放映的播放顺序为向后播放
F: 改变幻灯片放映的播放顺序为向前播放
L: 返回索引画面
N: 显示上一个文件
F: 开始幻灯片放映
Q: 结束幻灯片放映
O: 显示下一个文件
播放文件 (续)
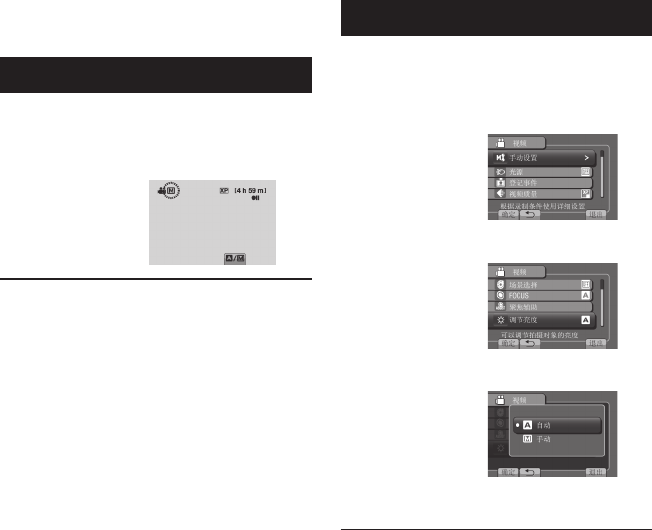
23
CS
手动记录模式用于手动设定聚焦和画面亮度
等。
切换到手动记录模式
准备事项:
•选择!或#模式。
•选择记录模式。
选择两次[A/M]。
返回自动记录模式
选择[A/M],使@指示出现。
菜单中的手动设定
手动记录模式:
1 触一下MENU。
2 选择[手动设置]。
3 选择所需菜单。
4 选择所需设定。
取决于您选择的设定,可以通过使用触摸感
应器来设定数值。
返回前一个画面
选择@。
退出画面
选择[退出]。
手动记录
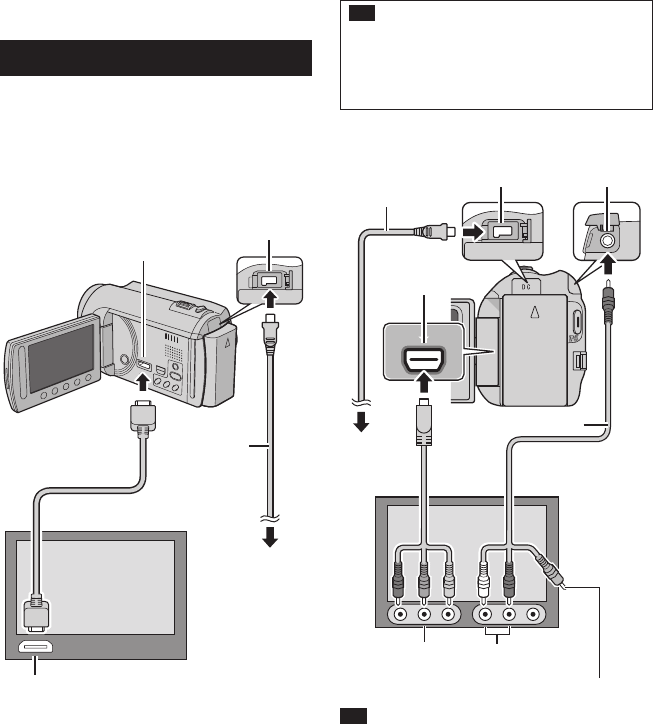
24 CS
本摄像机适用于高清或PAL制式的彩色电视信
号。它不能用于其他标准的电视机。
连接电视机
可以从HDMI接口、COMPONENT接口或AV接
口输出视频。请选择最适合电视机的接口。
准备事项:
关闭所有设备。
使用HDMI小型接口连接
我们建议使用2类HDMI电缆(高速电缆)。
注
•
当连接到HDMI电缆时,电视可能无法正常显
示图像或声音,具体视所连接的电视而定。在
这种情况下,请执行以下操作。
1)断开HDMI电缆并重新连接。
2)关闭摄像机并再次启动。
使用COMPONENT接口连接
COMPONENT
注
根据连接更改[组件输出]中的设定。
在电视机上观看文件
与电视机一起使用
HDMI小型接口
交流电源适配器
直流电接口
HDMI接口
HDMI电缆(选购)
(小型到全尺寸HDMI电缆)
至交流电源插座
交流电源适配器
直流电接口
组件电缆
至交流电源插座
AV接口
COMPONENT接口
AV电缆
COMPONENT输入
接口
左右音频输入接口
视频接口尚未使用。
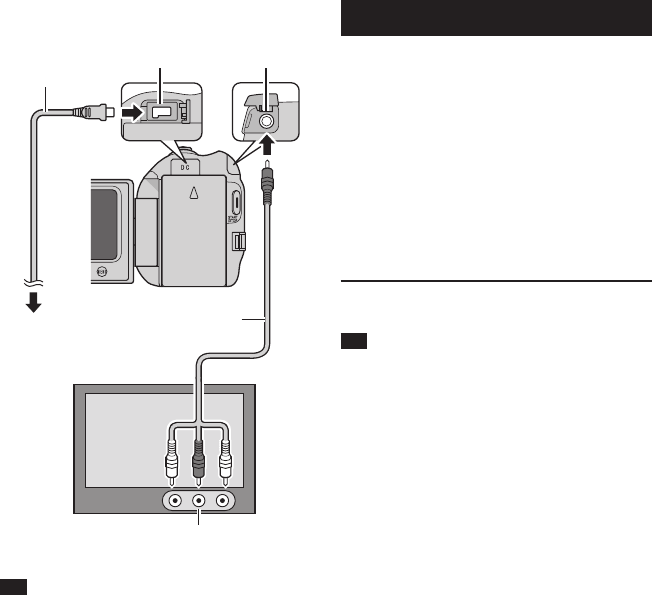
25
CS
使用AV接口连接
注
更改[视频输出]中的设定,使其符合电视机屏
幕尺寸。
播放操作
完成电视机连接之后
1 开启摄像机和电视机。
2 将电视机设为视频模式。
3(仅限于将摄像机连接到磁带录像机/DVD
录像机时)
开启磁带录像机/DVD录像机,然后将其
设为辅助输入模式。
4 在摄像机上启动播放。(Z第21,22页)
在电视机上显示摄像机的屏幕显示
设定[在电视机上显示]为[开]。
注
x.v.Colour™设为[开]的情况下记录视频
时,请改变电视机上的x.v.Colour™设定。
有关详情,请参阅电视机的使用说明书。
AV电缆
直流电接口
交流电源适
配器
至交流电源
插座
AV接口
AV输入接口
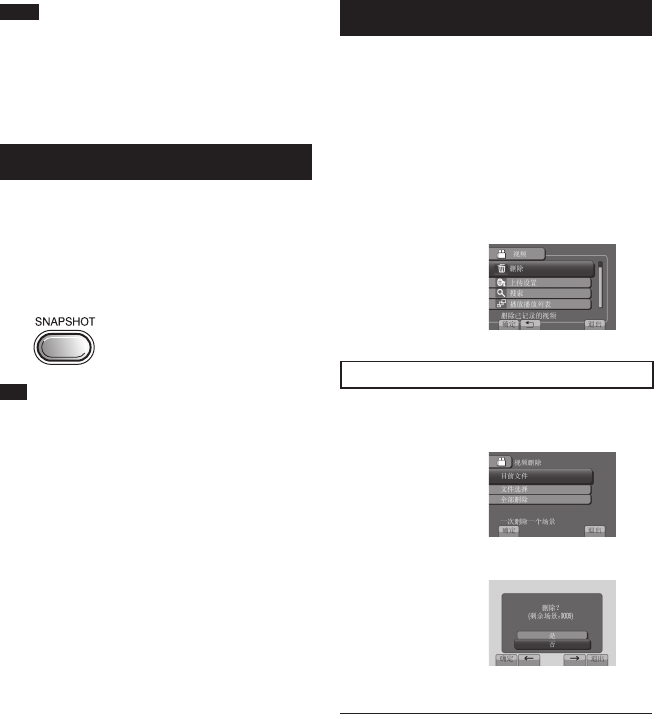
26 CS
管理文件
编辑
小心
存取文件时,请勿取出记录媒体或执行任何其
他操作(例如关闭电源)。并且务必使用附带
的交流电源适配器,因为如果在操作时电池耗
尽,记录媒体上的数据可能受损。如果记录媒
体上的数据受损,则请格式化记录媒体以备再
次使用该媒体。
从视频截取静像
您可以从记录的视频截取所需场景,然后将其
存储为静像。
准备事项:
•选择!模式。
•选择播放模式。
在暂停播放时按SNAPSHOT。
注
•截取的静像以1920×1080的分辨率进行存
储。根据视频源文件图像质量的不同,图像可
能会被水平或垂直拉伸。
•连拍功能不能用于截取图像。
•不能在播放中截取视频。
删除文件
•保护的文件无法删除。要删除这些文件,请先
取消保护。
•文件一旦删除便无法恢复。删除之前请先检查
文件。
准备事项:
•选择!或#模式。
•选择播放模式。
1 触一下MENU。
2 选择[删除]。
删除当前显示的文件
执行步骤1-2 后
3 选择[目前文件]。
4 选择[是]。
您可以通过选择%或&来选择上一个或
下一个文件。
退出画面
选择[退出]。
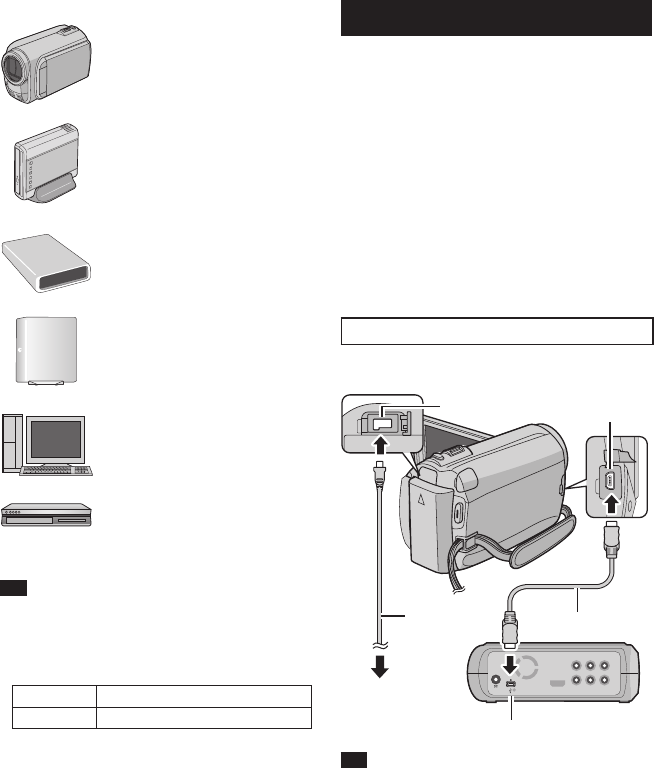
27
CS
复制文件
复制
复制和可连接设备种类
本摄像机
您可以单独使用本摄像机相互
复制硬盘和microSD插卡上
的文件。
DVD刻录机
CU-VD50/CU-VD3
您可以将本摄像机上记录的文
件复制到光盘上。
BD刻录机
莱希型号:301828
您可以将本摄像机上记录的文
件复制到光盘上。
USB外置硬盘
您可以将本摄像机上记录的文
件复制到USB外置硬盘。
电脑
您可以使用电脑从摄像机复制
文件到光盘。
磁带录像机/DVD录像机
您可以将本摄像机上记录的视
频复录到磁带录像机/DVD录
像机上。
注
•
建议使用JVCDVD刻录机(CU-VD50/CU-
VD3)。使用CU-VD20或CU-VD40时,记录时
间可能比DVD刻录机使用说明书中所述的时间
长2倍左右。
•建议的USB外置硬盘
希捷 FreeAgentTMDesk系列
莱希 DesignbyNeilPoulton系列
•无法使用容量超过2TB的USB外置硬盘。
使用BD/DVD刻录机
使用BD/DVD刻录机可将摄像机中的文件备份
到光盘。
•请使用下列某种方法观看光盘。(如果您尝试
使用不兼容的播放机播放光盘,可能无法弹出
光盘。)
-使用摄像机播放光盘。
-使用BD/DVD刻录机播放光盘。*
-在电脑上播放*
-使用支持BD-MV和AVCHD的BD/DVD播放机
播放光盘。*
*DVD必须首先在摄像机上进行终结。
•不能播放除使用BD/DVD刻录机制作的光盘之
外的光盘。
•当连接DVD刻录机(CU-VD50)到电视机时,
您无需使用摄像机就可以播放创建的光盘。当
播放时断开USB电缆。
使用BD/DVD刻录机连接
准备事项:
先打开摄像机,然后打开BD/DVD刻录机。
注
•另请参阅选购的BD/DVD刻录机的使用说明书。
•当连接DVD刻录机时,请使用DVD刻录机附带
的USB电缆。
•当连接BD刻录机时,请使用带有小型-A(公)和
B(公)接口的USB电缆。建议使用JVC的
QAM0852-001(可选)。详情请参阅第34页。
直流电接口 USB接口
交流电源适配器
至交流电源插座
USB电缆
BD/DVD刻录机
USB接口
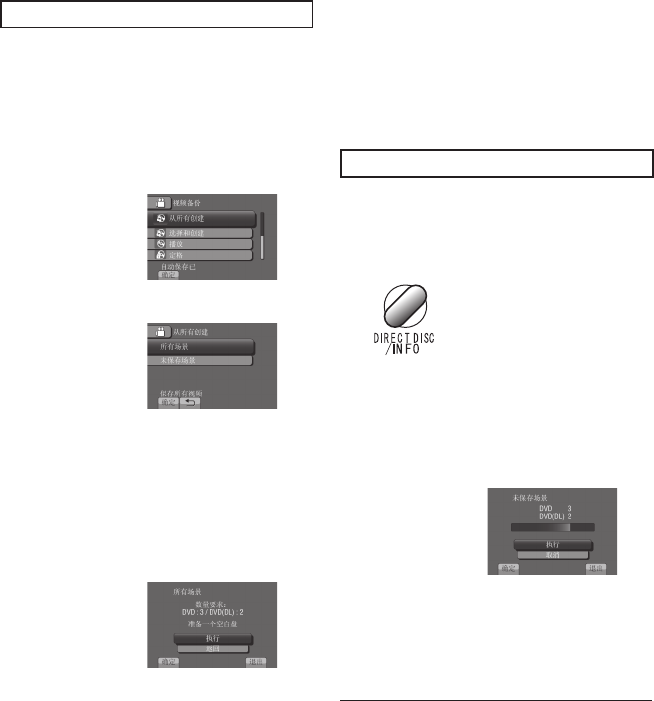
28 CS
复制文件 (续)
备份全部文件
准备事项:
•选择!或#模式。
•选择HDD或microSD卡。
•将摄像机连接到BD/DVD刻录机。
•使用BD刻录机时,选择[更改录制媒体]并
选择光盘类型。
1 选择[从所有创建](!模式)或[保存
全部](#模式)。
2 选择所需菜单。
•!模式:[所有场景]
#模式:[全部图像]
复制记录媒体中的全部文件。
•!模式:[未保存场景]
#模式:[未保存的图像]
对于尚未复制的文件,将自动选择并复
制。
3 选择[执行]。
4 选择[是]或[否]。
•[是]:按组显示缩略图。
•[否]:按照日期或播放列表显示缩略图。
5 选择[执行]。
•文件被复制到光盘。当出现[完成]时,
触一下OK。
•当出现[插入下一张碟按[取消]退出创建]
时,更换光盘。剩余的文件将复制到第二
张光盘。
•要取消复制,选择[取消]。
复制从未复制过的视频文件
自动选择并复制尚未复制到光盘的文件。
1 打开液晶监视器以开启摄像机。
2 按DIRECTDISC。
3 选择[是]或[否]。
•[是]:按组显示缩略图。
•[否]:按照日期或播放列表显示缩略图。
4 选择[执行]。
•开始创建光盘。出现[完成]时,触一下
OK。
•当出现[插入下一张碟按[取消]退出创建]
时,更换光盘。剩余的文件将复制到第二
张光盘。
•要取消创建光盘,选择[取消]。
退出画面
1)选择[退出]。
2)显示[退出?]时,选择[是]。
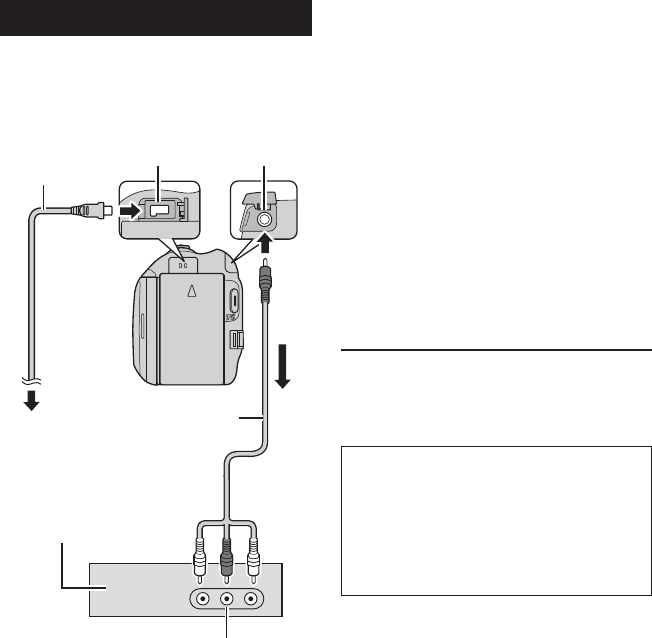
29
CS
复录文件到磁带录像机/DVD录像机
准备事项:
•创建播放列表。
•关闭所有设备。
使用AV接口连接(模拟复录)
1 打开液晶监视器以开启摄像机。
2 将磁带录像机/DVD录像机设为AUX输入
模式。
检查来自摄像机的图像已经正确输入磁带录
像机/DVD录像机。
3 在摄像机上播放播放列表。
1)触一下MENU。
2)选择[播放配音]。
3)选择所需播放列表。
4)选择[是]。(在第一个和最后一个场景
显示黑屏5秒钟。)
4 在您要开始复录的点上,在磁带录像
机/DVD录像机上开始记录。
参阅磁带录像机/DVD录像机的使用说明
书。
停止复录
在磁带录像机/DVD录像机上停止记录。
隐藏画面上的日期或图标
改变[在电视机上显示]中的设定。
AV电缆
直流电接口
交流电源适配器
至交流电源插座
AV接口
磁带录像机/DVD录像机
AV接口
(输入)
切换液晶监视器上指示模式
每触一下DISPLAY,液晶监视器上的指示将
按如下切换:
在记录模式中:
所有指示/所选功能的指示
在播放模式中:
所有指示/仅日期和时间/无指示
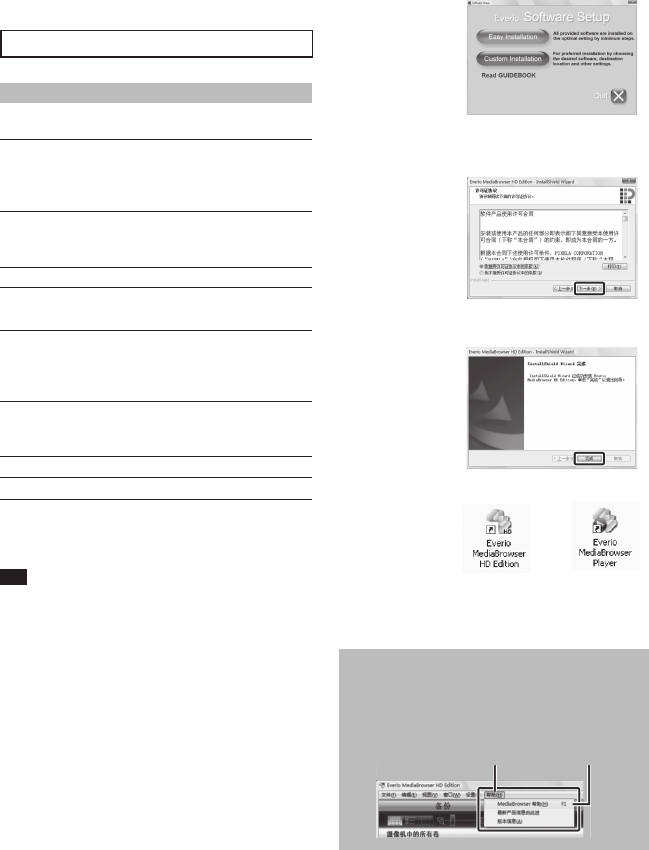
30 CS
在您安装软件之前,请阅读CD-ROM指南中
的“JVC软件许可权合约”。您可以使用电脑
从摄像机复制数据到光盘。
Q安装软件到电脑
系统要求
WindowsVista
操作
系统:
WindowsVista®®
HomeBasic(SP1)
HomePremium(SP1)
(32位,预装)
中央
处理
器:
Intel®CoreTMDuo,1.66GHz或以上
(建议使用Intel®CoreTM2Duo2.13
GHz或以上。)
内存: 至少2GB
WindowsXP
操作
系统:
Windows®XP
HomeEdition(SP2/SP3)
Professional(SP2/SP3)
(预装)
中央
处理
器:
Intel®CoreTMDuo,1.66GHz或以上
(建议使用Intel®CoreTM2Duo2.13
GHz或以上。)
内存: 至少1GB
要检查电脑规格
在[开始]菜单中右键单击[电脑](或[我
的电脑])并选择[属性]。
注
•确保您的电脑具有可刻录的BD/DVD光驱。
•如果您的系统不满足这些要求,建议使用
BD/DVD刻录机复制文件。(Z第27页)
•Macintosh用户可使用Macintosh附带的软
件(iMovie’08,iPhoto)来导入文件到其电
脑中。
准备事项:
将附带的CD-ROM装入电脑。
在WindowsVista中,出现自动播放对话框。
1 单击[EasyInstallation]。
按屏幕指示操作。
2 单击[下一步]。
3 单击[完成]。
桌面上将创建EverioMediaBrowser图标。
EverioMediaBrowserPlayer是一款在电
脑上播放AVCHD光盘的软件。
(无法播放DVD光盘。)
要查看EverioMediaBrowser的使用
指南
1)双击EverioMediaBrowser的图标。
2)单击[帮助],然后单击[MediaBrowser
帮助]。
单击 单击
使用电脑制作光盘
电脑操作
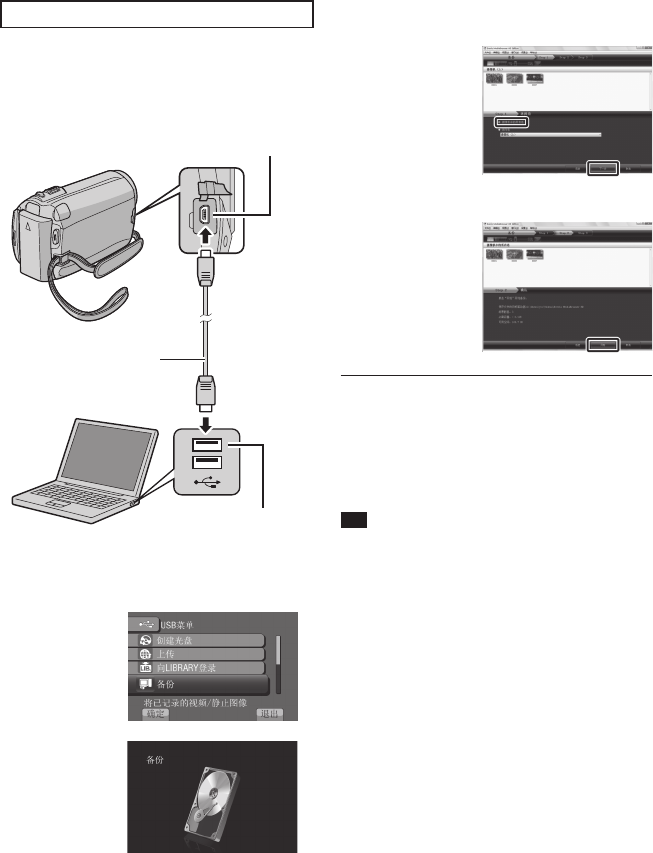
31
CS
R在电脑上备份
准备事项:
•安装软件到电脑。
•确保在电脑硬盘上留有足够剩余空间。
•关闭液晶监视器以关闭摄像机。
1 打开液晶监视器以开启摄像机。
2 选择[备份]。
EverioMediaBrowser在电脑上启动。
3 单击[摄影机中的所有卷]并单击
[下一步]。
4 单击[开始]。
开始备份。
要从电脑断开摄像机
1)在任务栏上右键单击图标(安全删除
硬件)并选择[安全删除USBMass
StorageDevice]。
2)按照屏幕指示操作并确保设备可以安全
移除。
3)断开USB电缆并关闭液晶监视器。
注
备份很多视频需花点时间。
USB接口
USB电缆
USB接口
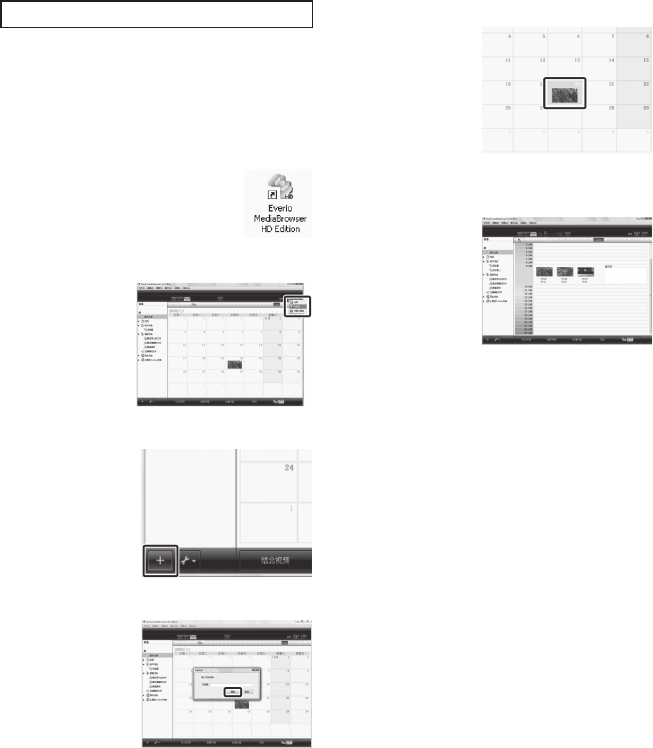
32 CS
S制作用户列表以安排文件
您可以制作某个对象(例如旅行、运动会)的
用户列表并将与对象相关的文件放在用户列表
中。
准备事项:
在电脑上备份。
1 双击图标并打开日历。
2 选择[仅电影]。
3 单击[+]。
4 输入新用户列表的名称并单击[确定]。
5 单击记录日期。
显示该日记录的文件。
6 将文件拖放到用户列表中。
要添加其他文件到用户列表,重复步骤5
和6。
使用电脑制作光盘 (续)
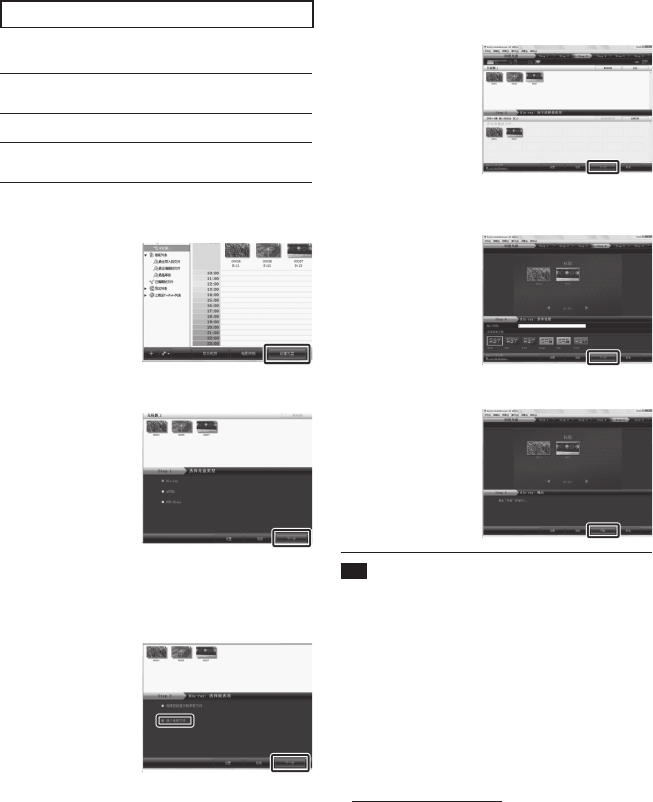
33
CS
T复制文件到光盘
EverioMediaBrowser支持3种光盘格式。选
择满足您的用途的格式。
DVD-Video
光盘:
如果将光盘送给亲朋好友,适合
选用这种。
AVCHD光盘: 适合高质量视频。
BD: 适合高质量视频且录制时间较长
的情况。
1 选择用户列表并单击[创建光盘]。
2 选择光盘类型并点击[下一步]。
3 单击[逐个选择文件]并单击[下一步]。
要添加所有文件到光盘,单击[选择目前显
示的所有文件],然后转到步骤5。
4 将文件拖放到底下的部分并单击
[下一步]。
5 输入光盘名称,选择顶层菜单样式并单击
[下一步]。
6 单击[开始]。
注
•您通过复制UXP记录模式记录的视频创建
AVCHD光盘时,复制前,需要将视频转换为
XP记录模式。因此,花费的时间可能超过复
制其他模式记录的视频。
•使用EverioMediaBrowserPlayer播放光
盘。操作时,请参阅EverioMediaBrowser
软件提供的帮助。
•有关操作EverioMediaBrowser的详情,单
击[帮助],并参考[MediaBrowser帮助]。
•必须安装Adobe®Reader®,才能阅读
[MediaBrowser帮助]。Adobe®Reader®®可以
从Adobe网站下载:
http://www.adobe.com
•有关操作附带软件的帮助,请参见支持信息。
(Z第34页)

34 CS
文件夹结构和扩展名
[DEM_XXXX.MTS]
[MOV_XXXX.MTS]
[XXXJVCSO]
[AVCHD]
[DCIM]
[EXTMOV]
[PRIVATE]
[BDMV]
[STREAM]
[XXXXX.MTS]
[BACKUP]
[CLIPINF]
[PLAYLIST]
[INDEX.BDM]
[MOVIEOBJ.BDM]
[DEM_XXXX.MTS]
[MOV_XXXX.MTS]
[JVC]
[XXXJVCSO]
[AVCHD]
[DCIM]
[EXTMOV]
[PRIVATE]
[BDMV]
[STREAM]
[XXXXX.MTS]
[BACKUP]
[CLIPINF]
[PLAYLIST]
[INDEX.BDM]
[MOVIEOBJ.BDM]
客户支持信息
此软件根据软件授权条款授权使用。
JVC
当就此软件联系您国内最近的JVC办事处或机构时(请访问JVC全球服务网络:
http://www.jvc-victor.co.jp/english/worldmap/index-e.html),请准备好以下信息。
•产品名称、型号、问题、错误信息
•电脑(制造商、机型(桌上型/膝上型)、中央处理器、操作系统、内存(MB)、可用的硬盘空间(GB))
请注意,取决于问题内容,可能要花些时间才能答复您的问题。
JVC无法回答有关电脑基本操作的问题,或有关规格或操作系统、其他应用程序或驱动程序性能等方面的
问题。
Pixela
地域 语言 电话号码
美国和加拿大 英语 +1-800-458-4029(免费电话)
欧洲(英国、德国、法国和西
班牙) 英语/德语/法语/西班牙语 +800-1532-4865(免费电话)
欧洲其他国家 英语/德语/法语/西班牙语/
意大利语/荷兰语 +44-1489-564-764
亚洲(菲律宾) 英语 +63-2-438-0090
中国 中文 +86-21-5385-3786
主页:http://www.pixela.co.jp/oem/jvc/mediabrowser/e/
有关最新信息及下载,请查看我们的网站。
X=编号
包含静像文件夹。
AVCHD格式的视频文件
管理信息不完整的视频文件同样
会保存。
包含事件的管理信息文件和/或
本摄像机所拍摄文件的光盘制作
信息。
EVERIO_HDD EVERIO_SD
使用电脑制作光盘 (续)
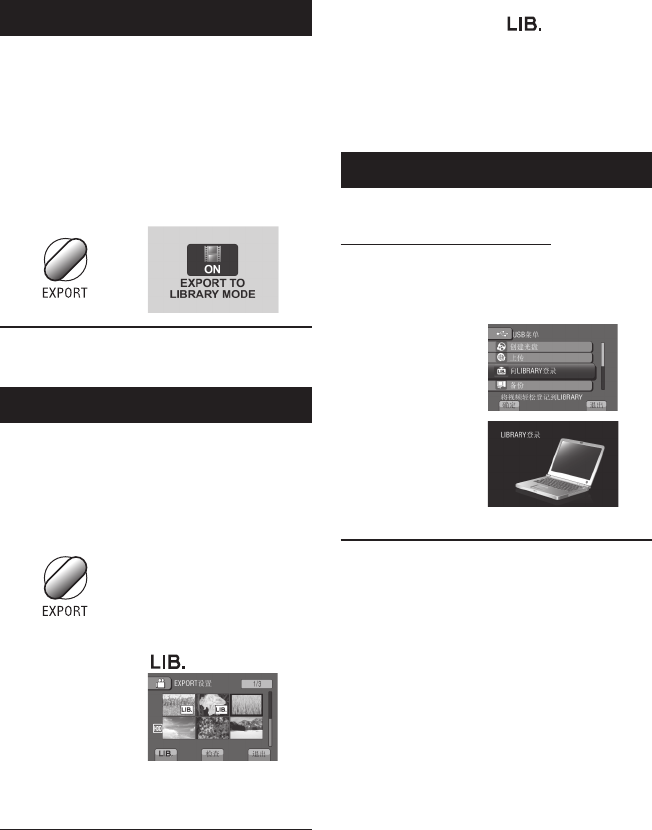
35
CS
与便携式媒体播放器一起使用
打开导出模式
您可以方便地将导出模式中记录的视频传送
到iTunes®。导出设定打开的所有文件均传送
到电脑。
有关传送的详情,请参阅CD-ROM中
MediaBrowser的操作指南。
准备事项:
•选择!模式。
•选择记录模式。
按两下EXPORT。
关闭导出模式
按两下EXPORT。
更改导出设定
您可将记录的视频设为导出设定。
准备事项:
•选择!模式。
•选择播放模式。
1 按EXPORT。
2 选择文件并设定[ ]。
要检查文件内容,选择[检查]。
3 选择[退出]。
取消导出设定
选择文件并再次选择[ ]。
退出画面
1)选择[退出]。
2)选择[是]。
确认导出设定
在索引画面上按EXPORT。
传送文件到电脑
准备:
在电脑上安装iTunes®。
http://www.apple.com/itunes/
1 用USB电缆连接摄像机到电脑。
2 选择[向LIBRARY登录]。
导出设定打开的所有文件均传送到电脑。
若无法导出该文件至iTunes®
请参阅所供EverioMediaBrowser软件
“帮助”的[最新产品信息由此进]下
的“Q&A”、“最新信息”、“下载信
息”等。
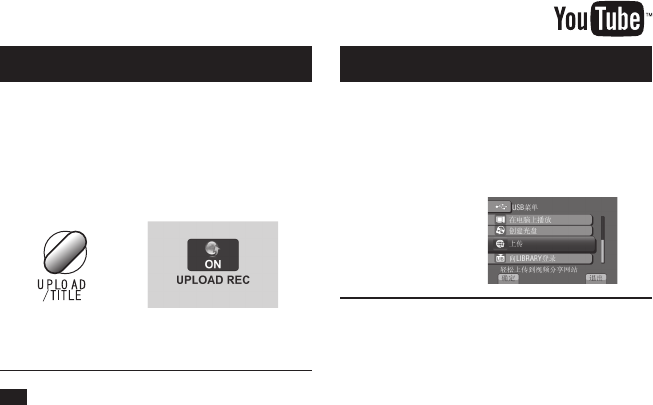
36 CS
打开上载模式
您可在记录之后快速上载文件到视频共享网站
(YouTube™)。
准备事项:
•选择!模式。
•选择记录模式。
按两下UPLOAD。
如果您在上载模式设为开时记录文件,将在
开始记录之后10分钟自动停止记录。
剩余时间显示在液晶监视器上。
注
每次完成记录时,上载模式将关闭。
上载文件到网站
上载文件
有关上载文件的详情,请参阅CD-ROM中
MediaBrowser的操作指南。
1 用USB电缆连接摄像机到电脑。
2 选择[上传]。
若无法上传该文件至YouTubeTM
• 您需要使用YouTubeTM账号来上传文件至
YouTubeTM。创建您的账号。
• 请参阅所供EverioMediaBrowser软件“帮
助”的[最新产品信息由此进]下
的“Q&A”、“最新信息”、“下载信
息”等
。

37
CS
1 触一下MENU。
2 选择所需菜单。
3 选择所需设定。
更改菜单设定
附加信息
返回前一个画面
选择@。
退出画面
选择[退出]。
故障排除
故障 措施
电源
没有供电。 •正确连接交流电源适配器。
•重新对电池充电。
显示
剩余电池电量显示错误。 •对电池进行完全充电并将其用完,然后重新对其充电。
•如果摄像机长时间在高温或低温下进行使用,或者电池反复进行充
电,则剩余电池电量可能会显示错误。
液晶监视器难以辨认。 •如果在直射阳光下等明亮的地方进行使用,则液晶监视器可能难以
辨认。
请求服务前,先参考下表。如果表中的解决方
案解决不了问题,请咨询最近的JVC经销商或
JVC服务中心。
另请参阅JVC网站上新产品的FAQ。
下列现象并非故障。
•长时间使用摄像机时,摄像机变热。
•充电期间电池变热。
•播放视频时,在场景之间的交接处图像短暂停
止或声音中断。
•记录阳光时液晶监视器暂时变红或变黑。
•液晶监视器上出现黑点、红点、绿点或蓝点。
(液晶监视器含有99.99%的有效像素,但
0.01%或更少的像素可能无效。)

38 CS
故障排除 (续)
故障 措施
记录
不能进行记录。 •滑动模式开关以选择所需模式(!或#)。
记录的图像上出现竖线。 •拍摄对象时如果有亮光照明,会出现这样的现象。这不是故障。
播放
声音或视频中断。 •在两个场景连接部位,播放有时会中断。这不是故障。
无法找到记录的视频。
•选择[播放其他文件],然后在索引画面上搜索视频。
(管理信息损坏的视频文件可以播放。)
•取消组显示和日期搜索功能。
•改变[视频记录媒体]或[图像记录媒体]中的设定。(不显示其
他媒体上的文件。)
其他问题
在视频模式和静像模式之
间切换时或者打开或关
闭电源时,摄像机操作
缓慢。
•如果摄像机中有许多文件(例如视频),摄像机要花点时间才能响
应。建议从摄像机复制所有文件到您的电脑,然后删除摄像机上的
文件。
电池充电时指示灯没有
闪烁。
•检查剩余电池电量。
(电池充满电后,指示灯不会闪烁。)
•在炎热或寒冷的环境中充电时,请确保在允许的温度范围内对电池
进行充电。
(如果在允许的温度范围之外对电池进行充电,则可能会停止充电
来保护电池。)
无法上传该文件至
YouTubeTM • 请参阅所供EverioMediaBrowser软件帮助的[最新产品信息由
此进]下的“Q&A”、“最新信息”、“下载信息”等。
无法导出该文件至
iTunes®
如果硬盘发生故障
! 执行[格式化硬盘]。(所有数据均被删除。)
# 如果上述操作无法解决故障,则请联系JVC客服进行维修。
在摄像机工作异常的情况下将其重设
! 关闭液晶监视器并切断摄像机电源(电池或交流电源适配器),然后重新接通。
# 执行[出厂前预设值]。

39
CS
警告指示
指示 措施
请设定日期/时间! •设定时钟。如果在设定时钟之后仍显示此信息,则时钟的电池已
经耗尽。请咨询您本地的JVC经销商。
信息读取错误 •请务必使用JVC电池。
无法在视频模式使用 •将[视频记录媒体]设为[HDD]。
•更换microSD插卡。
未格式化 •选择[确定]并选择[是]以执行格式化。
格式化出错! •检查操作过程并重新执行一次。
•关闭摄像机,然后再开启。
数据删除错误
硬盘错误! •执行格式化。(所有数据均被删除。)
•关闭摄像机,然后再开启。
存储卡出错!
•执行格式化。(所有数据均被删除。)
•取出microSD插卡并重新插入。(无法使用多媒体卡。)
•擦去microSD插卡端子上的所有污垢。
•打开电源之前插入microSD插卡。
•关闭摄像机,然后再开启。
此刻无法再拍摄更多的
静止图像 •停止记录视频,然后记录静像。(如果在记录视频时拔出或插入
microSD插卡,则不能记录静像。)
防摔保护正常工作
并且电源关闭
•将[视频记录媒体]设为[SD],然后记录到microSD插卡。
•关闭摄像机,然后再开启。
•防止摄像机振动和冲击。
摄录被取消
记录失败 microSD插卡:
•取出microSD插卡并重新插入。(无法使用多媒体卡。)
•擦去microSD插卡端子上的所有污垢。
•打开电源之前插入microSD插卡。
硬盘:
•请勿使摄像机受到碰撞/振动。
播放失败
40 CS
规格
一般
电源
DC11V(使用交流电源适配器)
DC7.2V(使用电池)
电源消耗
约3.5W*
*LED灯关闭且监视器背光设为[标准]模式
时。
尺寸(宽×高×深)
53mmx68mmx113mm
重量
约325g
约370g(包括电池)
工作温度
0°C至40°C
存放温度
-20°C至50°C
工作湿度
35%至80%
摄像机/液晶监视器
摄取元件
1/4.1"(3050000像素)逐行扫描CMOS
镜头
F1.9至3.2,f=2.9mm至58.0mm,
20:1电动变焦镜头
滤镜直径
ø30.5mm
液晶监视器
对角测量2.7",
液晶显示屏/TFT有源矩阵系统
LED灯
1.5m以内
(建议的拍摄距离)
接口
AV输出
视频输出:1.0V(p-p),75W
音频输出:300mV(rms),1kW
HDMI
HDMI™(可对应x.v.Colour™的1.3版)
组件输出
Y、Pb、Pr组件输出
Y:1.0V(p-p),75W
Pb/Pr:700mV(p-p),75W
USB
MiniUSBA型和B型,
兼容USB2.0
交流电源适配器
电源要求
AC110V至240V$,50Hz/60Hz
输出
DC11V
§
,1A
遥控器
电源
DC3V
电池使用寿命
约1年
(取决于使用频率)
工作距离
5m以内
工作温度
0°C至40°C
尺寸(宽×高×深)
42mmx14.5mmx91mm
重量
约30g
(含电池)
静像
格式
JPEG
图像大小
1920x1080
1440x1080
640x480
图像质量
精细/标准
视频
信号制式
1080/50i
记录/播放制式
视频: MPEG-4AVC/H.264
音频: DolbyDigital(2ch)
记录模式(视频)
UXP: VBR,平均24Mbps
XP: VBR,平均17Mbps
SP: VBR,平均12Mbps
EP: VBR,平均5Mbps
记录模式(音频)
48kHz,256kbps
设计和规格如有变更,恕不另行通知。
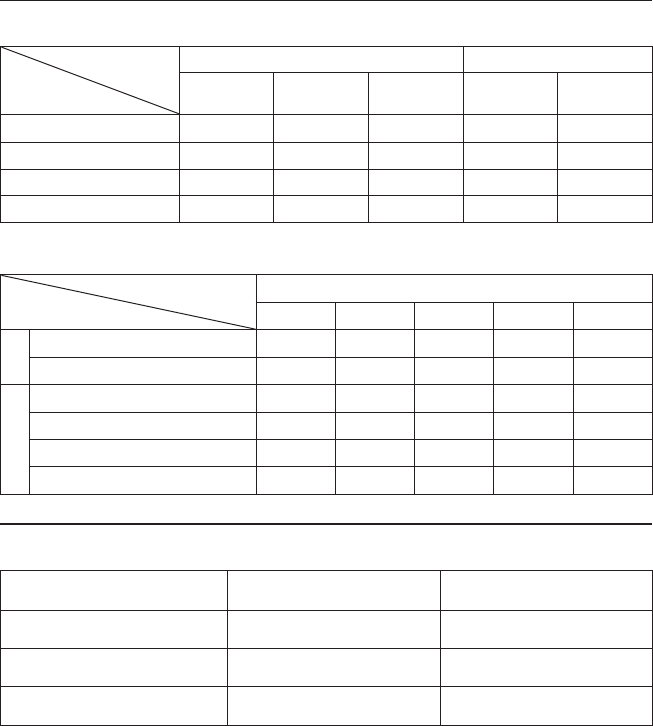
41
CS
h:小时/m:分钟
近似记录时间(对于视频)
记录媒体
画质
硬盘 microSD插卡
GZ-HD300
60GB
GZ-HD310
80GB
GZ-HD320
120GB 4GB 8GB
UXP 5h30m 7h20m 11h 20m 40m
XP 7h30m 10h 15h 30m 1h00m
SP 10h 14h 21h 44m 1h28m
EP 25h 33h 50h 1h40m 3h20m
近似图像数(对于静像)
在任一模式,硬盘可以记录最多9999张静像。
记录媒体
图像大小/画质
microSD插卡
512MB 1GB 2GB 4GB 8GB
16:9
1920x1080/精细 510 1040 2100 4200 8420
1920x1080/标准 800 1630 3210 6410 9999
4:3
1440x1080/精细 680 1370 2770 5540 9999
1440x1080/标准 1060 2160 4360 8700 9999
640x480/精细 3320 6720 9999 9999 9999
640x480/标准 5980 9999 9999 9999 9999
h:小时/m:分钟
所需充电/记录时间(近似值)
电池 充电时间 记录时间
BN-VF808U
(配备) 1h50m 1h20m*
BN-VF815U 2h40m 2h50m*
BN-VF823U 3h40m 4h10m*
*LED灯关闭且监视器背光设为[标准]模式时。
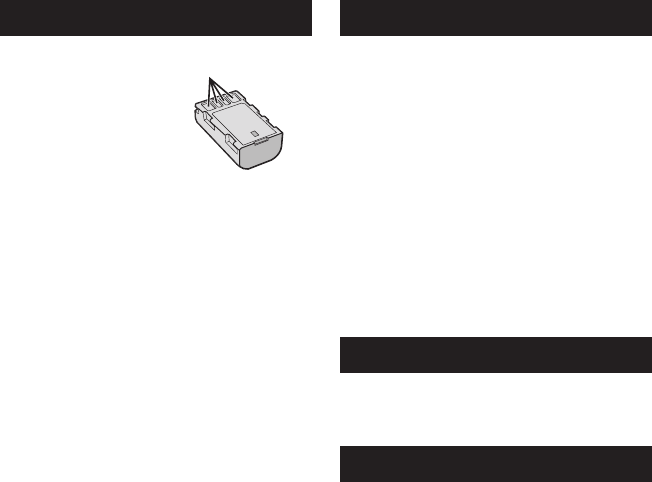
42 CS
注意事项
电池
所提供的电池是锂电池。在
使用所提供的电池或选购的
电池前,请一定阅读以下注
意事项:
端子
•为避免危险
...请勿燃烧。
...请勿短路端子。不使用时远离金属物体。运输
时,请确定所提供的电池帽与电池装置正确。如
果电池帽装置的位置不对,请使用塑料袋携带电
池。
... 请勿修改或拆解。
... 请勿将电池暴露在温度超过60℃的环境中,否
则可能引起电池过热、爆炸或着火。
... 只可使用所提供的充电器。
• 为避免毁坏并延长使用寿命
... 避免不必要的震动。
... 请在10℃至35℃的温度范围内进行充电。低
温需要较长时间充电,某些情况下会完全停止充
电。高温会导致无法完全充电,某些情况下会完
全停止充电。
... 在凉爽干燥的地方保存。长时间暴露在高温下会
引起自然放电,并缩短使用寿命。
... 电池长期放置不用时,每六个月进行一次完全充
电然后完全放电。
... 从充电器或未使用的加电设备中取出,因为某些
设备即使是在关机的状态下也会有电流。
记录媒体
•请务必遵循以下指南,以免损坏记录的数据。
•请勿弯折或掉落记录媒体,或让其经受强烈压
力、冲击或振动。
•请勿将水洒到记录媒体上。
•请勿在有强烈静电或电气噪声的地方使用、更换
或贮存记录媒体。
•在拍摄、播放或在其他访问记录媒体时,请勿关
闭摄像机电源、取出电池或断开交流电源适配
器。
•请勿将记录媒体放在有强烈磁场或释放强烈电磁
波的物体附近。
•请勿将记录媒体存放在高温或高湿的地方。
•请勿触摸金属部件。
•当使用摄像机格式化或删除数据时,仅对文件管
理信息作了更改。硬盘数据并未完全删除。如果
您要完全删除所有数据,我们建议您使用专门为
该用途设计的市售软件,或用锤子等物理销毁摄
像机。
硬盘
•
请勿在受到振动或高声影响的环境下使用设备。
•如果您突然移动设备,防摔保护功能可能启动同
时电源被关闭。
液晶监视器
•为防止液晶监视器损坏,请勿
... 用强力推入或振动。
... 放置摄像机时将液晶监视器置于底部。
•为了延长使用寿命
... 避免使用粗布擦拭。

43
CS
主机
•为保证安全,请勿
... 打开摄像机底盘。
... 拆解或修改设备。
... 让易燃物、水或金属物体进入设备。
... 在开机时取出电池或断开电源。
... 摄像机不使用时仍保持电池连接。
... 将本机靠近明火,如点燃的蜡烛等。
... 使设备受到滴水或溅水。
... 使电源插头或交流电源插座沾附灰尘或金属物
体。
... 将异物插入摄像机。
•避免在以下地方使用设备
... 过潮或多尘的地方。
... 有烟灰或蒸汽的地方,例如靠近厨灶的地方。
... 振动或抖动过大的地方。
... 靠近电视机。
... 靠近产生强磁场或强电场的地方(扬声器、广播
天线等)。
... 温度过高(超过40℃)或过低(低于0℃)的
地方。
... 气压较低的地方(海拔3000m以上)。
•请勿将设备放在
... 超过50℃的地方。
... 湿度过低(35%以下)或过高(80%以上)的地
方。
... 阳光直射下。
... 夏季时封闭汽车内。
... 靠近加热器的地方。
... 电视机等高处。在连接了电缆的情况下将设备放
置于高处时,如果绊到电缆且主机跌落到地面,
则可能导致故障。
•为保护设备,请勿
... 弄湿设备。
... 摔落设备或将其撞击硬物。
... 在运输过程中振动或过度抖动。
... 长时间使镜头直接对着过亮的物体。
... 将镜头暴露于直射阳光。
... 使用手带时猛烈摇晃。
... 过度摇晃装有摄像机的摄像机包。
... 将摄像机放置在多尘或多沙的地方,如海滩上。
•为防止设备跌落,
•扣紧手握带。
•使用三脚架时,请将摄像机牢固地安装在三脚架
上。
如果摄像机跌落,可能会使您受到伤害,摄像机
也可能会受到损坏。
儿童务必在家长的监护下使用该设备。

0209FOH-AL-VM
AG/AH
© 2009 Victor Company of Japan, Limited
A
AV连接..............................25,29
B
BD/DVD刻录机............................27
BD/DVD备份..............................27
变焦.....................................20
便携式媒体播放器.........................35
播放缩放.............................21,22
C
菜单设定.................................37
CD-ROM...............................14,30
D
导出到Library模式......................35
电池.................................15,42
F
复录播放.................................29
复制文件.................................27
H
HDMI.....................................24
I
iTunes...................................35
J
交流电源适配器...........................15
记录媒体.................................42
K
可记录时间...............................41
快速查看.............................18,19
L
LED灯...................................20
M
microSD插卡.............................17
P
屏幕变焦控制.............................20
屏幕记录控制.............................18
R
人脸检测.............................18,19
日期/时间设定............................3
S
删除文件.................................26
上载文件.................................36
剩余电池电量.............................20
剩余记录时间.............................20
时钟设定.................................15
手动记录.................................23
T
图像数...................................41
U
USB电缆.............................27,31
Y
扬声器音量...............................21
遥控器...............................11,14
液晶监视器...........................12,42
硬盘.....................................42
YouTube..................................36
语言设定.................................16
Z
在电视机上观看文件.......................24
摘要播放.................................21
组件连接.................................24
术语
