JVC KD G415UT Cover_KD G416_G415[U_UH]3 User Manual G415UT, G416UT GET0259 007A
KD-G416UT KD-G416UT GET0259-007A English, Traditional Chinese,
User Manual: JVC KD-G415UT KD-G415UT, KD-G416UT English, Traditional Chinese,
Open the PDF directly: View PDF ![]() .
.
Page Count: 50
ENGLISH
CD RECEIVER KD-G416/KD-G415
KD-G416/KD-G415
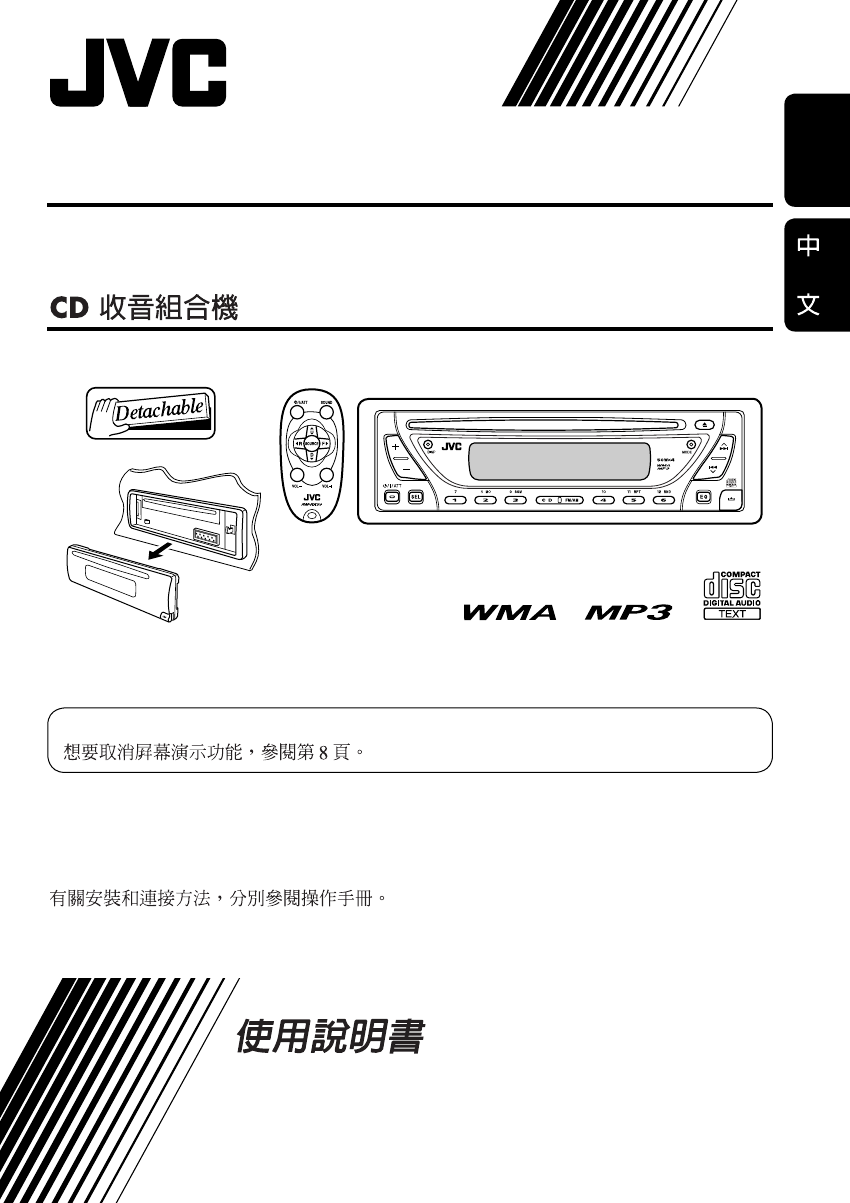
For canceling the display demonstration, see page 8.
For installation and connections, refer to the separate manual.
INSTRUCTIONS
GET0259-007A
[UT]
Cover_KD-G416_G415_007A_f.indd 2Cover_KD-G416_G415_007A_f.indd 2 11/11/04 6:50:00 PM11/11/04 6:50:00 PM
2
ENGLISH
Thank you for purchasing a JVC product.
Please read all instructions carefully before operation, to ensure your complete understanding and to
obtain the best possible performance from the unit.
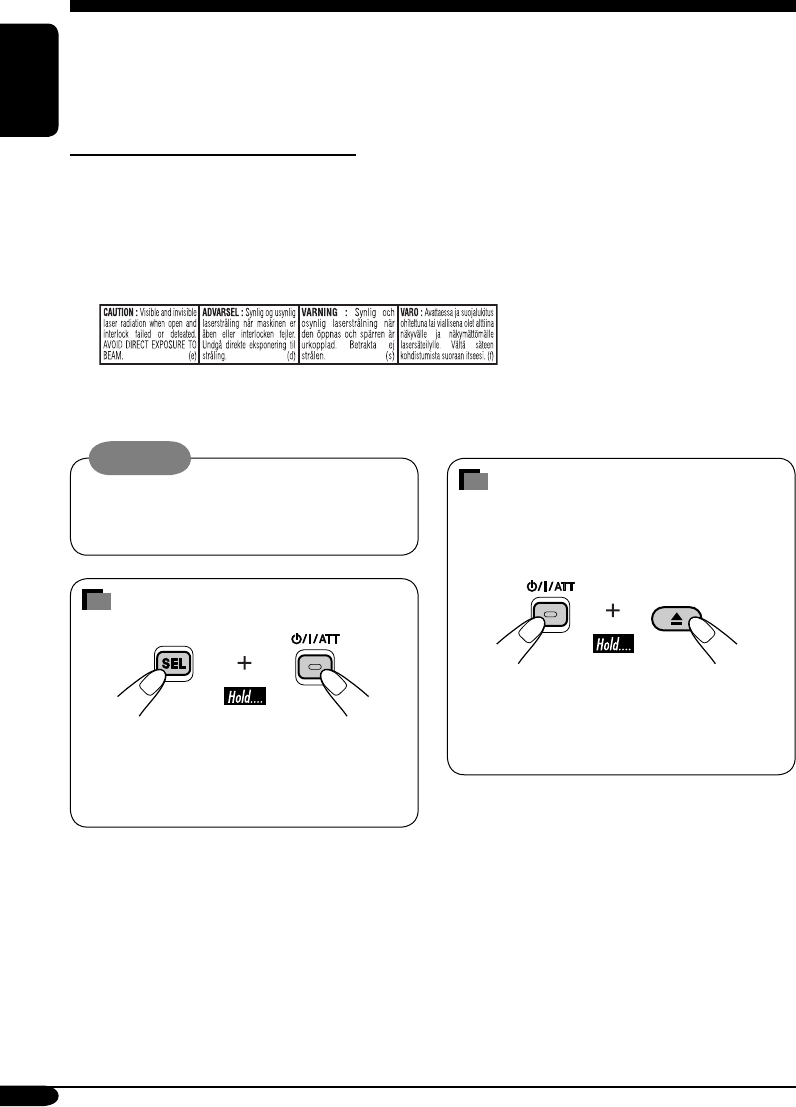
IMPORTANT FOR LASER PRODUCTS
1. CLASS 1 LASER PRODUCT
2. CAUTION: Do not open the top cover. There are no user serviceable parts inside the unit; leave
all servicing to qualified service personnel.
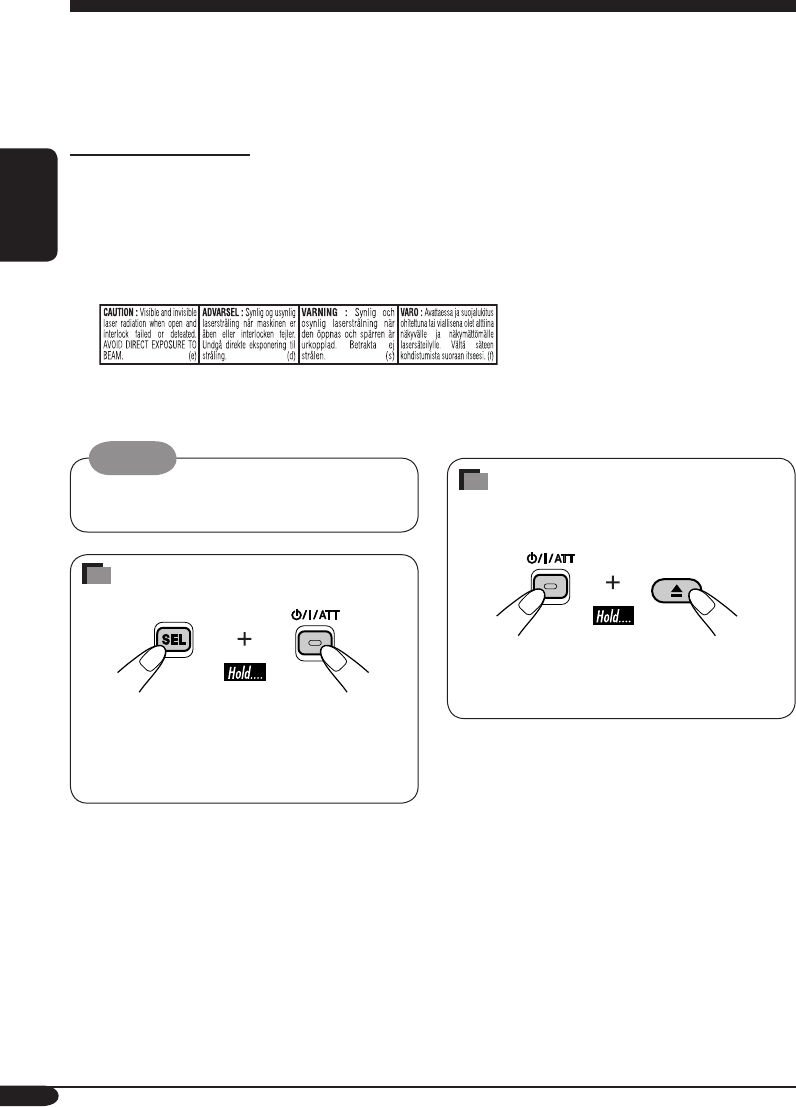
3. CAUTION: Visible and invisible laser radiation when open and interlock failed or defeated.
Avoid direct exposure to beam.
4. REPRODUCTION OF LABEL: CAUTION LABEL, PLACED OUTSIDE THE UNIT.
Warning:
If you need to operate the receiver while
driving, be sure to look ahead carefully or
you may be involved in a traffic accident.
How to reset your unit
• This will reset the microcomputer. Your
preset adjustments will also be erased.
• If a disc is loaded, it will eject. Be careful
not to drop the disc.
How to forcibly eject a disc
If a disc cannot be recognized by the
receiver or cannot be ejected, ejects the disc
as follows.
• If this does not work, try to reset your
receiver.
• Be careful not to drop the disc when it
ejects.
EN02-05KD-G416_415[U_UH]3.indd 2EN02-05KD-G416_415[U_UH]3.indd 2 10/28/04 5:40:51 PM10/28/04 5:40:51 PM

3
ENGLISH
How to reset your unit ........................... 2
How to forcibly eject a disc ................... 2
How to read this manual ........................ 4
How to use the MODE button ............... 4
Control panel
— KD-G416/KD-G415 ............... 5
Parts identification ................................. 5
Remote controller — RM-RK50
... 6
Main elements and features ................... 6
Getting started ....................... 7
Basic operations .................................. 7
Canceling the display demonstrations ... 8
Setting the clock .................................... 8
Radio operations ................... 9
Listening to the radio ........................... 9
Storing stations in memory .................... 10
Listening to a preset station ................... 11
Disc operations ...................... 12
Playing a disc ..................................... 12
Changing the display information ......... 14
Selecting the playback modes ................ 15
Sound adjustments ................ 16
Selecting preset sound modes
(C-EQ: custom equalizer) .................. 16
Adjusting the sound ............................... 17
General settings — PSM ......... 18
Basic procedure ..................................... 18
Detaching the control panel .... 19
Maintenance .......................... 20
More about this receiver ........ 21
Troubleshooting ..................... 23
Specifications ......................... 25
*For safety....
• Do not raise the volume level too much, as
this will block outside sounds, making driving
dangerous.
• Stop the car before performing any
complicated operations.
Contents
*Temperature inside the car....
If you have parked the car for a long time in
hot or cold weather, wait until the temperature
in the car becomes normal before operating the
unit.
EN02-05KD-G416_415[U_UH]3.indd 3EN02-05KD-G416_415[U_UH]3.indd 3 10/28/04 5:40:52 PM10/28/04 5:40:52 PM

4
ENGLISH
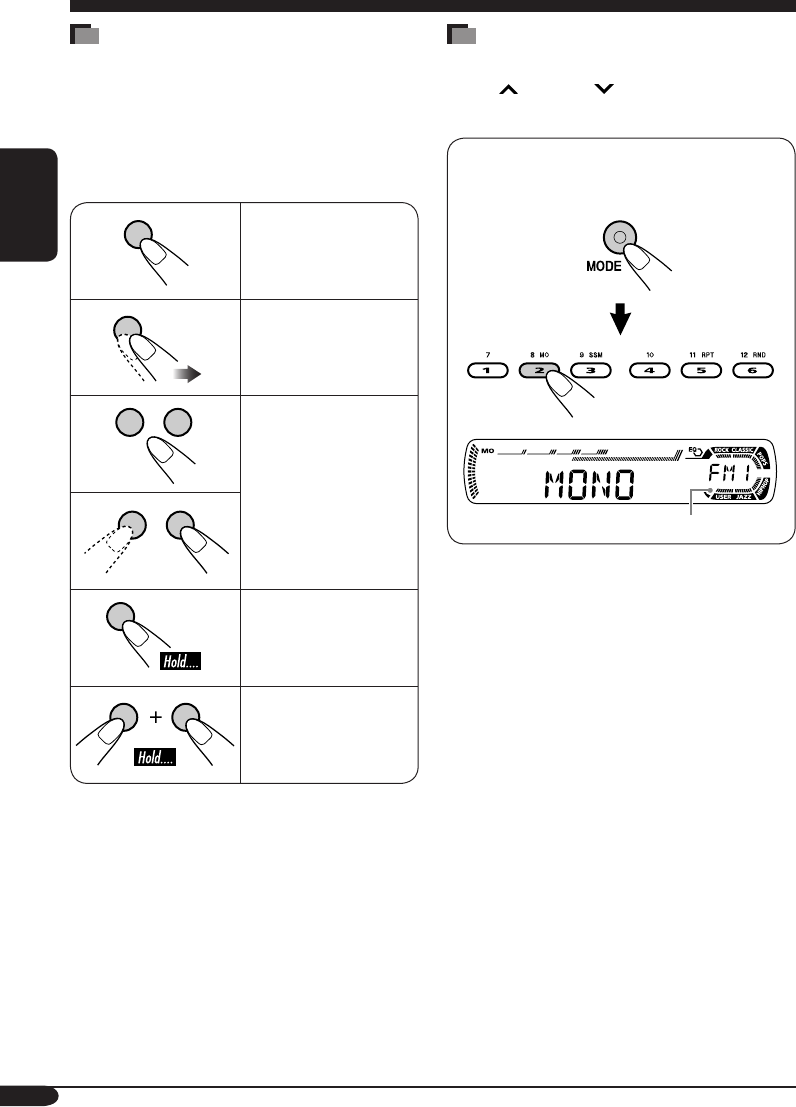
How to read this manual
The following methods are used to made the
explanations simple and easy-to-understand:
• Some related tips and notes are explained in
“More about this receiver” (see pages 21 and
22).
• Button operations are mainly explained with
the illustrations as follows:
Press briefly.
Press repeatedly.
Press either one.
Press and hold until
your desired response
begins.
Press and hold both
buttons at the same
time.
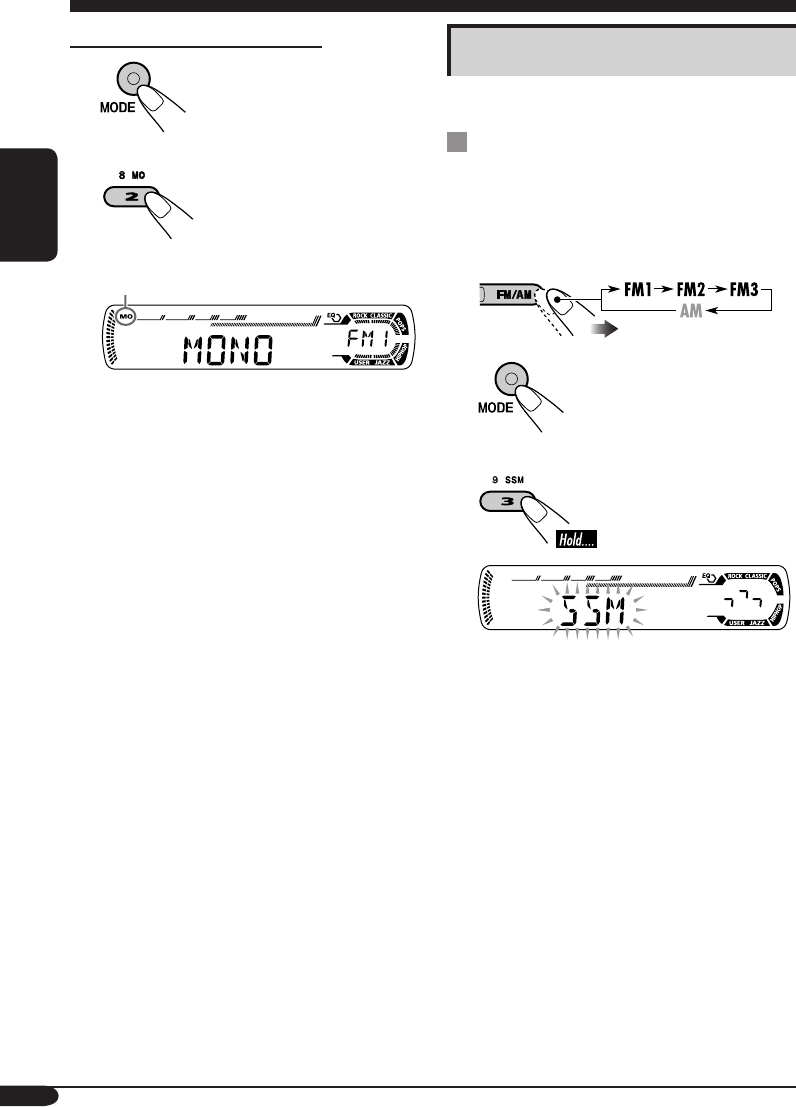
How to use the MODE button
If you press MODE, the receiver goes into
functions mode, then the number buttons and
¢/4 buttons work as different
function buttons.
Ex.: When number button 2 works as
MO (monaural) button.
Time countdown indicator
To use these buttons for original functions
again after pressing MODE, wait for
5 seconds without pressing any of these buttons
until the functions mode is cleared.
• Pressing MODE again also clears the
functions mode.
EN02-05KD-G416_415[U_UH]3.indd 4EN02-05KD-G416_415[U_UH]3.indd 4 10/28/04 5:40:52 PM10/28/04 5:40:52 PM
5
ENGLISH
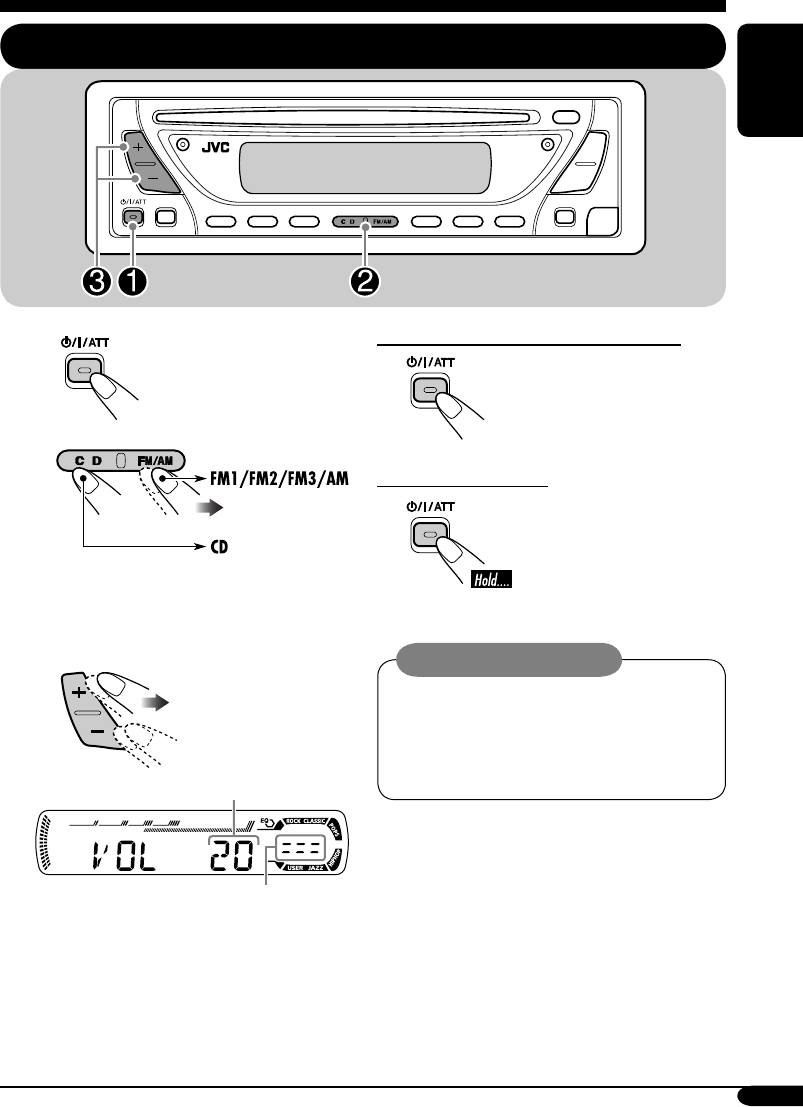
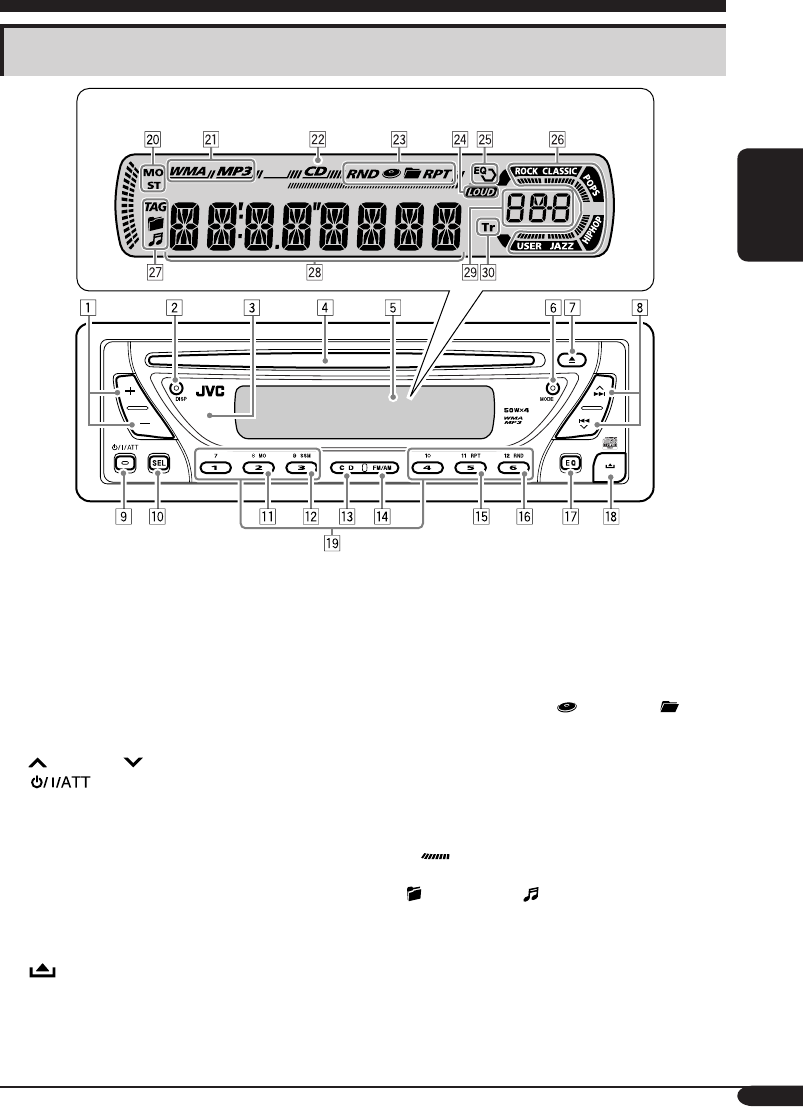
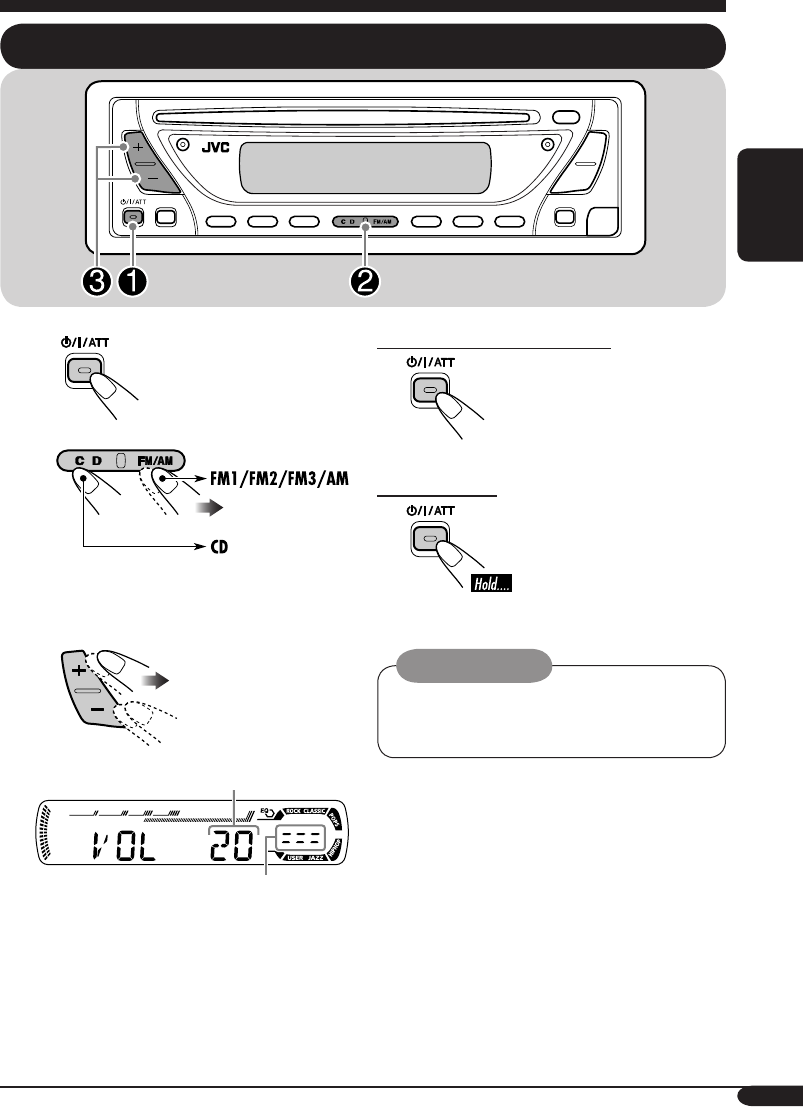
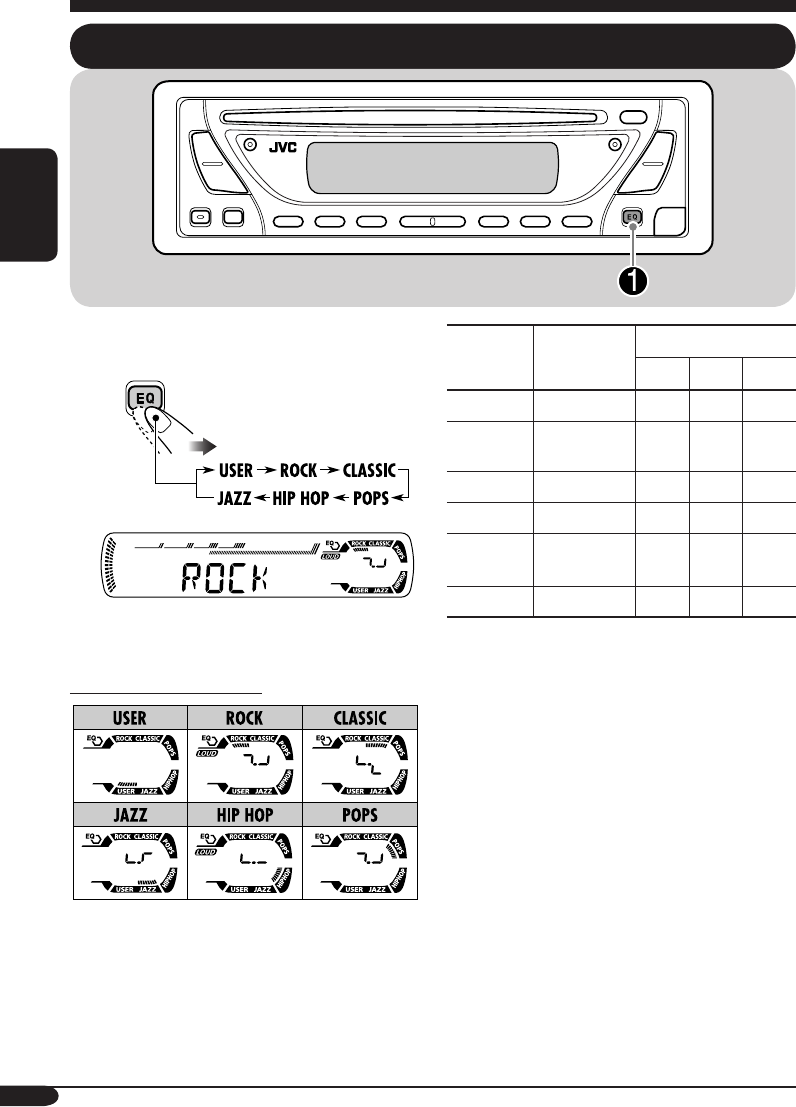
Control panel — KD-G416/KD-G415
1 +/– buttons
2 DISP (display) button
3 Remote sensor
• DO NOT expose the remote sensor to
strong light (direct sunlight or artificial
lighting).
4 Loading slot
5 Display window
6 MODE button
7 0 (eject) button
8 ¢/4 buttons
9 (standby/on/attenuator) button
p SEL (select) button
q MO (monaural) button
w SSM (Strong-station Sequential Memory)
button
e CD button
r FM/AM button
t RPT (repeat) button
y RND (random) button
u EQ (equalizer) button
i (control panel release) button
o Number buttons
Display window
; Tuner reception indicators—
MO (monaural), ST (stereo)
a Disc type indicators—WMA, MP3
s CD indicator
d Playback mode / item indicators—
RND (random), (disc), (folder),
RPT (repeat)
f LOUD (loudness) indicator
g EQ (equalizer) indicator
h Sound mode (C-EQ: custom equalizer)
indicators—ROCK, CLASSIC, POPS,
HIP HOP, JAZZ, USER
• also works as the time countdown
indicator.
j Disc information indicators—TAG (ID3
Tag), (folder), (track/file)
k Main display
l Source display / Volume level indicator
/ Tr (track) indicator
Parts identification
Display window
EN02-05KD-G416_415[U_UH]3.indd 5EN02-05KD-G416_415[U_UH]3.indd 5 10/28/04 5:40:52 PM10/28/04 5:40:52 PM
6
ENGLISH
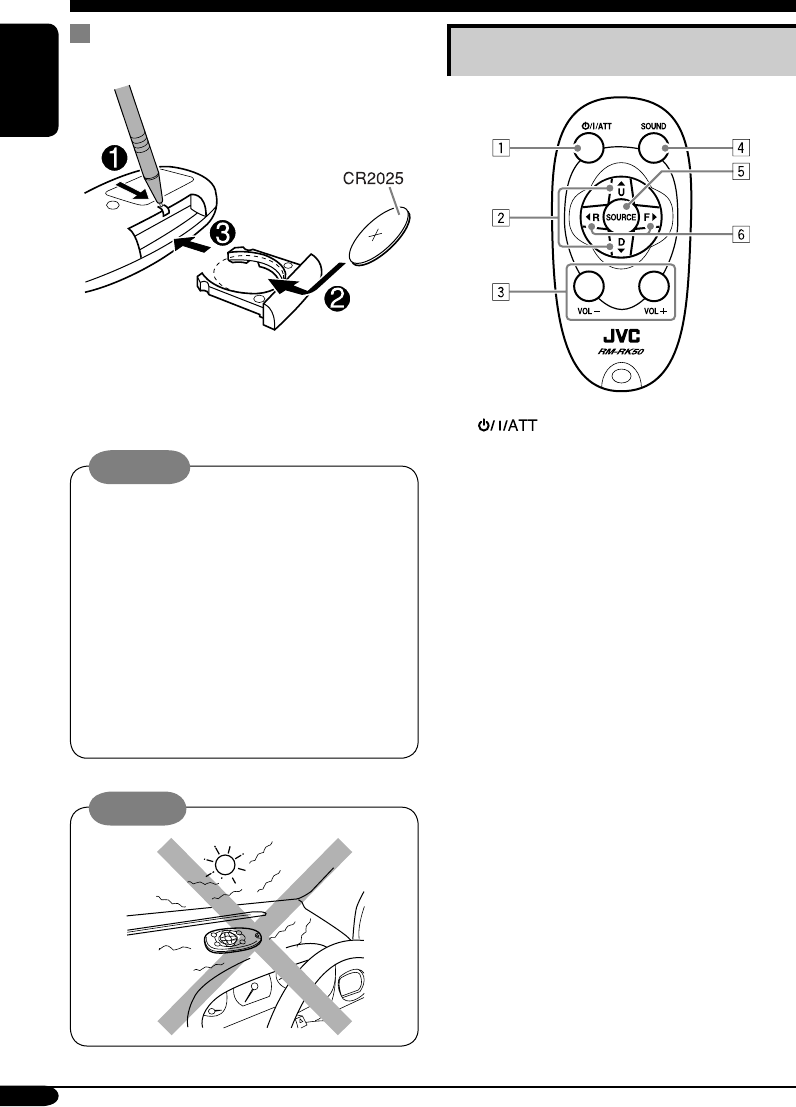
Remote controller — RM-RK50
Main elements and features
1 (standby/on/attenuator) button
• Turns on and off the power and also
attenuates the sound.
2 5 U (up) / D (down) ∞ buttons
• 5 U: Changes the FM/AM bands.
• D ∞: Changes the preset stations.
• Changes the folder of the MP3/WMA
discs.
3 VOL – / VOL + buttons
• Adjusts the volume level.
4 SOUND button
• Selects the sound mode (C-EQ: custom
equalizer).
5 SOURCE button
• Selects the source.
6 2 R (reverse) / F (forward) 3 buttons
• Searches for stations if pressed briefly.
• Fast-forwards or reverses the track if
pressed and held.
• Changes the tracks of the disc.
Installing the lithium coin battery
(CR2025)
• When operating, aim the remote controller
directly at the remote sensor on the
receiver. Make sure there is no obstacle in
between.
Warning:
• Store the battery in a place where children
cannot reach to avoid risk of accident.
• To prevent the battery from over-heating,
cracking, or starting a fire:
– Do not recharge, short, disassemble, or
heat the battery or dispose of it in a fire.
– Do not leave the battery with other
metallic materials.
– Do not poke the battery with tweezers or
similar tools.
– Wrap the battery with tape and insulate
when throwing away or saving it.
Caution:
EN06-11KD-G416_415[U_UH]3.indd 6EN06-11KD-G416_415[U_UH]3.indd 6 10/28/04 5:41:12 PM10/28/04 5:41:12 PM
7
ENGLISH
Getting started
Basic operations
~
Ÿ
You cannot select “CD” as the playback
source if there is no disc in the loading
slot.
!
Volume level appears.
Volume level indicator
⁄ Adjust the sound as you want.
(See pages 16 and 17.)
To drop the volume in a moment (ATT)
To restore the sound, press
it again.
To turn off the power
Caution on volume setting:
Discs produce very little noise compared
with other sources. Lower the volume
before playing a disc to avoid damaging
the speakers by the sudden increase of the
output level.
EN06-11KD-G416_415[U_UH]f.indd 7EN06-11KD-G416_415[U_UH]f.indd 7 11/1/04 4:52:26 PM11/1/04 4:52:26 PM
8
ENGLISH
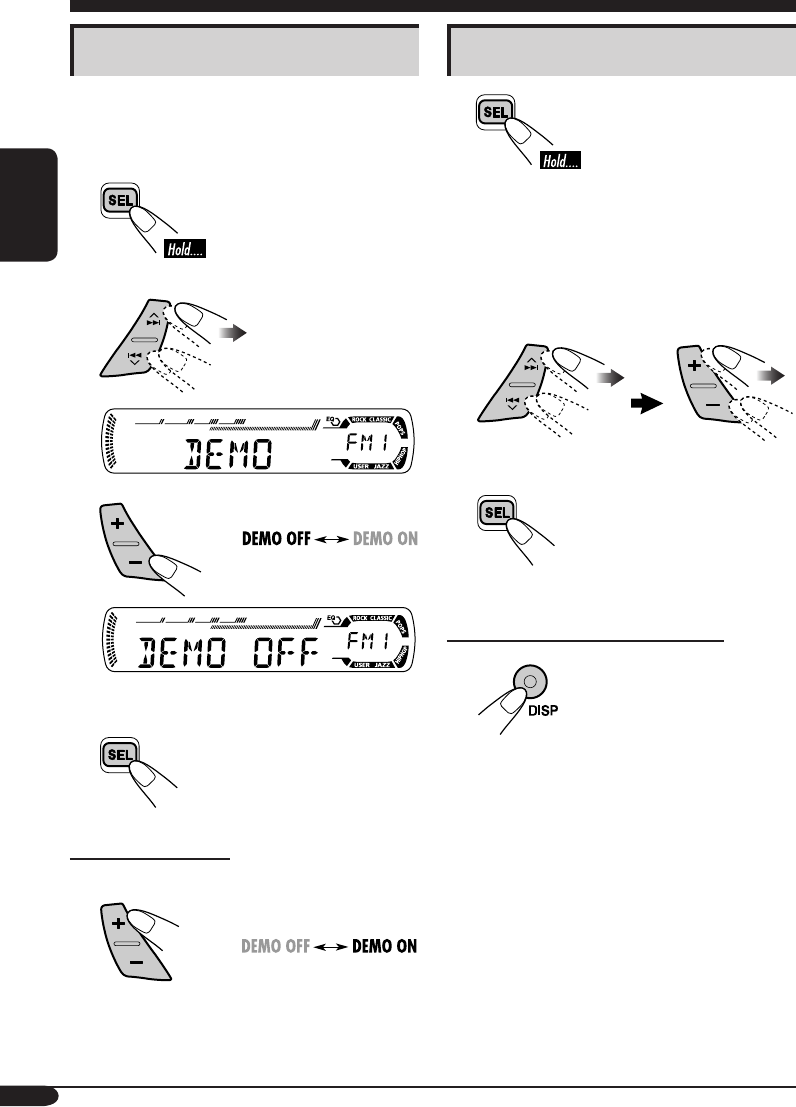
Canceling the display
demonstrations
If no operations are done for about 20 seconds,
display demonstration starts.
[Initial: DEMO ON]—see page 18.
1
2
3
4 Finish the procedure.
To activate the display demonstration
In step 3 above...
Setting the clock
1
2 Set the hour and minute.
1 Select “CLOCK H” (hour), then
adjust the hour.
2 Select “CLOCK M” (minute),
then adjust the minute.
3 Finish the procedure.
To check the current clock time when the
power is turned off
EN06-11KD-G416_415[U_UH]f.indd 8EN06-11KD-G416_415[U_UH]f.indd 8 11/1/04 4:52:27 PM11/1/04 4:52:27 PM
9
ENGLISH
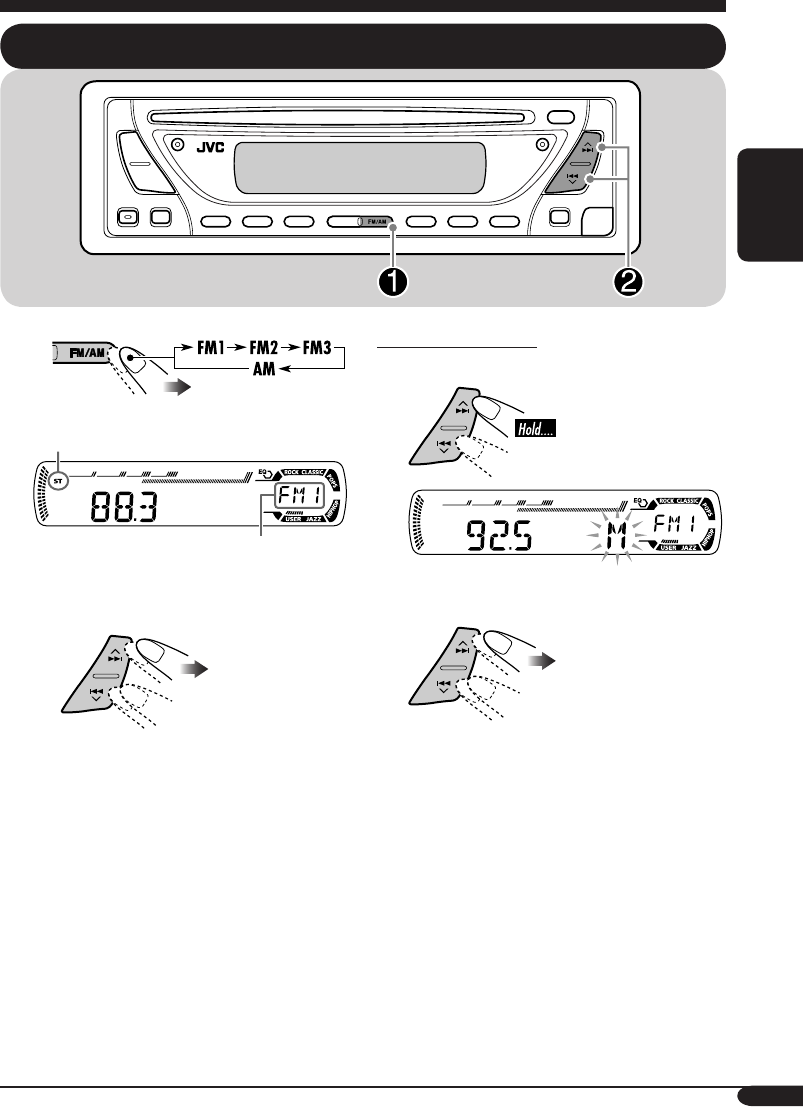
Radio operations
Listening to the radio
~
Lights up when receiving an FM stereo
broadcast with sufficient signal strength.
Selected band appears.
Ÿ Start searching for a station.
When a station is received, searching
stops.
To stop searching, press the same
button again.
To tune in to a station manually
In step Ÿ on the left...
1
2 Select the desired station frequencies.
EN06-11KD-G416_415[U_UH]3.indd 9EN06-11KD-G416_415[U_UH]3.indd 9 10/28/04 5:41:13 PM10/28/04 5:41:13 PM
10
ENGLISH
When an FM stereo broadcast is hard to
receive
1
2
Lights up when monaural mode is activated.
Reception improves, but stereo effect will
be lost.
To restore the stereo effect, repeat the same
procedure. “MONO OFF” appears and the MO
indicator goes off.
Storing stations in memory
You can preset six stations for each band.
FM station automatic presetting —
SSM (Strong-station Sequential
Memory)
1 Select the FM band (FM1 – FM3)
you want to store into.
2
3
“SSM” flashes, then disappears when
automatic presetting is over.
Local FM stations with the strongest signals are
searched and stored automatically in the FM
band.
EN06-11KD-G416_415[U_UH]3.indd 10EN06-11KD-G416_415[U_UH]3.indd 10 10/28/04 5:41:13 PM10/28/04 5:41:13 PM
11
ENGLISH
Manual presetting
Ex.: Storing FM station of 92.5 MHz into the
preset number 4 of the FM1 band.
1
2
3
Preset number flashes for a while.
Listening to a preset station
1
2 Select the preset station (1 – 6) you
want.
To check the current clock time while
listening to an FM or AM station
EN06-11KD-G416_415[U_UH]3.indd 11EN06-11KD-G416_415[U_UH]3.indd 11 10/28/04 5:41:14 PM10/28/04 5:41:14 PM
12
ENGLISH
Disc operations
Playing a disc
About MP3 and WMA discs
MP3 and WMA (Windows Media® Audio)
“tracks” (words “file” and “track” are used
interchangeably) are recorded in “folders.”
• When inserting an MP3 or a WMA disc:
*1 Either the MP3 or WMA indicator lights up
depending on the detected file.
• When inserting an audio CD or a CD Text
disc:
*2 Elapsed playing time appears for a while if
the current disc is an audio CD.
To stop play and eject the disc
Total folder
number
Total track
number
Total playing time of
the inserted disc
Total track number
of the inserted disc
All tracks will be played
repeatedly until you
change the source or eject
the disc.
Disc information appears
automatically (see page 14).
Selected folder number
CD Text: Disc title/performer =
Track title appears automatically
(see page 14).
Current track
number
Clock
Current track
number
Clock*2
EN12-17KD-G416_415[U_UH]3.indd 12EN12-17KD-G416_415[U_UH]3.indd 12 10/28/04 5:41:48 PM10/28/04 5:41:48 PM
13
ENGLISH
To fast-forward or reverse the track
Fast-forwards.
Reverses.
To go to the next or previous tracks
To the following
tracks.
To the beginning of the current track, then
the previous tracks.
To go to the next or previous folders (only
for MP3 or WMA discs)
1
2
To next folders.
To previous folders.
To locate a particular track (for CD) or
folder (for MP3 or WMA discs) directly
To select a number from 01 – 06:
To select a number from 07 – 12:
• To use folder search on MP3/WMA discs, it
is required that folders are assigned with
2-digits number at the beginning of their
folder names—01, 02, 03, and so on.
• To select a particular track in a folder (for
MP3 or WMA disc) after selecting a folder:
Prohibiting disc ejection
You can lock a disc in the loading slot.
To cancel the prohibition, repeat the same
procedure.
EN12-17KD-G416_415[U_UH]3.indd 13EN12-17KD-G416_415[U_UH]3.indd 13 10/28/04 5:41:49 PM10/28/04 5:41:49 PM
14
ENGLISH
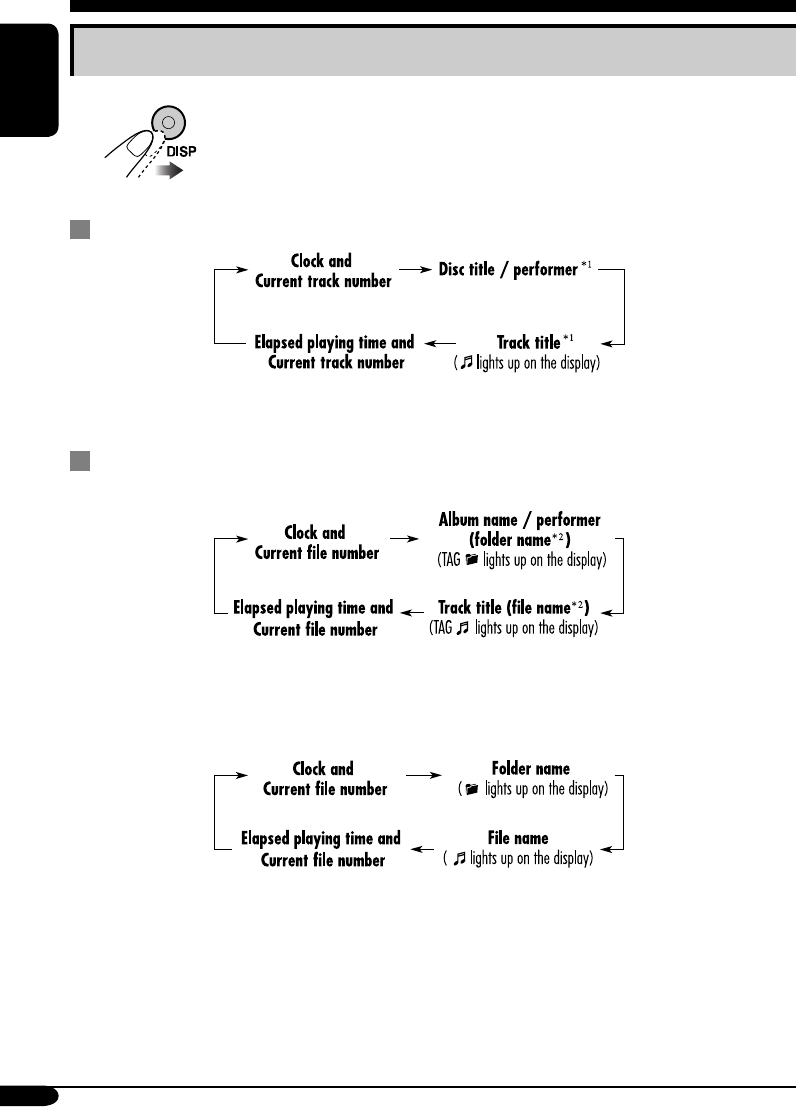
Changing the display information
While playing an audio CD or a CD Text
*1 If the current disc is an audio CD, “NO NAME” appears.
While playing an MP3 or WMA disc
• When “TAG DISP” is set to “TAG ON” (see page 18)
*2 If an MP3/WMA file does not have ID3 tags, folder name and file name appear. In
this case, the TAG indicator will not light up.
• When “TAG DISP” is set to “TAG OFF”
EN12-17KD-G416_415[U_UH]3.indd 14EN12-17KD-G416_415[U_UH]3.indd 14 10/28/04 5:41:49 PM10/28/04 5:41:49 PM
15
ENGLISH
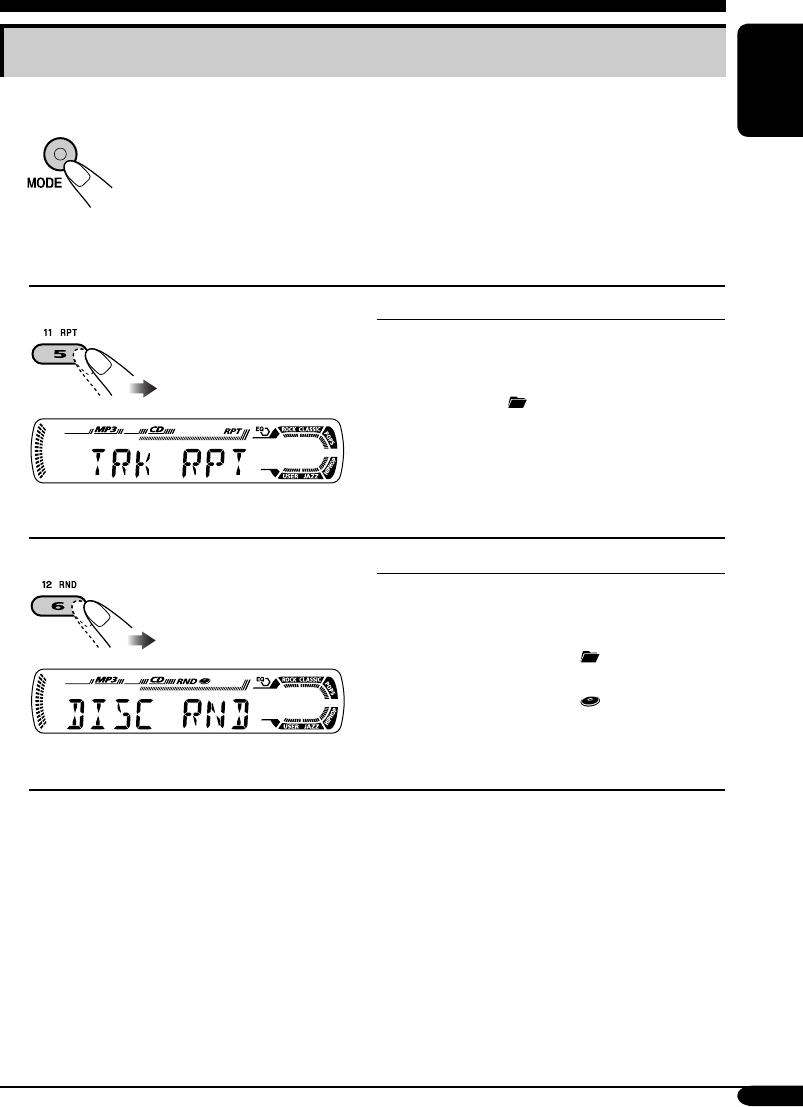
Selecting the playback modes
You can use only one of the following playback modes at a time.
1
2 Select your desired playback mode.
Repeat play
Ex.: When “TRK RPT” is selected while
playing an MP3 disc
Mode Plays repeatedly
TRK RPT: The current track.
• RPT lights up.
FLDR RPT*: All tracks of the current folder.
• and RPT light up.
RPT OFF: Cancels.
Random play
Ex.: When “DISC RND” is selected while
playing an MP3 disc
Mode Plays at random
FLDR RND*: All tracks of the current folder,
then tracks of the next folder
and so on.
• RND and light up.
DISC RND: All tracks of the current disc.
• RND and light up.
RND OFF: Cancels.
* Only while playing an MP3 or WMA disc.
EN12-17KD-G416_415[U_UH]3.indd 15EN12-17KD-G416_415[U_UH]3.indd 15 10/28/04 5:41:49 PM10/28/04 5:41:49 PM
16
ENGLISH
Sound adjustments
Selecting preset sound modes (C-EQ: custom equalizer)
You can select a preset sound mode suitable to
the music genre.
~
Ex.: When “ROCK” is selected
Indication pattern for each sound mode:
Indication For: Preset values
BAS*1TRE*2
LOUD
*3
USER (Flat sound) 00 00 OFF
ROCK Rock or
disco music
+03 +01 ON
CLASSIC Classical
music
+01 –02 OFF
POPS Light music +04 +01 OFF
HIP HOP Funk or rap
music
+02 00 ON
JAZZ Jazz music +02 +03 OFF
*1 BAS: Bass
*2 TRE: Treble
*3 LOUD: Loudness
EN12-17KD-G416_415[U_UH]3.indd 16EN12-17KD-G416_415[U_UH]3.indd 16 10/28/04 5:41:50 PM10/28/04 5:41:50 PM
17
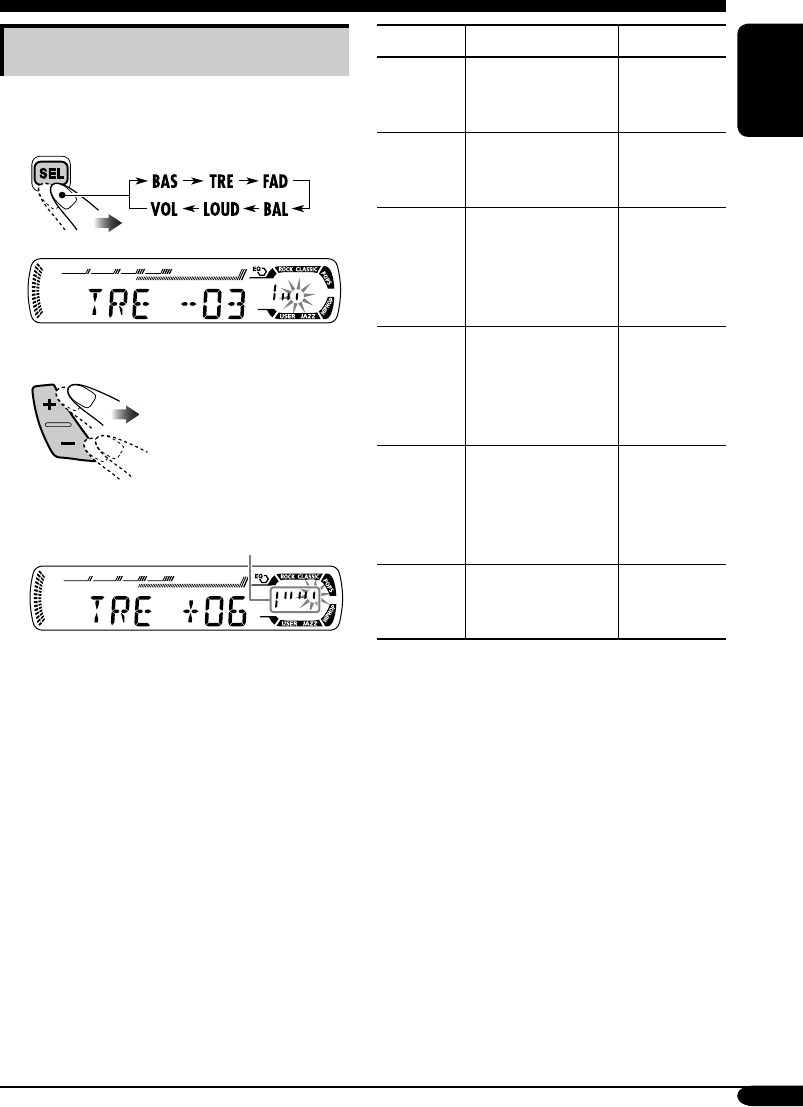
ENGLISH
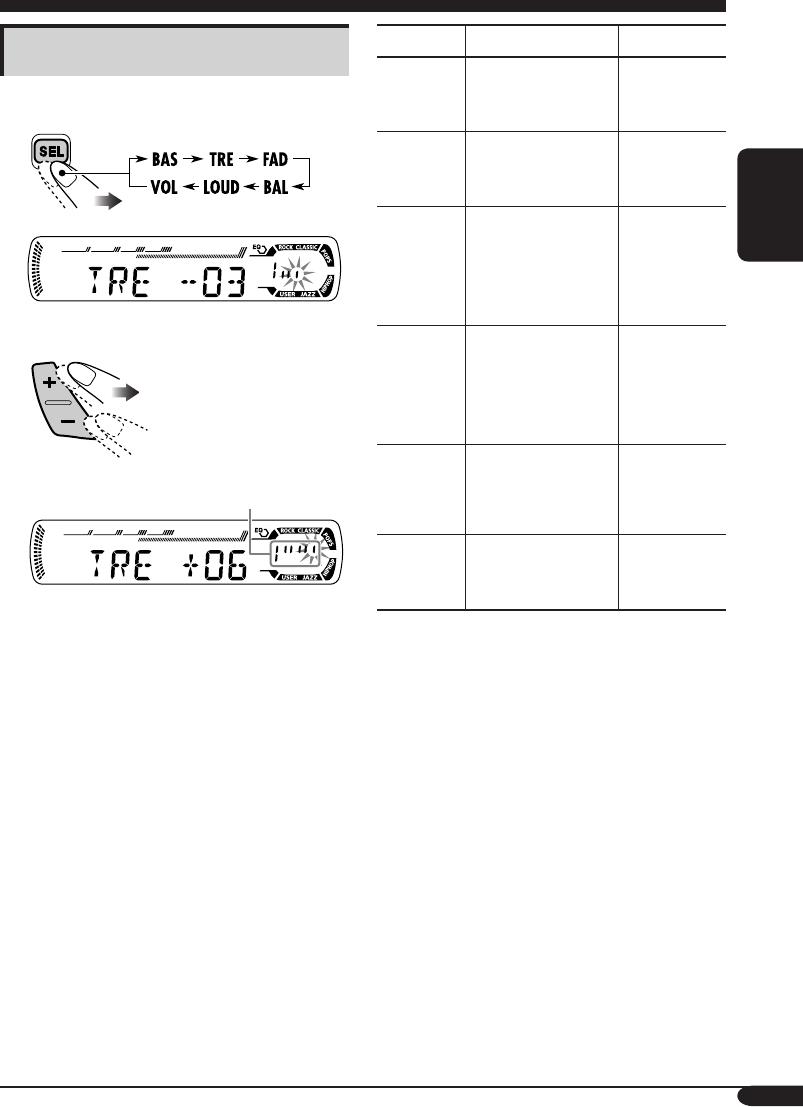
Adjusting the sound
You can adjust the sound characteristics to your
preference.
1
Ex.: When “TRE” is selected
2
Indication pattern changes as
you adjust the level.
Indication To do: Range
BAS*1
(bass)
Adjust the bass. –06 (min.)
to
+06 (max.)
TRE*1
(treble)
Adjust the treble. –06 (min.)
to
+06 (max.)
FAD*2
(fader)
Adjust the front
and rear speaker
balance.
R06 (Rear
only)
to
F06 (Front
only)
BAL
(balance)
Adjust the left
and right speaker
balance.
L06 (Left
only)
to
R06 (Right
only)
LOUD*1
(loudness)
Boost low and
high frequencies
to produce a well-
balanced sound at
low volume level.
LOUD ON
J
LOUD OFF
VOL*3
(volume)
Adjust the volume. 00 (min.) to
30 or 50
(max.)*4
*1 When you adjust the bass, treble, or
loudness, the adjustment you have made is
stored for the currently selected sound mode
(C-EQ) including “USER.”
*2 If you are using a two-speaker system, set
the fader level to “00.”
*3 Normally the +/– buttons work as the
volume control. So you do not have to select
“VOL” to adjust the volume level.
*4 Depending on the amplifier gain control
setting. (See page 18 for details.)
EN12-17KD-G416_415[U_UH]3.indd 17EN12-17KD-G416_415[U_UH]3.indd 17 10/28/04 5:41:50 PM10/28/04 5:41:50 PM
18
ENGLISH
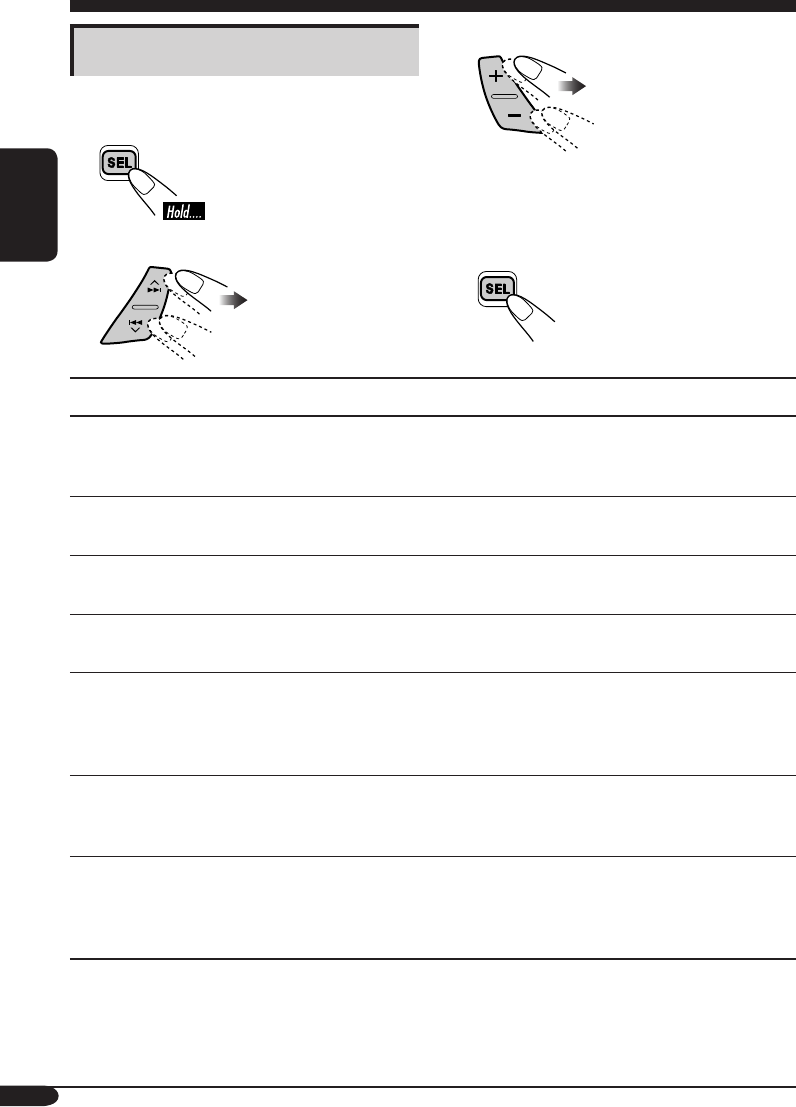
General settings — PSM
Basic procedure
You can change PSM (Preferred Setting Mode)
items listed in the table that follows.
1
2 Select a PSM item.
3 Adjust the PSM item selected.
4 Repeat steps 2 and 3 to adjust the
other PSM items if necessary.
5 Finish the procedure.
Indications Selectable settings, [reference page]
DEMO
Display demonstration
DEMO ON: [Initial]; Display demonstration will be activated
automatically if no operation is done for about
20 seconds, [8].
DEMO OFF: Cancels.
CLOCK H
Hour adjustment
1 – 12, [8]
[Initial: 1 (1:00)]
CLOCK M
Minute adjustment
00 – 59, [8]
[Initial: 00 (1:00)]
DIMMER
Dimmer
ON: Activates dimmer.
OFF: [Initial]; Cancels.
SCROLL*
Scroll
ONCE: [Initial]; Scrolls the disc information once.
AUTO: Repeats scrolling (5-seconds interval in between).
OFF: Cancels.
• Pressing DISP for more than one second can scroll the display
regardless of the setting.
TAG DISP
Tag display
TAG ON: [Initial]; Shows the ID3 tag while playing
MP3/WMA tracks, [14].
TAG OFF: Cancels.
AMP GAIN
Amplifier gain control
You can change the maximum volume level of this receiver.
LOW PWR: VOL 00 – VOL 30 (Select this if the maximum
power of the speaker is less than 50 W to prevent
them from damaging the speaker.)
HIGH PWR: [Initial]; VOL 00 – VOL 50
* Some characters or symbols will not be shown (and will be blanked) on the display.
(Ex. “ABCå!d#” ]“ABCA D ”.)
EN18-21KD-G416_415[U_UH]3.indd 18EN18-21KD-G416_415[U_UH]3.indd 18 10/28/04 5:42:07 PM10/28/04 5:42:07 PM
19
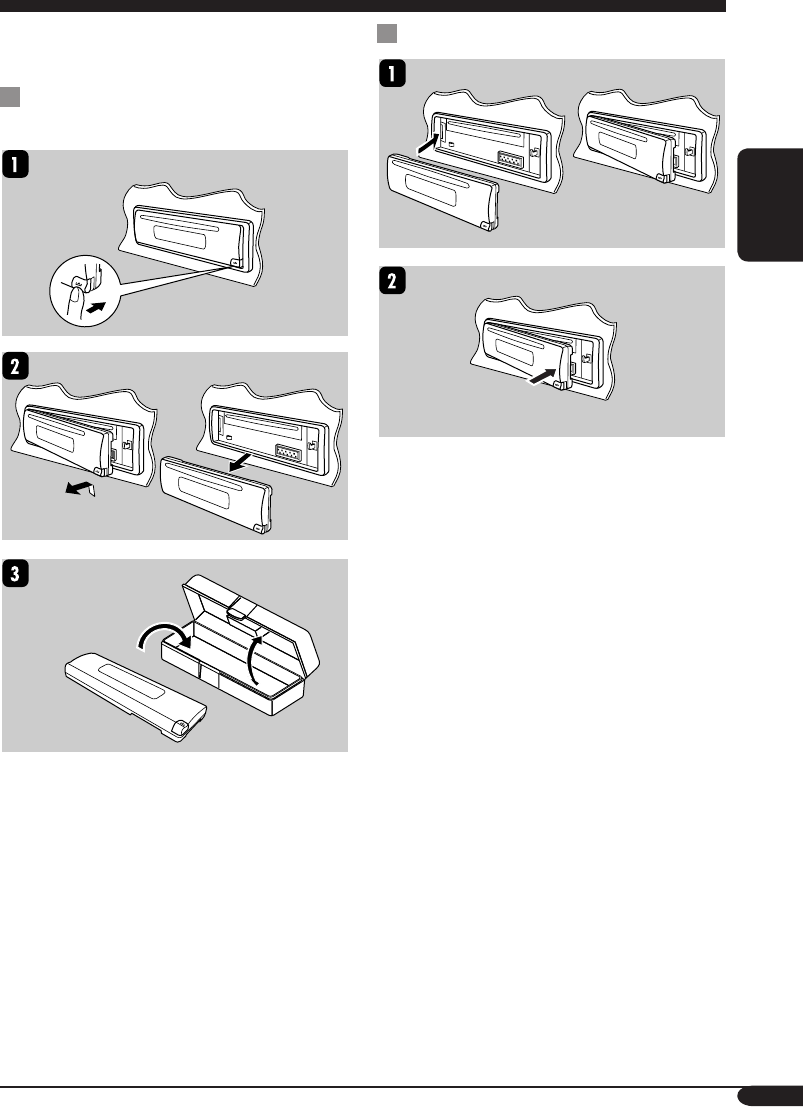
ENGLISH
When detaching or attaching the control panel,
be careful not to damage the connectors on
the back of the control panel and on the panel
holder.
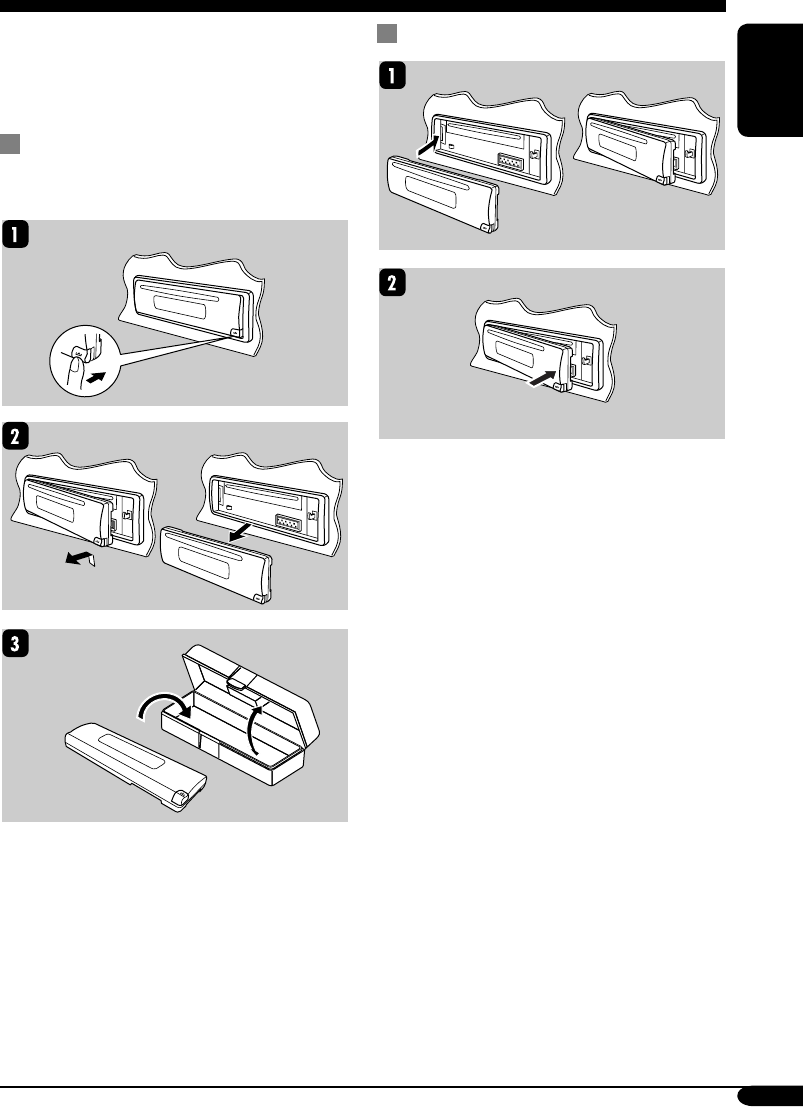
Detaching the control panel
Before detaching the control panel, be sure to
turn off the power.
Attaching the control panel
Detaching the control panel
EN18-21KD-G416_415[U_UH]3.indd 19EN18-21KD-G416_415[U_UH]3.indd 19 10/28/04 5:42:08 PM10/28/04 5:42:08 PM
20
ENGLISH
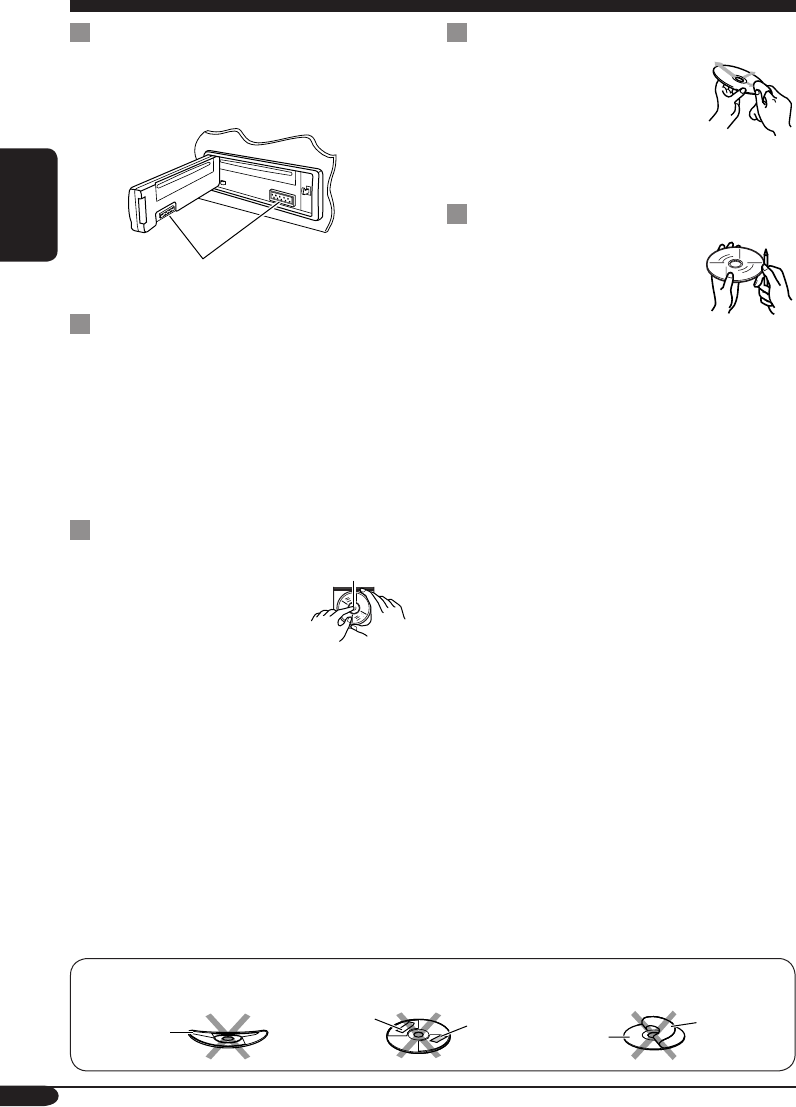
Maintenance
How to clean the connectors
Frequent detachment will deteriorate the
connectors.
To minimize this possibility, periodically wipe
the connectors with a cotton swab or cloth
moistened with alcohol, being careful not to
damage the connectors.
Connector
Moisture condensation
Moisture may condense on the lens inside the
CD player in the following cases:
• After starting the heater in the car.
• If it becomes very humid inside the car.
Should this occur, the CD player may
malfunction. In this case, eject the disc and
leave the receiver turned on for a few hours
until the moisture evaporates.
How to handle discs
When removing a disc from
its case, press down the center
holder of the case and lift the
disc out, holding it by the
edges.
• Always hold the disc by the edges. Do not
touch its recording surface.
When storing a disc into its case, gently insert
the disc around the center holder (with the
printed surface facing up).
• Make sure to store discs into the cases after
use.
To keep discs clean
A dirty disc may not play correctly.
If a disc does become dirty, wipe
it with a soft cloth in a straight line
from center to edge.
• Do not use any solvent (for
example, conventional record cleaner, spray,
thinner, benzine, etc.) to clean discs.
To play new discs
New discs may have some rough
spots around the inner and outer
edges. If such a disc is used, this
receiver may reject the disc.
To remove these rough spots, rub the edges
with a pencil or ball-point pen, etc.
Center holder
Warped
disc
Sticker Sticker
residue Disc
Stick-on
label
Do not use the following discs:
EN18-21KD-G416_415[U_UH]3.indd 20EN18-21KD-G416_415[U_UH]3.indd 20 10/28/04 5:42:08 PM10/28/04 5:42:08 PM

21
ENGLISH
More about this receiver
Basic operations
Turning on the power
• By pressing CD or FM/AM on the receiver,
you can also turn on the power.
Turning off the power
• If you turn off the power while listening to a
disc, disc play will start from where playback
has been stopped previously, next time you
turn on the power.
Tuner operations
Storing stations in memory
• During SSM search...
– All previously stored stations are erased
and stations are stored newly.
– Received stations are preset in No. 1
(lowest frequency) to No. 6 (highest
frequency).
– When SSM is over, the station stored in
No. 1 will be automatically tuned in.
• When storing a station manually, a previously
preset station is erased when a new station is
stored in the same preset number.
Disc operations
General
• This receiver has been designed to reproduce
CDs/CD Texts, and CD-Rs (Recordable)/
CD-RWs (Rewritable) in audio CD (CD-DA),
MP3 and WMA format.
• When a disc has been loaded, selecting “CD”
for the playback source starts disc play.
Inserting a disc
• When a disc is inserted upside down, the disc
automatically ejects.
• Do not insert 8 cm discs (single CD) and
unusual shape discs (heart, flower, etc.) into
the loading slot.
Playing a disc
• While fast-forwarding or reversing on an MP3
or WMA disc, you can only hear intermittent
sounds.
Playing a CD-R or CD-RW
• Use only “finalized” CD-Rs or CD-RWs.
• This receiver can play back only the files of
the same type which is first detected if a disc
includes both audio CD (CD-DA) files and
MP3/WMA files.
• This receiver can play back multi-session
discs; however, unclosed sessions will be
skipped while playing.
• Some CD-Rs or CD-RWs may not play
back on this receiver because of their disc
characteristics, and for the following causes:
– Discs are dirty or scratched.
– Moisture condensation occurs on the lens
inside the receiver.
– The pickup lens inside the receiver is dirty.
– CD-R or CD-RW on which the files are
written with “Packet Write” method.
– There are improper recording conditions
(missing data, etc.) or media conditions
(stain, scratch, warp, etc.).
• CD-RWs may require a longer readout time
since the reflectance of CD-RWs is lower
than that of regular CDs.
• Do not use the following CD-Rs or CD-RWs:
– Discs with stickers, labels, or protective
seal stuck to the surface.
– Discs on which labels can be directly
printed by an ink jet printer.
Using these discs under high temperatures or
high humidities may cause malfunctions or
damages to discs.
EN18-21KD-G416_415[U_UH]3.indd 21EN18-21KD-G416_415[U_UH]3.indd 21 10/28/04 5:42:08 PM10/28/04 5:42:08 PM

22
ENGLISH
Playing an MP3/WMA disc
• This receiver can play back MP3/WMA files
with the extension code <.mp3> or <.wma>
(regardless of the letter case—upper/lower).
• This receiver can show the names of albums,
artists (performer), and ID3 Tag (Version 1.0,
1.1, 2.2, 2.3, or 2.4) for MP3 files and for
WMA files.
• This receiver can handle only one-byte
characters. No other characters can be
correctly displayed.
• This receiver can play back MP3/WMA files
meeting the conditions below:
– Bit rate: 8 kbps — 320 kbps
– Sampling frequency:
48 kHz, 44.1 kHz, 32 kHz (for MPEG-1)
24 kHz, 22.05 kHz, 16 kHz (for MPEG-2)
– Disc format: ISO 9660 Level 1/ Level 2,
Romeo, Joliet, Windows long file name
• The maximum number of characters for file/
folder names vary among the disc format used
(includes 4 extension characters—<.mp3> or
<.wma>).
– ISO 9660 Level 1: up to 12 characters
– ISO 9660 Level 2: up to 31 characters
– Romeo*: up to 128 (72) characters
– Joliet*: up to 64 (36) characters
– Windows long file name*: up to 128 (72)
characters
* The parenthetic figure is the maximum
number of characters for file/folder names
in case the total number of files and folders
is 313 or more.
• This receiver can recognize the total of 512
files, of 200 folders, and of 8 hierarchies.
• This receiver can play back the files recorded
in VBR (variable bit rate).
The files recorded in VBR have a discrepancy
in elapsed time display, and do not show
the actual elapsed time. Especially, after
performing the search function, this difference
becomes noticeable.
• This receiver cannot play back the following
files:
– MP3 files encoded with MP3i and MP3
PRO format.
– MP3 files encoded in an unappropriated
format.
– MP3 files encoded with Layer 1/2.
– WMA files encoded with lossless,
professional, and voice format.
– WMA files which are not based upon
Windows Media® Audio.
– WMA formatted files copy-protected with
DRM.
– Files which have the data such as WAVE,
ATRAC3, etc.
• The search function works but search speed is
not constant.
Changing the source
• If you change the source, playback also stops
(without ejecting the disc).
Next time you select “CD” for the playback
source, disc play starts from where it has been
stopped previously.
Ejecting a disc
• If the ejected disc is not removed within
15 seconds, the disc is automatically inserted
again into the loading slot to prevent it from
dust. (Disc will not play this time.)
General settings—PSM
• If you change the “AMP GAIN” setting from
“HIGH PWR” to “LOW PWR” while the
volume level is set higher than “VOL 30,” the
receiver automatically changes the volume
level to “VOL 30.”
EN22-25KD-G416_415[U_UH]3.indd 22EN22-25KD-G416_415[U_UH]3.indd 22 10/28/04 5:42:26 PM10/28/04 5:42:26 PM
23
ENGLISH
Symptoms Causes Remedies
General
• Sound cannot be heard
from the speakers.
The volume level is set to
the minimum level.
Adjust it to the optimum
level.
Connections are incorrect. Check the cords and
connections.
• The receiver does not
work at all.
The built-in microcomputer
may have functioned
incorrectly due to noise, etc.
Reset the receiver (see page
2).
FM/AM
• SSM automatic presetting
does not work.
Signals are too weak. Store stations manually.
• Static noise while listening
to the radio.
The antenna is not connected
firmly.
Connect the antenna firmly.
Disc playback
• Disc automatically ejects. Disc is inserted upside
down.
Insert the disc correctly.
• CD-R/CD-RW cannot be
played back.
• Tracks on the CD-R/
CD-RW cannot be
skipped.
CD-R/CD-RW is not
finalized.
• Insert a finalized CD-R/
CD-RW.
• Finalize the CD-R/
CD-RW with the
component which you
used for recording.
• Disc can be neither played
back nor ejected.
Disc is locked. Unlock the disc (see page
13).
The CD player may have
functioned incorrectly.
Eject the disc forcibly (see
page 2).
• Disc sound is sometimes
interrupted.
You are driving on rough
roads.
Stop playback while driving
on rough roads.
Disc is scratched. Change the disc.
Connections are incorrect. Check the cords and
connections.
• “NO DISC” appears on
the display.
No disc is in the loading
slot.
Insert a disc into the loading
slot.
Disc is inserted incorrectly. Insert the disc correctly.
Troubleshooting
What appears to be trouble is not always serious. Check the following points before calling a service
center.
EN22-25KD-G416_415[U_UH]3.indd 23EN22-25KD-G416_415[U_UH]3.indd 23 10/28/04 5:42:27 PM10/28/04 5:42:27 PM
24
ENGLISH
Symptoms Causes Remedies
MP3/WMA playback
• Disc cannot be played
back.
No MP3/WMA tracks are
recorded on the disc.
Change the disc.
MP3/WMA tracks do not
have the extension code
<.mp3> or <.wma> in their
file names.
Add the extension code
<.mp3> or <.wma> to their
file names.
MP3/WMA tracks are not
recorded in the format
compliant with ISO 9660
Level 1, Level 2, Romeo, or
Joliet.
Change the disc.
(Record MP3/WMA
tracks using a compliant
application.)
• Noise is generated. The track played back is not
an MP3/WMA file (although
it has the extension code
<.mp3> or <.wma>).
Skip to another track or
change the disc. (Do not add
the extension code <.mp3>
or <.wma> to non-MP3 or
WMA tracks.)
• A longer readout time is
required (“CHECK” keeps
flashing on the display).
Readout time varies due to
the complexity of the folder/
file configuration.
Do not use too many
hierarchies and folders.
• Tracks cannot be played
back as you have intended
them to play.
Playback order is determined
when the files are recorded.
• Elapsed playing time is
not correct.
This sometimes occurs
during play. This is caused
by how the tracks are
recorded on the disc.
• “NO FILES” appears on
the display.
The current disc does not
contain any MP3/WMA
tracks.
Insert a disc that contains
MP3/WMA tracks.
• Correct characters are
not displayed (e.g. album
name).
This receiver can only
display alphabets (capital:
A – Z), numbers, and a
limited number of symbols.
EN22-25KD-G416_415[U_UH]3.indd 24EN22-25KD-G416_415[U_UH]3.indd 24 10/28/04 5:42:27 PM10/28/04 5:42:27 PM

25
ENGLISH
Specifications
AUDIO AMPLIFIER SECTION
Maximum Power Output:
Front: 50 W per channel
Rear: 50 W per channel
Continuous Power Output (RMS):
Front: 19 W per channel into 4 Ω, 40 Hz
to 20 000 Hz at no more than 0.8%
total harmonic distortion.
Rear: 19 W per channel into 4 Ω, 40 Hz
to 20 000 Hz at no more than 0.8%
total harmonic distortion.
Load Impedance: 4 Ω (4 Ω to 8 Ω allowance)
Tone Control Range:
Bass: ±10 dB at 100 Hz
Treble: ±10 dB at 10 kHz
Frequency Response: 40 Hz to 20 000 Hz
Signal-to-Noise Ratio: 70 dB
Line-Out Level/Impedance:
2.0 V/20 kΩ load (full scale)
Output Impedance: 1 kΩ
TUNER SECTION
Frequency Range:
FM: 87.5 MHz to 108.0 MHz
AM: 531 kHz to 1 602 kHz
[FM Tuner]
Usable Sensitivity: 11.3 dBf (1.0 µV/75 Ω)
50 dB Quieting Sensitivity:
16.3 dBf (1.8 µV/75 Ω)
Alternate Channel Selectivity (400 kHz): 65 dB
Frequency Response: 40 Hz to 15 000 Hz
Stereo Separation: 35 dB
Capture Ratio: 1.5 dB
[AM Tuner]
Sensitivity: 20 µV
Selectivity: 35 dB
CD PLAYER SECTION
Type: Compact disc player
Signal Detection System: Non-contact optical
pickup (semiconductor laser)
Number of Channels: 2 channels (stereo)
Frequency Response: 5 Hz to 20 000 Hz
Dynamic Range: 96 dB
Signal-to-Noise Ratio: 98 dB
Wow and Flutter: Less than measurable limit
MP3 Decoding Format:
MPEG1/2 Audio Layer 3
Max. Bit Rate: 320 kbps
WMA (Windows Media® Audio) Decoding
Format:
Max. Bit Rate: 192 kbps
GENERAL
Power Requirement:
Operating Voltage:
DC 14.4 V (11 V to 16 V allowance)
Grounding System: Negative ground
Allowable Operating Temperature:
0°C to +40°C
Dimensions (W × H × D):
Installation Size (approx.):
182 mm × 52 mm × 150 mm
Panel Size (approx.):
188 mm × 58 mm × 11 mm
Mass (approx.):
1.3 kg (excluding accessories)
Design and specifications are subject to change
without notice.
• Microsoft and Windows Media are either
registered trademarks or trademarks of
Microsoft Corporation in the United States
and/or other countries.
EN22-25KD-G416_415[U_UH]f.indd 25EN22-25KD-G416_415[U_UH]f.indd 25 11/23/04 11:22:53 AM11/23/04 11:22:53 AM
2
中
文
如何強制彈出碟片
如果碟片不能被本機識別或者不能被彈出,請
按如下所示將碟片彈出。
•
如果以上操作無效,請嘗試重設本機。
•
在彈出碟片時,小心不要將碟片掉落。
多謝您惠購 JVC 的產品。
在使用之前,請詳讀全部說明書,以確保完全理解本機使用方法,
並獲得較長的使用壽命。
鐳射產品的重要說明
1. 一級鐳射產品
2. 注意: 請勿打開頂蓋板,本機內部沒有用戶可自行維修的部件;所有維修工作應由有資格的人員完
成。
3. 注意: 當內部鎖定裝置失效或者損壞後,打開蓋板可能會產生可視或不可視的鐳射輻射。應避免受
到鐳射光束的直接照射。
4. 標籤的複製標示:注意標籤位於機外。
警告:
如果您在駕駛時需要操作接收機,請確保小心
地看著前方,否則可能發生交通意外。
如何重設本機
•
此項操作重設主機內置的微處理器。您所做
的預設調整亦會被清除。
•
此時如果裝入碟片,本機會將其彈出。小心
不要將碟片掉落。
CT02-05KD-G416_415[U_UH]1.indd 2CT02-05KD-G416_415[U_UH]1.indd 2 2004.11.18 11:21:47 AM2004.11.18 11:21:47 AM

3
中
文
如何重設本機 .......................................... 2
如何強制彈出碟片 ................................... 2
如何閱讀本使用手冊 ............................... 4
如何使用 MODE 鍵 ................................ 4
控制面板
— KD-G416/KD-G415 ............... 5
部件識別 ................................................. 5
遙控器
— RM-RK50
...................... 6
主要組成部分及作用 ............................... 6
著手準備 ................................... 7
基本操作 ............................................. 7
取消屏幕演示 .......................................... 8
設定時鐘 ................................................. 8
收音機的操作 .............................. 9
收聽廣播電臺 ...................................... 9
將電臺儲存到記憶體中 ............................ 10
收聽預設電臺 .......................................... 11
碟片的操作 ................................ 12
播放碟片 ............................................ 12
切換顯示信息 .......................................... 14
選擇播放模式 .......................................... 15
聲音調整 ................................... 16
選擇預設聲音模式
(C-EQ:預製均衡器) ...................... 16
調整聲音 ................................................. 17
一般設定
—
PSM ........................ 18
基本步驟 ................................................. 18
卸下控制面板 .............................. 19
保養 ........................................ 20
關於本接收機的附加信息 ................. 21
故障排除 ................................... 23
規格 ........................................ 25
*基於安全事項....
• 切勿將音量設定得太高,因為這會妨礙聽到外
界的聲音,給駕駛帶來危險。
•
在進行任何複雜的操作之前請先將車停下。
目錄
*關於車內溫度....
若長時間將車停在炎熱或寒冷的氣候裡,在操作
主機前請等待一段時間,直到車內的溫度恢復到
正常。
CT02-05KD-G416_415[U_UH]1.indd 3CT02-05KD-G416_415[U_UH]1.indd 3 2004.11.18 11:21:49 AM2004.11.18 11:21:49 AM
4
中
文
如何使用 MODE 鍵
若按 MODE 鍵,本機將進入功能模式,此時數
字鍵和 ¢/4 鍵將發揮不同功能鍵的
作用。
例: 當數字鍵 2 發揮 MO(單聲道)鍵的功能
時。
倒計時指示燈
按 MODE 鍵后想要再次使用這些鍵原來的功能
時,在 5 秒鐘內不要按這些鍵,直至功能模式被
清除。
• 再次按 MODE 鍵也可以清除功能模式。
如何閱讀本使用手冊
為了使解釋盡可能地簡潔和通俗易懂,我們採用
以下方法:
• 一些相關的條目和注意事項將在之後的“關於
本接收機的附加信息”中進行解釋(參閱第 21
和 22 頁)。
• 按鍵的操作主要用如下所示的圖表進行解釋:
短促地按。
反復地按。
按其中之一。
按住直到您所需的操作
開始進行。
同時按住兩個按鍵。
CT02-05KD-G416_415[U_UH]1.indd 4CT02-05KD-G416_415[U_UH]1.indd 4 2004.11.18 11:21:50 AM2004.11.18 11:21:50 AM
5
中
文
控制面板 — KD-G416/KD-G415
1 +/– 鍵
2 DISP(顯示)鍵
3 遙感器
•
切勿將遙感器暴露於強光照射處(直射的陽
光或人工光線)。
4 載槽
5 顯示窗
6 MODE(模式)鍵
7 0(彈出)鍵
8 ¢/4 鍵
9 (待機/開機/減音)鍵
p SEL(選擇)鍵
q MO(單聲道)鍵
w SSM(強信號電臺順次記憶)鍵
e CD 鍵
r FM/AM 鍵
t RPT(重複播放)鍵
y RND(隨機播放)鍵
u EQ(均衡器)鍵
i (鬆開控制面板)鍵
o 數字鍵
顯示窗
; 調諧器接收指示燈—
MO(單聲道),ST(立體聲)
a 碟片類型指示燈—WMA,MP3
s CD
指示燈
d 播放模式/項目指示燈—
RND(隨機播放), (碟片), (文
件夾),RPT(重複播放)
f LOUD(響亮度)指示燈
g EQ(均衡器)指示燈
h 聲音模式(C-EQ: 預製均衡器)指示燈—
ROCK, CLASSIC, POPS, HIP HOP, JAZZ,
USER
•
也可作為倒計時指示燈使用
j 碟片信息指示燈—TAG(ID3 標籤),
(文件夾), (曲目 / 文件)
k 主顯示屏
l 播放源顯示屏 / 音量水平指示燈
/ Tr(曲目)指示燈
部件識別
顯示窗
CT02-05KD-G416_415[U_UH]1.indd 5CT02-05KD-G416_415[U_UH]1.indd 5 2004.11.18 11:21:51 AM2004.11.18 11:21:51 AM
6
中
文
遙控器 — RM-RK50
主要組成部分及作用
1 (待機/開機/減音)鍵
• 打開,關閉電源及降低音量。
2 5 U(向上)/D(向下)∞ 鍵
• 5 U:切換 FM/AM 波段。
• D ∞:切換預設電臺。
• 切換 MP3/WMA 碟片上的文件夾。
3 VOL – / VOL + 鍵
• 調整音量水平。
4 SOUND 鍵
• 選擇聲音模式(C-EQ:預製均衡器)。
5 SOURCE
鍵
• 選擇播放源。
6 2 R(倒退)/F(前進)3 鍵
• 若短促地按則搜索電臺。
• 若按住則快進或倒退曲目。
• 切換碟片上的曲目。
安裝鈕扣型鋰電池(CR2025)
• 操作時,請將遙控器直接對準本機上的遙感
器。確保兩者之間沒有障礙物。
警告:
• 請將電池存放在孩童無法拿到的地方,以避
免事故發生的危險。
• 為防止電池過熱,炸裂或引起火災:
– 切勿為電池充電,使電池短路,分解電池
或加熱電池或將其扔置於火中。
– 切勿將電池與其它金屬物質放在一起。
– 切勿用鑷子或類似的工具穿刺電池。
– 要廢棄或保存電池時,請用膠帶纏繞並使
其處於絕緣狀態。
注意:
CT06-11KD-G416_415[UT]1.indd 6CT06-11KD-G416_415[UT]1.indd 6 2004.11.23 12:23:35 PM2004.11.23 12:23:35 PM
7
中
文
~
Ÿ
如果載槽內沒有碟片,您不能選擇
“CD”作為播放源。
!
音量水平出現。
音量水平指示燈
⁄ 根據需要調整音量。(參閱第 16 和
17 頁。)
著手準備
基本操作
如何暫時降低音量(ATT)
想要恢復到原來的音量時,
可再次按該鍵。
如何關閉電源
音量設定須知:
與其他播放源相比,碟片產生的噪音非常小。
為避免輸出音量水平突然增大而損壞揚聲器,
請在播放碟片之前將音量調低。
CT06-11KD-G416_415[U_UH]1.indd 7CT06-11KD-G416_415[U_UH]1.indd 7 2004.11.18 1:32:11 PM2004.11.18 1:32:11 PM
8
中
文
取消屏幕演示
如果在 20 秒左右沒有對本機進行任何操作,屏幕
演示將會自動開始播放。
[
初始設定:
DEMO ON]—
參閱第
18
頁。
1
2
3
4 完成設定。
如何啟動屏幕演示
在以上步驟 3 中...
設定時鐘
1
2 設定小時和分鐘。
1 選擇“CLOCK H”(小時),然後
調整小時。
2 選擇“CLOCK M”(分鐘),然後
調整分鐘。
3 完成設定。
如何在電源關閉時查看當前時間
CT06-11KD-G416_415[U_UH]1.indd 8CT06-11KD-G416_415[U_UH]1.indd 8 2004.11.18 1:32:11 PM2004.11.18 1:32:11 PM
9
中
文
收音機的操作
收聽廣播電臺
~
在接收具有足夠信號強度的 FM 立體聲廣播
時點亮。
所選波段出現。
Ÿ 開始搜索電臺。
接收到電臺後,搜索停止。
若要停止搜索時,再次按相同鍵。
如何手動調收電臺
在左欄步驟 Ÿ 中…
1
2 選擇所需的電臺頻率。
CT06-11KD-G416_415[U_UH]1.indd 9CT06-11KD-G416_415[U_UH]1.indd 9 2004.11.18 1:32:12 PM2004.11.18 1:32:12 PM
10
中
文
當 FM 立體聲廣播接收不良時
1
2
啟動單聲道模式時點亮。
接收效果得以改善,但是立體聲效果被取消。
若要恢復立體聲效果時,重複相同步驟,
“MONO OFF”字樣出現且 MO 指示燈熄滅。
將電臺儲存到記憶體中
您可在每個波段預設六個電臺。
自動預設 FM 電臺—SSM(強信號
電臺順次記憶)
1 選擇想要儲存電臺的 FM 波段
(FM1 – FM3)。
2
3
“
此項操作將搜索到當地信號最強的 FM 電臺,並
自動將其儲存至 FM 波段中。
CT06-11KD-G416_415[U_UH]1.indd 10CT06-11KD-G416_415[U_UH]1.indd 10 2004.11.18 1:32:12 PM2004.11.18 1:32:12 PM
11
中
文
手動預設電臺
例:將頻率為 92.5 MHz 的 FM 電臺儲存到 FM1
波段的預設號 4 中。
1
2
3
預設號碼會閃爍片刻。
收聽預設電臺
1
2 選擇所需的預設電臺(1 – 6)。
如何在收聽 FM 或 AM 電臺時查看當前
時間
CT06-11KD-G416_415[U_UH]1.indd 11CT06-11KD-G416_415[U_UH]1.indd 11 2004.11.18 1:32:13 PM2004.11.18 1:32:13 PM

12
中
文
關於 MP3 與 WMA 碟片
MP3 與 WMA(Windows Media® Audio)
“曲目”(單詞“文件”和“曲目”互換使
用)錄製在“文件夾”中。
• 當裝入 MP3 或 WMA 碟片時:
*1
MP3
指示燈點亮或者
WMA
指示燈點亮取決於
所檢測到的文件類型。
碟片的操作
播放碟片
• 當裝入音頻 CD 或文本 CD 碟片時:
*2
如果當前碟片是音頻
CD
,已過播放時間出現
片刻。
如何停止播放並彈出碟片
總文件夾數量 總曲目數量
所裝入碟片的
總播放時間
所裝入碟片的
總曲目數量
重複播放所有曲目直到您
切換播放源或彈出碟片。
碟片信息自動出現(參閱第
14 頁)。
選取的文件夾號碼
文本 CD:碟片標題/表演者 =
曲目標題自動出現(參閱第 14
頁)。
當前曲目號碼
時鐘
當前曲目號碼
時鐘*2
*1
CT12-17KD-G416_415[U_UH]1.indd 12CT12-17KD-G416_415[U_UH]1.indd 12 2004.11.18 11:46:18 AM2004.11.18 11:46:18 AM
13
中
文
如何直接播放某一指定曲目(對應 CD )
或文件夾(對應 MP3 或 WMA 碟片)
從 01 – 06 之間選擇曲目號碼:
從 07 – 12 之間選擇曲目號碼:
• 想要在 MP3/WMA 碟片上使用文件夾搜索
時,要求在文件夾名稱的開始處配備 2 位數
字— 01,02,03 等。
• 選擇文件夾後,想要選擇文件夾中的特定曲目
(對應 MP3 或 WMA 碟片)時:
禁止碟片彈出
您可以在載槽中將碟片鎖定。
若要取消碟片鎖定時,重複相同步驟即可。
如何快進或倒退曲目
快進。
倒退。
如何播放後面或前面的曲目
播放後面的曲目。
退回當前曲目的開始處,然後播放
前面的曲目。
如何播放後面或前面的文件夾(僅對應
MP3 或 WMA 碟片)
1
2
播放後面的文件夾。
播放前面的文件夾。
CT12-17KD-G416_415[U_UH]1.indd 13CT12-17KD-G416_415[U_UH]1.indd 13 2004.11.18 11:46:19 AM2004.11.18 11:46:19 AM
14
中
文
切換顯示信息
當播放音頻 CD 或文本 CD 時
*1
如果當前碟片是音頻
CD,
“
NO NAME
”
字樣出現。
當播放 MP3 或 WMA 碟片時
• 當“TAG DISP”設定為“TAG ON”時(參閱第 18 頁)
*2
如果
MP3/WMA
文件沒有
ID3
標籤,文件夾名稱及文件名稱出現。在此情況下,
TAG
指
示燈不會點亮。
• 當“TAG DISP”設定為“TAG OFF”時
CT12-17KD-G416_415[U_UH]1.indd 14CT12-17KD-G416_415[U_UH]1.indd 14 2004.11.19 4:23:32 PM2004.11.19 4:23:32 PM
15
中
文
選擇播放模式
您一次祇能使用以下一種播放模式。
1
2 選擇所需的播放模式。
重複播放
例:當播放 MP3 碟片的過程中,
選擇“TRK RPT”時
模式 重複播放
TRK RPT: 當前曲目。
• RPT 指示燈點亮。
FLDR RPT*: 當前文件夾中的所有曲目。
• 和 RPT 指示燈點亮。
RPT OFF: 取消。
隨機播放
例:當播放 MP3 碟片的過程中,
選擇“DISC RND”時
模式 隨機播放
FLDR RND*: 當前文件夾中的所有曲目,然後
是下一個文件夾中的所有曲目,
以此類推。
• RND 和 指示燈點亮。
DISC RND: 當前碟片中的所有曲目。
• RND 和 指示燈點亮。
RND OFF: 取消。
*
僅當播放
MP3
或
WMA
碟片時。
CT12-17KD-G416_415[U_UH]1.indd 15CT12-17KD-G416_415[U_UH]1.indd 15 2004.11.18 11:46:20 AM2004.11.18 11:46:20 AM
16
中
文
聲音調整
選擇預設聲音模式 (C-EQ: 預製均衡器)
您可以根據音樂流派選擇適當的預設聲音模式。
~
例:當選擇“ROCK”時
每種聲音模式的顯示式樣:
顯示 用於: 預設值
BAS*1TRE*2
LOUD
*3
USER (平音) 00 00 OFF
ROCK 搖滾或迪斯
科音樂
+03 +01 ON
CLASSIC 古典音樂 +01 –02 OFF
POPS 輕音樂 +04 +01 OFF
HIP HOP Funk 或
Rap 音樂
+02 00 ON
JAZZ 爵士樂 +02 +03 OFF
*1 BAS:
低音
*2 TRE:
高音
*3 LOUD:
響亮度
CT12-17KD-G416_415[U_UH]1.indd 16CT12-17KD-G416_415[U_UH]1.indd 16 2004.11.18 11:46:21 AM2004.11.18 11:46:21 AM
17
中
文
顯示 用於: 調整範圍
BAS*1
(
低音
)
調整低音。 –06
(最小)
至
+06
(最大)
TRE*1
(
高音
)
調整高音。 –06
(最小)
至
+06(最大)
FAD*2
(弱化)
調整前置和後置揚
聲器的音量平衡。
R06(僅後
置)
至
F06(僅前
置)
BAL
(平衡)
調整左置和右置揚
聲器的音量平衡。
L06(僅左
置)
至
R06(僅右
置)
LOUD*1
(響亮度)
在音量水平較低的
情況下,提高低頻
及高頻的音量以達
到更好的平衡效果。
LOUD ON
J
LOUD OFF
VOL*3
(音量)
調整音量。 00
(最小)
至
30 或 50
(最大)
*4
*1
在調整低音,高音或響亮度時,您所作的調整
將儲存至當前所選的聲音模式(
C-EQ
),包
括“
USER
”。
*2
如果您使用的是雙揚聲器系統,請把弱化設定
為“
00
”。
*3
通常情況下
+/–
鍵即可用于控制音量。因此您
無需選擇“
VOL
”來調整音量。
*4
取決于放大器增益控制的設定。(詳情請參閱
第
18
頁。)
調整聲音
您可以根據個人喜好調整聲音特性。
1
例:當選擇“TRE”時
2
顯示式樣隨所調的音量
水平而改變。
CT12-17KD-G416_415[U_UH]1.indd 17CT12-17KD-G416_415[U_UH]1.indd 17 2004.11.18 11:46:21 AM2004.11.18 11:46:21 AM
18
中
文
一般設定—PSM
基本步驟
您可以修改在以下表格中所列的 PSM(優先設置
模式)項目。
1
2 選擇一個 PSM 項目。
3 調整所選的 PSM 項目。
4 如需要,重複步驟 2 和步驟 3 調整其他
PSM 項目。
5 完成設定。
顯示 可選擇的設定,〔參考頁碼〕
DEMO
屏幕演示
DEMO ON: [
初始設定
]; 如果在 20 秒左右沒有對本機進行任何
操作,屏幕演示將自動開始播放, [8]。
DEMO OFF: 取消。
CLOCK H
小時調整
1 – 12, [8]
[
初始設定
: 1 (1:00)]
CLOCK M
分鐘調整
00 – 59, [8]
[
初始設定
: 00 (1:00)]
DIMMER
減光器
ON: 啟動減光器。
OFF: [
初始設定
]; 取消。
SCROLL*
捲動
ONCE: [
初始設定
]; 捲動碟片信息一次。
AUTO: 重複捲動(間隔 5 秒)。
OFF: 取消。
• 按 DISP 鍵 1 秒以上可以不考慮設定捲動播放顯示。
TAG DISP
標籤顯示
TAG ON: [
初始設定
]; 當播放 MP3/WMA 曲目時顯示 ID3 標
籤, [14]。
TAG OFF: 取消。
AMP GAIN
放大器增益控制
您可以切換本接收機的最大音量水平。
LOW PWR: VOL 00 – VOL 30 (如果揚聲器的最大功率小於
50 W 時,為避免損壞揚聲器,請選擇此項。)
HIGH PWR: [
初始設定
]; VOL 00 – VOL 50
*
某些字符或符號不會在顯示屏上顯示(將會被留白)。(例:“
ABCå!d#
”
]“ABCA D
”)。
CT18-21KD-G416_415[U_UH]1.indd 18CT18-21KD-G416_415[U_UH]1.indd 18 2004.11.18 11:24:20 AM2004.11.18 11:24:20 AM
19
中
文
在卸下或安裝上控制面板時,小心不要損壞控制
面板後面及面板托座上的連接器。
卸下控制面板
卸下控制面板之前,請確認電源已關閉。
裝上控制面板
卸下控制面板
CT18-21KD-G416_415[U_UH]1.indd 19CT18-21KD-G416_415[U_UH]1.indd 19 2004.11.18 11:24:22 AM2004.11.18 11:24:22 AM
20
中
文
如何清潔連接器
經常性的拆卸會損壞連接器。
為了降低這種可能性,定期用棉條或布沾酒精擦
拭,要小心避免損壞連接器。
連接器
水蒸氣結露
在下列情況下,CD 播放機內部的鏡頭可能發生
水蒸氣結露:
• 打開車內取暖氣後。
• 若車內異常潮濕。
發生此種情況時,CD 播放機可能發生故障。此
時可彈出碟片,將主機啟動幾個小時,直到結露
蒸發掉。
如何保養碟片
當將碟片從盒中取出時,請握持
碟片的邊緣,同時按下盒內的中
央鈕將其取出。
• 請一定握持碟片的邊緣。切勿
觸摸其錄音面。
欲將碟片放回盒中時,請將碟片輕輕套在中央鈕
上(使印刷面朝上)。
• 使用後務必將碟片放入盒中保存。
保養
如何保持碟片的清潔
髒污的碟片無法正確播放。
如果碟片確實髒污,請用軟布從中
心到邊緣直線擦拭。
• 切勿使用任何溶劑(例如:傳統
的錄音清潔劑,噴霧劑,稀釋
劑,輕油精等)來清潔碟片。
如何播放新碟片
新碟片的裡面邊緣和外邊緣上可能
有一些粗糙的污點。使用這樣的碟
片時,本機可能將其退出。
若要去除這些粗糙的污點時,請用
鉛筆或圓珠筆等擦拭碟片的邊緣。
中央鈕
彎曲的
碟片
黏貼紙 黏貼紙
標籤 碟片
上面貼的
標籤
切勿使用下列碟片:
CT18-21KD-G416_415[U_UH]1.indd 20CT18-21KD-G416_415[U_UH]1.indd 20 2004.11.18 11:24:22 AM2004.11.18 11:24:22 AM

21
中
文
關於本接收機的附加信息
基本操作
啟動電源
• 按下本機上的 CD 鍵或 FM/AM 鍵,您也可以
啟動電源。
關閉電源
• 如果您在聽碟片時關閉電源,下次啟動電源
時,碟片會從上次停止的地方開始播放。
調諧器的操作
將電臺儲存到記憶體中
• 在 SSM 搜索過程中...
– 該波段原本儲存的所有電臺被刪除,電臺被
重新儲存。
– 接收到的電臺被預設到號碼 1(頻率最低的電
臺)至號碼 6(頻率最高的電臺)。
– SSM 結束後,自動調收儲存在號碼 1 裡的電
臺。
• 手動儲存電臺時,當一個新的電臺被存到同一
個預設號碼上時,原來的預設電臺被抹除。
碟片的操作
一般操作
• 本機允許以音頻 CD(CD-DA),MP3 及
WMA 格式錄製 CD/文本 CD,CD-R(可錄
音)/CD-RW(可反復錄音)。
• 當碟片已經裝入載槽時,選擇“CD”作為播放
源開始播放碟片。
裝入碟片
• 如果碟片正面朝下顛倒裝入時,碟片會自動彈
出。
• 切勿將 8 公分的碟片(單面 CD)及任何形狀异
常的碟片(心形,花形等)裝入載槽。
播放碟片
• 當快進或倒退 MP3 或 WMA 碟片時,您祇能
聽到間斷的聲音。
播放 CD-R 或 CD-RW
• 僅可使用“格式化”之後的 CD-R 或 CD-RW。
• 如果碟片同時包含音頻 CD(CD-DA)文件和
MP3/WMA 文件,本機祇能播放最先檢測到的
相同類型的文件。
• 本機可播放多區段數據碟片,但在播放時將跳
過未關閉的區段。.
• 基於碟片本身的特性和下述原因,某些 CD-R
或 CD-RW 可能無法在本機上播放:
– 碟片髒污或被刮傷。
– 本機內部的鏡頭發生水蒸氣結露。
– 本機內部的讀取頭髒污。
– CD-R 或 CD-RW 內的文件是以“數據
包”格式寫入的。
– 錄製錯誤(丟失數據等)或媒介出現問題
(污塊,刮痕或彎曲等)。
• 由於 CD-RW 的反射比普通的 CD 低,因此
CD-RW 可能需要較長的讀取時間。
• 切勿使用以下的 CD-R 或 CD-RW:
– 表面貼有貼紙,標籤或起防護作用的標誌的
碟片。
– 標籤可直接用噴墨打印機打印的碟片。
在高溫或極度潮濕的情況下使用這些碟片可能
會導致故障或損壞碟片。
CT18-21KD-G416_415[U_UH]1.indd 21CT18-21KD-G416_415[U_UH]1.indd 21 2004.11.18 11:24:23 AM2004.11.18 11:24:23 AM

22
中
文
播放 MP3/WMA 碟片
• 本機可以播放帶有增設碼 <.mp3> 或 <.wma>
的 MP3/WMA 文件(不論字母大小寫—大
寫/小寫)。
• 本機可以顯示 MP3 文件及 WMA 文件的專輯
名稱,演唱者(表演者)及 ID3 標籤(1.0,
1.1,2.2,2.3 或 2.4 版本)。
• 本機僅能處理單字節字符。其他字符無法正確
顯示。
• 本機可以在下述條件下播放 MP3/WMA 文
件:
– 比特率:8 kbps — 320 kbps
– 抽樣頻率:
48 kHz,44.1 kHz,32 kHz(對應 MPEG-1)
24 kHz,22.05 kHz,16 kHz(對應 MPEG-2)
– 碟片格式:ISO 9660 Level 1/Level 2,
Romeo,Joliet,Windows 長文件名
• 文件/文件夾名最多允許的字符數因採用的碟
片格式而異(包括 4 位增設字符—<.mp3> 或
<.wma>)。
– ISO 9660 Level 1:最多 12 個字符
– ISO 9660 Level 2:最多 31 個字符
– Romeo*:最多 128(72)個字符
– Joliet*:最多 64(36)個字符
– Windows 長文件名*:最多 128(72)個字
符
*
括號內插入說明的數字是文件/文件夾名稱的
最多字符數,假如文件和文件夾總數不少于
313
。
• 本機總共可以識別 512 個文件,200 個文件
夾,及 8 個層級。
• 本機可以播放以 VBR(可變比特率)錄製的文
件。
以 VBR 錄製的文件在顯示已過播放時間上會有
差異,並不顯示實際已過播放時間。特別是在
操作搜索功能之後,這種差異更為明顯。
• 本機不能播放下列文件:
– 以 MP3i 和 MP3 PRO 格式編碼的 MP3 文
件。
– 以不適當格式編碼的 MP3 文件。
– 以 1/2 層編碼的 MP3 文件。
– 以無損的,專業的聲音格式編碼的 WMA 文
件。
– 非基于 Windows Media® Audio的 WMA 文
件。
– 以 DRM 拷貝保護的 WMA 格式文件。
– 包含如 WAVE,ATRAC3 等數據的文件。
• 可操作搜索功能,但搜索速度不恆定。
切換播放源
• 如果您切換播放源,播放也會停止(碟片不會
彈出)。
下次您選擇“CD”為播放源時,碟片會從上次
停止的地方開始播放。
彈出碟片
• 如果 15 秒以內彈出的碟片沒有被拿出,碟片會
自動再次插入載槽以免被弄髒。(此次碟片不
會播放。)
一般設定—PSM
• 如果您在音量設定高於“VOL 30”時將
“AMP GAIN”設定從“HIGH PWR”切換
為“LOW PWR”,本機會自動將音量水平切
換為“VOL 30”。
CT22-25KD-G416_415[U_UH]1.indd 22CT22-25KD-G416_415[U_UH]1.indd 22 2004.11.18 11:24:46 AM2004.11.18 11:24:46 AM
23
中
文
症狀 原因 措施
一般
• 揚聲器不發出聲音。 音量水平設定為最小。 將音量設定在合適的水平。
線路連接不正確。 檢查導線和線路連接。
• 本機完全不工作。 可能由於噪音等原因導致內置
微處理器功能失常。
重設本機(參閱第 2 頁)。
FM/AM
• SSM 自動預設功能失效。 信號太弱。 手動儲存電臺。
• 收聽廣播時有靜電干擾。 天線連接鬆動。 將天線連接牢固。
碟片播放
• 碟片自動彈出。 碟片被正面朝下顛倒裝入。 正確裝入碟片。
•
不能播放 CD-R/CD-RW。
• 不能跳播 CD-R/CD-RW
上的曲目。
CD-R/CD-RW 沒有被格式
化。
• 裝入已格式化的 CD-R/
CD-RW。
• 使用您用來錄音的組件將
CD-R/CD-RW 格式化。
• 碟片既不能播放也不能被彈
出。
碟片被鎖住。 為碟片解鎖(參閱第 13
頁)。
CD 播放機功能失常。 強制彈出碟片(參閱第 2
頁)。
• 碟片有時聲音中斷。 行駛在崎嶇顛簸的道路上。 行駛在崎嶇顛簸的道路上時,
停止播放碟片。
碟片被刮傷。 更換碟片。
線路連接不正確。 檢查導線和線路連接。
• “NO DISC”字樣在顯示
屏上出現。
載槽內無碟片。 將碟片裝入載槽。
碟片裝入不正確。 正確裝入碟片。
故障排除
所出現的問題並不總是嚴重的故障。在洽詢維修服務中心之前,請首先檢查下述要點。
CT22-25KD-G416_415[U_UH]1.indd 23CT22-25KD-G416_415[U_UH]1.indd 23 2004.11.18 11:24:47 AM2004.11.18 11:24:47 AM
24
中
文
症狀 原因 措施
播放 MP3/WMA
• 碟片無法播放。 碟片中沒有錄製 MP3/WMA
曲目。
更換碟片。
MP3/WMA 曲目在其文件名
稱中沒有增設碼 <.mp3> 或
<.wma>。
在文件名中加入增設碼
<.mp3> 或 <.wma>。
MP3/WMA 曲目並非以 ISO
9660 Level 1,Level 2,
Romeo 或 Joliet 兼容格式
灌錄。
更換碟片。
(用相應的應用程序錄製
MP3/WMA 曲目。)
• 產生噪音。 當前播放曲目不是 MP3/
WMA 曲目(即使含有增設
碼 <.mp3> 或 <.wma>)。
跳至另一首曲目或更換碟片
(切勿在非 MP3 或 WMA 曲
目上加入增設碼 <.mp3> 或
<.wma>。)
• 需要很長的讀取時間
(“CHECK”字樣在顯示
屏上持續閃爍)。
讀取時間因文件夾/文件設置
的複雜程度而異。
切勿使用太多層級和文件夾。
• 您想播放的曲目無法播放。 播放順序在文件錄製時已決
定。
• 已播放時間不正確。 在播放過程中有時會發生此種
情況。原因出自曲目如何錄製
在碟片上。
• “NO FILES”字樣在顯示
屏上出現。
當前的碟片中不含有 MP3/
WMA 曲目。
裝入含有 MP3/WMA 的碟
片。
• 不能正確顯示字符(例如專
輯名稱)。
本機僅能顯示字母(大寫:A
– Z),數字和有限的符號。
CT22-25KD-G416_415[U_UH]1.indd 24CT22-25KD-G416_415[U_UH]1.indd 24 2004.11.18 11:24:48 AM2004.11.18 11:24:48 AM

25
中
文
規格
音頻放大器部分
最大輸出功率:
前聲道:每聲道 50 W
後聲道:每聲道 50 W
連續輸出功率(RMS):
前聲道:
每聲道 19 W ,在 40 Hz 至 20 000 Hz 時
驅動於 4 Ω,總諧波失真不超過 0.8%。
後聲道:
每聲道 19 W ,在 40 Hz 至 20 000 Hz 時
驅動於 4 Ω,總諧波失真不超過 0.8%。
負載阻抗: 4 Ω(4 Ω 至 8 Ω 容限)
音調控制範圍:
低音: 100 Hz 處 ±10 dB
高音: 10 kHz 處 ±10 dB
頻率響應: 40 Hz 至 20 000 Hz
信噪比: 70 dB
線路輸出水平/阻抗:
2.0 V/20 kΩ 負載(滿刻度)
輸出阻抗: 1 kΩ
調諧器部分
頻率範圍:
FM: 87.5 MHz 至 108.0 MHz
AM: 531 kHz
至 1 602 kHz
[FM 調諧器]
有效靈敏度: 11.3 dBf (1.0 µV/75 Ω)
50 dB 靜噪靈敏度:
16.3 dBf (1.8 µV/75 Ω)
交流聲道選擇性 (400 kHz): 65 dB
頻率響應: 40 Hz 至 15 000 Hz
立體聲分隔頻率: 35 dB
接收比: 1.5 dB
[AM 調諧器]
靈敏度: 20 µV
選擇性: 35 dB
CD 播放機部分
類型: 碟片播放機
信號檢測系統: 無接合光學拾波(半導體鐳射)
聲道數: 2 聲道(立體聲)
頻率響應:5 Hz 至 20 000 Hz
動態範圍:96 dB
信噪比: 98 dB
抖晃率: 小到不可測量
MP3 解碼格式:
MPEG1/2 Audio Layer 3
最大比特率:320 kbps
WMA (Windows Media® Audio) 解碼格式:
最大比特率:192 kbps
一般資訊
電源要求:
操作電壓:
直流 14.4 V(11 V 至 16 V 容限)
接地系統: 負極接地
允許操作溫度:
0°C 至 +40°C
體積(寬 × 高 × 深):
安裝尺寸(大約):
182 mm × 52 mm × 150 mm
面板尺寸(大約):
188 mm × 58 mm × 11 mm
重量(大約):
1.3 kg(不包括附件)
設計和規格若有變更恕不另行通知。
• Microsoft 和 Windows Media 是美國和/或其
他國家微軟公司的注冊商標或商標。
CT22-25KD-G416_415[UT]1.indd 25CT22-25KD-G416_415[UT]1.indd 25 2004.11.23 12:04:51 PM2004.11.23 12:04:51 PM
© 2004 Victor Company of Japan, Limited
EN, CT
1104DTSMDTJEIN
Having TROUBLE with operation?
Please reset your unit
Refer to page of How to reset your unit
Rear_KD-G416_G415_007A_f.indd 2Rear_KD-G416_G415_007A_f.indd 2 11/11/04 6:50:16 PM11/11/04 6:50:16 PM
