JVC KW AV70BTU AV70BT/KW AV70[U] User Manual AV70BTU, AV70U LVT2304 001A
KW-AV70BTU, KW-AV70U KW-AV70BTU, KW-AV70U LVT2304-001A
User Manual: JVC KW-AV70BTU KW-AV70BTU, KW-AV70U English, Simplified Chinese, Thai,
Open the PDF directly: View PDF ![]() .
.
Page Count: 221 [warning: Documents this large are best viewed by clicking the View PDF Link!]
- Contents
- How to reset your unit
- How to forcibly eject a disc
- INTRODUCTIONS
- AV SOURCE OPERATIONS
- Selecting the playback source
- Listening to the radio
- Disc operations
- SD operations (only for KW-AV70BT)
- USB operations
- Listening to the iPod/iPhone device
- Using other external components
- Rear source operations
- Sound adjustment
- Changing display design
- Setting for video playback
- Using a rear view camera
- Setting menu items
- BLUETOOTH OPERATIONS
- REFERENCE
- The countries where you may use the Bluetooth® function (For KS-UBT1)
ENGLISH
LVT2304-001A
[U]
KW-AV70BT/KW-AV70
INSTRUCTIONS
MONITOR WITH DVD RECEIVER
For installation and connections, refer to the separate manual.
For canceling the display demonstration, see page 6.
/
Covers_AV70[U].indb 2 11/12/03 14:27
EN, CT, TH
1211EHHMDWJEIN
© 2011 JVC KENWOOD Corporation
Having TROUBLE with operation?
Please reset your unit
Refer to page of How to reset your unit
Covers_AV70[U].indb 2 11/12/03 14:27
Instructions MONITOR WITH DVD RECEIVER KW-AV70BT/KW-AV70
2
ENGLISH
Thank you for purchasing a JVC product.
Please read all instructions carefully before operation, to ensure your complete understanding and to obtain the best
possible performance from the unit.
IMPORTANT FOR LASER PRODUCTS
1. CLASS 1 LASER PRODUCT
2. CAUTION: Do not open the
top cover. There are no user
serviceable parts inside the
unit; leave all servicing to
qualified service personnel.
3. CAUTION: Visible and/or invisible class 1M laser radiation when open. Do not view directly with optical
instruments.
4. REPRODUCTION OF LABEL: CAUTION LABEL, PLACED OUTSIDE THE UNIT.
WARNINGS: (To prevent accidents and damage)
• DO NOT install any unit or wire any cable in a location
where;
– it may obstruct the steering wheel and gearshift
lever operations.
– it may obstruct the operation of safety devices
such as air bags.
– it may obstruct visibility.
• DO NOT operate the unit while driving.
If you need to operate the unit while driving, be sure
to look around carefully.
• The driver must not watch the monitor while driving.
• The driver must not put on the headphones while
driving.
• Excessive sound pressure from earphones or
headphones can cause hearing loss when you listen
through earphones or headphones playing the rear
source.
[European Union only]
EN_KW-AV70U.indb 2EN_KW-AV70U.indb 2 11/12/15 16:4111/12/15 16:41
3
ENGLISH
Cautions on the monitor:
• The monitor built in this unit has been produced with
high precision, but it may have some ineffective dots.
This is inevitable and is not considered defective.
• Do not expose the monitor to direct sunlight.
• Do not operate the touch panel using a ball-point
pen or similar tool with the sharp tip.
Touch the buttons on the touch panel with your
finger directly (if you are wearing a glove, take it off).
• When the temperature is very cold or very hot...
–
Chemical changes occur inside, causing malfunction.
– Pictures may not appear clearly or may move
slowly. Pictures may not be synchronized with
the sound or picture quality may decline in such
environments.
For safety...
• Do not raise the volume level too much, as this will
make driving dangerous by blocking outside sounds,
and may cause hearing loss.
• Stop the car before performing any complicated
operations.
Temperature inside the car...
If you have parked the car for a long time in hot or cold
weather, wait until the temperature in the car becomes
normal before operating the unit.
How to read this manual:
• Illustrations of KW-AV70BT are mainly used for explanation.
• This manual mainly explains operations using the buttons on the monitor panel and touch panel. For
operations using the remote controller (RM-RK252 ) , ☞ page 60.
• < > indicates the variable screens/menus/operations/settings that appear on the touch panel.
• [ ] indicates the buttons on the touch panel.
• Indication language: English indications are used for the purpose of explanation. You can select the
indication language from the <Settings> menu. (☞ page 46)
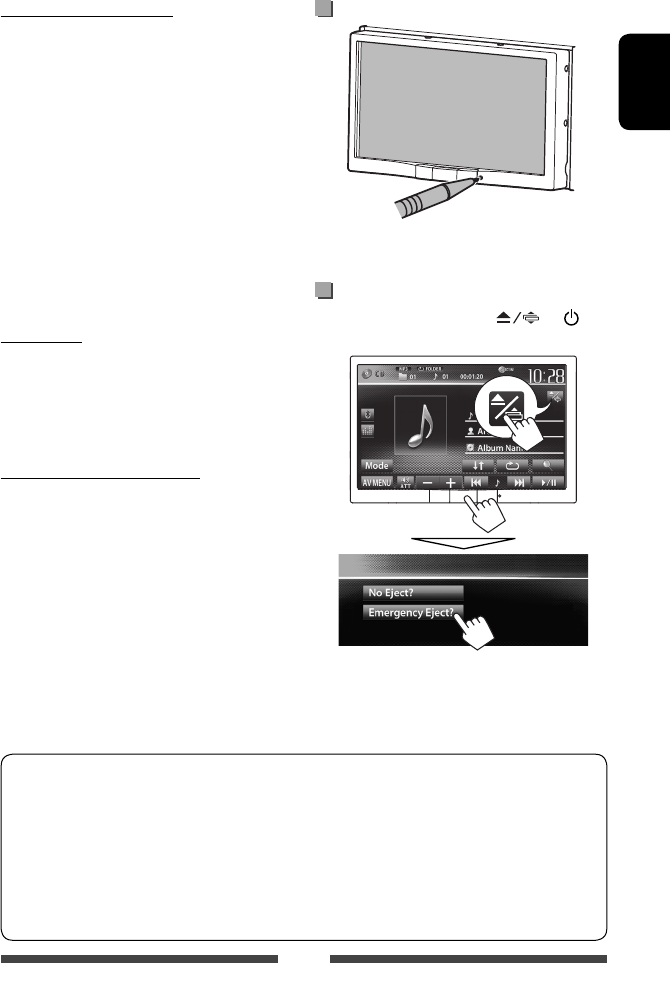
How to reset your unit
• Your preset adjustments will also be erased (except
the registered Bluetooth devices).
How to forcibly eject a disc
On the source control screen, press and /
MENU at the same time.
• Be careful not to drop the disc when it ejects.
• If this does not work, reset your unit. (☞ above)
EN_KW-AV70U.indb 3EN_KW-AV70U.indb 3 11/12/15 16:4111/12/15 16:41

4
ENGLISH
Contents
How to reset your unit ...........................................3
How to forcibly eject a disc ....................................3
INTRODUCTIONS
Detaching/attaching the monitor panel ...5
Initial settings .......................................6
Setting the clock ....................................7
Common operations ...............................8
Turning on the power ............................................8
Turning off the power ............................................8
Turning on/off the AV source ................................. 8
Turning off the screen ............................................ 8
Adjusting the volume ............................................ 9
Monitor panel operations — Open/Tilt ................9
Switching screens ................................10
Operations on the screen ......................11
AV SOURCE OPERATIONS
Selecting the playback source ...............12
Listening to the radio ...........................13
Disc operations.....................................16
Playing a disc.......................................................16
Playable disc types ..............................................17
Playback operations ............................................ 18
Settings for disc playback ....................................22
SD operations (only for KW-AV70BT) ......23
Playing files in an SD card ...................................23
USB operations.....................................25
Playing a USB device ...........................................25
Listening to the iPod/iPhone device ......27
Preparation .........................................................27
Setting iPod control mode ................................... 28
Selecting preference settings for iPod/iPhone
playback ..............................................................28
iPod/iPhone playback operations for
<Head> mode .................................................... 29
iPod/iPhone playback operations for
<iPod Out> mode ..............................................30
Using an App of iPod touch/iPhone ..................... 31
Using other external components ..........33
AV-IN ...................................................................33
Using the external navigation unit .....................34
Rear source operations .........................36
Sound adjustment ................................37
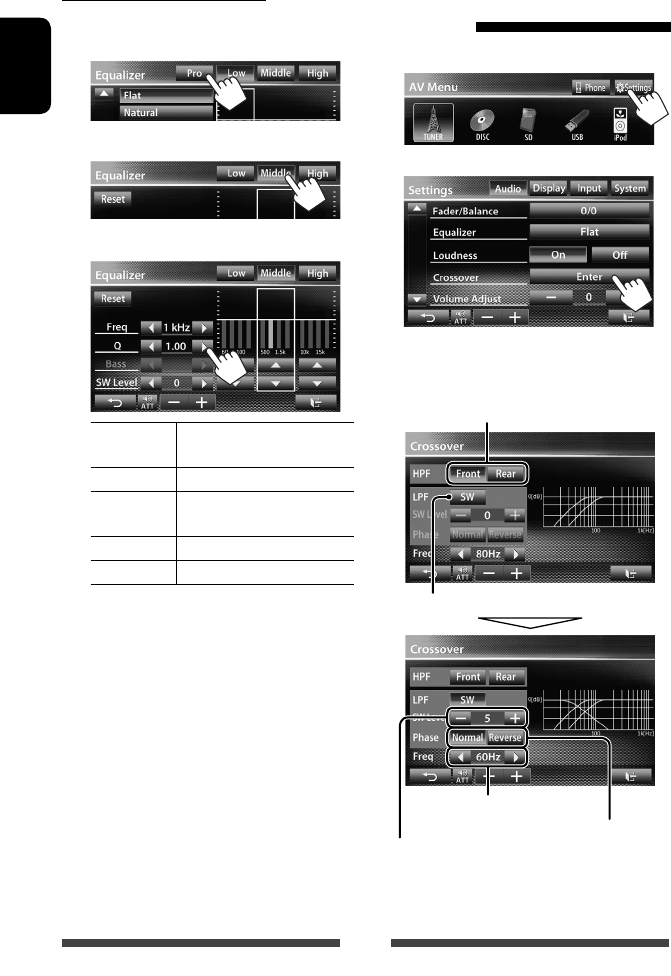
Using the sound equalization ..............................37
Adjusting the crossover frequency ....................... 38
Changing display design .......................39
Setting for video playback ....................41
Adjusting the picture ........................................... 41
Changing the aspect ratio ................................... 42
Zooming the picture ............................................ 42
Using a rear view camera ......................43
Setting menu items ..............................44
Memorizing/recalling the settings .....................47
Updating the system ........................................... 48
Adjusting the touch position ..............................48
BLUETOOTH OPERATIONS
Information for using Bluetooth®
devices..........................................49
Bluetooth operations for KW-AV70BT ....49
Connecting Bluetooth devices .............................50
Using the Bluetooth mobile phone ...................... 52
Using the Bluetooth audio player ........................ 57
Bluetooth device settings .................................... 58
Bluetooth operations for KW-AV70 ........59
Using the Bluetooth mobile phone .....................59
Using the Bluetooth audio player .......................59
REFERENCE
Using the remote controller ..................60
Operations using the remote controller
(RM-RK252) ........................................................ 60
Maintenance .......................................63
More about this unit .............................64
Troubleshooting ................................... 67
Specifications.......................................71
EN_KW-AV70U.indb 4EN_KW-AV70U.indb 4 11/12/15 16:4111/12/15 16:41
5
ENGLISH
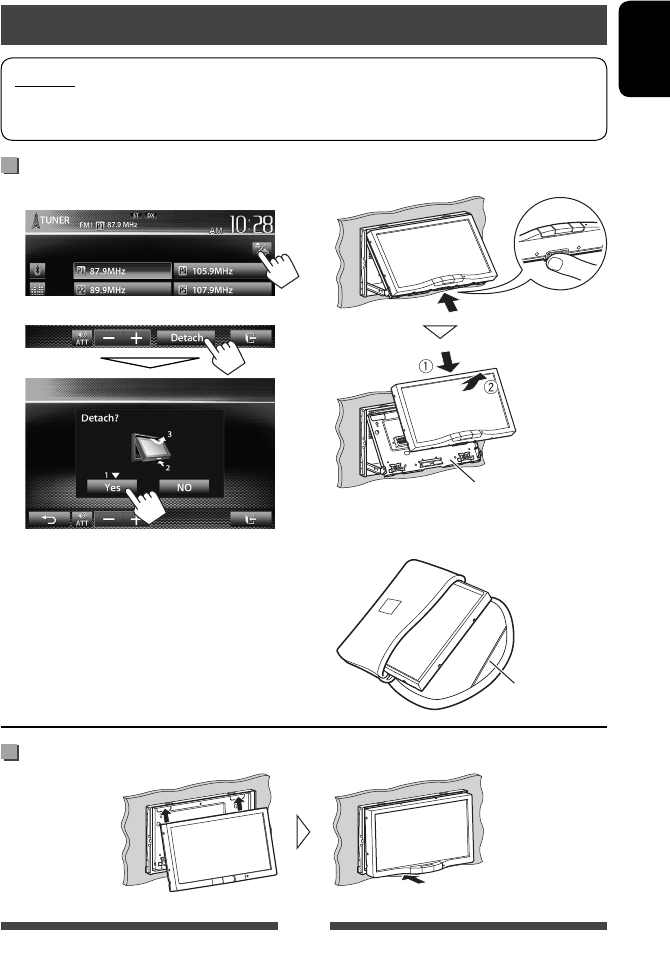
Attaching
Detaching
1 On the source control screen:
2
The monitor panel opens by about 50°.
• It closes automatically when no operation is
done for about 60 seconds.
Remove the monitor panel before this happens.
Cautions
• Hold the monitor panel securely so as not to drop it accidentally.
• Fit the monitor panel onto the attaching plate until it is firmly locked.
Detaching/attaching the monitor panel
3
Attaching plate
The monitor panel is
unlocked.
• The attaching plate closes automatically about
10 seconds after the monitor panel is unlocked.
4
Soft case (supplied)
INTRODUCTIONS
EN_KW-AV70U.indb 5EN_KW-AV70U.indb 5 11/12/15 16:4111/12/15 16:41
6
ENGLISH
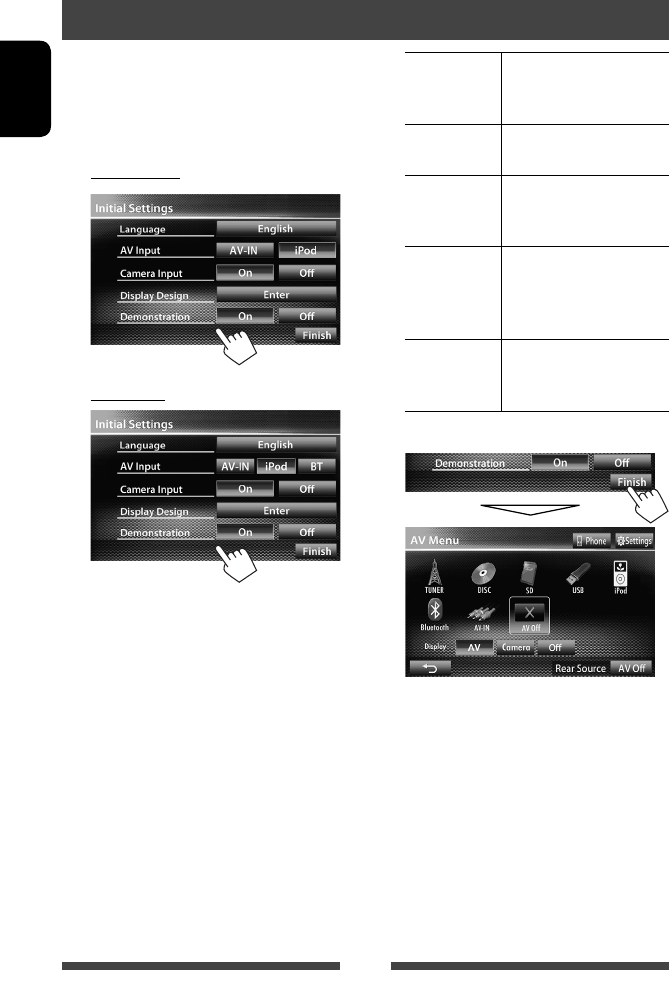
Initial settings
When you power on the unit for the first time or reset
the unit, the initial setting screen appears.
• You can also change the settings on the <Settings>
screen. (☞ page 44)
1 For KW-AV70BT
For KW-AV70
Language Select the text language used
for on-screen information.
(☞page 46)
AV Input Select an external component
to play. (☞page 45)
Camera Input Select <On> when
connecting the rear view
camera. (☞page 46)
Display
Design
Select the background and
the colors of the text and
the touch panel buttons.
(☞page 39)
Demonstration
Activate or deactivate the
display demonstration.
(☞page 45)
2 Finish the procedure.
<AV Menu> screen is displayed.
• <AV Off> is selected initially. Select the
playback source. (☞page 12)
EN_KW-AV70U.indb 6EN_KW-AV70U.indb 6 11/12/15 16:4111/12/15 16:41
7
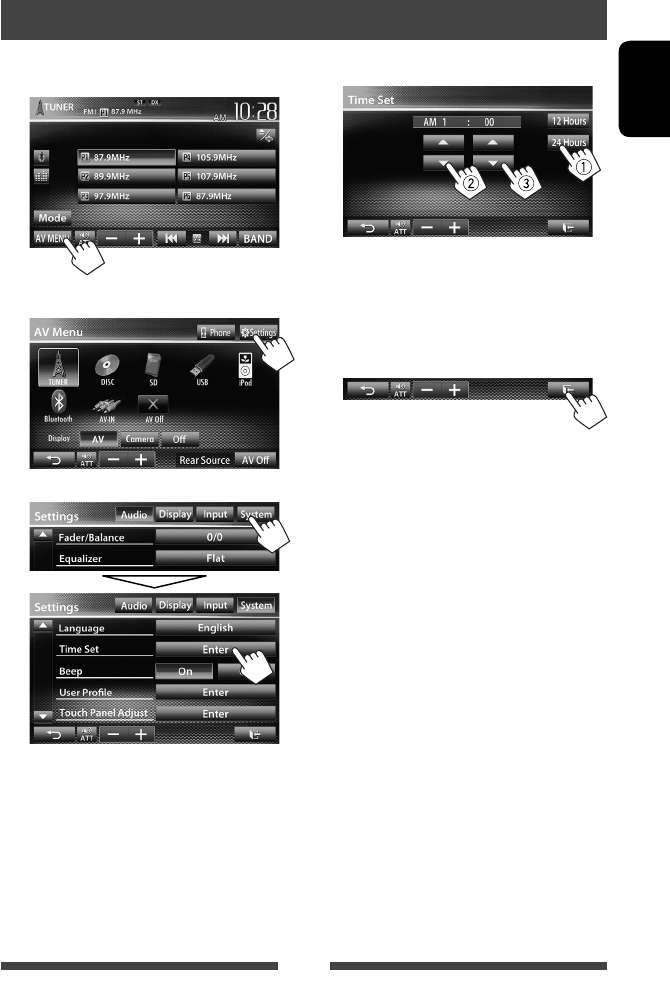
ENGLISH
Setting the clock
1 Display <AV Menu> screen.
On the source control screen:
2 Display <Settings> screen.
3
4 Set the clock time.
1Select the time display format
2Adjust the hour
3Adjust the minute
5 Finish the procedure.
EN_KW-AV70U.indb 7EN_KW-AV70U.indb 7 11/12/15 16:4111/12/15 16:41
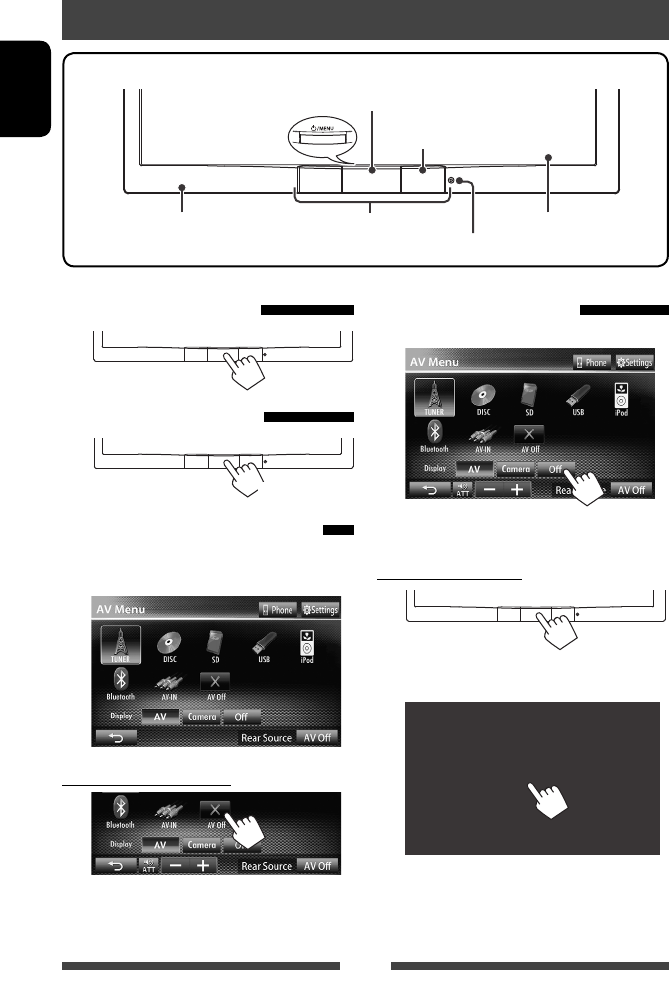
8
ENGLISH
Screen (touch panel)Monitor panel
Remote sensor
Reset button (☞ page 3)
Motion sensor (☞ page 11)
• Turns on/off the power. (☞ below)
• Displays <AV Menu> screen. (Press) (☞ page 10)
Turning on the power
Turning off the power
(Hold)
Turning on/off the AV source
You can activate the AV function by selecting source on
<AV Menu> screen.
To turn off the AV source
AV source is turned off.
Turning off the screen
On <AV Menu> screen:
The screen is turned off.
To turn on the screen
or
Touch the screen to display <AV Menu> screen.
Common operations
EN_KW-AV70U.indb 8EN_KW-AV70U.indb 8 11/12/15 16:4111/12/15 16:41
9
ENGLISH
Adjusting the volume
To adjust the volume (00 to 50)
• On the source control screen, you can also adjust the
volume by moving your finger on the touch panel as
illustrated.
IncreaseDecrease
To attenuate the sound
The ATT indicator lights up.
To cancel the attenuation, press [ ] again.
Caution on volume setting:
Digital devices (CD/SD*/USB/iPod) produce very
little noise compared with other sources. Lower
the volume before playing these digital sources to
avoid damaging the speakers by sudden increase
of the output level.
* “
SD
” is available only for KW-AV70BT.
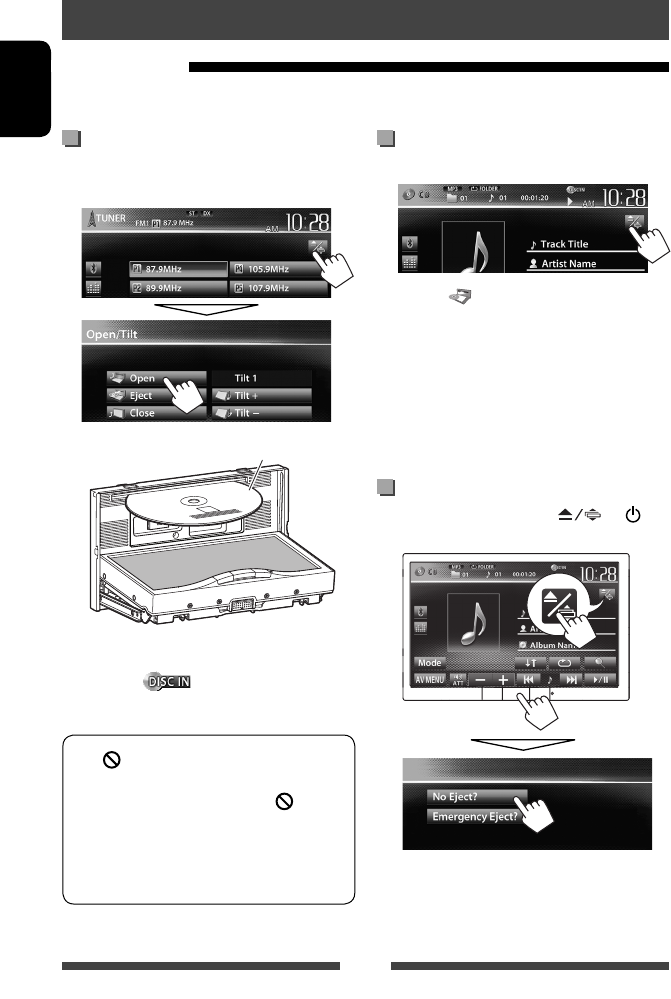
Monitor panel operations —
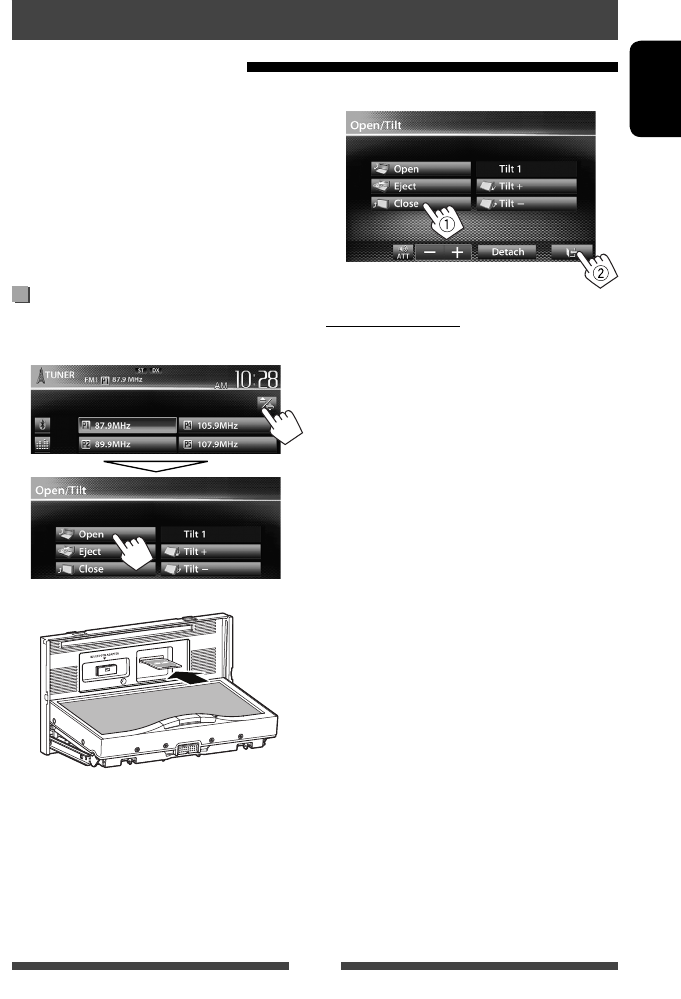
Open/Tilt
1 On the source control screen:
2
[ Open]Opens the monitor panel.
[ Eject] Ejects the disc.
[ Close]
Closes the monitor panel.
• Do not place your finger
behind the monitor panel.
[ Tilt +]
[ Tilt –]
Tilts the monitor panel.
[Detach] To detach the monitor panel.
(☞ page 5)
[ ] Goes back to the current source
screen.
• When the ACC is off, you can also eject the disc. Hold
/MENU to display the <Open/Tilt> screen.
(Hold)
EN_KW-AV70U.indb 9EN_KW-AV70U.indb 9 11/12/15 16:4111/12/15 16:41
10
ENGLISH
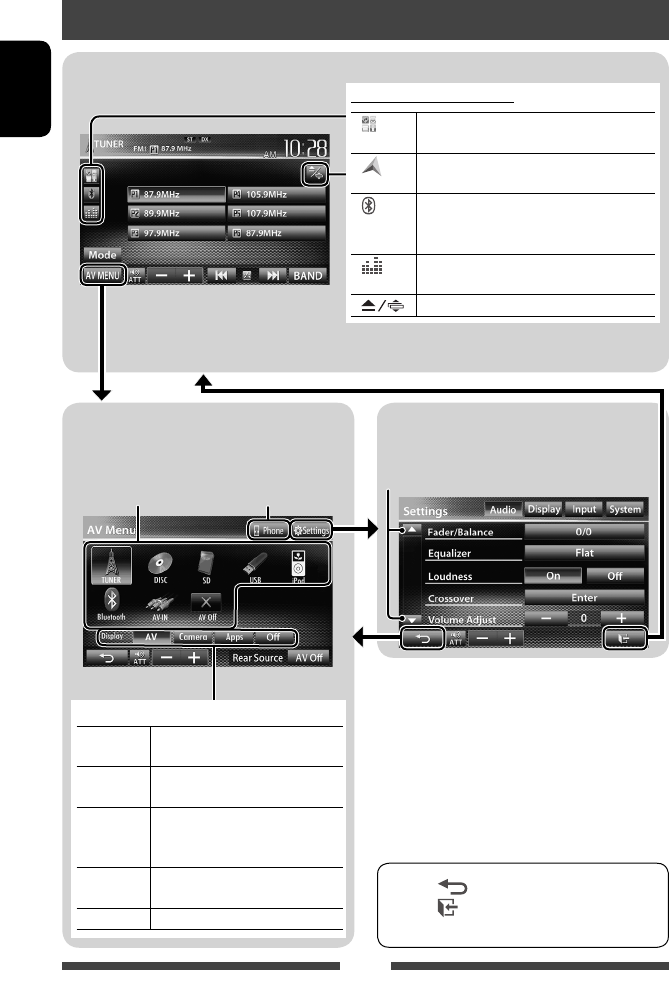
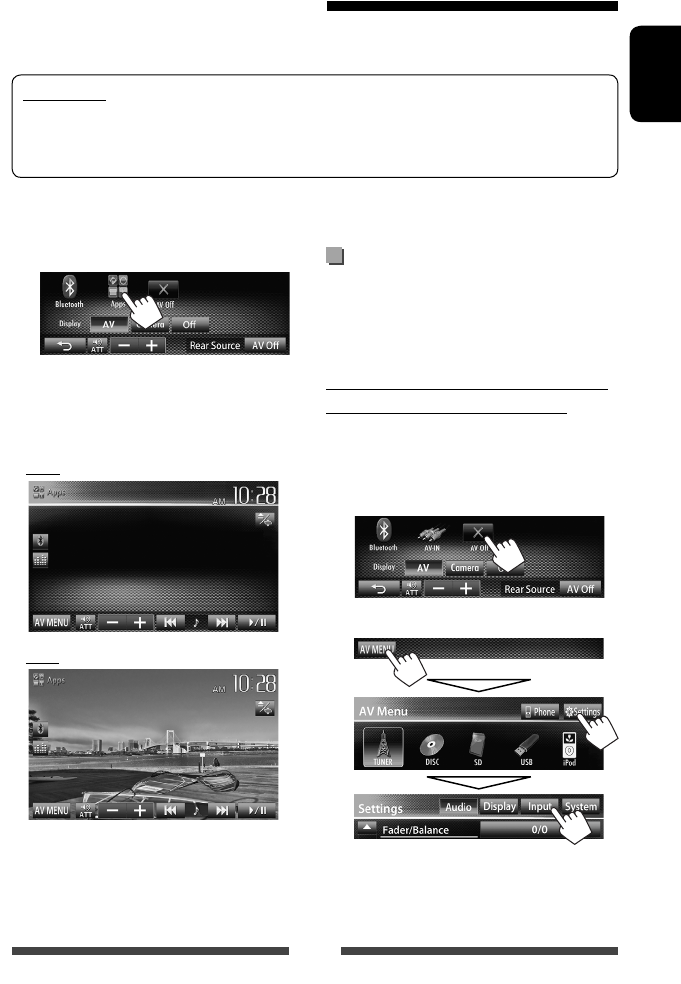
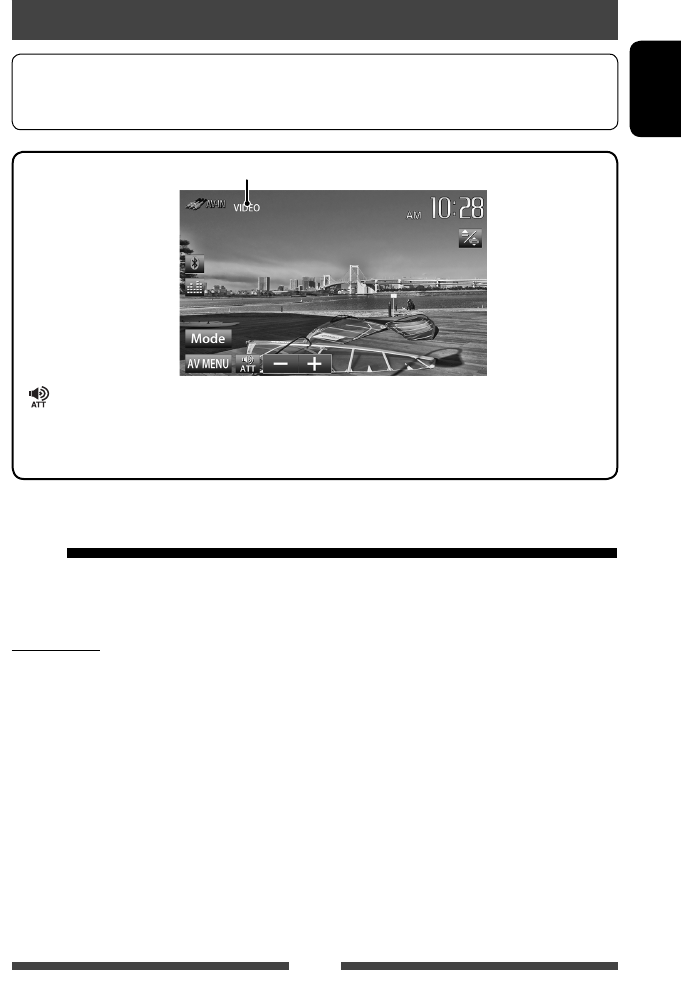
<AV Menu> screen
Displays source control screen/settings screen and
changes picture source.
Source control screen
• Press [ ] to return to the previous screen.
• Press [ ] to display the current source control
screen.
<Settings> screen
Changes the detailed settings. (☞ page 44)
Switching screens
Changes the page
Displays the phone
control screen * 3
☞ page 12
*1 Appears when <Input> setting in <Navigation
Input> screen is set to <iPhone>. (☞ page 31)
*2 Appears when <Input> setting in <Navigation
Input> screen is set to <RGB>. (☞ page 34)
* 3 Only for KW-AV70BT.
* 4 The icon varies depending on the connection status of
the Bluetooth device (☞ page 49).
Select an item to display on the screen.
[AV] Displays the source control screen.
(☞above)
[Camera] Displays the picture from the rear
view camera. (☞page 43)
[Apps] *1Displays the screen of App from
connected iPod touch/iPhone.
(☞page 31)
[Navi] *2Displays the screen of the connected
navigation unit. (☞page 35)
[Off]Turns off the screen. (☞page 8)
Common operating buttons
[ ] *1Displays the screen of App from connected
iPod touch/iPhone. (☞ page 31)
[ ] *2Displays the screen of connected navigation
unit. (☞ page 35)
[ ]*3*4• Displays the phone control screen. (Press)
• Switches to the last connected mobile
phone. (Hold) (☞ page 51)
[ ]Displays the sound adjustment screen.
(☞ page 37)
[ ] Displays <Open/Tilt> screen. (☞ page 9)
EN_KW-AV70U.indb 10EN_KW-AV70U.indb 10 11/12/15 16:4111/12/15 16:41

11
ENGLISH
Operations on the screen
Setting <Display Sensor>
Change the settings of how to display the buttons, the
sensitivity of the motion sensor, and how the screen is
changed when no operation is performed for a while.
1 On <AV Menu> screen:
2
3
<Sensor>
Selects the method to show the buttons and playback
information.
Motion Shows the buttons and playback
information when you move your hand
closer to the motion sensor.
• The motion sensor does not work when
the screen is turned off. (☞ page 8)
Touch Shows the buttons and playback
information when you touch the screen.
Off Deactivates the <Motion> or <Touch>
function.
• To hide the buttons and playback information again
when
<Motion> or
<Touch> is selected, touch the
screen repeatedly.
<Motion Sensitiv.>
Selects the sensor sensitivity (<High> or <Low>).
• Available when <Sensor> is set to <Motion>.
<Time Out Mode>
Selects the items shown on the screen when no
operation is performed for approximately 10 seconds
and when the light of the /MENU on the monitor
panel is turned off.
• Available when <Sensor> is set to <Motion> or
<Touch> (☞ above).
Simple Shows source information and some
source control buttons (such as volume
control buttons).
Backgrnd The background is shown.
BlackOut The screen is turned off.
• To restore the screen:
– When <Sensor> is set to
<Motion>, move your hand
closer to the motion sensor.
– When <Sensor> is set to
<Touch>, touch the screen.
EN_KW-AV70U.indb 11EN_KW-AV70U.indb 11 11/12/15 16:4111/12/15 16:41
12
ENGLISH
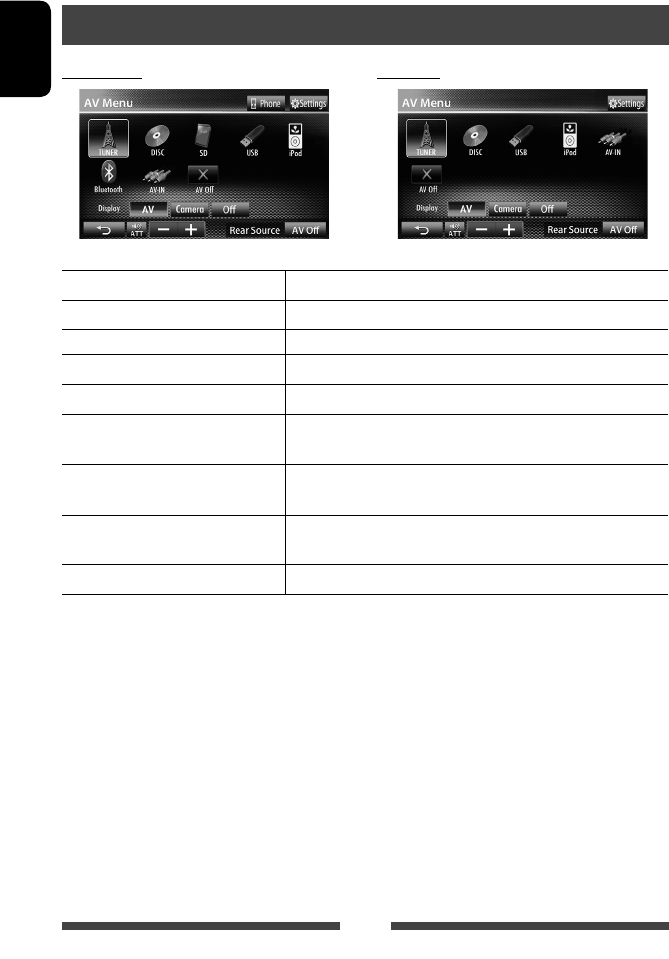
TUNER
(☞ page 13) Switches to the radio broadcast.
DISC
(☞ page 16) Plays a disc.
SD
*1 (☞ page 23) Plays files on an SD card.
USB
(☞ page 25) Plays files on a USB device.
iPod
(☞ page 27) Plays an iPod/iPhone.
Bluetooth
*2 (KW-AV70BT : ☞ page 57/
KW-AV70 : ☞ page 59)
• KW-AV70BT : Plays a Bluetooth audio player.
• KW-AV70 : Operates a Bluetooth device.
AV-IN
* 3 (☞ page 33) Switches to an external component connected to LINE IN/VIDEO IN jacks
on the rear panel.
Apps
*4 (☞ page 31) Switches to the screen of App from the connected iPod touch/
iPhone.
AV Off
(☞ page 8) Turns off the AV source.
*1 Only for KW-AV70BT.
* 2 For KW-AV70: Appears only when <AV Input> is set to <BT>. (☞ page 45 )
* 3 Appears only when <AV Input> is set to <AV-IN>. (☞ page 45 )
* 4 Appears only when <AV Input> is set to <iPod>. (☞ page 45 )
AV SOURCE OPERATIONS
Selecting the playback source
KW-AV70BT KW-AV70
EN_KW-AV70U.indb 12EN_KW-AV70U.indb 12 11/12/15 16:4111/12/15 16:41
13
ENGLISH
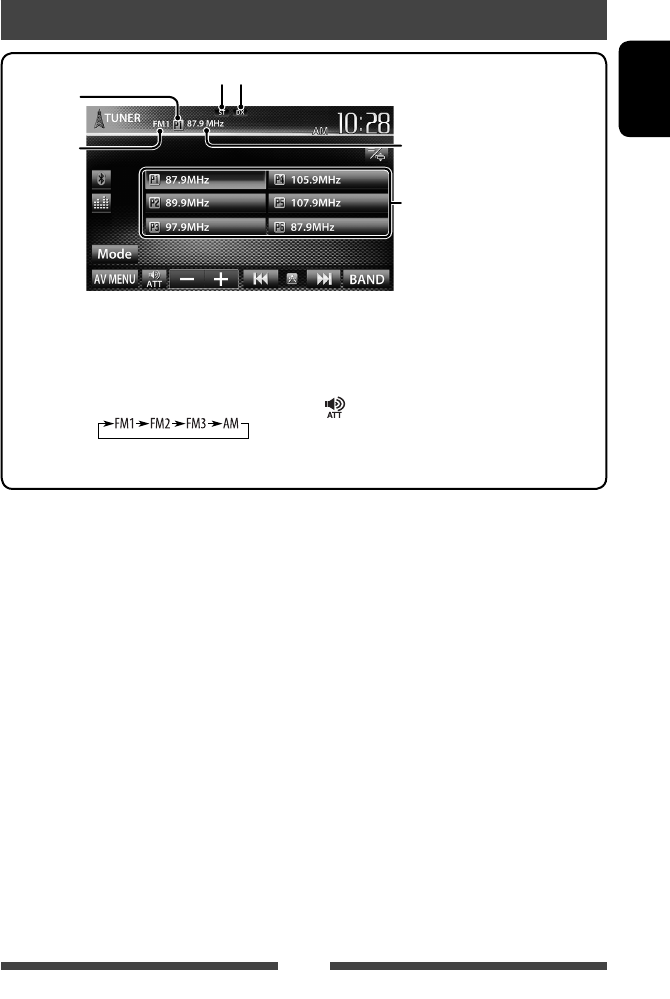
Listening to the radio
• The ST indicator lights up when receiving an FM stereo broadcast with sufficient signal strength.
DX/LO indicator
[P1] – [P6] • Tunes in the preset station. (Press)
• Presets the currently tuned
station. (Hold)
[BAND] Selects the band.
[4] [¢] Searches for a station.
• Auto search (Press)
• Manual search (Hold)
[ ] [–] [+] Adjusts the volume.
[Mode]* Displays tuner setting screen.
(☞ pages 14 – 15)
[AV MENU] Displays <AV Menu> screen.
Band
Preset no.
Preset list
ST/MO indicator
The station frequency currently
tuned in
* Appears only when FM is selected as the source.
EN_KW-AV70U.indb 13EN_KW-AV70U.indb 13 11/12/15 16:4111/12/15 16:41
14
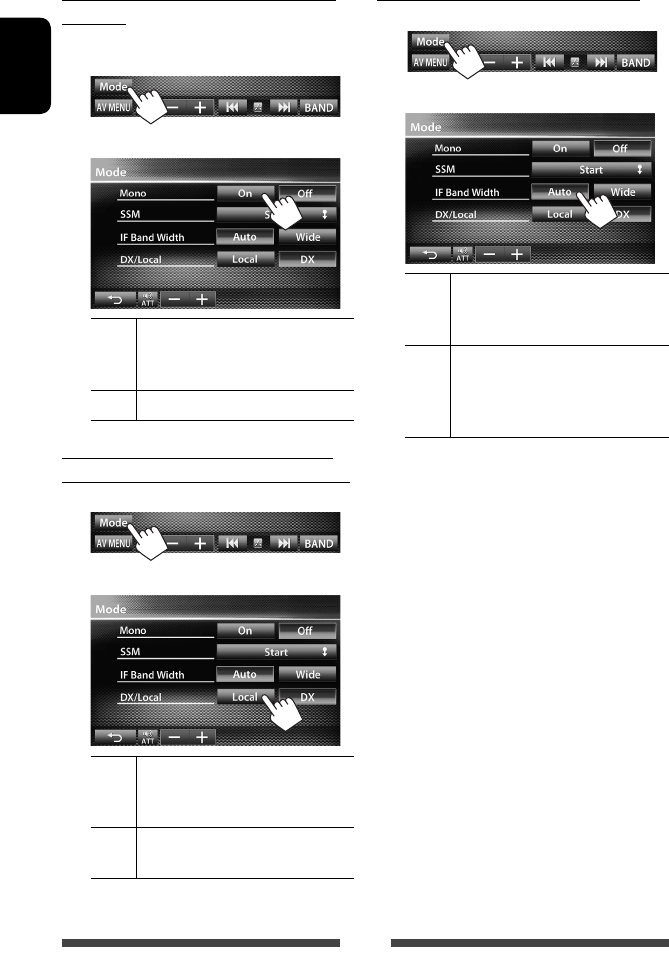
ENGLISH
When an FM stereo broadcast is hard to
receive...
Activate monaural mode for better reception.
1
2
On Activate monaural mode to improve FM
reception, but the stereo effect will be
lost. The MO indicator lights up.
Off Restore the stereo effect.
To tune in FM stations only with strong
signals—LO/DX (Local/Distance-extreme)
1
2
Local Select this to tune in only to stations
with sufficient signal strength. The LO
indicator lights up.
DX Deactivate the function. The DX
indicator lights up.
When the FM reception is interfered...
1
2
Auto Increases the tuner selectivity to reduce
interference noises between adjacent
stations. (Stereo effect may be lost.)
Wide Subject to the interference from
adjacent stations, but sound quality
will not be degraded and the stereo
effect will remain.
EN_KW-AV70U.indb 14EN_KW-AV70U.indb 14 11/12/15 16:4111/12/15 16:41

15
ENGLISH
Storing stations in memory
You can preset six stations for each band.
Automatic presetting — SSM (Strong-
station Sequential Memory) (For FM only)
1
2
(Hold)
Local stations with the strongest signals are searched
and stored automatically.
Manual presetting
1 Tune in to a station you want to preset.
(☞ page 13)
2 Select a preset number.
(Hold)
The station selected in step 1 is stored.
Selecting a preset station
EN_KW-AV70U.indb 15EN_KW-AV70U.indb 15 11/12/15 16:4111/12/15 16:41
16
ENGLISH
To eject a disc
1 On the source control screen:
2 Press [ Eject].
• You can eject a disc when playing another AV source.
• If the ejected disc is not removed within 15 seconds,
the disc is automatically inserted again into the
loading slot to protect it from dust.
• If the disc cannot be ejected, ☞ page 3 .
When removing a disc, pull it horizontally.
To prohibit disc ejection
On the source control screen, press and /
MENU at the same time.
To cancel the prohibition, repeat the same procedure
to select <Eject OK?>.
Disc operations
Playing a disc
• If a disc does not have any disc menu, all tracks on it will be played repeatedly until you change the source or eject
the disc.
Inserting a disc
1 Open the monitor panel.
On the source control screen:
2 Label side
The source changes to “
DISC
” and playback starts.
• The DISC IN ( ) indicator lights up while a
disc is inserted.
• If “ ” appears on the screen, the unit cannot
accept the operation you have tried to do.
– In some cases, without showing “ ,”
operations will not be accepted.
• When playing back a multi-channel encoded
disc, the multi-channel signals are downmixed
to stereo.
EN_KW-AV70U.indb 16EN_KW-AV70U.indb 16 11/12/15 16:4111/12/15 16:41
17
ENGLISH
Playable disc types
Disc type Recording format, file type, etc. Playable
DVD
• DTS sound cannot be
reproduced or emitted from
this unit.
DVD-Video *1
Region Code: 3
DVD-Audio/DVD-ROM
DVD Recordable/Rewritable
(DVD-R/-RW *2, +R/+RW *3)
• DVD Video: UDF bridge
• DVD-VR
• DivX /MPEG1/MPEG2/JPEG/
MP3/WMA/WAV : ISO 9660 level
1, level 2, Romeo, Joliet
DVD-Video
DVD-VR *4
DivX /MPEG1/MPEG2
JPEG
MP3/WMA/WAV
MPEG4/AAC/DVD+VR/DVD-RAM
Dual Disc DVD side
Non-DVD side
CD/VCD Audio CD/CD Text (CD-DA)
VCD (Video CD)
DTS-CD/SVCD (Super Video CD)/CD-ROM/CD-I(CD-I Ready)
CD Recordable/Rewritable
(CD-R/-RW)
• ISO 9660 level 1, level 2,
Romeo, Joliet
CD-DA
VCD (Video CD)
DivX /MPEG1/MPEG2
JPEG
MP3/WMA/WAV
MPEG4/AAC
*1 If you insert a DVD Video disc of an incorrect Region Code, “Region Code Error” appears on the screen.
*2 DVD-R recorded in multi-border format is also playable (except for dual layer discs). DVD-RW dual layer discs are not
playable.
*3 It is possible to play back finalized +R/+RW (Video format only) discs. “DVD” is selected as its disc type when a
+R/+RW disc is loaded. +RW double layer discs are not playable.
* 4 This unit cannot play back contents protected with CPRM (Content Protection for Recordable Media).
Caution for DualDisc playback
The Non-DVD side of a “DualDisc” does not comply with the “Compact Disc Digital Audio” standard. Therefore, the use
of Non-DVD side of a DualDisc on this product may not be recommended.
EN_KW-AV70U.indb 17EN_KW-AV70U.indb 17 11/12/15 16:4111/12/15 16:41
18
ENGLISH
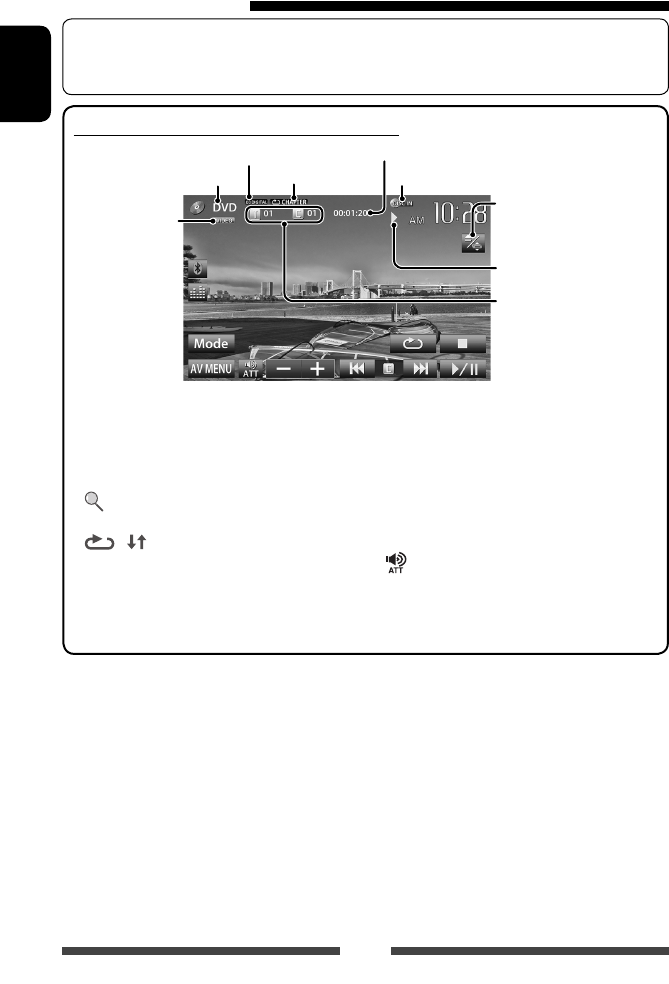
Playback operations
To select the method to display the source control screen, ☞ page 11.
• The operation buttons disappear when no operation is done for about 10seconds.
For DVD/DVD-VR/VCD/DivX/MPEG1/MPEG2/JPEG
Media type
Audio format
Video format/
video playback
mode—VIDEO/
VR-PRG (program)/
VR-PLAY (playlist)/
DivX/MPEG/PBC
Playback status
(3: play / 8: pause / 7: stop)
Playing time
• DVD Video: Title no./
Chapter no.
• DVD-VR: Program no. (or
Playlist no.)/Chapter no.*1
• DivX/MPEG1/MPEG2:
Folder no./Track no.
• JPEG: Folder no./File no.
• VCD: Track no.
Playback mode
(☞page 21)
☞ page 9
DISC IN indicator
[7]*2Stops playback.
[ ]*3Displays folder/track list. (☞
page 19)
[ ] [ ]*4Selects playback mode. (☞
page 21)
[6] Starts/pauses playback.
[4] [¢]*5• Selects chapter/track.
(Press)
• Reverse/forward search.*6
(Hold)
[ ] [–] [+] Adjusts the volume.
[Mode]*7Changes the settings for disc
playback. (☞ page 22)
[AV MENU] Displays <AV Menu> screen.
* 1 To display the Original Program/Playlist screen, ☞page20.
*2 Appears only for DVD/DVD-VR/VCD.
*3 Does not appear for DVD/DVD-VR/VCD.
*4 Does not appear for DVD/DVD-VR/JPEG.
*5 The icon displayed between the buttons varies depending on the type of disc or file.
*6 Search speed varies depending on the type of disc or file.
*7 Does not appear for VCD.
EN_KW-AV70U.indb 18EN_KW-AV70U.indb 18 11/12/15 16:4111/12/15 16:41
19
ENGLISH
Playing Recordable/Rewritable discs
• This unit can recognize a total of 5 000 files and
250 folders (a maximum of 999 files per folder).
• Use only “finalized” discs.
• This unit can play back multi-session discs;
however, unclosed sessions will be skipped
while playing.
• Some discs or files may not be played back due
to their characteristics or recording conditions.
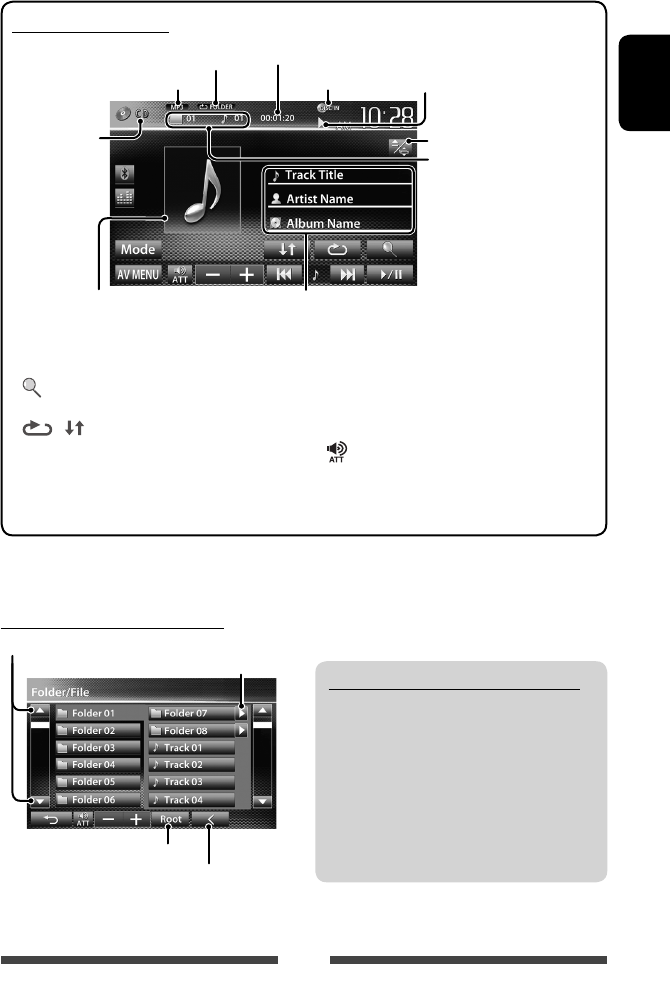
Selecting folder/track on the list
Plays tracks/files in the folder
Changes the page
Returns to the root folder
Returns to the upper layer
For CD/MP3/WMA/WAV
DISC IN indicator
Media type
Audio format
Playback status
(3: play / 8: pause )
Playing time
• MP3/WMA/WAV: Folder
no./Track no.
• CD: Track no.
Playback mode (☞ page 21)
Track/file information
• Touching an information bar scrolls the text if not all of the
text is shown.
While playing, the jacket picture is
shown if the file has the tag data
including the jacket picture.
☞ page 9
[ ]*1Displays folder/track list.
(☞below)
[ ] [ ] Selects playback mode.
(☞page21)
[6] Starts/pauses playback.
[4] [¢] • Selects track. (Press)
• Reverse/forward search.*2
(Hold)
[ ] [–] [+] Adjusts the volume.
[Mode]*1Changes the settings for disc
playback. (☞ page 22)
[AV MENU] Displays <AV Menu> screen.
*1 Does not appear for CD.
*2 Search speed varies depending on the type of disc or file.
EN_KW-AV70U.indb 19EN_KW-AV70U.indb 19 11/12/15 16:4111/12/15 16:41
20
ENGLISH
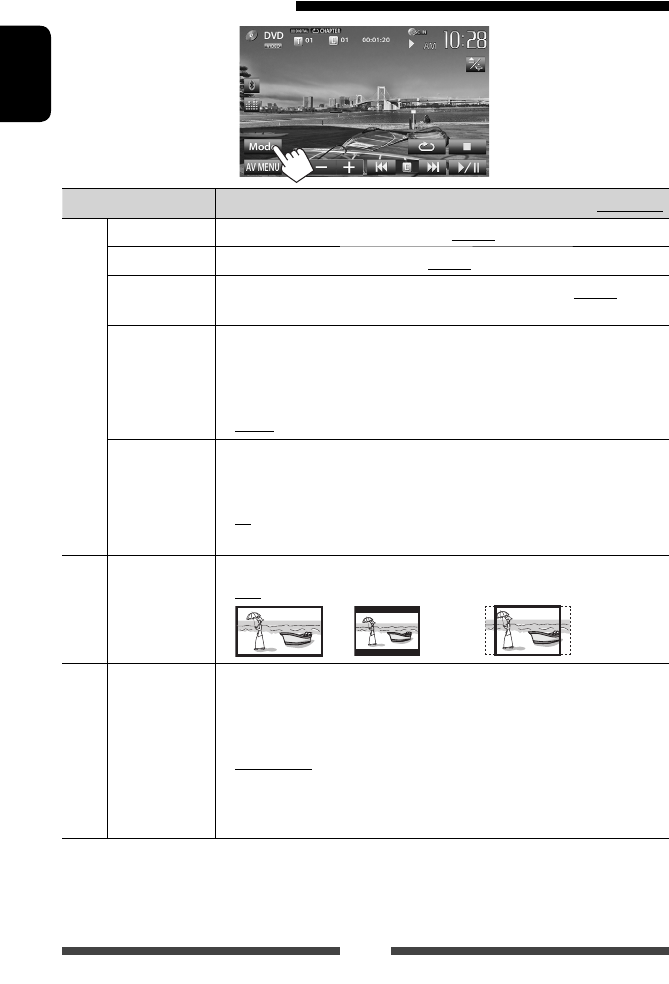
Video menu operations
You can display the video menu screen while watching
the playback pictures on the screen.
• Available items on the screen differ depending on the
types of the loaded disc and playback files.
• The operation buttons disappear when no operation
is done for about 10 seconds.
Touch any position of the screen other than
operation buttons.
• The screen for MPEG1/MPEG2 differs from the above.
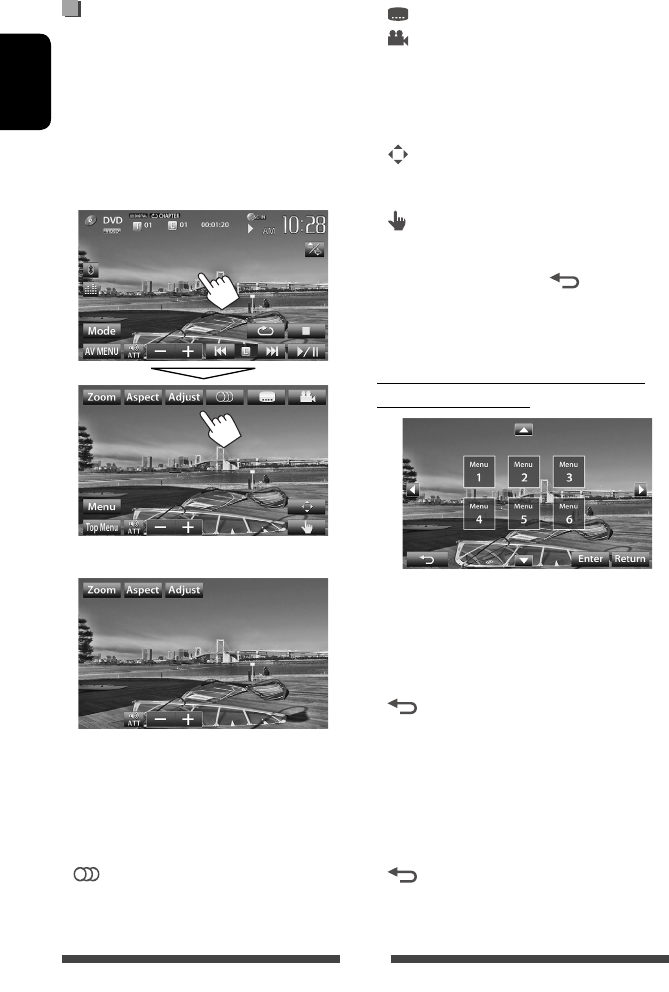
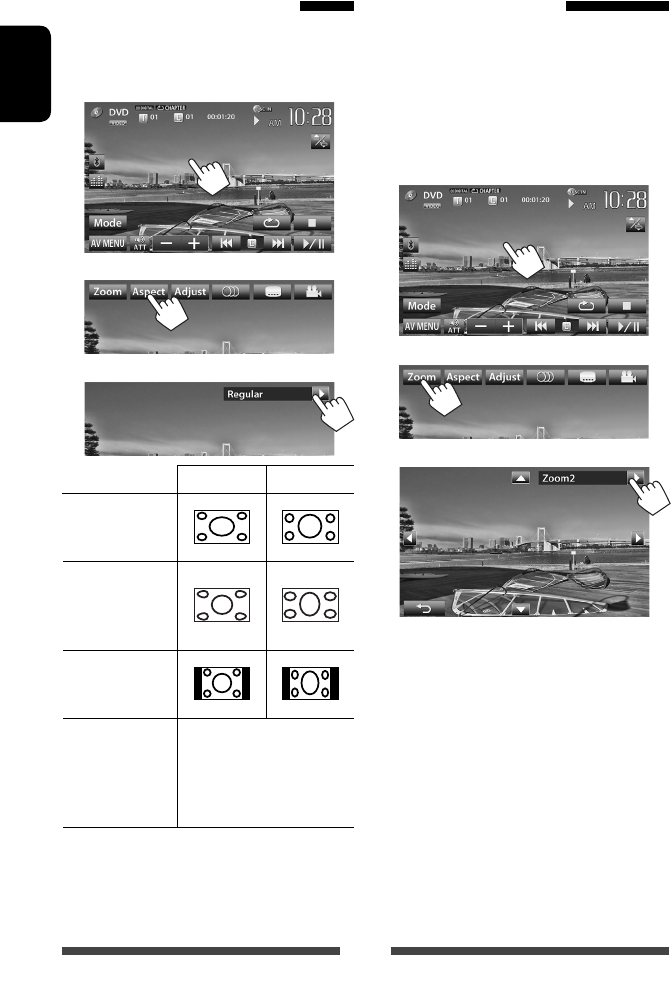
[Zoom] Displays the picture size selecting
screen. (☞ page 42)
[Aspect]Selects aspect ratio. (☞ page 42)
[Adjust] Displays picture adjustment screen.
(☞ page 41)
[ ] Selects the audio type.
• For DVD-VR: Selects the audio
channel (ST: stereo, L: left, R: right).
[ ] Selects the subtitle type.
[ ] Selects view angle.
[Menu] Displays the disc menu (DVD)/playlist
(DVD-VR).
[Top Menu] Displays the disc menu (DVD)/original
program (DVD-VR).
[ ] Displays the menu/playlist/original
program/scene selecting screen.
(☞ below)
[ ] Switches to the direct menu selection
mode. Touch the target item to select.
• To exit from the menu selecting
screen, press [ ].
• Touching any position other than operation buttons
displays the source control screen.
Using menu/playlist/original program/
scene selecting screen
[5] [∞]
[2] [3]Selects an item.
[Enter] Confirms the selection.
[Return] Returns to the menu screen of the
previous layer.
[]Displays the menu screen of the top
layer when several menu screens exist
on the disc.
• For DivX only
[2] [3] Skips back or forward by about 5
minutes.
[Return] Returns to the previous screen.
[]Exits from the scene selecting screen.
EN_KW-AV70U.indb 20EN_KW-AV70U.indb 20 11/12/15 16:4111/12/15 16:41
21
ENGLISH
Only for VCD
1
2
Direct selecting buttons (☞ below)
[Zoom] Displays the picture size selecting
screen. (☞ page 42)
[Aspect]Selects aspect ratio. (☞ page 42)
[Adjust] Displays picture adjustment screen.
(☞ page 41)
[ ] Selects the audio channel (ST: stereo,
L: left, R: right).
[Return] Displays the previous screen or the
menu.
[Menu] Displays the disc menu.
[ ] Displays/hides the direct selecting
buttons. (☞ below)
• To select a track directly
– To switch between chapter/track entry and title/
folder entry, press [Direct/CLR].
– When you enter a wrong number, press [Direct/
CLR] to delete the last entry.
• To deactivate the PBC function, press [7] then the
direct selecting buttons to select a track number.
Selecting playback mode
For DVD/DVD-VR
Selects Repeat playback mode
For VCD (without PBC)/CD/DivX/MPEG1/MPEG2/MP3/
WMA/WAV
Selects Repeat
playback mode*
Selects Random
playback mode*
* You cannot activate the repeat mode and the random
mode at the same time.
• Each time you press the button, the playback mode
changes. (The corresponding indicator lights up.)
– Available items differ depending on the types of
loaded disc and playback file.
Indicator Playback mode
CHAPTER Repeats current chapter.
TITLE Repeats current title.
PROGRAM
Repeats current program (not
available for Playlist playback).
SONGS Repeats current track.
FOLDER Repeats all tracks of the current
folder.
FOLDER Randomly plays all tracks of
current folder, then tracks of next
folders.
ALL Randomly plays all tracks.
To cancel, press the button repeatedly until the
indicator disappears.
EN_KW-AV70U.indb 21EN_KW-AV70U.indb 21 11/12/15 16:4111/12/15 16:41
22
ENGLISH
Settings for disc playback
Disc Setup items Selectable setting/item Initial: Underlined
For DVD/DVD-VR/DivX
Menu Language Select the initial disc menu language; Initial English (☞ page 65).
Audio Language Select the initial audio language; Initial English (☞ page 65).
Subtitle Select the initial subtitle language or erase the subtitle (Off) ; Initial English (☞
page 65).
Down Mix When playing back a multi-channel disc, this setting affects the signals reproduced
through the FRONT OUT/REAR OUT jacks.
♦ Dolby Surround : Select this to enjoy multi-channel surround audio by
connecting an amplifier compatible with Dolby Surround.
♦ Stereo : Normally select this.
D. (Dynamic)
Range Compres.
(Compression)
You can change the dynamic range while playing Dolby Digital software.
♦ Off : Select this to enjoy a powerful sound at a low volume
level with its full dynamic range.
♦ On : Select this to reduce the dynamic range a little.
♦ Dialog : Select this to reproduce the movie dialog more clearly.
For discs except
VCD/CD
Monitor Type Select the monitor type to watch a wide screen picture on the external monitor.
♦ 16:9
♦ 4:3 LB (Letterbox)
♦ 4:3 PS (PanScan)
For discs containing audio/
video/picture files
File Type Select the playback file type when a disc contains different types of files.
♦ Audio
♦ Still Picture
♦ Video
♦ Audio&Video
: Plays back audio files.
: Plays back JPEG files.
: Plays back DivX/MPEG1/MPEG2 files.
: Plays back audio files and DivX/MPEG1/MPEG2 files.
• For playable file types, ☞ page 17.
• If the disc contains no files of the selected type, the existing files are played in the
following priority: audio, video, then still picture.
EN_KW-AV70U.indb 22EN_KW-AV70U.indb 22 11/12/15 16:4111/12/15 16:41
23
ENGLISH
• This unit can play JPEG/MPEG1/MPEG2 */MP3/WMA/
WAV files stored in an SD card.
• This unit can recognize a total of 5 000 files and 250
folders (a maximum of 999 files per folder).
• Make sure all important data has been backed up to
avoid losing the data.
* Except for MPEG2 files recorded by JVC Everio
camcorder (extension code <.mod>).
Inserting an SD card
1 Open the monitor panel.
On the source control screen:
2
Push in the SD card until you hear a clicking sound.
The source changes to “
SD
” and playback starts.
• All tracks in the SD card will be played
repeatedly until you change the source.
Playing files in an SD card
SD operations (only for KW-AV70BT)
3 Close the monitor panel.
To eject the SD card
1 Open the monitor panel.
2 Push the SD card gently.
• Do not release your finger quickly; otherwise,
the SD card may pop out from the loading slot.
3 Close the monitor panel.
EN_KW-AV70U.indb 23EN_KW-AV70U.indb 23 11/12/15 16:4111/12/15 16:41

24
ENGLISH
Setting <File Type>
Audio Plays back audio files.
Still Picture Plays back JPEG files.
Video Plays back MPEG1/MPEG2 files.
Audio&Video Plays back audio files and MPEG1/
MPEG2 files.
• If the SD card contains no files of the selected type,
the existing files are played in the following priority:
audio, video, then still picture.
Setting <Monitor Type>
Select the monitor type to watch a wide screen picture
on the external monitor.
16:9 4:3 LB
(Letterbox)
4:3 PS
(PanScan)
Playback status
(3: play / 8: pause)
Playing time
• MP3/WMA/WAV: Folder no./
Track no.
• JPEG: Folder no./File no.
Playback mode (☞ below)
Track/file information (for MP3/
WMA/WAV)
• Touching an information bar
scrolls the text if not all of the
text is shown.
While playing, the jacket picture is shown if the file has the tag
data including the jacket picture.
Audio format
Video format—
MPEG/JPEG
[ ] Selects repeat playback mode. *1 *2
• SONGS: Repeats current
track.
• FOLDER: Repeats all tracks of
the current folder.
[ ] Selects random playback mode. *1 *2
• FOLDER: Randomly plays all
tracks of the folder.
• ALL: Randomly plays all tracks.
[ ] Displays folder/track list. (☞ page 19)
[6] Starts/pauses playback.
[4] [¢]*
3
• Selects track. (Press)
• Reverse/forward search.*4 (Hold)
[] [–] [+]Adjusts the volume.
[Mode] Changes the settings for <File Type>
and <Monitor Type>. (☞below)
[AV MENU] Displays <AV Menu> screen.
• Available items differ depending on the types of playback file.
*1 To cancel random or repeat mode, press the button repeatedly until the indicator disappears.
*2 You cannot activate the repeat mode and the random mode at the same time.
*3 The icon displayed between the buttons varies depending on the file type.
*4 Search speed varies depending on the file type.
To select the method to display the source control screen, ☞ page 11.
• The operation buttons disappear when no operation is done for about 10seconds.
• To change settings for video playback, ☞ page 41.
EN_KW-AV70U.indb 24EN_KW-AV70U.indb 24 11/12/15 16:4111/12/15 16:41
25
ENGLISH
• This unit can play JPEG/MPEG1/MPEG2 */MP3/WMA/
WAV files stored in a USB mass storage class device.
• This unit can recognize a total of 5 000 files and 250
folders (a maximum of 999 files per folder).
• Make sure all important data has been backed up to
avoid losing the data.
* Except for MPEG2 files recorded by JVC Everio
camcorder (extension code <.mod>).
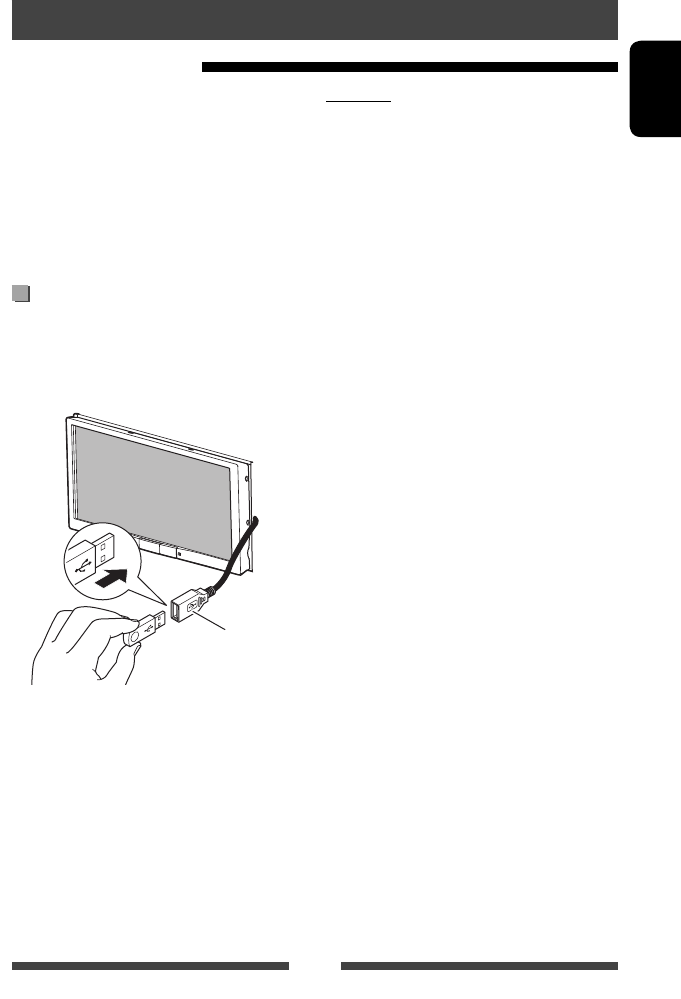
Connecting a USB device
You can connect a USB mass storage class device such as
a USB memory, Digital Audio Player etc. to the unit.
• You cannot connect a computer or portable HDD to
the USB cable from the rear of the unit.
USB cable from the
rear of the unit
The source changes to “
USB
” and playback starts.
• All tracks in the USB device will be played repeatedly
until you change the source.
Playing a USB device
USB operations
Cautions:
• This unit may not play back files in a USB device
properly when using a USB extension cord.
• USB devices equipped with special functions such as
data security functions cannot be used with the unit.
• Do not use a USB device with 2 or more partitions.
• Depending on the shape of the USB devices and
connection ports, some USB devices may not be
attached properly or the connection might be loose.
• This unit cannot recognize a USB device whose rating
is other than 5 V and exceeds 1 A.
• This unit may not recognize a memory card inserted
into the USB card reader.
• Connect only one USB device to the unit at a time. Do
not use a USB hub.
• When connecting with a USB cable, use the USB 2.0
cable.
• The maximum number of characters for (when the
characters are 1 byte):
– Folder names: 50 characters
– File names: 50 characters
• Avoid using the USB device if it might effect driving
safety.
• Do not pull out and connect the USB device
repeatedly while “Now Reading” is shown on the
screen.
• Electrostatic shock at connecting a USB device may
cause abnormal playback of the device. In this case,
disconnect the USB device then reset this unit and
the USB device.
• Operation and power supply may not work as
intended for some USB devices.
• Do not leave a USB device in the car, or expose
to direct sunlight or high temperature to avoid
deformation or damage to the device.
EN_KW-AV70U.indb 25EN_KW-AV70U.indb 25 11/12/15 16:4111/12/15 16:41
26
ENGLISH
Setting <File Type>
Audio Plays back audio files.
Still Picture Plays back JPEG files.
Video Plays back MPEG1/MPEG2 files.
Audio&Video Plays back audio files and MPEG1/
MPEG2 files.
• If the USB device contains no files of the selected
type, the existing files are played in the following
priority: audio, video, then still picture.
Setting <Monitor Type>
Select the monitor type to watch a wide screen picture
on the external monitor.
16:9 4:3 LB
(Letterbox)
4:3 PS
(PanScan)
Playback status
(3: play / 8: pause)
Playing time
• MP3/WMA/WAV: Folder no./
Track no.
• JPEG: Folder no./File no.
Playback mode (☞ below)
Track/file information (for MP3/
WMA/WAV)
• Touching an information bar
scrolls the text if not all of the
text is shown.
While playing, the jacket picture is shown if the file has the tag
data including the jacket picture.
Audio format
Video format—
MPEG/JPEG
[ ] Displays folder/track list. (☞ page 19)
[ ] Selects repeat playback mode. *1 *2
• SONGS: Repeats current
track.
• FOLDER: Repeats all tracks of
the current folder.
[ ] Selects random playback mode. *1 *2
• FOLDER: Randomly plays all
tracks of the folder.
• ALL: Randomly plays all tracks.
[ ]Switches between the internal and
external memory source of the
connected device (such as mobile
phone).
[6] Starts/pauses playback.
[4] [¢]*
3
• Selects track. (Press)
• Reverse/forward search.*4 (Hold)
[ ] [–] [+] Adjusts the volume.
[Mode] Changes the settings for <File Type>
and <Monitor Type>. (☞below)
[AV MENU] Displays <AV Menu> screen.
• Available items differ depending on the types of playback file.
*1 To cancel random or repeat mode, press the button repeatedly until the indicator disappears.
*2 You cannot activate the repeat mode and the random mode at the same time.
*3 The icon displayed between the buttons varies depending on the file type.
*4 Search speed varies depending on the file type.
To select the method to display the source control screen, ☞ page 11.
• The operation buttons disappear when no operation is done for about 10seconds.
• To change settings for video playback, ☞ page 41.
EN_KW-AV70U.indb 26EN_KW-AV70U.indb 26 11/12/15 16:4111/12/15 16:41
27
ENGLISH
iPod/iPhone that can be connected to this unit:
Made for
– iPod with video (5th Generation)
– iPod classic
– iPod nano (6th Generation)
– iPod nano (5th Generation)
– iPod nano (4th Generation)
– iPod nano (3rd Generation)
– iPod nano (2nd Generation)
– iPod nano (1st Generation)
– iPod touch (4th Generation)
– iPod touch (3rd Generation)
– iPod touch (2nd Generation)
– iPod touch (1st Generation)
– iPhone 4
– iPhone 3GS
– iPhone 3G
– iPhone
Connecting iPod/iPhone
Connect your iPod/iPhone using the appropriate cable
according to your purpose.
• To listen to music: USB 2.0 cable (accessory of the
iPod/iPhone)
To iPod/iPhone
USB cable from the
rear of the unit
• To watch video and listen to music: USB
Audio and Video cable for iPod/iPhone—KS-U30
(separately purchased) (☞Installation/Connection
Manual)
Caution:
• Video is not displayed on the screen if connected with
any cable other than KS-U30.
Listening to the iPod/iPhone device
Preparation
• To use App of iPod touch/iPhone , ☞ page 31.
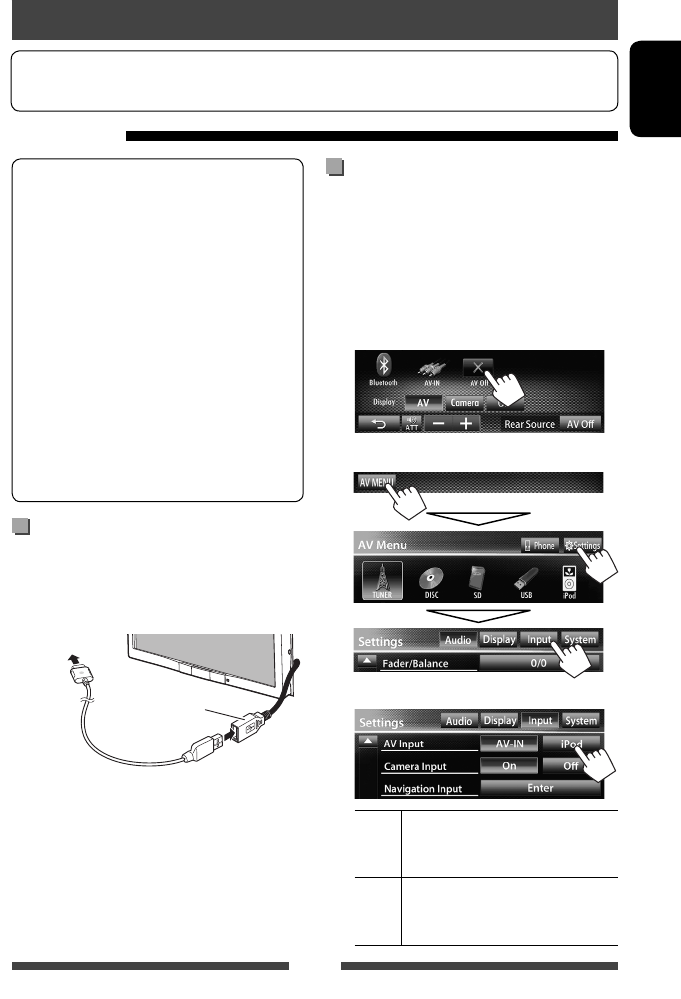
Setting <AV Input> for iPod/iPhone
playback
Select appropriate input setting for <AV Input>
according to the connection method of the iPod/iPhone.
• Make sure that “
AV Off
” is selected as the rear
source. (☞ page 36)
1 Turn off the AV source.
On <AV Menu> screen:
2 Display <Input> setting screen.
3
AV-IN Select this when the iPod/iPhone is
connected by using USB 2.0 cable
(accessory of the iPod/iPhone).
iPod Select this when the iPod/iPhone is
connected by using KS-U30 (separately
purchased).
EN_KW-AV70U.indb 27EN_KW-AV70U.indb 27 11/12/15 16:4111/12/15 16:41
28
ENGLISH
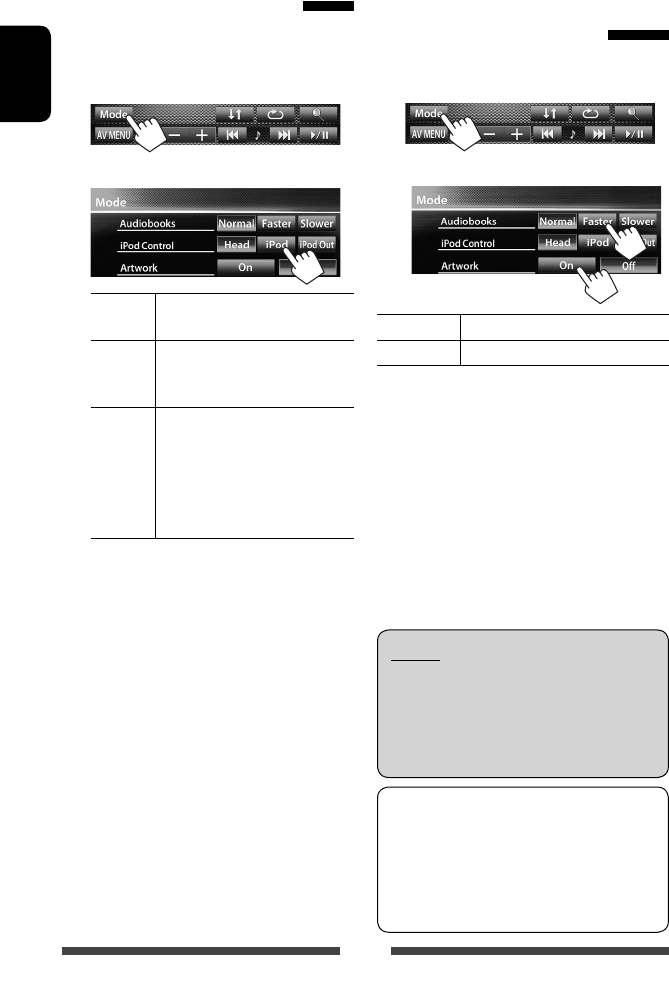
Setting iPod control mode
Select the unit controlling iPod/iPhone playback.
When the source is “
iPod
”...
1
2
Head Controls playback from this unit.
(☞ page 29)
iPod Controls audio/video playback from
the iPod/iPhone.
• Playback information is shown.
iPod
Out *
Displays the menu and playback
screen output from iPod/iPhone.
(☞page 30)
• You can control playback from
this unit in the same way as on
the iPod/iPhone.
• When using iPod nano (1st Generation) or iPod
with video (5th Generation) with <iPod> selected
for <iPod Control>, select <iPod> for <AV
Input> and connect iPod using KS-U30 (separately
purchased). (☞page 27)
* <iPod Out> is available only for the following iPod/
iPhone models:
– iPod nano (6th Generation)
– iPod touch (4th Generation)
– iPod touch (3rd Generation)
– iPod touch (2nd Generation)
– iPhone 4
– iPhone 3GS
– iPhone 3G
Selecting preference settings
for iPod/iPhone playback
When the source is “
iPod
”...
1
2
Audiobooks Select the speed of audio books.
Artwork Shows/hides the iPod artwork.
Notice:
When operating an iPod/iPhone, some operations
may not be performed correctly or as intended. In
this case, visit the following JVC web site: <http://
www3.jvckenwood.com/english/car/> (English
website only)
For some iPod/iPhone models, the performance
may be abnormal or unstable during operation. In
this case, disconnect the iPod/iPhone device, then
check its condition.
If the performance is not improved or slow, reset
your iPod/iPhone.
EN_KW-AV70U.indb 28EN_KW-AV70U.indb 28 11/12/15 16:4111/12/15 16:41
29
ENGLISH
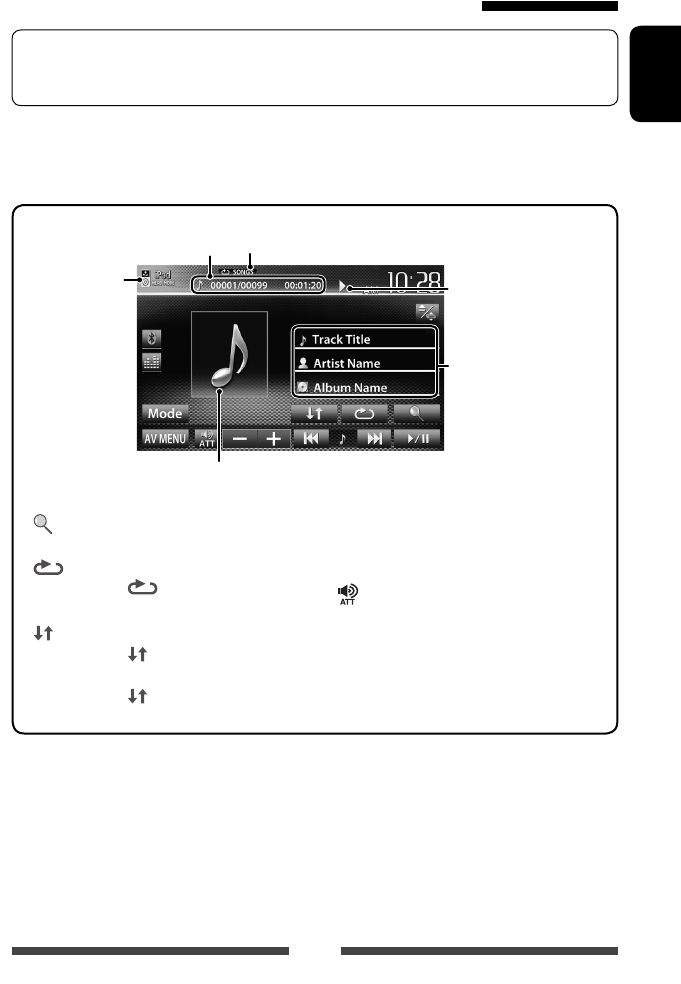
iPod/iPhone playback operations for <Head> mode
To select the method to display the source control screen, ☞ page 11.
• The operation buttons disappear when no operation is done for about 10seconds.
• To change settings for video playback, ☞ page 41.
• Select “
iPod
” as the source. (☞ page 12)
• Make sure to select <Head> for <iPod Control>. (☞ page 28)
• When you turn on this unit, the iPod/iPhone is charged through the unit.
Track no./Total track number/
Playing time
iPod control mode
(☞ page 28)
Song/video information
• Touching an information bar
scrolls the text if not all of
the text is shown.
Playback status ( 3:
play/8: pause)
Playback mode (☞ below)
While playing, Artwork (the picture displayed on the screen of iPod/iPhone) is shown if the song
contains the Artwork (☞ page 28).
[ ] Displays the Music/Video menu on
the iPod/iPhone. (☞ page 30)
[ ] Selects Repeat playback mode. *1
• SONGS: Functions the
same as “Repeat One.”
[ ] Selects Random playback mode. *1
• SONGS: Functions the same
as “Shuffle Songs.”
• ALBUMS: Functions the
same as “Shuffle Albums.”
[6] Starts/pauses playback.
[4] [¢]
• Selects a track/video. *2 (Press)
• Reverse/forward search. (Hold)
[ ] [–] [+] Adjusts the volume.
[ Mode] Changes the settings for iPod
playback. (☞ page 28)
[AV MENU] Displays <AV Menu> screen.
• To watch the video, select an item on the list of the Video menu. (☞ page 30)
*1 To cancel random and repeat mode, press the button repeatedly until the indicator disappears.
*2 You cannot resume playback for video sources.
EN_KW-AV70U.indb 29EN_KW-AV70U.indb 29 11/12/15 16:4111/12/15 16:41
30
ENGLISH
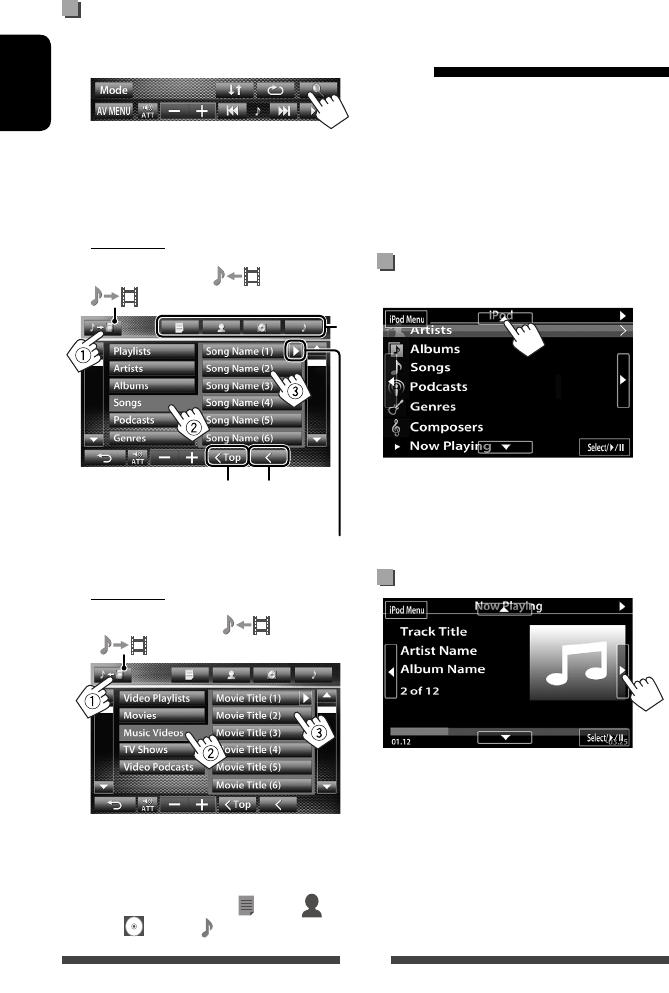
Selecting a track/video from menu
on the iPod/iPhone
1
2 Select the menu (Music or Video) (1), a
category (2), then a desired item (3).
• Select the item in the selected layer until a
desired track starts playing.
Music menu:
Switches between Music ( ) and Video
( )
Returns to the
previous layer
Plays all items in the layer
Returns to the top layer
*
Video menu:
Switches between Music ( ) and Video
( )
• Available categories differ depending on the type of
your iPod/iPhone.
* You can switch to the top of the category by pressing
the corresponding tab: Playlist ( ), Artist ( ),
Albums ( ) or Songs( ).
iPod/iPhone playback
operations for <iPod Out>
mode
• Connect the iPod touch/iPhone using KS-U30
(separately purchased). (☞ Installation/Connection
Manual)
• Select <iPod> for <AV Input> setting. (☞page 27)
• Make sure to select <iPod Out> for <iPod
Control>. (☞ page 28)
• Select “
iPod
” as the source. (☞ page 12)
Selecting a track from the menu on
the iPod/iPhone
[5] [∞] Selects a category.
[Select/6] Confirms the selection.
[iPod Menu] Returns to the previous layer.
Operations during playback
[2] [3] Skips to the previous/next track.
[Select/6] Starts/pauses playback.
[iPod Menu] Displays the menu.
EN_KW-AV70U.indb 30EN_KW-AV70U.indb 30 11/12/15 16:4111/12/15 16:41
31
ENGLISH
• When you use an App of the iPod touch or iPhone,
see also page 66 for safety instructions.
Displaying the screen of App while
listening to other source
You can switch the display to screen of App from
connected iPod touch/iPhone while listening to other
source.
Activating input of iPod touch/iPhone to
show buttons for switching display
• Make sure that “
AV Off
” is selected as the rear
source. (☞ page 36)
1 Turn off the AV source.
On <AV Menu> screen:
2 Display <Input> setting screen.
1 Start App on your iPod touch/iPhone.
2 Select “
Apps
” as the source.
On <AV Menu> screen:
• You can also play back the audio/video using iPod/
iPhone itself instead of the unit.
– You can operate for basic playback on the touch
panel.
Audio
Video
Using an App of iPod touch/iPhone
You can use an App of the connected iPod touch/iPhone on this unit.
• You can operate some functions of an App on the touch panel.
Preparation
• Connect the iPod touch/iPhone using KS-U30 (separately purchased). (☞ Installation/Connection Manual)
• Select <iPod> for <AV Input> setting. (☞page 27)
• For Apps you can use on this unit, visit < http://www3.jvckenwood.com/english/car/>.
EN_KW-AV70U.indb 31EN_KW-AV70U.indb 31 11/12/15 16:4111/12/15 16:41
32
ENGLISH
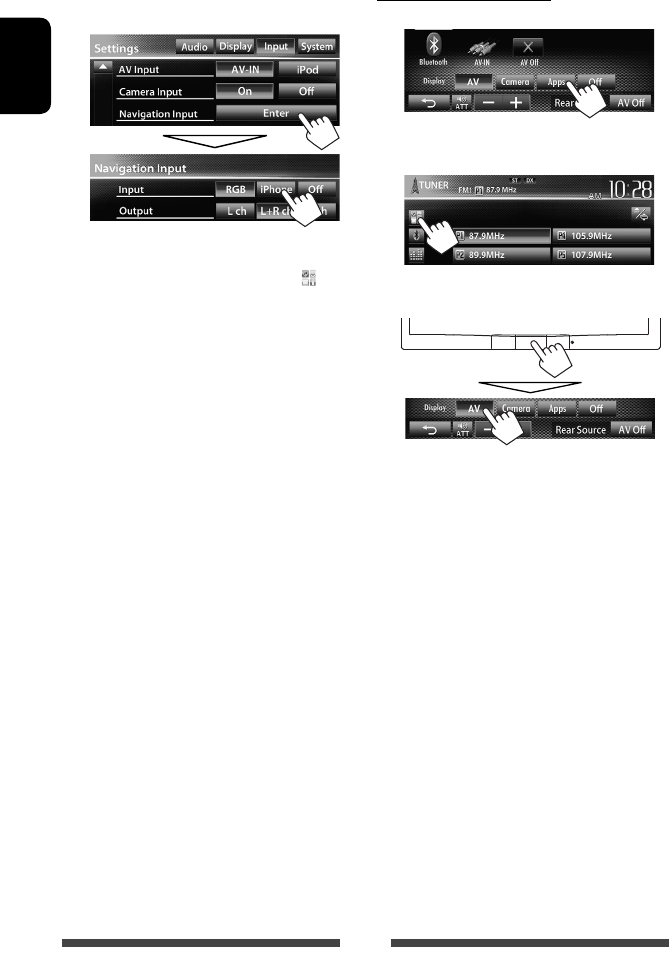
3 Select <iPhone> for <Input> setting
on <Navigation Input> screen.
• When <Input> is set to <iPhone>, [Apps] button
is shown on the <AV Menu> screen, and [ ]
button is shown on the source control screen. You can
display the screen of App by pressing either button.
(☞below)
• When <Input> is set to <iPhone>, <AV Input>
setting is automatically changed and fixed to
<iPod>.
To deactivate, select <Off> for <Input>.
To view the screen of App
On <AV Menu> screen:
or
On source control screen:
To cancel the screen of App
EN_KW-AV70U.indb 32EN_KW-AV70U.indb 32 11/12/15 16:4111/12/15 16:41
33
ENGLISH
AV-IN name ( ☞ below)
You can connect an external component to the LINE IN/
VIDEO IN jacks. (☞ Installation/Connection Manual)
Preparation:
Select <AV-IN> for <AV Input> setting. (☞ page 45)
• <AV Input> setting can be changed only when
<Input> setting in <Navigation Input> is set to
<RGB> or <Off>.
Using other external components
To select the method to display the source control screen, ☞ page 11.
• The operation buttons disappear when no operation is done for about 10seconds.
• To change settings for video playback, ☞ page 41.
[ ] [–] [+]Adjusts the volume.
[Mode] Changes the AV-IN name.
• Press [2] or [3] to select an AV-IN name.
[AV MENU] Displays <AV Menu> screen.
1 Select “
AV-IN
” as the source. (☞ page 12)
2 Turn on the connected component and
start playing the source.
AV-IN
EN_KW-AV70U.indb 33EN_KW-AV70U.indb 33 11/12/15 16:4111/12/15 16:41

34
ENGLISH
Using the external navigation unit
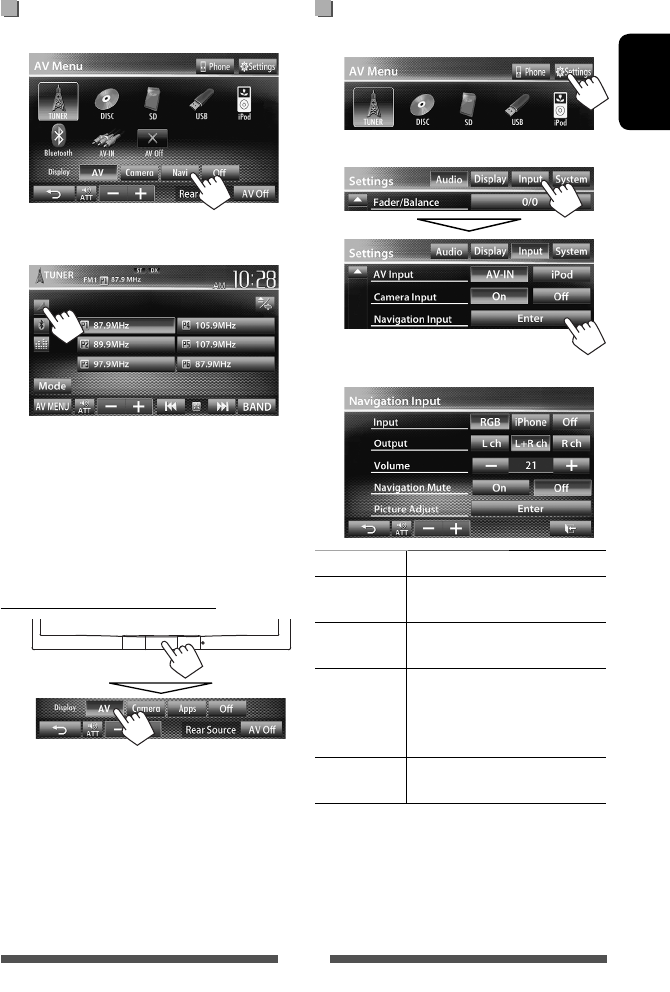
You can connect a navigation unit (not supplied) to the RGB input terminal so that you can view the navigation
screen. (☞ the Installation/Connection Manual)
• Please contact your dealer to inquire about compatible navigation units.
Activating navigation
1 Turn off the AV source.
On <AV Menu> screen:
2 Display <Input> setting screen.
3 Select <RGB> for <Input> setting on
<Navigation Input> screen.
• When <Input> is set to <RGB>, [Navi] button is
shown on the <AV Menu> screen, and [ ] button
is shown on the source control screen. You can display
the navigation screen by pressing either button.
(☞page 35)
To deactivate, select <Off> for <Input>.
EN_KW-AV70U.indb 34EN_KW-AV70U.indb 34 11/12/15 16:4111/12/15 16:41
35
ENGLISH
Settings for navigation unit
1 On <AV Menu>:
2
3
Input ☞ page 34
Output Select front speakers used for the
navigation guidance.
Volume Adjust the volume of the navigation
guidance. (0 to 35)
Navigation
Mute
Select <On> to attenuate the
sound coming through speakers
other than the front speakers during
navigation guidance.
Picture
Adjust
Adjust the brightness and blackness.
(☞ page 41)
To view the navigation screen
On <AV Menu> screen:
or
On source control screen:
• While the navigation screen is displayed, the touch
panel operations are available only for navigation.
• The aspect ratio of the navigation screen is fixed to
<Full> regardless of the <Aspect> setting (☞
page 42).
• You can select the source “
AV-IN
” for listening to an
audio source connected to the LINE IN jacks.
To cancel the navigation screen
EN_KW-AV70U.indb 35EN_KW-AV70U.indb 35 11/12/15 16:4111/12/15 16:41
36
ENGLISH
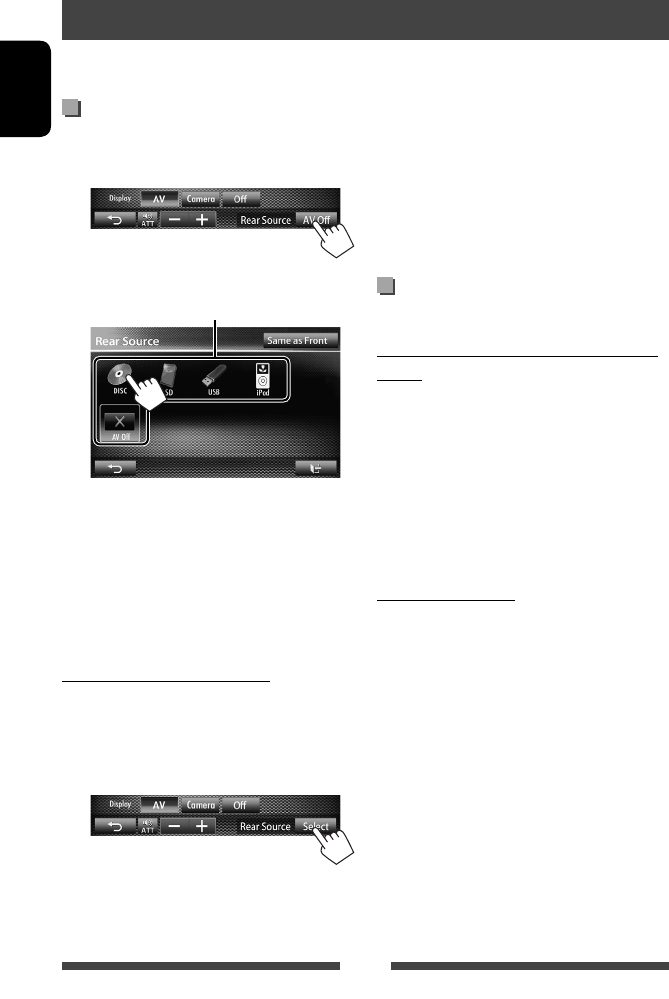
Displaying rear source images on
the external monitor
1 On <AV Menu> screen:
2 Select the rear source.
Selects the rear source
• If “
DISC
”, “
SD
”*, “
USB
”, or “
iPod
” is selected
as the front source, only the buttons of “
AV-
IN
”, “
AV Off
”, and the one selected as the front
source can be selected.
• You cannot select “
DISC
”, “
SD
”*, “
USB
”, or
“
iPod
” as the rear source when you select
“
Apps
” as the front source.
While activating rear source...
• To view a front source image on the rear monitor,
press [Same as Front].
– To select a source other than the front source as
the rear source, press [Select] on <AV Menu>
screen.
Rear source operations
You can enjoy the rear source playback on the external monitor connected to the VIDEO OUT and 2nd AUDIO OUT
jacks, while listening to any source.
• When you press [Same as Front] while listening to
music, the track list appears.
• If the selected source is other than “
DISC
”, “
SD
”*,
“
USB
”, or “
iPod
” or “
AV-IN
”, nothing appears on
the rear monitor.
* “
SD
” is available only for KW-AV70BT.
Operations on the external monitor
(from the remote controller only)
Selecting a folder or track on the control
screen
For DivX/MPEG1/MPEG2/JPEG/MP3/WMA/WAV/
CD/iPod
• DivX/MPEG1/MPEG2/JPEG: While playback is
stopped.
• CD/iPod: Skip step 1.
1 Press @ / # to select “Folder” column or “Track”
column.
2 Press % / fi to select a Folder or Track.
Using the list screen
For DivX/MPEG1/MPEG2/JPEG/MP3/WMA/WAV
While playback is stopped.
1 Press TOP M or MENU to display the list screen.
2 Press % / fi / @ / # to select a folder/track on
the list.
• To go back to the folder list, press RETURN.
3 Press ENT to confirm the selection.
EN_KW-AV70U.indb 36EN_KW-AV70U.indb 36 11/12/15 16:4111/12/15 16:41
37
ENGLISH
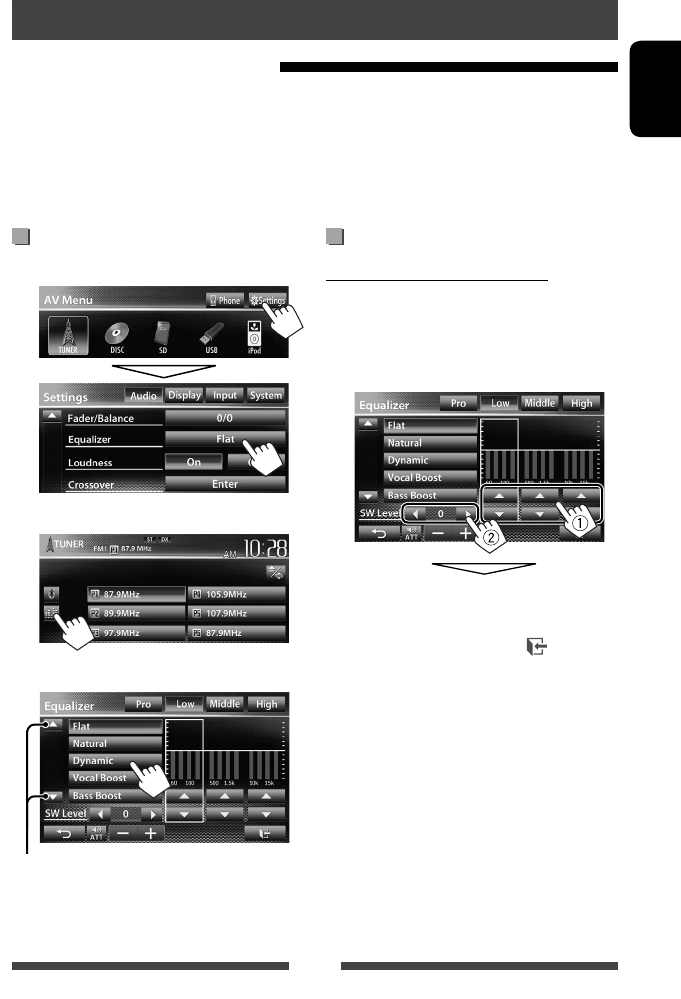
Sound adjustment
Selecting a preset sound mode
1 On <AV Menu> screen:
or
On the source control screen:
2 Select a sound mode.
Changes the page
Storing your own adjustment
Customizing preset sound mode
1 Select a sound mode. (☞ “Selecting a preset
sound mode”)
2 Adjust the level of each band (1), then
select the subwoofer level (2).
The adjustments are stored and <User> is
activated.
• To finish the procedure, press [ ].
• To make precise adjustments, ☞page 38.
Using the sound equalization
• The adjustment is memorized for each source until you adjust the sound again. If the source is a disc, the
adjustment is stored for each of the following categories.
– DVD/DVD-VR/ VCD
– CD
– DivX/MPEG1/MPEG2/MP3/WMA/WAV
• You cannot adjust the sound when the AV source is turned off.
EN_KW-AV70U.indb 37EN_KW-AV70U.indb 37 11/12/15 16:4111/12/15 16:41
38
ENGLISH
Adjusting the crossover
frequency
1 On <AV Menu> screen:
2
3 Select the item to adjust, then make
adjustments.
Adjusts the subwoofer level.
Adjusts the crossover frequency.
Selects the phase for the subwoofer.*
Adjusts the crossover for front or rear speakers
(high pass filter).
Adjusts the crossover for subwoofer (low pass filter).
* Not selectable when <Freq> is set to <Through>.
Adjusting the sound precisely
1 Perform steps 1 and 2 of “Selecting a
preset sound mode,” then...
2 Select a band.
3 Adjust the sound.
Reset Changes level of Low/Mid/
High to 0.
Freq Selects frequency.
QAdjusts the width of the
frequency.*1
Bass Activates/deactivates bass.*2
SW Level Adjusts subwoofer level.
The adjustments are overwritten if <User>
setting has been made (☞ page 37), and <User>
is activated.
• The adjustments are memorized until you
adjust sound again.
• To make adjustment for other bands, repeat
steps 2 and 3.
*1 Fixed for “High” band.
*2 Only for “Low” band.
EN_KW-AV70U.indb 38EN_KW-AV70U.indb 38 11/12/15 16:4111/12/15 16:41
39
ENGLISH
1 On <AV Menu> screen:
2
3 Select an item (<Backgrnd>, <Text> or
<Buttons>), then change the setting.
Background
1Select a background
Basic image (default)
You can select a color on the color
palette or adjust the color on the user
color adjuster (☞ the right column)
For setting your favorite scene as the background,
☞ page 40
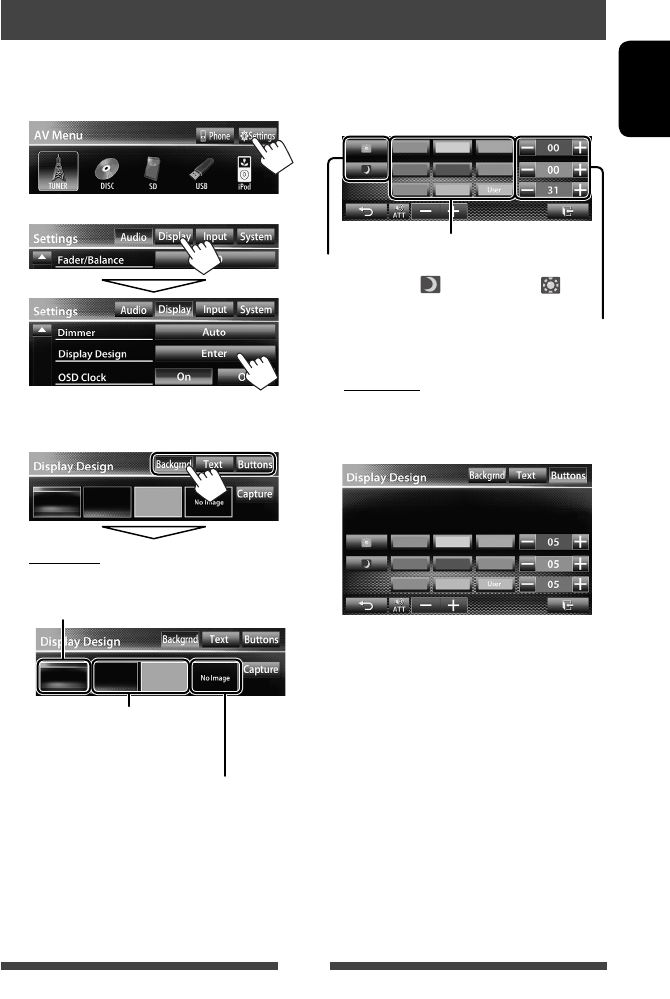
Changing display design
You can change the background, the color of text and touch panel buttons .
2Select/adjust the color
User color adjuster: You can make your own
color adjustment and store it to <User>
Dimmer setting: You can make selections for each
dimmer setting—< > (Dimmer On) or < >
(Dimmer Off)
Color palette
Text/Buttons
Select/adjust the color. (For details, ☞ above.)
• On the button color selecting screen, you can
select a color for touch panel buttons.
EN_KW-AV70U.indb 39EN_KW-AV70U.indb 39 11/12/15 16:4111/12/15 16:41
40
ENGLISH
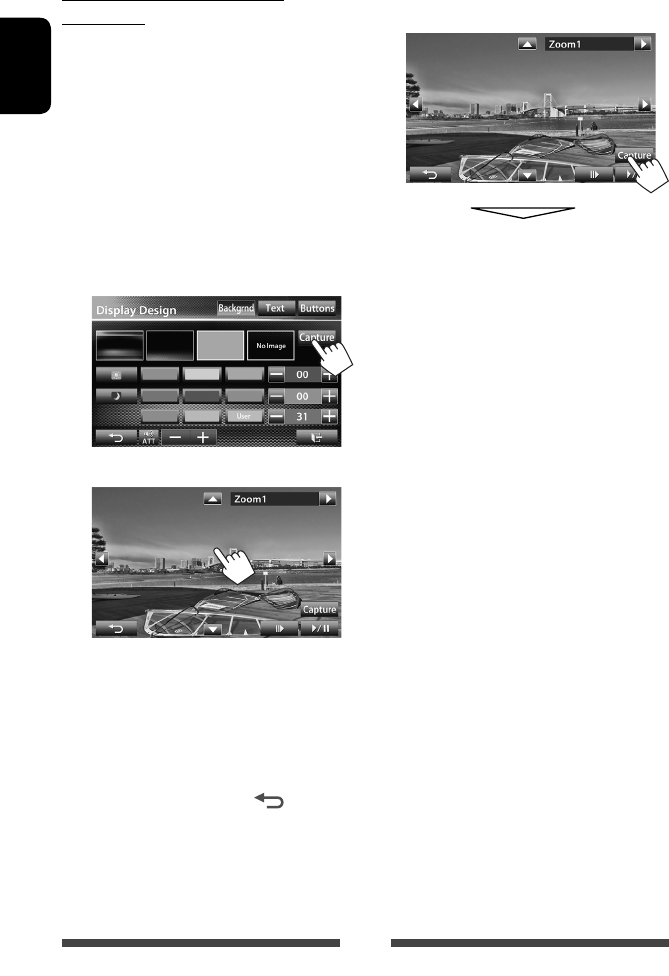
Using your favorite scene as the
background
While playing a video or JPEG, you can capture an image
and use the captured image as a background.
• You cannot capture copyrighted content and image
from iPod/iPhone.
• When using a JPEG file as the background, make sure
that the resolution is 800 x 600 pixels.
• The color of the captured image may look different
from that of the actual scene.
1 Play back a video or JPEG.
2 Display <Display Design> screen.
(☞page 39)
3
4 Adjust the image.
[6] *1Starts/pauses playback.
[E] *1Advances scenes frame-by-frame.
[3] Magnifies the scene. (<Full>,
<Zoom1> – <Zoom3>)
[5] [∞]
[2] [3] *2Moves the zooming frame.
• To cancel the capture, press [ ].
*1 Not displayed when playing an external
component connected to LINE IN/VIDEO IN jacks.
*2 Not displayed when <Full> is selected.
5 Capture the image displayed on the
screen.
A confirmation message appears. Press [Yes] to
store the newly captured image. (The existing
image is replaced with the new one.)
• Press [No] to return to the previous screen.
EN_KW-AV70U.indb 40EN_KW-AV70U.indb 40 11/12/15 16:4111/12/15 16:41
41
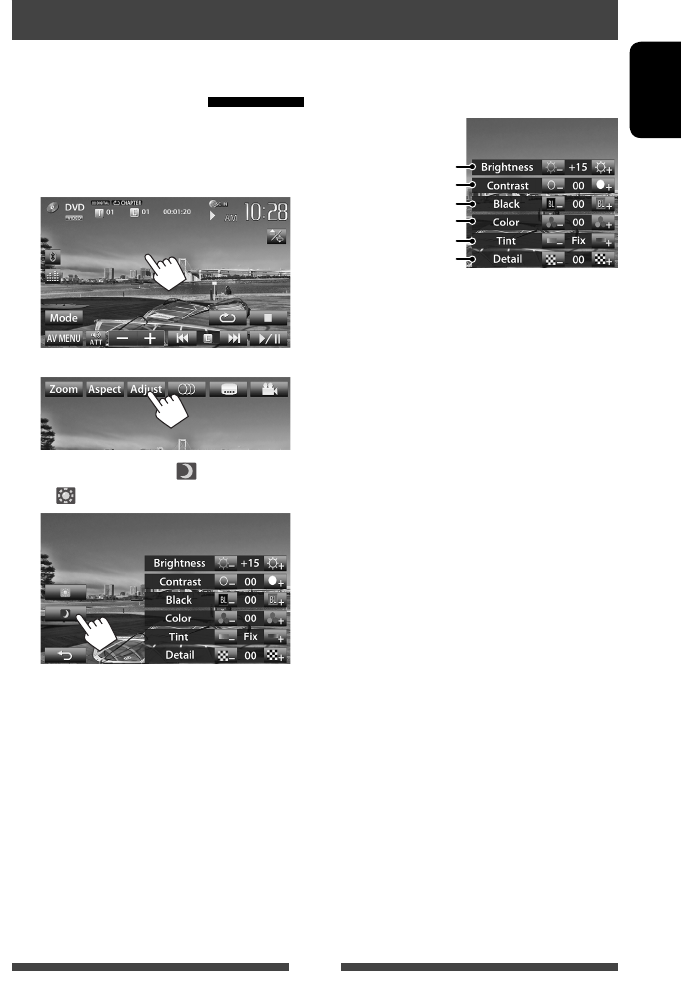
ENGLISH
Setting for video playback
You can change the setting for video playback.
Adjusting the picture
You can adjust the picture quality.
1 Touch any position of the screen other
than operation buttons.
2
3 Select Dimmer On (< >) or Off
(< >).
4 Adjust the picture (–15 to +15).
Adjusts the brightness
Adjusts the contrast
Adjusts the tint *
Adjusts the color
Adjusts the blackness
Adjusts the detail
* Adjustable only when the incoming signal is
NTSC.
EN_KW-AV70U.indb 41EN_KW-AV70U.indb 41 11/12/15 16:4111/12/15 16:41
42
ENGLISH
Changing the aspect ratio
You can change the aspect ratio for video playback.
1 Touch any position of the screen other
than operation buttons.
2
3
4:3 signal 16:9 signal
Full*1:
For 16:9 original
pictures
Panorama:
For viewing 4:3
pictures naturally
on the wide screen
Regular*1:
For 4:3 original
pictures
Auto: • For “
DISC
”/ “
SD
”*2/
“
USB
” only: Aspect ratio
is automatically selected
to match to the incoming
signals.
*1 While DivX is played back with <Monitor Type>
set to <16:9> (☞ page 22), the aspect ratio is not set
correctly.
*2 “
SD
” is available only for KW-AV70BT.
Zooming the picture
You can zoom the picture (<Full>, <Zoom1> to
<Zoom3>).
• When <Aspect> is set to <Panorama> or
<Auto> (☞ the left column), the picture is zoomed
with the aspect ratio of the <Full> setting.
1 Touch any position of the screen other
than operation buttons.
2
3
[5] [∞] [2] [3]* : Moves the zooming frame.
* Not displayed when <Full> is selected.
• Zooming function cannot be used for some video
sources.
EN_KW-AV70U.indb 42EN_KW-AV70U.indb 42 11/12/15 16:4111/12/15 16:41
43
ENGLISH
Activating the rear view camera
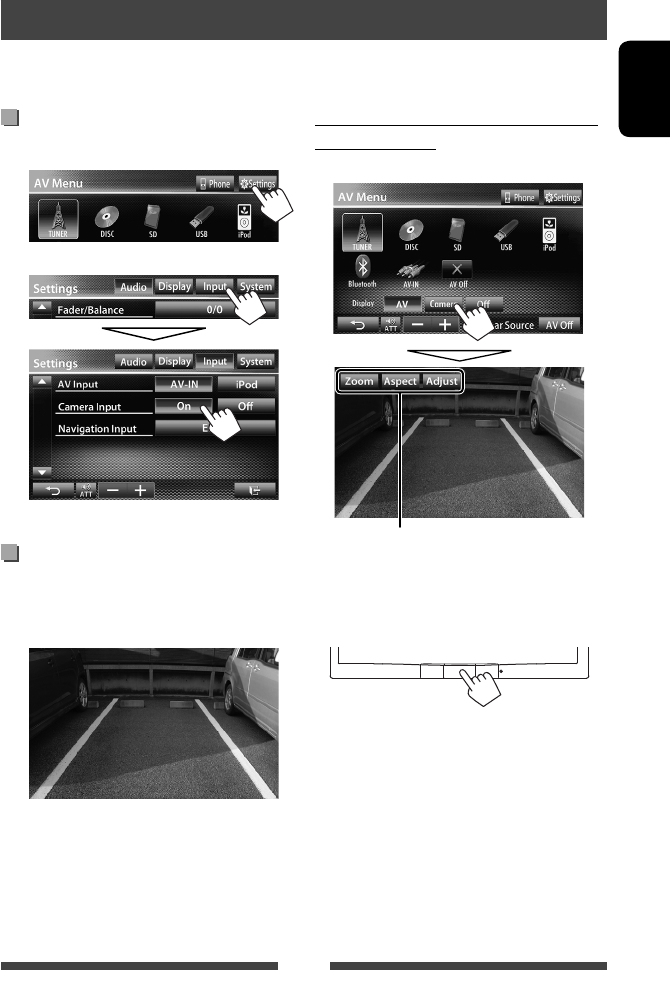
1 On <AV Menu> screen:
2
To deactivate, select <Off>.
Displaying the picture from the rear
view camera
The rear view screen is displayed when you shift the
gear to the reverse (R) position.
Using a rear view camera
• To use a rear view camera, the REVERSE GEAR SIGNAL lead connection is required. For connecting a rear view
camera, ☞ Installation/Connection Manual.
To display the picture from the rear view
camera manually
On <AV Menu> screen:
When displaying the picture from the rear view
camera manually, you can change the setting of the
picture. (☞ page 41)
To cancel the rear view screen
EN_KW-AV70U.indb 43EN_KW-AV70U.indb 43 11/12/15 16:4111/12/15 16:41
44
ENGLISH
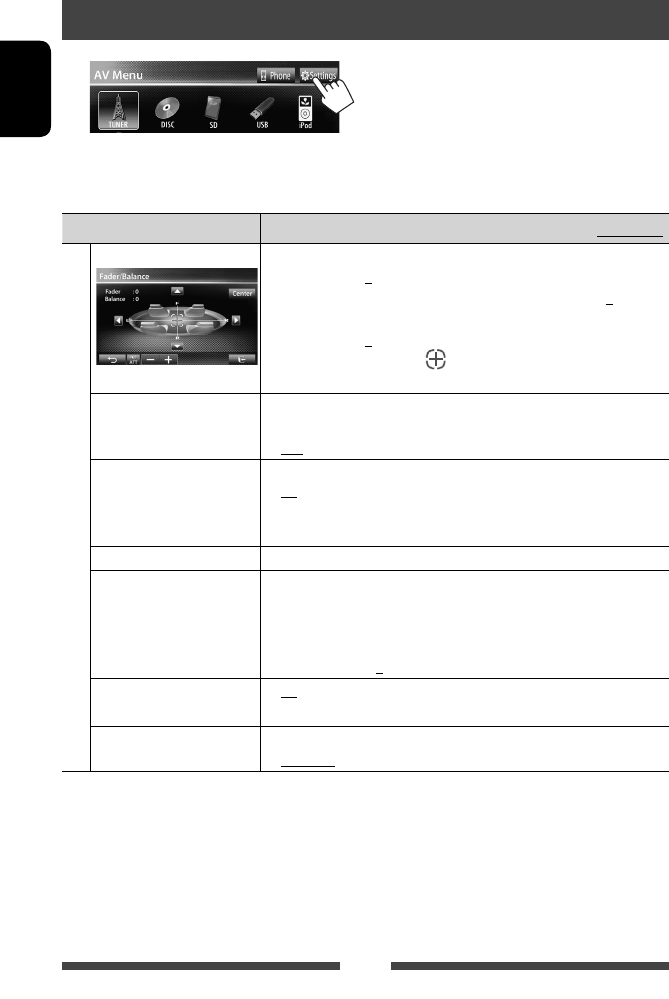
Setting menu items
• When changing settings for <Amplifier Gain>, <AV Input> and <Input> setting in <Navigation Input>,
turn off the AV source. For other settings, change them when the AV source is turned on.
Menu item Selectable setting/item Initial: Underlined
Audio
Fader/Balance Fader : Adjust the front and rear speaker output balance.
♦ F6 to R6; Initial 0
• When using a two-speaker system, set the fader to the center (0).
Balance : Adjust the left and right speaker output balance.
♦ L6 to R6; Initial 0
Press [ 5/∞/2/3 ] or drag [ ] to adjust.
• To clear the adjustment, press [Center].
Equalizer Change the sound mode or adjust and store the equalization for each source.
(☞ page 37)
♦ Flat/Natural/Dynamic/Vocal Boost/Bass Boost/Vibrant/User
Loudness You can activate/deactivate loudness.
♦ On
♦ Off
: Boost low and high frequencies to produce a well-
balanced sound at a low volume level.
: Cancels.
Crossover Adjust the crossover frequency. (☞ page 38)
Volume Adjust Adjust and store the auto-adjustment volume level for each source. (For
discs, the adjustment is stored for each of the following categories: DVD/
DVD-VR, VCD/CD, and DivX/MPEG1/MPEG2/MP3/WMA/WAV.) The volume
level will automatically increase or decrease when you change the source.
♦ –15 to +6; Initial 0
Amplifier Gain* ♦ On : Activates the built-in amplifier.
♦ Off : Deactivates the built-in amplifier.
Speaker Select Select the size of the connected speaker.
♦ Standard/Narrow/Middle/Wide
* To change the setting, turn off the AV source by pressing [AV Off] on <AV Menu> screen beforehand.
EN_KW-AV70U.indb 44EN_KW-AV70U.indb 44 11/12/15 16:4111/12/15 16:41
45
ENGLISH
Menu item Selectable setting/item Initial: Underlined
Display
Dimmer ♦ Auto
♦ On
♦ Off
♦ Dimmer
Time Set
: Dims the screen and button illumination when you turn
on the headlights.
• The ILLUMI lead connection is required. (☞
Installation/Connection Manual)
: Activates dimmer.
: Cancels.
: Sets the Dimmer On ( )/Off ( ) times.
• Press [5] or [∞] to set the time.
Display Design Change the display design (background, text color and touch panel button
color). (☞ page 39)
OSD Clock ♦ On
♦ Off
: Displays the clock while a video source is played back.
: Cancels.
Demonstration ♦ On
♦ Off
: Activates the demonstration on the screen.
: Cancels.
Scroll ♦ Auto
♦ Once
♦ Off
: Repeats scrolling.
: Scrolls the displayed information once.
: Cancels.
• Touching an information bar scrolls the text regardless of this setting.
GUI Adjust Adjust the brightness and blackness of the screen.
Press [Enter] to display the setting screen, select Dimmer On ( )/Off ( ),
then change the following settings:
♦ Brightness
♦ Black
: Adjusts brightness (–15 to +15; Initial 00 for Dimmer
On/+15 for Dimmer Off).
: Adjusts blackness (–15 to +15; Initial 00).
NTSC/PAL Select the color system of the external monitor.
♦ NTSC, PAL
Display Sensor Change the settings of how to display the buttons, the sensitivity of the
motion sensor, and how the screen is changed when no operation is
performed for a while. (☞ page 11)
Input
AV Input*1 You can determine the use of LINE IN/VIDEO IN jacks.
♦ AV-IN*2 : Select to use the external component connected to
LINE IN/VIDEO IN jacks or the iPod/iPhone connected by
using USB 2.0 cable (☞ pages 27 and 33)
♦ iPod
♦ BT*2*3
: Select to use the iPod/iPhone connected by using JVC
KS-U30. (☞ page 27)
: Select when playing back the Bluetooth audio player
using the Bluetooth adapter (KS-BTA100). (☞ page 59)
*1 To change the setting, turn off the AV source by pressing [AV Off] on <AV Menu> screen and select ”
AV Off
” as the
rear souce beforehand. <AV Input> setting can be changed only when <Input> setting in <Navigation Input>
is set to <RGB> or <Off>.
*2 When <AV Input> is set to <AV-IN> or <BT>, the video from iPod/iPhone is not displayed on the screen.
* 3 Only for KW-AV70.
EN_KW-AV70U.indb 45EN_KW-AV70U.indb 45 11/12/15 16:4111/12/15 16:41
46
ENGLISH
Menu item Selectable setting/item Initial: Underlined
Input
Camera Input ♦ On
♦ Off
: Displays the picture from the rear view camera when
you shift the gear to the reverse (R) position.
: Cancels.
Navigation Input Change the settings for displaying the screen of App from connected iPod
touch/iPhone/external navigation unit. (☞ pages 31 and 35)
• When <Input> is set to <iPhone>, <Navigation Mute> does not
work.
System
Language Select the text language used for on-screen information.
♦ English /Español/Français/Deutsch/Italiano/Nederlands/Svenska/
Dansk/Руccĸий /Português/ / / /
Türkçe/ / /
• “Please Power Off” appears when the setting is changed. Turn off the
power, then turn on to enable the change.
♦ GUI
Language
: Select a language (<English> or <Local>: the
language selected above) used for displaying operation
buttons and menu items.
Time Set Adjust the clock time. (☞ page 7)
Beep ♦ On
♦ Off
: Activates the key-touch tone.
: Cancels.
User Profile You can memorize, recall, or clear the settings you have made. (☞ page 47)
Touch Panel Adjust Adjust the touch position of the buttons on the screen. (☞ page 48)
Initialize Initialize all settings you have made. Hold [Enter] to initialize the settings.
• After initializing the settings, adjust the settings on the <Initial
Settings> screen. (☞ page 6)
Serial Number Displays the serial number.
DivX® VOD
This unit has its own Registration Code. Once you have played back a file
with which the Registration Code recorded, this unit’s Registration Code is
overwritten for copyright protection.
• Press [Enter] to display the information.
• To return to the previous screen, press [OK].
System Information Displays the version information on the software. You can update the
software. (☞ page 48)
Steering Remote Learning This setting is not used.
EN_KW-AV70U.indb 46EN_KW-AV70U.indb 46 11/12/15 16:4111/12/15 16:41
47
ENGLISH
Memorizing your settings
1 On <Settings> screen:
2
3 Select an item (<User1>, <User2> or
<User3>) to memorize the settings.
A confirmation message appears. Press [Yes].
4 Finish the procedure.
Recalling your settings
• Turn off the AV source by pressing [AV Off] on <AV
Menu> and select “
AV Off
” as the rear source
beforehand.
1 On <User Profile> screen (☞ step 2 on the left
column):
A confirmation message appears. Press [Yes].
2 Finish the procedure.
Clearing your settings
1 On <User Profile> screen (☞ step 2 on the left
column):
2
Clears all settings memorized in <User1>,
<User2> and < User3>
A confirmation message appears. Press [Yes].
3 Finish the procedure.
Memorizing/recalling the settings
You can memorize the following settings:
• Settings on <Settings> screen: Fader/Balance, Equalizer, Loudness, Crossover (HPF/LPF/SW Level
settings), Volume Adjust, Speaker Select, Dimmer, Display Design, Display Sensor, AV Input, Camera
Input, Navigation
• Settings for “
AV-IN
”: AV-IN Name
EN_KW-AV70U.indb 47EN_KW-AV70U.indb 47 11/12/15 16:4111/12/15 16:41
48
ENGLISH
Updating the system
You can update the system by connecting a USB device
containing an update file.
1 Create an update file, copy it to a USB
device, and connect it to the unit.
• To connect a USB device, ☞ page 25.
2 On <Settings> screen:
3
It may take a while.
If the update has been completed successfully,
“Update Completed” appears. Reset the unit.
• If the update has failed, turn the power off and then
on, and retry the update.
• Even if you have turned off the power during the
update, you can restart the update after the power
is turned on. The update will be performed from the
beginning.
Adjusting the touch position
You can adjust the touch position on the touch panel if
the position touched and the operation performed do
not match.
1 On <Settings> screen:
2 Touch the center of the marks at the
lower left and at the upper right as
instructed.
• To cancel the current operation, press [Cancel].
• To reset to the initial setting, press [Reset].
EN_KW-AV70U.indb 48EN_KW-AV70U.indb 48 11/12/15 16:4111/12/15 16:41
49
ENGLISH
Bluetooth operations for KW-AV70BT
Bluetooth is a short-range wireless radio communication technology for the mobile device such as mobile phones,
portable PCs, and other devices. The Bluetooth devices can be connected without cables and communicate with each
other.
• Refer to pages i and ii at the end of manual to check the countries where you may use the Bluetooth® function.
Information for using Bluetooth® devices
BLUETOOTH OPERATIONS
When shipped from the factory, the Bluetooth
adapter (KS-UBT1) is attached.
Bluetooth adapter
(KS-UBT1)
• Keep the Bluetooth adapter attached when using
the Bluetooth function.
• This port is designed for the use with KS-UBT1
only. Other Bluetooth adapters or USB devices
cannot be used.
Bluetooth profile
This unit supports the following Bluetooth profiles;
• HFP (Hands-Free Profile) 1.5
• OPP (Object Push Profile) 1.1
• A2DP (Advanced Audio Distribution Profile) 1.2
• AVRCP (Audio/Video Remote Control Profile) 1.3
• PBAP (Phone Book Access Profile) 1.0
Icons for Bluetooth button
: No device is connected.
: A Bluetooth audio player is
connected.
: A Bluetooth mobile phone is
connected.
: Both a Bluetooth mobile phone and
audio player are connected.
• Some Bluetooth devices may not be connected to
this unit depending on the Bluetooth version of the
device.
• This unit may not work for some Bluetooth devices.
• Connecting condition may vary depending on
circumstances around you.
• For some Bluetooth devices, the device is
disconnected when the unit is turned off.
Bluetooth Information: If you wish to
receive more information about Bluetooth, visit
the following JVC web site: <http://www3.
jvckenwood.com/english/car/> (English website
only)
EN_KW-AV70U.indb 49EN_KW-AV70U.indb 49 11/12/15 16:4111/12/15 16:41
50
ENGLISH
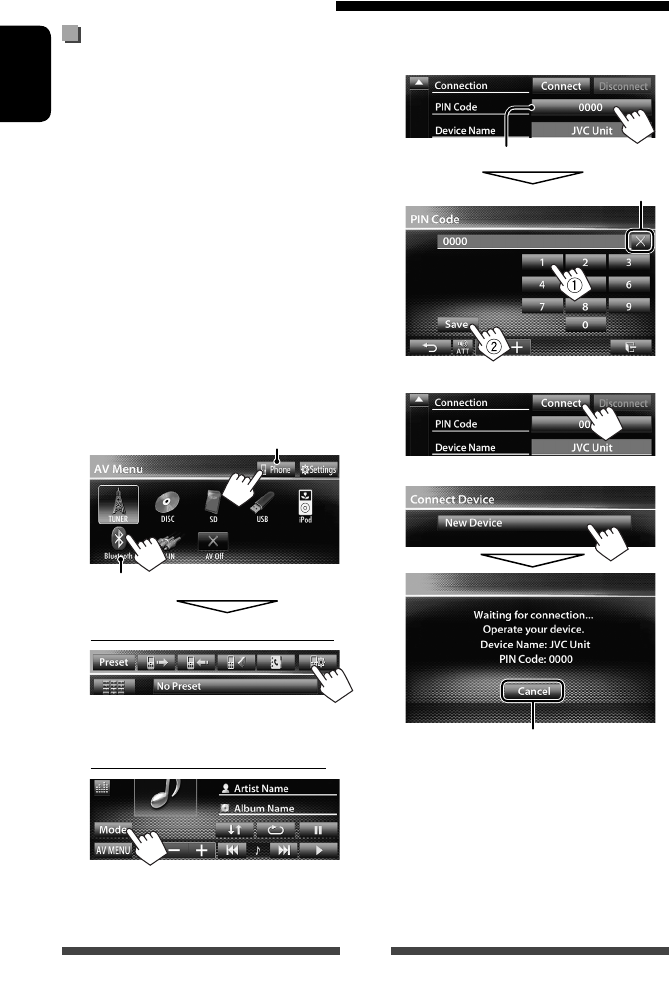
Connecting a new Bluetooth device
for the first time
When you connect a Bluetooth device to the unit
for the first time, make pairing between the unit
and the device. Pairing allows Bluetooth devices to
communicate each other.
To make pairing, you may need to enter the PIN
(Personal Identification Number) code of your Bluetooth
device you want to connect.
• Once the connection is established, it is registered in
the unit even if you reset the unit. Up to 5 devices can
be registered in total.
• Only one device for Bluetooth phone and one for
Bluetooth audio can be connected at a time.
• To use the Bluetooth function, you need to turn on
Bluetooth function of the device.
1 Display the Bluetooth setting screen.
On <AV Menu> screen:
Mobile phone
Audio player
For connecting a Bluetooth mobile phone
The phone setting screen is displayed.
For connecting a Bluetooth audio player
<Mode> screen is displayed.
Connecting Bluetooth devices
2 Change the PIN code.
• If you skip changing the PIN code, go to step 3.
PIN code (initial: 0000)
Deletes last character
3
4
Cancel
5 Operate the Bluetooth device to
connect.
“Connected” appears. Press [OK] to confirm the
operation.
Now connection is established and you can use the
Bluetooth device through the unit.
EN_KW-AV70U.indb 50EN_KW-AV70U.indb 50 11/12/15 16:4111/12/15 16:41
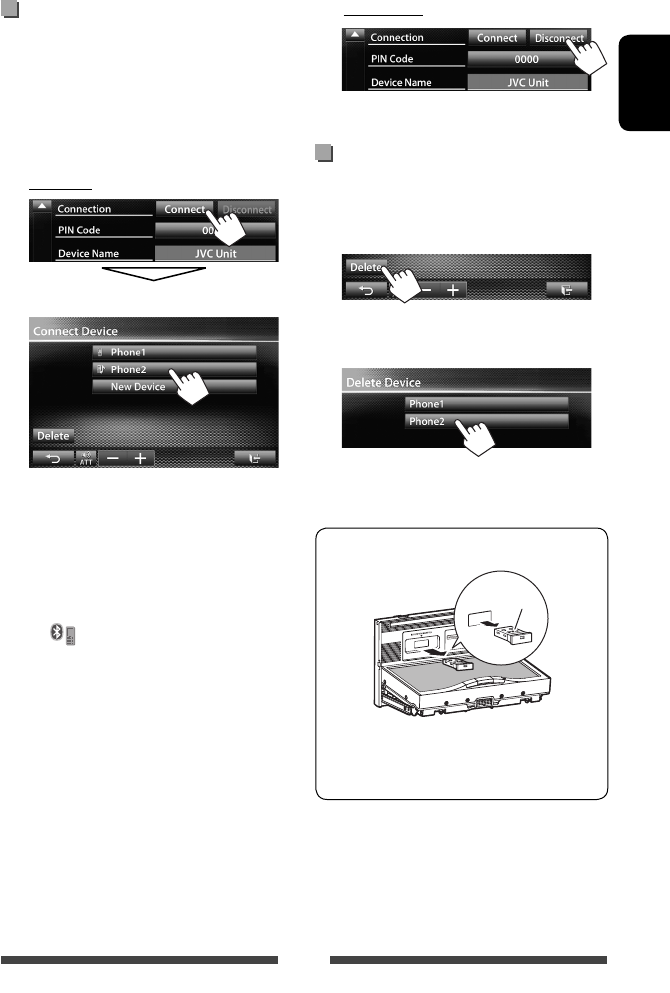
51
ENGLISH
Connecting/disconnecting a
registered Bluetooth device
1 Display the Bluetooth setting screen.
(☞ page 50)
• For Bluetooth mobile phone: Phone setting
screen
• For Bluetooth audio player: <Mode> screen
2 To connect
Select the device you want to connect.
“Connected” appears. Press [OK] to confirm the
operation.
• All registered devices (mobile phone and audio
player) are listed on <Connect Device>.
– Selectable items depend on the device you
are operating.
• When a mobile phone is connected, holding
[ ] on the source control screen switches
between the last connected mobile phone and
current one.
To disconnect
A confirmation message appears. Press [Yes].
Deleting a registered Bluetooth
device
1 On <Connect Device> screen (☞ Step 2 on the
left column):
2 Select a device to delete the
registration.
A confirmation message appears. Press [Yes].
To detach the Bluetooth adapter
“JVC”
• Store the Bluetooth adapter in the supplied bag.
• When inserting the Bluetooth adapter again,
attach it firmly with the JVC logo facing up.
EN_KW-AV70U.indb 51EN_KW-AV70U.indb 51 11/12/15 16:4111/12/15 16:41
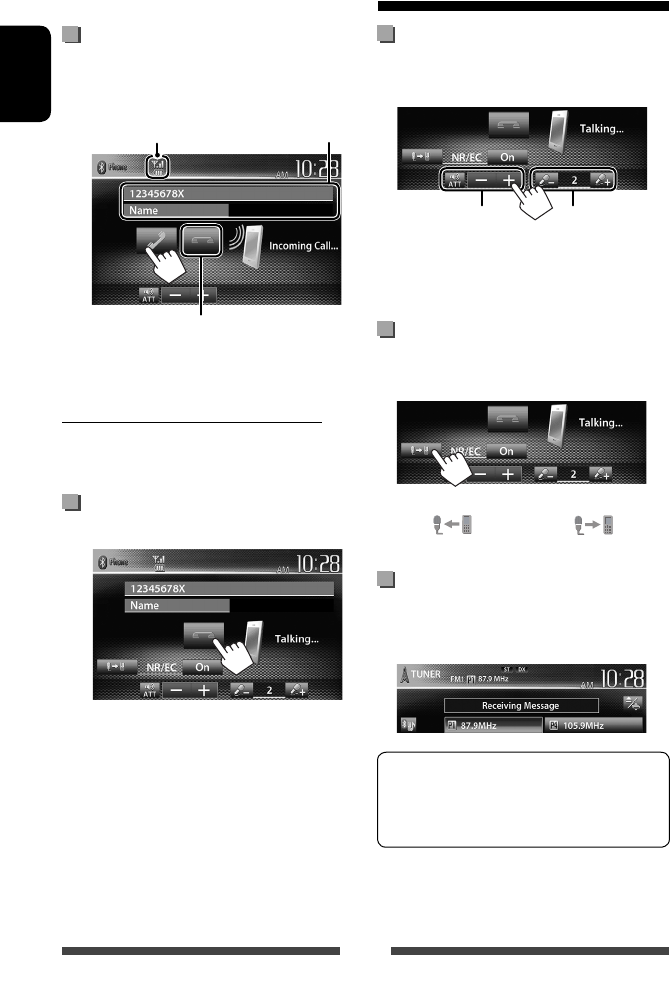
52
ENGLISH
Receiving a call
When a call comes in...
Status of the device/Battery
reminder (only when the
information comes from the device)
Call information
(if acquired)
Rejects the call
• Phone operation is not available while the picture
from the rear view camera is displayed. (☞ page 43)
When <Auto Answer> is set to <On>
The unit answers the incoming call automatically.
(☞ page 58)
Ending a call
While talking...
Using the Bluetooth mobile phone
Adjusting the volume of calls/
earpiece/microphone
While talking...
Adjusts the
microphone volume
Adjusts the volume of
calls/earpiece
• This adjustment does not affect the volume level of
the other sources.
Switching between handsfree mode
and phone mode
While talking...
Each time you press the button, the talking method is
switched ( : handsfree mode / : phone
mode).
Checking SMS reception
If the mobile phone is compatible with SMS (Short
Message Service), the unit tells you a message has been
received.
To read a received message, operate the mobile
phone after stopping the car in a safe place.
• You cannot read, edit, or send a message through
the unit.
• For some mobile phones, the notification message
may not be shown even if the SMS function is
supported.
EN_KW-AV70U.indb 52EN_KW-AV70U.indb 52 11/12/15 16:4111/12/15 16:41
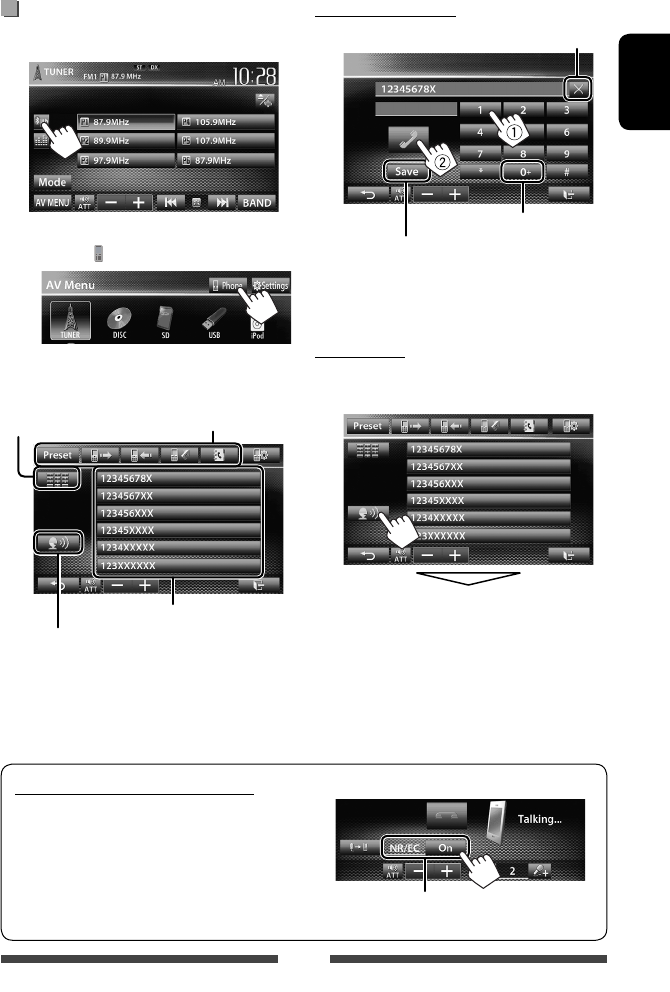
53
ENGLISH
To reduce echo/noise while talking
Make sure that NR/EC (Noise reduction/Echo cancel)
function is activated on the screen while talking.
Select <On> to reduce the noise and cancel the echo
while talking.
Making a call
1 On the source control screen:
• You can also display the phone control screen by
pressing [ Phone] on <AV Menu> screen.
2 Select a method to make a call.
Preset list (For presetting, ☞ page 55)
Direct number entry
(☞the right column)
Voice dialing (☞ the right column)
Preset list/phone book/call
lists (☞ page 54)
Direct number entry
Hold: Adds “+”
Presets the entered phone number on
the preset list (☞ page 55)
Deletes last character
• You can enter up to 32 numbers.
Voice Dialing
• Available only when the connected mobile phone has
the voice recognition system.
Speak the name you want to call.
To cancel, press [Cancel].
EN_KW-AV70U.indb 53EN_KW-AV70U.indb 53 11/12/15 16:4111/12/15 16:41
54
ENGLISH
Using the preset list/phone book/call lists
1
[Preset] From preset list
[ ] From dialled call list.
[ ] From received call list.
[ ] From missed call list.
[ ] From phone book.
• For copying the phone book,
☞ page 55.
2
To use the A to Z search on phone book
When phone book list screen is displayed, you can
search by initial.
1
2 Select the initial.
Displays the other letters
3 Select a phone number from the list.
To display the details of an entry
When phone book list screen is displayed, you can
display the details of an entry and select a phone
number if several phone numbers are registered.
1 Display the details of the desired entry.
2 Select a phone number to call.
EN_KW-AV70U.indb 54EN_KW-AV70U.indb 54 11/12/15 16:4111/12/15 16:41
55
ENGLISH
Presetting the phone numbers
You can preset up to 6 phone numbers.
1 On the source control screen:
2 Select an item from phone book/call
lists.
3 Select a phone number.
(Hold)
4 Select a preset number to store.
• You can also preset a phone number entered on the
direct number entry screen by pressing [Save]. (☞
page 53)
Copying the phone book
You can copy the phone book memory of a mobile
phone into the unit (up to 400 entries).
1 On the source control screen:
2
Numbers of the phone book entries copied
PIN code (initial: 0000)
3 Operate the target mobile phone.
• Refer to the instruction manual supplied with
your mobile phone.
• To cancel the transfer, press [Finish].
4 Finish the procedure.
The phone book memory is copied from the
mobile phone.
EN_KW-AV70U.indb 55EN_KW-AV70U.indb 55 11/12/15 16:4111/12/15 16:41
56
ENGLISH
Deleting the phone number entries
in the unit
1 Display the preset list/phone book/call
list you want to delete. (☞ page 54)
2
• You cannot delete data when <Phone> is
selected.
3 Select the item you want to delete.
Delete all the numbers/names in the selected list
A confirmation message appears. Press [Yes].
About mobile phones compatible
with Phone Book Access Profile
(PBAP)
If your mobile phone supports PBAP, the phone book
and call lists are automatically copied to the unit when
the mobile phone is connected.
• Phone book: up to 5 000 entries
• Dialled calls, received calls, and missed calls: up to 50
entries each
To display the phone book/call lists of the
mobile phone or the unit
Connected mobile phone
This unit
EN_KW-AV70U.indb 56EN_KW-AV70U.indb 56 11/12/15 16:4111/12/15 16:41
57
ENGLISH
• To register a new device, ☞ page 50.
• To connect/disconnect a device, ☞ page 51.
Using the Bluetooth audio player
Status of the device/Battery reminder
(only when the information comes
from the device)
Tag data (current track title/artist
name/album title) *1
• Touching an information bar
scrolls the text if not all of the
text is shown.
Playback status
(3: play / 8: pause) * 1
Track no./Playing time *1
Playback mode *1 (☞ below)
☞ page 49
• The operation buttons, indications and information displayed on the screen differ depending on the
connected device.
[8] Pauses playback.
[ ]Selects Repeat playback mode. *1 * 2
[ ] Selects Random playback
mode. *1 *2
[3] Starts playback.
[4] [¢] • Selects track. (Press)
• Reverse/forward search. (Hold)
[] [–] [+] Adjusts the volume.
[Mode] Displays the Bluetooth setting
screen. (☞ page 58)
[AV MENU] Displays <AV Menu> screen.
*1 Available only for the devices compatible with AVRCP 1.3.
*2 To cancel random and repeat mode, press the button repeatedly until the indicator disappears.
EN_KW-AV70U.indb 57EN_KW-AV70U.indb 57 11/12/15 16:4111/12/15 16:41
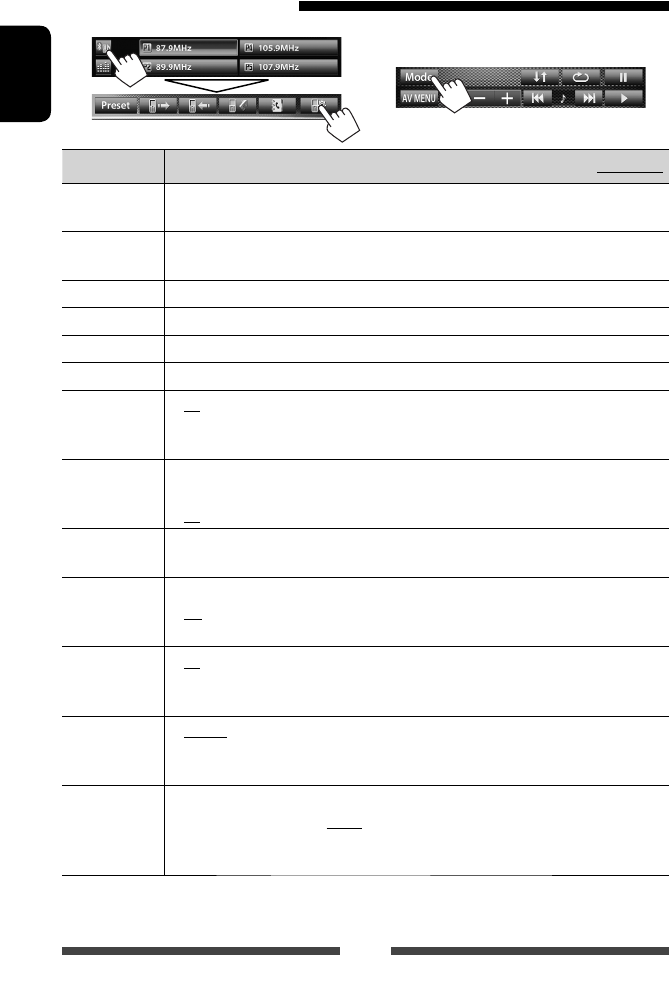
58
ENGLISH
Mobile phone
Menu items Selectable setting/item Initial: Underlined
Connection ♦ Connect
♦ Disconnect
: ☞ page 51
: ☞ page 51
PIN Code Changes the PIN code of the unit.
• Touch the current PIN code, enter a new PIN code, then press [Save].
Device Name Shows the device name to be shown on the Bluetooth device—JVC Unit.
Device Address Shows the MAC address of the unit.
Phone Device*1Shows the phone device name.
Audio Device*2Shows the audio device name.
Auto connect ♦ On
♦ Off
: The connection is automatically established with the last connected
Bluetooth device when the unit is turned on.
: Cancels.
HF/Audio
Output
Select the speakers used for Bluetooth (both phone use and audio player).
♦ Front
♦ All
: From front speakers only.
: From all speakers.
Initialize Hold [Enter] to clear the registration of Bluetooth devices and memory of the preset list and
call lists.
Auto Answer *1♦ On
♦ Off
: The unit answers the incoming calls automatically.
: The unit does not answer the calls automatically. Answer the calls
manually.
SMS Notify*1♦ On
♦ Off
: The unit informs you of the arrival of a message by ringing and
displaying “Receiving Message.”
: The unit does not inform you of the arrival of a message.
Ring Mode*1♦ System
♦ Phone
: Selects the ring tone set on the unit.
: Selects the ring tone set on the mobile phone. (This function may not
work depending on the mobile phone.)
Ring Tone
Change*1
When <Ring Mode> is set to <System>, press [Enter], then select the ring tone for
received calls and SMS from <Tone1>, <Tone2>, <Tone3>.
♦ Call Tone
♦ Message Tone
: Selects the ring tone for phone calls.
: Selects the ring tone for SMS.
*1 Appears only for the phone setting screen.
*2 Appears only for <Mode> screen while “
BT Audio
” is selected as the source.
Bluetooth audio player
On “
BT Audio
” source control screen:
Bluetooth device settings
EN_KW-AV70U.indb 58EN_KW-AV70U.indb 58 11/12/15 16:4111/12/15 16:41
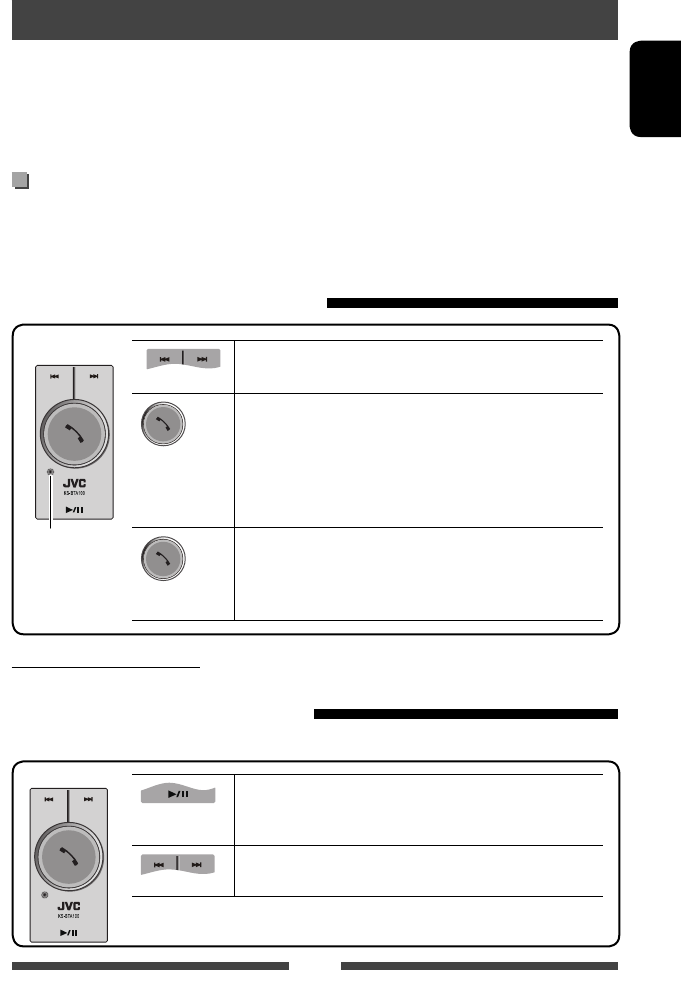
59
ENGLISH
Bluetooth operations for KW-AV70
For Bluetooth operations, it is required to connect the Bluetooth adapter, KS-BTA100 (separately purchased) to the
LINE IN terminals on the rear of the unit. (☞ the Installation/Connection Manual)
• KS-BTA100 is not available in some countries. Please contact your dealer where you purchased this unit.
• For details, refer also to the instructions supplied with the Bluetooth adapter and the Bluetooth device.
• Operations may be different according to the connected device.
Preparation
1 Register (pair) a Bluetooth device with KS-BTA100.
• Refer to the instructions manual supplied with KS-BTA100.
2 Select <BT> for <AV Input> setting. (☞ page 45 )
Using the Bluetooth mobile phone
Adjusting the microphone volume
Volume level: High/Normal (initial)/Low
(Low) (High)
(Press)
• Receiving a call
When a call comes in...
• Making a call
Making a call to the last connected number from your phone.
• Switching between handsfree and phone
While talking...
(Hold)
• Ends/rejects call
• Voice dialing
Voice dialing is available only when the connected mobile phone
has the voice recognition system.
KS-BTA100
Microphone
About microphone volume:
• When you turn off the power of the unit, the volume level changes to Normal.
Using the Bluetooth audio player
1 Select “
Bluetooth
” as the source. (☞ page 12)
Starts playback/pauses.
• If playback does not start, operate the Bluetooth audio player to
start playback.
• Selects track. (Press)
• Fast-forwards or reverses the track. (Hold)
KS-BTA100
EN_KW-AV70U.indb 59EN_KW-AV70U.indb 59 11/12/15 16:4111/12/15 16:41
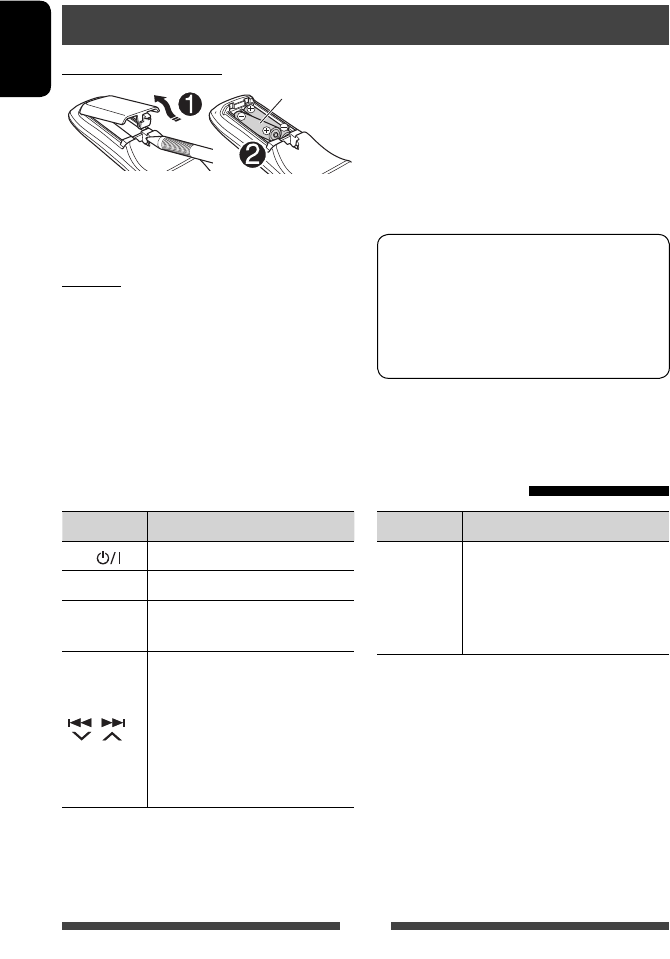
60
ENGLISH
Installing the batteries
R03/LR03/AAA
Insert the batteries into the remote controller by
matching the polarity (+ and –) correctly.
Caution:
• Danger of explosion if battery is incorrectly replaced.
Replace only with the same or equivalent type.
• Battery shall not be exposed to excessive heat such as
sunshine, fire, or the like.
Using the remote controller
REFERENCE
Button Operations
ATT / Attenuates/restores the sound.
DISP Does not function for this unit.
5 / ∞• Selects the preset stations.
• Selects a title/item/folder.
/
• Searches for stations
automatically.
• Searches for stations manually.
(Hold)
• Selects track.
• Reverse search/forward search.
(Hold)
If the effectiveness of the remote controller
decreases, replace the batteries.
Before using the remote controller:
• Aim the remote controller directly at the remote
sensor on the unit.
• DO NOT expose the remote sensor to bright light
(direct sunlight or artificial lighting).
The unit is equipped with the steering wheel
remote control function.
• See the Installation/Connection Manual
(separate volume) for connection.
• Operations may differ depending on the types of
the steering wheel remote control.
Operations using the remote controller (RM-RK252)
Button Operations
1 / ¡
• Reverse search/forward search.
• DVD-Video/DVD-VR/VCD: Slow
motion playback (during pause).
– DVD-VR/VCD: Reverse slow
motion does not work.
EN_KW-AV70U.indb 60EN_KW-AV70U.indb 60 11/12/15 16:4111/12/15 16:41

61
ENGLISH
Button Operations
VOL +/VOL –
• Adjusts the volume level.
• “2nd VOL” function does not
work for this unit.
SOURCE Selects the source.
6Starts/pauses*1
playback.
PHONE / Answers incoming calls.*2
BAND / 7/
• Selects the bands.
• Stops playback.
• Ends the call.
• Pauses playback of Bluetooth
audio.*2
0 – 9
(☞ page 62)
• Enters a number while holding
SHIFT.
• “SETUP” function does not work
for this unit.
1 – 6 Enters preset station number while
holding SHIFT.
ASPECT
Changes the aspect ratio.
• To check the current aspect ratio
setting, operate on the touch
panel. (☞ page 42)
RETURN Returns to the previous screen.
TOP M
(☞ page 62)
• DVD-Video: Shows the disc
menu.
• DVD-VR: Shows the Original
Program screen.
• VCD: Resumes PBC playback.
MENU
(☞ page 62)
• DVD-Video: Shows the disc
menu.
• DVD-VR: Shows the Playlist
screen.
• VCD: Resumes PBC playback.
% / fi/@ / #
• DVD-Video: Makes selection/
settings.
• DivX
: Skips back or forward by
about 5 minutes.
Button Operations
ENT Confirms selection.
OSD/ Does not function for this unit.
DUAL/ Does not function for this unit.
SHIFT Functions with other buttons.
DIRECT/CLR
• Enters direct search mode when
pressed with SHIFT button.
(☞ page 62)
• Erases the misentry when
pressed with SHIFT button.
• “SURROUND” function does not
work for this unit.
* 1 Does not work while listening to Bluetooth audio.
*2 Only for KW-AV70BT .
EN_KW-AV70U.indb 61EN_KW-AV70U.indb 61 11/12/15 16:4111/12/15 16:41

62
ENGLISH
Various disc operations
Using the disc menu
• DVD-Video/DVD-VR
1 For DVD Video, press TOP M or MENU.
For DVD-VR, press...
TOP M: To display Original Program
MENU: To display Playlist
2 Press % / fi/@ / # to select an item you want to
play.
3 Press ENT to confirm the selection.
• VCD
During PBC playback...
1 Press DIRECT while holding SHIFT to enter the
search mode.
2 Press a number button while holding SHIFT to
select the item you want to play.
3 Press ENT to confirm the selection.
• To return to the previous screen, press RETURN.
To cancel PBC playback
1 Press 7 to stop PBC playback.
2 Press DIRECT while holding SHIFT.
3 Press a number button while holding SHIFT to
select a desired track.
4 Press ENT to confirm the selection.
• To resume PBC, press TOP M or MENU.
Searching for an item directly
Tuner frequency
1 Press DIRECT while holding SHIFT to enter the
search mode.
2 Press number buttons while holding SHIFT to enter
a frequency.
• To erase a misentry, press CLR (clear) while
holding SHIFT.
3 Press ENT to confirm the entry.
DVD-Video/DVD-VR/DivX/MPEG1/MPEG2/JPEG/
MP3/WMA/WAV/VCD/CD
1 Press DIRECT while holding SHIFT to enter the
search mode.
• Each time you press DIRECT, the item to search
for changes.
2 Press a number button while holding SHIFT to
select a desired item.
• To erase a misentry, press CLR (clear) while
holding SHIFT.
3 Press ENT to confirm the selection.
EN_KW-AV70U.indb 62EN_KW-AV70U.indb 62 11/12/15 16:4111/12/15 16:41
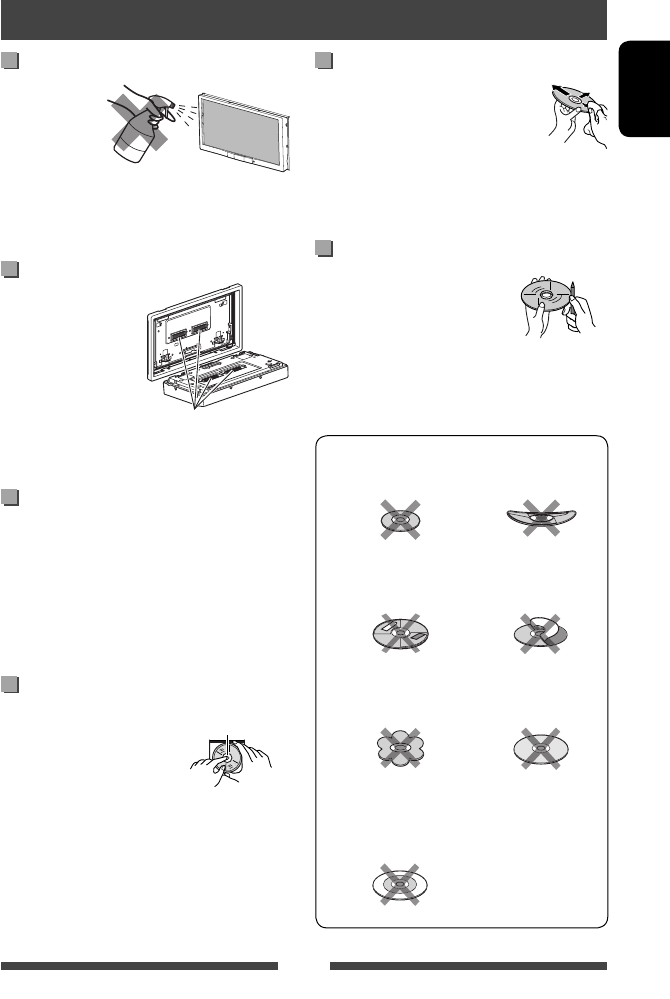
63
ENGLISH
Caution on cleaning the unit
Do not use any
solvent (for
example, thinner,
benzine, etc.),
detergent, or
insecticide. This may damage the monitor or the unit.
Recommended cleaning method:
Gently wipe the panel with a soft, dry cloth.
How to clean the connector
Frequent detachment will
deteriorate the connectors.
To minimize this
possibility, periodically
wipe the connectors with
a cotton swab or cloth
moistened with alcohol,
being careful not to damage the connectors.
Moisture condensation
Moisture may condense on the lens inside the unit in
the following cases:
• After starting the heater in the car.
• If it becomes very humid inside the car.
Should this occur, the unit may malfunction. In this
case, eject the disc and leave the unit turned on for a
few hours until the moisture evaporates.
How to handle discs
When removing a disc from
its case, press down the center
holder of the case and lift the
disc out, holding it by the edges.
• Always hold the disc by the
edges. Do not touch its recording surface.
When storing a disc in its case, gently insert the
disc around the center holder (with the printed surface
facing up).
• Make sure to store discs in their cases after use.
Connectors
Center holder
To keep discs clean
A dirty disc may not play correctly.
If a disc does become dirty, wipe it with a
soft cloth in a straight line from center to
edge.
• Do not use any solvents (for example, conventional
record cleaner, spray, thinner, benzine, etc.) to clean
discs.
To play new discs
New discs may have some rough spots
around the inner and outer edges. If
such a disc is used, this unit may reject
the disc.
To remove these rough spots, rub the edges with a
pencil or ball-point pen, etc.
Do not use the following discs:
8 cm CD Warped disc
Sticker and sticker
residue Stick-on label
Unusual shape
C-thru Disc (semi-
transparent disc)
Transparent or semi-
transparent parts on its
recording area
Maintenance
EN_KW-AV70U.indb 63EN_KW-AV70U.indb 63 11/12/15 16:4111/12/15 16:41

64
ENGLISH
Playing MP3/WMA/WAV files
• This unit can play back files with the extension code
<.mp3>, <.wma>, or <.wav> (regardless of the
letter case—upper/lower).
• This unit can play back the files meeting the
conditions below:
– Bit rate:
MP3/WMA: 32 kbps — 320 kbps
– Sampling frequency:
48 kHz, 44.1 kHz, 32 kHz (for MPEG1)
24 kHz, 22.05 kHz, 16 kHz (for MPEG2)
48 kHz, 44.1 kHz, 32 kHz, 22.05 kHz (for WMA)
44.1 kHz (for WAV)
• This unit can show ID3 Tag Version
1.0/1.1/2.2/2.3/2.4 (for MP3).
• This unit can also show WAV/WMA Tag.
• This unit can play back files recorded in VBR (variable
bit rate).
• Files recorded in VBR have a discrepancy in elapsed
time indication.
• This unit cannot play back the following files:
– MP3 files encoded with MP3i and MP3 PRO
format.
– MP3 files encoded with Layer 1/2.
– WMA files encoded with lossless, professional, and
voice format.
– WMA files which are not based upon Windows
Media® Audio.
– WMA files copy-protected with DRM.
• This unit can display the jacket picture meeting the
conditions below:
– Picture size: 32 x 32 to 1 232 x 672 resolution
– Data size: less than 650 KB.
− File type: JPEG
File playback
Playing DivX files (for discs only)
• This unit can play back DivX files with the extension
code <.divx>, <.div>, or <.avi> (regardless of the
letter case—upper/lower).
• Audio stream should conform to MP3 or Dolby
Digital.
• The file encoded in the interlaced scanning mode
may not be played back correctly.
• The maximum bit rate for video signals (average) is
4 Mbps.
Playing MPEG1/MPEG2 files
• This unit can play back MPEG1/MPEG2 files with the
extension code <.mpg>, <.mpeg>, or <.mod>.
• The stream format should conform to MPEG system/
program stream.
The file format should be MP@ML (Main Profile at
Main Level)/SP@ML (Simple Profile at Main Level)/
MP@LL (Main Profile at Low Level).
• Audio streams should conform to MPEG1 Audio
Layer-2 or Dolby Digital.
• The maximum bit rate for video signals (average) is
4 Mbps.
Playing JPEG files
• This unit can play back JPEG files with the extension
code <.jpg>, or <.jpeg>.
• This unit can play back JPEG files that are at 32 x 32 to
8 192 x 7 680 resolution.
It may take time to display the file depending on its
resolution.
• This unit can play back baseline JPEG files.
Progressive JPEG files or lossless JPEG files cannot be
played.
We bear no responsibility for any loss of data
in an iPod/iPhone and USB mass storage
class device while using this unit.
More about this unit
EN_KW-AV70U.indb 64EN_KW-AV70U.indb 64 11/12/15 16:4111/12/15 16:41

65
ENGLISH
Sound signals emitted through the rear terminals
Through the analog terminals (Speaker out/REAR OUT/FRONT OUT)
2-channel signal is emitted. When playing multi-channel encoded disc, multi-channel signals are downmixed.
Language codes (for DVD/DVD-VR/DivX language selection)
Code Language Code Language Code Language Code Language
AA Afar GL Galician MI Maori SO Somali
AB Abkhazian GN Guarani MK Macedonian SQ Albanian
AF Afrikaans GU Gujarati ML Malayalam SR Serbian
AM Ameharic HA Hausa MN Mongolian SS Siswati
AR Arabic HI Hindi MO Moldavian ST Sesotho
AS Assamese HR Croatian MR Marathi SU Sundanese
AY Aymara HU Hungarian MS Malay (MAY) SW Swahili
AZ Azerbaijani HY Armenian MT Maltese TA Tamil
BA Bashkir IA Interlingua MY Burmese TE Telugu
BE Byelorussian IE Interlingue NA Nauru TG Tajik
BG Bulgarian IK Inupiak NE Nepali TH Thai
BH Bihari IN Indonesian NO Norwegian TI Tigrinya
BI Bislama IS Icelandic OC Occitan TK Turkmen
BN Bengali, Bangla IW Hebrew OM (Afan) Oromo TL Tagalog
BO Tibetan JA Japanese OR Oriya TN Setswana
BR Breton JI Yiddish PA Panjabi TO Tonga
CA Catalan JW Javanese PL Polish TR Turkish
CO Corsican KA Georgian PS Pashto, Pushto TS Tsonga
CS Czech KK Kazakh QU Quechua TT Tatar
CY Welsh KL Greenlandic RM Rhaeto-Romance TW Twi
DZ Bhutani KM Cambodian RN Kirundi UK Ukrainian
EL Greek KN Kannada RO Rumanian UR Urdu
EO Esperanto KO Korean (KOR) RW Kinyarwanda UZ Uzbek
ET Estonian KS Kashmiri SA Sanskrit VI Vietnamese
EU Basque KU Kurdish SD Sindhi VO Volapuk
FA Persian KY Kirghiz SG Sangho WO Wolof
FI Finnish LA Latin SH Serbo-Croatian XH Xhosa
FJ Fiji LN Lingala SI Singhalese YO Yoruba
FO Faroese LO Laothian SK Slovak ZU Zulu
FY Frisian LT Lithuanian SL Slovenian
GA Irish LV Latvian, Lettish SM Samoan
GD Scots Gaelic MG Malagasy SN Shona
EN_KW-AV70U.indb 65EN_KW-AV70U.indb 65 11/12/15 16:4111/12/15 16:41

66
ENGLISH
• Manufactured under license from Dolby Laboratories. Dolby and the double-D symbol are trademarks of Dolby
Laboratories.
• “DVD Logo” is a trademark of DVD Format/Logo Licensing Corporation registered in the US, Japan and other
countries.
• DivX®, DivX Certified® and associated logos are trademarks of Rovi Corporation or its subsidiaries and are used
under license.
ABOUT DIVX VIDEO: DivX® is a digital video format created by DivX, LLC, a subsidiary of Rovi Corporation. This is
an official DivX Certified® device that plays DivX video. Visit divx.com for more information and software tools to
convert your files into DivX videos.
ABOUT DIVX VIDEO-ON-DEMAND: This DivX Certified® device must be registered in order to play purchased DivX
Video-on-Demand (VOD) movies. To obtain your registration code, locate the DivX VOD section in your device
setup menu. Go to vod.divx.com for more information on how to complete your registration.
• Microsoft and Windows Media are either registered trademarks or trademarks of Microsoft Corporation in the
United States and/or other countries.
• “Made for iPod,” and “Made for iPhone” mean that an electronic accessory has been designed to connect
specifically to iPod, or iPhone, respectively, and has been certified by the developer to meet Apple performance
standards. Apple is not responsible for the operation of this device or its compliance with safety and regulatory
standards. Please note that the use of this accessory with iPod, or iPhone may affect wireless performance.
iPhone, iPod, iPod classic, iPod nano, and iPod touch are trademarks of Apple Inc., registered in the U.S. and other
countries.
• This item incorporates copy protection technology that is protected by U.S. patents and other intellectual property
rights of Rovi Corporation. Reverse engineering and disassembly are prohibited.
• Font for this product is designed by Ricoh.
Only for KW-AV70BT
• SDHC Logo is a trademark of SD-3C, LLC.
•
The Bluetooth word mark and logos are owned by the Bluetooth SIG, Inc. and any use of such marks by
JVCKENWOODCorporation is under license. Other trademarks and trade names are those of their respective owners.
SAFETY INSTRUCTIONS
Use of the iPhone Navigation App is only permitted if the traffic conditions are suitable and you are absolutely
sure that no risk, obstruction or injury will be incurred to you, your passengers or other road users. The
requirements of the Road Traffic Regulations must always be followed and may vary by state. The destination
must not be entered while the vehicle is in motion.
iPhone Navigation guidance may not be applicable to the current situation because of changes in traffic
conditions (e.g. changes in tollroads, principal roads, one-way traffic, or other traffic regulations). In this case,
observe the current traffic signs or regulations.
• Traffic signs should be observed carefully while driving using the iPhone Navigation App. iPhone Navigation
App is only an aid. Driver must always decide whether or not to heed the information provided. We do not
accept liability for erroneous data provided by the iPhone Navigation App.
• Do not operate the unit while driving.
EN_KW-AV70U.indb 66EN_KW-AV70U.indb 66 11/12/15 16:4111/12/15 16:41

67
ENGLISH
What appears to be trouble is not always serious. Check the following points before calling a service center.
• For operations with the external components, refer also to the instructions supplied with the adapters used for the
connections (as well as the instructions supplied with the external components).
• Messages (enclosed in “ ”) in the tables below are shown in the language selected on <Language> (☞page 46 ).
If the following messages appear
Message Remedy/Cause
“No Signal” • Start the playback on the external component connected to VIDEO IN jack.
• Check the cords and connections.
• Signal input is too weak.
“MISWIRING Check wiring
connection then reset unit”
“WARNING Check wiring
connection then reset unit”
A speaker cord has shorted or it has come in to contact with the car chassis.
Wire or insulate the speaker cord as appropriate, then reset the unit
(☞page3 ). See also the Installation/Connection Manual.
“Parking Brake” No playback picture is shown when the parking brake is not engaged.
“Eject Error” / “Loading Error” Eject the disc forcibly. (☞ page 3 )
“Restricted Device” Check whether the connected iPod/iPhone is compatible with this unit. (☞
page 27)
“USB Device Error” • The USB power voltage is abnormal.
• Turn off and turn on the unit.
• Connect another USB device.
“No BT Dongle”* Bluetooth adapter (KS-UBT1) is removed.
“Connection Error”* The device is registered but the connection has failed. Connect the registered
device. (☞ page 51)
“Please Wait...”*
The unit is preparing to use the Bluetooth function. If the message does not
disappear, turn off and turn on the unit, then connect the device again (or reset
the unit).
“No Voice Device”* The connected mobile phone does not have the voice recognition system.
“No Data”* No phone book data is contained in the connected Bluetooth phone.
“Initialize Error”* The unit has failed to initialize the Bluetooth module. Try the operation again.
“Dial Error”* Dialing has failed. Try the operation again.
“Hung Up Error”* The call has not ended yet. Park your car, and use the connected mobile phone
to end the call.
“Pick Up Error”* The unit has failed to receive a call.
“Pairing Error”* Pairing between the unit and Bluetooth device has failed. Register the device
again. (☞ page 50)
* Only for KW-AV70BT .
Troubleshooting
EN_KW-AV70U.indb 67EN_KW-AV70U.indb 67 11/12/15 16:4111/12/15 16:41

68
ENGLISH
If there seems to be a problem
Symptom Remedy/Cause
General
No sound comes out of the speakers. • Adjust the volume to the optimum level.
• Check the cords and connections.
No picture is displayed on the screen. Turn on the screen. (☞ page 8 )
The unit does not work at all. Reset the unit. (☞ page 3 )
<Display Sensor> does not work properly. The display sensor may malfunction when an object exists
close to the motion sensor. In this case, select <High> for
<Motion Sensitiv.>. (☞ page 11)
The remote controller does not work. • Deactivate the rear source. (☞ page 36) (While the rear
source is activated, the remote controller only functions
for operating the DVD/CD player.)
• Replace the battery.
Desired source button (“
Bluetooth
”*
, “
AV-
IN
”, or “
Apps
”) is not displayed on <AV
Menu> screen.
Select appropriate setting for <AV Input>. (☞ page 45 )
TUNER
SSM automatic presetting does not work. Store stations manually. (☞ page 15 )
Static noise while listening to the radio. Connect the antenna firmly.
Disc in general
Disc can be neither recognized nor played
back.
Eject the disc forcibly. (☞ page 3 )
Disc cannot be ejected. Unlock the disc. (☞ page 16)
• Recordable/Rewritable discs cannot be
played back.
• Tracks on the Recordable/Rewritable discs
cannot be skipped.
• Insert a finalized disc.
• Finalize the discs with the component which you used
for recording.
Playback does not start. The format of files is not supported by the unit.
No picture appears on the external monitor. • Connect the video cord correctly.
• Select the correct input on the external monitor.
DivX/MPEG1/MPEG2/
JPEG/MP3/WMA/WAV
Disc cannot be played back. • Record the tracks using a compliant application on the
appropriate discs. (☞ page 17)
• Add appropriate extension codes to the file names.
Tracks are not played back as you have
intended them to play.
Playback order may differ from the one played back using
other players.
* Only for KW-AV70 .
EN_KW-AV70U.indb 68EN_KW-AV70U.indb 68 11/12/15 16:4111/12/15 16:41

69
ENGLISH
Symptom Remedy/Cause
USB/SD*
“Now Reading...” keeps flashing on the
screen.
Turn off the power and on again.
While playing a track, sound is sometimes
interrupted.
The tracks are not properly copied into the USB device or
the SD card. Copy tracks again, and try again.
iPod/iPhone
No sound comes out of the speakers. • Disconnect the iPod, then connect it again.
• Select another source, then reselect “
iPod
”.
The iPod/iPhone does not turn on or does
not work.
• Check the connecting cable and its connection.
• Update the firmware version.
• Charge the battery.
• Check whether the iPod control mode is correctly
selected. (☞ page 28)
• Reset the iPod/iPhone.
Sound is distorted. Deactivate the equalizer either on this unit or the iPod/
iPhone.
A lot of noise is generated. Turn off (uncheck) “VoiceOver” of the iPod. For details, visit
<http://www.apple.com>.
No operations are available when playing
back a track containing Artwork.
Operate the unit after the Artwork is loaded. (☞ page 29)
Sound does not synchronize with the video. Select <iPod> for <AV Input>. (☞ page 45 )
• Videos cannot be played.
• No sound of videos come out.
• Connect with USB Audio and Video cable JVC KS-U30.
Other cables cannot be used.
• Select <iPod> for <AV Input>. (☞ page 45 )
AV-IN
No picture appears on the screen. • Turn on the video component if it is not on.
• Connect the video component correctly.
* Only for KW-AV70BT.
EN_KW-AV70U.indb 69EN_KW-AV70U.indb 69 11/12/15 16:4111/12/15 16:41

70
ENGLISH
Symptom Remedy/Cause
Bluetooth (only for KW-AV70BT)
Phone sound quality is poor. • Reduce the distance between the unit and the
Bluetooth mobile phone.
• Move the car to place where you can get a better signal
reception.
The sound is interrupted or skipped while
using a Bluetooth audio player.
• Reduce the distance between the unit and the
Bluetooth audio player.
• Disconnect the device connected for Bluetooth phone.
• Turn off, then turn on the unit.
• (When the sound is not yet restored) connect the player
again.
The connected audio player cannot be
controlled.
Check whether the connected audio player supports AVRCP
(Audio Video Remote Control Profile).
Bluetooth device does not detect the unit. • Check whether the Bluetooth adapter (KS-UBT1) is
inserted correctly.
• Search from the Bluetooth device again.
• When “Waiting for connection...” appears on the screen,
press [Cancel] then connect a Bluetooth device.
The unit does not make pairing with the
Bluetooth device.
Enter the same PIN code for both the unit and target
device. If the PIN code of the device is not indicated on its
instructions, try “0000” or “1234.”
Echo or noise occurs. • Adjust the microphone unit position.
• Make sure that NR/EC (Noise reduction/Echo cancel)
function is activated. (☞ page 53)
The unit does not respond when you try to
copy the phone book to the unit.
You may have tried to copy the same entries (as stored)
to the unit.
EN_KW-AV70U.indb 70EN_KW-AV70U.indb 70 11/12/15 16:4111/12/15 16:41
71
ENGLISH
AMPLIFIER
Maximum Power Output Front/Rear 50 W per channel
Continuous Power Output
(RMS)
Front/Rear 20 W per channel into 4 Ω, 40 Hz to 20 000
Hz at no more than 0.8% total harmonic
distortion
Load Impedance 4 Ω (4 Ω to 8 Ω allowance)
Equalizer Control Range Frequencies Low: 60Hz, 80Hz, 100Hz, 150Hz
Mid: 500Hz, 1kHz, 1.5kHz, 2kHz
High: 10kHz, 12.5kHz, 15kHz, 17.5kHz
Level ±10 dB
Signal-to-Noise Ratio 70 dB
Audio Output Level
LINE OUT (FRONT/REAR),
SUBWOOFER
Line-Out Level/Impedance 4 V/20 kΩ load (full scale)
Output Impedance 1 kΩ
Other Terminals Input LINE IN, VIDEO IN, CAMERA IN, USB input, MIC
IN*, Antenna input
Output 2nd AUDIO OUT
Others OE REMOTE, RGB input
FM/AM TUNER
Frequency Range FM 87.5 MHz to 108.0 MHz
AM 531 kHz to 1 611 kHz
FM Tuner Usable Sensitivity 9.3 dBf (0.8 μV/75 Ω)
50 dB Quieting Sensitivity 16.3 dBf (1.8 μV/75 Ω)
Alternate Channel Selectivity
(400 kHz)
65 dB
Frequency Response 40 Hz to 15 000 Hz
Stereo Separation 40 dB
AM Tuner Sensitivity/Selectivity 20 μV/40 dB
* Only for KW-AV70BT.
Specifications
EN_KW-AV70U.indb 71EN_KW-AV70U.indb 71 11/12/15 16:4111/12/15 16:41
72
ENGLISH
DVD/CD
Signal Detection System Non-contact optical pickup (semiconductor laser)
Frequency Response DVD, fs=48 kHz/96 kHz 16 Hz to 22 000 Hz
VCD/CD 16 Hz to 20 000 Hz
Dynamic Range 93 dB
Signal-to-Noise Ratio 95 dB
Wow and Flutter Less than measurable limit
Color System PAL/NTSC
Video-Out (composite) 1 Vp-p/75 Ω
SD*
Compatible File System FAT 32/16/12
Capacity 8 Mbytes to 32 Gbytes
Data Transfer Rate Maximum 10 Mbps
USB
USB Standards USB 2.0 Full Speed
Data Transfer Rate Full Speed Maximum 12 Mbps
Low Speed Maximum 1.5 Mbps
Compatible Device Mass storage class
Compatible File System FAT 32/16/12
Max. Current DC 5 V 1 A
BLUETOOTH*
Version Bluetooth 2.0 certified
Output Power +4 dBm Max. (Power class 2)
Service Area Within 10 m
Profile HFP (Hands-Free Profile) 1.5
OPP (Object Push Profile) 1.1
A2DP (Advanced Audio Distribution Profile) 1.2
AVRCP (Audio/Video Remote Control Profile) 1.3
PBAP (Phone Book Access Profile) 1.0
* Only for KW-AV70BT.
EN_KW-AV70U.indb 72EN_KW-AV70U.indb 72 11/12/15 16:4111/12/15 16:41

73
ENGLISH
MONITOR
Screen Size 7 inch wide liquid crystal display
Number of Pixel 1 152 000 pixels: 800 (horizontal) × 3 (RGB) × 480 (vertical)
Drive Method TFT (Thin Film Transistor) active matrix format
Color System NTSC/PAL
Aspect Ratio 16:9 (wide)
GENERAL
Power Requirement Operating Voltage DC 14.4 V (11 V to 16 V allowance)
Grounding System Negative ground
Allowable Storage Temperature –10°C to +60°C
Allowable Operating Temperature 0°C to +40°C
Dimensions (W × H × D) Installation Size (approx.) 178 mm × 100 mm × 160 mm
Panel Size (approx.) 171 mm × 97 mm × 28 mm
Mass (approx.) 2.5 k
g
Design and specifications are subject to change without notice.
EN_KW-AV70U.indb 73EN_KW-AV70U.indb 73 11/12/15 16:4111/12/15 16:41
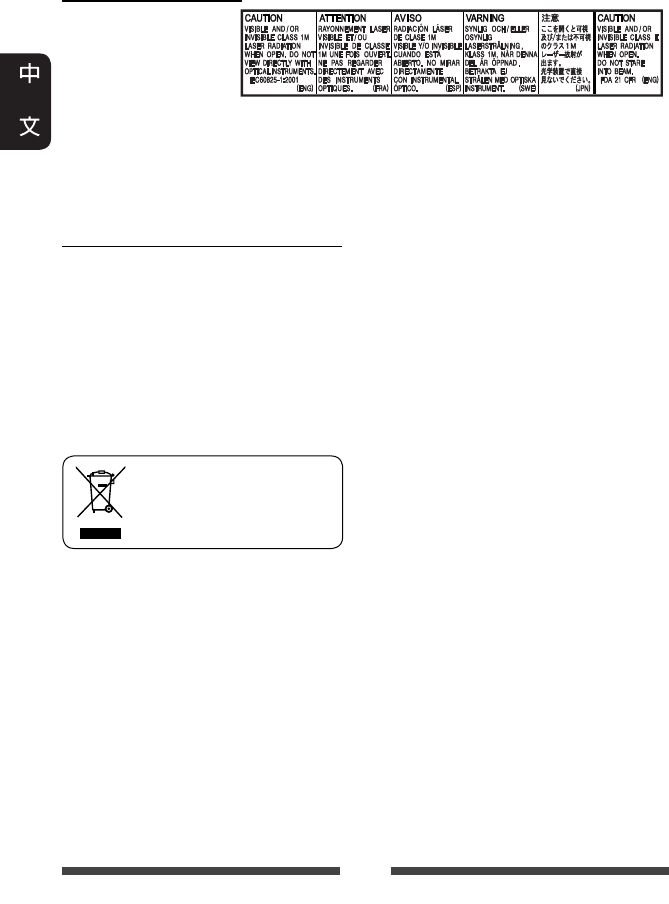
2
多謝您惠購 JVC 的產品。
在使用之前,請詳讀全部說明書,以確保完全理解本機使用方法,
並獲得較長的使用壽命。
雷射產品的重要說明
1. 一級雷射產品
2. 注意:請勿打開頂蓋
板。本機內部沒有用
戶可自行維修的零
件;所有維修工作應
由有資格的人員完成。
3. 注意:打開蓋板可能會產生可見或不可見的 1M 級雷射。不要使用光學儀器直接
進行直視。
4. 複製的標籤:注意標籤位於機外。
警告:(防止意外事故和損壞)
• 切勿在下列位置安裝本機或纏繞電
纜;
– 可能會妨礙方向盤和變速排檔桿的
操作。
– 可能會妨礙操作安全裝置,如安全
氣袋等。
– 可能會妨礙視野。
• 切勿在駕駛過程中操作本機。
在駕駛過程中若需要操作本機,切記
要密切注意前方。
• 駕駛員在駕駛過程中切勿觀看顯示
器。
• 駕駛員在駕駛過程中切勿戴上頭戴耳
機。
• 當您從耳機或頭戴耳機聆聽後置播放
源的播放時,耳機或頭戴耳機的過度
音壓可能會引起聽力損傷。
[僅對應歐洲聯盟]
CT_KW-AV70_U.indb 2CT_KW-AV70_U.indb 2 12/20/11 10:48:33 AM12/20/11 10:48:33 AM
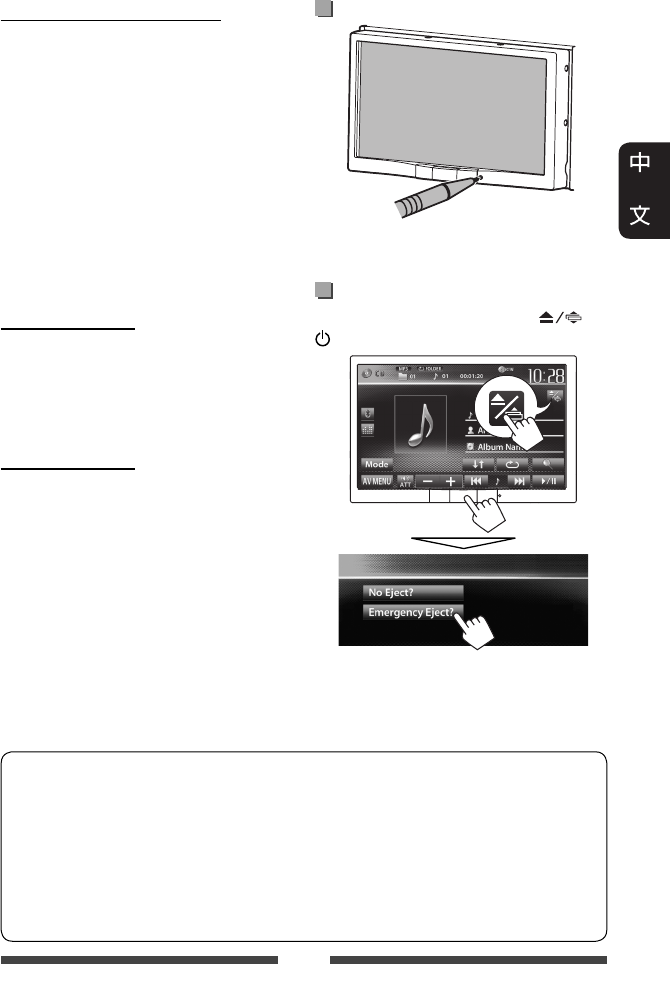
3
關於顯示器的注意事項:
• 本機內建的顯示器以高精度製造,
但仍有某些不足之處。這是不可避免
的,且不視為缺陷。
• 切勿將顯示器暴露於直射的陽光下。
• 切勿使用原子筆或類似帶尖頭的工具
操作觸摸屏。
直接用手指觸摸觸摸屏上的按鍵(如
果您戴了手套,將其脫掉)。
• 當溫度過低或過高時...
–
會引起內部化學變化,產生故障。
– 畫面顯示不清,或滾動速度過慢。
在此種環境下,畫面可能與聲訊不
同步,或畫面質量下降。
基於安全事項...
• 切勿將音量設定得太高,因為這會
妨礙聽到外界的聲訊,給駕駛帶來危
險,並可能導致聽力損傷。
• 在進行任何複雜的操作之前請先將車
停下。
關於車內溫度...
若長時間將車停在炎熱或寒冷的氣候
裡,在操作主機前先等待一段時間,直
到車內的溫度恢復到正常。
本手冊的閱讀方法:
• 主要使用 KW-AV70BT 的圖例進行解釋說明。
• 本使用手冊主要對使用顯示器面板和觸摸屏上的按鍵完成的操作進行解釋說
明。關於使用遙控器(RM-RK252)進行的操作,☞ 第 60 頁。
• < > 用於表示出現在觸摸屏上的可變畫面/選單/操作/設定。
• [ ] 用於表示觸摸屏上的按鍵。
• 指示語言:解釋說明用英語進行指示。您可以從 <Settings> 選單選擇指示語
言。(☞ 第 46 頁)
如何重置本機
• 您所做的預設調整亦會被清除(除了
已註冊的藍牙裝置)。
如何強制退出碟片
在播放源控制畫面上,同時按 和
/MENU 鍵。
•
在退出碟片時,小心不要將碟片掉
落。
•
如果以上操作無效,重置本機。
(
☞
以上內容)
CT_KW-AV70_U.indb 3CT_KW-AV70_U.indb 3 12/20/11 10:48:34 AM12/20/11 10:48:34 AM

4
目錄
如何重置本機 ...............................................3
如何強制退出碟片 .....................................3
簡介
卸下/安裝顯示器面板 .....................5
初始設定 ............................................6
設定時鐘 ............................................7
一般操作 ............................................8
啟動電源 ......................................................... 8
關閉電源 ......................................................... 8
打開/關閉 AV 播放源...................................8
關閉畫面 ......................................................... 8
調整音量 ......................................................... 9
顯示器面板的操作—打開/傾斜 .........9
切換畫面 ..........................................10
畫面上的操作 .................................11
AV 播放源的操作
選擇播放源 ...................................... 12
收聽廣播 ..........................................13
碟片的操作 ...................................... 16
播放碟片 ....................................................... 16
可播放碟片類型 ........................................17
播放操作 ....................................................... 18
碟片播放的設定 ........................................22
SD 的操作(僅對應 KW-AV70BT)...23
播放 SD 卡中的檔案 .................................. 23
USB 的操作 ........................................ 25
播放 USB 裝置 ............................................... 25
聆聽 iPod/iPhone 裝置 ......................27
著手準備 ....................................................... 27
設定 iPod 控制模式 ....................................28
為 iPod/iPhone 播放選擇偏好設定 ........28
<Head> 模式下的 iPod/iPhone
播放操作 ....................................................... 29
<iPod Out> 模式下的 iPod/iPhone
播放操作 ....................................................... 30
使用 iPod touch/iPhone 的應用程式 ......... 31
使用其他外接裝置 ......................... 33
AV-IN ...................................................................33
使用外接導航裝置 .................................. 34
後置播放源的操作 ......................... 36
聲訊調整 ..........................................37
使用聲訊等化器 ........................................37
調整交叉頻率 .............................................38
更改顯示外觀 .................................39
視訊播放的設定 .............................41
調整圖像 ....................................................... 41
切換長寬比 .................................................. 42
放大圖像 ....................................................... 42
使用後視攝影機 .............................43
設定選單項目 .................................44
儲存/調出設定 ........................................... 47
升級系統 ....................................................... 48
調整觸摸位置 ............................................ 48
藍牙的操作
藍牙(Bluetooth®)裝置的
使用須知 ...................................49
藍牙操作對應 KW-AV70BT ................49
連接藍牙裝置 .............................................50
使用藍牙移動電話 ...................................52
使用藍牙音頻播放機 .............................57
藍牙裝置的設定 ........................................58
藍牙操作對應 KW-AV70 ...................59
使用藍牙移動電話 .................................. 59
使用藍牙音頻播放機 ............................. 59
參考
使用遙控器 ...................................... 60
使用遙控器(RM-RK252)操作 ............ 60
保養 ...................................................63
想要更加了解本機 ......................... 64
故障排除 ..........................................67
規格 ...................................................71
CT_KW-AV70_U.indb 4CT_KW-AV70_U.indb 4 12/20/11 10:48:35 AM12/20/11 10:48:35 AM
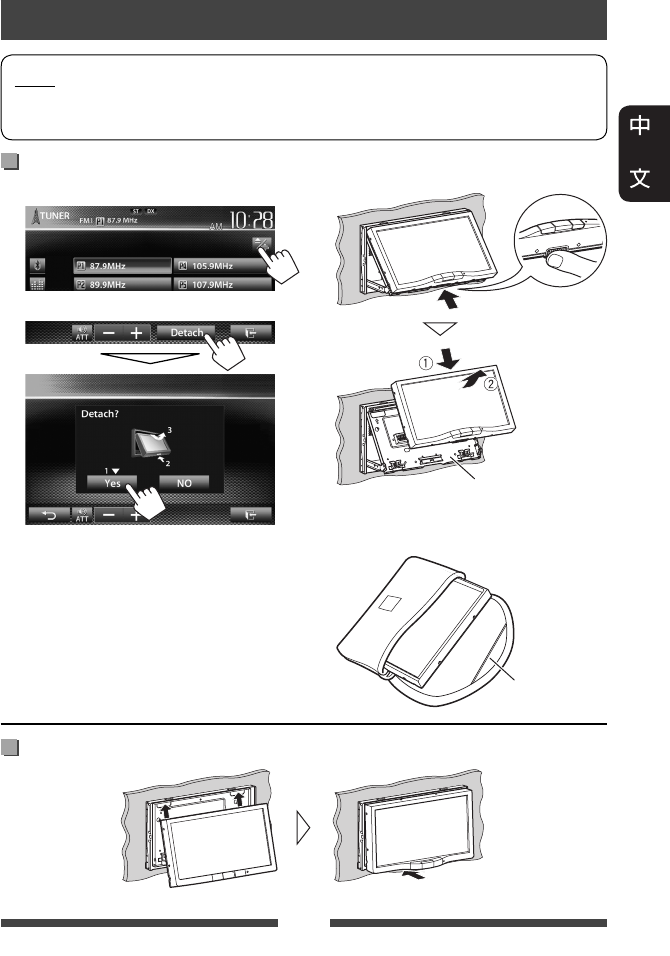
5
注意
• 按緊顯示器面板,以防其意外脫落。
• 將顯示器面板安裝至安裝盤,直至牢固鎖定。
卸下/安裝顯示器面板
簡介
安裝
卸下
1 在播放源控制畫面上:
2
顯示器面板打開約 50°。
• 約 60 秒左右沒有進行任何操作
時,顯示器面板將會自動閉合。
請在此之前卸下顯示器面板。
3
安裝盤
顯示器面板
已解鎖。
• 顯示器面板解鎖後約 10 秒左右,
安裝盤將會自動閉合。
4
軟盒(附帶)
CT_KW-AV70_U.indb 5CT_KW-AV70_U.indb 5 12/20/11 10:48:35 AM12/20/11 10:48:35 AM
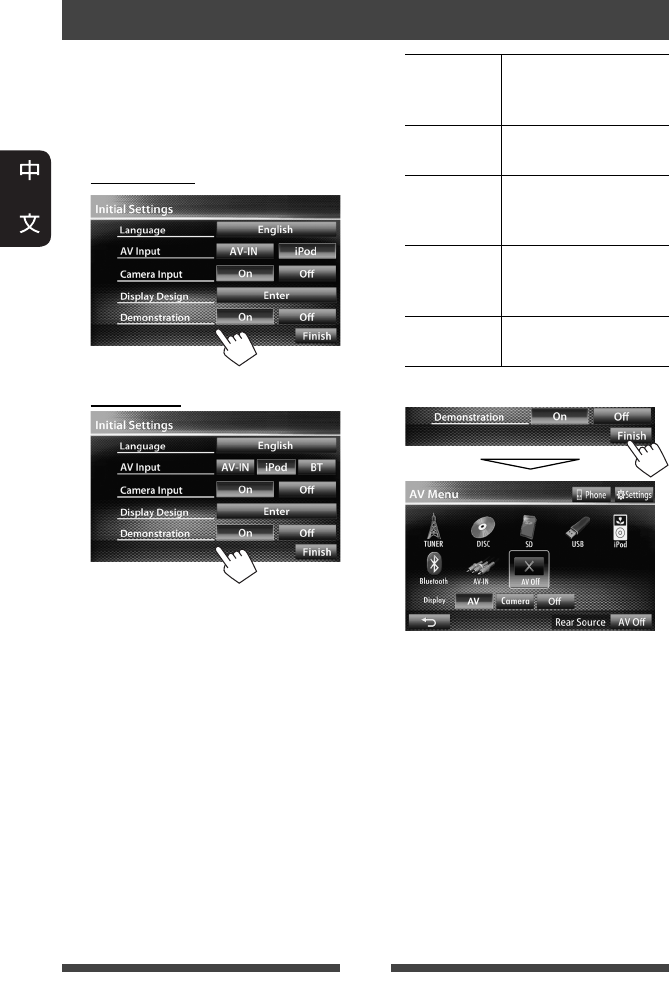
6
初始設定
首次啟動本機的電源或重置本機時,初
始設定畫面出現。
• 您也可以在 <Settings> 畫面上更改設
定。(☞ 第 44 頁)
1 對應 KW-AV70BT
對應 KW-AV70
Language 選擇用於螢幕訊息的
文案語言。(☞ 第
46 頁)
AV Input 選擇想要播放的外接
裝置。(☞ 第 45 頁)
Camera Input 連接後視攝影機時
選擇 <On>。(☞ 第
46 頁)
Display
Design
選擇背景,以及文案
和觸摸屏按鍵的顏
色。(☞ 第 39 頁)
Demonstration
啟動或停用屏幕演
示。(☞ 第 45 頁)
2 完成設定。
<AV Menu> 畫面顯示。
• <AV Off> 為初始設定。選擇播放
源。(☞ 第 12 頁)
CT_KW-AV70_U.indb 6CT_KW-AV70_U.indb 6 12/20/11 10:48:36 AM12/20/11 10:48:36 AM
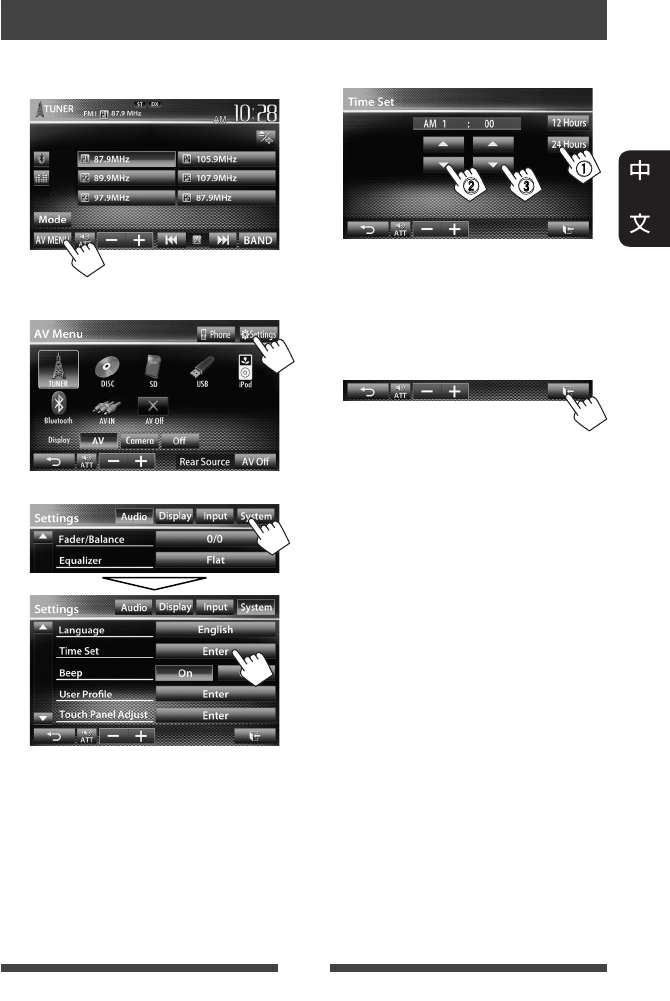
7
設定時鐘
1 顯示 <AV Menu> 畫面。
在播放源控制畫面上:
2 顯示 <Settings> 畫面。
3
4 設定時鐘。
1選擇時間顯示格式
2調整小時
3調整分鐘
5 完成設定。
CT_KW-AV70_U.indb 7CT_KW-AV70_U.indb 7 12/20/11 10:48:37 AM12/20/11 10:48:37 AM
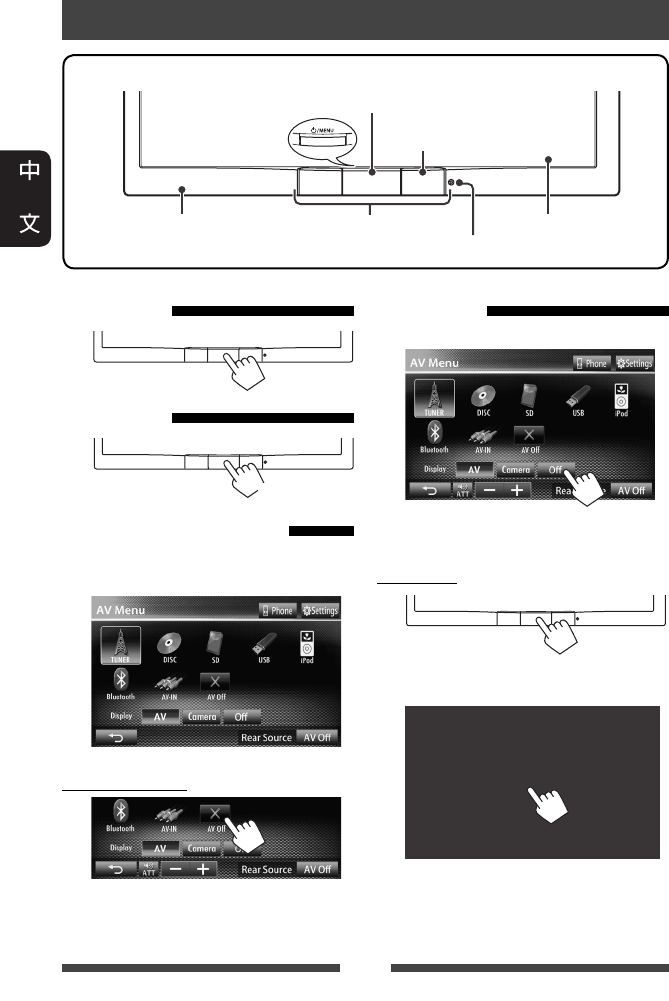
8
一般操作
熒幕(觸摸屏)顯示器面板
遙控檢知器
重置鍵(☞ 第 3 頁)
運動傳感器(☞ 第 11 頁)
• 啟動/關閉電源。(☞ 以下內容)
• 顯示 <AV Menu> 畫面。(按)(☞ 第 10 頁)
啟動電源
關閉電源
(按住)
打開/關閉 AV 播放源
您可以在 <AV Menu> 畫面上選擇播放
源,以此來啟動 AV 功能。
關閉 AV 播放源
AV 播放源關閉。
關閉畫面
在 <AV Menu> 畫面上:
畫面關閉。
打開畫面
或
觸摸畫面,以顯示 <AV Menu> 畫面。
CT_KW-AV70_U.indb 8CT_KW-AV70_U.indb 8 12/20/11 10:48:38 AM12/20/11 10:48:38 AM

9
調整音量
調整音量(00 至 50)
• 在播放源控制畫面上,您也可以如
圖所示在觸摸屏上移動手指來調整音
量。
升高降低
降低音量
AT T 指示燈點亮。
想要取消音量的降低,再次按 [ ] 鍵。
音量設定注意事項:
數位裝置(CD/SD*/USB/iPod)與其他
播放源相比產生的噪音較少。播放
這些數位播放源前調低音量以避免
因為輸出強度的突然增加而損壞揚
聲器。
*
“
SD
”僅適用於
KW-AV70BT。
顯示器面板的操作—
打開/傾斜
1 在播放源控制畫面上:
2
[ Open]打開顯示器面板。
[ Eject]退出碟片。
[ Close]
閉合顯示器面板。
• 切勿將手指放在顯示
器面板後面。
[ Tilt +]
[ Tilt –]
傾斜顯示器面板。
[Detach]卸下顯示器面板。
(☞ 第 5 頁)
[ ] 返回當前播放源畫面。
• 當 ACC 關閉時,您也可以退出碟片。
按住 /MENU 鍵顯示 <Open/Tilt> 畫面。
(按住)
CT_KW-AV70_U.indb 9CT_KW-AV70_U.indb 9 12/20/11 10:48:40 AM12/20/11 10:48:40 AM
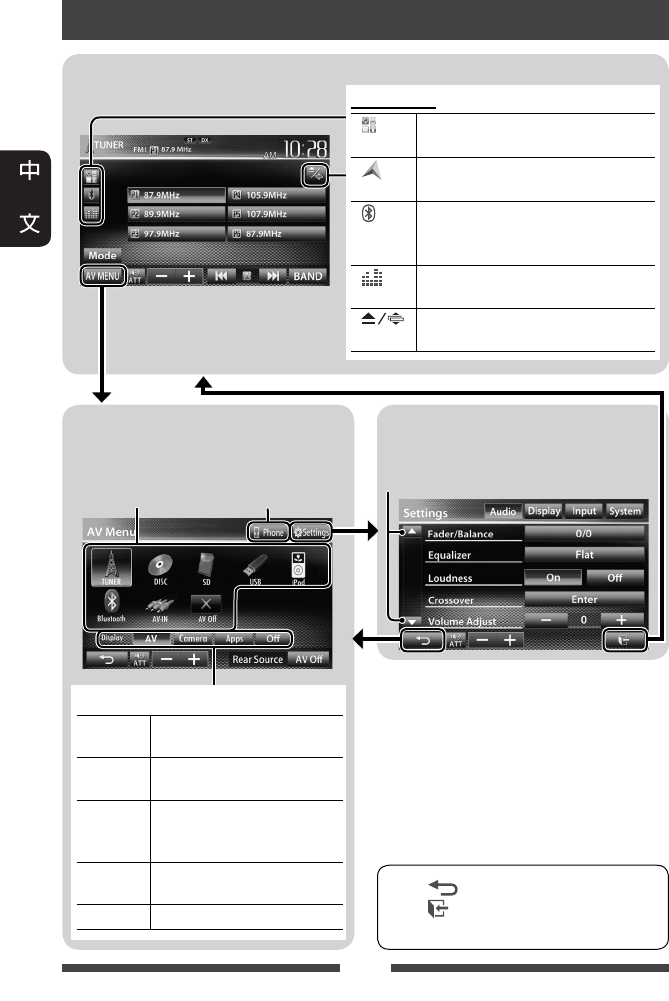
10
切換畫面
<AV Menu> 畫面
顯示播放源控制畫面/設定畫面並切
換圖像播放源。
• 按 [ ] 鍵返回上一畫面。
• 按 [ ] 鍵顯示當前播放源的控制
畫面。
<Settings> 畫面
更改詳細設定。(☞ 第 44 頁)
切換頁面
顯示電話控制
畫面 * 3
☞ 第 12 頁
*1
當
<Navigation Input>
畫面中的
<Input>
設定切換為
<iPhone>
時出現。
(
☞
第
31
頁)
*2
當
<Navigation Input>
畫面中的
<Input>
設定切換為
<RGB>
時出現。
(
☞
第
34
頁)
*3
僅對應
KW-AV70BT
。
*4
圖標因藍牙裝置接上的狀態而會有所
不同(
☞
第
49
頁)。
選擇想要顯示在畫面上的項目。
[AV]顯示播放源控制畫面。
(☞ 以上內容)
[Camera]顯示後視攝影機的圖像。
(☞ 第 43 頁)
[Apps] *1顯示所接 iPod touch/iPhone 上
應用程式的畫面。
(☞ 第 31 頁)
[Navi] *2顯示所接導航裝置的畫
面。(☞ 第 35 頁)
[Off]關閉畫面。(☞ 第 8 頁)
播放源控制畫面
一般操作鍵
[ ] *1顯示所接 iPod touch/iPhone 上應用程
式的畫面。(☞ 第 31 頁)
[ ] *2顯示所接導航裝置的畫面。
(☞ 第 35 頁)
[ ]*3*4• 顯示電話控制畫面。(按)
• 切換至最後接上的移動電話。
(按住)(☞ 第 51 頁)
[ ]顯示聲訊調整畫面。
(☞ 第 37 頁)
[]顯示 <Open/Tilt> 畫面。
(☞ 第 9 頁)
CT_KW-AV70_U.indb 10CT_KW-AV70_U.indb 10 12/20/11 10:48:41 AM12/20/11 10:48:41 AM
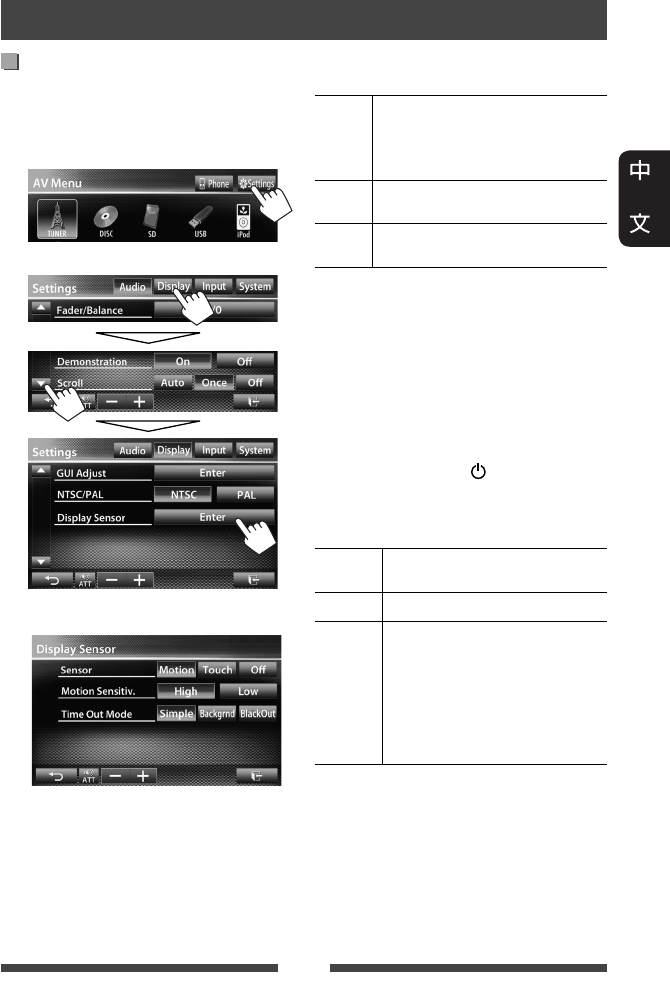
11
畫面上的操作
設定 <Display Sensor>
對於一段時間未進行任何操作之後,按
鍵的顯示方式,運動傳感器的靈敏度以
及畫面的變化方式進行設定。
1 在 <AV Menu> 畫面上:
2
3
<Sensor>
選擇按鍵和播放訊息的顯示方式。
Motion 將手指靠近運動傳感器可顯示
按鍵和播放訊息。
• 當畫面關閉時,運動傳感器
不起作用。(☞ 第 8 頁)
Touch 觸摸畫面可顯示按鍵和播放
訊息。
Off 停用 <Motion> 或 <Touch> 功
能。
• 若選擇了
<Motion> 或
<Touch>,想要再
次隱藏按鍵和播放訊息,請反複觸摸
畫面。
<Motion Sensitiv.>
選擇傳感器的靈敏度(<High> 或 <Low>)。
• 當 <Sensor> 設定為 <Motion> 時可用。
<Time Out Mode>
選擇在 10 秒左右沒有進行任何操作時,
以及顯示器面板上的 /MENU 燈熄滅
時,想要在畫面上顯示的項目。
• 當 <Sensor> 設定為 <Motion> 或 <Touch>
時可用(☞ 以上內容)。
Simple
顯示播放源訊息和某些播放源
控制鍵(如音量控制鍵)。
Backgrnd 背景顯示。
BlackOut 畫面關閉。
• 恢復畫面:
– 當 <Sensor> 設定為
<Motion> 時,將手指靠近
運動傳感器。
– 當 <Sensor> 設定為
<Touch> 時,觸摸畫面。
CT_KW-AV70_U.indb 11CT_KW-AV70_U.indb 11 12/20/11 10:48:43 AM12/20/11 10:48:43 AM

12
TUNER
(☞ 第 13 頁) 切換至廣播。
DISC
(☞ 第 16 頁) 播放碟片。
SD
*1(☞ 第 23 頁) 播放 SD 卡上的檔案。
USB
(☞ 第 25 頁) 播放 USB 裝置上的檔案。
iPod
(☞ 第 27 頁) 播放 iPod/iPhone。
Bluetooth
*2
(KW-AV70BT:☞ 第 57 頁/
KW-AV70:☞ 第 59 頁)
• KW-AV70BT:播放藍牙音頻播放機。
• KW-AV70:操作藍牙裝置。
AV-IN
*3(☞ 第 33 頁) 切換至後面板 LINE IN/VIDEO IN 插孔接上的外接裝置。
Apps
*4(☞ 第 31 頁) 切換為所接 iPod touch/iPhone 上應用程式的畫面。
AV Off
(☞ 第 8 頁) 關閉 AV 播放源。
*1
僅對應
KW-AV70BT
。
*2
對應
KW-AV70:
僅當
<AV Input>
設定為
<BT>
時出現。(
☞
第
45
頁)
*3
僅當
<AV Input>
設定為
<AV-IN>
時出現。(
☞
第
45
頁)
*4
僅當
<AV Input>
設定為
<iPod>
時出現。(
☞
第
45
頁)
AV 播放源的操作
選擇播放源
KW-AV70BT KW-AV70
CT_KW-AV70_U.indb 12CT_KW-AV70_U.indb 12 12/20/11 10:48:44 AM12/20/11 10:48:44 AM
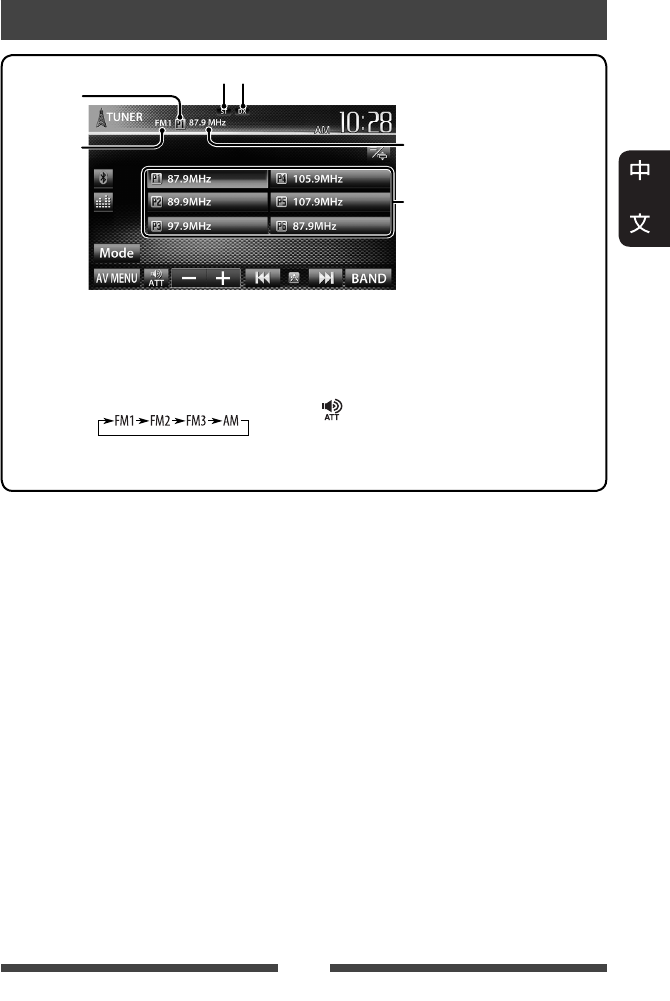
13
收聽廣播
• ST 指示燈在接收具有足夠信號強度的 FM 立體聲廣播時點亮。
[P1] – [P6]• 接收預設電台。(按)
• 預設當前接收的電台。
(按住)
[BAND]選擇波段。
[4] [¢]搜尋電台。
• 自動搜尋(按)
• 手動搜尋(按住)
[] [–] [+]調整音量。
[Mode]* 顯示調諧器設定畫面。
(☞ 第 14 – 15 頁)
[AV MENU]顯示 <AV Menu> 畫面。
*
僅當選擇
FM
作為播放源時出現。
DX/LO 指示燈
波段
預設號碼
預設列表
ST/MO 指示燈
當前接收的電台頻率
CT_KW-AV70_U.indb 13CT_KW-AV70_U.indb 13 12/20/11 10:48:44 AM12/20/11 10:48:44 AM
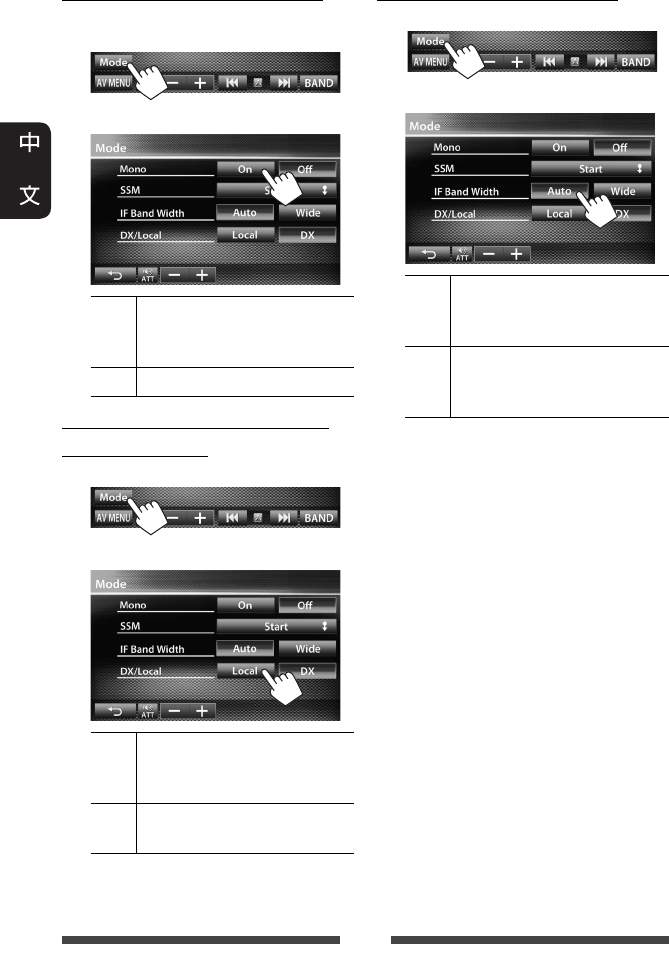
14
當 FM 立體聲廣播接收不良時...
啟用單聲道模式來改善接收效果。
1
2
On
啟用單聲道模式來改善 FM 的
接收效果,但立體聲效果將
會喪失。MO 指示燈點亮。
Off 恢復立體聲效果。
只接收信號強的 FM 電台—LO/DX
(本地/遠距離)
1
2
Local 想要只接收具有足夠信號強
度的電台則選擇此項。LO 指
示燈點亮。
DX 停用該功能。DX 指示燈點
亮。
當 FM 接收效果受到干擾時...
1
2
Auto 增強調諧器選擇性以減小鄰
近電台間的噪音干擾。(立
體聲效果可能會喪失。)
Wide 不受鄰近電台噪音干擾的影
響,音質不會降低且保留立
體聲效果。
CT_KW-AV70_U.indb 14CT_KW-AV70_U.indb 14 12/20/11 10:48:45 AM12/20/11 10:48:45 AM
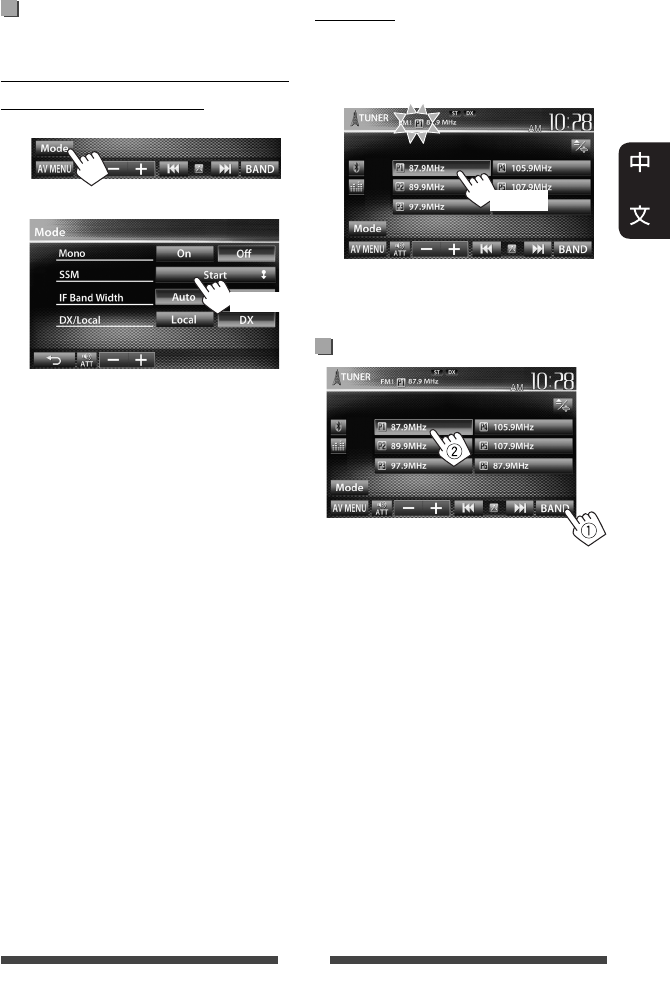
15
將電台儲存在記憶體中
您可以為每個波段預設六個電台。
自動預設—SSM(依序儲存信號強
的電台)(僅對應 FM)
1
2
信號最強的本地電台會被自動搜到並
儲存。
手動預設
1 接收您想要預設的電台。
(☞ 第 13 頁)
2 選擇預設號碼。
(按住)
步驟 1 中選擇的電台被儲存。
選擇預設電台
(按住)
CT_KW-AV70_U.indb 15CT_KW-AV70_U.indb 15 12/20/11 10:48:46 AM12/20/11 10:48:46 AM
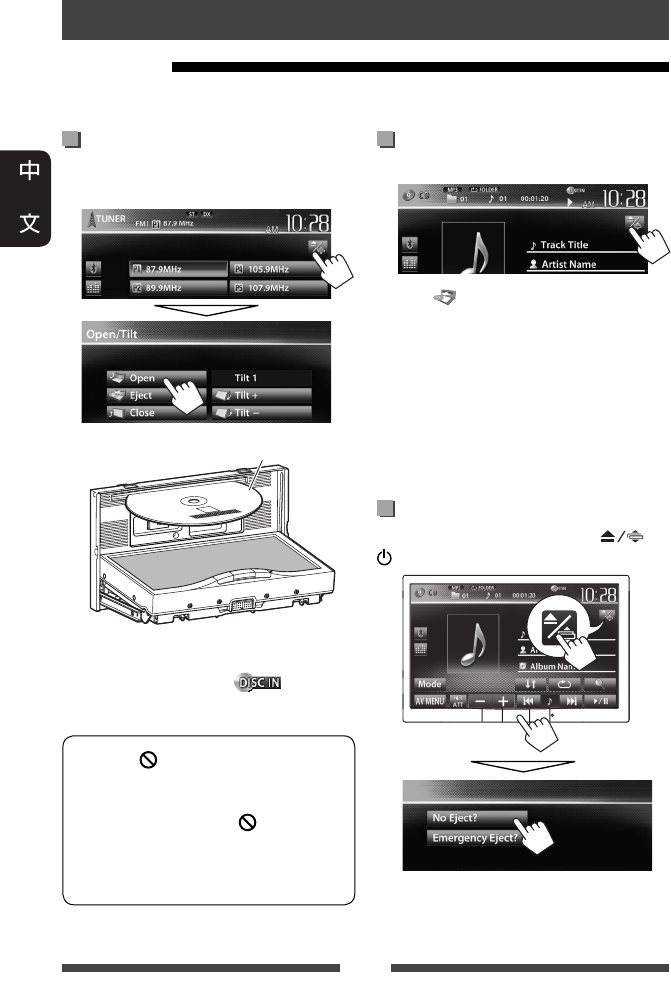
16
如何退出碟片
1 在播放源控制畫面上:
2 按 [ Eject] 鍵。
• 您可以在另一個 AV 播放源播放時退出
碟片。
• 如果 15 秒以內退出的碟片沒有被拿
出,碟片會自動再次插入載槽以免被
弄髒。
• 如果碟片無法退出,☞ 第 3 頁。
取出碟片時,請水平將其拉出。
如何禁止碟片退出
在播放源控制畫面上,同時按 和
/MENU 鍵。
想要取消碟片鎖定,重複相同步驟選擇
<Eject OK?> 即可。
碟片的操作
播放碟片
• 如果碟片中沒有碟片選單,將會重複播放所有曲目直到您更換播放源或退出碟
片。
裝入碟片
1 打開顯示器面板。
在播放源控制畫面上:
2 標籤面
播放源切換至“
DISC
”且播放開始。
• 碟片裝入時,DISC IN()指示燈
點亮。
• 如果“ ”字樣出現在畫面上,
說明本機不能接受您所嘗試的操
作。
– 在某些情況下,“ ”字樣不
顯示,但操作仍然不被接受。
• 當播放多聲道編碼的碟片時,多
聲道信號被下行混合為立體聲。
CT_KW-AV70_U.indb 16CT_KW-AV70_U.indb 16 12/20/11 10:48:47 AM12/20/11 10:48:47 AM
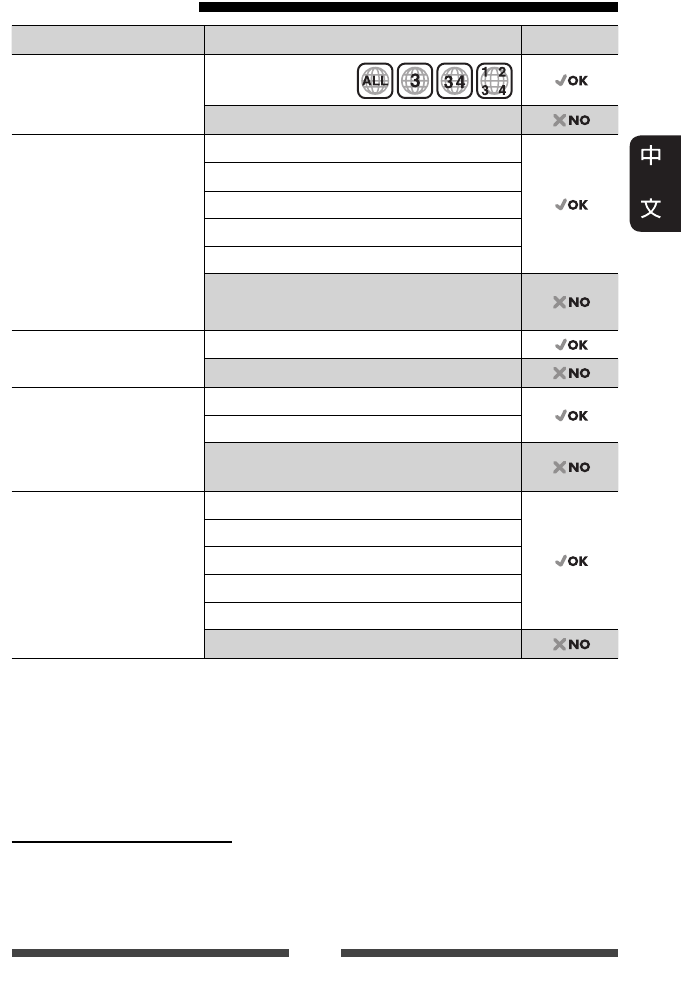
17
可播放碟片類型
碟片類型 錄製制式,檔案類型等 可否播放
DVD
• 不能從本機重現或輸
出 DTS 聲訊。
DVD-視訊 *1
區碼:3
DVD-音頻/DVD-ROM
可錄製/可反複錄製的
DVD(DVD-R/-RW *2,
+R/+RW *3)
• DVD 視訊:UDF bridge
• DVD-VR
• DivX/MPEG1/MPEG2/JPEG/
MP3/WMA/WAV:
ISO 9660 level 1,level 2,
Romeo,Joliet
DVD-視訊
DVD-VR *4
DivX/MPEG1/MPEG2
JPEG
MP3/WMA/WAV
MPEG4/AAC/DVD+VR/DVD-RAM
雙層光碟 DVD 碟面
非 DVD 碟面
CD/VCD 音頻 CD/文案 CD(CD-DA)
VCD(視訊 CD)
DTS-CD/SVCD(超級視訊 CD)/CD-ROM/CD-I
(CD-I 就緒)
可錄製/可反複錄製的 CD
(CD-R/-RW)
• ISO 9660 level 1,level 2,
Romeo,Joliet
CD-DA
VCD(視訊 CD)
DivX/MPEG1/MPEG2
JPEG
MP3/WMA/WAV
MPEG4/AAC
*1
如果裝入了區碼不正確的
DVD
影像光碟,則“
Region Code Error
”字樣會在顯示器上
出現。
*2
以多邊界格式錄製的
DVD-R
也可以播放(雙層光碟除外)。不可以播放
DVD-RW
雙
層光碟。
*3
可以播放封片的
+R/+RW
(僅視訊格式)碟片。當
+R/+RW
碟片載入時,選擇
“
DVD
”作為其碟片類型。不可以播放
+RW
雙層光碟。
*4
本機無法播放受
CPRM
(可錄製媒體內容保護)保護的內容。
雙層光碟播放之注意事項
“DualDisc(雙層光碟)”的非 DVD 碟面與“CD 數位音訊”標準不相容。因此,建議
您不要在本產品上播放雙層光碟的非 DVD 碟面。
CT_KW-AV70_U.indb 17CT_KW-AV70_U.indb 17 12/20/11 10:48:49 AM12/20/11 10:48:49 AM
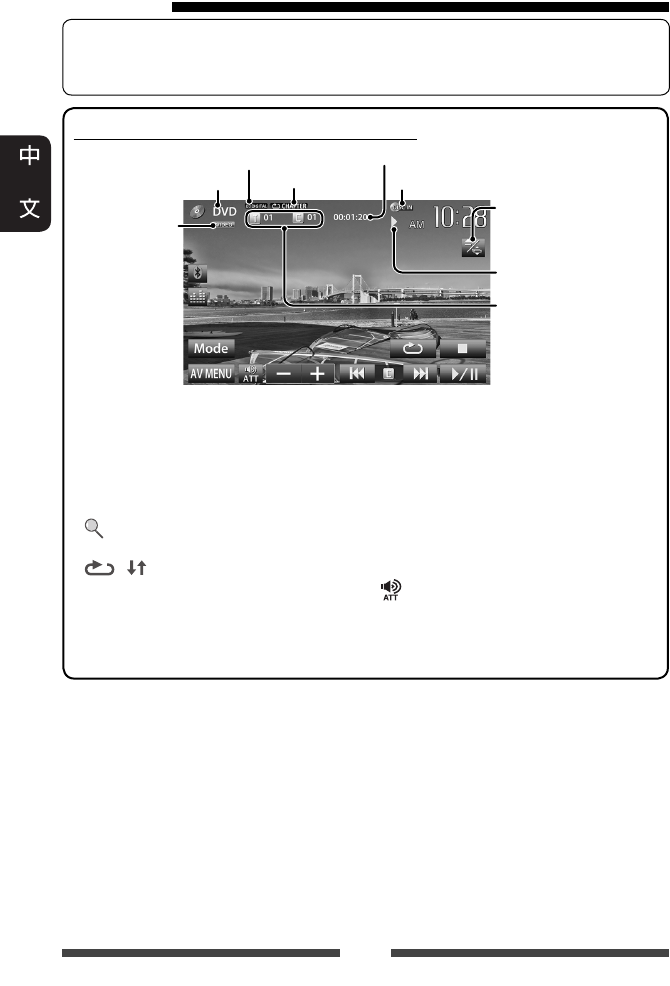
18
播放操作
想要選擇播放源控制畫面的顯示方式,☞ 第 11 頁。
• 約 10 秒左右沒有進行任何操作時,操作鍵將會消失。
對應 DVD/DVD-VR/VCD/DivX/MPEG1/MPEG2/JPEG
媒體類型
音頻格式
視訊格式/視訊
播放模式—
VIDEO/VR-PRG
(程序)/
VR-PLAY
(播放列表)/
DivX/MPEG/PBC
播放狀態(3:播放 /
8:暫停播放 /
7:停止播放)
播放時間
• DVD 視訊:標題號碼/
章節號碼
•
DVD-VR:程序號碼
(或播放列表號碼)/
章節號碼
*1
•
DivX/MPEG1/MPEG2:資料
夾號碼/曲目號碼
• JPEG:資料夾號碼/
檔案號碼
播放模式
(☞ 第 21 頁)
☞ 第 9 頁
DISC IN 指示燈
[7]*2停止播放。
[ ]*3顯示資料夾/曲目列
表。(☞ 第 19 頁)
[ ] [ ]*4選擇播放模式。
(☞ 第 21 頁)
[6]開始/暫停播放。
[4] [¢]*5• 選擇章節/曲目。
(按)
• 倒退/前進搜尋。*6
(按住)
[] [–] [+]調整音量。
[Mode]*7更改碟片播放的設
定。(☞ 第 22 頁)
[AV MENU]
顯示 <AV Menu> 畫面。
*1
想要顯示原來程序
/
播放列表畫面,
☞
第
20
頁。
*2
僅對應
DVD/DVD-VR/VCD
出現。
*3
對應
DVD/DVD-VR/VCD
不出現。
*4
對應
DVD/DVD-VR/JPEG
不出現。
*5
按鍵的顯示圖標因碟片或檔案類型而會有所不同。
*6
搜尋速度因碟片或檔案類型而有所不同。
*7
對應
VCD
不出現。
CT_KW-AV70_U.indb 18CT_KW-AV70_U.indb 18 12/20/11 10:48:49 AM12/20/11 10:48:49 AM

19
播放可錄製/可反複錄製碟片
• 本機總共可以識別 5 000 個檔案和
250 個資料夾(每個資料夾最多
999 個檔案)。
• 僅可使用“已封片”的碟片。
• 本機可以播放多重區段碟片;然
而,播放時未關閉的區段將被跳
過。
• 基於其自身特性或錄製情況,某
些碟片或檔案可能無法播放。
在列表上選擇資料夾/曲目
對應 CD/MP3/WMA/WAV
DISC IN 指示燈
媒體類型
音頻格式
播放狀態(3:播放 /
8:暫停播放 )
播放時間
• MP3/WMA/WAV:資料
夾號碼/曲目號碼
• CD:曲目號碼
播放模式(☞ 第 21 頁)
曲目/檔案訊息
• 若文案訊息沒有顯示完整,觸摸訊息條使
文案滾動顯示。
若檔案中包含封套圖片的標
籤數據,則播放時封套圖片
將會顯示。
☞ 第 9 頁
[ ]*1顯示資料夾/曲目列
表。(☞ 以下內容)
[ ] [ ] 選擇播放模式。
(☞ 第 21 頁)
[6]開始/暫停播放。
[4] [¢]• 選擇曲目。(按)
• 倒退/前進搜尋。*2
(按住)
[] [–] [+]調整音量。
[Mode]*1更改碟片播放的設定。
(☞ 第 22 頁)
[AV MENU]顯示 <AV Menu> 畫面。
*1
對應
CD
不出現。
*2
搜尋速度因碟片或檔案類型而有所不同。
返回上一層
返回根資料夾
播放資料夾中的曲目/檔案
切換頁面
CT_KW-AV70_U.indb 19CT_KW-AV70_U.indb 19 12/20/11 10:48:50 AM12/20/11 10:48:50 AM
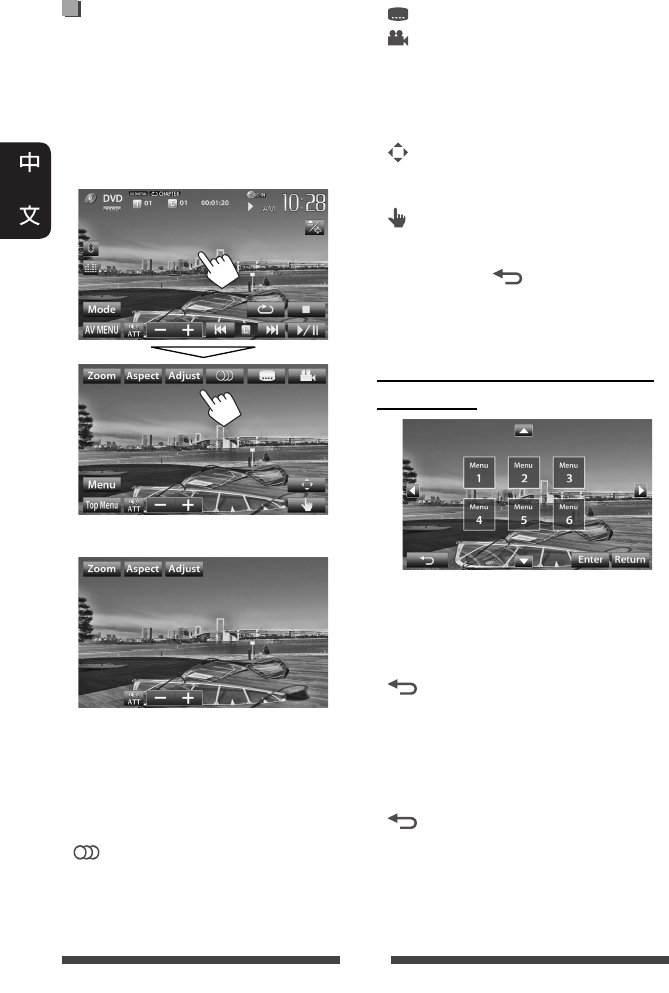
20
視訊選單的操作
在螢幕上觀看播放圖像的同時,您可以
顯示視訊選單畫面。
• 畫面上的可用項目因裝載的碟片和播
放檔案的類型而有所不同。
• 約 10 秒左右沒有進行任何操作時,操
作鍵將會消失。
觸摸畫面上除操作鍵以外的任何位置。
•
MPEG1/MPEG2 畫面與上述說明有所不同。
[Zoom]顯示圖像尺寸選擇畫面。
(☞ 第 42 頁)
[Aspect]選擇長寬比。(☞ 第 42 頁)
[Adjust]顯示圖像調整畫面。
(☞ 第 41 頁)
[ ] 選擇音頻類型。
• 對應 DVD-VR:選擇聲道
(ST:立體聲,L:左聲
道,R:右聲道)。
[ ] 選擇字幕類型。
[ ] 選擇觀賞角度。
[Menu]顯示碟片選單(DVD)/播放
列表(DVD-VR)。
[Top Menu]
顯示碟片選單(DVD)/原來
程序(DVD-VR)。
[ ] 顯示選單/播放列表/原來程
序/場景選擇畫面。
(☞ 以下內容)
[ ] 切換至選單直接選擇模式。
觸摸想要選擇的目標項目。
• 想要退出選單選擇畫面,
按 [ ] 鍵。
• 觸摸顯示在播放源控制畫面上除操作
鍵以外的任何位置。
顯示選單/播放列表/原來程序/場
景選擇畫面
[5] [∞]
[2] [3]選擇一個項目。
[Enter]確認選擇。
[Return]返回上一層的選單畫面。
[]當碟片上一些選單畫面關閉
時,按此鍵可顯示頂層的選
單畫面。
• 僅對應 DivX
[2] [3]向後或向前跳播約 5 分鐘。
[Return]返回上一畫面。
[]退出場景選擇畫面。
CT_KW-AV70_U.indb 20CT_KW-AV70_U.indb 20 12/20/11 10:48:51 AM12/20/11 10:48:51 AM
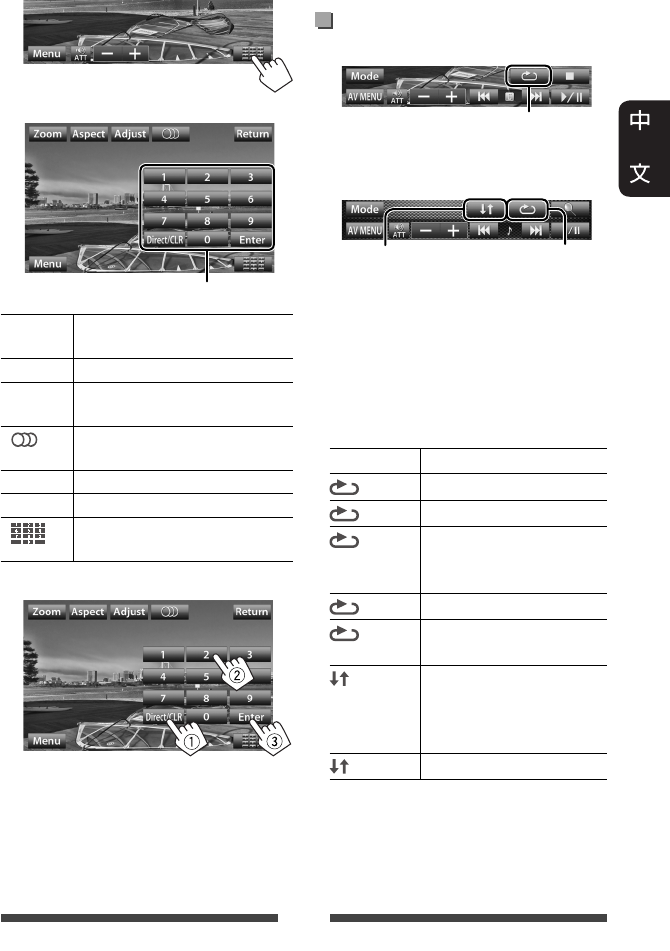
21
僅對應 VCD
1
2
[Zoom]顯示圖像尺寸選擇畫面。
(☞ 第 42 頁)
[Aspect]選擇長寬比。(☞ 第 42 頁)
[Adjust]顯示圖像調整畫面。
(☞ 第 41 頁)
[ ] 選擇聲道(ST:立體聲,
L:左聲道,R:右聲道)。
[Return]顯示上一畫面或選單。
[Menu]顯示碟片選單。
[ ] 顯示/隱藏直接選擇鍵。
(☞ 以下內容)
• 直接選擇曲目
– 想要在章節/曲目輸入和標題/資料
夾輸入之間切換,按 [Direct/CLR] 鍵。
– 輸入了錯誤的號碼時,按 [Direct/CLR]
鍵刪除上一次的輸入。
• 想要停用 PBC 功能,按 [7] 鍵,然後按
直接選擇鍵選擇曲目號碼。
選擇播放模式
對應 DVD/DVD-VR
對應 VCD(不帶有 PBC 功能)/CD/DivX/
MPEG1/MPEG2/MP3/WMA/WAV
*
您無法同時啟動重複播放模式和隨機
播放模式。
• 每次按該鍵,播放模式切換。(相應
的指示燈點亮。)
– 可用項目因裝載的碟片和播放檔案
的類型而有所不同。
指示燈 播放模式
CHAPTER 重複播放當前章節。
TITLE 重複播放當前標題。
PROGRAM
重複播放當前程序(不
適用於播放列表的播
放)。
SONGS 重複播放當前曲目。
FOLDER 重複播放當前資料夾中
的所有曲目。
FOLDER 隨機播放當前資料夾中
的所有曲目,接著播放
下一個資料夾中的曲
目。
ALL 隨機播放所有曲目。
想要取消,反複按該鍵,直到指示燈
熄滅。
直接選擇鍵(☞ 以下內容)
選擇重複播放模式
選擇隨機播放
模式*
選擇重複播放
模式*
CT_KW-AV70_U.indb 21CT_KW-AV70_U.indb 21 12/20/11 10:48:53 AM12/20/11 10:48:53 AM

22
碟片播放的設定
碟片設定項目 可選擇的設定/項目 初始設定:加有下划線
對應 DVD/DVD-VR/DivX
Menu Language
(選單語言)
選擇初始碟片選單語言;初始設定 English(☞ 第 65 頁)。
Audio Language
(聲音語言)
選擇初始音頻語言;初始設定 English(☞ 第 65 頁)。
Subtitle
(字幕語言)
選擇初始字幕語言或清除字幕(Off);初始設定 English
(☞ 第 65 頁)。
Down Mix
(下行混合)
在播放多聲道碟片時,該設定會影響從 FRONT OUT/REAR OUT
插孔重現的信號。
♦ Dolby Surround :
在連接與杜比環繞音效相容的放大器
時,想要欣賞多聲道環繞聲音響則選擇
此項。
♦ Stereo : 一般情況下選擇此項。
D. Range Compres.
(動態範圍控
制)
您可以在播放杜比數位軟體節目時更改動態範圍。
♦ Off : 想要在低音量強度下欣賞全動態範圍
的強勁音效則選擇此項。
♦ On : 想要略微減小範圍則選擇此項。
♦ Dialog :
想要更清晰地重現電影對白則選擇此項。
對應除 VCD/CD
以外的碟片
Monitor Type
(螢幕型式)
選擇顯示器類型,以便在外接顯示器上觀賞寬螢幕圖像。
♦ 16:9
♦ 4:3 LB(信箱螢幕)
♦ 4:3 PS(全景螢幕)
對應包含音頻/視訊/
圖像檔案的碟片
File Type
(文件類型)
當碟片包含不同類型的檔案時,選擇播放檔案的類型。
♦ Audio
♦ Still Picture
♦ Video
♦ Audio&Video
: 播放音頻檔案。
: 播放 JPEG 檔案。
: 播放 DivX/MPEG1/MPEG2 檔案。
: 播放音頻檔案和 DivX/MPEG1/MPEG2 檔案。
• 關於可播放的檔案類型,☞ 第 17 頁。
• 如果碟片中不包含所選類型的檔案,則已存在的檔案會
按以下的優先順序播放:音頻,視訊,然後靜止圖像。
CT_KW-AV70_U.indb 22CT_KW-AV70_U.indb 22 12/20/11 10:48:54 AM12/20/11 10:48:54 AM
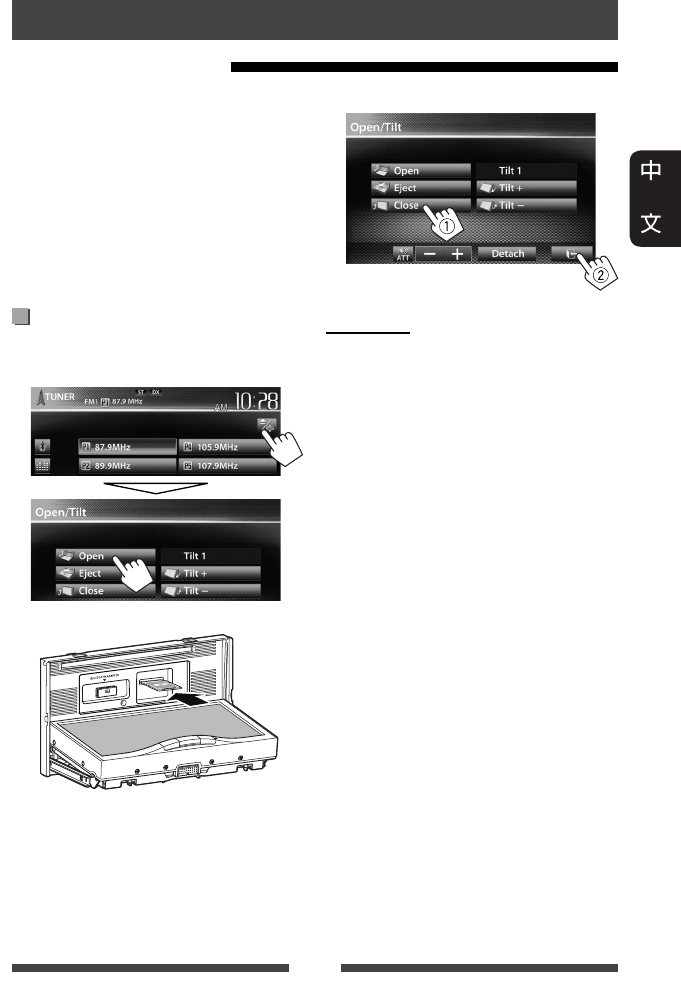
23
• 本機可以播放儲存在 SD 卡中的 JPEG/
MPEG1/MPEG2 */MP3/WMA/WAV 檔案。
• 本機總共可以識別 5 000 個檔案和
250 個資料夾(每個資料夾最多 999 個
檔案)。
• 確認已做好重要數據的備份以防止丟
失數據。
* 除用 JVC Everio 可攜式攝像機錄製的
MPEG2 檔案以外(副檔名 <.mod>)。
插入 SD 卡
1 打開顯示器面板。
在播放源控制畫面上:
2
按壓 SD 卡,直到您聽卡嗒聲。播放
源切換至“
SD
”且播放開始。
• SD 卡中的所有曲目將重複播放,
直到您切換播放源。
播放 SD 卡中的檔案
SD 的操作(僅對應 KW-AV70BT)
3 閉合顯示器面板。
退出 SD 卡
1 打開顯示器面板。
2 輕輕按壓 SD 卡。
• 切勿立即鬆開手指;否則 SD 卡可
能會從載槽中彈出。
3 閉合顯示器面板。
CT_KW-AV70_U.indb 23CT_KW-AV70_U.indb 23 12/20/11 10:48:55 AM12/20/11 10:48:55 AM

24
播放狀態(3:播放 /
8:暫停播放)
播放時間
• MP3/WMA/WAV:資料夾
號碼/曲目號碼
• JPEG:資料夾號碼/
檔案號碼
播放模式(☞ 以下內容)
曲目/檔案訊息(對應
MP3/WMA/WAV)
• 若文案訊息沒有顯示
完整,觸摸訊息條使
文案滾動顯示。
若檔案中包含封套圖片的標籤數據,
則播放時封套圖片將會顯示。
音頻格式
視訊格式—
MPEG/JPEG
[ ] 選擇重複播放模式。*1 *2
• SONGS:重複播放當前
曲目。
• FOLDER:重複播放當
前資料夾中的所有曲目。
[ ] 選擇隨機播放模式。*1 *2
• FOLDER:隨機播放資料
夾中的所有曲目。
• ALL:
隨機播放所有曲目。
[ ] 顯示資料夾/曲目列表。
(
☞ 第 19 頁)
[6]開始/暫停播放。
[4] [¢]*
3
• 選擇曲目。(按)
•
倒退/前進搜尋。*
4
(按住)
[] [–] [+]調整音量。
[Mode]
切換 <File Type> 和 <Monitor Type>
的設定。(☞ 以下內容)
[AV MENU]顯示 <AV Menu> 畫面。
• 可用項目因播放檔案的類型而有所不同。
*1
想要取消隨機播放或重複播放模式,反複按該鍵,直到指示燈熄滅。
*2
您無法同時啟動重複播放模式和隨機播放模式。
*3
按鍵的顯示圖標因檔案類型的不同而會有所差異。
*4
搜尋速度因檔案類型的不同而會有所差異。
想要選擇播放源控制畫面的顯示方式,☞ 第 11 頁。
• 約 10 秒左右沒有進行任何操作時,操作鍵將會消失。
• 想要更改視訊播放的設定,☞ 第 41 頁。
設定 <File Type>
Audio 播放音頻檔案。
Still Picture 播放 JPEG 檔案。
Video 播放 MPEG1/MPEG2 檔案。
Audio&Video 播放音頻檔案和 MPEG1/
MPEG2 檔案。
• 如果 SD 卡中不包含所選類型的檔案,
則已存在的檔案會按以下的優先順序
播放:音頻,視訊,然後靜止圖像。
設定 <Monitor Type>
選擇顯示器類型,以便在外接顯示器上
觀賞寬螢幕圖像。
16:9 4:3 LB
(信箱螢幕)
4:3 PS
(全景螢幕)
CT_KW-AV70_U.indb 24CT_KW-AV70_U.indb 24 12/20/11 10:48:56 AM12/20/11 10:48:56 AM
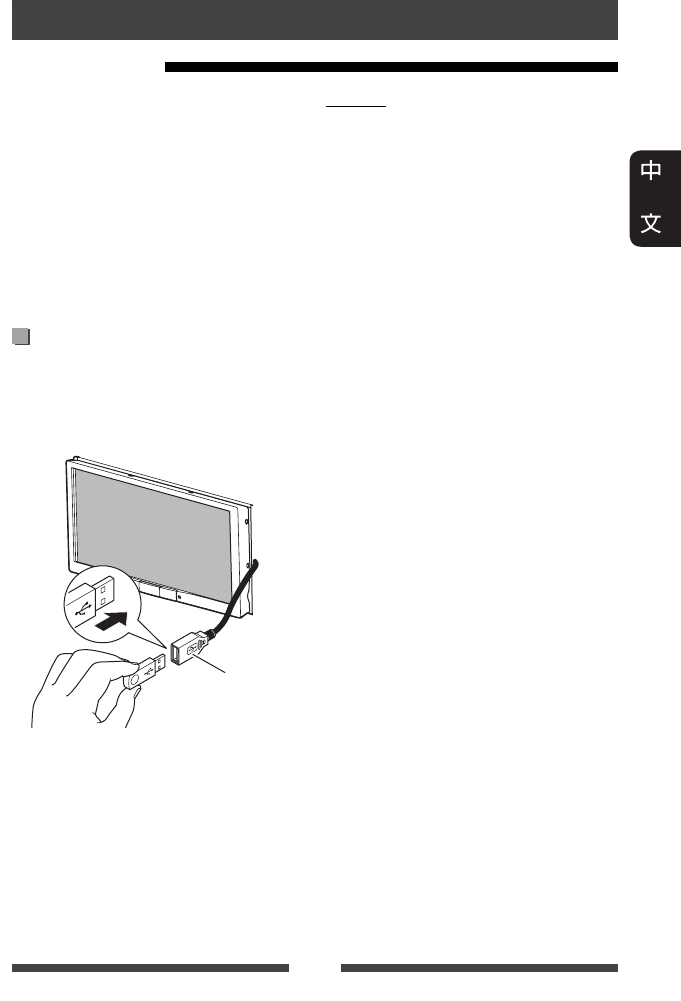
25
• 本機可以播放儲存在 USB 大量儲存裝
置上的 JPEG//MPEG1/MPEG2 */MP3/WMA/WAV
檔案。
• 本機總共可以識別 5 000 個檔案和
250 個資料夾(每個資料夾最多 999 個
檔案)。
• 確認已做好重要數據的備份以防止丟
失數據。
* 除用 JVC Everio 可攜式攝像機錄製的
MPEG2 檔案以外(副檔名 <.mod>)。
連接 USB 裝置
您可以將 USB 記憶體,數位播放機等 USB
大量儲存裝置連接至本機。
• 您無法將電腦或手提式 HDD 連接至本
機後部的 USB 電纜。
本機後部的
USB 電纜
播放源切換至“
USB
”且播放開始。
• USB 裝置中的所有曲目將重複播放,
直到您切換播放源。
播放 USB 裝置
USB 的操作
注意:
• 當使用 USB 延長導線時,本機可能無
法正常播放 USB 裝置中的檔案。
• 具備如數據安全功能等特殊功能的
USB 裝置不能與本機使用。
• 切勿使用 2 個或更多分區的 USB 裝置。
• 基於 USB 裝置和連接端口的形狀,某
些 USB 裝置可能無法正確連接或連接
可能鬆動。
• 本機不能識別額定值不是 5 V 且超過
1 A 的 USB 裝置。
• 本機可能無法識別插入 USB 讀卡器的
記憶卡。
• 一次只連接一個 USB 裝置到本機。切
勿連接 USB 集線器。
• 當使用 USB 電纜連接時,使用 USB 2.0 電
纜。
• 資料夾和檔案名稱的字母數最多為
(當字母為單字節時):
– 資料夾名稱:50 個字母
– 檔案名稱:50 個字母
• 若影響駕駛安全,請避免使用 USB 裝
置。
• 切勿在“Now Reading”字樣在畫面上顯
示時反複拔出和連接 USB 裝置。
• 在連接 USB 裝置時受到靜電干擾可能
會引起裝置播放不正常。此種情況
下,拔開 USB 裝置後再重置本機和 USB
裝置。
• 對應某些 USB 裝置,操作和電源可能
無法按想要的方式進行。
• 切勿將 USB 裝置放置在車內,曝露於
直射陽光下或高溫的位置,以免引起
裝置變形或損壞。
CT_KW-AV70_U.indb 25CT_KW-AV70_U.indb 25 12/20/11 10:48:57 AM12/20/11 10:48:57 AM
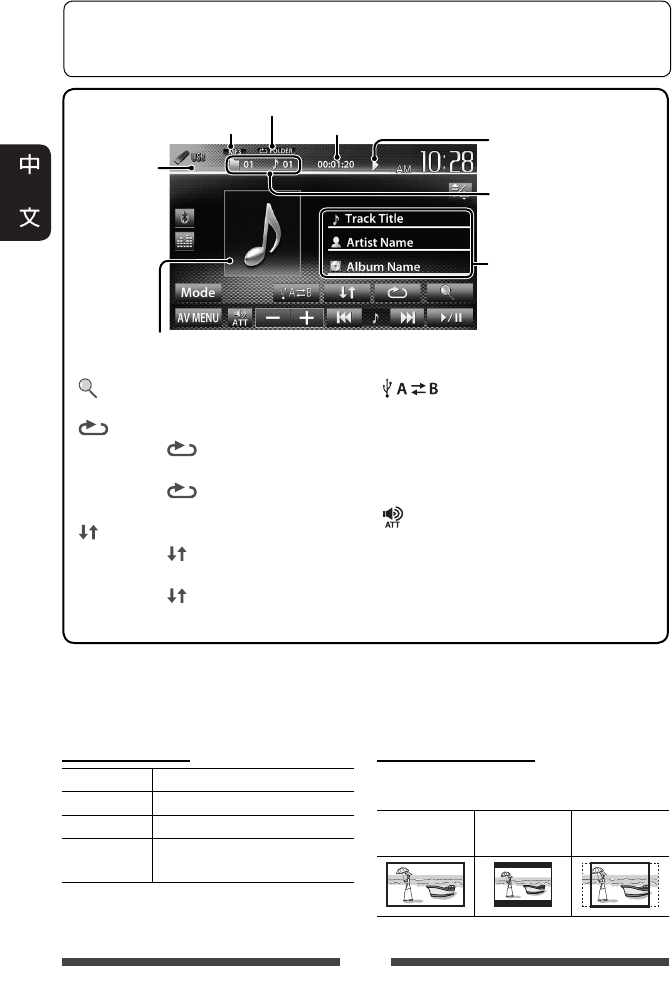
播放狀態(3:播放 /
8:暫停播放)
播放時間
• MP3/WMA/WAV:資料夾
號碼/曲目號碼
• JPEG:資料夾號碼/
檔案號碼
播放模式(☞ 以下內容)
曲目/檔案訊息
(對應 MP3/WMA/WAV)
• 若文案訊息沒有顯示
完整,觸摸訊息條使
文案滾動顯示。
若檔案中包含封套圖片的標籤數據,
則播放時封套圖片將會顯示。
音頻格式
視訊格式—
MPEG/JPEG
26
設定 <File Type>
Audio 播放音頻檔案。
Still Picture 播放 JPEG 檔案。
Video 播放 MPEG1/MPEG2 檔案。
Audio&Video 播放音頻檔案和 MPEG1/
MPEG2 檔案。
•
如果 USB 裝置中不包含所選類型的檔
案,則已存在的檔案會按以下的優先順
序播放:音頻,視訊,然後靜止圖像。
設定 <Monitor Type>
選擇顯示器類型,以便在外接顯示器上
觀賞寬螢幕圖像。
16:9 4:3 LB
(信箱螢幕)
4:3 PS
(全景螢幕)
[ ] 顯示資料夾/曲目列表。
(☞ 第 19 頁)
[ ] 選擇重複播放模式。*1 *2
• SONGS:重複播放當
前曲目。
• FOLDER:重複播放當
前資料夾中的所有曲目。
[ ] 選擇隨機播放模式。*1 *2
• FOLDER:隨機播放資料
夾中的所有曲目。
• ALL:
隨機播放所有曲目。
[ ]在所接裝置(如移動電
話)的內外記憶源間進行
切換。
[6]開始/暫停播放。
[4] [¢]*
3
• 選擇曲目。(按)
•
倒退/前進搜尋。*
4
(按住)
[ ] [–] [+] 調整音量。
[Mode]切換 <File Type> 和 <Monitor
Type> 的設定。(☞ 以下
內容)
[AV MENU]顯示 <AV Menu> 畫面。
• 可用項目因播放檔案的類型而有所不同。
*1
想要取消隨機播放或重複播放模式,反複按該鍵,直到指示燈熄滅。
*2
您無法同時啟動重複播放模式和隨機播放模式。
*3
按鍵的顯示圖標因檔案類型的不同而會有所差異。
*4
搜尋速度因檔案類型的不同而會有所差異。
想要選擇播放源控制畫面的顯示方式,☞ 第 11 頁。
• 約 10 秒左右沒有進行任何操作時,操作鍵將會消失。
• 想要更改視訊播放的設定,☞ 第 41 頁。
CT_KW-AV70_U.indb 26CT_KW-AV70_U.indb 26 12/20/11 10:48:58 AM12/20/11 10:48:58 AM
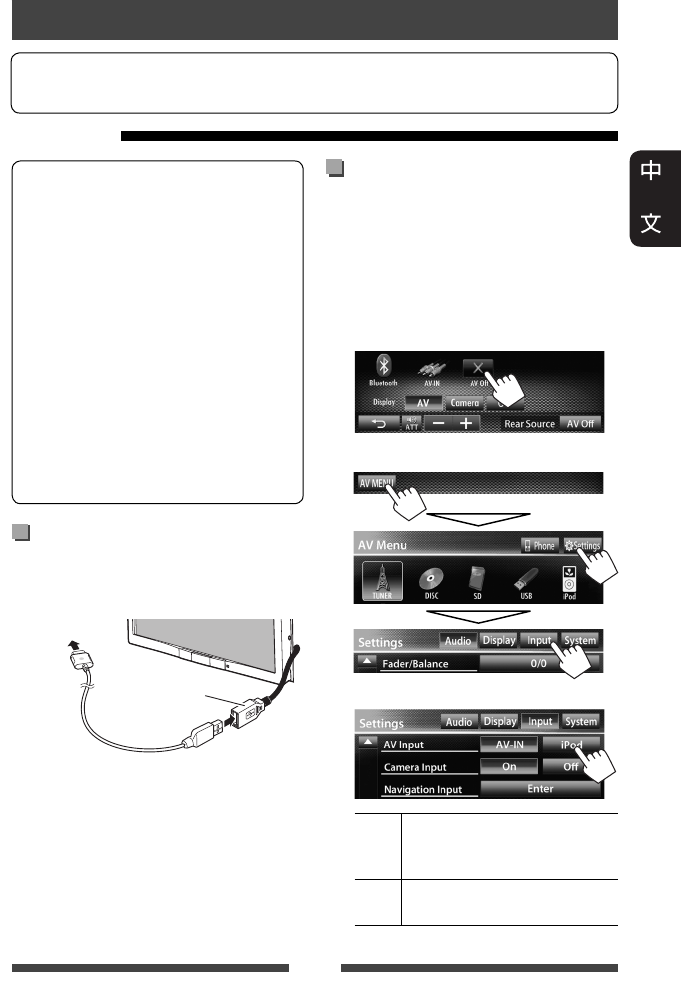
27
可以接上本機的 iPod/iPhone:
Made for
– iPod with video (5th Generation)
– iPod classic
– iPod nano (6th Generation)
– iPod nano (5th Generation)
– iPod nano (4th Generation)
– iPod nano (3rd Generation)
– iPod nano (2nd Generation)
– iPod nano (1st Generation)
– iPod touch (4th Generation)
– iPod touch (3rd Generation)
– iPod touch (2nd Generation)
– iPod touch (1st Generation)
– iPhone 4
– iPhone 3GS
– iPhone 3G
– iPhone
連接 iPod/iPhone
根據目的使用適當的電纜連接 iPod/iPhone。
• 聆聽音樂:USB 2.0 電纜(iPod/iPhone 的
附件)
接至 iPod/iPhone
本機後部的
USB 電纜
• 觀看視訊和聆聽音樂:對應 iPod/iPhone
的 USB 聲音和影像電纜—KS-U30(另
購)(☞ 安裝/連接手冊)
注意:
• 如果用於連接的電纜不是 KS-U30,熒
幕上將不會顯示視訊。
聆聽 iPod/iPhone 裝置
著手準備
• 想要使用 iPod touch/iPhone 的應用程式,☞ 第 31 頁。
為 iPod/iPhone 播放設定
<AV Input>
根據 iPod/iPhone 的連接方式為 <AV Input>
選擇適當的輸入設定。
• 確認選擇“
AV Off
”作為後置播放
源。(☞ 第 36 頁)
1 關閉 AV 播放源。
在 <AV Menu> 畫面上:
2 顯示 <Input> 設定畫面。
3
AV-IN 若 iPod/iPhone 是使用 USB 2.0 電
纜(iPod/iPhone 的附件)接上
的則選擇此項。
iPod
若 iPod/iPhone 是使用 KS-U30(另
購)接上的則選擇此項。
CT_KW-AV70_U.indb 27CT_KW-AV70_U.indb 27 12/20/11 10:48:59 AM12/20/11 10:48:59 AM
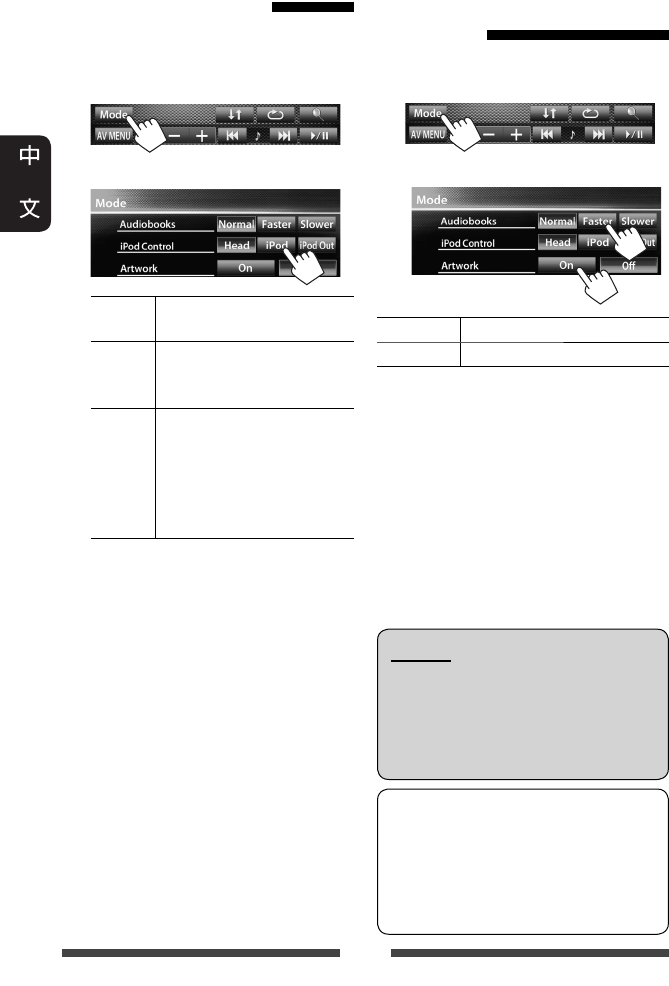
28
設定 iPod 控制模式
選擇控制 iPod/iPhone 播放的裝置。
當播放源為“
iPod
”時...
1
2
Head 從本機控制播放。
(☞ 第 29 頁)
iPod 從 iPod/iPhone 控制音頻/視
訊播放。
• 播放訊息顯示。
iPod
Out *
顯示從 iPod/iPhone 輸出的
選單和播放畫面。
(☞ 第 30 頁)
• 您可以從本機控制播
放,就像在 iPod/iPhone 上
控制播放一樣。
• 當使用 iPod nano (1st Generation) 或 iPod with
video (5th Generation),並為 <iPod Control>
選擇了 <iPod> 時,請為 <AV Input> 選
擇 <iPod>,並使用 KS-U30(另購)來連
接 iPod。(☞ 第 27 頁)
* <iPod Out>
僅適用於以下
iPod/iPhone
型
號:
– iPod nano (6th Generation)
– iPod touch (4th Generation)
– iPod touch (3rd Generation)
– iPod touch (2nd Generation)
– iPhone 4
– iPhone 3GS
– iPhone 3G
為 iPod/iPhone 播放選擇
偏好設定
當播放源為“
iPod
”時...
1
2
Audiobooks 選擇有聲書的速度。
Artwork 顯示/隱藏 iPod 插圖。
注意:
當操作 iPod/iPhone 時,某些操作可能
無法正常或按意願進行。此種情況
下,參閱下列 JVC 網站:
<http://www3.jvckenwood.com/english/car/>
(僅英語網站)
對應某些 iPod/iPhone 型號,在操作過
程中其性能可能不正常或不穩定。
此種情況下,拔開 iPod/iPhone 裝置,
然後對其進行檢查。
如果性能沒有提高或運行緩慢,請
重置 iPod/iPhone。
CT_KW-AV70_U.indb 28CT_KW-AV70_U.indb 28 12/20/11 10:49:00 AM12/20/11 10:49:00 AM
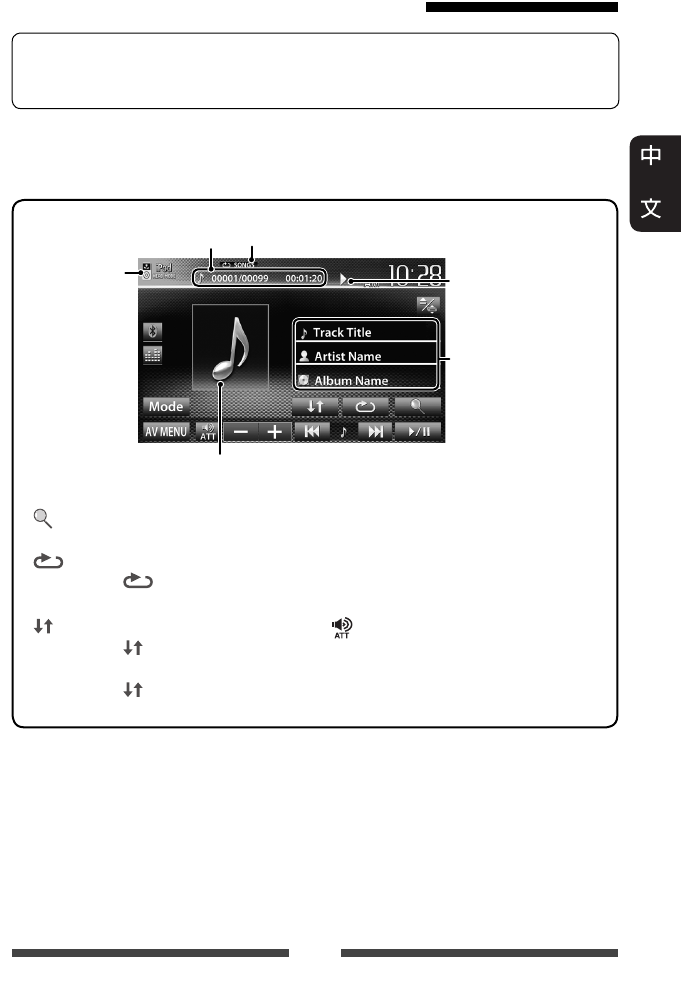
29
<Head> 模式下的 iPod/iPhone 播放操作
想要選擇播放源控制畫面的顯示方式,☞ 第 11 頁。
• 約 10 秒左右沒有進行任何操作時,操作鍵將會消失。
• 想要更改視訊播放的設定,☞ 第 41 頁。
• 選擇“
iPod
”作為播放源。(☞ 第 12 頁)
• 確認為 <iPod Control> 選擇 <Head>。(☞ 第 28 頁)
• 當您啟動本機時,iPod/iPhone 從本機進行充電。
[ ]
顯示 iPod/iPhone 上的音樂/
視訊選單。(☞ 第 30 頁)
[ ] 選擇重複播放模式。 * 1
• SONGS:功能與
“Repeat One”相同。
[ ] 選擇隨機播放模式。 *1
• SONGS:功能與
“Shuffle Songs”相同。
• ALBUMS:功能與
“Shuffle Albums”相同。
[6]開始/暫停播放。
[4]
[¢]
• 選擇曲目/視訊。*2
(按)
• 倒退/前進搜尋。
(按住)
[ ] [–] [+] 調整音量。
[Mode]更改 iPod 播放的設定。
(☞ 第 28 頁)
[AV MENU] 顯示 <AV Menu> 畫面。
• 想要觀看視訊,在視訊選單列表上選擇一個項目。(☞ 第 30 頁)
*1
想要取消隨機播放和重複播放模式,反複按該鍵,直到指示燈熄滅。
*2
對應視訊播放源,您無法繼續播放。
曲目號碼/總曲目數/
播放時間
iPod 控制模式
(☞ 第 28 頁)
歌曲/視訊訊息
• 若文案訊息沒有顯
示
完整,觸摸訊息條
使
文案滾動顯示。
播放狀態(3:播放/
8:暫停播放)
播放模式(☞ 以下內容)
若歌曲中包含插圖,則播放時插圖(顯示在 iPod/iPhone 畫面上的
圖像)會顯示(☞ 第 28 頁)。
CT_KW-AV70_U.indb 29CT_KW-AV70_U.indb 29 12/20/11 10:49:01 AM12/20/11 10:49:01 AM
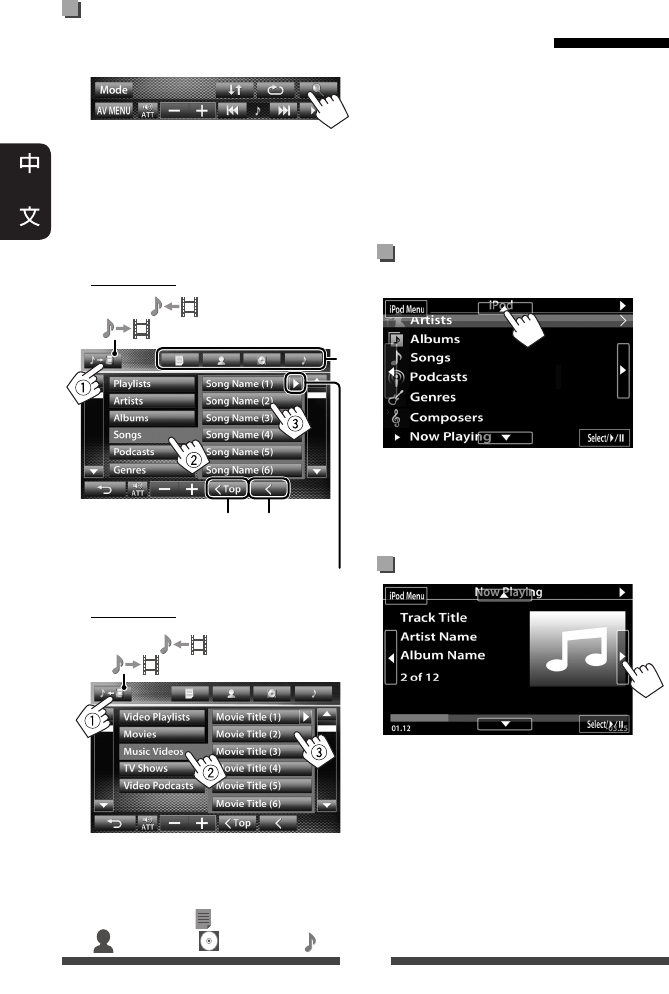
30
從 iPod/iPhone 上的選單選擇
曲目/視訊
1
2
選擇選單(音樂或視訊)(1),
類別(2),然後選擇所需的項目
(3)。
• 在所選層級中選擇項目,直到所
需的曲目開始播放。
音樂選單:
在音樂( )和視訊
( )之間切換
返回上一層
播放該層中的所有項目
返回頂層
*
視訊選單:
在音樂( )和視訊
( )之間切換
• 可用類別因 iPod/iPhone 的類型而有所不
同。
* 您可以按相應的標籤鍵切換至類別頂
部:播放列表( ),藝術家
( ),專輯( )或歌曲( )。
<iPod Out> 模式下的 iPod/
iPhone 播放操作
• 使用 KS-U30(另購)連接 iPod touch/
iPhone。(☞ 安裝/連接手冊)
• 為 <AV Input> 設定選擇 <iPod>。
(☞ 第 27 頁)
• 確認為 <iPod Control> 選擇 <iPod Out>。
(☞ 第 28 頁)
• 選擇“
iPod
”作為播放源。
(☞ 第 12 頁)
從 iPod/iPhone 上的選單選擇
曲目
[5] [∞] 選擇一個類別。
[Select/6]確認選擇。
[iPod Menu]返回上一層。
播放過程中的操作
[2] [3]跳播上一/下一曲目。
[Select/6]開始/暫停播放。
[iPod Menu]顯示選單。
CT_KW-AV70_U.indb 30CT_KW-AV70_U.indb 30 12/20/11 10:49:02 AM12/20/11 10:49:02 AM
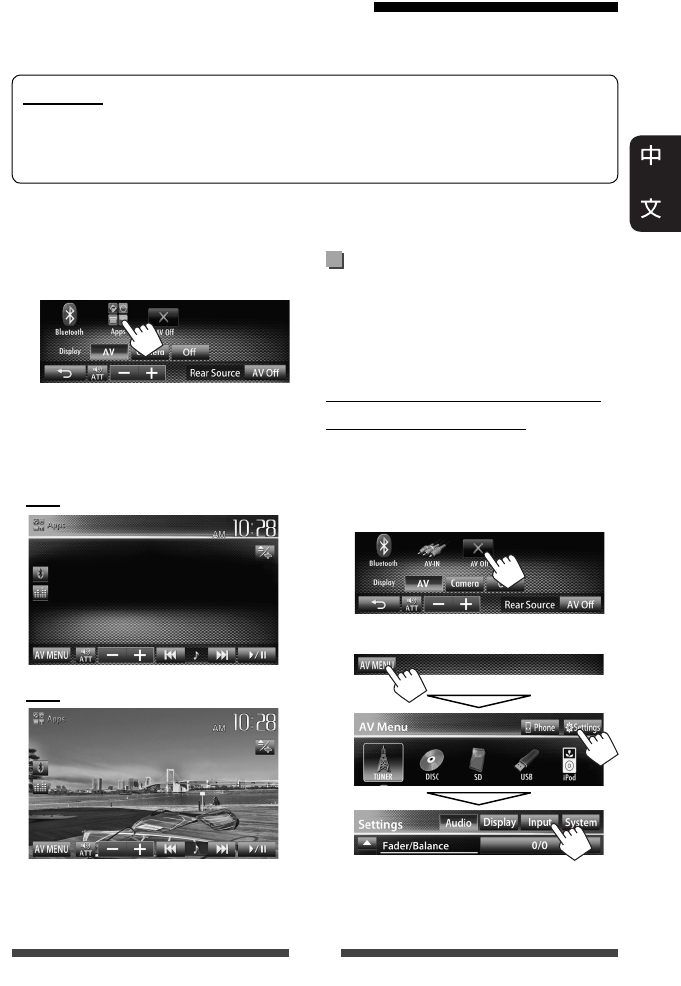
31
• 當您使用 iPod touch 或 iPhone 的應用程式
時,另參閱第 66 頁的安全說明。
在聆聽其他播放源時顯示應
用程式畫面
您可以在聆聽其他播放源時將畫面切
換為所接 iPod touch/iPhone 上應用程式的
畫面。
啟動 iPod touch/iPhone 的輸入,以
顯示切換畫面用的按鍵
• 確認選擇“
AV Off
”作為後置播放
源。(☞ 第 36 頁)
1 關閉 AV 播放源。
在 <AV Menu> 畫面上:
2 顯示 <Input> 設定畫面。
1 開啟 iPod touch/iPhone 上的應用程
式。
2 選擇“Apps”作為播放源。
在 <AV Menu> 畫面上:
• 您也可以使用 iPod/iPhone 代替本機來播
放音頻/視訊。
– 您可以在觸摸屏上進行基本的播放
操作。
音頻
視訊
使用 iPod touch/iPhone 的應用程式
您可以在本機上使用所接 iPod touch/iPhone 上的應用程式。
• 您可以在觸摸屏上操作應用程序的某些功能。
著手準備
• 使用 KS-U30(另購)連接 iPod touch/iPhone。(☞ 安裝/連接手冊)
• 為 <AV Input> 設定選擇 <iPod>。(☞ 第 27 頁)
•
關於本機上可以使用的應用程式,請造訪 <http://www3.jvckenwood.com/english/car/>。
CT_KW-AV70_U.indb 31CT_KW-AV70_U.indb 31 12/20/11 10:49:04 AM12/20/11 10:49:04 AM
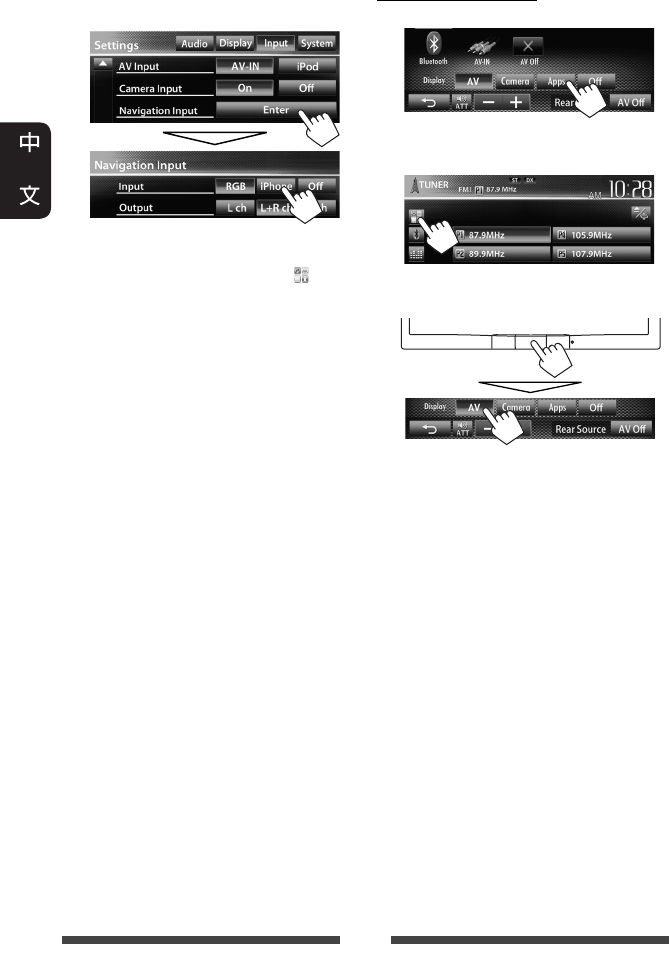
32
3 在 <Navigation Input> 畫面上為
<Input> 設定選擇 <iPhone>。
• 當 <Input> 設定為 <iPhone> 時,[Apps]
鍵在 <AV Menu> 畫面上顯示,[ ] 鍵在
播放源控制畫面上顯示。您可以按這
兩個按鍵中的其中一個鍵來顯示應用
程式畫面。(☞ 以下內容)
• 當 <Input> 設定為 <iPhone> 時,
<AV Input> 設定會自動切換,恆定為
<iPod>。
想要停用,為 <Input> 選擇 <Off>。
查看應用程式畫面
在 <AV Menu> 畫面上:
或
在播放源控制畫面上:
取消應用程式畫面
CT_KW-AV70_U.indb 32CT_KW-AV70_U.indb 32 12/20/11 10:49:05 AM12/20/11 10:49:05 AM
33
您可以將外接裝置連接至 LINE IN/VIDEO IN
插孔。(☞ 安裝/連接手冊)
著手準備:
為 <AV Input> 設定選擇 <AV-IN>。
(☞ 第 45 頁)
• 當 <Navigation Input> 中的 <Input> 設定
是 <RGB> 或 <Off> 時,<AV Input> 設定
可以變更。
使用其他外接裝置
想要選擇播放源控制畫面的顯示方式,☞ 第 11 頁。
• 約 10 秒左右沒有進行任何操作時,操作鍵將會消失。
• 想要更改視訊播放的設定,☞ 第 41 頁。
[ ] [–] [+] 調整音量。
[Mode]更改 AV-IN 名稱。
• 按 [2] 或 [3] 鍵選擇 AV-IN 名稱。
[AV MENU]顯示 <AV Menu> 畫面。
1 選擇“
AV-IN
”作為播放源。
(☞ 第 12 頁)
2 啟動所接上的裝置並開始播放
播放源。
AV-IN
AV-IN 名稱( ☞ 以下內容)
CT_KW-AV70_U.indb 33CT_KW-AV70_U.indb 33 12/20/11 10:49:06 AM12/20/11 10:49:06 AM
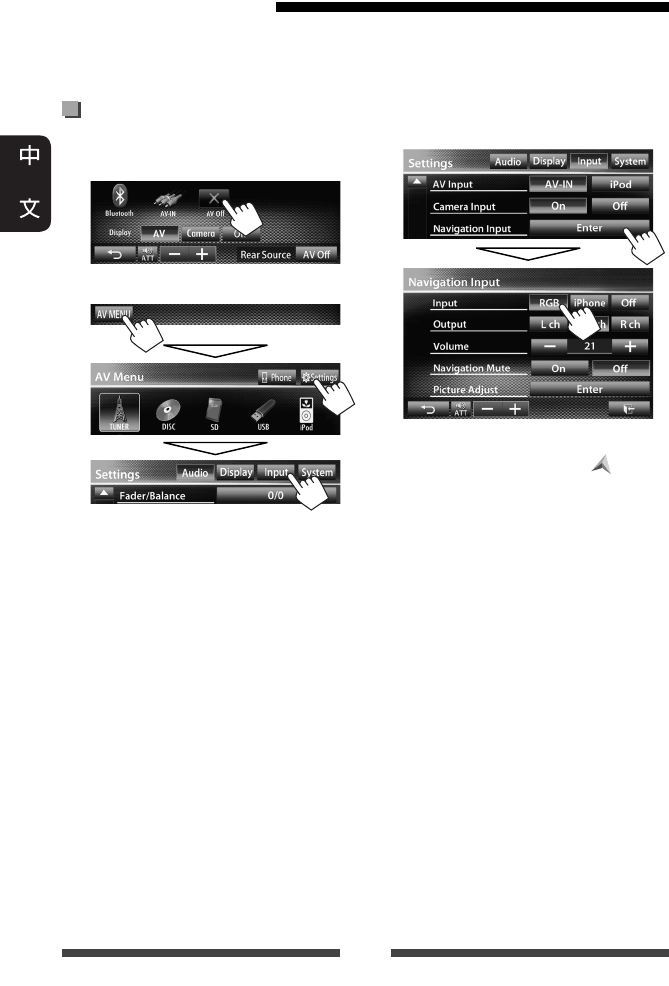
34
使用外接導航裝置
您可以將外接導航裝置(另購)連接至 RGB 端子,以便觀看導航畫面。(☞ 安裝/
連接手冊)
• 請洽詢分銷商關於相容導航裝置的訊息。
啟動導航功能
1 關閉 AV 播放源。
在 <AV Menu> 畫面上:
2 顯示 <Input> 設定畫面。
3 在 <Navigation Input> 畫面上為
<Input> 設定選擇 <RGB>。
• 當 <Input> 設定為 <RGB> 時,[Navi] 鍵
在 <AV Menu> 畫面上顯示,[] 鍵在播
放源控制畫面上顯示。您可以按這兩
個按鍵中的其中一個鍵來顯示導航畫
面。(☞ 第 35 頁)
想要停用,為 <Input> 選擇 <Off>。
CT_KW-AV70_U.indb 34CT_KW-AV70_U.indb 34 12/20/11 10:49:06 AM12/20/11 10:49:06 AM
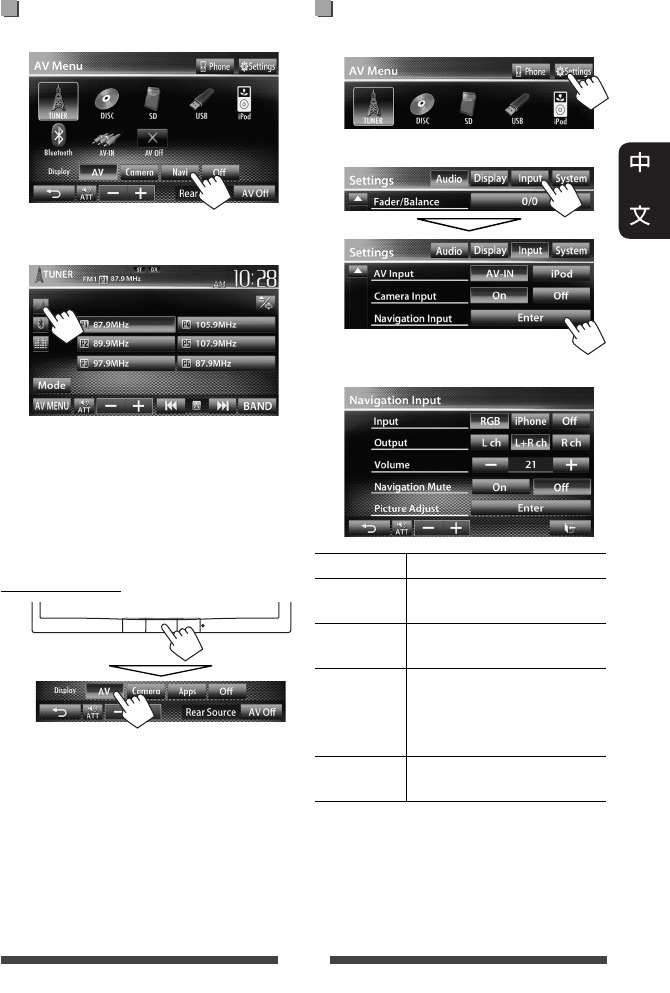
35
導航裝置的設定
1 在 <AV Menu> 上:
2
3
Input ☞ 第 34 頁
Output 選擇用於導航指南的前置
揚聲器。
Volume 調整導航指南的音量。
(0 至 35)
Navigation
Mute
在導航指南過程中,選
擇 <On> 降低從前置揚聲
器以外的揚聲器輸出的
聲訊。
Picture
Adjust
調整亮度和黑度。
(☞ 第 41 頁)
查看導航畫面
在 <AV Menu> 畫面上:
或
在播放源控制畫面上:
• 當導航畫面顯示時,觸摸屏操作僅適
用於導航功能。
• 導航畫面的長寬比固定為 <Full>,與
<Aspect> 設定(☞ 第 42 頁)無關。
• 您可以選擇播放源“
AV-IN
”來聆聽接
上 LINE IN 插孔的音頻播放源。
取消導航畫面
CT_KW-AV70_U.indb 35CT_KW-AV70_U.indb 35 12/20/11 10:49:07 AM12/20/11 10:49:07 AM
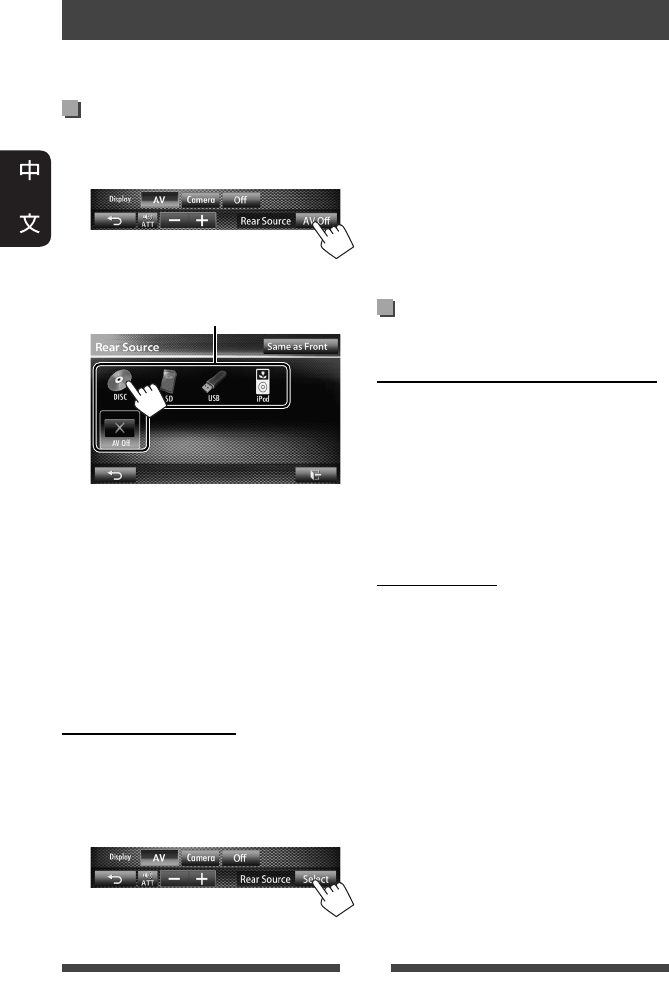
36
在外接顯示器上顯示後置播
放源的圖像
1 在 <AV Menu> 畫面上:
2 選擇後置播放源。
選擇後置播放源
•
如果選擇了“DISC”,“SD”*,
“USB”或“iPod”作為播放源,
那麼只有“AV-IN”,“AV Off”
和被選定的前置播放源按鍵才可
供選擇。
•
選擇“Apps”作為前置播放源時,
您無法選擇“DISC,“SD”*,
“USB”或“iPod”作為後置播
放源。
啟動後置播放源時...
• 想要在後置顯示器上觀看前置播放源
的圖像時,按 [Same as Front] 鍵。
– 想要選擇除前置播放源以外的播放
源作為後置播放源時,在 <AV Menu>
畫面上按 [Select] 鍵。
後置播放源的操作
您可以邊聆聽任意播放源,邊在 VIDEO OUT 和 2nd AUDIO OUT 插孔所接的外接顯示器上欣
賞後置播放源的播放。
• 當您在聆聽音樂時按下 [Same as Front]
鍵,曲目列表將會出現。
•
如果選擇的是除“DISC”,“SD”*,
“USB”,“iPod”或“AV-IN”以外
的播放源,則後置顯示器上不會有任
何顯示。
*
“
SD
”僅適用於
KW-AV70BT。
外接顯示器上的操作(僅使
用遙控器)
在控制畫面上選擇資料夾或曲目
對應 DivX/MPEG1/MPEG2/JPEG/MP3/WMA/WAV/
CD/iPod
• DivX/MPEG1/MPEG2/JPEG:當播放停止時。
• CD/iPod:跳過步驟 1。
1 按 @ / # 鍵選擇“Folder”欄或
“Track”欄。
2 按 % / fi 鍵選擇資料夾或曲目。
使用列表畫面
對應 DivX/MPEG1/MPEG2/JPEG/MP3/WMA/WAV
當播放停止時。
1 按 TOP M 或 MENU 鍵顯示列表畫面。
2 按 % / fi / @ / # 鍵在列表上選擇資料
夾/曲目。
• 想要返回資料夾列表,按 RETURN
鍵。
3 按 ENT 鍵確認選擇。
CT_KW-AV70_U.indb 36CT_KW-AV70_U.indb 36 12/20/11 10:49:09 AM12/20/11 10:49:09 AM
37
聲訊調整
選擇預設聲訊模式
1 在 <AV Menu> 畫面上:
或
在播放源控制畫面上:
2 選擇聲訊模式。
切換頁面
儲存您的調整
自訂預設聲訊模式
1 選擇聲訊模式。(☞“選擇預設
聲訊模式”)
2 調整各個波段的強度(1),
然後選擇重低音揚聲器的強度
(2)。
調整被儲存且 <User> 啟動。
• 想要完成設定,按 [ ] 鍵。
• 想要進行精確調整,☞ 第 38 頁。
使用聲訊等化器
• 為每個播放源儲存調整,直到您再次調整聲訊。如果播放源為碟片,則調整儲
存為以下各個類別。
– DVD/DVD-VR/VCD
– CD
– DivX/MPEG1/MPEG2/MP3/WMA/WAV
• 當 AV 播放源關閉時您無法調整聲訊。
CT_KW-AV70_U.indb 37CT_KW-AV70_U.indb 37 12/20/11 10:49:10 AM12/20/11 10:49:10 AM
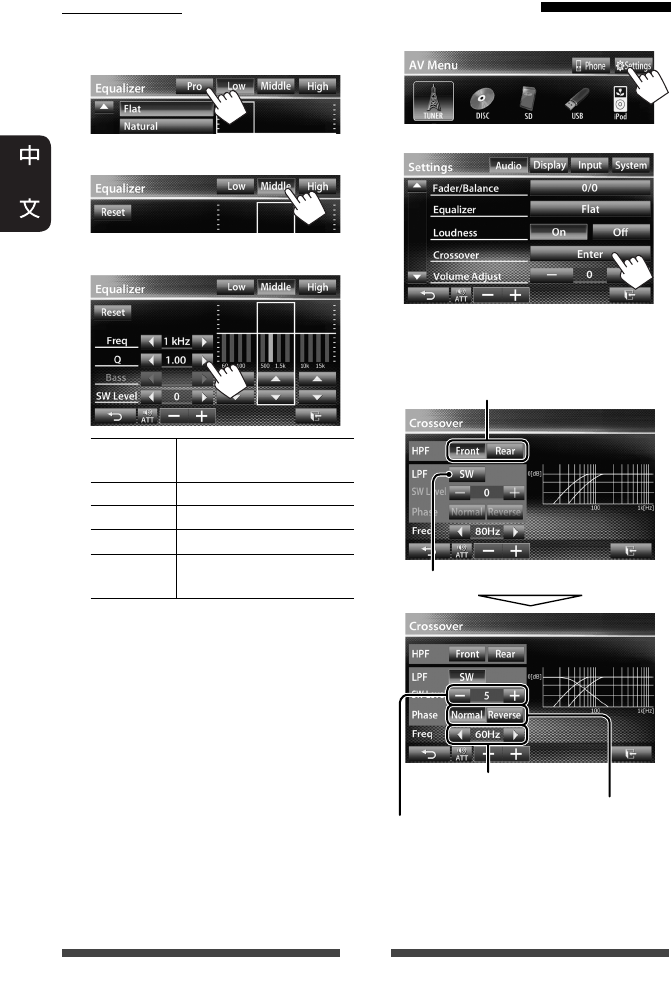
38
調整交叉頻率
1 在 <AV Menu> 畫面上:
2
3 選擇想要調整的項目,然後進
行調整。
*
當 <Freq> 設定為 <Through> 時不可選。
精確調整聲訊
1 執行“選擇預設聲訊模式”的
步驟 1 和 2,然後...
2 選擇波段。
3 調整聲訊。
Reset 將低/中/高音強度切換
至 0。
Freq 選擇頻率。
Q調整頻寬。*1
Bass 啟動/停用低音。*2
SW Level 調整重低音揚聲器的
強度。
如果已調整 <User> 設定,則所做的
調整會被覆蓋(☞ 第 37 頁),且
<User> 啟動。
• 調整被儲存,直到您再次調整聲
訊。
• 想要調整其他波段,重複步驟 2
和 3。
*1 “High”波段為固定值。
*2 僅對應“Low”波段。 調整重低音揚聲器的強度。
調整交叉頻率。
選擇重低音揚聲器的相位。*
為前置或後置揚聲器調整交叉頻率
(高通濾波器)。
為重低音揚聲器調整交叉頻率(低通濾
波器)。
CT_KW-AV70_U.indb 38CT_KW-AV70_U.indb 38 12/20/11 10:49:11 AM12/20/11 10:49:11 AM
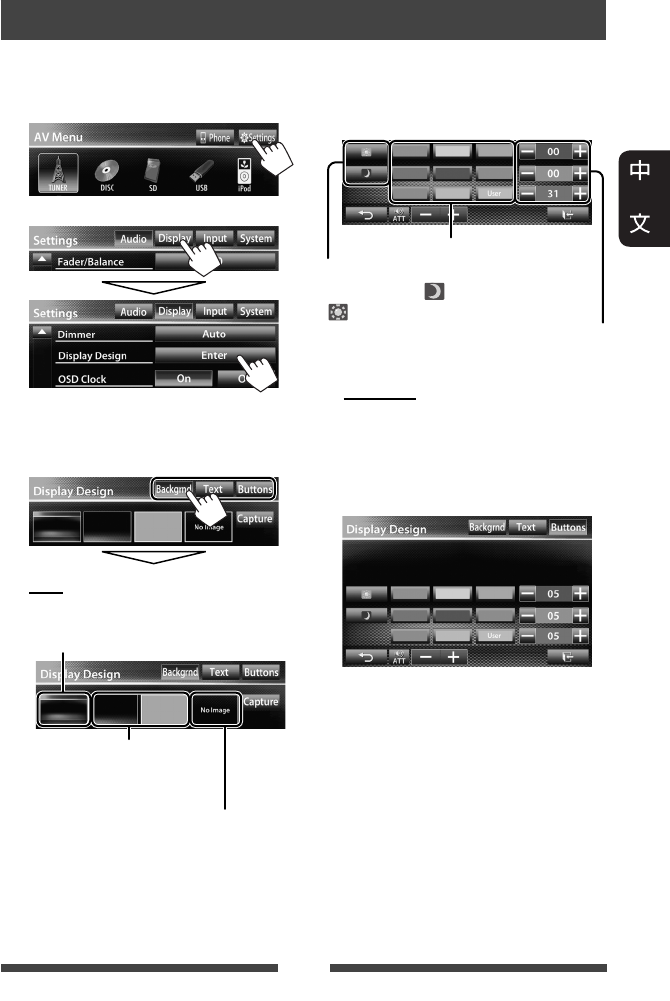
39
1 在 <AV Menu> 畫面上:
2
3 選擇一個項目(<Backgrnd>,
<Text> 或 <Buttons>),然後更
改設定。
背景
1選擇背景
更改顯示外觀
您可以更改背景,以及文案和觸摸屏按鍵的顏色。
2選擇/調整顏色
文案/按鍵
選擇/調整顏色。(關於詳情,☞ 以
上內容。)
• 在按鍵顏色選擇畫面上,您可以
為每個觸摸屏按鍵選擇一種顏
色。
基本圖像(預設)
關於設定您最喜愛的畫面作為背景,
☞ 第 40 頁
您可以在調色板上選擇顏
色或在用戶顏色調整器上
調整顏色(☞ 右欄)
用戶顏色調整器:您可以自己
創建顏色,並儲存在 <User> 中
調色板
調光器設定:您可以逐一選擇各項調
光器的設定—<>(調光器開啟)或
< >(調光器關閉)
CT_KW-AV70_U.indb 39CT_KW-AV70_U.indb 39 12/20/11 10:49:13 AM12/20/11 10:49:13 AM
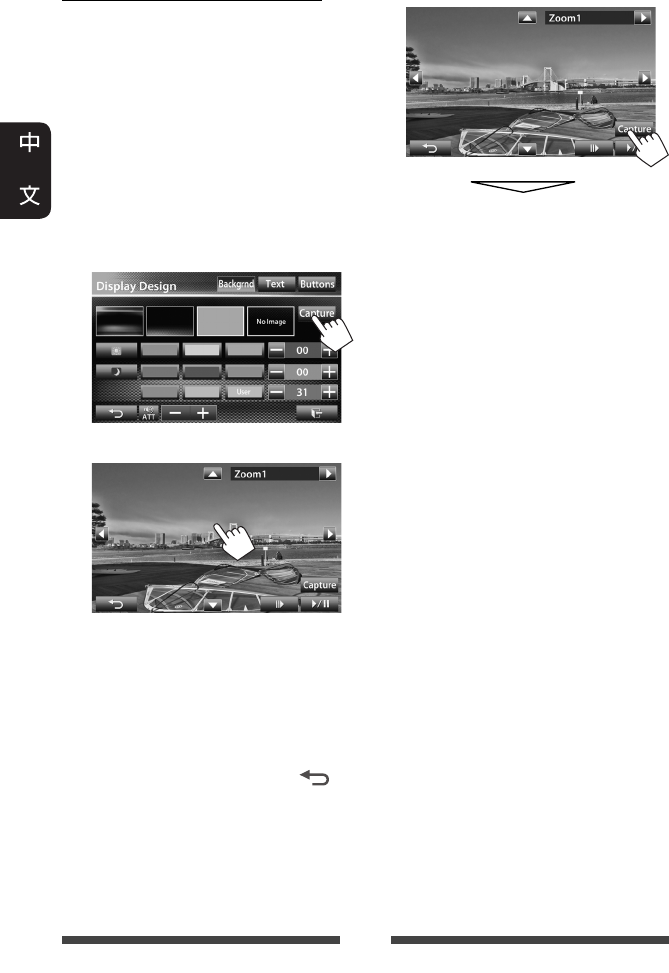
40
使用您最喜愛的畫面作為背景
播放視訊或 JPEG 時,您可以截取一個圖
像並使用該圖像作為背景。
• 您無法從 iPod/iPhone 截取受版權保護的
內容和圖像。
• 使用 JPEG 檔案作為背景時,確認解晰
度為 800 x 600 像素。
• 截取圖像的顏色可能看起來與實際畫
面有所不同。
1 播放視訊或 JPEG。
2 顯示 <Display Design> 畫面。
(☞ 第 39 頁)
3
4 調整圖像。
[6] *1開始/暫停播放。
[E] *1逐幀向前播放畫面。
[3]放大畫面。(<Full>,
<Zoom1> – <Zoom3>)
[5] [∞]
[2] [3] *2移動放大框。
• 想要取消截取的畫面,按 [ ]
鍵。
*1
當播放
LINE IN/VIDEO IN
插孔接上的外
接裝置時不顯示。
*2
當
<Full>
被選擇時不顯示。
5 截取顯示在螢幕上的圖像。
確認訊息出現。按 [Yes] 鍵儲存新截
取的圖像。(現有的圖像更換為新
圖像。)
• 按 [No] 鍵返回上一畫面。
CT_KW-AV70_U.indb 40CT_KW-AV70_U.indb 40 12/20/11 10:49:14 AM12/20/11 10:49:14 AM
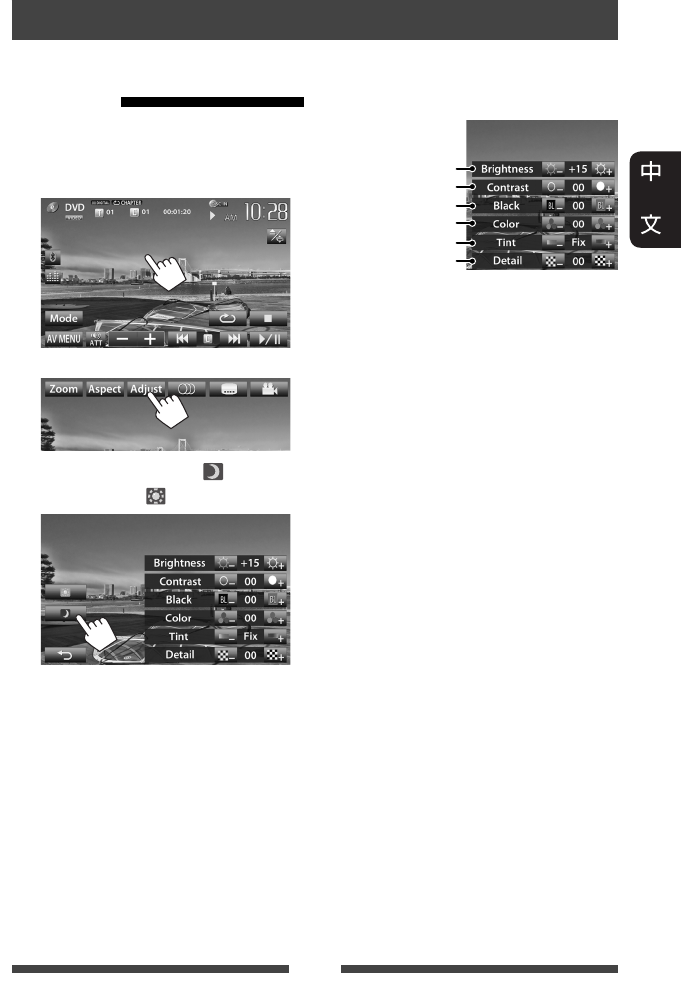
41
視訊播放的設定
您可以更改視訊播放的設定。
調整圖像
您可以調整畫質。
1 觸摸畫面上除操作鍵以外的任
何位置。
2
3 選擇啟動調光器(< >)或關
閉調光器(<>)。
4 調整圖像(–15 至 +15)。
調整亮度
調整對比度
調整色調 *
調整顏色
調整黑度
調整清晰度
*
僅當輸入信號為
NTSC
時才可調
整。
CT_KW-AV70_U.indb 41CT_KW-AV70_U.indb 41 12/20/11 10:49:15 AM12/20/11 10:49:15 AM
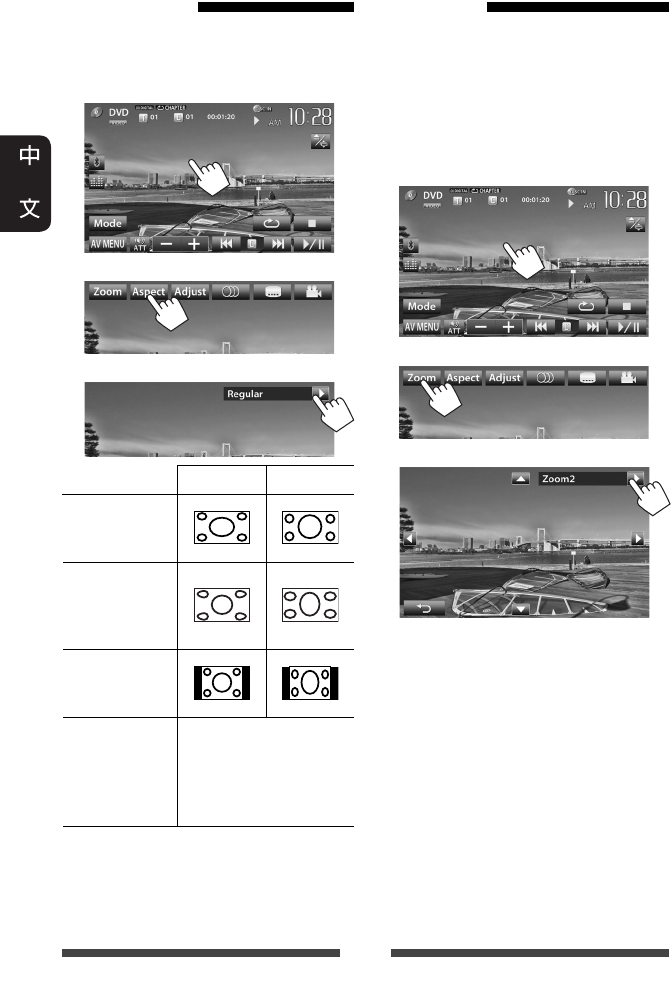
42
切換長寬比
您可以切換視訊播放的長寬比。
1 觸摸畫面上除操作鍵以外的任
何位置。
2
3
4:3 信號 16:9 信號
Full*1:
用於 16:9 原始
圖像
Panorama:
用於在寬螢
幕上觀看 4:3
圖像
Regular*1:
用於 4:3 原始
圖像
Auto:•
僅對應“DISC”/
“SD”*
2
/“USB”:
自動選擇長寬比,
使其與輸入信號相
一致。
*1
當
<Monitor Type>
設定為
<16:9>
時若要
播放
DivX
(
☞
第
22
頁),此長寬比設
定不正確。
*2
“
SD
”僅適用於
KW-AV70BT。
放大圖像
您可以放大圖像(<Full>,<Zoom1> 至
<Zoom3>)。
• 當 <Aspect> 設定為 <Panorama> 或
<Auto> 時(☞ 左欄),圖像按照
<Full> 設定的長寬比放大。
1 觸摸畫面上除操作鍵以外的任
何位置。
2
3
[5] [∞] [2] [3]*:移動放大框。
*
當
<Full>
被選擇時不顯示。
• 放大功能不適用於某些視訊播放源。
CT_KW-AV70_U.indb 42CT_KW-AV70_U.indb 42 12/20/11 10:49:16 AM12/20/11 10:49:16 AM
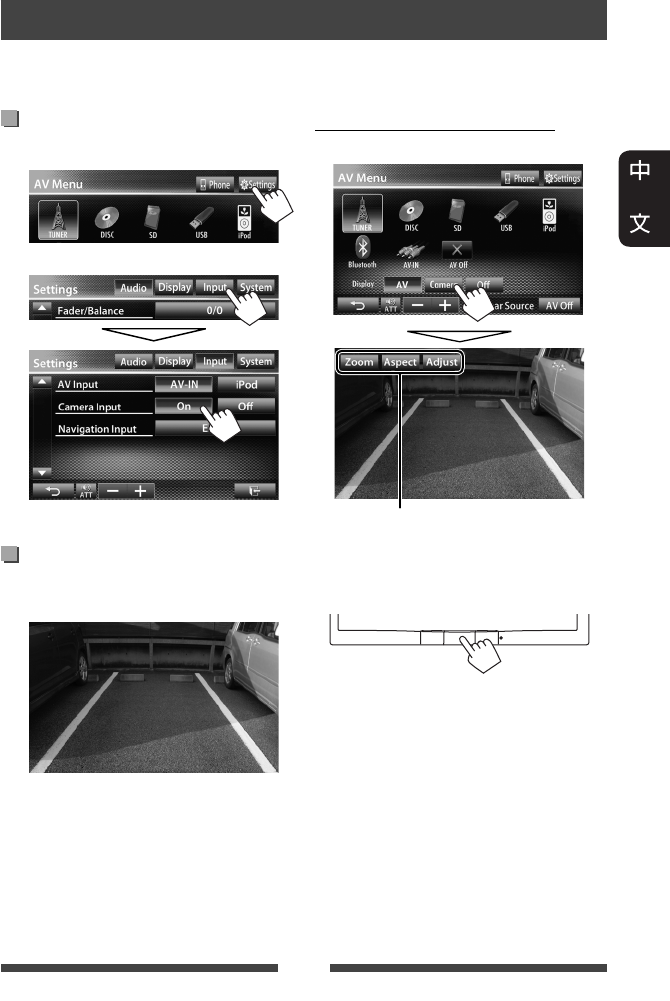
43
啟動後視攝影機
1 在 <AV Menu> 畫面上:
2
想要停用,選擇 <Off>。
顯示後視攝影機的圖像
當您將變速器轉到反向(R)位置時,
後視畫面顯示。
使用後視攝影機
• 想要使用後視攝影機,需要連接 REVERSE GEAR SIGNAL 導線。關於連接後視攝影
機,☞ 安裝/連接手冊。
手動顯示後視攝影機的圖像
在 <AV Menu> 畫面上:
取消後視畫面
手動顯示後視攝影機的圖像時,您可
以更改圖像的設定。(☞ 第 41 頁)
CT_KW-AV70_U.indb 43CT_KW-AV70_U.indb 43 12/20/11 10:49:18 AM12/20/11 10:49:18 AM
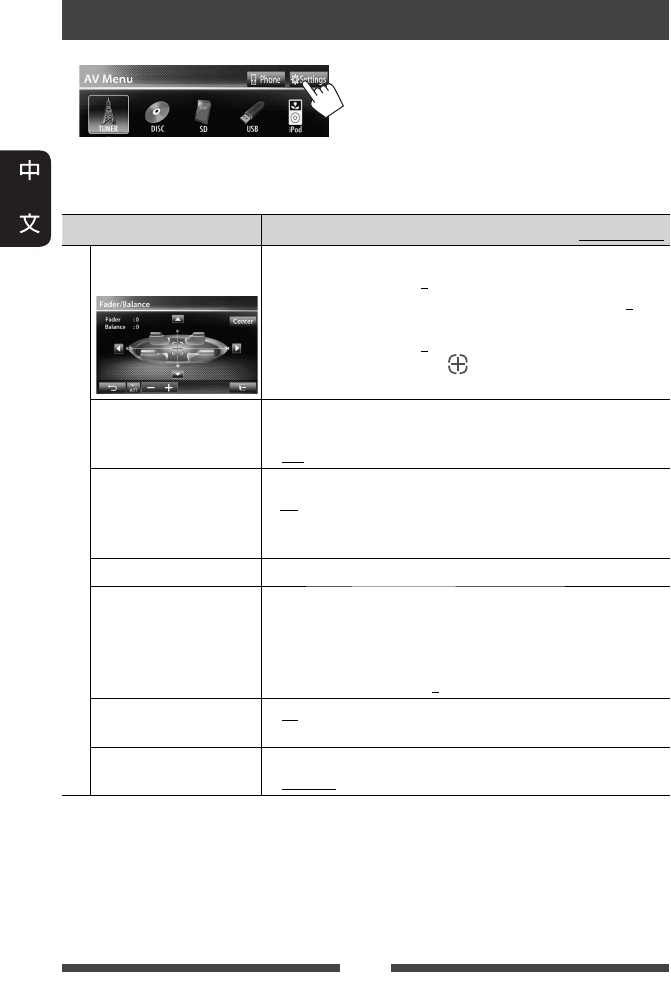
44
設定選單項目
• 在 <Navigation Input> 中切換 <Amplifier Gain>,<AV Input> 和 <Input> 的設定時,請關
閉 AV 播放源。對應其他設定,請在 AV 播放源開啟後再切換設定。
選單項目 可選擇的設定/項目 初始設定:加有下划線
Audio(音樂檔)
Fader/Balance
(衰減器/平衡器)
Fader:調整前置和後置揚聲器的輸出平衡。
♦ F6 至 R6;初始設定 0
•
使用雙揚聲器系統時,將衰減器設定在中間位置(0)。
Balance:調整左置和右置揚聲器的輸出平衡。
♦ L6 至 R6;初始設定 0
按 [ 5/∞/2/3 ] 鍵或拖動 [ ] 鍵進行調整。
• 想要清除調整,按 [Center] 鍵。
Equalizer(等化器) 為各個播放源切換聲訊模式或調整並儲存等化器設
定。(☞ 第 37 頁)
♦ Flat/Natural/Dynamic/Vocal Boost/Bass Boost/Vibrant/User
Loudness(響度) 您可以啟動/停用響亮度功能。
♦ On
♦ Off
: 在音量強度較低的情況下,提高低頻和
高頻的音量以達到更好的平衡效果。
: 取消。
Crossover(交界頻率) 調整交叉頻率。(☞ 第 38 頁)
Volume Adjust
(音量調整)
為各個播放源調整並儲存自動調整音量強度。(關於
碟片,調整儲存為以下各個類別:DVD/DVD-VR,VCD/CD
和 DivX/MPEG1/MPEG2/MP3/WMA/WAV。)當切換播放源時,
音量強度會自動升高或降低。
♦ –15 至 +6;初始設定 0
Amplifier Gain
(放大器功率) *
♦ On : 啟動內建功率放大器。
♦ Off : 停用內建功率放大器。
Speaker Select
(喇叭選擇)
選擇所接揚聲器的尺寸。
♦ Standard/Narrow/Middle/Wide
*
想要切換設定,先在
<AV Menu>
畫面上按
[AV Off]
鍵關閉
AV
播放源。
CT_KW-AV70_U.indb 44CT_KW-AV70_U.indb 44 12/20/11 10:49:19 AM12/20/11 10:49:19 AM
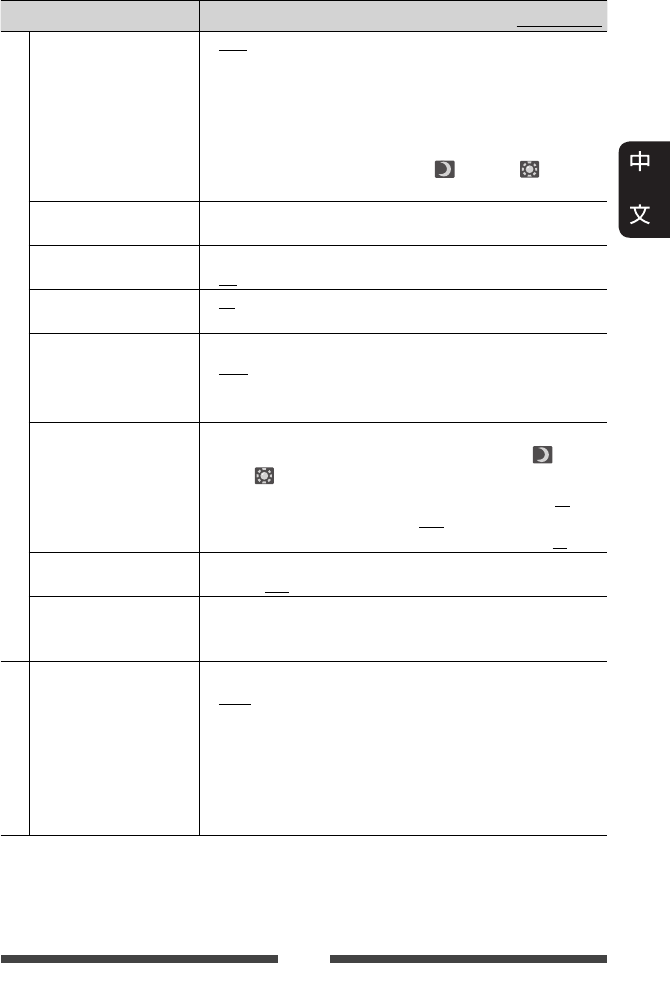
45
選單項目 可選擇的設定/項目 初始設定:加有下划線
Display(顯示設定)
Dimmer(調光器) ♦ Auto
♦ On
♦ Off
♦ Dimmer
Time Set
: 當您打開車前燈時降低螢幕和按鍵照明
的亮度。
• 需要連接 ILLUMI 導線。(☞ 安裝/連接
手冊)
: 啟動調光器。
: 取消。
:
設定調光器啟動( )/關閉( )時間。
• 按 [5] 或 [∞] 鍵設定時間。
Display Design
(顯示外觀編輯)
更改顯示外觀(背景,文案顏色和觸摸屏按鍵的顏
色)。(☞ 第 39 頁)
OSD Clock(時間顯示) ♦ On
♦ Off
: 當視訊播放源播放時顯示時鐘。
: 取消。
Demonstration
(屏幕演示)
♦ On
♦ Off
: 在螢幕上啟動演示功能。
: 取消。
Scroll(文本捲動) ♦ Auto
♦ Once
♦ Off
: 重複滾動顯示。
: 滾動顯示訊息一次。
: 取消。
•
觸摸訊息條可以使文案滾動顯示,這與該設定無關。
GUI Adjust(用戶圖形
界面調整)
調整螢幕的亮度和黑度。
按 [Enter] 鍵顯示設定畫面,選擇調光器啟動( )/
關閉( ),然後切換以下設定:
♦ Brightness
♦ Black
: 調整亮度(–15 至 +15;初始設定 00 對
應調光器啟動/+15 對應調光器關閉)。
:
調整黑度(–15 至 +15;初始設定 00)。
NTSC/PAL(電視制式) 選擇外接顯示器的彩色制式。
♦ NTSC,PAL
Display Sensor
(顯示感知器)
對於一段時間未進行任何操作之後,按鍵的顯示方
式,運動傳感器的靈敏度以及畫面的變化方式進行設
定。(☞ 第 11 頁)
Input(輸入設定)
AV Input(聲音及影像
輸入)*1
您可以決定是否使用 LINE IN/VIDEO IN 插孔。
♦ AV-IN*2:
想要使用 LINE IN/VIDEO IN 插孔所接的外接裝
置或使用經 USB 2.0 電纜接上的 iPod/iPhone
時則選擇此項。(☞第 27 和 33 頁)
♦ iPod
♦ BT*2*3
: 想要使用以 JVC KS-U30 接上的 iPod/iPhone 時
則選擇此項。(☞ 第 27 頁)
:
當使用藍牙轉換器(KS-BTA100)播放藍牙
音頻播放機時選擇此項。(☞ 第 59 頁)
*1
想要更改設定,先在
<AV Menu>
畫面上按
[AV Off] 鍵關閉 AV
播放源,並選擇“
AV
Off
”作為後置播放源。當
<Navigation Input>
中的
<Input>
設定為
<RGB>
或
<Off>
時,
<AV Input>
設定可以變更。
*2
當
<AV Input>
設定為
<AV-IN>
或
<BT>
時,
iPod/iPhone
中的視訊不會在熒幕上顯示。
*3
僅對應
KW-AV70。
CT_KW-AV70_U.indb 45CT_KW-AV70_U.indb 45 12/20/11 10:49:20 AM12/20/11 10:49:20 AM
46
選單項目 可選擇的設定/項目 初始設定:加有下划線
Input(輸入設定)
Camera Input
(倒車攝影機輸入)
♦ On
♦ Off
: 將變速器轉到反向(R)位置時顯示後
視攝影機的圖像。
: 取消。
Navigation Input
(導航輸入)
切換所接 iPod touch/iPhone/外接導航裝置上應用程式畫面
的顯示設定。(☞ 第 31 和 35 頁)
• 當 <Input> 設定為 <iPhone> 時,<Navigation Mute> 不起
作用。
System(系統)
Language(語言) 選擇用於螢幕訊息的文案語言。
♦ English/Español/Français/Deutsch/Italiano/Nederlands/Svenska/
Dansk/Руccĸий/Português/ / / /
Türkçe/ / /
• 當設定更改時,“Please Power Off”字樣出現。關閉電
源,然後再重新啟動,從而使更改生效。
♦GUI
Language
: 選擇一種語言(<
English> 或 <Local>:以
上選擇的語言)來顯示操作鍵和選單項
目。
Time Set(時間設定) 調整時鐘。(☞ 第 7 頁)
Beep(嗶聲聲) ♦ On
♦ Off
: 啟動觸鍵音。
: 取消。
User Profile
(使用者記錄)
您可以儲存,調出或清除已完成的設定。(☞ 第 47 頁)
Touch Panel Adjust
(觸控面板調整)
調整螢幕上按鍵的觸摸位置。(☞ 第 48 頁)
Initialize
(返回初始設定)
將所有已調整的設定返回初始狀態。按住 [Enter] 鍵返
回初始設定。
• 返回初始設定後,在 <Initial Settings> 畫面上調整設
定。(☞ 第 6 頁)
Serial Number(序號) 顯示序列號。
DivX® VOD(DivX® VOD)本機有其自帶的註冊代碼。當播放帶有註冊代碼的檔
案時,註冊代碼將改寫為版權保護。
• 按 [Enter] 鍵顯示訊息。
• 想要返回上一畫面,按 [OK] 鍵。
System Information
(系統資訊)
顯示軟體節目的版本訊息。您可以更新軟體節目。
(☞ 第 48 頁)
Steering Remote Learning
(學習式方向盤搖
控)
該設定不使用。
CT_KW-AV70_U.indb 46CT_KW-AV70_U.indb 46 12/20/11 10:49:20 AM12/20/11 10:49:20 AM
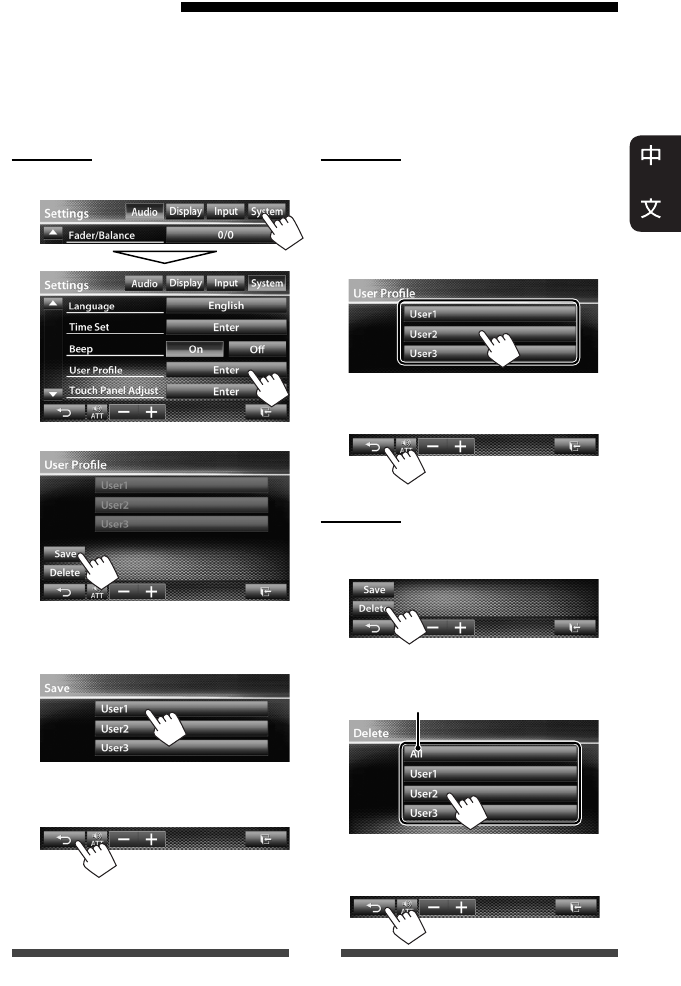
47
儲存/調出設定
您可以儲存以下設定:
• 在 <Settings> 畫面上的設定:Fader/Balance,Equalizer,Loudness,Crossover(HPF/LPF/
SW Level 設定),Volume Adjust,Speaker Select,Dimmer,Display Design,Display Sensor,
AV Input,Camera Input,Navigation
• “
AV-IN
”的設定:AV-IN Name
儲存設定
1 在 <Settings> 上:
2
3 選擇一個項目(<User1>,
<User2> 或 <User3>)儲存設定。
確認訊息出現。按 [Yes] 鍵。
4 完成設定。
調出設定
• 先在 <AV Menu> 上按 [AV Off] 鍵關閉 AV
播放源,並選擇“
AV Off
”作為後置
播放源。
1 在 <User Profile> 畫面上(☞ 左欄的
步驟 2):
確認訊息出現。按 [Yes] 鍵。
2 完成設定。
清除設定
1 在 <User Profile> 畫面上(☞ 左欄的
步驟 2):
2 清除儲存在 <User1>,<User2> 和
< User3> 中的所有設定
確認訊息出現。按 [Yes] 鍵。
3 完成設定。
CT_KW-AV70_U.indb 47CT_KW-AV70_U.indb 47 12/20/11 10:49:21 AM12/20/11 10:49:21 AM
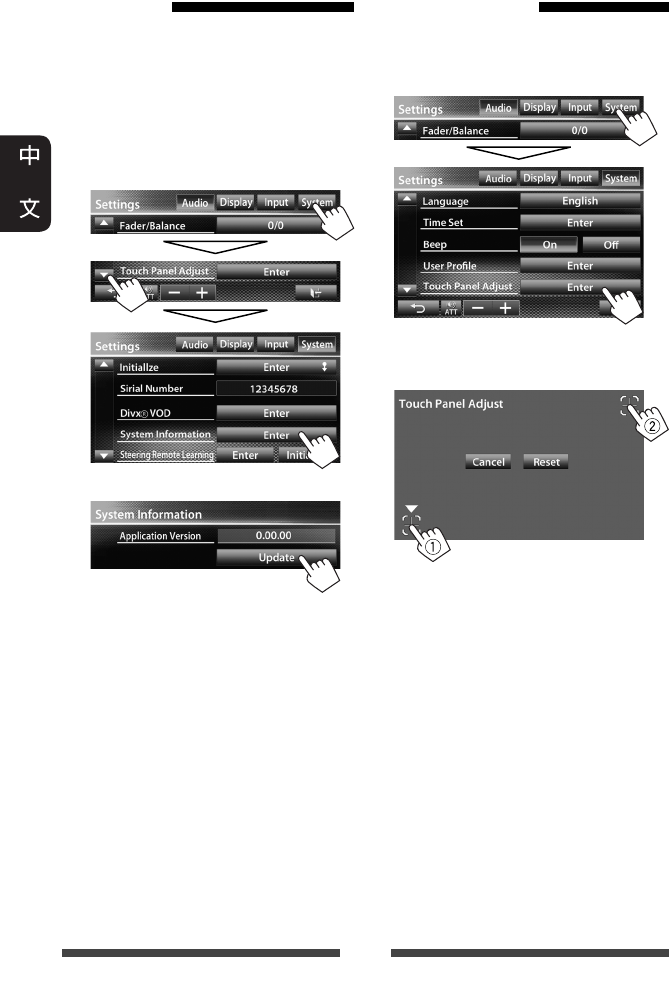
48
升級系統
在連接了含有升級檔案的 USB 裝置後,
您可以升級系統。
1 創建一個升級檔案,將其複製
到 USB 裝置,然後將該裝置連接
到本機。
• 想要連接 USB 裝置,☞ 第 25 頁。
2 在 <Settings> 畫面上:
3
可能要稍等片刻。
如果升級成功,則“Update Completed”
字樣會出現。重置本機。
• 如果升級失敗,請關閉電源後再重新
啟動,然後重新開始升級。
• 即使在升級過程中關閉電源,您也可
以在電源啟動後再重新開始升級。升
級將從頭開始。
調整觸摸位置
如果觸摸的位置與進行的操作不符,您
可以調整觸摸屏上的觸摸位置。
1 在 <Settings> 上:
2 按指示觸摸左下和右上標記的
中心。
• 想要取消當前操作,按 [Cancel]
鍵。
• 想要恢復初始設定,按 [Reset]
鍵。
CT_KW-AV70_U.indb 48CT_KW-AV70_U.indb 48 12/20/11 10:49:23 AM12/20/11 10:49:23 AM
49
藍牙操作 對應 KW-AV70BT
藍牙是一種短距離無線傳輸通訊技術,用於移動電話,手提式 PC 和其他移動裝
置。藍牙裝置可以不經電纜接上而進行通訊。
• 參閱本使用手冊末尾的第 i 和 ii 頁,查看可以使用藍牙(Bluetooth®)功能的國家。
藍牙(Bluetooth®)裝置的使用須知
藍牙的操作
出廠時,藍牙轉換器(KS-UBT1)已
安裝。
藍牙轉換器
(KS-UBT1)
• 當使用藍牙功能時,讓藍牙轉換器
一直插在端口中。
• 該端口僅用於 KS-UBT1。其他藍牙轉
換器或 USB 裝置無法使用。
藍牙配置檔案
本機支援以下藍牙配置檔案;
• HFP(免持聽筒配置檔案)1.5
• OPP(對象推送配置檔案)1.1
• A2DP(進階音頻傳輸配置檔案)1.2
• AVRCP
(音頻/視訊遠程控制配置檔案)1.3
• PBAP(通訊錄訪問配置檔案)1.0
藍牙按鍵的圖標
: 未接上裝置。
: 藍牙音頻播放機已接上。
: 藍牙移動電話已接上。
: 藍牙移動電話和音頻播放
機均已接上。
• 某些藍牙裝置可能無法接上本機,這
取決於裝置的藍牙版本。
• 對應某些藍牙裝置,本機可能無法工
作。
• 連接情況可能因周圍環境不同而不
同。
• 對應某些藍牙裝置,當本機關閉時,
裝置拔開連接。
藍牙訊息:如果想要了解關於藍牙
的更多訊息,訪問下列 JVC 網站:
<http://www3.jvckenwood.com/english/car/>
(僅英語網站)
CT_KW-AV70_U.indb 49CT_KW-AV70_U.indb 49 12/20/11 10:49:24 AM12/20/11 10:49:24 AM
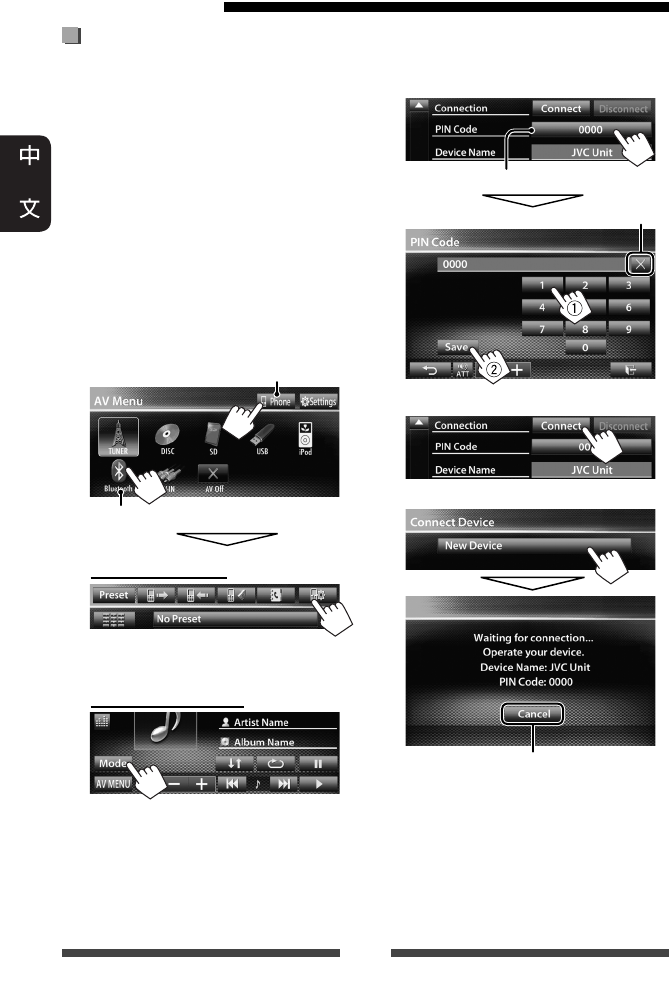
50
第一次連接新的藍牙裝置
第一次連接藍牙裝置至本機時,將藍牙
裝置和本機配對。配對可讓藍牙裝置相
互通訊。
想要配對時,需要輸入您想要連接的藍
牙裝置的 PIN(身份識別碼)碼。
• 一旦建立連接,它將在本機內註冊,
即使您重置本機。最多可註冊 5 個裝
置。
• 對應藍牙電話和藍牙音頻播放機,一
次僅可接上一項裝置。
• 想要使用藍牙功能時,需要打開裝置
的藍牙功能。
1 顯示藍牙設定畫面。
在 <AV Menu> 畫面上:
移動電話
音頻播放機
連接藍牙移動電話
電話設定畫面顯示。
連接藍牙音頻播放機
<Mode> 畫面顯示。
連接藍牙裝置
2 更改 PIN 碼。
• 如果要跳過 PIN 碼的更改,請進入
步驟 3。
PIN 碼(初始設定:0000)
刪除最後一個字母
3
4
5 操作想要連接的藍牙裝置。
“Connected”字樣出現。按 [OK] 鍵確
認操作。
現在連接已經建立,您可以從本機
使用藍牙裝置。
取消
CT_KW-AV70_U.indb 50CT_KW-AV70_U.indb 50 12/20/11 10:49:25 AM12/20/11 10:49:25 AM
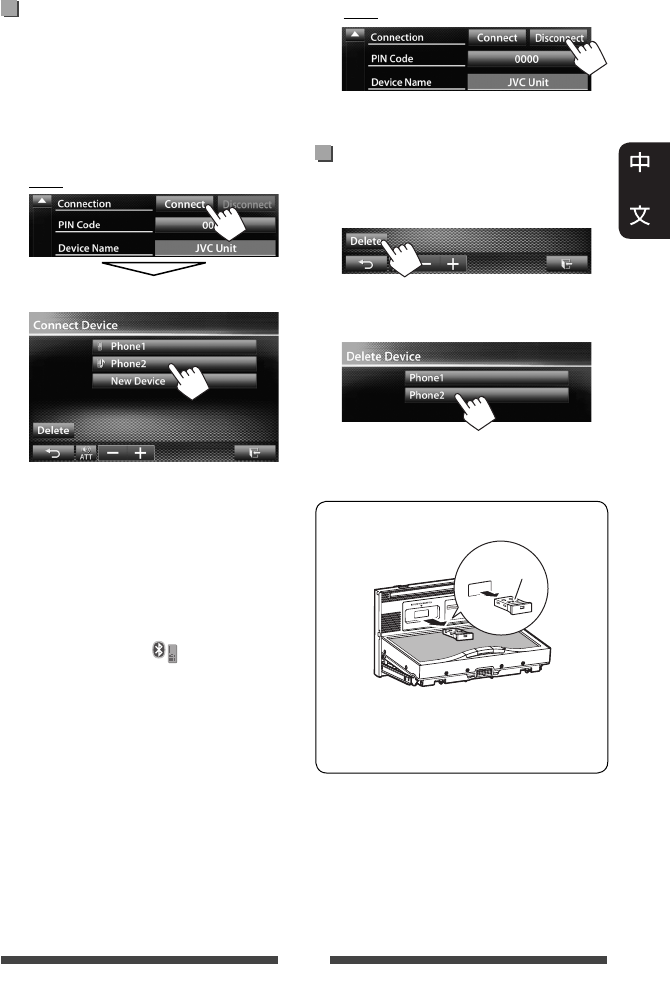
51
連接/拔開已註冊的藍牙裝置
1 顯示藍牙設定畫面。
(☞ 第 50 頁)
• 對應藍牙移動電話:電話設定畫
面
• 對應藍牙音頻播放機:<Mode> 畫
面
2 連接
選擇您想要連接的裝置。
“Connected”字樣出現。按 [OK] 鍵確
認操作。
• 所有已註冊的裝置(移動電話和
音頻播放機)列在 <Connect Device>
上。
– 可用項目取決於您正在操作的
裝置。
• 當移動電話接上時,按住播放源
控制畫面上的 [ ] 鍵在最後接上
的移動電話和當前移動電話之間
切換。
拔開
確認訊息出現。按 [Yes] 鍵。
刪除已註冊的藍牙裝置
1 在 <Connect Device> 畫面上(☞ 左欄
的步驟 2):
2 選擇想要刪除其註冊訊息的裝
置。
確認訊息出現。按 [Yes] 鍵。
卸下藍牙轉換器
“JVC”
•
將藍牙轉換器存放在附帶的包中。
• 再次裝上藍牙轉換器時,將其牢
牢裝上並使 JVC 標誌朝上。
CT_KW-AV70_U.indb 51CT_KW-AV70_U.indb 51 12/20/11 10:49:27 AM12/20/11 10:49:27 AM
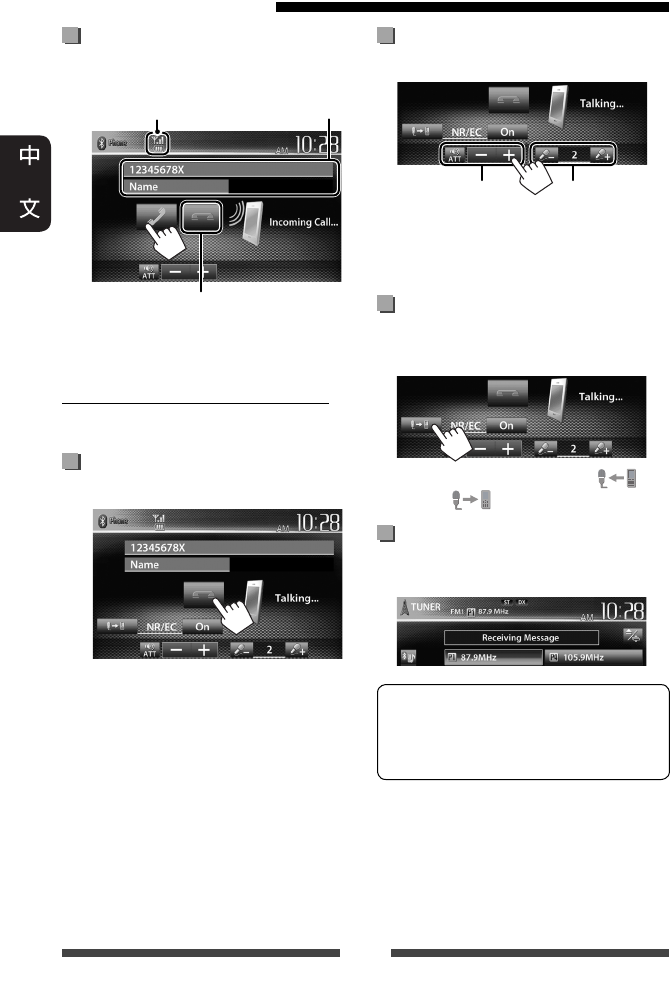
52
接聽來電
當有電話接入時...
• 電話操作在後視攝影機的圖像顯示時
不可用。(☞ 第 43 頁)
當 <Auto Answer> 設定為 <On> 時
本機自動接聽來電。(☞ 第 58 頁)
結束通話
通話時...
使用藍牙移動電話
調整通話/耳機/麥克風的音量
通話時...
調整麥克風
的音量
調整通話/
耳機的音量
• 該調整不影響其他播放源的音量強
度。
在免提模式和電話模式之間
切換
通話時...
每次按該鍵,通話方式切換( :
免提模式/ :電話模式)。
查看 SMS 接收
如果移動電話與 SMS(短訊息服務)相
容,本機會告知您已收到訊息。
想要閱讀已收到的訊息,把汽車停
在一個安全的地方後操作移動電話。
• 不能從本機閱讀,編輯或發送訊
息。
• 對應某些移動電話,即使機器支援
SMS 功能,通知訊息也可能不會顯
示。
裝置狀態/電池電量提示
(僅當訊息來自裝置時)
電話訊息
(若需要)
拒絕來電
CT_KW-AV70_U.indb 52CT_KW-AV70_U.indb 52 12/20/11 10:49:28 AM12/20/11 10:49:28 AM
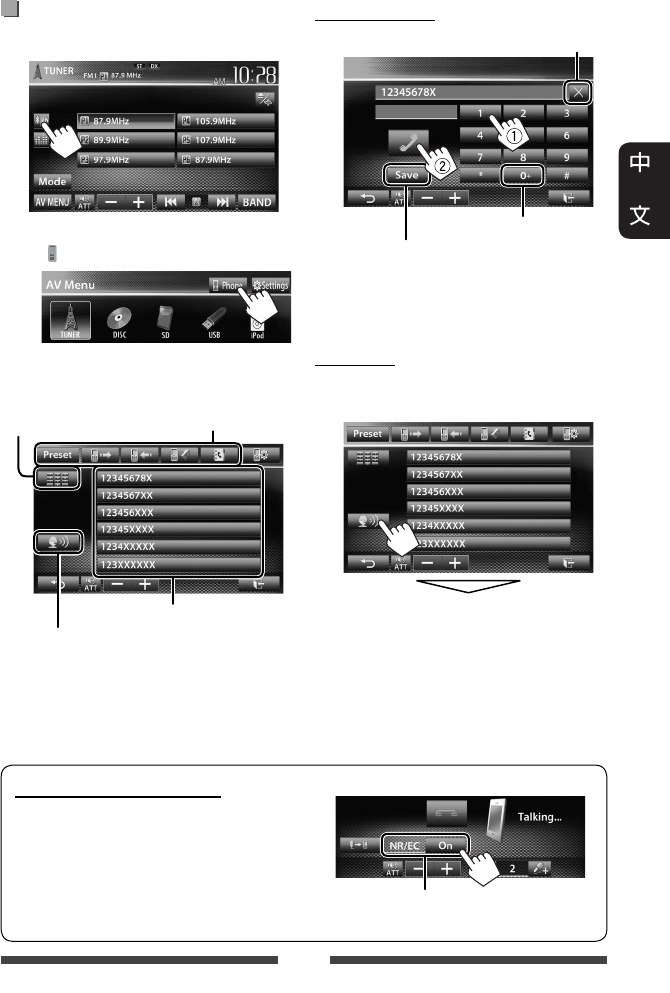
53
減少通話時的迴音/雜訊
確認通話時 NR/EC(雜訊抑制/迴音消除)
功能已在畫面上啟動。
撥打電話
1 在播放源控制畫面上:
• 您也可以按 <AV Menu> 畫面上的
[ Phone] 鍵來顯示電話控制畫面。
2 選擇撥打電話的方法。
直接輸入號碼
按住
:添加“+”
在預設列表上預設輸入的
電話號碼(☞ 第 55 頁)
刪除最後一個字母
• 您最多可以輸入 32 個號碼。
語音撥號
• 僅當接上的移動電話配備了語音識別
系統時可用。
說出您想要撥打電話的姓名。
想要取消,按 [Cancel] 鍵。
直接輸入號碼
(☞ 右欄)
預設列表/通訊錄/電話
列表(☞ 第 54 頁)
預設列表(關於預設,☞ 第 55 頁)
語音撥號(☞ 右欄)
選擇 <On> 可在通話時抑制雜訊和
消除迴音。
CT_KW-AV70_U.indb 53CT_KW-AV70_U.indb 53 12/20/11 10:49:29 AM12/20/11 10:49:29 AM
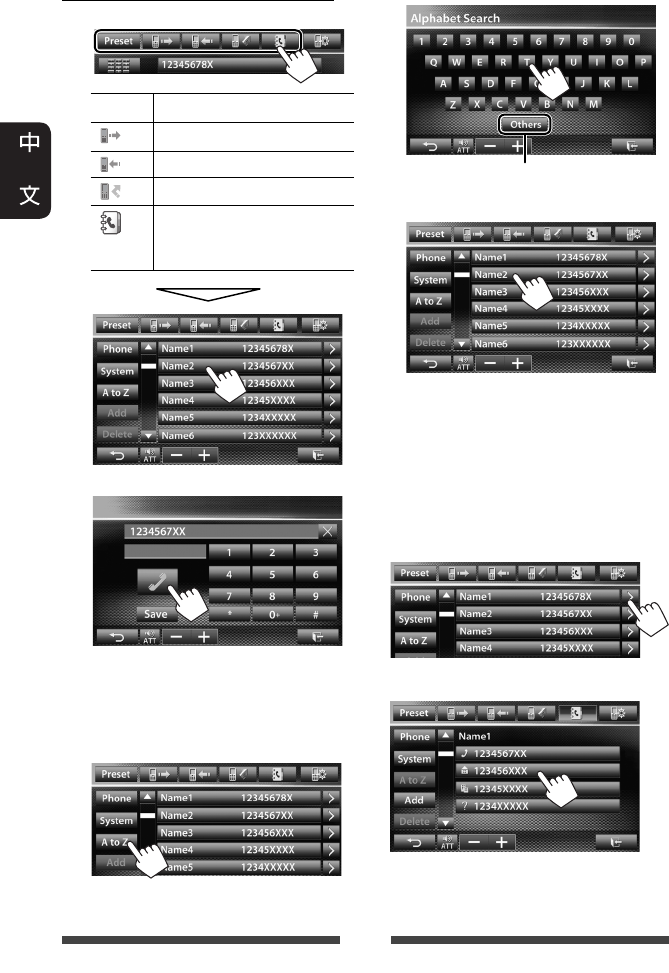
54
使用預設列表/通訊錄/電話列表
1
[Preset] 從預設列表
[ ] 從已撥電話列表。
[ ] 從已接電話列表。
[ ] 從未接電話列表。
[ ] 從通訊錄。
• 關於複製通訊錄,
☞ 第 55 頁。
2
在通訊錄中使用 A 到 Z 搜尋
當通訊錄列表畫面顯示時,您可以按首
字母進行搜尋。
1
2 選擇首字母。
3 從列表中選擇一個電話號碼。
顯示通訊錄條目的詳細內容
當通訊錄列表畫面顯示時,您可以顯示
通訊錄條目的詳細內容,如果該條目已
登記了幾個電話號碼,請選擇一個電
話號碼。
1 顯示所需通訊錄條目的詳細內
容。
2 選擇想要撥打的電話號碼。
顯示其他字母
CT_KW-AV70_U.indb 54CT_KW-AV70_U.indb 54 12/20/11 10:49:31 AM12/20/11 10:49:31 AM
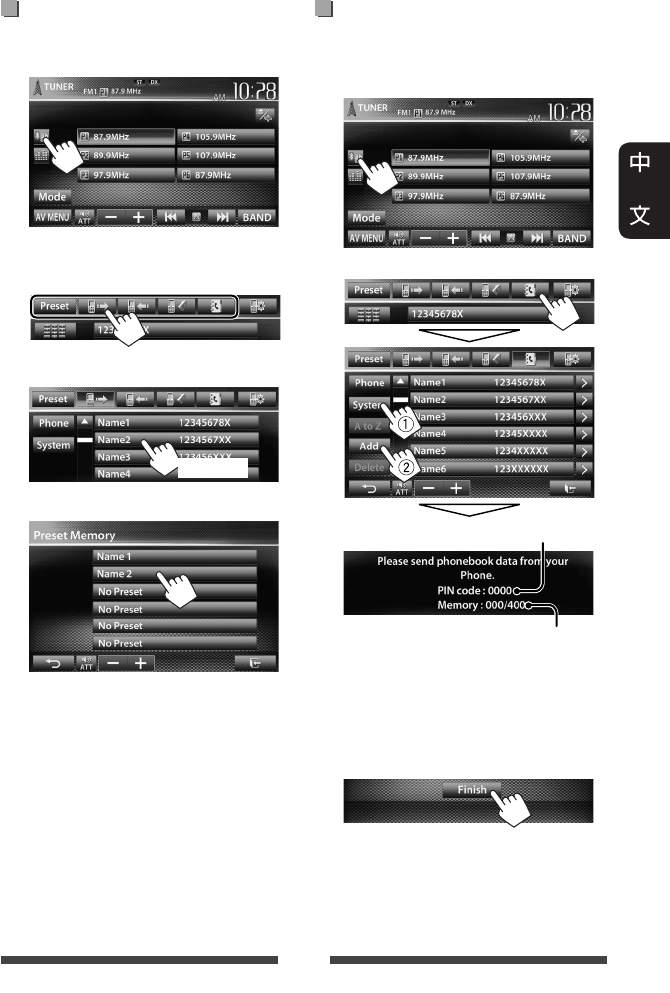
55
預設電話號碼
您最多可以預設 6 個電話號碼。
1 在播放源控制畫面上:
2 從通訊錄/電話列表選擇一個項
目。
3 選擇電話號碼。
4 選擇想要儲存的預設號碼。
• 您也可以按 [Save] 鍵,對直接輸入號
碼畫面上輸入的電話號碼進行預設。
(☞ 第 53 頁)
複製通訊錄
您可以將移動電話的通訊錄複製到本機
(最多 400 條)。
1 在播放源控制畫面上:
2
3 操作目標移動電話。
• 參閱隨移動電話附帶的使用說明
書。
• 想要取消傳輸,按 [Finish] 鍵。
4 完成設定。
通訊錄從移動電話被複製。
(按住)
PIN 碼(初始設定:0000)
複製的通訊錄條目數
CT_KW-AV70_U.indb 55CT_KW-AV70_U.indb 55 12/20/11 10:49:33 AM12/20/11 10:49:33 AM
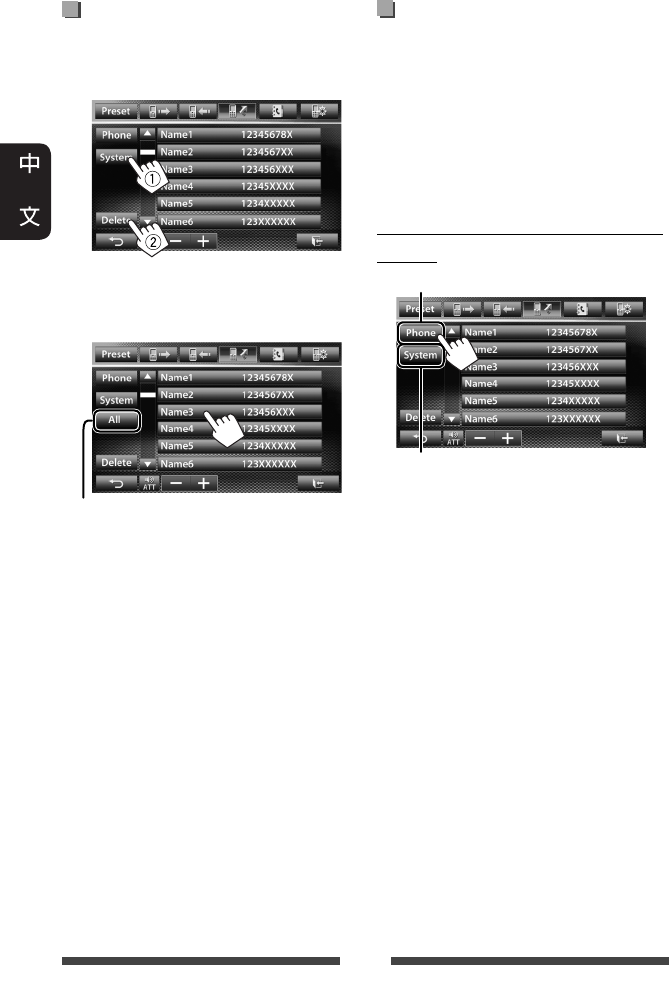
56
刪除本機的電話號碼
1 顯示您想要刪除的預設列表/通
訊錄/電話列表。(☞ 第 54 頁)
2
• 當選擇了 <Phone> 時,您無法刪
除數據。
3 選擇您想要刪除的項目。
確認訊息出現。按 [Yes] 鍵。
關於相容通訊錄訪問配置檔
案(PBAP)的移動電話
如果移動電話支援 PBAP,當電話接上
時,通訊錄和電話列表會自動複製到
本機。
• 通訊錄:最多 5 000 條
• 已撥電話,已接電話和未接電話:
最多各 50 條
顯示移動電話或本機的通訊錄/電
話列表
刪除所選列表中的所有號碼/姓名
接上的移動電話
本機
CT_KW-AV70_U.indb 56CT_KW-AV70_U.indb 56 12/20/11 10:49:34 AM12/20/11 10:49:34 AM
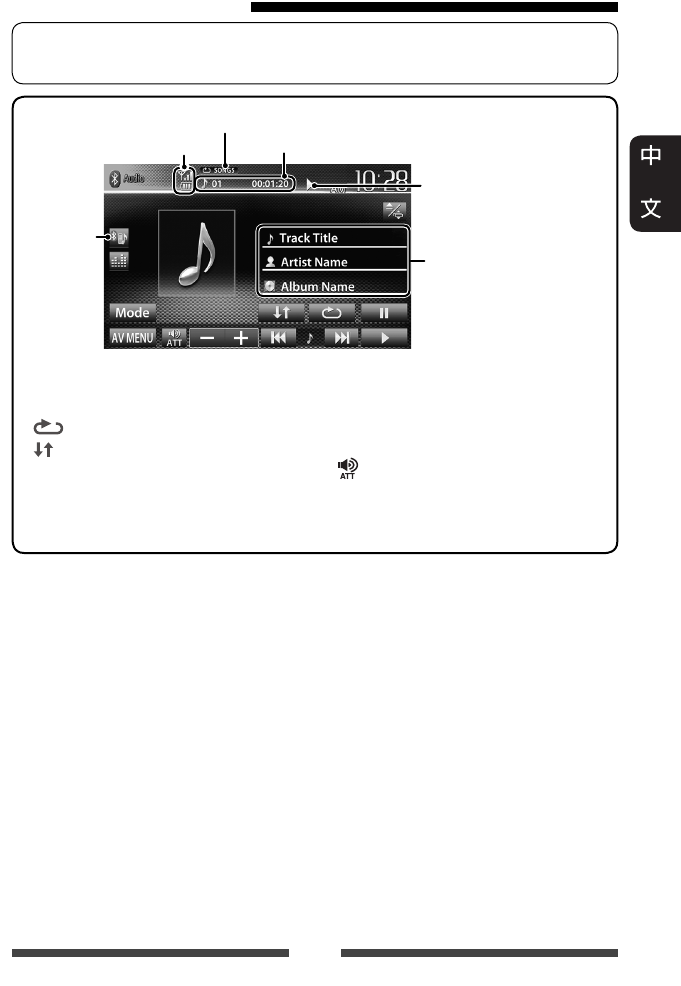
57
• 想要註冊新的裝置,☞ 第 50 頁。
• 想要連接/拔開裝置,☞ 第 51 頁。
使用藍牙音頻播放機
裝置狀態/電池電量提示
(僅當訊息來自裝置時)
標籤數據(當前曲目標題/
藝術家名稱/專輯標題)*1
• 若文案訊息沒有顯示完
整,觸摸訊息條使文案
滾動顯示。
播放狀態
(3:播放 / 8:暫停播
放)*1
曲目號碼/播放時間 * 1
播放模式 * 1(☞ 以下內容)
☞ 第 49 頁
• 操作鍵,畫面上顯示的指示和訊息因接上的裝置而有所不同。
[8]暫停播放。
[ ]選擇重複播放模式。 * 1 * 2
[ ]選擇隨機播放模式。 *1 * 2
[3]開始播放。
[4] [¢]• 選擇曲目。(按)
• 倒退/前進搜尋。
(按住)
[] [–] [+] 調整音量。
[Mode]顯示藍牙設定畫面。
(☞ 第 58 頁)
[AV MENU]顯示 <AV Menu> 畫面。
*1
僅適用於相容
AVRCP 1.3
的裝置。
*2
想要取消隨機播放和重複播放模式,反複按該鍵,直到指示燈熄滅。
CT_KW-AV70_U.indb 57CT_KW-AV70_U.indb 57 12/20/11 10:49:35 AM12/20/11 10:49:35 AM
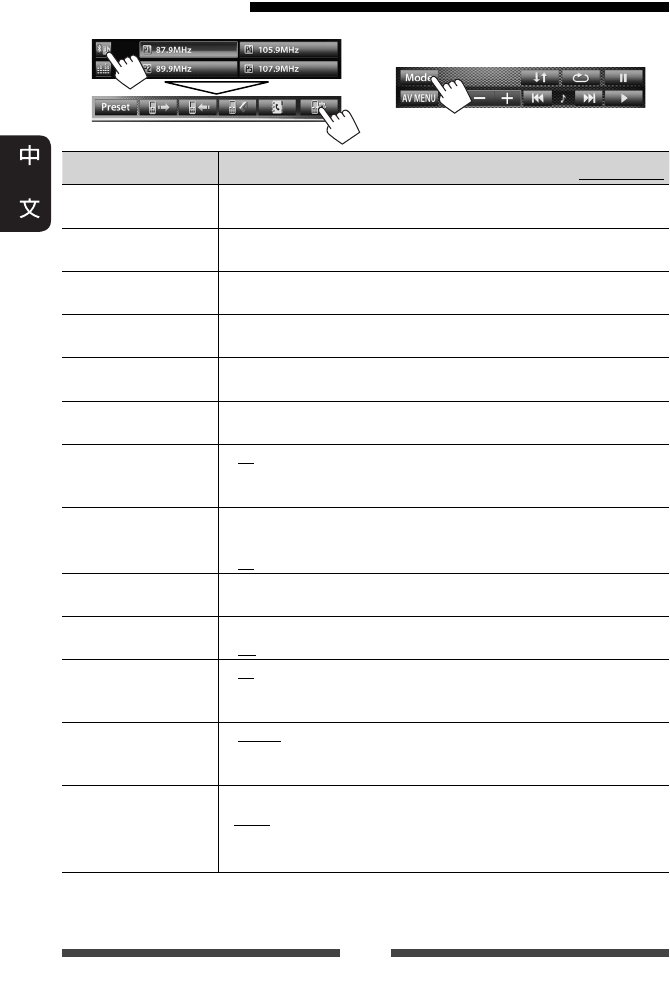
58
移動電話
選單項目 可選擇的設定/項目 初始設定:加有下划線
Connection
(連接)
♦ Connect
♦ Disconnect
: ☞ 第 51 頁
: ☞ 第 51 頁
PIN Code
(PIN 碼)
更改本機的 PIN 碼。
• 觸摸當前 PIN 碼,輸入新的 PIN 碼,然後按 [Save] 鍵。
Device Name
(裝置名稱)
顯示想要在藍牙裝置上顯示的裝置名稱—JVC Unit。
Device Address
(裝置地址)
顯示本機的 MAC 地址。
Phone Device
(電話裝置)*1
顯示電話裝置的名稱。
Audio Device
(音源裝置)*2
顯示音響設備的名稱。
Auto connect
(自動連線)
♦ On
♦ Off
: 當本機啟動時,自動與最後接上的藍牙裝
置建立連接。
: 取消。
HF/Audio Output
(藍牙免持選擇)
選擇用於藍牙(電話使用和音頻播放機)的揚聲器。
♦ Front
♦ All
: 僅從前置揚聲器。
: 從所有揚聲器。
Initialize(返回初始
設定)
按住 [Enter] 鍵清除藍牙裝置的註冊訊息,以及預設列表和電
話列表的記憶。
Auto Answer
(自動接聽)*1
♦ On
♦ Off
: 本機自動接聽來電。
: 本機不會自動接聽來電。手動接聽來電。
SMS Notify(訊息來
信表示)*1
♦ On
♦ Off
: 本機發出鈴音並顯示“Receiving Message”字
樣,通知您已收到訊息。
: 本機不會通知您已收到訊息。
Ring Mode(藍牙鈴
聲模式選擇)*1
♦ System
♦ Phone
: 選擇本機上設定的鈴聲。
: 選擇移動電話上設定的鈴聲。(此功能可
能無效,這取決於移動電話的種類。)
Ring Tone Change
(藍牙來電鈴聲變
更)*1
當 <Ring Mode> 設定為 <System> 時,按 [Enter] 鍵,然後從
<Tone1>,<Tone2>,<Tone3> 中為已接電話和 SMS 選擇鈴聲。
♦ Call Tone
♦ Message Tone
: 為電話選擇鈴聲。
: 為 SMS 選擇鈴聲。
*1 僅對應電話設定畫面才會出現。
*2 當選擇“
BT Audio
”作為播放源時,僅對應 <Mode> 才會出現。
藍牙音頻播放機
在“
BT Audio
”播放源控制畫面上:
藍牙裝置的設定
CT_KW-AV70_U.indb 58CT_KW-AV70_U.indb 58 12/20/11 10:49:36 AM12/20/11 10:49:36 AM
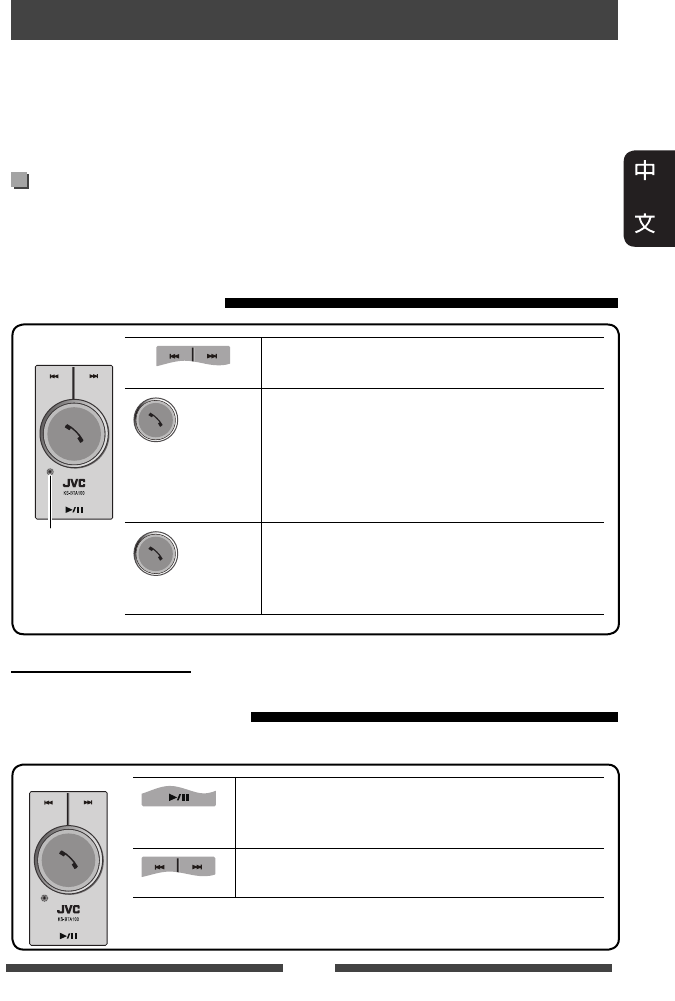
59
藍牙操作 對應 KW-AV70
藍牙操作需要將藍牙轉換器,KS-BTA100(另購)連接至本機後面板上的 LINE IN 端
子。(☞ 安裝/連接手冊)
• KS-BTA100 在某些國家無法獲得。請聯繫經銷商購買本機。
• 關於詳情,另參閱隨藍牙轉換器和藍牙裝置附帶的使用說明書。
• 操作可能因接上的裝置而有所不同。
著手準備
1 註冊(配對)帶有 KS-BTA100 的藍牙裝置。
• 參閱隨 KS-BTA100 附帶的使用說明書。
2 為 <AV Input> 設定選擇 <BT>。(☞ 第 45 頁)
使用藍牙移動電話
調整麥克風的音量
音量強度:高/正常(初始設定)/低
(低) (高)
(按)
• 接聽來電
當有電話接入時...
• 撥打電話
從您的電話撥打最後接上的號碼。
• 在免提模式和電話模式之間切換
通話時...
(按住)
• 結束通話/拒絕來電
• 語音撥號
僅當接上的移動電話配備了語音識別系統
時語音撥號才可用。
KS-BTA100
關於麥克風的音量:
• 當關閉本機的電源時,音量強度切換為正常。
使用藍牙音頻播放機
1 選擇“Bluetooth”作為播放源。(☞ 第 12 頁)
開始播放/暫停播放。
• 如果播放沒有開始,操作藍牙音頻播放機開
始播放。
• 選擇曲目。(按)
• 快進或倒退曲目。(按住)
KS-BTA100
麥克風
CT_KW-AV70_U.indb 59CT_KW-AV70_U.indb 59 12/20/11 10:49:37 AM12/20/11 10:49:37 AM
60
安裝電池
R03/LR03/AAA
將電池裝入遙控器,正確對準正負極
(+ 和 –)。
注意:
• 錯誤更換電池會有爆炸的危險。僅使
用相同或同等類型的電池進行更換。
• 不得將電池暴露於陽光、火焰或類似
的環境中,使其過度受熱。
使用遙控器
參考
按鍵 操作
ATT / 降低/恢復音量。
DISP 不適用於本機。
5 / ∞• 選擇預設電台。
• 選擇標題/項目/資料夾。
/
• 自動搜尋電台。
• 手動搜尋電台。
(按住)
• 選擇曲目。
• 倒退搜尋/前進搜尋。
(按住)
如果遙控器的有效性降低,更換電池。
在使用遙控器之前:
• 將遙控器直接對準本機上的遙控檢知
器。
• 切勿將遙控檢知器暴露於強光照射處
(直射的陽光或人工光線)。
本機配備了方向盤遙控功能。
• 關於連接,參閱安裝/連接手冊
(別冊)。
• 操作可能因方向盤遙控的類型而
有所不同。
使用遙控器(RM-RK252)操作
按鍵 操作
1 / ¡
• 倒退搜尋/前進搜尋。
• DVD-視訊/DVD-VR/VCD:慢
動作播放(當播放已暫
停)。
– DVD-VR/VCD:倒退慢動
作無效。
CT_KW-AV70_U.indb 60CT_KW-AV70_U.indb 60 12/20/11 10:49:38 AM12/20/11 10:49:38 AM

61
按鍵 操作
VOL +/VOL –
• 調整音量強度。
• “2nd VOL”功能不適用
於本機。
SOURCE 選擇播放源。
6開始/暫停*1播放。
PHONE / 接聽來電。*2
BAND / 7/
• 選擇波段。
• 停止播放。
• 結束通話。
• 暫停播放藍牙音頻。*2
0 – 9
(☞ 第 62
頁)
• 按住 SHIFT 鍵輸入號碼。
• “SETUP”功能不適用於
本機。
1 – 6 按住 SHIFT 鍵輸入預設電
台號碼。
ASPECT
切換長寬比。
• 想要查看當前長寬比設
定,在觸摸屏上進行操
作。(☞ 第 42 頁)
RETURN 返回上一畫面。
TOP M
(☞ 第 62
頁)
• DVD-視訊:顯示碟片選
單。
• DVD-VR:顯示原來程序
畫面。
• VCD:繼續 PBC 播放。
MENU
(☞ 第 62
頁)
• DVD-視訊:顯示碟片選
單。
• DVD-VR:顯示播放列表
畫面。
• VCD:繼續 PBC 播放。
% / fi/@ / #
• DVD-視訊:進行選擇/設
定。
• DivX:向後或向前跳播
約 5 分鐘。
按鍵 操作
ENT 確認選擇。
OSD/ 不適用於本機。
DUAL/ 不適用於本機。
SHIFT 与其他按鍵同時使用。
DIRECT/CLR
• 當與 SHIFT 鍵同時按下時
則進入直接搜尋模式。
(☞ 第 62 頁)
• 當與 SHIFT 鍵同時按下時
則清除錯誤輸入。
• “SURROUND”功能不適
用於本機。
*1
聆聽藍牙音頻時不起作用。
*2
僅對應
KW-AV70BT。
CT_KW-AV70_U.indb 61CT_KW-AV70_U.indb 61 12/20/11 10:49:38 AM12/20/11 10:49:38 AM

62
各種碟片操作
使用碟片選單
• DVD-視訊/DVD-VR
1 對應 DVD 視訊,按 TOP M 或 MENU 鍵。
對應 DVD-VR,按...
TOP M:顯示原來程序
MENU:顯示播放列表
2 按 % / fi/@ / # 鍵選擇您想要播放的
項目。
3 按 ENT 鍵確認選擇。
• VCD
在 PBC 播放過程中...
1 按住 SHIFT 鍵的同時按 DIRECT 鍵進入搜
尋模式。
2 按住 SHIFT 鍵的同時按數字鍵選擇您
想要播放的項目。
3 按 ENT 鍵確認選擇。
• 想要返回上一畫面,按 RETURN 鍵。
取消 PBC 播放
1 按 7 鍵停止 PBC 播放。
2 按住 SHIFT 鍵的同時按 DIRECT 鍵。
3 按住 SHIFT 鍵的同時按數字鍵選擇所
需曲目。
4 按 ENT 鍵確認選擇。
• 想要繼續 PBC 播放,按 TOP M 或 MENU
鍵。
直接搜尋項目
調諧器頻率
1 按住 SHIFT 鍵的同時按 DIRECT 鍵進入搜
尋模式。
2 按住 SHIFT 鍵的同時按數字鍵輸入頻
率。
• 想要清除錯誤輸入,按住 SHIFT 鍵
的同時按 CLR(清除)鍵。
3 按 ENT 鍵確認輸入。
DVD-視訊/DVD-VR/DivX/MPEG1/MPEG2/JPEG/
MP3/WMA/WAV/VCD/CD
1 按住 SHIFT 鍵的同時按 DIRECT 鍵進入搜
尋模式。
• 每次按 DIRECT 鍵,想要搜尋的項目
進行切換。
2 按住 SHIFT 鍵的同時按數字鍵選擇所
需項目。
• 想要清除錯誤輸入,按住 SHIFT 鍵
的同時按 CLR(清除)鍵。
3 按 ENT 鍵確認選擇。
CT_KW-AV70_U.indb 62CT_KW-AV70_U.indb 62 12/20/11 10:49:39 AM12/20/11 10:49:39 AM
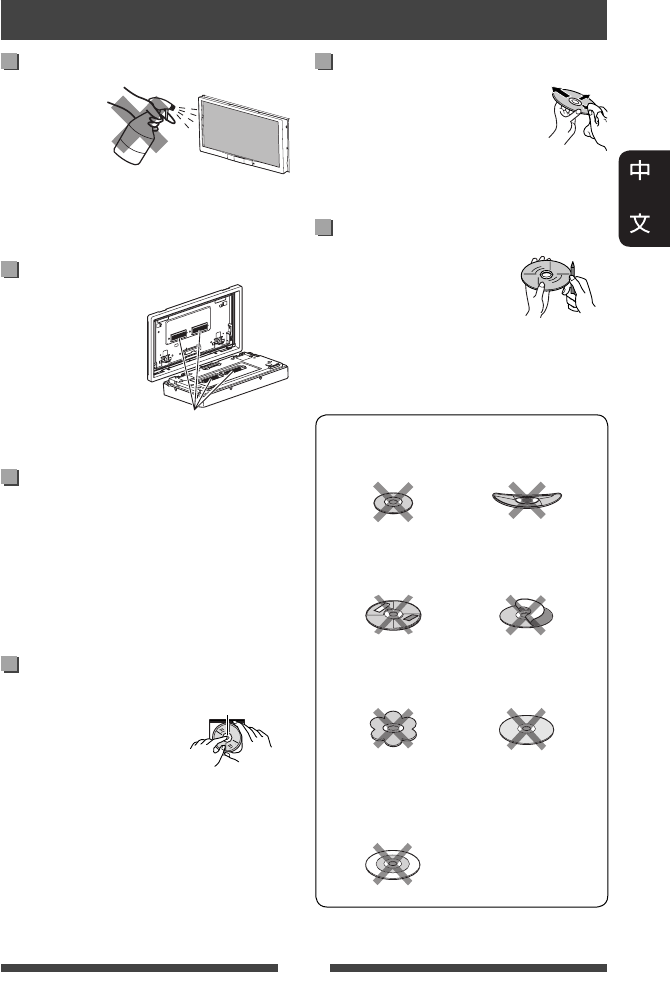
63
清潔本機的注意事項
切勿使用任何
溶劑(如稀釋
劑,輕油精
等),清潔劑
或殺蟲劑。這
可能損壞顯示器或本機。
建議的清潔方法:
用柔軟乾燥的布輕柔地擦拭面板。
清潔連接器
經常性的拆卸會損
壞連接器。
為了降低這種可能
性,定期用棉條或
布沾酒精擦拭,要
小心避免損壞連
接器。
水蒸氣結露
在下列情況下,本機內部的鏡頭可能發
生水蒸氣結露:
• 打開車內取暖器後。
• 若車內異常潮濕。
發生此種情況時,本機出現故障。此時
可退出碟片,將主機啟動幾個小時,直
到結露蒸發掉。
保養碟片
當將碟片從盒中取出
時,握持碟片的邊
緣,同時按下盒內的
中央鈕將其取出。
• 需握持碟片的邊緣。
切勿觸摸其錄製面。
欲將碟片放回盒中時,請將碟片輕輕套
在中央鈕上(使印刷面朝上)。
• 使用後務必將碟片放入盒中保存。
連接器
保持碟片的清潔
髒污的碟片無法正確播放。
如果碟片確實髒污,請用軟布
從中心到邊緣直線擦拭。
• 切勿使用任何溶劑(例如:
傳統的錄音清潔劑,噴霧劑,稀釋
劑,輕油精等)來清潔碟片。
播放新碟片
新碟片的裡面邊緣和外邊緣
上可能有一些粗糙的污點。
使用這樣的碟片時,本機可
能將其退出。
若要去除這些粗糙的污點時,請用鉛筆
或原子筆等擦拭碟片的邊緣。
切勿使用下列碟片:
8 公分 CD 彎曲的碟片
黏貼紙及其
殘留部分 上面貼的標籤
形狀異常
C-thru 碟片
(半透明碟片)
錄製面有透明
或半透明部分
的碟片
保養
中央鈕
CT_KW-AV70_U.indb 63CT_KW-AV70_U.indb 63 12/20/11 10:49:39 AM12/20/11 10:49:39 AM

64
播放 MP3/WMA/WAV 檔案
• 本機可以播放副檔名為 <.mp3>,
<.wma> 或 <.wav>(不論字母大小寫—
大寫/小寫)的檔案。
• 本機可以播放滿足以下情況的檔案:
– 位元率:
MP3/WMA:32 kbps — 320 kbps
– 取樣頻率:
48 kHz,44.1 kHz,32 kHz(對應 MPEG1)
24 kHz,22.05 kHz,16 kHz(對應 MPEG2)
48 kHz,44.1 kHz,32 kHz,22.05 kHz
(對應 WMA)
44.1 kHz(對應 WAV)
• 本機可以顯示 ID3 標籤版本
1.0/1.1/2.2/2.3/2.4(對應 MP3)。
• 本機也可以顯示 WAV/WMA 標籤。
• 本機可以播放以 VBR(可變位元率)
錄製的檔案。
• 以 VBR 錄製的檔案在顯示已過播放時
間上會有差異。
• 本機不能播放下列檔案:
– 以 MP3i 和 MP3 PRO 格式編碼的 MP3 檔
案。
– 以 1/2 層編碼的 MP3 檔案。
– 以無損的,專業的聲音格式編碼的
WMA 檔案。
– 非基於 Windows Media® Audio 的 WMA 檔
案。
– 以 DRM 拷貝保護的 WMA 檔案。
• 本機可以顯示滿足以下條件的封套圖
片:
– 圖片大小:解晰度為 32 x 32 至
1 232 x 672
– 數據大小:小於 650 KB。
– 檔案類型:JPEG
檔案的播放
播放 DivX 檔案(僅對應碟片)
• 本機可以播放副檔名為 <.divx>,<.div>
或 <.avi>(不論字母大小寫—大寫/小
寫)的 DivX 檔案。
• 音頻串流應與 MP3 或杜比數位相一
致。
• 以交錯掃描模式編碼的檔案可能無法
正確播放。
• 影像信號的最大位元率(平均)為
4 Mbps。
播放 MPEG1/MPEG2 檔案
• 本機可以播放副檔名為 <.mpg>,
<.mpeg> 或 <.mod> 的 MPEG1/MPEG2 檔案。
• 串流式格式應與 MPEG 系統/程序串流
相一致。
檔案格式應該是 MP@ML(Main Profile at
Main Level)/SP@ML(Simple Profile at Main
Level)/MP@LL(Main Profile at Low Level)。
• 音頻串流應該與 MPEG1 Audio Layer-2 或杜
比數位相一致。
• 影像信號的最大位元率(平均)為
4 Mbps。
播放 JPEG 檔案
• 本機可以播放副檔名為 <.jpg> 或
<.jpeg> 的 JPEG 檔案。
• 本機可以播放解晰度為 32 x 32 至
8 192 x 7 680 的 JPEG 檔案。
根據其解晰度,顯示檔案可能需要一
些時間。
• 本機可以播放基線式 JPEG 檔案。不
能播放漸進 JPEG 檔案或無損耗 JPEG 檔
案。
本公司不對使用本機時 iPod/iPhone
和 USB 大量儲存裝置中任何數據的
遺失承擔責任。
想要更加了解本機
CT_KW-AV70_U.indb 64CT_KW-AV70_U.indb 64 12/20/11 10:49:40 AM12/20/11 10:49:40 AM

65
從後面板端子輸出的聲訊信號
從類比端子(揚聲器輸出/REAR OUT/FRONT OUT)輸出
輸出雙聲道信號。當播放多聲道編碼的碟片時,多聲道信號會被下行混合處理。
語言代碼(對應 DVD/DVD-VR/DivX 語言選擇)
代碼 語言 代碼 語言 代碼 語言 代碼 語言
AA 阿法爾語 GL 加利西亞語 MI 毛利語 SO 索馬裡語
AB 阿布哈茲語 GN 瓜拉尼語 MK 馬其頓語 SQ
阿爾巴尼亞語
AF
南非利堪斯語
GU 古吉拉特語 ML
馬拉亞拉姆語
SR 塞爾維亞語
AM 阿姆哈拉語 HA 豪薩語 MN 蒙古語 SS 塞斯瓦替語
AR 阿拉伯語 HI 印地語 MO
摩爾達維亞語
ST 塞索托語
AS 阿薩姆語 HR 克羅地亞語 MR 馬拉提語 SU 蘇丹語
AY 埃馬拉語 HU 匈牙利語 MS
馬來語(MAY)
SW 斯瓦希利語
AZ 阿塞拜疆語 HY 亞美尼亞語 MT 馬爾他語 TA 泰米爾語
BA 巴什基爾語 IA 國際語 AMY緬甸語 TE 泰盧固語
BE 白俄羅斯語 IE 國際語ENA瑙魯語 TG 塔吉克語
BG 保加利亞語 IK 依努庇克語 NE 尼泊爾語 TH 泰國語
BH 比哈爾語 IN 印尼語 NO 挪威語 TI
提格里尼亞語
BI 比斯拉瑪語 IS 冰島語 OC 奧克西唐語 TK 土庫曼語
BN 孟加拉語 IW 希伯來語 OM (阿梵)
奧洛寞語
TL 塔加路族語
BO 藏語 JA 日語 OR 奧利亞語 TN 塞茨瓦納語
BR 布列塔尼語 JI 依地語 PA 旁遮普語 TO 湯加語
CA 加泰隆語 JW 爪哇語 PL 波蘭語 TR 土耳其語
CO 科西嘉語 KA 格魯吉亞語 PS 普什圖語 TS 從咖語
CS 捷克語 KK 哈薩克語 QU 凱楚亞語 TT 韃靼語
CY 威爾士語 KL 格陵蘭語 RM 利托–羅曼語 TW 特維語
DZ 不丹語 KM 柬埔寨語 RN 基隆迪語 UK 烏克蘭語
EL 希臘語 KN 坎納達語 RO 羅馬尼亞語 UR 烏爾都語
EO 世界語 KO
朝鮮語 (KOR)
RW
基尼阿萬達語
UZ 烏茲別克語
ET 愛莎尼亞語 KS 克什米爾語 SA 梵語 VI 越南語
EU 巴斯克語 KU 庫爾德語 SD 信德語 VO 沃拉普克語
FA 波斯語 KY 吉爾吉斯語 SG 桑戈語 WO 沃洛夫語
FI 芬蘭語 LA 拉丁語 SH 塞爾維亞-
克羅地亞語
XH 科薩語
FJ 斐濟語 LN 林加拉語 SI 僧加羅語 YO 約魯巴語
FO 法羅斯語 LO 老撾語 SK 斯洛伐克語 ZU 祖魯語
FY 弗里西亞語 LT 立陶宛語 SL
斯洛文尼亞語
GA 愛爾蘭語 LV 拉托維亞語 SM 薩摩亞語
GD 蘇格蘭語 MG
馬達加斯加語
SN 紹納語
CT_KW-AV70_U.indb 65CT_KW-AV70_U.indb 65 12/20/11 10:49:40 AM12/20/11 10:49:40 AM

66
• 由 Dolby Laboratories 授權製造。杜比,Dolby 與雙 D 記號是 Dolby Laboratories 的商標。
• “DVD Logo”是 DVD 格式/標識許可公司在美國,日本和其他國家的註冊商標。
• DivX®, DivX Certified® and associated logos are trademarks of Rovi Corporation or its subsidiaries and are used
under license.
ABOUT DIVX VIDEO: DivX® is a digital video format created by DivX, LLC, a subsidiary of Rovi Corporation. This is
an official DivX Certified® device that plays DivX video. Visit divx.com for more information and software tools to
convert your files into DivX videos.
ABOUT DIVX VIDEO-ON-DEMAND: This DivX Certified® device must be registered in order to play purchased DivX
Video-on-Demand (VOD) movies. To obtain your registration code, locate the DivX VOD section in your device
setup menu. Go to vod.divx.com for more information on how to complete your registration.
• Microsoft 和 Windows Media 是美國和/或其他國家微軟公司的註冊商標或商標。
• “Made for iPod,” and “Made for iPhone” mean that an electronic accessory has been designed to connect
specifically to iPod, or iPhone, respectively, and has been certified by the developer to meet Apple performance
standards. Apple is not responsible for the operation of this device or its compliance with safety and regulatory
standards. Please note that the use of this accessory with iPod, or iPhone may affect wireless performance.
iPhone, iPod, iPod classic, iPod nano, and iPod touch are trademarks of Apple Inc., registered in the U.S. and other
countries.
• 本項目的防止拷貝技術受 Rovi Corporation 的美國專利和其他知識產權保護法的保
護。使用本機時不可進行違規操作或分解。
• 本產品使用的字體由 Ricoh 設計。
僅對應 KW-AV70BT
• SDHC 商標是 SD-3C, LLC 的商標。
• Bluetooth 字符和標識屬 Bluetooth SIG, Inc. 所有,並為 JVC KENWOOD Corporation 在許可下使
用。其他商標和商品名稱分別屬其他所有者所有。
安全說明
僅當交通狀況適合,並且您非常確定您自己,乘客或其他道路使用者不會遇到
危險,受到阻礙或受傷時才可以使用 iPhone 導航應用程式。請務必遵守道路交
通規則,各地的道路交通規則可能有所不同。請勿在汽車行駛時輸入目的地。
因為交通狀況的改變(如收費公路,主幹道,單行道或其他交通規則等發生
變化),iPhone 導航應用程式可能會不適用於當前狀況。此時,請遵循當前交
通標誌或規則。
• 在駕車時使用 iPhone 導航應用程式應遵循交通標記的指示。iPhone 導航應用程
式只是輔助手段。駕車者應決定是否聽從提供的訊息。本公司不對 iPhone 導
航應用程式提供的錯誤數據承擔責任。
• 切勿在駕駛過程中操作本機。
CT_KW-AV70_U.indb 66CT_KW-AV70_U.indb 66 12/20/11 10:49:41 AM12/20/11 10:49:41 AM

67
所出現的問題並不總是嚴重的故障。在洽詢維修服務中心之前,請首先檢查下述
要點。
• 對應外接裝置的操作,另參閱隨用於連接的轉換器附帶的說明書(和隨外接裝
置附帶的說明書)。
• 下表中的訊息(附在“ ”內)是用 <Language>(☞ 第 46 頁)上選擇的語言進行
顯示的。
如果以下訊息出現
訊息 措施/原因
“無訊號” • 開始播放接上 VIDEO IN 插孔的外接裝置。
• 檢查導線和線路連接。
• 傳入的信號太弱。
“接線錯誤 檢查接
線後重置本機”
“警告 檢查接線後
重置本機”
某根揚聲器導線短路或與汽車底盤碰觸。正確連接揚聲器
導線或使其絕緣,然後重置本機(☞ 第 3 頁)。另參閱安
裝/連接手冊。
“手煞車” 未進行泊車制動時播放圖像不顯示。
“退片錯誤”/
“載入錯誤”
強制退出碟片。(☞ 第 3 頁)
“受限設備” 檢查接上的 iPod/iPhone 是否與本機相容。(☞ 第 27 頁)
“USB 裝置錯誤” • USB 電壓不正常。
• 關閉,然後啟動本機。
• 連接另一個 USB 裝置。
“非藍牙 Dongle”*藍牙轉換器(KS-UBT1)拔出。
“連接錯誤”*已註冊裝置但連接失敗。連接註冊的裝置。(☞ 第 51 頁)
“請稍候...”*
本機正在為使用藍牙功能做準備。如果訊息不出現,關閉
並啟動本機,然後再次連接該裝置(或重置本機)。
“無語音裝置”*接上的移動電話沒有語音識別系統。
“沒有資料”*接上的藍牙電話中沒有通訊錄數據。
“初始化錯誤”*本機初始化藍牙模塊失敗。再次嘗試該操作。
“撥號錯誤”*撥號失敗。再次嘗試該操作。
“掛起錯誤”*通話尚未結束。停下汽車,然後使用接上的移動電話結束
通話。
“摘機錯誤”*本機接聽電話失敗。
“配對模式錯誤”*本機與藍牙裝置之間的配對失敗。再次註冊該裝置。
(☞ 第 50 頁)
*
僅對應
KW-AV70BT
。
故障排除
CT_KW-AV70_U.indb 67CT_KW-AV70_U.indb 67 12/20/11 10:49:41 AM12/20/11 10:49:41 AM

68
若發生問題
症狀 措施/原因
一般
揚聲器不發出聲訊。 • 將音量調至最佳強度。
• 檢查導線和線路連接。
畫面上不顯示圖像。 打開畫面。(☞ 第 8 頁)
本機完全不工作。 重置本機。(☞ 第 3 頁)
<Display Sensor> 無法正常運行。 當運動傳感器附近有物體時,顯示感知
器可能發生故障。此時,為 <Motion
Sensitiv.> 選擇 <High>。(☞ 第 11 頁)
遙控器不工作。 • 停用後置播放源。(☞ 第 36 頁)(當
後置播放源啟動時,遙控器僅可用於操
作 DVD/CD 播放機。)
• 更換電池。
所需的播放源鍵
(“Bluetooth”*,“AV-IN”
或“Apps”)未顯示在
<AV Menu> 畫面上。
為 <AV Input> 選擇適當的設定。
(☞ 第 45 頁)
調諧器
SSM 自動預設功能失效。 手動儲存電台。(☞ 第 15 頁)
收聽廣播時有靜電干擾。 將天線連接牢固。
一般碟片
碟片既不能被識別也不能播
放。
強制退出碟片。(☞ 第 3 頁)
不能退出碟片。 為碟片解鎖。(☞ 第 16 頁)
• 不能播放可錄製/可反複錄製
碟片。
• 可錄製/可反複錄製碟片上的
曲目不能跳播。
• 裝入已封片的碟片。
• 使用您用來錄音的裝置將碟片封片。
不能開始播放。 本機不支援檔案的格式。
外接顯示器上不出圖像。 • 正確連接影像線。
• 在外接顯示器上選擇正確的輸入。
DivX/MPEG1/MPEG2/
JPEG/MP3/WMA/WAV
碟片無法播放。 • 在合適的碟片上用相容的應用程式錄製
曲目。(☞ 第 17 頁)
• 為檔案名稱增加合適的副檔名。
無法按照您想要的順序播放曲
目。
曲目沒有正確複製到 USB 裝置或 SD 卡上。
重新複製曲目,並再試一次。
*
僅對應
KW-AV70
。
CT_KW-AV70_U.indb 68CT_KW-AV70_U.indb 68 12/20/11 10:49:41 AM12/20/11 10:49:41 AM

69
症狀 措施/原因
USB/SD*
“讀取中”字樣在畫面上持續
閃爍。
關閉電源然後再重新啟動。
當播放曲目時,聲訊有時中
斷。
曲目沒有正確複製到 USB 裝置上。再次複
製曲目,並再試一次。
iPod/iPhone
揚聲器不發出聲訊。 • 拔開 iPod,然後重新連接。
• 選擇另一個播放源,然後重新選擇
“
iPod
”。
iPod/iPhone 不能啟動或根本無法
工作。
• 檢查連接電纜及其連接狀況。
• 更新固件版本。
• 為電池充電。
• 查看是否正確選擇了 iPod 控制模式。
(☞ 第 28 頁)
• 重置 iPod/iPhone。
聲訊失真。 停用本機或 iPod/iPhone上的等化器。
產生大量噪音。 關閉(不勾選)iPod 的“VoiceOver”功能。
關於詳情,請訪問 <http://www.apple.com>。
當播放含有插圖的曲目時,無
法進行任何操作。
在插圖裝載後操作本機。(☞ 第 29 頁)
聲訊與視訊不同步。 為 <AV Input> 選擇 <iPod>。(☞ 第 45 頁)
• 視訊無法播放。
• 視訊未傳出聲訊。
• 用 USB 聲音和影像電纜 JVC KS-U30 進行連
接。不能使用其他電纜。
•
為 <AV Input> 選擇 <iPod>。(☞ 第 45 頁)
AV-IN
畫面上不出現圖像。 • 如果沒有啟動影像裝置,將其啟動。
• 正確連接影像裝置。
*
僅對應
KW-AV70BT
。
CT_KW-AV70_U.indb 69CT_KW-AV70_U.indb 69 12/20/11 10:49:41 AM12/20/11 10:49:41 AM

70
症狀 措施/原因
藍牙(僅對應 KW-AV70BT)
電話音質不佳。 • 減少本機和藍牙移動電話間的距離。
• 將汽車開至通話信號較強的地方。
在使用藍牙音頻播放機的過程
中,聲訊發生中斷或跳動。
• 減少本機和藍牙音頻播放機間的距離。
• 拔開為藍牙電話接上的裝置。
• 關閉,然後啟動本機。
• (當聲訊沒有恢復時,)再一次連接播
放機。
接上的音頻播放機無法控制。 檢查接上的音頻播放機是否支援 AVRCP
(音頻視訊遠程控制配置檔案)。
藍牙裝置不能檢測到本機。 • 檢查藍牙轉換器(KS-UBT1)是否正確插
入。
• 再次從藍牙裝置進行搜尋。
• 當“等待連結...”字樣在畫面上出現
時,按 [Cancel] 鍵,然後連接藍牙裝置。
本機無法與藍牙裝置進行配
對。
為本機和目標裝置輸入相同的 PIN 碼。如
果說明書上沒有指出 PIN 碼,嘗試“0000”
或“1234”。
出現迴音或噪音。 • 調整麥克風裝置的位置。
• 確認 NR/EC(雜訊抑制/迴音消除)功能
已啟動。(☞ 第 53 頁)
當您嘗試將通訊錄複製到本機
時,本機沒有反應。
您可能複製了(与儲存)相同的輸入至
本機。
CT_KW-AV70_U.indb 70CT_KW-AV70_U.indb 70 12/20/11 10:49:42 AM12/20/11 10:49:42 AM
71
功率放大器
最大功率輸出 前/後聲道 每聲道 50 W
連續功率輸出(RMS)前/後聲道 每聲道 20 W 驅動於 4 Ω,40 Hz 至
20 000 Hz 總諧波失真不超過 0.8%
負載阻抗 4 Ω(4 Ω 至 8 Ω 容限)
等化器控制範圍 頻率 低:60 Hz,80 Hz,100 Hz,150 Hz
中:500 Hz,1 kHz,1.5 kHz,2 kHz
高:10 kHz,12.5 kHz,15 kHz,17.5 kHz
強度 ±10 dB
訊噪比 70 dB
聲音輸出強度
LINE OUT(FRONT/REAR),
SUBWOOFER
線性輸出強度/
阻抗
4 V/20 kΩ 負載(滿刻度)
輸出阻抗 1 kΩ
其他端子 輸入
LINE IN,VIDEO IN,CAMERA IN,
USB 輸入,MIC IN*,天線輸入
輸出 2nd AUDIO OUT
其他 OE REMOTE
,RGB 輸入
FM/AM 調諧器
頻率範圍 FM 87.5 MHz 至 108.0 MHz
AM 531 kHz 至 1 611 kHz
FM 調諧器 有效靈敏度 9.3 dBf(0.8 μV/75 Ω)
50 dB 靜噪靈敏度 16.3 dBf(1.8 μV/75 Ω)
交流聲道選擇性
(400 kHz)
65 dB
頻率響應 40 Hz 至 15 000 Hz
立體聲分隔頻率 40 dB
AM 調諧器 靈敏度/選擇性 20 μV/40 dB
*
僅對應
KW-AV70BT
。
規格
CT_KW-AV70_U.indb 71CT_KW-AV70_U.indb 71 12/20/11 10:49:42 AM12/20/11 10:49:42 AM
72
DVD/CD
信號檢測系統 無接合光學拾波(半導體雷射)
頻率響應 DVD,fs=48 kHz/96 kHz 16 Hz 至 22 000 Hz
VCD/CD 16 Hz 至 20 000 Hz
動態範圍 93 dB
訊噪比 95 dB
抖晃率 小到無法測量
彩色制式 PAL/NTSC
影像輸出(合成) 1 Vp-p/75 Ω
SD*
相容檔案系統 FAT 32/16/12
容量 8 M 至 32 G
數據傳輸率 最大 10 Mbps
USB
USB 標準 USB 2.0 全速
數據傳輸率 全速 最大 12 Mbps
低速 最大 1.5 Mbps
相容裝置 大量儲存
相容檔案系統 FAT 32/16/12
最大電流 DC 5 V 1 A
藍牙*
版本 藍牙 2.0 認證
輸出功率 最大 +4 dBm(2 級功率)
有效區域 10 m 以內
配置檔案 HFP(免持聽筒配置檔案)1.5
OPP(對象推送配置檔案)1.1
A2DP(進階音頻傳輸配置檔案)1.2
AVRCP(音頻/視訊遠程控制配置檔案)1.3
PBAP(通訊錄訪問配置檔案)1.0
*
僅對應
KW-AV70BT
。
CT_KW-AV70_U.indb 72CT_KW-AV70_U.indb 72 12/20/11 10:49:42 AM12/20/11 10:49:42 AM

73
顯示器
螢幕尺寸 7 英吋寬螢幕液晶顯示器
像素數 1 152 000 像素:800(水平)× 3(RGB)× 480(垂直)
驅動方式 TFT(薄膜晶體管)主動型矩陣格式
彩色制式 NTSC/PAL
長寬比 16:9(寬度)
一般
電源要求 操作電壓 DC 14.4 V(11 V 至 16 V 容限)
接地系統 負極接地
可讓儲存溫度 –10°C 至 +60°C
可讓操作溫度 0°C 至 +40°C
外形尺寸
(寬 × 高 × 深)
安裝尺寸(大約) 178 mm × 100 mm × 160 mm
面板尺寸(大約) 171 mm × 97 mm × 28 mm
重量(大約) 2.5 k
g
設計和規格若有變更,恕不另行通知。
CT_KW-AV70_U.indb 73CT_KW-AV70_U.indb 73 12/20/11 10:49:43 AM12/20/11 10:49:43 AM
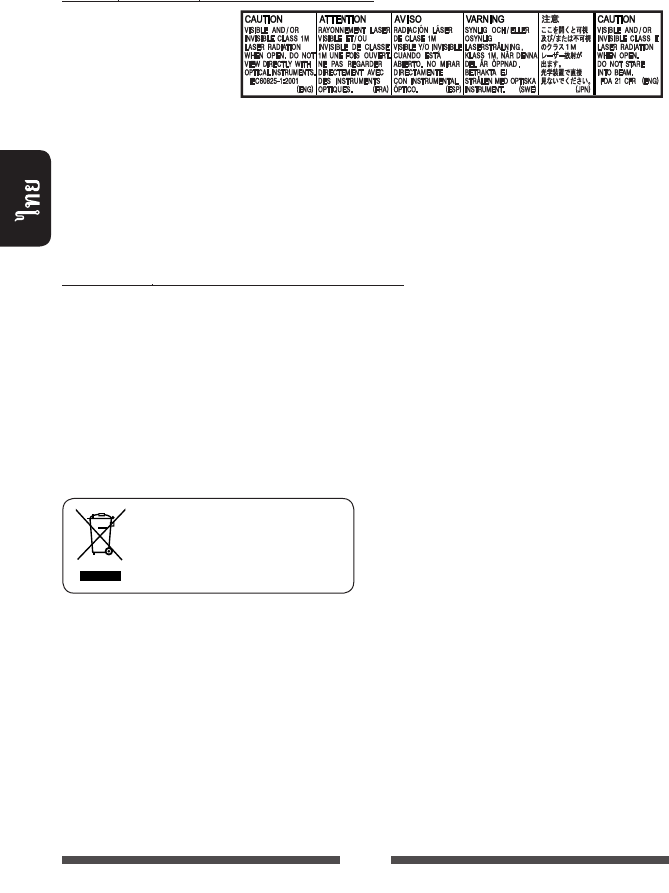
2
JVC
1.
1
2. :
3. : 1M /
4. :
: ( )
• :
–
–
–
•
•
•
•
[]
TH_KW-AV70_U_f.indb 2TH_KW-AV70_U_f.indb 2 12/12/11 5:50:07 PM12/12/11 5:50:07 PM
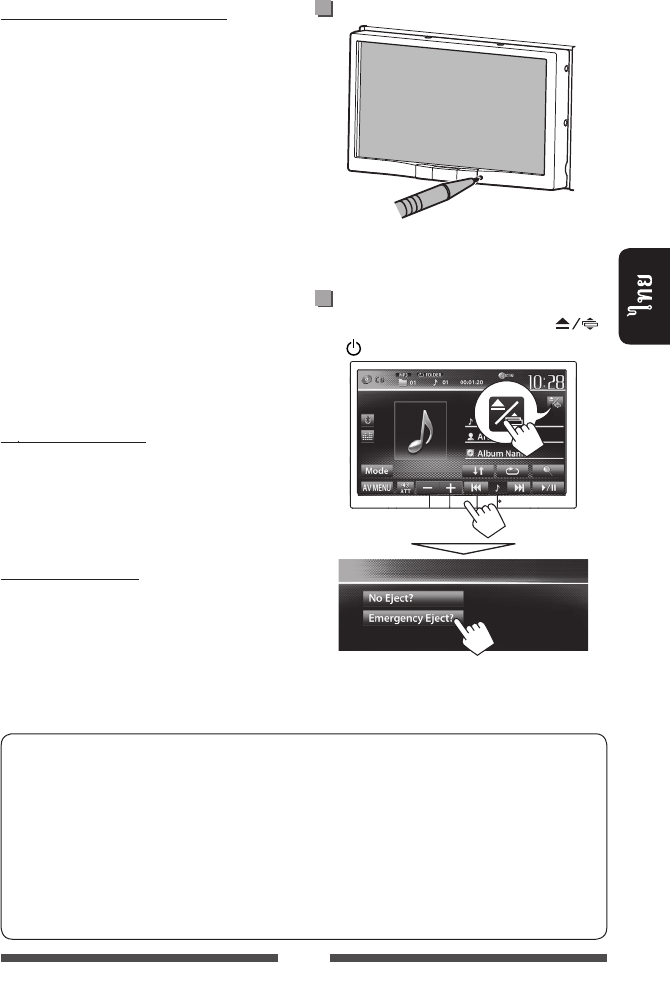
3
:
•
•
•
(
)
• ...
–
–
...
•
•
...
:
• KW-AV70BT
•
(RM-RK252), ☞ 60
• < > // /
• [ ]
• :
<Settings> (☞ 46)
• (
Bluetooth )
/MENU
•
•
(
☞
)
TH_KW-AV70_U_f.indb 3TH_KW-AV70_U_f.indb 3 12/12/11 5:50:07 PM12/12/11 5:50:07 PM

4
............................................ 3
................................ 3
/ ................5
...................................6
.........................................7
......................................8
....................................................8
.......................................................8
/ AV ........................8
....................................................8
............................................. 9
— / ........9
.................................. 10
.......................... 11
AV
...........12
..........................................13
..............................16
.............................................. 16
......... 17
............................................. 18
.................. 22
SD ( KW-
AV70BT) .............................23
SD................ 23
USB .............................. 25
USB ......................................... 25
iPod/iPhone .................27
.................................................... 27
iPod ............................ 28
iPod/iPhone .........................................28
iPod/iPhone
<Head>..............................................................29
iPod/iPhone
<iPod Out> ........................................................30
App iPod touch/iPhone .................31
.................33
AV-IN ...................................................................33
....................... 34
...36
.......................................37
......................................... 37
............................. 38
...............39
...............41
...................................................... 41
................................42
........................................................ 42
............................43
............................44
/ ..................... 47
............................................. 48
..................................48
BLUETOOTH
Bluetooth® .................................... 49
Bluetooth
KW-AV70BT ...................................49
Bluetooth ....................... 50
Bluetooth ..................... 52
Bluetooth ...................... 57
Bluetooth ............................. 58
Bluetooth
KW-AV70 ....................................... 59
Bluetooth ....................59
Bluetooth ..................... 59
........................... 60
(RM-RK252) ... 60
.....................................63
...........64
......................67
....................................... 71
TH_KW-AV70_U_f.indb 4TH_KW-AV70_U_f.indb 4 12/12/11 5:50:08 PM12/12/11 5:50:08 PM
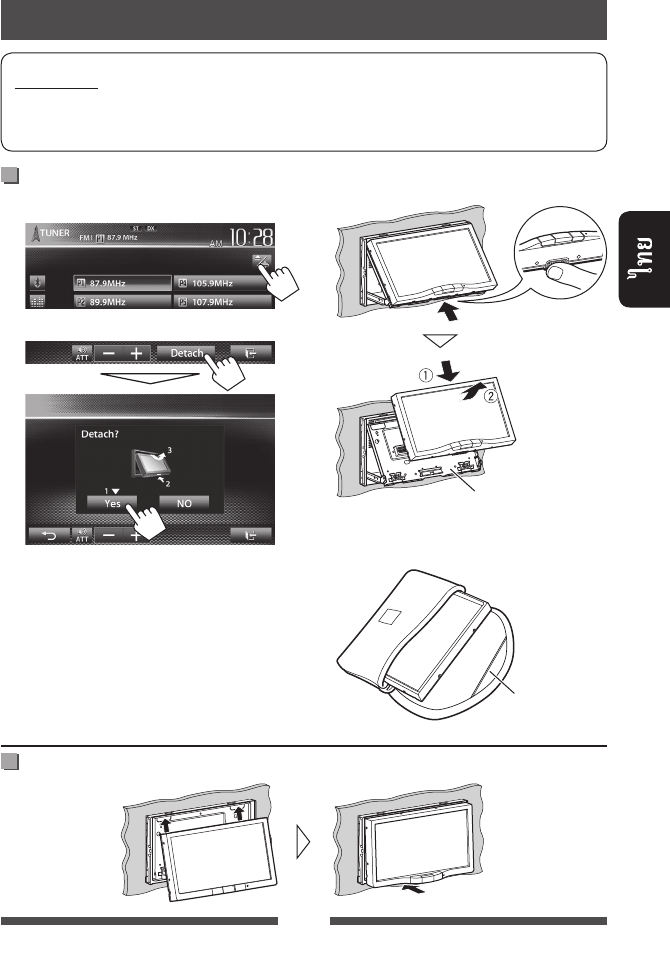
5
•
•
/
1 :
2
50
•
60
3
• 10
4
()
TH_KW-AV70_U_f.indb 5TH_KW-AV70_U_f.indb 5 12/12/11 5:50:08 PM12/12/11 5:50:08 PM
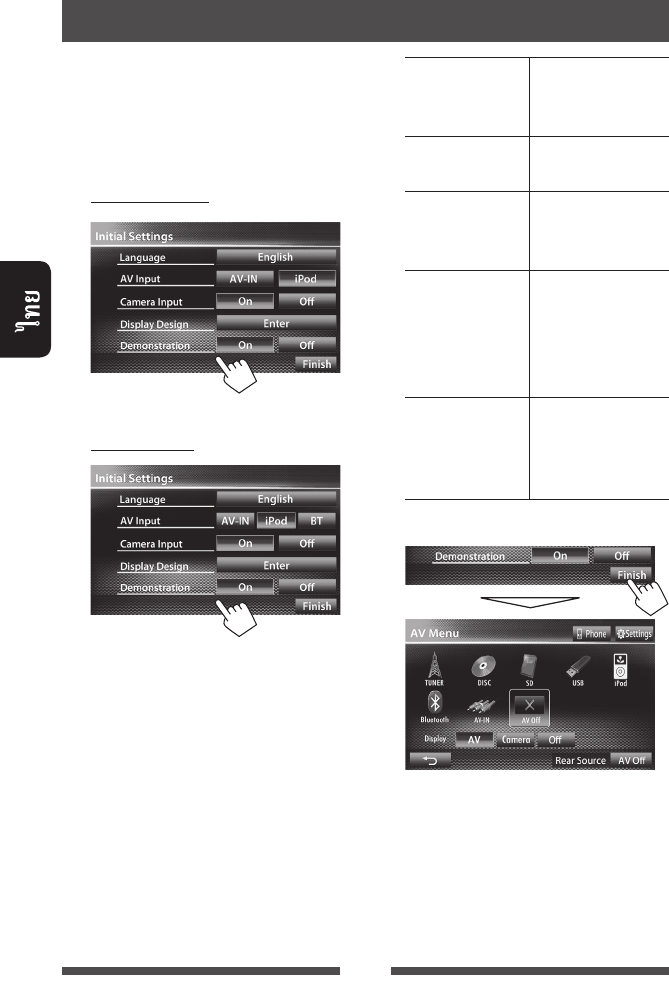
6
•
<Settings> (☞ 44)
1 KW-AV70BT
KW-AV70
Language
(
☞
46)
AV Input
(
☞
45)
Camera Input
<
On
>
(
☞
46)
Display Design
(
☞
39)
Demonstration
(☞
45)
2
<AV Menu>
• <AV Off>
(☞ 12)
TH_KW-AV70_U_f.indb 6TH_KW-AV70_U_f.indb 6 12/15/11 3:16:16 PM12/15/11 3:16:16 PM
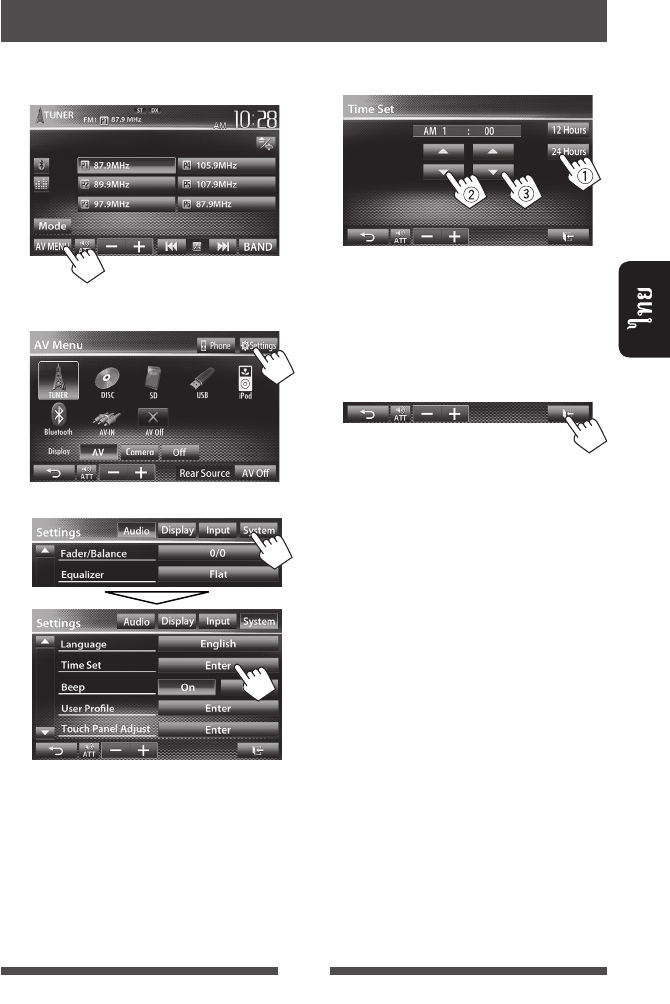
7
1 <AV Menu>
:
2 <Settings>
3
4
1
2
3
5
TH_KW-AV70_U_f.indb 7TH_KW-AV70_U_f.indb 7 12/15/11 3:16:17 PM12/15/11 3:16:17 PM
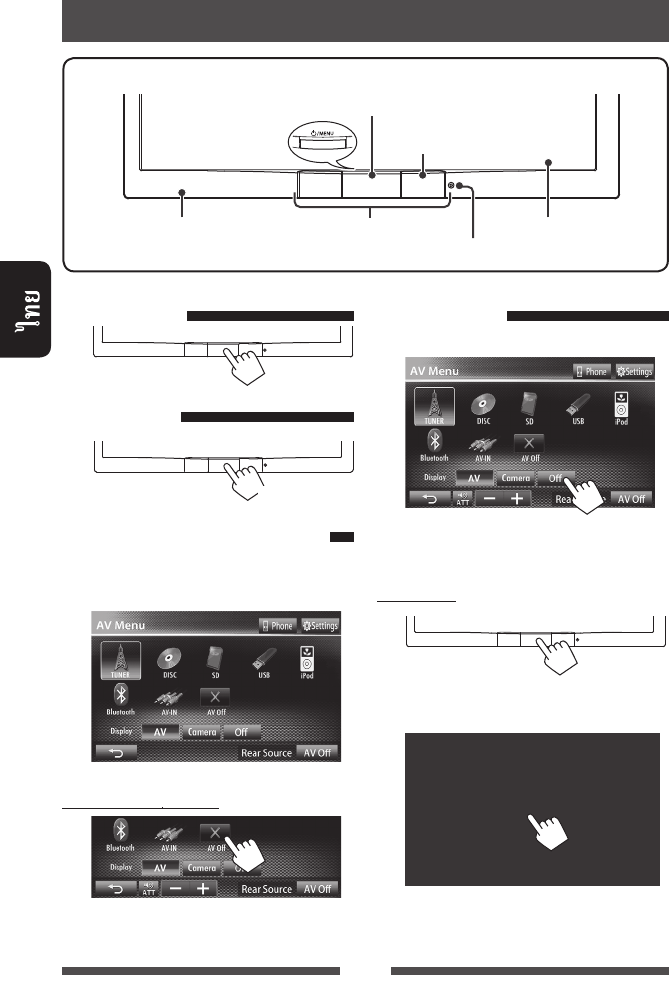
8
()
(☞ 3)
(☞ 11)
• / (☞ )
• <AV Menu> () (☞ 10)
()
/ AV
AV
<AV Menu>
AV
AV
<AV Menu>:
<AV Menu>
TH_KW-AV70_U_f.indb 8TH_KW-AV70_U_f.indb 8 12/19/11 2:17:57 PM12/19/11 2:17:57 PM
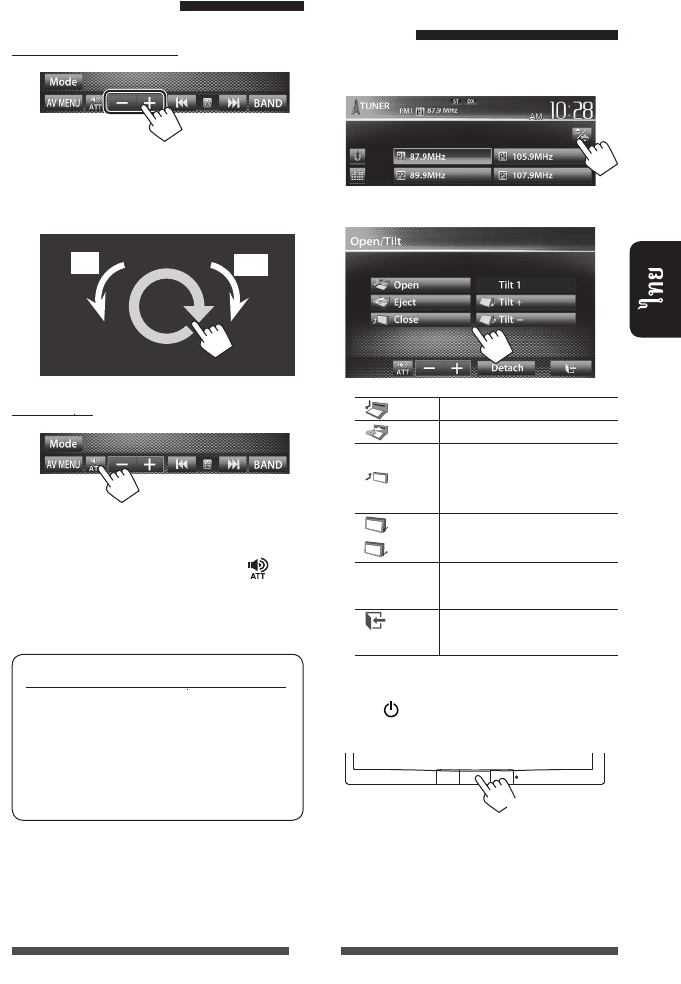
9
(00 50)
•
ATT
[ ]
:
(CD/SD*/USB/iPod)
* “
SD
”
KW-AV70BT
—
/
1 :
2
[ Open]
[ Eject]
[ Close]
•
[ Tilt +]
[ Tilt –]
[Detach]
(☞ 5)
[ ]
•
ACC
/MENU <Open/
Tilt>
()
TH_KW-AV70_U_f.indb 9TH_KW-AV70_U_f.indb 9 12/19/11 2:28:46 PM12/19/11 2:28:46 PM
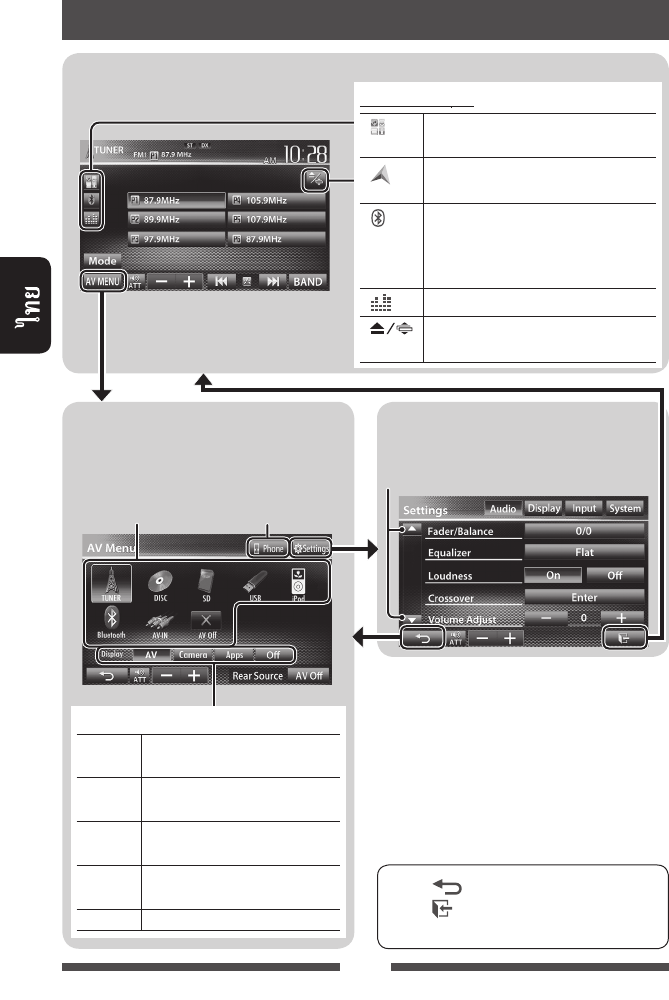
10
<AV Menu>
/
• [ ]
• [ ]
<Settings>
(☞ 44)
*3
☞ 12
*1
<Input>
<Navigation Input>
<iPhone>
(
☞
31)
*2
<Input>
<Navigation Input>
<RGB>
(
☞
34)
*3
KW-AV70BT
*4
Bluetooth (
☞
49)
[ ] *1
App iPod touch/
iPhone (☞ 31)
[ ] *2
(☞ 35)
[ ]*3*4
• (
)
•
( ) (☞ 51)
[ ]
(☞ 37)
[ ] <Open/Tilt>
(☞ 9)
[AV]
(☞ )
[Camera]
(☞ 43)
[Apps] *1
App iPod
touch/iPhone (☞ 31)
[Navi] *2
(☞ 35)
[Off]
(☞ 8)
TH_KW-AV70_U_f.indb 10TH_KW-AV70_U_f.indb 10 12/15/11 3:16:18 PM12/15/11 3:16:18 PM
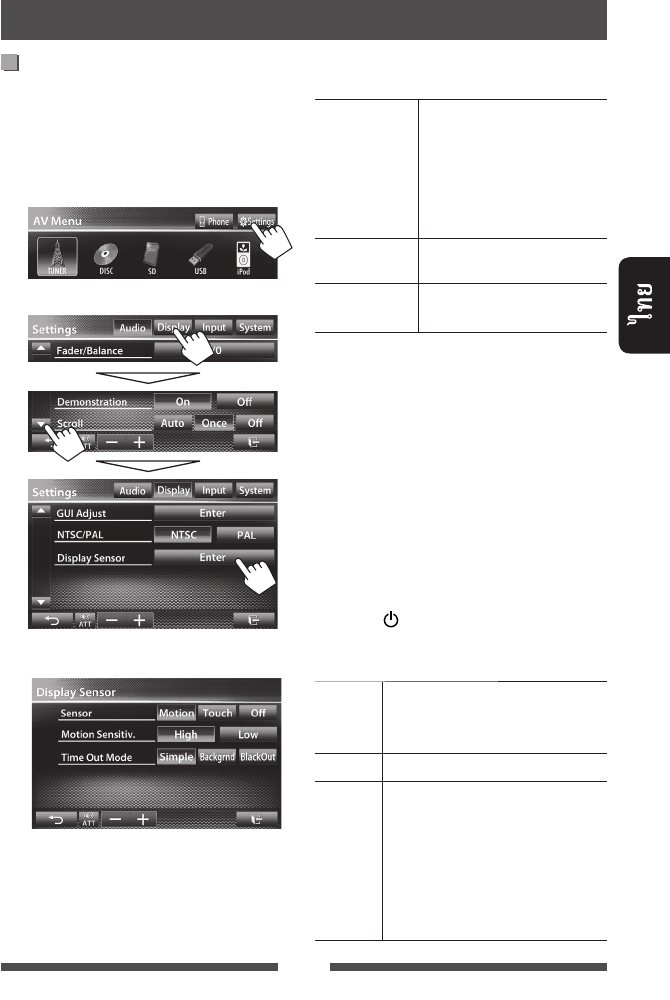
11
<Display Sensor>
1 <AV Menu>:
2
3
<Sensor>
Motion
•
(☞ 8)
Touch
Off
<Motion> <Touch>
•
<Motion>
<Touch>
<Motion Sensitiv.>
(<
High
> <Low>)
•
<Sensor>
<Motion>
<Time Out Mode>
10
/MENU
• <Sensor>
<Motion> <Touch> (☞ )
Simple
()
Backgrnd
BlackOut
• :
– <Sensor>
<Motion>
– <Sensor>
<Touch>
TH_KW-AV70_U_f.indb 11TH_KW-AV70_U_f.indb 11 12/15/11 3:16:18 PM12/15/11 3:16:18 PM

12
TUNER
(☞ 13)
DISC
(☞ 16)
SD
*1 (☞ 23 ) SD
USB
(☞ 25) USB
iPod
(☞ 27) iPod/iPhone
Bluetooth
*2 (KW-AV70BT:
☞ 57/KW-AV70: ☞ 59)
• KW-AV70BT: Bluetooth
• KW-AV70:
AV-IN
*3 (☞ 33) LINE IN/VIDEO IN
Apps
*4 (☞ 31) App iPod touch/iPhone
AV Off
(☞ 8) AV
*1
KW-AV70BT
*2
KW-AV70:
<AV Input>
<BT>
(
☞
45)
*3
<AV Input>
<AV-IN>
(
☞
45)
*4
<AV Input>
<iPod>
(
☞
45)
การทำงานของแหล่งสัญญาณ AV
การเลือกแหล่งสัญญาณการเล่น
KW-AV70BT KW-AV70
TH_KW-AV70_U_f.indb 12TH_KW-AV70_U_f.indb 12 12/19/11 2:17:58 PM12/19/11 2:17:58 PM
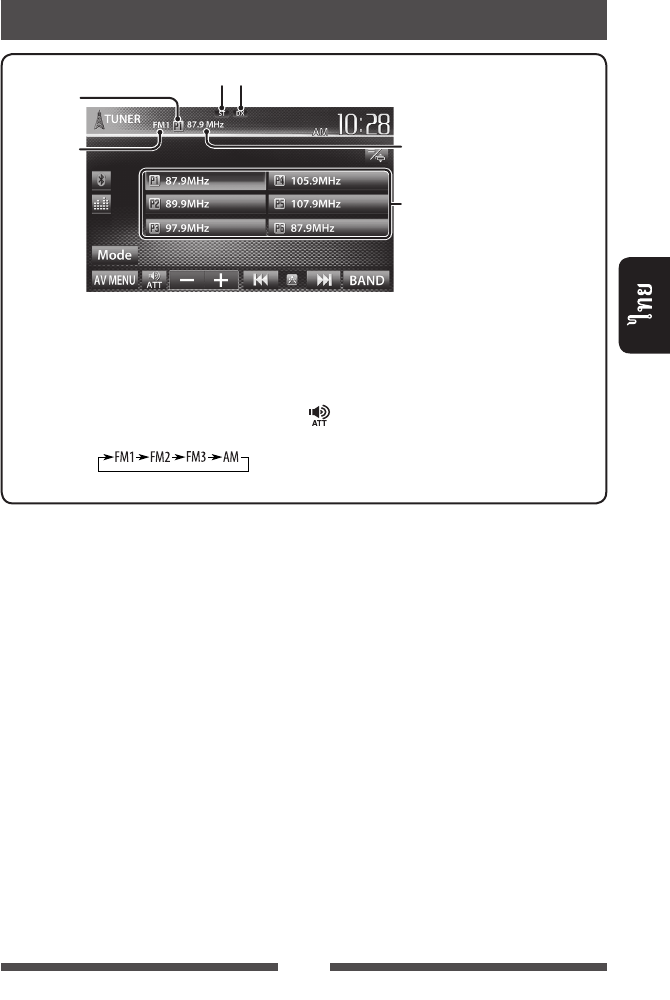
13
• ST FM
DX/LO
[P1] – [P6]•
()
•
()
[BAND]
[4] [¢]
• ()
• ()
[] [–] [+]
[Mode]*
(☞ 14 – 15)
[AV MENU] <AV Menu>
ST/MO
*
FM
TH_KW-AV70_U_f.indb 13TH_KW-AV70_U_f.indb 13 12/12/11 5:50:10 PM12/12/11 5:50:10 PM
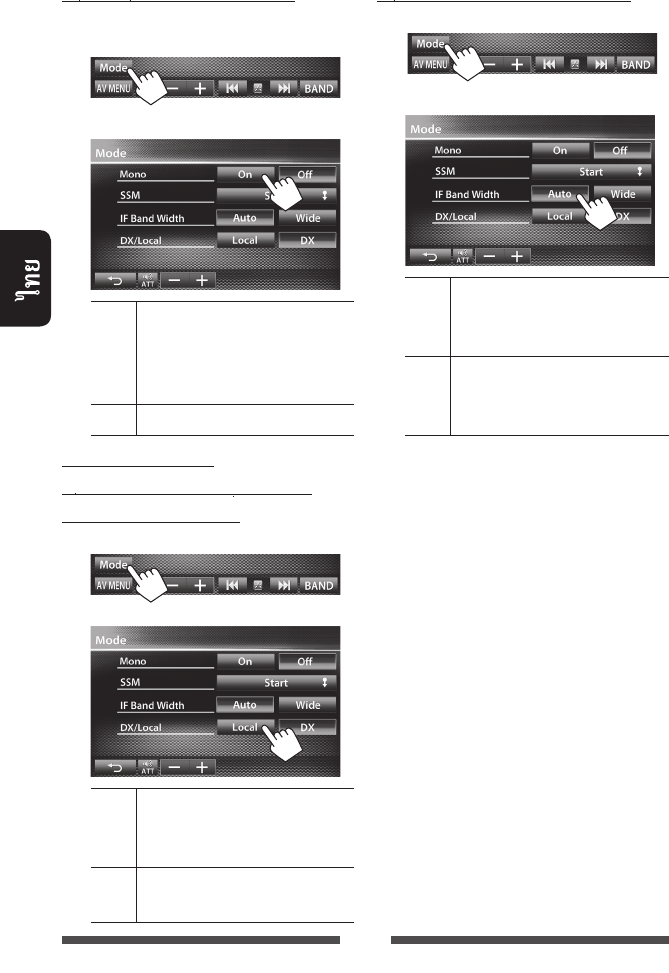
14
FM ...
1
2
On
FM
MO
Off
FM
—LO/DX
(Local/ Distance-extreme)
1
2
Local
LO
DX DX
FM ...
1
2
Auto
( )
Wide
TH_KW-AV70_U_f.indb 14TH_KW-AV70_U_f.indb 14 12/12/11 5:50:10 PM12/12/11 5:50:10 PM

15
6
—SSM (
)
( FM )
1
2
1
(☞ 13)
2
1
()
()
TH_KW-AV70_U_f.indb 15TH_KW-AV70_U_f.indb 15 12/12/11 5:50:11 PM12/12/11 5:50:11 PM
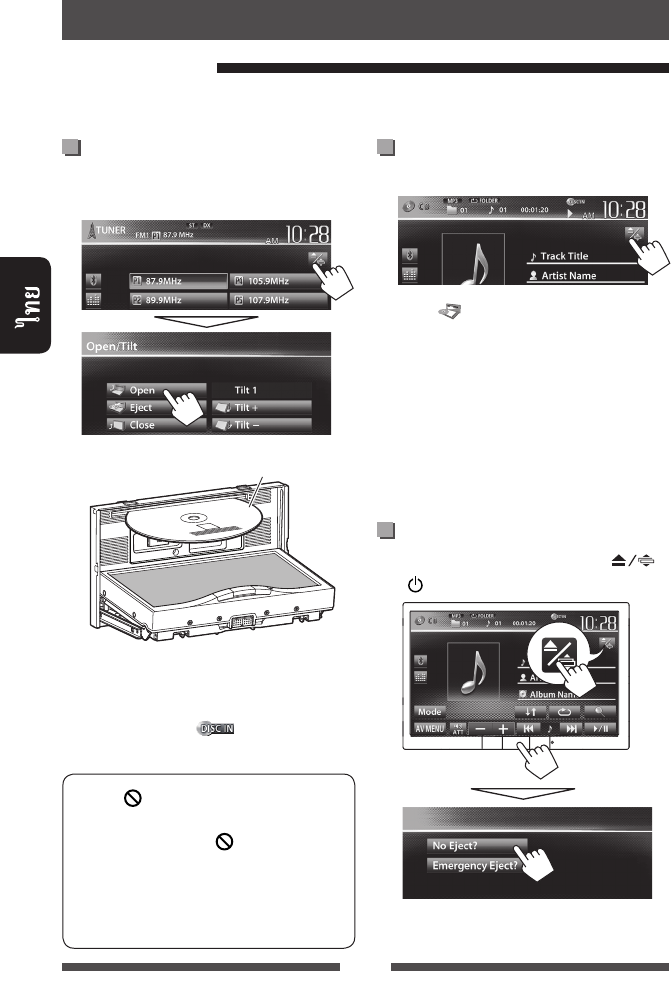
16
1 :
2 [ Eject].
•
AV
• 15
• ☞ 3
/MENU
<Eject OK?>
•
1
:
2
“
DISC
”
• DISC IN ( )
• “ ”
– “ ”
•
TH_KW-AV70_U_f.indb 16TH_KW-AV70_U_f.indb 16 12/15/11 3:16:19 PM12/15/11 3:16:19 PM
17
DVD
•
DTS
DTS
DVD-Video *1
: 3
DVD-Audio/DVD-ROM
DVD
/
(DVD-R/-RW *2, +R/+RW *3)
• DVD Video: UDF bridge
• DVD-VR
• DivX/MPEG1/MPEG2/JPEG/
MP3/WMA/WAV: ISO 9660
level 1, level 2, Romeo, Joliet
DVD-Video
DVD-VR *4
DivX/MPEG1/MPEG2
JPEG
MP3/WMA/WAV
MPEG4/AAC/DVD+VR/DVD-RAM
Dual Disc DVD
DVD
CD/VCD Audio CD/CD Text (CD-DA)
VCD (Video CD)
DTS-CD/SVCD (Super Video CD)/CD-ROM/CD-I (CD-I Ready)
CD /
(CD-R/-RW)
• ISO 9660 level 1, level 2,
Romeo, Joliet
CD-DA
VCD (Video CD)
DivX/MPEG1/MPEG2
JPEG
MP3/WMA/WAV
MPEG4/AAC
*1
DVD Video
Region Code
“Region Code Error”
*2
DVD-R
multi-border
(
(dual layer))
DVD-RW
*3
+R/+RW
(
)
+R/+RW
“DVD”
+RW
*4
CPRM (Content Protection for Recordable Media)
(DualDisc)
DVD “DualDisc” “
” DVD DualDisc
TH_KW-AV70_U_f.indb 17TH_KW-AV70_U_f.indb 17 12/12/11 5:50:11 PM12/12/11 5:50:11 PM
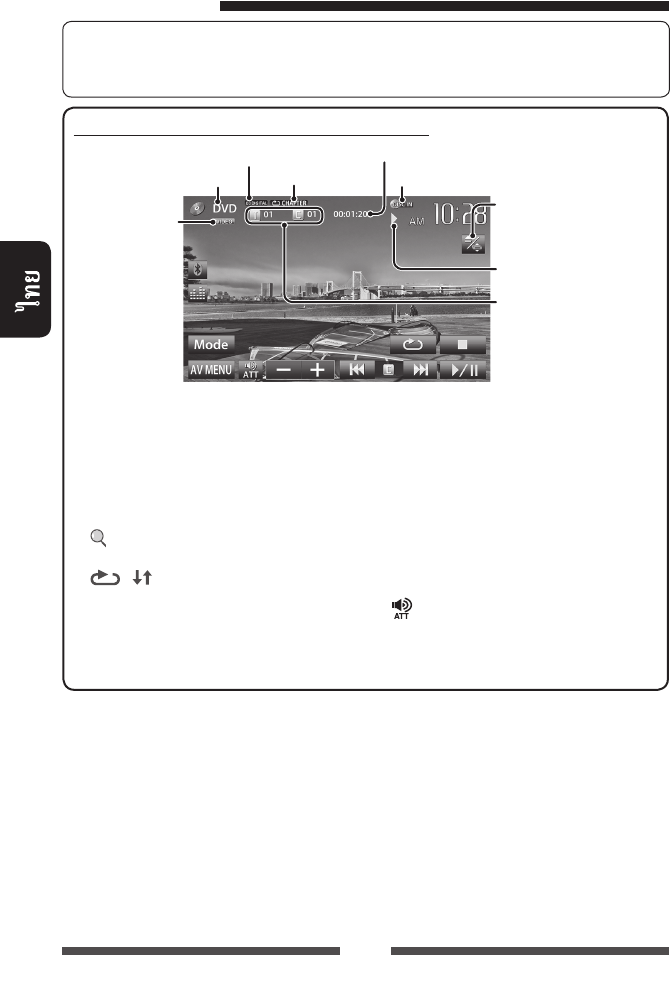
18
☞ 11
• 10
DVD/DVD-VR/VCD/DivX/MPEG1/MPEG2/JPEG
/
—
VIDEO/VR-PRG
()/VR-PLAY
()/
DivX/MPEG/PBC
(3: / 8: /
7: )
• DVD Video: /
• DVD-VR:
( )/
*
1
• DivX/MPEG1/MPEG2:
/
• JPEG: /
• VCD:
(☞ 21)
☞ 9
DISC IN
*1
/
,
☞
20
*2
DVD/DVD-VR/VCD
*3
DVD/DVD-VR/VCD
*4
DVD/DVD-VR/JPEG
*5
*6
*7
VCD
[7]*2
[ ]*3
/
(
☞
19)
[ ] [ ]*4
(
☞
21)
[6]
/
[4] [¢]*5•
/
(
)
•
/
*
6
(
)
[] [–] [+]
[Mode]*7
(
☞
22)
[AV MENU]
<
AV Menu
>
TH_KW-AV70_U_f.indb 18TH_KW-AV70_U_f.indb 18 12/15/11 3:16:20 PM12/15/11 3:16:20 PM
19
/
• 5 000
250 ( 999
)
• “ ”
•
•
/
CD/MP3/WMA/WAV
DISC IN
(3: / 8: )
• MP3/WMA/WAV:
/
• CD:
(☞ 21)
/
•
“”
☞ 9
[ ]*1/
(☞ )
[ ] [ ]
(☞ 21)
[6]/
[4] [¢]• ( )
• /*2
()
[] [–] [+]
[Mode]*1
(☞ 22)
[AV MENU] <AV Menu>
*1
CD
*2
/
TH_KW-AV70_U_f.indb 19TH_KW-AV70_U_f.indb 19 12/15/11 3:16:20 PM12/15/11 3:16:20 PM
20
•
•
10
• MPEG1/MPEG2
[Zoom]
(☞ 42)
[Aspect]
(☞ 42)
[Adjust]
(☞ 41)
[ ]
• DVD-VR:
(ST:
, L: , R: )
[ ]
[ ]
[Menu]
(DVD)/
(DVD-VR)
[Top
Menu]
(DVD)/
(DVD-VR)
[ ]
/
/
(
☞
)
[ ]
•
[ ]
•
/
/ /
[5] [∞]
[2] [3]
[Enter]
[Return]
[ ]
• DivX
[2] [3]
5
[Return]
[ ]
TH_KW-AV70_U_f.indb 20TH_KW-AV70_U_f.indb 20 12/12/11 5:50:12 PM12/12/11 5:50:12 PM
21
VCD
1
2
[Zoom]
(☞ 42)
[Aspect] (☞ 42)
[Adjust] (☞
41)
[ ]
(ST: ,
L: , R: )
[Return]
[Menu]
[ ]/
(☞ )
•
– /
/
[Direct/CLR]
– [Direct/CLR]
• PBC [7]
DVD/DVD-VR
VCD ( PBC)/CD/DivX/MPEG1/MPEG2/
MP3/WMA/WAV
*
• (
)
–
CHAPTER
TITLE
PROGRAM
(
)
SONGS
FOLDER
FOLDER
ALL
(☞ )
*
*
TH_KW-AV70_U_f.indb 21TH_KW-AV70_U_f.indb 21 12/12/11 5:50:13 PM12/12/11 5:50:13 PM
22
/
:
DVD/DVD-VR/DivX
Menu Language
()
English
(☞ 65)
Audio Language
()
;
English (☞ 65)
Subtitle () (Off); English
(☞ 65)
Down Mix
()
FRONT OUT/REAR
OUT
♦ Dolby Surround :
Dolby Surround
♦ Stereo :
D. Range Compres.
()
Dolby Digital
♦ Off
:
♦ On
:
♦ Dialog
:
VCD/CD
Monitor Type
()
♦ 16:9
♦ 4:3 LB (Letterbox)
♦ 4:3 PS (PanScan)
/
/
File Type
()
♦ Audio
♦ Still Picture
♦ Video
♦ Audio&Video
:
: JPEG
: DivX/MPEG1/MPEG2
: DivX/MPEG1/MPEG2
• ☞ 17
•
:
TH_KW-AV70_U_f.indb 22TH_KW-AV70_U_f.indb 22 12/12/11 5:50:13 PM12/12/11 5:50:13 PM

23
•
JPEG/MPEG1/MPEG2 */
MP3/WMA/WAV SD
• 5 000
250 ( 999 )
•
*
MPEG2
JVC
Everio (
<.mod>)
SD
1
:
2
SD
“
SD
”
• SD
SD
SD
( KW-AV70BT)
3
SD
1
2 SD
•
SD
3
TH_KW-AV70_U_f.indb 23TH_KW-AV70_U_f.indb 23 12/12/11 5:50:13 PM12/12/11 5:50:13 PM
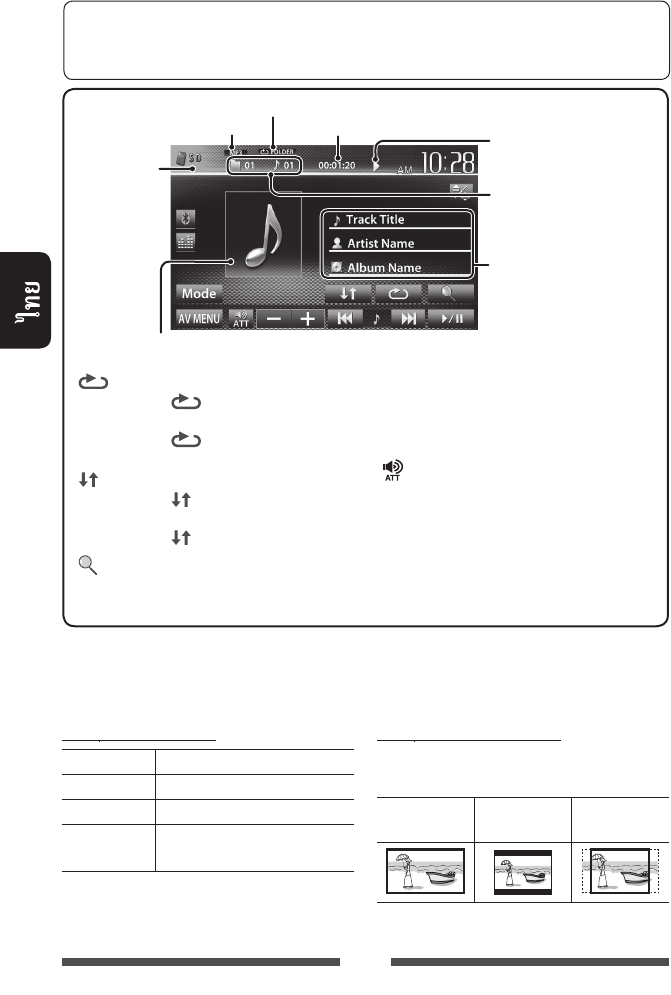
24
<File Type>
Audio
Still Picture JPEG
Video MPEG1/MPEG2
Audio&Video MPEG1/
MPEG2
• SD
:
<Monitor Type>
16:9 4:3 LB
(Letterbox)
4:3 PS
(PanScan)
(3: / 8: )
• MP3/WMA/WAV:
/
• JPEG: /
(☞ )
/ (
MP3/WMA/WAV)
•
“ ”
—
MPEG/JPEG
[ ] *1 *2
• SONGS:
• FOLDER:
[ ] *1 *2
• FOLDER:
• ALL:
[ ] / (☞
19)
[6]/
[
4
] [
¢
]*3• ( )
• /*4
()
[] [–] [+]
[Mode] <File
Type> <Monitor Type>
(☞ )
[AV MENU] <AV Menu>
•
*1
*2
*3
*4
☞ 11
• 10
• ☞ 41
TH_KW-AV70_U_f.indb 24TH_KW-AV70_U_f.indb 24 12/12/11 5:50:14 PM12/12/11 5:50:14 PM
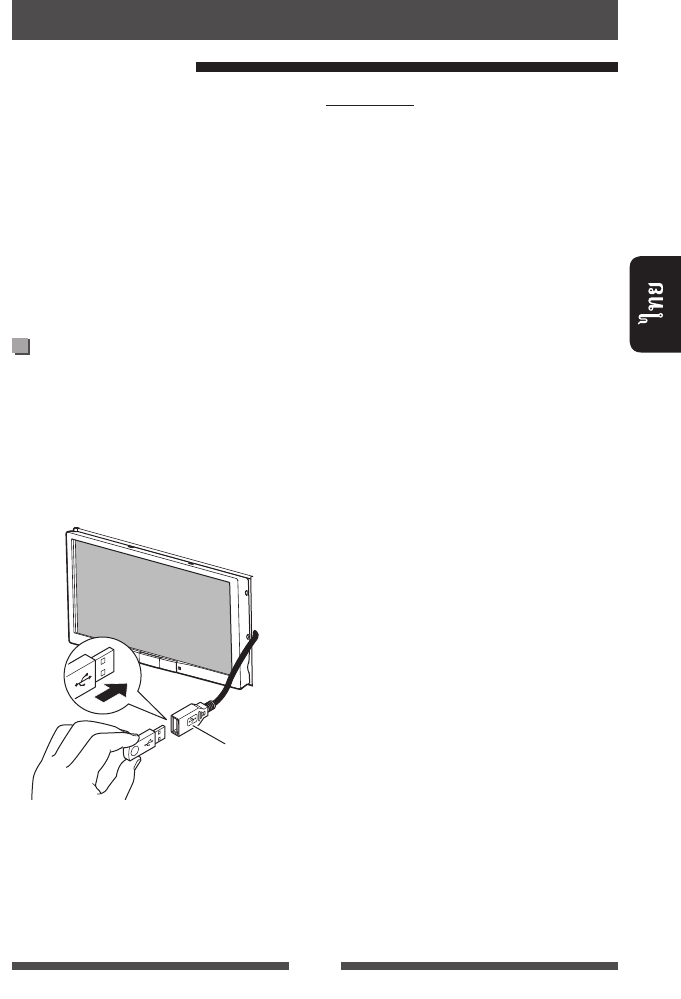
25
• JPEG/MPEG1/
MPEG2 */MP3/WMA/WAV
USB
• 5 000
250 ( 999 )
•
*
MPEG2
JVC
Everio
(
<.mod>)
USB
USB USB,
,
• HDD
USB
USB
“
USB
”
• USB
USB
USB
:
• USB
USB
• USB
• USB 2
• USB
• USB
5 1 A
• USB
• USB
USB hub
• USB
USB 2.0
• (
1 ):
– : 50
– : 50
• USB
• USB
“Now Reading”
• USB
USB
USB
•
USB
• USB
TH_KW-AV70_U_f.indb 25TH_KW-AV70_U_f.indb 25 12/12/11 5:50:14 PM12/12/11 5:50:14 PM

26
<File Type>
Audio
Still Picture JPEG
Video MPEG1/MPEG2
Audio&Video MPEG1/
MPEG2
•
USB
:
<Monitor Type>
16:9 4:3 LB
(Letterbox)
4:3 PS
(PanScan)
•
*1
*2
*3
*4
☞ 11
• 10
• ☞ 41
—
MPEG/JPEG
(☞ )
(3: / 8: )
• MP3/WMA/WAV:
/
• JPEG: /
/
( MP3/
WMA/WAV)
•
“”
[ ] /
(☞ 19)
[ ]
*
1
*
2
• SONGS:
• FOLDER:
[ ] *
1
*
2
• FOLDER:
•
ALL:
[ ]
( )
[6]
/
[4
] [
¢]
*3•
(
)
•
/
*
4
(
)
[] [–] [+]
[
Mode
]
<File Type>
<Monitor Type> (☞ )
[
AV MENU
]
<
AV Menu
>
TH_KW-AV70_U_f.indb 26TH_KW-AV70_U_f.indb 26 12/12/11 5:50:14 PM12/12/11 5:50:14 PM

27
iPod/iPhone :
Made for
– iPod with video (5th Generation)
– iPod classic
– iPod nano (6th Generation)
– iPod nano (5th Generation)
– iPod nano (4th Generation)
– iPod nano (3rd Generation)
– iPod nano (2nd Generation)
– iPod nano (1st Generation)
– iPod touch (4th Generation)
– iPod touch (3rd Generation)
– iPod touch (2nd Generation)
– iPod touch (1st Generation)
– iPhone 4
– iPhone 3GS
– iPhone 3G
– iPhone
iPod/iPhone
iPod/iPhone
• : USB 2.0 (
iPod/iPhone)
iPod/iPhone
USB
• :
USB iPod/iPhone—KS-U30
( ) (☞ / )
:
•
KS-U30
iPod/iPhone
• App iPod touch/iPhone ☞ 31
<AV Input>
iPod/iPhone
<AV Input> iPod/iPhone
• “
AV Off
”
(☞ 36)
1 AV
<AV Menu>:
2 <Input>
3
AV-IN iPod/
iPhone USB 2.0
( iPod/iPhone)
iPod iPod/
iPhone KS-U30 ()
TH_KW-AV70_U_f.indb 27TH_KW-AV70_U_f.indb 27 12/15/11 3:16:23 PM12/15/11 3:16:23 PM
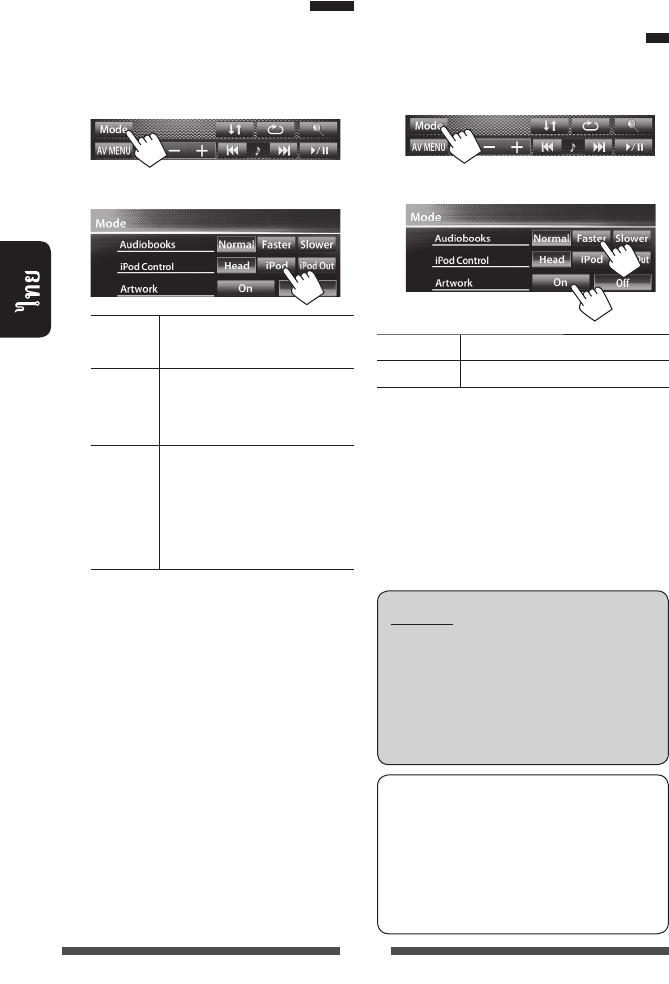
28
iPod
iPod/iPhone
“
iPod
”...
1
2
Head
(☞ 29)
iPod /
iPod/iPhone
•
iPod Out *
iPod/iPhone (☞ 30)
•
iPod/iPhone
• iPod nano (1st Generation) iPod
with video (5th Generation) <iPod>
<iPod Control> <iPod>
<AV Input> iPod
KS-U30 () (☞ 27)
*
<iPod Out>
iPod/
iPhone
:
– iPod nano (6th Generation)
– iPod touch (4th Generation)
– iPod touch (3rd Generation)
– iPod touch (2nd Generation)
– iPhone 4
– iPhone 3GS
– iPhone 3G
iPod/iPhone
“
iPod
”...
1
2
Audiobooks
Artwork / iPod
:
iPod/iPhone,
JVC: <http://
www3.jvckenwood.com/english/car/> (
)
iPod/iPhone
iPod/iPhone
iPod/iPhone
TH_KW-AV70_U_f.indb 28TH_KW-AV70_U_f.indb 28 12/19/11 2:18:03 PM12/19/11 2:18:03 PM
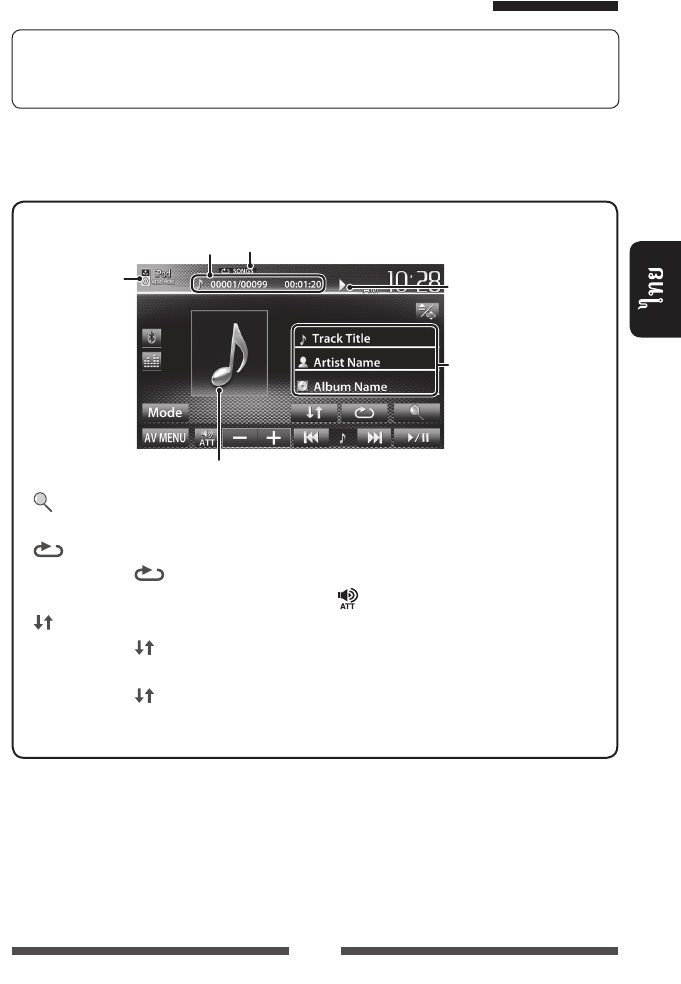
29
iPod/iPhone <Head>
☞ 11
• 10
• ☞ 41
• “
iPod
” (☞ 12)
• <Head> <iPod Control> (☞ 28)
• iPod/iPhone
[ ] / iPod/
iPhone (☞ 30)
[ ] *1
• SONGS:
“Repeat One”
[ ] *1
• SONGS:
“Shuffle Songs”
• ALBUMS:
“Shuffle
Albums”
[6]/
[
4
]
[
¢
]• / *2 (
)
• /
()
[] [–] [+]
[Mode]
iPod (☞ 28)
[AV MENU] <AV Menu>
• (☞ 30)
*1
*2
/
/ (☞ )
iPod
(☞ 28) ( 3:
/8: )
/
•
Artwork ( iPod/iPhone) Artwork (☞ 28)
TH_KW-AV70_U_f.indb 29TH_KW-AV70_U_f.indb 29 12/19/11 2:18:03 PM12/19/11 2:18:03 PM
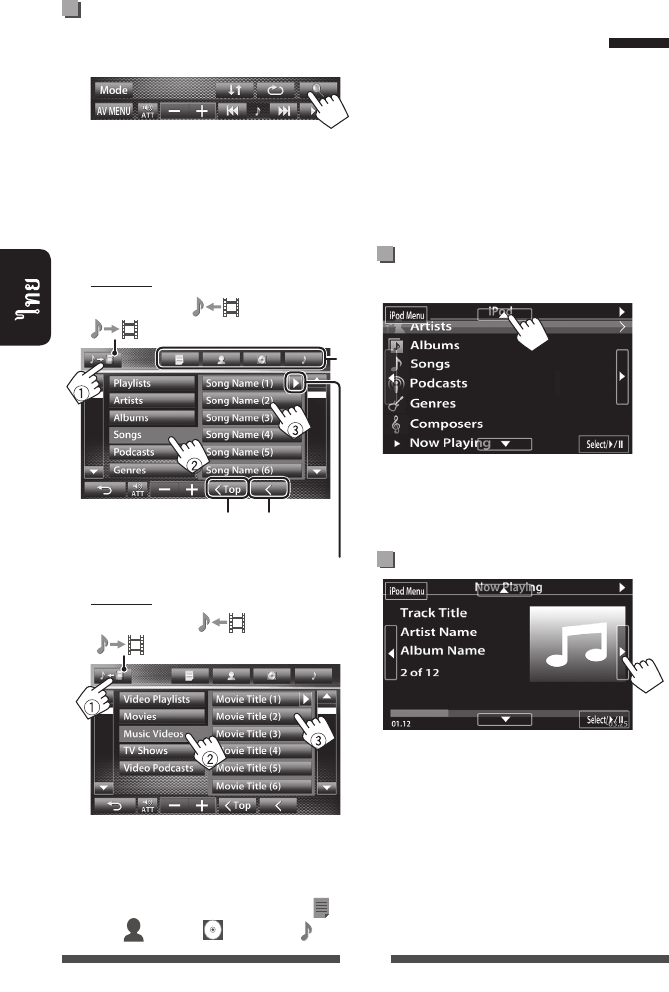
30
/
iPod/iPhone
1
2 ()
(1) (2)
(3)
•
:
*
:
•
iPod/iPhone
*
:
( )
( )
( )
( )
iPod/iPhone
<iPod Out>
• iPod touch/iPhone KS-U30
() (☞ /)
• <iPod> <AV Input>
(☞ 27)
• <iPod Out>
<iPod Control> (☞ 28)
• “
iPod
” (☞ 12)
iPod/
iPhone
[5] [∞]
[Select/6]
[iPod Menu]
[2] [3]/
[Select/6]/
[iPod Menu]
( )
( )
( )
( )
TH_KW-AV70_U_f.indb 30TH_KW-AV70_U_f.indb 30 12/19/11 2:18:04 PM12/19/11 2:18:04 PM
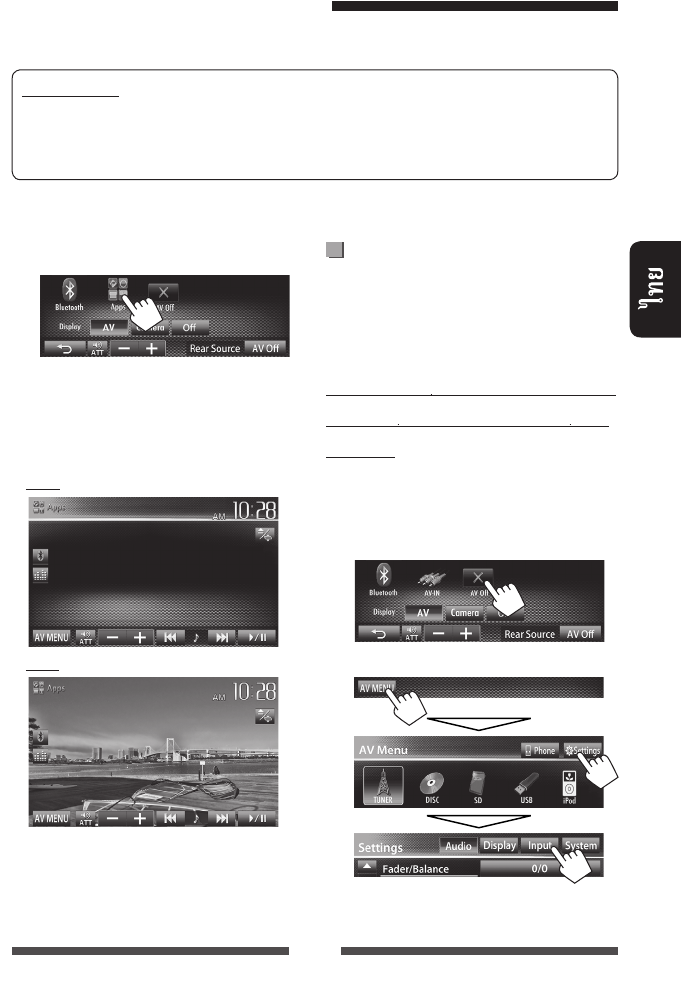
31
• App iPod touch iPhone
66
App
App
iPhone/iPod touch
iPod touch/
iPhone
• “
AV Off
”
(☞ 36)
1 AV
<AV Menu>
2 <Input>
1
App iPod touch/iPhone
2 “
Apps
”
<AV Menu>
• /
iPod/iPhone
–
Audio
Video
App iPod touch/iPhone
App iPod touch/iPhone
• App
• iPod touch/iPhone KS-U30 () (☞ /)
• <iPod> <AV Input> (☞ 27)
• Apps <http://www3.jvckenwood.com/english/car/>
TH_KW-AV70_U_f.indb 31TH_KW-AV70_U_f.indb 31 12/15/11 5:40:30 PM12/15/11 5:40:30 PM
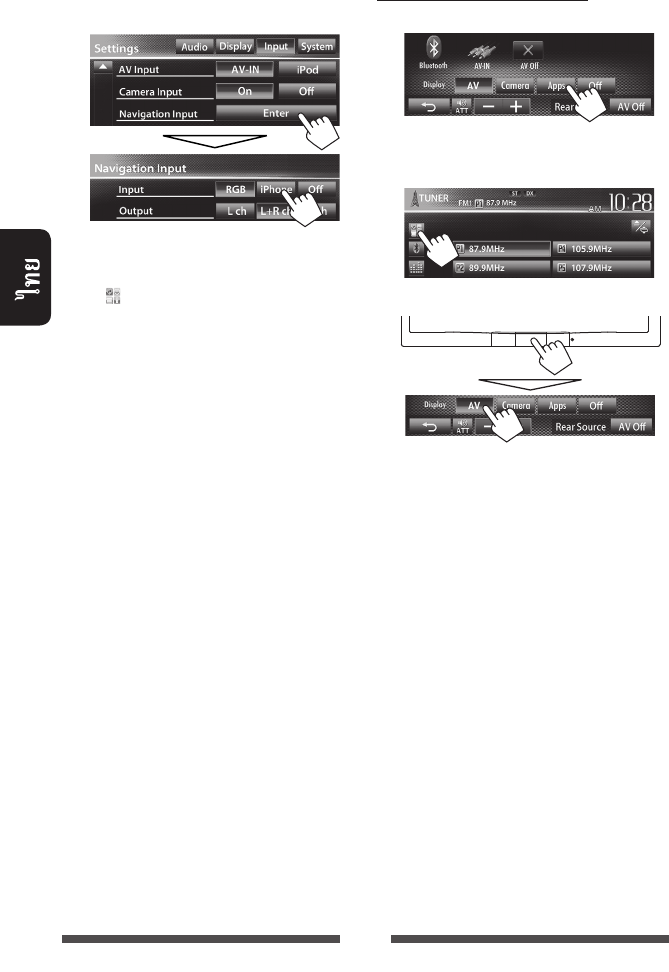
32
3 <iPhone> <Input>
<Navigation Input>
• <Input> <iPhone>
[Apps] <AV Menu>
[ ]
App
(☞ )
• <Input> <iPhone>
<AV Input>
<iPod>
<Off>
<Input>
App
<AV Menu>:
:
App
TH_KW-AV70_U_f.indb 32TH_KW-AV70_U_f.indb 32 12/12/11 5:50:16 PM12/12/11 5:50:16 PM

33
AV-IN ( ☞ )
☞ 11
• 10
• ☞ 41
[ ] [–] [+]
[Mode]* AV-IN
• [2] [3] AV-IN
[AV MENU] <AV Menu>
LINE IN/VIDEO IN (☞ /)
:
<AV-IN> <AV Input>
(☞ 45)
• <AV Input>
<Input> <Navigation
Input> <RGB> <Off>
AV-IN
1 “
AV-IN
”
(☞ 12)
2
TH_KW-AV70_U_f.indb 33TH_KW-AV70_U_f.indb 33 12/15/11 3:16:25 PM12/15/11 3:16:25 PM

34
( ) RGB
(☞ /)
•
1 AV
<AV Menu>:
2 <Input>
3 <RGB> <Input>
<Navigation Input>
• <Input> <RGB> [Navi]
<AV Menu> [ ]
(☞ 35)
<Off>
<Input>
TH_KW-AV70_U_f.indb 34TH_KW-AV70_U_f.indb 34 12/15/11 3:16:25 PM12/15/11 3:16:25 PM

35
1 <AV Menu>:
2
3
Input ☞ 34
Output
Volume
(0 35)
Navigation
Mute
<On>
Picture
Adjust
(☞ 41)
<AV Menu>:
:
•
•
<Full> <Aspect>
(☞ 42)
• “
AV-IN
”
LINE IN
TH_KW-AV70_U_f.indb 35TH_KW-AV70_U_f.indb 35 12/15/11 3:16:25 PM12/15/11 3:16:25 PM
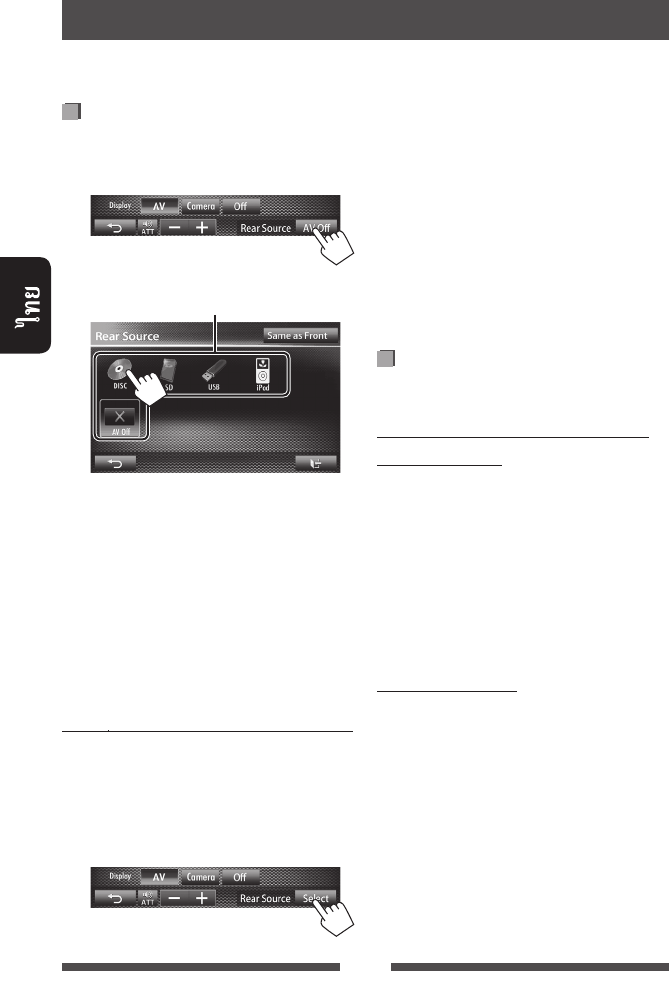
36
1 <AV Menu>:
2
• “
DISC
”, “
SD
”*, “
USB
”
“
iPod
”
“
AV-IN
”, “
AV
Off
”
• “
DISC
”, “
SD
”*, “
USB
”
“
iPod
”
“
Apps
”
...
•
[Same as Front]
–
[Select]
<AV Menu>
VIDEO OUT
AUDIO OUT
• [Same as Front]
•
“
DISC
”, “
SD
”*, “
USB
” “
iPod
”
“
AV-IN
”
* “
SD
”
KW-AV70BT
( )
DivX/MPEG1/MPEG2/JPEG/MP3/WMA/
WAV/CD/iPod
• DivX/MPEG1/MPEG2/JPEG:
• CD/iPod: 1
1 @ / # “”
“”
2 % / fi
DivX/MPEG1/MPEG2/JPEG/MP3/WMA/
WAV
1 TOP M MENU
2 % / fi / @ / # /
•
RETURN
3 ENT
TH_KW-AV70_U_f.indb 36TH_KW-AV70_U_f.indb 36 12/15/11 5:40:31 PM12/15/11 5:40:31 PM

37
1 <AV Menu>:
:
2
1 (☞ “
”)
2 (1)
(2)
<User>
• [ ]
• ☞
38
•
– DVD/DVD-VR/VCD
– CD
– DivX/MPEG1/MPEG2/MP3/WMA/WAV
• AV
TH_KW-AV70_U_f.indb 37TH_KW-AV70_U_f.indb 37 12/15/11 3:16:26 PM12/15/11 3:16:26 PM
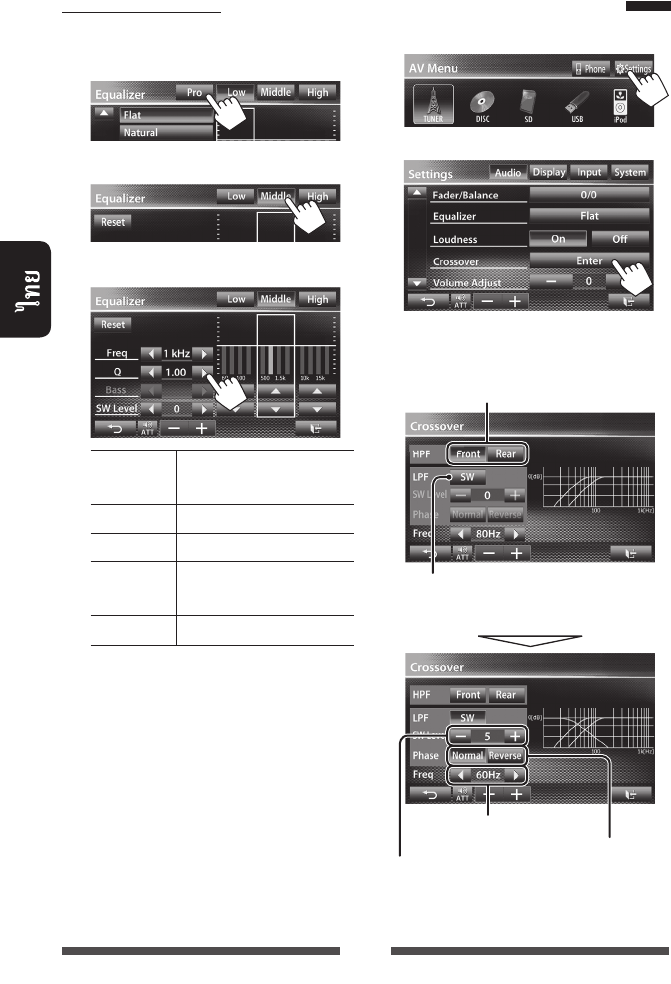
38
1 <AV Menu>:
2
3
*
<Freq>
<Through>
1
1 2 “
” ...
2
3
Reset //
0
Freq
Q*1
Bass /
*2
SW Level
<User> (☞ 37)
<User>
•
•
2 3
*1
“High”
*2
“Low”
*
( )
(
)
TH_KW-AV70_U_f.indb 38TH_KW-AV70_U_f.indb 38 12/15/11 3:16:26 PM12/15/11 3:16:26 PM
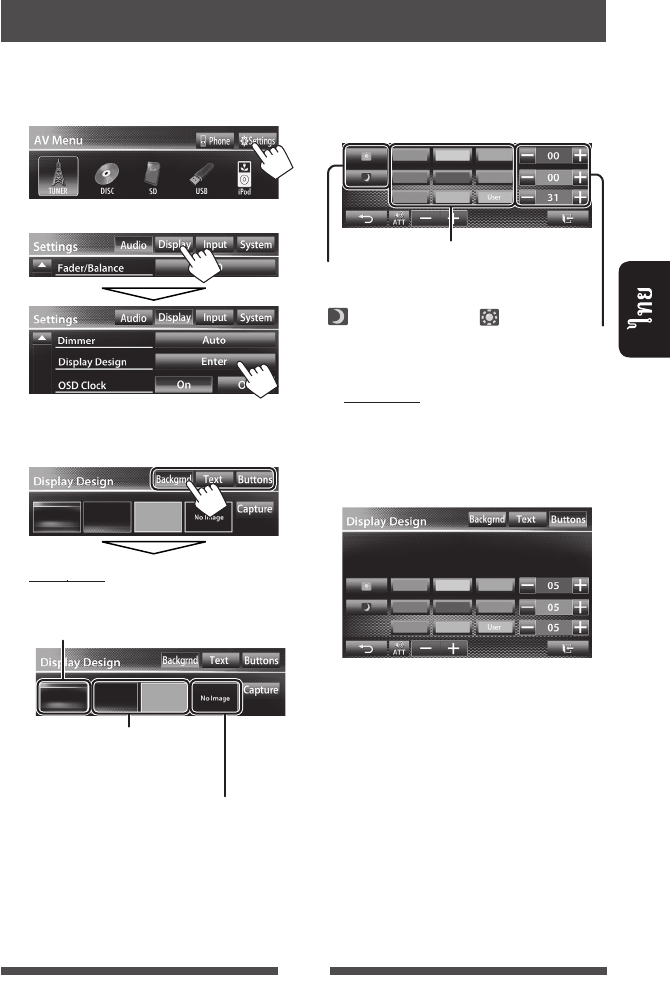
39
1 <AV Menu>:
2
3
(<Backgrnd>, <Text>
<Buttons>)
1
2/
/
/ (
☞ )
•
()
☞ 40
(☞ )
:
<User>
:
—
< > ( ) < > ( )
TH_KW-AV70_U_f.indb 39TH_KW-AV70_U_f.indb 39 12/15/11 3:16:27 PM12/15/11 3:16:27 PM

40
JPEG
• iPod/
iPhone
• JPEG
800 x 600
•
1 JPEG
2 <Display Design>
(☞ 39)
3
4
[6] *1/
[E] *1
[3] (<Full>, <Zoom1> –
<Zoom3>)
[5] [∞]
[2] [3] *2
•
[ ]
*1
LINE IN/VIDEO IN
*2
<Full>
5
[Yes]
(
)
• [No]
TH_KW-AV70_U_f.indb 40TH_KW-AV70_U_f.indb 40 12/12/11 5:50:19 PM12/12/11 5:50:19 PM
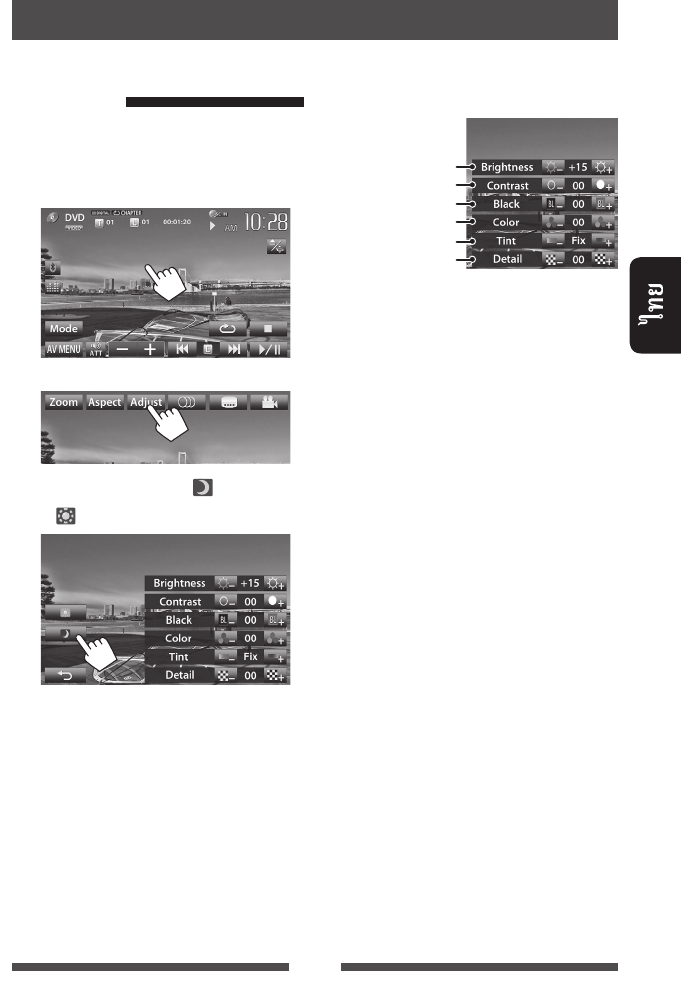
41
1
2
3 (< >)
(< >)
4 (–15 +15)
*
*
NTSC
TH_KW-AV70_U_f.indb 41TH_KW-AV70_U_f.indb 41 12/12/11 5:50:19 PM12/12/11 5:50:19 PM

42
1
2
3
4:3 16:9
Full*1:
16:9
Panorama:
4:3
Regular*1:
4:3
Auto: • “DISC”/
“SD”*2/“USB” :
*1
DivX
<Monitor Type>
<16:9>
(
☞
22)
*2 “
SD
”
KW-AV70BT
(<Full>, <Zoom1>
<Zoom3>)
• <Aspect> <Panorama>
<Auto> (☞ )
<Full>
1
2
3
[5] [∞] [2] [3]*:
*
<Full>
•
TH_KW-AV70_U_f.indb 42TH_KW-AV70_U_f.indb 42 12/12/11 5:50:20 PM12/12/11 5:50:20 PM
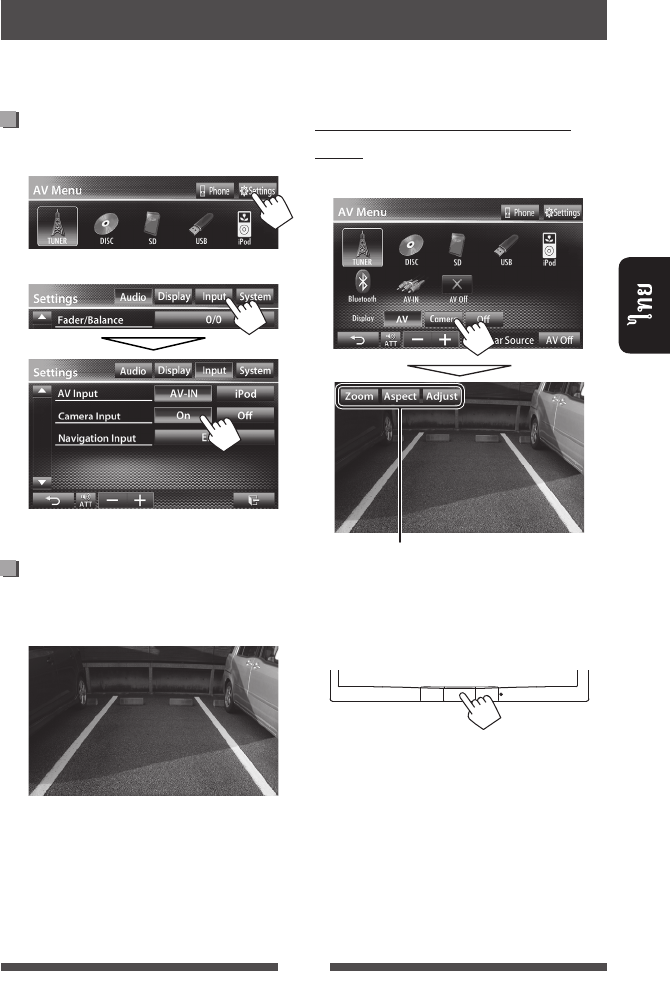
43
1 <AV Menu>:
2
<Off>
(R)
• REVERSE GEAR SIGNAL
☞ /
<AV Menu>:
(☞ 41)
TH_KW-AV70_U_f.indb 43TH_KW-AV70_U_f.indb 43 12/15/11 3:16:28 PM12/15/11 3:16:28 PM
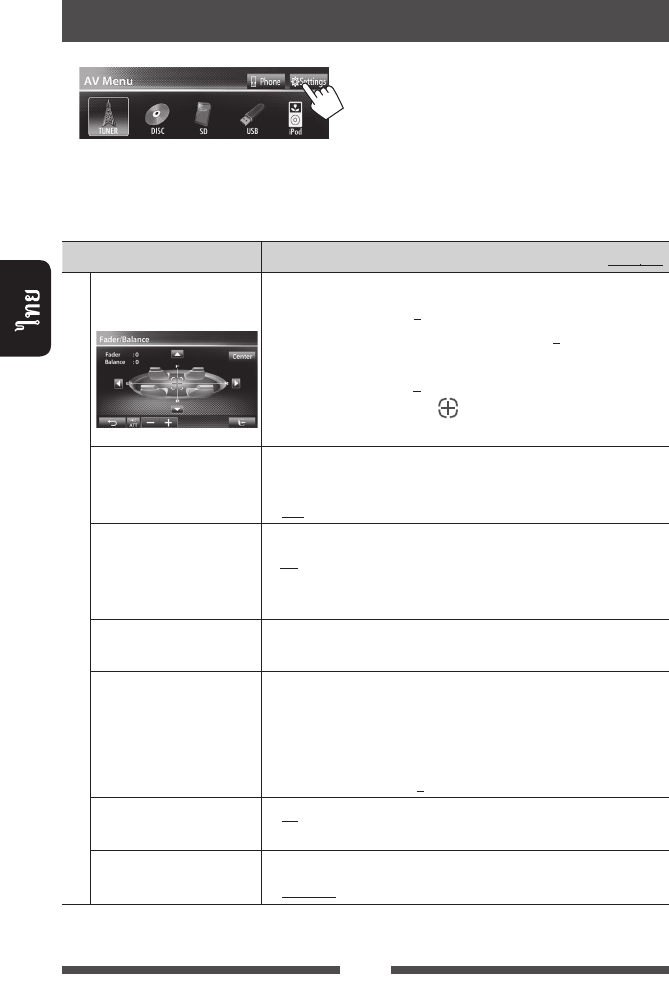
44
• <Amplifier Gain>, <AV Input> <Input> <Navigation
Input> AV AV
/
:
Audio ()
Fader/Balance (/
)
Fader :
♦ F6 R6 0
• (0)
Balance :
♦ L6 R6 0
[ 5/∞/2/3 ] [ ]
• [Center]
Equalizer ()
(☞ 37)
♦ Flat/Natural/Dynamic/Vocal Boost/Bass Boost/Vibrant/User
Loudness
()
/
♦ On
♦ Off
:
:
Crossover
()
(☞ 38)
Volume Adjust
()
(
: DVD/DVD-VR, VCD/CD, DivX/MPEG1/MPEG2/
MP3/WMA/WAV)
♦ –15 +6; 0
Amplifier Gain
()*
♦ On :
♦ Off :
Speaker Select
()
♦ Standard/Narrow/Middle/Wide
*
AV
[AV Off]
<AV Menu>
TH_KW-AV70_U_f.indb 44TH_KW-AV70_U_f.indb 44 12/15/11 3:16:29 PM12/15/11 3:16:29 PM
45
/
:
Display ()
Dimmer ()♦ Auto
♦ On
♦ Off
♦ Dimmer
Time Set
:
• ILLUMI (☞ /)
:
:
: ( )/ ( )
• [5] [∞]
Display Design
()
( ) (☞ 39)
OSD Clock ()♦ On
♦ Off
:
:
Demonstration
()
♦ On
♦ Off
:
:
Scroll (-)♦ Auto
♦ Once
♦ Off
:
:
:
•
GUI Adjust ( GUI)
[Enter] ( )/
( ) :
♦ Brightness
♦ Black
: (–15 +15; 00
/+15 )
: (–15 +15 00)
NTSC/PAL (NTSC/PAL)
♦ NTSC, PAL
Display Sensor
()
(☞ 11)
Input ()
AV Input
()
*1
LINE IN/VIDEO IN
♦ AV-IN
*2
: LINE IN/VIDEO IN
iPod/iPhone USB 2.0 (☞ 27
33)
♦ iPod
♦ BT
*2
*3
: iPod/iPhone JVC KS-U30 (☞ 27)
: Bluetooth Bluetooth
(KS-BTA100) (☞ 59)
*1
AV
[AV Off]
<AV
Menu>
“
AV Off
”
<
<AV
Input>
<Input>
<Navigation Input>
<RGB>
<Off>
*2
<AV Input>
<AV-IN>
<BT>
iPod/iPhone
*3
KW-AV70
TH_KW-AV70_U_f.indb 45TH_KW-AV70_U_f.indb 45 12/15/11 3:16:29 PM12/15/11 3:16:29 PM
46
/
:
Input ()
Camera Input
()
♦ On
♦ Off
:
(R)
:
Navigation Input
()
App iPod touch/iPhone/
(☞ 31 35)
•
<
Input
> <
iPhone
> <
Navigation Mute
>
System ()
Language ()
♦ English/Español/Français/Deutsch/Italiano/Nederlands/Svenska/
Dansk/Руccĸий/Português/ / / /
Türkçe/ / /
• “Please Power Off”
♦ GUI
Language
: (<English> <Local>:
)
Time Set () (☞ 7)
Beep ()♦ On
♦ Off
:
:
User Profile () (☞ 47)
Touch Panel Adjust
()
(☞ 48)
Initialize () [Enter]
• <Initial Settings>
(☞ 6)
Serial Number
()
DivX® VOD (DivX® VOD)
• [Enter]
• [OK]
System Information
()
(☞ 48)
Steering Remote Learning
()
TH_KW-AV70_U_f.indb 46TH_KW-AV70_U_f.indb 46 12/15/11 3:16:29 PM12/15/11 3:16:29 PM
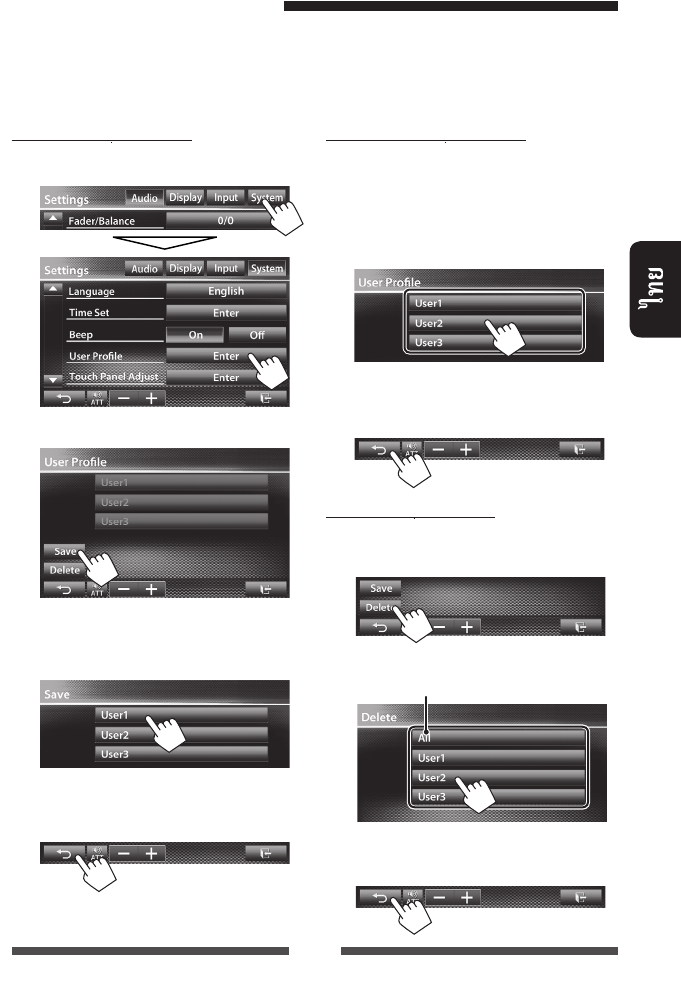
47
1 <Settings>:
2
3 (<User1> <User2>
<User3>)
[Yes]
4
• AV [AV Off] <AV
Menu> “
AV Off
”
1 <User Profile> (
☞
2
):
[Yes]
2
1 <User Profile> (
☞
2
):
2
[Yes]
3
/
:
•
<Settings> Fader/Balance, Equalizer, Loudness, Crossover (HPF/LPF/SW Level), Volume
Adjust, Speaker Select, Dimmer, Display Design, Display Sensor, AV Input, Camera Input, Navigation
•
“AV-IN”: AV-IN Name
<User1>
<User2> <User3>
TH_KW-AV70_U_f.indb 47TH_KW-AV70_U_f.indb 47 12/15/11 3:16:29 PM12/15/11 3:16:29 PM
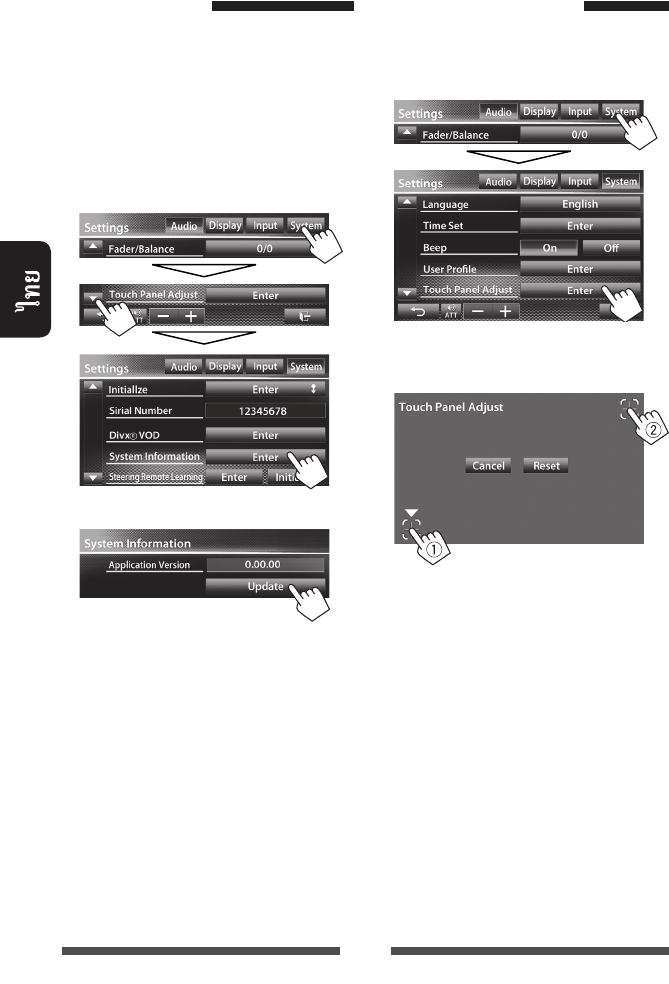
48
USB
1
USB
• USB
☞
25
2 <Settings>:
3
“Update Completed”
•
•
1 <Settings>:
2
•
[Cancel]
•
[Reset]
TH_KW-AV70_U_f.indb 48TH_KW-AV70_U_f.indb 48 12/12/11 5:50:22 PM12/12/11 5:50:22 PM
49
Bluetooth
KW-AV70BT
Bluetooth
Bluetooth
• i ii
Bluetooth®
Bluetooth®
BLUETOOTH
Bluetooth
(KS-UBT1)
Bluetooth
(KS-UBT1)
• Bluetooth
Bluetooth
• KS-UBT1
Bluetooth USB
Bluetooth
Bluetooth
• HFP (Hands-Free Profile) 1.5
• OPP (Object Push Profile) 1.1
• A2DP (Advanced Audio Distribution Profile) 1.2
• AVRCP (Audio/Video Remote Control Profile) 1.3
• PBAP (Phonebook Access Profile) 1.0
Bluetooth
:
: Bluetooth
: Bluetooth
:
Bluetooth
• Bluetooth
Bluetooth
• Bluetooth
•
• Bluetooth
Bluetooth :
Bluetooth
JVC :
<http://www3.jvckenwood.com/english/car/>
( )
TH_KW-AV70_U_f.indb 49TH_KW-AV70_U_f.indb 49 12/15/11 3:16:30 PM12/15/11 3:16:30 PM
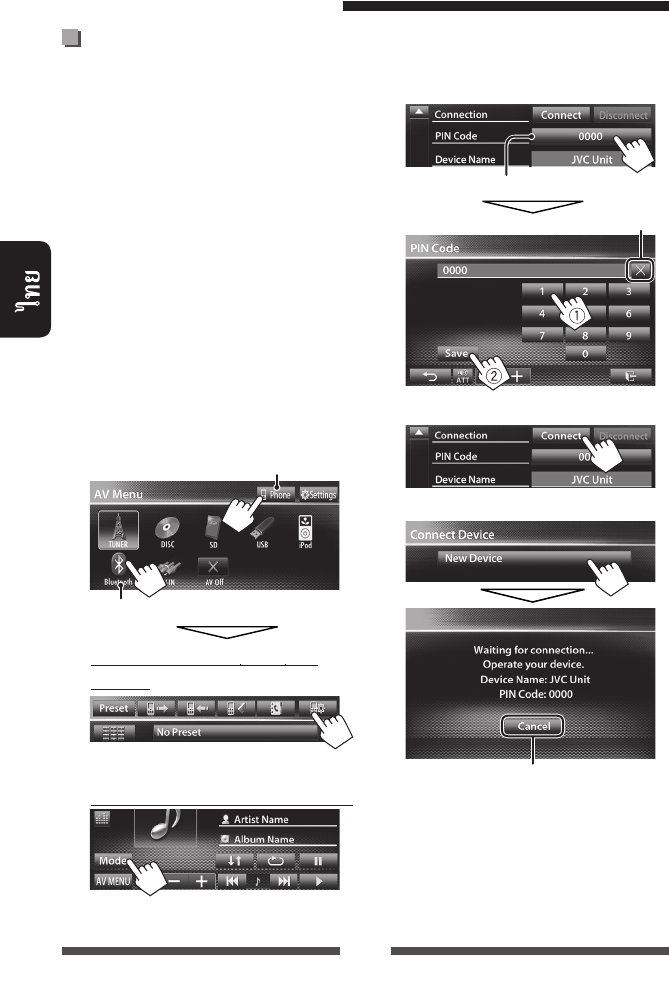
50
Bluetooth
Bluetooth
Bluetooth
PIN (
) Bluetooth
•
5
• Bluetooth
Bluetooth
• Bluetooth
Bluetooth
1 Bluetooth
<AV Menu>:
Bluetooth
Bluetooth
<Mode>
Bluetooth
2 PIN
• PIN
3
3
4
5 Bluetooth
“Connected” [OK]
Bluetooth
PIN (: 0000)
TH_KW-AV70_U_f.indb 50TH_KW-AV70_U_f.indb 50 12/15/11 3:16:30 PM12/15/11 3:16:30 PM
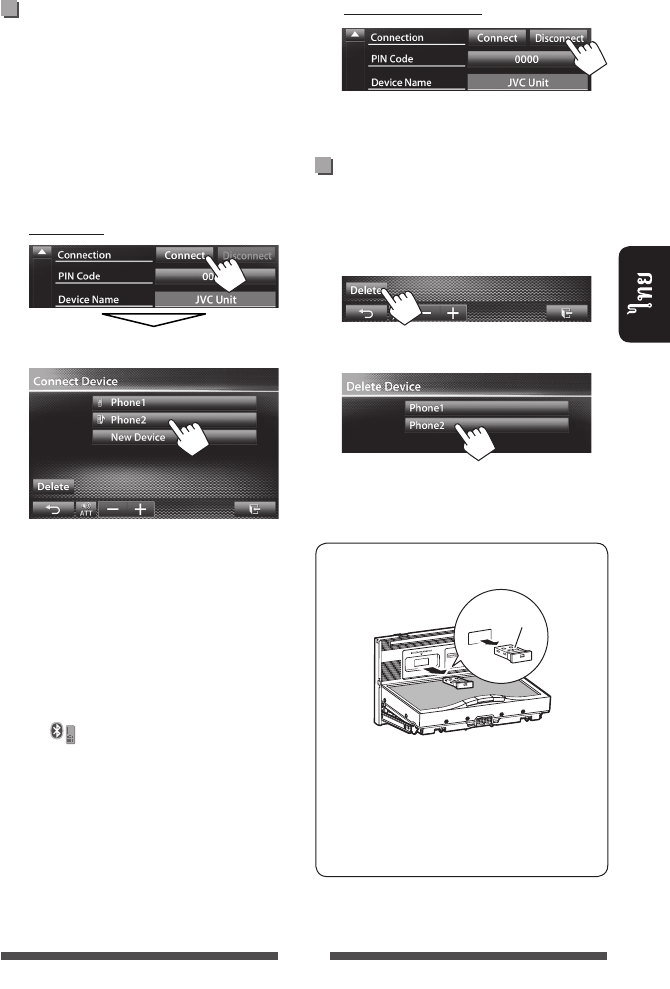
51
/
Bluetooth
1 Bluetooth
(☞ 50)
• Bluetooth:
• Bluetooth:
<Mode>
2
“Connected” [OK]
• (
)
<Connect Device>
–
•
[ ]
[Yes]
Bluetooth
1 <Connect Device> (☞
2 ):
2
[Yes]
Bluetooth
“JVC”
• Bluetooth
• Bluetooth
JVC
TH_KW-AV70_U_f.indb 51TH_KW-AV70_U_f.indb 51 12/12/11 5:50:23 PM12/12/11 5:50:23 PM
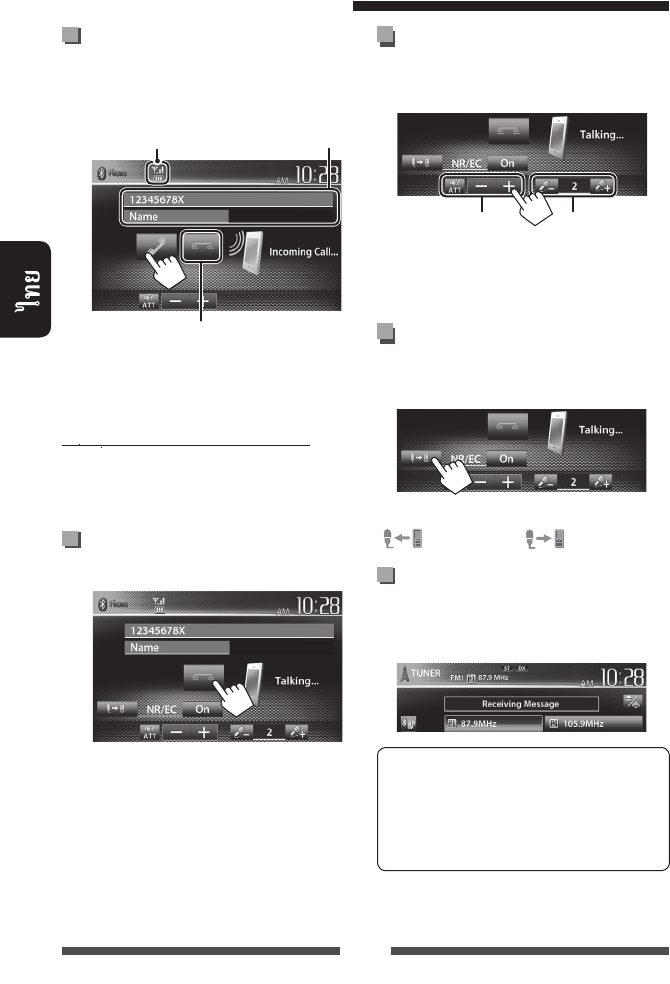
52
...
•
(☞ 43)
<Auto Answer> <On>
(☞
58)
...
Bluetooth
/ /
...
/
•
...
( : / : )
SMS
SMS
( )
•
•
SMS
/
(
)
()
TH_KW-AV70_U_f.indb 52TH_KW-AV70_U_f.indb 52 12/15/11 3:16:31 PM12/15/11 3:16:31 PM
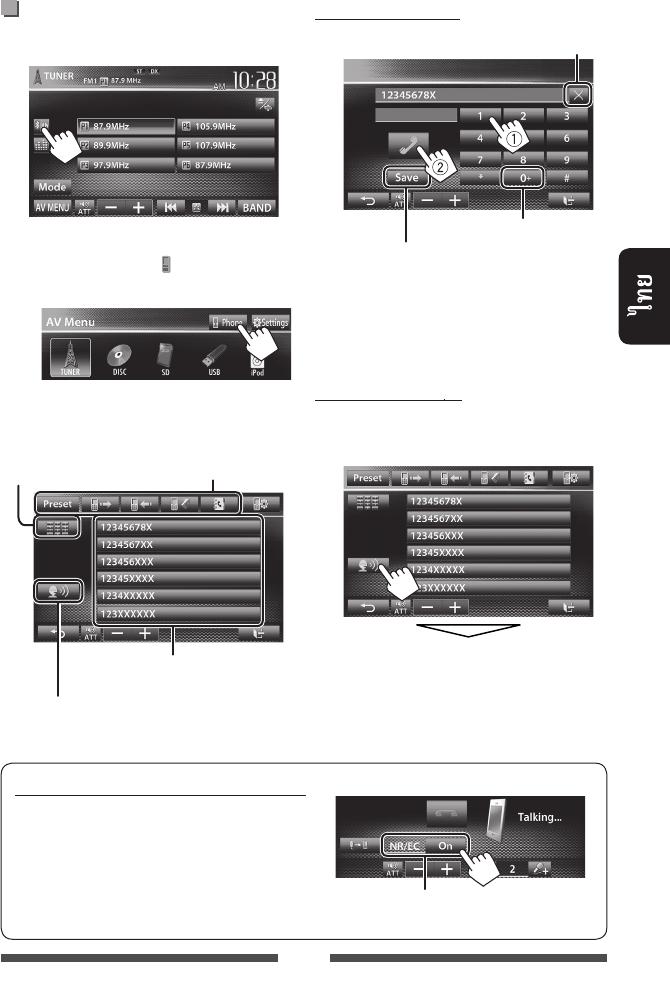
53
/
NR/EC (/
)
:
1
•
[ Phone] <AV
Menu>
2
• 32
•
[Cancel]
(☞ 55)
: “+”
(☞ )
/ /
(☞ 54)
(
☞
55)
(☞ )
<On>
TH_KW-AV70_U_f.indb 53TH_KW-AV70_U_f.indb 53 12/15/11 3:16:32 PM12/15/11 3:16:32 PM
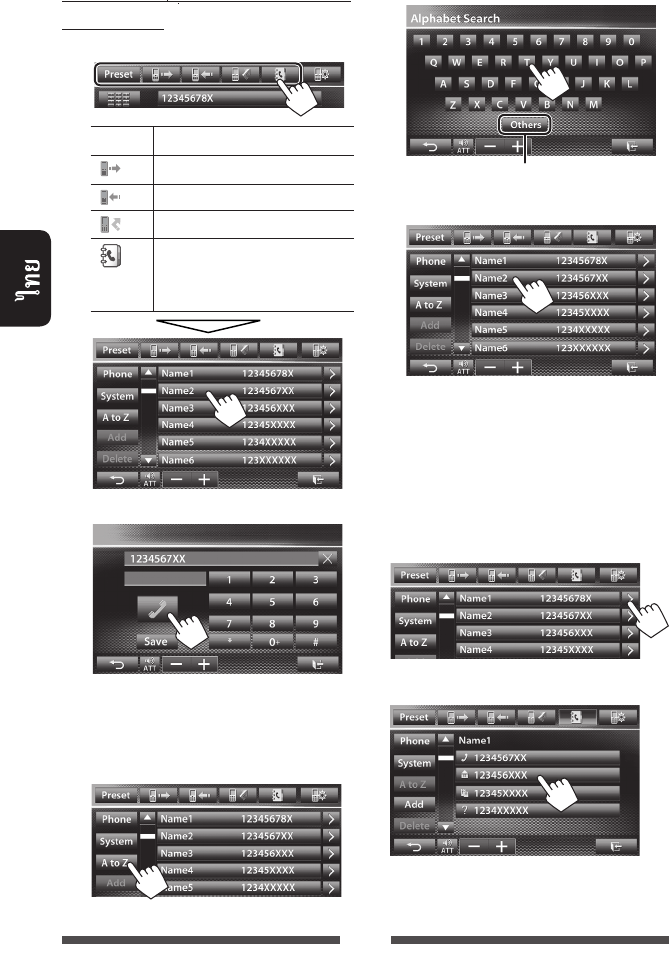
54
/ /
1
[Preset]
[ ]
[ ]
[ ]
[ ]
•
☞ 55
2
A Z
1
2
3
1
2
TH_KW-AV70_U_f.indb 54TH_KW-AV70_U_f.indb 54 12/12/11 5:50:24 PM12/12/11 5:50:24 PM
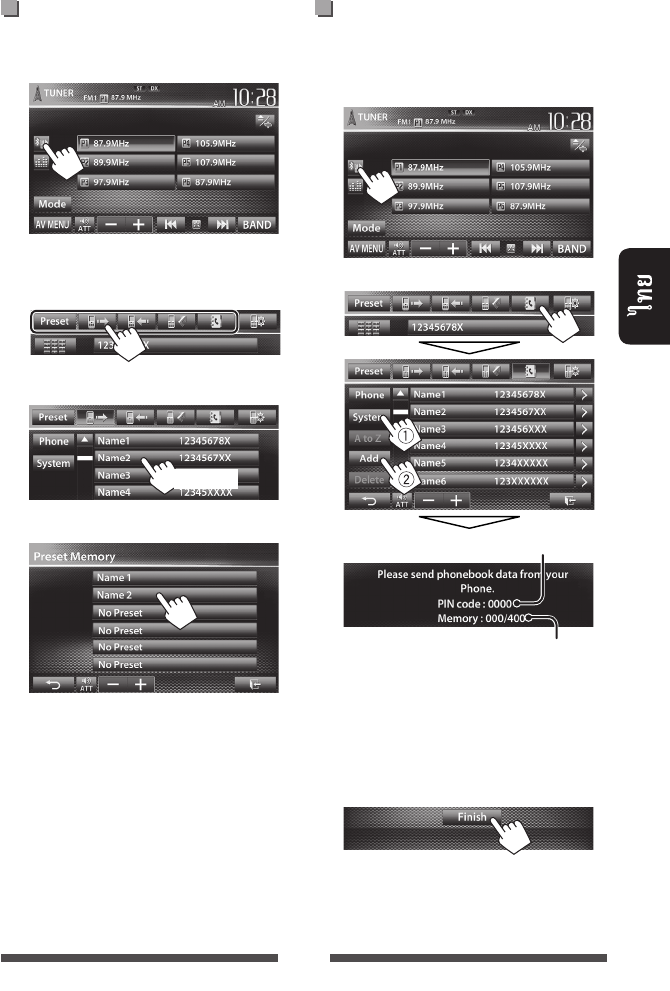
55
6
1
2 /
3
4
•
[Save] (☞ 53)
( 400 )
1
2
3
•
• [Finish]
4
()
PIN (: 0000)
TH_KW-AV70_U_f.indb 55TH_KW-AV70_U_f.indb 55 12/12/11 5:50:24 PM12/12/11 5:50:24 PM
56
1 /
/
(☞ 54)
2
•
<Phone>
3
[Yes]
(PBAP)
PBAP
• : 5 000
• :
50
/
/
TH_KW-AV70_U_f.indb 56TH_KW-AV70_U_f.indb 56 12/12/11 5:50:25 PM12/12/11 5:50:25 PM
57
• ☞ 50
• / ☞ 51
Bluetooth
•
[8]
[ ] *1 *2
[ ] *1 *2
[3]
[4] [¢]• ( )
• /
()
[] [–] [+]
[Mode] Bluetooth
(☞ 58)
[AV MENU] <AV Menu>
*1
AVRCP 1.3
*2
☞ 49
/
(
)
*1 (☞ )
/ *1
(3: / 8: ) *1
(/
/ ) *1
•
TH_KW-AV70_U_f.indb 57TH_KW-AV70_U_f.indb 57 12/12/11 5:50:25 PM12/12/11 5:50:25 PM
58
/
:
Connection ()♦ Connect
♦ Disconnect
: ☞ 51
: ☞ 51
PIN Code
( PIN)
PIN
• PIN PIN [Save]
Device Name () Bluetooth— JVC
Device Address () MAC
Phone Device ()*
1
Audio Device ()*
2
Auto connect ()♦ On
♦ Off
:
Bluetooth
:
HF/Audio Output ( /
)
Bluetooth
()
♦ Front
♦ All
:
:
Initialize () [Enter] Bluetooth
/
Auto Answer
()*
1
♦ On
♦ Off
:
:
SMS Notify
( SMS )*
1
♦ On
♦ Off
:
“Receiving Message”
:
Ring Mode ()*
1
♦ System
♦ Phone
:
:
( )
Ring Tone Change
()*
1
<Ring Mode> <System> [Enter]
SMS <Tone1> <Tone2> <Tone3>
♦ Call Tone
♦ Message Tone
:
: SMS
*1
*2
<Mode>
“
BT Audio
”
Bluetooth
“
BT Audio
”
Bluetooth
TH_KW-AV70_U_f.indb 58TH_KW-AV70_U_f.indb 58 12/12/11 5:50:25 PM12/12/11 5:50:25 PM
59
Bluetooth
KW-AV70
Bluetooth Bluetooth, KS-BTA100 ()
LINE IN (☞ /)
• KS-BTA100
• Bluetooth Bluetooth
•
1 () Bluetooth KS-BTA100
• KS-BTA100
2 <BT> <AV Input> (☞ 45)
Bluetooth
: / ()/
()()
()
•
...
•
•
...
()
• /
•
:
•
Bluetooth
1 “
Bluetooth
” (☞ 12)
/
• Bluetooth
• ( )
• ()
KS-BTA100
KS-BTA100
TH_KW-AV70_U_f.indb 59TH_KW-AV70_U_f.indb 59 12/12/11 5:50:26 PM12/12/11 5:50:26 PM
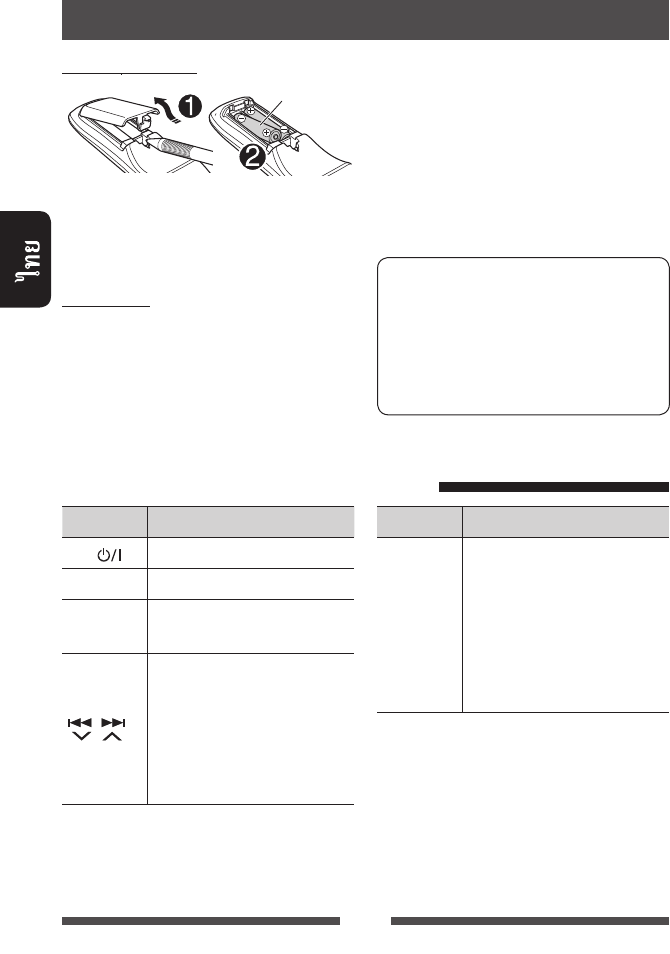
60
R03/LR03/AAA
(+
–)
:
•
•
ATT / /
DISP
5 / ∞•
• //
/
•
•
()
•
• /
()
:
•
• (
)
• / ( )
•
(RM-RK252)
1 / ¡
• /
• DVD-Video/DVD-VR/VCD:
(
)
– DVD-VR/VCD:
TH_KW-AV70_U_f.indb 60TH_KW-AV70_U_f.indb 60 12/12/11 5:50:26 PM12/12/11 5:50:26 PM

61
VOL +/VOL –
•
• “2nd VOL”
SOURCE
6/*1
PHONE / *2
BAND / 7/
•
•
•
•
Bluetooth*2
0 – 9
(☞ 62)
• SHIFT
• “SETUP”
1 – 6
SHIFT
ASPECT
•
(☞ 42)
RETURN
TOP M
(☞ 62)
• DVD-Video:
• DVD-VR:
• VCD: PBC
MENU
(☞ 62)
• DVD-Video:
• DVD-VR:
• VCD: PBC
% / fi / @ / #
• DVD-Video: /
• DivX:
5
ENT
OSD/
DUAL/
SHIFT
DIRECT/CLR
•
SHIFT
(☞ 62)
•
SHIFT
• “SURROUND”
*1
Bluetooth
*2
KW-AV70BT
TH_KW-AV70_U_f.indb 61TH_KW-AV70_U_f.indb 61 12/12/11 5:50:26 PM12/12/11 5:50:26 PM

62
• DVD-Video/DVD-VR
1 DVD Video TOP M MENU
DVD-VR ...
TOP M:
MENU:
2 % / fi / @ / #
3 ENT
• VCD
PBC...
1 DIRECT SHIFT
2 SHIFT
3 ENT
•
RETURN
PBC
1 7 PBC
2 DIRECT SHIFT
3 SHIFT
4 ENT
• PBC TOP M
MENU
1 DIRECT SHIFT
2 SHIFT
• CLR ()
SHIFT
3 ENT
DVD-Video/DVD-VR/DivX/MPEG1/MPEG2/JPEG/
MP3/WMA/WAV/VCD/CD
1 DIRECT SHIFT
• DIRECT
2 SHIFT
• CLR ()
SHIFT
3 ENT
TH_KW-AV70_U_f.indb 62TH_KW-AV70_U_f.indb 62 12/12/11 5:50:26 PM12/12/11 5:50:26 PM
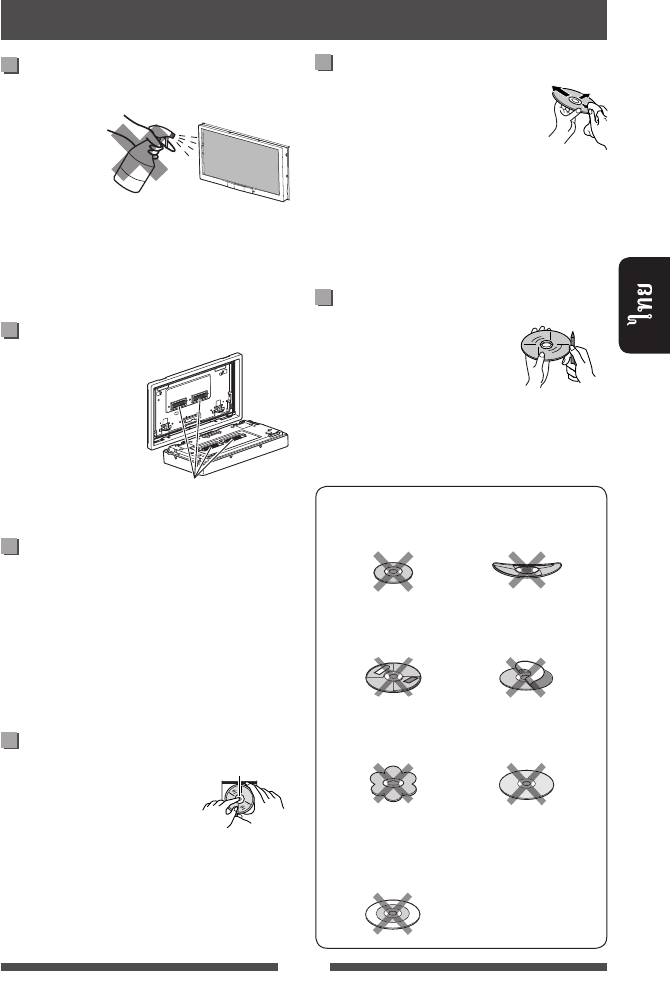
63
(
)
:
r
:
•
•
•
( )
•
•
(
)
:
CD 8 ..
C-thru
()
TH_KW-AV70_U_f.indb 63TH_KW-AV70_U_f.indb 63 12/12/11 5:50:26 PM12/12/11 5:50:26 PM

64
MP3/WMA/WAV
•
<.mp3>, <.wma> <.wav> (
)
•
:
– :
MP3/WMA: 32 kbps — 320 kbps
– :
48 kHz, 44.1 kHz, 32 kHz ( MPEG1)
24 kHz, 22.05 kHz, 16 kHz ( MPEG2)
48 kHz, 44.1 kHz, 32 kHz, 22.05 kHz (
WMA)
44.1 kHz ( WAV)
•
ID3 1.0/1.1/2.2/2.3/2.4 ( MP3)
• WAV/WMA
• VBR
(variable bit rate)
• VBR
• :
– MP3 MP3i
MP3 PRO
– MP3 Layer 1/2
– WMA
– WMA Windows
Media® Audio
– WMA
DRM
•
:
– : 32 x 32 1 232 x
672
– : 650 KB
– : JPEG
DivX ()
• DivX
<.divx>, <.div> <.avi> (
)
• (audio stream)
MP3 Dolby Digital
•
• ()
4 Mbps
MPEG1/MPEG2
• MPEG1/MPEG2
<.mpg>, <.mpeg>
<.mod>
•
/ MPEG
MP@ML (Main Profile at Main
Level)/SP@ML (Simple Profile at Main Level)/MP@LL
(Main Profile at Low Level)
• Audio stream MPEG1 Audio
Layer-2 Dolby Digital
• ()
4 Mbps
JPEG
• JPEG
<.jpg> <.jpeg>
• JPEG
32 × 32 8 192 × 7 680
• baseline JPEG
Progressive JPEG lossless JPEG
iPod/iPhone
USB
TH_KW-AV70_U_f.indb 64TH_KW-AV70_U_f.indb 64 12/12/11 5:50:26 PM12/12/11 5:50:26 PM

65
(Speaker out/REAR OUT/FRONT OUT)
2
( DVD/DVD-VR/DivX)
AA GL MI SO
AB GN MK SQ
AF GU ML SR
AM HA MN SS
AR HI MO ST
AS HR MR SU
AY HU MS (MAY) SW
AZ HY MT TA
BA IA MY TE
BE IE NA TG
BG IK NE TH
BH IN NO TI
BI IS OC TK
BN , IW OM ( ) TL
BO JA OR TN
BR JI PA TO
CA JW PL TR
CO KA PS , TS
CS KK QU TT
CY KL RM - TW
DZ KM RN UK
EL KN RO UR
EO KO (KOR) RW UZ
ET KS SA VI
EU KU SD VO
FA KY SG WO
FI LA SH
-
XH
FJ LN SI YO
FO LO SK ZU
FY LT SL
GA LV
,
SM
GD MG SN
TH_KW-AV70_U_f.indb 65TH_KW-AV70_U_f.indb 65 12/12/11 5:50:26 PM12/12/11 5:50:26 PM

66
• Dolby Laboratories Dolby D
Dolby Laboratories
• “DVD Logo” DVD Format/Logo Licensing Corporation
• DivX®, DivX Certified® and associated logos are trademarks of Rovi Corporation or its subsidiaries and are used
under license.
ABOUT DIVX VIDEO: DivX® is a digital video format created by DivX, LLC, a subsidiary of Rovi Corporation. This is
an official DivX Certified® device that plays DivX video. Visit divx.com for more information and software tools to
convert your files into DivX videos.
ABOUT DIVX VIDEO-ON-DEMAND: This DivX Certified® device must be registered in order to play purchased DivX
Video-on-Demand (VOD) movies. To obtain your registration code, locate the DivX VOD section in your device
setup menu. Go to vod.divx.com for more information on how to complete your registration.
• Microsoft Windows Media Microsoft
Corporation /
• “Made for iPod,” and “Made for iPhone” mean that an electronic accessory has been designed to connect
specifically to iPod, or iPhone, respectively, and has been certified by the developer to meet Apple performance
standards. Apple is not responsible for the operation of this device or its compliance with safety and regulatory
standards. Please note that the use of this accessory with iPod, or iPhone may affect wireless performance.
iPhone, iPod, iPod classic, iPod nano, and iPod touch are trademarks of Apple Inc., registered in the U.S. and other
countries.
•
Rovi Corporation
• Ricoh
KW-AV70BT
• SDHC SD-3C, LLC.
• Bluetooth Bluetooth SIG, Inc.
JVC KENWOOD Corporation
iPhone Navigation App
iPhone Navigation
(
)
• iPhone Navigation App iPhone
Navigation App
iPhone Navigation App
•
TH_KW-AV70_U_f.indb 66TH_KW-AV70_U_f.indb 66 12/15/11 3:16:35 PM12/15/11 3:16:35 PM

67
•
( )
• ( “ ”) <Language>
(☞ 46)
/
“ ”• VIDEO IN
•
•
“
”
“
”
(☞ 3) /
“”
“ ” /
“ ”
(☞ 3)
“”
iPod/iPhone (☞ 27)
“ USB ”• USB
•
• USB
“ BT Dongle”* Bluetooth (KS-UBT1)
“”*
(☞ 51)
“...”*
Bluetooth
( )
“”*
“”* Bluetooth
“”* Bluetooth
“”*
“”*
“”*
“”* Bluetooth
(☞ 50)
*
KW-AV70BT
TH_KW-AV70_U_f.indb 67TH_KW-AV70_U_f.indb 67 12/12/11 5:50:27 PM12/12/11 5:50:27 PM

68
/
•
•
(☞ 8)
(☞ 3)
<Display Sensor>
<High> <Motion Sensitiv.> (☞ 11)
• (☞ 36) (
DVD/CD )
•
(“
Bluetooth
”*, “
AV-IN
” “
Apps
”)
<AV Menu>
<AV Input>
(☞ 45)
TUNER
SSM (☞ 15)
(☞ 3)
(☞ 16)
•
/
•
/
•
• (Finalize)
•
•
DivX/MPEG1/MPEG2/
JPEG/MP3/WMA/WAV
•
(☞ 17)
•
*
KW-AV70
TH_KW-AV70_U_f.indb Sec1:68TH_KW-AV70_U_f.indb Sec1:68 12/15/11 3:16:35 PM12/15/11 3:16:35 PM

69
/
USB/SD*
“”
USB SD
iPod/iPhone
• iPod
• “
iPod
”
iPod/iPhone • iPod/
iPhone
•
•
• iPod
(☞ 28)
• iPod/iPhone
iPod/iPhone
( ) “VoiceOver” iPod
<http://www.apple.com>
Artwork
Artwork
(☞ 29)
<iPod> <AV Input> (☞ 45)
•
•
• USB
JVC KS-U30
• <iPod> <AV Input> (☞ 45)
AV-IN
•
•
*
KW-AV70BT
TH_KW-AV70_U_f.indb Sec1:69TH_KW-AV70_U_f.indb Sec1:69 12/12/11 5:50:27 PM12/12/11 5:50:27 PM

70
/
Bluetooth ( KW-AV70BT)
•
Bluetooth
•
Bluetooth
•
Bluetooth
•
•
• ( )
AVRCP (Audio Video Remote Control Profile)
Bluetooth • Bluetooth (KS-UBT1)
• Bluetooth
• “ ...”
[Cancel] Bluetooth
Bluetooth PIN
PIN “0000”
“1234”
•
• NR/EC (/
) (☞ 53)
()
TH_KW-AV70_U_f.indb Sec1:70TH_KW-AV70_U_f.indb Sec1:70 12/12/11 5:50:27 PM12/12/11 5:50:27 PM
71
/ 50
(RMS) / 20 4 Ω,
40 Hz 20 000 Hz
0.8%
4 Ω ( 4 Ω 8 Ω)
: 60 Hz, 80 Hz, 100 Hz, 150 Hz
: 500 Hz, 1 kHz, 1.5 kHz, 2 kHz
: 10 kHz, 12.5 kHz, 15 kHz, 17.5 kHz
±10 dB
70 dB
LINE OUT (FRONT/REAR),
SUBWOOFER
/ 4 V/20 kΩ load ()
1 kΩ
LINE IN, VIDEO IN, CAMERA IN, USB,
MIC IN*,
2nd AUDIO OUT
OE REMOTE, RGB
FM/AM
FM 87.5 MHz 108.0 MHz
AM 531 kHz 1 611 kHz
FM 9.3 dBf (0.8 μV/75 Ω)
50 dB 16.3 dBf (1.8 μV/75 Ω)
(400 kHz)
65 dB
40 Hz 15 000 Hz
40 dB
AM /
20 μV/40 dB
*
KW-AV70BT
TH_KW-AV70_U_f.indb Sec1:71TH_KW-AV70_U_f.indb Sec1:71 12/12/11 5:50:27 PM12/12/11 5:50:27 PM
72
DVD/CD
()
DVD, fs=48 kHz/96 kHz 16 Hz 22 000 Hz
VCD/CD 16 Hz 20 000 Hz
93 dB
95 dB
PAL/NTSC
()1 Vp-p/75 Ω
SD*
FAT 32/16/12
8 - 32
10 Mbps
USB
USB USB 2.0
12 Mbps
1.5 Mbps
(Mass storage class)
FAT 32/16/12
DC 5 V 1 A
BLUETOOTH*
Bluetooth 2.0
+ 4 dBm (Power class 2)
10
HFP (Hands-Free Profile) 1.5
OPP (Object Push Profile) 1.1
A2DP (Advanced Audio Distribution Profile) 1.2
AVRCP (Audio/Video Remote Control Profile) 1.3
PBAP (Phone Book Access Profile) 1.0
*
KW-AV70BT
TH_KW-AV70_U_f.indb Sec1:72TH_KW-AV70_U_f.indb Sec1:72 12/12/11 5:50:27 PM12/12/11 5:50:27 PM

73
7
1 152 000 : 800 () × 3 (RGB) × 480 ()
TFT (Thin Film Transistor)
NTSC/PAL
16:9 ()
14.4 V ( 11 V 16 V)
–10°C +60°C
0°C +40°C
( x x ) () 178 . × 100 . × 160 .
()
171 . × 97 . × 28 .
()2.5 kg
TH_KW-AV70_U_f.indb Sec1:73TH_KW-AV70_U_f.indb Sec1:73 12/12/11 5:50:27 PM12/12/11 5:50:27 PM
7 The countries where you may use the
Bluetooth® function (For KS-UBT1)
7 Die Länder, in denen Sie die Bluetooth® Funktion verwenden können
7 Pays où vous pouvez utiliser la fonction Bluetooth®
7 De landen waar u de Bluetooth®-functie mag gebruiken
7 Países en los que se puede utilizar la función Bluetooth®
7 Paesi nei quali è possibile utilizzare la funzione Bluetooth®
7 Länder där du kan använda Bluetooth®-funktionen
7 Lande, hvor du kan bruge Bluetooth®-funktionen
7 Land hvor du kan bruke Bluetooth®-funksjonen
7 Maat, joissa voi käyttää Bluetooth®-toimintoa
7 Países onde pode usar a função Bluetooth®
7 Países onde você pode usar a função Bluetooth®
7 Οι χώρες όπου μπορείτε να χρησιμοποιήσετε τη λειτουργία Bluetooth®
7 Страны, где можно воспользоваться функцией Bluetooth®
7 Země, ve kterých můžete využívat funkci Bluetooth®
7 Azok az országok, amelyekben használhatjuk a Bluetooth®-funkciót
7 Kraje, w których można używać funkcji Bluetooth®
7 Države, kjer lahko uporabljate funkcijo Bluetooth®
7 Krajiny, v ktorých môžete využívať funkciu Bluetooth®
7 Valstis, kur jūs varat izmantot Bluetooth® funkciju
7 Šalys, kuriose galite naudotis „Bluetooth®“ funkcija
7 Il-pajjiżi fejn tista’ tuża l-funzjoni Bluetooth®
7 Lönd þar sem hægt er að nota Bluetooth®
7 Riigid, kus on võimalik kasutada Bluetooth® funktsiooni
7 Bluetooth® fonksiyonunu kullanabileceğiniz ülkeler
7
7 Na tíortha inar féidir leat feidhmiú Bluetooth® a úsáid
7 Länner an denen der d’Bluetooth® Funktioun benotze kënnt.
7 Ở những quốc gia mà bạn có thể sử dụng chức năng Bluetooth®
7 Els països on podrà fer servir la funció Bluetooth®
7 Zemlje u kojima je dozvoljena upotreba Bluetooth® funkcije.
7 Zemlje u kojima možete koristiti Bluetooth® funkciju
7 Zemlje u kojima je dopušteno koristiti Bluetooth®.
7 Земји каде можете да ја користите функцијата Bluetooth®
7 Страните, в които можете да ползвате функцията Bluetooth®
7 Ţările în care puteţi utiliza funcţia Bluetooth®
7 Die lande waar u die Bluetooth®-funksie kan gebruik
7 Amazwe lapho ungasebenzisa khona uhlelo lwe-Bluetooth®
7 Ang mga bansa kung saan maaari kang gumamit ng Bluetooth® function
7 Negara-negara yang memperbolehkan penggunaan fungsi Bluetooth®
7 Negara-negara yang anda boleh menggunakan fungsi Bluetooth®
7
ȯ ȯ ¡ȡȱ ] %OXHWRRWKp ȡ[-¢ȡ ȡ `Ȫ ȯ ¡ɇ
7 您能够使用 Bluetooth® 功能的国家
7 您能夠使用 Bluetooth® 功能的國家
7 Bluetooth® 기능을 사용할 수 있는 국가
7
i
BTList__11_1672_007.indd 2BTList__11_1672_007.indd 2 11/10/25 21:5611/10/25 21:56
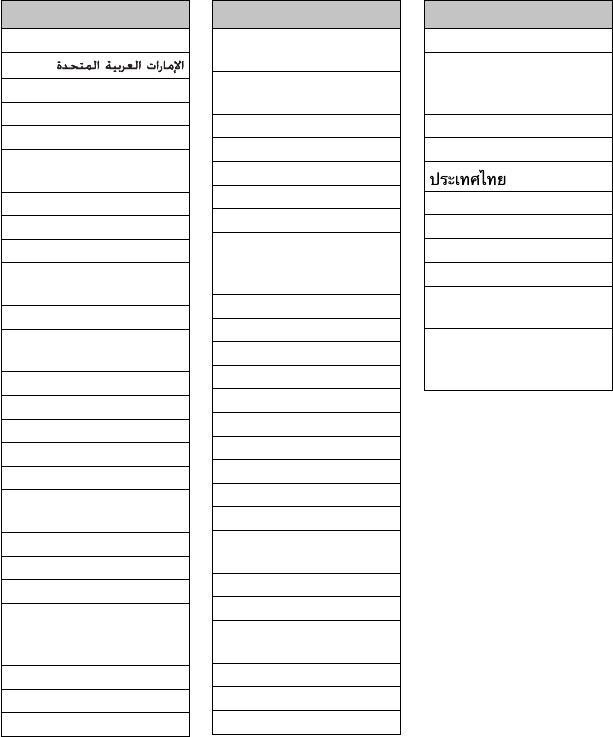
Country
Andorra
Australia
Österreich
Bosna i Hercegovina
Belgien
Belgique
България
Brasil
Canada
Schweiz
Suisse
Chile
Κύπρος
Kıbrıs
Česká republika
Deutschland
Danmark
Eesti
España
Suomi
Finland
France
United Kingdom
Ελλάδα
Hong Kong
香港
香港
Hrvatska
Magyarország
Indonesia
Country
Ireland
Éire
India
ȯ ȯ ¡ȡȱ ] %OXHWRRWKp ȡ[-¢ȡ ȡ `Ȫ ȯ ¡ɇ
ȡ
Ísland
Italia
대한민국
Lichtenstein
Lietuva
Luxemburg
Luxembourg
Lëtzebuerg
Latvija
Monaco
Crna Gora
Македонија
Malta
Malaysia
Nederland
Norge
New Zealand
Perú
Philippines
Pilipinas
Polska
Portugal
República Oriental del
Uruguay
România
Srbija
Россия
Country
Sverige
Singapore
新加坡
Singapura
Slovenija
Slovensko
Türkiye
台湾
United States of America
Venezuela
Vietnam
Việt Nam
South Africa
ENingizimu Afrika
Suid-Afrika
ii
11-1672-007
BTList__11_1672_007.indd 3BTList__11_1672_007.indd 3 11/10/25 21:5611/10/25 21:56
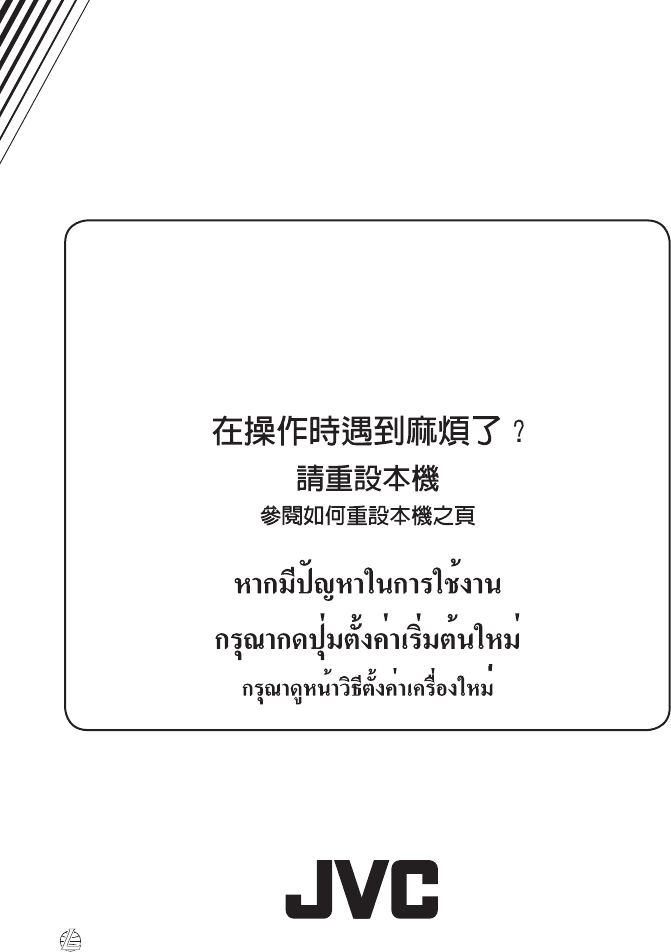
ENGLISH
LVT2304-001A
[U]
KW-AV70BT/KW-AV70
INSTRUCTIONS
MONITOR WITH DVD RECEIVER
For installation and connections, refer to the separate manual.
For canceling the display demonstration, see page 6.
/
Covers_AV70[U].indb 2 11/12/03 14:27
EN, CT, TH
1211EHHMDWJEIN
© 2011 JVC KENWOOD Corporation
Having TROUBLE with operation?
Please reset your unit
Refer to page of How to reset your unit
Covers_AV70[U].indb 2 11/12/03 14:27
Instructions MONITOR WITH DVD RECEIVER KW-AV70BT/KW-AV70
