JVC KW AVX700UN AVX706/KW AVX701/KW AVX700[UN] User Manual AVX700UN, AVX701UN, AVX706UN LVT1469 004A
KW-AVX701UN KW-AVX701UN LVT1469-004A English, Indonesian,
KW-AVX706UN KW-AVX706UN LVT1469-004A English, Indonesian,
KW-AVX700UN KW-AVX700UN (Asia) LVT1469-004A
User Manual: JVC KW-AVX700UN KW-AVX700UN, KW-AVX701UN, KW-AVX706UN English, Indonesian,
Open the PDF directly: View PDF ![]() .
.
Page Count: 107 [warning: Documents this large are best viewed by clicking the View PDF Link!]
ENGLISH
INDONESIA
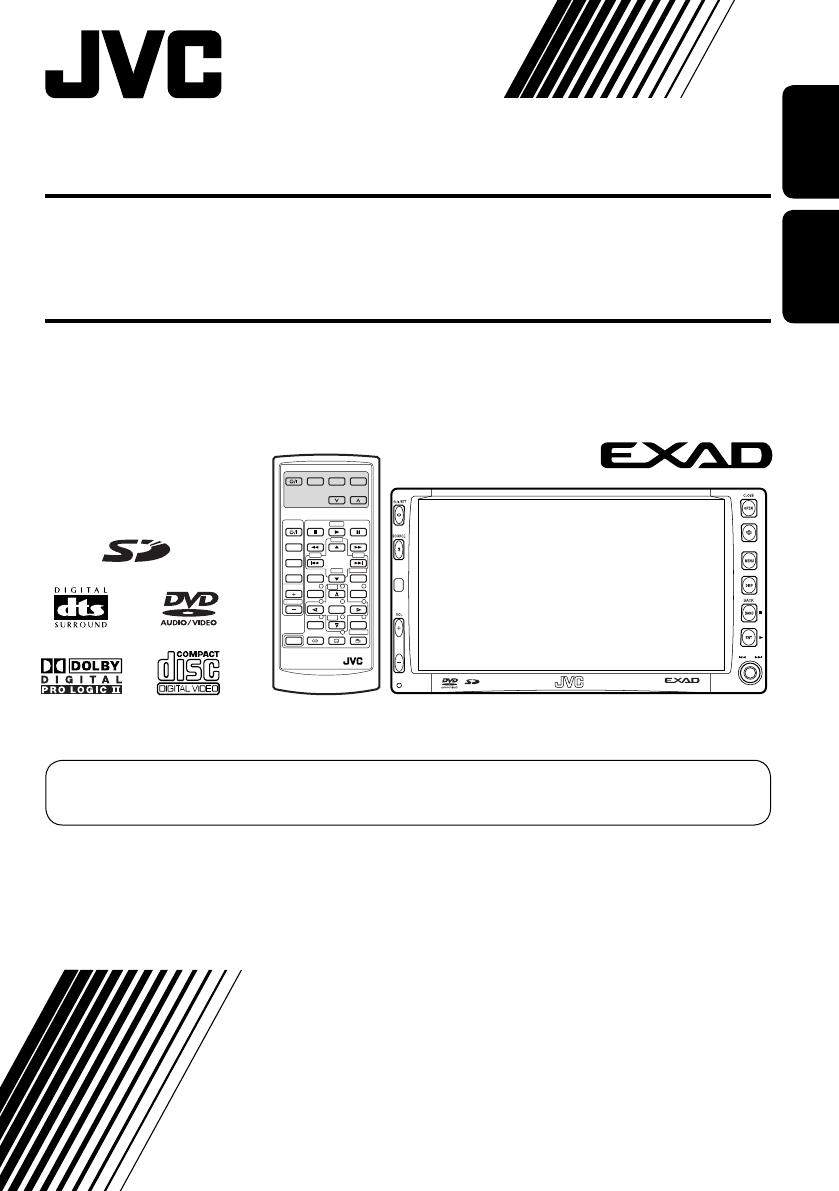
KW-AVX706/KW-AVX701/
KW-AVX700
For canceling the display demonstration, see page 5.
Untuk membatalkan tampilan demonstrasi, lihat halaman 5.
For installation and connections, refer to the separate manual.
Untuk instalasi dan penyambungan, lihat buku pedoman terpisah.
INSTRUCTIONS
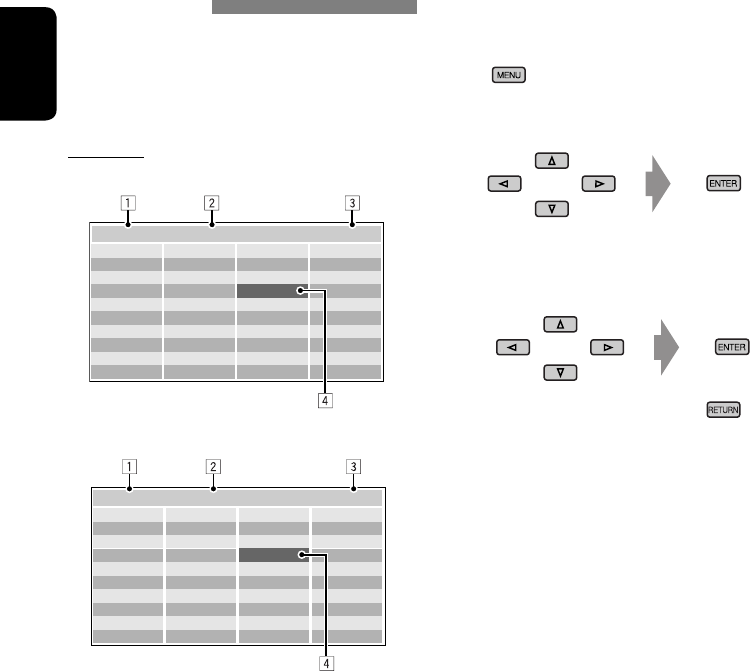
BUKU PETUNJUK
LVT1469-004A
[UN]
MODE MENU
ASPECT
ZOOM
ATT
SOURCE
DISC+
DISC–
DVD / RECEIVER CONTROL
EXTRA MONITOR CONTROL
+10
–10
123
456
78
0
9
–100
BAND
OSD
MENUTOP M
SETUP
RM-RK240
RETURN
ENTER
DUAL
SHIFT
VOL
2nd VOL
+100
DIRECT
ASPECT
ALAT PENERIMA DVD
DENGAN MONITOR
DVD RECEIVER WITH
MONITOR
KW-AVX706/KW-AVX701/
KW-AVX700
Cover_KW-AVX700U_004A.indd 2Cover_KW-AVX700U_004A.indd 2 2/21/06 4:05:44 PM2/21/06 4:05:44 PM
ENGLISH
2
How to reset your unit
• Your preset adjustments will also be erased.
For safety...
• Do not raise the volume level too much, as
this will block outside sounds, making driving
dangerous.
• Stop the car before performing any
complicated operations.
Temperature inside the car...
If you have parked the car for a long time in hot
or cold weather, wait until the temperature in
the car becomes normal before operating the
unit.
Thank you for purchasing a JVC product.
Please read all instructions carefully before operation, to ensure your complete understanding and
to obtain the best possible performance from the unit.
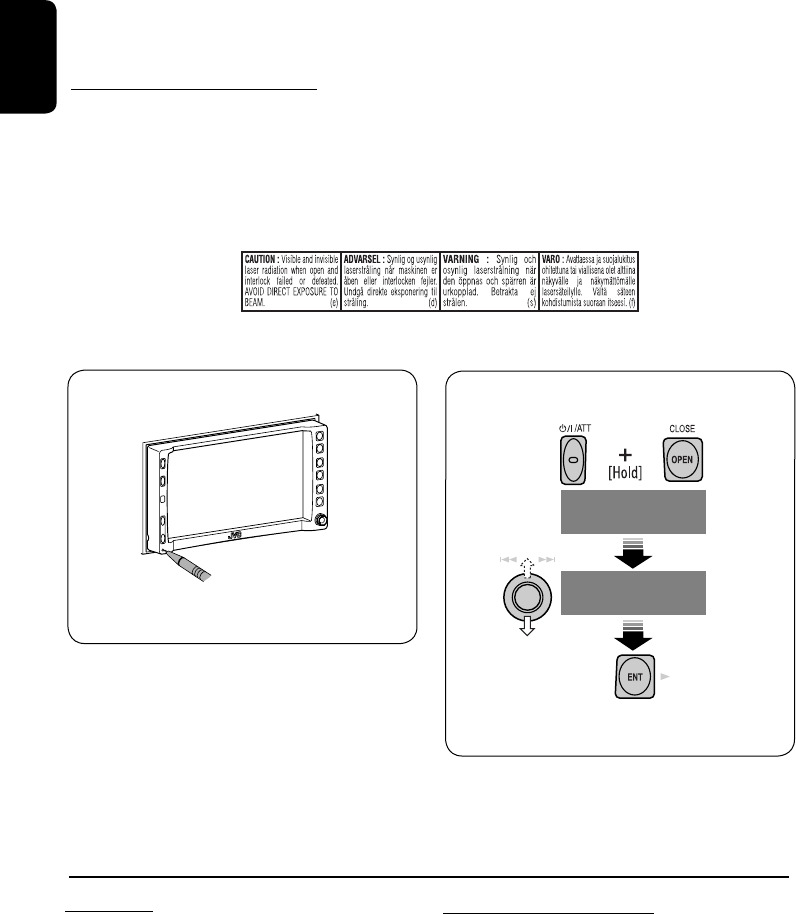
IMPORTANT FOR LASER PRODUCTS
1. CLASS 1 LASER PRODUCT
2. CAUTION: Do not open the top cover. There are no user serviceable parts inside the unit; leave
all servicing to qualified service personnel.
3. CAUTION: Visible and invisible laser radiation when open and interlock failed or defeated.
Avoid direct exposure to beam.
4. REPRODUCTION OF LABEL: CAUTION LABEL, PLACED OUTSIDE THE UNIT.
How to forcibly eject a disc
• If this does not work, reset the unit.
NO EJECT?
EMERGENCY EJECT?
NO EJECT?
EMERGENCY EJECT?
EN02-06_KW-AVX700UN_f.indd 2EN02-06_KW-AVX700UN_f.indd 2 06.2.21 9:45:33 AM06.2.21 9:45:33 AM

ENGLISH
3
WARNINGS:
To prevent accidents and damage
• DO NOT install any unit in locations where;
– it may obstruct the steering wheel and
gearshift lever operations.
– it may obstruct the operation of safety devices
such as air bags.
– it may obstruct visibility.
• DO NOT operate the unit while driving.
If you need to operate the unit while driving, be
sure to look ahead carefully.
• The driver must not watch the monitor while
driving.
CONTENTS
Introduction ............................................. 4
• Before operating the unit ............................... 5
OPERATIONS
Basic operations
• Control panel ............................................. 7
• Remote controller (RM-RK240) ......................... 8
Listening to the radio ................................ 10
Disc operations ......................................... 13
Dual Zone operations ................................ 24
SD operations ........................................... 27
EXTERNAL DEVICES
Listening to the CD changer ....................... 29
Watching TV ............................................. 31
Listening to the iPod®/D. player ................. 33
Listening to other external components ..... 34
SETTINGS
Sound equalization ................................... 35
Assigning titles to the sources .................... 36
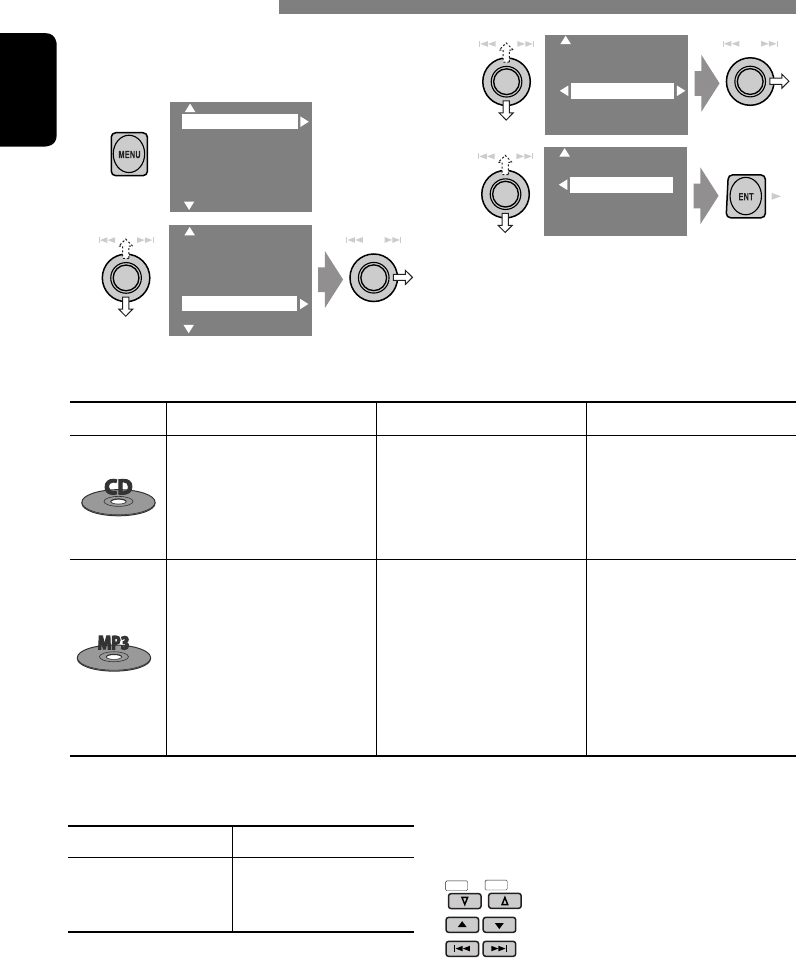
Menu operations ...................................... 37
Maintenance ............................................ 45
More about this unit ................................. 46
Troubleshooting ....................................... 49
Specifications ........................................... 52
Cautions on the monitor:
• The monitor built in this receiver has
been produced with high precision, but
it may have some ineffective dots. This is
inevitable and is not malfunction.
• Do not expose the monitor to direct
sunlight.
• Do not touch the surface of the liquid
crystal panel directly.
• When the temperature is very cold or very
hot...
– Chemical changes occur inside, causing
malfunction.
– Pictures may not appear clearly or
may move slowly. Pictures may not
be synchronized with the sound or
picture quality may decline in such
environments.
This product incorporates copyright
protection technology that is protected
by U.S. patents and other intellectual
property rights. Use of this copyright
protection technology must be authorized
by Macrovision, and is intended for home
and other limited viewing uses only unless
otherwise authorized by Macrovision.
Reverse engineering or disassembly is
prohibited.
EN02-06_KW-AVX700UN_f.indd 3EN02-06_KW-AVX700UN_f.indd 3 06.2.21 9:45:36 AM06.2.21 9:45:36 AM
ENGLISH
4
Introduction
Notice for DualDisc playback
The Non-DVD side of a “DualDisc” does
not comply with the “Compact Disc Digital
Audio” standard. Therefore, the use of Non-
DVD side of a DualDisc on this product is not
recommended.
Disc type Recording format, file type, etc. Playable
DVD DVD Video
DVD Audio
DVD-ROM
DVD Recordable/Rewritable
(DVD-R*1/-RW, +R/+RW*2)
• Compliant to UDF bridge format
• DVD-RAM cannot be played.
DVD Video
MPEG1/MPEG2
JPEG
MP3/WMA/WAV
DivX/MPEG4
DVD-VR, +VR
Dual Disc DVD side
Non-DVD side
CD/VCD Audio CD/CD Text (CD-DA), DTS-CD
VCD (Video CD)
SVCD (Super Video CD)
CD-ROM
CD-I (CD-I Ready)
CD Recordable/Rewritable
(CD-R/-RW)
• Compliant to ISO 9660 level 1,
level 2, Romeo, Joliet
CD-DA
MPEG1/MPEG2
JPEG
MP3/WMA/WAV
DivX/MPEG4
Caution on volume setting:
Discs produce very little noise compared
with other sources. Lower the volume
before playing a disc to avoid damaging
the speakers by the sudden increase of the
output level.
*1 DVD-R recorded in multi-border format is also playable (except for dual layer discs).
*2 It is possible to play back finalized +R/+RW (Video mode only) discs. However, the use of +R double layer disc is not recommended.
• “DVD Logo” is a trademark of DVD Format/Logo Licensing Corporation registered in the US, Japan and other countries.
EN02-06_KW-AVX700UN_f.indd 4EN02-06_KW-AVX700UN_f.indd 4 06.2.21 9:45:38 AM06.2.21 9:45:38 AM
ENGLISH
5
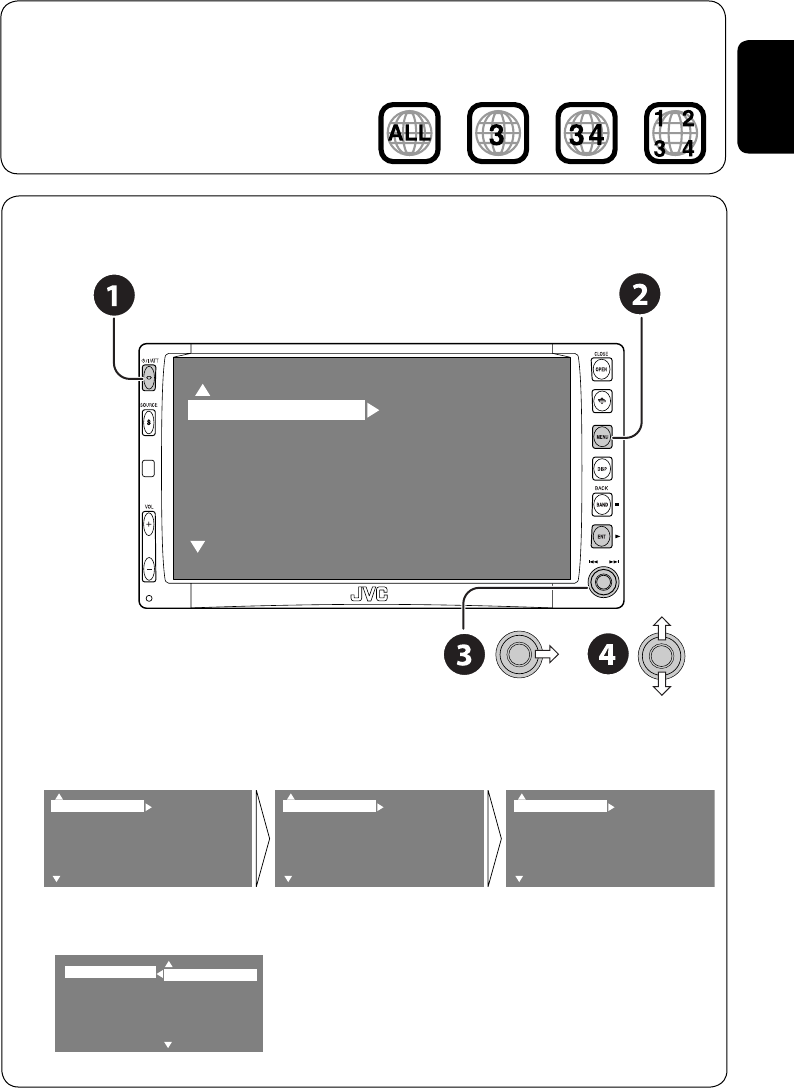
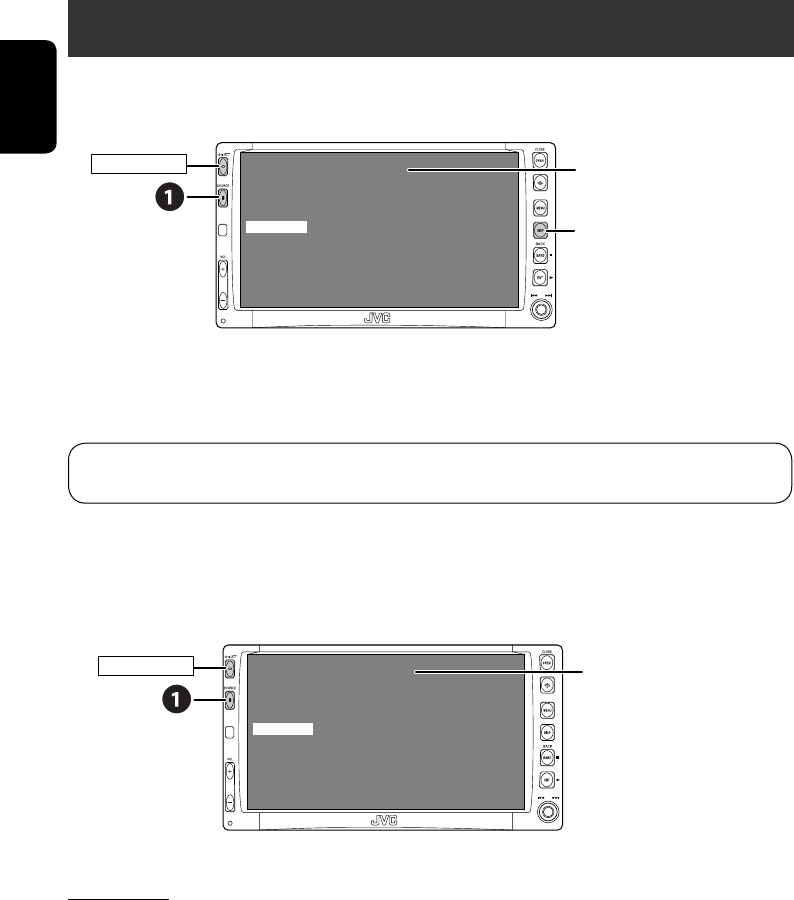
Before operating the unit—Cancel the display demonstration and set the clock
• See also page 37.
~ Turn on the power.
Ÿ Display the <MENU>.
! Select <Setup> ] <Display> ] <Demonstration>, then activate the <Demonstration>
screen.
⁄ Cancel the display demonstrations.
Select “Off.”
Note on Region Code:
DVD players and DVD Video discs have
their own Region Code numbers. This unit
can only play back DVD discs whose Region
Code numbers include “3.”
If you insert a DVD Video disc of an
incorrect Region Code
“Region Error Please Eject” appears on the
monitor.
Display
Clock
Disc Setup 1
Disc Setup 2
Tuner
Input
Display
Clock
Disc Setup 1
Disc Setup 2
Tuner
Input
Demonstration
Wall Paper
Level Meter
Scroll
Tag Display
Dimmer
Off
On
Demonstration
Wall Paper
Level Meter
Scroll
Tag Display
Dimmer
Setup
Surround
Equalizer
Sound
Mode
List
Demonstration
Wall Paper
Level Meter
Scroll
Tag Display
Dimmer
Off
On
Continued on the next page
Setup
Surround
Equalizer
Sound
Mode
List
Display
Clock
Disc Setup 1
Disc Setup 2
Tuner
Input
MENU
EN02-06_KW-AVX700UN_f.indd 5EN02-06_KW-AVX700UN_f.indd 5 06.2.21 9:45:39 AM06.2.21 9:45:39 AM
ENGLISH
6
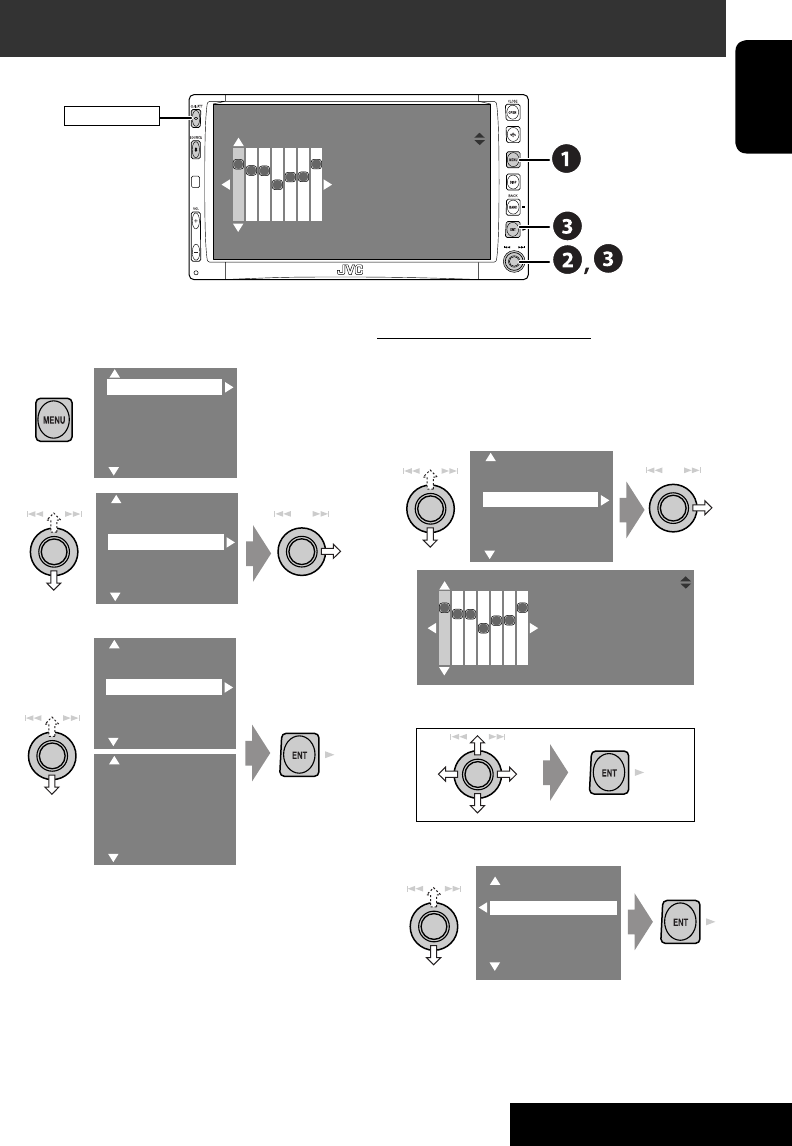
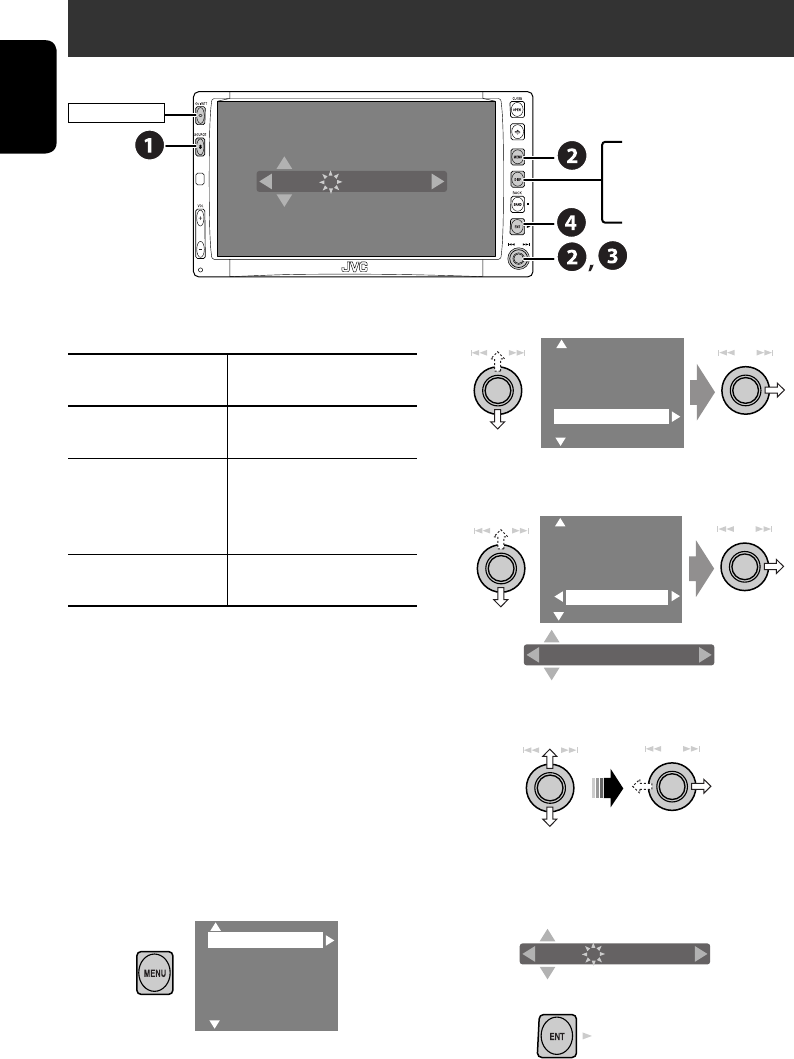
$ Return to the <Clock> menu.
› Select <12Hours/24Hours>.
% Activate the <12Hours/24Hours> screen.
fi Select either the 12-hour or 24-hour
system.
^ Finish the procedure.
@ Return to the <Setup> menu.
¤ Select <Clock> ]<Time Set>.
# Activate the <Time Set> screen.
‹ Set the clock time.
Time Set
12Hours/24Hours
1:00 AM
Time Set
12Hours/24Hours
3:45 PM
Time Set
12Hours/24Hours 12 Hours
24 Hours
Time Set
12Hours/24Hours
1:00 AM
EN02-06_KW-AVX700UN_f.indd 6EN02-06_KW-AVX700UN_f.indd 6 06.2.21 9:45:40 AM06.2.21 9:45:40 AM
ENGLISH
OPERATIONS
7
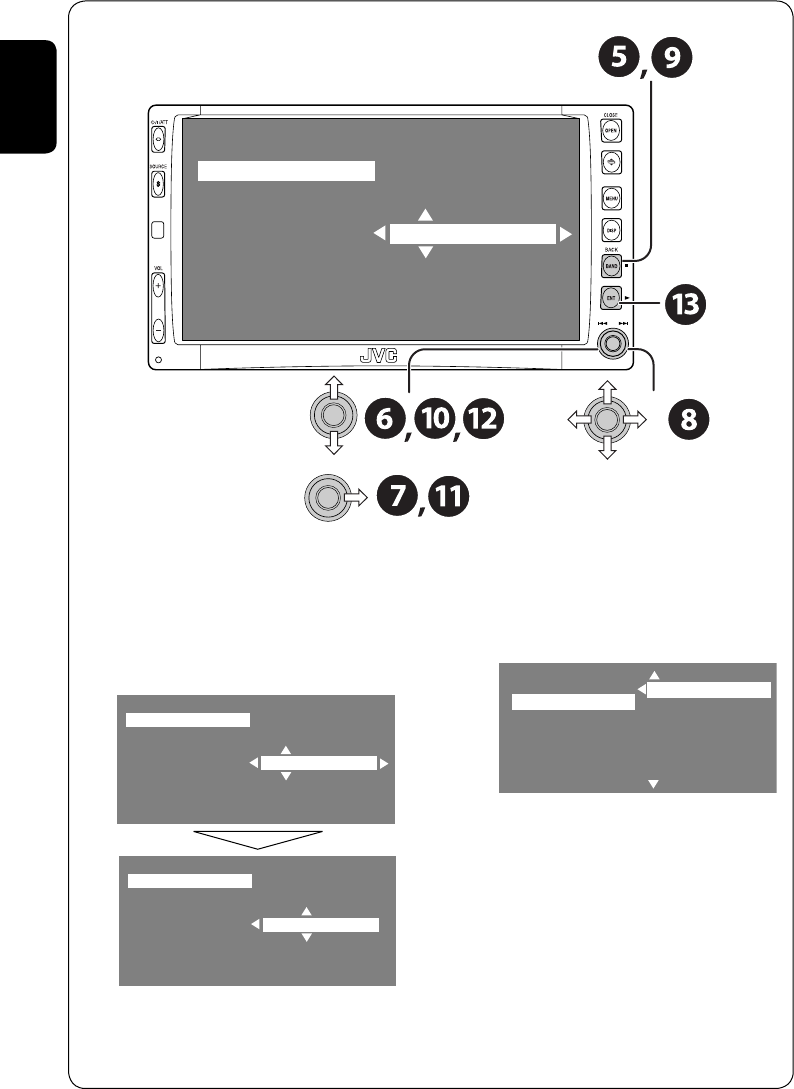
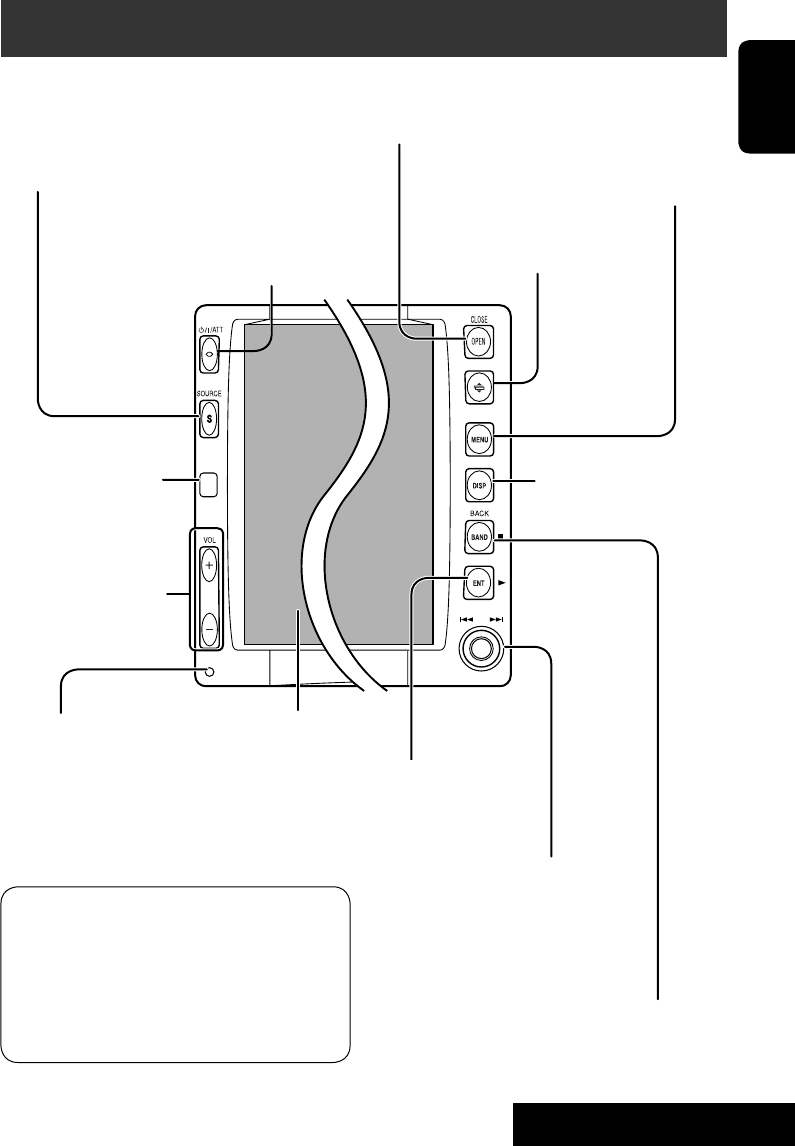
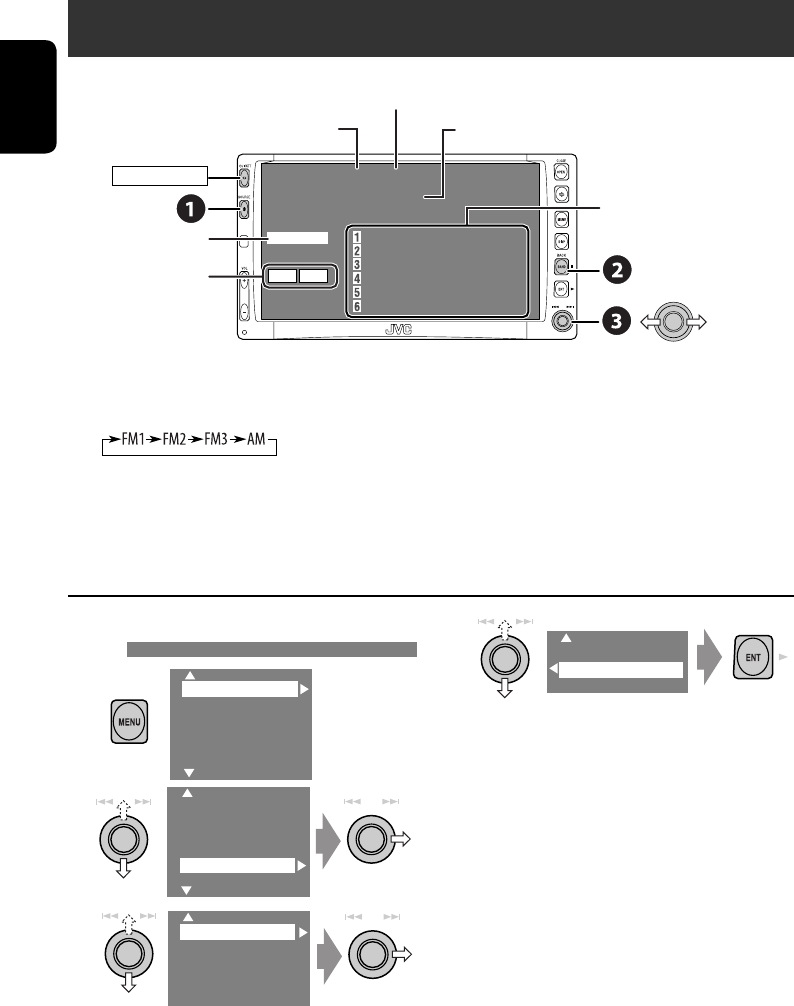
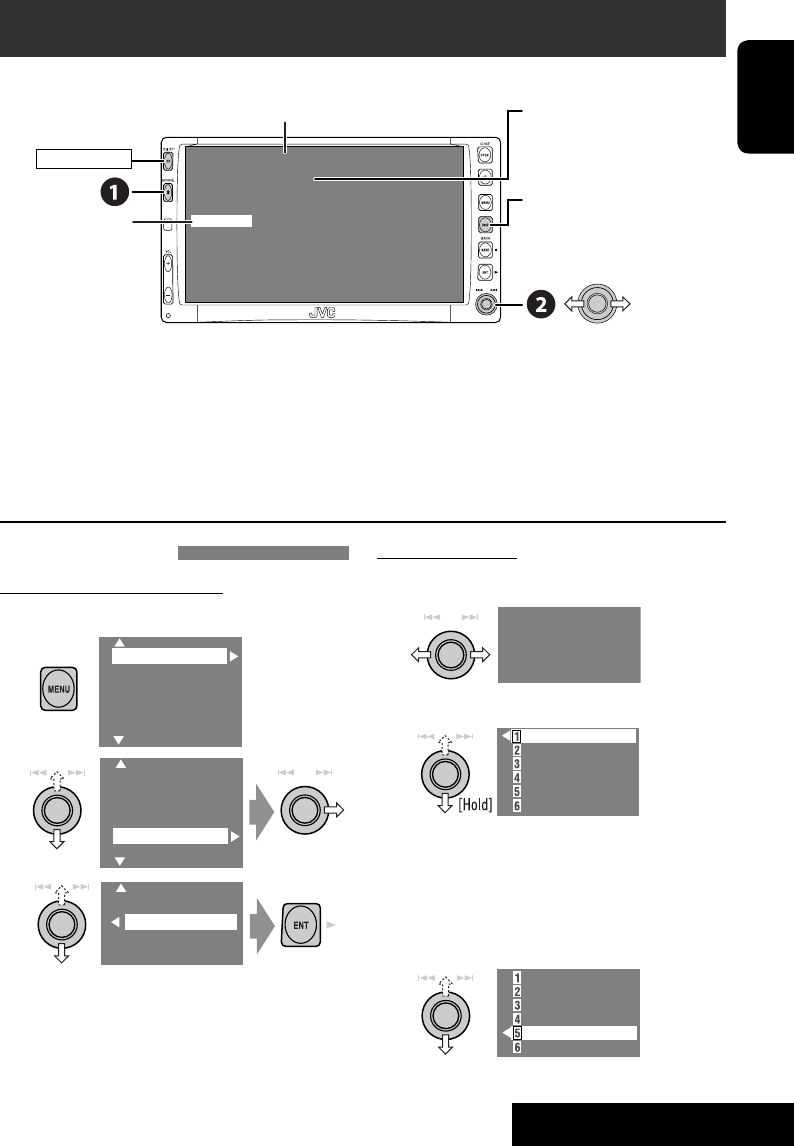
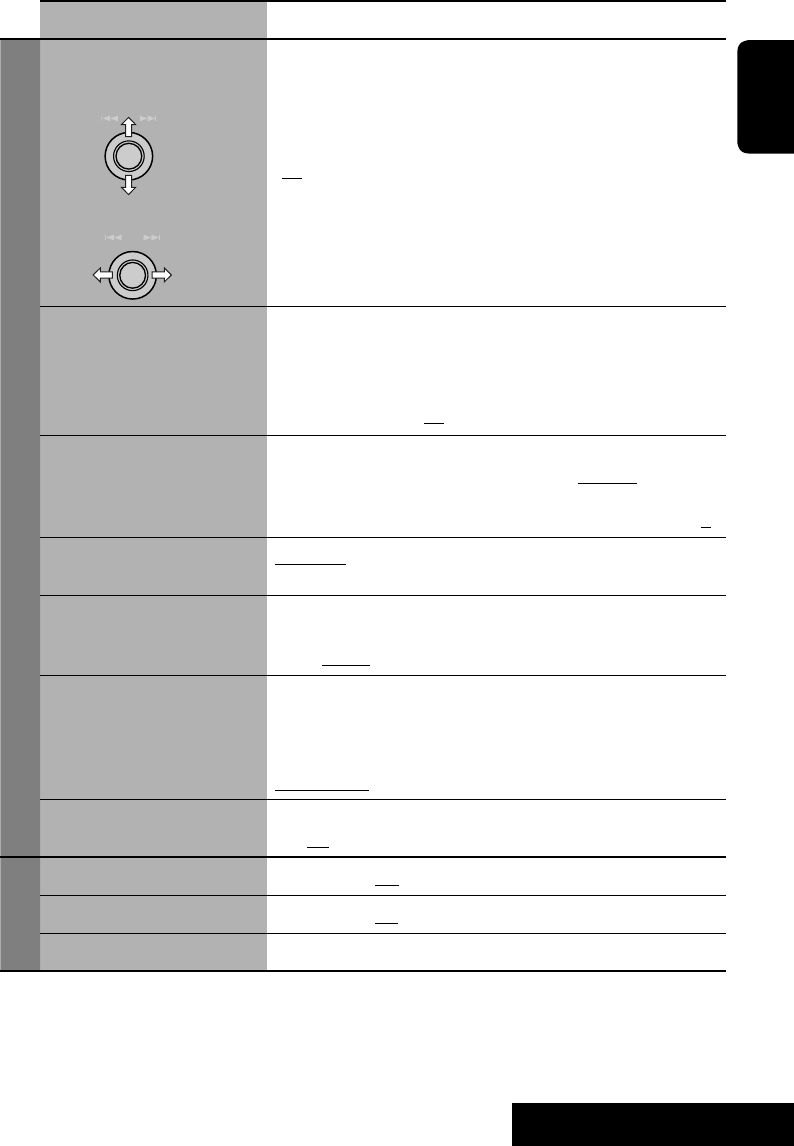
Basic operations — Control panel
• TUNER: Select the bands.
• DISC: Stop playing.
• On menus: Back.
Select the source.
TUNER = DISC (DVD/VCD/CD) = SD =CD-CH, iPod,
D.PLAYER, or EXT-IN = TV = AV-IN =(back to the beginning)
• You cannot select these sources if they are not
ready.
Display window
Open and close the monitor panel.
• When the monitor panel is open, you can
insert a disc and an SD card.
*1 <MENU> screens
You can use the menus to set up various
settings.
The <MENU> screen consists of the
following sub-menus—Setup/Surround/
Equalizer/Sound/Mode/List/DualZone.
• For details, see pages 37 to 44.
• Turn on the power.
• Turn off the power [Hold].
• Attenuate the sound (if the power is on).
Change the display
information.
• TUNER: Search for stations.
• DISC: Select chapters/tracks.
• On menus: Select items.
• iPod/D.PLAYER: Select tracks.
• TV: Select TV stations.
Change the monitor panel angle.
Remote sensor
Adjust the volume.
Reset the unit.
• Use only when the internal
system malfunctions.
Display or erase <MENU>*1.
• DISC: Start playing.
• On menus: Enter.
EN07-12_KW-AVX700UN_f.indd 7EN07-12_KW-AVX700UN_f.indd 7 06.2.21 9:52:48 AM06.2.21 9:52:48 AM
8
ENGLISH
MONITOR CONTROL
1 Monitor control buttons
• Used for a JVC monitor—KV-MR9010,
or KV-MH6510.
DVD/RECEIVER CONTROL
2 • Turns on the power.
• Attenuates the sound if the power is on.
• Turns off the power if pressed and held
(while the power is on).
3 Selects the source.
4 Selects the FM/AM bands.
5 Changes the aspect ratio of the playback
pictures.
6 Activates or deactivates Dual Zone.
7 Adjusts the volume level.
• Also functions as 2nd VOL button when
pressed with SHIFT button (☞ page 24)
.
8*1 • DVD: Shows the disc menu.
• VCD: Resumes PBC playback
(☞page 19).
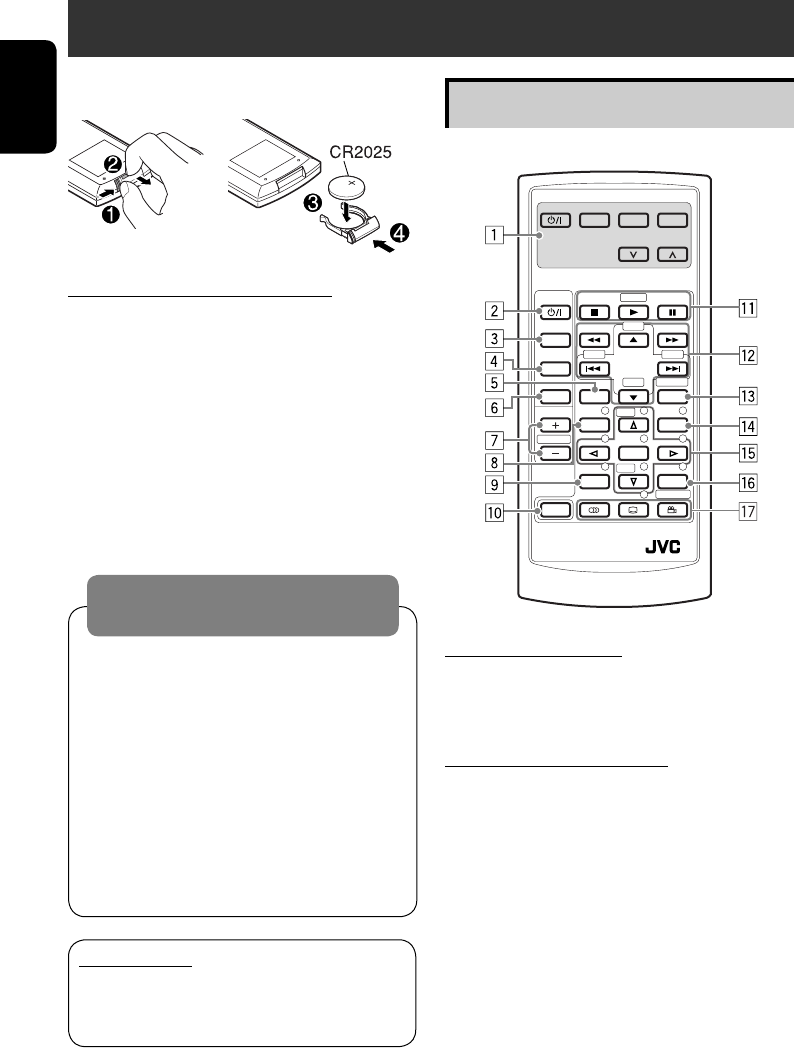
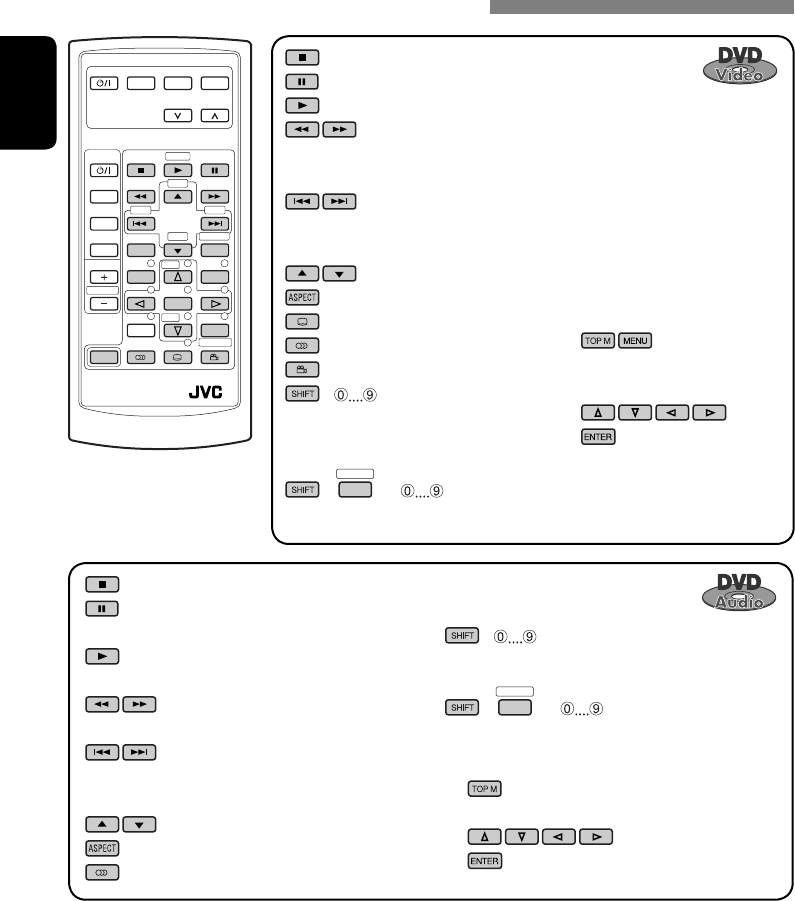
Basic operations — Remote controller (RM-RK240)
Installing the lithium coin battery (CR2025)
Before using the remote controller:
• Aim the remote controller directly at the
remote sensor on the unit.
• DO NOT expose the remote sensor to bright
light (direct sunlight or artificial lighting).
Warning:
To prevent accidents and damage
• Do not install any battery other than
CR2025 or its equivalent.
• Store the battery in a place where children
cannot reach.
• Do not recharge, short, disassemble, or
heat the battery or dispose of it in a fire.
• Do not leave the battery with other
metallic materials.
• Do not poke the battery with tweezers or
similar tools.
• Wrap the battery with tape and insulate
when throwing away or saving it.
IMPORTANT:
If Dual Zone is activated (☞ page 24),
the remote controller functions only for
operating the DVD/CD player.
Main elements and features
MODE MENU
ASPECT
ZOOM
ATT
SOURCE
DISC+
DISC–
DVD / RECEIVER CONTROL
EXTRA MONITOR CONTROL
+10
–10
123
456
78
0
9
–100
BAND
OSD
MENUTOP M
SETUP
RM-RK240
RETURN
ENTER
DUAL
SHIFT
VOL
2nd VOL
+100
DIRECT
ASPECT
SURROUND
EN07-12_KW-AVX700UN_f.indd 8EN07-12_KW-AVX700UN_f.indd 8 06.2.21 9:52:53 AM06.2.21 9:52:53 AM
ENGLISH
OPERATIONS
9
9*1 Not used as SETUP button for this
receiver.
p SHIFT button
q 7 (stop), 3 (play), 8 (pause)
• 3 (play) also function as ZOOM button
when pressed with SHIFT button (☞
page 20).
•
Not applicable for CD changer operations.
w*2 For advanced disc operations:
• 5 / ∞
DVD: Selects the titles.
Other discs except CD: Selects the
folders.
• 4 / ¢: reverse skip/forward skip
• 1 / ¡: reverse search/forward
search
For FM/AM/TV tuner operations:
• 5 / ∞:
Changes the preset stations.
• 4 / ¢:
– Functions to search for stations.
Press briefly: auto search
Press and hold: manual search
For Apple iPod®/JVC D. player
operations:
• ∞: Pauses/stops or resumes playback.
• 5: Enters the main menu (then
5/∞/4 / ¢ work as the menu
selecting buttons).*3
• 4 / ¢ (in menu selecting mode)
– Selects an item if pressed briefly. (Then,
press ∞ to confirm the selection.)
– Skips 10 items at a time if pressed and
held.
e Shows the on-screen bar.
• Also functions as DIRECT button when
pressed with SHIFT button (☞ pages 18
to 20).
r*1 • DVD: Shows the disc menu.
• VCD: Resumes PBC playback
(☞page 19).
t*1 • Makes selection/settings.
• ~: Skips back or forward by 5 minutes
for MPEG.
• DISC +/– buttons: Changes discs for
“CD-CH.”
y*1 RETURN button
u • DVD: Selects audio language
(), subtitles ( ), angle ( ).
• VCD: Selects audio channel ( ).
•
(angle) also functions as
SURROUND button when pressed with
SHIFT button (☞page 21).
*1 Functions as number buttons when pressed
with SHIFT button.
– TUNER: Selects preset station.
– DISC: Selects chapter/title/group/folder/
track.
*2 Functions as +10/–10/+100/–100 buttons
when pressed with SHIFT button.
*3 5 : Returns to the previous menu.
∞ : Confirms the selection.
How to select a number
To select a number from 0 – 9:
To select a number greater than 9:
• +100/–100 buttons used only for searching
for tracks whose number is greater than 99.
EN07-12_KW-AVX700UN_f.indd 9EN07-12_KW-AVX700UN_f.indd 9 06.2.21 9:52:54 AM06.2.21 9:52:54 AM
10
ENGLISH
FM1 P1
ABC Radio
87.5 MHz
TUNER
3: 45 PM
FLAT
POWER]ON
87.5 MHz ABC Radio
88.3 MHz DEF FM
88.7 MHz GHI Radio
91.5 MHz JVC FM
93.1 MHz JKL Radio
95.3 MHz MNO FM
MO LO
When an FM stereo broadcast is hard to
receive
1
2
3
Listening to the radio
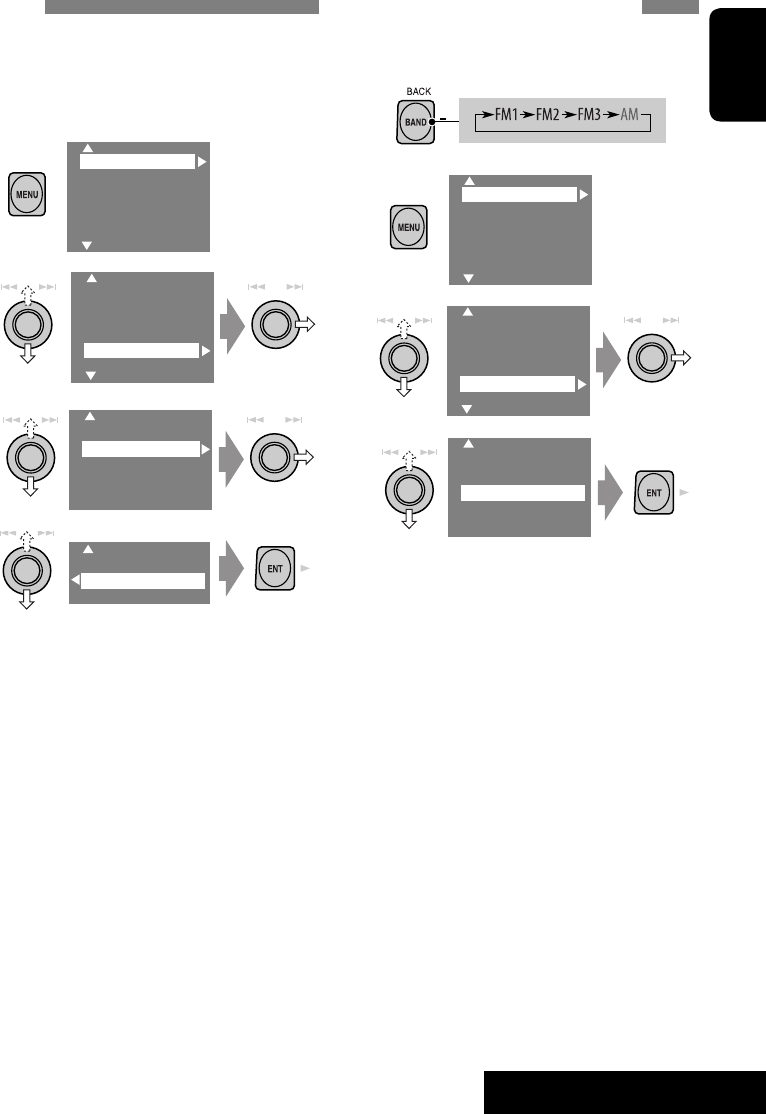
~ Select “TUNER.”
Ÿ Select the bands.
! Search for a station—Auto Search.
• Manual Search: Hold either to left or right until “Manual Search” appears on the display, then
push it repeatedly.
• The ST indicator lights up when receiving an FM stereo broadcast with sufficient signal
strength.
4
Reception improves, but stereo effect will be
lost.
• The MO indicator lights up.
To restore stereo effect, select “Off” in step 4.
Assigned station name. If no name is assigned,
“NO NAME” appears.
Preset No.
Band
☞ page 35.
Tuner indicators
Setup
Surround
Equalizer
Sound
Mode
List
Setup
Surround
Equalizer
Sound
Mode
List
Off
On
Preset list—frequency/
assigned station names
Mono
DX/Local
SSM
Title Entry
EN07-12_KW-AVX700UN_f.indd 10EN07-12_KW-AVX700UN_f.indd 10 06.2.21 9:52:57 AM06.2.21 9:52:57 AM
ENGLISH
OPERATIONS
11
FM station automatic presetting —SSM
(Strong-station Sequential Memory)
This function works only for FM bands.
You can preset six stations for each band.
1
2
3
4
Local FM stations with the strongest signals
are searched and stored automatically in the
FM band.
Tuning in to stations with sufficient signal
strength
This function works only for FM bands.
Once you have activated this function (selected
“Local”), it always works when searching for FM
stations.
1
2
3
4
Only stations with sufficient signal strength
will be detected.
• The DX indicator goes off, then the LO
indicator lights up.
Mono
DX/Local
SSM
Title Entry
Setup
Surround
Equalizer
Sound
Mode
List
Setup
Surround
Equalizer
Sound
Mode
List
DX
Local
Setup
Surround
Equalizer
Sound
Mode
List
Setup
Surround
Equalizer
Sound
Mode
List
Mono
DX/Local
SSM
Title Entry
EN07-12_KW-AVX700UN_f.indd 11EN07-12_KW-AVX700UN_f.indd 11 06.2.21 9:52:59 AM06.2.21 9:52:59 AM
12
ENGLISH
Selecting preset stations
On the remote:
1
2
or
On the unit:
1
2
• Preset List can also be accessed through
<MENU> = <List>.
Setup
Surround
Equalizer
Sound
Mode
List
Setup
Surround
Equalizer
Mode
List
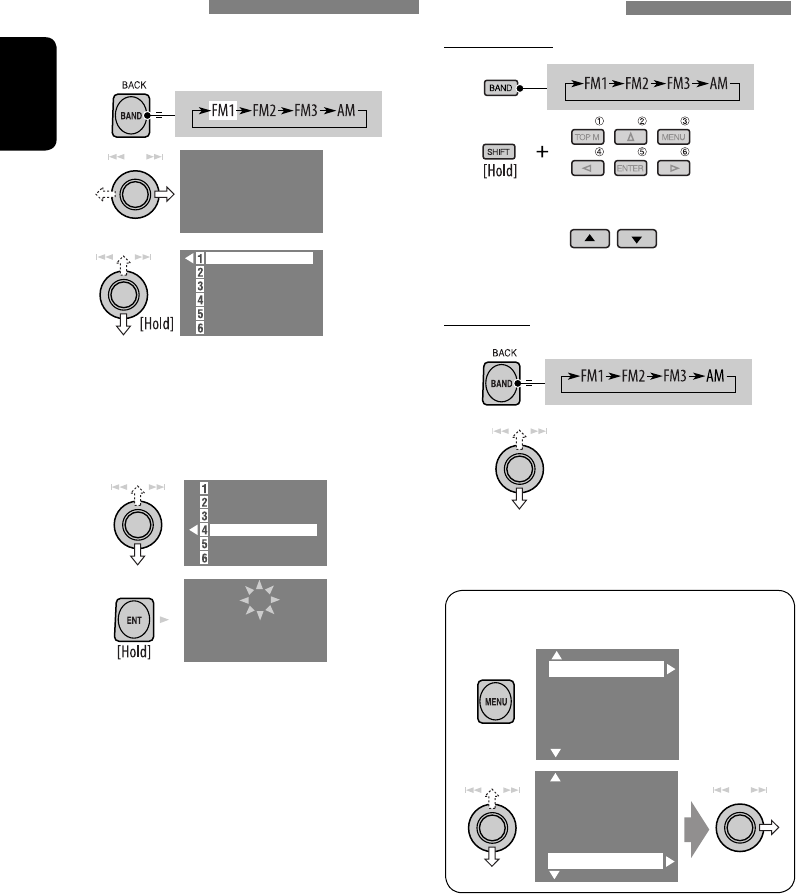
Manual presetting
Ex.: Storing FM station of 92.5 MHz into preset
number 4 of the FM1 band.
1
2
3
• Each time you keep pushing up or down
the knob, you can change the FM bands.
• Preset List can also be accessed through
<MENU> = <List> (☞ right).
4 Select a preset number.
5
87.5 MHZ
88.3 MHz
88.7 MHz
91.5 MHz
93.1 MHz
95.3 MHz
FM1
NO NAME
92.5 MHz
FM1 P4
NO NAME
92.5 MHz
87.5 MHZ
88.3 MHz
88.7 MHz
91.5 MHz
93.1 MHz
95.3 MHz
EN07-12_KW-AVX700UN_f.indd 12EN07-12_KW-AVX700UN_f.indd 12 06.2.21 9:53:01 AM06.2.21 9:53:01 AM
ENGLISH
OPERATIONS
13
Disc operations
The disc type is automatically detected, and playback starts automatically (for some discs: automatic
start depends on its internal program).
If a disc does not have any disc menu, all tracks in it will be played repeatedly until you change the
source or eject the disc.
If “ ” appears on the monitor, the unit cannot accept the operation you have tried to do.
• In some cases, without showing “ ,” operations will not be accepted.
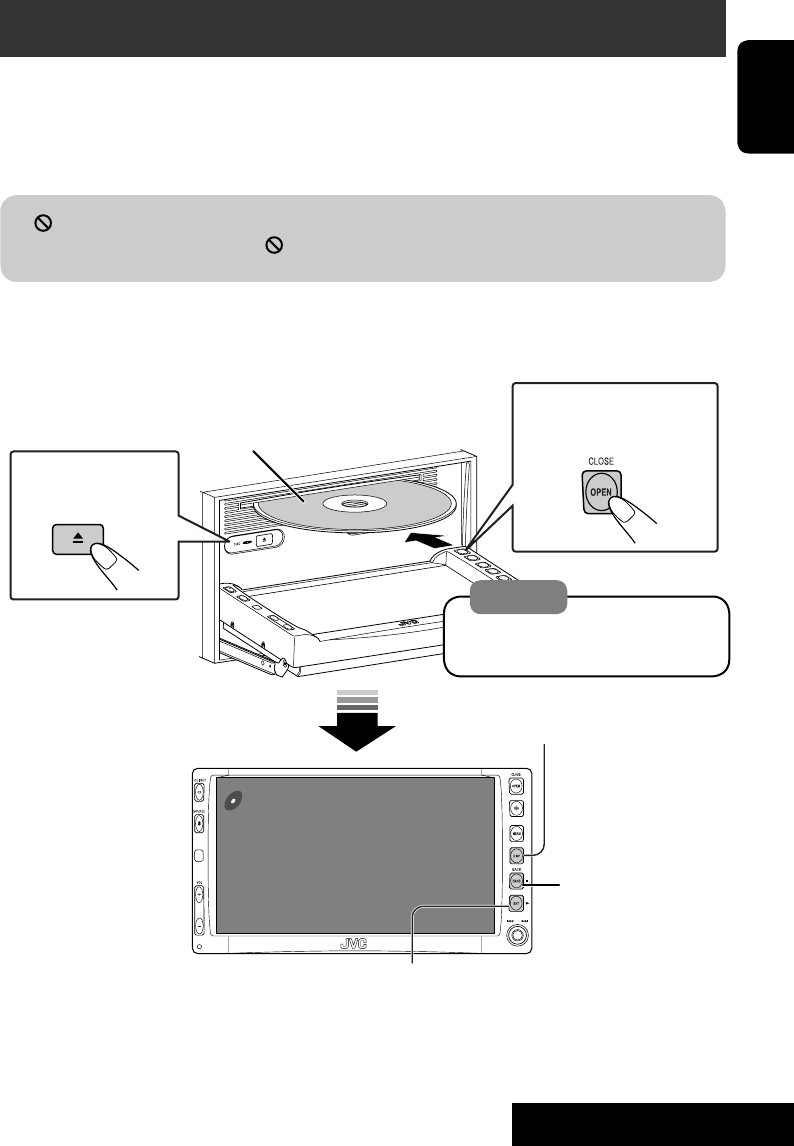
Now Reading...
DISC
3: 45 PM
Label side
To open/close the
monitor panel
To eject the disc
3: Start playback if necessary.
(For DVD: 10-second review if pressed during play.)
DISP: Press if no playback picture appears , but disc
information (☞ pages 14 and 15) screen is displayed.
Open the monitor panel and insert the disc.
Playback starts automatically.
7: Stop.
Caution:
Do not place your finger behind the
monitor panel.
EN13-28_KW-AVX700UN_f.indd 13EN13-28_KW-AVX700UN_f.indd 13 06.2.21 9:53:39 AM06.2.21 9:53:39 AM
14
ENGLISH
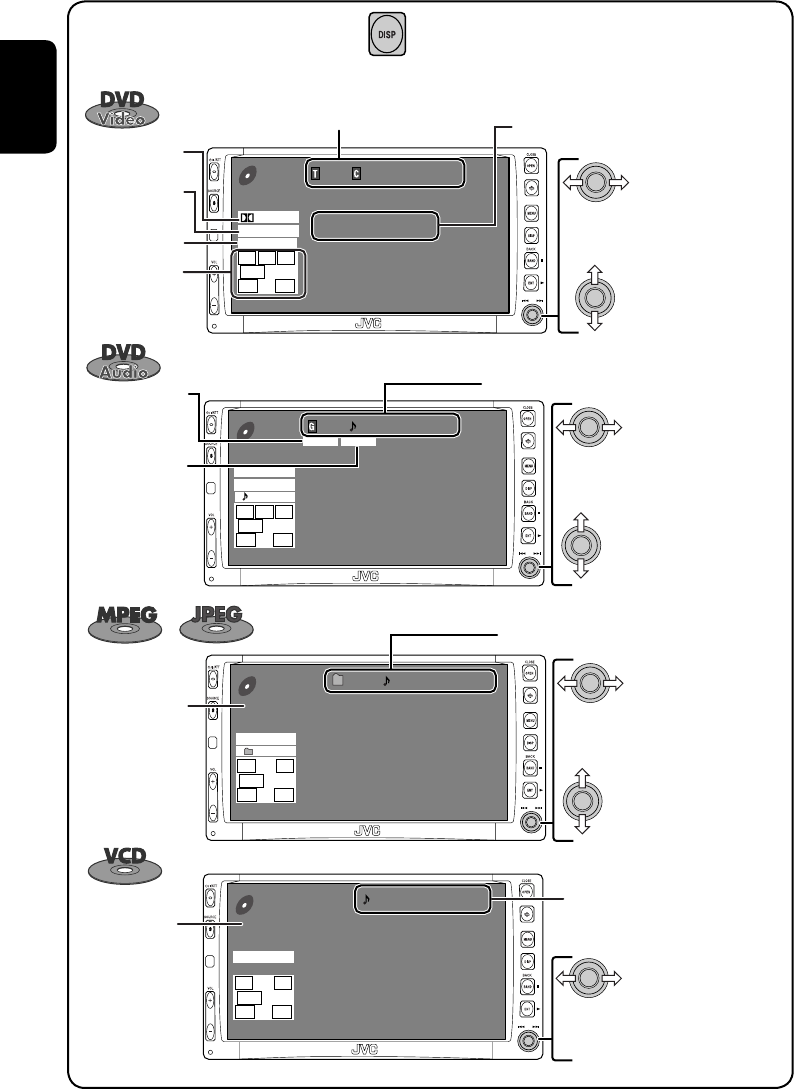
While playing the following discs, press .
01 01 0:00:12
48kHz 24Bit 3/2.1
DVD
VIDEO
MULTI
L C R
SW LFE
LS RS
DIGITAL
CHAP.RPT
3: 45 PM
Press: Select chapter
Hold: Reverse/forward search*1
Surround/
sound mode
Audio format
Title no./Chapter no./Play time Sampling frequency/Bit rate/Recorded
signal channels
Press: Select track
Hold: Reverse/forward search*1
Playback mode
Group no./Track no./Play time
01 01 0:00:12
96kHz 24Bit 3/2.1
DVD
AUDIO
3: 45 PM
MULTI
L C R
SW LFE
LS RS
PPCM
BONUS B.S.P
REPEAT
Press: Select track
Hold: For MPEG: Reverse/forward
search*2
01 01 0:00:12
Current folder Name
Current file name.mpg
Next file name.mpg
Next file name.mpg
Next file name.mpg
Next file name.mpg
Next file name.mpg
Next file name.mpg
CD
MPEG
3: 45 PM
FLAT
REPEAT
L R
SW
LS RS
Press: Select folder
Hold: Display Folder List
Disc type
• Each time you press the button, playback
picture and disc information screens
(with/without level meter) appear in turn.
01 0:00:12
VCD
PBC
3: 45 PM
FLAT
L R
SW
LS RS Press: Select track
Hold: Reverse/forward search*1
Track no./Play time
Press: Select group
Speaker/signal
indicators
(☞ page 46) Press: Select title
PBC indicator
lights up when
PBC is in use.
BONUS indicator
(☞ page 20)
B.S.P. indicator
(☞ page 20)
For MPEG: Folder no./Track no./Play time
For JPEG: Folder no./Track no.
EN13-28_KW-AVX700UN_f.indd 14EN13-28_KW-AVX700UN_f.indd 14 06.2.21 9:53:43 AM06.2.21 9:53:43 AM
ENGLISH
OPERATIONS
15
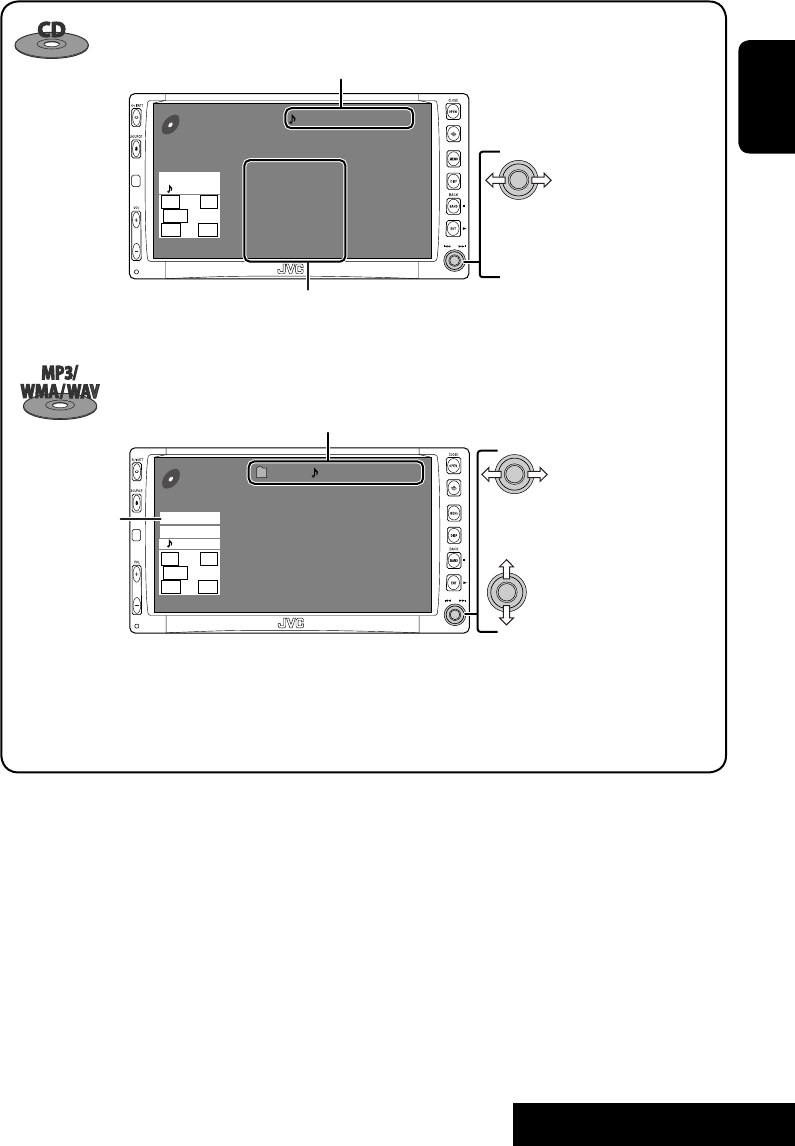
Track no./Play time
Next track list (only for CD Text)
01 0:00:12
Disc Title
Current track Title
Next track title
Next track title
Next track title
Next track title
Next track title
Next track title
CD
3: 45 PM
FLAT
L R
SW
LS RS
REPEAT
• “NO NAME” appears if no title is assigned
or recorded.
Folder no./Track no./Play time
01 01 0:00:12
Current folder Name
Current file name.mp3
Next file name.mp3
Next file name.mp3
Next file name.mp3
Next file name.mp3
Next file name.mp3
Next file name.mp3
CD
FLAT
MP3
REPEAT
3: 45 PM
L R
SW
LS RS
• Tag data will be shown instead of folder/
file names when they are recorded (with
“Tag Display” set to “On” ☞ page 38).
Press: Select track
Hold: Reverse/forward search*1
Press: Select track
Hold: Reverse/forward search*1
Press: Select folder
Hold: Display Folder List
Audio format
(MP3/WMA/WAV)
*1 Search speed: x2 ] x10.
*2 Search speed: ¡1 ] ¡2.
• Microsoft and Windows Media are either registered
trademarks or trademarks of Microsoft Corporation in the
United States and/or other countries.
EN13-28_KW-AVX700UN_f.indd 15EN13-28_KW-AVX700UN_f.indd 15 06.2.21 9:53:45 AM06.2.21 9:53:45 AM
16
ENGLISH
You can use only one of the following playback
modes—Intro/Repeat/Random.
Ex. To select Track Repeat
1
2
3
4
When one of the playback modes is
selected, the corresponding indicator lights
up on the disc information screen.
To cancel, select “Off” in step 3 or 4.
Selecting playback modes
Setup
Surround
Equalizer
Sound
Mode
List
Setup
Surround
Equalizer
Sound
Mode
List
Off
Intro
Repeat
Random
Disc type Intro Repeat Random
—
Chapter: Repeats current
chapter
Title: Repeats current title
—
—Track: Repeats current track —
Track: Plays the first 15
seconds of each track (for
VCD: PBC not in use)
Track: Repeats current track
(for VCD: PBC not in use)
Disc: Randomly plays all tracks
(for VCD: PBC not in use)
Track: Plays the first 15
seconds of each track
Folder: Plays the first 15
seconds of the first track of
each folder
Track: Repeats current track
Folder: Repeats all tracks of the
current folder
Folder: Randomly plays all
tracks of current folder,
then tracks of next folders
Disc: Randomly plays all tracks
—Track: Repeats current track
Folder: Repeats current folder —
—Folder: Repeats current folder —
Off
Track
Folder
EN13-28_KW-AVX700UN_f.indd 16EN13-28_KW-AVX700UN_f.indd 16 06.2.21 9:53:46 AM06.2.21 9:53:46 AM
ENGLISH
OPERATIONS
17
Selecting tracks on the list
If a disc includes folders, you can display the
Folder/Track Lists, then start playback.
1
Folder List with the current
Track List on the right column
appears.
2 Select a folder, then activate the Track
List.
3 Select a track, and start playing.
• Preset List can also be accessed through
<MENU> = <List>.
Setup
Surround
Equalizer
Sound
Mode
List
Setup
Surround
Equalizer
Mode
List
Track001.mp3
Track002.mp3
Track003.mp3
Track004.mp3
Track005.mp3
Track006.mp3
My Best
Cinema
My Best 2
Pops
Favorite Songs
Easy Listenings
My Best
Cinema
My Best 2
Pops
Favorite Songs
Easy Listenings
Song015.mp3
Song016.mp3
Song017.mp3
Song018.mp3
Song019.mp3
Song020.mp3
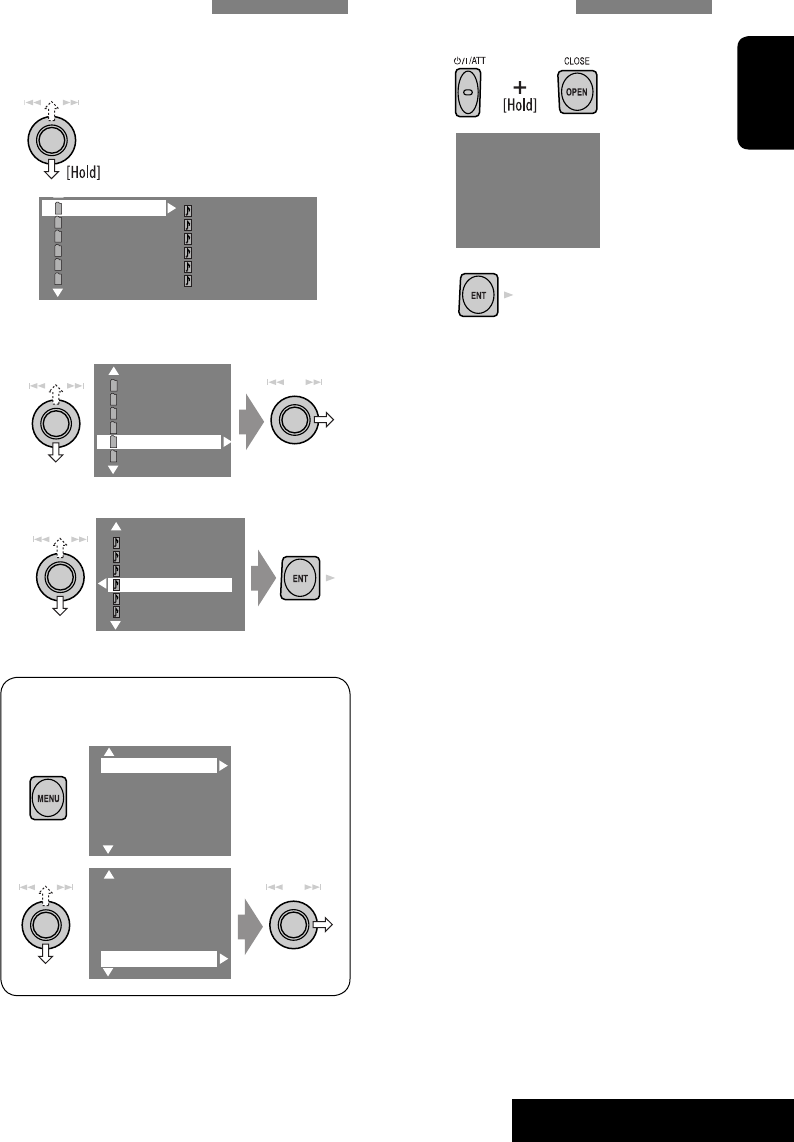
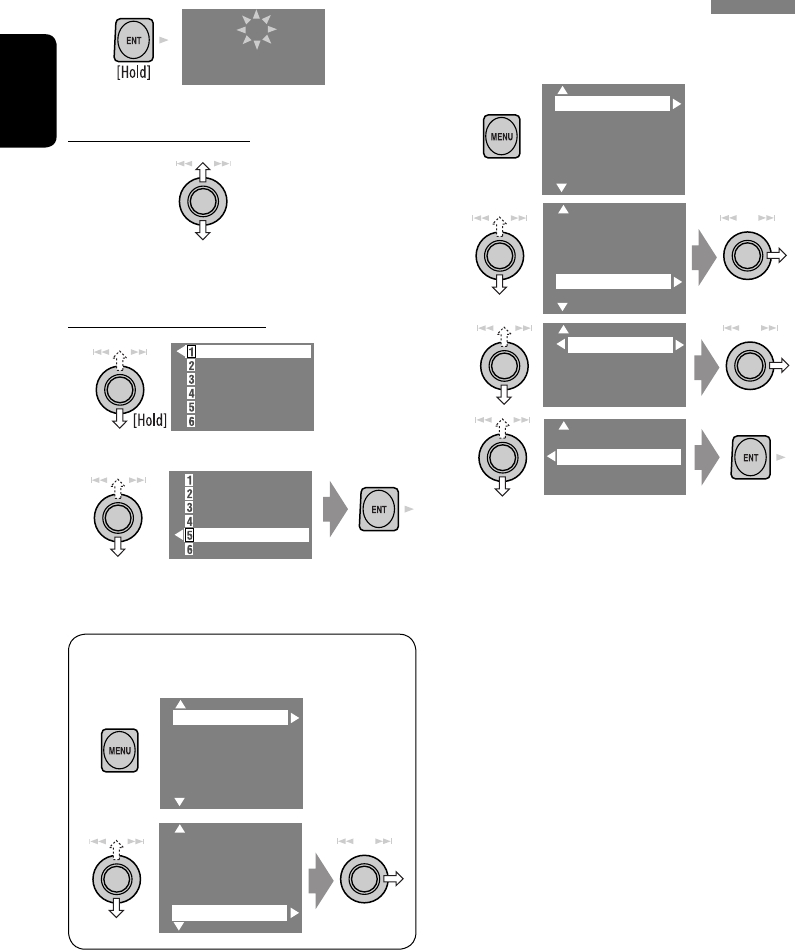
Prohibiting disc ejection
You can lock a disc in the loading slot.
1
2
“No Eject” appears.
To cancel the prohibition, repeat the same
procedure to select “EJECT OK”.
NO EJECT?
EMERGENCY EJECT?
EN13-28_KW-AVX700UN_f.indd 17EN13-28_KW-AVX700UN_f.indd 17 06.2.21 9:53:49 AM06.2.21 9:53:49 AM
18
ENGLISH
Operations using the remote controller—RM-RK240
: Stop play.
: Pause (Frame by frame playback if pressed during pause).
: Start play (10-second review if pressed during play).
:
Reverse/forward search*1 (No sound can be heard.)
(Slow motion*2 during pause. No sound can be heard.)
:
Press: Select chapter (during play or pause).
Hold: Reverse/forward search*3
: Select title.
: Select aspect ratio.
: Select subtitle language.
: Select audio language.
: Select view angle.
+ :
Select chapter (during play or pause).
Select title (when not playing).
+( OSD
DIRECT
= ):
Select title directly.
MODE MENU
ASPECT
ZOOM
ATT
SOURCE
DISC+
DISC–
DVD / RECEIVER CONTROL
EXTRA MONITOR CONTROL
+10
–10
123
456
78
0
9
–100
BAND
OSD
MENUTOP M
SETUP
RM-RK240
RETURN
ENTER
DUAL
SHIFT
VOL
2nd VOL
+100
DIRECT
ASPECT
SURROUND
: Stop play.
: Pause (Frame by frame playback if pressed
while pausing moving pictures).
: Start play (10-second review if pressed while
playing moving pictures).
:
Reverse/forward search*1.
:
Press: Select track.
Hold: Reverse/forward search*3.
: Select group.
: Select aspect ratio.
: Select audio language.
+ :
Select track.
+( OSD
DIRECT
= ):
Select group directly.
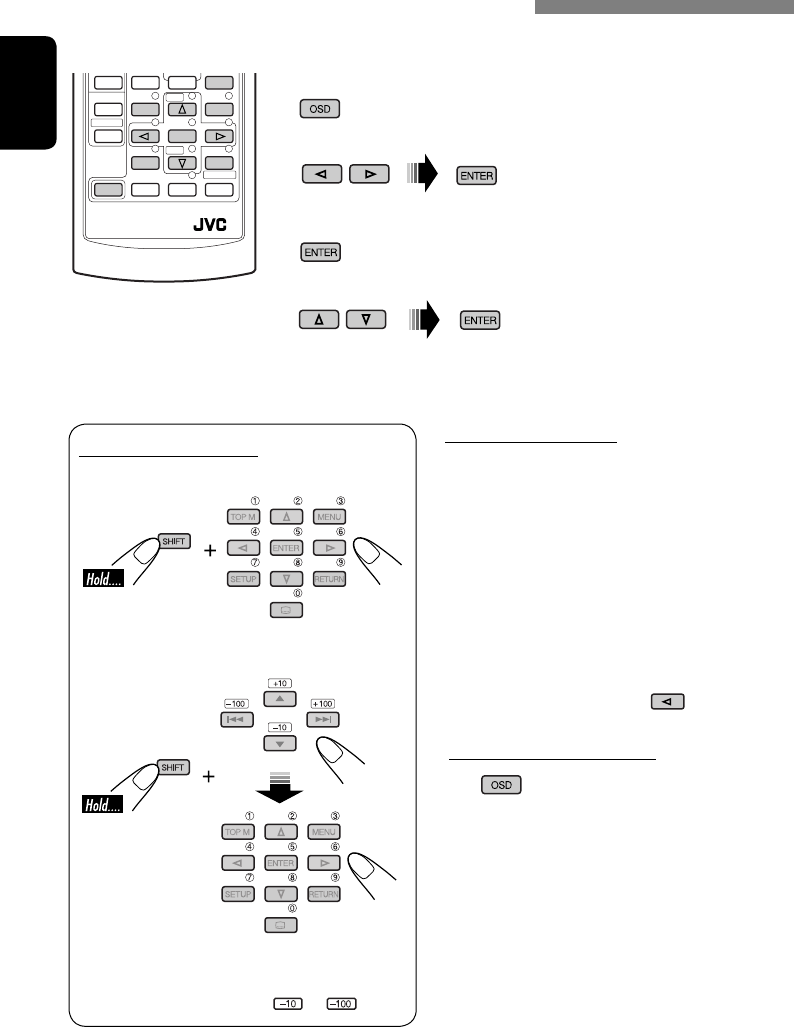
Using menu driven features...
1
2 Select an item you want to start play.
3
*1 Search speed: x2 ] x5 ] x10 ] x20 ] x60
*2 Slow motion speed: 1/32 ] 1/16 ] 1/8 ] 1/4 ] 1/2
*3 Search speed: x2 ] x10
• To select a number, see also
“How to select a number” on
page 9.
Using menu driven features...
1
2 Select an item you want to start
play.
3
EN13-28_KW-AVX700UN_f.indd 18EN13-28_KW-AVX700UN_f.indd 18 06.2.21 9:53:51 AM06.2.21 9:53:51 AM
ENGLISH
OPERATIONS
19
+ :
Select track.
During PBC playback...
+ : Select an item on the menu.
To return to the previous menus, press .
To cancel PBC playback
1
2 While holding , press to start the
desired track.
• To resume PBC, press / .
: Stop play.
: Pause (Frame by frame playback if pressed
during pause).
: Start play.
:
Reverse/forward search*1 (Forward slow
motion*2 during pause. No sound can be
heard.)
• Reverse slow motion does not work.
:
Press: Select track.
Hold: Reverse/forward search*3 (No sound
can be heard.)
: Select aspect ratio.
: Select audio channel (ST: stereo, L: left,
R: Right).
: Stop play.
: Pause (Frame by frame playback if pressed
during pause).
: Start play.
: Reverse/forward search*4. (No sound can
be heard.)
: Press: Select track.
Hold: Reverse/forward search*5. (No
sound can be heard.)
: Select folder.
: Select aspect ratio.
+ :
Select track (within the same folder).
+( OSD
DIRECT
= ):
Select folder directly*6.
: Stop play.
: Pause.
: Start play.
: Select track.
: Select folder.
: Select aspect ratio.
1st press
1st press 2nd press
3rd press
2nd press
While playing...
: Return/advance the scenes by 5 minutes.
+ :
Select track (within the same folder).
+( OSD
DIRECT
= ):
Select folder directly*6.
Current playback position
*4 Search speed: ¡1 ] ¡2 ] ¡3
*5 Search speed: ¡1 ] ¡2
*6 When 2-digit numbers are assigned at the beginning of their
folder names—01, 02, 03, and so on.
EN13-28_KW-AVX700UN_f.indd 19EN13-28_KW-AVX700UN_f.indd 19 06.2.21 9:53:58 AM06.2.21 9:53:58 AM
20
ENGLISH
: Stop play.
: Pause.
: Start play.
: Reverse/forward search*1.
: Press: Select tracks.
Hold: Reverse/forward search*3.
: Select folder.
: Stop play.
: Pause.
: Start play.
: Reverse/forward search*1.
: Press: Select track.
Hold: Reverse/forward search*3.
+ : Select track.
Enlarging the view (Zoom in)
During moving picture playback...
While pausing...
To cancel zoom, select “ZOOM OFF.”
ZOOM 1 ZOOM 2 ZOOM 3 ZOOM 4
ZOOM 5ZOOM 6
ZOOM OFF
ZOOM 1 ZOOM 2
ZOOM OFF
Playing back a bonus group
If a DVD Audio including a “bonus group” is
detected, the BONUS indicator lights up on the
disc information screen.
To play a bonus group...
1 Select the bonus group.
• The bonus group is usually recorded as
the last group.
2 Enter the key number.
• “key number” (a kind of password) for
the bonus group is not open to public.
The way of getting the key number
depends on the disc.
3 Follow the interactive instructions
shown on the monitor.
Selecting browsable still picture...
When a disc including browsable still pictures
is detected, the B.S.P. indicator lights up on the
disc information screen.
When disc shows the BSP selecting icons such
as @ or # on the screen...
1 Select an item you want to display.
2
+ :
Select track (within the same folder).
+( OSD
DIRECT
= ):
Select folder directly*6.
*1 Search speed: x2 ] x5 ] x10 ] x20 ] x60
*3 Search speed: x2 ] x10
*6 When 2-digit numbers are assigned at the beginning of their
folder names—01, 02, 03, and so on.
Move the enlarged
portion.
EN13-28_KW-AVX700UN_f.indd 20EN13-28_KW-AVX700UN_f.indd 20 06.2.21 9:54:07 AM06.2.21 9:54:07 AM
ENGLISH
OPERATIONS
21
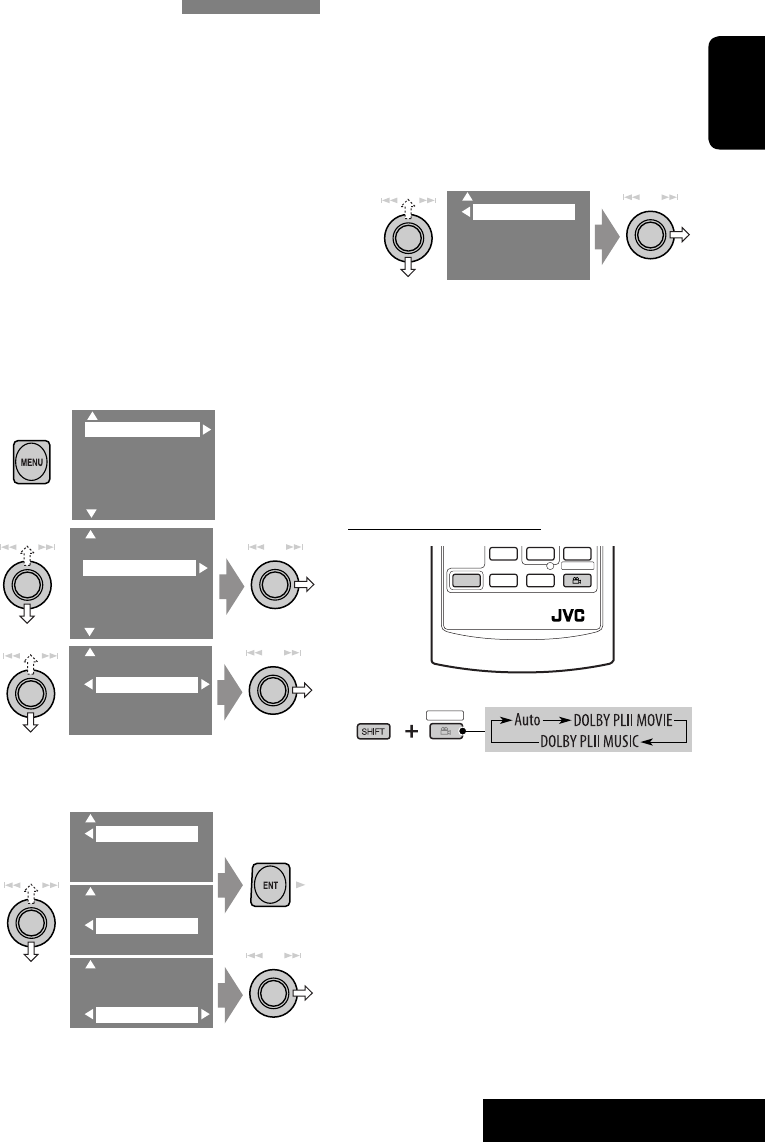
Enjoying surround sounds
You can enjoy multi-channel surround
playback through the front, center, surround
speakers.
• Without connecting (and activating) center
speaker and surround speakers, you cannot
enjoy surround playback .
MULTI: For multi-channel encoded sources
such as Dolby Digital*1, DTS*2, and DVD
Audio. (When activated, “MULTI” is shown on
the disc information screen.)
Dolby Pro Logic II (Movie/Music): For 2
channel sources except for MPEG 2-channel
discs. (This can also be used for SD card
playback. ☞ page 27)
To turn on the surround...
1
2
3
• Surround Off: Deactivates surround.
• Surround On: Activates surround = go to
the following steps.
4
Setup
Surround
Equalizer
Sound
Mode
List
Setup
Surround
Equalizer
Mode
List
Auto
Dolby PLII Movie
Dolby PLII Music
Auto
Dolby PLII Movie
Dolby PLII Music
Auto
Dolby PLII Movie
Dolby PLII Music
Surround Off
Surrond On
• Auto: “MULTI” surround is activated when
multi-channel digital signals are detected.
• Dolby PLII Movie: Activates Dolby Pro
Logic II Movie.
• Dolby PLII Music: Activates Dolby Pro
Logic II Music = go to the following step.
5 Only when selecting “Dolby PLII
Music”
• Panorama: Select “Panorama On” to add
wraparound sound effect.
• CenterWidth: Adjust the center image
so it may be heard only from the center
speaker, only form the left/right front
speaker as a “phantom” center image, or
various combination of these speakers. As
the number increases, the “phantom” effect
becomes stronger (normally select “4”).
On the remote controller:
1
• You cannot change the “Dolby PL II Music”
settings using the remote controller.
*1 Manufactured under license from Dolby Laboratories. Dolby,
Pro Logic, MLP Lossless, and the double-D symbol are
trademarks of Dolby Laboratories.
*2 “DTS” and “DTS Digital Surround” are registered trademarks
of Digital Theater Systems, Inc.
Panorama
CenterWidth
RM-RK240
SHIFT
SURROUND
SURROUND
EN13-28_KW-AVX700UN_f.indd 21EN13-28_KW-AVX700UN_f.indd 21 06.2.21 9:54:13 AM06.2.21 9:54:13 AM
22
ENGLISH
Entering time/numbers
Ex.:
DVD ] _:_ _:_ _
To enter 1 (hours): 02 (minutes): 00 (seconds),
press 1, 0, 2, 0, 0, then ENTER.
VCD (PBC not in use) ] _ _:_ _
To enter 64 (minutes): 00 (seconds),
press 6, 4, 0, 0, then ENTER.
• It is not required to enter tailing zeros (the
last two digits in the examples above).
• To correct a misentry, use .
To remove the on-screen bar
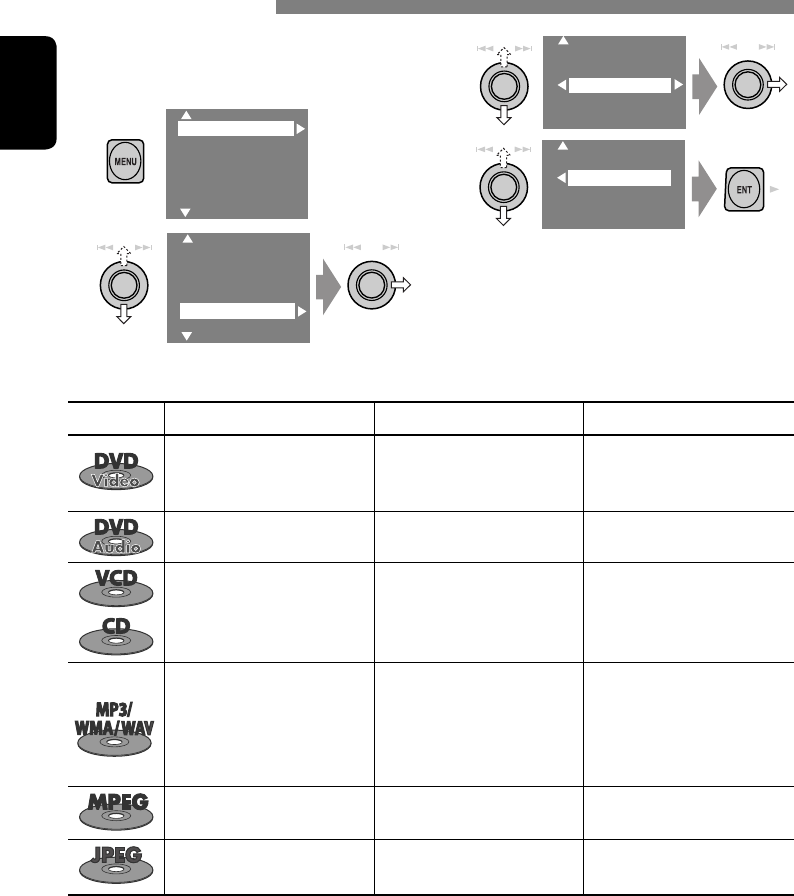
Operations using the on-screen bar (DVD/VCD/MPEG/JPEG)
These operations are possible on the monitor using the remote controller.
~ Display the on-screen bar (☞ page 23).
(twice)
Ÿ Select an item.
! Make a selection.
If pop-up menu appears...
• For entering time/numbers, see below.
123
456
78
0
9
OSD
RM-RK240
ENTER
SHIFT
How to select a number
To select a number from 0 – 9:
To select a number greater than 9:
• +100/–100 buttons used only to enter the
number greater than 99.
• To reduce numbers, use or .
EN13-28_KW-AVX700UN_f.indd 22EN13-28_KW-AVX700UN_f.indd 22 06.2.21 9:54:15 AM06.2.21 9:54:15 AM
ENGLISH
OPERATIONS
23
Information
Operation
DVD -V T02-C03 TOTAL 1:25:58
TIME TITLE CHAP
RPT
C. RPT
On-screen bar
1 Disc type
2 • DVD: Audio signal format
• VCD: PBC
3 Playback mode
DVD Video:
T. RPT: Title repeat
C. RPT: Chapter repeat
DVD Audio:
T. RPT: Track repeat
MPEG:
T. RPT: Track repeat
F. RPT: Folder repeat
JPEG:
F. RPT: Folder repeat
VCD:
T. RPT: Track repeat
D. RND: Disc random
T. INT: Track intro
Plays the beginning 15 seconds of
the current track
4 Playback information
T02-C03 Current title/chapter
G02-T03 Current group/track
TRACK 01 Current track
F001-T001 Current folder/track
5 Time indication
TOTAL Elapsed playing time of the disc
T. REM Remaining title time (for DVD)
Remaining disc time (for others)
TIME Elapsed playing time of the current
chapter/track
REM Remaining time of the current
chapter/track
6 Playback status
Play
Reverse/forward search
Reverse/forward slow-motion
Pause
Stop
7 Operation icons
TIME Change time indication (see 5)
Time Search (Enter the elapsed playing
time of the current title or of the disc.)
TITLE Title Search (by its number)
GROUP
Group Search (by its number)
CHAP Chapter Search (by its number)
TRACK
Track Search (by its number)
RPT Repeat play*1
INT Intro play*1
RND Random play*1
Change the audio language or audio
channel
Change the subtitle language
Change the view angle
*1 ☞ page 16.
Above example is of DVD Video. Items shown on the bar vary due to the disc type.
EN13-28_KW-AVX700UN_f.indd 23EN13-28_KW-AVX700UN_f.indd 23 06.2.21 9:54:17 AM06.2.21 9:54:17 AM
24
ENGLISH
Dual Zone operations
You can enjoy a disc playback on the external
monitor connected to the VIDEO OUT and 2nd
AUDIO OUT plugs, while listening to any other
source through the speakers.
• When Dual Zone is in use, you can only
operate the DVD/CD player using the remote
controller.
1
2
3
• Off: Deactivates Dual Zone.
• On/Surround Off (DUAL): Activates
Dual Zone without applying Headphone
Surround*.
• On/Surround On (DUAL SURR): Activates
Dual Zone and applies Headphone
Surround.
When Dual Zone is activated, the main source is
changed to “DISC.”
Ex. When “On/Surround On” is selected.
To select a different source (main source) to
listen through the speakers:
Press SOURCE on the control panel.
• You cannot select “SD” for the main source.
• By using the buttons on the control panel, you
can operate the newly selected source without
affecting Dual Zone (DVD/CD) operations.
On the remote controller:
1
2 Adjust the volume through the 2nd
AUDIO OUT plug.
3 Operate the DVD/CD player.
* JVC original headphone virtual surround
system. This surround will also work for the
main source “DISC” though it is activated for
the sub-source. This surround does not work
for MPEG discs.
Setup
Surround
Equalizer
Sound
Mode
List
DualZone
Off
0n/Surround Off
0n/Surround On
01 01 0:00:12
48kHz 24Bit 3/2.1
DVD
VIDEO
MULTI
DTS
DUAL SURR
RM-RK240
DUAL
SHIFT
VOL
2nd VOL
EN13-28_KW-AVX700UN_f.indd 24EN13-28_KW-AVX700UN_f.indd 24 06.2.21 9:54:22 AM06.2.21 9:54:22 AM
ENGLISH
OPERATIONS
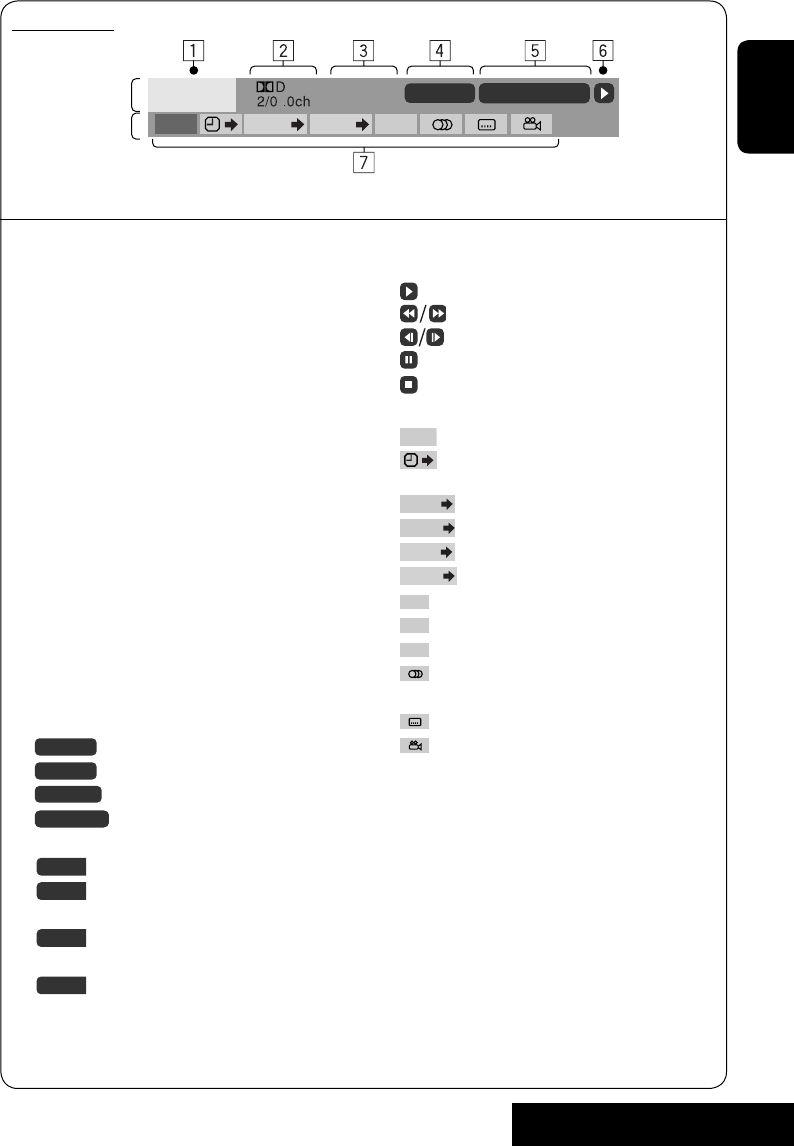
25
Operations using the control screen (MP3/
WMA/WAV/MPEG/JPEG/CD)
While Dual Zone is on,
these operations are
possible on the external monitor using the
remote controller.
The control screen automatically appears when
you insert a disc. (For MPEG/JPEG; while not
playing.)
Control screen
MP3/WMA/WAV/MPEG/JPEG
1 Current folder
2 Current folder number/total folder number
3 Folder list
4 Selected playback mode
5 Elapsed playing time of the current track
(not displayed for JPEG)
6 Operation status
7 Current track number/total number of
tracks in the current folder (total number of
tracks on the disc)
8 Track information (only for MP3/WMA/
WAV)
9 Track list
p Current track (highlighted bar)
To select a folder or track
1 Select “Folder” column or “Track” column
on the control screen.
2 Select a folder or track.
• If necessary, press ENTER
to start playback.
Folder : 2 / 3
TIME 00:00:14T. RPT
Track : 5 / 14 (Total 41)
01 Music
02 Music
03 Music
Track Information
Cloudy.mp3
Fair.mp3
Fog.mp3
Hail.wma
Indian summer.mp3
Rain.mp3
Shower.mp3
Snow.mp3
Thunder.wma
Typhoon.mp3
Wind.mp3
Winter sky.mp3
Album
Weather
Artist
Robert M. Smith
Title
Rain
TIME 00:14
Track : 5 / 14
Track Information
Cloudy
Fair
Fog
Hail
Indian summer
Rain
Shower
Snow
Thunder
Typhoon
Wind
Winter sky
Album
Four seasons
Artist
Robert M. Smith
Title
Rain
T. RPT
Ex.: MP3/WMA
Ex.: CD Text
Control screen
CD
1 Selected playback mode
2 Elapsed playing time of the current track
3 Operation status
4 Current track number/total number of
tracks on the disc
5 Track information
6 Track list
7 Current track (highlighted bar)
To select a track
• If necessary, press ENTER
to start playback.
To change the playback modes
You can also change the playback modes.
• For CD/MP3/WMA/WAV: Intro/Repeat/
Random
• For others: Repeat
1
2 Only for CD/MP3/WMA/WAV: Select a
playback mode
3 Select your desired option.
4
OSD
EN13-28_KW-AVX700UN_f.indd 25EN13-28_KW-AVX700UN_f.indd 25 06.2.21 9:54:24 AM06.2.21 9:54:24 AM
26
ENGLISH
Operations using the list screen (MP3/WMA/
WAV/MPEG/JPEG)
While Dual Zone is on,
these operations are
possible on the external monitor using the
remote controller.
List screen
Folder list
Track list
1 Current folder number/total folder number
2 Current track number/total number of
tracks in the current folder
3 Current page/total number of the pages
included in the list
4 Current folder/track (highlighted bar)
Folder : 144/240 Track 144/198 Page : 4/7
fol120
fol121
fol122
fol123
fol124
fol125
fol126
fol127
fol128
fol129
fol150
fol151
fol152
fol153
fol154
fol155
fol156
fol157
fol158
fol159
fol140
fol141
fol142
fol143
fol144
fol145
fol146
fol147
fol148
fol149
fol130
fol131
fol132
fol133
fol134
fol135
fol136
fol137
fol138
fol139
file0141.wma
file0142.mp3
file0143.wma
file0144.mp3
file0145.mp3
file0146.mp3
file0147.mp3
file0148.wma
file0149.wma
file0150.wma
file0151.wma
file0152.mp3
file0153.wma
file0154.mp3
file0155.wma
file0156.wma
file0157.wma
file0158.wma
file0159.mp3
file0160.wma
Folder : 144/240 Track 144/198 Page : 4/5
file0121.mp3
file0122.mp3
file0123.wma
file0124.mp3
file0125.mp3
file0126.wma
file0127.wma
file0128.mp3
file0129.mp3
file0130.wma
file0131.mp3
file0132.mp3
file0133.mp3
file0134.mp3
file0135.wma
file0136.mp3
file0137.wma
file0138.mp3
file0139.wma
file0140.wma
Ex.: Track list for MP3/WMA
While not playing...
1 Display the folder list.
Each time you press the button,
the list screen comes on and goes
off.
2 Select a folder on the list.
The track list of the selected folder appears.
3 Select a track on the list.
To go back to the folder list, press .
EN13-28_KW-AVX700UN_f.indd 26EN13-28_KW-AVX700UN_f.indd 26 06.2.21 9:54:26 AM06.2.21 9:54:26 AM
ENGLISH
OPERATIONS
27
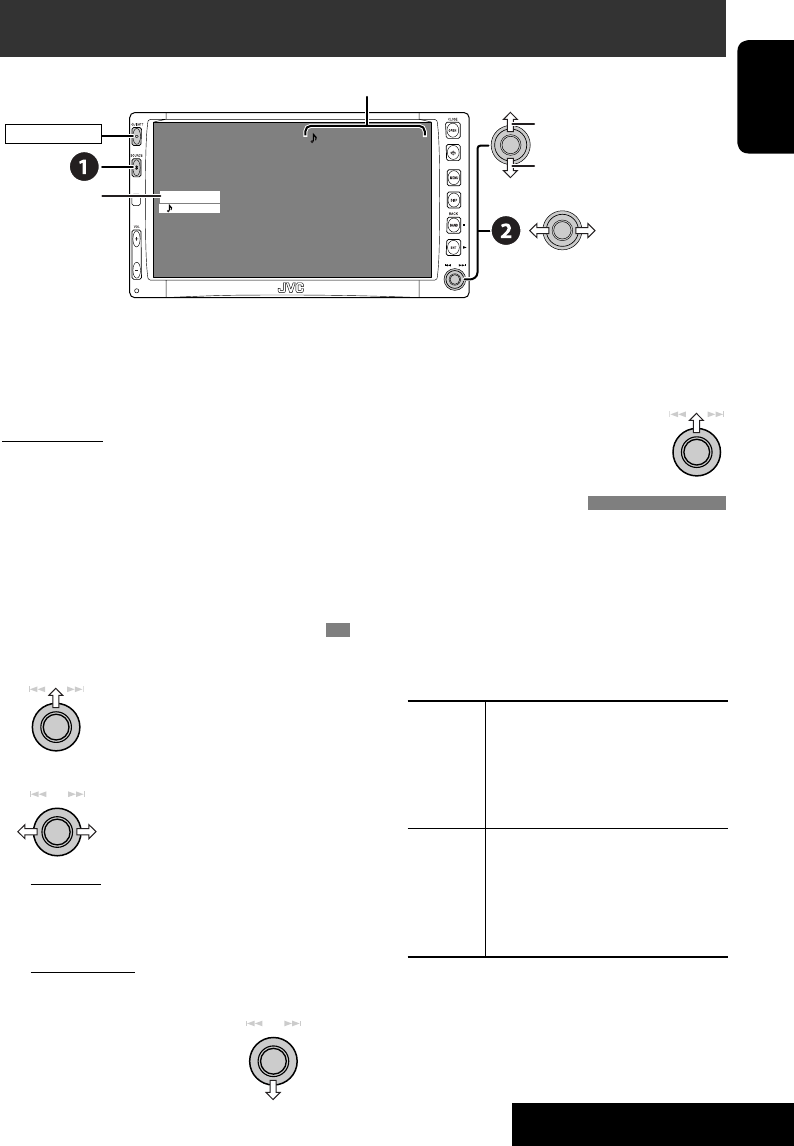
Now Reading...
SD
3: 45 PM
SD operations
This unit can play MP3/WMA/JPEG tracks
stored in SD cards.
All tracks in the SD card will be played
repeatedly until you change the source.
• Removing the SD card will stop playback.
• You cannot select “SD” when Dual Zone is in
use.
Caution:
Make sure all important data has been
backed up.
To open/close the
monitor panel
To eject the disc
push in the SD card
lightly.
Press: Select track
Hold: Reverse/forward search
Press: Select folder
Hold: Display Folder List
(☞ page 17)
3: Restart playback
7: Stop
Push in the SD card until you
hear a clicking sound.
Caution:
Do not release your finger quickly;
otherwise, the SD card may pop out
from the unit.
You can operate the SD playback in the same
way you operate the MP3/WMA/JPEG discs
(except the OSD operation and those on the
external monitor).
• For general operational information, see
pages 13 to 21.
EN13-28_KW-AVX700UN_f.indd 27EN13-28_KW-AVX700UN_f.indd 27 06.2.21 9:54:27 AM06.2.21 9:54:27 AM
28
ENGLISH
You can use only one of the following playback
modes—Intro/Repeat/Random.
Ex. To select Track Repeat
1
2
3
4
When one of the playback modes is
selected, the corresponding indicator lights
up on the monitor.
To cancel, select “Off” in step 3 or 4.
Selecting playback modes
Setup
Surround
Equalizer
Sound
Mode
List
Setup
Surround
Equalizer
Sound
Mode
List
Off
Intro
Repeat
Random
Off
Track
Folder
OPERATIONS
File type Intro Repeat Random
Track: Plays the first 15
seconds of each track
Folder: Plays the first 15
seconds of the first track of
each folder
Track: Repeats current track
Folder: Repeats all tracks of the
current folder
Folder: Randomly plays all
tracks of current folder,
then tracks of next folders
SD: Randomly plays all tracks
—Folder: Repeats current folder —
EN13-28_KW-AVX700UN_f.indd 28EN13-28_KW-AVX700UN_f.indd 28 06.2.21 9:54:28 AM06.2.21 9:54:28 AM
29
ENGLISH
EXTERNAL DEVICES
Listening to the CD changer
It is recommended to use a JVC
MP3-compatible CD changer with your unit.
• You can play only CDs (CD-DA) and MP3
discs.
Preparation:
Make sure “Changer” is selected for the external
input setting. (☞ page 42)
~ Select “CD-CH.”
Ÿ Display the Disc List.
• Each time you keep pushing up or down
the knob, you can display the other list of
the remaining discs.
! Select a disc to start playing.
• When using the remote
controller, press...
Not displayed for
conventional CD
01 0:00:12
Disc Title
Current track Title
Next track title
Next track title
Next track title
Next track title
Next track title
Next track title
3: 45 PM
FLAT
REPEAT
CD-CH
Disc No.
POWER]ON
Track no./Play time
Press: Select track
Hold: Reverse/forward search
Press: Select folder (MP3 only)
Hold: Display Disc List
MP3 DISC
JVC CAR AUDIO
BEST 10
BEST JAZZ
DISC 05
DISC 06
MP3 DISC
JVC CAR AUDIO
BEST 10
BEST JAZZ
DISC 05
DISC 06
01FOLDER
02FOLDER
03FOLDER
04FOLDER
TRACK001
TRACK002
TRACK003
TRACK004
DISC+
DISC–
• While playing an MP3 disc, you can
select and start playing a track in the disc
using the Lists: Display List (select the
current disc) = Folder List =Track List,
then start playing a track you want.
MP3 DISC
JVC CAR AUDIO
BEST 10
BEST JAZZ
DISC 05
DISC 06
EN29-34_KW-AVX700UN_f.indd 29EN29-34_KW-AVX700UN_f.indd 29 06.2.21 9:55:19 AM06.2.21 9:55:19 AM
30
ENGLISH
You can use only one of the following playback
modes—Intro/Repeat/Random.
Ex. To select Track Repeat
1
2
3
4
When one of the playback modes is
selected, the corresponding indicator lights
up on the monitor.
To cancel, select “Off” in step 3 or 4.
Selecting playback modes
Setup
Surround
Equalizer
Sound
Mode
List
Setup
Surround
Equalizer
Sound
Mode
List
Off
Intro
Repeat
Random
Disc type Intro Repeat Random
Track: Plays the first 15
seconds of each track
Disc: Plays the first 15 seconds
of the first track of all
loaded discs
Track: Repeats current track
Disc: Repeats all tracks of the
current disc
Disc: Randomly plays all tracks
of the current disc
All: Randomly plays all tracks of
all loaded discs
Track: Plays the first 15
seconds of each track
Folder: Plays the first 15
seconds of the first track of
each folder
Disc: Plays the first 15 seconds
of the first track of all
loaded discs
Track: Repeats current track
Folder: Repeats all tracks of the
current folder
Disc: Repeats all tracks of the
current disc
Folder: Randomly plays all
tracks of current folder,
then tracks of next folders
Disc: Randomly plays all tracks
All: Randomly plays all tracks of
all loaded discs
Off
Track
Folder
Disc
You can use the following buttons on the
remote controller to operate the CD changer.
DISC–
DISC+
: Select disc.
: Select folder (MP3 only).
: Select track.
To use <Mode> menu ☞ above.
To use <List> menu
☞ pages 17 and 29.
Display List = Folder
List =Track List
EN29-34_KW-AVX700UN_f.indd 30EN29-34_KW-AVX700UN_f.indd 30 06.2.21 9:55:23 AM06.2.21 9:55:23 AM
31
ENGLISH
EXTERNAL DEVICES
Manual presetting
1 Select a station to preset.
2 Display the Preset list.
• Each time you keep pushing up or down
the knob, you can change to the other
page of the Preset list.
• Preset List can also be accessed through
<MENU> = <List> (☞ page 32).
3 Select a preset number.
4
BBC1
TV
3: 45 PM
FLAT
POWER]ON
Presetting TV stations
Automatic Memory presetting
You can preset 12 TV stations.
1
2
3
Local TV stations with the strongest signals
are searched and stored automatically.
Watching TV
You can connect JVC’s TV Tuner Unit (KV-C1000, KV-C1001, or KV-C1008) to the AV BUS
terminal on the rear.
~ Select “TV.”
Ÿ Search for a station to listen—Auto Search.
• Manual Search: Hold either to left or right until “Manual Search” appears on the display, then
push it repeatedly.
• You can also use the remote controller supplied for the TV tuner unit, but some functions
may not work. (Aim it to the remote sensor of this receiver.)
☞ page 35.
Setup
Surround
Equalizer
Sound
Mode
List
Setup
Surround
Equalizer
Sound
Mode
List
Channel no.
OSD
Auto MEMORY
Title
BBC1
BBC2
ABCTV
CBS
WHTV
HTV
BBC1
BBC2
ABCTV
CBS
WHTV
HTV
2
JVCTV
DISP: Press if no playback picture
appears, but source information
(this) screen is displayed.
Assigned name appears. If no
name is assigned, “NO NAME”
appears.
EN29-34_KW-AVX700UN_f.indd 31EN29-34_KW-AVX700UN_f.indd 31 06.2.21 9:55:26 AM06.2.21 9:55:26 AM
32
ENGLISH
Changing on-screen information
You can display channel number and assigned
name of the station while watching TV.
1
2
3
4
• Off: No information will be displayed
while watching TV.
• Channel: Channel number will be
displayed while watching TV.
• Channel+Station: Channel number and
assigned name of the received station will
be displayed while watching TV.
4
Selecting preset stations
Selecting on the Preset List
1
2 Select a preset station.
• Preset List can also be accessed through
<MENU> = <List>.
BBC1
BBC2
ABCTV
CBS
JVCTV
HTV
BBC1
BBC2
ABCTV
CBS
JVCTV
HTV
Setup
Surround
Equalizer
Sound
Mode
List
Setup
Surround
Equalizer
Mode
List
Setup
Surround
Equalizer
Sound
Mode
List
Setup
Surround
Equalizer
Sound
Mode
List
OSD
Auto MEMORY
Title Entry
Off
Channel
Channel+Station
2 P5
JVCTV
EN29-34_KW-AVX700UN_f.indd 32EN29-34_KW-AVX700UN_f.indd 32 06.2.21 9:55:28 AM06.2.21 9:55:28 AM
33
ENGLISH
EXTERNAL DEVICES
For Apple iPod and JVC D. player, it is required
to connect the interface adapter (KS-PD100 or
KS-PD500) to the CD changer jack on the rear.
Preparation:
Make sure “iPod” or “D. player” is selected for
the external input setting. (☞ page 42)
~ Select “iPod” or “D. PLAYER.”
Playback starts automatically.
Ÿ Select a song.
Selecting a track from the player’s menu
1 Enter the player’s menu.
• This mode will be canceled if no
operations are done for about
5 seconds.
2 Select the desired menu.
For iPod:
Playlists Ô Artists Ô Albums Ô Songs
Ô Genres Ô Composers Ô (back to the
beginning)
For D. player:
Playlist Ô Artist Ô Album Ô Genre Ô
Track Ô (back to the beginning)
3 Confirm the selection.
Listening to the iPod®/D. player
01 0:00:06
Album Name / Artist Name
Track Title
D.PLAYER
FLAT
REPEAT
POWER]ON
3: 45 PM
Enter player‘s menu
Track no./Play time
☞ page 35.
4 Repeat steps 2 and 3 to select a track.
• When a track is selected finally, playback
starts.
• To return to the previous menu...
Selecting playback modes
• When one of the playback modes is selected,
the corresponding indicator lights up on the
monitor.
1 Display <MENU>, then select <Mode>
] <Repeat> or <Random>.
2 Select an appropriate option.
Repeat One: Functions the same as “Repeat
One” or “Repeat Mode =
One.”
All: Functions the same as “Repeat
All” or “Repeat Mode = All.”
Random Album: Functions the same as
“Shuffle Albums” of the iPod.
Song/On: Functions the same as
“Shuffle Songs” or “Random
Play = On.”
To cancel, select “Off.”
• iPod is a trademark of Apple Computer, Inc., registered in
the U.S. and other countries.
Press: Select track
Hold: Reverse/forward search
Pause/stop playback
• To resume, press again.
Press: Select an item
Hold: Skip 10 items at a time if more
than 10
EN29-34_KW-AVX700UN_f.indd 33EN29-34_KW-AVX700UN_f.indd 33 06.2.21 9:55:29 AM06.2.21 9:55:29 AM
34
ENGLISH
AV-INPUT
You can connect an external component to the LINE IN/VIDEO IN plugs.
~ Select “AV-IN.”
Ÿ Turn on the connected component and start playing the source.
If you select “Camera Reverse” for “AV Input” (☞ page 42), some status messages such as
volume level change will not appear on the monitor while viewing the picture.
EXT-INPUT
You can connect an external component to the CD changer jack on the rear using the Line Input
Adapter—KS-U57 (not supplied) or AUX Input Adapter—KS-U58 (not supplied).
Preparation:
Make sure “External Input” is selected for the external input setting. (☞ page 42)
~ Select “EXT-IN.”
Ÿ Turn on the connected component and start playing the source.
Listening to other external components
AV-INPUT
AV-IN
3: 45 PM
FLAT
POWER]ON
EXT-INPUT
EXT-IN
3: 45 PM
FLAT
POWER]ON
Assigned title (☞ page 36)
Assigned title (☞ page 36)
DISP: Press if no playback picture
appears, but source information (this)
screen is displayed.
EN29-34_KW-AVX700UN_f.indd 34EN29-34_KW-AVX700UN_f.indd 34 06.2.21 9:55:32 AM06.2.21 9:55:32 AM
ENGLISH
SETTINGS
35
Selecting sound mode
~
Ÿ
! Select a sound mode.
• For preset values of each sound mode,
☞ page 51.
• When surround (☞ page 21) is activated,
sound equalization is temporarily
canceled.
Storing your own adjustment
You can store your adjustment into User 1,
User 2, and User 3.
1 Repeat steps ~ and Ÿ, then in step
!...
2 Adjust.
3 Store.
Sound equalization
Setup
Surround
Equalizer
Sound
Mode
List
Setup
Surround
Equalizer
Sound
Mode
List
Flat
Hard Rock
R&B
Pop
Jazz
Dance
Country
Reggae
Classic
User 1
User 2
User 3
Flat
Hard Rock
R&B
Pop
Jazz
Dance
Freq. 60Hz +03
Freq. 150Hz +02
Freq. 400Hz +02
Freq. 1kHz 00
Freq. 2.5kHz +01
Freq. 6.3kHz +01
Freq. 15kHz +03
User 1
User 2
User 3
POWER]ON
Freq. 60Hz +03
Freq. 150Hz +02
Freq. 400Hz +02
Freq. 1kHz 00
Freq. 2.5kHz +01
Freq. 6.3kHz +01
Freq. 15kHz +03
EN35-44_KW-AVX700UN_f.indd 35EN35-44_KW-AVX700UN_f.indd 35 06.2.21 9:56:06 AM06.2.21 9:56:06 AM
36
ENGLISH
You can assign titles to the following...
Sources Maximum number of
characters
AV-INPUT
EXT-INPUT
Up to 16 characters.
FM/AM/TV stations Up to 16 characters—up
to 30 stations separately
for radio (FM/AM) and
for TV.
DISC/CD-CH*Up to 32 characters—up
to 30 discs.
* You can assign titles only to conventional CDs.
~ Select the sources.
• For FM/AM: Select the band, then tune
in to a station.
• For AV-IN/EXT-IN: Select the source.
• For TV station: Select “TV,” then tune in
to a TV station.
• For a CD in this receiver: Insert a CD.
• For CDs in the CD changer: Select
“CD-CH,” then select a disc number.
Ÿ Display the title entry screen.
1
2
3
! Assign a title.
1 Select a character, then enter.
• To change the character set, press DISP.
(For available characters, ☞ page 45.)
2 Repeat step 1 until you finish entering
the title.
⁄ Finish the procedure.
Ex.: When you select “DISC” as the source
Assigning titles to the sources
Setup
Surround
Equalizer
Sound
Mode
List
Setup
Surround
Equalizer
Sound
Mode
List
Off
Intro
Repeat
Random
Title Entry
MY BEST
POWER]ON
MY BEST Press: Change character set
Hold: Erase title
EN35-44_KW-AVX700UN_f.indd 36EN35-44_KW-AVX700UN_f.indd 36 06.2.21 9:56:10 AM06.2.21 9:56:10 AM
ENGLISH
SETTINGS
37
!
• Some items require you to repeat this
steps to set the sub-items.
⁄
Setup
Surround
Equalizer
Sound
Mode
List
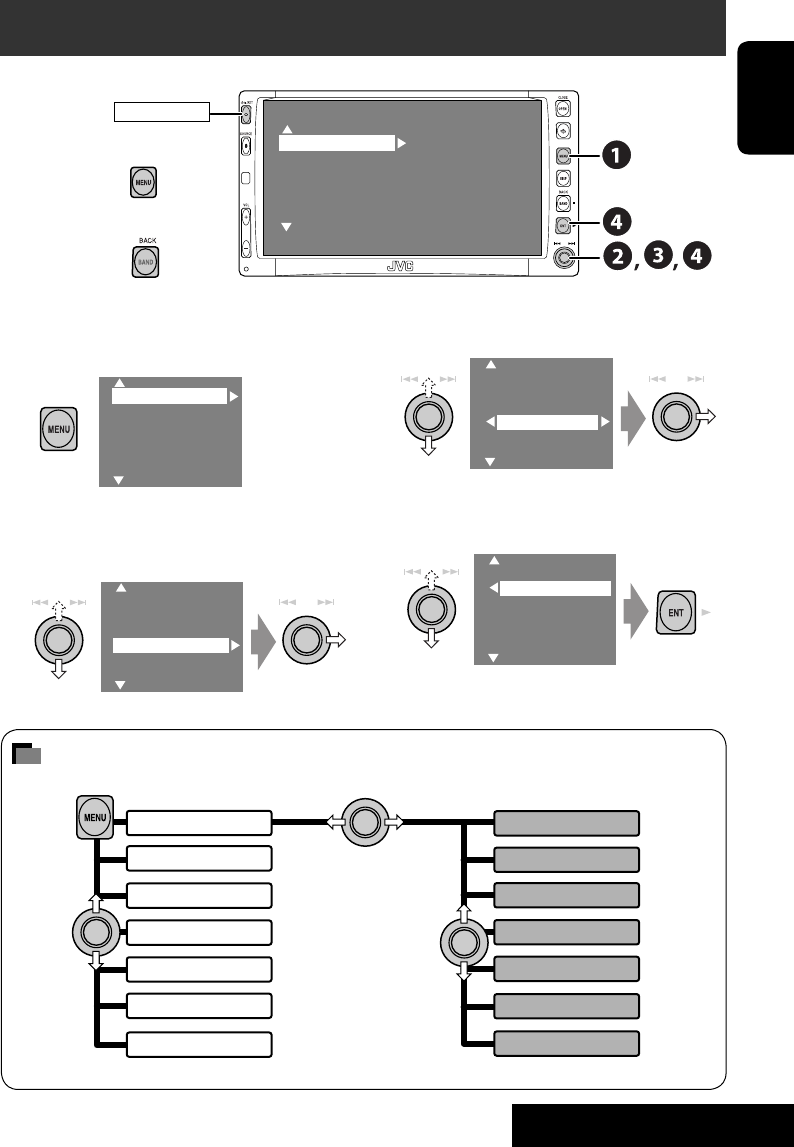
Menu items
Menu operations
Ex. Changing the “High Pass Filter” setting
~
• Non-available items will be displayed
being shaded.
Ÿ
POWER]ON
Setup
Surround
Equalizer
Sound
Mode
List
Display
Clock
Disc Setup1
Disc Setup2
Tuner
Input
MENU
List
Setup
Surround
Equalizer
Sound
Mode
Dual Zone
Input
Display
Clock
Disc Setup 1
Disc Setup 2
Tuner
Others
Through
On
Fader/Balance
Volume Adjust
Subwoofer
High Pass Filter
Crossover
Amplifier Gain
To return to (or erase) the top menu
To return to the previous screen
Setup
Surround
Equalizer
Sound
Mode
List
EN35-44_KW-AVX700UN_f.indd 37EN35-44_KW-AVX700UN_f.indd 37 06.2.21 9:56:12 AM06.2.21 9:56:12 AM

38
ENGLISH
Menu items Selectable settings, [reference page]
Display
Demonstration Off : Cancels.
On: Activates the demonstration on the monitor.
Wall Paper
You can select the background picture of the monitor.
Standard, Geometric Design, Sea, Simple Green, Simple
Orange, Simple Red, Simple Brown, Simple Grey
Level Meter
You can select the level meter you want.
Meter 1, Meter 2, Meter 3
• Press DISP repeatedly to display the selected level meter on
the monitor.
Scroll Off : Cancels.
Once: Scrolls the disc information once.
Auto:
Repeats scrolling (5-second intervals).
• Holding DISP scrolls the information regardless of this
setting.
Tag Display Off : Cancels.
On: Shows the Tag data while playing MP3/WMA/WAV
tracks.
Dimmer Off : Cancels.
On: Activates dimmer.
Auto: Dims the monitor when you turn on the headlights.
Time Set: Sets the Dimmer On/Off times.
Dimmer Level You can preset the brightness for dimmer.
00 (brightest) to 10 (darkest); Initial 05
Bright You can adjust color and brightness of the monitor.
–15 (darkest) to +15 (brightest); Initial 00
Screen Control*1You can adjust the following to make the monitor clear and
legible for watching the playback picture. The settings are
stored separately for each source—“DISC,” “AV-IN,” and
“TV.”
–15 to +15; Initial 00
Bright: Adjust if the picture is too bright or too dark.
Contrast: Adjust the contrast.
Color: Adjust the color of the picture—lighter or darker.
Tint: For NTSC playback: Adjust the tint if the human
skin color is unnatural.
For PAL playback: “FIX” appears. This cannot be
adjusted.
Initial: Underlined
EN35-44_KW-AVX700UN_f.indd 38EN35-44_KW-AVX700UN_f.indd 38 06.2.21 9:56:13 AM06.2.21 9:56:13 AM
ENGLISH
SETTINGS
39
Menu items Selectable settings, [reference page]
Display
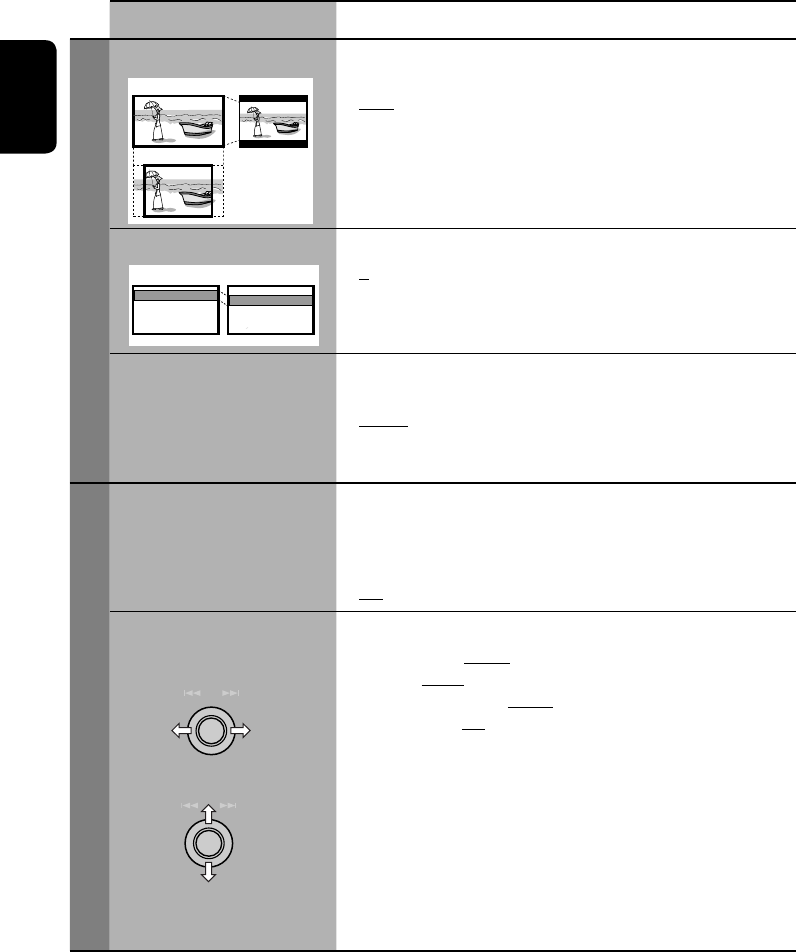
Aspect*1You can change the aspect ratio of the picture.
Aspect ratio of incoming signal
4:3 16:9
Normal:
For 4:3 original
pictures
Full:
For 16:9 original
pictures
Just:
Zoom:
Auto:
•
For “DISC”:
Aspect ratio is
automatically selected to match to the
incoming signals.
•
For the other video sources:
Aspect
ratio is xed to “NORMAL.”
NTSC/PAL This setting is valid only to the external monitor connected.
Select the color system of the external monitor—NTSC, PAL.
•
Turn off the power and turn on it again to make the new
setting effective.
Clock
Time Set ☞ [6]
12Hours/24Hours 12 Hours, 24 Hours, ☞ [6]
Disc Setup 1*2
Menu Language Select the initial disc menu language; Initial English (☞ also
page 44).
Audio Language Select the initial audio language; Initial English (☞ also
page 44).
Subtitle Select the initial subtitle language or erase the subtitle (OFF);
Initial English (☞ also page 44).
OSD Language Select the on-screen language used for the external monitor
connected to the VIDEO OUT plug; Initial English.
*1 Not adjustable for audio sources.
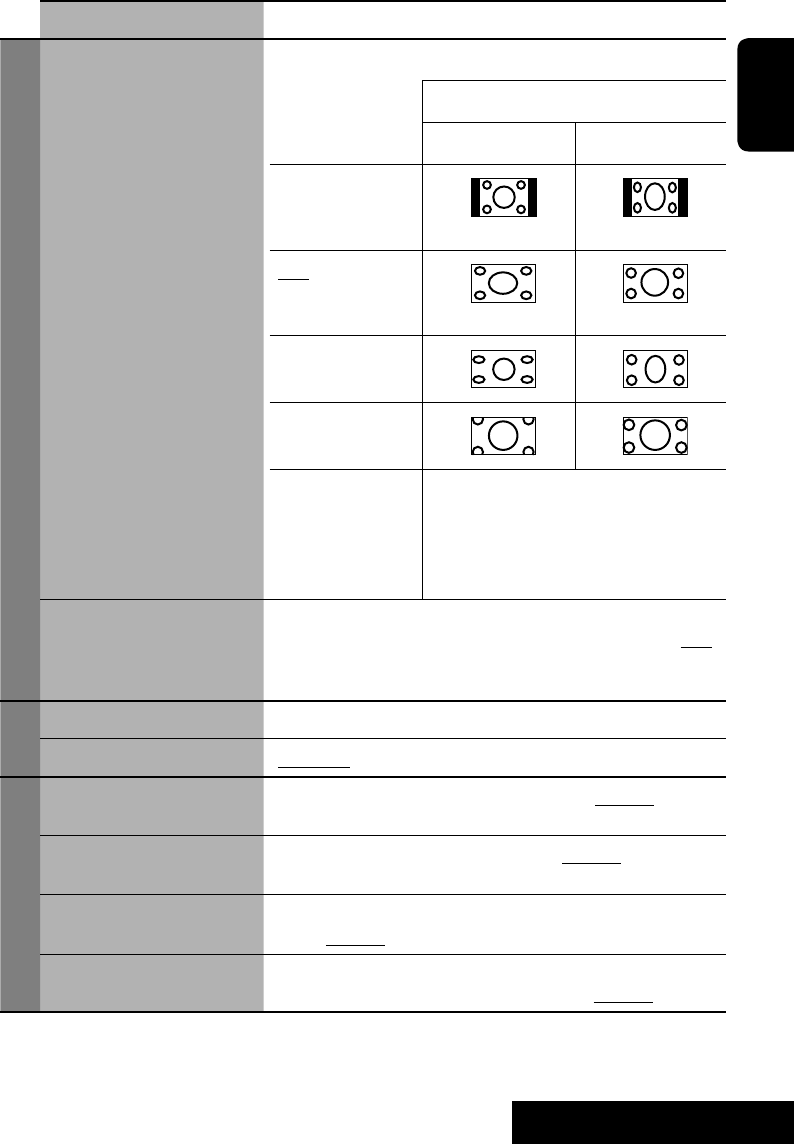
*2 Selectable only for “DISC” or “SD” (while not playing).
EN35-44_KW-AVX700UN_f.indd 39EN35-44_KW-AVX700UN_f.indd 39 06.2.21 9:56:16 AM06.2.21 9:56:16 AM
40
ENGLISH
Menu items Selectable settings, [reference page]
Disc Setup 1*2
Monitor Type Select the monitor type to watch a wide screen picture on the
external monitor.
• 16:9 : Select when the aspect ratio of the external monitor
is 16:9.
• 4:3LB [Letter Box]/4:3PS [Pan Scan]: Select when the
aspect ratio of the external monitor is 4:3. Refer to the
illustrations on the left to see how the pictures are shown
on the monitor.
OSD Position Select the position of the on-screen bar, ☞ [23].
• 1 : Higher position
• 2 : Lower position
File Type Select playback file type when a disc or an SD card contains
different types of files.
• Audio : Plays back audio files.
• Picture : Plays back JPEG files.
• Video : Plays back MPEG files (not available for SD cards).
Disc Setup 2*3
D. (Dynamic) Range
Compres. (Compression)*2
You can enjoy a powerful sound at a low volume level while
playing Dolby Digital software.
• Auto : Select to apply the effect to multi-channel encoded
software.
• On : Select this to always use this function.
Speaker Size*2You can adjust the speaker size setting.
• Front: Small, Large
• Center: None, Small, Large
• Rear: None, Small, Large
• Sub Woofer: On, Off
• Speaker size: “Large” for 13-cm diameter or more; “Small”
for 13 cm or less.
Regardless of the setting above...
• No sound comes out of the subwoofer while playing Dolby
Pro Logic II Movie or Music if the front speaker is set to
“Large.”
• No sound comes out of the center speaker when surround
is deactivated.
*2 Selectable only for “DISC” or “SD” (while not playing).
*3 Selectable only for “DISC” or “SD.”
16:9 4:3 LB
4:3 PS
Position 1 Position 2
Adjusts the speaker size
Selects the speaker
EN35-44_KW-AVX700UN_f.indd 40EN35-44_KW-AVX700UN_f.indd 40 06.2.21 9:56:18 AM06.2.21 9:56:18 AM
ENGLISH
SETTINGS
41
Menu items Selectable settings, [reference page]
Disc Setup 2*3
Speaker Level You can adjust the output level of the activated speakers (☞
see “Speaker Size” on page 40), monitoring the test tone.
• Front Left/Center/Front Right/Rear Right/
Sub Woofer*4/Rear Left: adjust the output level of each
speaker in the range of –10dB to +10dB; Initial 00.
• Press and hold ENT to turn on and off the test tone—Test
Tone: ON, OFF.
Speaker Distance*5You can adjust the speaker output timing.
• Front Left/Center/Front Right/Rear Right/Rear Left:
adjust the speaker distance from the listening position in
the range of 15 cm/6 inches to 600 cm/240 inches in 15-
cm/6-inch step. [Initial: 120 cm (for center speaker), 150
cm (for the other speakers)]
• Press and hold DISP to change the measuring unit—cm and
inch.
Tuner
IF Band Width Auto: Increases the tuner selectivity to reduce interference
noises between adjacent stations. (Stereo effect may
be lost.)
Wide: Subject to the interference from adjacent stations,
but sound quality will not be degraded and the stereo
effect will remain.
TV Channel Area*6Select the country where you use this unit with the TV tuner
unit—KV-C1001/KV-C1008.
• For KV-C1001: ITALY, INDONESIA, CCIR (for other
countries)
• For KV-C1008: AUSTRALIA, NEW ZEALAND,
INDONESIA, CCIR (for other countries)
*4 This subwoofer level setting takes effect only when surround is activated (☞ also page 43).
*5 Not selectable when only the front speakers are activated.
*6 Not displayed when KV-C1000 is connected.
Adjusts the speaker distance
Adjusts the speaker level
Selects the speaker
Selects the speaker
EN35-44_KW-AVX700UN_f.indd 41EN35-44_KW-AVX700UN_f.indd 41 06.2.21 9:56:21 AM06.2.21 9:56:21 AM
42
ENGLISH
Menu items Selectable settings, [reference page]
Input
AV Input You can determine the use of LINE IN and VIDEO IN plugs.
Off : Select when no component is connected
(“AV-IN” is skipped while selecting the
source).
Audio&Video: Select when connecting an AV
component such as a VCR.
Audio: Select when connecting an audio
component such as an MD player.
Camera*7: Select when connecting the rear view
camera.
Camera Reverse*7: The mirror image of the rear view is
displayed on the monitor (The monitor
on the receiver only; the normal rear view
appears on the external monitor.).
External Input When connecting an external component to the CD changer
jack on the rear.
Changer/iPod/D. player*8: CD changer, iPod, or D. player
☞ [29, 33]
External Input: Any other than the above. ☞ [34]
Others
Beep Off : Cancels.
On: Activates the key-touch tone.
Telephone Muting Off : Cancels.
Muting1, Muting2: Select either one which mutes the
sounds while using the cellular phone.
Power LED Flash Off : Cancels.
On: When the ignition is turned off, the lamp on the
button flashes.
Surround*9
Surround Off
Select to deactivate the surround function.
Surround On
Select to activate the surround function.
☞ [21]
Auto, Dolby PLII Movie, Dolby PLII Music
• When you select “Dolby PLII Music,” you can adjust
“Panorama” and “CenterWidth.”
Equalizer*10
Flat/Hard Rock/R&B/Pop/
Jazz/Dance/Country/
Reggae/Classic/User
1/User 2/User 3
☞ [35]
*7 Reverse lamp wire connection is required. See Installation/Connection Manual (separate volume).
The rear view through the camera appears on the monitor in “Full” aspect ratio (regardless of the
aspect ratio setting) when you shift the gear to the reverse (R) position.
*8 The name of the component detected through the CD changer jack is shown.
*9 Selectable only for “DISC” and “SD.”
*10 Selectable only when surround is deactivated.
EN35-44_KW-AVX700UN_f.indd 42EN35-44_KW-AVX700UN_f.indd 42 06.2.21 9:56:23 AM06.2.21 9:56:23 AM
ENGLISH
SETTINGS
43
Menu items Selectable settings, [reference page]
Sound
Fader/Balance Adjust fader—speaker output balance between the front and
rear speakers.
• Upmost—front only
• Downmost—rear only
When using a two-speaker system, set the fader to the center
(00).
Adjust balance—speaker output balance between the left and
right speakers.
• Leftmost—left only
• Rightmost—right only
Volume Adjust Adjust and store auto-adjustment volume level for each
source, comparing to the FM volume level. The volume level
will automatically increase or decrease when you change the
source.
• –12 to +12; Initial 00
Subwoofer Adjust the settings below in the submenu:
• Phase: Subwoofer phase. Select either “Normal” or
“Reverse,” which reproduces a better sound.
• Level*11: Subwoofer output level. Level: –6 to +8; Initial 0
High Pass Filter Through: Select when the subwoofer is not connected.
On: Select when the subwoofer is connected.
Crossover Adjust the crossover frequency between the front/rear
speakers and the subwoofer.
80Hz, 120Hz, 150Hz
Amplifi er Gain You can change the maximum volume level of this receiver.
Off : Deactivates the built-in amplifier.
Low Power: VOL 00 to 30 (Select this if the maximum
power of the speakers is less than 50 W)
High Power: VOL 00 to 50
Rear Speaker*12 You can activate/deactivate the rear speakers.
Off, On
Mode*13
Mono
Only for FM. (Off, On),
☞ [10]
DX / Local
Only for FM. (DX, Local),
☞ [11]
SSM
Only for FM.
☞ [11]
*11 This subwoofer level setting take effects only when surround is deactivated (☞ also page 41).
*12 Functions only when Dual Zone is activated.
*13 Items listed under <Mode> vary among the playback sources.
Adjusts fader
Adjust balance
EN35-44_KW-AVX700UN_f.indd 43EN35-44_KW-AVX700UN_f.indd 43 06.2.21 9:56:27 AM06.2.21 9:56:27 AM
44
ENGLISH
Menu items Selectable settings, [reference page]
Mode*13
Title Entry
Only for conventional CDs, FM/AM stations, TV stations, AV-
IN, and EXT-IN.
☞ [36]
Off /Intro/Repeat/Random
Only for disc playback, SD playback, and iPod/D. player.
☞ [16, 30, 33]
OSD
Only for TV. (Off, Channel, Channel+Station),
☞ [32]
Auto MEMORY
Only for TV.
☞ [31]
List
The accessible lists differ depending on the sources.
Dual Zone
Off , On/Surround Off, On/Surround On,
☞ [24]
*13 Items listed under <Mode> vary among the playback sources.
Code Language Code Language Code Language Code Language Code Language
AA Afar FA Persian KL Greenlandic OC Occitan ST Sesotho
AB Abkhazian FI Finnish KM Cambodian OM (Afan) Oromo SU Sundanese
AF Afrikaans FJ Fiji KN Kannada OR Oriya SW Swahili
AM Ameharic FO Faroese KO Korean (KOR) PA Panjabi TA Tamil
AR Arabic FY Frisian KS Kashmiri PL Polish TE Telugu
AS Assamese GA Irish KU Kurdish PS Pashto, Pushto TG Tajik
AY Aymara GD Scots Gaelic KY Kirghiz PT Portuguese TH Thai
AZ Azerbaijani GL Galician LA Latin QU Quechua TI Tigrinya
BA Bashkir GN Guarani LN Lingala RM
Rhaeto-Romance
TK Turkmen
BE Byelorussian GU Gujarati LO Laothian RN Kirundi TL Tagalog
BG Bulgarian HA Hausa LT Lithuanian RO Rumanian TN Setswana
BH Bihari HI Hindi LV Latvian,Lettish RW Kinyarwanda TO Tonga
BI Bislama HR Croatian MG Malagasy SA Sanskrit TR Turkish
BN Bengali, Bangla HU Hungarian MI Maori SD Sindhi TS Tsonga
BO Tibetan HY Armenian MK Macedonian SG Sangho TT Tatar
BR Breton IA Interlingua ML Malayalam SH Serbo-Croatian TW Twi
CA Catalan IE Interlingue MN Mongolian SI Singhalese UK Ukrainian
CO Corsican IK Inupiak MO Moldavian SK Slovak UR Urdu
CS Czech IN Indonesian MR Marathi SL Slovenian UZ Uzbek
CY Welsh IS Icelandic MS Malay (MAY) SM Samoan VI Vietnamese
DZ Bhutani IW Hebrew MT Maltese SN Shona VO Volapuk
EL Greek JI Yiddish MY Burmese SO Somali WO Wolof
EO Esperanto JW Javanese NA Nauru SQ Albanian XH Xhosa
ET Estonian KA Georgian NE Nepali SR Serbian YO Yoruba
EU Basque KK Kazakh NO Norwegian SS Siswati ZU Zulu
SETTINGS
EN35-44_KW-AVX700UN_f.indd 44EN35-44_KW-AVX700UN_f.indd 44 06.2.21 9:56:29 AM06.2.21 9:56:29 AM
ENGLISH
45
Maintenance
Moisture condensation
Moisture may condense on the lens inside the
DVD/CD player in the following cases:
• After starting the heater in the car.
• If it becomes very humid inside the car.
Should this occur, the DVD/CD player may
malfunction. In this case, eject the disc and
leave the unit turned on for a few hours until
the moisture evaporates.
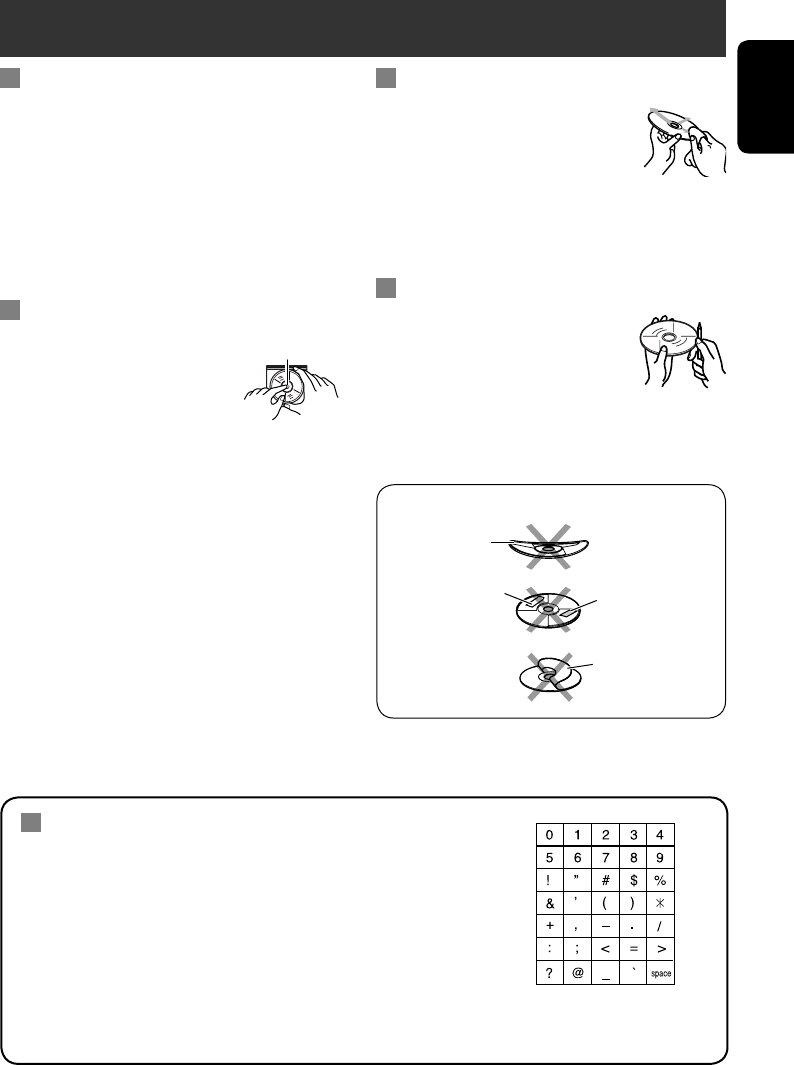
How to handle discs
When removing a disc from
its case, press down the center
holder of the case and lift the
disc out, holding it by the
edges.
• Always hold the disc by the edges. Do not
touch its recording surface.
When storing a disc into its case, gently insert
the disc around the center holder (with the
printed surface facing up).
• Make sure to store discs into the cases after
use.
To keep discs clean
A dirty disc may not play correctly.
If a disc does become dirty, wipe it
with a soft cloth in a straight line
from center to edge.
• Do not use any solvent (for example,
conventional record cleaner, spray, thinner,
benzine, etc.) to clean discs.
To play new discs
New discs may have some rough
spots around the inner and outer
edges. If such a disc is used, this
unit may reject the disc.
To remove these rough spots, rub the edges with
a pencil or ball-point pen, etc.
Warped disc
Sticker Sticker residue
Stick-on label
Do not use the following discs:
Center holder
Characters shown on the monitor
In addition to the roman alphabet (A – Z, a – z), the following
characters will be used to show the various information on the
monitor.
• You can also use the following characters to assign titles (see
page 36).
• To assign the titles to the TV stations, you can only use the
roman alphabet (A – Z, a – z) and numbers (0 – 9).
Numbers and symbols
EN45-48_KW-AVX700UN_f.indd 45EN45-48_KW-AVX700UN_f.indd 45 06.2.21 9:57:00 AM06.2.21 9:57:00 AM
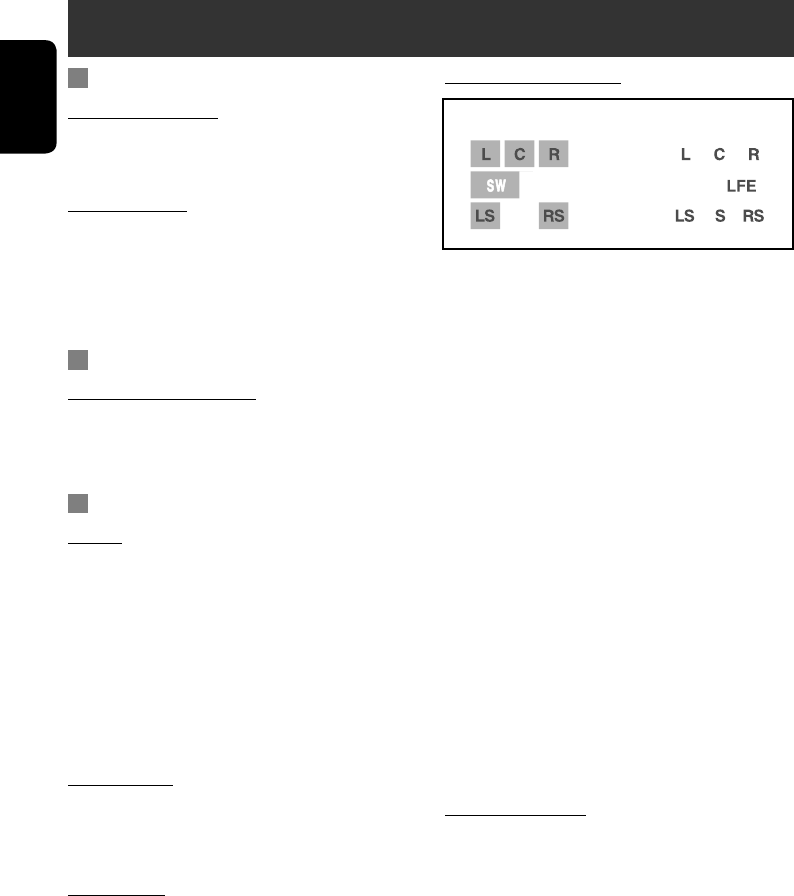
ENGLISH
46
More about this unit
General
Turning on the power
• By pressing SOURCE on the unit, you can
also turn on the power. If the source is ready,
playback starts.
Watching picture
• If you change the aspect ratio to “Just,” both
sides of the picture are extended horizontally
to fit the picture to the monitor size. It may
cause the center portion of the picture to look
distorted.
FM/AM
Storing stations in memory
• When SSM is over, received stations are
preset in No. 1 (lowest frequency) to No. 6
(highest frequency).
Disc
General
• In this manual, words “track” and “file” are
interchangeably used.
• This unit can also play back 8 cm discs.
• This unit can only play back audio CD
(CD-DA) files if different type of files are
recorded in the same disc.
• This unit can display only one-byte
characters. No other characters can be
correctly displayed.
Inserting a disc
• When a disc is inserted upside down, “Disc
Error Please Eject” appears on the monitor.
Eject the disc.
Ejecting a disc
• If the ejected disc is not removed within
15 seconds, the disc is automatically inserted
again into the loading slot to protect it from
dust. (Disc will not play this time.)
Speaker/signal indicators
• The speaker indicators—squares around “L,”
“R,” “LS,” and “RS” lights in light blue, when
the corresponding speakers are set to “Large”
or “Small” (☞ page 40).
• The center speaker indicator—square around
“C” lights in light blue, when the center
speaker is set to “Large” or “Small” and when
surround is activated.
• Sounds come out of the speakers whose
speaker indicators are lit on the monitor.
• The SW indicator lights up when “Sub
Woofer” is set to “On” (☞ page 40).
• The signal indicators indicate the incoming
signals—L (front left) / R (front right) / C
(center) / LFE (low frequency effect) / LS (left
surround) / RS (right surround) / S (monaural
surround).
• If the speaker is activated, but the signals
corresponding to the speaker are not coming
in, the signal indicators changes their color
from white to black to indicate no signals
coming in (therefore no sound comes through
the corresponding speakers).
Changing the source
• If you change the source with Dual Zone
deactivated, playback also stops without
ejecting the disc.
Next time you select “DISC” for the playback
source, disc play starts from where it has been
stopped previously.
Speaker indicators Signal indicators
EN45-48_KW-AVX700UN_f.indd 46EN45-48_KW-AVX700UN_f.indd 46 06.2.21 9:57:03 AM06.2.21 9:57:03 AM

ENGLISH
47
Playing MP3/WMA/WAV files
• This unit can play back files with the
extension code <.mp3>, <.wma>, or <.wav>
(regardless of the letter case—upper/lower).
• This unit can play back the files meeting the
conditions below:
– Bit rate: MP3/WMA: 32 kbps — 320 kbps
– Sampling frequency:
48 kHz, 44.1 kHz, 32 kHz (for MPEG1)
24 kHz, 22.05 kHz, 16 kHz (for MPEG2)
48 kHz, 44.1 kHz, 32 kHz (for WMA)
44.1 kHz (for WAV)
• This unit can play back files recorded in VBR
(variable bit rate).
Files recorded in VBR have a discrepancy in
elapsed time indication.
• This unit cannot play back the following files:
– MP3 files encoded with MP3i and MP3 PRO
format.
– MP3 files encoded with Layer 1/2.
– WMA files encoded with lossless,
professional, and voice format.
– WMA files which are not based upon
Windows Media® Audio.
– WMA files copy-protected with DRM.
– Files which have the data such as AIFF,
ATRAC3, etc.
Enjoying surround sounds
• If “Surround On” is selected, “MULTI”
surround playback automatically starts for
multi-channel encoded discs regardless of the
“Surround On” setting.
• You cannot activate surround for MPEG
multi-channel DVD Video and MPEG 2-
channel sources. If “Surround On” is selected,
stereo sounds are emitted only through the
front speakers. “FRONT 2CH” appears on the
disc information screen.
• With “Auto” selected for “Surround On,”
stereo playback will start for DVD, DTS-
CD, and MPEG 2-channel sources without
surround signal encoded. In this case, no
sound comes out of the subwoofer.
• When “FIX” appears on the disc information
screen, no sound comes out of the subwoofer.
Playing Recordable/Rewritable discs
• This unit can recognize a total of 3 500 files
and 250 folders (a maximum of 999 files per
folder).
• Use only “finalized” discs.
• This unit can play back multi-session discs;
however, unclosed sessions will be skipped
while playing.
• This unit can show the Tag data (Version 1.0,
1.1, 2.2, 2.3, or 2.4) for the files.
• This unit may be unable to play back some
discs or files due to their characteristics or
recording conditions.
Playing MPEG files
• This unit can play back MPEG files with the
extension code <.mpg> or <.mpeg>.
• The stream format should conform to MPEG
system/program stream.
• The file format should be MP@ML (Main
Profile at Main Level)/SP@ML (Simple Profile
at Main Level)/MP@LL (Main Profile at Low
Level).
• Audio streams should conform to MPEG1
Audio Layer-2.
Playing JPEG files
• It is recommended that you record a file at
640 x 480 resolution.
• This unit can play back baseline JPEG files.
Progressive JPEG files or lossless JPEG files
cannot be played.
EN45-48_KW-AVX700UN_f.indd 47EN45-48_KW-AVX700UN_f.indd 47 06.2.21 9:57:04 AM06.2.21 9:57:04 AM

ENGLISH
48
Playing SD cards
• The required recording format is FAT 16/32
and the recommended storage type is 8 MB to
512 MB.
iPod® or D. player operations
• When you turn on this unit, the iPod or
D. player is charged through this unit.
• The text information may not be displayed
correctly. This unit can display up to 40
characters.
Notice:
When operating an iPod or a D. player,
some operations may not be performed
correctly or as intended. In this case, visit the
following JVC web site:
For iPod users: <http://www.jvc.co.jp/
english/car/support/ks-pd100/index.html>
For D. player users: <http://www.jvc.co.jp/
english/car/support/ks-pd500/index.html>
Title assignment
• If you try to assign titles to more than 30 radio
stations, 30 TV stations, or 30 CDs, “NAME
FULL” flashes for a while. Delete unwanted
titles before assignment.
• Titles assigned to CDs in the CD changer can
also be shown if you play back the discs in the
built-in DVD/CD player and vice versa.
About sounds reproduced through the rear
terminals
• Speaker out/analog discrete output (F-
OUT/R-OUT/CENTER/SUBWOOFER):
Multi-channel signals are emitted for a
multi-channel encoded disc. (When Dual
Zone is activated, the same signal emitted
through 2nd AUDIO OUT plugs are
emitted for the main source “DISC.”)
• 2nd AUDIO OUT: 2-channel signal is
emitted when Dual Zone is activated.
When playing a multi-channel encoded
disc, multi-channel signals are downmixed
(except for some DVD Audio).
Menu settings
• If you change the “Amplifier Gain” setting
from “High Power” to “Low Power” while the
volume level is set higher than “30,” the unit
automatically changes the volume level to
“VOL 30.”
•
After you change any of “Menu Language/
Audio Language/Subtitle” settings, turn off then
on the power, and re-insert the disc (or insert
another disc) so that your setting takes effect.
• When you select “16:9” for a picture whose
aspect ratio is 4:3, the picture slightly changes
due to the process for converting the picture
width.
• Even if “4:3 PS” is selected, the screen size
may become “4:3 LB” for some discs.
• When selecting “None” for the center/rear
speakers and “Off” for subwoofer (Speaker
Size), surround setting is canceled and cannot
be adjusted.
• Center speaker size cannot be set to “Large”
if both the front and rear speakers are set to
“None” or “Small.”
EN45-48_KW-AVX700UN_f.indd 48EN45-48_KW-AVX700UN_f.indd 48 06.2.21 9:57:05 AM06.2.21 9:57:05 AM

ENGLISH
49
Troubleshooting
What appears to be trouble is not always serious. Check the following points before calling a service
center.
Symptoms Remedies/Causes
General
• No sound comes out of the center speaker. Center speaker is used only for surround playback. No sound
comes out for stereo playback.
• No sound comes out of the subwoofer while
playing in stereo.
This happens while playing some discs with “Auto” selected
for “Surround On” (☞ pages 21 and 42). Cancel surround.
• The monitor is not clear and legible for
watching the playback picture.
Sunshine from the windshield may cause this symptom.
Adjust “Bright” and “Contrast” of “Screen Control.” (☞
page 38).
• Remote controller does not work. Deactivate Dual Zone (☞ page 24).
(While Dual Zone is activated, the remote controller only
functions for operating the DVD/CD player.)
• “Position Error Push Open Key” appears on the
monitor.
The monitor panel angle has been forcibly adjusted, or
interrupted while opening or closing. Press OPEN/CLOSE.
• “Mecha Error Push Reset” appears on the
monitor, and the panel does not move.
Reset the unit (☞ page 2).
• “SD Loading Error” appears on the monitor. SD is not inserted fully. Fully insert it into the slot to close
the monitor panel.
• The unit does not work at all. Reset the unit (☞ page 2).
FM/AM
• SSM automatic presetting does not work. Store stations manually.
• Static noise while listening to the radio. Connect the antenna firmly.
Disc playback
• Disc can be neither recognized nor played . Eject the disc forcibly (☞ page 2).
• Disc cannot be ejected. Unlock the disc (☞ page 17).
• Recordable/Rewritable discs cannot be played
back.
• Tracks on the Recordable/Rewritable discs
cannot be skipped.
• Insert a finalized disc.
• Finalize the discs with the component which you used for
recording.
• “Disc Error Please Eject” appears on the
monitor.
Insert the disc correctly again.
• “Eject Error” or “Loading Error” appears on the
monitor.
Changing the source by pressing SOURCE will solve this
error.
• Sound and pictures are sometimes interrupted
or distorted.
• Stop playback while driving on rough roads.
• Change the disc.
• No playback picture appears on the monitor. Parking brake wire is not connected properly. (☞
Installation/Connection Manual.)
• The external monitor shows black and white
wavy pictures.
“NTSC/PAL” setting is not correct. Select an appropriate
setting (☞ page 39).
• “Region Error Please Eject” appears on the
monitor when you insert a DVD Video.
Region code is not correct (☞ page 5).
EN49-53_KW-AVX700UN_f.indd 49EN49-53_KW-AVX700UN_f.indd 49 06.2.21 9:58:17 AM06.2.21 9:58:17 AM

ENGLISH
50
Symptoms Remedies/Causes
MP3/WMA/WAV playback
• Disc cannot be played back. • Change the disc.
• Record the tracks using a compliant application in the
appropriate discs (☞ page 4).
• Add appropriate extension codes to the file names.
• Noise is generated. The track played back is not a playable file format. Skip to
another file.
• Tracks cannot playback as you have intended
them to play.
Playback order may differs from the one played back using
other players.
• Elapsed playing time is not correct. This sometimes occurs during playback. This is caused by
how the tracks are recorded.
• “Disc No Files Please Eject” appears on the
monitor.
Insert a disc that contains tracks of proper formats.
SD card playback
• Noise is generated. The track played back is not a playable file format. Skip to
another file.
• Tracks cannot playback as you have intended
them to play.
Playback order may differs from the one played back using
other players.
• “Now Reading” keeps flashing on the
monitor.
• Readout time varies depending on the SD card.
• Do not use too many hierarchy and folders.
• Turn off the power then on again.
• “SD No Files Please Eject” appears on the
monitor, then returns to the previous source.
Insert an SD card that contains tracks encoded in an
appropriate format.
• “Not Support” appears on the monitor and
track is skipped.
Track is unplayable.
• “SD Error Please Eject” appears on the
monitor, then returns to the previous source.
• SD card may be malfunctioning, or may not have been
formatted correctly.
• Do not pull out or attach the SD card while “Now
Reading” is shown.
CD changer
• “No Disc” appears on the monitor. Insert a disc into the magazine.
• “No Magazine” appears on the monitor. Insert the magazine.
• “No Files” appears on the monitor. Disc does not include playable files. Replace the disc with
playable files.
• “Reset 08” appears on the monitor. Connect this unit and the CD changer correctly and press the
reset button of the CD changer.
• “Reset 01” – “Reset 07” appears on the
monitor.
Press the reset button of the CD changer.
• The CD changer does not work at all. Reset the unit (☞ page 2).
EN49-53_KW-AVX700UN_f.indd 50EN49-53_KW-AVX700UN_f.indd 50 06.2.21 9:58:21 AM06.2.21 9:58:21 AM

ENGLISH
51
Symptoms Remedies/Causes
TV tuner
• TV tuner unit does not work at all. Press the reset button of the TV tuner unit.
• “Reset 08” appears on the monitor. This unit is not connected to the TV tuner unit correctly.
Connect it correctly then press the reset button of the TV
tuner unit.
• For KV-C1001/KV-C1008: TV stations cannot
be received.
“TV Channel Area” setting is not correct (☞ page 41).
iPod/D. player playback
• The iPod or D. player does not turn on or does
not work.
• Check the connecting cable and its connection.
•
Charge the battery.
• For D. player: Update the firmware version.
• The sound is distorted. Deactivate the equalizer either on this unit or the iPod/
D. player.
• “Disconnect” appears on the monitor.
Check the connecting cable and its connection.
• For iPod: Playback stops. The headphones are disconnected during playback. Restart
playback.
• No sound can be heard when connecting an
iPod nano.
Disconnect the headphones from the iPod nano.
• No sound can be heard.
• “ERROR 01” appears on the monitor when
connecting a D. player.
Disconnect the adapter from the D. player. Then, connect it
again.
• “NO FILES” or “NO TRACK” appears on the
monitor.
No tracks are stored. Import tracks to the iPod or D. player.
• “RESET 01” – “RESET 07” appears on the
monitor.
Disconnect the adapter from both this unit and iPod/D.
player. Then, connect it again.
• “RESET 08” appears on the monitor. Check the connection between the adapter and this unit.
• The iPod’s or D. player’s controls do not work
after disconnecting from this unit.
Reset the iPod or D. player.
AV-IN
• “No Signal” appears on the monitor. • Turn on the video component if it is not on.
• This unit is not connected to the video component
correctly. Connect it correctly.
Sound mode Preset equalizing values
60 Hz 150 Hz 400 Hz 1 kHz 2.5 kHz 6.3 kHz 15 kHz
Flat 00 00 00 00 00 00 00
Hard Rock +03 +03 +01 00 00 +02 +01
R&B +03 +02 +02 00 +01 +01 +03
Pop 00 +02 00 00 +01 +01 +02
Jazz +03 +02 +01 +01 +01 +03 +02
Dance +04 +02 00 –02 –01 +01 +01
Country +02 +01 00 00 00 +01 +02
Reggae +03 00 00 +01 +02 +02 +03
Classic +02 +03 +01 00 00 +02 00
User 1/2/3 00 00 00 00 00 00 00
EN49-53_KW-AVX700UN_f.indd 51EN49-53_KW-AVX700UN_f.indd 51 06.2.21 9:58:23 AM06.2.21 9:58:23 AM

ENGLISH
52
Specifications
AMPLIFIER
Maximum Power Output: Front/Rear: 50 W per channel
Continuous Power Output
(RMS):
Front/Rear: 20 W per channel into 4 Ω, 40 Hz to
20 000 Hz at no more than 0.8% total
harmonic distortion
Load Impedance: 4 Ω (4 Ω to 8 Ω allowance)
Equalizer Control Range: Frequencies: 60 Hz, 150 Hz, 400 Hz, 1 kHz, 2.5 kHz,
6.3 kHz, 15 kHz
Level: ±10 dB
Signal-to-Noise Ratio: 70 dB
Audio Output Level
(F-OUT/R-OUT/CENTER/
SUBWOOFER):
Line-Out Level/Impedance: 2.5 V/20 kΩ load (full scale)
Output Impedance: 1 kΩ
Color System: PAL/NTSC
Video Output (composite): 1 Vp-p/75 Ω
Other Terminals: Input: LINE IN, VIDEO IN, Antenna input
Output: 2nd AUDIO OUT
Others: CD changer, AV BUS
FM/AM TUNER
Frequency Range: FM: 87.5 MHz to 108.0 MHz
AM: 531 kHz to 1 602 kHz
FM Tuner Usable Sensitivity: 11.3 dBf (1.0 μV/75 Ω)
50 dB Quieting Sensitivity: 16.3 dBf (1.8 μV/75 Ω)
Alternate Channel Selectivity
(400 kHz):
65 dB
Frequency Response: 40 Hz to 15 000 Hz
Stereo Separation: 35 dB
AM Tuner Sensitivity/Selectivity: 20 μV/35 dB
Having TROUBLE with operation?
Please reset your unit
Refer to page of How to reset your unit
EN49-53_KW-AVX700UN_f.indd 52EN49-53_KW-AVX700UN_f.indd 52 06.2.21 9:58:26 AM06.2.21 9:58:26 AM
ENGLISH
53
DVD/CD
Signal Detection System: Non-contact optical pickup (semiconductor laser)
Frequency Response: DVD, fs=48 kHz: 16 Hz to 22 000 Hz
DVD, fs=96 kHz: 16 Hz to 44 000 Hz
VCD/CD: 16 Hz to 20 000 Hz
Dynamic Range: 93 dB
Signal-to-Noise Ratio: 95 dB
Wow and Flutter: Less than measurable limit
MONITOR
Screen Size: 6.5 inch wide liquid crystal display
Number of Pixel: 280 800 pixels: 400 (horizontal) × 3 × 234 (vertical)
Drive Method: TFT (Thin Film Transistor) active matrix format
Color System: PAL/NTSC
Aspect Ratio: 16:9 (wide)
Allowable Storage Temperature: –10°C to +60°C
Allowable Operating Temperature: 0°C to +40°C
GENERAL
Power Requirement: Operating Voltage: DC 14.4 V (11 V to 16 V allowance)
Grounding System: Negative ground
Allowable Operating Temperature: 0°C to +40°C
Dimensions (W × H × D): Installation Size (approx.): 178 mm × 100 mm × 160 mm
Panel Size (approx.): 170 mm × 93 mm × 29 mm
Mass (approx.): 2.6 kg (excluding accessories)
Design and specifications are subject to change without notice.
CAUTION: When ejecting the monitor, keep an open
space for the monitor to come out. If not, the monitor
may obstruct the steering wheel and gearshift lever
operations, as this may result in a traffic accident.
Required space for the monitor ejection
160 88.5
100
Unit: mm
EN49-53_KW-AVX700UN_f.indd 53EN49-53_KW-AVX700UN_f.indd 53 06.2.21 9:58:28 AM06.2.21 9:58:28 AM
INDONESIA
2
Bagaimana mereset unit anda
• Penyetelan-penyetelan pengaturan awal
anda akan terhapus juga.
Untuk keselamatan...
• Jangan menaikkan level volume terlalu tinggi
karena akan menghalangi suara dari luar, dan
membahayakan perjalanan anda.
• Hentikan mobil sebelum melakukan
pengoperasian yang rumit.
Suhu dalam mobil...
Jika anda telah memarkir mobil terlalu lama
dalam cuaca yang panas atau dingin, tunggu
hingga suhu dalam mobil menjadi normal
kembali sebelum mengoperasikan unit ini.
Terima kasih telah membeli produk JVC.
Harap membaca seluruh petunjuk dengan teliti sebelum mengoperasikan, untuk memastikan anda
memahami secara keseluruhan dan mendapatkan performansi terbaik dari unit ini.
PENTING UNTUK PRODUK-PRODUK LASER
1. PRODUK LASER KELAS 1
2. PERHATIAN: Jangan membuka penutup atas. Tidak ada bagian yang dapat diperbaiki oleh
pengguna di dalam unit tersebut; biarkanlah semua bagian yang diperbaiki untuk memenuhi
syarat perbaikan teknis.
3. PERHATIAN: Radiasi laser yang terlihat dan tidak terlihat ketika membuka dan salah sambung
atau gagal. Hindari sorotan pencahayaan yang langsung.
4.
REPRODUKSI DARI LABEL: LABEL PERHATIAN, TEMPATKAN DI LUAR UNIT TERSEBUT.
Bagaimana secara paksa mengeluarkan
sebuah disk
• Jika ini tidak berhasil, setel ulang alatnya.
NO EJECT?
EMERGENCY EJECT?
NO EJECT?
EMERGENCY EJECT?
IN02-06_KW-AVX700[UN]f.indd 2IN02-06_KW-AVX700[UN]f.indd 2 2/20/06 10:30:39 AM2/20/06 10:30:39 AM

INDONESIA
3
PERINGATAN:
Untuk mencegah kecelakaan dan
kerusakan
• JANGAN memasang unit pada tempat-tempat
dimana;
– ini dapat menghalangi pengoperasian roda
kemudi dan tuas gigi persneling.
– ini dapat menghalangi pengoperasian alat
pengaman seperti kantung udara.
– ini dapat menghalangi pandangan.
• JANGAN mengoperasikan unit sewaktu
mengemudi.
Jika Anda harus mengoperasikan unit sewaktu
mengemudi, pastikan Anda melihat ke depan
dengan hati-hati.
• Pengemudi tidak boleh menonton monitor selagi
mengemudi.
DAFTAR ISI
Pendahuluan ........................................... 4
• Sebelum mengoperasikan unit ........................ 5
PENGOPERASIAN
Pengoperasian dasar
• Panel kontrol ............................................. 7
• Remote kontrol (RM-RK240) ........................... 8
Mendengarkan radio ................................ 10
Pengoperasian disk .................................. 13
Pengoperasian Zona Dual
.......................... 24
Pengoperasian SD ..................................... 27
ALAT EKSTERNAL
Mendengarkan CD changer ........................ 29
Menonton TV ............................................ 31
Mendengarkan iPod®/D. player ................. 33
Mendengarkan komponen eksternal
lainnya ................................................. 34
PENGATURAN
Penyeragaman suara ................................ 35
Menetapkan judul untuk sumber ............... 36
Pengoperasian menu ................................ 37
Perawatan ............................................... 45
Lebih lagi tentang alat penerima ini .......... 46
Pemecahan Masalah ................................. 49
Spesifikasi-spesifikasi ............................... 52
PERHATIAN pada monitor:
• Monitor yang terpasang tetap di dalam
alat penerima ini telah dibuat dengan
ketelitian yang tinggi tetapi monitor ini
mungkin mempunyai titik-titik yang tidak
efektif. Hal ini tak dapat dihindarkan dan
bukan kesalahan fungsi.
• Jangan membiarkan monitor tersebut
pada sinar matahari langsung.
• Jangan menyentuh permukaan panel
kristal cair secara langsung.
• Ketika temperatur sangat dingin atau
sangat panas...
– Terjadi perubahan kimia di dalam,
menyebabkan kesalahan fungsi.
– Gambar-gambar mungkin tidak
tampak bersih atau mungkin bergerak
lambat. Gambar-gambar mungkin tidak
singkron dengan suara atau kualitas
gambar mengalami kemunduran dalam
beberapa lingkungan-lingkungan.
Produk ini tergabung dalam teknologi
perlindungan hak cipta yang dilindungi oleh
paten Amerika dan hak cipta harus disahkan
oleh Macrovision, dan diperuntukkan
untuk rumah dan hanya penggunaan-
penggunaan pemandangan terbatas yang
lain kalau sebaliknya harus disahkan oleh
Microvision. Membalik keahlian tehnik atau
pembongkaran adalah dilarang.
IN02-06_KW-AVX700[UN]f.indd 3IN02-06_KW-AVX700[UN]f.indd 3 2/21/06 12:28:31 PM2/21/06 12:28:31 PM
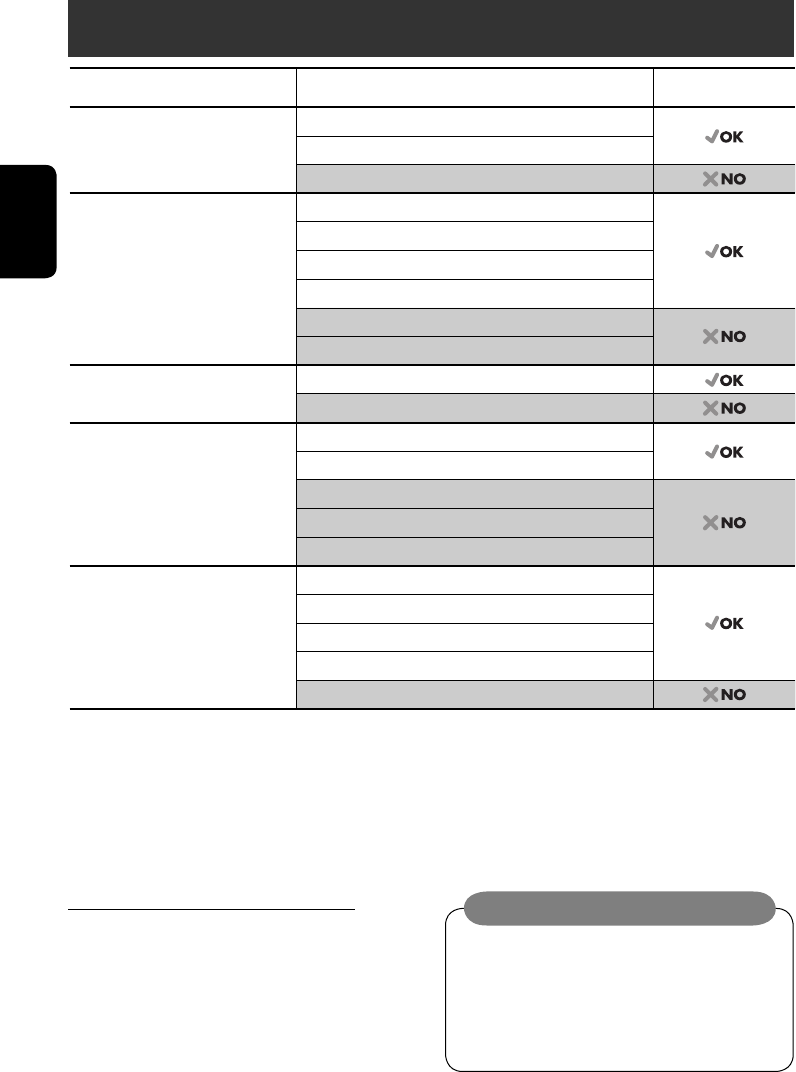
INDONESIA
4
Pendahuluan
Perhatikan untuk putar ulang DualDisc
Sisi yang non-DVD dari sebuah “DualDisc”,
tidak tunduk pada standar “Compact Disc
Digital Audio”. Oleh karena itu, penggunaan
sisi Non-DVD dari sebuah DualDisc pada
produk ini tidak disarankan.
Tipe disk Format perekaman, jenis file, dsb. Dapat diputar
DVD DVD Video
DVD-Audio
DVD-ROM
DVD dapat direkam/dapat
ditulis ulang
(DVD-R*1/-RW, +R/+RW*2)
• Sesuai standar format UDF
bridge
• DVD-RAM tidak bisa diputar.
DVD Video
MPEG1/MPEG2
JPEG
MP3/WMA/WAV
DivX/MPEG4
DVD-VR, +VR
Dual Disc Bagian DVD
Bagian non-DVD
CD/VCD CD audio/Teks CD (CD-DA), DTS-CD
VCD (Video CD)
SVCD (Super Video CD)
CD-ROM
CD-I (CD-I Ready)
CD dapat direkam/dapat
ditulis ulang
(CD-R/-RW)
• Sesuai standar ISO 9660 level 1,
level 2, Romeo, Joliet
CD-DA
MPEG1/MPEG2
JPEG
MP3/WMA/WAV
DivX/MPEG4
Perhatian pada pengaturan volume:
Disk-disk menghasilkan sangat kecil noise
(derau) dibandingkan dengan sumber yang
lain. Kecilkan volume sebelum disk untuk
menghindari kerusakan speaker-speaker
dengan penambahan mendadak dari level
keluaran.
*1 DVD-R yang direkam dalam format multi-border, juga dapat diputar (kecuali disk lapis ganda).
*2 Anda dapat memutar kembali disk +R/+RW (hanya format video DVD) yang sudah dirampungkan. Namun, penggunaan disk
lapis ganda +R tidak direkomendasikan.
• “DVD Logo” adalah merek dagang dari format DVD/Badan Hukum Lisensi Logo yang terdaftar di Amerika, Jepang dan negara-
negara lain.
IN02-06_KW-AVX700[UN]f.indd 4IN02-06_KW-AVX700[UN]f.indd 4 2/20/06 10:30:47 AM2/20/06 10:30:47 AM
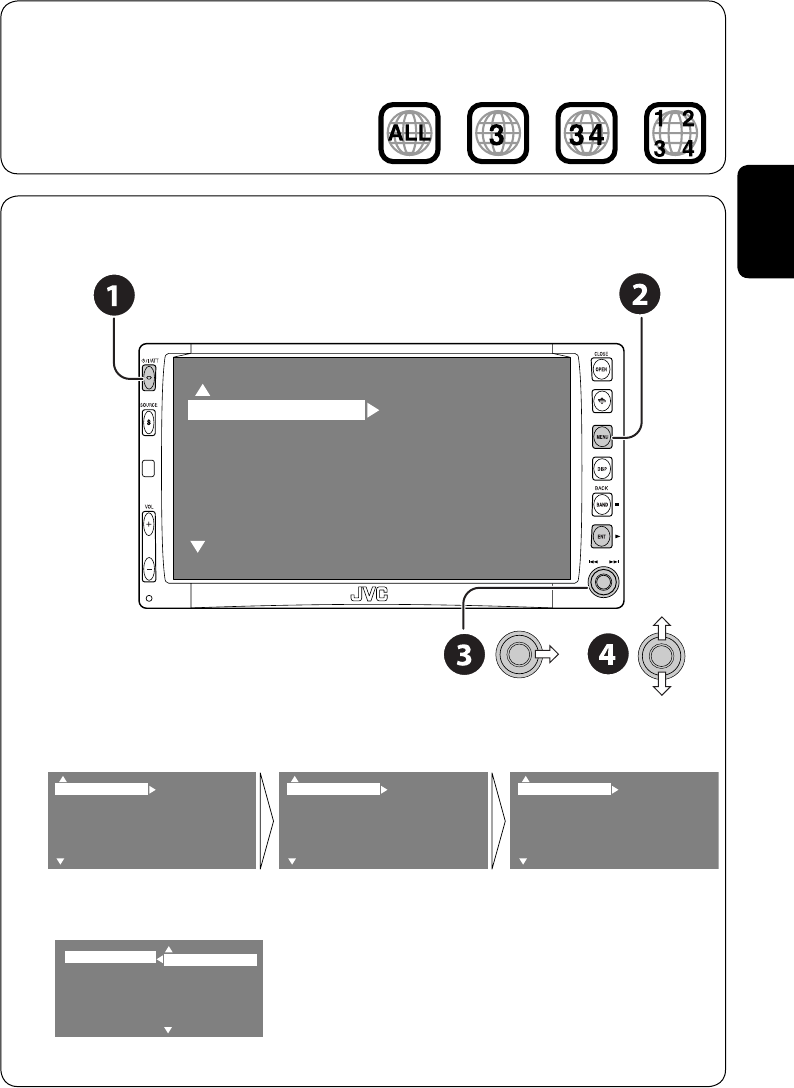
INDONESIA
5
Sebelum mengoperasikan unit—Batalkan demo tampilan dan setel jam
• Lihat juga halaman 37.
~ Menghidupkan power.
Ÿ Tampilkan <MENU>.
! Pilih <Setup> ] <Display> ] <Demonstration>, kemudian aktifkan layar <Demonstration>.
⁄ Batalkan demo tampilan.
Pilih “Off”.
Catatan pada Kode Region:
Pemutar-pemutar DVD dan disk-disk DVD
Video memiliki nomor Kode Region mereka
sendiri. Radio ini hanya dapat memutar
ulang disk-disk DVD yang kode nomor
Regionnya termasuk “3”.
Jika anda menyisipkan sebuah disk DVD
Video yang tidak benar Kode Regionnya
“Region Error Please Eject” muncul pada
monitor.
Display
Clock
Disc Setup 1
Disc Setup 2
Tuner
Input
Display
Clock
Disc Setup 1
Disc Setup 2
Tuner
Input
Demonstration
Wall Paper
Level Meter
Scroll
Tag Display
Dimmer
Off
On
Demonstration
Wall Paper
Level Meter
Scroll
Tag Display
Dimmer
Setup
Surround
Equalizer
Sound
Mode
List
Demonstration
Wall Paper
Level Meter
Scroll
Tag Display
Dimmer
Off
On
Setup
Surround
Equalizer
Sound
Mode
List
Display
Clock
Disc Setup 1
Disc Setup 2
Tuner
Input
MENU
Bersambung ke halaman berikutnya
IN02-06_KW-AVX700[UN]f.indd 5IN02-06_KW-AVX700[UN]f.indd 5 2/20/06 10:30:47 AM2/20/06 10:30:47 AM
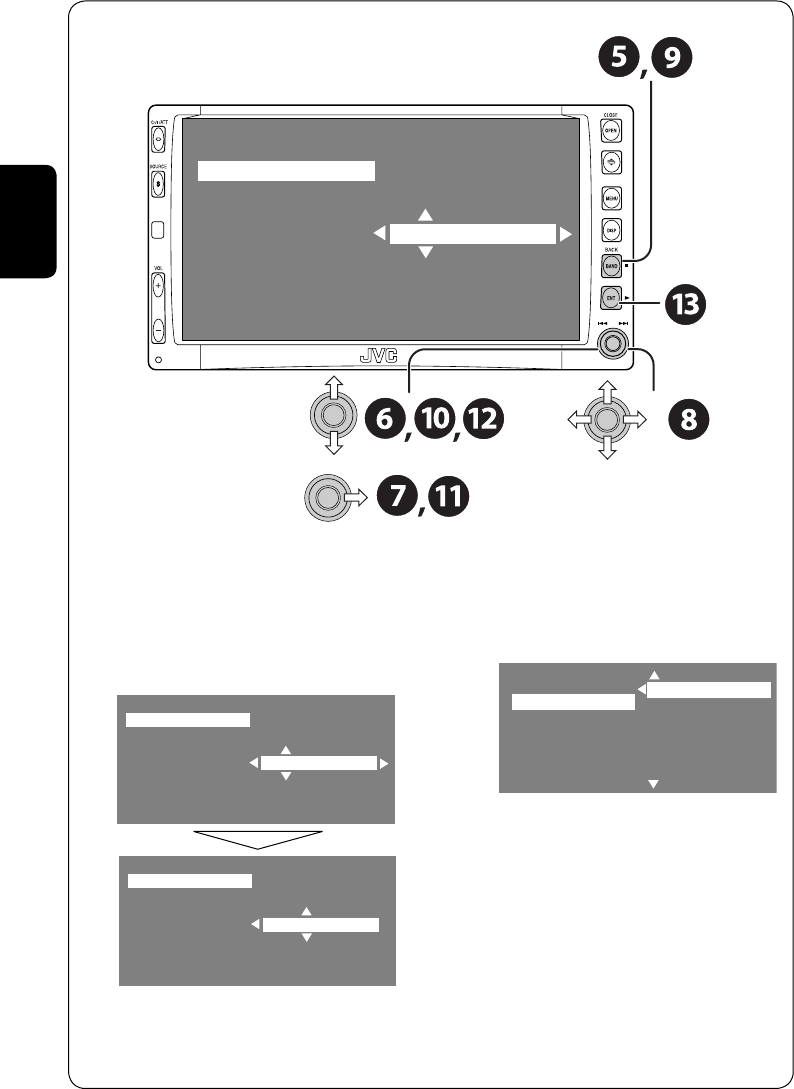
INDONESIA
6
$ Kembali ke menu <Clock>.
› Pilih <12Hours/24Hours>.
% Aktifkan layar <12Hours/24Hours>.
fi Pilih salah satu, sistem 12-jam atau
24-jam.
^ Prosedur selesai.
@ Kembali ke menu <Setup>.
¤ Pilih <Clock> ]<Time Set>.
# Aktifkan layar <Time Set>.
‹ Atur waktu jam.
Time Set
12Hours/24Hours
1:00 AM
Time Set
12Hours/24Hours
3:45 PM
Time Set
12Hours/24Hours 12 Hours
24 Hours
Time Set
12Hours/24Hours
1:00 AM
IN02-06_KW-AVX700[UN]f.indd 6IN02-06_KW-AVX700[UN]f.indd 6 2/20/06 10:30:48 AM2/20/06 10:30:48 AM
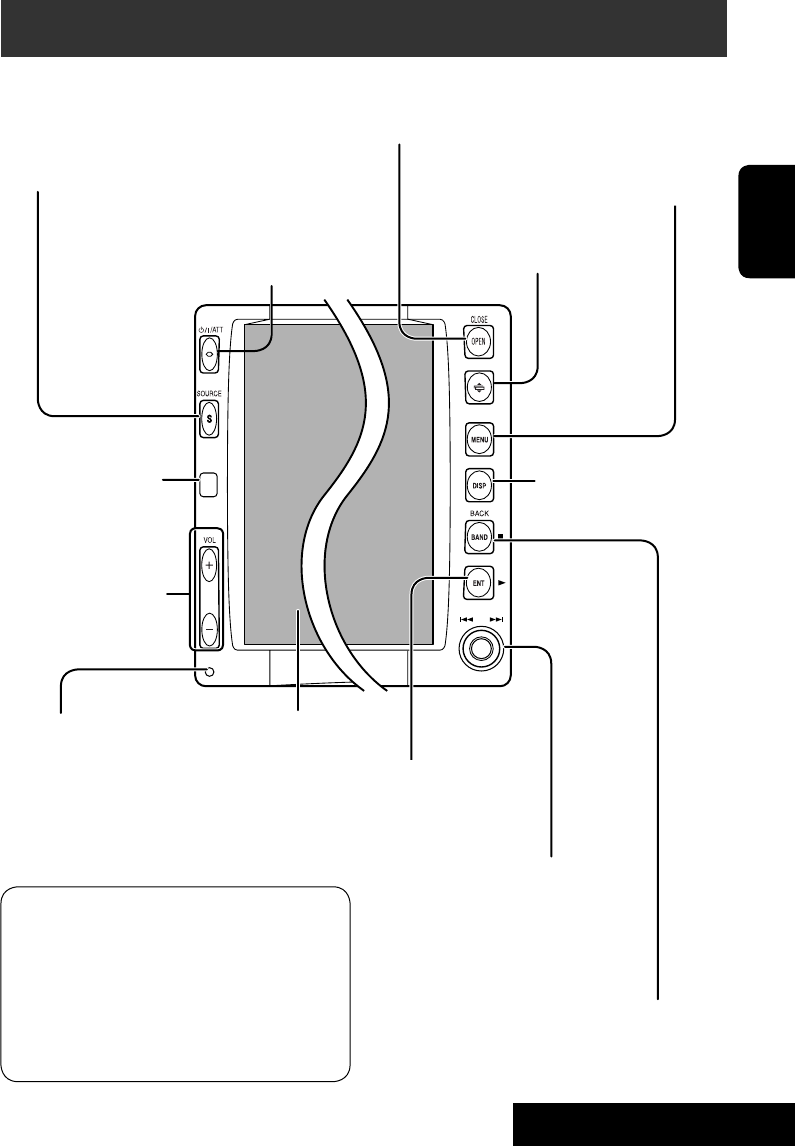
PENGOPERASIAN
7
INDONESIA
Pengoperasian dasar — Panel kontrol
• TUNER: Memilih jalur.
• DISC: Menghentikan pemutaran.
• Pada menu: Kembali.
Memilih sumber.
TUNER = DISC (DVD/VCD/CD) = SD =CD-CH, iPod, D.PLAYER,
atau EXT-IN = TV = AV-IN =(kembali ke permulaan)
• Anda tidak dapat memilih sumber ini jika
sumber tersebut tidak siap.
Jendela tampilan
Buka dan tutup panel monitor.
• Apabila panel monitor terbuka, Anda dapat
memasukkan disk dan kartu SD.
*1 Layar <MENU>
Anda dapat menggunakan menu untuk
menata berbagai pengaturan.
Layar <MENU> terdiri atas sub-menu
berikut ini—Setup/Surround/Equalizer/Sound/
Mode/List/DualZone.
• Untuk lebih jelas, lihat halaman 37 sampai
44.
• Menghidupkan power.
• Matikan daya [Tahan].
• Melemahkan suara (jika daya dalam posisi on)
Mengganti tampilan
informasi.
• TUNER: Cari stasiun-stasiun.
• DISC: Pilih bab-bab/trek-trek.
• Pada menu: Pilih item.
• iPod/D.PLAYER: Pilih trek-trek.
• TV: Pilih stasiun TV.
Mengubah sudut panel monitor.
Sensor remote
kontrol
Setel volume.
Reset alat penerima.
• Hanya gunakan apabila
sistem internal tidak berfungsi
dengan baik.
Tampilkan atau hapus <MENU>*1.
• DISC: Mulai memutar.
• Pada menu: Masuk.
IN07-12_KW-AVX700[UN]f.indd 7IN07-12_KW-AVX700[UN]f.indd 7 2/20/06 10:31:15 AM2/20/06 10:31:15 AM
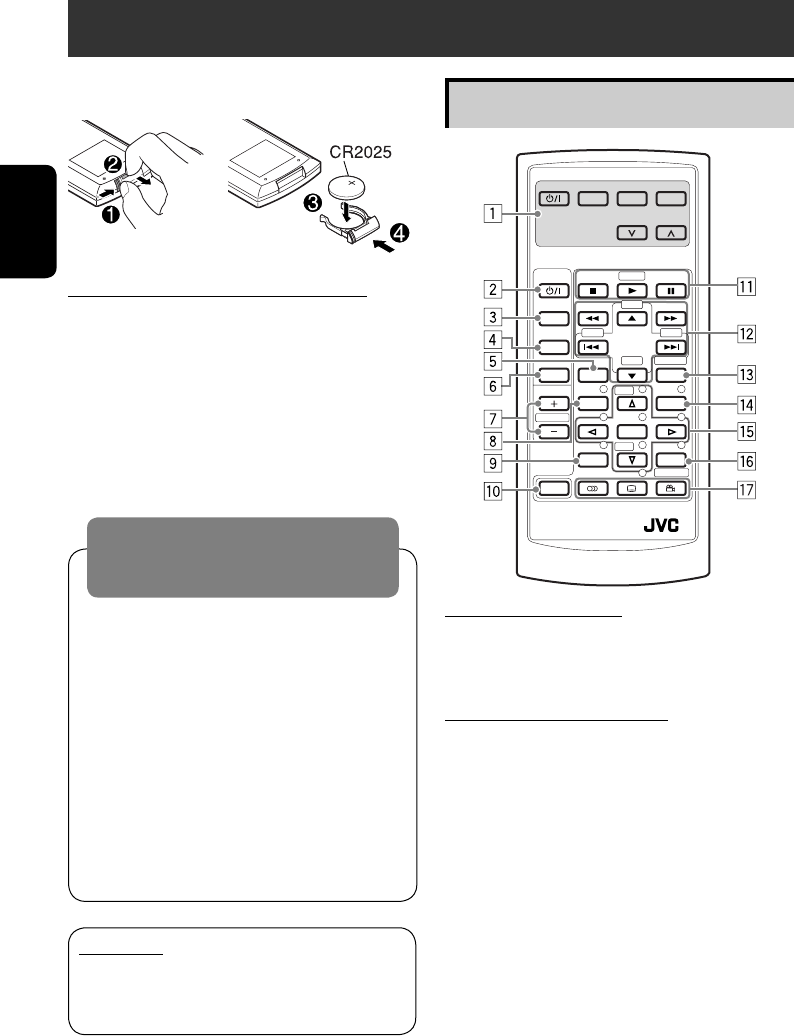
8
INDONESIA
MONITOR CONTROL
1 Tombol-tombol kontrol monitor
• Digunakan untuk monitor JVC—
KV-MR9010 atau KV-MH6510.
DVD/RECEIVER CONTROL
2 • Menghidupkan daya.
• Melemahkan suara jika daya dalam
posisi on.
• Mematikan power (daya) jika ditekan
terus (sewaktu power menyala).
3 Memilih sumber.
4 Memilih jalur-jalur FM/AM.
5 Mengubah rasio aspek gambar pemutaran
ulang.
6 Mengaktifkan atau menonaktifkan Zona
Dual.
7 Menyetel level volume.
• Juga berfungsi sebagai tombol 2nd VOL
apabila ditekan dengan tombol SHIFT
(☞ halaman 24)
.
8*1 • DVD: Tunjukkan menu disk.
• VCD: Memulai pemutaran PBC
(☞ halaman 19)
.
Pengoperasian dasar — Remote kontrol (RM-RK240)
Memasang baterai koin litium (CR2025)
Sebelum menggunakan remote kontrol:
• Arahkan remote kontrol secara langsung ke
sensor remote kontrol pada unit.
• JANGAN memaparkan sensor jarak jauh ke
cahaya yang sangat terang (cahaya matahari
langsung atau pencahayaan artifisial).
Peringatan:
Untuk mencegah kecelakaan dan
kerusakan
• Jangan memasang baterai selain CR2025
atau yang setara.
• Simpan baterai di tempat yang tidak dapat
dijangkau anak-anak.
• Jangan mengisi ulang, hubung pendek,
ambil bagian, atau memanaskan baterai
atau menempatkannya dalam api.
• Jangan meninggalkan baterai dengan
bahan-bahan dari logam.
• Jangan mendorong baterai dengan
penjepit atau alat yang sejenis.
• Bungkus baterai dengan pita atau isolasi
ketika membuang atau menyimpannya.
PENTING:
Jika Zona Dual telah diaktifkan (☞ halaman
24), maka remote kontrol hanya berfungsi
untuk pengoperasian DVD/CD Player.
Elemen-elemen utama dan fitur-fitur
MODE MENU
ASPECT
ZOOM
ATT
SOURCE
DISC+
DISC–
DVD / RECEIVER CONTROL
EXTRA MONITOR CONTROL
+10
–10
123
456
78
0
9
–100
BAND
OSD
MENUTOP M
SETUP
RM-RK240
RETURN
ENTER
DUAL
SHIFT
VOL
2nd VOL
+100
DIRECT
ASPECT
SURROUND
IN07-12_KW-AVX700[UN]f.indd 8IN07-12_KW-AVX700[UN]f.indd 8 2/20/06 10:58:42 AM2/20/06 10:58:42 AM
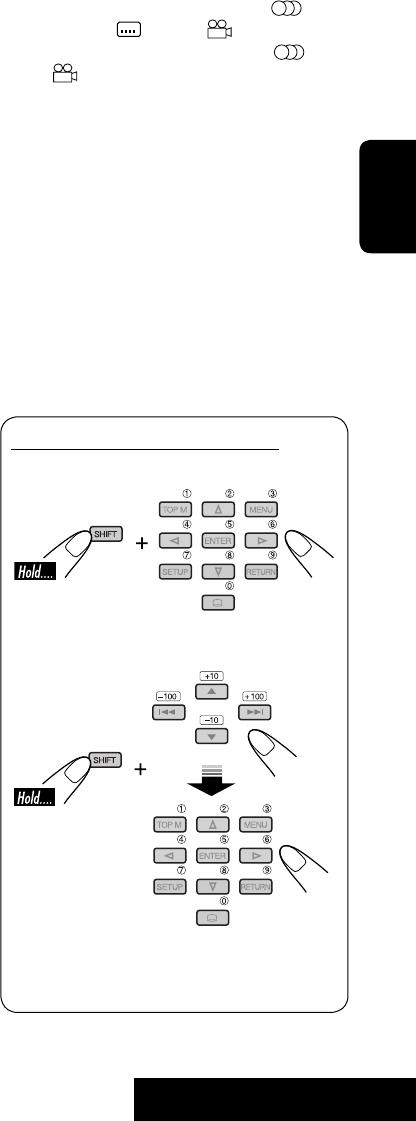
PENGOPERASIAN
9
INDONESIA
9*1 Jangan digunakan sebagai tombol SETUP
untuk alat penerima ini.
p Tombol SHIFT
q 7 (berhenti), 3 (putar), 8 (Jeda)
• 3 (putar) berfungsi juga sebagai tombol
ZOOM ketika ditekan dengan tombol
SHIFT (☞ halaman 20).
•
Tidak berlaku untuk pengoperasian CD
changer.
w*2 Untuk pengoperasian disk lebih
lanjut:
• 5 / ∞
DVD: Memilih title [judul].
Disk lainnya kecuali CD:
Memilih folder-folder.
• 4 / ¢: melompat mundur/
melompat maju
• 1 / ¡: pencarian mundur/
pencarian maju
Operasi radio FM/AM/TV:
• 5 / ∞:
Mengganti stasiun yang telah diatur
sebelumnya.
• 4 / ¢:
– Berfungsi untuk mencari stasiun-
stasiun.
Tekan dengan singkat: Pencarian
otomatis
Tekan dan tahan: Pencarian manual
Untuk pengoperasian Apple iPod®/
JVC D. player:
• ∞: Menunda/menghentikan atau
melanjutkan pemutaran.
• 5: Masuk ke menu utama (selanjutnya,
5/∞/4 / ¢ berfungsi sebagai
tombol pemilihan menu).*3
• 4 / ¢
(dalam mode pemilihan menu)
– Memilih item jika ditekan sekilas.
(Kemudian, tekan ∞ untuk
mengkonfirmasi pilihan).
– Meloncati 10 item sekaligus jika ditekan
terus.
e Menunjukkan bar pada-layar.
• Juga berfungsi sebagai tombol DIRECT
apabila ditekan dengan tombol SHIFT
(☞ halaman 18 hingga 20).
r*1 • DVD: Tunjukkan menu disk.
• VCD: Memulai pemutaran PBC
(☞ halaman 19)
.
t*1 • Melakukan pemilihan/pengaturan.
• ~: Lompati atau majukan 5 menit
untuk MPEG.
•
Tombol DISC +/–: Ganti disk ke “CD-CH”.
y*1 Tombol RETURN
u • DVD: Memilih bahasa audio ( ),
subtitle ( ), sudut ( ).
• VCD: Memilih saluran audio ( ).
•
(sudut) berfungsi juga sebagai
tombol SURROUND ketika ditekan
dengan tombol SHIFT (☞halaman 21).
*1 Berfungsi sebagai tombol angka apabila
ditekan dengan tombol SHIFT.
– TUNER: Memilih stasiun preset.
– DISC: Pilih chapter/title/group/folder/track.
*2 Berfungsi sebagai tombol +10/–10/+100/–100
apabila ditekan dengan tombol SHIFT.
*3 5 : Kembali ke menu sebelumnya.
∞ : Mengkonfirmasi pemilihan.
Bagaimana memilih sebuah nomor
Untuk memilih sebuah nomor dari 0 – 9:
Untuk memilih nomor yang lebih besar dari 9:
• Tombol +100/–100 digunakan hanya untuk
mencari nomor trek yang lebih besar dari
99.
IN07-12_KW-AVX700[UN]f.indd 9IN07-12_KW-AVX700[UN]f.indd 9 2/20/06 10:31:27 AM2/20/06 10:31:27 AM
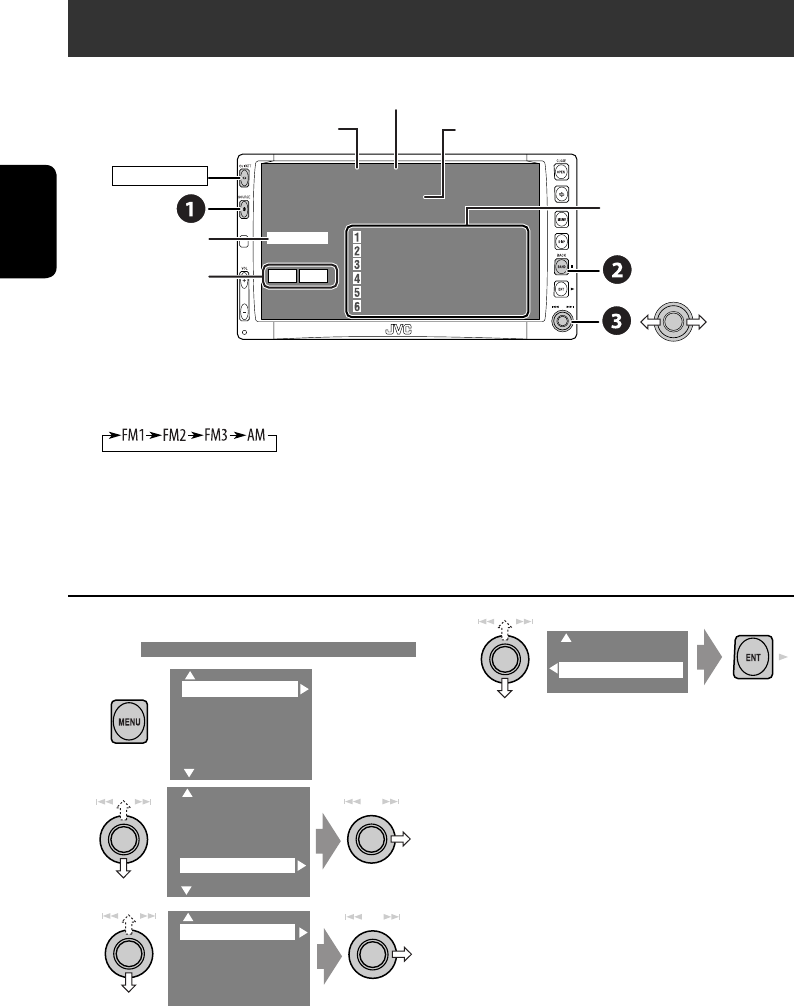
10
INDONESIA
FM1 P1
ABC Radio
87.5 MHz
TUNER
3: 45 PM
FLAT
POWER]ON
87.5 MHz ABC Radio
88.3 MHz DEF FM
88.7 MHz GHI Radio
91.5 MHz JVC FM
93.1 MHz JKL Radio
95.3 MHz MNO FM
MO LO
Ketika sebuah siaran stereo FM sulit
diterima
1
2
3
Mendengarkan radio
~ Pilih “TUNER”.
Ÿ Memilih jalur.
! Mencari stasiun—Auto Search [Cari Otomatis].
• Manual Search [Pencarian Manual]: Tahan ke kiri atau ke kanan sampai muncul “Manual
Search” [Cari Manual] di layar, kemudian tekan berulang-ulang.
• Indikator ST menyala ketika menerima sebuah siaran stereo FM dengan kekuatan sinyal yang
cukup.
4
Penerimaan membaik, tetapi efek stereo
akan hilang.
• Lampu indikator MO menyala.
Untuk menyimpan efek stereo, pilih “Off”
pada langkah 4.
Tentukan nama stasiun. Jika tidak ada nama yang
ditentukan, muncul “NO NAME”.
No. Prasetel
Jalur
☞ halaman 35.
Indikator tuner
Setup
Surround
Equalizer
Sound
Mode
List
Setup
Surround
Equalizer
Sound
Mode
List
Off
On
Daftar prasetel—frekuensi/
tentukan nama stasiun
Mono
DX/Local
SSM
Title Entry
IN07-12_KW-AVX700[UN]f.indd 10IN07-12_KW-AVX700[UN]f.indd 10 2/20/06 10:31:29 AM2/20/06 10:31:29 AM
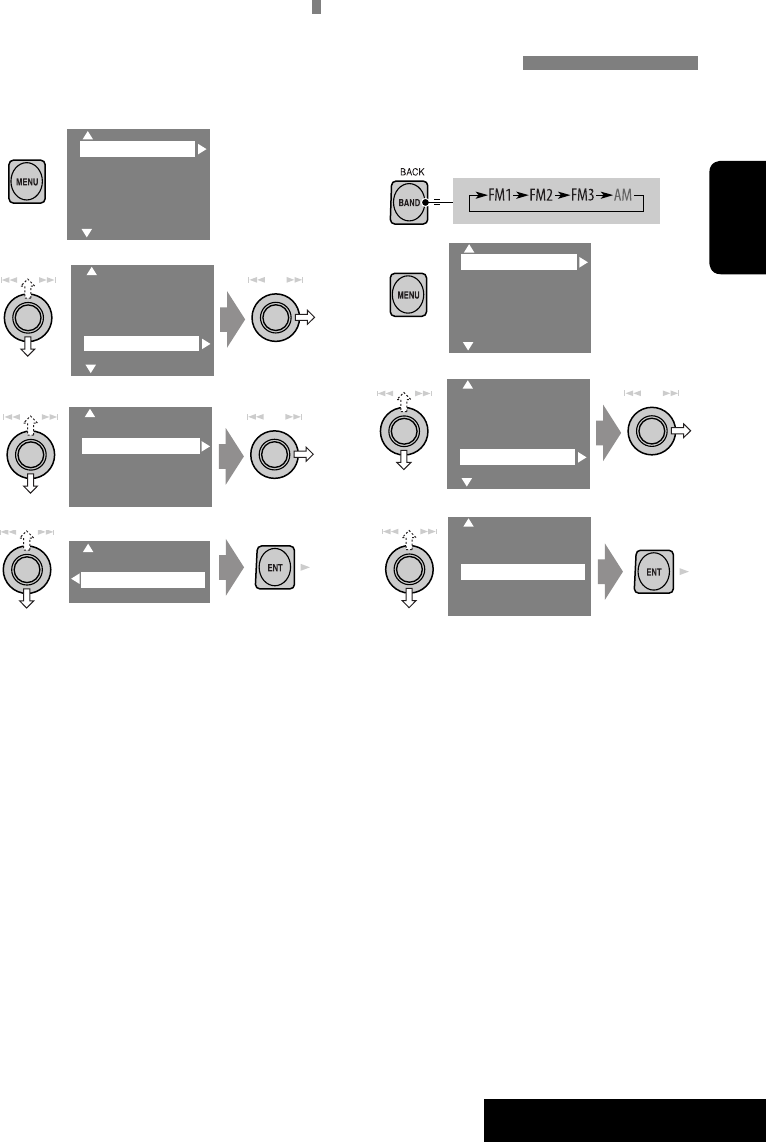
PENGOPERASIAN
11
INDONESIA
Mempreset (Mengatur awal) secara
otomatis stasiun FM—SSM (Memori
Urutan Stasiun-kuat)
Fungsi ini hanya untuk jalur FM.
Anda dapat preset (mengatur awal) enam
stasiun untuk setiap jalur.
1
2
3
4
Stasiun-stasiun FM lokal dengan sinyal-
sinyalterkuat dicari dan disimpan secara
otomatis dalam jalur FM tersebut.
Menala stasiun yang sinyalnya cukup kuat
Fungsi ini hanya untuk jalur FM.
Setelah Anda mengaktifkan fungsi ini (pilih
“Local”), fungsi ini selalu menjadi aktif apabila
mencari stasiun FM.
1
2
3
4
Hanya stasiun-stasiun dengan kekuatan
sinyal yang cukup, yang akan terdeteksi.
• Indikator DX menghilang kemudian
indikator LO menyala.
Mono
DX/Local
SSM
Title Entry
Setup
Surround
Equalizer
Sound
Mode
List
Setup
Surround
Equalizer
Sound
Mode
List
DX
Local
Setup
Surround
Equalizer
Sound
Mode
List
Setup
Surround
Equalizer
Sound
Mode
List
Mono
DX/Local
SSM
Title Entry
IN07-12_KW-AVX700[UN]f.indd 11IN07-12_KW-AVX700[UN]f.indd 11 2/20/06 10:31:30 AM2/20/06 10:31:30 AM
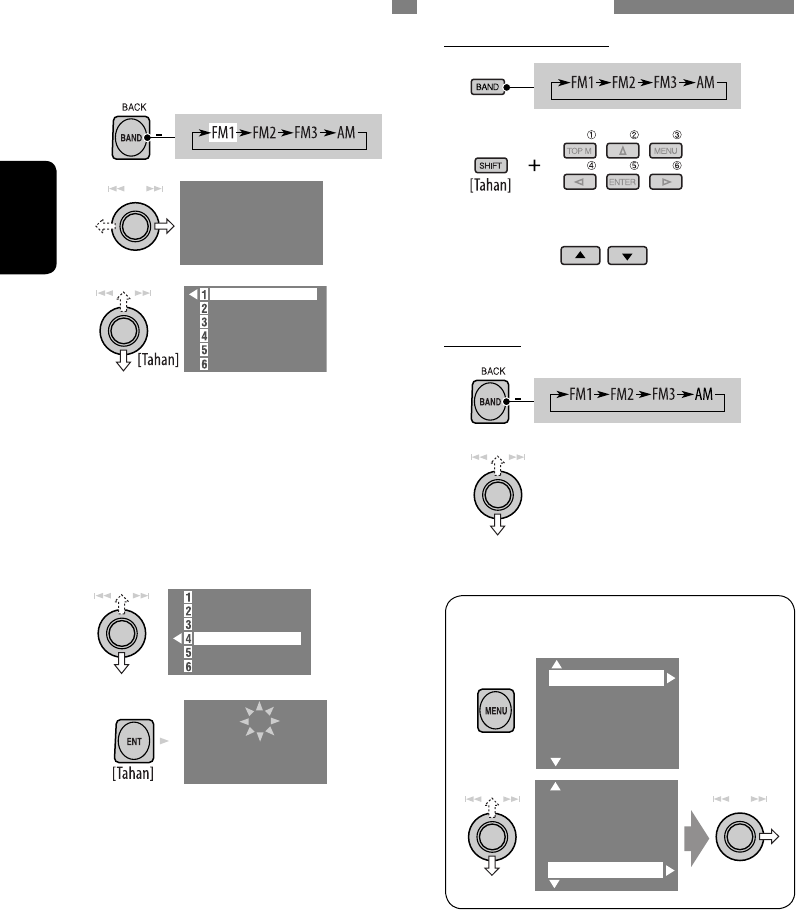
12
INDONESIA
Memilih stasiun preset
Pada pengontrol jauh:
1
2
atau
Pada unit:
1
2
• Daftar Prasetel juga dapat diakses melalui
<MENU> = <List>.
Setup
Surround
Equalizer
Sound
Mode
List
Setup
Surround
Equalizer
Mode
List
Mempreset (Mengatur awal) secara manual
Contoh: Menyimpan stasiun FM dari 92.5 MHz
ke dalam pengaturan sebelumnya
nomor 4 dari jalur FM1.
1
2
3
• Setiap kali Anda mendorong kenop
ke atas atau ke bawah, Anda dapat
mengubah jalur FM.
• Preset List [Daftar Prasetel] juga dapat
diakses melalui <MENU> = <List>
(☞ kanan).
4 Pilih nomor yang telah diatur
sebelumnya.
5
87.5 MHZ
88.3 MHz
88.7 MHz
91.5 MHz
93.1 MHz
95.3 MHz
FM1
NO NAME
92.5 MHz
FM1 P4
NO NAME
92.5 MHz
87.5 MHZ
88.3 MHz
88.7 MHz
91.5 MHz
93.1 MHz
95.3 MHz
IN07-12_KW-AVX700[UN]f.indd 12IN07-12_KW-AVX700[UN]f.indd 12 2/20/06 10:31:31 AM2/20/06 10:31:31 AM
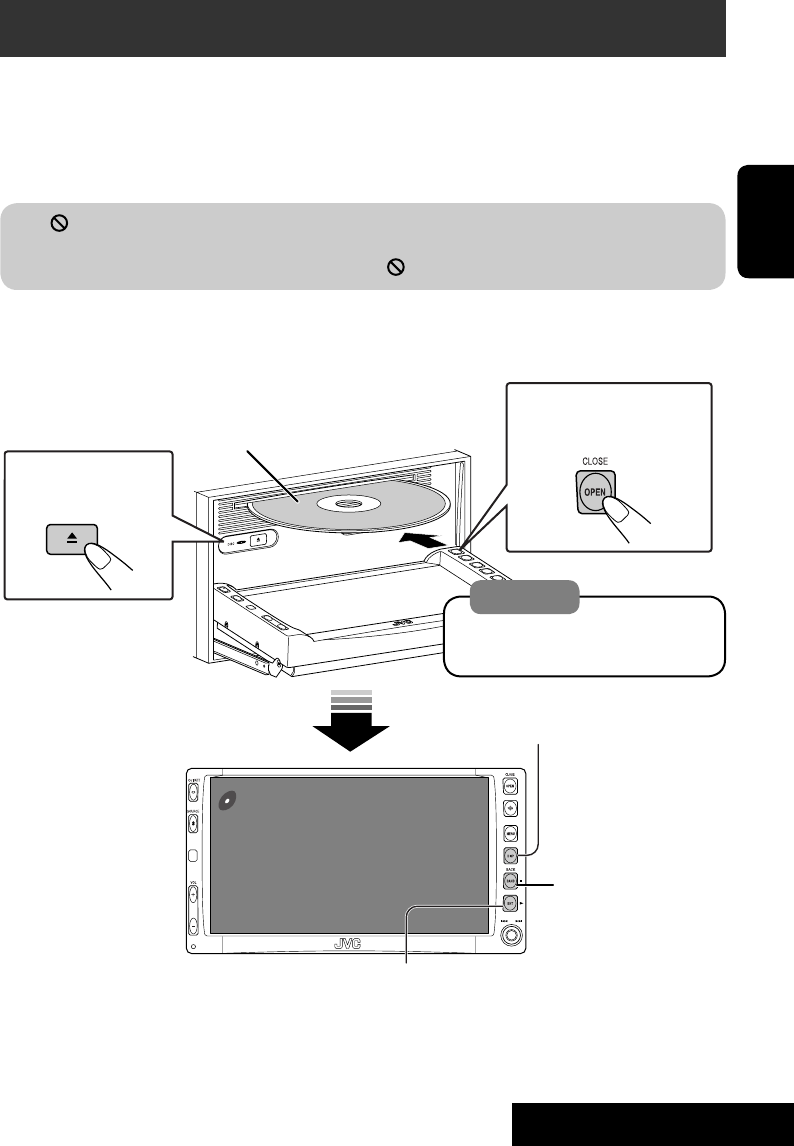
PENGOPERASIAN
13
INDONESIA
Pengoperasian disk
Tipe disk secara otomatis terdeteksi dan mulai memutar ulang secara otomatis (untuk beberapa
disk: mulai secara otomatis tergantung program di dalamnya).
Jika disk tidak memiliki menu disk apa pun, semua trek akan diputar berulang-ulang sampai Anda
mengubah sumber atau mengeluarkan disk.
Jika “ ” muncul pada monitor, berarti radio tersebut tidak dapat menerima pengoperasian yang
anda coba lakukan.
• Dalam beberapa kasus, tanpa mempertunjukkan “ ” pengoperasian tidak akan diterima.
Now Reading...
DISC
3: 45 PM
Sisi label
Buka/tutup panel
monitor
Untuk mengeluarkan
sebuah disk
3: Mulai pemutaran jika perlu.
(Untuk DVD: peninjauan 10 detik jika ditekan sewaktu pemutaran.)
DISP: Tekan jika tidak ada gambar pemutaran ulang
muncul, tapi layar informasi disk
(☞ halaman 14 dan 15) ditampilkan.
Buka panel monitor dan masukkan disk.
Putar ulang mulai secara otomatis.
7: Berhemti.
Perhatian:
Jangan menaruh jari Anda di
belakang panel monitor.
IN13-28_KW-AVX700[UN]f.indd 13IN13-28_KW-AVX700[UN]f.indd 13 2/20/06 10:28:07 AM2/20/06 10:28:07 AM
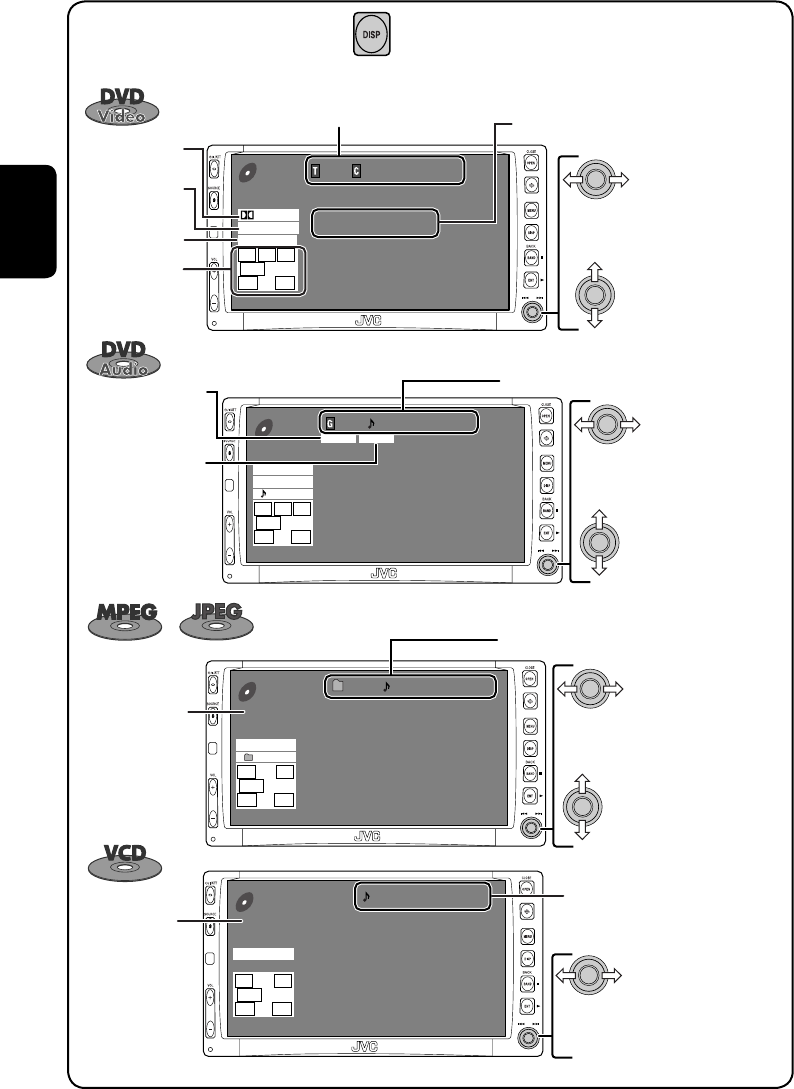
14
INDONESIA
Sewaktu memutar disk berikut, tekan .
01 01 0:00:12
48kHz 24Bit 3/2.1
DVD
VIDEO
MULTI
L C R
SW LFE
LS RS
DIGITAL
CHAP.RPT
3: 45 PM
Tekan: Memilih chapter
Tahan: Pencarian mundur/maju*1
Modus
Surround/sound
Format audio
No. Judul/No. Chapter/Waktu putar Saluran sinyal Sampling frequency/Bit rate/
Recorded
Tekan: Memilih trek
Tahan: Pencarian mundur/maju*1
Mode putar ulang
01 01 0:00:12
96kHz 24Bit 3/2.1
DVD
AUDIO
3: 45 PM
MULTI
L C R
SW LFE
LS RS
PPCM
BONUS B.S.P
REPEAT
Tekan: Memilih trek
Tahan: Untuk MPEG: Pencarian
mundur/maju*2
01 01 0:00:12
Current folder Name
Current file name.mpg
Next file name.mpg
Next file name.mpg
Next file name.mpg
Next file name.mpg
Next file name.mpg
Next file name.mpg
CD
MPEG
3: 45 PM
FLAT
REPEAT
L R
SW
LS RS Tekan: Memilih folder
Tahan: Tampilkan Folder List
[Daftar Folder]
Tipe disk
• Setiap kali Anda menekan tombol, layar
informasi tentang gambar dan disc yang
diputar (dengan/tanpa level meter) muncul
bergantian.
01 0:00:12
VCD
PBC
3: 45 PM
FLAT
L R
SW
LS RS Tekan: Memilih trek
Tahan: Pencarian mundur/maju*1
No. Trek/Waktu putar
Tekan: Pilih grup
Indikator-indikator
speaker/sinyal
(☞ halaman 46) Tekan: Memilih judul
Indikator PBC
menyala apabila
PBC sedang
digunakan.
No. Grup/No. Trek/Waktu putar
Untuk MPEG: No. Folder/No. Trek/Waktu putar
Untuk JPEG: No. Folder/No. Trek
Indikator BONUS
(☞ halaman 20)
Indikator B.S.P.
(☞ halaman 20)
IN13-28_KW-AVX700[UN]f.indd 14IN13-28_KW-AVX700[UN]f.indd 14 2/21/06 12:30:48 PM2/21/06 12:30:48 PM
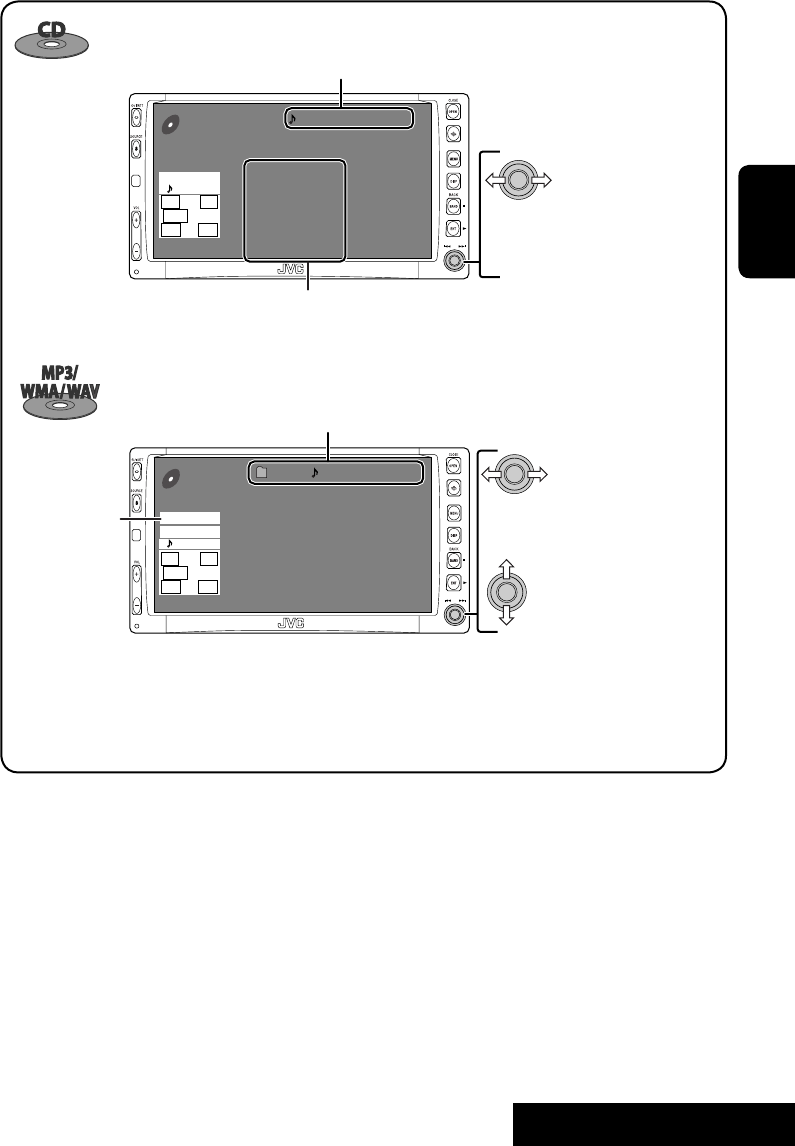
PENGOPERASIAN
15
INDONESIA
No. Trek/Waktu putar
Daftar trek berikutnya (hanya untuk Teks CD)
01 0:00:12
Disc Title
Current track Title
Next track title
Next track title
Next track title
Next track title
Next track title
Next track title
CD
3: 45 PM
FLAT
L R
SW
LS RS
REPEAT
• “NO NAME” muncul jika tidak ada judul
yang ditentukan atau direkam.
No. Folder/No. Trek/Waktu putar
01 01 0:00:12
Current folder Name
Current file name.mp3
Next file name.mp3
Next file name.mp3
Next file name.mp3
Next file name.mp3
Next file name.mp3
Next file name.mp3
CD
FLAT
MP3
REPEAT
3: 45 PM
L R
SW
LS RS
• Data tag akan ditunjukkan alih-alih nama
folder/file apabila direkam (dengan “Tag
Display” disetel ke “On” ☞ halaman 38).
Tekan: Memilih trek
Tahan: Pencarian mundur/maju*1
Tekan: Memilih trek
Tahan: Pencarian mundur/maju*1
Tekan: Memilih folder
Tahan: Tampilkan Folder List
[Daftar Folder]
Format audio
(MP3/WMA/WAV)
*1 Kecepatan cari: x2 ] x10.
*2 Kecepatan cari: ¡1 ] ¡2.
• Microsoft dan Windows Media adalah baik merek dagang
yang terdaftar maupun merek dagang dari Badan Hukum
Microsoft di Amerika Serikat dan/atau negara-negara lain.
IN13-28_KW-AVX700[UN]f.indd 15IN13-28_KW-AVX700[UN]f.indd 15 2/20/06 10:28:23 AM2/20/06 10:28:23 AM
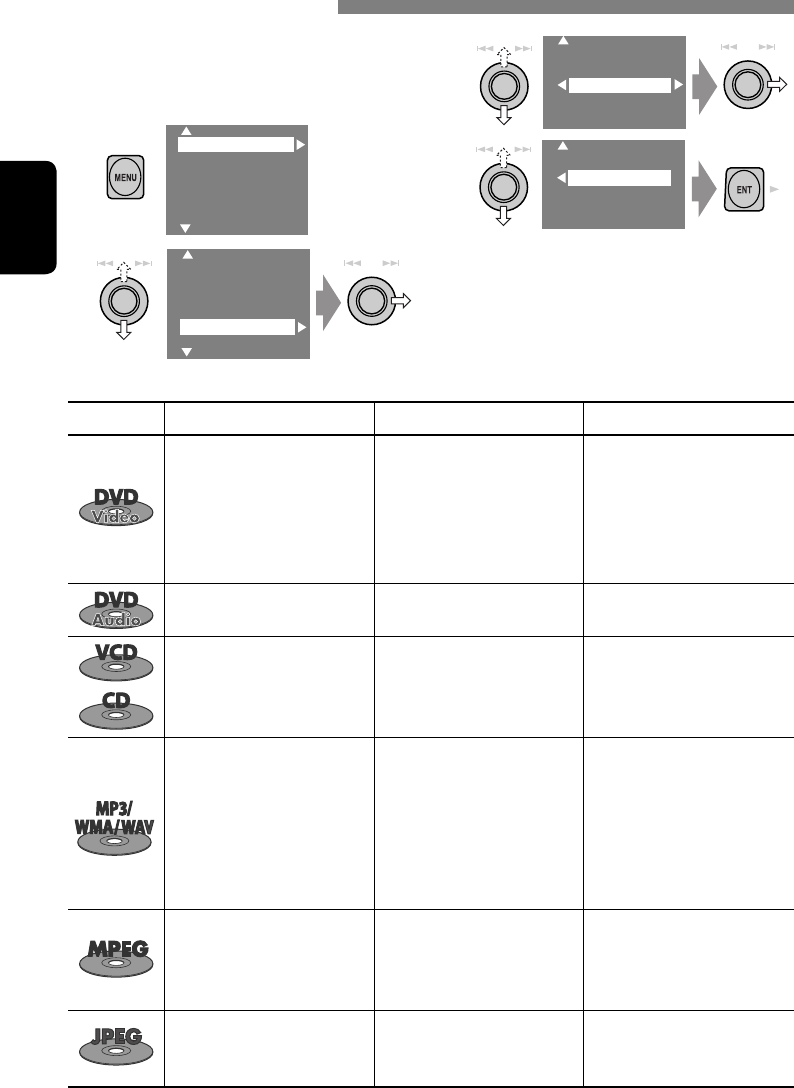
16
INDONESIA
Anda dapat menggunakan hanya satu dari
mode putar ulang berikut—Intro/Ulang/Acak.
Contoh: Untuk memilih Track Repeat (Ulang
Trek)
1
2
3
4
Apabila salah satu modus playback
(pemutaran) dipilih, lampu indikator yang
terkait menyala pada layar informasi disk.
Untuk membatalkan, pilih “Off” pada langkah
3 atau 4.
Memilih mode-mode putar ulang
Setup
Surround
Equalizer
Sound
Mode
List
Setup
Surround
Equalizer
Sound
Mode
List
Off
Intro
Repeat
Random
Tipe disk Intro Repeat Random
—
Chapter: Mengulangi chapter
yang sekarang
diputar
Title: Mengulangi title
[judul] yang sekarang
diputar
—
—Track: Mengulangi trek yang
sekarang diputar —
Track: Memutar 15 detik
pertama dari setiap trek
(untuk VCD: PBC tidak
digunakan)
Track: Mengulangi trek yang
sekarang diputar
(untuk VCD: PBC tidak
digunakan)
Disc: Memutar secara acak
semua trek (untuk VCD:
PBC tidak digunakan)
Track: Memutar 15 detik
pertama dari setiap trek
Folder: Memutar 15 detik
pertama dari trek
pertama setiap folder
Track: Mengulangi trek yang
sekarang diputar
Folder: Mengulang semua
trek dari folder yang
sekarang diputar
Folder: Memutar secara acak
semua trek dari folder
yang sekarang diputar,
kemudian trek dari
folder berikutnya
Disc: Memutar secara acak
semua trek
—
Track: Mengulangi trek yang
sekarang diputar
Folder:
Mengulangi folder
yang sekarang diputar
—
—
Folder: Mengulangi folder
yang sekarang
diputar
—
Off
Track
Folder
IN13-28_KW-AVX700[UN]f.indd 16IN13-28_KW-AVX700[UN]f.indd 16 2/20/06 10:28:25 AM2/20/06 10:28:25 AM
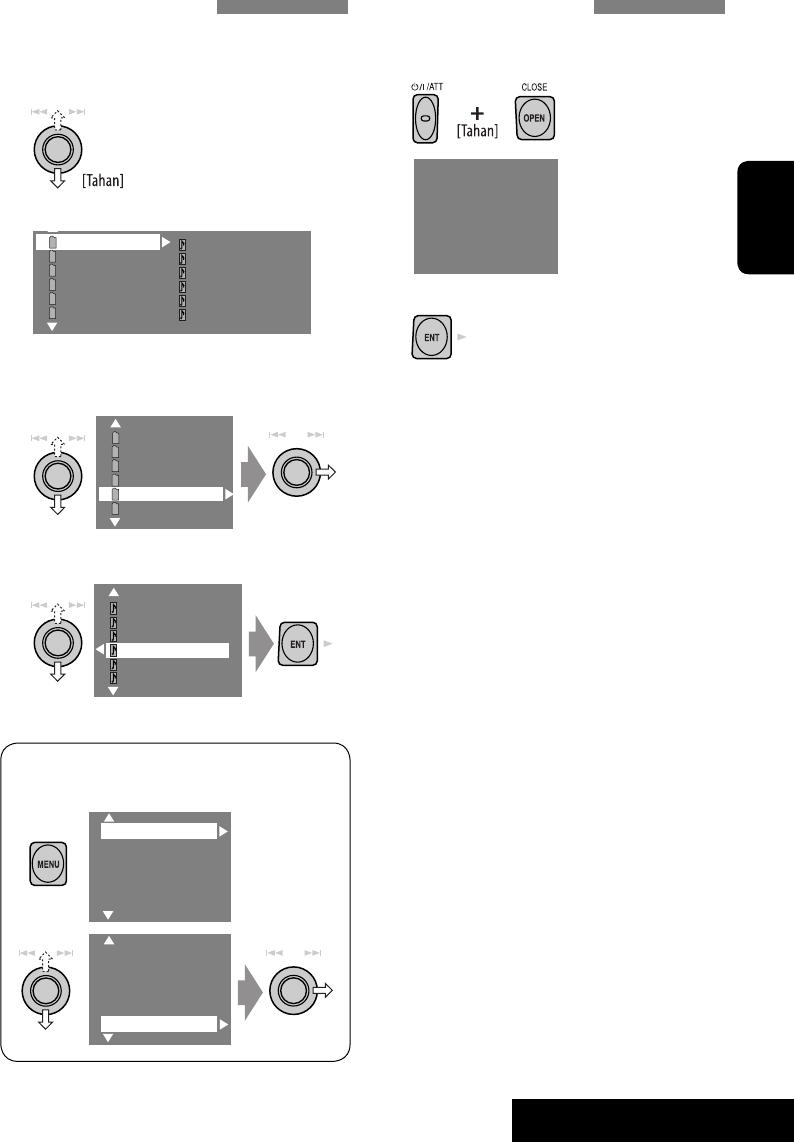
PENGOPERASIAN
17
INDONESIA
Memilih trek dalam daftar
Jika disk menyertakan folder, Anda dapat
menampilkan Daftar Folder/Trek, kemudian
mulai pemutaran.
1
Folder List [Daftar Fodler]
berikut Track List [Daftar
Trek] yang sekarang diputar
muncul di kolom kanan.
2 Pilih folder, kemudian aktifkan Track
List (Daftar Trek).
3 Pilih trek, lalu mulai putarkan.
• Daftar Prasetel juga dapat diakses melalui
<MENU> = <List>.
Setup
Surround
Equalizer
Sound
Mode
List
Setup
Surround
Equalizer
Mode
List
Track001.mp3
Track002.mp3
Track003.mp3
Track004.mp3
Track005.mp3
Track006.mp3
My Best
Cinema
My Best 2
Pops
Favorite Songs
Easy Listenings
My Best
Cinema
My Best 2
Pops
Favorite Songs
Easy Listenings
Song015.mp3
Song016.mp3
Song017.mp3
Song018.mp3
Song019.mp3
Song020.mp3
Pengeluaran disk dilarang
Anda dapat mengunci sebuah disk dalam celah
pemuatan.
1
2
“No Eject” muncul.
Untuk membatalkan larangan, ulangi prosedur
yang sama untuk memilih “EJECT OK”.
NO EJECT?
EMERGENCY EJECT?
IN13-28_KW-AVX700[UN]f.indd 17IN13-28_KW-AVX700[UN]f.indd 17 2/20/06 10:28:26 AM2/20/06 10:28:26 AM
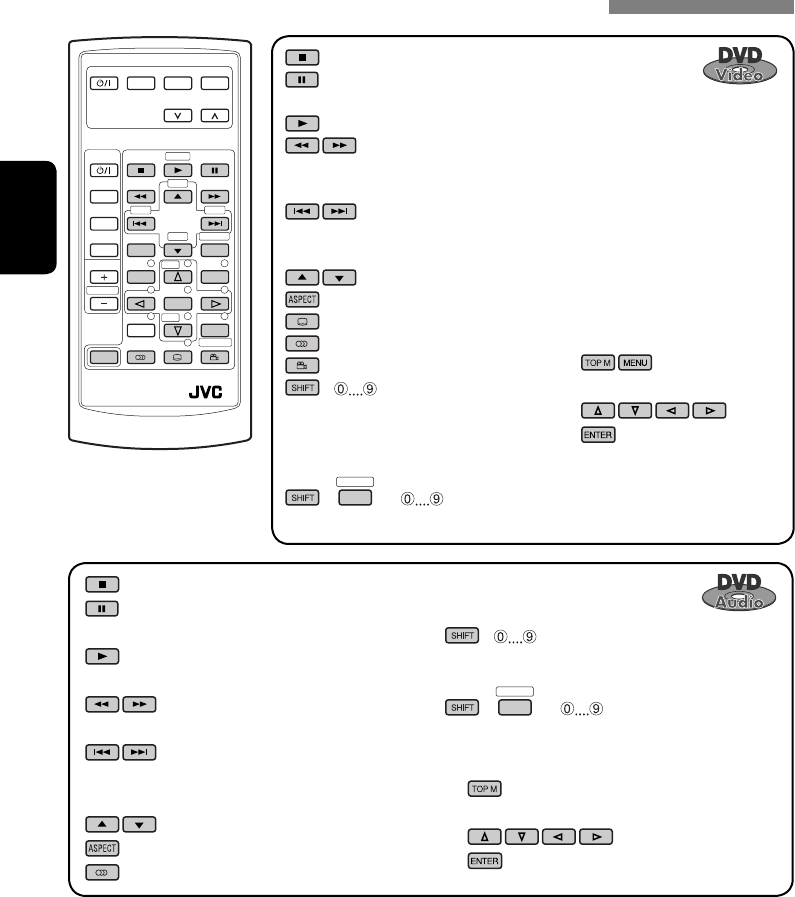
18
INDONESIA
Pengoperasian dengan menggunakan remote control—RM-RK240
: Hentikan pemutaran.
: Jeda (Pemutaran frame demi frame jika ditekan sewaktu
jeda).
: Mulai memutar (peninjauan 10 detik jika ditekan sewaktu pemutaran).
:
Pencarian mundur/maju*1 (Tidak ada suara yang terdengar).
(Gerakan lamban*2 sewaktu jeda. Tidak ada suara yang terdengar).
:
Tekan: Memilih chapter (sewaktu pemutaran atau jeda).
Tahan: Pencarian mundur/maju*3
: Pilih judul.
: Pilih rasio aspek.
: Pilih bahasa subtitle.
: Pilih bahasa audio.
: Pilih sudut tampilan.
+ :
Memilih chapter (sewaktu pemutaran
atau jeda).
Memilih judul (ketika tidak memutar).
+( OSD
DIRECT
= ):
Memilih judul secara langsung.
MODE MENU
ASPECT
ZOOM
ATT
SOURCE
DISC+
DISC–
DVD / RECEIVER CONTROL
EXTRA MONITOR CONTROL
+10
–10
123
456
78
0
9
–100
BAND
OSD
MENUTOP M
SETUP
RM-RK240
RETURN
ENTER
DUAL
SHIFT
VOL
2nd VOL
+100
DIRECT
ASPECT
SURROUND
: Hentikan pemutaran.
: Jeda (Akan memutarkan frame demi frame
jika ditekan sewaktu menunda film).
: Mulai putar (Meninjau kembali selama 10-
detik jika ditekan sewaktu memutar film).
:
Pencarian mundur/maju*1.
:
Tekan: Memilih trek.
Tahan: Pencarian mundur/maju*3.
: Pilih grup.
: Pilih rasio aspek.
: Pilih bahasa audio.
+ :
Memilih trek.
+( OSD
DIRECT
= ):
Pilih grup secara langsung.
Menggunakan fitur arahan menu...
1
2 Pilih item yang ingin Anda putar.
3
*1 Kecepatan cari: x2 ] x5 ] x10 ] x20 ] x60
*2 Kecepatan gerakan lamban: 1/32 ] 1/16 ] 1/8 ] 1/4 ] 1/2
*3 Kecepatan cari: x2 ] x10
• Untuk memilih nomor, lihat
juga “Bagaimana memilih
sebuah nomor” pada hal. 9.
Menggunakan fitur arahan
menu...
1
2 Pilih item yang ingin Anda putar.
3
IN13-28_KW-AVX700[UN]f.indd 18IN13-28_KW-AVX700[UN]f.indd 18 2/20/06 10:28:27 AM2/20/06 10:28:27 AM
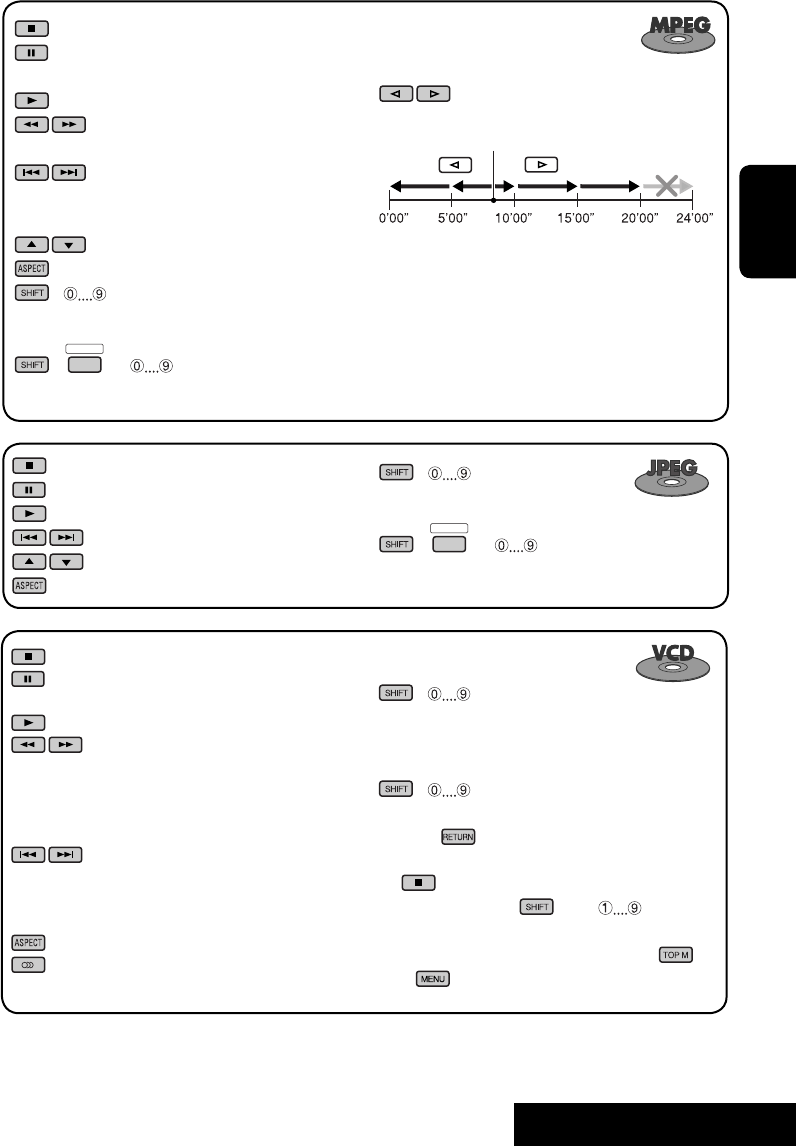
PENGOPERASIAN
19
INDONESIA
+ :
Pilih trek.
Sewaktu pemutaran PBC...
+ : Pilih item pada menu.
Untuk kembali ke menu sebelumnya, tekan
.
Untuk membatalkan pemutaran PBC
1
2 Sewaktu menahan , tekan untuk
mulai memutar trek yang dikehendaki.
• Untuk melanjutkan kembali PBC, tekan /
.
: Hentikan pemutaran.
: Jeda (Pemutaran frame demi frame jika
ditekan sewaktu jeda).
: Mulai memutar.
:
Pencarian mundur/maju*1 (Gerakan lamban
maju*2 sewaktu jeda. Tidak ada suara yang
terdengar).
• Gerakan lamban mundur tidak bekerja.
:
Tekan: Memilih trek.
Tahan: Pencarian mundur/maju*3 (Tidak
ada suara yang terdengar).
: Pilih rasio aspek.
: Pilih saluran audio (ST: stereo, L: Kiri,
R: Kanan).
: Hentikan pemutaran.
: Jeda (Pemutaran frame demi frame jika
ditekan sewaktu jeda).
: Mulai memutar.
: Pencarian mundur/maju*4. (Tidak ada
suara yang terdengar).
: Tekan: Memilih trek
Tahan: Pencarian mundur/maju*5.
(Tidak ada suara yang terdengar).
: Pilih folder.
: Pilih rasio aspek.
+ :
Pilih trek (dalam folder yang sama).
+( OSD
DIRECT
= ):
Pilih folder secara langsung*6.
: Hentikan pemutaran.
: Jeda.
: Mulai memutar.
: Memilih trek.
: Pilih folder.
: Pilih rasio aspek.
Tekanan ke-1
Tekanan ke-1 Tekanan ke-2
Tekanan ke-3
Tekanan ke-2
Sewaktu memutar...
: Kembali/majukan scene 5 menit.
+ :
Pilih trek (dalam folder yang sama).
+( OSD
DIRECT
= ):
Pilih folder secara langsung*6.
Posisi pemutaran sekarang
*4 Kecepatan cari: ¡1 ] ¡2 ] ¡3
*5 Kecepatan cari: ¡1 ] ¡2
*6 Apabila nomor 2-digit ditentukan pada awal nama
foldernya—01, 02, 03, dan seterusnya.
IN13-28_KW-AVX700[UN]f.indd 19IN13-28_KW-AVX700[UN]f.indd 19 2/21/06 12:30:53 PM2/21/06 12:30:53 PM
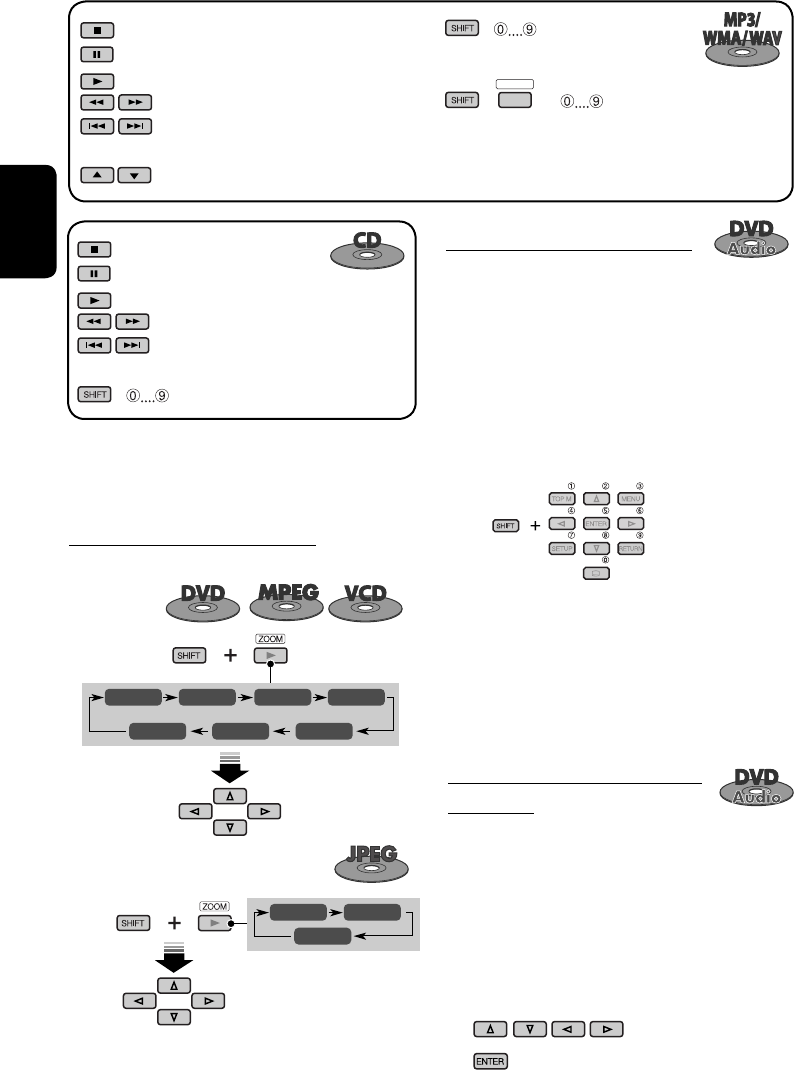
20
INDONESIA
: Hentikan pemutaran.
: Jeda.
: Mulai memutar.
: Pencarian mundur/maju*1.
: Tekan: Pilih trek-trek.
Tahan: Pencarian mundur/maju*3.
: Pilih folder.
: Hentikan pemutaran
: Jeda.
: Mulai memutar.
: Pencarian mundur/maju*1.
: Tekan: Memilih trek.
Tahan: Pencarian mundur/maju*3.
+ : Memilih trek.
Memperbesar tampilan (Zoom in)
Sewaktu menggerakkan pemutaran gambar...
Sewaktu menunda...
Untuk membatalkan zoom, pilih “ZOOM OFF”.
ZOOM 1 ZOOM 2 ZOOM 3 ZOOM 4
ZOOM 5ZOOM 6
ZOOM OFF
ZOOM 1 ZOOM 2
ZOOM OFF
Memutarkan kembali grup bonus
Jika DVD Audio termasuk “bonus group”
terdeteksi, lampu indikator BONUS menyala
pada layar informasi disk.
Untuk memutarkan grup bonus...
1 Pilih grup bonus.
• Grup bonus biasanya direkam sebagai
grup terakhir.
2 Masukkan nomor kode.
• “key number” (semacam sandi) untuk
grup bonus tidak terbuka untuk umum.
Cara mendapatkan nomor kode
tergantung pada disk.
3 Ikuti petunjuk interaktif yang
ditunjukkan pada monitor.
Memilih gambar diam yang dapat
ditelusuri...
Apabila disk yang menyertakan gambar
diam yang dapat ditelusuri, terdeteksi, lampu
indikator B.S.P. menyala pada layar informasi
disk.
Apabila disk menunjukkan ikon pemilihan
BSP, seperti @ atau # pada layar...
1
Pilih item yang ingin Anda tampilkan.
2
+ :
Pilih trek (dalam folder yang sama).
+( OSD
DIRECT
= ):
Pilih folder secara langsung*6.
*1 Kecepatan cari: x2 ] x5 ] x10 ] x20 ] x60
*3 Kecepatan cari: x2 ] x10
*6 Apabila nomor 2-digit ditentukan pada awal nama
foldernya—01, 02, 03, dan seterusnya.
Memindahkan
bagian yang
diperbesar.
IN13-28_KW-AVX700[UN]f.indd 20IN13-28_KW-AVX700[UN]f.indd 20 2/20/06 10:28:38 AM2/20/06 10:28:38 AM

PENGOPERASIAN
21
INDONESIA
Menikmati surround sounds
Anda dapat menikmati pemutaran multi-
saluran surround melalui speaker depan, tengah
dan surround.
• Tanpa menghubung (dan mengaktifkan)
speaker tengah dan speaker surround, Anda
tidak dapat menikmati pemutaran surround.
MULTI: Untuk sumber berkode multi-
saluran seperti Dolby Digital*1, DTS*2, dan
DVD Audio. (Apabila diaktifkan, “MULTI”
ditunjukkan pada layar informasi disk).
Dolby Pro Logic II (Movie/Music): Untuk
sumber 2 saluran, kecuali disk MPEG 2-saluran.
(Ini juga dapat digunakan untuk pemutaran
kartu SD. ☞ halaman 27)
Untuk mengaktifkan surround...
1
2
3
• Surround Off: Menonaktifkan surround.
• Surround On: Aktifkan surround = ke
langkah berikut.
4
Setup
Surround
Equalizer
Sound
Mode
List
Setup
Surround
Equalizer
Mode
List
Auto
Dolby PLII Movie
Dolby PLII Music
Auto
Dolby PLII Movie
Dolby PLII Music
Auto
Dolby PLII Movie
Dolby PLII Music
Surround Off
Surrond On
• Auto: “MULTI” surround diaktifkan
apabila sinyal digital multi-saluran
terdeteksi.
• Dolby PLII Movie: Aktifkan Dolby Pro
Logic II Movie.
• Dolby PLII Music: Aktifkan Dolby Pro
Logic II Music = ke langkah berikut.
5 Hanya apabila memilih “Dolby PLII
Music”
• Panorama: Pilih “Panorama On” untuk
menambah efek suara wraparound.
• CenterWidth: Setel bagian tengah maka
mungkin akan terdengar hanya dari
tengah speaker, hanya dari kiri/kanan
depan speaker, sebagai sebuah “hantu”
tengah gambar, atau variasi kombinasi dari
tiga speaker-speaker. Malah bertambah
angkanya efek “hantu” menjadi makin kuat
(secara normal pilih “4”).
Pada remote kontrol:
1
• Anda tidak dapat mengubah pengaturan
“Dolby PL II Music” dengan menggunakan
remote kontrol.
*1 Diproduksi di bawah lisensi dari Dolby Laboratories. Dolby,
Pro Logic, MLP Lossless, dan simbol D-ganda merupakan
merek-merek dagang dari Dolby Laboratories.
*2 “DTS” dan “DTS Digital Surround” adalah terdaftar merek
dagang dari perusahaan Digital Theater Systems, Inc.
Panorama
CenterWidth
RM-RK240
SHIFT
SURROUND
SURROUND
IN13-28_KW-AVX700[UN]f.indd 21IN13-28_KW-AVX700[UN]f.indd 21 2/20/06 10:28:41 AM2/20/06 10:28:41 AM

22
INDONESIA
Memasukkan waktu/angka
Contoh:
DVD ] _:_ _:_ _
Untuk memasukkan 1 (jam): 02 (menit): 00
(detik), tekan 1, 0, 2, 0, 0 kemudian ENTER.
VCD (PBC tidak digunakan) ] _ _:_ _
Untuk memasukkan 64 (menit): 00 (detik),
tekan 6, 4, 0, 0 kemudian ENTER.
• Anda tidak perlu memasukkan angka nol di
belakang (dua digit terakhir seperti dalam
contoh di atas).
• Untuk koreksi entri yang salah, gunakan .
Untuk menghapus bar pada layar
Pengoperasian dengan menggunakan bar pada layar (DVD/VCD/MPEG/JPEG)
Pengoperasian ini dapat dilakukan pada monitor dengan menggunakan remote kontrol.
~ Tampilkan bar pada layar (☞ halaman 23).
(dua kali)
Ÿ Pilih sebuah item.
! Buat sebuah pilihan.
Jika menu pop-up muncul...
• Untuk memasukkan waktu/angka, lihat di bawah ini.
123
456
78
0
9
OSD
RM-RK240
ENTER
SHIFT
Bagaimana memilih sebuah nomor
Untuk memilih sebuah nomor dari 0 – 9:
Untuk memilih nomor yang lebih besar dari 9:
• Tombol +100/–100 hanya digunakan untuk
memasukkan angka yang lebih besar dari
99.
• Untuk mengurangi angka, gunakan
atau .
IN13-28_KW-AVX700[UN]f.indd 22IN13-28_KW-AVX700[UN]f.indd 22 2/20/06 10:28:43 AM2/20/06 10:28:43 AM
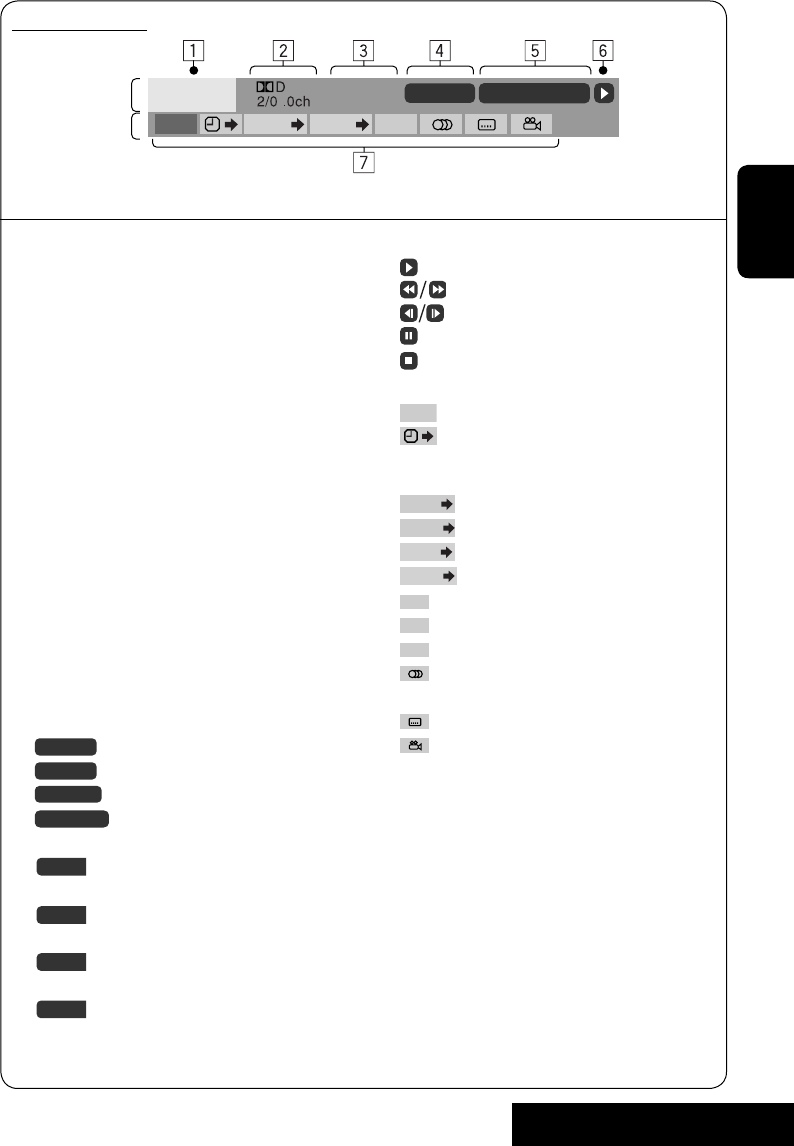
PENGOPERASIAN
23
INDONESIA
Informasi
Pengoperasian
DVD -V T02-C03 TOTAL 1:25:58
TIME TITLE CHAP
RPT
C. RPT
Bar-bar On-Screen
1 Tipe disk
2 • DVD: Format sinyal audio
• VCD: PBC
3 Mode putar ulang
DVD Video:
T. RPT: Mengulang judul
C. RPT: Mengulang chapter
DVD Audio:
T. RPT: Mengulang trek
MPEG:
T. RPT: Mengulang trek
F. RPT: Mengulang folder
JPEG:
F. RPT: Mengulang folder
VCD:
T. RPT: Mengulang trek
D. RND: Disk acak
T. INT: Intro trek
Memutar 15 detik pertama dari trek
yang sekarang diputar
4 Informasi putar ulang
T02-C03 Judul/chapter sekarang
G02-T03 Grup/trek sekarang
TRACK 01 Trek yang sekarang
F001-T001 Folder/trek yang sekarang
5 Indikasi waktu
TOTAL Waktu putar yang telah lewat dari
disk tersebut
T. REM Sisa waktu judul (untuk DVD)
Sisa waktu disk (untuk lain)
TIME Waktu putar yang telah lewat dari
bab/trek yang sekarang
REM Waktu disk yang tersisa dari bab/
trek yang sekarang
6 Status pemutaran
Putar
Pencarian mundur/maju
Mundur/maju gerak lambat
Jeda
Berhenti
7 Ikon-ikon pengoperasian
TIME Mengubah indikasi waktu (lihat 5)
Waktu Pencarian—Masukkan waktu
putar yang telah lewat dari judul yang
sekarang atau disk.
TITLE Pencarian Judul (menurut nomornya)
GROUP
Pencarian Grup (menurut nomornya)
CHAP Pencarian Chapter (menurut nomornya)
TRACK
Pencarian Trek (menurut nomornya)
RPT Putar berulang*1
INT Putar intro*1
RND Putar acak*1
Mengganti bahasa audio atau saluran
audio
Mengganti bahasa subtitle
Mengganti sudut pandang
*1 ☞ halaman 16.
Di atas adalah contoh DVD Video. Item yang ditunjukkan pada bar bervariasi sesuai tipe disk.
IN13-28_KW-AVX700[UN]f.indd 23IN13-28_KW-AVX700[UN]f.indd 23 2/20/06 10:28:45 AM2/20/06 10:28:45 AM
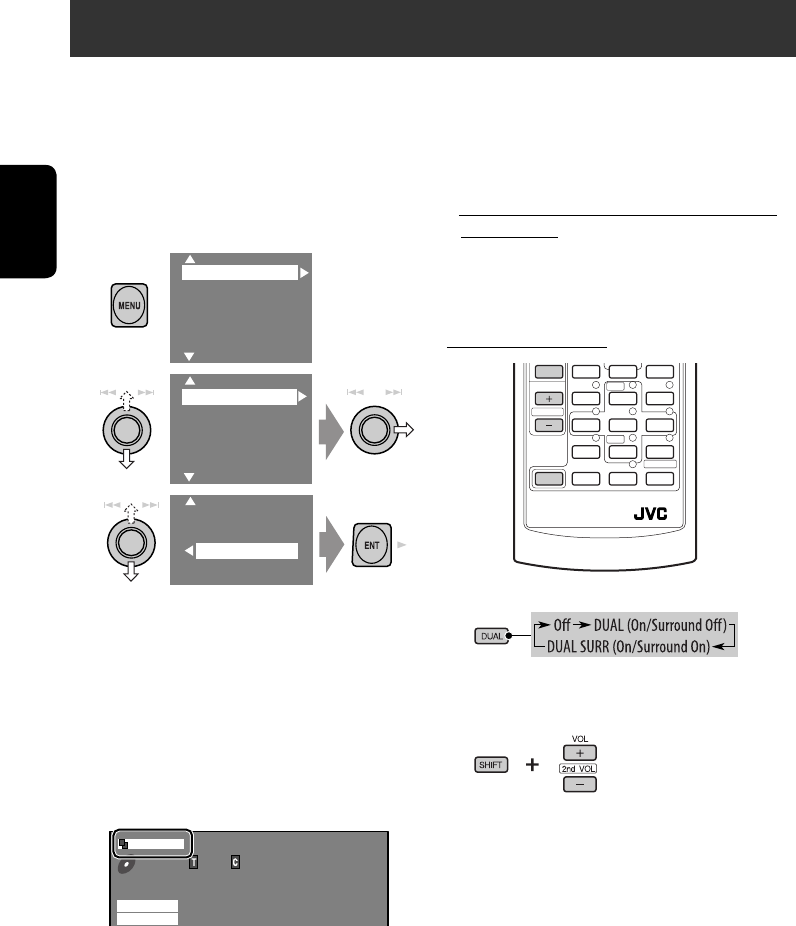
24
INDONESIA
Pengoperasian Zona Dual
Anda dapat menikmati pemutaran disk pada
monitor eksternal yang dihubungkan ke VIDEO
OUT dan steker 2nd AUDIO OUT, sewaktu
mendengarkan sumber lain yang mana pun
melalui speaker.
• Ketika Zona Dual sedang digunakan, anda
hanya dapat mengoperasikan pemutar DVD/
CD dengan menggunakan remote kontrol.
1
2
3
• Off: Menonaktfikan Dual Zone.
• On/Surround Off (DUAL): Aktifkan Dual
Zone [Zona Ganda] tanpa memasang
Headphone Surround*.
• On/Surround On (DUAL SURR): Aktifkan
Dual Zone [Zona Ganda] dan memasang
Headphone Surround.
Apabila Dual Zone diaktifkan, sumber utama
diubah ke “DISC”.
Contoh: Ketika “On/Surround On” telah dipilih.
Untuk memilih sumber yang berbeda
(sumber utama) untuk mendengarkan
melalui speaker:
Tekan SOURCE pada panel kontrol.
• Anda tidak dapat memilih “SD” untuk
sumber utama.
• Dengan menggunakan tombol-tombol pada
panel kontrol, anda dapat mengoperasikan
sumber terbaru yang telah dipilih tanpa
mempengaruhi pengoperasian Zona Dual
(DVD/CD).
Pada remote kontrol:
1
2 Setel volume melalui steker 2nd
AUDIO OUT.
3 Mengoperasikan DVD/CD player.
* Sistem surround maya headphone asli JVC.
Surround ini juga berfungsi untuk sumber
utama “DISC” meskipun diaktifkan untuk sub-
sumber. Surround ini tidak berfungsi untuk
disk MPEG.
Setup
Surround
Equalizer
Sound
Mode
List
DualZone
Off
0n/Surround Off
0n/Surround On
01 01 0:00:12
48kHz 24Bit 3/2.1
DVD
VIDEO
MULTI
DTS
DUAL SURR
RM-RK240
DUAL
SHIFT
VOL
2nd VOL
IN13-28_KW-AVX700[UN]f.indd 24IN13-28_KW-AVX700[UN]f.indd 24 2/20/06 10:28:49 AM2/20/06 10:28:49 AM
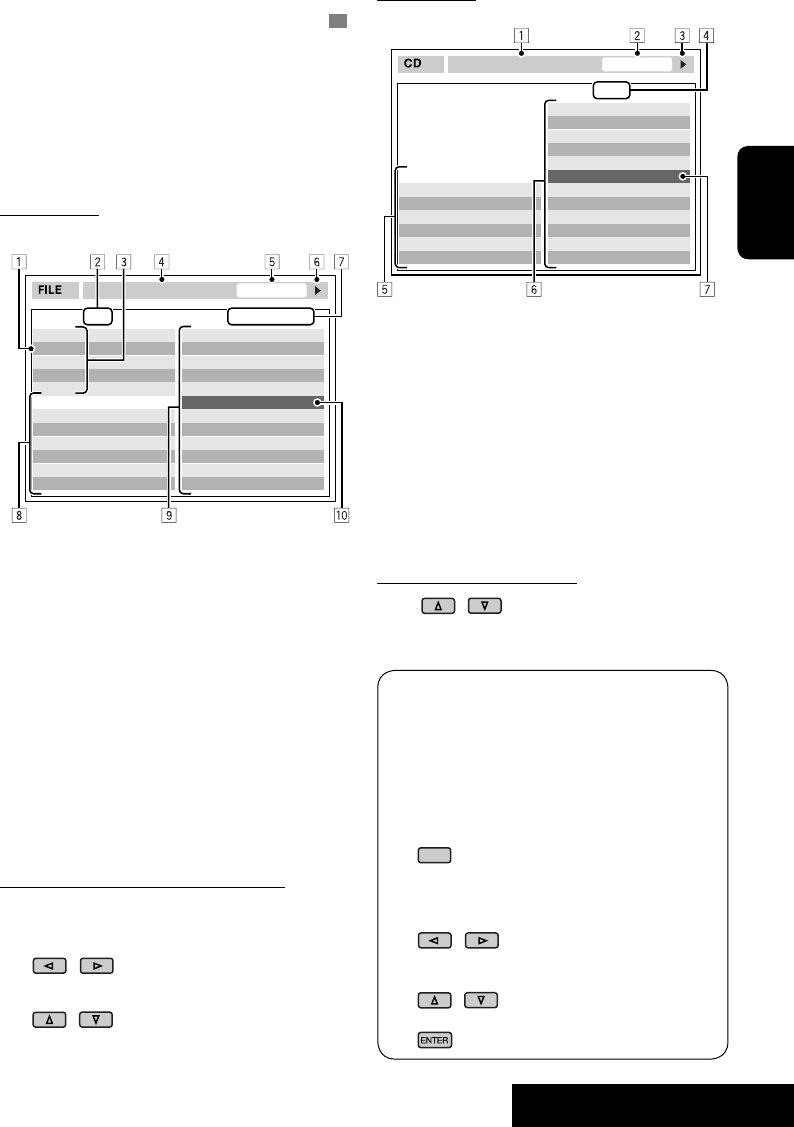
PENGOPERASIAN
25
INDONESIA
Pengoperasian dengan menggunakan layar
kontrol (MP3/WMA/WAV/MPEG/JPEG/CD)
Sewaktu Zona Dual aktif,
pengoperasian ini
dimungkinkan pada monitor eksternal dengan
menggunakan remote kontrol.
Layar kontrol secara otomatis muncul sewaktu
Anda memasukkan disk. (Untuk MPEG/JPEG;
sewaktu tidak sedang memutar).
Layar kontrol
MP3/WMA/WAV/MPEG/JPEG
1 Folder yang sekarang
2 Nomor folder yang sekarang/total jumlah
folder
3 Daftar folder
4 Mode putar ulang yang dapat dipilih
5 Waktu pemutaran yang sudah berjalan
dari trek yang sekarang (tidak ditampilkan
untuk JPEG)
6 Status pengoperasian
7 Nomor trek/total jumlah trek yang sekarang
dalam folder yang sedang digunakan (total
jumlah trek pada disk)
8 Informasi trek (hanya untuk MP3/WMA/
WAV)
9 Daftar trek
p Trek yang sekarang (bar yang disorot)
Untuk memilih sebuah folder atau trek
1 Pilih kolom “Folder” atau kolom “Track”
pada layar kontrol.
2 Pilih sebuah folder atau trek.
• Jika perlu, tekan ENTER
untuk memulai pemutaran.
Folder : 2 / 3
TIME 00:00:14T. RPT
Track : 5 / 14 (Total 41)
01 Music
02 Music
03 Music
Track Information
Cloudy.mp3
Fair.mp3
Fog.mp3
Hail.wma
Indian summer.mp3
Rain.mp3
Shower.mp3
Snow.mp3
Thunder.wma
Typhoon.mp3
Wind.mp3
Winter sky.mp3
Album
Weather
Artist
Robert M. Smith
Title
Rain
TIME 00:14
Track : 5 / 14
Track Information
Cloudy
Fair
Fog
Hail
Indian summer
Rain
Shower
Snow
Thunder
Typhoon
Wind
Winter sky
Album
Four seasons
Artist
Robert M. Smith
Title
Rain
T. RPT
Contoh: MP3/WMA
Contoh: Teks CD
Layar kontrol
CD
OSD
1 Mode putar ulang yang dapat dipilih
2 Waktu putar yang telah lewat dari trek yang
sekarang
3 Status pengoperasian
4 Nomor trek/total jumlah trek yang sedang
digunakan pada disk
5 Informasi trek
6 Daftar trek
7 Trek yang sekarang (bar yang disorot)
Untuk memilih sebuah trek
• Jika perlu, tekan ENTER
untuk memulai pemutaran.
Untuk mengubah modus pemutaran
Anda juga dapat mengubah modus
pemutaran.
• Untuk CD/MP3/WMA/WAV: Intro/
Ulang/Acak
• Untuk lain: Ulang
1
2 Hanya untuk CD/MP3/WMA/WAV:
Pilih mode pemutaran
3 Pilih opsi yang Anda kehendaki.
4
IN13-28_KW-AVX700[UN]f.indd 25IN13-28_KW-AVX700[UN]f.indd 25 2/21/06 12:30:57 PM2/21/06 12:30:57 PM
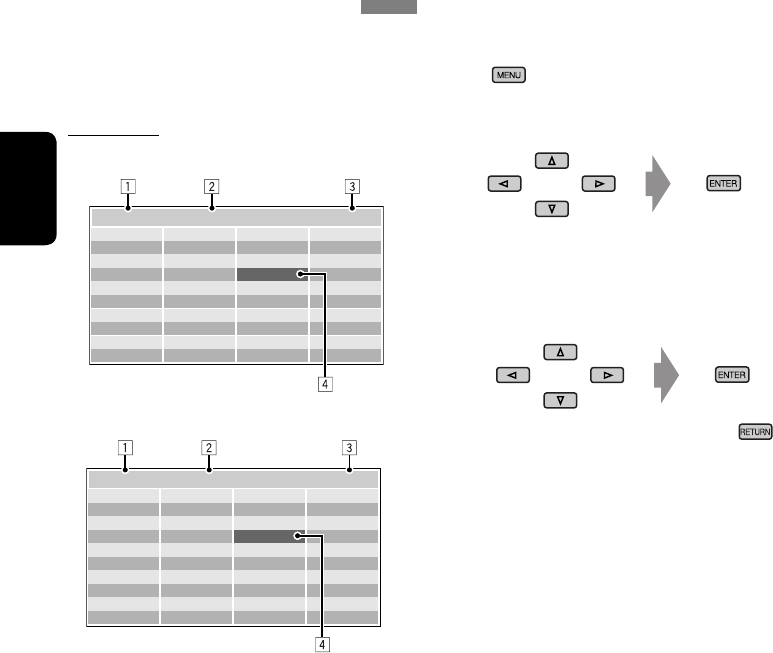
26
INDONESIA
Pengoperasian dengan menggunakan layar
daftar (MP3/WMA/WAV/MPEG/JPEG)
Sewaktu Zona Dual aktif,
pengoperasian ini
dimungkinkan pada monitor eksternal dengan
menggunakan remote kontrol.
Layar daftar
Daftar folder
Daftar trek
1 Nomor folder yang sekarang/total jumlah
folder
2 Nomor trek yang sekarang/total nomor dari
trek-trek dalam folder yang sekarang
3 Halaman yang sekarang/total nomor dari
halaman-halaman yang termasuk dalam
daftar
4 Folder/trek yang sekarang (bar yang
disorot)
Folder : 144/240 Track 144/198 Page : 4/7
fol120
fol121
fol122
fol123
fol124
fol125
fol126
fol127
fol128
fol129
fol150
fol151
fol152
fol153
fol154
fol155
fol156
fol157
fol158
fol159
fol140
fol141
fol142
fol143
fol144
fol145
fol146
fol147
fol148
fol149
fol130
fol131
fol132
fol133
fol134
fol135
fol136
fol137
fol138
fol139
file0141.wma
file0142.mp3
file0143.wma
file0144.mp3
file0145.mp3
file0146.mp3
file0147.mp3
file0148.wma
file0149.wma
file0150.wma
file0151.wma
file0152.mp3
file0153.wma
file0154.mp3
file0155.wma
file0156.wma
file0157.wma
file0158.wma
file0159.mp3
file0160.wma
Folder : 144/240 Track 144/198 Page : 4/5
file0121.mp3
file0122.mp3
file0123.wma
file0124.mp3
file0125.mp3
file0126.wma
file0127.wma
file0128.mp3
file0129.mp3
file0130.wma
file0131.mp3
file0132.mp3
file0133.mp3
file0134.mp3
file0135.wma
file0136.mp3
file0137.wma
file0138.mp3
file0139.wma
file0140.wma
Contoh: Daftar trek untuk MP3/WMA
Sewaktu tidak memutar...
1 Tampilkan daftar folder.
Setiap kali anda menekan tombol
tersebut, layar daftar muncul dan
menghilang.
2 Pilih folder pada daftar tersebut.
Daftar trek dari folder yang telah dipilih
muncul.
3 Pilih trek pada daftar tersebut.
Untuk kembali ke daftar folder, tekan .
IN13-28_KW-AVX700[UN]f.indd 26IN13-28_KW-AVX700[UN]f.indd 26 2/20/06 10:52:30 AM2/20/06 10:52:30 AM
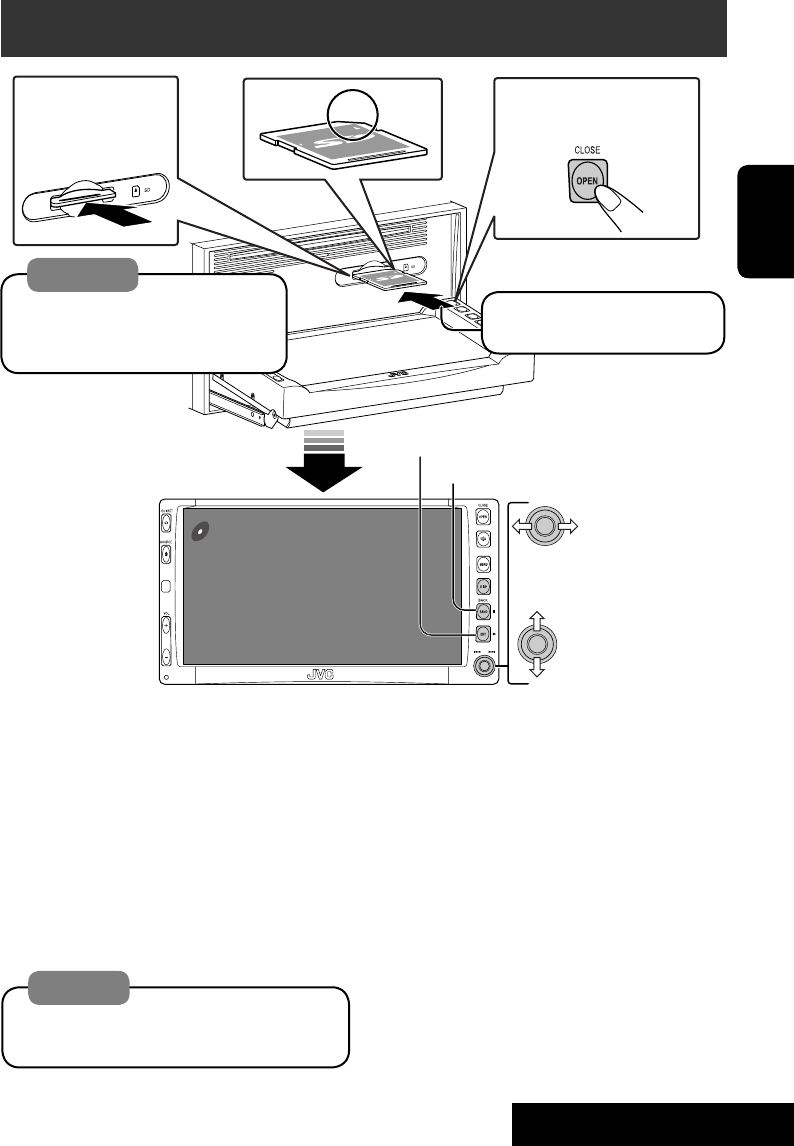
PENGOPERASIAN
27
INDONESIA
Now Reading...
SD
3: 45 PM
Pengoperasian SD
Unit ini dapat memutar trek MP3/WMA/JPEG
yang disimpan dalam kartu SD.
Semua trek dalam kartu SD akan diputar
berulang-ulang sampai Anda mengubah
sumbernya.
• Melepaskan kartu SD akan menghentikan
pemutaran.
• Anda tidak dapat memilih “SD” sewaktu Dual
Zone digunakan.
Perhatian:
Pastikan semua data penting sudah di-back
up.
Buka/tutup panel
monitor
Untuk mengeluarkan
sebuah disk
sorong perlahan-
lahan kartu SD.
Tekan: Memilih trek
Tahan: Pencarian mundur/maju
Tekan: Memilih folder
Tahan: Tampilkan Folder
List [Daftar Folder]
(☞ halaman 17)
3: Mulaikan lagi pemutaran
7: Berhenti
Sorong masuk kartu SD sampai
Anda mendengar bunyi klik.
Perhatian:
Jangan melepaskan jari Anda secara
cepat, sebaliknya kartu SD mungkin
keluar dari unit.
Anda dapat mengoperasikan pemutaran SD
dengan cara yang sama Anda mengoperasikan
disk MP3/WMA/JPEG (kecuali pengoperasian
OSD dan yang ada di monitor eksternal).
• Untuk mendapatkan informasi operasional
umum, lihat halaman 13 hingga 21.
IN13-28_KW-AVX700[UN]f.indd 27IN13-28_KW-AVX700[UN]f.indd 27 2/20/06 10:28:55 AM2/20/06 10:28:55 AM
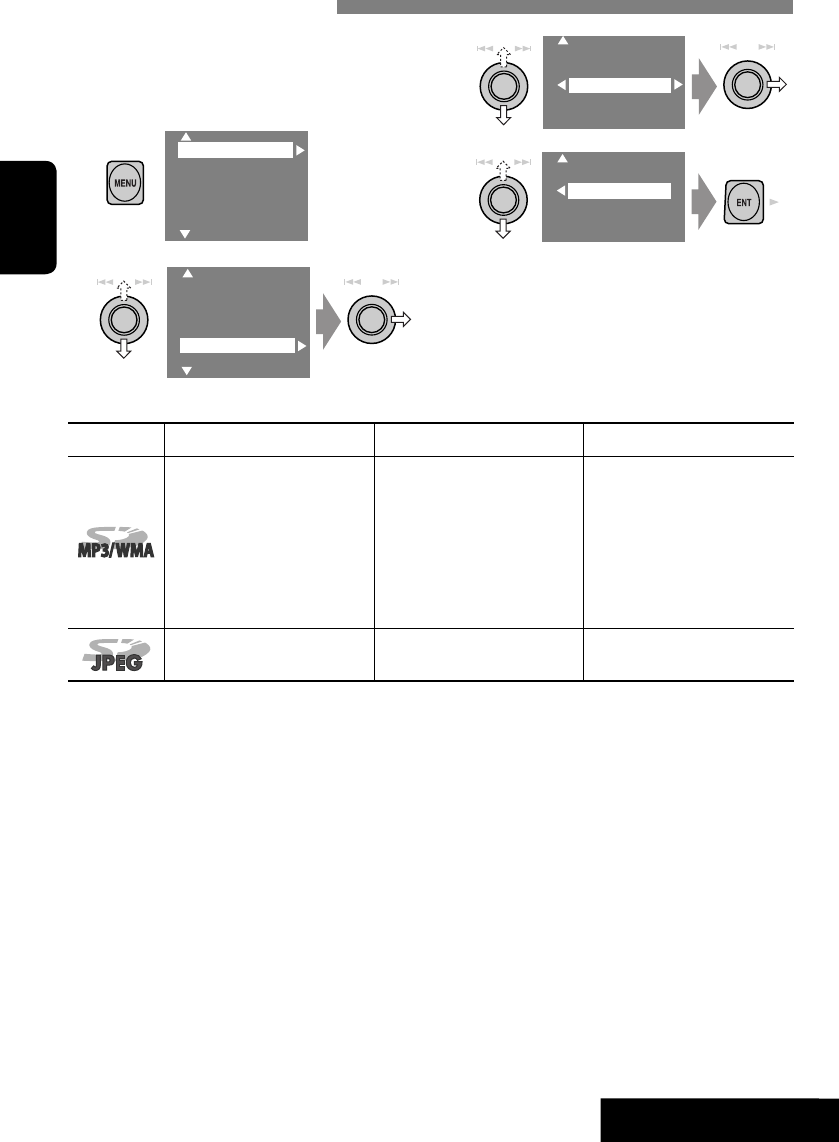
28
INDONESIA
Anda dapat menggunakan hanya satu dari
mode putar ulang berikut—Intro/Ulang/Acak.
Contoh: Untuk memilih Track Repeat (Ulang
Trek)
1
2
3
4
Apabila salah satu modus playback
[pemutaran] dipilih, lampu indikator yang
terkait menyala pada monitor.
Untuk membatalkan, pilih “Off” pada langkah
3 atau 4.
Memilih mode-mode putar ulang
Setup
Surround
Equalizer
Sound
Mode
List
Setup
Surround
Equalizer
Sound
Mode
List
Off
Intro
Repeat
Random
Off
Track
Folder
PENGOPERASIAN
Tipe file Intro Repeat Random
Track: Memutar 15 detik
pertama dari setiap trek
Folder: Memutar 15 detik
pertama dari trek
pertama setiap folder
Track: Mengulangi trek yang
sekarang diputar
Folder: Mengulang semua
trek dari folder yang
sekarang diputar
Folder: Memutar secara acak
semua trek dari folder
yang sekarang diputar,
kemudian trek dari
folder berikutnya
SD: Memutar secara acak
semua trek
—Folder: Mengulangi folder yang
sekarang diputar —
IN13-28_KW-AVX700[UN]f.indd 28IN13-28_KW-AVX700[UN]f.indd 28 2/20/06 10:28:56 AM2/20/06 10:28:56 AM
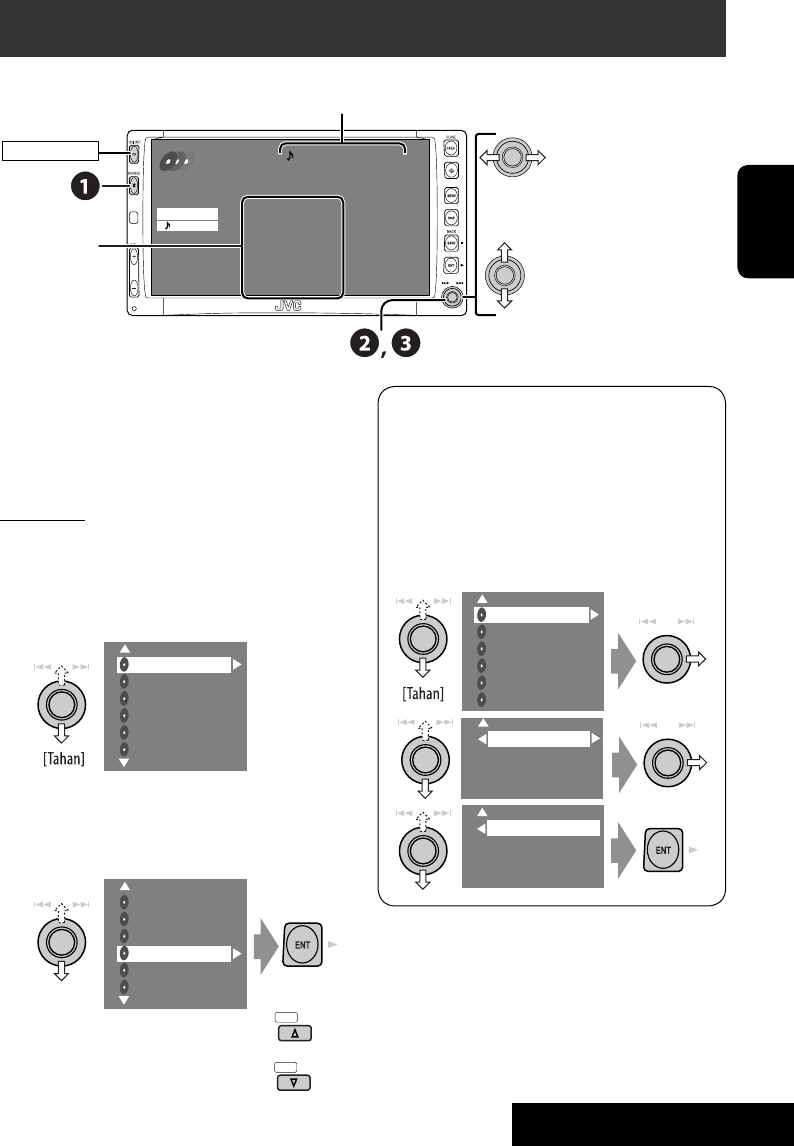
29 ALAT EKSTERNAL
INDONESIA
Mendengarkan CD changer
Disarankan untuk menggunakan JVC CD
changer yang kompatibel-MP3 dengan alat
penerima anda.
•
Anda dapat memutar hanya disk CD (CD-DA)
dan MP3.
Persiapan:
Pastikan Anda memilih “Changer” untuk
pengaturan input eksternal. (☞ halaman 42)
~ Pilih “CD-CH”.
Ÿ Tampilkan Disk List (Daftar Disk).
• Setiap kali Anda menekan kenop ke atas
atau ke bawah, Anda dapat menampilkan
daftar lain dari disc yang tersisa.
! Memilih disk untuk diputar.
• Ketika menggunakan remote
kontrol, tekan...
01 0:00:12
Disc Title
Current track Title
Next track title
Next track title
Next track title
Next track title
Next track title
Next track title
3: 45 PM
FLAT
REPEAT
CD-CH
Disc No.
POWER]ON
No. Trek/Waktu putar
Tekan: Memilih trek
Tahan: Pencarian mundur/maju
Tekan: Memilih folder (hanya MP3)
Tahan: Tampilkan Daftar Disc
MP3 DISC
JVC CAR AUDIO
BEST 10
BEST JAZZ
DISC 05
DISC 06
DISC+
DISC–
Tidak ditampilkan
untuk CD
konvensional
MP3 DISC
JVC CAR AUDIO
BEST 10
BEST JAZZ
DISC 05
DISC 06
01FOLDER
02FOLDER
03FOLDER
04FOLDER
TRACK001
TRACK002
TRACK003
TRACK004
• Sewaktu memutar disk MP3, Anda dapat
memilih dan mulai memutarkan trek
dalam disk dengan menggunakan Daftar:
Display List (Daftar Tampilan) (pilih
disk yang sekarang diputar) = Folder
List (Daftar Folder) =Track List (Daftar
Trek), kemudian mulai putar trek yang
Anda inginkan.
MP3 DISC
JVC CAR AUDIO
BEST 10
BEST JAZZ
DISC 05
DISC 06
IN29-34_KW-AVX700[UN]f.indd 29IN29-34_KW-AVX700[UN]f.indd 29 2/20/06 10:30:06 AM2/20/06 10:30:06 AM
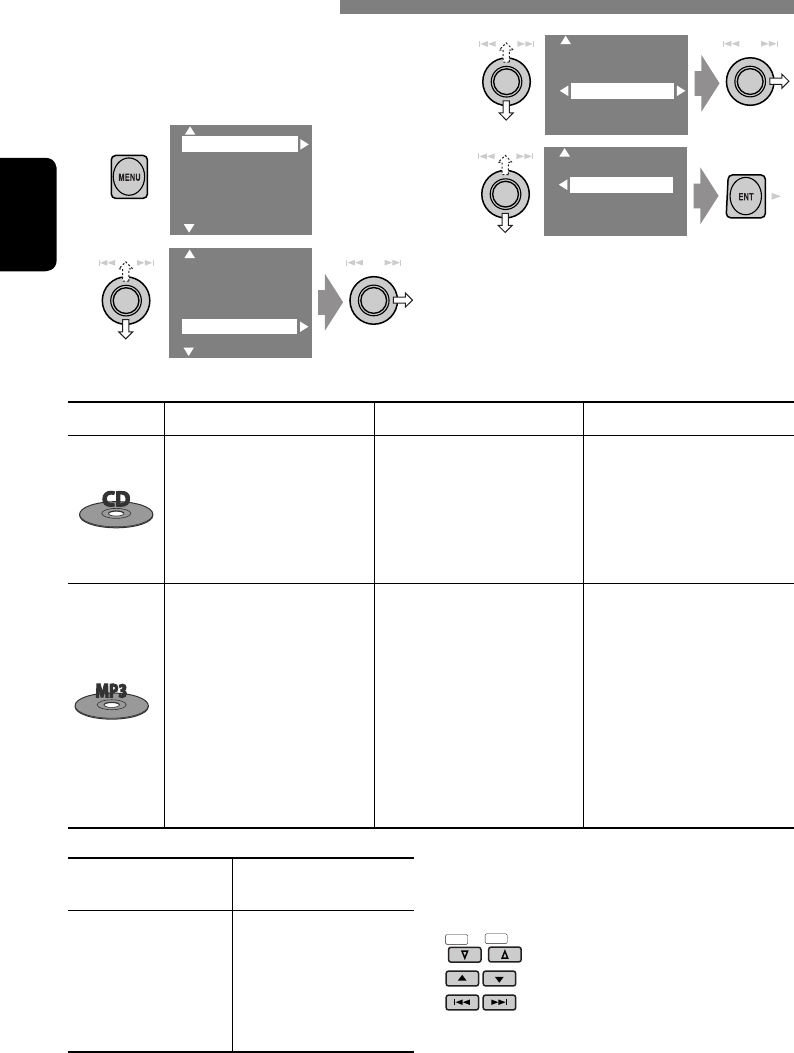
30
INDONESIA
Anda dapat menggunakan hanya satu dari
mode putar ulang berikut—Intro/Ulang/Acak.
Contoh: Untuk memilih Track Repeat (Ulang
Trek)
1
2
3
4
Apabila salah satu modus playback
(pemutaran) dipilih, lampu indikator yang
terkait menyala pada monitor.
Untuk membatalkan, pilih “Off” pada langkah
3 atau 4.
Memilih mode-mode putar ulang
Setup
Surround
Equalizer
Sound
Mode
List
Setup
Surround
Equalizer
Sound
Mode
List
Off
Intro
Repeat
Random
Tipe disk Intro Repeat Random
Track: Memutar 15 detik
pertama dari setiap trek
Disc: Memutar 15 detik
pertama dari trek
pertama dari semua
disk yang dimuatkan
Track: Mengulangi trek yang
sekarang diputar
Disc: Mengulang semua trek
dari disk yang sekarang
diputar
Disc: Memutar secara acak
semua trek dari disk
yang sekarang diputar
All: Secara acak memutar
semua trek dari semua
disk yang dimuatkan
Track: Memutar 15 detik
pertama dari setiap trek
Folder: Memutar 15 detik
pertama dari trek
pertama setiap folder
Disc: Memutar 15 detik
pertama dari trek
pertama dari semua
disk yang dimuatkan
Track: Mengulangi trek yang
sekarang diputar
Folder: Mengulang semua
trek dari folder yang
sekarang diputar
Disc: Mengulang semua trek
dari disk yang sekarang
diputar
Folder: Memutar secara acak
semua trek dari folder
yang sekarang diputar,
kemudian trek dari
folder berikutnya
Disc: Memutar secara acak
semua trek
All: Secara acak memutar
semua trek dari semua
disk yang dimuatkan
Off
Track
Folder
Disc
Anda dapat menggunakan tombol berikut pada
remote control untuk mengoperasikan CD
changer.
DISC–
DISC+
: Memilih disk.
: Memilih folder (hanya MP3).
: Memilih trek.
Untuk menggunakan
menu <Mode>
☞ di atas.
Untuk menggunakan
menu <List>
☞ halaman 17 dan 29.
Display List (Daftar
Tampilan) = Folder
List (Daftar Folder)
=Track List (Daftar
Trek)
IN29-34_KW-AVX700[UN]f.indd 30IN29-34_KW-AVX700[UN]f.indd 30 2/20/06 10:30:15 AM2/20/06 10:30:15 AM
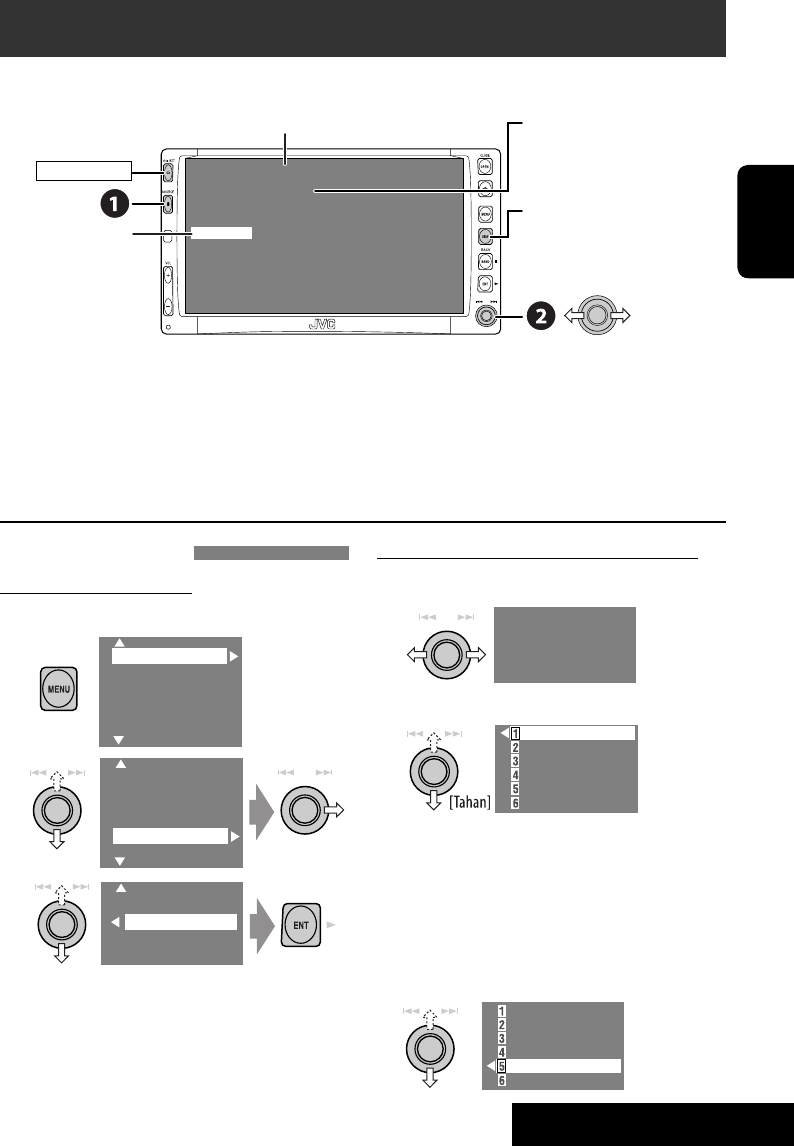
31 ALAT EKSTERNAL
INDONESIA
Mempreset (Mengatur awal) secara manual
1 Pilih stasiun untuk diprasetel.
2
Tampilkan Preset List (Daftar Prasetel).
• Setiap kali Anda mendorong kenop ke
atas atau ke bawah, Anda dapat berganti
ke halaman lain dari daftar Prasetel.
• Preset List [Daftar Prasetel] juga dapat
diakses melalui <MENU> = <List> (☞
halaman 32).
3 Pilih nomor yang telah diatur
sebelumnya.
4
BBC1
TV
3: 45 PM
FLAT
POWER]ON
Memprasetel stasiun TV
Prasetel Memori Otomatis
Anda dapat memprasetel 12 stasiun TV.
1
2
3
Stasiun TV lokal yang sinyalnya terkuat
akan dicari dan disimpan secara otomatis.
Menonton TV
Anda dapat menghubungkan TV Tuner Unit JVC ( KV-C1000, KV-C1001, atau KV-C1008) ke
terminal AV BUS di bagian belakang.
~ Pilih “TV”.
Ÿ Mencari stasiun yang akan didengarkan—Auto Search [Pencarian Otomatis].
• Manual Search (Pencarian Manual): Tahan ke kiri atau ke kanan sampai muncul “Manual
Search” (Cari Manual) di layar, kemudian tekan berulang-ulang.
• Anda juga dapat menggunakan remote kontrol yang disediakan untuk unit TV tuner tetapi
beberapa fungsi mungkin tidak bekerja. (Arahkan ke sensor remote dari alat penerima ini).
☞ halaman 35.
Setup
Surround
Equalizer
Sound
Mode
List
Setup
Surround
Equalizer
Sound
Mode
List
No. Chapter
OSD
Auto MEMORY
Title
BBC1
BBC2
ABCTV
CBS
WHTV
HTV
BBC1
BBC2
ABCTV
CBS
WHTV
HTV
2
JVCTV
DISP: Tekan, jika gambar
pemutaran ulang tidak muncul,
tetapi layar informasi sumber
(yang ini) ditampilkan.
Muncul nama yang sudah
ditentukan. Jika tidak ada nama
yang ditentukan, muncul
“NO NAME”.
IN29-34_KW-AVX700[UN]f.indd 31IN29-34_KW-AVX700[UN]f.indd 31 2/20/06 10:30:17 AM2/20/06 10:30:17 AM
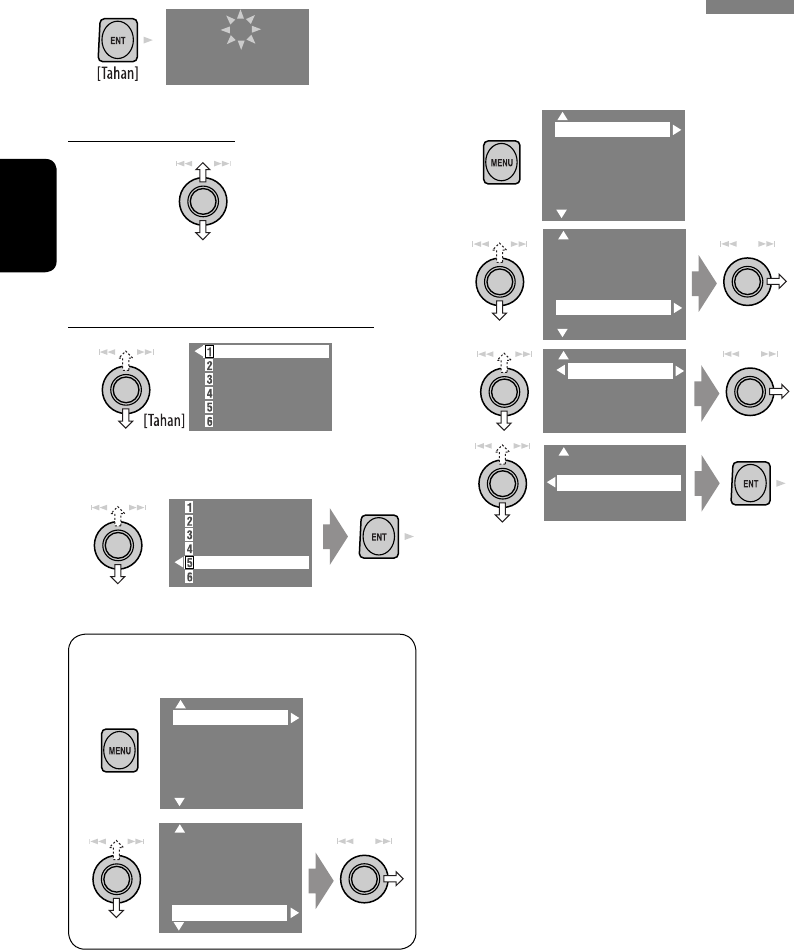
32
INDONESIA
Mengubah informasi pada layar
Anda dapat menampilkan nomor saluran
dan nama stasiun yang ditentukan sewaktu
menonton TV.
1
2
3
4
• Off: Tidak ada informasi yang akan
ditampilkan sewaktu Anda menonton TV.
• Channel: Nomor saluran akan
ditampilkan sewaktu Anda menonton TV.
• Channel+Station: Nomor saluran dan
nama stasiun yang ditentukan dan yang
diterima akan ditampilkan sewaktu Anda
menonton TV.
4
Memilih stasiun preset
Memilih pada Preset List [Daftar Prasetel]
1
2 Pilih stasiun yang telah diatur
sebelumnya.
• Daftar Prasetel juga dapat diakses melalui
<MENU> = <List>.
BBC1
BBC2
ABCTV
CBS
JVCTV
HTV
BBC1
BBC2
ABCTV
CBS
JVCTV
HTV
Setup
Surround
Equalizer
Sound
Mode
List
Setup
Surround
Equalizer
Mode
List
Setup
Surround
Equalizer
Sound
Mode
List
Setup
Surround
Equalizer
Sound
Mode
List
OSD
Auto MEMORY
Title Entry
Off
Channel
Channel+Station
2 P5
JVCTV
IN29-34_KW-AVX700[UN]f.indd 32IN29-34_KW-AVX700[UN]f.indd 32 2/20/06 10:30:18 AM2/20/06 10:30:18 AM
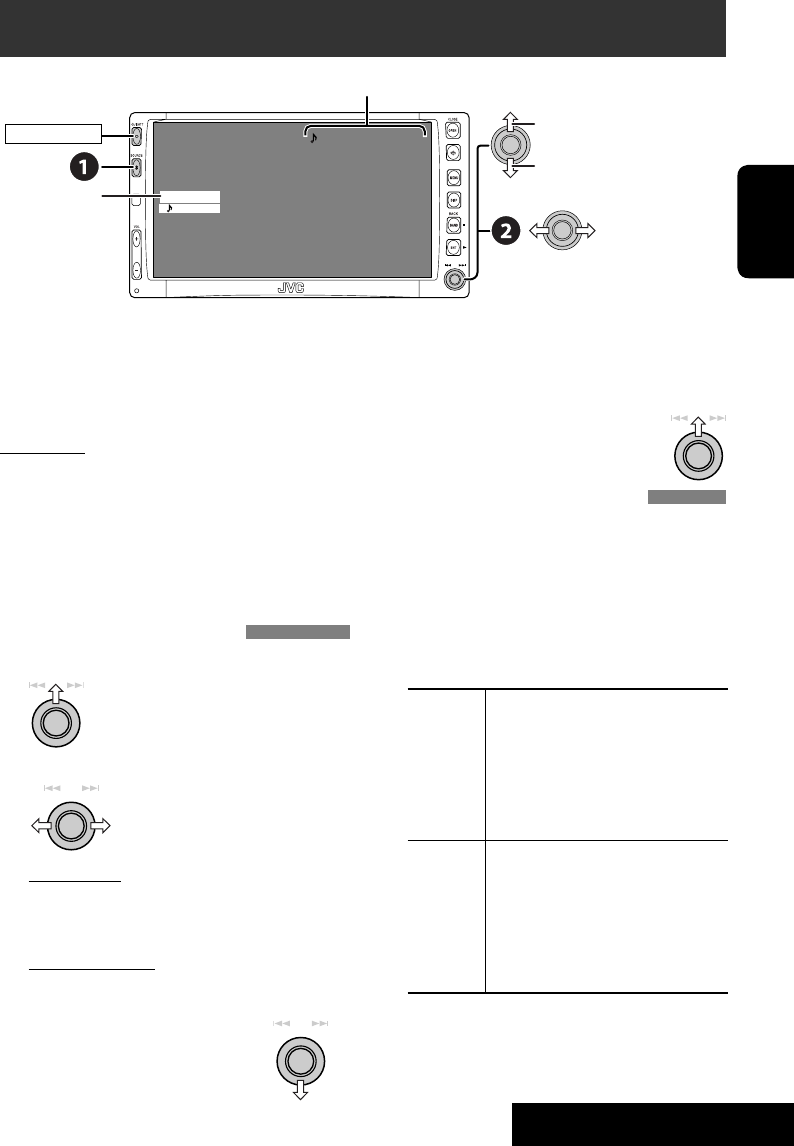
33 ALAT EKSTERNAL
INDONESIA
Untuk Apple iPod dan JVC D. player, Anda
harus menghubungkan adaptor interface (KS-
PD100 atau KS-PD500) ke jack CD changer di
bagian belakang.
Persiapan:
Pastikan Anda memilih “iPod” atau “D. player”
untuk pengaturan input eksternal. (☞ halaman 42)
~ Pilih “iPod” atau “D. PLAYER”.
Putar ulang mulai secara otomatis.
Ÿ Pilih lagu.
Memilih trek dari menu player
1 Masuk ke menu player.
• Mode ini akan dibatalkan jika
tidak ada pengoperasian selama
sekitar 5 detik.
2 Memilih menu yang dikehendaki.
Untuk iPod:
Playlists Ô Artists Ô Albums Ô Songs
Ô Genres Ô Composers Ô (kembali ke
permulaan)
Untuk D. player:
Playlist Ô Artist Ô Album Ô Genre Ô
Track Ô (kembali ke permulaan)
3 Mengkonfirmasi pemilihan.
Mendengarkan iPod®/D. player
01 0:00:06
Album Name / Artist Name
Track Title
D.PLAYER
FLAT
REPEAT
POWER]ON
3: 45 PM
Masuk ke menu player
No. Trek/Waktu putar
☞ halaman 35.
4 Ulangi langkah 2 dan 3 untuk
memilih trek.
•
Setelah trek dipilih, pemutaran akan dimulai.
• Untuk kembali ke menu
sebelumnya...
Memilih mode-mode putar ulang
• Apabila salah satu modus playback
[pemutaran] dipilih, lampu indikator yang
terkait menyala pada monitor.
1
Tampilkan <MENU>, kemudian pilih
<Mode> ] <Repeat> atau <Random>.
2 Pilih opsi yang sesuai.
Repeat Satu: Fungsinya sama seperti
“Repeat One” atau “Repeat
Mode = One”.
All: Fungsinya sama seperti
“Repeat All” atau “Repeat
Mode = All”.
Random Album: Fungsinya sama seperti
“Shuffle Albums” pada
iPod.
Song/On: Fungsinya sama seperti
“Shuffle Songs” atau
“Random Play = On”.
Untuk membatalkan, pilih “Off”.
• iPod adalah merek dagang dari Apple Computer, Inc.,
terdaftar di Amerika Serikat dan di negara-negara lain.
Tekan: Memilih trek
Tahan: Pencarian mundur/maju
Jeda/stop pemutaran
•
Untuk melanjutkan, tekan lagi.
Tahan: Pilih sebuah item
Tahan: Melompati 10 item setiap kali
jika ada lebih dari 10
IN29-34_KW-AVX700[UN]f.indd 33IN29-34_KW-AVX700[UN]f.indd 33 2/20/06 10:30:19 AM2/20/06 10:30:19 AM
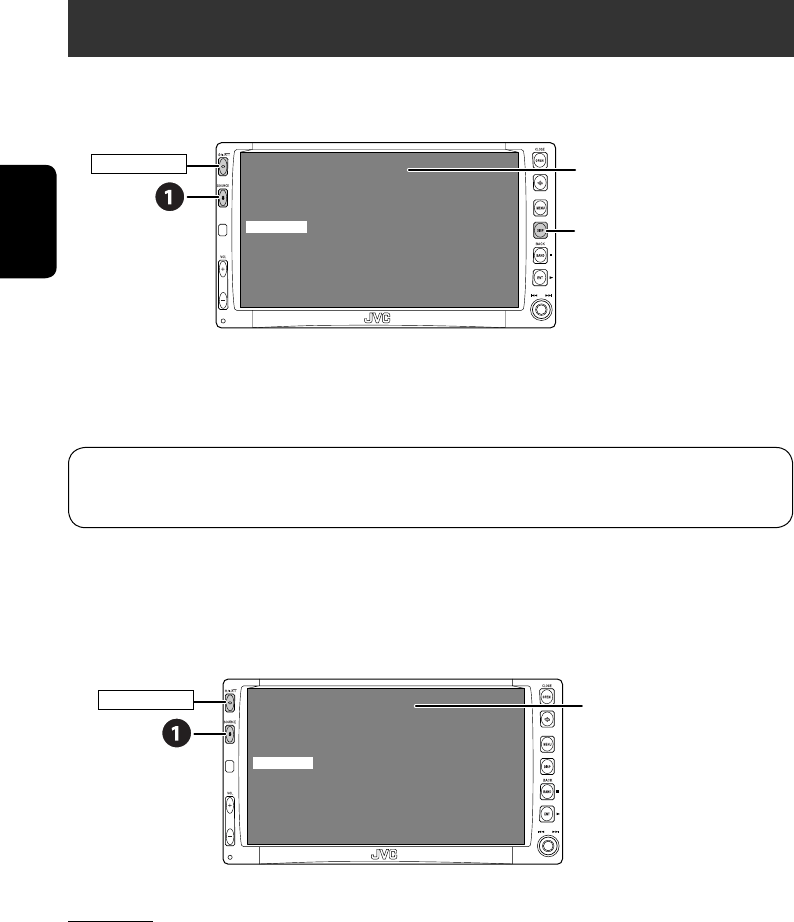
34
INDONESIA
AV-INPUT
Anda dapat menghubungkan komponen eksternal ke steker LINE IN/VIDEO IN.
~ Pilih “AV-IN”.
Ÿ Hidupkan komponen yang telah tersambung dan mulai memutar sumber tersebut.
Jika Anda memilih “Camera Reverse” [Pembalikan Kamera] untuk “AV Input” (☞ halaman 42),
beberapa pesan status seperti perubahan level volume tidak akan muncul pada monitor sewaktu
Anda menayangkan gambar.
EXT-INPUT
Anda dapat menghubungkan komponen eksternal pada jack CD changer di bagian belakang dengan
menggunakan Line Input Adapter [Adaptor Input Saluran]—KS-U57 (tidak disediakan) atau AUX
Input Adapter (Adaptor Input AUX)—KS-U58 (tidak disediakan).
Persiapan:
Pastikan Anda memilih “External Input” untuk pengaturan input eksternal. (☞ halaman 42)
~ Pilih “EXT-IN”.
Ÿ Hidupkan komponen yang telah tersambung dan mulai memutar sumber tersebut.
Mendengarkan komponen eksternal lainnya
AV-INPUT
AV-IN
3: 45 PM
FLAT
POWER]ON
EXT-INPUT
EXT-IN
3: 45 PM
FLAT
POWER]ON
Judul yang ditentukan
(☞ halaman 36)
DISP: Tekan, jika gambar
pemutaran ulang tidak
muncul, tetapi layar
informasi sumber (yang ini)
ditampilkan.
Judul yang ditentukan
(☞ halaman 36)
IN29-34_KW-AVX700[UN]f.indd 34IN29-34_KW-AVX700[UN]f.indd 34 2/21/06 12:31:38 PM2/21/06 12:31:38 PM
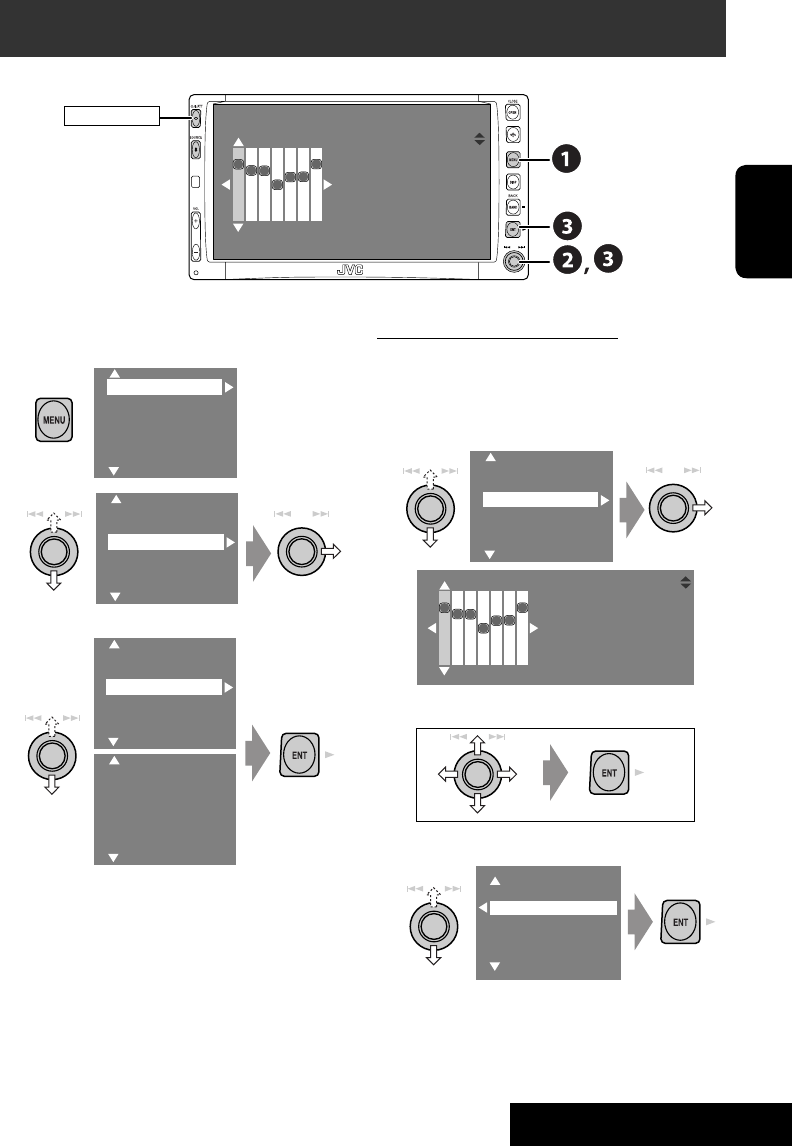
PENGATURAN
35
INDONESIA
Memilih mode suara
~
Ÿ
! Pilih sebuah mode suara.
• Untuk angka setelan prasetel dari setiap
mode suara, ☞ halaman 51.
• Apabila surround (☞ halaman 21)
diaktifkan, penyeragaman suara
sementara dibatalkan.
Menyimpan setelan Anda sendiri
Anda dapat menyimpan setelan Anda ke User 1,
User 2, dan User 3.
1 Ulangi langkah ~ dan Ÿ, kemudian
dalam langkah !...
2 Setel.
3 Simpan.
Penyeragaman suara
Setup
Surround
Equalizer
Sound
Mode
List
Setup
Surround
Equalizer
Sound
Mode
List
Flat
Hard Rock
R&B
Pop
Jazz
Dance
Country
Reggae
Classic
User 1
User 2
User 3
Flat
Hard Rock
R&B
Pop
Jazz
Dance
Freq. 60Hz +03
Freq. 150Hz +02
Freq. 400Hz +02
Freq. 1kHz 00
Freq. 2.5kHz +01
Freq. 6.3kHz +01
Freq. 15kHz +03
User 1
User 2
User 3
POWER]ON
Freq. 60Hz +03
Freq. 150Hz +02
Freq. 400Hz +02
Freq. 1kHz 00
Freq. 2.5kHz +01
Freq. 6.3kHz +01
Freq. 15kHz +03
IN35-44_KW-AVX700[UN]f.indd 35IN35-44_KW-AVX700[UN]f.indd 35 2/20/06 10:29:17 AM2/20/06 10:29:17 AM
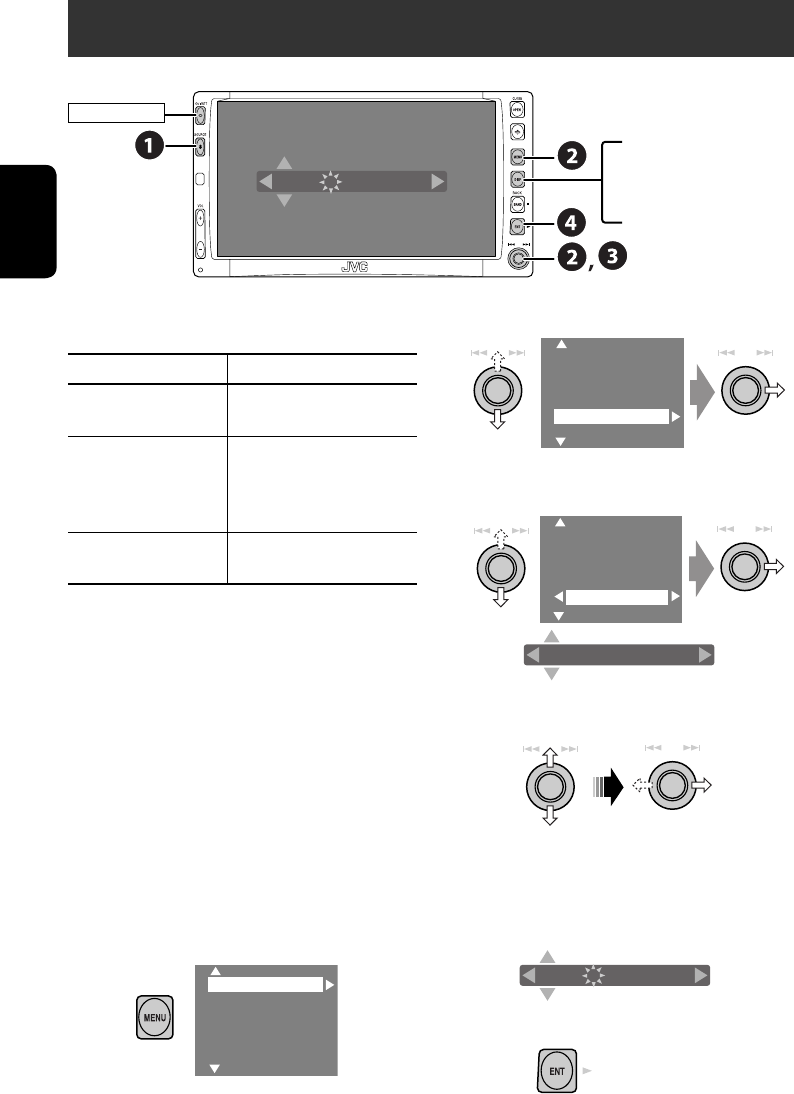
36
INDONESIA
Anda dapat menentukan judul ke yang berikut...
Sumber Maksimum jumlah karakter
AV-INPUT
EXT-INPUT
Sampai 16 karakter.
Stasiun FM/AM/TV Sampai
16 karakter—
sampai
30 stasiun secara
terpisah untuk radio
(FM/AM) dan untuk TV.
DISC/CD-CH*Sampai 32 karakter—
sampai 30 disk.
* Anda dapat menentukan judul hanya pada
CD konvensional.
~ Pilih sumber-sumber.
• Untuk FM/AM: Pilih jalur, kemudian
tala ke stasiun.
• Untuk AV-IN/EXT-IN: Memilih sumber.
• Untuk stastiun TV: Pilih “TV”, kemudian
tala ke stasiun TV.
• Untuk CD dalam radio ini: Sisipkan
sebuah CD.
• Untuk CD-CD dalam CD changer: Pilih
“CD-CH” kemudian pilih sebuah nomor
disk.
Ÿ Tampilkan layar entri judul.
1
2
3
! Tetapkan sebuah judul.
1 Pilih karakter, kemudian masuki.
• Untuk mengubah set karakter, tekan
DISP. (Untuk melihat karakter yang
tersedia, ☞ halaman 45).
2 Ulangi langkah 1 sampai anda selesai
memasukkan judul.
⁄ Prosedur selesai.
Contoh: Ketika anda memilih “DISC” sebagai sumber
Menetapkan judul untuk sumber
Setup
Surround
Equalizer
Sound
Mode
List
Setup
Surround
Equalizer
Sound
Mode
List
Off
Intro
Repeat
Random
Title Entry
MY BEST
POWER]ON
MY BEST
Tekan: Mengubah set
karakter
Tahan: Menghapus judul
IN35-44_KW-AVX700[UN]f.indd 36IN35-44_KW-AVX700[UN]f.indd 36 2/20/06 10:29:25 AM2/20/06 10:29:25 AM
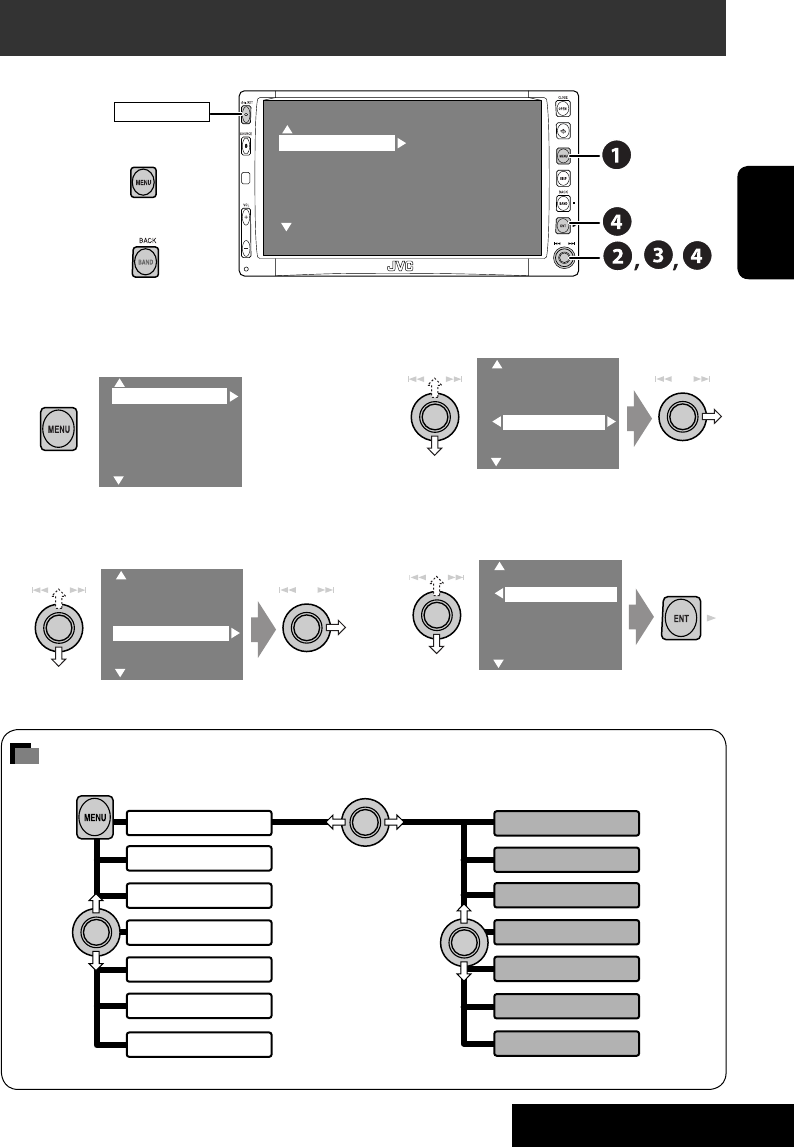
PENGATURAN
37
INDONESIA
!
• Pada beberapa item, Anda harus
mengulangi langkah-langkah ini untuk
menyetel sub-item.
⁄
Setup
Surround
Equalizer
Sound
Mode
List
Item menu
Pengoperasian menu
Contoh: Mengubah pengaturan “High Pass Filter”
~
• Item yang tidak tersedia akan
ditampilkan dalam bayangan.
Ÿ
POWER]ON
Setup
Surround
Equalizer
Sound
Mode
List
Display
Clock
Disc Setup1
Disc Setup2
Tuner
Input
MENU
List
Setup
Surround
Equalizer
Sound
Mode
Dual Zone
Input
Display
Clock
Disc Setup 1
Disc Setup 2
Tuner
Others
Through
On
Fader/Balance
Volume Adjust
Subwoofer
High Pass Filter
Crossover
Amplifier Gain
Untuk kembali (atau menghapus) ke
menu atas
Untuk kembali ke layar sebelumnya
Setup
Surround
Equalizer
Sound
Mode
List
IN35-44_KW-AVX700[UN]f.indd 37IN35-44_KW-AVX700[UN]f.indd 37 2/20/06 10:29:27 AM2/20/06 10:29:27 AM
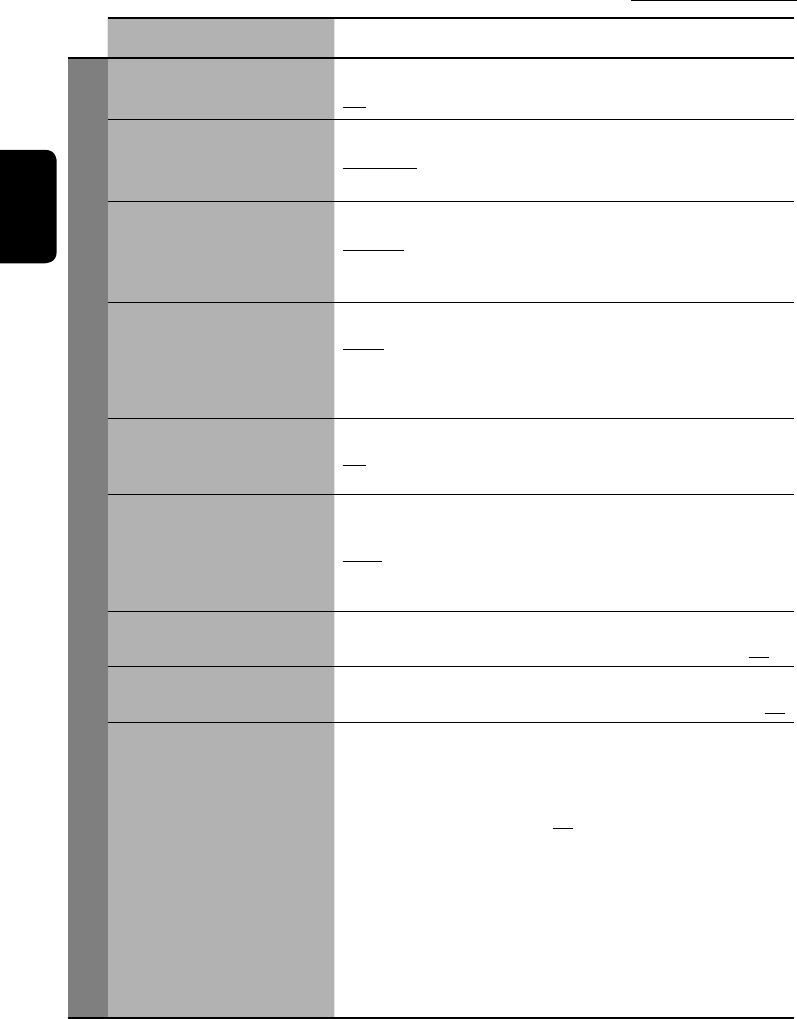
38
INDONESIA
Item menu Pengaturan-pengaturan yang terpilih, [halaman referensi]
Display
Demonstration Off : Batal.
On: Aktifkan demo pada monitor.
Wall Paper Anda dapat memilih gambar latar belakang monitor.
Standard, Geometric Design, Sea, Simple Green, Simple
Orange, Simple Red, Simple Brown, Simple Grey
Level Meter Anda dapat memilih level meter yang diinginkan.
Meter 1, Meter 2, Meter 3
• Tekan DISP berulang-ulang untuk menampilkan level meter
yang dipilih pada monitor.
Scroll Off : Batal.
Once: Menggulung informasi disk sekali.
Auto: Mengulangi penggulungan (selang waktu 5-detik).
• Tahan DISP yang menggulir informasi terlepas dari
pengaturan ini.
Tag Display Off : Batal.
On: Menunjukkan Tag data sewaktu memutar trek
MP3/WMA/WAV.
Dimmer Off : Batal.
On: Mengaktifkan peredup.
Auto: Meredupkan monitor ketika anda menghidupkan
lampu utama.
Time Set: Menyetel waktu On/Off Dimmer.
Dimmer Level Anda dapat memprasetel kecerahan dimmer.
00 (paling terang) sampai 10 (paling gelap); Permulaan 05
Bright
Anda dapat menyesuaikan warna dan kecerahan monitor.
–15 (paling gelap)
sampai
+15 (paling terang); Permulaan 00
Screen Control*1Anda dapat menyesuaikan yang berikut ini untuk membuat
monitor terlihat bersih dan jelas untuk menonton pemutaran
ulang gambar. Pengaturan disimpan secara terpisah untuk
masing-masing sumber—“DISC”, “AV-IN”, dan “TV”.
–15 sampai +15; Permulaan 00
Bright: Sesuaikan jika gambar terlalu terang atau terlalu
gelap.
Contrast: Sesuaikan kontras.
Color: Sesuaikan warna gambar—lebih terang atau lebih
gelap.
Tint: Untuk pemutaran NTSC: Sesuaikan nuansa warna
jika warna kulit manusia tidak tampak alami.
Untuk pemutaran PAL: “FIX” muncul. Ini tidak
dapat disesuaikan.
Permulaan: Yang digaris-bawahi
IN35-44_KW-AVX700[UN]f.indd 38IN35-44_KW-AVX700[UN]f.indd 38 2/20/06 10:29:28 AM2/20/06 10:29:28 AM
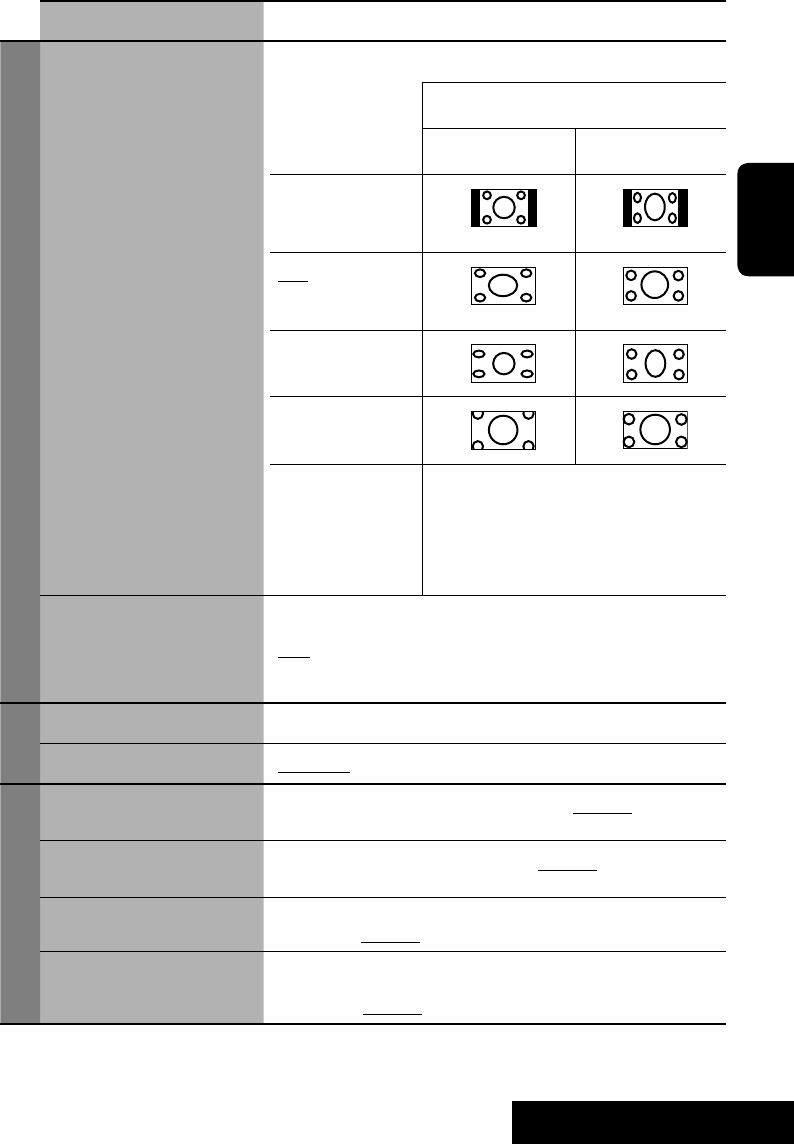
PENGATURAN
39
INDONESIA
Item menu Pengaturan-pengaturan yang terpilih, [halaman referensi]
Display
Aspect*1Anda dapat mengubah rasio aspek gambar.
Rasio aspek sinyal masuk
4:3 16:9
Normal:
Untuk gambar asli
4:3
Full:
Untuk gambar asli
16:9
Just:
Zoom:
Auto: • Untuk “DISC”: Rasio aspek secara
otomatis dipilih dan diselaraskan
dengan sinyal masuk.
• Untuk sumber video yang lain:
Perbandingannya ditetapkan ke
“NORMAL”.
NTSC/PAL Pengaturan ini sahih hanya untuk monitor eksternal
disambungkan. Pilih sistem warna untuk monitor—NTSC,
PAL.
• Matikan daya dan hidupkan kembali agar dapat berlaku
pengaturan baru.
Clock
Time Set ☞ [6]
12Hours/24Hours 12 Hours, 24 Hours, ☞ [6]
Disc Setup 1*2
Menu Language Pilih bahasa awal menu disk; Permulaan English (☞ juga
halaman 44).
Audio Language Pilih bahasa awal audio; Permulaan English (☞ juga
halaman 44).
Subtitle Pilih bahasa awal subtitle atau hapus subtitle (OFF);
Permulaan English (☞ juga halaman 44).
OSD Language Pilih bahasa pada layar yang digunakan untuk monitor
eksternal yang dihubungkan ke steker VIDEO OUT;
Permulaan English.
*1 Tidak dapat disesuaikan untuk sumber audio.
*2 Hanya dapat dipilih untuk “DISC” atau “SD” (sewaktu tidak sedang diputar).
IN35-44_KW-AVX700[UN]f.indd 39IN35-44_KW-AVX700[UN]f.indd 39 2/21/06 12:32:15 PM2/21/06 12:32:15 PM
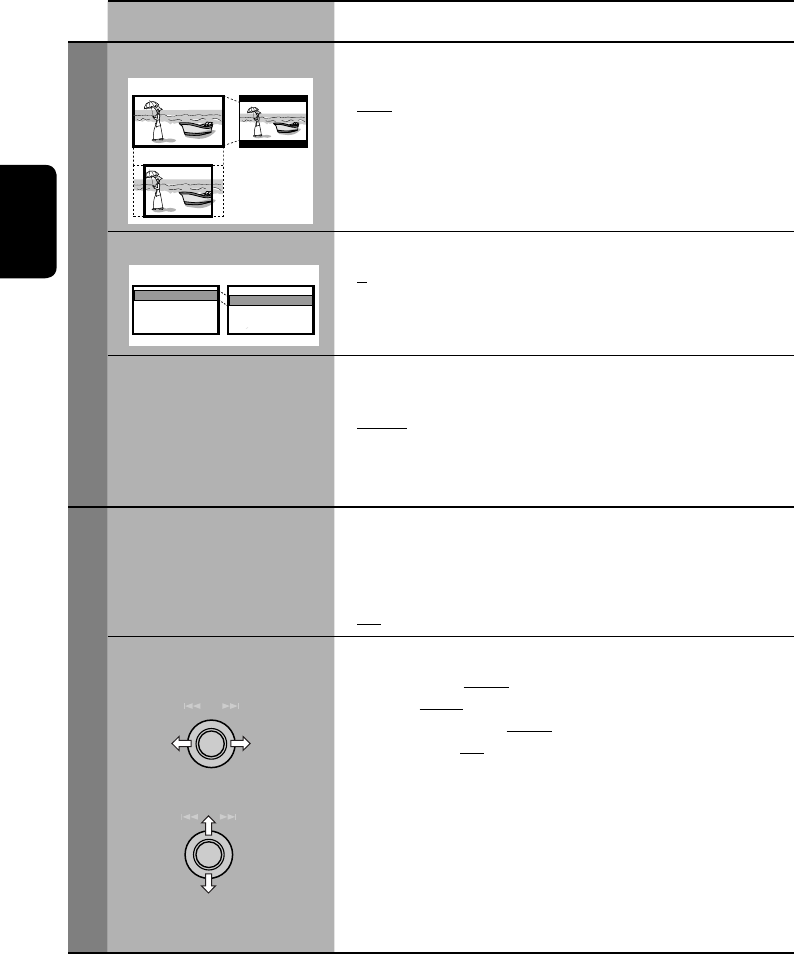
40
INDONESIA
Item menu Pengaturan-pengaturan yang terpilih, [halaman referensi]
Disc Setup 1*2
Monitor Type Pilih jenis monitor untuk menonton film layar lebar pada
monitor eksternal Anda.
• 16:9: Pilih, apabila rasio aspek monitor eksternal 16:9.
• 4:3LB [Letter Box]/4:3PS [Pan Scan]: Pilih, apabila rasio
aspek monitor eksternal 4:3. Rujuk ke gambar di sebelah
kiri untuk melihat bagaimana gambar ditampilkan pada
monitor.
OSD Position Pilih posisi bar pada layar, ☞ [23].
• 1: Posisi tertinggi
• 2: Posisi lebih rendah
File Type Pilih tipe file pemutaran apabila disk atau kartu SD berisikan
tipe file yang berbeda-beda.
• Audio: Pemutaran file audio.
• Picture: Pemutaran file JPEG.
• Video: Putar kembali file MPEG (tidak tersedia untuk
kartu SD).
Disc Setup 2*3
D. (Dynamic) Range
Compres. (Compression)*2
Anda dapat menikmati suara yang dahsyat pada level volume
rendah sewaktu memutar perangkat lunak Dolby Digital.
• Auto: Pilih ini untuk menerapkan efek pada perangkat
lunak multisaluran yang dikodekan.
• On: Pilih ini untuk selalu menggunakan fungsi ini.
Speaker Size
*2
Anda dapat menyesuaikan pengaturan ukuran speaker.
• Front: Small, Large
• Center: None, Small, Large
• Rear: None, Small, Large
• Sub Woofer: On, Off
• Ukuran speaker: “Large” [Besar] untuk diameter 13-cm
atau lebih; “Small” [Kecil] 13 cm atau kurang.
Terlepas dari pengaturan di atas...
• Tidak ada suara yang keluar dari subwoofer sewaktu
memutar Dolby Pro Logic II Movie atau Music jika speaker
depan disetel ke “Large”.
• Tidak ada suara yang keluar dari speaker tengah sewaktu
surround dinonaktifkan.
*2 Hanya dapat dipilih untuk “DISC” atau “SD” (sewaktu tidak sedang diputar).
*3 Hanya dapat dipilih untuk “DISC” atau “SD”.
Pilih speaker
Sesuaikan ukuran speaker
16:9 4:3 LB
4:3 PS
Position 1 Position 2
IN35-44_KW-AVX700[UN]f.indd 40IN35-44_KW-AVX700[UN]f.indd 40 2/20/06 10:29:32 AM2/20/06 10:29:32 AM
PENGATURAN
41
INDONESIA
Item menu Pengaturan-pengaturan yang terpilih, [halaman referensi]
Disc Setup 2*3
Speaker Level Anda dapat menyesuaikan tingkat keluaran dari speaker
yang diaktifkan (☞ lihat “Speaker Size” di halaman 40),
untuk memonitor nada uji.
• Front Left/Center/Front Right/Rear Right/
Sub Woofer
*4
/Rear Left: menyesuaikan tingkat output
setiap speaker dalam kisran –10dB sampai +10dB;
Permulaan 00.
• Tekan terus ENT untuk mengaktifkan dan menonaktifkan
nada tes—Test Tone: ON, OFF.
Speaker Distance
*5
Anda dapat menyesuaikan pengaturan waktu keluaran
pengeras suara.
• Front Left/Center/Front Right/Rear Right/Rear Left:
sesuaikan jarak speaker dari posisi dengar dalam kisaran
15 cm/6 inches sampai 600 cm/240 inches pada step
15-cm/6-inci. [Permulaan: 120 cm (untuk speaker tengah),
150 cm (untuk speaker lainnya)]
• Tekan terus DISP untuk mengubah satuan ukuran—cm dan
inch.
Tuner
IF Band Width Auto: Penambahan selektivitas radio untuk menekan
gangguan noise di antara stasiun-stasiun dekat. (Efek
stereo mungkin hilang).
Wide: Kecuali apabila ada gangguan dari stasiun radio
yang berdampingan, kualitas suara/bunyi tidak akan
menurun dan efek stereo tidak akan hilang.
TV Channel Area
*6
Pilih negara tempat Anda menggunakan unit ini berikut unit
TV tuner—KV-C1001/KV-C1008.
• Untuk KV-C1001: ITALY, INDONESIA, CCIR (untuk
negara lainnya)
• Untuk KV-C1008: AUSTRALIA, NEW ZEALAND,
INDONESIA, CCIR (untuk negara lainnya)
*4 Pengaturan level subwoofer ini hanya berlaku apabila surround diaktifkan( (☞ juga halaman 43).
*5 Tidak dapat dipilih apabila hanya speaker depan yang diaktifkan.
*6 Tidak ditampilkan apabila KV-C1000 dihubungkan.
Sesuaikan jarak speaker
Menyesuaikan level speaker
Pilih speaker
Pilih speaker
IN35-44_KW-AVX700[UN]f.indd 41IN35-44_KW-AVX700[UN]f.indd 41 2/20/06 10:29:34 AM2/20/06 10:29:34 AM
42
INDONESIA
Item menu Pengaturan-pengaturan yang terpilih, [halaman referensi]
Input
AV Input Anda dapat menentukan penggunaan steker LINE IN dan
VIDEO IN.
Off : Pilih, apabila tidak ada komponen yang
dihubungkan (“AV-IN” dilompati
sewaktu memilih sumber).
Audio&Video: Pilih ini apabila menghubungkan
komponen AV seperti VCR.
Audio: Pilih ini apabila menghubungkan
komponen audio seperti MD player.
Camera
*7
: Pilih ini apabila menghubungkan
kamera tampilan belakang.
Camera Reverse
*7
: Pantulan cermin tampilan belakang
ditampilkan pada monitor (Hanya
monitor pada alat penerima; tampilan
belakang yang normal muncul pada
monitor eksternal).
External Input Apabila menghubungkan komponen eksternal ke jack CD
changer di bagian belakang.
Changer/iPod/D. player
*8
: CD changer, iPod atau D.
player ☞ [29, 33]
External Input: Apa pun selain yang di atas. ☞ [34]
Others
Beep Off : Batal.
On: Mengaktifkan suara sentuh-kunci.
Telepon Muting Off : Batal.
Muting1, Muting2:
Pilih salah satu yang membungkam suara
sementara menggunakan telepon selular.
Power LED Flash Off : Dibatalkan.
On:
Apabila tombol pemicu dimatikan, lampu
pada tombol berkilat-kilat.
Surround*9
Surround Off
Pilih ini untuk menonaktifkan fungsi surround.
Surround On
Pilih ini untuk mengaktifkan fungsi surround.
☞ [21]
Auto, Dolby PLII Movie, Dolby PLII Music
• Apabila memilih “Dolby PLII Music”, Anda dapat
menyesuaikan “Panorama” dan “CenterWidth”.
Equalizer*10
Flat/Hard Rock/R&B/Pop/
Jazz/Dance/Country/
Reggae/Classic/User
1/User 2/User 3
☞ [35]
*7 Anda harus memutar-balik hubungan kabel lampu. Lihat Manual Pemasangan/Penyambungan
(bagian yang terpisah). Tampilan belakang melalui kamera, muncul dengan rasio aspek “Full”
(Penuh) pada monitor (terlepas dari pengaturan rasio aspeknya) apabila Anda memindahkan gigi
persneling ke posisi mundur (R) .
*8 Nama komponen yang terdeteksi melalui jack CD changer jack akan diperlihatkan.
*9 Hanya dapat dipilih untuk “DISC” dan “SD”.
*10 Hanya dapat dipilih apabila surround dinonaktifkan.
IN35-44_KW-AVX700[UN]f.indd 42IN35-44_KW-AVX700[UN]f.indd 42 2/20/06 10:29:36 AM2/20/06 10:29:36 AM
PENGATURAN
43
INDONESIA
Item menu Pengaturan-pengaturan yang terpilih, [halaman referensi]
Sound
Fader/Balance Menyetel pemasang-surut (Fader)—speaker depan dan
belakang.
• Paling atas—depan saja
• Paling bawah—belakang saja
Apabila menggunakan sistem dua-speaker, setel fader ke
tengah (00).
Menyetel penyeimbang (Balance)—menyeimbangkan
keluaran speaker antara speaker-speaker kiri dan kanan.
• Paling kiri—kiri saja
• Paling kanan—kanan saja
Volume Adjust Menyesuaikan dan menyimpan tingkat volume penyesuaian-
otomatis untuk masing-masing sumber, membandingkan
dengan tingkat volume FM. Tingkat volume akan secara
otomatis bertambah atau berkurang apabila Anda mengubah
sumber.
• –12 sampai +12; Permulaan 00
Subwoofer Menyesuaikan pengaturan di bawah dalam submenu:
• Phase: Fase subwoofer. Pilih salah satu,“Normal” atau
“Reverse” yang mereproduksi suara yang lebih baik.
• Level*11: Level output subwoofer. Level (Tingkat): –6
sampai +8; Permulaan 0
High Pass Filter Through: Pilih apabila subwoofer tidak dihubungkan.
On: Pilih apabila subwoofer dihubungkan.
Crossover Sesuaikan frekuensi seberangan antara speaker depan/
belakang dan subwoofer.
80Hz, 120Hz, 150Hz
Amplifi er Gain
Anda dapat mengganti level volume maksimum dari radio ini.
Off : Menonaktifkan penguat-penguat yang
terpasang tetap di dalam.
Low Power:
VOL 00 sampai 30 (Pilih ini jika daya
maksimum
speaker
kurang dari 50 W)
High Power: VOL 00 sampai 50
Rear Speaker*12 Anda dapat mengaktifkan/menonaktifkan speaker belakang.
Off, On
Mode*13
Mono
Hanya untuk FM. (Off, On),
☞ [10]
DX / Local
Hanya untuk FM. (DX, Local),
☞ [11]
SSM
Hanya untuk FM.
☞ [11]
*11
Pengaturan level subwoofer ini hanya berlaku apabila surround dinonaktifkan (☞ juga halaman 41).
*12 Hanya berfungsi apabila Dual Zone diaktifkan.
*13 Item yang tercantum di bawah <Mode> bervariasi di antara sumber pemutaran.
Menyetel pemasang-surut (Fader)
Menyetel penyeimbang (Balance)
IN35-44_KW-AVX700[UN]f.indd 43IN35-44_KW-AVX700[UN]f.indd 43 2/20/06 10:29:37 AM2/20/06 10:29:37 AM
44
INDONESIA
Item menu Pengaturan-pengaturan yang terpilih, [halaman referensi]
Mode*13
Title Entry
Hanya untuk CD konvensional, stasiun FM/AM, stasiun TV,
AV-IN dan EXT-IN.
☞ [36]
Off /Intro/Repeat/Random
Hanya untuk pemuaran disk, pemutaran SD dan iPod/D. player.
☞ [16, 30, 33]
OSD
Hanya untuk TV. (Off, Channel, Channel+Station),
☞ [32]
Auto MEMORY
Hanya untuk TV.
☞ [31]
List
Daftar yang dapat diakses berbeda-beda, tergantung pada
sumbernya.
Dual Zone
Off , On/Surround Off, On/Surround On,
☞ [24]
*13 Item yang tercantum di bawah <Mode> bervariasi di antara sumber pemutaran.
PENGATURAN
Kode Bahasa Kode Bahasa Kode Bahasa Kode Bahasa Kode Bahasa
AA Afar FA Persia KL Greenland OC Occitan ST Sesotho
AB Abkhazian FI Finnish KM Kamboja OM (Afan) Oromo SU Sunda
AF Afrikaans FJ Fiji KN Kannada OR Oriya SW Swahili
AM Amharik FO Faroese KO Korean PA Panjabi TA Tamil
AR Arab FY Frisian KS Kasmir PL Polandia TE Telugu
AS Assamese GA Irish KU Kurdi PS Pashto, Pushto TG Tajik
AY Aymara GD Scots Gaelic KY Kirghiz PT Portugis TH Thai
AZ Azarbaijan GL Galician LA Latin QU Quechua TI Tigrinya
BA Bashkir GN Guaran LN Lingala RM
Rhueto-Romance
TK Turkmen
BE Belarusia GU Gujarati LO Laothian RN Kirundi TL Tagalog
BG Bulgaria HA Hausa LT Lithuania RO Rumania TN Setswana
BH Bihari HI Hindi LV Latvian,
Lettish
RW Kinyarwanda TO Tonga
BI Bislama HR Kroasia MG Malagasi SA Sanskrit TR Turki
BN Benggali,
Bangla
HU Hungaria MI Maori SD Sindhi TS Tsonga
BO Tibet HY Armenia MK Makedonia SG Sangho TT Tatar
BR Breton IA Interligua ML Malayualam SH Serbo-Kroasia TW Twi
CA Catalan IE Interligue MN Mongolia SI Singhalese UK Ukraina
CO Corsican IK Inupiak MO Maldovian SK Slovakia UR Urdu
CS Czech IN Indonesia MR Marathi SL Slovenia UZ Uzbek
CY Welsh IS Icelandic MS Melayu SM Samoa VI Vietnam
DZ Butan IW Ibrani MT Maltese SN Shona VO Volapuk
EL Yunani JI Yiddish MY Burma SO Somali WO Wolof
EO Esperanto JW Jawa NA Nauru SQ Albania XH Xhoso
ET Estonia KA Georgian NE Nepal SR Serbia YO Yoruba
EU Basque KK Kazakh NO Norwegia SS Siswati ZU Zulu
IN35-44_KW-AVX700[UN]f.indd 44IN35-44_KW-AVX700[UN]f.indd 44 2/20/06 10:29:39 AM2/20/06 10:29:39 AM
45
INDONESIA
Perawatan
Pengembunan uap air
Uap air mungkin mengembun pada lensa di
dalam pemutar DVD/CD dalam kasus-kasus
berikut:
• Setelah menyalakan pemanas di dalam mobil.
• Jika ini menjadi sangat lembab di dalam
mobil.
Jika ini terjadi, pemutar DVD/CD mungkin
mengalami kesalahan fungsi. Keluarkan
disk atau biarkan alat penerima hidup untuk
beberapa jam sampai uap air menguap.
Bagaimana menangani disk-disk
Ketika memindahkan sebuah
disk dari wadahnya, tekan ke
bawah penahan tengah dari
wadah tersebut dan angkat disk
keluar, pegang CD pada bagian
pinggir.
• Selalu memegang disk pada bagian pinggir.
Jangan menyentuh permukaan yang
terekamnya.
Ketika menyimpan sebuah disk ke dalam
wadahnya, dengan baik masukkan disk
tersebut ke sekeliling penahan tengah (dengan
permukaan yang tercetak menghadap ke atas).
• Pastikan untuk menyimpan disk-disk ke
dalam wadah-wadahnya setelah digunakan.
Untuk menjaga disk-disk bersih
Sebuah disk yang kotor mungkin
tidak dapat diputar secara benar.
Jika sebuah disk menjadi kotor, lap
dengan sebuah kain lembut dalam
satu garis lurus dari tengah ke pinggir.
• Jangan menggunakan suatu pelarut (sebagai
contoh pembersih rekaman konvensional,
semprotan, tiner, bensin, dsb.) untuk
membersihkan disk-disk.
Untuk memutar disk-disk baru
Disk-disk baru mungkin
mempunyai bagian-bagian yang
kasar di sekitar bagian dalam
dan luar pinggiran disk. Jika
disk seperti ini digunakan, alat
penerima ini mungkin menolak disk tersebut.
Untuk menghilangkan bagian-bagian kasar
ini, gosok pinggiran-pinggiran dengan sebuah
pensil atau pena, dsb.
Label yang menonjol
Stiker Bekas stiker
Disk melengkung
Jangan gunakan disk-disk berikut:
Penahan tengah
Karakter diperlihatkan pada monitor
Selain abjad romawi (A – Z, a – z), karakter berikut akan
digunakan untuk memperlihatkan berbagai informasi pada
monitor.
• Anda juga dapat menggunakan karakter-karakter berikut untuk
memberikan judul-judul (lihat halaman 36).
• Untuk menentukan judul ke stasiun TV, Anda hanya dapat
menggunakan huruf latin (A – Z, a – z) dan angka (0 – 9).
Nomor-nomor dan simbol-simbol
IN45-48_KW-AVX700[UN]f.indd 45IN45-48_KW-AVX700[UN]f.indd 45 2/20/06 10:29:48 AM2/20/06 10:29:48 AM
46
INDONESIA
Lebih lagi tentang alat penerima ini
Umum
Menghidupkan power
• Dengan menekan SOURCE pada alat
penerima, Anda dapat juga menghidupkan
power. Jika sumber sudah siap, pemutaran
dimulai.
Menonton tayangan gambar
• Jika Anda mengubah rasio aspek ke “Just”,
kedus sisi gambar diperpanjang secara
horisontal untuk memuatkan gambar ke
ukuran monitor. Ini dapat menyebabkan
bagian tengah gambar terlihat tidak normal.
FM/AM
Menyimpan stasiun-stasiun dalam memori
• Apabila SSM sudah berakhir, stasiun radio
yang diterima diprasetel pada No. 1 (frekuensi
terendah) sampai No. 6 (frekuensi tertinggi).
Disk
Umum
• Dalam manual ini, kata-kata “track” dan “file”
secara bergantian digunakan.
• Radio ini juga dapat memutar ulang disk-disk
8 cm.
• Radio ini hanya dapat memutar ulang file-file
CD audio (CD-DA), jika file-file yag berbeda
tipe telah direkam dalam disk yang sama.
• Alat penerima ini dapat menampil hanya 1
byte karakter. Tidak ada karakter-karakter
lain dapat secara benar ditampilkan.
Menyisipkan sebuah disk
• Apabila disk dimasukkan terbalik, akan
muncul “Disc Error Please Eject” di monitor.
Mengeluarkan disk.
Mengeluarkan sebuah disk
• Jika disk yang dikeluarkan tidak dipindahkan
dalam 15 detik, disk secara otomatis
akan disisipkan kembali ke dalam tempat
pemuatan untuk melindungnya dari debu.
(Disk tidak diputar dalam waktu ini).
Indikator-indikator speaker/sinyal
• Indikator speaker—segi empat di sekeliling
“L”, “R”, “LS” dan “RS” bersinar biru terang,
apabila speaker yang terkait disetel ke “Large”
atau “Small” (☞ halaman 40).
• Indikator speaker tengah—segi empat di
sekeliling “C” bersinar biru terang apabila
speaker tengah disetel ke “Large” atau “Small”
dan apabila surround diaktifkan.
• Suara keluar dari speaker yang mana
indicator-indikator speaker menyala pada
monitor.
• Indikator SW menyala ketika “Sub Woofer”
diatur ke “On” (☞ halaman 40).
• Indikator sinyal menunjukkan sinyal masuk—
L (kiri depan) / R (kanan depan) / C (tengah)
/ LFE (efek frekuensi rendah) / LS (surround
kiri) / RS (surround kanan) / S (surround
mono).
• Jika speaker diaktifkan, tetapi sinyal yang
bersangkutan ke speaker tidak masuk,
indikator sinyal berubah warna dari putih ke
hitam, untuk menandakan tidak ada sinyal
masuk (oleh karena itu, tidak ada suara dari
speaker yang bersangkutan).
Mengganti sumber
• Jika Anda mengubah sumber sementara Zona
Dual tidak diaktifkan, pemutaran pun akan
berhenti tanpa mengeluarkan disk.
Pada waktu berikutnya anda memilih
“DISC” untuk sumber putar ulang, disk
mulai memutar dari tempat mana pernah
dihentikan sebelumnya.
Indikator-indikator speaker Indikator-indikator sinyal
IN45-48_KW-AVX700[UN]f.indd 46IN45-48_KW-AVX700[UN]f.indd 46 2/20/06 10:29:52 AM2/20/06 10:29:52 AM

47
INDONESIA
Memutarkan file MP3/WMA/WAV
• Alat penerima ini dapat memutar ulang
file-file dengan kode perpanjangan <.mp3>,
<.wma> atau <.wav> (mengabaikan jenis
huruf—huruf besar/kecil).
• Alat receiver ini dapat memutar kembali file
yang memenuhi kondisi di bawah:
– Kecepatan bit: MP3/WMA: 32 kbps —
320 kbps
– Frekuensi sampling:
48 kHz, 44.1 kHz, 32 kHz (untuk MPEG1)
24 kHz, 22.05 kHz, 16 kHz (untuk MPEG2)
48 kHz, 44.1 kHz, 32 kHz (untuk WMA)
44.1 kHz (untuk WAV)
•
Alat penerima ini dapat memutar ulang file yang
terekam dalam VBR (Rata-rata bit variabel).
File yang direkam dalam VBR memiliki selisih
indikasi waktu yang berlalu.
• Alat penerima ini tidak dapat memutar ulang
file berikut:
– File MP3 yang disandikan dengan format
MP3i dan MP3 PRO.
– File MP3 disandikan dengan Lapisan 1/2.
– File WMA disandikan dengan tanpa
kerugian, profesional dan format suara.
– File WMA yang tidak berdasarkan Windows
Media® Audio.
– File WMA yang dilindungi dari pengcopyan
dengan DRM.
– File yang memiliki data seperti AIFF,
ATRAC3, dll.
Menikmati surround sounds
• Jika “Surround On” yang dipilih, pemutaran
“MULTI” surround untuk disk dengan
pengyandian multi-channel [multi-saluran]
secara otomatis akan memulai, terlepas dari
pengaturan “Surround On” yang Anda setel.
• Anda tidak dapat mengaktifkan surround
untuk MPEG multi-channel DVD Video dan
sumber MPEG 2-saluran. Jika “Surround
On” dipilih, suara stereo akan dipancarkan
hanya melalui speaker depan. “FRONT 2CH”
muncul di layar informasi disk.
• Dengan memilih “Auto” untuk “Surround
On”, pemutaran stereo akan dimulai untuk
sumber DVD, DTS-CD dan MPEG 2-channel
tanpa penyandian sinyal surround. Dalam
hal ini, tidak ada suara yang keluar dari
subwoofer.
• Apabila “FIX” muncul di layar informasi
disk, tidak akan ada suara yang keluar dari
subwoofer.
Memutarkan disk Recordable/Rewritable
• Unit ini dapat mengenali sebanyak 3 500
file dan 250 folder (maksimum 999 file per
folder).
• Gunakan hanya disk-disk yang telah
“diselesaikan” (finalized).
• Alat penerima ini dapat memutar ulang
disk-disk multisesi; bagaimanapun, sesi-sesi
yang belum ditutup akan dilewati sementara
memutar.
• Unit ini dapat menunjukkan Tag data (Versi
1.0, 1.1, 2.2, 2.3, atau 2.4) untuk file.
• Unit ini mungkin tidak dapat memutar
beberapa disk atau file karena karakteristiknya
atau kondisi rekamannya.
Memutarkan file MPEG
• Unit ini dapat memutarkan kembali file
MPEG dengan kode ekstension <.mpg> atau
<.mpeg>.
• Format stream [pengaliran] harus sesuai
dengan MPEG system/program stream.
• Format file harus MP@ML (Main Profile at
Main Level)/SP@ML (Simple Profile at Main
Level)/MP@LL (Main Profile at Low Level).
• Audio stream [Pengaliran audio] harus sesuai
standar MPEG1 Audio Layer-2.
Memutarkan file JPEG
• Anda dianjurkan untuk merekam file pada
resolusi 640 x 480.
• Unit ini hanya dapat memutar file JPEG
baseline. File JPEG Progressive dan file JPEG
lossless tidak dapat diputar.
IN45-48_KW-AVX700[UN]f.indd 47IN45-48_KW-AVX700[UN]f.indd 47 2/20/06 10:29:53 AM2/20/06 10:29:53 AM

48
INDONESIA
Memutar kartu SD
• Format perekam yang dibutuhkan adalah
FAT 16/32 dan tipe penyimpan yang
disarankan adalah 8 MB sampai 512 MB.
Pengoperasian iPod®/D. player
• Apabila Anda menghidupkan unit ini, iPod
atau D. player dialiri arus listrik melalui unit
ini.
• Informasi teks mungkin tidak dapat
ditampilkan dengan benar. Unit ini dapat
menampilkan hingga 40 karakter.
Pemberitahuan:
Sewaktu pengoperasian sebuah iPod atau
sebuah D.player, beberapa pengoperasian
mungkin tidak bisa dilakukan dengan benar
atau sebagaimana mestinya. Jika ini terjadi,
kunjunglah situs web JVC berikut:
Untuk pengguna iPod: <http://www.jvc.
co.jp/english/car/support/ks-pd100/index.
html>
Untuk pengguna D. player: <http://www.jvc.
co.jp/english/car/support/ks-pd500/index.
html>
Penentuan judul
• Jika Anda menentukan judul ke lebih dari
30 stasiun radio, 30 stasiun TV atau 30 CD,
“NAME FULL” akan berkedip-kedip sebentar.
Hapus judul-judul yang tidak diinginkan
sebelum penetapan judul.
• Penetapan judul pada CD dalam CD changer
dapat juga ditunjukkan jika Anda memutar
kembali disk dalam DVD/CD player built-in
dan sebaliknya.
Mengenai suara-suara yang dihasilkan
melalui terminal-terminal belakang
• Speaker out/analog discrete output (F-
OUT/R-OUT/CENTER/SUBWOOFER):
Sinyal multi-saluran dipancarkan untuk
disk berkode multi-saluran. (Apabila Zona
Dual diaktifkan, sinyal yang sama, yang
dipancarkan melalui steker 2nd AUDIO
OUT, dipancarkan untuk sumber utama
“DISC”.)
• 2nd AUDIO OUT: Sinyal 2-saluran
dipancarkan apabila Zona Dual diaktifkan.
Apabila memutar disk berkode multi-
saluran, sinyal multi-saluran di-downmix
(kecuali untuk sejumlah DVD Audio).
Pengaturan menu
• Jika anda mengganti pengaturan “Amplifier
Gain” dari “High Power” ke “Low Power”
sementara level volume diatur lebih tinggi
dari “30”, radio secara otomatis mengganti
level volume ke “VOL 30”.
• Setelah Anda mengubah pengaturan “Menu
Language/Audio Language/Subtitle” (Bahasa
Menu/Bahasa Audio/Teks film), matikan
power dan masukkan kembali disc (atau
masukkan disc yang lain) agar pengaturan
Anda berlaku.
• Ketika anda memilih “16:9” untuk sebuah
gambar yang rasio perbandingannya adalah
4:3, gambar berubah secara meramping
karena proses konversi gambar melebar.
• Meskipun Anda memilih “4:3 PS”, ukuran
layar mungkin saja menjadi “4:3 LB” untuk
sejumlah disk.
• Apabila memilih “None” untuk pengeras
suara tengah/belakang dan “Off” untuk
subwoofer (Ukuran Pengeras Suara),
pengaturan surround dibatalkan dan tidak
dapat disesuaikan.
• Ukuran speaker tengah tidak dapat disetel ke
“Large” jika speaker depan dan belakang distel
ke “None” atau “Small”.
IN45-48_KW-AVX700[UN]f.indd 48IN45-48_KW-AVX700[UN]f.indd 48 2/21/06 12:33:09 PM2/21/06 12:33:09 PM

49
INDONESIA
Pemecahan Masalah
Apa yang muncul dan menjadi masalah tidak selalu serius. Cek poin-poin berikut sebelum
memanggil sebuah pusat layanan.
Gejala-gejala Perbaikan-perbaikan/Sebab-sebab
Umum
• Tidak ada suara yang keluar dari speaker tengah.
Speaker tengah hanya digunakan untuk pemutaran surround. Tidak
ada suara yang keluar untuk pemutaran stereo.
• Tidak ada suara yang keluar dari subwoofer
sewaktu memutar dalam stereo.
Ini terjadi sewaktu memutarkan beberapa disk di mana
“Auto” dipilih untuk “Surround On”(☞ halaman 21 dan 42).
Membatalkan surround.
• Monitor tidak jelas dan tidak terbaca untuk
menonton gamar yang diputar.
Mungkin, sinar matahari dari kaca depan yang menyebabkan
gejala ini.
Sesuaikan “Bright” (Kecerahan) dan “Contrast” (Kontras) pada
“Screen Control” (Kontrol Layar). (☞ halaman 38).
• Remote kontrol tidak bekerja. Menonaktfikan Zona Dual (☞ halaman 24).
(Ketika Zona Dual telah diaktifkan, remote kontrol hanya
berfungsi untuk mengoperasikan pemutar DVD/CD.)
• “Position Error Push Open Key” muncul pada
monitor.
Sudut panel monitor sudah disesuaikan secara paksa, atau terganggu
sewaktu membuka atau menutup. Tekan OPEN/CLOSE.
• “Mecha Error Push Reset” muncul di monitor dan
panel tidak bergerak.
Reset alat penerima (☞ halaman 2).
• “SD Loading Error” muncul pada monitor.
SD tidak sepenuhnya dimasukkan. Masukkan kartu sepenuhnya ke
dalam slot agar panel monitor dapat ditutup.
• Alat penerima tidak bekerja secara keseluruhan. Reset alat penerima (☞ halaman 2).
FM/AM
• Preset (pengaturan awal) SSM otomatis tidak
bekerja.
Simpan stasiun-stasiun secara manual.
• Noise (Derau) statis sementara mendengarkan radio.
Kencangkan sambungan antena.
Putar ulang disk
• Disk tidak dapat dikenali maupun diputar. Keluarkan disk secara paksa (☞ halaman 2).
• Disk tidak dapat dikeluarkan. Buka kunci disk (☞ halaman 17).
• Disk Recordable/Rewritable tidak dapat diputar
kembali.
• Trek pada disk Recordable/Rewritable tidak dapat
diloncati.
• Masukkan disk yang telah selesai.
• Selesaikan disk dengan komponen yang anda gunakan untuk
merekam.
• “Disc Error Please Eject” muncul pada monitor. Masukkan lagi disk dengan benar.
• “Eject Error” atau “Loading Error” muncul pada
monitor.
Mengubah sumber dengan menekan SOURCE akan mengatasi
kesalahan ini.
• Suara dan gambar kadang-kadang diinterupsi atau
didistorsi.
• Hentikan putar ulang sementara mengemudi pada jalan yang
kasar.
• Ganti disk tersebut.
• Tidak ada gambar permainan-ulang yang muncul di
monitor.
Kabel rem parkir tidak terhubung dengan benar.
(☞ Manual Pemasangan/Penyambungan.)
• Monitor eksternal menampilkan gambar hitam-
putih bergelombang.
Pengaturan “NTSC/PAL” tidak benar. Pilih pengaturan yang sesuai
(☞ halaman 39).
• “Region Error Please Eject” muncul di monitor
apabila Anda memasukkan DVD Video.
Region code [Kode region] tidak benar (☞ halaman 5).
IN49-53_KW-AVX700[UN]f.indd 49IN49-53_KW-AVX700[UN]f.indd 49 2/20/06 10:30:59 AM2/20/06 10:30:59 AM

50
INDONESIA
Gejala-gejala Perbaikan-perbaikan/Sebab-sebab
Putar ulang MP3/WMA/WAV
• Disk tidak dapat dimainkan. • Ganti disk tersebut.
• Rekam trek dengan menggunakan aplikasi sesuai standar
dalam disk yang sesuai (☞ halaman 4).
• Tambah kode ekstension yang sesuai pada nama file.
• Derau dibangkitkan. Trek yang diputar bukan merupakan format file yang dapat
diputar. Lompati dan langsung ke file lainnya.
• Trek tidak dapat diputar seperti yang Anda
harapkan.
Urutan pemutaran dapat berbeda dari yang diputar dengan
menggunakan player lain.
• Waktu putar yang sudah lewat tidak benar. Kadang-kadang ini terjadi sewaktu pemutaran. Hal ini
disebabkan dengan bagaimana trek-trek tersebut direkam
pada disk.
• “Disc No Files Please Eject” muncul pada
monitor.
Masukkan disk yang memuat trek dengan format yang
sesuai.
Putar ulang kartu SD
• Derau dibangkitkan. Trek yang diputar bukan merupakan format file yang dapat
diputar. Lompati dan langsung ke file lainnya.
• Trek tidak dapat diputar seperti yang Anda
harapkan.
Urutan pemutaran dapat berbeda dari yang diputar dengan
menggunakan player lain.
• “Now Reading” tetap berkedip pada monitor. • Waktu readout [pembacaan] berbeda-beda, tergantung
pada kartu SD.
• Jangan menggunakan terlalu banyak hirarki-hirarki dan
folder-folder.
• Matikan daya, kemudian hidupkan lagi.
• “SD No Files Please Eject” muncul pada
monitor, kemudian kembali ke sumber
sebelumnya.
Masukkan kartu SD yang memuat trek berkode dalam
format yang sesuai.
• “Not Support” muncul di monitor dan trek
dilompati.
Trek tidak dapat diputar.
• “SD Error Please Eject” muncul pada monitor,
kemudian kembali ke sumber sebelumnya.
• Kartu SD mungkin mengalami malafungsi, atau mungkin
tidak diformat dengan benar.
• Jangan mencabut atau memasangkan kartu SD sewaktu
tulisan “Now Reading” ditunjukkan.
CD changer
• “No Disc” muncul pada monitor. Sisipkan disk ke dalam tempat disk.
• “No Magazine” muncul pada monitor. Sisipkan tempat disk.
• “No Files” muncul pada monitor. Di dalam disk tidak ada file yang dapat diputar. Ganti disk
dengan disk lain yang berisi file yang dapat diputar.
• “Reset 08” muncul pada monitor. Sambungkan alat penerima ini dan CD changer secara benar
dan tekan tombol reset dari CD changer.
• “Reset 01” – “Reset 07” muncul pada
monitor.
Tekan tombol reset dari CD changer.
• CD changer tidak bekerja secara keseluruhan. Reset alat penerima (☞ halaman 2).
IN49-53_KW-AVX700[UN]f.indd 50IN49-53_KW-AVX700[UN]f.indd 50 2/20/06 10:31:04 AM2/20/06 10:31:04 AM

51
INDONESIA
Gejala-gejala Perbaikan-perbaikan/Sebab-sebab
Tuner TV
• Unit Tuner TV tidak bekerja sama sekali. Tekan tombol reset dari unit tuner TV tersebut.
• “Reset 08” muncul pada monitor. Unit ini tidak tersambung ke sebuah unit tuner TV secara
benar. Hubungkan dengan benar kemudian tekan tombol
reset dari unit TV tuner.
• Untuk KV-C1001/KV-C1008: Stasiun-stasiun
TV tidak dapat diterima.
“TV Channel Area” diatur tidak benar (☞ halaman 41).
Pemutaran iPod/ D. player
• iPod atau D.player tidak menyala atau tidak
berfungsi.
• Periksalah kabel penghubung dan sambungannya.
•
Isikan baterai.
• Untuk D. player: Mutakhirkan versi firmware.
• Suara diputarbalikkan. Dinonaktifkan equalizer pada unit atau iPod/ D.player.
• “Disconnect” muncul pada monitor.
Periksalah kabel penghubung dan sambungannya.
• Untuk iPod: Pemutaran berhenti. Headphone akan terputus selama pemutaran. Mulaikan
lagi pemutaran.
• Tidak ada suara yang terdengar sewaktu
menghubungkan iPod nano.
Lepaskan headphone dari iPod nano.
• Tidak ada suara yang terdengar.
• “ERROR 01” muncul pada monitor D.player
terhubung.
Cabut adaptor dari D. player. Kemudian,
sambung
lagi.
• “NO FILES” atau “NO TRACK” muncul pada
monitor.
Tidak ada trek yang disimpan. Impor trek ke iPod atau
D. player.
• “RESET 01” – “RESET 07” muncul pada
monitor.
Lepaskan adaptor dari kedua-dua unit dan iPod/D.player.
Kemudian, sambung lagi.
• “RESET 08” muncul pada monitor. Periksa sambungan antara adaptor dan unit ini.
• Kontrol iPod atau D. player tidak berfungsi
setelah diputuskan dari unit ini.
Reset iPod atau D. player.
AV-IN
• “No Signal” muncul pada monitor. • Hidupkan komponen video jika belum dinyalakan.
• Unit ini tidak tersambung ke komponen video dengan
benar. Sambungkan yang benar.
Mode suara Nilai-nilai ekualisasi yang telah diatur sebelumnya
60 Hz 150 Hz 400 Hz 1 kHz 2.5 kHz 6.3 kHz 15 kHz
Flat 00 00 00 00 00 00 00
Hard Rock +03 +03 +01 00 00 +02 +01
R&B +03 +02 +02 00 +01 +01 +03
Pop 00 +02 00 00 +01 +01 +02
Jazz +03 +02 +01 +01 +01 +03 +02
Dance +04 +02 00 –02 –01 +01 +01
Country +02 +01 00 00 00 +01 +02
Reggae +03 00 00 +01 +02 +02 +03
Classic +02 +03 +01 00 00 +02 00
User 1/2/3 00 00 00 00 00 00 00
IN49-53_KW-AVX700[UN]f.indd 51IN49-53_KW-AVX700[UN]f.indd 51 2/21/06 6:26:09 PM2/21/06 6:26:09 PM
52
INDONESIA
Spesifikasi-spesifikasi
AMPLIFIER
Maksimum keluaran
power:
Depan/Belakang: 50 W per saluran
Output Power Kontinu
(RMS):
Depan/Belakang: 20 W per saluran dalam 4 Ω, 40 Hz ke
20 000 Hz pada lebih dari 0.8% total distorsi
harmoni
Impedansi Muat: 4 Ω (4 Ω ke 8 Ω yang diizinkan)
Cakupan Kontrol
Ekualiser:
Frekuensi-frekuensi:
60 Hz, 150 Hz, 400 Hz, 1 kHz, 2.5 kHz, 6.3 kHz,
15 kHz
Level (Tingkat): ±10 dB
Perbandingan Sinyal ke Noise: 70 dB
Audio output level
(F-OUT/R-OUT/CENTER/
SUBWOOFER):
Tingkat Line-Out/Impedansi: 2.5 V/ 20 kΩ muat (skala penuh)
Impedansi Output: 1 kΩ
Sistem warna: PAL/NTSC
Output video (composite): 1 Vp-p/75 Ω
Terminal lain: Input: LINE IN, VIDEO IN, Antena input
Output: 2nd AUDIO OUT
Lainnya: CD changer, AV BUS
TUNER FM/AM
Cakupan Frekuensi: FM: 87.5 MHz sampai 108.0 MHz
AM: 531 kHz sampai 1 602 kHz
Tuner FM Sensitivitas yang dapat digunakan: 11.3 dBf (1.0 µV/75 Ω)
50 dB Sensitivitas Peredaan: 16.3 dBf (1.8 µV/75 Ω)
Selektifitas Saluran Alternatif
(400 kHz):
65 dB
Respon Frekuensi: 40 Hz sampai 15 000 Hz
Pemisahan Stereo: 35 dB
Tuner AM Sensitifitas/Selektifitas: 20 μV/35 dB
Ada MASALAH dengan cara pengoperasian?
Setel kembali unit Anda
Lihat halaman mengenai Bagaimana mereset unit anda
IN49-53_KW-AVX700[UN]f.indd 52IN49-53_KW-AVX700[UN]f.indd 52 2/20/06 10:31:05 AM2/20/06 10:31:05 AM
53
INDONESIA
DVD/CD
Sistem Pendeteksi Sinyal: Optik non kontak terbuka (laser semikonduktor)
Respon Frekuensi: DVD, fs=48 kHz: 16 Hz sampai 22 000 Hz
DVD, fs=96 kHz: 16 Hz sampai 44 000 Hz
VCD/CD: 16 Hz sampai 20 000 Hz
Cakupan Dinamik: 93 dB
Perbandingan Sinyal ke Noise: 95 dB
Wow dan Flutter: Kurang dari batas ukuran
MONITOR
Ukuran Layar: 6.5 inci tampilan lebar kristal cair
Jumlah elemen gambar: 280 800 elemen gambar: 400 (horisontal) × 3 × 234 (vertikal)
Metode Drive: TFT (Transistor Film Tipis) format aktif matriks
Sistem warna: PAL/NTSC
Rasio perbandingan: 16:9 (lebar)
Temperatur penyimpanan yang diizinkan: –10°C sampai +60°C
Temperatur pengoperasian yang diizinkan: 0°C sampai +40°C
UMUM
Power yang Diperlukan: Voltase Pengoperasian: DC 14.4 V (kelonggaran 11 V sampai 16 V)
Sistem Pertanahan: Tanah negatif
Temperatur pengoperasian yang diizinkan: 0°C sampai +40°C
Dimensi (L × T × T): Ukuran instalasi (kira-kira): 178 mm × 100 mm × 160 mm
Ukuran panel (kira-kira): 170 mm × 93 mm × 29 mm
Massa (kira-kira): 2.6 kg (tidak termasuk aksesoris)
Disain dan spesifikasi dapat berubah sewaktu-waktu tanpa pemberitahuan.
PERHATIAN: Ketika mengeluarkan monitor, tetap
berikan ruang terbuka untuk monitor menutup. Jika
tidak, monitor mungkin menghalangi sistem kemudi
stir dan tinggat pengoperasian perpindahan gigi,
dimana ini mungkin menyebabkan kecelakaan lalu
lintas.
Ruang pengeluaran monitor yang dibutuhkan
160 88.5
100
Unit: mm
IN49-53_KW-AVX700[UN]f.indd 53IN49-53_KW-AVX700[UN]f.indd 53 2/20/06 10:31:05 AM2/20/06 10:31:05 AM

EN, IN
0206MNMMDWJEIN
© 2006 Victor Company of Japan, Limited
Rear_KW-AVX700U_004A.indd 2Rear_KW-AVX700U_004A.indd 2 2/17/06 3:34:14 PM2/17/06 3:34:14 PM

Instructions DVD RECEIVER WITH MONITOR KW-AVX706/KW-AVX701/KW-AVX700
