JVC Digital Camcorder Manual L0105112
User Manual: JVC JVC Digital Camcorder Manual JVC Digital Camcorder Owner's Manual, JVC Digital Camcorder installation guides
Open the PDF directly: View PDF ![]() .
.
Page Count: 92
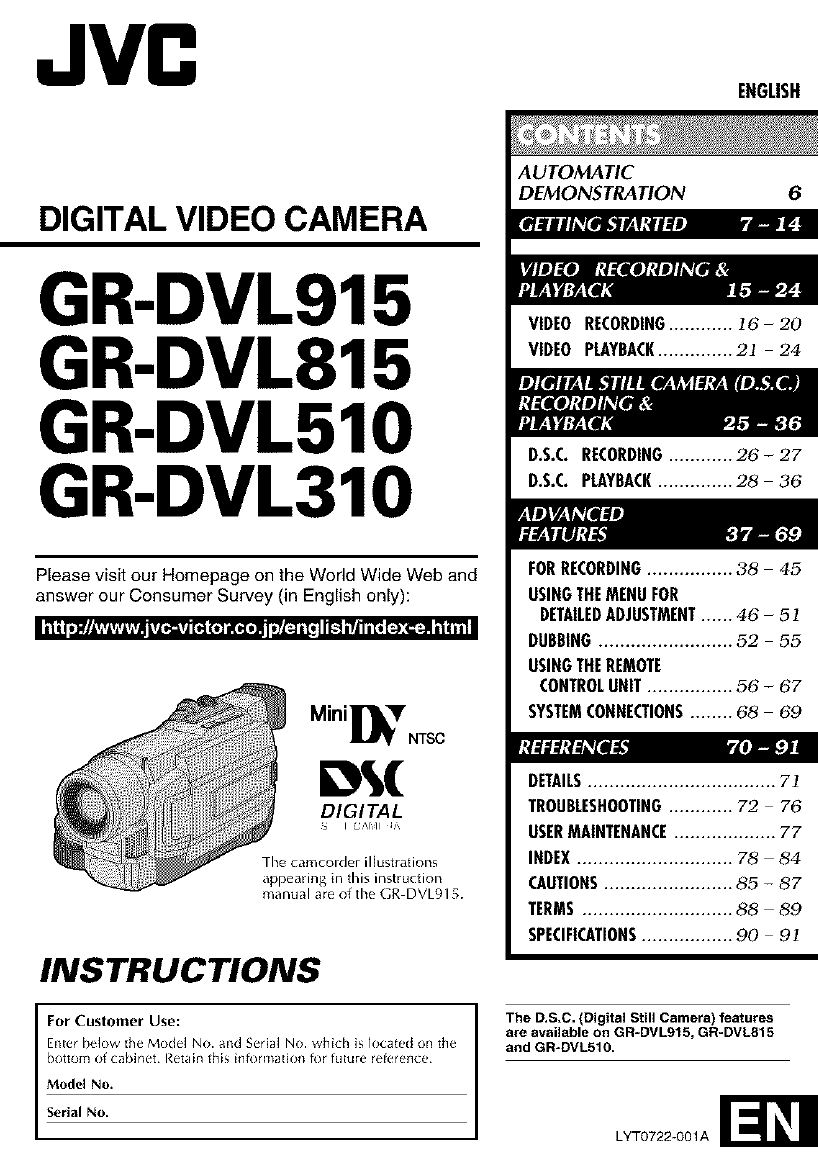
JVC ENGLISH
DIGITAL VIDEO CAMERA
GR-DVL915
GR-DVL815
GR-DVL510
GR-DVL310
Please visit our Homepage on the World Wide Web and
answer our Consumer Survey (in English only):
MiniVer NTSC
DIGITAL
The camcorder illustrations
appearing in this instruction
manual are of the GR DVL915.
INSTRUCTIONS
For Customer Use:
Enter below the Model No. and Serial No. which is located on the
bottom of cabinet¸ Retain [his i(]tormat]o(1 tot future reterence
Model No.
Serial No.
AUTOMATIC
DEMONSTRATION 6
VIDEO RECORDING............ ]6-20
VIDEO PLAYBACK.............. 2] 24
D.S.C. RECORDING............ 26 - 27
D.S.C. PLAYBACK.............. 28 36
FORRECORDING................ 38 45
USINGTHEMENUFOR
DETAILEDADJUSTMENT...... 46 -5 ]
DUBBING......................... 52 55
USINGTHEREMOTE
CONTROLUNIT ................ 56 -67
SYSTEMCONNECTIONS........ 68 69
DETAILS................................... 7]
TROUBLESHOOTING............ 72 76
USERMAINTENANCE................... 77
INDEX............................. 78 - 84
CAUTIONS........................ 85 -87
TERMS............................ 88 -89
SPECIFICATIONS................. 90 9]
The D.S.C. (Digital Still Camera) features
are available on GR=DVL91 S, GR-DVL815
and GR-DVLS10.
LYT0722-001A
2EN
Dear Customer,
Thank you for pulchasing this digital video camera. Before use, please lead the safety infom_ation and
precautions contained in the following pagesto ensure safe use of this ploduct.
Using This Instruction Manual
•All majol sections and subsections are listed in the Table Of Contents on the cover page,
• Notes appear after most subsections, Be sure to read these as well,
• Basic and advanced leatures/opelation ale separated Br easier reference,
It is recommended that you...
.... reler to tile Index (L_ pgs. 78 84) and lamiliadze yourseff with button locations, etc. befor_ use,
.... read thoroughly the Salety Precautions and Safety Instructions that follow, They contain extremely
important inlormation legalding the sale use of this pro(luG,
You are recommended to carefully read the cautions on pages 85 through 87 before use,
I
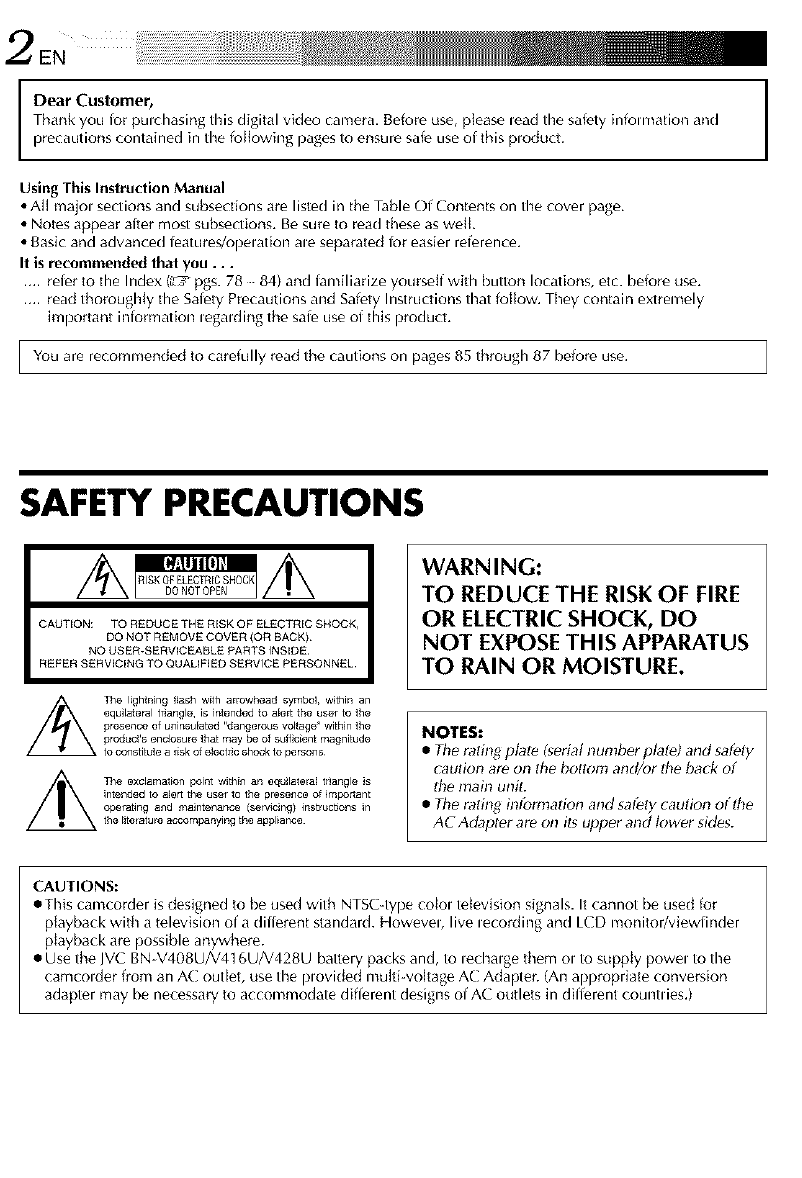
SAFETY PRECAUTIONS
The lightning l_ash with arrowhead symbol, within an
equilateral t r_angle, is intended to alert the user to the
presence of uninsu[ated "dangerous volt ag_3" within the
product's enclosure that may be ol su[ficient magnitude
to constitute a Iisk of elect_c shock to persons¸
The exclamation point within an equilateral tl!angle is
intended to alert the3user to the pre_ence of important
operating and maintenance (servicing) instructions in
the titelature accompanying the appliance
WARNING:
TO REDUCE THE RISK OF FIRE
OR ELECTRIC SHOCK, DO
NOT EXPOSE THIS APPARATUS
TO RAIN OR MOISTURE.
NOTES:
•The rating plate (serial nunlber pla_) and safely
caution are on the bc)ttom and/or the back of
the main unit.
• The rating infom_adon and safety caution of the
AC Adapter are on its upper and k_wer sides.
CAUTIONS:
•This camcorder isdesigned to be used with NTSGtype colol television signals. It cannot be used for
playback with a television of a different standard. Howevel, live lecording and LCD monitor/viewfinder
playback ar_ possible anywhere.
•Use the JVC BN V408U/V416U/V428U battery packs and, to lechalge them ol to supply powel to the
camcolder from an AC outlet, use the plovided multi-voltag_ AC Adapter. (An appropriate conversion
adapter may be necessary to accommodate different designs of AC outlets in different countries.)

Whentheequipmentisinstalledinacabinetolonashelf,makesulethatithassufficientspaceonall
sidestoallowfolventitation(I0cm(3-15/16")ormoreonbothsides,ontopandattherear).
Donotblocktheventilationholes.
(Iftheventilationholesaleblockedbyanewspaper,orclothotc,theheatmaynotbeabletogotout.)
Nonakedf{amesources,suchaslightedcandles,shouMbeplacedontheapparatus.
Whendiscardingbatteries,environmentalproblemsmustbeconsideredandthelocalrulesorlaws
governingthedisposalofthesebatteriesmustbefollowedstrictly.
Theapparatusshall not be exposed to dlipping or splashing.
Do not use this equipment in a bathroom or places with water.
Also do not place any containels filled with water or liquids (such as cosmetics ol medicines, flower vases,
potted plants, cups etc.) on top of this unit,
(If water ol liquid is allowed to enter this equipment, fire or electric shock may be caused.)
(1) Read these instructions. (10)
(2) Keep these instructions.
(3) Heed all warnings,
(4) Follow all instructions.
(5) Do not use this apparatus heal watel,
(6) Clean only with dry cloth.
(7) Do not biock any ventilation openings.
Instal[ in accordance with the
manufacturer's instructions. (11)
(8) Do not instal[ neal any heat sources such
as radiators, heat rogisters, stoves, or othel
apparatus (including amplifiers) that (12)
produce heat,
(9) Only use attachments/accessolies specified
by the manufact_irer.
Use only with the cart,
stand, tripod, blackot,
or table specified by
time manulacturer, or
sold with the
apparatus, When a
cart is used, use
caution when moving
timecart/appalatus combination to avoid
injury from tip-ovel,
Unplug this apparatus during lightning
storms or when unused for long peliods of
time.
Refer all servicing to qualified service
pelsonnek Servicing is required when the
apparatus has been damaged in any way,
such as powel-suppiy cold or plug is
damaged, {iquid has been spilled or objects
have fallen into the apparatus, the apparatus
has been exposed to lain or n_oistLire, does
not operate normally, or has been dropped,
4E"
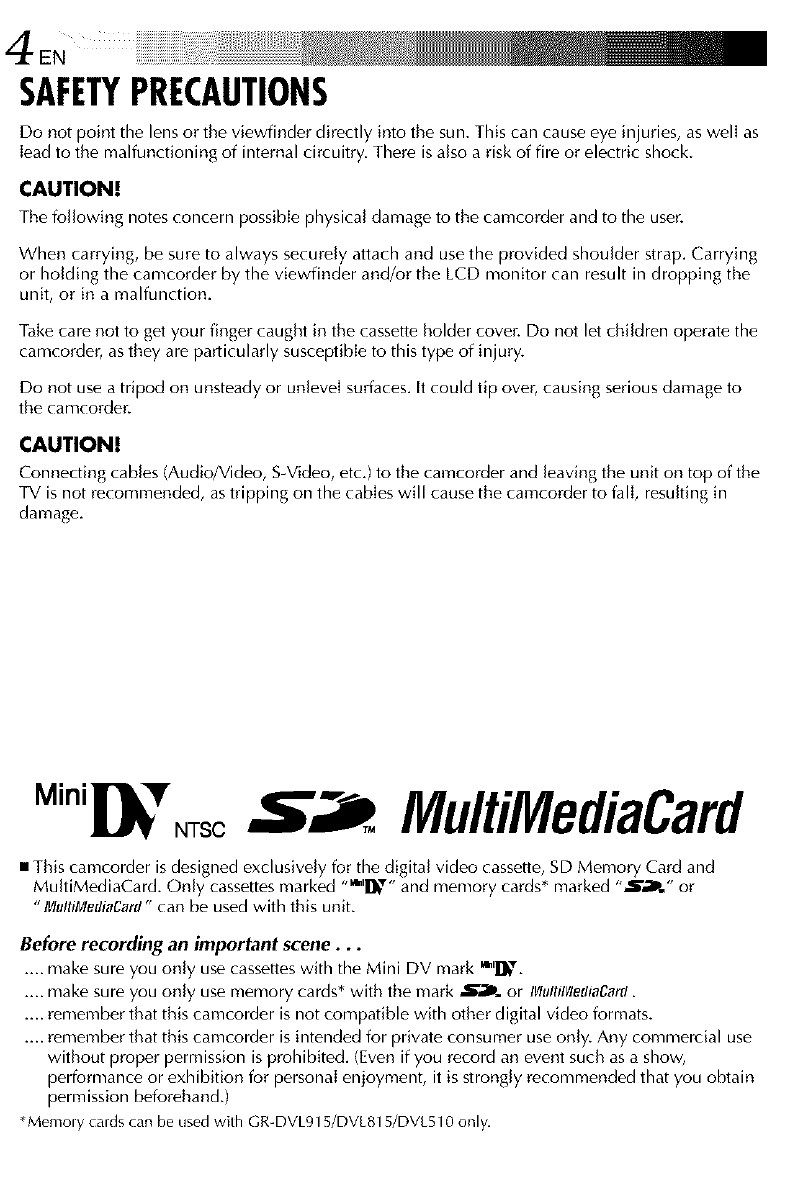
SAFETYPRECAUTIONS
Do not point the lens or the viewfinder directly into the sun. This can cause eye injuries, as well as
lead to the malfunctioning of internal circuitry. There is also a risk of fire or electric shock.
CAUTIONI
The following notes concern possible physical damage to the camcorder and to tile user.
When carrying, be sure to always securely attach and use the provided shoulder strap. Carrying
or holding the camcorder by the viewfinder and/or the LCD monitor can result in dropping the
unit, or in a malfunction.
Take care not to get your finger caught in the cassette holder cover. Do not let children operate the
camcorder, as they are particularly susceptible to this type of injury.
Do not use a tripod on unsteady or unlevel surfaces. It could tip over, causing serious damage to
the camcorder.
CAUTION!
Connecting cables (Audio/Video, S-Video, etc.) to the camcorder and leaving the unit on top of the
TV is not recommended, astripping on the cables will cause the camcorder to fall, resulting in
damage.
Mini NTSC MultiMediaCard
•This camcorder isdesigned exclusively for the digital video cassette, SD Memory Card and
MultiMediaCard. Only cassettes marked "'_'l]_'" and memory cards* marked ",_P." or
"IVlultilVlediaCarfl"can be used with this unit.
Before recording an important scene...
.... make sure you only use cassettes with the Mini DV mark '_l_,'.
.... make sure you only use memory cards* with the mark -@'_P..or IVl,llllVlethaCarcI.
.... remember that this camcorder is not compatible with other digital video formats.
.... remember that this camcorder is intended for private consumer use only. Any commercial use
without proper permission is prohibited. (Even if you record an event such as a show,
performance or exhibition for personal enjoyment, it is strongly recommended that you obtain
permission beforehand.)
*Memoly cardscanbe usedwith GR-DVL915/DVL815/DVL510only.
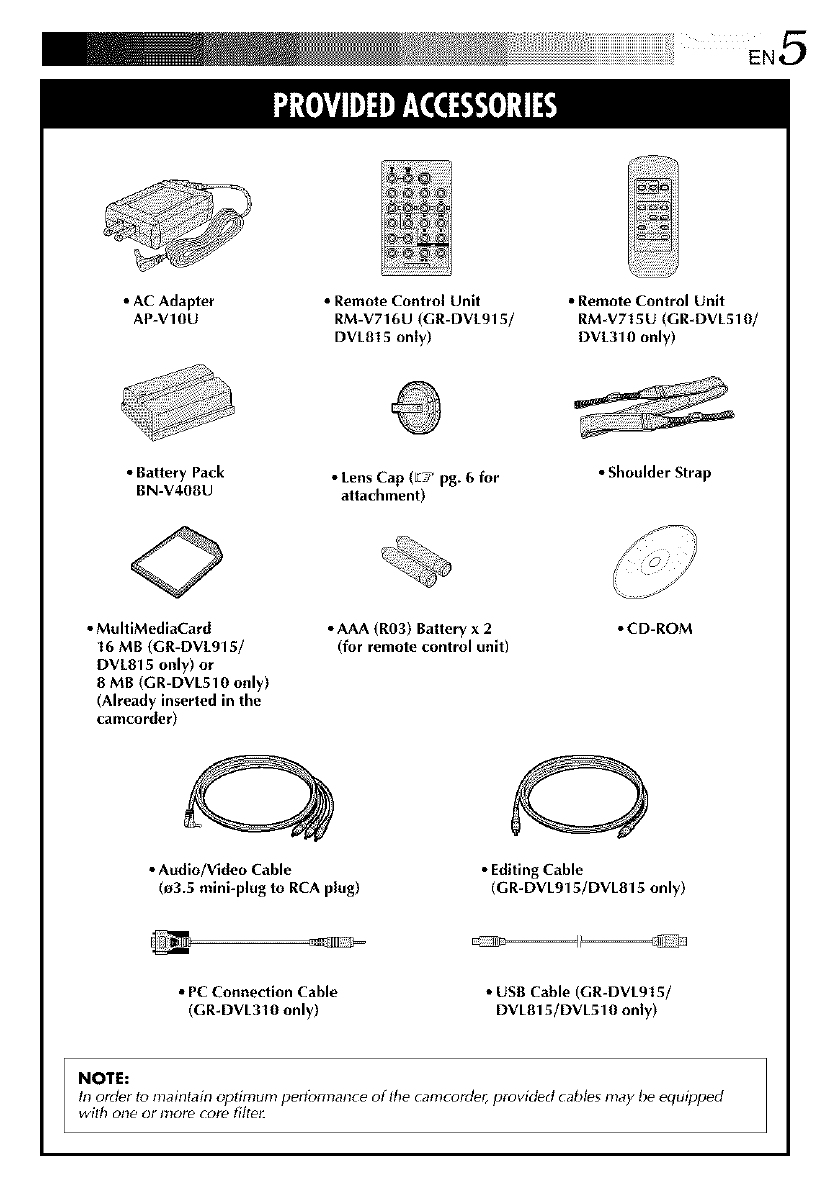
iii ii i iiii i iiii iii ii iiii i i i i i i i i i i i i i i i i i i i i i i i i i i i i i i i i i i i !i! ¸ EN5
•AC Adapter
AP-V10U
•Remote Control Unit
RM-V716U (GR-DVL915/
DVL815 only)
•Remote Control Unit
RM-V715U (GR-DVL510/
DVL310 only)
•Battery Pack •Lens Cap (E! pg. 6 for • Shoulder Strap
BN-V40BU attachment)
•MultiMediaCard
16 MB (GR-DVL915/
DVL815 only) or
8 MB (GR-DVL510 only)
(Already inserted in the
camcorder)
•Audio/Video Cable
(_3.5 mini-plug to RCA plug)
oAAA (R03) Battery x 2
(for remote control unit)
•CD-ROM
•Editing Cable
(GR-DVL915/DVL815 only)
•PC Connection Cable
(GR-DVL310 only)
•USB Cable (GR-DVL915/
DVL815/DVL510 only)
NOTE:
In order to maintain oplimum pertbrmanc e of lt_e camc order, provided cables may be equipped
with one or inc_recore fitte_
EN ii
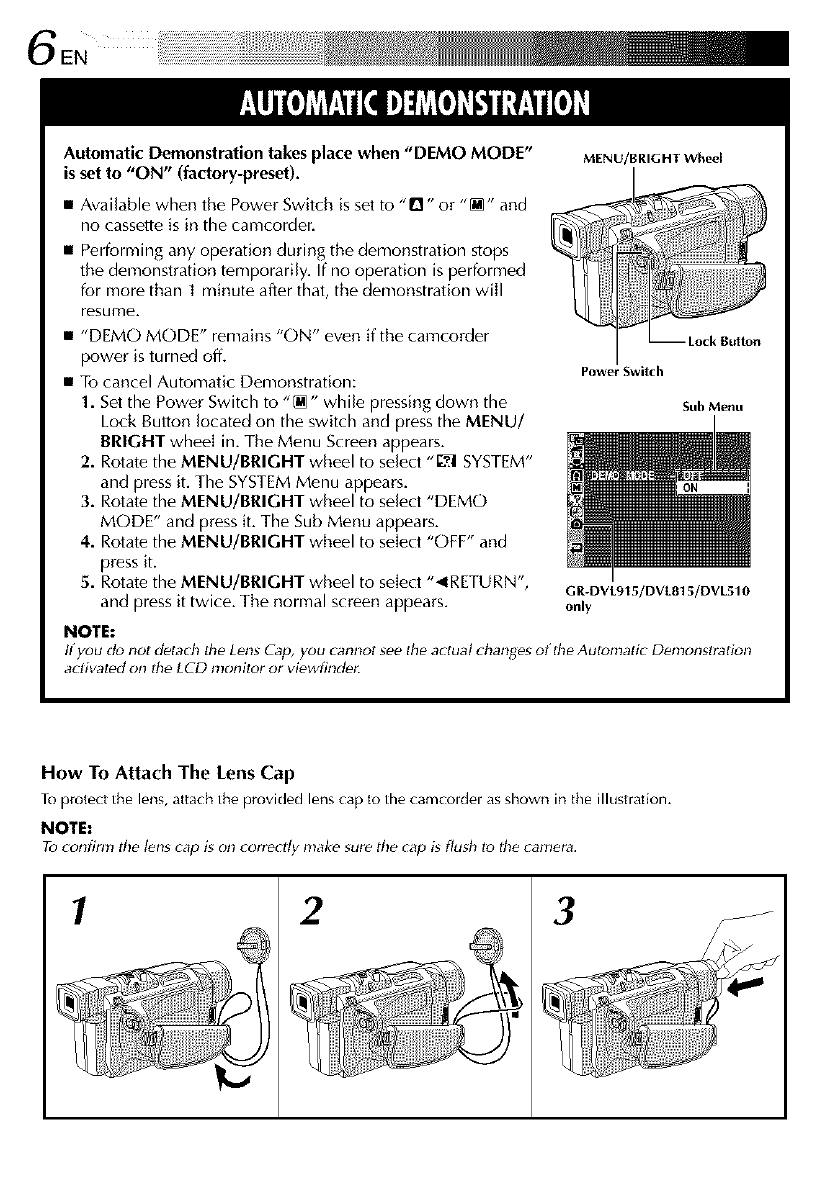
Automatic Demonstration takes place when "DEMO MODE"
is set to "ON" (factory-preset). MENU/BRIGHT Wheel
•Available when the Power Switch is set to "0" or "[]" and
no cassette is in the camcorder.
•Performing any operation during the demonstration stops
the demonstration temporarily. If no operation is performed
for more than ] minute after that, the demonstration will
resume.
•"DEMO MODE" remains "ON" even if the camcorder
power is turned off.
• To cancel Automatic Demonstration:
1. Setthe Power Switch to "[M" while pressing down the
Lock Button located on the switch and press the MENU/
BRIGHT wheel in. The Menu Screen appears.
2. Rotate the MENU/BRIGHT wheel to select "L-_:ISYSTEM"
and press it. The SYSTEMMenu appears.
3. Rotate the MENU/BRIGHT wheel to select "DEMO
MODE" and press it. The Sub Menu appears.
4. Rotate the MENU/BRIGHT wheel to select "OFF" and
press it.
5. Rotate the MENU/BRIGHT wheel to select "_IRETURN',
and press it twice. The normal screen appears.
Power Switch
Sub Menu
GR-DVL915/DVL815/DVL510
only
NOTE:
If you do not detach the Lens Cap, you cannot see the actual d_anges olthe Automatic Demonstration
aclivated on lhe LCD monitor or viewfinde_
How To Attach The Lens Cap
To protect fl_e lens, attach fl_e provided lens cap to the camcoldel as shown in the illustration.
NOTE:
To_onfirm the lenscap is _mcorrectly make sure the cap is flud_ to the camera.
1 2 3
7
CONTENTS
EN
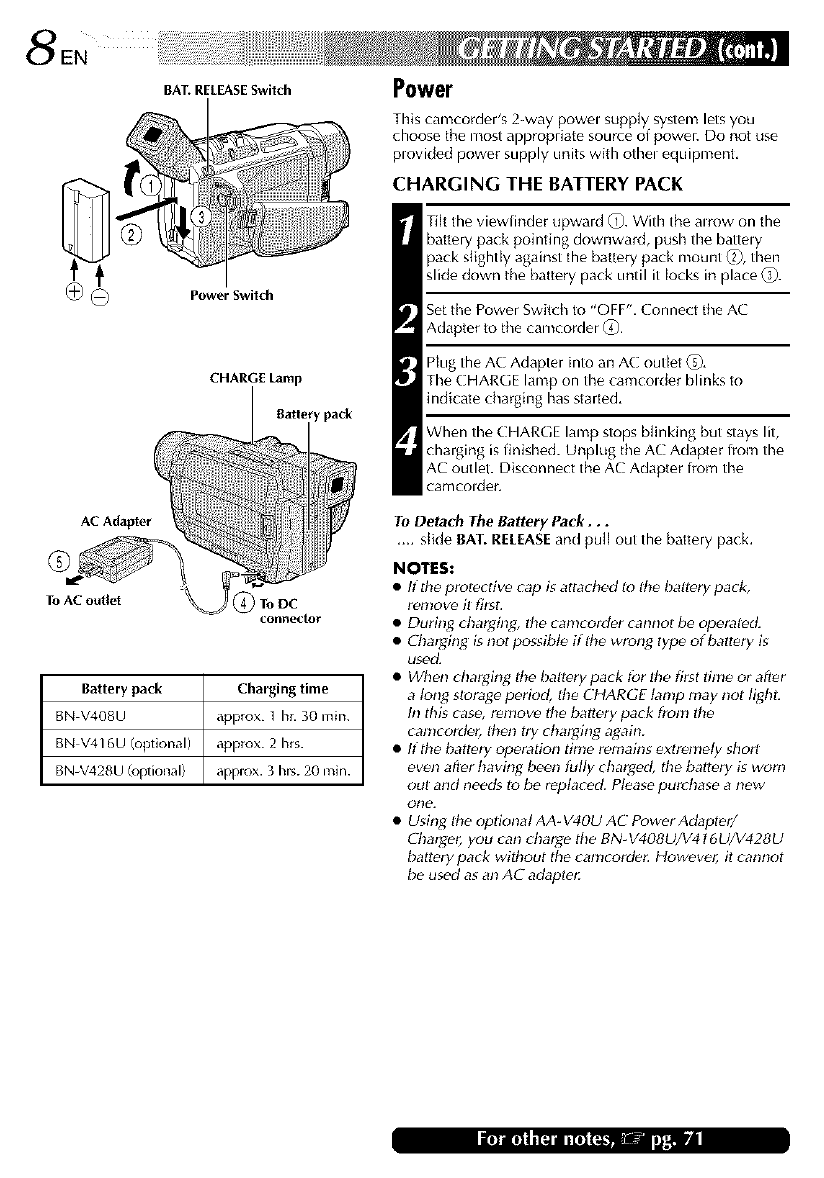
BAT. RELEASE Switch
CHARGE Lamp
'y pack
To AC outlet ToDC
coNr_ector
Battery pack Charging time
BN V408U approx. I hr. 30 min.
BN V416U (optional) approx. 2 hrs.
BN-V428U/optional) approx. 3 hrs. 20 rain.
Power
This camcorder's 2-way powel supply system lets you
choose the most appropriate source ol power. Do not use
plovided power supply units with othel equipment,
CHARGING THE BATTERY PACK
Tiff tile viewfinder upward _0. With the alrow on the
battery pack pointing downward, push the battely
pack slightly against the battery pack mount _2),then
slide down the battery pack until it locks in place (_.
Set the Power Switch to "OFF". Connect the AC
Adapter to the camcorder (_.
Plug the AC Adapter into an AC outlet _),
The CHARGE lamp on the camcolder blinks to
indicate charging has started,
When the CHARGE lamp stops blinking but stays lit,
charging is finished. Unplug the AC Adapter from the
AC outlet. Disconnect the AC Adapter from the
camcolder,
To Detach The Battery Pack...
.... slide BAT. RElEASE and pullout the battery pack.
NOTES:
•If the prolective cap is attad_ed lo U_ebattery pad_,
remove it first.
• During charging, the camcorder cannol be operal_d.
•ChargTng is notpossibt_ ifUte wrong type of battery is
usedL
• When charging lt_e ballery pack tbr the first time or after
a long storage period, Ute CHARGE tamp may not light:
In this cas_, remove the battery pack from the
canlcorder, lhen try chargTng again.
• If the battery operation time remains extremely short
even after having been fully charged, the battery is worn
out and needs to l;e replaced. Please purchase a new
otle.
• Using lt_eoptional AA- V40U AC Power Adapter/
Charger, you can charge the BN-V408U/V416U/V428U
battery pack without the camcorder However, it cannot
be used as an AC adaptei:
III III I i Ill I i III Ill.. : )litll'ill
¸¸¸ EN9
I TTENTION:
Before detaching the power source, make
sure that the camcorder's powo is turned
off. Failule to do so can result h_ a
camcorder maffuncfion.
NOTES:
•Recording time is reduced significantly under
ltte following conditions:
•Zoom or Record-Standby nlod_ is engaged
repeatedly.
• The LCD monitor is used repeatedly.
• The playback mode is engaged repeatedly.
• Before extended use, it is reconlnlended that
you prepare enough ballery packs Io cover 3
times tile planned shooting time.
INFORMATION:
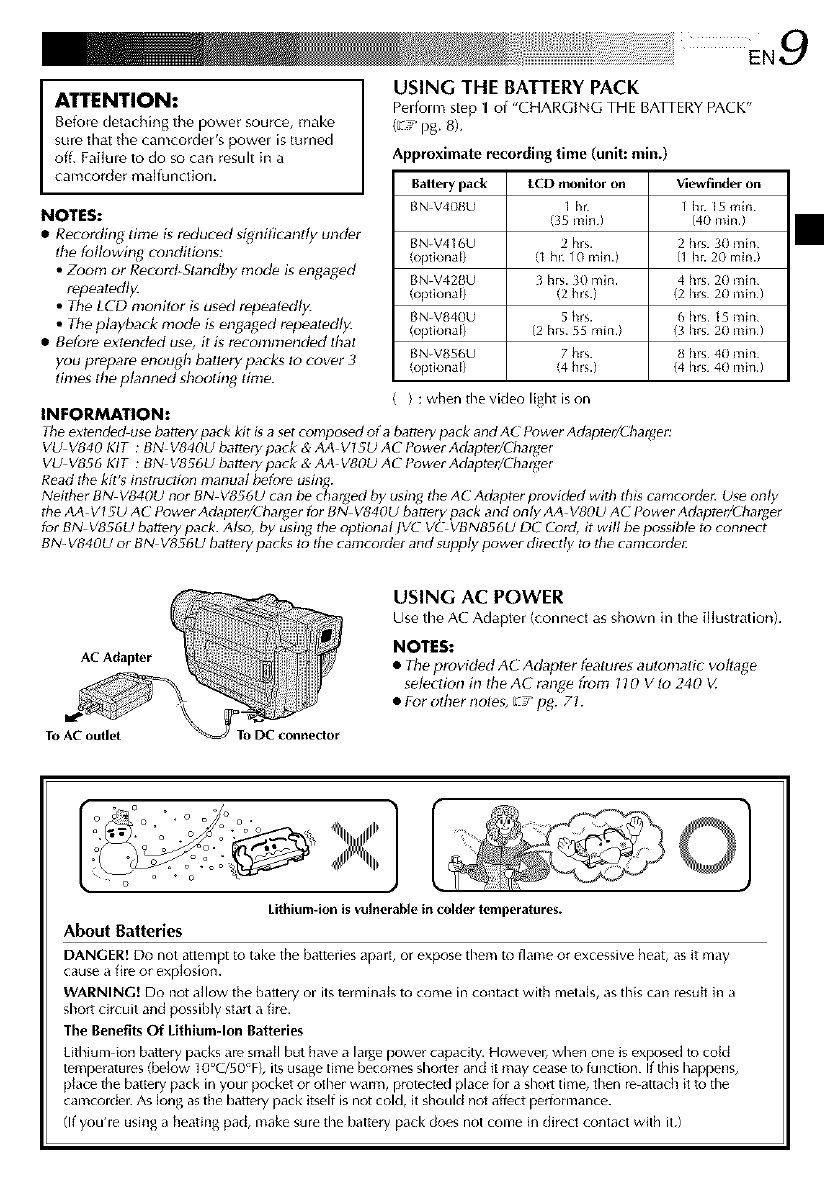
USING THE BATTERY PACK
Perfom_ step 1 of "CHARGING THE BATI ERYPACK"
(L:_ pg. 8).
Approximate recording time (unit: rain.)
Battery pack LCD monitor on Viewfinder on
BN V4OBU 1 hr 1 h_. 15 mln.
(35 rain) (40 rain.)
BN-V416U 2 hrs. 2 hrs. 30 rain
(optional) (1 hL 1(I mln.) fl hr. 20 min./
BN-V42BU 3 hrs. 30 Tnln. 4 hrs 20 rain
(optional) (2 hs.) /2 hrs 20 mini
BN-VB40U 5 hrs. 6 hrs 15 rain
(optional) (2 hrs. 55 rain.) /3 hrs 20 mini
BN-VB56U 7 hrs. _ hrs 40 rain
(optkJrlal) (4 hs.) /4 hrs 4B rain)
} : when the video light is on
The ext_nded use battery pack kit is a set composed of a battery pack and AC Pcswer Adapt_r/Cha_er:
VU V840 KIT : BN V840U battery pack & AA V15U AC Puwer Adapt_r/Charger
VU V856 KIT : BN V856U battery pack & AA V80U AC Puwer Adapter/Charger
Read the kit's instruction manual before using.
Neither BN V840U not BN V856U can be chat[¢ed by using the AC Adapter provided with tbis camcordet: Use only
the AA VI _U AC fower Adaptet/('hat_er fur B N V640U battery pack and only AA V80U AC ! ower Adaptmi( hat_er
fut BN V856U batter), pack. Also, by using the optional IV(-" VC VBN856U DC Cord, it will be possible to connect
BN- V840U or BN V856U battery packs to the camcorder and supply power directly to the camcordet:
AC Adapter
To AC outlet To DC connector
USING AC POWER
Use the AC Adapter (connect as shown in the iflustration).
NOTES:
• The provided A('Adapter f_atures automatir voltage
selection in the A( range from 110 V to 240 V.
• For other notes, _,_'pg. 7t.
i o o
L
Lithium-ion is vulnerable in colder temperatures.
About Batteries
DANGER! Do not attempt to tdke the battelies apalt, ol expose them to flame o_ excessive heat, as it may
cause a fire or explosion.
WARNING! Do not allow the battery or its termina{s to come in contact with metals, as this can restltt in a
short circuit and possibly start a fire.
The Benefits Of Lithium-Ion Batteries
Lithium ion battely packs dI_ small but have a lalge powel cdpaclty. However, when one is exposed to cokJ
tempelatures (below 10°C/50°F), its usage time becomes shorter and it may cease to function. If this happens,
place the batte Wpack in you_ pocket or othe_ warn% protected place ia_ a short time, then re attach it to the
camco_de_: As k_ng as the batle Wpack itself is not cold, it should not affect pertormance.
(If you'le using d heating pad, make sule the bdttel_/ pack does not come in direct contact with it.)
]OEN
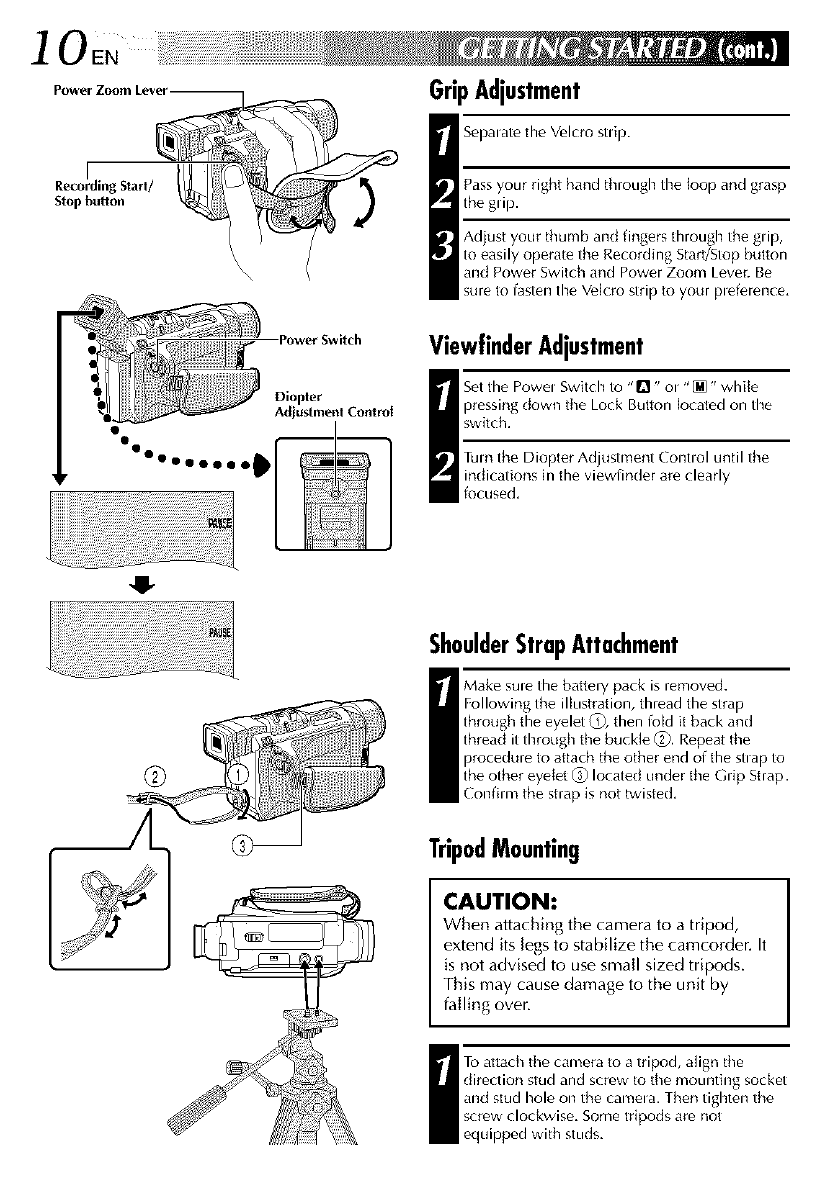
Power Zoom Lever-
I
RecordingStart/
Stopbutton f
•Power Switch
Diopter
Adjustment Control
GripAdjustment
I Sel)alate the V_lcro stlip.
Pass your right hand through the loop an(] grasp
the glip.
Adjust your thumb and fingers through the glip,
to easily operate the Recording Start/Stop button
and Power Switch and Power Zoom Lever. Be
sure to fasten the Vdcro strip to your pleference,
ViewfinderAdjustment
Set file Powel Switch to "Q" ol "[M" whi{e
pressing down the Lock Button located on the
switch,
Turn the Diopter Adjustment Contlol u{ltil the
indications in the viewfinder are clearly
focused,
,.I-
ShoulderStrapAttachment
Make sule the battery pack is removed.
Following the illustration, thread the strap
through the eyelet _), then foM it back and
thread it through the buck]e (_). Repeat the
procedure to attach the other end of the stlap to
the other eyelet _) located under the Grip Strap.
Confim_ the strap is not twisted,
TripodMounting
CAUTION:
When attaching the camera to a tripod,
extend its legs to stabilize the camcorder. It
is not advised to use small sized tripods.
This may cause damage to the unit by
failing over.
I To attach the camera to a tripod, align the
direction stud and screw to the moul_ting socket
and stud hole on the camela. Then tighten the
screw clockwise. Some tripods are not
equipped with studs.
.........i i i 7!iiiiiiiiiiiiiiiiiiiiiiiiiiiiiiiiiiiiiiiiiiiiiiiiiiiiiiiiiiiiiiiiiiiiJi!i¸i¸ EN1 1
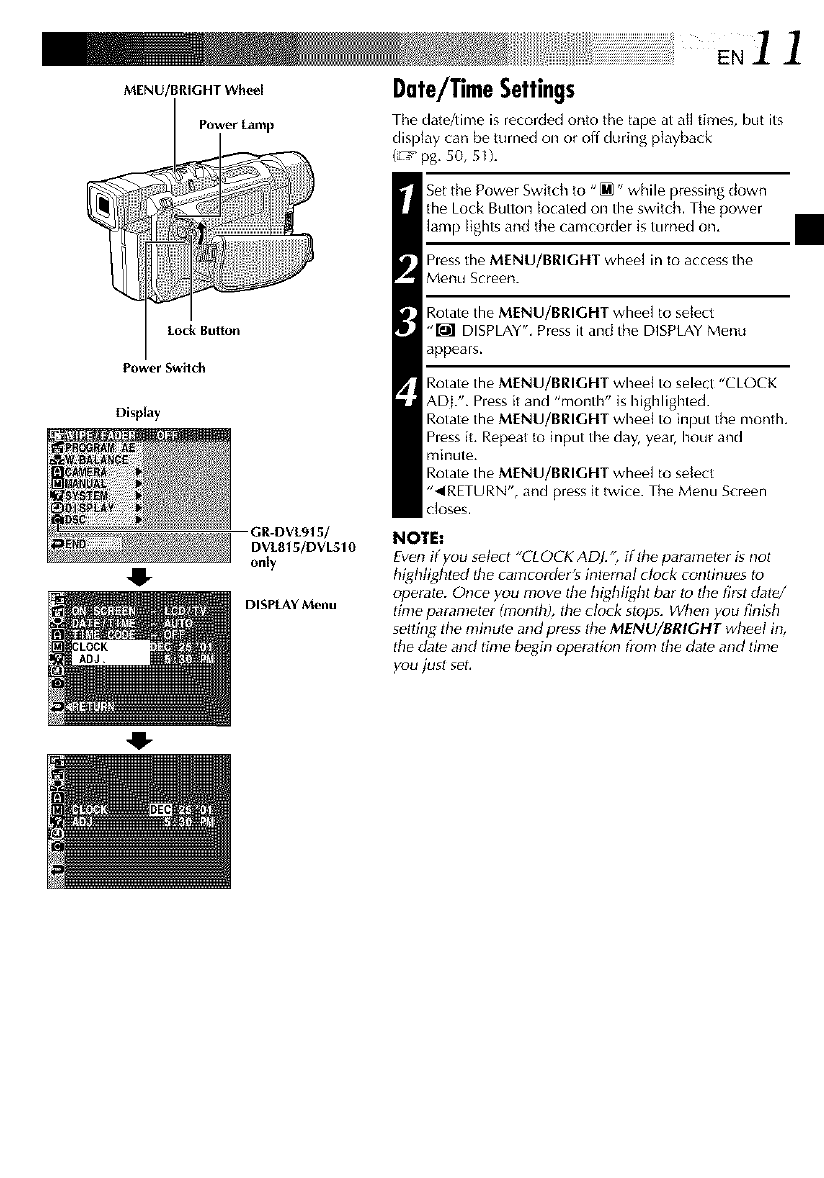
MENU/BRIGHT Whe_'l Date/TimeSettings
Power Lamp The date/time is recorded onto the tape at all times, butits
dislJay can be turned on or oil during playback
(L'_ pg. 50, 5U,
Set the Power Switch to "_" while pressing down
the Lock Button Located on the switch. The power
lamp lights and the camcorder is turned on,
hess the MENU/BRIGHT wheel in to access the
Menu Screen.
Rotate the MENU/BRIGHT wheel to sdect
"M DISPLAY". Press it and the DISPLAY Menu
appears.
Lock Bulton
Power Switch
Display
GR-DVL9t 5/
DVL815/DVL510
only
DISPLAY Menu
Rotate the MENU/BRIGHT wheel to select "CLOCK
ADI.". Pless it and "month" is highlighted.
Rotate the MENU/BRIGHT wheel to input the montk
hess it Repeat to input the day, year, hour and
minute,
Rotate the MENU/BRIGHT wheel to sdect
"_IRETURN", and press it twice. The Menu Screen
Closes.
NOTE:
Even if you select "CLOCK ADJ.", if _e parameter is nol
highlighted the camcorder's internal clock continues to
operate. Once you move Ihe highlight bar to lhe frst dat_/
time parameter (month), the clock stops. When you finish
setting tile minul_ and press lhe MENU/BRIGHT wheel in,
the dat_ and time _Jeginoperation tronl tile dal_ and time
you jusl set.
2 EN ilil
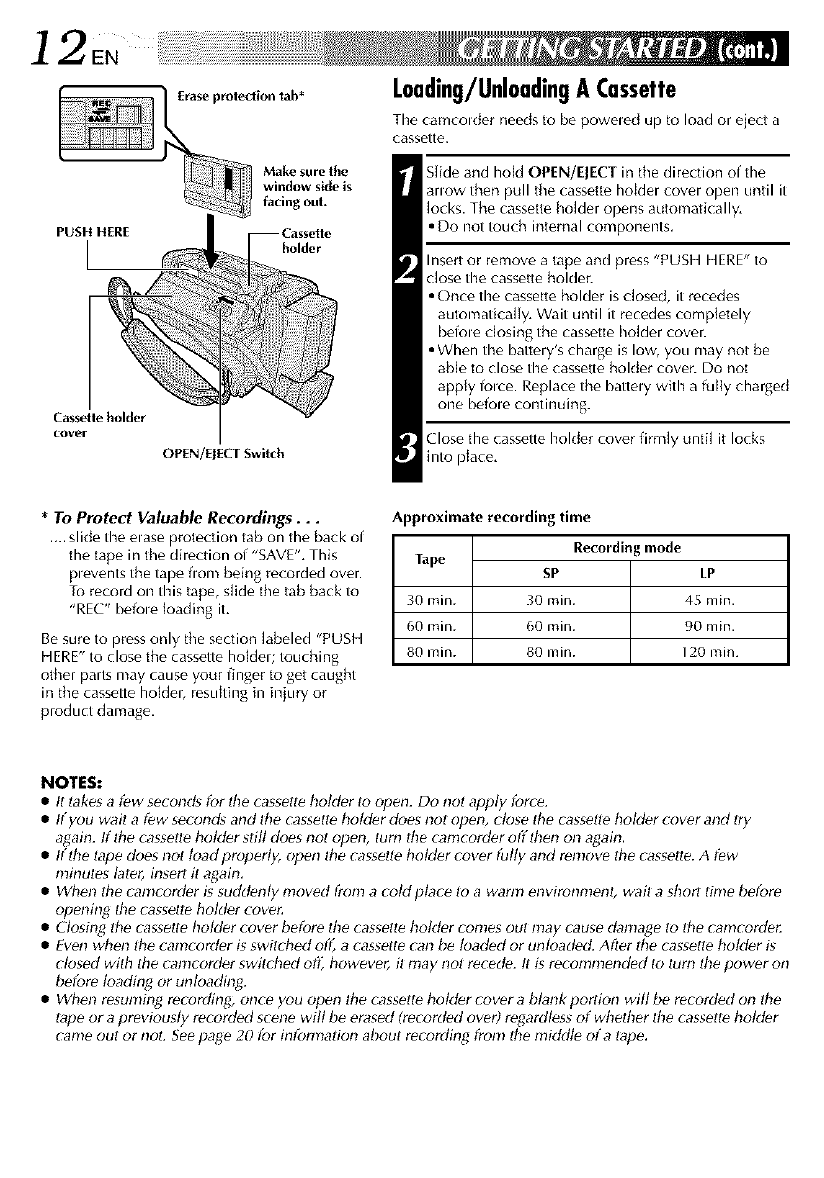
PUSH HERE
Cassette holder
cover
Erase protection tab*
Make sure the
window side is
facing out.
OPEN/EJECT Switch
Loading/UnloadingA Cassette
The camcolder needs to be poweled tip to load or eject a
cassette.
SJideand hold OPEN/ElECT in tile direction of the
anow then pull tile cassette holder cover open until it
locks. The cassette holder opens automatically.
• Do not touch internal components.
Insert or remove a tape and press "PUSH HERE" to
close the cassette holder.
• Once the cassette holder is closed, it recedes
automatically. Wait until it r_cedes completely
befole dosing the cassette holder cover.
• When the battery's charge is low, you may not be
able to close the cassette hoMer cover. Do not
apply folce. Replace the battely with a fully charged
one befole continuing.
Close the cassette holder cover firmly until it locks
into place,
Approximate recording time
Recording mode
Tape SP LP
30 rain. 30 rain. 45 rain.
60 rain. 60 rain. 90 rain.
80 rain. 80 rain. 120 rain.
*To Protect Valuable Recordings.,,
.... slide the elase protection tab on the back of
the tape in the direction of "SAVE". This
plevents the tape fiom being recorded over.
To record on this tape, slide the tab back to
"REC" befole loading it.
Be sure to pressonly the section labeled "PUSH
HERE" to close the cassette holdeu touching
other parts may cause your finger to get caught
in the cassette holdel, resulting in injury or
product damage.
NOTES:
•It takes afew second_ fc_r the cassett_ bolder to open. Do not apply force.
•If you wait afew serond_ and tile cassette ttolder does not open, close tile cassette holder _over and try
again. If Ihe cassetle bolder still (foes not opine, turn the camcorder off then on again,
• If tile lape does not toad properly, open Ihe casseIl_ holder cover fully and r_n!ove the cassette. A f_w
minules later, insert it again,
• When the camcorder is suddenly moved from a coldptace lo a warm environmenl; wait a short time before
opening tbe cassette holder cove_
• Closing the cassette holder cover before the cassett_ holder comes out may cause danlage to the canlcorde_
• Even when tile camcorder is switHted off, a cassette can b_ loaded or unloaded. After lbe cassette holder g
closed with tile canlcorder switched ofl_ however, it may not recede. It is reconln!ended to lure tile power on
b_fore loading or unloading.
• When resuming recording, once you open lbe cassette holder cover a blank portion will be recorded on the
tape or a previously recorded scene will be erased Imcorded over) regardless of whether the cassette holder
came out or noL See page 20 for intbrmafion about recording from the nliddte of a tape,
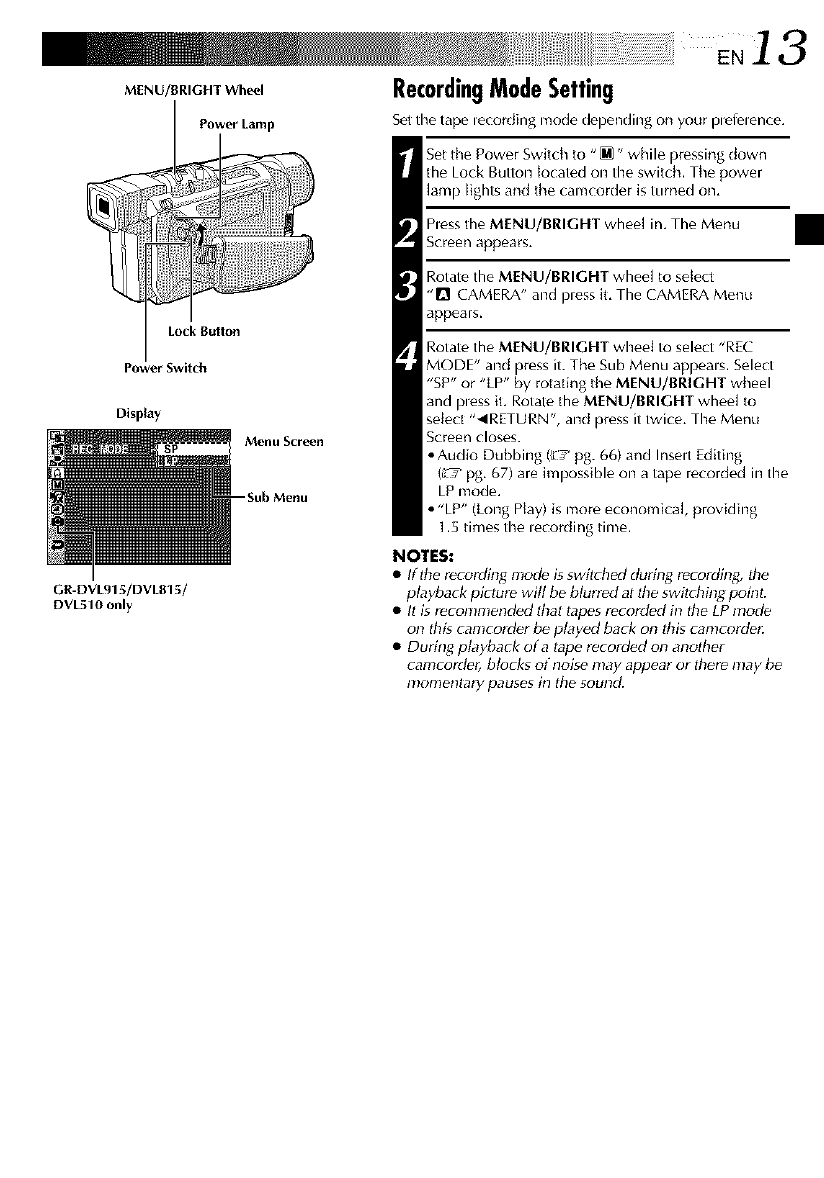
M NU/BR,C.T RecordingModeSetting
Power L;imp
GR-DVL915/DVL815/
DVL510 only
Sot the tape lecording mode depending on your Defelence.
Set the Power Switch to "_" while pressing down
the Lock Button {ocated on the switch. The power
lamp lights and the camcorder is turned on,
hess the M[NU/BRIGHT wheel in, The Menu
Screen appears.
Rotate the M[NU/BRIGHT wheel to sdect
"D CAMERA" and pless it, The CAMERA Menu
appears.
Rotate the M[NU/BRIGHT wheei to select "REC
MODE" and press it. The Sub Menu appeals. Select
"SP" or "LP" by rotating the MENU/BRIGHT wheel
and pless it, Rotate the M[NU/BRIGHT wheel to
select "_IRETURN', and press it twice, The Menu
Screen closes.
• Audio Dubbing (_7 pg. 66) and Inselt Editing
(L'_ pg, 67) are impossible on a tape recorded in the
LP mode.
• "LP" (Long Play) is more economica], providing
1.5 times the lecording time.
NOTES:
•If the recording mode is switched du_g recording, _e
playback picture will be blurred at the swikhin_ point:
• It is r_conlmend_d that tapes recorded in the LP mode
on thg camcorder b_ played back on this calncorder.
• During playback of a tape recorded on another
camcorder, blorks of noise may appear or there may tJe
momentary pauses in the sound.
14EN
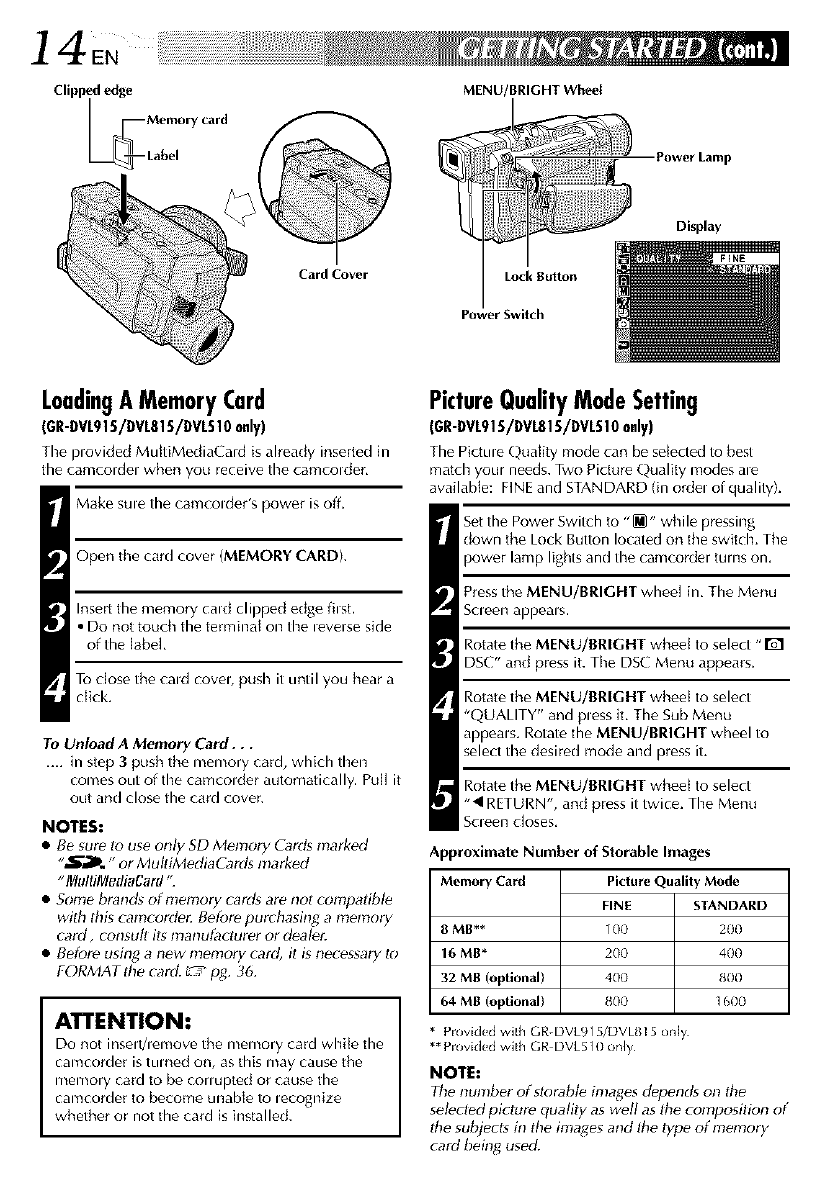
Clippededge
LmMemory card
[_-- Labe
Card Cover
MENU/BRIGHT Wheel
Lock Button
Power Switch
-Power Lamp
Display
LoadingAMemoryCard
(GR-DVL915/DVL815/DVL510only)
The provided Mu_tiMediaCard is already inserted in
the camcordet when you receive the camcotder,
Make sule the camcolder's power is off.
Open the card cover (MEMORY CARD).
Insert the memory cald clipped edge filst.
•Do not touch the terminal on the _everse side
of the label.
To close the cald coveb push it until you hear a
click,
To Unload A Memory Card...
.... in step 3push the memory card, which then
comes out of the camcolder automatically. Puff it
out and close the card cover
NOTES:
•Be sure to use only SD Memory Cards marked
"_. " or MultiMediaCbrds marked
" lVh/ItilVlediaCard ".
• Some brand_ of memory cards are nol compatibl_
with this camcorde_ Before purchasing a memory
card, consuh its manufacturer or d#alar.
• Before using a new memory card, it is necessary to
FORMAT tile card. C_;_fag. 36.
ATTENTION:
Do not insed/lemove the memory card whi{e the
carflcorder is tulned on, as this may cause the
memory card to be con upted or cause the
camcorder 1o become unable to lecognize
whether or not the card is installed.
PictureQualityModeSetting
(GR-DVL915/DVL815/DVL510only)
The PiGme QaaHW mode can be selects] to be_
matd_ your needs. Two Pictar_ Quality modes ale
awdlable: FINE and STANDARD (in ordel of qualityL
Set the Power Switch to "_" while pressing
down the Lock Button located on the switch. The
power lamp lights and the camcorder turns on,
Press the MENU/BRIGHT wheel in, The Menu
Soeen appeals.
Rotate the MENU/BRIGHT wheel to select "1"5"1
DSC" and press it. Tile DSC Menu appears.
Rotate the MENU/BRIGHT whee{ to select
"QUALITY" and press iL The Sub Menu
appear s. Rotate the MENU/BRIGHT wheel to
select the desired mode and press iL
Rotate the MENU/BRIGHT whee{ to select
"• RETURN", and press it twice. The Menu
Scleen c]oses.
Approximate Number of Storable Images
Memory Card Picture Quality Mode
8MB**
16 MB*
32 MB (optional)
64 MB (optional)
FINE STANDARD
100 200
200 400
400 800
800 ] 600
Piovided with GR-DVL915/DVLSI 5 only
** Provided with GR DVL510 only
NOTE:
The number of 5torabt_ hTlagesdepends m_ the
selPc[ed picture quality as well as dte composition of
Ihe subjects in tile images and tile type of memory
card being used.
®_ _ _ i_,_,i,, '_,_!_i!_i!_i!_!ii ii.............
CONTENTS
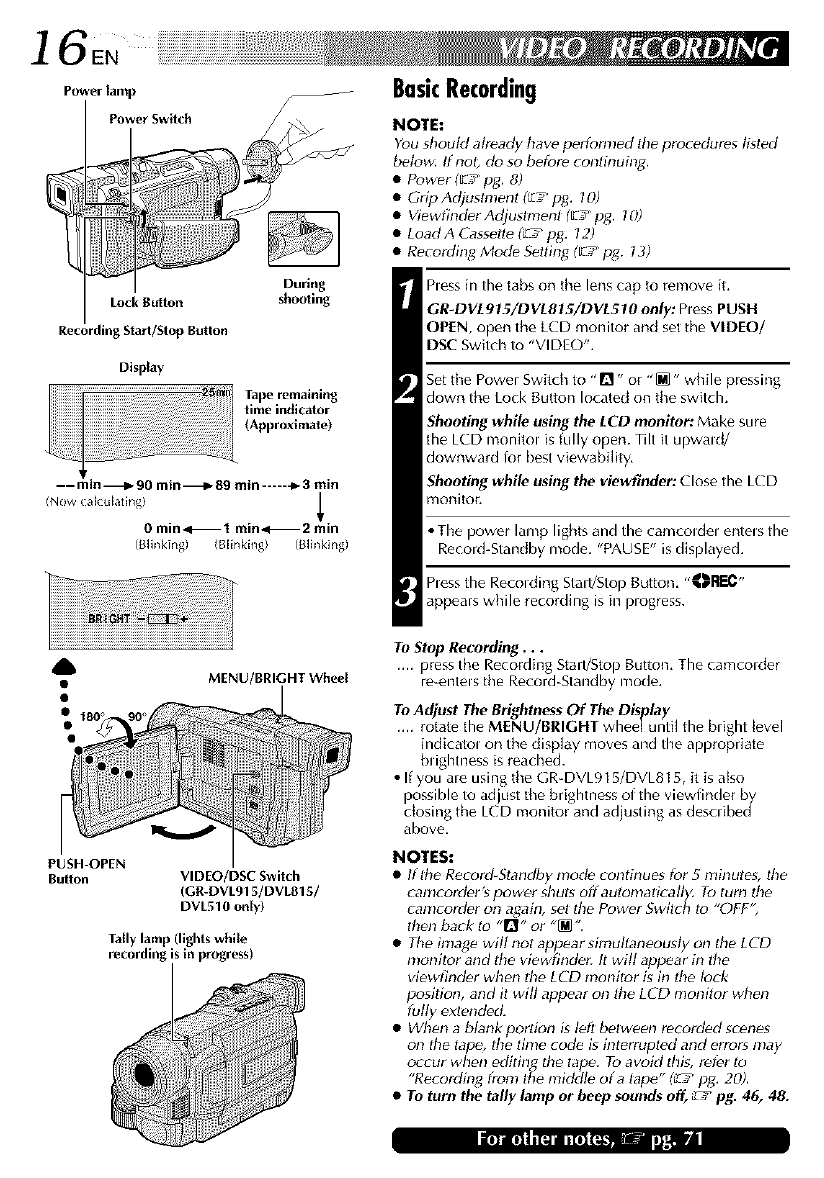
] 6EN
Power lamp
PowerSwitch
i :r
During
LockButton shooting
RecordingStarl/StopButlon
Display
--min---IP90 min---IP 89 rain------_3 min
(Now ( ak ub*ting)
0 min,<--I min,<-- 2 rain
(BNnk;ng) (BNnking) (BNnking)
BasicRecording
NOTE**
You should already have perfom!ed the procedures fgted
below. If not, do so before continuing.
•Power (L7 pg. 8)
•Grip Adjustnlenl ('z._ pg. 70)
• Viewgnder Adjustment ([:7 pg, 7O)
• Load A Ca_seB# _ pg. 72)
• Recording Mode S_Iting (El pg. 73)
hess in the tabs on the lens cap to remove it,
GR-DVL915/DVL815/DVL510 on@ hess PUSH
OPEN, open the LCD monitor and set the VIDEO/
DSC Switch to "VIDE()".
Set the Power Switch to "0" or "_" while pressing
down the Lock Button located on the switch.
Shooting while using the LCD monitor: Make sure
the LCD monitol is fully open. Tilt it upwald/
downward lor best viewability,
Shooting while using the viewfinder: Close the LCD
monitor,
•The power lamp lights and the camcoldel entels the
Record-Standby mode, "PAUSE" is displayed.
hess the Recolding Stad/Stop Buttun, "_Rr_-
appears while recording is in plogress.
PUSH-OPEN
Button
MENU/BRIGHT Wheel
VIDEO/DSC Switch
(GR-DVL915/DVLB15/
DVL510 o_[y)
Tally lamp (lights while
recording is in progress)
To Stop Recording...
.... press the Recording Start/Sto) Button, The camcolder
re-entels the Record-Standby mode.
To Adjust The BrightnessOf The Display
.... rotate the MENU/BRIGHT wheel until the bright level
indicatol on the display moves and the appropriate
bughtness is reached.
If you ale using the GR-DVL91 _/DVL815, it is also
possible to adjust the brightness of the viewfinder by
5
closing the LCD monitor and adjusting as described
above.
NOTES:
•Iflhe Record-Standby mod_ continues for 5 minutes, file
camcorder's power shuts off automatically. To turn the
camcorder on again, set Ihe Power Swilch to "OFF',
then back to "Q" or "_".
• The image wig not appear simullaneousty on the LCD
monitor and the viewfinder. It wig appear in the
viewfind_r whc,nthe LCD monitor is in the fork
position, and it will appear on the LCD nlonitor when
fugy extend_L
• When a blank portion is left between recorded scenes
on the tape, the time code is interrupted and errors may
occur when editing the tape. To avoid this, refer to
"Recording from ttl_ middle of a tape" (_ pg. 20).
•TOturn the tally lamp or beep sounds off, L'_/pg. 46, 4&
III III I I Ill I I III Ill.. : )lit_l_ill
.17
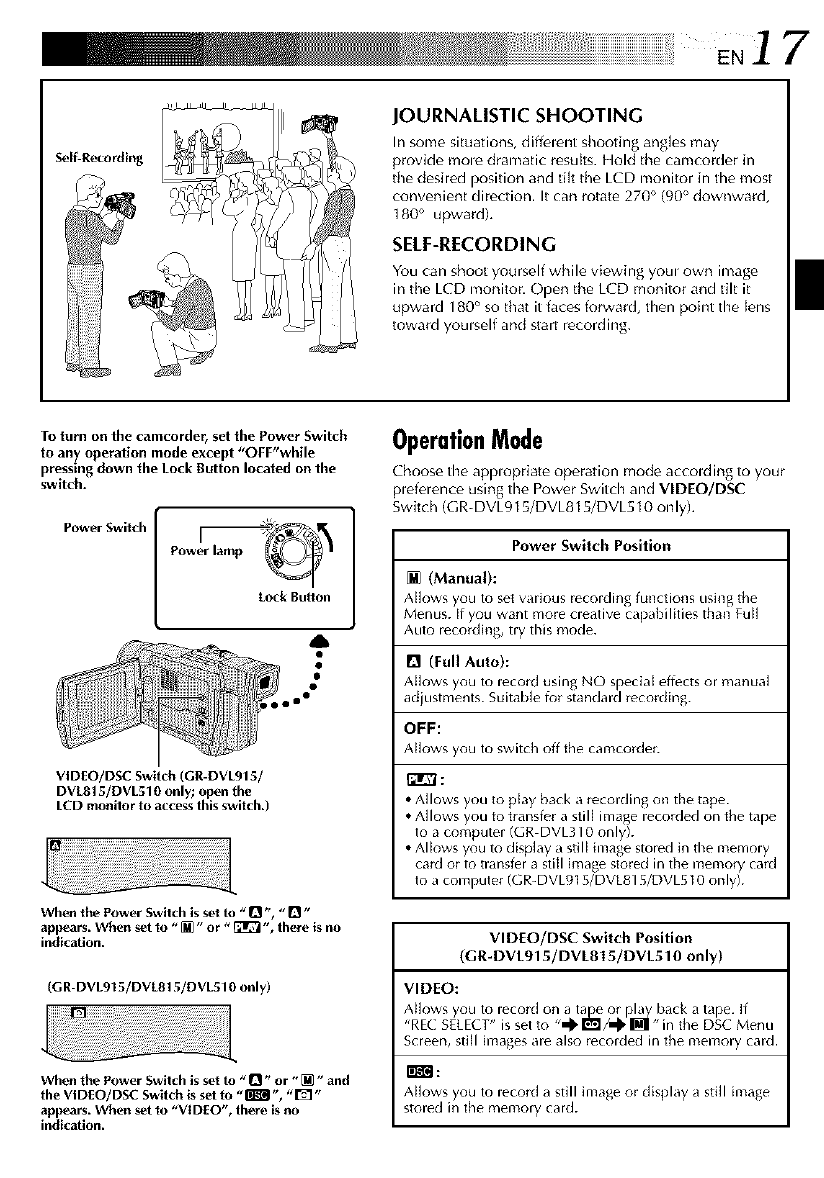
Self-Recording
JOURNALISTIC SHOOTING
In sonle situations, diffelent shooting ang]es may
provide mole dramatic r_su[ts. Hold the canlcorder in
the desired position and tilt the LCD monitor in tile most
convenient direction, It can rotate 270 ° (90° downward,
180 ° upwardL
SELF-RECORDING
You can shoot yourself while viewing yore own imag_
in the LCD monitor. Open the LCD monitor and tilt it
upward 180 ° so that it faces forward, then point the lens
toward yomself and start recording.
To turn on the camcorder rset the Power Switch
to any operation mode except "OFF'while
pressing down the Lock Button located on the
switch.
Lock Bu_on
VIDEO/DSC Switch (Gr-DVL915/
DVLB15/DVL510 only; open the
LCD monitor to access this switch.)
When the Power Switch is set to "O ", "D"
appears. When set to "[]" or "_ ", there is no
indication.
(G R-DVL915/DVL815/DVL510 only)
When the Power Switch is set to "_ '_or "[]" and
the VIDEO/DSC Switch is set to "_ ", "1_ '_
appears. When set to "VIDEO", there is no
indication.
OperationMode
Choose the appropriate operation mode accolding to your
plefemnce using the Power Switch and VIDEO/DSC
Swit( h (G R- DVL915/DVL815/DVL510 on ly).
Power Switch Position
[] (Manual):
Al]ows you to set wlfious recolding functions using the
Menus. If you want mole cleative capabilities than Full
Auto leco_ding, tly this mode.
Q(Full Auto):
Allows you to lecord using NO special effects ol manual
adjustments. Suitable for standald recolding.
OFF:
Alk_ws you to switch off the cdmco_der.
_r_:
• Allows you to play back a recolding on the tape.
• Allows you to transfel a still image leccmled on the tape
to a computer (GR DVL310 only).
• Allows you to display a still image stored in the memory
card or to mmsfer a still image stored in the memory card
to a computer (GR-DVL915/DVL815/DVL510 only).
VIDEO/DSC Switch Position
(GR-DVL915/DVL815/DVL510 only)
VIDEO:
Allows you to lecord on a latrineor pla_i<_yback a tape. If
"REC SELECT" is set to "_" I_1/_, _,, ill the DSC Menu
Screen, still images are also recorded in the memory card.
r_r_:
Allows you to record a still image or display a still image
stored in the memory card.
l 8EN
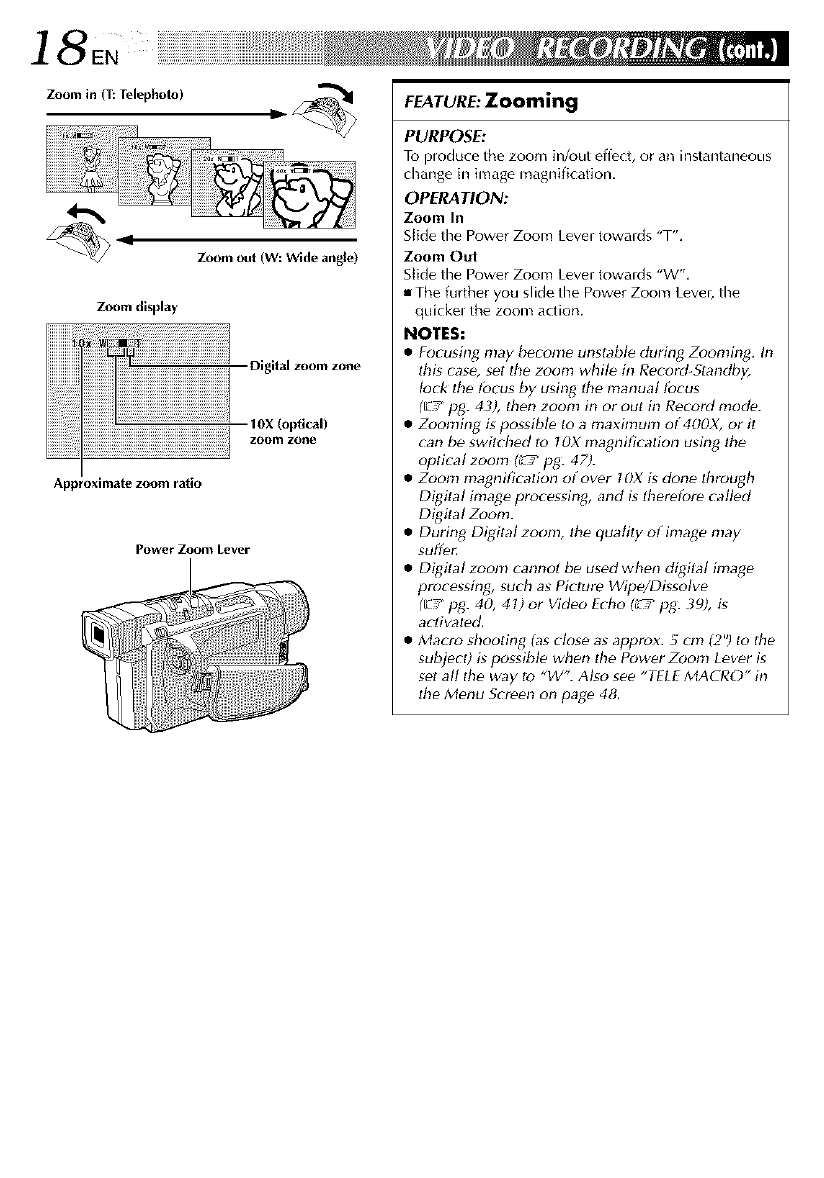
Zoom in (T: Telephoto)
Zoomout (W:Wide angle)
Zoom display
Digital zoom zone
,dx<°ro,i ,l
Approximate zoom ratio
Power Zoom Lever
FEATURE: Zooming
PURPOSE:
To ploduce the zoom in/out effect, or an instantaneous
change in image magnification.
OPERATION:
Zoom In
Slide the Power Zoom Lever towalds "T'.
Zoom Out
St{de the Power Zoom Lever towalds "W",
• The further you slide the Power Zoom Lever, the
quickel the zoom action.
NOTES:
•Focusing may bPcome unstable during Zooming. In
Ihis case, set the zoom whil_ in Record_Standby,
lock the tbcus by using ltte manual tbcus
(L7 pg: 43), then zoom in or out in Record mode.
• Zooming is possibl_ to a maxhnum of 400X, or il
can be switched Io 70X magnificatfon using the
optical zoom _pg: 47).
• Zoom magnificatfon of over IOX is done through
Digital image processing, and is lbei_fore called
Digital Zoom.
• During Digital zoonl, the quality of inlage may
SUffPt:
• Digital zoom cannot be used when digftal image
processing, such as Picture Wipe/Dissolve
(_-/pg: 40, 4 t) or Video Echo _pg: 39), is
acliw_ted,
• Macro shooting (as close as approx. 5 cm 12")to tile
subject) is possible when tile Power Zoom Lever is
set all the way to "W". Also see "TELEMACRO" in
Ihe Menu Screen on pag_ 48.
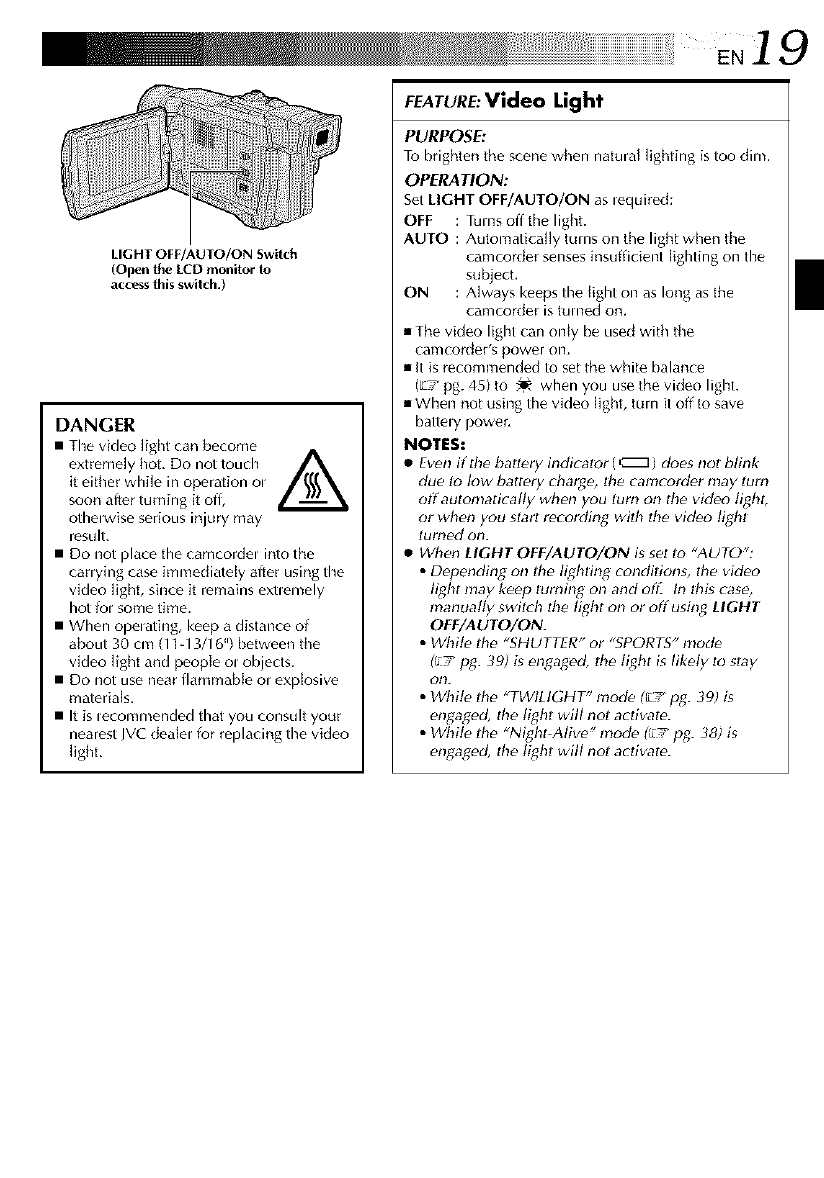
LIGHT OFF/AUTO/ON Switch
(open the LCD monitor to
access this switch.)
DANGER
•The video light can become A
extremely hot, Do not touch _._
it either while in operation ol
soon after turning it off,
otherwise serious injury may
result.
• Do not place the camcordel into the
carrying case immediately after using the
vkJeo light, since it remains exuemely
hot tel some time.
• When opelating, keep a distance of
about 30 cm (11-13/16") between the
vkJeo light and people el objects.
• Do not use near flammable el explosive
materials.
• It is lecommended that you consult your
nearest JVC dealel for replacing the video
light,
E.19
FEATURE:VIdeo Light
PURPOSE:
To brighten the scene when natural lighting is too dim,
OPERATION:
Set LIGHT OFF/AUTO/ON as lequired:
OFF :Turns off the light.
AUTO : Automatically turns on the light when the
camcorder senses insufficient lighting on the
subject,
ON : Always keeps the light on as long as the
car'ncorder is ruined On,
• The video light can only be used with the
caFncorder's power on,
• it is recommended to set the white balance
%7 pg. 45) to _ when you use the video light.
• When not using the video light, t_+rnit off to save
battely power,
NOTES:
•Even if the batl_ry indicator (_) does not blink
due lo low battery charge, lhe camcorder may turn
off automatically when you turn on the video light,
or when you starl recording wilh Ihe video lighl
turned on.
•When LIGHT OFF/AUTO/ON is sel to "AUTO":
•Depending on the lighting condilion_, the video
light may keep turning on and of£ In lhg case,
manually switch the light on or off using LIGHT
OFF/AUTO/ON.
• while the "SHUTTER" or "SPORTS" nlod_
(El pg. 39) gengaged, lhe light is likely to stay
on.
• While the "TWILIGHT" mode ('£/pg. 39) is
engaged, the lighl will not activate.
• While the "NightAlive" mode (F+7pg. 38) is
engaged, the lighl will not activate.
20EN
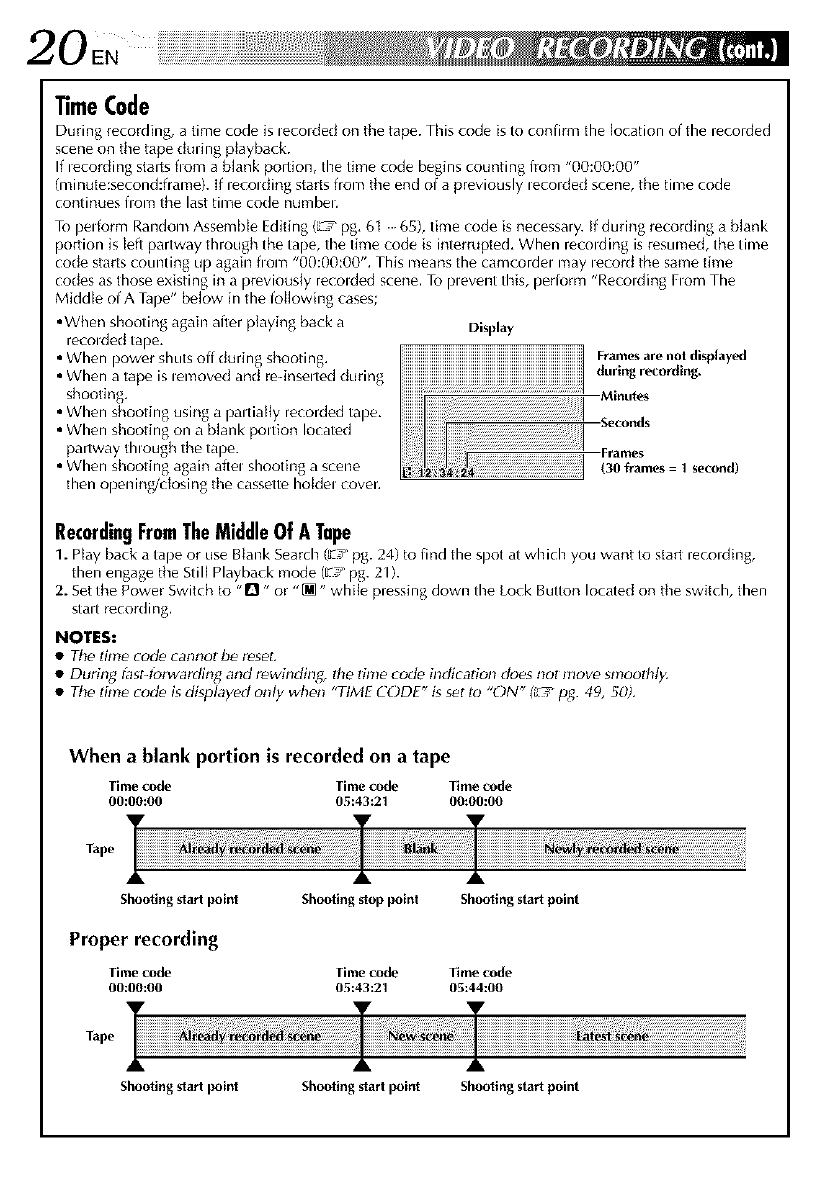
"timeCode
During recording, a time code is lecolded on the tape. This code is to confirm the location of the recorded
scene on tile tape during ptayba(k.
If lecording slarts flora a blank portion, the time code begins counting from "00:00:00"
(minute:second:frame). If lecolding starts from tile end of a previously lecolded scene, the time code
continues from the last time code numbel.
To perform Random Assemble Editing (L'_ pg, 6t 65), time code is necessary. If during recording a blank
portion is left partway through the tape, the time code is interrupted, When recolding is resumed, the time
code starts counting Lip again fiom "00:00:00'% This means the camcordel may lecord the same time
codes as those existing in a previously recolded scene. To plevent this, periorm "Recolding Fiom The
Middle of A Tape" below in the following cases;
• When shooting again after playing back a
recolded tape,
• When power shuts off during shooting.
• When a tape is lemoved and re-inselted during
shooting,
• When shooting using a paltiatty recorded tape.
• When shooting on a blank poltion located
partway though the tape.
• When shooting again aftel shooting a scene
then opening/dosing the cassette holdel cover.
Display
!ii!ii_ii_ii_i_i_i_i_i_i_i_i_i_i_i_i_i_i_i_i_i_i_i_i_i_i_i_i_i_i_i_i_i_i_i_i_i_i_i_i_i_i_i_!_!_!_i_i!i_i_i!i!_!_FramesarelIOtdlspjaylL_j
!!!!!!!!!!!!!!!!!!!!!!!!!!!!!!!!!!!!!!!!!!!!!!!!!!!!!!!!!!!!!!!!!!!!!!!!!
MimlteS
i!iiiiiiiii
ii ;!ii!!i oeds
!i i 130 frames = 1 second)
RecordingFromTheMiddleOf ATape
1. Play back a tape or use Blank Search (z! pg. 24) to find the spot at which you want to start recording,
then engag_ the Still Playback mode ([:_'_pg. 21).
2. Setthe Power Switch to "!"! - or "[M" while pressing down the Lock Button located on the switch, then
staff recording.
NOTES:
•Tile time _od_ cannot be reset.
• During fast4brwarding and rewinding, the time code indication does not move smoothl F
• Tile time _od_ is displayed only when "TIME CODE" is set lo "ON" _ pg. 49, 50).
When a blank portion is recorded on a tape
Time cede Time cede Time code
00:00:00 05:43:21 00:00:00
Tape
Shootingslarl point Shooting sloppoint Shootingstartpoint
Proper recording
Time cede Time cede Time code
00:00:00 05:43:21 05:44:00
Tape
Shootingslarl point Shooting slarl point Shootingstartpoint
E.21
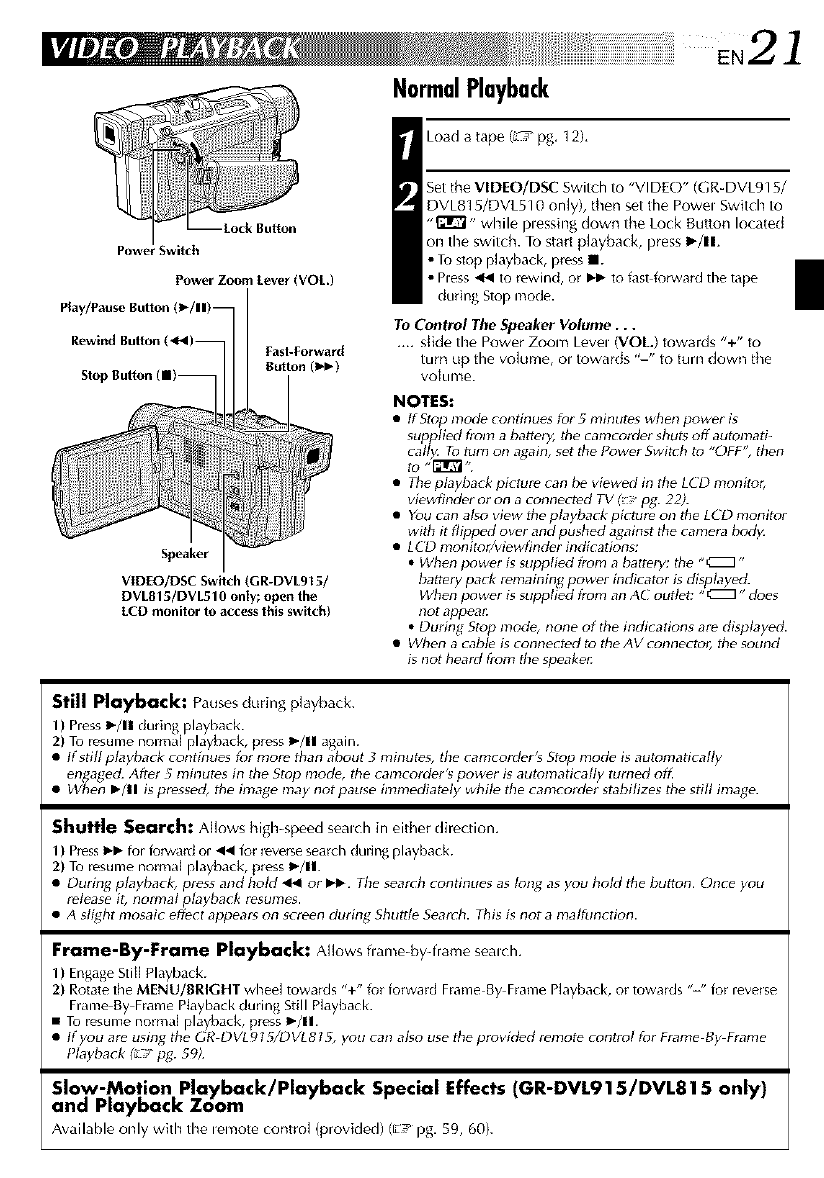
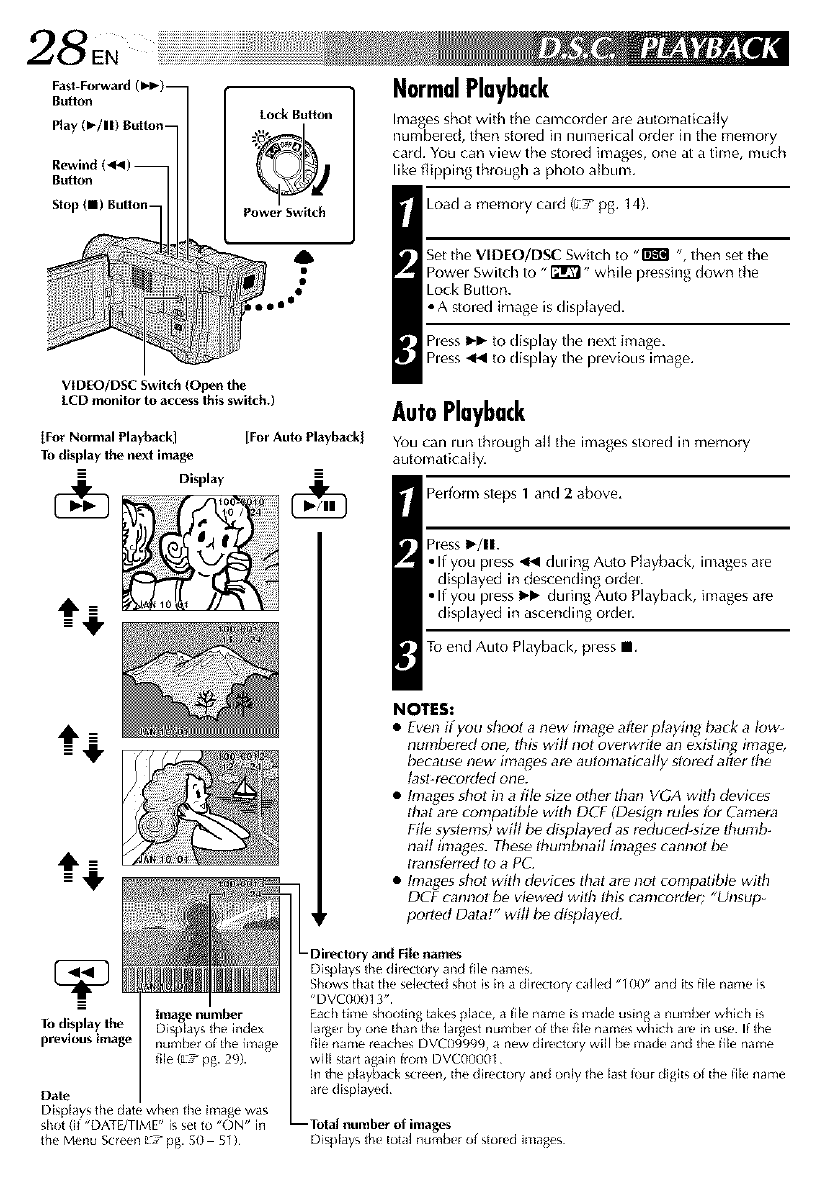
NormalPlayback
Power Zoom Lever (VOL.)
Play/Pause Button (1_/11)_
Rewind Button /
Slo|
I Load a tape (L'C_pg, 12),
Set the VIDEO/DSC Switch to "VI DLO" (GR-DVL915/
DVL815/DVL510 onJy), then set the Powel Switch to
"_" while plessing down the Lock Button located
on the switch. To start pJayback, press I_/11,
• Tustop p]ayback, press III.
• Press _ to rewind, or Ik-lbto fast forward the tape
during Stop mode.
To Control The Speaker Volume...
.... s[ide the Power Zoom Level (VOL) towards "+" to
turn up the volume, ol towards "-" to turn down the
volume.
Speaker
VIDEO/DSC Switch (GR-DVL915/
DVLB15/DVL510 only; open the
LCD monitor to access this switch)
NOTES:
•ttStup mod_ continues tu_ 5 minutes when powe_ is
supplied from a battery, the camcordet shuts off automatF
cally. Tu turn on again, set the Powe_ Switch to "OFF", then
to ,,[_1_..
• The p/ayba_ p_re can be v_wed in _e LCD moni_
vie_,inct_ o_ on a connected TV - pg. 22).
•You can ago view the playback picture on the LCD monito_
with it fl_ed over and push_ _alnst the came_ body.
• LCD monitotyviewfinder indications:
•When power is supplied from a battery: the "CZZ3"
battery pack remaining power indicator is displayed.
When power i_ supplied from an AC outlet: " (_]" does
not appeal:
• During Stop mode, none of the indications are displayed.
• When a cable is connected to the AV connector, the sound
is not heald ffz2m the speakeg
Still Playback: Pauses during playback.
1) Press I_/11 during playback.
2) Tu resume normal playback, press I_/11 again.
• tf still playback continues for more than about _ minutes, the camcorder's Stop mode is automatically
en ,aged. After 5 minutes in the Stop mode, the camcordeKs power is automaticagy turned off.
• V_]/_en I_/11 is pressed, the image may not pause immediately while the camcorder stabilizes the still image.
Shuttle Search: AHows high-speed sealch in either dire(lion,
1) Pless I_-Ibtur fu_ald or 41.€fur l_velse seardl during playback.
2) Tu resume normal playback, press I_/11.
• During playback, press and hok] _or I_1_ Fhe search continues as long as you hold the button. Once you
release it, normal playback resumes.
• A slight mosaic effect appears on screen during Shuttle Search. This is not a maltunction.
Frame-By-Frame Playback: Allowsflame-by-frame sealch,
1) Engage Still Playback.
2) Rotate the MENU/BRIGHT whee[ towalds "+" for forward Frame By Frame Playback, or towalds "-" for revelse
Frame By Frame Ptayback during Still Playback.
• Tu resume norma[ playback, press I_/11.
• tfyou are using the GR DVLgIS/DVLBIS, you can al_o use the provld_d remot_ control fur Flame By Frame
Playback (_ _r pg. 59).
Slow-Motion Playback/Playback Special Effects (GR-DVL91 S/DVL81 S only)
and Playback Zoom
Awdlable onlywith the _emotecontrol (provided)(E, pg. 59, 60).
22en
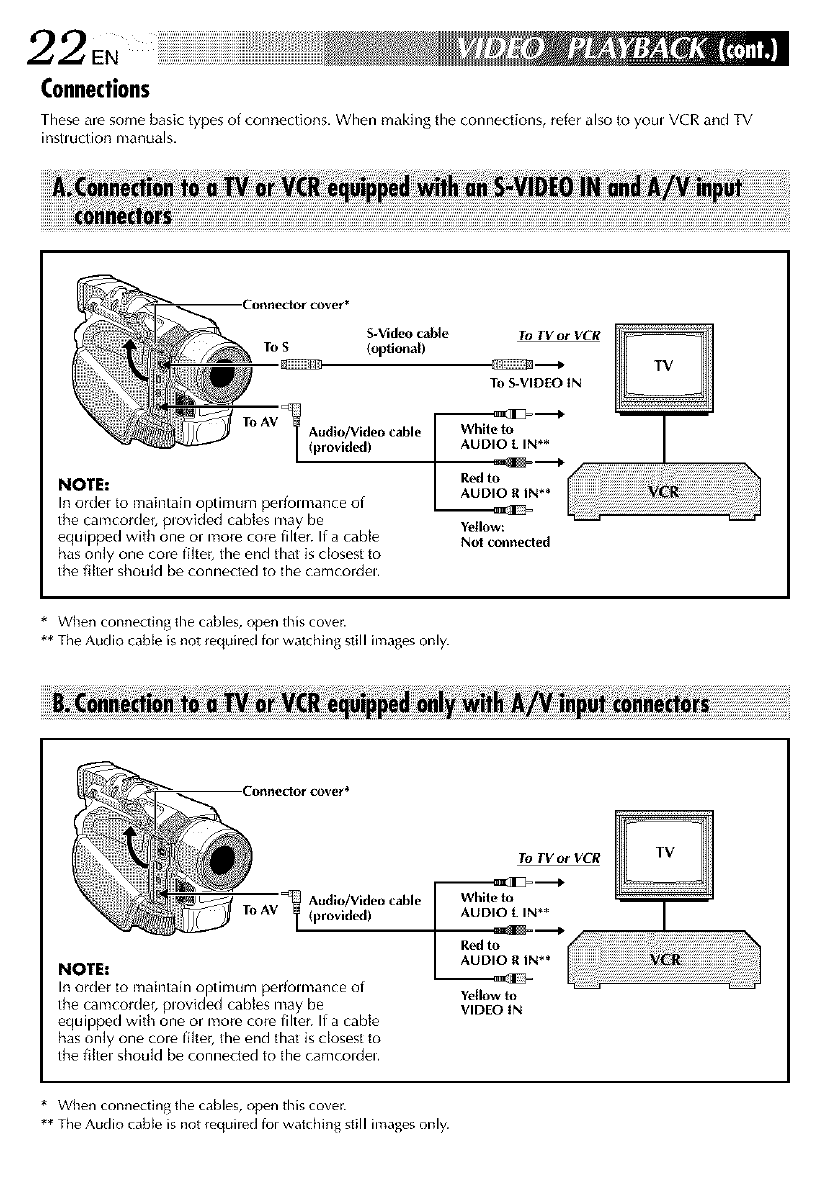
Connections
These are some basic types of cor_nections, When making the connections, refer also to youi VCR and TV
inSll Uclion manuals.
S-Video cable To TV or VCR
To S (optional)
.
To S-VIDEO IN
T°AVlAudi°/Vide°cable(provided)
NOTE:
In order to maintain optimum perfolmance of
the camcorder, plovk]ed cables may be
equipped with one or more core filter. If a cable
has only one core filter, the end thai is closest to
the filter should be connected to the camcordel.
White to
AUDIO [IN s*
Red to
AUDIO RIN s*
Yellow:
Not connecled
* When connecting the cables, open this cover.
** The Audio cabte is not reguired for watching still images only.
Audio/Video cable
To AV T (provided)
NOTE:
In order to maintain optimum perfolmance of
the camcorder, plovk]ed cables may be
equipped with one or more core filter. If a cable
has only one core filter, the end thai is closest to
the filter should be connected to the camcordel.
To TV or VCR
"--_3[_'--_
White to
AUDIO [IN s*
Red to
AUDIO R IN s*
Yellow to
VIDEO IN
* When connecting the cables, open this cover.
** The Audio cable is not iequired for watching still images only.
i!i!i!iii!ii i iii! i! i! i! i! i! i! ii ii ii ii ii ii ii ii ii ii ii ii ii ii ii ii ii ii ii ii ii ii ii ii ii ii ii ii ii ii ii ii ii ii! !!! : !i¸ E,23
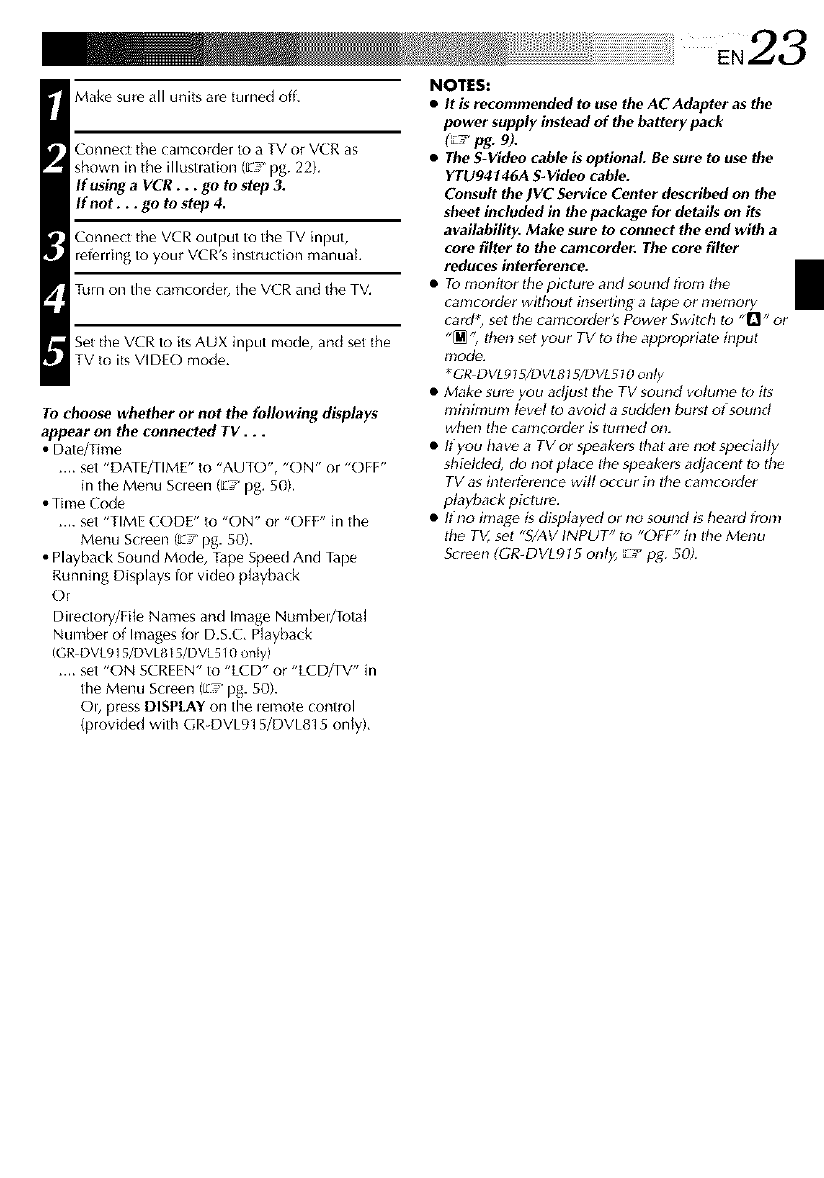
Make sure all units are turned off.
Connect tile camcorder to a TV or VCR as
shown in tile illustlation ([:_'_pg. 22).
If usinga VCR ...go to step 3.
ff not ...go to step 4.
Conne(t the VCR output to the TV input,
referring to your VCR's h/struction manual
Turn on the camcolder, tile VCR and the TV.
Set the VCR to its AUX input mode, and set tile
TV to its VIDEO mode.
To choose whether or not the following displays
appear on the connected TV. . .
• Date/Time
.... set "DATE/TIME" t(_"AUTO", "ON" or "OFF"
in the Menu Scleen ([:7 _pg. 50).
• Time Code
.... set "TIME CODE" to "ON" or "OFF" in the
Menu Screen (z! pg. 50).
• Playback Sound Mode, Tape Speed And Tape
Running Displays lor video p[ayback
Or
Dilectory/File Names and Image Numbel/Total
Number of Images tor D.S.E. Playback
(GRDVL915/DVL815/DVL510 only)
.... set "ON SCREEN" to "LCD" or "LC D/TV" in
the Menu Scleen (E_ pg. 50).
O_, press DISPLAY on the _emote control
(provided with GR DVL915/DVL815 only).
NOTI:$:
•It is recommended to use the AC Adapter as the
power supply instead of the battery pack
(_7 pg. 9).
•The S-Video cable is optional. Be sure to use the
YTU94146A S-Video cable.
Consult the JVC Service Center described on the
sheet included in the package for details on its
availability. Make sure to connect the end with a
core filter to the camcorder. The core filter
reduces interference.
• To monitor the picture and sound fiom lhe
camcorder wilhout h_serling atape or nlemory
card _, set the canlcorder's Power Switch Io .1"!,, or
"_", lhen set your TV to the appropdale input
mode.
*GR DVL9tS/DVL815/DVLStO onl_,
• Make sure you adjust the TV sound volume to its
minimum level lo avoid a sudden burst of sound
when tile canlcorder is turned on.
• If you have a TV or speakers that are not specially
shiHded, do not place lhe speakers adjacent to the
TV as interfPrence will occur in the camcorder
playback pirlure.
• If no image is displayed or no sound is heard fron!
the TV, set "SLAVINPUT" to "OFF" in the Menu
S{ reen (GR-DVLgt 5 only, _._'pg. 50).
EN
BLANK SEARCH Button
Power Switch
Display
Stop Button (11)
VIDEO/DSC Switch (GR-DVL915/
DVLB15/DVL510 only; open the
LCD monitor to access this switch)
BlankSearch
Helps you find where you shoukJ _arl leco_ing in the
mMdle of a tape to avoid time comteintem_ption (_ pg, 20),
Load a tape (L'h_pg, 12).
Set the VIDEO/DSC Switch to "VIDEO" (GR-DVE915/
DVL81 5/DVL510 onLy), then set the Powel Switch to
"[_" while pressing down the Lock Button located
on the switch.
hess BLANK SEARCH.
• "BLANK SEARCH" appears blinking and the
camcolder automatically starts reverse or forward
shuttle search, then stops at the spot which is about
3 seconds of tape befole the beginning of the
deteded blank portion.
To cancel Blank Search midway...
.... press II.
NOTES:
•In st_p 3, if the currenl position is at ablank porlion the
camcord_r searches in the reverse direction, and if the
currenl position is al a recorded portion tile canlcorder
searches in the forward direction.
• Blank Search does not work if "HEAD CLEANING
REQUIRED. USE €lEANING CASSETTE" has appeared
with tile tape.
• If the b_ginning or end oflhe tape is reached during
Blank Search, ftte camcorder slops autonladcatly.
• A blank portion which gshorter than 5 seconds of tape
may nol be dPtected.
• Tile d_lect_d blank pc)rtion may be located between
recorded scenes. Before you start recording; make sure
there is no recorded scene after the blank pordon.
CONTENTS
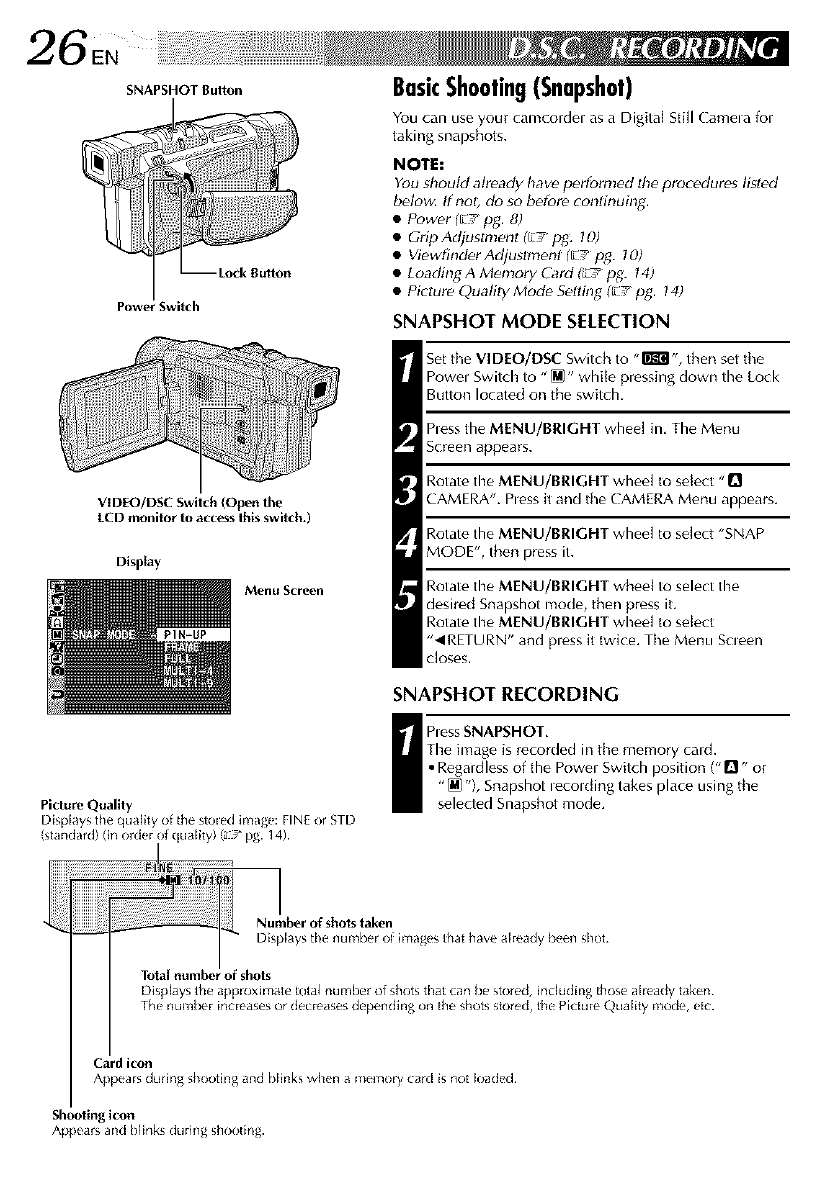
Power Switch
BasicShooting(Snapshot)
You can use your cam(ordel as a Digital Still Camela fol
taking snapshots.
NOTEt
You sboutd already have p_rformed the procedures lisled
belong If not, do so before continuing.
•Power (_7 pg. 8)
• Grip Adjustmenl (_-: pg. 10)
• Viewfind_r Adjustment (_-: pg. 70)
• Loading A Memory Card _pg. 14)
• Picture Quality Mode S_lting (_/pg. 14)
SNAPSHOT MODE SELECTION
Set the VIDEO/DSC Switch to ,,rlk"_l', then set the
Powel Switch to "_" while pressing down the Lock
Button located on the switch.
hess the MENU/BRIGHT wheel in. The Menu
Screen appears.
Rotate the MENU/BRIGHT wheel to select "D
CAMERA". hess it and the CAMERA Menu appears.
Rotate the MENU/BRIGHT wheel to select "SNAP
MODE", then press it.
Rotate the MENU/BRIGHT wheel to select the
desired Snapshot mode, then press it.
Rotate the MENU/BRIGHT wheel to select
"_IRETURN" and pless it twice. The Menu Scleen
Closes.
SNAPSHOT RECORDING
VID[O/DSC Switch (Open the
LCD monitor"to access lbls switcb.)
Display
Menu Screen
Picture Quality
Displays the quality of the stoled image: FINE or STD
(standard) (irl order of quality) (_/pg. 14).
hess SNAPSHOT,
The image is recorded in the memory cald.
• Regardless of the Powel Switch position (" rl ,, or
"(@ % Snapshot lecolding takes place using the
selected Snapshot mode.
1
Number of shots taken
Displaysthe number of imagesthat havealreadybeen shot.
of shots
Displays the approximate total number of shots that (:an be stored, including those ah_ady taken
The num[x,r ir_creases or decreases dependlng on the shots stored, the Pi{ture Quality mode, etc.
Card icon
Appears during shooting an(] blinks when a nlemory car([ is llot loaded.
Shooting icon
Appears and blirlks during shootlrlg.
i!i!iiiiii iiiiiiii!i iiiiii i i i i i i i i i i i i i i i i i i i i i i i i i i i i i i i i i i i i ii¸ EN2Z
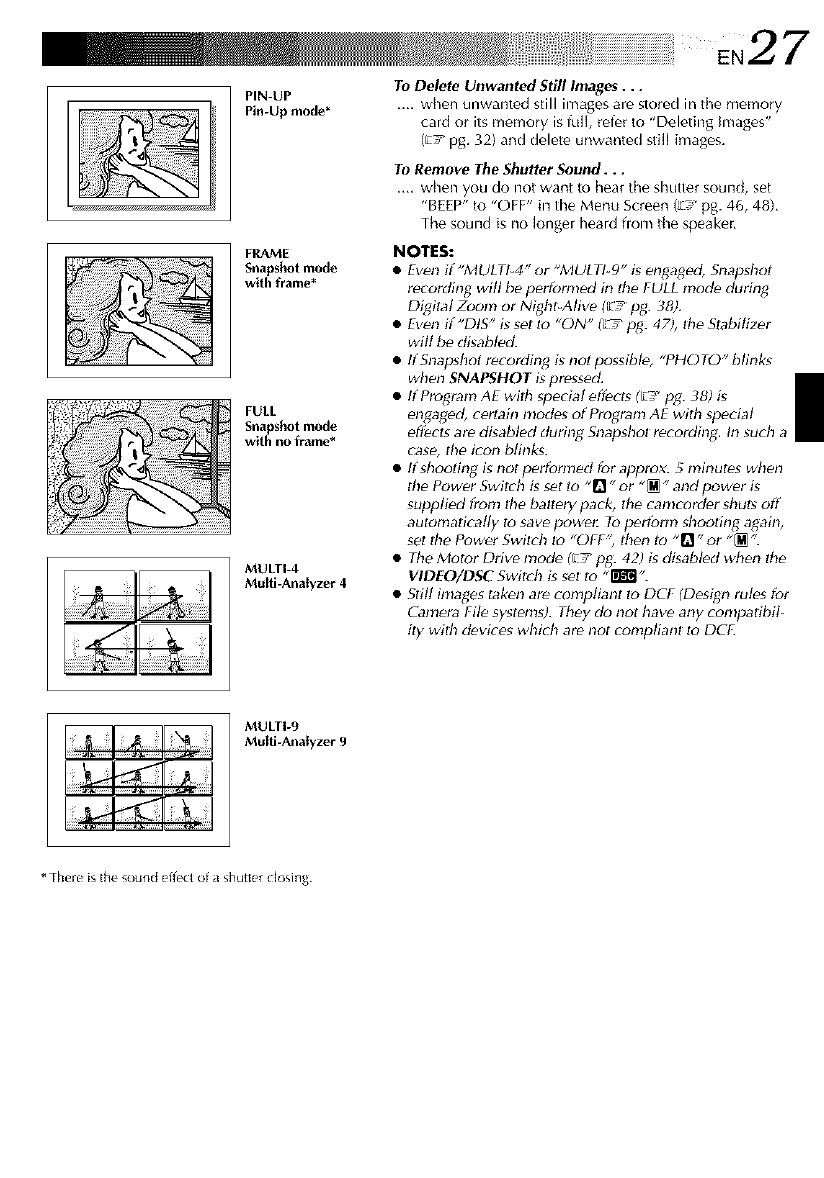
PIN-UP
Pin-Up mode*
To Delete Unwanted Still Images...
.... when unwanted still images are stored in tile memory
card or its memory is fftl[, refer to "Deleting Images"
(_:7 pg. 32) and delete unwanted still images.
To Remove The Shutter Sound...
.... when you do not want to hear tile shutter sound, set
"BEEP" to "OFF" in the Menu Screen (_ pg. 46, 48),
The sound is no [onger heard flora tile speaker,
FRAME
Snapshot mode
with frame*
FULL
Snapshot mode
with no frame*
MULTI-4
Multi-Analyzer 4
NOTES:
•Even if"MULTI-4" or "MULTI-9" is enDgod, Snapshot
recording will be perh_mled in the FULL mod_ dudng
Digital Zoom or Night-Alive ('_ pg. 38).
• Even if "DIS" g set Io "ON" _ pg_ 47), Ihe Slabitizer
wilt bP disabled.
• If Snapshot recordin_ gnot possible, "PHOTO" blinks
when SNAPSHOT is pressed,
• ItProgram AE wilh special effects ([E_,p_. 38) is
engaged, certain nlodes of Program AE with special
eff_cls are disabled during Snapshol recording, In such a
case, the icon blinks.
• If shooting is not performed for approx. 5 minutes when
tile Power Swilch is set to "1]" or "_ "and power is
supplied from tile battery pack, the canlcorder shuts off
automatically to save pc_we_ Top_rtbrm shoot_n_ again,
sel Ihe Power Switch to "OFF", then lo "_" or "_ ".
• The Motor Drive mode (El pg. 42) isdisabled when the
VIDEO/DSC Switch is set Io ,l'Ig_',
• Stfll images taken are compliant to DCF (Desi[;n rules for
__mera File systpms). They do not have any compatibil-
ity with d_vi_es which are not compliant Io DCI.
MULTI-9
Multi-Analyzer 9
* There is the soured effect of a shutter dosing.
28 ,
Fast-Forward (Iblp) --
Butlon
Play (1_/11) Button-
Stop (m) Button-
Lock Button
Power Switch
VIDEO/DSC Switch (Open the
LCD monitor to access this switch.)
[For Normal Playback] [For Auto Playbackl
To display the ne×t image
-- --
Display
---I!"
_--q,
NormalPlayback
Images shot with tile camcorder are automatica]ly
numbeled, then stored h_ numerical order in the memory
card. You can view the stored images, one at a time, much
like flipping through a photo album.
Load a memory cald (E! pg. 14).
Set the VIDEO/DSC Switch to ,,B_'J ',, then set the
Powel Switch to "_" while pressing down the
Lock Button.
•A stored image is displayed.
hess I_!_ to display the next image,
hess _1 to display the plevious image.
AutoPlayback
You can lun through all the images stored in memory
automatically.
Perform steps 1 and 2 above.
hess I_/11.
•If you pless 441 duung Auto P[ayback, images are
displayed in descending ordel.
• If you pless I_1_ during Auto Playback, images are
displayed in ascending order.
To end Auto Playback, pless II.
NOTES:
•Even ify_u shoot a flew image afterplaying back a I_w-
numbered one, tbis will not overwrite an exisling image,
because new images are autonlatically stored att'_r tbe
tasl_recorded one.
• Images shot in a file size olher lhan VGA wilh d_vices
that are compatible with DCF (Design rules far Camera
File systems) will be displayed as reduced-size tbumb-
nail images. These tbunlbnail images cannot be
transferred to aP(_.
• Images shot with devices that are not compaI_ble with
DCF cannot be viewed with tbis camcorder; "Unsup_
ported Data!" wilt t;e displayed.
Image number
To display the DispDys the index
previous image rlLun[xr of the hnage
1lEe(_:7 pg. 29).
Date
Displays the date when the image wag
shot (if "DAT_TIME" is set to "ON" in
the Menu Scre_n : 7 pg. 50 51)
-Directory and File names
Displays the dkectory and file names.
Shows that the selected shot is in a directory called "_00" and its file name is
"DVC00013".
Each time shooting takes peace, a iile name is made using a number whlch is
larger by one than the largest number of the file names which are in use I{ the
fleename reaches DVC09999, a new dkectory will be made and the iile name
wile start again trom DVC00001
In the playback screech,the di_ctory and only the Jast _ur diglts of the iile name
a_edisplayed¸
Displays the iota] lit Jr fiber of stored JMag( s
E.29
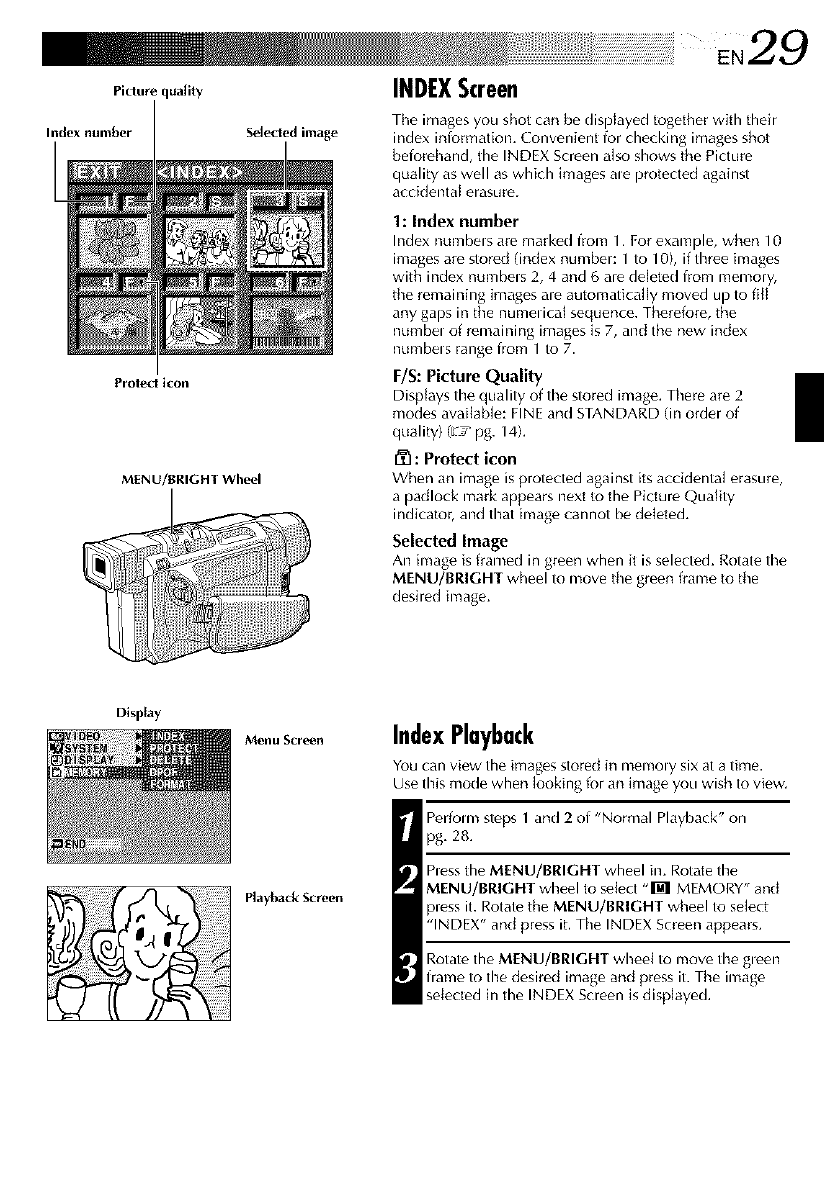
Picture quality INDEXScreen
Index number Selected image Tile images you shot can be displayed together with their
index iniormation. Convenient for checking images shot
beiorehand, the INDEX Screen also shows the Picture
quality as well as which images ale protected against
accidental erasure.
Protect ico.
MENU/BRIGHT Wheel
1: Index number
Index numbels are marked from 1. For example, when 10
images are stored (index number: 1 to 10), if thr_e images
with index numbels 2, 4 and 6 are deleted from memory,
the remaining images are automatically moved up to fill
any gaps in the numerical sequence. Therefore, the
numbel of romaining images is 7, and the new index
numbels range from 1 to 7.
F/S: Picture Quality
Displays the quality of the stored imag_. There are 2
modes available: FINE and STANDARD (in order of
quality) (ET pg. 14).
[_1: Protect icon
When an image is protected against its accidental erasure,
a padlock mark appears next to the Picture Quality
indicator, and that image cannot be deleted,
Selected Image
An image is framed in green when it is selected. Rotate the
MENU/BRIGHT wheel to move the green frame to the
desired image.
Display
MeNu Screell
Playback Screen
IndexPlayback
You can view the images stored in memoly six at a time.
Use this mode when looking for an image you wish to view.
Perfom_ steps 1and 2 of "Normal Playback" on
pg, 28.
hess the MENU/BRIGHT wheel in. Rotate the
MENU/BRIGHT wheel to select "M MEMORY" and
press it. Rotate the MENU/BRIGHT wheel to select
'INDEX' and press it. The INDEX Screen appears.
Rotate the MENU/BRIGHT wheel to move timegleen
frame to timedesired image and press it. The image
selected in the INDEX Screen is displayed.
30EN
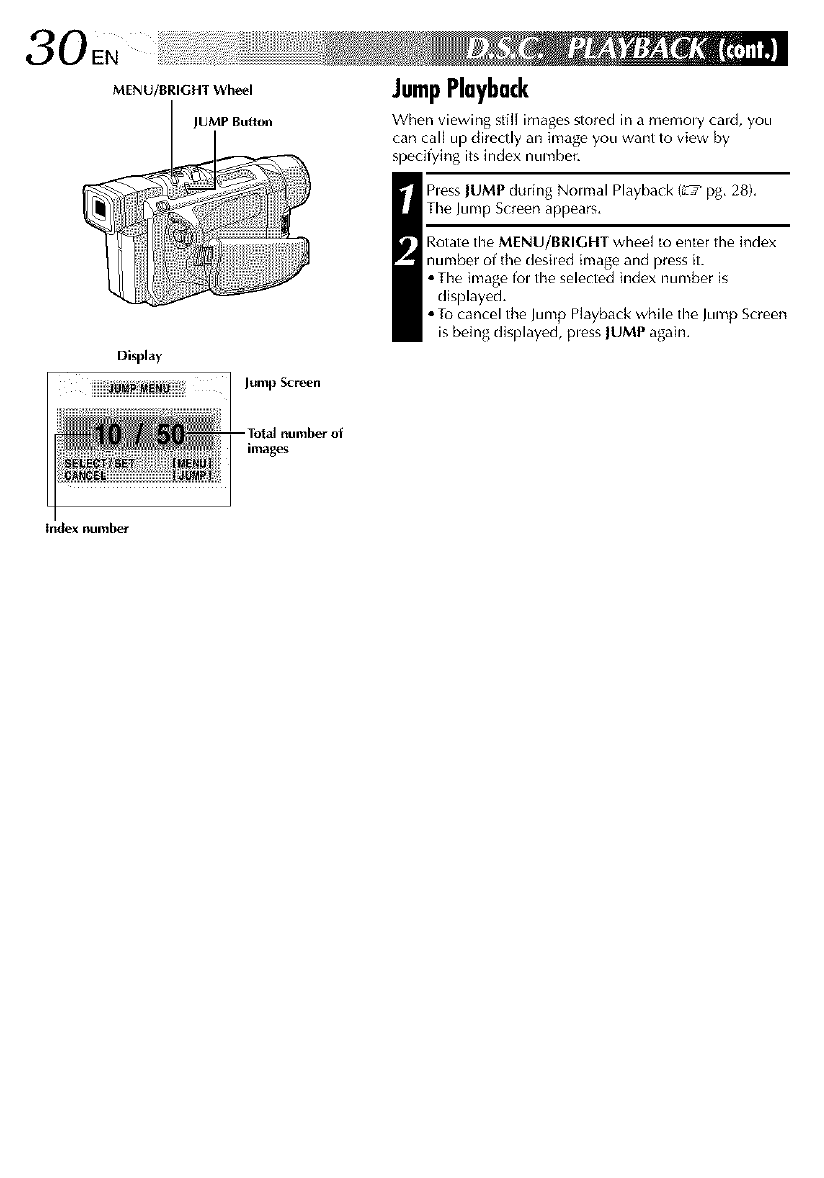
MENU/BRIGHT Wheel
JUMP Button
Display
Jump Screen
images
Index number
JumpPlayback
When viewing still images stored in a memoly card, you
can call up directly an image you want to view by
specifying its index number.
_ less lUMP during Nomlal Playback (L'_ pg. 28).
The Jump Screen appears.
Rotate the MENU/BRIGHT wheel to enter the index
number of tile desiled image and press it.
• The image fol the selected index number is
displayed.
• To cancel the Jump Playback while the Jump Screen
is being displayed, pless lUMP agaim

E,31
MENU/BRIGHT Wheel ProtectingImages
The Protect mode he{ps prevent the accidental elasure of
images. When a padlock mark is displayed next to the
Picture Quality indication, that image cannot be deleted.
Power Switch
VIDEO/DSC Switch (Open the
LCD monitor to access this switch)
Display
Menu Screen
4
Normal playback
Set the VIDEO/DSC Switch to "_', then set tile
Powel Switch to "f_rvl,, while plessing down the
Lock Button.
• A stored image is displayed.
hess the MENU/BRIGHT wheel in. The Menu
Screen appears. Rotate tire MENU/BRIGHT wheel to
select "M MEMORY" and press it. The MEMORY
Menu appears.
Rotate the MENU/BRIGHT wheel to select
"PROTECT" and press it. The PRE)TECT index Screen
appears.
TO PROTECT AN IMAGE
Before doing the following, perform steps 1through 3
above,
_ Rotate the MENU/BRIGHT wired to move the green
frame to tire desired image and press it. A "1_1"
padlock malk appears on the selected image.
Repeal this procedure for all images you do not wish
to delete by accident.
Rotate the MENU/BRIGHT wheel upward to select
"EXIT" and press it. The normal playback screen
appears.
PROTECT Index
ScrqL_,ll
NOTE:
When the memory is initialized or corrupl_d, even
prolected images are dHeted. If you do not wahl lo lose
important images, transfer Ihem Io a PC and save Ihem.
TO REMOVE PROTECTION
Before doing the following, perform steps 1through 3
above.
I otate the MENU/BRIGHT wheel to move tire green
frame to the desired image and press it. The "IYI"
padlock malk located above the image disappeals
and the image is no longer protected
Repeat this procedure for all images fiom which you
wish to remove protection.
Rotate the MENU/BRIGHT wheel upward to select
"EXIT" and press it. The normal playback screen
appears.
Normal playback
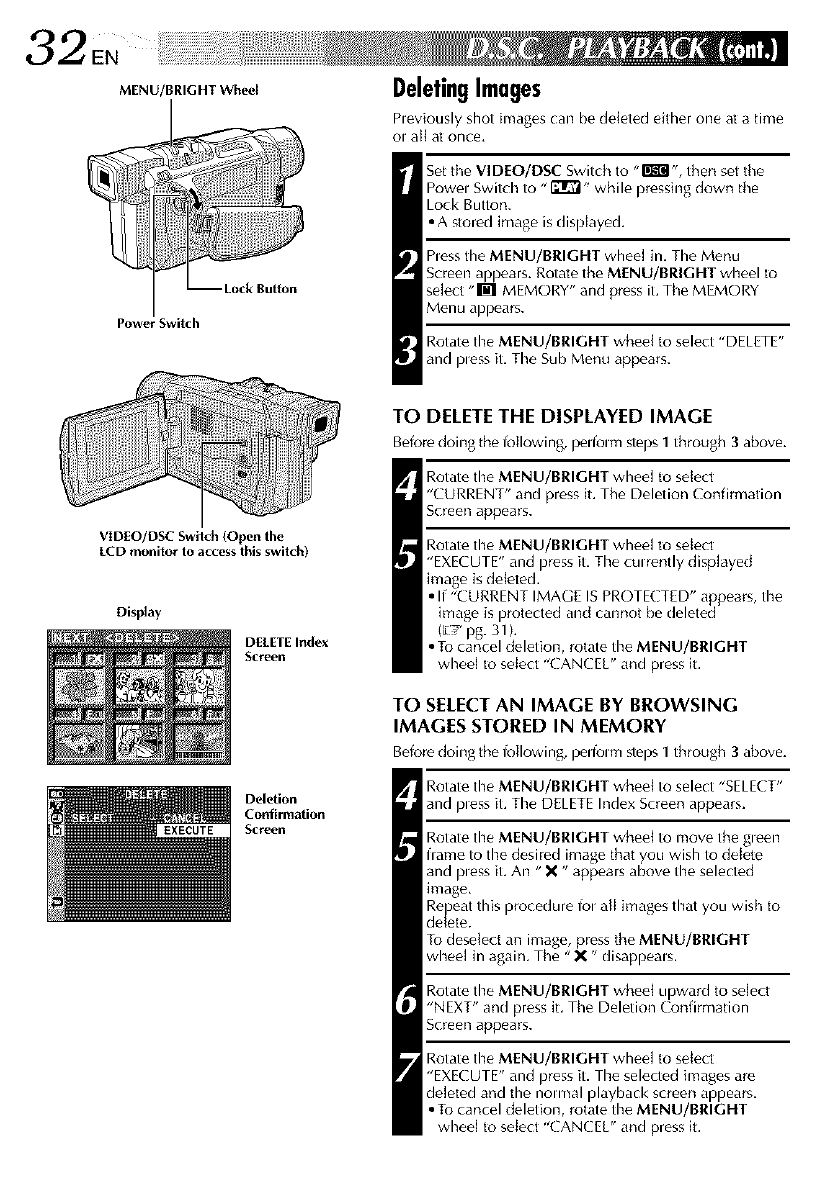
MENU/BRIGHT Wheel
Power Switch
VIDEO/DSC Switch (Open the
LCD monitor to access Ibis switch)
Display
DELETE Index
Screen
Deletion
Confirmation
Screen
DeletingImages
heviously shot hrlages can be deleted either one at a time
ol all at once.
Set tile VIDEO/DSC Switch to -I'_k_- then set tile
Powel Switch to "_" while pressing down tile
Lock Button.
•A stored image is dispJayed,
hess the MENU/BRIGHT wheel in, The Menu
Screen appears. Rotate the MENU/BRIGHT wheel to
select "M MEMORY" and press iL The MEMORY
Menu appears.
Rotate the MENU/BRIGHT wheel to select "DELETE"
and pless it, The Sub Menu appears.
TO DELETE THE DISPLAYED IMAGE
Befor_ doing the l_)llowing, pelfoun steps 1through 3above.
Rotate tire MENU/BRIGHT wheel to select
"CURRENT" and press it. The Deletion Confirmation
Screen appears.
Rotate tire MENU/BRIGHT whee[ to select
"EXECUTE" and press it. The culr_ntly disp]ayed
image is deleted.
•If "CURRENT IMAGE ISPROTECTED" appears, the
image is protected and cannot be deleted
(_7 pg. 31 ).
• To cancel deletion, rotate the MENU/BRIGHT
wheel to select "CANCEU' and press it.
TO SELECT AN IMAGE BY BROWSING
IMAGES STORED IN MEMORY
Beforedoing thelbllowing, pelfolm steps1through 3above.
Rotate tire MENU/BRIGHT wheel to select "SELECT"
and pless it. The DELETE Index Screen appears.
Rotate the MENU/BRIGHT wheel to move the gleen
frame to the desired image that you wish to deI_te
and pless it. An "X" appears above the selected
image.
Re)eat this procedure fol all images that you wish to
de ete.
To dese[ect an image, press the MENU/BRIGHT
wheel in again. The "X" disappeals.
Rotate the MENU/BRIGHT wheel upward to select
"NEXT" and press it. The Deletion Confirmation
Screen appears.
Rotate tire MENU/BRIGHT wheel to setect
"EXECUTE" and press it. Tire selected images ar_
deleted and the nom_al playback screen appears,
• To cancel deletion, rotate the MENU/BRIGHT
wheel to select "CANCEU' and press it.
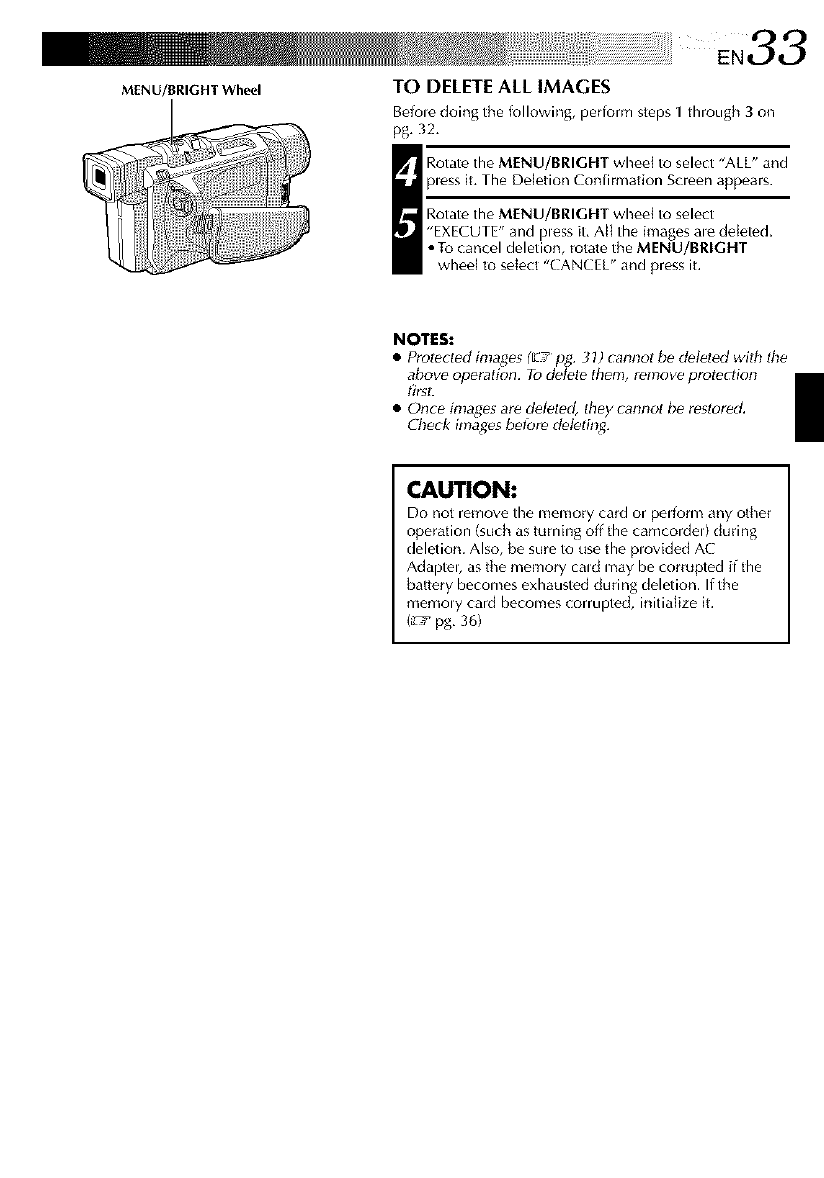
MENU/BRIGHT Wheel TO DELETE ALL IMAGES
Befole doing the following, peHorm steps 1 through 3on
pg, 32,
_ otate the MENU/BRIGHT wheal to select "ALL" and
pless it, The Deletion Confirmation Screen appears.
Rotate the MENU/BRIGHT wheal to select
"EXECUTE" and pless it, At{ the images ale deleted,
• To cancel deletion, rotate the MENU/BRIGHT
wheal to sdect "CANCEL" and press it.
NOTES:
•Protectod images (_7 pg. 31) cannot b_ d_l_ted with d_e
above operation. Todelete them, remove protecdon
first.
•Once images are deleted, they cannot t_ reslored.
Check images betbr_ d_leting.
CAUTION:
Do not remove the memory card or perform any other
operation (such as turning off the camcordel) dudng
deletion. Also, be sure to use the plovided AC
Adaptel, as the memory cald may be corrupted ff the
battery becomes exhausted during deletion. If the
memo Wcard becomes corrupted, initialize it.
(L'h_pg, 36)
34 N
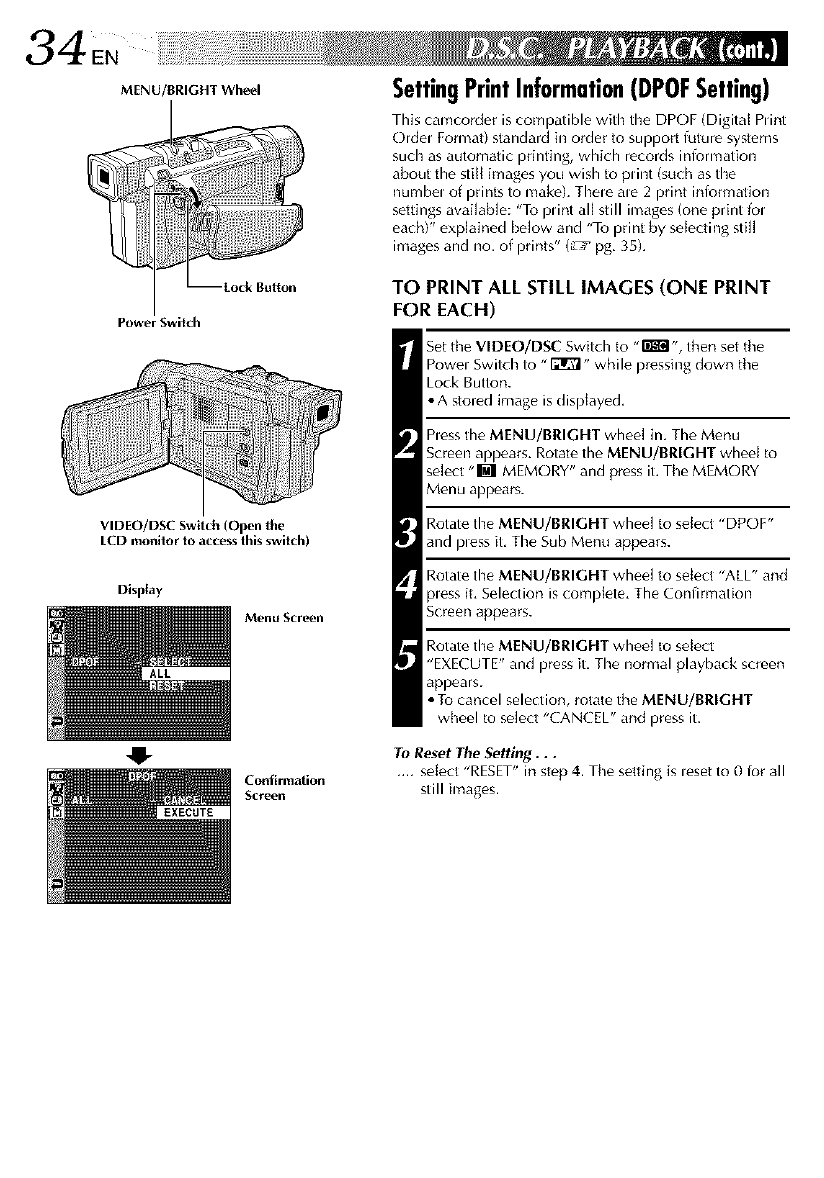
MENU/BRIGHT Wheel
Power Switch
VIDEO/DSC Switch (Open the
LCD monitor to access this switch)
Display
Menu Scr,_n
41-
SettingPrintInformation(DPOFSetting)
This camcorder is compatible with the DPOF (Digital Punt
Ordel Format) standard in order to support future systems
such as automatic printing, which records information
about the stitl images you wish to punt (such as time
numbel of prints to make). Thele ale 2 print iniormafion
settings avaiiabJe: "To punt all still images (one print fol
each)" explained beJow and "To print by selecting stiJ[
imag_s and no. of prints" (L'T pg, 35).
TO PRINT ALL STILL IMAGES (ONE PRINT
FOR EACH)
Set tile VIDEO/DSC Switch to ,,l'i'g_l,, then set tile
Powel Switch to "F21RI" while pressing down tile
Lock Button.
• A stored image is displayed,
hess the MENU/BRIGHT whee[ in, The Menu
Screen appears. Rotate the MENU/BRIGHT wheel to
se[ect "M MEMORY" and press it. The MEMORY
Menu appears.
Rotate the MENU/BRIGHT whee[ to select "DPOF"
and pless it, The Sub Menu appears.
Rotate the MENU/BRIGHT whee[ to select "ALL" and
p_essit, Selection is complete, The Confirmation
Screen appears.
Rotate timeMENU/BRIGHT whee[ to select
"EXE( UTE" and press it. The normal playback screen
appears.
• To cancel selection, rotate the MENU/BRIGHT
wheel to se]ect "CANCEL" and press it.
To Reset The Setting...
.... seiect "RESET" in step 4, The setting is leset to 0 for all
Coafirmation
Screen still images.
MENU/BRIGHT Wheel
Display
DPOF Scr,_n
O
Confirmation
Screen
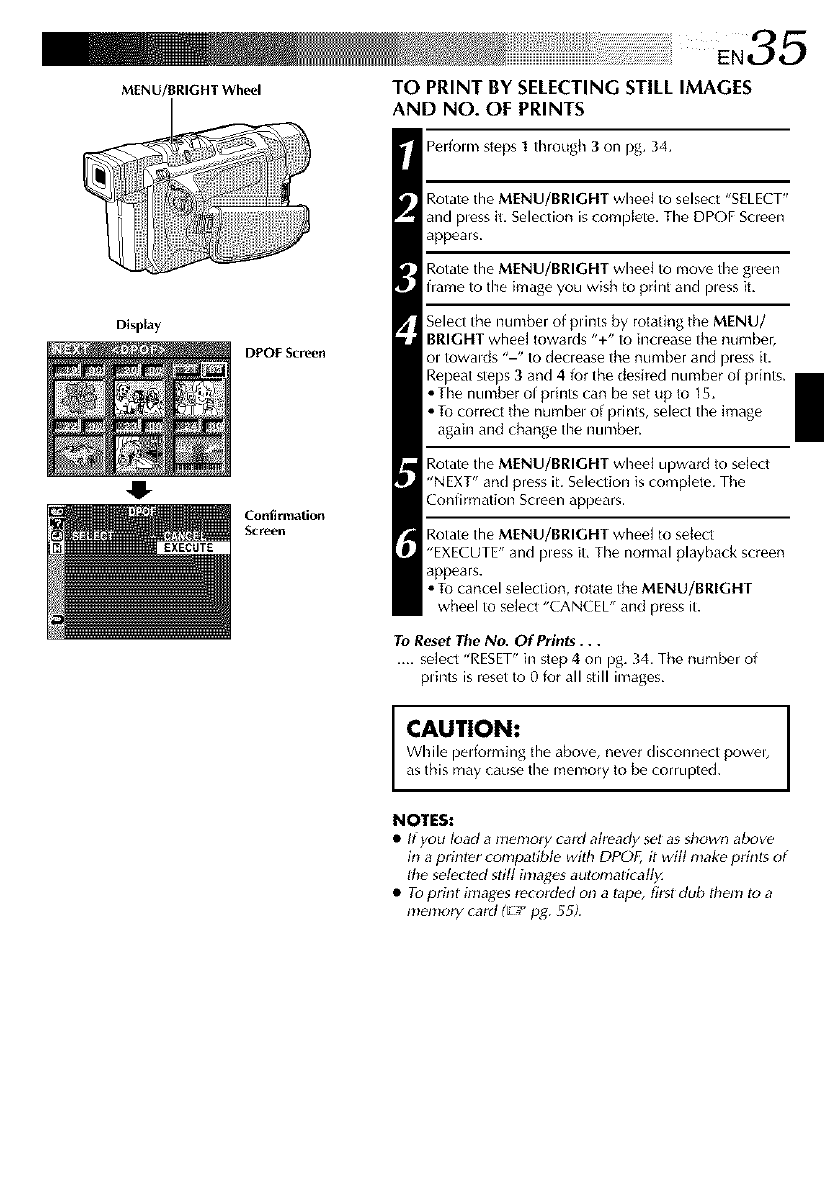
TO PRINT BY SELECTING STILL IMAGES
AND NO. OF PRINTS
Perfom_ steps 1through 3on pg. 34.
Rotate the MENU/BRIGHT wheel to selsect "SELECT"
and pless it, Selection iscompJete, The DPOF Scleen
appears.
Rotate the MENU/BRIGHT wheel to move the gleen
frame to the image you wish to print and pless it,
Select the number of punts by rotating tile MENU/
BRIGHT wheel towards "+" to inclease the number,
ol towalds "-" to declease the number and pless it.
Repeat steps 3and 4 for the desired number of prints.
• The number of prints can be set up to 15.
• Tu correct the numbel of prints, select the image
again and change the number_
Rotate the MENU/BRIGHT wheei upward to select
"NEXT" and press it. Selection is complete. The
Confirmation Screen appears.
Rotate the MENU/BRIGHT wheel to se{ect
"EXECUTE" and pless it, The normal playback screen
appears.
• Tu cancel selection, rotate the MENU/BRIGHT
wheel to select "CANCEL" and press it.
To ResetThe No. Of Prints...
.... select "RESET" in step 4 on pg. 34. The number of
plints is reset to 0 for all still images,
CAUTION:
While pedorming the above, never disconnect powel,
as this may cause the memory to be corrupted.
NOTES:
•If you load a nlemory card already sel as sbown above
in a printer compatible with DPOF, it wilt make prinls of
tbe selected still inlages autonlalfcatty.
• Toprint hnages recorded on a Iape, first dub tbc,n! to a
mc,mory card (El pg. 55f.
36EN
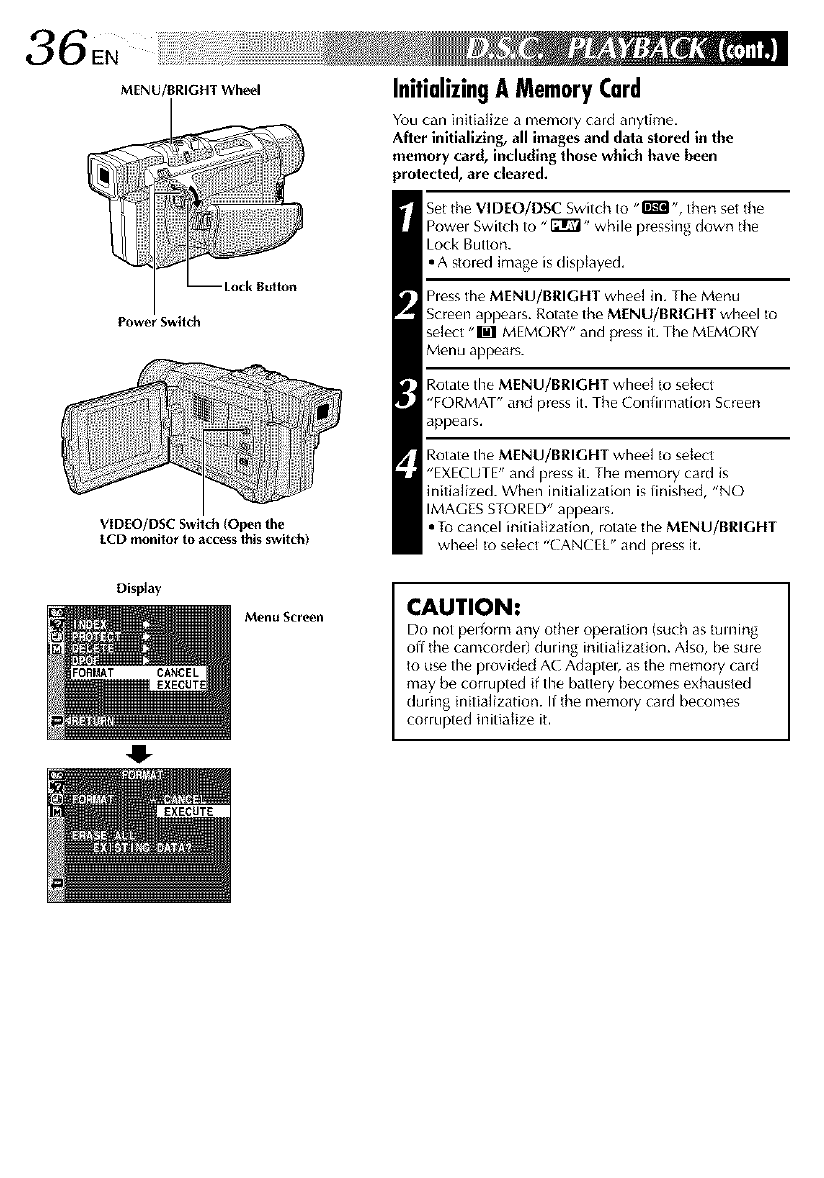
MENU/BRIGHT Wheel
Power Switch
VIDEO/DSC Switch (Open the
LCD monitor to access Ibis switch)
Display
Menu Scr,_n
O
InitializingAMemoryCard
You can initialize a memoly card anytime,
After initializing, all imagesand data stored in the
memory card, including those which have been
protected, are cleared.
Set the VIDEO/DSC Switch to "m ", then set the
Powel Switch to "_" while pressing down the
Lock Button.
• A stored image is displayed,
Pless the MENU/BRIGHT wheel in, The Menu
Screen appears. Rotate the MENU/BRIGHT wheel to
select "_ MEMORY" and press it. The MEMORY
Menu appears.
Rotate the MENU/BRIGHT wheel to select
"FORMAT" and press it. The Confilmation Screen
appears.
Rotate timeMENU/BRIGHT wheel to select
"EXECUTE" and press it. Timememory card is
initialized. When initialization is finished, "NO
IMAGES STORED" appeals.
• To cancel initialization, rotate the MENU/BRIGHT
wheel to select "CANCEL" and press it.
CAUTION:
Do not pel_rm any other operation (such as turning
off the camcorder) dudng initialization. Also, be sure
to use the plovided AC Adapteb as the memory cald
may be corrupted if the battery becomes exhausted
during initialization. If the memoly card becomes
corrupted initialize it.
CONTENTS
38 N
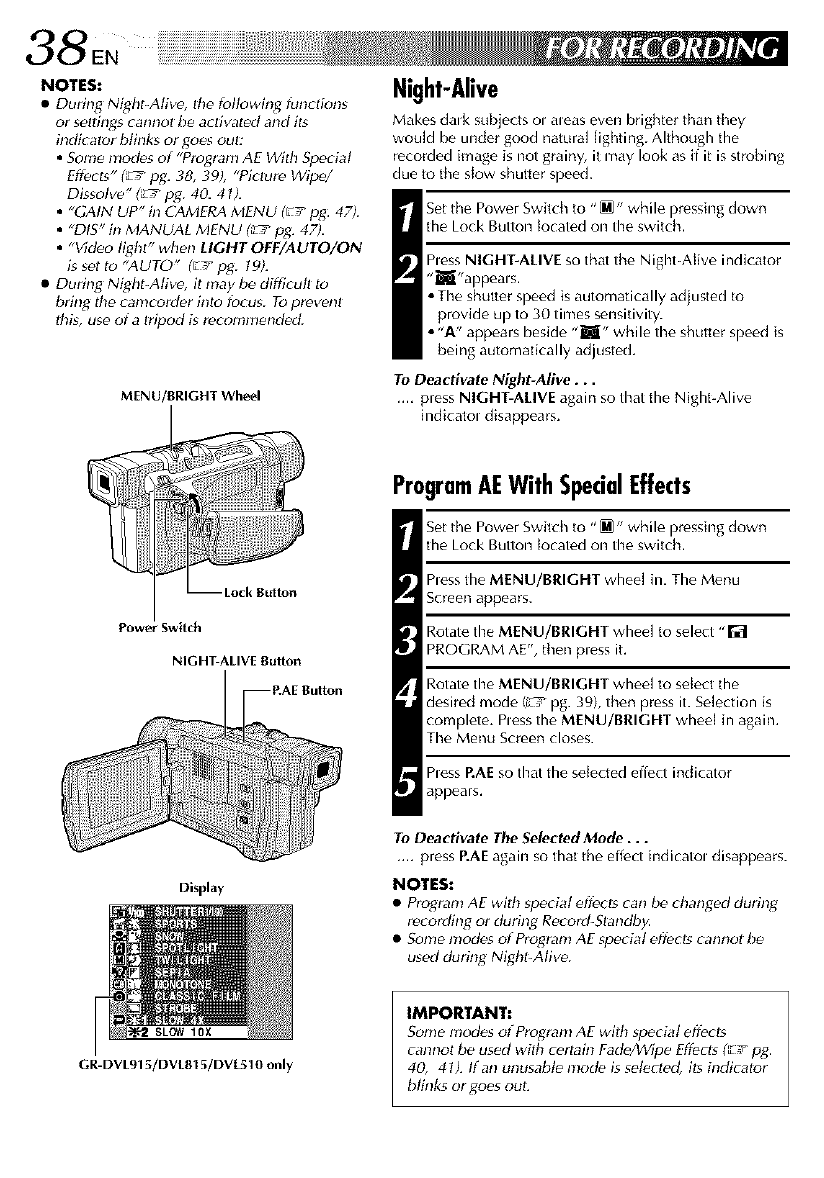
NOTES:
•During Night-Alive, the following funrlions
or selth_gs cannot be acl_vated and its
indicator blinks or goes out:
•Some modes of "Proglam AE With Special
Effects" _pg. 38, 39), "Piclure Wipe/
Dissolve" _pg. 40. 41).
•"GAIN UP" in CAMERA MENU (El pg: 47),
•"DIS" in MANUAL MENU (_ pg. 47).
•"Video light" when LIGHT OFF/AUTO/ON
is set to "AUTO" (E _pg. t9).
• During Night-Alive, it may be difficull to
bdng the camcorder into focus. To prevenl
thg, use of aIripod g recomnlended.
MENU/BRIGHT Wheel
Night-Alive
Makes dalk subjeds ol aleas even brighter than they
wouM be under good natural lighting. Although the
recorded image is not grainy, it may look as ff it is strobing
due to the slow shutter speed.
Set the Power Switch to "_" while pressing down
the Lock Button tocated on the switch.
hess NIGHT-ALIVE so that the Night=AiNe indicator
"_"appeals.
• The shutter speed is automatically adjusted to
provide up to 30 times sensitivity.
• "A" appears beside "Jl" while the shutter speed is
being automatically adjusted,
To Deactivate Night-Alive...
.... press NIGHT-ALIVE again so that the Night-Alive
indicatol disappears.
Power Switch
NIGHT-ALIVE Button
Display
SLOW10X
GR-DVL915/DVL815/DVL510 only
ProgramAEWith SpecialEffects
Set the Power Switch to "_" while pressing down
the Lock Button tocated on the switch.
hess the MENU/BRIGHT wheel in, The Menu
Screen appears.
Rotate the MENU/BRIGHT wheel to select "_
PROGRAM AE", then press it.
Rotate the MENU/BRIGHT wheel to sdect the
desired mode (_ pg. 39), then press it. SeLection is
complete. Pless the MENU/BRIGHT wheel in again.
The Menu Screen closes.
hess P.AEso that the selected effect indicator
appears.
To Deactivate The Selected Mode...
.... press P.AEagain so that the effect h_dicatoldisappears.
NOTES:
• Program AE with special effects _an be changed during
_cordi_ or du_ Record-Standb_
• Some mod_s of Program AE special effects cannot be
used during Nighl-Alive.
IMPORTANT:
Some mod_s of Proglam AE wilh special effects
cannot be used with certain Fade/kVipe Eff_cts (_-/pg.
40, 41). tf an unusable mode is sel_cled, its indicator
blinks or goes out:
SHUTTER
1/60 The shutter speed is fixed at 1/60th of a
second, B{ack bands that usually appear when
shooting a TV screen become nanower,
1/100The shutter speed is fixed at 1/100th of a
second, The flickering that occurs when shooting
under a fluorescent light or mer(ury vapol lamp is
leduced.
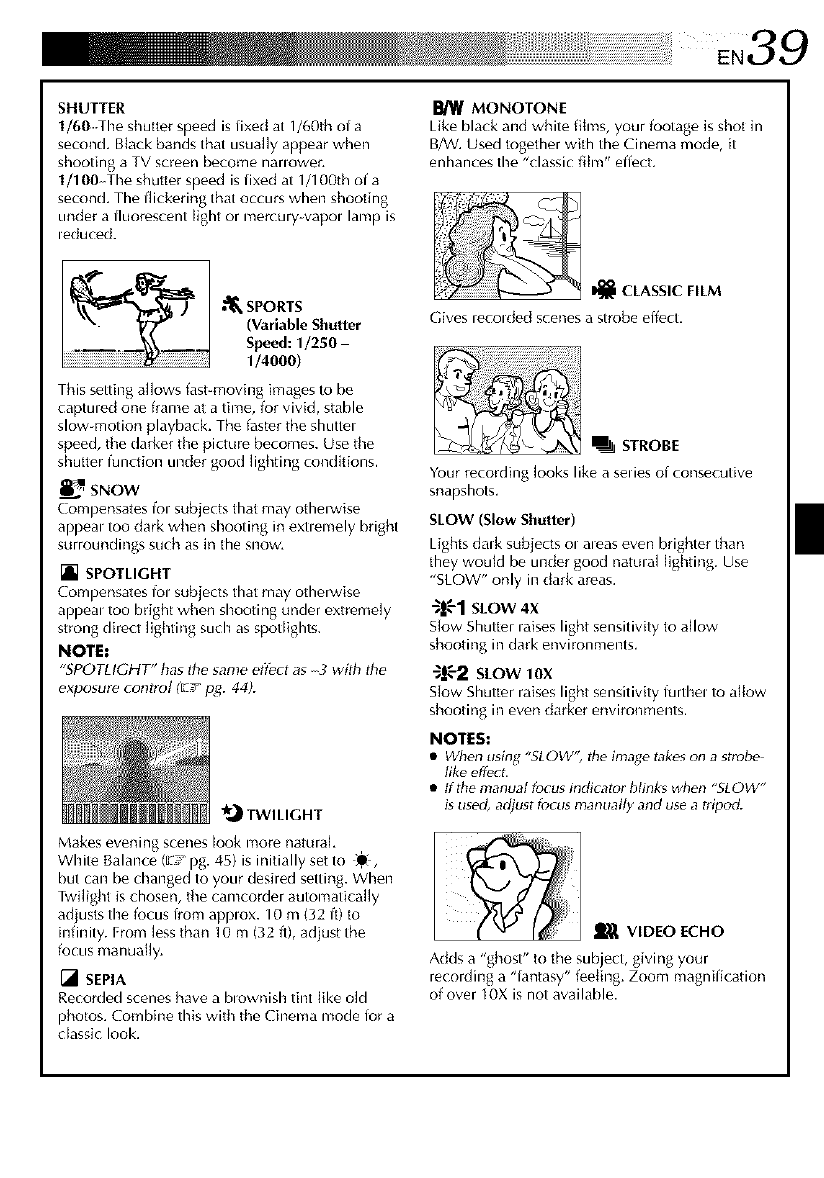
•"_ SPORTS
(Variable Shutter
Speed: 1/250-
1/4000)
This setting a]lows fast-moving images Io be
captuled one frame at a time, for vivid, stable
slow motion playback The faster the shutter
speed, the darker the picture becomes. Use the
shutter function under good lighting conditions.
_ SNOW
Corapensates fol subjects that may otherwise
appeal too dark when shooting in exuemely bright
surroundings such as in the snow,
[] SPOTLIGHT
Compensates fol subjects that may otherwise
appeal too bright when shooting under extremely
strong direct Hghting such as spotlights.
NOTE:
_PO_IGH_ has the same effect as _wi_ _e
exposure conlrol (El pg. 44).
_.,_ TWILIGHT
Makes evening scenes look more natural
White Balance (E_'_pg. 45) is initially set to D_,
but can be changed to your desired setting. When
Twilight is chosen, the camcorder automatically
adjusts the focus lrom applox. 10 m (32 if) to
infinity. From [ess than 10 m (32 fl), adjust the
focus manuafly.
[] SEPIA
Recorded scenes have a blownish tint like old
photos. Combine this with the Cinema mode lor a
cIassi( look.
MONOTONE
Like black and white films, your footage is shot in
B/W. Used together with the Cinema mode, it
enhances the "classic film" effect.
I_ CLASSIC FILM
Gives lecolded scenes a strobe effect.
STROBE
Your recording looks like a sedes of consecutive
snapshots.
SLOW (Slow Shutter)
Lights dalk subjects ol aleas even brighter than
they would be under good natural lighting. Use
"SLOW" only in clark areas.
-_g-1SLOW4X
Slow Shutter raises light sensitivity to allow
shooting in clarkenvironments.
_-2 StOW 10x
S[ow Shutter raises light sensitivity furthel to allow
shooting in even darker environments.
NOTES:
•When using "SLOW'; the image take_on a strob_
fike effect.
•ttthe manual focus indicator blink_ when _SLOW"
isused, adjust fcJcusmanually and use a tripod.
VIDEO ECHO
Adds a "ghost" to the subject, giving your
recording a "lantasy" feeling. Zoom magnification
of over IOX is not available.
I
40EN
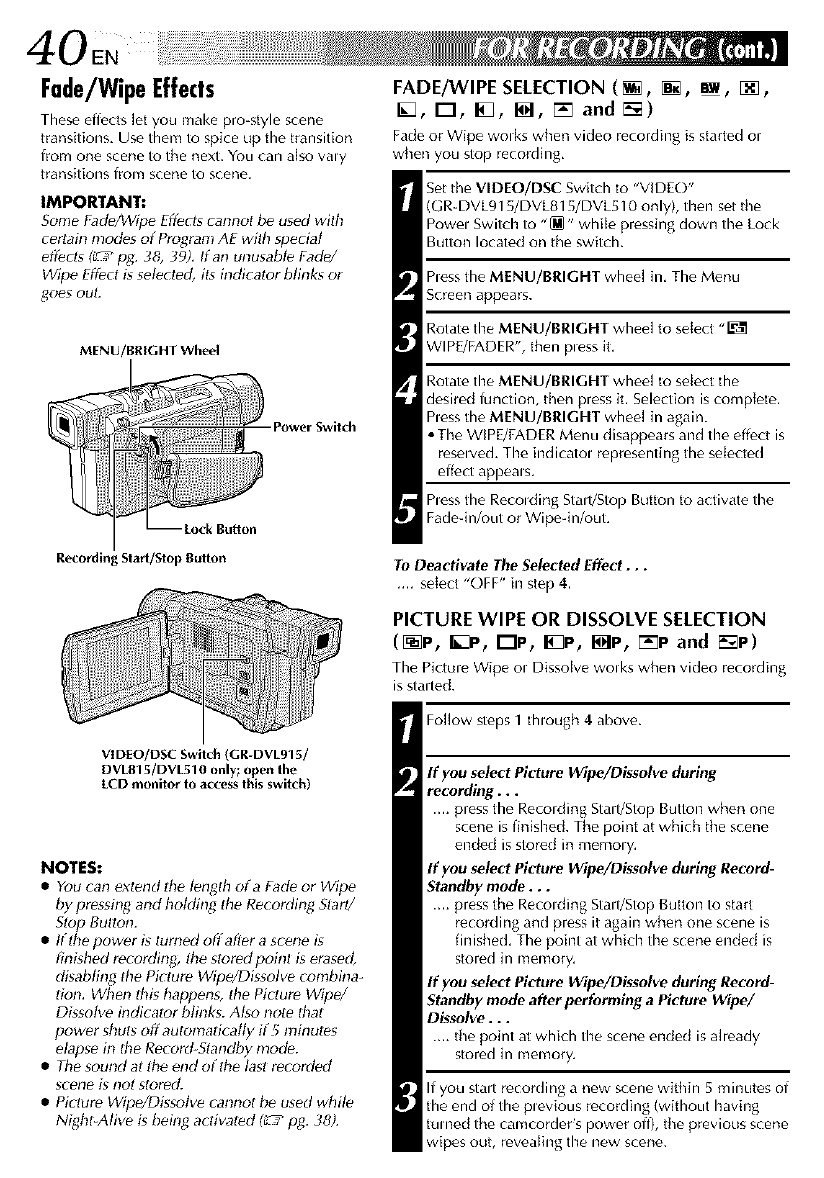
Fade/WipeEffects
These effects let you make pro_style scene
transitions, Use them to spice up the transition
lrom one scene to the next. You can also valy
transitions lrom scene to scene.
IMPORTANT:
Some FadeAWipe Eff_c_scannot be used wilh
certah_ modes of Program AE with special
efl_cls (_ pg. 38, 39), If an unusable Fade/
Wipe Effect g selected, its indicalor blinks or
goes out.
MENU/BRIGHT Wheel
Power Switch
FADE/WIPE SELECTION (_, _, _, [_,
I_, I--I, I_, I_, [] and r'-_)
Fadeor Wipe wolks whenvideo recordingisstartedor
when youstop recording,
Set the VIDEO/DSC Switch to "VIDE()"
(GR-DVL915/DVL815/DVL510 only), then set tile
Powel Switch to "[M" while pressing down the Lock
Button located on tile switch.
hess the MENU/BRIGHT wheel in, The Menu
Screen appears.
Rotate the MENU/BRIGHT wheel to select "_
WIPE/FADER", then pless it,
Rotate the MENU/BRIGHT wheel to select the
desired function, then press it. Selection is complete.
hess the MENU/BRIGHT wheel in again.
• The WIPE/FADER Menu disappears and the effect is
resewed. The indicatol representing the selected
effect appeals.
hess the Recolding Stall/Stop B_ttton to activate the
Fade-in/out or Wipe-in/out.
R[_ording Start/Stop Button To Deactivate The Selected Effect...
.... select "OFF" in step 4.
PICTURE WIPE OR DISSOLVE SELECTION
([_P, B_P, lip, I_P, I_P, []P and [_P)
Tile Picture Wipe ol Dissolve wolks when video recording
is staffed.
VID[O/DSC Swilch (GR-DVL915/
DVL815/DVL510 only; open the
LCD monitor" to access this switch)
NOTES:
•You can extend tt_e lenf_th ofa FadP or Wipe
by pressh_g and holding tile Recording Slar_/
Slop BuIIoI1.
• Ifdte power gturned offaflPr a scene is
finiMled recording, die stored poinl is erased,
disabling tile Picture Wipe/Dissolve combina-
tion, When this happens, the Picture Wipe/
Dgsolve indicalor blink_. Also note that
power shuts off automadcatty if5 minutes
elapse in the Record Standby mode.
• The sound at die end of the last recorded
sce_le i_ llot stored.
• Picture Wipe/Dissolve cannot be used while
Night-Alive is being actiw_ted _pg. 38).
Follow steps 1though 4 above.
If you select Picture Wipe/Dissolve during
recording...
.... press tile Reco,ding Sta,t/Stop Button when one
scene is finished. The point at which tile scene
ended is stored in memo W.
If you select Picture Wipe/Dissolve during Record-
Standby mode...
.... press the Recolding Stall/Stop Button to start
recording and press it again when one scene is
finished, The point at which the scene ended is
stored in memory,
If you select Picture Wipe/Dissolve during Record-
Standby mode after performing a Picture Wipe/
Dissolve...
.... tile point at which the scene ended isalready
stored in memory,
If you stalt recording a new scene within 5 minutes of
the end of the plevious recording (without having
turned the camcorder's power off), tile previous scene
wipes out, revealing the new scene.
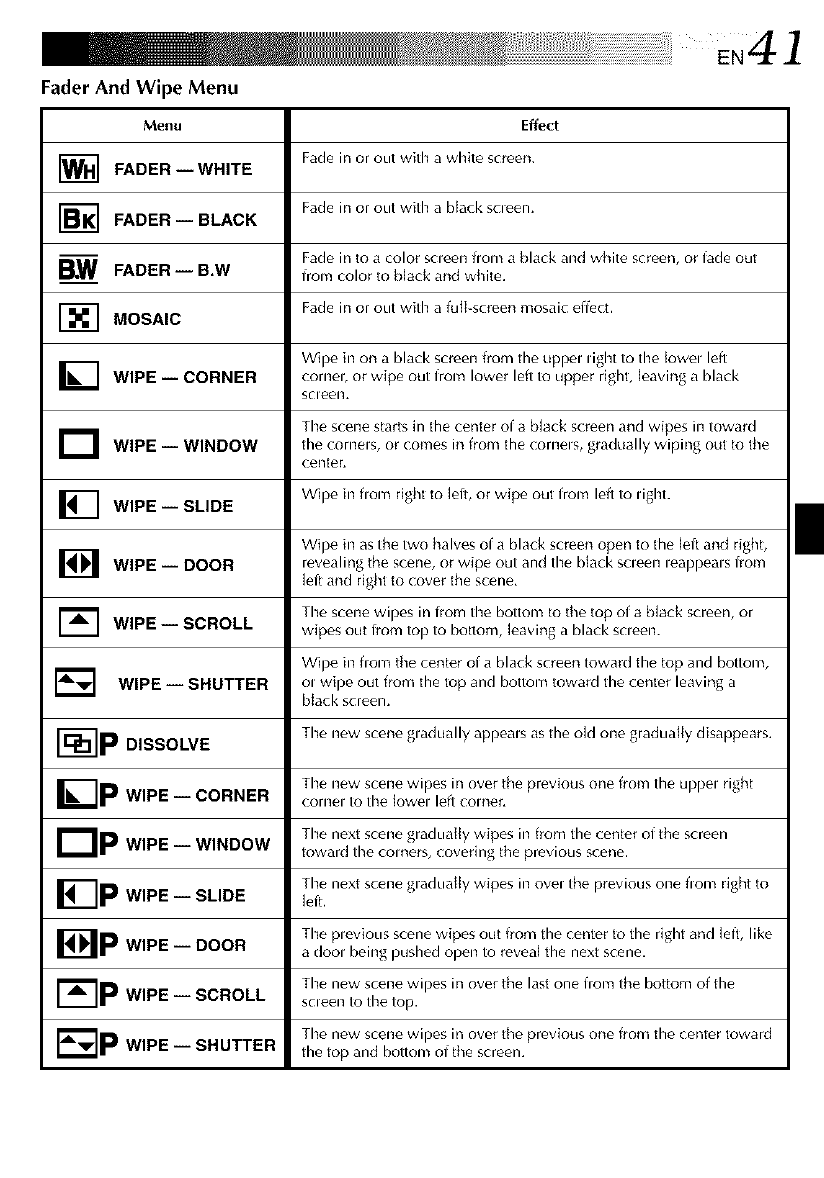
Fader And Wipe Menu
Menu
FADER--WHITE
1-_ FADER-- BLACK
_W FADER-- B,W
I-_ MOSAIC
WIPE -- CORNER
]WIPE-- WINDOW
_] WIPE -- SLIDE
WIPE -- DOOR
1_ WIPE-- SCROLL
Effect
Fade in or out with a white screen.
Fade in or out with a black scleen.
Fade in to a color scleen from a black and white screen, or fade out
from color to black and white.
Fade in or out with a fuJkscreen mosaic effe(t.
Wipe in on a black screen from the uppel light to time[owel left
cornel, or wipe out from lower left to upper right, leaving a black
scleen,
Timescene starts in the center of a b[ack screen and wipes in toward
the cornels, or comes in from the cornels, gradually wiping out to the
center.
Wipe in flom right to leit, or wipe out from left to Hght.
Wipe in as the two halves of a black screen open to the [eft and right,
revealing the scene, or wipe out and the black scleen leappeals from
left and right to cover the scene.
The scene wipes in from timebottom to the top of a black screen, or
wipes out from top to bottom, leaving a black scleen.
Wipe in flom the center of a black screen toward the top and bottom,
WIPE -- SHUTTER o, wipe out from the top and bottom toward the center leaving a
black screen.
r-_---]p The new scene gladually appeals as the old one gradually disappears.
DISSOLVE
Timenew scene wipes in over the previous one from the uppe= right
K-IF WIPE -- CORNER cornel to the Iowel left comer.
Dp The next scene gradually wipes in from the center of the screen
WIPE -- WINDOW •toward the comers, covering the previous scene, i
I_-]p Timenext scene gradually wipes in ovel the previous one flora right to
WIPE -- SLIDE left.
The plevious scene wipes out from the center to the right and left, like
I IP WIPE -- DOOR a dool being pushed open to reveal the next scene,
The new scene wipes in over the last one from the bottom of the
WIPE -- SCROLL scleen to the top.
The new scene wipes in over the previous one from the center toward
E_]p WIPE -- SHUTTER the top and bottom of the screen.

42EN
SNAPSHOT Butlon Snapshot(ForVideoRecording)
This featule tets you record stiJ[ images that book {ike
photoglaphs onto a tape,
SNAPSHOT MODE SELECTION
Power Switch
VIDEO/DSC Switch (GR-DVL915/
DVL815/DVL510 only; open the
LCD monitor 1o access this switch.)
Set the VIDEO/DSC Switch tu "VIDEO" (GR DVL9t 5/
DVL815/DVL510 only), then set the Power Switch to
"[]" while pressing down the Lock Button located on
the switch.
Press the MENU/BRIGHT wheel in. The Menu Screen
appears.
Rotate the MENU/BRIGHT wheel to select "rt
CAMERA". Press it and the CAMERA Menu appears.
Rotate the MENU/BRIGHT wheel to select "SNAP
MODE", then press it.
Rotate the MENU/BRIGHT wheel to select the desired
Snapshot mode, then press it.
Rotate the MENU/BRIGHT wheel to select
".4RETURN" and press it twice. The Menu Screen closes.
• The available Snapshot modes are the same as those on
pg. 27.
SNAPSHOT RECORDING
Display
Menu Scr,_n
Press SNAPSHOT.
If you press during Record-Standby...
"PHOTLY appea_s and a still image will be lecorded
fol approx. 6 seconds, then the camcolde_ _e entels
the Record Standby mode.
If you press during Recording...
"PHOTO" appea_s and a still image will be lecorded
ful approx. 6 seconds, then the normal leco_ding
resumes.
• Regardless of the Power Switch position (" _" or "[M "),
Snapshot recording takes 31ace using the selected
Snapshot mode.
Motor Drive Mode
Kee _ing SNAPSHOT pressed provides an effect similar to serial
p Iotograp ly. (Interw_ between sti I images: approx. I second)
NOTES:
•To remove the shutter sound, "BEEP" on lag. 46, 48.
•Even if "MULTI 4_"o_ "MULTI 9" is engaged, Snapshot recording will be perforated in the FULL mode during Digital
Zoom o_ Night Alive I_ pg. 38).
•If Snapshot recording is not possible_ "PHOTO" Minks when SNAPSHOT is pressed.
•If Ptc_ram AE with special eft_cts (pg. 38) is engag_t, celtain modes of Program AE with special effects are disabled
during Snapshot recording. In such a case, the icon blinks.
•IfSNAPSHOTi_ pressed when _'DIS" is set to "ON" (rt_. 47), the Stabilizel will be disaMed.
• The Motor Ddve mod_ is disabled when "REC SELECT" is set to "_ I_1 /_ _" in the Menu Screen
(" pg. 49).
• During tape playback as well, all snapshot modes are available when _,1_1_ _ COPY" is set to _'OFF" in the
Menu Screen ( pg. 50). Howevel; the shutter sound is not heard.
• During Snapshot recording, the image displayed in the viewfinder may be pariially missing. However, there is no
eft_ct in the recorded image.
• When a cable is connected tu the AV connectut; the shutter sound is not heard from the speaket; however it is
recorded onto the tape.
•_PHOTO will appear whil_ the snapshot i_ b_ing taken.
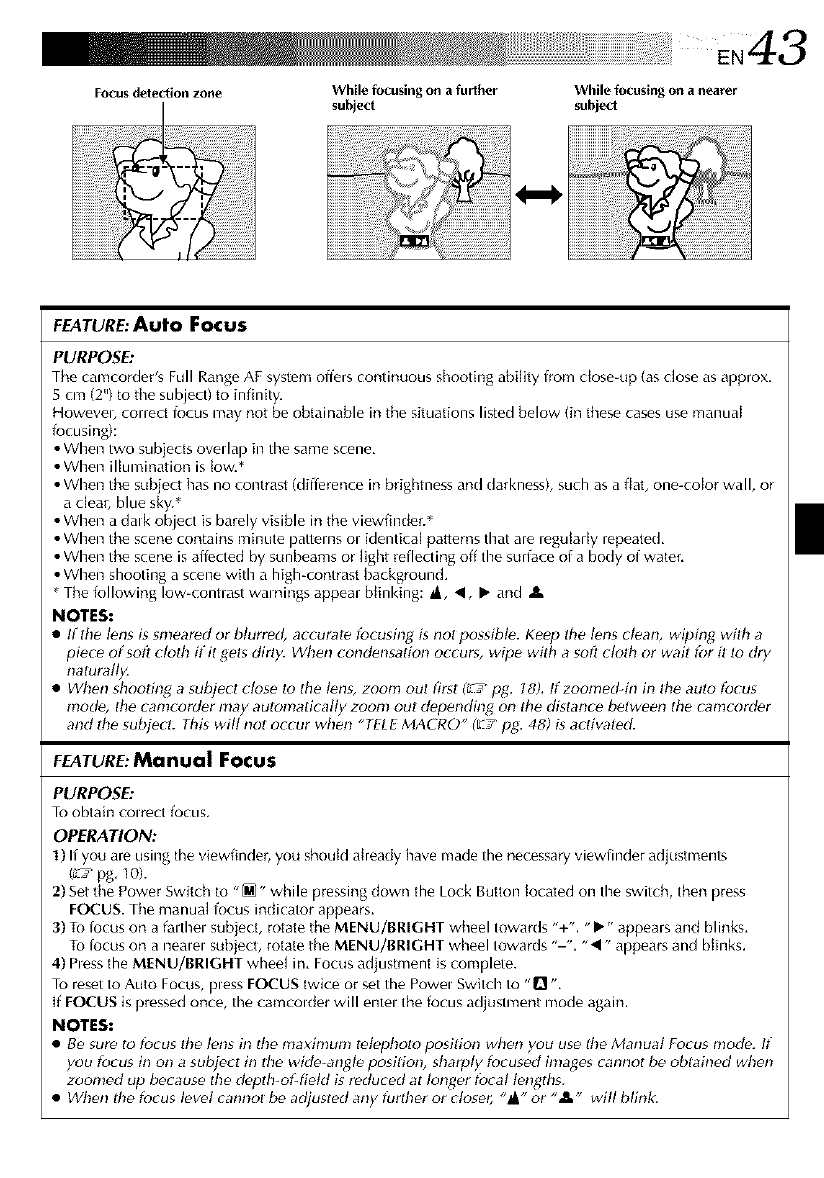
Focus dete_ion zone While focusing on a further
subject
N43
While focusing ona nearer
subject
FEATURE:Auto Focus
PURPOSE:
The camcorder's Full Range AF system offers continuous shooting ability lrom dose-up (as close as approx.
5 cm (2") to the subject) to infinky.
Howevel, correct focus may not be obtainable in tile situations listed below (in these cases use manual
focusing):
• When two subjects ovellap in the same scene.
• When illumination is low.*
• When the subje(t has no contrast (diiierence in brightness and darkness), such as a flat, one-color wall, or
a clear, blue sky.*
• When a dalk object is barely visible in the viewfinder. _"
• When the scene contains minute pattelns or identical patterns that are regularly repeated.
• When the scene is affected by sunbeams or light reflecting off the surface of a body of water.
• When shooting a scene with a high-contrast background.
* The following low-contrast walnings appear [)linking: _l 41, • and IlL
NOTES:
•If tile I_ns is snleared or blurred, accurate focusing is not possibl_. Kec,p the I_ns clean, wiping with a
piece of soft cloth if it get_ dirty. When condensation occurs, wipe with a soft clolh or wait for it to dry
naturally.
• When shooting a subject close to tile lPns, zoom out first (_.'C_pg. t8). If zoomed-in in the auto focus
modP, the camcorder may automatically zoom out depending on the distance between the camcorder
and lhe subjPct: This will not occur when "TELE MACRO" (E;' p_: 48) is activatPd.
FEATURE:Manual Focus
PURPOSE:
To obtain toltec: fOCUS,
OPERATION:
1)If you are using the viewfinder, you shoutd already have made the ne_essary viewfinder adjustments
(_ pg. 10).
2) Set the Power Switch to "_" while pressing down the Lock Button tocated on the switch, then press
FOCUS. The manual focus indicator appears.
3) To locus on a falthel subject, rotate the MENU/BRIGHT wheel towards "+'. "•" appears and blinks.
To locus on a nealel subject, rotate the MENU/BRIGHT wheel towards "-". "_1" appears and blinks.
4) hess the MENU/BRIGHT wheel in. Focus adjustment is complete.
To reset to Auto Focus, pless FOCUS twice or set the Powel Switch to "n ,,
If FOCUS is pressed once, the camcolder will entel the focus adj_istment mode again.
NOTES:
• Be sure to focus the lens in Ihe maximum tet_photo position when you use the Manual Focus mode. It"
you focus in on a subject in tile wide_angt_ position, sharply focused inlages _annot be oblained when
zoomed up because the depth-of-field is reduced at longer tbcal lengths.
• When the focus level cannol bP adjusted any furtbel or closer, "_" or ",_" will blink:
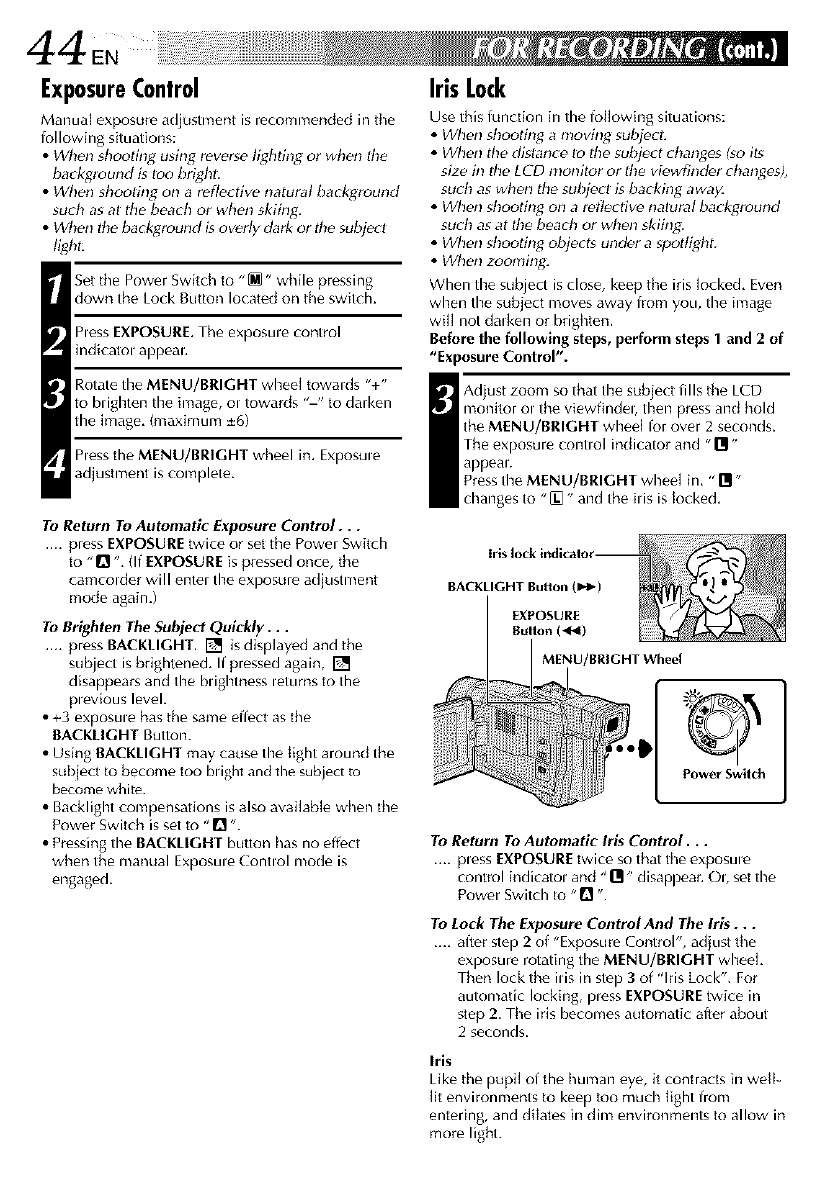
ExposureControl
Manua_ exposure adjustment is recomnlended in the
lollowing situations:
•When shooting using reverse lighting or when the
backglound is too bright:
• When shooting on a reflective natural background
surb as at tile beach or when skiing.
• When the backglound is overly dart_or tbe subject
light:
Set the Power Switch to "_" while pressing
down the Lock Button located on the switch,
Pless EXPOSURE. The exposule control
indicalol appeal.
Rotate timeMENU/BRIGHT wheel towards "+"
to brighten timeimage, ol towards "-" to darken
the image, (maximum -+6)
hess the MENU/BRIGHT wheel in. Exposule
adjustment iscomplete.
To Return To Automatic Exposure Control...
.... press EXPOSURE twice or set the Power Switch
to "Q ", (If EXPOSURE is pressed once, the
camcorder will enter the exposure adjustment
mode again,)
To Brighten The Subject Quickly...
.... press BACKLIGHT. [] is displayed and the
subject is brightened, Ifpressed again, []
disappears and the bHghmess letums to the
plevious level,
•+3 exposule has the same effect as the
BACKLIGHT Button.
•Using BACKLIGHT may cause timelight arounct the
subject to become too blight and the subject m
become whim.
•Backlight compensations is also available when the
Power Switch is set to "D ".
•Pressing the BACKLIGHT button has no effect
when the manual Exposu.e Control mode is
engaged.
Iris Lock
Use this ffmction in the foIMwing situations:
• When shooting a n!oving subj_cL
• When the distance to the subject changes Iso its
size in the LCD monitor or the viPwfinder changes),
such as when the subject is ba_king away.
• When shooting on a reflective natural bact_ground
such as at the beadl or wben skiing:
• When shooting objects under a spottigbt.
• When zooming.
When the subject is close, keep the iris Mcked, Even
when the subject moves away from you, the image
will not dalken or brighten.
Before the following steps,perform steps 1 and 2 of
"Exposure Control".
idjust zoom so that the subject fills the LCD
monitor ol the viewfindeb then press and hold
the MENU/BRIGHT wheel for over 2 seconds.
The exposure control indicator and "Ol"
appeal.
PresstimeMENU/BRIGHT wheel in,"111-
changes to "{I. " and the his is locked,
Iris lock indicalor --
BACKLIGHTButton (1_!_)
EXPOSURE
Rulton (_F_)
MENU/BRIGHT Wheel
Power Switch
To Return To Automatic Irls Control...
.... pless EXPOSURE twice so that the exposule
control indicatol and "Ill- disappear. Ob set the
Power Switch to "I1 -.
To Lock The Exposure Control And The Iris...
.... after step 2of "Exposure Control", adjust the
exposure rotating the MENU/BRIGHT wheel
Then lock the ilis in step 3of "Iris Lock". For
automatic locking, pless EXPOSURE twice in
step 2. The iris becomes automatic after about
2 seconds.
Iris
Like the pupil of the human eye, it contracts in well-
lit environments to keep too much light from
entering, and dilales in dim environments to allow in
more light.
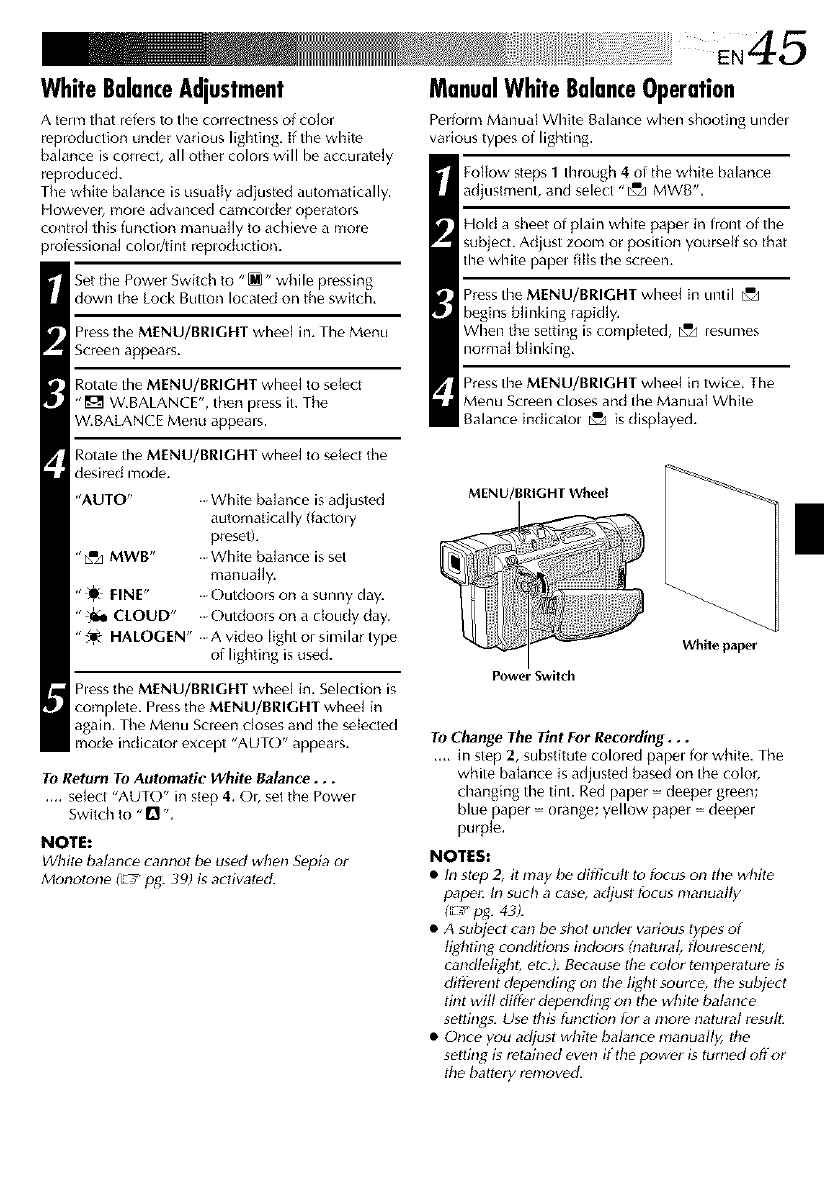
WhiteBalanceAdjustment
A term that refers to timecouectness of color
reproduction under various lighthmg. If the white
balance is correct, all other colors will be acculately
reproduced.
The wNte balance is usually adjusted automatically.
However, mole advanced camcolder operators
contro] this function manua][y to achieve a more
professional color/tint reploduction.
Set the Power Switch to "_" while pressing
down the Lock Button located on the switch.
hess the MENU/BRIGHT wheel im The Menu
Screen appears.
Rotate the MENU/BRIGHT wheel to select
"[[_ W.BALANCE', then press it. The
W.BALANCE Menu appears.
Rotate the MENU/BRIGHT wheel to sdect the
desired mode.
"AUTO" White balance is adjusted
autumatically (facto W
preset).
"[x",d MWB" White balance is set
manually.
"_, FINE" Outdoors on a sunny day.
"'_ CLOUD" Outdoors on a cloudy clay.
";'_ HALOGEN" A video light or similar type
of lighting is used.
hess the MENU/BRIGHT wheel in. Selection is
complete, hess the MENU/BRIGHT wheel in
again. The Menu Scleen closes and the selected
mode indicator except "AUTO" appears.
To Return To Automatic White Balance...
.... select "AUTO" in step 4, Or, set the Power
Switch to "O ",
NOTE:
White balance cannot b_ used when Sepia or
Monotone _ p_. 39) is acdvalPd.
ManualWhiteBalanceOperation
Pertom_ ManuM White Balance when shooting undel
various types of lighting,
Follow steps 1 through 4of the white balance
adjustment, and select "[x_,dMWB'.
Hold a sheet of plain white paper in front of the
subject. Adjust zoom or position yourself so that
the white papel fills the screen.
Press the MENU/BRIGHT wheel in until _
begins blinking rapidly.
When the setting is completed, k'_ resumes
normal blinking.
Press timeMENU/BRIGHT wheel in twice. The
Menu Screen closes and the Manual White
Balance indicatol _'zJisdisplayed.
MENU/BRIGHT Wh_l
Power Switch
White paper
To Change The Tint For Recording...
.... in step 2, substitute colored papel for white. The
white balance is adjusted based on the color,
changing the tint. Red paper - deeper green;
blue paper - orange; yellow paper = deeper
purple.
NOTES:
•In stPp2, il may be difficult to focus on the white
pape_ In such a cas_, adjusl focus nlanually
(';-/ pg. 43).
• A subject can be shot under various types of
tigbting conditions indoors (natural flourescenl;
candtelight; ek.). Because d}e color temperature is
different dependin_ on lhe light sourcp, the subject
that will differ dependin_ on the white balance
selthlgs. Use thg funrdon for a more natural result:
• Once you adjust white balance manually, die
setdn_ is retained even if the lx)wer is turned off or
tile battery removed.
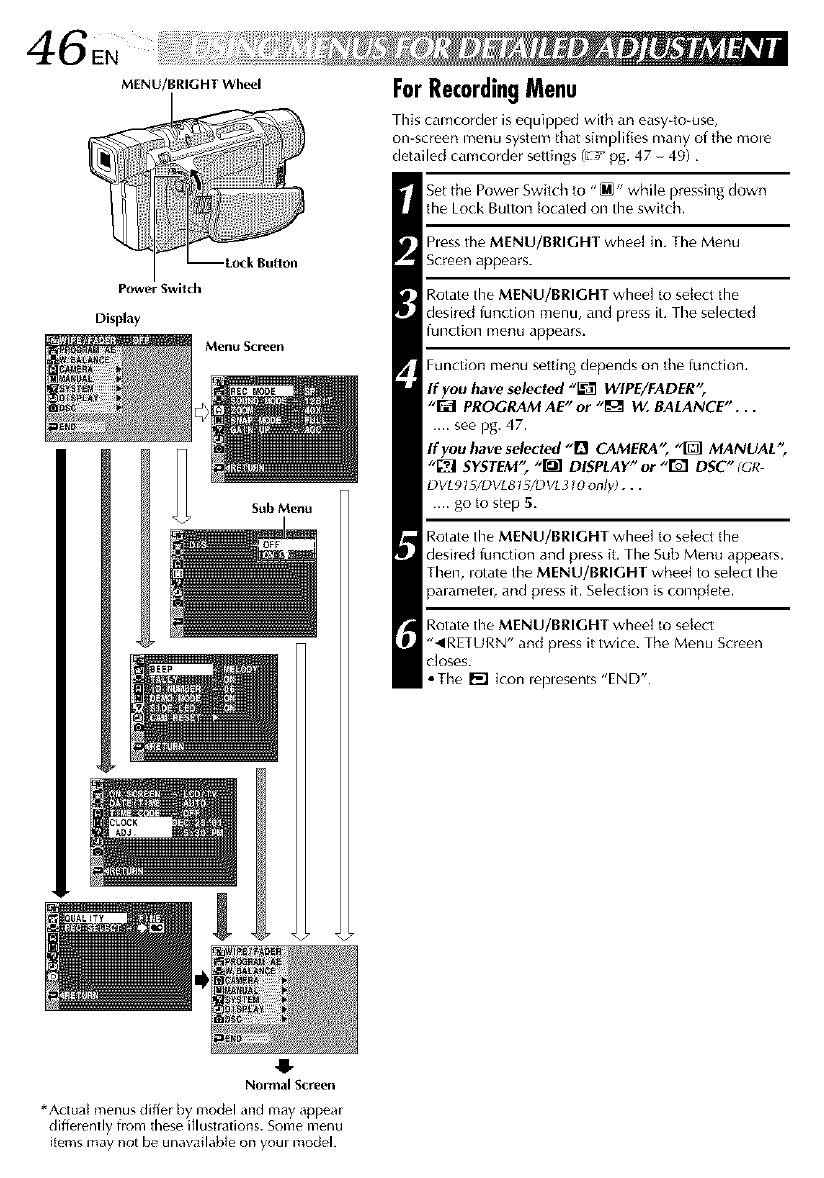
MENU/BRIGHT Wheel
Sub Menu
[
Normal Screen
ForRecordingMenu
This camcorder is equipped with an easy-to-use,
onlscreen menu system that simplifies many of the mole
detailed camcorder settings (E! pg. 47 49),
Set the Power Switch to "_" while pressing down
the Lock Button tocated on the switch.
hess the MENU/BRIGHT wheel in. The Menu
Screen appears.
Rotate the MENU/BRIGHT wheel to select the
desired ffm(tion menu, and press iL The selected
function menu appears.
Function menu setting depends on the lunction,
If you have selected "_ WIPE/FADER';
"_ PROGRAM AE" or "_ 144.BALANCE"...
.... see pg. 47.
If you have selected ,,!1 CAMERA", "_ MANUAL"
"_ SYSTEM'; "1_ DISPLAY" or -I%1 DSC" (GR
DVLgt _/DVL8t _/DVL310 only)...
.... go to step 5.
Rotate the MENU/BRIGHT wheel to select the
desired function and pless it. The Sub Menu appears.
Then, iotate the MENU/BRIGHT wheel to select the
parameteb and press it. Selection is complete.
Rotate the MENU/BRIGHT wheel to select
"_IRETURN" and press it twice. The Menu Screen
Closes.
°The [_] icon leplesents "END".
*Actual menus differ by model and may appear
differently from these illustrations. Some menu
items may not be unaw_ilable on your model.
Menu Screen Explanations
<
z
<
_WIP_FADER
r;_PROGRAM AE
I'_W, BALANCE
REC MODE
SOUND
MODE
16 BIT
ZOOM 10X
400X
SNAP MODE
GAIN UP OFF
AUTO
_|-'-A
DIS
Refer to "Fade/Wipe Effects" (E! pg. 40, 41 ).
Refer to "Proglam AE With Special Effects" (L_ pg, 38, 39L
Refer to "White Balance Adjustment" and "Mamtal White Balance
Opelation" ([;' pg. 45).
Allows you to set the video recolding mode (SP or LP) depending on you.
pleference (L_ pg. 13L
Enab[es video lecolding of stereo sound on four separate channels, and is
recommended for use when performing audio dubbing, (Equivalent to the
32 kHz mode of previous models)
Enables video lecolding of stereo sound on two separate channels, (Equiva-
lent to the 48 kHz mode of previous models)
When set to "t0X" while using digital zoom, the zoom magnification will
reset to 10X since digital zoom will be disengaged,
Allows you to use the Digital Zoom, By digitally processing and magnifying
images, zooming is possible from 10X (the optical zoom limit), to a maximum
of 40X digital magnificaBon,
Allows you to use the Digital Zoom, By digitally processing and magnifying
images, zooming is possible from 10X (the optical zoom limit), to a maximum
of 400X digital magnification.
Refer to "Basic Shooting (Snapshot)" (L_ pg, 26) ol "Snapshot (For Video
Recolding)" ([;_ i)g, 42L
Allows you to shoot dark scenes with no picture brightness adjustmenL
The overall appearance may be grainy, but the image is bdght.
The shutter speed is automatically adjusted (1/30 1/200 sec.). Shooting a
subject in low or pool lighting at 1/30 sec. shutter speed provides a brighter
image than in the AGC mode, but the subject's movements are not smooth or
natulak The overall appearance may be grainy, While the shuttel speed is
being automatica[ly adjusted, "_|" A" is displayed.
To compensate for unstable images caused by camera-shake, particularly at
high magnificaBom
NOTES:
•Accurate stabilization may not be possible ff hand shake is excessive, or
under the fol]owing conditions:
• When shooting subjects with vertical ol horizontal stlil)es.
ON [_l), • When shooting (lark or dim subjects.
• When shooting subjects with excessive backlighting.
• When shooting scenes with movement in various directions.
• When shooting scenes with low-contrast backgrounds.
• Switch off this mode when lecolding with the camcorder on a tripod.
•n/ _ -
The [_ ndcaorbhnksolgoesou iI heSablzelcannotbeused.
: Factory-preset
NOTES:
•The "n CAMERA •settings are effective when the Power Switch is set to both "_] " and "_ ".
•The "_] MANUAL'seIIings are effective only when the PowerSwitch is sel to "_'.
CONTINUED ON NEXT PAGE
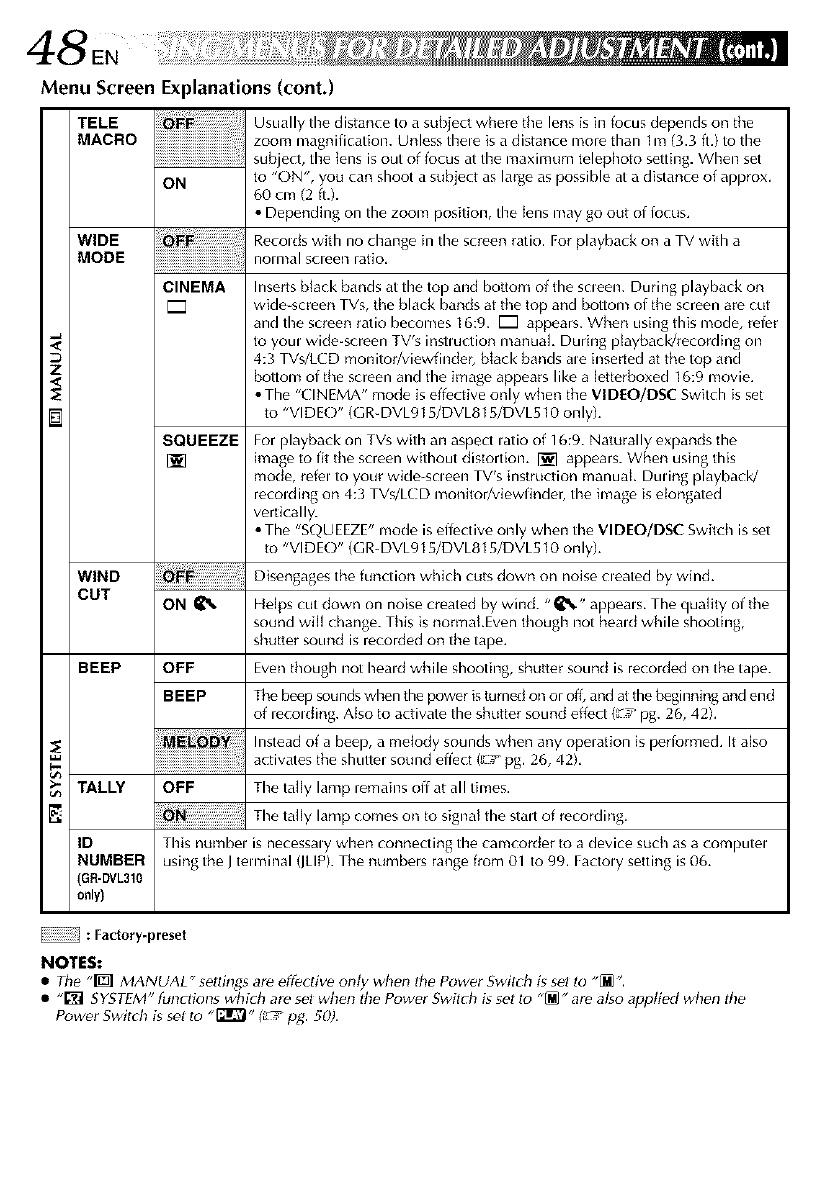
48 ,
Menu Screen Explanations (cont.)
TELE
MACRO !!!!!!!!!!!!!!!!!!!!!!!!!!!!!!!!!!!!!i
ON
Usually the distance to a subject where tile lens is in focus depends on tile
zoom magnification. Unless thele is a distance more than 1m (3.3 ft.) to the
subject, tire lens is out of focus at tire maximum telephoto setting. When set
to "ON', you can shoot a subject as large as possible at a distance of approx.
60 cm (2 fig.
• Depending on the zoom position, the lens may go out of locus.
WIDE Recolds with no change in the screen ratio. For playback on a TV with a
MODE nom_al screen ratio.
CINEMA Inserts black bands at the top and bottom of the scleen. During playback on
[Z wide-screen TVs, the black bands at the top and bottom of the screen are cut
and the screen ratio becomes 16:9. [Z appears. When using this mode, refer
to youl wide-screen TV's instluction manual During pDyback/recording on
D 4:3 TVs/L( D monitor/viewfinder, black bands ale inserted at the top and
Z
<bottom of the screen and the image appears like a [etterboxed 16:9 movie.
1_ • The "CINEMA" mode is effective only when the VID[O/DSC Switch is set
to "VI D EO" (GR-DVL915/DVL815/DVL510 on ly).
SQUEEZE For playback on TVs with an aspect latio of 16:9. Naturally expands the
[_] image to fit the screen without distortion. I_] appears. When using this
mode, refel to your wide-scleen TV's instruction manuak Duung playback!
recolding on 4:3 TVs/LCD monitor/viewfinder, the image is elongated
vertically.
• The "SQUEEZE" mode is effective only when the VIDEO/DSC Switch isset
to "VI D EO" (GR-DVL915/DVL815/DVL510 on ly).
WIND Disengages the function which cuts down on noise cleated by wind.
CUT ON _ Helps cut clown on noise created by wind. "_%" appeals. The quality of the
sound will change. This is normakEven though not heald while shooting,
shutter sound is recorded on the tape.
BEEP OFF Even though not heald while shooting, shutter sound is recorded on the tape.
5
BEEP The beep soundswhen the power is turned on or off, and at the beginning and end
of lecolding. Atso to activate the shutter sound effect (_' pg. 26, 42).
Instead of a beep, a melody sounds when any operation is perJormed. It also
activates the shuttel sound effect (_/pg. 26, 42).
TALLY OFF The tally lamp remains off at all times.
Tile taHy lamp comes on to signal the sta,t of recording.
ID This numbel is necessaWwhen connecting tire camcorder to a device such as a computel
NUMBER using the J tem_inal (JLIP).The numbers range from 01 to 99. FactoWsetting is06.
GR-DVL310
only)
: Factory-preset
NOTES:
•The "_ MANUAL"settings are effective only wb_'n the PowerSwitch is sel lo "_".
• "[_] SYSTEM" functions whi_h are sel when the Power Switch is set to "_ " are also appti_'d when tile
Power Switch is set to "_" f_ tog. 50).
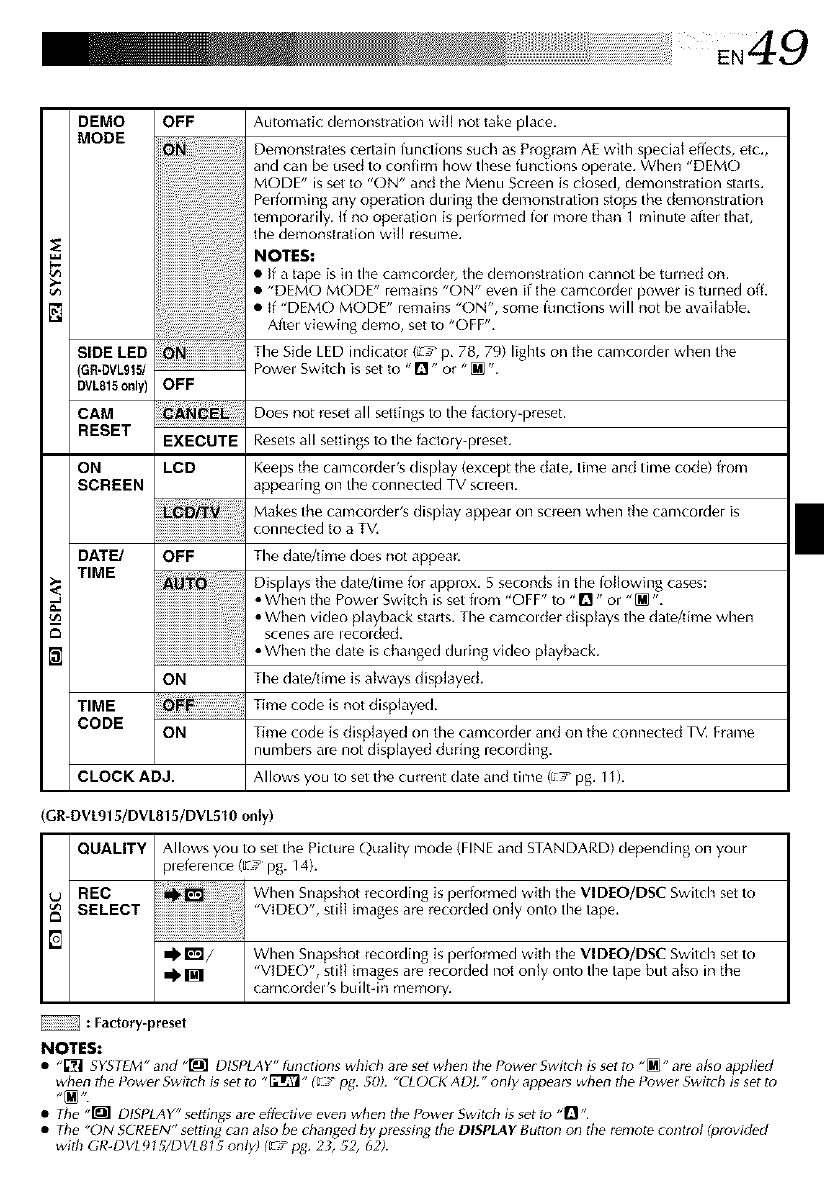
5
DEMO OFF
MODE
SIDE LED
(GR-DVL915/.....................................
DVL815only) OFF
CAM
RESET EXECUTE
ON LCD
SCREEN
DATE/ OFF
TIME
N
ON
TIME
CODE ON
CLOCK ADJ.
Automatic demonstration wit[ not take place.
Demonstrates certain functions such as Program AE with special effects, etc.,
and can be used to confirm how these functions operate. When "DEMO
MODE" is set to "ON" and the Menu Screen is closed, demonstration stalts.
Perforating any operation duung the demonstlation stops the demonsu ation
temporarily, If no operation is performed fol more than 1 minute after that,
the demonstration will resume,
NOTES:
•If a tape is in the camcolder, the demonstration cannot be turned on,
• "DEMO MODE" remains "ON" even if the camcordel power is turned off.
• If "DEMO MODE" remains "ON", some ffmctions will not be available,
After viewing demo, set to "OFF",
The Side LED indicator (Lth_p, 78, 79) lights on the camcorder when the
Powel Switch is set to "_]" or "[] ".
Does not reset all settings to the factory-preset,
Resets all settings to the factory-pleset.
Keeps the camcorder's display (except the (late, time and time code) from
appearing on the connected TV scleen.
Makes the camcordeRs display appear on screen when the camcorder is
connected to a TV,
The date/time does not appear,
Displays the date/time for approx, 5 seconds in the following cases:
•When the Power Switch is set flom "OFF" to "D" or "[] ",
• When video playback starts. The camcolder displays the date/time when
scenes ale lecolded.
•When the (late is changPd during video playback.
The date/time is always displayed.
Time code is not displayed,
Time code is disp[ayed on the camcordel and on the connected TV. Frame
numbers are not disp[ayed during recording.
Allows you to set the current (late and time (E! pg. 1t ),
(GR-DVL915/DVL815/DVL510 only)
QUALITY Allows you to set the Picture Q_ality mode (FINE and STANDARD) depending on your
pleference (_' pg. 14).
UREC When Snapshot recording is performed with the VIDEO/DSC Switch setto
SELECT ' VIDE()', still images are recorded only onto the tape,
I_1/ When Snapshot recording is performed with the VIDEO/DSC Switch setto
_. _ "VIDEO", still images are recorded not only onto the tape but also in the
camcordeds built-in memo W.
: Factory-preset
NOTES:
• _'[_] SYSTEM" and "_] DISPLA Y" tunctions which are set when the Powe_ Switch is set to "[]" are also applied
when the Power Switch is set tu "[_" (_rT pg. 50). "CLOCK A DI." only appea_ when the Power Switch is set tu
•The "_] DISPLAY" settings are effective even when the Power Switch is set to ,'R ..
•The "ON SCREEN" setting can also be changed by pressing the DISPLAY Button on the remote control (provided
with GR-DVLgI 5/DVL815 only) (_'T t__. 2_, 52, 62).
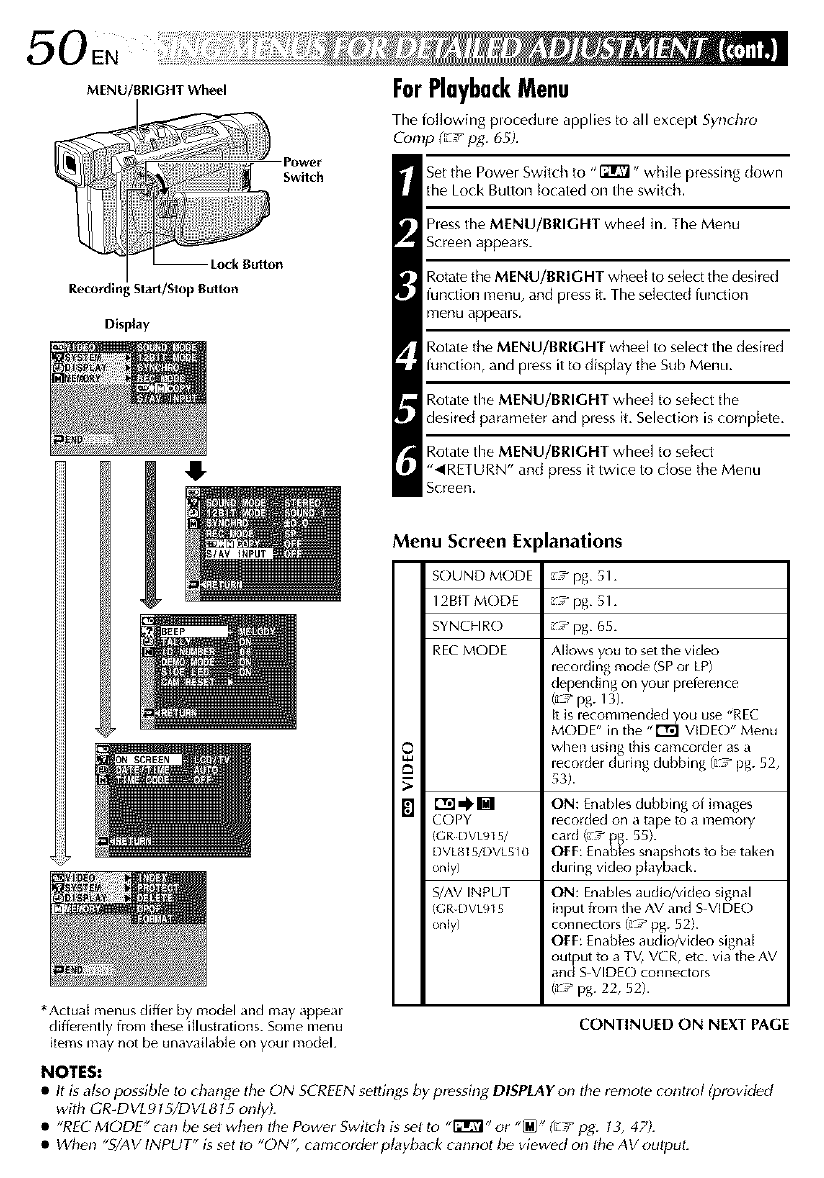
0EN i
MENU/BRIGHT Wheel
R,_ordi Slarl/Stop Bulton
Display
I
PoWer
Swilch
ForPlaybackMenu
The following plocedure applies to all except Synchlo
Comp (_7 pg. 65).
Set the Power Switch to "l':Jlr?l ,, while pressing down
the Lock Button tocated on the switch,
hess the MENU/BRIGHT whee[ in. The Menu
Screen appears.
Rotate the MENU/BRIGHT wheel to select the desired
function menu, and press it. The selected function
menu appears,
Rotate the MENU/BRIGHT wheel to select the desired
function, and Dess it to display the Sub Menu.
Rotate the MENU/BRIGHT wheel to select the
desired parameter and pless it. Selection is complete.
Rotate the MENU/BRIGHT whee[ to select
"_IRETURN" and press it twice to dose the Menu
Screen,
Menu Screen Ex _lanations
SOUND MODE _7pg. 51.
12BtT MODE _7 pg. 51.
SYNCHRO _7 pg. 65.
REC MODE Allows you to set the video
recording mode (SP or LP)
depending on your preierence
(_,* pg. 13).
It is recommended you use 'REC
MODE" in the ,,r'rgl VIDE()" Menu
when using this camcorder as a
recorder during dubbing (7 pg. 52,
53).
r'rll _ [] ON: Enables dubbing of images
COPY recorded on a tape to a memory
(GR DVL915/ card (_7 pg. 55h
DVLS15/I)Vk5 l0 OFF: Enables snapshots to be taken
only) during video ph_yback.
S/AV INPUT ON: Enables audio/video signal
(GR DVL915 input from the AV and S VIDE()
only) connectors (_ pg. 52).
OFF: Enables audio/video signal
out ut to a TV, VCR, etc. via the AV
an([_S VIDEO connectors
(_::,_pg. 22, 52).
CONTINUED ON NEXT PAGE
*Actual menus differ by model and may appear
differently from these illustrations. Some menu
items may not be unaw_ilable on your model.
NOTES:
•It is al_o possibl_ lo change tile ON SCREENsettings by pressing DISPLAY on the renlole conlrol (provided
with GR_DVL9t5/DVL8t5 only).
•"RE{- MODE" can be sel when the Power Switch is set to "_" or "_" (L/' pg. t 3, 47).
• When "SLAVINPUT" is set to "ON" camcorder playback cannot be viewed on the AV output.
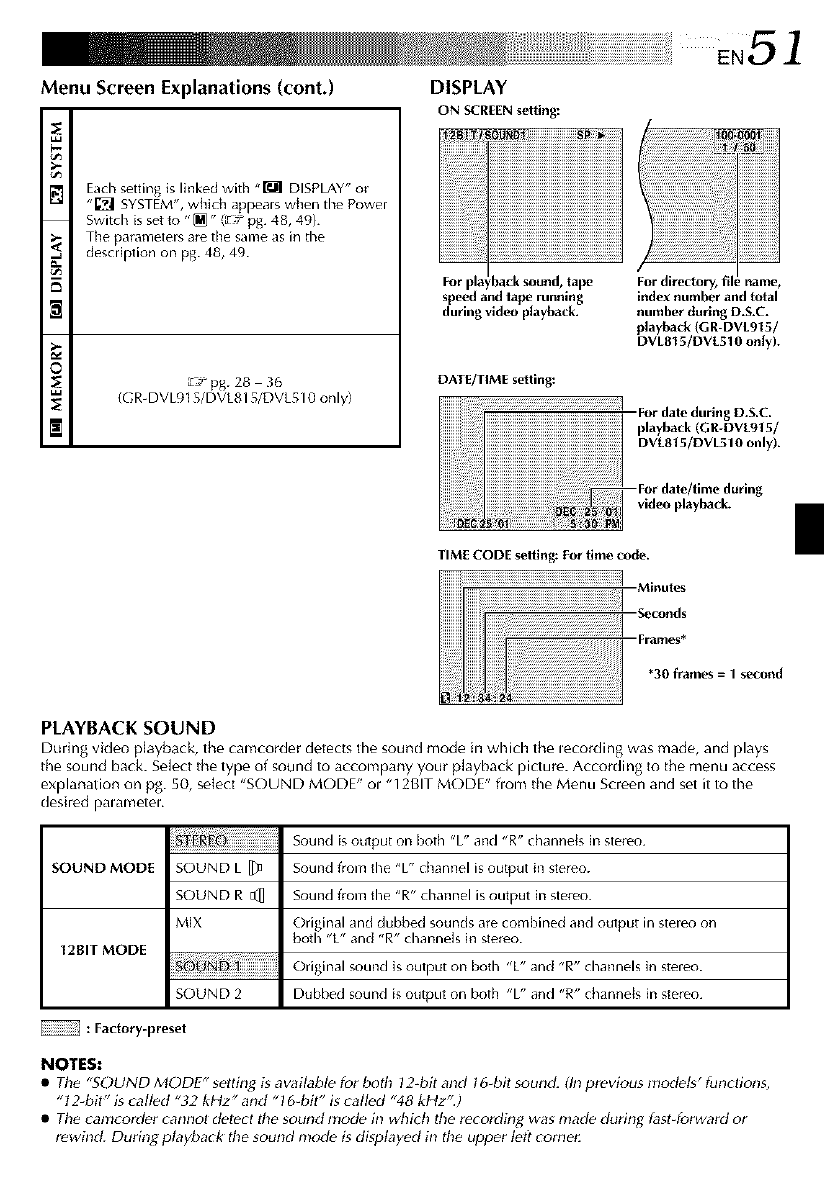
Menu Screen Explanations (cont.) DISPLAY
ON SCREEN setting:
E
Each setting is linked with "_ DISPLAY" or
"[_] SYSTEM", which appears when the Power
Switch is set to "_" (LrTr pg. 48, 49).
The parameters are the same as in the
description on pg. 48, 49.
o
E
_-_ pg. 28 3(_
/GR-DVL915/DVL815/DVL510 only}
For pla back sound, tape
speed and tape running
during video playback.
DATE/TIME setting:
index number and total
number during D.S.C.
playback (GR-DVLgt 5/
DVLBt 5/DVL510 only).
-For date during D.S.C.
playback (GR-DVE915/
DVLB15/DVL510 only).
--For date/time during
video playback.
"Frames*
*30 frames =1 second
PLAYBACK SOUND
During video playback, the camcorder detects the sound mode in which the lecording was made, and plays
the sound back. Select the type of sound to accompany your playback picture. According to the menu access
explanation on pg. 50, select "SOUND MODE" ol "12BIT MODE" flom the Menu Screen and set it to the
desired palametel,
SOUND MODE SOUND L []_
SOUND R E_]
MIX
12BIT MODE
SOUND 2
Sound is output on both %" and "R" channeJs in stereo.
Sound f_om the %" channel is output in stereo.
Sound f_om the "R" channel is output in stereo.
Original and dubbed sounds are combined and output in stereo on
both %" and "R" channels in stereo.
Original sound is output on both %" and "R" channels in stereo.
Dubbed sound is output on both %" and "R" channeJs in stereo.
: Factory-preset
NOTES:
•The "SOUND MODE" setting is availabl_ for both 12-bit and t 6_bil sound. (In prevk_us nlodeg" functions,
"12-bit" is called "32 kHz "and "16-bit" is called "48 kHz".)
• The camcorder cannol detect the sound mode in whidh the recording was made during fast-forward or
rewind. Durin_ playback the sound mode is displayed in the upper left corne_
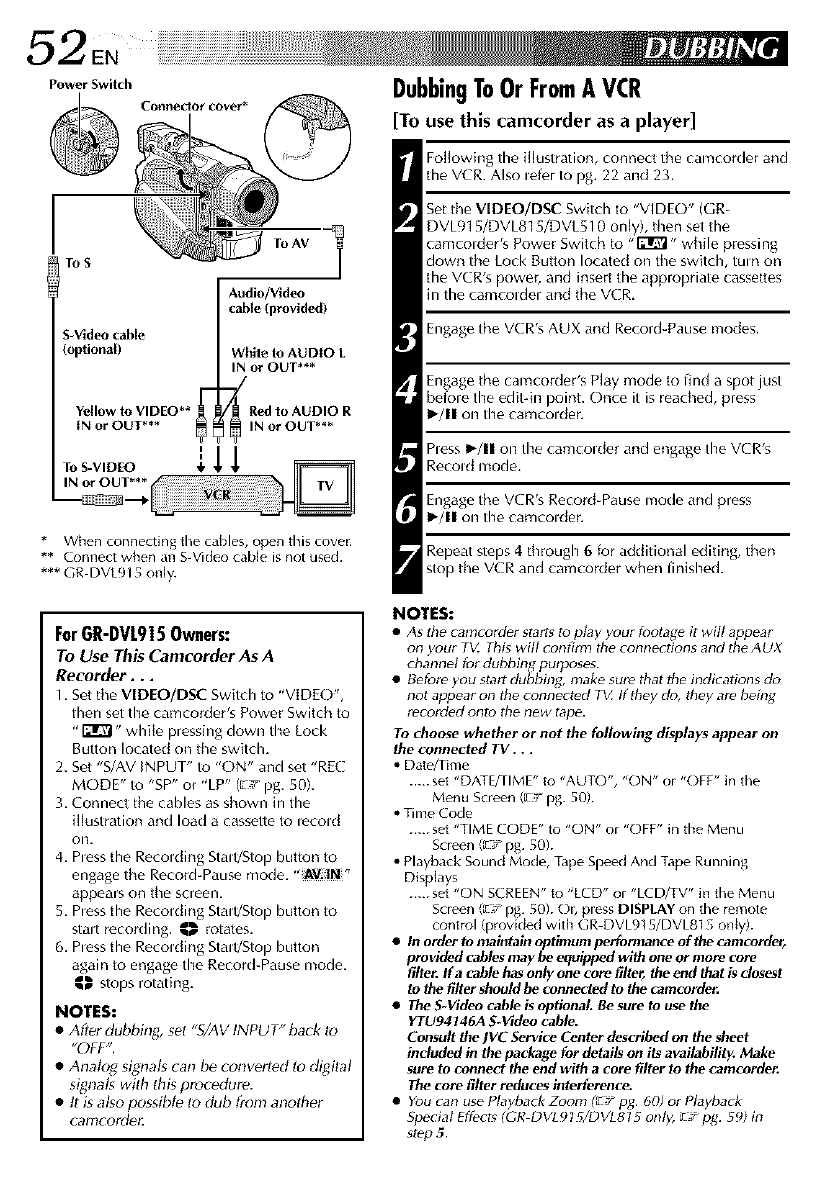
Power Switch
@C_net_otcover* _
ToS ToAV
Audio/Video
cable (provided)
S-Video cable
(optional) White to AUDIO L
IN or OUT***
J
Yellow to VIDEO** £ _ Red to AUDIO R
IN or OUT*** _INotOUT***
* When connecting the cables, open this cover.
** Connect when an SVideo cable is not used,
*** GR DVL915 only.
ForGR-DVL9|5 Owners:
To Use This Camcorder As A
Recorder,.,
1. Set tile VIDEO/DSC Switch to "VIDE()",
then set the camcorder's Power Switch to
"_" while pressing down the Lock
Button located on tile switch.
2. Set "SLAV INPUT" to "ON" and set "RE(:
MODE" to "SP" or "LP" (E7 pg. 50).
3. Connect the cables as shown in the
illustration and load a cassette to lecold
Ol3.
4. hess the Recolding Stall/Stop button to
engage the Record-Pause mode, "AV.IN "
appears on the screen.
5. hess the Recolding Stall/Stop button to
stair r_cording, ,I_, rotates.
6, hess the Recolding Stall/Stop button
again to engag_ the Record-Pause mode,
,I_, stops rotating,
NOTES:
•After dubbing, set _S/AV INPUT" back to
"OFF".
• Analog signals can be converled lo digilal
signals with this procedure.
• tl is also possible to club from another
camcorder
DubbingToOrFromAVCR
[To use this camcorder as a player]
Following the illustration, connect the camcorder and
the VCR. Also lefer to pg. 22 and 23.
Set the VIDEO/DSC Switch to "VIDEO" (GR-
DVL915/DVL8] 5/DVL510 only), then set the
camcolder's Power Switch to -ITI_ - while pressing
down the Lock Button located on the switch, turn on
the VCR's power, and insert the appropriate cassettes
in the camcoldo and the VCR.
Engag_ the VCR's AUX and Record-Pause modes.
Engage the camcorder's Play mode to find a spot just
befole the edit-in point. Once it is reached, press
I_/11 on the camcolder.
hess I._/11on the camcolder and engage the VCR's
Recold mode.
Engag_ the VCR's Record-Pause mode and press
I_/11 on the camcolder.
Repeat steps 4through 6 for additional editing, then
stop the VCR and camcorder when finished.
NOTES:
•As the camcorde_ starts to play you_ k_otage it will appea;
on you_ T_Z This will confinn the connections and the AUX
channel for dubhing_ puq_oses.
•Betore you stari dubbing, make sure that the indications do
not appea_ on the connected T_ If they do, they are heing
recorded on_ _e new tape.
To choose _zhether or not the following displays appear on
the connected TV. . .
• Date/lime
..... set "DATE/TIME" to "AUTO", "ON" or "OFF" in the
Menu Screen (_ Tpg. 50).
• Time Code
..... set "TIME CODE" to "ON" or "OFF" in the Menu
Screen (c__ pg. 50).
• Playback Sound Mode, Tape Speed And Tape Running
Displays
..... s_t "ON SCREEN" to ' LCD" ol "LCD/iV" in the Menu
Soeen (L_Tpg. 50). Ob pless DISPLAY on the remote
control (provided with GR DVL915/DVL815 only).
•In order to maintain optimum performance of the camcotdert
provided cables may be equipped with one or mote cote
filler If acable has only one core filt_r, the end that is closest
to the filter should be connected to the camcorde_
•The SWideo cable is optional. Be sure to use the
YTU94146A S-Video cable.
Consult the JVC Service Center described on the sheet
included in the package for details on its availability. Maka
sure to connect the end with a core filter to the camcorder.
The core filter reduces interference.
• You can use Playback Zoom (._:r pg. 601 o; Playhack
Special Effects (GR DVL91S/DVLS15 only, _T t_q- 5c_) in
step 5.
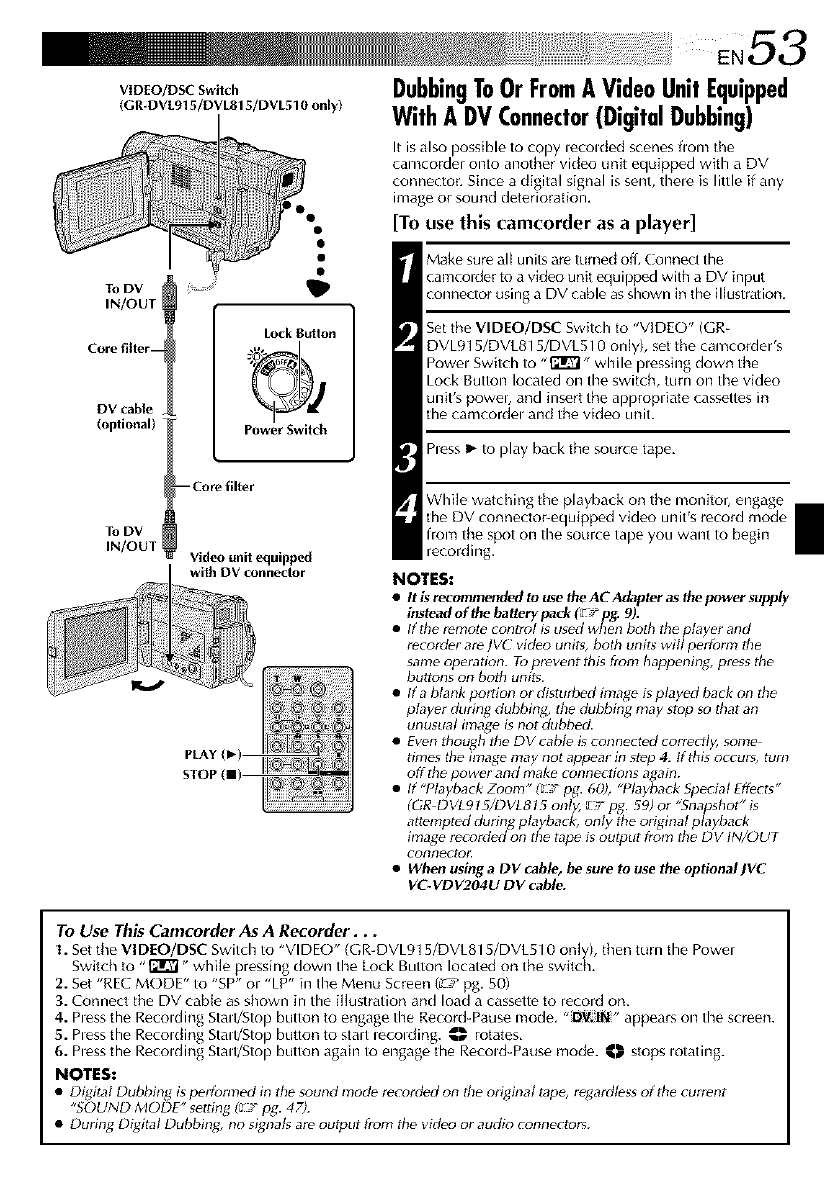
VIDEO/DSC Switch
(GR-DVL915/DVL815/DVL510 only)
To DV
IN/OUT
Core filter--
DV cable
(optional)
To DV
IN/OUT
Lock Button
PowerSwitch
-- Core filter
Video unit equipped
with DV connector
PLAY
STOP
DubbingToOrFromAVideoUnitEquipped
WithADVConnector(DigitalDubbing)
It isalso _ossible to copy lecolded scenes flom the
camcorder onto another vk eo unit equipped with a DV
connectur. Since a digital signal is sent, thele is little if any
image or sound deterioration,
[To use this camcorder as a player]
Make sur_ all units ar_ turned o(1.Contlect the
camcorder to a video unit equipped with a DV input
connector using a DV cable as shown in the illustration.
Set the VIDEO/DSC Switch to "VIDEO" (GR-
DVL915/DVL815/DVL510 only), set the camcorder's
Powel Switch to ,,_r_- while plessing down the
Lock Button located on the switch, turn on the video
unit's poweb and insert the appropriate cassettes in
the camcordel and the video unit.
hess I_ to play back the source tape.
While watching the playback on the monitor, engage
the DV connector-equipped video unit's record mode
from the spot on the source tape you want to begin
recording.
NOTES:
•It is recommendedto usethe AC Adapteras the power supply
insteadof the batterypack(L___pg. 9).
• If the remotecon#ol isused when both the player and
recorder are/V_ video units, both units will perform the
sameoperatkm. Toprevent thi_ from happening, pressthe
buttons on both units.
• If a blank portion o_ distufl_ed image isplayed back on the
player during, dubbing, the dubbing may stop so that an
unusual image isnot dubbed.
• Even though the DV cable is connected correctly, some
times the imag_ may not appear in step 4. If thls occuts, turn
off the power and make connections a[4,ain.
• If I layback Zoom "(_ pg. 60) "_la) back Special Effects
(GR DVL915/DVL81a only, upg. a9) or "Snapshot is
attempted during playback, only the original playback
image recoMed on the tape is output horn the DV IN/OUT
connect_21_
• When usingaDV cable,be sure to use the optionalJVC
VC-VDV204U DV cable.
To Use This Cam(order As A Recorder...
1. Setthe VIDEO/DSC Switch to "VIDE()" (GR-DVL915/DVL815/DVL510 only), then turn the Powel
Switch to ,,_r_,, while pressing down the Lock Button located on the switdl.
2. Set "REC MODE" to "SP" or "LP" in the Menu Screen (_" pg. 50)
3. Connect the DV cable as shown in the illustration and load a cassette to record on.
4. hess the Recolding Stad/Stop button to engage the Record-Pause mode. "_.t. IN" appears on the screen.
5. hess the Recolding Stad/Stop button to start lecolding. _,w rotates.
6. hess the Recording Stad/Stop button again to engage the Record-Pause mode. _ stops _otating.
NOTES:
• Digital Dubbing isperformed in the sound mod_ recorded on the original tape, rega_ctlessof the current
"_OUND MODE" _ettin_ (_T pg.47).
• During Digital Dubbing, no signals are output from the video o_audio connectors.
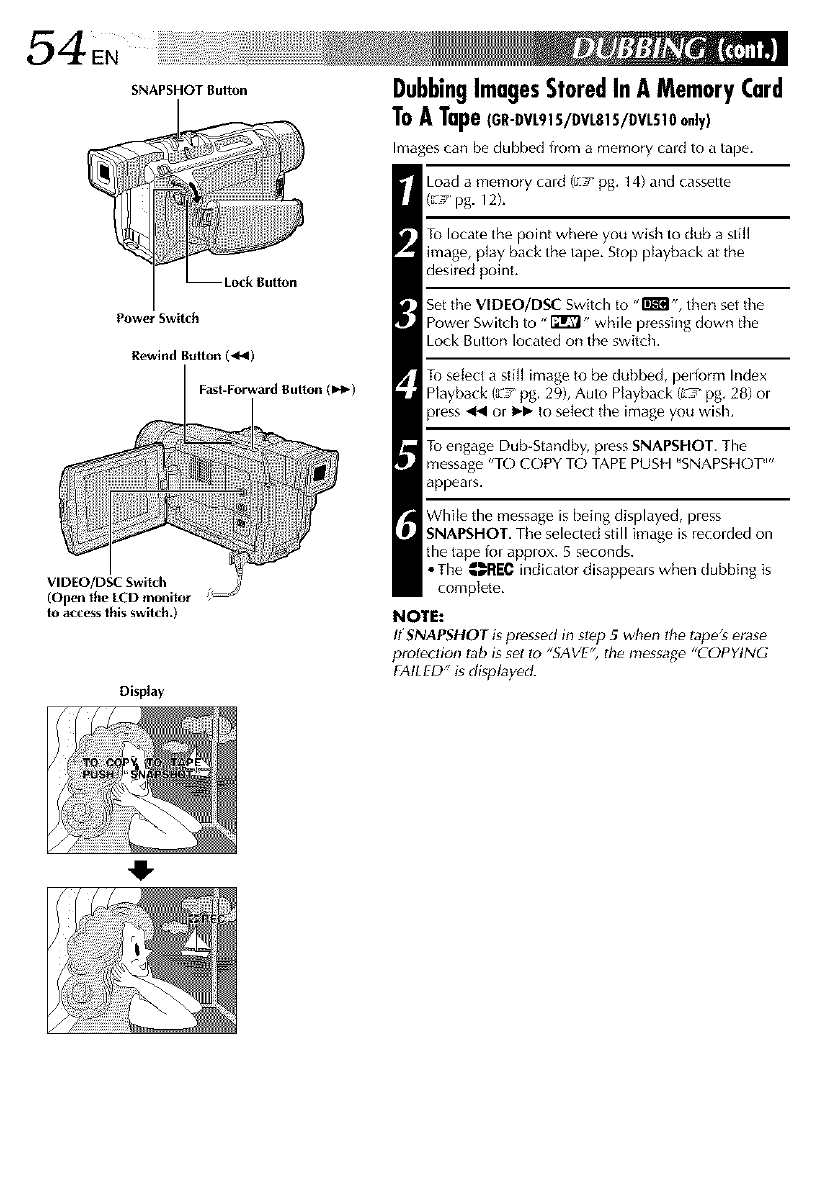
54en
SNAPSHOT Button
Power Switch
Rewind Bulton (4/_1)
Fast-Forward Button (1_)
VIDEO/DSC Switch
(Open the LCD monitor
to access this switch.)
Display
DubbingImagesStoredInA MemoryCard
ToATape_GR-DVL91S/DVLSlS/DVLS_Oo._y_
Images can be dubbed from a memory cald to a tape.
Load a memory cald (E! pg. 14) and cassette
(_ pg. 12).
To locate the point where you wish to dub a still
image, play back the tape. Stop playback at the
desired point,
Set the VIDEO/DSC Switch to "m ", then set the
Powel Switch to "_" while pressing down the
Lock Button located on the switch.
To select a still image to be dubbed, p_l_form Index
Playback (_J' pg. 29), Auto Playback ([_ pg. 28) ol
pless _4 or mm to sele<t the image you wish.
To engage Dub-Standby, press SNAPSHOT. The
message "TO COPY TO TAPE PUSH "SNAPSHOT""
appears.
White the message is being displayed, pless
SNAPSHOT, The selected still image is recorded on
the tape lor approx. 5 seconds.
•The _I{EC indicator disappears when dubbing is
complete,
NOTE:
If SNAPSHOT is pressed in step 5when the tape's erase
proteclion lab is set to "SAVE", the message "COPYING
FAILED" gdisplay_L
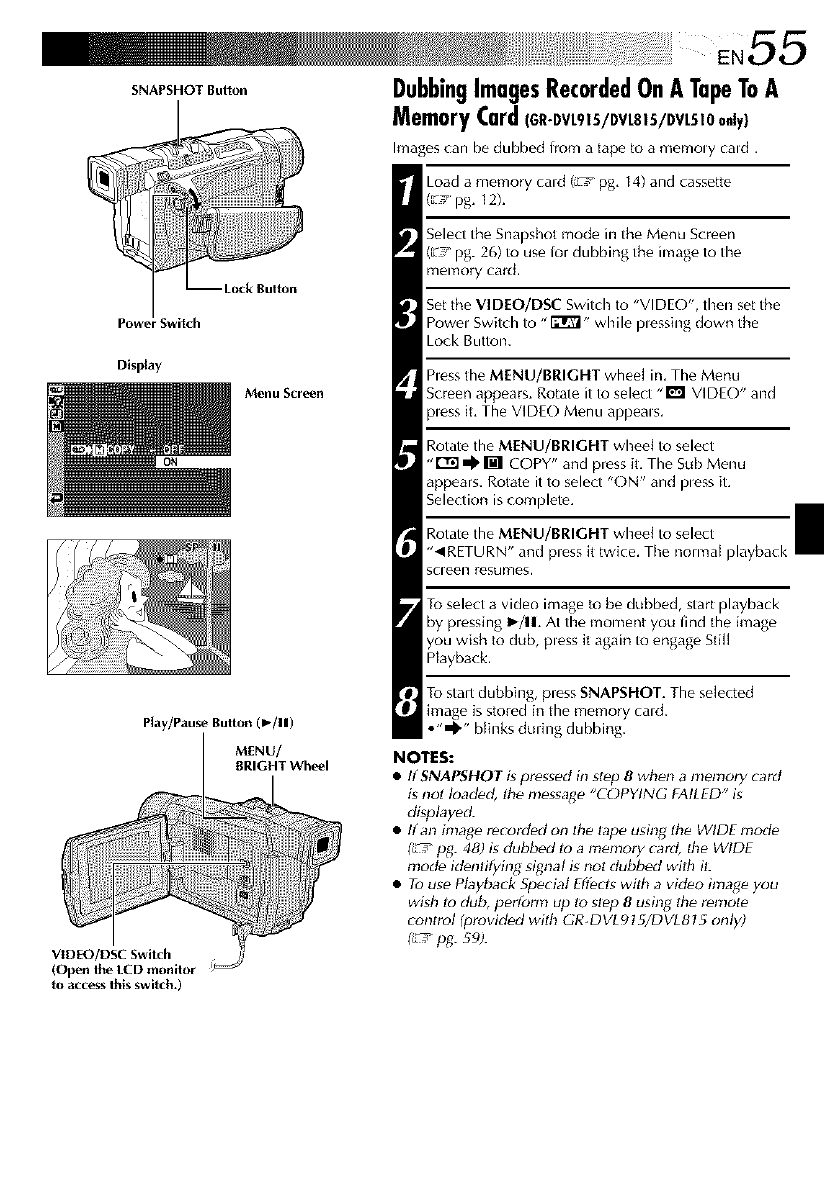
SNAPSHOT Button
Power Switch
Display
Menu Screen
OH
Play/Pause BultOn (1_/11)
MENU/
BRIGHT Wheel
VIDEO/DSC Switch
(Open lhe LCD monitor '_
to access this switch.)
DubbingImagesRecordedOnATapeToA
MemoryCardCGE-DVL9 S/DVLS S/DVLS O
h'nagescan be dubbed from a tape k_a mel'noly cald .
Load a memory cald (LtC_pg. 14) and cassette
([:? pg. 12).
Select the Snapshot mode in the Menu Screen
([__ pg. 26) to use lor dubbing the image to the
memory card,
Set the VIDEO/DSC Switch to "VIDEO", then set the
Powel Switch to "I_" while plessing down the
Lock Button.
hess the MENU/BRIGHT wheel in. The Menu
Screen appears. Rotate it to select "1_1 VIDEO" and
pless it. The VIDEO Menu appeals.
Rotate the MENU/BRIGHT wheel to select
,,r'_ _ M COPY" and press it. The Sub Menu
appears. Rotate it to select "E)N" and pless iL
Selection is complete.
Rotate the MENU/BRIGHT wheel to select
"_IRETURN" and press it twice. The normal playback
scleen resumes.
To select a video image to be dubbed, start playback
by pressing I_/11. At the moment you find the image
you wish to dub, pless it again to engage Still
Playback.
To start dubbing, press SNAPSHOT. The selected
image is stored in the memory cald.
•"_'" blinks during dubbing.
NOTES:
•If SNAPSHOT gpressed in st_p 8when a memory card
is not loaded, tile nlessa_e "COPYING FAILED" is
displayed.
• If an inla_e recorded on the tape using tile WIDE mode
_pg. 48) is dubbed to a menlory card, the WIDE
mod_ identifying signal is not dubbed with it:
• Touse Ptaybark Special Effects with a video image you
wish to dub, pertbrm up to slop 8usil_g the remote
control (provided with GR-DVLgt 5/DVLSI 5 only)
_ pg. 59).
56EN
®
Lockhole
®
The Full-Function Remote Control Unit can opelate
this camcorder from a distance as well as the basic
opelations (Playback, Stop, Pause, Fast-Forwald and
Rewind) of your VCR. It also makes additional
playback functions possible.
For GR-DVL51O/DVL310 Owners: If you want to
perform Random Assemble Editing (_-/pgs. 61 65),
use the optional RM-V700U remote control.
InstallingTheBatteries
(RM-V716UorRM-V715U,provided)
The remote control uses two "AAA (R03)" size
batteries. Bee "General Battery Precautions"
(_' pg. 85).
Open the battery compartment cover as
illustrated,
hsert two "AAA (R03)" size batteries in the
correct direction.
Replace the battely compartment cover,
InstallingTheBattery
(RM-V7OOU,optional)
The lemote _ontml uses one lithium battery (CR2025).
There are 2 ways to pull the battery holder out
of the RM-V7OOU.
_) : Pull out the battery holder while sliding the
lock hole.
_): Pinch the release tab and pull out the
battery holder.
Insert the battery in the holder, and be sure to
have the "+" mark visible.
Slide the holder back in until you hear a click.
• Read the caution concerning lithium batteries
in the RM-V7OOU instruction manual
Remote set_sor
Transmi_ed beam
e_edive area
5 m (16 ft)
30 °
When using the remote control, be sure to point it
at the remote sensor. The illustration shows the
approximate uansmitted beam effective alea fol
indoor use.
The t_ansmitted beam may not be effe(tive or
may cause incorrect operation outdoors ol when
the remote sensol is dire(tly exposed to sunlight
ol powerful lighting.
RM-V716U (Provided
with GR-DVL915/
DVL815 only)
ButtoNs
OInfrar,'d beam transmitting window
Zoom (T/W) Buttons
DISPLAY Button
SHIFT Button
SLOW Rewind/Forward Buttons
L_ft/Bight Buttons
REW Button
With the camcorder's Power Switch
set to the camera position
(" D" or "_').
Transmits the tx,am signal
Zoom in/out (: 7 pg. 18)
Functions
With the camcorder's Power Switch
set to __ ".
Zoom in/out (2¢pg. 60)
z-7 pg 23, 52, 62
z-7 pg 60, 61
_'_ pg 59
_-7 pg 60
• Rewind/Revelse Shuttle Semch
on the tape (_J* pg 21 )
• Displays previous image in the
memory card (:'7 pg. 28)
_'7 pg 61_
z'7 pg 59
z'7 pg 59
z'7 pg 62
FADE/WIPE Button
EFFECTON/OFF Button
EFFECTButton
PAUSE IN Connector
START/STOP Button Functions the same as the Recording Start/Stop Button on the camcorden
MBB SET Button _-7 pg 61
SNAPSHOT Button Functions the same as SNAPSHOT on the camcoFder
Up Button _'_ pg 60
INSERT Button _'7 pg 67
Down Button _'_ pg 60
A. DUB Button _'7 pg 66
PLAY Button • Star_ Play_ck d tbe tape _ pg. 21 )
• StaE_sAuto Playback of the memory
caFd (_'7 pg 28)
FF Button • FoE_var_Forward Shuttle Search
on the tape (;_ pg. 21 )
• Displays next image in the
memory card (_'7 pg. 28)
STOP Button • S_s the tape (_ pg 21 )
• S_s Au_ Playback/s _ _ 28)
PAUSE Button Pauses the tape (_7 pg. 59)
OR.A.EDITButtons _'7 pg 61 65
RM-V715U (Provided with RM-V7OOU (optional)
GR-DVL510/DVL310 only)
O o O o
Om • o @
@
Buttons
QInfrared beam
transmitling window
ZOOM (T/W) Buttons
PLAY Button
REW Button
[:unctlons
With the camcorder*s Power Switch sel to With lhe camcorder's Power Switch sel
the camera position (" []" or "[] "). to "F21r_ ,_.
Transmits the, beam signal.
Zoom in/out (a¢pg. 18) Zoom inA)ut {_7 pg 60)
•Starts PlayBack of the tape (_ pg 21 /
• Starts Auto Playback of the memory
card/GR DVLS10 only, _7 pg. 28)
• Rewind/Reverse Shuttle Search on the
_ape(_3 pg. 21)
• Displays pEevious image in the memory
card/GR DVLS10 only, _7 pg. 28)
O STOP Button • Stops Ihe _ape (_7 pg. 21)
• Stops Auto Playback (GI_ DVL510 on Jy,
¢pg. 28)
OINSERT Button __ pg. 67
OREC TIME Button _
ANIM. Button _
OSTART/STOP Button Fur_ctions the same as the I_ecordlng Start/Stop Button (in the camcorder
OFF Button • FoEward/Forward ShLit_JeSearch on _he
_ape(_ pg 21)
• Displays nexL image in the memory card
(GI_ DVLSI0 only, _7 pg 28)
O PAUSE Button Pauses the _ape (_-7 pg 59)
OA.DUB Button __ pg. 66
OIN1: TIME Button*
SELFTIMER Button*
O PAUSE IN Connector __ pg. 62
OMBR SET Button __ pg. 61
QVISS Button*
OVCR CTL Button _¢pg. 61
OR.A.EDIT Buttons __ pg. 61 6S
*This fundion is unavailable with this camcorde_ O 0: RM V700U only
Remole $e.,1so r
RM-V716U (Provided with
GR-DVL915/DVL815 o.ly)
PLAYBACK EFFECT
Select Me.u
FEATURE:Slow-Motion Playback
(GR-DVL915/DVL815 only)
PURPOSE:
To alk_w slow speed search in eithel dilection dining
video playback.
OPERATION:
1) To change f)om nora/a[ to Sk>w Motion Playback, pless
SLOW (41 ol I_-) more than applox. 2 seconds. Aftel
approx. I minute in Slow Rewind or approx. 2 minutes
in Slow Forward, normal playback resumes.
• To stop Slow-Motion Playback, press PLAY (lb).
NOTES:
•You can also c,n_agu SIow-Moli_n Playback h_m Still
Play_Kk by p_ssh_g SLOW mo_ than approx. 2 sw:onds.
•During Slow-Molion Phyback, du_, to dig&d imag_,
proc c'ssing, lhr_piclur_ may lak_ on amosaic elt_ L
•Allc'_ SLOW l< o_I_) isprc,ss_d and h_,kt, lhe slig im_gc'
map be displayed Ib_a t_w seconcg _llowed by a blue
scleen fol a_ew sc'cond_, this i_ not a m _ffunction.
•Thr_lc' may be a snlag malgin bc'twec'n the' sJow-molion
J/ayback slalt Joinl you chos_ _nd lh_ actual stall poinl fol
S_w-Molion P ayba_k.
•Dudng Sluw-Motiun Playback, lhc'._ will be' dislud_ances in
video and lhe piclu_e map seem uns_*bl_ e_eci_dly with
sleady _a_es. Th_ is not a magunclion.
•During Slow Molion Playback. la_e_sPAUSE (ll) to paus.
plapba_k.
FEATURE:Frame-By-Frame Playback
(GR-DVL915/DVL815 only)
PURPOSE:
To allow flame-by-frame seamh duung video playback.
OPERATION:
1) To change flora normal to Flame By FLame Playback,
press SLOW (1_')lepeatedly for folwald ol SLOW ('q)
repeatedly for reverse. Each time it is p_essed, the hame
is played back.
NOTE:
Yuu can also _,ngagc'Frame-B_Pram_. Plapback from Still
Playback by pres_int4 SLOW (< _r I_) _epeat_d/_
FEATURE: Playback Special Effects (GR-DVL91S/DVL815 only)
PURPOSE:
To allow you to add creative effects to the playback image.
OPERATION:
1) To stalt playback, pless PLAY (1_).
2) Point the remote control at the camcorder's _emote sensor and press EFFECT. The PLAYBACK EFFECT Select
Menu appears.
3) Move the highlight bar to the desired effect by pressing EFFECT. The selected function is activated and after
2 seconds the menu disappears.
• I_ deactivate the selected effect, press EFFECT ON/OFF on the remote control. Pressing it again re actiw]tes the
setected effect.
• To change the selected effect, repeat from step 2 above.
NOTES:
•When some Playback Special Eftecls a_ u_ &e MultiAnalyzer 4 and MuHi Analyzer 9 Snap_hol mode_
(_ pg_ 42) an, not available'.
Th_ _l_cls that can be used durin_ _]ayback a_e Classic Film, Monoton_. Sepia. Strobe and _kleo Echo. The eflb_ ts
wolk the same in pJayback as fl_r*y did in lecolding. Reler to page' _9 for morr_ Mlornlalfon.
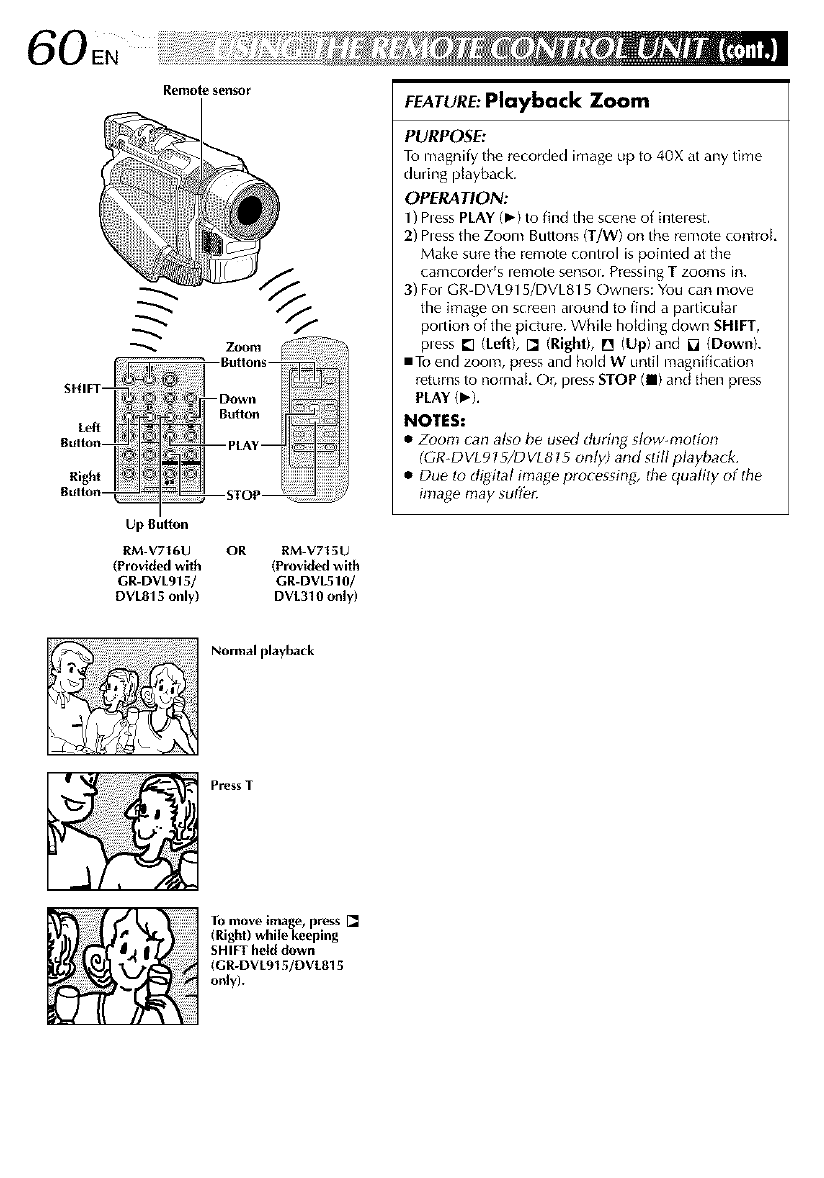
60EN
Remo[q2 serlsor
Up Button
BM-V716U OR BM-V715U
(Provid,_with (Provid,_with
GR-DVL915/ GR-DVL510/
DVL815 only) DVL310 only)
FEATURE:Playback Zoom
PURPOSE:
To magnily the r_corded irnag_ up to 40X at any time
during p_ayback.
OPERATION:
1) hess PLAY (_) to find the scene of intelest.
2) hess the Zoom Buttons (T/W> on the r_mote control
Make sure the remote conuol is pointed at the
camcolder_s relnote sensol. Pressing T zooms in.
3) For GR-DVL915/DVL815 Owners: You can move
the image on screen alound to find a particular
poltion of the picture. While homing down SHIFT,
pless [] (Left), [] (Right), [] (Up)and [] (Down).
inTo end zoom, press and hold W until magnification
r_turns to normal, Or, press STOP (11)and then press
PLAY(_).
NOTES:
•Zoonl can also be used during sk)w-nlotfon
(GR-DVI 915/DVL815 only) and still playback.
•Due to digital image processing_ the quality of tile
image may sufl_r.
Normal playback
P_ess T
To move image, press []
(Righl) while keeping
SHIFT held down
(GR-DVL915/DV{.815
only).
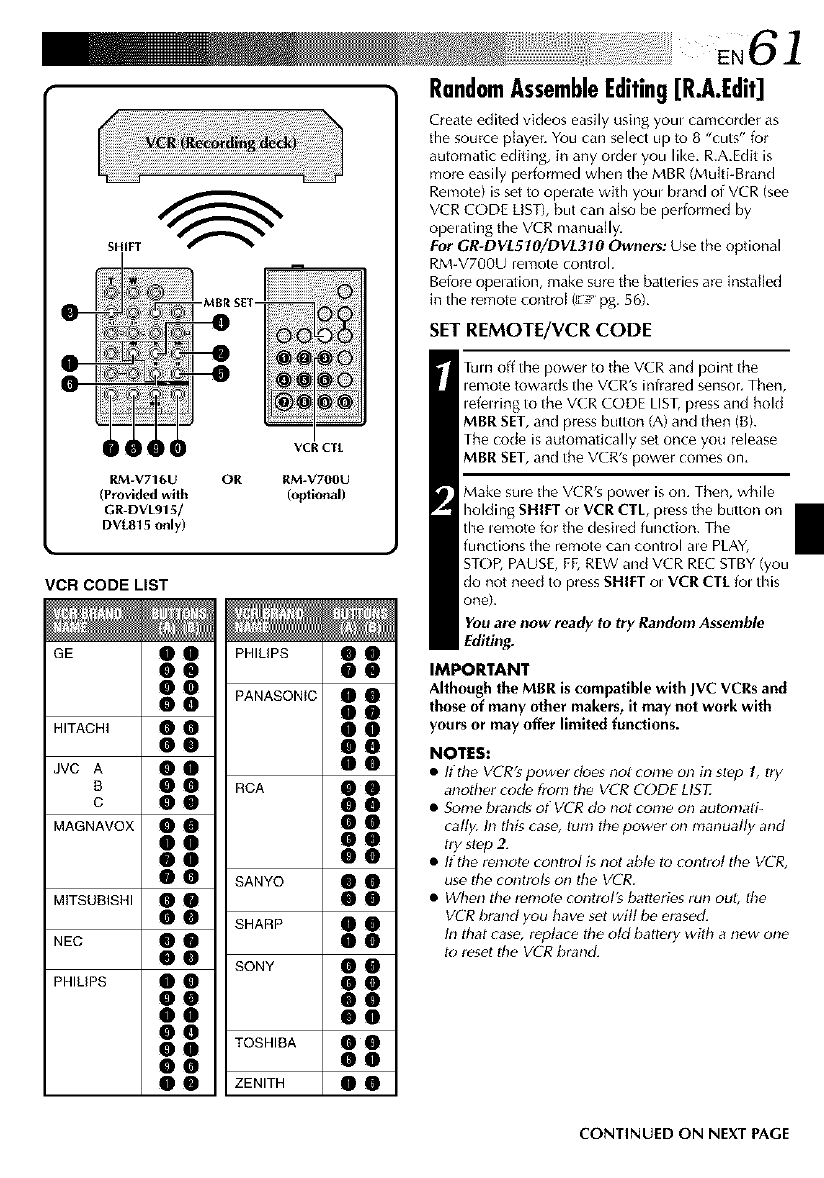
SHIFT
RM-V716U
(Provided with
GR-DVL915/
DVL815 only)
OR
VCR CTL
RM-V700U
(o_ional)
VCR CODE LIST
GE
HITACHI
JVC A
B
C
MAGNAVOX
MITSUBISHI
NEC
PHILIPS
oo
00
o0
oo
oo
oo
oo
oo
oo
oo
oo
oo
oo
oo
oo
oo
oo
oo
oo
oo
oo
oo
oo
oo
PHILIPS
PANASONIC
RCA
SANYO
SHARP
SONY
TOSHIBA
ZENITH
oo
00
oo
oo
oo
0o
oo
oo
00
oo
oo
00
00
0o
oo
00
oo
oo
oo
oo
oo
oo
oo
RandomAssembleEditing[R.A.Edit]
Create edited videos easily using youl camcorder as
the source p[ayer_You can select up to 8 "cuts" for
automatic editing, in any ordel you like, R.A,Edit is
more easily performed when the MBR (Multi-Brand
Remote) is set to opelate with youl brand of VCR (see
VCR CODE LIST), but can also be pedormed by
opelating the VCR manually,
For GR-DVL51O/DVL310 Owners: Use the optional
RM-V700U remote control.
Before opelalion, make sure the batteries are instal[ed
in the remote control (_ pg. 56L
SET REMOTF/VCR CODE
Turn off timepower to the VCR and point the
lemote towards timeVCR's infrared sensor. Then,
lefelring to the VCR CODE LIST,press and hold
MBR SET,and press button (A) and then (B).
The code is automatically set once you release
MBR SET,and the VCR's power comes on.
Make sure the VCR's power is on. Then, while
hoMing SHIFT or VCR CTL, press the button on
the lemote for the desiled function. The
functions the remote can control ale PLAY,
STOP, PAUSE, FF,REW and VCR REC STBY (you
do not need to press SHIFT el VCR CTEfol this
one).
Youare now ready to try Random Assemble
Editing.
IMPORTANT
Although the MBR is compatible with JVC VCRs and
those of many other makers, it may not work with
yours or may offer limited functions.
NOTES:
•If tim VCR's power does not come on in slop 1, lry
another cod_ fronl the VCR CODE LISL
• Some brands of VCR do not come on aulomati-
call)/. In this cas_, turn the power on manually arid
try stop 2.
• If the ren!ote conlrol is not abl_ to control tile VCR,
use Ihe conlrol_ on the VCR.
• When the remole conlrol's batleries run oul, lhe
VCR brand you have set wilt be erased.
hi that case, replace the old battery with a new one
to reset lhe VCR brand.
CONTINUED ON NEXT PAGE

ITo JEIP***
orEDIT***
Editing
cable****
[][]
To Remote PAUSE
or R.A.EDIT
Audio/Video S-Video
cable cable
(provided) (optionall
Whiteto
AUDIO L IN
Yellowto AUDIO
VIDEO IN RIN
illl--
1 T.
S-VIDEO
IN
[] ToPAUSEIN I
RM-V716U RM-V700U
(Provided with (optional)
Gr-DVL915/
DVLBt5 only)
Connect when an S Video cable is not used.
** When connecting cables, open this cover.
*** ]LIP :GR DVL310
EDIT :GR DVL915/DVL815/DVL510
**** Provided with GR DVL915/DVL815 only.
MAKE CONNECTIONS
Atsoreferto pg, 22 and 23.
[] A JVC VCR equipped with a remote pause
connector . . .
,.. connect tile editing cable to the Remote
PAUSE connector,
[] A JVC VCR not equipped with aremote
pause connector but equipped with an R.A.
EDIT connector...
,.. connect the editing cable to the R,A.EDIT
collnectol,
[] A VCR other than above...
,,. connect the editing cable to the remote
contlol's PAUSE IN conne(tor.
Insert a recorded tape into the camcorder. Set the
VIDEO/DSC Switch to "VIDEO" (GR-DVL915/
DVL81 5/DVL510 only), then set timePowel Switch to
"_" while pressing down the Lock Button located
on the switch.
Turn the VCR power on, inselt a lecoldable tape and
engag_ the AUX mode (refer to the VCR's instructions).
NOTES:
•Betbre Random Assembl_ Edilin_ make sure lhe
h_dicadons do not appear _ the TV moni_ ff _ey do,
they will be recorded ont_ tile new tape.
To choose whether or not the following displays appear
on the connected TV. . .
•Date/Time
.... set "DATE/TIME" to "AUTO", "ON" or "OFF" in the
Menu Screen (E! pg. 50).
• Time Code
.... set "TIME CODE" to "ON" or "OFF" in the Menu
Screen (_ pg. 50).
• Playback Sound Mode, Tape Speed And Tape Running
Displays
.... set "ON SCREEN" to "LCD" or "LCD/TV" in time
Menu Screen (E_'_pg. 50). Or, press DISPLAY on the
remote control (provided with GR-DVL915/DVL815
only).
•In order to maintain optimum performance of the
camcorder,provided cablesmay be equipped with one or
more core filter. If a cable hasonly one core filter, the end
that is closestto the filtershouldbe connected to the
camcorder.
•TheS-Video cable is optional. The Editing cable is
optional for GR-DVL510/DVL310 only. Be sure to use
the following cables:
•YTU94146A S-Video cable.
•YTU94154A Editing cable.
Consult the JVC Service Center described on the sheet
included in the package for details on its availability.
Make sure to connect the end with a core filter to the
camcotder. Thecore filter reduces interference.
• When editing on aVCR equipped with a DV input
connector, an optional DV cable can b_ connected
instead of an S-Video cabl_ and audio/video cabl_.
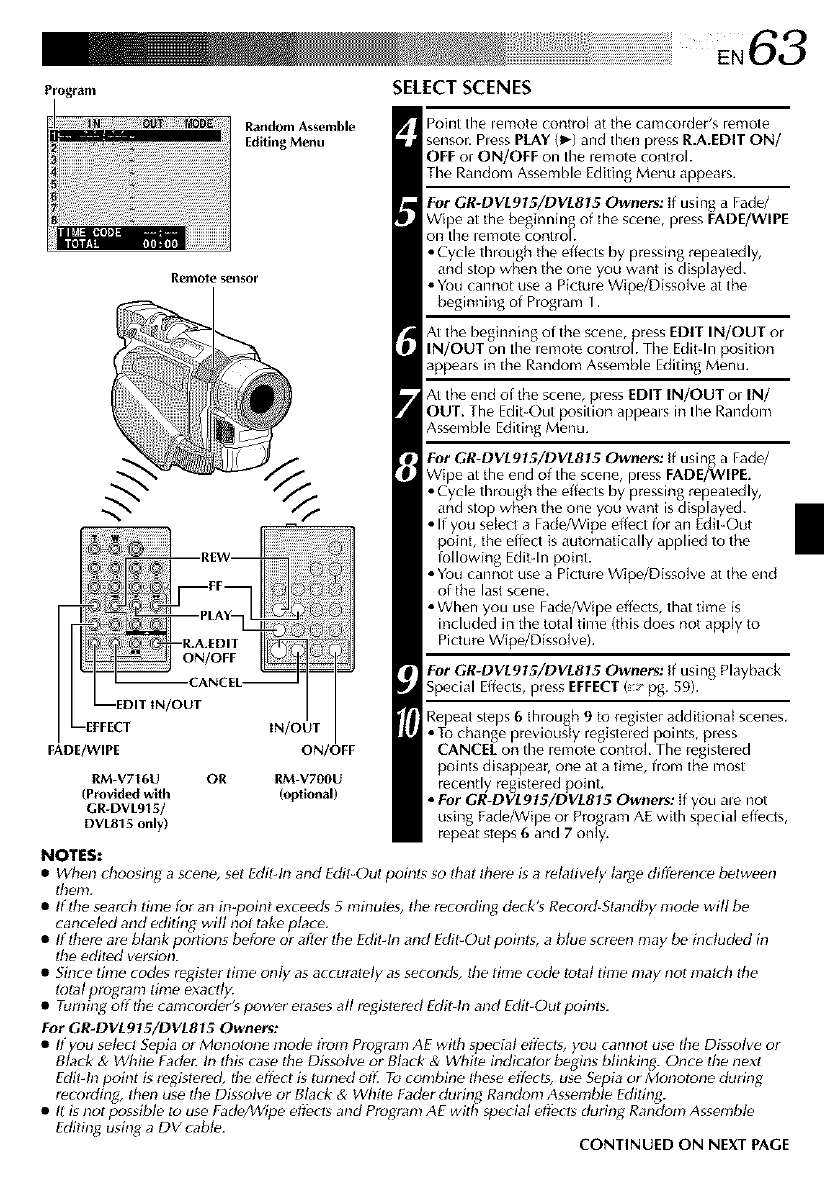
F*rogi'aln SELECT SCENES
PoiNt the lemo{e cof_tro] at the camcorder/s re{T/ote
sensor. Pless PLAY (1_)and then press R.A.EDIT ON/
OFF or ON/OFF on the remote controh
The Random Assemble Editing Menu appears.
For GR-DVL915/DVL815 Owners: If using a Fad_/
Wipe at tile beginning of tile scene, pless FADE/WIPE
OR tire lemote control.
• Cycle through the effects by pressing repeatedly,
and sto) when the one you want is displayed.
• You cannot use a Picture Wipe/Disso ve at the
beginning of Program 1.
At the beginning of the scene, press EDIT IN/OUT or
IN/OUT on the lemote controh The Edit-In position
appears in the Random Assemble Editing Menu.
At the end of the scene, press EDIT IN/OUT or IN/
OUT. The Edit-Out position appeals in the Random
Assemble Editing Menu.
Remote sensor
_/out
FADE/WIPE
rM-V716U OR
(Provided with
GR-DVL915/
DVL815 only)
NOTES:
Random Assemble
Editing Menu
RM-V700U
(oPtional)
For GR-DVL915/DVL815 owners: If using a Fade/
Wipe at the end of the scene, pless FADE/WIPE.
• Cycle throu
the effect is automatically applied to the
lollowing Edit-In point.
• You cannot use a Picture Wip_/Disso[ve at the end
of the last scene.
• When you use Fade/Wipe effects, that time is
included in the total time (this does not app[y to
Picture Wipe/Dissolve).
For GR-DVL915/DVL815 Owners: If using Playback
Special Effects, press EFFECT( pg. 59).
Repeat steps 6 through 9to register additional scenes.
• To change previously registeled points, pless
CANCEE on tire lemote controk The registered
points disappear, one at a time, from the most
recently registered point.
•For GR-DVL915/DVL815 Owners: if you ale not
using Eade/Wi )e or Program AE with special effects,
repeat steps 6 and 7only,
•When choosing a scene, set Fdit-b_ and Edit_Oul points so that there is a relatively large difference between
tbenl.
• If the search time for an in_poinl exceeds 5 minutes, the recording deck's Record-Standby mode will be
canceled and editing will not take place.
• If there are blank portions before or after the Edit-ln and Edit-Out points, a blue screen may be included in
the ediled version.
• Since lh_e codes regbter time only as accuralely as second_, the time code total time may nol makh Ihe
lotal program time exactly.
• Turning off the camcorder's power erases all registered Editqn and Edit-Out points.
For GR-DVLg?5/DVL815 Owners:
• Ifyou select Sepia or Monotone mode t?om Program AE with special eft_cts, you cannol use the Dissolve or
Black & White Fade_ In this case tile Dissolve or Black & White indicator begins blinking. Once the next
Edit-In point is registered, the effect is turned ore To combine these effects, use Sepia or Monotone during
recording, :ben use Ihe Dissolve or Black & White Fader during Random Assemble Editing.
• I_is not fx_ssible to use Fade/_Vipe eft_cts and Program AE with special eft_cts during Random Assemble
FdiBng using a DV cable. CONTINUED ON NEXT PAGE
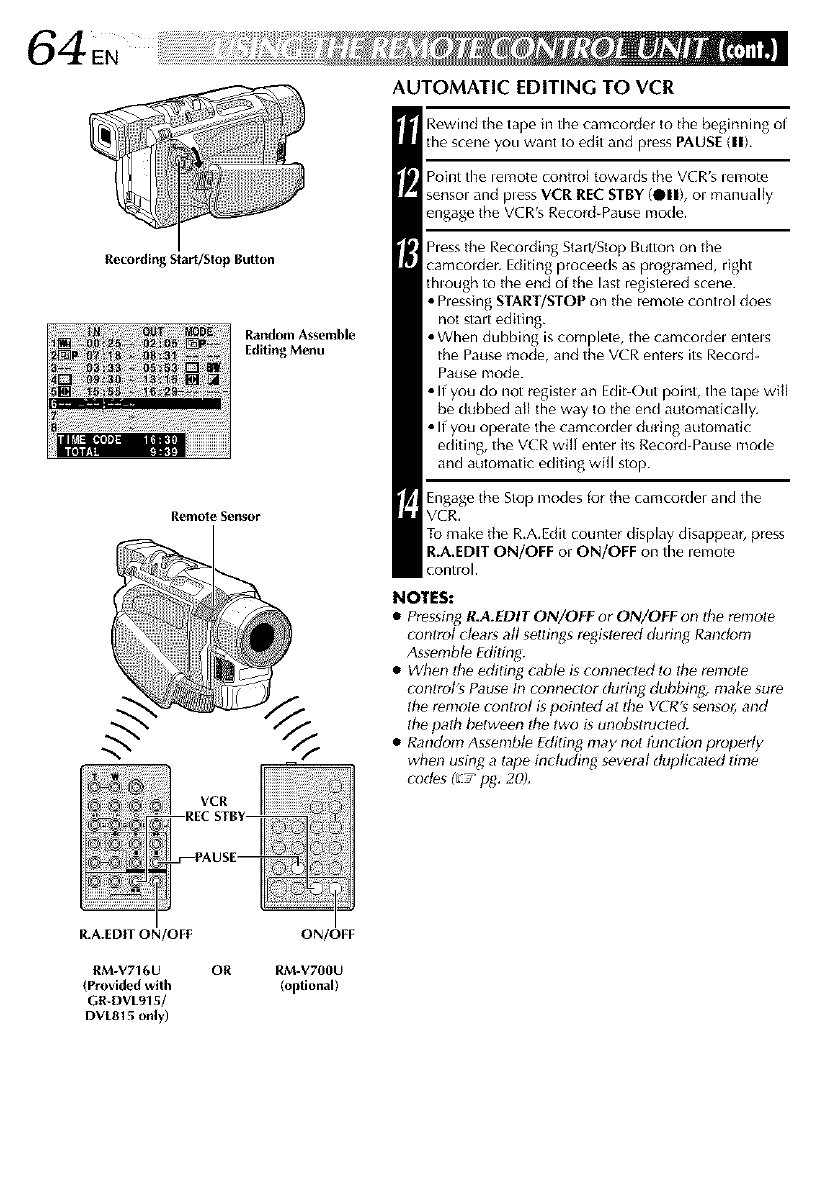
64EN
Recording Start/Slop Button
Random Assemble
Editing Menu
Ret51ot e Sensor
AUTOMATIC EDITING TO VCR
Rewind the tape in the camcorder tu the beginning of
tile scene you want to edit and press PAUSE(11),
Point the _emote contro[ towards the VCR's _emote
sensor and pless VCR RECSTBY (111), or manually
engage the VCR's Record-Pause mode,
hess the Recording Start/Stop Button on the
camcolder. Editing proceeds as programed, right
though to the end of the last registered scene.
• hessing START/STOP on the remote control does
not start editing.
• When dubbing is complete, the camcordel entels
the Pause mode, and the VCR enters its Record-
Pause mode.
• If you do not register an Edit-Out point, the tape will
be dubbed atl the way to the end automatically,
• If you opelate the camcoldel during automatic
editing, the VCR wilt enter its Record-Pause mode
and automatic editing will stop.
Engage the Stop modes for the camcorder and the
VCR,
To make the R,A,Edit counter display disappear, press
R.A.EDIT ON/OFF ol ON/OFF on the lemote
contml.
NOTES:
•Pressing R.A.EDIT ON/OFF or ON/OFF on the ren!ote
control ct_ar_ all settings registered during Randonl
Assemble Edilh_:
•When the editing _abl_ is _onnected lo the remote
controt's Pause In connector during dubbing, make sure
the remote control _ poh_t_ at the VCR_ senso_ and
the path b_tween lhe two gunobstructed.
• Random Assemble Editing may not tPnction properly
whm_ using a lape including several duplicaled time
cod_s (E,t' pg. 20).
R,A.EDIT ON/OFF ON/OFF
RM-V716U OR RM-V700U
(Provided with (optional)
GR-DVL915/
DVL815 only)
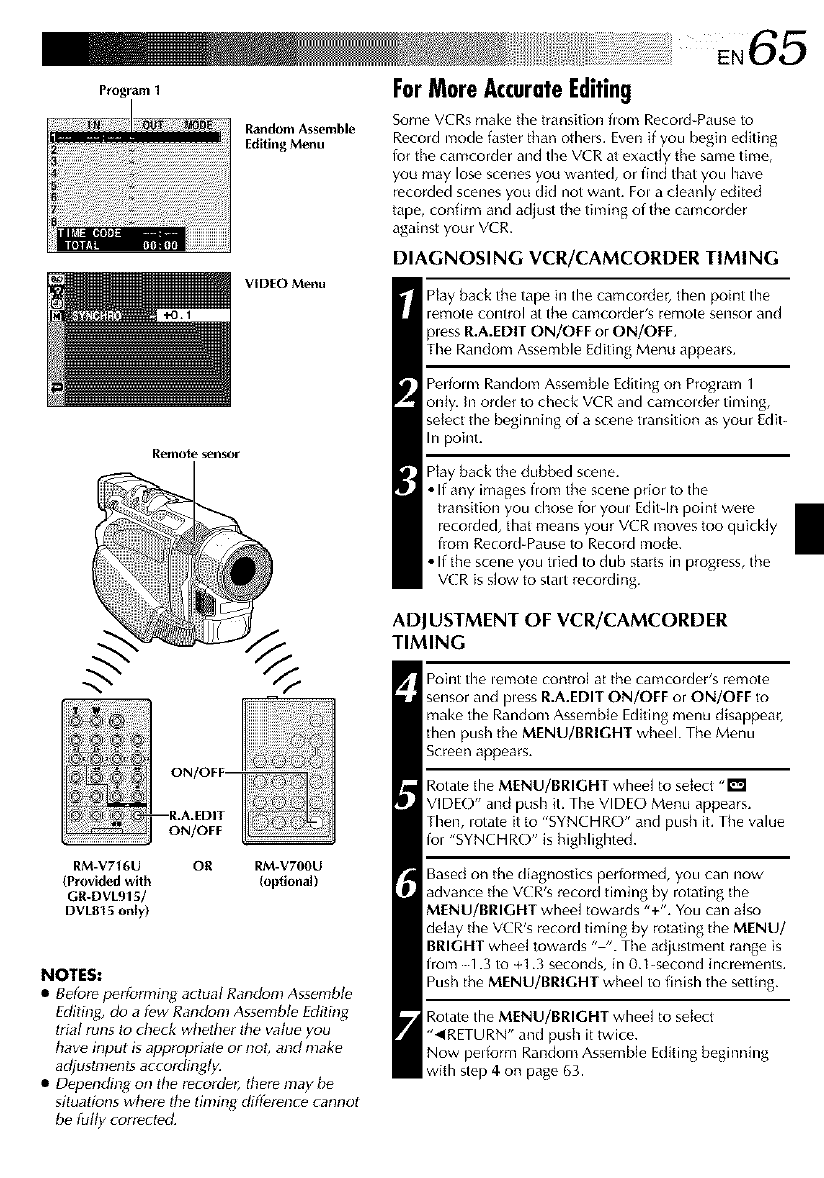
ProgramI
Remote seNsor
Random Assemble
Editing Menu
VIDEO Menu
ForMoreAccurateEditing
Some VCRs make the transition flora Record-Pause to
Record mode faster than others. Even if you beghmediting
lor the cam(order and timeVCR at exactly the same time,
you may lose scenes you wanted, or find that you have
recorded scenes you did not want. Fol a cleanly edited
tape, confirm and adiust the timing of the camco_Jer
against your VCR.
DIAGNOSING VCR/CAMCORDER TIMING
Hay back the tape in the camcorder, then point the
ret*f]ote control at the calY1corder_s remote sensor and
pless R.A.EDIT ON/OFF or ON/OFF,
The Random Assemble Editing Menu appears.
Perfom_ Random Assemble Editing on Program 1
only. In order to check VCR and camcolder timing,
select the beginning of a scene transition as your Edit-
In point.
Play back the dubbed scene,
•If any images from the scene prior to the
transition you chose for youl Editqn point were
recorded, that means your VCR moves too quickly
from Record-Pause to Record mode.
• If the scene you tried to dub starts in progress, the
VCR is slow to stall recording,
ADJUSTMENT OF VCR/CAMCORDER
TIMING
ON/OFF
R.A.EDITII
ON/OFF
RM-V716U OR RM-V700U
(Provided with (optional)
GR-DVL915/
DVLBI 5 only)
NOTES:
•Before perfomlh_g aclual Random Assembl_
Ediling, do a f_w Random Assembl_ Ediling
lrial runs to check whether Ihe wdue you
have input is approprial_ or not, and make
adjustnlenls accordingly.
• D_pendin_ on tile recorder, there may be
situations where dte timing difference cam_ot
be fully corrected.
Po[Imttimelenlote control at the camcorder's remote
sensor and pless R.A.EDIT ON/OFF or ON/OFF to
make the Random Assemb[e Editing menu disappear,
then push the MENU/BRIGHT wheel. The Menu
Screen appears.
Rotate the MENU/BRIGHT whee[ to select -I_1
VIDE()" and push it. TimeVIDE() Menu appears.
Then, iotate it to "SYNCHRO" and push it. The value
for "SYNCHRO" is highlighted.
Based on the diagnostics perlormed, you can now
advance the VCR's record timing by rotating the
MENU/BRIGHT wheel towards "+", You can also
delay the VCR's record timing by rotating the MENU/
BRIGHT wheel towards "-". The adjustment range is
from 1.3 to +1,3 seconds, in 0.1-second increments,
Push the MENU/BRIGHT wheel to finish the setting.
Rotate the MENU/BRIGHT wheel to select
"_IRETURN" and push it twice.
Now perform Random Assemble Editing beginning
with step 4on page 63.
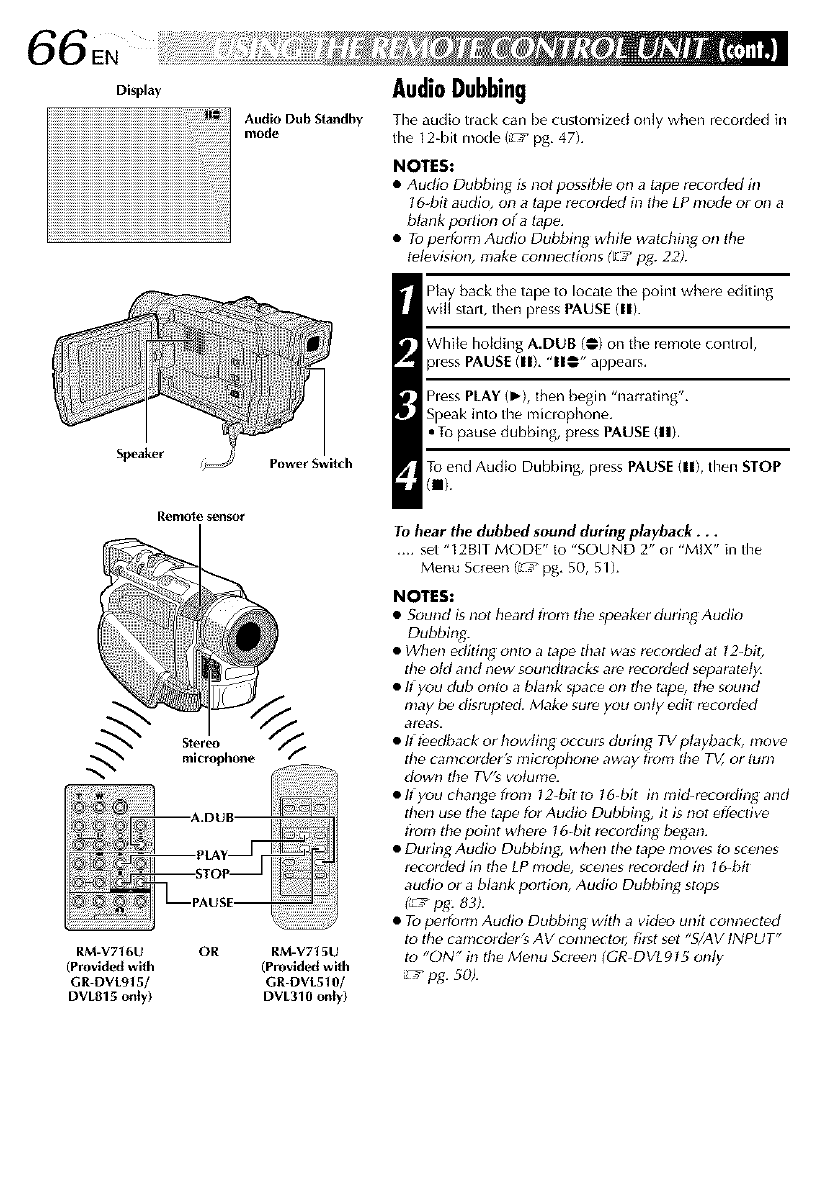
Speaker
Remote g¢2_o_
Audio Dub Standby
mode
Power Switdl
microphoneStere°%
RM-VTt6U OR RM-VTt 5U
(Provided with (Provided with
GR-DVL915/ GR-DVL510/
DVL815 only) DVL310 only)
AudioDubbing
The audio tlack can be customized only when re(orded in
the 12-bit mode (_ pg. 47L
NOTES:
eAudio Dubbing is not possibte on a tape mrorded in
t 6 bit audio, on a lape r_cord_d in th_ LP mode or on a
blankportion ofa lape.
•Toperform Audio Dubbing while watching on
t_l_vision, make connedions (L ,r pg. 22).
Hay back the tape to locate the poim where editing
will staff, then press PAUSE(IlL
White homing A.DUB (@) on the remote comml,
pl_ss PAUSE(IlL "11@" appoars.
Pl_ss PLAY (_'), then begin "narrating".
To _nd Audio Dubbing, press PAUSE(ll), then STOP
(m).
Tohearthe_ubbe__ouna_urJn_playbac_. ..
.... sot "12BIT MODE" to "SOUND 2" or "MIX" in the
M_nu S_r_en (_/pg, 50, 51),
NOTES:
•Sound is not h_ard t?om th_ sp_akor during Audio
Dubbing.
• When _diting onI_ a tape that was recorded at 124air,
th_ old and n_w soundtracks ar_ recorded _oparat_ty.
• lf you dub onto a bkmk spa_ on th_ tatJ_, lh_ sound
may be disrupted. Make sure you onty edit recorded
•Ift_dba_k or howling occurs during TVplayback, mow
th_ canlcord_r's microphone away t?om th_ TV or turn
down tile TV'_ wflumo.
• It'you change from 12-bit to 16-bit in mid-rovording and
thon us_ th_ tape for Audio Dubbing, it is not eff_ctivo
t?om the point wh_'m 16bit re_ording b_gan.
• During Audio Dubbing, when the tape mows to scol_os
recorded in ttl_ I P mode, sr _nos recorded in 1&bit
audio or a blank portion, Audio Dubbing stops
(_ /fag. 83).
•To p_rform Audio Dubbing with a video unit connected
to tile ¢anlcorder's AV connector, first _et "SLAV INPUT"
to "ON" ill th_ Monu S¢reon (GR-DVLgl5 only
_" fag. 50).
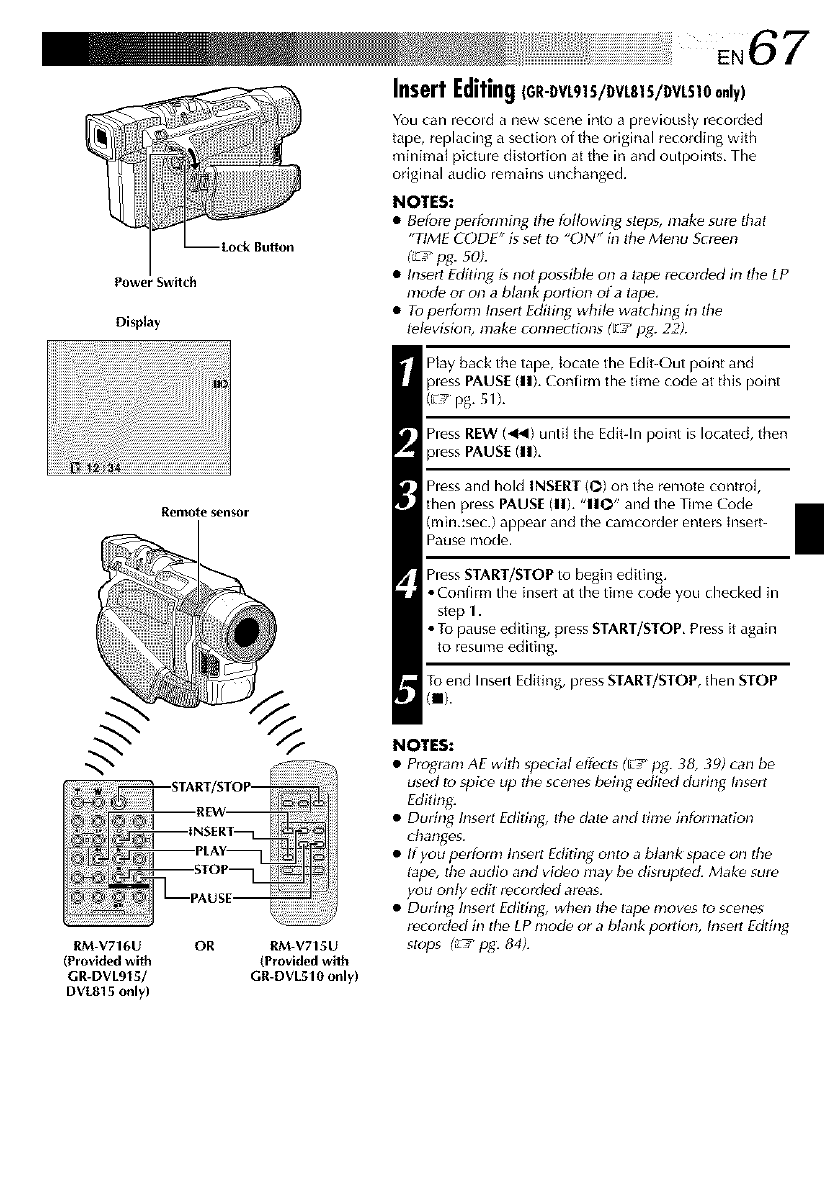
Power Swilch
Display
Remo{e sensor
RM-V716U OR RM-V715U
(Provld,_l with (Provided wilh
GR-DVL915/ GR-DVL510 only)
DVL815 only)
InsertEditing(GR-DVL915/DVL8|5/DVL510 only)
You can recold a new scene into a previously recorded
tape, replacing a section of the original recording with
minimal pictule distortion at tile in and outpoints, The
original audio remains unchanged.
NOTES:
•Before pc,rforming tile fogowing steps, make sure that
"TIME CODE" is set to "E)N" in Ihe Menu Semen
(_ pg_ 50).
• Insert Editing gnot possibl_ on a Iape recorded in lhe LP
mode or on a blank portion of a tape.
• Toperform Insert Fditing whil_ walching in Ihe
l_l_vision, nlake connecBons (El pg. 22).
Play back the tape, locate the Edit-Out point and
pless PAUS[ (11),Confirm the time code at this point
(_' pg, 51),
hess REW (_1) until the Edit-In point is located, then
pless PAUS[ (11),
hess and hold INS[RT (O) on the remote control,
then pless PAUS[ (11), "110" and the Time Code
(min,:sec.) appeal and the camcorder enters Insert-
Pause mode.
hess START/STOP to begin editing,
•Confirm the insert at the thne code you checked in
step 1.
• To pause editing, pressSTART/STOP, Press it again
to resume editing.
Toend Inselt Editing,pressSTART/STOP,then STOP
(m).
NOTES:
• Progranl AE wilh special effect_ (F_Fpg. 38, 39) can be
used to spice up the scenes being _dit_d during Insert
Editing.
• During Inserl Edil_ng, the date and If ale information
dtanges.
• If you perform Insert Editing onto a blank _pace on lhe
lap_, the audio and video may be dgrupted Mak_ sure
you only edit recorded areas.
• Dudng Inserl Editing, when Ihe tape moves to scenes
recorded in the LP mode or a blank porlion, Insert Edting
stops _pg: 84).
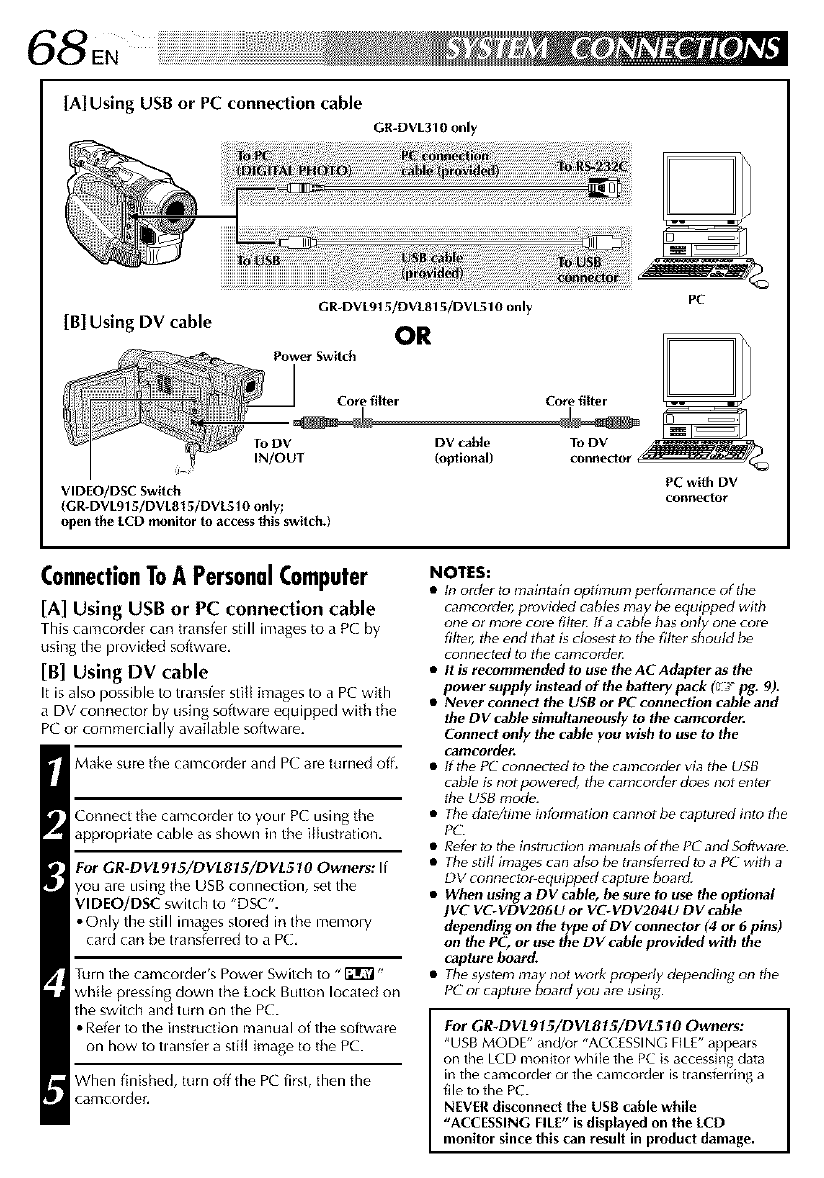
68EN
[A] Using USBor PC connection cable
GR-DVL310 only
[B] Using DV cable
GR-DVLgt 5/DVL815/DVL510 only
OR
Power Switch
PC
Core filter Core filter
To DV DV cable To DV _
IN/OUT (optional) connector
VIDEO/DSC Switch PC with DV
(GR-DVL915/DVLB15/DVL510 only; connector
open the ECD monitor to access this switch.)
ConnectionToAPersonalComputer
[A] Using USB or PC connection cable
This camcorder can traosl_r still images to a PC by
using the plovided software,
[B] Using DV cable
It is also possible to tlansfer stitl images to a PC with
a DV connector by using software equipped with the
PC or commelcially available software.
Make sure the camcorder and PC are turned off.
Connect the camcorder to you,, PC using the
applopriate cable as shown in the illustration.
For GR-DVL915/DVLS?5/DVL510 Owners: If
you are using the USB connection, set the
VIDEO/DSC switch to "DSC'.
•Only the still images stoled in the memory
card can be transfened to a PC.
Turn the camcoldel's Powel Switch to "_"
while plessing down the Lock Button located on
the switch and turn on the PC.
• Refel to the instruction manual of the software
on how to tlansfer a still image to the PC.
When finished, t£1rnoff the PC first, then the
camcolder,
NOTES:
•tn order tu maintain optimum performance of the
camcoMer, provided cables may be equipped with
one or mote core filte_ tf a cable has only one core
filtv5 the end that is closest to the filtvr should b_
connected tu the camcorder:
•It is recommended to use tbe AC Adapter as tbe
power supply instead of tbe battery pack (L__r pg. 9).
•Never connect tbe USB or PC connection cable and
the DV cable simultaneously to tbe camcorde_
Connect only the cable you wish to use to the
camcorder.
• tfthe PC connected to the camcordet via the USB
cablv is not powered, the camcordet dues not entvr
the USB mode.
• The date/time information cannot b_ captured intu the
PC.
• Refvr to the instnlction manuals of the PC and Software.
• The still images can also be transfvrred to a PC with a
DV connecto_ equipped capture bored.
•When using a DV cable, be sure to use tbe optional
JVC VC-VDV206U or VC-VDV204U DV cable
depending on the type of DV connector (4 or 6 pins)
on the PC, or use tbe DV cable provided with tbe
capture board.
• The system may not work propedy depending on the
PC ol capture boald you are using.
For GR.DVL915/DVL815/DVL510 Owners:
"USB MODE" and/or "ACCESSING FILE" appears
on the LCD monitor while the PC is accessin_ data
in the camcorder or the camcorder is transferring a
file to the PC.
NEVER disconned the USB cable while
"ACCESSING FILE" is dlsptayed on the ECD
monitor since this can result in product damage.
Power Switch
To DViN/OUT
To DV IN
CoNrlec|or ,
_ToPC
cl_necto,"
DigitalPrinter
PC connection
cable
ConnectionToAVideoUnitEquippedWith
A DVConnector
Connection to the GVDT3 Digital Plintel (optional) allows
you to print out images or transfel them to a PC. It is also
possible to copy recorded scenes from the camcolder onto
another video unit equipped with a DV connector. This
ffmction is called Digital Dubbing (_'_'_pg. 53), which
offers virtually no image Ol sound deterioration.
Make sure all units are turned off.
Make connections t() the device you want to connect
to using a DV cable, as shown in the illustlation.
If necessary, connect the PC connection cable
(provided with GV-DT3) to the plintel's PC connectol
and the PCs RS-232C connectol.
Turn the camcordel's Power Switch to "_" while
plessing down the Lock Button located on the switch
and turn on the other units.
NOTES:
•It is recommended to use the AC Adapter as the power
supply instead of the battery pack (_ _pg. 9).
•fiStill Playback, Slow-Motion Ptaybark (GR-DVL975/
DVLS15 only), Fast-Forward or Rewind is altenlpl_d
with the camcorder connectPd tc; a video unit via the
DV connector, the hnage will lake on an effPct simiMr Io
a colored mosaic pattern or il will become black.
• Also rPfPr to the instruction nlanual_ oflhe connected
unit_.
•When using aDV cable, be sure to use the optionallVC
VC-VDV204U DV cable.
•When using a cable supplied with a core filter, be sure
to connect the end with the core filter to the
camcorder. The core filler reduces interference.
_] ToRS-232C
PC
70_
CONTENTS
Power
( Jopg.8)
iiiill i_i ii
VIDEO
RECORDING
(_" pg. 16, 17)
O Perform charging where the temperature is between 10°C and 35°C
(50°F and 95°F). 20°C to 25°C (68°F to 77°F) is the ideal
temperature range for charging. If the environment is too cold,
charging may be incomplete.
O Charging times are for a fully discharged battery pack.
O Chargb_gtime varies according to the ambient temperature and the
status of the battery pack.
O To avoid interference with reception, do not use the AC Adapter
near a radio.
O Since the AC Adapter processes electricity internally, it becomes
warm during use. Be sure to use it only in well ventilated areas.
O The following operation stops charging:
• Setthe Power Switch to "131_" "Q" or "[]'.
• Disconnect the AC adapter from the camcorder.
• Unplug the AC adapter's power cord from the AC outlet.
• Detach the battery from the camcorder.
0 When you usethe LCD monitor outdoors in direct sunlight, the
LCD monitor may be difficult to see. If this happens, use the
viewfinder instead.
0 The cassette holder cannot be opened unless a power supply is
attached.
O There may be a delay after you open the cassette holder cover until
the cassette holder opens. Do not useforce.
O Once the cassette holder is closed, it recedes automatically. Wait
until it recedes completely before closing the cassette holder cover.
O When the Recording Start/Stop button ispressed, it may take a few
seconds before actual recording starts. ",_," starts rotating when
the camcorder actually starts recording.
O The time required to calculate and display the remaining tape
length, and the accuracy of the calculation, may vary according to
the type of tape used.
O "TAPE END" appears when the tape reaches itsend, and the power
goes off automatically if left in this condition for 5 minutes. "TAPE
END" also appears when a cassette at its end is loaded.
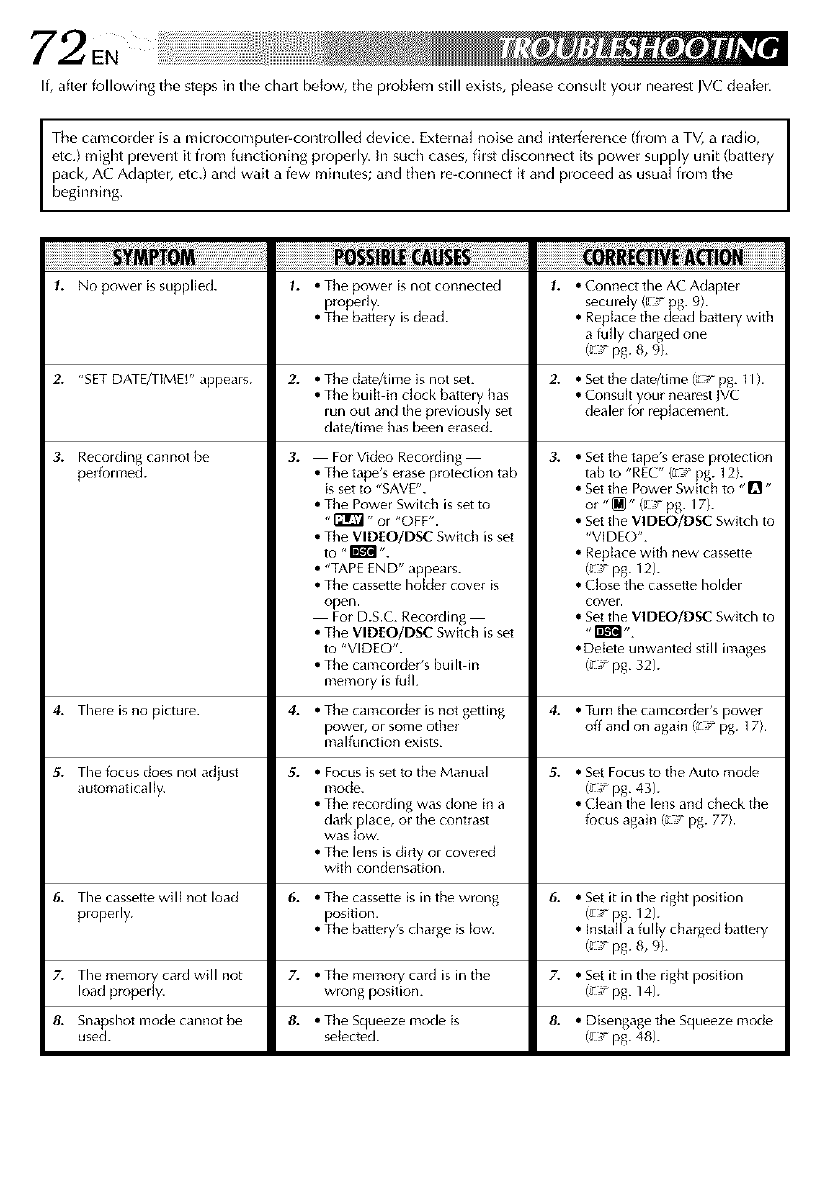
72 EN
If, aftel following the steps in the chalt below, tile problem still exists, please consult your nearest JVC dealer.
I The camcorder is a miclocomputer-controlled device. External noise and interference (flom a TV, a ladio,
etc,) might plevent it from functioning properly. In such cases, fhst disconnect its power supply unit (battery
pack, A( Adapter, etc.) and wait a few minutes; and then re-connect it and ploceed as usual from the
beginning.
1. No power is supplied. 1. •The power is not connected 1. •Connect the AC Adapter
properly, securely (Lr__ pg. 9).
• The batlery is dead. •Replace the dead batlery with
a tully charged one
(_ Tpg. 8, 9).
2. "SET DATE/TIME!" appears. 2. *S_t the date/time (_," pg. 1I ).
• Consuk your nearest IVC
dealer for replacement.
3. Recording cannot be 3.
perf_rmed.
• Set the tape's erase protection
tab to "REC" (_° pg. ] 2}.
• Set the Power Switch to "D"
or "_" (_ 7- pg. 17).
• Set the VlDEO/D$C Switch to
"VIDE()".
• Replace with new cassette
(_r_r pg. 12).
• Close the cassette holder
covel.
• Set the VIDEO/D$C Switch to
• Delete unwanted still images
(_ T pg. 32).
• The date/time is not set. 2.
• The built in clock battery has
run out and the previously set
date/time has been erased.
For Video Recording 3.
• The tape's erase plotection tab
is set to "SAVE".
• The Power Switch is set to
"_" or "OFF".
• The VIDEO/DSC Switch is set
to "_ ".
• "TAPE END" appears.
• The cassette holder cover is
open.
For D.S.C. Recording
• The VIDEO/DgC Switch is set
to "VIDEO".
• The camcorder's built in
memory is full.
• The camcorder is not getting 4.
Fx->we6or some othel
malfunction exists.
• Focus is set t_ the Manual 3".
mode.
• The recording was done in a
dark place, or the contrast
was lOW.
• The lens is dirty or covered
with condensation.
• The cassette is in the wrong 6.
position.
• The batlery's charge is low.
• The memoly card is in the 2'.
wrong position.
• The Squeeze mode is &
seJected.
4. There is no picture. 4. *Turn the camcorder's power
off and on again {_ _rpg. 17}.
3". The k_cus does not adjust 5. *Set Focus to the Auto mode
automatically. (_;r pg. 43).
• Clean the lens and check the
f_cus again {_ _r pg. 77).
6. The cassette will not load 6. • Set it in the right position
properly. (g_- pg. 12).
• Install a fully charged battery
(_ 7 pg. 8, 9).
The memo card will not •Set it in the right position
7" load prope Iy.r[y 7. (_;r pg. 14).
& Snapshot mode cannot be & •Disengage the Squeeze mode
used. (_ T pg. 48).
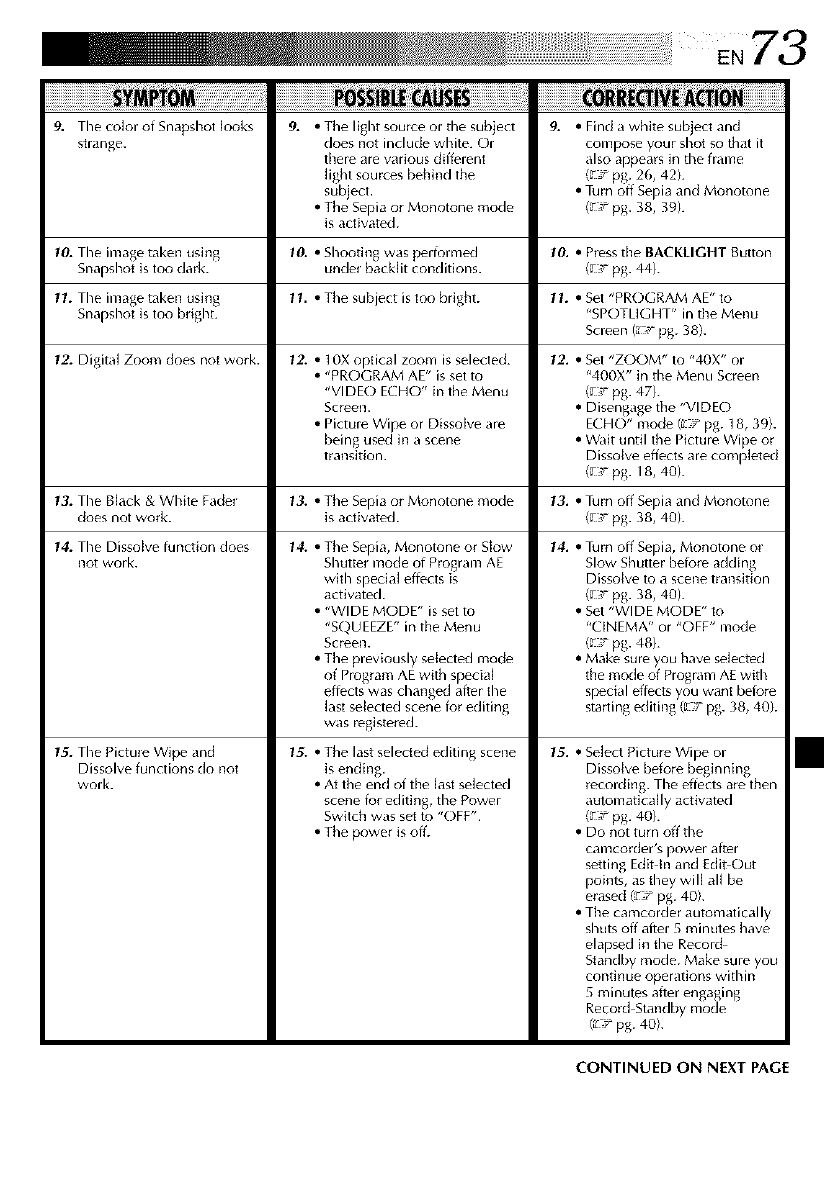
9. The color of Snapshot looks 9. • The light soulce or the subject 9. • Find a white subject and
strange, does not include white_ Or comF_-_seyour shot so that it
there are various different also appears in the frame
light sou_-es behind the (_:_ pg. 26, 42h
subject. • Turn off Sepia and Monotone
• The Sepia or Monotone mode (_ ;, pg. 38, 39).
is activated.
10. The image taken using 10. • Shooting was performed 10. • Press the BACKLIGHT Button
Snapshot is too dark. unde_ backlit conditions. (g_:r pg. 44).
1L The image taken using 11. • The subject is too bright. 1L * Set "PROGRAM AE" to
Snapshot is too hdght. "SPOTLIGHT" in the Menu
Screen (gF pg. 38).
1Z Digital Zoom does not work. 12. • 10X optical zoom is selected. 12. * Set "ZOOM" to "40X" or
• "PROGRAM AE" is set to "400X" in the Menu Screen
"VIDE() ECHO" in the Menu (g ,_ pg. 47).
Scl_en. * Disengage the "VIDEO
• Picture Wipe or Dissolve are ECHO" mode (_F pg. 18, 391.
being used in a scene *Wait until the Picture Wipe ol
transition. Dissolve effects are completed
(_ Tpg. 18, 40h
13. The Black & White Fadel 13. • The Sepia or Monotone mode 13. * Turn off Sepia and Monotone
does not work. is activated. (_ T pg. 38, 40h
14. The Dissolve tuncRon does
not work.
15. The Picture Wipe and
Dissolve functions do not
work.
14. • The Sepia, Monotone ol Slow
Shutte_ mode of Program AE
with special effects is
activated.
• "WIDE MODE" is set to
"SQUEEZE" in the Menu
Screen.
• The previously selected mode
of Program AE with special
effects was changed after the
last selected scene for editing
was registered.
13". *The last selected editing scene
is ending.
• At the end of the last selected
scene for editing, the Power
Switch was set to "OFF".
• The power is off.
14. •Turn off Sepia, Monotone or
Slow Shutter beiore adding
Dissolve to a scene transition
(_ _ pg. 38, 40).
• Set "WIDE MODE" to
"CINEMA" or "OFF" mode
(g_,_pg. 48).
• Make sure you have selected
the mode of Program AE wfth
special effects you want beio_e
stalting editing (g T pg. 38, 40).
1£:. •Select Picture Wipe or
Dissolve before beginning
recording. The effects are then
automatically activated
(_ T pg. 40).
• Do not turn offthe
camcotder's powel afte_
setting Edit tn and Edit Out
points, as they will all be
erased/_ :_ pg. 40).
• The camcorder automatically
shuts off after 5 minutes have
elapsed in the Record
Standby mode. Make sure you
continue operations within
5 minutes after engaging
Record Standby mode
(_ _ pg. 40).
CONTINUED ON NEXT PAGE
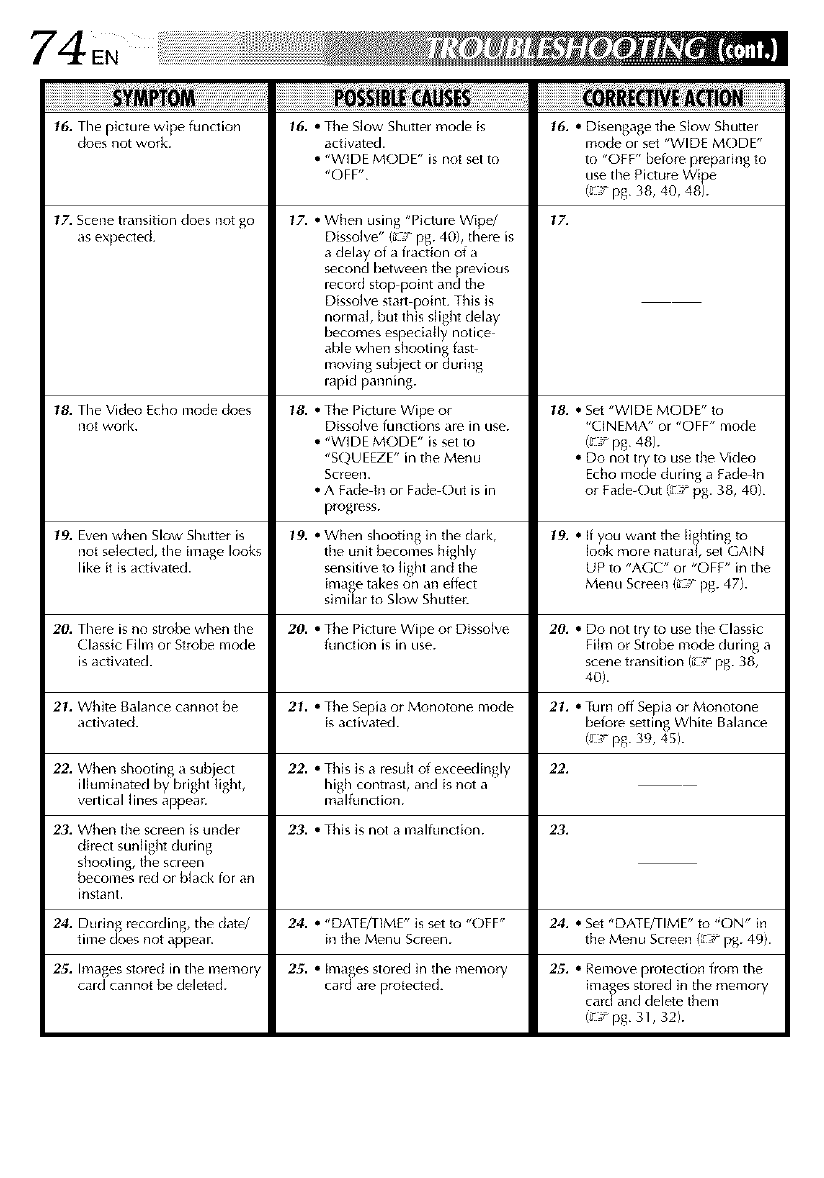
74EN
16. The picture wipe function
does not work.
17. Scene transition does not go
as expected.
18. The Video Echo mode does
not work.
19. Even when Slow Shutter is
not selected, the image looks
like it is actiw_ted.
20. There is no strobe when time
Classic Film or Strobe mode
is actiw]ted.
21. White Balance cannot be
actiw]ted.
22. When shooting a sub ect
illuminated by bright light,
vertical lines appear.
23. When the screen is under
direct sunlight during
shooting, the screen
becomes red or black tor an
instant.
24. During recording, the date/
time does not appear.
25. Images stored in the memory
card cannot be deleted.
16. • The Slow Shutter mode is
activated.
•"WIDE ME)DE" is not set to
"OFF".
17. • When using "Picture Wipe/
Dissolve" (_° pg. 40), there is
a delay of a fraction of a
second between the previous
record stop point and the
Dissolve start point. This is
normal, but this slight delay
becomes especially notice
able when shcx-_ting fast
moving subject or during
rapid panning.
18. • The Picture Wipe or
Dissolve functions are in use.
•"WIDE ME)DE" is set to
"SQUEEZE" in the Menu
So-een.
•A Fade in or Fade Out is in
progress.
19. • When shooting in time dark,
the unit becomes highly
sensitive to light and time
image takes on an effect
similar to Slow Shutter.
20. • The Picture Wipe or Dissolve
function is in use.
21. •The Sepia or Monotone mode
is activated.
22. •This is a result of exceedingly
high contrast, and is not a
malfunction.
23. •This is not a malfunction.
24. •"DATE/lIME" is set to "OFF"
in the Menu Screen.
2_'. •Images stored in timememo W
card are protected.
16. • Disengage the Slow Shutter
mode or set "WIDE ME)DE"
to "OFF" belore preparing to
use the Picture Wipe
(_ Tpg. 38, 40, 48).
17.
18. • Set "WIDE ME)DE" to
"CINEMA" or "OFF" mode
(_ Tpg. 48).
•Do not try to use the Video
Echo mode during a Fade In
or Fade-Out (_Tpg. 38, 40).
19. •If you want the Iiglhting to
look more natural, set GAIN
UP to "AE;C" or "OFF" in the
Menu Screen {_f pg. 47}.
20. •Do not try to use the Classic
Film or Strobe mode during a
scene transition (_ pg. 38,
40).
21. •Turn off Sepia or Monotone
before setting White Balance
(_;r pg. 39, 45).
22.
23.
24. •Set "DATE/71ME" to ' E)N" in
the Menu Screen {_ pg. 49h
25. •Remove protection flora the
ima _es stored in the memory
cat'and delete them
(s_mpg. 31,32).
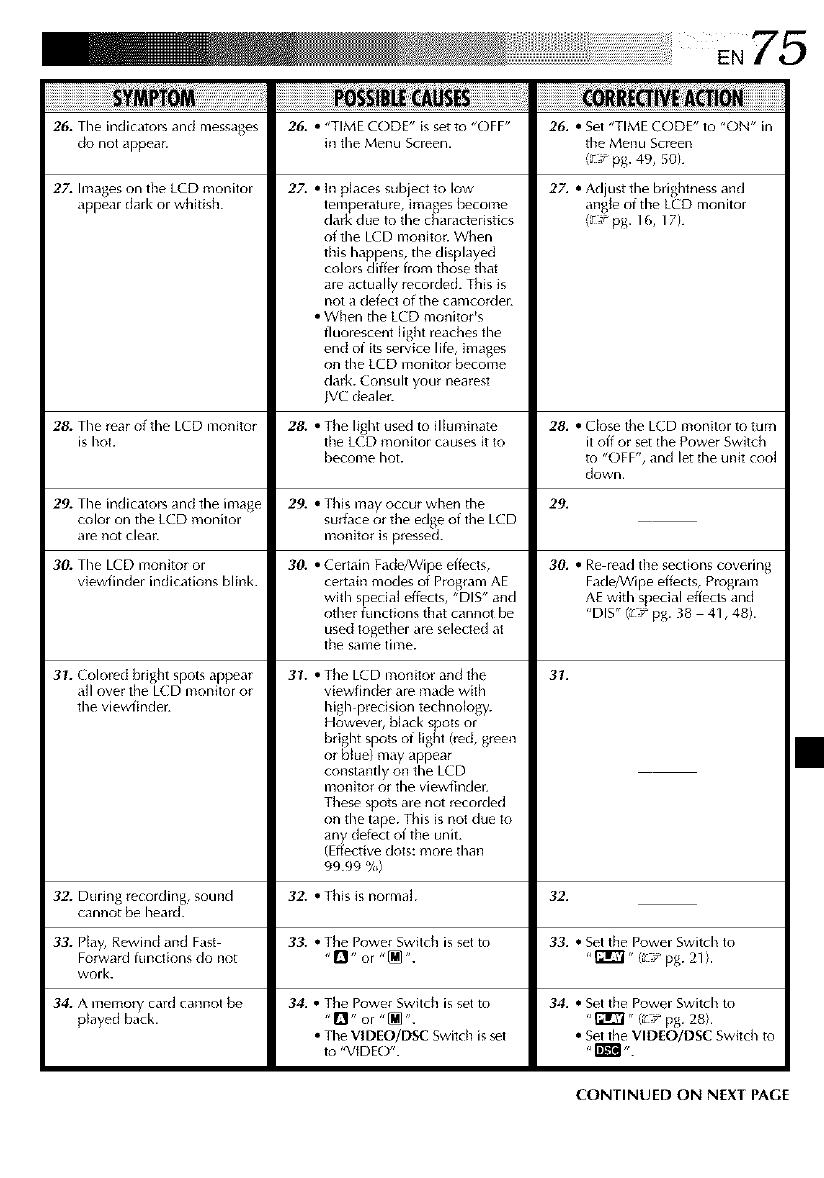
26. The indicators and messages 26. •"TIME CODE" is set t{; "OFF"
do not appear, in the Menu Screen.
27. Images on the LCD monilor
appear dark or whitish.
27. •I1_places subject to low
temperature, images become
dark due to the characteristics
of the LCD n]onJtot. When
this happens, the displayed
colors differ from those that
are actually recorded. This is
not a defect of the camco_de_:
• When the LCD monitoPs
fluorescent light reaches the
end of its service lite, images
on the LCD monitor become
dark. Consult your nearest
NC dealel.
26. • Set "TIME CODE" to "ON" in
the Menu Screen
(_ Tpg. 4% 50).
27. • Adjust the brightness and
angle of the LCD monitor
(_T pg. 16, 17).
28. The rear ofthe LCD monitor 28. •The light used to illuminate 28. • Close the LCD monitor toturn
is hot. the LCD monitor causes it to it off or set the Power Switch
become hot. to "OFF", and let the unit cool
down.
29. The indicators and the image 29.
color on the LCD monitor
dre not clea_:
30. The LCD monitor or
viewfinder indications blink.
29. •Thismay occur when the
surface or the edge of the LCD
monitor is pressed.
30. • Certain Fade/Wipe effects,
certain modes of Program AE
with special effects, "DIS" and
other functions that cannot be
used together are selected at
the same time.
3_. • The LCD monitor and the
viewfinder are made with
high precision technology.
However, black spots or
bright spots of light (_ed, green
or bk_e) may appear
constantly on the LCD
moaitor or the viewfinde_:
These spots are not recorded
on the tape. This is not clue to
any defect of the unit.
(Effective clots: more than
99.99 %)
31. Colored bright spots appear
all over the LCD monitor or
the viewfinde_:
34. •The Power Switch is set to
"_]" or "[M'.
• The VIDEO/DSC Switch is set
t{_ "VIDE()".
30. • Re read the sections covering
Fade/Wipe effects, Program
AE with special effects and
"DIS" (t F pg. 38 41,48).
31.
32. During recording, sound 32. • This is normal. 32.
cannot be heard.
33. Ptdy, Rewind dnd Fdst 33. • The Powel Switch is set to 33. • Set the Powel Switch to
Forward functions do not ,!'1- o_ "[_ ". "_" (_ _, pg. 21h
woN.
34. A memory card cannot be
pkwed bdck.
34. • Set the Power Switch to
,l_" (_,, pg. 28).
• Set the VlDEO/DSC Switch to
CONTINUED ON N[XT PAGE
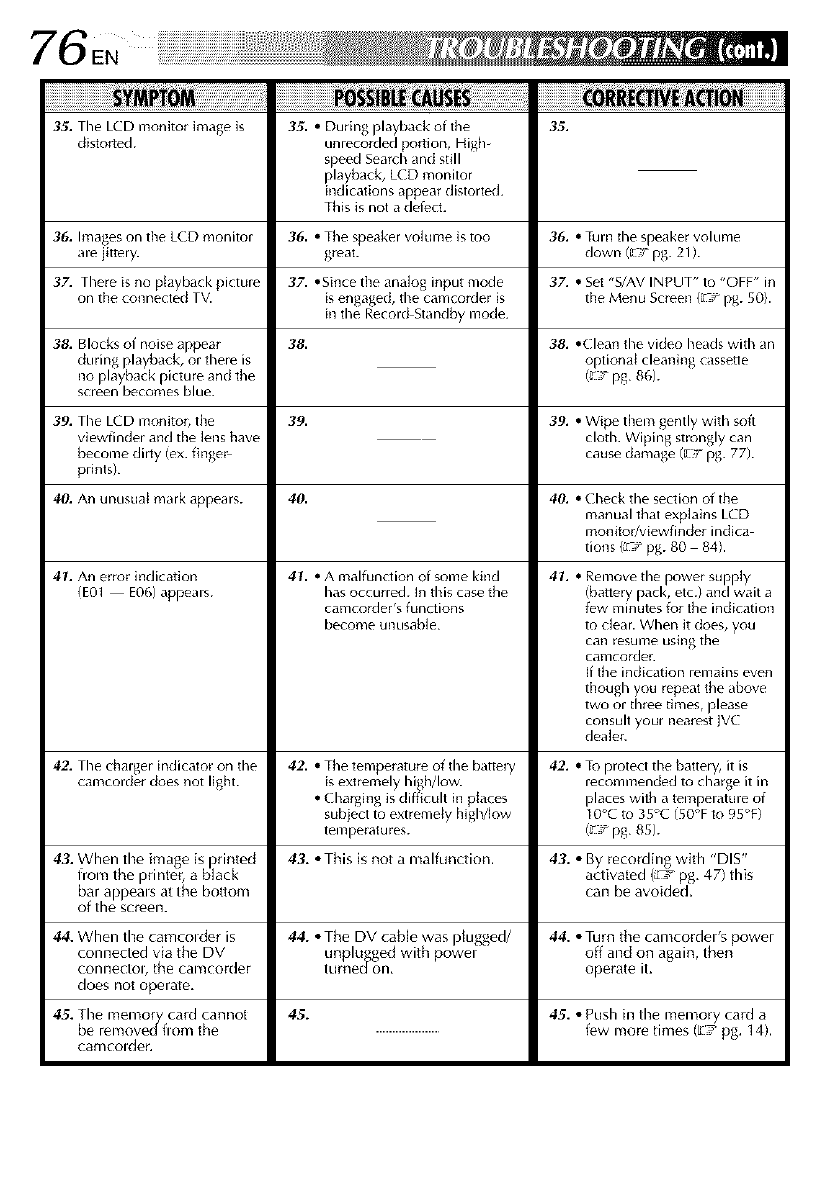
'76EN
35. The LCD monitor image is
distorted. 35. • During playback of the
unrecorded portion, High-
speed Search and still
playback, LCD monitor
indications appear distorted.
This is not a deject.
35.
36. Images on the LCD monitor 36. • The speaker voklme is too 36. • Turn the speaker volume
are jittery, great, down (_7 pg. 21).
37. There is no 3[ayback picture 37..Since the analog input mode 37. • Set "S/AV INPUT" to "OFF" in
on the connectec TV. is engaged, the camcorder is the Menu Screen (_r pg. 50).
in the Record Standby mode.
38.
38. Blocks of noise appear
during playback, or there is
no playback picture and the
screen becomes blue.
39. The LCD monitor, the
viewfinder and the lens have
become dirty (ex. fingel
prints).
40. An unusuat mark appears.
39.
40.
41. •A malfunction of some kind
has occurred. In this case the
camcolder's functions
become unusable.
41. An error indication
(E01 E06) appears.
38. •(lean the video heads with an
optiona{ cleaning cassetle
(_ pg. 86).
39. •Wipe them gently with soft
cloth. Wiping strongly can
cause damage (c_:rpg. 77).
4& •Check the section of the
manual that explains LCD
monitudviewfinder indica
tions {_ f pg. 80 84).
41. •Remove the power supply
(battery pack, etc.) and wait a
few minutes for the indication
to clear. When it does, you
can [esume using the
camcolde[.
If the indication remains even
though you repeat the above
two or three times, please
consult your nearest JVC
dealel.
42. The charger indicator on the 42. •Thetemperature of the battelT 42. •To protect the battery, it is
can_corderdoes not light, isextremely high/low, recommended to charge it in
•Charging is difficult in p{aces places with a temperature of
subject to extremely higMow 10°C to 35°C (50°F to 95°F)
temperatures. (_ pg. 85).
43. When the image is i)rinted 43. • This is not a malfunction, 43. •By recording with "DIS"
from the printer, a black activated (L'__'_pg, 47) this
bar appeals at the bottom can be avoided.
of the screen.
44. When the camcolder is 44. •The DV cable was pMgged/ 44. •Turn the camcorder's power
connected via the DV unplugged with power off and on again, then
conlleCtOl, the camcorder tume(/on, operate it.
does not operate,
45. The memorry card cannot 45. 45. . Push hl the memory card a
be removed fiom the ............................................ few more times (_7' pg. 14),
camcolder,

AfterUse
Turn off tile camcordel.
Sfide and hold OPEN/EJECT in the direction of
the arrow, then puff the cassette ho[del covel
open until it locks. The cassette ho]der opens
automafica]ly, Remove the cassette.
hess "PUSH HERE" to close the cassette holder.
•Once the cassette holder is closed, it lecedes
automatically, Wait until it rocedes completely
beiure closing the cassette holder cover,
Tilt tile viewfinder upward _). Slide BATT.
RELEASE_) and remove the battely pack _).
Remove
Casset
cover
OPEN/EJECI Switch
CleaningTheCamcorder
To dean tile exterior, wipe gently with a soft
cloth.
Put the cloth in diluted mild soap and wring it
well to wipe off heavy dirt, Then wipe again
with a dry cloth.
Pross PUSH-OPEN and open the LCD monitol.
Wipe gently with a soft cloth. Be caleful not to
damage the monitor. Close the LCD monitol.
To clean the lens, blow it with a btowel brush,
then wipe gently with lens cleaning papel.
To clean the viewfinder, raise it to the vertical
position. Open the viewfindel cleaning hatch in
the dilection of the awow _.
Insert a lens btowel or soft cloth into the gap at
the bottom of tile viewfinder and clean the
interior of tile viewfinder with it _.
Close the hatch. Tilt tile viewfinder back to the
horizontal position.
NOTES:
•Avoid using slrong cleaning agents 5ud_ as benzine
or alcohol.
• Cleaning shouM be done only after lhe battery
pack has been removed or other power unils ha ve
beon disconnecle_L
• Mold may form if the t_ns is l_fl dirty.
• When using a cleaner or chemically lreat_d cloth
refer to the cautions of each product.
BAT[. RELEASESwitch
Hatch Lens blower
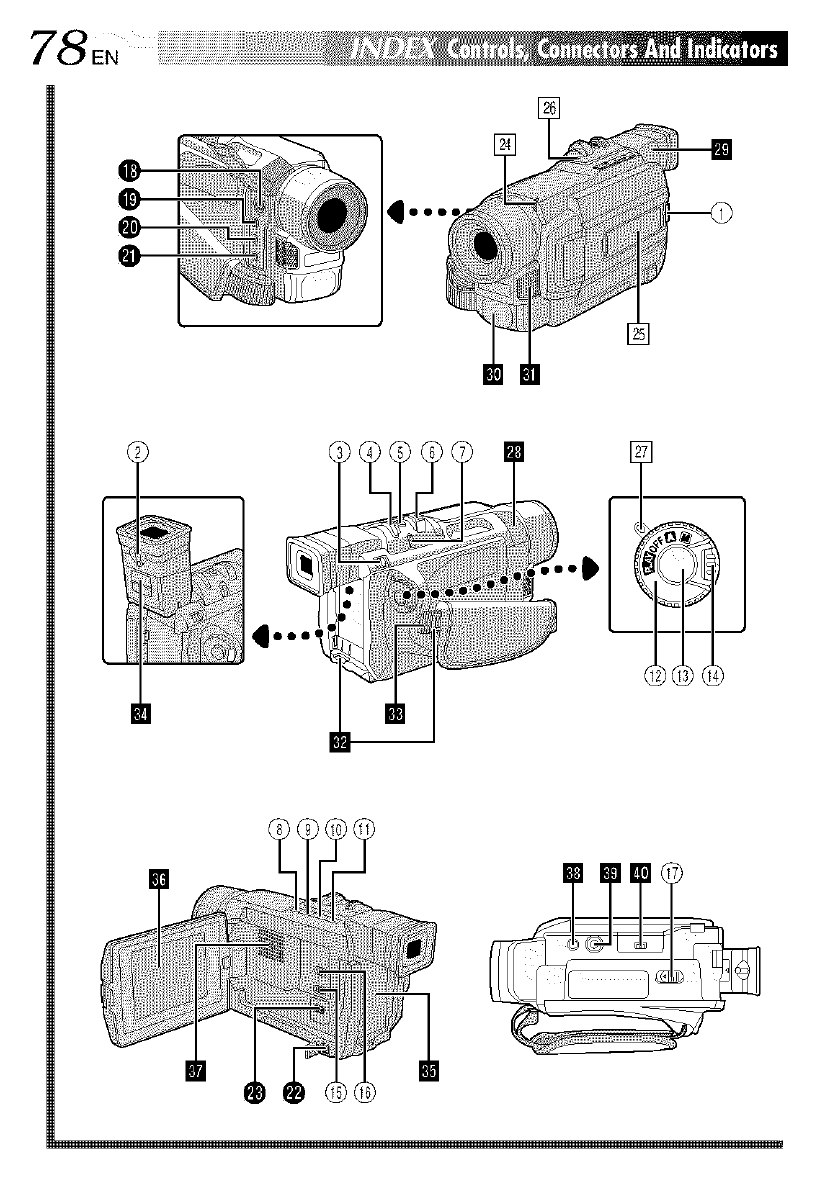
78_,
i...
II
Controls
@ Monitor Open Button
[PUSH ()PEN] ..................................... E<pg. 16
@ Diopter Adjustment Control ................. _,_' pg. 10
@Battery Release Switch
[BAT. RELEASE]...................................... _F pg. 8
(_) •MENU Wheel [%, PUSH] ............... _,_'pg. 46
• LCD Monitor BRIGHT
(Brightness) Control [% .................. _,_'pg. 16
_) Snapshot Button
[SNAPSHOT] ................ _s pg. 26, 27, 42, 54, 55
_) • Power Zoom Lever iT/W] .................. _,_' pg. 18
• Speakel Volume Control [VOL.] ........ _< pg. 21
(!) •FOCUS Button .................................. E,_'pg. 43
• BLANK SEARCH Button .................... _,_' pg. 24
• JUMP Button (GR-DVL91 S/DVL81 S/
DVL510 only) ................................... E,_'pg. 30
@ •Stop Button ill ................................. [c,_'pg. 21
• NIGHT-ALIVE Button ........................ E_"pg. 38
@ • Rewind Button [_l] ......................... _,_'pg. 21
• EXPOSURE Button ............................ _ < pg. 44
@•Play/Pause Button [_-/11] ................... _,_' pg. 21
•Programme AE Button {P,AE] ............. _ < pg. 38
@•Fast-Forward Button [1_1_1................. 'z/pg. 21
• BACKLIGHT Button .......................... _,_' pg. 44
@ Power Switch
[Q, [], g'_'_], OFFI ........................... _< pg. 17
@ Recolding Start/Stop Button .................. _ < pg. 16
@ Lock Button ......................................... _,_' pg. 17
@ Video Light Switch
[LIGHT OFF/AUTO/ON] ...................... _,_' pg. 19
@ VIDEO/DSC Switch [VIDEO, I'/k_rdl]
(GR-DVL915/DVL815/DVL510 only) ... E< pg. 17
@ OPEN/ElECT Switch ............................. _,_' pg. 12
Connectors
The connectors _ to _ are located beneath a cover,
S-Video Input (GR-DVL915 only)/Output
Connector [S] .......................... _- pg, 22, 52, 62
• PC (DIGITAL PHOTO) Connector
(GR-DVL310 only) ............................ _,_' pg. 68
• USB (Universal Sedal Bus) Connector
(GR-DVL915/DVL815/DVL510
only) ................................................. _,_' pg, 68
Connect to a USB-equipped computer to
download the entire contents of a memo Wcald
in only 80 seconds using tile provided software.
•I Te,minal [fLIP (Joint Level Interface Protocol)]
(GR-DVL310 only) ............................ _7 _pg. 62
Connect to a fLiP-compatible camcorder or VCR
to control it from the computer using the
provided Software.
Connect the editing cable when perforating
Random Assemble Editing ......... _¢ pg. 61 65
• Edit Connector [EDIT] (GR-DVL915/DVL815/
DVL510 only) ................................... E_' pg, 62
Audio/Video Input (GR-DVL915 only)/Output
Connector [AV] ....................... _F pg. 22, 52, 62
DC Input Connector .......................... _,_' pg, 8, 9
Digital Video Connector [DV IN/OUT]
(Llink*) .................................... _,_' pg. 53, 68, 69
• LLink refers to the IEEE1394-t 995 industr_
specification and extensions thereof. The F, logo
is used for products compliant with the LLink
standard,
Indicators
[] Tally Lamp ..................................... _7 pg. 16, 48
[] Skle LED Indicator (GR-DVL915/DVL815
only) .................................................... _,_'pg, 49
[] CHARGE Lamp ...................................... _,_'pg. 8
[] Power Lamp .................................. _,_'pg. 16, 17
Other Parts
[] •Remote Senso,, ................................. _,_' pg. 56
• E-alTlela SeDgor
Be careiul [lot to cover this alea, a sensor
necessa,y fo, shooting is built-in here,
[] Viewfinde, , .......................................... _7 _pg, 10
[] Video Light .......................................... _,_'pg, 19
[] Stereo Microphone .............................. _,_' pg.
[] Shoulder Strap Eyelets .......................... _:,_'pg. _;
[] G, ip St, ap ............................................ _,_'pg. 1B
[] Viewfinder Cleaning Hatch .................. _,_' pg. 77
[] Battery Pack Mount ............................... _¢ pg. 8
[] L(D Monitor ................................. _,_' pg. 16, 17
[] Speaker ............................................... _7 pg. 21
[] Stud Hole ............................................ _,_' pg. 10
[] Tripod Mounting Socket ....................... _,_'pg, 10
[] MEMORY CARD Cover (GR-DVL91 S/
DVL81S/DVLS 10 only) ........................ _,_' pg. 14
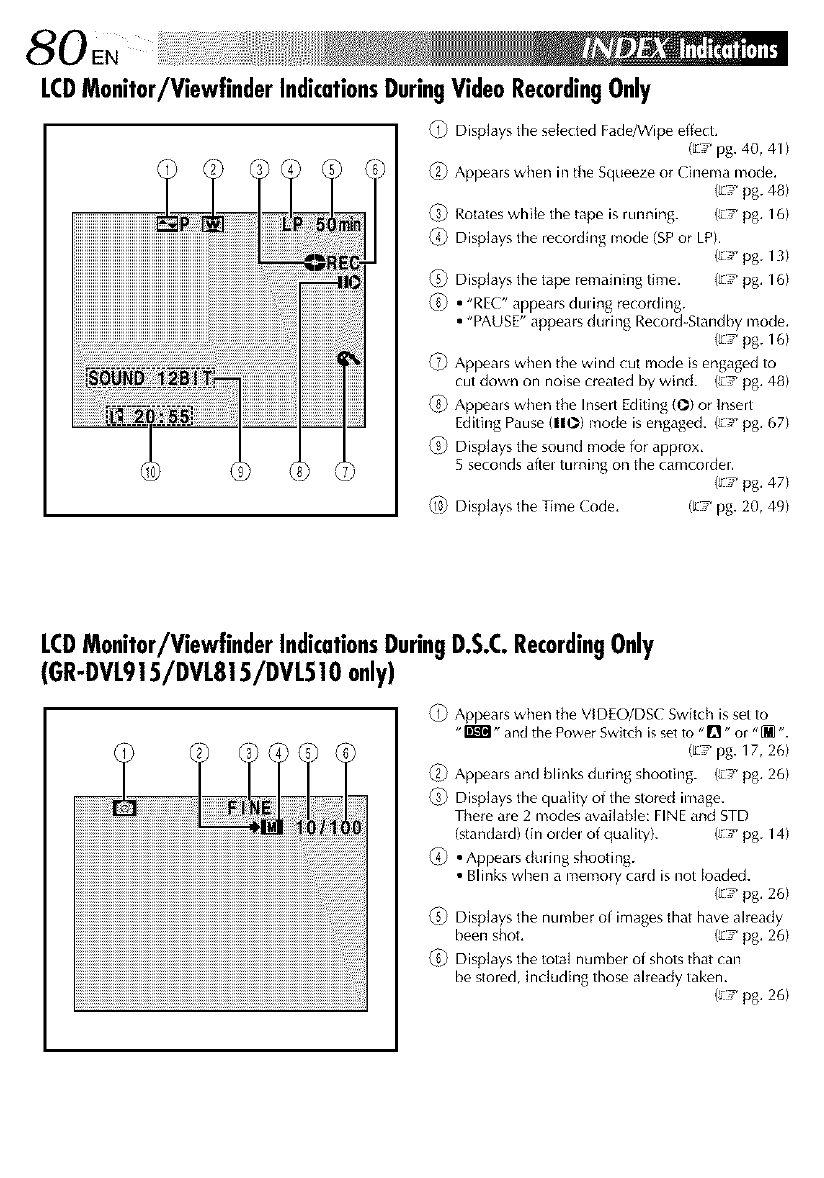
0EN i!iil
LCDMonitor/ViewfinderIndicationsDuringVideoRecordingOnly
_i_ Displays the selected Fade/gVipe effect.
(_7 pg. 40, 41 )
_2_ Appears when in the Squeeze or Ch_ema mode.
(';v_ pg. 48)
ffi_ Rotates whi{e the tape is running. (;7 pg. 16)
_ Displays the recording mode (SPor LP).
(';v_pg. 13)
ffi) Displays the tape remaining time. (';7 pg. 16)
_ • "REC" appears duung recording.
• "PAUSE" appears during Record-Standby mode.
(;7 pg. 16)
_ Appears when the wind cut mode is engaged to
cut down on noise created by wind. (;7 pg. 48)
_) Appears when the Insert Editing (O) or Insert
Editing Pause (110) mode isengaged. (_v_pg. 67)
_) Displays the sound mode for approx,
5 seconds aflel turning on the camcordel.
(_,r pg. 47)
_ Displays the Time Code, (L-! pg. 20, 49)
LCDMonitor/ViewfinderIndicationsDuringD.S.C.RecordingOnly
(GR-DVL9!5/DVL815/DVL5!0 only)
_i_ Appears when the VIDEO/DSC Switch is set to
"_" and the Power Switch is setto "Q" or "[_ ".
(l:7 pg. 17, 26)
_2) Appears and blinks durii_g shooting. (__ pg. 26)
_i) Displays the quality of the stored image.
There are 2 modes available: FINE and STD
(standard) (in oldel of quality). (,,/pg. 14)
_) • Appears during shooting.
• Blinks when a memory card is not loaded.
(_7 pg. 26)
_i) Displays the number of images that have already
been shot, (_-s pg. 26)
_ Displays the total number of shots that can
be stored, including those already taken.
(;/pg. 26)
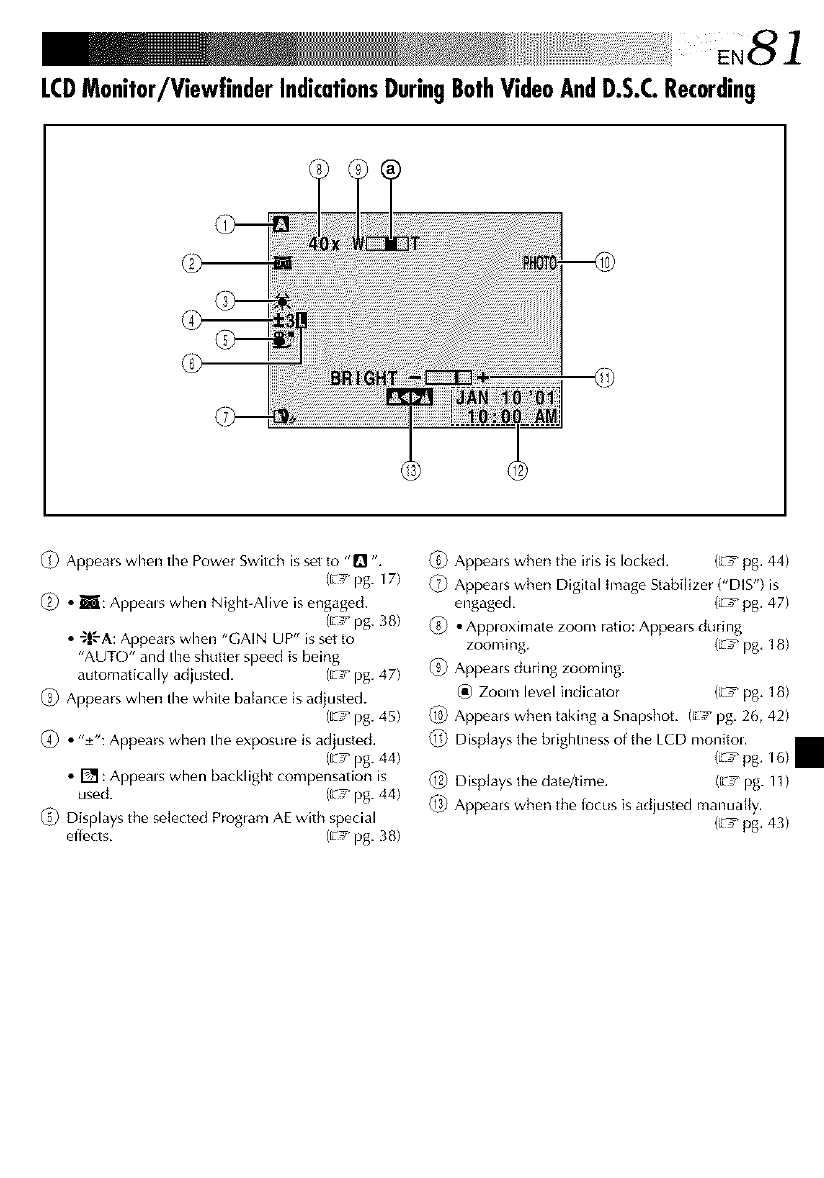
LCDMonitor/ViewfinderIndicationsDuringBothVideoAndD.S.C.Recording
@
_) Appears when the Power Switch issot to "Q ",
(E_ pg. 17)
if2) • E: Appeals when Night-Alive is engaged.
(Ev_pg. 38)
• _|-'-A: Appears when "GAIN UP" is set to
"AUTO" and the shutter speed is being
automatically adjusted, (E! pg. 47)
_S) Appears when the white balance is adjusted.
(E_, pg. 45)
_4) • "±": Appears when the exposure is adjusted.
(E! pg. 44)
• [] :Appeals when backlight compensation is
used. (£_ pg. 44)
_i) Displays the selected Program AE with special
effects, (E_ pg. 38)
QS)Appears when the iris is locked. (L_:_ pg, 44)
_ Appears when Digital Image Stabilizer ("DIS") is
engaged, (L'T pg. 47)
_) •Apploximate zoom ratio: Appears during
zooming, (L'h_pg, 18)
_ Appears during zooming.
(_) Zoom level indicator (L'h_pg, 18)
_ Appears when taking a Snapshot, (E_ pg. 26, 42)
_ Displays the brightness of the LCD monitoL
(L'T pg. 16)
_ Displays the data/time. (_7 pg. 1])
_ Appears when the locus is adjusted manually.
(L'T pg. 43)
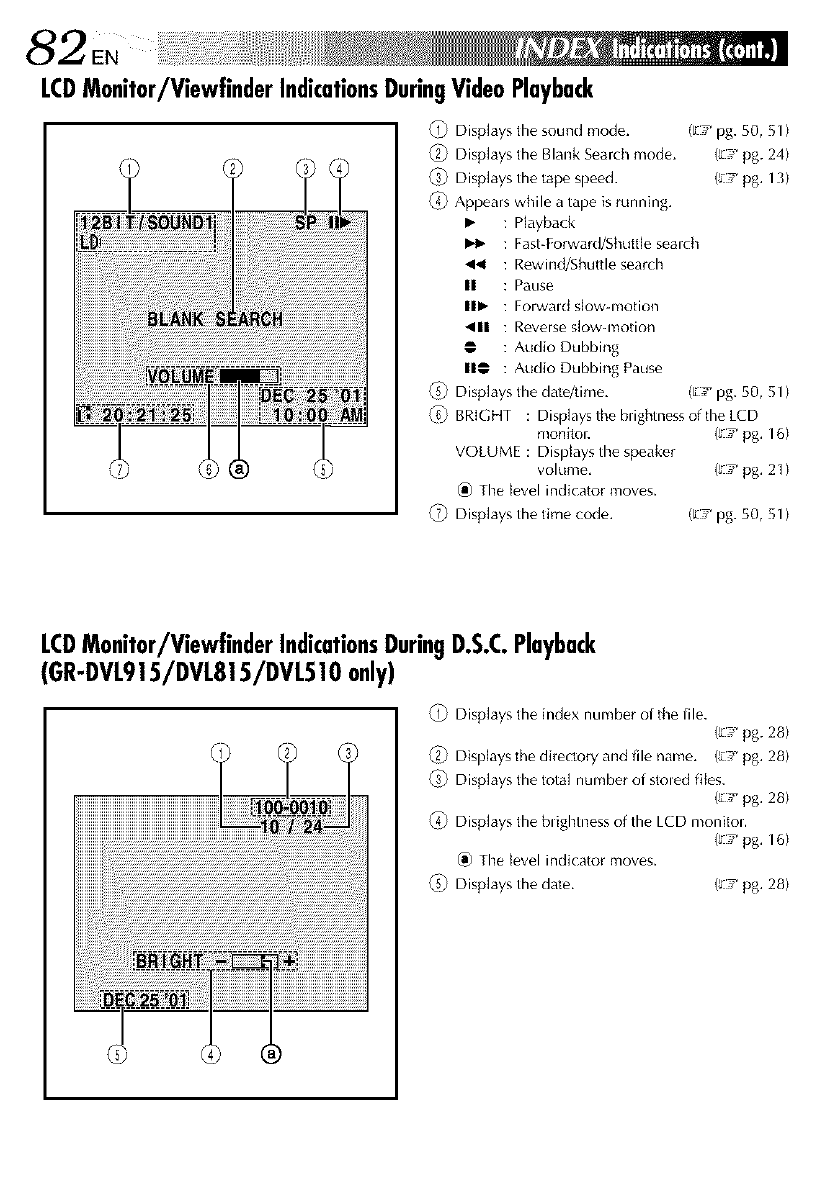
82 .
LCDMonitor/ViewfinderIndicationsDuringVideoPlayback
_i_ Displays the sound mode.
_2_ Displays the Blank Search mode.
_i_ Displays the tape speed.
_4_ Appears while a tape is running.
• : Playback
: Fast-Forward/Shuttle search
,_ : Rewind/Shuttle search
II : Pause
I1• : Forwald slow-motion
_111 : Reverse slow-motion
@ : Audio Dubbing
I1@ : Audio Dubbing Pause
_i_ Displays the data/time.
©
(E/pg. 50, 51)
(6,, pg. 24)
(L! pg. 13)
(_F pg. 50, 51)
BRIGHT : Displays the bughtness of the LCD
monitok (_/pg. 16)
VOLUME : Displays the speaker
volume, (_/pg. 21)
_) The level indicator moves.
Displays the time code. (E! pg. 50, 51 )
LCDMonitor/ViewfinderIndicationsDuringD.S.C.Playback
(GR-DVL9!5/DVL815/DVL510only)
_i_ Displays the index number of the file.
(6_ pg. 28)
_2) Displays the directory and file name. (£_ pg. 28)
_i_ Displays the total number of stoled files.
(_7 pg. 28)
_4_ Displays the brightness of the LCD monitoL
(_/pg. 16)
(_) The level indicator moves.
_i_ Displays the date. (_*/pg. 28)
WarningIndications
Indications
m(mmml
CHECK TAPE'S ERASE
PROTECTION TAB
0
HEAD CLEANING
REQUIRED USE
CLEANING CASSETTE
Function
Displaysthe battery remaining power.
Remaining power level: high
Remaining power level: exhausted
As the battery power comes close to nil, the battery indicator _blinks.
When the battery power is exhausted, power turns off automatically.
Appears when no tape is (oaded. (_ pg. 12)
Appears when the erase protecllon tab is set to "SAVE" while the Power
Switch is set to "Q" or "_" and the VIDEO/DSC Switch (GR-DVLgl 5/
DVLBl 5/DVL510 only)is set to "VIDEO'. (_ pg. 12)
Appears if dirt is dete_ed on the heads during recording. Use an optional
cleaning cassette. (_ pg. 86)
IA] Appears if condensation occurs. When this indication is displayed, wait
more than 1 hour until condensation disappears.
CONDENSATION
OPERATION PAUSED
PLEASE WAIT
Appears if atape is not loaded wben the Recording Start/Stop Button or
SNAPSHOT Button is pressed while the Power Switch is set to "Q" or
TAPE! ,,[M "and the VIDEO/DSC Swltcb (GR-DVL9b/DVLB15/DVL510 onIy) is
set to "VIDEO".
TAPE END Appears when the tape ends during recording or playback. (_ pg. 70)
DIFFERENT Appears if atape in another format is loaded.
FORMATTED TAPE
• Appears when the date/tlme is not set. (_ pg. 11 )
SET DATE/TIME) •Appears when the built-ln clock battery runs out and the previousIy set
date/time is erased. Consult your nearest JVC dealer for replacement.
LENS CAP Appears for 5 seconds after power is turned on if the lens cap is attached.
A. DUB ERROR! Appears if Audio Dubbing is attempted on a blank portion of a tape.
(_ pg.66)
A. DUB ERROR! •Appears if Audio Dubbing is attempted on a tape recorded in the LP
<CANNOT DUB mode. (_ pg. 66)
ON ALP RECORDED •Appears if Audio Dubbing is attempted on a tape recorded in 16-bit
TAPE> audio. (_ pg. 66)
<CANNOT DUB •Appears if A. DUB (_) on the remote control is pressed when the erase
ON A 16BIT
RECORDING> protection tab is set to "SAVE". (_ pg. 66)
<CHECK TAPE'S ERASE
PROTECTION TAB>
CONTINUED ON NEXT PAGE
Indications Function
INSERT ERROR! Appears if Insert Editing is attempted on a blank portion of a tape.
(L_ pg. 67)
INSERT ERROR! eAppears if Insert Editing is attempted on a tape recorded in the LP mode.
<CANNOT EDIT (L_ pg. 67)
ON A LP RECORDED •Appears if INSERT (O) on the remote control is pressedwhen the erase
TAPE> protection tab is set to "SAVE". (L_ pg. 67)
<CHECK TAPE'S ERASE
PROTECTION TAB>
Appears when the memory card's memory is full and shooting is not
MEMORY IS FULL possible.
COPYING FAILED
• Appears if dubbing of copyguarded signals is attempted while this
camcorder is being used as a recorder.
•Appears in the following cases when dubbing from atape to amemory
card:
- when no memory card is loaded.
- when the memory card's memory is full.
- when the memory card is not formatted.
- when a copy-protected SD Memory Card is loaded. (_7 pg. 55)
•Appears in the following cases when dubbing stiff images stored in the
memory card to atape:
- when condensation occurs.
- when no tape is loaded.
- when the erase protection tab is set to "SAVE".
- when a tape in another format is loaded.
- when the tape ends. (_/pg. 54)
Appears if a memory card is not loaded when SNAPSHOT is pressed whiIe
MEMORY CARD! the Power Switch is set to n or _and the VIDEO/DSC switch is set
to "DSC". (_/pg. 26)
PLEASE Appears when there is a problem with a memory card and its memory is
FORMAT corrupt, or it has not been initialized. Initialize the memory card.
(_/pg. 36)
Appears if there is no images stored in the memory card when the Power
NO IMAGES STORED Switch is set to "_" and the VIDEO/DSC Switch is set to "m ".
Appears when the camcorder takes more than 60 seconds to recognize the
loaded memory card. Remove the memory card once and insert it again.
CARD ERROR! Repeat these procedures until no indication appears. If the indication still
appears, the memory card is corrupted.
CHECK CARD'S WRITE Appears when you attempt to shoot digital stiff images while a copy-
PROTECTION SWITCH protected SD Memory Card is loaded.
The error indications (E01 -- E06) show what type of malfunction has
E0t -- E06 occured. When an error indication appears, the camcorder turns off
UNIT IN SAFEGUARD automatically. Remove the power supply (battery, etc.) and wait a few
MODE REMOVE AND
REATTACH BATTERY minutes for tbe indication to clear. When it does, you can resume using the
camcorder. If the indication remains, consult your nearest JVC dealer.
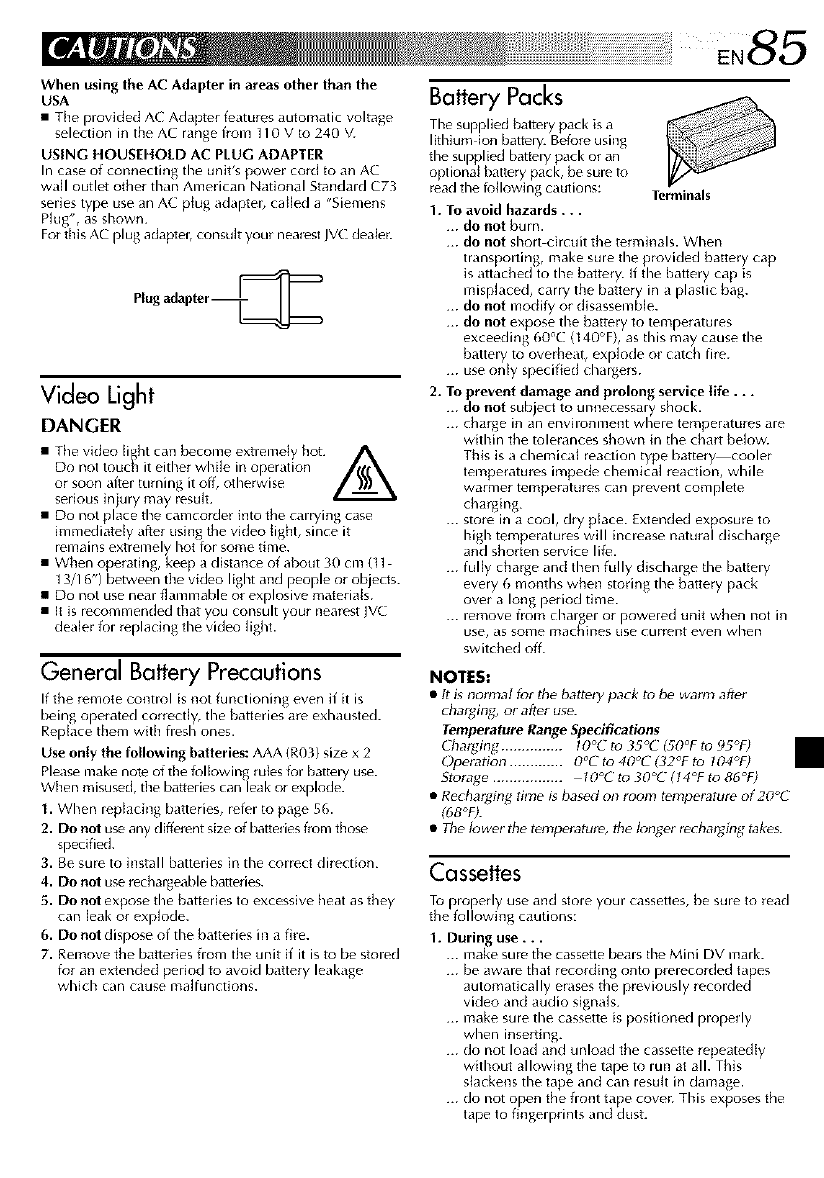
WhenusingtheACAdapterinareasotherthanthe
USA
•The plovJded AC Adaptel f_atules automatic voltage
selection in the AC lange from 110 V to 240 V.
USING HOUSEHOLD AC PLUG ADAPTER
In case of connecting the unWs powe_ co_d to an AC
wall outlet oilier than Ameucan National StandaM C73
selies type use an AC plug ,_daptel_ called a "Siemens
Plug", as shown.
For this AC plug adaptel, consult your nearest JVC deale_.
Plug adapter--_
Video Light
DANGFR
• Tbe vk]eo fig,ht can become extremely hot. A
Do not touch it either while ill operation _[ff_
or soon affel turning it off, otherwise I)))\
sedous inju Wmay _esuh.
• Do not place the camcoMe_ into tbe cauying case
immediately after using tbe vkJeo light, since it
_emains extremely hot fo_ some time.
• When operating, keep a distance of about 30 cm (t 1
13/I 6") between the video light and people or objects.
• Do not use near flammable or explosive materials.
• It is recommended that you consult your nearest JVE
dealer for replacing the video ligbt.
General Battery Precautions
If the remote control is not functioning even if it is
being operated correctly, tile batteries are exhausted.
Replace them with fresh ones.
Use only the following batteries: AAA (R03) size x 2
Please make note of the fullowing rules k_r battery use.
When misused, the batteries can leak or explode.
1. When repJacing batteries, refer to page 56.
2. Do not use any different size of batteries frum those
specified.
3. Be sure to install batteries in the correct direction.
4. Do not use _echalgeable batteries.
5. Do not expose tbe batteries to excessive beat as they
can leak or explode.
6. Do not dispose of the batteries in a fire.
7. Remove the batteries from the unit if it is to be stored
tor an extended period to avoid battery leakage
which can cause malfunctions.
Battery Packs
Tile supplied t_attery pack is a
Ikhium ion battery. Before using
tile supplied batte Wpack or an
optional battery pack, be sure to
read tile ioHowJng cautions: Terminals
1. To avoid hazards...
... do not bum.
... do not sho)t ci)cuit tbe terminals. When
t)anspo)ting, make sine tile provided batte Wcap
is attached to the battery. If tbe battery cap is
misplaced, carry the battery in a plastic bag.
... do not modify or disassemble.
... do not expose tile battery to temperatures
exceeding 60% (140°F), as tbis may cause the
battery to overheat, explode or catcb fire.
... use only specified chargers.
2. To prevent damage and prolong service life...
... do not subject to unnecessaly sbock.
... chaise in an environment where temperatures are
within the tolerances shown in tile cha_t below.
This is a chemical reaction type battery cooler
temperatures impede chemical reaction, while
warmer temperdtures call prevent complete
charging.
... store in a cool, dry place. Extended exposure to
high temperatures will increase natural discharge
and shoden service life.
... fully charge and then fully discharge the battery
every 6 months when storing the battery pack
over a long period time.
... remove from charger or powered unit when not in
use, as gonle n_acbines use cuilent even when
switcbed off.
NOTES:
•tt is normal for the battery pack to be warm after
chargln_ o_ aft_ use.
Temperature Range Specifications
['ba_ging ............... 10°(" to 35%" (50°F to 95°F)
OpeI_tion ............. O°C to 40°C (d2°F to 104°F)
Storage ................. 10% to 30°(" (14°F to 86°F)
•Recharging time is based on room tempe_ture of 20°(
(08°F).
•The lower the temperature, the longer recharging takes.
Cassettes
To properly use anti store your cassettes, be sure to read
the following cautions:
1. During use...
... make sine the cassette betas the Mini DV mall<.
... be awaie that recording onto p_eleco_ded tapes
automatically eK_ses tbe p_eviously reco)ded
video and audio signals.
... make sure the cassette is positioned propedy
when inserting.
... do not load and unload the cassette repeatedly
without allowing the tape to run at all. This
slackens the tape and can resutt in damage.
... do not open the front tape cover. This exposes the
tape to fingerprints and dust.
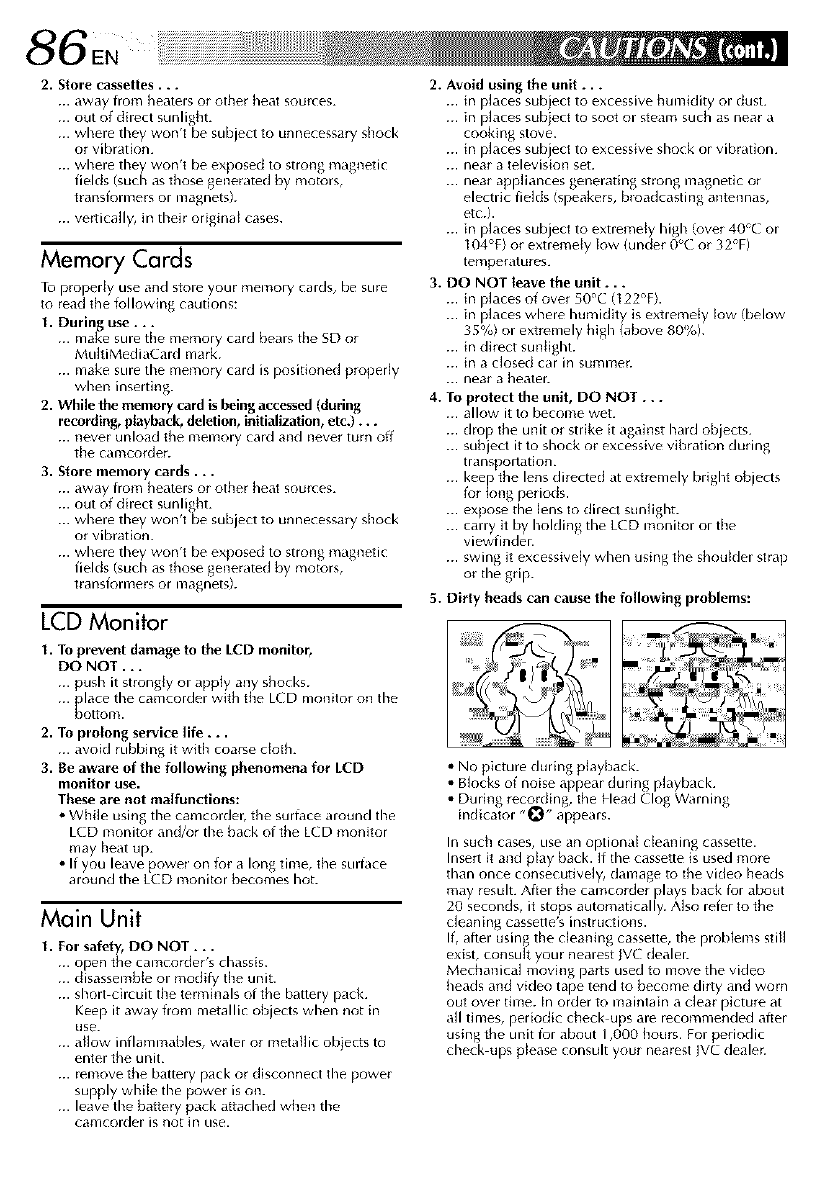
86EN
2, _ore cassettes , . .
... away from heaters or other heat sources.
... out of direct sunlight.
... where they won't be subject to unnecessary shock
or vibration.
... where they won't be exposed to strong magnetic
fields (such as those generated by motors,
ttansformels ol magnets).
... vertica[ly, in tbeb original cases.
Memory Cards
Tu properly use and store your memory cards, be sure
to read the fullowing cautions:
1. During use...
... make sure the memory card bears the SD or
MultiMediaCard mark.
... make sure the memory card is positioned properly
when inserting.
2. While the memory card is being accessed (during
recording, playback, deletion, initialization, etc.) ...
... never unload the memory card and nevel turn off
the camcolder.
3. Store memory cards...
... away from heaters or other heat sources.
... out of direct sunlight.
... where they won't be subject to unnecessary shock
or vibration.
... where they won't be exposed to strong magnetic
fields (such as those generated by motors,
tlansformers el magnets).
LCD Monitor
1. To prevent damage to the LCD monitor_
DO NOT . ..
... push it strongly or apply any shocks.
lace the camcorder with the LCD monitor on the
[_otto111.
2. To prolong service life...
... avoid rubbing it with coarse ctoth.
3. Be aware of the following phenomena for LCD
monitor use.
These are not malfunctions:
• White using the camcoldel; the sultace alound the
LCD monito_ and/ur the back of the LCD monitol
may heat up.
•If you leave powel on fuf a long time, the sultace
alound the LCD monilol becomes hoL
Main Unit
1. For safety, DO NOT...
... open the camcorder's chassis.
disassemble or modify the unit.
... short circuit the terminals of the battery pack.
Keep it away from metallic objects when not in
use.
... aflow inflammables, water or metaflic objects to
enter the unit.
... remove the battery pack or disconnect the power
supply while the power is on.
... leave the battery pack attached when the
camcorder is not in use.
2. Avoid using the unit...
... in places subject to excessive humidity or dust.
... in places subject to soot or steam such as near a
cooking stove.
... in places subject to excessive shock or vibration.
... near a television set.
... near appliances generating strong magnetic or
electric fields (speakers, b_oadcasting antennas,
etc.}.
... in places sub ect to extremeJy high (over 40% or
104°F) or extremely low {under 0°C or 32°F)
temperatures.
3. DO NOT leave the unit...
... in places of over 50'C (122%).
... in places where humidity is extremely low/below
35%) or extremely high (above 80%).
... in direct sunlight.
... in a closed car in summel.
... near a heatel_
4. To protect the unit, DO NOT...
... allow it to become wet.
... drop the unit or strike it against hard objects.
... subject it to shock or excessive vibration during
transportation.
... kee the lens directed at extremely bright objects
for _mg periods.
... expose the lens to direct sunlight.
... carry it by holding the LCD monitor or the
viewfinder.
... swing it excessively when using the shoulder strap
or the grip.
5. Dirty heads can cause the following problems:
• No picture during playback.
• Blocks of noise appear during playback.
• During recording, the Head Clog Warning
indicator "_" appears.
In such cases, use an optional cleaning cassette.
Inse_t it and play back. If the cassette is used more
than once consecutively, damage to the video heads
may result. After the camcorder plays back for about
20 seconds, it stops automatically. Also refer to the
cleaning cassette's instructions.
If, after using the cleaning cassette, the problems still
exist, consult your nearest _VC dealel:
Mechanical moving pa_ts used to move the video
heads and video tape tend to become dffty and worn
out over time. In order to maintain a clear picture at
all times, periodic check ups are recommended atter
using the unit tur about 1,000 hours. For periodic
check ups please consult your nearest JVC deale_.
How To Handle A CD-ROM
• Take car_ not to soil or scratch the minor surface
(opposite to the plinted surface). Do not write
anything or put a sticker on eithel the front or
back sulface. If the ( D-ROM gets dhty, gently
wipe it with a soft cloth outward from the center
hole using a circular motion,
• Do not use conventional disc cleaners or cleaning
splay,
• Do not bend tile CD-ROM ol touch its milror
SUlJOce,
• Do not stor_ your CD-ROM in a dusty, hot or
humid environment, Keep it away from dired
sunlight.
About moisture condensation...
•You have observed that pouring a cold liquid
into a glass will cause dlops of water to form
on the glass' outer su0ace. This same
phenomenon occuls on the head drum of a
camcolder when it is moved flora a cool
place to a warm p[ace, after heating a coM
room, undel exhemdy humid conditions ol
in a place directly subjected to the cool air
flora an air conditioner,
• Moisture on the head dlum can cause severe
damage to the video tape, and can lead to
internal damage to the camcoldel itself,
Serious malfunctioning
if maliunctioning occurs, stop using the unit
immediately and consult youl local JVC dealer.
The camcorder is a nlicloconlputer-controtled
device, External noise and interference (from a
TV, a radio, etc.) might plevent it from lunction-
ing properly, In such cases, first disconnect its
power supply unit (battery pack, AC Adaptel,
etc.) and wait a few nlinutes and then re-
connect it and proceed as usual from the
beginning.
Declaration of Conformity
Model Number GR-DVL915U/DVL815U/
DVL510U/DVL310U
Trade Name JVC
Responsible party JVC AMERICAS CORP.
Address 1700 Valley Road Wayne,
N. J. 07470
Telephone Number :973-3155000
This device complies with Part 15 of FCC Rules,
Operation is subject to the following two
conditions:
(1) This device may not cause harmful
interfelence, and (2) this device must accept
any inte0erence leceived, including inte0er-
ence that may cause undesired operation.
Change or modifications not approved by the
paffy responsible lot compliance could void the
user's autholity to operate the equipment, This
equipment has been tested and found to
comply with the limits for a Class B digital
device, pursuant to Part ] 5 of the ECC Rules,
These limits are designed to provide reasonable
protection against harmiul intederence in a
residential installation. This equipment
genelates, uses, and can radiate radio frequency
enelgy and, if not installed and used in
accoldance with the instluctions, may cause
ham_ful interference to radio communications,
However, there is no guarantee that interference
will not occur in a particulal installation. If this
equipment does cause harmful interfelence to
radio or television reception, which can be
determined by turning the equipment off and
on, the user is encouraged to try to correct the
interfelence by one or more of the following
measures:
Reorient o_ rdocate the _eceiving antenna.
Increase the separation between the equip-
nlent and receiver.
Connect the equipment into an outlet on a
circuit different from that to which the
leceiver is connected,
Consult the dealer or an experienced radio/
TV technician for help,
This Class B digital apparatus complies with
Canadian ICES-003.
Cet appaleit nunl6rique de la classe Best
coniorme _ la notate NMB-003 du Canada.
88 ,
A
AC Adapter ............................................ _Y pg. B, 9
Analog Input ...................................... L'T pg, SO, 52
Audio Dubbing ........................................ EY pg. BB
Auto Date ................................................. EY pg. 49
Auto Focus ............................................... EY pg. 43
Auto Playback .......................................... L:_,pg. 28
Auto Shut off ................................. _ pg, 16, 21, 27
B
Back{ight Compensation ........................... _7 pg. 44
Battery Low .............................................. _Y pg. 83
Battery Pack ...................................... _ pg. B, 9, 85
Beep ........................................................ _Y pg. 48
Blank Search ............................................ E7 pg. 24
Blighten The LCD Monitor ........................ _Y pg. 16
C
Channels (Left/Right) ................................. _7 pg. 51
Charge Tile Battery Pack ............................. _ pg. 8
Cinema .................................................... _Y pg. 48
Classi( Film .............................................. [:Y pg. 39
Clean The Camcorder ............................... Ey pg. 77
Connections -. _Y pg, 8, 9, 22, 23, 52, $3, 62, B8, 69
D
Darken Tile LCD Monitor ......................... 'zs pg. 16
Dato/Time Display ........................ _ pg, 49, 50, 51
Date/Time Settings .................................... L_7_pg, 11
Deleting hnages ........................................ _Y pg. 32
Demonstration Mode ............................ _Y pg. 6, 49
Digital Zoom ...................................... L_ pg, 18, 47
DIS (Digital image Stabilizer) .................... Ey pg. 47
Diopter Adjustment .................................. _Y pg. 10
DPOE (Digital Print Older Format) ............ _Y pg. 34
Dubbing ........................................... _,r pg. 52 55
Erase Protection ........................................ E7 pg. 12
Exposule Control ...................................... _Y pg. 44
[
Fade-In/Out ........................................ _Y pg. 40, 41
Fast-Forward Tile Tape .............................. _ Y pg, 21
Frame-By-Frame Playback .................. _Y pg. 21, $9
G
Gain Up ................................................... _-Y pg. 47
GHp Adjustment ....................................... _ Y pg, 1O
I
Icons ................................................ _Y pg, 47 49
Index Playback ......................................... _Y pg. 29
Index Screen ............................................ _7 pg. 29
Initialize A Memo WCald .......................... [_7 pg. 36
Inselt Editing ............................................. g,' pg. 67
his ............................................................ _Y pg. 44
his Lock ................................................... _-Y pg, 44
I
Journalistic Shooting ................................. _Y pg. 17
Jump Playback ......................................... _Y pg, 30
[
LCD monitol/Viewfinder
Indications ..................................... _Y pg, 80 84
Load A Tape ............................................. _Y pg, 12
M
Manual Focus ........................................... _Y pg. 43
Memory Card ..................................... F_ypg. 14, 86
Menu Bcleen, CAMERA ............................ _Y pg, 47
Menu Bcleen, DISPLAY ....................... _Y pg. 49, SO
Menu Screen, DBC ............................. _Y pg. 14, 49
Menu Bcleen, MANUAL ..................... _Y pg. 47, 48
Menu Bcleen, MEMORY ..................... _' pg. 31, 51
Menu Bcleen, SYSTEM ................. _Y pg. 48, 49, S0
Menu Screen, VIDEO ............................... g7 pg. SO
Monotone ................................................ _'_ pg. 39
Motor Drive Mode .................................... _Y pg. 42
MultiMediaCard ................................. _Y pg. 14, 86
N
Night-Alive ............................................... _pg, 38
P
Picture Quality Mode ............................... _._ pg. 14
Pi_ure Wipe/Dissolve ......................... L'T pg. 40, 41
Playback Special Effects ............................ _7 pg. 59
Playback Zoom ........................................ E7 pg. 60
Power Switch Position .............................. _ pg. 17
Printer ...................................................... _ pg. 69
Program AE With Specia_ Effects .......... L'T pg. 38, 39
Protecting Images ..................................... _7 pg. 31
Provided Accessories .................................. _7 pg, S
R
Random Assemble Editing ................. _Y pg. 61 65
Record-Standby ........................................ _7 ¸pg. 16
Recording Mode ....................................... E7 pg. 13
Remote Control ........................................ E__ pg. 56
Reset ........................................................ _7 pg. 49
Rewind The Tape ...................................... _7 pg. 21
SD Memoly Card ................................ L'_ pg. 14, 86
SelgRecolding .......................................... _v pg. 17
Sepia ........................................................ _Y pg. 39
Set Remote Contro[/VCR Code .................. EY pg. 61
Shuttle Search ........................................... _' pg. 21
Shutter Speed ........................................... _.' pg. 39
Slow-Motion Hayback ........................ L'T pg. 21, 59
Slow Shutter ............................................. _S pg. 39
Snapshot ............................................. _ pg. 26, 42
Snapshot Mode .................................. L'T pg. 26, 42
Snow ........................................................ [_Y pg. 39
Sound Mode ................................. _ pg. 47, SO,51
Speakel Volume ....................................... It., pg. 21
Speclflca ions ...................................... _ pg. 90, 91
Sports ....................................................... 'cy pg. 39
Spotlight ................................................... [_v pg. 39
Squeeze ................................................... EY pg. 48
Still Playback ............................................ E7 pg. 21
Strobe ...................................................... _Y pg. 39
T
Tally ......................................................... _,r pg, 48
T_le Macro ............................................... E., pg, 48
Tinle Code .............................. L_ pg. 20, 49, 50, $1
Tripod Mounting ....................................... _Y pg, 10
Twilight .................................................... EY pg, 39
U
Unload A Tape ......................................... _Y pg, 12
V
VIDEO/DSC Switch Position ..................... '_Y pg, 17
Vkieo Echo ............................................... EV pg, 39
Vkieo Light ............................................... _Y pg, 19
W
White Balance .......................................... _'_ pg, 4S
Wide Mode .............................................. _v pg, 48
Wind Cut ................................................. _s pg. 48
Wipe In/Out ....................................... _Y pg. 40, 41
Z
Zooming .................................................. _Y pg, 18
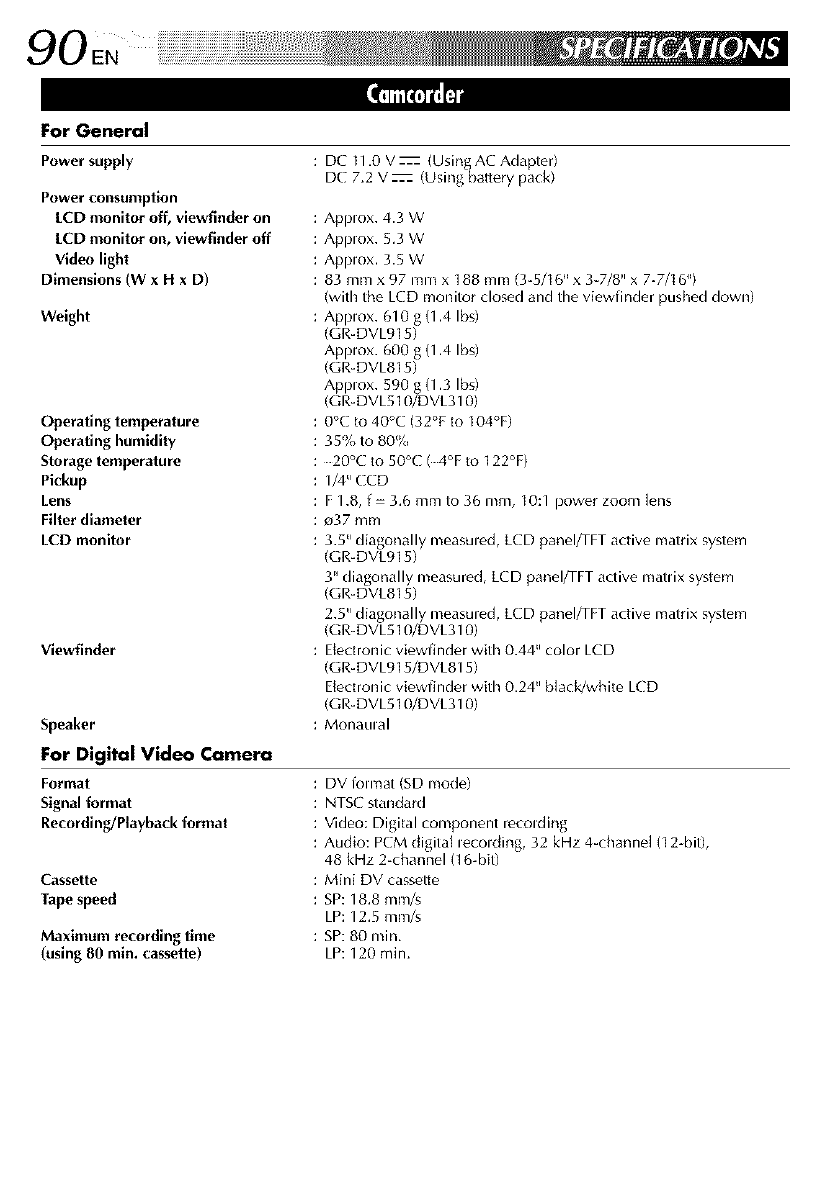
90EN
For General
Power supply
Power consumption
[CD monitor off, viewfinder on
[CD monitor on, viewfinder off
Video light
Dimensions (W xH x D)
Weight
Operating temperature
Operating humidity
Storage temperature
Pickup
Lens
Filter diameter
LCD monitor
Viewfinder
Speaker
: DC 11.0 V z (Using AC Adapter)
DC 7.2 V z (Usingbattery pack)
: Applox. 4.3 W
: Applox. 5.3 W
: Applox. 3.5 W
: 83 mm x 97 nln) x 18[3toni (3-5/16 _ x 3-7/8 IIx 7-7/I 6_)
(with the LCD monitor closed and the viewfinder pushed down)
: Applox. 610 g (1.4 Ibs)
(GR-DVL915)
Applox. 600 g (1.4 Ibs)
(GR-DVL815)
Applox. 590 g (1.3 Ibs)
(GR-DVL510/DVL310)
: 0°C to 40°C (32% to 104°F)
: 35% to 80%
: 20°C to 50°C (4°F to 122°F)
: 1/4" CCD
: F 1.8, f- 3.6 mm to 36 mm, 10:1 power zoom lens
: e_37mm
: 3.5" diagonally measuled, LCD panel/TFT active matrix system
(GR-DVL915)
3" diagonally measured, LCD panel/TFT active matlix system
(GR-DVL815)
2.5" diagonally measuled, LCD panel/TFT active matrix system
(GR-DVL510/DVL310)
: Electronic viewfinder with 0.44" color LCD
(GR-DVL915/DVL815)
Electronic viewfinder with 0.24" black/white LCD
(GR-DVL510/DVL310)
: MonaLll al
For Digital Video Camera
Format
Signal format
Recording/Playback format
Cassette
Tape speed
Maximum recording time
(using 80 min, cassette)
: DV folnlat (SD mode)
: NTSC standard
: Video: Digital component recolding
: Audio: PCM digital lecolding, 32 kHz 4-channel (12 bit),
48 kHz 2-ctlannel (16-bit)
: Mini DV cassette
: SP: 18,8 mm/s
LP: 12,5 mm/s
: SP:80 min.
LP: 120 min.
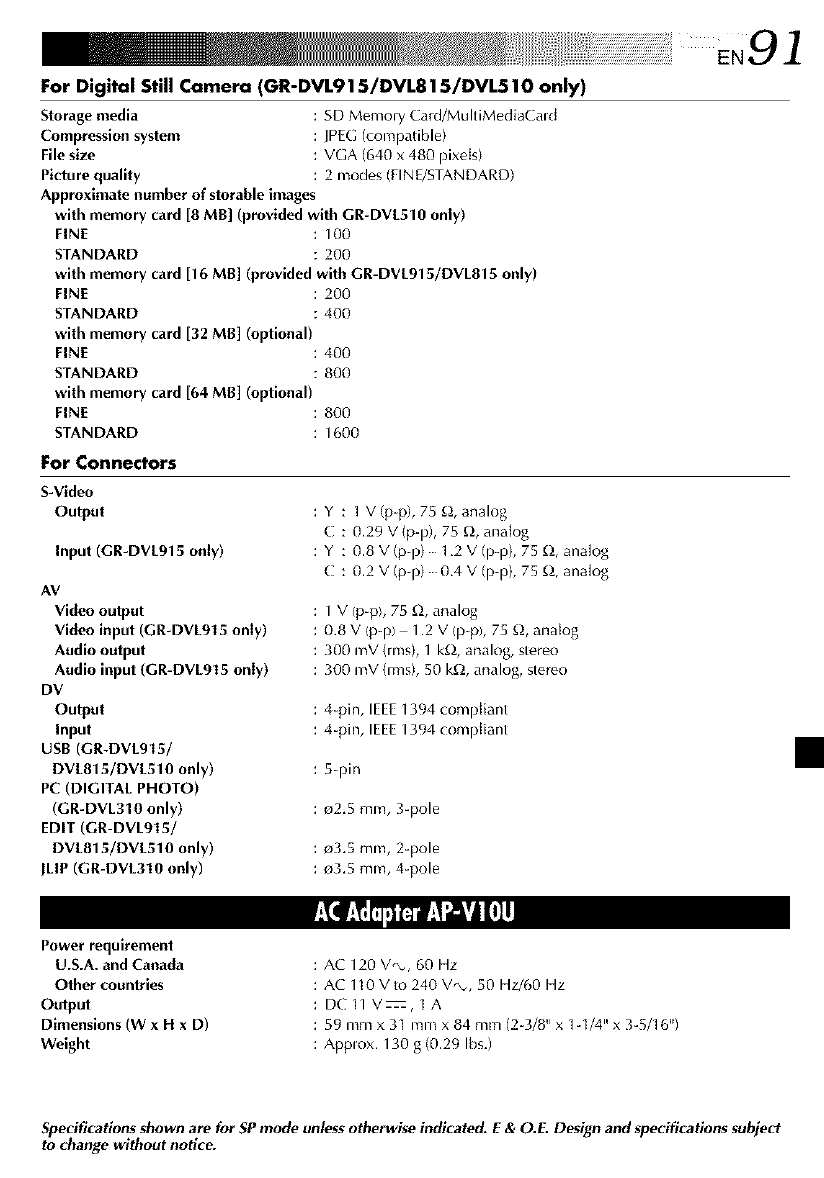
For Digital Still Camera (GR-DVL915/DVL815/DVL510 only)
Storage media : SD Memory Card/MultiMediaCald
Compression system : JPEG(conlpatible)
File size : VGA (640 x 480 pixets)
Picture quality : 2 modes (FINE/STANDARD)
Approximate number of storable images
with memory card [8 MB] (provided with GR-DVL510 only)
FINE : 100
STANDARD : 200
with memory card [16 MB] (provided with GR*DVL915/DVL815 only)
FINE : 200
STANDARD : 400
with memory card [32 MB] (optional)
FINE : 400
STANDARD : 800
with memory card [64 MB] (optional)
FINE : 800
STANDARD : 1600
For Connectors
S-Video
Output
Input (GR-DVL915 only)
AV
Video output
Video input (GR-DVL915 only)
Audio output
Audio input (GR-DVL915 only)
DV
Output
Input
USB (GR-DVL915/
DVL815/DVL510 only)
PC (DIGITAL PHOTO)
(GR-DVL310 only)
EDIT (GR-DVL915/
DVL815/DVL510 only)
JLIP (GR-DVL310 only)
: Y : 1 V (p-p), 75 _), analog
C : 0.29 V (p-p), 75 _), analog
: Y : 0.8 V (p-p) 1.2 V (p-p), 75 _, analog
C : 0.2 V(p-p) 0.4 V (p-p), 75 _, analog
: 1 V (p-p), 75 _2, analog
: 0.8 V (p-p) 1.2 V (p-p), 75 _), analog
: 300 mV (rms), 1 k£_,analog, stereo
: 300 mV(rms), 50 k£_,analog, stereo
: 4-pin, IEEE1394 compliant
: 4-pin, IEEE1394 compliant
: 5-pin
: _2.5 mm, 3-pole
: e3.5 mm, 2-pole
: e3.5 mm, 4-pole
Power requirement
U.S.A. and Canada
Other countries
Output
Dimensions (W xH x D)
Weight
: AC 120 V,_, 60 Hz
: AC H0 Vto 240 V,_, 50 Hz/60 Hz
: DC11V_,1A
: 59 mm x 31 mm x 84 mm (2-3/8" x 1_1/4" x 3-5/16'9
: Applox. 130 g (0,29 Ibs.)
Specifications shown are for SP mode unless otherwise indicated. E & O.E. Design and specifications subject
to change without notice.

<<<<
OO_
JVC
VICTOR COMPANy OF JAPAN_ LIMITED
Printed in Japan
COPYRIGHT@ 2000 VICTOR COMPANY OF JAPAN, LTD. [] _ 1200NOV _-UN_-YP
