JVC DVD Systems Manual L0412079
User Manual: JVC JVC DVD Systems Manual JVC DVD Systems Owner's Manual, JVC DVD Systems installation guides
Open the PDF directly: View PDF ![]() .
.
Page Count: 112 [warning: Documents this large are best viewed by clicking the View PDF Link!]
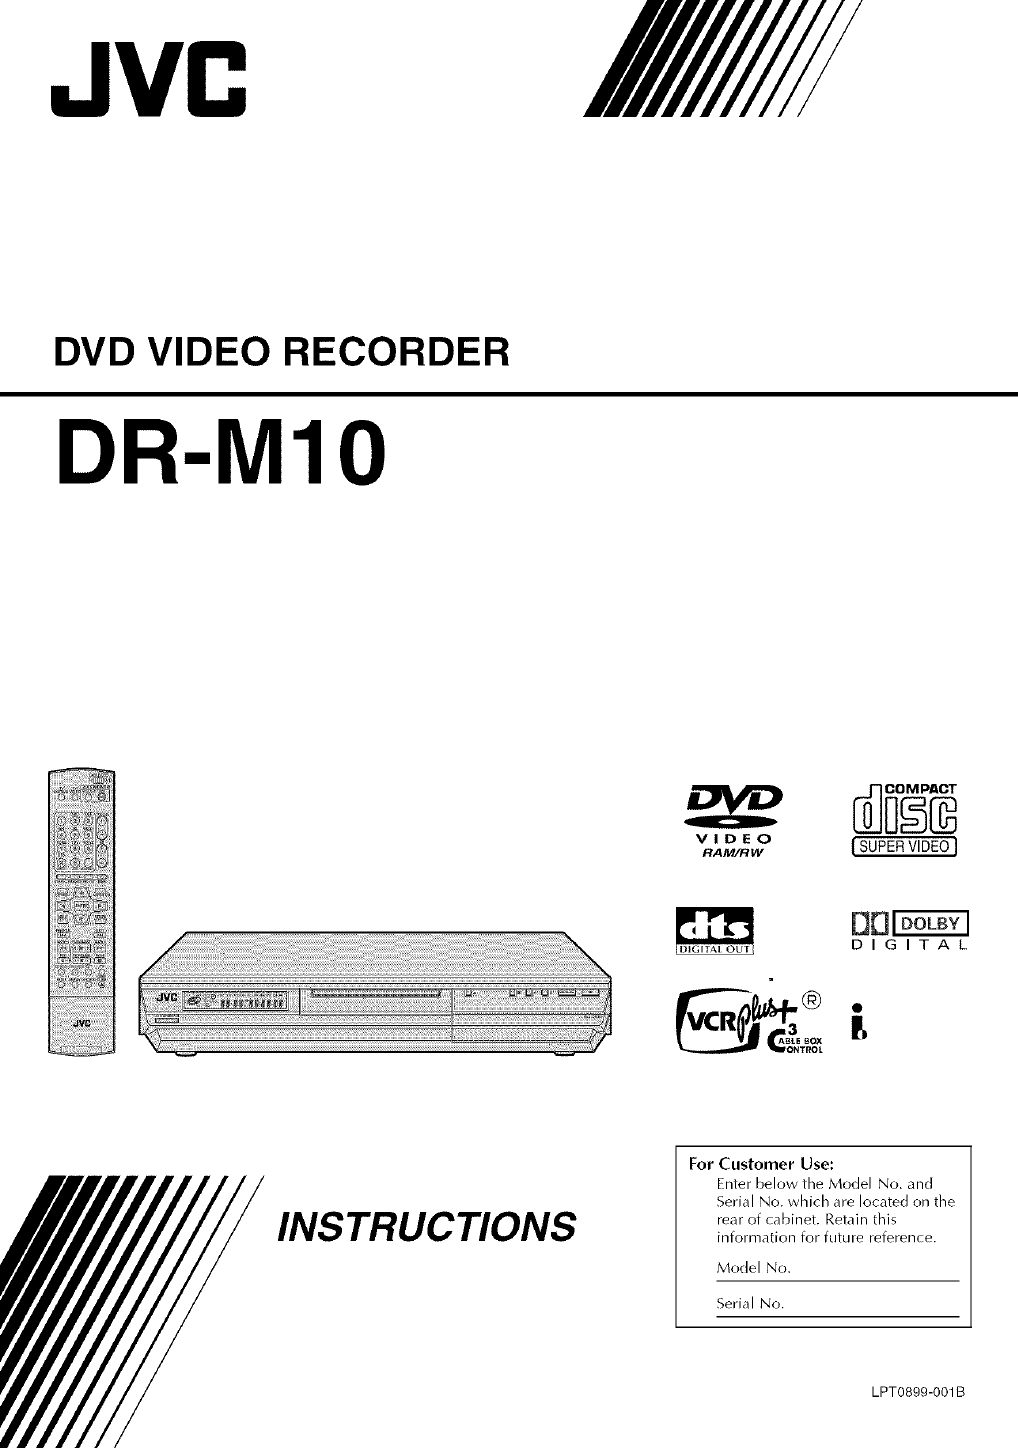
JVC
DVD VIDEO RECORDER
DR-M10
i_ilil
VIDEO
RAM/RW I SUPER VIDEO I
INSTRUCTIONS
For Customer Use:
Enter below the Model No. and
Serial No. which are located on the
rear of cabinet. Retain this
information for future reference.
Model No.
Serial No.
LPTO899-OO1B
2EN
Dear Customer,
Thank you for purchasing the JVC DVD vide() recorder.
Before use, please read the safety information an(]
precautions to ensure safe use of your new unit.
CAUTIONS
CAUTION: TO REDUCE THE RISK OF ELECTRIC SHOCK.
DO NOT REMOVE COVER (OR BACK).
NO USER-SERVICEABLE PARTS INSIDE.
REFER SERVICING TO QUALIFIED SERVICE PERSONNEL.
The lightning flash with arrowhead symbol,
within an equilateral triangle, is intended to
alert the user to the presence of uninsulated
"dangerous voltage" within the product's
enclosure that may be of sufficient magnitude
to constitute a risk of electric shock to
persons.
The exclamation point within an equilateral
triangle is intended to alert the user to the
presence of important operating and
maintenance iservicing) instructions in the
literature accompanying the appliance.
WARNING:
TO PREVENT FIRE OR SHOCK HAZARD, DO
NOT EXPOSE THIS UNIT TO RAIN OR
MOISTURE.
CAUTION:
This unit should be used with AC 120V'_, 60Hz only.
To prevent electric shocks and fire hazards, DO NOT use any
other power source.
CAUTION:
TO PREVENT E[ECTRIC SHOCK, MATCH WIDE BLADE OF
PLUG TO WIDE SLO[. FULtY INSERT.
ATTENTION:
POUR EVITER LES CHO(:S _l ECTRIQUES, INTRODUIRE LA
LAME LA PlUS LARGE DE ]A FICHE DANS [A BORNE
CORRESPONDANTE DE LA PRISE ET POUSSER JUSQU'AU
FOND.
Note to CATV system installer:
This reminder is provided to call the CATV system installer's
attention to Article 820-40 of the NFC that provides guidelines
for proper grounding and, in particular, specifies that the cable
ground shall be connected to the grounding system of the
building, as close to the point of cable entry as practical.
CAUTION:
Changes or modifications not approved by IVC could void
user's authority to operate the equipment.
CAUTION
A UNI[ IS A CI.ASS 1 lASER PROIDUCY. HOWEVER ]HIS UNII USES A VISIBLE lASER BEAM WHICH COULD
CAUSE HAZARDOUS RADIAlION EXPOSURE IF DIRECI ED. BE SURE IO OPERA] E [HE UNIT CORRECIIY AS
INSTRUC I ED.
WHEN IHIS UN[] IS PLUGGED [NIO ]HE WALl OU FEEl, DO NO] PLACE YOUR EYES CI.OSE IO [HE
OPENING OF IHE [DISC FRAY AND O[HER OPENINGS IO EOOK INTO ]HE INSIDE OF [HIS UNII.
USE OF CONTROLS OR ADJUS1 MENTS OR PERFORMANCE OF PROCEDURES OIHER FHAN IHOSE SPECIFIED
HEREIN MAY RESUI T IN HAZARDOUS RADIAIION EXPOSURE.
DO NOT OPEN COVERS AND DO NO1 REPAIR YOURSE[ F. REFER SERVICING TO QUA[ IF[ED PERSONNEl.
CLASS 1 lASER PRODUCT
REPRODUC [ION OF I.ABELS
WARNING [ABE[ INSIDE OF/HE UNI[
CAUTIONVISIBLE AND INVISIBLE LASER RADiATiON WHEN OPEN. AVOID EXPOSURETO BEAM.
DO NOT STARE iNTO BEAM OR ViEW DIRECTLYWiTH OPTICAL iNSTRUMENTS.
ADVARSELSYNL,_ oG USVNL,GL ,SERS'rR, L,NGVED._BN[NG.UNDGAUDSAETTELSEFORSTRAL[NG
SE IKKEIND I STRALEN=HELLERIKKE MED OPTISKEINSTRUMENTER.
ADVARSELSYNLIGOGUSYNLIGLASERSTRALINGNARDEKSELAPNE&UNDGAEKSPONERINGFORSTRALEN
STIRR[KKEINN[ STRALENELLERSEDIREKTEMEDOPTISKEINSTRUMENTER.
VARO! AVATTAESSAOLET ALTTIINANAKYV_,AJA NAKYMATON LASERSATEILYLLE
ALA TUIJOTA S_,TEESEENAL_,KAKATSOSlT_, OPTISENLAITTEENLAPL
VARNING SYNLIGOCHOSYNLIGLASERSTRALNINGN_,BDENNADELAROPPNAD.STRALENAR FARLIG
STIRRAEJ IN I STRALENOCHBETRAKTAEJ STRALENMEDOPTIBKAINSTRUMENT.
OR
ohdistunstasuoma'_rseesi(_
E-3
IMPORTANTPRODUCT
SAFETYINSTRUCTIONS
Electrical energy can perform many useful functions. But
improper use can result in potential electrical shock or fire
hazards. This product has been engineered and manufactured to
assure your personal safety. [n order not to defeat the built-in
safeguards, observe the following basic rules for its installation,
use and servicing.
ATTENTION
Follow and obey all warnings and instructions marked on your
product and its operating instructions. For your safety, please
read all the safety and operating instructions before you operate
this product and keep this booklet for future reference.
INSTALLATION
1. Grounding or Polarization
(A) Your product may be equipped with a polarized alternating-
current line plug (a plug having one blade wider than the
other). This plug will fit into the power outlet only one way.
This is a safety feature.
If you are unable to insert the plug fully into the outlet, try
reversing the plug. if the plug should still fail to fit, contact
your electrician to replace your obsolete oudet. Do not
defeat the safety purpose of the polarized plug.
(g) Your product may be equipped with a 3-wire grounding-type
plug, a plug having a third (grounding) pin. This plug will
only fit into a grounding-type power oudet. This is a safety
feature.
[f you are unable to insert the plug into the outlet, contact
your electrician to replace your obsolete outlet. Do not
defeat the safety purpose of the grounding-type plug.
2. Power Sources
Operate your product only from the type of power source
indicated on the marking label. If you are not sure of the type of
power supply to your home, consult your product dealer or local
power company. If your product is intended to operate from
battery power, or other sources, refer to the operating
instructions.
3. Overloading
Do not overload wall outlets, extension cords, or integral
convenience receptacles as this can result in a risk of fire or
electric shock.
4. Power Cord Protection
Power supply cords should be routed so that they are not likely
to be walked on or pinched by items place(] upon or against
them, paying particular attention to cords at plugs, convenience
receptacles, and the point where they exit from the product.
5. Ventilation
Slots an(] openings in the cabinet are provided for ventilation. [o
ensure reliable operation of the product and to protect it from
overheating, these openings must not be blocked or covered.
• Do not block the openings by placing the product on a be(],
sofa, rug or other similar surface.
• Do not [)lace the product in a built-in installation such as a
bookcase or rack unless proper ventilation is provided or the
manufacturer's instructions have been adhered to.
6. Wall or Ceiling Mounting
The product should be mounted to a wall or ceiling only as
recommended by the manufacturer.
ANTENNA INSTALLATION INSTRUCTIONS
1. Outdoor Antenna Grounding
If an outside antenna or cable system is connected to the
product, be sure the antenna or cable system is grounded so as
to provide some protection against voltage surges an(] built-up
static charges. Article 810 of the National Electrical Code, ANSI/
NFPA 70, provides information with regard to proper grounding
of the mast and supporting structure, grounding of the lead-in
wire to an antenna discharge unit, size of grounding connectors,
location of antenna discharge unit, connection to grounding
electrodes, and requirements for the grounding electrode.
2. Lightning
For added protection for this product during a lightning storm, or
when it is left unattended and unused for long periods of time,
unplug it from the wall outlet an(] disconnect the antenna or
cable system. This will prevent damage to the product due to
lightning and power-line surges.
3. Power Lines
An outside antenna system should not be located in the vicinity
of overhead power lines or other electric light or power circuits,
or where it can fall into such power lines or circuits. When
installing an outside antenna system, extreme care should be
taken to kee I) from touching such power lines or circuits as
contact with them might be fatal.
EXAMPLE OF ANTENNA GROUNDING AS PER
NATIONAL ELECTRICAL CODE, ANSI/NFPA 70
LEAD IN WIRE
GROUNOCLAMP
ELECTRICSERVICE
_ANTENNA
DISCHARGE UNIT
(NECSECTION
810-20)
3ROUNDING
CONDUCTORS
(NEC SECTION 810-21)
GROUND CLAMPS
POWER SERVICEGROUNDING ELECTRODESYSTEM
(NEC ART 250. PARTH)
NEC - NATIONAL ELECTRICAL CODE
EN
USE
1. Accessories
"]b avoid personal injury:
• Do not place this product on an unstable cart, stand, tripod,
bracket, or table. It may fall, causing serious injury to a child
or adult, and serious damage to the product.
• Use only with a cart, stand, tripod, bracket, or table
recommended by the manufacturer or sold with the product.
• Use a mounting accessory recommended by the manufacturer
and follow the manufacturer's instructions for any mounting of
the product.
• Do not try to roll a cart with small casters across thresholds or
deep-pile carpets.
2. Product and Cart Combination PORTABLECARTWARNING
A product and cart combination should (Symbolprovidedby RETAC)
be moved with care. Quick stops,
excessive force, an(] uneven surfaces
may cause the product and cart
combination to overturn.
3. Water and Moisture
Do not use this product near wate_for example, near a bath
tub, wash bowl, kitchen sink or laundry tub, in a wet basement,
or near a swimming pool and the like.
4. Object and Eiquid Entry
Never push objects of any kin(] into this product through
openings as they may touch dangerous voltage points or short-
out [)arts that could result in a fire or electric shock. Never spill
liquid of any kind on the product.
5. Attachments
Do not use attachments not recommended by the manufacturer
of this product as they may cause hazards.
6. Cleaning
Unplug this product from the wall outlet before cleaning. Do not
use liquid cleaners or aerosol cleaners. Use a damp cloth for
cleaning.
7. Heat
The product should be situated away from heat sources such as
radiators, heat registers, stoves, or other products (including
amplifiers) that produce heat,
SERVICING
1. Servicing
if your product is not operating correctly or exhibits a marked
change in performance and you are unable to restore normal
operation by following the detailed procedure in its operating
instructions, do not attempt to service it yourself as opening or
removing covers may expose you to dangerous voltage or other
hazards. Refer all servicing to qualified service personnel.
2. Damage Requiring Service
Unplug this product from the wall outlet an(] refer servicing to
qualified service personnel under the following conditions:
a. When the power supply cord or plug is damaged.
b. If liquid has been spilled, or objects have fallen into the
product.
c. If the product has been expose(] to rain or water.
d. If the product does not operate normally by following the
operating instructions. Adjust only those controls that are
covered by the operating instructions as an improper
adjustment of other controls may result in damage an(] will
often require extensive work by a qualified technician to
restore the product to its normal operation.
e. If the product has been dropped or damaged in any way.
f. When the product exhibits a distinct change in
performance--this indicates a need for service.
3. Replacement Parts
When replacement parts are required, be sure the service
technician has used replacement parts specified by the
manufacturer or which have the same characteristics as the
original part. Unauthorized substitutions may result in fire,
electric shock or other hazards.
4. Safety Check
Upon completion of any service or repairs to this product, ask
the service technician to perform safety c hecks to determine that
the product is in safe operating condition.
HOW TO USE THIS INSTRUCTION MANUAL
• All major sections and subsections are listed in the l\d_le Of
Contents on page 6. Use this when searching for information
on a specific procedure or feature.
• The index on pages 12 17 lists frequently-used terms, and
the number of the page on which they are used or explained in
the manual. This section also illustrates the controls and
connections on the front and rear panel, the front display
panel and the remote controh
• The _€_ mark signals a reference to another page for
instructions or related information.
• Operation buttons necessary for the various procedures are
clearly indicated through the use of illustrations at the
beginning of each major section.
BEFORE YOU INSTALL YOUR NEW UNIT...
•.. please read the sections/literature listed below•
• "CAUTIONS" on [)age 2
• "IMPORTANT PRODUCT SAFETY INSTRUCTIONS" on
pages 3 - 4

EN5
This equipment has been tested and found to comply with
the limits for a Class g digital device, pursuant to Part 15 of
the FCC Rules. These limits are designed to provide
reasonable protection against harmful interference in a
residential installation. This equipment generates, uses, and
can radiate radio frequency energy and, if not installed and
used in accordance with the instructions, may cause harmful
interference to radio communications. However, there is no
guarantee that interference will not occur in a particular
installation. If this equipment does cause harmful
interference to radio or television reception, which can be
determined by turning the equipment off and on, the user is
encouraged to try to correct the interference by one or more
of the following measures:
Reorient or relocate the receiving antenna.
increase the separation between the equipment and
receiver.
Connect the equipment into an outlet on a circuit
different from that to which the receiver is connected.
Consult the dealer or an experienced radio/TV
technician for help.
2. DO NOT block the unit's ventilation openings or
holes.
(If the ventilation openings or holes are blocked by a
newspaper or cloth, etc., the heat may not be able to
get outd
3. DO NOT place heavy objects on the unit or Remote.
4. DO NOT place anything which might spill on top of
the unit or Remote.
(If water or liquid is allowed to enter this equipment,
fire or electric shock may be caused.)
5. DO NOT expose the apparatus to dripping or
splashing.
6. DO NOT use this equipment in a bathroom or places
with water. Also DO NOT place any containers filled
with water or liquids (such as cosmetics or medicines,
flower vases, potted plants, cups, etc.) on top of this
unit.
7. DO NOT place any naked flame sources, such as
lighted candles, on the apparatus.
8. AVOID violent shocks to the unit during transport.
VCR Plus+, C _ and PlusCode are registered trademarks of
Gemstar Development Corporation.
The VCR Plus+ system is manufactured under license from
Gemstar Development Corporation.
DSS TM is an official trademark of DIRECTV, Inc., a unit of GM
Hughes Electronics. DISH Network r_ is a trademark of Echostar
Communications Corporation.
DE]
DIGITAL
• Manufactured under licence from Dolby Laboratories.
"Dolby" and double-D symbol are trademarks of Dolby
Laboratories.
• "DTS" and "DTS Digital Out" are trademarks of Digital
Theater Systems, Inc.
• This product incorporates copyright protection technology that
is protected by method claims of certain U.S. patents and
other intellectual property rights owned by Macrovision
Corporation and other rights owners. Use of this copyright
protection technology must be authorized by Macrovision
Corporation, and is intended for home and other limited
viewing users only unless otherwise authorized by
Macrovision Corporation. Reverse engineering or disassembl
is prohibited.
MOISTURE CONDENSATION
Moisture in the air will condense on the unit when you
move it from a cold place to a warm place, or under
extremely humid conditions--just as water droplets form
on the surface of a glass filled with cold liquid. In
conditions where condensation may occur, disconnect
the unit's power plug from the wall and keep it
disconnected for a few hours to let the moisture dry, then
turn on the unit.
ATTENTION
To mobile phone users:
Using a mobile phone in the vicinity of the unit may
cause picture vibration on the TV screen or change
the screen to a blue back display.
On placing the unit:
Some TVs or other appliances generate strong
magnetic fields. Do not place such appliances on top
of the unit as it may cause picture disturbance.
When the equipment is installed in a cabinet or a shelf,
make sure that it has sufficient space on all sides to allow
for ventilation (10 cm or more on both sides, on top and
at the rear/.
When discarding batteries, environmental problems must
be considered and the local rules or laws governing the
disposal of these batteries must be followed strictly.
Failure to heed the following precautions may result in
damage to the unit, Remote or disc.
1. DO NOT place the unit --
in an environment prone to extreme temperatures
or humidity.
-- in direct sunlight.
in a dusty environment.
-- in an environment where strong magnetic fields are
generated.
on a surface that is unstable or subject to vibration,
EN CONTENTS
DISCINFORMATION 7
About Discs ......................................................... 7
INDEX 12
INSTALLINGYOURNEWUNIT 18
Basic Connections ............................................. 18
S-VIDEO Connection ........................................ 19
Component Video Connection .......................... 20
INITIALSETTINGS 21
Plug & Play Set .................................................. 21
I.anguage ........................................................... 22
Clock Set ........................................................... 24
Tuner Set ........................................................... 26
Monitor Set ....................................................... 28
Cable Box Control Setting ................................. 29
DBS Receiver Control Setting ............................ 32
PLAYBACKOPERATIONS 35
Basic Playback .................................................. 35
Playback Features .............................................. 36
live Memory Playback ...................................... 41
Using Play Set Up Menu ................................... 46
Parental lock .................................................... 53
EDITING 86
I)V l)ubbing ...................................................... 86
Edit From A Camcorder ..................................... 88
Edit To Or From Another Recorder .................... 89
Digital Audio Dubbing ...................................... 90
REMOTE 91
Remote Control Functions ................................. 91
SYSTEMCONNECTIONS 95
Connecting ro A Dolby l)igital Decoder or
An Amplifier With Built-in Drs ...................... 93
SUBSIDIARYSETTINGS 96
Mode Set ........................................................... 96
Format a disc ................................................... 1O1
Finalize a disc ................................................. 102
Scan Mode Set ................................................. 103
]ray I.ock ........................................................ 103
TROUBLESHOOTING 104
GLOSSARY 108
SPECIFICATIONS 109
RECORDING 57 LISTOFTERMS
Basic Recording ................................................ 57
Recording Features ............................................ 58 FORSERVICING(Onlyin U.S.A.)
110
111
TIMERRECORDING 60
VCR Plus+ _) limer Programing .......................... 60
Changing VCR Plus+ <_)Setting ........................... 62
Manual Timer Programing ................................. 64
On-Disc Timer Programing ............................... 66
Satellite Auto Recording .................................... 71
WARRANTY(OnlyinU.S.A.) 112
NAVIGATION 72
library Database DVD Navi .............................. 72
Modify Original InR)rmation .............................. 75
Modify Play list Information .............................. 78
Modify I ibrary Information ................................ 82
Playback with MP3/JPEG Navigation ................. 84
DISC INFORMATION EN 7
AboutDiscs
Recordable/playablediscs
You can use discs with the following Iogos for recording and
playback.
DVD-RAM 12 cm: 4.7 GB/9.4 GB
8 cm: 1.4 GB/2.8 GB (VR mode)
DVD-R/RW Discs
[t is only possible to use DVD-R discs which _onform with
DVD-R standard Version 2.0.
When a DVD-R/RW disc (Video mode) is finalized (_ pg. 102),
it can be played back on a standard DVD player as a
DVD VIDEO disc.
When a DVD-RW disc (VR mode)is finalized (_-_" pg. 102), it
can be played back on a standard DVD player compatible with
the VR mode of DVD-RW discs.
• Use discs labeled "lx SPEED".
• This unit is not in compliance with DVD-RW Version 1.2.
• This unit is not in compliance with DVD+RW discs.
RAM
RAM4.7
DVD-R
R
R4.7
DVD-RW
RW
Version 2.0
Version 2.1
Version 2.1/3x
12 cm: 4.7 GB
8 cm: 1.4 GB
(Video mode)
General Version 2.0
General Version 2.0/4x
General Version 2.0/8x
12 cm: 4.7 GB
(Video modeNR mode)
Version 1.1
Version 1.1/2x
Before finalizing (_ pg. 102) --
-- it is possible to record on unrecorded areas of the disc, edit
the disc title an(] program titles, an(] delete programs.
• Before finalizing it is possible to play or record DVD-R/RW
(Video mode) discs only on this unit.
• [t is impossible to overwrite recorded areas of DVD-R discs.
• Available recording capacity does not increase even if a
recorded program is deleted from a DVD-R disc.
After finalizing (_J pg. 102) --
After a DVD-R/RW disc (Video mode) has been finalize(), it is
possible to play back the recorded programs (video and/or
audio) on a standard DVD video player as a DVD VIDEO disc.
• Edited titles are displayed as the "DVD menu" in video mode.
• The above table is based on the information as of February
2004.
• Recording and playback may not be performed with some
DVD-RAM, DVD-R/-RW, and CD-R/-RW discs depending on
the characteristics and condition of the disc used, leading to
unsatisfactory results. Using discs manufactured by JVC is
recommended since they have been tested to be compatible
with this uniL
DVD-RAM Discs
It is only possible to use discs whkh conform with DVD-RAM
standard Version 2.0 or 2.1.
• It is impossible to record on DVD-RAM discs which do not
confornl to this standard. If you use a disc formatted under a
different standard version, format it on this unit before use.
• [t may not be possible to record, play back, edit or dub a
DVD-RAM disc even if it conforms to the standard if it was
recorded or edited on the devices from other manufacturers or
on a PC, or if it has far too many titles, or if there is very little
available capacity remaining on the disc.
• DVD-RAM discs recorded on this unit cannot be played back
on an incompatible DVD player.
• [t is possible to record copy-once programs of digital
broadcasts only onto 4.7/9.4 GB DVD-RAM discs (2.8 GB
DVD-RAM discs are not compatible).
• It is impossible to record, edit or delete the data either in video
mode or in VR mode.
• Either in video mode or in VR mode, although the disc can be
played back on DVD players from other manufacturers,
sometimes it may not be possible to play depending on the
disc and recording conditions.
• It is impossible to record on CD-R/RW or DVD-R discs used
for authoring.
• [t is impossible to record onto DVD-R/RW iVideo mode) discs
broadcasts that allow you to copy once. The copy once
programs can only be recorded onto DVD-RW discs formatted
in VR mode.
NOTES:
The following may result if you play back a DVD-R disc
recorded on another unit.
• The disc does not play.
• A mosaic pattern (block noise) appears on the screen.
• Video or audio may be dropped out.
• The unit stops during playback.
8EN DISC INFORMATION (cont.)
Discsfor PlaybackOnly
You (an use dis(s with the following Iogos for playba(k only.
DVD VIDEO
Q
VIDEO
(example of region code
indications)
@N
@@
Audio CD
CD-DA
DIGITAL AUDIO
CD-RW
CD-DA/
files
{ReWritable]
Video CD/Super Video CD
[DIGITAL VIDEOI(SUPERVIDEO]
CD-R
CD-DA/
files
[Recordable]
CD-ROM
files
UnplayableDiscs
The following types of discs cannot be played using this unit.
Do not attempt to play back any kind of disc that is damaged
(cracked, warped, or repaired with adhesive tape) or discs in
unusual shapes (heart-shaped, octagonal, or other forms). If such
discs are accidentally played back, it may cause noise that can
lead to speaker damage.
• CD-ROM discs (including PHOTO-CD and CD-G)
• Discs recorded in Packet Write (UDF) format.
• 1.3-GB double density CDs (DDCD)
• High density CDs (HDCD)
The following discs also cannot be played back.
• Discs of a region number other than "1"
• DVD-RAM (2.6 GB/5.2 GB)
RegionNumber
The world is divided into 6 regions for DVD VIDE(J) discs.
DVD VIDEO discs are assigned a region number to indicate
which region they may be played back in. A disc cannot be
played back on this unit unless the region number of the disc
matches that of the unit. [he region number for this unit is "1 ".
Only discs whose region number includes "1" or "ALl" can be
played back such as shown below.
Examples of DVD VIDEO labels which can be played back using
this unit.
• Playback may not be performed depending on the
characteristics and condition of the disc used.
• DTS Audio CDs can also be played back (An optional DTS
decoder is required).
• MP3 and IPEG discs can be played back on this unit only
when they have been recorded in the [SO9660 or Joliet format
and finalized.
•JPEG files that can be played back on this unit must conform to
JFIF/Baseline process, and the maximum resolution of a JPEG
file is 3,840 x 2,160 pixels.
• CD-R/RW discs recorded in music CD format need to be
finalized to play on this unit.
• Operation and audio quality of this unit are not guaranteed for
discs that do not conform to the Compact Disc specification
(CD-DA).
Before you play back a CD, check for the CD logo and read
the notes on the package to confirm that it conforms to the
Compact Disc specification.
• Depending on the intentions of the author of the software,
recording conditions of DVD discs and Video CD/SVCD discs
may be restricted. Since this unit plays back discs according to
the intentions of the author of the software as indicated on the
disc, some functions may not operate as commanded.
• When switching from the first layer to the second layer of
double-layered DVD VIDEO discs, the image and sound may
be momentarily distorted. This is not a malfunction.
• DVD-AUDIO discs compatible with DVD video players can
be played.
• Super Audio CDs (SACD) compatible with conventional CD
players can be played.
Marks of discs in this instruction manual
Allows operation
with a DVD-RAM
disc.
Allows operation
with a DVD-R disc.
Allows operation
with a Video CD/
Super Video CD
(SVCD) disc.
Allows operation
with an Audio CD
disc.
Allows operation
with a DVD-RW
disc.
Allows operation
with a DVD VIDEO
disc.
Allows operation
with a disc
including MP3 files.
Allows operation
with a disc
including JPEG files.
RecordingMediumandFormat FileStructureofDiscs
E.9
DVD-RAM
• Recording and erasing can be performed as many times as
possible on a disc.
• Editing can be performed after recording, such as deleting
unwanted parts.
• While recording, it is possible not only to start playback of a
program currently being recorded, but also to watch another
program previously recorded.
DVD-RW (VR mode)
• Recording and erasing can be performed as many times as
possible on a disc.
• Editing can be performed after recording, such as deleting
unwanted parts.
DVD-RW (Video mode)
• Can be played back on other DVD players.
• New recording can be performed by erasing all the data on a
disc once played back.
DVD-R
• Can be played back on other DVD players.
• Suitable when keeping a recorded disc for a long time.
DVD VIDEO
Typkally, DVD VIDE(:) discs are made up of larger units called
"titles". Each title has a number (title number) that can be used
to select desired titles. Titles are further divided into units called
"chapters". Each chapter has a number (chapter number) that
can also be used to select desired chapters. Note that some discs
are not divided into titles and chapters.
When you record a program on a DVD-RAM/RW (VR mode)
disc
A single recording session results in a single title (a single
chapter). However, chapter marks are automatically inserted
when recording is pause(], or audio changes from monaural or
bilingual to stere() due to commercial breaks, etc. It is also
possible to insert chapter marks at desire(] locations during
playback. (_-_" pg. 38)
When you record a program on a DVD-R/RW (Video mode)
disc
A single recording session results in a single title (a single
chapter). However, chapter marks are automatically inserted
when recording is paused, or audio changes due to commercial
breaks, etc. It is also possible to insert chapter marks at desired
locations during either recording or playback. Once the disc has
been finalize(], these chapter marks are deleted and new chapter
marks are assigned automatically approximately every 5
minutes.
_._ DVD-RAM, DVD-RW, DVD-R or DVE) VIDEO dis(
T,t,el qp nt,e2 H
• In Video mode, even before finalizing, it is impossible to
perform editing operations other than changing the disc name
and/or title names and deleting programs and/or titles.
• After finalizing, it is impossible to perform editing operations.
Audio CD/Video CD/SVCD
Typically, Audio CD discs are divided into separate tracks each
containing one song. Each track is assigned a number. For
example, the third track is Track 3. The same is true for Video
CD/SVCD discs.
However, some discs are not divided into tracks.
Audio CD or Video CD/SVCD
Track 1 -1 Track 2 _ Track 3 i_ Track 4
Z0EN DISC INFORMATION (cont.)
JPEG/MP3 Disc (CD-R/RW/ROM)
MP3/JPEG files put in directories nested in several levels on a
disc will be organized as if they were put in single level
directories (groups) by the MP3/JPEG Navigation of this unit,
?-_ pg. 84)
File structure of a disc before starting the MP3/IPEG Navigation
Root
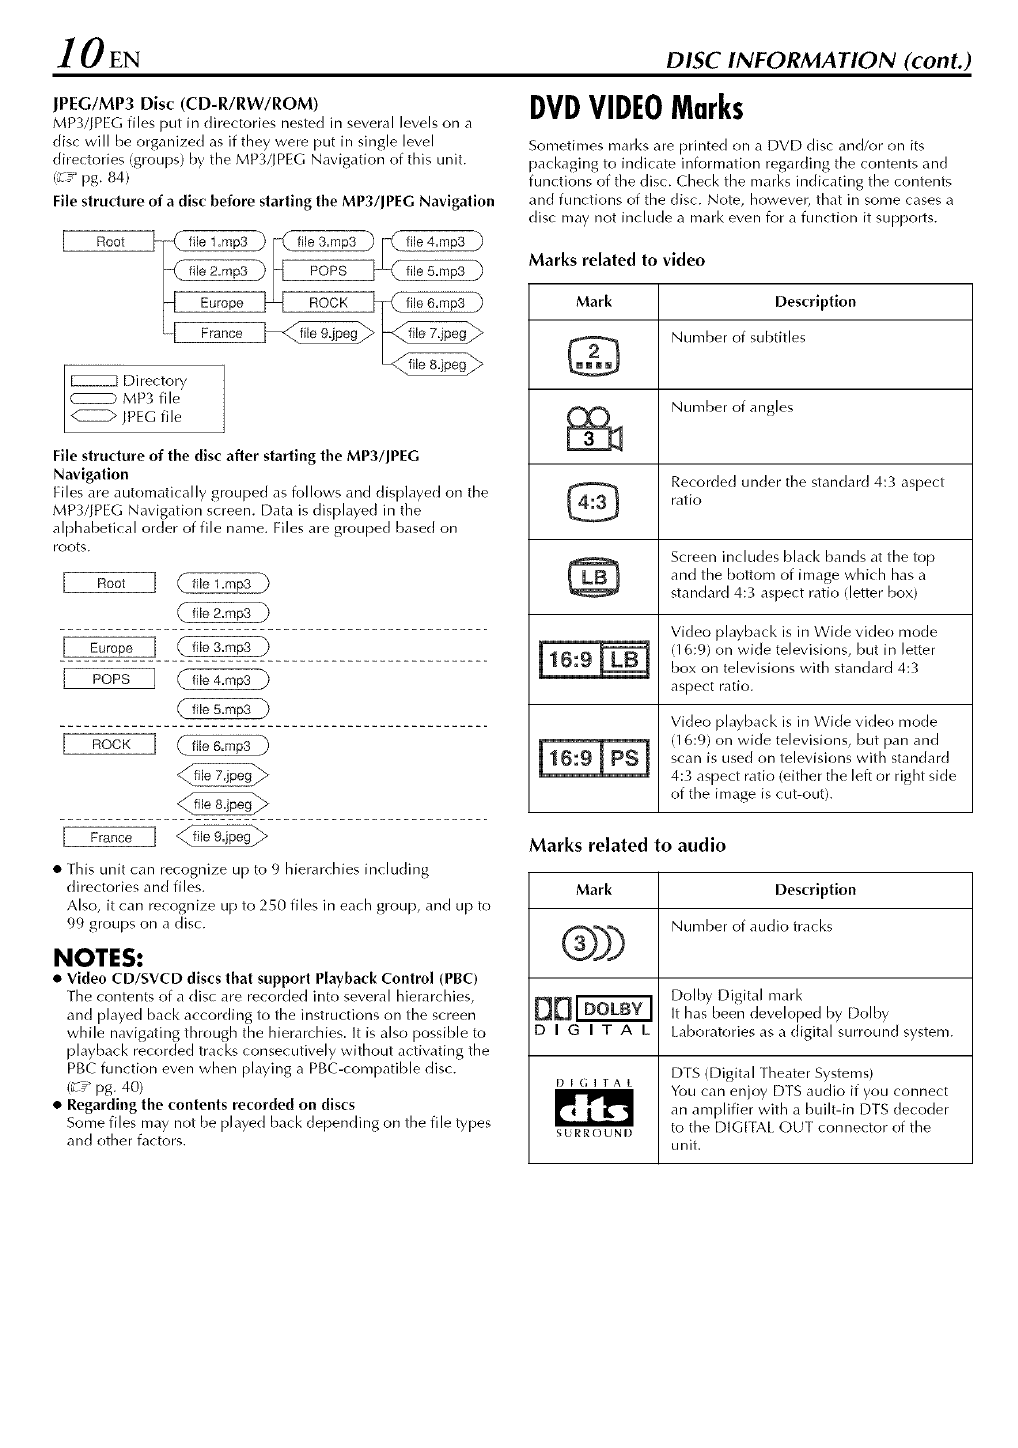
DVDVIDEOMarks
Sometimes marks are printed on a DVD disc and/or on its
packaging to indicate information regarding the contents and
functions of the disc. Check the marks indicating the contents
and functions of the disc. Note, however, that in some cases a
disc may not include a mark even for a function it supports.
Marks related to video
Directory
CZZZZ) MP3 file
O JPEG file
File structure of the disc after starting the MP3/JPEG
Navigation
Files are automatically grouped as follows and displayed on the
MP3/]PEG Navigation screen. Data is displayed in the
alphabetical order of file name. Files are grouped base(] on
roots.
Root ] file 1.mp3 }
file 2.rap3
Europe ] file 3.rap3 }
POPS file 4.mp3 )
file 5.rap3 }
ROCK]
• This unit can recognize up to 9 hierarchies including
directories an(] files.
Also, it can recognize up to 250 files in each group, an(] up to
99 groups on a disc.
NOTES:
•Video CD/SVCD discs that support Playback Control (PBC)
The contents of a disc are re(orded into several hierarchies,
and played back according to the instructions on the screen
while navigating through the hierarchies. It is also possible to
playback recorded tracks consecutively without activating the
PBC function even when playing a PgC-compatible disc.
C_" pg. 40)
•Regarding the contents recorded on discs
Some files may not be played back depending on the file types
and other factors.
Mark
@
@
Description
Number of subtitles
Number of angles
Recorded under the standard 4:3 aspect
ratio
Screen includes black bands at the top
and the bottom of image which has a
standard 4:3 aspect ratio (letter box)
Video playback is in Wide video mode
(16:9) on wide televisions, but in letter
box on televisions with standard 4:3
aspect ratio.
Video playback is in Wide video mode
(16:9) on wide televisions, but pan and
scan is used on televisions with standard
4:3 aspect ratio (either the left or right side
of the image is cut-outh
Marks related to audio
Mark Description
®))
Dolby Digital mark
BB_ It has been developed by Dolby
D I G I T A L kaboratories as a digital surround system.
DTS (Digital Theater Systems)
DIGITAL You can enjoy DTS audio if you connect
an amplifier with a built-in DTS decoder
SURROUND to the DIGFFAL OUT connector of the
unit.
EN11
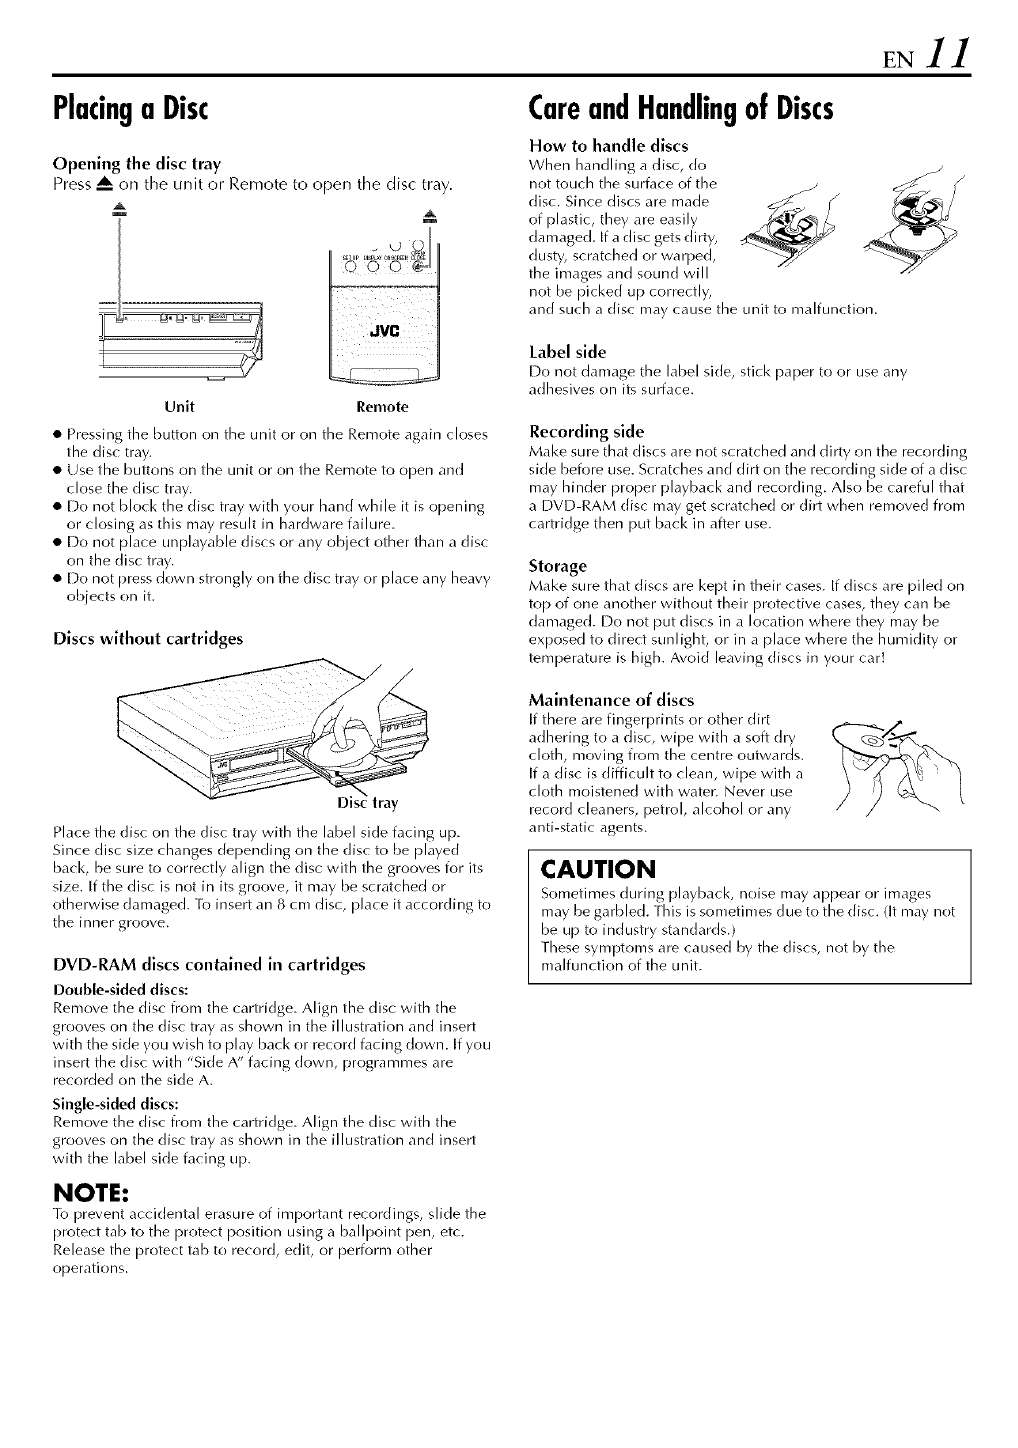
Placinga Disc
Opening the disctray
Press A on the unit or Remote to open the disc tray.
CareandHandlingof Discs
How to handle discs
When handling a disc, do
not touch the surface of the
disc. Since discs are made
of plastic, they are easily
damaged. If a disc gets dirty,
dusty, scratched or warped,
the images and sound will
not be picked up correctly,
and such a disc may cause the unit to malfunction.
Unit Remote
•Pressing the button on the unit or on the Remote again closes
the disc tray.
• Use the buttons on the unit or on the Remote to open and
close the disc tray.
• Do not block the disc tray with your hand while it is opening
or closing as this may result in hardware failure.
• Do not place unplayable discs or any object other than a disc
on the disc tray.
• Do not press down strongly on the disc tray or place any heavy
objects on it.
Discs without cartridges
Place the disc on the disc tray with the label side facing up.
Since disc size changes depending on the disc to be played
back, be sure to correctly align the disc with the grooves for its
size. If the disc is not in its groove, it may be scratched or
otherwise damaged. To insert an 8 cm disc, [)lace it according to
the inner groove.
DVD-RAM discs contained in cartridges
Double-sided discs:
Remove the disc from the cartridge. Align the disc with the
grooves on the disc tray as shown in the illustration and insert
with the side you wish to play back or record facing down. If you
insert the disc with "Side A" facing down, programmes are
recorded on the side A.
Single-sided discs:
Remove the disc from the cartridge. Align the disc with the
grooves on the disc tray as shown in the illustration and insert
with the label side facing up.
NOTE:
qb prevent accidental erasure of important recordings, slide the
protect tab to the protect position using a ballpoint pen, etc.
Release the protect tab to record, edit, or perform other
operations.
Label side
Do not damage the label side, stick paper to or use any
adhesives on its surface.
Recording side
Make sure that discs are not scratched and dirty on the recording
side before use. Scratches and dirt on the recording side of a disc
may hinder proper playback and recording. Also be careful that
a DVD-RAM disc may get scratched or dirt when removed from
cartridge then put back in after use.
Storage
Make sure that discs are kept in their cases. If discs are piled on
top of one another without their protective cases, they can be
damaged. Do not put discs in a location where they may be
exposed to direct sunlight, or in a place where the humidity or
temperature is high. Avoid leaving discs in your cart
Maintenance of discs
If there are fingerprints or other dirt
adhering to a disc, wipe with a soft dry
cloth, moving from the centre outwards.
If a disc is difficult to clean, wipe with a
cloth moistened with water. Never use
record cleaners, petrol, alcohol or any
anti-static agents.
CAUTION
Sometimes during playback, noise may appear or irrlages
may be garbled. This is sometimes due to the disc. (It may not
be up to industry standards.)
These symptoms are caused by the discs, not by the
malfunction of the unit.
J2 EN
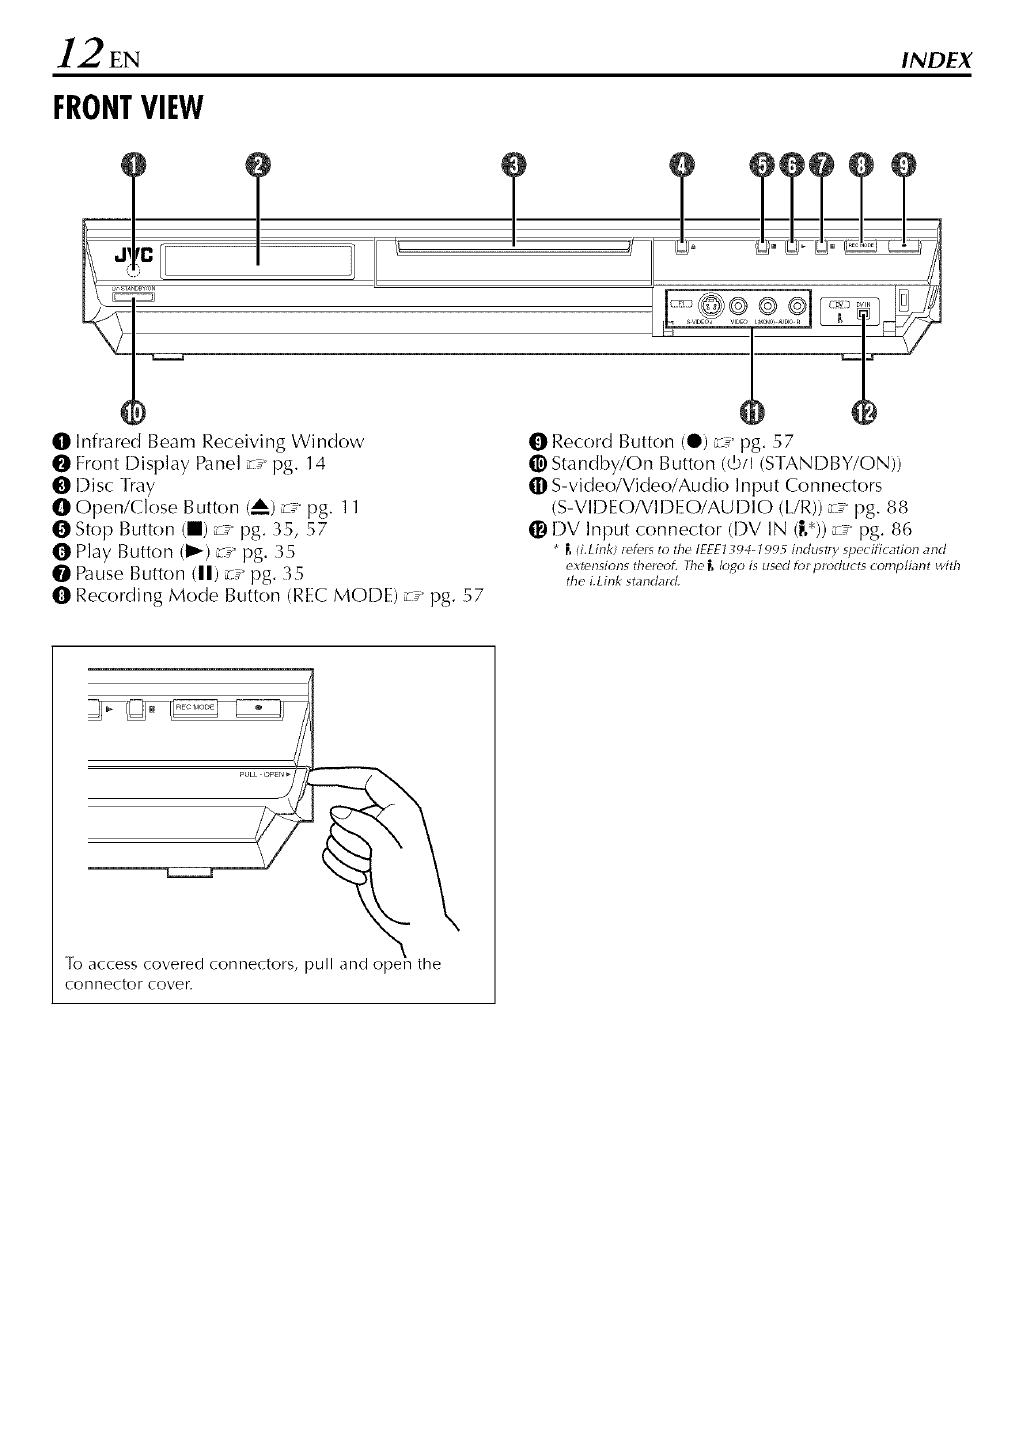
FRONTVIEW
INDEX
O Infrared Beam Receiving Window
0 Front Display Panel _ pg, 14
O Disc Tray
O Open/Close Button (___)_ pg. 11
O Stop Button (11)u pg. 35, 57
O Play Button (1_)_ pg. 35
O Pause Button (11)_ pg. 35
O Recording Mode Button (REC MODE) _ pg. 57
O Record Button (O) _ pg. 57
Standby/On Button (_b/I (STANDBY/ON))
q[DS-video/Video/Audio Input Connectors
(S-VIDEO/VIDEO/AUDIO (L/R)) _ pg. 88
DV Input connector (DV IN (|,*)) _ pg. 86
*F, (i.LinkJ letels to the IEEE1394_1995 industl 7speciti_tion and
extensions theleoL The _, Io_o is used k_l ploducts complL_nt with
the LLink standald.
[b access covered connectors, pull and opeil the
C011 nector cover.
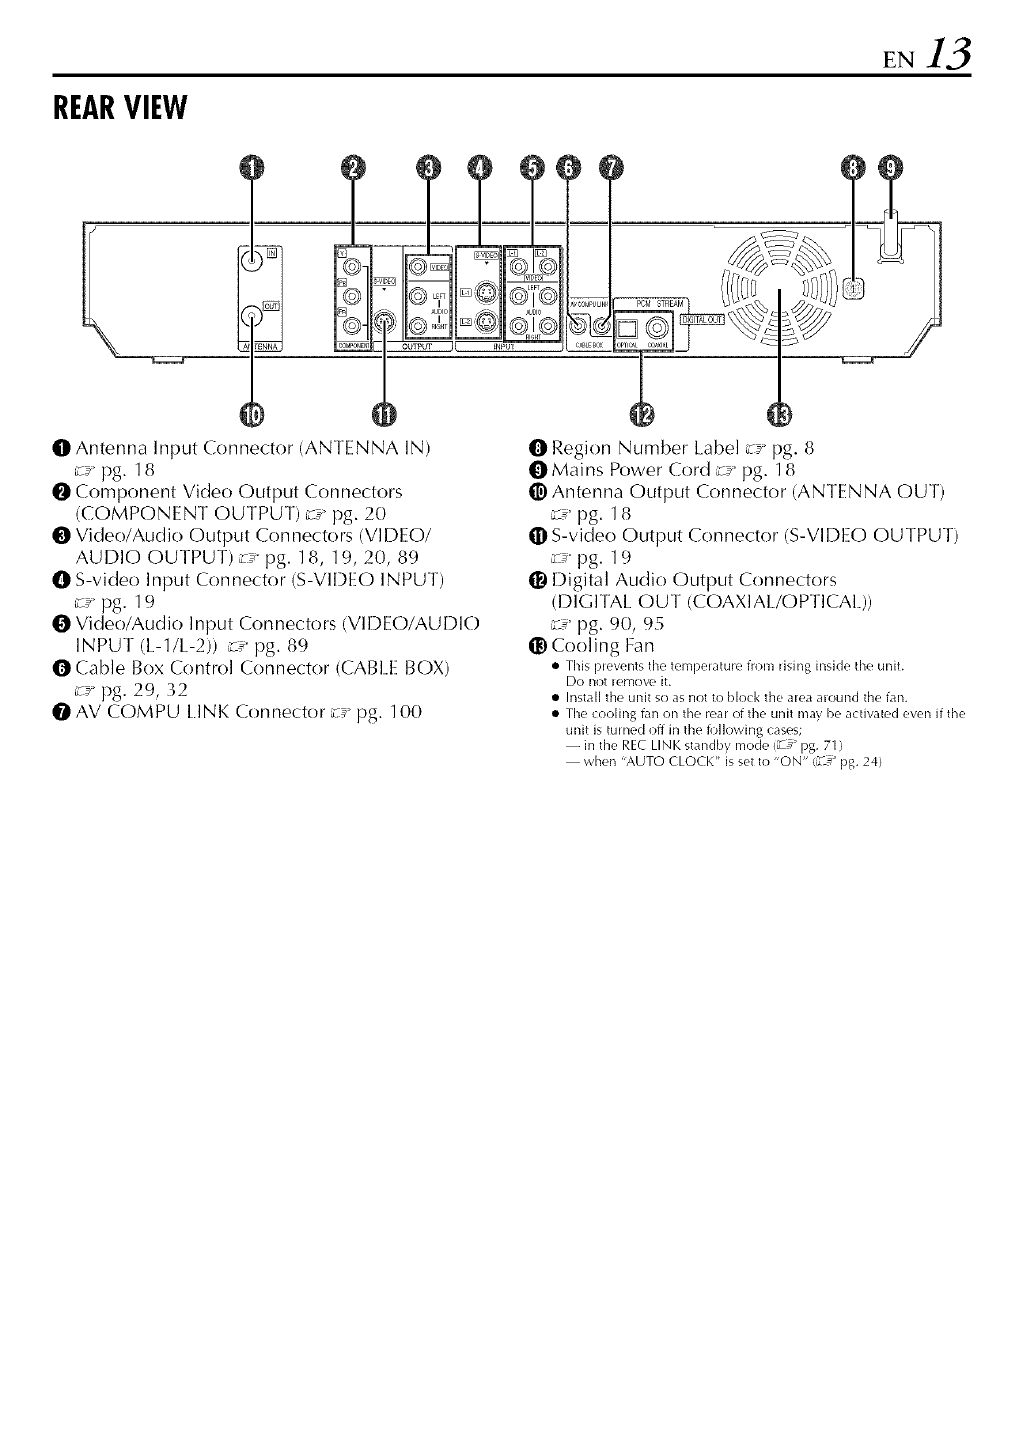
REARVIEW
EN13
@
ENN_ CO_(_E_nr- OUTPUT I{
I]t Antenna Input Connector (ANTENNA IN)
_ pg. 18
O Component Video Output Connectors
(COMPONENT OUTPUT) z__pg. 20
O Video/Audio Output Con nectors (VIDEO/
AUDIO OUTPUT) z__pg. 18, 19, 20, 89
O S-video Input Connector (S-VIDEO INPUT)
_ pg. 19
O Video/Aud io In put Con nectors (VI D EO/AU D IO
INPUT (L-I/L-2)) _ pg. 89
O Cable Box Control Connector (CABI E BOX)
_ pg. 29, 32
O AV COMPU I.INK Connector _¢ pg. 100
ORegion Number Label _:_ pg. 8
0Mains Power Cord _:_ pg. 18
_) Antenna Output Connector (ANTENNA OUT)
_ pg. 18
• S-video Output Connector (S-VIDEO OUTPUT)
z__pg. 19
11_Digital Audio Output Connectors
(DIGIIAL OUT (COAXIAl!OPTICAl.))
_ pg. 90, 95
Cooling Fan
• This pievents time tempelature from Hsing inside time unit.
Do not H'movl' it.
• Install the unit so as not to Nod< the area alound the fan.
• Time cooling fan on time rear of the unit may be activatt,d even if the
unit is tulned off in the fl)llowing cases;
-- in the REC LINK standby mode (_ _ pg. 71)
when "AUTO CLOCK" is set to "ON" (Z#_ pg. 24)
14EN
FRONTDISPLAYPANEL
INDEX (cont.)
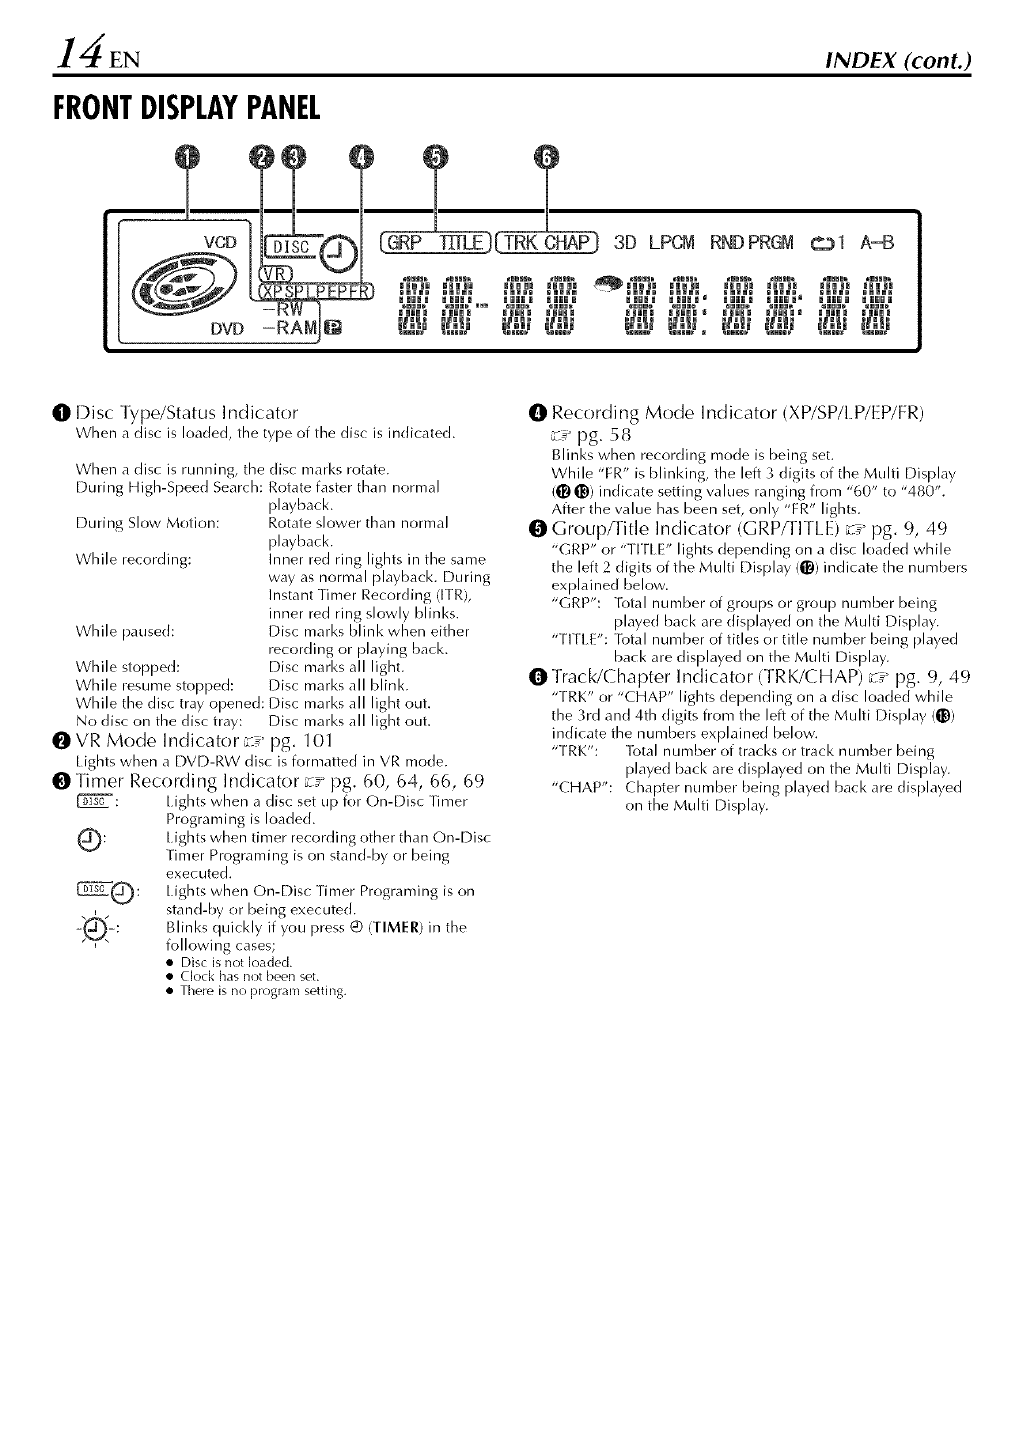
0Disc Type/Status Indicator
When a disc is loaded, the type of the disc is indicated.
When a disc is running, the disc marks rotate.
During High-Speed Search: Rotate faster than normal
playback,
During Slow Motion: Rotate slower than normal
playback,
While recording: Inner red ring lights in the same
way as normal playback. During
Instant Timer Recording (ITR),
inner red ring slowly blinks.
While paused: Disc marks blink when either
recording or playing back.
While stopped: Disc marks all light.
While resume stopped: Disc marks all blink.
While the disc tray opened: Disc marks all light out.
No disc on the disc tray: Disc marks all light out.
O VR Mode Indicator __:"pg. 101
Eights when a DVD-RW disc is formatted in VR mode.
O Timer Recording Indicator z__pg. 60, 64, 66, 69
_: Lights when a disc set up for On-Disc Timer
Programing is loaded,
Q: Eights when timer recording other than On-Disc
Timer Programing is on stand-by or being
executed.
Lights when On-Disc Timer Programing is on
,,stand-by or being execute((,
-'k¢_-: Blinks quickly if you press (D (TIMER) in the
following cases;
• Disc is not loaded.
• Clod< has not been set.
• There is no program setting.
ORecording Mode Indicator (XP/SP/I P/EP/FR)
_ pg. 58
Blinks when recording mode is being set.
While "FR" is blinking, the left 3 digits of the Multi Display
(([_ _) indicate setting values ranging from "60" to "480".
After the value has been set, only "ER" lights.
Groupfritle Indicator (GRPfrlTLE) _" pg. 9, 49
"GRP" or "TITLE" lights depending on a disc loaded while
the left 2 digits of the Multi Display (_) indicate the numbers
explained below,
"GRP': Total number of groups or group number being
played back are displayed on the Multi Display,
"TITLE": Total number of titles or title number being played
back are displayed on the Multi Display.
O Track/Chapter Indicator (TRK/CHAP) _ pg. 9, 49
"TRK" or "CHAP" lights depending on a disc loaded while
the 3rd and 4th digits from the left of the Multi Display (_))
indicate the numbers explained below.
"TRK': [btal number of tracks or track number being
played back are displayed on the Multi Display.
"CHAP": Chapter number being played back are displayed
on the Multi Display.
VCD
DVD
XPSPLPEPFR
-RW
-RAN_
GRP _ TRK CHAP
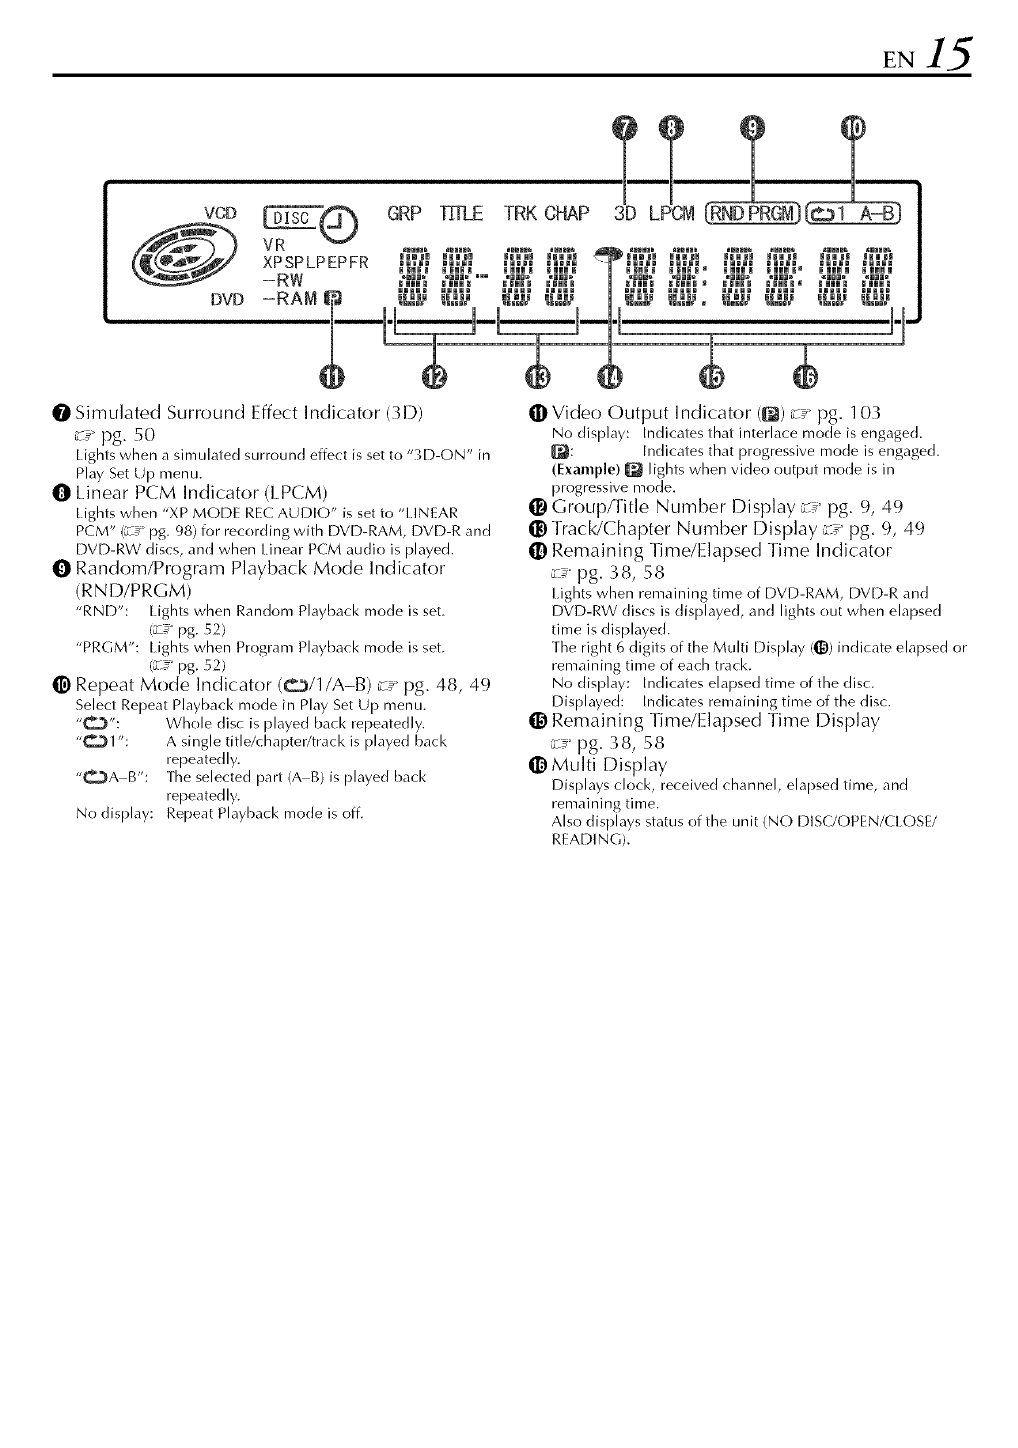
O Simulated Surround Effect Indicator (3D)
_ pg. 50
Eights when a simulated surround effect is set to "3D-ON" in
Play Set Up menu.
Linear PCM Indicator (LPCM)
Lights when "XP MODE REC AUDIO" is set to "LINEAR
PCM" (_ pg. 98) for recording with DVD-RAM, DVD-R and
DVD-RW discs, and when Iinear PCM audio is played.
O Random/Program Playback Mode Indicator
(RND/PRGM)
"RND': Eights when Random Playback mode is set.
(_ pg. 52)
"PRGM": Eights when Program Playback mode is set.
(z_" pg. 52)
_) Repeat Mode Indicator (C3/1/A-B) _ pg. 48, 49
Select Repeat Playback mode in Play Set Up menu.
"_Z3": Whole disc is played back repeatedly.
"_,Z_I ": A single title/chapter/track is played back
repeatedly.
"OA B": The selected part (AB) is played back
repeatedly.
No display: Repeat Playback mode is off.
([])Video Output Indicator (@) _ pg. 103
No display: Indicates that interlace mode is engaged.
[j_: Indicates that progressive mode is engage(].
(Example) _ lights when video output mode is in
progressive mode.
Group/I-itle Number Display _ pg. 9, 49
@)Track/Chapter Number Display _ pg. 9, 49
([]) Remaining Time/Elapsed Time Indicator
_ pg. 38, 58
Lights when remaining time of DVD-RAM, DVD-R and
DVD-RW discs is displayed, and lights out when elapsed
time is displayed.
The right 6 digits of the Multi Display (_)) indicate elapsed or
remaining time of each track.
No display: Indicates elapsed time of the disc.
Displayed: Indicates remaining time of the disc.
_]) Remaining Time/Elapsed Time Display
_ pg. 38, 58
Multi Display
Displays clock, received channel, elapsed time, and
remaining time.
Also displays status of the unit (NO DISC/OPEN/CLOSE/
READING).
] 6EN INDEX (cont.)
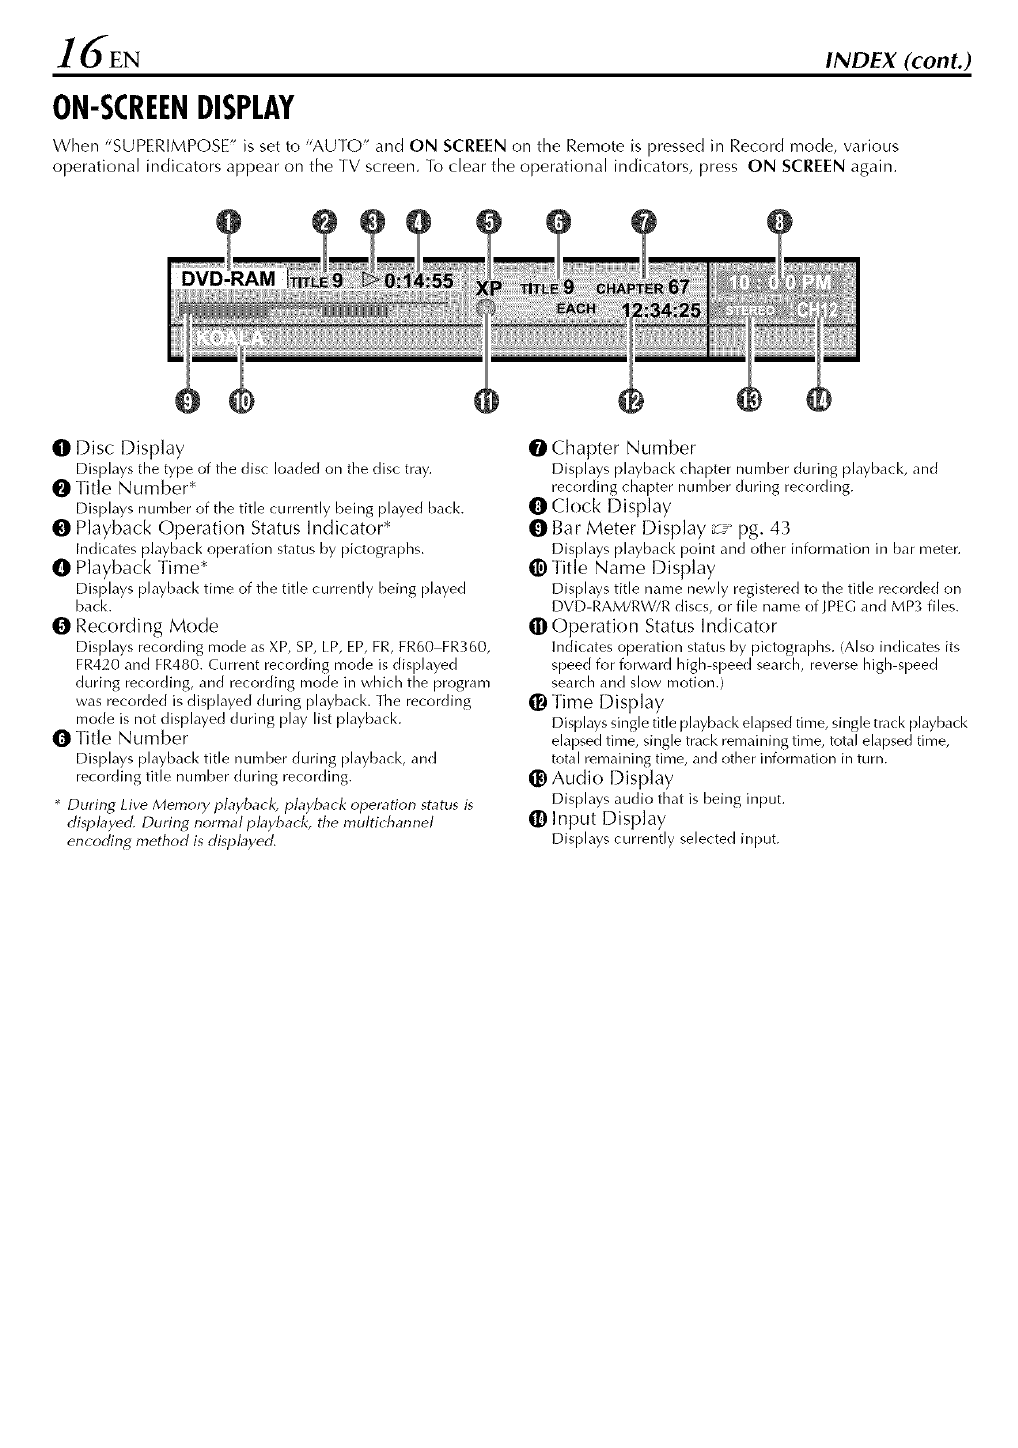
ON-SCREENDISPLAY
When "SUPERIMPOSE" is set to "AUTO" and ON SCREEN on the Remote is pressed in Record mode, various
operational indicators appear on the TV screen. Tb clear the operational indicators, press ON SCREEN again.
DVD,RAM
ODisc Display
Displays the type of the disc loaded on the disc tray.
O Title Number*
Displays number of the title currently being played back.
O Playback Operation Status Indicator*
Indicates playback operation status by pictographs.
O Playback Time*
Displays playback time of the title currently being played
back.
O Recording Mode
Displays recording mode as XP, SP, LP, EP, FR, FR60 FR360,
FR420 and FR480. Current recording mode is displayed
during recording, and recording mode in which the program
was recorded is displayed during playback. The recording
mode is not displayed during play list playback.
O Title Number
Displays playback title number during playback, and
recording title number during recording.
* During Live Memory playback, playback ope_ation status is
displayed. During nom_al playback, the multi_ hannel
encoding method is displayed.
O Chapter Number
Displays playback chapter number during playback, and
recording chapter number during recording.
0Clock Display
O Bar Meter Display _ pg. 43
Displays playback point and other information in bar meten
_) Title Name Display
Displays title name newly registered to the title recorded on
DVD-RAM/RW/R discs, or file name of IPEG and MP3 files.
• Operation Status Indicator
Indicates operation status by pictographs. (Also indicates its
speed for forward high-speed search, reverse high-speed
search and slow motion.)
Time Display
Displays single title playback elapsed time, single track playback
elapsed time, single track remaining time, total elapsed time,
total remaining time, and other information in turn.
@ Audio Display
Displays audio that is being input.
Input Display
Displays currently selected input.
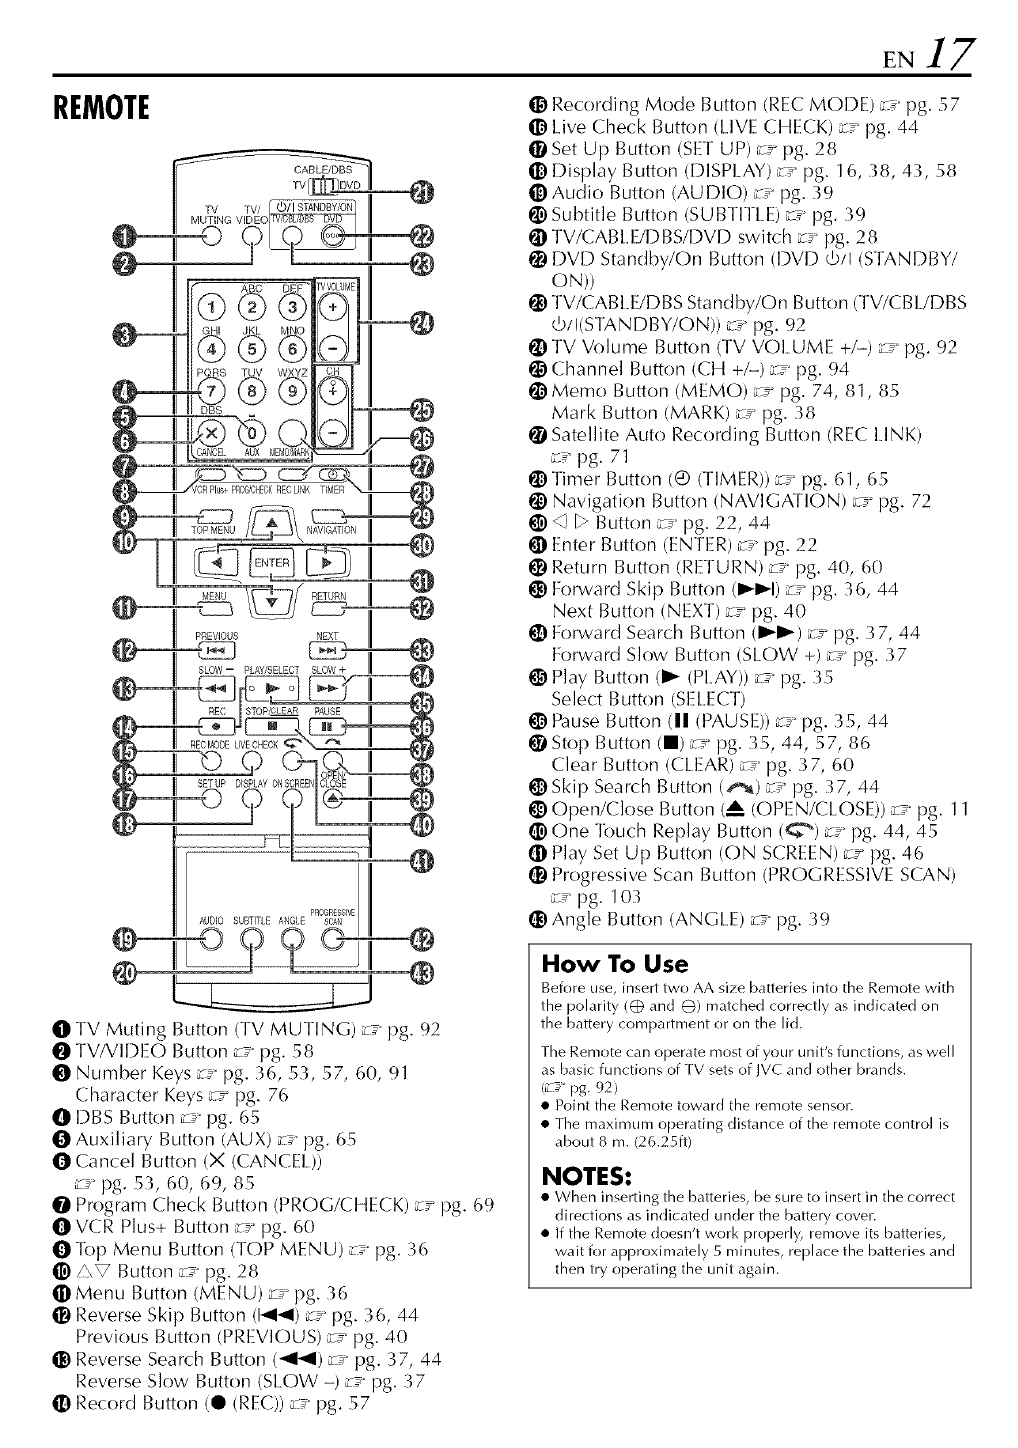
EN17
REMOTE t]) Recording Mode Button (RECMODE) _ pg. 57
Live Check Button dIVE CHECK) _ pg. 44
1_ISet Up Button (SET UP) u pg. 28
Display Button (DISPLAY) _ pg. 16, 38, 43, 58
Audio Button (AUDIO) _ pg. 39
@)Subtitle Button (SUBTIILE) _ pg. 39
TV/CABI.E/DBS/DVD switch _ pg. 28
I_ DVD Standby/On Button (DVD _/I (STANDBY/
ON))
I_tTV/CA BI.E/DBSStandby/O n Butto n (TV/C BI./D BS
¢/1(S rANDBY/ON)) _ pg. 92
I_ TV Volume Button (TV VOLUME +/-/_ pg. 92
I_ Channel Button (CH +/-) _ pg. 94
I_ Memo Button (MEMO) _ pg. 74, 81, 85
Mark Button (MARK) _ pg. 38
_I Satellite Auto Recording Button (REC I.INK)
_ pg. 71
_ Timer Button (® (TIMER))_ pg. 61, 65
Navigation Button (NAVIGATION) _ pg. 72
_ D Button _ pg. 22, 44
Enter Button (ENTER)_ pg. 22
!_ Return Button (RETURN) _ pg. 40, 60
_) Forward Skip Button (_1_1)_ pg. 36, 44
Next Button (NEXT) _ pg. 40
_) Forward Search Button (1_I_) _ pg. 37, 44
Forward Slow Button (SLOW +) _ pg. 37
_1 Play Button (I_ (PLAY))z__pg. 35
Select Button (SEI.ECT)
@1Pause Button (11(PAUSE))z__pg. 35, 44
@IStop Button (11)_ pg. 35, 44, 57, 86
Clear Button (CLEAR) _ pg. 37, 60
!_ Skip Search Button (_,_) _ pg. 37, 44
Open/Close Button (A (OPEN/CLOSE)) _ pg. 11
_) One Touch Replay Button (_) _ pg. 44, 45
(D Play Set Up Button (ON SCREEN)_ pg. 46
(D Progressive Scan Button (PROGRESSIVESCAN)
_ pg. 103
I_ Angle Button (ANGLE) _ pg. 39
OTV Muting Button (TV MUTING) _ pg. 92
TV/VIDEO Button _ pg. 58
t81Number Keys _ pg. 36, 53, 57, 60, 91
Character Keys _ pg. 76
ODBS Button _ pg. 65
O Auxiliary Button (AUX) _ pg. 65
0 Cancel Button (X (CANCEl.))
_ pg. 53, 60, 69, 85
O Program Check Button (PROG/CHECK) _ pg. 69
OVCR Plus+ Button _ pg. 60
OR)p Menu Button (TOP MENU) _ pg. 36
_ Button _ pg. 28
lIDMenu Button (MENU) _ pg. 36
Reverse Skip Button (1_1_1)_ pg. 36, 44
Previous Button (PREVIOUS) _ pg. 40
!_) Reverse Search Button (_1_1) _ pg. 37, 44
Reverse Slow Button (SLOW -) _ pg. 37
Record Button (0 (REC))_ pg. 57
How To Use
Before use, insert two AA size batteries into the Remote with
the polarity ((Z) and O) matched correctly as indicated on
the battery compartment or on the lid.
The Remote can operate most of your unit's functions, as well
as basic functions of TV sets of JVC and other brands.
(_-_ pg. 92)
•Point the Remote toward the remote sensor.
• The maximum operating distance of the remote control is
about 8 m. (26.25fl)
NOTES:
• When inserting the batteries, be sure to insert in the correct
directions as indicated under the battery cover.
• If the Remote doesn't work properly, remove its batteries,
wait for approximately 5 minutes, replace the batteries and
then try operating the unit again.
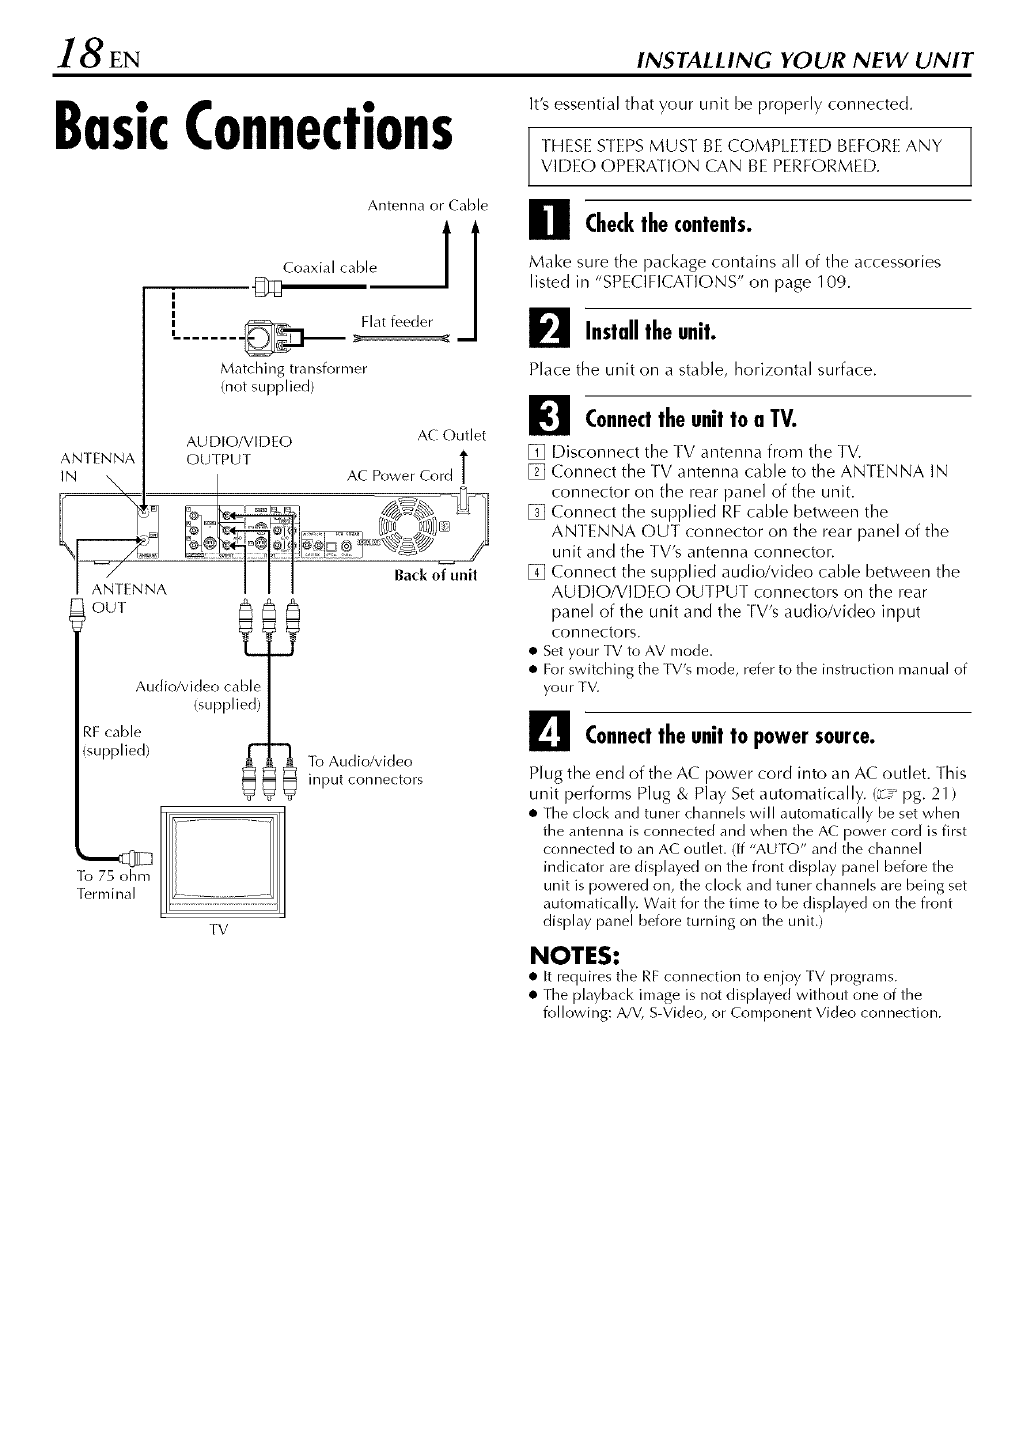
18 EN INSTALLING YOUR NEW UNIT
BasicConnections
It's essential that your unit be properly connected.
THESE STEPS MUST BE COMPLETED BEFORE ANY
VIDEO OPERATION CAN BE PERFORMED.
Check lhe c0nlenls.
Make sure the package contains all of the accessories
listed in "SPECIFICAYIONS" on page 109.
F_ Installtheunit.
Place the unit on a stable, horizontal surface.
ANTENNA
OUT
I
I
I
I
Audio/video cable
(supplied)
_,Fcable
(supplied)
Antenna or Cable
Coaxial cable ]
._ :Flat feeder
Matching transformer
(not supplied)
AUDIO/VIDEO AC Outlet
OUTPUT T
AC Power Cord
To 75 ohm
Terminal
]b Audio/video
input connectors
TV
I_1 Connecttheunit to a TV.
[] Disconnect the TV antenna from the IV.
[] Connect the TV antenna cable to the ANTENNA IN
connector on the rear panel of the unit.
[] Connect the supplied RF cable between the
ANTENNA OUT connector on the rear panel of the
unit and the TV's antenna connector.
[] Connect the supplied audio/video cable between the
AUDIO/VIDEO OUTPUT connectors on the rear
panel of the unit and the TV's audio/video input
connectors.
•Set your TV to AV mode.
• For switching the TV's mode, refer to the instruction manual of
your TV.
Connecttheunit to power source.
Plug the end of the AC power cord into an AC outlet. This
unit performs Plug & Play Set automatically. (_-_" pg. 21 )
• The clock and tuner channels will automatically be set when
the antenna is connected and when the AC power cord is first
connected to an AC outlet. (If "AUTO" and the channel
indicator are displayed on the front display panel before the
unit is powered on, the clock an(] tuner channels are being set
automatkally, Wait for the time to be displayed on the front
display panel before turning on the unit,)
NOTES:
• It requires the RF (-onne(tion to enjoy TV programs.
• The playback image is not displayed without one of the
following: A/V, S-Video, or Component Video connection.
EN19
S-VIDEO
Connection
ANTENNA [
ANTENNA
OUT
I
I
I
I
S-Video cable
(not supplied)
]b S-VIDEO
nput connector
Antenna or Cable
Flat feeder
Matching transformer
(not supplied)
S-VIDEO OUTPUT
A_DIO OUTPUT
AC Outlet
AC Power Cord T
Yellow:
Not con nected
Audio/video cable
(supplied)
To Audio input
_onnectors
IITo connect to TV's S-VIDEO input and AUDIO input
connectors
Connecttheunit to a TV.
[] Connect the antenna, unit and TV as per "Basic
Connections" (_-_ pg. 18).
[] Connect the unit's S-VIDEO OUTPU1- connector to
the TV's S-VIDEO input connector.
[] Connect the unit's AUDIO OUIPUT connectors to the
TV's AUDIO input connectors.
_Connecttheunit to power source.
Plug the end of the AC power cord into an AC outlet. This
unit performs Plug & Play Set automatically. (_:_ pg. 21 )
• The clock and tuner channels will automatically be set when
the antenna is connected and when the AC power cord is first
connected to an AC outlet. (If "AUTO" and the channel
indicator are displayed on the front display panel before the
unit is powered on, the dock an(] tuner channels are being set
automatically. Wait for the time to be displayed on the front
display panel before turning on the unit.)
NOTES:
• You _an obtain high-quality S-VHS pictures,
• If your IV is not stereo-capable, use the unit's AUDIO
OUTPUT connectors to connect to an audio amplifier for
Hi-Fi stereo sound reproduction.
• For switching the TV's video input mode, refer to the
instruction manual of your television.
]b 75 ohm
]_rminal
TV
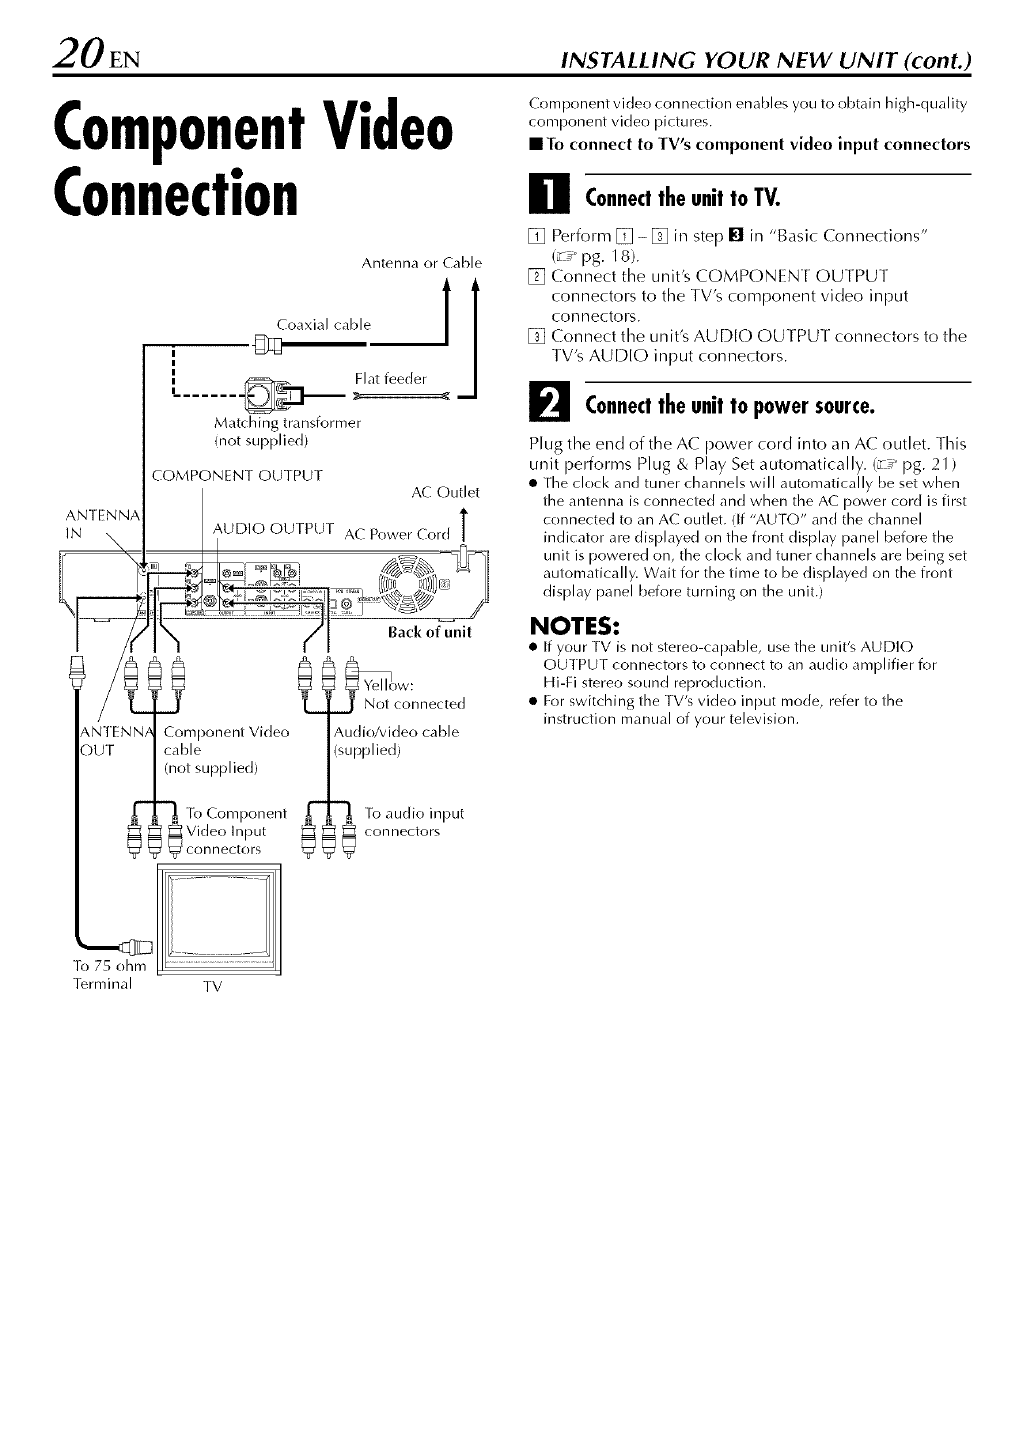
20 EN INSTALLING YOUR NEW UNIT (cont.)
ComponentVideo
Connection
Antenna or Cable
Coaxial cable ]
._ Flat feeder
Matching transformer
(not supplied)
ANTENNA
IN
COMPONENT OUTPUT
Component Video
cable
(not supplied)
To Component
Video Input
connectors
AC Outlet
Component video connection enables you to obtain high-quality
component video pictures,
IITo connect to TV's component video input connectors
Connecttheunit to TV.
[] Perform [] -[] in step [] in "Basic Connections"
g-_ pg. 18).
[] Connect the unit's COMPONENT OUTPUI
connectors to the TV's component video input
connectors.
[] Connect the unit's AUDIO OUIPUT connectors to the
TV's AUDIO input connectors.
F_ Connecttheunit to power source.
Plug the end of the AC power cord into all AC outlet, lhis
unit performs Plug & Play Set automatically. (_7_pg. 21 )
• The clock an(] tuner channels will automatically be set when
,,_N ot_-:_':):nne(ted
Audio/video cable
(supplied)
the antenna is connected and when the AC power cord is first
connected to an AC outlet. (if "AUTO" an(] the channel
indicator are displayed on the front display panel before the
unit is powered on, the clock an(] tuner channels are being set
automatically. Wait for the time to be displayed on the front
display panel before turning on the unit.)
NOTES:
• If your 1-V is not stereo-capable, use the unit's AUDIO
OUTPUT connectors to connect to an audio amplifier for
Hi-Fi stere() sound reproduction.
• For switching the TV's vide() input mode, refer to the
instruction manual of your television.
To audio input
con nectors
R) 75 ohm
Terminal TV
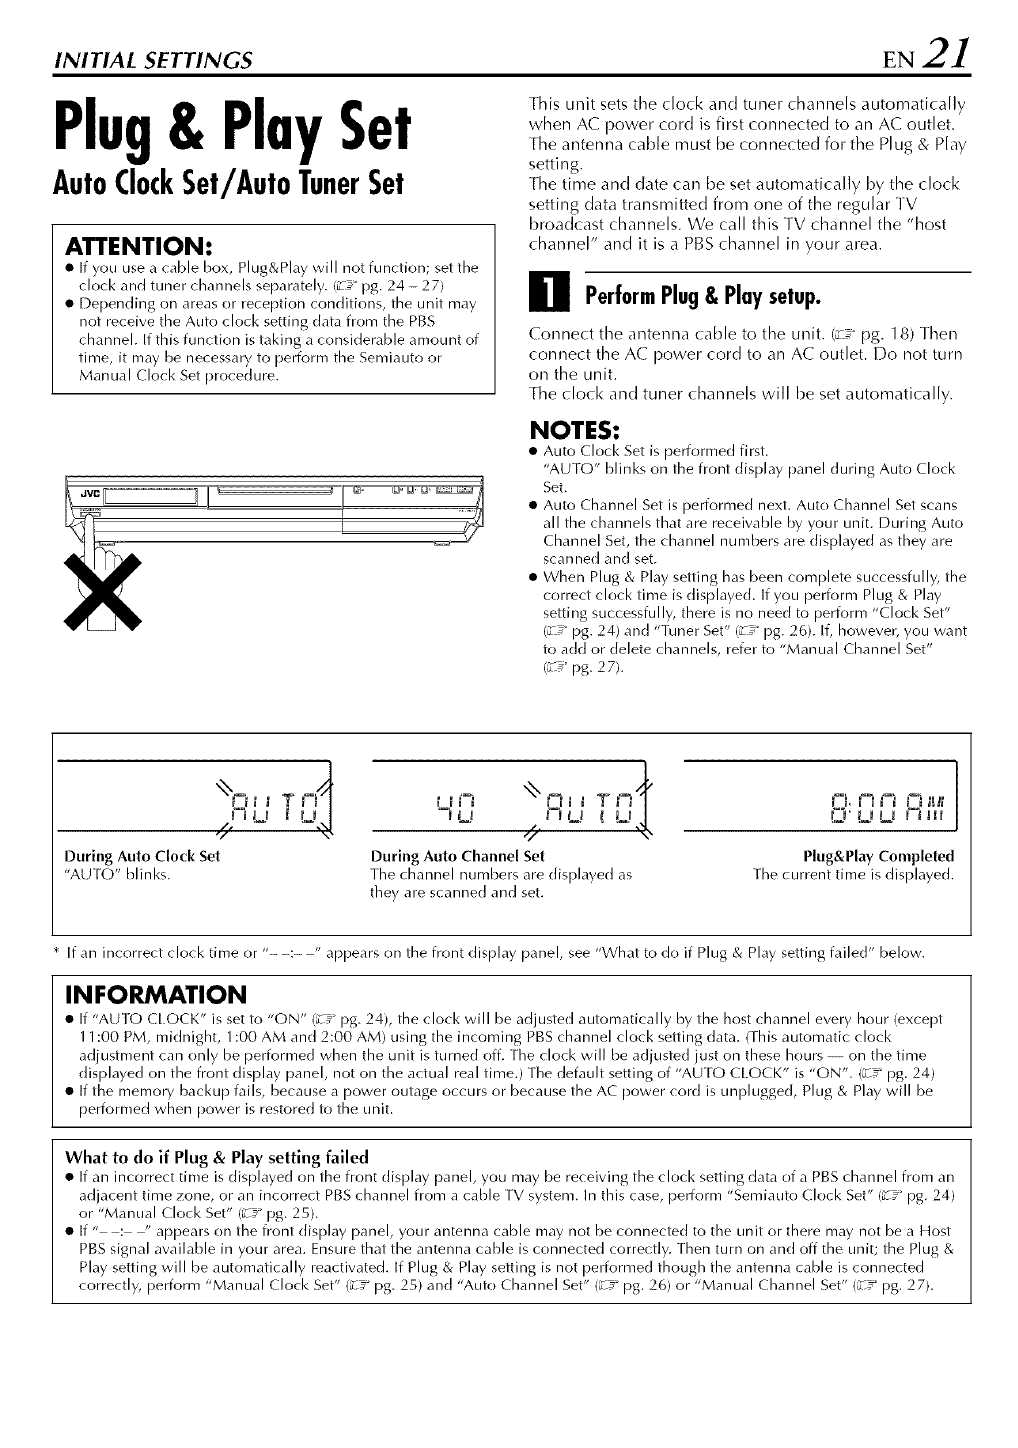
Plug& PlaySet
AutoClockSet/AutoTunerSet
ATTENTION:
• [f you use a cable box, Plug&Play will not function; set the
clock and tuner channels separately. (_-2" pg. 24 - 27)
• Depending on areas or reception conditions, the unit may
not receive the Auto clock setting data from the PBS
channel. If this function is taking a considerable amount of
time, it may be necessary to perform the Semiauto or
Manual Clock Set procedure.
This unit sets the clock and tuner channels automatically
when AC power cord is first connected to an AC outlet.
The antenna cable must be connected for the Plug & Play
setting.
The time and date can be set automatically by the clock
setting data transmitted from one of the regular TV
broadcast channels. We call this TV channel the "host
channel" and it is a PBS channel in your area.
PerformPlug& Playsetup.
Connect the antenna cable to the unit. (_:(" pg. 18) Then
connect the AC power cord to an AC outlet. Do not turn
on the unit.
[he clock and tuner channels will be set automatically.
NOTES:
• Auto Clock Set is performed first.
"AUTO" blinks on the front display panel during Auto Clock
Set.
• Auto Channel Set is performed next. Auto Channel Set scans
all the channels that are receivable by your unit. During Auto
Channel Set, the channel numbers are displayed as they are
scanned and set.
• When Plug & Play setting has been complete successfully, the
correct clock time is displayed. If you perform Plug & Play
setting successfully, there is no need to perform "Clock Set"
(_-_" pg. 24) and "Tuner Set" (_-_" pg. 26). If, however, you want
to add or delete channels, refer to "Manual Channel Set"
(_-_" pg. 27).
Xx'ri_ _ T' ¢°tp t!j K LJ
During Auto Clock Set
"AUTO" blinks.
wwaa \\Naa I
'-' .= T'i-_
ILJ ..d.IILJ ( !J ..
During Auto Channel Set
The channel numbers are displayed as
they are scanned and set.
i,i ia a i ag._i
(ZrUU I till
Plug&Play Completed
The current time is displayed.
If an incorrect clock time or "- -:- -" appears on the front display panel, see "What to do if Plug & Play setting failed" below.
INFORMATION
• If "AUTO CLOCK" is set to "ON" (c__"pg. 24), the clock will be adjusted automatically by the host channel every hour (except
11:00 PM, midnight, 1:00 AM and 2:00 AM) using the incoming PBS channel clock setting data. ([his automatic clock
adjustment can only be performed when the unit is turned off. ['he clock will be adjusted just on these hours -- on the time
displayed on the front display panel, not on the actual real time.) The default setting of "AUTO CLOCK" is "ON". (_-(" pg. 24)
• [f the memory backup fails, because a power outage occurs or because the AC power cord is unplugged, Plug & Play will be
performed when power is restored to the unit.
What to do if Plug &Play setting failed
• If an inconect time is displayed on the front display panel, you may be receiving the clock setting data of a PBS channel from an
adjacent time zone, or an incorrect PBS channel from a cable TV system. In this case, perform "Semiauto Clock Set" (_-(" pg. 24)
or "Manual Clock Set" (_-_" pg. 25).
• [f " : " appears on the front display panel, your antenna cable may not be connected to the unit or there may not be a Host
PBS signal available in your area. Ensure that the antenna cable is connected correctly. [.hen turn on and off the unit; the Plug &
Play setting will be automatically reactivated. If Plug & Play setting is not performed though the antenna cable is connected
correctly, perform "Manual Clock Set" (_-(" pg. 25) and "Auto Channel Set" (_-(" pg. 26) or "Manual Channel Set" (_-(" pg. 27).
22 EN INITIAL SETTINGS (cont.)
Language
• Turn oil the unit.
• Turn on the TV and select the AV mode.
• Slide the TV/CABLE/DBS/DVD switch to DVD.
TvD ....
_ CZD CZD (2D)
YenPlu_Pn0_6HECKnECLINKTIMEn
TOPr,IENU r_'lC4_10_
,,u_' ,,,,,
r_E_U nETunN
PREVl0US
CE_3
SLOW- PL_¥,_LECT SLOW÷
C_En
REC_IODELI_E'CHECK
o 0q0,ZN
SETUP
_00®SITUP
JVC
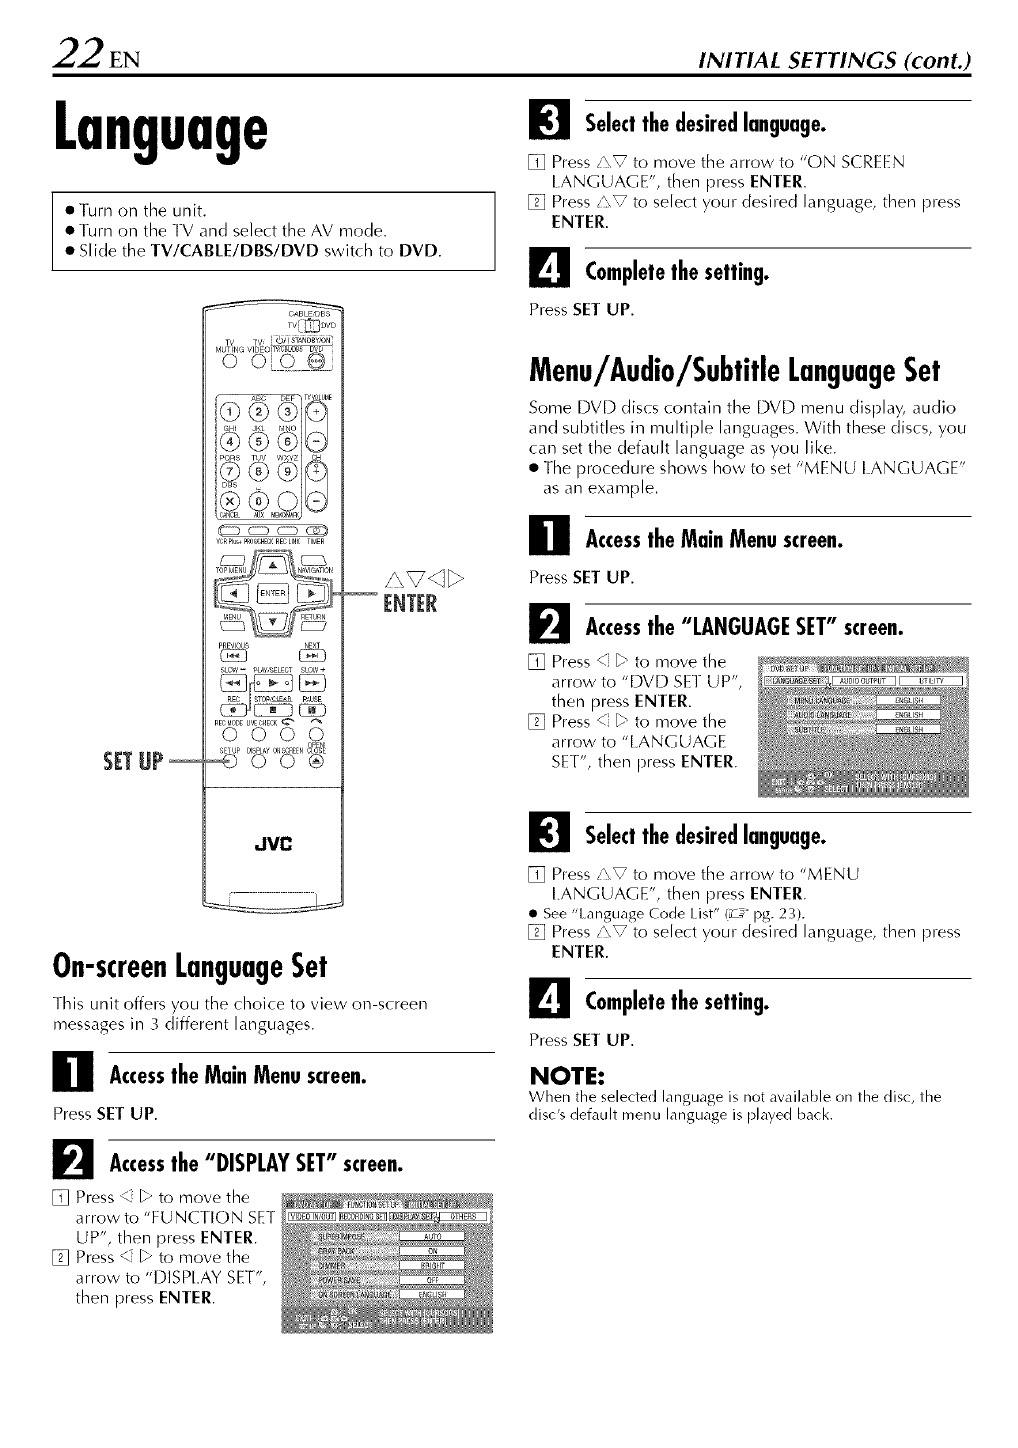
I_1 Selectthedesiredlanguage.
[] Press zZT, to move the arrow to "ON SCREEN
lANGUAGE", then press ENTER.
[] Press z"_ to select your desired language, then press
ENTER.
L_e Completethe setting.
Press SET UP.
Menu/Audio/SubtithLanguageSet
Some DVD discs contain the DVD menu display, audio
and subtitles in multiple languages. With these discs, you
can set the default language as you like.
• The procedure shows how to set "MENU [ ANGUAGE"
as an example.
Accessthe MainMenuscreen.
Press SET UP.
_Accessthe "LANGUAGESET"screen.
[] Press < _" to move the
arrow to "DVD SET UP',
then press ENTER.
[] Press < _" to move the
arrow to "LANGUAGE
SET", then press ENTER.
On-screenLanguageSet
This unit offers you the rhoice to view on-screen
messages in 3 different languages.
Accessthe MainMenuscreen.
Press SET UP.
_Accessthe "DISPLAYSET"screen.
[] Press _ _" to move the
arrow to "FUNCTION SET
UP', then press ENTER.
[] Press _ _" to move the
arrow to "DISP[AY SET",
then press ENTER.
I_1 Selectthedesiredlanguage.
[] Press/'\T, to move the arrow to "MENU
[.ANGUAGE', then press ENTER.
• See "language Code List" (_ pg. 23).
[] Press/'\V to select your desired language, then press
ENTER.
L_e Completethe setting.
Press SET UP.
NOTE:
When the selected language is not awfilable on the disq the
•g / -
dl_c s detault menu language is played back.
LanguageCodeList
AA
AB
AF
AM
AR
AS
AY
AZ
BA
BE
BG
BH
BI
BN
BO
BR
CA
CO
CS
CY
DZ
El
EO
ET
EU
FA
FJ
FO
FY
GA
GD
GL
GN
GU
HA
HI
HR
HU
HY
IA
IE
Afar
Abkhazian
Afrikaans
Ameharic
Arabic
Assamese
Aymara
Azerbaijani
Bashkir
Byelorussian
Bulgarian
Bihari
Bislama
Bengali, Bangla
Tibetan
Breton
Catalan
Corsican
Czech
Welsh
Bhutani
Greek
Esperanto
Estonian
Basque
Persian
Eiji
Faroese
Frisian
irish
Scots Gaelic
Galician
Guarani
Gujarati
Hausa
Hindi
Croatian
Hungarian
Armenian
Interlingua
Interlingue
IK
IN
IS
IW
J[
jw
KA
KK
KI
KM
KN
KO
KS
KU
KY
LA
LN
kO
IT
IV
MG
MI
MK
ML
MN
MO
MR
MS
MT
MY
NA
NE
OC
OM
OR
PA
PL
PS
PT
QU
RM
[nupiak
indonesian
icelandic
Hebrew
Yiddish
Javanese
Georgian
Kazakh
Greenlandic
Cambodian
Kannada
Korean (KOR)
Kashmiri
Kurdish
Kirghiz
Latin
Lingala
Laothian
lithuanian
Latvian, [ettish
Malagasy
Maori
Macedonian
Malayalam
Mongolian
Moldavian
Marathi
Malay (MAY)
Maltese
Burnlese
Nauru
Nepali
Occitan
(Alan) Oromo
Oriya
Panjabi
Polish
Pashto, Pushto
Portuguese
Quechua
Rhaeto-Romance
RN
RO
RU
RW
SA
SD
SG
SH
SI
SK
SI
SM
SN
SO
SQ
SR
SS
ST
SU
SW
TA
TE
TG
TH
TI
TK
TL
TN
TO
TR
TS
TT
TW
UK
UR
UZ
VI
VO
WO
XH
YO
ZU
Kirundi
Rumanian
Russian
Kinyarwanda
Sanskrit
Sindhi
Sangho
Serbo-Croatian
Singhalese
Slovak
Slovenian
Samoan
Shona
Somali
Albanian
Serbian
Siswati
Sesotho
Sundanese
Swahili
Tamil
Telugu
Tajik
Thai
Tigrinya
Turkmen
Taga log
Setswana
Tonga
Turkish
Tsonga
Tatar
Twi
Ukrainian
Urdu
Uzbek
Vietnamese
Volapuk
Wolof
Xhosa
Yoruba
Zulu
24 EN INITIAL SETTINGS (cont.)
ClockSet
• Furn on tile unit.
• [urn on the/V and select the AV mode.
•Slide the TV/CABLE/DBS/DVD switch to DVD.
TV_OVO
TV TV _21_TA_Oi3_id_i
_ CZ) CZ) CED)
vcR_u_pRCC_HECKRECLINKTIMER
PnEVlOUS
{Z_3
SLOW= pt_ySSEtECTSTOW÷
RECMODEUVECHECK_
oooo
SETUP DBpL_y ONSOnEEN_l_
_)00®
Perform clock setting only if the clock has not been set
correctly by the Plug&Play setting.
SETUP
dVC
SemiautoClockSet
You can change the host channel/D.S.T. (Daylight Saving lime)/
time zone setting manually.
NOTE:
The time set previously will be erased when "AUTO CLOCK",
"HOST CH', "D.S.T." or "TIME ZONE" setting is changed.
Accessthe MainMenuscreen.
Press SET UP,
[NT[iR
I_1 Accessthe "CLOCKSET"screen.
[] Press <_ to select
"INITIAl. SE[ UP", then
press ENTER.
[] Press 4 _ to select
"CLOCK SET", then press
ENTER.
I_1 Set "AUTOCLOCK"to "ON".
[] Press/'\V to move the arrow to "AU IO CLOCK", then
press ENTER.
[] Press/'\V until "ON" is selected, then press ENTER.
L_e Selectthehostchannel.
You can either select "AU 10" or enter a PBS channel
number.
[] Press i\V to move the arrow to "HOSI CH", then
press ENTER.
[] Press/\V to select "AU ]O" or the desired PBS
channel numbeb then press ENTER.
NOTE:
Some PBS channels do not transmit clock setting data.
_Selectthe D.S.T.mode.
[] Press/\V to move the arrow to "D.S.I.", then press
ENTER.
[] Press/'\V to select the desired setting, then press
ENTER.
AUTO: Select if you want to adjust your unit's clock
automatically by the incoming signal from the
host channeh Be sure to select the correct time
zone manually in step 1_!.
ON: Adjustment will be made by the buih-in clock
itself.
OFF: Select when Daylight Saving lime does not apply
to you.
_t Selectthe time zone.
[] Press/\V to move the arrow to "lIME ZONE", then
press ENTER.
[] Press/\V to select "AUTO" or the desired time zone,
then press ENTER. Each time you press/\ ,,T, the time
zone changes as follows:
_--AUT0..-,ATLANTIC..-,EASTERN-,-,CENTRAL-,-,
MOUNTAIN*-,PAClFIC*-,ALASKA-,-,HAWAII-,-,
(backto the beginning)
NOTE:
If an incorre_-t time is displayed by the Plug & Play fum-tion, you
may be receiving the clock setting data of a PBSchannel from an
adjacent time zone or from an incorrect PBS channel from a
cable TV system. If you selected "AUTO" for the host channel in
step I_'1be sure to select the correct time zone manually.
_ Completethe SemiautoClockSet.
Press SET UP to return to normal screen.
IMPORTANT:
Turn off the unit after performing Serniauto Clock. "AUTO"
will appear on the front display panel while the clock is
being set. The current clock time will appear automatically
when the clock setting is complete.
AUTO DAYLIGHT SAVING TIME
"]'his function enables autonlatic adjustnlent of the unit's
clock at the start and end of Daylight Saving Time.
With Auto DST activated,
on the first Sunday of April at 2:00 AM, the clock is
adjusted to 3:00 AM.
on the last Sunday of October at 2:00 AM, the clock is
adjusted to 1:00 AM.
NOTE:
Timer re_-ording may not function correctly at the time
Daylight Saving Time is adjusted.
ManualClockSet
Accessthe MainMenuscreen.
Press SET UP.
_Accessthe "CLOCKSET"screen.
[] Press _ to select
"INITIAl. SET UP', then
press ENTEr.
[] Press <" _" to select
"CLOCK SET", then press
ENTEr.
I_1 Set "AUTOCLOCK"to "OFF".
[] Press/\V to move the
arrow to "AUTO CLOCK",
then press ENTEr.
[] Press/\V to select "OFF",
then press ENTEr.
Lqset time, date andyear.
[] Press/'\V to move the arrow to "TIME", then press
ENTEr.
[] Press i\V until the desired time appears, then press
ENTER. Set the date and year in the same way.
• Holding/\V changes the time in 30-minute intervals, or
changes the date in 15-day intervals.
_SelectD.S.T.mode.
[] Press/\V to move the arrow to "D.S.T.", then press
ENTER.
[] Press z'\V to select the desired setting, then press
ENTEr.
011: Adjustment will be made by the built-in clock
itself.
OFF: Select when Daylight Saving Time does not apply
to you.
_! Start clock.
Press SET UP and normal screen appears.
26"EN INITIAL SETTINGS (cont.)
[unerSet
elurn oil the unit.
• Turn on the TV and select the AV mode.
• Slide the TV/CABLE/DBS/DVD switch to DVD.
TV_DVD
w w fo/ _TANO_Y76_'
v_nPlu_Pn0G_H_nECLINKTIMEn
MENU nETURN
PREVIOUS
SLOW- P_SE_ECT SLOW+
REC_ODELIVECHECK_
0000
_00®
SITUP
AutoChannelSet
Perform Auto Channel Set only if dlannels have not been set
correctly by the Plug&Play setting.
dVC
Accessthe MainMenuscreen.
Press SET UP.
I_1 Accessthe "TUNERSET"screen.
[] Press _ to select
"INITIAl. SET UP", then
press ENTER.
[] Press _ _ to select
"TUNER SET", then press
ENTER.
I_1 PerformAutoChannelSet.
Press/"_V to move the arrow
to "AUTO CH SET", then
press ENTER. You can
automatically set the
receivable channels in your
area in the order of their
frequencies.
• When Auto Channel Set is complete, "SCAN COMPLETED"
appears on the IV screen.
• [f the scan was unsuccessful, "SCAN COMPLETED NO
SIGNAL-" appears on screen. Check the connections and start
again.
L_e Completethe setting.
Press SET UP.
INFORMATION
]he unit selects the correct band (TV or CATV) automatically
during Auto Channel Set. [he selected band will be
displayed on the right side of "BAND" on the Tuner Set
screen.
0--9_
SETUP
EN27
TV_DVD
_ CED CED CiZ))
vcRplu_pR_HECKnECLINKTIMEn
pREVIOUS
SLOW= pt_Y;SEI£GT SLO_¢÷
RECrCODEUVECHECK_
o 0Zo,%&
SETUP
-,_ 0 0 ®
JVC
_'° INTER
ManualChannelSet
You can add the channels you want or delete the dlannels you
do not want manually,
Accessthe MainMenuscreen.
Press SET UP.
I_1 Accessthe "TUNERSET"screen.
[] Press < _" to select
"INIEIAI. SE] UP", then
press ENTER.
[] Press _ _" to select
"FUNER SET", then press
ENTER.
I_1 Accessthe ManualChannelSetscreen.
Press/\T, to move the arrow to "MANUAL CH SE1",
then press ENTER.
L_eAdd or skip thedesiredchannels.
To add channels
[] Press i\V to move the
arrow to "CH', then press
ENTER.
[] Press the number keys to
select a channel number
you want to add, then
press ENTER.
[] Press/\V to move the arrow to "ADD/SKIP", then
press ENTER.
[] Press/\_ to select "ADD", then press ENTER.
[] Repeat [] [] to add other channels.
To skip channels
[] Press/'\V to move the arrow to "CH', then press
ENTER.
[] Press the number keys to select a channel number you
want to skip, then press ENTER.
[] Press i\V to move the arrow to "ADD/SKIP", then
press ENTER.
[] Press/\V to select "SK]P', then press ENTER.
[] Repeat [] - [] to skip other channels.
_Completethe setting.
Press SET UP.

28 EN INITIAL SETTINGS (cont.)
MonitorSet
You call select the monitor type depending on the TV
used when you play back DVD VIDEO discs recorded for
wide-screen TVs.
• Turn on the unit.
• Turn on the TV and select the AV mode.
• Slide the TV/CABLE/DBS/DVD switch to DVD.
Accessthe MainMenuscreen.
Press SET UP.
F_ Accessthe "VIDEOIN/OUT" screen.
[] Press _ _ to move the
arrow to "FUNCTION SET
UP', then press ENTER.
[] Press % _" to move the
arrow to "VIDEO IN/
OUT", then press ENTER.
{The boldface settings in the table below indicate the settings at
your purchase.)
•MONITORTYPE
4:3LB(LetterBoxconversion):
Select this when the aspect ratio of your TV is
4:3 (conventional TV). While viewing a wide
screen picture, the black bars appear on the
top and the bottom of the screen.
4:3PS(Pan&Scan):
Select this when the aspect ratio of your TV is
4:3 (conventional TV). While viewing a wide
screen picture, the black bars do not appear;
however, the left and right edges of the
pictures will not be shown on the screen.
16:9AUTO(Widetelevisionconversion):
Select this when the aspect ratio of your TV is
1 6:9 (wide TV).
16:9FIX(Widetelevisionconversion):
Select this when the aspect ratio of your TV is
fixed to 16:9 (wide TV). The unit automatically
adjusts the screen width of the output signal
correctly when playing back a picture whose
aspect ratio is 4:3.
I_1 Selectthe desiredoption.
[]Press _V to select"MONITOR TYPE",thenpress
ENTER.
[]Press_ZV to selectthe desired option, thenpress
ENTER.
L_e Completethe setting.
Press SET UP.
Pan&Scan/Letter Box
In general, DVD VIDEO disc are produced for a wide-screen
TV with 16:9 aspect ratio.
Material with this ratio will not fit to a TV with 4:3 aspect
ratio. There are two styles to display the image, "Pan&Scan"
(PS) an(] "Letter Box" (IB).
Pan&Scan
The right and left side of the image are
cut off. The image fills the screen.
• The picture will be shown in the
"4:3LB" mode depending on the disc
even if the "4:3PS" mode is selected.
Letter Box
Bla_k bands appear at the top and
bottom of the image. The image itself
appears in 16:9 aspect ratio.

EN29
CableBoxControl
Setting
Place the cable box on top of the unit. Attach the unit's
Controller to the top of the unit with the Controller's
transmitter pointed towards the cable box's remote
sensor.
The following procedure is required if you receive your
TV channels through a cable box (descrambler). The
Controller allows the unit to automatically switch the
cable box channel during timer recording. The Controller
is effective for recording broadcasts that have been
programed using "VCR Plus+ _'Timer Programing"
1=_"pg. 60) or "Manual Timer Programing" (=_" pg. 64).
InstallingController
ATTENTION:
The Controller can also control a DBS receiver. If both a cable
box and a DBS receiver are used, position the Controller so its
signal reaches the remote sensors of both the cable box and DBS
receiver.
Cable box
Your unit
Cable box
Controller
(suggested locations)
Controller
]b RF output
Transmitter
To
ANTENNA
IN
Your unit
To Audio/
video
output
or
To
AUDIO/
VIDEO
• ,INPUT I
Installa Controller.
Place a Controller so that the path between its transmitter
and the cable box's remote sensor is unobstructed.
_Attachthe Controller.
Fix securely using the adhesive strip attached on the back
of the Controller.
I_1 Make connections.
If your cable box does not have audio/video output
counectors
Connect the RF output connector on the cable box to the
ANTENNA IN connector on the rear of your unit.
If your cable box has audio/video output connectors
Connect an audio/video cable between the AUDIO/
VIDEO INPUT connectors on the rear of the unit and the
audio/video output connectors on the cable box.
NOTE:
When connecting your cable box, refer to its instruction manual.
L_e ConnecttheControllertounit.
Connect the Controller to the CABI£ BO× connector on
the rear paneh
How to control the cable box
This unit has two separate methods to control your cable
bOX,
• The unit's wireless Remote can control your cable box.
This eliminates the need for a separate cable box's Remote.
• The unit's Controller can also vontrol your cable box. [his
allows the unit to change your cable box's channel number
during timer recording.
Each method must be set up separately. |o set up the unit's
Remote, refer to page 93. lb set up the Controller, go to
page 30.
30EN
SETUP
TV_DVD
__)
vcRplu_PROG_HeCKnECLINKTIMEn
TOPMENU _VI_rlON
MENU nETURN
PREVIOUS
REC_IODELIVECHECK_'_ _
0000
_ETUPO,_,_r_0,_,EE,_0_
_00®
JVC
INITIAL SETTINGS (cont.)
Settingcablebox'sbrandandchannel
After installation, set the cable box's brand and channel
correctly; otherwise, the Controller cannot work
correctly.
• Turn on the unit.
• Turn on the TV and select the AV mode.
• Slide the TV/CABLE/DBS/DVD switch to DVD.
Turnon thecablebox.
Turn oil the cable box's power.
I_1 Accessthe MainMenuscreen.
Press SET UP.
I_1 Accessthe "CABLEBOXSET"screen.
[] Press <" _ to move the
arrow to "INITIAL SET
UP", then press ENTER.
[] Press <" _ to move the
arrow to "STB SET", then
press ENTER.
[] Press/\V to move the
arrow to "CABLE BOX
SET", then press ENTEr.
L_e Selectthecablebox's channel.
Your selection depends on
how the cable box is
connected to your unit.
[] Press/'\_ to move the
arrow to "CAB] E BOX
OUTPUT CH', then press
ENTER.
[] If the cable box is
connected to your unit's ANTENNA IN connector on
the rear panel, press/'\_ to select the channel
number representing the cable box's output (CH2 -
CH9), then press ENTER.
If the cable box is connected to your unit's AUDIO/
VIDEO INPUT connectors on the rear panel, press
/\V to select "[.-1" or "[.-2", then press ENTER.
If you do not use a cable box, press/\V to select
"OFF", then press ENTER.
EN31
II_!] Enterthecablebox's brand.
[] Press i\V to move the arrow to "CABLE BOX
BRAND", then press ENTER.
[] Press/\_ to select the brand code from the following
list, then press ENTEr.
[] Press i\V to move the arrow to "TEST MODE", then
press ENTEr.
If the (:'able box's channel changes to 9, setting is
complete.
Press ENTER and "CABI.E
BOX CONTROl. IS ON" ......
appears on the screen for
about 5 seconds, then the
screen in step [] appears.
If the (:'able box's channel
does not change to 9;
[] Press <" _ to move the
arrow to "NO", then press ENTER.
[] Repeat step [] until the cable box's channel changes to
9 by entering another code.
[] If the channel does not change after going through all
the code numbers listed for your model of cable box,
then try all the other numbers.
NOTES:
• The Controller may not work with all types of cable box.
• [f your cable box does not respond to any code between 1 and
28, you cannot use the Controller to change cable box
channels. [n this case, make sure to leave the cable box turned
on an(:] tuned to the proper channel before the scheduled start
time of timer recording.
Contact your cable company about the possibility of
exchanging your current cable box with the one compatible
with your unit.
• The unit can only change the cable box channel through the
Controller during timer recording.
• If your cable box cannot be operated with a Remote (because
it has no remote sensor), you cannot use the Controller to
change its channels. Make sure to leave the cable box turned
on and tuned to the proper channel before the scheduled start
time of timer recording.
• If the unit's memory backup expires because of a power
failure, set the cable box output channel and brand again.
• For customers in U.S.A.: If you are unable to set the
Controller, contact JVC toll free at 1-800-252-5722.
BRAND NAME
ARCHER
CABI.ETENNA
CABkEVIEW
CITIZEN
CURTIS
DIAMOND
GC BRAND
GEMINI
GENERAl. INSTRUMENTS
CODE
1,5,17
1,17
15,16,17,21,25
15,16,17,21,25
2,8
1,17
15,16,17,21,25
15
1,4,6,11,12,15,28
HAMLIN
JASCO
JERROt D
NOVAVISION
OAK
PANASONIC
PULSER
RCA
REGAl
REMBRANDT
SAMSUNG
SCIENTIFIC ATLANTA
SIGMA
SI MARX
SPRUCER
SIARGATE
TELEVIEW
TOCOM
UNIKA
UNIVERSAl
VIDEOWAY
ZENITH
10, 18, 23
15
1,4,6,11,12,15,28
2,8
7, 20
13, 14
15,16,17,21,25
13, 14
10, 18,23
1,16,17
5,16,24
2,8
7, 20
5, 16, 17,24,25
13, 14
5, 15, 16, 17,21,24,25
5,16,24
1,4,16
1,17
16, 17, 25
3,9,22
3,9,22
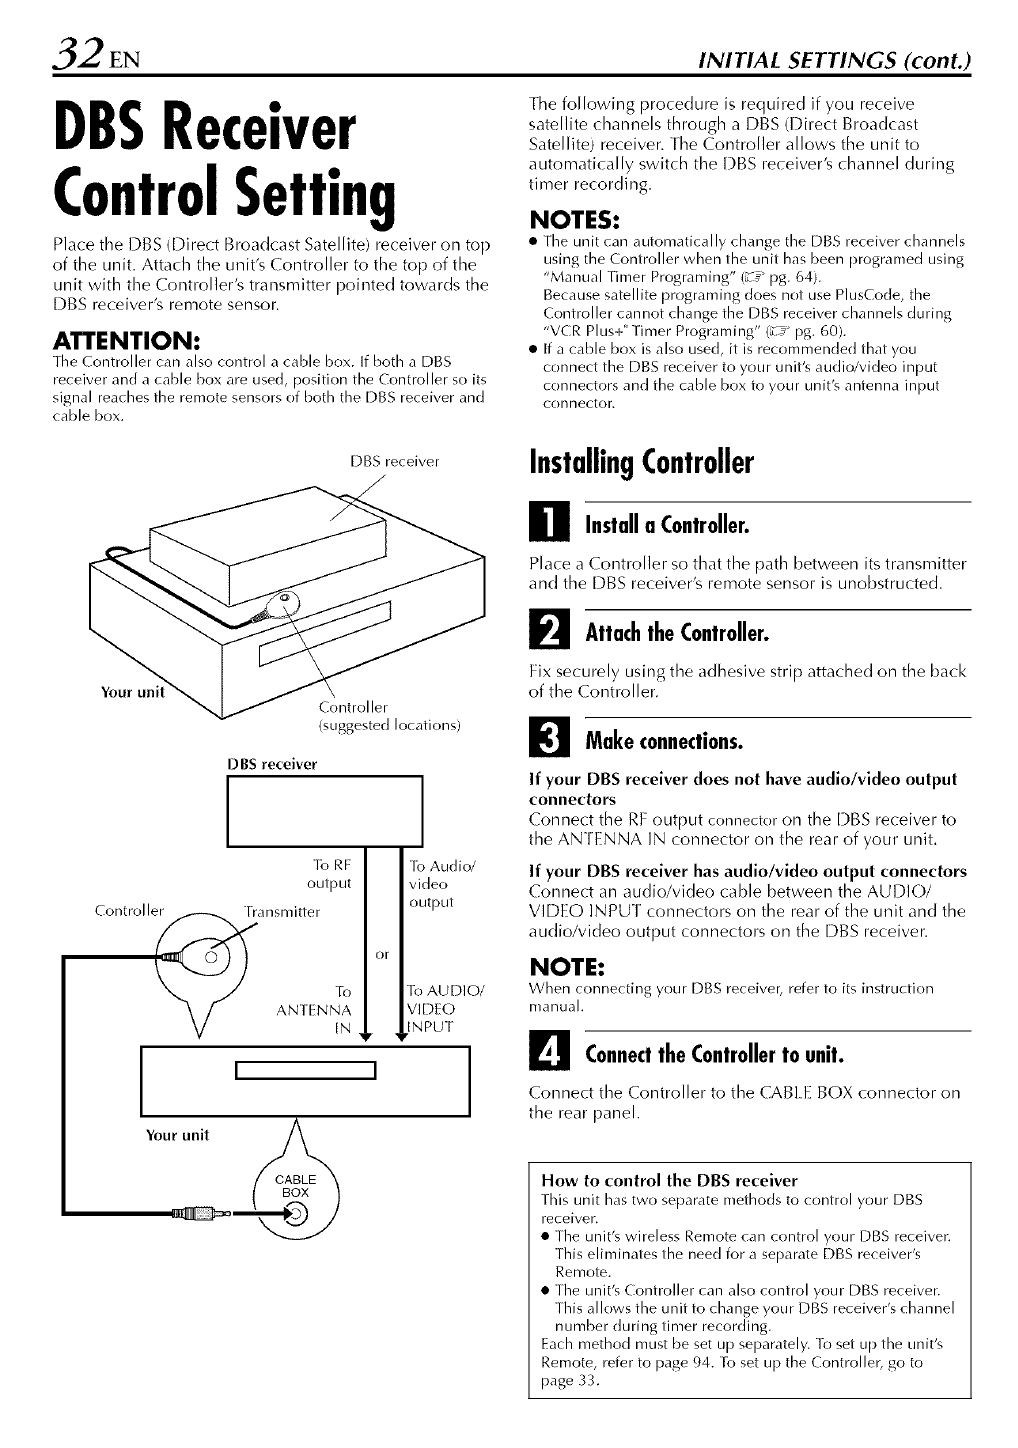
2EN INITIAL SETTINGS (cont.)
DBSReceiver
ControlSetting
Place the DBS (Direct Broadcast Satellite) receiver on top
of the unit. Attach the unit's Controller to the top of the
unit with tile Controller's transmitter pointed towards the
DBS receiver's remote sensor.
ATTENTION:
The Controller can also control a cable box. If both a DBS
receiver and a cable box are used, position the Controller so its
signal reaches the remote sensors of both the DBS receiver and
cable box.
The following procedure is required if you receive
satellite channels through a DBS (Direct Broadcast
Satellite) receiver. The Controller allows the unit to
automatically switch the DBS receiver's channel during
timer recording.
NOTES:
•The unit carl automatically change the [-)BS receiver channels
using the Controller when the unit has been programed using
"Manual Timer Programing" (_z__ pg. 64).
Because satellite programing does not use PiusCode, the
Controller cannot change the DBS receiver channels during
"VCR Plus+ ' Timer Programing" (_-_" pg. 60).
• If a cable box is also used, it is recommended that you
connect the DBS receiver to your unit's audio/video input
connectors and the cable box to your unit's antenna input
connector.
DBS receiver InstallingController
Controller
(suggested locations)
DBS receiver
]b RF ]b Audio/
output video
output
Controlle_ansmitter or
V IN
Your unit
To AUDIO/
VIDEO
• INPUT
'I
Installa Controller.
Place a Controller so that the path between its transmitter
and the DBS receiver's remote sensor is unobstructed.
_Attachthe Controller.
Fix securely using the adhesive strip attached on the back
of the Controller.
_1 Make connections.
If your DBS receiver does not have audio/video output
conuectors
Connect the RF output connector on the DBS receiver to
the ANTENNA IN connector on the rear of your unit.
If your DBS receiver has audio/video output connectors
Connect an audio/video cable between the AUDIO/
VIDEO INPUT connectors on the rear of the unit and the
audio/video output connectors on the DBS receiver.
NOTE:
When connecting your [-)BS receiver, refer to its instruction
manuah
L_e ConnecttheControllertounit.
Connect the Controller to the CABLE BO× connector on
the rear paneh
How to control the DBS receiver
This unit has two separate methods to control your DBS
receiver.
• The unit's wireless Remote can control your DBS receiven
This eliminates the need for a separate DBS receiver's
Remote.
• The unit's Controller can also control your DBS receiver.
This allows the unit to change your DBS receiver's channel
number during timer recording.
Each method must be set up separately, lo set up the unit's
Remote, refer to page 94. R_ set up the Controller, go to
page 33.

SETUP
TV_DVD
VCRPlu_Pno_H_ nECUNKTIMER
TOPMEF_U F_'I_ION
MENU nE_U_N
PREWOUS
SLOW= P_¥,SE_ECTSLOW_
REC_IODEUVECHECK_ _
SETUP
_00®
JVC
SettingDBSreceiver'sbrandand
channel
After installation, set the DBS receiver's brand and
channel correctly; otherwise, the Controller cannot work
correctly.
• Turn on the unit.
• Turn on the TV and select the AV mode.
• Slide the TV/CABLE/DBS/DVD switch to DVD.
Turnon the DBSreceiver.
Turn oil the DBS receiver's power.
_Accessthe MainMenuscreen.
Press SET UP.
I_1 Accessthe "DBS RECEIVERSET"screen.
[] Press <" _ to move the
arrow to "INITIAl SET
UP", then press ENTER.
[] Press <" _" to move the
arrow to "STB SET", then
press ENTER.
[] Press/\_ tO mOVe the
arrow to "DBS RECEIVER
SET", then press ENTER.
L_e Selectthe DBSreceiver'schannel.
Your selection depends on how the DBS receiver is
connected to your unit.
[] Press/\_ to move the
arrow to "DBS RECEIVER
OUTPUT CH', then press
ENTER.
[] If the DBS receiver is
connected to your unit's
ANTENNA IN connector
on the rear panel, press
/\_ to select the channel number representing the
DBS receiver's output (CH3 or CH4), then press
ENTER.
If the DBS receiver is connected to your unit's
AUDIO/VIDEO INPUT connectors on the rear panel,
press /'\_ to select "k-1" or "1.-2", then press ENTER.
If you do not use a DBS receiver, press/\_ to select
"OFF", then press ENTER.

4EN INITIAL SETTINGS (cont.)
_Enterthe DBSreceiver'sbrand.
[] Press i\V to move the arrow to "DBS RECEIVER
BRAND", then press ENTER.
[] Press/\_ to select the brand code from the following
list, then press ENTER.
[] Press i\V to move the arrow to "TEST MODE", then
press ENTER. The program currently received through
the DBS receiver appears.
BRAND NAME CODE
JVC (DISH Network) 51
ECHOSTAR (DISH Network) 51
SONY (DSS) 41
RCA (DSS) 40
If the DBS receiver's channel
changes to the channel listed
below for your brand, setting
is complete.
JVC --,- 100
ECHOSTAR --,- 100
SONY --,- 205
RCA --,- 205
Press ENTER and "DBS RECEIVER CONTROL IS ON"
appears on the screen for about 5 seconds, then press
ENTER.The screen in step [] appears.
If the DBS receiver's channel does not change as shown
above;
[] Press _ _" to move the arrow to "NO", then press
ENTER.
[] Repeat step [].
NOTES:
•The Controller may not work with all types of DBS receiver.
• If your DBS receiver does not respond to the code, you cannot
use the Controller to change satellite channels. In this case,
make sure to leave the DBS receiver turned on and tuned to
the proper channel before the scheduled start time of timer
recording.
• The unit can only change the satellite channel through the
Controller during timer recording.
• If your DBS receiver cannot be operated with a Remote
(because it has no remote sensor), you cannot use the
Controller to change its channels. Make sure to leave the DBS
receiver turned on and tuned to the proper channel before the
scheduled start time of timer recording.
• If the unit's memory backup expires because of a power
failure, set the cable box output channel and brand again.
• For customers in U.S.A.: If you are unable to set the
Controller, contact JVC toll free at 1-800-252-5722.
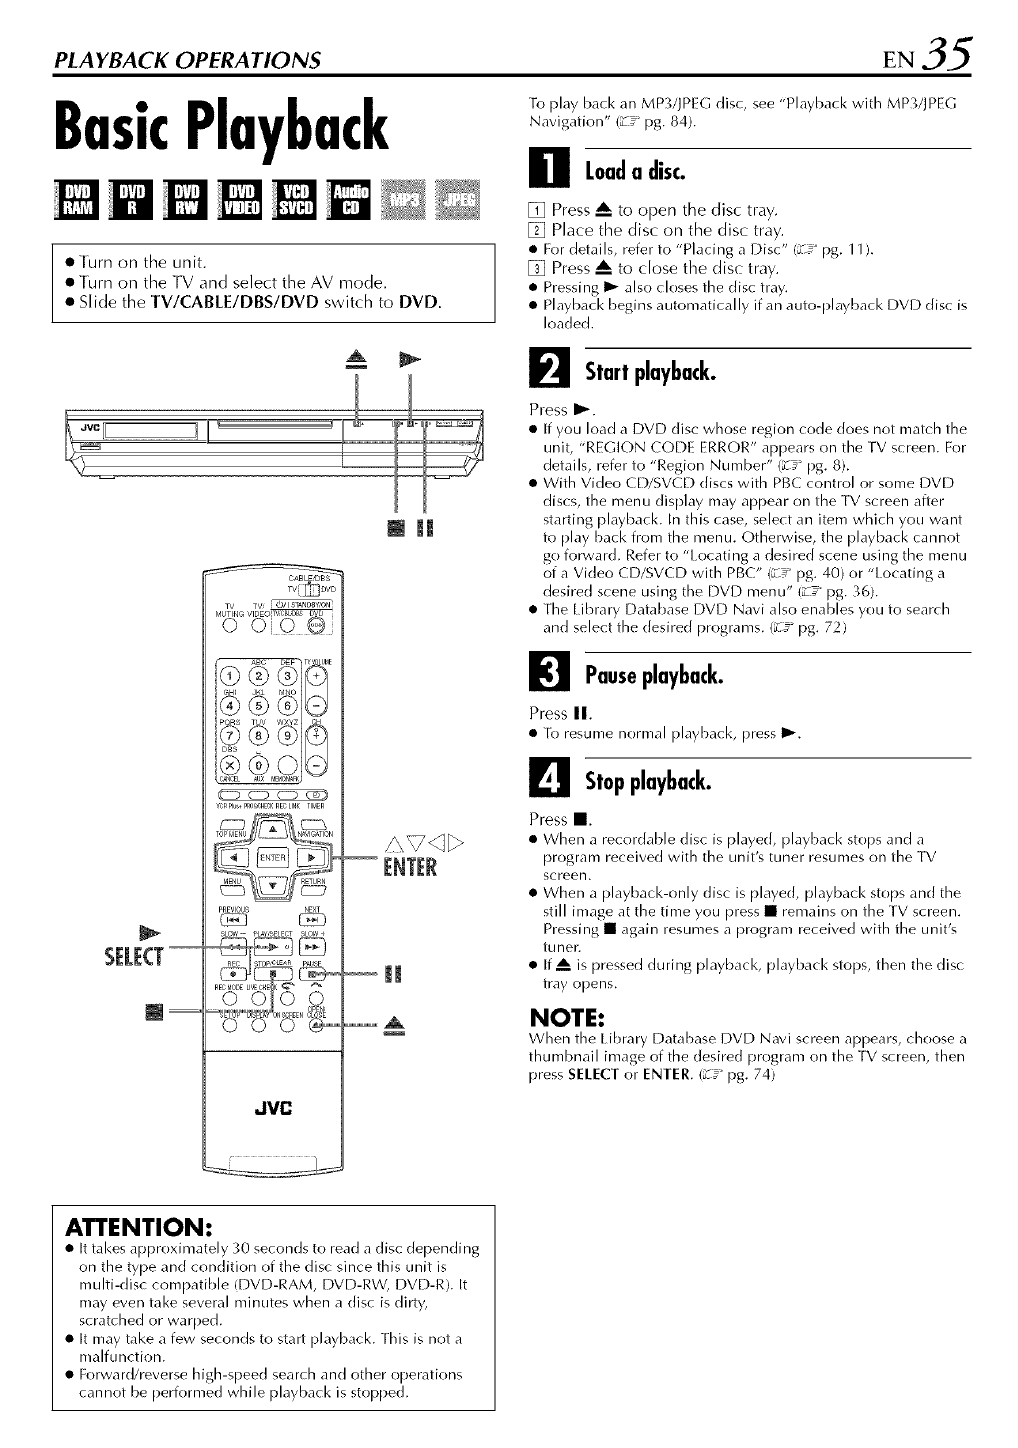
BasicPlayback
• lurn oil the unit.
• Turn oil the TV and select the AV mode.
• Slide the TV/CABtE/DBS/DVD switch to DVD.
l
(U_) CTZ)CTZ)_
VCR Plu> PnogeHg, KnEg LINK TIMER
PREVIOUg
SLOW- pLAYBELECT SLO_I
000_
..IVC
@ ||
To play back an MP3!JPEG disc, see "Playback with MP3/JPEG
Navigation" (_7 _pg. 84).
Loada disc.
[] Press A to open the disc tray.
[] Place the disc on the disc tray.
• For details, refer to "Placing a Disc" (_ pg. 11).
[] Press A to close the disc tray.
• Pressing I_ also closes the disc tray.
• Playback begins automatically if an auto-playback DVD disc is
loaded.
_Start playback.
Press I_.
• If you load a DVD disc whose region code does not match the
unit, "REGION CODE ERROR" appears on the TV screen. For
details, refer to "Region Number" (_-€" pg. 8).
• With Video CD/SVCD discs with PBC control or some DVD
discs, the menu display may appear on the TV screen after
starting playback. In this case, select an item which you want
to play back from the menu. Otherwise, the playback cannot
go forward. Refer to "l.ocating a desired scene using the menu
of a Video CD/SVCD with PBC" (_-_" pg. 40) or "l.ocating a
desired scene using the DVD menu" (_-_" pg. 36).
• The Library Database DVD Navi also enables you to search
and select the desired programs. {_ pg. 72)
I_1 Pauseplayback.
Press II.
• To resume normal playback, press I_.
Stopplayback.
Press II.
• When a recordable disc is played, playback stops and a
program received with the unit's tuner resumes on the TV
screen.
• When a playback-only disc is played, playback stops and the
still image at the time you press • remains on the lV screen.
Pressing • again resumes a program received with the unit's
tuner.
• If A is pressed during playback, playback stops, then the disc
tray opens.
NOTE:
When the Library Database DVD Navi screen appears, choose a
thumbnail image of the desired program on the TV screen, then
press SELECT or ENTER. (_ pg. 74)
ATTENTION:
• It takes approximately 30 seconds to read a disc depending
on the type and condition of the disc since this unit is
multi-disc compatible (DVD-RAM, DVD-RW, DVD-R). It
may even take several minutes when a disc is dirty,
scratched or warped.
• It may take a few seconds to start playback. [his is not a
malfunction.
• Forward/reverse high-speed search and other operations
cannot be performed while playback is stopped.
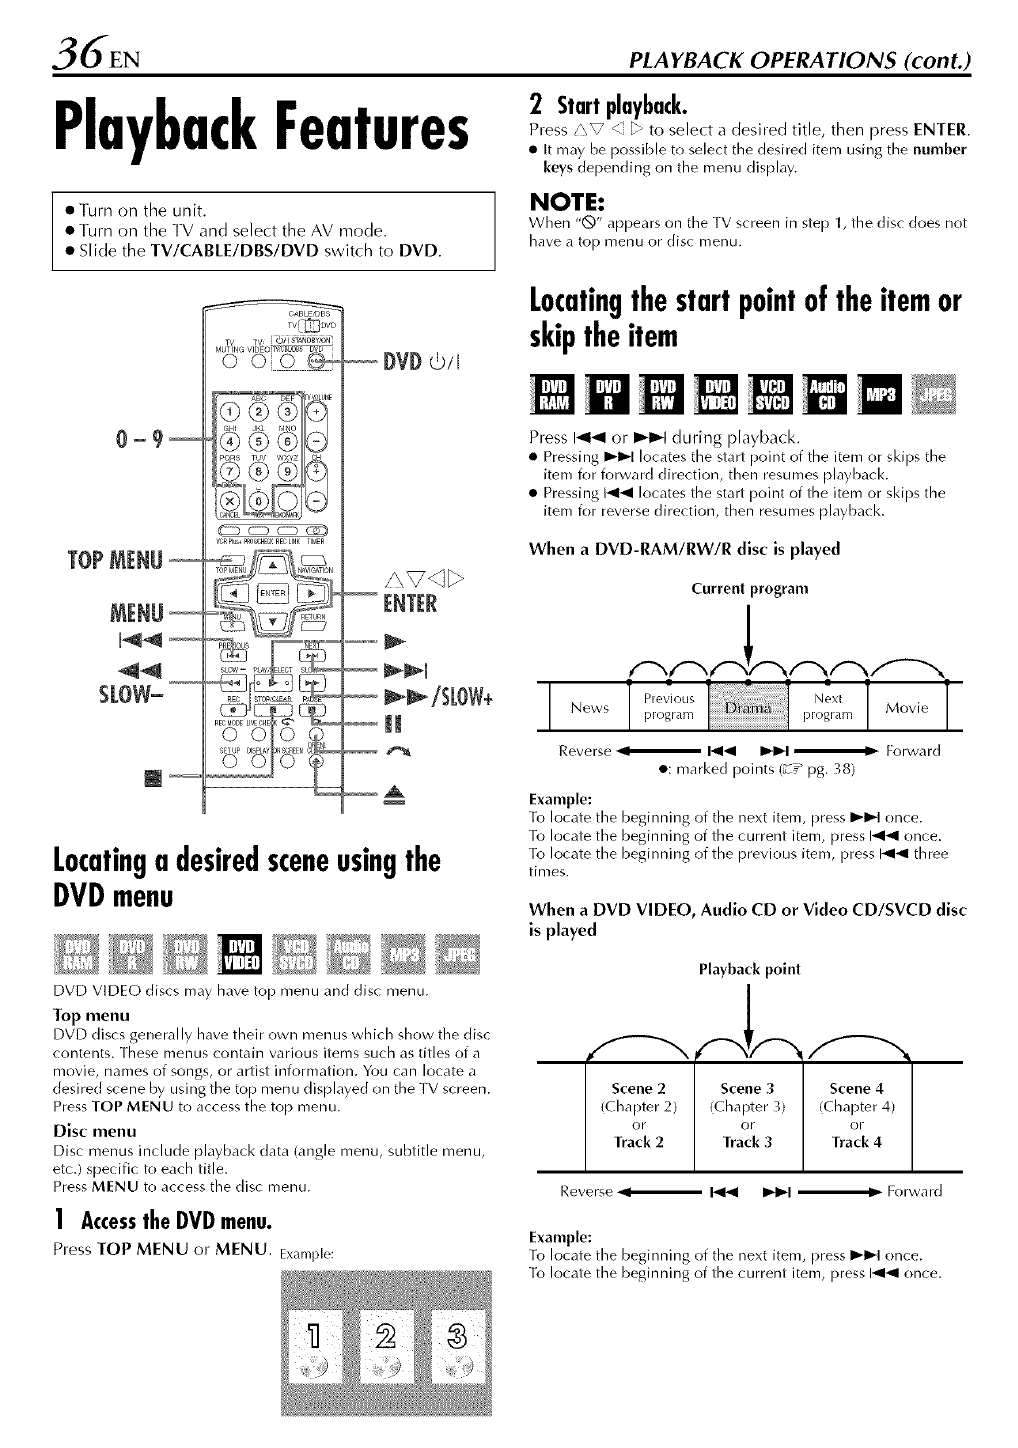
6EN PLAYBACK OPERATIONS (cont.)
PlaybackFeatures
elurn oil the unit.
• Turn on the TV and select the AV mode.
• Slide the TV/CABLE/DBS/DVD switch to DVD.
2Start playback.
Press i\V < _, to select a desired title, then press ENTER.
• It may be possible to select the desired item using the number
keys depending on the menu display.
NOTE:
When "Q" appears on the TV screen in step 1, the disc does not
have a top menu or disc menu.
0--9_
TOPMENU
MENU
[-,q4[
44
SLOW-
w TV [_21_TA_6_i6_
_ (ZZD(ZZD(2D)
w plu_PnO_HeCKnECLINKTIMEn
-IT
_ pb_V,_CT SL_
o_
DVDcb!I
_i_/SLOW÷
Locatinga desiredsceneusingthe
DVDmenu
DVD VIDEO discs may have top menu and disc menu.
Top menu
DVD discs generally have their own menus whkh show the disc
contents. These menus contain various items such as titles of a
movie, names of songs, or artist information. You can locate a
desired scene by using the top menu displayed on the TV screen.
Press TOP MENU to access the top menu.
Disc menu
Disc menus include playback data (angle menu, subtitle menu,
etc.) specific to each title.
Press MENU to access the disc menu.
!Accessthe DVDmenu.
Press TOP MENU or MENU. Example:
_]
Locatingthestartpointoftheitemor
skiptheitem
Press I_l-ql or _-I_1 during playback.
• Pressing I_1 locates the start point of the item or skips the
item for forward direction, then resumes playback.
• Pressing t_141 locates the start point of the item or skips the
item for reverse direction, then resumes playback.
When a DVD-RAM/RW/R disc is played
Current program
Reverse _ I_1_1 _1 _ Forward
• : marked points (z_" pg. 38)
Example:
To locate the beginning of the next item, press I_1_1 once.
To locate the beginning of the current item, press 141_1 once.
To locate the beginning of the previous item, press 141_1 three
times.
When a DVD VIDEO, Audio CD or Video CD/SVCD disc
is played
Playback point
ii!iT il
Reverse _1 I_1_1 I_),,-I _ Forward
Example:
To locate the beginning of the next item, press I_1_1 once.
To locate the beginning of the current item, press 141_1 once.

High-SpeedSearch ResumeFunction
During playback, press I1_1_ for forward high-speed
search, or _1_1 for reverse high-speed search.
• Each press of the button increases the search speed for each
direction.
• To resume normal playback, press I_.
OR
During playback, press and hold I_1_1 for 2 or more
seconds for forward high-speed search, or press and hold
I_1_1 for 2 or more seconds for reverse high-speed search.
• Releasing the button resumes normal playback.
StillPicture/Frame-By-Frame
Playback
!Pauseduringplayback.
Press I!
2Activateframe-by-frameplayback.
Press I!
• Each press of II advances the still picture frame by frame.
OR
Press<" _.
• Each press of _ _-- adwmces/reverses the still picture frame by
frame.
• Frame-by-frame playback for reverse direction cannot be
performed with Video CD/SVCD discs.
• To resume normal playback, press I_.
SlowMotion
While paused, press SLOW -or SLOW +.
• Each press of SLOW - or SLOW + increases the slow motion
speed for each direction (from 1/16 to 1/2 times the normal
speed).
• Slow motion for reverse direction cannot be performed with
Video CD/SVCD discs.
OR
Press 14141 or I_1_1 for 2 or more seconds.
SkipSearch
During playback, press _.
• Each press initiates an approximately 30-second period of fast-
motion playback. Normal playback resumes automatically.
It is possible to memorize the position where you stop playback
and resume playback from that position.
s"" ) "_1• Be_ure to set RESUME t( ON or"DISC RESUME".
(Z_" pg. 100)
IMemorize
a resume p0inl.
Press • during playback.
• The unit enters Resume Stop mode and memorizes the
position where you have stopped playback as a resume point.
{The inside of the disc status indicator on the front display
panel blinks in the Resume Stop mode.)
• The unit retains a memory of the resume points of the last 30
discs played back, even though they have been ejected if
"RESUME" is set to "DISC RESUME". (L<_:" pg. 100)
• To clear the resume points:
{The inside of the disc status indicator stops blinking and
lights.)
When "RESUME" is set to "ON":
•Press r.b/I on the unit or DVDcb/I on the Remote to turn off
the unit.
• Press A to take out the disc.
• Press • in stop mode.
•Press TOP MENU to display the top menu, then start
playback by selecting an item, etc.
• Press MENU to display the disc menu, then start playback by
selecting an item, etc.
When "RESUME" is set to "DISC RESUME":
•Set "RESUME" to "OFF". (_" pg. 100)
• Press • in stop mode.
• Press TOP MENU to display the top menu, then start
playback by selecting an item, etc.
• Press MENU to display the disc menu, then start playback by
selecting an item, etc.
2Resumeplayback.
Press I_ in stop mode. The unit starts playback from the
resume point.
NOTES:
• "DISC RESUME" setting works on DVD VIDEO, VCD, SVCD
and already finalised DVD-R/DVD-RW (video mode) discs. Eor
other types of discs, the function under "ON" setting will be
applied even if "RESUME" is set to "DISC RESUME".
• If you stop the playback of a disc for which an resume point
has already been memorized, the memory will be updated
with the new resume point.
• After the unit has memorized the resume point for 30 discs,
remembering a new resume point will cause the unit to delete
the oldest memorized point. Stopping playback of a disc for
which a resume point is already stored may change the order
in which the points are stored. This may potentially change the
order in which points are deleted.
• When the unit memorizes a resume point for a disc, it also
remembers audio language, subtitle and angle settings.
• This function may not work for some Video CD or SVCD.
• When "RESUME" is changed to "ON" or "OFF", resume
points of the discs memorized with "RESUME" set to "DISC
RESUME" will be cleared.
• Resume points are memorized for each side of a double-sided
disc.
38 EN PLAYBACK OPERATIONS (cont.)
TV_DVD
/CZ_ CZD CZD (ZD)
VCRRlu_PRO_H_RECLINKTIMER
TOPMENU r_'IG_DN
MENU REtUrN
PREVIOUS
SLOW= PLaY,SElECTSLOW_
EC_IODELI'_ECHECK_ _
0®0®
ANGLE
Markingpositionsto playagainlater
It is possible to mark positions (up to 999 points) where you
want to play back once again later, and start playback from a
marked position. Marking onto DVD-RAM/RW/R discs when
recording is helpful to locate a start point when you play back
the discs later.
I Mark positions.
During playback, press
MARl( at positions you want
to mark.
•"MARK" appears on the TV
screen. You can easily locate
the marked positions using
I_1_1 or I_1_1 when you play
back the disc.
2Deletethemarkedpositions.
While paused, press I_1_1or
_-I_1 to locate a marked
position you want to delete,
then press MARl(.
• Crossed "MARK" appears on
the TV screen, and the marked
position is deleted.
MARK
NOTES:
• When a monaural program or bilingual program changes to a
stereo program while recording, a mark signal is automatically
recorded.
• When a DVD-R/RW (Video mode) disc is finalized, marked
points marked before finalizing will be deleted, and programs
will be divided automatically into "chapters" approximately
every 5 minutes. (z-__pg. 102, "Finalize a disc")
Checkingthetimeinformation
You can change the counter display on the front display panel
and TV screen to check disc remaining time (only discs before
finalizing).
During playback
Each press of DISPLAY changes the display as follows:
Clock time (front display panel only) -*" Current title elapsed
time -*" Disc remaining time -'_ (back to the beginning)
• Clock time is displayed only when a recordable disc is played.
In stop mode or during playback
• In FR mode, it is possible to set recording time in detail using
b'> (_-_- pg. 59, "Free Rate Function")
• [t is not possible to switch the recording mode during playback
or while recording.
SwitchingTimeIndication
You can check time information of an audio CD and a Video
CD/SVCD on the front display panel and the TV screen.
Each press of DISPLAY changes the time indication as follows:
During playback
Current track elapsed time -'_ Current track remaining time -'_
Total elapsed time -*" Total remaining time -*" (back to the
beginning)
In stop mode
0:00 -*" Playback time of track 1 -*" 0:00 -*" Total length of a disc
-*" (back to the beginning)
NOTE:
When a PBC-compatible Video CD/SVCD disc is loaded,
dea_tiw_te the PBC function. (_° pg. 40)
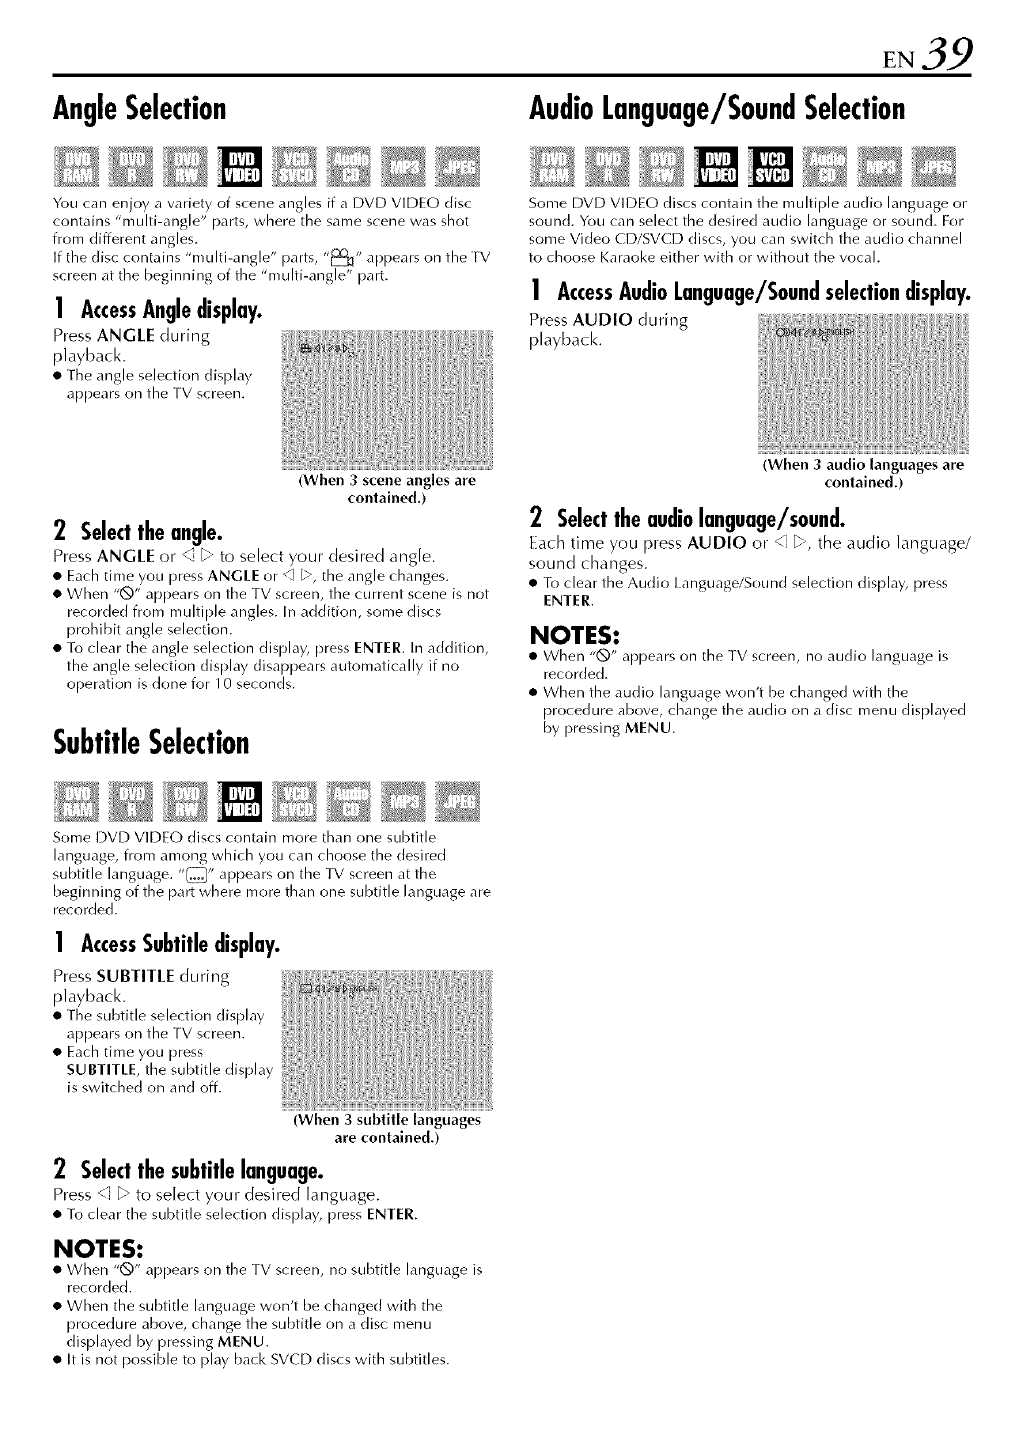
AngleSelection AudioLanguage/SoundSelection
You can enjoy a variety of scene angles if a DVD VIDEO disc
contains "multi-angle" parts, where the same scene was shot
from different angles.
If the disc contains "multi-angle" parts, "_j_" appears on the TV
screen at the beginning of the "multi-angle" part.
!AccessAngledisplay.
Press ANGLE during
playback.
• The angle selection display
appears on the TV screen.
(When 3 scene angles are
contained.)
Some DVD VIDEO discs contain the multiple audio language or
sound. You can select the desire(] audio language or sound. For
some Video CD/SVCD discs, you can switch the audio channel
to choose Karaoke either with or without the vocal.
!AccessAudioLanguage/Soundselectiondisplay.
Press AUDIO during
playback.
2Selectthe angle.
Press ANGLE or _ _" to select your desired angle.
• Each time you press ANGLE or Q [->, the angle changes.
• When "Q" appears on the TV screen, the current scene is not
recorded from multiple angles. In addition, some discs
prohibit angle selection.
• To clear the angle selection display, press ENTER. In addition,
the angle selection display disappears automatically if no
operation is done for 10 seconds.
SubtitleSelection
Some DVD VIDEO discs contain more than one subtitle
language, from among which you can choose the desired
subtitle language. "_" appears on the TV screen at the
beginning of the part where more than one subtitle language are
recorded.
!AccessSubtitledisplay.
Press SUBTITLE during
playback.
• The subtitle selection display
appears on the TV screen.
• Each time you press
SUBTITLE, the subtitle display
is switched on and off.
(When 3 subtitle languages
are contained.)
(When 3 audio languages are
contained.)
2Selecttheaudiolanguage/sound.
Each time you press AUDIO or <" _', the audio language/
sound changes.
• To clear the Audio kanguage/Sound selection display, press
ENTER.
NOTES:
• When "Q" appears on the TV screen, no audio language is
recorded.
• When the audio language won't be changed with the
procedure above, change the audio on a disc menu displayed
by pressing MENU.
2Selectthe subtitlelanguage.
Press <" _ to select your desired language.
• To clear the subtitle selection display, press ENTER.
NOTES:
• When "Q" appears on the TV screen, no subtitle language is
recorded.
• When the subtitle language won't be changed with the
procedure above, change the subtitle on a disc menu
displayed by pressing MENU.
• It is not possible to play back SVCD discs with subtitles.
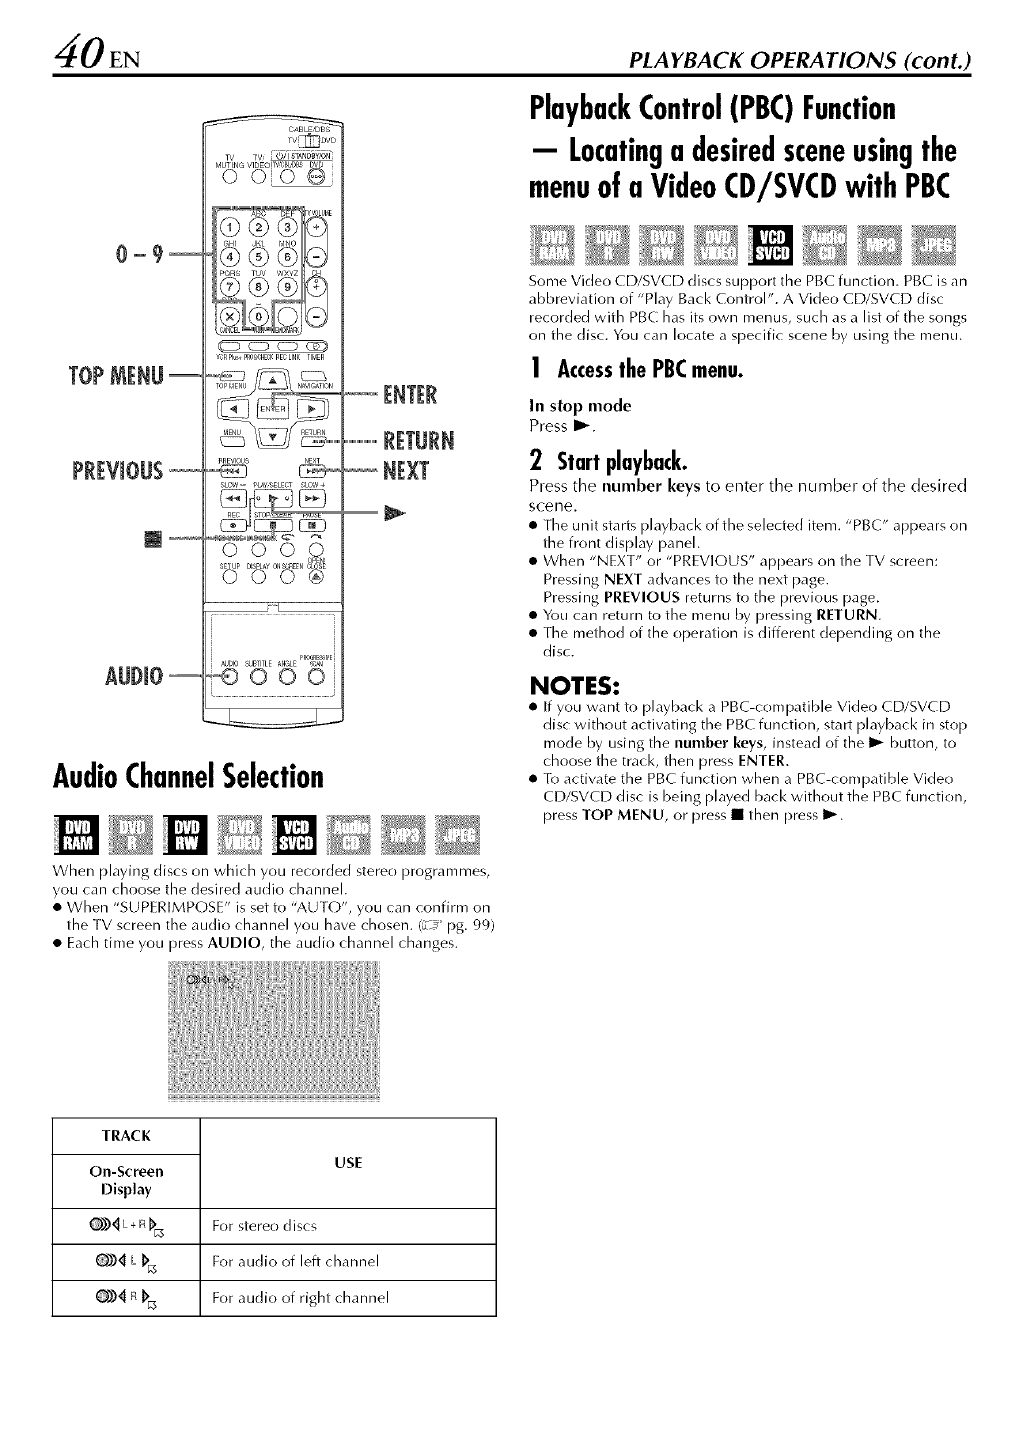
40 EN PLAYBACK OPERATIONS (cont.)
0_9_
TOPMENU
AlJl)[O
TV_DVD
_ cz) _ _
yenplu_PRO_HECKRF¢UNKTIMEn
PREVIOUS
SLO_- pb_¥/SBLECTStSa_÷
0000
_u_ o,_ o,_E, _o_
000®
P_GRE_E_
_DIO _BTITLE_t_GLE _
-©O00
AudioChannelSelection
When playing discs on which you recorded stere() programmes,
you can choose the desired audio channel.
• When "SUPERIMPOSE" is set to "AUTO", you can confirm on
the TV screen the audio channel you have chosen. (_-_€_pg. 99)
• Each time you press AUDIO, the audio channel changes.
PlaybackControl(PBC)Function
- Locatinga desiredsceneusingthe
menuof a VideoCD/SVCDwith PBC
Some Video CD/SVCD discs support the PBC function. PBC is an
abbreviation of "Play Back Control". A Video CD/SVCD disc
recorded with PBC has its own menus, such as a list of the songs
on the disc. You can locate a specific scene by using the menu.
!Accessthe PBCmenu.
In stop mode
Press I_.
2Start playback.
Press the number keys to enter the number of the desired
scene.
• The unit starts playback of the selected item. "PBC" appears on
the front display panel.
• When "NEXT" or "PREVIOUS" appears on the TV screen:
Pressing NEXT advances to the next page.
Pressing PREVIOUS returns to the previous page.
• You can return to the menu by pressing RETURN.
• The method of the operation is different depending on the
disc.
NOTES:
• If you want to playback a PBC-compatible Video CD/SVCD
disc without activating the PBC function, start playback in stop
mode by using the number keys, instead of the I_ button, to
choose the track, then press ENTER.
• To activate the PBC function when a PBC-compatible Vide()
CD/SVCD disc is being played back without the PBC function,
press TOP MENU, or press • then press I_.
TRACK
On-Screen
Display
o))___
o))4 R)_
USE
For stere() discs
For audio of left channel
For audio of right channel

LiveMemory
Playback
This unit records pictures onto DVD-RAM discs, instead of video
tapes, then plays back the pictures recorded on the discs. This
makes it possible to achieve high-speed writing and read-out
that has not been possible with conventional VCRs, enabling
recording and playback simultaneously.
High-speed spin
Recording _ Playback
IH g_-speed w ng} (High-speed _ead-out)
Image figure of DVD-RAM disc
It is called "Live Memory Playback" to start playback of the
program being recorded, with a time-lag between a recording
goint and a playback point, as shown in the figure below.
Recolding start point
!
Current playback point
iLive Memory Playbad<;
Current recording position
{Recolding point)
!
_,_; playback !1 , Recolding
continues |_¢_ con inues
m
3o rnin. lhoul
Currently elapsed _ecolding time I
iI
Recording/playbackstatusdisplay
DISPLAY
I.ive Memory Playback status can
be checked by pressing DISPLAY
to display the bar meter on the
superimpose display.
TV_DVD
o CZD CZD _ZE_
,_¢nPl_+P_HECKnE¢UlK TIMEn
PRf_0US
SLOW- PLAY'SELECTSL0W÷
F_USf
AUDIOSUBTITLEAN_Lf _
0000_
Press DISPLAY. The current status is superimposed on the TV
screen,
Not only can this unit play back a program previously recorded
while recording or timer recording another program, but the unit
also allows you to play back from the beginning of a program
while continuing to record the same program.
Ba_ metei display
Superimpose display
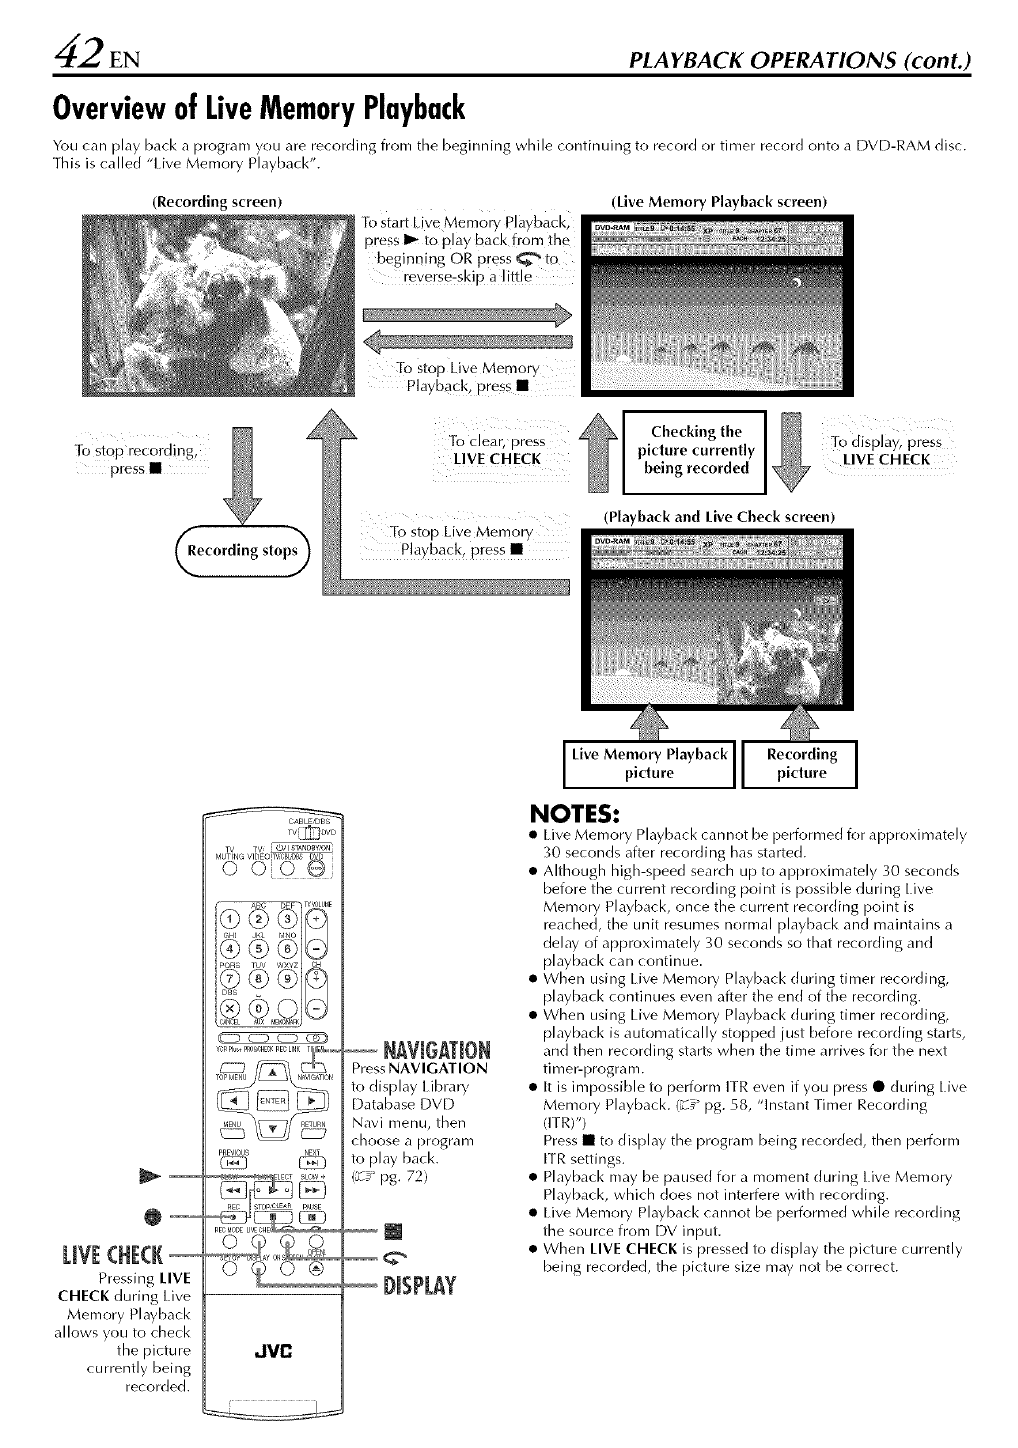
_2 EN PLAYBACK OPERATIONS (cont.)
OverviewofLiveMemoryPlayback
You can play back a program you are re_ording from the beginning while (ontinuing to re_ord or timer record onto a DVD-RAM disc.
This is called "Live Memory Playback".
(Recording screen)
lb start Live Memory playback,
press I_ to play back from the
beginning OR press _to
reverse:skip a little
(Live Memory Playback screen)
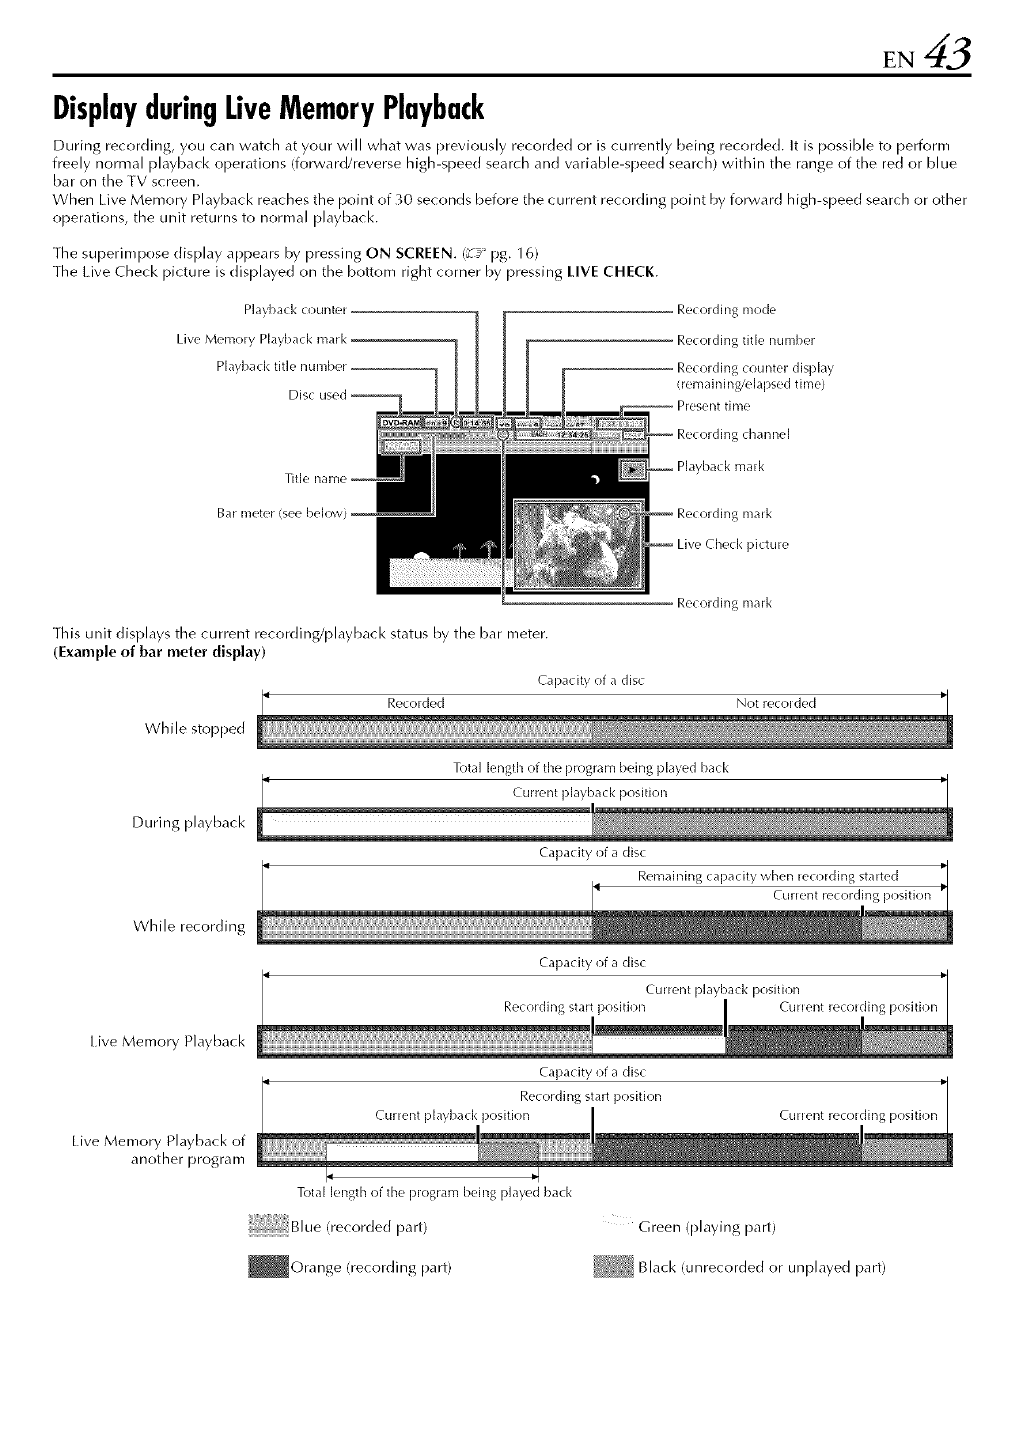
DisplayduringLiveMemoryPlayback
During recording, you carl watch at your will what was previously recorded or is currently being recorded. It is possible to perform
freely normal playback operations (forward/reverse high-speed search an(] variable-speed search) within the range of the re(] or blue
bar on the TV screen.
When Live Memory Playback reaches the point of 30 seconds before the current recording point by forward high-speed search or other
operations, the unit returns to normal playback.
The superimpose display appears by pressing ON SCREEN. (z):_ pg. 16)
The Live Check picture is displayed on the bottom right corner by pressing LIVE CHECK.
Playback count_,i
Live Memoly Playback mark
Playback title number
Disc used
Recording nlode
Recording title number
Recording counter display
!remaining/Napsed time}
-- P_esent time
Recording channel
Title Playback ma_k
Bar meter/see beh)w) Recording malk
Live Check picture
This unit displays the current recording/playback status by the bar meter.
(Example of bar meter display)
Capacity of a disc
Rec_lded
While stopped
Recording malk
Total length of the program being played back
Not recol ded
During playback
While recording
Live Memory Playback
Current
Capacity of a disc
Remaining capacity when recording started
Curlent recording pc)sltlOn
Capacity of a disc
CuHent playback position
Recording start position
Capacity of a disc
Recording start position
Cunent playback position
Live Memory Playback of
another program
Total length of the p[ogram being played back
(recorded [)art)
_Orange (recording part)
Cullent recolding pc)sltlc)n
Green (playing [)art)
Black (unrecorded or unplayed [)art)

_ZIEN
ButtonstobeusedduringLiveMemoryPlayback
PLAYBACK OPERATIONS (cont.)
TV_D\tD
'/ORPlu_PROG_H_RECLINKTIMEfi
TOPMENU N_IG_ION
MENU fiBTURN
PREVIOUS
000®
JVC
_l
Available Functions
buttons
•P_essingonce ski )s fop.yard to the
beginning of the next chaptel being played
bad<.
• P[essing do\_41for 2 o[ more seconds duiing
playback advances playback at 5 times the
normal speed while pressed. Releasing the
button resqmes noHlla[ plaYback.
Available only when paused
• P[essing do\vn fo[ 2 or more seconds
advances playback at 1/1 6 times the noima[
speed.
• Piessingonce ski )s back to the beginning
of the dlaptel )eing payed -_ac<.
• Plessing down for 2 ol more seconds duling
_layback reverses _layback at 5 times the
norma speed \',_i e pressed. Re easing t_e
button resumes nolma[ )]avback.
Ava ab e Oll y when paused
• Pie%ing down fo[ 2 ol mole seconds
I_'w'Ises p[aybad< at 1/10 times the' normal
speed.
• Each )Iess of the button duling playback
advances t_e p ay)ac< speed in 4 steps fol
forwald direction.
Available only when paused
• Piessing once advances _lavbad< by 1/1 6
times the normal speed.
• Each _[ess of the button during forward 1/
Ibtimes s ii\v411otion advances s OW_
motion bv 1/1 6 times, 1/4 times and 1/2
times the'normal speed.
• Each )less of the button during playbad<
advances t_e p aw_ac< speed in 5 steps for
revers(! direction.
Available only when paused
Z iessing once reversesplaybacl< by 1/16
times the normal s_eed.
Each p[ess of t _e )utton during reve[se 1/16
times s[o\v-nlotion reverses s[o\_.41lotion by
1/16 times, 1/4 times and 1/2 times the
normal speed.
Plessmg once )auses )laybad< istill )ictule
_lavbad<). Pressin_ [e_eatedlv advances the
still picture flame '[_yt_ame.
Available only when paused
• Advancesheverses the stile picture flame by
fI_!llle.
II
Sto )s Live Menlorv Plavbad< to return to the
• screen _eing reco(de&'
rhe_ a resume point is stored.
P_essing • again stops _ecor@_g.
Plessing once skips fi_rwald fl)r apFo×imatdy
30 seconds and resumes playbacL
PIessing le)eatedly ski )sfo[waid
coI]tiI]qoqsh/as many times as pressed.
It is useful _}hen skipi_ing over unwanted
sections.
Plessing once skips bad< for apploximately 7
seconds and [esumes )laybad<.
Plessing repeated y skips -)ack continuous y
as many tinles as p[essod.
It is useful when watching spolts proglams,
t_tC.
PIessing once displays the picture cunently
being recolded and the one being played
back simultaneouslv.
LiVE CHECK PIessing successively clears the Live Check
windo\v and displays only the )icture
culrently being )layed back.
You can check, for example, if the proglam
you ale _ecolding has aheady finished.

• Turn on the unit.
• Turn on the rv and select the AV mode.
• Slide the IV/CAB[E/DBS/DVD switch to DVD.
TV_DVD
_ CZD _ _)
,/0RPlu_pR0r_H_RECLINKTIMEn
PREVl0US
000®
JVC
Toplaybackfromthebeginningofthe
programwhilerecording
You carl play back a program you are recording from the
beginning while continuing to record or timer record onto a
DVD-RAM disc.
!Start LiveMemoryPlayback.
Press ID,-.
• Playback starts from the beginning of the program being
recorded.
• Pressing I_1_1/1_1_1allows you to Io(ate the desired scenes.
Tomovebacktheplaybackposition
slightlywhilerecording(OneTouch
Replayfunction)
You can move ba_k the playback position while _ontinuing to
record or timer record onto a DVD-RAM disc.
!Start OneTouchReplayfunction.
Press _.
• Each press skips back for approximately 7 seconds and
resumes playback.
• Pressing while paused skips back for approximately 7 seconds
and resunles pause.
Towatcha programpreviously
recordedwhilerecording
You can play back a program you re_orded previously while
re(ording.
!Start LiveMemoryPlayback.
Press I_ while recording to establish Live Memory
Playback mode.
2Locatethebeginningof the desiredprogram.
Press I_1_1or I,,-I_1.
NOTE:
To stop playback, press III. The program being recorded is
displayed.
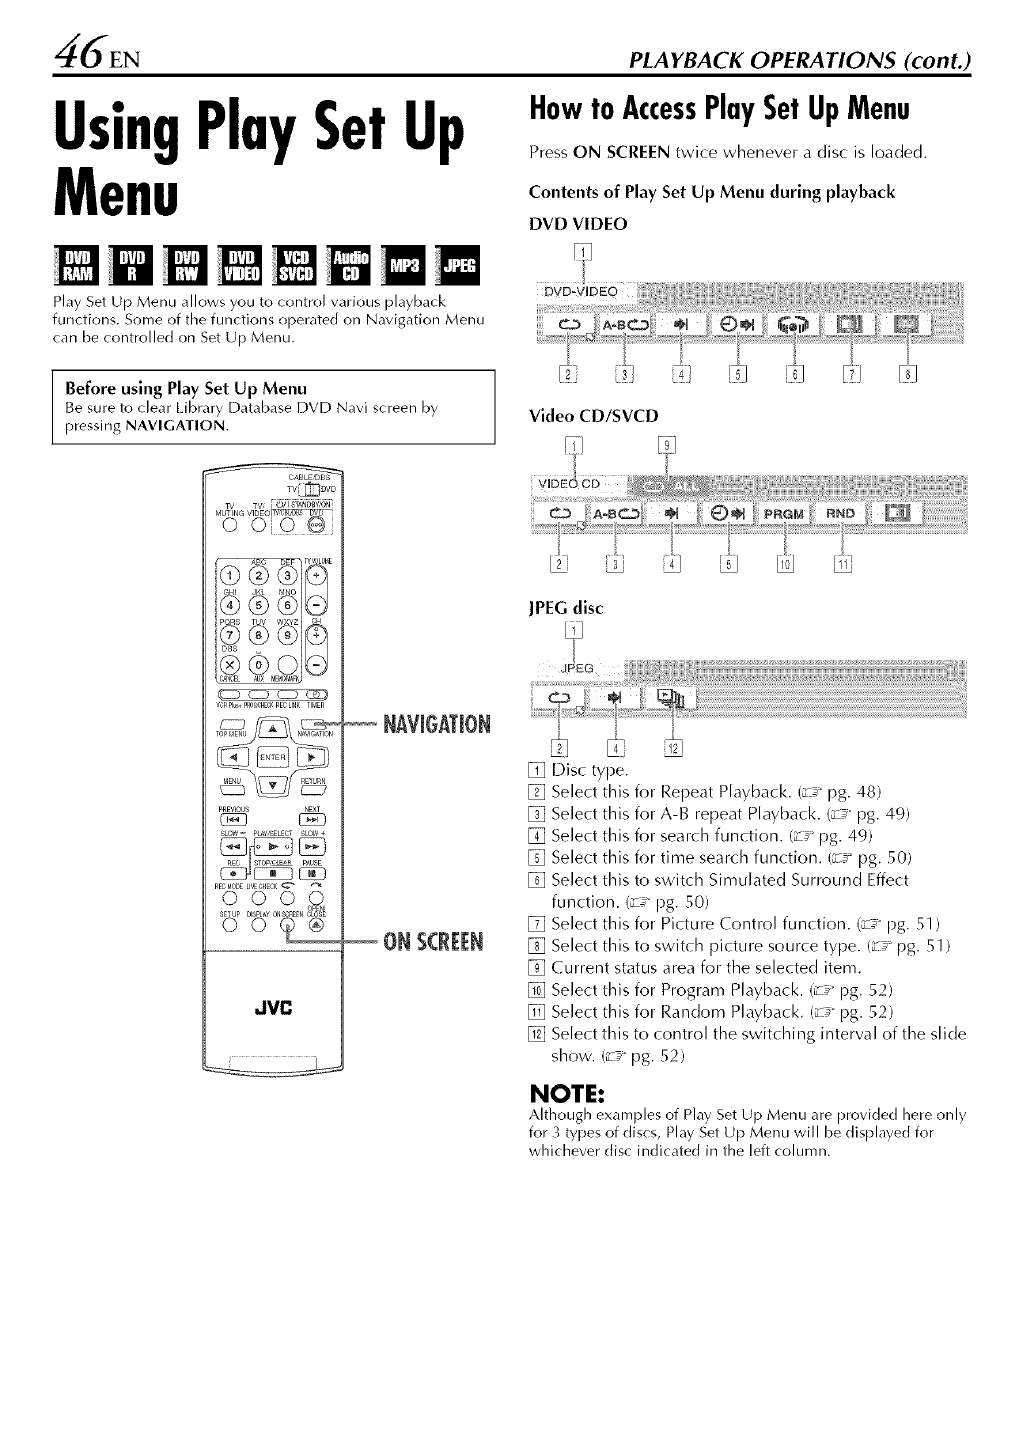
46EN
UsingPlaySetUp
Menu
PLAYBACK OPERATIONS (cont.)
HowtoAccessPlaySetUpMenu
Press ON SCREEN twice whenever a disc is loaded.
Contents of Play Set Up Menu during playback
DVD VIDEO
Play Set Up Menu allows you to control various playback
functions. Some of the functions operated on Navigation Menu
can be controlled on Set Up Menu,
Before using Play Set Up Menu
Be sure to clear Library Database DVD Navi screen by
pressing NAVIGATION. Video CD/SVCD
TV_DVD
vcpPlu_PR0_HECKPFCLIHKTIMEn
PREVJOUS
C_3
SLOW= pLay,sELECTSLO_+
PF.r;_0DELI_E'_HECK
o OqOHq
SETUP
JVC
NAViGATiON
ON S(RE[N
JPEG disc
[] Disc type.
[] Select this for Repeat Playback. (£€_pg. 48)
[] Select this for A-B repeat Playback. (_ pg. 49)
[] Select this for search function. (_€_ pg. 49)
[] Select this for time search function. (:-_ pg. 50)
[] Select this to switch Simulated Surround Effect
function. (_-#_pg. 50)
[] Select this for Picture Control function. (_#_ pg. 51 )
[] Select this to switch picture source type. (_-#_pg. 51 )
[] Current status area for the selected item.
[] Select this for Program Playback. (:-€_ pg. 52)
[] Select this for Random Playback. (:-_ pg. 52)
[] Select this to control the switching interval of the slide
show. (_ pg. 52)
NOTE:
Although examples of Play Set Up Menu are provided here only
for 3 types of discs, Play Set Up Menu will be displayed for
whichever disc indicated in the left column.
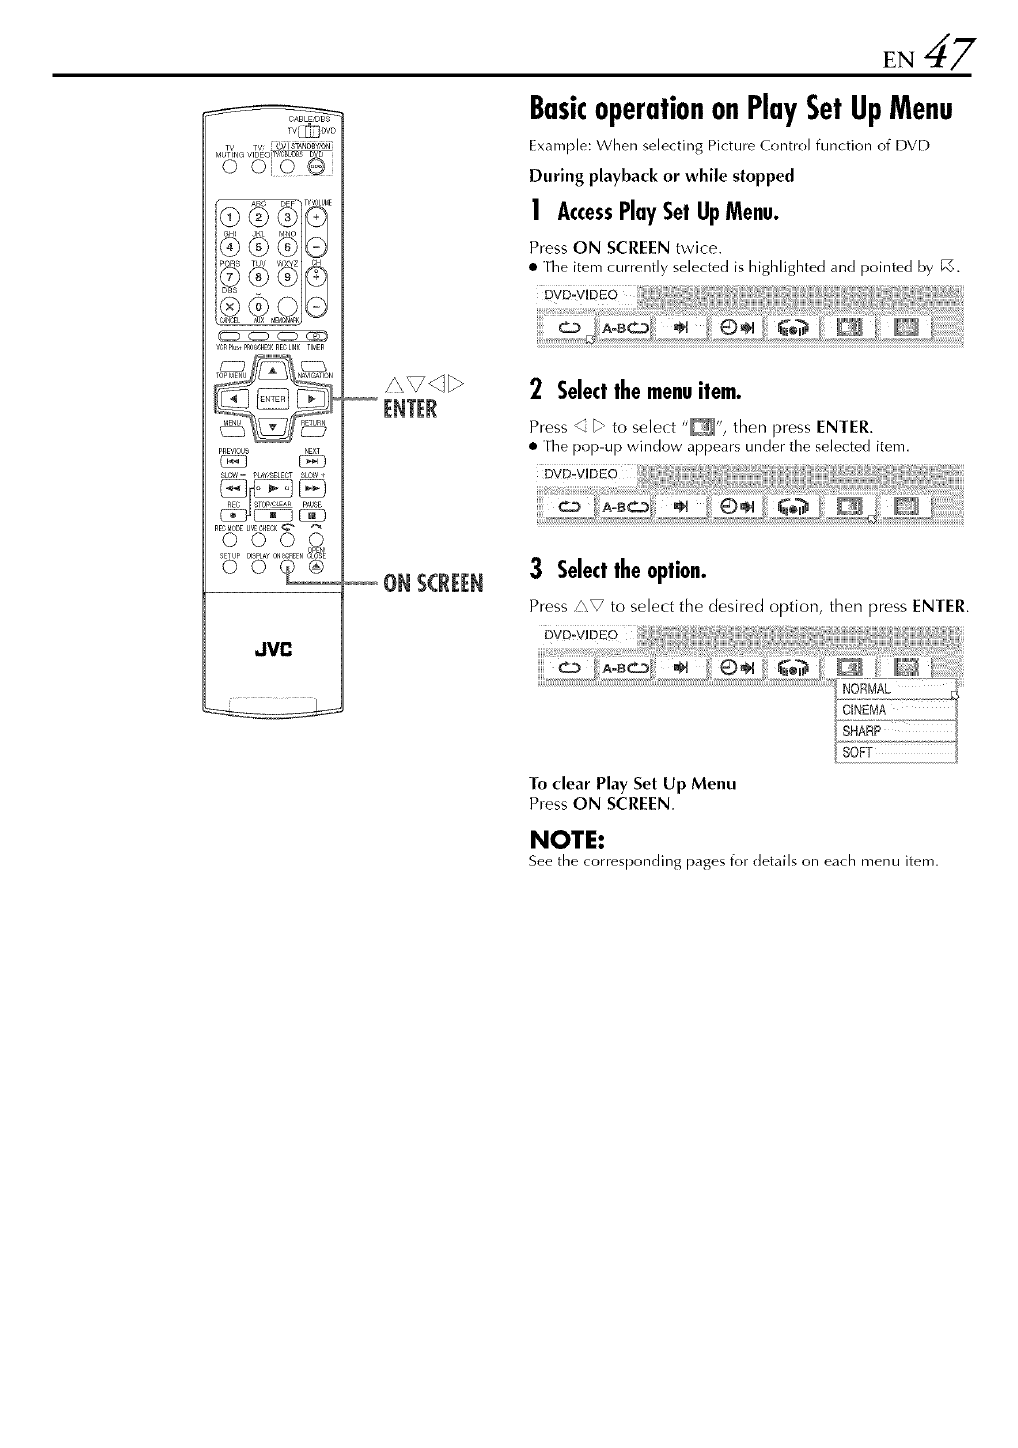
TV_DVD
(CZD C_ CZD _
voRPlu_PR0_H_nECLINKTIMER
TOPrdENU r_'I_TION
MENU nE_U_N
PnEWOUS
(Z_3
SLOW= pLay,SElECTSLO_
RFC_IODELI'_EOHECK_
o oqo_Z_
SETUP
JVC
ONS(R[[N
BasicoperationonPlaySetUpMenu
Example: When selecting Pkture Control function of DVD
During playback or while stopped
| AccessPlaySet UpMenu.
Press ON SCREEN twice.
• The item currently selected is highlighted and pointed by [_.
DVD-V[DEC)
2Selectthemenuitem.
Press _ _" to select "_", then press ENTER.
• The pop-up window appears under the selected item.
DYE
3 Selecttheoption.
Press z'\V to select the desired option, then press ENTER.
To clear Play Set Up Menu
Press ON SCREEN.
NOTE:
See the _orresponding pages for details on each menu item.
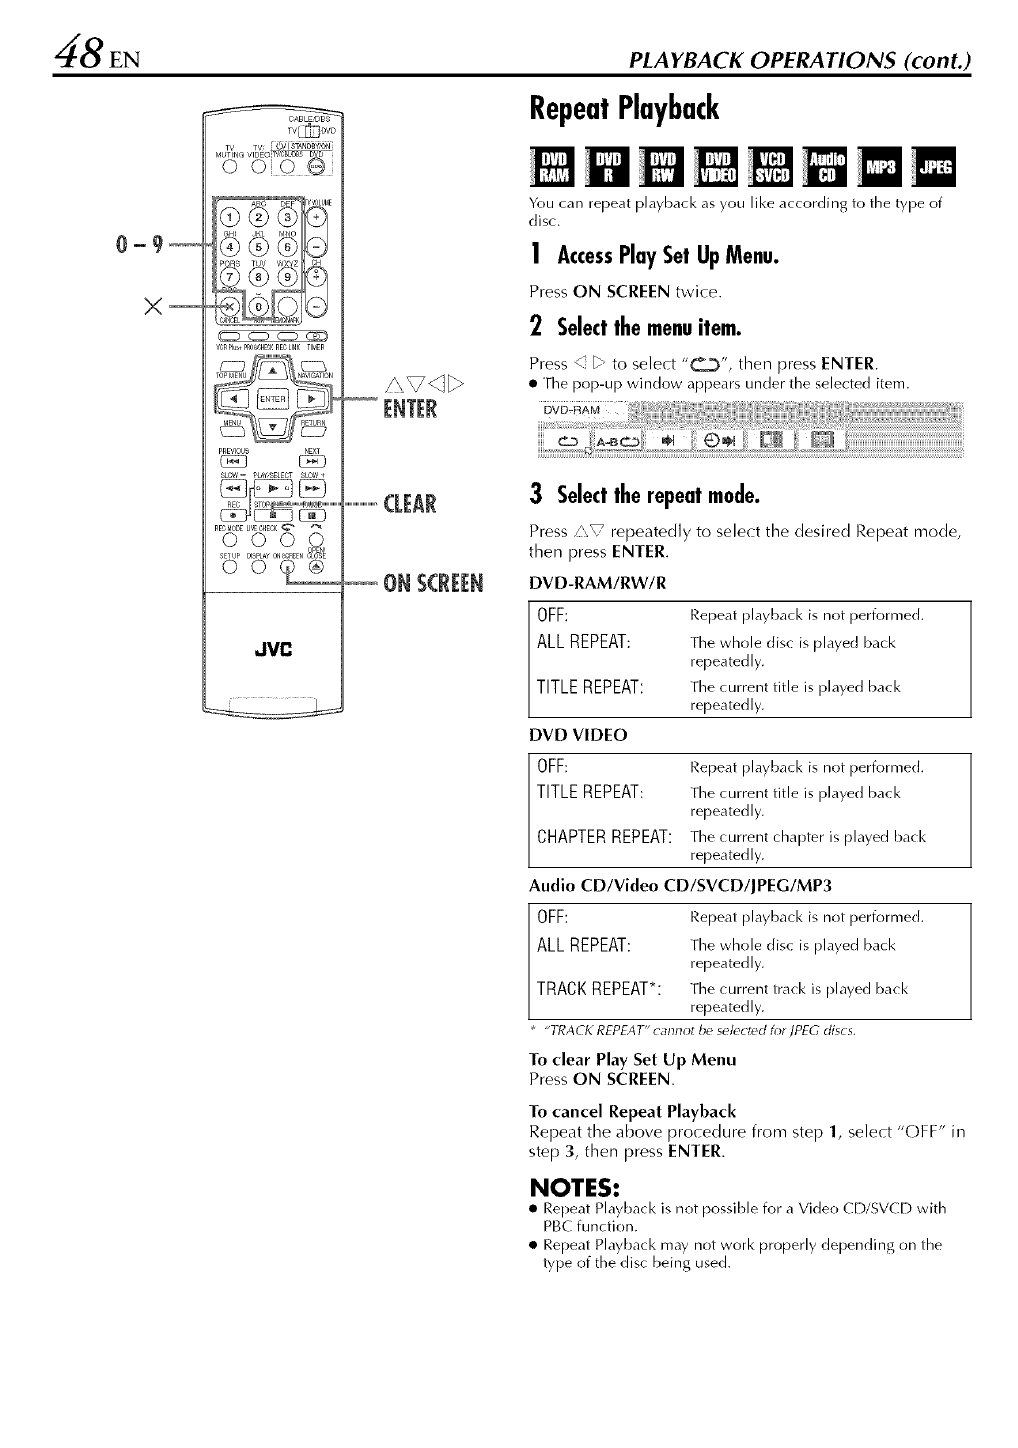
0_9_
TV_DVD
_ C:D C:D _
VOPPlu_pROr_H_nECLINKTIMER
TOPrdENU r_'IGA_ION
MENU nE_U_N
PREWOUS
SLOW= pLay/SElECTStO't_4
PEC_IODELI'_EOHECK_
o oqo,%,
SETUP
JVC
...........................(LIAR
ONSCREEN
PLAYBACK OPERATIONS (cont.)
RepeatPlayback
You can repeat playback as you like according to the type of
disc.
| AccessPlaySet UpMenu.
Press ON SCREEN twice.
2Selectthemenuitem.
Press < _" to select "(_)", then press ENTER.
•]he pop-up window appears under the selected item.
DVD-RAM
C.D
3 Selecttherepeatmode.
Press P_V repeatedly to select the desired Repeat mode,
then press ENTER.
DVD-RAM/RW/R
OFF: Repeat playback is not performed.
ALLREPEAT: The whole disc is played back
repeatedly.
TITLEREPEAT: The current title is played back
repeatedly.
DVD VIDEO
OFF: Repeat playback is not performed.
TITLEREPEAT: The current title is Played back
repeatedly.
cHAPTERREPEAT:The current chapter is Played back
repeatedly.
Audio CD/Video CD/SVCD/JPEG/MP3
OFF: Repeat playback is not performed.
ALLREPEAT: The whole disc is played back
repeatedly.
TRACKREPEAT*: The current track is played back
repeatedly.
*"TRAC_: REPEAT" cannot be selected tot IPEG discs.
To clear Play Set Up Menu
Press ON SCREEN.
To cancel repeat Playback
Repeat the above procedure from step 1, select "OFF" in
step 3, then press ENTER.
NOTES:
• Repeat Playback is not possible for a Video CD/SVCD with
PBC function.
• Repeat Playback may not work properly depending on the
type of the disc being used.
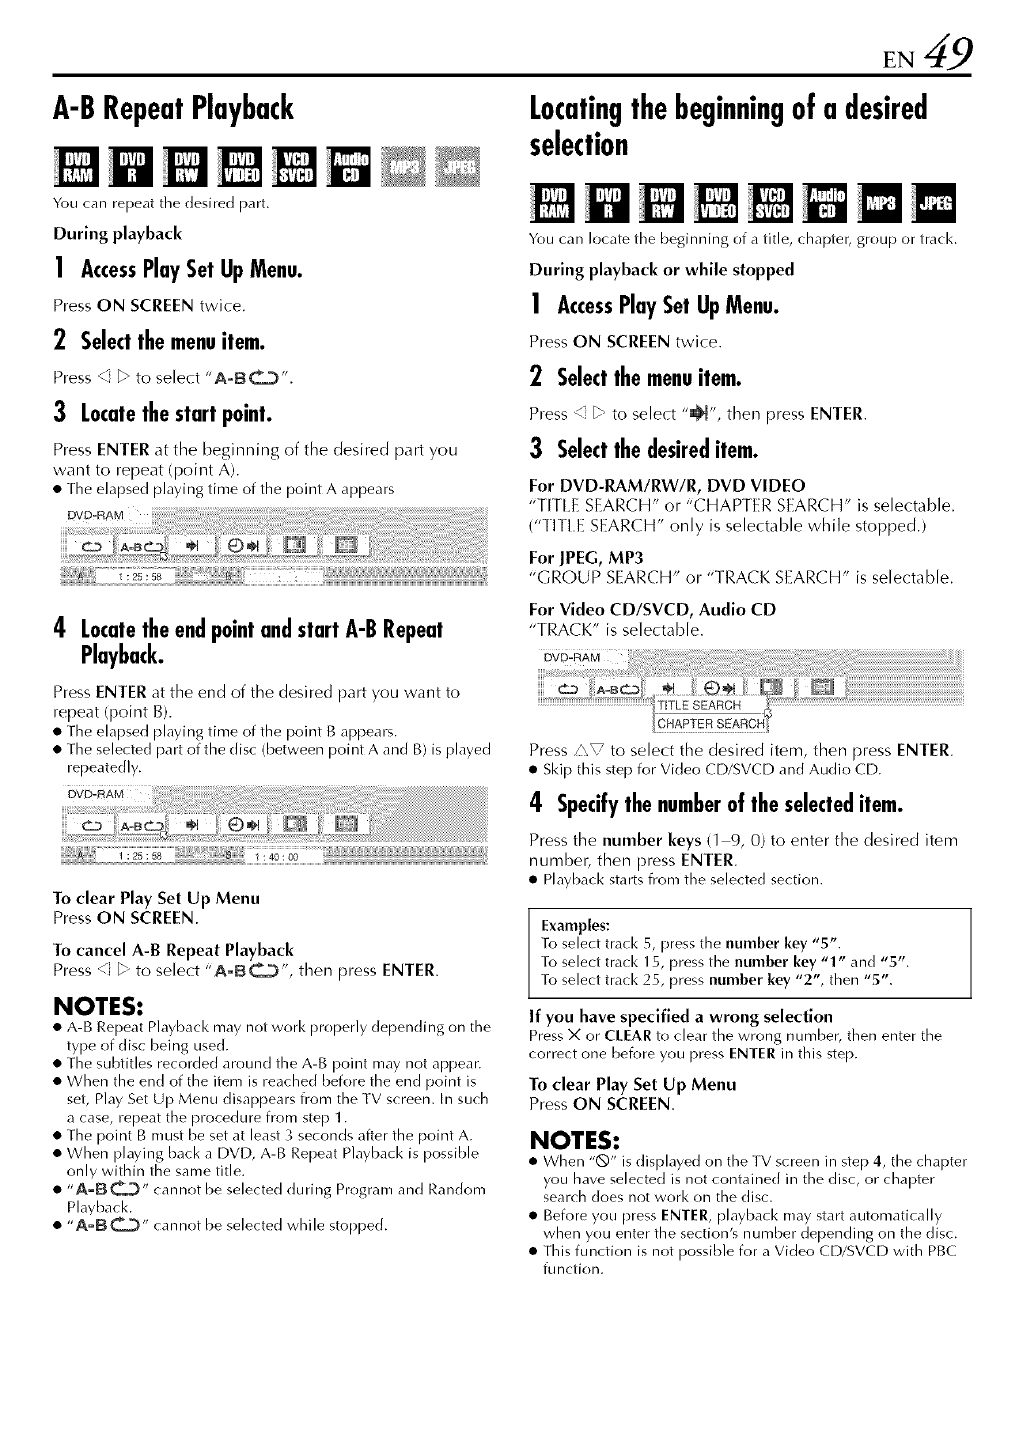
A-BRepeatPlayback
You can repeat the desired parL
During playback
!AccessPlaySetUpMenu.
Press ON SCREEN twice.
2Selectthe menuitem.
Press _ _ to select "A=IBCZ_)".
3 Locatethestart point.
Press ENTER at the beginning of the desired part you
want to repeat (point A).
• The elapsed playing time of the point A appears
_VDmRAM
Locatingthebeginningofa desired
selection
You can locate the beginning of a title, chapter, group or track.
During playback or while stopped
1AccessPlaySetUpMenu.
Press ON SCREEN twice.
2Selectthemenuitem.
Press < _" to select ,,l_", then press ENTER.
3 Selectthedesireditem.
For DVD-RAM/RW/R, DVD VIDEO
"TFFI.E SEARCH" or "CHAPTER SEARCH" is selectable.
('qTFI E SEARCH" only is selectable while stopped.)
For JPEG, MP3
"GROUP SEARCH" or "TRACK SEARCH" is selertable.
4 LocatetheendpointandstartA-BRepeat
Playback.
Press ENTEr at the end of the desired part you want to
repeat/point B).
• The elapsed playing time of the point g appears,
• The selected part of the disc (between point A and B) is played
repeatedly,
To clear Play Set Up Menu
Press ON SCREEN.
To cancel A-B repeat Playback
Press <1 b, to select "A-B_", then press ENTER.
NOTES:
• A-B Repeat Playback may not work properly depending on the
type of disc being used.
• The subtitles recorded around the A-B point may not appear.
• When the end of the item is reached before the end point is
set, Play Set Up Menu disappears from the TV screen. In such
a case, repeat the procedure from step 1.
• The point B must be set at least 3 seconds after the point A.
• When playing back a DVD, A-B Repeat Playback is possible
only within the same title.
• "A_BC_" cannot be selected during Program and Random
Playback.
• "A-BC_" cannot be selected while stopped.
For Video CD/SVCD, Audio CD
"TRACK" is selectable.
Press zZV to select the desired item, then press ENTER.
• Skip this step for Video CD/SVCD and Audio CD.
4 Specifythe numberof the selecteditem.
Press the number keys (1 9, 0) to enter the desired item
number, then press ENTER.
• Playback starts from the selected section.
Examples:
To select track 5, press the number key "5".
To select track 15, press the number key "1" an(] "5".
To select track 25, press number key "2", then "5".
If you have specified a wrong selection
Press X or CLEAR to clear the wrong number, then enter the
correct one before you press ENTER in this step.
To clear Play Set Up Menu
Press ON SCREEN.
NOTES:
• When "@" is displayed on the TV screen in step 4, the _hapter
you have selected is not contained in the disc, or chapter
search does not work on the disc.
• Before you press ENTER, playback may start automatically
when you enter the section's number depending on the disc.
• This function is not possible for a Video CD/SVCD with PBC
fu nction.
50 EN
TimeSearch
PLAYBACK OPERATIONS (cont.)
SimulatedSurroundEffect
You can play back a disc from the desired point by specifying the
elapsed playing time from the beginning of a title (DVD-RAM,
DVD-R, DVD-RW and DVD VIDEO) or a disc ]Video CD/SVCD
an(] Audio CD).
!AccessPlaySetUpMenu.
Press ON SCREEN twice.
2Selectthe menuitem.
Press _ to select "_)@4", then press ENTER.
•The pop-up window appears under the selected item.
DVD-RAM
It is possible to get a simulated surround effect from your stereo
system. You can enjoy the virtual surround sound with your
2-channel stereo system.
1AccessPlaySetUpMenu.
Press ON SCREENtwice.
2Selectthemenuitem.
Press ¢" _ to select "t['i'['o'[i'll', then press ENtEr.
• Above the selected item, "3D-ON" appears an(] Simulated
Surround Effect is activated.
• Each time you press ENTER, "3D-ON" appears and disappears
alternately.
DVD VUDEO
3 Enterthe time.
Use number keys (1-9, 0) to enter the time, then press
ENTER.
• Playback starts from the specified time.
Example:
]b play back from a point 12 (minutes): 50 (seconds) elapsed.
Press 1 Press 2
Press 5 Press 0
To cancel the simulated surround effect
Press ENTER to clear "3D-ON" from the screen.
NOTES:
• The simulated surround effect works correctly only when
playing back a title recorded in mulfichannels.
• Simulated Surround Effect does not affect the DVD VIDEO
bitstream signal from the DIGITAL OUT connector.
• When Simulate(] Surround Effect is activate(], the settings of
"ANALOG AUDIO OUT" and "D. RANGE CONFRO[" are
disable(h (:-_ pg. 97)
If you have specified a wrong selection,
Press X (for the last entered number) or • (for whole numbers)
to clear the wrong number, then enter the correct one(s) before
you press ENTER in this step.
To clear Play Set Up Menu
Press ON SCREEN.
NOTES:
• When "(_" is displayed on the TV screen in step 3, you have
selected a point that excesses the recording time of the disc.
• Some DVD VIDEO discs do not contain time information, and
it is not possible to use the lime Search function. In such
cases, "Q" is displayed on the TV screen as well.
• This function is not possible for a Video CD/SVCD with PBC
function.
Adjustingthepicturequality
E.51
Settingtheprogressivemode
You can obtain optimal picture quality by selecting an
appropriate picture mode.
1AccessPlaySetUpMenu.
Press ON SCREEN twice.
2Selectthe menuitem.
Press _ to select "_", then press ENTER.
• The pop-up window appears under the selected item.
DVD-RAM
You can obtain optimal picture quality by selecting whether the
content on the disc is processed by field (video source) or by
frame (film source).
1AccessPlaySetUpMenu.
Press ON SCREEN twice.
2Selectthemenuitem.
Press < _ to select "_", then press ENTEr.
• ]he pop-up window appears under the selected item.
3 Selectthe desiredoption.
Press z"_ to select the desired option, then press ENTEr.
NORMAL:
CINEMA:
SHARP:
SOFr:
Normally select this option.
Suitable for a movie disc, etc.
Clearer, sharper-edged picture when viewing
images with lots of flat, same-coloured surfaces
such as cartoons.
Select this option when to() much noise appears.
3 Selectthedesiredoption.
Press z"_V to select the desired option, then press ENTEr.
AUTO1:
AUTO 2:
FILM:
VIDEO:
Use(] to play a disc containing both vide()
and film source materials. [his system
recognizes the sou roe type (video or film) of
the current disc according to the disc
information. Normally select this option.
Almost the same as the "AUTO 1", but the
processing of the scenes with movement is
different. Select "AUTO 1" or "AUTO 2" to
your preference.
Suitable for [)laying back a progressive
scanned fihrl source disc.
Suitable for playing back a video source disc.
The outlines on the played back pictures will
be soft.
2EN PLAYBACK OPERATIONS (cont.)
ProgramPlayback RandomPlayback
You can play back up to 30 tracks in the desired order.
While stopped
!AccessPlaySetUpMenu.
Press ON SCREEN twice.
2Selectthe menuitem.
You can play back all the tracks on the disc in random order.
While stopped
1AccessPlaySetUpMenu.
Press ON SCREEN twice.
2Selectthemenuitem.
Press _ to select "PRGM", then press ENTER.
• The program table appears under Play Set Up Menu.
VIDEO-CD
.....i, ii : ii : ii ilili
,RnD
Press _ _" to select "RND", then press ENTER.
• Playback starts in random Order.
3 Selectthe tracksin thedesiredorder.
Use number keys (1 9, 0) to enter the track numbers.
To clear Play Set Up Menu
Press ON SCREEN.
To cancel Random Playback
Perform steps 1 and 2.
NOTE:
The same track will not be played back more than once during
Random Playback.
Selecttheswitchingintervalofthe
slideshow
Examples:
• To select track 5, press the number key "5" and ENTER.
• To select track 15, press the number key "1" and "5".
• To select track 25, press the number key "2" and "5".
If you have specified a wrong selection
Press X. The last selection is erased.
Or press II. The whole selection is erased.
4 Start playback.
PressI_. Playback starts in the programed order.
• When all of the programed tracks have been played back,
Program Playback stops, but the programed information
remains.
• To add tracks to the end of the program, perform steps 1
through 3.
• During Program Playback, pressing I_1_1 skips to the next
selection of the program. Pressing I_l_l returns to the
beginning of the current selection.
To clear Play Set Up Menu and the contents of the
program from the screen
Press ON SCREEN.
To cancel Program Playback
Press <[ _" to select "PRGM", then press ENTER.
NOTE:
Program Playback is not possible depending on the type of disc.
You can control the switching interval of the slide show.
I AccessPlaySetUpMenu.
Press ON SCREEN twice.
2Selectthemenuitem.
Press _ _" to select ,,1_" then press ENTER.
• The pop-up window appears under the selected item.
3 Selectthedesiredoption.
Press z"s_ to select the desired option, then press ENTER.
• Each time you press/\_, the interval changes as follows:
5 SEC. "-" 10 SEC. _ 15 SEC. "-" 20 SEC._ 25 SEC.
30 SEC. _ (Back to the beginning)
ParentalLock
i i_ii!_ii i_ _i__i_ii_
This function restricts playback of DVD VIDEO discs which
contain violent (an(] other) scenes according to the level set by
the user. For example, if a movie which includes violent scenes
supports the parental lock feature, such scenes which you do not
want to let children view can be cut or replaced by other scenes.
• Turn on the unit.
• Turn oil the TV and select the AV mode.
• Slide the TV/CABLE/DBS/DVD switch to DVD.
0_9_
SETUP
TX/ W [ (i)il STAN0_y,_bN
oo0®
YenPlu_,Pno_H_ nECLINKTIMEn
TOPMENU rC_VlG_TION
MEnU nETunN
PREVIOUS
C_E]
SL_- pLay;sELECTSLOW+
REC_ODELI_E'CH_CK
000_
_ETUP DISPLAYoN_nEE_ OLO_E
_00®
JVC
TosetParentalLockforthefirsttime
While stopped
Accessthe "DVD SETUP" screen.
[] Press SET UP.
[] Press <[ b to select "DVD SET UP", then press ENTER.
!
[] Press <" _ to select
"UTILITY', then press
ENTER.
[] Press i\V to select
"PARENTAl EOCK", then
press ENTER.
Accessthe "PARENTALLOCK"screen.
!
[] Press/\_ repeatedly to
select "PARENIA[.
lEVEl.", then press ENTER.
[] Press/\_ repeatedly to
select the desired level,
then press ENTER.
• The smaller the value of level
is, the more restrictive the
Parental Lock level becomes.
• Select "NONE" to cancel the
restriction.
Selectthedesiredlevel.
Enteryourpassword.
Press the number keys to
enter your desired four-digit "_............
number, then press ENTER.
• If you made a mistake, enter a
correct number again.
!
[] Press/\_ repeatedly to
select "CO U NTRY
CODE", then press
ENTER.
[] Press/'\_ repeatedly to
select your country code,
then press ENTER.
• If you do not need to change
your country code, jump to t']
• See "Country/Area Code List
for Parental lock" (L__pg. 55).
l_! Enteryourpassword.
Selectyourcountrycode.
Press the number keys to enter the same )assword as in
step [] above, then press ENTER.
_Completethe setting.
Press SET UP twice.
• The normal screen resunles.
NOTE:
Remember your password, or make a note ot it.
54 EN PLAYBACK OPERATIONS (cont.)
Tochangethesettings
You can dlange the Parental lock settings later.
Perform steps [] to [] of "1o set Parental Lock for the first
time" on [)age 53 to access the "PARENTAL LOCK" screen
before continuing.
TotemporarilyreleaseParentalLock
When you set the parental lock level strictly, some discs may not
be played back at all. When you insert such a disc and try to
play it back, the confirmation screen appears on the TV screen,
asking you whether you want Parental Lock to be temporarily
release(] or not.
Changethe level.
[] Press/\V repeatedly to select "PARENTAE LEVEL",
then press ENTER.
[] Press i\V repeatedly to select the desired level, then
press ENTER.
_Changethe countrycode.
[] Press i\V repeatedly to select "COUNTRY CODE",
then press ENTER.
[] Press i\V repeatedly to select your country code, then
press ENTEr.
• See "Country/Area Code List for Parental Lock" i_-u"pg. 55).
I_lEnter yourpassword.
Press the number keys to enter the same password as in
step [] of "lo set Parental lock for the first time", then
press ENTER.
L_e Completethe setting.
Press SET UP twice.
• The normal screen resumes.
Accessthe passwordscreen.
[] Place the disc on the disc tray.
• [f the disc is rate(] higher than the selected level, the
confirmation screen appears.
[] Press < _" to select "YES", then press ENTER,
• If you select "NO", you cannot play back that disc.
_Enter yourpassword.
Press the number keys to enter the same password as in
step [] of "lo set Parental lock for the first time", then
press ENTER.
• When you enter the COFFeCt password, the Parental Lock is
released an(] the unit starts playback.
• [f you enter a wrong password, "ENTRY ERROR RETRY"
appears on the TV screen. Enter the correct password.
• If you have successively entered wrong password three times,
"ENTRY ERROR CAN NOT CHANGE PASSWORD" appears
on the TV screen. In such a case, press ENTER, The disc will
stop. Then play the disc again, and try the procedure again
from step [].
NOTE:
If you forget your password, enter "8888" in step _1.
NOTE:
If you forget your password, enter "8888" in step I[1.
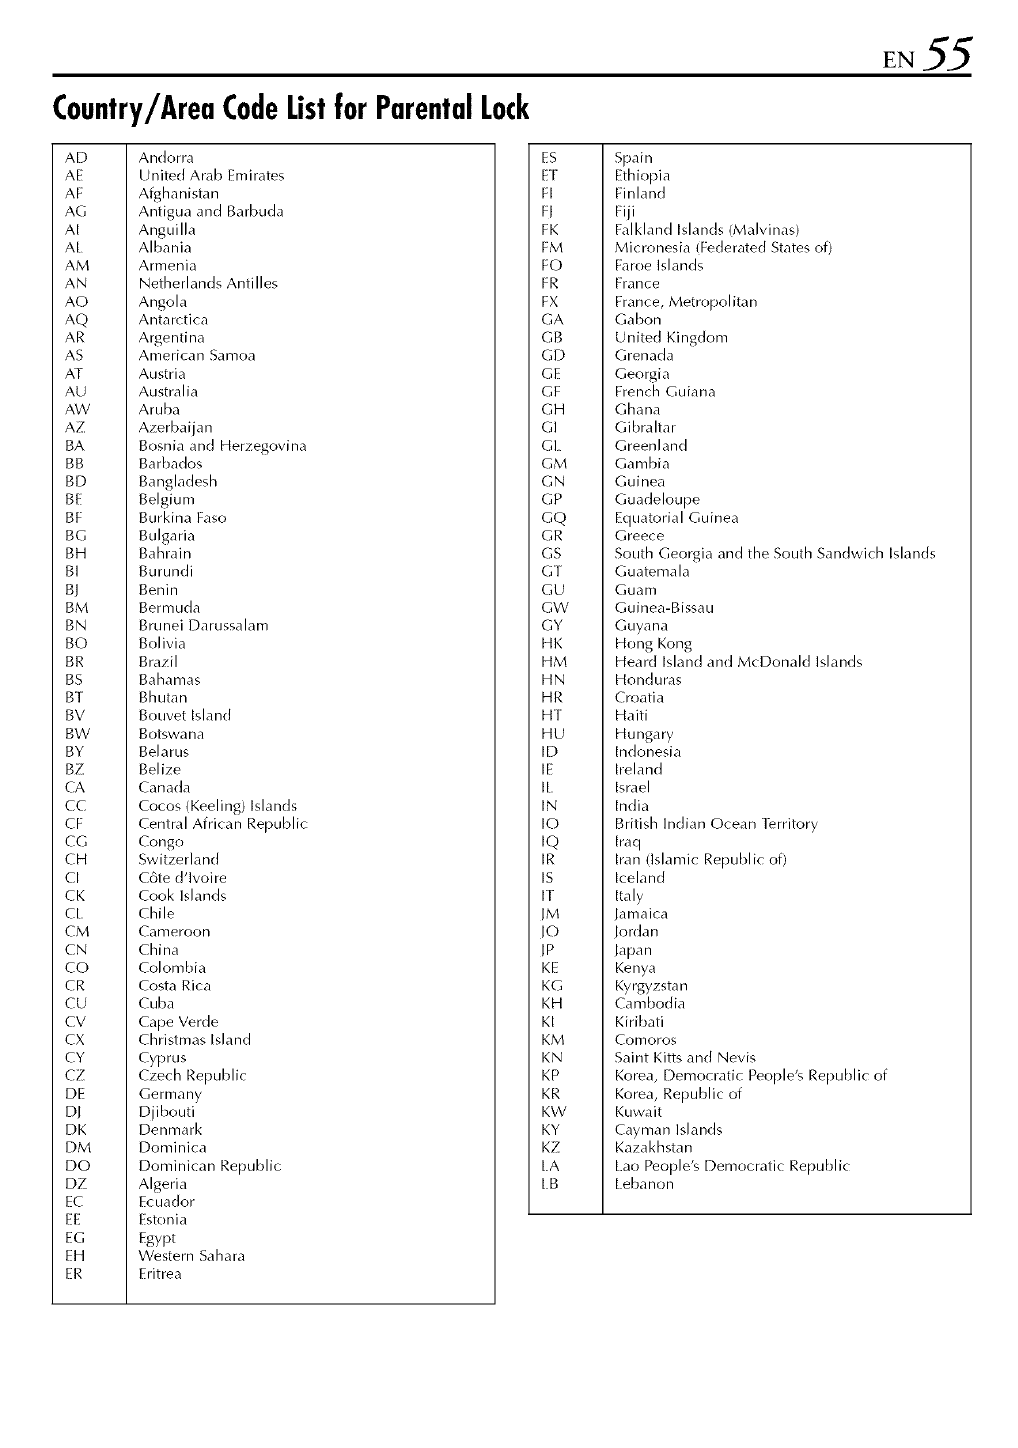
Country/AreaCodeListfor ParentalLock
AD
AE
AF
AG
AI
AL
AM
AN
AO
AQ
AR
AS
Gr
AU
AW
AZ
BA
BB
BD
BE
BF
BG
BH
BI
BJ
BM
BN
BO
BR
BS
BT
BV
BW
BY
BZ
CA
CC
CF
CG
CH
CI
CK
C[
CM
CN
CO
CR
CU
CV
CX
CY
CZ
DE
DJ
DK
DM
DO
DZ
FC
FE
FG
FH
FR
Andorra
United Arab Fmirates
Afghanistan
Antigua and Barbuda
Anguilla
Albania
Armenia
Netherlands Antilles
Angola
Antarctica
Argentina
American Samoa
Austria
Australia
Aruba
Azerbaijan
Bosnia and Herzegovina
Barbados
Bangladesh
Belgium
Burkina Faso
Bulgaria
Bahrain
Burundi
Benin
Bermuda
Brunei Darussalam
Bolivia
Brazil
Bahamas
Bhutan
gouvet Island
Botswana
Belarus
Belize
Canada
Cocos (Keeling] Islands
Central African Republic
Congo
Switzerland
C6te d'lvoire
Cook Islands
Chile
Cameroon
China
Colombia
Costa Rica
Cuba
Cape Verde
Christmas Island
Cyprus
Czech Republic
Germany
Djibouti
Denmark
Dominica
Dominican Republic
Algeria
Ecuador
Estonia
Egypt
Western Sahara
Fritrea
ES
ET
F[
FI
FK
FM
FO
FR
FX
GA
GB
GD
GE
GF
GH
GI
GI
GM
GN
GP
GQ
GR
GS
GI
GU
GW
GY
HK
HM
HN
HR
HT
HU
[D
IE
I[
IN
IO
[Q
IR
IS
IT
IM
IO
IP
KE
KG
KH
KI
KM
KN
KP
KR
KW
KY
KZ
[A
LB
Spain
Ethiopia
Finland
Fiji
Falkland Islands (Malvinas)
Micronesia (Federated States of)
Faroe Islands
France
France, Metropolitan
Gabon
United Kingdom
Grenada
Georgia
French Guiana
Ghana
Gibraltar
Greenland
Gambia
Guinea
Guadeloupe
Equatorial Guinea
Greece
South Georgia and the South Sandwich Islands
Guatemala
Guam
Guinea-Bissau
Guyana
Hong Kong
Hear(] Island and McDonald Islands
Honduras
Croatia
Haiti
Hungary
Indonesia
Ireland
Israel
India
British Indian Ocean [erritory
[raq
Iran (Islamic Republic of)
Iceland
Italy
Jamaica
Jordan
Japan
Kenya
Kyrgyzstan
Cambodia
Kiribati
Comoros
Saint Kitts an(] Nevis
Korea, Democratic People's Republic of
Korea, Republic of
Kuwait
Cayman islands
Kazakhstan
[ao People's Democratic Republic
Lebanon
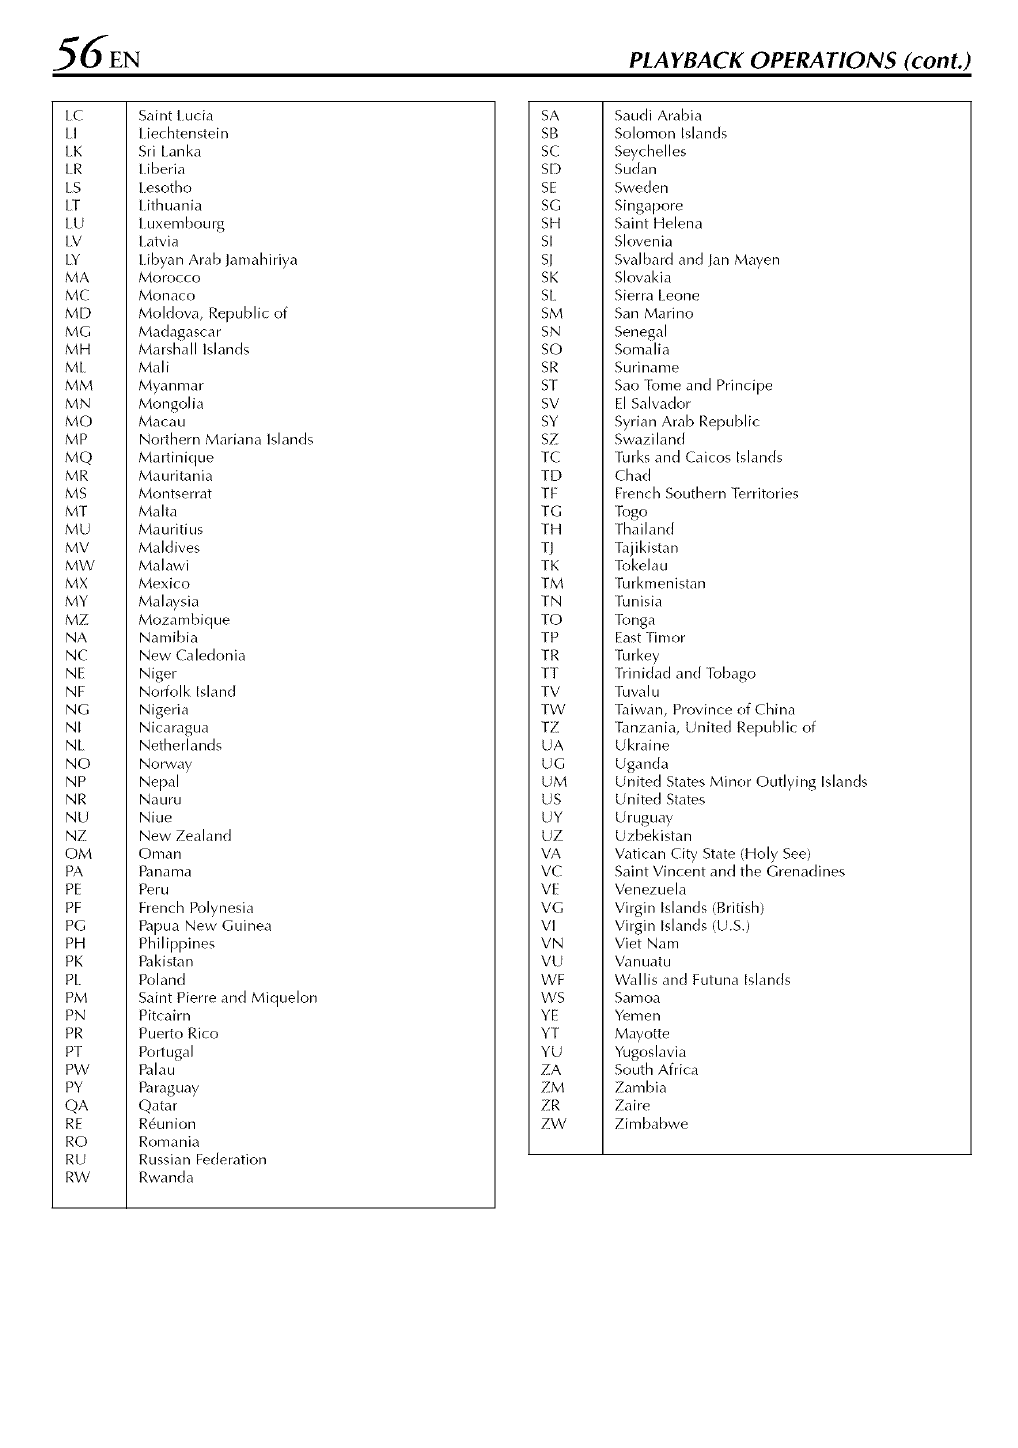
6"EN PLAYBACK OPERATIONS (cont.)
LC
LI
LK
LR
LS
IZ
LU
IV
IY
MA
MC
MD
MG
MH
ML
MM
MN
MO
MP
MQ
MR
MS
MT
MU
MV
MW
MX
MY
MZ
NA
NC
NE
NF
NG
NI
NL
NO
NP
NR
NU
NZ
OM
PA
PE
PF
PG
PH
PK
P[
PM
PN
PR
PT
PW
PY
QA
RE
RO
RU
RW
Saint I.ucia
Liechtenstein
Sri Lanka
Liberia
Lesotho
Lithuania
Luxembourg
Latvia
Libyan Arab Jamahiriya
Morocco
Monaco
Moldova, Republic of
Madagascar
Marshall Islands
Mall
Myanmar
Mongolia
Macau
Northern Mariana Islands
Martinique
Mauritania
Montserrat
Malta
Mauritius
Maldives
Malawi
Mexico
Malaysia
Mozambique
Namibia
New Caledonia
Niger
Norfolk Island
Nigeria
Nicaragua
Netherlands
Norway
Nepal
Nauru
Niue
New Zealand
Oman
Panama
Peru
French Polynesia
Papua New Guinea
Philippines
Pakistan
Poland
Saint Pierre and Miquelon
Pitcairn
Puerto Rico
Portugal
Palau
Paraguay
Qatar
R6union
Romania
Russian Federation
Rwanda
SA
SB
SC
SD
SE
SG
SH
SI
sI
SK
SI.
SM
SN
SO
SR
ST
SV
SY
SZ
TC
TD
TF
TG
TH
TJ
TK
TM
TN
TO
TP
TR
TT
TV
TW
TZ
UA
UG
UM
US
UY
UZ
VA
VC
VE
VG
VI
VN
VU
WF
WS
YE
YT
YU
ZA
ZM
ZR
ZW
Saudi Arabia
Solomon Islands
Seychelles
Sudan
Sweden
Singapore
Saint Helena
Slovenia
Svalbard and lan Mayen
Slovakia
Sierra Leone
San Marino
Senegal
Somalia
Suriname
Sao Tome and Principe
El Salvador
Syrian Arab Republic
Swaziland
Turks and Caicos Islands
Chad
French Southern [_'rritories
Togo
Thailand
Tajikistan
Tokelau
Turkmenistan
Tunisia
Tonga
East Tim or
Turkey
Trinidad and ]bbago
Tuvalu
Taiwan, Province of China
Tanzania, United Republic of
Ukraine
Uganda
United States Minor Outlying Islands
United States
Uruguay
Uzbekistan
Vatican City State (Holy See)
Saint Vincent and the Grenadines
Venezuela
Virgin Islands (British)
Virgin Islands (U.S./
Viet Nam
Vanuatu
Wallis and Futuna Islands
Samoa
Yemen
Mayotte
Yugoslavia
South Africa
Zambia
Zaire
Zimbabwe

BasicRecording Choosea program.
Press CH +1- or the number keys to select the channel
_ *'_v,>_'_ _ '_*_ • you wish to record.
I_lset the recordingspeed.
• Turn on the unit.
• lurn on the FV and select the AV mode.
• Slide the TV/CABLE/DBS/DVD switch to DVD.
ATTENTION:
It is not possible to record programs on a DVD-R (]is< whi<h
has al ready been finalized.
0_9_
O
Tvil_ ....
CD CD CD (ZD)
vcRplu_PR0_H[CKnECLINKTIMER
...........EZZ
_TOPrdEr_U r_Vi_liON
r_ENU REtUrN
JVC
,A @_|| @
(H+/-
l
R[(:MOD[
Press REC MODE repeatedly until the desired recording
speed appears.
• Each time you press REC MODE, the recording speed changes
as follows:
XP -+ SP -+ LP -'_ EP -+ FR60 FR360*, FR420, FR480 -+
(Back to the beginning)
* The value is selectable tl()m 1 to 6 houIs in 5-min. inclement by
pressing < _ lepeated/y aftel selecting "FR60 FR360". 7b change
the value in 30m_in. h3ciements, press and hold :'.
• For details on the recording speed, see page 58.
Lqstart recording.
Press and hold S, then press I_ ol3 the Remote, or press
• on the unit.
_Pauserecording.
Press II.
• To resume recording, press I_.
_J Stoprecording.
Press II.
It takes about 10 seconds to end the writing session when
you stop recording.
NOTES:
• It is recommended to format a DVD-RAM disc before use if
you use the disc on this unit for the first time.
• When using a brand-new DVD-RW disc, format the disc either
in VR mode or in Video mode. (_-_ pg. 101, "Format a
DVD-RW disc")
• You can record up to 99 programs and 999 play lists on each
disc.
• Some programs can only be recorded one time.
• When recording is started, an index of the first part of
recording is automatically recorded (_-€_pg. 72, "Library
Database DVD Navi'). |b record a satellite programs, refer to
page 71. lb delete the index, refer to page 77.
• Recording sometimes may stop or cannot be performed even if
there is enough available capacity remaining on the disc.
RecordingResumeFunction
If there is a power outage during recording, Instant Timer
Recording (ITR) (_:_ pg. 58) or timer recording (_:_ pg. 60,
64), the recording will resume automatically when power is
restored to the unit unless the unit's memory backup has
expired.
Loada disc.
[] Press A to open the disc tray.
[] Place a recordable disc on the disc tray.
• For details, refer to "Placing a Disc" (_-u"pg. 11).
[] Press A to close the disc tray.
8EN RECORDING (cont.)
RecordingFeatures
_JVC
@
111'
TV_DVD
VCRplu_PnO_H_RECLINKTIMEn
PREVIOUS
SLO_'_- P_¥,_SELECTSDW÷
REC_ODELI'_ECHECK_ _
0000
®o®
CH+/-
Recording Speed
MPEG2 format is used as recording format. As a guide for picture
quality, the "bps" unit is used to represent how much data can
be recorded per second. The larger this value is, the better the
picture quality becomes but more capacity is required for the
recording. Select XP or SP for programs where quick movement
occurs, such as sports programs, and LP or EP for talk shows, etc.
with relatively less movement.
The recording
Recording
speed
XP
SP
I P
EP
FRfi0 FR360
(_'pg39)
FR420
FR480
)eeds for a 4.7 GB disc are set as follows:
Recording amount
(approx.)
10 Mbps
5 Mbps
2 Mbps
1.6 Mbps
The amount varies
depending on the
selected time.
Maximum recording
time (approx.)
1 hour
2 hours
4 hours
6 hours
1 6 hours
7 hour
8 hour
InstantTimerRecording(ITR)
[his easy method lets you re_ord for from 30 minutes to 6 hours
(selectable in 30-min. increments), and shuts the unit off after
recording is finished.
!Start recording.
Press • on the unit.
2Engagethe ITRmode.
Press • again. On the front display panel, "0 30'
a ppea rs.
3 Setthe recordingduration.
If you want to record for rnore than _0 minutes, press •
to extend the time. Each press extends recording time by
30 minutes.
NOTES:
•You _an only perform ITR using the •button on the unit's
front panel.
• It is possible to set the recording duration up to 6 hours, but it
is impossible to set exceeding the disc remaining time.
WatchAnotherProgramWhile
RecordingontheUnit
While re_ording is going on, you can watd_ another program on
the TV by using the TV's tuner. It is required that the Remote is
set to be able to operate the TV in advance. (L_ _pg. 92, "TV
Multi-Brand Remote Control")
!Switchthe TVto TV mode.
During recording, press TV/VIDEO to select TV mode.
• Video mode is disengaged and the video indicator on the unit
is turned off.
• The program received on the TV's tuner is displayed on the TV
screen.
2Switchthe Remoteto TV controlmode.
Slide the TV/CABLE/DBS/DVD switch to TV.
3 Selectthedesiredchannel.
Press CH +/- repeatedly.
ElapsedRecordingTimeandDisc
RemainingTimeIndication
During recording, press DISPLAY repeatedly until the
desired indication appears on the front display panel.
• Each time you press DISPLAY, the time indi(ation changes as
follows:
Elapsed recording time -'* Dis( remaining time -* CIo_k -'*
(Back to the beginning)
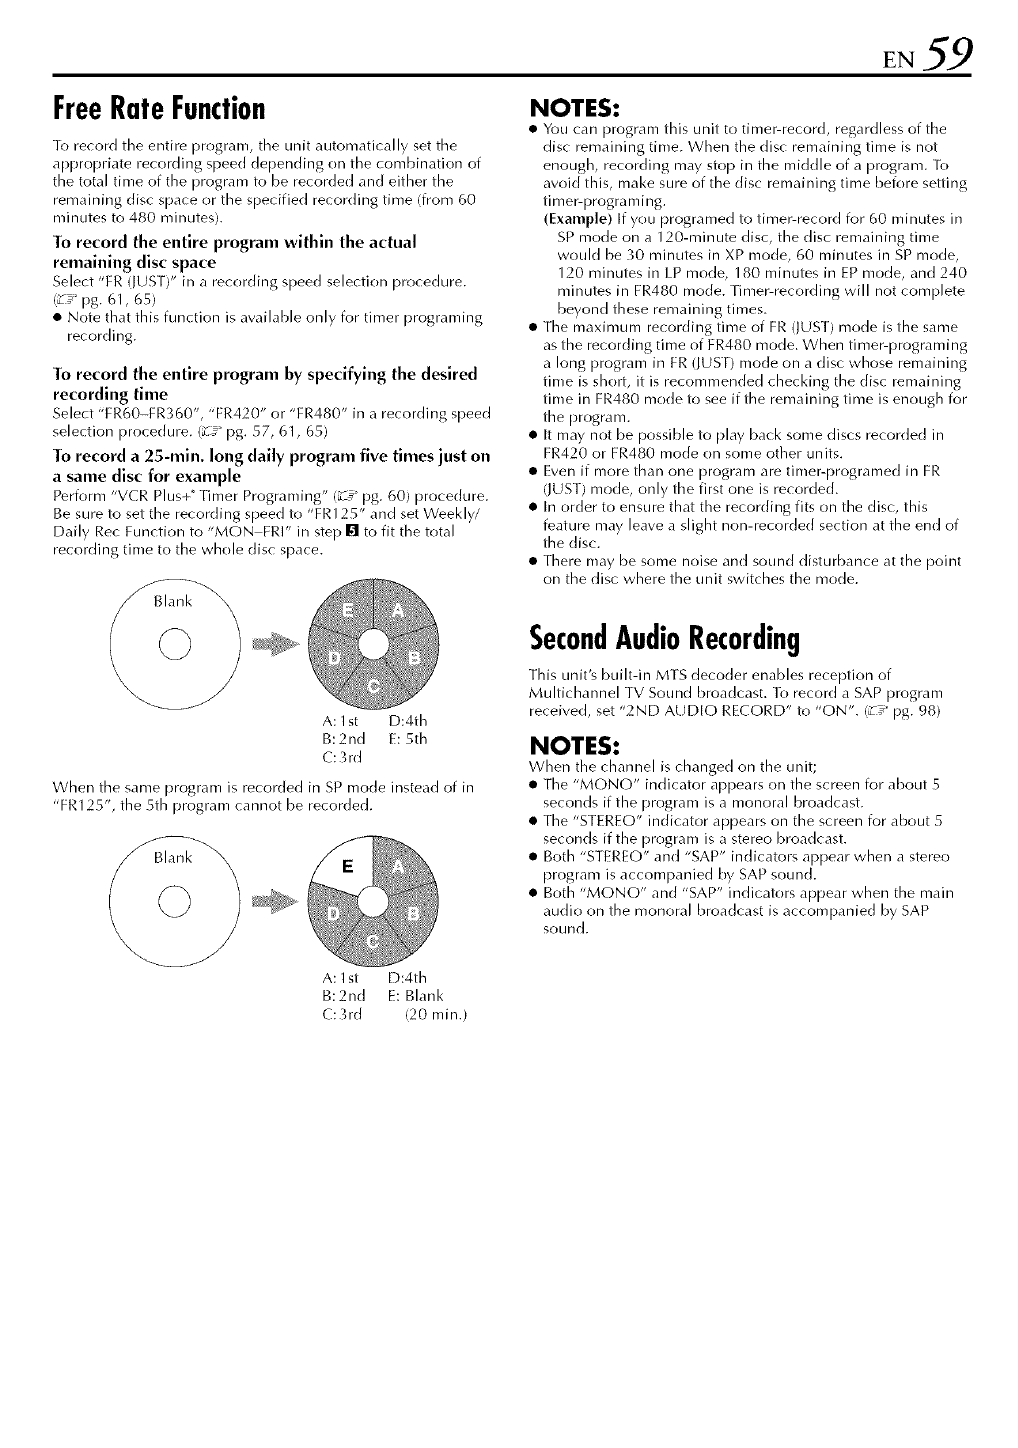
FreeRateFunction
To record the entire program, the unit automatically set the
appropriate recording speed depending on the combination of
the total time of the program to be recorded an(] either the
remaining disc space or the specified recording time (from 60
minutes to 480 minutes).
To record the entire program within the actual
remaining disc space
Select "FR (lUST)" in a recording speed selection procedure.
(_-_ pg. 61,65)
• Note that this function is available only for timer programing
recording.
To record the entire program by specifying the desired
recording time
Select "FR60-FR360", "FR420" or "FR480" in a re_ording speed
selection procedure. (_ pg. 57, 61, 65)
To record a 25-rain. long daily program five times just on
a same disc for example
Perform "VCR Plus+_Timer Programing" (_ pg. 60) procedure.
Be sure to set the recording speed to "FR125" and set Weekly/
Daily Rec Function to "MON FRI" in step [] to fit the total
recording time to the whole disc space.
A: 1st D:4th
B: 2nd E: 5th
C: 3 rd
When the same program is recorded in SP mode instead of in
"FR125", the 5th program cannot be recorded.
A: 1st D:4th
B:2nd E: Blank
C:3rd (20 rain.)
NOTES:
• You can program this unit to timer-record, regardless of the
disc remaining time. When the disc remaining time is not
enough, recording may stop in the middle of a program. To
avoid this, make sure of the disc remaining time before setting
timer-programing.
(Example) If you programed to timer-record for 60 minutes in
SP mode on a 120-minute disc, the disc remaining time
would be 30 minutes in XP mode, 60 minutes in SP mode,
120 minutes in IP mode, 180 minutes in EP mode, and 240
minutes in FR480 mode. Timer-recording will not complete
beyond these remaining times.
• The maximunl recording time of FR (JUSI) mode is the same
as the recording time of FR480 mode. When timer-programing
a long program in FR (lUST) mode on a disc whose remaining
time is short, it is recommended checking the disc remaining
time in FR480 mode to see if the remaining time is enough for
the program.
• It may not be possible to [)lay back some discs recorded in
FR420 or FR480 mode on some other units.
• Even if more than one program are timer-programed in FR
(JUST) mode, only the first one is recorded.
• In order to ensure that the recording fits on the disc, this
feature may leave a slight non-recorded section at the end of
the disc.
• There may be some noise and sound disturbance at the point
on the disc where the unit switches the mode.
SecondAudioRecording
This unit's built-in MTS decoder enables reception of
Multichannel TV Sound broadcast. lo record a SAP program
received, set "2ND AUDIO RECORD" to "ON". (_-_ pg. 98)
NOTES:
When the channel is changed on the unit;
• The "MONO" indicator appears on the screen for about 5
seconds if the program is a monoral broadcast.
• The "STEREO" indicator appears on the screen for about 5
seconds if the program is a stereo broadcast.
• Both "STEREO" an(] "SAP" indicators appear when a stere()
program is accompanied by SAP sound.
• Both "MONO" an(] "SAP" indicators appear when the main
audio on the monoral broadcast is accompanied by SAP
sound.
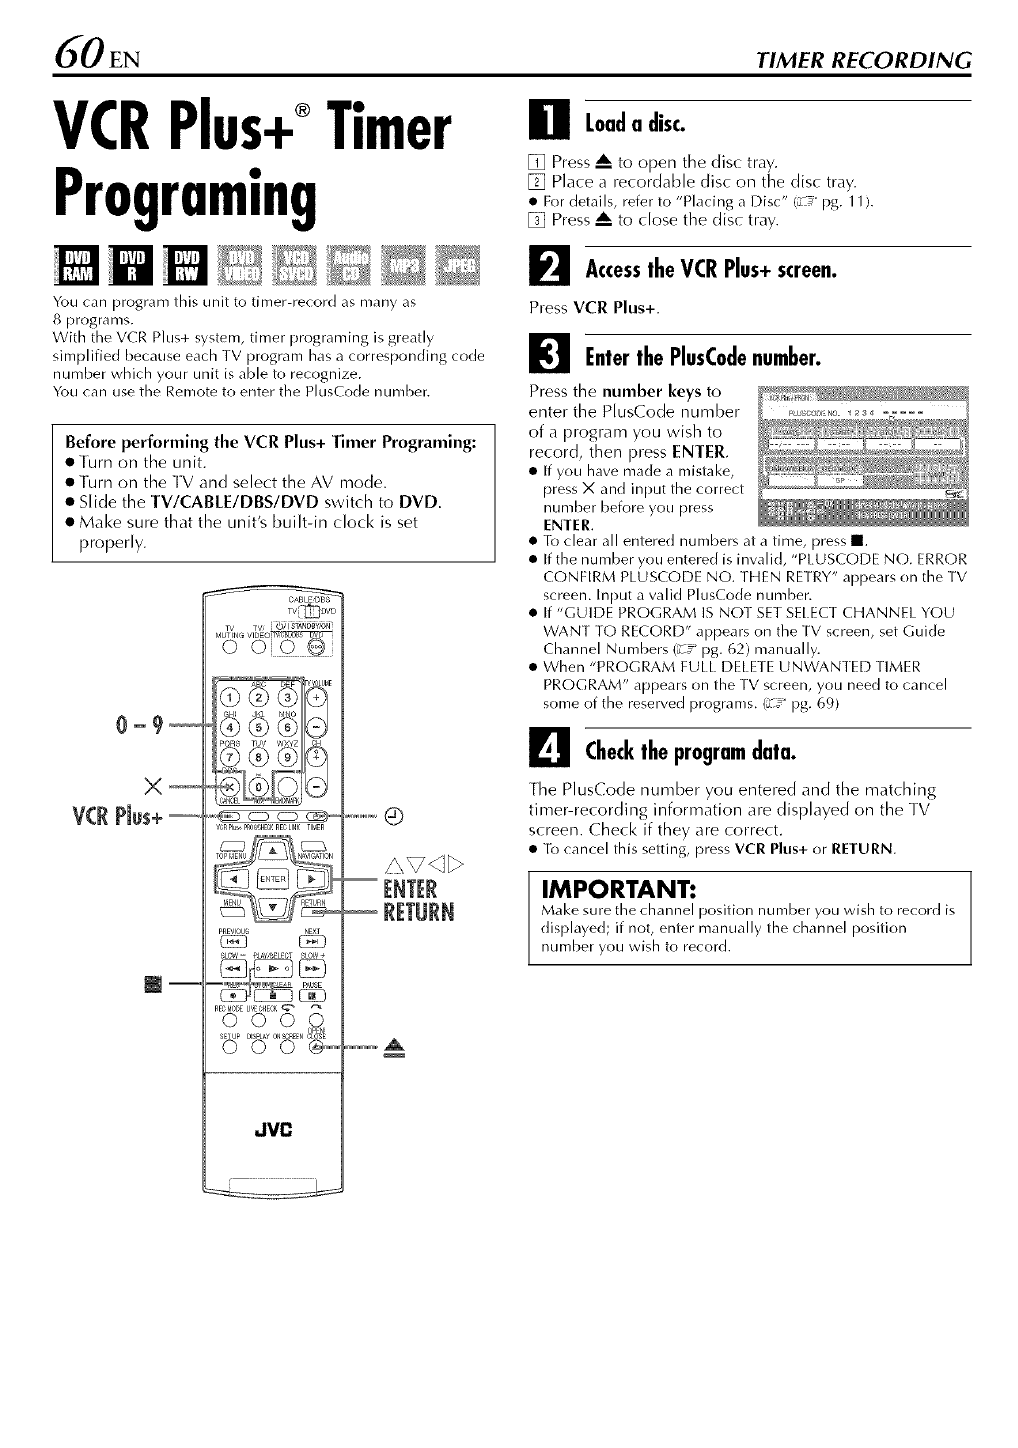
dO EN TIMER RECORDING
VCRPlus+®Timer
Programing
You can program this unit to timer-record as many as
8 programs.
With the VCR Plus+ system, timer programing is greatly
simplified because each TV program has a corresponding code
number which your unit is able to recognize.
You can use the Remote to enter the PlusCode number.
Before performing the VCR Plus+ Timer Programing:
• Turn on the unit.
• Turn on the TV and select the AV mode.
• Slide the TV/CABLE/DBS/DVD switch to DVD.
• Make sure that the unit's built-in clock is set
properly.
0_9_
X_
VCRPlus+
TV[_iD....
T,_ TV [_)i _TA_bi3"i6_
VCRPlu_pR0r_._HECKRECLINKTIMER
PREVlOU_
SLOW- P_¥;_LEOT SLOW÷
REC_IODELI_E'C_¢K
°0Z0,Z,Z
SETUP
0 0 0 _)
JVC
[NT[_
l
Loada disc.
[] Press A to open the disc tray.
[] Place a recordable disc on the disc tray.
• For details, refer to "Placing a Disc" (L_ _pg, 1 1).
[] Press A to close the disc tray.
F_I Accessthe VCRPlus+screen.
Press VCR Plus+.
I_1 Enterthe PlusCodenumber.
Press the number keys to
enter the PlusCode number
of a program you wish to
record, then press ENTER.
• [f you have made a mistake,
press X and input the correct
number before you press
ENTER.
• To dear all entered numbers at a time, press lB.
• If the number you entered is invalid, "PI USCODE NO. ERROR
CONFIRM PLUSCODE NO. THEN RETRY" appears on the TV
screen. Input a valid PlusCode number.
• If "GUIDE PROGRAM IS NOT SE] SELECT CHANNEl YOU
WANT TO RECORD" appears on the TV screen, set Guide
Channel Numbers (_-_" pg. 62) manually.
• When "PROGRAM FULL DELETE UNWANIED TIMER
PROGRAM" appears on the TV screen, you need to cancel
some of the reserved programs. (__ pg. 69)
L_e Checkthe programdata.
The PlusCode number you entered and the matching
timer-recording information are displayed on the TV
screen. Check if they are correct.
• To cancel this setting, press VCR Plus+ or RETURN.
IMPORTANT:
Make sure the channel position number you wish to re_ord is
displayed; if not, enter manually the channel position
number you wish to record.
Set thefollowingrecordingoptionsas
required.
[] Press <i K" to select the desired option.
[] Press z'_V to select the desired setting, then press
ENTER.
"REC MODE"/_-_" pg. 58, "Recording Speed") (z_" pg. 59,
"Free Rate Function"), "DAI[.Y/WEEKI.Y" (_-_ pg. 61,
"Daily/Weekly Rec Function"), "NAME" (k_" pg. 76,
"Modify Program Name"), and "STOP" (lb advance/go
back the stop time by 30 minutes, press and hold/\_).
_J Accessthe confirmationscreen.
Press ENTEr.
F'_ Completetimerprograming.
PressENTEr.
• To program another timer, repeat steps [] b'_.
• If "PROGRAM OVERLAPPED" appears on the TV screen, see
"When programs overlap each other" (_-_ pg. 70).
_Engagetheunit'stimermode.
Press ® ITIMFr). The unit turns off automatically and
"®" appears on the front display panel.
• To disengage the timer mode, press Q {TIMER) again.
IMPORTANT
If you have moved to a different area or if a broadcasting
station's channel number has been change(], the wrong
channel number will be displayed on the VCR Plus+ program
screen in step []. When this happens, set the correct Guide
Channel number for that station. (_ pg. 60, "VCR Plus+ _
Timer Programing')
NOTES:
• There may be cases that VCR Plus+ Timer Programing function
prolongs the stop time of the programing.
• When two successive programs are recorded on a DVD-RW
disc with VCR Plus+ Timer Programing function, the beginning
of the second one may be left off the recording.
• VCR Plus+ Timer Programing is not possible on the discs used
exclusively for On-Disc Timer Programing.
• If the copy limited program is receive(] during timer-recording,
the unit enters Record Pause mode. Recording starts again if it
is switched to a recordable broadcast during the time you
programed.
Cable Box or DBS receiver Users
To timer-record a satellite broadcast using the VCR PI us+
system:
[] Perform "Cable Box Control Setting" (_L__pg. 29) or "DBS
Receiver Control Setting" (z_" pg. 32).
[] Perform "VCR Plus+ _Timer Programing'.
[] Leave the Cable Box or DBS receiver's power on.
Daily/Weekly rec Function
You can record programs with one of the following weekly/daily
timer settings.
WEEKLY
MON-FRI
MON-SAT
SUN-SAT
Select to record a weekly program.
Select to record a daily program from
Monday through Friday.
Select to record a daily program from
Monday through Saturday.
Select to record a daily program from Sunday
through Saturday.
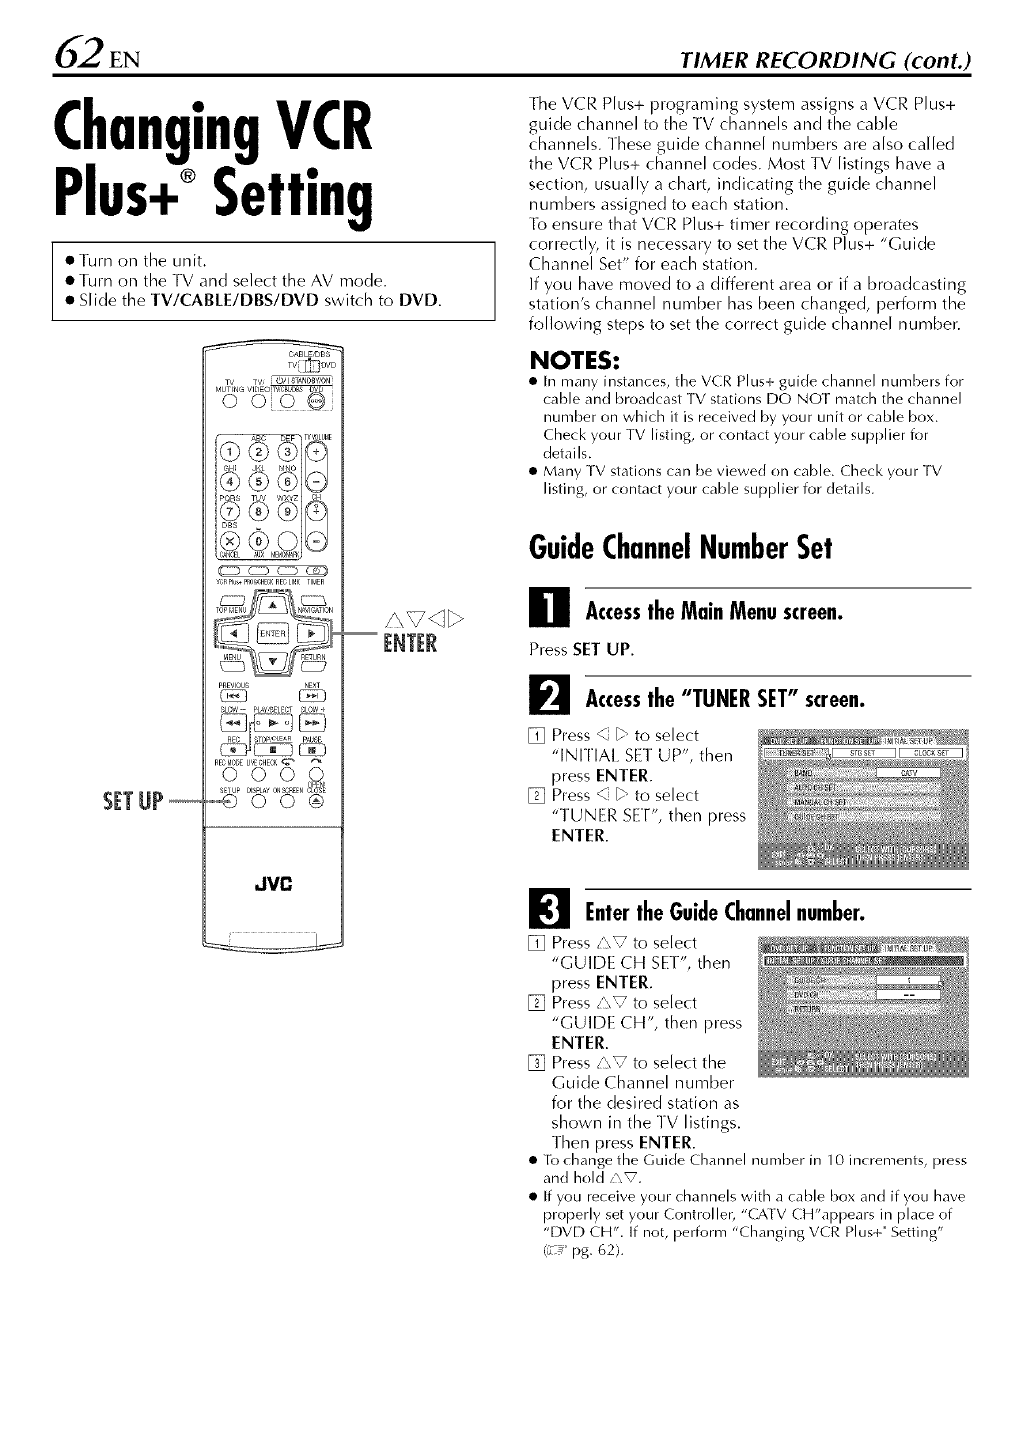
62 EN TIMER RECORDING (cont.)
ChangingVCR
Plus+®Setting
• Turn on the unit.
• Turn on the TV and select the AV mode.
• Slide the TV/CABLE/DBS/DVD switch to DVD.
SETUP
iw TV
vcRplu_PROG_HeCKnECLINKTIMEn
PREVIOUS
SLOW- Pt_SEtECT SLOW+
REC_ODELIVECHECK_
o 0q0,PEN£
SETUP
_00@
JVC
The VCR Plus+ programing system assigns a VCR Plus+
guide channel to the TV channels and the cable
channels. These guide channel numbers are also called
the VCR Plus+ channel codes. Most TV listings have a
section, usually a chart, indicating the guide channel
numbers assigned to each station.
lb ensure that VCR Plus+ timer recording operates
correctly, it is necessary to set the VCR Plus+ "Guide
Channel Set" for each station.
If you have moved to a different area or if a broadcasting
station's channel number has been changed, perform the
following steps to set the correct guide channel number.
NOTES:
•In many instances, the VCR Plus+ guide dlannel numbers for
cable and broadcast TV stations DO NOT match the channel
number on which it is received by your unit or cable box.
Check your TV listing, or contact your cable supplier for
details.
• Many TV stations can be viewed on cable. Check your TV
listing, or contact your cable supplier for details.
GuideChannelNumberSet
Accessthe MainMenuscreen.
Press SET UP.
I_1 Accessthe "TUNERSET"screen.
[] Press _ _" to select
"INFrIAI. SET UP', then
press ENTER.
[] Press 4 b" to select
"TUNER SET", then press
ENTER.
I_1 EntertheGuideChannelnumber.
[] Press i\V to select
"GUIDE CH SET", then ..... _ "_
press ENTER.
[] Press/'\_ to select
"GUIDE CH', then press
ENTER.
[] Press i\V to select the
Guide Channel number
for the desired station as
shown in the TV listings.
Then press ENTER.
• To change the Guide Channel number in 10 increments, press
and hold/\V.
• [f you receive your channels with a cable box and if you have
properly set your Controller, "CATV CH'appears in place of
"DVD CH'. if not, perform "Changing VCR Plus+ _Setting"
(_-_"pg. 62).
L_e Enterthereceivingchannelpositionnumber.
[] Press/\_ to select "DVD CH', then press ENTER.
[] Press/\V to select the number of the unit's channel
position on which the Guide Channel number's
broadcast is received by the unit or the DBS receiver.
Then press ENTER.
• To timer-record a satellite program with the VCR Plus+ system,
you need to install a supplied Controller and perform the
procedure described in "Cable Box Control Setting"
(_ pg. 29) or "DBS Receiver Control Setting" (_-_ pg. 32).
• Repeat steps [] and [] as necessary.
_Completethe setting.
Press SET UP.
GuideChannelNumber
"Guide Channel (GUIDE CH) number" refers to the assigned
TV station numbers, according to broadcast area, for the VCR
Plus+ timer recording. The Guide Channel numbers can be
found in most TV listings.
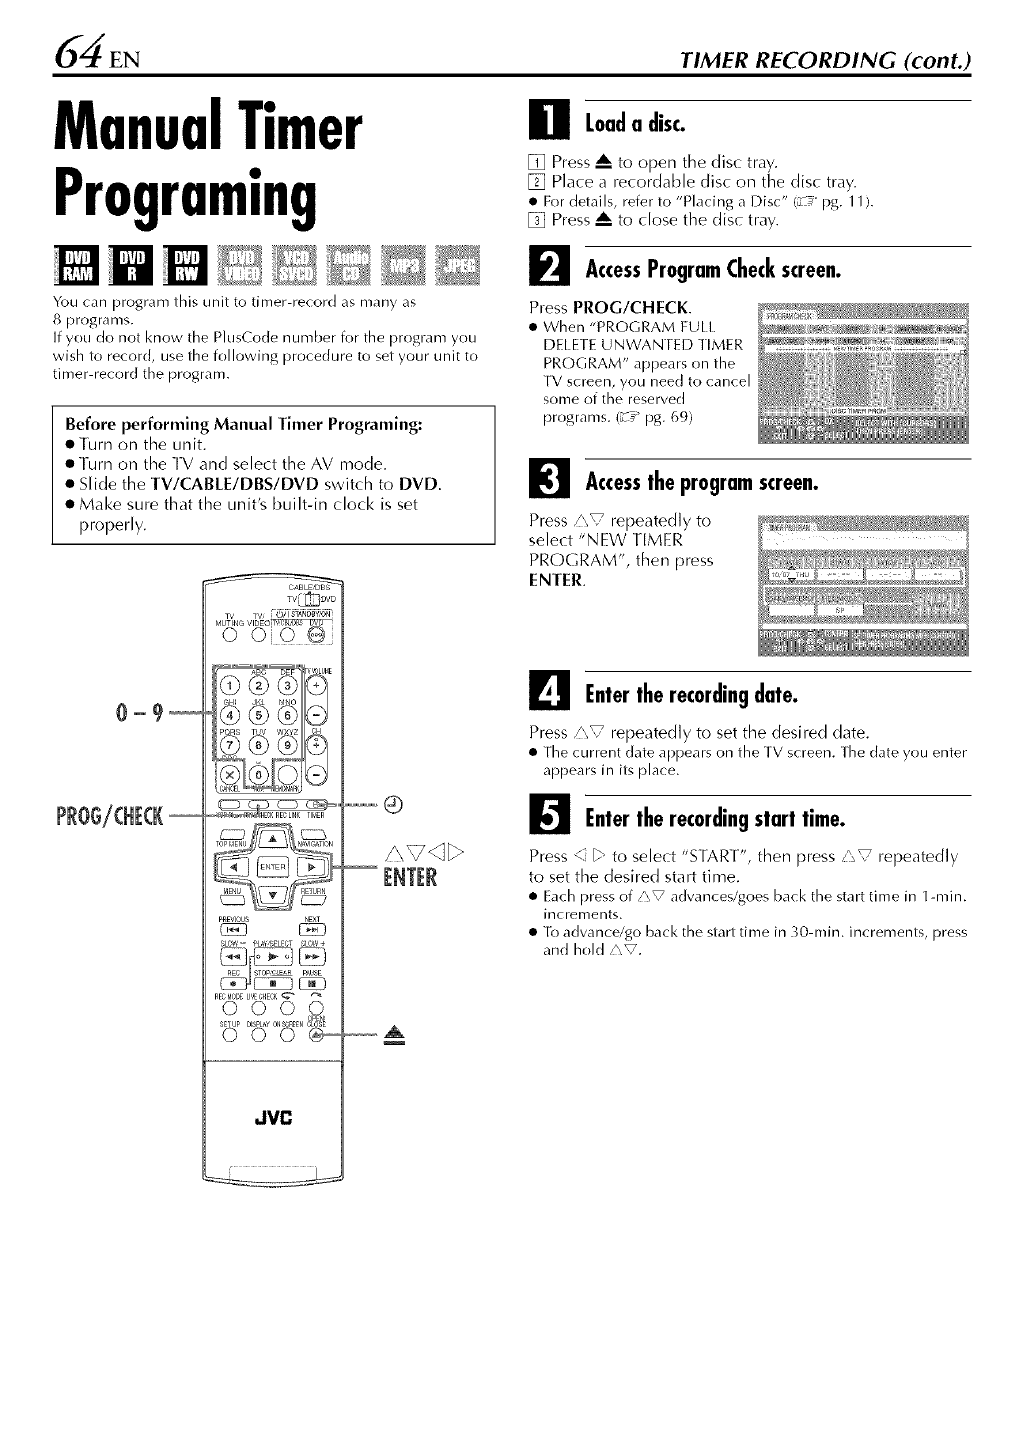
d_ EN TIMER RECORDING (cont.)
ManualTimer
Programing
You can program this unit to timer-record as many as
8 programs.
If you do not know the PlusCode number for the program you
wish to record, use the following procedure to set your unit to
timer-record the program.
Before performing Manual Timer Programing:
• Turn on the unit.
• Turn on the TV and select the AV mode.
• Slide the TV/CABLE/DBS/DVD switch to DVD.
• Make sure that the unit's built-in clock is set
properly.
0_9_
TV_DVD
T0PMEN0 r_Vl_'ll0N
r_ENU nET0_N
PREVJ0US
(ZE3
SLOW= P_¥;SELECTSLOW÷
REC_0DELI_E'CHECK
°0ZoN%Z
SETOP
OOO_
JVC
l
Loada disc.
[] Press A to open the disc tray.
[] Place a recordable disc on the disc tray.
• For details, refer to "Placing a Disc" (L_ _pg. 1 1).
[] Press A to close the disc tray.
F_ AccessProgramCheckscreen.
Press PROG/CHECK.
• When "PROGRAM FULL
DELETE UNWANTED TIMER
PROGRAM" appears on the
TV screen, you nee(] to cancel
some of the reserved
programs. ?-€_ pg. 69)
I_1 Accessthe programscreen.
Press/\_ repeatedly to
select "NEW TIMER
PROGRAM", then press
ENTER.
L_e Entertherecordingdate.
Press/\_ repeatedly to set the desired date.
• The current (]ate appears on the TV screen. The date you enter
appears in its [)lace.
_Entertherecordingstart time.
Press <" b" to select "START", then press/\_ repeatedly
to set the desired start time.
• Each press of/\_ advances/goes back the start time in l-rain.
increments.
• To advancdgo back the start time in 30-rain. increments, press
an(] hold/\_.
_] Entertherecordingstoptime.
Press _ _ to select "STOP", then press/\_ repeatedly to
set the desired stop time.
• Each press of/\x7 advances/goes back the stop time in 1-min.
increments.
• To advance/go back the stop time in 30-rain. increments, press
and hold/\V.
_Enterthechannelposition.
Press _ _ to select "CH", then press/'\_ repeatedly to
select the desired channel.
• If you are using a DBS receiver, see "A1TENTION FOR DBS
RECEIVER USERS" in the right column.
_Set the otherrecordingoptionsas required.
Refer to step [] in "VCR Plus+<'Iimer Programing"
{_ pg. 60).
L_ Accessthe confirmationscreen.
Press ENTER.
Cable Box or DBS receiver Users
To timer-record a satellite broadcast using Man ual Timer
Programing:
[] Perform "Cable Box Control Setting" (L_ _pg. 29) or "DBS
Receiver Control Setting" (_ pg. 32).
[] Perform "Manual Timer Programing".
[] Leave the Cable Box or DBS receiver's power on.
ATTENTION FOR DBS RECEIVER USERS
If you are using a DBS receiver (unless "DBS RECEIVER SET"
is set to "OFF" L_ _pg. 33), the band indication (TV, CA/V or
DBS) appears on the left of the channel number indication.
No indication:
lb timer-record a regular TV broadcast received on
the unit.
CATV: lb timer-record a cable TV broadcast received on the
unit, or through a cable box (unless "CABLE BOX
SET" is set to "OFF" zv _pg. 30).
DBS: lb timer-record a satellite broadcast received through
a DBS receiver.
NOTE:
If the dlannel number entered requires that the band be set,
"7=DBS" is displayed on the screen.
[f this happens, press the DBS (number key "7") to select
"DBS'.
Completetimerprograming.
PressENTEr.
• To program another timer, repeat steps [] [_.
Engagetheunit'stimermode.
Press @ {TIMER). lhe unit turns off automatically and
"®" appears on the front display panel.
• To disengage the timer mode, press (!) {TIMER) again.
NOTES:
• When two successive programs are recorded on a DVD-RW
disc with Manual timer programing recording function, the
beginning of the second one may be left off the recording.
• [f the copy limited program is received during timer-recording,
the unit enters Record Pause mode. Recording starts again if it
is switched to a recordable broadcast during the time you
programed.
6EN TIMER RECORDING (cont.)
0n-DiscTimer
Programing
On-Disc timer Programing is a function used with discs that are
especially intended for a specific program. The disc is then
programed for a program you always watch every day or every
week. Since older programs are automatically overwritten, a
single DVD-RAM/RW (VR mode) disc can be used without
worrying about how much recording capacity remains.
(_-_" pg. 68, "How discs are overwritten")
You can program each disc to timer-record as many as
8 programs.
Before performing On-Disc Timer Programing:
•Turn on the unit.
• Turn on the TV and select the AV mode.
• Slide the TV/CABLE/DBS/DVD switch to DVD.
• Make sure that the unit's built-in clock is set
properly.
ATTENTION:
•On-Disc Timer Programing is possible only with the disc
for On-Disc Timer Programing.
• ff data is recorded on a disc for On-Disc Timer Programing
using a unit from another manufacturel_ On-Disc Timer
Programing may no longer function properly.
Tomakethediscfor 0n-DiscTimer
Programing
Loada disc.
[] Press A to open the disc tray.
[] Place a recordable disc on the disc tray.
• For details, refer to "Placing a Disc" (_-€_pg. 11).
[] Press A to close the disc tray.
_AccessProgramCheckscreen.
Press PROG/CHECK,
I_1 Accessthe programscreen.
When On-Disc Timer Programing is made for the first
time on the disc
Press i\V repeatedly to select "DISC TIMER PRGM',
then press ENTER.
• When some programs are recorded on the disc, a caution
message appears, in such a case, backup the programs as
require(], then format the disc before making On-Disc Timer
Programing. (_-_ pg. 101, "Format a disc")
When On-Disc Timer Programing has already been
made on the disc
Press i\T, repeatedly to select "NEW TIMER
PROGRAM", then press ENTER.
Entertherecordingdate.
TV _DVD
TOPMENU r_q_TION
M_U RETURN
PRE_OUS
SLOW= P_Y/SELEGTSLOW+
RFC_ODEU_E'CHECK
0 0
2......
000_
JVC
DVDO!I
Press z'_V repeatedly to set the desired date.
• The (urrent (]ate appears on the TV screen. The (]ate you enter
appears in its place.
_Entertherecordingstart time.
Press <" _" to select "START", then press/\_ repeatedly
to set the desired start time.
• Each press of/\x7 advances/goes back the start time in 1-min.
increments.
• To advance/go back the start time in 30-rain. increments, press
and hold/\V.
_A l
_1_ Entertherecordingstoptime.
Press _ _ to select "STOP", then press/\_ repeatedly to
set the desired stop time.
• Each press of/\x7 advances/goes back the stop time in 1-min.
increments.
• To advance/go back the stop time in 30-min. increments, press
and hold/\V.
I_"]1 Enterthechannelposition.
Press _ _ to select "CH", then press/\_ t-epeatedly to
select the desired channel.
_Set "DAILY/WEEKLY"option.
Refer to step [] in "VCR Plus+ '_limer Programing"
!_ pg. 60).
• It is necessary to set "DAllY/WEEKlY" option for On-Disc
Timer Programing. (_-€_pg. 61, "Daily/Weekly Rec Function")
L_Set the otherrecordingoptionsas required.
Refer to step [] in "VCR Plus+ _'Iimer Programing"
{z¢ pg. 60).
• You can select XP, SP, LP, EP or FR480 mode for "REC
MODE". You cannot select FR (JUST), FR60-FR360 and
FR420.
Accessthe confirmationscreen.
Press ENTER.
[H Completetimerprograming.
PressENTEr.
• To program another timer, repeat steps [] -I11
Cable Box or DBS receiver Users
lb timer-record a satellite broadcast using the On-Disc Timer
Programing function:
[] Perform "Cable Box Control Setting" (_-u" pg. 29) or "DBS
Receiver Control Setting" (_€_ pg. 32).
[] Perform "On-Disc Timer Programing'.
[] Leave the Cable Box or DBS receiver's power on.
Totimer-recordtheprogramwiththe
programeddisc
Loadthe disc.
[] Press A to open the disc tray.
[] Place the programed disc on the disc tray.
• For details, refer to "Placing a Disc" {_-_"pg. 11).
[] Press A to close the disc tray.
Engagethe unit'stimer mode.
Press DVD _b/I. [he unit turns off and "_(_" apl)ears
on the front display panel.
• lo disengage the timer mode, press DVD cb/I again.
NOTES:
• Even if On-Disc Timer Programing is overlapping with other
timer programing, any caution message does not appear. In
such a case, recording will be executed in the descending
order of the recording start time of the program.
• On-Disc Timer Programing is not possible on a DVD-RW disc
formatted in video mode. {£_ pg. 101, "Format a DVD-RW
disc")
• The information of a program recorded with On-Disc Timer
Programing is not stored in the library. (_-_" pg. 82)
• The play list is not created for the programs recorded with On-
Disc Timer Programing. (£_ pg. 78)
• VCR Plus+ Timer Programing is not possible on the discs used
exclusively for On-Disc Timer Programing.
• Manual Timer Programing is not possible on the On-Disc
Timer Programed disc. (_ pg. 64)
• Basic Recording is not possible on the On-Disc Timer
Programed disc. (£_ pg. 57)
• The On-Disc Timer Programing function does not work on the
unit form other manufactures even if the On-Disc Timer
Programed disc is loaded.
• The beginning of a program may not be recorded. Also, if the
1st program's recording stop time and the 2nd program's
recording start time is the same, the ending of the I st program
may not be recorded.
• If there is a power cut while recording, the recordings before
the power cut are not guaranteed.
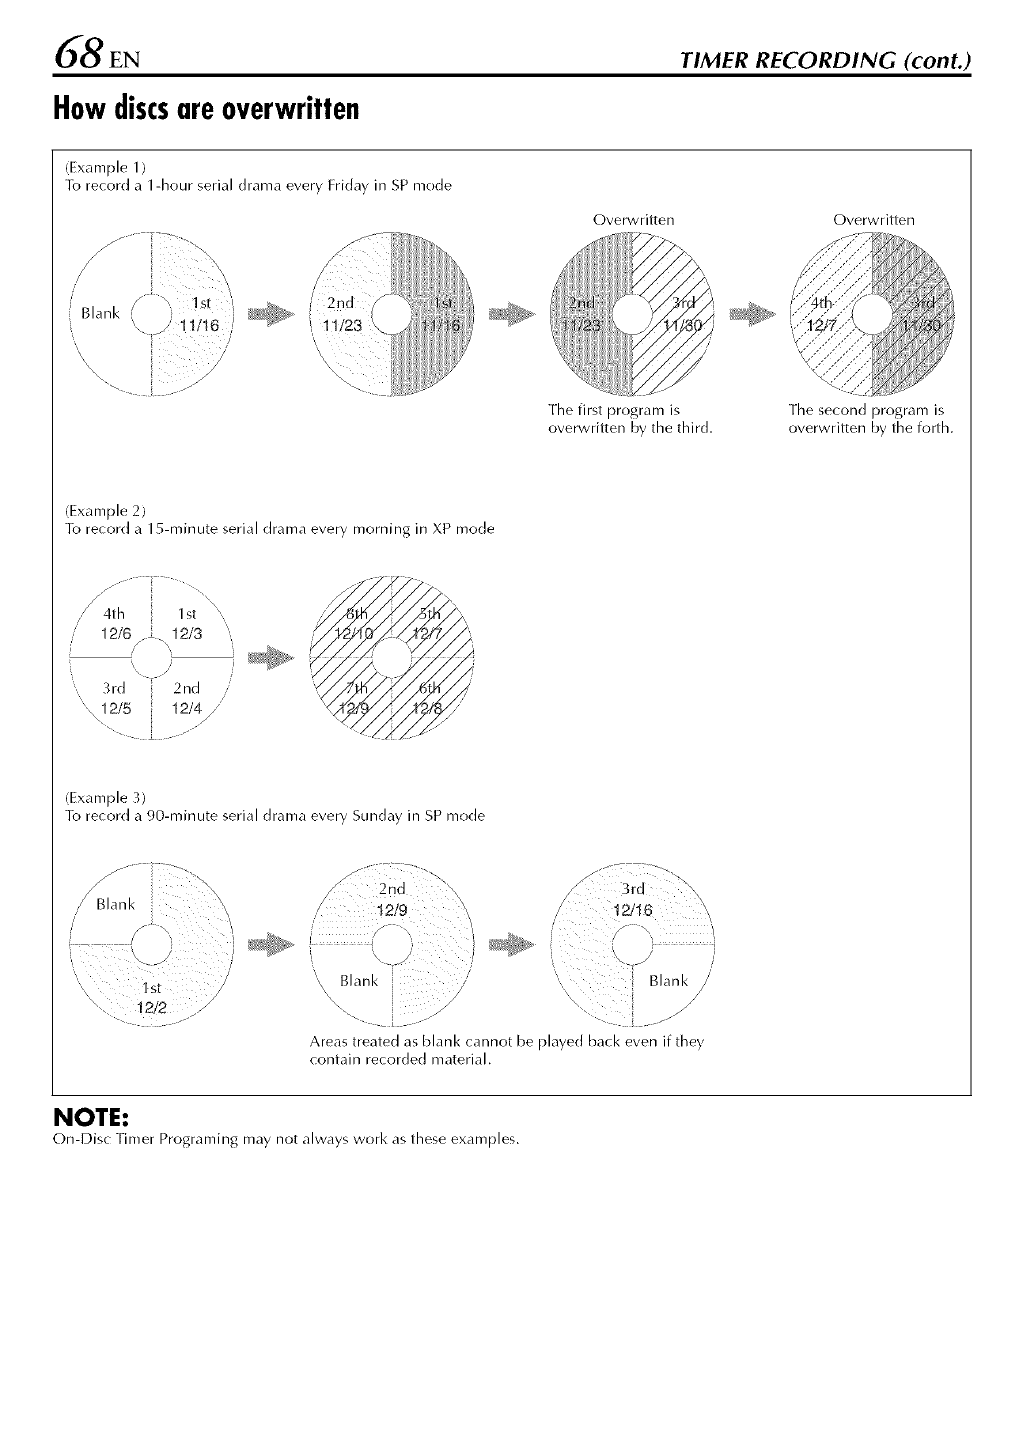
68 EN TIMER RECORDING (cont.)
Howdiscsareoverwritten
(Example 1)
]b record a 1-hour serial drama every Friday in SP nlode
Overwritten Overwritten
111 r ,
The first program is
overwritten by the third.
(Example 2)
]b record a 15-minute serial drama every morning in XP mode
12/6fL \12/3
• J
3 rd 2 nd
" 12/5 :
,\
\
x
J
s
/'
(Example 3)
]b record a 90-minute serial drama every Sunday in SP nlode
;_,ank \
i J-',
,/
\.. 12/2
,,,
i 'X-"J iJ ....",, Blank/'
'\B'anki ,
Areas treated as blank cannot be played back even if they
contain recorded material.
NOTE:
On-Dis_ Tinier Programing may not always work as these exanlples.
The second program is
overwritten by the forth.
TV_DVD
TOPMEr_U r_'I_ION
MENU nE_U_N
PREW0US
SLOW= pLay,SElECTSL0_
DVi)cb!I
_1 Accessthe programscreen.
Press i\V to select the program, then press ENTER.
_ Changeaprogram.
Change the settings of the desired recording options as
required.
• Refer to steps [] - [] in "Manual Timer Programing"
(_ pg. 64).
_'_ Completetimer correction.
Press PROG/CHECK.
• The previous screen resumes.
_J Engagethe unit'stimer mode.
For VCR Plus+ or Manual Timer Programing
ReC_IODELI'_EOHECK_ _
o oqo,%,
SETUP
000®
dVC
Check,cancelandchangeprograms
Disengagethe timer mode.
When "®" lights on the front display panel
Press Q ITIMER), then press DVD cb/k
When "_(_" lights on the front display panel
Press DVD O/i.
when "R-LK" lights on the front display panel
Press REC LINK, then press DVD (b/[.
_AccessProgramCheckscreen.
PressPROG/CHECK,
• To return to the previous
screen after you check the
program, press PROG/CHECK
again.
To cancel the program
Press/\V repeatedly to
select a program to be
cancelled, then press X.
Press ® (TIMER).
For On-Disc Timer Programing
Press DVD tb/I.
For Satellite Auto recording
Press REC LINK for 2 seconds or more.
Program's information on the front display panel
You can check the details of the programs even when the
power is turned off. (It is necessary that the Power Save mode
(_-_ pg. 99, "POWER SAVE") is disengaged or the unit is not
in timer standby mode.) However, it is not possible to cancel
or change the program's setting.
[] Press PROG/CHECK.
• "NEW PROG" or "P-1" (if 8 programs have already been
set) appears.
[] Press/\V repeatedly until the desired program number
("P-1" to "P-8") appears, then press ENTER.
[] Press _.
• Each time you press L>, the indication changes as follows
(the settings in parentheses are examples):
Date ("DATE 03.08SU') -'_ Start time ("ON 11:00") -_ Stop
time ("OFF 11:30") -_ Channel ("CH 1") -'_ Weekly/Daily
("MO-FR DAILY") -_ Program number ("P-1 ") an(] Recording
speed (SP) -'_ (Back to the beginning)
[] Press PROG/CHECK to complete checking.
• The normal display resumes.
X
TV_DVD
MENU nE_U_N
PREVJ0US
SLOW= P_¥,SELECTSt0_'_+
RFC_IODELI'_EOHECK_
°0ZoN%
SETUP
000®
JVC
Whenprogramsoverlapeachother
If "PROGRAM OVERLAPPED" appears, you have another
program overlapping the program you have just made.
Confirm with the arrow on "OK", then press PROG/CHECK.
Program Check screen appears and conflicting programs will be
highlighted in pink.
Example: Program 3 (you have just made) and Program 4
overlap each other.
Confirmtheoverlappingprograms.
Overlapping programs appear on the TV screen.
NOTE:
If you (to not mind this overlap, press PROG/CHECK to finish
the timer program setting. The program with the lower program
number will be recorded an(] the other one will not be recorded
correctly. If no changes are made for approximately 1 minute,
the unit will return to the normal screen.
_Selectthedesiredprogramtobecancelledor
changed.
Press z'_V.
To cancel the program
Press X.
• "THE TIMER PROGRAMING SETTING WAS CANCELLED"
appears on the TV screen for about 5 seconds, then the normal
screen resumes,
To change the program setting
Press ENTER.
I_1 Changethe programsetting.
• Refer to steps [] - [] in "Manual Timer Programing"
(_-_ pg. 64).
L_e Checkif the conflicthasbeensettled.
Press PROG/CHECK.
• Program dleck s_reen appears.
I[_l Engage the unit's limer made.
• Refer to step l_l in "Check, cancel an(] change programs"
(_-_ pg. 69).
NOTE:
When any overlaps remain after deletion and modification of
programs, Program Check screen remains showing the
conflicting programs. In such a case, repeat the procedure above
until the conflict is solve(].
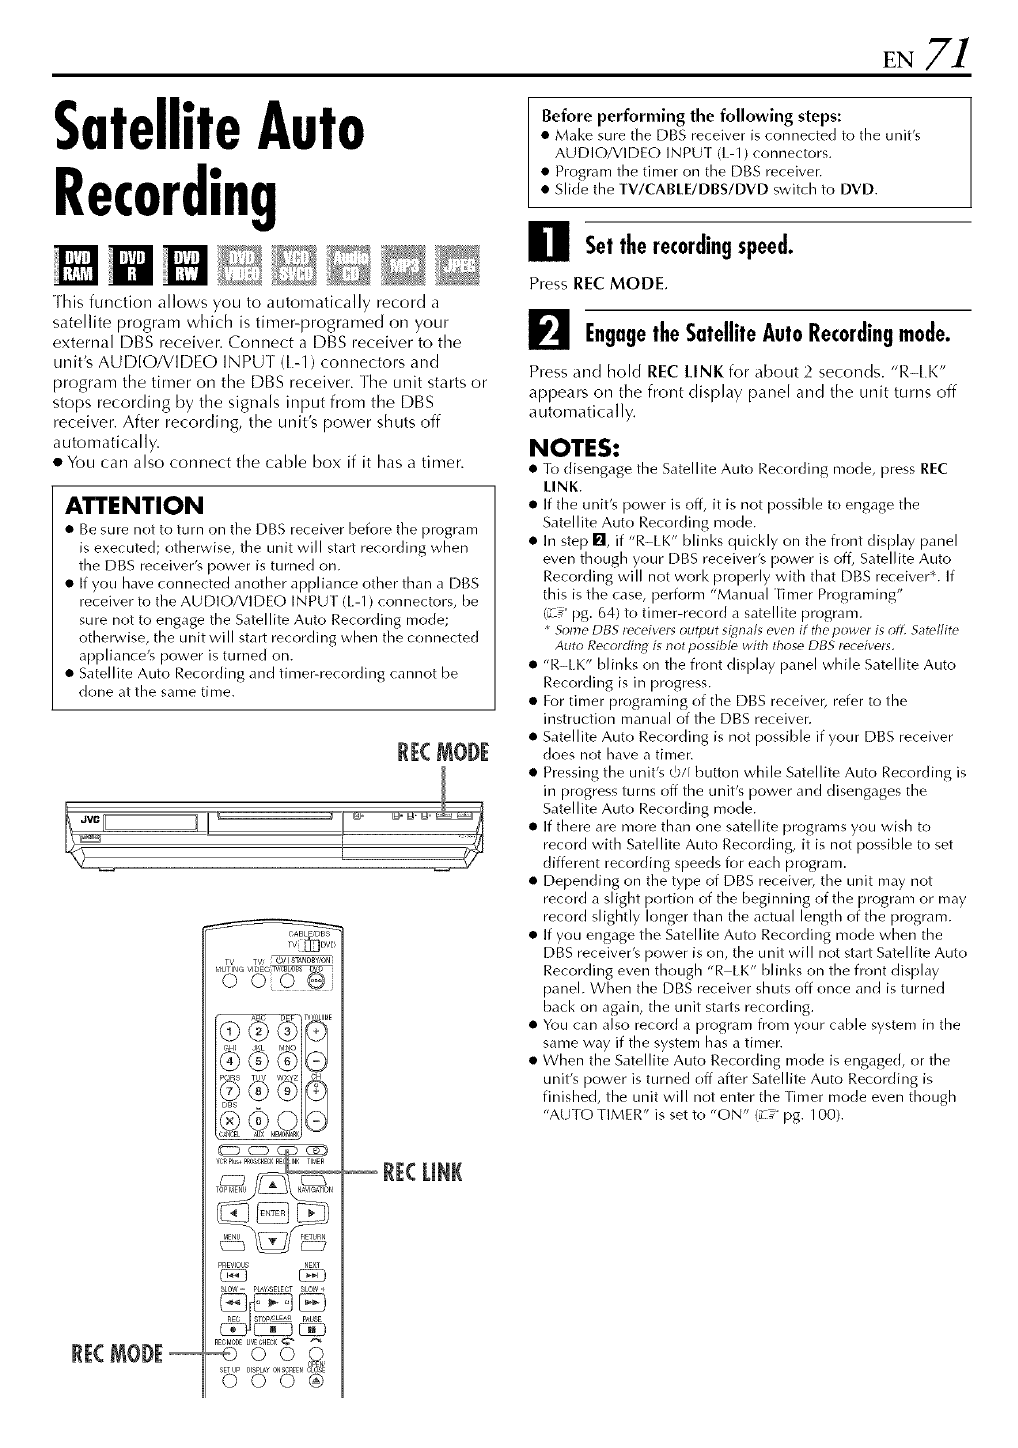
SatelliteAuto
Recording
Ihis function allows you to automatically record a
satellite program which is timer-programed on your
external DBS receiver. Connect a [)BS receiver to the
unit's AUDIO/VIDEO INPUI ([.-1) connectors and
program the timer on the DBS receiver. Fhe unit starts or
stops recording by the signals input from the DBS
receiver. After recording, the unit's power shuts off
automatically.
• You can also connect the cable box if it has a timer.
ATTENTION
• Be sure not to turn on the DBS receiver before the program
is executed; otherwise, the unit will start recording when
the DBS receiver's power is turned on.
• If you have connected another appliance other than a DBS
receiver to the AUDIO/VIDEO INPUT ([-1) connectors, be
sure not to engage the Satellite Auto Recording mode;
otherwise, the unit will start recording when the connected
appliance's power is turned on.
• Satellite Auto Recording and timer-recording cannot be
done at the same time.
R[(:MOD[
TvIII[:D.....
PnEVJ0US
_L0','¢- Pt_Y_SE_ECTSL0W_
nECMODEU'JEOHECK_"
_OO_
SETUP DISpLay0N_J_nFFN_
000®
R[(: LINK
Before performing the following steps:
• Make sure the DBS receiver is connected to the unit's
AUDIO/VIDEO INPUT (L-l) connectors.
• Program the timer on the DBS receiver.
• Slide the TV/CABLE/DBS/DVD switch to DVD.
Setthe recordingspeed.
Press REC MODE.
_Engagethe SatelliteAutoRecordingmode.
Press and hold REC LINK for about 2 seconds. "R-[.K"
appears on the front display panel and the unit turns off
automatically.
NOTES:
• lo disengage the Satellite Auto Re_ording mode, press REC
LINK.
• If the unit's power is off, it is not possible to engage the
Satellite Auto Recording mode.
• In step _, if "R-LK" blinks quickly on the front display panel
even though your DBS receiver's power is off, Satellite Auto
Recording will not work properly with that DBS receiver*. If
this is the case, perform "Manual Timer Programing"
(_ pg. 64) to tinier-record a satellite program.
* Some DBS leceivels output signals even if the powel is oft. Sateflite
Auto Recoldin_ is not possible with those DBS leceivels.
• "R-LK" blinks on the front display panel while Satellite Auto
Recording is in progress.
• For timer programing of the DBS receiver, refer to the
instruction manual of the DBS receiver.
• Satellite Auto Recording is not possible if your DBS receiver
does not have a timer.
• Pressing the unit's d;/[ button while Satellite Auto Recording is
in progress turns off the unit's power and disengages the
Satellite Auto Recording mode.
• If there are more than one satellite programs you wish to
record with Satellite Auto Recording, it is not possible to set
different recording speeds for each program.
• Depending on the type of DBS receiver, the unit may not
record a slight portion of the beginning of the program or may
record slightly longer than the actual length of the program.
• If you engage the Satellite Auto Recording mode when the
DBS receiver's power is on, the unit will not start Satellite Auto
Recording even though "R LK" blinks on the front display
panel. When the DBS receiver shuts off once and is turned
back on again, the unit starts recording.
• You can also record a program from your cable system in the
same way if the system has a timer.
• When the Satellite Auto Recording mode is engage(], or the
unit's power is turned off after Satellite Auto Recording is
finished, the unit will not enter the Timer mode even though
"AUTO TIMER" is set to "ON" (Z_" pg. 100).
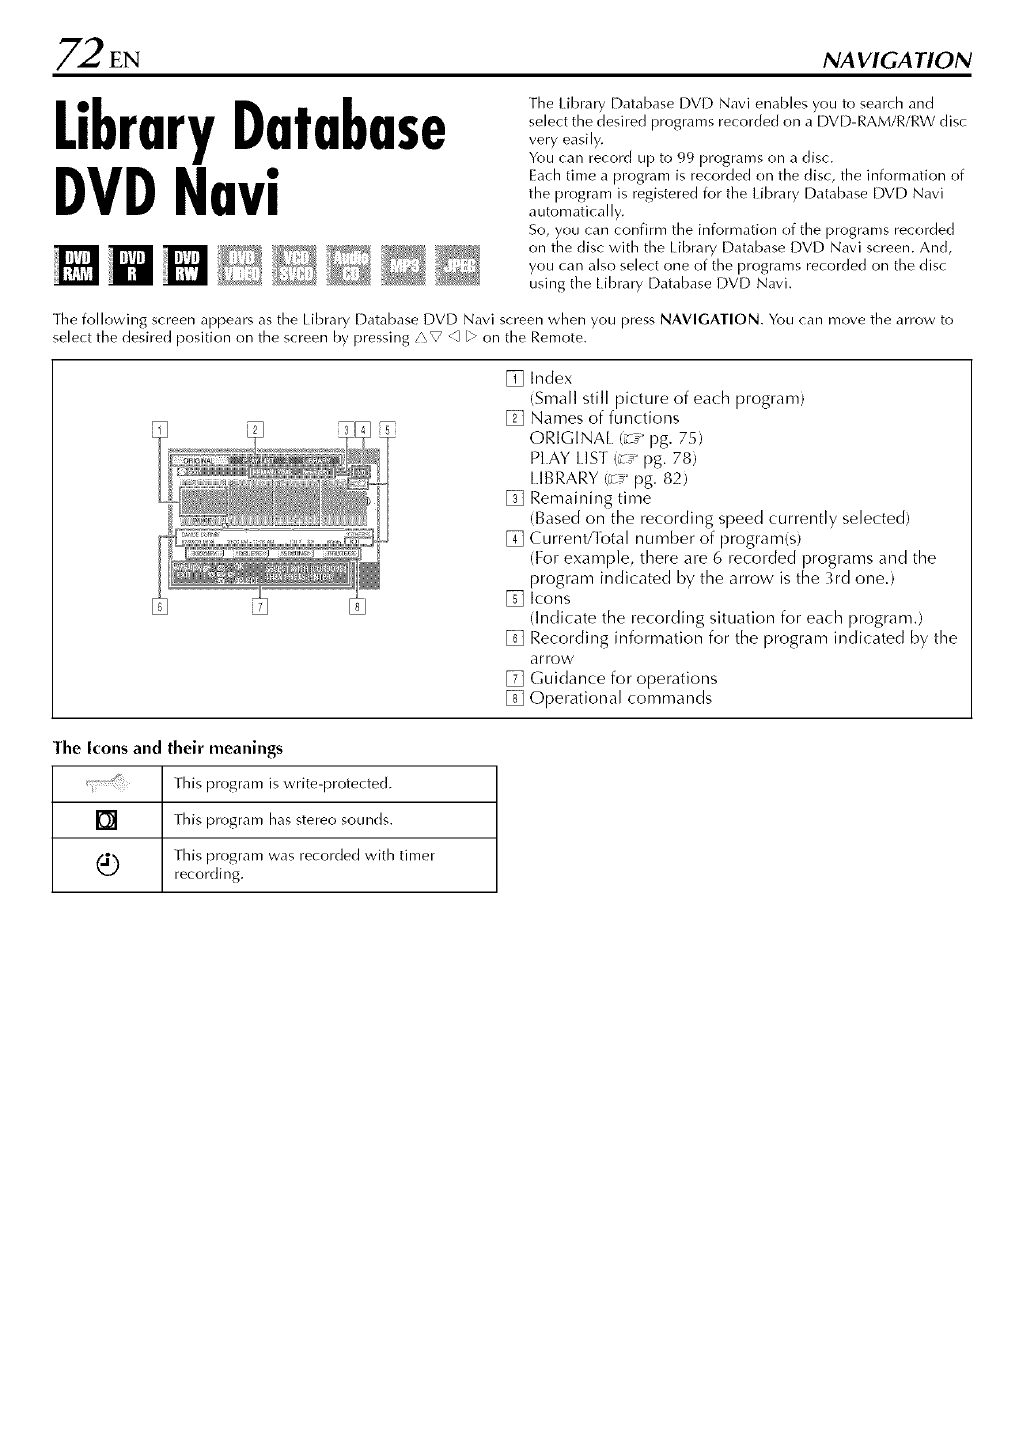
2EN NA VIGA TION
LibraryDatabase
DVDNavi
The library Database DVD Navi enables you to search and
select the desired programs recorded on a DVD-RAM/R/RW disc
very easily.
You can record up to 99 programs on a disc.
Each time a program is recorded on the disc, the information of
the program is registered for the Library Database DVD Navi
automatically.
So, you can confirm the information of the programs recorded
on the disc with the Library Database DVD Navi screen. And,
you can also select one of the programs recorded on the disc
using the Library Database DVD Navi.
The following screen appears as the Library Database DVD Navi screen when you press NAVIGATION. You can move the arrow to
select the desired position on the screen by pressing/\V _ L>on the Remote.
[] Index
(Small still picture of each program)
[] Names of functions
ORIGINAL (_" pg. 75)
PI.AY I.IST (::_" pg. 78)
[IBRARY (_" pg. 82)
[] Remaining time
(Based on the recording speed currently selected)
[] Current!Iotal number of program(s)
(For example, there are 6 recorded programs and the
program indicated by the arrow is the 3rd oned
[] Icons
(Indicate the recording situation for each program.)
[] Recording information for the program indicated by the
arrow
[] Guidance for operations
[] Operational commands
The Icons and their meanings
This program is write-protected.
[] This program has stereo sounds.
This program was recorded with timer
recording.
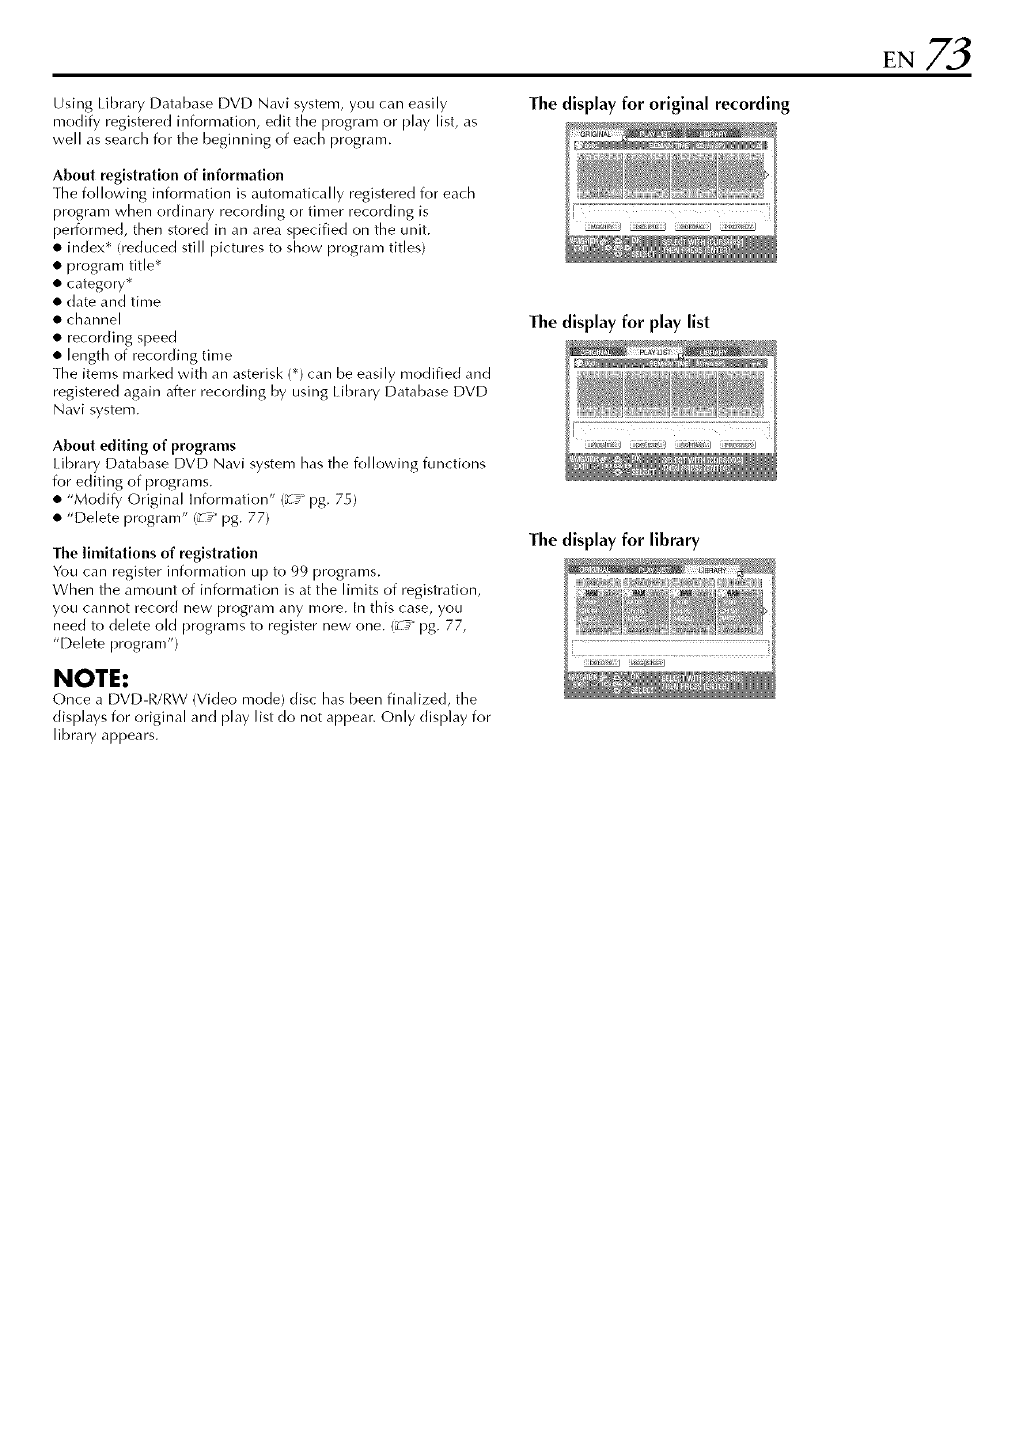
UsingLibraryDatabaseDVDNavisystem,youcaneasily
modifyregisteredinformation,edittheprogramorplaylist,as
wellassearchforthebeginningofeachprogram.
Aboutregistrationofinformation
Thefollowinginformationisautomaticallyregisteredforeach
programwhenordinaryrecordingortimerrecordingis
performed,thenstoredinanareaspecifiedontheunit.
• index*(reducedstillpicturestoshowprogramtitles)
• programtitle*
• category*
• dateandtime
• channel
• recordingspeed
• lengthofrecordingtime
Theitemsmarkedwithanasteriski*)canbeeasilymodifiedand
registeredagainafterrecordingbyusingLibraryDatabaseDVD
Navisystem.
About editing of programs
library Database DVD Navi system has the following functions
for editing of programs.
• "Modify Original Information" (_-_" pg. 75)
• "Delete program" (z_" pg. 77)
The limitations of registration
You can register information up to 99 programs.
When the amount of information is at the limits of registration,
you cannot record new program any more. In this case, you
nee(] to delete old programs to register new one. (_-_ pg. 77,
"Delete program")
NOTE:
Once a DVD-R/RW (Video mode) dis_ has been finalized, the
displays for original and play list do not appear. Only display for
library appears.
The display for original recording
The display for play list
The display for library
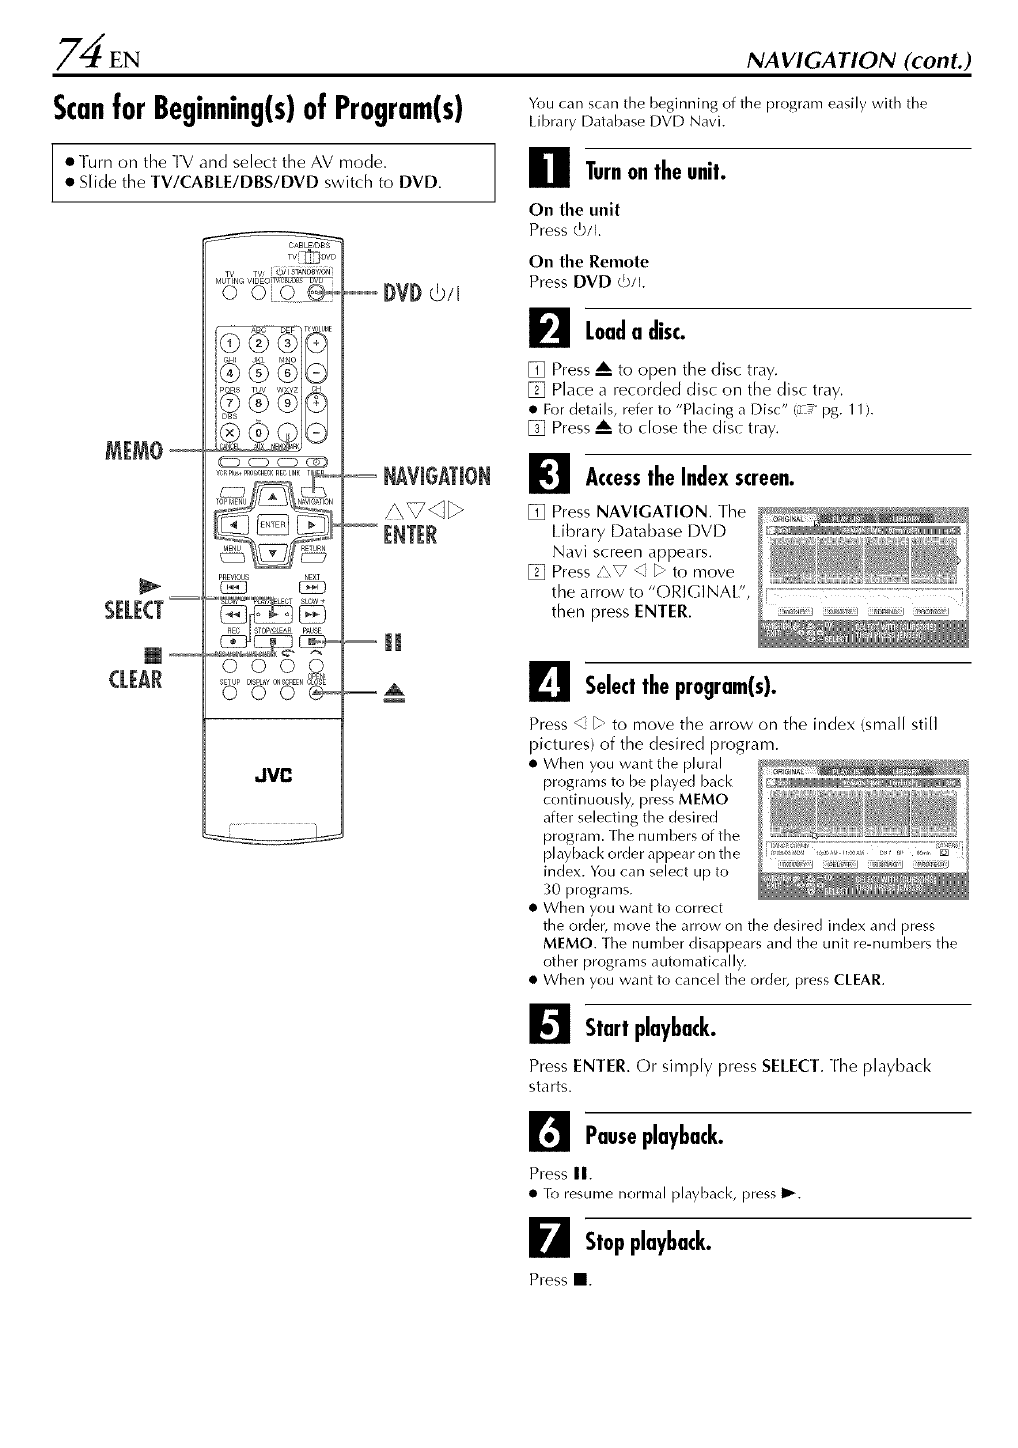
4EN NAVIGATION (cont.)
Scanfor Beginning(s)ofProgram(s) You can scan the beginning of the program easily with the
Library Database DVD Navi.
• Turn oil the TV and select the AV mode.
• Slide the TV/CABLE/DBS/DVD switch to DVD.
SELECT
@
CLEAR
PREVIOUS
_'%_"" ' LECT StOVe+
SETUP
000_
JVC
DVDG![
NAVIGATION
Turnon theunit.
On the unit
Press G/i.
On the Remote
Press DVD t5/I.
I_1 Loada disc.
[] Press A to open the disc tray.
[] Place a recorded disc on the disc tray.
• For details, refer to "Placing a Disc" i_-<"pg. 11).
[] Press A to close the disc tray.
I_1 Accessthe Indexscreen.
[] Press NAVIGATION. ]he
library Database DVD
Navi screen appears.
[] Press/",V <[ _" to move
the arrow to "ORIGINAl/',
then press ENTER.
L_e Selecttheprogram(s).
Press _ _" to move the arrow on the index (small still
pictures) of the desired program.
• When you want the plural
programs to be played back
continuously, press MEMO
after selecting the desired
program. The numbers of the
playback order appear on the
index. You can select up to .....i-_J _r _,J _ ;'_)'_fJ
30 programs.
• When you want to correct
the order, move the arrow on the desired index and press
MEMO. The number disappears and the unit re-numbers the
other programs automatically.
• When you want to cancel the order, press CLEAR.
_Start playback.
Press ENTER. Or simply press SELECT. The playback
starts.
Pauseplayback.
Press II.
• To resume normal playback, press I_.
_Stop playback.
Press II.
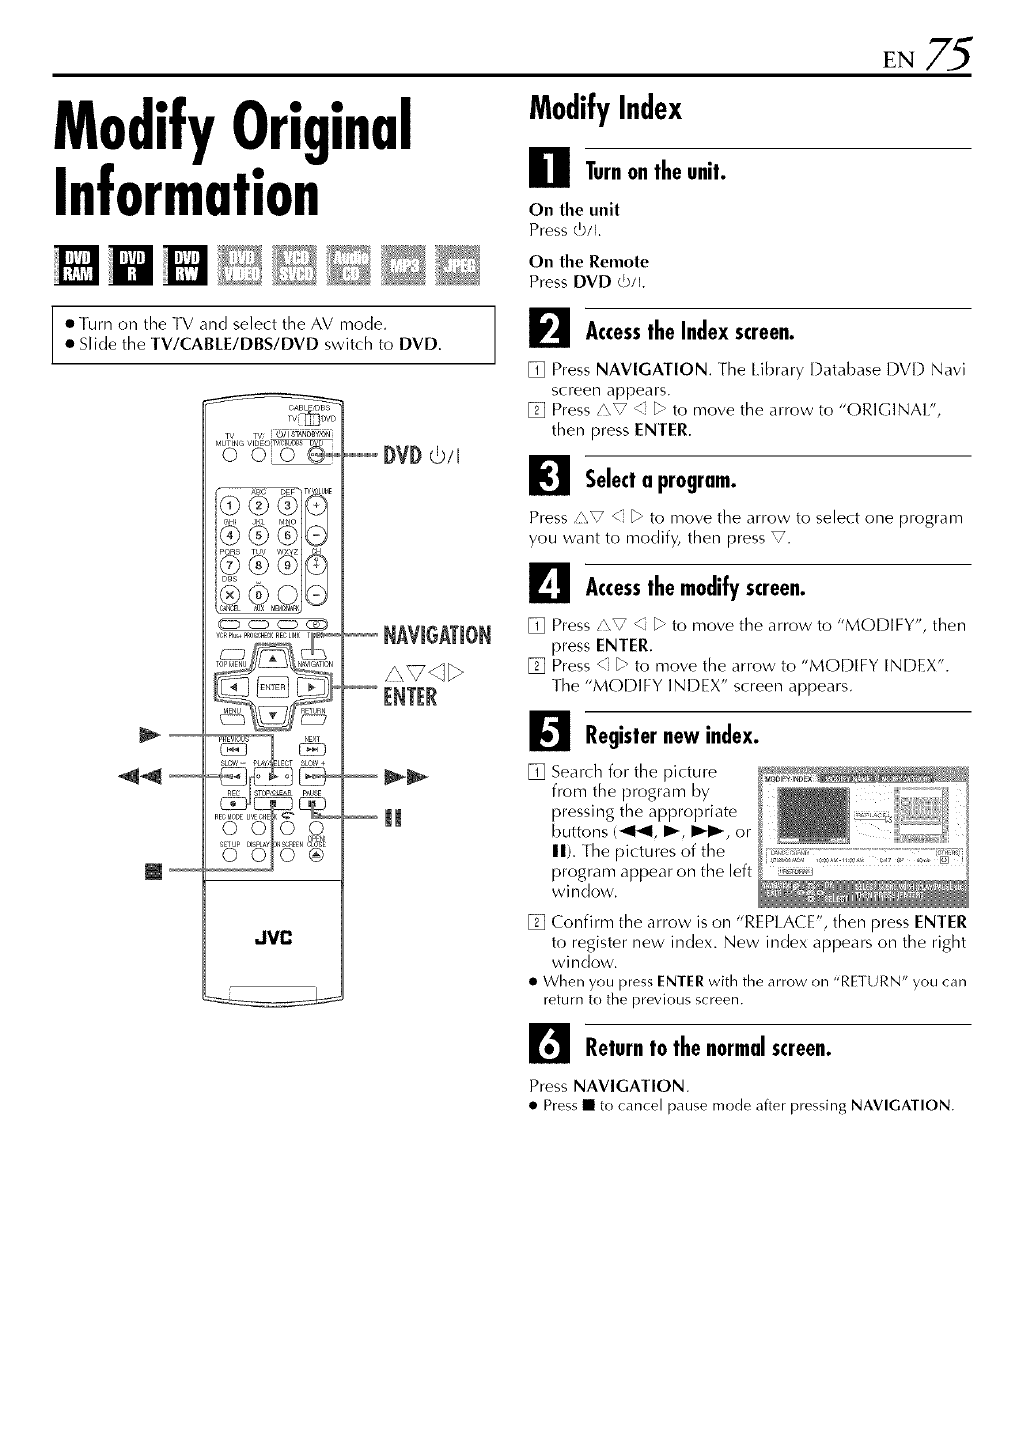
ModifyOriginal
Information
_'_ _ _ "7
ModifyIndex
Turnon theunit.
On the unit
Press tb/1.
On the Remote
Press DVD c5/I.
•Turn oil the TV and select the AV mode.
',Slide the TV/CABLE/DBS/DVD switch to DVD.
TV_pV0
CD CSD _)
oo_oo
_u_ 0,_B,_ 8l_
®
JVC
DVDG![
J F_ Accessthe Indexscreen.
[] Press NAVIGATION. [-he [ ibrary [)atabase DVD Navi
screen appears.
[] Press/\V <} _ to move the arrow to "ORIGINAl/',
then press ENTER.
I_1 Selecta program.
Press zZV <" _" to move the arrow to select one program
you want to modify, then press _.
L_e Accessthe modifyscreen.
[] Press/'\V <" _" to move the arrow to "MODIFY", then
press ENTER.
[] Press <" _ to move the arrow to "MODIFY INDEX'.
The "MODIFY INDEX" screen appears.
_Registernew index.
[] Search for the picture
from the program by
pressing the appropriate
buttons (41_1, I_, I_1_, or
II). The pictures of the
program appear on the left
window.
[] Confirm the arrow is on "REPLACE", then press ENTER
to register new index. New index appears on the right
window.
• When you press ENTER with the arrow on "RETURN" you can
return to the previous screen.
_J Returnto the normalscreen.
Press NAVIGATION.
• Press • to cancel pause mode after pressing NAVIGATION.
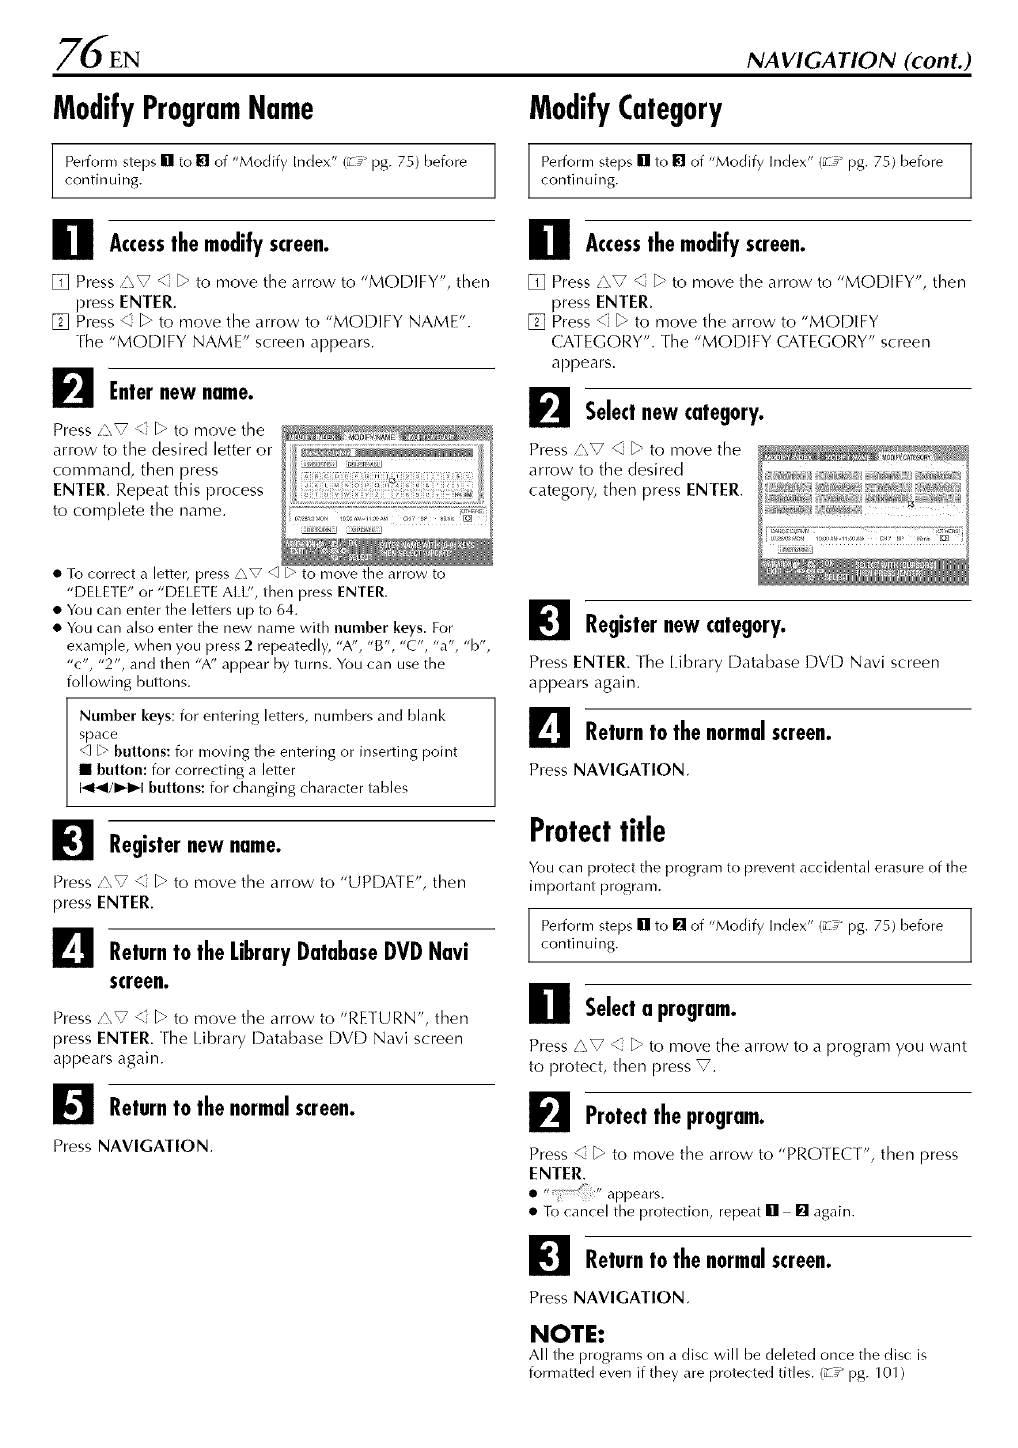
76"EN
ModifyProgramName
Perform steps [] to [] of "Modify Index" (c7° pg. 75) before
continuing.
NAVIGATION (cont.)
ModifyCategory
Perform steps [] to [] of "Modify Index" (c_° pg. 75) before
continuing.
Accessthe modifyscreen.
[] Press i\V <" _ to move the arrow to "MODIFY", then
press ENTER,
[] Press _ _ to move the arrow to "MODIFY NAME".
The "MODIFY NAME" screen appears.
F_ Enternew name.
Press/\_ < _-to move the
arrow to the desired letter or
command, then press
ENTER. Repeat this process
to complete the name.
• To correct a letter, press/\V _ l-> to move the arrow to
"DELEIE" or "DEI.ETE AI3", then press ENTER.
• You can enter the letters up to 64.
• You can also enter the new name with number keys. For
example, when you press 2 repeatedly, "A', "B', "C', "a', "b',
"c', "2", and then "A" appear by turns. You can use the
following buttons.
Number keys: for entering letters, numbers and blank
space
_-- buttons: for moving the entering or inserting point
•button: for correcting a letter
I_1_1/1_1_1 buttons: for changing character tables
I_1 Registernew name.
Press /\V <" _ to move the arrow to "UPDATE", then
press ENTER.
Returnto the LibraryDatabaseDVDNavi
screen.
Press/\V <i _ to move the arrow to "RETURN", then
press ENTER. The [ ibrary Database DVD Navi screen
appears again.
_Returnto the normalscreen.
Press NAVIGATION.
Accessthe modifyscreen.
[] Press Z\V < _ to move the arrow to "MODIFY", then
press ENTER.
[] Press <1 _" to move the arrow to "MODIFY
CATEGORY". [-he "MODIFY CATEGORY" screen
appears.
_Selectnew category.
Press _"_V _ _" to move the
arrow to the desired
category, then press ENTER.
I_1 Registernewcategory.
Press ENTER. The library Database DVD Navi screen
appears again.
L_e Returnto the normalscreen.
Press NAVIGATION.
Protecttitle
You can protect the program to prevent accidental erasure of the
important program.
Perform steps [] to [] of "Modify Index" {_" pg. 75) before
continuing.
Selecta program.
Press/\V <" _ to move the arrow to a program you want
to protect, then press _.
_Protectthe program.
Press _" to move the arrow to "PROIECT', then press
ENTER.
• appears.
• To cancel the protection, repeat [] [] again.
I_1 Returnto the normalscreen.
Press NAVIGATION.
NOTE:
All the programs on a disc will be deleted once the disc
formatted even if they are protected titles. {z_" pg. 101)
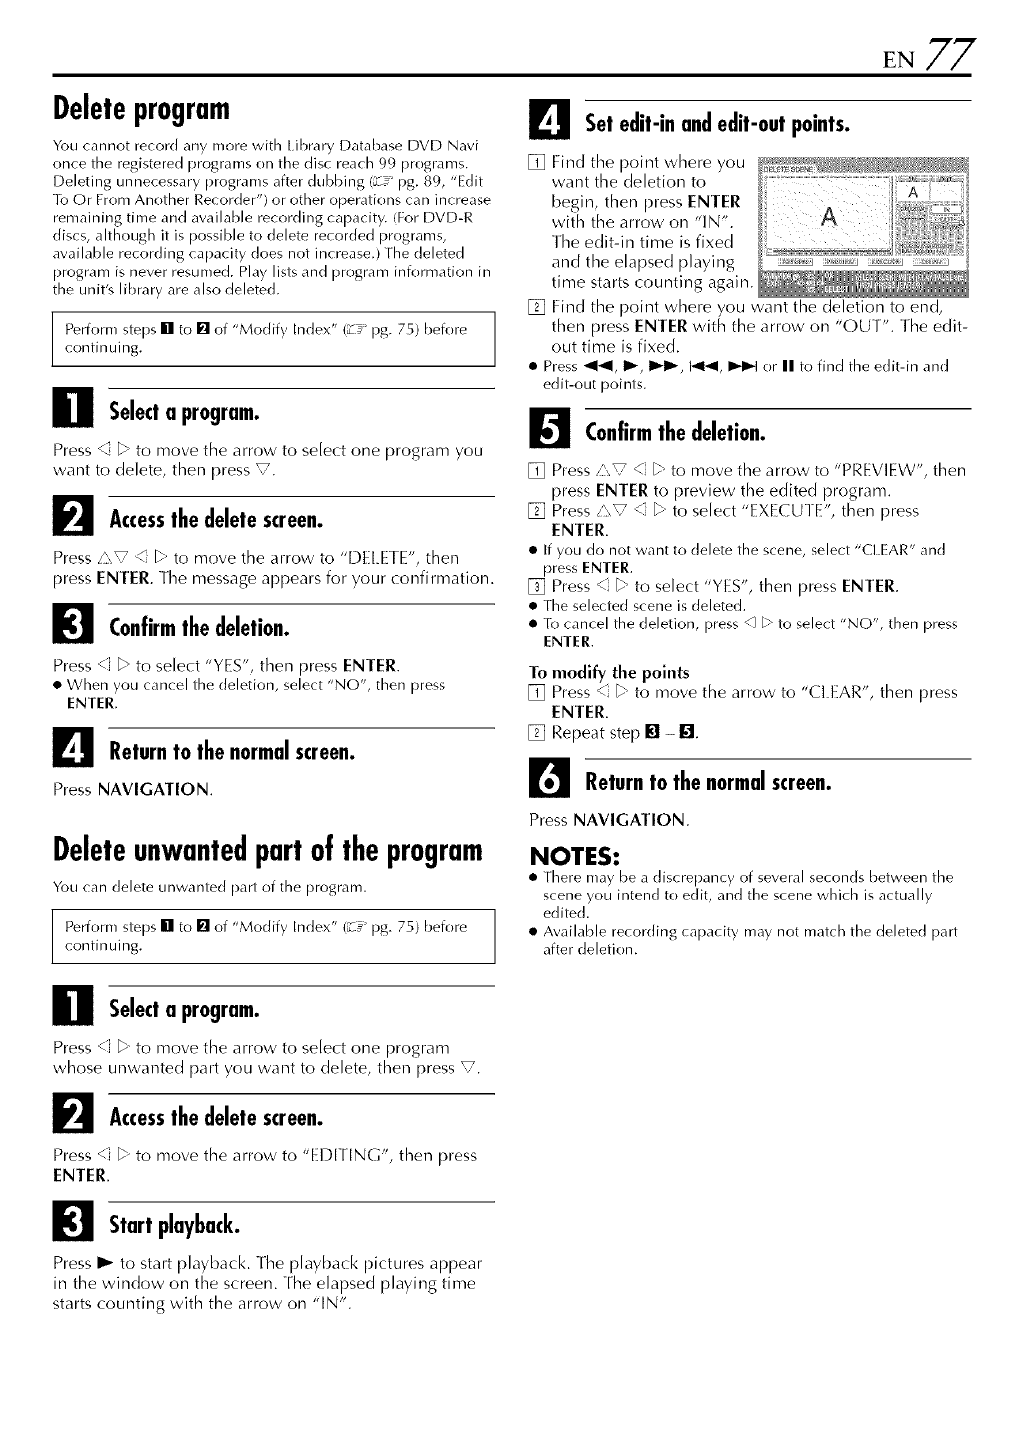
Deleteprogram
You cannot record any more with Library Database DVD Navi
once the registered programs on the disc reach 99 programs.
Deleting unnecessary programs after dubbing (_-_"pg. 89, "Edit
]b Or From Another Recorder") or other operations can increase
remaining time and available recording capacity. (For DVD-R
discs, although it is possible to delete recorded programs,
available recording capacity does not increase.) The deleted
program is never resumed. Play lists and program information in
the unit's library are also deleted.
Perform steps [] to [] of "Modify Index" (z_ =_pg, 75) before
continuing.
Selecta program.
Press _ _ to move the an-ow to select one program you
want to delete, then press V.
_Accessthe deletescreen.
Press/",V < P" to move the arrow to "DEI.ETE", then
press ENTEr. The message appears for your confirmation.
I_1 Confirmthedeletion.
Press < _ to select "YES", then press ENTER.
• When you cancel the deletion, select "NO", then press
ENTER.
Returnto thenormalscreen.
Press NAVIGATION.
Deleteunwantedpartof theprogram
You can delete unwanted part of the program.
Perform steps [] to [] of "Modify Index" (z_ ° pg. 75) before
continuing.
L_eset edit-inandedit-outpoints.
[] Find the point where you want the deletion to end,
then press ENTER with the arrow on "OUT". ]he edit-
out time is fixed.
• Press _1-_1,I_, 1_11%I_1_1,I_1_1or II to find the edit-in and
edit-out points.
_Confirmthedeletion.
[] Press/",V <[ P" to move the arrow to "PREVIEW", then
press ENTEr to preview the edited program.
[] Press/",V <[ b- to select "EXECUTE", then press
ENTER.
• If you do not want to delete the scene, select "CLEAR" and
press ENTER.
[] Press <" _ to select "YES", then press ENTEr.
• The selected scene is deleted.
• To cancel the deletion, press _ b> to select "NO", then press
ENTER.
To modify the points
[] Press <" P"to move the arrow to "CLEAR", then press
ENTER.
[] Repeat step [] - [].
_J Returnto the normalscreen.
Press NAVIGATION.
NOTES:
• There may be a discrepancy of several seconds between the
scene you intend to edit, and the scene which is actually
edited.
• Available recording capacity may not match the deleted part
after deletion.
Selecta program.
Press < _ to move the arrow to select one program
whose unwanted part you want to delete, then press V.
_Accessthe deletescreen.
Press <" P" to move the arrow to "EDFF[NG', then press
ENTER.
Start playback.
Press I_ to start playback. The playback pirtures appear
in the window on the screen. [-he elapsed playing time
starts counting with the arrow on "IN'.
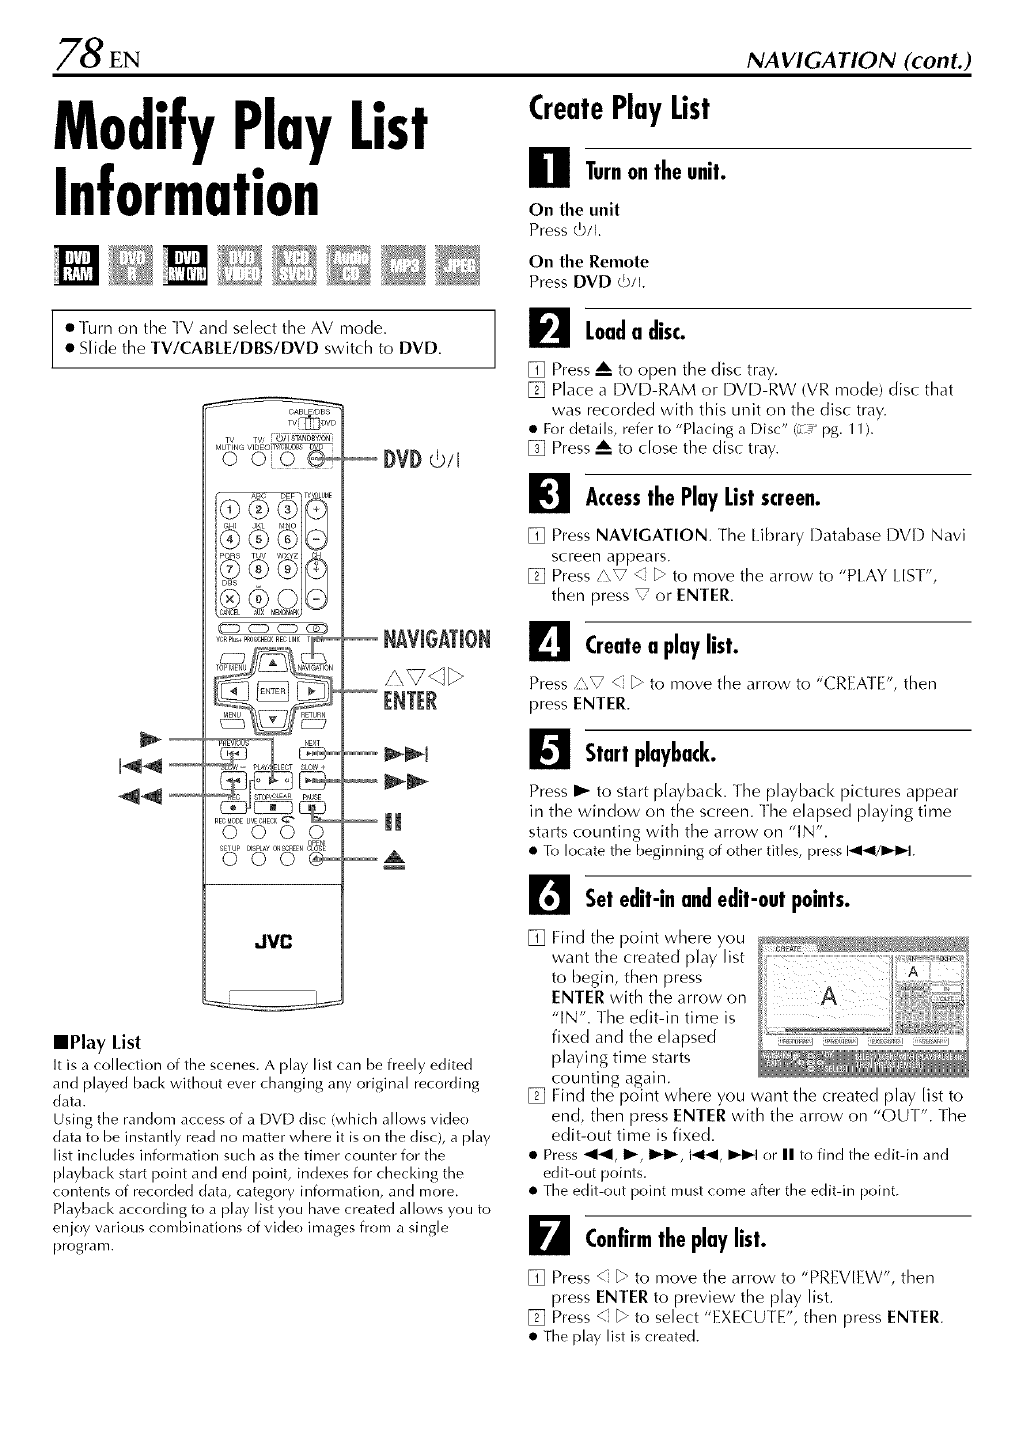
,,78 EN NAVIGATION (cont.)
ModifyPlayList
Information
E
CreatePlayList
Turnon theunit.
On the unit
Press t5/I.
On the Remote
Press DVD t5/I.
eTurn oil the TV and select the AV mode.
eSlide the TV/CABLE/DBS/DVD switch to DVD.
414_
TV_DVD
wTV [o_ STAN0_Yi6_
_ZZ) _D _D C_D)
OOOO
_TU__,_ o,_, 8_o_
000_
JVC
DVD0/1
NAVIGATION
_1
l
IIPlay List
It is a (ollection of the scenes. A play list can be freely edited
and played back without ever changing any original recording
data.
Using the random access of a DVD disc (which allows video
data to be instantly read no matter where it is on the disc), a play
list includes information such as the timer counter for the
playback start point and end point, indexes for checking the
contents of recorded data, category information, and more.
Playback according to a play list you have created allows you to
enjoy various combinations of video images from a single
program.
|Loadadisc.
[] Press A to open the disc tray.
[] Place a DVD-RAM or DVD-RW (VR mode) disc that
was recorded with this unit on the disc tray.
• For details, refer to "Placing a Disc" (_" pg. 11).
[] Press A to close the disc tray.
I_1 Accessthe PlayListscreen.
[] Press NAVIGATION. [-he library Database DV[) Navi
screen appears.
[] Press/\V <1 _ to move the arrow to "PEAY IJSI",
then press _ or ENTER.
Createa playlist.
Press z'_sV <" b to move the arrow to "CREATE", then
press ENTER.
_Start playback.
Press I1_ to start playback. The playback pictures appear
in the window on the screen. The elapsed playing time
starts counting with the arrow on "IN".
• To locate the beginning of other titles, press 141_1/1_1_1.
_]Set edit-inandedit-outpoints.
[] Find the point where you
want the created play list .....
to begin, then press
ENTER with the arrow on
"IN". The edit-in time is
fixed and the elapsed
playing time starts
counting again.
[] Find the point where you want the created play list to
end, then press ENTER with the arrow on "OUT". The
edit-out time is fixed.
• Press _1-_1,I_, 1_1_, I_1_1,I_1_1or II to find the edit-in and
edit-out points.
• The edit-out point must come after the edit-in point.
_Confirmtheplay list.
[] Press <" _ to move the arrow to "PREVIEW", then
press ENTER to preview the play list.
[] Press < _ to select "EXECUTE", then press ENTER.
• The play list is created.

To modify the points
[] Press _ to move the arrow to "CLEAR", then press
ENTER.
[] Repeat step[] _.
_Returnto the normalscreen.
Press NAVIGATION.
_Confirmtheaddition.
[] Press <" _ to move the arrow to "PREVIEW", then
press ENTER to preview approximately 5 seconds
before and after the edited scene.
[] Press _ b" to select "EXECUTE", then press ENTER.
• The selected scene is added.
NOTES:
• There may be a discrepancy of several seconds between the
scene you intend to edit, and the scene which is actually
edited.
• The title, index and category of the play list can be modified in
the same way as "ORIGINAl". (_z_"pg. 75, "Modify Original
Information')
• You can modify the play list that has ust been created here by
adding, moving, or deleting unwanted parts to create a digest
edition, etc.
Addscenesto a playlist
To modify the points
[] Press <" _ to move the arrow to "CLEAR", then press
ENTER.
[] Repeat step [] - [].
_Returnto the normalscreen.
Press NAVIGATION.
NOTE:
There may be a discrepancy of several seconds between the
scene you intend to edit, and the scene which is actually edited.
Perform steps [] to [] of "Create Play List" (_u" pg. 78) before
continuing.
Selecta playlist.
Press <" _" to move the arrow to the play list to which you
wish to add a scene, then press V.
Movescenes
_Accessthe Editingscreen.
[] Press _ _ to move the
[] Press <" _ to move the
arrow to "ADD SCENE". _IiZ,Z]_.;;,,_
I_1 Start playback.
Press I_ to start playback. The playback pictures appear
in the window on the screen. The elapsed playing time
starts counting with the arrow on "IN".
• To locate the beginning of other titles, press 141_1/1_1_1.
L_eset edit-inandedit-outpoints.
[] Find the point where you want the added scene to
begin, then press ENTER with the arrow on "IN". The
edit-in time is fixed and the elapsed playing time starts
counting again.
[] Find the point where you want the added scene to
end, then press ENTER with the arrow on "OUT". The
edit-out time is fixed.
• Press _1-_1,I_, 1_11%I_1_1,I_1_1or II to find the edit-in and
edit-out points.
Perform steps [] to [] of "Create Play List" (L_ :"pg. 78) before
continuing.
Selecta playlist.
Press < _ to move the arrow to a play list into which you
wish to move a scene, then press _.
F_ Accessthe Editingscreen.
[] Press _ _" to move the
arrow to "EDllING", then [press ENTEr. _:_,
[] Press _ _ to move the
arrow to "MOVE SCENE".
I_1 Start playback.
Press I_ to start playback. The playback pictures appear
in the window on the screen. The elapsed playing time
starts counting with the arrow on "IN".
• To locate the beginning of other titles, press I_1_1/1_1_1.

80 EN NAVIGATION (cont.)
L_eset edit-inandedit-outpoints.
[] Find the point where you want the moved scene to
begin, then press ENTER with the arrow on "IN". The
edit-in time is fixed and the elapsed playing time starts
counting again.
[] Find the point where you want the moved scene to
end, then press ENTER with the arrow oil "OUT". The
edit-out time is fixed.
[] Press I_ to start playback.
[] Find the point where you want the moved scene to be
moved, then press ENTER with the arrow on "MOVE
TO'.
• Press _1-_1,I_, 1_1_, t_1_1,I_1_1or II to find the edit-in, edit-
out and move-to points.
_Confirm themove.
[] Press <" _ to move the arrow to "PREVIEW", then
press ENTER to preview the part approximately 5
seconds before and after the point to which the scene
has been moved.
[] Press <" _ to select "EXECUTE", then press ENTER.
• The selected scene is moved.
To modify the points
[] Press _ _" to move the arrow to "CLEAR", then press
ENTER.
[] Repeat step [] - [].
[_] Returnto the normalscreen.
Press NAVIGATION.
NOTE:
There may be a discrepancy of several seconds between the
scene you intend to edit, and the scene which is actually edited.
Deleteunwantedpartfromplaylist
1_1 Start playback.
Press I,,- to start playback. The playback pictures appear
in the window on the screen. The elapsed playing time
starts counting with the arrow on "IN".
• To locate the beginning of other titles, press 141_1/1_1_1.
Setedit-inandedit-outpoints.
[] Find the point where you want the deletion to begin,
then press ENTER with the arrow on "IN". ]he edit-in
time is fixed and the elapsed playing time starts
counting again.
[] Find the point where you want the deletion to end,
then press ENTER with the arrow on "OUT". The edit-
out time is fixed.
• Press _1-_1,I_, 1_11_,i_l_l, I_1_1or II to find the edit-in and
edit-out points.
_Confirmthedeletion.
[] Press <" _ to move the arrow to "PREVIEW", then
press ENTER to preview the scene approximately 5
seconds before and after the deleted part.
[] Press <" _ to select "EXECUTE", then press ENTER.
• The selected scene is deleted.
To modify the points
[] Press < _" to move the arrow to "CLEAR", then press
ENTER.
[] Repeat steps [] - [].
[_] Returnto the normalscreen.
Press NAVIGATION.
NOTE:
There may be a discrepancy of several seconds between the
scene you intend to edit, and the scene which is actually edited.
Perform steps [] to [] of "Create Play List" {_ pg. 78) before
continuing.
Selecta playlist.
Press _ _ to move the arrow to a play list from which
you wish to delete unwanted parts, then press V.
_Accessthe Editingscreen.
[] Press _ _" to move the _
arrow to "E D IT[ N G", t h e n
press ENTER. ....................................
__:_) .....
[] Press <_ to move the I
arrow to "DEI.ETE _' _ 11!i' ' _'_',_;,,_:,o_._
SCENE", then press _,_J ,_,,
ENTER.
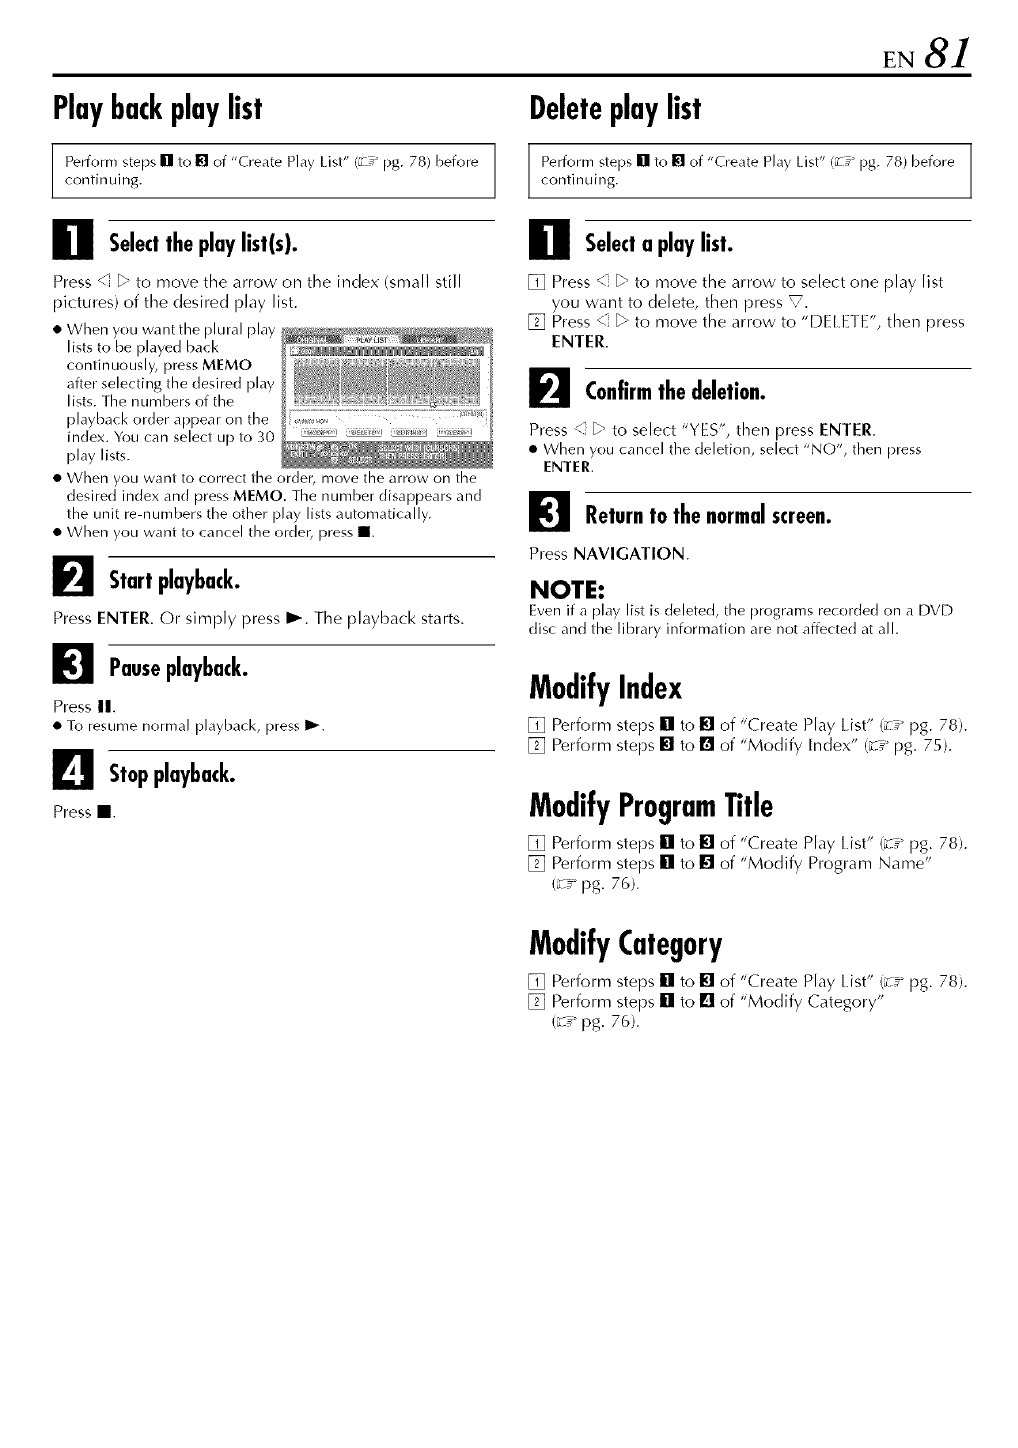
Playbackplaylist
Perform steps [] to [] of "Create Play List" (_° pg. 78) before
continuing.
EN 81
Deleteplaylist
Perform steps [] to [] of "Create Play List" (_° pg. 78) before
continuing.
Selectthe playlist(s).
Press <" _ to move the arrow on the index (small still
pictures) of the desired play list.
• When you want the plural play
lists to be played back
continuously, press MEMO
after selecting the desired play
lists. The numbers of the
playback order appear on the
index. You can select up to 30 ...._........ ......
play lists.
• When you want to correct the order, move the arrow on the
desired index and press MEMO. The number disappears and
the unit re-numbers the other play lists automatically.
• When you want to cancel the order, press II.
F_ Start playback.
Press ENTER. Or simply press I_. [-he playback starts.
_1 Pauseplayback.
Press II.
• To resume normal playback, press _.
L_stop playback.
PressII.
Selecta playlist.
[] Press <. _ to move the arrow to select one play list
you want to delete, then press V.
[] Press < b to move the arrow to "DELETE",then press
ENTER.
F_ Confirmthedeletion.
Press < _ to select "YES", then press ENTER.
• When you cancel the deletion, select "NO", then press
ENTER.
I_1 Returnto the normalscreen.
Press NAVIGATION.
NOTE:
Even if a play list is deleted, the programs recorded on a I-)VD
disc and the library information are not affected at all.
ModifyIndex
[] Perform steps [] to [] of "Create Play list" (_:" pg. 78).
[] Perform steps [] to [] of "Modify Index" (z_" pg. 75).
ModifyProgramTitle
[] Perform steps [] to [] of "Create Play List" I_ ° pg. 78).
[] Perform steps [] to [] of "Modify Program Name"
/z_" pg. 76).
ModifyCategory
[] Perform steps [] to [] of "Create Play I.ist" (_° pg. 78).
[] Perform steps [] to [] of "Modify Category"
/_ :" pg. 76).
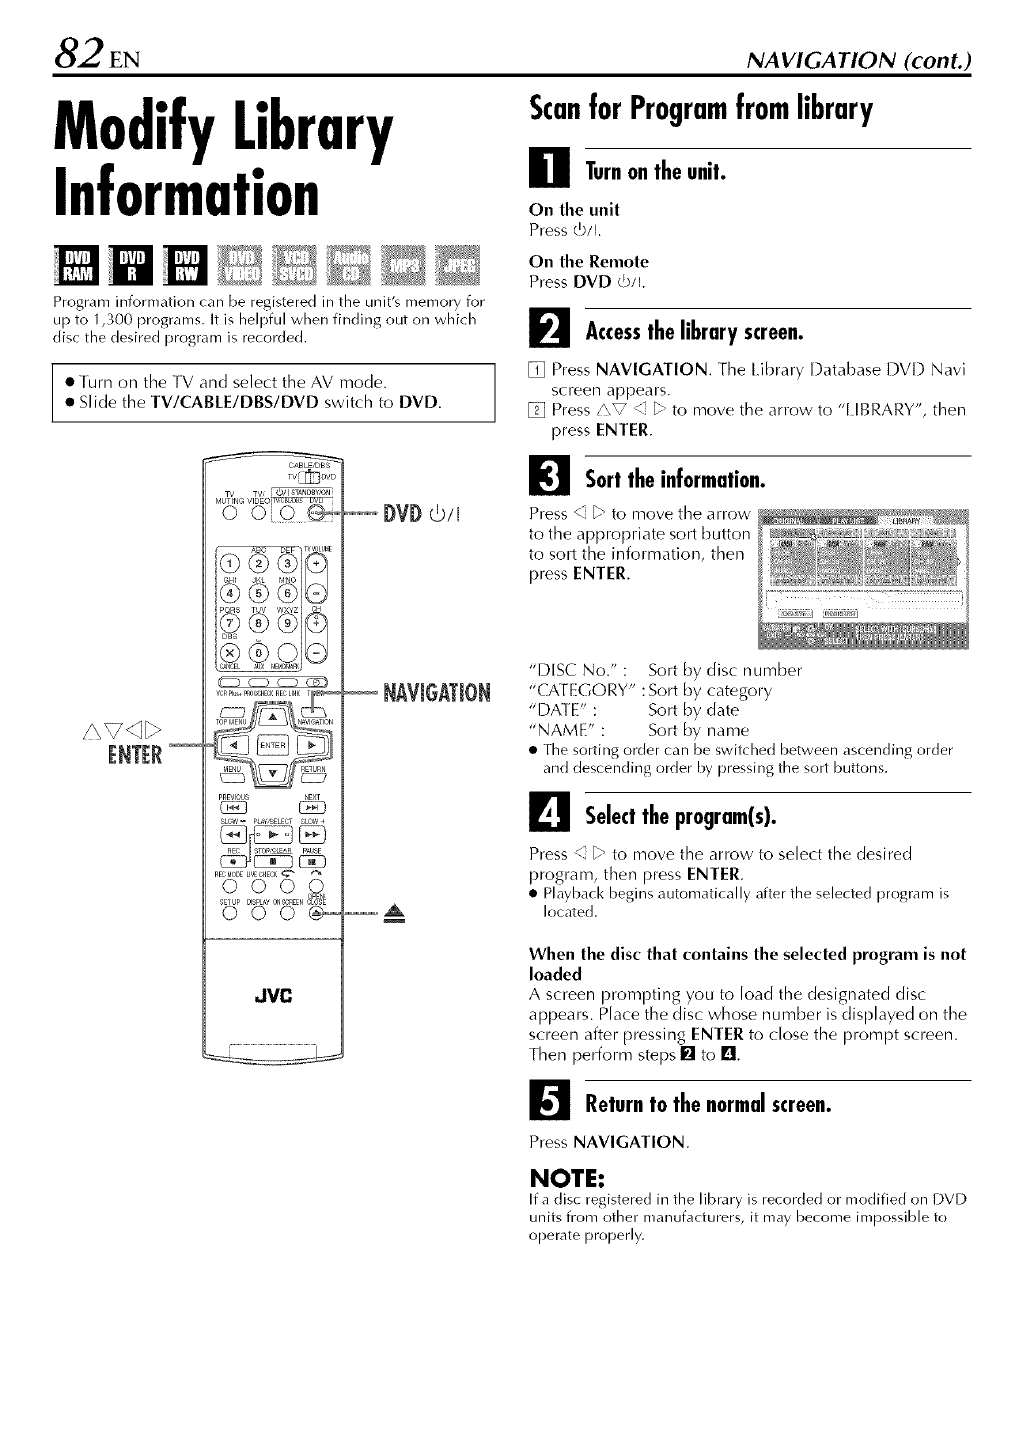
82 EN NAVIGATION (cont.)
ModifyLibrary
Information
Program information can be registered in the unit's memory for
up to 1,300 programs. It is helpful when finding out on which
disc the desired program is recorded.
•Turn on tile TV and select the AV mode.
• Slide the TV/CABLE/DBS/DVD switch to DVD.
TV_DVD
[NT[R
PREVl0US
GE]
SL_- PL_¥,_SELECTSL0't_+
REC_IODEU'_ECHECK_g_ _
o 0q0,Z,Z
SETUP
000_
dVC
DVDG![
ScanforProgramfromlibrary
Turnon theunit.
On the unit
Press G/I.
On the Remote
Press DVD t5/I.
F_ Accessthe libraryscreen.
[] Press NAVIGATION. The library Database DVD Navi
screen appears.
[] Press/\V <[ _ to move the arrow to "[ [BRARY', then
press ENTER.
I_1 Sortthe information.
Press _ _ to move the arrow
to the appropriate sort button
to sort the information, then
press ENTER.
NAVIGAI]0N
_A l
"DISC No." : Sort by disc number
"CATEGORY" : Sort by category
"DATE" : Sort by date
"NAME" : Sort by name
•The sorting order can be switched between ascending order
and descending order by pressing the sort buttons.
Selecttheprogram(s).
Press <] _ to move the arrow to select the desired
i)rograrn, then press ENTEr.
• Playback begins automatically after the selected program is
located.
When the disc that contains the selected program is not
loaded
A screen prompting you to load the designated disc
appears. Place the disc whose number is displayed on the
screen after pressing ENTEr to close the prompt screen.
Then perform steps [] to El.
_Returnto the normalscreen.
Press NAVIGATION.
NOTE:
If a disc registered in the library is recorded or modified on DVD
units from other manufacturers, it may become impossible to
operate properly.
Registerdisc Deleteinformation
Turnonthe unit.
On the unit
Press t5/I.
On the Remote
Press DVD t5/I.
I_1 Loada disc.
[] Press A to open the disc tray.
[] Place a disc you want to register on the disc tray.
• For details, refer to "Placing a Disc" (_-u"pg. 11).
[] Press A to close the disc tray.
I_1 Accessthe libraryscreen.
[] Press NAVIGATION. The library Database DVD Navi
screen appears.
[] Press z"sV < b, to move the arrow to "lIBRARY", then
press ENTER.
L_e Registerthe disc.
Press<1_ to move the arrow to "REGISTER", then press
ENTER.
_Confirmtheregistration.
Press <" _ to select "REGISTER", then press ENTER.
_J Returnto the normalscreen.
Press NAVIGATION.
NOTES:
• It is not possible to register discs used for On-Disc Timer
Programing. (_" pg, 66)
• [t is not possible to register discs formatted on devices other
than JVC's DVD recorders.
• It is not possible to register discs recorded on devices other
than JVC's DVD recorders.
• [t is not possible to register discs when "SAVE AS LIBRARY" is
set to "OFF" in FUNCTION SET UP menu. (_:_"pg. 98)
Turnon theunit.
On the unit
Press tb/I.
On the Remote
Press DVD cb/I.
I_1 Accessthe library screen.
[] Press NAVIGATION. The library Database DVD Navi
screen appears.
[] Press/\V <i _ to move the arrow to "[ [BRARY', then
press ENTER.
I_1 Selecta program.
[] Press/'\V < _" to move the arrow to the appropriate
sort button to sort the information, then press ENTER.
[] Press _ _" to move the arrow to a program you want to
delete, then press _.
L_e Deletethe program.
Press/\V < _ to move the arrow to "DELETE", then
press ENTER.
_Confirmthedeletion.
Press < _" to select "DELETE", then press ENTER.
_!1_t Returnto the normalscreen.
Press NAVIGATION.
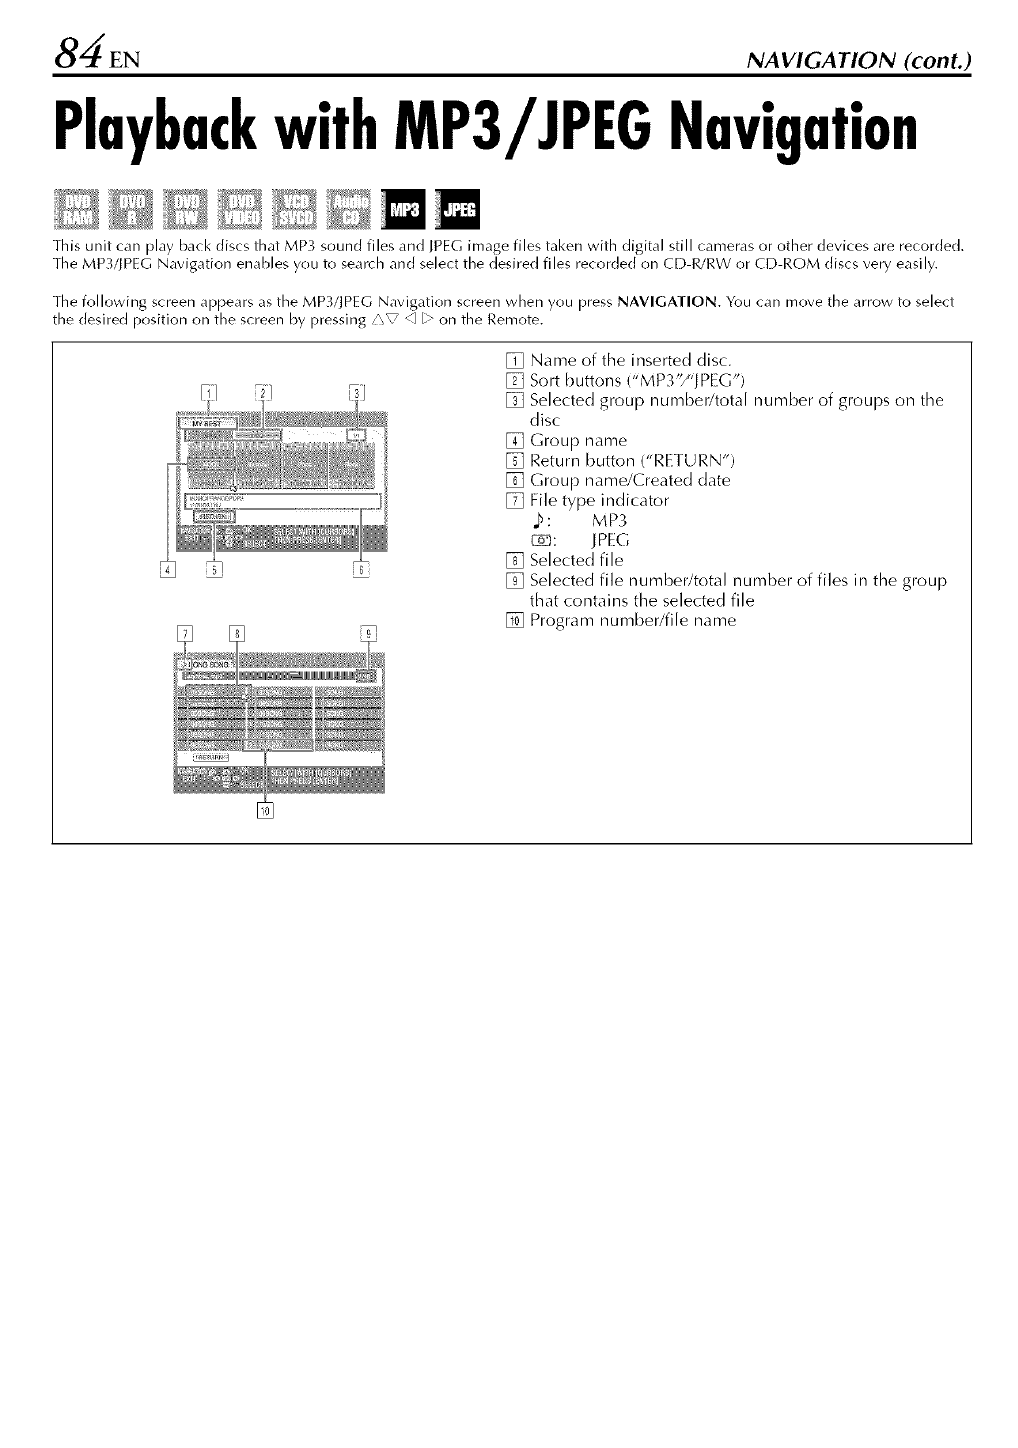
84 EN NAVIGATION (cont.)
PlaybackwithMP3/JPEGNavigation
This unit can play back discs that MP3 sound files and JPEG image files taken with digital still cameras or other devices are recorded.
The MP3/JPEG Navigation enables you to search and select the desired files recorded on CD-R/RW or CD-ROM discs very easily.
The following screen appears as the MP3!JPEG Navigation screen when you press NAVIGATION. You can move the arrow to select
the desired position on the screen by pressing/\V _ L> on the Remote.
[] Name of the inserted disc.
[] Sort buttons ('MP3'_'(JPEG')
[] Selected group number/total number of groups on the
disc
[] Group name
[] Return button ("RETURN")
[] Group name/Created date
[] File type indicator
b: MP3
_: IPEG
[] Selected file
[] Selected file number/total number of files in the group
that contains the selected file
[] Program number/file name
Locatingthedesiredgroupandtracks ProgramPlayback
Loada disc.
[] Press A to open the disc tray.
[] Place a disc on the disc tray.
• For details, refer to "Placing a Disc" {_u" pg. 11).
[] Press A to close the disc tray.
_Accessthe MP3/JPEG Navigationscreen.
Press NAVIGATION. 3he MP3!JPEG Navigation screen
appears.
I_1 Displaytheitem.
For MP3 Playback
Press <" _ to move the arrow to "MP3".
• Only groups which contain MP3 files appear.
For JPEG Playback
Press < b to move the arrow to "]PEG'.
• Only groups which contain JPEGfiles appear.
Selectthe group.
Press < _ to move tile arrow
to the desired group, then
press ENTER.
For MP3 Playback
• The tracks in the sele(ted
group appear.
For JPEG Playback
• The irrlages in the selected
group appear.
_Selectthe item.
Press/"_V < _, to move the
arrow to the desired item,
then press ENTER. ]he unit
starts playback from the
selected item.
• The unit stops when all items
in the selected group are
played back.
NOTES:
• If you press I1_ instead of ENTER in step I_11the unit starts
playback from the first file of the group.
• JPEG files are played back as a slide show at the set intervals.
(_" pg. 52, "Select the switching interval of the slide show")
• If a file name includes any 2-byte character, the unit may not
show the file name correctly.
• Press/\V to move the arrow to "RETURN", then press ENTER
to return to the screen that shows the group(s).
• The order of the groups and items shown in step [] and [] may
differ from the order shown on your PC.
Perform steps [] to [] of "Locating the desired group and
tracks" in the left column before continuing.
Selecttheitemsinthe desiredorder.
Press/",V _ b- to move the arrow to the desired item,
then press MEMO.
• The order number appears on the left of the track name.
• Repeat this step as necessary.
• To cancel the track, press/\_7 _ [.'-"to move the arrow to the
track, then press X.
• Pressing • clears all the order numbers.
F_ Start playback.
Press I_.
• To quit the Program Playback, press •.
• Repeat playback can be performed if it is set as such in Play
Set Up menu. {_-u" pg. 48, "Repeat Playback")
NOTES:
• It is not possible to select tracks and irrlages simultaneously.
• It is not possible to select tracks or images in other groups.
On completion of the playback of all the items
[] Perform steps [] to [] of "Locating the desired group
and tracks" in the left column.
[] Press II.
• The order numbers are reset and cleared.
[] Press NAVIGATION to complete the procedure.
86EN EDITING
DVDubbing
You can dub programs from a camcorder or DV equipment
connected to the unit with a DV cable. The unit's Remote allows
you the limited control of the connected camcorder or DV
equipment functions during dubbing.
NOTE:
When you connect a PC to the DV IN connector, we do not
assure the normal operation of this unit.
Your unit
DV IN connector
Camcorder
/\
DV equipment
DV caN(
{not supplied)
DV con nector
RE( MOD[
TV_DVD
_@OOO
_u_ ,,_ o,_o_,ffg_
oo_
dVC
CH+/-
EN 87
Make connections.
Connect a camcorder or DV equipment to the DV IN
connector on the unit's front paneh
I_ Preparethe unitfor dubbing.
[] I.oad a DVD-RAM/RW/R
disc on the unit.
[] Press CH +/- to set the
channel to "DV
DUBBING".
• The "DV DUBBING"
controller appears on the TV
screen.
• If "_o_l@" does not appear on
the "DV DUBBING"
controller, make sure the DV
equipment is connected
correctly.
[] Press _ to move _ to '_g !, then press
ENTER.
[] Press i',V repeatedly to select the desired sound track,
then press ENTER.
[] Press REC MODE repeatedly until the desired
recording speed appears. 1_-<_"pg. 58, "Recording
Speed")
I_1 Preparethe DV equipmentfor dubbing.
locate the point from where you want to start dubbing,
then stop or pause playback by pressing the following
buttons on the Remote:
I_, I_1_, -_141, I, II
• To play back in slow speed (1/10 of the normal speed), press II
to pause playback, then press _1-_1or 1_1)'_.
• To play back frame-by-frame, press II to pause playback, then
press II repeatedly. Each press of II advances a frame.
• To change the playback direction, press _1-_1or 1_11_.
L_e Start dubbing.
Press <" _" to move the arrow to then press
ENTER.
• Playback on the external DV equipment and recording on the
unit should start simultaneously.
• When the playback from the beginning is not possible, the
"DV DUBBING" controller cannot be used. Perform dubbing
without using the "DV DUBBING" controller. (_€" right
column)
• To pause dubbing, press "_- _ to move FS to _2_O _, then
press ENTER. Both the unit an(] the external DV equipment
pause dubbing. Pressing II on the unit also works the same
way.
• To clear the "DV DUBBING" controller from the TV screen,
press ON SCREEN.
I_ Stopdubbing.
Press • on the Remote.
• Both the unit an(] the external DV equipment stop dubbing.
NOTES:
• Dubbing copyright guarded programs is not possible.
• Original DV informations such as the recording (]ate an(] time
are not recorded.
• The superimposed indication during the operation or dubbing
is not recorded.
• Only DV format image can be dubbed; MPEG2 format image
cannot be dubbed.
Performing dubbing without using the "DV DUBBING"
controller
[] Press CH +/-to set the channel to'DV DUBBING".
[] Press REC MODE repeatedly until the desired recording
speed appears.
[] Start playback on the external DV equipment slightly before
the actual point from where you wish to start dubbing.
[] Press an(] hold •, then press I_ on the Remote, or press •
on the uniL
• Dubbing starts.
[] When the dubbing ends, press • on the unit, then stop
playback on the external DV equipment.
88 EN EDITING (cont.)
EditFromA
Camcorder
[] If the camcorder has no S-VIDEO output connector:
]P
AUDIO/VIDEO input
Audio/video cable
(supplied)
AUDIO/VIDEO
OUT
Player
[] If the camcorder has an S-VI DEO output connector:
Recorder
S-VIDEO input AUDIO input
]1IIs
S-Video cable
(not supplied)
OUTS-VIDEO
Not connected
Audio/video cable (supplied)
AUDIO OUT
Player
You can use a camcorder as the source player and your
unit as the recording deck.
Slide the TV/CABLE/DBS/DVD switch to DVD. ]
Make connections.
[] If the camcorder has no S-VIDEO output connector:
-- connect the camcorder's AUDIO OUTPUT and
VIDEO OUT connectors to the unit's AUDIO and
VIDEO input connectors on the front panel.
[] If the camcorder has an S-VIDEO output connector:
connect the camcorder's AUDIO OUTPU] and
S-VIDEO OU] connectors to the unit's AUDIO and
S-VIDEO input connectors on the front panel.
• When using a monaural camcorder, connect its AUDIO
OUTPUT connector to the AUDIO L input connector on your
unit.
_Set the unit'sinputmode.
Press CH +/- to set the channel to "F-1 ".
• When using S-VIDEO connector, set "FRONT AUX F-1" to
"S-VIDEO'. (_ pg. 98)
• When using VIDEO connector, set "FRONT AUX F-1" to
"VIDEO". (t-€_pg. 98)
I_1 Setthe recordingspeed.
Press REC MODE repeatedly until the desired recording
speed appears.
L_e Preparethe camcorderfor dubbing.
Start playback on the camcorder slightly before tile actual
point from where you wish to start dubbing.
_Start dubbing.
Press and hold S, then press I_ on the Remote, or press
• on the unit.
_J Stopdubbing.
Press • on the unit, then sto I) playback on tile
camcorder.
NOTES:
• All necessary cal)les can be obtained from your dealer.
• Refer to the camcorder's instruction manual for operating
procedure.
• The quality of dubbed picture becomes poorer than that of the
original.
EditroOrFrom
AnotherRecorder
[]
[]
You call use your unit as the source player or as the
recording deck.
Slide the TV/CABLE/DBS/DVD switch to DVD.
Make connections.
]
TV receiver
AV mode
Player Your unit
S-Video cable I _Audio/video
[] When using your unit as the source player ...
... connect its AUDIO/VIDEO or AUDIO/S-VIDEO
OUTPUT connectors to the audio/video or audio/S-video
input connectors on another recorder.
[] When using your unit as the recording deck ...
... connect its AUDIO/VIDEO or AUDIO/S-VIDEO
INPUT connectors to tile audio/video or audio/S-video
output connectors on another recorder.
•If connecting a unit with an S-VIDEO input!output connector,
it is recommended to use an optional S-Video cable to
minimize picture degradation while editing.
_Set the inputmodeof recordingdeck.
With this video unit, press CH +/-to select "1.-1 "or "1-2"
depending on the connectors being used.
• When using S VIDEO connector, set "REAR AUX k-1" or
"REAR AUX [-2" to "S-VIDEO". i_-€_ pg. 98)
Recorder
TV receiver
Your unit
_ _<_r_
S-Video cable
Audio/video _'_
cable
Another recorder
Player
Recorder
Jdio/video
ble 1
• When using VIDEO connector, set "REAR AUX I.-1" or "REAR
AUX [.-2" to "VIDEO". (_-u"pg. 98)
• When using another recorder as the recording deck, refer to its
instruction manual.
I_1 Setthe recordingspeed.
Press REC MODE repeatedly until the desired recording
speed appears.
L_e Start the sourceplayer.
Engage the Play mode of the source player.
_Start the recordingdeck.
Engage the Record mode of the recording deck.
_J Stopdubbing.
Stop recording on the recording deck, then stop playback
on the source player.
NOTES:
• All necessary cables can be obtained from your dealer.
• When you use this unit as the source [)layer for editing, be sure
to set "SUPERIMPOSE" to "OFF" before starting. (_-_"pg. 99)
90 EN EDITING (cont.)
DigitalAudio
Dubbing
• Turn on the TV and select the AV mode.
• Slide the TV/CABLE/DBS/DVD switch to DVD.
Recorder
You can dub selected audio from a DVD or Audio CD disc to a
digital audio device.
However, it is not possible to dub copy-protected discs.
Example: Dubbing to an MD
Make connections.
Connect the unit and a digital audio device using either
an optional optical cable or all optional coaxial cable.
_Placea discandloadan MD.
For the unit
[] Press A to open the disc tray.
[] Place a disc on the disc tray.
[] Press A to close the disc tray,
For the digital audio device
load an MD.
DigitaliMDaudiOdeck,deviCeet<A B Preparethe unitfor dubbing.
j|audio to be dubbed.
//-slightly before the actual point from
Coaxial (able [[Optical cable to start dul)bing.
mLcn>,l.OUT V _ digitalaudiodevicefor dubbing.
(COAXIAL) I I\
L o -i
_ I_ to start playback on tile unit.
f unit _ [__ X_ recording oil the digital audio device.
DI(;ITAI OUT I [ Stopdubbing.
Note for connection: Stop recording on the digital audio device. Then press •
Remove the protection to stop playback on the unit.
cap from the cable. NOTE:
There r'nay be a discrepan(y of several se(onds between where
you intend editing to start, an(] where it actually starts.
RrMOTr EN91
RemoteControl
Functions
Remote1/2/3/4 CodeSwitching
The Remote is capable of controlling four JVC video units
independently. Each of the units can respond to one of four
codes (1,2, 3 or 4). The Remote is preset to send 3 code signals
because your unit is initially set to respond to 3 code signals.
You can easily modify your unit to respond to 1,2 or 4 code
signals.
[ Slide the TV/CABLE/DBS/DVD switch to DVD. ]
[ J
(b/I
I ...............
S[I"UP
TV_D\tD
wfo/_TmO_776fi'
,/ORPlu_nRO_H_RECLINKTIMEn
PREVIOUS
SLO_- POW,SE_ECTSCOW+
REC_ODELI_E'CHECK
0000
sEtuP05 _ 0_ _l_
_00®
JVC
On the Remote
Kee I) pressing SET UP down during steps [] - [].
Changethe remotecontrolcode.
Press the number key "1" for 1, "2" for 2, "3" for 3 or
"4" for 4.
I_lset the remotecontrolcode.
Press ENTER to set the code.
On the unit
_1 Turnoff the unit.
Press t5/I on the unit.
L_e Displaythe code.
Press li,- on the unit for over 5 seconds while the unit is
turned off.
• The code currently set appears on the front display panel.
_Changethe unit'scode.
Press • on the Remote.
• The code currently set on the Remote blinks on the front
display panel for approximately 5 seconds, and is applied to
the unit.
NOTE:
When "POWER SAVE" is set to "ON" (ZY° pg. 99), it is not
possible to change the remote code.

9.2 EN REMOTE (cont.)
TVMulti-BrandRemoteControl
Your Remote can operate the basic functions of your TV set. In
addition to JVC TVs, other manufacturer's TVs can also be
control led.
Before performing the following steps:
• Turn off the TV using its Remote.
• Slide the TV/CABLE/DBS/DVD switch to TV.
_ cz3 cz3 _
v_nPlu_+Pno_H_ RECUNKTlrCEn
TOPrdEr_U N_IOATIOk
MEkU nETURN
PREVDUS
SLOW- P_¥;SELECTSLOW÷
REC_ODELI_E'CH_CK
o 0o07,,
_ETUP
-,_ ® O ®SETUP
IMPORTANT:
JVC
W/(BL/DBS
(5/1
IV VOLUM[
CH+/-
Setthe TVbrandcode.
Keep pressing SET UP down during step i11.
Enter your TV's [)rand code using the number keys, then
press ENTER.
Press TV/cBL/DBS cb/I oil the unit's Remote to turn on
the TV and try operations (_" step _1).
• Once you have set the Remote to operate the TV, you do not
have to repeat this step until you replace your Remote's
batteries.
• Some brands of TVs have more than one code. If the TV does
not function with one code, try entering another.
_Operatethe TV.
Press the corresponding button: TV/CBL/DBS cb/I,TV/
VIDEO, CH +/-, TV VOLUME +/-, TV MUTING,
number keys.
• For some brands of TVs, you must press ENTER after having
pressed the number keys.
BRAND NAME CODE
lVC
HITACHI
MAGNAVOX
MITSUBISHI
PANASONIC
RCA
SHARP
SONY
SAMSUNG
SANYO
SEARS
TOSHIBA
ZENITH
01,03
10
02
03
04, 11
05
06
07
12
13
13
08
09
Although the supplied Remote unit is compatible with JVC
televisions, as well as many other models, it may not work with
your TV, or in some instances, may have limited function
CableBoxMulti-BrandRemoteControl
Your Remote can operate the basic functions of your cable box
set. In addition to JVC cable boxes, other manufacturer's cable
boxes can also be controlled.
Slide the TV/CABLE/DBS/DVD switch to CABLE/DBS. ]
0_9_
SITUP
,_CRPlu_PR0_CH_Re.r:LINKTIMER
TOPrdEr_u r_VI_TION
MENU nETURN
PREV40US
SLOW= Pt_LECT SL0_
Re.r:_IODELI'_ECHECK_ _
0000
JVC
TV/(BL/DBS
(.b/[
(H +/-
IMPORTANT:
It may not work with your cable box, or in some instances, may
have limited function capability.
NOTES:
•You must set the cable box bran(] for your Remote and the
cable box brand for your Controller i_-_ pg. 29) separately. The
list of cable box brands that can be control led by your Remote
is different from the list of brands that can be controlled by
your controller.
• It's not possible to set the Remote for both your cable box and
a DBS receiver at the same time. You can only set the Remote
to operate one of these units at a time.
Setthe cablebox brandcode.
Keep pressing SET UP down during step il.
Enter your cable box's [)rand code using the number
keys, then press ENTER.
Press TV/CBL/DBS cb/I on the unit's Remote to turn on
the cable box and try operations (_ step _1).
• Once you have set the Remote to operate the cable box, you
do not have to repeat this step until you replace your Remote's
batteries.
• Some brands of cable box have more than one code. If the
cable box does not function with one code, try entering
another.
I_1 Operatethe cablebox.
Press the corresponding button: TV/CBL/DBS G/I,
CH +/-, number keys.
• For some brands of cable box, you must press ENTER after
having pressed the number keys.
• The number keys may not function with some cable boxes.
BRAND NAME
ARCHER
CABLETENNA
CABLEVIEW
CE1IZEN
CURTIS 02
DIAMOND 01,
GC BRAND 15,
GEMINI 15
GENERAl INSTRUMENTS 01,
HAMLI N 10,
CODE
01,05,17
01, 17
15, 16, 17, 21,25
15, 16, 17, 21,25
17
16,17,21,25
04,06, 11, 12, 15,28
18,23
JASCO
JERROID
NOVAVISION
OAK
PANASONIC
PULSER
RCA
REGAL
REMBRANDT
SAMSUNG
SCIENTIFIC ATLAN 1A
SIGMA
SL MARX
SPRUCER
STARGATE
TELEVIEW
TOCOM
UNIKA
UNIVERSAL
V IDEOWAY
ZENITH
15
01,04,06, 11, 12, 15,28
O2
O7
13, 14
15, 16, 17, 21,25
13, 14
10,18,23
01, 16, 17
05, 16, 24
O2
O7
05,16,17,24,25
13, 14
05, 15, 16, 17, 21,24, 25
05, 16, 24
01,04, 16
01, 17
16,17,25
03, 09, 22
03, 09, 22
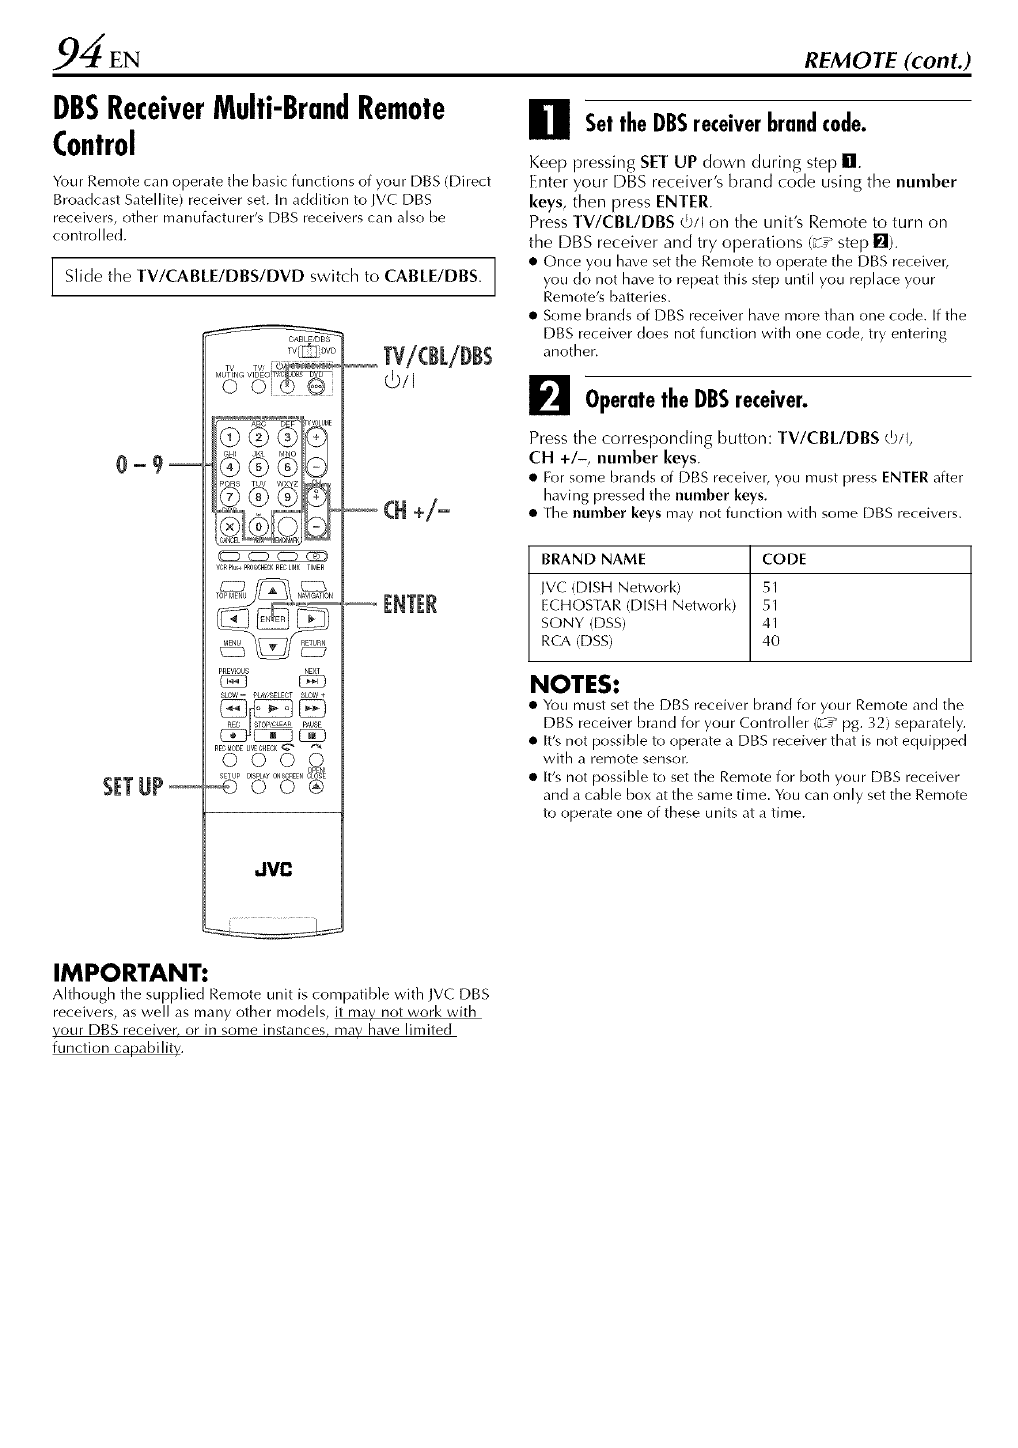
94 EN REMOTE (cont.)
DBSReceiverMulti-BrandRemote
Control
Your Remote can operate the basic functions of your DBS (Direct
Broadcast Satellite) receiver set. In addition to JVC DBS
receivers, other manufacturer's DBS receivers can also be
control led.
Slide the TV/CABLE/DBS/DVD switch to CABLE/DBS. ]
Tv_DVD
_ tEED(ZD _)
vcPPlu_pR0_cH_PEcuHK TIMER
PREvDus
SL_= PLaY;SElEcTsLO't_+
c_E R
PEc_0DELI_E'cHEcK
sETuP
_00®
dVC
0_9_
SETUP
TV/(BL/I)BS
(b!I
(H +/-
Setthe DBSreceiverbrandcode.
Keep pressing SET UP down during step tl.
Enter your DBS receiver's [)rand code using the number
keys, then press ENTEr.
Press TV/CBL/DBS cb/I on the unit's Remote to turn on
the DBS receiver and try operations (_-_ step U).
• Once you have set the Remote to operate the DBS receiver,
you do not have to repeat this step until you replace your
Remote's batteries.
• Some brands of DBS receiver have more than one code. If the
DBS receiver does not function with one code, try entering
another.
_1 Operatethe DBSreceiver.
Press the corresponding button: TV/CBL/DBS G/I,
CH +/-, number keys.
• For some brands of DBS receiver, you must press ENTER after
having pressed the number keys.
• The number keys may not function with some DBS receivers.
BRAND NAME CODE
JVC (DISH Network) 51
ECHOSTAR (DISH Network) 51
SONY (DSS) 41
RCA (DSS) 40
NOTES:
• You must set the DBS receiver brand for your Remote and the
DBS receiver brand for your Controller (_-u" pg. 32) separately.
• It's not possible to operate a DBS receiver that is not equipped
with a remote sensor.
• It's not possible to set the Remote for both your DBS receiver
and a cable box at the same time. You can only set the Remote
to operate one of these units at a time.
IMPORTANT:
Although the supplied Remote unit is compatible with JVC DBS
receivers, as well as many other models, it may not work with
your DBS receiver, or in some instances, may have limited
function capability.
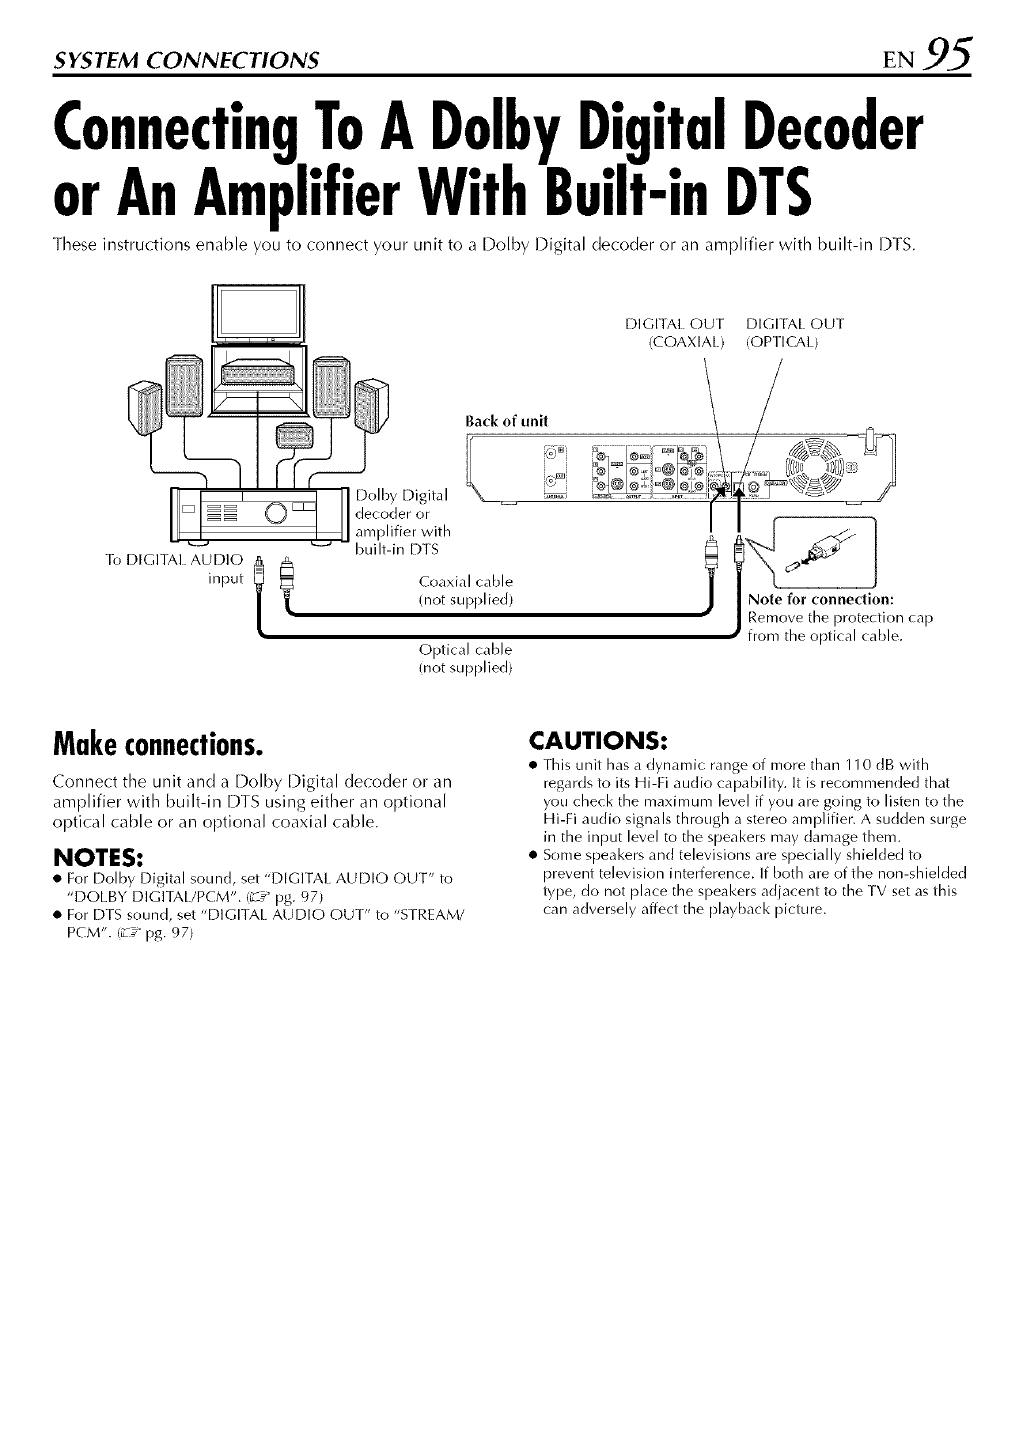
SYSTEM CONNECTIONS EN 95
ConnectingToADolbyDigitalDecoder
orAnAmplifierWithBuilt-inDTS
These instructions enable you to connect your unit to a Dolby Digital decoder or an amplifier with built-in DTS.
I
======
To DIGITAI_ AUDIO
input
_] olby Digital
decoder or
amplifier with
built-in DIS
DIGITAl OUT DIGITAL OUT
(COAXIAl) (OPTICAl)
Back of unit
L
Coaxial cable
(not supplied)
Optical cable
(not supplied)
Note for connection:
Remove the protection ca r)
from the optical cable.
Makeconnections.
Connect the unit and a Dolby Digital decoder or an
amplifier with built-in DTS using either an optional
optical cable or an optional coaxial cable.
NOTES:
• For Dolby Digital sound, set "DIGITAL AUDIO OUT" to
"DOLBY DIGITAL/PCM'. (_ pg. 97)
• For DTS sound, set "DIGI]AL AUDIO OUT" to "STREAM/
PCM'. (Z_" pg. 97)
CAUTIONS:
• This unit has a dynamic range of more than 110 dB with
regards to its Hi-Fi audio capability. It is recommended that
you check the maximum level if you are going to listen to the
Hi-Fi audio signals through a stereo amplifier. A sudden surge
in the input level to the speakers may damage them.
• Some speakers and televisions are specially shielded to
prevent television interference. If both are of the non-shielded
type, do not place the speakers adjacent to the TV set as this
can adversely affect the playback picture.
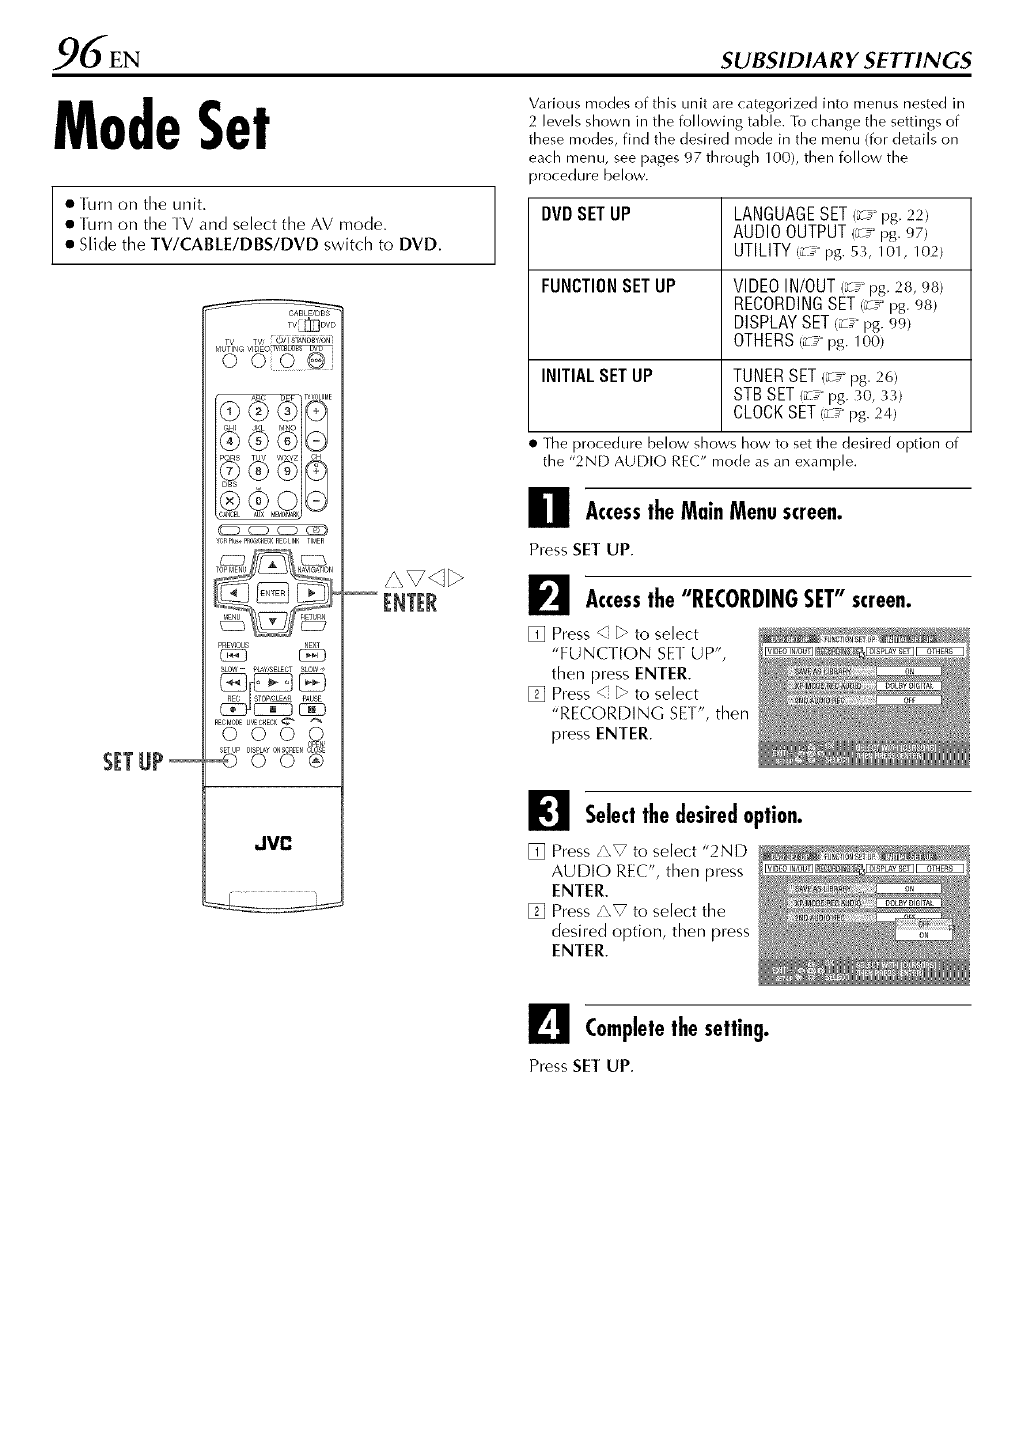
6EN SUBSIDIA R Y SETTINGS
ModeSet
• [urn on the unit.
• lurn on the IV and select the AV mode.
• Slide the TV/CABLE/DBS/DVD switch to DVD.
TV_DVD
(CD CD CD (]_D)
vcRPlu_pR_e4_KRECLIt4KTIMER
PREWOUS
(z_]]
SLOW- pbW;SE_OT SLOW÷
RECMODEUVECHE_K'_ *'_
o 0Z0,%
SETUP
_OO®
SETUP
,JVC
Various modes of this unit are categorized into menus nested in
2 levels shown in the following table. To change the settings of
these modes, find the desired mode in the menu (for details on
each menu, see pages 97 through 100), then follow the
_rocedure below.
DVDSET UP LANGUAGESET(a_"pc. 22)
AUDIO OUTPUT(_" pc, 97)
UTILITY(_:_pg.53, 101,102)
FUNCTIONSETUP VIDEOIN/OUTi_-#pg. 28, 98)
RECORDINGSET(a_"pg. 98)
DISPLAYSET(a_"pg. 99)
OTHERSi_ _pc. 100)
INITIALSET UP TUNERSET(_- pc. 26)
STBSET(_- pc.30,33)
CLOCKSET(_" pc.24)
• The procedure below shows how to set the desire(] option of
the "2ND AUDIO RE(:" mode as an example.
Accessthe MainMenuscreen.
Press SET UP.
ENTER I_1 Accessthe "RECORDINGSET"screen.
[] Press _ _ to select
"FUNCIION SEI UP",
then press ENTER.
[] Press < _ to select
"RECORDING SE[', then
press ENTER.
I_1 Selectthedesiredoption.
[] Press/'\V to select "2ND
AUDIO REC', then press
ENTER.
[] Press/'\V to select the
desired option, then press
ENTER.
L_e Completethe setting.
Press SET UP.
AUDIOOUTPUT
The boldface settings in the table below indicate the settings at your purchase.)
• DIGITALAUDIOOUT Set to the appropriate mode according to the type of the device connected to
DOLBY DIGITAL/PCM DIGITAL OUT connector.
STREAM/PCM DOLBYDIGITAL/PCM:
PCM ONLY Select this when you connect the digital input connector of a Dolby
Digital decoder or an amplifier with a built-in Dolby Digital
decoder.
STREAM/PCM:
Select this when you connect the digital input connector of an
amplifier with a built-in DTS, Dolby Digital, or MPEG multichannel
decoder.
PCMONLY:
Select this when you connect the linear PCM digital input of other
audio equipment (amplifieb MD or DAT deck, etc.).
•ANALOGAUDIOOUT
STEREO
DOLBYSURROUND
•D. RANGECONTROL
NORMAL
WIDERANGE
TVMODE
•OUTPUTLEVEL
STANDARD
LOW
Select the appropriate setting to accommodate the unit to the connected A/V
equipment. This function takes effect when a DVD VIDEO disc is played back.
STEREO:
Select this when listening to conventional two-channel stereo audio
with the unit's AUDIO OUTPUT connectors connected to a stereo
amplifiedreceiver or TV set, or in case you want to record the audio
from a DVD VIDE(-) disc to a Mini Disc, etc.
DOLBY SURROUND:
Select this when listening to multichannel surround audio with the
unit's AUDIO OUTPUT connectors connected to an amplifietf
receiver with a built-in surround decoder or a surround decoder.
The dynamic range (the difference between the loudest sound and the quietest
one) can be compressed during playback of a program encoded in Dolby
Digital format.
This function takes effect when a DVD VIDEO disc recorded in Dolby Digital
format is played back at low or middle volume.
NORMAL:
Normally select this setting to activate this function.
WIDE RANGE:
Select this to deactivate this function when you enjoy wide dynamic
range program.
TVMODE:
Select this when you hear the sound through the TV's speaker(s).
NOTES:
•This function takes no effect on programs other than that re_orded in Dolby Digital
format,
• This fun(tion dose not work when Simulated Surround Effect is activated. (_ pg. 50)
• The effect of "NORMAl" an(] "WIDE RANGE" may not be different depending on discs.
You can lower the output level of analog audio to accommodate the unit to the
connected A/V equipment.
STANDARD:
Normally select this setting.
LOW:
The output level of analog audio is lowered.
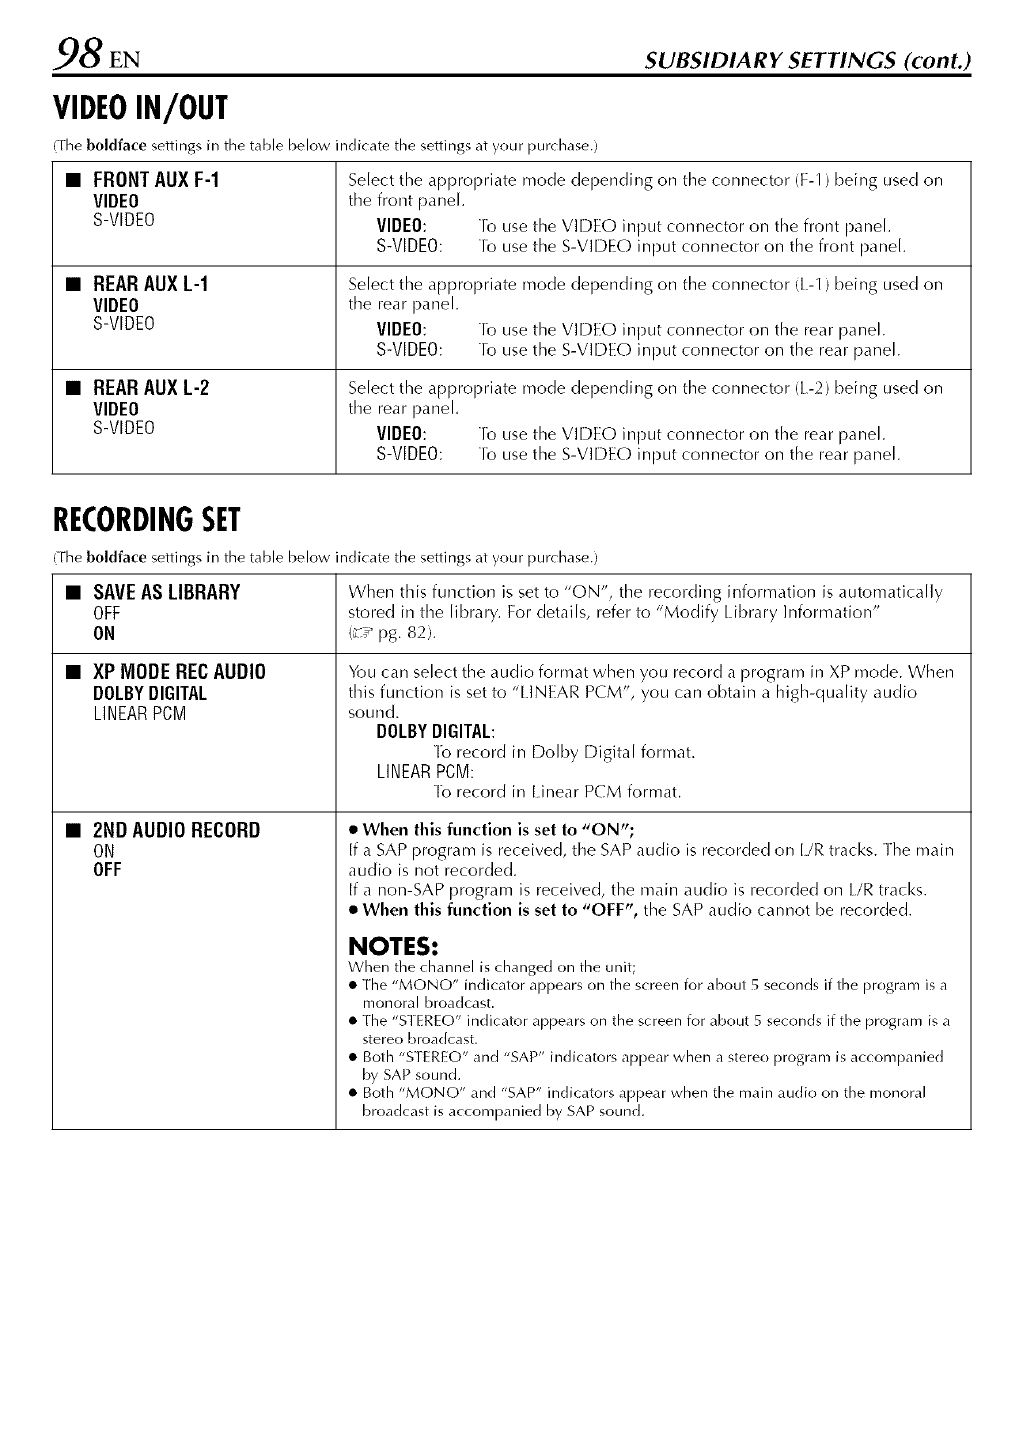
98 EN SUBSIDIARY SETTINGS (cont.)
VIDEOIN/OUT
The boldface settings in the table below indkate the settings at your pur(hase.)
• FRONTAUXF-1 Select the appropriate mode depending on tile connector (F-1) being used on
VIDEO the front panel.
S-VIDE0 VIDEO: /o use the VIDEO input connector on the front panel.
S-VIDE0: ]b use the S-VIDEO input connector on the front pane[.
•REARAUXL-1
VIDEO
S-VIDE0
•REARAUXL-2
VIDEO
S-VIDE0
Select the appropriate mode depending on the connector (L-I) being used on
tile rear paneh
VIDEO: ]b use the VIDEO input connector on the rear panel.
S-VIDE0: ]b use the S-VIDEO input connector on the rear panel.
Select the appropriate mode depending on the connector (L-2) being used on
the rear paneh
VIDEO: ]b use the VIDEO input connector on the rear panel.
S-VIDE0: ]b use the S-VIDEO input connector on the rear panel.
RECORDINGSET
The boldface settings in the table below indicate the settings at your purchase.)
•SAVEAS LIBRARY When this function is set to "ON", the recording information is automatically
OFF stored in the library. For details, refer to "Modify [ ibrary Information"
ON /_ pg. 82).
•XP MODERECAUDIO
DOLBYDIGITAL
LINEARPCM
•2ND AUDIORECORD
ON
OFF
You can select the audio format when you record a program in XP mode. When
this function is set to "lINEAR PCM', you carl obtain a high-quality audio
sound.
DOLBYDIGITAL:
1o record ill Dolby Digital format.
LINEARPCM:
1o record in [inear PCM format.
• When this function is set to "ON";
If a SAP program is received, the SAP audio is recorded on [/R tracks. The main
audio is not recorded.
If a non-SAP program is received, the main audio is recorded on I!R tracks.
• When this function is set to "OFF", the SAP audio cannot be recorded.
NOTES:
When the channel is _-hanged on the unit;
• The "MONO" indicator appears on the screen for about 5 seconds if the program is a
monoral broadcast,
• The "SI EREO" indicator appears on the screen for about 5 seconds if the program is a
stereo broadcast,
• Both "STEREO" and "SAP" indicators appear when a stereo program is accompanied
by SAP sound.
• Both "MONO" and "SAP" indicators appear when the main audio on the monoral
broadcast is accompanied by SAP sound.
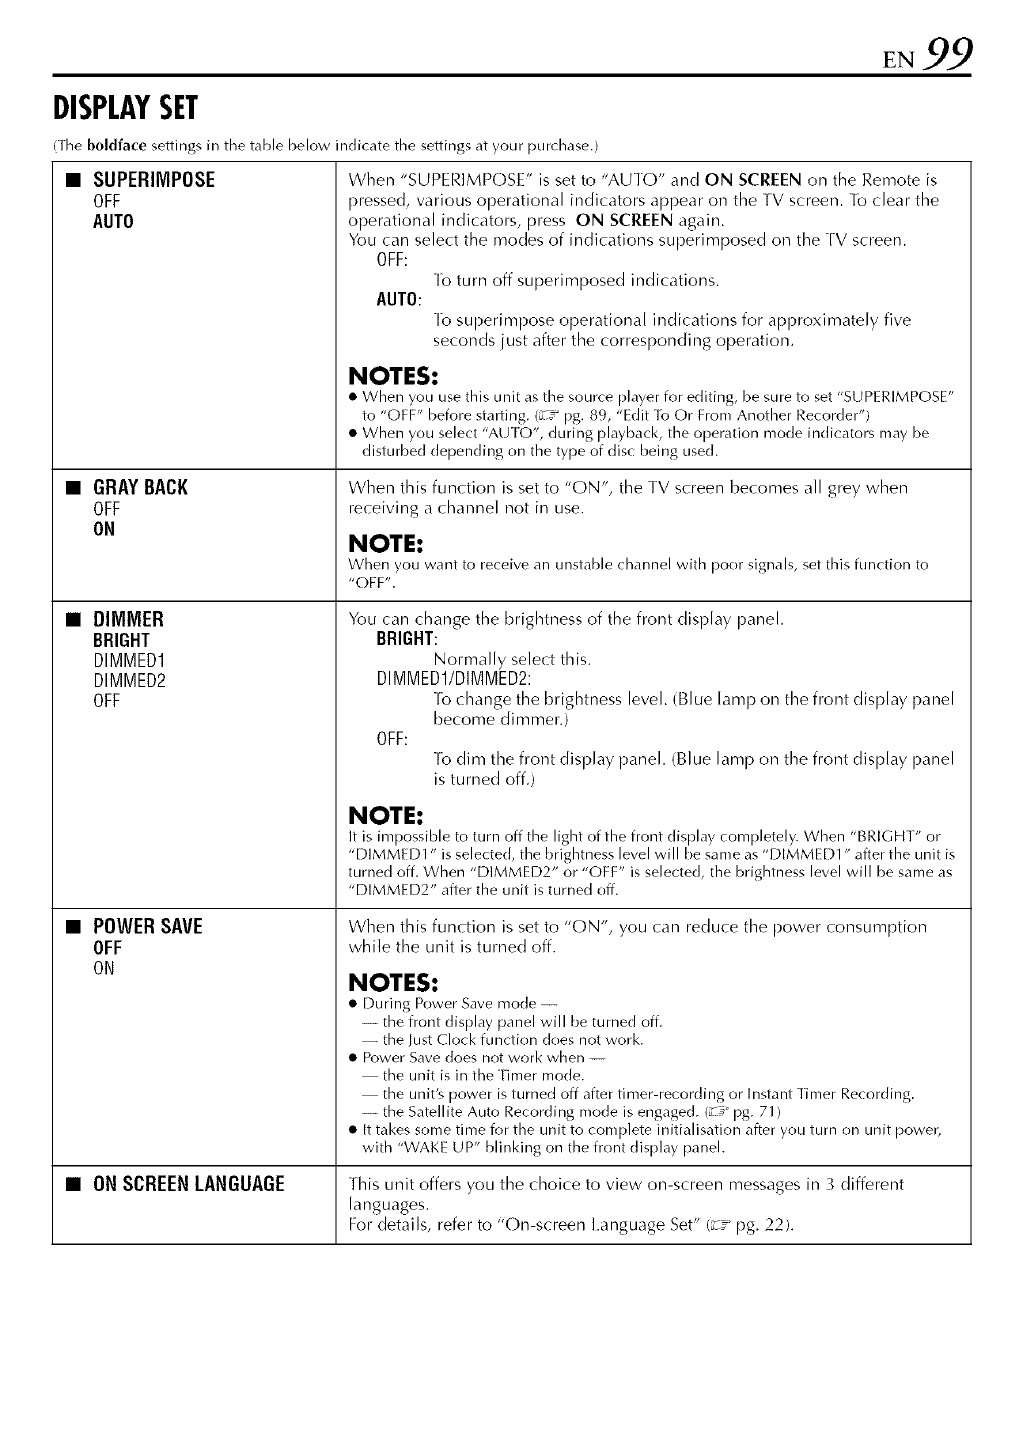
DISPLAYSET
The boldface settings in the table below indicate the settings at your purchase.)
•SUPERIMPOSE
OFF
AUTO
•GRAYBACK
OFF
ON
When "SUPERIMPOSE" is set to "AUTO" and ON SCREEN on the Remote is
pressed, various operational indicators appear on the TV screen. To clear the
operational indicators, press ON SCREEN again.
You can select the modes of indications superimposed on the TV screen.
OFF:
[b turn off superimposed indications.
AUTO:
[b superimpose operational indications for approximately five
seconds just after the corresponding operation,
•DIMMER
BRIGHT
DIMMED1
DIMMED2
OFF
•POWERSAVE
OFF
ON
NOTES:
•When you use this unit as the source player for editing, be sure to set "SUPERIMPOSE"
to "OFF" before starting. (_z__ pg. 89, "Edit ]b Or From Another Recorder")
• When you select "AUTO", during playback, the operation mode indicators may be
disturbed depending on the type of disc being used.
When this function is set to "ON", the TV screen becomes all grey when
receiving a channel not in use.
NOTE:
When you want to receive an unstable _hannel with poor signals, set this function to
"OFE'.
You can change the brightness of the front display paneh
BRIGHT:
Normally select this.
DIMMED1/DIMMED2:
[b change the brightness level. (Blue lamp on the front display panel
become dimmer.)
OFF:
[b dim the front display paneh (Blue lamp on the front display panel
is turned off.)
NOTE:
It is impossible to turn off the light of the front display completely. When "BRIGHT" or
"DIMMED1 " is selected, the brightness level will be same as "DIMMED1" after the unit is
turned off. When "DIMMED2" or "OFF" is selected, the brightness level will be same as
"DIMMED2" after the unit is turned off.
When this function is set to "ON", you can reduce the power consumption
while the unit is turned off.
NOTES:
• During Power Save mode-
-- the front display panel will be turned off.
-- the lust Clock function does not work.
• Power Save does not work when --
the unit is in the Timer mode.
the unit's power is turned off after timer-recording or Instant Timer Recording.
-- the Satellite Auto Recording mode is engage(]. (_-_ pg. 71 )
• [t takes some time for the unit to complete initialisation after you turn on unit power,
with "WAKE UP" blinking on the front display panel.
• ON SCREENLANGUAGE This unit offers you the choice to view on-screen messages in 3 different
languages.
For details, refer to "On-screen Eanguage Set" (_-_"pg. 22).
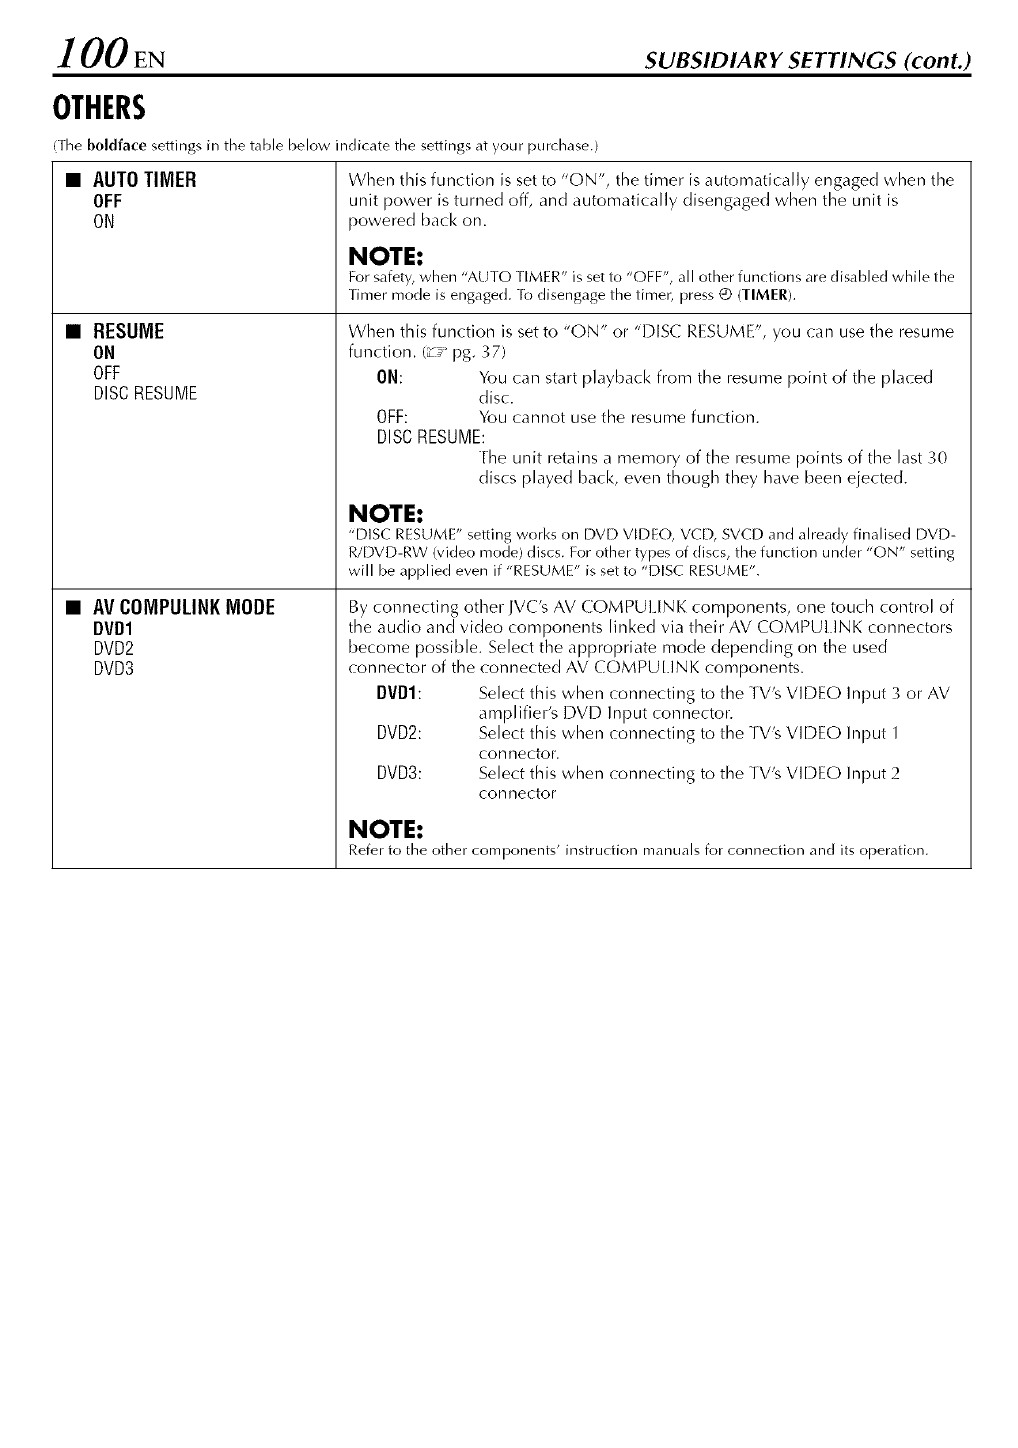
.l 00 EN SUBSIDIARY SETTINGS (cont.)
OTHERS
The boldface settings in the table below indicate the settings at your purchase.)
•AUTOTIMER
OFF
ON
•RESUME
ON
OFF
DISCRESUME
•AV COMPULINKMODE
DVD1
DVD2
DVD3
When this function is set to "ON", the timer is automatically engaged when the
unit power is turned off, and automatically disengaged when the unit is
powered back on.
NOTE:
For safety, when "AUTO TIMER" is set to "OFF", all other functions are disabled while the
Timer mode is engage(]. [b disengage the timer, press (D (TIMER).
When this function is set to "ON" or "DISC RESUME", you can use the resume
function./_-_ _pg. 37)
ON: You can start playback from the resume point of the placed
disc.
OFF: You cannot use the resume function.
DISCRESUME:
The unit retains a memory of the resume points of the last 30
discs played back, even though they have been ejected.
NOTE:
"DISC RESUME" setting works on [-)VD VIDE(-), VCL-),SVCE) and already finalised DVD-
R/DVD-RW (video mode) discs. For other types of discs, the function under "ON" setting
will be applied even if "RESUME" is set to "DISC RESUME".
By connecting other JVC's AV COMPUIENK components, one touch control of
the audio and video components linked via their AV COMPUI.INK connectors
become possible. Select the appropriate mode depending on the used
connector of the connected AV COMPU[ INK components.
DVDI: Select this when connecting to the TV's VIDEO Input _; or AV
amplifier's DVD Input connector.
DVD2: Select this when connecting to the TV's VIDEO Input 1
connector.
DVD3: Select this when connecting to the TV's VIDEO Input 2
connector
NOTE:
Refer to the other components' instru<tion manuals for connection and its operation.

EN101
Formata disc
Some DVD-RAM/RW discs are unformatted.
Format the disc when you use an unformatted disc or you want
to delete all recordings and data on the disc.
ATTENTION:
• When a disc is formatted, all recordings and data are
erased, It is impossible to restore them.
• Never turn off the unit or disconnect the mains power cord
while "NOW FORMATTING..." is displayed on the TV
screen.
Formata DVD-RAMdisc
Accessthe MainMenuscreen.
Press SET UP.
_Accessthe "UTILITY"screen.
[] Press/'\_ _ _" to select
"DVD SET UP", then press
ENTER.
[] Press <[ _" to select
"UTILFFY', then press
ENTER.
•Turn on the unit.
• Turn on the TV and select the AV mode.
• Slide the TV/CABLE/DBS/DVD switch to DVD.
• hoad a DVD-RAM/RW disc to format.
SETUP
_ZDCZDCZD_)
VCRplu_ PRO_H_RECLINKTIMER
............CZ_
_TOPr_E_U r_'iG_iON
r_ENU nE_UR_
SLOW= P_E_ECT SLOW+
REC_ODELIVECHECK_ _
o 0o0,Z,Z
SETUP
_©OO®
dVC
I_1 Formatthe disc.
[] Press/'\_, to select "FORMAT", then press ENTER.
Press <_ _" to select "YES", then press ENTER when
"DISC WIll BE FORMATTED" appears on the TV
screen.
[] Press <" _ to select "OK", then press ENTEr when
"DISC FORMATTING WAS SEI.ECTED" appears on
the TV screen.
Formata DVD-RWdisc
Perform steps [] to [] of "Format a DVD-RAM disc" on the
above before continuing,
Formatthe disc.
[] Press/'\_ to select "FORMAT", then press ENTER.
Press < _ to choose "VR MODE" or "VIDEO MODE",
then press ENTER when "DISC WIlL BE
FORMATTED" appears on the TV screen.
"VR MODE": lb be chosen when you want to
record, erase, or edit data on the
disc repeatedly.
"VIDEO MODE':To be chosen when you want to
erase all the data on the disc once
played back to record new data, or
play the disc on other DVD players.
[] Press <" _" to select "YES", then press ENTEr when
"DISC W[[.I. BE FORMATTED IN VR MODE/VIDEO
MODE" appears on the TV screen.
NOTES:
• It is impossible to format Version 1.0 DVD-RW discs in Video
nlode.
• It is impossible to format DVD-R discs.
• All the programs on a disc will be deleted once the disc is
formatted even if they are protected titles. 1_u" pg. 76, "Protect
title")
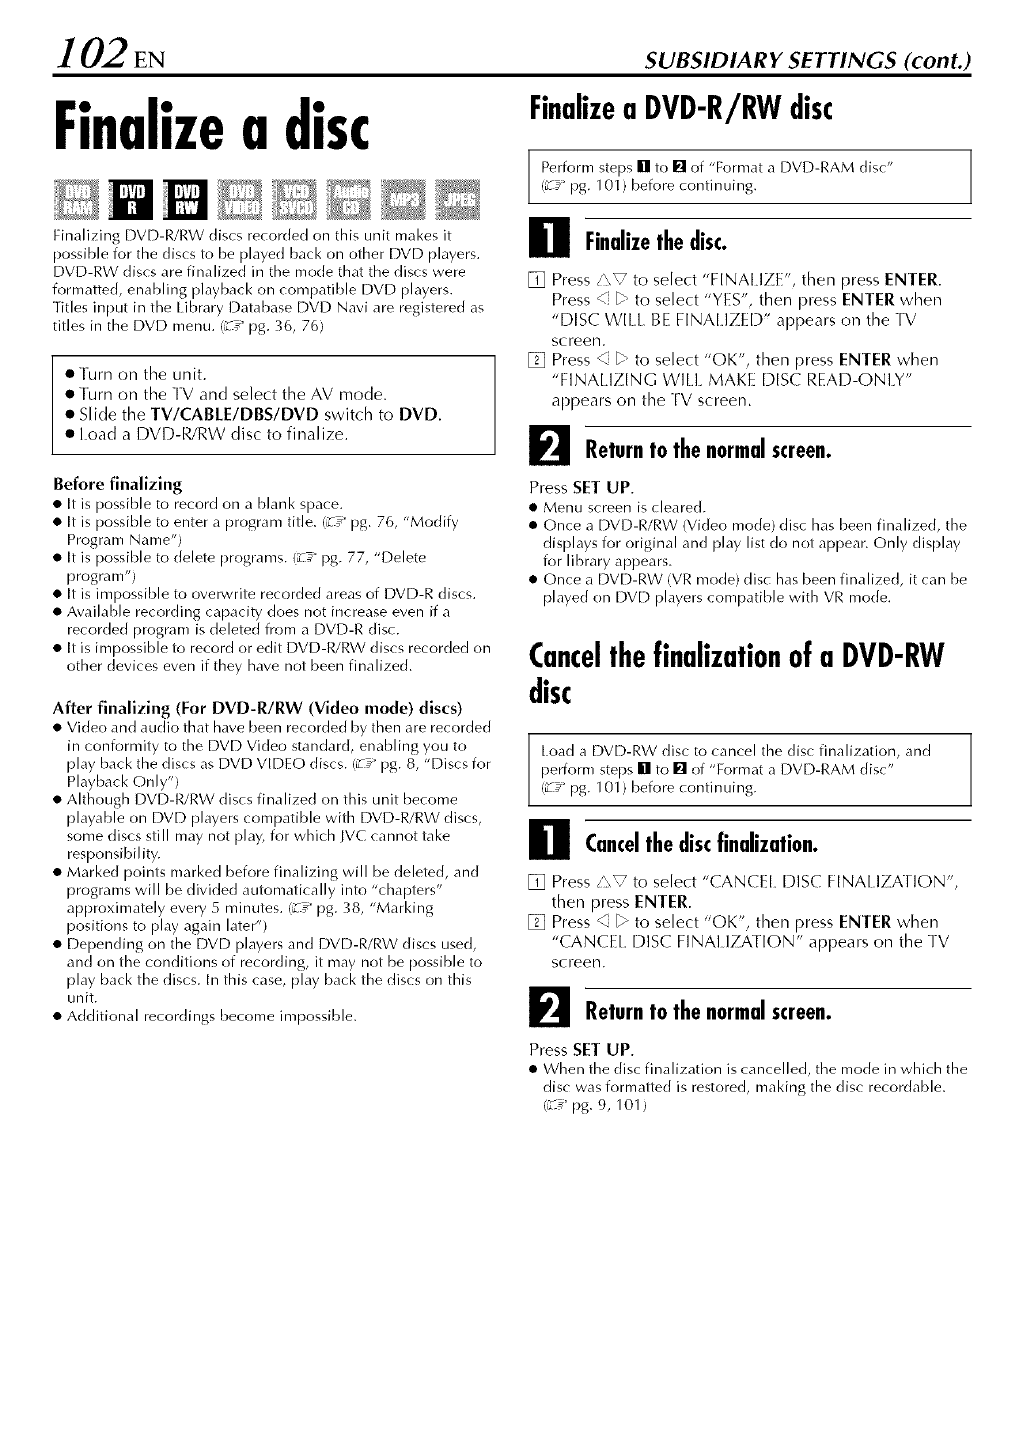
102 EN SUBSIDMRY SETTINGS (cont.)
Finalizea disc
i
Finalizing DVD-R/RW discs recorded on this unit makes it
possible for the discs to be played back on other DVD players.
DVD-RW discs are finalized in the mode that the discs were
formatted, enabling playback on compatible DVD [)layers.
Titles input in the Library Database DVD Navi are registered as
titles in the DVD menu. (L_" pg. 36, 76)
• Turn on the unit.
• Turn on the TV and select the AV mode.
• Slide the TV/CABLE/DBS/DVD switch to DVD.
• Load a DVD-R/RW disc to finalize.
Before finalizing
• It is possible to re_ord on a blank spa(e.
• [t is possible to enter a program title. (L_" pg. 76, "Modify
Program Name")
• It is possible to delete programs. (_-_" pg. 77, "Delete
program")
• It is impossible to overwrite recorded areas of DVD-R discs.
• Available recording capacity does not increase even if a
recorded program is delete(] from a DVD-R disc.
• [t is impossible to record or edit DVD-R/RW discs recorded on
other devices even if they have not been finalize(].
After finalizing (For DVD-R/RW (Video mode) discs)
• Video and audio that have been re_-orded by then are re_-orded
in conformity to the DVD Video standard, enabling you to
play back the discs as DVD VIDEO discs. (L_" pg. 8, "Discs for
Playback Only")
• Although DVD-R/RW discs finalized on this unit become
playable on DVD [)layers compatible with DVD-R/RW discs,
some discs still may not [)lay, for which IVC cannot take
responsibility.
• Marked points m a rked before fi nalizi ng will be deleted, and
programs will be divided automatically into "chapters"
approximately every 5 minutes. (z_" pg. 38, "Marking
positions to [)lay again later")
• Depending on the DVD players and DVD-R/RW discs used,
and on the conditions of recording, it may not be possible to
play back the discs. In this case, play back the discs on this
unit.
• Additional recordings become impossible.
Finalizea DVD-R/RWdisc
Perform steps [] to [] of "Format a DVD-RAM disc"
(L_ :" pg. 101) before continuing.
Finalizethe disc.
[] Press/'\V to select "FINAI.IZE', then press ENTER.
Press < b" to select "YES", then press ENTEr when
"DISC WElL BE FINAl IZED" appears on the TV
screen.
[] Press _ b" to select "OK", then press ENTER when
"FINALIZING WILL MAKE D[SC READ-ONLY"
appears on the TV screen.
I_1 Returnto the normalscreen.
Press SET UP.
• Menu screen is cleared.
• Once a DVD-R/RW (Video mode) disc has been finalized, the
displays for original an(J play list do not appear. Only display
for library appears.
• Once a DVD-RW (VR mode) disc has been finalize(], it can be
played on DVD players compatible with VR mode.
Cancelthefinalizationofa DVD-RW
disc
Load a DVD-RW disc to cancel the disc finalization, and]
perform steps [] to [] of "Format a DVD-RAM disc"
(z_" pg. 101) before continuing.
Cancelthe discfinalization.
[] Press/'\_ to select "CANCEl [DISC FINALIZATION",
then press ENTER.
[] Press _ _ to select "OK", then press ENTER when
"CANCEl DISC FINALIZATION" appears on the TV
screen.
I_1 Returnto the normalscreen.
Press SET UP.
• When the disc finalization is cancelled, the mode in which the
disc was formatted is restored, making the disc recordable.
(_-_"pg. 9, 101)
EN103
ScanModeSet
You can select the scan mode from two modes: Interlaced
scan mode which is used in the conventional TV system,
and Progressive scan mode which enables reproduction
of higher-quality images. For details, refer to
"G[OSSARY" (_-_¢pg. 108).
TrayLock
You call lock the disc tray to prohibit the unwanted disc
ejection by children.
I oTurn off the unit. ]
• Turn on the unit.
• Turn on the TV and select the AV mode.
• Slide the IV/CAB[E/DBS/DVD switch to DVD.
ATTENTION:
Your TV needs to be compatible with Progressive.
Setthe scanmode.
Press PROGRESSIVE SCAN for 3 or more seconds.
• Vide() output indicator (_l) lights on the front display panel if
Progressive scan mode has been established. (_z__pg. 15)
• Each press of PROGRESSIVE SCAN for 3 or more seconds
switches the scan mode.
NOTES:
• Interlaced scan mode isthe setting at your purchase.
• Interlace(] scan mode might be suitable depending on video
material.
• Scan mode cannot be set while menu screen is displayed.
Lockthe disctray.
While the unit is turned off, press and hold II, then press
A on the unit. "[ OCK" appears on the front display
paneh
• If you try to eject the discs, "LOCK" appears an(] indicates that
tray is locke(].
To unlock tray
While the unit is turned off, press and hold II, then press
A on the unit. "UNLOCK" appears on the display panel.
.l O_ EN TROUBLESHOOTING
Before requesting service for a problem, use this chart and see if you can solve tile trouble yourself. Small problems are
often easily solved, and this can save you the trouble of sending your unit off for repair.
GENERAL
SYMPTOM POSSIBLECAUSE CORRECTIVEACTION
1. No power is supplied to the unit. •The AC power plug is disconnected from Connect the AC power plug to the mains
the mains, securely. (_-_ pg. 18)
2. The channel cannot be changed. • Recording or Live Memory recording is Press II to pause recording, change the
in progress, channel, then press I_ to resume
recording.
3. The Remote does not operate the unit. • The setting of the remote control code is Set the same remote control code (1,2, 3,
inappropriate, or 4) on both the unit an(] the Remote.
• The batteries are discharged. Replace the dead batteries with new ones.
4. Dubbing from the external equipment • The setting of the input channel position Select the input channel position ("F-1 ",
is not possible, is inappropriate. "L-1 ", or "L-2") that corresponds to the
input terminal connected to the external
equipment. (_-_" pg. 89)
5. The on-screen display superimposed Set "SUPERIMPOSE" to "OFF".
on the program played back/received (_-_" pg. 99)
on this unit is recorded when you dub
the program to an external recording
equipment.
6. The Remote does not work properly. Remove the batteries, wait for 5 minutes
or more, then load the butteries again.
• The batteries are discharged. Replace the dead batteries with new ones.
7. The unit does not operate. • There are cases when the operation is
prohibited on the disc.
• Lightning or static electricity may cause Press d)/[ on the unit or DVD_;/[ on the
malfunction of the unit. Remote to turn the power off, then press
the button again to turn the power on.
PLAYBACK
SYMPTOM .POSSIBLECAUSE ICORRECTIVEACTION
1. Images do not appear on the TV • The TV is not set to the AV mode. Set the TV to the AV mode.
screen, • When interlace scanned program is
played back, progressive scan mode is
selected,
• The disc is loaded upside (]own,2. Playback dose not start or stop
immediately after playback is started
by pressing I_.
On the front display panel, "NO DISC"
appears. • A disc not being compatible with the
unit is loaded.
• A dirty disc is loaded.
• Defective disc is loaded.
Press an(] hold PROGRESSIVE SCAN until
[_ disappears from the front display
paneh
Place the disc on the disc tray with the
playback surface facing downward,
(_ _'"pg. 11 )
Load a playable disc on the unit.
(_:_'"pg. 7, 8)
Clean the disc. (_" pg. 11)
Replace the warped or scratched disc with
a normal one.
3. Images are blurred or distorted when Images are blurred or distorted at the point
you start High-Speed Search. where the playback speed changes and
this is not a malfunction of the unit,
4. Playback does not start, Playback does not start for approximately
-- 30 seconds after recording is stopped and
this is not a malfunction of the unit,
5. Playback does not start when you • The Parental Lock is engage(] an(:] the Release the Parental Lock temporarily or
select a title or a chapter, disc is rate(] higher than the set level, change the set level, i_-_" pg. 53)

E. 105
RECORDING
SYMPTOM . POSSIBLECAUSE I CORRECTIVEACTION
1. The desired program cannot be
recorded.
2. Recording an(] editing cannot be
made.
• The channel position does not
correspond to that in the receiving area.
• No disc or a disc not being compatible
with the unit is loaded.
• The disc loaded is not formatted.
• A finalized DVD-R disc is loaded.
Set the correct channel position for the
receiving broadcast. (_-u" pg. 26)
Load a recordable disc on the unit.
(,X_" pg. 7)
Format the disc. (z_ _pg. 101 )
Recording and editing cannot be made on
finalized discs. (z4" pg. 102) Load a
recordable disc on the unit.
Clear unnecessary programs on the disc or
load a blank disc. (:-_ pg. 77)
Release the protect tab. (_-_" pg. 11 )
• The disc is full or does not have enough
space for the program to be recorded.
• The protect tab on the DVD-RAM
cartridge is set to the protect position.
• Date and time is not correct.
• Power failure occurred before the timer
programed recording starts.
• Date an(] time set on the unit is not
correct,
• The channel position does not
correspond to that in the receiving area.
• The DBS receiver is not connected
properly to this unit.
3. Timer programing cannot be made. Set date and time correctly. (z_" pg. 24)
4. Timer programing recording does not Check the timer programing. (_-_" pg. 69)
start.
5. VCR Plus+ Timer Programing cannot Set date and time correctly. (_-_" pg. 24)
be made.
Set the correct channel position for the
receiving broadcast. (___"pg. 26)
6. Satellite Auto Recording recording Connect the DBS receiver to the AUDIO/
does not start. VIDEO INPUT (L-1) connector properly.
(:-_ pg. 32)
• Power failure occurred. Set date and time correctly. (z_ _pg. 24)7. On the front display panel, " :
appears.
8. "PROGRAM FUll." appears on the TV
screen during timer programing.
• Eight programs have already been timer Clear unnecessary programs on the unit,
programed, then try timer programing again.
(_:_ pg. 69)
9. The disc space does not increase when • The PC's data recorded on a DVD-RAM Format the disc, (When the disc is soiled,
recorded programs are cleared, ()rive cannot be cleared on this unit, wipe the disc with a soft dry cloth before
formatting,) (_-_ pg. 11,101)
INITIALIZING
SYMPTOM POSSIBLECAUSE I CORRECTIVEACTION
1. Malfunction occurs on the unit. Press L)/[ to turn off the unit, press and
-- hold Lb/I, then press • for two seconds or
more.
2. ]he Disc. Tray doesn't ()pen, R_ke out the disc in following ways,
• Connect an(] the disconnect the power
cord from the main outlet.
• Press an(:] hold the open/dose button
(_) on the unit until the disc tray opens.
(it will take about 30see.)
• (_:lose the disc tray by pressing the open/
close button after taking out the disc.
(the main power shuts down.)
ATTENTION:
]his unit contains microcomputers. External electronic noise or interference could cause malfunctioning. In such cases, switdl the
unit off and unplug the mains power cord. Then plug it in again and turn the unit on. Bike out the disc. After checking the disc,
operate the unit as usual.
106EN TROUBLESHOOTING (cont.)
ON-SCREEN MESSAGES
MESSAGE DESCRIPTION
MEMORY IS FULL The memory is full for registration for the Navigation system. lhe
NOTHING MORE CAN BE REGISTERED IN THE lIBRARY recording cannot be started even though the capacity for the
IF YOU DELETE UNNECESSARY TITI.E INFORMATION, recording is enough. (z_° pg. 77)
YOU CAN THEN REGISTER ADDITIONAL INFORMATION
AVAILABLE MEMORY IS lOW The remaining capacity of the memory is not enough for
SOON YOU WILL NO LONGER BE ABLE registration for the Navigation system. The recording cannot be
TO REGISTER INFORMATION IN THE LIBRARY started even though the capacity for the recording is enough.
IF YOU DELETE UNNECESSARY TITLE INFORMATION, (Z_:_pg. 77)
YOU CAN THEN REGISTER ADDITIONAL INFORMATION
DISC NOT REGISTERED IN THE LIBRARY A disc that is not registered in the library has been inserted.
REGISTER DISC? Register the disc as necessary. (zT" pg. 83)
INSERT DISC _XXXX Ap years when a title that has been selected in the library is not
contained in the loaded disc. (L_ :_pg. 82)
CAN NOT RECORD OR MAKE PLAY LIST • Recording and/or editing cannot be performed with a loaded
DELETE UNWANTED TITLES DVD-RAM disc.
• The number of titles exceeds 99.
• The number of play lists exceeds 999.
SET CLOCK BEFORE TIMER PROGRAMING ]b set the timer program, the clock must be set in advance.
(_7" pg. 24)
PROGRAM FUH. You can program this unit to timer-record as many as 8
DELETE UNWANTED TIMER PROGRAM )rograms. ]Z) )rogram more, you need to cancel a timer program
already set. (L_ :_pg. G9)
CAN NOT SET DISC TIMER PROGRAMING WITH [HIS DISC On-Disc Timer Programing has been attempted when a disc that
PREPARE A FORMATTED DISC AS DESCRIBED BELOW is not compatible with the function is loaded. (z_ ° pg. G6)
DVD-RAM
DVD-RW (VR MODE)
NO DISC INSERTED On-Disc Timer Programing has been attem )ted when a disc is
not loaded, or loaded upside down. (z_ :_pg. 11,66)
DISC NOT RECORDABLE When a )layback-only disc or a finalized disc is loaded, • has
INSERT RECORDABLE DISC been pressed. (z_ :_pg. 8, 102)
PLUSCODE NO. ERROR An invalid PlusCode number has been input. (zT" pg. 60)
CONFIRM PLUSCODE NO. THEN RETRY
GUIDE PROGRAM IS NOT SET To set the timer program using the VCR Plus+ system, the Guide
SELECT CHANNEl. YOU WANT TO RECORD Channel number must be set in advance. (L_ :_pg. 62)
CAN NOT SET VCR PLUS+ TIMER PROGRAMING DURING Appears when you tried to input a PlusCode number during
TIMER RECORDING OR INSTANT TIMER RECORDING timer recording or instant timer recording.
CANCEl. TIMER RECORDING OR
INSTANT TIMER RECORDING, THEN
ENTER THE PLUSCODE AGAIN
REGION CODE ERROR A disc loaded cannot be )layed back on this unit since the
CHECK DISC region number of the (isc (oes not match that of the unit.
(_:" pg. 8)
UNREADABLE DISC When an incompatible disc is loaded, I_ has been pressed.
CHECK DISC (zT" pg. 8)
COULD NOT FORMAT THE DISC Formatting is not complete since the disc may be dirty or
CHECK THE DISC damaged. R-_ke out the disc, clean it and retry. (zT" pg. 11, 101 )
COULD NOT FINALIZE [HE DISC Finalizing is not complete since the disc may be dirty or
CHECK THE DISC damage(L R]ke out the disc, clean it and retry. (L_:_pg. 11, 102)
COULD NOT CANCEL DISC F[NAHZATION Cancelling disc finalization is not complete since the disc may
CHECK THE DISC be dirty or damaged. li/ke out the disc, clean it and retry.
(z_° pg. 11, 102)
EN107
PRESS [STOPI AGAIN TO STOP RECORDING During lave Memory playback, • has been pressed. (_-_ pg. 44)
TIMER RECORDING COMPLETED _Timer recording has finished during Live Memory playback.
PLAYBACK Will STOP Timer recording finished during lave Memory playback, then the
THEN TIMER RECORDING WILL START next timer recording is about to begin while playback continues.
COPY PROHIBITED • An attempt has been made to record copy-protected contents.
CAN NOT RECORD • An attempt has been made to record copy-once contents on a
disc that is not CPRM compatible, such as DVD-R.
COPY PROHIBITED The unit has detected invalid contents at the start or in the
CAN NOT PLAY middle of playback.
THE i.I INK DEVICE THAT YOU HAVE CONNECTED IS NOT An attem )t has been made to start DV dubbing when a digital
RECOGNIZED vi( eo camera is not proper y connecte( to the unit.
MAKE SURE THAT IHE DEVICE IS CONNECTED PROPERLY Check the connection. (_-_ pg. 86)
AND POWERED ON
108 EN C.tOSSARY
IAspect ratio
The ratio of vertical and horizontal sizes of a displayed image.
The horizontal vs. vertical ratio of conventional TVs is 4:3, and
that of wide-screens is 16:9.
• Chapter
Refers to individual chapters included in a title.
• Composite video signal
Refers to video signal comprised of three kinds of signals
combine(]: an image signal made up of luminance and
chrominance signals using the frequency multiplication
technique; burst signal providing the basis for colour
reproduction; and synchronization signal.
• Component video signal
A video signal system where parts of information necessary for
reproducing image signal comprised of the three primary
colours of light are transmitted via separate signal lines. Types of
signal, such as R/G/B, Y/PB/PR, etc., are available.
• Disc menu
A s_reen display prepared for allowing selection of images,
sounds, subtitles, multiangles, etc. recorded on a DVD disc.
• Dolby Digital (AC-3)
A six-channel system consisting of left, centre, right, left rear,
right rear and lEE (Low-Frequency Effect channel, for use with a
sub-woofer) channels. All processing is (]one in the digital
donlain.
Not all Dolby Digital discs contain six (5.1) channels of
information.
• Down-mix
Internal stereo mix of multichannel surround audio by a DVD
player. lhe down-mix signals are output from stereo output
connectors.
• DTS
A Digital Surround audio encoding format configured with six
(5.1) channels, similar to Dolby Digital. It requires a decoder,
either in the player or in an external receiver. DTS stands for
Digital Theater Systems.
Not all DTS discs contain six (5.1) channels of information.
•Interlaced scan
In the conventional video system, a picture is shown on the
display monitor in two halves. The Interlaced scan system places
lines of the second half of the )icture in-between lines of the first
half of the picture.
IJPEG
A still-picture data compression system proposed by the Joint
Photographic Expert Group, which features small decrease in
image quality in spite of its high compression ratio.
• Letter box
A method of displaying wide images like movies in the centre of
a 4:3 TV screen with no part of the image deleted, by placing
black bands on the top and bottom of the screen. This name has
resulted from the screen form looking literally like a letter box.
• Linear PCM (PCM: Pulse Code Modulation)
A system for converting analog sound signal to digital signal for
later processing, with no data compression used in conversion.
•MP3
A file format with a sound data compression system. "MP3" is
the abbreviation of Motion Picture Experts Group 1 (or MPEG-1 )
Audio Layer 3. By using MP3 format, one CD-R/RW can contain
about 10 times as much data volume as a regular CD can.
IMPEG
A family of Standards for _ompressing audio-visual information_
"MPEG" standards include MPEG-1, MPEG-2 and MPEG-4.
Video CD/SVCD and MP3 are based on MPEG-1, while DVD is
based on MPEG-2. MPEG stands for Moving Picture coding
Experts Group.
•Multlangle
By recording multiple scenes progressing at the same time in a
single title, the user can select view angles. This feature is called
the multiangle function.
•Multichannel
DVD is specified to have each sound track constitute one sound
field. Multichannel refers to a structure of sound tracks having
three or more channels.
• Multilanguage
When a title is created to cope with multiple languages, it is
generally called a multilanguage title.
• NTSC (National television system committee)
A black and white and colour television system format used in
the U.S.A., Canada, Mexico and Japan.
•PAL (Phase Alternation by Line)
A colour television system format used extensively in Western
Europe.
•Parental Lock
A feature of this system to automatically determine whether or
not to reproduce particular DVD software by comparing its
parental lock level (a measure of undesirability of scenes, etc.
from educational viewpoint) set for the software beforehand
with that set on this system by the user; if the software's level is
less restrictive than the user-set level, it will be reproduced.
•Playback control (PBC)
Refers to the signal recorded on Video CDs/SVCD for controlling
reproduction. By using menu screens recorded on a Video CD/
SVCD that supports PBC, you can enjoy interactive-type
software as well as software having a search function.
•Progressive scan
Progressive scan displays all the horizontal lines of a picture at
one time, as a single frame. This system can convert the
interlaced video from DVD into progressive format for
connection to a progressive display. It dramatically increases the
vertical resolution.
• Region Code
A system for allowing discs to be played back only in the regions
designated beforehand. All the countries in the world are
grouped into six regions, each region being identified by a
specified Region Code (or region number). If the Region Code
given to a disc includes a numeral which matches one in the
Region Code of a player, the player can play back the disc.
•Sampling frequency
Frequency of sampling data when analog data is converted to
digital data. Sampling frequency numerically represents how
many times the original analog signal is sampled per second.
•Surround
A system for creating three-dimensional sound fields full of
realism by arranging multiple speakers around the listener.
•Transfer rate
The rate of transferring digital data. Usually the measure is in
baud per second. The DVD system applies a variable transfer
rate system for high efficiency.
SP CmCArXONS EN109
GENERAL
Power requirement : AC 120 V%, 60 Hz
Power consumption
Power on 34 W
Power off 16.2 W
iemperature
Operating 5°C to 40°C (41 °F to 104°F)
Storage -20°C to 60°C (_°F to140°F)
Operating position Horizontal only
Dimensions (WxHxD)
4_¢5 mm x 70 mm x 346 mm
4.5 kgWeight
VI D EO/AU D I O
Recordable disc
Recording format
DVD-RAM
DVD-R
DVD-RW
DVD-RAM I2 cm (4.7 GB/9.4 GB)
DVD-RAM 8 cm (1.4 GB/2.8 GB)
DVD-R (12 cm: 4.7 GB,
8 cm: 1.4 GB for General Ver. 2.0)
DVD-RW (4.7 GB for Ver. 1.0/1.1 )
: DVD Video Recording format
: DVD-Video format
: DVD-Video format, DVD Video
Recording format
Recording time
Maximum 8 hours (with 4.7 GB disc)
(XP) : Approx. 1 hour
(SP) : Approx. 2 hours
(I.P) : Approx. 4 hours
(EP) : Approx. 6 hours
(FR) : Approx. 1 hour 8 hours
Playable disc : DVD-RAM 12 cm (4.7 GB/9.4 GB)
DVD-RAM 8 cm (1.4 GB/2.8 GB)
DVD-R (12 cm: 4.7 GB,
8 cm: 1.4 GB for General Ver. 2.0)
DVD VIDEO, DVD-RW (4.7 GB)
Music CD (CD-DA)
Video CD
Input/Output
S-video input
Y
C
S-video output
Y
C
Video input
Video output
Audio input
Audio output
i.l.ink
0.8 1.2 Vp-p, 75 ohms
0.2 0.4 Vp-p, 75 ohms
1.0 Vp-p, 75 ohms
0.3 Vp-p, 75 ohms
0.5 - 2.0 Vp-p, 75 ohms (pin jack)
1.0 Vp-p, 75 ohms (pin jack)
-8 dB, 50 kilohms (pin jack)
Corresponding to mono (left)
8 dB, 1 kilohms (pin jack)
4-pin for DV input
Component video output
Y : 1.0 Vp-p, 75 ohms
PB/PR : 0.7 Vp-p, 75 ohms
Corresponding to copy protection
[Digital audio output
Optical : -1 8 dBm, 660 nm
Coaxial
TUNER
Tuning system
Channel coverage
VHF
UHF
CATV
Super Video CD (SVCD)
CD-R/RW (CD-DA, Video CD/
: 0.7 Vp-p, 75 ohms
Corresponding to Dolby Digital and
DTS Digital Surround
Bit stream
Selectable in digital audio output
setting menu
SVCD formatted discs)
Audio recording system
: Dolby [Digital (2 ch)
].inear PCM (XP mode only)
Video recording compression system
: MPEG2 (CBR/VBR)
Frequency synthesized tuner
Channels 2 - 13
Channels 14- 69
113 Channels
Specifications shown are for SP mode unless otherwise
specified.
E.& O.E. Design and specifications subject to change without
notice.
ACCESSORI ES
Provided accessories
: RF cable,
Audio/video cable,
Controller,
Infrared remote control unit,
"AA" battery x 2
TIMER
Clock reference : Quartz
Program capacity : 1-year programmable timer/
8 programs
Memory backup time
Approx. 60 min.
110 EN usroJ:r RMS
A
A-B Repeat Playback ............................................ 49
Adjusting the picture quality .................................. 51
Angle Selection .................................................... 39
Audio Channel Selection ....................................... 40
Audio I anguage/Sound Selection ........................... 39
AUDIO OUTPUI ................................................. 97
Auto Channel Set ................................................. 26
C
Check, cancel and change programs ....................... 69
Clock Set ............................................................ 24
Controller ........................................................... 32
D
DBS receiver ....................................................... 32
Delete program .................................................... 77
Disc menu .......................................................... 36
Discs for Playback Only .......................................... 8
DISPLAY SET ....................................................... 99
DVD menu ......................................................... 36
F
File Structure of Discs ............................................. 9
Free Rate Function ............................................... 59
G
Guide Channel Number ........................................ 63
H
High-Speed Search ............................................... 37
I
[nstant rimer Recording (ITR) ................................. 58
I_
[etter Box ........................................................... 28
[ ibrary Database DVD Navi .................................. 72
[ire Memory ....................................................... 41
M
Manual Channel Set ............................................. 27
Manual Clock Set ................................................. 25
Marking positions to play again later ....................... 38
Menu/Audio/Subtitle [ anguage Set ......................... 22
O
On-Disc rimer Programing .................................... 66
One louch Replay ............................................... 45
On-screen language Set ........................................ 22
P
Pan&Scan ........................................................... 28
Parental [.ock ....................................................... 53
Play list .............................................................. 78
Play Set Up Menu ................................................ 46
Playback Control (PBC) ......................................... 40
Plug&Play Set ...................................................... 21
Program Playback ................................................ 52
R
Random Playback ................................................. 52
Recordable/playable discs ....................................... 7
Recording Medium and Format ................................ 9
Recording Resume Function ................................... 57
RECORDING SET ................................................. 98
Recording Speed .................................................. 58
Region Number ...................................................... 8
Register disc ........................................................ 83
Repeat Playback ................................................... 48
Resume Function .................................................. 37
S
Scan Mode Set ................................................... 103
Select the switching interval of the slide show .......... 52
Semiauto Clock Set ............................................... 24
Setting the progressive mode .................................. 5]
Simulated Surround Effect ...................................... 50
Skip Search .......................................................... 37
Slow Motion ........................................................ 37
Still Picture/Frame-By-Frame Playback ..................... 37
Subtitle Selection .................................................. 39
T
rime Search ......................................................... 50
Top menu ............................................................ 36
Tuner Set ............................................................. 26
U
Unplayable Discs ................................................... 8
WARRANTY (Only in U.S.A.) EN 111
JVC *
• LIMITEDWARRANTY USAONLY *
-k
. ONLYFORPRODUCTPURCHASEDINU.S.A. CONSUMERVIDEO1-90 .
,JVC COMPANY OF AMERICA warrants this product and all parts thereof, except as set forth below ONLY TO THE ORIGINAL,
PURCHASER AT RETAIL to be FREE FROM DEFECTIVE MATERIALS AND WORKMANSHIP from the date of original retail
purchase for the period as shown below. ("The Warranty Period")
_ HIS LIMITED WARRANTY IS VALID ONLY IN THE FIFTY (50) UNITED STATES, THE DISTRICT OF COLUMBIA AND IN _
COMMONWEALTH OF PUERTO RICO.
_. WHAT WE WILL DO:
If this product is found to be defective, JVC will repair or replace defective parts at no charge to the original owner. Such repair
-k and replacement services shall be rendered by JVC during normal business hours at JVC authorized service centers. Parts
used for replacement are warranted only for the remainder of the Warranty Period. All products and parts thereof may be _r
brought to a JVC authorized service center on a carry-in basis except for Television sets having a screen size 25 inches and -k
above which are covered on an in-home basis. -k
:WHAT YOU MUST DO FOR WARRANTY SERVICE: .*
Return your product to a JVC authorized service center with a copy of your bill of sale. For your nearest JVC authorized service -k
center, please call toll free: (800) 252-5722.
If service is not available locally box the product carefully preferably in the original carton and ship insured with a copy of
. , . , , , , . ,_-
,_ your b_llof sale plus a letter of explanation of the problem to the nearest JVC Factory Service Center, the name and location of
which will be given to you by the toll-free number.
If you have any questions concerning your JVC Product, please contact our Customer Relations Department.
•WHAT IS NOT COVERED: *
_r
.This limited warranty provided by JVC does not cover: ,k
1. Products which have been subject to abuse, accident, alteration, modification, tampering, negligence, misuse, faulty
installation, lack of reasonable care, or if repaired or serviced by anyone other than a service facility authorized by JVC to
render such service, or if affixed to any attachment not provided with the products, or if the model number or serial number _r
has been altered, tampered with, defaced or removed;
"_ 2. Initial installation and installation and removal for repair; _r
3. Operational adjustments covered in the Owner's Manual, normal maintenance, video and audio head cleaning; ,_
-_ 4. Damage that occurs in shipment, due to act of God, and cosmetic damage;
5. Signal reception problems and failures due to line power surge;
"_ 6. Video Pick-up Tubes/CCD Image Sensor, Cartridge, Stylus (Needle) are covered for 90 days from the date of purchase;
7. Accessories; "_
8. Batteries (except that Rechargeable Batteries are covered for 90 days from the date of purchase); _,
There are no express warranties except as listed above. -k
_r
• THE DURATION OF ANY IMPLIED WARRANTIES, INCLUDING THE IMPLIED WARRANTY OF MERCHANTABILITY, IS _:
LIMITED TO THE DURATION OF THE EXPRESS WARRANTY HEREIN. t_-
JVC SHALL NOT BE LIABLE FOR ANY LOSS OF USE OF THE PRODUCT, INCONVENIENCE, LOSS OR ANY OTHER -k
DAMAGES, WHETHER DIRECT, INCIDENTAL OR CONSEQUENTIAL (INCLUDING, WITHOUT LIMITATION, DAMAGE TO
-litTAPES, RECORDS OR DISCS) RESULTING FROM THE USE OF THIS PRODUCT, OR ARISING OUT OF ANY BREACH OF
THIS WARRANTY. ALL EXPRESS AND IMPLIED WARRANTIES, INCLUDING THE WARRANTIES OF MERCHANTABILITY
AND FITNESS FOR PARTICULAR PURPOSE, ARE LIMITED TO THE WARRANTY PERIOD SET FORTH ABOVE. -k
Some states do not allow the exclusion of incidental or consequential damages or limitations on how long an implied warranty _
lasts, so these limitations or exclusions may not apply to you. This warranty gives you specific legal rights and you may also
have other rights which vary from state to state.
JVC COMPANY OF AMERICA 1700 Valley Road -k
DIVISION OF JVC AMERICAS CORR Wayne, NJ 07470
************************************************************
REFURBISHED PRODUCTS CARRY A SEPARATE WARRANTY, THIS WARRANTY DOES NOT APPLY. FOR DETAILS OF
REFURBISHED PRODUCT WARRANTY, PLEASE REFER TO THE REFURBISHED PRODUCT WARRANTY INFORMATION
PACKAGED WITH EACH REFURBISHED PRODUCT.
For customer use:
Enter below the Model No. which is located either on the rear, bottom or side of the cabinet. Retain this information for future
reference.
Model No. : Serial No. :
Purchase date : Name of dealer :
FOR SERVICING (Only in U.S.A.)
Authorized Service Centers
QUALITY SERVICE
HOW TO LOCATE YOUR JVC SERVICE CENTER
TOLL FREE: 1 (800) 252-5722
http://www.jvc.com
Dear Customer,
In order to receive the most satisfaction from your purchase, please read the instruction booklet before
operating the unit. In the event that repairs are necessary, please call 1 (800) 252-5722 for your nearest
authorized service location or visit our website at www.JVC.com
Remember to retain your Bill of Sale for Warranty Service.
!3
!
Q
i
Do not attempt to service the product yourself
Caution
To prevent electrical shock, do not open the cabinet. There are no user serviceable parts
inside. Please refer to qualified service personnel for repairs.
Accessories
To purchase accessories for your JVC product, please call toll free: 1 (800) 252-5722 or
visit us on the web at www.JVC.com
JVC
VICTOR COMPANY OF JAPAN, LIMITED
COPYRIGHT© 2004 VICTOR COMPANY OF JAPAN, LTD. [_ Printed in Japan
0404MNH-ID-VP
