JVC Digital Camcorder Manual L0604322
GR-DVF21 GR-DVF21 JVC DIGITAL VIDEO CAMERA - Manuals and Guides L0604322 View the owners manual for your JVC DIGITAL VIDEO CAMERA #GRDVF21. Home:Electronics Parts:Jvc Parts:Jvc DIGITAL VIDEO CAMERA Manual
User Manual: JVC JVC Digital Camcorder Manual JVC Digital Camcorder Owner's Manual, JVC Digital Camcorder installation guides
Open the PDF directly: View PDF ![]() .
.
Page Count: 64
JVC
ENGLISH
DIGITAL VIDEO CAMERA
GR-DVF21
GR-DVF11
Please visit our CyberCam Homepage on the
World Wide Web and answer our Consumer
Survey (in English only):
Mini NTSC
INSTRUCTIONS
For Customer Use:
Enter below the Model No. and Serial No. which is located on the
bottonl of cabinet. Retain this information for future reference.
Model No.
Serial No.
SAFETY PRECAUTIONS 2- 5
PROWDED ACCESSORIES 5
Power ............................................ 6
Dnte/TimeSettings............................ 8
Londing/gnloadlngA Cassette............... 9
RecordingModeSettin9 ..................... lO
GripAd[nstment.............................. 11
VlewflnderAdinstment...................... 11
ShouLderStropAttachment................. 11
TripodMounting............................... 11
BaskRecording............................... 12
AdvancedFeotnres........................... 17
BosicPhybn& ................................ .29
AdvnncedFe_ltnres........................... 30
Busk Connecffons............................. 32.
AdvnncedConnections....................... 34
TAPE DUBBING 36 - 37
Tope Dnbblng.................................. 36
Digltd Dnbbing................................ 37
USING THE REMOTE CONTROL
UNIT 38 - 48
RnndomAssemWe[dltin9 ................... 42
FerMere Accurate[ditln9 ................... 46
AudioDubbing................................. 48
TROUBLESHOOTING 49 -53
USER MAINTENANCE 54
CAUTIONS 55 -57
INDEX 58 - 62
Controls,ConnectorsAndIndlcnters....... 58
Indications..................................... 60
Terms........................................... 62'
SPECIFICATIONS 6.3
LYTO421-OO1B
DearCustomer,
Thankyouforpurchasingthisdigitalvideocamera.Beforeuse,pleasereadtilesafetyinformationand
i)recautions contained in the following [)ages to ensure safe use of this product.
Using This Instruction Manual
° All major sections and subsections are listed in the Table (-)f Contents on the cover.
• Notes appear after most subsections. Be sure to read these as well.
• Basic all(] advanced features/operation are separated for easier reference.
It is recommended that you...
.... refer to the Index (_-v_ pgs. 58 62) and familiarize yourself with button locations, etc. before use.
.... read dloroughly the Safety Precautions and Safety Instructions that follow. They contain extremely
important inl(>rmation regarding the safe use of this product.
You recommended to carefully read tile cautions 55 dlrough 57 before
are on [)ages use.
SAFETY PRECAUT|ONS
CAUTION: TO REDUCE THE RISK OF ELECTRIC SHOCK,
DO NOT REMOVE COVER (OR SACK).
NO USER-SERVICEABLE PARTS INSIDE
REFER SERVICING TO QUALIFIED SERVICE PERSONNEL.
The lightning flash with arrowhead symbol within an
equilateral triangle, is intended to alert the user to the
presence of uninsuIated "dangerous voltage" within the
product's enclosure that may be of sufficient magnitude
to constitute a risk of electric shock to persons¸
The exclamation point within an equilateral triangle is
intended to alert the user to the presence of important
operating and maintenance (servicing) instructions in
the literature accompanying the appliance.
Warning on lithium cell battery
(for remote control unit)
The battery used in this device may present a fire
or chemical hurn hazard if mistreated. Do not
recharge, disassemble, heat above l 0()_( (212"F)
or incinerate.
Replace the battery with Maxell, Panasonic
(Matsushita Electric), Sanyo or Sony CR2025; use
of another battery may present a risk of fire or
explosion.
[] Dispose of used battery promptly.
[] Keep away from children.
[] Do not disassemble and do not dispose of in
fire.
The AA-V20U AC Power Adal)ter/Charger should be
used with:
AC 120 V,_,, 60 Hz in the USA and Canada,
AC 1I 0 240 V,_, 50/60 Hz in other countries.
CAUTION (applies to the AA-V20U)
TO PREVENT ELECTRIC SHOCK MATCH WIDE
BLADE OF PLUG TO WIDE SLOT, FULLY INSERT.
ATTENTION (s'applique _ FAA-V20U)
POUR EVITER LESCHOCS ELECTRIQUES,
INTR(-)DUIRE LA LAME LA PLUS LARGE DE LA
FICHE DANS LA BORNE CORRESPONDANTE DE
LA PRISE ET PC)USSER IUSQU'AU FOND.
WARNING:
TO PREVENT FIRE OR SHOCK
HAZARD, DO NOT EXPOSE
THIS UNIT TO RAIN OR
MOISTURE.
NOTES:
[] The rating plate &erial number plat_) and safety
caution are on the bott_*m and/or the back of
the main unit,
[] The rating plate (_erial number plate) ot the AC
Power Adapter/( harger is on its boF.om.
This camcorder is designed to be used with
NTS( -type color television signals. It cannot be
used for playback with a television of a different
standard. However, live recording and LCD
monitor/viewfinder playback are possible
anywhere. Use BN-V207U/V214U battery packs
and, to recharge them, the provided multi-
vohage A( Power Adapter/Charger. (An
appropriate conversion adapter may be
necessary to accommodate different designs of
AC outlets in different countries.)
-- _r EN_.,_
IMPORTANTPRODUCT
SAFETYINSTRUCTIONS
Electrical elleJgy can perk)rm many usefuJ fimctions.
But improper use car/ result in potential electrical
shock or fire hazards. This product has been
engineered and manufactured to assure your
personal safety, lit order not to defeat tile built-in
safeguard% observe the f_4k/Nvingbasic rules for its
installation, use and servicing.
ATTENTION:
Follow and ob%, all warnings and instructions
marl<ed on your product and its operating instruc-
tions. For your safety, [)lease read all the safety and
operating instructions before you operate this
product and keep this Pnanual for future reference.
INSTALLATION
1. Grounding or Polarization
(A) Your product may be equipped with a polarized
alternatiDg-current line plug (a plug having one [)lade
wider than the other). This plug will fit into the
power outlet only one way. This is a safety feature.
If you are unable to insert the plug frilly into the
outlet, try reversing the plug. If the [)lug should still
fail to fit, contact your electrician to replace your
obscllete outlet. Do not defeat tile safety purpose of
the polarized plug.
fiB) Your product may be eE]uipped with a 3-wire
grounding4y )e plug, a plug having a third (_round_
ing) pin. Tbis plug will cmly fit into a groundingqype
power outlet. This is a safety feature.
If you are unable to insert the plug into the outlet,
contact your electri( ian to replace your obsolete
outlet. Do not defeat the safety purpose of the
grounding-type plug.
2. Power Sources
(-)perate your product only from the type of power
source indicated cm the marking label. If you are not
sure of the type of power supply to your home consult
your product dealer or k>cal power company, ff your
product is intended to operate from battery powel, or
other sources, refer to the operating instructions.
3o Overloading
Do not overload wall outlets, extension cords, or integral
convenience receptacles as this can result in a risk of fire
or electric shock.
4. Power Cord Protection
Power supply cords should be routed so that they are
not likely to be walked on or pinched by items placed
upon or against them, paying particular attention to
cords at pMgs, convenience receptacles, and the point
where they exit from the product.
5. Ventilation
Slots and openings in tbe cabinet ale provided for
ventilation. To ensure reliable operation of the product
and to protect it from overheating, these openings must
not be blod<ed or covered.
Do not block the openings by placing the product on a
bed, sofa, rug or other similar surface.
o Do not place the product in a built-in installation such
as a bookcase or racl< Lmless proper ventilation is
provided or the manufacturer's instructions have been
adhered to.
6. Wall or Ceiling Mounting
The product should be mounted to a wall or ceiling only
as recommended by the manufacturec
ANTENNA INSTALLATION
INSTRUCTIONS
1. Outdoor Antenna Grounding
Ifan outside antenna or cable system isconnected to the
product, be sure the antenna or cable system is
grounded so as to provide some protection against
voltage surges and bElilt-up static charges. Article 81 0 of
the National Electrical Code, ANSI/NFPA 70, provides
infomtation with regard to [)roper grounding of the mast
and supporting structure, grounding of the leadqn wire
to an antenna discharge unit, size of grounding
ct_nductors, k_cation of antenna discharge unit,
connection to grounding electrodes, and requiremeDts
for the grounding electrode.
2. Lightning
For added protection for this product during a lightning
storm, or when it is left unattended and UDLIsed for long
periods of time, unplug it from the wall outlet and
disconnect the antenna or cable system. This wi}}
prevent danrage to the product due to lightning add
power- fine surges.
3. Power Lines
Art outside antenna systePn should not be located in the
vicinity of overhead power lines or other electric light or
power circuits, or where it can fall into such power lines
or circuits. When installing an outside antenna system,
extreme care should be taken to keep from touching
such power lines or circuits as contact with them might
be fatal.
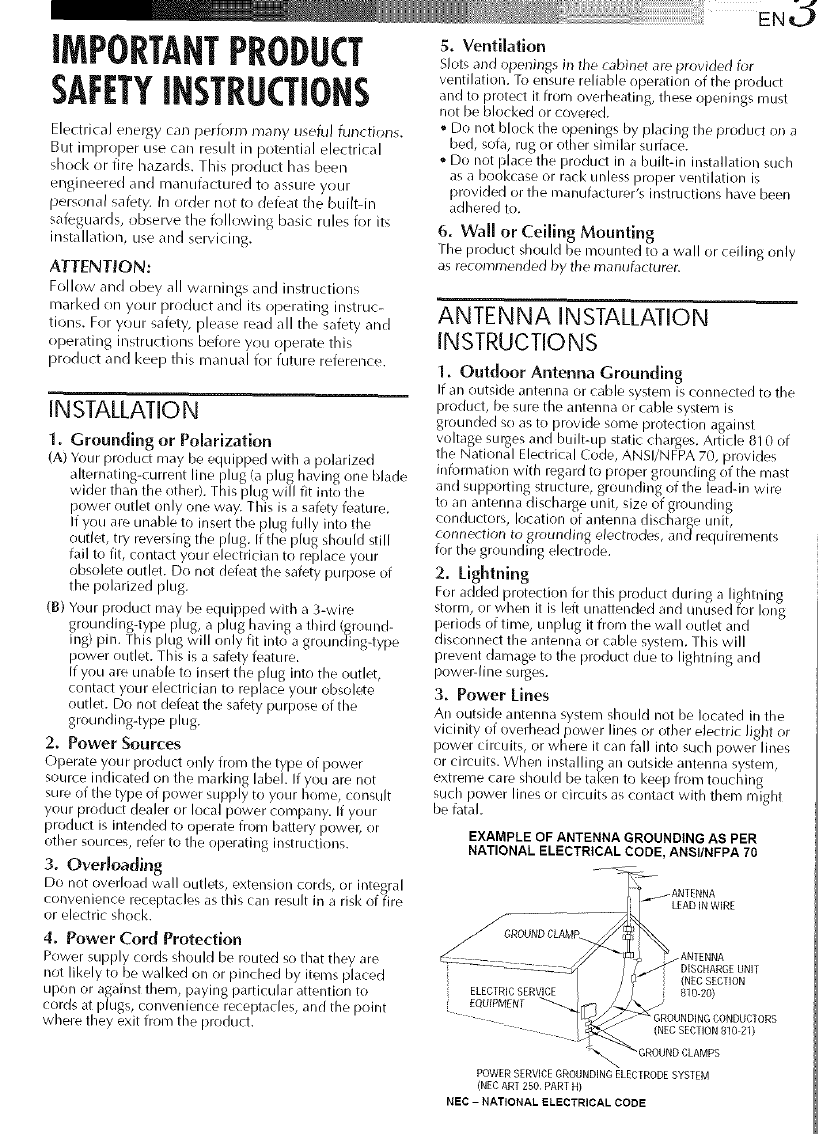
EXAMPLE OF ANTENNA GROUNDING AS PER
NATIONAL ELECTRICAL CODE, ANSI/NFPA 70
LEADIN WIRE
ELECTRICSERVICE
EQUIPM[NT
.ANTENNA
DISCHARGEUNIT
(NECSECTION
g10 20)
(NECSECTION810 21)
POWERSERVICEGROUNDINGELECTRODESYSTEM
(NECART250 PARTH)
NEe -NATIONAL ELECTRICAL CODE
USE
1. Accessories
To avoid personal injury:
• Do not place this product on an unstable cart,
stand, tripod, bracket or table. It may fldl, causing
serious injury to a child or adult, and serious
damage to the product.
•Use only with a cart, stand, tripod, bracket, or table
recommended by the manut\_cturer or sold with the
product.
• Use a mounting accessory recommended by the
rnanufacturer and follow the i_/anut\lcturer's
instructions for any mounting of the product.
°Do not try to roll a cart with small casters across
thresholds or deep-pile carpets.
2. Product and Cart PORTABLECARTWARNING
Comblnatlou (Symbol providedby RETAC)
A product and cart
combination shotdd be D
moved with care. Quick
stops, excessive force, and
uneven surfaces may cause
tile product and cart
COlTlbination to ()vertum.
3. Water and Moisture
Do not use this product near water'or example,
near a bath tub, wash bowl, I<itchen sinl< or laundry
tub, in a wet basement, or near a swimming pool and
the like.
4. Object and Liquid Entry
Never push objects of any Idnd into this product
through openings as they may touch dangerous
w>ltage points or short-out [)arts that could result in a
fire or electric shocl<. Never spill liquid of any Idnd
on the product.
5. Attachments
Do not use attachments not recommended by tile
manut\_cturer of this product as they may cause
hazards.
6. Cleaning
Unplug this product from the wa II outlet before
cleaning. Do not use liquid cleaners or aerosol
cleaners. Use a damp cloth k)r cleaning.
7. Heat
The product should be situated away from heat
sources such as radiators, heat registers, stoves, or
other products (including amplifiers) that produce
heat.
SERVICING
1. Servicing
If your product is not operating correctly or exhibits a
marked change in performance and you are unable
to restore normal operation by following the detailed
procedure in its operating instructions, do not
attempt to service it yourself as opening or removing
covers may expose you to dangerous vohage or other
hazards. Refer all servicing to qualified service
persol313el.
2. Damage Requiring Service
Unplug this product from the wall outlet and refer
servicing to qualified service personnel under the
following conditions:
a. When the power supply cord or plug is damaged.
b. If licluid has been spilled, or objects have t\dlen
into tile product.
c. If the product has been exposed to raiil or water.
d. If the product does not operate normally by
followi ng th e operating instructions. Adjust only
those controls that are covered by the operating
instructions as a nimprrlper adjustment (if other
controls may resuh in damage and will often
recluire extensive worl< by a clualified technician
to restore the product to its normal operation.
e. If the product has been dropped or damaged in
any way.
f. When the product exhibits a distinct change in
performance_his indicates a need for service.
3. Replacement Parts
When replacement parts are required, be sure the
service technician has used replacement parts
specified by the manufacturer or have the same
characteristics as tile original part. Unauthorized
substitutions may resuh in fire, electric shocl< or other
hazards.
4. Safety Check
Upon completion of any service or repairs to this
product, ask the service technician to perform safety
checks to determine that the product is in safe
operating conditioil.
E N5
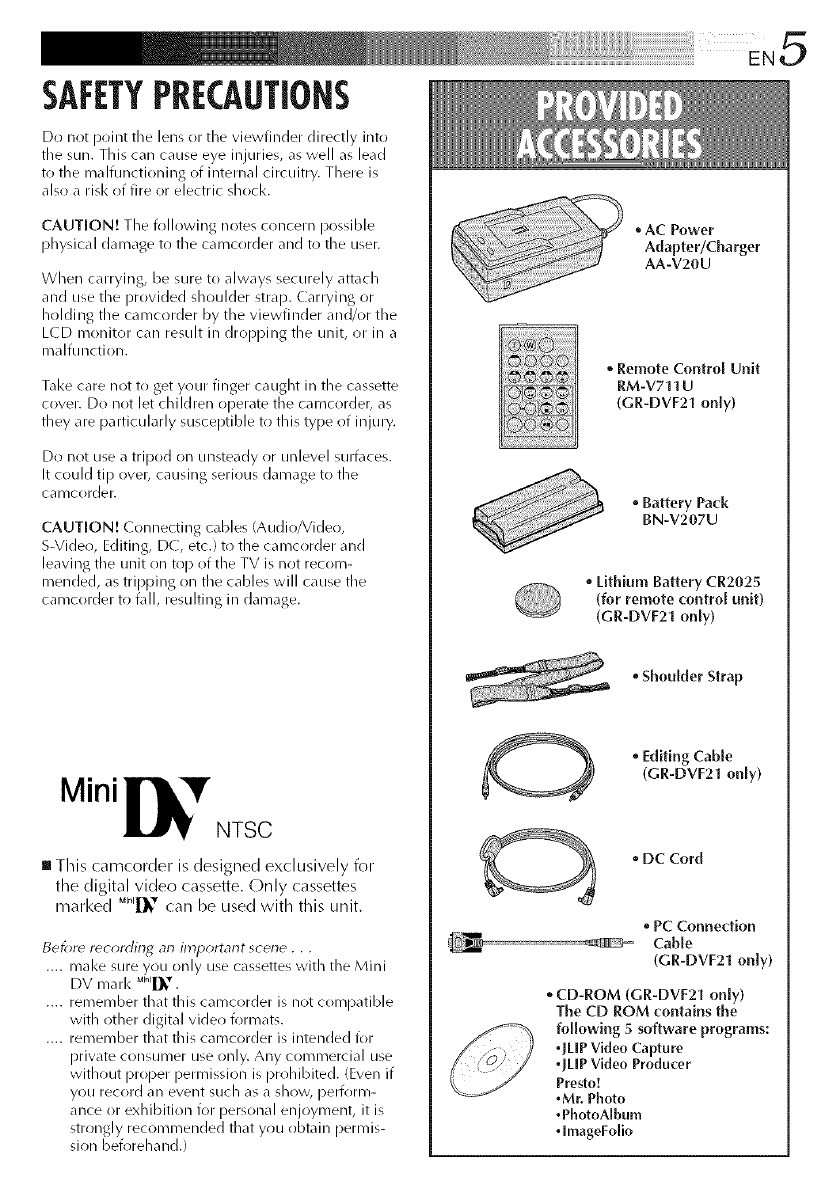
SAFETYPRECAUTIONS
Do not point the lens or tile viewfinder directly into
the sun. This can cause eye injuries, as well as lead
to the malfunctioning of internal circuitry. There is
also a risk of fire or electric shock.
CAUTiONt Tile following notes concern possible
physical damage to the camcorder and to the user.
When carrying, be sure to always securely attach
and use the provided shoulder strap. Carrying or
holding the camcrlrder by the viewfinder and/or the
LCD IT)onitor can resuh iu dropping the uuit, or in a
malfullction.
Tal<e care not to get your finger caught in the cassette
cover. Do not let children operate the camcorder, as
they are particularly susceptible to this type of injury.
Do not use a tripod on unsteady or unlevel surt\lces.
It could tip over, causing serious damage to the
cal_/corder.
CAUT[ONt Connecting cables (Audir!/Vider!,
S-Video, Editing, DC, etc.) to the camcorder and
leaving the unit on top of the TV is not recom-
mended, as tripping on the cables will cause the
camcorder to t\dl, resulting in damage.
Mini
NTSC
Ill This camcorder is designed exclusively for
the digital video cassette. Only cassettes
marked M1_'r can be used with this uniL
Bef_)re recording an important scene, , ,
.... mal<e sure you only use cassettes with the Miui
DV marl< MI1]l_'r.
.... remember that this camcorder is not compatible
with other digital video formats.
.... remember that this camcorder is intended for
private consumer use only. Any commercial use
without proper permission is prohibited. (Even if
you record an event such (IS (I sh()'vv_ i)elfOrl_]-
ance or exhibition for personal enjoyment, it is
strongly recommended that you obtain permis-
sion beforehand.)
•AC Power
Adapter/Charger
AA-V20U
• Remote Control Unit
RM-V711 U
(GR-DVF21 only)
Battery Pa('k
BN-V207U
Lithium Battery CR2025
(for remote control unit)
(GR-DVF21 only)
Shoulder Strap
*Editing Cable
(GR-DVF21 only)
*DC Cord
PC Connection
Cable
(GR-DVF21 only)
CD-ROM (GR-DVF21 only)
The CD ROM {'ontains the
following 5 software programs:
•JLIP Video Capture
•JLIP Video Producer
Presto!
•Mr. Photo
•PhotoAlbum
•imageFolio

Batterypad(BN-V207UorBN-V2t4U
CHARGEindicator
POWERindicator
AC Power
Adapter/Charger
AA-V20U
DC OUT connector
Battery pack Charging time
BN-V207U approx. 1 hr. 30 min.
BN-V214U (optional) approx. 3 hrs.
Power
This camcorder's 2-way power supply system lets you
choose tile cnost appropriate source of power. Do not use
provided pr)wer supply units with other equipment.
CHARGING THE BATTERYPACK
Make sure yon unplug the camcorder's DC cord from
the A( Power Adapter/Charger. Plug the At- Adapter/
Charger's power cord into an A( outlet. The POWER
indicator lights.
Remove the battery pack's protective cap. Attach the
battery pacl< with its long groove pointing toward the
indicator side of the battery pacl< mount on the A(
Power Adapter/Charger. The (HARGE Indicator
begins blinl<ing to indicate charging has started.
When the (HARGE indicator stops blinl<ing but stays
lit, charging is finished.
Slide tile battery in the opposite direction of the arrow
and lift off. Remember to unplug tile AC Adapter/
(harger's power cord froth tile At- outlet.
NOTES:
•Perlbrm charging where tile temperature is between 1d_*and _d_*C(_@'F arid 86 _'F). 2d ° t_; 25_'( (t_8_'F to
77°F) is the ideal temperature range for chm_ing, If the erlvirorlmertt is too cold, charging may be
incomplete.
• CharginE times noted above are for a tully discharged battety pack.
•Charging time wtries according to tile ambient temperature and the status of the battery pack.
•To avoid interference with reception, do not use tile AC Power A&_pter/dharger near a radio,
•If you connect the camcorder's DC cord t_>the adapter during battery charging, power is supplied to the
camcorder and char_,ing stops.
•Since the AC Power Adapter/(harger pn;cesses electricity irtten-lally, it beom_es warm durirlg use. Be sure t_;
use it only irl well-ventilated areas.
•When char_ing the battery pack for the firq time or after a long storage period, the CHARGE indi_ at_;r may
not light. In this case, remove the battery pack from the AC Power AM_pte_/( hargec then try charging again.
•If the battery operation time remains extremely short even after havin_ been tblly charged, the battery is
worn out and needs to be replaced, Please purchase a new one,
Ioooo o
o .Oo.OOGo°
l° o o o
Lithium-ion is vulnerable in colder
telnperatures.
About Batteries
DANGER[ Do not attempt to take the batteries apart, or
expose them to flame or excessive heat, as it may cause a fire
or explosion.
WARNING! Do not allow the battery or its terminals to come
in contact with metals, as this can result in a short circuit and
possibly start a fire.
The Benefits Of Lithium4on Batteries
Lithiumdon battery packs are small but have a large power
capacity. However, when one is exposed to cold temperatures
(below 10 ° C/50 ° F), its usage time becomes shorter and it
may cease to function. If this harlpens, place the battery pack
in your pocl<et or other warm, protected place for a short time,
then re-attach it to the camcorder. As long as the battery pack
itself is not cold, it should not affect r)erformance.
(If you're using a heating pad, make sure the battery pad< does
not come in direct contact with it.)
iii iiiii i iii!i! i ii!!iiiii Hii!i Hi! i!ii i i i i i i i i i i i i i i i i i i i i i i i i i i i i i i i i !i ¸ EN7
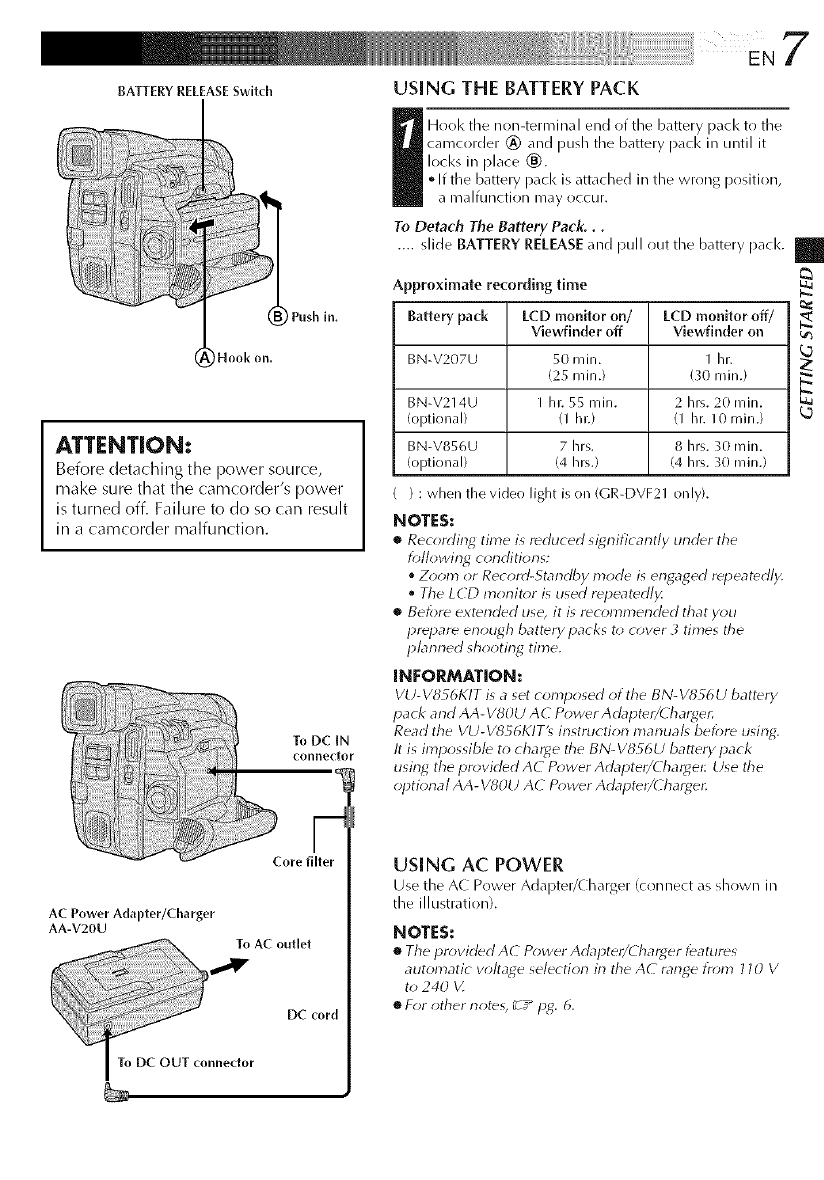
BATTERY RELEASESwitch
Hook on.
ATTENTION:
Before detaching the power source,
make sure that the camcorder's power
is turned off. Failure to do so can result
in a camcorder malfunction.
¸ ToOC,N
connector
coreBBer
AC Power Adapter/Charger
AA-V20U
To AC outlet
DC cord
To DC OUT connector
USING THE BATTERY PACK
I ool< the non-terminal end of the battery pack to the
camcorder @and push the battery pacl< in until it
locks in place _).
• If the battery pack is attached in the wrong position,
a malfunction may occur.
To Detach The Battery Pack...
.... slide BATTERY RELEASE and pull out the battery pacl<.
Approximate recording time
Battery pack LCD monitor on/ LCD monitor off/
Viewfinder off Viewfinder on
BN-V207U 50 rain. 1 hr.
(25 min.) (30 min.)
BN-V214U I hr. 55 rain. 2 hrs. 20 rain.
(optional) (1 hr.) (1 hr. 10 rain.)
BN-V856U 7 hrs. 8 hrs. 30 min.
(optional) (4 hrs.) (4 hrs. 30 rain.)
) : when the video light is on (GR-DVF21 only).
NOTES:
•Recording time is reduced significantly under the
following conditions:
•Zoom or Record-Starldby mode is engaged r_peat_dly.
•The LCD morlitor is used repeatedl_
•Belbrd extended use, it is rdcolnn_er}cldd that you
prepare erlough battery packs to cover 3 times the
pbnned shooting time.
INFORMATION:
VU-VS_6I(IT i_ aset composed ot the BN-V856 U battery
pack and AA- V80U A C Powdr Adaptd¢JEharger.
Read the VU- V856KIT_ irlstructiorl marlual_ before using.
It is impossible to charge the BN- V8_6U battery pack
using the i_rovid_d AC Power Adapter/Charge_: Use the
optiorla I AA- VSOU AC Power Adapteti(harger.
USING Ac POWER
Use the AC Power Adapter/Charger (con nect as shown in
the illustration).
NOTES:
•The provided A( Power Adapter/Charger features
automatic voltage selection in the AC range from 110 V
to 240 V.
•For other notes, _T _pg. 6.
V
Powe
Power gwitch
Display
Recording Menu
Mode Menu
Date/Time Menu
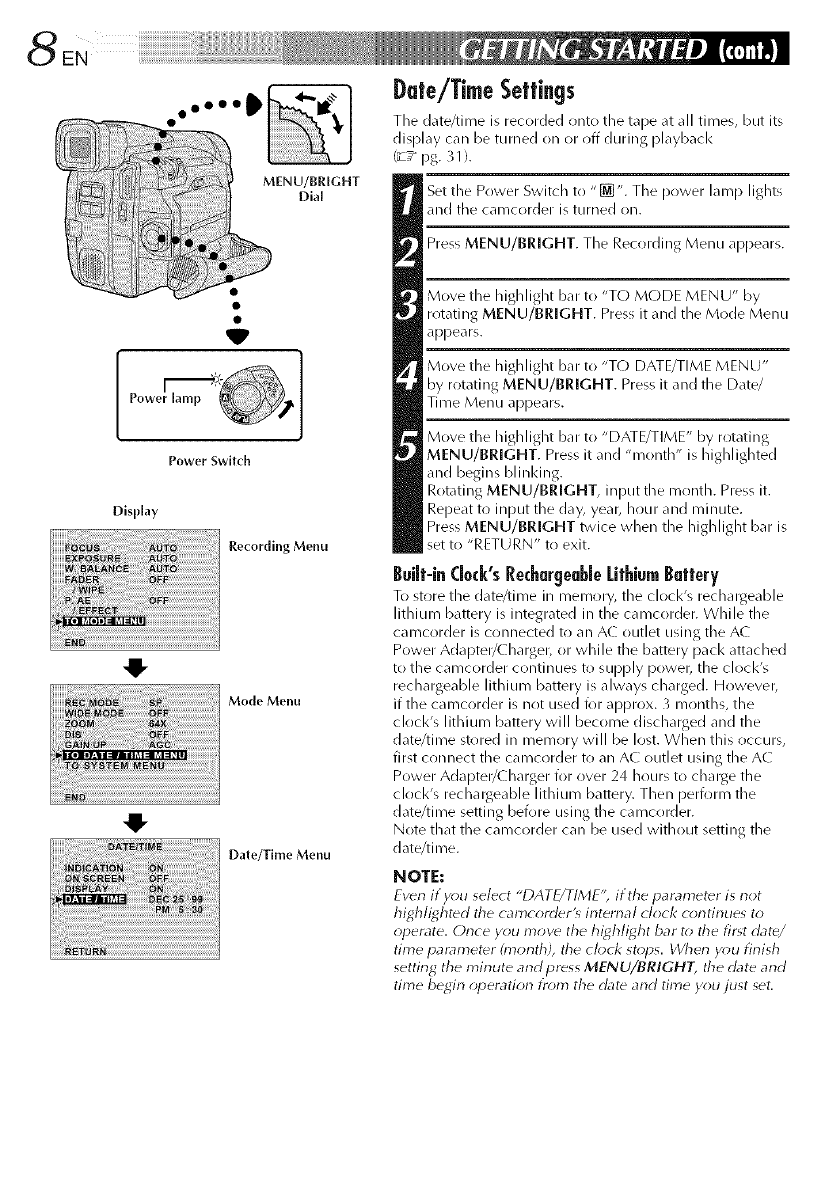
Date/Time Settings
The date/time is recorded onto the t_pe at _dl times, but its
display can be turned on or off during playback
_/pg. 31).
Set the Power Switch tr)" [_J". The power lamp lights
and the camcorder is turned on.
Press MENU/BRIGHT. The Recording Menu appears.
Move the highlight bar to "TO MODE MENU" by
rotating MENU/BRIGHT. Press it and the Mode Menu
appears.
Move the highlight bar to "TO DATE/TIME MENU"
by rotating MENU/BRIGHT. Press it and the Date/
Time Menu appears.
Move the highlight bar to "DATE/TIME" by rotating
MENU/BRIGHT. Press it and "month" is highlighted
and begins blinldng.
Rotating MENU/BRIGHT, input the mr)nth. Press it.
Repeat to input the day, year, hr)Lir and millute.
Press MENU/BRIGHT twice when the highlight bar is
set to "RETURN" tr) exit.
Buiif-in(10ck'sRechargeableLithiumBaftery
To store the data/time ill memory, the clock's rechargeable
lithium battery is integrated in the camcorder. While the
camcorder is connected to an A( outlet using tile A(
Power Adapter/Lharger, or while tile battery pack attached
to the camcorder continues to supply powel; the clock's
rechargeable lithium battery is always charged. However,
if the camcorder is not used for approx. 3 mr)nths, the
clock's lithium battery will become discharged and the
date/time stored in memory will be lost. When this occurs,
first connect the camcr)rder tr) an AC outlet using the AC
Power Adapter/Charger for over 24 hours to charge the
clock's rechalgeable lithium battery. Then perform the
date/time setting before using the camcorder.
Note that the camcorder can be used without setting the
date/time.
NOTE:
Ewn it you select "DATE/TIM E'; if the parameter is not
highlighted the camcorder'_ internal clock contirlues to
_;perate. Once you move the highlight bar to tile firq dat_/
time parameter (month), tile ok)ok st_;ps. When y_u finish
setting the mirlute arid press MENU/BRIGHT, the date arid
time begh-1 operatiorl from the date arid time you just set.
.....iii!i !i!i!iiiilililililililililililililililililililililili¸ii! i ! i¸¸!:¸i¸¸eN9
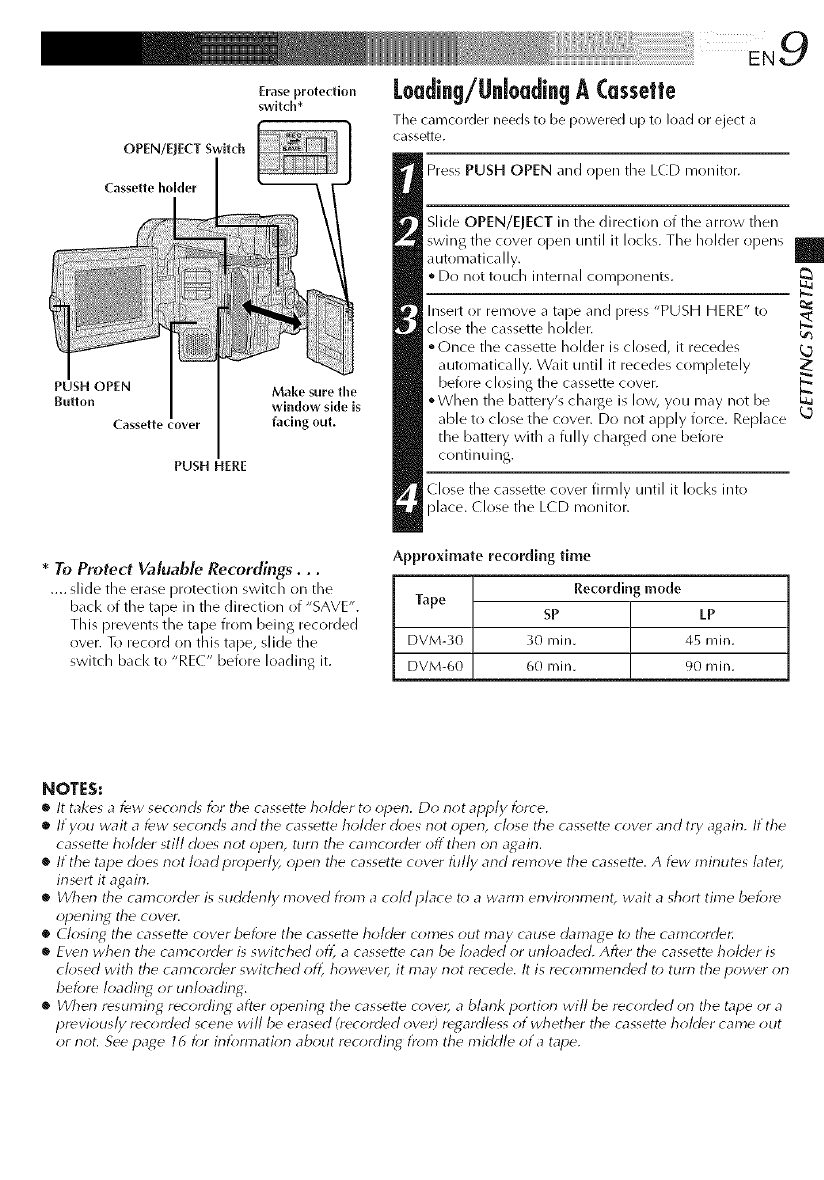
OPEN/EJECT Switch
Cassette holder
PUSH OPEN
Button
Cassette cover
PUSH HERE
Erase protection
switch*
Make sure the
window side is
faring ouL
Loading/Unbadingk Cassette
Tile camcorder needs to be powered up to load or eject a
cassette.
Press PUSH OPEN and open tile LCD monitor.
Slide OPEN/EJECT in the direction of the arrow then
swing the cover open until it locks. The holder opens
automatically.
• Do not touch internal COl_/Donents.
Insert or remove a tape and press "PUSH HERE" to
close the cassette holder.
• Once the cassette holder is closed, it recedes
automatically. Wait until it recedes completely
before c losing the ca ssette cover.
°When the battery's change is low, you may not be
able to close the cover. Do not apply force. Replace _D
the battery with a fully charged one before
continuing.
Close the cassette cover firmly until it locks into
[)lace. Close the LCD monitor.
Approximate recording time
Recording mode
Tape SP LP
DVM-30 30 rain, 45 rain.
DVM-60 60 rain. 90 rain.
*To Protect Valuable Recordings...
.... slide the erase protection switch on the
back of the tape in the direction of "SAVE".
This prevents the tape from being recorded
over. To record on this tape, slide the
switch back to "REC" before loading it.
NOTES:
•It takes afew seconcg _*r the cassette h_*hler to open. D_*not apply force.
•If you wait a few seconds and the cassette holder does riot open, ch*se the cassette cover and try a_ain. If the
cassette holder still does not open, turn the camcorder off therl on again.
•If the tape does not load properly, _*pen the cassette cover tully and remove the cassette.A t_w minutes later,
insert it again.
•When the camc_*rder is suddenly moved from acoM place t_*a warm environment, wait a short time before
_*pening the cover,
®Closin_ the _assette u)ver belore the cassette holder _omes out may _ause damage to the camcordet:
•Ewn when the camcorder is switched oft: a cassette can be loaded or unloaded. After the cassette holder is
ch)sed with the camo)rder switched ofl_ however, it Inay not recede, It is recomlnended to turn the power on
bek)re loading or unloading.
•When resuming recording after opening the cassette cover, ablank portion will be recorded on the tape or a
previously recorded scene will be erased (recorded over) re(4ardlessof whether the cassette holder calne out
or not. See pa_e 16 for inlbnnation about rec_*rding l?_*lnthe Iniddle of atape,
00000_
W
[ I
Power Switch
MENU/BRIGHT
Dial
Display
Recording Menu
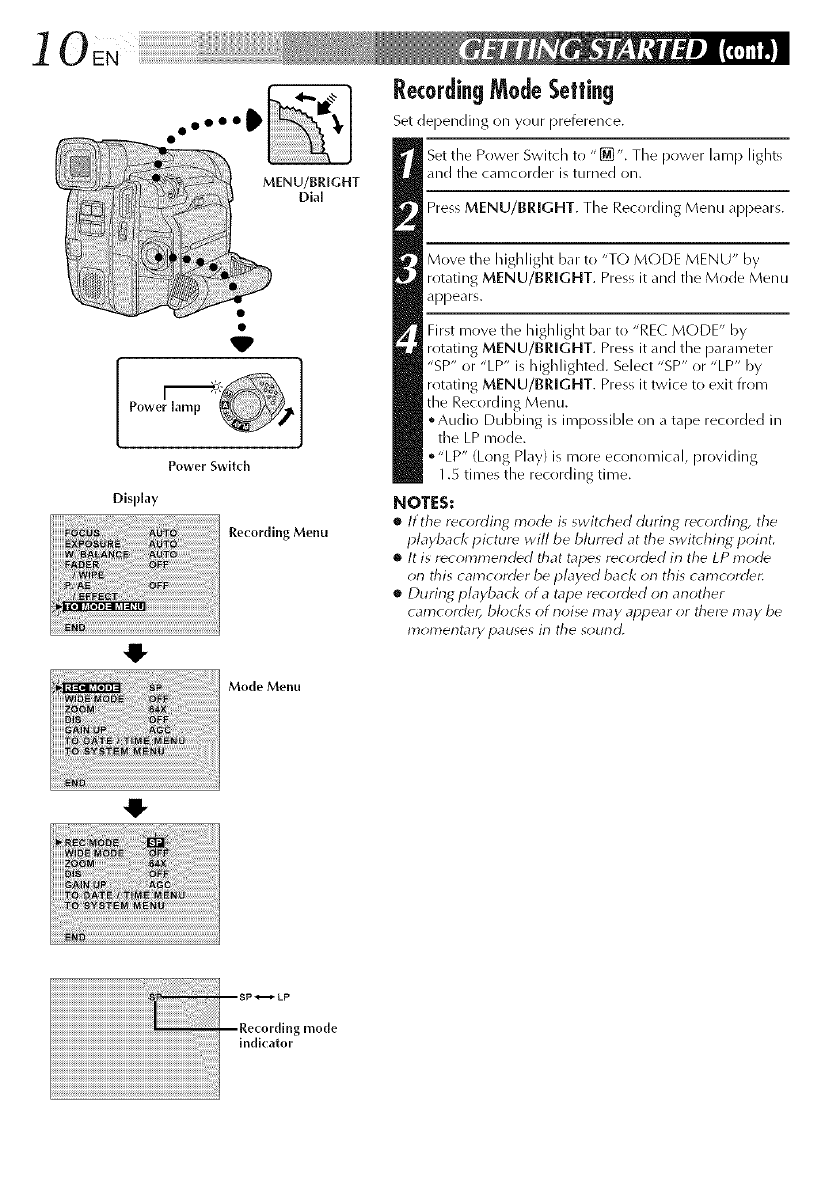
Set depending on your preference.
Set the Power Switch to "[_". The power lamp lights
and the camcorder is turned on.
Press MENU/BRIGHT. The Recording Menu appears.
Move the highlight bar to "TO MODE MENU" by
rotating MENU/BRiGHT. Press it and the Mode Menu
appears.
First move the highlight bat to "RE( MODE" by
rotating MENU/BRIGHT. Press it and the paracneter
"SP" or "LP" is highlighted. Select "SP" or "LP" by
rotating MENU/BRIGHT. Press it twice to exit from
the Recording Menu.
• Audio Dubbing is impossible on a tape recorded in
the LP mode.
•"LP" (Lrlng Play) is llloreeconomical, providing
1.5 times the recording time.
NOTES:
•If the recording mode is switched during recording, the
playbacl< picture will be blurred at the switching point.
•It is recommended that tapes recorded in the LP mode
on this camcorder be played back on this camcorder,
•During playback ota tape recorded orl another
camcorder, blod<s of noise may appear or there may be
17}olT_et-ltal)/ pauses in the sound,
Mode Menu
mode
¸:EN¸]
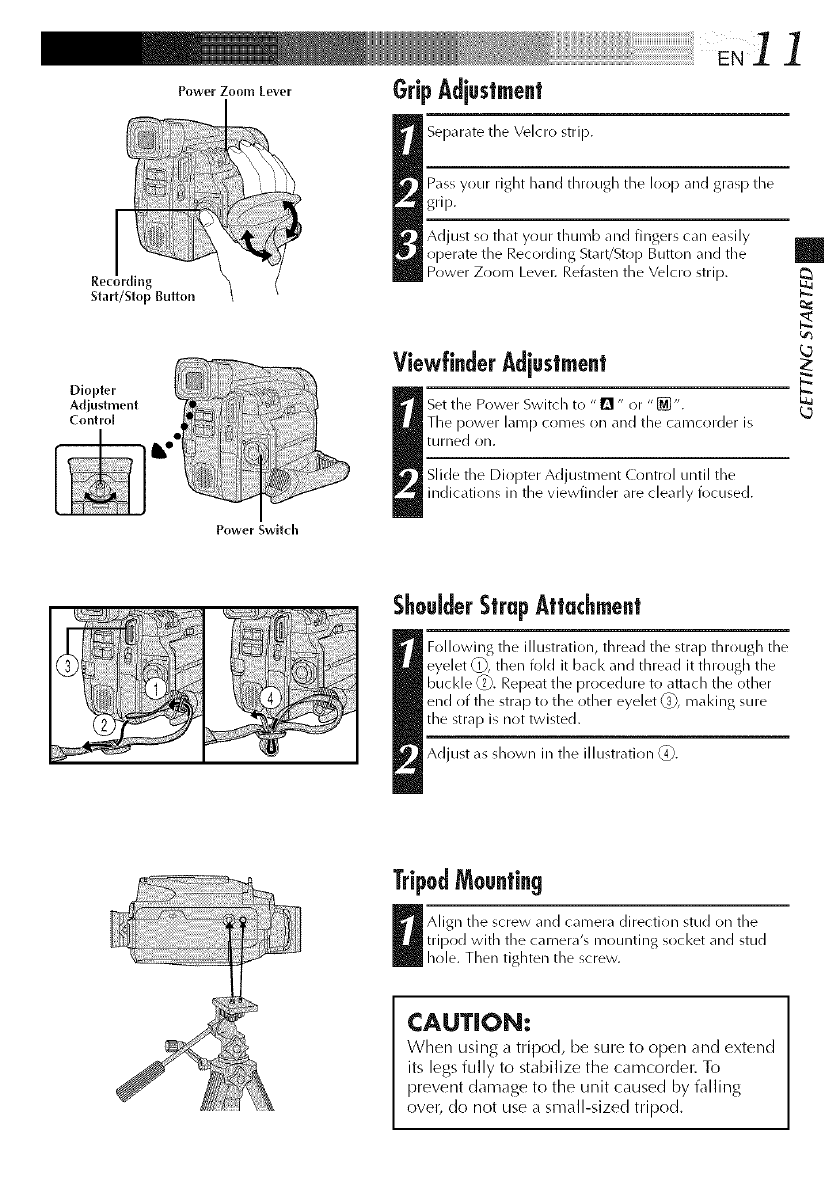
Poworzoo,,,_o_or GripAdiustment
_ Separate the Velcro strip.
P_lss your right hand through the Ioo1_ and grasp the
grip.
Adjust so that your thumb and fingers can easily
operate the Recording Start/Stop Button and the
Power Zoom Level. Refasten the Velcro strip.
ReCq
Start/Stop Buiton
Power Swltcll
Viewfinder Adjustment
Set the Power Switch to "[]" or "[_".
The power lamp comes on and the camcorder is
turned on.
Slide the Diopter Adjustment Control until the
indications in the viewfinder are clearly focused.
]
ISh0u[derStrapAttachment
_ ollowing the illustration, thread the strap through the
eyelet _), then fold it back and thread it through the
buelde _. Repeat the i_rocedure to attach the other
end of the strap to the other eyelet (_, making sure
the strap is not twisted.
Adjust as show n ill tile illustratio n (_.
TripodM0untin 9
U lign the screw and camera direction stud on the
tripod with the camera's mounting socket and stud
hole. Then tighten the screw.
CAUTION:
When using a tripod, be sure to open and extend
its legs fully to stabilize the camcorder. To
prevent damage to the unit caused by falling
oveb do not use a small-sized tripod.
12, E,¸¸iii__i__i__i__i__i__i__i__i__i__i__i__i__i__i__i__i__i__i__i__i__i__i__i__i__i__i__i__i___i__i__i!_!_ii!i!iiii_i__iiiii_!!_!i!!i!!!!!!!!:_
Recording
Start/S
Dkphy
Power Switch 4
Tape remaining time
indicator (Approximate)
-- min,,_- 90 min._. 89 rain ..... ._ 3 rain
(Now cak ulafing)
0 min_l min_2 min
(131inking) (Blinking) (Blinking)
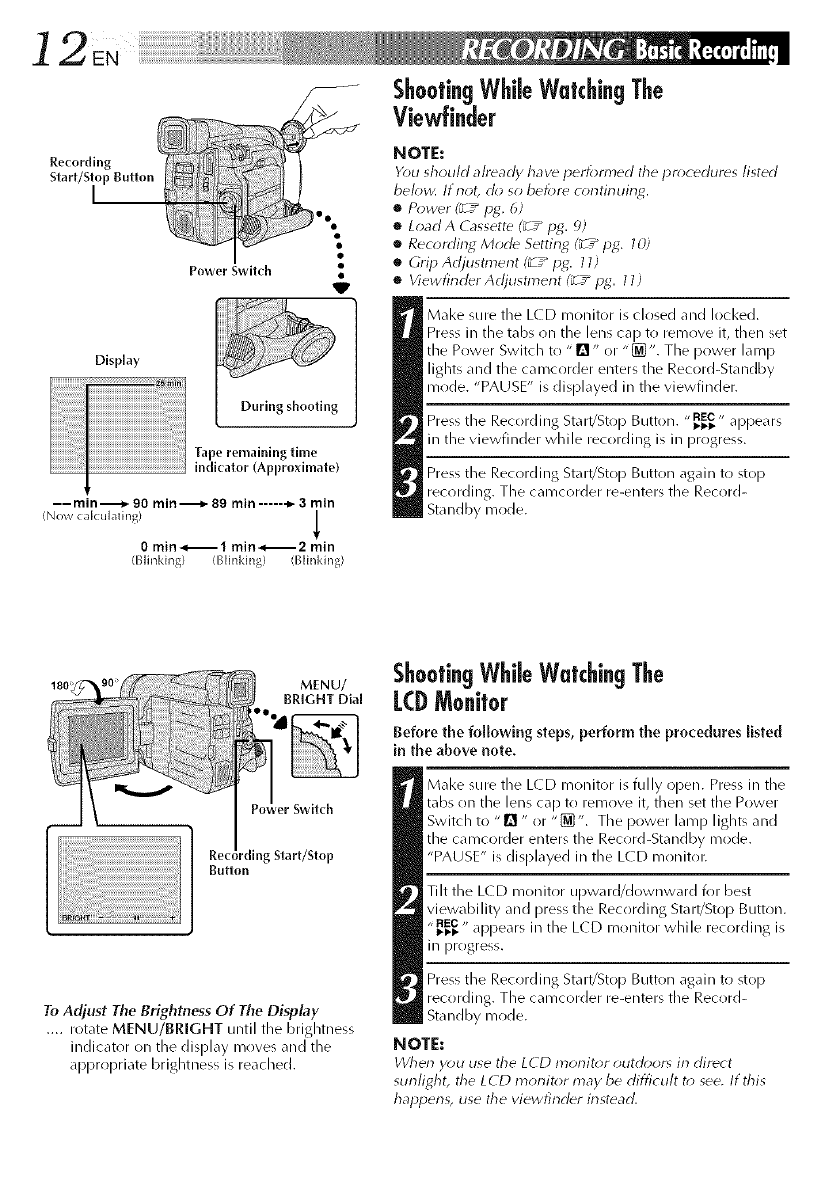
Shoot!.ngWhileWatchingThe
V|ewhnder
NOTE:
Y_)u should already have perk)m,ed the pr_)cedures listed
bek)w. If riot, do so be/i;re c_)ntinuin_.
•Power (_ /pg. 6)
•LoadA Cassette (; /pg. 9)
oRecording Mode Setting (_ /I)_. 1O)
oGrip Adjustment (_ /i)g: 11)
•ViewfinderAdjustngent (_ /p_. 11)
Make sure the L(D monitor is closed and locked.
Press in the tabs on the lens ca[) to remove it, then set
the Power Switch to "1_" or "[_'. The power lamp
lights and the camcorder enters the Record-Standby
mode. "PAUSE" is displayed in the viewfinder.
Press the Recording Start/Stop Button. "_" appears
in the viewfinder while recording is in progress.
Press the Recording Start/Sto I) Button again to st()[)
recording. The camcorder re-enters the Record-
Standby mode.
Button
To Adjust The Brightness Of The Display
.... rotate MENU/BRIGHT until the brightness
indicator on the display moves and the
appropriate brightness is reached.
ShootingWhileWatchingThe
LCDMonitor
Before the following steps, perform the procedures listed
in the above note.
Make sure the LC D monitor is fully open. Press in the
tabs on the lens cap to remove it, then set the Power
Switch to "B" or "[_'. The power lamp lights and
the camcorder enters the Record-Standby mode.
"PAUSE" is displayed in the LCD monitoc
Tilt the LCD monitor upward/downward for best
viewability and press the Recording Start/Stop Button.
"_" appears in the LCD monitor while recording is
in progress.
Press the Recording Start/Stop Button again to st()[)
recording. The camcorder re-enters the Record-
Standby mode.
NOTE:
When you use the LCD monit_;r _;utdoor_ irl direct
sunlit4ht, the LCD monitor may be difficult t_)see, If this
hapigen_, use the viewfinder instead.
Power Switch Position
[] (Full Auto mode):
Suitable for standard recording
using NO special effects or
manual adjustments. When set
to this cnode, "F.AUT(-)"
appears.
[_ (Manual mode):
Allows you to set recording
functions using the menus for
more creative capabilities.
When set to this mode,
"MAN UAL" appears.
OFF:
Switches off the camcorder.
Setting to this position resets
Manual Focus and Exposure
Control to "AI.jT(-)".
PLAY:
Allows you to play back your
recordings.
NOTES:
•The image will not appear simultane_usly in the LCD
morlit_r arid the viewfincl_r.
•The cassette homer carlrlot be operled unless a power
slq._ply is attached.
•There may be a delay after y_u operl the cassette cover
urltil the holder opens. Do riot use forcd.
•Once the cassette holcler is ck_secl, it recedes automati-
call)4 _it until it rdceclds compldtdly beford closing the
cassettd cover
•The time required to calculate arlc] display the rdmairlirlg
tape length, arid the accuracy (>1the calculatiorl, may
w_ry accorcling to the type of tape used.
• "TAPE END" appear_ wherl the tape reaches its erlc], arid
the power goes off automatically if left in this corlditiorl
tbr 5 minutes. "TAPE END" also appears when a cassette
at its erld is k_acled.
•If the Record-Standby mode continues _;r _ minutes, the
camcorder'_ power shuts off automatically. T_ turn the
camcorder on again, set the Power Switch to "OFF';
therl back to "[]" or "_".
•When ablank portiorl is left betweerl recorded scenes
on the tape, the time code is interrupted and errors may _
occur when editing the tape. To aw_ic] this, refer to
"Recordirlg t)'om the middle of a tape" (?E/pg. 16).
•During recording, sound is not heard trom the speaker. "_
Serf-Recording
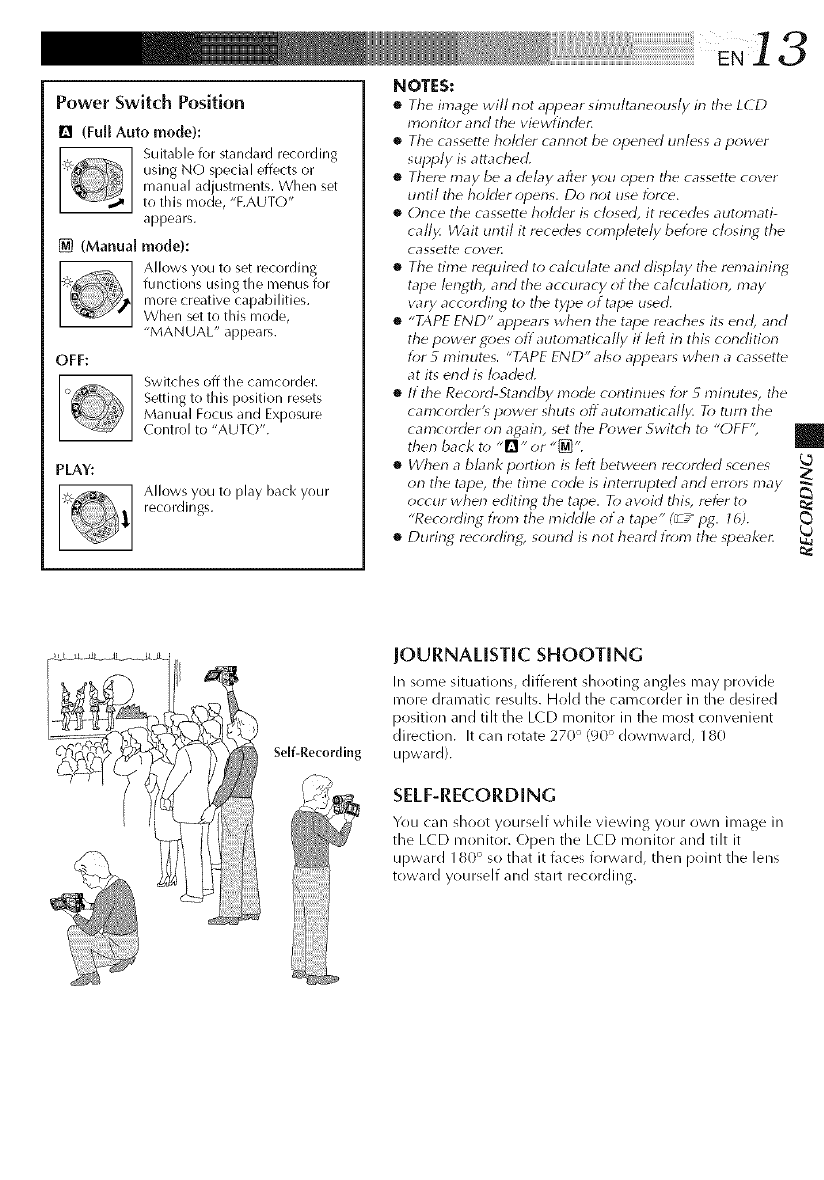
JOURNALISTIC SHOOTING
In some situations, different shooting angles may provide
more dramatic results. Hold the camcorder in the desired
position and tilt the L(D monitor in the most convenient
direction. It can rotate 270 ° (90 ° downward, 180
upward).
SELF-RECORDING
You can shoot yourself while viewing your own image in
the LCD monitor. (-)pen the LCD monitor and tilt it
upward 180 ° so that it t\_ces forward, then point the lens
toward yourself and start recording.
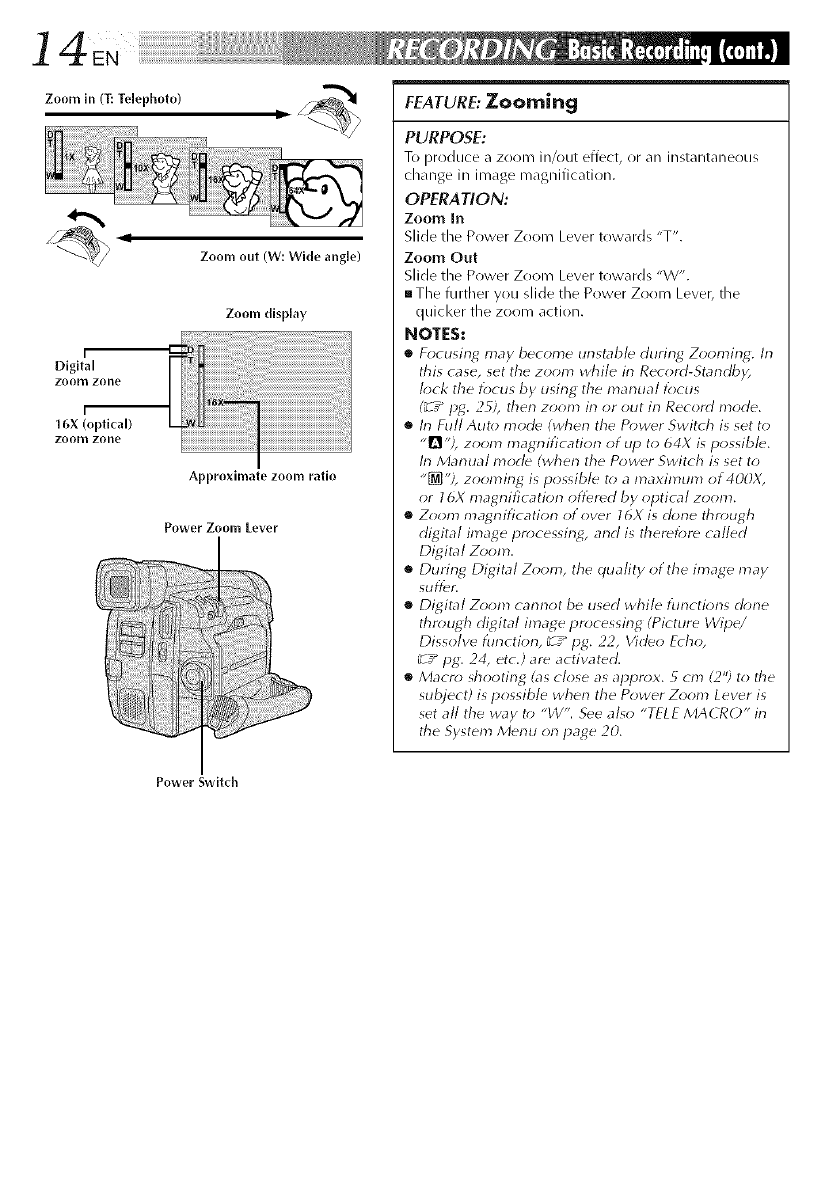
Zoom in (T: Te[ephoto)
Zoom out (W: Wkle angle)
r
Digital
zoom zone
r
16X (optical)
zoom zone
Zoom dlsplay
Approximate zoom ratio
Power Zoonl [ever
FEATURE: Zooming
PURPOSE:
To produce a ZOOITI in/out effect, or an instantaner)tlS
change in in)age magnification.
OPERATION:
Zoom In
Slide tile Power Zoom Lever towards "T".
Zoom Out
Slide the Power Zoom Lever towards "W".
mThe further you slide the Power Zoom Lever, the
quicker the zoom action.
NOTES:
•Focusing inay become unstabl_ during Zooming. h-1
&is case, set the zoom while in Record-Standb>
k>ck the focus by using the manual lbcus
(_ ,_ lag. 25), &en zoom in or out in Record mode.
•In Full Auto mode (when the Power Switch is set to
"n"), zoom magr-lification of tip to 64X is possible.
In Manual mode (when the Power Switch is set to
"[_'9, zooming is possible to a maxin'lum of 4OOX,
or 16X magr-lification oflbred by optical zoom.
•Zoom magnification of over 16X is done through
digital image processing, and is therefore called
Digital Zoom.
•During Digital Zoom, the quality of the image may
•Digital Zoom cannot be used while functions done
&rr;tgh digital image pn_cessing (Picture Wipe/
Dissolve lunction, _7" lag. 22, Vicleo E_ho,
_7_ lag. 24, etc.) are activated.
•Macro shooting (as close as alapn>x. 5 cm (2'9 to the
subject) is possible when the Power Zoom Lever is
set all the way to "W'. See also "TELE MACRO" in
the System Menu on page 20.
Power Switch
EN]5
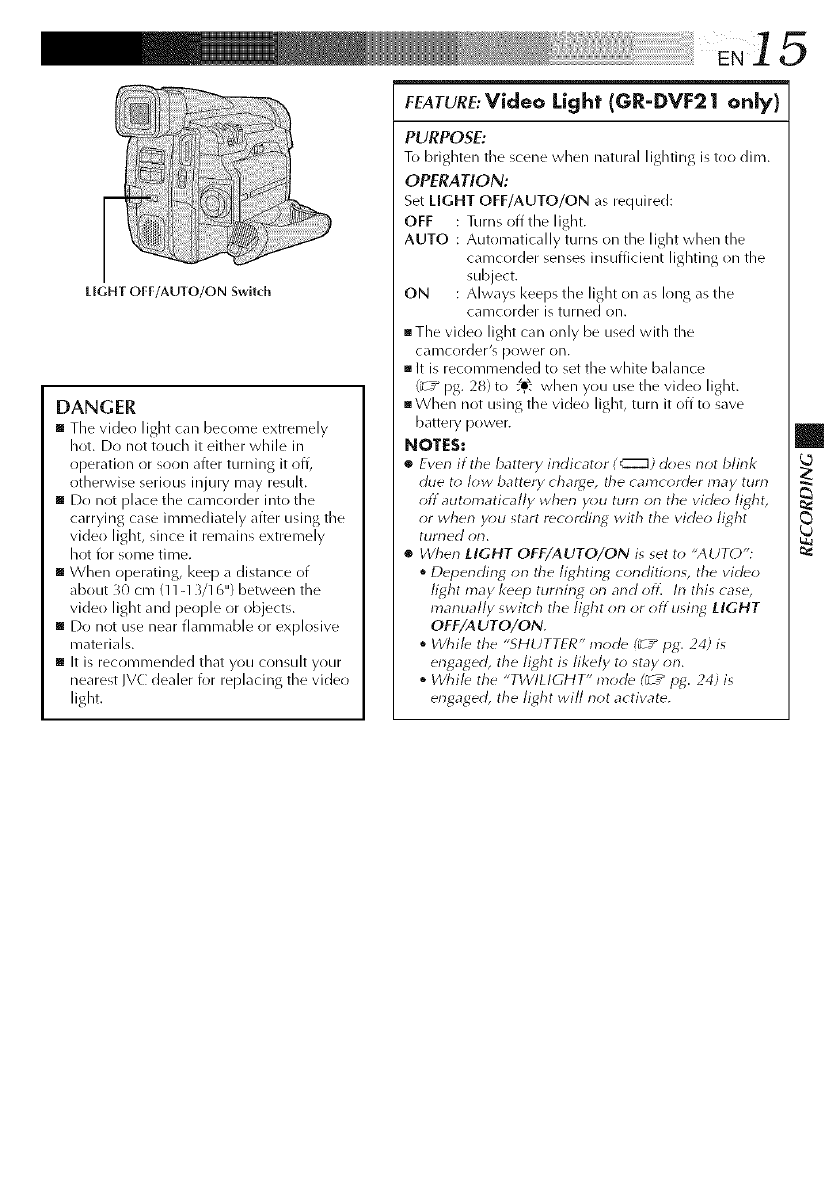
LIGHT OFF/AUTO/ON Switch
DANGER
[] Tile video light can become extremely
hot. Do not touch it either while in
operation or soon after turning it off,
otherwise serious injury may result.
[] Do not ()lace the camcorder into the
carrying case immediately ariel using the
vide() light, since it remains extremely
hot for some time.
[] When operating, I<eep a distance of
about _(:) cm (11-13/16") between the
vide() light and people or objects.
[] Do not use near flammable or explosive
materials.
[] It is recommended that you consuh your
nearest IV(:: dealer for replacing the video
light.
fEATURE:Video Light (GR-DVF21 only)
PURPOSE:
To brighten tile scene when natural lighting is too dim.
OPERATION:
Set LIGHT OFF/AUTO/ON as required:
OFF Turns off the light.
AUTO Automatically turns on the light when the
camcorder senses insufficient lighting on the
subject.
ON Always I<eeps the light on as long as the
cal-ncorder is turned on.
mThe video light car/only be used with the
camcorder's power on.
m It is recommended to set the white balance
£7 _ pg. 28) to :,_: when you use the vide() light.
mWhen not using the video light, turn it off to save
battery power.
NOTES:
[] Even if tile battery indicator ( _) does not blink
due to low battery charge, the camconler may turn
offautomatically when you turn on the video light,
or when you start recording with the video light
turoed or_,
[] When LIGHT OFF/AUTO/ON is set to "AUTO":
•Depending on the lighting conditions, the vMeo
light may keep turning on and off: In this case,
manually switch the light on or off usirlg LIGHT
OFF/A UTO/ON,
•While tile "SHUTTER" mode (_ /pg, 24) is
engaged, the light is likely to stay on,
• While the "TWILIGHT" mode (_z _pg. 24) is
engaged, the light will not activate,
]6 EN:iii__i__i__i__i__i__i__i__i__i__i__i__i__i__i__i__i__i__i__i__i__i__i__i__i__i__i__i__i___i__i__i!_!_ii!i!iiii_i__iiiii_!!_!i!!i!!!!!!!!__
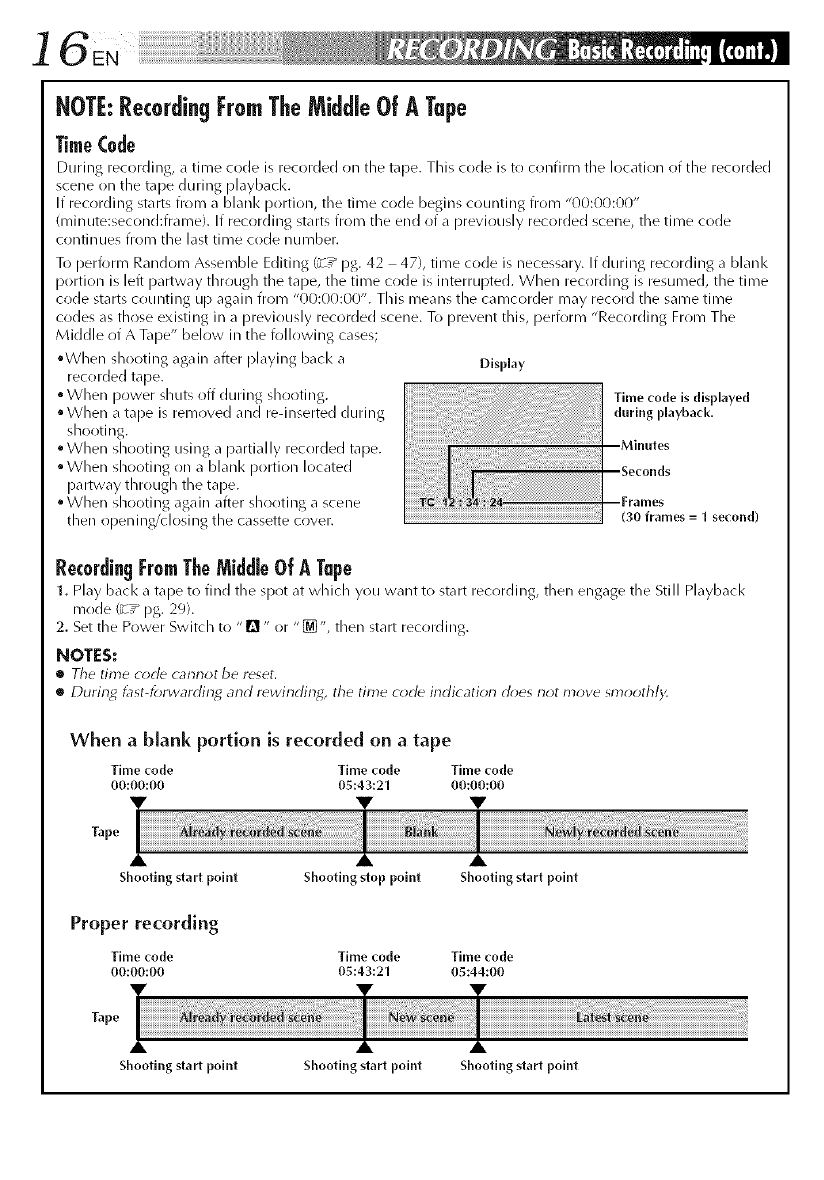
NOTE:RecordingFromTheMiddle Of A Tape
Time(0de
During recording, a time code is recorded lln the tape. This code is to cllnfirm the IocatJrln of the recorded
scene on the tape during playbacl<.
If recording starts fiorr_ a blank portion, tile time code begins counting from "00:00:00"
(minute:second:frame). If recording starts from the end of a previously recorded scene, the time code
continues from the last time code number.
To perform Random Assemble Editing (_T _ pg. 42 47), time code is necessary. If during recording a blank
portion is left partway through the tape, the time code is interrupted. When recording is resumed, the time
code starts counting up again from "00:00:00". This means the camcorder may record the same time
codes as thrlse existing in a previously recorded scene. To prevent this, perform "Recording From The
Middle of A Tape" below in the following cases;
• When shooting again after playing back a
recorded tape.
• When power shuts off during shorlting.
•When a tape is removed and rednserted during
shooting.
•When shooting using a partially recrlrded tape.
•When shooting on a blanl< portion located
partway through the tape.
•When shooting again after shot)tins a scene
then opening/closing the cassette cover.
Disp{ay
Time code is displayed
during playbacl(,
(30 frames = 1 se(ond)
RecordingFromTheMiddleOfA Tape
1. PI%, back _ tape to find the spot at which you want to start recording, then engage the Still Playback
mode (_7_ pg. 29).
2. Set the Power Switch to "1"_" or "[_", then start recording.
NOTES:
•Tile time code cannot be reset.
•Durin_ i_lSt-forwardin_ arid rewinding, the time c_;cle indication cl_;es not move smoothl)<
When a blank portion is recorded on a tape
Time _ode Time _-ode Time _ode
00:00:00 05143121 00:00:00
Tape
Shooting start point
Proper recording
Time code
00:00:00
Tape
Shooting start point
Shooting stop point Shooting start point
Time code Time code
05:43:21 05:44:00
Shooting start point Shooting start point
'i il ¸¸EN¸] 7
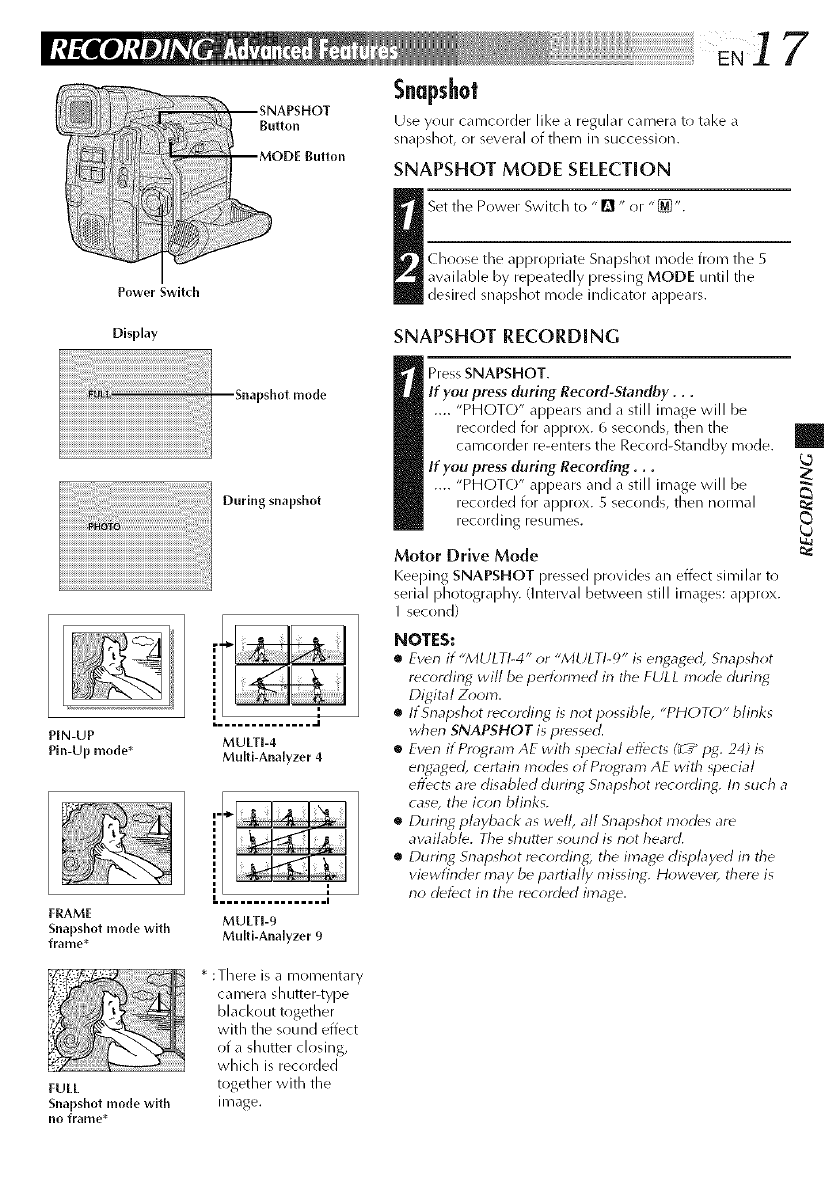
.... sAPSHOT
°ut2°D outtoo
Power switch
Snapshot
Use your camcorder like a regular camera to take a
snal3sh(>t ,or several of them in succession.
SNAPSHOT MODE SELECTION
Set tIle Power Switch to "Q " or "[]".
Choose the apl_ropriate Snal_shot mode from the S
available by repeatedly pressing MODE until tile
desired snapshot mode indicator appears.
Display
PIN-UP
Pin-Up mode*
During snapshot
L.............. .I
MULTI-4
Multi-Analyzer 4
I
I, ................ I
FRAME MULTI-9
Snapshot mode wlth Multi-Ana[yzer 9
frame*
SNAPSHOT RECORDING
_ ress SNAPSHOT.
If you press during Record-Standby...
.... "PHOTC)" _q)pears and a still image will be
recorded for approx. 6 seconds, then the
camcorder re-enters tile Record-Standby mode.
If you press during Recording...
.... "PHOT(-)" appears and a still image will be
recorded for approx. 5 seconds, then normal
record ing resllmeg.
Motor Drive Mode
Keeping SNAPSHOT pressed provides an effect similar to
serial phot()graphy. (Interw31between still images: approx.
Isecond)
NOTES:
•Even if "MULTI-4" or "MULTI-_Y" is enF,aged, Snapshot
rec_)rding will be performed in the FULL mode durin_
Digital Z_)oln.
•If Snapshot recording is not possible, "PHOT()" blinks
wherl SNAPSHOT is pressed.
•Even if Pro*gram AE with special eflect_ (_ /pg. 24) is
engaged, certain modes of Pr_*gram AE with special
eflect_ are disabled during Snapshot recording. In such a
case, the io;n blinks.
eDuring playback as well, all Snapshot modes are
available. Tile shutter sound is not heard.
•During Snapshot recordirlg, the image displayed in the
viewfinder may be partially missing. However, there is
no defect in the recorded image.
FULL
Snapshot mode wlth
no frame*
* :There is a momentary
camera shutter-type
blacl<out together
with the sound effect
of a shutter closing,
which is recorded
together with the
image.
MENU/BRIGHT
'Dial
ower Switch
8EN ' ......
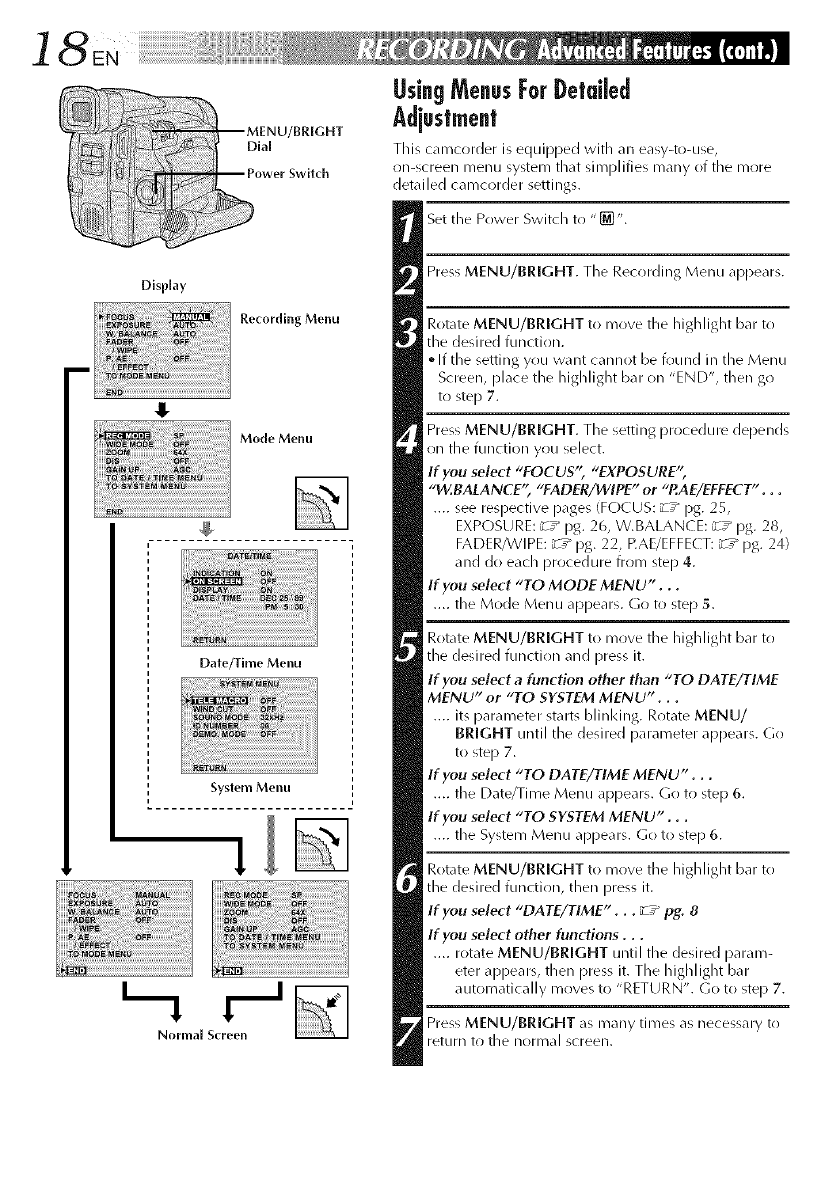
Using Menus For Detaled
Adiustmenl
This c_._corder is equipped with an easy4o-use,
omscreen menu system theft simpl flies many of the more
detailed camcorder settings.
Disp[ay
Recording Menu
Mode Menu
Date/Time Menu
System Menu
Normal Screen
Set tile Power Switch to "[]".
Press MENU/BRIGHT. Tile Recording Menu appears.
Rotate MENU/BRIGHT to move the highlight bar to
tile desired functirln.
• If tile setting yrlu want cannot be found ill tile Menu
Screen, [)lace the highlight bar on "END", then go
to step 7.
Press MENU/BRIGHT. Tile setting procedure depends
on the function you select.
If you select "FOCUS'; "EXPOSURE';
"W.BALANCE'; "FADER/WIPE" or "RAE/EFFECT". . .
.... see respective pages (FC)CUS: _-T_ pg. 25,
EXPOSURE: _-T_ pg. 26, W.BALANCE: _-T_ pg. 28,
FADER/WIPE: _T _ pg. 22, P.AE/EFFE( T: _T_ pg. 24)
and do each procedure from step 4.
If you select "TO MODE MENU "...
.... the Mode Menu appears. Go to step 5.
Rotate MENU/BRIGHT to move tile highlight bar to
tile desired function and press it.
If you select a function other than "TO DATE/TIME
MENU" or "TO SYSTEM MENU"...
.... its parameter starts blinl<ing. Rotate MENU/
BRIGHT until tile desired parameter appears. Go
to step 7.
If you select "TO DATE/TIME MENU "...
.... tile Date/Time Menu appears. Go to step 6.
If you select "TO SYSTEM MENU "...
.... tile System Menu appears. Go to step 6.
Rotate MENU/BRIGHT to move tile highlight bar to
the desired function, then press it.
If you select "DATE/TIME"... _7_pg. 8
If you select other functions...
.... rotate MENU/BRIGHT until tile desired param-
eter appears, then press it. Tile highlight bar
automatically moves to "RETURN". Go to step 7.
Press MENU/BRIGHT as many times as necessary to
return to the normal screen.
EN] 9
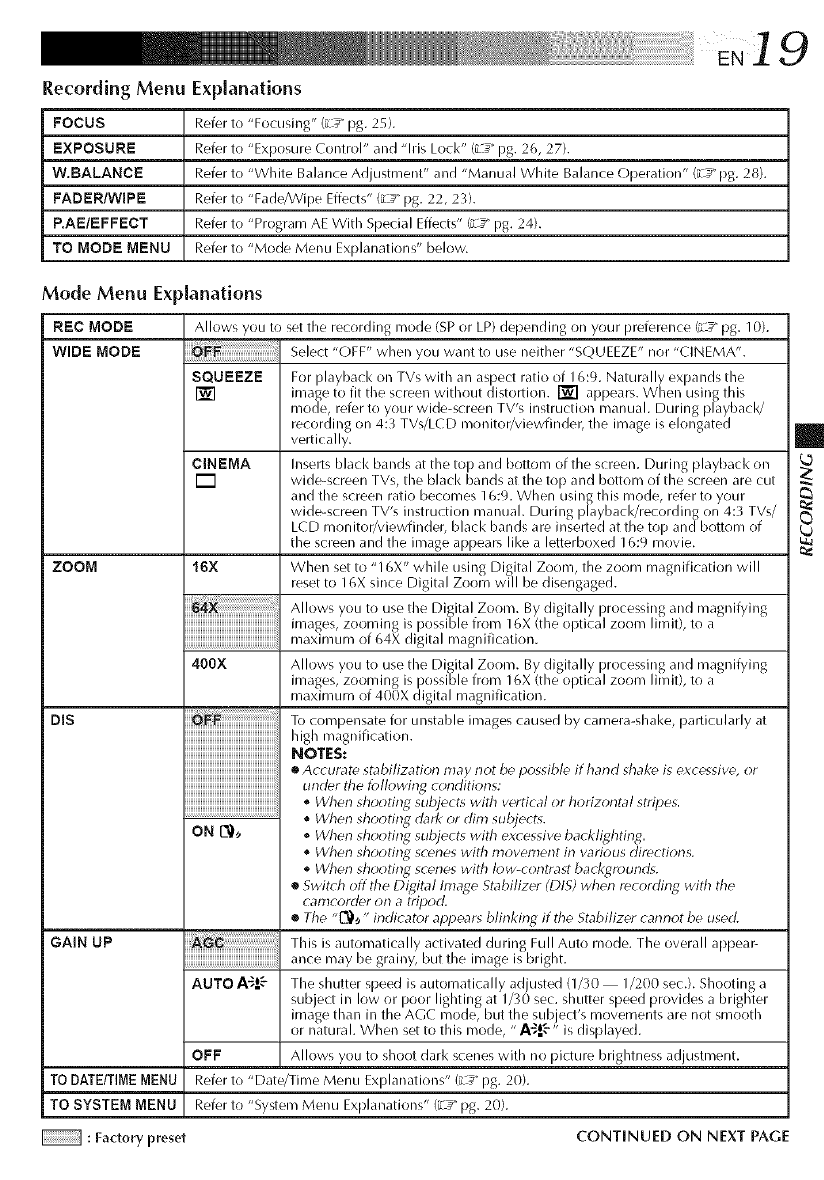
Recording Menu Explanations
FOCUS Refer to "Focusing" (L:_" pg. 25).
EXPOSURE Refer to "Exposure Control" and "his Loci<" (L_" pg. 26, 27).
W.BALANCE Refer to "White Balance Adjustment" and "Manual White Balance Operation" ('L_" pg. 28).
FADER/WIPE Refer to "Fade/Wipe Effects" CZ_"pg. 22, 23).
P.AE/EFFECT Refer to "Program AE With Special Effects" Cd_"pg. 24).
TO MODE MENU Refer to "Mode Menu Explanations" below.
Mode Menu Ex danations
REC MODE Allows you to
WIDE MODE
SQUEEZE
ZOOM
DIS
GAiN UP
TO DATE/TIME MENU
TO SYSTEM MENU
:Factory preset
CINEMA
r_
16X
set the recording mode (SP or LP) depending on your preference _z_ pg. 10).
Select "OFF" when you want to use neither "SQUEEZE" nor "CINEMA".
For playback on TVs with an aspect ratio of 1(,:9. Naturally expands the
image to fit the screen without distortion. _ appears. When using this
mode, refer to your wide-screen TV's instruction manual. During playback/
recording on 4:3 TVs/LCD rnonitor/viewfinder, the image is elongated
vertically.
Inserts black bands at the top and bottom of the screen. During playback on
wide-screen TVs, the black bands at the top and bottom of the screen are cut
and the screen ratio becomes 16:9. When using this mode, refer to your
wide-screen TV's instruction manual. During playback/recording on 4:3 TVs/
LCD monitor/viewfinder, black bands are inserted at the top andbottom of
the screen and the image appears like a letterboxed 16:9 movie.
When set to "16X" while using Digital Zoom, the zoom magnification will
reset to 16X since Digital Zoom will be disengaged.
400X Allows you to use the Digital Zoom. By digitally processing and magnifying
images, zooming is possible from 16X (the optical zoom limit), to a
maximum of 400X digital magnification.
To compensate for unstable images olused by c ame,a-shal<e, particularly at
high magnification.
NOT[ESt
•Accurate stabi/izatk)r_ may riot be p_)ssitale if hand shake is excessive, or
under ttle f_>llowir_g conditions:
•When shootir_g subjects with vertical or horizor_tal stripes.
•When shooting dark or dim subjects.
ON L_,_ * When shooting subjects with excessive backlighting.
•When shooting sc_nes with movement in various directions.
•When shooting scenes with Iow-corltrast bacT<grounris.
•Swit(h offthe Digital Image Stabilizer (DIS) when recording with the
carncorder on a tripor].
•The "L_,J " indicat_*r appears blinking if the Stabilizer car_not be used.
Th is is automatically activated du,,i ng Full Au,to mode. The overall appea e
[[ ybe grainy, but the image is bright.
AUTO A-_.°_" The shutter speed is automatically adjusted {1/30 1/200 sec.). Shooting a
subject in low or poor lighting at 1/30 sec. shutter speed provides a brighter
image than in the AGC mode, but the sub ect's movements are not smooth
or natural. When set to this mode, "A-_!_*" is displayed.
OFF Allows you to shoot dark scenes with no picture brightness adjustment.
Refer to "Date/Time Menu Explanations" (L 3" pg. 20).
Refer to "Syqern Menu Explanations" (_-_"pg. 20).
CONTINUED ON NEXT PAGE
20EN
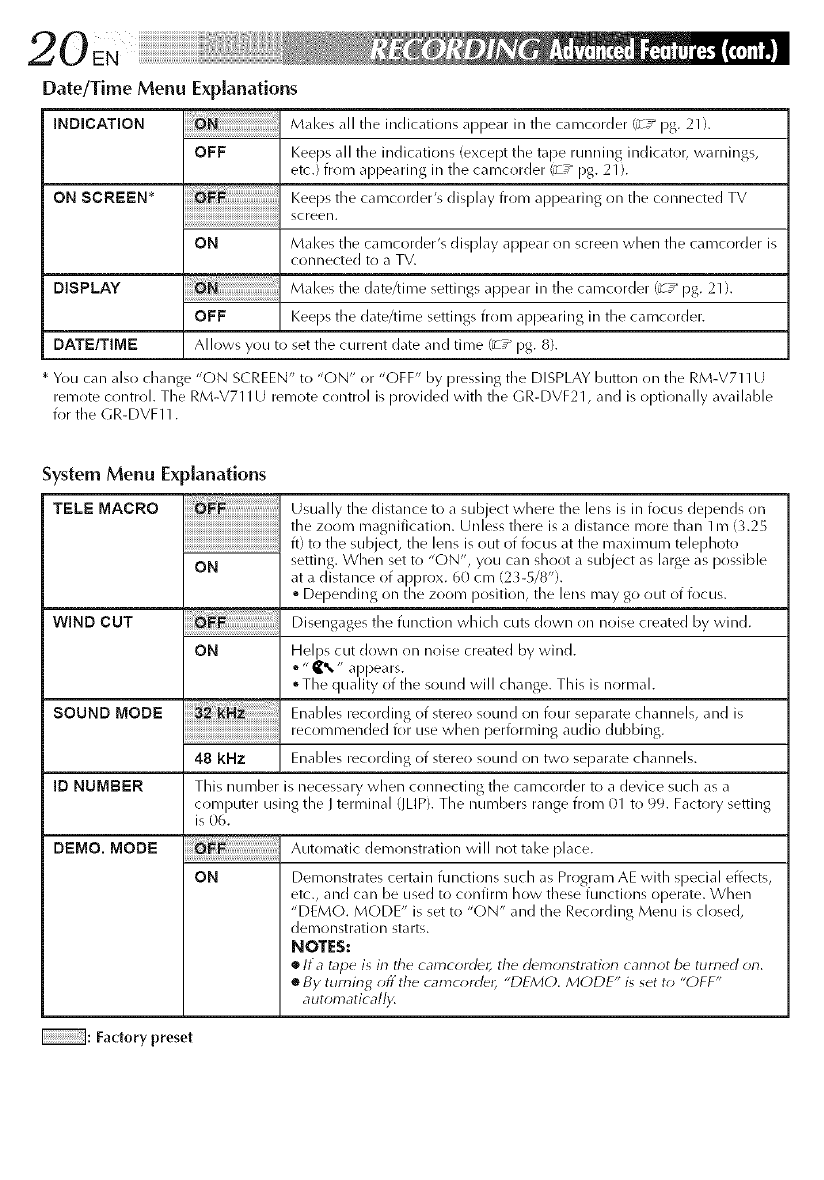
Date/Time Menu Explanations
INDICATION Makes all the indications appear in tie ca T/cor( er (Y-z_ pg 21).
OFF Keeps all tile indications (except tile tape running indicator, warnings,
etc.) from appearing in tile camcorder (_:T"pg. 21 ).
ON SCREEN* I<eepsthe camcr)rder's display frr,m appearing on the cr)nnected TV
screen.
ON Makes the camcorder's display appear on screen when the camcorder is
connected to a TV.
DISPLAY Mal<es the date/time settings apI)ear in the camcorder (_:z_pg. 21).
OFF Keeps tile date/time settings from api)earing in the camcorder.
DATI=/TIME Allows you to set the current date and time (_:T_ pg. 8}.
* You can also change "ON SCREEN" to "ON" or "OFF" by pressing tile DISPLAY button on the RM-V711 U
remote control. The RM-V711 U remote control isprovided with the GR-DVF21, and is optionally available
for the GR-DVF11.
System Menu Ex
TELl= MACRO
)lanations
iiiiiiiiii_i_ii_i_iilililililililililililililililililililililililililililij
ON
WIND CUT
SOUND MOOl=
ID NUMBl=R
is 06.
Dl=Mo.MODI=
ON
Usually the distance to a subject where the lens is in focus depends on
the zorlm magnification. Unless there is a distance more than 1m (X2S
if) to the subject, the lens is out of focus at the maxiFnuFntelephoto
ON setting. When set to "ON", you can shoot a subject as large as possible
at a distance of approx. 60 cFn(2 _-5/8").
• Depending on the zo(/m position, tile lens may go out of focus.
Disengages tile function which cuts down on noise created by wind.
Helps cut down on noise created by wind.
• " _%" appears.
• The quality of the sound will change. This is normal.
Enables recording of stere() sound on four separate channels, and is
recommended for use when performing audio dubbing.
48 RHz Enables recording of stere() sound on two separate channels.
This number is necessary when connecting the camcorder to a device such as a
computer using the Jterminal (IMP). The numbers range from 01 to 99. Factory setting
: Factory preset
Automatic demonstration will not take place.
Demonstrates certain functions such as Program AE with special effects,
etc., and can be used to confirm how these functions operate. When
"DEMO. MODE" is set to "C)N" and the Recording Menu is closed,
demonstration starts.
NOTES:
oIf a tape is in the camcorder, the demrmstmtion cannot be turned on,
•By turning off the camc_*r(leb "DEMO. MODE" is set to "OFF"
automatically,
¸¸¸EN21
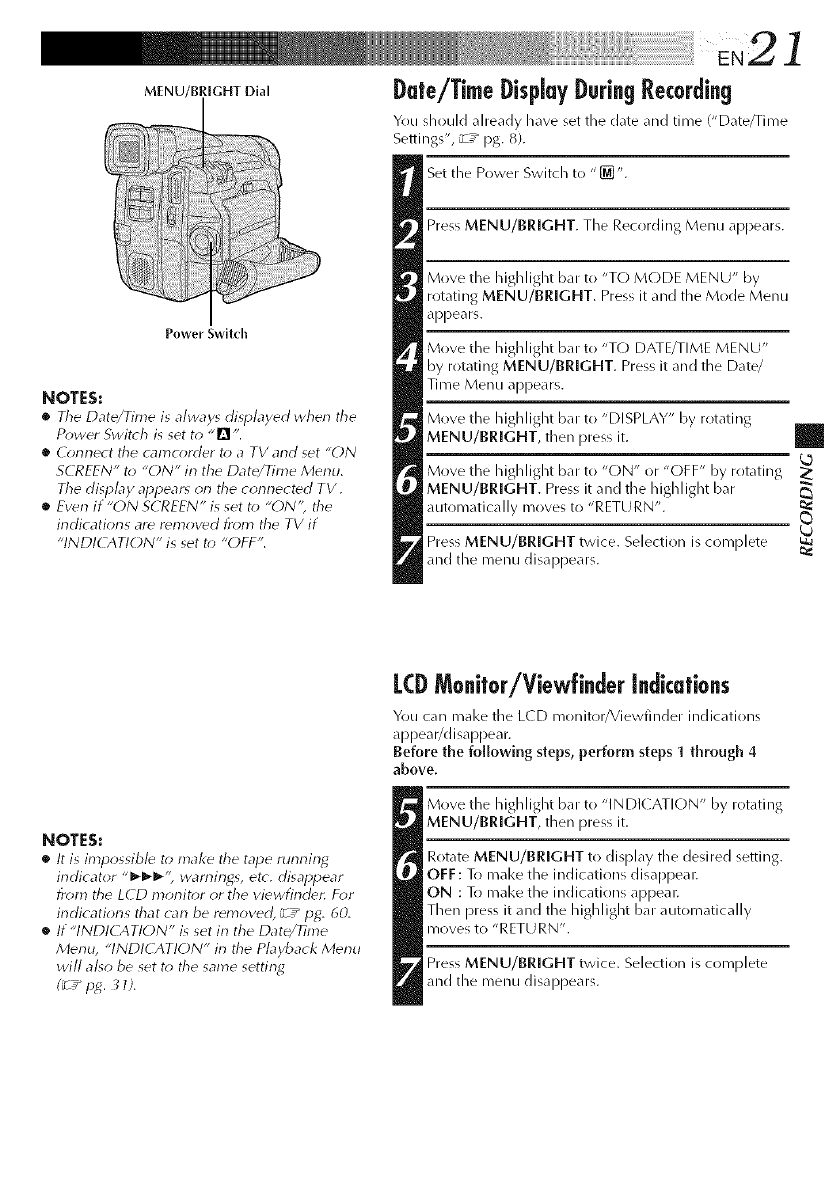
MENU/BRIGHT Dial
Power Switch
NOTES:
•The Date/Time is alway_ displayed when the
Pr)wer Swit{h is set to "Q'.
•dk_rmect the camc_;rder to aTY and set "ON
SCREEN" to "ON" in the Date/Time Menu,
The display appear_ on the corlrlect_d TV.
•Ewn if "ON SCREEN" is set to "ON'; the
indications are r_moved from the TV if
"INDK ATION" is set t_; "OFF".
Dale/TimeDisplayBuri.g Rec0rding
You should already have set the date and time ('Date/Time
Settings", _7_pg. 8).
Set the Power Switch to "[_".
Press MENU/BRIGHT. The Recording Menu appears.
Move the highlight bar to "TO MODE MENU" by
rotating MENU/BRIGHT. Press it and the Mode Menu
appears.
Move the highlight bar to "T() DATE/TIME MENU"
by rotating MENU/BRIGHT. Press it and the Date/
Time Menu appears.
Move the highlight bar to "DISPLAY" by rotating
MENU/BRIGHT, then press it.
Move the highlight bar to "ON" or "OFF" by rotating _:
MENU/BRIGHT. Press it and the highlight bar
automatically moves to "RETURN".
Press MENU/BRIGHT twice. Selection is complete
and the menu disappears.
NOTES:
•It is impossibl_ to inal<e the tape running
indicator "_'; warnings, et_. disappear
from the LCD m_;nit_r or the viewfind_c For
indications that _an be removed, __ p_. 6d.
If "INDICATION" is set in the Date/Time
Menu, "INDICATION" in the Playback Menu
will al_o be set t_) the same settin_
(_ _p_. _1).
L(BMo@0r/Viewfi.der I.dkati0.s
You can mal<e the LCD monitor/Viewfinder indications
appear/disappear.
Before the following steps, perform steps 1 through 4
above.
Move the highlight bar to "INDICATION" by rotating
MENU/BRIGHT, then press it.
Rotate MENU/BRIGHT to display the desired setting.
OFF: To make the indications disappear.
ON : To make the indications appear.
Then press it and the highlight bar automatically
moves to "RETURN'.
Press MENU/BRIGHT twice. Selection is complete
and the menu disappears.
Fade/WipeEffects
These effects let you make pro_style scene
transitions. Use them to spice up the transition
from one scene to the next. YOLI coin cllsr) vclry
transitirlns from scene to scene.
IMPORTANT:
Some Fade/Wipe Effects carinG( be u_ed with
certain modes ol ProEram AE with special
effects (_ /iJg,, 24). If an unusable Fade/_/Vipe
Effect is selected, its indicator blinks.
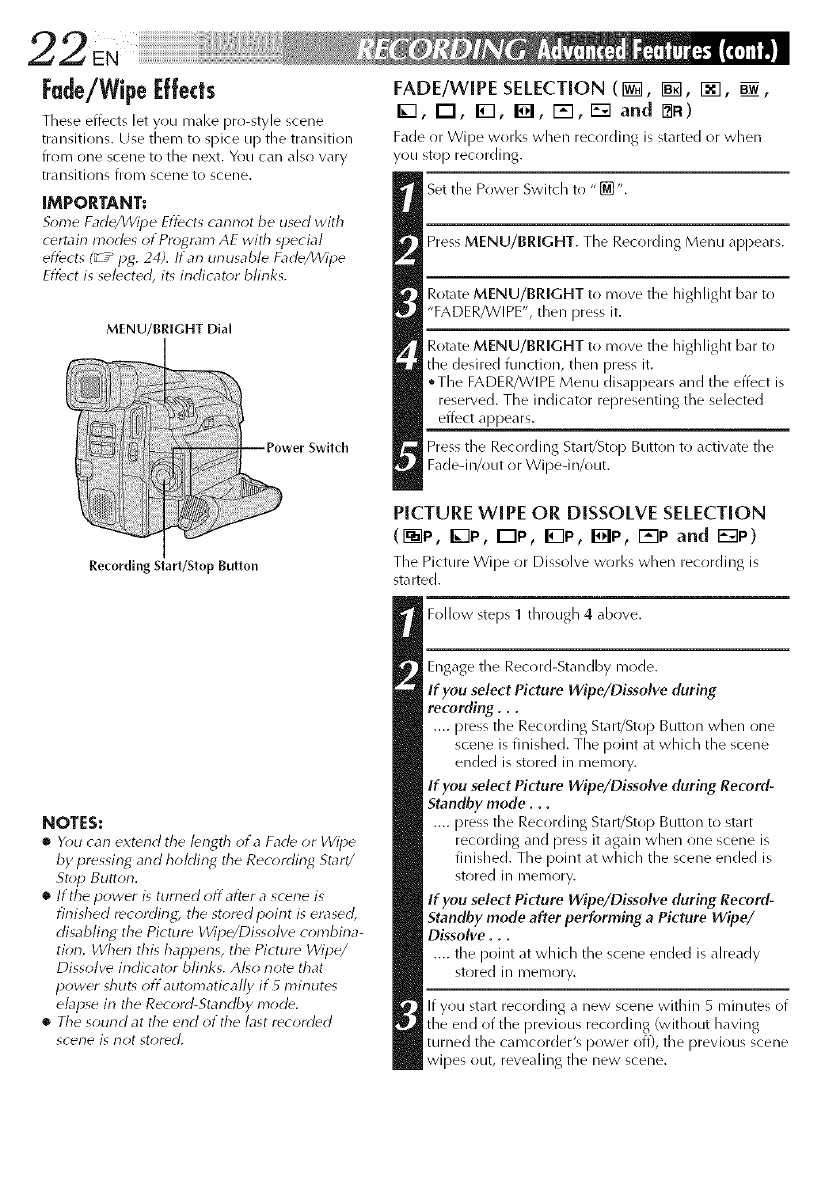
MENU/BRiGHT Dial
@
Recording Start/Stop Button
Switch
NOTES:
•You can extend the leng_ of a Fade or Wipe
by pressing arid holdirlg the Recording Start/
Stop Button.
•lithe power is turned offalter ,3 scene is
finished recording, the stored point is erased,
disabling the Picture Wipe/Dissolve combina-
tion, I/Vhen this happens, the Picture Wipe/
Dissolve indicator blinks, Al_o not_ that
power shut_ off automatically if5 nffnutes
elapse in the Record-Standby mode,
•The sound at the end of the last recorded
scene is not stored,
FADE/WIPE SELECTION rill, I_1, I_1, B_,
I_1, I--I, I_1, I_1, I"_'1,[33 and r_R)
Fade or Wipe works when recording is started or when
you stop recording.
Set the Power Switch to "[_]".
Press MENU/BRIGHT. The Recording Menu appears.
Rotate MENU/BRIGHT to move the highlight bar to
"FADER/WIPE", then press it.
Rotate MENU/BRIGHT to move the highlight bar to
the desired function, then press it.
°The FADER/WIPE Menu disappears and the effect is
reserved. The indicator representing the selected
effect appears.
Press the Recording Start/Stop Button to activate the
Fadedn/out or Wipedn/out.
PICTURE wIPE OR DISSOLVE SELECTION
(F_]P, I_P, I'--Ip, I_]P, IoIP, r-_P and I_-€]P)
The Picture Wipe or Dissolve works when recr)rding is
started.
Follow steps 1 through 4 above.
Engage the Recrlrd-Standby mode.
If you select Picture Wipe/Dissolve (luring
recording...
.... press the Recording Start/Stop Button when one
scene is finished. The point at which the scene
ended is stored in memory.
If you select Picture Wipe/Dissolve (luring Re(_rd-
Standby mode...
.... press the Recording Start/Stop Button to start
recording and press it again when one scene is
finished. The point at which the scene ended is
stored in memory.
If you select Picture Wipe/Dissolve during Record-
Standby mode after performing a Picture Wipe/
Dissolve...
.... the point at which the scene ended is aheady
stored in memory.
If you start recording a new scene within 5 minutes of
the end of the previous recording (without having
turned the camcorder's power off), the previous scene
wipes out, revealing the new scene.
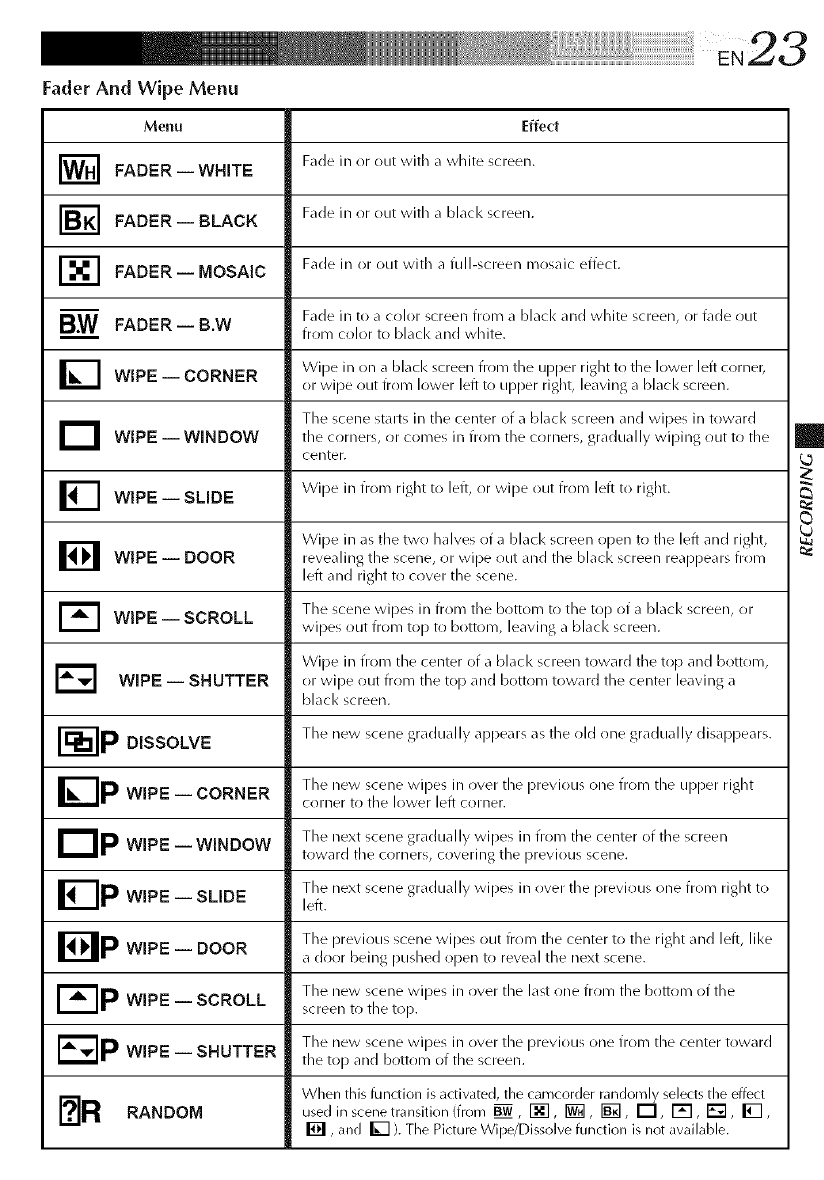
Fader And Wipe Menu
Effect
Fade in or out with a white screen.
Fade in or out with a black screen.
Fade in or out with a full-screen mosaic effect.
Menu
I_1 FADER--WHITE
I_ FADER-- BLACK
r-_ FADER-- MOSAIC
B.W FADER--B.W
WIPE -- CORNER
D WIPE -- WiNDOW
I_1 WIPE-- SLIDE
BWIPE--DOOR
] WIPE-- SCROLL
E2
Fade in to a color screen from a black and white screen, or fade out
from color to black and white.
Wipe in on a black screen from the upper right to the lower left corner,
or wipe out from lower left to upper right, leaving a black screen.
The scene starts in the center of a black screen and wipes in toward
the corners, or comes in from the corners, gradually wiping out to the
center.
Wipe in from right to left, or wipe out from left to right.
Wipe in as the two halves of a black screen open to the left and right,
revealing the scene, or wipe out and the black screen reappears from
left and right to cover the scene.
The scene wipes in from the bottom to the top of a black screen, or
wipes out from top to bottom, leaving a black screen.
Wipe in from the center of a blacl< screen toward tile top and bottom,
WIPE -- SHUTTER or wipe out from the top and bottom toward the center leaving a
blacl< screen.
I'_p DISSOLVE The new scene gradually appears as the (lid one gradually disal)pears.
I_IP WIPE -- CORNER The new scene wipes in over the previous one from the upper right
corller to the lower left corller.
DpThe next scene gradually wipes in from tile center of tile screen
WIPE -- WINDOW toward the corners, covering the previous scene.
FIP The next scene gradually wipes in ()vet tile previous one from right to
WIPE -- SLIDE left.
Bp WiPE -- DOOR The previo/l_; _;cene wipes out from the center to the right and left, like
a door being pushed open to reveal the next scene.
I'=-IPwiPE--SCROLL The new scene wipes in ()vet the last one from the bottom of the
screen to the top.
[_p The new scene wipes in ()vet the previous one from the center toward
WiPE -- SHUTTER the top and bottom of the screen.
When this function is activated, the carncorder r mdornly selects the effect
I?la RANDOM used in scene transition (from _, F_], [W_], IB_], 1"7 I'='1, F'_ I_],
Iol, and I_] ). The Picture Wipe/Dissolve function is not wailable.
IMPORTANT:
Some modes of Program AE with special effect,
carlnot be used with certain Fade/Wipe Effects
?_Z" pg. 23). If an unusable mode is selected, its
indi_ ator blinks,
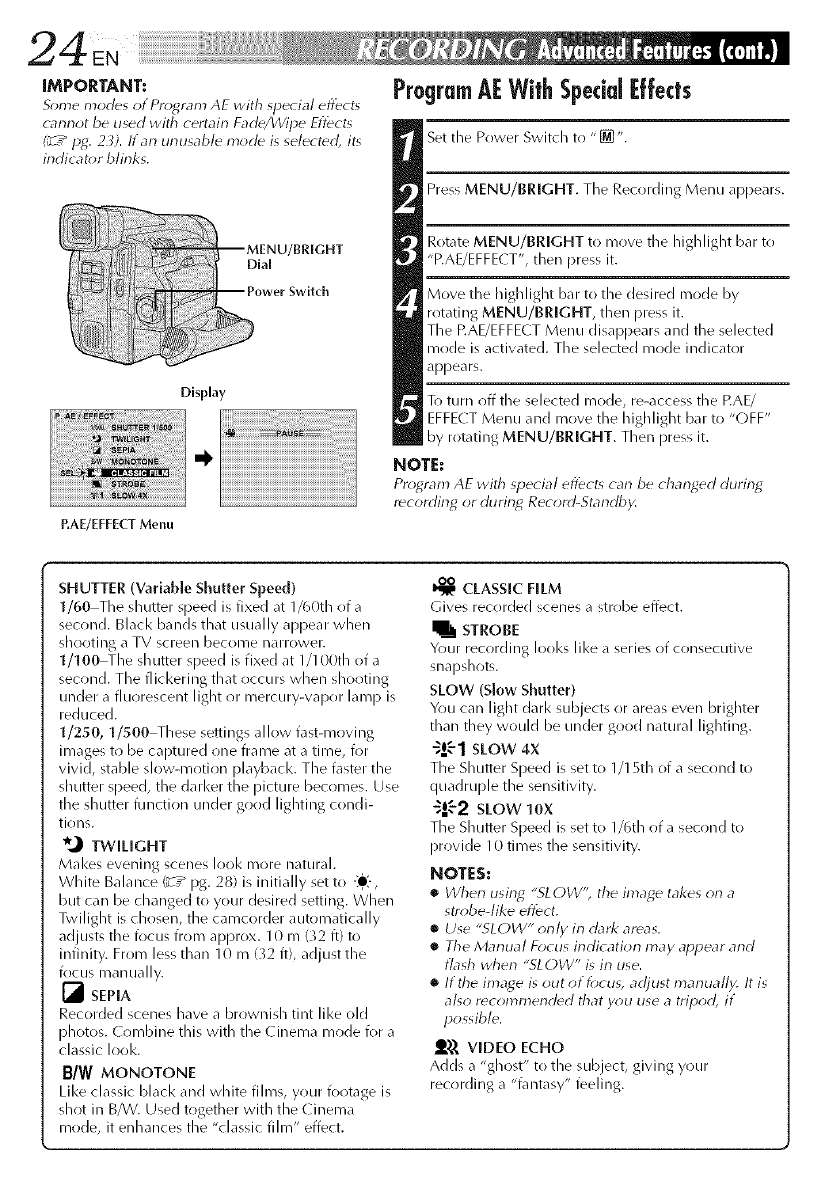
MENU/BRIGHT
Dial
ower Switch
Display
RAE/EFFECT Menu
ProgramA[ WithSpecialEffects
Set the Power Switch to "[]'.
Press MENU/BRIGHT. The Recording Menu appears.
Rotate MENU/BRIGHT to move the highlight bar to
"RAE/EFFE(T", then press it.
Move the highlight bar to the desired mode by
rotating MENU/BRIGHT, then press it.
The P.AE/EFFECT Menu disappears and the selected
mode is activated. The selected mode indicator
appears.
To turn off the selected mode, re-access the EAE/
EFFECTMenu and move the highlight bar to "OFF'
by rotating MENU/BRIGHT. Then press it.
NOTE:
Program AE with special efiect_ can be chan_ed during
recording or durin_ Record-Standb_
SHUTTER (VariabLe Shutter Speed)
1/60 The shutter speed is fixed at 1/G0th of a
second. Black bands that usually appear when
shooting a TV screen become narrower.
1/1 o0_he sh utter speed is fixed at 1/100th of a
second. The flicl<ering that occurs when shooting
under a fluorescent light or mercury-vapor lamp is
reduced.
1/250, 1/500_hese settings allow fast-moving
images to be captured one frame at a time, for
vivid, stable slow-motion playbacl<. The faster the
shutter speed, the darl<er the picture becomes. Use
the shutter function under good lighting condi-
tions.
_,_ TWILIGHT
Makes evening scenes look more natural.
White Balance _ /pg. 28) is initially set to [e?,
but can be changed to your desired setting. When
Twilight is chosen, the camcorder automatically
adjusts the focus from approx. 10 m(32 if) to
infinity. From less than 10 m (32 ft), adjust the
fflcus manually.
r_ SEPIA
Recorded scenes have a brownish tint like old
photos. ( ombine this with the Cinema mode for a
classic look.
B/W MONOTONE
Like classic black and white films, your footage is
shot in B/W. Used together with the ( inema
mode, it enhances the "classic film" effect.
CLASSIC FILM
Gives recorded scenes a strobe effect.
I_ STROBE
Your recording looks like a series of consecutive
snapshots.
SLOW (Slow Shutter)
You can light darl< subjects or areas even brighter
than they would be under good natural lighting.
-_!'1 stow 4x
The Shutter Speed is set to 1/1 Sth of a second to
quadruple the sensitivity.
"!"2 stow 10x
The Shutter Speed is set to 1/6th of a second to
provide 10 times the sensitivity.
NOTES:
•When using, "SLOW" the image takes on a
strobe-like effect.
•Use "SLOW" orlh/in dark areas.
•The Manua/Focus indication may appear and
flash when "SLOW" is in use.
•If the ilna_e is out of focus, adjust manually. It is
a/_o recon3mended that you use a tripod, if
possible.
_),), VIDEO ECHO
Adds a "ghost" to the subject, giving your
recording a "fantasy" feeling.
...................................................................N2 5
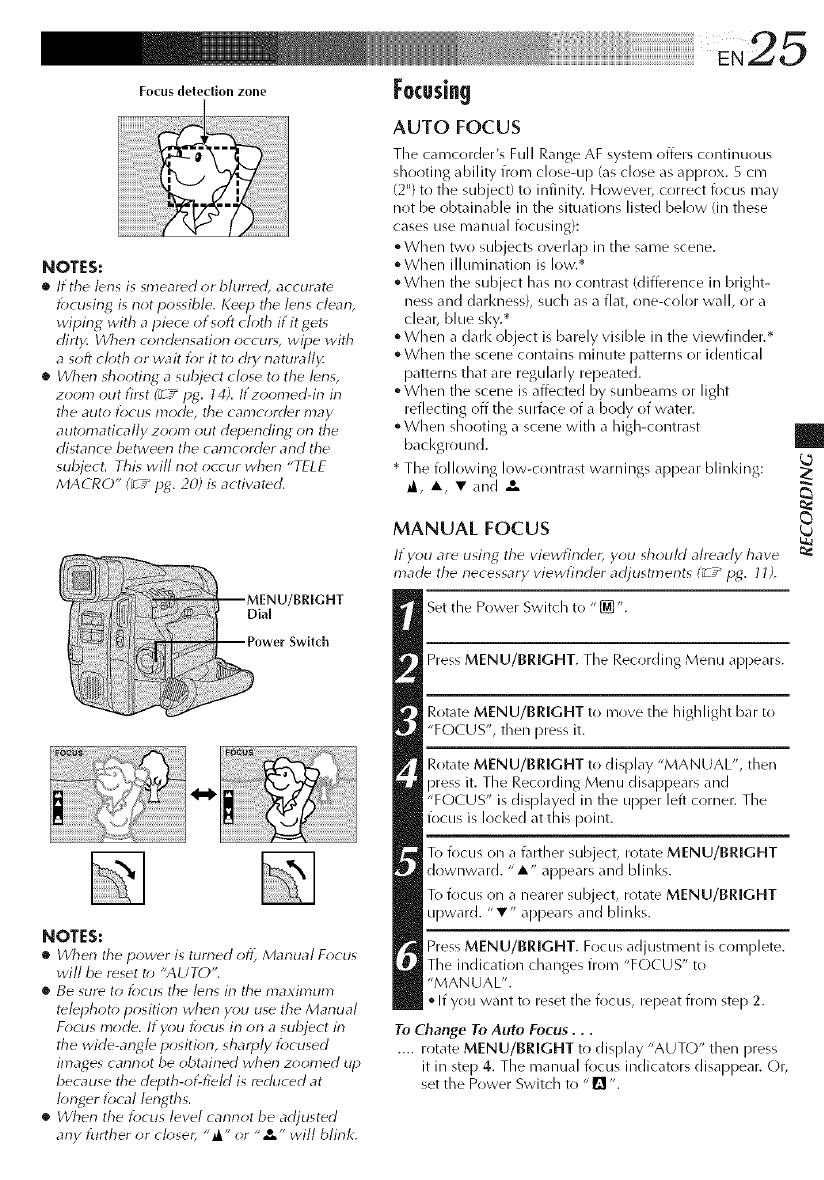
Fo_-usdetedion zone FOCUSing
NOTES:
•I/the I_ns is smeared or blurred, accurat_
iocusing is not possible. K_ep the lens dean,
wiping with a piece o/soft d_4h if it get_
dirt)_ Wherl corlrl_rlsation occum, wipe with
asoft cloth or wait tbr it t_* dry naturall)4
•dherl shooting asubject close to the I_rls,
zoom out flint (_ ,_ pg. 14). If zoomed@-_ in
the auto t}_cus mode, the camcorder may
automatically zoom out depending on the
distarlce betweerl the camcorder arid the
subject. This will riot occur wherl "TELE
MACRO" (_Z_pg. 20; is actiw_tdd.
MENU/BRIGHT
Dial
ower Switch
NOTES:
•When the power is turned oft_ Manual F_>cus
will be reset t_; "AUTO".
•Be sure to focus the lens in the nlaxinlum
tdlephoto positiorl wherl you use the Marlual
Focus I?}od_. lt you focus irl orl a subject irl
the wide-an_le position, shaq_ly focused
images carlrlot be obtairled wherl zoomed up
because the depth-of-field is reduced at
kruger focal lengths.
•dherl the focus level carlrlot be adjusted
arly further or ch*sel; " Jl " or "",_" will blink.
AUTO FOCUS
Tile camcorder's Full Range AF system offers continuous
shooting ability from close-up (as close as approx. 5 cm
(2") to the subject) to infinity. However, correct focus may
not be obtainable in the situations listed below (in these
cases use nlantld[ focusing):
• When two subjects overlap in tile same scene.
°When illumination is low.*
• When the subject has no contrast (difference in bright-
hess and darkness), such as a flat, one-color wall, or a
clear, blue sky.*
• When a dark object is barely visible ill the viewfinder.*
• When the scene contains minute patterns or identical
patterns that are regularly repeated.
• When the scene is affected by sunbeams or light
reflecting off the surface of a body of water.
• When shooting a scene with a high-contrast
bacl<ground.
• Tile following low-contrast warnings appear blinl<ing:
_, A • and ,&e
MANUAL FOCUS
If you are using the viewfirlder, you should already have
marie the rlecessary viewfirlder arljustmerlts (_ T_ IJ_. 11).
Set tile Power Switch to "[_".
Press MENU/BRIGHT. Tile Recording Menu appears.
Rotate MENU/BRIGHT to move the highlight bar to
"FOr US", then press it.
Rotate MENU/BRIGHT to display "MANUAL", then
press it. The Recording Menu disappears and
"FOr US" is displayed in the upper left corner. The
focus is Iocl<ed at this point.
To focus on a farther subject, rotate MENU/BRIGHT
downward. "A" appears and blinks.
To klcus on a nearer subject, rotate MENU/BRIGHT
upward. "•" appears and blinks.
Press MENU/BRIGHT. Focus adjustment is complete.
The indication changes from "FOCUS" to
"MANUAL".
• If you want to reset tile focus, repeat from step 2.
To Change To Auto Focus...
.... rotate MENU/BRIGHT to display "AUTO" then press
it in step 4. The manual focus indicators disappear. Or,
set tile Power Switch to "Q ".
MENU/BRIGHT Dial
Power Switch
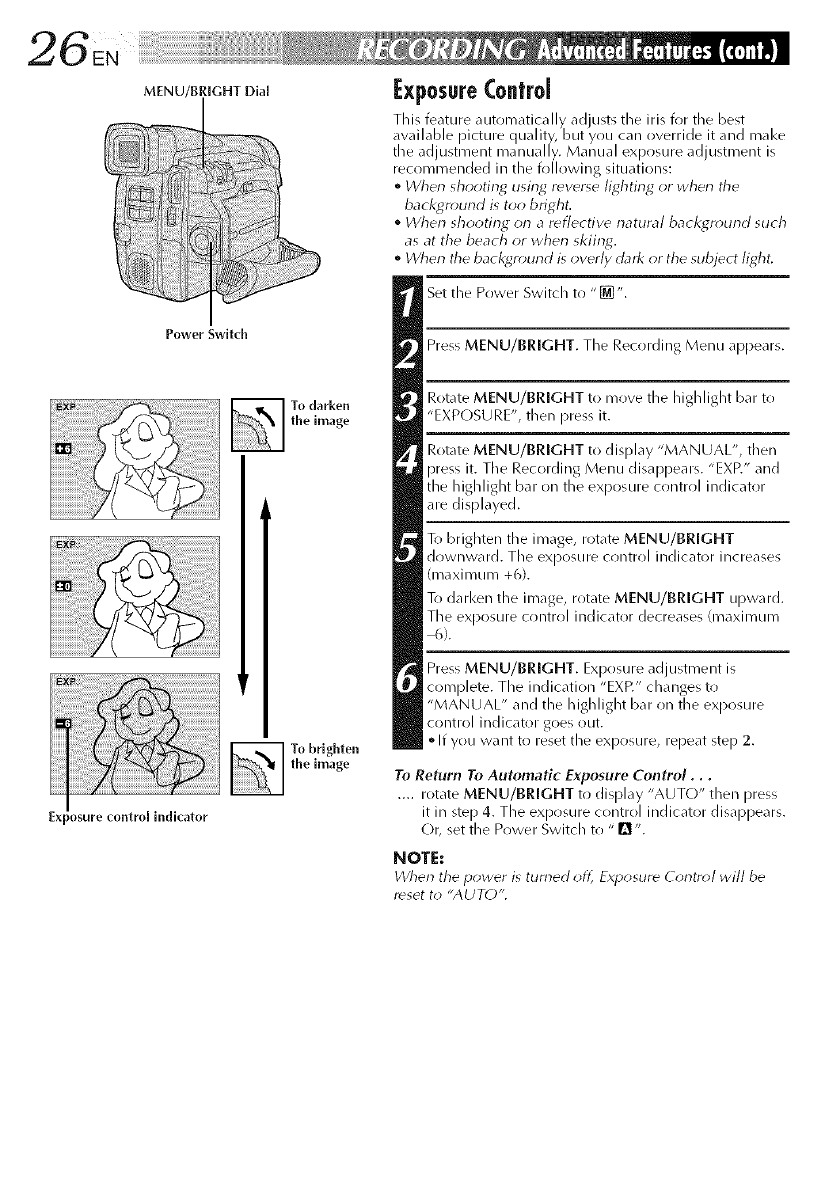
xposure controllndicator
To darken
thelmage
To brighten
thelmage
[xposore Control
This feature automatically ad usts tile iris for the best
available )icture c uality, but you can override it and mal<e
t/e adjustment manua ly. Manua exposure ac justment is
recommended in the k)llowing situations:
•When shooting using rever_e lightirlg or when the
bacl<gr_und is too bright.
•When shooting orl a reflective natural bacl<gr_>und such
as at the beach or when skiing.
•Whorl the bacl<gr_>urld is overly daft< or the subject light.
Set the Power Switch to "[_J".
Press MENU/BRIGHT. The Recording Menu appears.
Rotate MENU/BRIGHT to move the highlight bar to
"EXPOSU RE", then press it.
Rotate MENU/BRIGHT to display "MANUAL", then
press it. The Recording Menu disappears. "EXP." and
the highlight bar on the exposure control indicator
are displayed.
T() brighten the image, rotate MENU/BRIGHT
downward. The exposure control indicator increases
(maximum +6).
To darken the image, rotate MENU/BRIGHT upward.
Tile exposure control indicator decreases (maximum
6).
Press MENU/BRIGHT. Exposure adjustment is
complete. The indication "EXP." changes to
"MANUAL" and the highlight bar oil the exposure
control indicator goes out.
• If you want to reset the exposure, repeat step 2.
To Return To Automatic Exposure Control...
.... rotate MENU/BRIGHT to display "AUTO" then press
it in step 4. The exposure control indicator disappears.
Or, set the Power Switch to "Q".
NOTE:
When the power is turned ofl_ ExT_osure Control will be
reset to "AUTO".
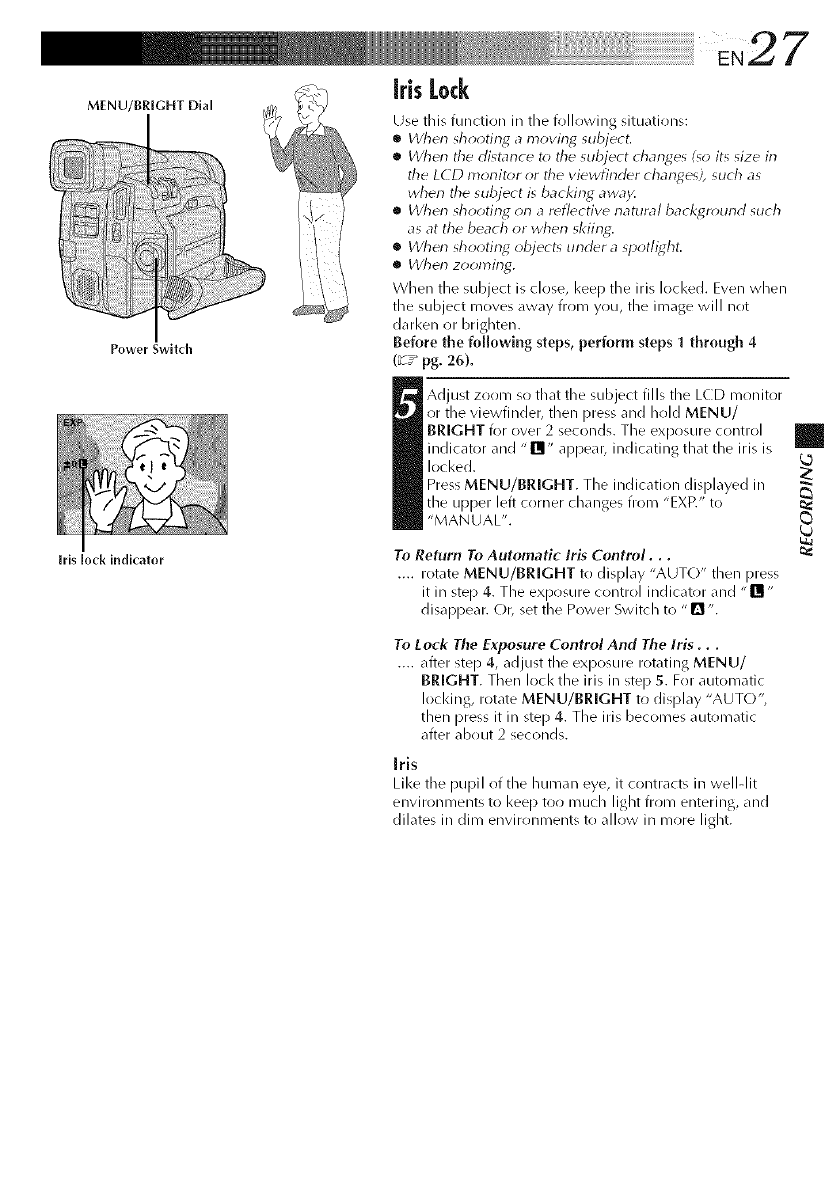
irisLock
MENU/BRIGHT Dial
Use this function in the following situk_tions:
•When shooting a moving subject.
•When the distarlce to the subject changes (so its size in
the LCD monitor or the viewfinder chan_es), such as
when the subject is backing awa_,4
•When shooting on areflective natural back_4round such
as at the beach or when skiing,:
•When shootin_ object_ under a spotlight.
•When zooming.
When the suhject is close, keep the iris locked. Even when
the subject moves away from you, the image will not
darken or hrighten.
Power Switch Before the following steps, perform steps 1 through 4
(_-T" pg. 26).
I djust zoom so that the subject fills the LCD monitor
or the viewfinder, then press and hold MENU/
BRIGHT for over 2 seconds. The exposure control
indicator and "Illl" appear, indicating that the Ms is
Iocl<ed.
Press MENU/BRIGHT. The indication displayed in
the upper left corner changes from "EXP." to
"MANUAL".
Iris lock indicator To Return To Automatic Iris Control,..
.... rotate MENU/BRIGHT to display "AUTO" then press
it in step 4. The exposure control indicator and "11"
disappear. Or, set the Power Switch to "Q ".
To Lock The Exposure Control And The Iris...
.... after step 4, adjust the exposure rotating MENU/
BRIGHT. Then lock the iris in step 5. For automatic
Iocl<ing, rotate MENU/BRIGHT to display "AUTO",
then press it in step 4. The iris becomes automatic
after about 2 seconds.
[rls
Like the pupil of the human eye, it contracts in welHit
environments to keep too much light from entering, and
dilates in dim environments to allow in more light.
WhiteBalanceAdiustment
A term that refers to the correctness of color
reproduction under w_rious lighting. If the white
balance is correct, all other colors will be accurately
reproduced.
The white balance is usually adjusted automatically.
mowevel_ more advanced camcr)rder r)perators
control this function manually to achieve a more
professional color/tint reprr)ductir)n.
Set the Power Switch to "[]".
Press MENU/BRIGHT. The Recording Menu
appears.
Rotate MENU/BRIGHT to move the highlight
bar to "W.BALANCE", then press it.
The Recording Menu disappears. "W.BAL."
appears in the upper left corner and the
currently selected mode indication is also
displayed.
Rotate MENU/BRIGHT to display the desired
setting.
"AUTO" White balance is adjusted automati-
cally (t\_ctory [)reset).
"i:_1" White balance is set manually.
":O? " Outdoors r)n a sunny day.
"-',r_" Outdr)r)rs on a cloudy day.
"@ " A video light or similar type of lighting
is used.
Press MENU/BRIGHT again. Selection is
complete. The indication "W.BAL." changes to
"MANUAL".
To Return To Automatic White Balant_. . .
.... select "AUT()" in step 5. Or, set tile Power
Switch to "Q ".
NOTE:
White balance cannot be used wherl Sepia or
Morlotorle (_T*pg. 24) isactiw_ted,
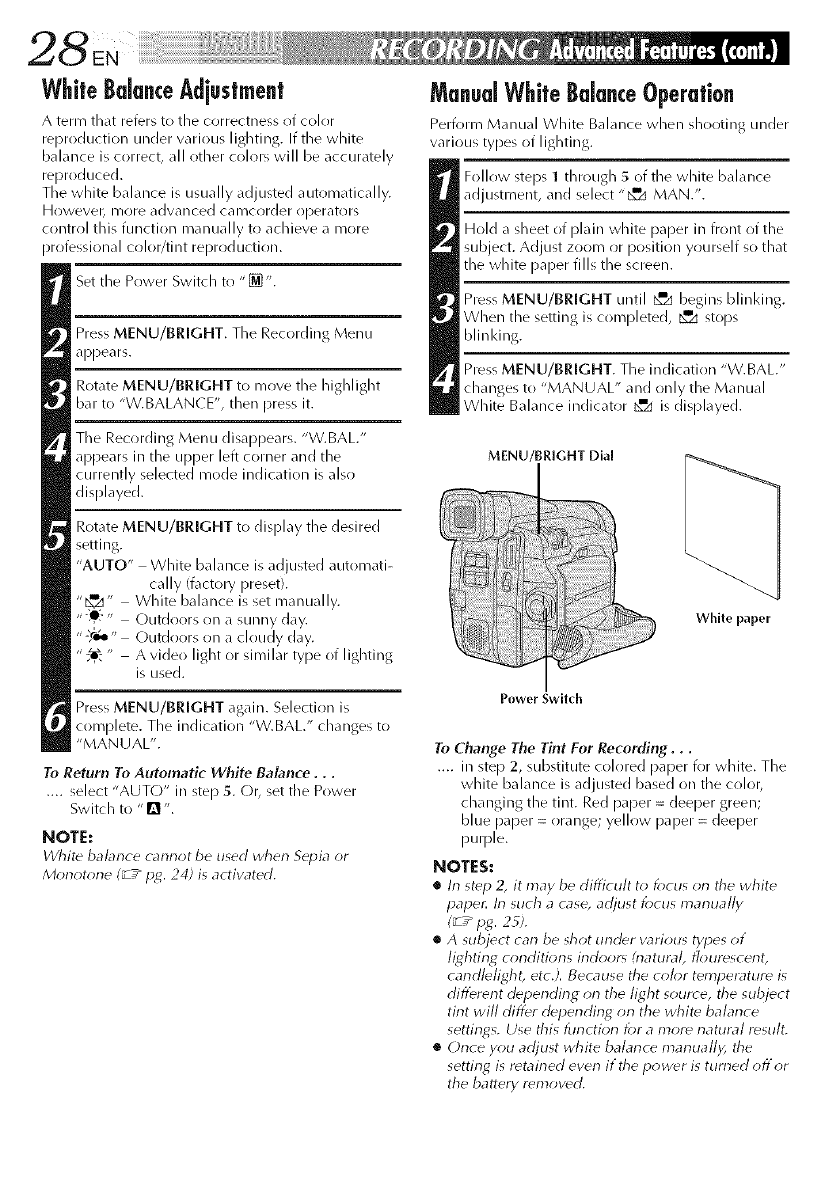
ManualWhileBalanceOperati0n
Perform Manual White Balance when sh()oting under
w3rious types of lighting.
Follow steps 1 through 5 of tile white balance
adjustment, and select "b,_zt MAN.".
Hold a sheet of plain white paper in front of the
subject. Adjust zoom or position yourself so that
the white paper fills the screen.
Press MENU/BRIGHT until _ begins blinl<ing.
When the setting is completed, _ stops
blinl<ing.
Press MENU/BRIGHT. The indication "W.BAL."
changes to "MANUAL" and only the Manual
White Balance indicator _:_ is displayed.
MENU/BRIGHT Dial
Whhe paper
Power Switch
To Change The Tint For Recording...
.... ill step 2, substitute colored paper for white. The
white balance is adjusted based on the color,
changing the tint. Red paper = deeper green;
blue paper= orange; yellow paper= deeper
purple.
NOTES:
•In st_p 2, it may be difficult t_ lbcus _n the white
pape,: In such a case, adjust focus manually
(_T_ pg. 29).
•Asubject can be shot under various types of
lighting corlditiorls irldoor_ (rlatuml, flourescent,
candlelight, etcd. Because tile color telTtperaturd is
different depending on the light source, tile subject
tint will differ depending on the white balance
settings. Use this functk)rl for a mor_ natural result.
•Once you adjust white balancd inanually, tile
setting is retained even if the power is turned off or
the battery removed.
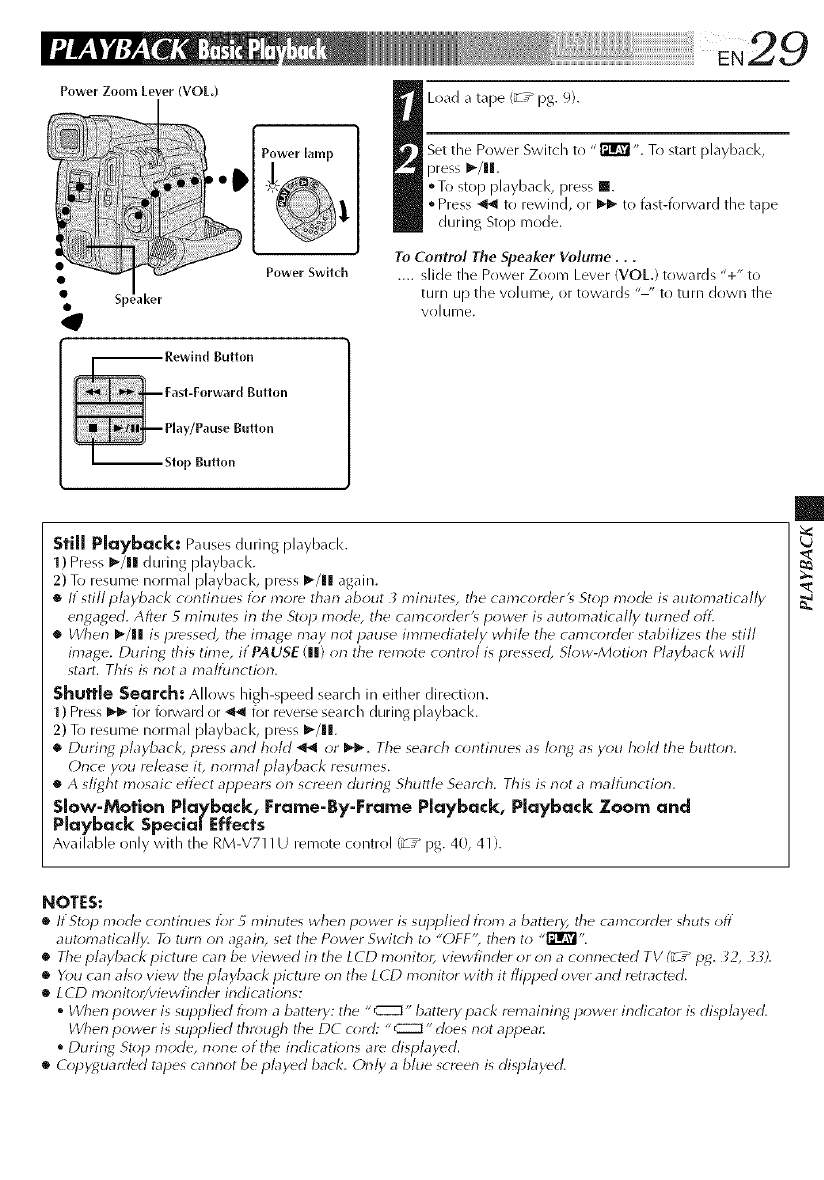
Power Zoom Lever (VOL)
Speaker
L )ad a tape (z7_ pg 9).
Set the Power Switch to "_'. To start playback,
press _/IH.
oTo stop playback, press Ill.
•Press _ to rewind, ()r _'_ to fast-forward tile tape
during Stop mode.
To Control The Speaker Volume...
.... slide the Pr)wer Zoom Lever (VOL.) towards "+" to
turn up tile volume, or towards "-" to turn down the
vr) [ u iYi e.
Still Playback: Pauses during playback.
1) Press _/11 during playback.
2) To resume normal playback, press _/lll again.
•If still pkryback corltirlues for more tharl about _mirlutes, the camcord_r's St_>p mode is automatically
erlgaged. After 5 mirlutds irl the Stop mode, the camcorder's power is automatically turned ()If.
•dherl _-/ll is pressed, the image may riot pause immediately while the camu)rder stabilizes the still
image. During this time, if PAUSE (Ill) orl the r_mote corltn*l is pressed, Slow-Motion Playback will
start. This is not a malfunction.
Shuttle Search: Allows high-speed search in either direction.
1 ) Press _ for forward or _ for reverse search during playback.
2) To resume normal playbacl<, press I_/ll.
•During I_layback, press arid hold _or I_1_. The search c_mtinues as I_mg as you hold the button.
Once you release it, nonr_al playback resumes.
•A slight mosaic effect appears on screen during Shuttle Search. This is riot a malfurlctiorl.
Slow-Motion Playback, Frame-By-Frame Playback, Playback loo_ and
Playback Specia/lfffects
Available only with the RM-V71 I U remote control (_ ,_ pg. 40, 41).
NOTES:
•IfStol_ mr*d_ c_*ntinues lbr 5 minutes when power is suHpIied lr_*m a batter); the camo;rder shuts _*fl
_utomatically. To turn r)n again, set the Power Switch to "OFF'; ther_ to ,,121P_".
•The playback picture carl be viewed in the LCD monitor, viewfind_r or orl a connected TV (_ ,_pg. 32, 33).
•You can also view the playback picture on the LCD morlitor with it flipped over arid retracted.
•LCD morfitor/viewfir_der indicatior_s:
•When power is supplied from abattery: the "_" battery pack r_n'lairling pow(_r indicat_)r is displayed.
dherl power is supplied through the DC c_)rd: " _:--m " does riot appear.
•During Stop mode, none ot the irldicatiorls are displayed.
•Copyguarded tapes {armor be played back. Orlly a blue screen is dispkly_d.
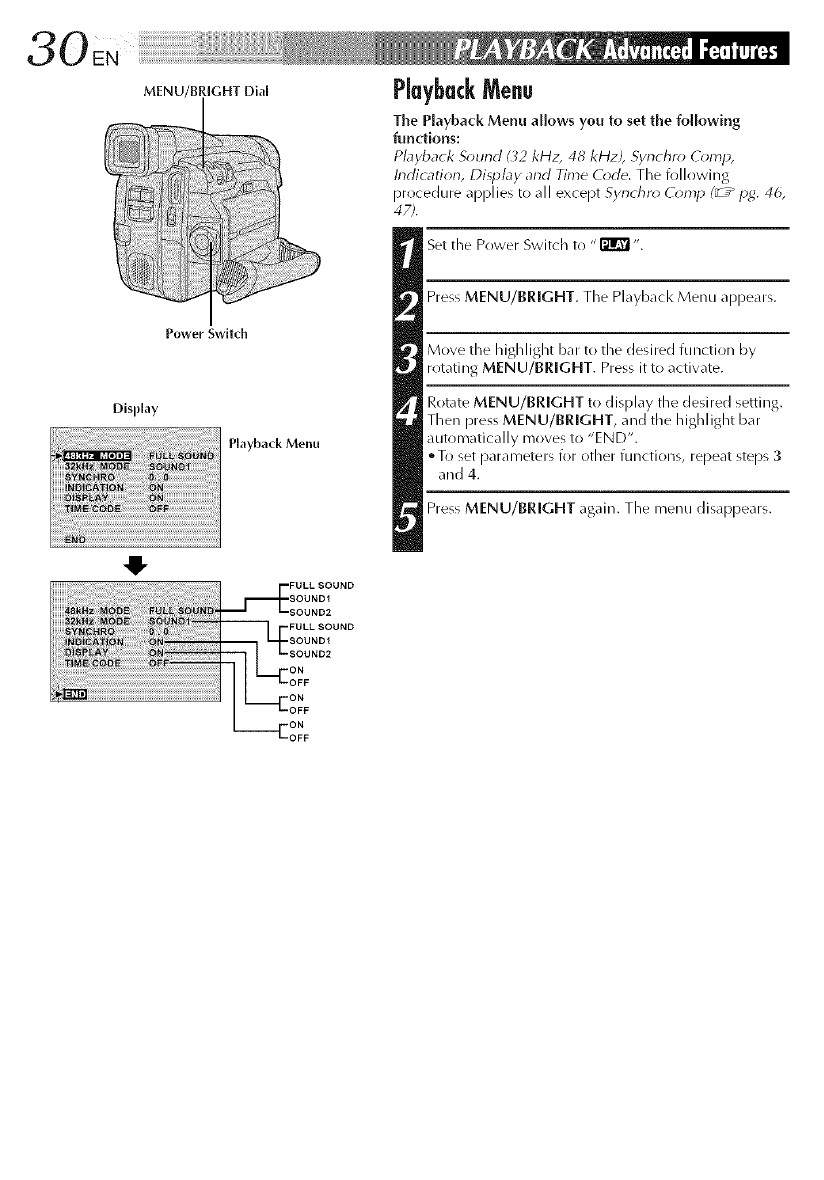
MENU/BRIGHT Dial
Power switch
Display
Playback Menu
O
PlaybackMenu
The Playback Menu allows you to set the following
functions:
Pbyback S_und U2 kHz, 48 kHz;, 5ynchr_ C_*mp,
Indication, Display and Time C_*de. The following
procedure applies to all except Syrlchr_; (_m_p (_ ,_i,_. 46,
47;.
Set the Power Switch to "_".
Press MENU/BRIGHT. The Playback Menu appears.
Move the highlight bar to the desired function by
rotating MENU/BRIGHT. Press it to activate.
Rotate MENU/BRIGHT to display the desired setting.
Then press MENU/BRIGHT, and the highlight bar
auto mat ica Ily moves to "E N D".
° To set parameters for other functions, repeat steps 3
and 4.
Press MENU/BRIGHT again. The menu disappears.
PlaybackSou.d
During playbacl<, the carncorder detect the sound mode in which tile recording was made, and plays tile
sound back. Select the type of sound to accompany your playbacl< picture. (_2 kHz is preset to "SOUND 1"
and 48 kHz is preset to "FULL S(-)UND'.)
Recording sound
32 kHz
48 kHz
Display
FULL SOUND
SOUND 1
SOUND 2
FULL SOUND
SOUND 1
SOUND 2
Output sound
Stere(-) sound
Stere(') sound
"L" sourld is ('>utput on both channels
"R" sound is output on both channels
If you want to change the output SOLind of a tape recorded at 32 kHz, access the Playbacl< Menu and, in step 3
on page 30, select "32 kHz MODE" and set it for "FULL SOUND", "SOUND l" or "SOUND 2". For tapes
recorded at 48 I<Hz, set in the same manner.
@OTES:
•Y_xl can al_o use the RM-V711U remote control'_ AUDIO MONITOR button to change the output sound
(without having to access the Playback Menu;. Make sure you point the remote contn# at the {amc_rder'_
remote senso_
•Tile camcorder carlnot detect the sound mode irl which the recording was made durin_ t:_st-_;rward or
rewind. During pbyback the sound mode is displayed in the UlJper left __n-ler.
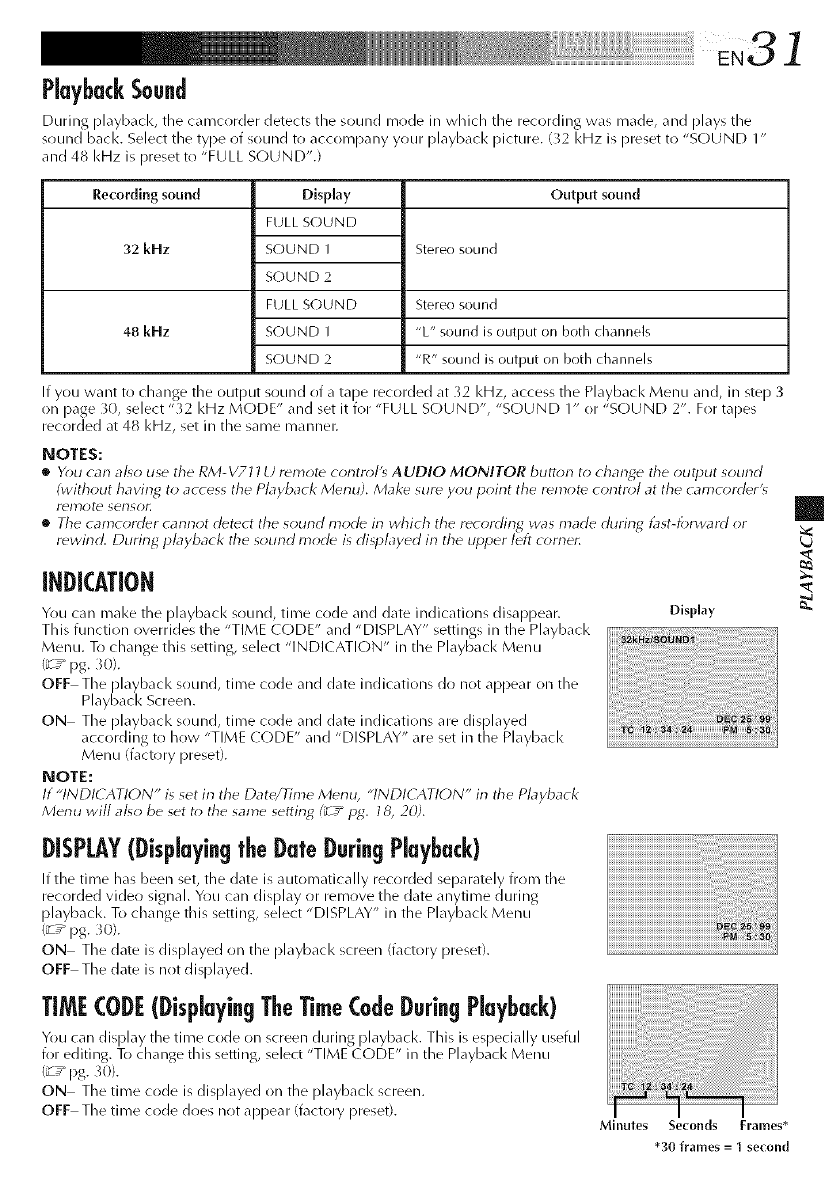
INDICATION
You car/make the playbacl< sound, time code and date indications disappear.
This function overrides the "TIME ((-)DE" and "DISPLAY" settings in the Playback
Menu. To change this setting, select "INDICATION" in the Playback Menu
(_T_ pg. }0).
OFF Tile playback sound, time code and date indications do not appear on the
Playbacl< Screen.
ON Tile playback sound, time code and date indications are displayed
according to how "TIME ([](-)DE" all('] "DISPLAY" are set in the Playback
Menu (factory preset).
@OTE:
It "INDICATI()N" is set in tile Date/Time Menu, "INDI(ATI()N" in the Playback
Merlu will al_o be set t_) tile same sePJng (_ /i)_. 18, 20).
DISPLAY(DisplayingtheDaleDuring Playback)
If the time has been set, the date is automatically recorded separately from the
recorded video signal. You can display or remove the date anytime during
playback. To change this setting, select "DISPLAY" in the Playback Menu
(_T_ pg. _0).
ON The date is displayed on the playbacl< screen (factory preset).
OFF The date is not displayed.
TIMECODE(DisplayingTEeTimeCodeDuringPlayback)
You car/display the time code on screen during playback. This is especially useful
(or edJtJug. To change this setting, select "TIME ((_)DE" in the Playbacl< Menu
(_7_pg. 30}.
ON The time code is displayed on the playbacl< screen.
OFF The time code does not appear (factory preset).
Oisl)[ay
Minutes Seconds Frames*
*30 frames = I second
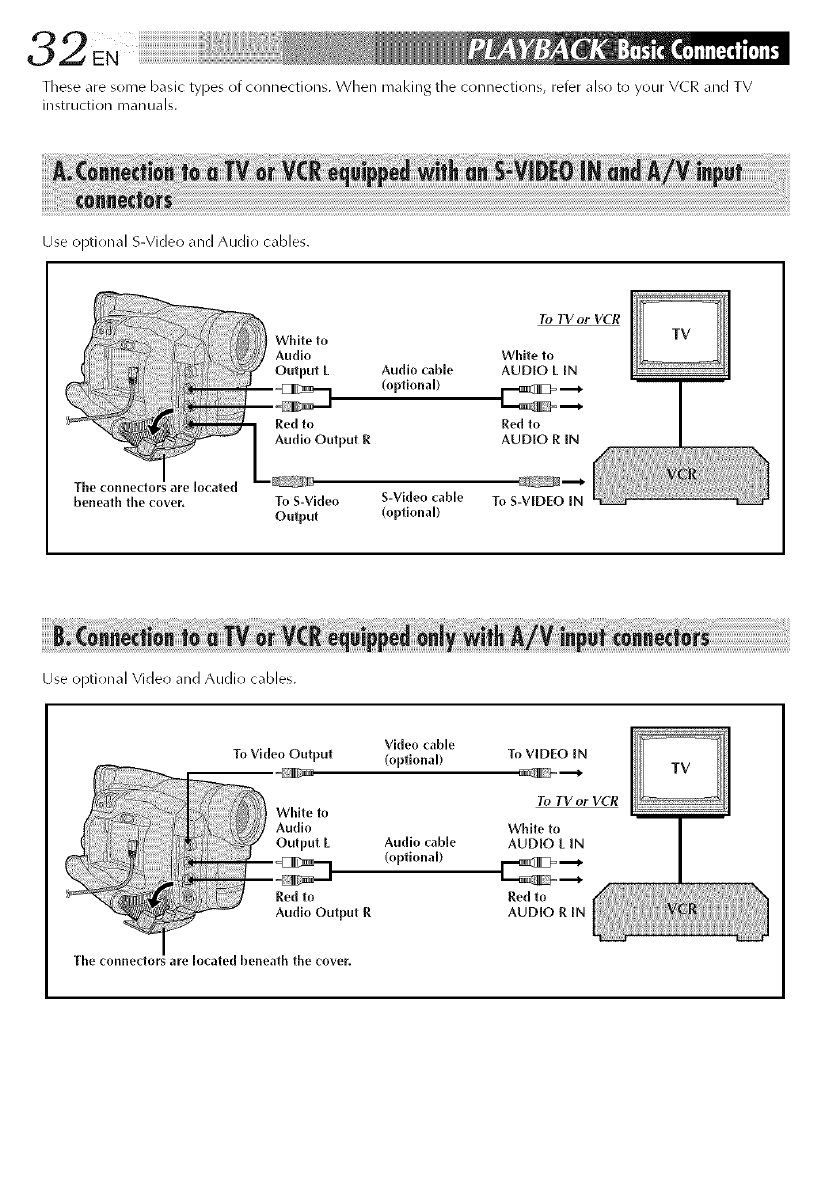
These are some basic types of connections. When malting tile connections, refer also to your VCR and TV
instruction i_oan uals.
Use optional S-Video and Audio cables.
White to
Audio
Output E Audio cable
(optional)
Red to
Audio Output R
To YV or VCR
White to
AUDIO E IN
Red to
AUDIO RIN
The connedors are located
beneath the cover. To S-Video S-Video cable To S-VIDEO IN
Output (optional)
Use optional Video and Audio cables.
Video cable
To Vldeo Output (optional) To VIDEO IN
_ hit_ to
Audlo
Red .to
Audio Output R
The connectors are located beneath the cover.
Audio cable
(optional)
To TV or VCR
White to
AUDIO E [N
Red to
AUDIO R IN
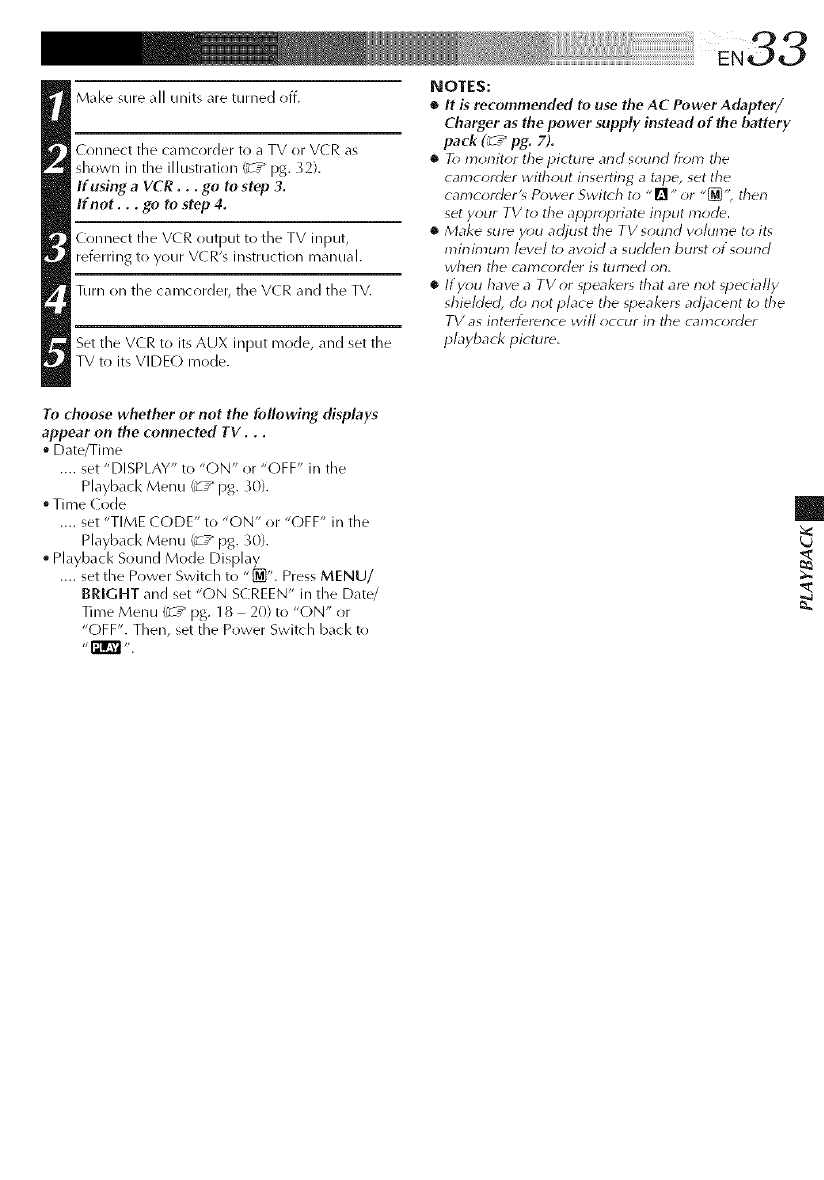
Make sure all units are turned off.
( onnect tile carncorder to a TV or V(R as
shown in the illustration ('_ ,_ pg. 32).
If using aVCR . . . go to step 3.
If not... .go to step 4.
Connect the V(R output to tile TV input,
referring to your VCR's instruction manual.
Turn on tile camcorder, tile V(R and tile TV.
Set tile VCR to its AUX input mode, and set tile
TV to its VIDEO triode.
NOTES:
•It is recommended to use the AC Power Adapter/
Charger as the power supply instead of the battery
pack (_ T_ pg. 7).
•F_ morlitor the pictur_ and sound tkom tile
camcorder without irlserting a tape, set the
camcorddr's R>wer Switch to " [] " or "_'; then
set your TV to the appr(;priate input mode.
•Make sure you adjust the TV sound vohlme to it_
mirlin_un_ level to avoid a sudden burq of sourld
when tile canlcorder is turned on.
•If you have a TVor speaker_ that are not _pecia/ly
shieMed, do not place the _peakers adjacerlt to the
TV as interference will occur in tile camc_*rrler
playback picture.
To choose whether or not the following displays
appear on the connected TV. . .
Date/Fime
.... set "DISPLAY" to "ON" or "OFF" in tile
Playback Menu /_ ,_ pg. 30}.
'_ Time (ode
.... set "TIME (ODE" to "ON" or "OFF" in tile
Playback Menu (; ," pg. }0}.
Playback Sound Mode Display
.... set the Power Switch to "_1". Press MENU/
BRIGHT and set "ON SCREEN" in the Date/
Tithe Menu (_7" pg. 18 20) to "ON" or
"OFF". Then, set the Power Switch back to
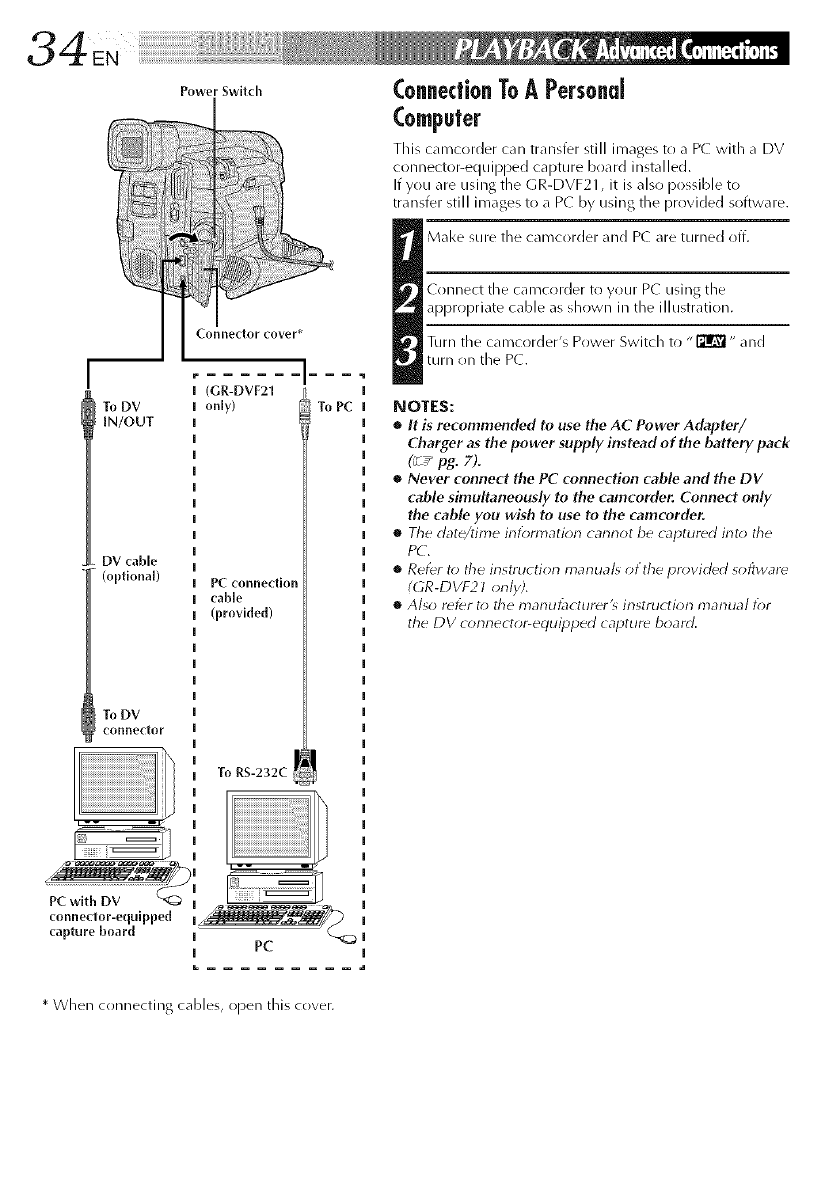
Power Swltch
Connector cover*
To DV
IN/OUT
DV cable
(optional)
To DV
connector
(GR-DVF21
only)
PC connection
cable
(provide{[)
To RS-232C
(onne¢lionToA Personal
(ompuler
This camcorder carl transfer still images to a P( with a DV
connector-equipped capture board installed.
If you are using the GR-DVF21, it is also possible to
transfer still images to a PC by using the provided software.
Mal<e sure the camcorder and P( are turned off.
Connect the camcorder to your PC using the
api)ropriate cable as shown in the illustration.
Turn the camcorder's Power Switch to "_" and
turn on the P(.
NOTES:
•It is recommended to use the AC Power Adapter/
Charger as the power supply instead of the battery pack
(_ ,_pg. 7).
•Never connect the PC connection cable and the DV
cable simultaneously to the camcorder. Connect only
the cable you wish to use to the camcorder.
•The date/time intbrmation cannot be captured int_; the
PC:.
•Refer h) the instruction marlual_ of the pr_vided software
(GR-DVF2I only).
•Also refer to the inanut:]cturer's instructior_ inanual tbr
the DV _()nnector-equipped capture board,
* When connecting cables, open this cover.
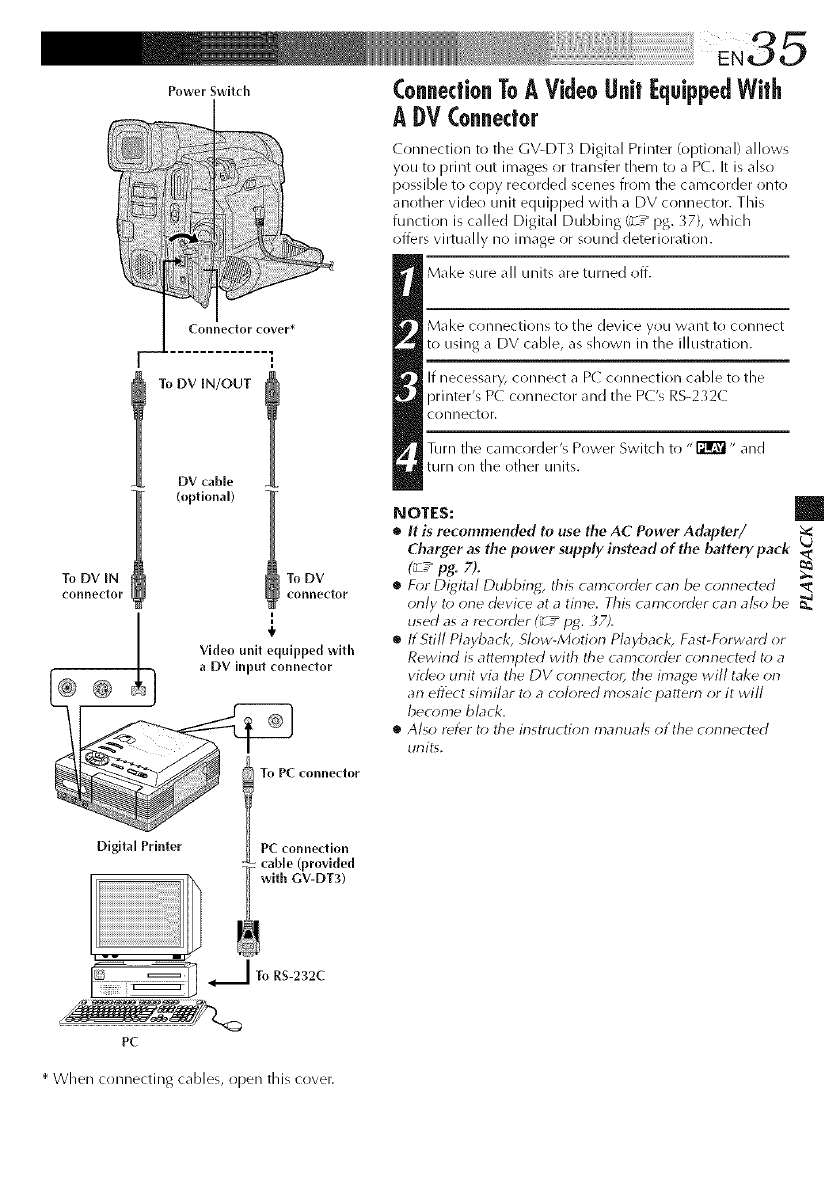
Power Switch
Connedof cover*
i
i
To DV IN/OUT
DV cable
(optional)
To DV IN To DV
connedoF con[lector
ConnectionToAVideoUnit[quippedWith
ADVConnector
Connection to the GV-DT3 Digital Printer (optional) allows
you to print out images or transfer them to a P(. It is also
possible to copy recorded scenes from the camcorder onto
another video unit equipped with a DV connector. This
function is called Digital Dubbing (_-7 pg. _7), which
offers virtually no image or sound deterioration.
Make sure all units are turned off.
Make connections to the device you want to connect
to using a DV cable, as shown in the illustration.
If necessary, connect a P( connection cable to the
printer's P( connector and the PC's RS-2 _2C
conllector.
Turn the camcorder's Power Switch to "_" and
turn on the other units.
NOTES:
•It is recommended to use tl_e AC Power Adapter/
Charger as the power supply instead of the battery pack
(_7 pg. 7).
•For Digital Dubbing, this camcorder carl be corlrlected
only to one device at a time. This camcorder can a/_o be
used as a recorder (_ 7_lag. ;7).
•If 5till Playback, Slow-Motion Pbyback, Fast-Forward or
Rewind is attempted with &e {amcorder omnected to a
video unit via the DV connectoc &e image will take on
an eflbct similar t. a c,doted mosaic pattern or it will
become bL_ck.
•Also refer t_; the instruction marlua/_ otthe connected
units.
JTo RS-232C
}_:::::::::::::::::::_
PC
* When connecting cables, open this cover.
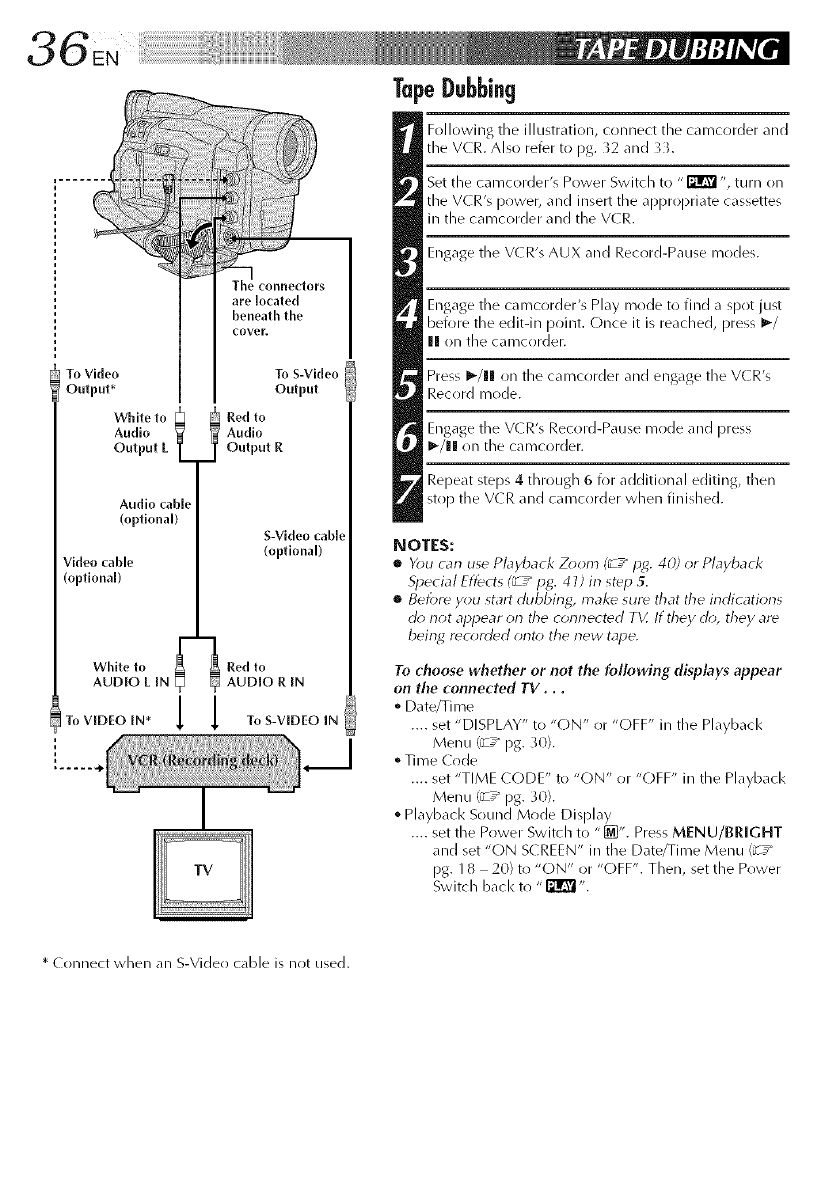
connectors
arelocated
beneath the
cove_
To Video To S-Video
Output* Output
Audio Audio
Output LOutput R
Audio cable
(optional)
Video cable
(optional)
S-Video cabi_
(optional)
White to _ 1 Red to
AUDIO L IN LoJ AUDIO R IN
ToVIDEOIN* 11ToS-VID[OIN
Following tile illustration, connect tile camcorder and
tile VCR. Also refer to pg. 32 and 3L
Set the cai_/corder's Power Switch to "i_E_" turn on
the VCR's power, and insert tile dppro[)riate cassettes
in the can/corder and the V(R.
Engage the V(R's AUX and Record-Pause modes.
Engage the camcorder's Play mode to find a spot just
before the edit-in point. (-)nce it is reached, press _-/
H on the camcorder.
Press _/llll on the carncorder and engage the V(R's
Record mode.
Engage the V(R's Record-Pause n/ride and press
_-/l! on the can/corder.
Repeat steps 4 through 6 for additional editing, then
stop tile V(R and camcrlrder when finished.
NOTES:
•You can use PLtyback Zoom (_ /lag. 40) or Playback
SIJecial Effects (_V_pg. 47) in step 5.
•Before you start dubbirlg, make sure that the indicatiorls
do riot appear orl tile connected TV. If they do, they are
bein_ reo;rded onto the new tape.
To choose whether or not the following displays appear
on the connected TV. . .
• Date/Ti rne
.... set "DISPLAY" to "C)N" or "OFF" in the Playback
Menu (_-T_ pg. 30).
• Tin/e Code
.... set "TIME (ODE" to "ON" or "OFF" in the Playback
Menu (_-T_ pg. _0).
•Playback Sound Mode Display
.... set the Power Switch to "[MJ". Press MENU/BRIGHT
and set "ON S( REEN" in the Date/Time Menu (_T_
pg. 18 20) to "ON" or "OFF". Then, set the Power
Switch bacl< to "_".
* Connect when an S-Video cable is not used.
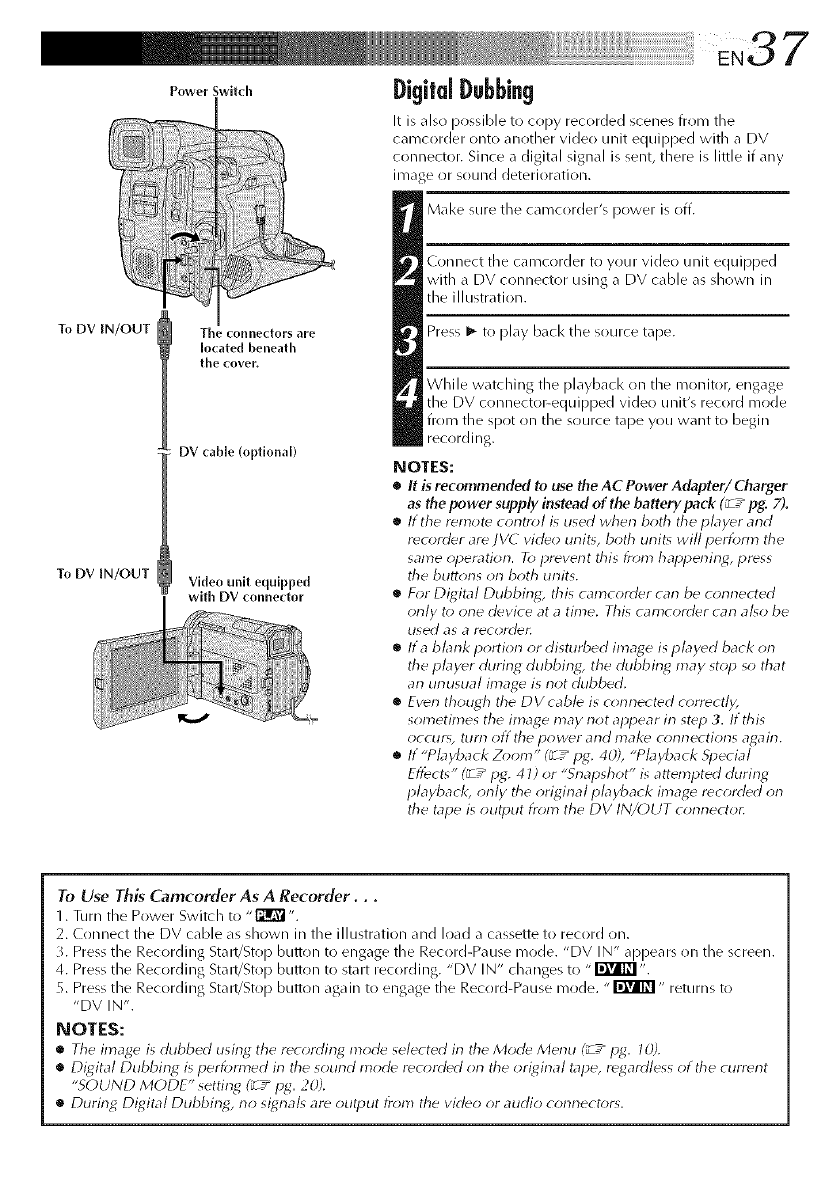
i ii ii ii ii ii ii ii ii ii ii ii ii ii ii ii ii ii ii ii ii ii ii ii ii ii ii iiiiiii¸EN3 7
owe,-Sw. .h Digi|alDubbing
It is also possible to copy recorded scenes from tile
camcorder onto another video unit equipped with a DV
connector. Since a digital signal is sent, there is little if any
image or sound deterioration.
To DV IN/OUT The connectors are
located beneath
the cover.
DV cable (optional)
To DV IN/OUT Video unlt equipped
with DV connector
Make sure the caRlcorder;s power is off.
Connect tile camcorder to your video unit equipped
with a DV connector using a DV cable as shown in
the illustration.
Press l_ to play back the source tape.
While watching the playback on the monitor, engage
the DV connector-equipped video unit's record mode
from the spot on the source tape you want to begin
recording.
NOTES:
•It is recommended to use the AC Power Adapter/Charger
as the power supply instead of the battery pack (_ z_ pg. 7).
•If the r_lnot_ contn_/is used wherl both tile player arid
rdcorder are/VC video unit_, both unit_ will perform tile
same operatiorl. To prdverlt this from happerling, press
tile buttons on both units.
•For Digital Dubbing, this camcorder can be connected
only t_ one device at a time, This camcorder can al_o be
used as a I_ecordeE
•Ira blank portion or disturbed image is played back on
the player during dubbing, the dubbing may stop so that
an unusual image is not dubbed,
•Even though tile DVcab/e is corlrlect_d correctly,
son_etimes the image may not appear in step 3If this
occurs, turrl off the power arid make corlrlections again.
•If "Playback Zoom" (_7 _pg. 4@, "Playback Special
Eflbcts" (_ 7_ pg. 4 7) or "Snapshot" is attempted during
playback, orlly the origirlal playback image recorded orl
tile tape is output fr_ln the DV IN/OUT connector.
To Use This Camcorder As A Recorder...
1. Turn the Power Switch to "[_".
2. Connect tile DV cable as shown in tile illustration and load a cassette to record on.
3. Press the Recording Start/Stop button to engage the Record-Pause mode. "DV IN" appears on the screen.
4. Press the Recording Start/Stop button to start recording. "DV IN" changes to ,, I'i1_I_"
5. Press the Recording Start/Stop button again to engage the Record-Pause mode. "_" returns to
"DV IN".
@OTES:
•The image is dubbed using the r_cording mode selected in the Mod_ Menu (_ /pg. 1@.
•Digital Dubbing is i_erfom_ed irl tile sound mode rec_rrled orl tile original tape, regardless of tile currerlt
"SOUND MODE" setting (_ /pg. 2@.
•During Digital Dubbing, no signals are output fn;m the video or audio connect_rs.
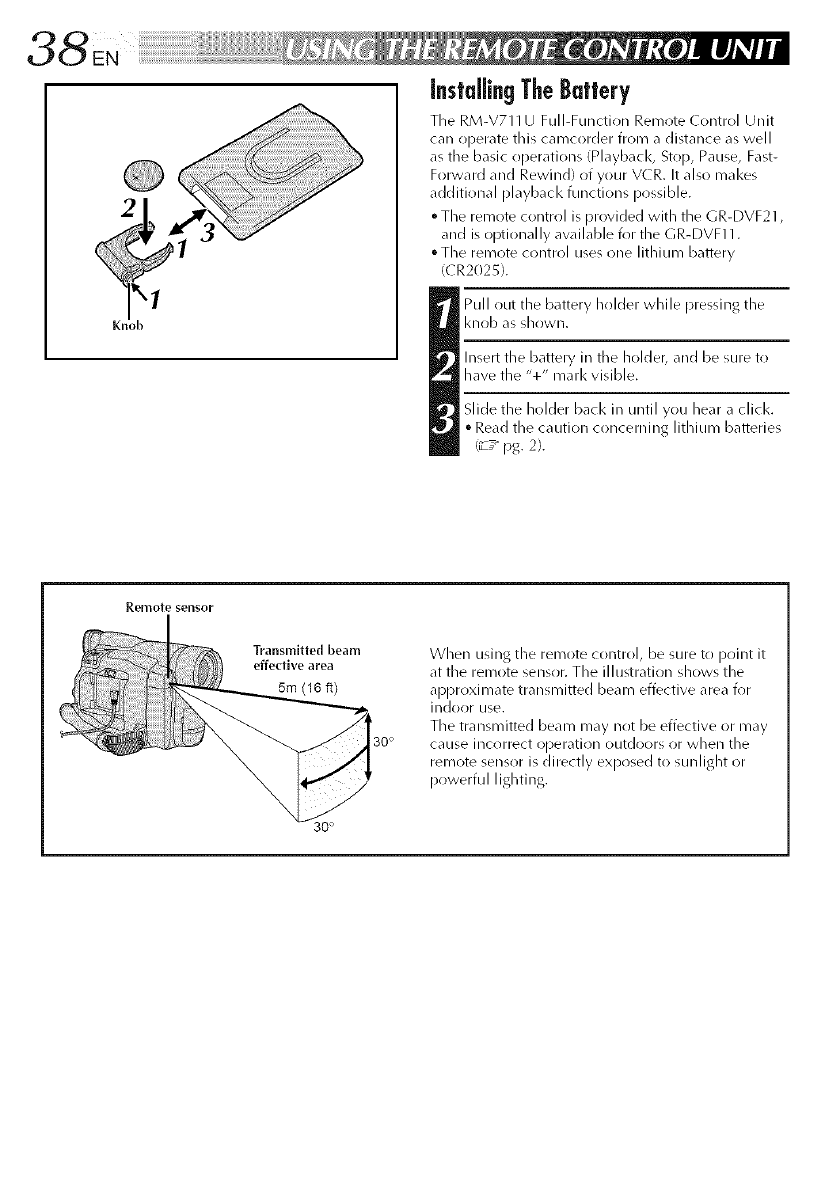
2
Knob
insMlin9 TheBattery
Tile RM-V711 U Full-Function Remote (k)ntrol Unit
can operate this camcorder from a distance as well
as the basic operations (Playbacl<, Stop, Pause, F<lst-
Forward and Rewind) of your V(R. It also makes
additional playbacl< functions possible.
° The remote control isprovided with the GR-DVF21,
and is optionally available for the GR-DVF11.
• The remote control uses one lithium battery
((R2025).
Pull out tile battery holder while pressing the
knob as shown.
Insert the battery in the holder, and be sure to
have the '%" marl<visible.
Slide the holder back in until you hear a click.
° Read the caution concerning lithium batteries
(__-"pg. 2).
Remote sensor
Transmitted beam
effective area
5m (16 ft)
30 °
When using the remote control, be sure to point it
at the remote sensor. The illustration shows the
approximate transmitted beam effective area for
indoor rise.
The transmitted beam may not be effective or may
cause incorrect operation outdoors or when the
remote sensor is directly exposed to sunlight or
powerful lighting.
30 °
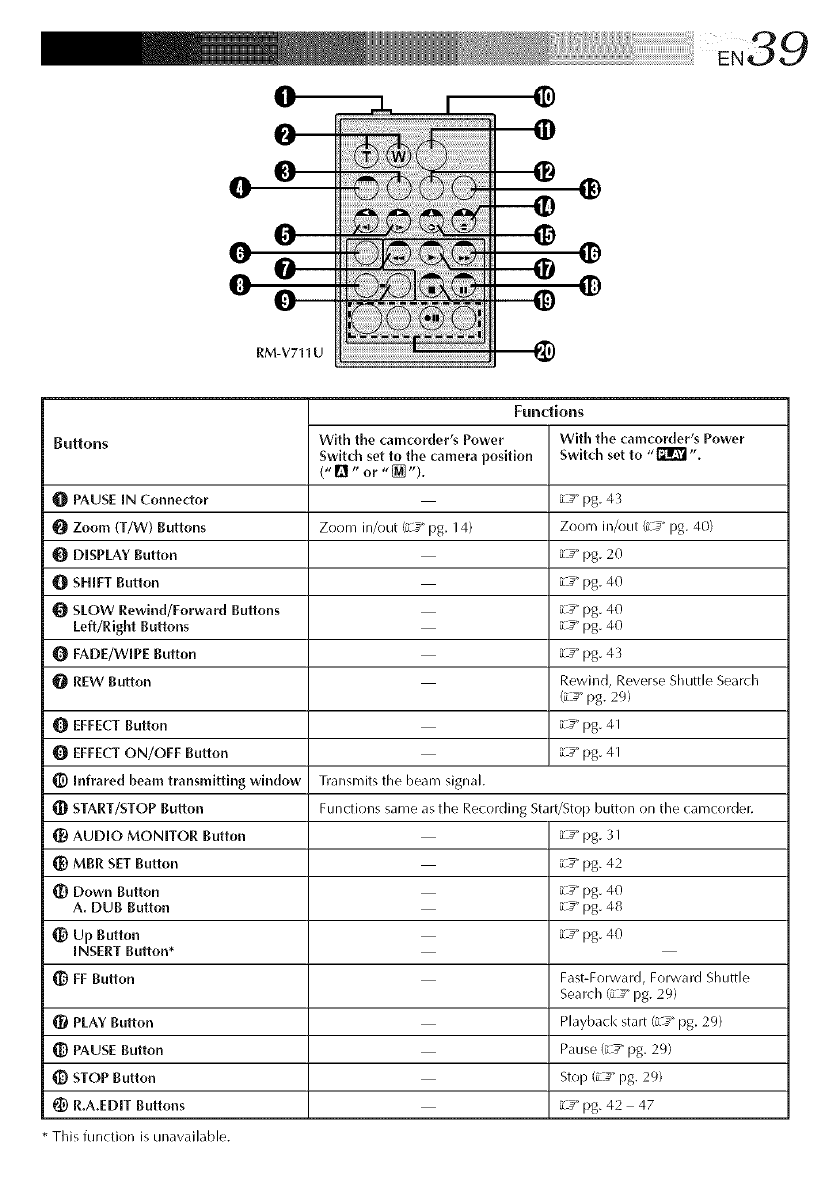
O@
C
Cq)
Cq)
RM-V711 U
Buttons With the camcorder's Power
Switch set to the camera position
("lit"or"@}").
Zoorn in/out (iL_" pg. 14)
Functions
With the camcorder's Power
Switch set to "_ ".
* This function is unavailable.
Il! PAUSE IN Connector 0__"pg. 43
0 Zoom (T/W) Buttons Zoom in/out (iL€*"pg. 40)
ODISPLAY Button 0__" pg. 20
SHIFT Button _-_"pg. 40
0SLOW Rewind/Forward Buttons 0__"pg. 40
Left/Right Buttons o__" pg. 40
FADE/WIPE Button _-_"pg. 43
REW Button Rewind, Reverse Shuttle Search
(z _"pg. 29)
EFFECT Button 0__" pg. 4 I
Gi EFFECT ON/OFF Button 0__" pg. 4 I
_) Infrared beam transmitting window Transmits the beam signal.
{D START/STOP Button Functions same as the Recording Start/Stop button on the camcorder.
AUDIO MONITOR Button _-_"pg. 31
MBR SET Button _-_"pg. 42
1_) Down Button 0__"pg. 40
A. DUB Button 0__"pg. 48
Up Button _-_" pg. 40
INSERT Button*
_) FF Button Fast-Forward, Forward Shuttle
Search (0__" pg. 29)
PLAY Button Playback start (iL_" pg. 29)
PAUSE Button Pause (_-_" pg. 29)
_) STOP Button Stop (iL_"pg. 29)
R.A.EDIT Buttons 0__"pg. 42 47
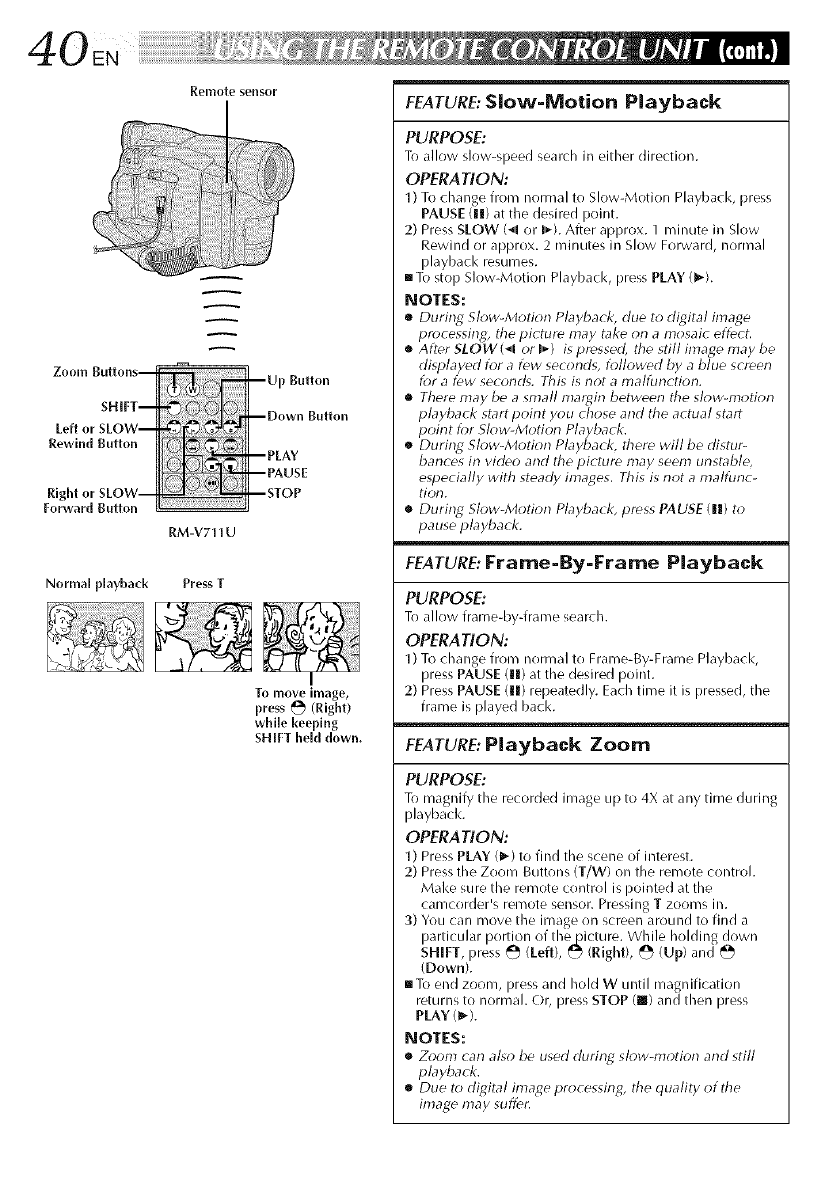
Zo o11_1 BUttOnS--
SHIFT--
Left or SLOW--
Rewind Button
Right or SLOW--
Forward Button
Rel_1ote sensor
A
A
RM-V711 U
--Up Button
--Down Button
--PLAY
--PAUSE
--STOP
Normal playback Press T
I
To move image,
press _ (Right)
while keeping
SHIFT held down,
FEATURE:Slow-Motion Playback
PURPOSE:
To allow slow-speed search in either direction.
OPERATION:
1) To change from normal to Slow-Motion Playback, press
PAUSE (1|) at the desired point.
2) Press SLOW (-41or I_-).After approx. 1 minute in Slow
Rewind or approx. 2 minutes in Slow Forward, normal
playback resumes.
[] To stop Slow-Motion Playback, press PLAY (_).
@OTES:
[] During Sh_w-Motion Playback, due t(_ di[jital image
processirlg, the picture may take on a nlosaic effect.
[] After SLOW(_I or I_) is pressed, the still image may be
displayed for a few seconds, followed by a blue screen
f_)r a few secorlds. This is not a malfurlction.
[] There may be a small margin betweerl the slow-motion
playback start point you chose and the actual start
point for Slow-Motion Playback.
[] Durirlg Slow-Motion Playback, there will be distur-
barites in video and tile picture may seem unstable,
especially with steady images. This is not a malfurlc-
tion.
[] During Slow-Motion Playback, press PAUSE (ll) to
pause playback.
FEATURE:Frame-By-Frame Playback
PURPOSE:
To allow frame-by4rame search.
OPERA TI 0 N:
1) To change from normal to Frame-By-Frame Playback,
press PAUSE (n) at the desired point.
2) Press PAUSE (n) repeatedly. Each time it is pressed, the
frame is played back.
FEATURE:Playback Zoom
PURPOSE:
To magnify the recorded image up to 4X at any time during
playbacl<.
OPERA TI 0N:
1) Press PLAY (Ib-) to find the scene of interest.
2) Press the Zoom Buttons (T/W) on the remote control.
Make sure the remote control is pointed at the
camcorder's rel-note sensor. Pressing T ZOOl-nSin.
3) You can move the image on screen around to find a
particular portion of thepicture. While holding down
SHIFT, press _ (Left), _ (Right), L_ (Up) and _._
(Down).
[]To end zoom, press and hold W until magnification
returns to normal. Or, press STOP (@) and then press
PLAY (_,-).
@OTES:
[] Zoom can also be used durinq slow-motion and still
playback.
[] Due to diqital image processirlq, the quality of the
image may suffer.
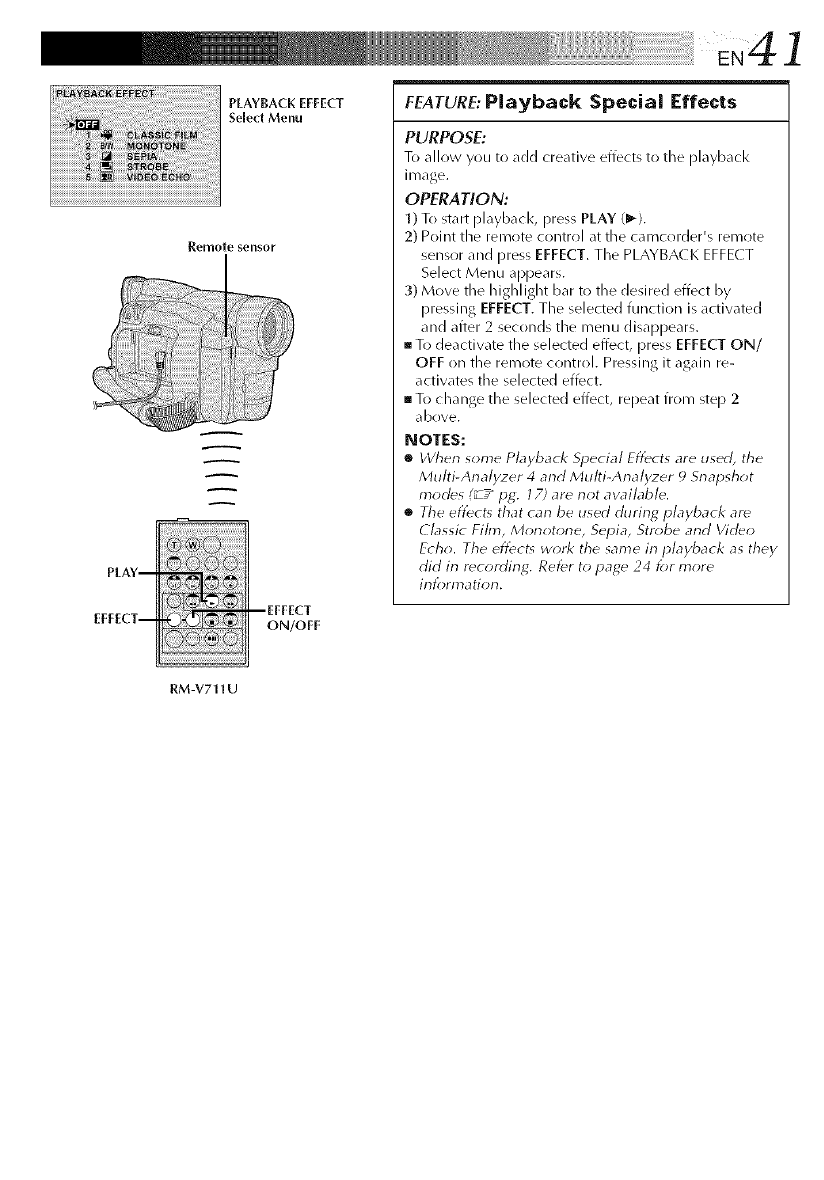
iiii_i_i_il,_i!i!i!i!ii!iiiiiiiiii_i_iiiii_!iiiii_iiliiiiiiiiiiiiiiiiiiiiiiil_ii_ii_l_l_ii!il!iliiiililililililiiiii_iiliil_l_l_iii_i!_i!_i!_i!_i:iiiiiiii!ii!iiiiiiiiiiiiii!ii!iiiiiiiiiiiiii_il
iiiiii_!._!.!iiii_iii_!_!_!_!_!_!_!_!_!_!t!.!!i_ii_!_!_!i!i!iiii!iill_i_i_i_i_i_!!!_!_!_!i_!i_!_!_!_!i_i!iiii_i_i_!i_i_i_i_ii_ii_ii_ii_ii_ii_ii_ii_iiii_ii_ii_ii_ii_iii_!!
iiiiiii_ i:_!i_iiiiiii_iiiiiiiiiiiiiiiii!,!i_i_i!ii_i_i_i_i_)_i!!_!_!i__!,_i_iiii:,_,_;i_:i_i_,_,_i_!_!i_!!ii_i!i!_ii_!i_!!!_i_i_!_
iiiiiiiiiiiiiiii_,_!i_i_iii_!_iiiiiiiiii_!_iig'?!_!_!iiill_I_I_i'_i_IZ_ii_iiiiii!_i_i_i_i_i_i_i_i_i_
iiiiiiiiiiiiiiiii_'i!i_iiiii_iiiiiiil_i_ _!_i_i_i_iiiiiiiiiii__!ii'!!!!!!!!!!!
PLAYBACK EFFECT
Select Menu
Remote sensor
A
A
PLAY--
EFFECT-- --EFFECT
ON/OFF
FEATURE:Playback Special Effects
PURPOSE:
To allow you to add creative effects to the playback
image.
OPERATION:
1) To start playbacl<, press PLAY (1_).
2) Point the remote COl_trol dt the camcorder's remote
sensor and press EFFECT. The PLAYBA( K EFFE( T
Select Menu appears.
3) Move the highlight bar to the desired effect by
pressing EFFECT. The selected function is activated
and after 2 seconds the menu disappears.
To deactivate the selected effect, press EFFECT ON/
OFF on the remote control. Pressing it again re-
activates the selected effect.
To change the selected effect, repeat from step 2
above.
@OTES:
•Wherl some Playback Special Effects are used, the
Multi-Analyzer 4 arid Multi-Analyzer q Snapshot
modes (_/ I)g. 17) are riot awdlable.
The et}_cts that carl be used during playback are
Classic Film, Morlotorle, Sepia, Str_)be arid Video
E(ho. The effect_ work the same irl playback as they
did in r_cordirlg. Ret_r to page 24 f_)r more
inlbrmation,
RM-V711 U
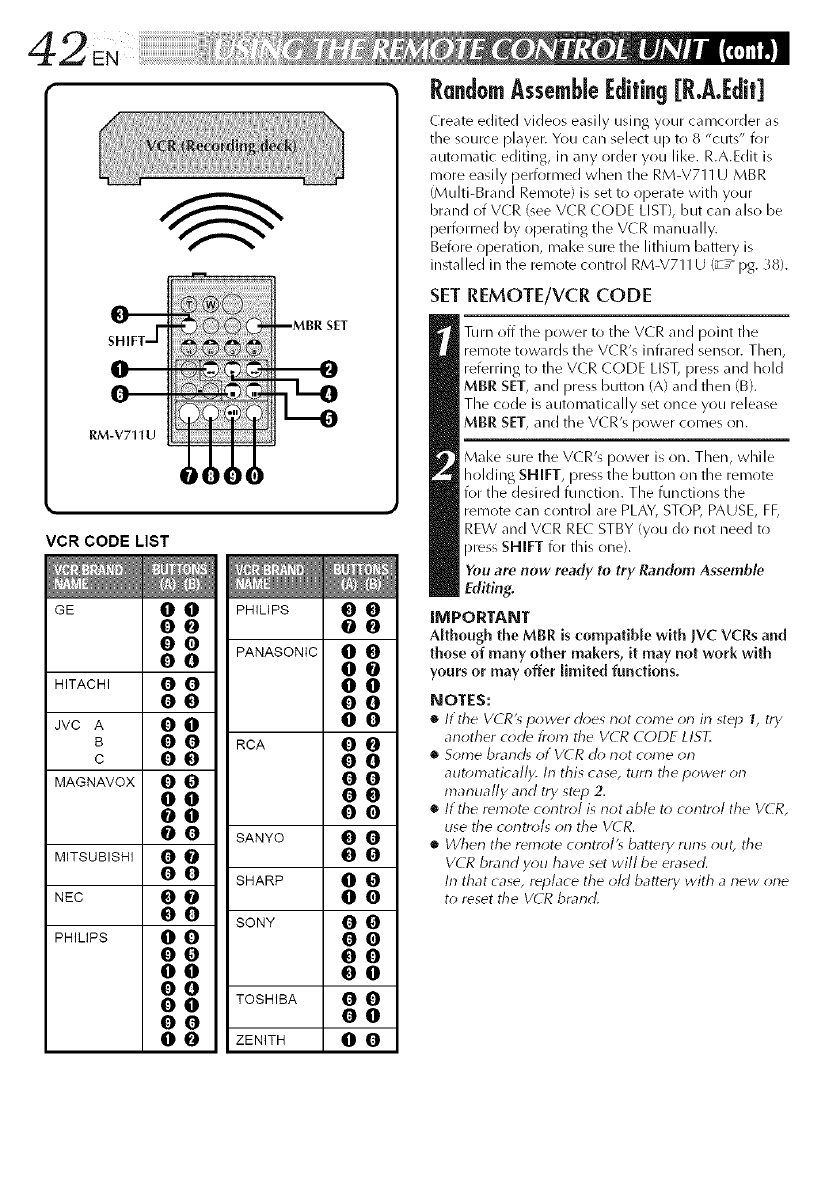
SHIFTJ"
RM-V711U
mMBR SET
VCR CODE LIST
GE O O PHILIPS O O
OO @O
O O PANASONIC O O
OO O@
HITACHI O O O O
OO O0
JVC A OO O O
B0 0 RCA 0 0
cOO OO
MAGNAvOx O O O O
OO OO
O0 O0
O O SANYO OO
MITSUBISHI OOOO
0 0 SHARP 0 0
NEC OO O O
OOsONY O O
PHILIPS O O O O
O0 O0
O0 O0
O0
0 0 TOSHIBA 0 0
O0 O0
0 0 ZENITH 0 0
RandomAssemblel:difing [R.A.Edit]
Create edited videos easily using your camcorder as
the source ))layer. You can select up to 8 "cuts" for
automatic editing, in any order you like. R.A.Edit is
more easily performed when the RM-V711 U MBR
(Multi-Brand Remote) is set to operate with your
brand of VCR (see VCR (ODE LIST), but can also be
perk)rmed by operating the VCR manually.
Before operation, mal<e sure the lithium battery is
installed in the remote control RM-V711 U (_-:_ pg. 38).
SET REMOTE/vcR cODE
Turn off the power to the VCR and point tile
remote towards the VCR's infiared sensor. Then,
referring tr) the VCR CODE LIST, press and hr)ld
MIBR SET, and press button (A) and then (B).
The code is automatically set once you release
MBR SET, and tile VCR's power comes on.
Make sure the VCR's power is on. Then, while
holding SHIFT, pressthe button on the remote
for the desired function. The functions the
remote can control (_rePLAY, STOP, PAUSE, FF,
REW and VCR RE( STBY (you do not need to
press SHIFT for this one),
You are now ready to try Random Assemble
Editing.
IMPORTANT
Although the MBR is compatible with JVC VCRs and
those of many other makers, it may not work with
yours or may offer limited functions.
NOTES:
•It the VCRk power does not come orl irl step 1, try
arlother o*de from the VCR CODE LIST.
•Some bmnrl_ ot V¢R rh* not c_)me on
aut_m_atically. In this case, turn the power on
manually and try step 2.
•If tile rdmotd cor}tR)l is r}ot able to c_)ntr_;I the V( R,
use the controls on the V(R.
• _Vherl the rdmote control's battdty furls ()tit, tile
VCR brand y_*u have set will be erased.
In that case, replace the oM battery with a new one
to reset tile V(R brand.
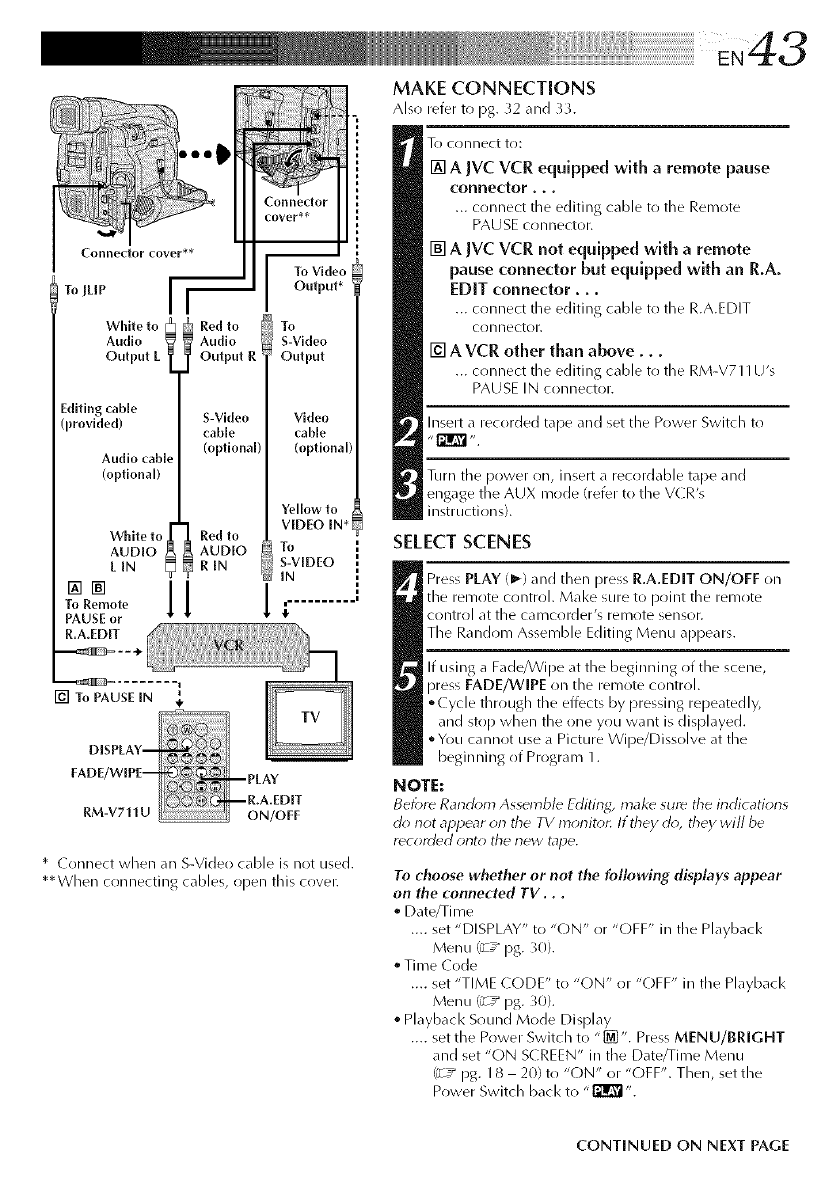
Conneftor cover*m.J I
To JLIP
White to _ Red to I
Audio ' _ Audio /
Output L1.1 Output R
/
Editing cable |
(provided) / cableS-Vide°
(optlona[)
Audio cab[ /
/
(optional) L
White to _ _ Red to
AUDIO _ _ AUDIO
L[N [_ [_ R[N
11
To Remote
PAUSE or
R.A.EDIT
TO Video
output*
To
S-Video
Output
Vkleo
cable
(optional
Yellow to
VIDEO IN*
To
S-VIDEO
IN
|.......... i
,!
* Connect when an S-Video cable is not used.
**When connecting cables, open this cover.
MAKE CONNECTIONS
Also refer to pg. _2 and _.
To CoRRect to:
[] A JVC VCR equlpped wlth a remote pause
connector .. ,
... connect the editing cable to the Remote
PAUSE connector.
[] A ]VC VCR not equipped wlth a remote
pause connector but equlpped with an R.A.
EDIT connector...
... connect tile editing cable to tile R.A.EDIT
connector.
[] AVCR other than above...
... connect the editing cable to the RM-V711 U's
PAUSE IN connector.
Insert a recorded tape and set tile Power Switch to
Turn the power on, insert a recordable tape and
engage the AUX mode (refer to the VCR's
instructions).
SELECTSCENES
Press PLAY (1_) and then press R.A.EDIT ON/OFF on
tile ren/ote control. Make sure to Doillt tile rerf/ote
CORtFO[ at tile camcorder's remote sensor.
The Random Assemble Editing Menu appears.
If using a Fade/Wipe at tile beginning of tile scene,
press FADE/WIPE on the remote control.
°( ycle through the effects by pressing repeatedly,
and stop when the one you want is displayed.
• You cannot use a Picture Wipe/Dissolve at the
beginning of Progral_ 1.
NOTE:
Bef_)r_Ranrh)m Assembl_ Editing, make sur_ the indicatiorls
oh)not appear on the TV rnorlit_)r. If they oh;, they wil/ be
recorded onto the rlew tape.
To choose whether or not the following displays appear
on the connected TV. . .
Date/Time
.... set "DISPLAY" to "C)N" or "OFF" in the Playback
Menu (_-/pg. 30).
Time Code
.... set "TIME (ODE" to "ON" or "OFF' in the Playback
Menu (_T_ pg. _0).
Playback Sound Mode Display
.... set the Power Switch to "[_'. Press MENU/BRIGHT
and set "ON S( REEN" in the Date/Time Menu
_'_/pg. 18 20) to "ON" or "OFF". Then, set the
Power Switch bacl< to "_".
CONTINUED ON NEXT PAGE
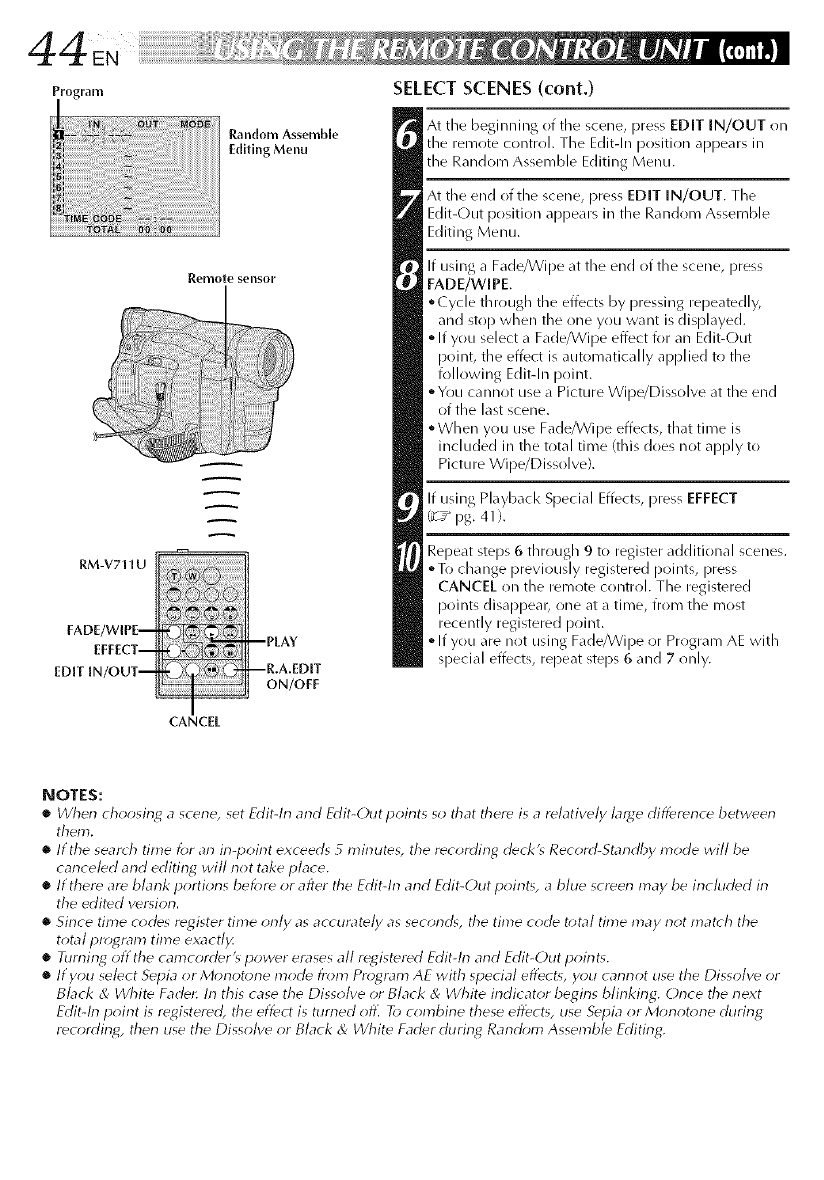
Random AssembLe
Editing Menu
Remote sensor
A
RM-V711U
EADE/WmE-- _ _'.
EEEECT-- --PLA
EDIT IN/OUT-- _ --R.A.EDIT
ON/OFF
CANCEL
SELECTSCENES(cont.)
At tile beginning of the scene, press EDiT iN/OUT on
tile remote control. Tile Editdn position appears in
the Random Assemble Editing Menu.
At the end of the scene, press EDIT IN/OUT. The
Edit-Out position appears in the Random Assemble
Editing Menu.
If using a Fade/Wipe at the end of the scene, press
FADE/WIPE.
o( ycle through the effects by pressing repeatedly,
and stop when the one you want is displayed.
• If you select a Fade/Wipe effect for an Edit-Out
point, the effect is automatically applied to the
following Editdn point.
• You cannot use a Picture Wipe/Dissolve at the end
of the last scene.
°When you use Fade/Wipe effects, that time is
included in the total time (this does not apply to
Picture Wipe/Dissolve).
If using Playback Special Effects, press EFFECT
(_ ," pg. 41).
Repeat steps 6 through 9 to register additional scenes.
oTo change previously registered points, press
CANCEL on the remote control. The registered
points disappear, one at a time, from the most
recently registered point.
• If you are not using Fade/Wipe or Program AE with
special effects, repeat steps 6 and 7 only.
NOTES:
•Wherl choosing a scene, set Edit-lrl arid Edit-Outpoirlts so that there is arelatively large difference between
them.
•If the search time k_r an in-poirlt exceeds _ tT}ir}llte% the recording deck'_ Record-Starldby mode will be
canceled and editing will not take place.
•If there are blank portions be_*re or after the Editdn arid Edit_Out points, a blue screen may be included in
the edited verqon.
•Sirlce time codes register time only as accurately as second_, the time code total time may riot mat(h the
total pro;gram time exactl_
• Riffling off the camcorder% power erases all r_gistered Edit-lrl arid Edit-Out point_.
•If you select Sepia or M()notor_e mode from Program AE with special effects, you cannot use the Dissolve or
Black & White Fadet: In this case the Dissolve or Black & White indicator begins blinking. Once the next
Edit-lrl poirlt is registered, the effect is turned off] R> combirle these effects, use Sepia or Monot_me during
recording, therl use the Dissolve or Black & White Fader durirlg Rand_m Assemble Editing.
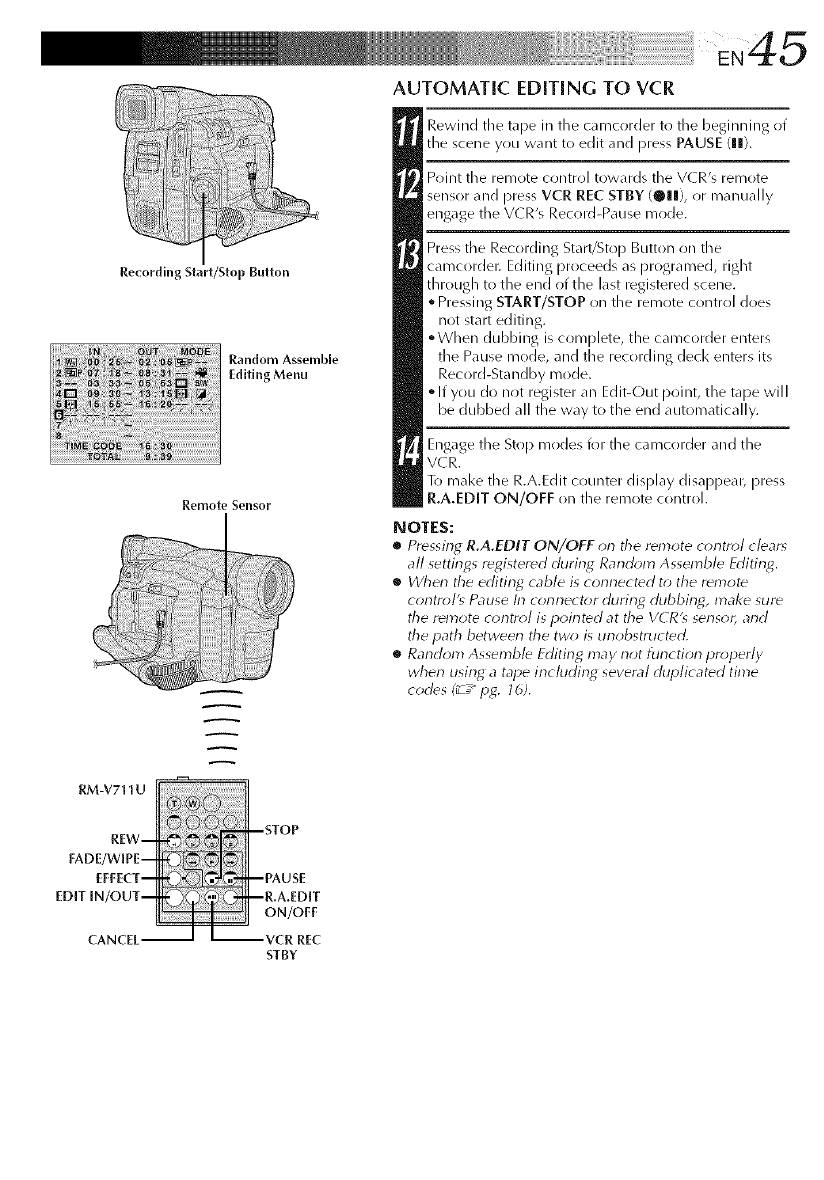
Recording Start/Stop Button
Random Assemble
Editing Menu
Remote Sensor
RM-V7.U --STOP
REW--
FADE/WIPE-
EFFECT- _ _--PAUSE
EDIT IN/OUT-- _ --R,A,EDIT
ON/OFF
CANCEL. JI'----_VCR REC
STBY
AUTOMATic EDiTiNG TO vcR
Rewind the tape in tile camcorder to the beginning of
tile scene you want to edit and press PAUSE (eli).
Point the remote control towards the V(R's remote
sensor and press VCR REC STBY (@|1), or manually
engage the V(R's Record-Pause mode.
Press tile Recording Start/Stop Button on tile
camcorder. Editing proceeds as programed, right
through to the end of the last registered scene.
•Pressing START/STOP on the remote control does
not start editing.
°When dubbing is complete, the camcorder enters
the Pause mode, and the recordillg decl< enters its
Record-Sta ndby mode.
•If you do not register an Edit-Out point, the tape will
be dubbed all the way to the end automatically.
Engage tile Stop modes for the camcorder and the
V( R.
To mal<ethe R.A.Edit counter display disappear, press
R.A.EDIT ON/OFF on the remote control.
NOTES:
•Pressing R.A.EDIT ON/OFF on tile remote control clears
all settings registered during Random Assemble Editing.
•When tile editing cable is connected to the remote
control's Pause fll c_nnector during dubbing, make sure
the remote control is pointed at the VCR's sensor, and
the path between the two is unobstructed.
•Random Assemble Editing may not function properly
when using a tape including several duplicated time
codes (_ ,_ pg. 16).

Program1
OT _ ;
Random Assemble
Edlting Menu
RM-V711U
ForMoreAccurate@ifin9
Some V(Rs mal<e tile transition from Record-Standby to
Record mode t\lster than others, Even if you begin editing
for the camcorder and the VCR at exactly the same time,
you may lose scenes yrlu wanted, or find that yrlu have
recorded scenes you did not want, For a cleanly edited
tape, confirm and adjust tile timing of the cai_/corder
against your VCR.
DIAGNOSING VCR/CAMCORDER TIMING
Play bacl< the tape in tile camcorder, then point the
remote control at the Cal_/corder_s remote sensrlr and
press R.A.EDIT ON/OFF.
The Random Assemble Editing Menu appears.
Perform Random Assemble Editing on Program 1
only. In order to check V(R and camcorder timing,
select the beginning of a scene transition as your Edit-
In point.
Play back tile dubbed scene.
• If any images from the scene prior to tile
transition you chose for your Edit-In point were
recorded, that means your VCR moves too quicl<ly
from Record-Pause to Record mode.
• If the scene you tried to dub starts in progress, the
VCR is slow to start recording.
........ -,.- -- --R.A.EDIT ON/OFF
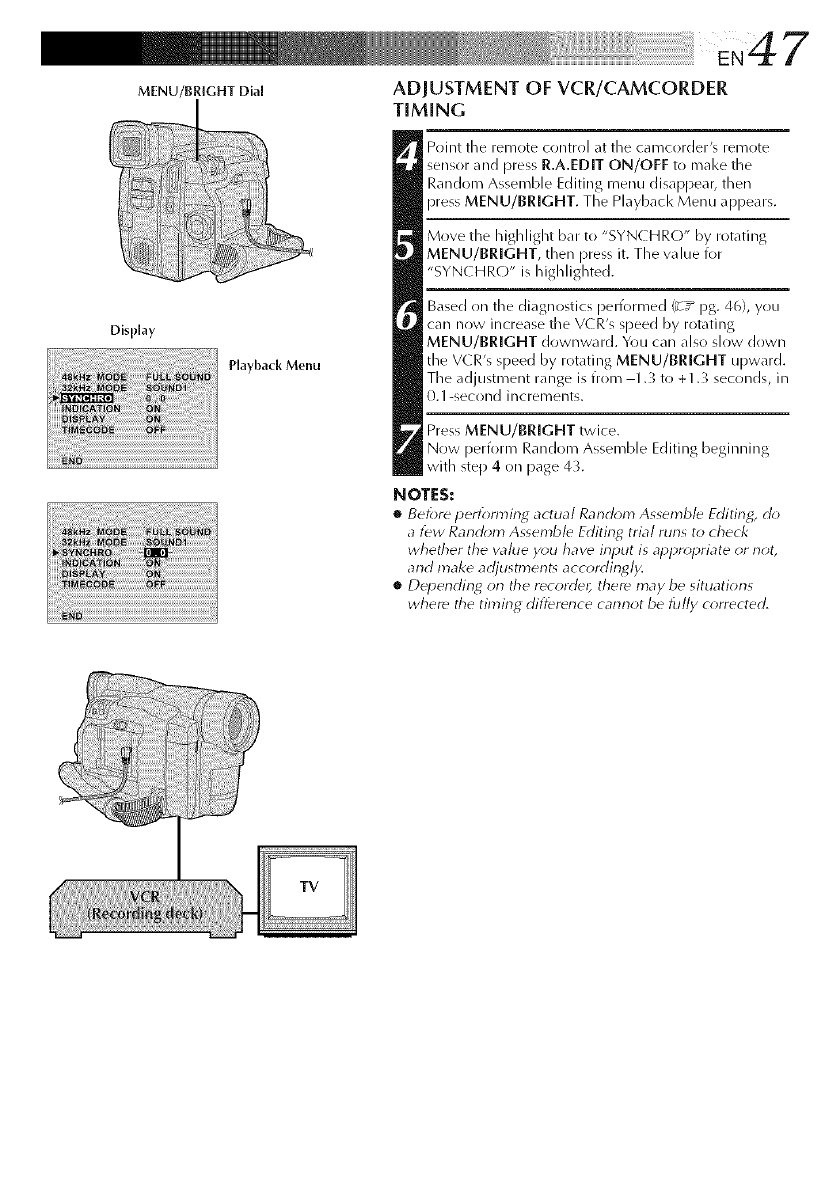
EN47
MENU/BRIGHTDial ADJUSTMENT OF VCR/CAMCORDER
TIMING
Display
Playback Menu
Point tile remote control at tile camcorder's remote
sensor and press R.A.EDIT ON/OFF to mal<e tile
Random Assemble Editing menu disappear, then
press MENU/BRIGHT. The Playback Menu appears.
Move tile highlight bat to "SYNCHRC)" by rotating
MENU/BRIGHT, then press it. The value for
"SYNCHRO" is highlighted.
Based on tile diagnostics performed _'z/pg. 46), you
car/ now increase the V(R's speed by rotating
MENU/BRIGHT downward. You car/also slow drlwn
tile VCR's speed by rotating MENU/BRIGHT upward.
The adjustment range is from 1.) to +1. _ seconds, in
0.1 -second increments.
Press MENU/BRIGHT twice.
Now perform Random Assemble Editing beginning
with step 4 on page 4).
NOTES:
•Belbr_ i_erlbrming actual Random Assembl_ Editing, do
al_w Random Assembl_ Editing trial furls to check
whether the value you have input is al_l_ropriate or not,
and make adjustment_ accordingly.
•D_l_ending on tile r_cord_, ther_ may be situations
where tile timing difference cannot be fully corrected.
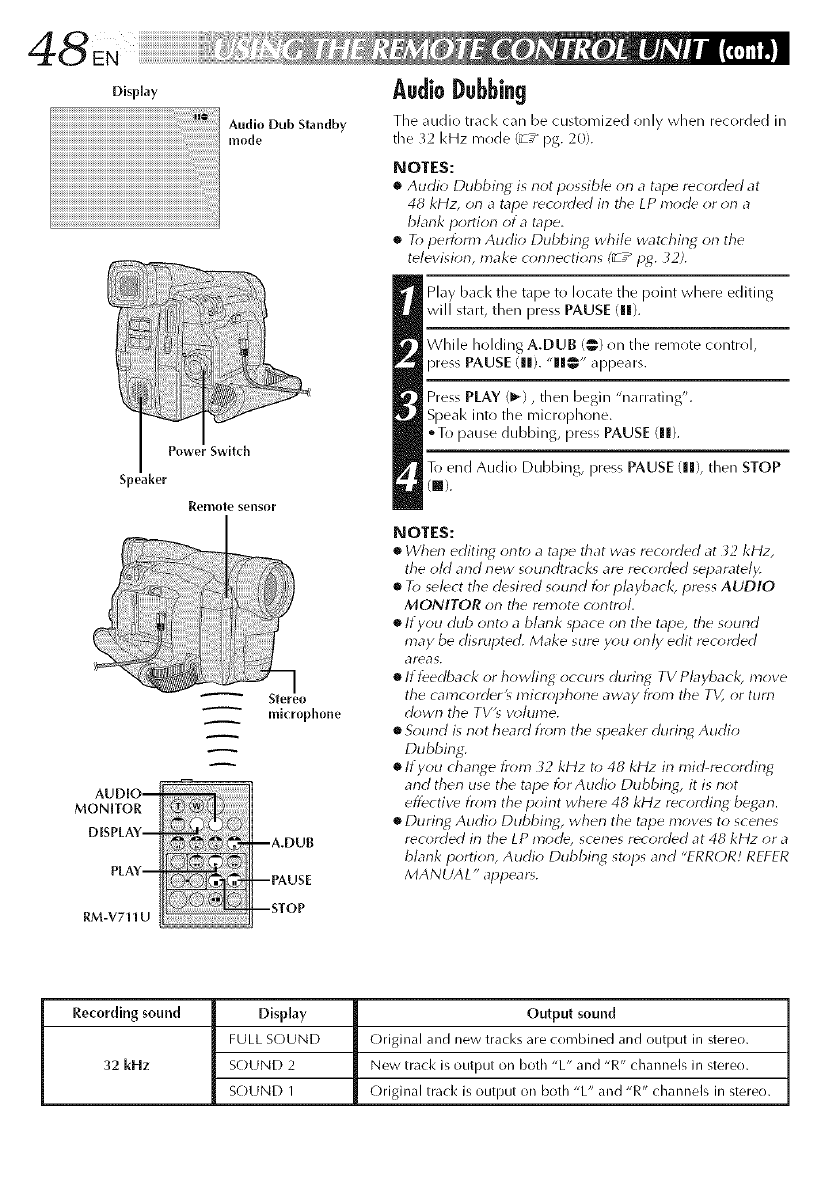
AudioDubbing
The audio track can be customized only when recorded in
the _2 kHz mode (_T_ pg. 20).
@O'[E$:
•Audio Dubbing is not possible on a tape recorded at
48 kHz, on a tape recorded in the LP mode or on a
blank portion of a tape.
•To perform Audio Dubbing while watching on the
television, make connections (_ ,_ pg, 32),
Play back the tape to locate the point where editing
While holding A.DUB (_) on the remote control,
press PAUSE (ll). "Ill@" appears.
Press PLAY (1_), then begin "narrating".
Speak into the microl)hone.
oTo pause dubbing, press PAUSE (ll).
Power Swih-h
To e/c Au ( ) Du bb /g, press PAUSE (11), tl3en STOP
3eaker (m).
Remote sensor
ii_i_!!!!!ii_?_ii!i!;!;!;!;!;!;!i_!iiii:i/iii_ii_li:
mkrophone
AUDIO--
MONITOR
DISPLAY--
PLAY--
RM-V711 U
--A.DUB
--PAUSE
--STOP
NOTES:
•When editin_ onto a tape that was recorded at _2 kHz,
the old and new soundtracks are recorded separatel)<
•To select the desired sound for pbyback, prdss AUDIO
MONITOR on the remote control,
•If you dub onto a blank space on the tape, the sound
may be disrupted. Make surd you only edit recorded
ar_as,
•If teedback or howling occur_ during TV Playback, move
the calncord_r_ microphone away from the TV, or turn
down the TV'_ w*lume,
•Sound is not heard t;'om the speaker durin_ Audio
Dubbing:
•If you change from 32 kHz to 48 kHz in mid-recordin_
and then use the tape _;r Audio Dubbing, it is not
effective from the point where 48 kHz recording began.
•During Audio Dubbing, when the tape moves to scenes
recorded in the LP mode, scenes recorded at 48 kHz or a
blank portion, Audio Dubbin_ stops and "ERROR. f REFER
MANLML" appears,
Recording sound Display Output sound
FULL SOUND Original and new tracks are combined and output in stereo.
32 kHz S(-)UND 2 New track is output on both "L" and "R" channels in stereo.
S(-)UND 1 Original track is output on both "L" and "R" channels in stereo.
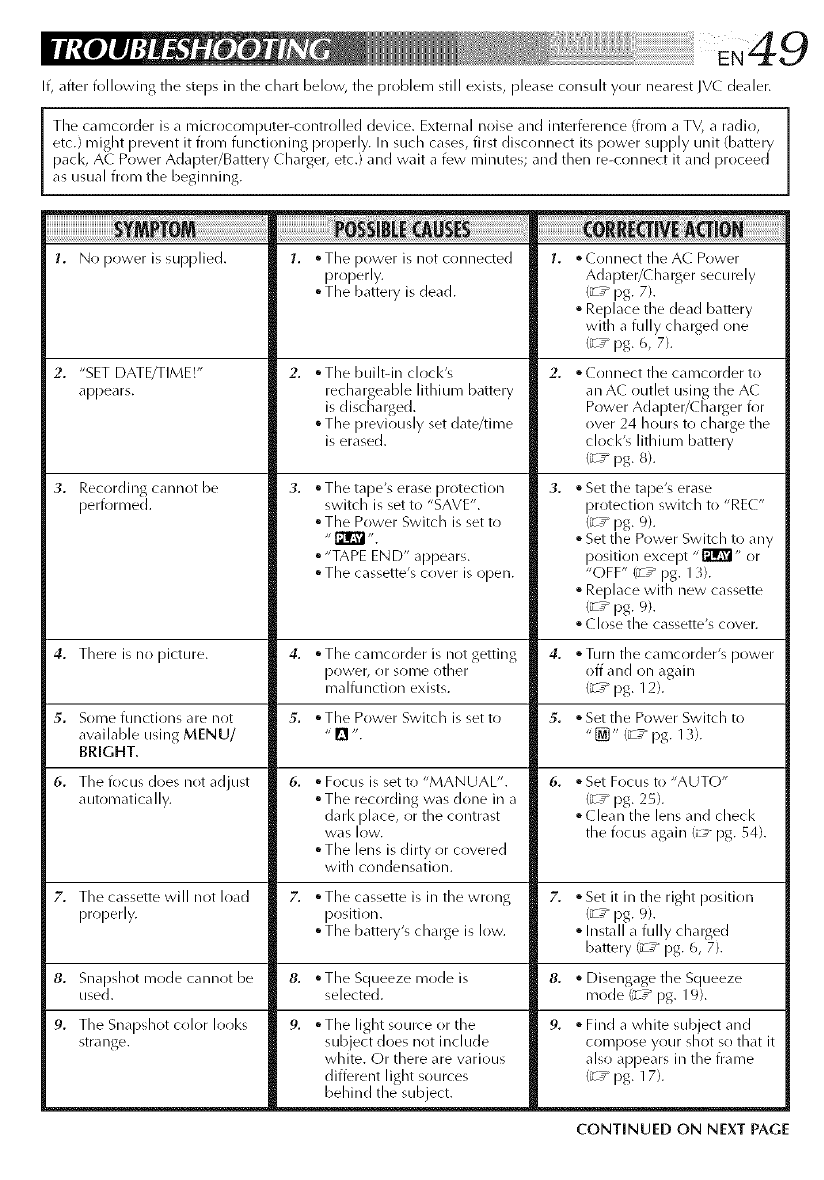
If,afterfollowingthestepsinthechartbelow,theproblemstillexists,[)lease consult your nearest IV( dealer.
etc.) might prevent it from functioning i}roperly. In such cases, first disconnect its power supply unit (battery
pacl<, AC Power Adapter/Battery ( harger, etc.) and wait a few minutes; and then re-connect it and proceed
as usual from the beginning.
L No power is supplied. L • The power is not connected L • ( onnect the AC Power
properly. Adapter/(harger securely
°The battery is dead. (_T_ pg. 7).
•Replace the dead battery
with a fully charged one
(_T_pg.6, 7).
2. "SET DATE/TIME[" 2. •The built-in clocl<'s 2. •( onnect the camcorder to
appears, rechargeable lithium battery an A( outlet using the A(
is discharged. Power Adapter/( harger for
•The previously set date/time over 24 hours to charge the
is erased, clock's lithium battery
(_-7_pg.8).
3. Recording cann(,t be 3.
performed.
• Tile tape's erase protection
switch is set to "SAVE".
• The Power Switch is set to
• "TAPE END" appears.
• The cassette's cover is (,pen.
3. • Set tile tape's erase
protection switch to "RE("
(_7_ pg. %.
• Set the Power Switch to any
position except "1_" or
"OFF" (_7_ pg. 1_).
• Replace with new cassette
(_7- pg. 9).
• Close the cassette's cover.
4. There is no picture. 4. • Tile camcorder is not getting 4. • Turn the camcorder's power
power, or some other off and on again
malfunction exists. (_T_ pg. 12).
5. Some functions are not 5. • The Power Switch is set to 5. • Set the Power Switch to
available using MENU/ "r_ ". "[_" (_7_pg. 1 _).
BRIGHT.
6. The focus does not adjust 6. • Focus is set to "MANUAL". 6. • Set Focus to "AUTO"
automatically. • The recording was done in a (_-7_ pg. 25}.
dark [}lace, or the COlltrast • Clean the lens and check
was low. the focus again (_:_ pg. 54).
• The lens is dirty or covered
with condensation.
7. The cassette will not load 7. • The cassette is in the wrong 7. • Set it in the right position
properly, position. (_7_ pg. 9).
•The battery's charge is low. •Install a fully chmged
battery ('_ ,_ pg. 6, 7).
8. Snapshot mode cannot be 8. oThe Squeeze mode is 8. •Disengage the Squeeze
used. selected, mode C_ ,_ pg. 19).
9. The Snapshot color Iool<s 9.
strange.
9. oTl/e light source or the
subject does not include
white. Or there are various
different light sources
behind the subject.
• Find a white subject and
compose your shot so that it
also appears in the frame
(_7" pg. 17).
CONTINUED ON NEXT PAGE
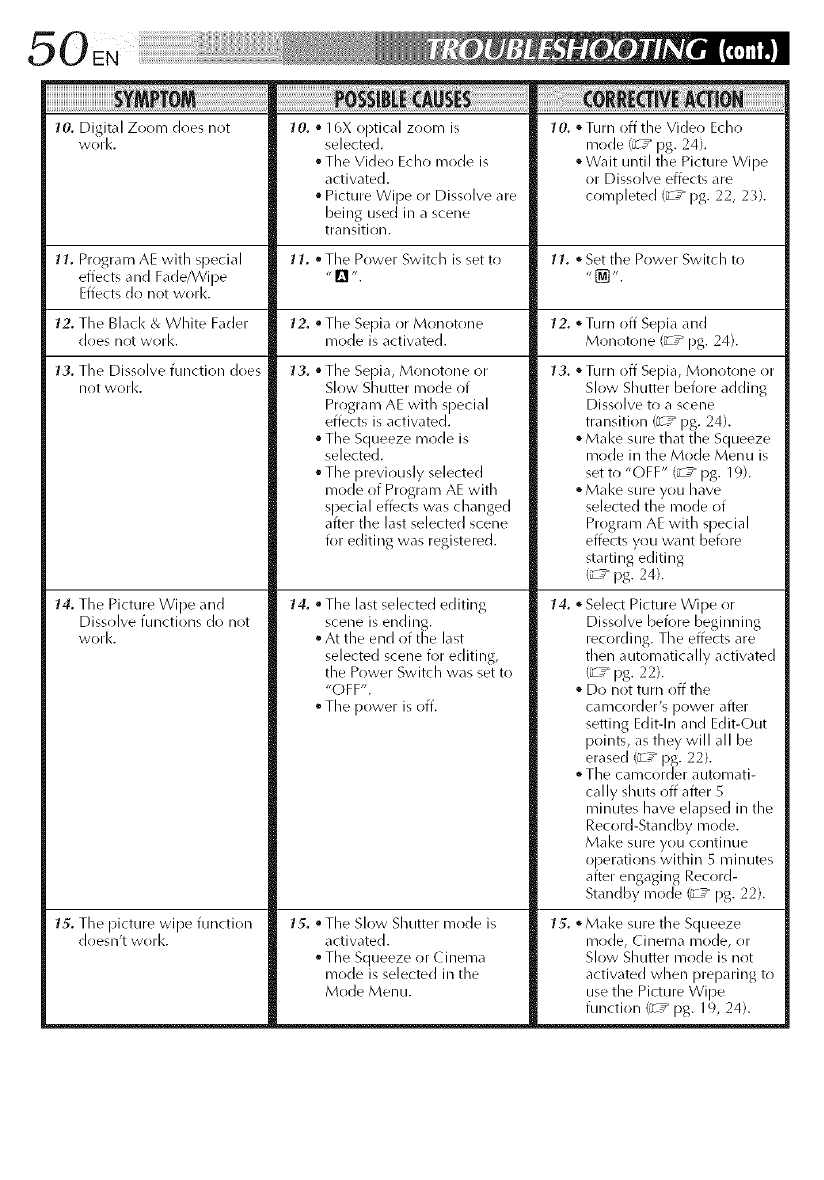
10. Digital Zoom does not
work,
10. • 16X optical zoom is
selected.
The Video Echo mode is
activated.
Picture Wipe or Dissolve are
being used in a scene
transition.
l0. ° Turn off tile Video Echo
mode (_; pg. 24).
°Wait until the Picture Wipe
or Dissolve effects are
completed (_-; pg. 22, 23).
IL Program AE with special I L • The Power Switch is set to IL ° Set the Power Switch to
effects and Fade/Wipe "[] ". "[_] ".
Effects do nrlt work.
12. The Black & White Fader 12. • The Sepia or Monotone 12. • Turn off Sepia and
does not work. mode is activated. Monotone (_-; pg. 24).
13. The Dissolve function does
not work,
13. • The Sepia, Monotone or
Slow Shutter mode of
Program AE with special
effects is activated.
The Squeeze n/ride is
selected.
• The previously selected
mode of Program AE with
special effects was changed
after the last selected scene
for editing was registered.
14. The Picture Wipe and 14.
Dissolve functions do not
work,
•The last selected editing
scene is ending.
• At the end of the last
selected scene for editing,
the Power Switch was set to
"OFF".
• The power is off.
15. •The Slow Shutter mr)de is
activate(].
The Squeeze or ( inema
mode is selected in the
Mode Menu.
15. The picture wipe function
dr)esn't work.
13. • Turn off Sepia, Monotone r)r
Slow Shutter before adding
Dissolve to a scene
transition (_-; pg. 24).
• Make sure that the Squeeze
mode in the Mode Menu is
set to "OFF" (_; pg. 19).
oMake sure you have
selected the mode of
Program AE with special
effects you want before
starting editing
(_-; pg. 24).
14. Select Picture Wipe or
Dissolve before beginning
recording. The effects are
then automatically activated
(_7_ pg. 22).
• Do not turn off the
camcorder's pr)wer after
setting Edit-In and Edit-Out
points, as they will all be
erased (_7_ pg. 22).
• The call/corder automati-
cally shuts off after 5
minutes have elapsed in the
Record-Standby mode.
Make sure yOU cr)ntinue
operations within 5 mii_utes
after engaging Record-
Standby mode (_ ;pg. 22).
15. • Make sure the Squeeze
mode, Cinema mode, or
Slow Shutter mode is not
activated when prel_aring to
use the Picture Wipe
function (_7_ pg. 19, 24).
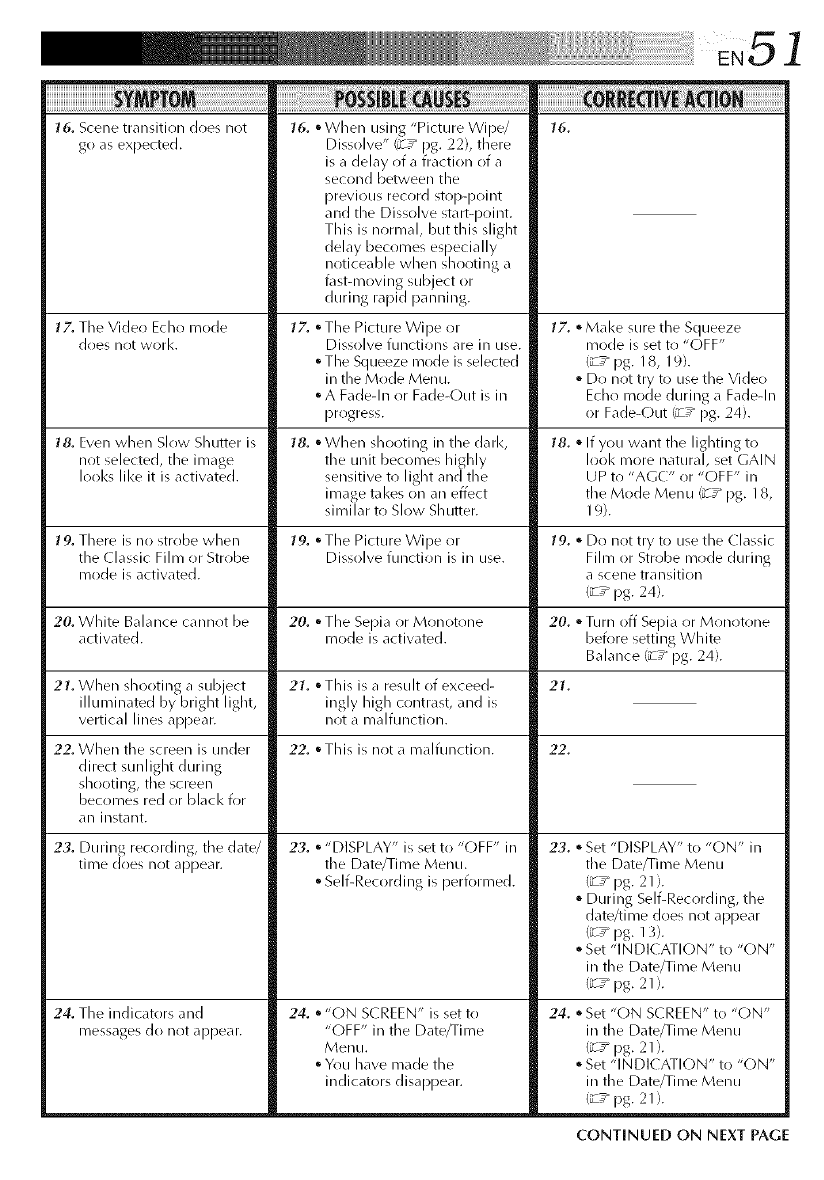
EN5 /
76. Scene transition does not
go as expected.
17. The Video Echo mode
does I/Ot worl<.
21. When shooting a subject
illuminated by bright light,
vertical lines appear.
76. • When using "Picture Wipe/
Dissolve" (¢ ,_ pg. 22), there
is a delay of a fraction of a
second between the
previous record stop-point
and the Dissolve start-point.
This is normal, but this slight
delay becomes especially
noticeable when shooting a
t\_st-moving subject or
during rapid panning.
17. • The Picture Wipe or
Dissolve functions are in use.
•The Squeeze mode is selected
in tile Mode Menu.
• A Fat]e-In or Fade-Out is in
progress.
ii¸ii¸ii¸ii¸ii¸ii¸ii¸ii¸ii¸i¸!i¸!i¸!I
75,
17. • Make sure the Squeeze
mode is set to "OFF"
(_ pg. 18, 19).
• Do not try to use the Vide()
Echo mode during a Fade-In
or Fade-Out (_ ,_pg. 24).
_8. Even when Slow Shutter is _8. • When shooting in the darl<, _8. • If you want tile lighting to
not selected, the image tile unit becomes highly look more natural, set GAIN
looks like it is activate(], sensitive to light and the UP to "AGC" or "OFF" in
image takes on an effect the Mode Menu (_ ,_ pg. 18,
similar to Slow Shutter. 19).
19, There is no strobe when 19, • The Picture Wipe or 19, • Do not try to use the Classic
the ( lassic Film or Strobe Dissolve function is in use. Film or Strobe mode during
mode is activated, a scene transition
(_-? pg. 24).
20. White Balance cannot be 20. • The Sepia or Monotone 20. • Turn off Sepia or Monotone
activated, mode is activated, before setting White
Balance (_ ,_ pg. 24).
21. • This is a resuh of exceed- 21.
ingly high contrast, and is
not a malfunction.
22. • This is not a malfunction.
23. • "DISPLAY" is set to "OFF" in
tile Date/Time Menu.
• Self-Recording is performed.
24. • "(-)N SCREEN" is set to
"OFF" in the Date/Time
Menu.
• You have made the
indicators disappear.
22. When tile screen is under
direct sunlight during
shooting, tile screen
becomes red or black for
an instant.
23. During recording, tile date/
time does not appear.
24. The indicators and
messages do not appear.
22.
23. ,_Set "DISPLAY" to "ON" in
tile Date/Time Menu
(_? pg. 21 ).
• During Self-Recording, the
date/time does not appear
(_T_ pg. 13).
• Set "INDI( ATION" to "ON"
in the Date/Time Menu
(_-_ pg. 21 ).
24. • Set "C)N SCREEN" to "C)N"
in tile Date/Time Menu
(_T_ pg. 21 ).
•Set "INDICATION" to "ON"
in the Date/Time Menu
(_? pg.21).
CONTINUED ON NEXT PAGE
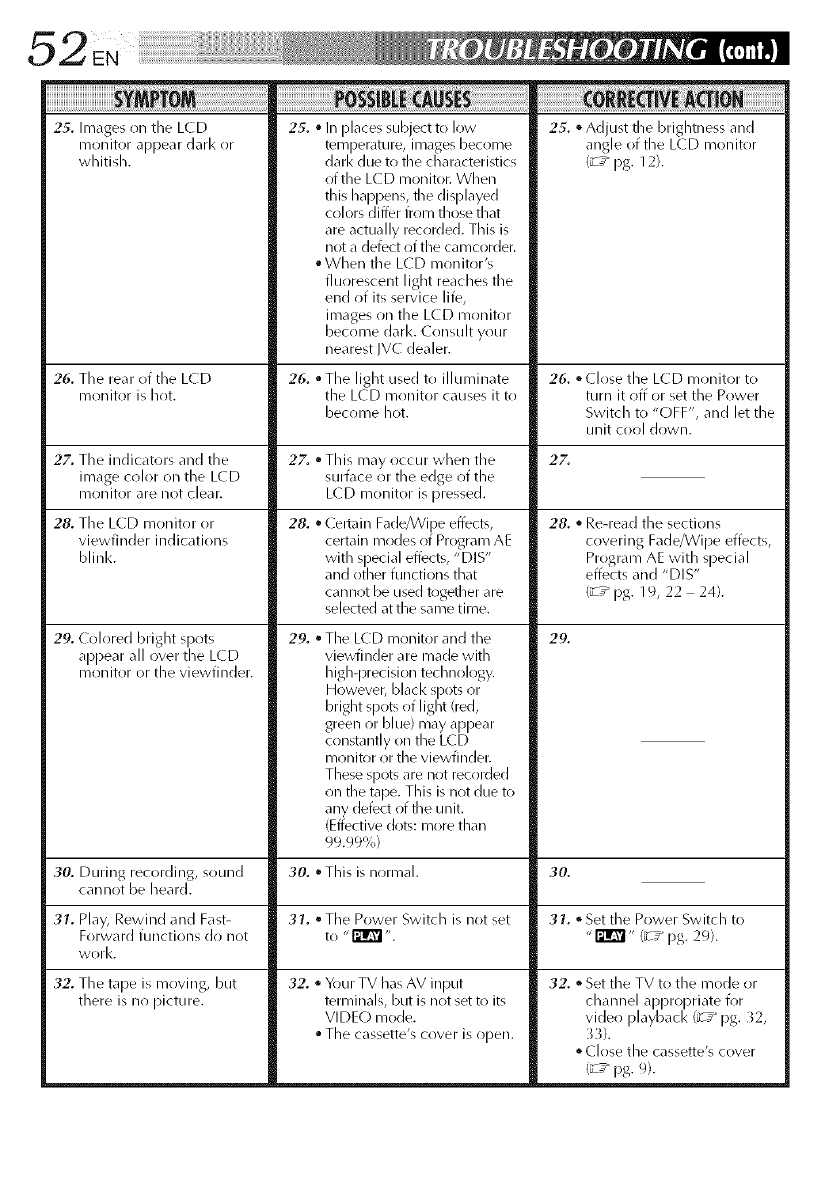
25. Images on tile LCD
monitor appear dark or
whitidl.
25. • In [)laces subject to low 25. • Adjust tile brightness and
temperature, images become angle of the L(D monitor
daft< due to the characteristics (_T_ pg. 12).
of the L(D monitor. When
this happens, tile displayed
colors differ from those that
are actually recorded. This is
not a defect of the camcorder.
When the LCD monitor's
fluorescent light reaches the
end of its service life,
images on the LCD monitor
become darl<. Consuh your
nearest IV( dealer.
26. The rear of the LCD 26. • The light used to illuminate 26. • Close the LCD monitor to
monitor is hot. the LCD monitor causes it to turn it off or set the Power
become hot. Switch to "OFF", and let the
unit cool down.
27. Tile indicators and the 27.
image color on the LCD
monitor are not clear.
28. Tile LCD monitor or
viewfinder indications
blinl<.
29. Colored bright spots
appear all over the LCD
monitor or the viewfinder.
22. • This may occur when tile
surt\lce or tile edge of the
L(D monitor is pressed.
28. "CeRtain Fade/VVipe effects,
certain modes of Program AE
with special effects, "DIS"
and other functions that
cannot be used together are
selected at the same time.
29. • The LCD monitor and the
viewfinder are made with
high-precision technology.
However, black spots or
bright spots of light (red,
green or blue) may appear
constantly on the LCD
monitor or the viewfindec
These spots are not recorded
on the tape. This is not due to
any defect of the unit.
(Effective clots: more than
99.99%)
28. " Re-read the sections
covering Fade/Wipe effects,
Program AE with special
effects and "DIS"
(_ pg. 19, 22 24}.
3,2. , Your TV has AV input
terminals, butt is not set to its
VI DE(-) mode.
The cassette's coveR is open.
29.
30. During recording, sound 30. • This is normal. 30.
cannot be heard.
31. Play, Rewind and Fast- 31. • The Power Switch is not set 31. • Set the Power Switch to
Forward functions do not to "_". "_" (_-T_ pg. 29).
worl<.
32. The tape is moving, but
there is no picture.
3,2. • Set the TV to the mode or
channel appropriate for
video playbacl< (z7* pg. _2,
_3}.
Close the cassette's cover
(_T_pg.9).
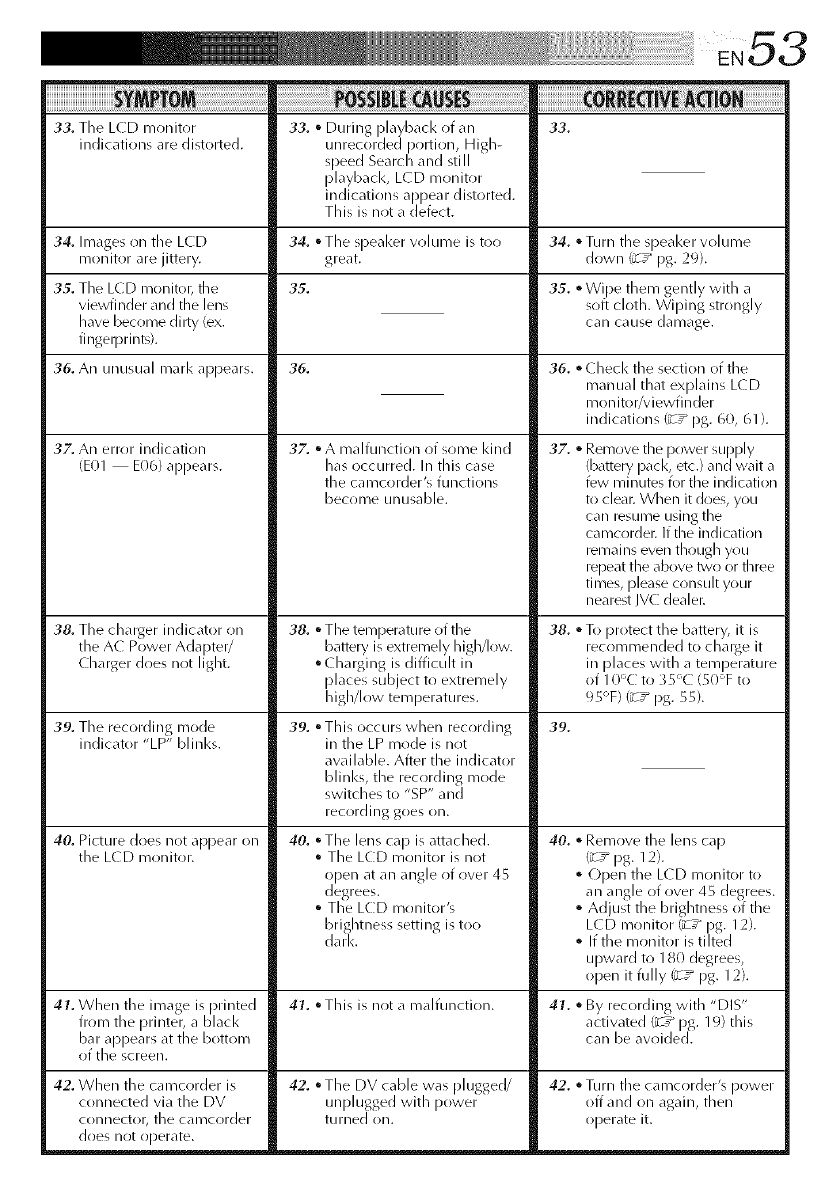
33. Tile LCD monitor
indications are distorted. 33. •During playback of an
unrecorded portion, High-
speed Search and still
playback, LCD monitor
indications appear distorted.
This is nrlt a defect.
33.
34. Images on the LCD 34. • The speal<er volume is too 34. • Turn the speal<er w)lume
monitor are jittery, great, down (_ ,_ pg. 29).
35.
35. The LCD rnonito_? the
viewfinder and the lens
have become dilty rex.
fingerprints).
36. An unusual marl< appears.
37. An error indication
rE01 E06) appears.
38. The charger indicator oil
the AC Power Adapter/
Charger does not light.
39. Tile recording mode
indicator "LP" blinl<s.
35. • Wipe them gently with a
soft cloth. Wiping strongly
can cause damage.
36.
32'. • A malfunction of some I<ind 32'.
has occurred. In this case
the camcorder's functions
become unusable.
40. Picture does not appear on
the L(D monitor.
42. When the camcr)rder is
connected via the DV
connector_ the calT_corder
does nr)t operate.
38. • The temperature of the 38.
battery is extremely higMow.
• ( harging is difficult in
[)laces subject to extremely
higMow temperatures.
39. • This occurs when recording 39.
in tile LP mode is not
available. Ariel the indicator
blinl<s, the recording mode
switches to "SP" and
recording goes on.
40. °The lens cap is attached. 40.
• The LCD monitor is not
open at an angle of over 45
degrees.
•The LCD rnr_nitor's
brightness setting is too
dark.
36. • Checl< tile section of tile
manual that explains L(D
monitor/viewfinder
indications (_-T_ pg. 60, 61).
• Remove the power supply
(battery pacl<, etc.) and wait a
few m incites for the indication
to clean When it does, you
can resume using the
camcoMen If the indication
remains even though you
repeat the above two or three
times, please consult your
nearest JVC dealer.
To protect the battery, it is
recommended to chalge it
in [)laces with a temperature
of 10%: to 35°C: (gOT to
95°F) (_ pg. 55).
• Remove the lens cap
(_7 pg. 12).
Open tile LCD rnonitor to
an angle of over 45 degrees.
• Adjust the brightness of the
LCD rnonitor Cz,_ pg. 12).
•If the monitor is ti hed
upward to 180 degrees,
open it fully Cz,_ pg. 12).
41. When tile image is printed 47. • This is not a malfunction. 47. • By recording with "DIS"
from the printer, a black activated (_z_ pg. 19) this
bar appears at the bottorn can be avoided.
of the screen.
42. • The DV cable was plugged/ 42.
unplugged with power
tllrlled on.
• Turn the camcorder's power
off and on again, then
operate it.
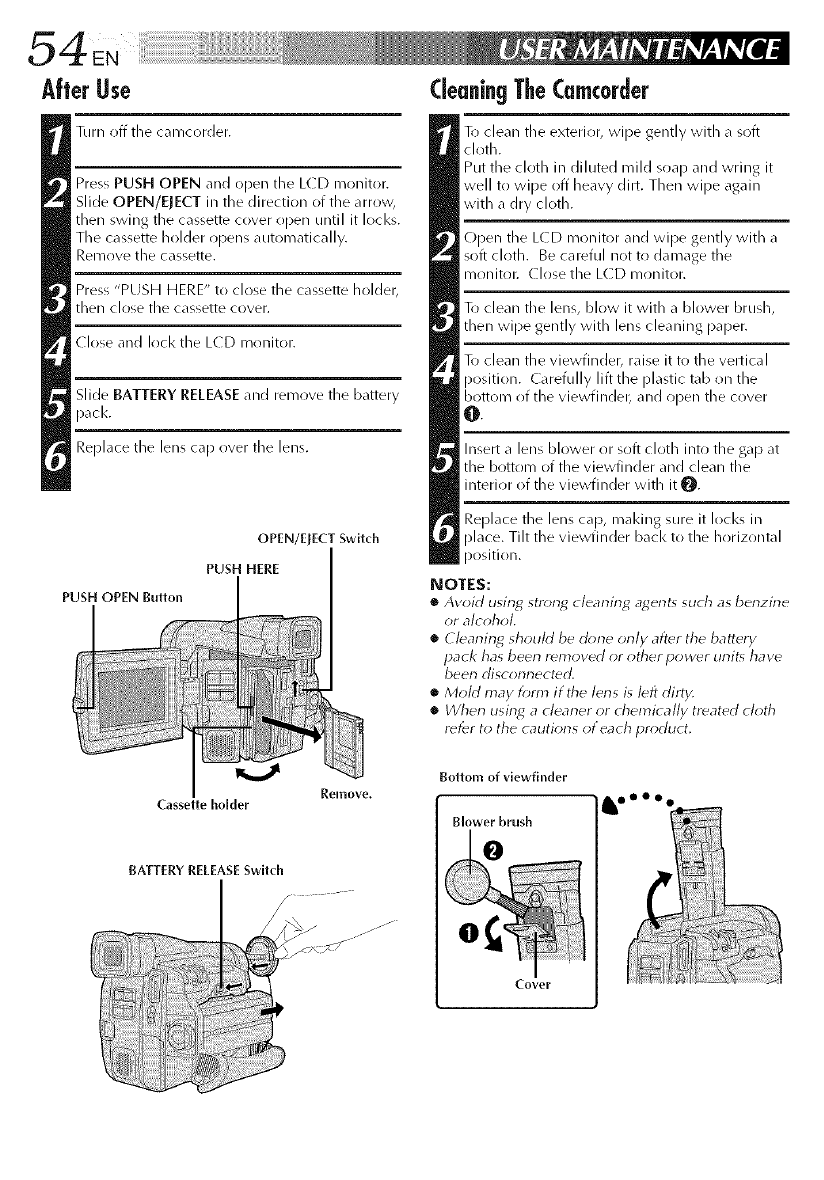
After Use
Turn off tile camcorder.
Press PUSH OPEN and open the LCD monitor.
Slide OPEN/ElECT in the direction of the arrow,
then swing the cassette cover r)pen until it locks.
The cassette holder opens automatically.
Remove the cassette.
Press "PUSH HERE" to close the cassette holder,
then close the cassette cover.
Close and lock the LCD monitor.
Slide BATTERYRELEASEand remove the battery
!)acl<.
Replace the lens ca[) over the lens.
OPEN/ErECT Switch
PUSH HERE
PUSH OPEN Button
CleaningTheCamcorder
To clean the exterior, wipe gently with a soft
cloth.
Put the cloth in diluted mild soap and wring it
well to wipe off heavy dirt. Then wipe again
with a dry cloth.
Open the LCD monitor and wipe gently with a
soft cloth. Be careful not to damage tile
monitoc Closethe LCD monitor.
To clean the lens, blow it with a blower brush,
then wipe gently with lens cleaning paper.
To clean the viewfinder, raise it to the vertical
position. Carefully lift the plastic tab on the
bottom of the viewfindet_ and ol)en tile cover
@
Insert a lens blower or soft cloth into the gap at
the bottom of the viewfinder and clean the
interior of the viewfinder with it O.
Replace the lens cap, Fnaking sure it locks in
[)lace. Tilt the viewfinder back to the horizontal
position.
NOTES:
•Avoid using stron_ cleaning ag,ent_ such as benzine
or alcohol,
•Cleaning should be done only after the battery
pack has beerl r_ntoved or other power unit_ have
been disconnected.
•Mohl may f_*rm if the lens is left dirty,
• _Vherl using aclearler or d_emically treated cloth
r_f_r to the cautions of each product.
Cassette holder
BATTERY RELEASE Switch
Remove.
Bottom of viewfinder
Blower brush
Cover
II
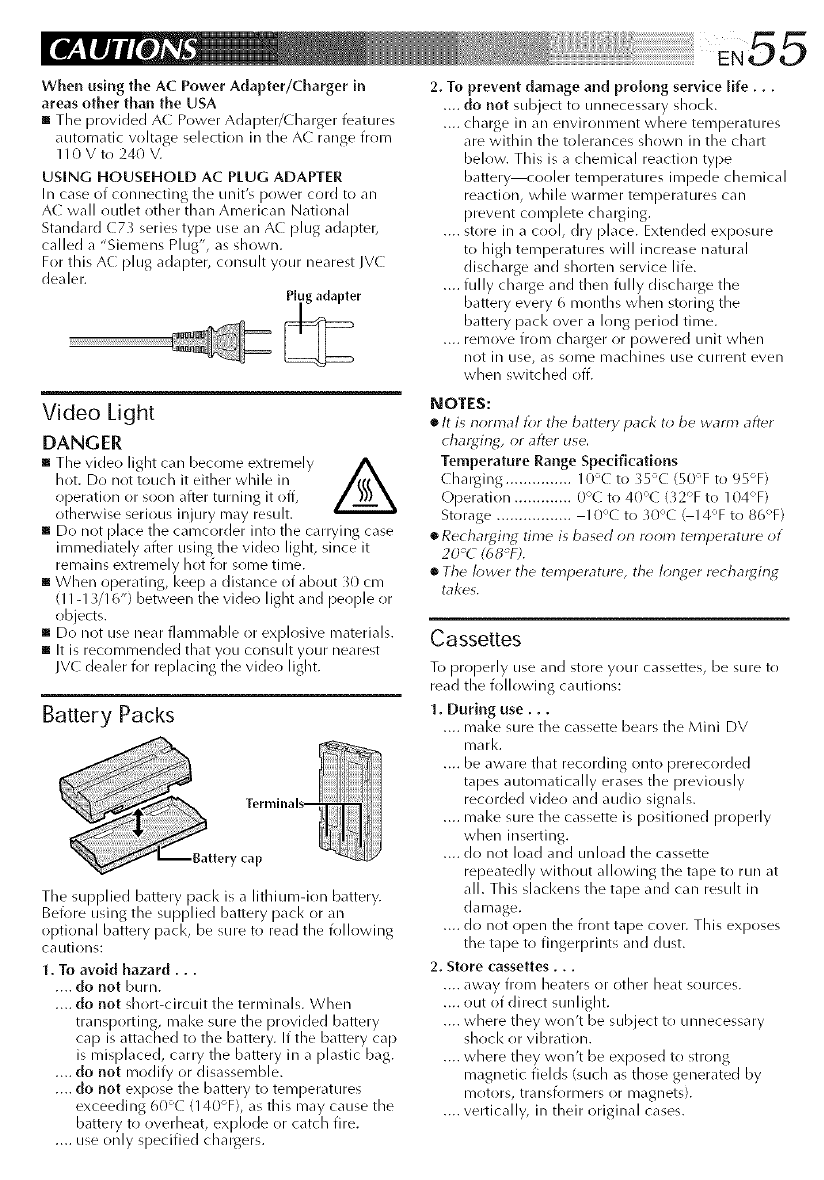
Whenusing the AC Power Adapter/Charger in
areas other than the USA
[] The provided AC Power Adapter/Charger features
automatic vohage selection in the AC range from
110 V to 240 V.
USING HOUSEHOLD AC PLUG ADAPTER
In case of connecting the unit's power cord to an
A( wall outlet other than American National
Standard (73 series type use an AC plug adapter,
called a "Siemens Plug", as shown.
For this AC plug adapter, consuh your nearest JVC
dealer.
Video Light
DANGER
[] The video light can become extremely A
hot. Do not touch it either while in
ol)eration or soon after turning it off,
otherwise serious injury may result.
[] Do not place the camcorder into the carrying case
iFnmediately after using the video light, since it
remains extremely hot for some time.
[] When operating, I<eep a distance of about }(i) cm
(I 1-13/16") between the vide() light and per)pie or
objects.
[] Do not use Ileal flammable or explosive materials.
[] It is recommended that you consuh your nearest
IV(-: dealer for replacing the video light.
Battery Packs
y cap
Tile supplied battery pacl< is a lithiumdon battery.
Before using the supplied battery pacl< or an
optional battery pacl<, be sure to read the following
ca uti ORS:
1. To avoid hazard...
.... do not burn.
.... do not short<ircuit the terminals. When
transporting, make sure the provided battery
cap is attached to the battery. If the battery cap
is misplaced, carry the battery in a plastic bag.
.... do not modify or disassemble.
.... do not expose the battery to temperatures
exceeding 60'C (140%), as this may cause the
battery to overheat, explode or catch fire.
.... use only specified chargers.
2. To prevent damage and prolong service life...
.... do not subject to unnecessary shocl<.
.... charge in an environlT/ent where telT/peratlJres
are within the tolerances shown in the chart
below. This is a chemical reaction type
battery cooler temperatures impede chemical
reaction, while warlT/er temperatures can
prevent complete charging.
.... store in a cool, dry place. Extended exposure
to high temperatures will increase natural
discharge and shorten service life.
.... fully charge and then fully discharge the
battery every 6 months when storing the
battery pacl< over a long period time.
.... remove from charger or powered unit when
not ill use, (is some machilles use current even
when switched off.
NOTES:
[] It is normal tbr the battery pack to be wann after
charging, or after use.
Temperature Range Specifications
Charging ............... 10'C to 35°C (50°F to 95°F)
Operation ............. 0';C to 40°C (32°F to 104°F)
Storage ................. 10'C to 30'C ( 14T to 86'F)
[] Recharging time is based on room temperature of
20°C (68°Fk
[] The k)wer the teml_erature, the longer recha)_ing
takes.
Cassettes
To properly use and store your cassettes, be sure to
read the following cautions:
1. During use...
.... mal<e sure the cassette bears the Mini DV
mark.
.... be aware that recording onto prerecorded
tapes automatically erases tile previously
recorded video and audio signals.
.... mal<e sure the cassette is positioned properly
when inserting.
.... do not load and unload the cassette
repeatedly without allowing the tape to run at
all. This slackens the tape and can resuh in
damage.
.... do not open the front tape cover. This exposes
the tape to fingerprints and dust.
2. Store cassettes...
.... away from heaters rlr other heat sources.
.... out of direct sunlight.
.... where they won't be subject to unnecessary
shr)ck or vibration.
.... where they won't be exposed to strong
magnetic fields (such as those generated by
n/r)tors, transforl_Ners or magnets).
.... vertically, in their original cases.
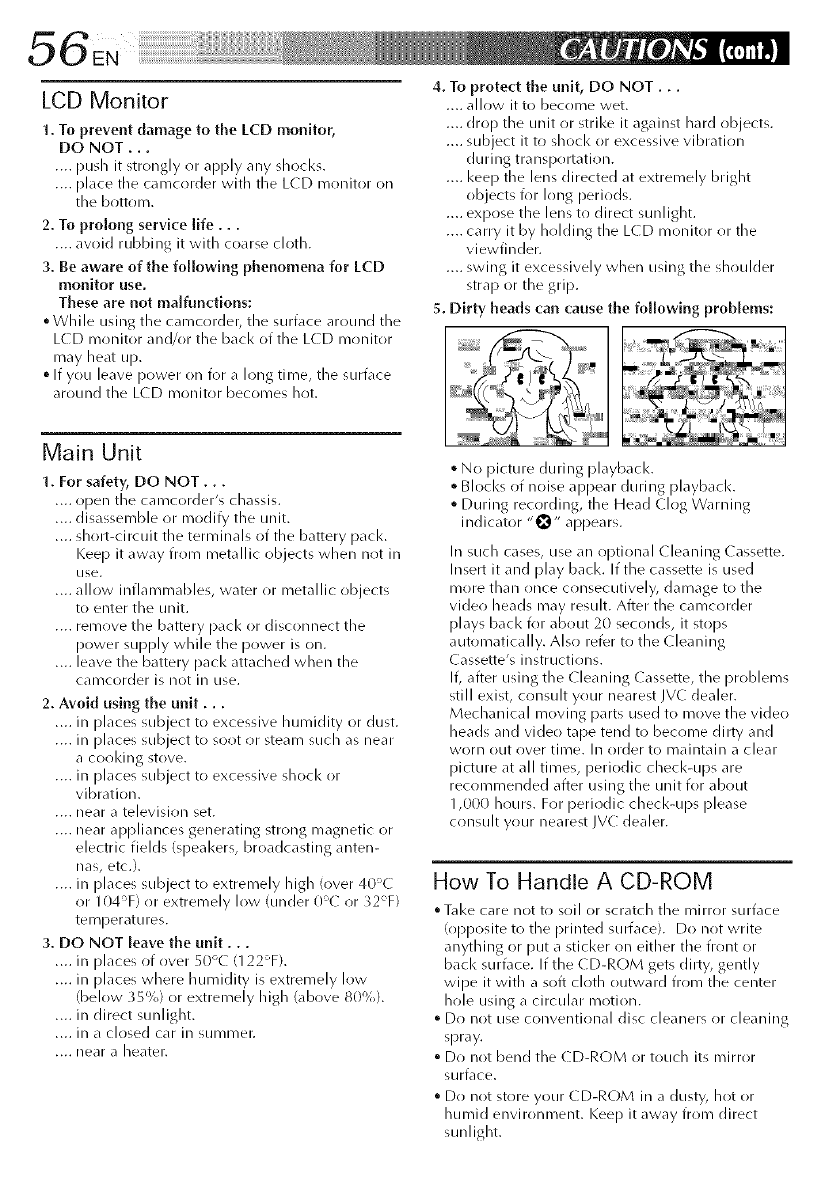
LCD Monitor
t. To prevent damage to the I_CD monitor,
DO NOT...
.... push it strongly or apply any shocl<s.
.... [)lace the camcorder with the L(D monitor on
the bottom.
2. To prolong service Jife...
.... aw>id rubbing it with coarse cloth.
3. Be aware of the following phenomena for LCD
monitor use.
These are not malfunctions:
°While using the camcorder, the surface around the
L(D monitor and/or the back of the L(D monitor
may heat up.
°If you leave power on for a long time, the surface
around the L(D monitor becomes hot.
4. To protect the unit, DO NOT...
.... allow it to become wet.
.... drop the unit (ir strike it against hard objects.
.... subject it to shocl< or excessive vibration
during transportation.
.... I<eep tile lens directed at extremely bright
objects for long periods.
.... expose the lens to direct sunlight.
.... carry it by holding the L(D monitor or the
viewfinder.
.... swing it excessively when using the shrlulder
strap or the grip.
5. Dirty heads (:an cause the following problems:
Main Unit
1. For safety, DO NOT...
.... open the camcorder's chassis.
.... disassemble rlr modify the unit.
.... short-circuit the terminals of the battery pacl<.
Keep it away from metallic objects when not in
/Ise.
.... allow inflammables, water or metallic objects
to enter the unit.
.... remove the battery pacl< or disconnect tile
power supply while the power is on.
.... leave the battery pacl< attached when the
cal_lcorder is not ill use.
2. Avoid using the unit...
.... in [)laces subject to excessive humidity or dust.
.... in [)laces subject to soot or steam such as BleaR"
a cooldng stove.
.... in [)laces subject to excessive shocl< or
vibration.
.... near a television set.
.... near appliances generating strong magnetic or
electric fields (speal<ers, broadcasting anten-
nas, etc.).
.... in [)laces subject to extremely high (over 40'C
or 104%) or extremely low (under 0'C or 32%)
temperatures.
3. DO NOT leave the unit...
.... in [)laces of over 50';C (122T).
.... in [)laces where humidity is extremely low
(below }5%) or extremely high (above 80%).
.... in direct sunligbt.
.... in a close(] car in summer.
.... near a heater.
• No picture during playbacl<.
° Blocl<s of noise appear during playbacl<.
• During recording, the Head Clog Warning
indicator "_" appears.
In such cases, use an optional Cleaning Cassette.
Insert it and play back. If the cassette is used
more than once consecutively, damage to the
video heads may result. After the camcorder
[)lays back k)r about 20 seconds, it stops
automatically. Also refer to the (leaning
Cassette's instructions.
If, after using the Cleaning Cassette, the problems
still exist, consuh your nearest JVC dealer.
Mechanical moving [)arts used to move the vide()
heads and video tape tend to become dirty and
worn ()tit over time. In order to II/ailltain a clear
picture at all times, periodic check-ups are
recommended after using the unit for about
1,000 hours. For periodic checl<-ups [)lease
consult your nearest JVC dealer.
How To Handle A CD-ROM
• Take care not to soil or scratch the mirror surface
(opposite to the printed surface). Do not write
anything or put a sticker on either the front or
back surface. If the CD-ROM gets dirty, gently
wipe it with a soft cloth outward from the center
hole using a circular iT_otion.
•Do not use conventional disc cleaners or cleaning
spray.
° Do not bend the CD-ROM or touch its mirror
surface.
• Dr) not store your CD-ROM in a dusty, hot or
humid environment. I<eep it away from direct
sunlight.
Declaration of Conformity
Model Number : GR-DVF21U
Trade Name : JVC
Responsible party : US JVC CORP.
Address : 1700 V,dley Road Wayne,
N. I. 07470
Telephone Number : 973-315 5000
This device complies with Part 15 of FC( Rules.
Operation is subject to the following two
conditions:
(1) This device may not cause harmful
interference, and (2) this device must accept
any interference received, including interfer-
ence that may cause undesired operation.
Change fir modifications not approved by tile
party responsible for compliance could w)id tile
user's authr)rity to operate tile equipment. This
equipment has been tested and found to
comply with tile limits for a Class B digital
device, pursuant to Part 15 of the F(( Rules.
These limits are designed to provide reasonable
protection against harmfl_l interference in a
residential installatir)n. This equipment
generates, uses, and car/radiate radio frequency
energy and, if not installed and used in
accordance with tile instructions, may cause
harmful interference to radio communications.
However, there is no guarantee that interference
will not occur ill a particular installation. If this
equipment does cause harmful interference to
radio or television reception, which car/be
determined by turning the equipment off and
on, tile user is encouraged to try to correct tile
interference by one or more of the follow[ %
I]/easu res:
Reorient r)r relocate tile receiving antenna.
Increase tile separation between tile equip-
n/ent (lll(] receiver.
Connect tile equipment into an outlet on a
circuit different from that to which the
receiver is connected.
Consult tile dealer or an experienced radio/
TV technician for help.
About moisture condensation,..
• You have r)bserved that pouring a cold liquid
into a glass will cause drops of water to form
on the glass' outer surface. This same
phenoiT/enon occurs r)n tile head drum of a
camcorder when it is moved from a cool
[)lace to a warm [)lace, after heating a cold
room, under extrel-nely humid conditions or
in a [)lace directly subjected to the cool air
from an air cr)nditioner.
• Moisture on the head drum can cause severe
damage to the vide{) tape, and can lead to
internal damage to the camcr)rder itself.
Serious malfunctioning
If malfunctioning occurs, stop using the unit
immediately and consult your local IV( dealer.
Tile camcorder isa iTficrocr)lT/puter<r)ntrolled
device. External noise and interference (from a
TV, a radio, etc.) might prevent it from function-
ing prr)perly. In such cases, first disconnect its
power supply unit (battery pacl<, AC Power
Adapter/Battery Charger, etc.) and wait a few
minutes and then re-connect it and proceed as
usual from the beginning.
This Class B digital apparatus cr)mplies with
Canadian I(ZS-O0 _.
(]et appareil num@ique de la classe Best
cr)nforme _1la norme NMB-O0 } du (anada.
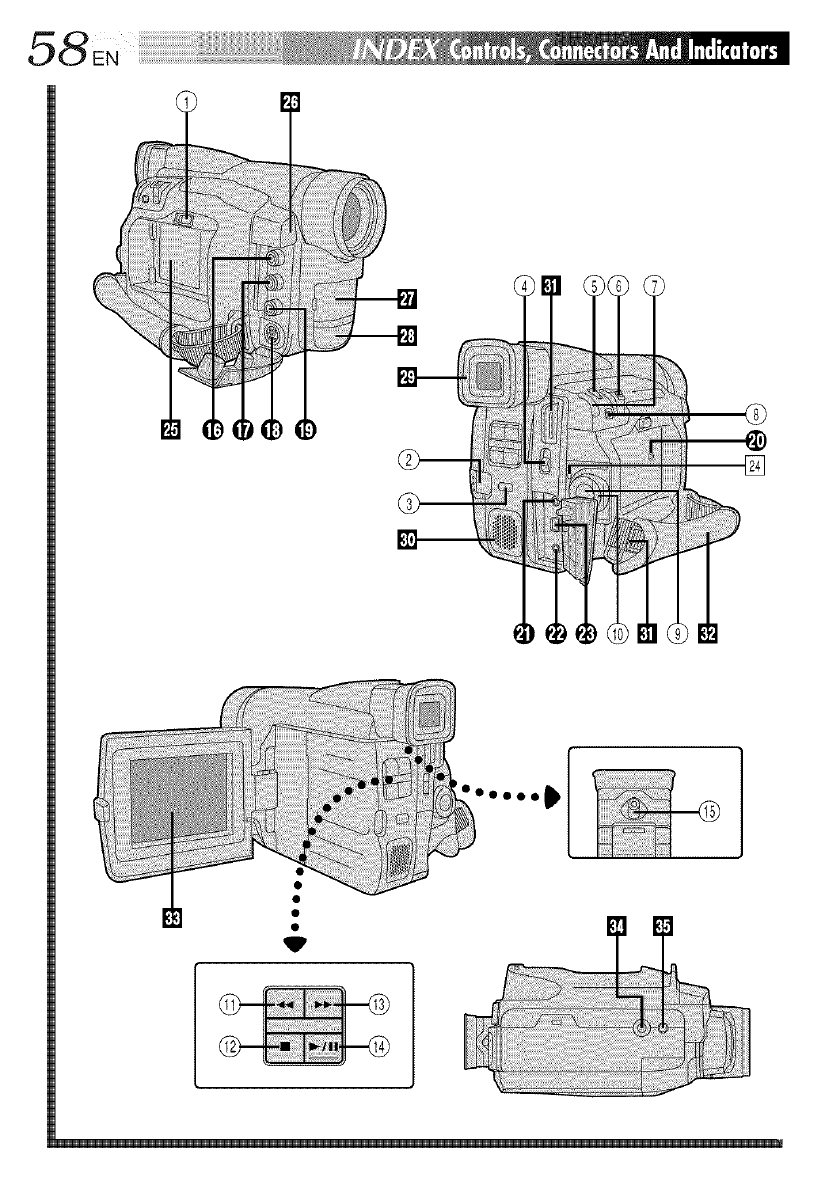
00000_
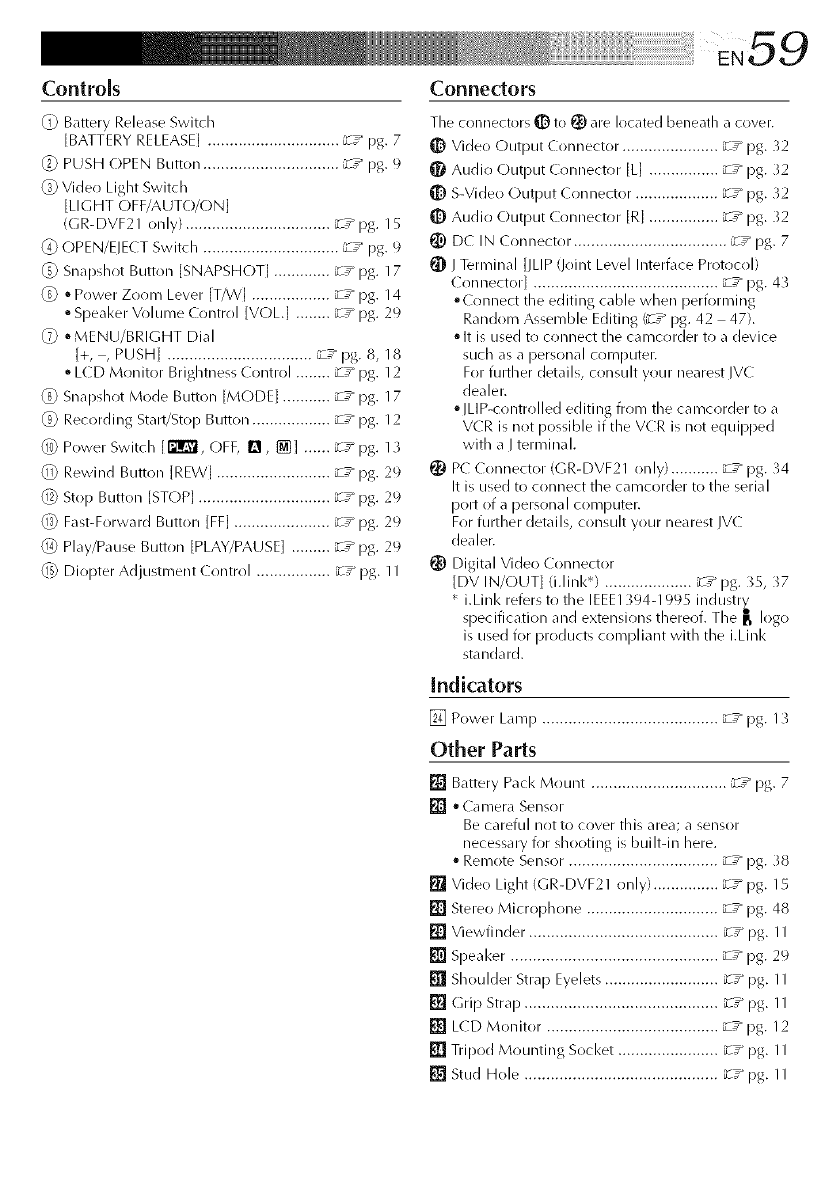
Controk Connectors
Battery Release Switch
[BATTERY RELEASE] .............................. _-_ pg. 7
_) PUSH (-)PEN Button ............................... _:" pg. 9
(_ Video Light Switch
[LIGHT OFF/AUTO/()N]
(GR-DVF21 only} ................................. _:" pg. 15
{_ OPEN/ElECT Switch ............................... _--_ pg. 9
_ Snapshot Button [SNAPSHO] ............. _'-* pg. 17
(_) • Power ZOOIT/ Level [T/W] .................. _--_ pg. 14
• Speal<er Volume Contr(!l ]VOL.[ ........ _--_ pg. 29
_} • MENU/BRIGHT Dial
]+, , PUSH[ ................................. _--" pg. 8, 18
• L(D Monitor Brightness Control ........ _7" pg. 12
(_ Snapshot Mode Button [MODE] ........... _T* pg. 17
(_ Recording StaB't/Stop Button .................. _T* pg. 12
{_) Power Switch [1_I_ OFF, [I, _] ...... _T* pg. 13
_) Rewind Button JREWI .......................... _T* pg. 29
_) St()[) Button ]STOP] .............................. _T_ pg. 29
(_ Fast-Forward Button ]FF] ...................... _T* pg. 29
Play/Pause Button [PLAY/PAUSE] ......... _-T_ pg. 29
_ Diopter Adjustment (ontrol ................. _T _ pg. 11
The connectors _ to _ are located beneath a cover.
1_ Video Output Connector. ..................... _-T_ pg. 32
Audio Output Coilnector ILl ................ _T* pg. 32
S-Video Output ( onnector ................... _7 _ pg. 32
O Audit) Output Coiqnector [R[ ................ ZT* pg. _2
_) DC IN ( onnector. .................................. _7" pg. 7
J Terminal ]JLIP (Jrlint Level Intert\lce Protocr!l)
( onnector[ .......................................... _7" pg. 43
•Connect the editing cable when performing
Random Assemble Editing ('_ ,_ pg. 42 47).
It is used to connect the camcorder to a device
such as a personal conlputer.
For further details, consult your nearest IV(::
dealer.
lLIP-controlled editing from the camcorder to a
VCR is not possible if the VCR is not equipped
with a I terminal.
l_ PC ( onnector (GR-DVF21 only) ........... _T_ pg. 34
It is used to connect the camcorder to the serial
port of a personal coFnputer.
For further details, consult your nearest JVC
dealer.
t_) Digital Vide() Connector
]DV IN/OUT[ (i.linl<*) .................... _'T_ pg. _5, _7
• i.Link refers to the IEEE13944 995 industr_
specification and extensions thereof. The !_ logo
is used for products compliant with the i.Linl<
stalldard.
Indicators
[] Power Lamp ........................................ _-7_ pg. 13
Other Parts
Battery Pack Mount ............................... _-7_ pg. 7
•Camera Sensor
Be careful not to cover this area; a sensor
necessary for shooting is builtqn here.
• Remote Sensor .................................. _T* pg. 38
[] Video Light (GR-DVF21 only) ............... _-:_ pg. 15
[] Stereo Microphone .............................. _T_ pg. 48
[] Viewfinder. .......................................... _T* pg. 11
[] Speaker ............................................... _-7_ pg. 29
[] Shoulder Strap Eyelets .......................... _7_ pg. 11
[] Grip Strap ............................................ _-7_ pg. 11
[] L(D Monitor. ...................................... _7_ pg. 12
[] Tripod Mounting Socket ....................... _T_ pg. 11
[] Stud Hole ............................................ _-T_ pg. 11
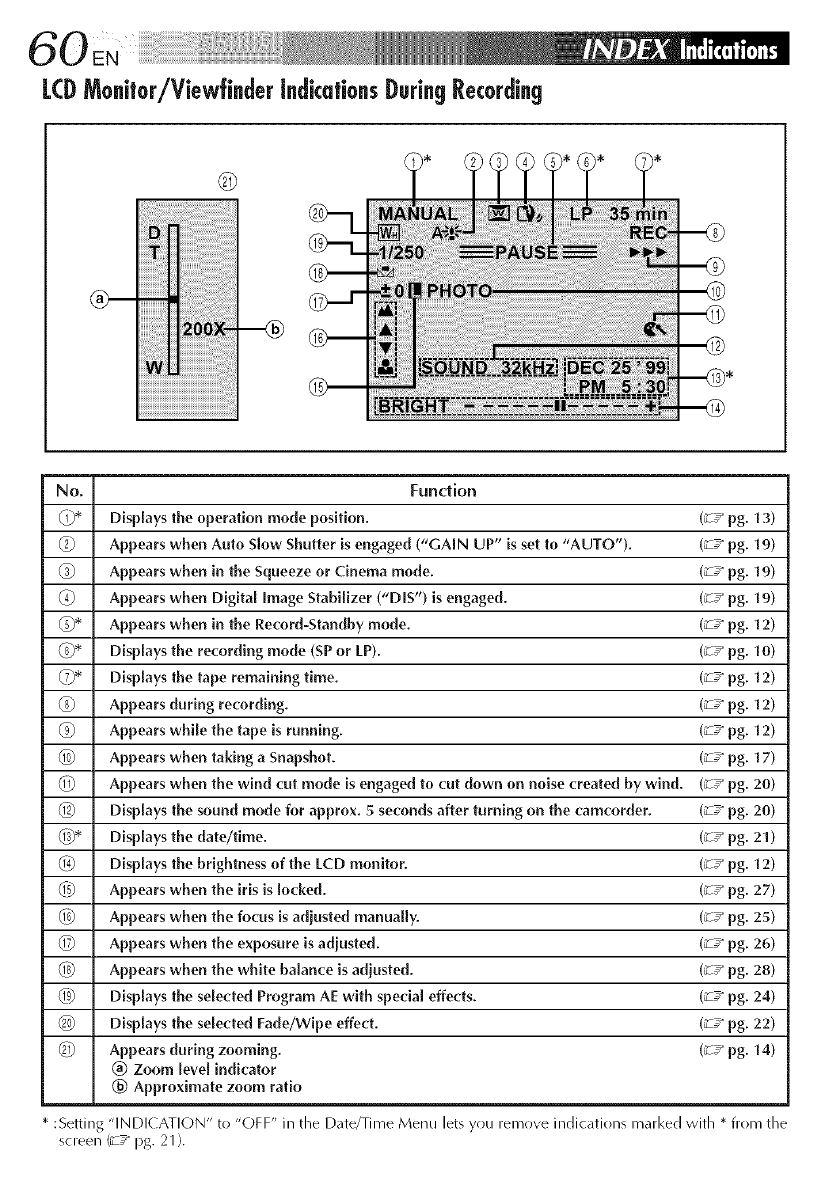
LCDMo.itor/Viewfi.deri.dicatio.s Duri.gRecordi.g
@
_iii!iiiii_i!iii_!iliiiiiiiiiiiiiiiiiiiiii'ii_i!iiiiiiiiiiiiiiill"_
iiiiiiiiiiiiiiiiiiiiiiiiiiiiiiiiiiiiiiiiiiiiiiiiiiiiiiiiiiiiiiiiiiiiiiiiiiiiiiiiiiiiiiiiii :::::
No. Function
_)* Displays the operation mode position. (2 T"pg. 13)
0) Appears when Auto Slow Shutter is engaged ("GAIN UP" is set to "AUTO"). (_-T"pg. 19)
G Appears when in the Squeeze or Cinema mode. (2 7_ pg. 19)
(_ Appears when Digital Image Stabilizer ("DIS") is engaged. (_T_ pg. 19)
_* Appears when in the Record-Standby mode. (2T_ pg. 12)
(_}* Displays the recording mode (SP or LP). (2 T_ pg. "l0)
_}* Displays the tape remaining time. (2T_ pg. "l2)
(_) Appears during recording. (_-T_ pg. "l2)
Appears while the tape is running. (2T_ pg. "l2)
_._ Appears when taking a Snapshot. (_-T_ pg. "l7)
Appears when the wind cut mode is engaged to cut down on noise created by wind. (_-T_pg. 20)
(_) Displays the sound mode for approx. 5 seconds after turning on the camcorder. (_-T_ pg. 20)
_* Displays the date/time. (_-T_ pg. 21)
_4_ Displays the brightness of the LCD monitor. (2T_ pg. 12)
_-_ Appears when the iris is locked. (_-T_ pg. 27)
_ Appears when the focus is adjusted manually. (2T_ pg. 25)
_ Appears when the exposure is adjusted. (2T_ pg. 26)
(_) Appears when the white ba[am:e is adjusted. (2T_ pg. 28)
_9) Displays the se[eded Program AE with special effects. (_T_ pg. 24)
_ Displays the selected Fade/Wipe effect. (_-T_ pg. 22)
_ Appears during zooming. (2T_ pg. 14)
_) Zoom [eve[ indicator
(_) Approximate zoom ratio
* :Setting "INDI( ATION" to "OFF" in the Date/Time Menu lets you remove indications marl<ed with * from the
screen (_ ,* pg. 21).
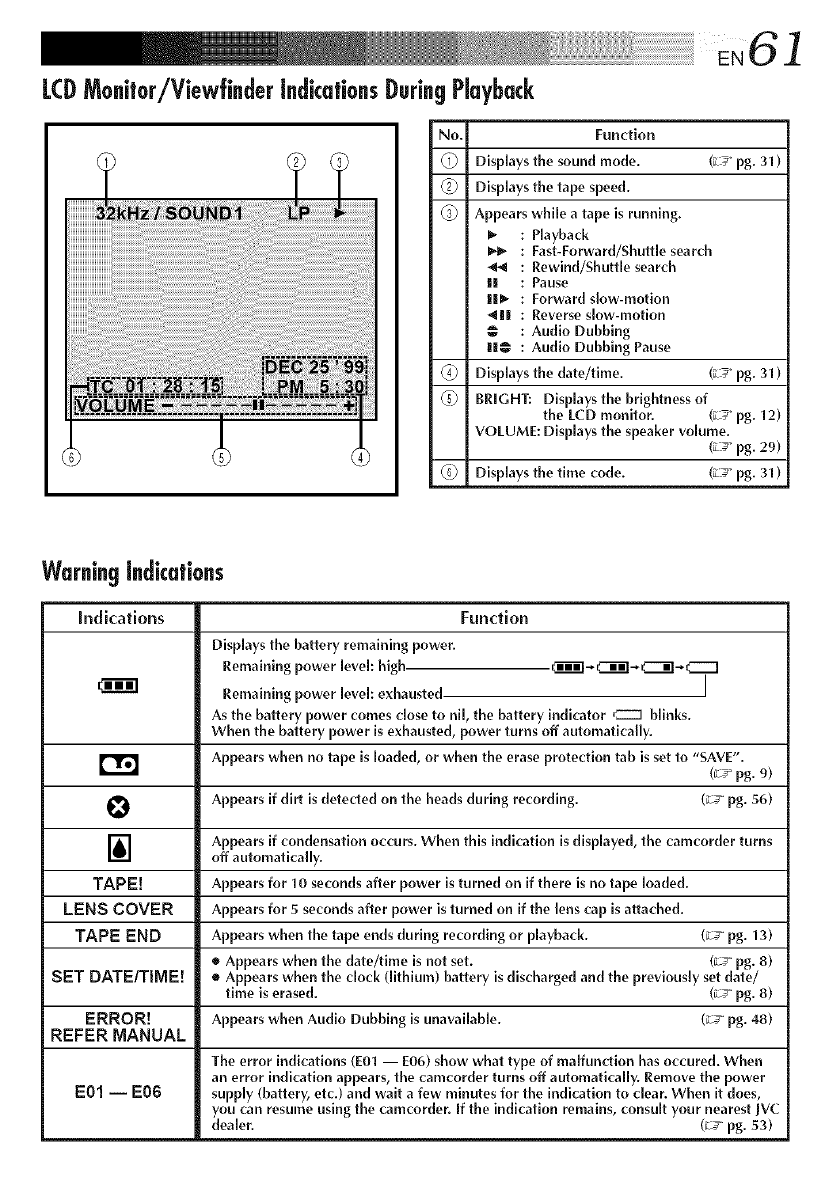
EN6]
LCDMo@or/ViewffnderindicationsDuringPlayba&
.....
NO.
©
©
Function
Displays the sound mode. (;L_ pg. 31 )
Displays the tape speed.
Appears while a tape is running.
: Playback
:Fast-Forward/Shuttle search
: Rewind/Shuttle search
I! : Pause
I[1_ : Forward slow-motion
_la! :Reverse slow-motion
@ : Audio Dubbing
I1[@ : Audio Dubbing Pause
Displays the date/time. (_L_ pg. 31 )
BRIGHT: Displays the brightness of
the LCD monitor. (_ pg. 12)
VOLUME: Displays the speaker volume.
(_ _ pg. 29)
Displays the time code. (_-_" pg. 31 )
Warning[ndkations
Indications Function
Displays the battery remaining power.
Remaining power level: high Cii'il-C3_]-C:3g-c-'-I
Remaining power level: exhausted I
As the battery power comes close to nil, the battery indicator ,-'--q blinks.
When the battery power is exhausted, power turns off automatically.
Appears when no tape is loaded, or when the erase protection tab is set to "SAVE".
(_7_ pg. 9)
Appears if dirt is detected on the heads during recording. (_ y pg. 56)
rye
O
]Appears if condensation occurs. When this indication is displayed, the camcorder turns
off automatically.
TAPE[ Appears for 10 seconds after power is turned on if there is no tape loaded.
LENS COVER Appears for 5 seconds after power is turned on if the lens cap is attached.
TAPE END Appears when the tape ends during recording or playback. (_ y pg. 13)
• Appears when the date/time is not set. (_T pg. 8)
SET DATE/TIME! • Appears when the clock (lithium) battery is discharged and the previously set date/
time is erased. (_T pg. 8)
ERROR! Appears when Audio Dubbing is unavailable. (_ y pg. 48)
REFER MANUAL
The error indications (E01 -- E06) show what type of maffunction has occured. When
an error indication appears, the camcorder turns off automatically. Remove the power
E01 -- E06 supply (battery, etc.) and wait a few minutes for the indication to clear. When it does,
you can resume using the camcorder. If the indication remains, consult your nearest IVC
dealer. (_y pg. 53)

A
AC Power Adapter/Charger .................... _-T_ pg. 6, 7
Audio Dubbing ........................................ _-T_ pg. 48
Auto Focus ............................................... _T* pg. 25
Auto Shut off ...................................... _-T_ pg. 13, 29
B
Battery Low .............................................. _-T_ pg. 61
Battery Pack ..................................... _-T_ pg. 6, 7, 55
Brighten The LCD Monitor. ...................... :T* pg. 12
Built-in Clock's Lithium Battery .................. _-T_ pg. 8
C
Charge The Battery Pack ............................ _-T_ pg. 6
( inema .................................................... _T* pg. 19
Classic Film ............................................. sT " pg. 24
Clean The ( amcorder .............................. _-T_ pg. 54
( onnections ........................... _T* pg. 7, _2 _7, 43
D
Darken The LCD Monitor ........................ :T* pg. 12
Date/Time Display ............................. _-T_ pg. 21, _1
Date/Time Settings ..................................... _T* pg. 8
Demonstration Mode ............................... _T* pg. 20
Digital Dubbing ....................................... _-T_ pg. }7
Digital Zoom ..................................... _T* pg. 14, 19
DIS (Digital Image Stabilizer) ................... _-T_ pg. 19
Diopter Adjustment .................................. _-T_ pg. 11
Dubbing .................................................. _T* pg. 36
E
Erase Protection ......................................... ZT* pg. 9
Exposure Control ..................................... _-T_ pg. 26
F
Fade-ln/C)ut ............................................. :T* pg. 22
Fast-Forward The Tape ............................. _-T_ pg. 29
G
Gain Up ................................................... _-T_ pg. 19
Grip Adjustment ....................................... _T* pg. 11
I
Ms ........................................................... _T _ pg. 27
Ms Lock ................................................... _T _ pg. 27
I
Journalistic Shooting ................................ _-T_ pg. 1
/
L(D Monitor/Viewfinder Indications ... :T* pg. 60, 61
Load A Tape ............................................... _-T_ pg. 9
M
Manual Focus .......................................... _-T_ pg. 25
Mode Menu ............................................. _T* pg. 19
Monotone ................................................ _-T_ pg. 24
Motor Drive Mode ................................... _-T_ pg. 17
P
Picture Wipe/Dissolve .............................. _-T_ pg. 22
Playback Menu ........................................ _-T_ pg. _0
Playback Special Effects ........................... :T* pg. 29
Playback Zoom ........................................ _-T_ pg. 29
Power Switch Position ............................. :T* pg. 1
Program AE With Special Effects .............. :T* pg. 24
Provided Accessories ................................. _-T_ pg. 5
R
Random Assemble Editing ................ _-T_ pg. 42 47
Record-Standby ....................................... _T _ pg. 12
Recording Menu ...................................... _T* pg. 19
Recording Mode ...................................... _-T_ pg. 10
Remote ( ontrol ........................................ _T _ pg. 38
Rewind The Tape ..................................... _-T_ pg. 29
S
Self-Recording ......................................... _-T_ pg. 13
Sepia ........................................................ _-T_ pg. 24
Set Remote Control/V( R (:()de ................. _T* pg. 42
Shoulder Strap Attachment ....................... _-T_ pg. 11
Shuttle Search .......................................... zT * pg. 29
Shutter Speed ........................................... zT * pg. 24
Slow-Motion Playback ............................. _-T_ pg. 29
Slow Shutter. ............................................ zT * pg. 24
Snapshot Mode ........................................ _-T_ pg. 17
Sound Mode ............................................ zT * pg. 31
Specifications ........................................... zT * pg. 63
Squeeze ................................................... _-T_ pg. 19
Still Playback ........................................... zT * pg. 29
Strobe ...................................................... _-T_ pg. 24
System Menu ........................................... _-T_ pg. 20
T
Tele Macro ............................................... _-T_ pg. 2o
Time (-:()de ............................................... _T* pg. 16
Tripod Mounting ...................................... _-T_ pg. 11
Twilight .................................................... _T * pg. 24
U
Unload A Tape ........................................... _-T_ pg. 9
V
Video Echo .............................................. _7 _ pg. 24
Video Light .............................................. _T* pg. 15
W
White Balance ......................................... _T* pg. 28
Wide Mode .............................................. _-T_ pg. 19
Wind Cut ................................................. _-T_ pg. 20
Wipe In/()ut ............................................. _T* pg. 22
Z
Zooming .................................................. _T _ pg. 14
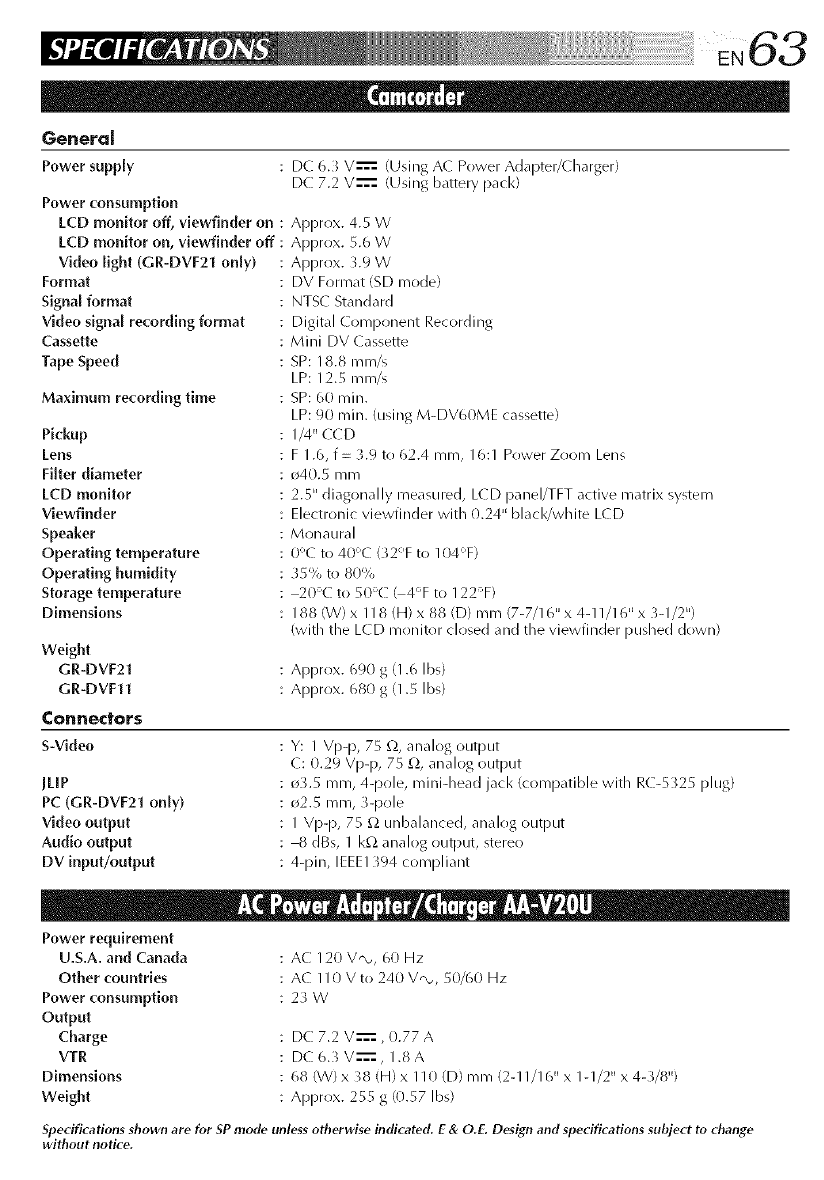
Genera[
Power supply
Power consumption
LCD monitor off, viewfinder on :
LCD monitor on, viewfinder off :
Video light (GR-DVF21 only)
Format
Signal format
Video signal recording format
Cassette
Tape Speed
Maximum recording time
Pickup
Lens
Filter diameter
LCD monitor
Viewfinder
Speaker
Operating temperature
Operating humidity
Storage temperature
Dimensions
Weight
GR-DVF21
GR-DVFll
Connectors
DC 6.) V---':=(Using A( Power Adapter/(harger)
DC 7.2 V---':: (Using battery pack)
Approx. 4.5 W
Approx. 5.6 W
Approx. 3.9 W
DV Format (SD mode)
NTSC Standard
Digital Component Recording
Mini DV ( assette
SP: 18.8 mm/s
LP: 12.5 mm/s
SP: 60 rain.
LP: 90 rain. (using M-DV60ME cassette)
I/4"CCD
F 1.6, f = 3.9 to 62.4 n/ITL 16:1 Power Zo()nl Lens
o40.5 mm
2.5" diagonally i_neasured,L(D panel/TFT active matrix system
Electr()nic viewfinder with 0.24" blacl</white L(D
Monaural
0_( to 40_C (32°F to 104_F)
_5% to 80%
20_C to 50'( ( 4°F to 122-_F)
188 (W) x 118 (H) x 88 (D) mm (7-7/16" x 4-11/16" x 3-1/2")
(with the L(D mrlnitor closed and the viewfinder pushed down)
Approx. 690 g (1.6 Ibs)
Approx. 680 g (1.5 Ibs)
S-Video
JLiP
PC (GR-DVF21 only)
Video output
Audio output
DV input/output
Y: 1 Vl>p, 75 _,_,analog output
C: 0.29 Vl>p, 75 £), analog outpLIt
o3.5 ram, 4q_ole, mini-head jack (compatible with RC-5 _25 plug)
o2.5 ram, 3q_ole
1 Vpq}, 75 _,_unbalanced, analog OUtpUt
8 dBs, 1 I<¢__m_d()gOlltl]llt , stere()
4q)in, IEEE1394 compliant
Power requirement
U.S.A. and Canada
Other countries
Power consumption
Output
Charge
VTR
Dimensions
Weight
: AC 120 V'_, 60 Hz
AC 110 V to 240 V'_, 50/60 Hz
23 W
DC 7.2 V---=:, (3.77 A
DC 6.3 V--'==, 1.8 A
68 (W) x 38 (H) x 110 (D) i11m(2-11/16" x 1-1/2" x 4Z_/8")
Approx. 255 g (0.57 Ibs)
SpecificMions shown are for SP mode unless otherwise indicated, E & O.E, Design and specificMions subject to change
without notice.

"M'rl
JVC
VICTOR COMPANY OF JAPAN, UMITED
[_q _ Printed in Japan
COPYRIGHT@ 1999 VICTOR COMPANY OF JAPAN, LTD. L_J_0699MKV_UNSYP
