JVC LT 32DP8BN 42/37/32P80BU, 42/37/32DP8BG/N/T User Manual 32DP8BN, 37DP8BN, 42DP8BN LCT2284 002A U EN
LT-32P80BU LT-32P80BU, LT-42P80BU LCT2284-002A-U_EN English,
LT-37DP8BG LT-37DP8BG, LT-37DP8BN, LT-37DP8BT LCT2284-002A-U_EN English,
LT-37P80BU LT-37P80BU LCT2284-002A-U_EN English,
LT-32DP8BG LT-32DP8BG, LT-37DP8BG, LT-42DP8BG LCT2284-002A-U_EN English,
User Manual: JVC LT-32DP8BN LT-32DP8BN, LT-37DP8BN, LT-42DP8BN English,
Open the PDF directly: View PDF ![]() .
.
Page Count: 59
LCT2284-002A-U
ENGLISH
DEUTSCH
FRANÇAIS
CASTELLANO
ITALIANO
SUOMI
DANSK
SVENSKA
LT-42P80BU
LT-37P80BU
LT-32P80BU
LT-42DP8BG/N/T
LT-37DP8BG/N/T
LT-32DP8BG/N/T
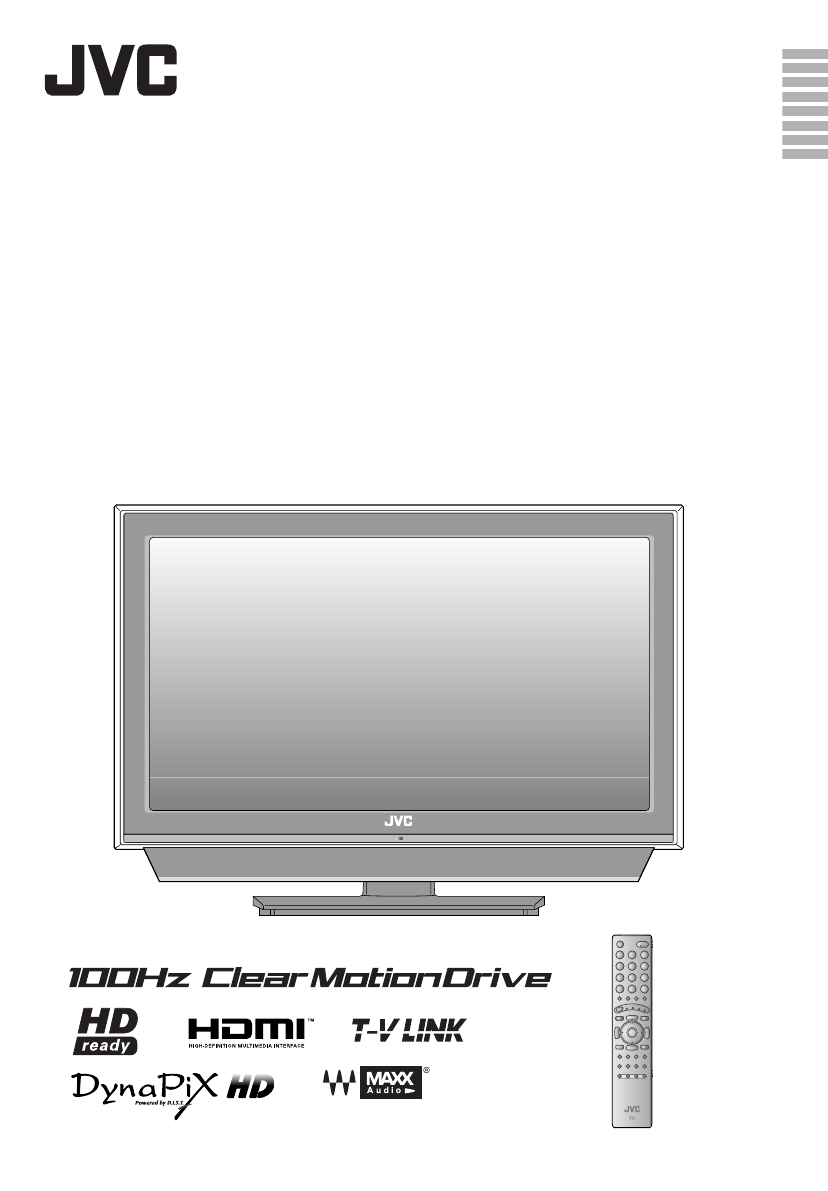
WIDE LCD PANEL TV
16:9 LCD TV
TELEVISEUR A ECRAN LCD PANORAMIQUE
TELEVISOR CON PANEL LCD PANORÁMICO
TV LCD WIDESCREEN
NESTEKIDENÄYTÖLLÄ VARUSTETTU
LAAJAKUVATELEVISIO
WIDE-SCREEN LCD-TV
BREDBILDS LCD-TV
INSTRUCTIONS
BEDIENUNGSANLEITUNG
MANUEL D’INSTRUCTIONS
MANUAL DE INSTRUCCIONES
ISTRUZIONI
KÄYTTÖOHJE
INSTRUKTIONSBOG
BRUKSANVISNING
LT-32DP8BT_EN_Analog.book Page 0 Tuesday, August 28, 2007 2:34 PM
LT-32DP8BT_EN_Analog.book Page 0 Tuesday, August 28, 2007 2:34 PM

i
Dear Customer,
This apparatus is in conformance with the valid European directives and standards regarding electromagnetic
compatibility and electrical safety.
European representative of Victor Company of Japan, Limited is:
JVC Technology Centre Europe GmbH
Postfach 10 05 52
61145 Friedberg
Germany
Sehr geehrter Kunde, sehr geehrte Kundin,
dieses Gerät stimmt mit den gültigen europäischen Richtlinien und Normen bezüglich elektromagnetischer
Verträglichkeit und elektrischer Sicherheit überein.
Die europäische Vertretung für die Victor Company of Japan, Limited ist:
JVC Technology Centre Europe GmbH
Postfach 10 05 52
61145 Friedberg
Deutschland
Cher(e) client(e),
Cet appareil est conforme aux directives et normes européennes en vigueur concernant la compatibilité
électromagnétique et à la sécurité électrique.
Représentant européen de la société Victor Company of Japan, Limited :
JVC Technology Centre Europe GmbH
Postfach 10 05 52
61145 Friedberg
Allemagne
Apreciado cliente,
Este aparato cumple con las normativas y normas europeas respecto a la seguridad eléctrica y a la compatibilidad
electromagnética.
El representante europeo de Victor Company of Japan, Limited es:
JVC Technology Centre Europe GmbH
Postfach 10 05 52
61145 Friedberg
Alemania
ENGLISH
DEUTSCH
FRANÇAIS
CASTELLANO
LT-32DP8BT_EN_Analog.book Page i Tuesday, August 28, 2007 2:34 PM

ii
Gentile Cliente,
Questa apparecchiatura è conforme alle direttive e alle norme europee relative alla compatibilità elettromagnetica e
alla sicurezza elettrica.
Il rappresentante europeo della Victor Company of Japan, Limited è:
JVC Technology Centre Europe GmbH
Postfach 10 05 52
61145 Friedberg
Germania
Hyvä asiakas,
Tämä laite on yhdenmukainen niiden voimassa olevien eurooppalaisten direktiivien ja standardien kanssa, jotka
koskevat sähkömagneettista yhteensopivuutta ja sähköturvallisuutta.
Victor Company of Japan, Limited:in Euroopan edustaja on:
JVC Technology Centre Europe GmbH
Postfach 10 05 52
61145 Friedberg
Saksa
Kære kunde
Dette apparat er i overensstemmelse med gældende europæiske direktiver og standarder vedrørende
elektromagnetisk kompatibilitet og elektrisk sikkerhed.
Europæisk repræsentant for Victor Company of Japan, Limited er:
JVC Technology Centre Europe GmbH
Postfach 10 05 52
61145 Friedberg
Tyskland
Bästa kund!
Denna apparat överensstämmer med gällande EU-direktiv och standarder beträffande elektromagnetisk
kompatibilitet och elsäkerhet.
Europarepresentant för Victor Company of Japan, Limited är:
JVC Technology Centre Europe GmbH
Postfach 10 05 52
61145 Friedberg
Tyskland
ITALIANO
SUOMI
DANSK
SVENSKA
LT-32DP8BT_EN_Analog.book Page ii Tuesday, August 28, 2007 2:34 PM
iii
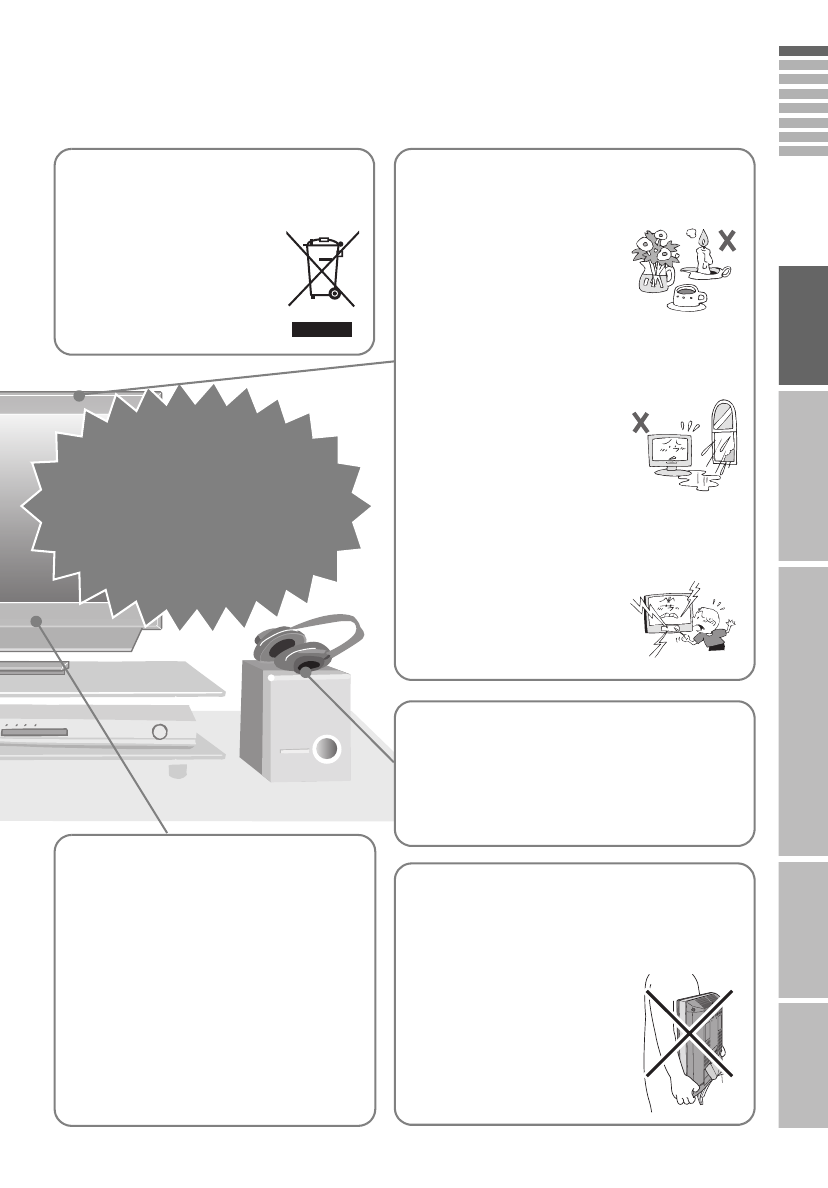
Information for Users on Disposal of Old Equipment ENGLISH
Attention:
This symbol is only
valid in the European
Union.
[European Union]
This symbol indicates that the electrical and electronic equipment should not be disposed as
general household waste at its end-of-life. Instead, the product should be handed over to the
applicable collection point for the recycling of electrical and electronic equipment for proper
treatment, recovery and recycling in accordance with your national legislation.
By disposing of this product correctly, you will help to conserve natural resources and will
help prevent potential negative effects on the environment and human health which could
otherwise be caused by inappropriate waste handling of this product. For more information
about collection point and recycling of this product, please contact your local municipal
office, your household waste disposal service or the shop where you purchased the product.
Penalties may be applicable for incorrect disposal of this waste, in accordance with national
legislation.
(Business users)
If you wish to dispose of this product, please visit our web page www.jvc-europe.com to
obtain information about the take-back of the product.
[Other Countries outside the European Union]
If you wish to dispose of this product, please do so in accordance with applicable national
legislation or other rules in your country for the treatment of old electrical and electronic
equipment.
Benutzerinformationen zur Entsorgung alter Geräte DEUTSCH
Hinweis:
Dieses Symbol ist
nur in der
Europäischen Union
gültig.
[Europäische Union]
Dieses Symbol zeigt an, dass das elektrische bzw. elektronische Gerät nicht als normaler
Haushaltsabfall entsorgt werden soll. Stattdessen sollte das Produkt zur fachgerechten
Entsorgung, Weiterverwendung und Wiederverwertung in Übereinstimmung mit der
Landesgesetzgebung einer entsprechenden Sammelstelle für das Recycling elektrischer
und elektronischer Geräte zugeführt werden.
Die korrekte Entsorgung dieses Produkts dient dem Umweltschutz und verhindert mögliche
Schäden für die Umwelt und die menschliche Gesundheit, welche durch unsachgemäße
Behandlung des Produkts auftreten können. Weitere Informationen zu Sammelstellen und
dem Recycling dieses Produkts erhalten Sie bei Ihrer Gemeindeverwaltung, Ihrem örtlichen
Entsorgungsunternehmen oder in dem Geschäft, in dem Sie das Produkt gekauft haben.
Für die nicht fachgerechte Entsorgung dieses Abfalls können gemäß der
Landesgesetzgebung Strafen ausgesprochen werden.
(Geschäftskunden)
Wenn Sie dieses Produkt entsorgen möchten, besuchen Sie bitte unsere Webseite
www.jvc-europe.com, um Informationen zur Rücknahme des Produkts zu erhalten.
[Andere Länder außerhalb der Europäischen Union]
Wenn Sie dieses Produkt entsorgen möchten, halten Sie sich dabei bitte an die
entsprechenden Landesgesetze und andere Regelungen in Ihrem Land zur Behandlung
elektrischer und elektronischer Geräte.
LT-32DP8BT_EN_Analog.book Page iii Tuesday, August 28, 2007 2:34 PM

iv
Informations relatives à l’élimination des appareils usagés,
à l’intention des utilisateurs FRANÇAIS
Attention:
Ce symbole n’est
reconnu que dans
l’Union européenne.
[Union européenne]
Lorsque ce symbole figure sur un appareil électrique et électronique, cela signifie qu’il ne
doit pas être éliminé en tant que déchet ménager à la fin de son cycle de vie. Le produit doit
être porté au point de pré-collecte approprié au recyclage des appareils électriques et
électroniques pour y subir un traitement, une récupération et un recyclage, conformément à
la législation nationale.
En éliminant correctement ce produit, vous contriburez à la conservation des ressources
naturelles et à la prévention des éventuels effets négatifs sur l’environnement et la santé
humaine, pouvant être dus à la manipulation inappropriée des déchets de ce produit. Pour
plus d’informations sur le point de pré-collecte et le recyclage de ce produit, contactez votre
mairie, le service d’évacuation des ordures ménagères ou le magasin dans lequel vous avez
acheté le produit.
Des amendes peuvent être infligées en cas d’élimination incorrecte de ce produit,
conformément à la législation nationale.
(Utilisateurs professionnels)
Si vous souhaitez éliminer ce produit, visitez notre page Web www.jvc-europe.com afin
d’obtenir des informations sur sa récupération.
[Pays ne faisant pas partie de l’Union européenne]
Si vous souhaitez éliminer ce produit, faites-le conformément à la législation nationale ou
autres règles en vigueur dans votre pays pour le traitement des appareils électriques et
électroniques usagés.
Información para los usuarios sobre la eliminación de equipos
usados CASTELLANO
Atención:
Este símbolo sólo es
válido en la Unión
Europea.
[Unión Europea]
Este símbolo indica que los aparatos eléctricos y electrónicos no deben desecharse junto
con la basura doméstica al final de su vida útil. El producto deberá llevarse al punto de
recogida correspondiente para el reciclaje y el tratamiento adecuado de equipos eléctricos y
electrónicos de conformidad con la legislación nacional.
Si desecha el producto correctamente, estará contribuyendo a conservar los recursos
naturales y a prevenir los posibles efectos negativos en el medio ambiente y en la salud de
las personas que podría causar el tratamiento inadecuado del producto desechado.
Para obtener más información sobre el punto de recogida y el reciclaje de este producto,
póngase en contacto con su oficina municipal, su servicio de recogida de basura doméstica
o la tienda en la que haya adquirido el producto.
De acuerdo con la legislación nacional, podrían aplicarse multas por la eliminación
incorrecta de estos desechos.
(Empresas)
Si desea desechar este producto, visite nuestra página Web www.jvc-europe.com para
obtener información acerca de la retirada del producto.
[Otros países no pertenecientes a la Unión Europea]
Si desea desechar este producto, hágalo de conformidad con la legislación nacional vigente
u otras normativas de su país para el tratamiento de equipos eléctricos y electrónicos
usados.
LT-32DP8BT_EN_Analog.book Page iv Tuesday, August 28, 2007 2:34 PM
v
Informazioni per gli utenti sullo smaltimento delle
apparecchiature obsolete ITALIANO
Attenzione:
Questo simbolo è
valido solo
nell’Unione Europea.
[Unione Europea]
Questo simbolo indica che l’apparecchiatura elettrica ed elettronica a cui è relativo non deve
essere smaltita tra i rifiuti domestici generici alla fine della sua vita utile. Il prodotto, invece,
va consegnato a un punto di raccolta appropriato per il riciclaggio di apparecchiature
elettriche ed elettroniche, per il trattamento, il recupero e il riciclaggio corretti, in conformità
alle proprie normative nazionali.
Mediante lo smaltimento corretto di questo prodotto, si contribuirà a preservare le risorse
naturali e a prevenire potenziali effetti negativi sull’ambiente e sulla salute umana che
potrebbero essere provocati, altrimenti, da uno smaltimento inappropriato del prodotto.
Per ulteriori informazioni sul punto di raccolta e il riciclaggio di questo prodotto, contattare la
sede comunale locale, il servizio di smaltimento rifiuti domestici o il negozio in cui si è
acquistato il prodotto.
L’utente è responsabile del conferimento dell’apparecchio a fina vita alle appropriate
strutture di raccolta, pena le sanzioni previste dalla vigente legislazione sui rifiuti.
(Per gli utenti aziendali)
Qualora si desideri smaltire questo prodotto, visitare la nostra pagina web
www.jvc-europe.com per ottenere informazioni sul ritiro del prodotto.
[Per altre nazioni al di fuori dell’Unione Europea]
Qualora si desideri smaltire questo prodotto, effettuare lo smaltimento in conformità alla
normativa nazionale applicabile o alle altre leggi della propria nazione relative al trattamento
delle apparecchiature elettriche ed elettroniche obsolete.
Tietoja käyttäjille vanhojen laitteiden hävittämisestä SUOMI
Huomio:
Tämä symboli on
voimassa vain
Euroopan unionissa.
[Euroopan unioni]
Tämä symboli tarkoittaa, että sähkö- ja elektroniikkalaitteita ei tule laittaa talousjätteisiin, kun
ne poistetaan käytöstä. Sen sijaan tuotteet tulee toimittaa asianmukaiseen sähkö- ja
elektroniikkalaitteiden kierrätyspisteeseen, jossa ne käsitellään uusiokäyttöä ja kierrätystä
varten paikallisen lainsäädännön mukaan.
Kun hävität tuotteen asianmukaisella tavalla, autat säästämään luonnonvaroja ja estämään
mahdollisia ympäristö- ja terveyshaittoja, joita voisi aiheutua tämän tuotteen vääränlaisesta
hävittämisestä. Lisätietoja keräyspisteistä ja tämän tuotteen kierrätyksestä saat
paikkakuntasi viranomaisilta, kotitalousjätteiden keräyksestä huolehtivasta yrityksestä tai
liikkeestä, josta ostit tuotteen.
Tuotteen vääränlaisesta hävittämisestä voi seurata paikallisen lainsäädännön mukaisia
rangaistuksia.
(Yrityskäyttäjät)
Jos haluat hävittää tämän tuotteen, web-sivustoltamme osoitteessa www.jvc-europe.com
löydät tietoja käytetyn tuotteen palautuksesta.
[Muut maat Euroopan unionin ulkopuolella]
Jos haluat hävittää tämän tuotteen, tee se kansallisen lainsäädännön tai muiden maassasi
voimassa olevien määräysten mukaan, jotka koskevat vanhojen sähkö- ja
elektroniikkalaitteiden käsittelyä.
LT-32DP8BT_EN_Analog.book Page v Tuesday, August 28, 2007 2:34 PM
vi
Brugerinformation om bortskaffelse af gammelt udstyr DANSK
Bemærk:
Dette symbol er kun
gyldigt i EU.
[EU]
Elektriske produkter og elektroniske apparater med dette symbol må ikke afhændes på
samme måde som almindeligt husholdningsaffald, når det skal smides ud. I stedet skal
produktet indleveres på det relevante indsamlingssted for elektriske apparater og elektronisk
udstyr, hvor det vil blive håndteret korrekt og efterfølgende genanvendt og recirkuleret i
henhold til de love, der gælder i dit land.
Ved at bortskaffe dette produkt korrekt, medvirker du til at bevare naturens ressourcer samt
forhindre eventuelle negative påvirkninger af miljøet og folkesundheden, der ellers kunne
forårsages ved forkert affaldshåndtering af dette produkt. Mere information om
indsamlingssteder og genanvendelse af dette produkt kan du få ved at kontakte din lokale
kommune, dit renovationsselskab eller den forretning, hvor du har købt produktet.
Ukorrekt bortskaffelse af dette affald kan være strafbar ifølge lovgivningen i nogle lande.
(Professionelle brugere)
Hvis du ønsker at bortskaffe dette produkt, kan du på vores webside www.jvc-europe.com få
information om tilbagetagning af produktet.
[Lande uden for EU]
Hvis du ønsker at bortskaffe dette produkt, bedes du gøre det i overensstemmelse med
gældende lovgivning eller andre regler i dit land for behandling af gammelt elektrisk og
elektronisk udstyr.
Information till användare gällande kassering av gammal
utrustning SVENSKA
Tänk på:
Att denna symbol
endast gäller inom
den Europeiska
gemenskapen.
[Europeiska gemenskapen]
Denna symbol anger att elektrisk och elektronisk utrustning inte ska kasseras som vanligt
hushållsavfall, när de inte ska användas mer. Istället ska produkten lämnas in på lämplig
återvinningsstation för elektrisk eller elektronisk utrustning, så att den kan tas om hand och
återvinnas i enlighet med ert lands lagstiftning.
Genom att avyttra denna profukt på rätt sätt, bidrar du till att bevara naturen och förhindrar
potentiellt negativa effekter på miljön och den mänskiliga hälsan, som annars kan bli
resultatet vid felaktig hantering av denna produkt. Kontakta ditt kommunkontor, det företag
som hanterar dina hushållssopor eller butiken där du köpt produkten, för mer information om
återvinningscentraler.
Det kan hända att du bötfälls i enlighet med ert lands lagstiftning om detta avfall kasseras på
fel sätt.
(Företagsanvändare)
Om ni vill kassera denna produkt, besök vår webbsida www.jvc-europe.com för att få
information om returnering av produkten.
[Övriga länder utanför den Europeiska gemenskapen]
Om du vill kassera denna produkt, ska detta göras i enlighet med gällande lagstiftning i
landet, eller enligt andra bestämmelser i ditt land, för behandling av gammal elektrisk eller
elektronisk utrustning.
LT-32DP8BT_EN_Analog.book Page vi Tuesday, August 28, 2007 2:34 PM
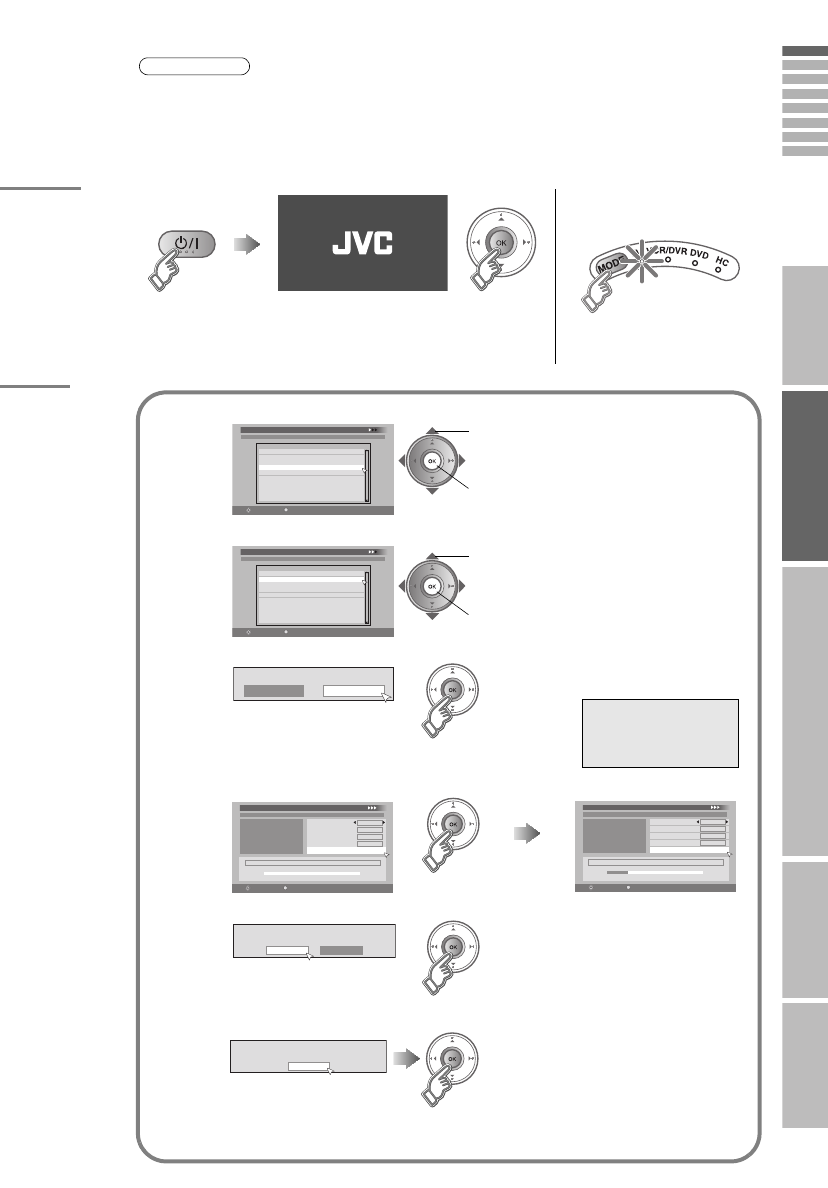
PREPARE USE SETTING TROUBLE?IMPORTANT
ENGLISH
1
INSTRUCTIONS
Specifications of your TV
Certain specifications differ depending on the version of the TV. Please check the
specification of your TV from the following table. The last character in the model name
indicates the version. For example, DP8BG means version “G”.
*1: Country selections available in step B - 2 of “Initial settings” (P. 15).
*2: Language selections available in step B - 1 of “Initial settings” (P. 15).
P80 Series
LT-42P80BU
LT-37P80BU
LT-32P80BU
zP80 series do not support digital channels (Digital
terrestrial broadcasting (DVB-T)). To watch digital
channels, a Digital terrestrial broadcasting (DVB-T)
compatible tuner is required.
DP8 Series
LT-42DP8BG/N/T
LT-37DP8BG/N/T
LT-32DP8BG/N/T
For DP8 series, a separate manual “WATCHING DIGITAL CHANNELS” is
provided.
Please refer to it when watching digital channels.
Before reading the separate manual
Read this manual’s “IMPORTANT” section (P. 4 - 5), and understand how
to use the TV safely. After that follow the instructions in the “PREPARE”
section (P. 6 - 11, P. 14 - 19) to connect the aerial and other external
devices to the TV, and configure the settings for the TV.
Version Countries that can receive digital
terrestrial broadcasting (*1)
Languages that can be used for the on-screen
displays (including DTV menus) (*2)
G France, Germany, Spain Castellano, Catalan, English, French, German
N Denmark, Finland, Sweden Danish, English, Finnish, Swedish
T Austria, Italy, Switzerland English, French, German, Italian
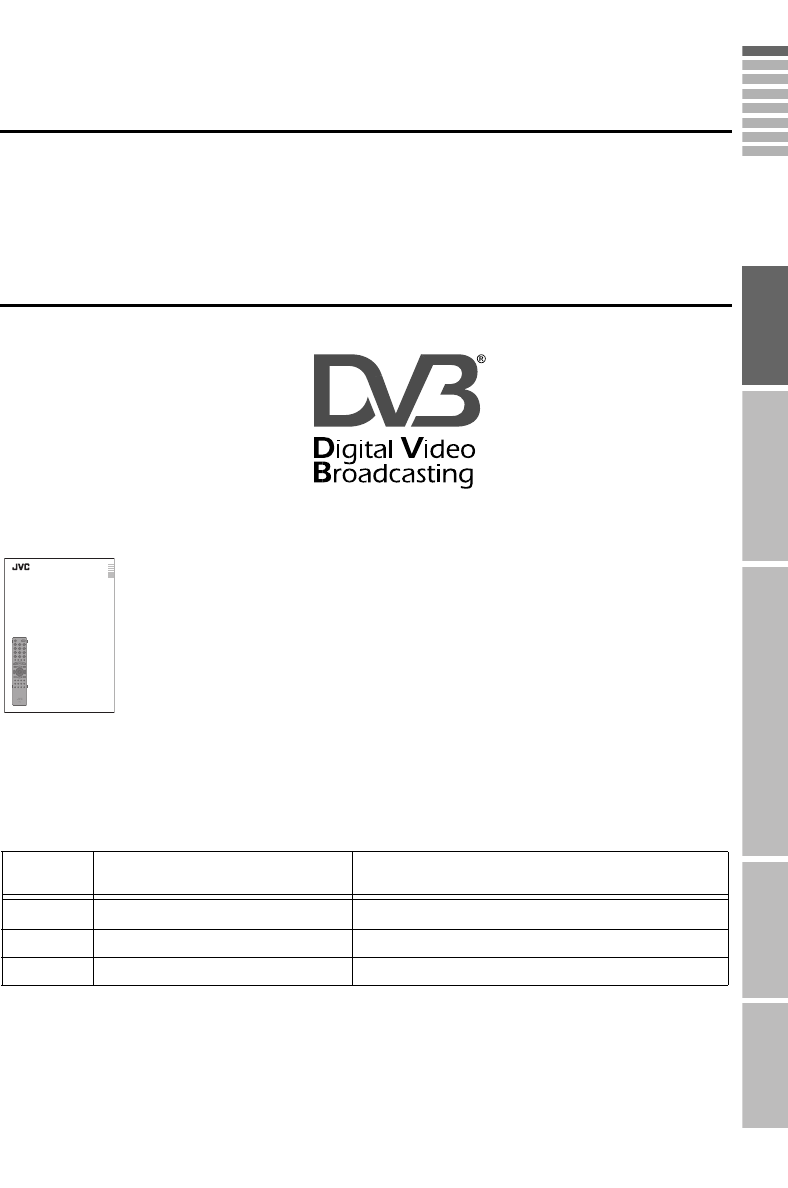
Trade Mark of the DVB Digital Video Broadcasting
Project (1991 to 1996) Number : 4820, 4821, 4822
LCT2287-001A-U
WATCHING DIGITAL CHANNELS
DIGITALE SENDER BETRACHTEN
REGARDER DES CANAUX NUMÉRIQUES
VISUALIZACIÓN DE CANALES DIGITALES
VISIONE DEI CANALI DIGITALI
DIGITAALISTEN KANAVIEN KATSELU
VISNING AF DIGITALE KANALER
TITTA PÅ DIGITALA KANALER
ENGLISH
DEUTSCH
FRANÇAIS
CASTELLANO
ITALIANO
SUOMI
DANSK
SVENSKA
LT-32DP8BT_EN_Analog.book Page 1 Tuesday, August 28, 2007 2:34 PM
2
Edit
Message Board ABC
Off
Close
To m y l ove l y wi f e
Happy B i r t hday !
Wi th a l l my l ove today and
always :-)
Edit
Message Board ABC
Off
Close
To m y l ove ly wi f e
Happ y B i r t h da y !
Wi t h a l l my l ove t oda y and
always :-)
As a small surprise on special
LT-32DP8BT_EN_Analog.book Page 2 Tuesday, August 28, 2007 2:34 PM
3
PREPARE USE SETTING TROUBLE?IMPORTANT
ENGLISH
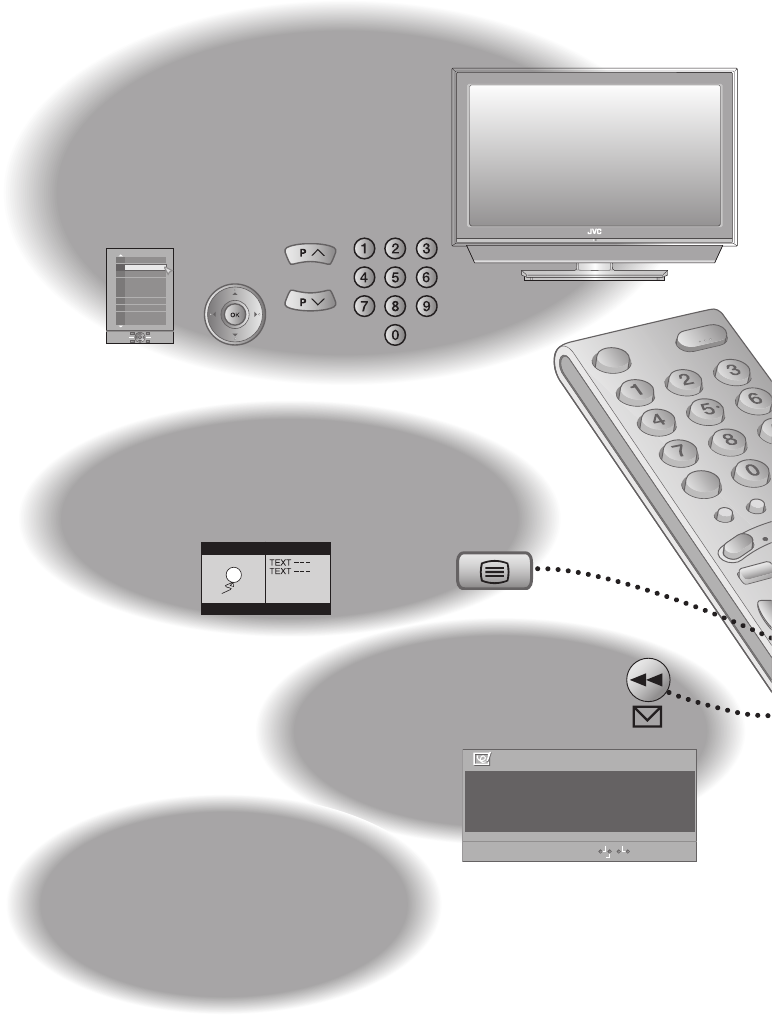
Contents
First things first!
z
Warning .......................................................4
Getting started
z
Names of all the parts ..................................6
z
Basic connections ........................................8
z
Connecting external devices .....................10
z
Initial settings .............................................12
z
Editing analogue channels .........................18
Let’s try it out
z
Enjoy your new TV! ....................................20
z
Watching analogue channels .....................22
z
Viewing teletext ..........................................24
z
Watching videos / DVDs ............................26
z
Message board ..........................................28
Try the advanced features
z
Useful functions .........................................30
z
Operate JVC recorders and other devices ... 32
Just the way you like it
z
Customising your TV ..................................34
When you have trouble
z
Troubleshooting .........................................42
z
Technical Information .................................45
z
“CH/CC” List ...............................................48
z
Specifications .............................................49
Analogue terrestrial broadcasting
(VHF / UHF) and analogue cable TV
g Analogue channels
Digital terrestrial broadcasting (DVB-T)
g Digital channels (DP8 series only)
DP8 series only
WATCHING DIGITAL
CHANNELS (Separate manual)
z
Watching digital channels .......................... 2
z
Using EPG................................................. 6
z
Customising your TV ................................. 8
z
Troubleshooting ....................................... 20
z
Technical Information............................... 22
occasions!
28
PAGE
Message board
LT-32DP8BT_EN_Analog.book Page 3 Tuesday, August 28, 2007 2:34 PM
4
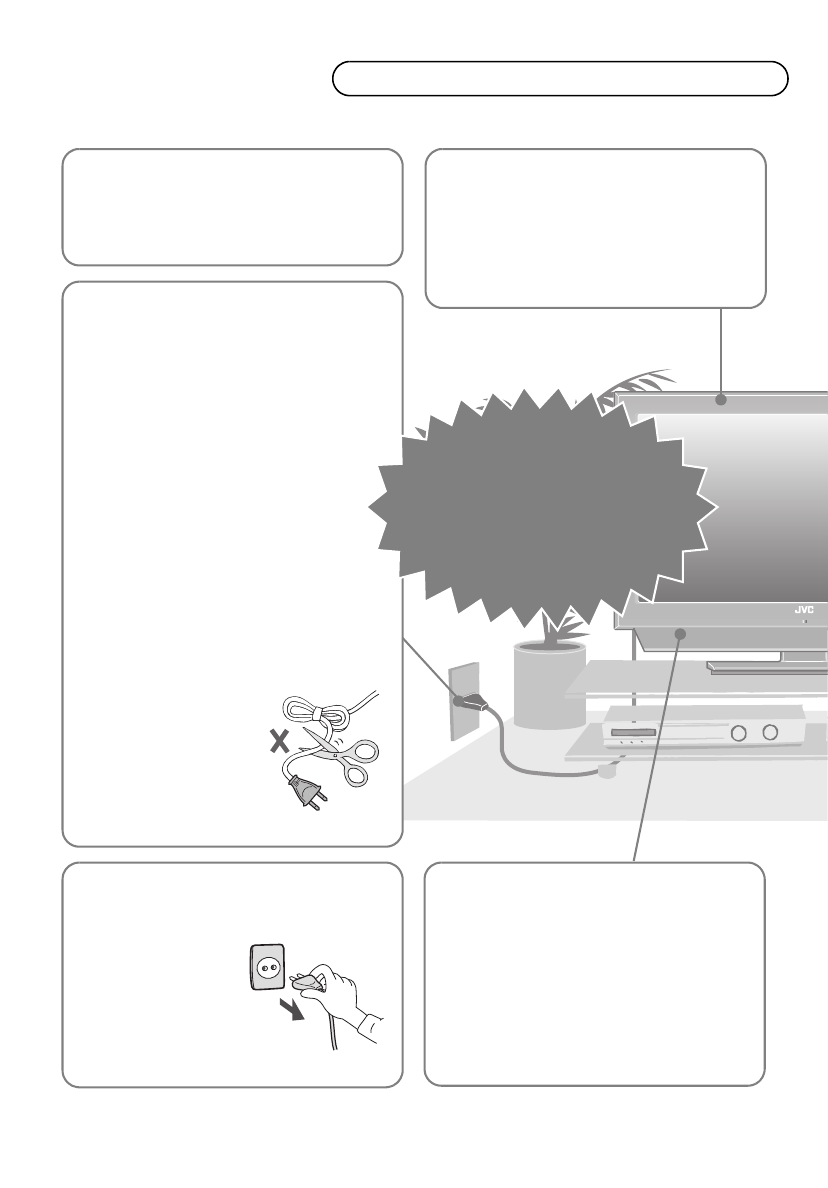
Warning Please follow all the guidelines below
Follow this manual
regarding setup!
zConnect only to a 220 - 240 V, 50 Hz AC
outlet.
Do not allow the TV to
fall!
zDo not rest your elbows on, or allow children to
hang from the TV.
There is a risk that the TV will fall and cause
injuries.
When attaching the TV
to the wall, use the
optional JVC wall
mounting unit!
zConsult a qualified technician.
zSee the included manual on mounting
procedures.
zJVC assumes no responsibility for damage due
to improper mounting.
Unplug the power cord
when going out!
zThe power buttons on
the remote control and
the TV unit cannot
completely turn off the
TV. (Make appropriate
arrangements for
bedridden people.)
Never try to repair
the TV yourself!
gIf the problem cannot be solved
in “Troubleshooting” (P. 42),
unplug the power cord and
contact your retailer.
Make enough room for
inserting and
removing the power
plug!
Place the TV as close
to the outlet as
possible!
zEven if the TV’s power lamp is unlit, the
main power supply is not cut off unless the
power cord is unplugged. The main power
supply for this TV is controlled by inserting or
removing the power plug.
Never cut or damage
the power cord!
zIf the power plug is not
the right shape, or the
power cord is not long
enough, use an
appropriate plug
adapter or extension
cable. (Consult your
retailer.)
For more details on installation, usage and safety g Consult your retailer
LT-32DP8BT_EN_Analog.book Page 4 Tuesday, August 28, 2007 2:34 PM
PREPARE USE SETTING TROUBLE?IMPORTANT
ENGLISH
5
On disposal of the
TV!
zFollow the instruction in
“Information for Users on
Disposal of Old Equipment”
(P. iii to P. vi).
Never place anything on
the TV!
Never expose to rain or
moisture!
Never insert objects into
the cabinet openings!
zIt may cause a fatal electric
shock. Take care when
children are near.
zPlacing liquids, naked flames,
cloths, paper, etc. on the TV
may cause a fire.
zTo prevent fire or electric
shock, never allow liquids to
enter the unit.
Never listen to
headphones at high
volume!
zIt may damage your hearing.
Hold the TV so as not to
scratch the screen!
zDo not touch the screen when carrying the TV.
Do not carry the
TV on your own!
zIn order to prevent accidents,
ensure that the TV is carried by
two or more people.
Never dismantle the
rear panel!
zIt may cause an electric shock.
Never obstruct the
ventilation holes!
zIt may cause overheating or a fire.
Handle LCD panel
with care!
zUse a soft, dry cloth when cleaning.
If the TV is damaged
or behaving
strangely, stop using
it at once!
gUnplug the power cord and
contact your retailer.
LT-32DP8BT_EN_Analog.book Page 5 Tuesday, August 28, 2007 2:34 PM
6
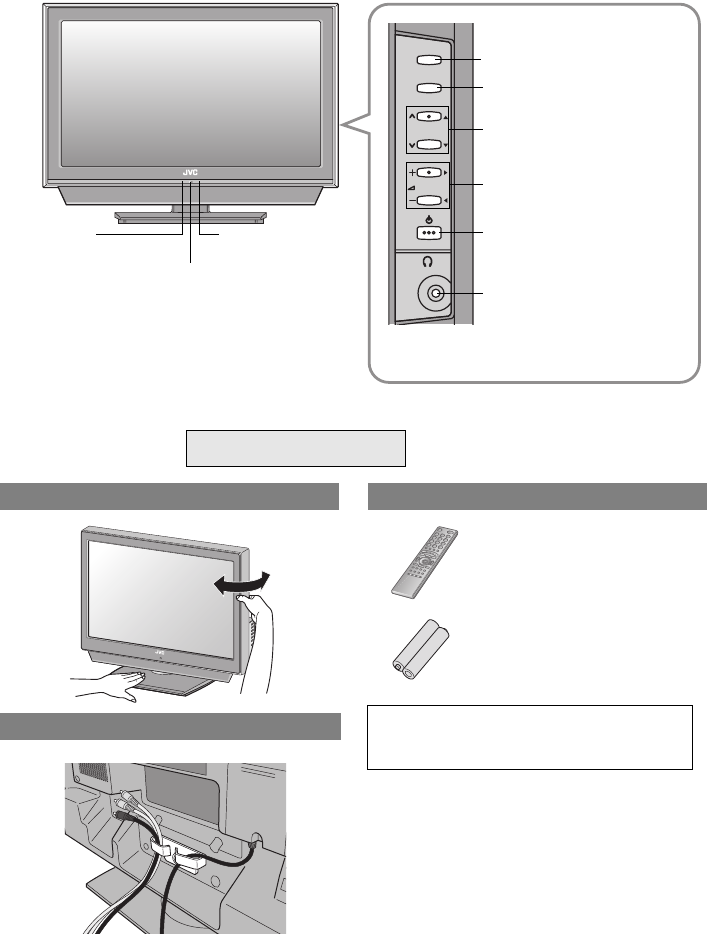
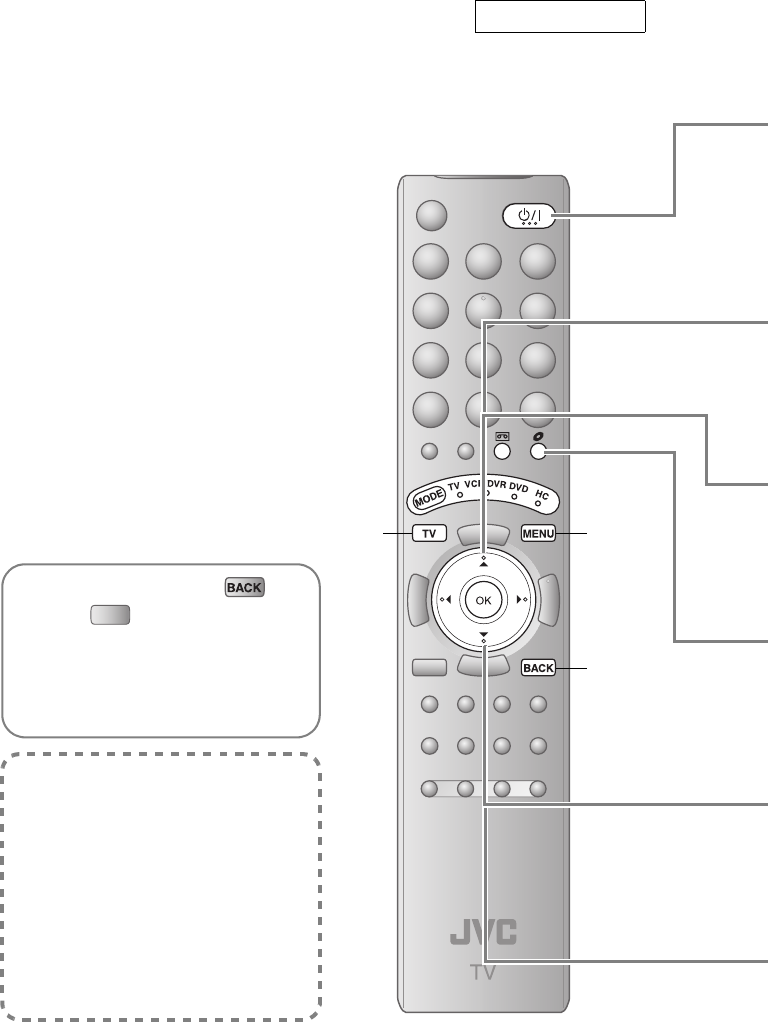
Names of all the parts
TV/AV
MENU/OK
P
Remote control
sensor
Power lamp
ON: Lit
OFF: Unlit
zWhen “Power Lamp” is set
to “Off”, the Power lamp will
not light up.
g“Power Lamp” (P. 39)
zThe power lamp will light in
green or orange during
recording. (DP8 series only)
WATCHING DIGITAL CHANNELS
“Timer” (P. 11)
Switch between TV and AV
devices (P. 27)
Display on-screen menu /
set
Change channel / page
Volume
Power On / Off
To headphones (P. 10)
Eco Sensor
g“What is “Eco
Mode”?” (P. 46)
zSwitch between digital / analogue
channels (DP8 series only) g(P. 27)
Change the direction of TV Check accessories
WARNING:
Batteries shall not be exposed to excessive
heat such as direct sunshine, fire or the like.
Remote control
P80 series: RM-C1910
DP8 series: RM-C1911
“AAA/R03” Batteries
(For confirming the TV works)
Tidying the cables
zLT-32P80BU and LT-32DP8BG/N/T are not
equipped with cable clamp.
LT-32DP8BT_EN_Analog.book Page 6 Tuesday, August 28, 2007 2:34 PM

7
IMPORTANT PREPARE USE SETTING TROUBLE?
ENGLISH
TV/DTV
When watching TV / Video
Power On / Off
Switch between “TV / VCR /
DVR / DVD / HC” (P. 32)
Change channel / page
To input characters (P. 28)
Watch video, etc. (P. 26)
Select and confirm settings in
menus
To the previous channel
Change channel / page
Mute
Channel information
(P. 22)
Return to TV
View teletext (P. 24)
Volume
Colour buttons Display on-screen menu
(P. 34)
Change the aspect ratio (P. 30)
Change the “MaxxAudio”
setting (P. 30)
Take a snapshot of the
screen (P. 31)
View in multi-picture mode (P. 31) Display the message board
When viewing analogue channels
When viewing teletext (P. 24)
Choose a favourite channel (P. 22)
Message Board (P. 28)
Operate JVC recorders and other
devices (P. 32)
(RM-C1911)
DP8 series only
(RM-C1910)
For more information, please read the separate
manual (WATCHING DIGITAL CHANNELS).
“Watching digital channels” (P. 2)
When watching digital channels
Switch between digital /
analogue channels
TV/DTV
Insert the batteries
Use two “AAA/R03” dry cell
batteries. Insert the batteries from
the - end, making sure the + and
- polarities are correct.
LT-32DP8BT_EN_Analog.book Page 7 Tuesday, August 28, 2007 2:34 PM
8
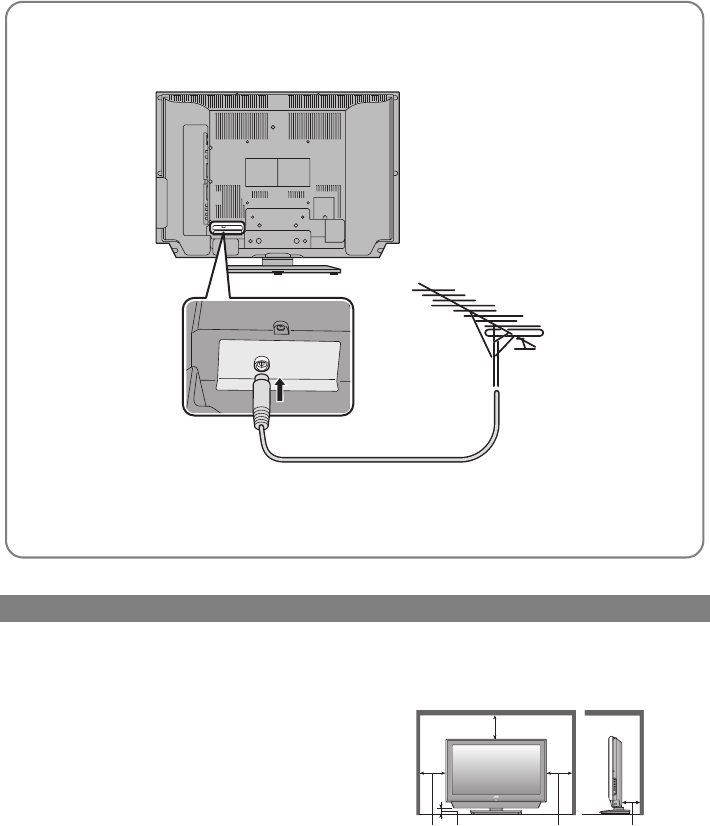
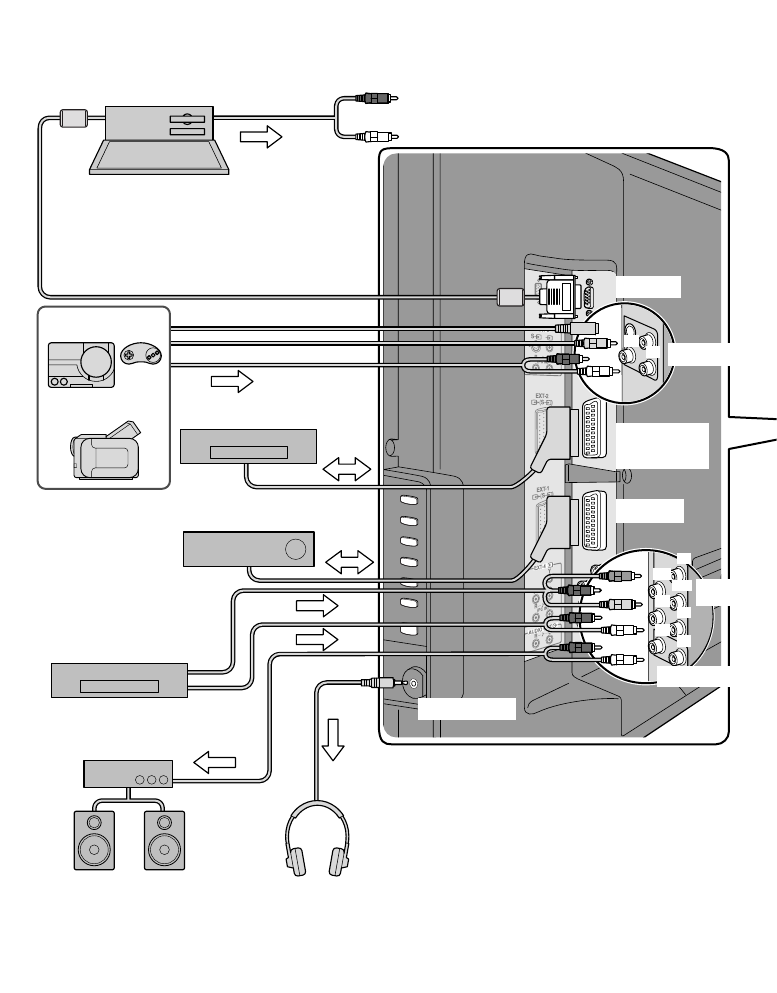
Basic connections
Please read the user manuals of each device carefully before setup.
It is necessary to connect an aerial to watch TV.
Connect with other devices g “Connecting external devices” (P. 10)
Care when setting
Power requirements
zConnect the power cord only to a 220 - 240 V, 50 Hz
AC outlet.
When attaching the TV to the wall, use the
optional JVC wall mounting unit
zConsult a qualified technician.
zSee the included manual on mounting procedures.
zJVC assumes no responsibility for damage due to
improper mounting.
z200 mm x 200 mm mount which conforms to VESA
standards.
Installation requirements
zTo avoid overheating, ensure the unit has ample
room.
AERIAL
zAfter all the connections have been made, insert the plug into an AC outlet.
Connect the aerial
200 mm
150 mm 50 mm 150 mm 50 mm
LT-32DP8BT_EN_Analog.book Page 8 Tuesday, August 28, 2007 2:34 PM
9
IMPORTANT PREPARE USE SETTING TROUBLE?
ENGLISH
Watch pay-TV digital channels (DP8 series only)
Subscribe to a broadcasting company beforehand. A Smart Card
(B) will be sent by the broadcasting company after subscribing to it.
It may be necessary for you to purchase a Conditional Access
Module (A) in addition to the Smart Card.
Consult your broadcasting company or retailer.
AUnplug the power cord
BInsert “B” into “A”.
CInsert “A”.
DPlug the power cord, and turn the power on.
EPerform necessary settings using “Common Interface”.
g
zPay-TV analogue channels cannot be watched.
AERIAL
Connect a VCR / DVD recorder
zAfter all the connections have been made, insert the plug into an AC outlet.
zConnect “T-V LINK” compatible recording device to EXT-2.
z“T-V LINK” g “What is “T-V LINK”?” (P. 12 / P. 14)
VCR / DVD recorder
EXT-2
EXT-1
WATCHING DIGITAL CHANNELS
“Common Interface” (P. 17)
A
B
Watch
LT-32DP8BT_EN_Analog.book Page 9 Tuesday, August 28, 2007 2:34 PM
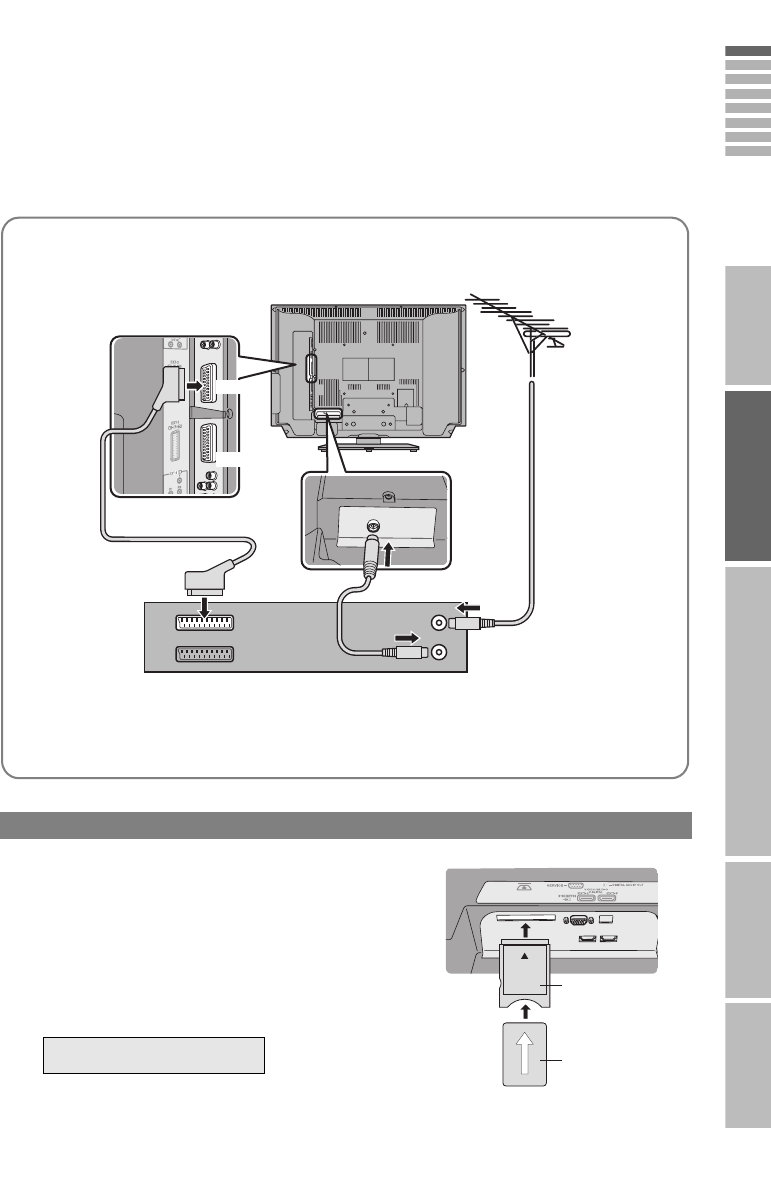
10
You can connect many different devices to the rear panel of the TV.
Please read the user manuals of each device before setting up.
(Connecting cables are not supplied with this TV.)
Connecting external
EXT-4
EXT-1
EXT-2
(T-V LINK)
EXT-3
PC IN
Headphone
Headphones
zAudio signals received from
EXT-5 and EXT-6 cannot be
sent to the AUDIO OUT
terminal.
DVD player
Satellite broadcast / Digital
broadcast tuner
VCR / DVD recorder
(“T-V LINK” compatible)
Video camera
Game consoles
To “EXT-3”
R / L (PC IN)
zCheck for PC compatibility
g“PC signals that can be displayed” (P. 45)
zUse cable with ferrite cores and no longer than
of 3 m to avoid electromagnetic disturbance.
Amplifier
(L) (R)
PC
AUDIO OUT
(R)
(L)
(Pr)
(Pb)
(R)
(L)
(R)
(L)
(Y)
LT-32DP8BT_EN_Analog.book Page 10 Tuesday, August 28, 2007 2:34 PM

11
IMPORTANT PREPARE USE SETTING TROUBLE?
ENGLISH
devices VCR / DVD / other devices
zUse S-VIDEO g “S-In” (P. 27)
zUse S-VIDEO g “S-In” (P. 27)
zSelect dubbing sources
g “Dubbing” (P. 27)
zConnect a decoder
g “Decoder(EXT-2)” (P. 41)
zUse S-VIDEO g “S-In” (P. 27)
z“Component Auto Select” g (P. 41)
z“HDMI Setting” g (P. 41)
zEXT-6 input does not support analogue
sound.
zUse HDMI CEC
g “What is “HDMI CEC”?” (P. 46)
AUDIO OUT
Listening to the TV on external speakers
DIGITAL AUDIO OUT *
Listening to the digital audio of digital
channels on external speakers
zThe sound from analogue channels and
external devices cannot be output.
EXT-1 Watching videos
Output jInput h
•Composite signal
•Sound L / R
•Composite signal
/ RGB / S-VIDEO
•Sound L / R
EXT-2 Dubbing videos using
“T-V LINK”
Output jInput h
•Composite signal
•Sound L / R
•Composite signal
/ RGB / S-VIDEO
•Sound L / R
EXT-3 Watching videos
Output jInput h
•Composite signal
/ S-VIDEO
•Sound L / R
EXT-4 Watching DVDs
Output jInput h
•Component signal
(P.49 /P.50)
•Sound L / R
EXT-5
EXT-6 Connecting HDMI
device
Output jInput h
•HDMI signal
(P.49 /P.50)
Output j
•Sound L / R
Output j
•Digital sound
(P. 50)
g
WATCHING DIGITAL CHANNELS
““Dolby Digital” output from
the DIGITAL AUDIO OUT
terminal” (P. 23)
: Signal direction
DVD player
(HDMI compatible)
EXT-6
(HDMI)
EXT-5
(HDMI)
Satellite broadcast / Digital broadcast tuner
(HDMI compatible)
AERIAL
CI (Common Interface) slot *
“Watch pay-TV digital channels” (P. 9)
DVI devices g “Connect DVI devices” (P. 45)
“T-V LINK” g “What is “T-V LINK”?” (P. 12 / P. 14)
Amplifier
(Digital optical
compatible)
DIGITAL
AUDIO OUT *
Not available.*
(For service adjustments)
*DP8 series only
LT-32DP8BT_EN_Analog.book Page 11 Tuesday, August 28, 2007 2:34 PM
12
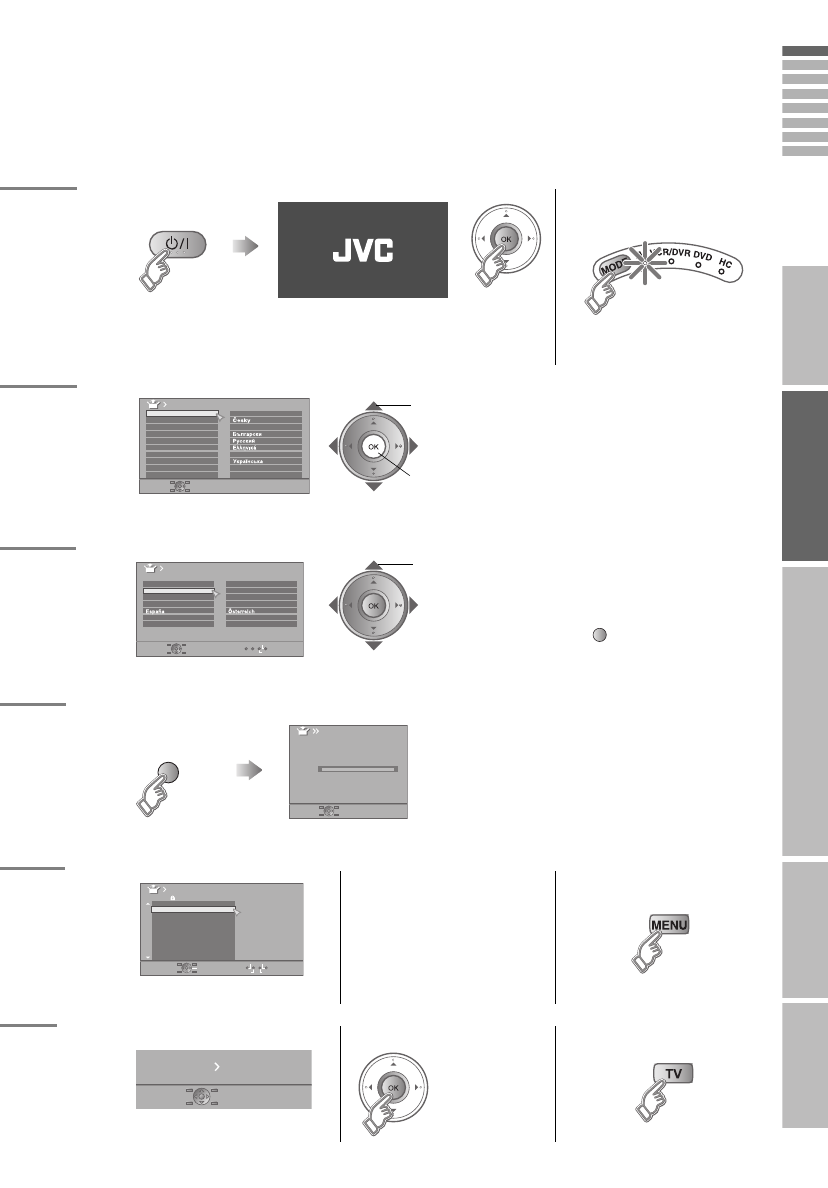
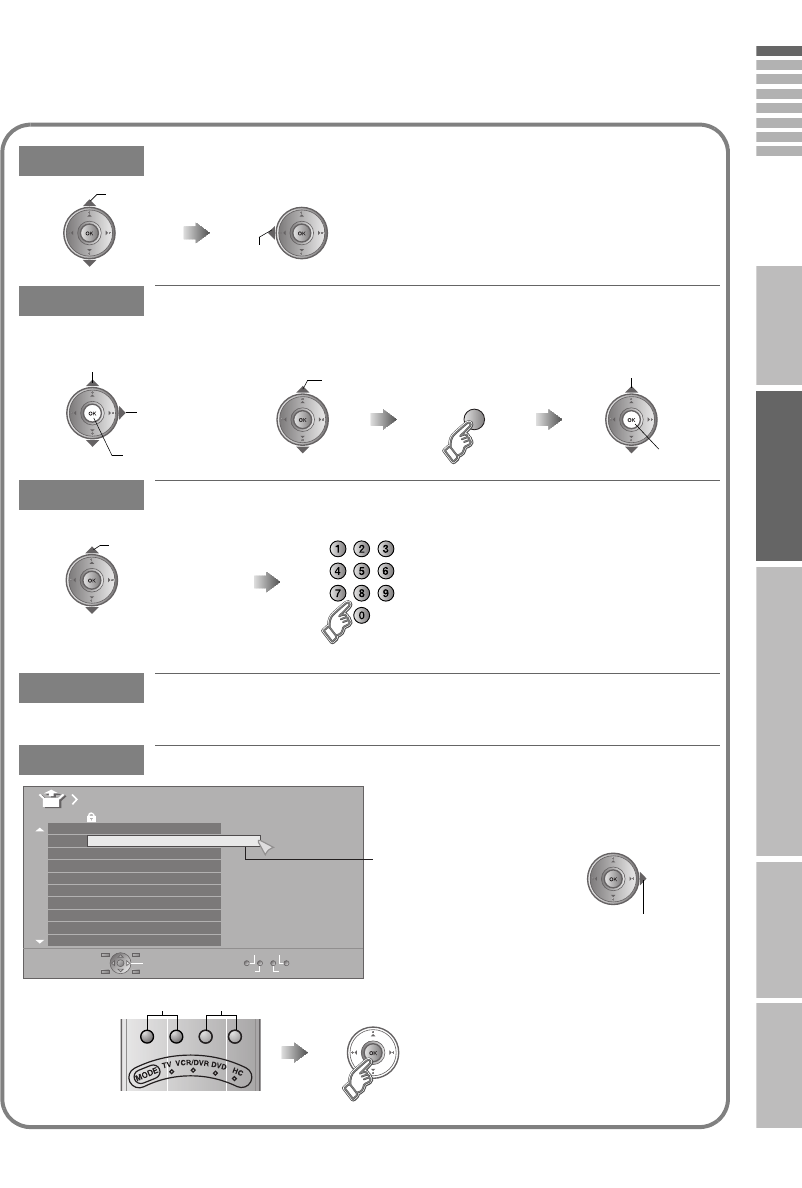
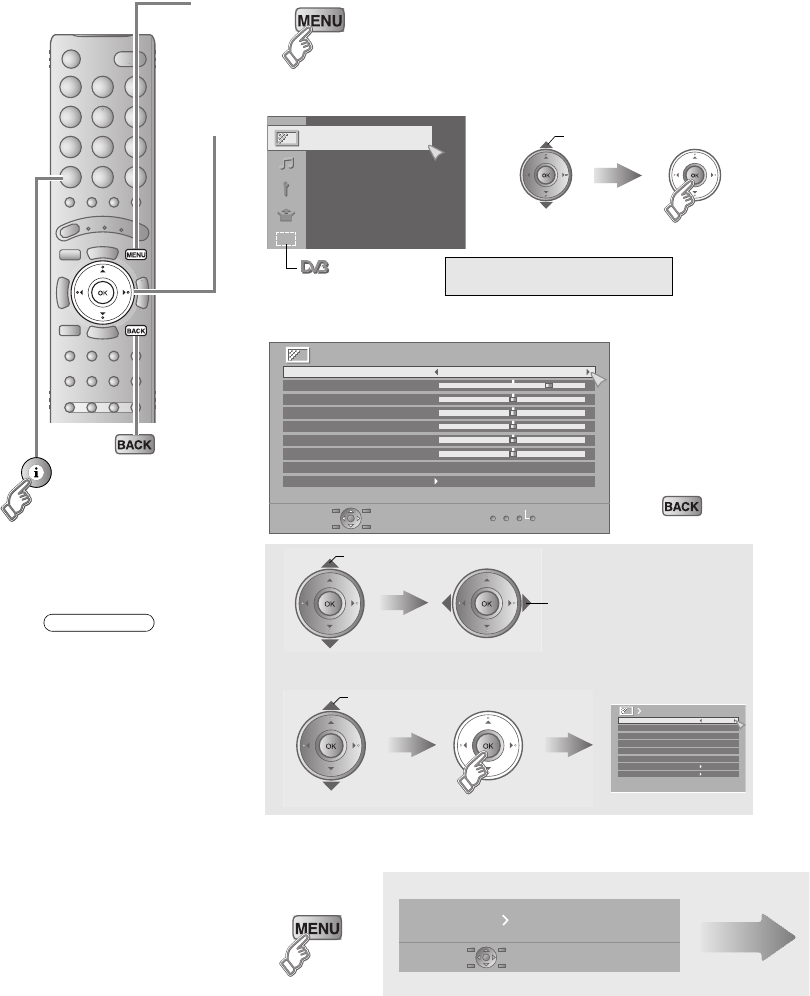
TV MENU
BACK
Initial settings
What is “T-V LINK”?
Connecting the TV to a “T-V LINK”
compatible device allows:
zChannels on the TV to be instantly
registered on the device.
zThe “Direct Rec” function to be used.
g“Technical Information” (P. 45)
“T-V LINK” variations
“T-V LINK” (JVC), “Q-LINK” (Panasonic),
“Megalogic” (Grundig), “Data Logic” (Metz),
“SMARTLINK” (Sony), “Easy Link” (Philips)
To the previous screen g
Exit g
If the “JVC” logo does not appear or if
you wish to make changes later
g“Language” and “Auto Program” (P. 40)
TV
P80 Series
LT-32DP8BT_EN_Analog.book Page 12 Tuesday, August 28, 2007 2:34 PM
13
IMPORTANT PREPARE USE SETTING TROUBLE?
ENGLISH
ABegin
The remote control doesn’t
work
zConfirm the mode is set to
“TV”.
BSelect a language
CSelect the country of installation
DAutomatically register channels
ECheck what was registered
To edit channels
g“Editing analogue channels”
(P. 18)
If not editing channels
FFinish
When using “T-V LINK”
zIf “Feature Not
Available”
appears
g (P. 44)
When not using “T-V LINK”
zShown only when powering on for the first time.
Language
Suomi
Svenska
Norsk
Dansk
Nederlands
Castellano
Italiano
Deutsch
Français
English
Català
Türkçe
Português
Magyar
Polski
Bset
Aselect
Auto Program
Belgium
Nederland
Italia
France
Deutschland
United Kingdom
Country
Suomi
Norge
Sverige
Danmark
Switzerland
Ireland
Start
More
select
zFor the next page g“ ” (Yellow)
Auto Program
CH
02
0%
zIf “ACI Start” appears, select and start settings.
(This will set up cable television channels.)
g“What is “ACI” (Automatic Channel Installation)?”
(P. 45)
Manual
Move ID
DeleteInsert
ARD
_ _ _ _ _ _
AV
PR ID
Edit
CH / CC
01 02CH
02 03CH
03 04CH
04
05
06
07
08
09
05CH
06CH
01CC
02CC
03CC
04CC
T - V LINK
Recording DeviceDownload TV
(blue)
LT-32DP8BT_EN_Analog.book Page 13 Tuesday, August 28, 2007 2:34 PM
14
TV/DTV
TV/DTV
BACK
MENU
Initial settings
What is “T-V LINK”?
Connecting the TV to a “T-V LINK”
compatible device allows:
zChannels on the TV to be instantly
registered on the device.
zThe “Direct Rec” function to be used.
g“Technical Information” (P. 45)
“T-V LINK” variations
“T-V LINK” (JVC), “Q-LINK” (Panasonic),
“Megalogic” (Grundig), “Data Logic” (Metz),
“SMARTLINK” (Sony), “Easy Link” (Philips)
To the previous screen g
Exit g
If the “JVC” logo does not appear or
if you wish to make changes later
zDigital channel settings:
gWATCHING DIGITAL CHANNELS
“Factory Settings” (P. 19)
“Service Scan” (P. 18)
“Menu Language” (P. 14)
zAnalogue channel settings:
g“Auto Program” (P. 40)
“Language” (P. 40)
TV/DTV
Register digital / analogue channels on TV. These channels can be edited later.
(In this manual, digital terrestrial broadcasting is indicated as digital channels,
analogue terrestrial broadcasting and analogue cable TV as analogue channels.)
DP8 Series
LT-32DP8BT_EN_Analog.book Page 14 Tuesday, August 28, 2007 2:34 PM
15
IMPORTANT PREPARE USE SETTING TROUBLE?
ENGLISH
ABegin
The remote control doesn’t
work
zConfirm the mode is set to
“TV”.
BSet digital channels
zShown only when powering on for the first time.
1Select a language (*2)
zLanguage for on-screen
displays when watching digital
channel including the DTV
menus.
2
Select the country of installation (*1)
zReceivable digital channels will
differ depending on the
“Country” setting.
3Set the aerial power supply zOnly when using an aerial
which requires external power,
select “On”.
g
4Scan digital channels
5Register digital channels
If digital channels are not found, the following message will appear.
z
After completing following steps, read “When the TV cannot find the digital channels”
(P. 17) and try scanning digital channels again
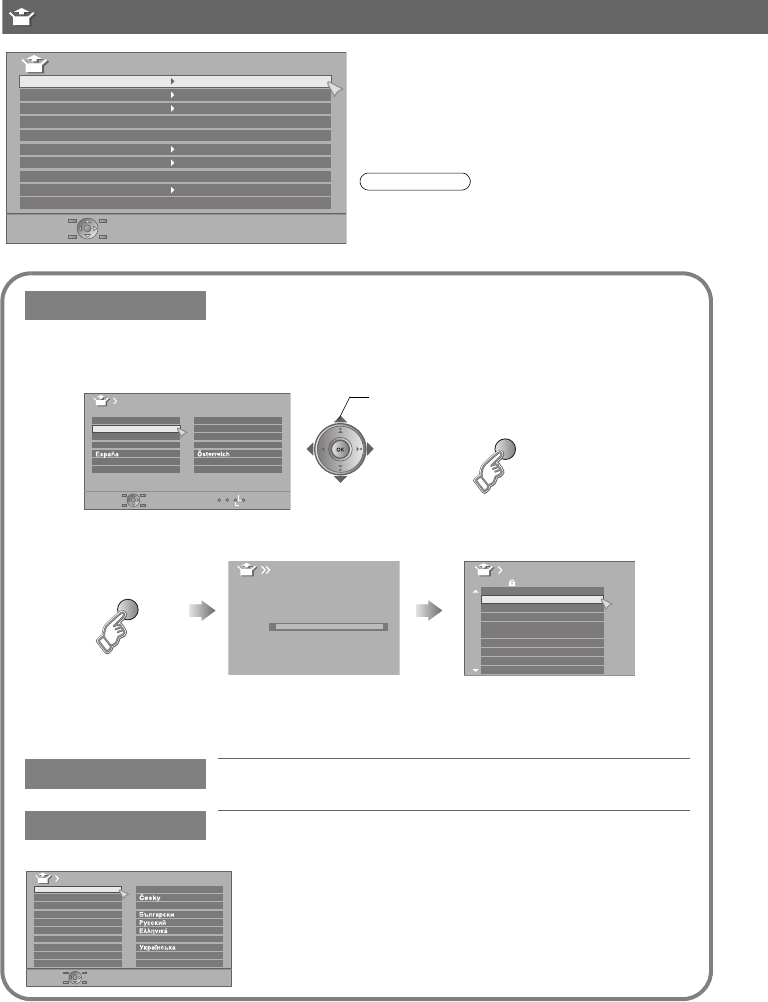
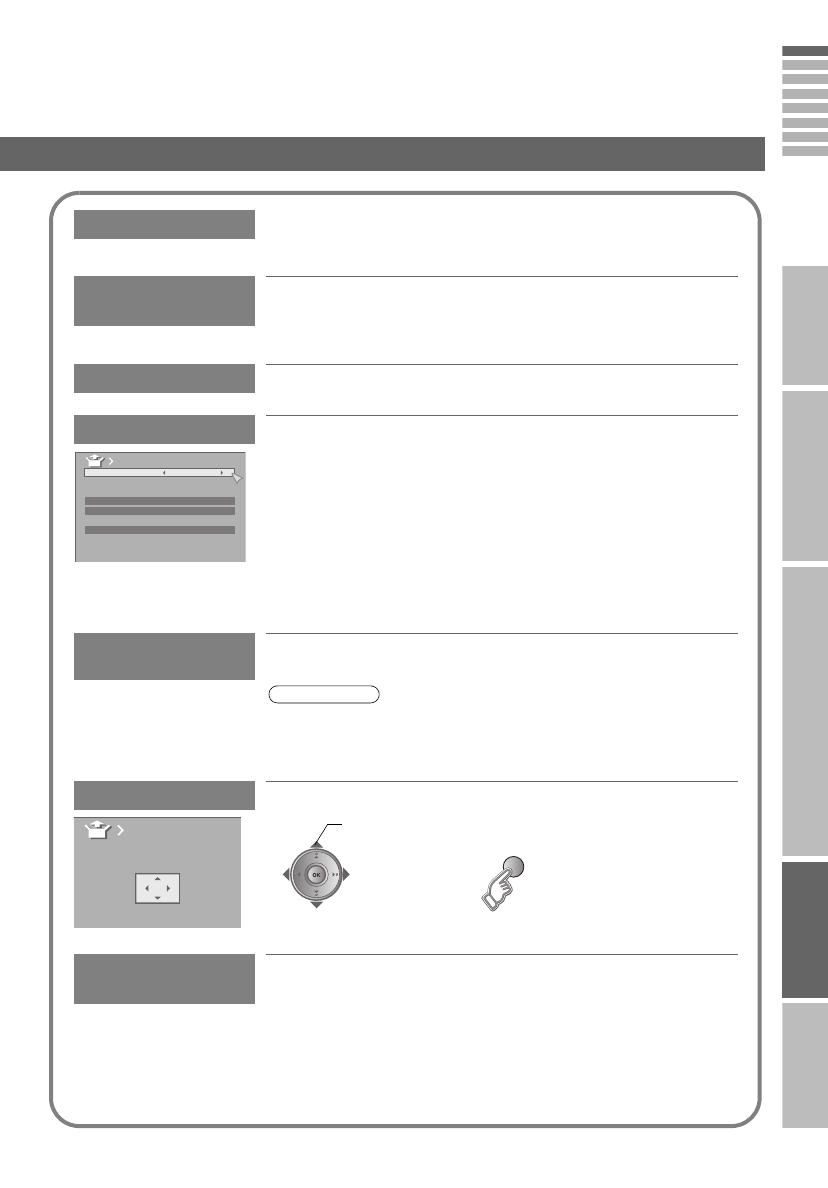
Castellano
Català
First Time Installation > Language Setting
Step 1: Please choose language
Language
Deutsch
English
Select
OK
Navigate
Français
Bset
Aselect
Germany
First Time Installation > Country Setting
Step 2: Please choose country
Country
Spain
Select
OK
Navigate
France
Bset
Aselect
Mode
Start Scan
On Off
Antenna Power
WATCHING DIGITAL
CHANNELS
“Power supply for the
indoor aerial” (P. 22)
First Time Installation > Service Scan
Step 3: Please press OK
Select
OK
Navigate
Automatic
Service
Scan
_ _
Start Channel
_ _
Stop Channel
Add
Mode
Start Scan
First Time Installation > Service Scan
Step 3: Please press OK
Select
OK
Navigate
Automatic
Service
Scan
_ _
Start Channel
_ _
Stop Channel
Add
Mode
Start Scan
UHF33 : 3 Services found
Doku/Kika
ZDF
Info/3sat
Scan completed! Store services?
Yes No
No services found!
OK gC(Next page)
*1, *2: Country selections (*1) and language selections (*2) differ depending on the version of the TV.
g“Specifications of your TV” (P. 1)
Note
LT-32DP8BT_EN_Analog.book Page 15 Tuesday, August 28, 2007 2:34 PM
16
CConfirm the language
When change a language
When not using analogue channels g g E
When using analogue channels (or cable TV) g g D
DSet analogue channels
Language
Suomi
Svenska
Norsk
Dansk
Nederlands
Castellano
Italiano
Deutsch
Français
English
Català
Türkçe
Português
Magyar
Polski
zLanguage for Message Board and
menus (excluding the DTV menus) select
TV/DTV
1Register analogue channels
To change the country
2Check what was registered
To edit channels
g“Editing analogue
channels” (P. 18)
If not editing
channels
3Set T-V LINK
When using “T-V LINK”
zIf “Feature Not Available”
appears g (P. 44)
When not using
“T-V LINK”
Auto Program
Belgium
Nederland
Italia
France
Deutschland
United Kingdom
Country
Suomi
Norge
Sverige
Danmark
Switzerland
Ireland
Start
More
select
Auto Program
CH
02
0%
zIf “ACI Start” appears, select and start
settings.
(This will set up cable television
channels.)
g“What is “ACI” (Automatic Channel
Installation)?” (P. 45)
(blue)
Manual
Move ID
DeleteInsert
ARD
AV
PR ID
Edit
CH / CC
01 02CH
02 03CH
03 04CH
04
05
06
07
08
09
05CH
06CH
01CC
02CC
03CC
04CC
_ _ _ _ _ _
T - V LINK
Recording DeviceDownload TV
TV/DTV
Initial settings DP8 Series
LT-32DP8BT_EN_Analog.book Page 16 Tuesday, August 28, 2007 2:34 PM
17
IMPORTANT PREPARE USE SETTING TROUBLE?
ENGLISH
If you still cannot watch digital channels after following the steps above, there may be a problem
with your aerial or its cable. Or, the signal may be too weak. g Consult your retailer
The “Missing or weak signal” message appears.
EInitial setting is complete
Edit digital channels using “Edit PR”
g
If digital channel reception is poor g “When the digital channel reception is poor” (P. 17)
If analogue channel reception is poor g “Troubleshooting” (P. 42)
Some digital channels cannot be watched on this TV.
g
When the TV cannot find the digital channels
When the digital channel reception is poor
You can check the broadcast signal level of the channel you are watching using “Signal Check”.
gWATCHING DIGITAL CHANNELS
P. 1 9
If you still cannot watch digital channels after following the steps above, there may be a problem
with your aerial or its cable. Or, the signal may be too weak. g Consult your retailer
WATCHING DIGITAL CHANNELS P. 1 2 - 13
WATCHING DIGITAL CHANNELS P. 2 2
Check the following points
zIs the TV connected correctly to the aerial?
zChange the direction of the indoor aerial.
zIs there a digital channels transmission tower nearby?
g Turn “Attenuator” to “On” (P. 41), since the radio waves are too strong.
z“Attenuator” attenuates the radio waves of analogue broadcast as well as those of digital broadcast. If
some noise or snow appears when watching an analogue channel, please set “Attenuator” to “Off”
temporarily.
Note
zRe-configure the initial settings
using “Factory Settings” gWATCHING DIGITAL CHANNELS
P. 19
Check the following points
zIs the TV connected correctly to the aerial?
zChange the direction of the indoor aerial.
zIs there a digital channels transmission tower nearby?
gTurn “Attenuator” to “On” (P. 41), since the radio waves are too strong.
z“Attenuator” attenuates the radio waves of analogue broadcast as well as those of digital broadcast. If
some noise or snow appears when watching an analogue channel, please set “Attenuator” to “Off”
temporarily.
Note
LT-32DP8BT_EN_Analog.book Page 17 Tuesday, August 28, 2007 2:34 PM
18
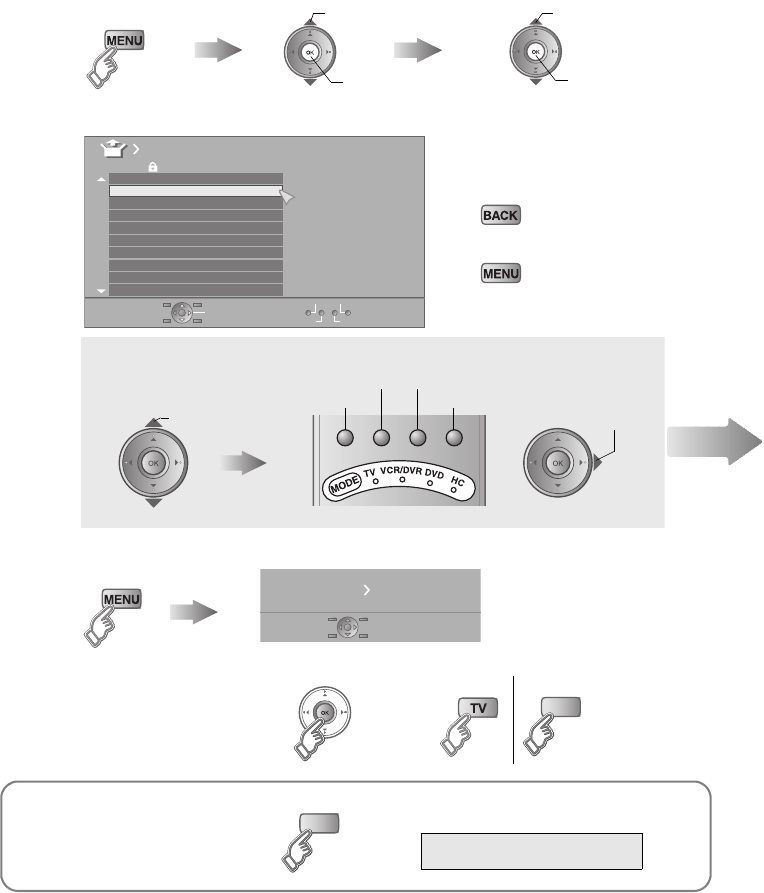
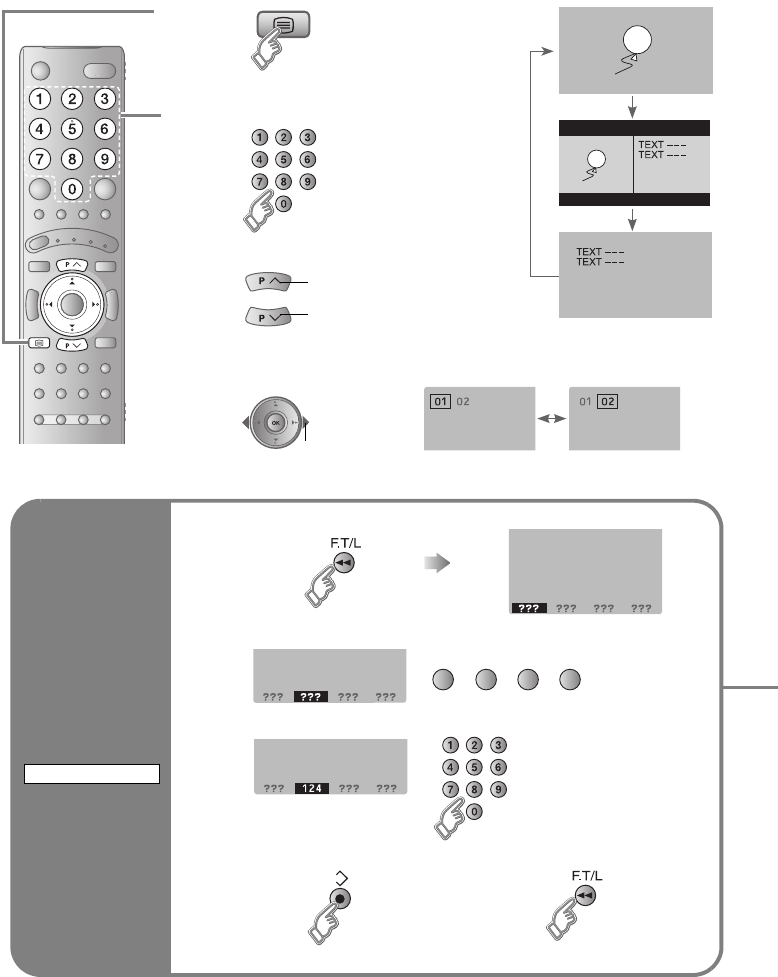
Editing analogue channels
Edit the channels registered with “Auto Program” in “Initial settings”.
ADisplay the “Edit” menu
Display the menu bar Select “Set Up” Select “Edit/Manual”
BEdit channels
To the previous menu
g
Exit
g
CFinish
zIf “Feature Not Available”
appears g (P. 44)
z“T-V LINK” g “What is
“T-V LINK”?” (P. 12 / P. 14)
When using “T-V LINK” When not using “T-V LINK”
DP8 series only
zIf you cannot display the “Edit” menu,
switch to the analogue channel
To edit digital channels
g
Aselect
Bnext Bnext
Aselect
Manual
Move ID
DeleteInsert
ARD
_ _ _ _ _ _
AV
PR ID
Edit
CH / CC
01 02CH
02 03CH
03 04CH
04
05
06
07
08
09
05CH
06CH
01CC
02CC
03CC
04CC
select a channel
Select channel Select edit function
ID
Insert Delete
Manual
Move
Next
T - V LINK
Recording DeviceDownload TV
TV/DTV
TV/DTV
WATCHING DIGITAL CHANNELS
P. 12 - 13
DP8 series
LT-32DP8BT_EN_Analog.book Page 18 Tuesday, August 28, 2007 2:34 PM
19
IMPORTANT PREPARE USE SETTING TROUBLE?
ENGLISH
Move Move a channel's position (PR)
ID Edit a channel name (ID)
Insert Insert a new channel directly by entering the CH/CC number
Delete Delete a channel
zPressing the button deletes the channel.
Manual Register a new channel
set
select
When selecting a preset name from the “ID List”
Bset
Aselect character
Bmove position
Cset
Aselect
enter the first
character (blue)
Naming a channel
z“CH/CC” List g(P. 48)
Select a “CH/CC”
zReceives the broadcast signal.
E
n
t
er a num
b
er
Fine-
System Search+
Fine+Search-
AV
PR ID
Manual
CH / CC
01
02 03CH
03 04CH
04
05
06
07
08
09
05CH
06CH
01CC
02CC
03CC
04
(B / G)
CC
ARD
_ _ _ _ _ _
02CH
zPress the red or green button. Auto-search
begins, and the nearest frequency is
imported.
g Repeat the previous steps until the
desired channel is displayed.
ASearch a channel Fine tune BSet
Select a system
zIf necessary, press X to
change the broadcasting
system.
g“Receivable broadcast
systems” (P. 45)
LT-32DP8BT_EN_Analog.book Page 19 Tuesday, August 28, 2007 2:34 PM
20
Watching analogue
channels
Enjoy your new TV!
Viewing teletext
24
PAGE
22
PAGE
Message
board
28
PAGE
Change the aspect ratio
Enjoy the good sound
Take snapshots of the screen
Watch in multi-picture mode
30
PAGE
Useful
functions
+10-10
PR List
09
08
07
06
05
04
03
02
01 ARD
_ _ _ _ _ _
AV
Edit
Message Board ABC
Off
Close
To m y love l y wi fe
Hap py B i r t hda y !
Wi th a l l my l ove today and
always :-)
LT-32DP8BT_EN_Analog.book Page 20 Tuesday, August 28, 2007 2:34 PM

21
IMPORTANT PREPARE USE SETTING TROUBLE?
ENGLISH
Picture settings
(Picture Mode, Features, etc.)
Sound settings
(Stereo/ t·u, MaxxAudio, etc.)
Set Up settings
(Auto Program, Language, etc.)
Features settings
(Sleep Timer / Child Lock, etc.)
Customising your TV
34
PAGE
Watching videos / DVDs
26
PAGE
Picture
Watching digital
channels
WATCHING DIGITAL CHANNELS
P. 2 - 5
Customising your TV
DTV menu settings
WATCHING DIGITAL CHANNELS
P. 8 - 19
(DP8 series only)
(DP8 series only)
LT-32DP8BT_EN_Analog.book Page 21 Tuesday, August 28, 2007 2:34 PM
22
Watching analogue channels
Switch between mono / stereo / bilingual
broadcasting
g “Stereo/ t·u” (P. 37)
zTo completely turn off the TV, unplug the power plug.
zUsing the TV buttons g “Names of all the parts” (P. 6).
ASet to “TV”
BPower on
zPress again to turn the screen off and
put the TV into standby mode.
CSelect a channel
To the previous channel
g
The power lamp on
the TV lights
Note
Register a channel
to a button
FAVOURITE
CHANNEL
Using the number
buttons, up / down
buttons
Using PR list
Channel information
and clock
Volume
Mute
DP8 series only
Switch between digital / analogue channels
g
TV/DTV
LT-32DP8BT_EN_Analog.book Page 22 Tuesday, August 28, 2007 2:34 PM

23
IMPORTANT PREPARE USE SETTING TROUBLE?
ENGLISH
Press a channel number Move up or down a channel
E.g.
15 :
1 :
up
down
PR List
+10-10
PR List
09
08
07
06
05
04
03
02
01 ARD
_ _ _ _ _ _
AV
zSelect a page g select
Bview
Aselect
Close PR List
ARD
1
12 : 00
Channel information
zTime is displayed only when teletext
broadcasting can be received.
(No indication)
Time
zPressing the button once displays the
“PR List”.
While the channel is displayed Press the number to register it on
The following “Picture” and “Sound” menu settings applied to the channel will be stored in the favourite channel as
well.
zPicture Mode / Super DigiPure / Colour System (P. 35 - 36)
zMaxxVolume / Voice Enhancer (P. 37)
Recall the favourite channel
Check your favourite channels
g Press “ ” and confirm that the channels you have registered have a beside them
Delete a favourite channel g “Favourite Setting” (P. 39)
Set 1-4?
Hold down for 3 seconds
Programmed!
Disappears after a few seconds
Note
Favourite 1-4?
Press the number you registered
zTo soften the picture for daily use, change the setting in “Picture Mode”
g“Picture Mode” (P. 35)
Note
LT-32DP8BT_EN_Analog.book Page 23 Tuesday, August 28, 2007 2:34 PM
24
Viewing teletext
This TV can display TV broadcasts and teletext on the same channel in two windows.
Bookmark
your favourite
page
1Display your favourites list
2Select a coloured button to save your page to
3Enter the number of the page to save
4Save
Exit g
Recall your favourite page g Press the coloured button as in step 2
LIST MODE
LIST MODE
(red) (green) (yellow) (blue)
AWhen watching TV
BEnter a teletext page
Move up or down a page
View sub-pages
TEXT
TV TEXT
up
down
to sub-page
.....
Viewing
teletext
LT-32DP8BT_EN_Analog.book Page 24 Tuesday, August 28, 2007 2:34 PM
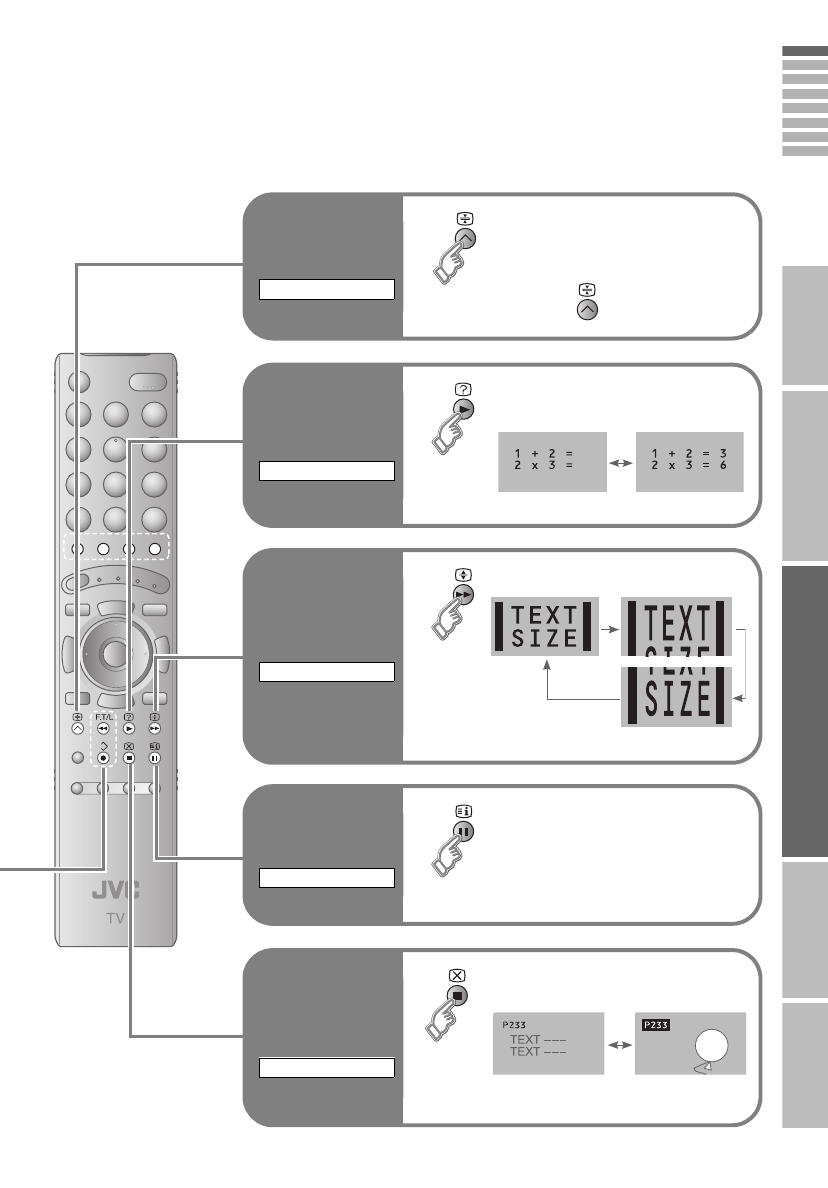
25
IMPORTANT PREPARE USE SETTING TROUBLE?
ENGLISH
Hold the
current page
Hold the current page
Release g Press “ ” again
HOLD
Reveal hidden
pages
Display hidden information
(answers to quizzes, etc.)
REVEAL
Switch briefly
from teletext
to TV
Leave the current page open, while
you switch to watch TV
zUseful when running a page search.
CANCEL
To the index
page
Returns to page “100” or a
previously designated page
INDEX
Enlarge the
text
Double the size of the displayed text
SIZE
LT-32DP8BT_EN_Analog.book Page 25 Tuesday, August 28, 2007 2:34 PM
26
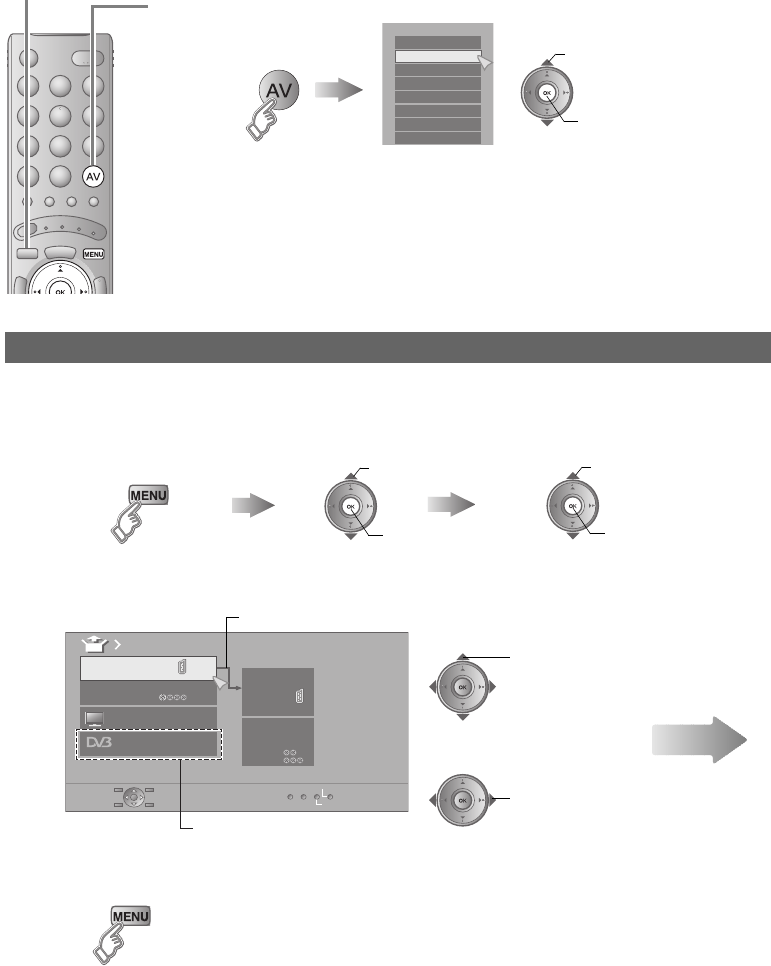
Watching videos / DVDs
To T V
Setting external terminals
1Display the “EXT Setting” menu
Display the menu bar Select “Set Up” Select “EXT Setting”
2Select an “EXT” or arrow, and then proceed with setting
3Finish
zAdjust the position of the PC image g “PC Position” (P. 41)
zHDMI terminal setting g “HDMI Setting” (P. 41)
Aselect
Bnext Bnext
Aselect
DTV
EXT Setting
EXT- 1
EXT- 2
Dubbing
EXT- 4
EXT- 3
TV
ID List
S-In
Arrow Select an “EXT”
Select the arrow
select
select
Available for DP8 series only
Next
ASelect the video source
BOperate the connected device and play a video
Operate JVC recorders and other devices (P. 32)
E.g. For EXT-1
Bwatch
Aselect
EXT Mode
0AV
1
EXT- 1
2
EXT- 2
3
EXT- 3
4
EXT- 4
5
HDMI1
6
HDMI2
7
PC
LT-32DP8BT_EN_Analog.book Page 26 Tuesday, August 28, 2007 2:34 PM

27
IMPORTANT PREPARE USE SETTING TROUBLE?
ENGLISH
Using the TV’s buttons
P
MENU/OK
TV/AV
Select a video source
A
B
C
TV/AV
EXT Mode
0AV
1
EXT- 1
2
EXT- 2
3
EXT- 3
4
EXT- 4
5
HDMI1
6
HDMI2
7
PC
Switch between digital / analogue
channels (DP8 series only)
A
B
CSelect a channel
TV/AV
EXT Mode
0AV
1
EXT- 1
2
EXT- 2
3
EXT- 3
4
EXT- 4
5
HDMI1
6
HDMI2
7
PC
8
DTV
To analogue channels
To digital channels
S-In Switch to S-Video input
ID List Edit names of connected devices
Dubbing Set up dubbing on “EXT-2”
Cancel this mode g Press “ ” (yellow) again
z“ ” mark will appear at the selected “EXT”.
zThe device selection display will change from “E1” to “S1”.
(yellow)
Clear the name g Select the blank space in the list
A Show the name list B Select a name from the list
(blue)
Bset
Aselect
select the dubbing source
LT-32DP8BT_EN_Analog.book Page 27 Tuesday, August 28, 2007 2:34 PM
28
Message board
The message board function allows you to display the message that were input beforehand on the
TV screen when the TV is turned on.
Times when the message board comes in handy!
zOn occasions such as birthdays (e.g. Happy birthday!)
zMessage to your children (e.g. I’m going out between 3 and 4 pm.)
zAn alternative to calendar (timetable) (e.g. 12/7 remember 7 o’clock parent night.)
A
BHide the message board
To hide temporarily
zThe message board is displayed
whenever the TV is turned on.
To turn off
zThe message board is not displayed
even if the TV is turned on.
zTo display g
zThe message board will not be displayed the first time you
turn on the TV upon purchased.
zIf you have trouble viewing the message board with its
translucent background, in the “Features” menu, change
“Appearance” to “Type B”. (P. 39)
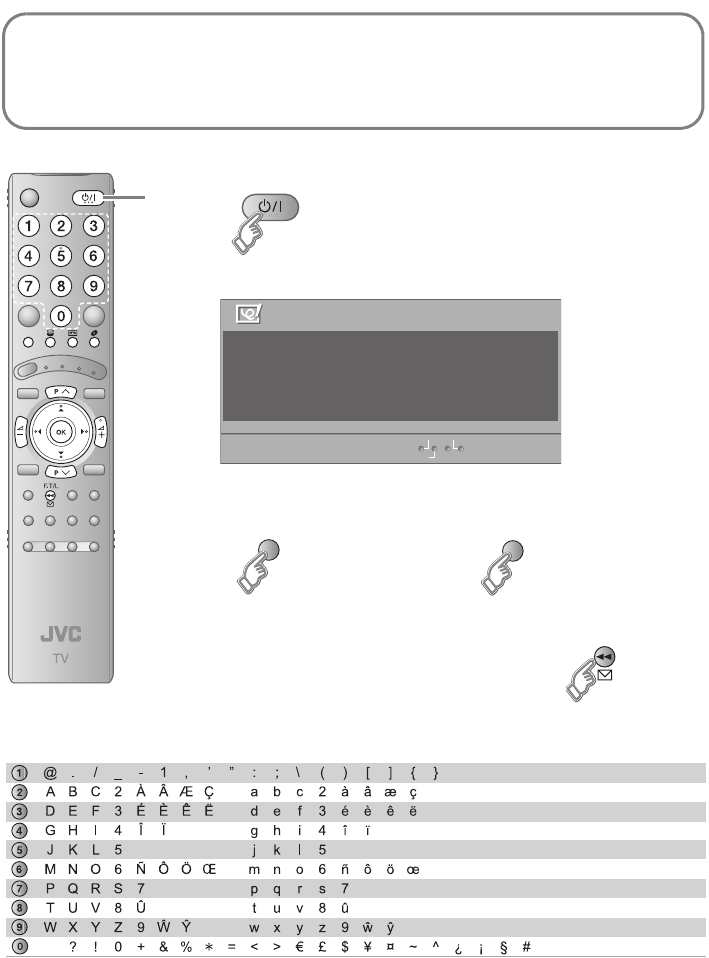
Edit
Message Board ABC
Off
Close
To m y l ove l y wi f e
Happy B i r t hda y !
Wi th a l l my love today and
always :-)
(green) (red)
Key code table
LT-32DP8BT_EN_Analog.book Page 28 Tuesday, August 28, 2007 2:34 PM

29
IMPORTANT PREPARE USE SETTING TROUBLE?
ENGLISH
ADisplay the message-editing screen
BInput the message
CSave the message
Composing message
(blue)
Display the message board Switch to the editing screen
zYou can enter up to maximum 210
characters (7 rows, 30 characters per
row).
zInserting a character in the text is not
allowed. The existing character will be
overwritten.
zTo input characters in a different
language, in the “Set Up” menu, change
the “Language” selection. (P. 40)
~
ABC / abc
Message Board ABC
Set
All ClearDelete
09
To m y l ove l
To enter the characters To move the cursor
To clear or change character
To clear all characters (press for more than 1 second)
To delete a character
To switch between uppercase and lowercase characters
zFor characters that can be input, see “Key code table” (P. 28).
Move the cursor
Start a new line
(red) zOnly one message can be saved. To compose a new
message, re-edit the current message.
LT-32DP8BT_EN_Analog.book Page 29 Tuesday, August 28, 2007 2:34 PM

30
Useful functions
Change the
aspect ratio
1
2Select the aspect ratio
3Move the picture with S or T while this
bar is displayed
zWhen 720p (750p) or 1080i (1125i) signal is
received, the signal will be displayed as “Full”.
The zoom menu will not be displayed.
zIn PC mode, “Regular” and “Full” can be selected.
zUsing “Auto” g “Auto in “Zoom”” (P. 47)
ZOOM
Zoom
Auto
Regular
Panoramic
14 : 9 Zoom
16 : 9 Zoom
16 : 9 Zoom Subtitle
Full
Aselect
Bset
16 : 9 Zoom
Enjoy the
good sound
1
2Select the “MaxxAudio”
setting
zYou can adjust the “MaxxAudio” settings in the
“Sound” menu. (P. 37)
zIf you connect the Headphone to the TV,
“MaxxAudio” setting is turned to “Off”.
MaxxAudio
Aselect
Bset
Sound
MaxxAudio Low
Off
Off
Reset
MaxxBass
MaxxTreble
MaxxStereo
MaxxVolume
Balance
Voice Enhancer
LT-32DP8BT_EN_Analog.book Page 30 Tuesday, August 28, 2007 2:34 PM
31
IMPORTANT PREPARE USE SETTING TROUBLE?
ENGLISH
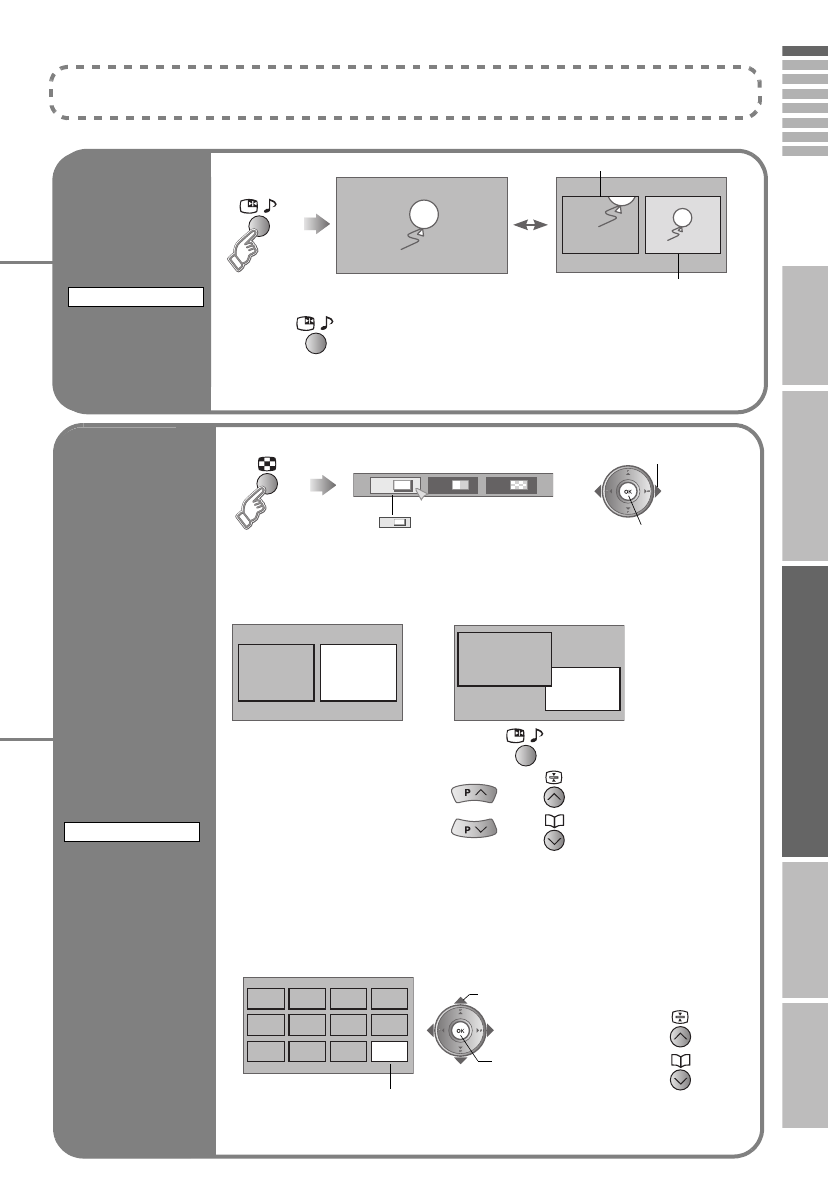
Take
snapshots of
the screen
(Not available for digital
channels and PC)
Cancel
gPress “ ” again, or change the channel
zNot available when the SUB-PICTURE is displayed, or when in digital channels
or PC mode.
zYou cannot save or export the snapshot.
FREEZE Still picture
Current programme
Watch in
multi-picture
mode
Watch in dual-picture mode
E.g. You can watch TV and video at the same time.
zSwitch between the sound sources g
zChange the channel g (Main) , (Sub)
zWhen watching digital channels, there may be occasions where the aspect
ratio changes, for example during commercials. In this case, the layout of the
screen in dual-picture mode changes automatically according to the aspect
ratio signal.
Select an analogue channel in 12-screen mode
All registered analogue channels are displayed as still images.
MULTI-PICTURE
Bset
1212
Select the number of screens
Selecting “ ” returns to normal
viewing mode
zNot available in PC mode.
1
Aselect
Main Sub Main
Sub
(For wide aspect ratio signals)
Bwatch
Aselect a channel
Main
zMove up or
down a page
Only the selected frame has a moving picture.
zNot available for digital channels, EXT-5, or EXT-6 input.
zFor more functions g “Customising your TV” (P. 34 - 41)
LT-32DP8BT_EN_Analog.book Page 31 Tuesday, August 28, 2007 2:34 PM

32
Operate JVC recorders
Try changing the remote control code
if you cannot operate a recorder.
zConfirm the code for your recorder by checking the manual it came
with.
zSome models of JVC devices cannot be operated with this remote
control.
zJVC DVD recorders and HDD recorders are set to code “C” or “3” by
default.
zIf the battery is removed, the remote control code reverts back to
code A or 1.
Code A or 1 (Default) Code C or 3
Press and hold Press and hold
Note
Operate the VCR,
DVD recorder or
HDD recorder
Operate the DVD
Player
Operate the home
theatre system
VCR/DVR
DVD
HC
ASelect a device
zThe indicator lights for 3 seconds
each time the remote control is
operated.
BTurn on the device
COperate the device
zOther buttons can be used to operate
the TV at any time.
VCRs
DVD recorders
HDD recorders Home theatre
system
TV DVD Players
TV VCR/DVR
HC DVD
The included remote control can be used to operate JVC recorders
and other devices.
LT-32DP8BT_EN_Analog.book Page 32 Tuesday, August 28, 2007 2:34 PM

IMPORTANT PREPARE USE SETTING TROUBLE?
33
ENGLISH
Select VCR / DVD recorder / HDD recorder
Operate DVD / HDD recorder menus Playback / Record etc.
Display the subtitle (DVD / HDD recorder mode) g Press “ ”
Operate DVD menus Playback etc.
Display the subtitle g Press “ ”
Operate HC menus Playback etc.
Display the subtitle g Press “ ”
Mute g Press “ ”
Volume g Press “ ”
Select a surround mode g Press “ ”
VCR
HDD recorders
DVD recorders
Display menu
Back to
previous menu
Display top
menu
Select
OK
Rewind / Playback /
Fast-forward
Record / Stop / Pause
Select a chapter
Display menu
Back to
previous menu
Display top
menu
Select
OK
Rewind / Playback /
Fast-forward
Stop / Pause
Select a chapter
Display menu
Back to
previous menu
Display top
menu
Select
OK
Rewind / Playback /
Fast-forward
Stop / Pause
Select a chapter
and other devices
LT-32DP8BT_EN_Analog.book Page 33 Tuesday, August 28, 2007 2:34 PM
34
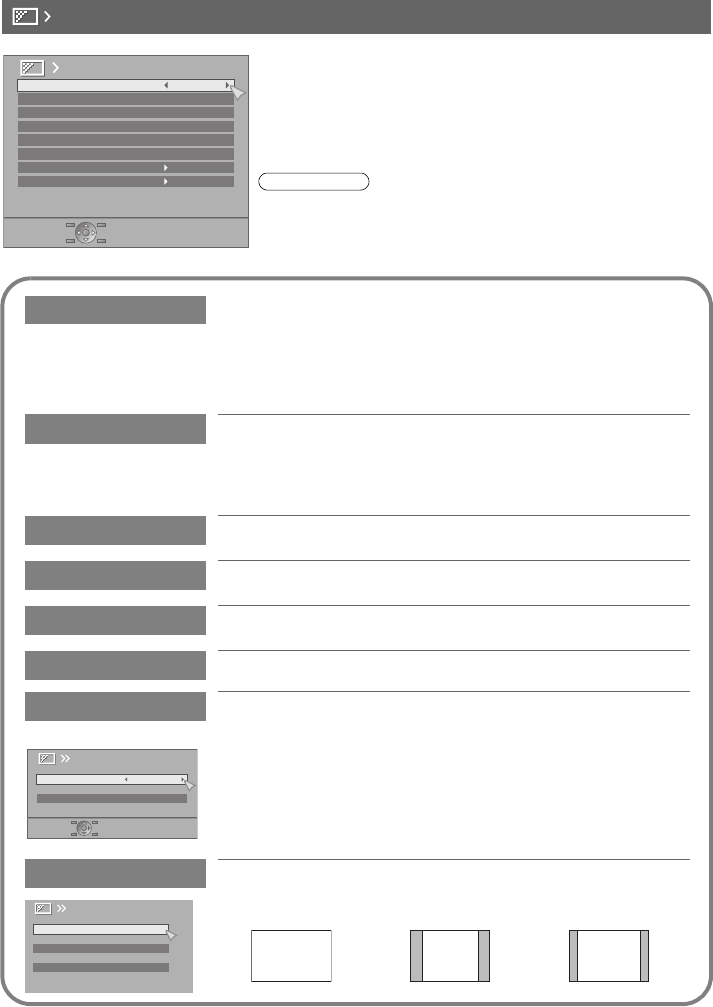
Customising your TV
ADisplay the menu bar
BDisplay the desired menu
(DTV menu)
(DP8 series only)
gWATCHING DIGITAL CHANNELS
P. 8 - 19
CChange or adjust the setting
zThe menu
(excluding DTV
menus)
disappears after
one minute of
inactivity.
To the previous
screen
g
To enter an item’s menu
DClose the menu
select
Picture
Picture
Picture Mode
Bright- 1
Standard
Normal
Reset
Contrast
Bright- 2
Sharp
Colour
Hue
Colour Temp.
Features
select
change / adjust
select
Super DigiPure Auto
Movie Theatre Auto
Colour Management On
Picture Management On
Smart Picture On
MPEG Noise Reduction On
Colour System
4 : 3 Auto Aspect
Features
T - V LINK
Recording DeviceDownload TV
When “T-V LINK” menu appears.
Next
Press to hide the
bottom area of the
menu (excluding
DTV menus). Press
again to display it.
zDepending on the
situation
(analogue
channels, digital
channels, video
signal formats,
external inputs,
etc.), some items
will be displayed
in gray colour
and will not work.
You will not be
able to change
their setting as
well.
Note
(E.g. Features)
LT-32DP8BT_EN_Analog.book Page 34 Tuesday, August 28, 2007 2:34 PM
35
IMPORTANT PREPARE USE SETTING TROUBLE?
ENGLISH
You can select a preset picture setting according to the brightness of your room.
You can make further adjustments to the selected preset “Picture Mode” to your liking.
To return to the default adjustments g (blue)
Picture Mode
Bright : in a fairly bright room
Standard : in a room with standard brightness
Soft : in a dark room
Bright-1 Backlight brightness (Darker l Brighter)
Contrast Contrast (Lower l Higher)
Bright-2 Brightness (Darker l Brighter)
Sharp Sharpness (Softer l Sharper)
Colour Colour (Lighter l Deeper)
Hue Tint (Reddish l Greenish) (NTSC only)
Colour Temp. Colour temperature (Warm / Normal / Cool)
Features g “Features (sub menu)” (P. 36)
Picture
Picture Mode
Bright- 1
Standard
Normal
Reset
Contrast
Bright- 2
Sharp
Colour
Hue
Colour Temp.
Features
TV
TV/DTV
When using “T-V LINK” When not using “T-V LINK” z“What is “T-V LINK”?” (P. 12 / P. 14)
zIf “Feature Not Available” appears
g (P. 44)
DP8 series
Picture
LT-32DP8BT_EN_Analog.book Page 35 Tuesday, August 28, 2007 2:34 PM
36
Customising your TV
Super DigiPure For natural-looking outlines
Min : When the picture loses
sharpness Auto : Automatically adjusts
Max : When noise appears Off : Function is turned off
Movie Theatre For smooth cinema film
On : Function is always on Off : Function is turned off
Auto : Automatically adjusts
Colour Management
Maintain a natural colour balance (On / Off)
Picture Management
Make it easier to view bright / dark pictures (On / Off)
Smart Picture Make it easier to view white areas (On / Off)
MPEG Noise Reduction
Reduce MPEG video noise (On / Off)
Colour System When there is no colour, change the colour system
(PAL, SECAM, NTSC3.58, NTSC4.43)
Main : Main picture
Sub : Sub-picture in MULTI-PICTURE mode (P. 31)
zWhen watching videos etc., you can select “Auto”
(Automatically selects the colour system)
4:3 Auto Aspect Select a default aspect ratio for Auto in “Zoom” (P. 30)
Panoramic Regular 14:9 Zoom
:
Main PAL
Sub Auto
Colour System
Panoramic
Regular
14 : 9
Zoom
4 : 3 Auto Aspect
16 : 9 4 : 3 14 : 9
Features (sub menu)
z“Smart Picture” is not available when “Picture Mode” is set to “Bright”
(P. 35).
Note
Super DigiPure Auto
Movie Theatre Auto
Colour Management On
Picture Management On
Smart Picture On
MPEG Noise Reduction On
Colour System
4 : 3 Auto Aspect
Features
LT-32DP8BT_EN_Analog.book Page 36 Tuesday, August 28, 2007 2:34 PM
37
IMPORTANT PREPARE USE SETTING TROUBLE?
ENGLISH
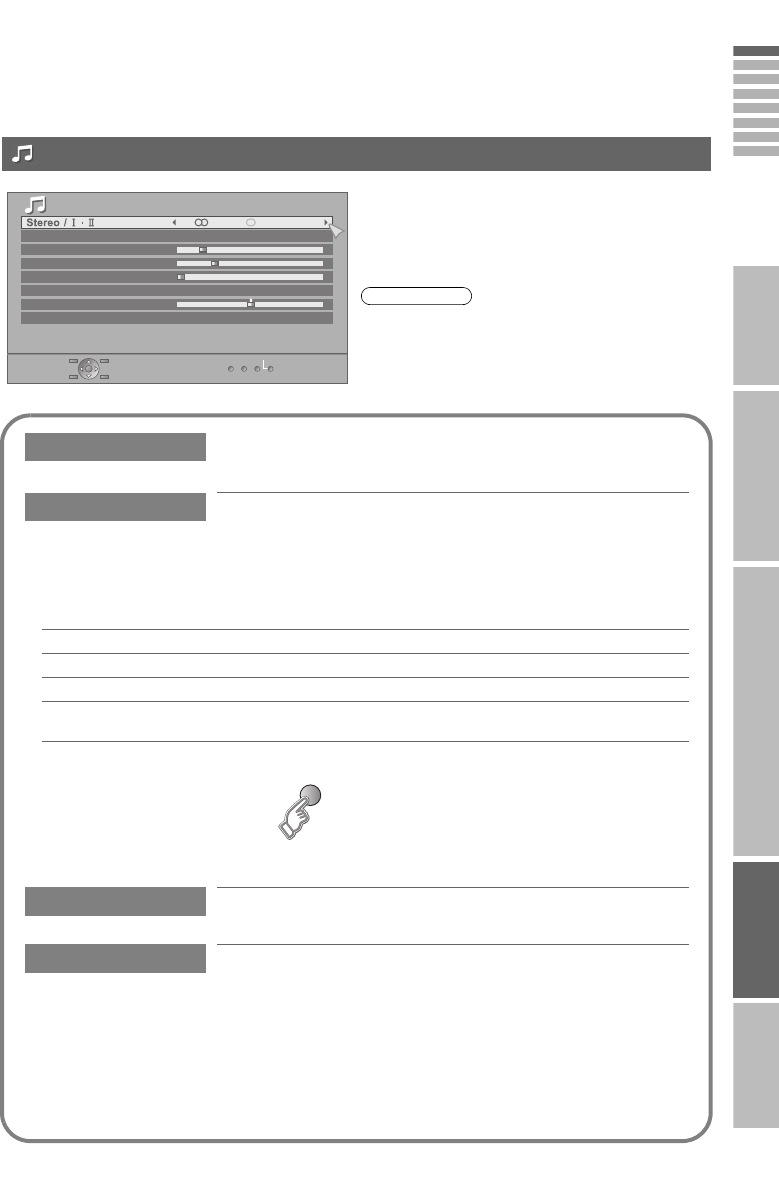
MaxxAudio improves sound performance with four sound features (MaxxBass, MaxxTreble, MaxxStereo
and MaxxVolume).
You can select one of the four “MaxxAudio” settings. (Off, Low, Mid, High)
You can make further adjustments to the four sound features of the selected preset
“MaxxAudio” to your liking.
Stereo/ t·uSelect stereo, monaural or language (analogue channels)
(v: Monaural / s: Stereo / t: SUB1 / u: SUB2)
MaxxAudio
MaxxBass Compensates low frequencies to widen the frequency band.
MaxxTreble Compensates high frequencies to widen the frequency band.
MaxxStereo Expands the stereo sound naturally.
MaxxVolume Maintains a uniform sound volume even if the sound becomes loud suddenly
(during commercial breaks etc.).
zAdjustments made to the three sound features (MaxxBass, MaxxTreble and MaxxStereo) will be
stored in the selected “MaxxAudio” setting.
zTo return to the default settings g (blue)
MaxxAudio is a registered trademark of Waves Audio Ltd. in the USA, Japan and other countries.
Balance Speaker balance (Left stronger l Right stronger)
Voice Enhancer Enhances the voice levels to make vocals or dialogues clearer
when the volume is set to low level (On / Off)
Sound
MaxxAudio Low
Off
Off
Reset
MaxxBass
MaxxTreble
MaxxStereo
MaxxVolume
Balance
Voice Enhancer zIf you connect the Headphone to the TV, “MaxxAudio”
setting is turned to “Off”.
Note
Sound
LT-32DP8BT_EN_Analog.book Page 37 Tuesday, August 28, 2007 2:34 PM

38
Customising your TV
Cancel g Set the time to “0”
Remaining time g Display this menu again
Lock a channel
Sleep Timer Timer for turning off the TV
Child Lock Stop children from watching specific channels (analogue channels)
1Display the menu
zOK button does not work.
Set an “ID No.”
2Select a channel and lock it. ( : locked)
View a locked channel
Use the number buttons to enter the channel number.
When “ ” appears, press “ ” and enter your “ID No.” with the number buttons.
zIf you forget your “ID No.”, perform step 1 again.
Sleep Timer
0 120
Off Bset
Aselect
0400
Cset
Aselect a number
Bto the next column
ARD
_ _ _ _ _ _
AV
P R I D CH / CC
01 02CH
02 03CH
03 04CH
04
05
06
07
08
09
05CH
06CH
01CC
02CC
03CC
04CC
Child Lock
select
(blue)
Lock / Release
Features
Sleep Timer
Child Lock
Type AAppearance
OnBlue Back
Favourite Setting
OnPower Lamp
OffEco Mode
Features
LT-32DP8BT_EN_Analog.book Page 38 Tuesday, August 28, 2007 2:34 PM

39
IMPORTANT PREPARE USE SETTING TROUBLE?
ENGLISH
Appearance Type of the on-screen displays, Message Board and menus
(excluding on-screen displays for digital channels and DTV menus)
Type A : translucent
Type B : not translucent
zYou cannot change this setting when viewing a digital channel. Switch to
an analogue channel or an EXT mode.
Blue Back Displays a blue screen and mutes the sound when the signal is
weak or absent (On / Off) (analogue channels)
Favourite Setting Remove a channel from the Favourite channel list (analogue
channels)
For more details g “FAVOURITE CHANNEL” (P. 22)
Power Lamp Lights the power lamp (P. 6) while the TV is on (On / Off)
Eco Mode Automatically adjusts the picture contrast according to the
brightness of your room (On / Off / Demo)
For more details g “What is “Eco Mode”?” (P. 46)
Favourite Setting
PR 01
1
PR 03
2
PR 05
3
PR 07
4
select
(blue)
Remove
LT-32DP8BT_EN_Analog.book Page 39 Tuesday, August 28, 2007 2:34 PM
40
Customising your TV
To change the country, perform step 1 only.
Auto Program Automatically registers the channels (analogue channels)
1Select the country of installation
2Start “Auto Program”
zIf “ACI Start” appears, select and start settings.
(This will set up cable television channels.)
g“What is “ACI” (Automatic Channel Installation)?” (P. 45)
Edit channels
g“Editing analogue channels”
(P. 18)
Edit/Manual g “Editing analogue channels” (P. 18)
Language Select a language for the Message Board and menus (excluding
DTV menus)
Auto Program
Belgium
Nederland
Italia
France
Deutschland
United Kingdom
Country
Suomi
Norge
Sverige
Danmark
Switzerland
Ireland
Start
More
(yellow)
select
zFor the next page
(blue)
Auto Program
CH
02
0%
ARD
_ _ _ _ _ _
AV
PR ID
Edit
CH / CC
01 02CH
02 03CH
03 04CH
04
05
06
07
08
09
05CH
06CH
01CC
02CC
03CC
04CC
Language
Suomi
Svenska
Norsk
Dansk
Nederlands
Castellano
Italiano
Deutsch
Français
English
Català
Türkçe
Português
Magyar
Polski
Auto Program
Edit / Manual
Language
OffDecoder
(EXT-2)
Component Auto Select Off
EXT Setting
HDMI Setting
Attenuator
PC Position
Set Up
Off
Off
Auto Demonstration
Set Up
z“Attenuator” is not available for P80 series and will not
be displayed in the “Set Up” menu.
Note
LT-32DP8BT_EN_Analog.book Page 40 Tuesday, August 28, 2007 2:34 PM
41
IMPORTANT PREPARE USE SETTING TROUBLE?
ENGLISH
Decoder(EXT-2) Select “On” when connecting the Decoder to EXT-2 through the
VCR (On / Off)
Component Auto
Select
Changes the TV input to “EXT-4” when a component signal is input
to EXT-4 (On / Off)
zNot available when viewing PC
EXT Setting g “Setting external terminals” (P. 26)
HDMI Setting Size :
If picture size is not correct in 480p (525p), change this setting to 1
or 2. Normally set to “Auto”.
Audio :
If there is no sound, change this setting to “Digital” or “Analogue”.
Normally set to “Auto”.
HDMI CEC :
If you use a HDMI CEC compatible device, set this setting to “On”.
zFor more details g “What is “HDMI CEC”?” (P. 46)
Attenuator
(DP8 series only)
Select “On” when digital channels are not received because of too
strong radio waves (On / Off)
z“Attenuator” attenuates the radio waves of analogue broadcast as well as
those of digital broadcast. If some noise or snow appears when watching
an analogue channel, please set “Attenuator” to “Off” temporarily.
PC Position Adjust the position of the PC image
Auto
Demonstration
Starts the “100Hz Clear Motion Drive” demonstration (On / Off)
(P. 47)
HDMI CEC
HDMI
-1
Auto
Auto
Size
Audio Auto
On
Size
HDMI Setting
HDMI
-2
Note
adjust
(blue)
Reset
PC Position
Attenua
tor
LT-32DP8BT_EN_Analog.book Page 41 Tuesday, August 28, 2007 2:34 PM

42
For problems concerning digital
channels (DP8 series only)
gWATCHING DIGITAL CHANNELS
P. 20 - 21
Troubleshooting
I can’t turn it on!
zIs the power cord connected to the AC outlet
correctly?
Analogue channels
Severe noise or snow
zIs the TV connected correctly to
the aerial?
zChange the direction of the aerial.
zIs the aerial or its cable
damaged?
gConsult your retailer
zIs the “Attenuator” set to “On”?
g“Attenuator” (P. 41)
(DP8 series only)
Patterns, stripes or
noise
zIs the aerial receiving interference
from high-voltage power lines or
wireless transmitters?
gConsult your retailer
zAre connected devices too close
to the TV?
gInsert the minimum distance
between the aerial and the
cause of interference until no
interference
Ghosting
(Doubling of images)
zAre you receiving interference
from signals reflected off
mountains or buildings?
gAdjust the direction of your
aerial, or change to a
good-quality directional aerial
The remote
control doesn’t
work!
zAre the batteries flat?
zAre you more than 7 meters away
from the TV?
zIs the “MODE (TV, VCR/DVR, DVD, HC)” set to “TV”?
zWhen viewing teletext, the TV menu bar does not appear.
zDepending on the stability of the signal, there may be a time
lag when changing channels.
LT-32DP8BT_EN_Analog.book Page 42 Tuesday, August 28, 2007 2:34 PM
43
IMPORTANT PREPARE USE SETTING TROUBLE?
ENGLISH
Problem Actions
Page
Basics Screen Picture Sound
Remote control stops
working zUnplug TV, several minutes later plug it in again. –
Aspect ratio changes
unintentionally zPress “ ” to return to your settings. 30
Poor picture quality
zChange the “Picture Mode” setting.
zUnnatural colour >>> Adjust “Colour” and “Bright-1”.
Check your “Colour System”.
zNoise >>> Set to the following functions.
Picture Mode: Standard
Super DigiPure: Max
zDull picture >>> Set to the following functions.
Picture Mode: Bright
Super DigiPure: Min
35
35
36
35
36
35
36
Strange picture when
using an external
device
z
If you connected S-Video output device, check the “S-In” setting.
z
If the top of the image is distorted, check the video signal quality
itself.
z
If movement appears unnatural when receiving a signal from a
DVD player etc., with 576p (625p), change the output setting of
the external device to 576i (625i).
27
–
–
Poor sound
zAdjust the “MaxxAudio” setting.
zIf receiving a poor signal in “Stereo/ t·u”, switch to “v”
(monaural).
zChange the broadcasting system using “Manual”.
37
37
19
PC screen alignment is
off zAdjust the “PC Position”. 41
No sound from the
audio component
zAudio signals received from EXT-5 and EXT-6 cannot be sent
to the AUDIO OUT terminal. –
Enters “100Hz Clear
Motion Drive”
demonstration when
watching TV
zSet “Auto Demonstration” to “Off”. 41
Black or white dots
appear on the screen
zLCD panels use fine dots (“pixels”) to display images.
While more than 99.99% of these pixels function properly, a
very small number of pixels may not light, or may light all the
time.
Please understand that this is not a malfunction.
–
LT-32DP8BT_EN_Analog.book Page 43 Tuesday, August 28, 2007 2:34 PM
44
Troubleshooting
HDMI
Problem Actions
No picture, no sound zUse the cable marked with HDMI logo. –
Wrong screen size
zSwitch “Size” in “HDMI Setting” to “1” or “2”. (480p (525p) only)
zRead the user manual of the connected device and perform the
following:
gCheck if the output setting of the device is correct.
gChange the signal format of the device to other format.
41
–
No sound
zCheck if the device is compliant with HDMI.
zSwitch “Audio” in “HDMI Setting” to “Digital” or “Auto” for HDMI
devices, or “Analogue” or “Auto” for DVI devices.
(Not available for EXT-6)
–
41
Green and distorted
screen
zWait a little for the signal to stabilize when switching the signal
format for an HDMI device. –
Some inputs cannot be
selected in the sub-
picture
z“EXT-4”, “EXT-5”, “EXT-6” inputs and PC mode cannot be
selected in the sub-picture.
zRGB input signal of “EXT-1” and “EXT-2” are not available in
dual-picture mode.
–
“Feature Not Available”
appears
zIs the “T-V LINK” compatible device connected to EXT-2?
zIs the SCART CABLE “Fully Wired”?
zIs the “T-V LINK” compatible device turned on?
After confirming all the conditions above, press “OK” button
again.
–
“ACI Error” appears
zPress W to start “ACI” again.
If you still receive the “ACI Error” after numerous tries, press X
to cancel “ACI”.
–
“No Recording” zA problem occurs at the recorder. –
Some functions do not
work
zIt is not a malfunction. Depending on the situation, some
function items will be displayed in gray colour and will not work. 34
“No Recording
Possible” zThe displayed video cannot be recorded. –
“No Recording Media
Problem”
zThe recorder is not ready for recording.
Check the videotape or DVD disc. –
“No Recording Device
Busy” zThe recorder is recording another programme, or is playing. –
Functions Error message
Page
LT-32DP8BT_EN_Analog.book Page 44 Tuesday, August 28, 2007 2:34 PM
45
IMPORTANT PREPARE USE SETTING TROUBLE?
ENGLISH
What is “T-V LINK”?
“T-V LINK” allows the TV to share information easily with a connected “T-V LINK” compatible device.
By using T-V LINK:
zYou can send the channel information programmed on the TV to the “T-V LINK” compatible device, so that both
the TV and the external device have the same channel settings. When connecting a new external device,
channel information is loaded into it, allowing channel setup to be completed very quickly. For more details,
refer to the external device’s manual.
zYou can easily record the TV programme you are viewing on a “T-V LINK” compatible device by using the
“Direct Rec” feature. For more details, refer to the external device’s manual.
What is “ACI” (Automatic Channel Installation)?
Some cable companies transmit a signal called “ACI” which contains information that allows TV channels to be
registered automatically on your TV.
When an ACI signal is received, “ACI Start / ACI Skip” appears in the “Auto Program” screen.
Receivable broadcast systems
Depending on the country selected during “Auto Program”, the receivable broadcast system differs.
zUNITED KINGDOM: Receive only PAL-I.
zFRANCE: Can receive SECAM-L.
To receive SECAM-L in countries other than France:
1) Change the “Country” to “France” in “Auto Program”. (P. 40)
2) Press the “BACK” button to return to the menu and enter the channel using “Insert” or “Manual”. (P. 19)
PC signals that can be displayed
zIf the signal doesn’t appear, check that the
vertical frequency on the PC is set to “60Hz”.
Resolution 640 x 480 (VGA) 1024 x 768 (XGA)
Vertical frequency (Hz) 60.0 60.0
Connect DVI devices
Connect a DVI device to EXT-5 (HDMI) using DVI-HDMI conversion cable. Connect analogue sound output of the
DVI device to L and R terminals in EXT-4.
zSet “Audio” in “HDMI Setting” to “Analogue” or “Auto” g (P. 41)
zEXT-6 input does not support analogue sound (EXT-4).
What is “Attenuator”? (DP8 series only)
Turn “Attenuator” to “On” when digital channels are not received because of too strong radio waves
g “Attenuator” (P. 41)
z“Attenuator” attenuates the radio waves of analogue broadcast as well as those of digital channels. If some
noise or snow appears when watching an analogue channel, please set “Attenuator” to “Off” temporarily.
Technical Information
DP8 series only
For more information, please read the separate manual (WATCHING DIGITAL
CHANNELS).
“Technical Information” (P. 22 - 23)
LT-32DP8BT_EN_Analog.book Page 45 Tuesday, August 28, 2007 2:34 PM
46
Technical Information
What is “Eco Mode”?
You can adjust this TV so that the screen automatically adjusts to the optimum contrast of light and dark according
to the brightness of your room. This function reduces eyestrain and the power consumption of this TV.
zSet “Eco Mode” g “Eco Mode” (P. 39)
zMake sure not to block the Eco Sensor on front of the TV (P. 6)
zTo fully reduce eyestrain and the power consumption of this TV. Set to the following functions.
Eco Mode: On or Demo (P. 39)
Smart Picture: On (P. 36)
Using “Demo” in “Eco Mode”, you can display the effect of the “Eco Mode” on the screen
What is “HDMI CEC”?
HDMI CEC (Consumer Electronics Control) allows the TV to connect and control multiple HDMI CEC enabled
devices with a single remote. CEC (Consumer Electronics Control) is an optional protocol used in HDMI.
zHDMI CEC on this TV is compliant with “High-Definition Multimedia Interface Specification”.
zThe TV does not support HDMI CEC functions that are not listed below.
zThe TV does not guarantee to support use of all HDMI CEC enabled devices.
zDevices that are not enabled to HDMI CEC cannot be controlled with this TV.
Control the TV using the HDMI CEC enabled device
zTurn the TV on and switch to the video source of the operating device.
zSwitch to the video source of the operating device.
zTurn the TV off with the HDMI CEC enabled device you are viewing.
* For operating instructions of the device, refer to the device’s manual.
Control the HDMI CEC enabled device using the TV
zTurn off the operating device by turning off the TV.
* Some device may not support this function. For more details refer to the device’s manual.
Send status of the TV to the HDMI CEC enabled device
zWhen switching the TV’s external input or channel.
zWhen switching the TV’s menu language.
* Information regarding behaviour of the device when status is received, refer to the external device’s manual.
Turning On / Off HDMI CEC:
zSet HDMI CEC g “HDMI Setting” (P. 41)
* Factory default setting is “On”.
If “HDMI CEC” does not work correctly:
zWhen HDMI CEC enabled device is connected to EXT-1 or EXT-2 with SCART cable and EXT-5 or EXT-6 with
HDMI cable, you may not be able to control TV’s external input. To solve the problem set “HDMI CEC” to “Off”.
Eco Mode
LightDark
LT-32DP8BT_EN_Analog.book Page 46 Tuesday, August 28, 2007 2:34 PM
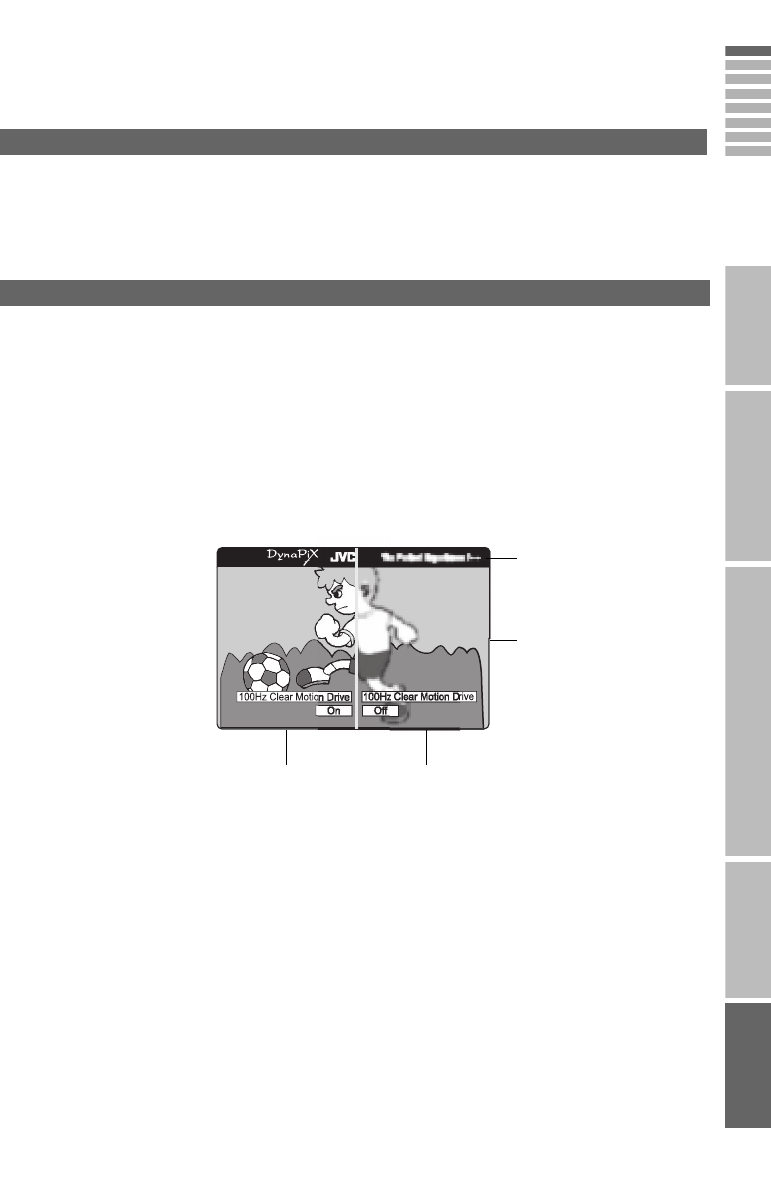
47
IMPORTANT PREPARE USE SETTING TROUBLE?
ENGLISH
Auto in “Zoom”
When “Auto” is selected in Zoom, the aspect ratio will turn to the ratio obtained from the information the TV
received.
zThe aspect ratio will turn to the ratio obtained from WSS (Wide Screen Identification Signal), video signal, or
control signal of the external devices. Without receiving the aspect information, it will be the setting in “4:3 Auto
Aspect” (P. 36)
zNot available in PC mode.
100Hz Clear Motion Drive
Most conventional LCD panel uses 50 frames per second (50 Hz) to display an image which needs long holding
time (time it takes to display single frame), causing blurring or ghost images when there is rapid or complex
movement across the screen - a phenomenon common to all LCD panels.
This TV is equipped with JVC’s original “100Hz Clear Motion Drive” technology, which displays two frames (the
original plus the new interpolated frame) in the time a 50 Hz set displays a single frame. Resulting to double the
typical rate, 100 frames per second (100 Hz) and half the holding time without reducing brightness or contrast.
By using this technology you will be able to reduce blurring or ghost images when there is rapid or complex
movement across the screen.
By using “Auto Demonstration”, you can display the differences between conventional LCD (50 Hz) and LCD panel
equipped with “100Hz Clear Motion Drive”.
*1 To simulate Moving image of conventional LCD, the TV will display two same frames at a time.
* The illustrations are emphasized to make clear differences between LCD panel equipped with “100Hz Clear
Motion Drive” and conventional LCD.
zSet “Auto Demonstration” to “On” “Off”. g “Auto Demonstration” (P. 41)
zWhen set to “On”, it automatically enters demonstration every time no operation is made for approximately 3
minutes. To stop automatic demonstration, set “Auto Demonstration” to “Off”.
zWhen the images are 60 frames per second (60 Hz), it will be produced as 120 frames per second (120 Hz).
erience /---- The “DynaPix” ticker will run
right to left
You can confirm the
differences of the two LCD’s
with actual moving images
Moving image of LCD panel equipped with “100Hz
Clear Motion Drive” (100 frames per second)
Moving image of 50 Hz conventional LCD (50
frames per second)*1
LT-32DP8BT_EN_Analog.book Page 47 Tuesday, August 28, 2007 2:34 PM

48
“CH/CC” List
To use the “Insert” function (P. 19), find the “CH/CC” number corresponding to the TV’s Channel number from this
table.
zWhen the Country setting is “France”, select a three-digit CH/CC number.
CH Channel CH Channel CC Channel CC Channel
CH 02/CH 202 E2, R1, IR A CH 40/CH 240 E40, R40 CC 01/CC 201 S1 CC 31/CC 231 S31
CH 03/CH 203 E3, ITALY A, IR B CH 41/CH 241 E41, R41 CC 02/CC 202 S2 CC 32/CC 232 S32
CH 04/CH 204
E4, ITALY B, R2, IR C
CH 42/CH 242 E42, R42 CC 03/CC 203 S3 CC 33/CC 233 S33
CH 05/CH 205
E5, ITALY D, R6, IR D
CH 43/CH 243 E43, R43 CC 04/CC 204 S4 CC 34/CC 234 S34
CH 06/CH 206
E6, ITALY E, R7, IR E
CH 44/CH 244 E44, R44 CC 05/CC 205 S5 CC 35/CC 235 S35
CH 07/CH 207
E7, ITALY F, R8, IR F
CH 45/CH 245 E45, R45 CC 06/CC 206 S6 CC 36/CC 236 S36
CH 08/CH 208 E8, R9, IR G CH 46/CH 246 E46, R46 CC 07/CC 207 S7 CC 37/CC 237 S37
CH 09/CH 209 E9, ITALY G CH 47/CH 247 E47, R47 CC 08/CC 208 S8 CC 38/CC 238 S38
CH 10/CH 210
E10, ITALY H, R10, IR H
CH 48/CH 248 E48, R48 CC 09/CC 209 S9 CC 39/CC 239 S39
CH 11/CH 211
E11, ITALY H+1, R11, IR J
CH 49/CH 249 E49, R49 CC 10/CC 210 S10 CC 40/CC 240 S40
CH 12/CH 212
E12, ITALY H+2, R12
CH 50/CH 250 E50, R50 CC 11/CC 211 S11 CC 41/CC 241 S41
CH 21/CH 221 E21, R21 CH 51/CH 251 E51, R51 CC 12/CC 212 S12 CC 75/CC 275 X
CH 22/CH 222 E22, R22 CH 52/CH 252 E52, R52 CC 13/CC 213 S13 CC 76/CC 276 Y, R3
CH 23/CH 223 E23, R23 CH 53/CH 253 E53, R53 CC 14/CC 214 S14 CC 77/CC 277 Z, ITALY C, R4
CH 24/CH 224 E24, R24 CH 54/CH 254 E54, R54 CC 15/CC 215 S15 CC 78/CC 278 Z+1, R5
CH 25/CH 225 E25, R25 CH 55/CH 255 E55, R55 CC 16/CC 216 S16 CC 79/CC 279 Z+2
CH 26/CH 226 E26, R26 CH 56/CH 256 E56, R56 CC 17/CC 217 S17
CH 27/CH 227 E27, R27 CH 57/CH 257 E57, R57 CC 18/CC 218 S18
CH 28/CH 228 E28, R28 CH 58/CH 258 E58, R58 CC 19/CC 219 S19
CH 29/CH 229 E29, R29 CH 59/CH 259 E59, R59 CC 20/CC 220 S20
CH 30/CH 230 E30, R30 CH 60/CH 260 E60, R60 CC 21/CC 221 S21
CH 31/CH 231 E31, R31 CH 61/CH 261 E61, R61 CC 22/CC 222 S22
CH 32/CH 232 E32, R32 CH 62/CH 262 E62, R62 CC 23/CC 223 S23
CH 33/CH 233 E33, R33 CH 63/CH 263 E63, R63 CC 24/CC 224 S24
CH 34/CH 234 E34, R34 CH 64/CH 264 E64, R64 CC 25/CC 225 S25
CH 35/CH 235 E35, R35 CH 65/CH 265 E65, R65 CC 26/CC 226 S26
CH 36/CH 236 E36, R36 CH 66/CH 266 E66, R66 CC 27/CC 227 S27
CH 37/CH 237 E37, R37 CH 67/CH 267 E67, R67 CC 28/CC 228 S28
CH 38/CH 238 E38, R38 CH 68/CH 268 E68, R68 CC 29/CC 229 S29
CH 39/CH 239 E39, R39 CH 69/CH 269 E69, R69 CC 30/CC 230 S30
CH Channel CH Channel CC Frequency (MHz) CC Frequency (MHz)
CH 102 F2 CH 141 F41 CC 110 116-124 CC 152 391-399
CH 103 F3 CH 142 F42 CC 111 124-132 CC 153 399-407
CH 104 F4 CH 143 F43 CC 112 132-140 CC 154 407-415
CH 105 F5 CH 144 F44 CC 113 140-148 CC 155 415-423
CH 106 F6 CH 145 F45 CC 114 148-156 CC 156 423-431
CH 107 F7 CH 146 F46 CC 115 156-164 CC 157 431-439
CH 108 F8 CH 147 F47 CC 116 164-172 CC 158 439-447
CH 109 F9 CH 148 F48 CC 123 220-228 CC 159 447-455
CH 110 F10 CH 149 F49 CC 124 228-236 CC 160 455-463
CH 121 F21 CH 150 F50 CC 125 236-244 CC 161 463-469
CH 122 F22 CH 151 F51 CC 126 244-252
CH 123 F23 CH 152 F52 CC 127 252-260
CH 124 F24 CH 153 F53 CC 128 260-268
CH 125 F25 CH 154 F54 CC 129 268-276
CH 126 F26 CH 155 F55 CC 130 276-284
CH 127 F27 CH 156 F56 CC 131 284-292
CH 128 F28 CH 157 F57 CC 132 292-300
CH 129 F29 CH 158 F58 CC 133 300-306
CH 130 F30 CH 159 F59 CC 141 306-311
CH 131 F31 CH 160 F60 CC 142 311-319
CH 132 F32 CH 161 F61 CC 143 319-327
CH 133 F33 CH 162 F62 CC 144 327-335
CH 134 F34 CH 163 F63 CC 145 335-343
CH 135 F35 CH 164 F64 CC 146 343-351
CH 136 F36 CH 165 F65 CC 147 351-359
CH 137 F37 CH 166 F66 CC 148 359-367
CH 138 F38 CH 167 F67 CC 149 367-375
CH 139 F39 CH 168 F68 CC 150 375-383
CH 140 F40 CH 169 F69 CC 151 383-391
LT-32DP8BT_EN_Analog.book Page 48 Tuesday, August 28, 2007 2:34 PM
49
IMPORTANT PREPARE USE SETTING TROUBLE?
ENGLISH
zWe may change the design and specifications without notice.
Main unit
Model LT-42P80BU LT-37P80BU LT-32P80BU
Broadcasting systems CCIR I / B / G / D / K / L (See “Technical Information”, P. 45)
Colour systems TV broadcast: PAL, SECAM
External input: PAL, SECAM, NTSC 3.58/4.43 MHz
Channels and frequencies
E2-E12 / E21-E69, F2-F10 / F21-F69, IR A-IR J, ITALY A-H / H+1 / H+2,
R1-R12 / R21-R69, S1-S41, X / Y / Z / Z+1 / Z+2,
French cable channels (Frequency: 116-172 MHz / 220-469 MHz)
Sound-multiplex systems NICAM (I / B / G / D / K / L), A2 (B / G / D / K)
Teletext systems FLOF (Fastext), TOP, WST (standard system)
Power requirements AC 220 V - 240 V, 50 Hz
Audio output (Rated power
output) 10 W + 10 W
Speakers (5.5 cm x 20 cm) oval x 2 (5.5 cm x 15 cm) oval x 2 (5.5 cm x 15 cm) oval x 2
Power consumption
[standby]
214 W
[0.5 W]
158 W
[0.5 W]
151 W
[1.0 W]
Screen size
(visible area size measured
diagonally)
105 cm 94 cm 80 cm
Dimensions (W x H x D: mm)
[without stand]
1030 x 719.2 x 296
[1030 x 672 x 122.4]
919 x 654.2 x 230
[919 x 603.8 x 124.1]
800 x 595.4 x 230
[800 x 545 x 115.4]
Weights
[without stand]
28 kg
[25.9 kg]
19.9 kg
[18.4 kg]
16.3 kg
[14.8 kg]
Accessories (See “Check accessories”, P. 6)
Terminals / Connectors
Terminal name Terminal type Signal type (IN) Signal type
(OUT) Notes
Input /
Output
terminals
EXT-1 Euroconnector x 1
(SCART connector)
Composite video, S-Video,
Analogue RGB
Audio L / R
TV out
EXT-2 Euroconnector x 1
(SCART connector)
Composite video, S-Video,
Analogue RGB
Audio L / R
Dubbing out “T-V LINK”
compatible
Input
terminals
EXT-3 RCA connectors x 3,
S-VIDEO connector x 1
Composite video, S-Video
Audio L / R
EXT-4 RCA connectors x 5
Analogue component
(576i (625i), 480i (525i),
Progressive: 576p (625p),
480p (525p),
HD: 1080i (1125i), 720p (750p))
Audio L / R
EXT-5
(HDMI-1) HDMI connector x 2
HDMI
(576i (625i), 480i (525i),
576p (625p), 480p (525p),
1080i (1125i), 720p (750p))
“HDMI CEC”
compatible
(P. 46)
EXT-6
(HDMI-2)
PC IN D-SUB (15 pins) x 1 Analogue PC signal (P. 45)
Output
terminals
AUDIO OUT RCA connectors x 2 Audio L / R
Headphone Stereo mini-jack x 1
(3.5 mm in diameter)
Headphone
output
Specifications P80 Series
LT-32DP8BT_EN_Analog.book Page 49 Tuesday, August 28, 2007 2:34 PM
50
Main unit
Model LT-42DP8BG/N/T LT-37DP8BG/N/T LT-32DP8BG/N/T
Broadcasting systems CCIR I / B / G / D / K / L (See “Technical Information”, P. 45)
Colour systems TV broadcast: PAL, SECAM
External input: PAL, SECAM, NTSC 3.58/4.43 MHz
Channels and frequencies
zDigital: Frequency: 174-230 MHz / 470-862 MHz
Country: See “Specifications of your TV” (P. 1)
zAnalogue:
E2-E12 / E21-E69, F2-F10 / F21-F69, IR A-IR J, ITALY A-H / H+1 / H+2,
R1-R12 / R21-R69, S1-S41, X / Y / Z / Z+1 / Z+2,
French cable channels (Frequency: 116-172 MHz / 220-469 MHz)
Sound-multiplex systems NICAM (I / B / G / D / K / L), A2 (B / G / D / K)
Teletext systems Digital: EBU Text
Analogue: FLOF (Fastext), TOP, WST (World Standard System)
Power requirements AC 220 V - 240 V, 50 Hz
Audio output (Rated power output)
10 W + 10 W
Speakers (5.5 cm x 20 cm) oval x 2 (5.5 cm x 15 cm) oval x 2 (5.5 cm x 15 cm) oval x 2
Power consumption
[standby]
220 W
[0.5 W]
164 W
[0.5 W]
156 W
[1.0 W]
Screen size
(visible area size measured
diagonally)
105 cm 94 cm 80 cm
Dimensions (W x H x D: mm)
[without stand]
1030 x 719.2 x 296
[1030 x 672 x 122.4]
919 x 654.2 x 230
[919 x 603.8 x 124.1]
800 x 595.4 x 230
[800 x 545 x 115.4]
Weights
[without stand]
28.5 kg
[26.4 kg]
20.3 kg
[18.8 kg]
16.6 kg
[15.1 kg]
Accessories (See “Check accessories”, P. 6)
zA Conditional Access Module for watching pay-TV digital channels can be installed. (P. 9)
zDC power can be supplied to the indoor aerial. gWATCHING DIGITAL CHANNELS P. 22
Terminals / Connectors
Terminal name Terminal type Signal type (IN) Signal type
(OUT) Notes
Input /
Output
terminals
EXT-1 Euroconnector x 1
(SCART connector)
Composite video, S-Video,
Analogue RGB
Audio L / R
TV out
EXT-2 Euroconnector x 1
(SCART connector)
Composite video, S-Video,
Analogue RGB
Audio L / R
Dubbing out “T-V LINK”
compatible
Input
terminals
EXT-3 RCA connectors x 3,
S-VIDEO connector x 1
Composite video, S-Video
Audio L / R
EXT-4 RCA connectors x 5
Analogue component
(576i (625i), 480i (525i),
Progressive: 576p (625p),
480p (525p),
HD: 1080i (1125i), 720p (750p))
Audio L / R
EXT-5
(HDMI-1) HDMI connector x 2
HDMI
(576i (625i), 480i (525i),
576p (625p), 480p (525p),
1080i (1125i), 720p (750p))
“HDMI CEC”
compatible
(P. 46)
EXT-6
(HDMI-2)
PC IN D-SUB (15 pins) x 1 Analogue PC signal (P. 45)
Output
terminals
AUDIO OUT RCA connectors x 2 Audio L / R
DIGITAL
AUDIO OUT OPTICAL connector x 1
Digital audio
(48 kHz, 16 bit
linear PCM /
Dolby Digital)
Headphone Stereo mini-jack x 1
(3.5 mm in diameter)
Headphone
output
zWe may change the design and specifications without notice.
Specifications DP8 Series
LT-32DP8BT_EN_Analog.book Page 50 Tuesday, August 28, 2007 2:34 PM

0807KTH-SW-MU
© 2007 Victor Company of Japan, Limited
LT-32DP8BT_EN_Analog.book Page 51 Tuesday, August 28, 2007 2:34 PM
