JVC NX D4B D4[B] User Manual GVT0277 001B
User Manual: JVC NX-D4B NX-D4B English,
Open the PDF directly: View PDF ![]() .
.
Page Count: 2
1 3
24
ENGLISH
Warnings, Cautions and Others
CAUTION:
To reduce the risk of electrical shocks, fire, etc.:
1. Do not remove screws, covers or cabinet.
2. Do not expose this appliance to rain or moisture.
CAUTION
The button in any position does not disconnect the
mains line.
Disconnect the mains plug to shut the power off completely
(the STANDBY lamp goes off).
The MAINS plug or an appliance coupler is used as the
disconnect device, the disconnect device shall remain readily
operable.
• When the System is on standby, the STANDBY lamp lights
red.
• When the System is turned on, the STANDBY lamp goes
off.
The power can be remote controlled.
IMPORTANT FOR LASER PRODUCTS
1. CLASS 1 LASER PRODUCT
2. CAUTION: Do not open the top cover or cabinet. There
are no user serviceable parts inside the unit; leave all
servicing to qualified service personnel.
3. CAUTION: Visible and/or invisible class 1M laser
radiation when open. Do not view directly with optical
instruments.
4. REPRODUCTION OF LABEL: CAUTION LABEL,
PLACED INSIDE THE UNIT.
GVT0277-001B[B]
1009WMKMDWJMM
©2009 Victor Company of Japan, Limited
COMPACT COMPONENT
SYSTEM
NX-D4
Thank you for purchasing a JVC product.
INSTRUCTIONS CA-NXD4 CA-NXD4
— Consists of CA-NXD4 and SP-NXD3
SP-NXD3SP-NXD3
CAUTION:
• Do not block the ventilation openings or holes. (If
the ventilation openings or holes are blocked by a
newspaper or cloth, etc., the heat may not be able to get
out.)
• Do not place any naked flame sources, such as lighted
candles, on the apparatus.
• When discarding batteries, environmental problems
must be considered and local rules or laws governing
the disposal of these batteries must be followed strictly.
• Do not expose this apparatus to rain, moisture, dripping
or splashing and that no objects filled with liquids, such
as vases, shall be placed on the apparatus.
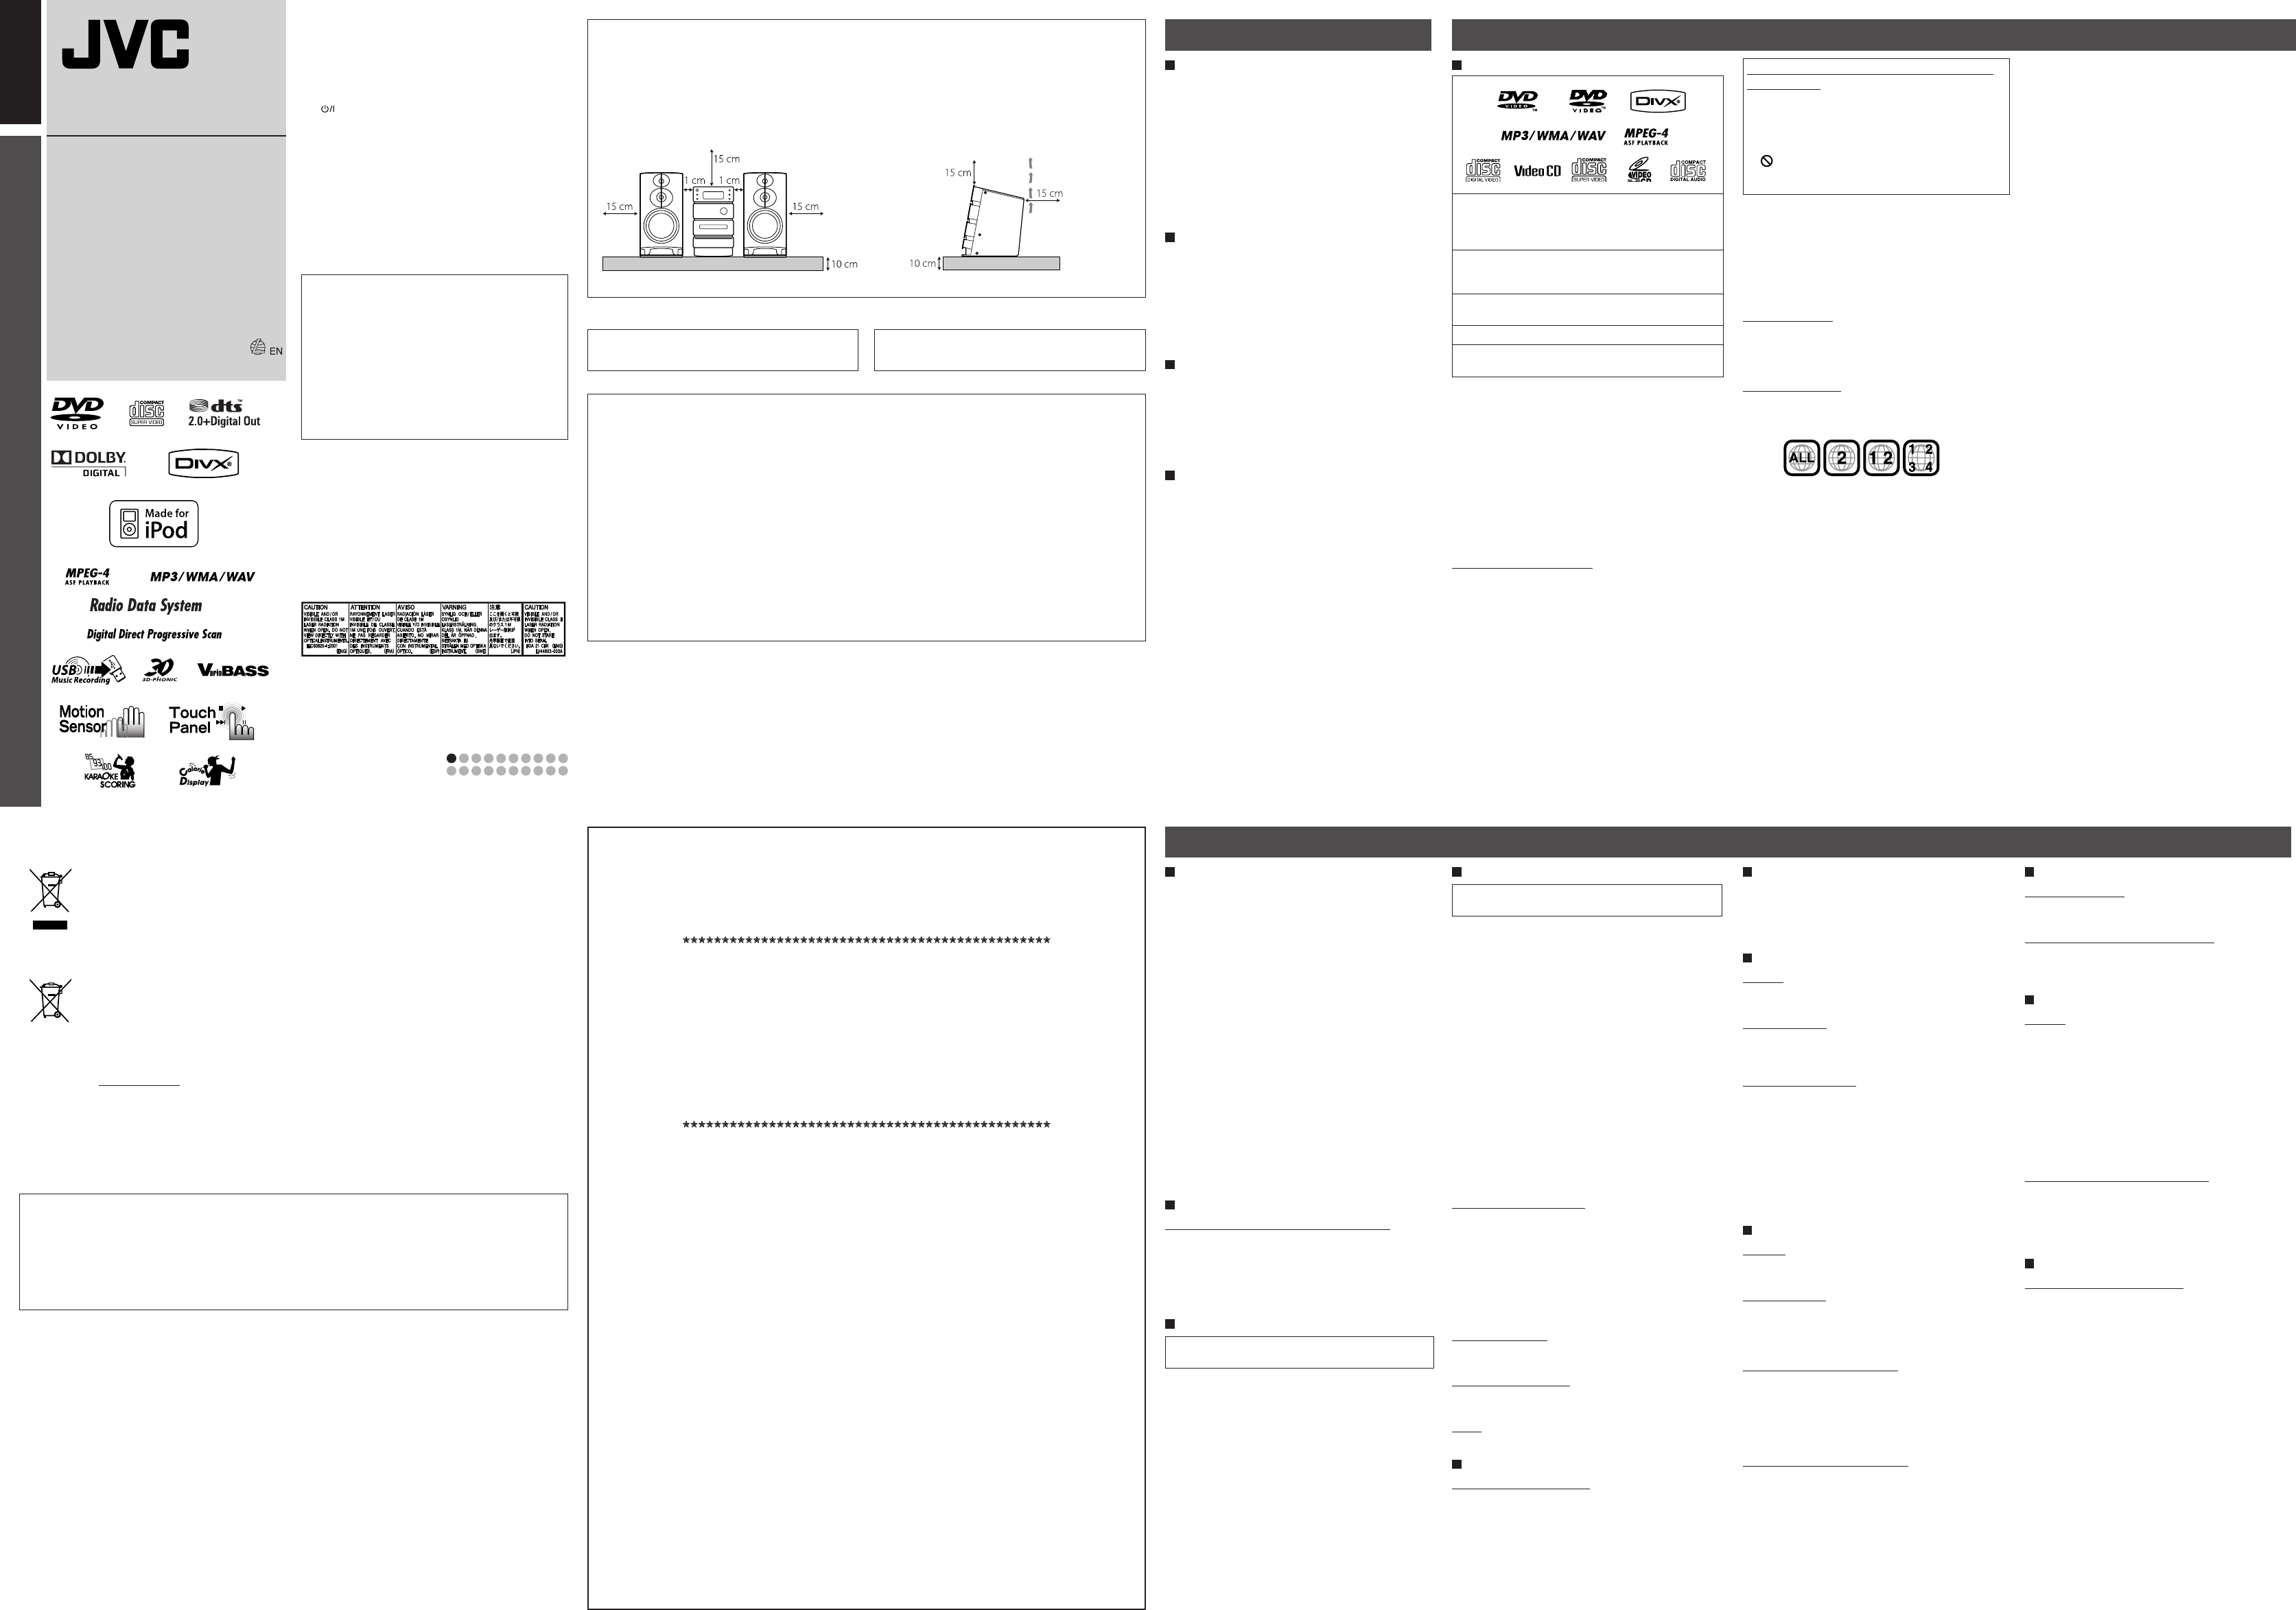
CAUTION: Proper Ventilation
To avoid risk of electric shock and fire, and to prevent damage, locate the apparatus as follows:
1. Front: No obstructions and open spacing.
2. Sides/Top/Back: No obstructions should be placed in the areas shown by the dimensions below.
3. Bottom: Place on the level surface. Maintain an adequate air path for ventilation by placing on a stand with a height of
10 cm or more.
Front view Side view
CAUTION
Battery shall not be exposed to excessive heat such as
sunshine, fire, or the like.
CAUTION:
Excessive sound pressure from earphones or headphones
can cause hearing loss.
IMPORTANT for the U.K.
DO NOT cut off the mains plug from this equipment. If the plug fitted is not suitable for the power points in your home
or the cable is too short to reach a power point, then obtain an appropriate safety approved extension lead or consult your
dealer.
BE SURE to replace the fuse only with an identical approved type, as originally fitted.
If nonetheless the mains plug is cut off ensure to remove the fuse and dispose of the plug immediately, to avoid a possible
shock hazard by inadvertent connection to the mains supply.
If this product is not supplied fitted with a mains plug then follow the instructions given below:
IMPORTANT:
DO NOT make any connection to the terminal which is marked with the letter E or by the safety earth symbol or coloured
green or green-and-yellow.
The wires in the mains lead on this product are coloured in accordance with the following code:
Blue: Neutral
Brown: Live
As these colours may not correspond with the coloured markings identifying the terminals in your plug proceed as follows:
The wire which is coloured blue must be connected to the terminal which is marked with the letter N or coloured black.
The wire which is coloured brown must be connected to the terminal which is marked with the letter L or coloured red.
IF IN DOUBT - CONSULT A COMPETENT ELECTRICIAN.
GVT0277-001B
NX-D4 INSTRUCTIONS—Starting up
Information for Users on Disposal of Old Equipment and Batteries
Products
Battery
Notice:
The sign Pb
below the
symbol for
batteries
indicates that
this battery
contains
lead.
[European Union]
These symbols indicate that the electrical and electronic equipment and the battery with this symbol
should not be disposed of as general household waste at its end-of-life. Instead, the products should be
handed over to the applicable collection points for the recycling of electrical and electronic equipment as
well as batteries for proper treatment, recovery and recycling in accordance with your national legislation
and the Directive 2002/96/EC and 2006/66/EC.
By disposing of these products correctly, you will help to conserve natural resources and will help to
prevent potential negative effects on the environment and human health which could otherwise be caused
by inappropriate waste handling of these products.
For more information about collection points and recycling of these products, please contact your local
municipal office, your household waste disposal service or the shop where you purchased the product.
Penalties may be applicable for incorrect disposal of this waste, in accordance with national legislation.
[Business users]
If you wish to dispose of this product, please visit our web page
http://www.jvc.eu/ to obtain information about the take-back of the product.
[Other Countries outside the European Union]
These symbols are only valid in the European Union.
If you wish to dispose of these items, please do so in accordance with applicable national legislation or
other rules in your country for the treatment of old electrical and electronic equipment and batteries.
Dear Customer,
This apparatus is in conformance with the valid European directives and standards regarding electromagnetic
compatibility and electrical safety.
European representative of Victor Company of Japan, Limited is:
JVC Technical Services Europe GmbH
Postfach 10 05 04
61145 Friedberg
Germany
SAFETY INSTRUCTIONS
“SOME DOS AND DON’TS ON THE SAFE USE OF EQUIPMENT”
This equipment has been designed and manufactured to meet international safety standards but,
like any electrical equipment, care must be taken if you are to obtain the best results and safety is
to be assured.
Do read the operating instructions before you attempt to use the equipment.
Do ensure that all electrical connections (including the mains plug, extension leads and
interconnections between pieces of equipment) are properly made and in accordance with the
manufacturer’s instructions. Switch off and withdraw the mains plug when making or changing
connections.
Do consult your dealer if you are ever in doubt about the installation, operation or safety of your
equipment.
Do be careful with glass panels or doors on equipment.
DON’T continue to operate the equipment if you are in any doubt about it working normally, or if it
is damaged in any way — switch off, withdraw the mains plug and consult your dealer.
DON’T remove any fixed cover as this may expose dangerous voltages.
DON’T leave equipment switched on when it is unattended unless it is specifically stated that it is
designed for unattended operation or has a standby mode.
Switch off using the switch on the equipment and make sure that your family know how to do this.
Special arrangements may need to be made for infirm or handicapped people.
DON’T use equipment such as personal stereos or radios so that you are distracted from the
requirements of traffic safety. It is illegal to watch television whilst driving.
DON’T listen to headphones at high volume as such use can permanently damage your hearing.
DON’T obstruct the ventilation of the equipment, for example with curtains or soft furnishings.
Overheating will cause damage and shorten the life of the equipment.
DON’T use makeshift stands and NEVER fix legs with wood screws — to ensure complete safety
always fit the manufacturer’s approved stand or legs with the fixings provided according to the
instructions.
DON’T allow electrical equipment to be exposed to rain or moisture.
ABOVE ALL
— NEVER let anyone, especially children, push anything into holes, slots or any other opening in
the case
—this could result in a fatal electrical shock.
— NEVER guess or take chances with electrical equipment of any kind — it is better to be safe
than sorry!
GVT0277-001A EN_NX-D4[B] Starting up
GVT0277-001A EN_NX-D4[B] Starting up
GVT0277-001A EN_NX-D4[B] Starting up
GVT0277-001A EN_NX-D4[B] Starting up
Learning More about This System
IntroductionPrecautions
IMPORTANT: Before playing a disc/file, make sure of
the following...
• Turn on the TV and select an appropriate input mode
on the TV to view the pictures or on-screen displays.
• For disc/file playback, you can change the initial setting
to your preference. Refer to “Setup Menu” in “Operating
Guide.”
If “ ” appears on the TV screen when you press a button,
the disc/file cannot perform the operation you have tried
to do.
• When playing a multi-channel encoded software, the
System properly converts the multi-channel signals into
2 channels, and emits the downmixed sound from the
speakers. To enjoy the powerful sound of these multi-
channel encoded software, connect a proper decoder or an
amplifier with a proper built-in decoder to the OPTICAL
DIGITAL OUTPUT terminal on the rear.
About color system
This System accommodates both PAL and NTSC system and
can play back discs/files recorded in either system.
To change the color system, see “Preparations.”
Note on Region Code
DVD players and DVDs have their own Region Code
numbers. This System can play back only DVDs with Region
Code numbers including “2.”
Ex.:
• “REGION ERR” appears if DVD with a wrong Region
Code is loaded.
7 License and Trademark
• “DVD Logo” is a trademark of DVD Format/Logo
Licensing Corporation.
• Manufactured under license from Dolby Laboratories.
“Dolby” and the double-D symbol are trademarks of
Dolby Laboratories.
• Manufactured under license under U.S. Patent numbers:
5,451,942; 5,956,674; 5,974,380; 5,978,762; 6,487,535 and
other U.S. and worldwide patents issued & pending. DTS
and DTS 2.0 + Digital Out are registered trademarks and
the DTS logos and Symbol are trademarks of DTS, Inc.
© 1996-2007 DTS, Inc. All Rights Reserved.
Playable Disc/File Types
• CD-R/-RW: Recorded in the Audio CD, Video CD, and
SVCD formats. MP3, WMA, WAV, JPEG, MPEG-1,
MPEG-2, ASF, and DivX files written in accordance with
the “ISO 9660” format can also be played.
• DVD-R/-RW, +R/+RW: MP3, WMA, WAV, JPEG,
MPEG-1, MPEG-2, ASF, and DivX files written in the
UDF-Bridge format can be played.
• DVD-R/-RW: Recorded in the DVD Video format and
the DVD Video Recording (VR) format.
• DVD+R: Recorded in the DVD Video format.
• USB device: MP3, WMA, WAV, JPEG, MPEG-1,
MPEG-2, ASF, and DivX* files.
In addition to the above discs/files, this System can play back
audio data recorded on CD-Extra and CD-G (CD-Graphics).
• The following discs cannot be played back:
DVD-RAM, CD-I (CD-I Ready), and Photo CD.
Playing back these discs will generate noise and damage the
speakers.
• CD Text and DVD Text can be played, but text information
will not be shown on the display.
• This System can play back Everio file with the extension
code <.mod> recorded on DVD, CD*, and USB device*.
* Only when the maximum bit rate is less than 2 Mbps.
Caution for DualDisc playback
The Non-DVD side of a “DualDisc” does not comply with the
“Compact Disc Digital Audio” standard. Therefore, the use of
the Non-DVD side of a DualDisc in this product may not be
recommended.
Notes on the power cord
• When you are away on travel or otherwise for an extended
period of time, remove the plug from the wall outlet.
• When unplugging the System from the wall outlet, always
pull the plug, not the power cord.
• Do not handle the power cord with wet hands.
• Disconnect the power cord before cleaning the System or
moving the System.
• Do not alter, twist or pull the power cord, or put anything
heavy on it, which may cause fire, electric shock, or other
accidents.
• If the cord is damaged, consult a dealer and have the power
cord replaced with a new one.
Avoid moisture, water, dust, and high
temperatures
• Do not place the System in moist or dusty places.
• If water gets inside the System, turn off the power and
remove the plug from the wall outlet, then consult your
dealer. Using the System in this state may cause a fire or
electrical shock.
• Do not expose the System to direct sunlight or place it near
a heating device.
Notes on installation
• Select a place which is level, dry and neither too hot nor too
cold—between 5˚C and 35˚C.
• Do not install the System in a place subject to vibrations.
• Do not put heavy objects on the System.
• Do not drag or push the speakers on the floor or table;
otherwise, the four feet at the bottom side of each speaker
may peel off or drop from the speaker.
To prevent malfunction or damage of the System
• Do not insert any metallic objects, such as wires, hairpins,
coins, etc. into the System.
• Do not block the vents.
There are no user-serviceable parts inside. If anything
goes wrong, unplug the power cord and consult your
dealer.
• DivX® is a registered trademark of DivX, Inc., and is used
under license.
• ABOUT DIVX VIDEO: DivX® is a digital video format
created by DivX, Inc. This is an official DivX Certified or
DivX Ultra Certified device that plays DivX video.
• ABOUT DIVX VIDEO-ON-DEMAND: This DivX®
Certified device must be registered in order to play
DivX Video-on-Demand (VOD) content. First generate
the DivX VOD registration code for your device and
submit it during the registration process. [Important:
DivX VOD content is protected by a DivX DRM (Digital
Rights Management) system that restricts playback to
registered DivX Certified devices. If you try to play DivX
VOD content not authorized for your device, the message
“Authorization Error” will be displayed and your content
will not play.] Learn more at www.divx.com/vod.
• Plays DivX® video
• iPod is a trademark of Apple Inc., registered in the U.S.
and other countries.
• “Made for iPod” means that an electronic accessory has
been designed to connect specifically to iPod and has been
certified by the developer to meet Apple performance
standards.
• Microsoft and Windows Media are either registered
trademarks or trademarks of Microsoft Corporation in the
United States and/or other countries.
• This product incorporates copyright protection
technology that is protected by U.S. patents and other
intellectual property rights. Use of this copyright
protection technology must be authorized by Macrovision,
and is intended for home and other limited viewing uses
only unless otherwise authorized by Macrovision. Reverse
engineering or disassembly is prohibited.
• “CONSUMERS SHOULD NOTE THAT NOT ALL
HIGH DEFINITION TELEVISION SETS ARE FULLY
COMPATIBLE WITH THIS PRODUCT AND MAY
CAUSE ARTIFACTS TO BE DISPLAYED IN THE
PICTURE. IN CASE OF 525 OR 625 PROGRESSIVE
SCAN PICTURE PROBLEMS, IT IS RECOMMENDED
THAT THE USER SWITCH THE CONNECTION
TO THE ‘STANDARD DEFINITION’ OUTPUT. IF
THERE ARE QUESTIONS REGARDING OUR TV SET
COMPATIBILITY WITH THIS MODEL 525p AND 625p
DVD PLAYER, PLEASE CONTACT OUR CUSTOMER
SERVICE CENTER.”
• USE OF THIS PRODUCT IN ANY MANNER THAT
COMPLIES WITH THE MPEG-4 VISUAL STANDARD
IS PROHIBITED, EXCEPT FOR USE BY A CONSUMER
ENGAGING IN PERSONAL AND NON-COMMERCIAL
ACTIVITIES.
Connections
• Make sure the antenna conductors do not touch any other
terminals, connecting cords or the power cord. Also, keep
the antennas away from metallic parts of the System,
connecting cords, and the power cord. These could cause
poor reception.
• Use only speakers with the same speaker impedance as
indicated by the speaker terminals on the rear of the
System.
• The speakers are magnetically shielded to avoid color
distortions on TVs. However, if not installed properly,
it may cause color distortions. So, pay attention to the
following when installing the speakers.
– When placing the speakers near a TV set, turn off the
TV’s main power switch or unplug it before installing the
speakers.
Then wait at least 30 minutes before turning on the TV’s
main power switch again.
– Some TVs may still be affected even though you have
followed the above instructions. If this happens, move
the speakers away from the TV.
• You cannot connect a computer and JVC Everio camcorder
to the USB terminals of the System.
• Electrostatic shock at connecting a USB device may cause
abnormal playback of the device. In this case, disconnect
the USB device then turn off this unit.
Preparations
To change the color system and scanning mode:
• You cannot display a high quality image of progressive
scanning in the following cases:
– When your TV does not support the progressive video
input.
– When you have not connected your TV to the System
using a component video cord.
Enjoying Movies/Music from your iPod
JVC is not responsible for any loss of or damage to iPod
that might result from the use of this product.
• Apple is not responsible for the operation of this device or
its compliance with safety and regulatory standards.
• Sound distortion may occur when playing back audio
sources with a high recording level. When distortion
occurs, it is recommended to turn off the equalizer of iPod.
For information on operating iPod, see the instruction
manual for iPod.
• If iPod does not play correctly, update iPod software to the
latest version.
• For details about updating iPod, check on the Apple web
site <http://www.apple.com>.
• JVC does not assure the compatibility of iPod released after
April 2009 with this unit.
Listening to a Disc/USB Device
JVC bears no responsibility for any loss of data in the USB
mass storage class device while using this System.
• When connecting with a USB cable, use the USB 2.0 cable
whose length is less than 1 m.
• You can connect a USB device such as a USB flash memory
device, hard disk drive, multimedia card reader, etc. to this
System.
• When you change the source to “DVD/CD” or “USB,” it
may take a while to activate the source.
• While the System is reading a disc, the source may not
change to “USB” properly. Press 7 to stop the disc before
changing the source to “USB.”
• On some discs, the actual operations may be different from
what is explained in this manual due to the programming
and disc structure; such differences are not a malfunction
of this System.
• The total number of tracks (files) that the System can detect
is 4 000.
• The System recognizes up to...
– 999 tracks (files) per group.
– 99 groups per disc.
Unplayable files are also counted in the total file number.
Playable files which do not belong to any groups are
recognized as files of group 1.
Program Play/Random Play:
• Program is cleared in the following cases:
– When the System is turned off (standby).
• During programming steps...
– Your entry will be ignored if you have tried to program
an item number that does not exist (for example,
selecting track 14 on a disc that only has 12 tracks).
– For MP3/WMA/WAV files, you can program up to 99
files.
– You cannot select the 151st or later tracks.
Playing Repeatedly:
• A-B Repeat cannot be used for MP3/WMA/WAV/JPEG/
MPEG-1/MPEG-2/ASF/DivX files and some DVDs.
To select the audio track:
• On some discs/files, you cannot change audio language
during playback.
Zoom:
• While zoomed in, the picture may look coarse.
On-screen Operations for Disc
Operating the On-screen Bar:
• A-B Repeat is available only within the same title/original
program/track.
Listening to the Radio
• If you store a new station into an occupied preset number,
the previously stored station in that number will be erased.
• When you unplug the power cord accidentally or if a
power failure occurs, the preset stations may be erased. If
this happens, preset the stations again.
Timer Operations
General:
• When the System is on standby, you cannot set the clock
and Daily Timer.
Setting the Clock:
• “0:00” will flash on the display until you set the clock.
• The clock may gain or lose 1 to 2 minutes per month. If
this happens, reset the clock.
Setting the Daily Timer:
• If you do not specify the preset station or track number
correctly while setting a timer, the currently selected
station or the first track will be played when the timer is
activated.
• When you unplug the power cord or if a power failure
occurs, the timer will be canceled. You need to set the
clock first, then the timer again.
• Daily Timer does not work correctly for DVD Video.
• If you set the Sleep Timer after Daily Timer starts playing
the selected source, Daily Timer is canceled.
Setup Menu
General:
• If the upper and lower parts of the menu are cut off, adjust
the picture size control of the TV.
LANGUAGE menu:
• When the language you have selected for “MENU
LANGUAGE,” “AUDIO LANGUAGE,” or “SUBTITLE” is
not recorded, the original language is used as the initial
language.
PICTURE menu—MONITOR TYPE:
• Even if “4:3 PS” is selected, the screen size may become 4:3
letter box while playing a disc/file. This depends on how
the discs are recorded.
• When you select “16:9 NORMAL” or “16:9 AUTO” for
a picture whose aspect ratio is 4:3, the picture changes
slightly due to the process of converting the picture width.
OTHERS menu—ON SCREEN GUIDE:
• The setup menu and on-screen bar will be displayed (and
recorded) even if this function is set to “OFF.” Subtitles
and the information for zoom-in always appear on the
display regardless of this setting.
Sound & Picture Adjustments
Adjusting the Sound:
• This function also affects the sound through the
headphones.
Setting My Sound (for DVD/CD and USB):
• My Sound setup is prohibited for certain file format.
• My Sound setup is prohibited during recording/editing or
while Mic Mixing is activated.
Enjoying Karaoke
General:
• You cannot enjoy all the Karaoke functions with DVD-
VR, video files and picture files.
• While the System is turned on, connecting a microphone
automatically activates Mic Mixing.
• While the System is turned off, connecting a microphone
does not activate Mic Mixing and any other Karaoke
related function. In this case, press MIC MIX after turning
the System on.
• You cannot activate Mic Mixing during My Sound setup.
• While recording, connecting microphones does not
automatically activate Mic Mixing.
Adjusting the Sound Track for Karaoke:
• Vocal Masking is not applied to the optical digital output
signals through the OPTICAL DIGITAL OUTPUT
terminal.
• For some music files, Vocal Masking does not provide the
correct effect.
Recording & Editing Operations
Editing Titles to Tracks or Groups:
• When a track is recorded, a title is automatically given to
the track. When you want to give a new title to the track,
delete the current title, then enter your desired title.
• You cannot edit files while using Karaoke function.
5 7
6 8
GVT0277-001A EN_NX-D4[B] Starting up
GVT0277-001A EN_NX-D4[B] Starting up
GVT0277-001A EN_NX-D4[B] Starting up
GVT0277-001A EN_NX-D4[B] Starting up
Basic Operations
Troubleshooting
Amplifier section
Output Power: 230 W (115 W + 115 W) at 3
(10% THD)
Audio Input:
AUDIO IN: Stereo mini (
φ
3.5 mm)
500 mV/47 kΩ (at “AUDIO LVL3”)
250 mV/47 kΩ (at “AUDIO LVL2”)
125 mV/47 kΩ (at “AUDIO LVL1”)
Digital Input/Output:
OPTICAL DIGITAL OUTPUT (output only):
–21 dBm to –15 dBm (660 nm ±30 nm)
USB REC/PLAY (input and output)
VIDEO OUT:
Color system:
PAL/NTSC (interlaced/progressive)
VIDEO (Composite):
1 V(p-p)/75 Ω
COMPONENT:
(Y) 1 V(p-p)/75 Ω
(PB/PR) 0.7 V(p-p)/75 Ω
Speaker impedance:
3 Ω – 16 Ω
Tuner section
FM tuning range: 87.50 MHz – 108.00 MHz
AM (MW) tuning range: 522 kHz – 1 629 kHz
Disc player section
Dynamic range: 80 dB
Horizontal resolution: 500 lines
Wow and flutter: Immeasurable
iPod section
Power supply: DC 5 V 500 mA (each iPod dock)
USB section
USB specification: Compatible with USB 2.0 Full Speed
Compatible device: Mass storage class
Compatible system: FAT16, FAT32
Output power: DC 5 V 500 mA
General
Power requirements:
AC 230 V , 50 Hz
Power consumption:
90 W (at operation) /
1.00 W or less (at standby)
Dimensions (approx.):
195 mm × 333 mm × 313 mm
(W × H × D)
Mass (approx.): 3.6 kg
System Speaker—SP-NXD3
Type: 3-way 3-speaker Bass Reflex Type
(Magnetically-Shielded Type)
Speaker units:
Tweeter: 2.0 cm cone × 1
Mid Range: 5.0 cm cone × 1
Woofer: 16.0 cm cone × 1
Impedance: 3 Ω
Power handling capacity:
115 W
Frequency range:
40 Hz – 20 000 Hz
Sound pressure level:
84 dB/W•m
Dimensions: 205 mm × 409.5 mm × 290.5 mm
(W × H × D)
Mass: 3.6 kg each
Connections
Using the number buttons and cursor buttons on
the remote control
How to cancel the demonstration
Press and hold DEMO button on the main unit (until
“DEMO CLEAR” appears on the display) while the unit is
on.
• Refer to the attached sheet “Information about the
demonstration function.”
• In this manual, operations using the remote control
are mainly explained; however, you can use the buttons
and controls on the main unit if they have the same (or
similar) name and marks.
• Button and control operations are explained in the table
below.
Indicates that you press the button.
2 sec. Indicates that you press and hold the
button for a specified period.
Indicates that you slide your finger
on the volume jog in the specified
direction(s).
For private listening
Connect a pair of headphones to the PHONES jack on
the main unit. The sound will no longer come out of the
speakers. “HPHONE IN” appears on the display for a while.
Be sure to turn down the volume before connecting or
putting on the headphones.
• Disconnecting the headphones will activate the speakers
again.
• When using the headphones with the L-shaped plug,
connect it with the head of the plug facing the right side
as illustrated below.
DO NOT turn off the System with the volume set at an
extremely high level; otherwise, the sudden blast of sound
may damage your hearing, speakers and/or headphones
when you turn on the System or start playback.
Changing the Display Brightness
You can dim the display and illumination lamp. Setting
DIMMER allows you to reduce power consumption.
DIMMER 1 Dims the display and the blue illumination
on the main unit.
DIMMER 2 Dims the display more than DIMMER 1
and turns off the blue illumination on the
main unit.
AUTO
DIMMER
Dims the display automatically to the
same level as DIMMER 2 and turns off the
blue illumination while playing moving
pictures or still pictures.
DIMMER OFF Normal brightness.
Turning Off the Power Automatically
Auto Standby
• This does not function while “FM,” “AM” or “AUDIO IN” is
selected as the source.
To cancel, repeat the procedure.
Sleep Timer
1 Specify the time (in minutes).
2 Wait until the set time disappears.
To check the time remaining until the shut-off time, press
SLEEP (while holding SHIFT) once.
To change the display information
• The information displayed and its order vary among the source.
On the remote
AUDIO IN:
Current source information = Clock
TUNER AM:
Frequency = Clock
TUNER FM:
Frequency = (PS)*1 = (PTY)*1 = (RT)*1 = Clock
DVD/CD:
Current source information = Group name, file name and tag information (for MP3, WMA, WAV) = Title and chapter
number (while playing)*2/Disc or file type (while stopped) = Clock
USB:
Current source information = Group name, file name and tag information (for MP3, WMA, WAV) = Title and chapter
number (while playing)*2/Disc or file type (while stopped) = Clock
iPod:
Current source information = Tag information (artist name, album name, track name)*3 = Clock
*1 Only when the Radio Data System is received.
*2 Only while playing back the following discs/files:
DVD-VR: Program number/Play List number and chapter number.
MP3/WMA/WAV/JPEG/MPEG-1/MPEG-2/ASF/DivX files: Group and file numbers.
DVD Video: Title and chapter numbers.
*3 Tag information cannot be displayed for some iPod models (refer to “Enjoying Movies/Music from your iPod” in “Operating
Guide”).
Changing the pattern of the level meter
You can select the appearance of the level meter from 5
patterns (“LVL MTR 1” – “LVL MTR 5”).
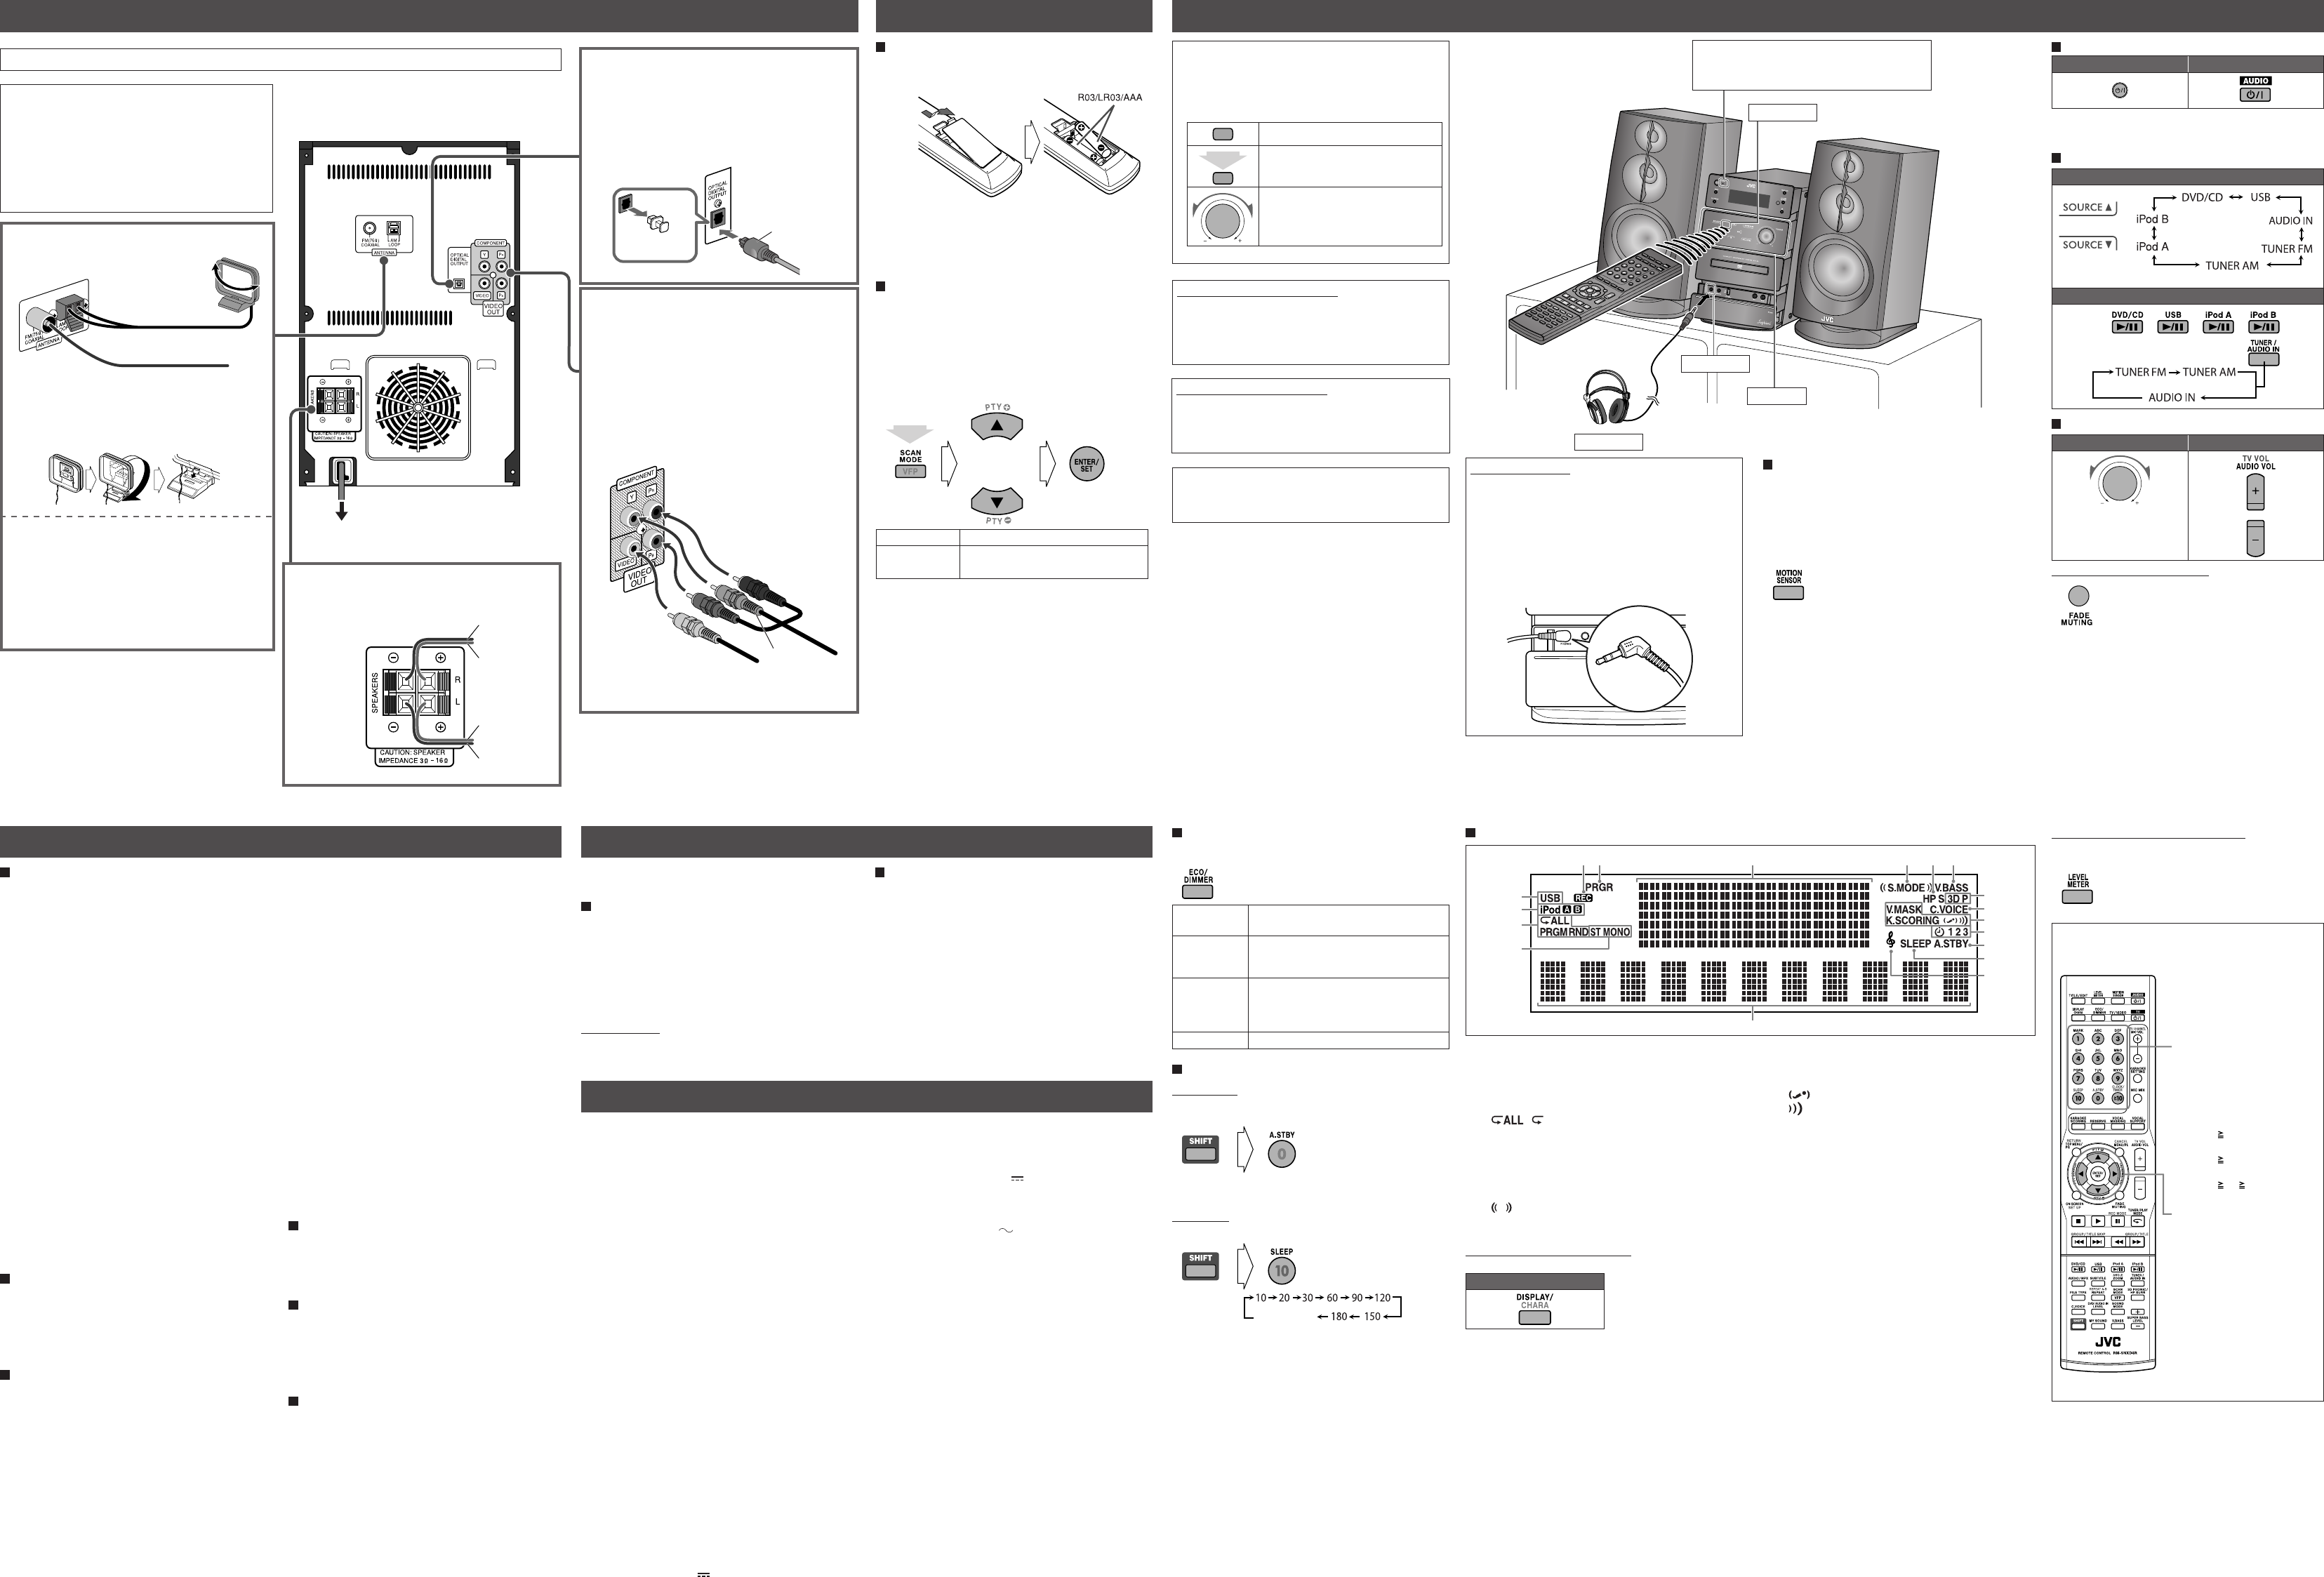
Turning On/Off the Power
On the main unit On the remote
• Selecting a source (see below) while in standby mode also
turns on the System.
Selecting the Source
On the main unit
(Touch to select)
On the remote
Adjusting the Volume
On the main unit On the remote
Volume +: Slide your finger
clockwise.
Volume –: Slide your finger
counterclockwise.
To drop the volume in a moment
To restore the volume, press again or adjust the volume
level.
(while holding)
(while holding)
1
3
2
4
56 7 8 9 p
q
w
r
e
t
y
u
i
(canceled)
Remote sensor
STANDBY lamp
Turns off: The System is turned on.
Lights in red: The System is on standby.
Blinks: The System is on standby and Daily Timer is set.
Headphones
PHONES jack
When using the remote control
Point the top of the remote control towards the remote
sensor as directly as possible. If you operate it from a
diagonal position, the operating range (about 5 m) may be
shorter.
Motion Sensor
When you move your hand close to the remote sensor in the
following cases, the illumination on the front panel turns on.
• When “DIMMER 1” or “DIMMER 2” is selected.
• When “AUTO DIMMER” is selected and playing moving
and still pictures.
To activate or deactivate the motion sensor, press
MOTION SENSOR.
The number buttons
Press to enter numbers.
Example:
• To select number 5, press 5.
• To select number 10,
press 10.
• To select number 15,
press 10, 1, then 5.
• To select number 30,
press 10, 3, then 0.
• To select number 125,
press 10, 10, 1, 2, then 5.
The cursor buttons
Press to select an item, adjust
a parameter, or move the
character entry position.
Touch panel
To get the best performance of the System, keep your discs
clean.
Handling Discs
• Remove the disc from its case by holding it at the edge
while pressing the center hole lightly.
• Do not touch the shiny surface of the disc, or bend the disc.
• Put the disc back in its case after use to prevent warping.
• Be careful not to scratch the surface of the disc when
placing it back in its case.
• Avoid exposure to direct sunlight, extreme temperature,
and moisture.
To clean the disc
Wipe the disc with a soft cloth in a straight line from center
to edge.
Cleaning the System
• Stains should be wiped off with a soft cloth. If the System is
heavily stained, wipe it with a cloth soaked in water-diluted
neutral detergent and wrung well, then wipe clean with a
dry cloth.
• Since the System may deteriorate in quality, become
damaged or get its paint peeled off, be careful about the
following:
– DO NOT wipe it with a hard cloth.
– DO NOT wipe it forcefully.
– DO NOT wipe it with thinner or benzine.
– DO NOT apply any volatile substance such as
insecticides to it.
– DO NOT allow any rubber or plastic to remain in
contact for a long time.
General
Adjustments or settings are suddenly canceled before
you finish.
] There is a time limit. Repeat procedure again.
Operations are disabled.
] The built-in microprocessor may malfunction due to
external electrical interference. Unplug the power cord
and then plug it back in.
Unable to operate the System from the remote control.
] The path between the remote control and the remote
sensor on the System is blocked.
] The batteries are exhausted.
No sound is heard.
] Speaker connections are incorrect or loose.
] Headphones are connected.
No picture appears on the TV screen.
] The video cord connections are incorrect or loose.
No picture is displayed on the TV screen, the picture is
blurred, or the picture is divided into two parts.
] The System is connected to a TV which does not support
progressive video input.
] Incorrect scanning mode is selected (see “Preparations”).
] When you unplug the power cord and plug it back again,
the scanning mode may change back to the initial setting
(see “Preparations”).
The left and right edges of the picture are missing on
the screen.
] Select “4:3 LB” for “MONITOR TYPE” (refer to “Setup
Menu” in “Operating Guide”).
iPod Device Playback Operations
Content on an iPod cannot be played back even
though “CONNECT” is displayed in the display window.
] The battery of the iPod is running low.
The iPod cannot be controlled from this unit.
] The iPod is not compatible with this unit.
Disc/USB Device Playback Operations
The disc does not play.
] You have inserted a disc whose Region Code is not
correct. (“REGION ERR” appears on the display.)
] The disc is placed upside down. Place the disc with the
label side facing up.
ID3 Tag on an MP3 file cannot be shown.
] Two types of ID3 Tag exist—Version 1 and Version 2.
This System can only show ID3 Tag Version 1.
Tracks are not played back as you expect.
] The playing order is determined when the groups
and tracks were recorded. It depends on the writing
application.
MP3, WMA, WAV, JPEG, MPEG-1, MPEG-2, ASF or DivX
files are not played back.
] The disc or the USB device may contain different types of
files (ex. MP3/WMA/WAV/JPEG). In this case, you can
only play back the files selected by pressing FILE TYPE.
] You have changed the “FILE TYPE” setting after the
System read the disc or the USB device. In this case,
reload the disc or disconnect the USB device and connect
it again.
The disc sound is discontinuous.
] The disc is scratched or dirty.
No subtitle appears on the display though you have
selected the initial subtitle language.
] Some DVDs are programmed not to display any subtitle
initially. If this happens, press SUBTITLE after starting
playback.
Audio language is different from the one you have
selected as the initial audio language.
] Some DVDs are programmed to always use the original
language initially. If this happens, press AUDIO/MPX
after starting playback.
The disc tray does not open or close.
] The power cord is not plugged in.
] Child Lock is in use. “LOCKED” appears on the display
(refer to “Listening to a Disc/USB Device” in “Operating
Guide”).
Radio Operations
Hard to hear broadcasts because of noise.
] Antenna connections are incorrect or loose.
] The AM loop antenna is too close to the System.
] The FM antenna is not properly extended and positioned.
Timer Operations
Daily Timer does not work.
] The System has been turned on when the on-time comes.
Timer starts working only when the System is turned off.
Daily Timer does not start playback.
] The loaded disc is a DVD Video. Change the disc.
Recording and Editing Operations
Unable to record into the USB device.
] The capacity of the USB device is full. Erase some tracks.
] You have recorded 999 tracks or group on the USB device
you want to record into. Erase unwanted tracks.
] You cannot record tracks while Mic Mixing is activated.
] The USB device is write-protected.
] The connected USB device is incompatible to this System.
Unable to assign title to tracks on the USB device.
] You cannot edit files while Mic Mixing is activated.
] When a track is damaged, you cannot edit that track. In
this case, turn off the System and turn on again.
] The USB device is write-protected.
Maintenance
Preparations
Specifications
Preparing the remote control
Insert the batteries into the remote control by matching the
polarity (+ and –) correctly.
If the range or effectiveness of the remote control decreases,
replace both batteries.
Caution:
Be careful your children do not put the batteries into their
mouths.
To change the color system and scanning mode
You can select the video output to match it to the color
system of your TV (PAL or NTSC).
• If you connect a progressive TV through the component
video cords, you can enjoy a high quality picture by
selecting progressive scanning mode.
• You can change the setting only while playback is stopped.
While “DVD/CD” is selected as the source and playback is
stopped...
PAL/NTSC For a conventional PAL or NTSC TV.
PAL PRGR /
NTSC PRGR
For a progressive PAL or NTSC TV.
Do not connect the power cord until all other connections have been made.
Supplied Accessories
After unpacking, check to be sure that you have all the
following items.
• FM antenna (×1)
• AM loop antenna (×1)
• Composite video cord (×1)
• Remote control; RM-SNXD4R (×1)
• Batteries (×2)
If any items are missing, consult your dealer immediately.
Speakers
When connecting the speaker cords, match the polarity
of the speaker terminals: red to (+) and black to (–)
TV/monitor
• Connect your TV directly to the System. Connecting
the System to a TV via other device, such as a VCR
or an HDD/DVD recorder, may interfere with your
viewing. Connecting an integrated TV/VCR system to
the System may also interfere with your viewing.
• After connecting a TV, select the appropriate video
signal output according to the color system. See
“Preparations” next.
• To select progressive scanning mode, use the
COMPONENT jacks.
AM/FM antenna
To assemble the AM loop antenna
Keep the AM loop antenna cable wrapped around the
AM loop antenna frame, otherwise the effectiveness and
sensitivity of the AM loop antenna may be reduced.
For better FM reception, disconnect the supplied FM
antenna, and connect to an outdoor FM antenna using a
75 Ω wire with coaxial type connector (not supplied).
Digital audio component
• Set “DIGITAL AUDIO OUTPUT” in the “AUDIO”
menu correctly according to the connected digital
audio equipment (refer to “Setup Menu” in “Operating
Guide”).
• Digital signal through the OPTICAL DIGITAL
OUTPUT terminal is transmitted only when “DVD/
CD” or “USB” is selected as the source.
To the wall outlet
2 sec.
FM antenna (supplied)
Extend it so that you can obtain the
best reception.
AM loop antenna
(supplied)
Turn it until the best
reception is obtained.
From right
speaker
From left
speaker
Protective cap
Blue
Green
Red
Component video cord (not
supplied)
Composite video cord (supplied)
Yellow
Black
Black
Red
Red
Optical digital cord
(not supplied)
1 USB indicator
2iPod indicator
3 Playback mode indicators
• PRGM indicator
• RND indicator
• Repeat Mode indicators
/
4 FM reception indicators
5 REC (Recording) indicator
6 PRGR (Progressive) indicator
7 Level meter
8 Sound Mode indicators
• S.MODE (Sound Mode) indicator
• (Surround) indicator
9 HP S (Headphone Surround) indicator
p V. BASS (Vario Bass) indicator
q 3D P (3D Phonic) indicator
w C. VOICE (Clear Voice) indicator
e Karaoke operation indicators
• K.SCORING (Karaoke Scoring) indicator
• (Mic Mixing) indicator
• (Echo) indicator
• V.MASK (Vocal Masking) indicator
r Timer indicators
t A.STBY (Auto Standby) indicator
y SLEEP indicator
u My Sound indicator
i Main display
Display Indicators
