JVC RA P1BB P1 User Manual LVT2122 004B
User Manual: JVC RA-P1BB RA-P1BB English,
Open the PDF directly: View PDF ![]() .
.
Page Count: 2
– 1 –
Warnings, Cautions and Others
INSTRUCTIONS
PORTABLE AUDIO SYSTEM
RA-P1B
iPod Compatibility Chart
iPod touch (2nd generation and Fall '09)
iPod touch
iPhone 3GS
iPhone 3G
iPhone
iPod classic
iPod video (5th Generation)
iPod photo (4th Generation)
iPod nano (5th Generation)
iPod nano (4th Generation)
iPod nano (3rd Generation)
iPod nano (2nd Generation)
iPod nano
iPod (4th Generation)
iPod mini (2nd Generation)
iPod mini
©2010 Victor Company of Japan, Limited
LVT2122-004B [B]
0510KMMCREBET
Specications
Model RA-P1B
Type Portable audio system
Amplier Power Output 2W + 2 W
1 kHz 10 % THD, 4 Ω
Input Sensitivity/ Impedance AUDIO IN 250 mV / 47 k Ω
Tuner Tuning Range 87.50 MHz - 108.00 MHz
Preset Stations 10
Speaker 1way full range, diameter 40 mm x 2
Input Terminal External DC IN (for AC adaptor)
AUDIO IN (mini jack)
iPod connector Output Power : DC5 V 500 mA
Power Source DC 6 V 2 A (EXTERNAL DC IN)
DC 6 V (SIZE R6, AA BATTERY OR EQUIVALENT x 4)
Power Consumption 0.5 W (When not under load) / 1.00 W or less (in Standby mode) / 3.5 W (with
iPod devices connected)
AC adaptor Input : AC 220 - 240 V , 50 Hz 0.5A
Output : DC 6 V 2 A
Dimensions (W x H x D) (W) 240 mm × (H) 58 mm × (D) 81 mm
Weight (Without batteries) 0.35 kg
Accessory AC adaptor
• Specications and appearance are subject to change without prior notice.
n NOTES on iPod
• This unit can only play the iPod audio.
You can use the iPod video function and hear the audio but cannot play the video.
• Do not carry the System with iPod connected. You might drop it down or it might cause
damages to the connector part.
• Do not touch or hit the iPod terminal pins or the connector pins directly. It might cause
damages to the connector part.
• If the iPod does not play correctly, please update your iPod software to the latest ver-
sion. - For details about updating your iPod, check on the Apple web site <http://www.
apple.com>.
• JVC is not responsible for any loss of or damage to iPod that might result from the use
of this product.
• Sound distortion may occur when playing back audio sources with high recording
levels. When distortion occurs, it is recommended to turn off the equalizer of the iPod.
For information on operating the iPod, see the iPod instruction manual.
• If you do not turn on the power of this unit and only connect the iPod to this unit, power
may be supplied to the iPod.
• “Made for iPod” and “Made for iPhone” mean that an electronic accessory has been
designed to connect specically to iPod or iPhone, respectively, and has been certied
by the developer to meet Apple performance standards. Apple is not responsible for
the operation of this device or its compliance with safety and regulatory standards.
• iPhone, iPod, iPod classic, iPod nano, and iPod touch are trademarks of Apple Inc.,
registered in the U.S. and other countries.
CAUTION
Battery shall not be exposed to excessive heat such as sunshine, re or the like.
CAUTION
To reduce the risk of electrical, shocks, re etc.:
1 Do not remove screws, covers or cabinet.
2 Do not expose this appliance to rain or moisture.
CAUTION
The button in any position does not disconnect the mains line. Disconnect the
mains plug to shut the power off completely.
The MAINS plug or an appliance coupler is used as the disconnect device, the
disconnect device shall remain readily operable.
Rating label is placed on the exterior of the bottom.
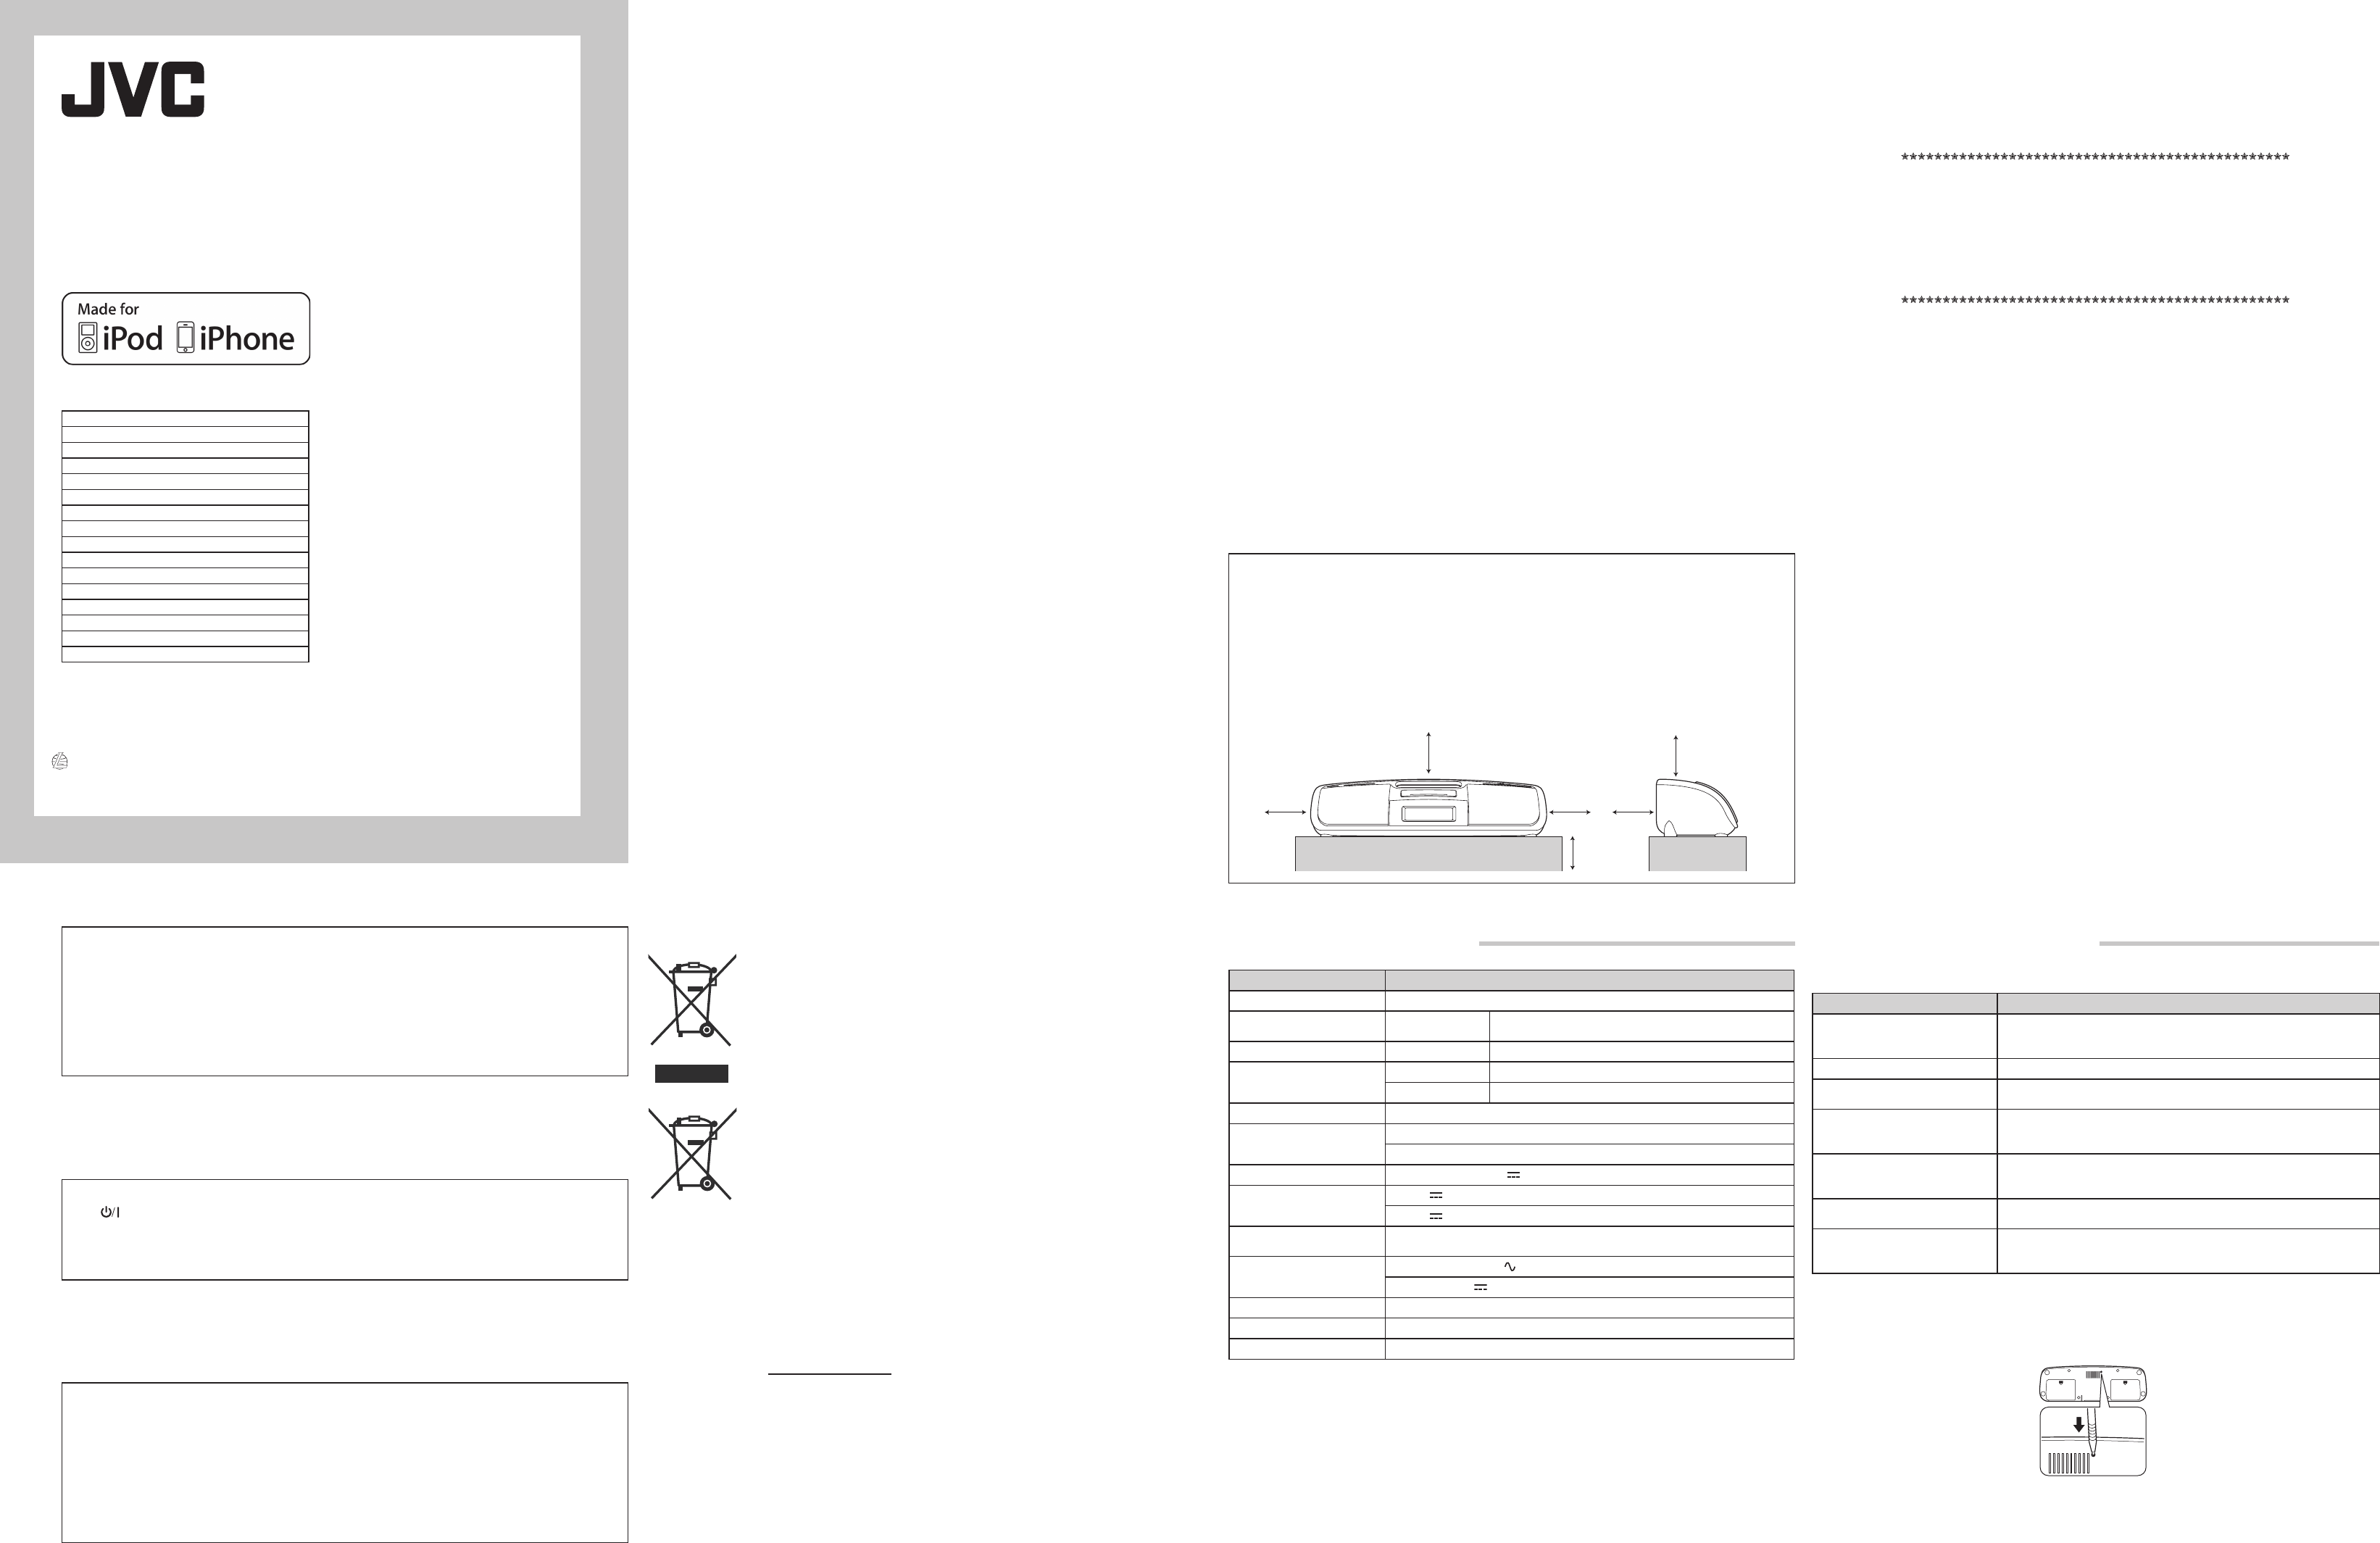
15cm15cm
15cm
15cm 15cm
10cm
Front Side
Caution: Proper Ventilation
To avoid risk of electric shock and re, and to prevent damage, locate the apparatus
as follows:
1. Front: No obstructions and open spacing.
2. Sides/ Top/ Back: No obstructions should be placed in the areas indicated by the
dimensions in the illustration.
3. Bottom: Place on the level surface. Maintain an adequate air path for ventilation
by placing on a stand with a height of 10 cm or more.
Troubleshooting
If you are having a problem with your System, check this list for a possible solution before calling for service.
In these cases Check the following points
Power does not come on.
• AC adaptor is not inserted securely. Plug in securely.
• The batteries are exhausted.
• Is the timer set? Turn off the alarm.
No longer works. Press the RESET button (see "Resetting the unit" below).
Cannot set the iPod. • Is the Dock adaptor properly mounted on the unit? Make sure to
mount the Dock adaptor properly.
Cannot operate iPod.
• Is the iPod rmly connected to the connector plug of the unit?
• Is the iPod properly functioning? Test the iPod functions in stand alone
condition.
iPod cannot be charged.
• Is the iPod rmly connected to the connector plug of the unit?
• Is the AC adaptor connected? The iPod cannot be charged while the
Unit is operated on batteries.
Hard to listen to broadcasts be-
cause of noise. The FM antenna is not properly extended and positioned.
When the volume level is manually
set higher than “16”, the unit auto-
matically lowers the level to “16”.
The batteries run low. Replace the batteries with new ones, or use the
AC adaptor.
Resetting the unit
If "Troubleshooting" does not eliminate malfunctioning (failure to operate or display properly, etc.),
press the RESET button on the bottom of the unit with something having a sharp point, while the unit is turned on.
After pressing RESET button, unplug the AC adaptor and wait a while before plugging it again.
• While resetting the unit, the clock is also reset. Adjust the clock after resetting the unit.
RESET
EN
Thank you for purchasing a JVC product.
CAUTION:
• Do not block the ventilation openings or holes. (If the ventilation openings or holes
are blocked by a newspaper or cloth, etc., the heat may not be able to get out.)
• Do not place any naked ame sources, such as lighted candles, on the apparatus.
• When discarding batteries, environmental problems must be considered and local
rules or laws governing the disposal of these batteries must be followed strictly.
• Do not expose this apparatus to rain, moisture, dripping or splashing and that no
objects lled with liquids, such as vases, shall be placed on the apparatus.
Information for Users on Disposal of Old Equipment and Batteries
[European Union]
These symbols indicate that the electrical and electronic equip-
ment and the battery with this symbol should not be disposed
of as general household waste at its end-of-life. Instead, the
products should be handed over to the applicable collection
points for the recycling of electrical and electronic equipment
as well as batteries for proper treatment, recovery and recycling
in accordance with your national legislation and the Directive
2002/96/EC and 2006/66/EC.
By disposing of these products correctly, you will help to conserve
natural resources and will help to prevent potential negative ef-
fects on the environment and human health which could otherwise
be caused by inappropriate waste handling of these products.
For more information about collection points and recycling of
theseproducts,pleasecontactyourlocalmunicipalofce,your
household waste disposal service of the shop where you pur-
chased the product.
Penalties may be applicable for incorrect disposal of this waste,
in accordance with national legislation.
[Business users]
If you wish to dispose of this product, please visit our web page
http://www.jvc.eu/ to obtain information about the take-back of
the product.
[Other Countries outside the European Union]
These symbols are only valid in the European Union.
If you wish to dispose of these items, please do so in accor-
dance with applicable national legislation or other rules in your
country for the treatment of old electrical and electronic equip-
ment and batteries.
IMPORTANT for the U.K.
DO NOT cut off the mains plug from this equipment. If the plug tted is not suitable for
the power points in your home or the cable is too short to reach a power point, then ob-
tain an appropriate safety approved extension lead or consult your dealer.
BE SURE to replace the fuse only with an identical approved type, as originally tted.
If nonetheless the mains plug is cut off ensure to remove the fuse and dispose of the
plug immediately, to avoid a possible shock hazard by inadvertent connection to the
mains supply.
If this product is not supplied tted with a mains plug then follow the instructions given
below:
IMPORTANT:
DO NOT make any connection to the terminal which is marked with the letter E or by the
safety earth symbol or coloured green or green-and-yellow.
The wires in the mains lead on this product are coloured in accordance with the follow-
ing code:
Blue: Neutral
Brown: Live
As these colours may not correspond with the coloured markings identifying the termi-
nals in your plug proceed as follows:
The wire which is coloured blue must be connected to the terminal which is marked with
the letter N or coloured black.
The wire which is coloured brown must be connected to the terminal which is marked
with the letter L or coloured red.
IF IN DOUBT - CONSULT A COMPETENT ELECTRICIAN.
SAFETY INSTRUCTIONS
“SOME DOS AND DON’TS ON THE SAFE USE OF EQUIPMENT”
This equipment has been designed and manufactured to meet international safety standards but, like any elec-
trical equipment, care must be taken if you are to obtain the best results and safety is to be assured.
Do read the operating instructions before you attempt to use the equipment.
Do ensure that all electrical connections (including the mains plug, extension leads and interconnections be-
tween pieces of equipment) are properly made and in accordance with the manufacturer’s instructions. Switch
off and withdraw the mains plug when making or changing connections.
Do consult your dealer if you are ever in doubt about the installation, operation or safety of your equipment.
Do be careful with glass panels or doors on equipment.
DON’T continue to operate the equipment if you are in any doubt about it working normally, or if it is damaged
in any way—switch off, withdraw the mains plug and consult your dealer.
DON’T remove any xed cover as this may expose dangerous voltages.
DON’T leave equipment switched on when it is unattended unless it is specically stated that it is designed for
unattended operation or has a standby mode.
Switch off using the switch on the equipment and make sure that your family know how to do this.
Special arrangements may need to be made for inrm or handicapped people.
DON’T use equipment such as personal stereos or radios so that you are distracted from the requirements of
trafc safety. It is illegal to watch television whilst driving.
DON’T listen to headphones at high volume as such use can permanently damage your hearing.
DON’T obstruct the ventilation of the equipment, for example with curtains or soft furnishings.
Overheating will cause damage and shorten the life of the equipment.
DON’T use makeshift stands and NEVER x legs with wood screws—to ensure complete safety always t the
manufacturer’s approved stand or legs with the xings provided according to the instructions.
DON’T allow electrical equipment to be exposed to rain or moisture.
ABOVE ALL
– NEVER let anyone, especially children, push anything into holes, slots or any other opening in the case.
— this could result in a fatal electrical shock.
– NEVER guess or take chances with electrical equipment of any kind—it is better to be safe than sorry!
Dear Customer,
This apparatus is in conformance with the valid European directives and standards regarding electromag-
netic compatibility and electrical safety.
European representative of Victor Company of Japan, Limited is:
JVC Technical Services Europe GmbH
Postfach 10 05 04
61145 Friedberg
Germany
Products
Battery
Notice:
The sign Pb below
the symbol for
batteries indicates
that this battery
contains lead.
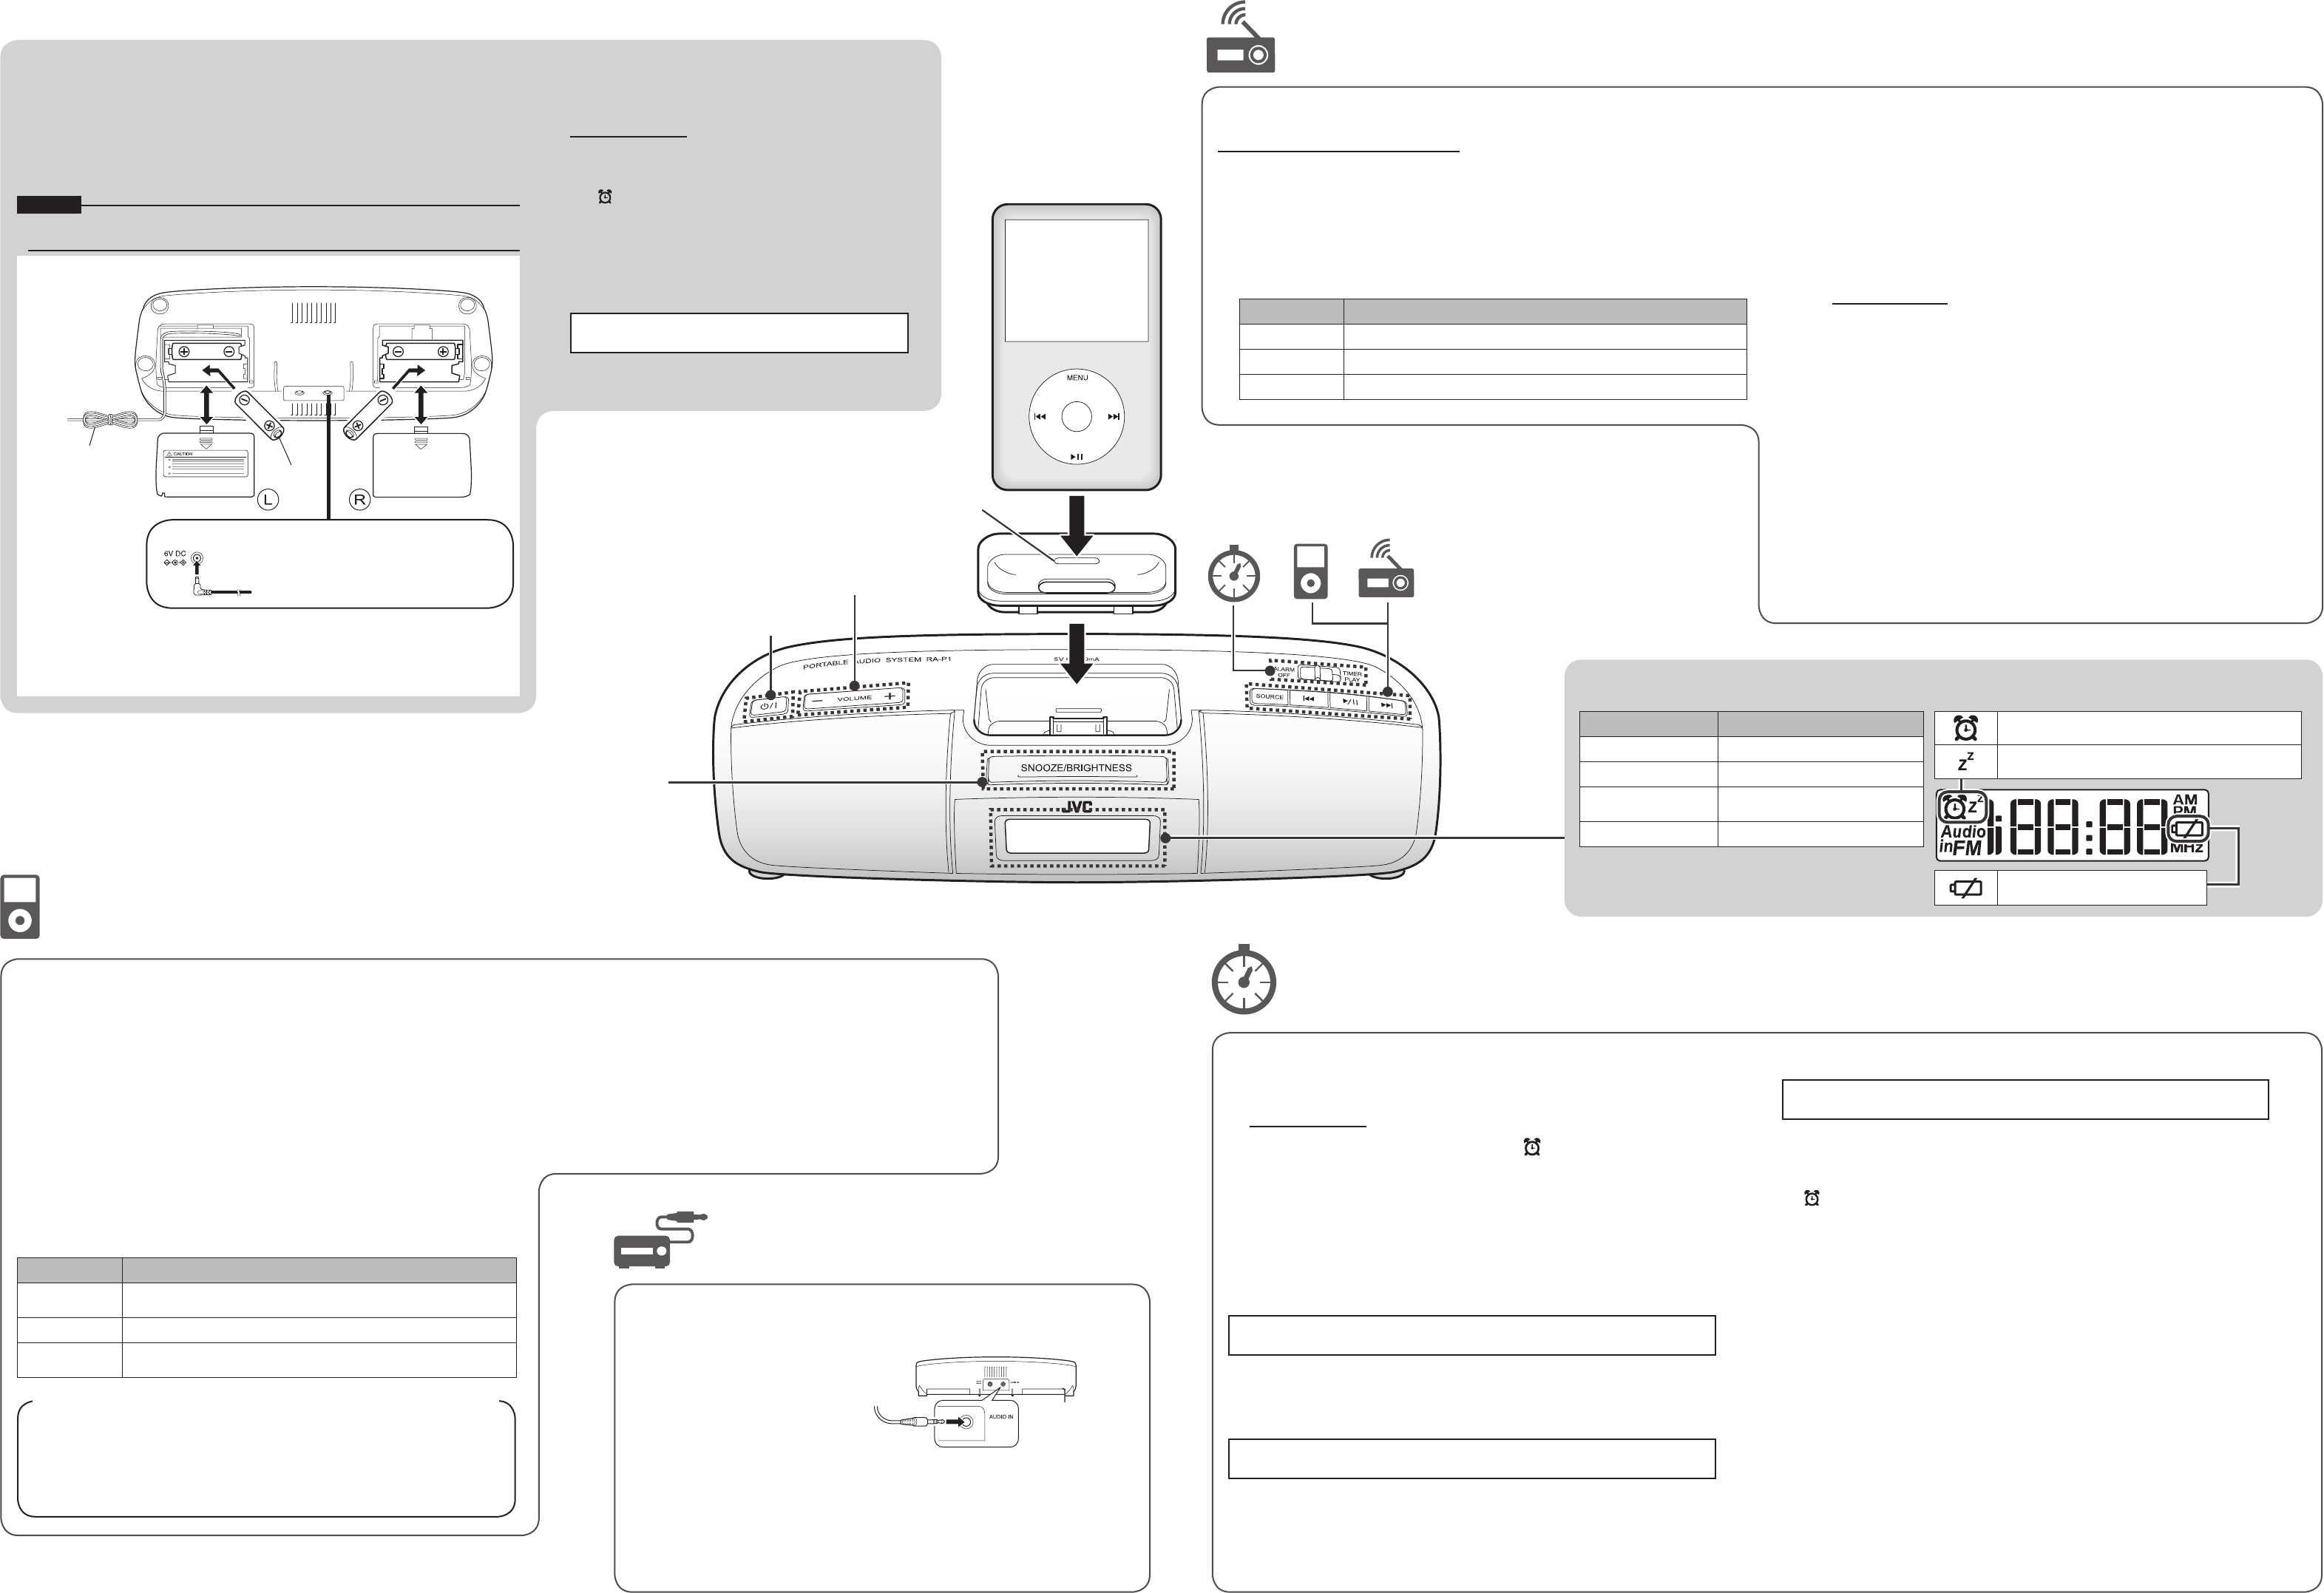
Dock adaptor
(Supplied with the iPod or
purchased separately)
Power button
VOLUME button
Adjusts the volume level of the Unit.
SNOOZE/BRIGHTNESS button
Pressing this button displays the current time.
* If you press and hold this button while the power is turned on,
the display light turns on and off.
* Even if the power is not supplied to the Unit, the display is lit.
– 2 –
Preparation of the Unit
n Setting the batteries / AC adaptor
This Unit runs on AA batteries or from the AC adaptor.
To load batteries, open the covers of the battery compartments and
insert AA batteries (not supplied) in the right and left compartments
(four batteries total).
Be sure to match the poles (+/-) correctly.
Read “Safety Precautions” on page 1 thoroughly in order to handle the dry batteries correctly.
CAUTION
n Setting the time
Set the time with the power off.
1
Press and hold the SOURCE button.
2
Whilethetimedisplayisashing,pressthe
SOURCE button.
* If is ashing, press 4 / ¢ to make the time display ash.
3
Select the time display setting and the current
time.
Use 4 / ¢ to select a number and press the SOURCE
button to enter it. Then, you can select the next item. The
items are switched in the following order.
24-hour display/12-hourdisplay → Hour → Minute → Setting
complete. (The current time is displayed.)
* If you made a mistake or the setting disappeared because of a
power failure or the like, start over from Step 1.
Listening to / Charging the iPod
■ListeningtotheiPod
1
Set the iPod in the Unit.
· Set the dock adaptor and then set the iPod.
· Securely insert the iPod all the way into the adaptor.
* A terminal cover is covering the connecter terminal when you purchase the Unit. Remove
the cover before use.
* If you do not connect the iPod, be sure to cover the connecter terminal with the terminal
cover. Dust or the like may inltrate the Unit and cause malfunctions.
* When you operate the iPod, support the iPod from the back side. Excessive force may
damage the connector terminal.
2
Turn on the power.
When the iPod is selected as the audio source, it automatically starts playback.
3
Select “iPod” with the SOURCE button.
The Unit automatically starts playback.
Button Function
6Playback / Pause
Press and hold this button to switch the iPod to the sleep mode.
¢Next song / Fast forward (Press and hold.)
4Previous song (Press this button during playback to jump back to the
beginning of the track.) / Fast rewind (Press and hold.)
Dock adaptor (Supplied with the iPod or purchased separately)
· You can remove the dock adaptor by pulling up the slot with your ngernail or
a ne-tipped tool.
· Pay attention not to injure your ngertip or damage the connector.
* If a dock adaptor was not supplied with your iPod, purchase a dock adaptor from
Apple Inc. For details, visit Apple’s website. <http://www.apple.com/>
Listening to External Devices
1
Connect an external device to the Unit.
Connect the external device to the AUDIO IN jack on the rear of the unit using a
stereo mini plug cord (not supplied).
To the audio output of a CD/MD/digital
audio player, etc. or headphones terminal
2
Turn on the power.
3
Select “Audio in” with the SOURCE button.
4
Start playback from the external device.
n Setting the timer
Set the timer with the power off.
1
Press and hold the SOURCE button.
2
Use the 4 / ¢ button to display and press the SOURCE
button.
3
Select the time and so on when to start playback.
Use the 4 / ¢ button to select the setting and press the SOURCE button to enter
it. Then, you can select the next item. The items are switched in the following order.
* If you made a mistake or the setting disappeared because of a power failure or the like, start
over from Step 1.
[Playing back from the iPod]
Hour → Minute → Sound source (iPod) → Volume level when timer playback starts →
Playback time → Setting complete. (The current time is displayed.)
· The last selected track is automatically played back.
· The playback time is set in 5-minute increments from 10 to 30 minutes.
[Receiving the signal from the FM radio]
Hour → Minute → Sound source (FM) → Channel is selected. → Volume level when timer
playback starts → Playback time → Setting complete. (The current time is displayed.)
· The playback time is set in 5-minute increments from 10 to 30 minutes.
* Register desired broadcast stations in preset channels in advance.
[Sounding buzzer]
Hour → Minute → Sound source (bb/ buzzer) → Setting complete. (The current time is
displayed.)
* You cannot set the volume level of the buzzer.
* If you do not stop the buzzer, it keeps sounding for 3 minutes.
4
Switch the ALARM switch to “TIMER PLAY.”
appears on the display.
* When the ALARM switch is switched to “TIMER PLAY”, the Unit is locked with the power off.
n Stopping Timer Playback
[Pausing timer playback (Snoozing function)]
Press the SNOOZE/BRIGHTNESS button during timer playback.
Timer playback stops temporarily but it restarts after 9 minutes. This operation repeats
up to 6 time.
[Stopping the timer playback]
Press the power button during timer playback.
Timer playback stops and it restarts at the same time the next day.
n Cancelling the timer
Switch the ALARM switch to “ALARM OFF.”
SettingtheTimeroftheiPod,FMRadioorBuzzer
n Listening to the radio
Extend the wire antenna to use it.
1
Turn on the power.
2
Select “FM” with the SOURCE button.
3
Select a frequency with the 4 / ¢ button.
· When you press and hold the 4 / ¢ button, the Unit automatically searches for
broadcast stations. The search is nished when a signal is picked up. Press the but-
ton again while searching is in progress to quit the search.
Button Function
6Press to switch between the frequency and channel display.
¢Press to raise the frequency or select a preset channel.
4Press to lower the frequency or selects a preset channel.
Listening to FM Broadcasts
FM wire antenna
Pull the FM wire an-
tenna out of the pocket
in the battery compart-
ment cover and extend
the antenna along the
groove of the Unit and
in the direction where
you can get the best
radio reception.
AA battery
uConnecting the AC adaptor
AC 220 - 240 V, 50 Hz
AC adaptor (supplied)
RA-P1B : AA-R613
n Charging the iPod
1
Connect the AC adaptor to the Unit.
* The iPod battery is not charged while the Unit is operated on battery
power supply.
2
Set the iPod to the Unit.
Charging starts.
· The iPod is charged while any function of the Unit is used.
· The iPod is charged while the Unit is turned off.
* See the iPod instruction manual about charging times.
n Registering broadcast station in preset channels
(Presetting)
You can preset up to 10 preferred stations (P01 to P10).
1
Select “FM” with the SOURCE button.
2
Press the 6 button.
A channel number is displayed.
3
Select your desired channel number with the 4 / ¢button,
and press and hold the 6 button.
The channel number starts ashing.
4
Whilethechannelnumberisashing,usethe4 / ¢ button to
select the frequency of the station that you wish to register and
press the 6 button.
The selected frequency will be registered in the selected channel.
* If you made a mistake or the setting disappeared because of a power failure or the like, start
over from Step 1.
n Listening to the channel of a broadcast station you
registered
1
Press the 6 button while “FM” is selected.
A channel number is displayed and the signal of the registered frequency is picked up.
2
Select a channel number with the
4 / ¢
button.
The signal of the frequency registered to the selected channel number is picked up.
n About the Display Indications
Functions used Displayednumbers,icons,etc.
Volume level adjustment 00 to 32
iPod iPod
FM radio
FM 87.50 to 108.00 MHz (Frequencies)
P01 to P10 (Channels)
External device
Audio in 00 to 32 (Volume level)
Lights when the timer mode is selected.
Flashes while the Unit is snoozing.
Flashes when the remaining battery
level is low.
CAUTION
To avoid the risk of re and to prevent damage,
· Do not use any AC adaptors other than the one supplied.
· Do not use the supplied AC adaptor for other equipment.
Wall outlet
