JVCKENWOOD 39578 Monitor with DVD Receiver User Manual DNX DDX8 instr K p1 63 r1 indd
JVC KENWOOD Corporation Monitor with DVD Receiver DNX DDX8 instr K p1 63 r1 indd
UserManual.wiki
>
JVCKENWOOD
>
39578 User Manual
manual
Navigation menu
Upload a User Manual
Namespaces
Wiki Guide
HTML
PDF
Info
Views
User Manual
Discussion / Help
Navigation


![ABC12 DNX8120/DDX812/DDX8032BT English 13Basic OperationsSwitching the function screenThe function control screen switches in the following order each time you press the button.Navigation screenEasy Control buttons appear.[FNC] button Picture or Video playback screenEasy Control buttons appear.[FNC] button Navigation screen Picture or Video playback screenP 0:00:05DVD MEDIAINPICTURE21SCRNOOEasy Control button Mode:Full AV Out:AV–INT 0:00:05Title 1Chap 1DVD VIDEODVD VIDEOINSCRNOOEasy Control button⁄• For the functions of Easy Control buttons, see <Control of Other Sources While Displaying the Navigation Screen> (page 14).BSwitches to the rear viewPress it for more than 1 second to switch to rear view.Press it again for more than 1 second to resume the normal display.⁄• Functions of the [NAV] button can be changed to Display Off function. See <System Setup> (page 72) for the function setting of the [NAV] button. ASwitches to the Hands Free controlPress it for more than 1 second to the Hands Free control screen.Press it again for more than 1 second to resume the normal display. BSwitches the Seek modePress it for more than 1 second to switch the Seek mode.C](https://usermanual.wiki/JVCKENWOOD/39578/User-Guide-923679-Page-7.png)
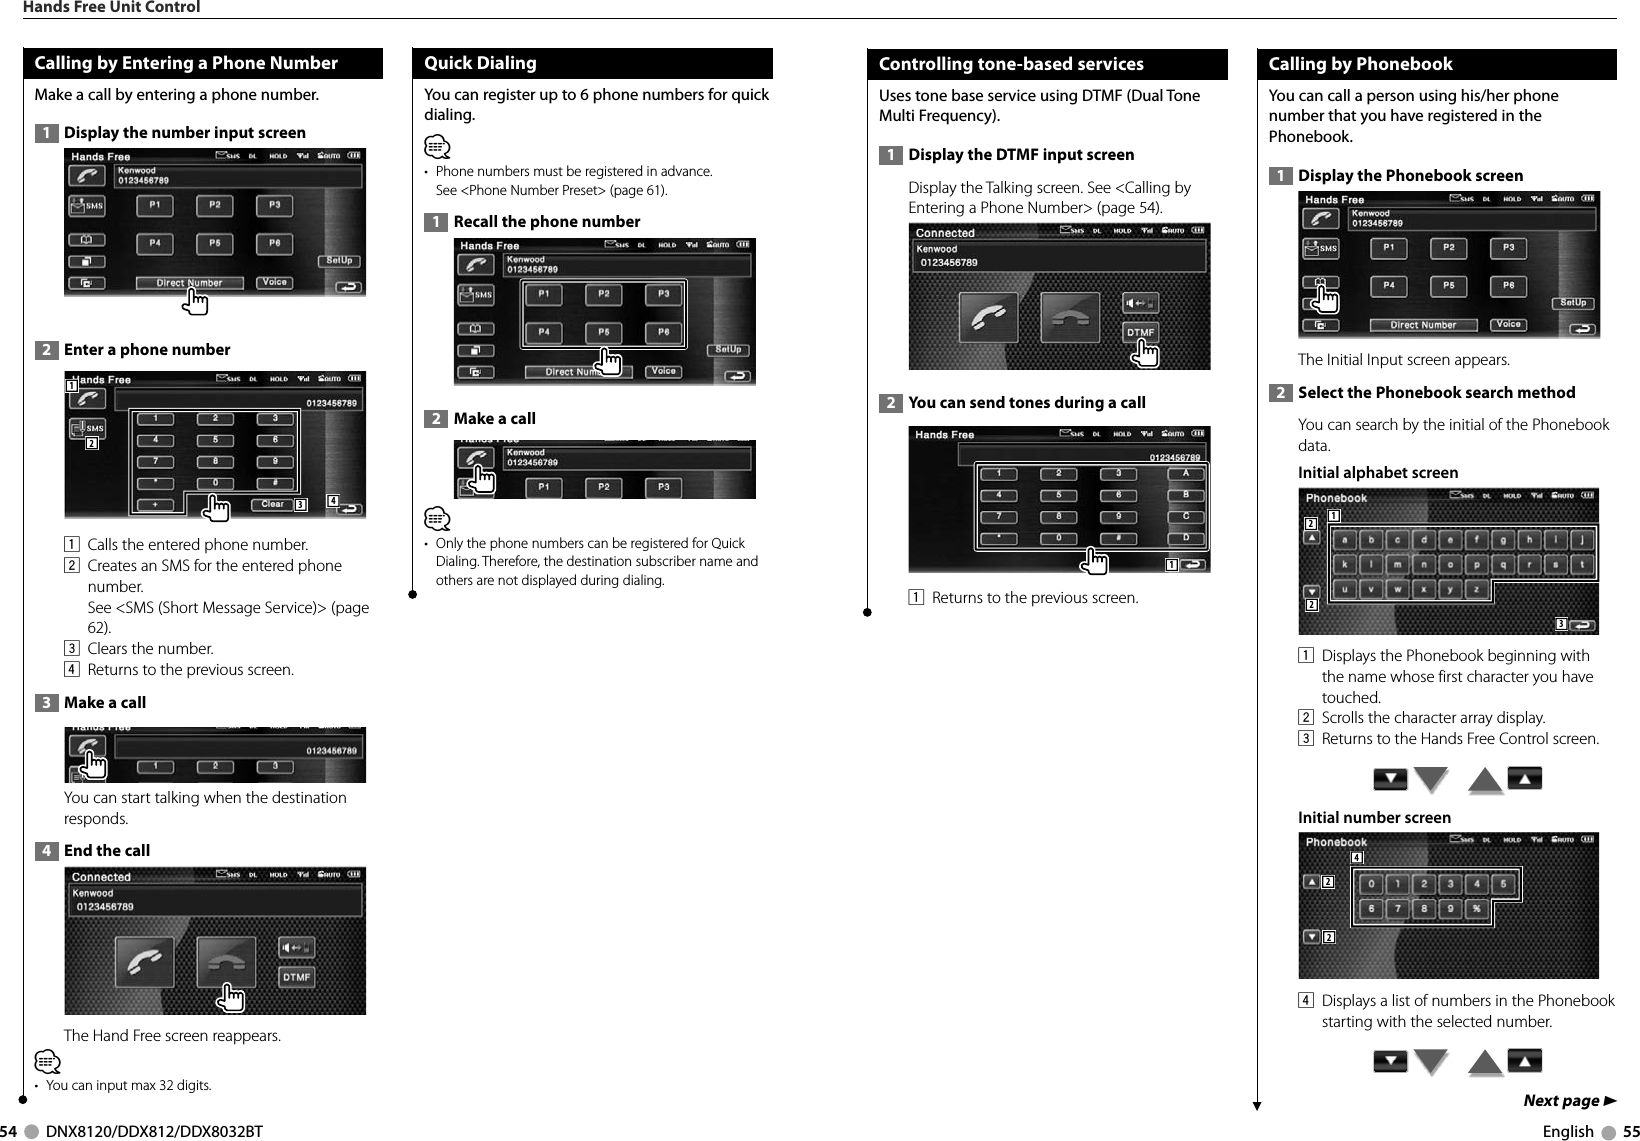
![52 DNX8120/DDX812/DDX8032BT English 53Before Use• To use the Phonebook, it must be downloaded to this unit in advance. For details, see <Downloading the Phonbook> (page 52).• You need to register your cell-phone before using it with this unit. For more details, see <Registering Bluetooth Unit> (page 86).• If you have registered two or more cell-phones, you need to select one of them. For more details, see <Bluetooth Unit Connection> (page 88).Downloading the Phonebook Downloads the phonebook data from the cell-phone to this unit so that you can use the Phonebook of this unit. 1 By operating the cell-phone, send the phonebook data to this unit. 2 By operating the cell-phone, start the hands-free connection.⁄• For the cell-phones which support auto-download of phonebook:If the phonebook is not downloaded automatically for some reasons, follow the procedure above to download manually.• For how to operate the cell-phone, refer to the Instruction Manual that comes with your cell-phone.• Up to 1000 phone numbers can be registered for each registered cell-phone. • Up to 32 digits can be registered for each phone number along with up to 40 characters representing a name. • Depending on the type of your cell-phone, the following restrictions are placed:- The phonebook data cannot be downloaded normally.- Characters in the Phonebook are garbled.- The phonebook data cannot be downloaded normally if it contains images. It may take several hours to a full day to download the phone book depending on the total image size. • To cancel downloading of the phonebook data, operate the cell-phone.Various functions can be used in the Hands Free control mode. Control Screen FunctionDisplaying the control screen and using various functions. 1 Display the Hands Free Control screenPress the [FNC] button for more than 1 second.or12345678910 11121 Displays the various conditions. : Displays short message status. If a cell-phone which supports SMS function is not connected, this mark does not appear. : There is unread short message. : There is no unread short message. : Downloading Phonebook. : Indicates there is a call on hold. : Displays the signal strength.* The more the number of bar segments, the stronger the signal. : Displays the present Auto Answering status : When Auto Answering is on : When Auto Answering is off : Displays the battery drain of the cell-phone.* The more the number of bar segments, the higher the battery level.2 Displays the called phone numbers.If you have registered a phone number in the Phonebook, the destination person name is displayed.3 Calls the displayed preset phone number. 4 Displays the SMS Select screen.See <SMS (Short Message Service)> (page 62).5 Displays the Search for Phonebook screen.See <Calling by Phonebook> (page 55).6 Displays the Outgoing Calls screen.See <Making a Call Using Outgoing/Incoming Call Records> (page 57).7 Displays the Incoming Calls screen.See <Making a Call Using Outgoing/Incoming Call Records> (page 57).8 Calls the preset phone number. For information on how to preset a phone number, see <Phone Number Preset> (page 61).9 Displays the Hands Free Set Up screen.See <Setting Up the Hands Free Phone> (page 58).p Displays the Dialing Display screen.See <Calling by Entering a Phone Number> (page 54).q Starts voice recognition. See <Calling by Voice Recognition> (page 57).w Returns to the previous screen.⁄• While your car is moving, some functions are disabled for safety’s sake. The buttons associated with the disabled functions become ineffective if pressed. • When the Hands Free Control screen appears, the name of the connected cell-phone is displayed for 5 seconds.• * Since the number of steps of the control unit is different from that of the cell-phone, the statuses displayed on the control unit may discord from those displayed on the cell-phone. No status is displayed if information about it cannot be obtained. • Setting the cell-phone in the private mode can disable the hands free function.When Received a CallWhen you receive a call, you can use the hands free phone. 1 Respond to a call2341 When a call arrives, the Talking screen appears automatically.1 Starts conversation with a person called. Switches the call destination if you hear a tone of call-waiting.Resumes conversation with the person on hold after completed conversation with the other party.2 Disconnects the phone. The Hand Free screen reappears.3 Switches the voice output between phone and speaker.4 Outputs dial tone. See <Controlling Tone-based Services> (page 55).Hands Free Unit Control](https://usermanual.wiki/JVCKENWOOD/39578/User-Guide-923679-Page-8.png)
![56 DNX8120/DDX812/DDX8032BT English 57Cyrillic alphabet search screen АО52235 Displays the Phonebook beginning with the name whose first character you have touched. 3 Select the name to call 77691011138126 Phonebook data list."REC" turns on for data with voice for voice recognition already registered. 7 Scrolls the Phonebook data list.8 Scrolls the name. 9 Registers the voice for voice recognition to the selected Phonebook. If there are already 35 voice tag registered in the same cell-phone, [Record] button is deactivated.See <Voice Registration> (page 59).p Plays the voice registered in the selected Phonebook data. q Deletes the voice registered in the selected Phonebook data. Touch to display the confirmation screen. Touch [YES] to delete or [NO] to cancel.w Displays the detail of the selected Phonebook data. e Returns to the Hands Free Control screen. 4 Select the phone number to call 1514181617r Calls the selected phone number. t Creates an SMS for the displayed phone number. See <SMS (Short Message Service)> (page 62).y Scrolls the phone number. u Returns to the Name List screen.i Returns to the Hands Free Control screen. 5 Make a call⁄• To use the Phonebook, it must have been downloaded from the cell-phone.• Initials including no corresponding name will not be displayed.• During search, a non-accent character such as "u" is searched for instead of an accent character such as "ü".Hands Free Unit ControlMaking a Call Using Outgoing/Incoming Call RecordsCalls by selecting a phone number from the outgoing or incoming calls list. 1 Display the Outgoing Calls or Incoming Calls screen : Outgoing Calls : Incoming Calls The Outgoing Calls or Incoming Calls list screen appears. 2 Select from calls list Example : Outgoing Calls screen12234561 Outgoing Calls list.2 Scrolls the list.3 Makes a call to the selected number.4 Creates an SMS for the selected phone number. See <SMS (Short Message Service)> (page 62).5 Displays the detail of the selected phone number. 6 Returns to the Hands Free Control screen. 3 Make a call⁄• The Outgoing Calls list screen or Incoming Calls list screen shows the list of the calls originated from or received at this unit. They are not the ones stored in the cell-phone memory. Calling by Voice RecognitionCalls by recognizing the registered voice. ⁄• In order to perform voice recognition, voice must be registered in the Phonebook data. See <Voice Registration> (page 59). Or, to perform voice recognition by Phone number category (Home, Office, Mobile etc.) of Phonebook data, a key word voice must be registered. See <Key Word Voice Registration> (page 60). 1 Display the Voice Recognition screen 2 Utter the voice registered in the Phonebook12Utter within 2 seconds after the Beep. 1 Displays the recognized phone number or address. 2 Cancels voice recognition. If the voice recognition is succeeded and there is only one phone number found: 32Make a call.2 Cancels voice recognition. 3 Displays the phonebook list. Next page 3](https://usermanual.wiki/JVCKENWOOD/39578/User-Guide-923679-Page-10.png)
![58 DNX8120/DDX812/DDX8032BT English 59If you hear another Beep sound:Speak the key word within 2 seconds after the Beep, or touch the [Phonebook List] button to select the phone number.Make a call.⁄• If there are more than one phone numbers registered under the same name, and the key word voice is registered for each phone number, you will hear another beep. For how to register key word, see <Key Word Voice Registration> (page 60).If there are more than one phone numbers registered under the same name, go to step 3. 3 Select a Phone number category548764 Calls the displayed phone number. 5 Creates an SMS to the displayed address. See <SMS (Short Message Service)> (page 62).6 Selects the Phone number category. 7 Scrolls the phone number. 8 Returns to the Hands Free Control screen. 4 Make a call⁄• A message is displayed if the voice is not recognized. Read the message for the further operation. Setting Up the Hands Free PhoneThe Hands Free system can be set as follows. 1 Display the Hands Free Setup screen 2 Setup each item 124356 7891011 121 Moves to the "Hands Free Setup 2" screen.2 Sets an automatic response time after call termination. ( "8") "Off": This function can not use. "0-99": Sets to calling ring time (second).3 Sets a ringing tone output position. ( "Front R") "Front L": Outputs the tone from the front left-hand side speaker. "Front R": Outputs the tone from the front right-hand side speaker. "Front All": Outputs the tone from the both front speakers.4 Sets the beep of the incoming call. ( "On") "On": Beep is heard. "Off": Beep is canceled.Hands Free Unit ControlNext page 35 Sets the beep of the incoming SMS. ( "On") "On": Beep is heard. "Off": Beep is canceled.6 Returns to the "Hands Free Control" screen.7 Returns to the "Hands Free Setup 1" screen.8 Sets whether to use cell-phone phonebook, outgoing calls list and incoming calls list. ( "On") "On": Yes. "Off": No.9 Sets the SMS function. ( "On") "On": Use SMS function. "Off": SMS not available. p Registers the voice to select phone number category with voice recognition. See <Key Word Voice Registration> (page 60).q Registers the phone number to Hands Free Control screen preset button. See <Phone Number Preset> (page 61). w Returns to the Hands Free Control screen.⁄• Either the time interval for automatic answer set on this unit or the time interval set on the cell-phone, whichever is shorter, takes effect. • Select the speaker which is further from the microphone in order to prevent howling or echoes.Voice RegistrationRegisters voice for voice recognition in Phonebook. Up to 35 voices can be recorded in one cell-phone. 1 Select the name to registerGo through the procedure of <Calling by Phonebook> (page 55).11 Selects a name. "REC" turns on for data with voice for voice recognition already registered. 2 Display the voice registration screen 3 Utter the voice to register (1st try) 322 Registers the voice. 3 Cancels voice registration. Utter within 2 seconds after the Beep. 4 Utter the voice to register (2nd try)](https://usermanual.wiki/JVCKENWOOD/39578/User-Guide-923679-Page-11.png)
![60 DNX8120/DDX812/DDX8032BT English 61 5 End voice registration⁄• A message is displayed if the voice is not recognized. Read the message for the further operation. • Repeat from 1st try if the voice is different from the 1st try.Key Word Voice RegistrationRegisters the voice to select the Phone number category by Voice Recognition. 1 Display the Key Word List screenDisplay the "Hands Free" screen and touch [Setup]. See <Control Screen Function> (page 52). 2 Select the Phone number category to register234511 Selects the Phone number category. "REC" turns on for data with voice for voice recognition already registered. 2 Registers voice for the selected Phone number category. 3 Plays voice registered for the selected Phone number category. 4 Deletes voice registered for the selected Phone number category. Touch to display the confirmation screen. Touch [YES] to delete or [NO] to cancel. 5 Returns to the Hands Free Set Up screen. 3 Display voice registration screenHands Free Unit Control 4 Utter the voice to register (1st try) 766 Registers the voice. 7 Cancels voice registration. Utter within 2 seconds after the Beep. 5 Utter the voice to register (2nd try) 6 End voice registration ⁄• A message is displayed if the voice is not recognized. Read the message for the further operation.• Repeat from 1st try if the voice is different from the 1st try. Phone Number PresetRegisters frequently used phone number to Hands Free control screen preset button. 1 Display the Hands Free Preset List screenDisplay the "Hands Free" screen and touch [Setup]. See <Control Screen Function> (page 52) 2 Select the Preset number to register11 Returns to the Hands Free Set Up screen. 3 Select the search destination of the number to register243567 89 10112 Registers from SMS incoming calls list. 3 Registers from SMS outgoing calls list. 4 Registers from Phonebook.5 Registers from outgoing calls list. 6 Registers from incoming calls list. 7 Registers by entering phone numbers. 8 Registers voice for voice recognition to preset number. Next page 3](https://usermanual.wiki/JVCKENWOOD/39578/User-Guide-923679-Page-12.png)
![62 DNX8120/DDX812/DDX8032BT English 639 Registers the currently displayed phone number. p Deletes the currently displayed phone number. q Returns to the previous screen. 4 Search phone number to register with each function 5 Register phone number ڥ Press [Delete] to delete the registered phone number. SMS (Short Message Service)Uses SMS function. 1 Display the SMS Select screen 2 Select a function154231 Displays received message list. 2 Displays sent message list. 3 Displays the Message screen. If there is an unfinished message, the button will be active. 4 Retrieves SMS messages from the cell-phone. 5 Returns to the Hands Free screen. 3 Select message to display 678896 Calls the number in the selected message. 7 Creates a new message for the selected message. 8 Scrolls the list. 9 Displays the selected message. Hands Free Unit ControlSMS Message screen10111212 13p Calls the number in the selected message. q Creates a new message for the selected message. w Scrolls the message. e Returns to the previous screen. 4 Create a message 141416171718 19 20 21 2215r Moves the cursor. t Displays remaining number of characters allowed. y Enters character. u Changes keyboard character type. i Sends the message. o Sets the key layout of the character buttons. ABC : Alphabetical key layout. QWE : Qwerty key layout.; Enters space.a Erases the entered character. If pressed more than 1 second, all the input characters are erased.s Returns to the previous screen.](https://usermanual.wiki/JVCKENWOOD/39578/User-Guide-923679-Page-13.png)