JVCKENWOOD 39597 GPS NAVIGATION SYSTEM User Manual
JVC KENWOOD Corporation GPS NAVIGATION SYSTEM
UserManual.wiki
>
JVCKENWOOD
>
39597 User Manual
manual
Navigation menu
Upload a User Manual
Namespaces
Wiki Guide
HTML
PDF
Info
Views
User Manual
Discussion / Help
Navigation
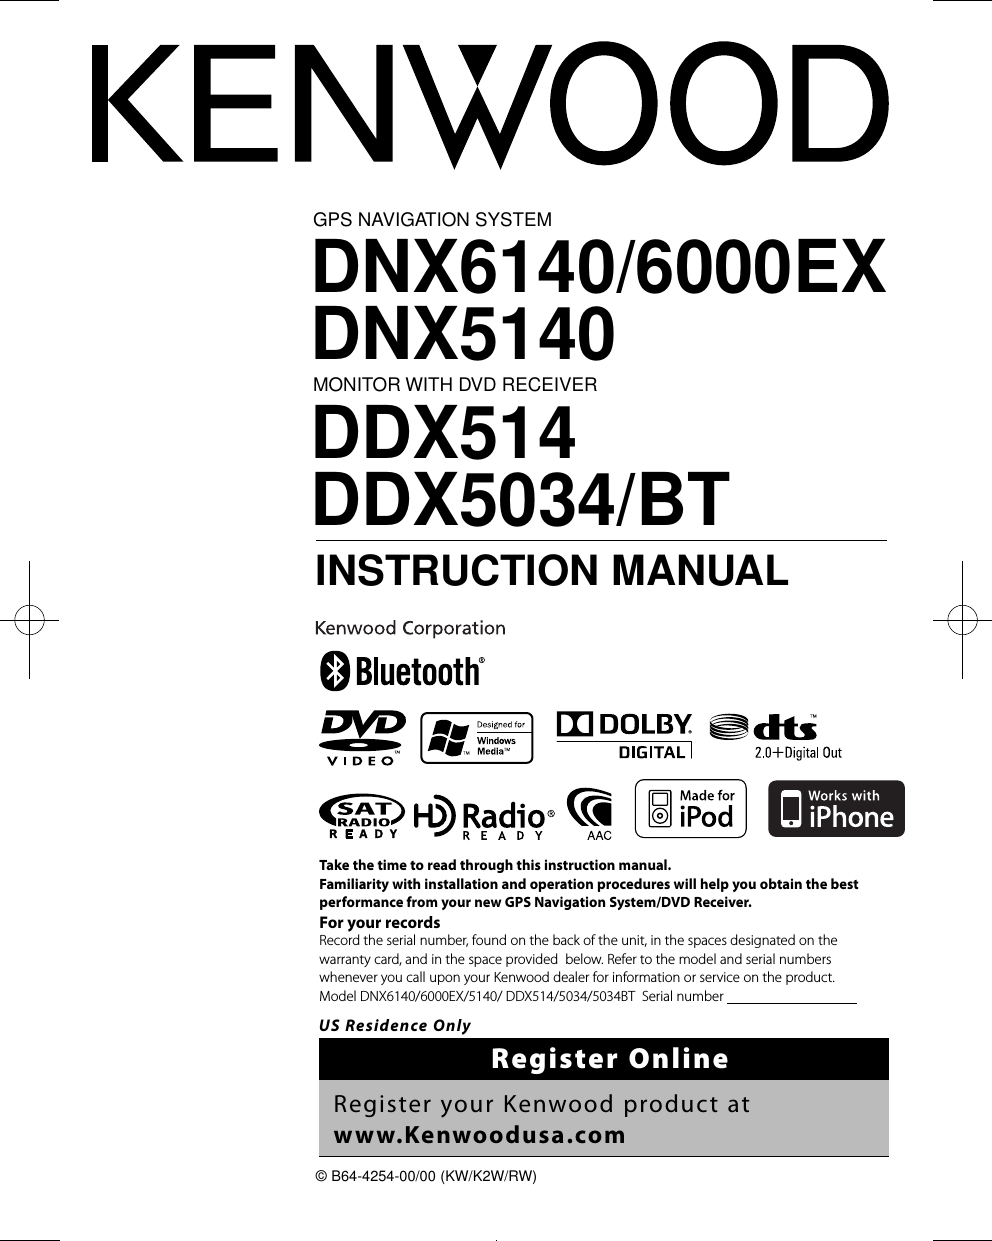

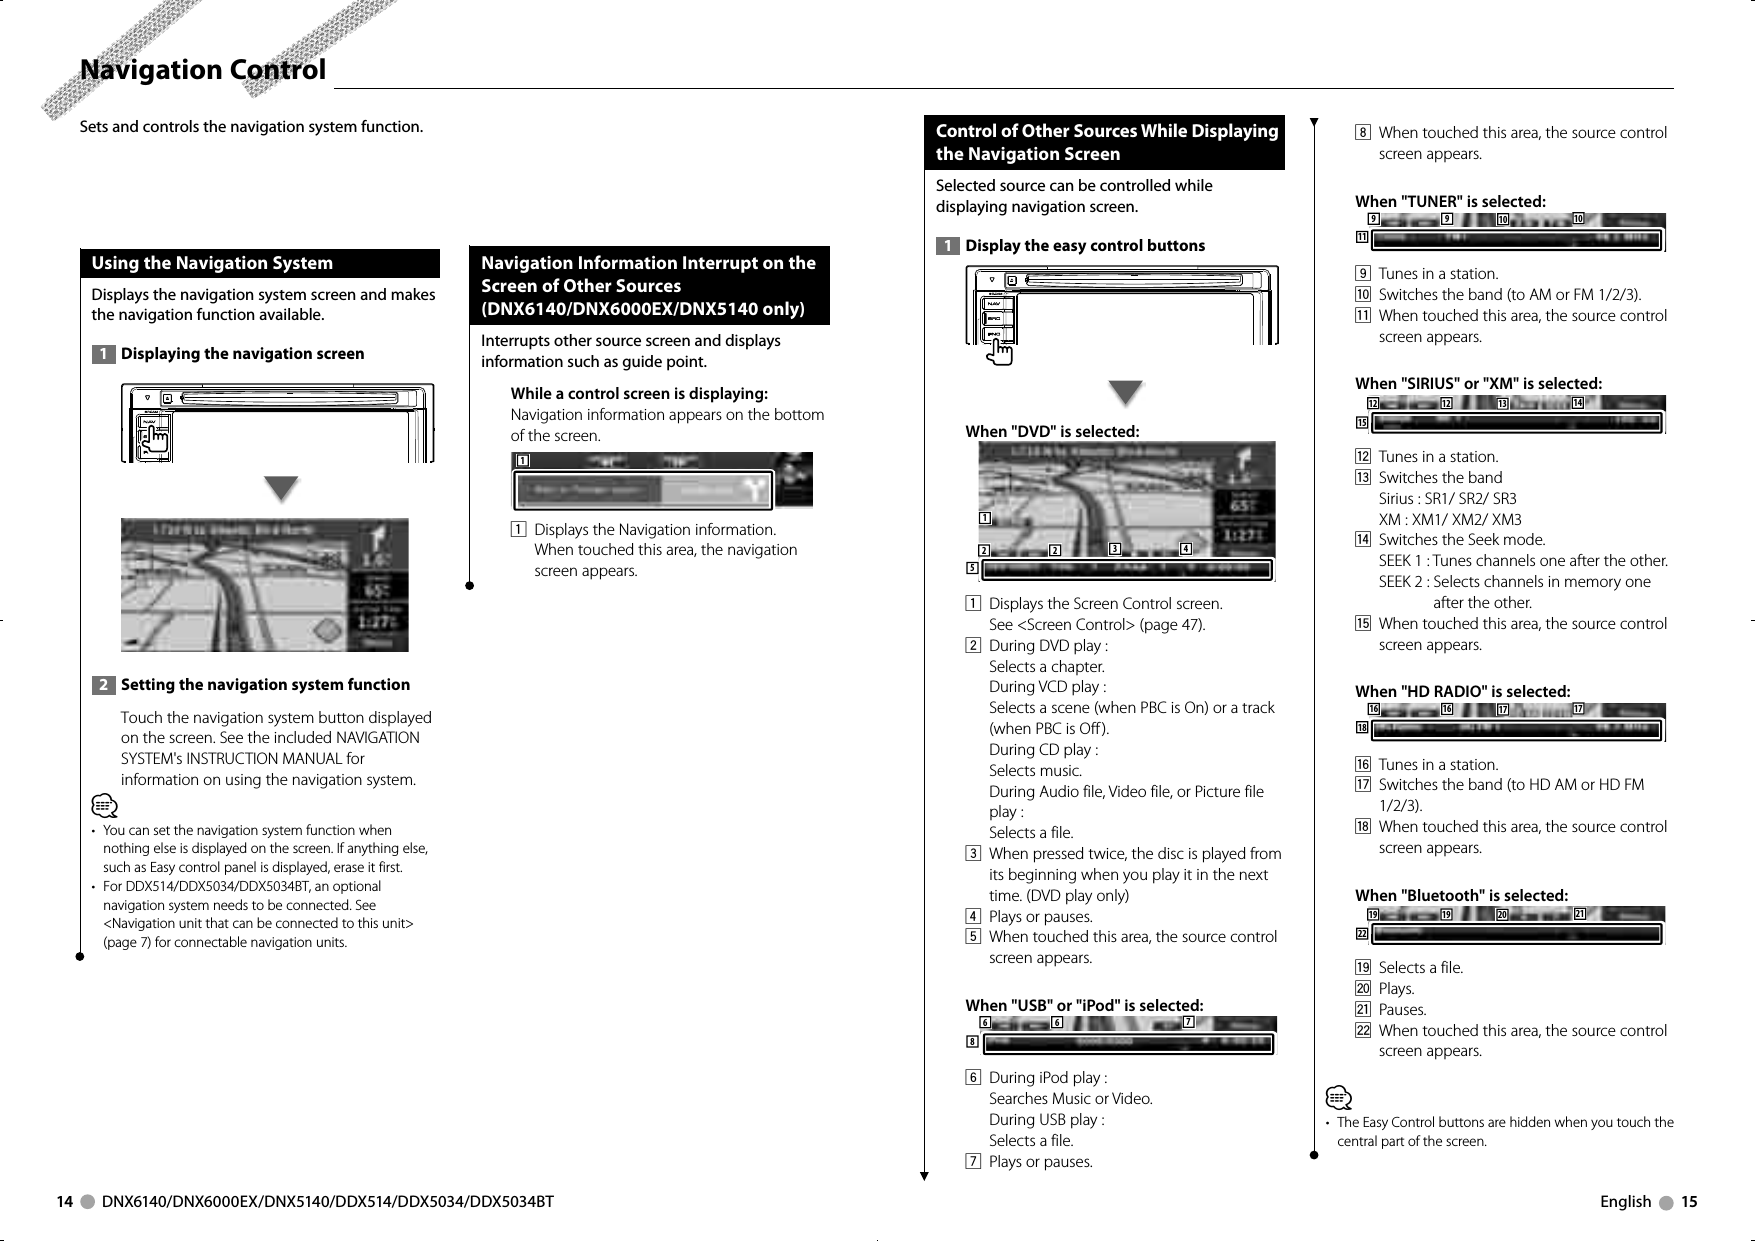
![CEBDA10 DNX6140/DNX6000EX/DNX5140/DDX514/DDX5034/DDX5034BT English 11Basic OperationsAdjusts the volumeTurn it either way to adjust the volume.EAttenuates the volumePress it to attenuate the volume.Press it again to cancel muting.ETurns power ON/OFFPress the button to turn on the power.When the button is pressed and held down for1 second or more, the power is turned off.CSwitches to the Navigation systemPress the button to switch the display to the navigation system screen.BPlaying a disc When you load a disc into disc loading slot, the disc starts playing.If a menu appears, when playing a video disc, select the desired item.⁄• See <List of playable discs> (page 7) for a list of supported discs and formats.Removing a disc Press [0] (Eject) button.APlaying a USB deviceWhen connecting a USB device, playback starts automatically.Removing the USB devicePress on the USB control screen to enter the USB suspend mode, and then remove the USB device. See <USB Device Control> (page 34).¤• Removing the USB device before entering the USB suspend mode may result in damaging the data in the USB device.⁄• If the USB source is selected when a USB device is not connected, "No Device" is displayed.• When the playback is stopped and then restarted, the playback will start from the point where it was stopped at the last time. Even if the USB is removed and connected again, the playback will start from the last stopped point unless the contents in the USB device is changed.• Make sure that the USB device is connected firmly.Selecting a source Press it to display the source select screen. Touch the source button to select the source.Full Source Select screen211456783 Favorite Source Select screen9C1 Scrolls the source display.2 Displays the Hands Free screen. (page 48)3 Press for at least 2 seconds to erase the buttons. Touch the screen to redisplay the buttons.⁄• The displayed source depends on the type of device connected. In addition, you cannot press the button of currently unavailable source.The following buttons are always displayed on the source select screen and source control screen.4 Displays the Source Select screen.The display switches between Favorite Source Select screen and Full Source Select screen by touching the button.5 Displays Source Control screen.6 Displays the Audio Control Menu screen. (page 86)7 Displays the Setup Menu screen. (page 60)8 Clock display⁄• If a Bluetooth Unit is not connected, [TEL] will not appear.9 Displays the Full Source Select screen.⁄• For how to register the frequently used source buttons to Favorite Source Select screen, see <Direct Source Button Setup> (page 69).SI indicatorB64-4254-00_00.indb 10-11 08.10.16 10:47:12 AM](https://usermanual.wiki/JVCKENWOOD/39597/User-Guide-1026061-Page-6.png)
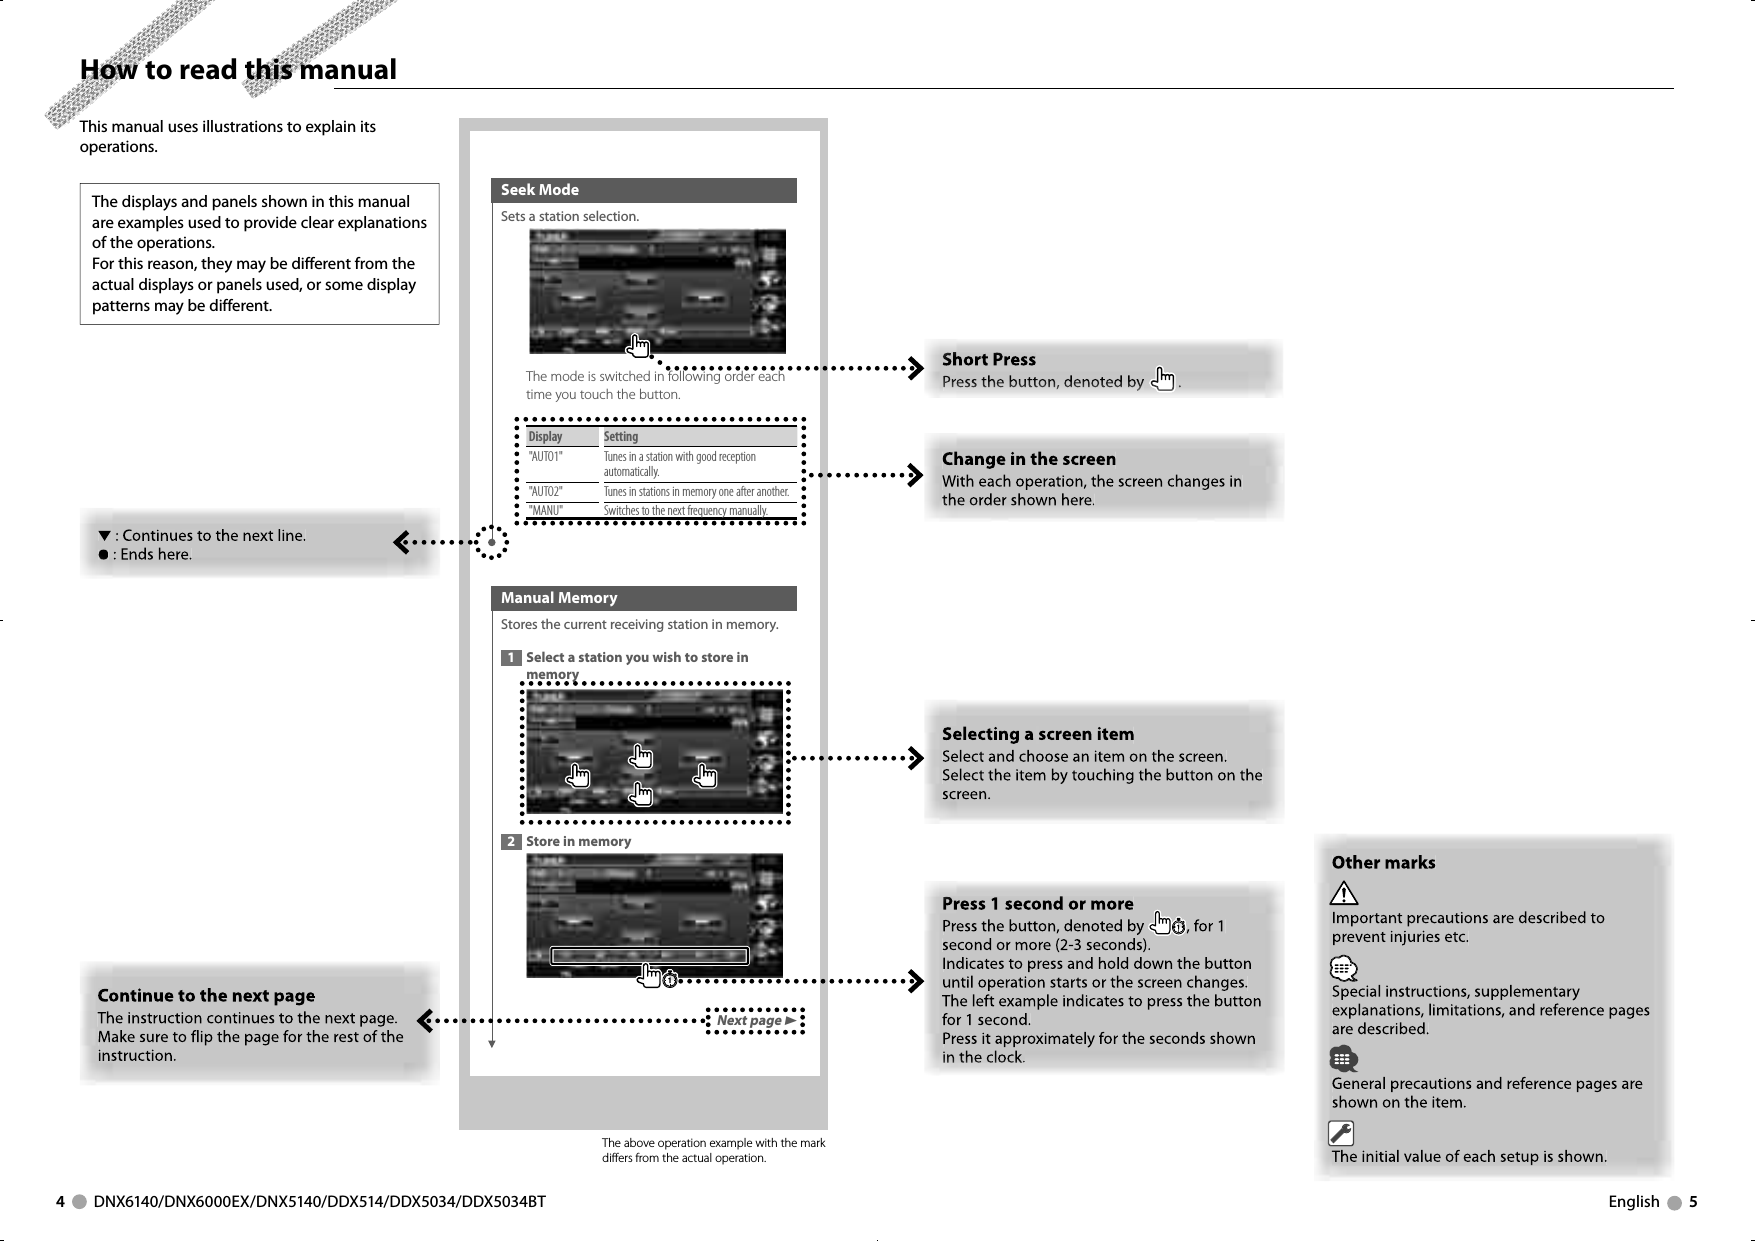
![CEBDA12 DNX6140/DNX6000EX/DNX5140/DDX514/DDX5034/DDX5034BT English 13Basic OperationsSwitching the function screenThe function control screen switches in the following order each time you press the button.Navigation screenEasy Control buttons appear.[FNC] button Picture or Video playback screenEasy Control buttons appear.[FNC] button Source Control screenNavigation information appears.*[FNC] button *DNX6140/DNX6000EX/DNX5140 onlyNavigation screen Picture or Video playback screenEasy Control button Mode:Full AV–OUT:AV–INT 0:00:05Title 1Chap 1DVD VIDEODVD VIDEOINSCRNEasy Control button⁄• For the functions of Easy Control buttons, see <Control of Other Sources While Displaying the Navigation Screen> (page 15).Source Control screenNavigation information (DNX6140/DNX6000EX/DNX5140 only)D⁄• For the functions of Navigation information, see <Navigation Information Interrupt on the Screen of Other Sources> (page 14).Playing an external playerConnect an external player such as a digital audio player to AV IN jack. Use of the optional cable CA-C3AV is recommended for connecting an external player.Switches to the rear viewPress it for more than 1 second to switch to rear view.Press it again for more than 1 second to resume the normal display.⁄• Functions of the [NAV] button can be changed to Display Off function. See <System Setup> (page 64) for the function setting of the [NAV] button. BSwitches to the Hands Free controlPress it for more than 1 second to the Hands Free control screen.Press it again for more than 1 second to resume the normal display. DScrolls the list and makes a selection When the list screen of a source control screen is displayed, press it for more than 1 second to enter list control mode.Turn it either way to scroll the list. Press it to make a selection.Press it again for more than 1 second to return to the volume control mode.EExample: List screen of DVD MEDIA sourceSI indicatorB64-4254-00_00.indb 12-13 08.10.16 10:47:15 AM](https://usermanual.wiki/JVCKENWOOD/39597/User-Guide-1026061-Page-7.png)
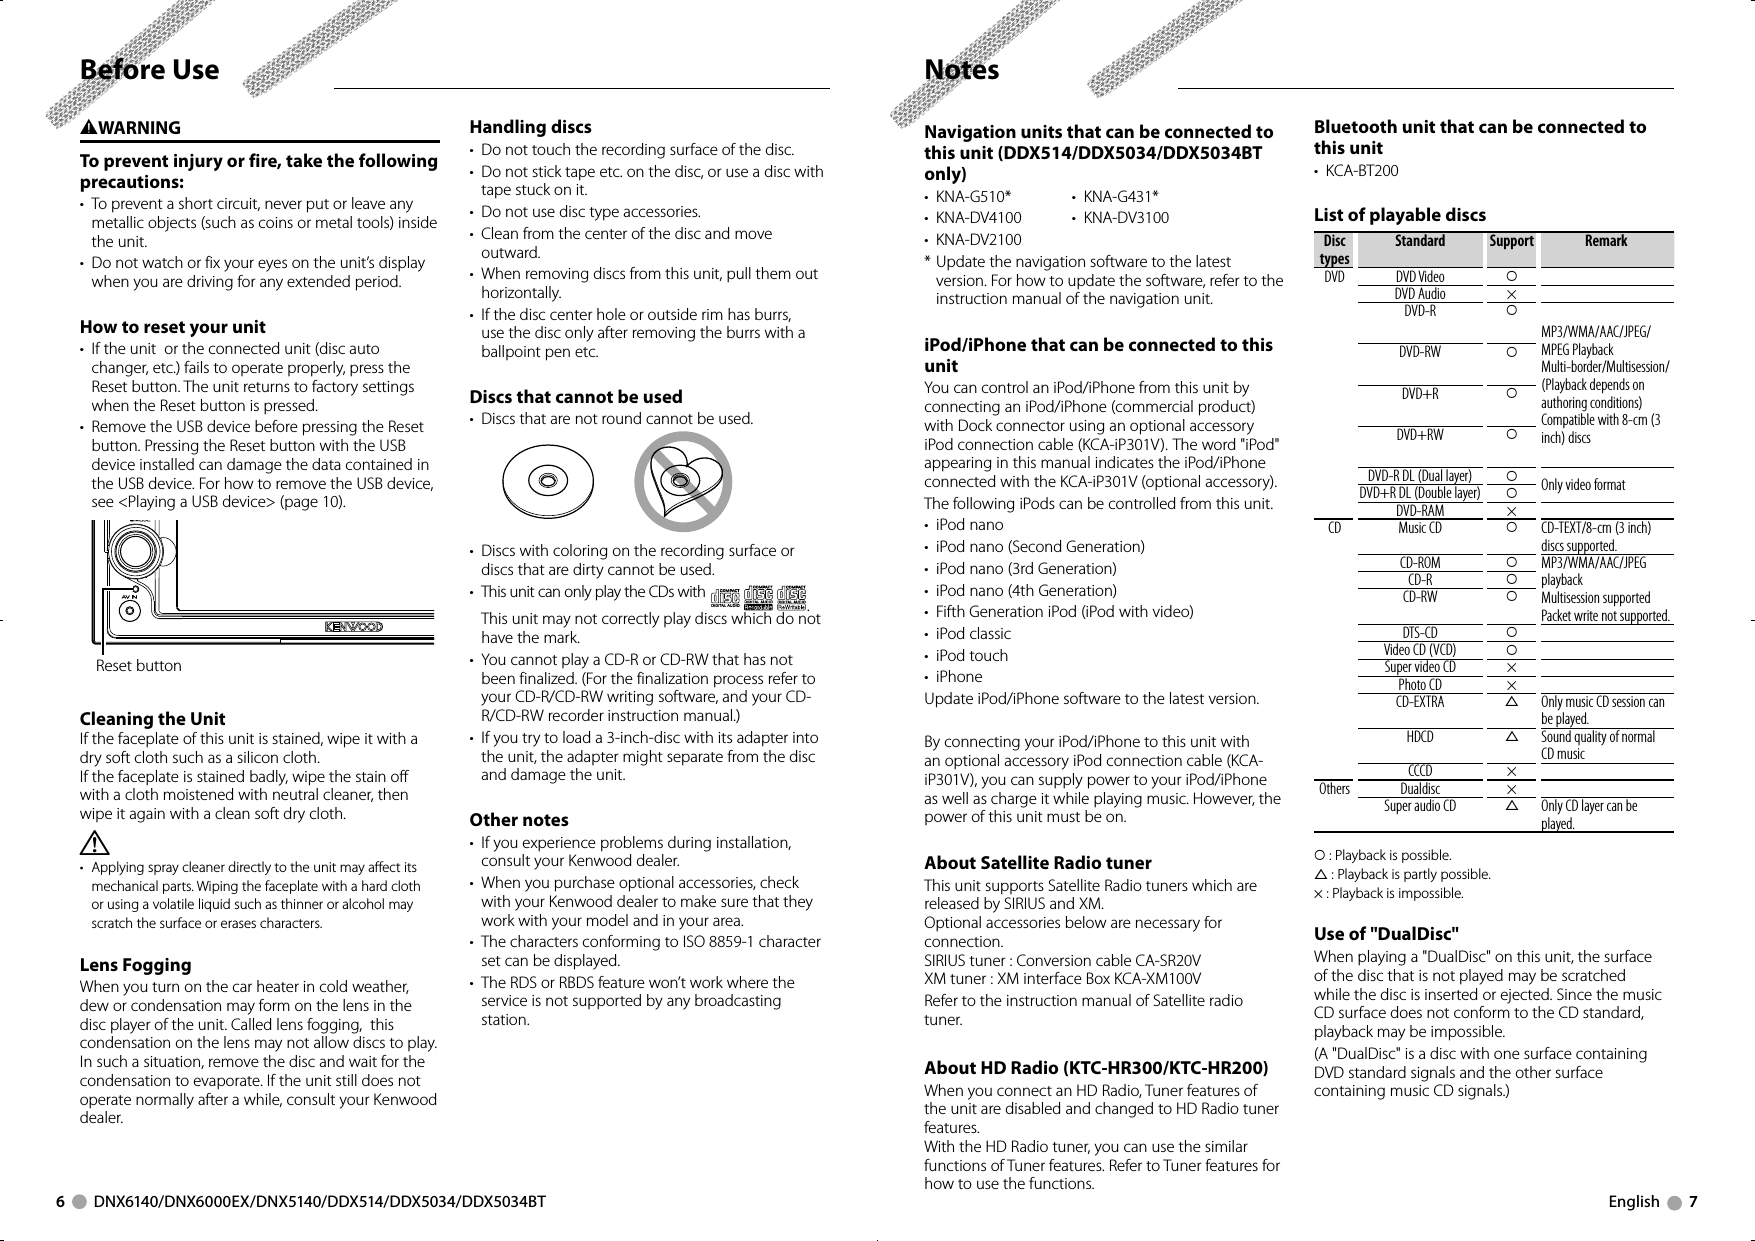
![16 DNX6140/DNX6000EX/DNX5140/DDX514/DDX5034/DDX5034BT English 17Watching DVD/VCDYou can play DVD/VCD using various functions.• For the basic method of how to watch DVD/VCD, see <Basic Operations> (page 10).• Set the remote controller mode switch to "DVD" mode before starting operation, see <Remote Controller mode switch> (page 90).Functions During the Playback ScreenBasic functions are available even when the playback screen is displayed. 1 Display the playback screenor[DVD] button on the "Source Select" screenDVD playback screenMode:Full AV–OUT:AV–INT 0:00:05Title 1Chap 1DVD VIDEODVD VIDEO1 2 35 4671 Title Number Display2 Chapter Number Display3 Play Time Display4 Forward Chapter Search Area Selects the next chapter.5 Backward Chapter Search Area Selects the previous chapter.6 DVD Disc Menu Control Buttons AreaDisplays the Disc Menu Control buttons (page 18).7 Information Display Button AreaVCD playback screenMode:FullP 0:05Scene 3DVD VCDDVD VCDAV–OUT:AV–INPBC VER2 ST IN AF8911 1012138 Scene/Track Number Display9 Play time Displayp Forward Scene/Track Search AreaSelects the next scene (when PBC is On) or track (when PBC is Off ).q Backward Scene/Track Search AreaSelects the previous scene (when PBC is On) or track (when PBC is Off ).w Zoom Control Button AreaDisplays the Zoom Control buttons (page 20).e Information Display Button Area⁄• The information display is cleared automatically after approximately 5 seconds. Also, the information can be displayed automatically when it is updated.Functions When Displaying the Easy Control PanelDisplays the basic operation buttons on the screen. 1 While the source is playing, press the [FNC] buttonMode:Full AV–OUT:AV–INT 0:00:05Title 1Chap 1DVD VIDEODVD VIDEOINSCRN21311 Chapter Search (during DVD play)Searches for a chapter.Scene/Track Search (during VCD play)Selects a scene (when PBC is On) or a track (when PBC is Off ).2 Stops playing.When pressed twice, the disc is played from its beginning when you play it in the next time.3 Plays or pauses.⁄• When the navigation screen is displayed, press the [NAV] button to switch to the source playback screen.• The Easy Control Panel is hidden when you touch a central part of the monitor.Functions While Displaying the Control ScreenSwitches to the source control screen to use various playback functions. 1 While the source is playing, press the [FNC] buttonMode:Full AV–OUT:AV–INT 0:00:05Title 1Chap 1DVD VIDEODVD VIDEOINSCRNWhen playing a DVD12678810911 1012 1213 143451615When playing a VCD17 18 191 Switches to the playback screen.2 Title Number Display (during DVD play)3 Chapter/Scene/Track Number Display4 Play Mode Display5 Play Time Display6 Volume Label Display When is appeared, the text display is scrolled by pressing it.7 Ejects the disc.8 Fast Forwards or Fast Backwards.Next page 3B64-4254-00_00.indb 16-17 08.10.16 10:47:21 AM](https://usermanual.wiki/JVCKENWOOD/39597/User-Guide-1026061-Page-9.png)
![18 DNX6140/DNX6000EX/DNX5140/DDX514/DDX5034/DDX5034BT English 19Watching DVD/VCD9 Stops playing. When pressed twice, the disc is played from its beginning when you play it in the next time.p Selects a chapter, a scene or a track. When the VCD is paused, touch this button to start single-frame stepping.q Plays or pauses.w Slow Forwards or Backwards. (during DVD play)e Switches the Repeat Play operations in the following sequence. DVD: Title Repeat, Chapter Repeat, Repeat Off VCD: Track Repeat, Repeat Off (Available when the PBC is off )r Switches the play time display in the following sequence. DVD: Chapter, Title, remaining titles VCD: Track, disc, remaining discs (Effective only when the PBC function is off )t Function Indicatory Appears when a disc is inserted.u Turns the PBC function of VCD On or Off.(only when VCD Ver 2.0 is in use)i Appears when PBC is On.o VCD version indicatorDVD Disc MenuSelects an option from the DVD Disc Menu. 1 Display the Disc Menu Control screenMode:Full AV–OUT:AV–INT 0:00:05Title 1Chap 1DVD VIDEODVD VIDEOEnterEnter Cance lCanc e lTopTopHighlightMenuMenuMenuCtrlMenuCtrlEx i tEx i tReturnReturn168572343331 Calls the Menu.2 Returns to the Disc Menu screen.3 Selects a menu option.4 Enters your menu selection.5 Returns to the previous menu screen.6 Displays the Top Menu.7 Highlight Control.8 Clears the Disc Menu Control.Highlight ControlYou can select a chapter and title for the DVD Menu screen. When you touch the screen, you can select the DVD menu.EnterEnter Cance lCanc e lTopTopHighlightMenuMenuMenuCtrlMenuCtrlEx i tEx i tReturnReturnHi gh l ight On⁄• To cancel Highlight Control, press [FNC] button. 2 Select Disc Menu optionsDisc MenuEnterEnter Cance lCanc e lTopTopHighlightMenuMenuMenuCtrlMenuCtrlEx i tEx i tReturnReturn1/1ZoomZoomSUBAudioAngle1/2MenuCtrlMenuCtrlEx i tEx i t3/ 391413 1011 129 Calls the Menu Control.p Switches the picture angle.(during program playback only)q Switches the subtitle language.(during program playback only)w Switches the voice language.(during program playback only)e Displays the Zoom Control screen.r Clears the Disc Menu Control.Zoom Control1/1ZoomZoomSUBAudioAngle1/2MenuCtrlMenuCtrlEx i tEx i t3/ 3x2 Canc e lCance lZoomCtrlZoomCtrlZoomZoom Ex i tEx i t15161616 1617 18t Changes the zoom ratio at 4 levels (2 times, 3 times, 4 times, or off) each time you touch.y Scrolls the screen in the direction you touch.u Returns to the Disc Menu Control screen.i Clears the Disc Menu Control.B64-4254-00_00.indb 18-19 08.10.16 10:47:27 AM](https://usermanual.wiki/JVCKENWOOD/39597/User-Guide-1026061-Page-10.png)
![20 DNX6140/DNX6000EX/DNX5140/DDX514/DDX5034/DDX5034BT English 21Watching DVD/VCDVCD Zoom ControlDisplays an enlarged VCD screen. 1 Display the Zoom Control screenMode:FullP 0:05Scene 3DVD VCDDVD VCDAV–OUT:AV–INPBC VER2 ST IN AFx2ZoomCtrlZoomCtrlZoomZoom Ex i tEx i t1222231 Changes the zoom ratio at 2 levels (2 times or off ) each time you touch.2 Scrolls the screen in the direction you touch.3 Clears the Zoom Control button.Music Disc & Audio File ListeningYou can recall various control screens during CD/Audio file playback.• For the basic method of how to play a music disc/audio file, see <Basic Operations> (page 10).• See <List of playable discs> (page 7) for playable discs.• See <About Audio file> (page 8) for playable files.Functions While Displaying the Control ScreenSwitches to the source control screen to use various playback functions.or[DVD] button on the "Source Select" screenDuring CD playback6742 316 17178910 911 12 13 14 1551 Switches to the wallpaper.2 Track (Music) Number Display3 Play Mode Display4 Play Time Display5 Music information displaySelects the Disc Text or Track Text. When is appeared, the text display is scrolled by pressing it.6 Ejects the disc.7 Fast Forwards or Fast Backwards.8 Stops playing the built-in disc player. When pressed twice, the disc is played from its beginning when you play it in the next time.9 Selects a track.p Plays or pauses.q Starts or stops Scan Play (that plays the beginning of each music one after the other).w Repeats to play (the present track).e Starts or stops Random Play (to play music in random order).r Switches the number of lines displayed in the Information Display.t Switches the play time display between Track, Disc, and Disc Remaining Time.y Function Indicatoru Appears when a disc is inserted.Next page 3B64-4254-00_00.indb 20-21 08.10.16 10:47:31 AM](https://usermanual.wiki/JVCKENWOOD/39597/User-Guide-1026061-Page-11.png)
![22 DNX6140/DNX6000EX/DNX5140/DDX514/DDX5034/DDX5034BT English 23During Audio file playback222119 203423 24 24 2526 27 2628 2829 30 31 32 33353618 37 38 39 40i Switches to the playback screen. If there is no playback screen, wallpaper is displalyed.o Folder and File Number Display; Play Mode Displaya Play Time Displays Music information displaySelects Folder Name, File Name, Title, Artist Name, or Album Name. When is appeared, the text display is scrolled by pressing it.d Ejects the disc.f Fast Forwards or Fast Backwards. (Disabled when a JPEG is being played.)g Stops playing. When pressed twice, the disc is played back from its beginning in the next time.h Selects a file.j Plays or pauses.k Selects a folder.l Switches the button display./ Starts or stops Scan Play (that plays the beginning of each music or data one after the other).z Repeats to play (the preset files or data).x Starts or stops Random Play (to play files of the present folder in random order).c Switches the number of lines displayed in the Information Display.v Function IndicatorMusic Disc & Audio File Listeningb MUSIC, MOVIE or PICTURE indicatorn Appears when a disc is inserted.m Repeats to play the music or data of the present folder., Displays images in the folder currently being played one after another. If there is no image in the folder currently being played, initial background is displayed. For information on setting the image display time, see <System Setup> (page 64).. You can search for folders and Audio files through a hierarchy.P Displays music information (such as Tag and content property) of Audio file being played. 414242 434445Q Lists folders and Audio filesFolder opens when touched, and the Audio file is played.When is appeared, the text display is scrolled by pressing it.W Scrolls the list.E Moves to the top hierarchy level.R Moves up a hierarchy level.T Displays the currently playing file.Function During Playback ScreenBasic functions are available even when the playback screen is displayed. 1 Display the playback screenor[DVD] button on the "Source Select" screenMode:Full AV–OUT:AV–INP 0:00:05DVD MEDIADVD MEDIAIN2112564 31 Folder/File Number Display 2 Play Time Display3 Forward File Search Area Selects the next file.4 Backward File Search Area Selects the previous file.5 JPEG: Picture Control Button Area (page 25) MPEG: Switches to the screen with subtitle language selection option and voice language selection option.6 Information Display Button Area⁄• The information display is cleared automatically after approximately 5 seconds. Also, the information can be displayed automatically when it is updated.You can recall various control screens during playback of video file (MPEG 1 and MPEG 2 file) and picture file (JPEG file).Video File/Picture WatchingB64-4254-00_00.indb 22-23 08.10.16 10:47:35 AM](https://usermanual.wiki/JVCKENWOOD/39597/User-Guide-1026061-Page-12.png)
![24 DNX6140/DNX6000EX/DNX5140/DDX514/DDX5034/DDX5034BT English 25Functions When Displaying the Easy Control PanelDisplays the basic operation buttons on the screen. 1 While the source is playing, press the [FNC] buttonMode:Full AV–OUT:AV–INP 0:00:05DVD MEDIADVD MEDIAINPICTURE21SCRN11231 Selects a file.2 Stops playing.3 Plays or pauses.⁄• When the navigation screen is displayed, press the [NAV] button to switch to the source playback screen.• The Easy Control Panel is hidden when you touch a central part of the monitor.Functions While Displaying the Control ScreenSwitches to the source control screen to use various playback functions. 1 While the source is playing, press the [FNC] buttonMode:Full AV–OUT:AV–INP 0:00:05DVD MEDIADVD MEDIAINPICTURE21SCRN542317677 8910 911 1112 13 14 15 1618191 20 21 22 231 Switches to the playback screen.2 Folder and File Number Display3 Play Mode Display4 Play Time Displayg Scrolls the list.h Moves to the top hierarchy level.j Moves up a hierarchy level.k Displays the currently playing file.Picture ControlAdjusting the video display. 1 Start Picture ControlMode:Full AV–OUT:AV–INP 0:00:05DVD MEDIADVD MEDIAIN21 2 Adjust the video displayExitPicture Ctrl21341 Reverses the picture horizontally.2 Rotates counter clockwise.3 Rotates clockwise.4 Ends Picture Control.Video File/Picture File Watching5 Video/Picture information display Selects Folder Name, File Name, Title, Artist Name, or Album Name. When is appeared, the text display is scrolled by pressing it.6 Ejects a disc.7 Fast Forwards or Fast Backwards. (Disabled when a JPEG is being played.)8 Stops playing.When pressed twice, the disc is played back from its beginning in the next time.9 Selects a file.p Plays or pauses.q Selects a folder.w Switches the button display.e Starts or stops Scan Play (that plays the beginning of each song or data one after the other).r Repeats to play (the preset files or data).t Starts or stops Random Play (to play files of the present folder in random order).y Switches the number of lines displayed in the Information Display.u Function Indicatori PICTURE, MOVIE or MUSIC indicatoro Appears when a disc is inserted.; Repeats to play the file of the present folder.a Displays images in the folder currently being played one after another. If there is no image in the folder currently being played, initial background is displayed. For information on setting the image display time, see <System Setup> (page 64).s You can search for folders and files through a hierarchy.d Displays information of file being played. 242525 262728f Lists folders and Video files/Picture files.Folder opens when touched, and the Video/Picture file is played.B64-4254-00_00.indb 24-25 08.10.16 10:47:39 AM](https://usermanual.wiki/JVCKENWOOD/39597/User-Guide-1026061-Page-13.png)
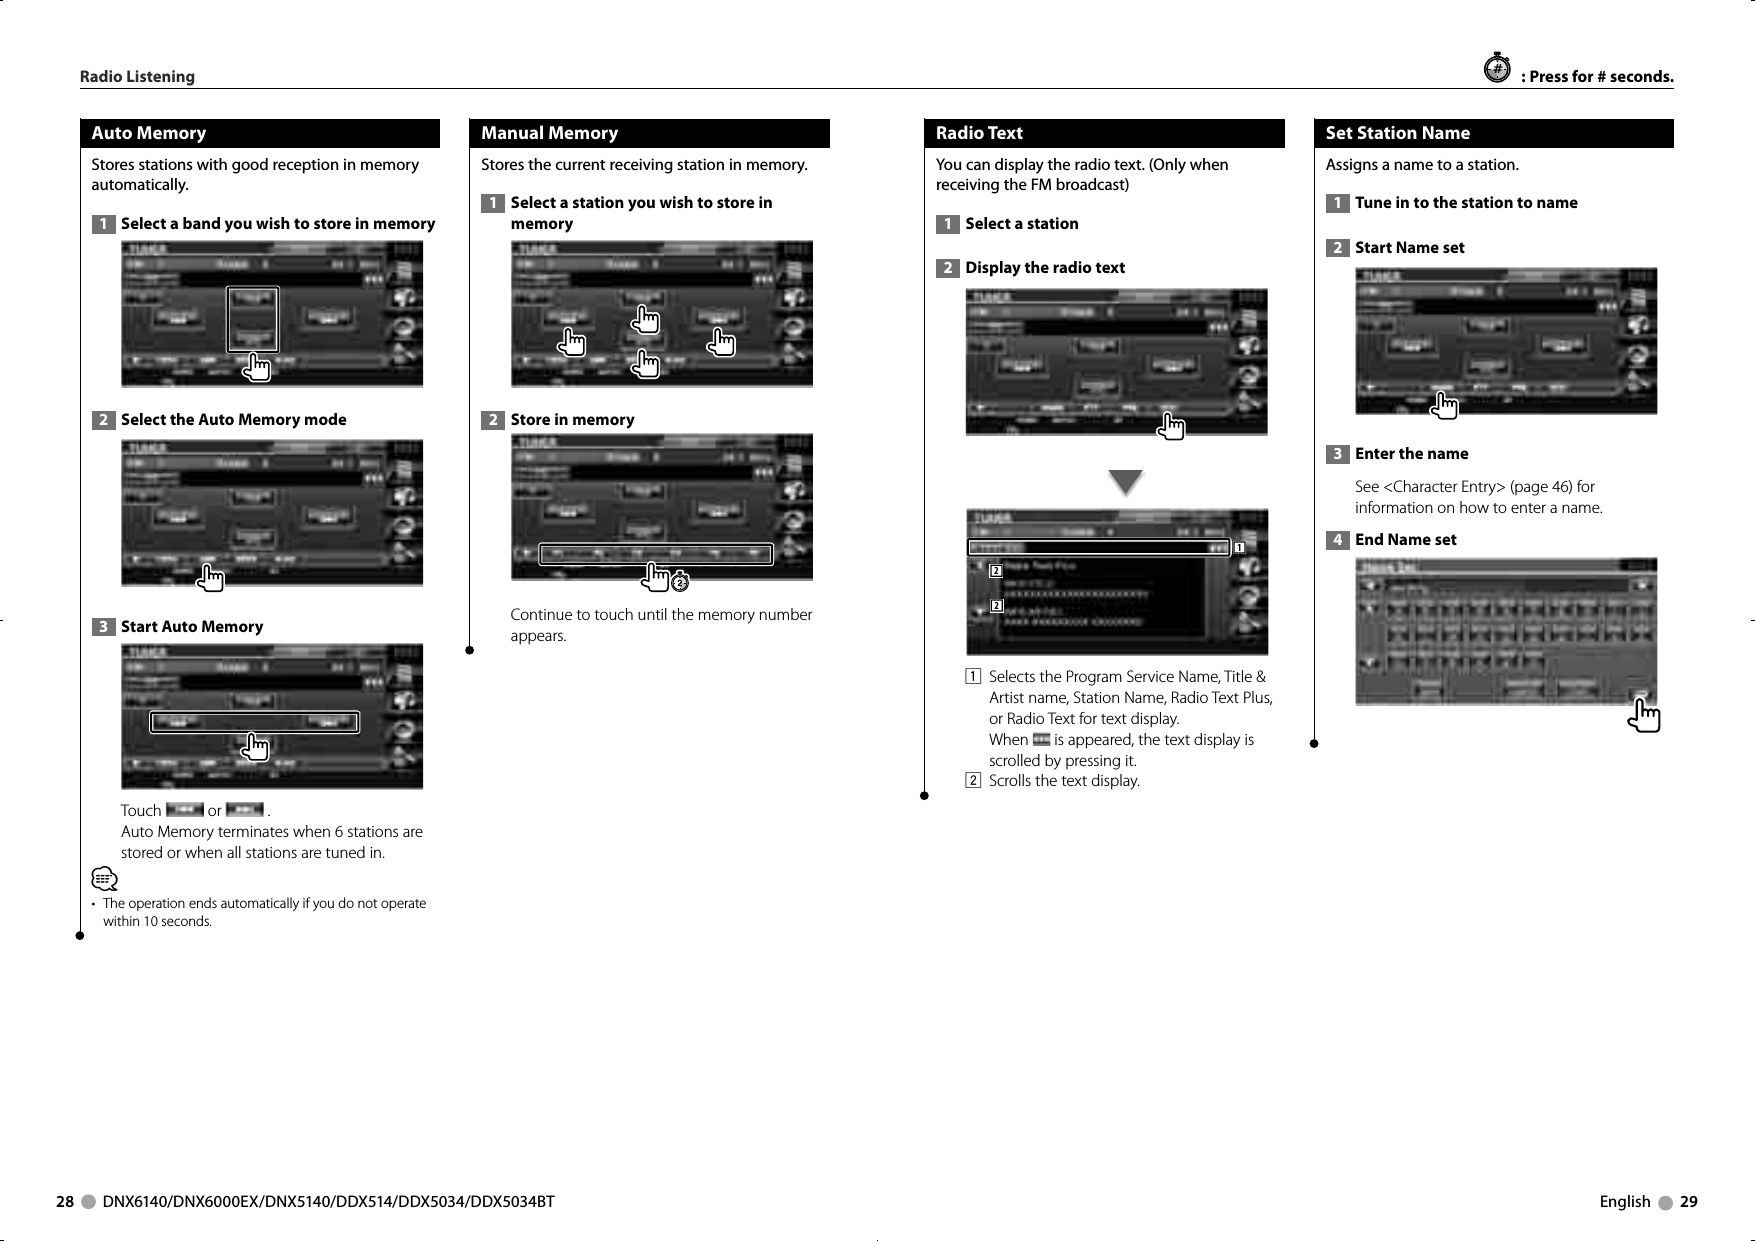
![26 DNX6140/DNX6000EX/DNX5140/DDX514/DDX5034/DDX5034BT English 27Radio ListeningFunctions While Displaying the Control ScreenSwitches to the source control screen to use various functions.[TUNER] button on the "Source Select" screen137759 10 11 12861234 14 15 16 17 181 Band display2 Preset number3 Frequency displayVarious control screens appear in the Tuner Source mode.• For the basic method of receiver button operations, see <Basic Operations> (page 10).• Set the remote controller mode switch to "AUD" mode before starting operation, see <Remote Controller mode switch> (page 90).4 Radio station information display.Selects the Program Service Name, Title & Artist name, Station Name, Category Name 1/2, or Radio Text.5 Switches to the FM1/2/3 band.6 Switches to the AM band.7 Tunes in a station.Use the <Seek Mode> (page 27) to change the frequency switching.8 Switches the button display.9 Turns the CRSC function On or Off. (Only when receiving the FM broadcast)p Selects the Auto Memory mode.(See page 28 for the <Auto Memory>)q Switches the Seek mode.(See page 27 for the <Seek Mode>)w Switches the number of lines displayed in the Information Display.e Turns the Traffic Information function On or Off.See <Traffic Information>, (page 30).r When to buttons appear, you can recall the stations on memory.For memory of broadcasting stations, see <Auto Memory> (page 28) or <Manual Memory> (page 28).t Sets a name to the station. See <Set Station Name> (page 29).y Searches station by program type. See <Search for Program Type> (page 30).u Lists and selects memorized station.i Displays Radio Text screen. See <Radio Text> (page 29). 202019 21o Memorized stations are displayed. Touch to tune in.; Scrolls the list.a Switches the list display name to Station name or Program Service Name.Seek ModeSets a station selection. The mode is switched in following order each time you touch the button.Display Setting"AUTO1" Tunes in a station with good reception automatically."AUTO2" Tunes in stations in memory one after another."MANU" Switches to the next frequency manually.B64-4254-00_00.indb 26-27 08.10.16 10:47:43 AM](https://usermanual.wiki/JVCKENWOOD/39597/User-Guide-1026061-Page-14.png)
![30 DNX6140/DNX6000EX/DNX5140/DDX514/DDX5034/DDX5034BT English 31Traffic InformationWhen a traffic bulletin starts, any source is switched to the traffic information and it is displayed automatically. 1 Set the Traffic information modeWhen the traffic bulletin starts...The Traffic Information screen appears automatically.Traffic Information screen⁄• It is necessary to have Traffic Information function set to On in order to have the Traffic Information screen appear automatically. • During reception of traffic information the adjusted volume is automatically remembered, and the next time it switches to traffic information it's automatically the remembered volume.Search for Program TypeA program is tuned when you set its program type. (Only when receiving the FM broadcast) 1 Enter Program Type mode 2 Select a Program Type2234151 Program Type is displayed. Touch to select a Program Type.2 Scrolls the Program Type list.3 Searches for the program type. It is displayed when the Program type is selected.4 Continue to touch more than 2 seconds, the currently receiving station is registered to have the selected program type.5 Returns to the previous screen. 3 Search a station of the selected Program TypeRadio Listening iPod ControlConnecting an iPodConnect an iPod to this unit.Mode:Full AV–OUT:AV–INP 0:00:05iPodiPodIN00002/000062 131 Forward music/video search area Selects the next music/video.2 Backward music/video search area Selects the previous music/video.3 Information display button area The information is displayed for 5 seconds.⁄• Remove all accessories such as headphone before connecting an iPod. You may not be able to control the iPod if you connect it with accessories attached.• When you connect an iPod to this unit, playback starts from the song you were playing on the iPod itself (Resume Function).• If you start playback after connecting the iPod, the music that has been played by the iPod is played first. In this case, "RESUMING" is displayed without displaying a folder name, etc. Changing the browse item will display a correct title, etc.• When the iPod is connected to this unit, "KENWOOD" or "✓" is displayed on the iPod to indicate that you cannot operate the iPod.• If the played song is not a video content, "No iPod Video Signal" is displayed on the video screen.You can control and listen to songs in your iPod by connecting an iPod to this unit with KCA-iP301V (optional accessory). You can also display video contents on this unit when connecting an iPod with video.Functions When Displaying the Easy Control PanelDisplays the basic operation buttons on the screen. 1 While the source is playing, press the [FNC] buttonMode:Full AV–OUT:AV–INP 0:00:05iPodiPodINSCRN00002/00006121.1 Music/Video Search.2 Plays or pauses.⁄• When the navigation screen is displayed, press the [NAV] button to switch to the source playback screen.• The Easy Control Panel is hidden when you touch a central part of the monitor.B64-4254-00_00.indb 30-31 08.10.16 10:47:48 AM](https://usermanual.wiki/JVCKENWOOD/39597/User-Guide-1026061-Page-16.png)
![32 DNX6140/DNX6000EX/DNX5140/DDX514/DDX5034/DDX5034BT English 33Functions While Displaying the Control ScreenSwitches to the source control screen to use various playback functions.When Video or picture is playing, press the [FNC] button.Mode:Full AV–OUT:AV–INP 0:00:05iPodiPodINSCRN00002/00006or[iPod] button on the "Source Select" screen56243108971211131 14 15 16 17 181 Image pictureSwitches to the playback screen. If there is no playback screen, wallpaper is displayed.2 Total number of music in the iPod and the music number display3 Play Mode Display4 Play Time Display5 Music/Video Information Display Selects the Title, Artist Name, Album Name or iPod Name. When is appeared, the text display is scrolled by pressing it.6 Fast Forwards or Fast Backwards.7 Selects Music/Video.8 Plays or pauses.9 Switches the button display.p Starts or stops Scan Play (that plays the beginning of each music or video one after the other).q Repeats to play (the preset files or data).w Starts or stops Random play.*e MUSIC or VIDEO indicatorr Starts or stops Album Random Play (plays randomly from current album).*t Displays the list of music category. y Displays the list of video category. u Displays the previous music/video list screen.i Displays information screen of music/video being played.⁄* Disabled when VIDEO is being played. 2020192122231o Categories and music are listed. Touch a category name to move its lower level. If music title is displayed, the music is played by touching it.When is appeared, the text display is scrolled by pressing it.When is appeared, all the music in its category is played by touching the button.; Switches list page.a Returns to previous category.s Moves to the top category.d Displays the currently playing category.iPod ControlB64-4254-00_00.indb 32-33 08.10.16 10:47:51 AM](https://usermanual.wiki/JVCKENWOOD/39597/User-Guide-1026061-Page-17.png)
![34 DNX6140/DNX6000EX/DNX5140/DDX514/DDX5034/DDX5034BT English 35You can control and listen to songs in your USB device by simply connecting it to the USB connector of this unit. • For the connection of a USB device, see <Basic Operations> (page 10).USB Device ControlFunctions When Displaying the Easy Control PanelDisplays the basic operation buttons on the screen. 1 While the source is playing, press the [FNC] buttonMode:Full AV–OUT:AV–INP 0:00:05USBINSCRN0002/0006USB112.1 Selects a file.2 Plays or pauses.⁄• The Easy Control Panel is hidden when you touch a central part of the monitor.Functions While displaying the Control ScreenSwitches to the source control screen to use various playback functions.When Video or picture is playing, press the [FNC] button.Mode:Full AV–OUT:AV–INP 0:00:05USBINSCRN0002/0006USBor[USB] button on the "Source Select" screen524311910813 141267115 16 17 18 19 201 Image pictureSwitches to the playback screen. If there is no playback screen, wallpaper is displalyed.2 Track Number Display3 Play Mode Display4 Play Time Display5 Music information displaySelects the Folder Name, File Name, TItle, Artist Name, or Album Name. When is appeared, the text display is scrolled by pressing it.6 Removes the USB device.When "No Device" is shown, the USB device can be removed safely.If you wish to play it again while the USB device is connected, press it again.7 Selects a folder. (Only in Folder Select Mode)*8 Selects a file.9 Plays or pauses.p Switches the button display.q Starts or stops Scan Play (that plays the beginning of each music one after the other). w Repeats to play (the present music).e Starts or stops Random Play (to play music in random order).*r Switches the number of lines displayed in the Information Display.t MUSIC, MOVIE or PICTURE indicatory Repeats to play the music or data of the present folder. (Only in Folder Select Mode)u Displays images in the folder currently being played one after another. If there is no image in the folder currently being played, initial background is displayed.For information on setting the image display time, see <System Setup> (page 64).i Displays the folder list. See <Folder Select> (page 36).o Displays the list of category.; Displays information screen of music being played.⁄* Disabled during play list mode. 222221232425261The display above can also be the folder list display. See <Folder Select> (page 36).a Switches to the lower level of the category. If the file is displayed, the music is played by touching it.s Scrolls the list.d Lists all the music in the selected category.f Moves to the upper level of the category.g Moves to the top category.h Displays the currently playing category. (Only in Category Mode)B64-4254-00_00.indb 34-35 08.10.16 10:47:55 AM](https://usermanual.wiki/JVCKENWOOD/39597/User-Guide-1026061-Page-18.png)
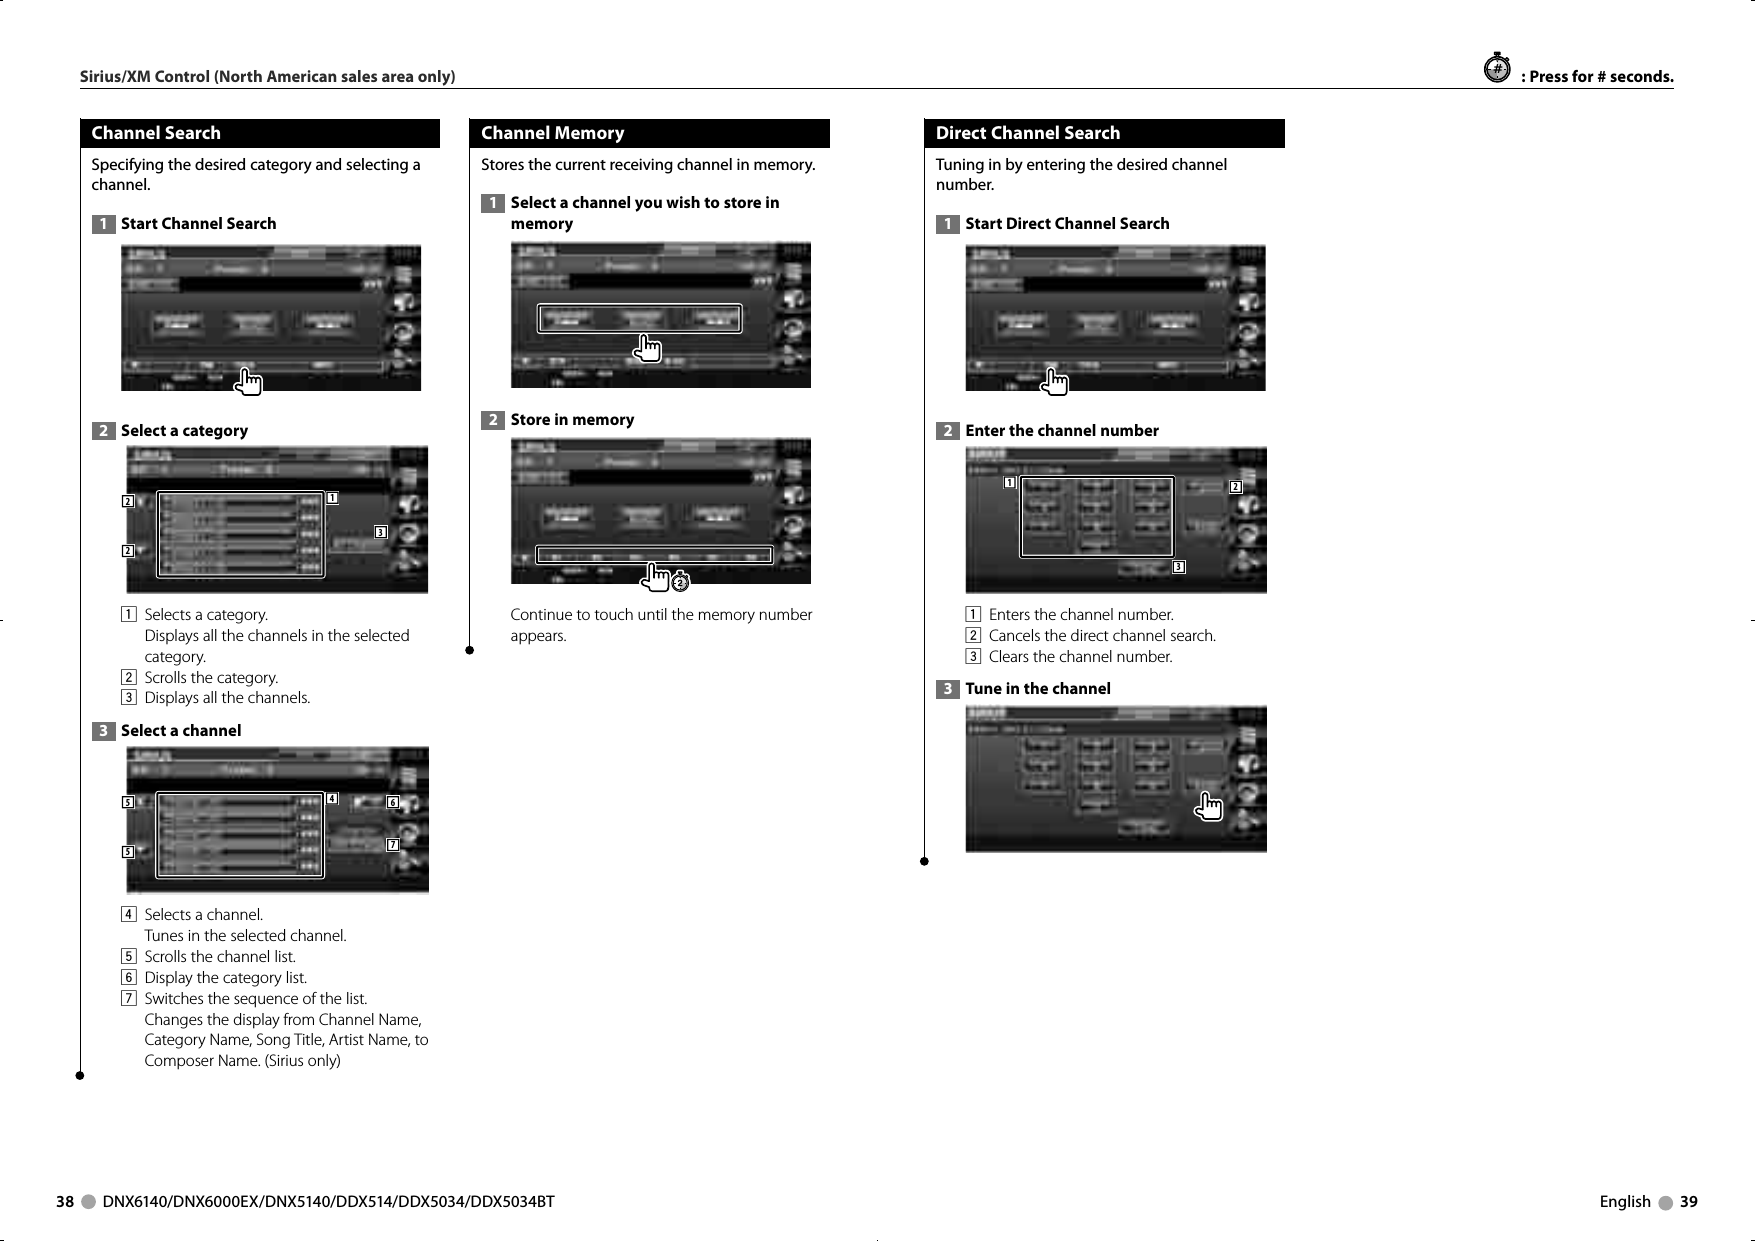
![36 DNX6140/DNX6000EX/DNX5140/DDX514/DDX5034/DDX5034BT English 37Folder SelectSearches folders and Audio files stored in the USB device according to hierarchy. 1 Start Folder Select 2 Select music22134561 Lists folders and Audio filesFolder opens when touched, and the Audio file is played.2 Scrolls the list.3 Moves to the top hierarchy level.4 Moves up a hierarchy level.5 Moves to the top page of the list.6 Displays the currently playing file.Sirius/XM Control (North American sales area only)Functions While Displaying the Control ScreenSwitches to control screen to use various functions.[SIRIUS] or [XM] button on the "Source Select" screen56748923510111 12 13 14 151 Band display2 Preset number3 Channel display4 Displays information concerning music being played.Various control screens appear in the Satellite radio source mode. (with the optional accessory Satellite radio connected only. To connect the Sirius tuner, a conversion cable CA-SR20V (optional accessory) is necessary and to connect the XM tuner, an XM interface Box KCA-XM100V (optional accessory) is necessary.) • This document uses the SIRIUS display as an example.Sirius : Changes the display from Channel Name, Song Title Name, Artist Name, Composer Name, to Category Name. XM : Changes the display from Channel Name, Title, Name, to Category Name. Displays the ID number when Channel 0 is selected.Sirius : Displays the SIRIUS ID. XM : Displays the RADIO ID.5 Tunes in a station.6 Switches the band.7 Switches the button display.8 Starts or stops Channel Scan (that tunes channels one after the other).9 Switches the Seek mode. SEEK 1: Tunes channels one after the other. SEEK 2: Selects channels in memory one after the other.p Switches the number of lines displayed in the Information Display.q Indicates current Seek modew When to buttons appear, you can recall the channel on memory. For memory of channel stations, see <Channel Memory> (page 38).e You can tune in by entering the desired channel number. See <Direct Channel Search> (page 39).r You can tune in by specifying the desired category. See <Channel Search> (page 38).t Displays the program information screen. See <Channel Search> (page 38) for channel search.USB Device ControlB64-4254-00_00.indb 36-37 08.10.16 10:47:59 AM](https://usermanual.wiki/JVCKENWOOD/39597/User-Guide-1026061-Page-19.png)
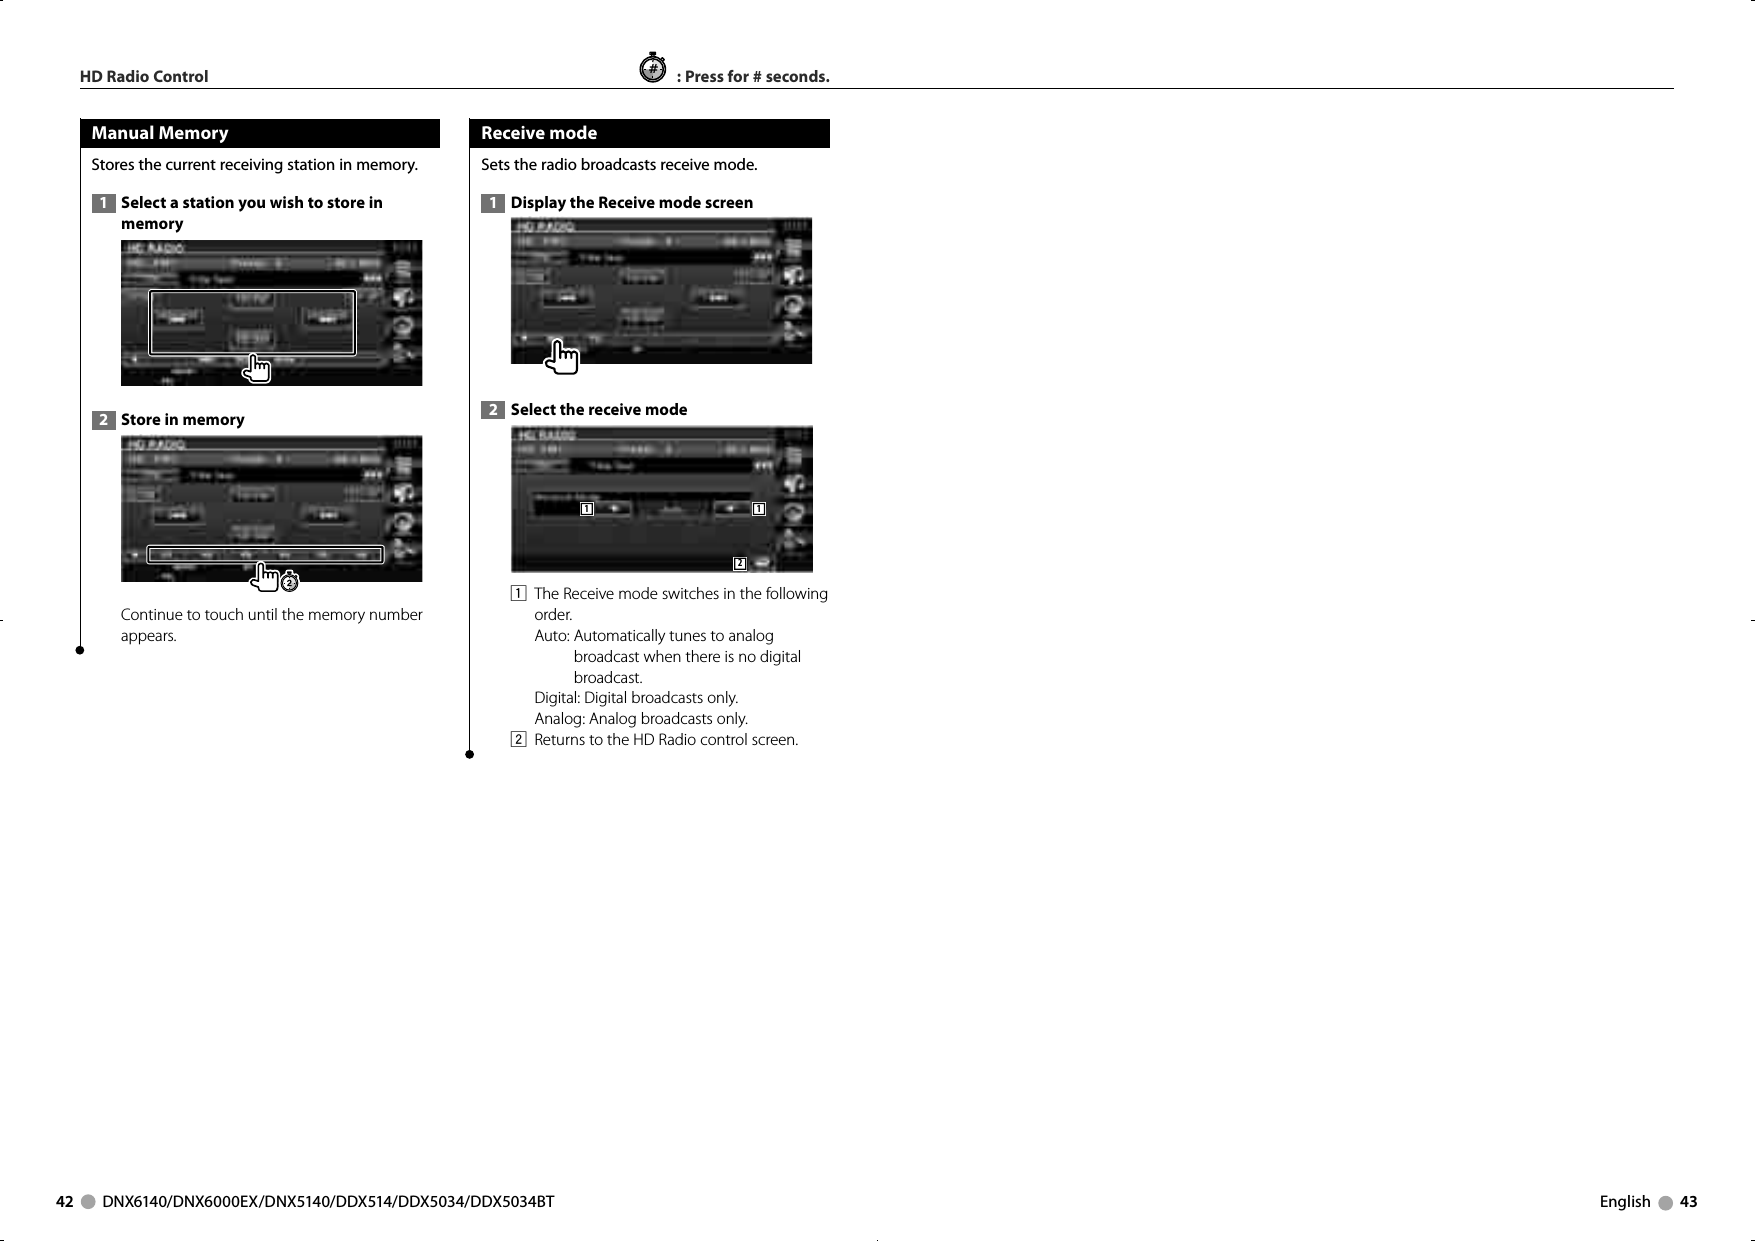
![40 DNX6140/DNX6000EX/DNX5140/DDX514/DDX5034/DDX5034BT English 41Functions While Displaying the Control ScreenSwitches to the source control screen to use various functions.[HD Radio] button on the "Source Select" screen871057116912423181 Band display2 Preset number3 Frequency display4 Displays information concerning music being played.Changes the display Call letter (8), Station Name (56), Song Title (60), Artist Name (60), Album Name (60), to Genre Name (8). The number in the ( ) indicates the maximum number of displayed characters.5 Switches to the HD FM1/2/3 band.6 Switches to the HD AM band.7 Tunes in a station. Use the <Seek Mode> (page 41) to change the frequency switching.8 Switches the channel.Various control screens appear in the HD Radio Source mode. (with the optional accessory HD Radio tuner connected only) Seek ModeSets a station selection mode.The mode is switched in following order each time you touch the button.Display Setting"AUTO1" Tunes in a station with good reception automatically."AUTO2" Tunes in stations in memory one after another."MANU" Switches to the next frequency manually.9 Switches the button display.p Selects the Auto Memory mode. Refer to <Auto Memory> (page 41)q Switches the Seek mode. See <Seek Mode> (page 41)w Switches the number of lines displayed in the Information Display. 13e Selects the channel on memory. 14 15r The Receive mode switches in the following order. See <Receive Mode> (page 42)t Displays the tuned in music information.Auto MemoryStores stations with good reception in memory automatically. 1 Select a band you wish to store in memory 2 Select the Auto Memory mode 3 Start Auto MemorySave six stations with the best reception in the memory and close Auto Memory Entry.HD Radio ControlB64-4254-00_00.indb 40-41 08.10.16 10:48:04 AM](https://usermanual.wiki/JVCKENWOOD/39597/User-Guide-1026061-Page-21.png)
![44 DNX6140/DNX6000EX/DNX5140/DDX514/DDX5034/DDX5034BT English 45Bluetooth Audio ControlBefore Use For DNX6140/DNX6000EX/DDX5034BT :• You need to register your audio player and cell-phone before using it with this unit. For more details, see <Registering Bluetooth Unit> (page 80).• If you have registered two or more audio players or cell-phones, you need to select one of them. For more details, see <Bluetooth Unit Connection> (page 82). For DNX5140/DDX514/DDX5034 :• You need to register your audio player and cell-phone to your Bluetooth Unit beforehand. Make sure to read the instruction manual of the Bluetooth Unit as well.Muting Audio Volume upon Reception of Phone callWhen the telephone is called, the system is paused automatically.Muting Audio Volume upon Reception of Phone CallWhen the telephone is called...The Phone Call ("CALL") screen appears, and system is paused.Phone Call ("CALL") screenWhen the call ends...Hang up the phone.The system resumes playing automatically.⁄• To use the TEL Mute feature, you need to hook up the MUTE wire to your telephone using a commercial telephone accessory. Refer to <INSTALLATION MANUAL>.You can listen to audio files stored in Bluetooth audio player and cell-phone. For DNX5140/DDX514/DDX5034, Bluetooth unit KCA-BT200 (optional accessory) is necessary.Functions While Displaying the Control ScreenSwitches to control screen to use various functions.[Bluetooth] button on the "Source Select" screen423141 Plays.2 Pauses.3 Stops playing.4 Selects a file.⁄• If the Bluetooth Audio player does not support AVRCP profile, buttons 1 to 4 are not displayed. Operate from the Audio player.B64-4254-00_00.indb 44-45 08.10.16 10:48:07 AM](https://usermanual.wiki/JVCKENWOOD/39597/User-Guide-1026061-Page-23.png)
![48 DNX6140/DNX6000EX/DNX5140/DDX514/DDX5034/DDX5034BT English 49Hands Free Unit ControlBefore Use• To use the Phonebook, it must be downloaded to this unit in advance. For details, see <Downloading the Phonebook> (page 48).For DNX6140/DNX6000EX/DDX5034BT :• You need to register your cell-phone before using it with this unit. For more details, see <Registering Bluetooth Unit> (page 80).• If you have registered two or more cell-phones, you need to select one of them. For more details, see <Bluetooth Unit Connection> (page 82).For DNX5140/DDX514/DDX5034 :• You need to register your cell-phone to your Bluetooth Unit beforehand. Make sure to read the instruction manual of the Bluetooth Unit as well.Downloading the Phonebook Downloads the phonebook data from the cell-phone to this unit so that you can use the Phonebook of this unit. 1 By operating the cell-phone, send the phonebook data to this unit. 2 By operating the cell-phone, start the hands-free connection.⁄• For the cell-phones which support auto-download of phonebook:If the phonebook is not downloaded automatically for some reasons, follow the procedure above to download manually.• For how to operate the cell-phone, refer to the Instruction Manual that comes with your cell-phone.• Up to 1000 phone numbers can be registered for each registered cell-phone. • Up to 32 digits can be registered for each phone number along with up to 40 characters representing a name. • Depending on the type of your cell-phone, the following restrictions are placed:- The phonebook data cannot be downloaded normally.- Characters in the Phonebook are garbled.- The phonebook data cannot be downloaded normally if it contains images. It may take several hours to a full day to download the phone book depending on the total image size. • To cancel downloading of the phonebook data, operate the cell-phone.Control Screen FunctionDisplaying the control screen and using various functions. 1 Display the Hands-Free Control screenPress the [FNC] button for more than 1 second.or[TEL] button on the "Source Select" screen12345678910 11 121 Displays the various conditions. : Displays short message status. If a cell-phone which supports SMS function is not connected, this mark does not appear. : There is unread short message. : There is no unread short message. : Downloading Phonebook. : Indicates there is a call on hold. : Displays the signal strength.* The more the number of bar segments, the stronger the signal. : Displays the present Auto Answering status : When Auto Answering is on : When Auto Answering is off : Displays the battery drain of the cell-phone.* The more the number of bar segments, the higher the battery level.2 Displays the called phone numbers.If you have registered a phone number in the Phonebook, the destination person name is displayed.3 Calls the displayed preset phone number. 4 Displays the SMS Select screen.See <SMS (Short Message Service)> (page 59).5 Displays the Search for Phonebook screen.See <Calling by Phonebook> (page 51).6 Displays the Outgoing Calls screen.See <Making a Call Using Outgoing/Incoming Call Records> (page 53).7 Displays the Incoming Calls screen.See <Making a Call Using Outgoing/Incoming Call Records> (page 53).8 Calls the preset phone number. For information on how to preset a phone number, see <Phone Number Preset> (page 58).9 Displays the Hands-Free Set Up screen.See <Setting Up the Hands-Free Phone> (page 55).p Displays the Dialing Display screen.See <Calling by Entering a Phone Number> (page 50).q Starts voice recognition. See <Calling by Voice Recognition> (page 54).w Returns to the previous screen.⁄• While your car is moving, some functions are disabled for safety’s sake. The buttons associated with the disabled functions become ineffective if pressed. • When the Hands-Free Control screen appears, the name of the connected cell-phone is displayed for 5 seconds.• * Since the number of steps of the control unit is different from that of the cell-phone, the statuses displayed on the control unit may discord from those displayed on the cell-phone. No status is displayed if information about it cannot be obtained. • Setting the cell-phone in the private mode can disable the hands-free function.When Received a CallWhen you receive a call, you can use the hands-free phone. 1 Respond to a call2341 When a call arrives, the Talking screen appears automatically.1 Starts conversation with a person called. Switches the call destination if you hear a tone of call-waiting.Resumes conversation with the person on hold after completed conversation with the other party.2 Disconnects the phone. 3 Switches the voice output between phone and speaker.4 Outputs dial tone. See <Controlling Tone-based Services> (page 51).Various functions can be used in the Hands Free control mode. For DNX5140/DDX514/DDX5034, Bluetooth unit KCA-BT200 (optional accessory) is necessary.B64-4254-00_00.indb 48-49 08.10.16 10:48:12 AM](https://usermanual.wiki/JVCKENWOOD/39597/User-Guide-1026061-Page-25.png)
![52 DNX6140/DNX6000EX/DNX5140/DDX514/DDX5034/DDX5034BT English 53Cyrillic alphabet search screen 52235 Displays the Phonebook beginning with the name whose first character you have touched. 3 Select the name to call 77691011131286 Phonebook data list."REC" turns on for data with voice for voice recognition already registered. 7 Scrolls the Phonebook data list.8 Scrolls the name. 9 Registers the voice for voice recognition to the selected Phonebook. If there are already 35 voice tag registered in the same cell-phone, [Record] button is deactivated.See <Voice Registration> (page 56).p Plays the voice registered in the selected Phonebook data. q Deletes the voice registered in the selected Phonebook data. Touch to display the confirmation screen. Touch [YES] to delete or [NO] to cancel.w Displays the detail of the selected Phonebook data. e Returns to the Hands-Free Control screen. 4 Select the phone number to call 1514181617Hands Free Unit Controlr Calls the selected phone number. t Creates an SMS for the displayed phone number. See <SMS (Short Message Service)> (page 59).y Scrolls the phone number. u Displays the Phonebook data list. i Returns to the Hands-Free Control screen. 5 Make a call⁄• To use the Phonebook, it must have been downloaded from the cell-phone. For more details, see the instruction manual of your Bluetooth Unit and your cell-phone.• Initials including no corresponding name will not be displayed.• During search, a non-accent character such as "u" is searched for instead of an accent character such as "ü".Making a Call Using Outgoing/Incoming Call RecordsCalls by selecting a phone number from the outgoing or incoming calls list. 1 Display the Outgoing Calls or Incoming Calls screen : Outgoing Calls : Incoming Calls The Outgoing Calls or Incoming Calls list screen appears. 2 Select from calls list Example : Outgoing Calls screen12234561 Outgoing Calls list.2 Scrolls the list.3 Makes a call to the selected number.4 Creates an SMS for the selected phone number. See <SMS (Short Message Service)> (page 59).5 Displays the detail of the selected phone number. 6 Returns to the Hands-Free Control screen. 3 Make a call⁄• The Outgoing Calls list screen or Incoming Calls list screen shows the list of the calls originated from or received at this unit. They are not the ones stored in the cell-phone memory. B64-4254-00_00.indb 52-53 08.10.16 10:48:18 AM](https://usermanual.wiki/JVCKENWOOD/39597/User-Guide-1026061-Page-27.png)
![54 DNX6140/DNX6000EX/DNX5140/DDX514/DDX5034/DDX5034BT English 55Calling by Voice RecognitionCalls by recognizing the registered voice. ⁄• In order to perform voice recognition, voice must be registered in the Phonebook data. See <Voice Registration> (page 56). Or, to perform voice recognition by Phone number category (Home, Office, Mobile etc.) of Phonebook data, a key word voice must be registered. See <Key Word Voice Registration> (page 57). 1 Display the Voice Recognition screen 2 Utter the voice registered in the PhoneBook1Utter within 2 seconds after the Beep.1 Cancels voice recognition. If the voice recognition is succeeded and there is only one phone number found: 2Make a call.2 Displays the phonebook list. Hands Free Unit ControlIf you hear another Beep sound:Speak the key word within 2 seconds after the Beep, or touch the [Phonebook List] button to select the phone number.Make a call.⁄• If there are more than one phone numbers registered under the same name, and the key word voice is registered for each phone number, you will hear another beep. For how to register key word, see <Key Word Voice Registration> (page 57).If there are more than one phone numbers registered under the same name, go to step 3. 3 Select a Phone number category4386573 Calls the displayed phone number. 4 Creates an SMS to the displayed address. See <SMS (Short Message Service)> (page 59).5 Selects the Phone number category. 6 Scrolls the phone number. 7 Displays the Phonebook data list. 8 Returns to the Hands-Free Control screen. 4 Make a call⁄• A message is displayed if the voice is not recognized. Read the message for the further operation. Setting Up the Hands-Free PhoneThe Hands-Free system can be set as follows. 1 Display the Hands Free Setup screen 2 Setup each item 124356 7891011 121 Moves to the "Hands Free Setup 2" screen.2 Sets an automatic response time after call termination. ( "8") "Off": This function can not use. "0-99": Sets to calling ring time (second).3 Sets a ringing tone output position. ( "Front All") "Front L": Outputs the tone from the front left-hand side speaker. "Front R": Outputs the tone from the front right-hand side speaker. "Front All": Outputs the tone from the both front speakers.4 Sets the beep of the incoming call. ( "ON") "ON": Beep is heard. "OFF": Beep is canceled.5 Sets the beep of the incoming SMS. ( "ON") "ON": Beep is heard. "OFF": Beep is canceled.6 Returns to the Hands-Free Control screen.7 Returns to the "Hands Free Setup 1" screen.8 Sets whether to use cell-phone phonebook, outgoing calls list and incoming calls list. ( "ON") "ON": Yes. "OFF": No.9 Sets the SMS function. ( "ON") "ON": Use SMS function. "OFF": SMS not available. p Registers the voice to select phone number category with voice recognition. See <Key Word Voice Registration> (page 57).q Registers the phone number to Hands Free Control screen preset button. See <Phone Number Preset> (page 58). w Returns to the Hands-Free Control screen.⁄• Either the time interval for automatic answer set on this unit or the time interval set on the cell-phone, whichever is shorter, takes effect. • Select the speaker which is further from the microphone in order to prevent howling or echoes.B64-4254-00_00.indb 54-55 08.10.16 10:48:20 AM](https://usermanual.wiki/JVCKENWOOD/39597/User-Guide-1026061-Page-28.png)
![56 DNX6140/DNX6000EX/DNX5140/DDX514/DDX5034/DDX5034BT English 57Hands Free Unit ControlVoice RegistrationRegisters voice for voice recognition in Phonebook. Up to 35 voices can be recorded in one cell-phone. 1 Select the name to registerGo through the procedure of <Calling by Phonebook> (page 51).11 Selects a name. "REC" turns on for data with voice for voice recognition already registered. 2 Display the voice registration screen 3 Utter the voice to register (1st try) 322 Registers the voice. 3 Cancels voice registration. Utter within 2 seconds after the Beep. 4 Utter the voice to register (2nd try) 5 End voice registration⁄• A message is displayed if the voice is not recognized. Read the message for the further operation. • Repeat from 1st try if the voice is different from the 1st try.Key Word Voice RegistrationRegisters the voice to select the Phone number category by Voice Recognition. 1 Display the Key Word List screenDisplay the "Hands Free" screen and touch [Setup]. See <Control Screen Function> (page 48). 2 Select the Phone number category to register234511 Selects the Phone number category. "REC" turns on for data with voice for voice recognition already registered. 2 Registers voice for the selected Phone number category. 3 Plays voice registered for the selected Phone number category. 4 Deletes voice registered for the selected Phone number category. Touch to display the confirmation screen. Touch [YES] to delete or [NO] to cancel. 5 Returns to the Hands-Free Set Up screen. 3 Display voice registration screen 4 Utter the voice to register (1st try) 766 Registers the voice. 7 Cancels voice registration. Utter within 2 seconds after the Beep. 5 Utter the voice to register (2nd try) 6 End voice registration ⁄• A message is displayed if the voice is not recognized. Read the message for the further operation.• Repeat from 1st try if the voice is different from the 1st try. B64-4254-00_00.indb 56-57 08.10.16 10:48:23 AM](https://usermanual.wiki/JVCKENWOOD/39597/User-Guide-1026061-Page-29.png)
![58 DNX6140/DNX6000EX/DNX5140/DDX514/DDX5034/DDX5034BT English 59Hands Free Unit ControlPhone Number PresetRegisters frequently used phone number to Hands Free control screen preset button. 1 Display the Hands Free Preset List screenDisplay the "Hands Free" screen and touch [Setup]. See <Control Screen Function> (page 48). 2 Select the Preset number to register11 Returns to the Hands-Free Set Up screen. 3 Select the search destination of the number to register243567 89 10112 Registers from SMS incoming calls list. 3 Registers from SMS outgoing calls list. 4 Registers from Phonebook.5 Registers from outgoing calls list. 6 Registers from incoming calls list. 7 Registers by entering phone numbers. 8 Registers voice for voice recognition to preset number. 9 Registers the currently displayed phone number. p Deletes the currently displayed phone number. q Returns to the previous screen. 4 Search phone number to register with each function 5 Register phone number ڥ Press [Delete] to delete the registered phone number. SMS (Short Message Service)Uses SMS function. 1 Display the SMS Select screen 2 Select a function154231 Displays Received Message List. 2 Displays Sent Message List. 3 Displays the Message screen. If there is an unfinished message, the button will be active. 4 Retrieves SMS messages from the cell-phone. 5 Returns to the Hands-Free Control screen. 3 Select message to display 678896 Calls the number in the selected message. 7 Creates a new message for the selected message. 8 Scrolls the list. 9 Displays the selected message. SMS Message screen1011121213p Calls the number in the selected message. q Creates a new message for the selected message. w Scrolls the message. e Returns to the previous screen. 4 Create a message 14 1416171718 19 20 21 2215r Moves the cursor. t Displays remaining number of characters allowed. y Enters character. u Changes keyboard character type. i Sends the message. o Sets the key layout of the character buttons. abc : Alphabetical key layout. qwe : Qwerty key layout.; Enters space.a Erases the entered character. If pressed more than 1 second, all the input characters are erased.s Returns to the previous screen.B64-4254-00_00.indb 58-59 08.10.16 10:48:25 AM](https://usermanual.wiki/JVCKENWOOD/39597/User-Guide-1026061-Page-30.png)
![60 DNX6140/DNX6000EX/DNX5140/DDX514/DDX5034/DDX5034BT English 61Setup MenuDisplays the Setup menu to set various functions. 1 Display the control screen of any sourceTouch any source button on the "Source Select" screen. 2 Display the Setup Menu 3 Select the setup item1221 The selected setup screen appears.2 Scrolls the setup menu.ڥ [Audio Setup] and [AV Interface] options can be locked. The key mark ( ) is displayed in reverse video for the locked option. See <Setup Memory> (page 84). You can set up various receiver parameters.Setup MenuAudio SetupYou can setup a speaker network, etc. 1 Display the Audio Setup screenTouch in the "Setup Menu" screen (page 60).ڥ [Audio Setup] cannot be selected under the following conditions: РWhen no source is selected.РWhen dual zone function is set to on. See <Zone Control> (page 88). 2 Setup each item23411 Selects the speaker to set the crossover. See <Crossover Network Setup> (page 61).2 Sets the availability of subwoofers. This can be selected only when Preout is set to "Subwoofer". See <System Setup> (page 64).3 Selects the type of front speakers. "Standard": Setup for general diameter speakers "Narrow": Setup for small diameter speakers "Middle": Setup for middle diameter speakers "Wide": Setup for large diameter speakers4 Switches to the crossover setup screen.See <Crossover Network Setup> (page 61).Next page 3Crossover Network SetupYou can set a crossover frequency of speakers. 1 Select the speaker to set the crossover2411231 Sets the High Pass Filter of the front speaker.2 Sets the High Pass Filter of the rear speaker.3 Sets the Low Pass Filter of the sub woofer.4 Switches to the crossover setup screen. 2 Display the Crossover setup screen 3 Set the crossover5675 Sets the cross over frequency.When front speaker or rear speaker is selected in step 1: High Pass Filter adjustmentWhen Subwoofer is selected in step 1 : Low Pass Filter adjustment6 Sets the sub woofer phase. (Only when "Subwoofer" is set to "ON" in Audio Setup and "LPF SUB FREQ" is set to other than "Through")7 Returns to the "Audio Setup" screen.DVD SetupYou can set up the DVD play. 1 Display the DVD Setup screenTouch in the "Setup Menu" screen (page 60). 2 Setup each item234511 Moves to the "DVD Setup 2" screen.2 Selects a disc Menu Language.*1(See <Language Setup>, page 62)3 Selects a Subtitle language.*1(See <Language Setup>, page 62)4 Selects an Audio Language.*1(See <Language Setup>, page 62)5 Sets the Dynamic Range.*1 ( "Wide")The dynamic range is reduced by changing from "Wide" to "Normal" and from "Normal" to "Dialog". "Dialog" makes the total sound volume becomes larger as compared with "Wide" and "Normal", allowing you to listen to the movie's dialog more clearly. This is effective only when you are using a Dolby Digital software.The operation is available during the play stop mode. B64-4254-00_00.indb 60-61 08.10.16 10:48:27 AM](https://usermanual.wiki/JVCKENWOOD/39597/User-Guide-1026061-Page-31.png)
![62 DNX6140/DNX6000EX/DNX5140/DDX514/DDX5034/DDX5034BT English 636789106 Returns to the "DVD Setup 1" screen.7 Sets an angle mark display.*1 ( "On")8 Selects the screen display mode.*1 ( "16:9") "16:9": Displays wide pictures. "4:3 LB": Displays wide pictures in the Letter Box format (having black stripes at the top and bottom of screen). "4:3 PS": Displays wide pictures in the Pan & Scan format (showing pictures cut at the right and left ends).9 Displays the Parental Lock screen.*1 ( "Off")(See <Parental Level Setup>, page 63)p Keep "Auto" to use.*1⁄• * Disabled when a DVD is being played.Setup MenuParental Level SetupSets a parental level. 1 Display the Parental Level code number screen See <DVD Setup> (page 61) and touch [Parental Level]. 2 Enter the code number123451 Enters a code number.2 Cancels the current setup and returns to the "DVD Setup 2" screen.3 Indicates the present parental lock level.4 Determines the code number and displays the Parental Level setup screen.5 Clears the code number.⁄• The number you enter first is set as your code number.• You can clear the code number by pressing the Reset button. 3 Display the Parental Level SETUP screenLanguage SetupSelects a language you use for the speech and menus. 1 Select the language item to set See <DVD Setup> (page 61) and select [Menu Language], [Sub Title Language] or [Audio Language]. 2 Display the Language Setup screen 321451 Enters a language code.2 Cancels the language setup and returns to the "DVD Setup 1" screen.3 Sets the original audio language.(It appears during Audio Language setup.)4 Sets the language and returns to the "DVD Setup 1" screen.(It appears after you have entered a language code.)5 Clears the language code. 3 Enter a language codeSee <DVD Language Codes> (page 95) and select the desired language. 4 Set the language you use 4 Select a parental level and complete the setup6766 Selects a parental level.7 Complete the parental level setup and returns to the "DVD Setup 2" screen.⁄• If a disc has higher parental lock level, you need to enter the code number.• The parental lock level varies depending on a loaded disc.• If a disc has no parental lock, anybody can play it back even when you have set the parental lock.B64-4254-00_00.indb 62-63 08.10.16 10:48:30 AM](https://usermanual.wiki/JVCKENWOOD/39597/User-Guide-1026061-Page-32.png)
![64 DNX6140/DNX6000EX/DNX5140/DDX514/DDX5034/DDX5034BT English 65Setup Menut Selects a picture display time. ( "Long")The Display of a JPEG picture is changed.("Short", "Middle", "Long")Panel Color CoordinateSets the screen and button illumination color. 1 Display the Panel Color Coordinate screenSee <System Setup> (page 64). 2 Select a color1231 Sets to the touched color. 2 Sets and registers favorite color. 3 Returns to the "System Setup 2" screen. To register your original color 1 Start the RGB coordinate 2 Adjust the each color value123451 Selects a preset number to register.2 Adjusts the Red value.3 Adjusts the Green value. System SetupYou can set up the system parameters. 1 Display the System Setup screenTouch in the "Setup Menu" screen (page 60). 2 Setup each item523411 Moves to the "System Setup 2" screen.2 Turns the key touch tone On or Off. ( "ON")3 Allows scrolling of text display on the Source Control screen. ( "Auto") "Auto": Scrolls the screen automatically. "Manual": Allows you to scroll the screen manually.4 Selects a remote control signal. ( "ON")When turned "OFF", the remote control of TV reception is rejected.5 Sets a music CD playback. ( "1") "1": Automatically recognizes and plays back an Audio file disc, a DVD or a music CD. "2": Forcibly plays back a disc as a music CD. Select "2" if you wish to play a music CD having a special format or if you cannot play a disc in the "1" position.⁄• You cannot play an Audio file/VCD disc in the "2" position. Also, you may not play some music CDs in the "2" position.• Your setup is disabled when the disc is being played. 67896 Returns to the "System Setup 1" screen.7 Moves to the "System Setup 3" screen.8 Sets the button illumination color. See <Panel Color Coordinate> (page 65).9 When set to "ON", the illumination color of the screen and buttons changes one after another. 10131211p Returns to the "System Setup 2" screen.q Moves to the "System Setup 4" screen.w Sets the Preout output. (Settable only when in Standby mode)"Rear" : Rear sound is output."Subwoofer" : Subwoofer sound is output. e Sets the function of the [NAV] button. "V. OFF" : Press the [NAV] button for more than 1 second to turn the display off. "R-CAM" : Press the [NAV] button for more than 1 second to switch to rear view. 1415r Returns to the "System Setup 3" screen.4 Adjusts the Blue value.5 Returns to the "Panel Color Coordinate" screen. 3 Select a Preset number to registerAdjusted color is registered to the selected Preset button. 4 Complete the color coordination# : Press for # seconds.B64-4254-00_00.indb 64-65 08.10.16 10:48:32 AM](https://usermanual.wiki/JVCKENWOOD/39597/User-Guide-1026061-Page-33.png)
![66 DNX6140/DNX6000EX/DNX5140/DDX514/DDX5034/DDX5034BT English 67AV Interface SetupYou can set audio and visual (AV) interface parameters. 1 Display the AV Interface screenTouch in the "Setup Menu" screen (page 60). 2 Setup each item12341 Moves to the "AV Interface 2" screen.2 Sets a name to be displayed when you select a system that is connected via the AV INPUT port. ( "VIDEO")3 Sets an image display of the system that is connected via the AV INPUT port. ( "OFF") "OFF": When the image source is switched, an image entered via the AV INPUT port is displayed. "ON": When an image signal is entered via the AV INPUT port, this image is displayed.4 Selects a navigation system connection. ( "RGB") (DDX514/DDX5034/DDX5034BT only) "RGB": Allows the Kenwood's Navigation System to connect via the AV INPUT port. "AV-IN": Allows a third-party navigation system to connect via the AV INPUT port. "Off": Must be used if no navigation system is connected. (The navigation display is cancelled when the AV source is switched.) Setup Menu1112131415q Returns to the "AV Interface 2" screen.w Selects speakers used for voice guidance of the navigation system. ( "Front LR") "Front L": Uses the front left side speaker for voice guidance. "Front R": Uses the front right side speaker for voice guidance. "Front LR": Uses both front speakers for voice guidance.e Adjusts the volume for voice guidance of the navigation system. ( DNX6140/DNX6000EX/DNX5140 : "25", DDX514/DDX5034/DDX5034BT : "23")r Mutes the volume during voice guidance of the navigation system. ( "ON")When turned "ON", the volume level drops for voice guidance.t Sets the guide display method of the Navigation system. ( "ON") (DNX6140/DNX6000EX/DNX5140 only)"ON" : Pops up the guide."OFF" : Guide is not displayed.56789105 Returns to the "AV Interface 1" screen.6 Moves to the "AV Interface 3" screen.7 Selects an AV source to be output at the AV OUTPUT port. ( "AV-IN")⁄• When in DVD source, "AV-OUT" cannot be set to USB. Or, when in USB source, "AV-OUT" cannot be set to DVD.• If "AV-OUT" is set to DVD or USB, the same source video or control screen as the front monitor is displayed in the rear monitor.• If the front source is switched from DVD (or USB) to another source, the rear source is also switched to the same source as front. In this case, displaying the navigation screen in front monitor allows the rear source to return to the DVD (or USB). Use the easy control buttons to operate the front source.8 Sets output of operation screen such as control screen to AV-OUT. Operation screen is not output when set to "Black". ( "Through")9 Sets a method to switch to the rear view camera video display. ( "OFF") "ON": Switches to the rear view camera video display when engaging the shift knob of car to "Reverse". "OFF": Switches to the rear view camera video display when engaging the shift knob of car to "Reverse" and then pressing the [NAV] button for more than 1 second.p You can flip the left and right of the rear view camera video display. Set to "ON" and the the rear view will be displayed left and right in mirror image on the screen.( "OFF") B64-4254-00_00.indb 66-67 08.10.16 10:48:34 AM](https://usermanual.wiki/JVCKENWOOD/39597/User-Guide-1026061-Page-34.png)


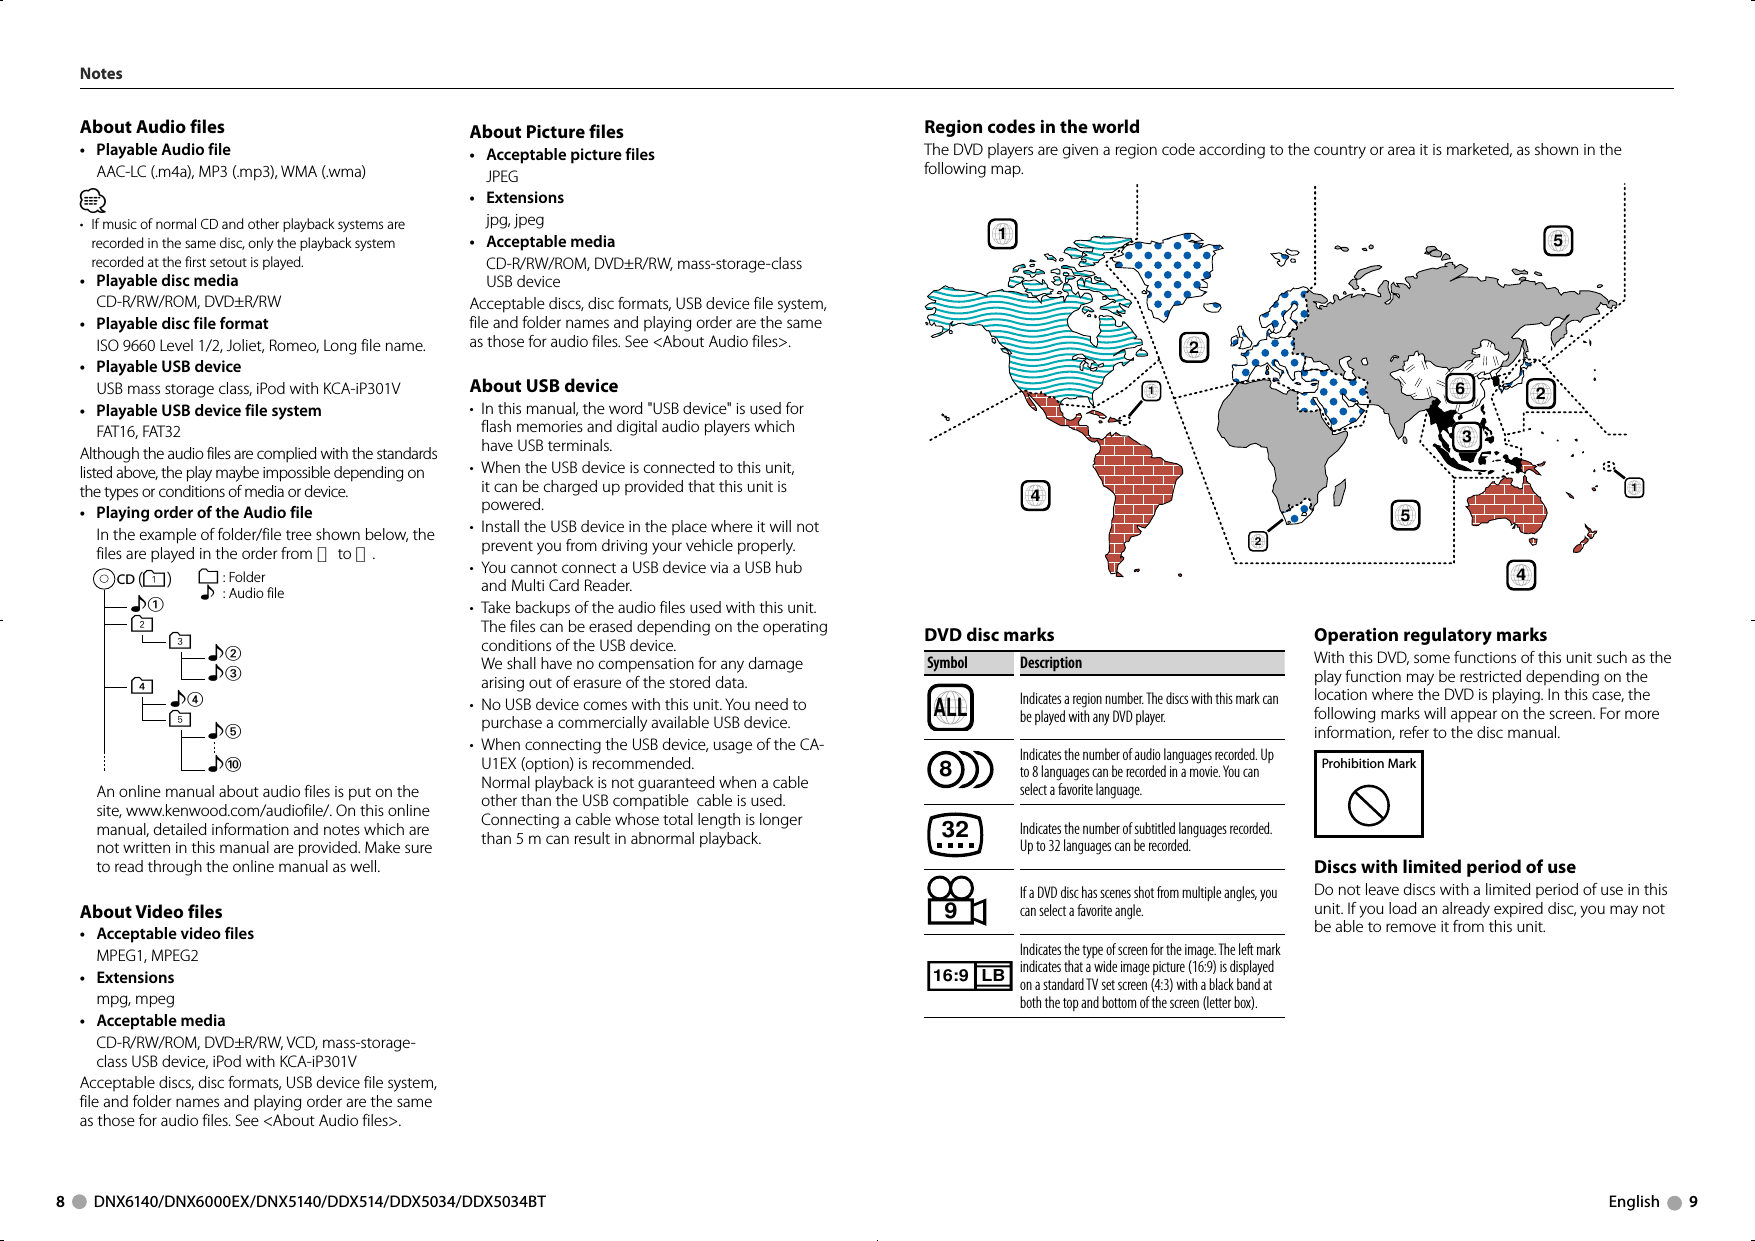
![92 DNX6140/DNX6000EX/DNX5140/DDX514/DDX5034/DDX5034BT English 93CDTrack numberPlay timeCancelAudio filesFolder numberFile numberCancelVCD 1.X, VCD 2.X (PBC OFF)Track numberCancelVCD 2.X (PBC ON)Scene numberNumberCancelOnce you have switched to the direct search feature, specify the search number from the numeric keypad, and then press [ENTER] key.Numeric keypadR.VOL12ABC 3DEF4GHI7PQRS5JKL8TUV09WXYZ6MNOCLEAR ATTDIRECT2 ZONEY1• Specify the number to search in direct search.• Press 1 2ABC to fast forward/backward. Switches the fast forward/backward speed each time you press this key.• Press 4GHI 5JKL to slow forward/backward. Switches the slow playback speed each time you press this key.DVD Top MenuReturns to the DVD top menu.V.SELMENUMODE FNC/PBCDISPAUDIO ANGLE ZOOMRETURNSRC TOP MENUDVD SETUPSUBTITLEDVD/VCD/CD/Audio files (DVD mode)Folder search Selects the folder to be played.12ABC 3DEFOPEN2 ZONEVOLFM+AM− DY1OOOTrack search and file searchSelects the track or file to be played.12ABC 3DEFOPEN2 ZONEVOLFM+AM− DY1OOOPlay/PausePauses the track.Press again to resume playing.MENUENTERDVD•TV•AUD•AUDIO ANGLE ZOOMRETURN OOOTOP MENUDVD SETUPSUBTITLEStopMemorizes the last point where the disc stopped. When pressed again, the last point is deleted.MENUENTERDVD•TV•AUD•AUDIO ANGLE ZOOMRETURN OOOTOP MENUDVD SETUPSUBTITLEDirect searchR.VOL4GHI7PQRS5JKL8TUV09WXYZ6MNOCLEAR ATTDIRECTPressing this button switches the features that can be searched directly.DVDTitle numberChapter numberPlay timeItem number*Cancel* You may not be able to use this function with some discs or scenes.Remote ControllerDVD MenuDisplays the DVD menu.Turns the playback control on or off while playing VCD.V.SELMENUMODE FNC/PBCDISPAUDIO ANGLE ZOOMRETURNSRC TOP MENUDVD SETUPSUBTITLESUBTITLESwitches the subtitle language.V.SELMENUMODE FNC/PBCDISPAUDIO ANGLE ZOOMRETURNSRC TOP MENUDVD SETUPSUBTITLEZOOMSwitches the zoom ratio each time you press this key.V.SELMENUMODE FNC/PBCDISPAUDIO ANGLE ZOOMRETURNSRC TOP MENUDVD SETUPSUBTITLEPicture AngleSwitches the picture angle each time you press this key.V.SELMENUMODE FNC/PBCDISPAUDIO ANGLE ZOOMRETURNSRC TOP MENUDVD SETUPSUBTITLEAUDIOSwitch Voice LanguageSwitches the voice language each time you press this key.V.SELMENUMODE FNC/PBCDISPAUDIO ANGLE ZOOMRETURNSRC TOP MENUDVD SETUPSUBTITLERadio (AUD mode)Band switchingSwitches to bands received by the unit.12ABC 3DEFOPEN2 ZONEVOLFM+AM− DY1OOOStation selectionSwitches to broadcast stations received by the unit.12ABC 3DEFOPEN2 ZONEVOLFM+AM− DY1OOODirect tuningAfter pressing this key, use the keypad to specify the broadcast station you wish to receive.R.VOL4GHI7PQRS5JKL8TUV09WXYZ6MNOCLEAR ATTDIRECTExample: 92.1MHz (FM)0 9WXYZ 2ABC 1Example: 810kHz (AM)0 8TUV 1 0Numeric keypadR.VOL12ABC 3DEF4GHI7PQRS5JKL8TUV09WXYZ6MNOCLEAR ATTDIRECT2 ZONEY1• To use preset tuning, press the number of a programmed broadcast station. (1 – 6MNO )• Press the direct tuning key first, then specify the frequency of the station to receive.B64-4254-00_00.indb 92-93 08.10.16 10:49:02 AM](https://usermanual.wiki/JVCKENWOOD/39597/User-Guide-1026061-Page-47.png)