Users Manual

1
TM
© 2014 JamHub Corp. All Rights Reserved.
P.O. Box 482 Whitinsville, MA | www.JamHub.com

2
Tracker MT16 — User Guide
© 2014 JamHub Corp. All rights reserved. Product features, specications, system requirements,
and availability are subject to change without notice. Patents pending.
TABLE OF CONTENTS
TRACKER MT16 WELCOME STATEMENT 4
INTRODUCTION 4
Safety Precautions 4
Electrical Interference 4
FCC Warning 5
Delcaration of Conformity 5
RF Warning for Portable Device 5
WHAT’S IN THE BOX? 6
Know Your Connections 6
A Plethora of Lights 7
A Selection of Buttons 7
TRACKER CONNECTIONS 8
Powering Your Tracker MT16 8
Connecting Your Tracker MT16 to a Mixer 8
ON-BOARD INPUTS 9
Powering Your Tracker MT16 9
Why a Half Insert? 9
Using Stereo Cables with the Insert Jack 9
Connecting Your Tracker MT16 to a JamHub Studio 10
Using the Tracker MT16 Breakout Cable 11
SAVE THE MUSIC 12
How Your Tracker MT16 Saves Files 12
Formatting Your SD Card 12

3
RECORDING 13
Preparing to Record 13
Arming Channels 13
Record Modes - Split or Combine 13
Sample Rate - 44.1 KHz, 48 KHz, 96KHz 14
Audio Formats - WAV, MP3, ALAC 14
RecordOn/O 15
Recording 15
SETTINGS 16
How to Set Up Your Wireless Netowrk - WiFi 16
What is BandLab? 16
How to Link to Your BandLab Account 16
BandLab Cloud 17
PLAY 18
How to Listen to a Recording 18
Ethernet 10/100 Mbps 18
Status 19
Supported Storage Devices 19
Firmware Updates 19
Trouble Shooting 20
Warranty 20

4
Tracker MT16 — User Guide
© 2014 JamHub Corp. All rights reserved. Product features, specications, system requirements,
and availability are subject to change without notice. Patents pending.
INTRODUCTION
This guide is intended to get you up and recording with your new
JamHub Tracker MT16. To get the most out of your experience,
please read the full manual thoroughly. If this copy is lost, a copy
of the manual can always be downloaded at www.JamHub.com.
Please direct any support requests to support@JamHub.com.
Safety Precautions
Do not let your Tracker MT16 become submerged in water,
or otherwise get wet. Do not expose your Tracker MT16 to extremes
oftemperature,suchasinthefreezerornearanopename.Useonly
the JamHub provided and approved AC adapter. Opening the plastic
housing will void the warranty, and expose the user to the possibility
of injury and electrical shock. Electrical Interference
For your safety, the Tracker MT16 has been built with maximum
protection against external interference and the emission of internal
electromagnetic radiation. However, equipment or materials that are
highly susceptible to interference or that are prone to electromagnetic
emissions should not be placed near the Tracker MT16 during
operation, as it is still possible, though unlikely, for data to
become corrupted.
TRACKER MT16 WELCOME STATEMENT
JamHub’s Tracker MT16 lets you capture the energy of your live
performance, with unparalleled quality for incredible recordings that
let the music shine without being bogged down by room noise and
reection.ThanksforjoiningtheJamHubfamilywithyourpurchase!

5
FCC Warning
This device complies with Part 15 of the FCC Rules. Operation is subject
to the following two conditions: (1) this device may not cause harmful
interference, and (2) this device must accept any interference received,
including interference that may cause undesired operation.
Changesormodicationsnotexpresslyapprovedbytheparty
responsible for compliance could void the user’s authority to operate
the equipment.
NOTE: This equipment has been tested and found to comply with the
limits for a Class B digital device, pursuant to Part 15 of the FCC Rules.
These limits are designed to provide reasonable protection against
harmful interference in a residential installation. This equipment
generates, uses and can radiate radio frequency energy and, if not
installed and used in accordance with the instructions, may cause
harmful interference to radio communications. However, there is no
guarantee that interference will not occur in a particular installation.
If this equipment does cause harmful interference to radio or television
reception, which can be determined by turning the equipment o and on,
the user is encouraged to try to correct the interference by one or more of
the following measures:
»Reorient or relocate the receiving antenna.
»Increase the separation between the equipment and receiver.
» Connect the equipment into an outlet on a circuit dierent from
that to which the receiver is connected.
» Consult the dealer or an experienced radio/TV technician
for help.
Declaration of Conformity:
JamHub hereby declares that this Tracker MT16™ Multitrack Recorder
is in compliance with the essential requirements and other relevant
provisions of Directive 1999/5/EC.
6
Tracker MT16 — User Guide
© 2014 JamHub Corp. All rights reserved. Product features, specications, system requirements,
and availability are subject to change without notice. Patents pending.
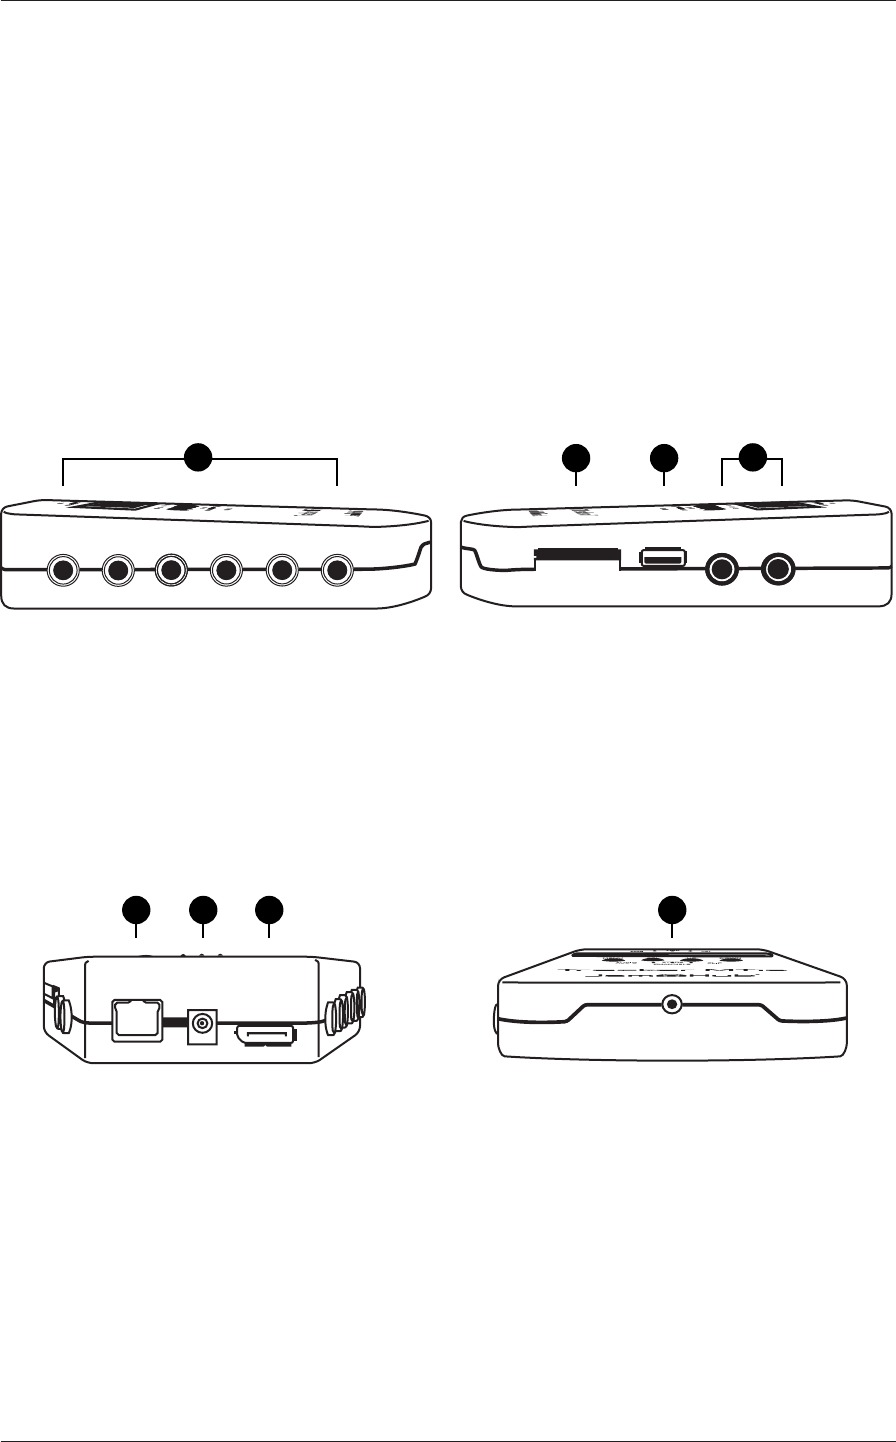
WHAT’S IN THE BOX?
»Tracker MT16
»Tracker MT16 Protective Case
»16GB class 10 SD RAM Card
Know Your Connections
Your new Tracker MT16 has a multitude of connection options…
Le Side:
1. 6 Built-in Mono Inputs – recording
to channels 1-6
T
M
Right Side:
2. 2 Built-in Stereo Inputs – recording
to channels 7-10
3. SD Card Slot – for all formatted class
10 SD cards
4. USB Slot – for computer updates and
letransfer
T
M
Back:
5. Ethernet Port 10/100 – high-speed
internet access for upload and download
6. DC Adapter Input – for use with the
included 5V DC adapter
7. JamHub Connect Cable Port – to plug
your Tracker MT16 directly into your
JamHub studio
Front:
8. ⅛” Headphone Jack – for instant
playback of individual tracks
»5V DC Adaptor
»JamHub Connect Cable
»Quick Start Guide
12
3 4
TM
856 7
7
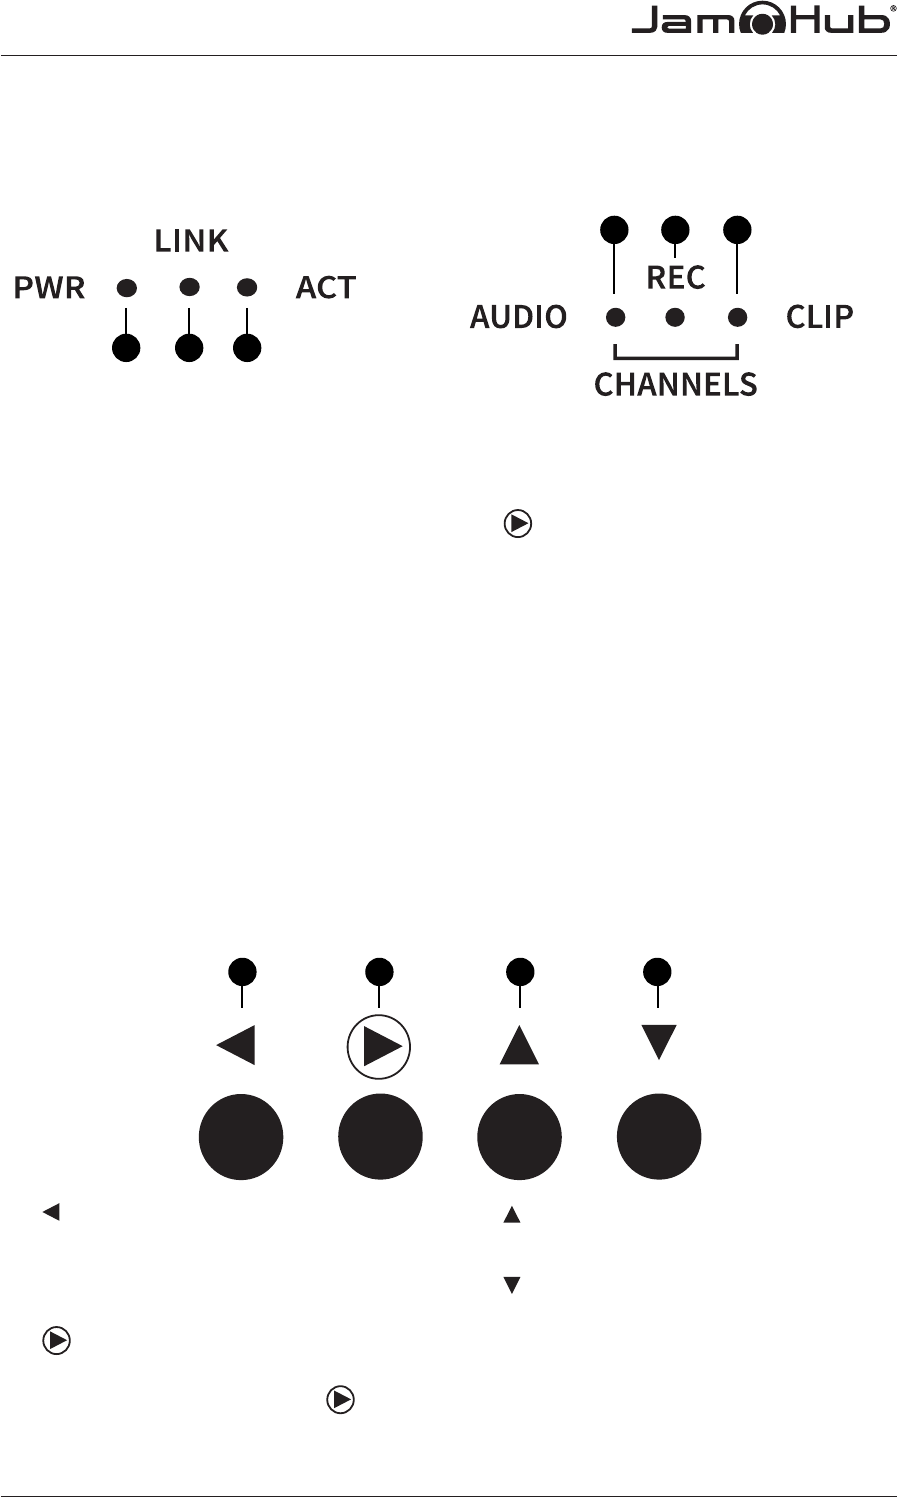
A Plethora of Lights
Above Display Lights:
9. PWR - Your Tracker MT16 is powered on
with proper line voltage and ready for use.
10. LINK – Network connectivity has been
successfully established and you are ready
to upload or download data.
11. ACT – Displays real-time data packet
activity in and out of your Tracker MT16.
A Selection of Buttons
Channel Lights:
12. AUDIO – Record mode is set to on and all
selected tracks will be recorded once the
button is pressed.
13. RECORD–Youarecapturingsound!
14. CLIP – Audio is beyond appropriate
levels on one or more channels and one
or more channels will need to be lowered
at the source.
Note:
Any single channel will set the clip light
o letting you know that that channel is
clipping (distorting) the sound before it gets
to the TrackerMT16 inputs. Please lower the
level at the source until all channels in the
TrackerMT16 is no longer clipping.
18171615
9 10 11
12 13 14
15. – Press menu to move back one level
in the menu hierarchy. Holding down the
menu button for 2 seconds will take you to
the top menu.
16. – Selects your current menu option
and starts a new recording when the
Record Mode is set to On. Hold down
for 3 seconds to save new settings for
a selected menu function.
17. – Navigates up the menu or character
hierarchy
18. – Navigates down the menu or character
hierarchy

8
Tracker MT16 — User Guide
© 2014 JamHub Corp. All rights reserved. Product features, specications, system requirements,
and availability are subject to change without notice. Patents pending.
TRACKER CONNECTIONS
Powering Your Tracker MT16
Plug your Tracker MT16 into the wall using the provided 5V DC Adapter.
When your Tracker MT16 is powered on, the PWR light will turn blue
and the LCD will display, “Initializing, please wait…” Your Tracker MT16
is a fully functioning UNIX computer, so it will take a moment to boot
up. Once the device is ready to go, you will see the RECORD menu.
Connecting Your Tracker MT16 to a Mixer
Your Tracker MT16 is designed to connect to a variety of devices, and
can be hooked up in 1 of 3 ways: using the on-board inputs, using the
available breakout cable, and using the JamHub Connect cable.
Connect your Tracker MT16 directly to any mixer using the direct out,
patch, or Insert Jack. The Insert Jack is a specially designed jack for
thesendandreturnofeectsloops:rarelyusedbuthighlyprized
space on a mixer.
9
ON-BOARD INPUTS
Your Tracker MT16 has 6 mono and 2 stereo built in jacks. Use these
to record directly from any audio source. The mono inputs will record
to Channels 1-6, and the stereo inputs will record to Channels 7-10.
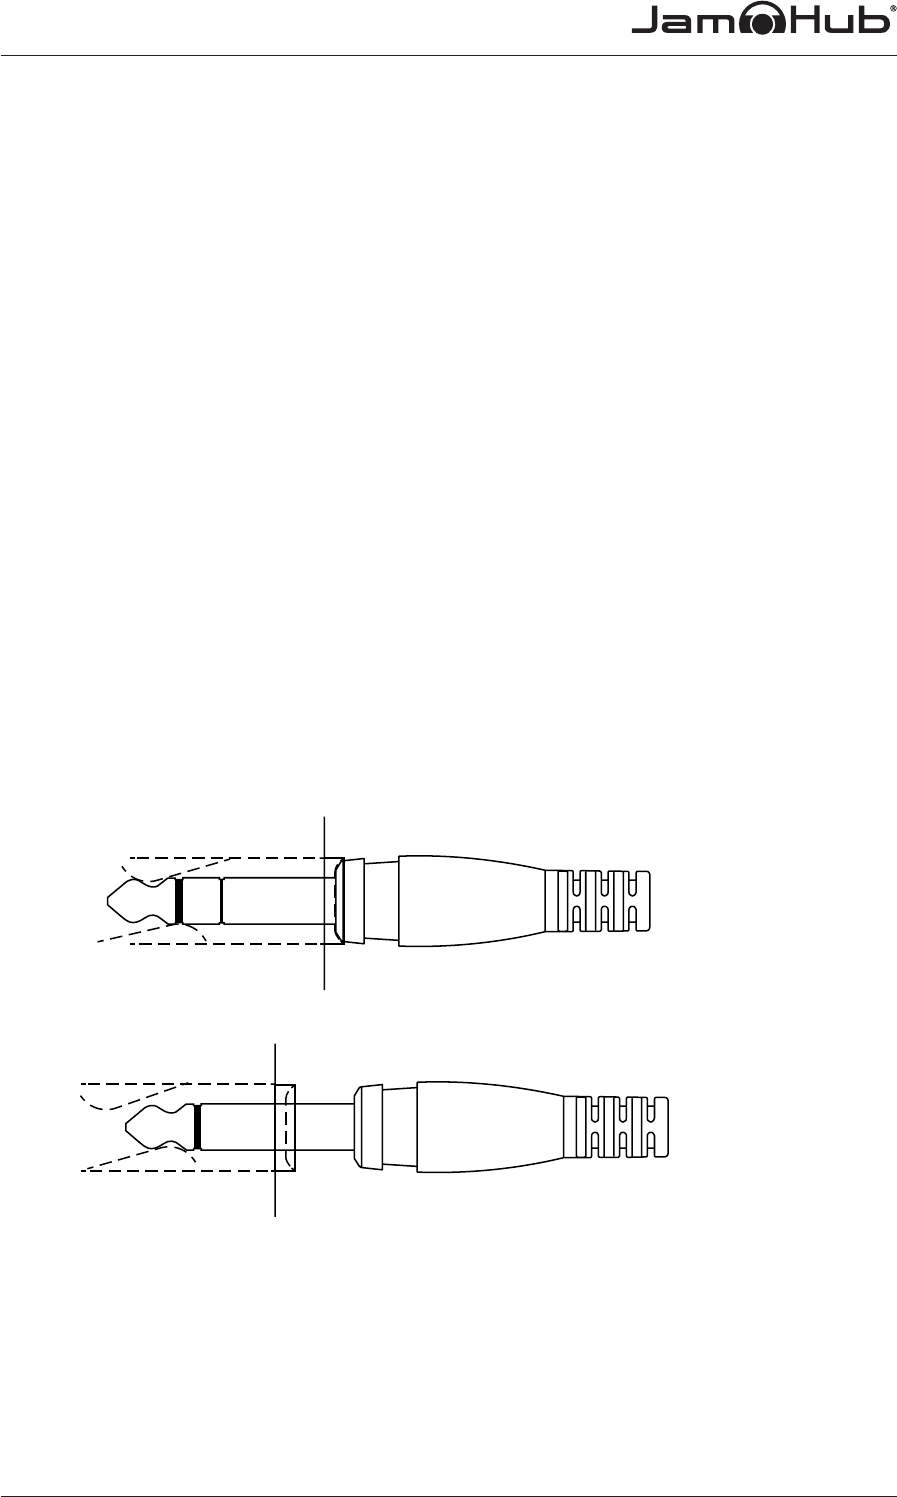
Using Mono Cables with the Insert Jack
The easiest way to record live audio from a mixer will be through the
Insert Jacks. If you are using mono cables to plug your Tracker MT16
into the Insert Jacks, you must use a “Half Insert.”
Why a Half Insert?
Insert Jack signals have 3 components: a Send, a Return, and
a Ground. If you fully insert a mono cable, the lack of a Return will
cause the signal to ground out. By using the Half Insert technique, you
will ensure that only the Send continues through the mixer and you will
notshutothechannelstrip.IftheChannelstopsmakingsound
in your mixer, you have fully inserted the cable.
Using Stereo Cables with the Insert Jack
The Tracker MT16’s built-in inputs are designed to allow you to use
stereo cables, or TRS cables, without any special consideration. Simply
plug your cables fully into the insert jacks and the Tracker MT16’s
inputs, arm your channels, and record. Note that stereo cables plugged
into an insert jack will avoid the need to use a half insert, but will only
record a mono signal.
Full Insert
Half Insert

10
Tracker MT16 — User Guide
© 2014 JamHub Corp. All rights reserved. Product features, specications, system requirements,
and availability are subject to change without notice. Patents pending.
Connecting Your Tracker MT16 to a JamHub Studio
Your Tracker MT16 comes with one JamHub Connect cable to connect
to any JamHub studio. Simply plug the JamHub Connect cable into
the JamHub Connect port on the back of your Tracker MT16, and
plug the other side into any of the SoleMix™ remote ports on your
JamHub studio.
When recording from a JamHub studio, it is important to note that the
Tracker MT16 will be recording up to 7 stereo channels of live audio,
and that the microphone and instrument inputs on each SoleMix
section are summed before being recorded. So if you have a guitar and
a microphone plugged into Section 1 (blue) of your JamHub studio, the
Tracker MT16 will record these as 1 stereo signal, rather than 2 separate
audiosources.Theglobaleects(theFXbus)inyourJamHubstudio
will be recorded in a separate stereo channel should you want it during
postproduction.
11
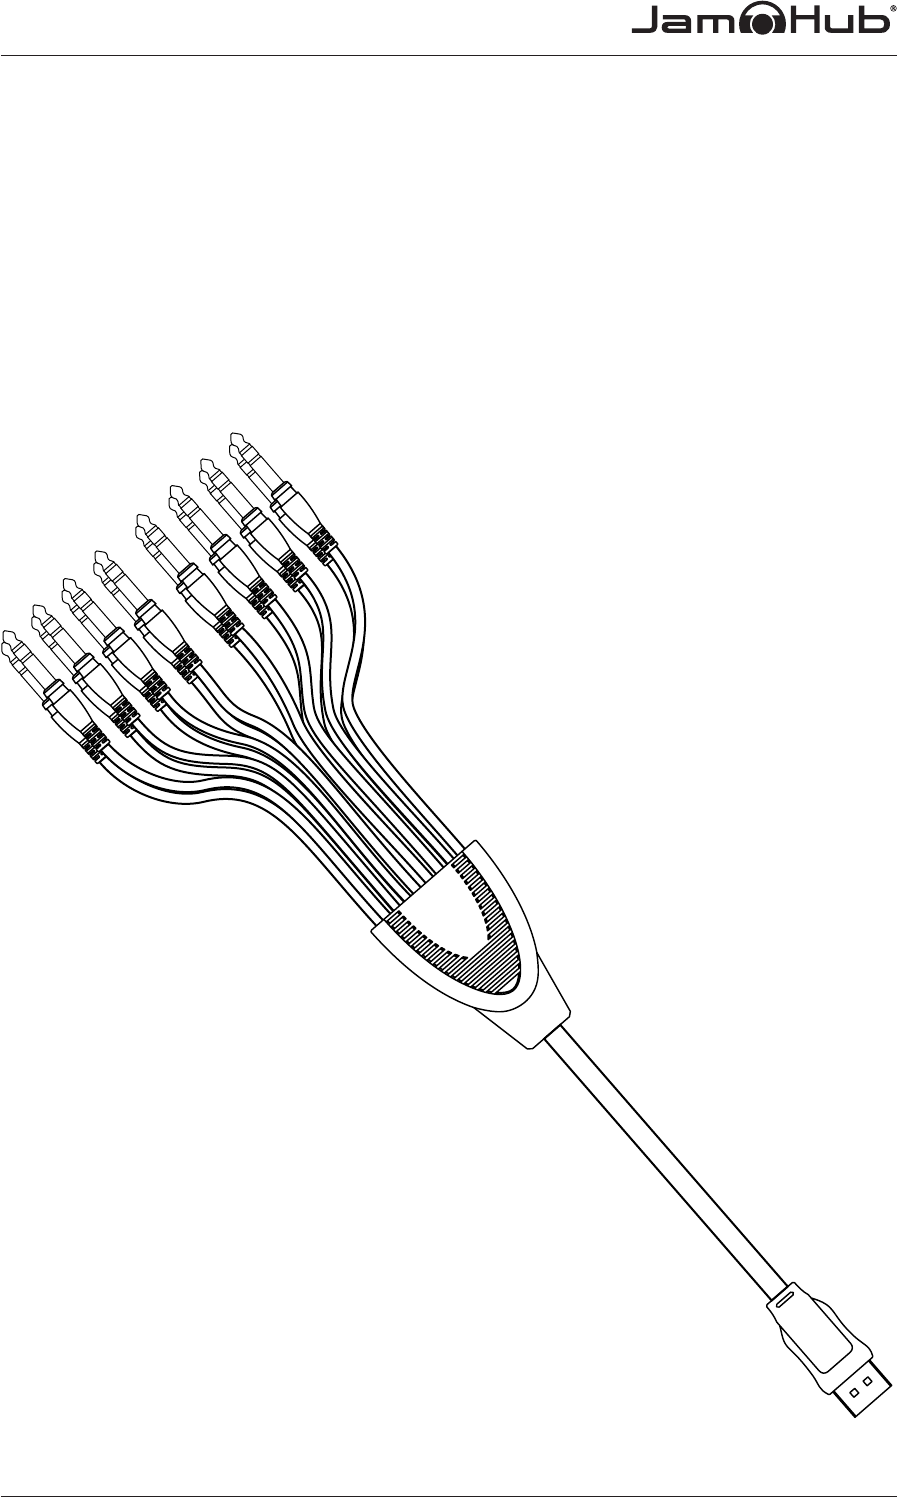
Using the Tracker MT16 Breakout Cable
To gain full access to the Tracker MT16’s 16 channels of recording
power, you will need to use JamHub’s Tracker MT16 Breakout Cable
(sold separately), which plugs easily into the JamHub Connect port
located next to the AC Adapter Input, and seamlessly connects you
to your mixing desk through the Insert Jacks.

12
Tracker MT16 — User Guide
© 2014 JamHub Corp. All rights reserved. Product features, specications, system requirements,
and availability are subject to change without notice. Patents pending.
SAVE THE MUSIC
How Your Tracker MT16 Saves Files
TheTrackerMT16saveslesontotheincludedSDcard.When
recording in “Split Mode”, each channel’s recording is saved as an
individualWAVle,MP3orALACle.MostDigitalAudioWorkstations
(DAWs) will open a WAV or MP3, you will need to check with your DAW
manufacturertondoutifALACcompressionformatsarecompatible.
In addition, the Tracker COMBINE mode will save all tracks recorded
inasingleWAVlethatcanbetransferredeasilyacrosstheInternet
to Bandlab. Bandlab will decode and breakout tracks recorded and
will prepare them for mixing.
Formatting Your SD Card
To format a new SD Card for your Tracker MT16, go to SETTINGS, then
scroll through the menu to the Format SD option and press .
Be aware that reformatting an SD Card will wipe any preexisting data
othatcardandyouwillloseanylesstoredonit.

13
RECORDING
Preparing to Record
Before you record, you will need to set Record Mode, Sample Rate,
and Audio Format and arm the individual channels you wish to record.
These options can all be found in the Settings Menu.
Arming Channels
In the Channels menu, scroll through the numbered channels and
switchthoseyouwishtorecordtoOnorOusingthe button.
Menu Top
»Setting → Audio → Channels 1-16
»Choose channels to record by turning them ON or OFF.
»Hold for 3 seconds to save.
»Channels are now armed and ready for recording
NOTE: Save space on your SD Card by turning o unused channels. Why
record dead air if you don’t have to?
Record Modes - Split or Combine
YourlesmaybesavedasasingletrackWAV,MP3orALACleusing
split mode, or all 16-channels will be saved as a combined WAV which
willappearasonelebutopenupas16channeledtracksusing
Bandlab cloud or the Combine decode utility that is included on every
Tracker SD card from the factory.
Menu Top
»Setting → Audio → Record Mode
»Choose Split or Combine using or buttons
» Save by pressing on the desired option, an ‘*’ indicates the
current setting

14
Tracker MT16 — User Guide
© 2014 JamHub Corp. All rights reserved. Product features, specications, system requirements,
and availability are subject to change without notice. Patents pending.
Sample Rate – 44.1KHz, 48KHz, 96KHz
Set your sample rate according to your recording needs, but note that
sampling rates are calculated by the speed of the media storage device
connected. If you try to record at higher frequencies than the device
supports, the Tracker MT16 will not allow you to select that rate.
Menu Top
»Setting → Audio → Sampling Rate
»Choose 44.1KHz, 48KHz or 96KHz using or buttons
» Save by pressing on the desired option, an ‘*’ indicates the
current setting
Audio Formats - WAV, MP3, or ALAC
TrackerMT16supportsWAV,MP3andALACleformats.WAVlesare
more commonly used for high quality recordings. Sending large WAV
lesacrossanetworkmaybetoslow,soyoucantryMP3orALAC.Both
compressthenativeWAVleintoacompactlepackagethatcanbe
sent on slow network links. To decode them, please check with you
DAW manufacturer user manual for more information.
Menu Top
»Setting → Audio → Audio Format
»Choose WAV, MP3 or ALAC using or buttons
» Save by pressing on the desired option, an ‘*’ indicates the
current setting

15
Record - ON/OFF
The Tracker MT16 uses the highest quality analog to digital (A/D)
converters in the industry, ensuring that you get high quality
recordings every time. Setting the Record option to ON will turn on the
A/D converters and prepare them for recording. With your Tracker MT16
armed for recording, you will see the AUDIO LED light turn on and the
LCD will display a time counter, audio format and sampling rate.
Menu Top
»Record ON/OFF
»Choose Record ON or OFF using or buttons
» Save by pressing on the desired option, an ‘*’ indicates the
current setting
Recording
Once you have armed your Tracker MT16 for recording, you can begin
capturing audio by pressing . The RECORD light will illuminate while
you are recording, and the counter will indicate how long you have
been recording. In addition, you will see the sampling rate and audio
formatofthelebeingrecorded.Thedefaultnameoftherecording
will be TAKE#, where “#” increases with each new recording.
To stop recording, press again. Your Tracker MT16 will remain armed
for recording until you press .
Menu Top
»Record ON
»Press to start and stop recording
»Pressingstopwillnalizetherecordedlebydisplaying
“Encoding…” if SPLIT mode was selected.
» Combine mode recording is the quickest and the highest quality
mode for recording more than 6 channels at a time.
NOTE: Wait until encoding is complete to avoid any loss of recorded les.
16
Tracker MT16 — User Guide
© 2014 JamHub Corp. All rights reserved. Product features, specications, system requirements,
and availability are subject to change without notice. Patents pending.
SETTINGS
How to Set Up Your Wireless Network – WiFi
Wireless options are located in the WiFi menu, under Settings.
You can turn the Tracker MT16’s wireless uploading capabilities
onando,selectyournetwork,andenterapasswordshouldyour
network require one.
Menu Top
»Settings → Network → WiFi
»Press to change WiFi ON or OFF
»Press for SSID
»Press to scan for available WiFi routers or devices
»Use or button to scroll through desired network to connect
»Press to select the desired network
» Press and enter your password using the , to scroll
character location, then press and use and to change
letters and numbers.
»Save your password by holding down for 3 seconds
» You are now connected, use Status menu to check link and
strength of connection
What is BandLab™?
BandLab is your world of musical collaboration in the cloud, and
the easiest way to upload, store, and edit all your Tracker MT16
recordings. Find out more about wireless uploading online by visiting
www.BandLab.comforyouraccounttoday!
How to Link to Your BandLab™ Account
To link your Tracker MT16 to your BandLab account for convenient
wirelessuploading,storage,andaccess,youwillrstneedtovisit
www.BandLab.com to sign up for an account. Once successfully signed
up,gotoyouraccountscreenandfollowtheinstructionsfornding
the Authentication Token in the BandLab Cloud menu and your
Ehernet MAC address on Settings menu of your Tracker MT16.

17
BandLab Cloud
Menu Top
»Settings → BandLab Cloud →
»Press
»AuthToken: XXXX (this number is unique for every Tracker MT-16)
»Settings → Status
»Press , use and to scroll to Ethernet MAC Address
» Sign up for Bandlab, go to the account screen and enter your
authentication token and UID (Ethernet MAC address)
»GototheTrackerMT-16’sSettingsmenuandndBandLab
Cloud
» Use and in the Connection Status menu switch between
onlineandolinemodes.WhenyourTrackerMT16isonline,
youwillbeabletouploadleswirelesslytoBandLab.
» While uploading, you will see a % Done indicator on the home
screen. Do not unplug or disconnect your Tracker MT16 until this
indicator reads 100%.

18
Tracker MT16 — User Guide
© 2014 JamHub Corp. All rights reserved. Product features, specications, system requirements,
and availability are subject to change without notice. Patents pending.
PLAY
How to Listen to a Recording
AtthetopmenundPlay.TurntheplayerONusingthe button,
and you will be taken to a menu full of your recordings. Use the /
buttonstonavigatetotheleyouwishtoreview,andpress to start.
Press again to stop.
Menu Top
»Play
»Navigate using the and buttontoyourrecordedle
»Press to play, press to stop playing
Note: Play function only supports single track playback
Ethernet 10/100 Mbps
The Tracker MT16 has a built in high speed Ethernet port to connect
to wired network(s) up to 100Mbs. The advantage of a wired network
is higher upload and download receive and transfer rates to the
Internet as long as your network can support it. In addition, this port
willbeusedforsowareupdatesandcanbeusedtostreamaudioles
real-time to a network storage device.
Menu Top
»Settings → Network → Ethernet
»DHCP: ON(allnetworkcongurationisautomatic)
» DHCP: OFF(allnetworkcongurationismanuallyentered,
see your network administrator for more details)
»Static IP:
»Static IP mask:
»Static Gateway:
»Static DNS:

19
Status
The Tracker MT-16 has a status menu for all devices connected to the
Internet.Itprovidessowarerevisionnumbers,SDmemoryspace
availabilityandMACaddressesusedforidenticationofeachTracker
MT16 on the World Wide Web.
Menu Top
»Settings → Status
»DHCP: OFF or ON
»WiFi: OFF or ON
» WiFi IP: (the IP address provided by a network when DHCP is on)
» Eth IP: (the IP address provided by a network or manually add-
ed by the user)
» IP Mask: (the IP mask provided by a network or manually added
by the user)
» Default Gateway: (the default gateway or router provided by
a network or manually added by the user)
»DNS (domain name server IP address)
» Eth MAC addr: (the unique WiFi MAC address of the Tracker MT-16)
»WiFi MAC
»Code rev:(CurrentsowarecodeinstalledintheTrackerMT-16)
»SD Memory (Available memory for recording)
Supported Storage Devices
Class 10 SD Card, formatted with drivers
Firmware Updates
Remote wireless when connected to BandLab, or Ethernet or WiFi

20
Tracker MT16 — User Guide
© 2014 JamHub Corp. All rights reserved. Product features, specications, system requirements,
and availability are subject to change without notice. Patents pending.
Troubleshooting
Supportstaavailableforremotetroubleshooting
SupportstaareavailableforremotetroubleshootingofyourTracker
MT16 by contacting JamHub Corp.
1-800-JAM-HUBS
support@JamHub.com
Warranty
1 year