Janam Technologies XT2WB Mobile Computer User Manual HT K10 Manual Toshiba page1 130103
Janam Technologies LLC Mobile Computer HT K10 Manual Toshiba page1 130103
User Manual

Front
Package contents Device layout
Menu keys
Device
Stylus pen with Tether
AC/DC Adaptor (AC plug)
Battery
Wrist Strap
LCD protection film
Touch Screen
Scan key
Front camera
Installing battery
1. Rotate lock to counter clockwise and pull up the
battery cover by holding both sides at bottom.
HANDHELD TERMINAL
Quick start guide
3. Hold the ribbon and lift upward to remove battery
XT2WB Function key
Recents key
• Tap to open the list of recent apps.
Home key
• Press to return to the Home screen while running apps
• Press to return to the Home screen from other screens
• Press and hold to launch internet
Back key
• Tab to return to the previous screen or to close current
screen (dialog box, option menu, notification panel, etc)
Function key
• Press to set functions on keys
• Press to create shortcut of programs
Device layout
Up/down & sides I/O Connector
Exit window
Device layout
Scan key
Power key
Volume Up/Down
LED indicator
2. Insert battery, top first, into the battery compartment.
4. Insert battery cover,
top first and press it
in the order named
on the picture.
Then press down on
battery at the center
again.
•Please read this manual before using the device and
follow the instructions correctly.
•Some content may differ from your device depending
on the device’s software version.
Back keyHome key
Recents key
Headset jack
Back
MSR
Battery cover lock
Battery cover
Speaker
Camera & Flashlight
Menu keys
DC socket
Removing battery
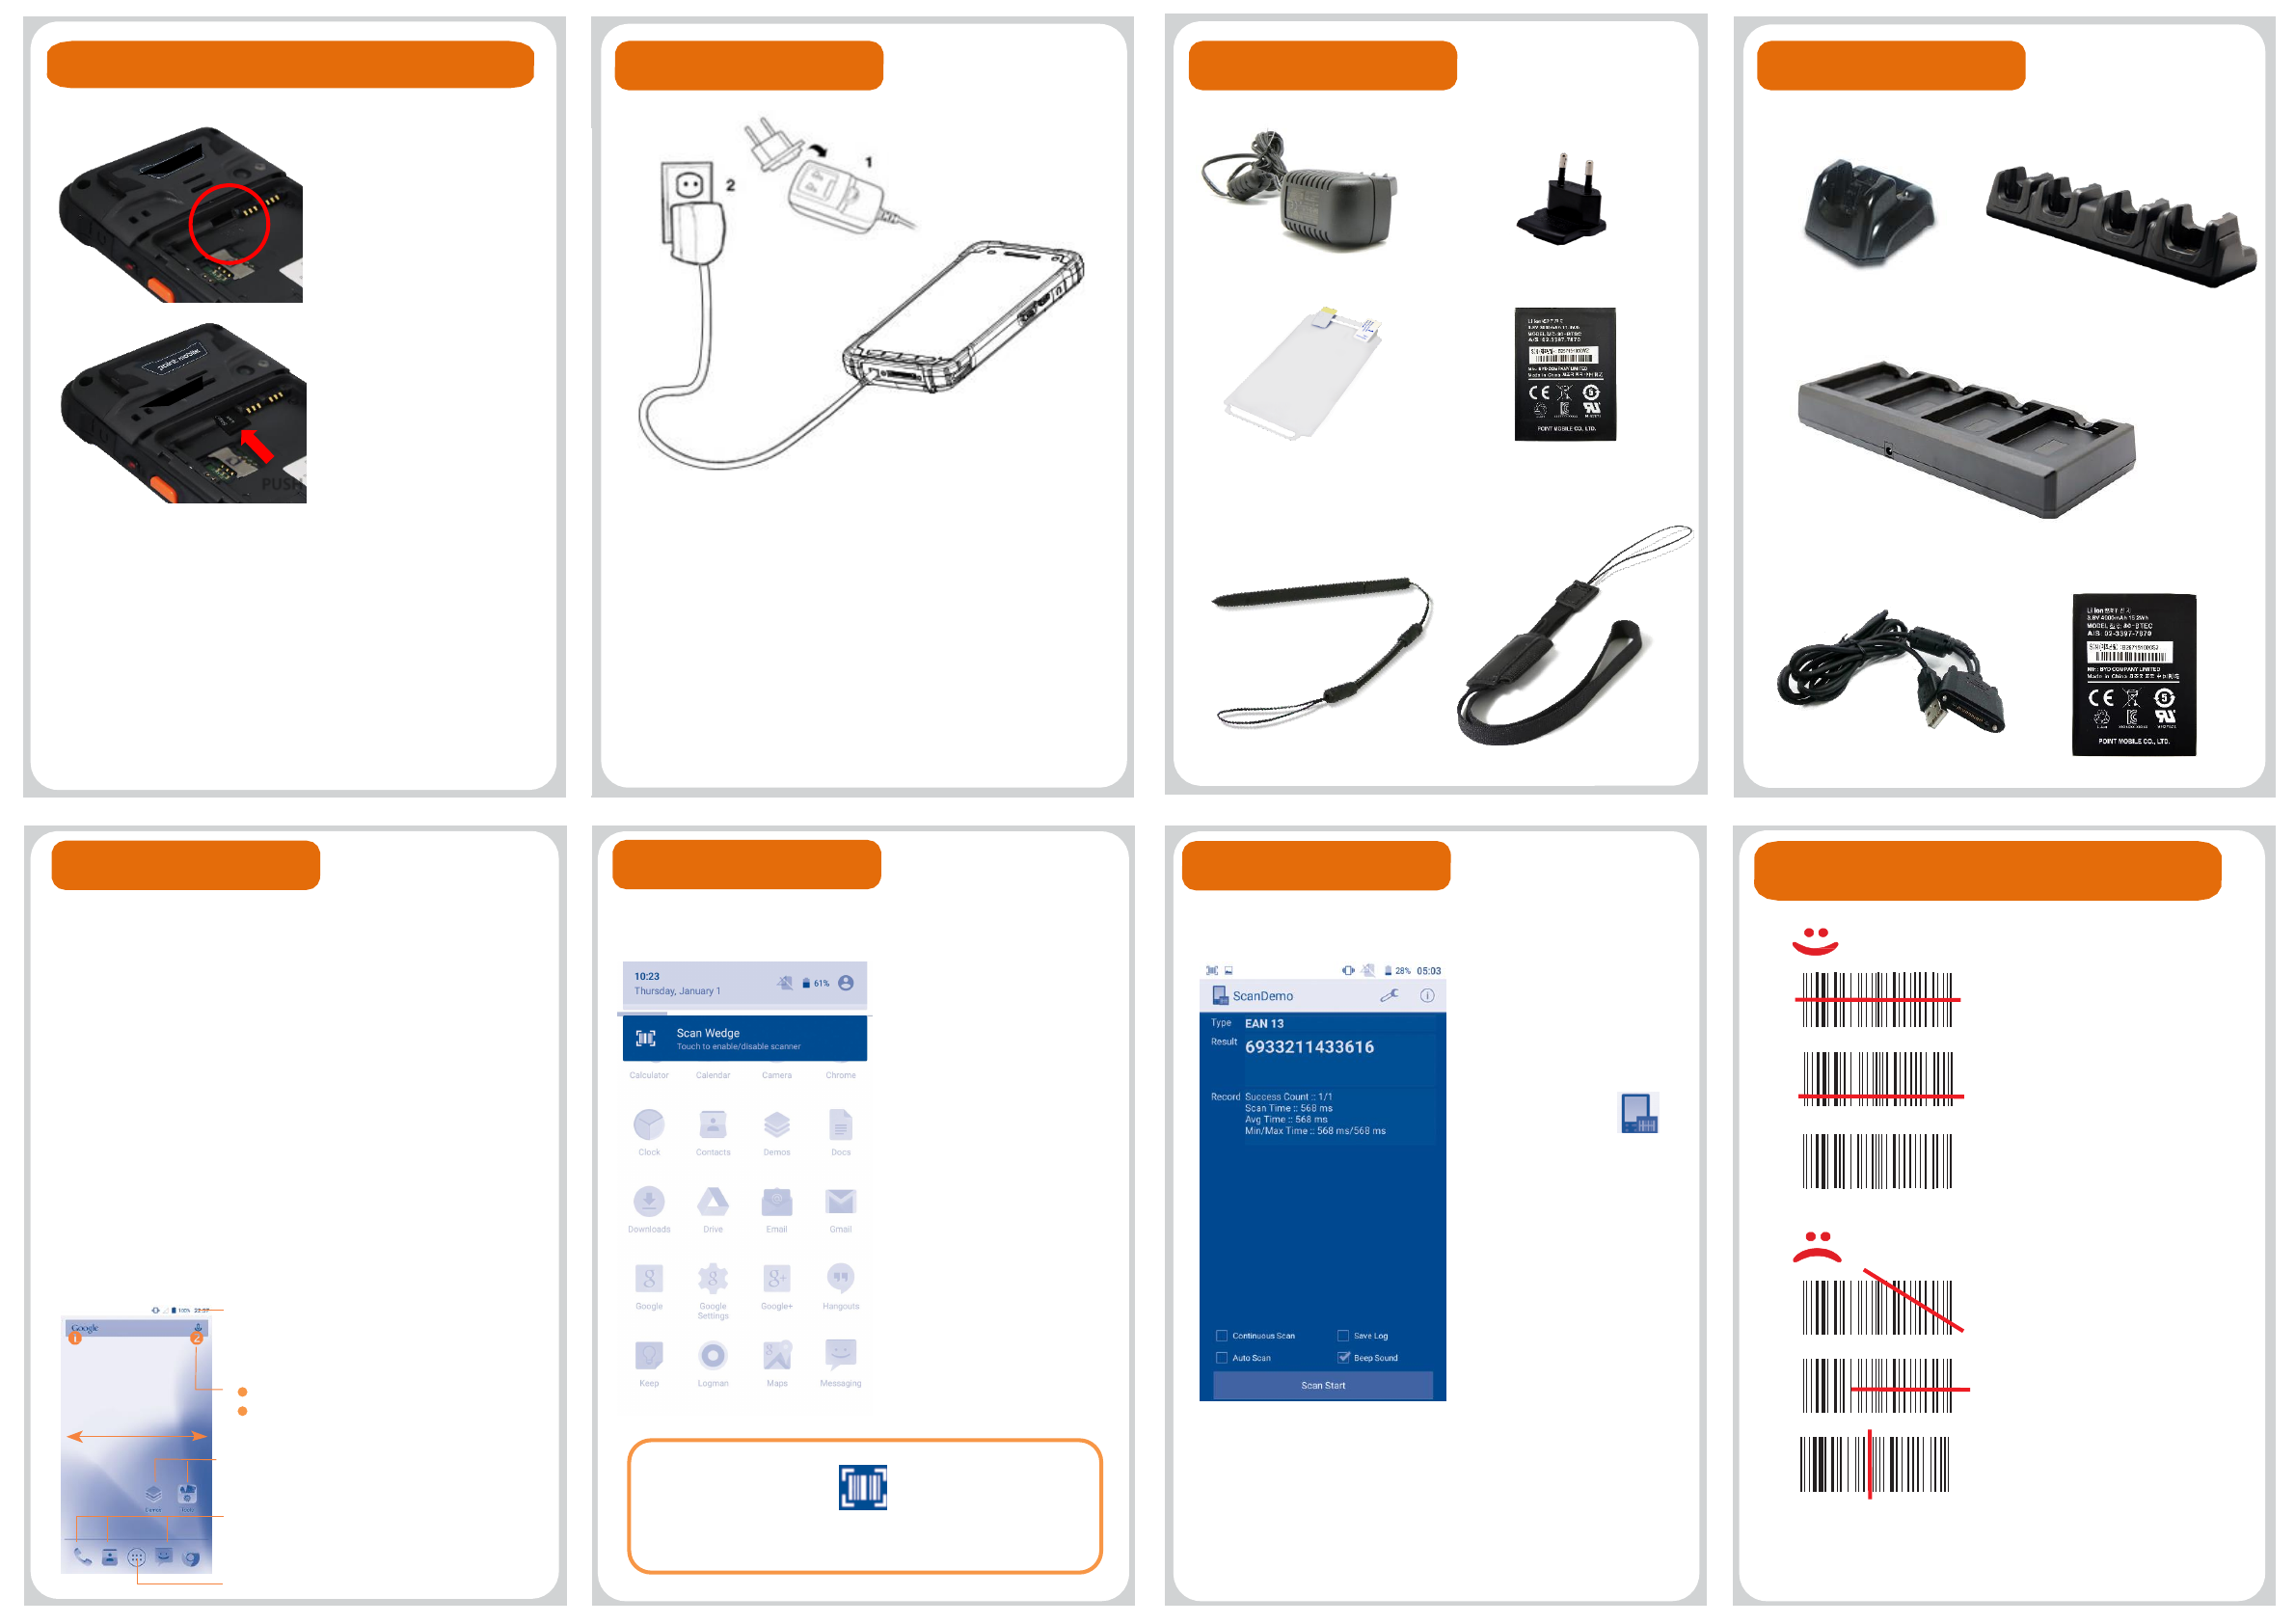
Installing/ Removing Micro SD card Standard accessory
Installing Micro SD card
1. Remove battery from
device and insert Micro SD
card.
2. Insert battery again after
installing Micro SD card.
Removing Micro SD
card
1. Press Micro SD card
gently and slide it out.
2. Remove Micro SD card
from device.
3. Insert battery again.
<Caution>
•Micro SD card is not
standard/optional
accessory. Do purchase it
from distributor.
•Device supports storage
extension upto 32GB with
Micro SD card.
•Turn off the device before
removing battery.
Charging the battery
•Due to installing/ removing
battery, save the working
data first and then install or
remove Micro SD card.
Getting Started
1. Insert plug on AC/DC Adaptor and connect to electric socket to
charge.
2. LED indicator on upper left of device shows red light while
charging and it turns to green light when the device is fully
charged.
<Caution>
•Use only items provided in your purchase for charging.
•You can also charge the device with optional accessory,
cradle.
5V 2A AC/DC Adaptor
Wrist Strap
Stylus pen with Tether
Battery (3000mAh)
plug
LCD
protection
film
Optional accessary
SSC(Single Slot Cradle) 4SC(4 Slot Cradle)
4SBC(4 Slot Battery Charger)
Turning the device on and off
On- Press power key on upper right of device to turn on.
After few seconds, device will turn on.
Off- Press and hold power key for a while till you and
tap power off on the screen options.
Home screen items
Point the scanning beam at the center of barcode and
keep scanning angle vertical to it.
Scanning range varies according to bar code size so
keep minimum distance for small barcode and further
distance for bigger one.
Scanning
Status bar
• Displays status/notification
• Tap and drag down to show notification
panel
PUSH
Good: Well aimed
So so: aimed a bit below
but still readable
Poor: aimed a bit one sided
but still readable.
Bad: aimed diagonal,
cannot read
Bad: aimed too one sided
to read, cannot read
Bad: aimed vertical, cannot
read
Scanning: aiming pattern
I/O USB Sync cable Extended Battery(4000mA)
Start with setting language input, google account, GPS,
etc when the device is on for the first time.
Device works without SIM card and device functions
are available through WLAN network connection and
google account registration.
Set up
Browser bar
Tab and google search by text
Tab and google search by voice
1
2
Home screen
• Tab and slide right/left to go other screens
• Tab icons to open applications/ folders
Favorites shortcut
•Press and hold to set/move applications
Opens apps window
Scanning
Enable/ disable Scan Wedge
1. Tab status bar on the
top and drag to open
notification panel.
2. Tab Scan Wedge to
enable/ disable scanner.
3 If Scan Wedge is set
disabled, scanner is at
same status.
Enabled scanner icon
1. Execute Demos
application on home
screen.
2. Tab ScanDemo to
open.
3. Press both scan keys
at once or any of scan
key on the device to scan
barcode.
4. Scanned barcode data
will show on screen as on
the picture left.
Testing barcode scanner
Resetting the device
Reboot
Press and hold power key for 3 seconds and select
Reboot on options to reboot the device.
Factory reset
Follow the process by tapping next button to complete
factory reset.
<Caution>
•Back up all data - personal, application settings,
account information and etc. before performing factory
reset as it causes all data delete.
Setting the date and time
Standard features
Go to below route to set date and time.
Access to above route and alter the following
settings according to user’s decision.
• Set date
• Set time
• Select time zone
• Use 24-hour format
• Select date format
Item
Specifications
Model
XT
2WB
Operating
System
Android
5.X or higher(GMS/CTS certified)
Software
Tools
and Demos
Micro
-Processor
Qualcomm
8016 1.2GHz Quad Core
Memory
1
GB RAM X 8GB Flash(Upgradable)
Memory
e
xtension
User
accessible Micro SD memory card slot.
Display
5
.0”Wideviewing angle IPS(1280 X720 pixels)
Data capture
options
2
D engine : SE4710
Keypad
Touch
screen & Front 4 hard keys
Audio
Built
-in microphone and speaker
I/O
High
speed USB 2.0 from cradle (or I/O cable)
Weight
279
g / 293g(MSR model) with battery
Wifi
802
.11 a/b/g/n(Up to 150Mbps)
Bluetooth
Bluetooth
v4.x, class2
NFC/RFID
13
.5593MHz
Serial(RS
232C)
9600
bps,19.2kpbs,38.4kbps,57.6kbps,115.2kbps
USB
USB
HS 2.0 OTG Support via I/O connector
Battery
Li
-ion battery 3.8V / 3000 mAh / 11.4 Wh
Adaptor
Output
: 5V / 2A, Input: 100-240V~50/60Hz 0.4A
Charger
5
V input through DC port.
Battery
Capacity:
3000mAh –Less than 4hrs.
Operating
temperature
-20ºC ~ 60ºC
Rain/dust
protection
IP67
Li-ion battery follows varied regulations in each
region/ country. Accordingly, recycle or disuse li-ion
battery properly. Do not leave or store it in fire or
heat it or disassemble or short circuit it.
Prevent plug and consent from dust and dirt to
keep them clean. Improper storing or misuse may
cause fire, electric shock, etc.
Warning
Do not allow any strong pressure or impact on the
touch screen. Do not touch any interior liquid from
LCD panel breakage that may cause skin irritation.
Use only approved AC/DC power adaptor
provided with device or from distributor.
Disapproved products may cause unexpected
problems as fire, electric shock, etc.
Disapproved modification or repair is not
guaranteed. Inquire to distributor for any
troubleshooting.
Offline
Tel: 02-3397-7870
Fax: 02-3397-7872
Address: 100 Crossways Park Drive West, Suite 105,
Woodbury, NY 11797 USA
Online
Website: http://www.janam.com/
E-mail: inquiries@janam.com
User guides supports detailed information on safety
& regulations of device and accessories.
Due to the possibility of electric wave interference
by device, no support on life safety.
Technical support & A/S
User guides
Certification
Equipment name: Wireless data communication system
device (Wireless Access System device with Wireless LAN)
Model: XT2WB
Trade name of certified: Janam Technology LLC.
Manufacturer/ Country of origin: Janam Technology LLC.
Production date: 2016.XX.XX
FCC ID: UTWXT2WB
IC ID: 6914A-XT2WB
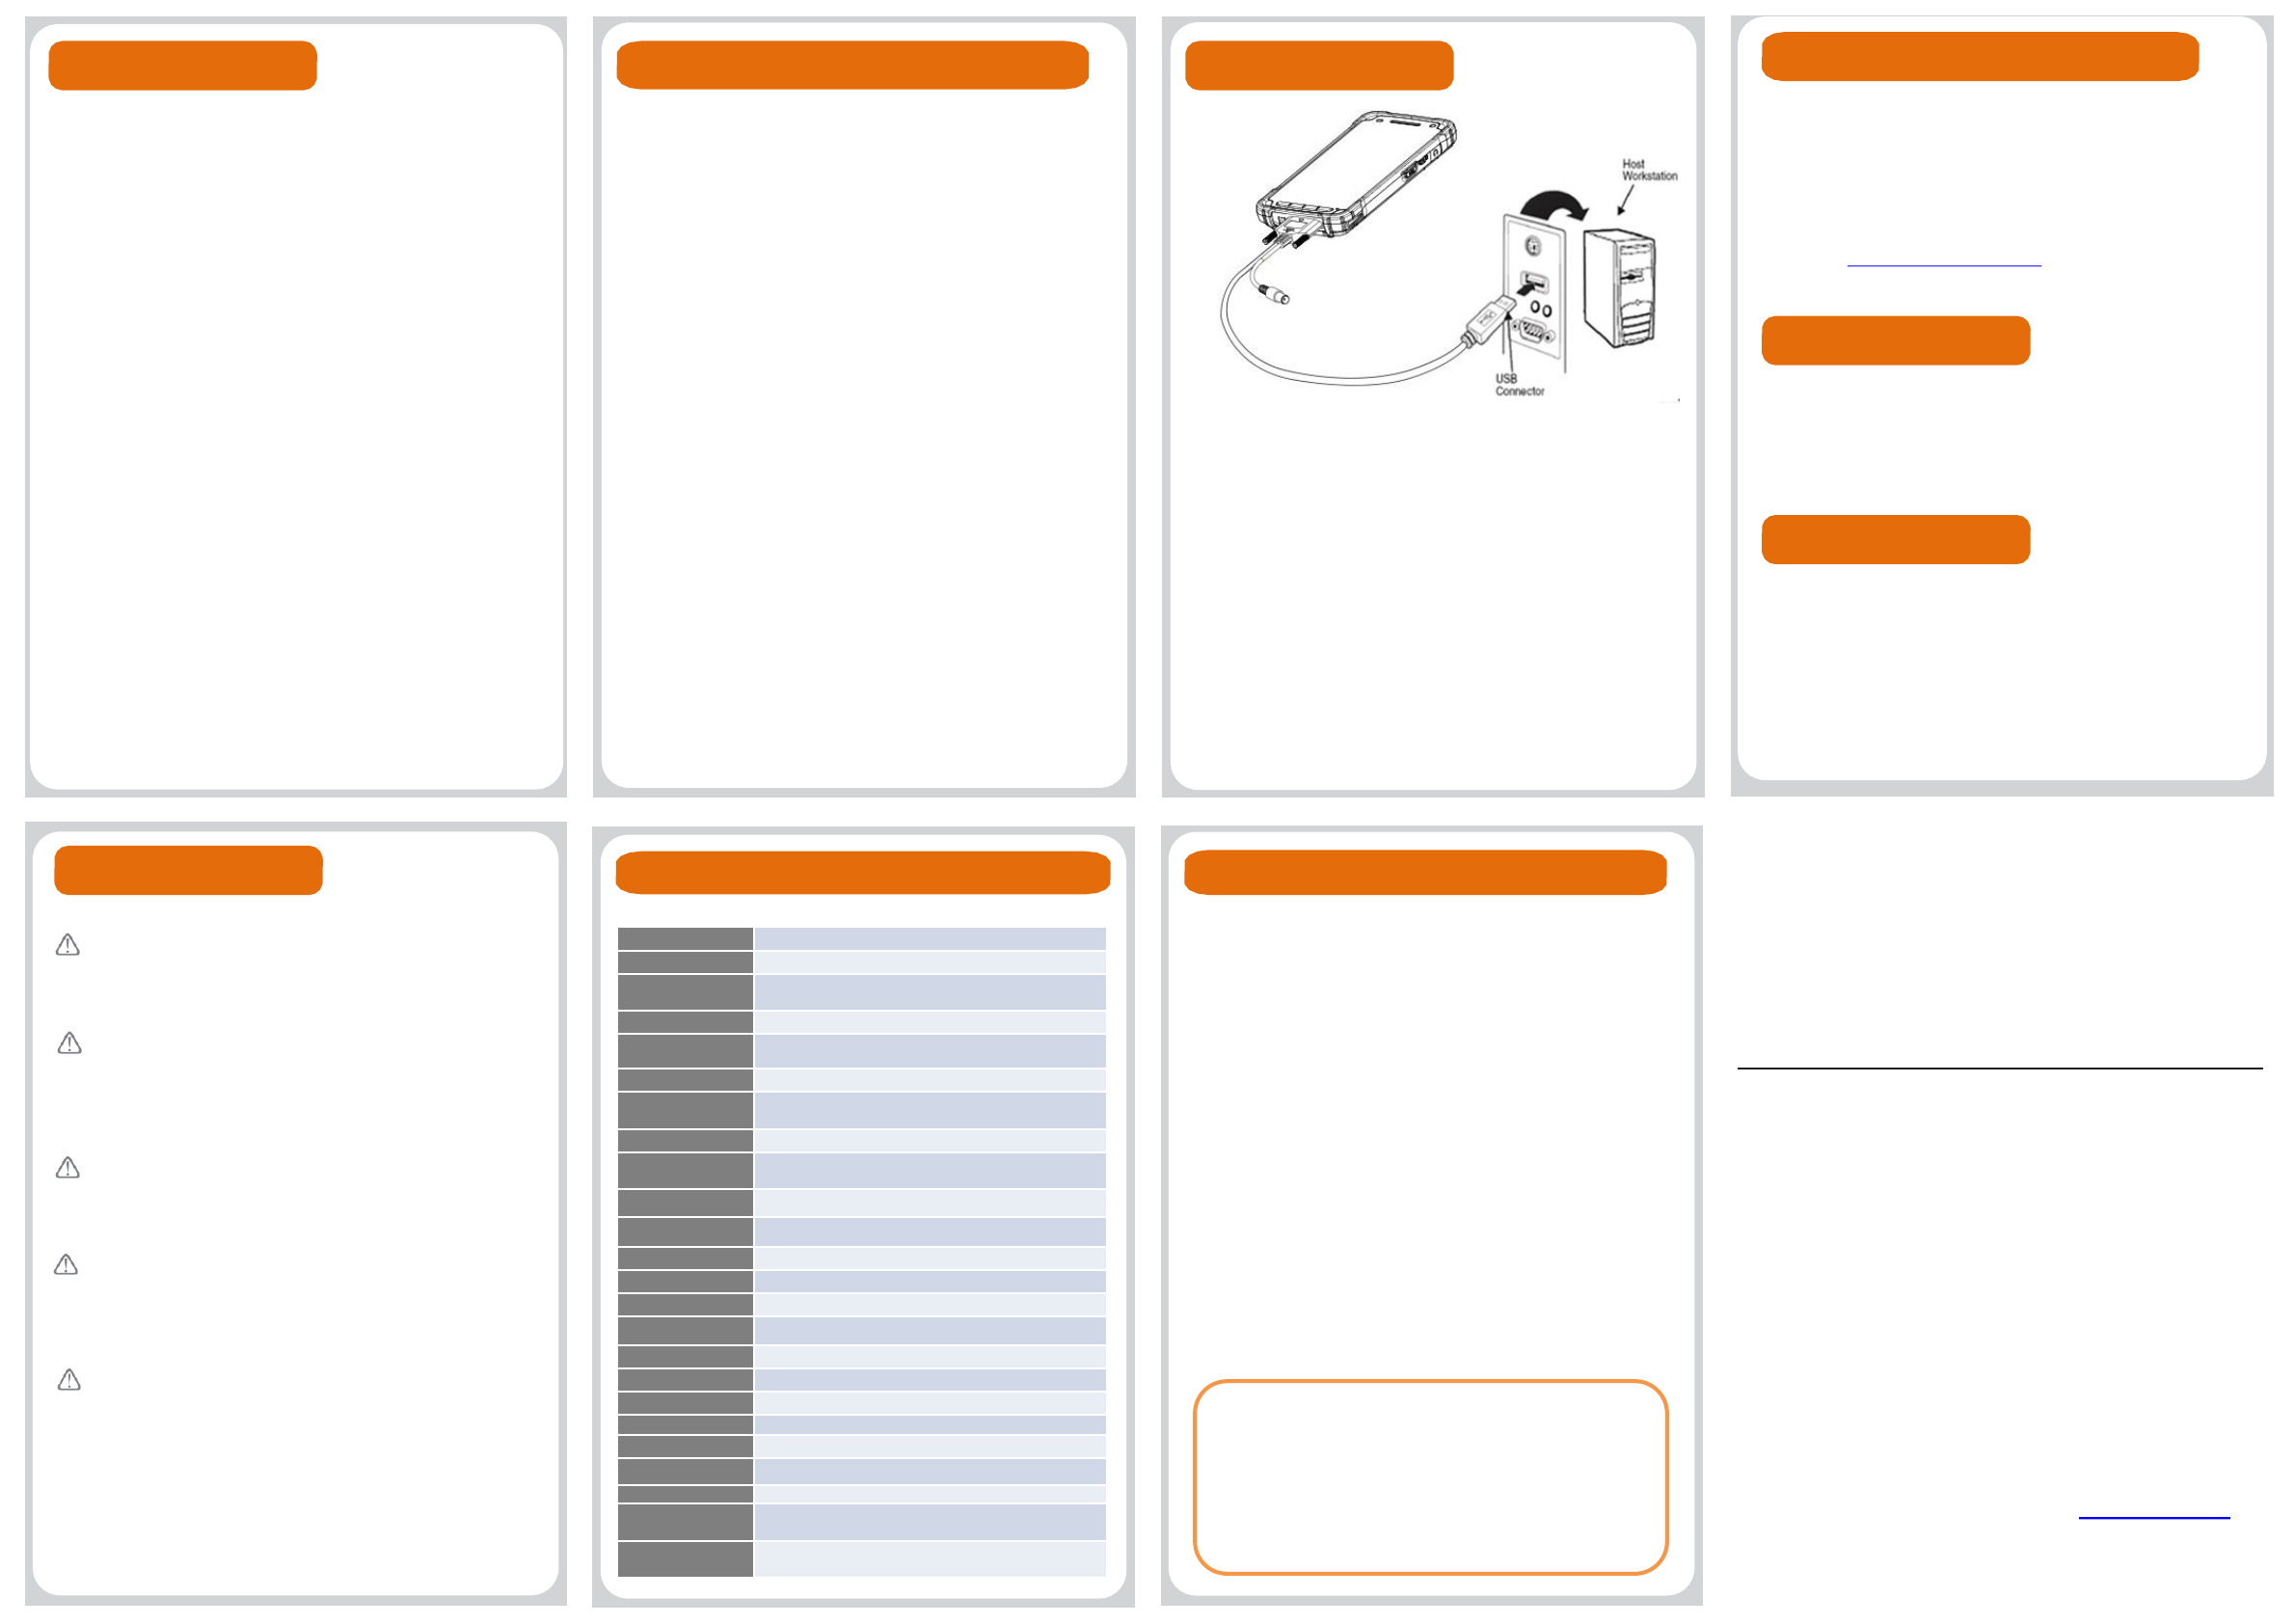
Connecting USB data Sync cable
Connect to PC and transfer data in Micro SD card/ device
storage with I/O USB data Sync cable.
Connecting –connect USB cable to USB port of PC and I/O
connector.
–Tab media device connection on notification panel
of status bar.
–Select file transfer on pop up window.
Disconnecting –Tab to show notification panel and select
media device connection.
–Select media device (MTP) and disable the
connection.
Connecting to PC
HANDY TERMINAL
Quick start guide
XT2WB
•For more details of product information and user
guide, please refer to our website (www.janam.com)
Settings -> back up and reset -> Factory reset ->
Reset phone
Settings -> Date and time -> Uncheck automatic date & time,
Uncheck automatic time zone
Wireless features (frequency)
WLAN
• 802.11b/g/n : 2412~2472MHz
• 802.11a/n: 5180~5240, 5260~5320, 5500~5620,
5745~5805MHz
Bluetooth
• 1~3Mbps: 2402~2480MHz
• LE: 2402~2480MHz
Allowed to use in all area.
Please use the device at 1 cm or more distance
away from your body.
Certificate & Regulatory
FCC
Allowed to use in all area. Please use the device at 1 cm or more distance away from your body.
This device complies with part 15 of the FCC Rules. Operation is subject to the following two conditions:
(1) This device may not cause harmful interference, and (2) this device must accept any interference received, including interference that may cause undesired operation. This device has been tested and
found to comply with the limits for a Class B digital device, pursuant to Part 15 of the FCC Rules. These limits are designed to provide reasonable protection against harmful interference in a residential
installation. This equipment generates uses and can radiate radio frequency energy and, if not installed and used in accordance with the instructions, may cause harmful interference to radio communications.
However, there is no guarantee that interference will not occur in a particular installation. If this equipment does cause harmful interference to radio or television reception, which can be determined by turning
the equipment off and on, the user is encouraged to try to correct the interference by one or more of the following measures:
-Reorient or relocate the receiving antenna.
-Increase the separation between the equipment and receiver.
-Connect the equipment into an outlet on a circuit different from that to which the receiver is connected.
-Consult the dealer or an experienced radio/TV technician for help.
IC
Canadian Compliance
This radio transmitter has been approved by Industry Canada to operate with the antenna types listed below with
the maximum permissible gain and required antenna impedance for each antenna type indicated. Antenna types not included in this list,
having a gain greater than the maximum gain indicated for that type, are strictly prohibited for use with this device.
Under Industry Canada regulations, this radio transmitter may only operate using an antenna of a type and maximum
(or lesser) gain approved for the transmitter by Industry Canada. To reduce potential radio interference to other users, the antenna type and its gain should be so chosen that the equivalent isotropically
radiated power (e.i.r.p) is not more than that necessary for successful communication.
This device complies with Industry Canada license-exempt RSS standard(s).
Operation is subject to the following two conditions:
(1)this device may not cause interference, and (2) this device must accept any interference, including interference that may cause undesired operation of the device.
Le présent émetteur radio a été approuvé par Industrie Canada pour fonctionner avec les types d'antenne énumérés ci-dessous et ayant un gain admissible maximal et l'impédance requise pour chaque type
d'antenne. Les types d'antenne non inclus dans cette liste, ou dont le gain est supérieur au gain maximal indiqué, sont strictement interdits pour l'exploitation de l'émetteur.
Conformément à la réglementation d'Industrie Canada, le présent émetteur radio peut fonctionner avec une antenne d'un type et d'un gain maximal (ou inférieur)
approuvé pour l'émetteur par Industrie Canada. Dans le but de réduire les risques de brouillage radioélectrique à l'intention des autres utilisateurs, il faut choisir le type d'antenne et son gain de sorte que la
puissance isotrope rayonnée équivalente (p.i.r.e.) ne dépasse pas l'intensité nécessaire à l'établissement d'une communication satisfaisante.
Le présent appareil est conforme aux CNR d'Industrie Canada applicables aux appareils radio exempts de licence.
L'exploitation est autorisée aux deux conditions suivantes :
(1)l'appareil ne doit pas produire de brouillage, et (2) l'utilisateur de l'appareil doit accepter tout brouillage radioélectrique subi, même si le brouillage est susceptible d'en compromettre le fonctionnement.
CE marking
CAUTION! This equipment may generate or use radio frequency energy. Changes or modifications to this equipment may cause harmful
interference unless the modifications are expressly approved in the instruction manual. The user could lose the authority to operate this
equipment if an unauthorized change or modification is made.
IC RF Exposure Statement
NII frequency band 5150-5250 MHz is restricted to indoor use only.