Janome America EDGE15X Digital Cutting Plotter User Manual r1
Janome America, Inc. Digital Cutting Plotter r1
User Manual r1
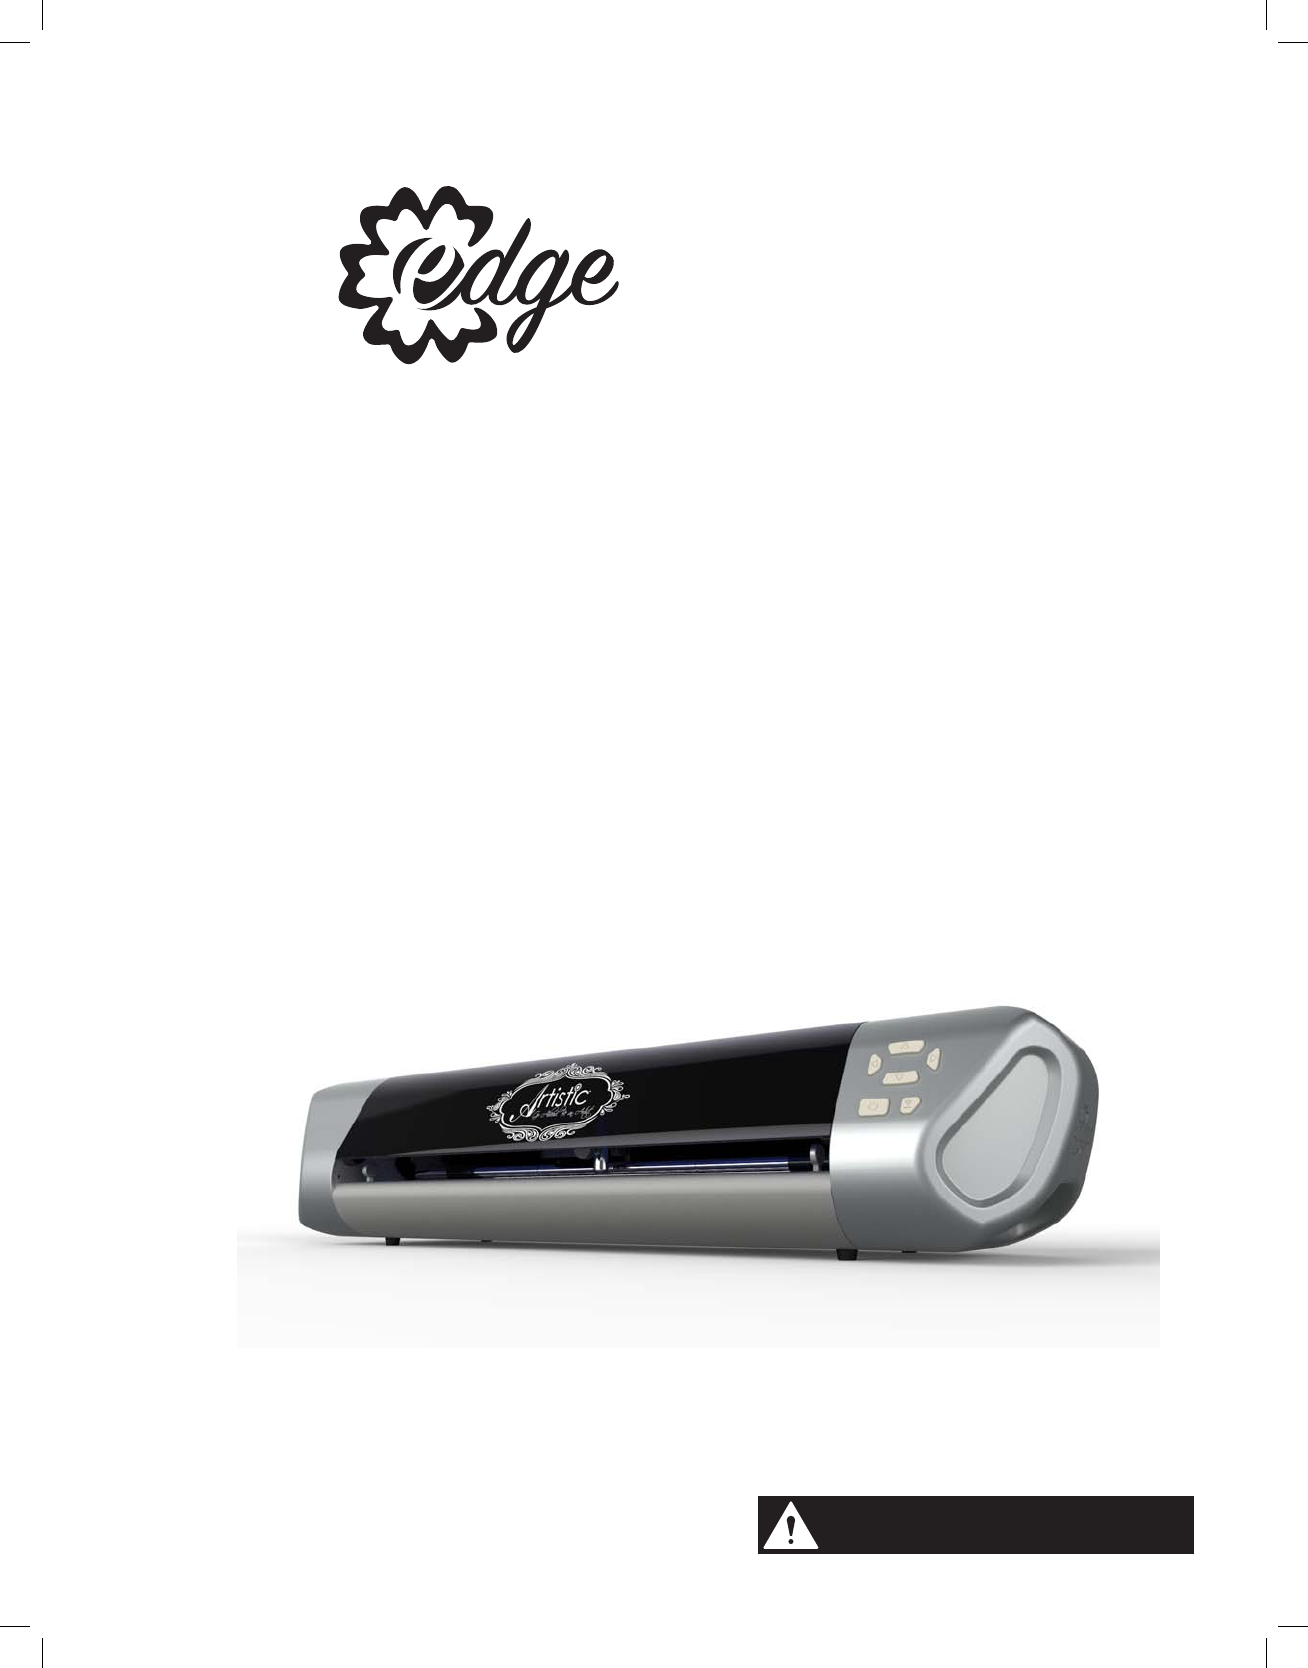
Digital Cutting Plotter Edge 12 / Edge 15X
USER’S GUIDE
Read Guide Before Operating Product.
Save Guide For Reference.
Artistic
2
READ THESE IMPORTANT SAFETY
INSTRUCTIONS
THIS DEVICE IS INTENDED FOR HOUSEHOLD
USE ONLY
To reduce the risk of re, electrical shock or
personal injury, it is important that you read and
understand all the instructions and warnings
that come with your Digital Cutter Edge 12/15X
(“Product”).
ELECTRICAL SHOCK HAZARD
Product is an electrical device. Use with
caution. Observe the following precautions:
• Do not operate Product on wet surfaces or
near any water sources (tub, shower, sink,
etc.).
• Keep liquids and beverages away from
Product.
• Unplug Product from outlet when not in use
or before cleaning.
• Unplug Product when removing or installing
blades or blade holder.
PINCH HAZARD
Cutting Carriage can pinch ngers or hand.
Feed Rollers can catch hair or clothing.
• Keep ngers away from moving parts.
• Keep hair and clothing away from moving
parts.
CUTTING HAZARD
Cutting Blades are sharp. Handle with care.
• Keep ngers away from exposed blade.
Keep away from children
• Choking hazard. Small parts.
This Product has a Class 1 laser and complies
with International Standards EN 60825-1; a
Class 1 laser product is safe under reasonably
foreseeable conditions of operation. Use of
controls or adjustments or performance of
procedures other than those specied herein
may result in hazardous radiation exposure.
WARNING
GENERAL RULES
• Do not disassemble the device.
• Do not shine laser on a reflective surface.
• Do dispose of product in accordance with local laws and
regulations of your region.
• Do not look directly at the laser at any time.
• Always operate product on a dry, clean and level surface.
• Do not operate product with wet hands.
• Keep area of operation well lit.
• Do not operate product near flammable liquids or gases.
• Do not operate product outside.
• Do not unplug product by tugging or pulling the power
cord.
• Do not touch the mat, blade holder or rollers while the
product is in operation.
FCC Part 15 compliance
• This device complies with Part 15 of the FCC Rules.
Operation is subject to the following two conditions: (1)
this device may not cause harmful interference, and
(2) this device must accept any interference received,
including interference that may cause undesired
operation.
Unlawful Use of Scanning Equipment notice
It is an offense to make reproductions of certain items or
documents with the intent to commit fraud. The following is
a non-exhaustive list of documents which may be unlawful
to produce copies of. We suggest you check with legal
counsel if in doubt about any particular item or document.
• Currency
• Bonds
• Certificates of Deposit
• Armed forces service papers
• Passports
• Postage Stamps
• Immigration papers
• Welfare documents
• Cheques or drafts written by government agencies
• Any copyrighted work cannot be copied legally, subject
to the “Fair Dealing” exception relating to sections of a
copyrighted work. Works of art should be considered
copyrighted works.
SAVE THESE INSTRUCTIONS AND WARNINGS and keep them near your Artistic Edge Digital Cutter.
3
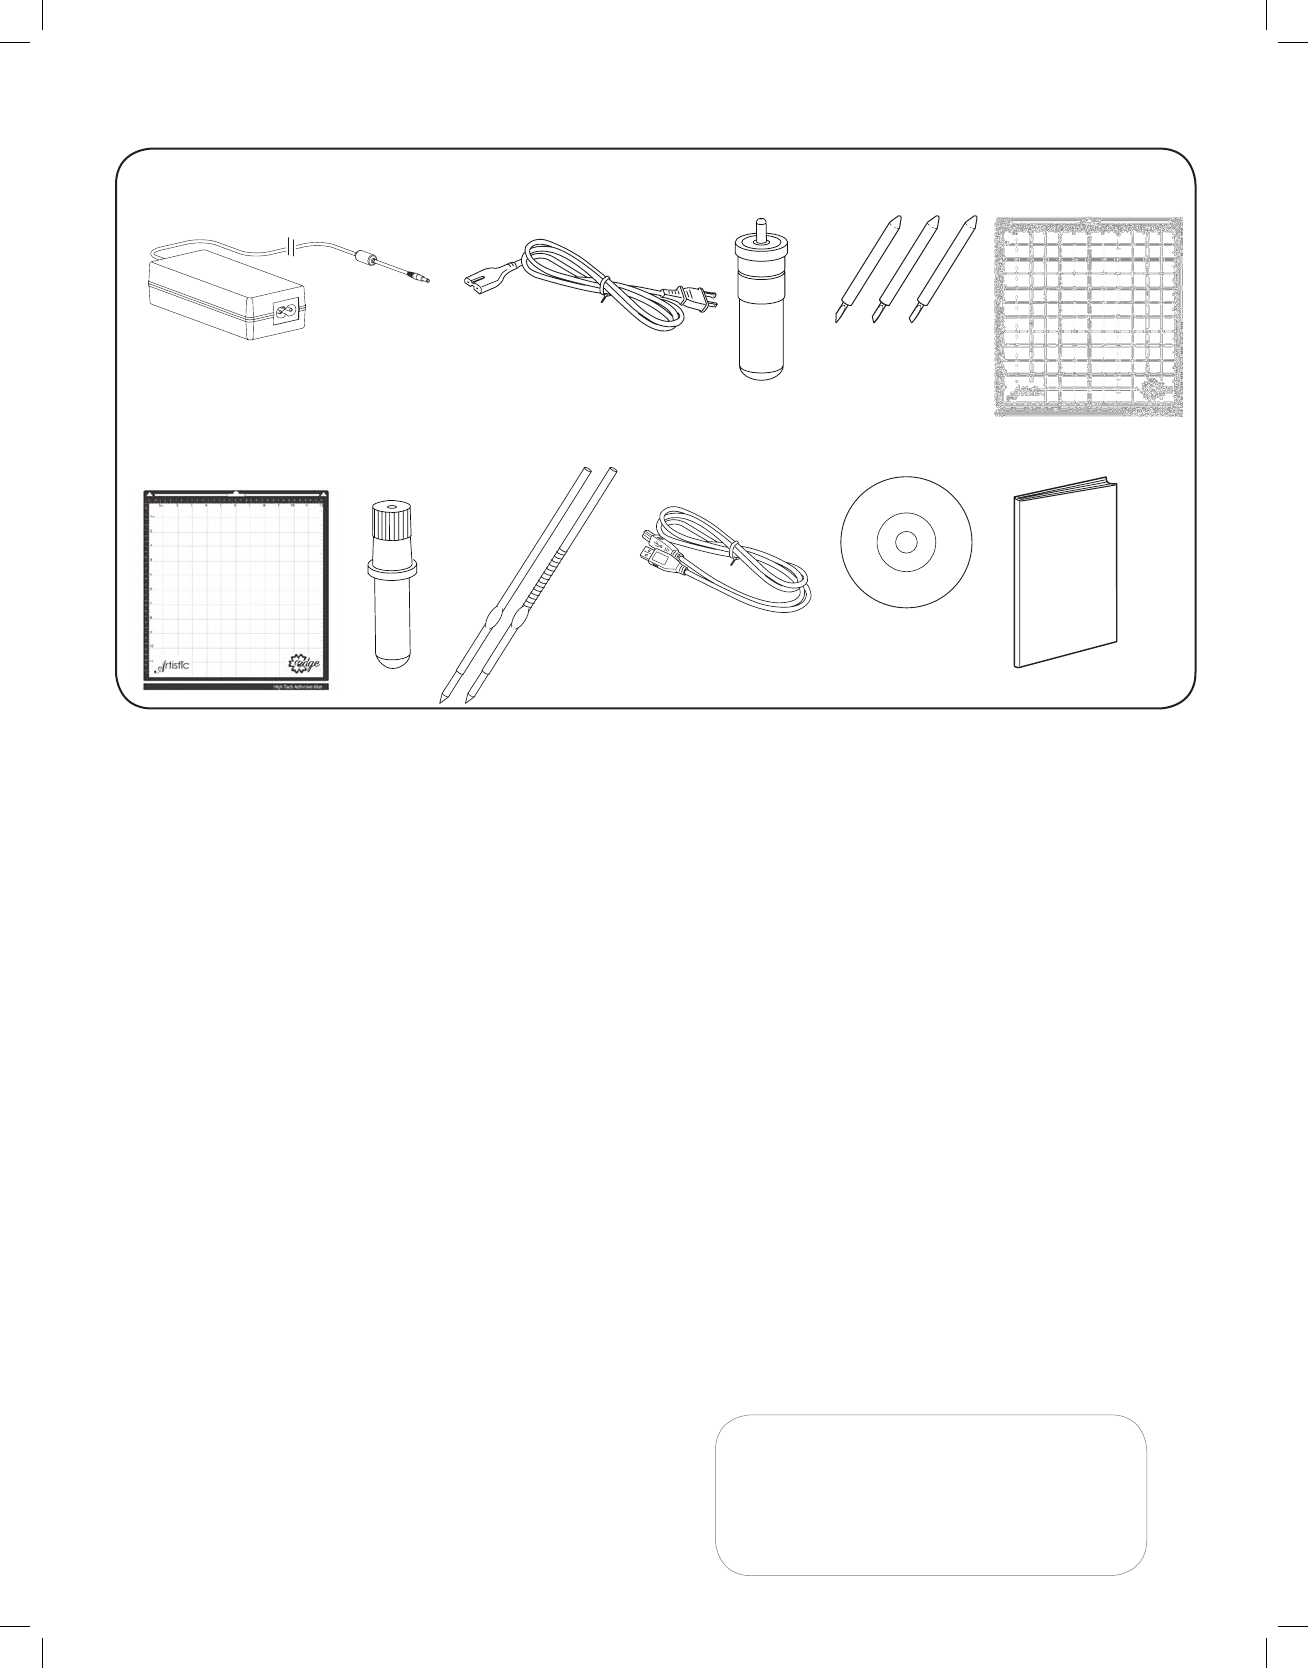
q w e r t
y u o
q Universal power supply
w Power cord
e Blade holder
r Blades
• Blue Cap Blades for cutting thicker materials
• Red Cap Blades for cutting thin materials
• Yellow Cap Blades for cutting fabrics
t 12˝x12˝ (or 15˝x15˝) low tack adhesive cutting mat
y 12˝x12˝ (or 15˝x15˝) high tack adhesive cutting mat
u Pen Holder
i Pens
o USB 2.0 cable
!0 Artistic SimpleCut Installation Disc
!1 Owner’s manual with Artistic SimpleCut activation code
i !0 !1
Standard Accessories
SimpleCut Software Installation Instructions
1. Insert the Artistic SimpleCut Installation DVD into your CD-ROM
drive. On most computers you will have a AUTORUN screen
pop up next. If your computer does not have the CD-ROM
AUTORUN feature activated, open Windows Explorer, then
open the CD-ROM folder and run the “setup.exe” program.
2. The Welcome screen informs you that you are about to install
Creative DRAWings SimpleCut Software. Click “Next” to
continue.
3. When the window with the License Agreement opens: Click
on the rst radio button of the window, conrming that you
accept the terms of the license agreement. Then click “Next” to
continue.
4. On the next window, select the installation type: If you choose
“Complete” (recommended), all program features will be
installed. If you choose “Custom”, you have to specify which
features of the program you want to install. Click “Install” after
you have made your decision.
5. Once the installation is nished, the Activation Form will appear.
Fill in the requested information together with the Activation Key
(found below these instructions).
6. Once you have lled this out, click the Activate Product button.
7. In order to activate Creative DRAWings SimpleCut, click on the
“Activate now” button. You must be connected to the Internet.
8. Once the activation procedure is nished, the “Activation
Successful” message will appear. If the Activation Key number
was wrong, or you are not connected to the Internet, you will
receive an Activation Failure message. Check your Activation
Key and your internet connection and try again. Once
successfully activated, click on the “Close” button to close the
dialog box.
9. When the Activation process nishes the installation of My
Editor v5.0 will start automatically. Click “Next” to continue.
10. The window with the License Agreement opens: click on the
rst radio button of the window, conrming that you accept the
terms of the License Agreement. Then click “Next” to continue.
11. In the next dialog box, enter the user name and the organization,
if any, and click “Next”.
12. The Destination Folder dialog box will appear. Press “Next”
to continue using the default destination, or specify another
location.
13. In the next window, select the installation type. If you choose
“complete” (recommended), all program features will be
installed. If you choose Custom, you will need to specify which
features you want to install. Click “Install” after you have made
your decision.
14. The next dialog box asks you to select what les you want My
Editor to handle. You can choose any selection that you want,
but it is recommended that you use the rst option: “my editor
v5.00 will handle only ngs, and mls”.
15. You are now ready to install. Click “Install” to begin.
Once the installation nishes, click on “Finish”.
16. The next dialog box informs you that the Creative DRAWings
SimpleCut was installed successfully. Click on the “Finish”
button to nish the installation process.
17. If an additional installation wizard starts to install DirectX9C, you
MUST allow it to install or the software will not work properly.
Follow on-screen prompts to install.
– Verification code –
4
q
r
w
t
yuio
!0
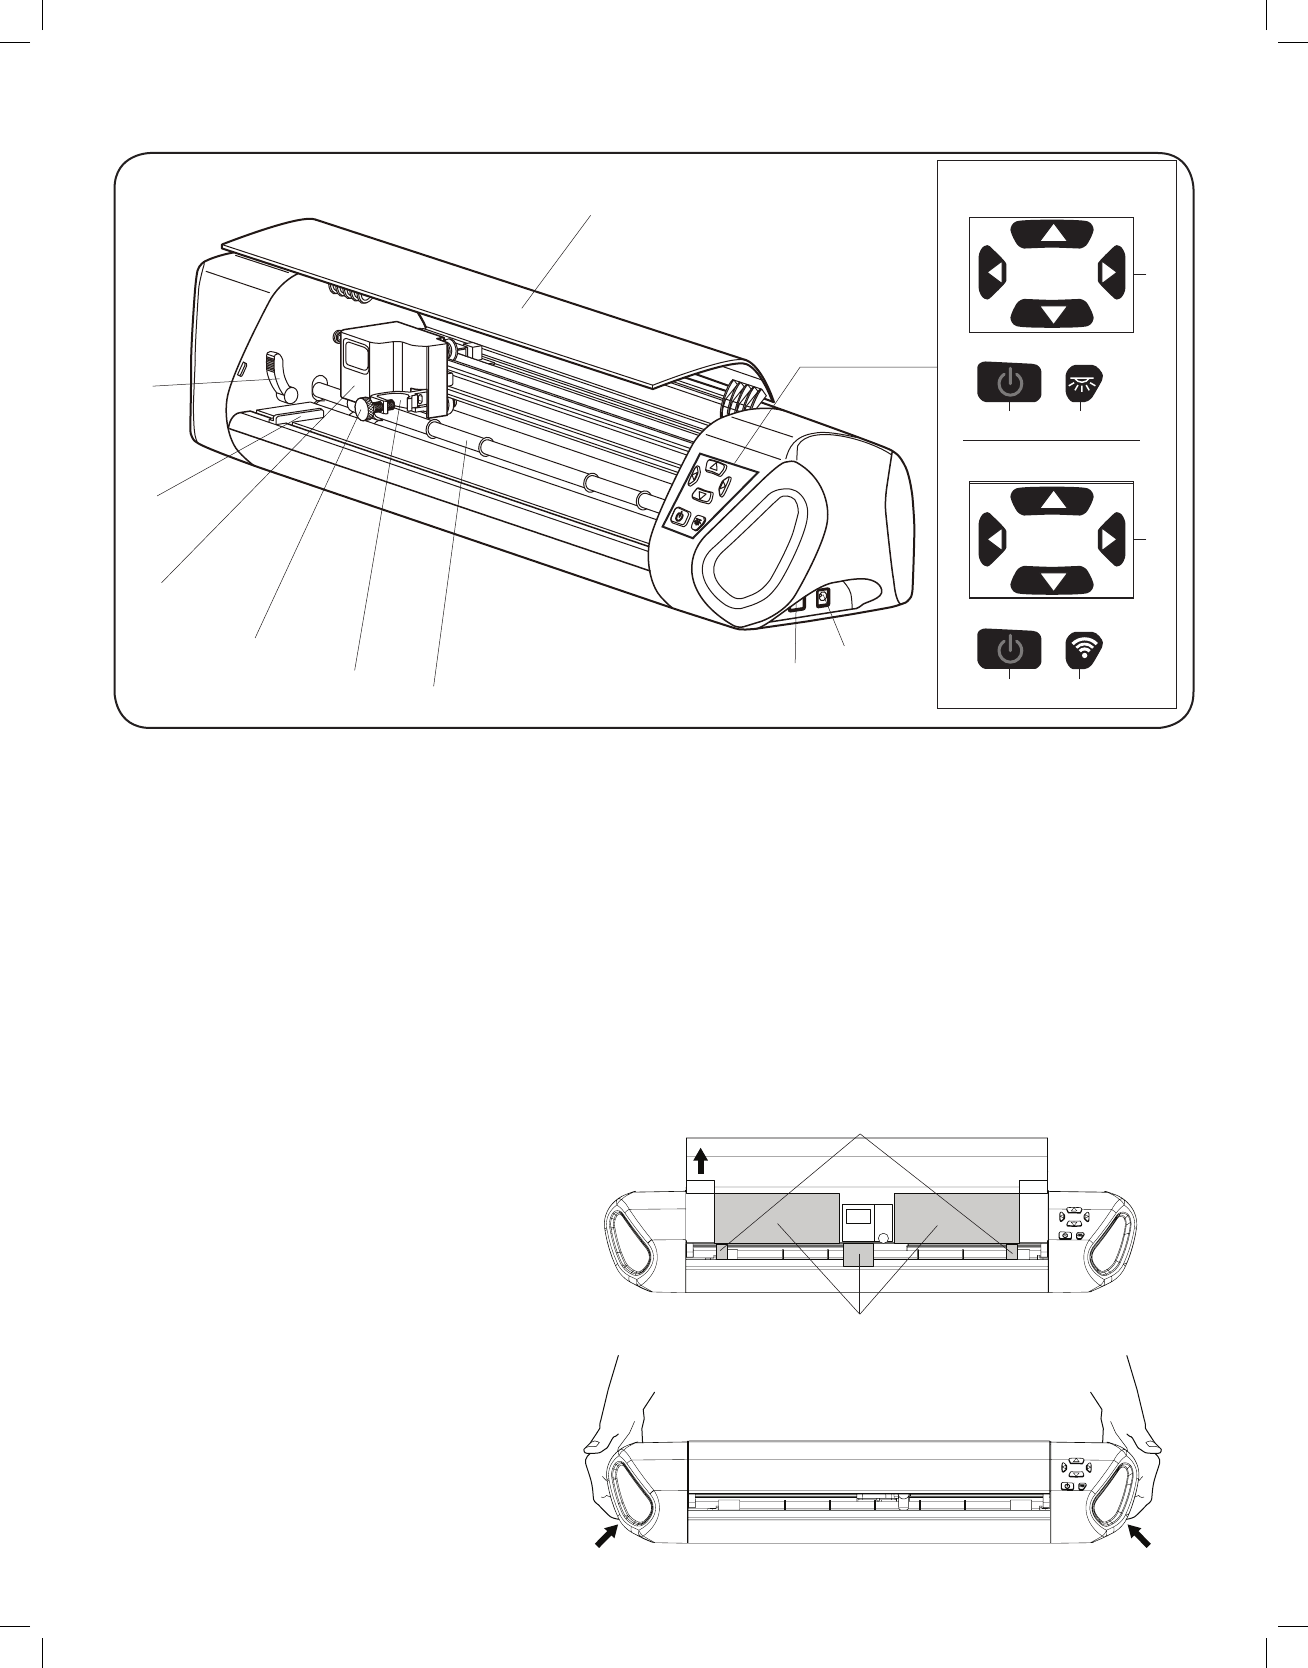
Names of parts
Edge 12
Edge 15X
!0
!1
!1
!2
!3
e
q
w
e
r
t
y
u
i
o
!0
!1
!2
!3
Front cover
Roller lifter (Located on the other side as well.)
Cutting mat guide (Located on the other side as well.)
Carriage
Clamp screw
Tool cradle
Feed roller
USB port
Power inlet
Jog buttons
Power button
Light button (for Edge 12)
Light/wireless button (for Edge 15X)
Carrying the Edge 12/15X
Carrying handles (holes) are located on
the lower part of the both sides of the
machine. Hold the carrying handles when
transporting the machine as illustrated.
Before turning on the Edge 12/15X
When using the machine for the rst time, remove
the protective forms and roller spacers from the
machine.
Protective Form
Roller Spacer
5
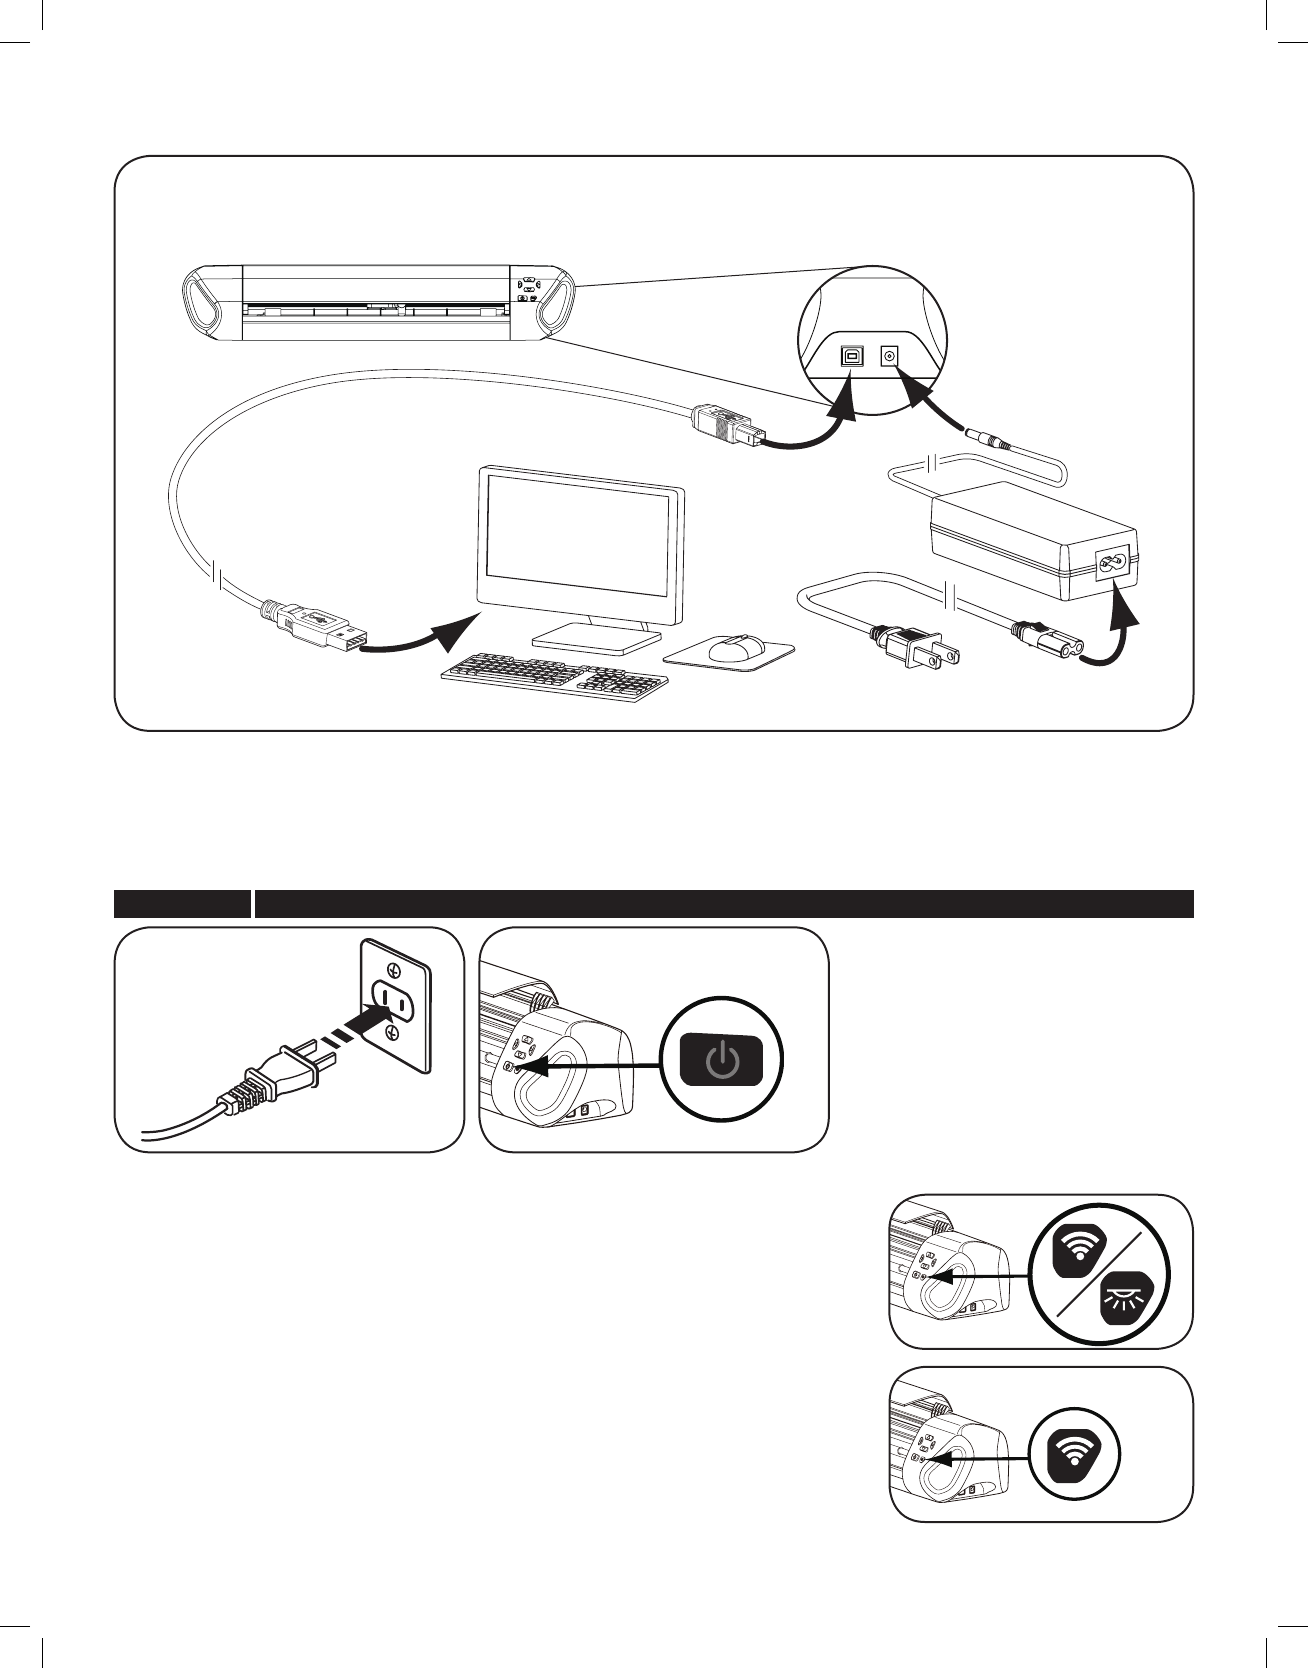
Right side of machine
Computer USB Port
Connecting the machine
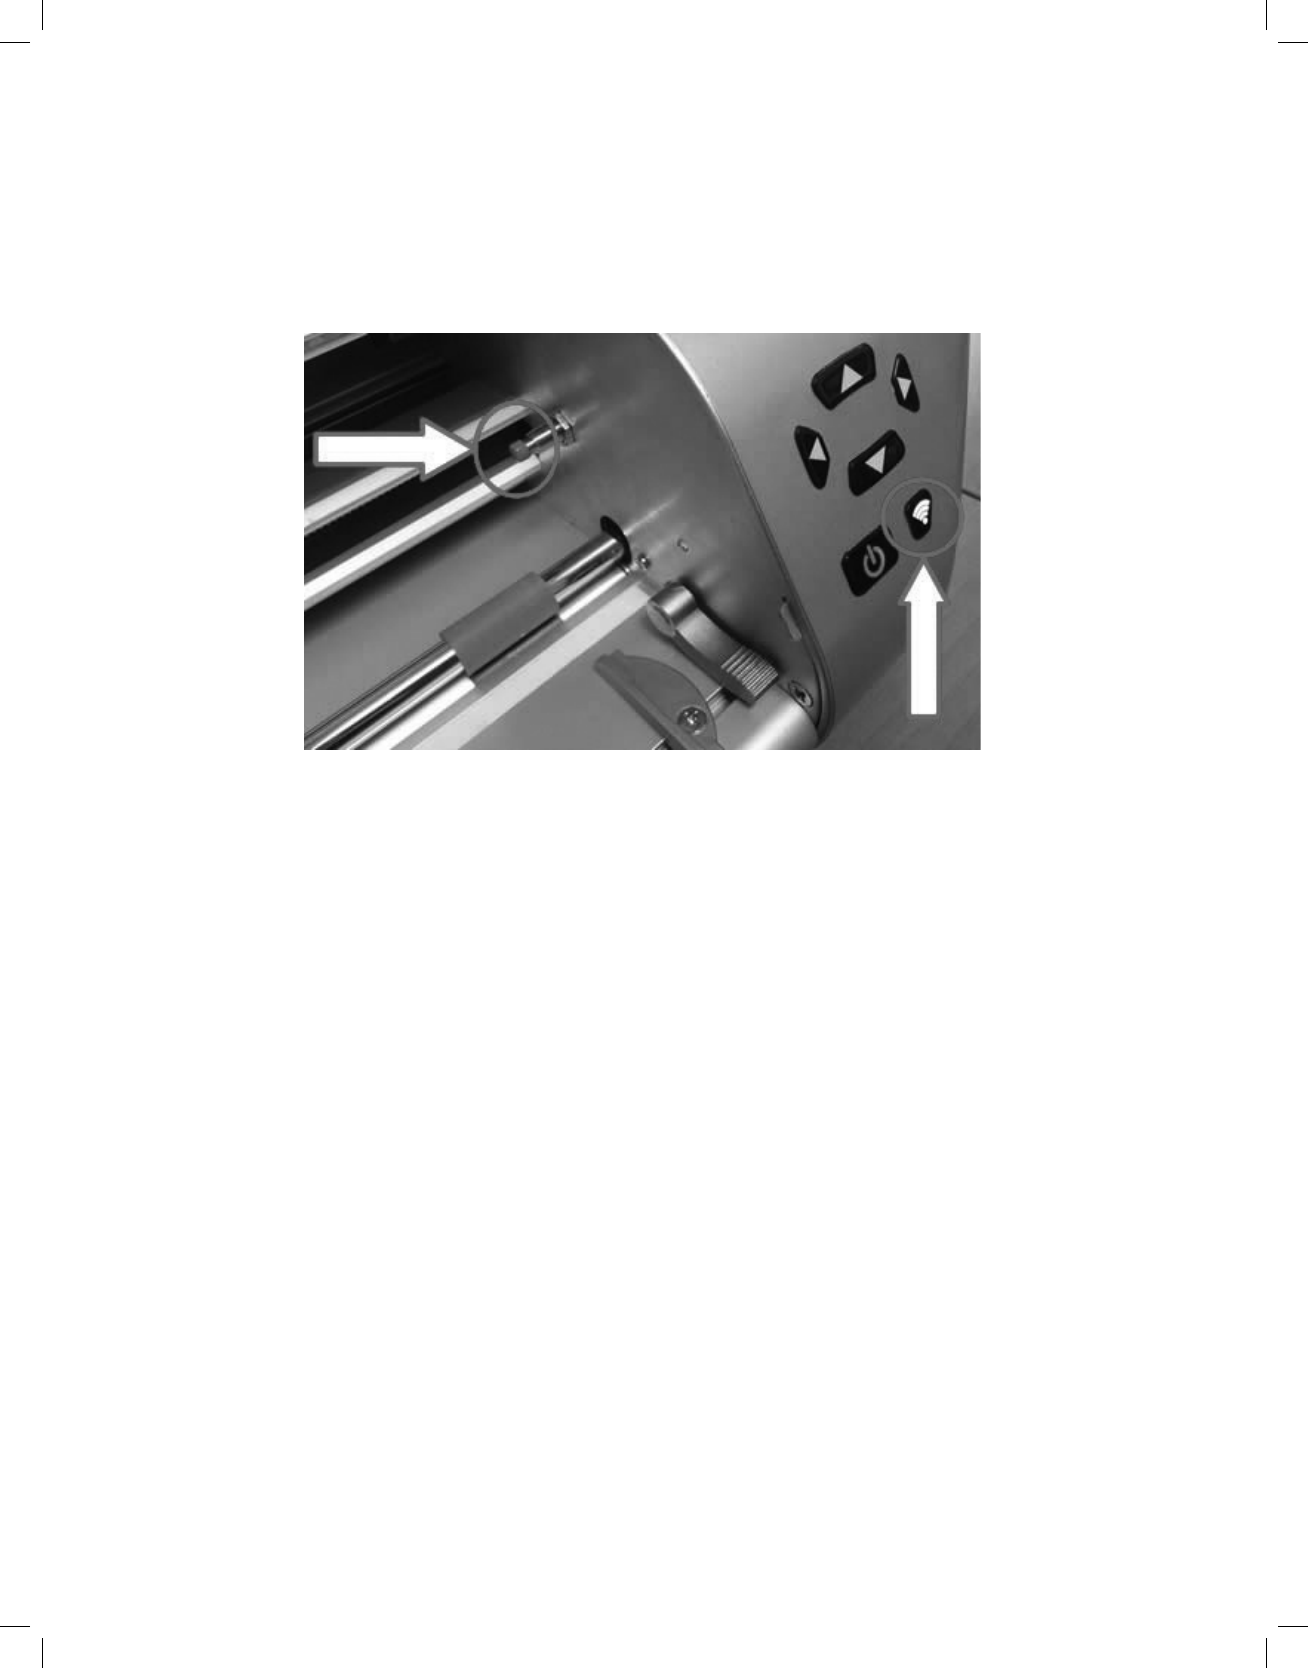
Connecting Edge to wireless network (for Edge 15X only)
1. Push and hold down light/wireless button for three seconds. The button will light
up once the wireless function is activated.
Edge wireless ID can be found on the bottom of the Edge digital cutter.
1. Plug the power cord into the universal power supply.
2. Plug the universal power supply into the power inlet (right side of the Edge machine).
3. Plug the small end of the USB cable into the side of the Edge machine.
4. Plug at end of the USB cable into a USB port on your computer.
NOTICE DO NOT unplug USB cable from computer while Machine is in use. This will cause loss of data.
Starting the machine
1. Plug the power supply plug into the
wall outlet.
2. Press the power button on the front
Machine light
1. Push Light or light/wireless button to turn the light on.
Push the button again to turn the light o.
For more details to set up the wireless function, see page 11.
6
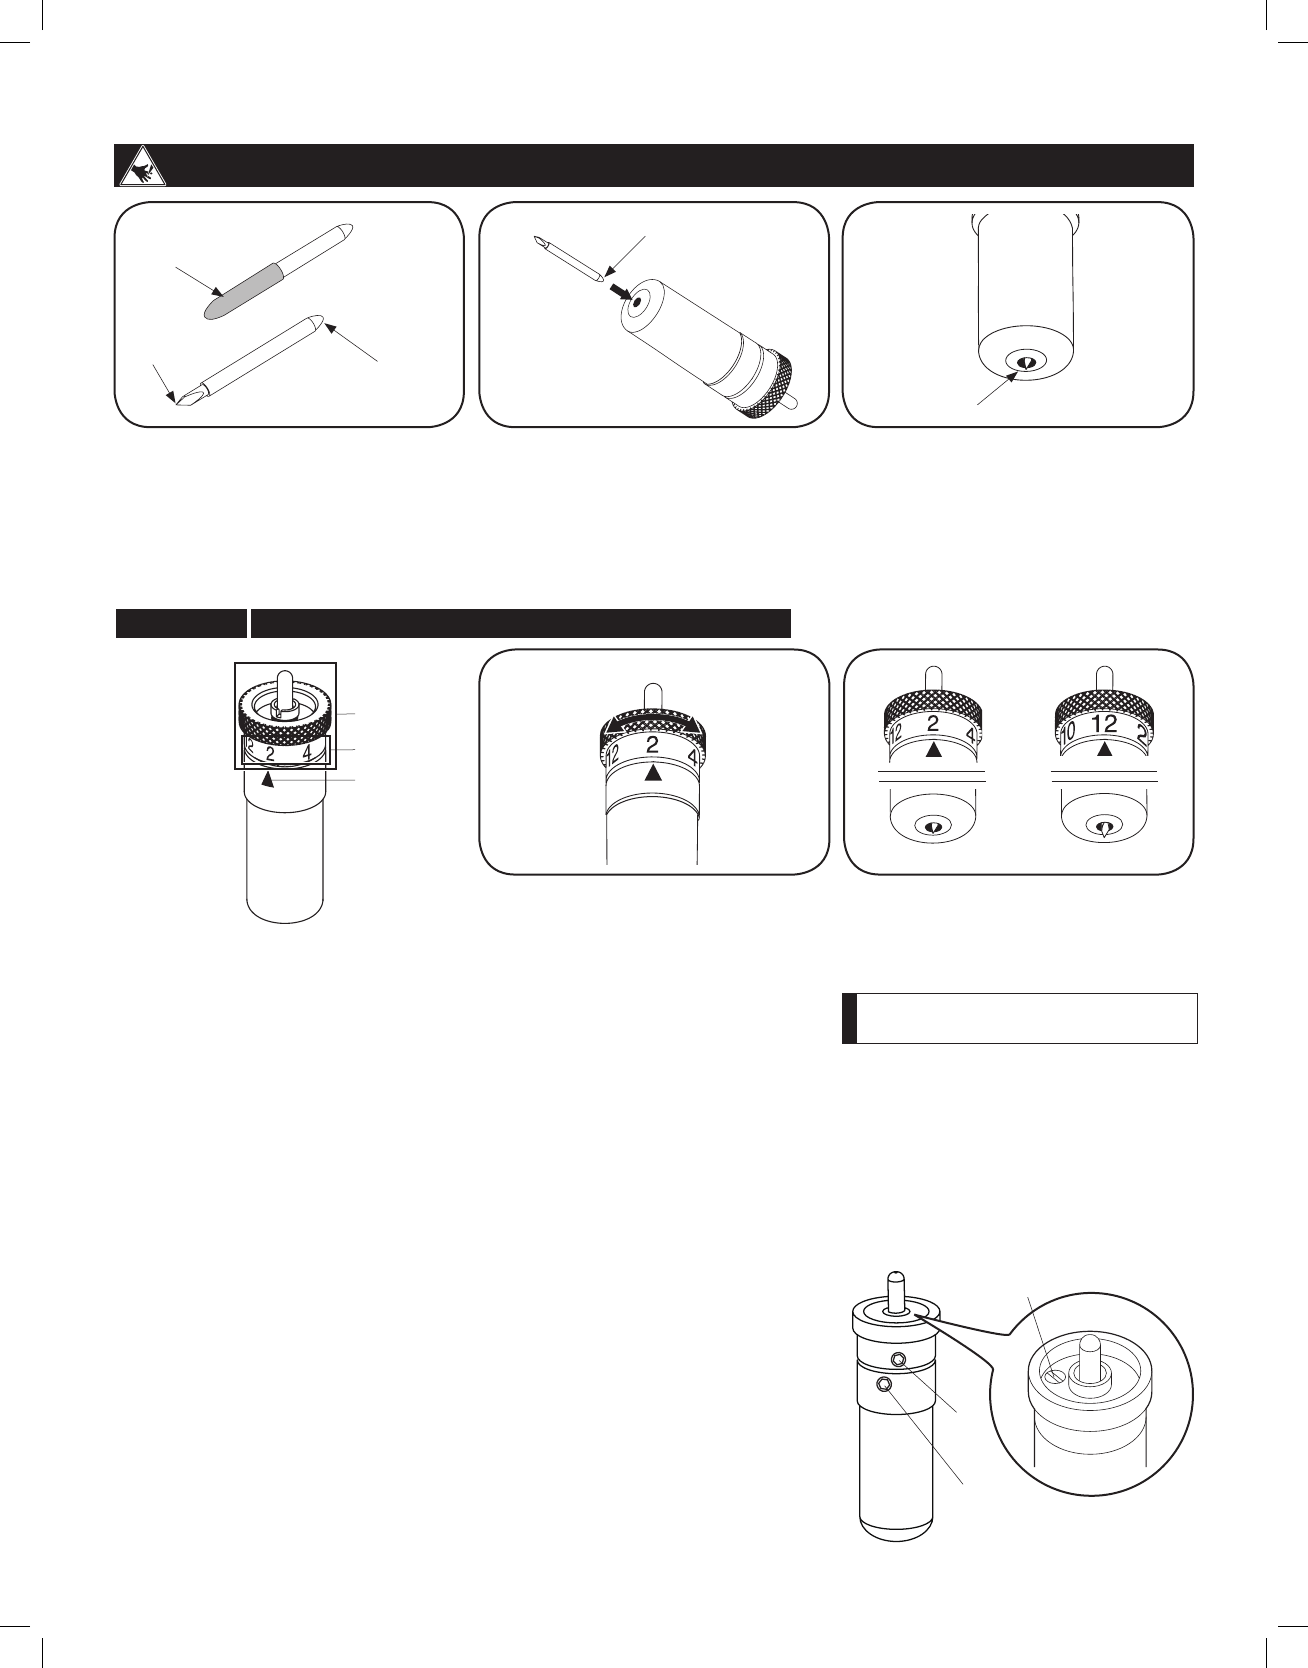
Inserting the blade into the blade holder
Safety cap
1. Remove the safety cap from the
blade, being very careful with the
sharp edge.
Insert this end into
blade holder
2. Carefully insert the round (non-
cutting side) of the blade into the
hole of the blade holder. The blade
will be held in place by a magnet so
that it will not fall out.
3. The blade will be just barely
exposed from the bottom of the
blade holder.
Angled
cutting edge
Round (Non-cutting side)
Blade
Setting the blade depth
Lower number for thinner material
Higher number for thicker material
NOTICE DO NOT adjust blade depth while Machine is operating.
1. To set the blade depth, you will
spin the blade holder cap. Printed
on a ring around the cap are blade
depth numbers ranging from 2-12
and an arrow on the blade holder
beneath it. Line the arrow up with
the numbered setting for dierent
blade depths.
q
w
e
q Blade holder cap
w Blade depth numbers
e Arrow
Thicker materials like heavy cardstock and template material will need more of the blade to cut through and therefore a
higher number needs to be selected. Thinner materials like vinyl only need a small amount of the blade to be exposed to
make the cut, therefore a lower number will be optimal.
For best results, always try a test cut rst so that you can make adjustments.
2. The higher the number you select,
the further out the blade protrudes.
The lower the number you select,
less of the blade is exposed.
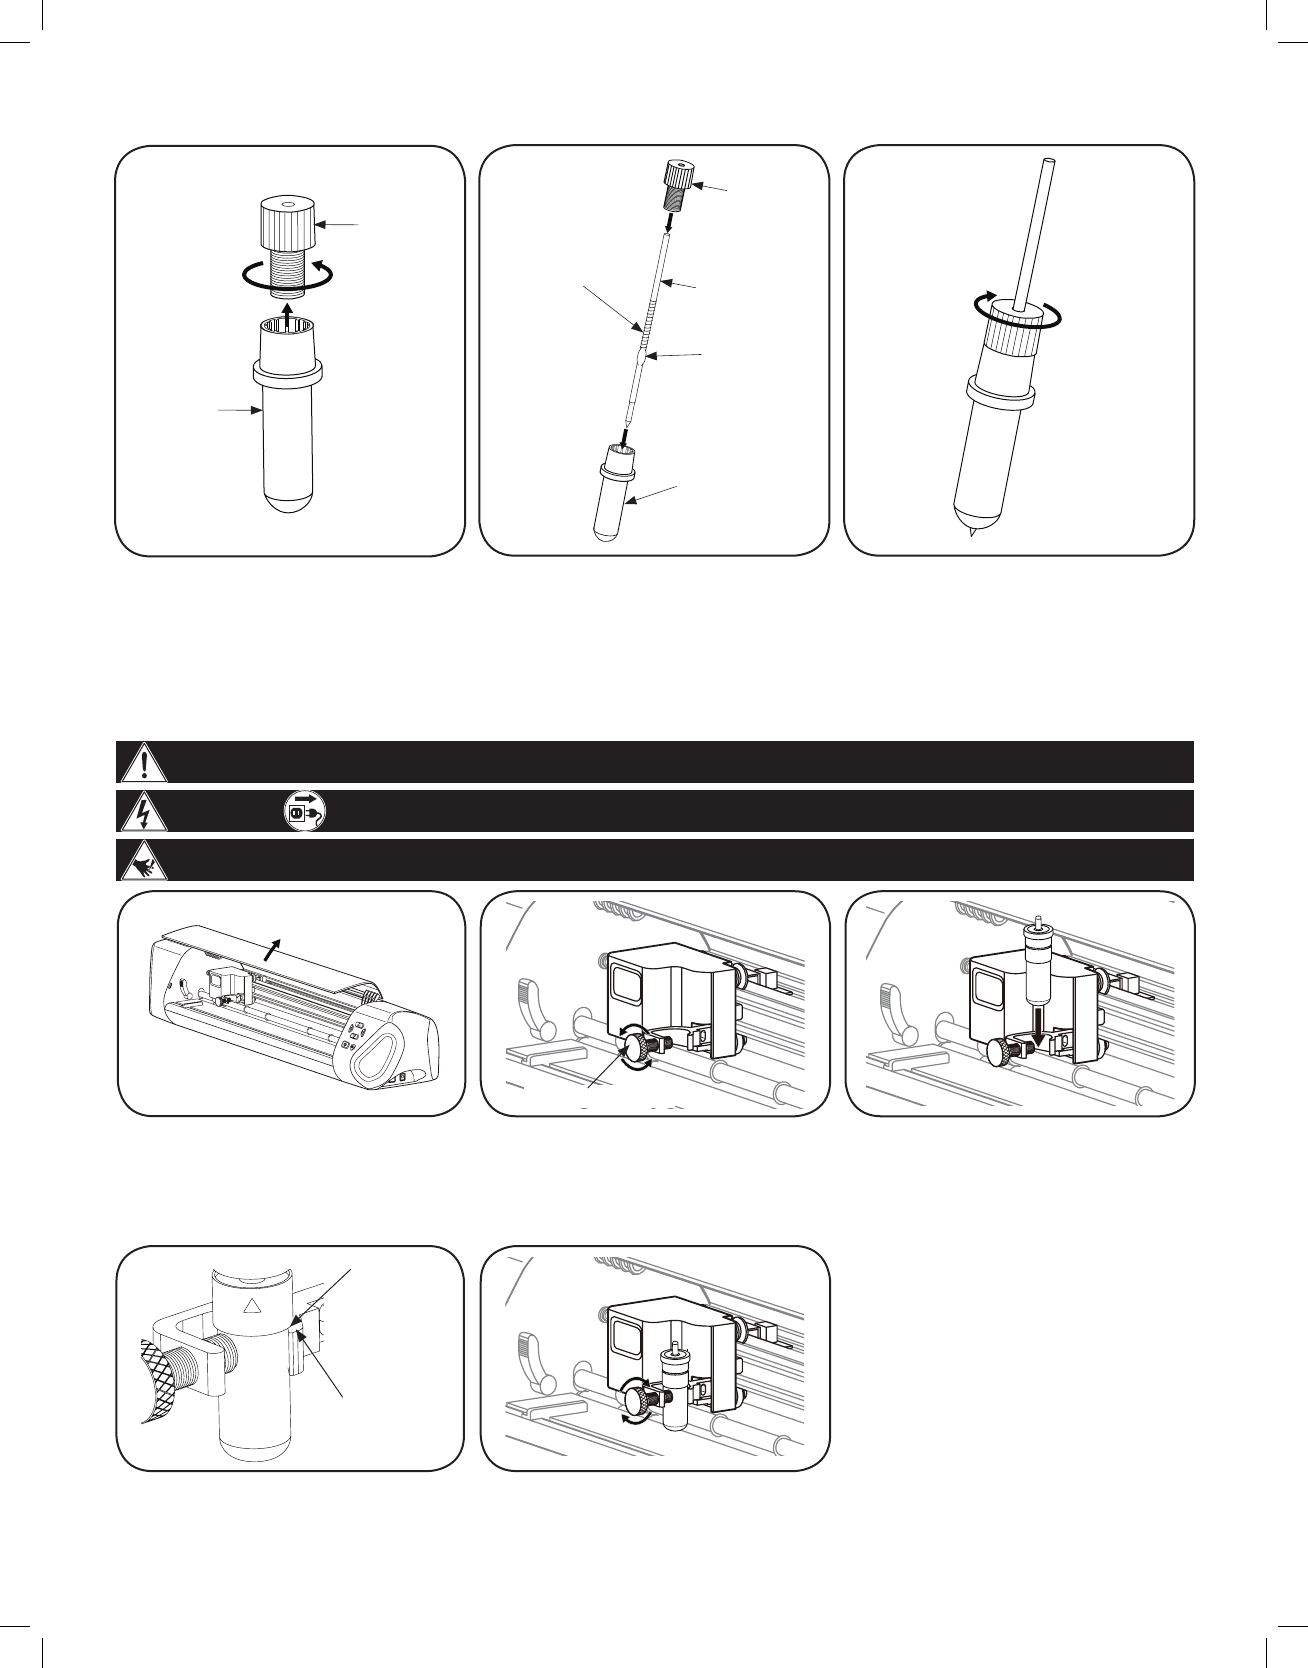
Fine tuning blade height on blade holder
For extra precision while cutting,
you may want to ne tune your blade
holder. Use a hexagonal screwdriver to
adjust the screws in three positions.
q Bottom Screw
The lower screw on the blade
holder will prevent the cap from
turning. Once you have selected
your blade height, tighten this
screw to ensure it will not move out.
w Middle screw
Loosening the screw in the middle
will push the blade further up in the
blade holder. This will allow you to
achieve a blade height of less than
2.
e Top Screw
Once this screw is tightened, the
blade holder cap will only be able
to make one rotation around. It acts
like a stopper to prevent the blade
coming out too far or too little.
q
w
e
CAUTION: CUTTING HAZARD Blade is sharp, handle with care.
7
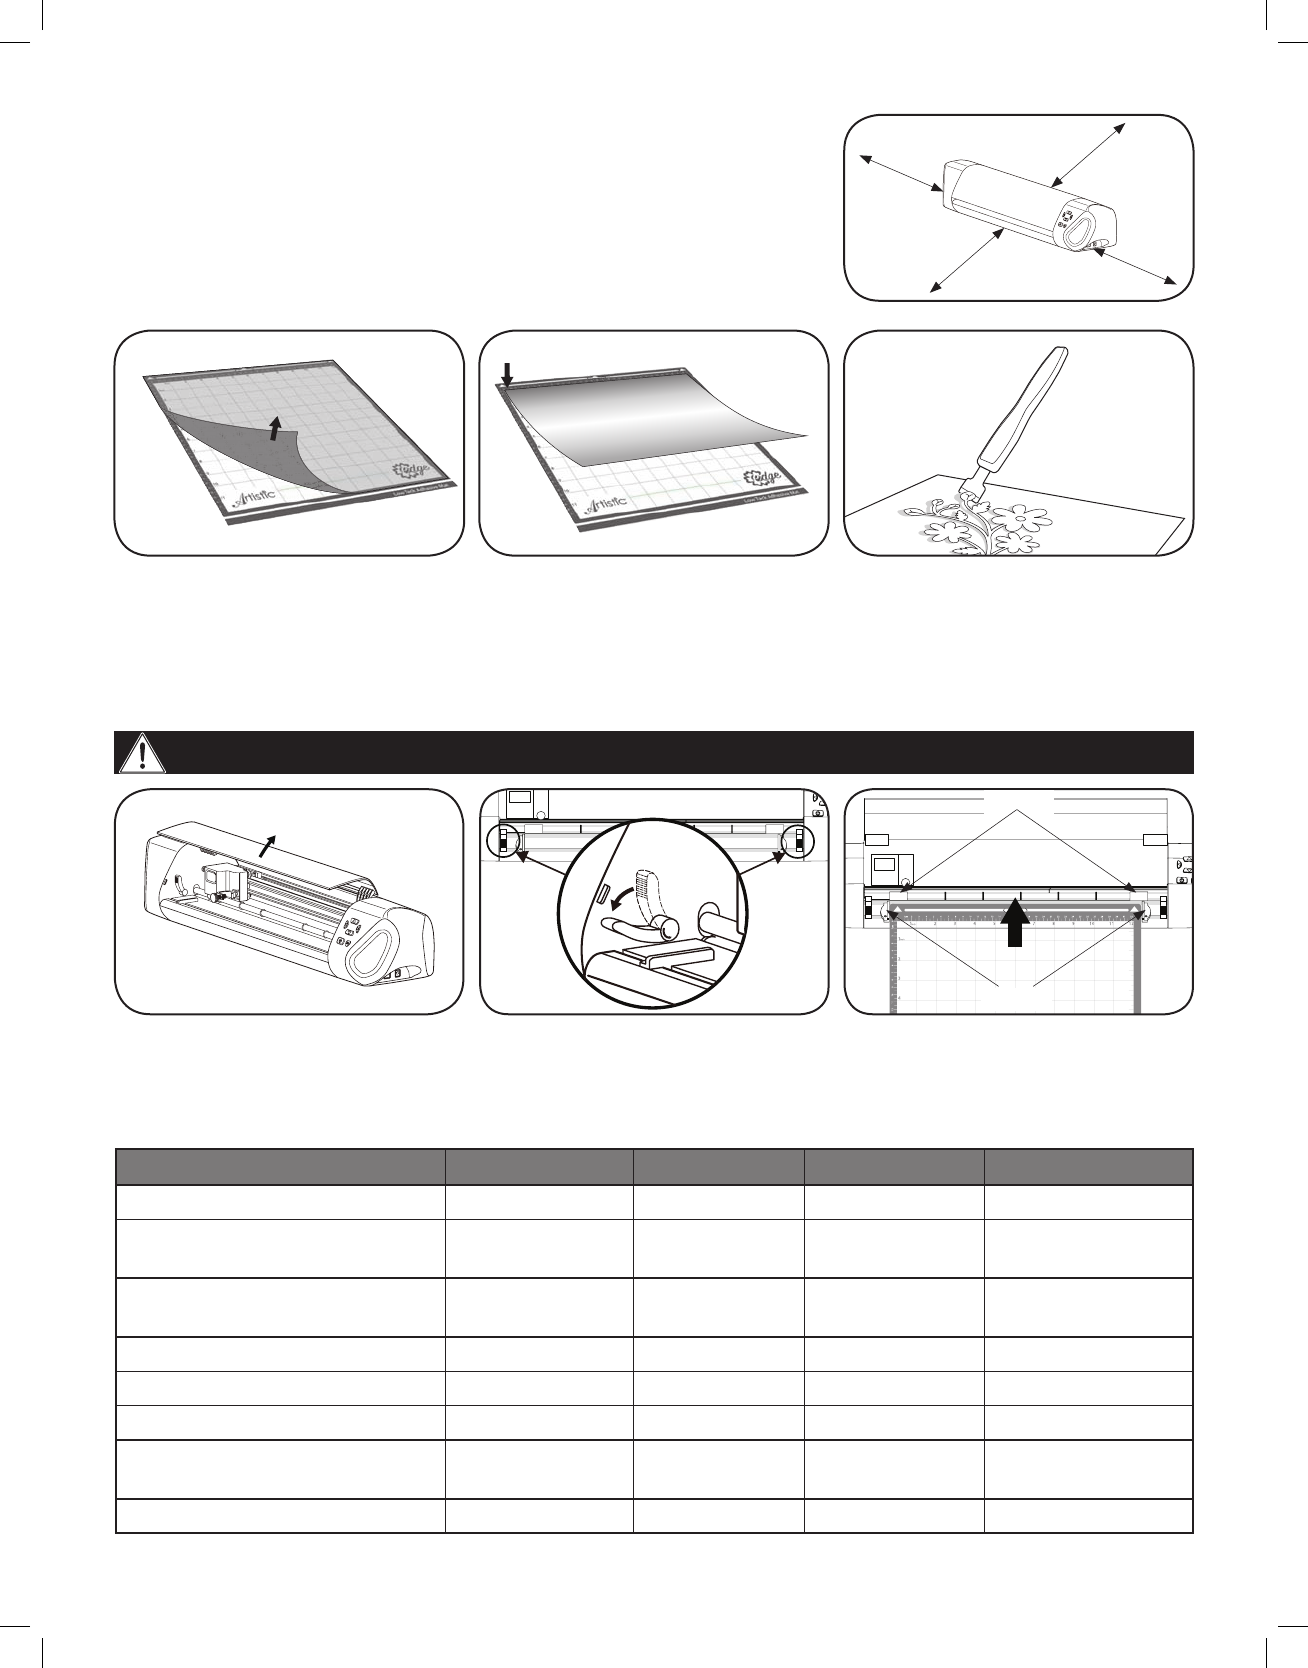
Clamp screw
Top surface of
the tool cradle
Groove of
the blade
holder
Installing the blade or pen holder
WARNING: MOVING PARTS: Keep fingers, hair and clothing away.
CAUTION: Always unplug Machine before removing or installing Blade Holder.
CAUTION: CUTTING HAZARD Keep fingers away from exposed blade.
1. Open the front cover by lifting it up
to expose the carriage and rollers.
2. On the front cover of the carriage
is a tool cradle for the blade/pen
holder. Loosen the tool cradle
by turning the clamp screw
counterclockwise.
3. Place the blade/pen holder into the
tool cradle. The blade depth arrow
should be facing out if you are
using the blade holder.
4. Be sure that the groove of the
blade/pen holder is touching to the
top surface of the tool cradle.
5. Tighten the clamp screw until the
blade/pen holder is secure.
Inserting the pen into the pen holder
Spring
Pen cap
Pen
Pen holder
Pen cap
Pen holder
1. Screw the pen cap o from the pen
holder.
2. Insert the pen into the pen holder,
with the writing end facing down.
Then insert the spring on the pen,
sitting on the dimple.
3. Put the pen cap on top, letting the
pen out the hole in the back. Screw
down and tighten. Remove the wax
protector on the end of the pen.
Dimple
8
Workspace
Keep your Edge machine on a clean, dry and stable surface.
Make sure that your Edge machine is 12˝ away from the end of your work
surface around all sides. If you are using a mat larger than 12˝, make sure that
you have enough space behind the machine for it to feed out.
(Machine shown). Unplug machine when not in use.
WARNING: MOVING PARTS Keep fingers, hair and clothing away.
12˝
12˝
12˝
12˝
Cutting mat
1. Peel o and remove protective
plastic cover from cutting mat.
2. Line your material up with the top-
left corner of the cutting mat. Press
evenly and rmly into place.
3. After you have made the cut, peel
the material o of the cutting mat.
When cutting more intricate
designs, the Artistic Scraper (sold
separately) is recommended to help
remove the project.
Rollers
Guides
Loading cutting mat into machine
1. Open the front cover by lifting it up
to expose the carriage and rollers.
2. Lower both levers to lift the feed
roller.
Material Cutting Blade Mat Blade Setting Pressure Setting
Lightweight Paper (Vellum) Red Cap Standard Mat 2-4 20-30
Medium Weight Paper
(Scrapbooking Paper) Red Cap Standard Mat 2-4 40-50
Heavy Weight Paper
(Cardstock) Blue Cap Standard Mat 2-4 50-60
Vinyl Red Cap High Tack Mat 2-4 40-50
Lightweight Fabric* (Appliqué) Yellow Cap High Tack Mat 2-4 40-50
Medium Weight Fabric* Yellow Cap High Tack Mat 2-4 45-55
Heavy Weight Material
(Magnet Sheets, Foam, etc) Blue Cap High Tack Mat 4-6 60-70
Crystal Template Material Blue Cap Standard Mat 4-6 60-70
* If using a very tacky fusible stabilizer, use Standard Cutting Mat.
3. Place cutting mat between guides
on the Edge machine and insert
until the leading edge touches to
the rollers. Raise the levers to lock
the mat in place. Use jog dials on
machine for further adjustments.
9
Maintenance
• Cleaning the blade
CAUTION: Always unplug Machine before removing or installing Blade Holder.
After several uses, the cutting blade may not be cutting as well as it did when it was new. In order to extend the life of
your blade, some cleaning may be required. Remove the blade from the blade holder (see steps 2 – 4 of “Replacing the
Cutting Blade” below) and place on a clean paper towel. Use Isopropyl Alcohol (rubbing alcohol) to rub the blade until it
is clean, being careful to avoid the sharp edge. You can clean the inside of the blade holder using the Artistic Hook (sold
separately).
CAUTION: CUTTING HAZARD Keep fingers away from exposed blade.
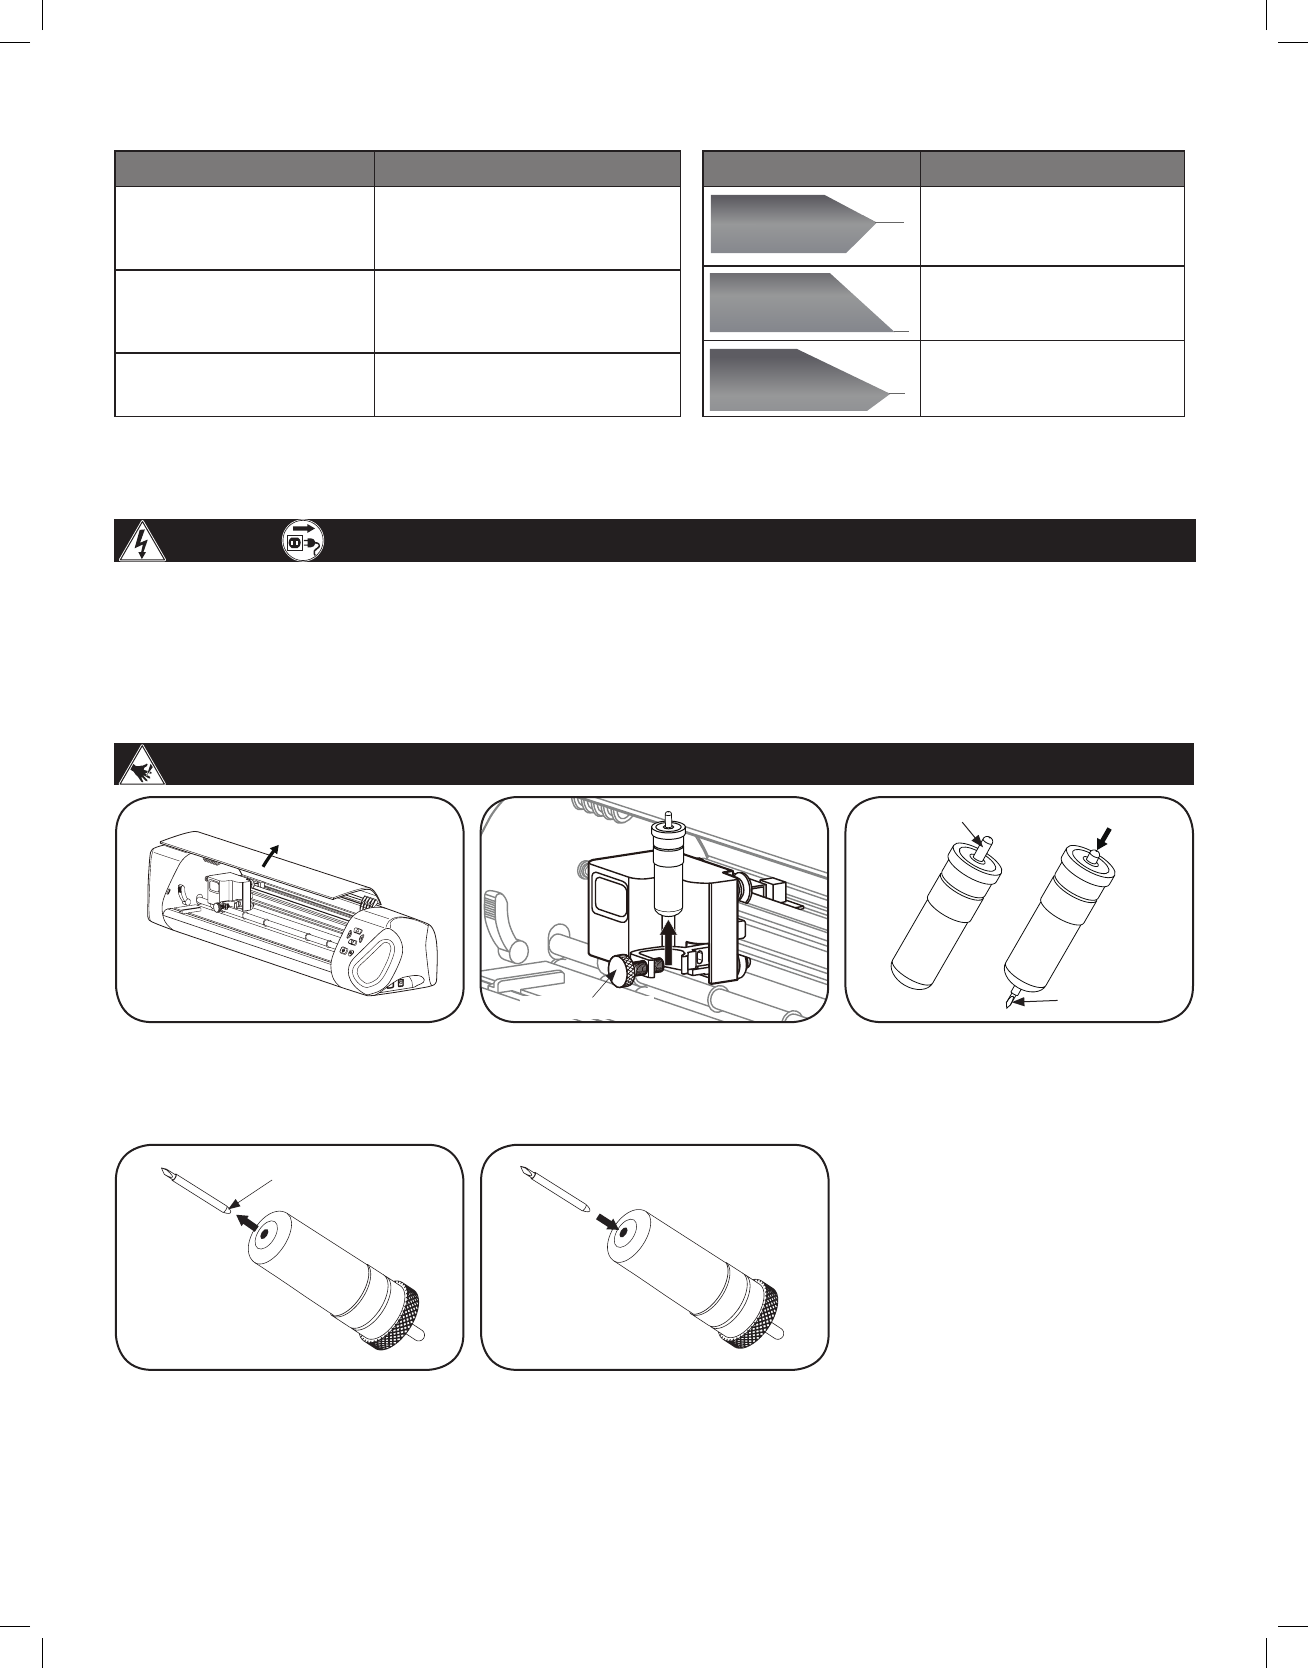
Clamp Screw
Blade release button
Blade
Non-Cutting Side
1. Open the front cover by lifting it up
to expose the carriage and rollers.
2. Loosen the blade holder clamp
by turning the clamp screw
counterclockwise and remove the
blade holder.
3. On the top of the blade holder is a
blade release button. Push down
on that carefully to release the
blade.
4. Carefully grab and remove the
blade.
5. Remove the safety cap from the
new cutting blade and carefully
insert the round (non-cutting side)
of the blade into the hole in the
blade holder. The blade will be
held in place by a magnet so that it
won’t fall out.
• Replacing the cutting blade
Trial Cut Results Recommended Adjustments
Material did not cut all
the way through.
The blade is not out far enough.
Turn the blade holder half a
mark to the right.
Part of the material
remains on the mat.
The blade is not out far enough.
Turn the blade holder half a
mark to the right.
Material cut all the way
through to the mat.
The blade is out too far. Turn the
blade holder a mark to the left.
How to Read the Result of a Trial cut
Blade Shape Blade Description
Red Cap Blade for thinner
materials
Yellow Cap Blade for
fabric
Blue Cap Blade for thick
materials
Cutting Blade Shapes

10
• Cleaning the Cutting Mat
Cutting mats retain their adhesiveness for many uses. If you clean it after each use, the cutting mat will no longer remain
sticky. When your cutting mat no longer holds your material, or if the materials get caught in the rollers, it is time to
replace your cutting mat.
1. After each use, make sure that all leftover material and debris is removed from the cutting mat. The Artistic Sraper (sold
separately) is a useful tool for doing this.
2. When not in use, replace the protective covering over the cutting mat to keep dust and particles from gathering on it.
Edge Cutter FAQ / Trouble shooting
Artistic Edge machine will not turn on.
• Unplug the system from the wall. Check all components of power supply to be sure they are plugged in properly.
When you are certain everything is connected, plug back into the wall and push the power button on the front of the
unit.
Artistic Edge is Freezing or Stopping and won’t Respond to Directional Buttons.
• Turn o the Artistic Edge. Wait 10 seconds and press the power button again to restart.
Artistic Edge is not Cutting with Quality that it Used To.
• Your cutting blade could be dirty or worn. Clean your cutting blade. If this does not help, replace the cutting blade with
a new one.
• Experiment with Cutting Pressure and Blade Depth. It could be that you are not using the proper settings for the
material.
Corners and Edges of my Cutting Design are Distorted.
• Consider replacing your cutting blade. It may have dulled.
• Check the Cutting Pressure in Artistic SimpleCut, it may be too high for the material. Change to a lower number to
lower the pressure.
• The cutting mat may have lost its adhesiveness. Try a new cutting mat.
• A fast cutting speed can pull up and distort corners on thin materials. Slow down the speed in Artistic SimpleCut to a
lower speed.
• If the blade depth is too high, you may have distortion. Lower the blade depth.
Machine is Cutting Outside of the Material
• Use “Trace” function in Artistic SimpleCut to make sure that the design ts on your material.
• Adjust the starting point of the cut accordingly.
• Material is shifting from original position during cutting.
• The cutting mat may have lost its adhesiveness. Try a new cutting mat.
• If there is a sticky side to your material, put that face down and mirror design in Artistic SimpleCut so that the cut is
correct.
Cutout cannot be removed from Cutting Mat
• Use the Artistic Scraper (sold separately) to remove intricate designs or adhesive materials from cutting mat.
Laser Alignment is not working properly.
• Calibrate the laser by opening a design and clicking File>Export>to Crystals/Cutter. In the top right menu click the
button that says “Calibrate”. Follow on screen prompts to calibrate your laser.
11
15X” Cutter Wireless Set-up Guide
Artistic
12
Connecting Edge directly to computer wirelessly (for Edge 15X only)
1. Push and hold down Light/wireless button for three seconds. The button will light up once the wireless function is
activated.
2. In order to connect to the Edge cutter you must press on the network icon on your desktop to view available
networks.
3. From the available networks, select the one called “Edge-xx-xx-xx” and press Connect to join the network.
4. You will be prompted for a security key. Enter “12345678”, click “Next”.
If the message below appears, choosing either “Yes” or “No” will make no dierence in the application, but “Yes”
is recommended. Then click “Close”.
1
2
1
4
5
Windows 8
Windows 8
Windows 8
Windows 7/Vista
Windows 7/Vista
Windows 7/Vista
Windows XP
Windows XP
Windows XP
13
You MUST verify your connection:
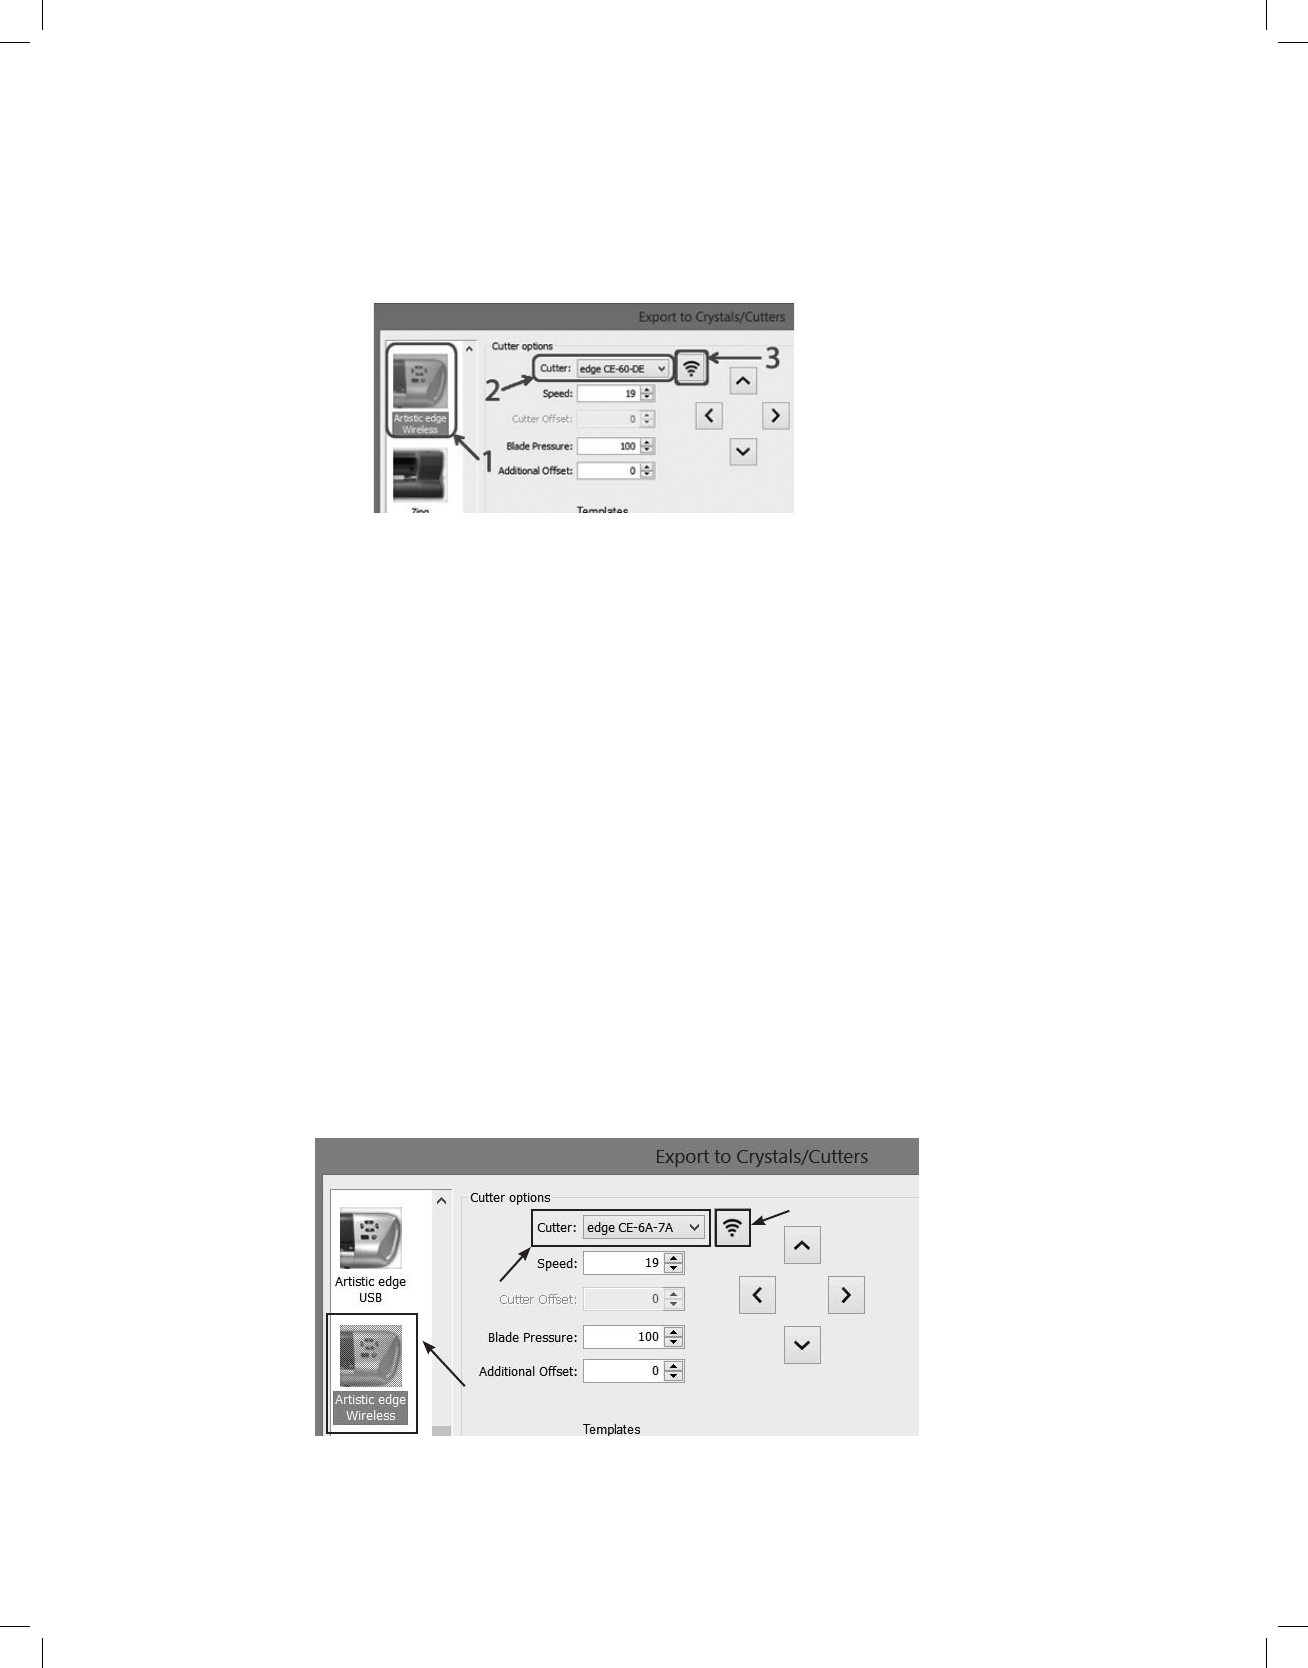
1. Open or create a cutwork design in Artistic Software
2. From the “File > Export > To Crystals/Cutters” dialog, select “Artistic Edge Wireless”.
3. If you are connected to the Edge cutter successfully, you will see the cutter next to the “Cutter” eld.
4. Now you can “Cut” the design.
Note: While you are directly connected with the Edge cutter, the Internet will not be available. To connect your PC back
to the internet you have to close your cutter or repeat steps 2-3 but this time connect to your wireless network.
Connecting Edge cutter to your local wireless network (for Edge 15X only)
Using these following steps will allow you to permanently add your edge cutter to your wireless home network, allowing
your cutter to be ready to use without having to repeat the previous steps.
Note: For this operation you will need the password for your home wireless network.
1. Open or create a design in Artistic software.
2. Now you can choose “File>Export>To Crystals/Cutters”.
3. Once the dialogue box opens, as shown after step 5, choose “Artistic Edge Wireless” from the available cutters on
the left.
4. In the Cutter options section, you will see edge xx-xx-xx in the “Cutter” eld.
5. Click on the “wireless” icon next to your cutters name, the Cutter conguration dialogue will open.
1
2
3
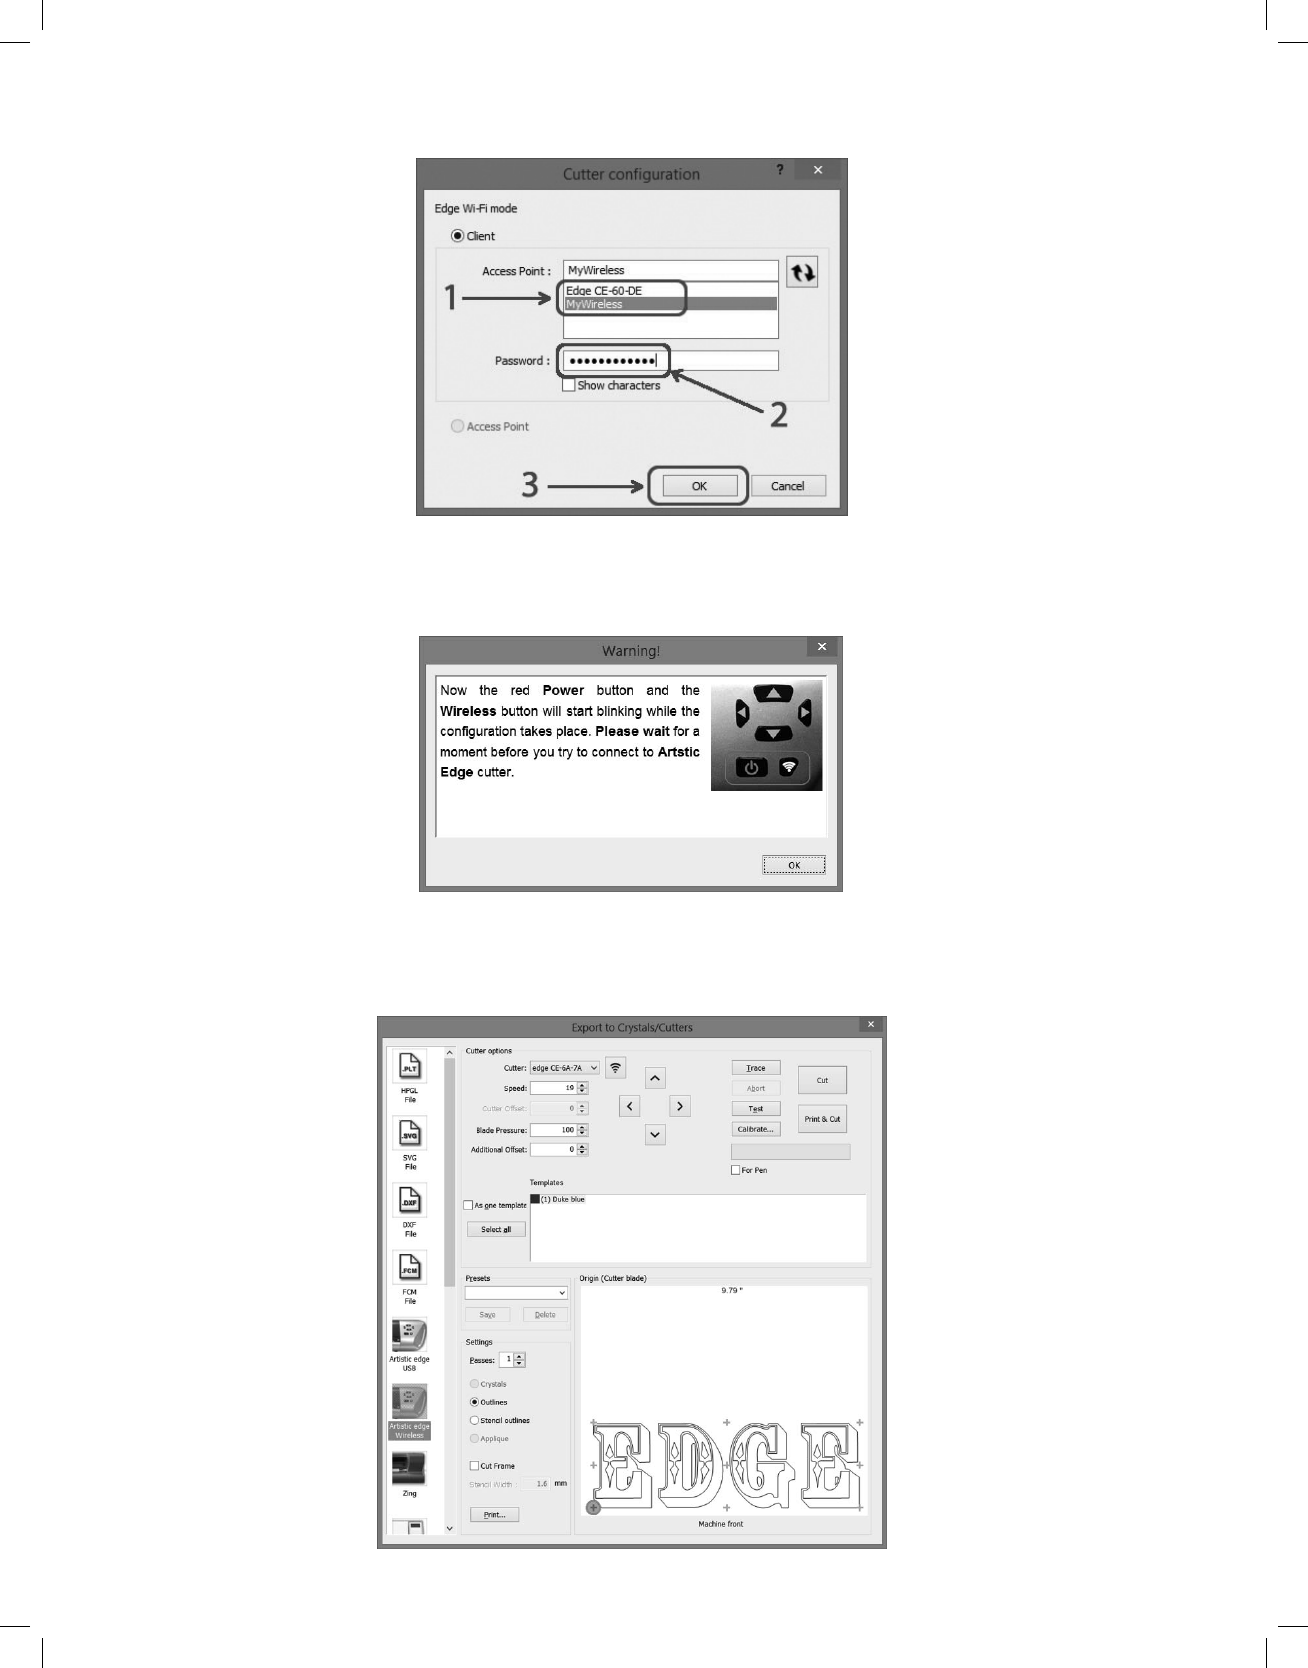
14
6. Select the name of your home wireless network and enter the password of your wireless home network.
7. Click “OK” once you have entered the wireless network password.
8. The red power button and wireless/light buttons will blink until the edge has joined your home network, you may
click “OK” while this process is taking place.
9. After the process is complete, your PC will automatically re-establish the connection to your home network.
Now you may create your design and send it to your Edge cutter. You will see that the cutter is identied as your Edge
cutter and all of the controls will be available.
15
Troubleshooting - Emergency reset to Access point mode
If you cannot connect to the cutter or any miss-conguration has happened and you cannot access the cutter, you
must reset the cutter to the default “Access point” mode and then re-connect to any wireless network in “Client mode”
again. In order to reset the cutter, you must keep the “Wireless button” and “Right limit button” pressed together for
3 seconds. When the “Power” button and the “Wireless button” is turned o, you may then release the button. At this
point the “Wireless button” will start blinking until the network initialization is completed. When the blinking stops you
are ready to connect to Edge-xx-xx-xx access point in order to use the cutter.
16
SimpleCut Software Start Guide
Artistic
17
To create a crystal/rhinestone template.
1. Create new>Next on the opening screen.
2. On the next screen, the fabric for embroidery will be selected (if embroidery was in the project). Leave it at
default>Next.
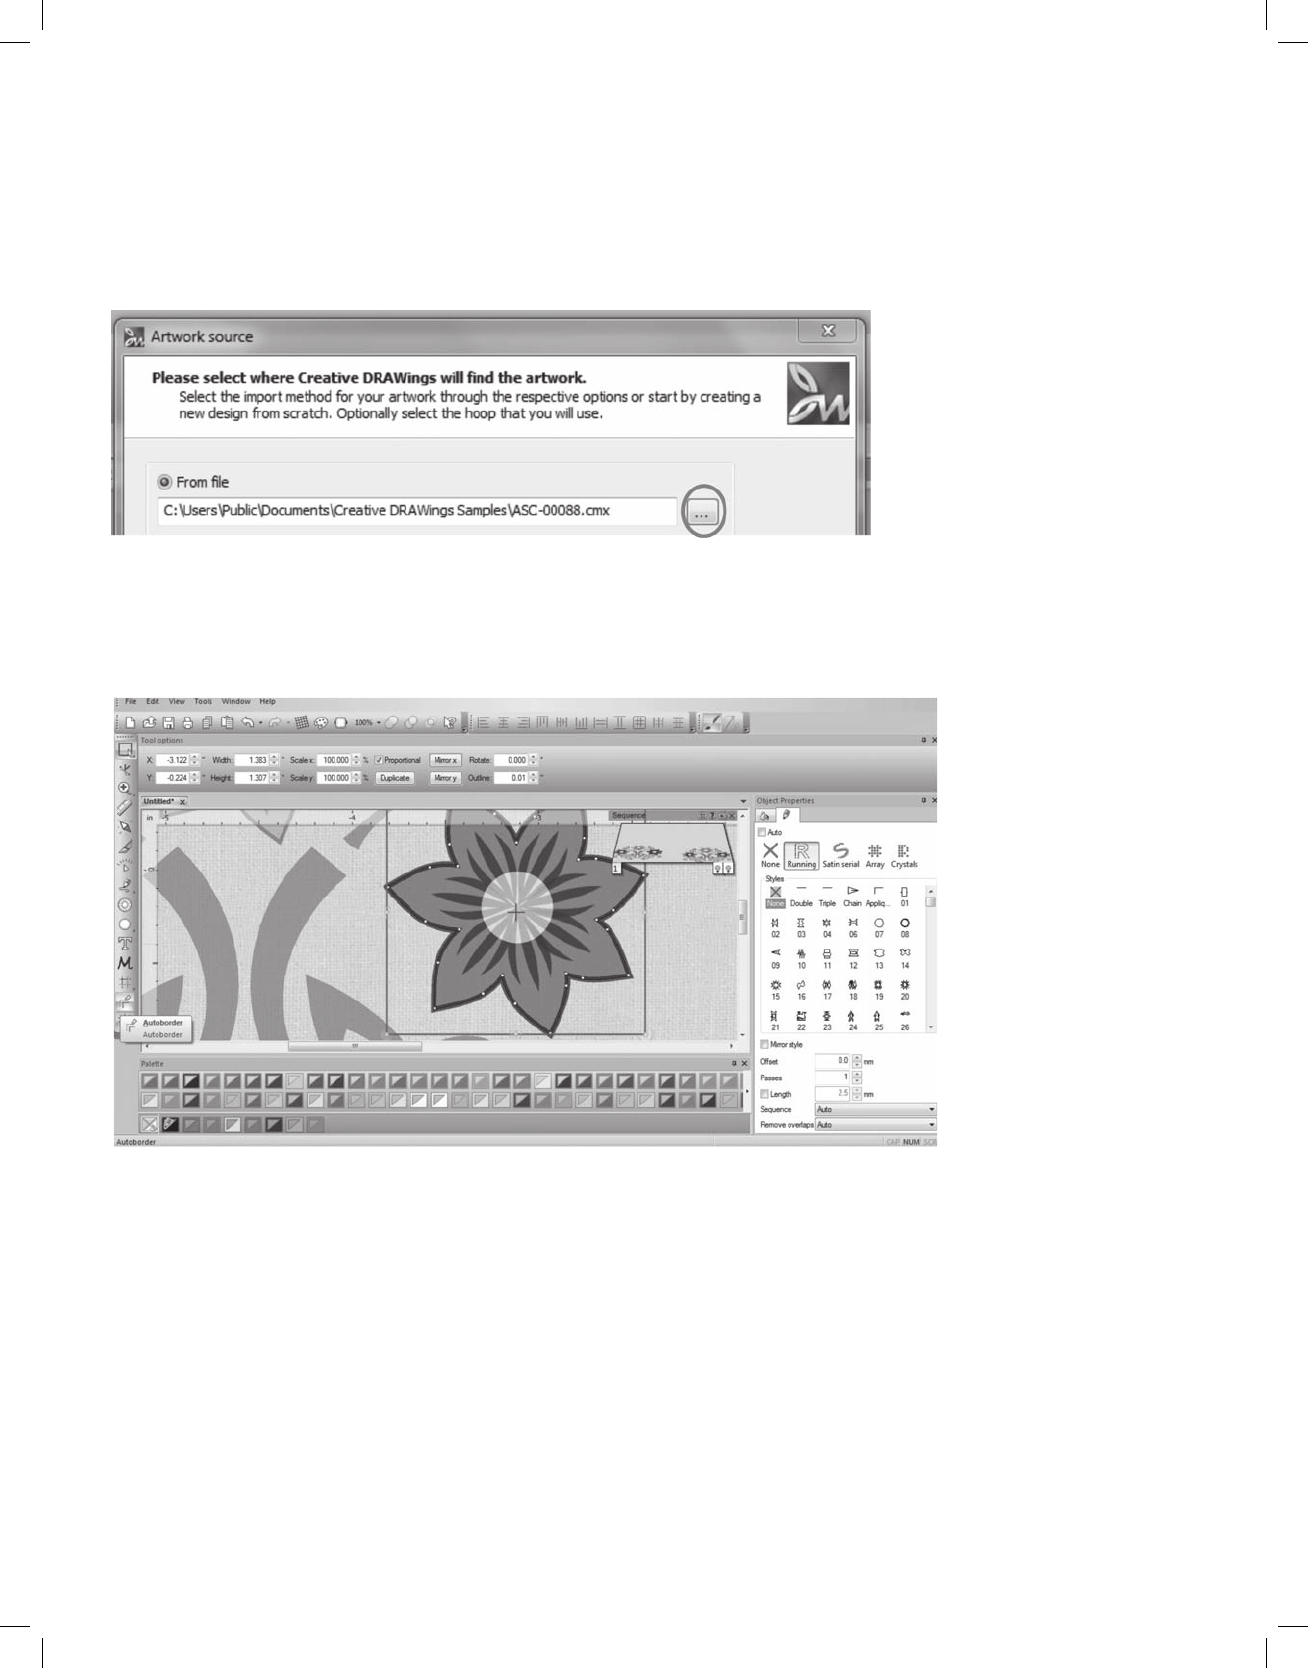
3. Select a graphic design “From File” (this is where graphics can be selected). The “…” at the end will allow browsing
in the computer.
Example will use 00088.cmx from the Creative DRAWings Samples.
4. Once the graphic is selected>Next.
5. The next screen will show the amount of colors in the design>Finish. Because Simple Cut also has embroidery
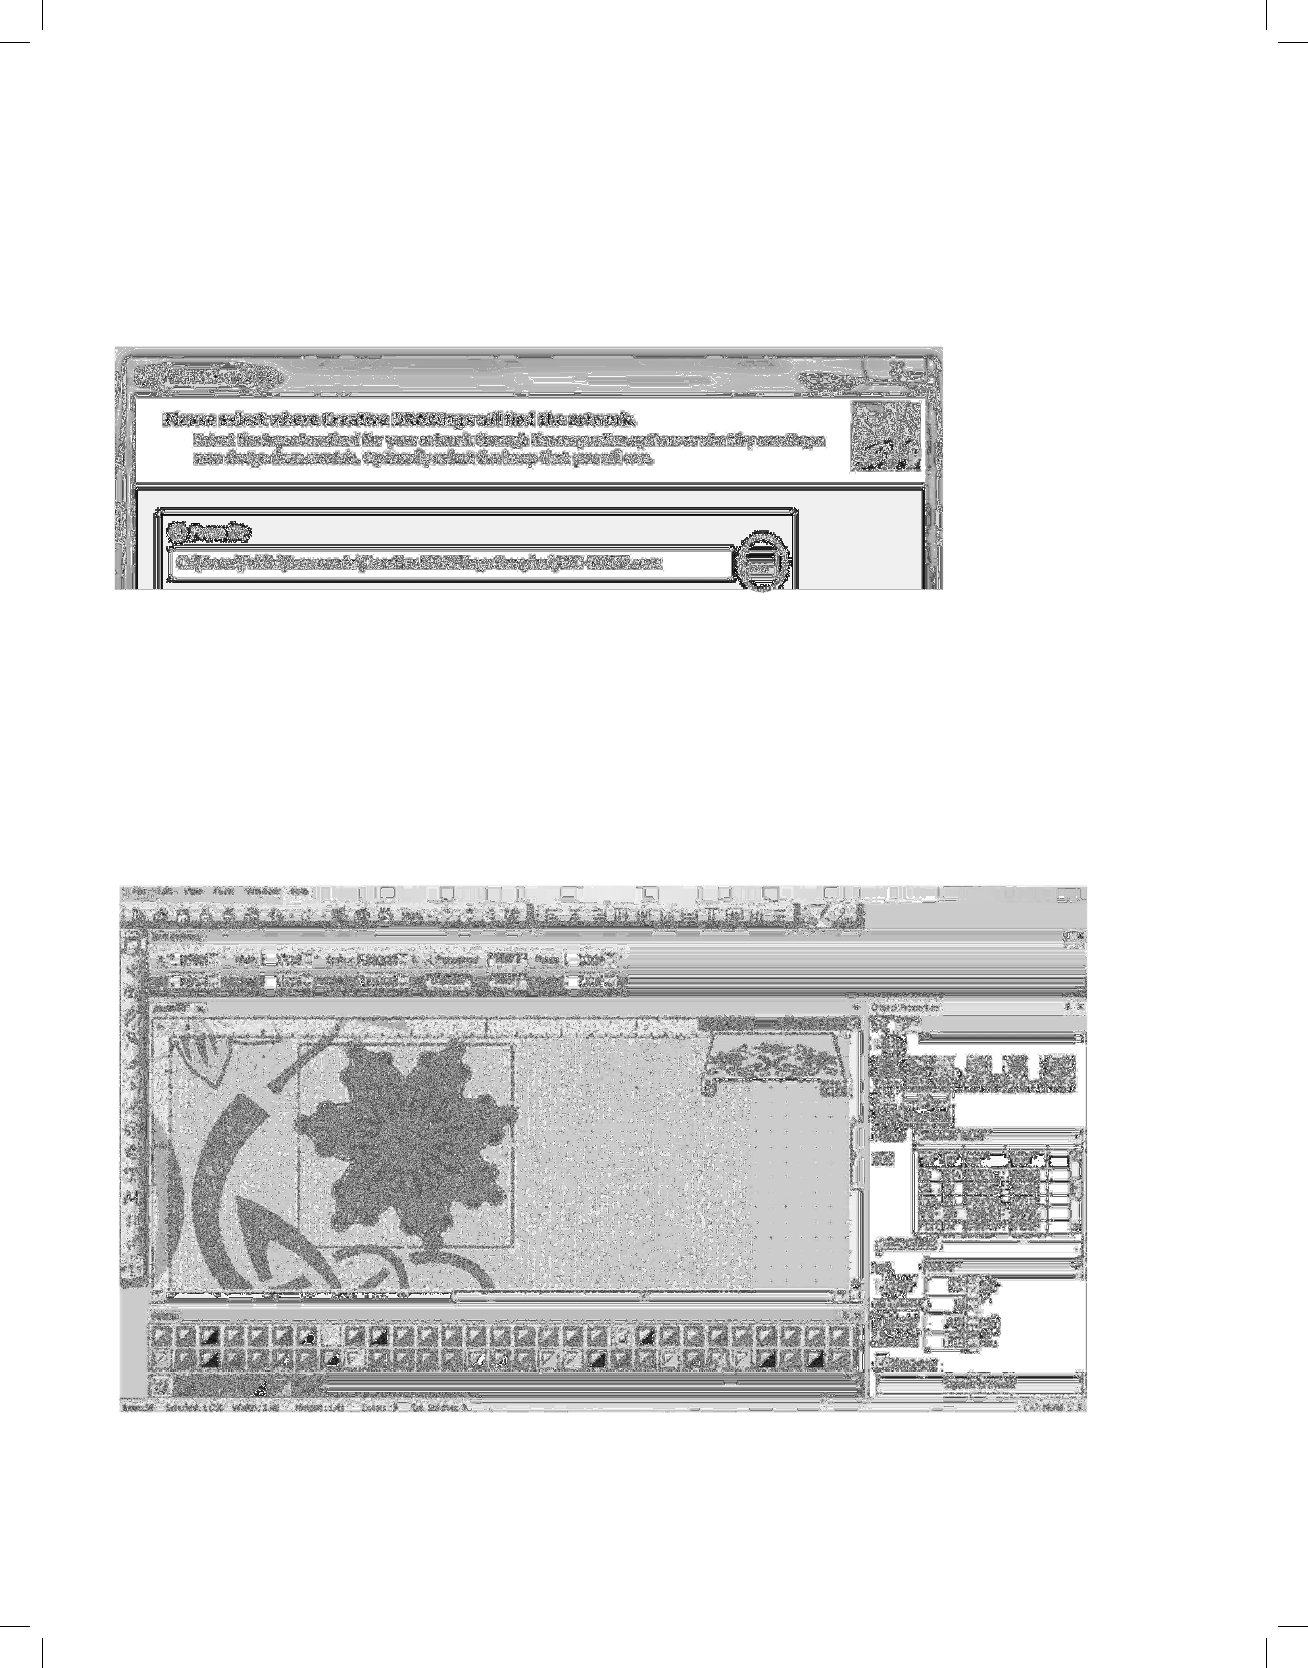
capabilities, the color selections serve as thread color choices as well.
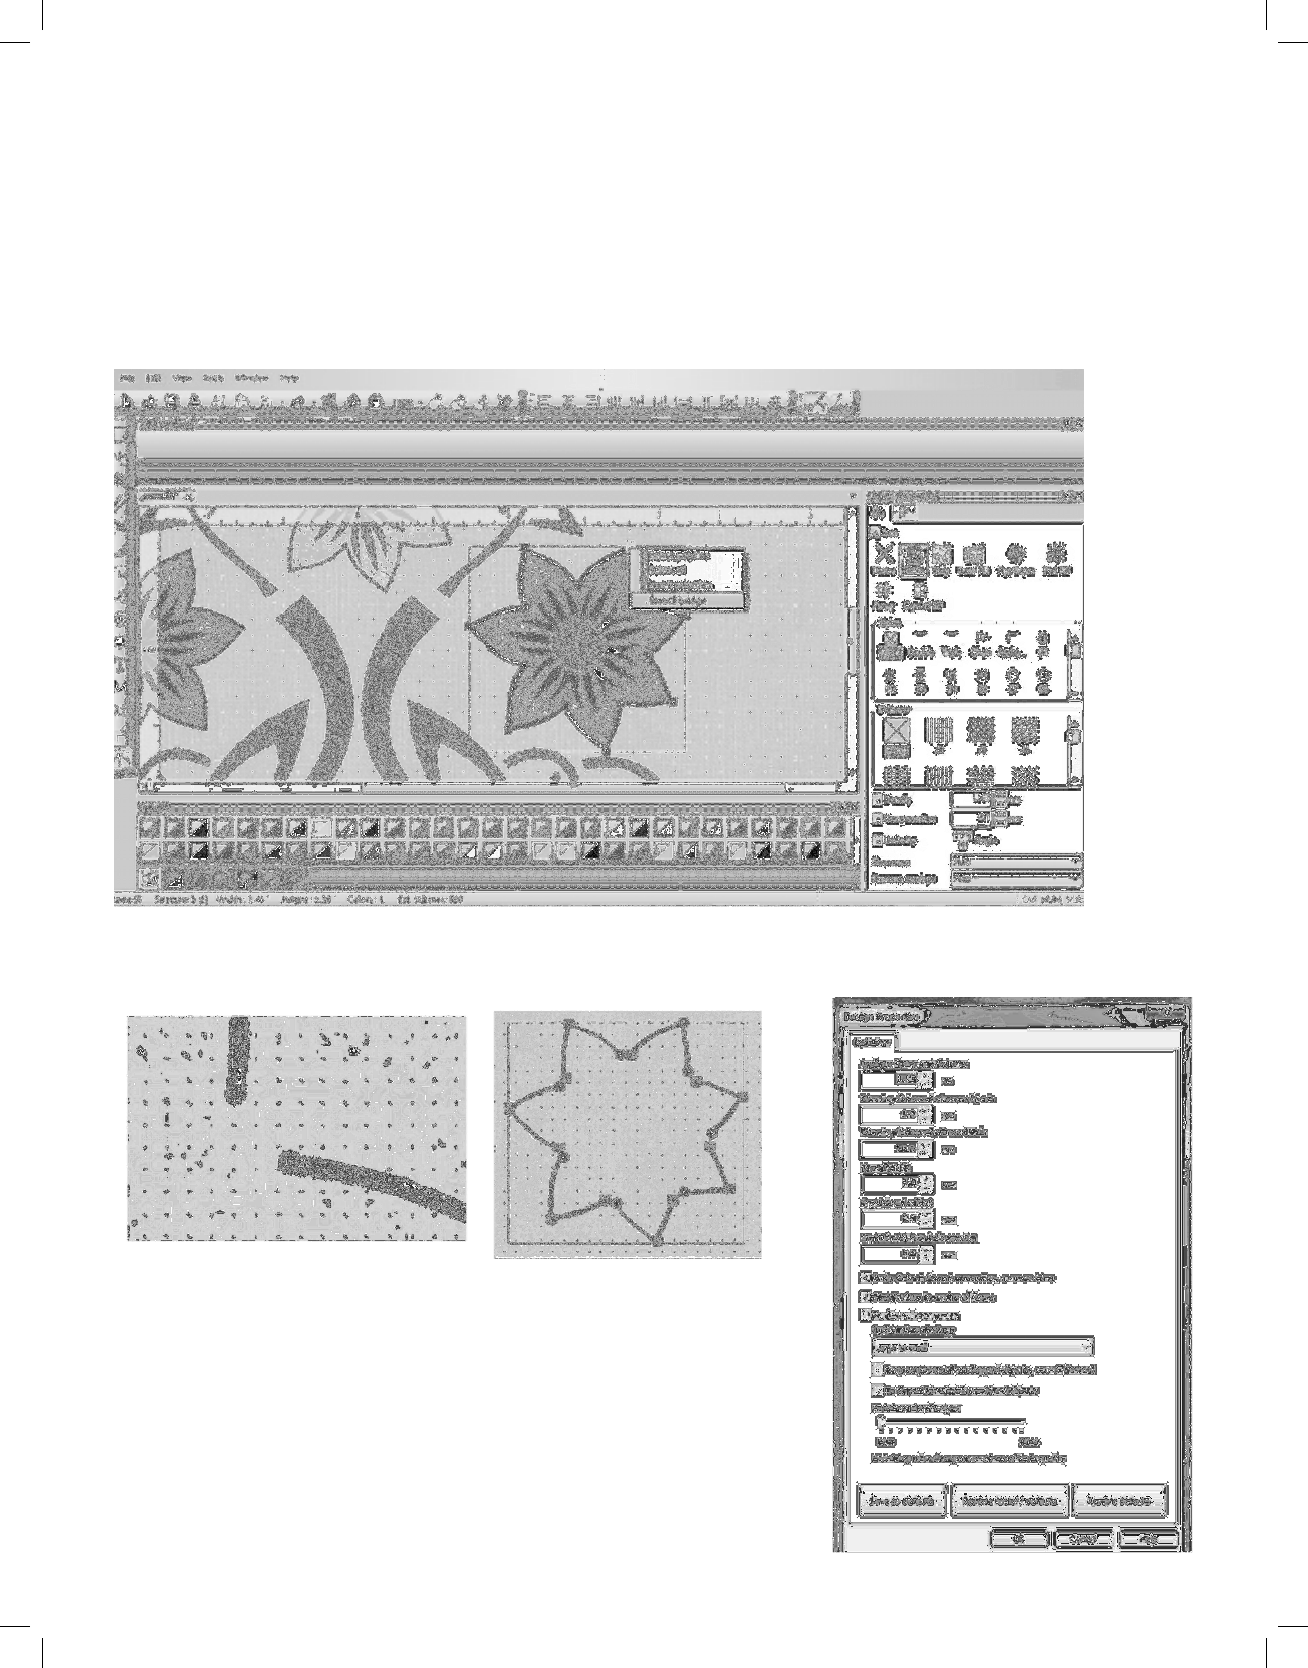
6. Select the area that will have the crystal/rhinestone outline applied. The sample has the outside line selected. In the
example below, only the ower on the right hand side was selected.
7. Go to Object Properties>Lines >select Crystals>select size (sample done with ss10).

18
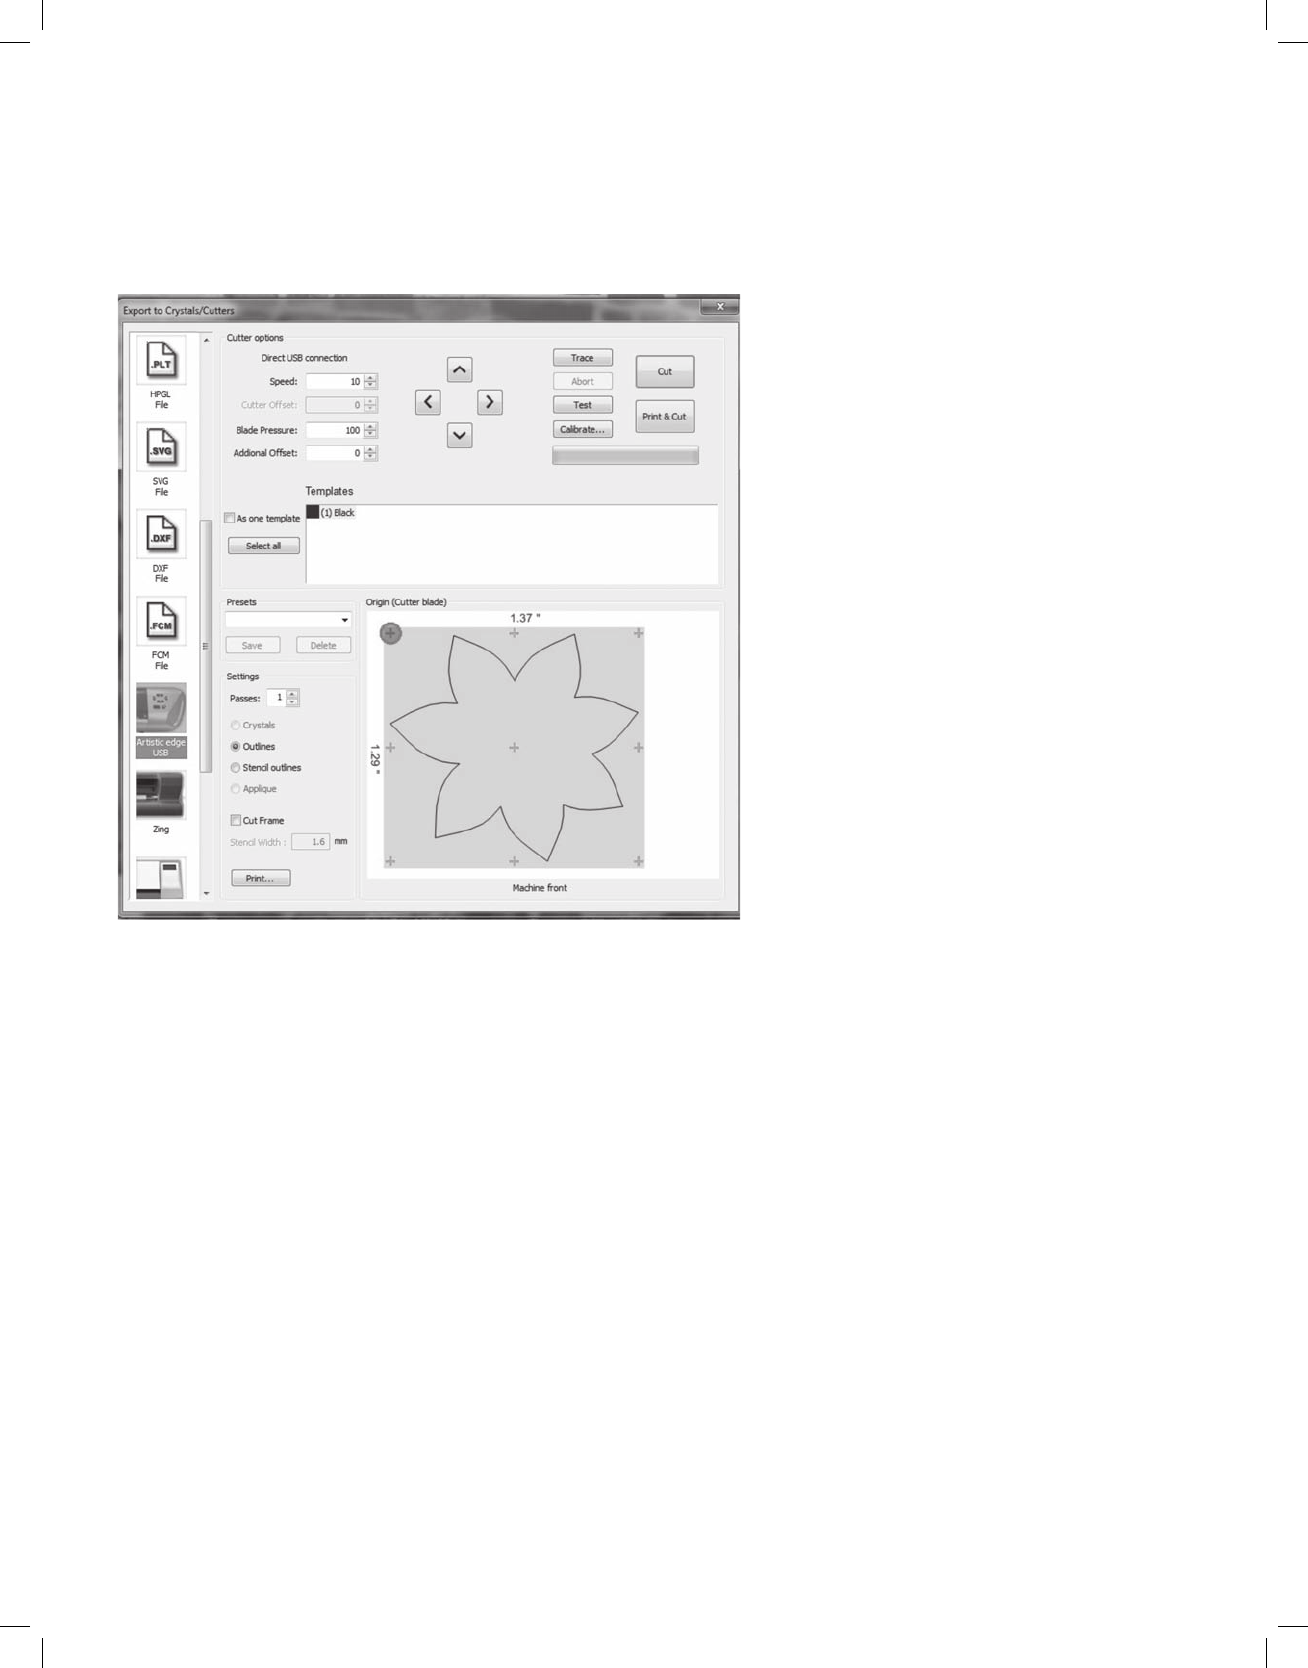
8. Go to File>Export>To Crystals/Cutter, then select the cutter options you would like and cut. The pink dot on the cut
diagram shows where the machine will start cutting. There’s a laser on the Artistic Edge that correlates to that dot. Use
the jog dials in the software to move the carriage. Clicking the trace button will make the machine trace the outside
border of your design to see if it will t on your material. You can adjust the carriage start position if needed.
Stencils
1. Create new>Next on the opening screen.
2. On the next screen, the fabric for embroidery will be selected (if embroidery was in the project). Leave it at
default>Next.
3. Select a graphic design “From File” (this is where graphics can be selected). The “…” at the end will allow browsing
in the computer.
Example will use 00088.cmx from the Creative DRAWings Samples.
19
4. Once the graphic is selected>Next.
5. The next screen will show the amount of colors in the design>Finish. Because Simple Cut also has embroidery
capabilities, the color selections serve as thread color choices as well.
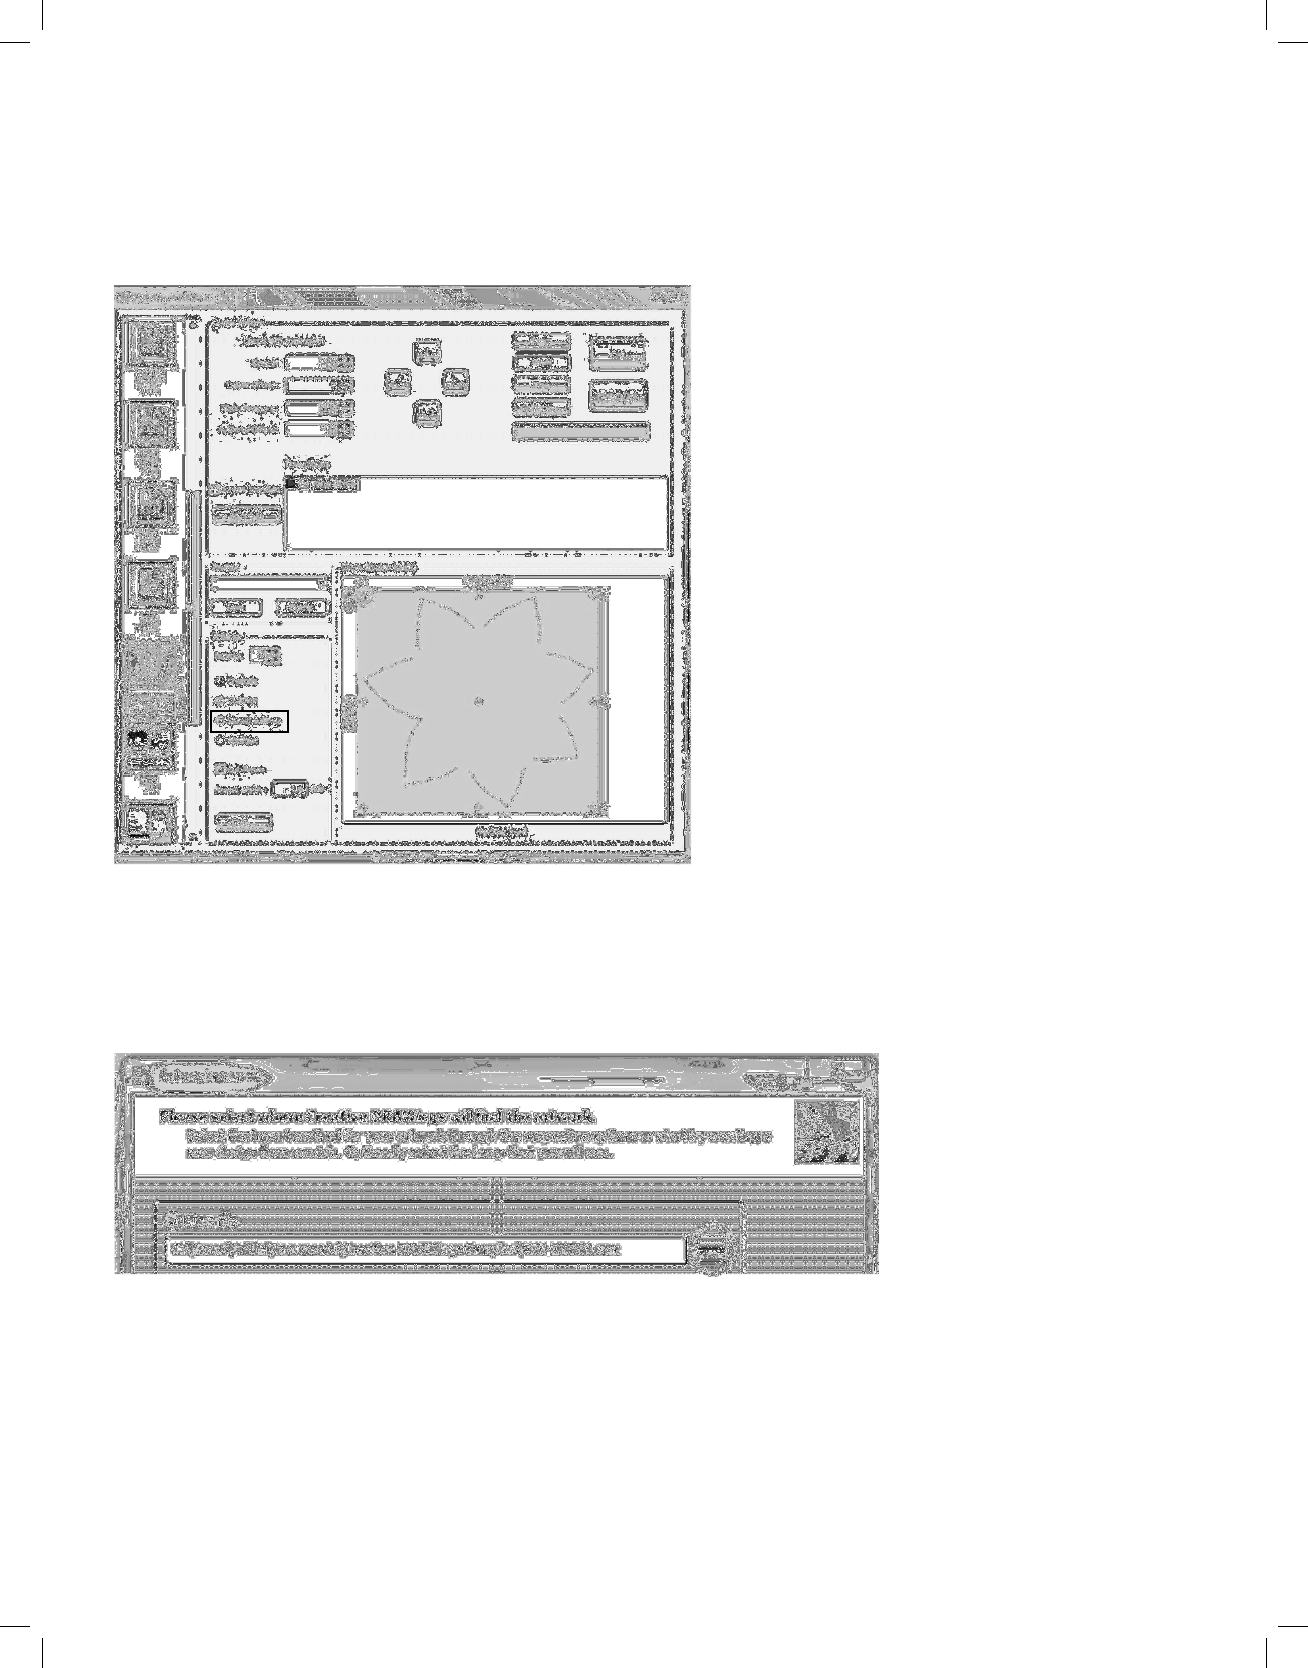
6. Select the outside stitch line or desired stencil line. In the example below, only the ower on the right hand side was
selected.
7. Select Reshape. Right click on the node where a Stencil Bridge is desired. In the example below, only the ower on
the right hand side was selected.
8. Apply Stencil Bridge at the node locations where a bridge is desired.
9. To change the width of the stencil opening, go to: Tools>Optimizer
Options> Stencil Width (default is 1.6mm).
20
10. Go to File>Export>To Crystals/Cutter then select the cutter options you would like and cut. Choose the option that
says, “Stencil Outlines” to cut a stencil. The pink dot on the cut diagram shows where the machine will start cutting.
There’s a laser on the Artistic Edge that correlates to that dot. Use the jog dials in the software to move the carriage.
Clicking the trace button will make the machine trace the outside border of your design to see if it will t on your
material. You can adjust the carriage start position if needed.
Appliqué, Card Stock and Vinyl
1. Create new>Next on the opening screen.
2. On the next screen the fabric for embroidery will be selected (if embroidery was in the project). Leave it at
default>Next.
3. Select a graphic design “From File” (this is where graphics can be selected). The “…” at the end will allow browsing
in the computer.
Example will use 00088.cmx from the Creative DRAWings Samples.
4. Once the graphic is selected>Next.
21
5. The next screen will show the amount of colors in the embroidery design (if embroidery is desired)>Finish.
6. Change colors of shapes as needed to make your design as many colors and cuts as you want. If you want the
design to be one cut, then make every piece the same color.
7. Material Preparation:
a. Fabric needs to be stabilized. It can be stabilized with a fusible web, iron-on tear away embroidery
stabilizer or be heavily starched. A product like Terial Magic* and Web Bond*can be used to stabilize the
fabric so it can be cut.
b. Iron on Vinyl comes with carrier/transfer paper attached to the right side of the product. This means that
the design needs to be a mirrored image and cut just deep enough to cut the vinyl, but not the carrier. The
carrier is heat resistant so it can tolerate the heat of a press or iron.
c. Paper does not need any additional preparation.
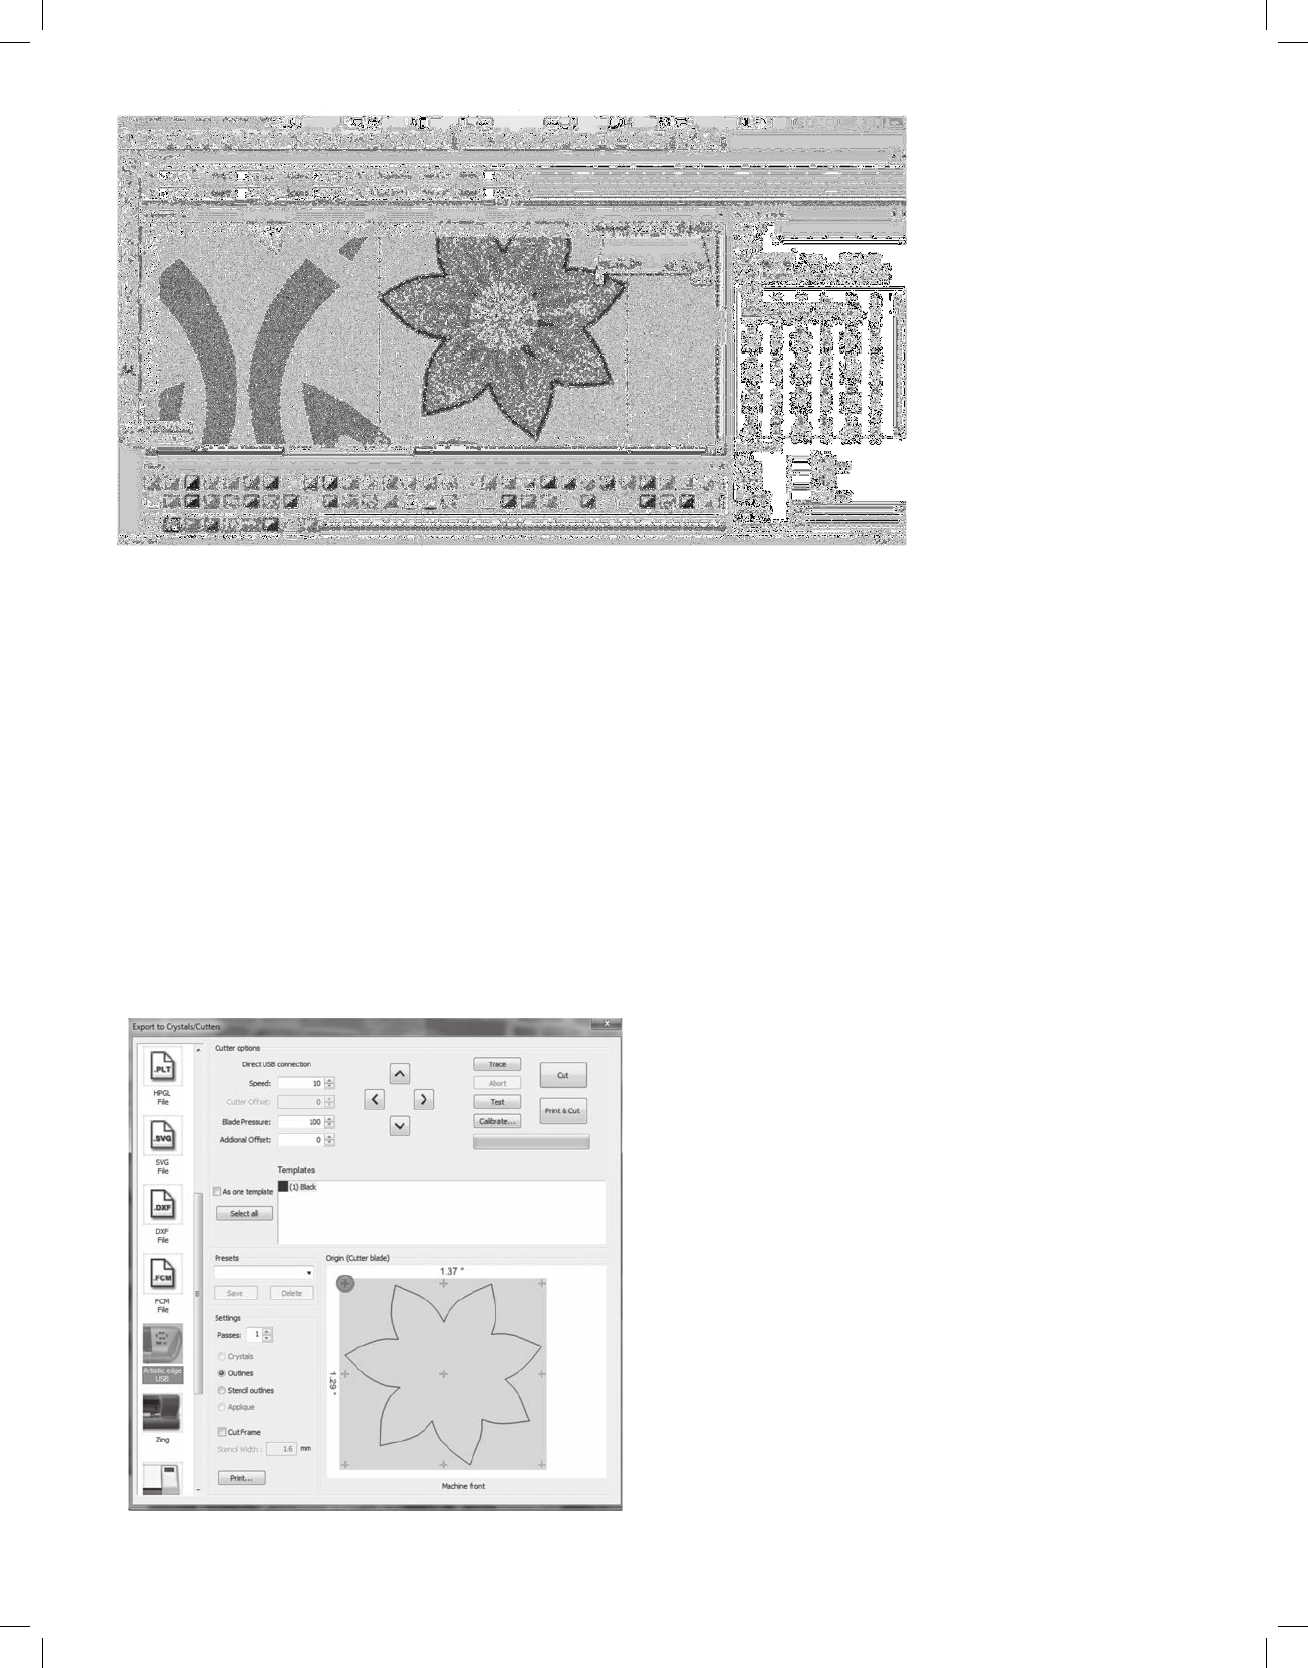
8. Go to File>Export>To Crystals/Cutter then select the cutter options you would like and cut. The pink dot on the cut
diagram shows where the machine will start cutting. There’s a laser on the Artistic Edge that correlates to that dot. Use
the jog dials in the software to move the carriage. Clicking the trace button will make the machine trace the outside
border of your design to see if it will t on your material. You can adjust the carriage start position if needed.
*Terial Magic and Web Bond are not Artistic products, but can be bought at your local Artistic Dealer.
22
Print and Cut
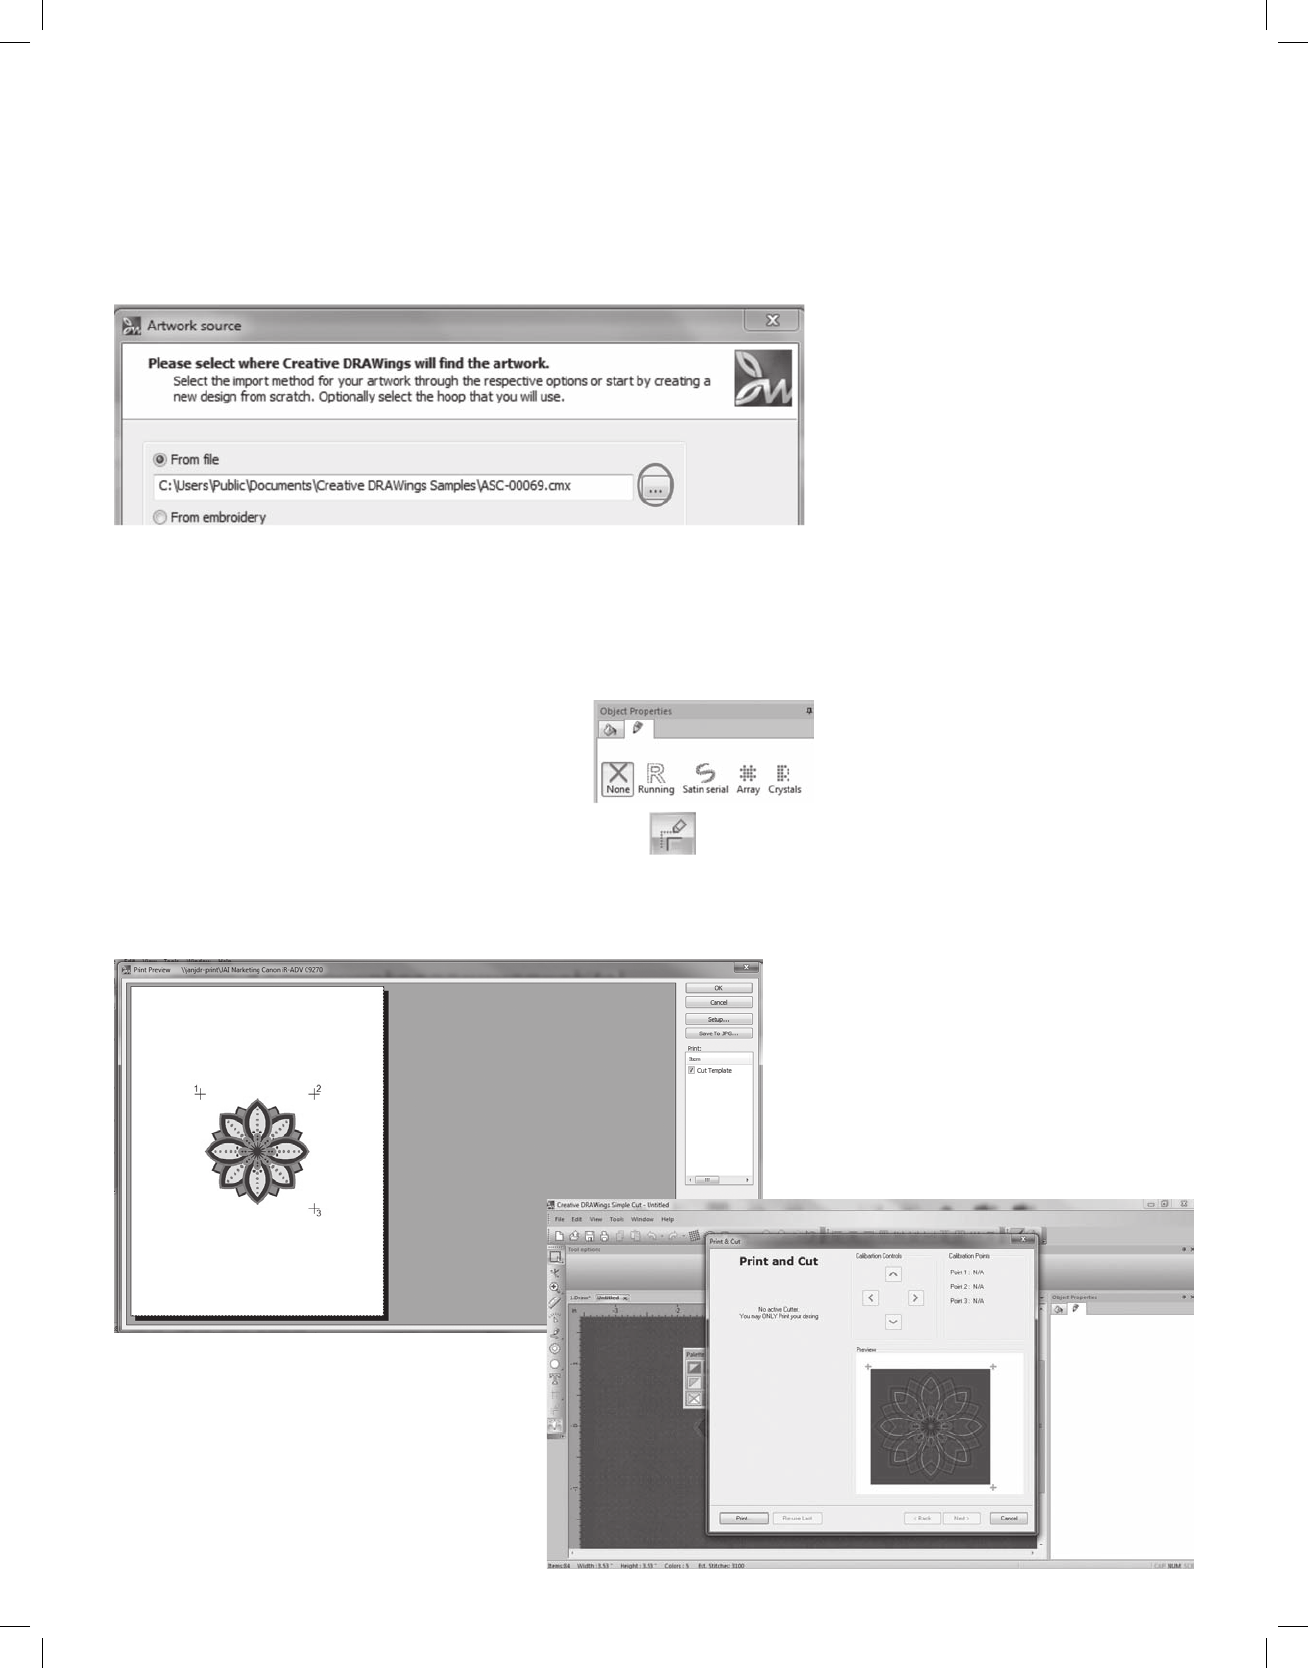
1. Create new>Next on the opening screen.
2. On the next screen the fabric for embroidery will be selected (if embroidery was in the project). Leave it at
default>Next.
3. Select a graphic design “From File” (this is where graphics can be selected). The “…” at the end will allow browsing
in the computer.
Example will use 00069.cmx from the Creative DRAWings Samples.
4. Once the graphic is selected>Next.
5. The next screen will show the amount of colors in the embroidery design (if embroidery is desired, if not, they will be
eliminated as needed)>Finish.
6. Edit>Select all.
7. In Object Details select “None” as the stitch type.
8. While the object is still highlighted, select Autoborder >Outside>Distance 0>Running>OK.
This will create a cut line.
9. File>Export>Crystals/Cutters. Click “Print and Cut” to print out a design on your home printer. Follow on screen
prompts to align printed hash marks.
23
Pen Tool
1. Create new>Next on the opening screen.
2. On the next screen the fabric for embroidery will be selected (if embroidery was in the project). Leave it at
default>Next.
3. Select a graphic design “From File” (this is where graphics can be selected). The “…” at the end will allow browsing
in the computer.
Example will use 00088.cmx from the Creative DRAWings Samples.
4. Once the graphic is selected>Next.
5. The next screen will show the amount of colors in the embroidery design (if embroidery is desired)>Finish.
6. Edit>Select All and then click Autoborder. Change colors of shapes as needed.
24
7. Insert the loaded Pen Tool into the Edge machine.
8. Go to File>Export>To Crystals/Cutter then select the cutter options you would like and cut. The pink dot on the cut
diagram shows where the machine will start cutting. There’s a laser on the Artistic Edge that correlates to that dot. Use
the jog dials in the software to move the carriage. Clicking the trace button will make the machine trace the outside
border of your design to see if it will t on your material. You can adjust the carriage start position if needed.

25
Warranty
We thank you for purchasing this Artistic digital cutting
plotter (the “Product”) and hope you will enjoy it. In the
event that your Product needs service covered by this
warranty, please contact the authorized Artistic dealer
from whom it was purchased. To locate an authorized
Artistic dealer, please call 1-800-848-3562 or visit our
web site at http://www.artisticcreativeproducts.com/. Your
Product was sold with an owner’s manual. To avoid any
unnecessary inconvenience on your part, we suggest that
you refer to the instruction booklet before contacting your
authorized Artistic dealer for service.
Janome America, Inc. warrants that the Product will meet
the written specications of Janome America, Inc., all of
which are within normal industry standards and included
in the owner’s manual. This Artistic warranty is exclusive
to the original purchaser of the Product and is provided in
respect of normal household use. Janome America, Inc.
warrants this Product for a period of one (1) year from the
date of original purchase against defects in materials or
workmanship, including (i) electronic components and (ii)
labor, which shall be provided for a period of one (1) year
from the date of purchase, free of charge. Following a lapse
of one (1) year from the date of purchase, your authorized
Artistic dealer can provide necessary replacement parts
and labor at an additional cost to you. As stated above,
this warranty is in respect of normal household use of the
Product. Products used commercially are warranted for
a period of ninety (90) days from the date of purchase in
respect of parts and service. No further warranty shall
apply to Products used for commercial purposes.
Each of the periods described in paragraph 2, above, shall
hereafter be referred to as a “Warranty Period”, together
the “Warranty Periods”.
Irrespective of whether the Product is used commercially
or for normal household use, in no event shall this warranty
cover the consumables such as cutting blade, cutting mat,
blade holder or pen holder.
This warranty is VOID – that is, the Product was
purchased without warranty – if you did not purchase
it from an authorized Artistic dealer within the United
States. A list of authorized Artistic dealers within the
United States is available on our website http://www.
artisticcreativeproducts.com/. This warranty will be
honored only when the original invoice or sales receipt
(indicating the date of purchase, product type and
authorized Artistic dealer’s name) is presented together
with the defective Product. This warranty will not apply
if the serial number on the Product has been altered,
deleted, removed or is illegible. This warranty covers
none of the following: (i) periodic maintenance and repair
or replacement of parts due to normal wear and tear; (ii)
postage, shipping and handling costs and all risks to the
Product associated with shipment or transport; (iii) damage
resulting from misuse of the Product or failure to provide
normal maintenance; (iv) repairs to the Product done by
unauthorized dealers, service providers or the purchaser;
(v) damage resulting from the use of non-Artistic brand
parts, supplies, or accessories; (vi) accidents, lightning,
res, water, power surges, or any other cause beyond the
reasonable control of Janome America, Inc.
If you suspect a defect in materials or workmanship of your
Product, you must report it to the authorized Artistic dealer
from whom you purchased it during the Warranty Periods
described in paragraph 2, above. Your authorized Artistic
dealer may require you to return the Product to it (properly
packaged, freight prepaid) together with a photocopy of
your original invoice or sales receipt.
Your authorized Artistic dealer will evaluate your report of a
possible defect and, if one is discovered, will (at its option)
repair or replace the Product, either with an identical
Product, or with a substitute product that is substantially
similar to the original Product. Your authorized Artistic
dealer reserves the right to supply refurbished Products
or substitute products provided that they conform to the
written specications of Janome America, Inc. for new
Products or new substitute products.
This warranty will also apply to any replacement Product
or substitute product. For purposes of establishing the
Warranty Periods described in paragraph 2 hereof with
respect to any replacement Product or substitute product,
the original date of purchase of the original Product will
continue to apply.
This warranty will be governed by the laws of the state
in which you purchased the Product (“Applicable Law”).
Unless otherwise required by Applicable Law, Janome
America, Inc. shall in no event be liable for incidental or
consequential damages arising directly or indirectly from
the use or inability to use the Product or any substitute
product for any reason. Any implied warranties of
merchantability or tness for purpose of the Product
or any substitute product are limited to the Warranty
Periods described in paragraph 2, above. Other than as
specied herein or as required by Applicable Law, all
other warranties, conditions or liabilities, whether express
or implied by operation of law or otherwise, are hereby
expressly excluded, and Janome America, Inc. hereby
disclaims all other warranties, conditions or liabilities.

26
DRAWSTITCH LIMITED
End-User License Agreement
IMPORTANT - READ CAREFULLY: THIS END USER LICENSE
AGREEMENT (“the Agreement”) IS A LEGAL AGREEMENT BETWEEN
YOU (EITHER ON BEHALF OF YOURSELF AS AN INDIVIDUAL OR ON
BEHALF OF AN ENTITY AS ITS AUTHORIZED REPRESENTATIVE)
AND DRAWSTITCH LTD (“DRAWSTITCH”) FOR Creative DRAWings®
Artistic edition SOFTWARE (“the Software”), consisting of the Creative
DRAWings® Advanced (Suite and/or Premium) edition version 7 and the
Creative DRAWings® Simple Cut edition version 7.
PLEASE READ THIS AGREEMENT CAREFULLY AND PRINT OUT
A COPY FOR YOUR RECORDS. THIS AGREEMENT SUPERSEDES
PREVIOUS VERSIONS.
BY CHECKING “I AGREE” IN THE CHECKBOX BELOW AND CLICKING
“NEXT”, INSTALLING THE SOFTWARE, COPYING OR OTHERWISE
USING THE SOFTWARE, YOU AGREE TO BE BOUND BY ALL OF
THE TERMS OF THIS AGREEMENT REGARDING YOUR USE OF
THE SOFTWARE. IF YOU DO NOT AGREE TO THE TERMS OF THIS
AGREEMENT, CLICK ON THE “I DO NOT AGREE” BUTTON AND/OR
DO NOT INSTALL, COPY OR OTHERWISE USE THE SOFTWARE.
Entire Agreement – Headings
This Agreement constitutes the entire agreement between the parties
concerning the subject matter hereof and cancels and supersedes
any prior understandings, statements, representations, warranties,
discussions, negotiations, commitments and agreements both oral and
written between the parties hereto with respect thereto, whether oral or
in writing. The division of this Agreement into sections and the insertion
of headings and titles are for convenience of reference only and shall not
affect the construction or interpretation of this Agreement.
The Software
The term “Software” shall also include Demonstration/Trial Version(s) of
the Software (“the Demo Software”) and any upgrades, supplements,
modules, add-on components, modified versions or updates of the
Software, as well as any images, photographs, templates, animations,
videos, and text incorporated into the Software and associated media,
printed materials and “on-line” or electronic documentation, licensed to
you by DRAWSTITCH and/or its licensors any time, even after the date
you obtain your initial copy of the Software, unless we provide other terms
along with the upgrade, supplement, add-on component, or update. Any
downloading, installation or use of the Software is subject to compliance
with the terms and conditions of this Agreement and all applicable laws
and regulations, including laws and regulations governing copyrights,
patents, trade secrets and trademarks.
IN DEMONSTRATION/TRIAL VERSIONS, SOME OF THE TOOLS/
FUNCTIONS OF THE SOFTWARE MAY BE DISABLED. THE EXACT
TOOLS/FUNCTIONS AVAILABLE IN THE SOFTWARE MAY BE SUBJECT
TO THE LEVEL/MODULE/ADD-ON PURCHASED BY THE USER.
IF THE SOFTWARE IS PART OF A SOFTWARE-PACKAGE, THE
TOOLS/FUNCTIONS DESCRIBED ON THE SOFTWARE-PACKAGE
BOX OR ACCOMPANYING LITERATURE MAY REFER TO OTHER
COMPONENTS OF THE SOFTWARE-PACKAGE OR THE COMBINED
USE OF THE SOFTWARE WITH OTHER COMPONENTS OF THE
SOFTWARE-PACKAGE.
The Software is protected by copyright laws and international copyright
treaties, as well as other intellectual property laws and treaties. The
Software is licensed, not sold.
License Grant
DRAWSTITCH grants you a license to Use one copy of the Software.
“Use” means storing, loading, installing, and executing or displaying the
Software. You may NOT modify the Software or disable any licensing or
control features of the Software. If the Software is licensed for “concurrent
use”, you may NOT allow more than the maximum number of authorized
users to use the Software concurrently.
You are a Licensed User of the Software only when you have fully paid for
acquiring from an authorized supplier of DRAWSTITCH a licensed copy
of the Software and a Hardware Key (USB Key/Security Key or dongle)
and/or Product Key and/or Activation Code and /or Upgrade Code and/
or Update Code (as applicable) that renders the Software operational, for
each separate computer that it will be installed or used on. You can then
use the Software as long as you need, with no time limitations. You may
not duplicate the Software in whole or in part, except that you can make
one copy of the Software for backup or archival purposes.
You understand and agree that from the purchase of the Software
you bear the risk of loss of the Hardware Key and/or Product Key,
Product Key Card, Activation and/or Upgrade and/or Update Code
and/or Activation/Upgrade/Update Code Card (as applicable)
which accompanies/-y your copies/-y of the Software, whereas,
for that matter, the Hardware Key/Product Key/Activation Code/
Upgrade Code/Update Code correspond(s) to the value of the
Software and should be insured accordingly.
You are entitled to replacement of a lost Hardware Key only if it
was “time-locked” (wherever applicable). In such case, you will be
charged only for the value of the Hardware Key as well as for the
applicable delivery expenses.
Ownership
The Software is owned and copyrighted by DRAWSTITCH. Your license
confers no title or ownership in the Software and is not a sale or grant of
any rights in the Software. The Software is licensed, not sold. Third party
suppliers and/or licensors of DRAWSTITCH may protect their rights in the
event of any violation of the Terms of this End-User License Agreement.
Separation of components
The Software is licensed as a single product. Its component parts may
NOT be separated for use on more than one computer. If the Software is a
component of a software-package, which you have purchased as a whole
product, you may use the Software as part of this software-package, but
not separate the Software from it.
Copies and Adaptations
You may only make one copy of the Software for archival or backup
purposes or when copying or adaptation is an essential step in the
authorized Use of the Software. All such copies shall remain the sole
property of Licensor, and shall be subject to the terms of this Agreement.
A complete list of such copies and their exact locations shall be provided
to Licensor by Licensee upon request. You must reproduce all copyright
notices in the original Software on all copies or adaptations. You may not
copy the Software onto any bulletin board or similar system.
Restrictions
You may NOT modify, translate, rent, lease, loan, distribute, resell for
profit, assign, or create derivative works based upon the Software or any
part thereof. You may NOT disassemble, decompile, reverse-engineer,
decrypt, recreate or generate the Software or any part thereof. You agree
not to reconfigure or modify the Software in order to enable features or
functionality without notifying DRAWSTITCH or its Licensors and paying
the applicable Software license fee. You may not remove any proprietary
notices or labels on the Software. Any use in violation of this Section shall
immediately terminate your license to the Software.
Consent to Use of Data
You agree that DRAWSTITCH and its licensors may collect and use
technical information gathered in any manner as part of the product
support services provided to you, if any, related to the Software.
DRAWSTITCH may use this information solely to improve its products or
to provide customized services or technologies to you. DRAWSTITCH
may disclose this information to others, but not in a form that personally
identifies you.
While installing the Software, you are being asked to register it by giving
DRAWSTITCH or its licensors some personal information (name, address,
zip code, country, e-mail address and occupation). (For more information,
please read our Privacy Policy). Registering the Software is not obligatory
though it is prerequisite in case you want to upgrade your version of the
Software with the latest one, at a special upgrade-price.
Transfer
Your license will automatically terminate upon any transfer of the

27
Software. Upon transfer, you must deliver the Software, including any
copies and related documentation, to the transferee and you must inform
DRAWSTITCH or its local supplier and/or licensor about the transfer. The
transferee must accept the Terms of this End-User License Agreement as a
condition to the transfer.
If the Software is a component of a software-package, which you have
purchased as a whole product, you may only transfer the Software as part
of the software-package, in other words you may only transfer the whole
product and not just the Software as a separate part.
Software acquired free of charge (such as for promotional purposes or
for use by educational establishments) , either marked as NFR (:Not For
Resale) or similar or not, CANNOT be transferred to any third party.
Termination
Without prejudice to any other rights, DRAWSTITCH may terminate your
license upon notice for failure to comply with any of the terms of this End-
User License Agreement. Upon termination, you must immediately destroy
the Software, together with all copies, adaptations and merged portions in
any form.
Export Requirements
You may not export or re-export the Software or any copy or part thereof in
violation of any applicable laws or regulations.
DISCLAIMER AND LIMITATION OF LIABILITY
1. DISCLAIMER: THIS SOFTWARE AND THE ASSOCIATED
DOCUMENTATION AND FILES ARE PROVIDED TO YOU “AS IS”
WITHOUT WARRANTIES OR CONDITIONS OF ANY KIND, WHETHER
ORAL OR WRITTEN, EXPRESS OR IMPLIED. DRAWSTITCH
SPECIFICALLY DISCLAIMS ANY IMPLIED WARRANTIES OR
CONDITIONS OF MERCHANTABILITY, SATISFACTORY QUALITY,
NON-INFRINGEMENT AND FITNESS FOR A PARTICULAR
PURPOSE.
2. LIMITATION OF LIABILITY: IN NO EVENT WILL DRAWSTITCH OR
ITS SUBSIDIARIES, AFFILIATES, LICENSORS OR SUPPLIERS BE
LIABLE FOR DIRECT, SPECIAL, INCIDENTAL, CONSEQUENTIAL
OR OTHER DAMAGES (INCLUDING LOST DATA, LOSS OF USE,
LOST PROFITS, LOSS OF SAVING OR DOWNTIME COSTS OR ANY
OTHER FINANCIAL LOSS), ARISING OUT OF THE USE, INABILITY
TO USE, OR THE RESULTS OF USE OF THE SOFTWARE, WHETHER
BASED IN WARRANTY, CONTRACT, TORT OR OTHER LEGAL
THEORY, AND WHETHER OR NOT ADVISED OF THE POSSIBILITY
OF SUCH DAMAGES OR FOR ANY CLAIM BY ANY OTHER PARTY.
3. YOUR USE OF THE SOFTWARE IS ENTIRELY AT YOUR OWN RISK.
SHOULD THE SOFTWARE PROVE DEFECTIVE, YOU ASSUME THE
ENTIRE COST OF ALL SERVICE, REPAIR OR CORRECTION.
4. NOTE: THESE WARRANTY TERMS DO NOT EXCLUDE, RESTRICT OR
MODIFY, AND ARE IN ADDITION TO, THE MANDATORY STATUTORY
RIGHTS APPLICABLE TO THE LICENSE OF THE SOFTWARE TO
YOU.
Guidelines for the Use of clipart designs and sample content:
The Software may contain numerous designs and/or sample content
(collectively referred to as the “Images”) which are either owned by
DRAWSTITCH or licensed from a third-party. As a user of the Software
you are free to Use, modify and publish the Images as you wish subject
to the restrictions set out below. If you are uncertain as to whether your
Use or intended Use is in compliance with the Guidelines set out below,
DRAWSTITCH recommends that you seek the advice of your own attorney
or legal counsel. DRAWSTITCH will not provide you with an opinion as to
whether your Use is in compliance with these Guidelines.
1. YOU MAY, subject to any restrictions set out in Section 2 below:
(i) incorporate any Image(s) into your own original work and publish, display
and distribute your work in any media, provided you include a copyright
notice in your work reflecting on the copyright ownership of both you and
DRAWSTITCH as follows:
“Copyright (c) 201___ [your name] and its licensors. All rights reserved.”;
and
(ii) make one (1) copy of the Image(s) for backup or archival purposes.
2 YOU MAY NOT:
(i) resell, sublicense or otherwise make available the Image(s) for Use
or distribution separately or detached from a product or web page. For
example, the Image(s) may be Used as part of a web page design, but not
be made available for downloading separately or in a format designed or
intended for permanent storage or re-use by others;
(ii) provide the Image(s) to third parties or permit the Use of the Image(s)
by third parties separately or as part of any other product, however, third
parties may be provided with copies of the Image(s) (including digital files)
as part of a work product;
(iii) create scandalous, obscene, defamatory or immoral works using the
Image(s) nor Use the Image(s) for any other purpose which is prohibited by
law;
(iv) Use or permit the Use of the Image(s) or any part thereof as a
trademark or service mark, or claim any proprietary rights of any sort in the
Image(s) or any part thereof;
(v) Use any of the Images which contain identifiable individuals or entities
for any commercial purpose including, without limitation, in a manner which
suggests their association with or endorsement of any product or service;
(vi) Use the Image(s) in electronic format, on-line or in multimedia
applications unless the Image(s) are incorporated for viewing purposes
only and no permission is given to download and/or save the Image(s) for
any reason;
(vii) rent, lease, sublicense or lend the Image(s), or a copy thereof, to
another person or legal entity. You may, however, transfer all your license
to Use the Image(s) to another person or legal entity, provided that (i) you
transfer the Software, including the Image(s), and this License, including
all copies (except copies incorporated into your work product as permitted
under this License), to such person or entity, (ii) that you retain no copies,
including copies stored on a computer or other storage device, and (iii)
the receiving party agrees to be bound by the terms and conditions of this
License; or
(viii) Use any Image(s) except as expressly permitted by this License.
Update of this Agreement
DRAWSTITCH reserves the right to update this Agreement at any time and
does not make any commitment that any changes in the products, services,
materials and the programs will occur.
Violation of this Agreement
Violation of this License Agreement is infringement of the international
laws on protection of intellectual property and will be prosecuted to the
maximum extent permitted by the Law.
Severability
If any provision of this License Agreement is declared by a court of
competent jurisdiction to be invalid, illegal, or unenforceable, such provision
or part thereof which is necessary to render the provision valid, legal and
enforceable, shall be severed from the License Agreement and the other
provisions and the remaining part of that provision shall remain in full force
and effect.
Copyright © 2002-2014 DRAWSTITCH LTD. All rights not expressly granted
in this Agreement are reserved by DRAWSTITCH LTD.
Creative DRAWings, DRAWings, and DRAWstitch, names and logos are
trademarks and/or registered trademarks of DRAWSTITCH.
Artistic, Artistic Suite and Artistic Simple Cut names and logos are
trademarks and/or registered trademarks of Janome America Inc.
The software uses Patent Pending technology for the creation of Weaving
Monogramming of letters and symbols in both graphic and embroidered
output. All rights on such code are reserved.
Last update, April 2014

Part # EdgeManual
Printed in China
Statement
Changes or modifications not expressly approved by the party responsible for compliance could void the user's
authority to operate the equipment.
This equipment has been tested and found to comply with the limits for a Class B digital device, pursuant to Part
15 of the FCC Rules. These limits are designed to provide reasonable protection against harmful interference in
a residential installation. This equipment generates uses and can radiate radio frequency energy and, if not installed
and used in accordance with the instructions, may cause harmful interference to radio communications. However,
there is no guarantee that interference will not occur in a particular installation. If this equipment does cause harmful
interference to radio or television reception, which can be determined by turning the equipment off and on, the
user is encouraged to try to correct the interference by one or more of the following measures:
-- Reorient or relocate the receiving antenna.
-- Increase the separation between the equipment and receiver.
-- Connect the equipment into an outlet on a circuit different from that to which the receiver is connected.
-- Consult the dealer or an experienced radio/TV technician for help