Janome 900Cpx Instruction Booklet 900CP
2015-04-28
: Janome Janome-900Cpx-Instruction-Booklet-715805 janome-900cpx-instruction-booklet-715805 janome pdf
Open the PDF directly: View PDF ![]() .
.
Page Count: 26
INSTRUCTION BOOK
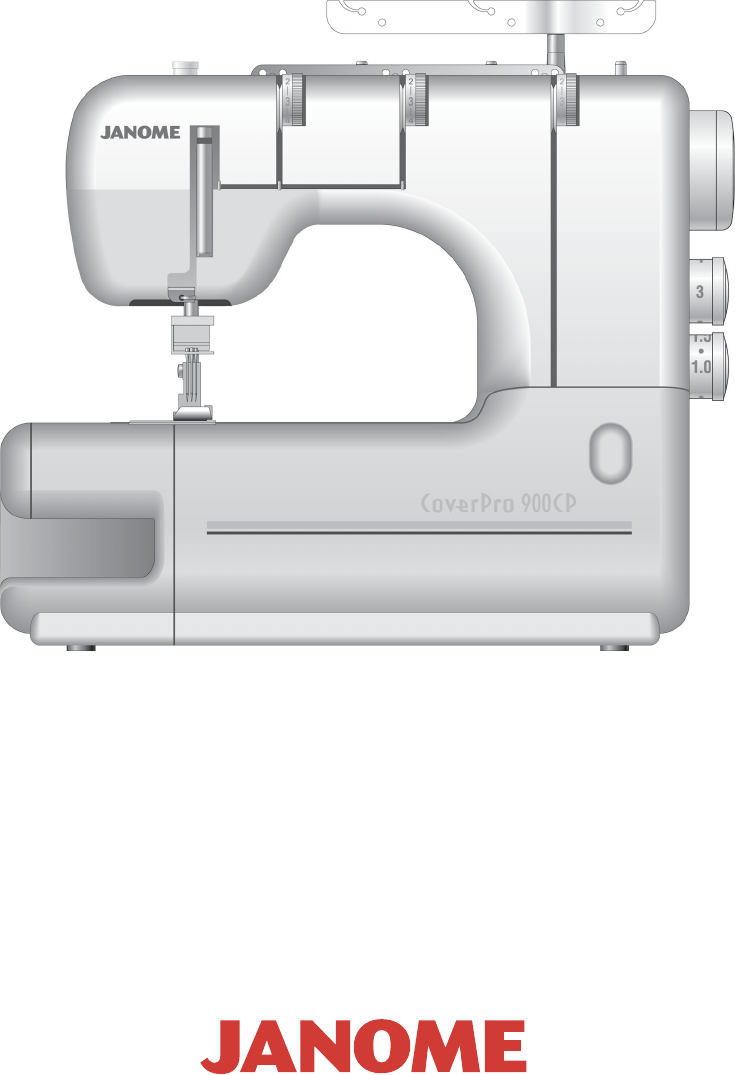
COVER PRO 900CP

IMPORTANT SAFETY INSTRUCTIONS
When using an electrical appliance, basic safety precautions should always be followed, including the
followings:
Read all instructions before using this appliance.
DANGER— To reduce the risk of electric shock:
1. An appliance should never be left unattended when plugged in. Always unplug this sewing machine
from the electric outlet immediately after using and before cleaning.
2. Always unplug before replacing a sewing machine bulb. Replace bulb with same type rated
15 Watts.
WARNING— To reduce the risk of burns, fire, electric shock, or injury to persons:
1. Do not allow to be used as a toy. Close attention is necessary when this sewing machine is used by
or near children.
2. Use this appliance only for its intended use as described in this owner’s manual.
Use only attachments recommended by the manufacturer as contained in this owner’s manual.
3. Never operate this sewing machine if it has a damaged cord or plug, if it is not working properly, if it
has been dropped or damaged, or dropped into water.
Return this sewing machine to the nearest authorized dealer or service center for examination,
repair, electrical or mechanical adjustment.
4. Never operate the appliance with any air opening blocked. Keep ventilation openings of this sewing
machine and foot controller free from accumulation of lint, dust and loose cloth.
5. Never drop or insert any object into any opening.
6. Do not use outdoors.
7. Do not operate where aerosol (spray) products are being used or where oxygen is being
administered.
8. To disconnect, turn all controls to the off (“O”) position, then remove plug from outlet.
9. Do not unplug by pulling on cord. To unplug, grasp the plug, not the cord.
10. Keep fingers away from all moving parts. Special care is required around the sewing machine
needle.
11. Always use the proper needle plate. The wrong plate can cause the needle to break.
12. Do not use bent needles.
13. Do not pull or push fabric while stitching. It may deflect the needle causing it to break.
14. Switch this sewing machine off (“O”) when making any adjustment in the needle area, such as
threading the needle, changing the needle, threading the bobbin or changing the presser foot, and
the like.
15. Always unplug this sewing machine from the electrical outlet when removing covers, lubricating, or
when making any other adjustments mentioned in this owner’s manual.
SAVE THESE INSTRUCTIONS
The design and specifications are subject to change without a prior notice.

795-800-003 (E)
Printed in Taiwan
1
TABLE OF CONTENTS
KNOW YOUR MACHINE
Names of Parts .................................................................................................. 2
Standard Accessories ........................................................................................ 3
GETTING READY TO SEW
Connecting the Machine to the Power Supply ................................................... 4
Controlling Sewing Speed .................................................................................. 4
How to Turn the Handwheel............................................................................... 5
Opening and Closing the Looper Cover ............................................................. 5
Extension Table ................................................................................................. 5
Raising or Lowering the Presser Foot ................................................................ 6
Removing the Presser Foot ............................................................................... 6
Attaching the Presser Foot................................................................................. 6
Adjustment of Foot Pressure.............................................................................. 6
Adjustment of Stitch Length ............................................................................... 7
Adjustment of Differential Feed Ratio ................................................................ 7
Changing Needle ............................................................................................... 8
How to use the needle threader/holder .................................................................... 8
Setting the Thread Guide Bar ............................................................................ 9
Setting the Spool Cones .................................................................................... 9
Threading the Machine .................................................................................... 10
Threading the needles ............................................................................................ 11
How to use the threader ......................................................................................... 12
Threading the looper .............................................................................................. 13
STITCH TYPES
Cover Stitch...................................................................................................... 15
Balancing the thread tension .................................................................................. 15
Chain Stitch ...................................................................................................... 16
Balancing the thread tension .................................................................................. 16
Finishing the Seam .......................................................................................... 17
Beginning of the seam ............................................................................................ 17
End of the seam ..................................................................................................... 17
Knotting the threads ............................................................................................... 17
Removing the Fabric in the Middle of the Stitching .......................................... 18
Hemming with the Cover Stitch ........................................................................ 19
Free Arm Hemming ..........................................................................................19
Cover Stitch Applications ................................................................................. 20
CARE OF YOUR MACHINE
Cleaning the Feed Dogs and Looper Area ....................................................... 21
Replacing the Light Bulb .................................................................................. 21
Troubleshooting................................................................................................ 22
2
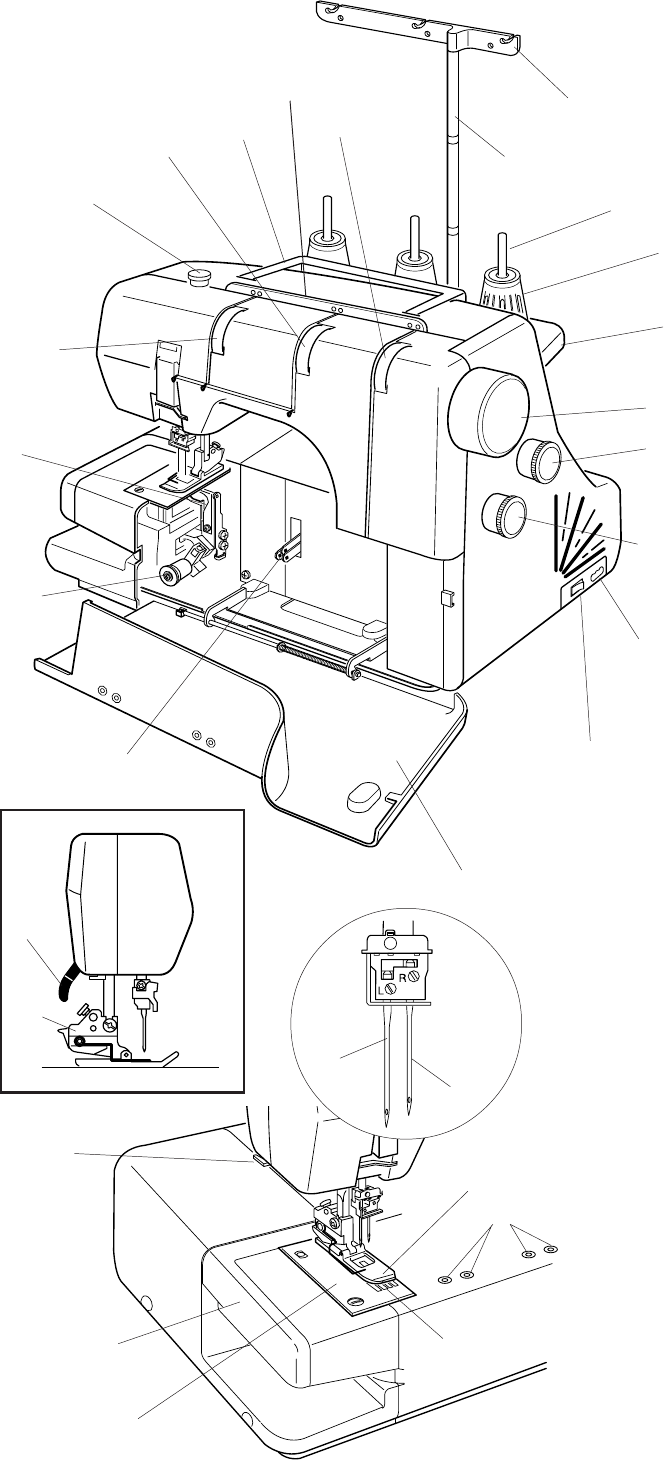
KNOW YOUR MACHINE
Names of Parts
qDifferential feed dial
wStitch length dial
eHandwheel
rSpool stand
tSpool holder
ySpool pin
uThread guide bar
iThread guide post
oThread guide plate
!0 Looper thread tension dial
!1 Carrying handle
!2 Right needle thread tension dial
!3 Pressure adjusting screw
!4 Left needle thread tension dial
!5 Looper
!65 Looper release knob
!7 Looper thread take-up lever
!8 Looper cover
!98 Power switch
@0 Machine socket
@1 Presser foot lifter
@2 Presser foot holder
@3 Thread cutter
@4 Extension table
@5 Needle plate
@6 Attachment mount
@7 Presser foot
@8 Left needle (#80/12)
@9 Right needle (#80/12)
#0 Feed dogs
w
q
@0
r
e
t
y
o
!1
!2
!3
!4
!5
u
i
!6
!7
!8
!9
@1
@2
@4
@9
#0
@5
@3
@8
@7
@6
!0
3
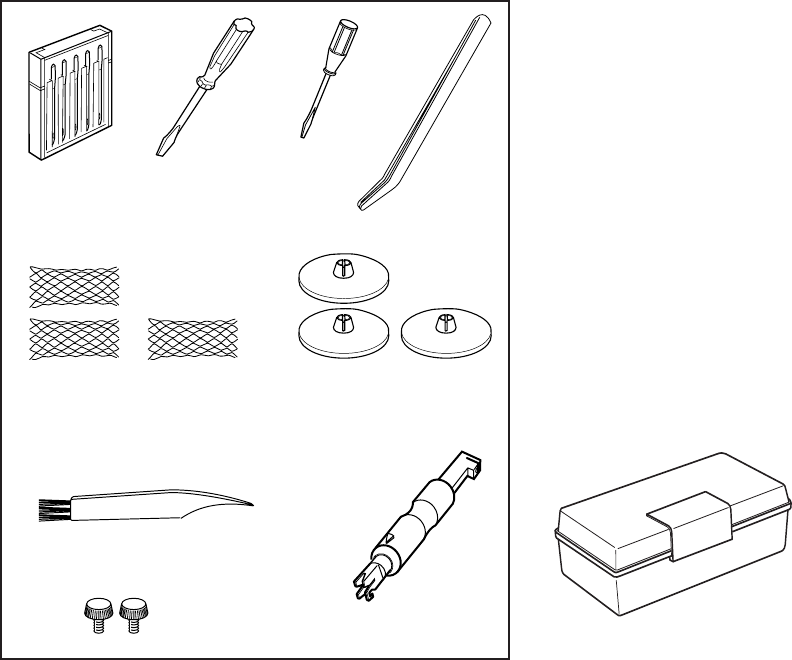
Standard Accessories
q Set of needles: 2 X #80/12, 3 X #90/14
(Schmetz EL X 705)
w Screwdriver (Large)
eScrewdriver (Small)
r Tweezers
t Nets
y Spool holder caps
u Lint brush
i Needle threader
o Attachment screws (for fixing optional accessories)
(Refer to the instructions of the optional
accessory)
!0 Accessory box
w
qr
e
ty
o
ui
!0
4
GETTING READY TO SEW
Connecting the Machine to the Power Supply
1Turn off the power switch, and connect the
machine plug to the machine socket.
2Connect the power supply plug to your power
supply.
3Turn on the power switch.
Controlling Sewing Speed
Sewing speed can be varied by the foot control.
The harder you press on the control, the faster the
machine runs.
Step on the foot control with the presser foot lifter up, and
practice controlling the speed.
For Your Safety:
* While the machine is in operation, always keep your
eyes on the sewing area, and do not touch any moving
parts such as the thread take-up lever, loopers,
handwheel or needles.
*Always disconnect the machine from the power
supply:
—when leaving the machine unattended.
— when attaching or removing parts.
— when threading or cleaning the machine.
* Do not place anything on the foot control,
except when the machine is in use.
qPower switch
wMachine plug
eMachine socket
rPower supply plug
tPower supply
yFoot control
qFoot control
Operating Instructions:
•The symbol “O” of a switch indicates the
“off” position of a switch.
•For appliances with a polarized plug (one
blade wider than the other): To reduce the
risk of electric shock, this plug is intended
to fit in a polarized outlet only one way. If
it does not fit fully in the outlet, reverse
the plug. If it still does not fit, contact a
qualified electrician to install the proper
outlet. Do not modify the plug in any way.
Foot controller Model YC-482-J
is for use with sewing
machine model 900P.
w
q
e
t
y
q
r
5
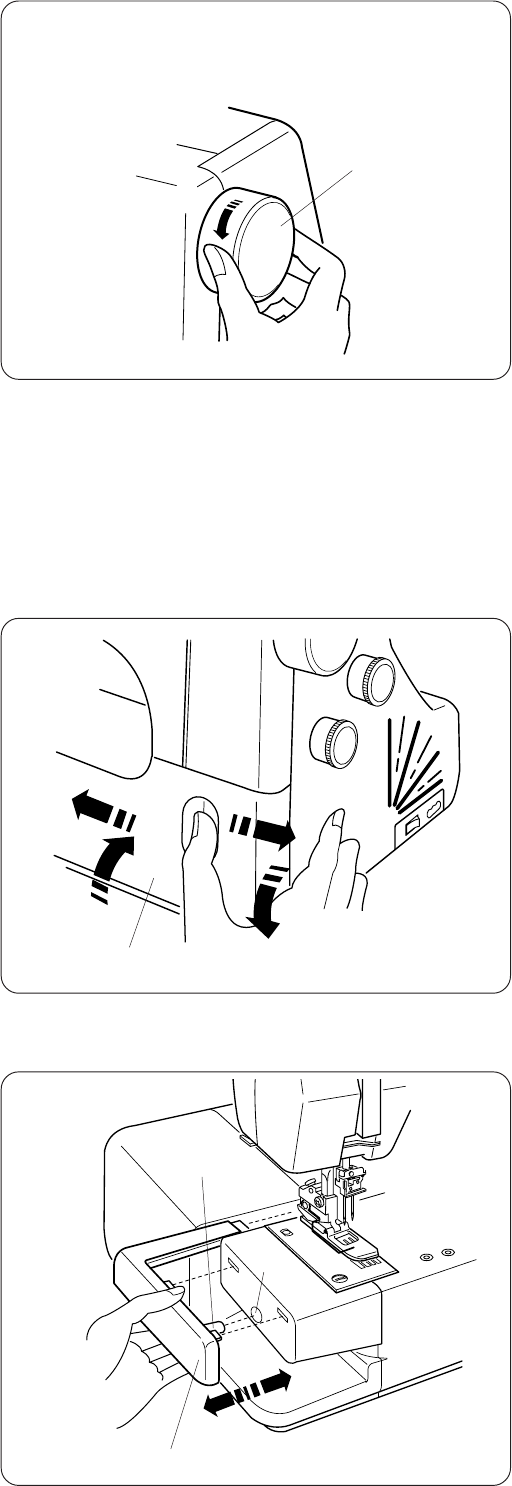
How to Turn the Handwheel
Always turn the handwheel toward you
(Counterclockwise).
qHandwheel
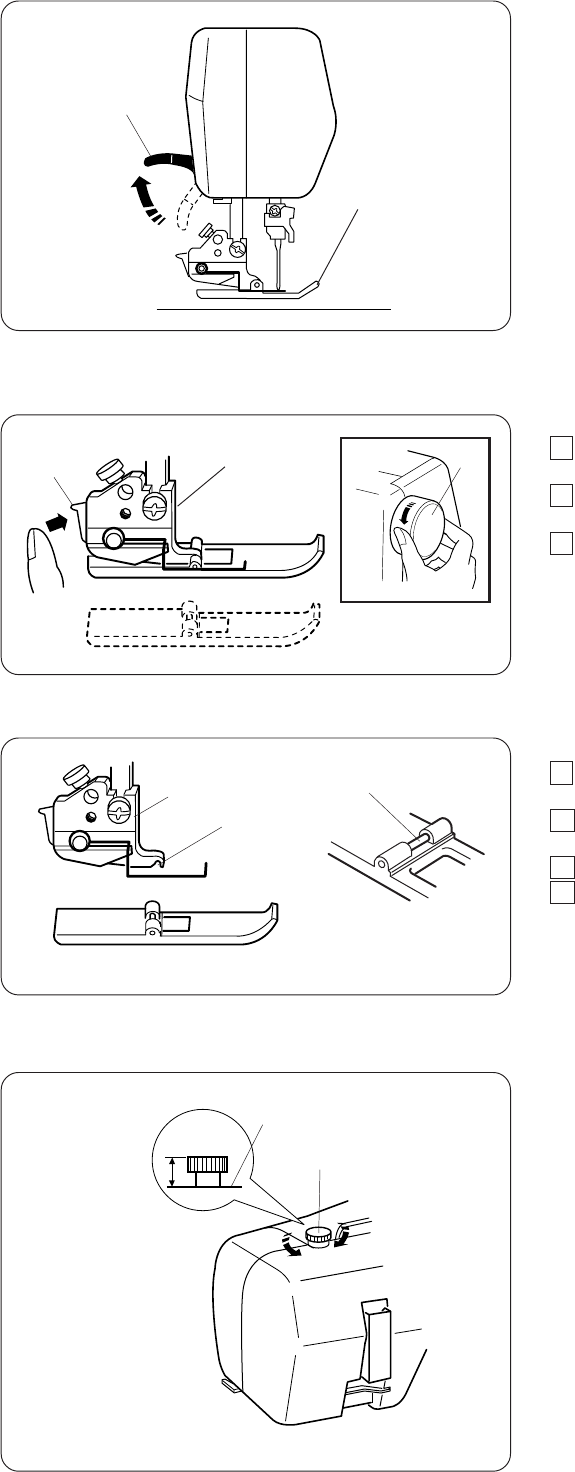
Opening and Closing the Looper Cover
To open: (A)
While pushing with the thumb to the right as far as it will
go, pull the looper cover toward you.
To close: (B)
Lift the looper cover and push it against the machine.
The looper cover snaps into its position automatically.
qLooper cover
Extension Table
The extension table provides added sewing surface and
can be easily removed for free arm sewing.
Detaching the table:
Pull the table away from the machine.
qExtension table
Attaching the table:
Align the pin on the table with the hole in the machine.
Push the extension table until it snaps into the machine.
wPin
eHole
q
q
(A)
(B)
w
e
q
6
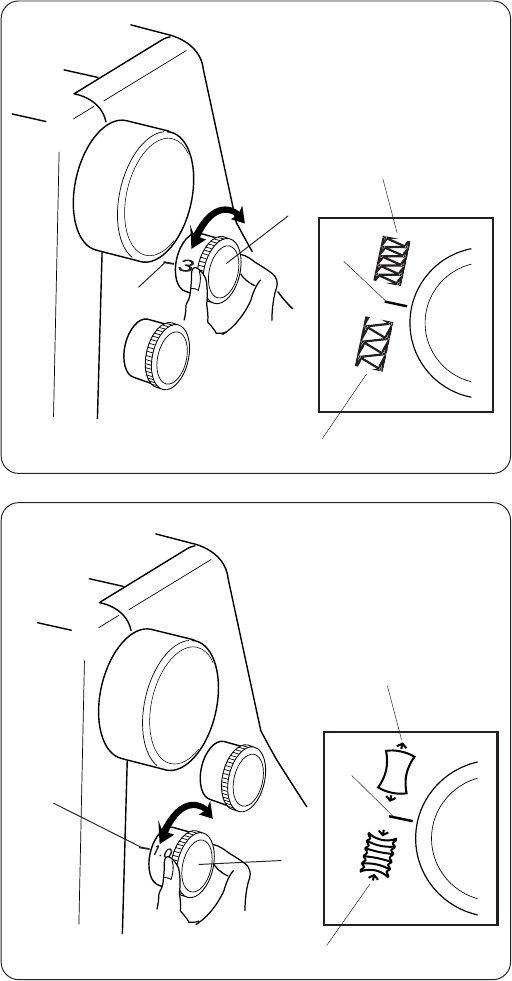
Raising or Lowering the Presser Foot
By raising or lowering the presser foot lifter, the presser
foot goes up or down.
* While in operation, keep the presser foot lowered
except when threading the machine or test
running without threads.
NOTE:
Thread tension will be released when the presser foot
lifter is raised.
qPresser foot
wPresser foot lifter
Removing the Presser Foot
1Turn off the power switch and unplug the
machine.
2Turn the handwheel toward you to raise the needle.
Raise the presser foot.
3Press the lever located on the back of the foot
holder. The presser foot will drop off.
qHandwheel
wLever
eFoot holder
Attaching the Presser Foot
1 Turn off the power switch and unplug the
machine.
2Place the presser foot so that the pin on the foot
lies just under the groove of the foot holder.
3 Lower the foot holder to lock the foot into place.
4 Raise the presser foot lifter to check that the
presser foot is secure.
qFoot holder
wGroove
ePin
Adjustment of Foot Pressure
It is not necessary to adjust the presser foot’s pressure
for normal sewing.
When you sew heavy or lightweight fabrics, turn the
adjusting screw:
–– clockwise for heavyweight fabric.
–– counterclockwise for Iight weight fabric.
* For regular sewing, set the adjusting screw so
the head protrudes 10 mm from the top of the
machine.
qTo decrease
wTo increase
eAdjusting screw
rTop of the machine
w
e
q
r
10 mm
w
e
q
w
e
q
wq
7
Adjustment of Stitch Length
To adjust the stitch length, turn the dial.
The larger the number, the longer the stitch.
The stitch length can be adjusted from 1 to 4 mm.
qStitch length dial
wSetting mark
eTo lengthen
rTo shorten
* For regular sewing, set the stitch length at 3 – 3.5.
Adjustment of Differential Feed Ratio
The differential feed ratio can be altered by turning the
dial.
The number on the dial indicates the ratio between the
main and the sub feed motion.
•Set the dial at 1.0 for regular sewing.
•Set the dial at a lower number when sewing fine fabrics
that tend to pucker.
•Set the dial at a higher number when sewing stretch
fabrics such as knits, jersey and tricot.
qDifferential feed dial
wSetting mark
eTo shrink
rTo stretch
w
e
q
r
w
w
e
q
r
w
8
Changing Needle
Turn the handwheel toward you to raise the needle to its
highest position.
qHandwheel
Then loosen the needle clamp screw for the needle you
are going to remove.
wNeedle clamp screw
eSmall screwdriver
Insert a new needle into the needle clamp with the flat
side to the back and push it up against the stopper, then
tighten the needle clamp screw.
rFlat side
tStopper
How to use the needle threader/holder
To attach the needle easily, use the end of the needle
threader to hold the needle.
Insert a needle into the needle threader/holder with
the flat side facing back as shown.
Hold the stem and insert the needle into the needle
clamp and push it up as far as it will go.
Tighten the needle clamp screw firmly while supporting
the holder in place.
Pull the holder down to remove it.
yNeedle threader/holder
NOTES:
Use Schmetz needles EL X 705 size 80/12 or EL X 705
size 90/14.
Do not use any needle which is bent or blunt.
WARNING:
Turn the power switch off and unplug the machine
before changing needles.
w
r
e
t
y
q
9
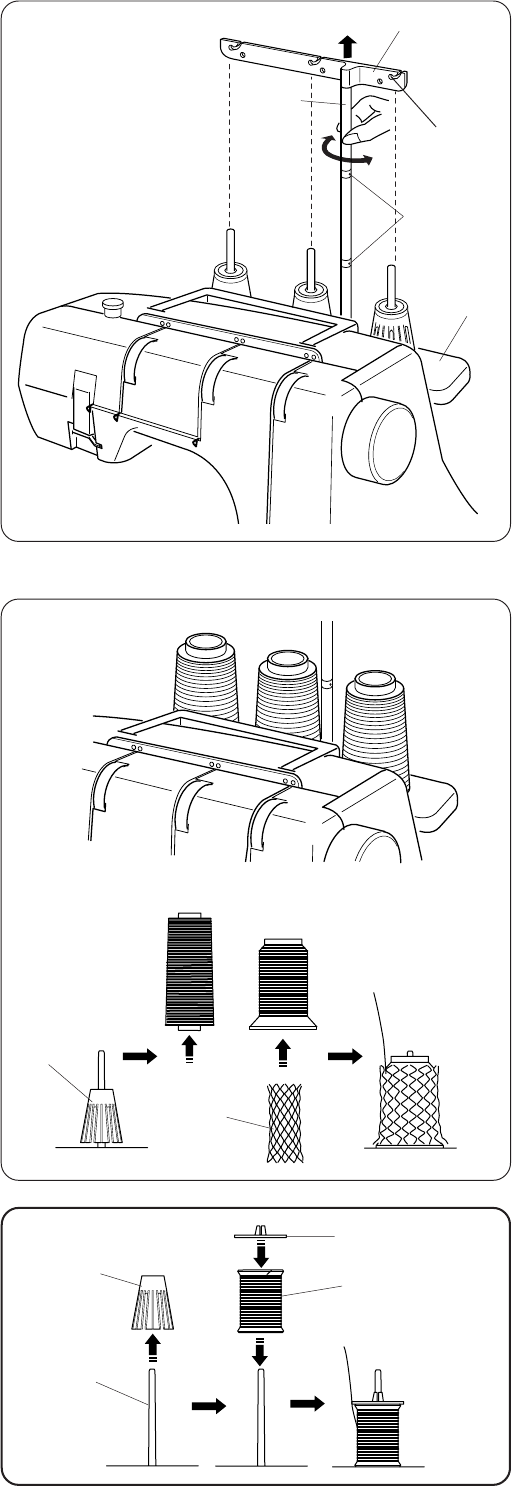
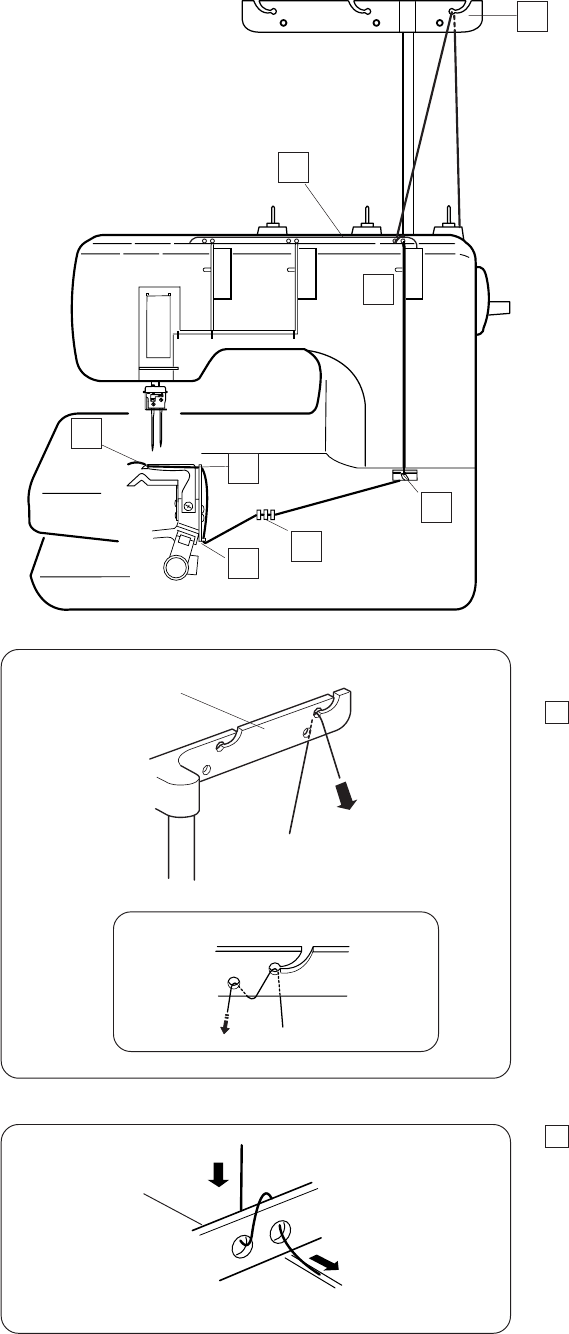
Setting the Thread Guide Bar
Pull the thread guide bar up as far as it will go.
Turn the thread guide bar so that the thread guides are
right above the spool pins.
qThread guide bar
wThread guide
eSpool pin
rStoppers
tThread guide post
NOTE:
Make sure the two stoppers on the thread guide post, as
shown, are set in at the correct position.
Setting the Spool Cones
Place the spool cones on the spool holders.
If the thread slips down from a spool cone during
threading and/or sewing, put a net over the spool cone
as illustrated to prevent jamming.
qSpool cone
wSpool holder
eNet
When using small spools, remove the spool holders from
the spool pins.
rSmall spool of thread
tSpool pin
Place the spool with its slit side up, and put the spool
holder cap on top of it.
ySpool holder cap
q
r
e
t
y
w
q
r
e
w
t
w
10
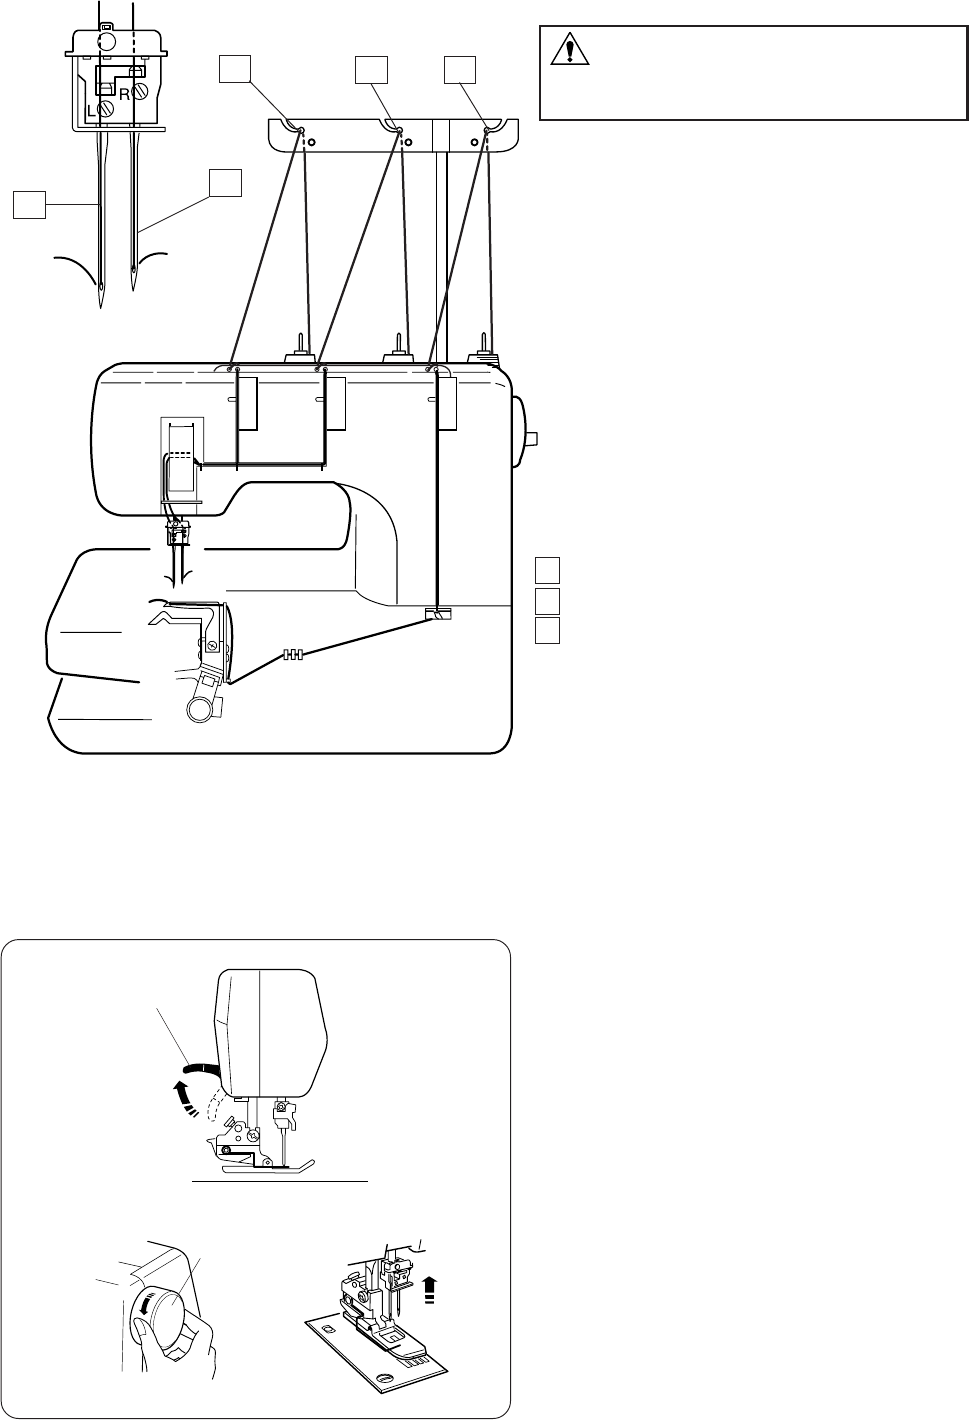
Thread the machine in the following order:
1Left needle thread
2Right needle thread
3Looper thread
Threading the Machine
Raise the presser foot lifter.
qPresser foot lifter
NOTE:
Always thread the machine with the presser foot raised.
Turn the handwheel toward you to bring the needles to
their highest position.
wHandwheel
WARNING:
Turn the power switch off and unplug the
machine before threading the machine.
w
q
123
12
11
w
Threading the needles
Thread each needle in the following steps:
1Draw the thread through the Left side thread
guide bar from back to front as shown (A).
NOTE:
If the thread is coming out from the thread guide notch,
pass the thread through the thread guide hole again as
shown (B).
qThread guide bar
2Pass the thread through the holes on the right side
of the thread guide plate as illustrated.
wThread guide plate
(A)
(B)
q
1
2
3
4
5
6
7
8
9
10
1
2
12
3Hold the thread at both ends and tug gently to
ensure the thread is correctly inserted between
the tension disks. ( If the presser foot lifter is
raised, the thread easily inserts between the
tension discs.)
eTension dial
rTension disks
4Pass the thread through the thread guide (A) from the
right.
t Thread guide (A)
5Draw the thread to the left and pass it through the
thread guide (B).
Draw the thread up and slip it behind the take-up
lever cover.
y Thread guide (B)
u Take-up lever cover
6Pull the thread down and slip it behind the thread
guide (C) from the right.
i Thread guide (C)
7Thread each needle as follows:
Left Needle (A): Pass the thread behind the thread
guide plate from the left. Pass the thread between the
left and center prongs.
Right needle (B): Pass the thread behind the thread
guide plate from the right. Pass the thread between
the right and center prongs.
o Thread guide plate
!0 Prongs
8Slip all the threads behind the needle bar thread
guide from the right.
Thread each needle with the threader (see below).
!1 Needle bar thread guide
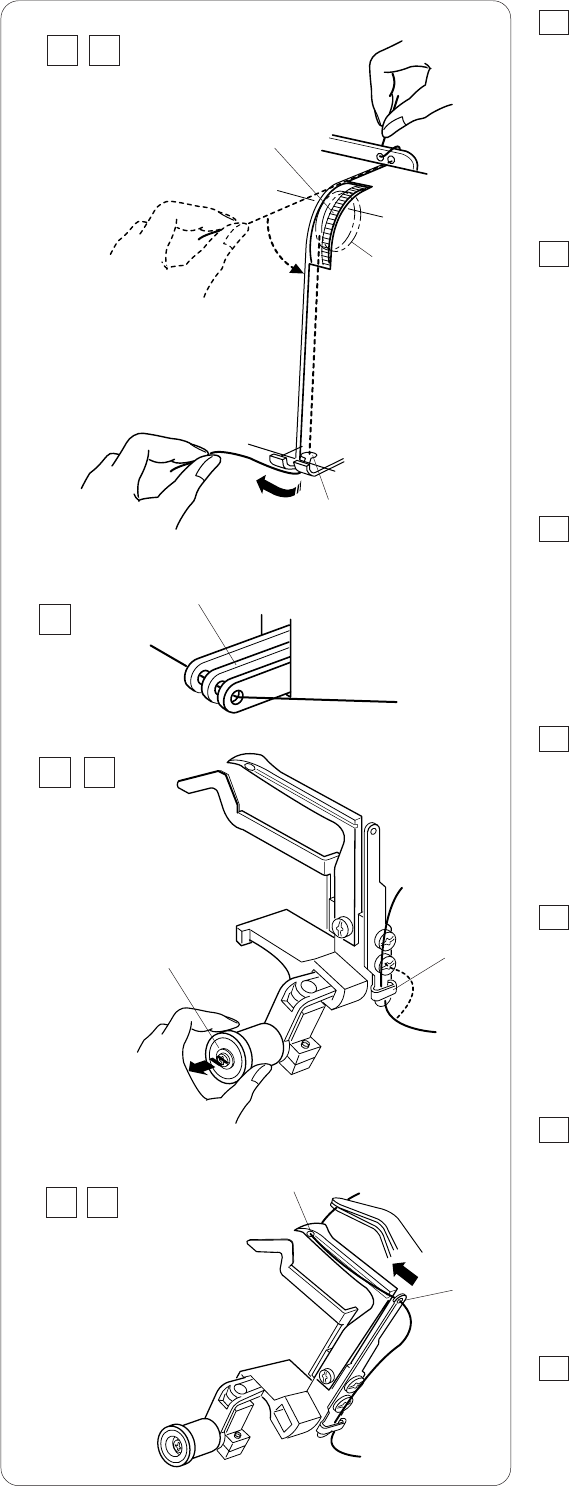
How to use the threader
1Hold the grip of the threader with the triangle mark up.
Insert the thread into the slit of the Y-shaped notch.
qTriangle mark
wY-shaped notch
2Place the V-shaped notch over the needle just above
the needle eye.
3Slide the threader down along the needle while
pushing it against the needle, until the threader pin
enters into the needle eye.
eV-shaped notch
rThreader pin
4Push the threader and the thread will go through the
needle eye.
5Remove the threader from the needle. Then pick up
the loop of the thread with the hook. Pull the thread
end out to the back.
tHook
e
r
t
y
u
i
i
!0
!1
(B)
o
34
5 6
78
(A)
r
e
q
t
1
3
25
4
13
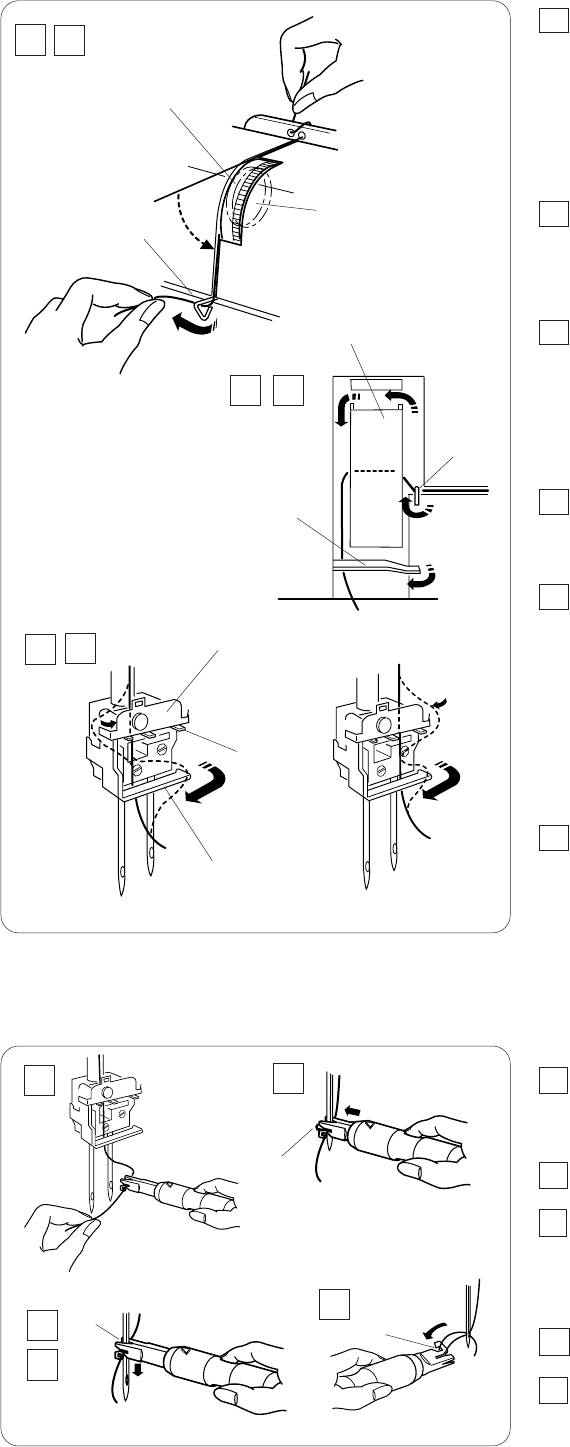
Threading the looper
Thread the looper in the following steps:
1Draw the thread through the right side thread
guide bar from back to front as shown (A).
NOTE:
If the thread is coming out from the thread guide notch,
pass the thread through the thread guide hole again as
shown (B).
qThread guide bar
2Pass the thread through the holes on the right side
of the thread guide plate as illustrated.
wThread guide plate
q(A)
(B)
w
1
2
3
4
5
6
7
8
14
3Hold the thread at both ends and tug gently to
ensure the thread is correctly inserted between
the tension disks. ( If the presser foot lifter is
raised, the thread easily inserts between the
tension disks.)
eTension dial
r Tension disks
4Pass the thread through the looper thread guide (A)
from the right.
t Looper thread guide (A)
5Pass the thread through the eyes of the looper
take-up levers.
y Looper take-up lever
NOTE:
Be sure to raise the needles to the highest position so
the eyes of the looper take-up levers will align.
6Slip the thread behind the looper thread guide (B)
from the right.
u Looper thread guide (B)
7Pull the looper release knob and the looper will slant
to the right for easy access.
i Looper release knob
8Pass the thread through the eye of the looper thread
guide (D) then through the eye of looper.
Draw the thread end 4” (10 cm) to the back.
o Looper thread guide (D)
!0 Eye of the looper
NOTE:
You may use a pair of tweezers.
9Push the looper in the direction of the arrow, back to
the original position.
e
t
y
iu
!0
o
r
34
5
6 7
8 9
15
44 2
STITCH TYPES
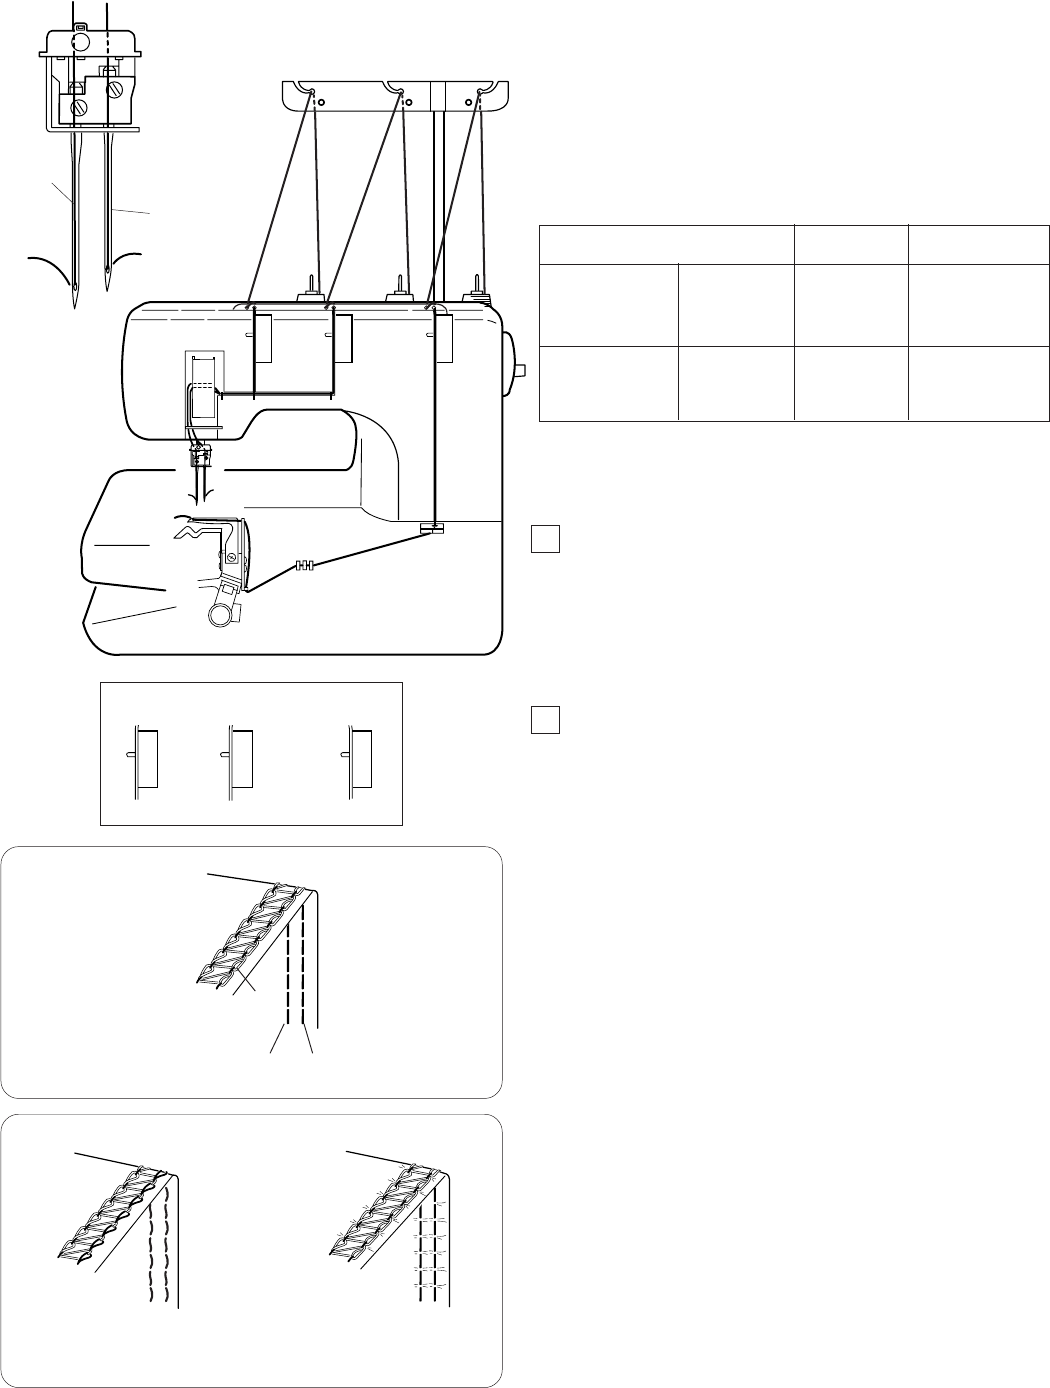
Cover Stitch
This stitch forms 5 mm wide two parallel rows of the
straight stitch on the right side, widely used on cuffs and
stretch welts of T-shirts etc.
q Left needle
w Right needle
w
Balancing the thread tension
1Set the tension dials as follows:
q Left needle thread tension dial: 4
wRight needle thread tension dial: 4
e Looper thread tension dial: 2
2Check the tension balance by test stitching on the
same fabric and threads as actual garment. Fine-tune
the tension as necessary.
Balanced tension:
The rows of stitches on the right side of the fabric are
straight and even. The looper thread forms a row of
squares with diagonals.
qWrong side of the fabric
wLooper thread
eLeft needle thread
rRight needle thread
(A) If the needle thread tension is too loose:
–The stitches on the right side are irregular and loose.
–There is a gap between head and tail of the looper
thread crossing points.
Tighten the needle thread tension, and/or loosen the
looper thread tension to correct it.
(B) If the needle thread tension is too tight:
–The fabric puckers.
Loosen the needle thread tension, and/or tighten the
looper thread tension to correct it.
q
w
q
w
r
e
(A) (B)
Light to
medium weight
Heavyweight
Fine knits
Fine Jersey
Jersey
Fleece
80/12 or
90/14
90/14
#60-90 Spun
#60 Spun
Type of Fabric Needle Size Type of Thread
NOTE: The machine is installed with the #80/12 needles.
16
33 2
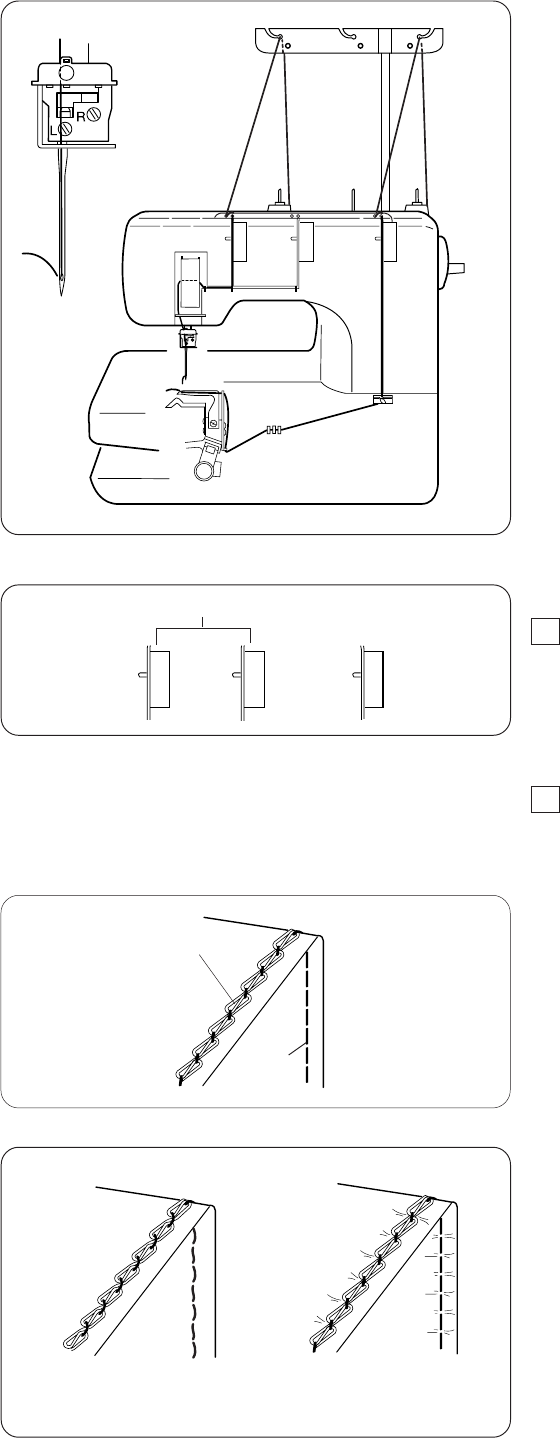
Chain Stitch
This stitch is sewn with a single needle and forms a chain
of looper thread on the wrong side of the fabric.
This is a durable and flexible stitch used for seaming knit
fabrics, attaching elastics, attaching bias tapes etc.
Thread one of the three needles and looper. Remove the
needles not to be used (see page 8).
NOTE:
Tighten the needle clamp screw on the side that is not
being used to prevent losing the screws.
Balancing the thread tension
1Set the tension dials as follows:
q Needle thread tension dial: 3
w Looper thread tension dial: 2
NOTE:
Adjust the tension dial for the needle being used.
2Check the tension balance by test stitching on the
same fabric and threads as actual garment. Fine-tune
the tension as necessary.
Balanced tension:
The straight stitch on the right side of the fabric is straight
and even. The looper thread forms a chain.
q Wrong side of the fabric
w Looper thread
e Needle thread
(A) If the needle thread tension is too loose:
–The stitch on the right side is irregular and loose.
–The needle thread forms loops on the wrong side of
the fabric.
Tighten the needle thread tension, and/or loosen the
looper thread tension to correct it.
(B) If the needle thread tension is too tight:
–The fabric puckers.
Loosen the needle thread tension, and/or tighten the
looper thread tension to correct it.
q
w
e
(A) (B)
qw
17
Finishing the Seam
To achieve the best results, use a piece of scrap fabric at
the beginning and end of the seam.
Beginning of the seam
1Raise the presser foot and insert a piece of scrap
fabric under the foot. Lower the foot and turn the
handwheel several times toward you.
Depress the foot control to start sewing slowly.
qHandwheel
2Stop sewing at the end of the scrap fabric.
Insert the work fabric after the scrap as shown, then
start sewing on the work fabric.
wScrap fabric
eWork fabric
End of the seam
3Stop sewing at the end of the work fabric.
Insert another piece of scrap fabric after the work
fabric as shown, then sew through the scrap.
rAnother scrap fabric
4 Cut the connecting threads between the work fabric
and scrap fabric.
tConnecting threads
Knotting the threads
Draw the needle threads to the wrong side of the
fabric by using a pair of tweezers and knot them together.
q
w
t
r
e
18
Removing the Fabric in the Middle
of the Stitching
1Raise the needles to their highest position by turning
the handwheel toward you.
qHandwheel
2Raise the presser foot with the presser foot lifter.
wPresser foot lifter
3Pull the needle threads before the needle eyes.
This prevents the threads from being caught when
removing the fabric.
4Pull the fabric to the rear.
5Remove the fabric and cut the threads with the thread
cutter.
eThread cutter
q
w
5
1
2
3
4
e
19
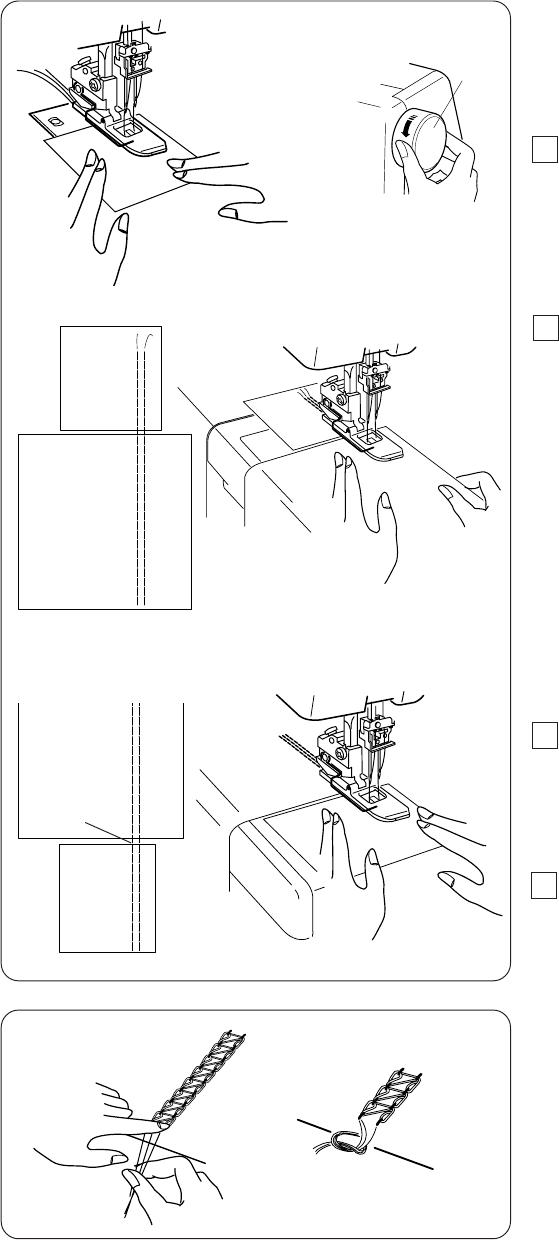
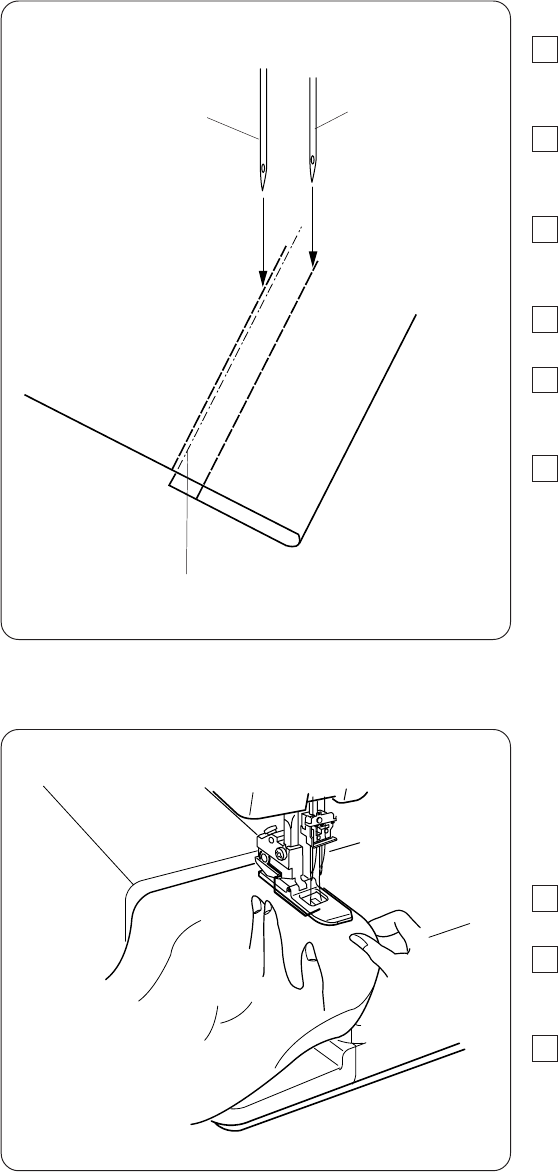
Hemming with the Cover Stitch
1Fold up the edge of the fabric to the wrong side and
press.
2Draw a line with a tailor’s chalk on the right side of the
fabric to mark the fabric edge.
3Place the fabric so the left needle drops just to the
left side of the marked line. Lower the presser foot.
4Sew carefully along the marked line.
5After finishing sewing, raise the presser foot and
remove the fabric to the rear.
6Draw the needle threads to the wrong side of the
fabric and knot them together.
qMarked line
wLeft needle
eRight needle
rRight side of the fabric
Free Arm Hemming
The extension table can be detached for free arm
hemming on the tubular parts of the garments, such as
sleeves, cuffs etc.
1Detach the extension table (see page 5).
2Stitch the hem in the same way as hemming with
cover stitch.
3Continue to sew over the stitches 2” (4 to 5 cm)
beyond the beginning of the seam and stop the
machine.
Cut the threads at the beginning and at the end.
q
w
r
e
20
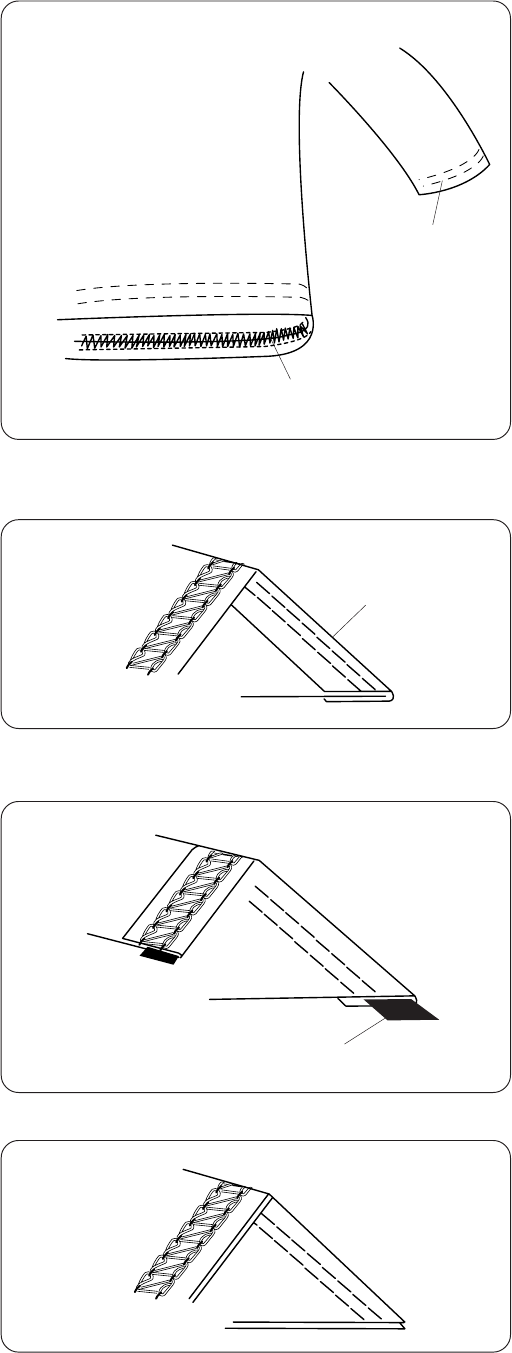
Cover Stitch Applications
Attaching laces and tapes
qTape or lace
wRight side of the fabric
eWrong side of the fabric
Attaching elastics
qRight side of the fabric
wWrong side of the fabric
eElastic
Decorative stitch
qRight side of the fabric
wWrong side of the fabric
Hemming on sleeves and waistlines
qSleeve
wWaistline
w
eq
w
e
q
w
q
w
q
21
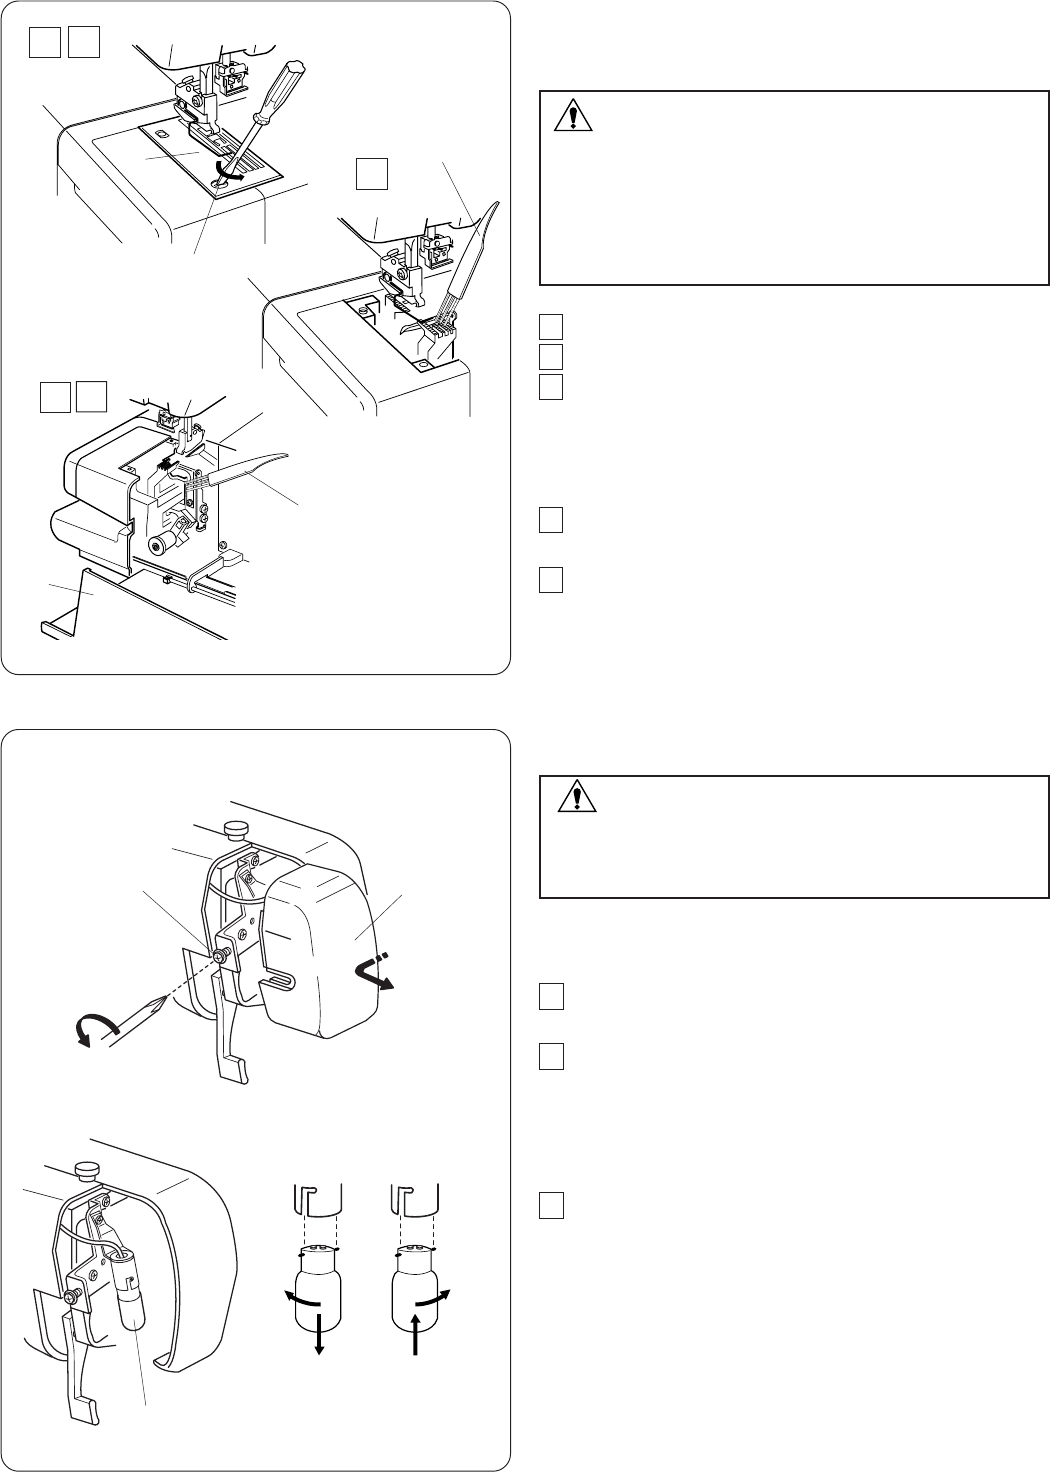
CARE OF YOUR MACHINE
Cleaning the Feed Dogs and Looper Area
WARNING:
Turn the power switch off and unplug the machine
before cleaning.
NOTE:
Do not dismantle the machine in any way other than
what is explained in this section.
1Remove the presser foot and needles.
2Remove the setscrew and needle plate.
3Clean the feed dogs with a lint brush.
qSetscrew
wNeedle plate
eLint brush
4Open the looper cover and clean the looper and
surrounding area with the lint brush.
5Replace the needle plate, needles and presser foot.
Close the looper cover.
rLooper cover
Replacing the Light Bulb
WARNING:
Turn the power off before replacing the light bulb.
The bulb could be HOT, wait until it has cooled
down before touching it.
1Remove the setscrew and face plate.
2Push up and twist the bulb counterclockwise (in the
direction “A”) to remove it.
Push up and twist the bulb clockwise (in the
direction “B”) to replace it.
3Attach the face plate with the setscrew.
qSetscrew
wFace plate
eLight bulb
q
we
e
r
qw
e
AB
5
12
3
4

22
Problem
Needle thread
breaks.
Needle bends or
breaks.
Skipped stitches
Seam puckering
Machine does not
operate.
Cause
1. The machine is not threaded correctly.
2. The thread tension is too tight.
3. The needle is bent or blunt.
4. The needle is not set correctly.
5. A wrong needle is used.
1. The needle is bent or blunt.
2. The needle is not set correctly.
3. The needle clamp screw is loose.
4. The fabric is forcedly pulled.
1. The needle is not set correctly.
2. The needle is bent or blunt.
3. The tension is out of balance.
4. The machine is not threaded correctly.
1. The tension is out of balance.
1. The machine is not connected to the power supply.
2. The foot control is not plugged in firmly.
Reference
See pages 10-14.
See pages 15, 16.
See page 8.
See page 8.
See page 8.
See page 8.
See page 8.
See page 8.
Do not pull the fabric.
See page 8.
See page 8.
See pages 15, 16.
See pages 10-14.
See pages 15, 16.
See page 4.
See page 4.
Troubleshooting
