Jasco BS2TX Transmitter Portion of Wireless Intercom User Manual 3028 BS Manual A
Jasco Products Company Transmitter Portion of Wireless Intercom 3028 BS Manual A
Jasco >
User Manual
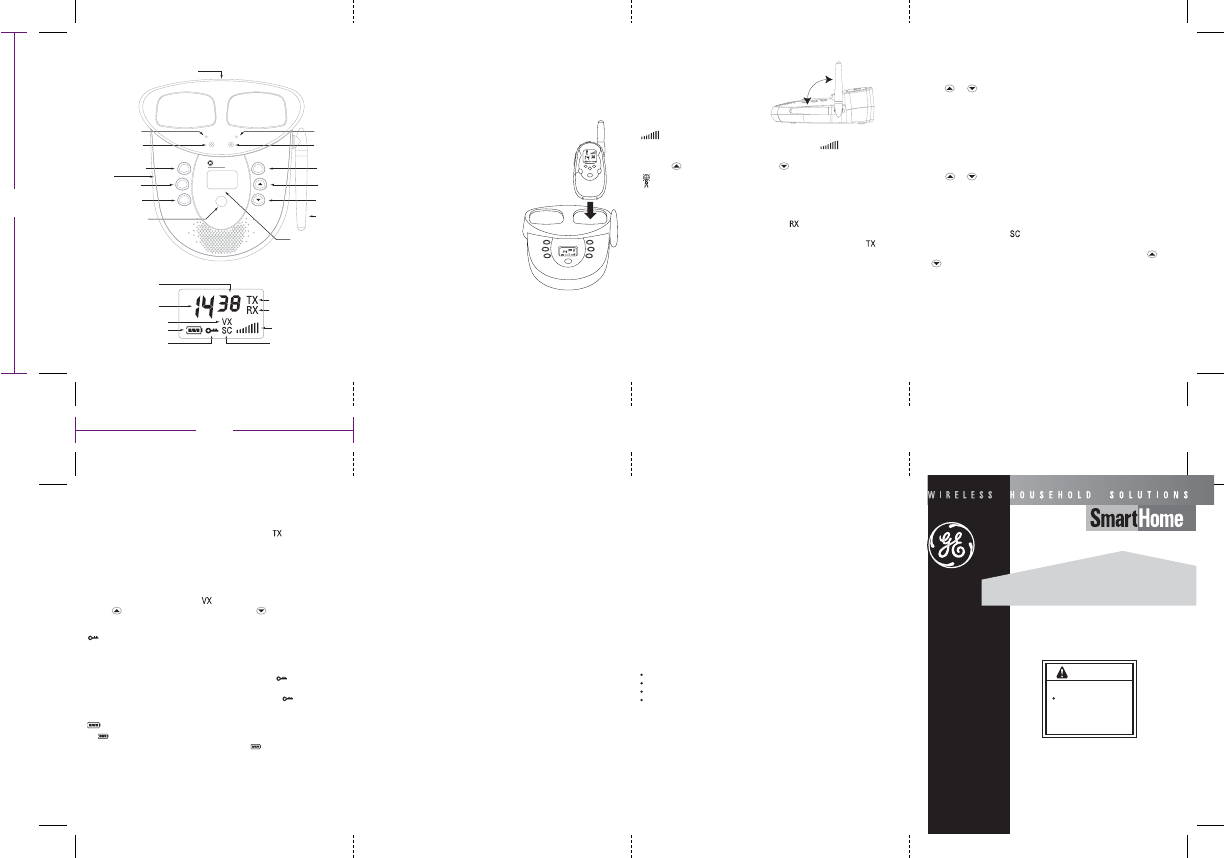
BUTTONS AND FUNCTIONS BATTERY INSTALLATION
The Intercom is designed to operate on both AC adapter and battery power. Using the AC
adapter ensures uninterrupted communication with other members in your group.
If using standard alkaline batteries (sold separately):
1. Remove the battery cover on the bottom of the unit by pulling on the small tab.
2. Insert (4) "AA" alkaline batteries with the polarities as shown in the battery compartment.
3. Replace the battery cover.
If using the AC adapter (included):
1. Plug the AC adapter plug into the corresponding
jack located on the back of the unit.
2. Plug the AC adapter into a standard 120V outlet.
The Wireless Intercom is also equipped with two
charging cradles. These are designed to charge
GE Wireless Handheld 2-Way Radios
(GE5811-WHH) that are used in conjunction
with the GE/Sanyo Rechargeable Battery Pack
(GES-NCF FR). Both can be purchased separately.
01
IMPORTANT: MAKE SURE THAT YOU USE ONLY THE
RECHARGEABLE BATTERY PACK THAT IS SPECIFIED
ABOVE (GES-NCF FR). USING ANOTHER MAY NOT
01
WORK AS THE UNIT IS DESIGNED SPECIFICALLY FOR IT.
CAUTION: DO NOT ATTEMPT TO RECHARGE ALKALINE
BATTERIES. KEEP THE HANDHELD UNITS OUT OF THE
CHARGING CRADLES WHEN USING STANDARD BATTERIES.
You can have multiple handheld units and intercoms to complete your family communications
needs. The units will all communicate with each other as long as they are set to the same channel
and subcode (see and for more information).SETTING THE CHANNEL SETTING THE SUBCODE
IMPORTANT: Remove batteries before storing the Wireless Intercom for extended periods.
Batteries corrode over time and may cause permanent damage to the unit. Different types
of batteries or new and used batteries should not be mixed. Exhausted batteries should be
removed from the unit and disposed of properly.
TURNING THE INTERCOM ON AND OFF
1. To turn the Intercom on, rotate the
antenna clockwise to a vertical position.
2. To turn the Intercom off, rotate the
antenna back to a horizontal position.
ADJUSTING THE VOLUME
The speaker volume level is indicated by the number of bars on the symbol displayed
on the bottom right portion of the LCD screen.
1. Press the button to increase the volume and the button to decrease the volume.
TRANSMITTING/RECEIVING - TALKING TO OTHERS IN YOUR GROUP
To communicate with others in your group, all members must have their units configured to the same
channel and subcode. See and for moreSETTING THE CHANNEL SETTING THE SUBCODE
information. When the intercom is on and not transmitting, the unit is in the standby mode. When you
receive a signal from another member in your group, the symbol will be displayed on the LCD.
To send a signal:
1. Press and hold the button to transmit. The transmit indicator will light RED and theTALK
symbol will be displayed on the LCD.
2. While holding the button, speak in a normal voice approximately 6 inches away fromTALK
the unit.
3. Release the button when you have finished speaking.TALK
IMPORTANT: To ensure that part of your communication is not cut off, allow a short pause after pressing
and before releasing the button when speaking. YOU CANNOT RECEIVE INCOMING MESSAGESTALK
WHEN THE TALK BUTTON IS PRESSED.
CHANNELS AND SUBCODES
The Intercom transmits and receives voice signals on 14 selectable channels (frequencies). In
addition to the 14 channels, the units are equipped with 38 selectable subcodes. To speak with
others in your group, all members must have their units configured to the same channel and subcode.
SETTING THE CHANNEL
1. Press the button repeatedly until the current channel flashes on the LCD.MENU
2. Use the and buttons to select the desired channel (1-14).
3. Press the button to confirm the channel selection and return to the standby mode.TALK
SETTING THE SUBCODE
Subcodes help filter interference and noise from other systems operating on the same channel.
When a subcode is activated, the unit ignores signals that are set to a different subcode. Thus,
a group can communicate on a 'noisy' channel using the subcode feature. The feature is perfect
for areas with heavy usage (e.g. construction zones) in which all 14 channels may be occupied.
1. Press the button repeatedly until the current subcode flashes on the LCD.MENU
2. Use the and buttons to select the desired subcode (0-38). Selecting 0 disables the
subcode feature.
3. Press the button to confirm the subcode selection and return to the standby mode.TALK
SCANNING CHANNELS
This feature continuously scans all channels and stops on the first active channel (observed traffic).
1. Press the button once. The symbol appears on the LCD and the unit beginsSCAN
scanning all 14 channels in order. The unit stops on the first active channel detected.
2. Press the button to communicate on that channel and leave the scan mode, or pressTALK
or to continue scanning for other active channels.
3. Press the button again to stop scanning.SCAN
MONITORING CHANNELS
By pressing the button, you are able to 'listen' to all traffic or noise active on the currentMONITOR
channel, regardless of signal strength and subcode settings. For continuous monitoring, press and
hold the button for at least three seconds. To deactivate continuous monitoring, pressMONITOR
the button again.MONITOR
CALL
The Intercom is equipped with a call feature that allows you to alert another party. In order
for the call feature to work, all radios must be on.
1. Press the button once. The transmit indicator will light RED and the symbolCALL
will be displayed on the LCD, indicating that a call transmission is taking place.
2. All nearby radios operating on the same channel and subcode will emit a page tone.
VOICE-ACTIVATED TRANSMISSION
The Intercom is equipped with a voice-activated transmission mode (hands-free mode). The
unit will transmit voice signals (and other loud sounds) without having to press the button.TALK
1. Press the button repeatedly until the symbol flashes on the LCD.MENU
2. Use the button to enable voice activated transmission and the button to disable it.
3. Press the button to confirm the selection and return to the standby mode.TALK
KEY LOCK
This function prevents unintended setting changes by locking all buttons. YOU WILLIMPORTANT:
NOT BE ABLE TO CHANGE THE CHANNEL, SUBCODE , VOICE-ACTIVATED TRANSMISSION
SETTINGS, OR OTHER SETTINGS WHEN THE KEY LOCK FEATURE IS ACTIVATED.
1. To lock the unit, press and hold the button for five seconds until the symbolMENU
appears on the LCD.
2. To unlock the unit, press and hold the button for five seconds until the symbolMENU
disappears from the LCD.
BATTERY LIFE INDICATOR
The symbol on the LCD shows the remaining battery level. Squares inside the symbol disappear
as the battery life decreases. When the battery level is low, the symbol will flash, indicating that
the batteries need to be changed. No rechargeable batteries allowed. (see BATTERY
INSTALLATION for more information).
CARING FOR YOUR INTERCOM
To clean the intercom, wipe with a soft cloth, slightly dampened with water. Do not use cleaners or
solvents on the radio as they can harm the body and leak inside, causing permanent damage.
Battery contacts can be wiped with a dry, lint-free cloth. If the intercom gets wet, turn off and
remove batteries immediately. Dry the battery compartment with a soft cloth to minimize potential
water damage. Leave cover off the battery compartment overnight or until completely dry. Do not
use intercom until completely dry.
SPECIFICATIONS
Frequency range ............................................................................................ 462.5625 to 467.7125 MHz
FRS channels ....................................................................................................................................... 14
Channel separation ......................................................................................................................... 25 kHz
Frequency deviation .......................................................................................................................... 1 kHz
CTCSS subcodes ................................................................................................................................ 38
Maximum range ........................................................................................................................... 2 miles*
Maximum RF output power ......................................................................................................... 0.01W
Battery life .......................................... 45 hours (40 standby, 5 talk/receive) using ALKALINE BATTERIES
* Functional range may be adversely affected by one or more of the following factors: weather,
radio frequency interference, low transmitter battery and obstructions between the transmitter
and receiver.
FCC INFORMATION
IMPORTANT: To maintain compliance with the FCC's
RF exposure guidelines, hold the transmitter and
antenna at least 2 inches (5 cm) from your face and speak in a normal voice, with the antenna pointed up
speak in a normal voice, with the antenna pointed up and away from the face. If you wear the handset on
your body while using the headset accessory, use only the supplied belt clip for this product and when
transmitting, take it out of the belt to ensure that the antenna is at least 2 inches (5 cm) from your body.
1 2 3 4
5 6 7
INSTRUCTION MANUAL
Questions? Call - -GE LIGHT
1800
Made in China for
GE Home Electric Products, Inc.
Nela Park, Cleveland, OH 44112
Desc.: GE5811-WCOM
WIRELESS INTERCOM
FAMILY COMMUNICATIONS
OFF
ON
VOLUME
TRANSMIT INDICATOR
RECEIVE INDICATOR
CHANNEL
SUBCODE
BATTERY LIFE INDICATOR
KEY LOCK SCAN CHANNEL
VOICE-ACTIVATED TRANSMISSION
LCD
SCREEN
TRANSMIT
INDICATOR
CHARGE
INDICATOR
CHARGE
INDICATOR
EAR/MIC
JACK (side)
MONITOR
TALK (push to talk: PPT)
POWER
SCAN
CALL
MENU
UP
DOWN
ANTENNA
(POWER
ON/OFF)
AC ADAPTER (top)
scan
talk
call
menu
chargecharge
power transmit
monitor
Charging Bay Charging Bay
Wireless Intercom
Use only the supplied antenna. Unauthorized antennas, modifications, or attachments could damage the
transmitter and may violate FCC regulations.
3.875"
4.75"
This device complies with Part 15 of the FCC Rules. Operation is subject to the following two conditions:
(1) this device may not cause harmful interference, and (2) this device must accept any interference received
including interference that may cause undesired operation.
WARNING: Adjustment to this unit or replacement of any transmitter component (crystal, semiconductor, etc)
to this unit that could result in a violation of the rules.
NOTE: This equipment has been tested and found to comply with the limits for a Class B digital device,
pursuant to Part 15 of the FCC Rules. These limits are designed to provide reasonable protection against
harmful interference in a residential installation. This equipment generates, uses and can radiate radio
frequency energy and, if not installed and used in accordance with the instructions, may cause harmful
interference to radio communications.
However, there is no guarantee that interference will not occur in a particular installation. If this equipment
does cause harmful interference to radio or television reception, which can be determined by turning the
equipment off and on, the user is encouraged to try to correct the interference by one or more of the
following measures:
Your wireless hand-held portable transceiver contains a low power transmitter. When the Push-to-Talk (PTT)
button is pushed it sends out radio frequency (RF) signals. The device is authorized to operate at a duty
factor not to exceed 50 %. In August 1996, the Federal Communications Commissions (FCC) adopted RF
exposure guidelines with safety levels for hand-held wireless devices.
Reorient or relocate the receiving antenna.
Increase the separation between the equipment and receiver.
Connect the equipment into an outlet on a circuit different from that to which the receiver is connected.
Consult the dealer or an experienced radio/TV technician for help.
WARNING
Risk of fire
When using an AC
to DC adapter, insure
proper polarity and
voltage.