Jawon Medical ECHOFT Wrist Type NIBP User Manual ECHO FT Arm
Jawon Medical Co., Ltd. Wrist Type NIBP ECHO FT Arm
UserManual.wiki
>
Jawon Medical
>
ECHOFT User Manual
Users Manual
Navigation menu
Upload a User Manual
Namespaces
Wiki Guide
HTML
PDF
Info
Views
User Manual
Discussion / Help
Navigation


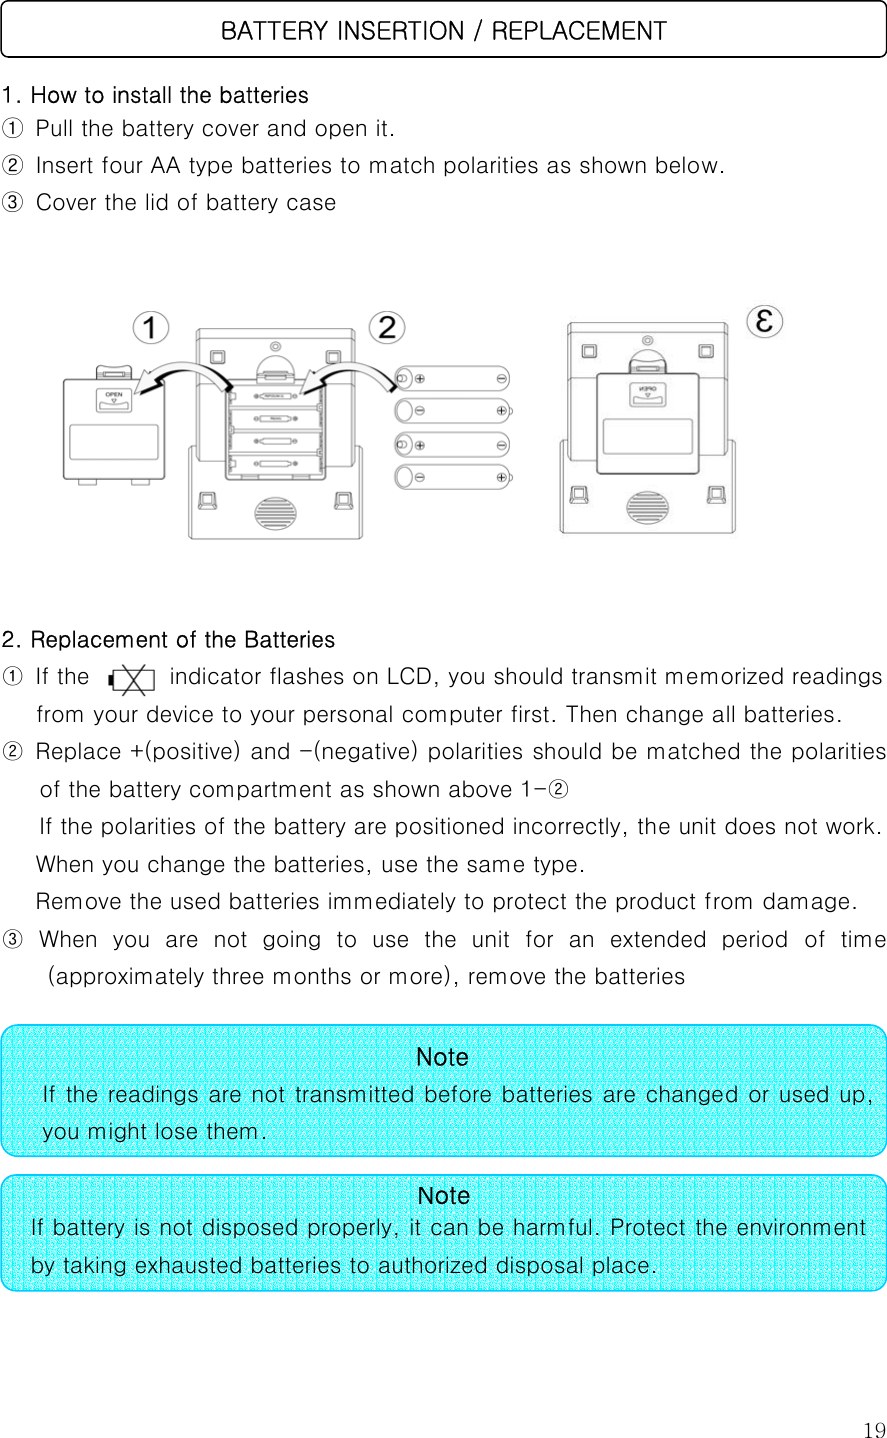
![20 Connect the AC adapter between unit and wall outlet • Sequence is Year→Month→Day→Hour→Minute. 1. Entering the mode to set date and time. ① After change batteries the mode appears on LCD automatically. ② At power off, press [CLOCK] button. [YEAR00] will appear on the screen, and [00] flashes. 2. Setting up ① Press [SET UP] button to set the year. Whenever ‘SETUP’ button is pressed or you keep it pressing, the number will increase gradually or rapidly by ‘01’. Its range is 00 to 99. ② After setting the year, press [CLOCK] button again. The month indicator, the first two numbers in upper LCD line, will flash. Set it by pressing ‘SET UP’ button. Its range is 01 to 12. SETTING DATE AND TIME CONNECTING OF AC ADAPTER](https://usermanual.wiki/Jawon-Medical/ECHOFT/User-Guide-486454-Page-20.png)
![21③ After setting the month, press [CLOCK] button once again. The day indicator, the second two numbers in upper LCD line, will flash. Set it as same way. Its range is 01 to 31. ④ After setting the day, press [CLOCK] button again. The hour indicator, the third two numbers in upper LCD line, will flash. Set it as same way. Its range is 00 to 23. ⑤ After setting the hour, press [CLOCK] button once more. The minute indicator, the last two numbers in upper LCD line, will flash. Set it. Its range is 00 to 59. ⑥ After setting the minute, please power off then on. 1. Sound ON/OFF ① If you press [I/O] button around 3 seconds, [Snd On/OFF] signal appears on LCD. ② By pressing [ ] button to change it. ③ Press [I/O] button to complete it. 2. Volume control ① If you keep [I/O] button pressing after appearing [Snd] signal, the signal is changed to [voL 1]. ② Select the volume size by pressing [ ] button. Its range is 1 to 4. ③ Press [I/O] button to complete it. Note : When you press [I/O] button after setting the date and time, they are stored coinciding with the power off. If you press [I/O] button on your way to set, what you have done will be stored. The date and time are maintaining during power off but they will return to initial status when batteries are changed or AC adapter is pulled out from a wall outlet. SOUND ON/OFF AND VOLUME CONTROL](https://usermanual.wiki/Jawon-Medical/ECHOFT/User-Guide-486454-Page-21.png)
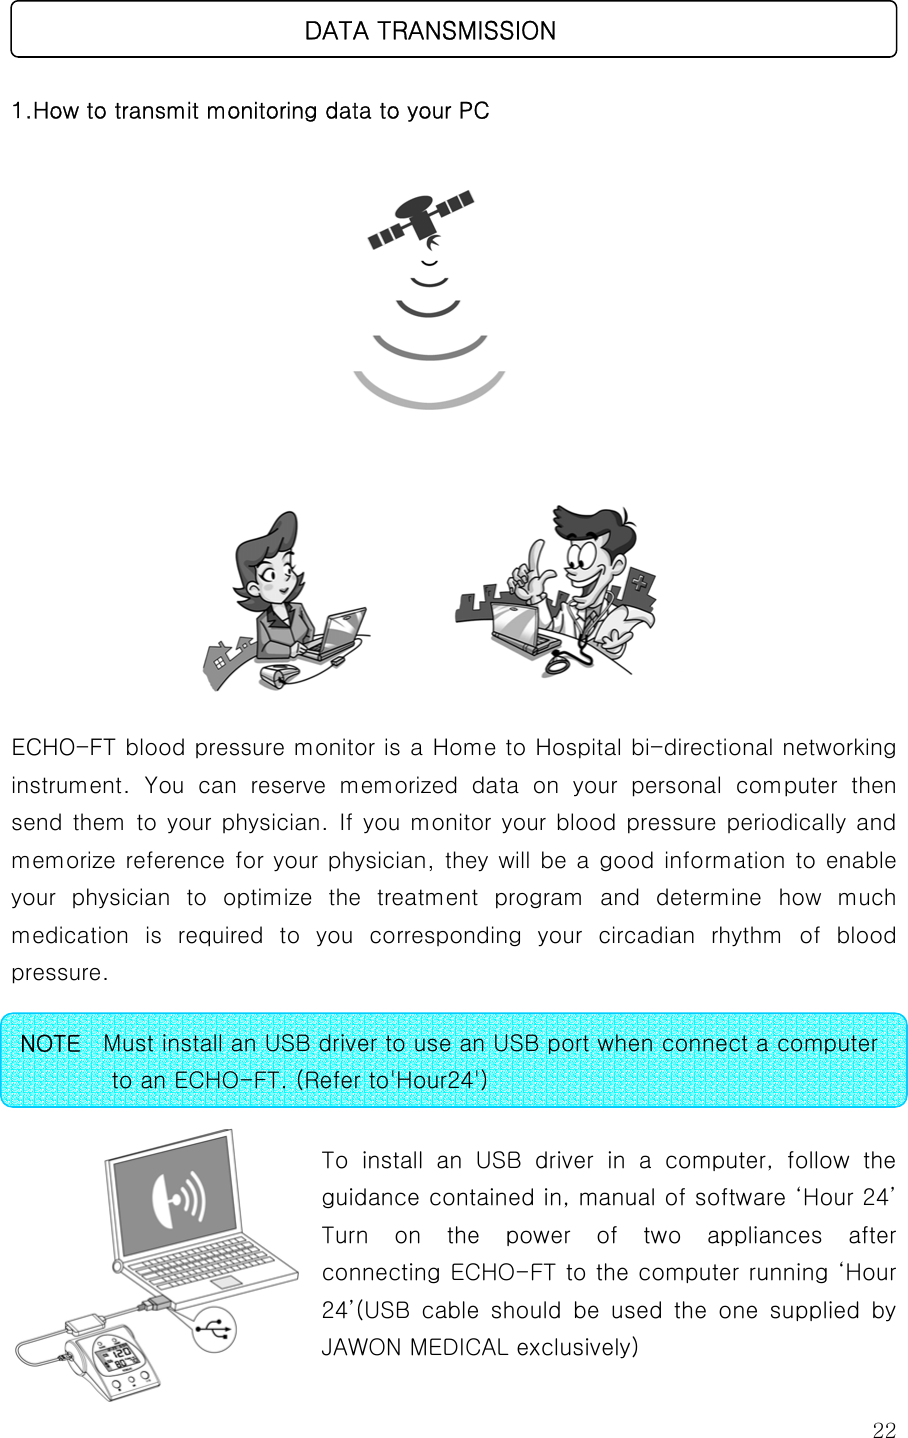
![232. Data transmission ① Execute software 'Hour 24' in a personal computer. ② Connect USB cable to a computer and a port of ECHO- FT in order to transmit saved data. ③ Press only one time of [ ] button of ECHO-FT. ④ Press a [ ] button to transmit to a computer. (All measurement data saved in memory is transmitted) 3. How to send the data to your doctor ① Retrieve saved data in order to select the date and time in software 'Hour 24'. ② An 'E-mail' button will be on right upper side appeared at various measurement graphs and right upper side when a data to send. ③ A window to get input if click a 'E-mail' button opens. Input a mail address and title and click a 'Send E-mail' button. (A save situation of a file is marked in E-mail title, and a transmitted figure file and blood pressure measurement file are saved in a computer of a user. ('Hour24' manual reference ) Ncte Please transmit the data file which use a [SAVE] function of software 'Hour24' use personal mail, and to transmit, and was saved. Detailed contents refer to 'Hour 24' manual. NOTE 1. 'Hour24' is transmitted using Microsoft Outlook Express or anything else. 2. Microsoft Outlook Express should be installed on user’s computerto use Microsoft Outlook Express mail.](https://usermanual.wiki/Jawon-Medical/ECHOFT/User-Guide-486454-Page-23.png)
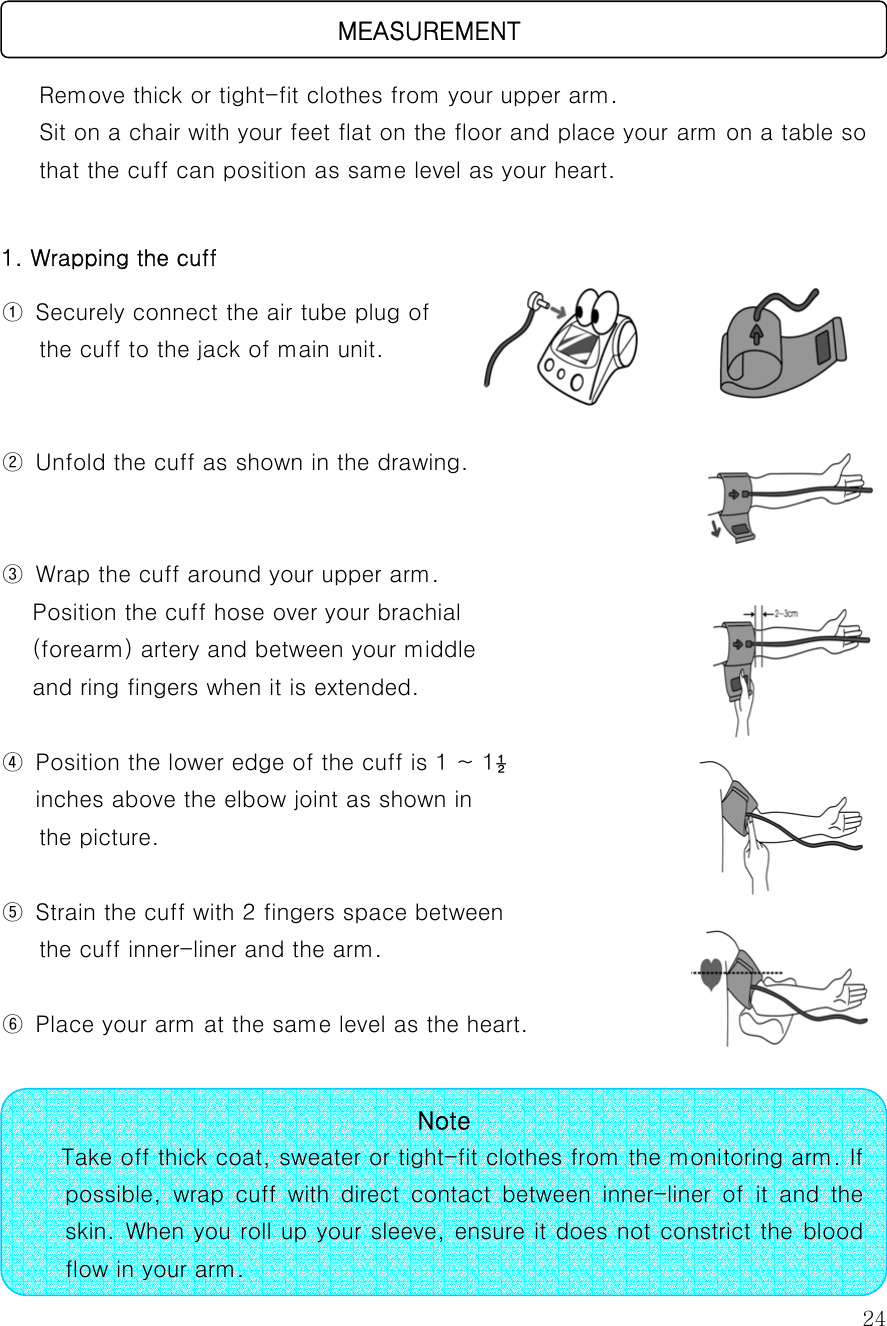
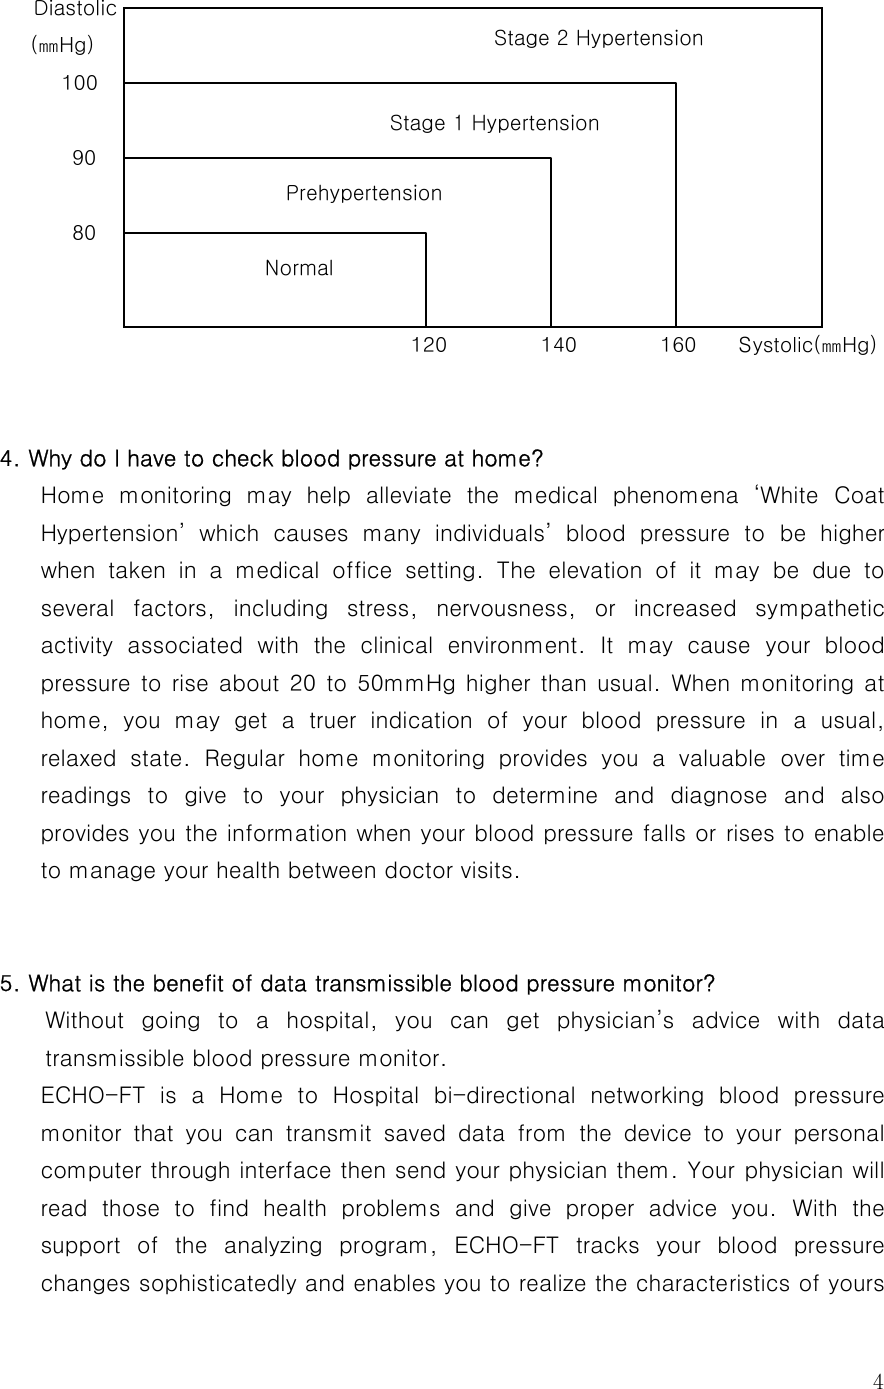
![25 2. Correct measuring posture ① Please place your arm with the palm facing up on the table. When the table is too low for your arm to position the heart level, adjust the level off with a cushion, towel or a similar material. ② For monitoring, sit down comfortably on a chair with your feet flat on the floor and take deep breaths 5 to 6 times and relax. 3. Measuring method ① Press the I/O button Wrap the cuff around your arm and press [I/O] button to start. There will be a momentary full-segment display. ② Automatic pressurization The LCD panel changes to the momentary screen displayed all symbol in LCD edge and [0] in main LCD. Note Sit comfortably on a chair with your feet flat on the floor and relax before monitoring starts. Monitoring should be taken in a quiet place.](https://usermanual.wiki/Jawon-Medical/ECHOFT/User-Guide-486454-Page-25.png)
![26Then [▲] symbol remains on LCD panel coinciding with a start of pressurization. At this time the number to show the inflated cuff pressure will increase rapidly as a normal process and the cuff will tighten as air enters in it. The value of pressurizing is determined automatically. Do not move your arm and remain still until the entire measurement completed. ③ Monitoring is in progress When the pressurizing is over, [▼] symbol appears and air is released from the cuff slowly. You can feel the cuff become less tight gradually. ④ Monitoring will start with deflation and if the pulse is sensed during deflation [♥] symbol appears and flashes. ⑤ When noise is detected during measurement, [ ] appears on its place on the screen. In case that you move or speak, [ ] is accompanied with a voice warning as “Don’t move or speak please.” But monitoring will be continued after a pause. ⑥ When Error occurs due to insufficient inflation, re-pressurization will be held automatically with a voice massage as “Can’t measure. We will try again.” ⑦ Display the results When monitoring is over, the value of systolic and diastolic blood pressure and pulse will be displayed Note 1.When noise or movement including talking is sensed during pressurization, re-pressurization will be held automatically. 2. If a higher inflation is needed in any circumstances, the device re-inflates the cuff up to 30~40㎜Hg higher](https://usermanual.wiki/Jawon-Medical/ECHOFT/User-Guide-486454-Page-26.png)
![27on LCD simultaneously, then the voice massage comes out as “Your blood pressure is systolic 000, diastolic 000, pulse 00.” If the noise or movement has been detected during monitoring, voice massage says also “There is movement during measuring.” and shows the [ ] in result view. ⑧ Switch off the power To finish the measurement, press the I/O button and remove the cuff gently. The monitored reading will be stored automatically into the memory. 4. Memorizing ECHO-FT has 64 reading memory capacities. When memorized readings are retrieved, they are displayed with monitoring date and time respectively. The reading detected noise or movement during measurement accompanies [ ]. 1) Storing the readings The readings are stored automatically when the monitoring is completed. When its memory capacity is fully occupied the last data replaces the oldest one. 2) How to retrieve the stored data ① Press the [ ] button. ② The latest reading will be displayed on main Note Even if you forget to press the I/O button, the power will be automatically turned off after 1 minutes. Caution 1. During measurement, do not move your fingers, hand, or arm, and do not put them on stress. 2. If you want to stop measuring, press the I/O button. Pressurization will stop immediately and air will be exhausted rapidly, then the power will be turned off.](https://usermanual.wiki/Jawon-Medical/ECHOFT/User-Guide-486454-Page-27.png)
![28LCD and the number ‘01’ appears in the memory number displaying part. ③ When the [ ] button is pressed again the second latest reading will be displayed on LCD with the memory number ‘02’. ④ Further pressing of the [ ] button, the data will be displayed respectively in reverse order from the latest one to oldest one with memory number increasing. Note 1.Data saved in memory can be all deleted, exchange battery or remove an AC adapter 2. Please insert battery in unit when use an AC adapter 3. To completely eliminate saved data, take out battery and please press one time of [I/O] button. 4. The memory capacity is subject to change for promotion.](https://usermanual.wiki/Jawon-Medical/ECHOFT/User-Guide-486454-Page-28.png)
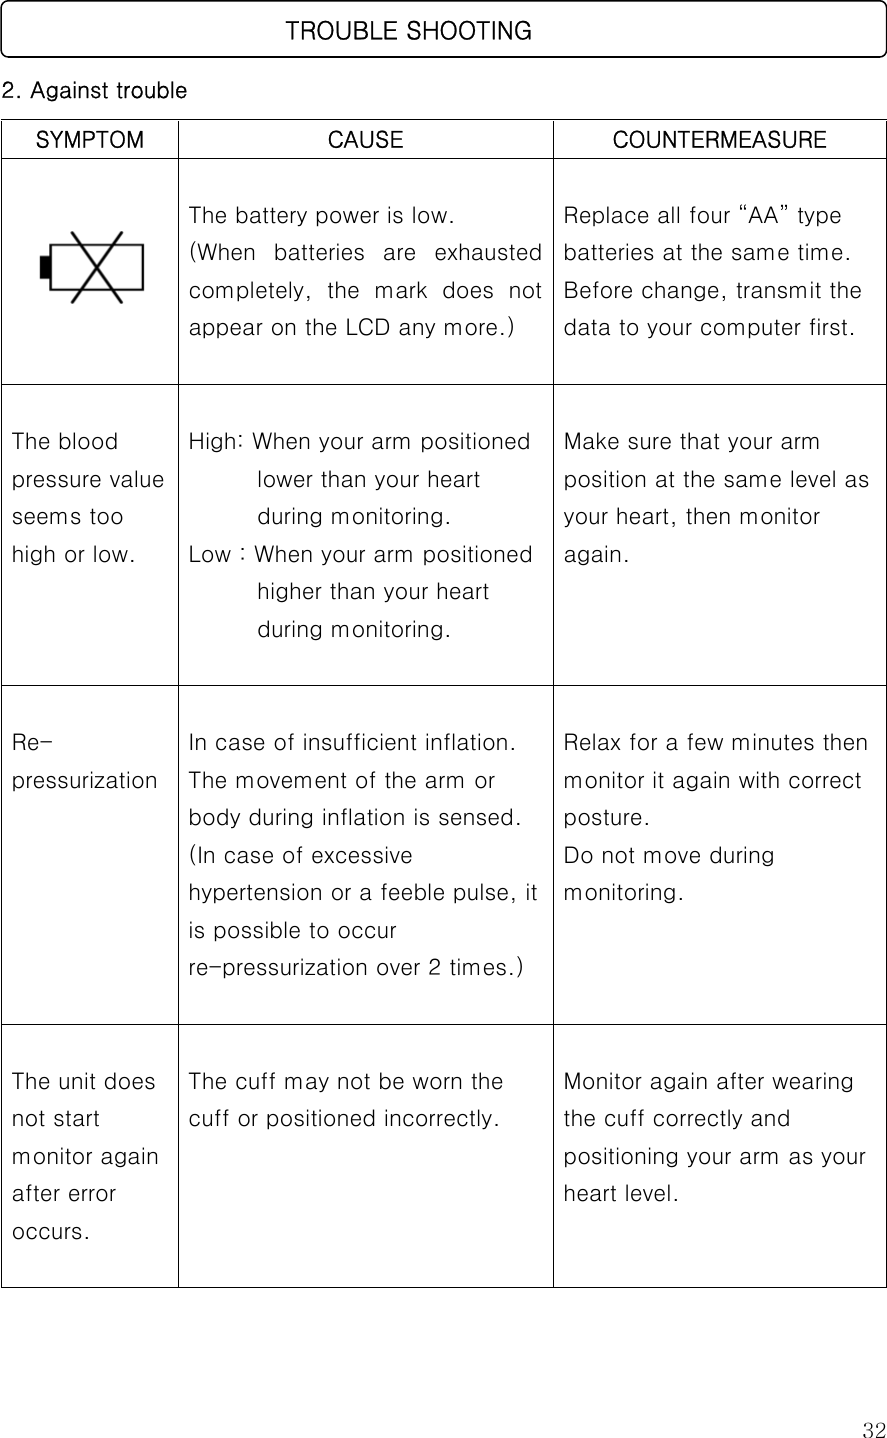
![31 1. Against Error ERROR CAUSE SOLUTION Err 0 * When inflation level is not sufficient. * When air hose is not connected well. * When air leaks from the cuff. * When battery power is low. * Please set higher inflationLevel. * Check if there is any ‘CAUSE’. * After settle it, monitor again. Err 1 * When a cuff is not connected to a monitor. *When a cuff is positioned incorrectly * Please check if the cuff is connected well to the unit and monitor again. Err 2 * When the pressurization is over than 300㎜Hg. * Please turn the power off then on and monitor again. Err 3 * When monitoring is carried out the wrong way. * When a read data is not output as a result of noise or movement detected. * Please read ‘wrapping the cuff’ and ‘correct measuring posture’ in ‘Measurement’ part. (page 18~19) *Monitor again following theway instructed. Err 4 * When moving or speaking is sensed during monitoring. * Please do not move or speak during monitoring. Err 5 *When battery is not fixed well. *When the polarities are positioned incorrectly. *Check if the polarities of the batteries are positioned correctly. *After disconnecting batteries in unit and press [I/O] button, then replace them. ※ If any error continues, call its service center. TROUBLE SHOOTING](https://usermanual.wiki/Jawon-Medical/ECHOFT/User-Guide-486454-Page-31.png)