Jehe Technology Development I20PD Mini PC User Manual Giada Slim i20 PD rev1
Shenzhen jiehe Technology Development Co.,Ltd. Mini PC Giada Slim i20 PD rev1
Giada Slim-i20-PD_User Manual_rev1
All rights reserved
www.giadatech.com
FCC ID:YIKI20PD
This device complies with Part 15 of the FCC Rules. Operation is subject to the following two conditions:
(1) this device may not cause harmful interference, and
(2) this device must accept any interference received, including interference that may cause undesired
operation.

Gratitude ……………………………………………………………………………
Copyright and Trademark …………………………………………………………
I. Introduction to the Manual………………………………………………………
1. Precautions …………………………………………………………………
2. Accessories …………………………………………………………………
II. About the product ………………………………………………………………
1. Appearance …………………………………………………………………
2. Features ……………………………………………………………………
III. System setup……………………………………………………………………
1.Install an operating system…………………………………………………
2. Drivers install ………………………………………………………………
IV. Equipment expansion …………………………………………………………
1. Card Reader…………………………………………………………………
2.USB device …………………………………………………………………
3. Audio device…………………………………………………………………
4. Network device………………………………………………………………
V. Power supply and maintenance ………………………………………………
1.Adapter ………………………………………………………………………
2. Maintenance…………………………………………………………………
VI. Troubleshooting…………………………………………………………………
Contents
2
4
3
4
5
6
6
8
9
9
11
12
12
12
13
13
15
15
16
17
1
www.giadatech.com

32
Gratitude
Copyright and Trademark
Dear Users,
Thank you for choosing Giada Slim series product.
In such an epoch of PC development, we launched Giada Slim-i series PC
which is characterized by the mini shape, vogue and ultra-thin structure,
environment friendly and lower power consumption. Giada Slim-i series provide
with multiple functions, including serving as exclusive downloader, small server,
internet access for office work and higher mobility when compared with
traditional PCs. Giada will allow you to undergo new experience in the field.
This User's Manual would allow you better understand the device. Therefore,
please carefully read the whole manual before you operate the device.
In case you have any questions concerning after-sales services in using the
product, please contact us according to the contact information below:
Website: www.giadatech.com
Add: 2/F, Building A, Tsinghua Information Harbor, North Section, Shenzhen
Hi-Tech Park, Nanshan, Shenzhen, China.
Shenzhen JIEHE Technology development Co., Ltd will try our best to ensure
the accuracy and intactness of this manual. However, as our products are
being upgraded all the time, we can't guarantee that this Manual is flawless
and shall bear no responsibility if it is misunderstood by the user. The User's
Manual is subject to change without prior notice.
Giada and the related mark are trademarks owned by Shenzhen JIEHE
Technology development Co., Ltd.
Windows, MS, MS-DOS, Windows XP, Windows Vista and Windows 7 are
trademarks of USA Microsoft Corporation, which were registered in the US,
other countries or other regions in the world.
INTEL and Atom are trademarks of USA's INTEL, which were registered in the
US, other countries or other regions in the world.
NVIDIA ION, Geforce, Geforce CUDA, PureVideo HD and PhysX are trademarks
of USA's NVIDIA, which were registered in the US, other countries or other
regions in the world.
Shenzhen JIEHE Technology development Co., Ltd reserves the right for final
interpretation of this Manual. Copying and reproduction of the contents in this
document, or storage and transfer in any form without the prior written permission
of Shenzhen JIEHE Technology development Co., Ltd is prohibited.
www.giadatech.com
54
I. Introduction to the Manual
1. Precautions
In order to prevent the PC from being damaged, extend its service time, and
ensure your normal use and personal safety, please carefully read the whole
User’s Manual and the related safety information and strictly follow the
requirements in it. You should also keep the Manual well.
· Please read the documents attached to the product first. The page exclusively
inserted should be read firstly.
· Please observe all alarm information and marks on safety.
· Please use the original power adapter, or use special power supply mentioned
in the Manual.
· Place place the product correctly on your table and make sure the anti-sliding
base is installed.
· In lightning time, do not plug or unplug the phone cable, network cable, power
cord or other conductors connecting outside.
· Unplug the power cord before you clean the device. Never use liquid, sprayed
cleaning agent or wet cloth to clean the product.
· In order to protect the operating system, motherboard and hard disk, please
do not keep pressing the power switch or the reset key. Avoid interrupt power
failure during system’s running, which might also physically damage the
operating system.
· Do not remove the shell or repair the product without permission. such work
should be done by professionals.
· Keep the PC away from heat source
Never block the heat vents. Keep your PC away from direct sunshine.
· Keep the product away from moisture
Never spill water or other liquid onto it. You should call the professional service
personnel under following circumstances:
a. The power cord or plug was damaged.
b. Conductive liquid went into the product.
c. The product was dropped onto the ground or its shell was damaged.
d. When unidentified errors occurred or the product’s performance is obviously
deteriorated, please cut off power immediately and contact professional
technicians.
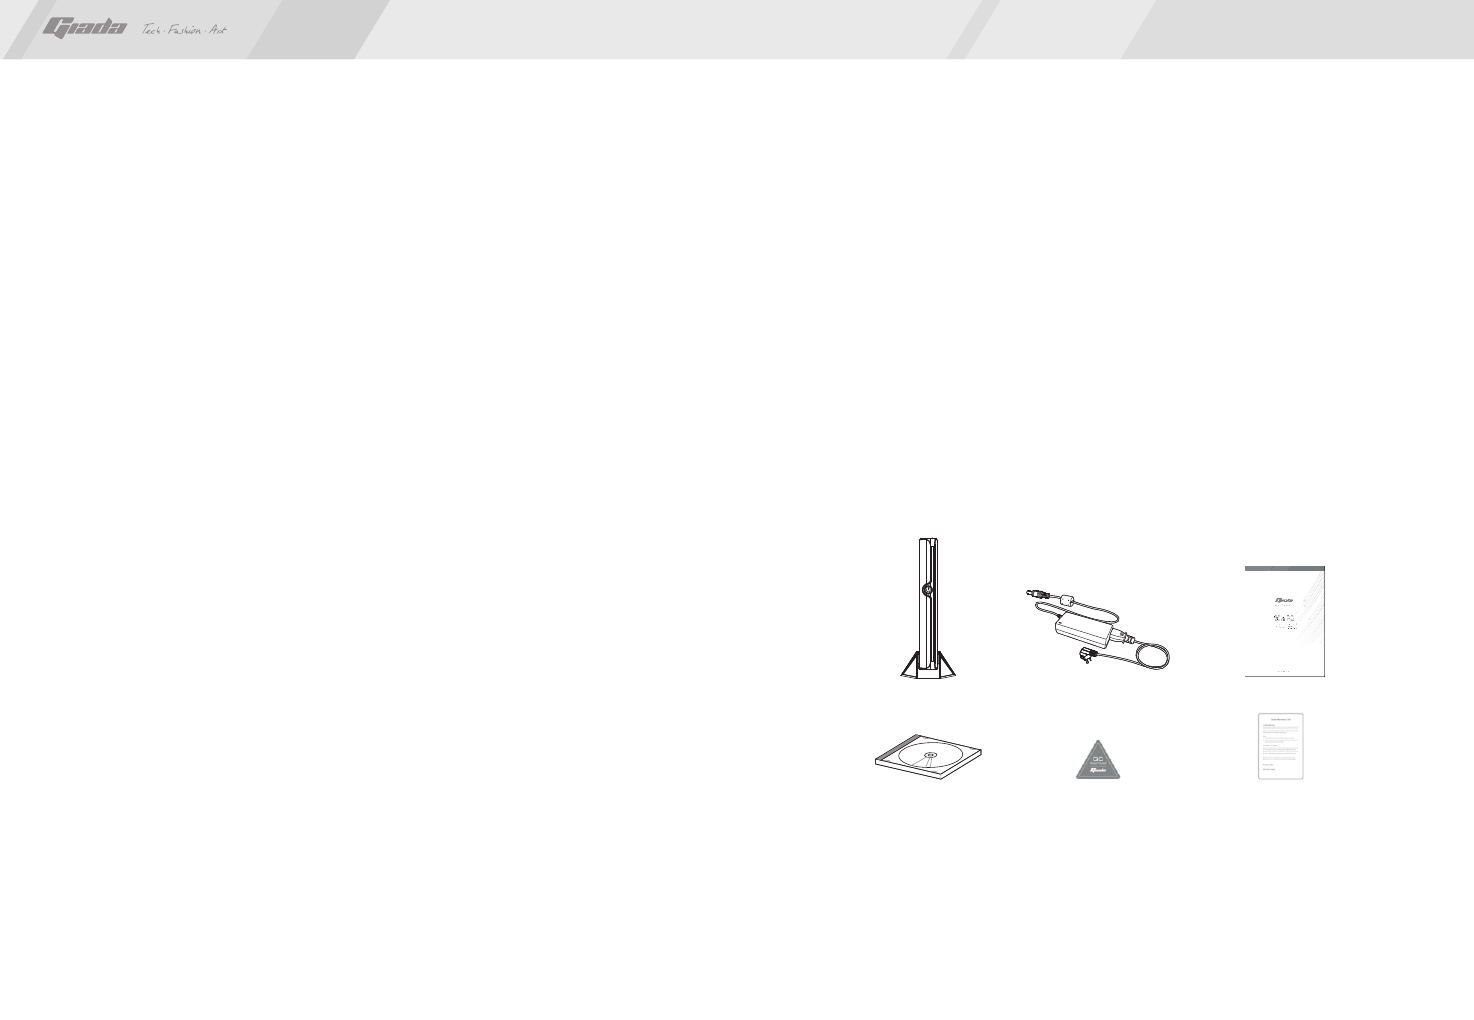
2. Accessories
Your Giada Slim-i series consists of the accessories in the table below. If any of
them is missing, please contact your local distributor or the customer service
center timely.
· Host (with base frame)1 unit · Adapter (with power cord)1 piece
· User’s Manual1 copy · Disk1 piece
· Certificate of Conformity1 copy · Warranty Card1 copy
Note: Picture is just for your reference, please subject to the physicals.
( PC ) ( Power Adapter ) ( User’s Manual )
( Drivers CD ) ( Certificate ) ( Warranty Card )
www.giadatech.com
76
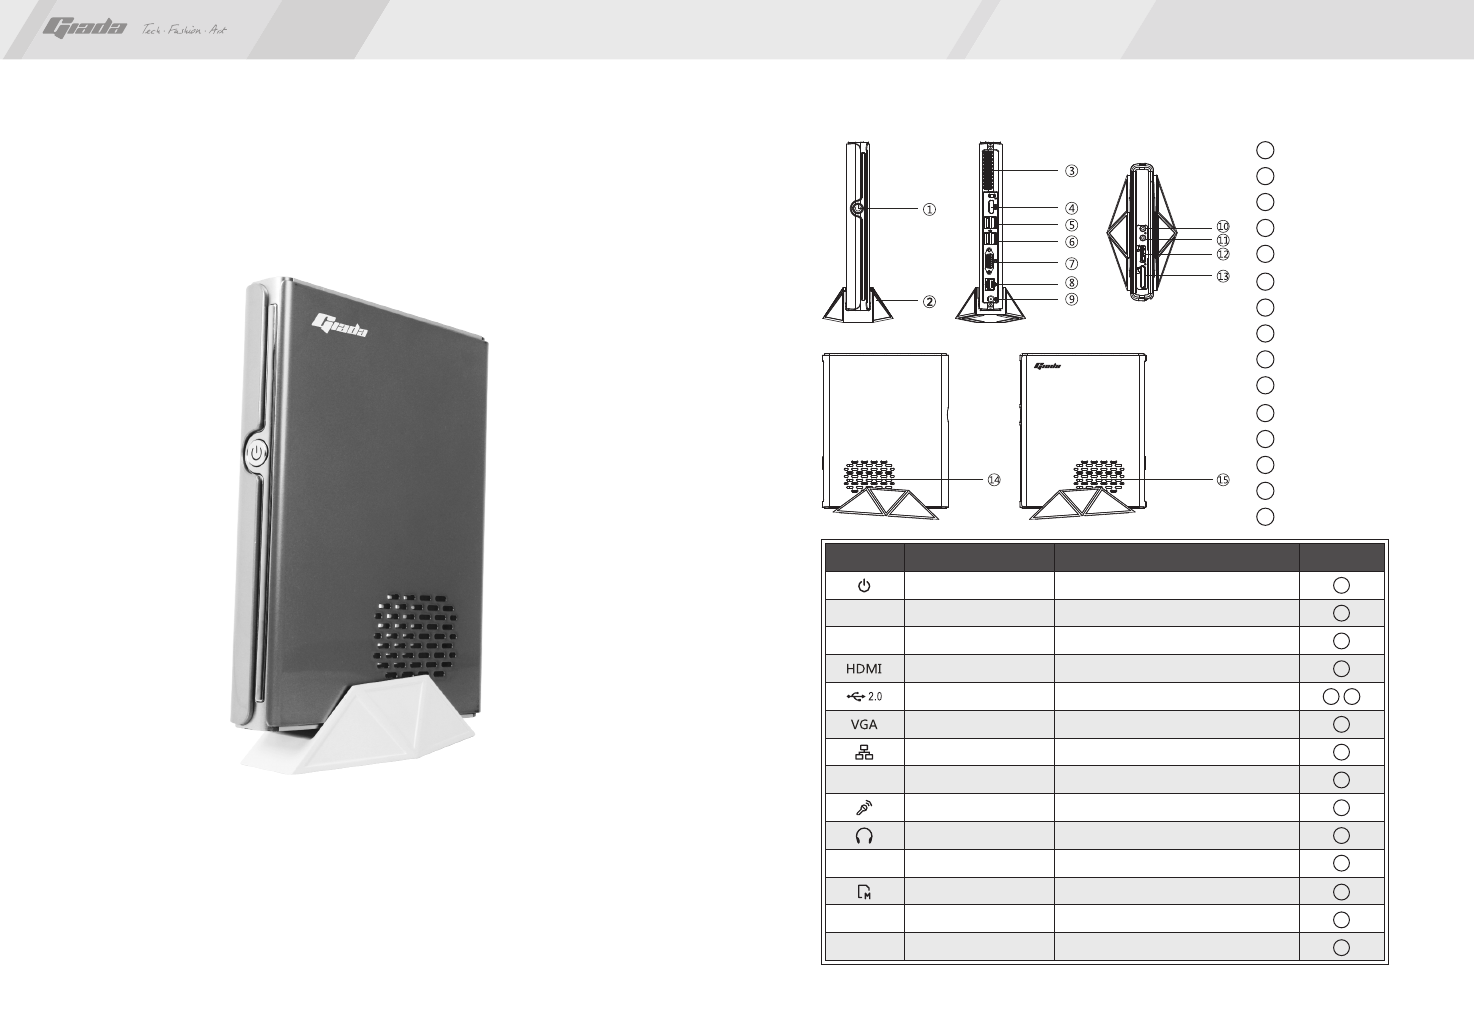
1. Appearance
II. About the product
15
14
13
12
11
Output for audio
USB/e-SATA port
Card reader
Left air vent
Right air vent
5
4
3
2
1
Power switch
Base frame
Port of heat sink
HDMI interface
USB interface
10
9
8
7
6
USB interface
VGA interface
LAN interface
Power interface
Input for mic
Picture of the shell
Giada mini PC with multiple interfaces can be connected to various types of
monitors, storage devices and so on. There are some brief for all kinds of
pictures in following table. The table will make you better understand the structure
of the product.
Power switch
Base frame
Port of heat sink
HDMI interface
USB interface
VGA interface
LAN interface
Power interface
Input for mic
Output for audio
Start the PC
To fix the PC for safety purposes
To allow the heat to be vented out
Connect to HDMI digital monitor
Connect USB devices
Connect VGA analog monitor
Link to the internet
Connect power adapter
Connect audio input device
Connect audio output device
DescriptionIcon Use Position
1
2
3
4
6
5
12
7
8
9
10
11
Card reader
13
14
15
To read SD/MMC/MS/MS PRO storage card
USB/e-SATA port Connect USB/e-SATA devices
Left air vent
Right air vent
To allow air to get through
To allow air to get through
www.giadatech.com
98
2. Features
A. Slim appearance and High mobility
Giada Slim-i series is only one-thirtieth of the desktop PC and less than 1kg,
easy to be carried anywhere. Your space can be saved with the stylish
appearance and book-size structure.
B. Household downloader/server
The product also features its environmental-friendly design, lower power
consumption (only 1/3 of traditional PC, less than that of ordinary power saving
lamps), improved laptop radiating technology and low noise. Low power
consumption and quiet running make it particularly suitable for downloading in
sleeping time.
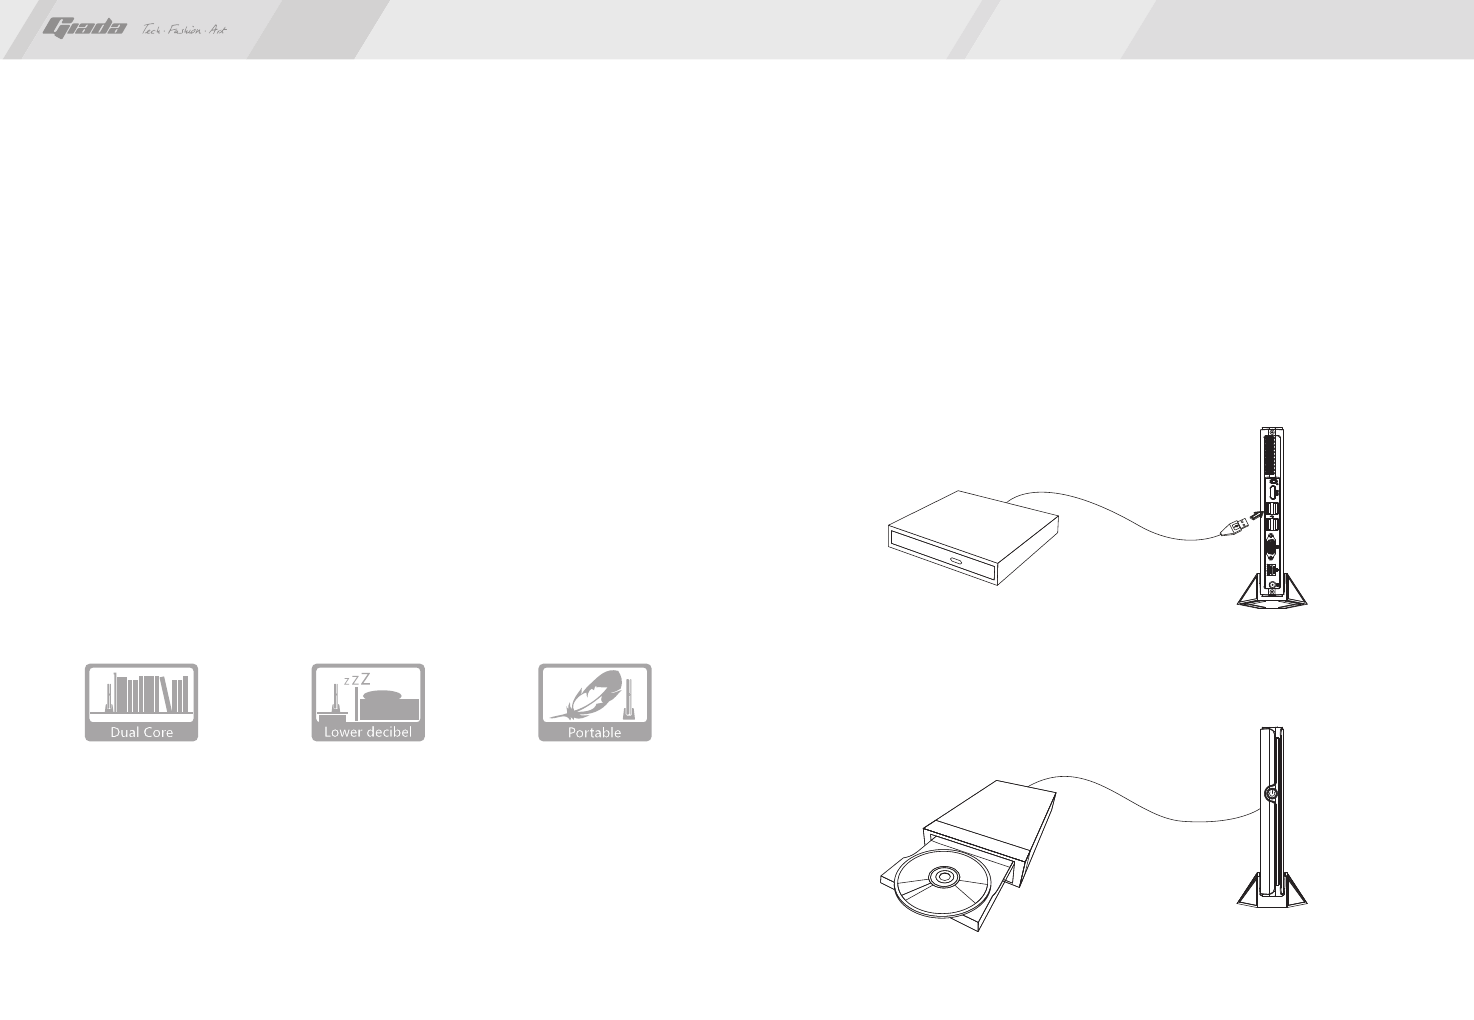
III. System setup
1. Install an operating system
This product supports Windows XP, Windows Vista, Windows 7 and other normal
operating systems. If you want to install a new or change your current operating
system, you can consult your local distributor, or you can connect the PC to an
external CD-ROM or DVD-ROM and use the disk for installation.
Step1. Connect the external CD-ROM or DVD-ROM to PC and start up.
Step2. Put your operating system disk in the external USB device.
www.giadatech.com
1110
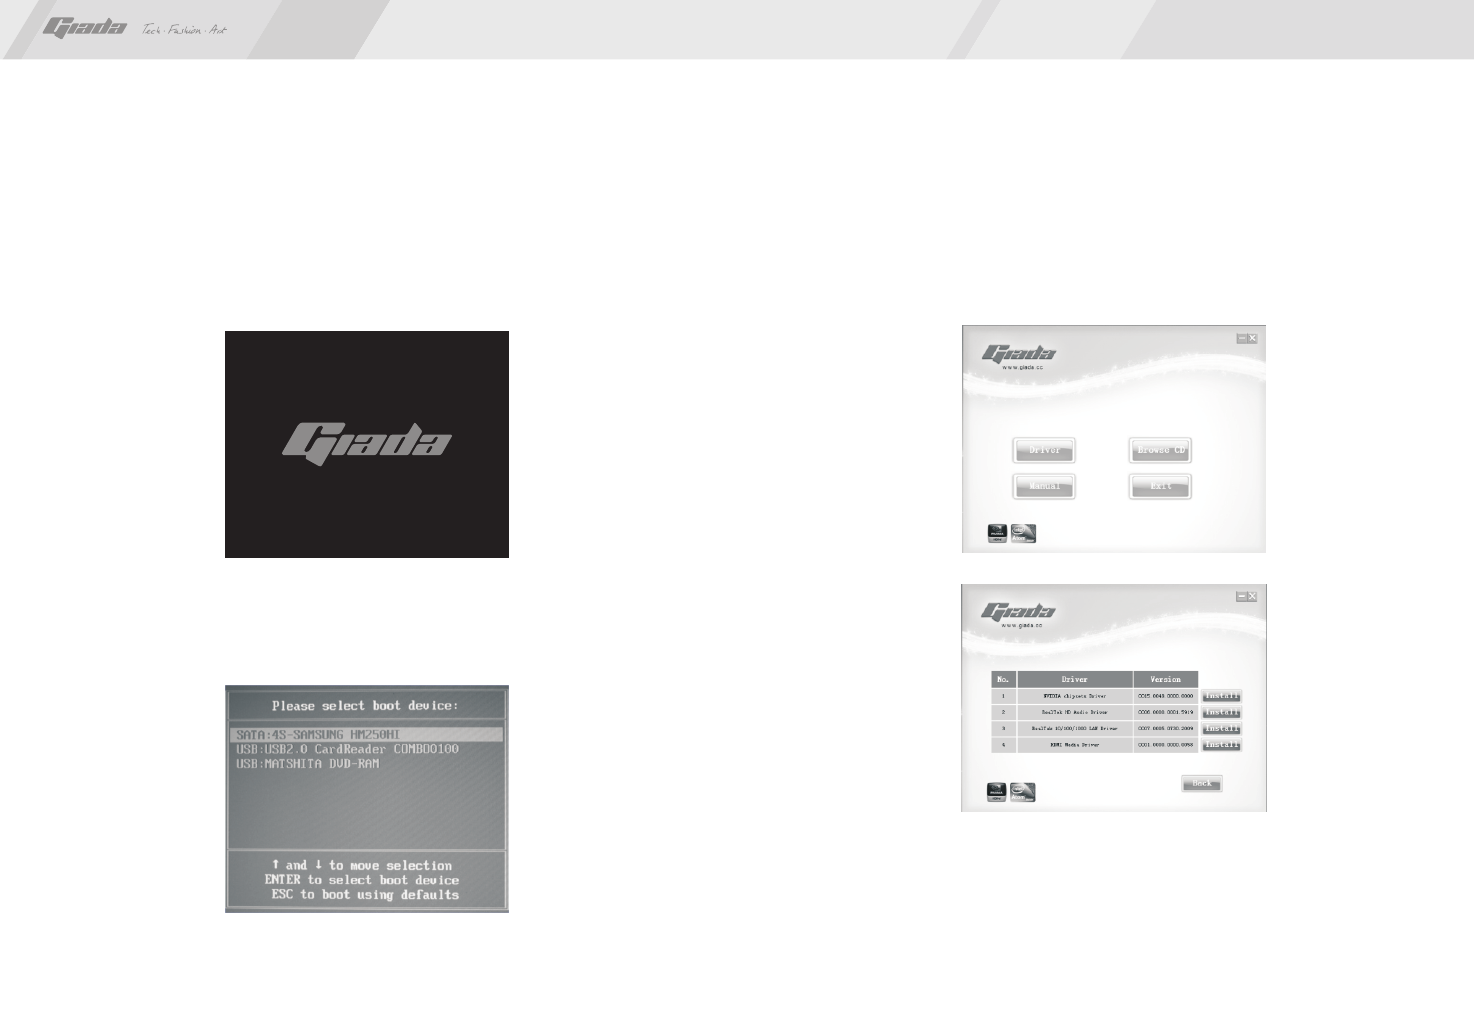
Step3. Press Hot-Key on your keyboard while “Giada” logo appears on your
screen after starting up:
For i20/22-PD, i35/36, press “F12”;
For i23, press “F10”. (see the picture showed below)
Step4. A window pops up as the picture below. It lists all the possible booting
devices you’ve connected to the PC, choose the one with operating system disk
and press “enter”.
Step4. Follow the instructions to complete install.
2. Drivers install
After the operating system has been installed, we need to install some hardware
drivers.
Step1. Put the drivers CD into CD-ROM, an user interface pop up automatically.
Click the “Drivers” button for next step. (for Windows XP, Windows Vista, Windows 7 OS)
Step2. The driver install program will sense your PC, and list all the drivers you need.
Step3. Install all the listed drivers follow by the program instruction, and than
restart the computer.
Caution:
· If you are using a wireless LAN card with Bluetooth, the Bluetooth function is
NOT supported under Windows VISTA.
· Some hardware have driver for Linux, they are in the document named “Linux”.
www.giadatech.com
1312
IV. Equipment expansion
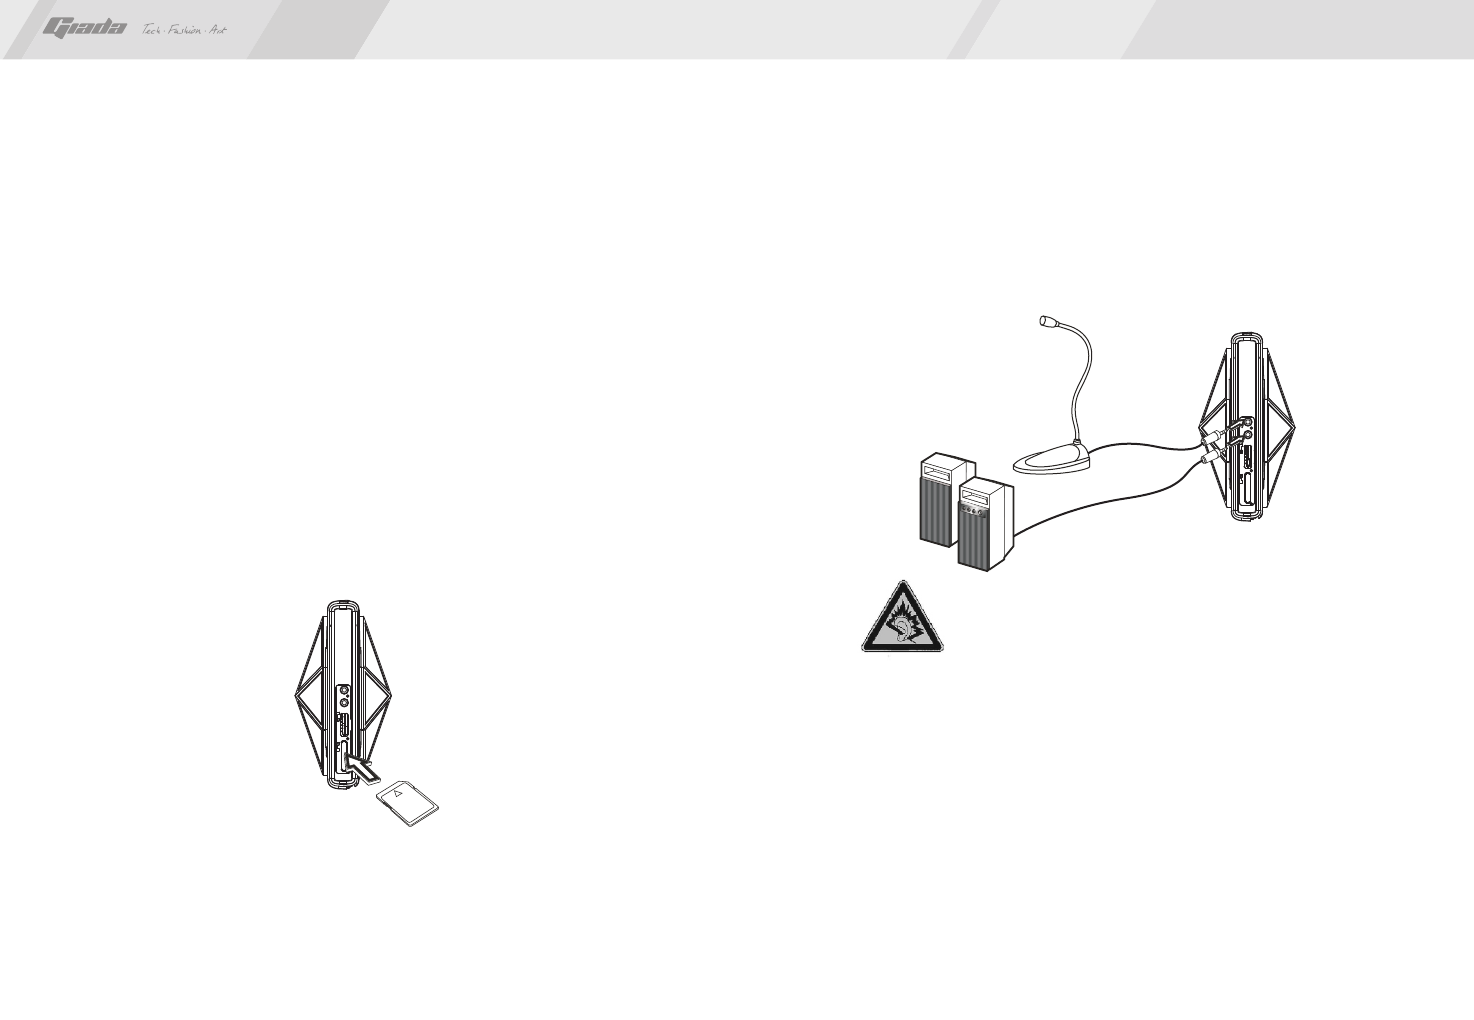
1. Card Reader
The card reader of this product can support SD, MS, MS PRO, MMC and other
mobile memory cards. It also supports PNP and hot swapping.
· Insert the mobile memory card into PC through the top port on it and pay
attention to the card’s sides. Never use excessive force when inserting the card.
Otherwise the memory card or the slot may be damaged.
Note: SD/MMC: with the omitted angle facing the right; MS/MS PRO: with the
omitted angle facing the left.
· Exit of memory card:
(1) Stop operation on the card;
(2) "Safely remove" the card through the operating system;
(3) Take out the card gently.
2. USB device
The USB interfaces can support various types of USB devices, including
USB CD-ROM, USB mobile device, USB mouse and USB TV card.
3. Audio device
You can connect the external microphone (or other audio input equipment) to
audio input, and connect the earphone or speaker to the output port.
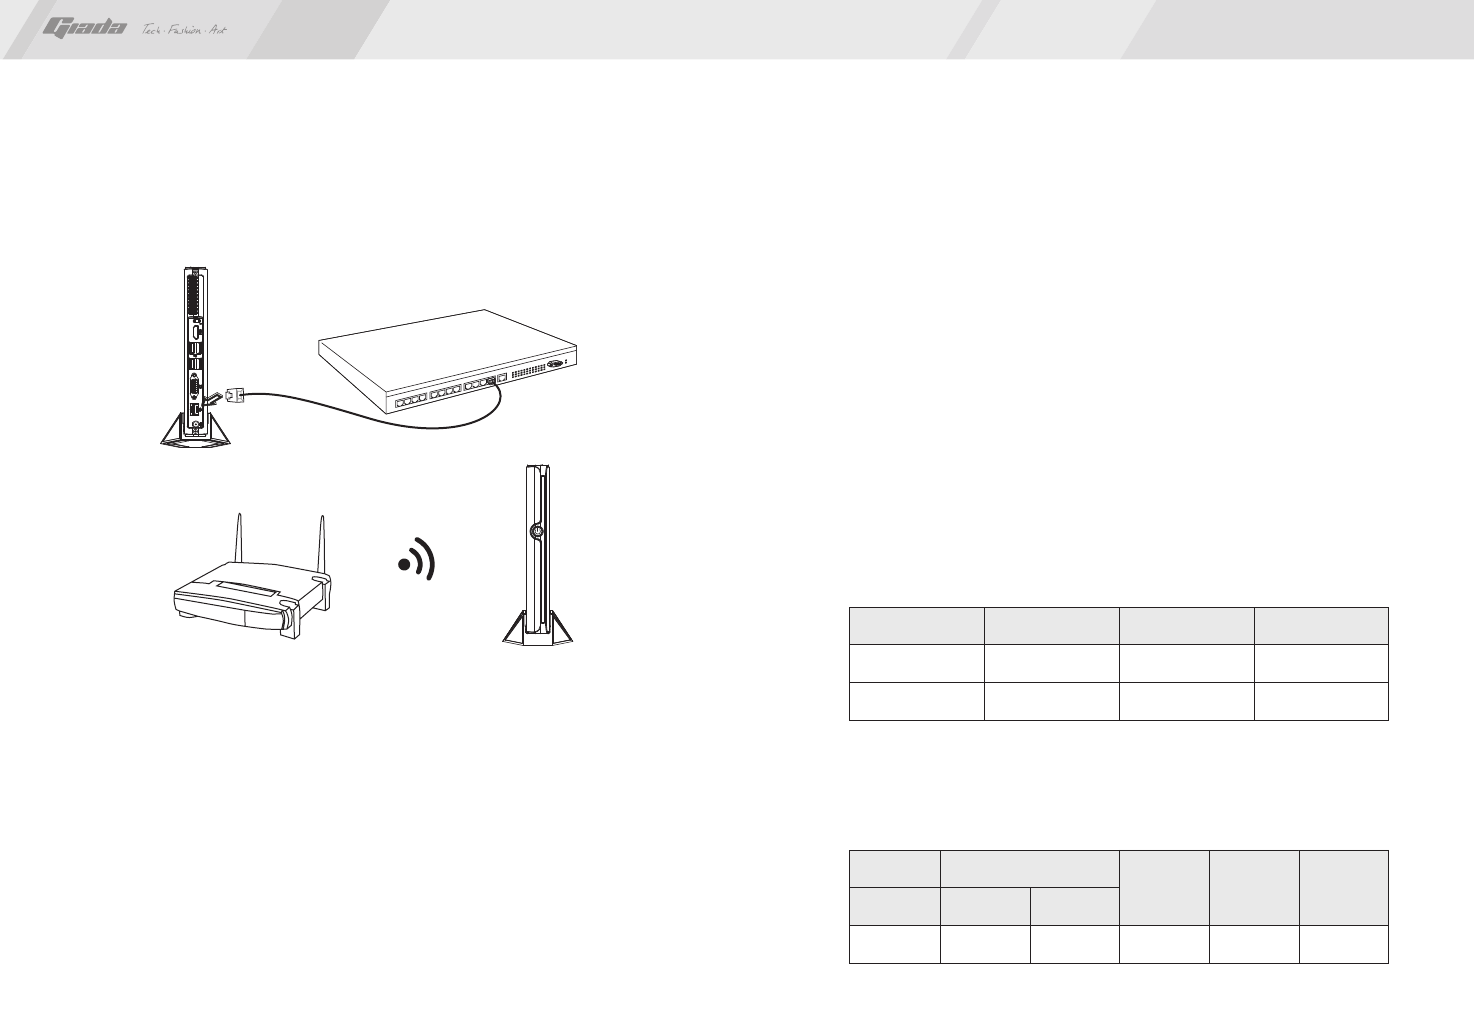
4. Network device
The WIFI device embedded in the product can help you set up a network, either
cabled or wireless. Make sure you have installed the hub or switch before you
set up the network. To construct a LAN or other network, please refer to following
photos.
Note: Before setting up the network, please make sure you have properly
installed the drivers for the network interface card and WIFI.
A. Cabled network
· Insert the terminal of network cable, which comes from the hub or server, into
the RJ-45 port, and make sure the connection is correct and firm.
Caution: Excessive sound pressure from earphones and
headphones can cause hearing loss.
www.giadatech.com
1514
· Please refer to the related instructions of operating systems and properly
install the driver and related applications for the network.
B. Wireless network
With the embedded wireless network device, you can connect your PC to the
Internet through the access point.
Note: To form a small-scale LAN for home use or office work, you need both the
wireless network device embedded in the product and a wireless router.
· Start your wireless router, and make proper configurations for it in accordance
with the operating instructions or instructions from the carrier.
· Start the WIFI device through the operating system of the host.
· Based on the instructions of operating system on network construction, select
the wireless network and make correct configurations for the software.
The wireless router
RJ - 45
V. Power supply and maintenance
Input Voltage
Input Frequency
Min.
90Vac
47Hz
Normal
100Vac~240Vac
60Hz/50Hz
Max.
264Vac
63Hz
Output
Rail
+19V
Rated Load
Min.Load
0.0A
Max.Load
3.42A
Peak Load
/
Voltage
regulation
±5%
Ripple& Noise
Max mVp-p
190mV
1. Adapter
In order to avoid personal injury and ensure the normal operation of the product,
please make sure the AC power you provide conforms to the specifications
described on the sign at the back of the adapter. Use three-core receptacle and
reliable grounding. In addition, you should also make sure the voltage from your
local power matches the respective rated value of the monitor and other external
equipment.
· It is recommended the attached adapter be used. If the attached adapter can’t
be used under some special circumstances, you must use a adapter with the
same specification.
· Input Characteristics
Range of input voltage: 90Vac-264Vac, single phase
· Output Characteristics
Static Output Characteristics <Vo & R+N>
www.giadatech.com

1716
2. Maintenance
As a high-tech product with sophisticated structure, Giada Mini PCs needs to be
maintained with properly. Misuse or rough handling may result in damage or
system failure.
· Body
Please prevent sharp objects from scratching on it. Make sure the power supply
to the host is cut off before cleaning the body. Never use wet cloth for cleaning.
Otherwise, water drops or other conductive liquid may go into the host.
To clean the base of the host, you should first remove the host. At the time,
you should put the host in a safe place where is won’t slide down or fall onto
the ground.
· Handling
This product is an ultra-light PC
Never place the product at the edge of the table. Otherwise, it may fall on the
ground and be damaged.
Always check the peripheral equipment and the connection cables to see
whether they are properly arranged, so that people might not be stumbled by
the wire or equipment and equipment not damaged.
· Radiation
Radiation is of great significance for PCs. Please place the product in a proper
position. Never block the air inlet and air outlet that are used for ventilation.
Do not place the product onto the bed, sofa or other soft objects for use.
Otherwise, the vents might be blocked and system halted because of the
overheating.
· Interfaces
Never use other objects to jam the interfaces on the host, nor use sharp
objects to scratch the pins. Otherwise, the pins might be damaged. If there is
any poor contact, you can use a soft brush to dust the place.
Caution: Risk of explosion if battery is replaced by an incorrect type. Dispose
of used batteries according to the instructions.
VI. Troubleshooting
Giada Mini PC was designed with the latest technologies and strictly tested before
delivery. It can provide long continuous working period and few failures might occur.
You may encounter some simple problems on setup, operation or system
compatibility at times you use the product. In this part, we will present the information
on how to identify the cause of a failure and how to solve the problems.
Identification: When your PC has a problem, please check it by referring the
information provided below:
1. PC has no reaction after the host is powered on.Make sure the power is supplied
to the host and the monitor, and check the power supply is normal running state.
If the hardware has been upgraded, make sure the new hardware was properly
and reliably installed. Check whether all signal cables are properly connected,
including cables between the keyboard and host, and mouse and host.
2. Host is automatically shut off. Please check whether the power supply is cut off,
or the power adapter is firmly inserted.
3. After the host is started, the start-up information appears. However, the operating
system can’t be loaded. The start-up order of setup tools is not compatible with
the configuration of the PC, or a password is set for your operating system. In
the latter case, you should enter the password to load the operating system.
4. Speaker sounds when the system is being electrified. Check whether there is
any part inside the host, especially whether the hard disk and memory are
properly installed. Note: The shell of the host should be opened only with the
assistance of professionals from Giada.
5. When the system is started, it seems the set parameters of the host have been
www.giadatech.com

1918
changed. It is possible the BIOS setup made at the time the system exited last
time was not saved.
6. PC stops responding Press <Ctrl+Alt+Del> to terminate the program whose
response is stopped. If the system can’t be restored after a long time, you should
press the power switch on the host to turn off the PC, and start it. Then check
whether the newly installed hardware is compatible with your system.
7. PC runs slowly and system halted frequently. Use antivirus software to check
whether the system is infected. Check whether excessive programs are added
when the computer is being started. They may temporarily occupy too many
resources. If many programs are installed in your system and the system has
not been optimized for a long time, it will also run slowly. In this case, you should
run the optimization software programs for the disk, or run the third-party
optimization software. If the problem still exists after above measures are taken,
it is recommended that the operating system be re-installed.
8. Abnormal display and sound. If some software or game programs can’t run
normally, you should check whether the software failure is caused by wrong
operation (including wrong installation of operating system and driver). Check
whether the version of your DirectX is conforming.
9. Sound disappeared abruptly. Check whether the connection between power
amplifier and speaker are reliable, and double click the volume icon to see
whether the audio part is set as “mute”.
10. Can’t access to Internet. Check whether the network system is properly
connected, or the wireless router runs normally. Check whether the driver for
the network equipment is properly installed and the related parameters are
correctly set. Finally, make sure the ISP service is still valid.
11. System can’t access the information on hard disk. Check whether the hard disk
is infected by virus. Note whether the hard disk is detected during the
self-detection process.
12. Blue screen and system crash. Check whether the system is infected by virus.
If the problem still exists, it is recommended that the operating system be
re-installed.
13. PC can’t recognize USB devices or USB devices can’t run normally. Check
whether these devices are properly installed (or the power is turned on), or the
latest version of the drive for the device is installed.
14. For i20/22-PD and i35/36, Hot plug the VGA connector would cause no display.
Press the combination key Ctrl + Alt + F1 to reset display.
15. For i20/22-PD and i35/36, When you first install the operating system, after
installed display driver, the display resolution settings should be:
(1) If only connected the HDMI devices, the default display mode is single mode,
and the display device is notebook. The maximum rate can achieve 1366X768,
(can also set other higher resolution, but the screen will be missed). If you
connected to the CRT display device at this moment, the screen will not display.
Please press CTRL + ALT + F1 to switch for the Intel (R) Dual Display Clone
mode after enter the operating system.
www.giadatech.com

20
(2) If only connected CRT display device, the default display mode is the Intel
(R) Dual Display Clone mode, the best resolution if the display is greater than
1366X768, will not achieve the best resolution display devices, display devices
need to manually set the most good resolution
Steps: right click desktop -> click “screen resolution” -> Settings "resolution”
(3) If HDMI and CRT display devices were connected at the same time, the
default display mode is the Intel (R) Dual Display clone mode, the maximum
resolution can be up to 1366x768 (can also set other higher resolution, but the
HDMI display will be missed).
If the problem can't solved even after the above measures are taken, you may
contact our customer service center or log in the official forum of Giada.
Please prepare the materials listed below before you contact so as to receive
prompt service from us.
· True product name and model;
· Product code and its serial number;
· Date of purchase;
· Brief introduction of the problem on your PC;
· Information concerning the software and other external hardware.
www.giadatech.com
Changes or modifications not expressly approved by the party responsible for
compliance could void the user's authority to operate the equipment
NOTE: This equipment has been tested and found to comply with the limits for a
Class B digital device, pursuant to Part 15 of the FCC Rules. These limits are
designed to provide reasonable protection against harmful interference in a
residential installation. This equipment generates, uses and can radiate radio
frequency energy and, if not installed and used in accordance with the
instructions, may cause harmful interference to radio communications. However,
there is no guarantee that interference will not occur in a particular installation. If
this equipment does cause harmful interference to radio or television reception,
which can be determined by turning the equipment off and on, the user is
encouraged to try to correct the interference by one or more of the following
measures:
-- Reorient or relocate the receiving antenna.
-- Increase the separation between the equipment and receiver.
-- Connect the equipment into an outlet on a circuit different from that to which
the receiver is connected.
-- Consult the dealer or an experienced radio/TV technician for help.
This equipment complies with FCC RF radiation exposure limits set forth for an
uncontrolled environment. This device and its antenna must not be co-located or
operating in conjunction with any other antenna or transmitter.
“To comply with FCC RF exposure compliance requirements. The antennas used
for this transmitter must be installed to provide a separation distance of at least 20
cm from all persons and must not be co-located or operating in conjunction with
any other antenna or transmitter.”
21