Jenn Air JXT8030ADS User Manual COOKING Manuals And Guides L0412352
JENN-AIR Range Hood Manual L0412352 JENN-AIR Range Hood Owner's Manual, JENN-AIR Range Hood installation guides
User Manual: Jenn-Air JXT8030ADS JXT8030ADS JENN-AIR JENN-AIR COOKING - Manuals and Guides View the owners manual for your JENN-AIR JENN-AIR COOKING #JXT8030ADS. Home:Kitchen Appliance Parts:Jenn-Air Parts:Jenn-Air JENN-AIR COOKING Manual
Open the PDF directly: View PDF ![]() .
.
Page Count: 8
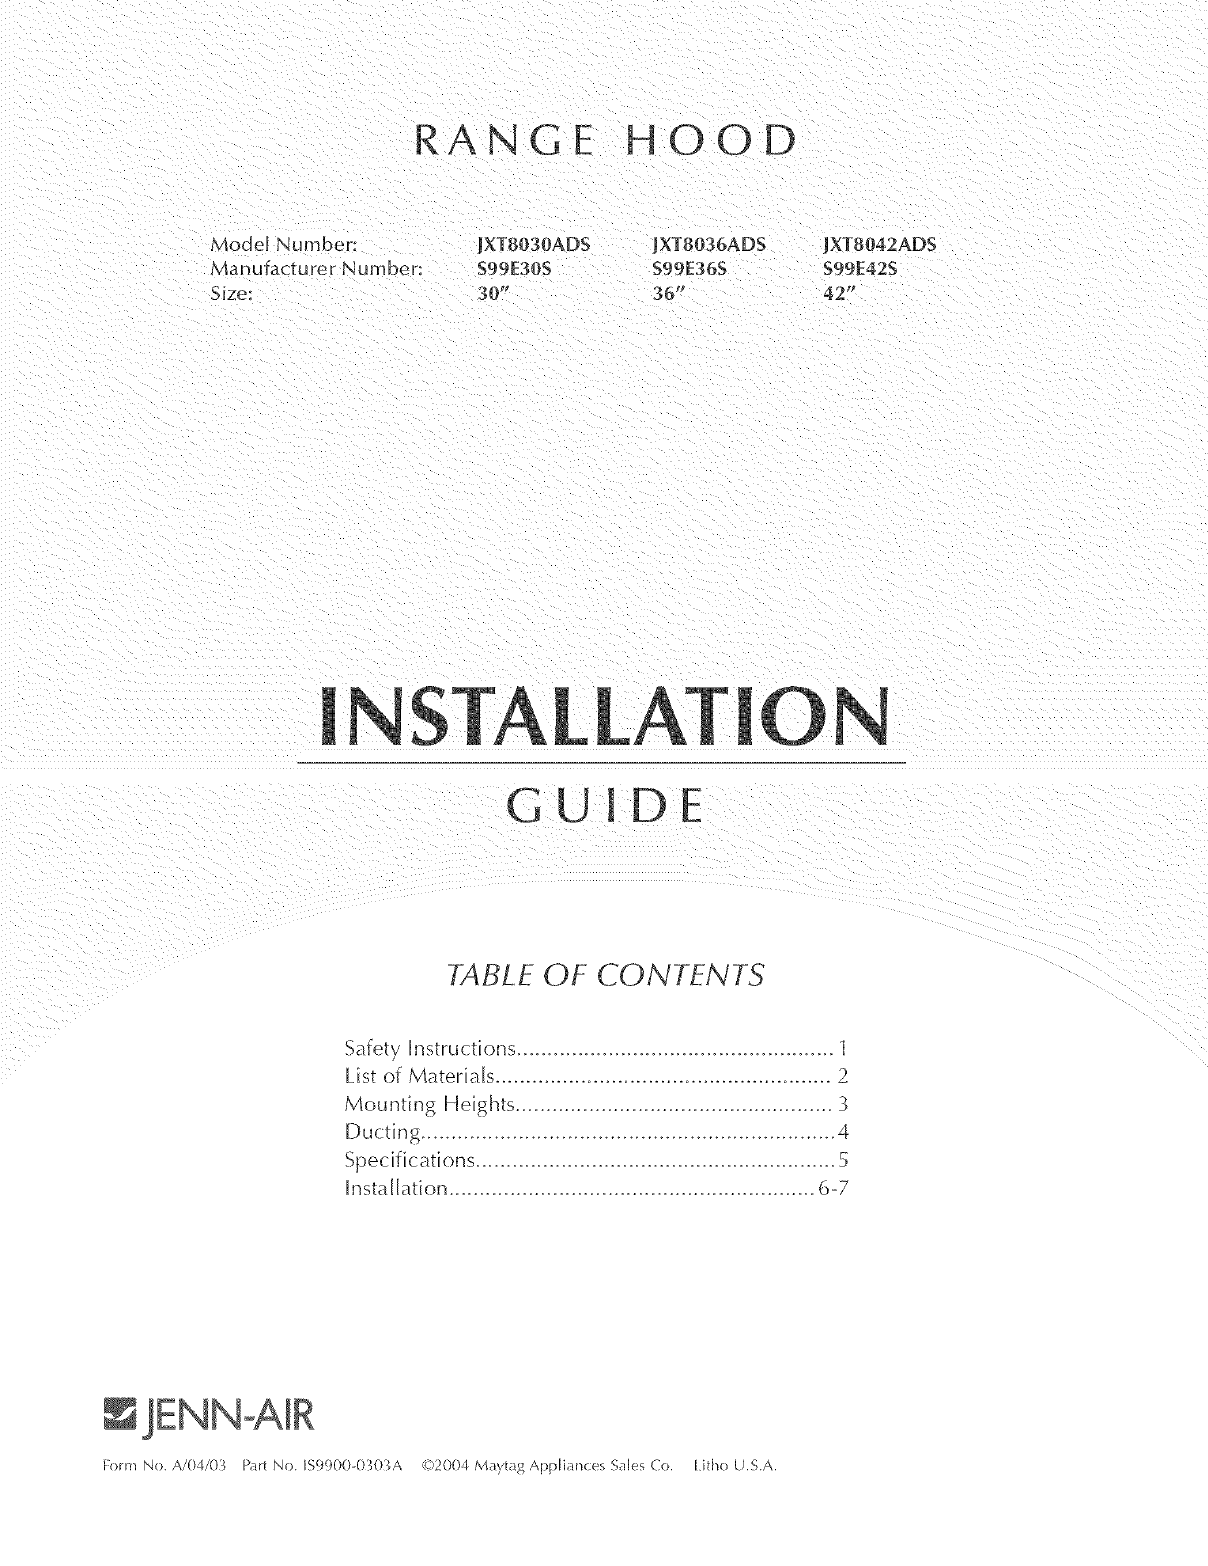
RANGE HOOD
Modal Number: [XTS030ADS [×T8036ADS
Manufacturer Number: S99E30S $99E36S
Size: 30" 36"
[XTB042ADS
S99E42S
42"
GUIDE
TABLE OF CONTENTS
Safet, Instructions .................................................... 1
List of Materials ....................................................... 2
Mounting Heights .................................................... 3
Ducting .................................................................... 4
Specifications ........................................................... 5
Installation ............................................................ 6-7
Form No. A/04/03 Part No. IS9900-0303A (02004 Maytag Appliances Sales Co, Litho U,S.A,
MODELS: JXT8030AD$ JXT8036AD$ JXT8042AD$
Installation
Theinstallationinthis manuaris intendedfor qualifiedinstarlers,servicetechniciansorpersons
withsimilarquarifiedbackground,DONOTattemptto instarlthisapprianceyourserf,hiury courd
resultfrominstallingthe unitdueto rackof appropriateerectricarandtechnicarbackground,
Air erectricar wiring must be prope@ installed, insulated and grounded. Overly accumulated
grease in old duct work should be cleanedout or duct work should be replaced if necessary to
avoid the possibility of a grease fire. Check all ioints on duct work to insure proper connection
and allioints should be properly taped.
*Please check for latest specification revisions before any custom work or cutouts.
iiiiii_
LiST OF MATERIALS
1-Hood Body
1-Duct CoverAssemNy (2 pieces)
1-Parts Bag:
1-Duct CoverMounting Bracket
2-Mounting Brackets
Packet of Mounting Screws
2-Metallic Filters
1-Metallic Bitterfly Damper
NO DUCTINGiS iNCLUDED
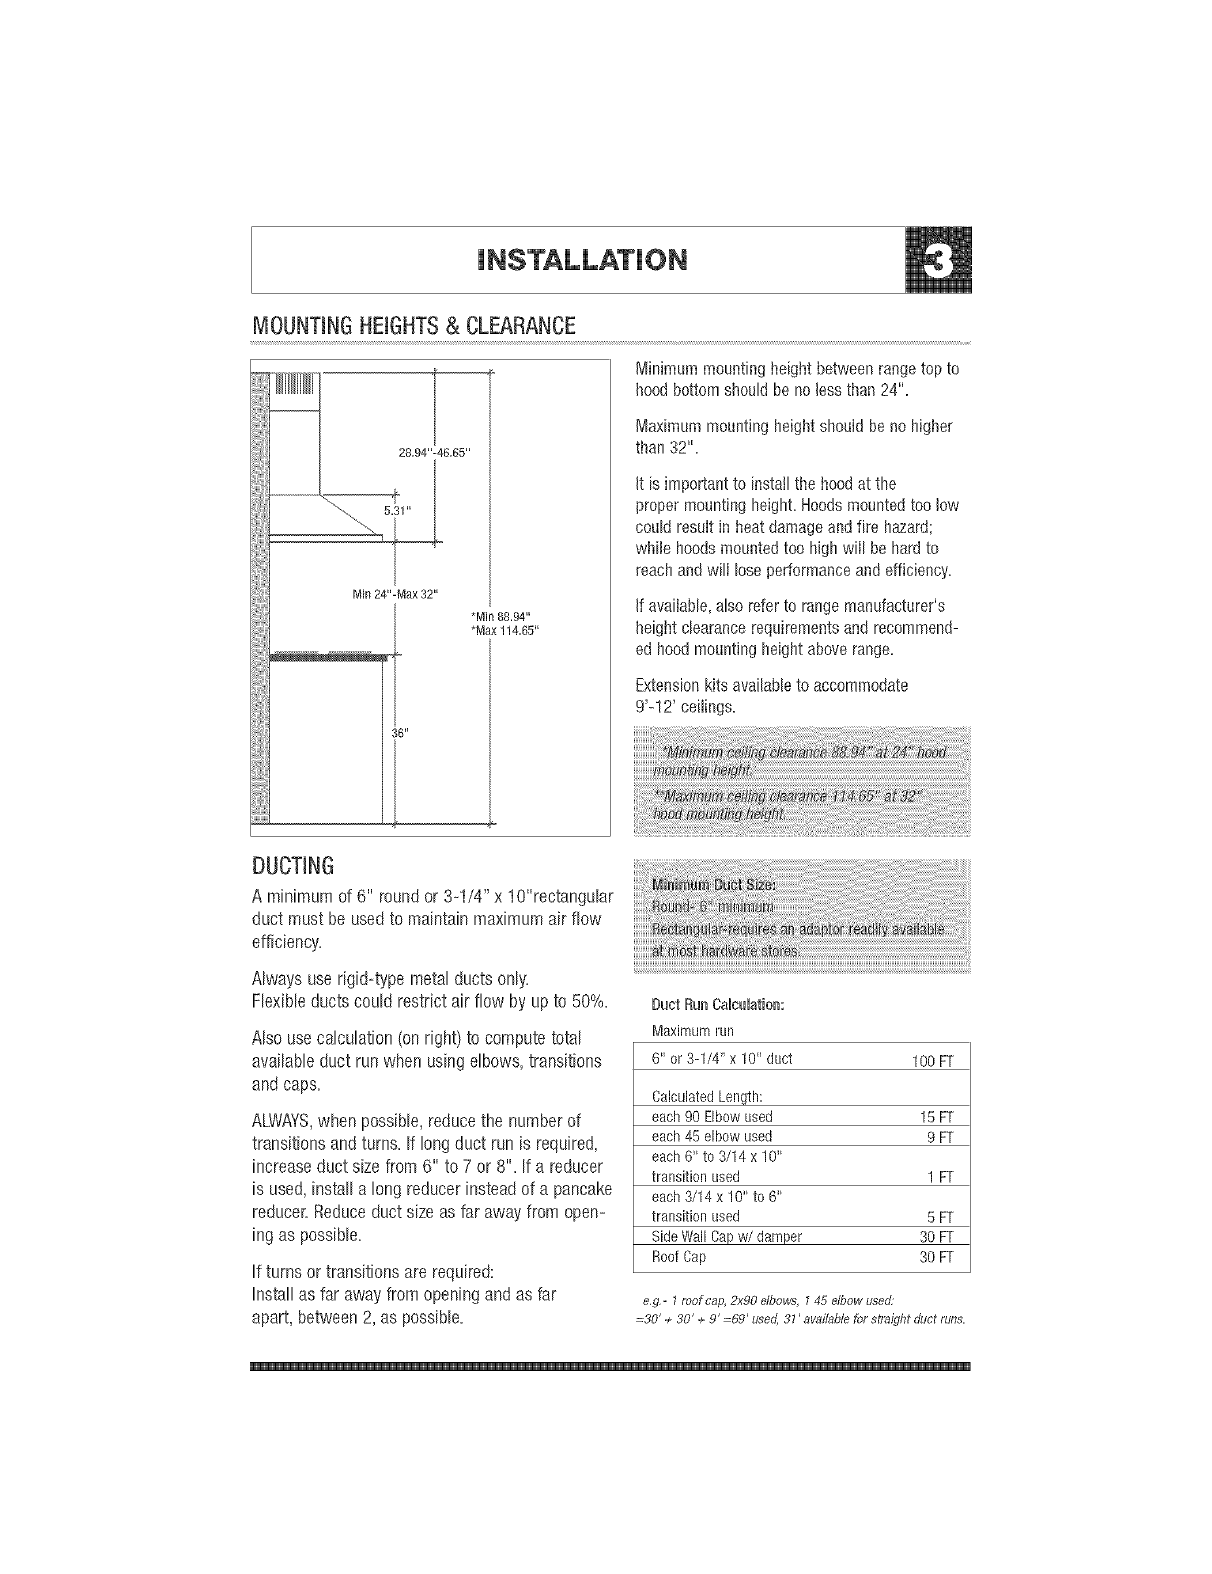
MOUNTINGHEIGHTS& CLEARANCE
28,94"-46,65"
Minimum mountingheight betweenrangetop to
hood bottom shouldbe noless than 24".
Maximum mounting heightshould be no higher
than 32".
It is importantto install the hoodat the
proper mountingheight.Hoodsmountedtoolow
could result in heat damageand fire hazard;
while hoodsmountedtoo high will be hardto
reachand will lose performanceand efficiency.
If available,also referto range manufacturer's
heightclearancerequirementsand recommend-
ed hoodmounting heightabove range.
Extensionkits avai[aNeto accommodate
9'-12' ceilings.
DUCTING
A minimum of 6" round or 3-1/4" x lO"rectangular
duct must be used to maintain maximum air flow
efficiency.
Always use rigid-type metal ducts only.
Flexible ducts could restrict air flow by up to 50%.
Also use calculation (on right) to compute total
availaNe duct run when using elbows, transitions
and caps.
ALWAYS,when possible, reduce the number of
transitions and turns. If long duct run is required,
increase duct size from 6" to 7 or 8". If a reducer
is used, install a long reducer instead of a pancake
reducer. Reduceduct size as far away from open-
ing as possible.
If turns or transitions are required:
Install as far away from opening and as far
apart, between 2, as possible.
Duct Run Calculation:
Maximumrun
6" or 3-1/4" x 10" duct 1O0FT
CalculatedLength:
each90 Elbow used 15 FT
each45 elbow used 9 FT
each6" to 3/14 x 10"
transition used 1 FT
each3/14 x 10" to 6"
transition used 5 FT
SideWall Capw/damper 30 FT
RoofCap 30 FT
e,g,- 1 roof cap, 2x90 elbows, 145 elbow use&'
=30' + 30' + 9' =69' used, 31' available for sflaiqbt duct runs,
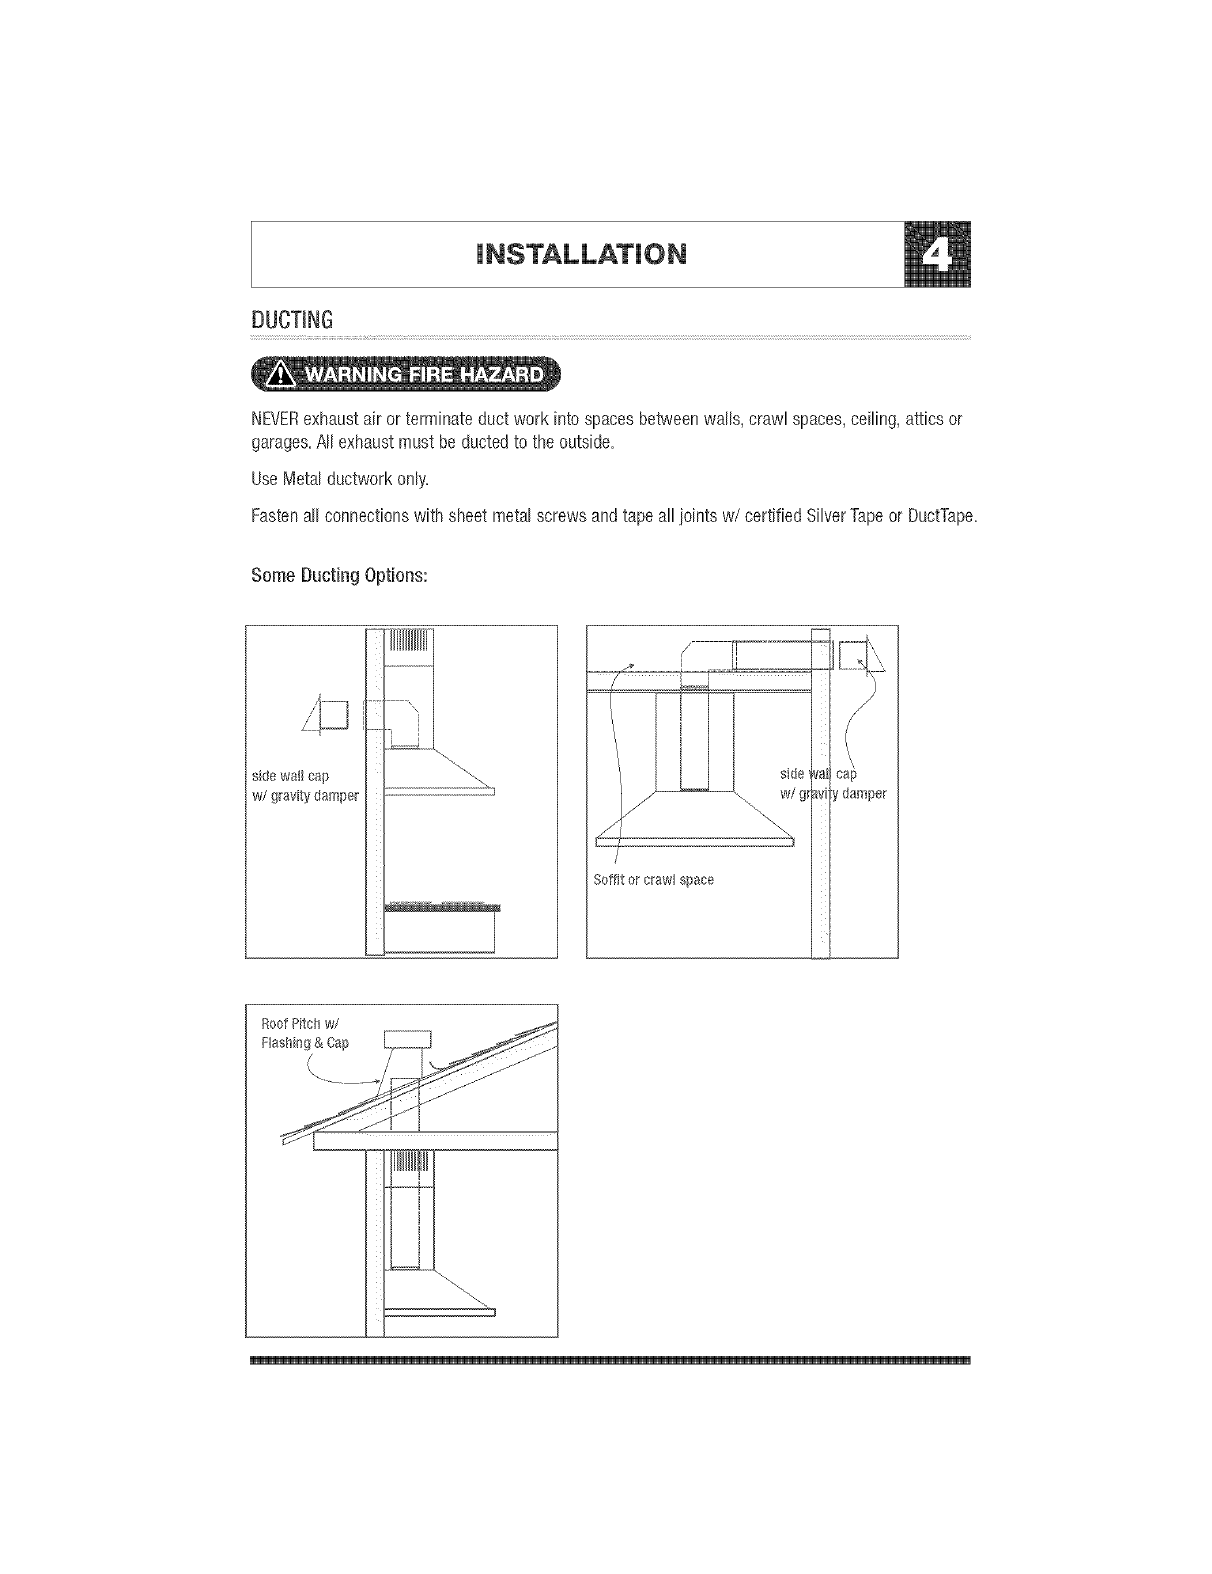
DUCTING
NEVERexhaust air or terminate duct work into spaces between walls, crawr spaces, ceiling, attics or
garages. Airexhaust must be ducted to the outside.
UseMetal ductwork only.
FastenaHconnections with sheet metal screws and tape aHjoints w/certified SHyerTape or DuctTape.
Some Ducting Options:
sidewallca[}
w/gravitydam[_er
RoofPitchw/
Flashing& Cap
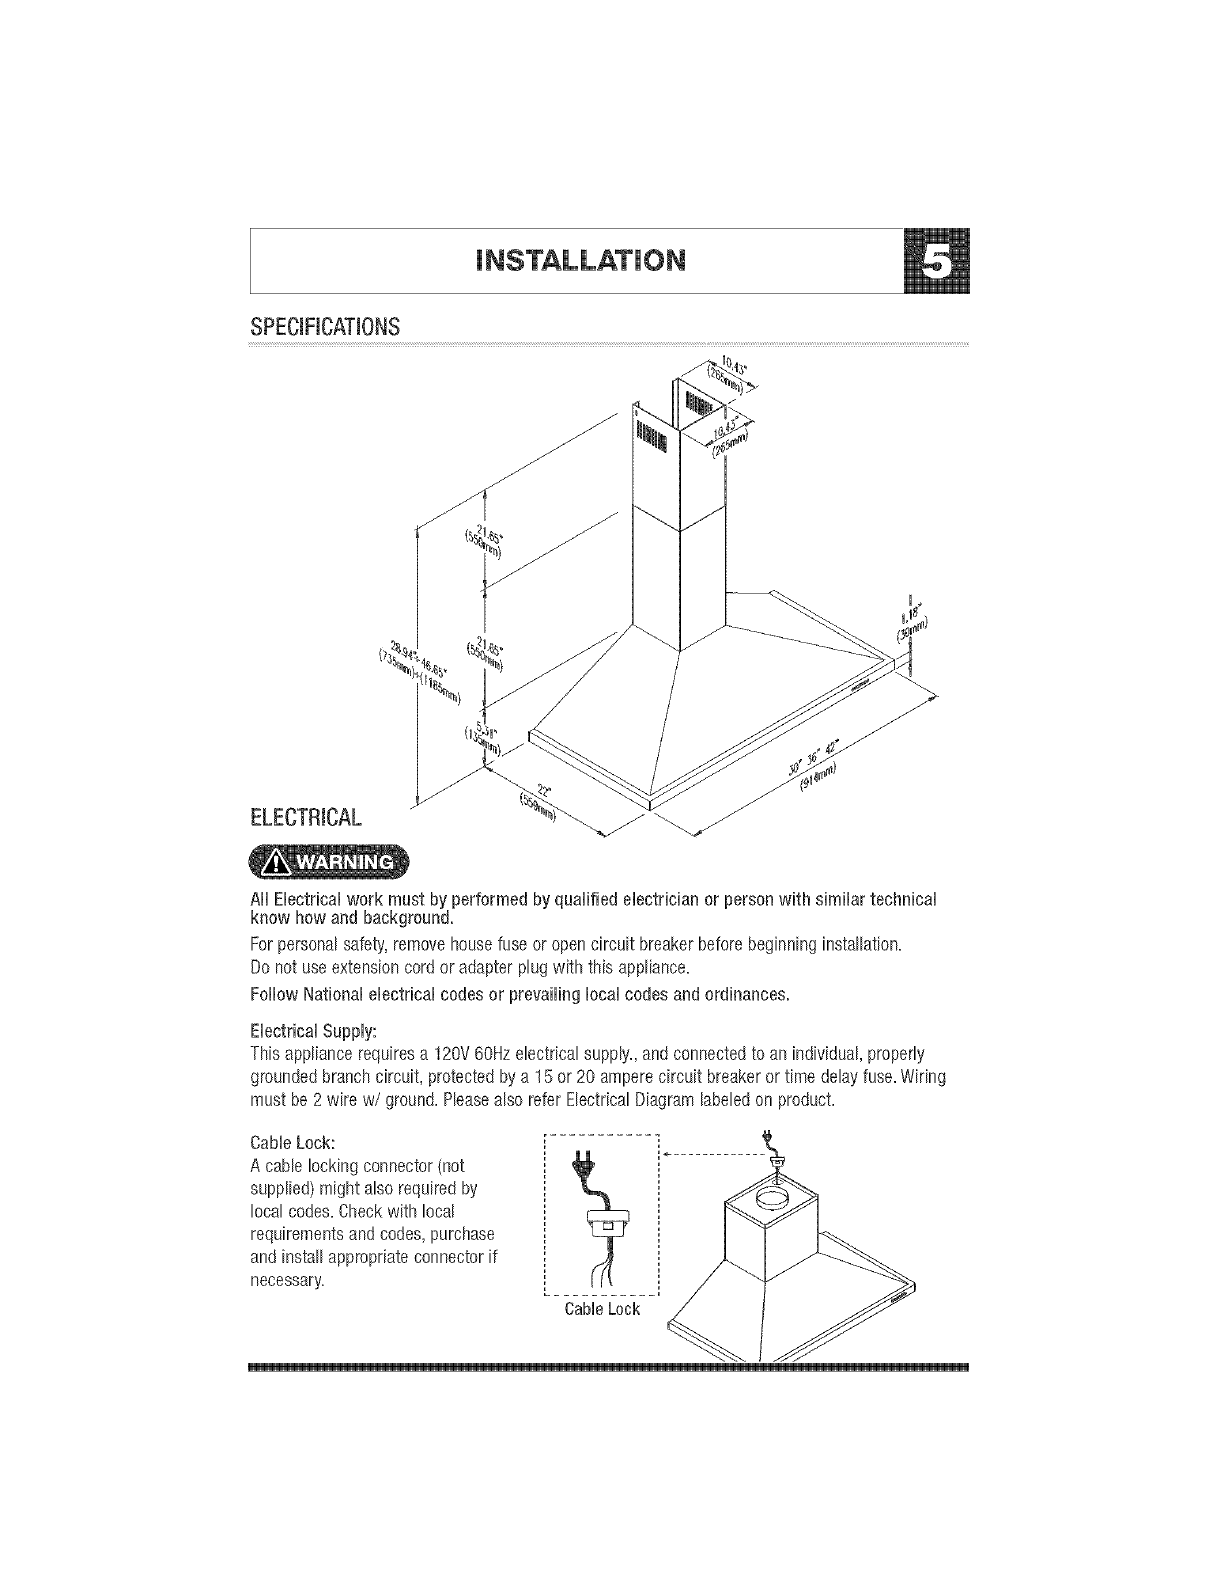
SPECiFiCATiONS
ELECTRICAL
AHEHectricaHwork must by performedby qualifiedeHectficianor personwith similartechnicaH
know howand background.
Forpersonalsafety,removehousefuseoropencircuitbreakerbeforebeginninginstallation.
Donot useextensioncordoradapterprugwith thisappriance.
FollowNationaleHectricaHcodesor prevaH#lgHocaHcodesandordinances.
Electrical Suppty:
This appliance requires a 120V 60Hz electrical supply,, and connected to an individual, properly
grounded branch circuit, protected by a 15 or 20 ampere circuit breaker or time delay fuse, Wiring
must be 2 wire w/ground, Pleasealso refer Electrical Diagram labeled on product,
CableLock:
A cablelockingconnector(not
supplied)mightalsorequiredby
localcodes,Checkwith local
requirementsandcodes,purchase
andinstallappropriateconnectorif
necessary,
CableLock
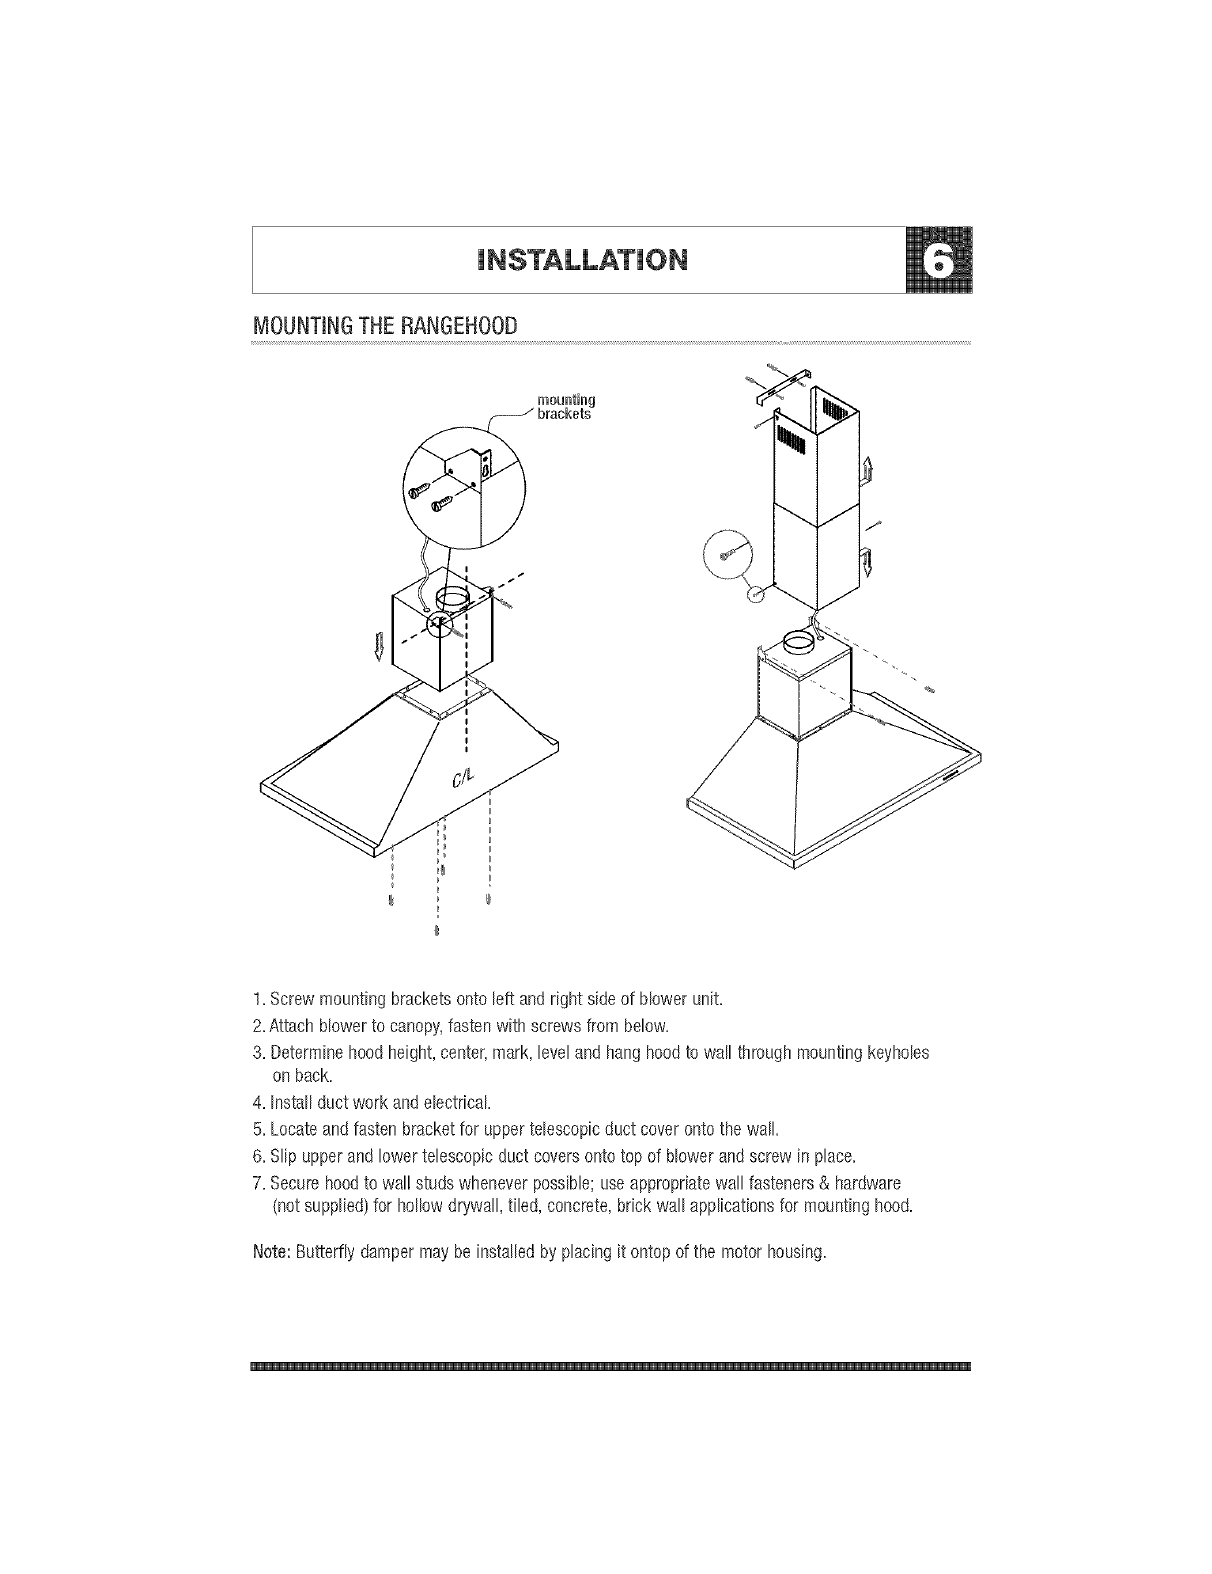
MOUNTINGTHEfiANGEHOOD
1. Screw mounting brackets onto left and right side of blower unit.
2. Attach blower to canopy, fasten with screws from below.
3. Determine hood height, center, mark, level and hang hood to wall through mounting keyholes
on back.
4. Install duct work and electrical.
5. Locate and fasten bracket for upper telescopic duct cover onto the wall.
6. Slip upper and lower telescopic duct covers onto top of blower and screw in place.
7. Secure hood to wal! studs whenever possible; use appropriate wall fasteners & hardware
(not supplied) for hollow drywall, tiled, concrete, brick wall applications for mounting hood.
Note: Butterfly damper may be installed by placing it ontop of the motor housing.
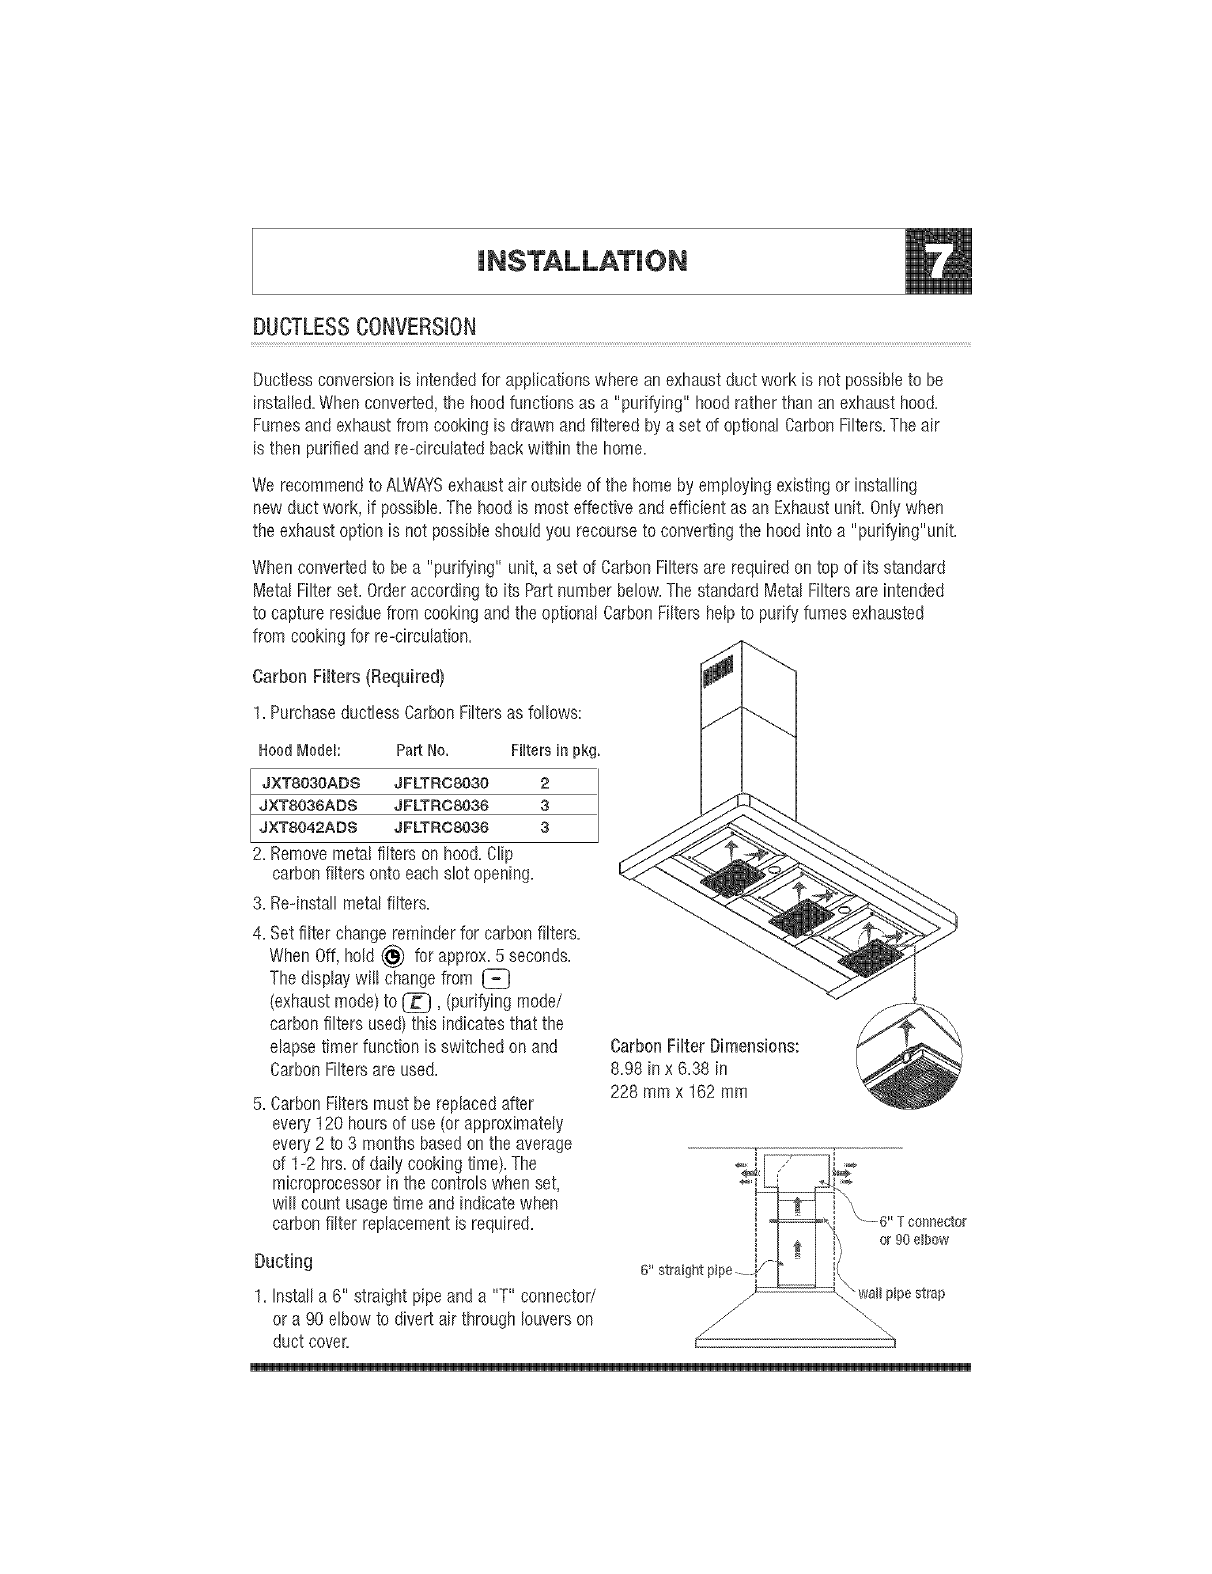
DUCTLESSCONVERSION
Ductbss conversion is intended for applications where an exhaust duct work is not possible to be
installed. When converted, the hood functions as a "purifying" hood rather than an exhaust hood.
Fumes and exhaust from cooking is drawn and filtered by a set of optional CarbonFilters.The air
is then purified and re°circulated hack within the home.
We recommend to ALWAYSexhaust air outside of the home by employing existing or installing
new duct work, if possibb. The hoodis most effective and efficient as an Exhaustunit. Onlywhen
the exhaust option is not possible should you recourse to converting the hood into a "purifying"unit.
Whenconverted to be a "purifying" unit, a set of Carbon Filters are required on top of its standard
Metal Filter set. Order according to its Part number below.The standard Metal Filtersare intended
to capture residue from cooking and the optional Carbon Filters help to purify fumes exhausted
from cooking for re-circulation.
CarbonFilters (Required)
1. PurchaseductlessCarbonFiltersas follows:
Hood Model: Part No. Filters in pkg.
JXT8030ADS JFLTRCS030 2
JXTS036ADS JFLTRCS036 3
JXTS042ADS JFLTRCS036 3
2. Removemeta! filters on hood.Clip
carbon filters onto each slot opening.
3. Re-install metal filters.
4. Setfilterchangereminderfor carbonfilters.
WhenOff,hold_) for approx.5 seconds.
Thedisplay'wil! changefrom
(exhaustmode)to @, (purifyingmode/
carbonfilters used)this indicatesthat the
elapsetimerfunctionis switchedonand
CarbonFiltersareused.
5. Carbon Filters must be replaced after
every 120 hours of use (or approximately
every 2 to 3 months based on the average
of 1-2 hrs. of daily cooking time). The
microprocessor in the controls when set,
will count usage time and indicate when
carbon filter replacement is required.
Carbon Filter Dimensions:
8.98 in x 6.38 in
228 mm x 162 mm
Ducting
1. Install a 6" straight pipe and a "T" connector/ "wall pipestrap
or a 90 elbow to divert air through louvers on _ ""-_
duct cover: K_ _':b
