Jethro SC628 Jethro Senior Cell Phone User Manual Users Manual
Jethro Trading LTD. Jethro Senior Cell Phone Users Manual
UserManual.wiki
>
Jethro
>
SC628 User Manual
>
Users Manual
Contents
1.
Users Manual
2.
Users Manual
Users Manual
Users Manual
Navigation menu
Upload a User Manual
Namespaces
Wiki Guide
HTML
PDF
Info
Views
User Manual
Discussion / Help
Navigation


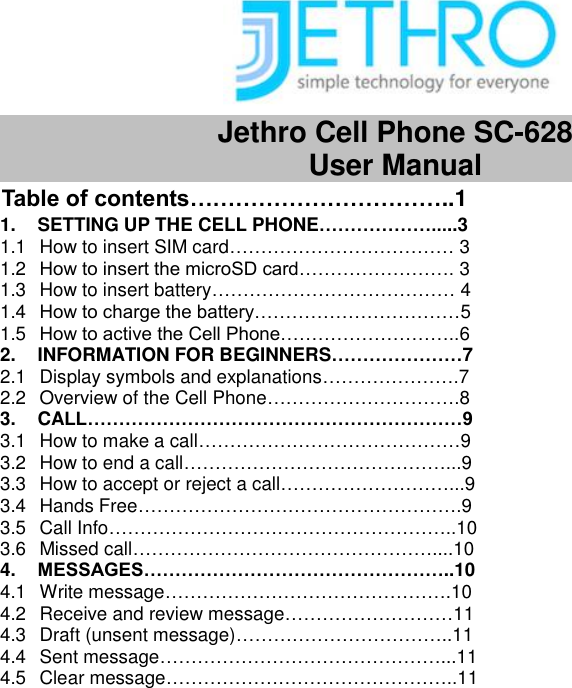
![ e 1.4 How to charge the Battery Warning: Use only the Jethro designed battery and charger, fail to comply with this rule may result in explosion of the mobile phone. Do not attempt to insert the charging cable into the socket for the headphone. This could damage the phone. 1. Charge with the Charging Cable Insert the charging cable into the USB connector on the top of the phone Then put the charging cable‟s main plug into the socket 2. Charge with the Desktop Charging Cradle (optional) *The Desktop Charging Cradle CDS-628 needs be purchased separately Insert the charging cable into the USB plug from back of the charging cradle. Then place the charging cable into the power socket Place the phone into the charging cradle. 3. Charge with the Computer You can connect your phone to your computer using the USB cable 4. During the charging process If the phone is off, battery symbol will display on the screen and button [+] flashes If the phone is on, the charging status display bars fill and the button [+] flashes 5. End of Charging Procedure After charging the batter, the battery symbol or the charge status display is completely filled, and the button [+] is lit continuously. You can now remove the charging cable. 1.5 How to activate the Cell Phone Attention:At the first activation of the cell phone, some adjustments must be made. You can make the settings later in the Setting menu, but we recommend you do so now. 1. Press two seconds on key to turn on the phone. You will feel a vibration, then Jethro logo appears on the screen. 2. Enter the 4-digit PIN code (optional). You can write your PIN here for the record: 3. Press to confirm when “OK” shows on screen 5. Enter the Date and Time using the keypad and select with the arrow keys to choose Language. Confirm each entry with key. The home screen is displayed. Note:In order to display AM/PM properly, When set up time, please always enter 24 hour format. For example, for time 10:32 pm please enter as 20:32. You can change the time format in “Menu” -> ”Settings” -> ”Phone Settings” -> ”Time and date” -> ”Set format” and use [*] or [#] key to change between 12 hours and 24 hour format. Please contact your local cellular carrier to obtain valid regular size SIM card. The phone is Hearing Aid Compatible with HAC rating M4/T4 Default Restore Factory Password is 0000. *Factory restoration will reset all phone setting to factory condition and erase all contacts and call history. Default keypad lock code is 0000](https://usermanual.wiki/Jethro/SC628.Users-Manual/User-Guide-2748234-Page-4.png)


![ e 1.4 How to charge the Battery Warning: Use only the Jethro designed battery and charger, fail to comply with this rule may result in explosion of the mobile phone. Do not attempt to insert the charging cable into the socket for the headphone. This could damage the phone. 1. Charge with the Charging Cable Insert the charging cable into the USB connector on the top of the phone Then put the charging cable‟s main plug into the socket 2. Charge with the Desktop Charging Cradle (optional) *The Desktop Charging Cradle CDS-628 needs be purchased separately Insert the charging cable into the USB plug from back of the charging cradle. Then place the charging cable into the power socket Place the phone into the charging cradle. 3. Charge with the Computer You can connect your phone to your computer using the USB cable 4. During the charging process If the phone is off, battery symbol will display on the screen and button [+] flashes If the phone is on, the charging status display bars fill and the button [+] flashes 5. End of Charging Procedure After charging the batter, the battery symbol or the charge status display is completely filled, and the button [+] is lit continuously. You can now remove the charging cable. 1.5 How to activate the Cell Phone Attention:At the first activation of the cell phone, some adjustments must be made. You can make the settings later in the Setting menu, but we recommend you do so now. 1. Press two seconds on key to turn on the phone. You will feel a vibration, then Jethro logo appears on the screen. 2. Enter the 4-digit PIN code (optional). You can write your PIN here for the record: 3. Press to confirm when “OK” shows on screen 5. Enter the Date and Time using the keypad and select with the arrow keys to choose Language. Confirm each entry with key. The home screen is displayed. Note:In order to display AM/PM properly, When set up time, please always enter 24 hour format. For example, for time 10:32 pm please enter as 20:32. You can change the time format in “Menu” -> ”Settings” -> ”Phone Settings” -> ”Time and date” -> ”Set format” and use [*] or [#] key to change between 12 hours and 24 hour format. Please contact your local cellular carrier to obtain valid regular size SIM card. The phone is Hearing Aid Compatible with HAC rating M4/T4 Default Restore Factory Password is 0000. *Factory restoration will reset all phone setting to factory condition and erase all contacts and call history. Default keypad lock code is 0000](https://usermanual.wiki/Jethro/SC628.Users-Manual/User-Guide-2748253-Page-4.png)