Jethro SC628 Jethro Senior Cell Phone User Manual Users Manual
Jethro Trading LTD. Jethro Senior Cell Phone Users Manual
Jethro >
Contents
- 1. Users Manual
- 2. Users Manual
Users Manual

Jethro Cell Phone SC-628
User Manual
Table of contents……………………………..1
1. SETTING UP THE CELL PHONE……………….....3
1.1 How to insert SIM card……………………………… 3
1.2 How to insert the microSD card……………………. 3
1.3 How to insert battery………………………………… 4
1.4 How to charge the battery……………………………5
1.5 How to active the Cell Phone………………………..6
2. INFORMATION FOR BEGINNERS…………………7
2.1 Display symbols and explanations………………….7
2.2 Overview of the Cell Phone………………………….8
3. CALL……………………………………………………9
3.1 How to make a call……………………………………9
3.2 How to end a call……………………………………...9
3.3 How to accept or reject a call………………………...9
3.4 Hands Free…………………………………………….9
3.5 Call Info………………………………………………..10
3.6 Missed call…………………………………………....10
4. MESSAGES…………………………………………..10
4.1 Write message……………………………………….10
4.2 Receive and review message………………………11
4.3 Draft (unsent message)……………………………..11
4.4 Sent message………………………………………...11
4.5 Clear message………………………………………..11

5. CONTACTS…………………………………………..12
5.1 Name search…………………………………………12
5.2 New contacts: save the name and number……….12
5.3 Edit contact……………………………………………12
5.4 Remove contact……………………………………....12
5.5 Send contact by SMS (text messages)…………….12
5.6 Speed dial buttons (M1/M2)…………………………12
6. EXTRA FEATURES………………………………….13
6.1 Camera/Video Recorder/Voice Recorder………….13
6.2 Calendar……………………………………………….13
6.3 FM radio……………………………………………….13
6.4 Bluetooth………………………………………………13
6.5 Alarm…………………………………………………..13
7. EMERGENCY FEATURES……………..……...14
7.1 Who to call in an emergency…………………………14
7.2 What will happen
when the emergency call is triggered? .....................14
7.3 How to Enter/Edit SOS list (emergency contacts)….15
7.4 How to Edit SMS content (emergency SMS)………..15
*Restore to factory settings……………………………….06
SAFETY INSTRUCTIONS……………….…….….…16
WARRANTY………………………………….…….…16
1. SETTING UP THE CELL PHONE
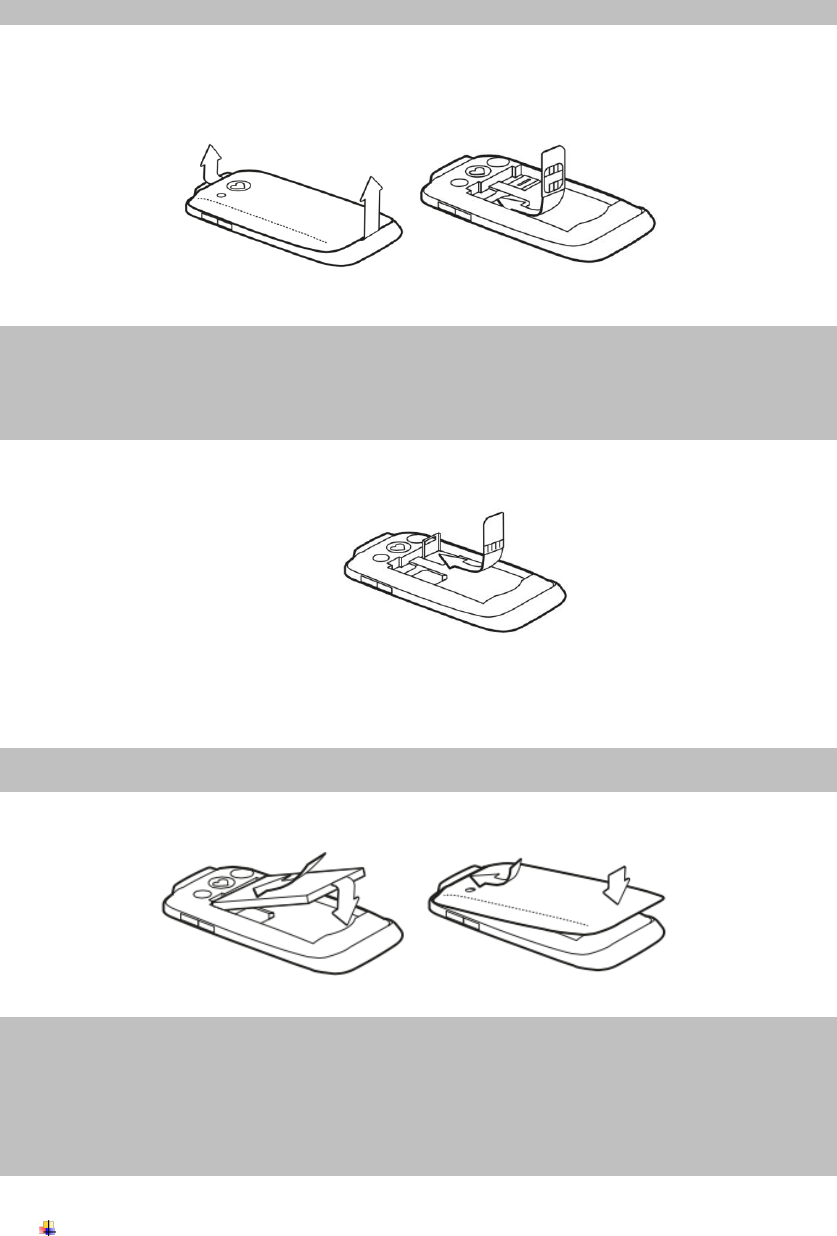
1.1 How to insert SIM card (not include in package)
Figure 1: Lift the battery cover, start for it at the recess the top left corner of the phone.
Figure 2: The location for the SIM card is in the top left corner, inserts the card with the gold chip face
down.
Figure 1 Figure 2
Caution:
1.Keep the SIM card out of reach of children.
2.Do not touch the portion that has the chips.
3.Keep the SIM card away from magnets.
4.Avoid putting the SIM card under direct heat such as sunshine.
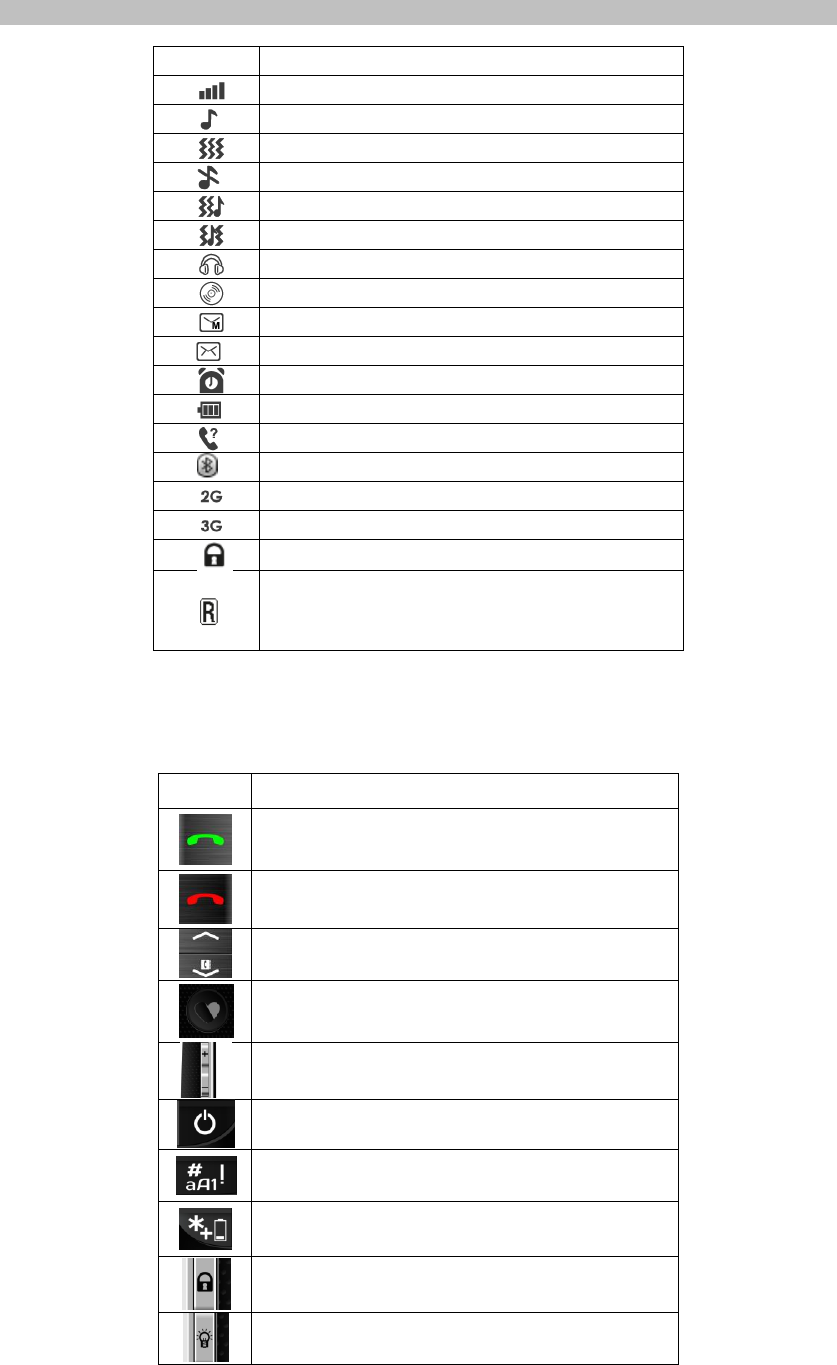
1.2 How to insert MicroSD card (optional)
Figure 3: Push the card holder switch to the top, place the card into the cardholder, close the cardholder
and pull the switch down
Figure 3
Page 3.
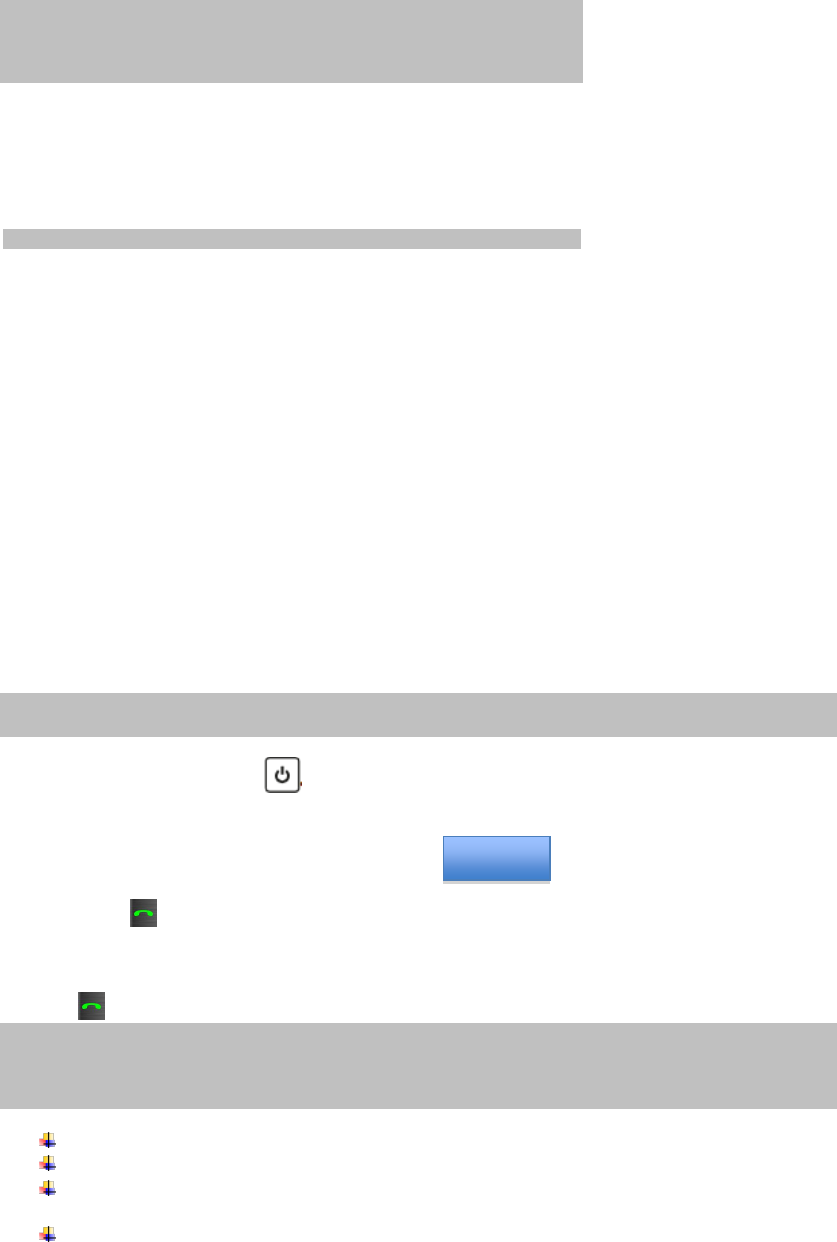
1.3 How to insert battery
Warning:Do not remove battery when the power is on or when the phone is connected to the charger.
Fail to comply this rule may result in damaging the cell phone and the SIM card.
Figure 4: Place the battery so the golden contact matches with phone.
Figure 5: Press the battery cover until it clicks. Start at the top of the phone, to the center.
Figure 4 Figure 5
Caution:
1.Before using the phone for the first time, please charge the battery for at least four hours. If you violate
this charging time, the battery life may decrease.
2.During the charging process, do not remove the battery. Fail to comply may damage the mobile.
3.It is normal if the phone or the charger is warm during charging.
4.If the battery capacity is exhausted, it takes a few minutes in the charging process before the charging
icon displays on the LCD.
If a part is missing or defective, please contact Jethro hotline at the number
1-888-509-6199 or email Jethro@jethroshop.com for any assistance

e
1.4 How to charge the Battery
Warning: Use only the Jethro designed battery and charger, fail to
comply with this rule may result in explosion of the mobile phone.
Do not attempt to insert the charging cable into the socket for the
headphone. This could damage the phone.
1. Charge with the Charging Cable
Insert the charging cable into the USB connector on
the top of the phone
Then put the charging cable‟s main plug into the
socket
2. Charge with the Desktop Charging Cradle (optional)
*The Desktop Charging Cradle CDS-628 needs be purchased separately
Insert the charging cable into the USB plug from back
of the charging cradle.
Then place the charging cable into the power socket
Place the phone into the charging cradle.
3. Charge with the Computer
You can connect your phone to your computer using
the USB cable
4. During the charging process
If the phone is off, battery symbol will display on the
screen and button [+] flashes
If the phone is on, the charging status display bars fill
and the button [+] flashes
5. End of Charging Procedure
After charging the batter, the battery symbol or the
charge status display is completely filled, and the
button [+] is lit continuously.
You can now remove the charging cable.
1.5 How to activate the Cell Phone
Attention:At the first activation of the cell phone, some adjustments must be made. You can make the
settings later in the Setting menu, but we recommend you do so now.
1. Press two seconds on key to turn on the phone. You
will feel a vibration, then Jethro logo appears on the screen.
2. Enter the 4-digit PIN code (optional).
You can write your PIN here for the record:
3. Press to confirm when “OK” shows on screen
5. Enter the Date and Time using the keypad and select with the
arrow keys to choose Language. Confirm each entry with
key. The home screen is displayed.
Note:In order to display AM/PM properly, When set up time, please always enter 24 hour format. For
example, for time 10:32 pm please enter as 20:32. You can change the time format in “Menu” -> ”Settings”
-> ”Phone Settings” -> ”Time and date” -> ”Set format” and use [*] or [#] key to change between 12 hours
and 24 hour format.
Please contact your local cellular carrier to obtain valid regular size SIM card.
The phone is Hearing Aid Compatible with HAC rating M4/T4
Default Restore Factory Password is 0000. *Factory restoration will reset all
phone setting to factory condition and erase all contacts and call history.
Default keypad lock code is 0000
2. INFORMATION FOR BEGINNERS
2.1 Display Symbols and Explanations
Symbols
Explanation
Indicates the cellular reception.
Ring only
Vibrates only
Indicates the Silent / Sleep mode is activated
Vibrate then ring
Vibrate and ring
Headphone plugged
Playing Music
Unread multimedia massage (MMS)
Unread text message (SMS)
Alarm on
Indicate charging status and battery level
Unread Missed call
Bluetooth on
2G network
3G network
Keypad lock is on
On foreign network, additional costs may apply.
*The R symbol maybe on if you are on sub network such as Straight
Talk (main network is AT&T), Cricket wireless (main network is
T-Mobile) or FIDO (main network is Rogers) etc.
2.2 Overview of the Cell Phone: Keys and explanations
Keys
Explanation
Green Button:
To answer or confirm
Red Button:
To hang up or return
Arrows:
To navigate Menu or shortcut to Contacts (down arrow)
or Alarms (up arrow)
Emergency Button:
In an emergency, press for 3 seconds
Volume Buttons:
To change the phone volume
Power Key:
Press and hold 3 seconds to power On / Off
Pound Key:
To change the input methods. *Press for 3 seconds to
activate the silent mode when at home screen
Star Key:
Battery charging indicator
Keypad Lock:
To lock and unlock, press and hold for 2 sec
Flashlight Key:
When the phone is activated, you can choose to have
continuous light or just brief light. * Press for 2 seconds

to turn continuous light On / Off
Family Number:
You can assign these two keys as your family speed dial
from your saved phone contacts.
Use Important Features
3. CALLS
3.1 How to make a Call
1. Enter area code and telephone number with the
numeric keys.
2. Press Green button to connect the call, caller name
or the number of the caller appears on the screen.
3. Once connected, the name or number of the caller and the
call duration are displayed on the screen.
3.2 How to end Call
1. To end the call, press the Red Button.
2. Once Call ended, the duration of the call is displayed on screen.
Note: if the caller hangs up before you, it is not necessary to press the Red Button.
3.3 How to accept or reject a call
1. When you receive a incoming call, name of the caller or number appears on the screen.
2. To accept the call, press the Green Button.
3. To reject the call, press the Red Button.
4. You can also put the call on temporary silent by pressing the Volume Button on the left side of
the phone.
3.4 Hands Free
1. To switch to hands-free mode, during the telephone call, press the Green Button to start the
“options”, select option one: “Handsfree”, then use the arrows to select “H-Free” and press
Green button to active the Hands Free.
2. To switch off hands-free mode, simply repeat the steps above and select “H-held” and press
Green Button.
3.5 Call Info
1. Call Info gives you a call overview of the last 20 calls. You can also call a contact from the list.
2. You can access Call Info by pressing the Green Button on the home screen.
3. You can use arrows to browse the call list. Select the contact and press the Green Button to call
the contact.
Note: Only Saved contact appears on the screen with the name. All the others appear only
with the phone number.
3.6 Missed Call
When you have missed a call, the message “ 1 missed call” appears on the home screen and
the Pound Key flashes. As soon as you view the missed call, the message disappears and the
Pound Key flash stops.
Note: When you review missed call list, you can press the Green Button to go to “options”. You
can select in “call”, “view”, “text”, “save to phonebook”, “edit” or “delete” the call.
4. MESSAGES
With your phone, you can write and send messages (Short Message Service, aka SMS). SMS are small
text message with up to 160 characters. You can also write and send multimedia messages (MMS)
Features available here: Write message, Inbox, Draft, Outbox, Sent messages, Templates and
Message Settings
You access this menu by pressing the Menu Key
4.1 Write messages
1. Select Text message (SMS) or Multimedia message (MMS) and select „Ok‟ by pressing the
Green Button.
2. Enter the text using the keyboard and press option to choose the recipient by “Entering number”

or “add from Phonebook”
Use Important Features
4.1 Write messages (continued from Page 10)
3. If you chose to write Multimedia message (MMS), in the options, you can add pictures, sound or
video to the text to send to the recipient.
Attention: The attachable file size for the MMS is very limited, any high definition picture,
sound or video may not be successfully sent to the recipient. If error occurred when send
multimedia message, it may be caused by incorrect carrier APN setting. The APN setting can
be changed in “Settings” -> “Connectivity” -> “Data account”. You can select the proper carrier
account, or add new PS account if your carrier name did not appear on the list. For more detail,
please call you carrier customer service for obtain MMS APN settings or contact Jethro
customer service 1-888-509-6199 or email Jethro@jethroshop.com for further assistance.
4.2 Receive and view messages
A ring informs you that you have received a new message. “1 new message” is displayed. Press Green
Button to view the message.
Older message can be viewed in Inbox in the Message menu.
4.3 Draft (Unsent message)
It contains the messages that you do not want to send immediately, and unsuccessfully sent messages
are saved under Outbox
4.4 Sent message
All messages you have sent are save in Sent message.
4.5 Clear message
A full memory blocks to receive new messages. Therefore they must be regularly removed. The memory
can hold about 250 messages.
5. CONTACTS
You can save up to 300 contacts in your phone. Once you registered the names and number of
your contacts (family, friend, doctor etc.) The contacts will be saved on your Phonebook.
You can access the menu by pressing Menu Key then press #2 key, or press Down Arrow Key
at home screen.
5.1 Name Search
You contacts are sorted alphabetically.
1. Open Contact or Phonebook menu.
2. Write the letter with the keyboard. Only the contacts starting with the letters appear on the
screen.
3. Use Arrow Keys to select desired contact.
5.2 New contacts: Save the number and number
1. Open Contact or Phonebook menu.
2. Select “Add new contact”, Choose save the contact to SIM or Phone memory in “Select”.
3. Use the keyboard to enter the contact‟s name, phone number and email address (optional).
Select “Option” by pressing the Green Button then select “Save”
4. You can add more details in “Options”. eg: Home, mobile etc.
5.3 Edit Contact
This function is to later edit an existing contact.
5.4 Remove Contact
You can delete contacts one by one or all contacts from the SIM card or the phone.
5.5 Send contact by SMS (Text message)
Select a contact and send it as an SMS to a recipient of your choice
5.6 Speed dial buttons
You can associate key #2 - #9 each with a phone number that you use often.
You can also assign M1/M2 Keys as speed dials for your family contacts.
Page 11

Use Important Features / Extra Features
5.6 Speed dial buttons (continued from page 12)
Note: To set up M1/M2 Keys: Open “Settings”->”Family Settings”
6. EXTRA FEATURES
6.1 Camera / Video Recorder / Voice Recorder
To active Camera or video recorder, press Menu Key and select “Extra” -> “Camera”. You can
take picture and video, or record voice.
6.2 Calendar
Press Menu Key and select “Extra” -> “Calendar”
6.3 FM radio
You can listen to local FM radio with this feature. For better radio reception, please plug in a
headphone. Use Arrow Keys to search channels, and use Pound Key to turn the radio On/Off.
6.4 Bluetooth
Bluetooth is a wireless connection between electronic devices. You can pair the phone with your
hands-free car-kit or a Bluetooth headset.
1. Enable Bluetooth: Open the Settings Menu and choose “Connectivity” and choose “Bluetooth”
power on.
2. Pair a new Bluetooth device: Select “My device” and search for new device. Ensure your
Bluetooth device is turned on and can be searched within range.
3. Devices found are displayed on the screen and a list of devices appears. If the desired device is
displayed, you can cancel the search with the Red Button.
4. Select the desired device and press Green Button to pair.
5. Follow the instructions on the screen.
6.5 Alarm
1. Set up the alarm: Press Up Arrow or open in “Menu” -> “Extra” -> “Alarm”
2. Set time: Enter the time you want and save. The Alarm is set and will sound at present every
day at the specified time.
Emergency Features
7. EMERGENCY FEATURES
Your phone has an emergency call function. You can quickly call for help in critical situations.
The emergency call button is disabled in the factory because this function is only effective if it is
adapted to your needs. To turn the emergency call button on, press the Menu Key at home
screen, select “Settings” -> “SOS settings” -> “SOS key” -> “on” and press Green Button to
confirm.
This section presents to you how emergency features work and what you should know about
this feature. Please read the entire chapter for your own safety.
7.1 Who to call in an emergency?
Each contact can be defined as in emergency call list. The emergency call function is only the
difference between private individuals and aid organizations. (A private person shall confirm the
emergency call. This ensures that the emergency call can not be on an answering machine)
Inquire with the persons you want to save as emergency contact list. (If you want to save
assistance organizations and official institutions (police, fire, etc.) as an emergency contact list,
you must first consult with the institutions concerned.
Attention: We accept no liability for possible costs related to involuntary calls.
Note: If no emergency contact is recorded, your credit is exhausted, the reception of your
phone is lost or when you are on a foreign network (eg. When roaming is not activated) the
United States and Canada emergency 911 is composed if pressing the emergency call button.
You call is sent directly to the nearest police station.
7.2 What will happen when the emergency call is triggered?
When you press three second on the emergency button on the back of your phone, the
emergency call sequence starts.
7.2 What will happen when the emergency call is triggered?
(Continued from Page 15)
1. Alarm Signal: An alarm sounds immediately, which alert people nearby. The alarm stops only
when the emergency call is canceled or confirmed.
2. Call Emergency contacts: The emergency call sequence starts immediately when the
emergency button is pressed for 3 second. With the emergency call text message (SMS) sent to
the contacts on SOS list.
3. Emergency Call SMS: The phone sends an SMS to private emergency call contacts, which

informs incoming emergency call.
4. Emergency Round: The four emergency numbers are called in the order defined by the SOS
list until someone answers the call.
If the first contact does not answer the emergency call, the second number is automatic called, if
the second emergency call contact does not respond, the third contact is called etc.
If you want to be sure that your emergency call was successful in all cases, record the
emergency number 911 as a contact list.
The phone will be on Emergency status for an hour unless you restart the phone by power it off
and on again.
Note: The cell phone active hands-free function at full volume for one hour during the
Emergency call status, and all incoming calls will be automatic picked up.
7.3 How to Enter/Edit SOS list (emergency contacts)
Press Menu key at home screen and select “settings” -> “SOS setting” -> “SOS list” and add or
edit.
7.4 How to Edit SMS content (emergency SMS)
Press Menu key at home screen and select “settings” -> “SOS setting” -> “SMS content” and
edit the SMS.
Safety Instructions
1. Traffic Safety First
Do Not use the Cell Phone while you drive.
2. Shut down in Restricted Areas
Comply with related restriction rules or regulations. Shut down the mobile phone on the airplane, or
around inflammable articles, chemicals, or medical appliances.
3. Interference
Mobile communication maybe affected by radio interferences, so the performance of the phone is
affected accordingly.
4. Professional Service
DO NOT dissemble the mobile phone and assemble it by yourself. The mobile phone is service only
by authorized organizations.
5. Waterproof
This mobile phone is not waterproof. Keep it dry under any situation.
6. Emergency Calls
Ensure the mobile phone is turned on and in the service area.
Warranty
7. The 12-month warranty period (6-month for the battery) begins on the date of receipt of the unit.
The exact date is on the original sales receipt (receipt, invoice) with IMEI number. Please keep
these documents carefully.
8. Our guarantee is base on our terms in effect at the time of purchase. This guarantee is only
valid if the original Jethro battery is used. Jethro disclaims all warranties, according to law, in the
following situations:
Loss of data or information
Individuals or incidental, and consequential
Damages or indirect, independently of how these
have occurred.
This device complies with Part 15 of the FCC Rules. Operation is subject to the following two
conditions: (1) this device may not cause harmful interference, and (2) this device must accept any
interference received, including interference that may cause undesired operation.
Changes or modifications not expressly approved by the party responsible for compliance could
void the user's authority to operate the equipment.
NOTE: This equipment has been tested and found to comply with the limits for a Class B digital
device, pursuant to Part 15 of the FCC Rules. These limits are designed to provide reasonable
protection against harmful interference in a residential installation. This equipment generates, uses
instructions, may cause harmful interference to radio communications. However, there is no
guarantee that interference will not occur in a particular installation. If this equipment does cause
harmful interference to radio or television reception, which can be determined by turning the
equipment off and on, the user is encouraged to try to correct the interference by one or more of
the following measures:
-- Reorient or relocate the receiving antenna.
-- Increase the separation between the equipment and receiver.
-- Connect the equipment into an outlet on a circuit different from that to which the receiver is
connected.
-- Consult the dealer or an experienced radio/TV technician for help.
Warnings:
This device complies with Industry Canada’s licence-exempt RSSs
Operation is subject to the following two conditions:
(1) This device may not cause interference and (2) this device must accept any
interference, including interference that may cause undesired operation of the device.
Le présent appareil est conforme aux CNR d'Industrie Canada applicables aux appareils
radio exempts de licence.L'exploitation est autorisée aux deux conditions suivantes :
(1) l'appareil ne doit pas produire de brouillage, et
(2) l'utilisateur de l'appareil doit accepter tout brouillage radioélectrique subi, même si le
brouillage est susceptible d'en compromettre le fonctionnement.
Under Industry Canada regulations, this radio transmitter may only operate using an
antenna of a type and maximum (or lesser) gain approved for the transmitter by Industry
Canada. To reduce potential radio interference to other users, the antenna type and its
gain should be so chosen that the equivalent isotropically radiated power (e.i.r.p.) is not
more than that necessary for successful communication.
Conformément à la réglementation d'Industrie Canada, le présent émetteur radio peut
fonctionner avec une antenne d'un type et d'un gain maximal (ou inférieur) approuvé pour
l'émetteur par Industrie Canada. Dans le but de réduire les risques de brouillage
radioélectrique
à l'intention des autres utilisateurs, il faut choisir le type d'antenne et son gain de sorte
que la
puissance isotrope rayonnée équivalente (p.i.r.e.) ne dépasse pas l'intensité nécessaire à
l'établissement d'une communication satisfaisante.
This radio transmitter (identify the device by certification number, or model number if
Category II) has been approved by Industry Canada to operate with the antenna types
listed below with the maximum permissible gain and required antenna impedance for
each antenna type indicated. Antenna types not included in this list, having a gain greater
than the maximum gain indicated for that type, are strictly prohibited for use with this
device.
Le présent émetteur radio (identifier le dispositif par son numéro de certification ou son
numéro de modèle s'il fait partie du matériel de catégorie I) a été approuvé par Industrie
Canada pour
fonctionner avec les types d'antenne énumérés ci-dessous et ayant un gain admissible
maximal et l'impédance requise pour chaque type d'antenne. Les types d'antenne non
inclus dans cette liste,
ou dont le gain est supérieur au gain maximal indiqué, sont strictement interdits pour
l'exploitation de l'émetteur
Users Manual

Jethro Cell Phone SC-628
User Manual
Table of contents……………………………..1
1. SETTING UP THE CELL PHONE……………….....3
1.1 How to insert SIM card……………………………… 3
1.2 How to insert the microSD card……………………. 3
1.3 How to insert battery………………………………… 4
1.4 How to charge the battery……………………………5
1.5 How to active the Cell Phone………………………..6
2. INFORMATION FOR BEGINNERS…………………7
2.1 Display symbols and explanations………………….7
2.2 Overview of the Cell Phone………………………….8
3. CALL……………………………………………………9
3.1 How to make a call……………………………………9
3.2 How to end a call……………………………………...9
3.3 How to accept or reject a call………………………...9
3.4 Hands Free…………………………………………….9
3.5 Call Info………………………………………………..10
3.6 Missed call…………………………………………....10
4. MESSAGES…………………………………………..10
4.1 Write message……………………………………….10
4.2 Receive and review message………………………11
4.3 Draft (unsent message)……………………………..11
4.4 Sent message………………………………………...11
4.5 Clear message………………………………………..11

5. CONTACTS…………………………………………..12
5.1 Name search…………………………………………12
5.2 New contacts: save the name and number……….12
5.3 Edit contact……………………………………………12
5.4 Remove contact……………………………………....12
5.5 Send contact by SMS (text messages)…………….12
5.6 Speed dial buttons (M1/M2)…………………………12
6. EXTRA FEATURES………………………………….13
6.1 Camera/Video Recorder/Voice Recorder………….13
6.2 Calendar……………………………………………….13
6.3 FM radio……………………………………………….13
6.4 Bluetooth………………………………………………13
6.5 Alarm…………………………………………………..13
7. EMERGENCY FEATURES……………..……...14
7.1 Who to call in an emergency…………………………14
7.2 What will happen
when the emergency call is triggered? .....................14
7.3 How to Enter/Edit SOS list (emergency contacts)….15
7.4 How to Edit SMS content (emergency SMS)………..15
*Restore to factory settings……………………………….06
SAFETY INSTRUCTIONS……………….…….….…16
WARRANTY………………………………….…….…16

1. SETTING UP THE CELL PHONE
1.1 How to insert SIM card (not include in package)
Figure 1: Lift the battery cover, start for it at the recess the top left corner of the phone.
Figure 2: The location for the SIM card is in the top left corner, inserts the card with the gold chip face
down.
Figure 1 Figure 2
Caution:
1.Keep the SIM card out of reach of children.
2.Do not touch the portion that has the chips.
3.Keep the SIM card away from magnets.
4.Avoid putting the SIM card under direct heat such as sunshine.
1.2 How to insert MicroSD card (optional)
Figure 3: Push the card holder switch to the top, place the card into the cardholder, close the cardholder
and pull the switch down
Figure 3
Page 3.
1.3 How to insert battery
Warning:Do not remove battery when the power is on or when the phone is connected to the charger.
Fail to comply this rule may result in damaging the cell phone and the SIM card.
Figure 4: Place the battery so the golden contact matches with phone.
Figure 5: Press the battery cover until it clicks. Start at the top of the phone, to the center.
Figure 4 Figure 5
Caution:
1.Before using the phone for the first time, please charge the battery for at least four hours. If you violate
this charging time, the battery life may decrease.
2.During the charging process, do not remove the battery. Fail to comply may damage the mobile.
3.It is normal if the phone or the charger is warm during charging.
4.If the battery capacity is exhausted, it takes a few minutes in the charging process before the charging
icon displays on the LCD.
If a part is missing or defective, please contact Jethro hotline at the number
1-888-509-6199 or email Jethro@jethroshop.com for any assistance
e
1.4 How to charge the Battery
Warning: Use only the Jethro designed battery and charger, fail to
comply with this rule may result in explosion of the mobile phone.
Do not attempt to insert the charging cable into the socket for the
headphone. This could damage the phone.
1. Charge with the Charging Cable
Insert the charging cable into the USB connector on
the top of the phone
Then put the charging cable‟s main plug into the
socket
2. Charge with the Desktop Charging Cradle (optional)
*The Desktop Charging Cradle CDS-628 needs be purchased separately
Insert the charging cable into the USB plug from back
of the charging cradle.
Then place the charging cable into the power socket
Place the phone into the charging cradle.
3. Charge with the Computer
You can connect your phone to your computer using
the USB cable
4. During the charging process
If the phone is off, battery symbol will display on the
screen and button [+] flashes
If the phone is on, the charging status display bars fill
and the button [+] flashes
5. End of Charging Procedure
After charging the batter, the battery symbol or the
charge status display is completely filled, and the
button [+] is lit continuously.
You can now remove the charging cable.
1.5 How to activate the Cell Phone
Attention:At the first activation of the cell phone, some adjustments must be made. You can make the
settings later in the Setting menu, but we recommend you do so now.
1. Press two seconds on key to turn on the phone. You
will feel a vibration, then Jethro logo appears on the screen.
2. Enter the 4-digit PIN code (optional).
You can write your PIN here for the record:
3. Press to confirm when “OK” shows on screen
5. Enter the Date and Time using the keypad and select with the
arrow keys to choose Language. Confirm each entry with
key. The home screen is displayed.
Note:In order to display AM/PM properly, When set up time, please always enter 24 hour format. For
example, for time 10:32 pm please enter as 20:32. You can change the time format in “Menu” -> ”Settings”
-> ”Phone Settings” -> ”Time and date” -> ”Set format” and use [*] or [#] key to change between 12 hours
and 24 hour format.
Please contact your local cellular carrier to obtain valid regular size SIM card.
The phone is Hearing Aid Compatible with HAC rating M4/T4
Default Restore Factory Password is 0000. *Factory restoration will reset all
phone setting to factory condition and erase all contacts and call history.
Default keypad lock code is 0000

2. INFORMATION FOR BEGINNERS
2.1 Display Symbols and Explanations
Symbols
Explanation
Indicates the cellular reception.
Ring only
Vibrates only
Indicates the Silent / Sleep mode is activated
Vibrate then ring
Vibrate and ring
Headphone plugged
Playing Music
Unread multimedia massage (MMS)
Unread text message (SMS)
Alarm on
Indicate charging status and battery level
Unread Missed call
Bluetooth on
2G network
3G network
Keypad lock is on
On foreign network, additional costs may apply.
*The R symbol maybe on if you are on sub network such as Straight
Talk (main network is AT&T), Cricket wireless (main network is
T-Mobile) or FIDO (main network is Rogers) etc.
2.2 Overview of the Cell Phone: Keys and explanations
Keys
Explanation
Green Button:
To answer or confirm
Red Button:
To hang up or return
Arrows:
To navigate Menu or shortcut to Contacts (down arrow)
or Alarms (up arrow)
Emergency Button:
In an emergency, press for 3 seconds
Volume Buttons:
To change the phone volume
Power Key:
Press and hold 3 seconds to power On / Off
Pound Key:
To change the input methods. *Press for 3 seconds to
activate the silent mode when at home screen
Star Key:
Battery charging indicator
Keypad Lock:
To lock and unlock, press and hold for 2 sec
Flashlight Key:
When the phone is activated, you can choose to have
continuous light or just brief light. * Press for 2 seconds
to turn continuous light On / Off
Family Number:
You can assign these two keys as your family speed dial
from your saved phone contacts.
Use Important Features
3. CALLS
3.1 How to make a Call
1. Enter area code and telephone number with the
numeric keys.
2. Press Green button to connect the call, caller name
or the number of the caller appears on the screen.
3. Once connected, the name or number of the caller and the
call duration are displayed on the screen.
3.2 How to end Call
1. To end the call, press the Red Button.
2. Once Call ended, the duration of the call is displayed on screen.
Note: if the caller hangs up before you, it is not necessary to press the Red Button.
3.3 How to accept or reject a call
1. When you receive a incoming call, name of the caller or number appears on the screen.
2. To accept the call, press the Green Button.
3. To reject the call, press the Red Button.
4. You can also put the call on temporary silent by pressing the Volume Button on the left side of
the phone.
3.4 Hands Free
1. To switch to hands-free mode, during the telephone call, press the Green Button to start the
“options”, select option one: “Handsfree”, then use the arrows to select “H-Free” and press
Green button to active the Hands Free.
2. To switch off hands-free mode, simply repeat the steps above and select “H-held” and press
Green Button.
3.5 Call Info
1. Call Info gives you a call overview of the last 20 calls. You can also call a contact from the list.
2. You can access Call Info by pressing the Green Button on the home screen.
3. You can use arrows to browse the call list. Select the contact and press the Green Button to call
the contact.
Note: Only Saved contact appears on the screen with the name. All the others appear only
with the phone number.
3.6 Missed Call
When you have missed a call, the message “ 1 missed call” appears on the home screen and
the Pound Key flashes. As soon as you view the missed call, the message disappears and the
Pound Key flash stops.
Note: When you review missed call list, you can press the Green Button to go to “options”. You
can select in “call”, “view”, “text”, “save to phonebook”, “edit” or “delete” the call.
4. MESSAGES
With your phone, you can write and send messages (Short Message Service, aka SMS). SMS are small
text message with up to 160 characters. You can also write and send multimedia messages (MMS)
Features available here: Write message, Inbox, Draft, Outbox, Sent messages, Templates and
Message Settings
You access this menu by pressing the Menu Key
4.1 Write messages
1. Select Text message (SMS) or Multimedia message (MMS) and select „Ok‟ by pressing the
Green Button.
2. Enter the text using the keyboard and press option to choose the recipient by “Entering number”

or “add from Phonebook”
Use Important Features
4.1 Write messages (continued from Page 10)
3. If you chose to write Multimedia message (MMS), in the options, you can add pictures, sound or
video to the text to send to the recipient.
Attention: The attachable file size for the MMS is very limited, any high definition picture,
sound or video may not be successfully sent to the recipient. If error occurred when send
multimedia message, it may be caused by incorrect carrier APN setting. The APN setting can
be changed in “Settings” -> “Connectivity” -> “Data account”. You can select the proper carrier
account, or add new PS account if your carrier name did not appear on the list. For more detail,
please call you carrier customer service for obtain MMS APN settings or contact Jethro
customer service 1-888-509-6199 or email Jethro@jethroshop.com for further assistance.
4.2 Receive and view messages
A ring informs you that you have received a new message. “1 new message” is displayed. Press Green
Button to view the message.
Older message can be viewed in Inbox in the Message menu.
4.3 Draft (Unsent message)
It contains the messages that you do not want to send immediately, and unsuccessfully sent messages
are saved under Outbox
4.4 Sent message
All messages you have sent are save in Sent message.
4.5 Clear message
A full memory blocks to receive new messages. Therefore they must be regularly removed. The memory
can hold about 250 messages.
5. CONTACTS
You can save up to 300 contacts in your phone. Once you registered the names and number of
your contacts (family, friend, doctor etc.) The contacts will be saved on your Phonebook.
You can access the menu by pressing Menu Key then press #2 key, or press Down Arrow Key
at home screen.
5.1 Name Search
You contacts are sorted alphabetically.
1. Open Contact or Phonebook menu.
2. Write the letter with the keyboard. Only the contacts starting with the letters appear on the
screen.
3. Use Arrow Keys to select desired contact.
5.2 New contacts: Save the number and number
1. Open Contact or Phonebook menu.
2. Select “Add new contact”, Choose save the contact to SIM or Phone memory in “Select”.
3. Use the keyboard to enter the contact‟s name, phone number and email address (optional).
Select “Option” by pressing the Green Button then select “Save”
4. You can add more details in “Options”. eg: Home, mobile etc.
5.3 Edit Contact
This function is to later edit an existing contact.
5.4 Remove Contact
You can delete contacts one by one or all contacts from the SIM card or the phone.
5.5 Send contact by SMS (Text message)
Select a contact and send it as an SMS to a recipient of your choice
5.6 Speed dial buttons
You can associate key #2 - #9 each with a phone number that you use often.
You can also assign M1/M2 Keys as speed dials for your family contacts.
Page 11

Use Important Features / Extra Features
5.6 Speed dial buttons (continued from page 12)
Note: To set up M1/M2 Keys: Open “Settings”->”Family Settings”
6. EXTRA FEATURES
6.1 Camera / Video Recorder / Voice Recorder
To active Camera or video recorder, press Menu Key and select “Extra” -> “Camera”. You can
take picture and video, or record voice.
6.2 Calendar
Press Menu Key and select “Extra” -> “Calendar”
6.3 FM radio
You can listen to local FM radio with this feature. For better radio reception, please plug in a
headphone. Use Arrow Keys to search channels, and use Pound Key to turn the radio On/Off.
6.4 Bluetooth
Bluetooth is a wireless connection between electronic devices. You can pair the phone with your
hands-free car-kit or a Bluetooth headset.
1. Enable Bluetooth: Open the Settings Menu and choose “Connectivity” and choose “Bluetooth”
power on.
2. Pair a new Bluetooth device: Select “My device” and search for new device. Ensure your
Bluetooth device is turned on and can be searched within range.
3. Devices found are displayed on the screen and a list of devices appears. If the desired device is
displayed, you can cancel the search with the Red Button.
4. Select the desired device and press Green Button to pair.
5. Follow the instructions on the screen.
6.5 Alarm
1. Set up the alarm: Press Up Arrow or open in “Menu” -> “Extra” -> “Alarm”
2. Set time: Enter the time you want and save. The Alarm is set and will sound at present every
day at the specified time.
Emergency Features
7. EMERGENCY FEATURES
Your phone has an emergency call function. You can quickly call for help in critical situations.
The emergency call button is disabled in the factory because this function is only effective if it is
adapted to your needs. To turn the emergency call button on, press the Menu Key at home
screen, select “Settings” -> “SOS settings” -> “SOS key” -> “on” and press Green Button to
confirm.
This section presents to you how emergency features work and what you should know about
this feature. Please read the entire chapter for your own safety.
7.1 Who to call in an emergency?
Each contact can be defined as in emergency call list. The emergency call function is only the
difference between private individuals and aid organizations. (A private person shall confirm the
emergency call. This ensures that the emergency call can not be on an answering machine)
Inquire with the persons you want to save as emergency contact list. (If you want to save
assistance organizations and official institutions (police, fire, etc.) as an emergency contact list,
you must first consult with the institutions concerned.
Attention: We accept no liability for possible costs related to involuntary calls.
Note: If no emergency contact is recorded, your credit is exhausted, the reception of your
phone is lost or when you are on a foreign network (eg. When roaming is not activated) the
United States and Canada emergency 911 is composed if pressing the emergency call button.
You call is sent directly to the nearest police station.
7.2 What will happen when the emergency call is triggered?
When you press three second on the emergency button on the back of your phone, the
emergency call sequence starts.
7.2 What will happen when the emergency call is triggered?
(Continued from Page 15)
1. Alarm Signal: An alarm sounds immediately, which alert people nearby. The alarm stops only
when the emergency call is canceled or confirmed.
2. Call Emergency contacts: The emergency call sequence starts immediately when the
emergency button is pressed for 3 second. With the emergency call text message (SMS) sent to
the contacts on SOS list.
3. Emergency Call SMS: The phone sends an SMS to private emergency call contacts, which

informs incoming emergency call.
4. Emergency Round: The four emergency numbers are called in the order defined by the SOS
list until someone answers the call.
If the first contact does not answer the emergency call, the second number is automatic called, if
the second emergency call contact does not respond, the third contact is called etc.
If you want to be sure that your emergency call was successful in all cases, record the
emergency number 911 as a contact list.
The phone will be on Emergency status for an hour unless you restart the phone by power it off
and on again.
Note: The cell phone active hands-free function at full volume for one hour during the
Emergency call status, and all incoming calls will be automatic picked up.
7.3 How to Enter/Edit SOS list (emergency contacts)
Press Menu key at home screen and select “settings” -> “SOS setting” -> “SOS list” and add or
edit.
7.4 How to Edit SMS content (emergency SMS)
Press Menu key at home screen and select “settings” -> “SOS setting” -> “SMS content” and
edit the SMS.
Safety Instructions
1. Traffic Safety First
Do Not use the Cell Phone while you drive.
2. Shut down in Restricted Areas
Comply with related restriction rules or regulations. Shut down the mobile phone on the airplane, or
around inflammable articles, chemicals, or medical appliances.
3. Interference
Mobile communication maybe affected by radio interferences, so the performance of the phone is
affected accordingly.
4. Professional Service
DO NOT dissemble the mobile phone and assemble it by yourself. The mobile phone is service only
by authorized organizations.
5. Waterproof
This mobile phone is not waterproof. Keep it dry under any situation.
6. Emergency Calls
Ensure the mobile phone is turned on and in the service area.
Warranty
7. The 12-month warranty period (6-month for the battery) begins on the date of receipt of the unit.
The exact date is on the original sales receipt (receipt, invoice) with IMEI number. Please keep
these documents carefully.
8. Our guarantee is base on our terms in effect at the time of purchase. This guarantee is only
valid if the original Jethro battery is used. Jethro disclaims all warranties, according to law, in the
following situations:
Loss of data or information
Individuals or incidental, and consequential
Damages or indirect, independently of how these
have occurred.
This device complies with Part 15 of the FCC Rules. Operation is subject to the following two
conditions: (1) this device may not cause harmful interference, and (2) this device must accept any
interference received, including interference that may cause undesired operation.
Changes or modifications not expressly approved by the party responsible for compliance could
void the user's authority to operate the equipment.
NOTE: This equipment has been tested and found to comply with the limits for a Class B digital
device, pursuant to Part 15 of the FCC Rules. These limits are designed to provide reasonable
protection against harmful interference in a residential installation. This equipment generates, uses
instructions, may cause harmful interference to radio communications. However, there is no
guarantee that interference will not occur in a particular installation. If this equipment does cause
harmful interference to radio or television reception, which can be determined by turning the
equipment off and on, the user is encouraged to try to correct the interference by one or more of
the following measures:
-- Reorient or relocate the receiving antenna.
-- Increase the separation between the equipment and receiver.
-- Connect the equipment into an outlet on a circuit different from that to which the receiver is
connected.
-- Consult the dealer or an experienced radio/TV technician for help.
Warnings:
This device complies with Industry Canada’s licence-exempt RSSs
Operation is subject to the following two conditions:
(1) This device may not cause interference and (2) this device must accept any
interference, including interference that may cause undesired operation of the device.
Le présent appareil est conforme aux CNR d'Industrie Canada applicables aux appareils
radio exempts de licence.L'exploitation est autorisée aux deux conditions suivantes :
(1) l'appareil ne doit pas produire de brouillage, et
(2) l'utilisateur de l'appareil doit accepter tout brouillage radioélectrique subi, même si le
brouillage est susceptible d'en compromettre le fonctionnement.
Under Industry Canada regulations, this radio transmitter may only operate using an
antenna of a type and maximum (or lesser) gain approved for the transmitter by Industry
Canada. To reduce potential radio interference to other users, the antenna type and its
gain should be so chosen that the equivalent isotropically radiated power (e.i.r.p.) is not
more than that necessary for successful communication.
Conformément à la réglementation d'Industrie Canada, le présent émetteur radio peut
fonctionner avec une antenne d'un type et d'un gain maximal (ou inférieur) approuvé pour
l'émetteur par Industrie Canada. Dans le but de réduire les risques de brouillage
radioélectrique
à l'intention des autres utilisateurs, il faut choisir le type d'antenne et son gain de sorte
que la
puissance isotrope rayonnée équivalente (p.i.r.e.) ne dépasse pas l'intensité nécessaire à
l'établissement d'une communication satisfaisante.
This radio transmitter (identify the device by certification number, or model number if
Category II) has been approved by Industry Canada to operate with the antenna types
listed below with the maximum permissible gain and required antenna impedance for
each antenna type indicated. Antenna types not included in this list, having a gain greater
than the maximum gain indicated for that type, are strictly prohibited for use with this
device.
Le présent émetteur radio (identifier le dispositif par son numéro de certification ou son
numéro de modèle s'il fait partie du matériel de catégorie I) a été approuvé par Industrie
Canada pour
fonctionner avec les types d'antenne énumérés ci-dessous et ayant un gain admissible
maximal et l'impédance requise pour chaque type d'antenne. Les types d'antenne non
inclus dans cette liste,
ou dont le gain est supérieur au gain maximal indiqué, sont strictement interdits pour
l'exploitation de l'émetteur