Jiangmen ShuoPu Science and Technology Development PS-02 Massager Remote User Manual cover
Jiangmen ShuoPu Science and Technology Development Co., Ltd. Massager Remote cover
User Manual

Should you have any issues with your F-Machine or require spare parts,
please contact your nearest F-Machine retailer or email us directly at sales@f-machine.com
WARNING: MOVING PARTS - RISK OF INJURY
Keep all objects away from moving parts during operation.
Ensure all nuts, bolts and clamps are sufficiently tight and
read user manual fully prior to operation. Keep away from liquids.
cover.pdf 1 26/09/2014 17:59
sales@f-machine.com
Thank you for purchasing the F-Machine Gigolo.
‘F’ stands for Fun (honestly) and that is exactly
what the F-Machine was designed for, FUN.
We have taken the utmost care in designing your F-Machine and we
hope that it will service you and your friends for many years to
come. Should you have any issues with your F-Machine or require
spare parts, please contact your nearest F-Machine retailer or email
us directly at sales@f-machine.com.
F-Machine Pro Contents
In your F-Machine box you should have the following:
• 2 x curved legs with feet – left hand and right hand
• 1 x leg T-piece with end cap
• 2 x bolts for leg assembly
• 1 x main head unit assembly
• 1 x thruster rod
• 1 x toy adaptor suitable for Vac-u-Lock products
• 1 x 8 inch toy
• 1 x autosensing 110/240V power supply with UK style kettle lead
• 1 x UK to EU mains power adaptor
• 1 x remote control + 12v 27A (MN27) battery
• 1 x 5mm hex key tool
• 1 x tool bag with additional tools for maintenance
• 1 x manual (you’re reading it)
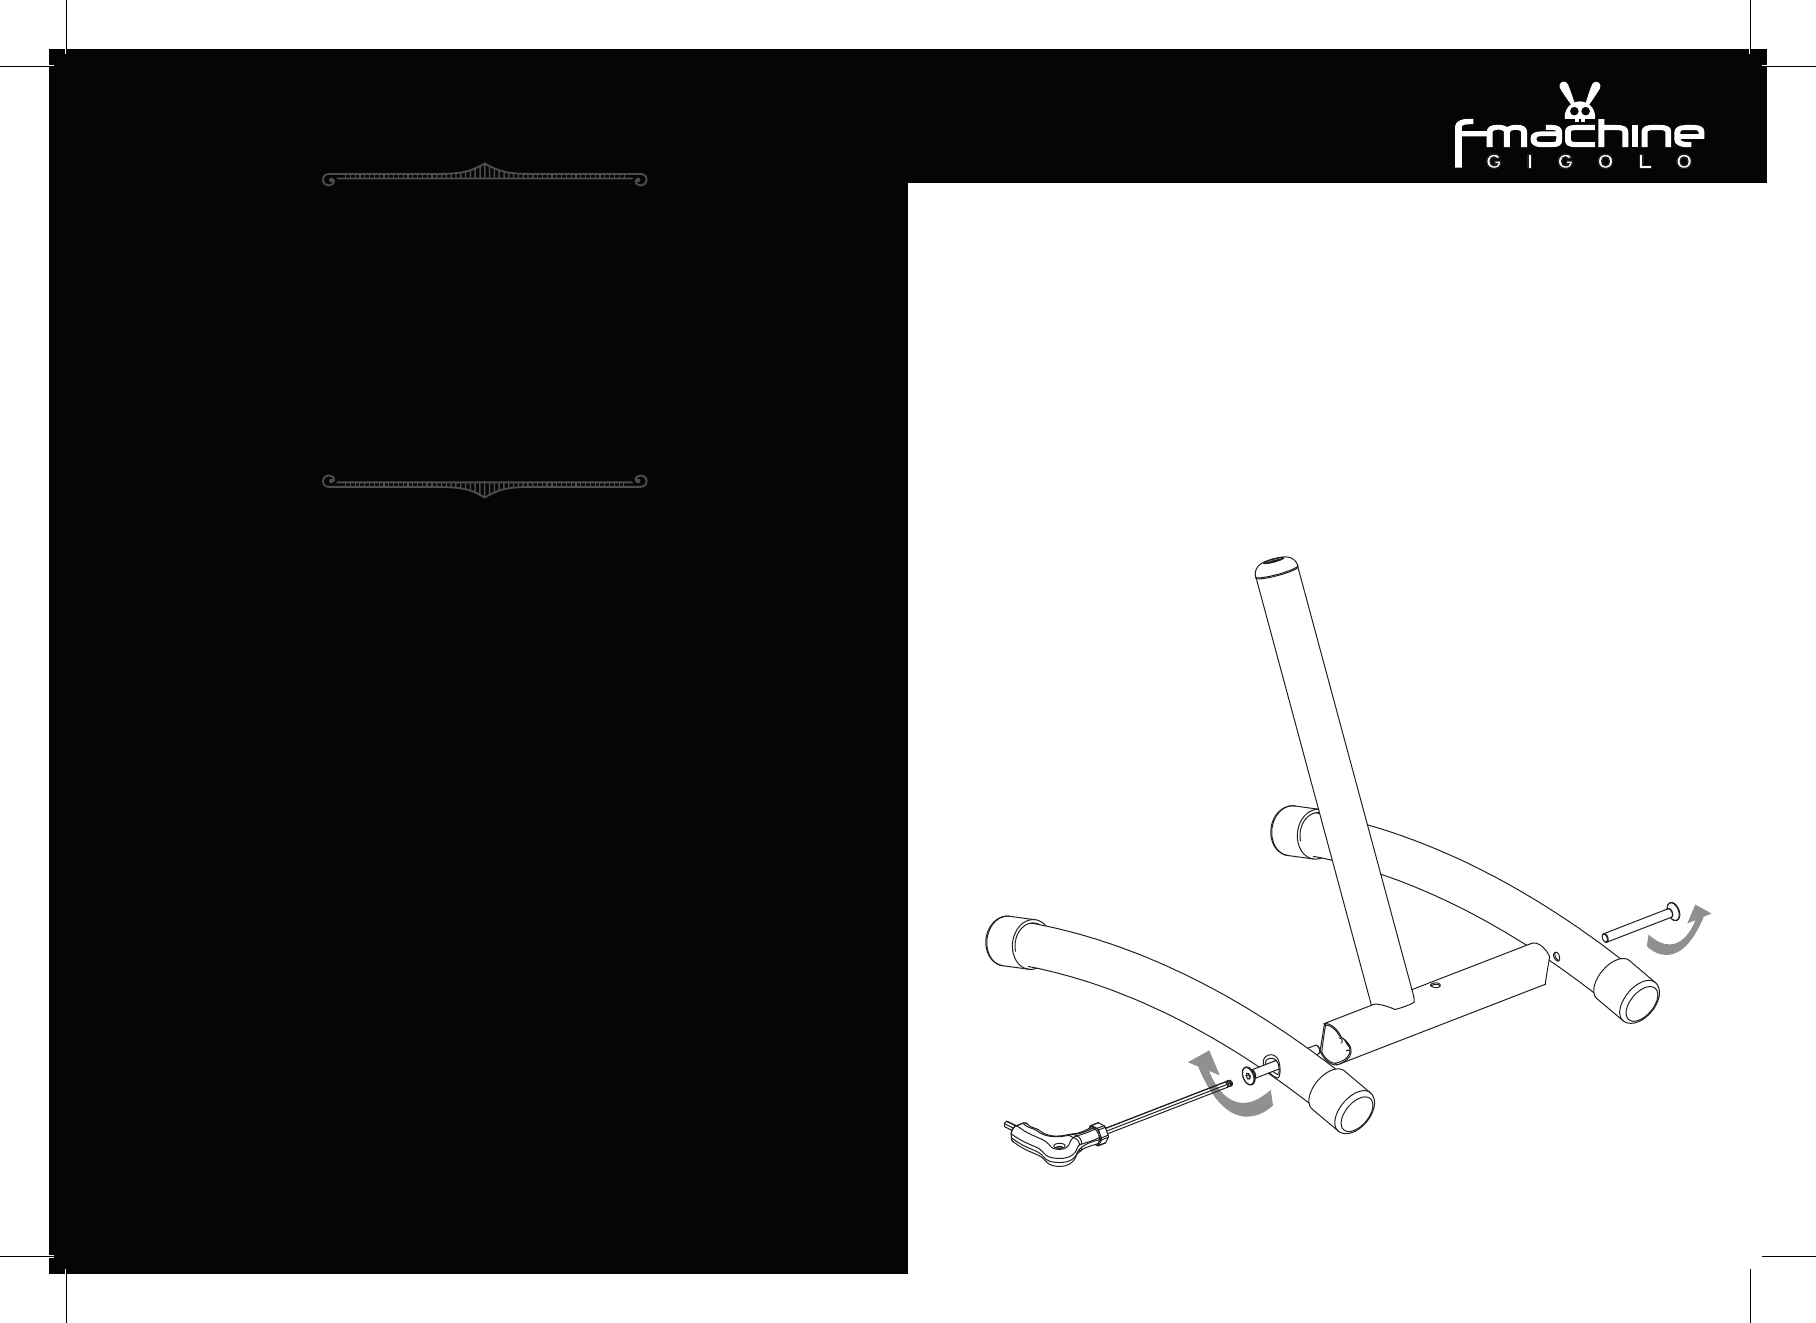
Leg Assembly
Take both the curved legs (note that
they are handed) and assemble them to
the central T-shaped leg, using the large
countersunk screws provided. Tighten
until there is no movement between the
pieces.
Place the F-Machine leg assembly on a
firm flat surface before moving to the
next stage.
Note: When operating the F-Machine,
always make sure that is used on a firm
flat surface so that it will not fall over
and cause any damage. Additional
stability and operating positions can be
achieved by use of the optional tie-down
kit (sold separately).
3
v
Assembly of the F-Machine Gigolo
sales@f-machine.com
2
p2p3.pdf 1 26/09/2014 18:00
sales@f-machine.com sales@f-machine.com
Installing the thruster rod
First screw the toy adapter onto the end
of the thruster rod. Next, slide the rod
assembly through the hole in the front of
the head unit until the it is fully engaged
in the slider block (it helps to look
through the window). Insert the long end
of the 5mm hex tool through the long
slot of the window and tighten the screw
to securely fasten the thruster rod in
to the slider block. Check that the
thruster rod is secure by trying to
rotate it by hand – it should not be
possible to move it.
45
w
w
w
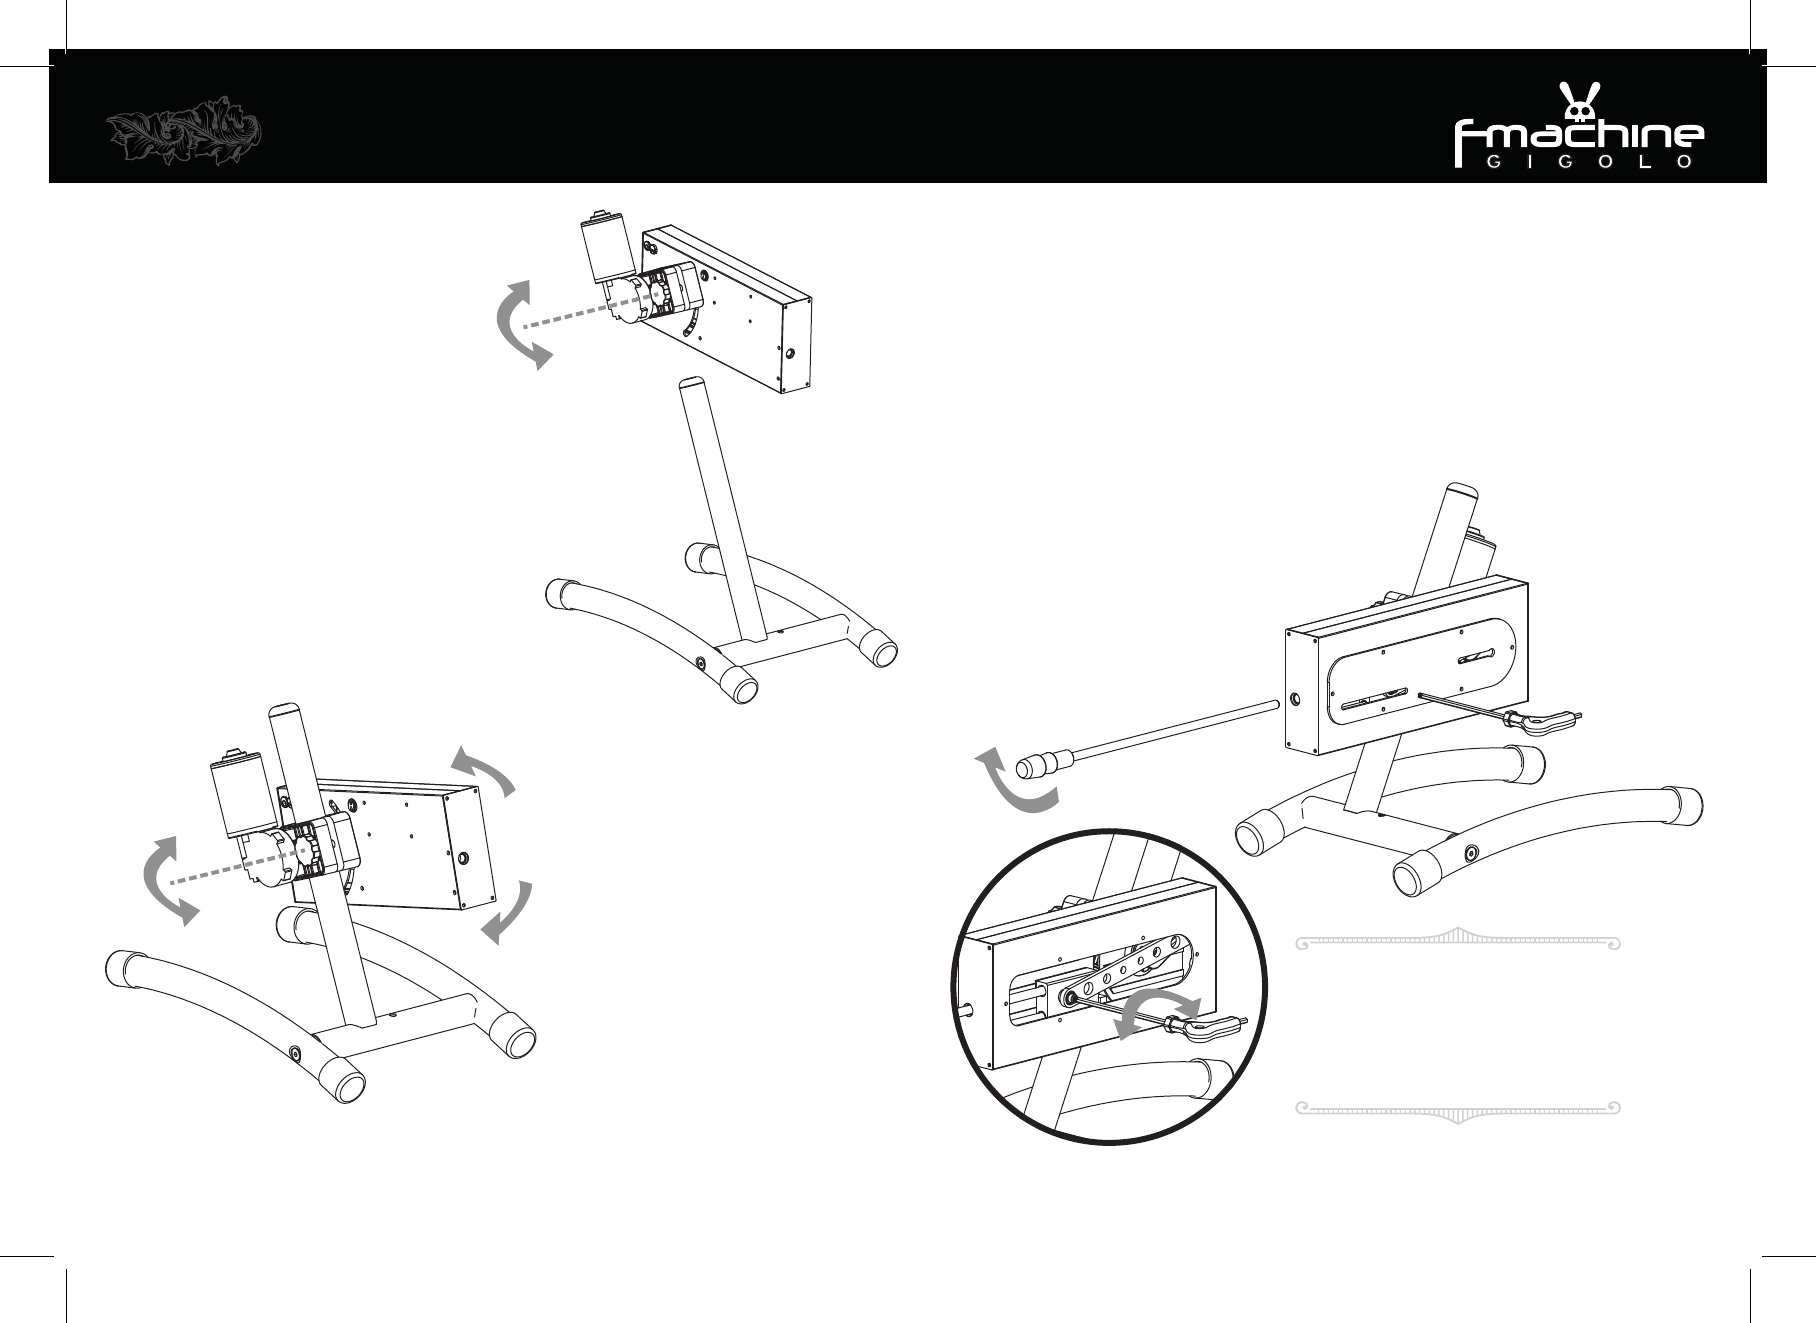
Now take the head unit of the machine
(with the motor body facing upwards)
and slide the clamp over the upright leg
(you may need to loosen the clamp a few
turns first if it is a little tight).
Once the head unit is in the desired
position, tighten the hand wheel
(clockwise) until the clamp grips the leg
firmly.
Note: Once the hand wheel is loose,
never unwind it more than two full turns.
The hand wheel controls both the
vertical position and the desired
angle of the head unit. Simply
loosen the clamp slightly to make
adjustments to the existing
position. Make sure the clamp is
fully tightened after each
adjustment. Support the head unit
with one hand when loosening the
hand wheel to prevent it dropping
beyond the desired position.
w
w
NOTE:
The guard window is not shown in
the illustration for clarity – never
operate the machine without the
window installed.
p4p5.pdf 1 26/09/2014 18:03
sales@f-machine.com sales@f-machine.com
67
more stroke
less stroke
The F-Machine Gigolo has a thruster rod
stroke that is adjustable from one to four
inches. To adjust the stroke you must
carry out the following procedure:
First make sure the thruster rod is firmly
secured to the slider block (see previous
instruction).
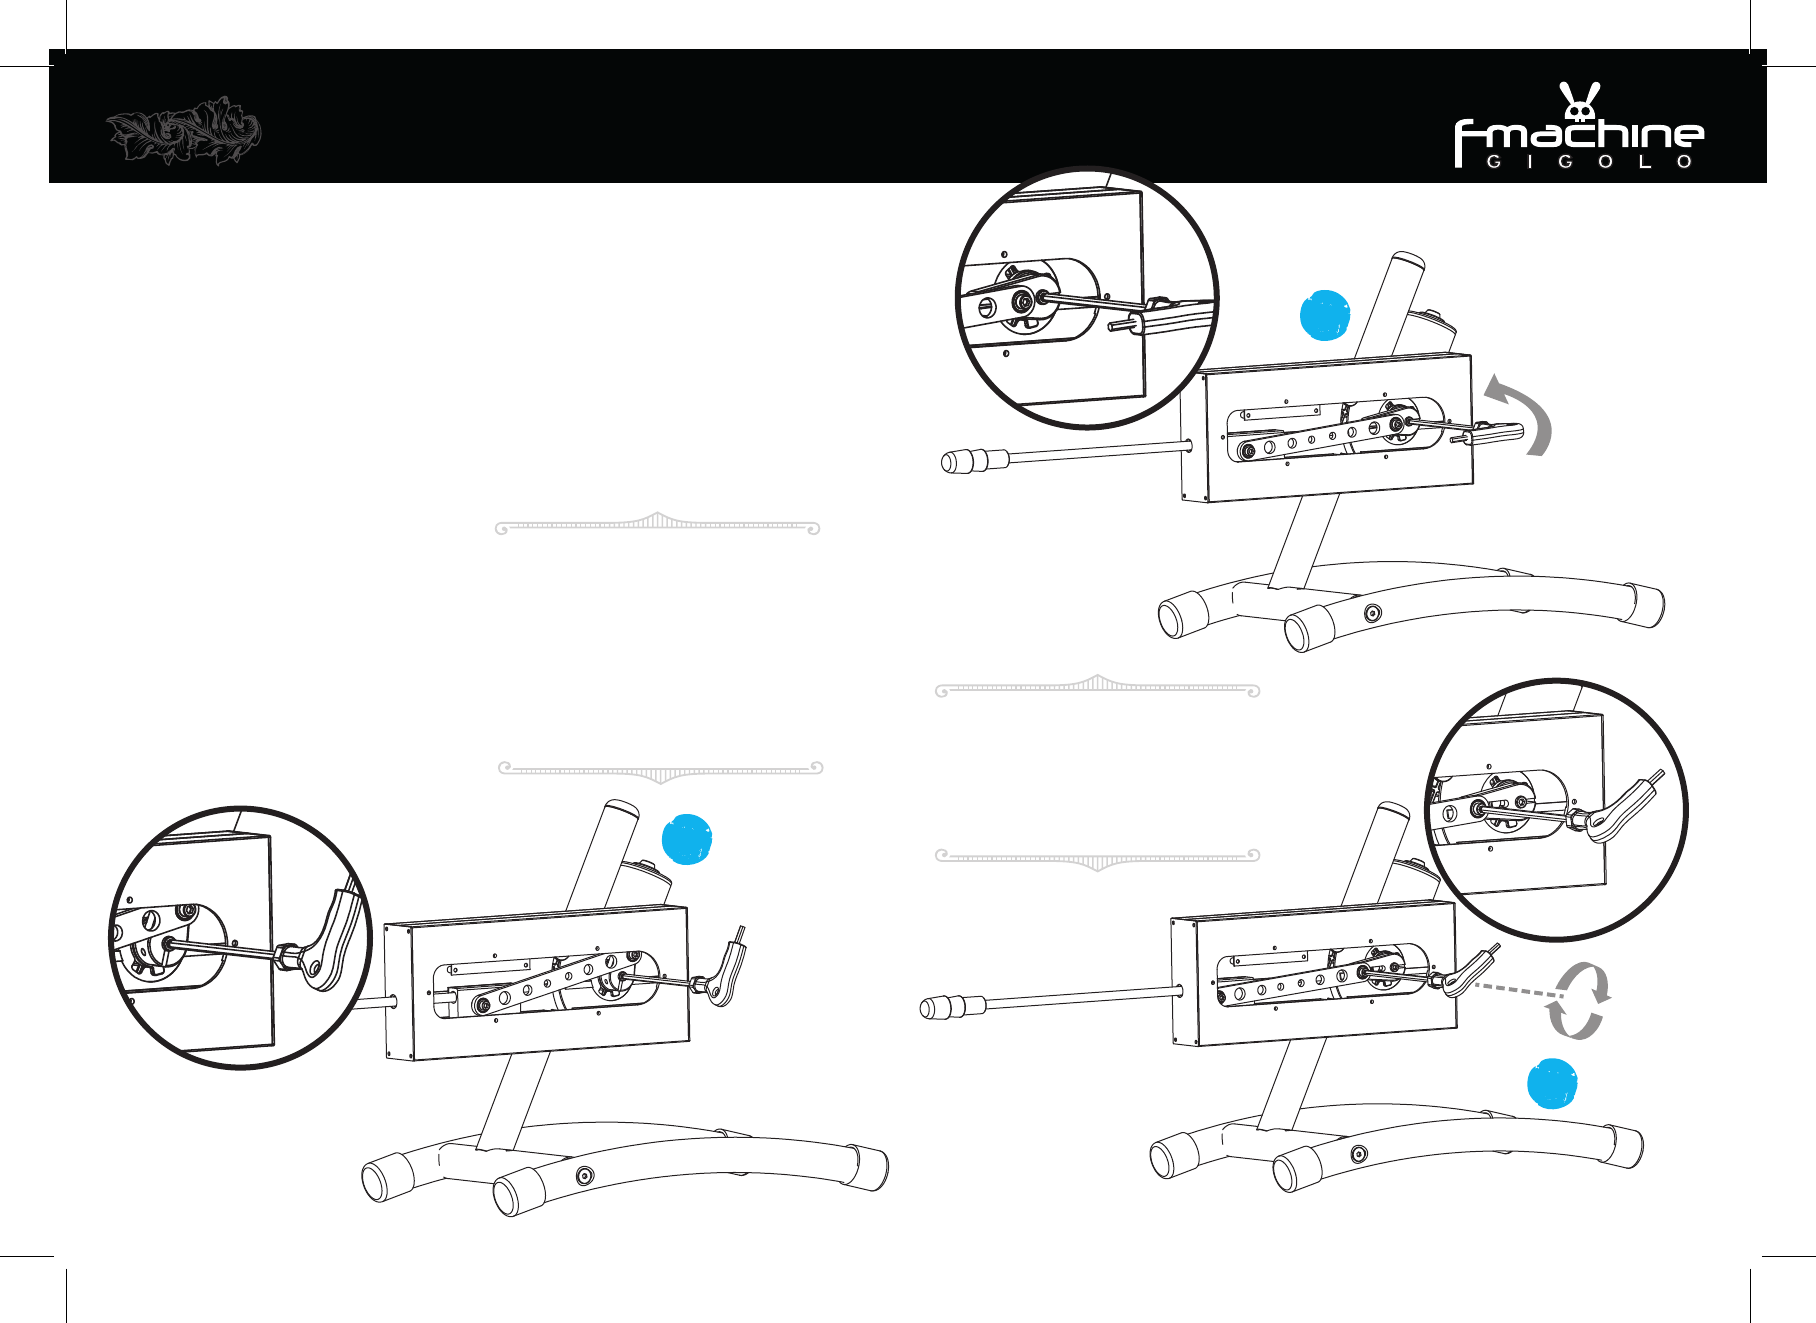
Next insert the long end of the 5mm hex
tool through the hole in the window in
front of the crank. The tool should
engage with the hexagonal key in the
middle of the crank arm (fig. 1)
Rotate the hex tool in the appropriate
direction so that the crank arm now
points forward in line with the slot in the
window (fig. 2)
Reposition the tool into the other
hexagonal bolt on the crank (on the end
of the connecting rod). With one hand on
the thruster rod, turn the hex tool about
half a turn anti-clockwise to loosen the
connecting rod bolt. You should now be
able to adjust the stroke of the crank
(it helps to push and pull on the thruster
rod). Once you have set the desired
stroke, simply tighten the connecting rod
bolt firmly with a clockwise motion of
the hex tool (fig 3).
NOTE:
Do not attempt to completely unwind
the connecting rod bolts or you may
damage your machine. Never put the
5mm tool through the slot in the
window if the machine is operating.
Never remove the front cover while
the machine is operating.
Adjusting the stroke of the thruster rod
FIG 1
FIG 2
NOTE:
The guard window is not shown in
the illustration for clarity – never
operate the machine without the
window installed.
FIG 3
w
w
w
w
w
more stroke
less stroke
p6p7.pdf 1 26/09/2014 18:02
sales@f-machine.com sales@f-machine.com
89
You have now set the desired head unit
position and thruster stroke, so you can
connect the power supply.
First check that the switch on the rear of
the head unit is in the OFF position. You
can now install the 90 degree connector
from the power supply into the power
inlet socket on the rear of the head unit.
The power supply kettle lead plug can
now be connected to a mains power
socket and turned on. The LED indicator
on the power supply should be lit. Finally,
the switch on the head unit can be
turned on and the blue LEDs inside the
F-Machine head unit should now light up
the window, giving you an indication that
the machine is live.
NOTE:
The F-Machine power supply is a
universal 110 / 240 volt auto-sensing
unit that will adapt to the mains
voltage of your country. There is no
need to make any adjustment.
The F-Machine power supply will be
supplied with a ‘kettle lead’ (IEC
60320-1 C13) and in most cases it will
be fitted with a UK style mains plug.
There may also be a UK to EU mains
adapter (with earth) to cover the EU
region.
If you reside outside of the EU, you
may have to obtain a suitable IEC
60320-1 C13 cable (kettle lead) for
your country which you can plug into
the F-Machine power supply. These are
commonly found on personal
computers and other similar
equipment. The alternative is to use an
earthed adapter plug for your region.
Connecting the power to the F-Machine
Switch is OFF
Power
inlet socket
p8p9.pdf 1 26/09/2014 18:00

sales@f-machine.com sales@f-machine.com
10 11
The machine is now ready to operate
and the speed can be controlled by the
remote control handset. First fit the
battery provided into the remote control
handset and replace the cover.
Note: replacement battery – Type Code:
27A (MN27) 12 volt battery (ø8.0 x
28.2mm).
Once you are happy the F-Machine is
free to operate without making contact
with anything it shouldn’t, set the switch
on the front panel of the remote to the
ON position (slide switch UPWARDS).
If the machine has just been powered
on, the default starting speed will be
zero RPM.
Press the upper button, marked with a
‘+’ sign, a couple of times and then press
the PAUSE/START button. The machine
should start to thrust slowly.
The speed of the machine can now be
increased or decreased by further
pressing the ‘+’ or ‘-’ buttons respectively
.
Once the machine is operating at the
desired speed, it can be stopped by
pressing the PAUSE/START button.
By pressing the PAUSE/START button
again, the machine will start at the same
speed as before. However, if the machine
is powered off or disconnected from the
mains, the default starting speed will be
zero RPM again.
Note: The F-Machine electronics have
been designed to cut out if the machine
is stalled for any reason. If this occurs,
remove whatever has caused the
concern and simply restart the machine
with the remote control handset. Never
attempt to stall the machine on purpose.
There are many toys available for your
F-Machine, most of which were originally
designed for use with ‘Vac-u-Loc’ style
harnesses; please check your nearest
adult toy supplier for the appropriate
attachments for you and your friends to
enjoy. We also supply an adapter for toys
with a suction cup base which will also fit
most flanged base type toys. Please see
our website for details.
Note: the maximum weight of any
attachments on the thruster rod should
be no more than 600g or damage may
be caused to the machine.
Operating the machine with the remote control handset
F-Machine does not start or runs intermittently
Once plugged into the mains socket the LED
indicator on the power supply should be lit. If it is
not, conduct the following checks.
Check the wall socket connection is fully engaged
and switched on (you can verify that the socket is
live by plugging another appliance into the same
socket).
Test and replace the fuse in the mains plug of your
F-Machine and check the kettle lead interface into
the power supply is connected properly. If the power
supply LED remains unlit you will need to obtain a
replacement power supply. Please contact your
F-Machine retailer. Never attempt to open the power
supply as you may be exposed to mains voltages
inside.
Once you have verified the power supply is working,
check to see if the LED lights inside the machine
head unit are on (look through the front window of
the head unit). If they are not lit, conduct the
following checks.
Check the power cable between the power supply
and the head unit for signs of damage. Check that
the 90 degree electrical connector is correctly
inserted into the inlet plug on the back of the
F-Machine head unit. Check the switch on the head
unit is set to the ON position. If the LEDs in the head
unit are still not lit then you have an internal
electrical fault with your machine. Please contact
your F-Machine retailer for assistance.
If the internal LEDs are lit then conduct the following
checks on the remote controller.
Check that the battery is inserted correctly and
replace if necessary. Check for signs of damage to
the controller. Follow the starting procedure
previously detailed in this manual. If the machine still
does not start, check that the crank arm and slider
mechanism can rotate and are free to move. This
can be done by inserting the 5mm hex tool through
the slot in the window and engaging it with the hex
socket in the middle of the crank arm. If the crank
arm will turn and there is no obvious sign of any
obstruction then the fault is most probably with the
remote control handset. Please contact your retailer
for assistance.
If the crank arm will not turn or the slider is
obviously jammed it may be possible to fix the
concern by removing the front cover of the machine
and making the necessary adjustments. This should
only be carried out by mechanically competent
persons and the machine must be disconnected from
the power supply whilst the cover is removed. The
cover must be replaced after the repair is carried out
and before using the machine again. Another
potential reason the crank arm may not turn is due
to a seized/broken motor. If this is suspected, please
contact your F-Machine retailer for assistance.
F-Machine makes a ‘knocking’ or other strange
noise
Inevitably the F-Machine will make some noise
during operation, however if that noise seems to be
excessive compared to normal, carry out the
following checks (only to be carried out by
mechanically competent persons):
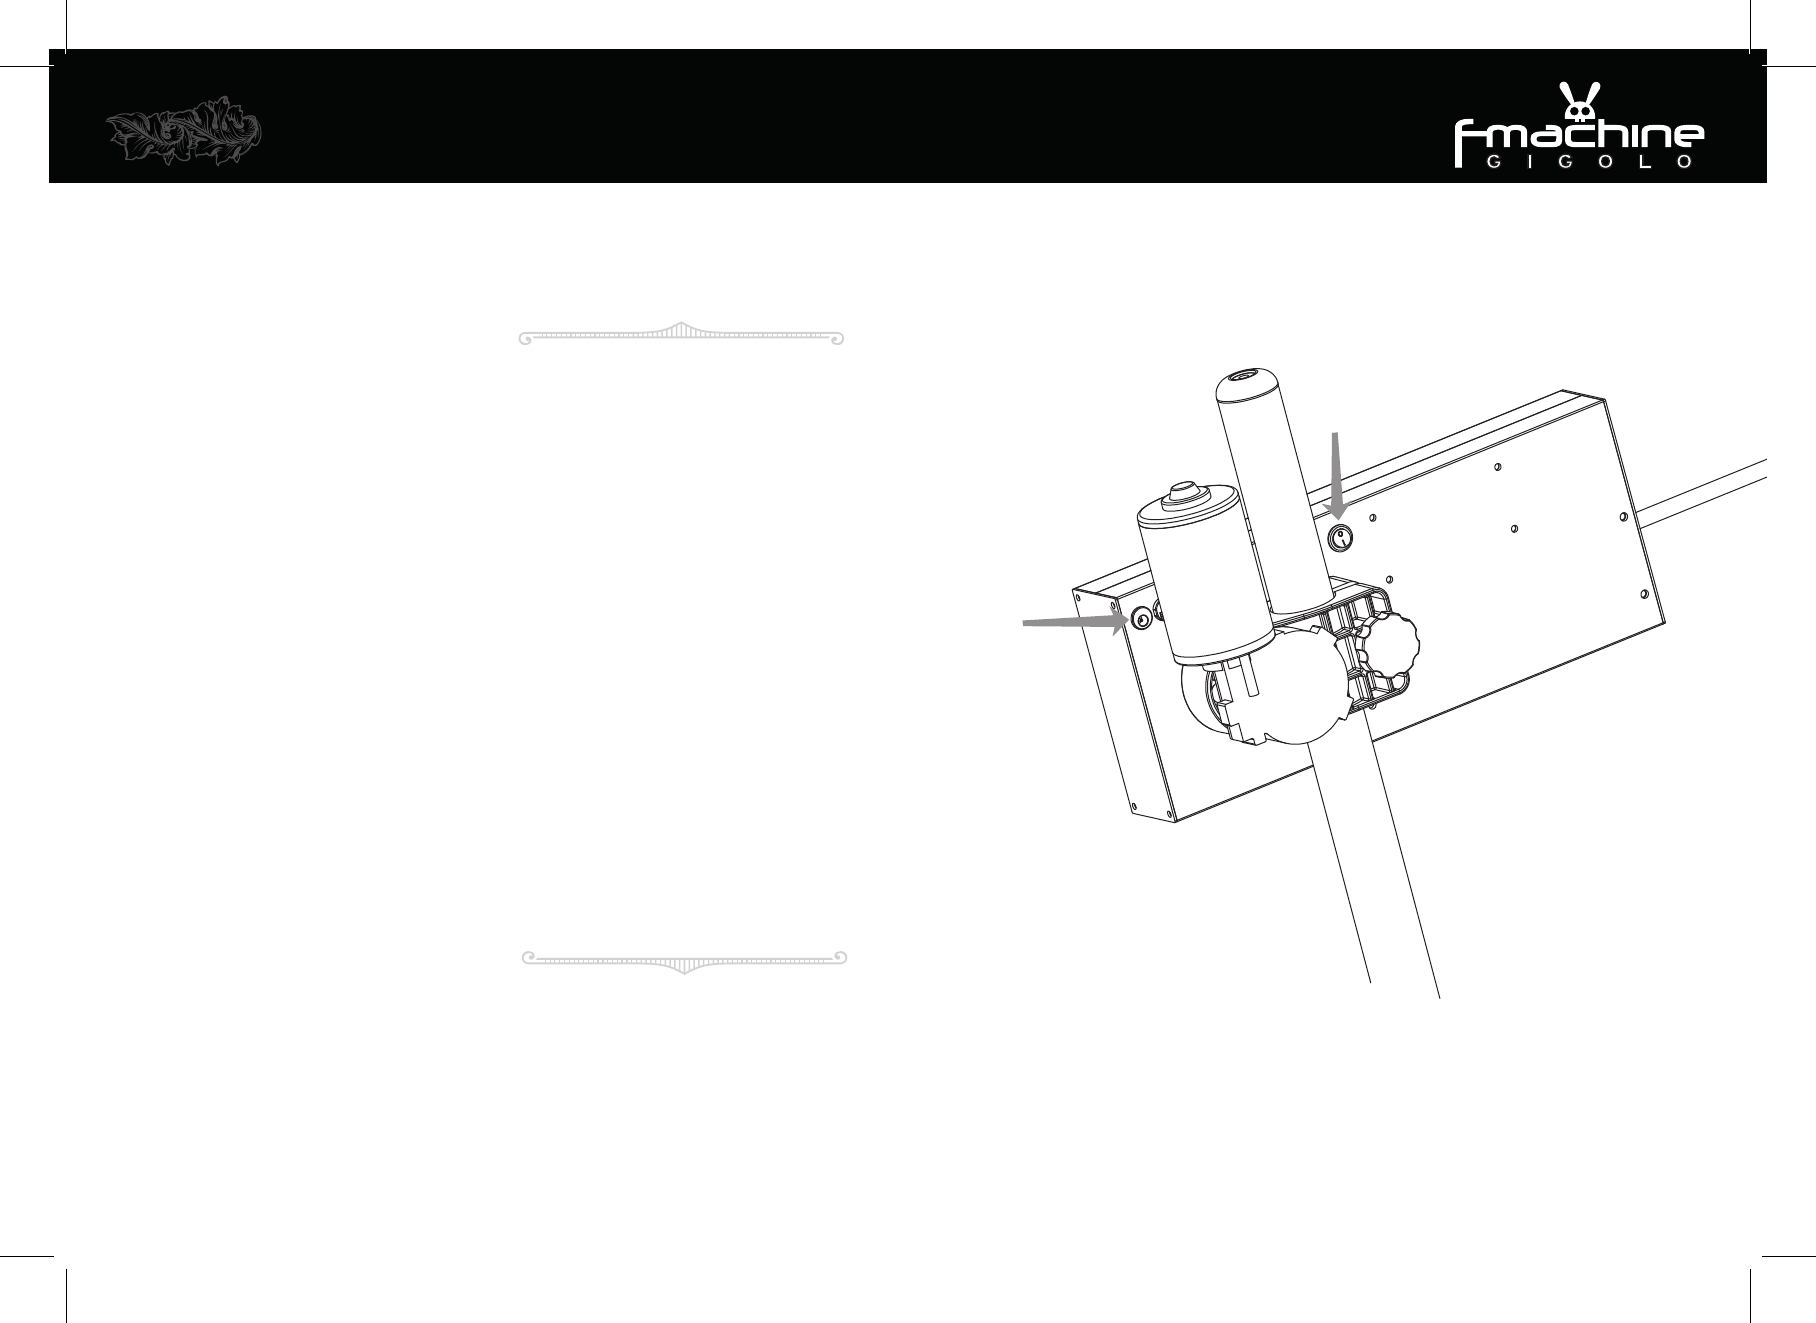
Making sure the machine is totally disconnected
from the power supply, remove the front cover of
the head unit (4 screws) and check the crank arm is
tight on the motor shaft.
Check the con-rod is tight both on the crank arm and
on the slider block. Check the slider rod and blocks
are held tightly and are firmly fixed to the back plate.
Check the slider block plastic slider bearings for play
and replace if excessively worn (contact your
F-Machine retailer). Check the thruster rod is held
tightly in the slider block. Rock the crank arm back
and forth with the con rod disconnected and listen
for a knocking noise coming from the motor
gearbox. If the noise comes from the gearbox then
carefully remove the gearbox cover and re-grease it.
Fault finding
SAFETY WARNING:
If the machine is operated for
extended periods at high speed and
loads the motor will become HOT.
This is within the design capability
of the motor. However, care must
be taken to not touch the motor
surface to avoid scalding. Observe
and follow the safety labels on
your machine. Do not cover the
motor or allow it to come into
contact with anything.
p10p11.pdf 1 26/09/2014 18:01

sales@f-machine.com sales@f-machine.com
12 13
Delivery
Immediately check the packaging and
F-Machine for any damage which may
have been caused in transit. Do not use
a damaged F-Machine, consult your
supplier.
Please dispose of the packing material
sensibly & responsibly, recycling where
appropriate.
The corrugated cardboard is constructed
from recycled paper.
Electrical connection & other safety
notes
Please read the operating instructions
before using the F-Machine for the first
time.
Please observe the instructions
contained in the Operating Instructions.
Please consider all warnings.
Make sure that all power connections
(extension cables and the connections
between the F-Machine components)
have been made properly and in
accordance with the manufacturer’s
instructions.
Before making or changing the
connections, power off the F-Machine
and unplug the mains connection plug.
If you have any doubts regarding the
installation, operation or safety of the
F-Machine, please refer to the vendor.
Do not cover the ventilation openings of
the F-Machine .
Overheating causes damage and
shortens the service life of the
F-Machine.
Your F-Machine may be damaged if you
place it under direct sunshine or close to
a heater. Please abstain from using the
product in very hot or humid locations or
in places where the temperature is likely
to decrease below 5°C (41°F). Do not
place the F-Machine on or near any hot
objects or items with open flames such
as candles or any night lamps. The high
temperature can melt plastic parts and
cause a fire.
Never operate F-Machines close to water.
For example, operating F-Machines near a
bathtub, washbasin, wet basement or
swimming pool can cause fire or electric
shock.
Do not allow your F-Machine to get wet.
Never pour any liquids onto the
F-Machine. Do not operate your
F-Machine if any solid or liquid substance
enters into it. This can cause electric
shock and your F-Machine may be
damaged. Have it checked immediately
by qualified personnel.
Always place the F-Machine on a firm,
flat and horizontal surface during
operation. Never place or operate the
F-Machine on soft furnishings.
Never operate the F-Machine on a raised
surface (such as a table), where there is
insufficient flat surface available or
where it could be knocked over and
cause injury or damage to property.
Never leave an F-Machine plugged in
unattended. Keep out of the reach of
minors and away from animals.
Never deliberately jam the crank arm or
slider mechanism.
Your F-Machine is a grounded product
(Class I) and it must certainly be
connected to a grounded socket.
The socket into which you plug in the AC
power cable or the adaptor must be
within easy reach.
Turn off your F-Machine with the on/off
switches and then unplug it in order to
disconnect it from mains. Do not use
defective power sockets. Make sure that
the plug is firmly inserted into the power
socket. If the plug remains loose, then it
can cause fire due to arcing. Refer to an
electrician to have your power socket
replaced.
Make sure that the power cable is not
stepped on and that there is no bending
at the plug sections, plug heads and
F-Machine output point.
Use only the add-ons/accessories
specified by the manufacturer.
Use only together with the bases,
tripods, brackets or stands specified by
the manufacturer or sold along with the
product.
Unplug the power cable during
thunderstorms or when you will not use
your F-Machine for a long period of time.
General Safety Notes (Important)
p12p13.pdf 1 26/09/2014 18:02

sales@f-machine.com sales@f-machine.com
14 15
Consult authorised service personnel for
service requirements. Never attempt to
repair the F-Machine yourself. Opening
the electronics control housing can
expose you to dangerous voltages or
other hazardous situations. Service is
required in situations such as damage to
the power cable of the F-Machine or its
plug, water spills or substances falling
into the F-Machine, if the F-Machine is
subjected to rain or moisture, it does not
operate normally or it is dropped.
Wipe the F-Machine clean with a soft and
dry cloth. Wipe dust gently with a soft
cloth. Stubborn stains can be cleaned
with a cloth slightly moistened with soap
and lukewarm water. Never use solvents
such as thinners or gasoline for cleaning.
Unplug the AC power cable from the
socket when cleaning the F-Machine.
Otherwise, there is the risk of electric
shock.
Do not short circuit, dismantle or modify
your F-Machine.
Dispose of the F-Machine in accordance
with the local laws and regulations in
order to protect our environment.
Do not dispose of your F-Machine with
regular household waste. Observe local
laws and regulations for disposal.
Do not operate the F-Machine whilst
under the influence of drugs or alcohol.
Do not use the F-Machine when
pregnant.
Consult your doctor about any existing
medical conditions before using the
F-Machine.
F-Machine is a FUN-Machine designed for fun use.
Where that fun takes you is entirely up to you and
entirely at your own risk. We at F-Machine accept
no liability or responsibility whatsoever for injury or
death caused as a result of the use of the F-Machine.
As already stated in this manual, the F-Machine is
very powerful and great care MUST be taken at all
times when using it.
If for any reason you are not happy with the
F-Machine, then please return it unused in its
original packaging within 14 days & you will be
issued with a full refund.
Disclaimer
p14p15.pdf 1 26/09/2014 18:02
Warning: Changes or modifications to this unit not expressly approved
by the party responsible for compliance could void the user’s authority
to operate the equipment.
Note: This equipment has been tested and found to comply with the
limits for a Class B digital device, pursuant to Part 15 of the FCC Rules.
These limits are designed to provide reasonable protection against
harmful interference in a residential installation. This equipment generates,
uses and can radiate radio frequency energy and, if not installed and used
in accordance with the instructions, may cause harmful interference to radio
communications. However, there is no guarantee that interference will not
occur in a particular installation. If this equipment does cause harmful interference
to radio or television reception, which can be determined by turning the equipment
off and on, the user is encouraged to try to correct the interference by one or more
of the following measures:
●Reorient or relocate the receiving antenna.
●Increase the separation between the equipment and receiver.
●Connect the equipment into an outlet on a circuit different from that to which
the receiver is connected.
●Consult the dealer or an experienced radio/TV technician for help.