Jingwah Information Technology CVR155 VR Headset User Manual
Shenzhen Jingwah Information Technology Co., Ltd. VR Headset
User manual

Setting up your ClassVR Headsets
1: Get Started with the Headsets
Turn your headset on
To turn your ClassVR headset on, simply press and hold the power button on the left side of the headset for five
seconds. You will see the ClassVR logo appear. After a few seconds you will see the menu screen.
To conserve power, the screen will turn o when not in use. It is activated by a sensor inside the headset.
Gesture controls
While students are wearing the ClassVR headset and it is not being controlled by the teacher, they can navigate
without pressing any buttons. Instead, the device is controlled by simple gestures.
To go back to the menu screen:
While wearing the headset, shake your head smoothly from side to side.
To select an experience:
Turn your head to find the icon you would like to select. Look at the icon. You should see a white dot appear.
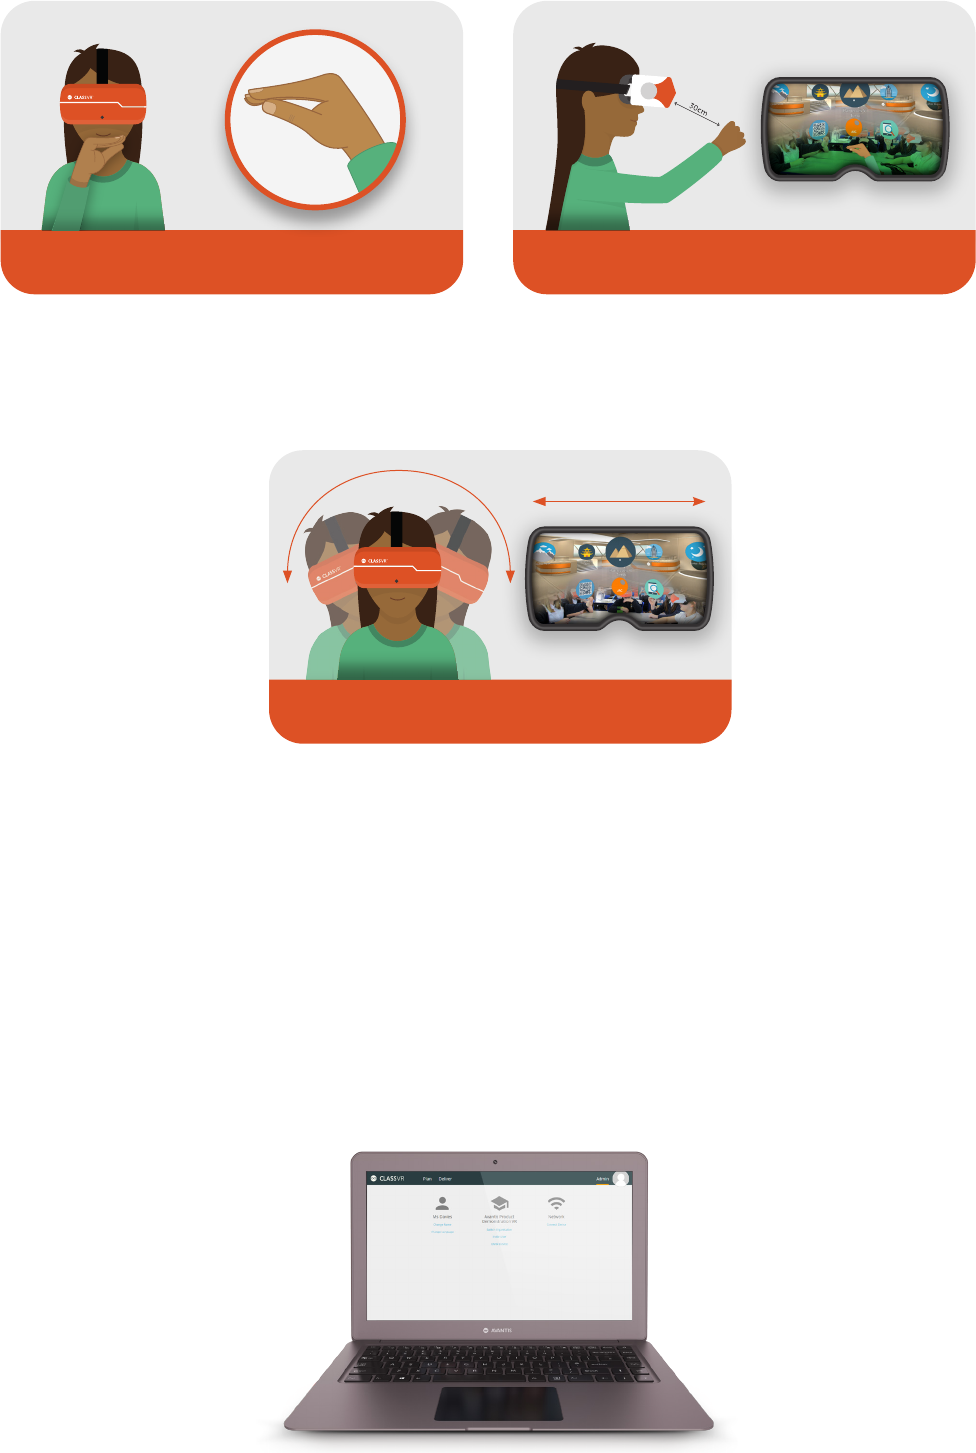
Keeping your eyes fixed on the icon, move your hand in front of the headset until you can see it at the
bottom of the screen. Make the ‘pinch’ gesture with your hand, holding it about 30cm in front of the camera.
The image will turn green when your gesture has been recognised.
To navigate left and right without turning around:
Tilt your head to the left to scroll towards the left of the screen. Tilt it to the right to scroll right.
2: Log in to your school’s ClassVR portal
To manage your ClassVR headsets, you’ll need to log in to the ClassVR Portal (www.portal.classvr.com) for
your school. If your information was provided to us prior to delivery as a Key Contact, you should receive an
email invitation from Avantis.
If you have not received the email, please check your Spam, Junk or Clutter folder. Click the link in the email
to create your account.
Once you’ve entered your chosen password, you’ll be directed to our EULA. If you’re happy with this, scroll to
the bottom of the page and click ‘accept’.
Now that you have logged in, you should see the ClassVR portal interface.
First of all, you will need to invite your colleagues to the ClassVR Portal. To do this, click Admin at the top
right of the page to access the management section:

From here, click ‘Invite User’ under the name of your school. When inviting colleagues, you have a number of user
types to choose from. Most colleagues should be invited as the ‘Teacher’ user type; this gives them the ability to
use all the day-today functions of the ClassVR Portal. IT Technicians and Computing Co-Ordinators should be
invited as the ‘Admin’ user type. Simply enter their email address and click ‘Send Invite’.
3: Connect your headsets to your school’s Wi-Fi network
Your ClassVR headsets have been pre-loaded with some VR experiences and can be used straight away. However,
in order to control the headsets, you will need to connect them to your school’s Wi-Fi network.
Create QRKeys
Visit www.portal.classvr.com and make sure you have logged in. Click Admin at the top right of the screen.
On the admin page, look for the Network section and click Connect Device:
This tool will generate a QRKey that you can scan with each ClassVR headset. Follow the steps below:
1. Select the correct network type.
2. Enter your school’s SSID (network name). Make sure you enter this exactly as it appears (including spaces and
capital/lowercase letters).
3. Enter the network password.
4. The system will automatically generate a QRKey (this will not be saved, so you may wish to print the page or
save an image of the QR using a snipping tool).
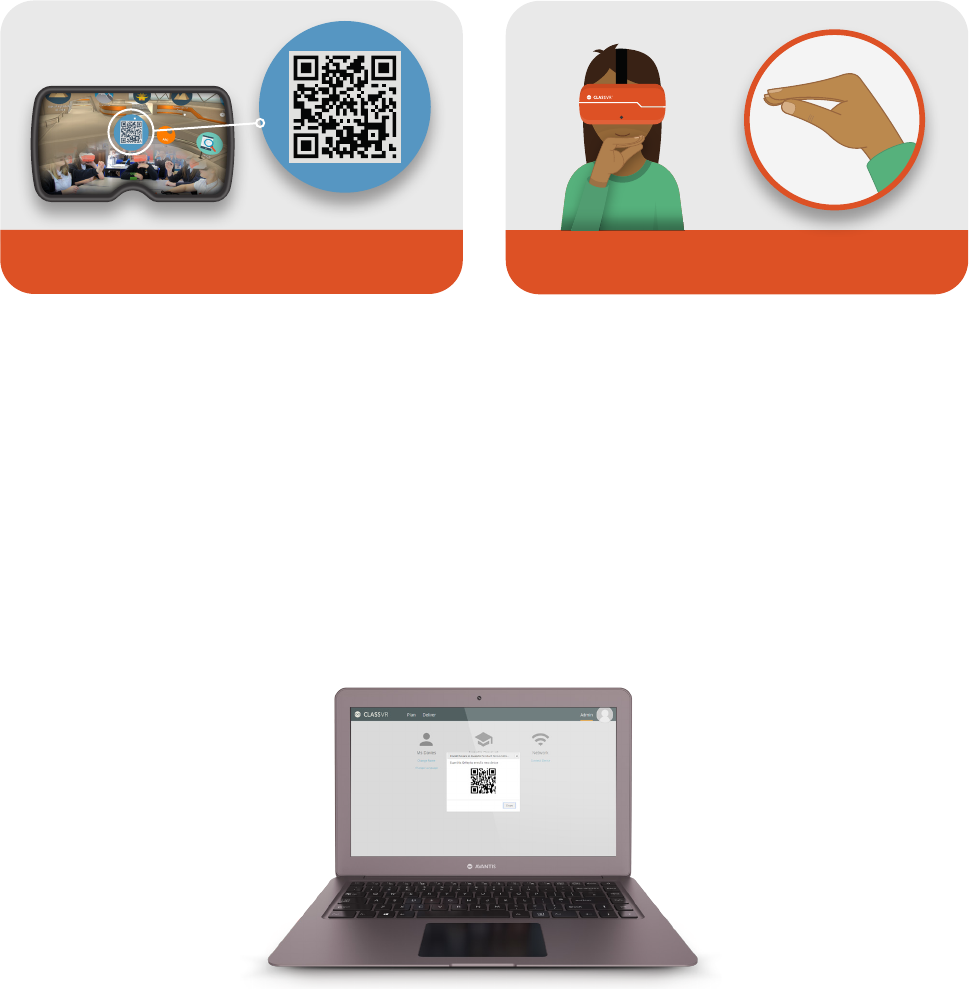
Scan QRKeys with each headset
On each of your ClassVR headsets, open the Scanner app by looking at the icon of a QR code and making the
‘pinch’ gesture with your hand in front of the device.
Once the Scanner app launches, simply look at the Wi-Fi QRkey until you hear a beep. This will add the Wi-Fi
connection to your headset.
If your school uses a proxy server that is not transparent, you will also need to generate a proxy QRKey; in this case,
please get in touch with our support team.
Scan your school’s enrolment QRKey
Your headsets may already be enrolled when you receive them. You can check this by going to http://portal.classvr.
com, clicking the Deliver tab at the top of the page, and looking at the Devices pane; the headsets should be listed
here. If you do not see all the devices you would expect, you may need to enrol them in your school’s organisation.
You can find the enrolment QRKey in the Admin section of the ClassVR portal, under the name of your school:
4: Start using ClassVR
Now you’re ready to begin using the headsets in your classroom. Simply visit the Plan tab to drag and drop
experiences, then get started using the Deliver tab. Visit www.classvr.com/portal-video for a quick guide.
If you require further assistance, get in touch with our support team: support@avantiseducation.com
FCCWarningStatement
Changesormodificationsnotexpresslyapprovedbythepartyresponsiblefor
compliancecouldvoidtheuser’sauthoritytooperatetheequipment.
ThisequipmenthasbeentestedandfoundtocomplywiththelimitsforaClassBdigital
device,pursuanttoPart15oftheFCCRules.Theselimitsaredesignedtoprovide
reasonableprotectionagainstharmfulinterferenceinaresidentialinstallation.This
equipmentgeneratesusesandcanradiateradiofrequencyenergyand,ifnotinstalled
andusedinaccordancewiththeinstructions,maycauseharmfulinterferencetoradio
communications.However,thereisnoguaranteethatinterferencewillnotoccurina
particularinstallation.Ifthisequipmentdoescauseharmfulinterferencetoradioor
televisionreception,whichcanbedeterminedbyturningtheequipmentoffandon,the
userisencouragedtotrytocorrecttheinterferencebyoneormoreofthefollowing
measures:
‐‐Reorientorrelocatethereceivingantenna.
‐‐Increasetheseparationbetweentheequipmentandreceiver.
‐‐Connecttheequipmentintoanoutletonacircuitdifferentfromthattowhichthe
receiverisconnected.
‐‐Consultthedealeroranexperiencedradio/TVtechnicianforhelp.