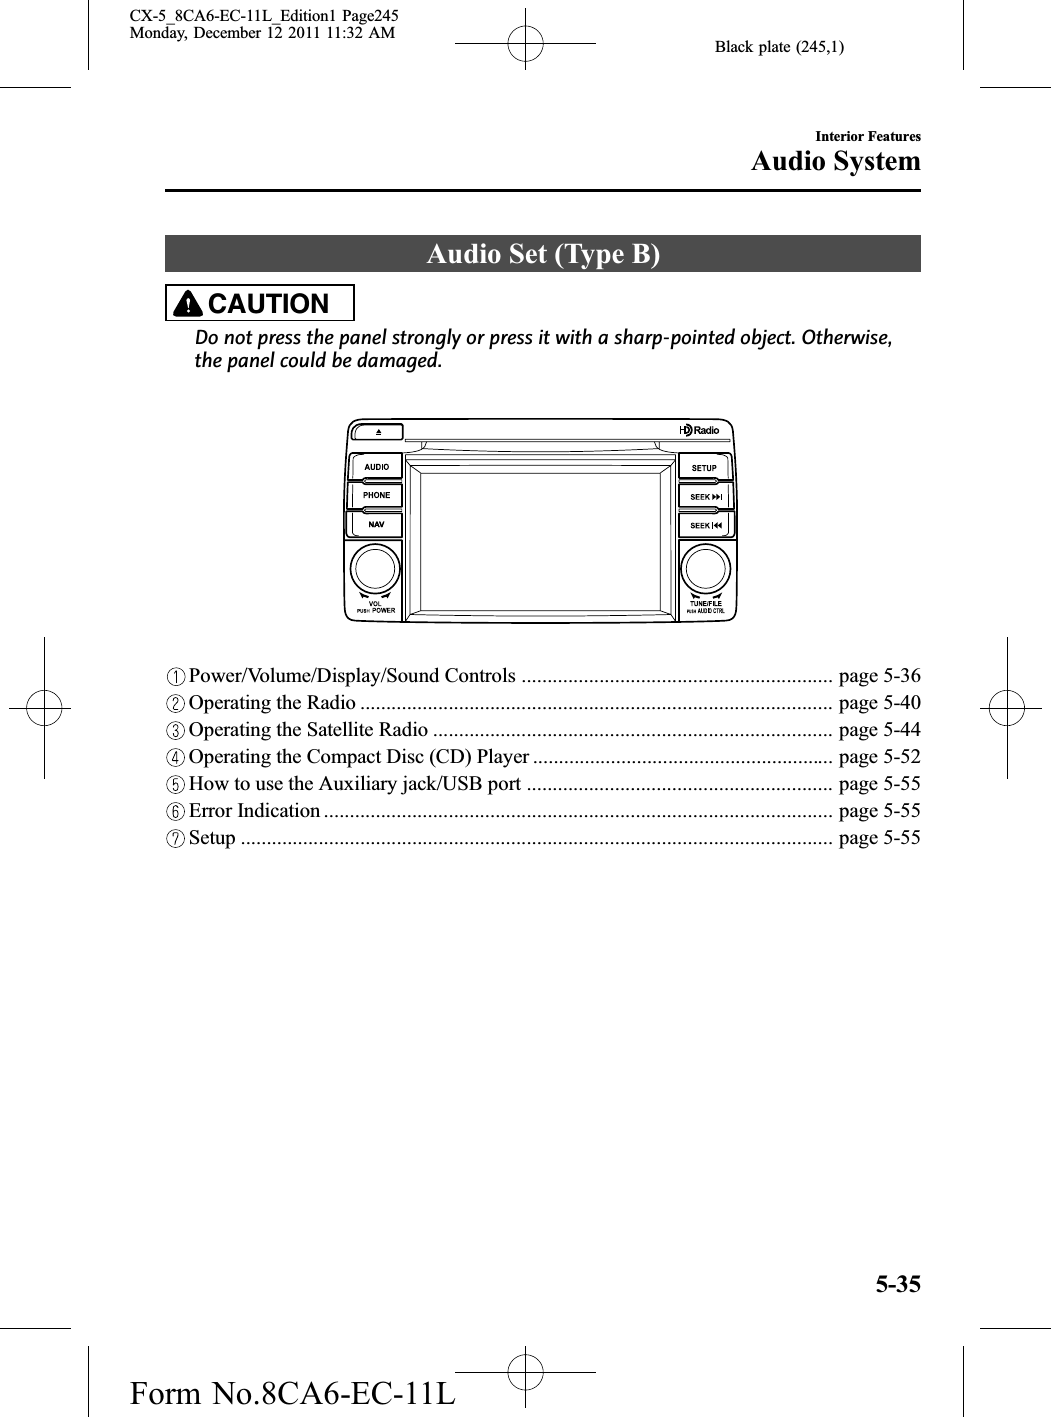
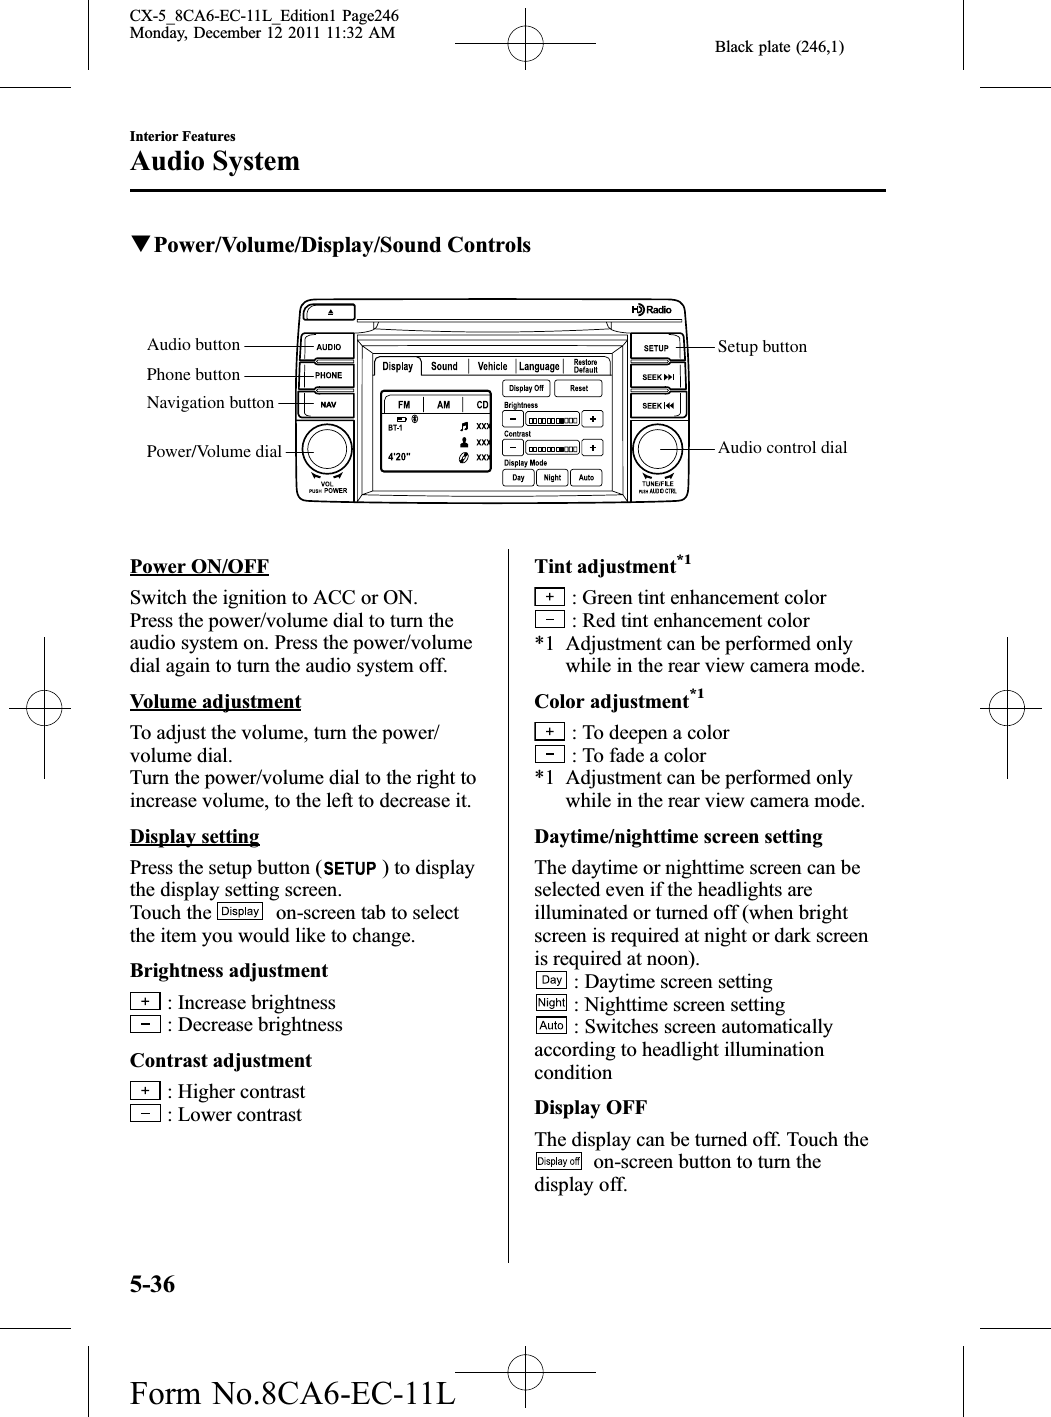
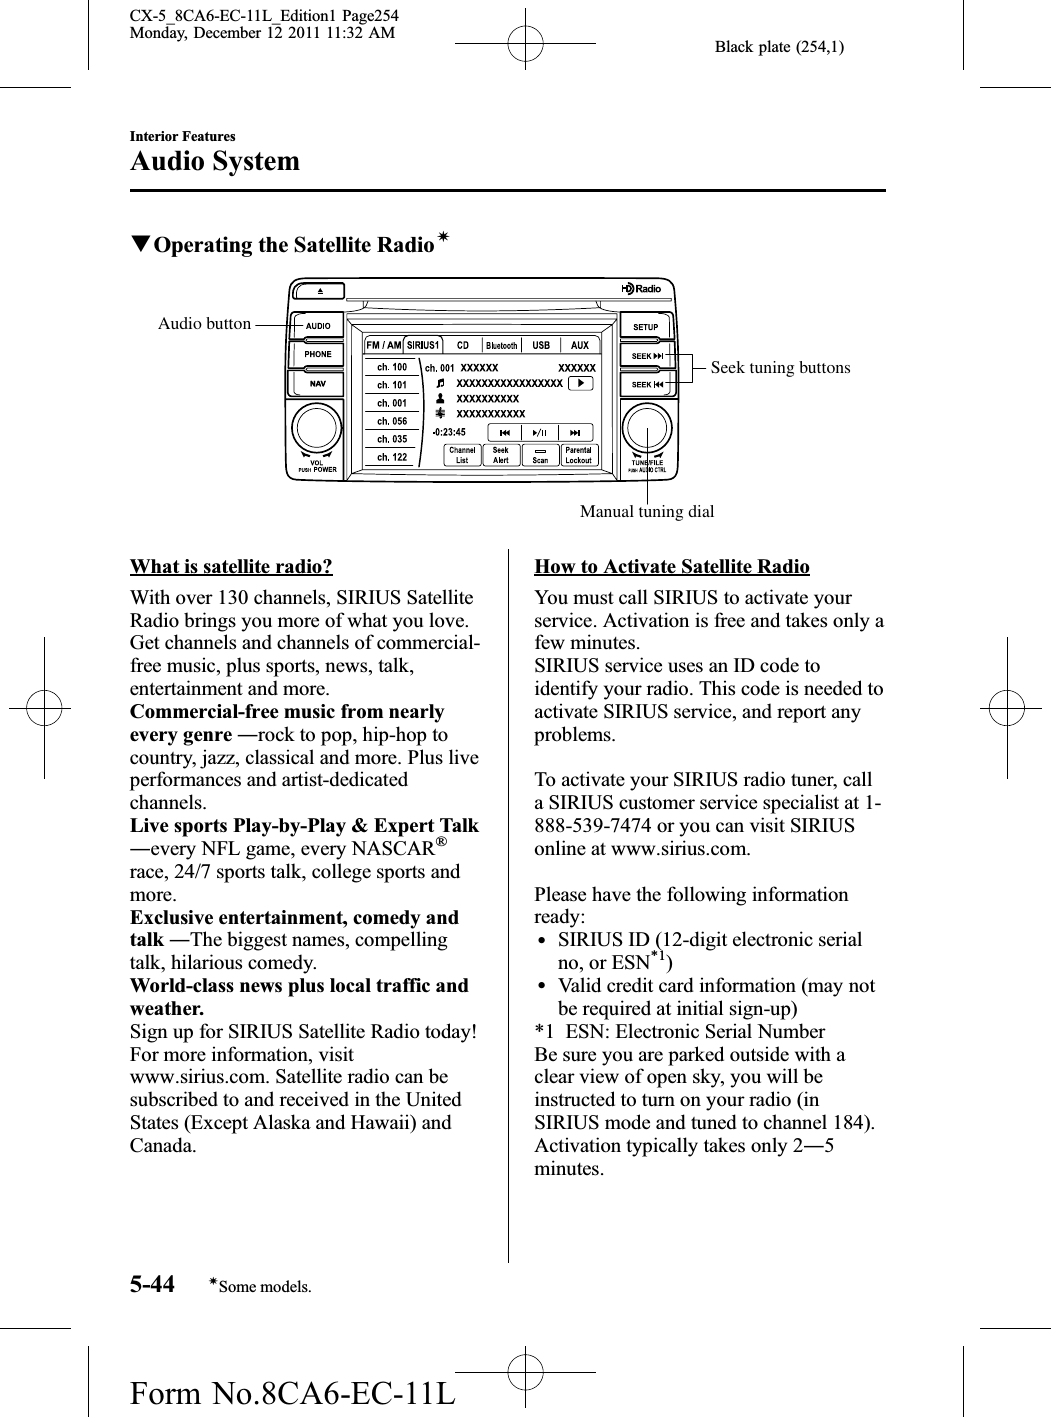
Johnson Controls Interiors MAZGEN6HFT Mazda Blue Tooth HandsFree User Manual J53C EA 1205 1 484
Johnson Controls Interiors L.L.C. Mazda Blue Tooth HandsFree J53C EA 1205 1 484
UserManual.wiki
>
Johnson Controls Interiors
>
MAZGEN6HFT User Manual
User Manual
Navigation menu
Upload a User Manual
Namespaces
Wiki Guide
HTML
PDF
Info
Views
User Manual
Discussion / Help
Navigation

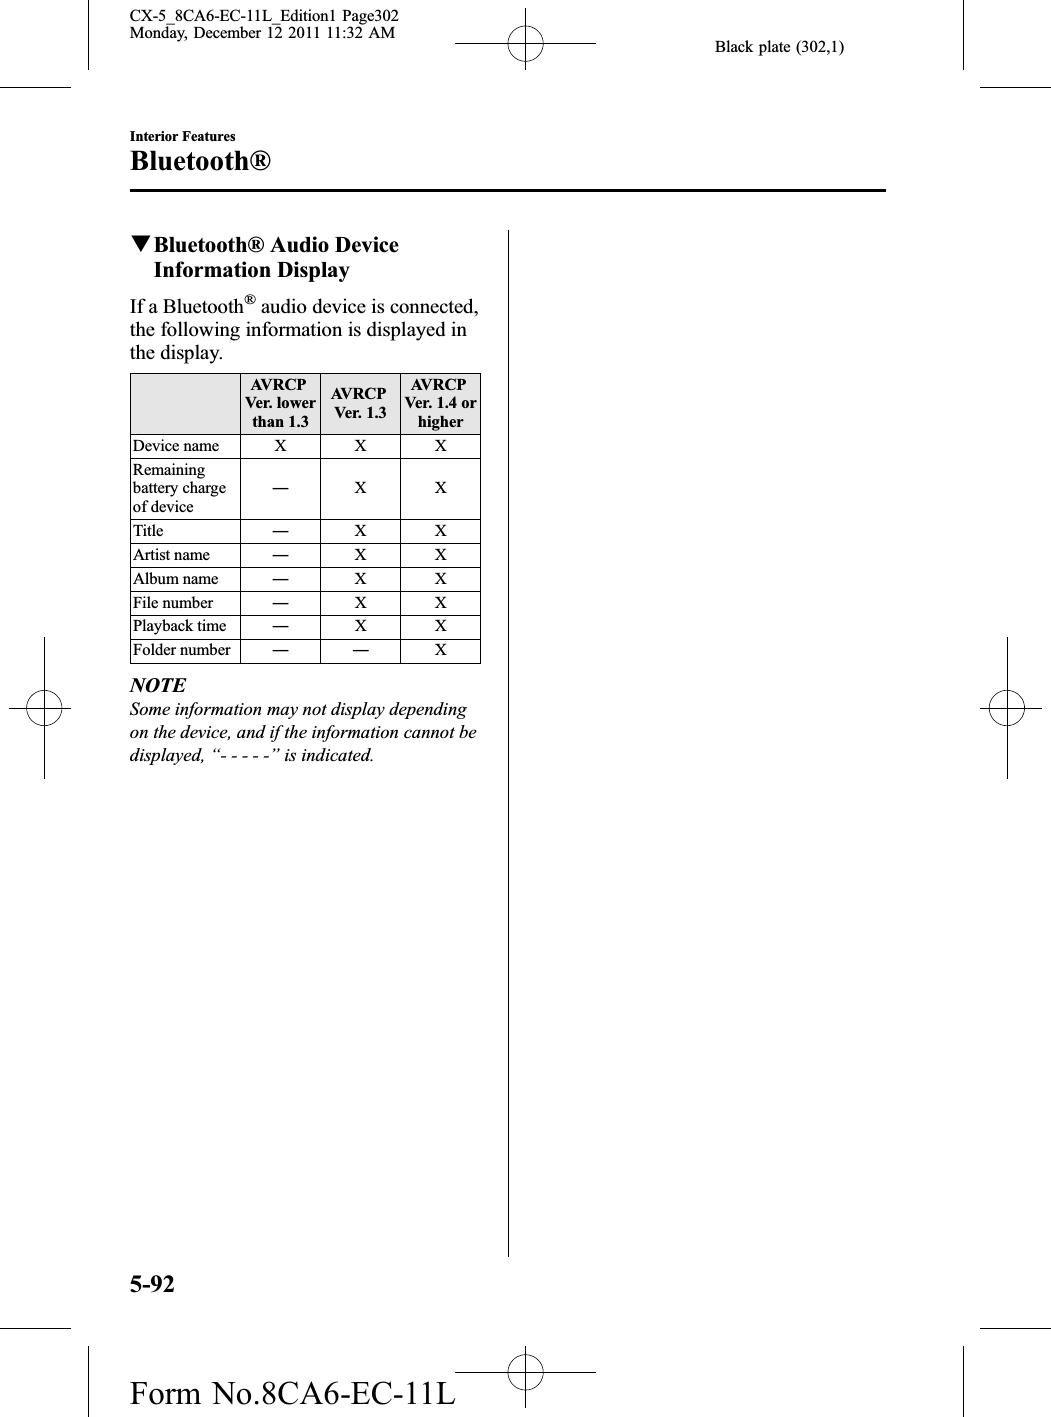
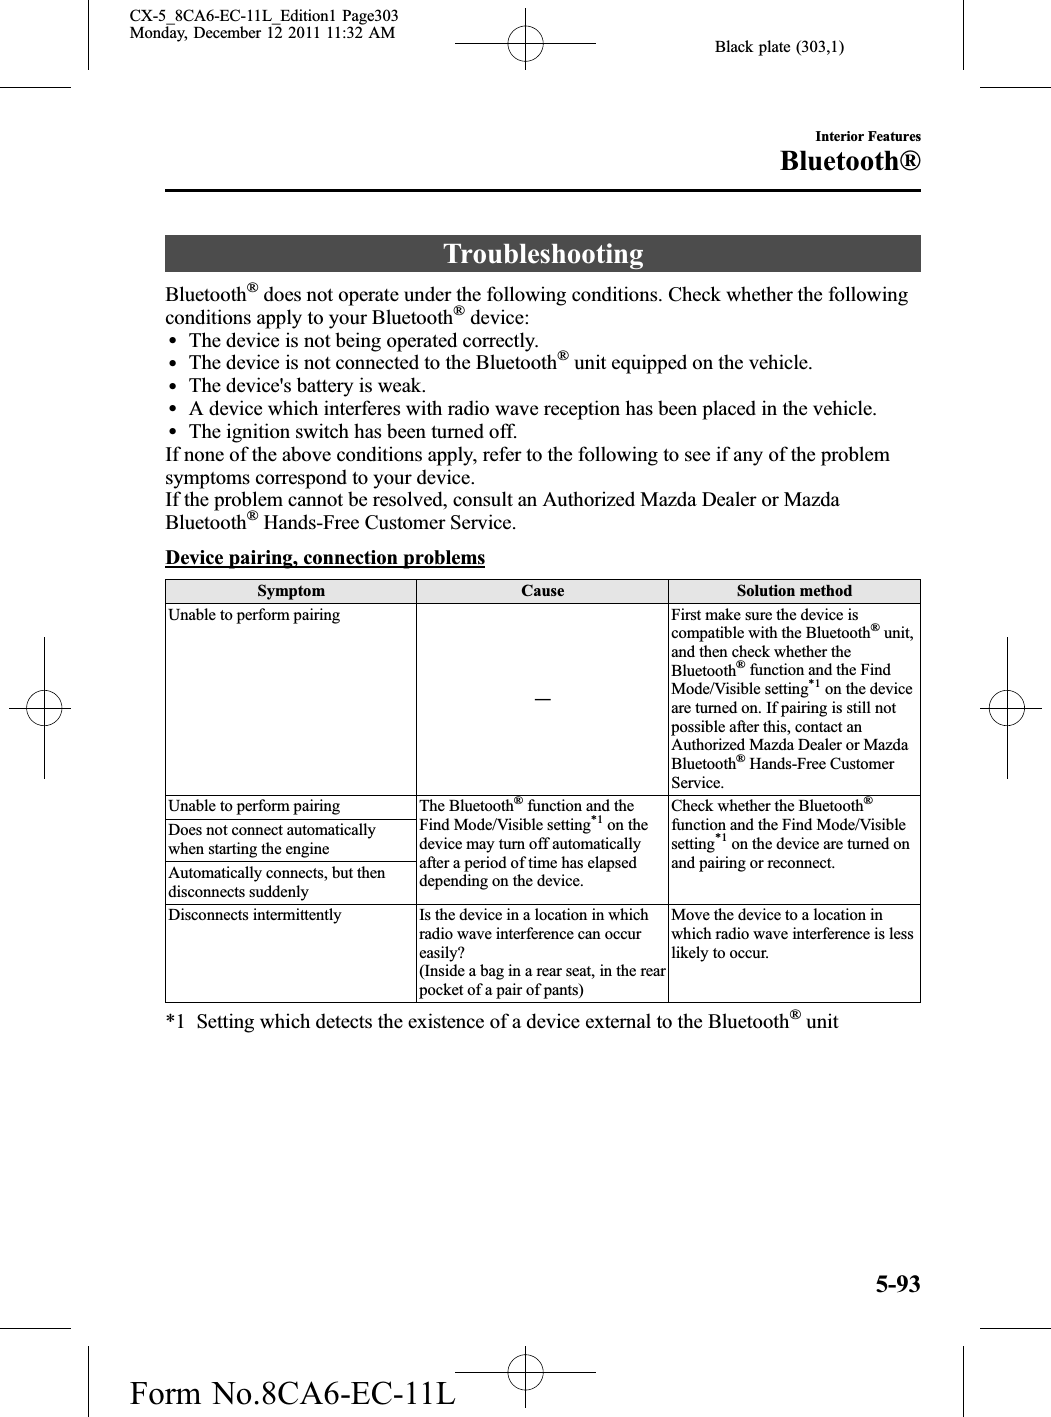
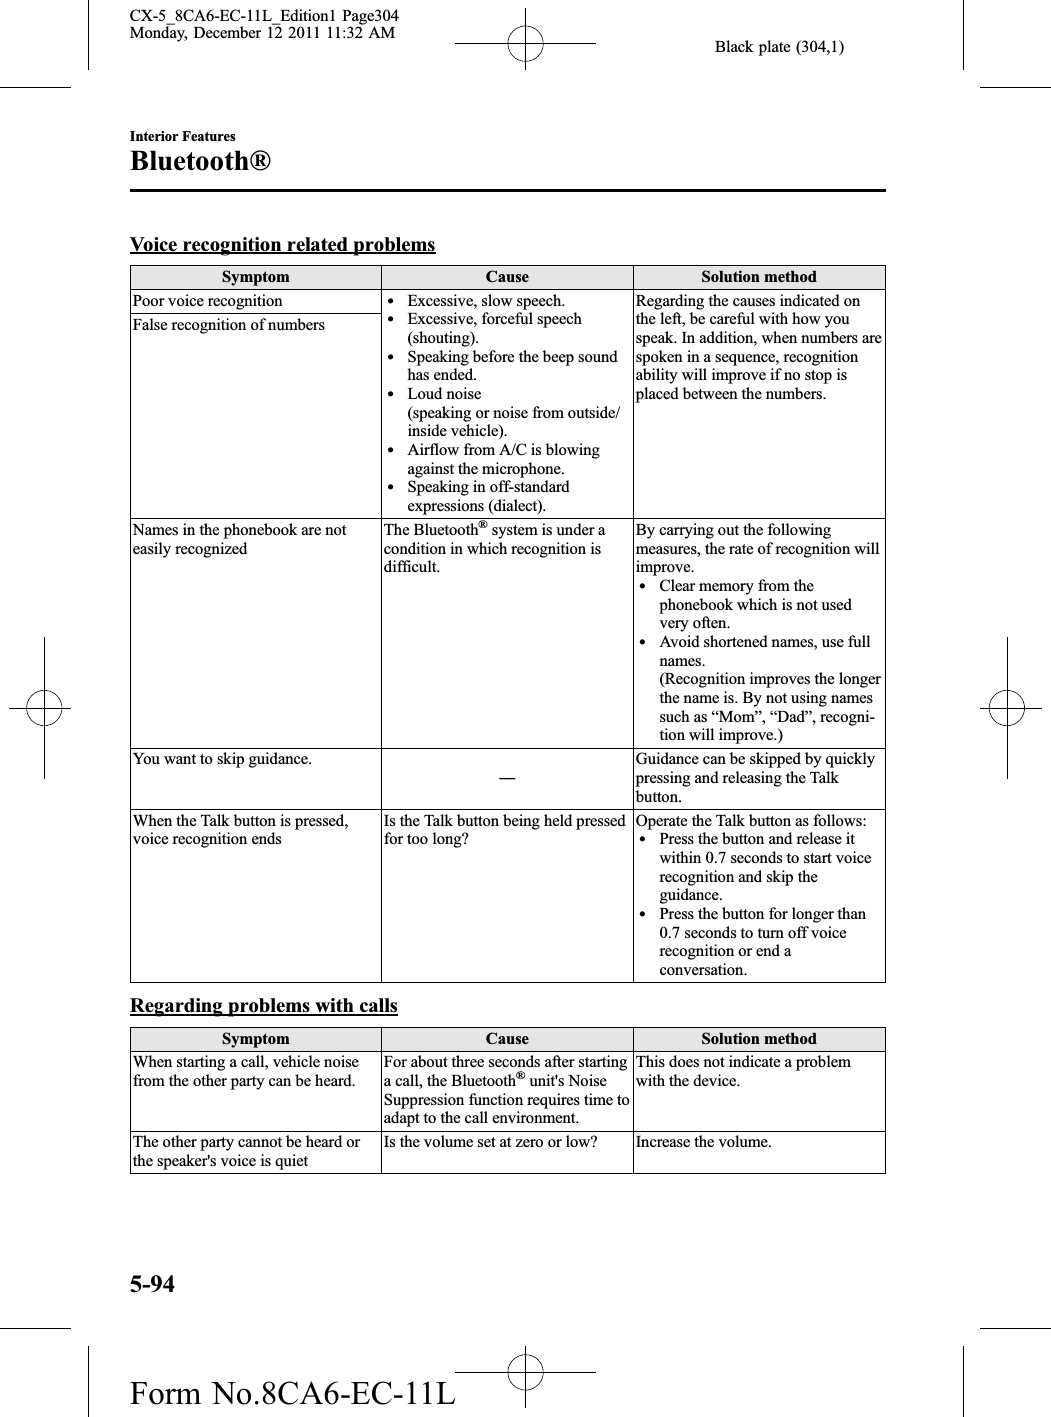
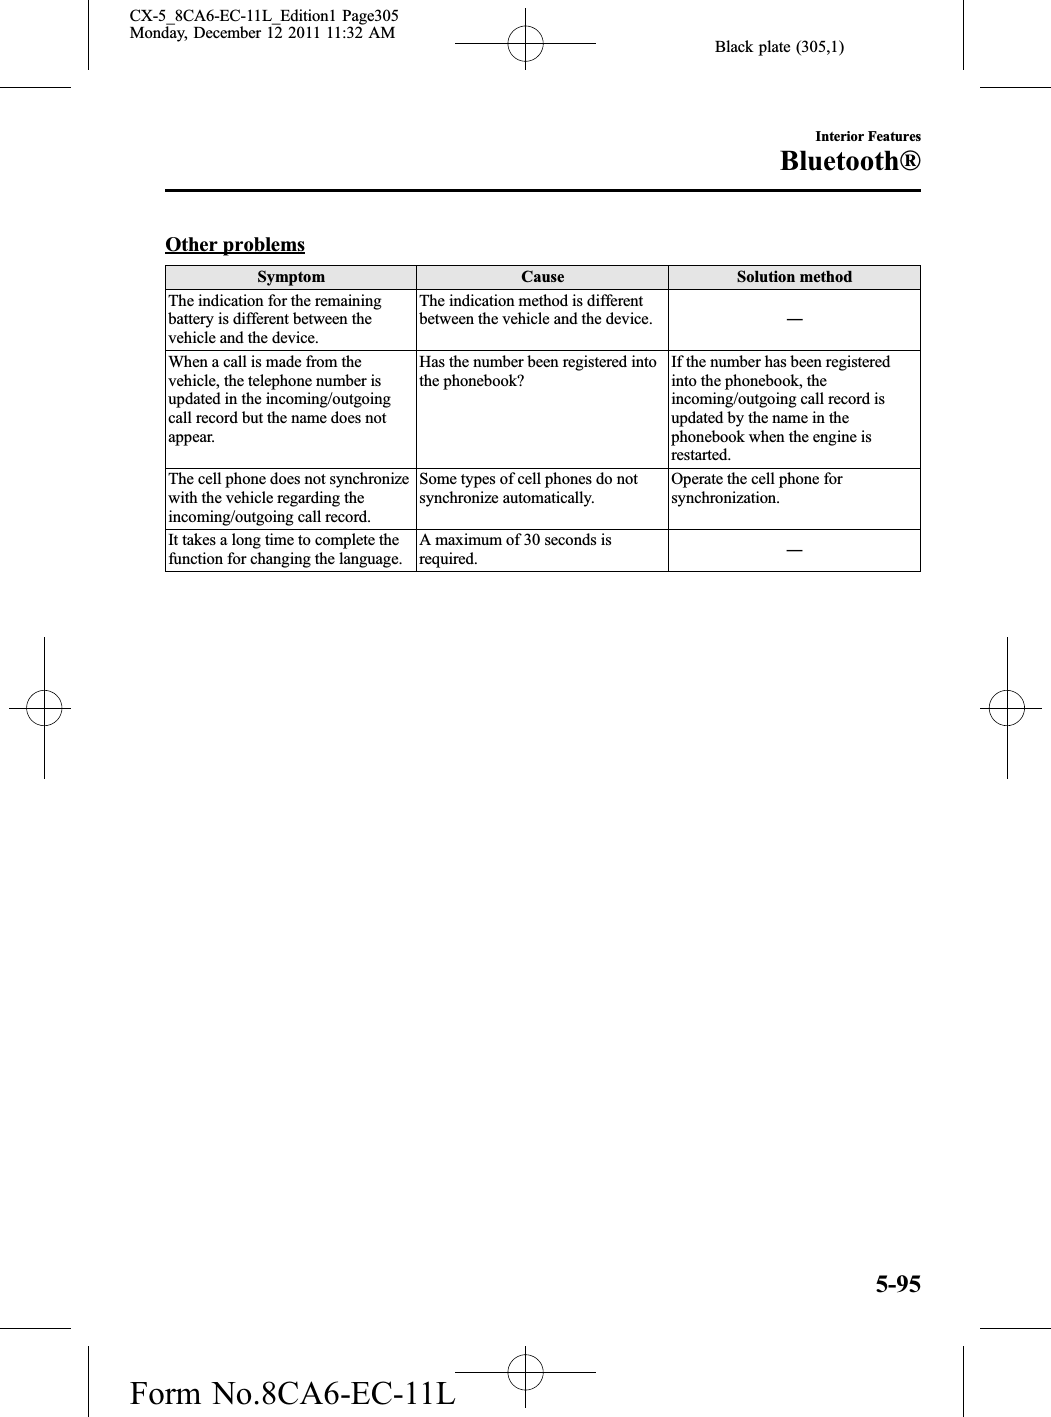
![Black plate (257,1)NOTEThe on-screen button is displayed only if awhole title cannot be displayed at one time.Instant replayThis function allows you to rewind andreplay the program that you werepreviously or are currently listening to.When the on-screen button istouched, playback starts from thebeginning of the current program.When the on-screen button istouched twice, playback starts from thebeginning of the previous program.Touch and hold the on-screenbutton to reverse the program while thebutton is being pressed.When the on-screen button istouched, playback starts from thebeginning of the next program.When the on-screen button istouched while the last program is beingplayed, the instant replay mode iscanceled.Touch and hold the on-screenbutton to fast-forward the program whilethe button is being pressed.When touching and holding the buttonuntil the end of the program, the instantreplay mode is canceled.Instant replay (PAUSE)If the on-screen button is touched,instant replay mode is turned on in apaused condition (PAUSE).Touch the on-screen button againto resume playback from the point atwhich it was paused.Parental lockParental lock, parental unlock, parentallock code change, and parental lock codereset can be set.NOTElTouch the on-screen button duringall the settings to return to the previousdisplay.lTouch the on-screen button during thecode and master code input to delete aninput number.lIf only a four-digit code or master code isinput, “Done”can be selected.lIf the registered code has been forgotten,reset the code in “Initialize Parental Code”to [0000].Parental lockIf a channel is locked, the channel ismuted.1. Turn the manual tuning dial to selectthe desired channel.2. Touch the on-screen button todisplay the settings screen.3. Touch the on-screenbutton to display the parental locksettings screen.4. “Input Parental Code”is displayed, andinput of the registered code is possible.To enter a number, use the numericalkeypad.5. After inputting the four digits, touchthe on-screen button to confirmthe four digits.6. If the four digits match the registeredcode, “Channel XXX locked”appearsand mute is turned on. If they do notmatch the registered code, “Wrongcode”appears and then the displayreturns to “Input Parental Code”.Interior FeaturesAudio System5-47CX-5_8CA6-EC-11L_Edition1 Page257Monday, December 12 2011 11:32 AMForm No.8CA6-EC-11L](https://usermanual.wiki/Johnson-Controls-Interiors/MAZGEN6HFT/User-Guide-1601562-Page-35.png)
![Black plate (258,1)Parental unlockChannels locked using the parental lockfunction can be unlocked.1. Select a channel to be unlocked byturning the manual tuning dial.2. Touch the on-screen button todisplay the settings screen.3. Touch the on-screenbutton to display the parental unlocksettings screen.4. “Input Parental Code”is displayed, andinput of the registered code is possible.To enter a number, use the numericalkeypad.5. After inputting the four digits, touchthe on-screen button to confirmthe four digits.6. If the four digits match the registeredcode, “Channel XXX unlocked”appears and mute is canceled. If theydo not match the registered code,“Wrong code”appears and then thedisplay returns to “Input ParentalCode”.Parental-lock code changeWhen changing the code, the new code isinput after the previous one is input first.1. Touch the on-screen button todisplay the settings screen.2. Touch the on-screen button to display the codechange screen.3. “Enter Current Code”is displayed, andinput of the registered code is possible.To enter a number, use the numericalkeypad.4. After inputting the four digits, touchthe on-screen button to confirmthe four digits.5. If the four digits match the registeredcode, “Enter New Code”is displayed.If they do not match the registeredcode, “Wrong code”appears and thenthe display returns to “Enter CurrentCode”. To enter a number, use thenumerical keypad.6. After inputting the four digits, touchthe on-screen button toconfirm the four digits.7. “Code changed”appears to indicatethat the new code input has beencompleted.8. The display returns to its normaldisplay.NOTEChannels locked before changing the coderemain after changing the code. To unlock achannel, input the changed code.Parental-lock code resetIf the registered code has been forgotten,reset the code to the default [0000] code.1. Touch the on-screen button todisplay the settings screen.2. Touch the on-screen button to display the code initialscreen.3. “Enter Master Code”is displayed, andinput of the registered code is possible.To enter a number, use the numericalkeypad.5-48Interior FeaturesAudio SystemCX-5_8CA6-EC-11L_Edition1 Page258Monday, December 12 2011 11:32 AMForm No.8CA6-EC-11L](https://usermanual.wiki/Johnson-Controls-Interiors/MAZGEN6HFT/User-Guide-1601562-Page-36.png)
![Black plate (259,1)NOTEMaster code:The Master Code is used to initialize or re-initialize the code in the event that the code isnot set to [0000] and/or the personalized codeis not known. The initialization process resetsthe code to [0000]. The master code canpotentially defeat the intent of the security ofthe parental lock if it is located by persons notauthorized by the owner to access certainchannels.SIRIUS Satellite Radio Master Code: [0913]4. After inputting the four digits, touchthe on-screen button toconfirm the four digits.5. If the four digits match the mastercode, “Code initialized”appears. Ifthey do not match the master code,“Wrong code”appears and the displayreturns to “Enter Master Code”.6. The code returns to the default [0000]code.Seek alertThe song title and artist name for the songcurrently being listened to, and teamnames at the sports game currently beinglistened to can be recorded as favorites.The user is notified when a programbegins which has favorites-relatedinformation recorded.Selection from seek alert program listSelect the station you want to listen tofrom the list to receive the program.Touch the on-screen button toreturn to the receiving screen.Storing songs, artists, and sports teamnamesNOTElA maximum of 10 songs, artists, and sportsteam names each can be stored.lIf the song title, artist name, sports teamname cannot be displayed, “No availableitems for this program”is displayed.lEven if the song title, and artist name aredisplayed in the main screen, it may not bepossible to record information for oldsongs.lIf a song name is stored, the song seekfunction is turned on.lIf an artist name is stored, the artist seekfunction is turned on.lIf a sports team name is stored, the gamealert function is turned on.1. Touch the on-screen button todisplay the current song and artistnames currently being received. Thesports team name is displayed whilethe sports program is being received.2. Select the item you want to store fromsong title, artist name and sports teamname.3. “XXXXX (song, artist, sports teamname) stored”is displayed.NOTEIf there is not enough available storage space,“Song Memory Full”or “Artist Memory Full”or “Team Memory Full”and “Delete one tostore new one”are displayed. Delete from thelist.Interior FeaturesAudio System5-49CX-5_8CA6-EC-11L_Edition1 Page259Monday, December 12 2011 11:32 AMForm No.8CA6-EC-11L](https://usermanual.wiki/Johnson-Controls-Interiors/MAZGEN6HFT/User-Guide-1601562-Page-37.png)


![Black plate (288,1)qComponent PartsMicrophoneTalk button, Pick-up button and Hang-up buttonMicrophoneTalk buttonHang-up buttonPick-up buttonAudio unitAudio unit (Type B)The audio unit (Type B) is used for volume adjustment and touch panel operation.Bluetooth®information is displayed in the display. The screen is switched by touching thetab for each function to be used.CAUTIONDo not press the panel strongly or press it with a sharp-pointed object.Display OFFThe audio unit display can be switched off by voice recognition operation.1. Press the pick-up button or talk button.2. Say: [Beep] “Display OFF”Numeral or symbol entryUse the numerical keypad.Long-press the on-screen button to input .Touch the on-screen button to delete the currently input value.5-78Interior FeaturesBluetooth®CX-5_8CA6-EC-11L_Edition1 Page288Monday, December 12 2011 11:32 AMForm No.8CA6-EC-11L](https://usermanual.wiki/Johnson-Controls-Interiors/MAZGEN6HFT/User-Guide-1601562-Page-66.png)
![Black plate (289,1)Activating navigation system (vehicles with navigation system)The voice recognition command for the navigation system is activated.1. Press the talk button.2. Prompt: “Ready”3. Say: [Beep] “Navigation”Talk button, Pick-Up button and Hang-Up button (Hands-Free)The basic functions of Bluetooth®Hands-Free can be used for such things as making callsor hanging up using the talk button, pick-up button and hang-up button on the steeringwheel.Microphone (Hands-Free)The microphone is used for speaking voice commands or exchanging conversation.qVolume AdjustmentThe power/volume dial of the audio unitis used to adjust the volume. Turn the dialto the right to increase volume, to the leftto decrease it.The volume can also be adjusted using thevolume button on the steering wheel.Pre-settingConversation volume and the volume ofthe voice guidance and ringtone can eachbe set in advance.1. Touch the on-screen tab todisplay the Bluetooth®setting screen.2. Touch the on-screenbutton to display the volumeadjustment screen.3. (Volume up) Touch the on-screenbutton.(Volume down) Touch the on-screen button.4. Prompt: “Phone call will be at thisvolume.”or “Voice guidance will be atthis volume.”NOTEThe volume of the audio unit cannot beadjusted while Bluetooth®Hands-Free is beingused.qVoice RecognitionTo prevent a deterioration in the voicerecognition rate and voice quality, thefollowing points should be observed:lThe Hands-free system cannot performvoice recognition while voice guidanceor a beep sound is operating. Wait untilthe voice guidance or the beep sound isfinished before saying your commands.lDialects or different wording other thanHands-Free prompts cannot berecognized by voice recognition. Speakin the wording specified by the voicecommands.lIt is not necessary to face themicrophone or approach it. Speak thevoice commands while maintaining asafe driving position.lDo not speak too slow or too loud.lSpeak clearly, without pausing betweenwords or numbers.Interior FeaturesBluetooth®5-79CX-5_8CA6-EC-11L_Edition1 Page289Monday, December 12 2011 11:32 AMForm No.8CA6-EC-11L](https://usermanual.wiki/Johnson-Controls-Interiors/MAZGEN6HFT/User-Guide-1601562-Page-67.png)
![Black plate (290,1)lClose the windows and/or themoonroof to reduce loud noises fromoutside the vehicle, or turn down theairflow of the air-conditioning systemwhile Bluetooth®Hands-Free is beingused.lMake sure the vents are not directingair towards the microphone.NOTEIf the voice recognition performance is notsatisfactory.Refer to Troubleshooting on page 5-93.Please be aware that the voice recognitionmay still make an error despite followingthe above points.When operating the audio unit or the A/Cwhile using Bluetooth® Hands-Free, thebeep sounds or voice guidance (audiounit)/cannot be heard.qHow to Use This SectionVoice recognitionDescriptions in the text are as follows:Say: Voice commands to be spoken byyou.Prompt: Voice guidance output from thespeaker.NOTESay voice commands after the beep sound[Beep] is heard.Example)Say: [Beep] “Dial”Prompt: “Number, please”Say: [Beep] “XXXXXXXXXXX (Ex.“5551234”) (Telephone number)”Bluetooth®Hands-Free ActivationMethodPress the pick-up button or talk button.The Hands-Free system is activated.Functions of the Hands-Free telephone,such as making and receiving calls, can beused after the activation.Refer toBluetooth® Hands-Free on page 5-84.NOTElPress the pick-up button to activate thephone mode. Press the talk button toactivate the main menu. The phone,tutorial, or navigation mode can beactivated in the main menu.lFor vehicles with a navigation system, thesystem operates by saying a voicerecognition command of the navigationsystem after pressing the talk button with ashort press. For voice recognition detailswith the navigation system, refer to theseparate “NAVIGATION SYSTEM Owner'sManual”.(Tutorial)The tutorial explains how to useBluetooth®Hands-Free.To activate the tutorial, do the following:1. Press the talk button.2. Prompt: “Ready”3. Say: [Beep] “Tutorial”4. Follow the prompts to receive theappropriate voice guidanceinstructions.Panel operationBluetooth®Hands-Free ActivationMethodPress the phone button ( ).5-80Interior FeaturesBluetooth®CX-5_8CA6-EC-11L_Edition1 Page290Monday, December 12 2011 11:32 AMForm No.8CA6-EC-11L](https://usermanual.wiki/Johnson-Controls-Interiors/MAZGEN6HFT/User-Guide-1601562-Page-68.png)
![Black plate (291,1)The Hands-Free system is activated.Functions of the Hands-Free telephone,such as making and receiving calls, can beused after the activation.Refer to Bluetooth® Hands-Free on page5-84.qBluetooth® PreparationDevice programming (Pairing)To use Bluetooth®Audio and Hands-Free,the device equipped with Bluetooth®hasto be programmed to the unit using thefollowing procedure. A maximum ofseven devices including Bluetooth®audiodevices and Hands-Free mobile phonescan be programmed to one vehicle.NOTElA device can be programmed only when thevehicle is parked. If the vehicle starts tomove, the pairing procedure will end.Attempting to program while driving isdangerous, therefore, pick-up your devicebefore you start driving. Park the car in asafe place before programming.lSince the communication range of aBluetooth®equipped device is about 10meters (32 ft), if a device is placed within a10-meter (32 ft) radius of the vehicle, it maybe detected/programmed unintentionallywhile another device is being programmed.Concerning the operation of a Bluetooth®audio device itself, refer to its instructionmanual. Some Bluetooth®audio deviceshave PIN codes (four digits). Refer to theaudio device's instruction manual becausethe programming procedure differsdepending on whether it has a PIN codeor not.Voice recognition1. Press the pick-up button.2. Prompt: “Available options are: Call,Dial, Redial, Call back , Setup orEmergency.”3. Say: [Beep] “Setup”4. Prompt: “This operation can only beperformed using the vehicle display.Select the desired option on thedisplay. Note that some options areonly available when the vehicle isstopped. Exiting Hands-Free mode.”5. The Bluetooth®setting screen isdisplayed and the voice recognitionmode is finished. Go to Step 3 belowfor the “Panel operation”.Panel operation1. Touch the on-screen button.2. Touch the on-screenbutton. The list of pairing devices isdisplayed.3. Touch the on-screen button todisplay the message and switch to thedevice operation.4. Using the device, perform a search forthe Bluetooth®device (Peripheraldevice).5. Select “Mazda”from the device listsearched by the device.Interior FeaturesBluetooth®5-81CX-5_8CA6-EC-11L_Edition1 Page291Monday, December 12 2011 11:32 AMForm No.8CA6-EC-11L](https://usermanual.wiki/Johnson-Controls-Interiors/MAZGEN6HFT/User-Guide-1601562-Page-69.png)
![Black plate (294,1)Bluetooth® Hands-FreeApplicable Bluetooth®specificationVer. 2.0 or higherResponse profilelHFP (Hands-Free Profile) Ver. 1.5lDUN (Dial-up Networking Profile)Ver. 1.1lPBAP (Phone Book Access Profile)Ver. 1.0lOPP (Object Push Profile) Ver. 1.1NOTElThe Bluetooth®Hands-Free system isoperable several seconds after the ignitionis switched to ACC or ON (requires lessthan 15 seconds).lIf the ignition is switched off during aHands-Free call, the line is transferred tothe device (Mobile phone) automatically.qMaking a Call Using a TelephoneNumberNOTEPractice this while parked until you areconfident you can do it while driving in a non-taxing road situation. If you are not completelycomfortable, make all calls from a safeparking position, and move out only when fullyunder control and you can devote your eyesand mind to driving.Voice recognition1. Press the pick-up button.2. Prompt: “Available options are: Call,Dial, Redial, Call back , Setup orEmergency.”3. Say: [Beep] “Dial”4. Prompt: “Dial. Number, please”5. Say: [Beep] “XXXXXXXXXXX (Ex.“5551234”) (Telephone number)6. Prompt: “XXXXXXXXXXX. (Ex“5551234”) (Telephone number (firstchoice))”7. Prompt: “Press the pick-up button todial, or continue to add numbers. Youcan also say ‘Option A’or ‘Option B’to replace the last block of digits withthe displayed alternate, or say ‘GoBack’to delete the last block of digits.”NOTEThe options may not be indicated dependingon the conditions.8. (Dialing)Press the pick-up button or say, “Dial”,then go to Step 9.(Adding/inputting telephonenumber)Say, “XXXX”(desired telephonenumber). Then go to Step 5.(The last recognized telephonenumber is replaced by Option A orB)Say, “Option A”or “Option B”. Thengo to Step 6.(Telephone number correction)Say, “Go Back”. The prompt replies,“The last entered numbers have beenremoved”. Then go back to Step 4 orStep 7.9. The call is made.NOTEThe “Dial”command and a telephone numbercan be combined.Ex. In Step 3, say, “Dial 1234567”, then, Steps4 and 5 can be skipped.5-84Interior FeaturesBluetooth®CX-5_8CA6-EC-11L_Edition1 Page294Monday, December 12 2011 11:32 AMForm No.8CA6-EC-11L](https://usermanual.wiki/Johnson-Controls-Interiors/MAZGEN6HFT/User-Guide-1601562-Page-72.png)
![Black plate (295,1)Panel operation1. Input the telephone number using thenumerical keypad.2. Touch the on-screen button tomake the call.qReceiving an Incoming Call1. Prompt: “Incoming call, press thepick-up button to answer”2. To accept the call, press the pick-upbutton or touch the on-screenbutton.To reject the call, press the hang-upbutton or touch the on-screenbutton.qHanging Up a CallPress the hang-up button or touch theon-screen button during the call.qHelp Function UseThe help function informs the user of allthe available voice commands under thecurrent conditions.1. Press the pick-up button or talk button.2. Say: [Beep] “Help”3. Follow the prompts to receive theappropriate voice guidanceinstructions.qCancelThe Bluetooth®Hands-Free systemtransitions to standby status if thefollowing operation is performed whilethe system is activating. Press the hang-upbutton, or the talk button with a longpress.qReturning to Previous OperationThis command is for returning to theprevious operation while in the voicerecognition mode.Say: [Beep] “Go Back”qPhonebook UsageImport contact (Download Phonebook)Phonebook data from your device (Mobilephone) can be sent and registered to yourBluetooth®Hands-Free phonebook usingBluetooth®.1. Touch the on-screen tab.2. Touch the on-screenbutton.3. Touch the oron-screen button to switch to thedevice operation.NOTElIf the phonebook has been alreadyregistered to the Hands-Free unit during“all phonebooks download”, the currentphonebook is overwritten.lA maximum of 1000 contacts can beregistered to the phonebook.lPhonebook, incoming/outgoing call record,and speed dialing memory is exclusive toeach mobile phone to protect privacy.4. Download will be started from themobile phone.Phonebook data deletion1. Touch the on-screen tab.2. Touch the contact information whichyou want to delete.3. Touch the on-screen button.Interior FeaturesBluetooth®5-85CX-5_8CA6-EC-11L_Edition1 Page295Monday, December 12 2011 11:32 AMForm No.8CA6-EC-11L](https://usermanual.wiki/Johnson-Controls-Interiors/MAZGEN6HFT/User-Guide-1601562-Page-73.png)
![Black plate (296,1)Making calls using the phonebookVoice recognitionTelephone calls can be made by sayingthe name of a person (voice tag) whosephone number has been registered inBluetooth®Hands-Free in advance. Referto Import contact (Download Phonebook).1. Press the pick-up button.2. Prompt: “Available options are: Call,Dial, Redial, Call back , Setup orEmergency.”3. Say: [Beep] “Call”4. Prompt: “Call. Name, please.”5. Say: [Beep] “XXXXX... (Ex. “John”)”(Say a name registered in thephonebook.)The name spoken will be searched forin the phonebook.If a contact is matched, go to Step 7.If multiple contacts are matched, go toStep 6.NOTEIf multiple contacts or a name with a similarpronunciation to the name you spoke has beenregistered to the phonebook, multiple contactinformation may be identified in thephonebook. If multiple contacts are identifiedin the phonebook, a maximum of three contactsare listed as a dialing choice.6. Prompt: “Would you like to callXXXXX... (Choice 1)?”(Person you would like to call)Say: [Beep] “Yes.”Then go to Step 7.(Person you do not want to call)Say: [Beep] “No”Then go to Step 6(Maximum 3 times)7. Prompt: “Would you like to callXXXXX... (Ex. “John”) at home, atwork, or mobile, or other... or press thehang-up button to exit Hands-Freemode.”8. Say: [Beep] “XXXXX... (Ex. “athome”)”9. Prompt: “XXXXX... (Ex. “John”)XXXX (Ex. “at home”). Press the pick-up button to call, or say Go Back toenter a different name.”10. (Dialing) Press the pick-up button orsay “Call”. Then go to Step 11.(Name correction) Say, “Go Back”.Then go back to Step 4.11. The call is made.NOTEThe “Call”command and the voice tag can becombined.Ex. In Step 3, say, “Call John's phone”, then,Steps 4 and 5 can be skipped.Panel operation1. Touch the on-screen tab todisplay the phonebook screen.2. Touch the contact you would like tocall to display the screen indicating thedetails for the contact.3. Touch the desired phone number tomake the call.5-86Interior FeaturesBluetooth®CX-5_8CA6-EC-11L_Edition1 Page296Monday, December 12 2011 11:32 AMForm No.8CA6-EC-11L](https://usermanual.wiki/Johnson-Controls-Interiors/MAZGEN6HFT/User-Guide-1601562-Page-74.png)
![Black plate (297,1)qMaking a Call Using the Call HistoryA call can be made using the call history(incoming/outgoing history) downloadedfrom the mobile phone (Redial/Call back).The call history is downloadedautomatically when connecting or pairingthe Hands-Free and mobile phone.Redial Function1. Press the pick-up button.2. Prompt: “Available options are: Call,Dial, Redial, Call back , Setup orEmergency.”3. Say: [Beep] “Redial”4. A call is made to the most recent call inthe Call history (outgoing).Call back Function1. Press the pick-up button.2. Prompt: “Available options are: Call,Dial, Redial, Call back , Setup orEmergency.”3. Say: [Beep] “Call back”4. A call is made to the most recent call inthe Call history (incoming).qEmergency callsA call can be made to the emergencyphone number (911: U.S.A/Canada, 066:Mexico) using the voice input command.It may not function properly in some areasin Mexico.1. Press the pick-up button.2. Prompt: “Available options are: Call,Dial, Redial, Call back, Setup, orEmergency.”3. Say: [Beep] “Emergency”4. Prompt: “Emergency. Press the Pick-Up button to dial the Emergencynumber.”5. (Dialing) Press the pick-up button orsay “Call.”6. Prompt: “Dialing XXX (911: U.S.A/Canada, 066: Mexico).”qSpeed Dial UsageA maximum of eight telephone numberscan be registered. It will take less time tomake a call after registering the telephonenumber. In addition, you do not have tolook for the person you want to call in thephonebook.Speed Dial registration fromphonebook1. Touch the on-screen tab.2. (New registration)Touch the on-screen button.(Changing registered contacts toother contacts)Touch the on-screen button.3. Touch the on-screen button.4. Touch the contact you would like toregister to the speed dial.5. Touch the telephone number youwould like to register.6. Verify that the registered name andtelephone number are displayed in thephonebook, and touch the on-screen button.Making calls using the Speed Dial1. Touch the on-screen tab.2. Touch the contact information youwould like to call.Interior FeaturesBluetooth®5-87CX-5_8CA6-EC-11L_Edition1 Page297Monday, December 12 2011 11:32 AMForm No.8CA6-EC-11L](https://usermanual.wiki/Johnson-Controls-Interiors/MAZGEN6HFT/User-Guide-1601562-Page-75.png)