Juniper Systems CT7G 4G Tablet PC User Manual CT7G manual with warning
Juniper Systems, Inc. 4G Tablet PC CT7G manual with warning
User Manual
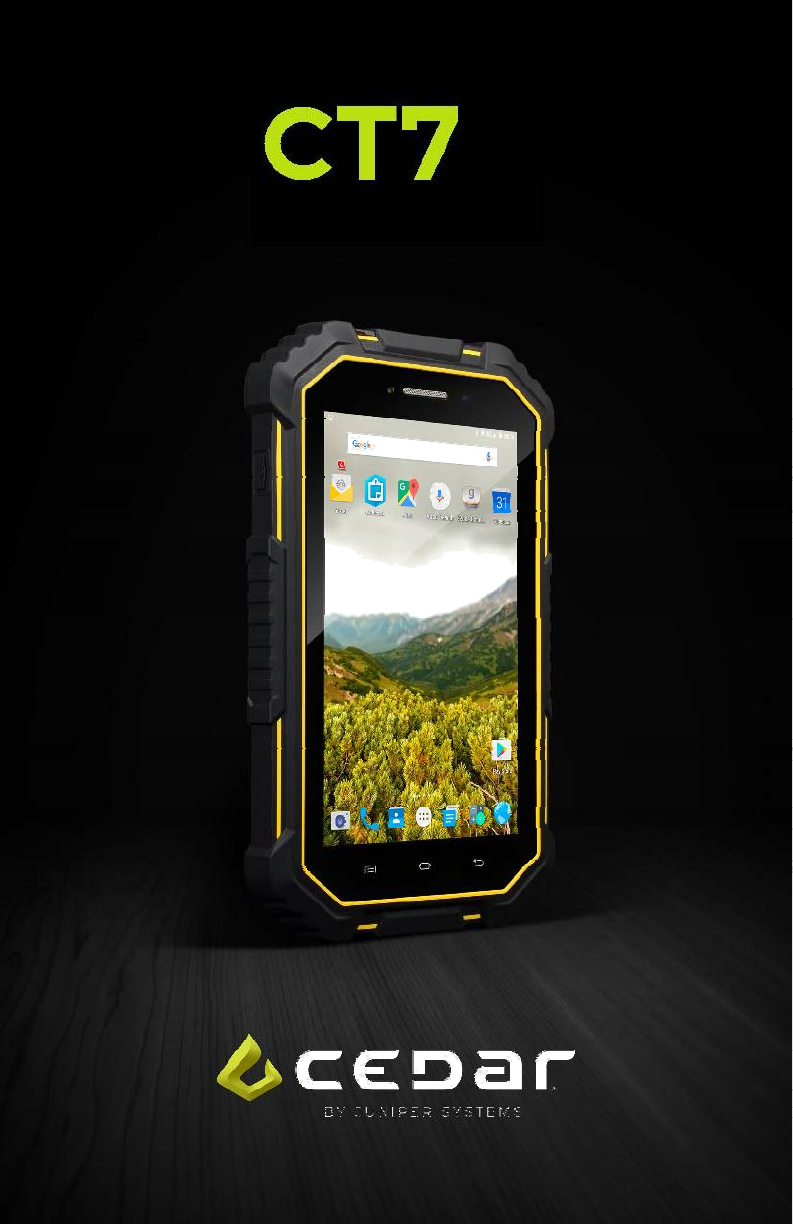
QUICK START GUIDE
Product Key
2
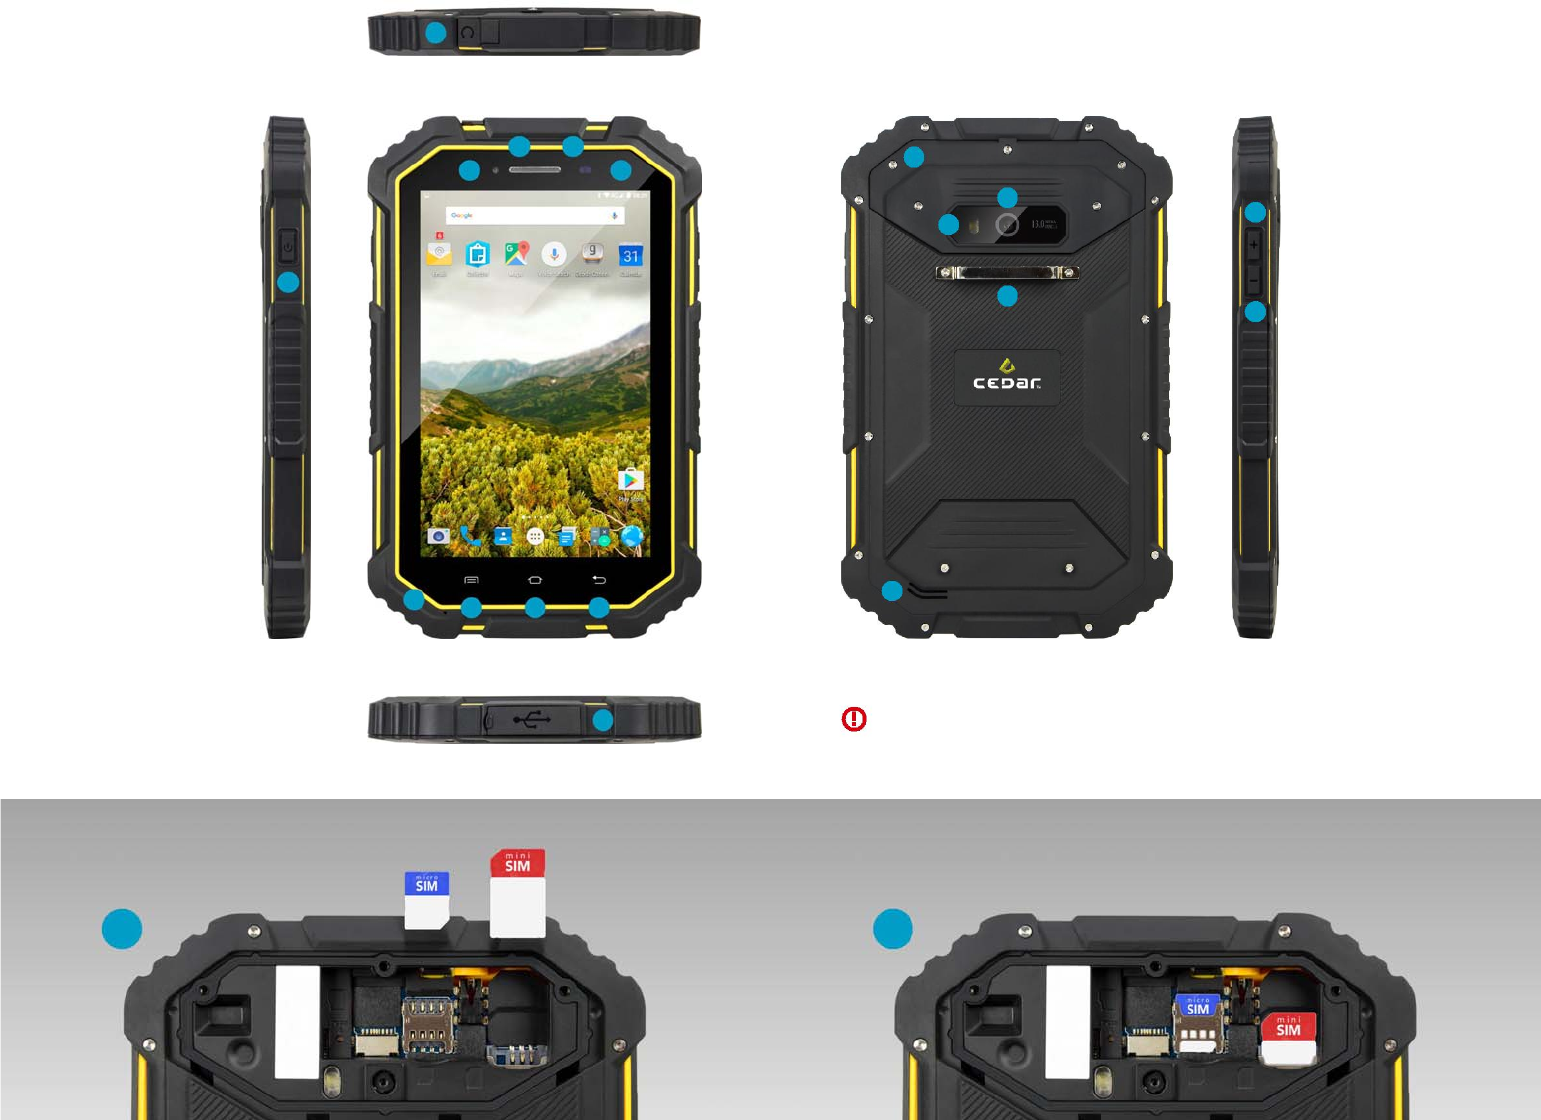
Top
4 5
3 6
12
14
1 Power Button
1
13
17
2
Earphone Connector
3
Front-Facing Camera
4 Speaker
5
Ambient Light Sensor
6 LED Indicator
7 Microphone
8 Menu
9 Home
10 Back
11 USB Connector
7 89 10
Left Side
Front
11
Bottom
15
18
12
Compartment Door
13
Rear-Facing Camera
14 Camera Flash
15 Hand Strap Mount
16 Rear Speaker
17 Volume Up
18 Volume Down
16
Back Right Side
WARNING: The top and bottom port covers must be clean and securely seated before
exposing the unit to water. Failure to perform this step could lead to water damage of the unit.
Installing the SIM Cards
A B
ADDING YOUR GOOGLE ACCOUNT
1 Tap Settings on the Home screen.
2 Tap Accounts and then tap Add an account.
3 Tap Google on the Add an account screen.
4 Follow the instructions to setup your Google account.
ACCESSING APPLICATIONS
1 Press the Home button.
2 Tap the Application icon at the bottom of the Home screen.
3 The screen shows all applications installed on your device.
4 Tap and hold the icon for any application to create a shortcut on the Home screen.
5 Tap Play Store to find and install new applications.
ACCESSING WIDGETS
1 Press the Home button.
2 Tap and hold a blank spot on the Home screen.
3 Icons for Wallpapers, Widgets, and Settings are shown at the bottom of the screen.
4 Tap Widgets.
5 Tap and hold the icon for any widget to install it on the Home screen.
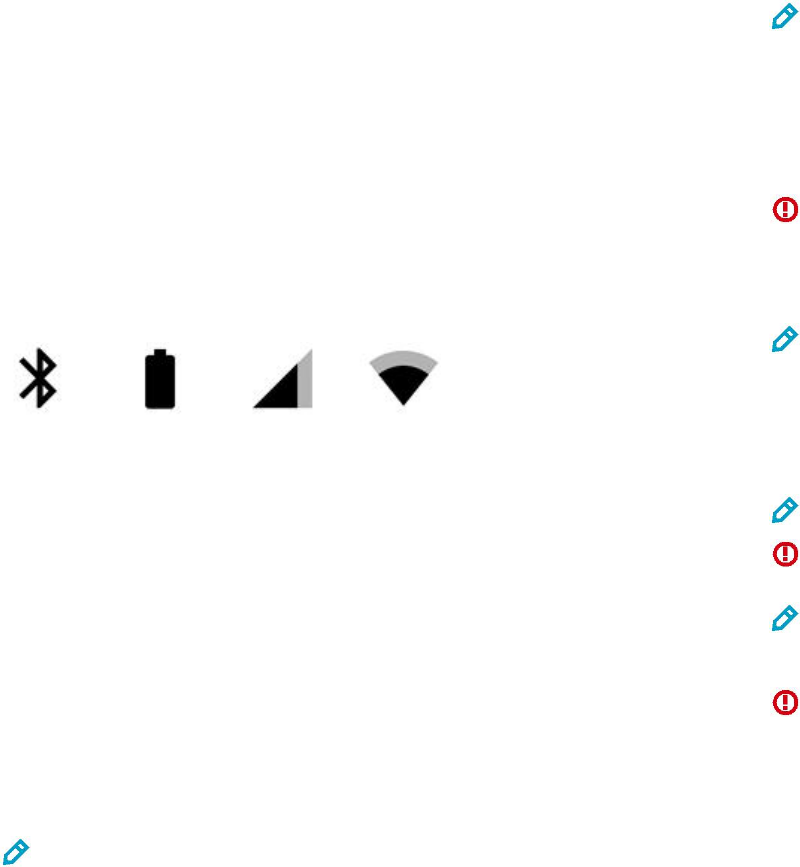
INDICATORS
Bluetooth Full Battery Network Cell Network WiFi
CONNECT TO Wi-Fi (WIRELESS LAN)
1 Press the Menu button.
2 Tap System settings.
3 Tap OFF on the Wi-Fi line to turn Wi-Fi on. The Wi-Fi indicator will appear at the
top of the screen and Wi-Fi will read ON.
4 Tap Wi-Fi to view the list of nearby networks and connect to a specific network.
5 Tap on the network you want to access.
CONNECT A BLUETOOTH DEVICE
1 Press the Menu button.
2 Tap System settings.
3 Tap OFF on the Bluetooth line to turn Bluetooth on. The Bluetooth indicator will appear
at the top of the screen and Bluetooth will read ON.
4 With Bluetooth on, this screen shows a list of nearby Bluetooth devices.
5 Tap on the device you want to access.
NOTE: While the Bluetooth settings page is open, the CT7G is discoverable, allowing other
devices to connect to the CT7G.
INSTALLING A SIM CARD OR AN SD CARD
1 With the unit powered on, press and hold the power button until the option to power off
the unit appears on the screen.
2 Tap Power Off, and then tap OK. Allow the device to power off.
3 Use a Phillips screwdriver to loosen the three screws that secure the cover over the camera
(on the back of the device), and remove the cover.
NOTE: The CT7G provides a mini SIM slot (right side of the compartment) and a micro
SIM slot2 (center of the compartment).
4 Orient the SIM card so the contacts are facing away from you.
a) For the mini SIM (right side), orient the SIM card so the notch is in the top left corner.
b) For the micro SIM (center), orient the SIM card so the notch is on the
bottom right corner.
5 Gently push the SIM card into the slot.
CAUTION: Do not force the card into the slot as it may damage the device. If the card does not
seat properly, check the orientation and try again.
6 To remove the SIM card, gently press on the flat surface of the card with the pad
of your finger and slide it toward the top of the device.
NOTE: If you cannot remove the card with the pad of your finger, try using a piece of tape to
slide the card out of the device.
7 The microSD card slot is located on the left side of the compartment and can be
inserted by orienting the card with connectors down and away from you.
8 Place the card in the compartment so that you can slide it into the slot.
9 Gently press on the flat surface of the card as you slide it into the slot.
NOTE: Only the narrow portion of the microSD card will slide into the slot.
CAUTION: Do not force the card into the slot as it may damage the device. If the card does not
seat properly, check the orientation and try again.
NOTE: The CT7G only accepts microSD cards.
11 Carefully place the cover over the compartment opening and tighten the screws.
WARNING: The connector must be properly seated and secured before exposing the unit to
water. Failure to perform this step could lead to water damage of the unit.
SENDING A TEXT MESSAGE
1 Press the Home button.
2 Tap on the Messaging icon on the Home screen.
3 Tap on the new message symbol at the top of the screen.
4 Enter the phone number of the person you are texting.
5 Type the text message.
6 Tap the send icon (paper airplane) at the bottom right.
OPERATING THE CAMERA
1 Tap Home >> Applications >> Camera.
2 Compose the photo using the pinch-to-zoom gesture on the screen.
3 Tap the camera icon in the bottom right to use the front facing camera.
4 Tap other icons on the left side of the screen for other options such as flash.
5 Tap the gear icon (bottom left corner of the screen) for additional camera options.
6 Tap the capture icon to take the picture.
7 You can capture video with sound by tapping the video icon.
SUPPORT
Web: http://www.junipersys.com/Juniper-Systems-Rugged-Handheld-
Computers/products/ Cedar-Products/Support
Email: CedarSupport@junipersys.com
Phone: 435-753-1881
REGULATORY INFORMATION
This equipment has been tested and found to comply with the limits for a Class B digital device,
pursuant to part 15 of the FCC Rules. Operation is subject to the following two conditions: (1)
This device may not cause harmful interference, and (2) this device must accept any
interference received, including interference that may cause undesired operation.
These limits are designed to provide reasonable protection against harmful interference in a
residential installation. This equipment generates, uses, and can radiate radio frequency energy
and, if not installed and used in accordance with the instructions, may cause harmful interference
to radio communications. However, there is no guarantee that interference will not occur in a
particular installation. If this equipment does cause harmful interference to radio or television
reception, which can be determined by turning the equipment off and on, the user is encouraged
to try to correct the interference by one or more of the following measures:
• Reorient or relocate the receiving antenna.
• Increase the separation between the equipment and receiver.
• Connect the equipment to an outlet on a circuit different from that to which the
receiver is connected.
• Consult the dealer or an experienced radio/TV technician for help.
IMPORTANT: Changes or modifications to this product not authorized by the manufacturer could void
the radio frequency compatibility and wireless compliance and negate your authority to operate the
product. The use of non-compliant peripheral devices could cause the emission of radiation is are not
within the limits set by part 15 of the FCC rules. Only use peripheral devices that have been tested to
provide electromagnetic compatibility when connected to this unit.
EXPOSURE TO RADIO FREQUENCY (RF) SIGNALS
Your device contains a radio transmitter and receiver. The radiated output power is far below the
international radio frequency exposure limits. These limits are part of comprehensive guidelines
and establish permitted levels of RF energy for the general population. The guidelines are based
on the safety standards previously set by international standards bodies:
• American National Standards Institute (ANSI) IEEE. C95.1-1992.
• National Council on Radiation Protection and Measurement (NCRP). Report 86. 1986.
• International Commission on Non-Ionizing Radiation Protection (ICNIRP) 1996.
• Ministry of Health (Canada), Safety Code 6. The standards include a substantial safety
margin designed to assure the safety of all persons, regardless of age and health.
The exposure standard for wireless mobile phones employs a unit of measurement known as
the Specific Absorption Rate, or SAR. The standard incorporates a substantial margin of safety
to give additional protection for the public and to account for any variations in usage.
As with other mobile radio transmitting equipment, users are advised that for satisfactory
operation of the equipment and for the safety of personnel, it is recommended that no part of the
human body be allowed to come too close to the antenna during operation of the equipment.
Your device has an internal antenna. Use only the supplied integral antenna. Use of
unauthorized or modified antennas may impair call quality and damage the phone, causing
loss of performance and SAR levels exceeding the recommended limits as well as result in
non-compliance with local regulatory requirements in your country.
To assure optimal phone performance and ensure human exposure to RF energy is within the
guidelines set forth in the relevant standards; always use your device only in its normal-use
position. Do not touch or hold the antenna area unnecessarily when placing or receiving a phone
call. Contact with the antenna area may impair call quality and cause your device to operate at a
higher power level than needed. Avoiding contact with the antenna area when the phone is IN
USE optimizes the antenna performance and the battery life.
WARNING
Labelling requirements.
This device complies with part 15 of the FCC Rules. Operation is subject to the condition that this
device does not cause harmful interference.
Information to user.
Any Changes or modifications not expressly approved by the party responsible for compliance
could void the user's authority to operate the equipment.
Information to the user.
Note: This equipment has been tested and found to comply with the limits for a Class B digital
device, pursuant to part 15 of the FCC Rules. These limits are designed to provide reasonable
protection against harmful interference in a residential installation. This equipment generates
uses and can radiate radio frequency energy and, if not installed and used in accordance with the
instructions, may cause harmful interference to radio communications. However, there is no
guarantee that interference will not occur in a particular installation. If this equipment does cause
harmful interference to radio or television reception, which can be determined by turning the
equipment off and on, the user is encouraged to try to correct the interference by one or more of
the following measures:
-Reorient or relocate the receiving antenna.
-Increase the separation between the equipment and receiver.
-Connect the equipment into an outlet on a circuit different from that to which the receiver is
connected.
-Consult the dealer or an experienced radio/TV technician for help.

Juniper Systems, Inc.
1132 West 1700 North
Logan, UT 84321
435.753.1881
junipersys.com
© 2016 Juniper Systems, Inc. All rights reserved. Juniper Systems, Cedar, and
CT7G are trademarks and/or registered trademarks of Juniper Systems, Inc.