Junlan Electronic BT0218RV SOUNDBAR PLAYER User Manual
Shenzhen Junlan Electronic Ltd SOUNDBAR PLAYER
User manual
SAFETY INSTRUCTIONS
1.Read these instructions.
2.Keep these instructions.
3.Heed all warnings.
4.Follow all instructions.
5.Do not use this apparatus near water.
6.Clean only with a slightly damp cloth.
7.Do not block any ventilation openings.
8.Install in accordance with the manufacturer’s instructions.
9.Do not install or operate near any heat sources such heat.
10.Unplug this apparatus during lightning storms or when unused for long periods of time.
11.Servicing is required when the apparatus has been damaged in any way, such as the
power-supply cord as radiators, stoves, or other apparatus that produce or plug is damaged, liquid
has been spilled or objects have fallen into the apparatus, the apparatus has normally, or has been
dropped.
Warning:
shock, do not expose this product to rain or moisture. The product must not be exposed to dripping
and placed on the product.
Caution:
Changes or modifications not expressly approved by the manufacturer could void the user’s
authority to operate this device.
Caution:
Usage of controls or adjustments or herein may result in hazardous exposure.
Refer all servicing to qualified service personnel.
Caution:
To reduce the risk of fire or electrical. No fire sources such as candles should be splashing and no
object filled with liquids should be placed on the products.
1
PRODUCT OVERVIEW
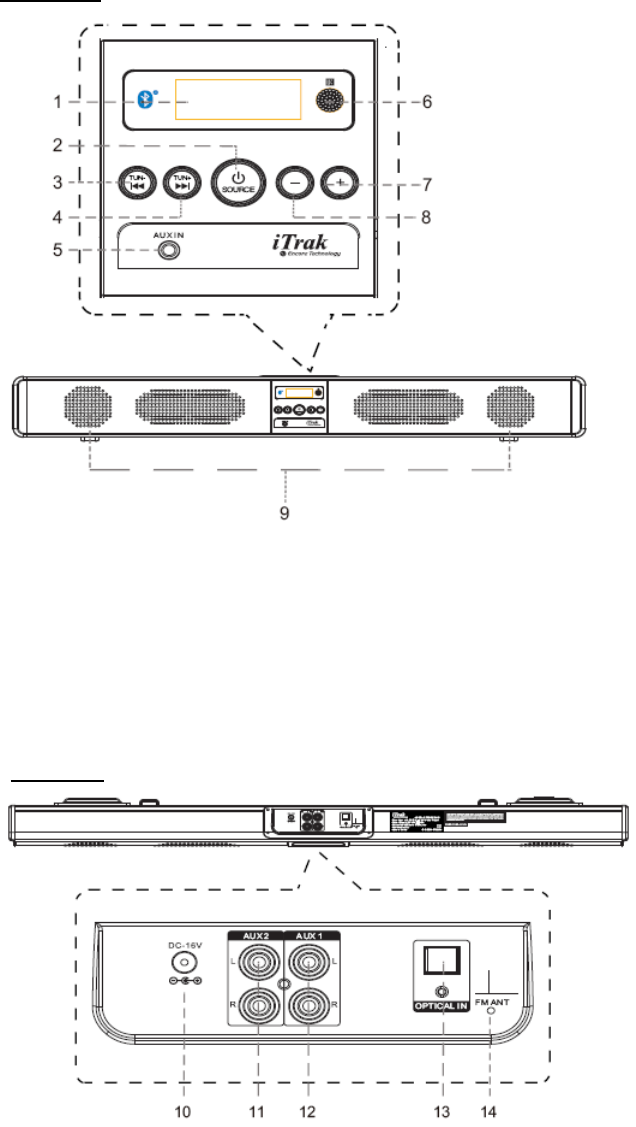
Front View
1. LCD Display 6. Remote Sensor
2. Standby / Source Button 7. Volume+ Button
3. Tune- Button 8. Volume- Button
4. Tune+ Button 9. Speakers
5. AUX IN Jack
Rear View
10. DC IN Jack 13. Optical Input Jack
11. RCA Audio Input Jacks 2 14. FM Antenna
12. RCA Audio Input Jacks 1
Remote Control
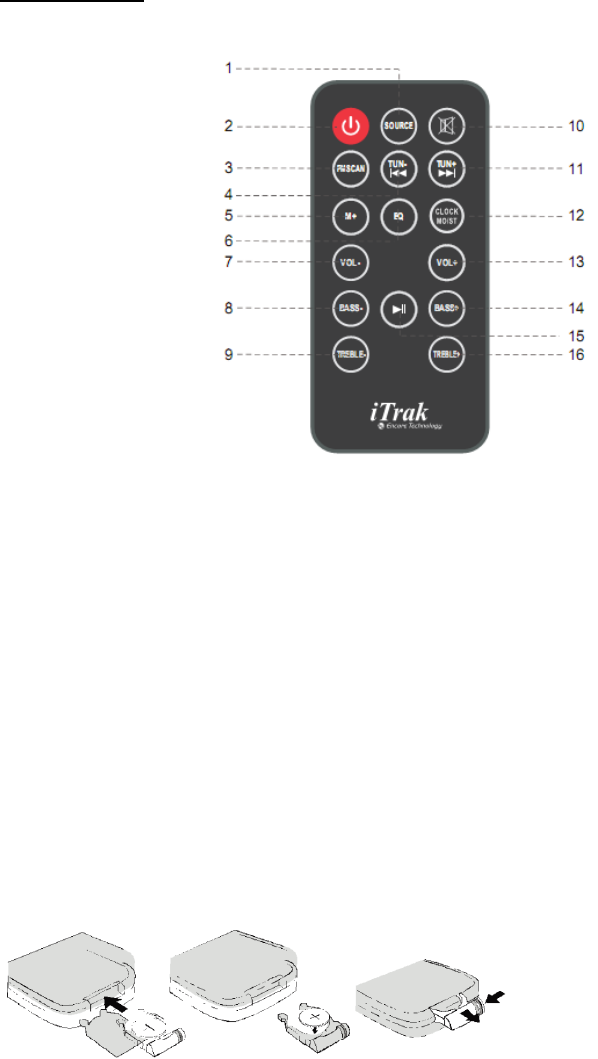
1.SOURCE Button 6.EQ Button 12. CLOCK/MO/ST Button
2.Standby Button 7. VOL-(Volume-) Button 13. VOL+ (Volume+) Button
3. FM SCAN Button 8. BASS- Button 14. BASS+ Button
4. TUNE-Button 9. TREBLE- Button 15. Play/Pause Button
5.M+(Memory+) Button 10.Mute Button 16. TREBLE+ Button
11. TUNE+ Button
BATTERY INSTALLATION
- Before installation
Remove and discard the insulation tab.
-Replace battery for the remote control
1. Push and slide out the battery holder as Figure 1 below.
2. Replace the battery with a new CR2025 button cell with the polarity (+) side upward.
3. Slide into the battery holder.
Battery precautions
• Never recharge the batteries, apply heat to them or take them apart.
• Battery shall not be exposed to excessive heat such as sunshine, ire or the like.
• Do not throw the batteries in ire!
• Attention should be drawn to the environmental aspects of battery disposal.
• If the remote control is not going to be used for a long time, remove the battery
to avoid damage caused by battery leakage corrosion.
3
POWER CONTROL
- To turn the unit on
·Connect the supplied AC/DC adapter.
·Press STANDBY button to turn on the unit.
- To turn the unit off
·Press STANDBY button on the remote control or hold STANDBY button in the front of the unit.
NOTE:
If the unit is not used for a long period of time, disconnect the power adapter.
TIME SETTING
1. Place the unit to standby mode.
2. Hold CLOCK/MO/ST button on the remote control until the hour digit flashes.
3.Then press TUNE+ or TUNE- button on the unit or remote control to adjust the hour.
4. Press CLOCK/MO/ST button on the remote control to confirm the hour setting and the minute
digit will flash.
5. Then press TUNE+ or TUNE- button on the unit or remote control to adjust the minute.
6. Press CLOCK/MO/ST button on the remote control to confirm the minute setting.
FM RADIO
Power on the unit and press SOURCE button repeatedly until the FM frequency appears on the
display.
- Search and store the stations
1. Hold TUNE+ or TUNE- button to search stations forward or backward. The unit will stop if a
station is found. Then press FM SCAN button, “CH XX” will flash and then use M+ button to
select the place you want the station stored to. Press FM SCAN button to confirm. Or
2. Hold FM SCAN button then release the unit will search and store the stations automatically.
- Listen to the preset stations
PressM+buttonrepeatedlytoselectthedesiredpresetstationstolistento.
NOTE:
If the received FM stations are in stereo mode, the unit will play in stereo mode automatically.If
reception is weak, press the CLOCK/MO/ST button to turn the unit to mono mode. Press again to
turn to stereo mode again.
4
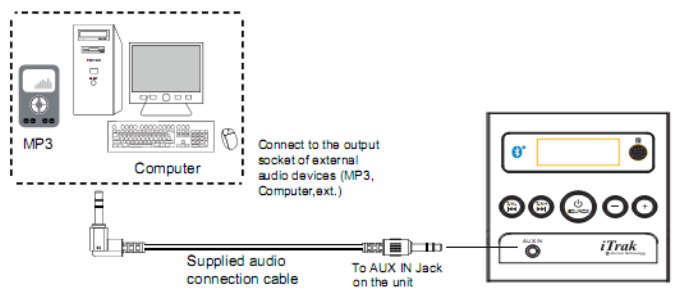
AUX IN
- AUX IN source may include:
·Personal audio players
·Personal computers or laptops
- AUX IN connection:
1. Connect a stereo 3.5mm jack cable (supplied) between the headphone or LINE/Audio output of
the personal audio player and the AUX IN jack on the front of the unit.
2. Power on the unit and press SOURCE button repeatedly until "AUX 1" appears on the display.
Set your personal audio player/computer to play.
NOTE: If there is no sound or if the volume is not loud enough, you may increase the setting on
the source.
- During playback
·Press MUTE button to turn off the sound. Press again to resume the sound.
·Press VOLUME+/- buttons to adjust the volume level.
·Press BASS+/- buttons to adjust bass level.
·Press TREBLE+/-buttons to adjust treble level.
·Press EQ button to switch between POP/JAZZ/CLASSIC/ROCK/NORMAL.
5
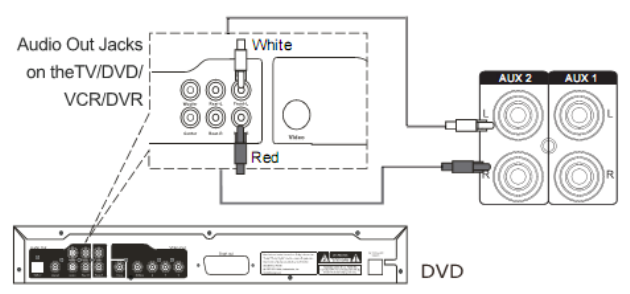
RCA AUX IN
- RCA AUX IN sources may include
·TV/DVD/VCR
- RCA AUX IN connection
1. Connect the RCA audio cable (supplied) to the audio output jack on DVD player and AUX IN
1orAUXIN2jackontherearoftheunit.
2. Press SOURCE button repeatedly until "AUX 1" or "AUX 2" appears on the display.
NOTE: Before RCA AUX IN 1 connection, make sure the AUX IN cable is not inserted into the
AUX IN jack on the front of the unit.
- During playback
·Press MUTE button to turn off the sound. Press again to resume the sound.
·Press VOLUME+/- buttons to adjust the volume level.
·Press BASS+/- buttons to adjust bass level.
·Press TREBLE+/-buttons to adjust treble level.
·Press EQ button to switch between POP/JAZZ/CLASSIC/ROCK/NORMAL.
6
BLUETOOTH
- Paring:
1.Press SOURCE button repeatedly until "BT" appears on the display.
2. Turn off the Bluetooth functionality of other devices that are paired with your unit.
3. Turn on Bluetooth functionality on your Bluetooth device. Typically, Bluetooth controls are
found on the device’s tools or settings menu (see your user manual).Turn on Bluetooth
connectivity and make your device “discoverable”.
4. Clean out the paring list on your Bluetooth device.
5. Choose “add a new Bluetooth device”or “setup Bluetooth device”on your device. It will start to
search. Once “BT0218”shows on your device, select it. If your device prompts you for a pass code,
please enter 0000. If the pairing attempt fails or times out, please start pairing procedure again.
6. After your device and the “BT0218”have connected each other, a “Du” sound can be heard.
NOTE:
The unit will automatically reconnect the last paired device when Bluetooth mode is reselected
from other mode.
- During playback:
Make sure the Bluetooth connection between the unit and the device is activated.
·Press PLAY/PAUSE button to suspend momentarily the playing track. Press again to resume
playing.
·PressTUNE+buttontoskipforwardtothenexttrackandTUNE-buttontoskipbackwardtothe
previous track.
·Press MUTE button to turn off the sound. Press again to resume the sound.
·Press VOLUME+/- buttons to adjust the volume level.
·Press BASS+/- buttons to adjust bass level.
·Press TREBLE+/-buttons to adjust treble level.
·Press EQ button to switch between POP/JAZZ/CLASSIC/ROCK/NORMAL.
7

OPTICAL IN
- Connecting
1. Press SOURCE button repeatedly until "OPTI" appears on the display.
2. Follow the figure below to make the connections.
- During playback
·Press MUTE button to turn off the sound. Press again to resume the sound.
·Press VOLUME+/- buttons to adjust the volume level.
·Press BASS+/- buttons to adjust bass level.
·Press TREBLE+/-buttons to adjust treble level.
·Press EQ button to switch between POP/JAZZ/CLASSIC/ROCK/NORMAL.
8
SPECIFICATIONS
Power source of the remote control................................................ DC 3V, 1x CR 2025 button cell
Output of the power adapter....................................................................................... .DC 16V 1.8A
Audio output........................................................................................................................ 10W x 2
Power consumption....................................................................................................................25W
Bluetooth working range............................................................................................................10M
FM coverage............................................................................................................ 87.5-108.0MHz
ACCESSORIES
1 x Power adapter
1 x Instruction manual
1 x Remote control
1 x CR 2025 button cell (Already installed in the remote control)
1 x Stereo audio connection cable with 3.5mm stereo plug
1 x RCA audio cable
2 x Wall-mount metal brackets
4 x Screws
9
FCC Statement:
This equipment has been tested and found to comply with the limits for a Class B digital
device, pursuant to Part 15 of the FCC Rules. These limits are designed to provide
reasonable protection against harmful interference in a residential installation. This
equipment generates, uses and can radiate radio frequency energy and, if not installed
and used in accordance with the instructions, may cause harmful interference to radio
communications. However, there is no guarantee that interference will not occur in a
particular installation. If this equipment does cause harmful interference to radio or
television reception, which can be determined by turning the equipment off and on, the
user is encouraged to try to correct the interference by one or more of the following
measures:
-- Reorient or relocate the receiving antenna.
-- Increase the separation between the equipment and receiver.
-- Connect the equipment into an outlet on a circuit different from that to which the
receiver is connected.
-- Consult the dealer or an experienced radio/TV technician for help.
This device complies with part 15 of the FCC Rules. Operation is subject to the
following two conditions:
(1) This device may not cause harmful interference, and (2) this device must accept any
interference received, including interference that may cause undesired operation.
The antenna(s) used for this transmitter must be installed to provide a separation
distance of at least 20 cm from all persons and must not be co-located or operating in
conjunction with any other antenna or transmitter.