Junlan Electronic CAB09166 Bluetooth Speaker User Manual
Shenzhen Junlan Electronic Ltd Bluetooth Speaker
User manual
SCR1996-PL
OPERATING INSTRUCTIONS
Bluetooth® Clock
Radio with USB
The Bluetooth® word mark and logos are owned by the Bluetooth SIG, Inc.
All other trademarks and trade names are those of their respective owners.
2
CAUTION
RISK OF ELECTRIC SHOCK
DO NOT OPEN
SEE BOTTOM OF UNIT FOR GRAPHIC SYMBOLS
The exclamation point within a triangle alerts
you to the presence of important operating,
maintenance and servicing instructions in this
user’s manual.
The lightning flash with an arrowhead within
a triangle alerts you to uninsulated dangerous
voltage within the product’s enclosure that could
cause an electric shock.
CAUTION: TO REDUCE THE RISK OF ELECTRIC SHOCK, DO NOT REMOVE
COVER (OR BACK). NO USER-SERVICEABLE PARTS INSIDE. REFER SERVICING
TO QUALIFIED PERSONNEL.
WARNING:TO PREVENT FIRE OR SHOCK HAZARD, DO NOT EXPOSE THIS UNIT
TO RAIN OR MOISTURE. DO NOT PLACE OBJECTS FILLED WITH LIQUIDS ON
OR NEAR THIS UNIT.
CAUTION: DANGER OF EXPLOSION IF BATTERY IS INCORRECTLY REPLACED.
REPLACE ONLY WITH THE SAME OR EQUIVALENT TYPE.
IMPORTANT SAFETY INSTRUCTIONS
• Readtheseinstructions.
• Keeptheseinstructions.
• Heedallwarnings.
• Followallinstructions.
• Donotusethisapparatusnearwater.
• Cleaning-Unplugthisproductfromthewalloutletbeforecleaning.Donotuseliquid
cleanersoraerosolcleaners.Useadryclothforcleaning.
• Donotblockanyventilationopenings.Installinaccordancewiththemanufacturer’s
instructions.
• Donotinstallnearanyheatsourcessuchasradiators,heatregisters,stoves,orother
apparatus(includingampliers)thatproduceheat.
• Donotdefeatthesafetypurposeofthepolarizedorgrounding-typeplug.Apolarized
plughastwobladeswithonewiderthantheother.Agroundingtypeplughastwo
bladesandathirdgroundingprong.Thewidebladeorthethirdprongisprovidedfor
yoursafety.Iftheprovidedplugdoesnottintoyouroutlet,consultanelectricianfor
replacementoftheobsoleteoutlet.
• Protectthepowercordfrombeingwalkedonorpinchedparticularlyatplugs,
conveniencereceptacles,andthepointwheretheyexitfromtheapparatus.
• Unplugthisapparatusduringlightningstormsorwhenunusedforlongperiodsoftime.
• Referallservicingtoqualiedservicepersonnel.Servicingisrequiredwhenthe
apparatushasbeendamagedinanyway,suchaspower-supplycordorplugis
damaged,liquidhasbeenspilledorobjectshavefallenintotheapparatus,the
apparatushasbeenexposedtorainormoisture,doesnotoperatenormally,orhas
beendropped.
• Thisunitshallnotbeexposedtodrippingorsplashingwaterandthatnoobjectlled
withliquidssuchasvasesshallbeplacedontheapparatus.
• Donotoverloadwalloutlet.Useonlypowersourceasindicated.
• Usereplacementpartasspeciedbythemanufacturer.
• PowerSources-Thisproductshouldbeoperatedonlyfromthetypeofpowersource
indicatedonthemarkinglabel.Ifyouarenotsureofthetypeofpowersupplytoyour
home,consultyourproductdealerorlocalpowercompany.Forproductsintendedto
operatefrombatterypower,orothersources,refertotheoperatinginstruction
3
PRECAUTIONS
Safety Information
1. Inordertoshutoffthepowerofthisproductcompletely,unplugthepowercordfrom
thewalloutletorremovetheconnectedUSBcable.Besuretounplugtheunitand
removeallpowersupplysuchasUSBcableordrybatteriesifyoudonotintendtouse
itforanextendedperiodoftime,suchaswhileonvacation.
2. Ifthisproductdevelopstrouble,contactaqualiedservicecenter,anddonotusethe
productinadefectivestate.
CAUTION:
Topreventelectricshock,matchwidebladeofplugtowideslot,fullyinsert.
BEFORE USE
1. Removeallpackagingmaterialsfromunit.Checktomakesurethatyouhaveremoved
allincludedcomponentsbeforediscardingtheboxandpacking.
2. Chooseunitinstallationlocationcarefully.Avoidplacingitindirectsunlightorcloseto
asourceofheat.Alsoavoidlocationssubjecttovibrationsandexcessivedust,coldor
moisture.Keepawayfromsourcesthathum,suchastransformersormotors.
3. Donotopenthecabinetasthismightresultindamagetothecircuitryorelectrical
shock.Ifaforeignobjectshouldgetintotheset,contactyourdealer.
4. Whenremovingthepowerplugfromthewalloutlet,alwayspulldirectlyontheplug,
neverpullthecord.
5. Donotattempttocleantheunitwithchemicalsolventsasthismightdamagethe
nish.Useaclean,drycloth.
6. Keepthismanualinasafeplaceforfuturereference.
4
PRODUCT FEATURES
• Bluetooth®withhands-freefunction
• Dimmerfunction
• Sleeptimerfunction
• FMdigitaltunerwith20presets
• Dualalarmclockfunction—WaketoRadio/Buzzer
• Snoozefunction
• Auxiliaryinput
• USBcharge
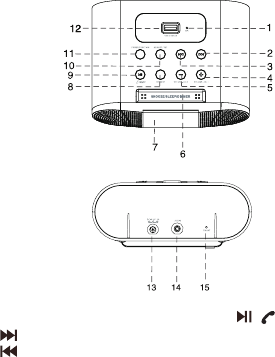
LOCATION OF CONTROLS
TOP VIEW
REAR VIEW
1. MIC(Built-inmicrophone)
2. Button
3. Button
4. VOLUME+/AL1button
5. VOLUME-/AL2button
6. SNOOZE/SLEEP/DIMMERbutton
7. LEDdisplay
8. CHmodebutton
9. / /MO/ST
10.MEMORY/SETbutton
11.POWER/FUNCTIONbutton
12. USB CHARGE
13.DCINjack
14.AUXINjack
15.FMANT(FMAntenna)
(Play/Pause/Hands-Free/Mono/Stereo button

5
LED DISPLAY
AL1: IconlightswhenAlarm1ison.
AL2:IconlightswhenAlarm2ison.
PM:PMtimeindicator
FM:FMindicator
POWER SOURCE
TheunitisdesignedtobeoperatedbyusingtheincludedACadaptor.2x1.5V
“AAA”batteries(notincluded)arealsorequiredfortheclock,radio,presetand
alarmmemorybackup.
CONNECTING THE POWER ADAPTOR
1.PlugoneendofthepoweradaptorintotheDCinjackontherearoftheunit.
2.ConnecttheACplugoftheAC/DCadaptorto100-240V~50/60Hzpower
source.
NOTE:
Disconnect the power adaptor when the unit is not used for a long period of time.
BATTERY INSTALLATION
1.Unscrewtoopenthebatterydooronthebottomofthecabinet.
2. Insert2newbatteries(notincluded)intothecompartmentfollowingthe+and-
markingsinsidethecompartmentandclosethebatterydoor.
WARNING:
DANGER OF EXPLOSION IF BATTERY IS INCORRECTLY REPLACED.
REPLACE ONLY WITH THE SAME OR EQUIVALENT TYPE.
BATTERY CARE
i. Iftheunitisnotusedforanextendedperiodoftimeremovethebattery.Anold
orleakingbatterycancausedamagetotheunitandmayvoidthewarranty.
ii. Donotdisposeofbatteriesinre.Batteriesmayleakorexplode.
iii. Donottrytorechargebatteriesthatarenotintendedtoberecharged.Theycan
overheat,ruptureandleak.(Followthebatterymanufacturer’sdirections.)
iv. (a)Donotmixoldandnewbatteries.
(b)Donotmixalkaline,standard(carbon-zink)orrechargeable(nickel-
cadmium)batteries.

6
CLOCK SETTING
Connectthepoweradaptor.Theunitwillbeinstandbymode.Youcannowsetthe
clocktimeandadjusttheLEDbrightnessasfollows:
SETTING THE TIME MANUALLY
1.) Tosetthehour,pressandholdtheMEMORY/SETbuttonuntilthehourdigits
ash.
2.) Whilethehourdigitsareashing,repeatedlypressthe or buttontoselect
thecorrecthourdigits.
3.) PresstheMEMORY/SETbuttontoconrmthehoursettingandtheminute
digitswillashtopromptforinput.
4.) Whiletheminutedigitsareashing,repeatedlypressthe or buttonsuntil
thecorrectminutedigitsaredisplayed.
5.) PresstheMEMORY/SETbuttonagaintocompletetheclocksetting.
6.) Withthecurrenttimeshowing,pressandholdtheSNOOZE/SLEEP/DIMMER
buttonuntil“12H”apppearsandashesonthedisplay.Pressthe or
buttontoswitchto24hourformat.
NOTE:
i. When setting the PM time in 12H mode, make sure the PM indicator turns on.
DIMMER
1.Whentheunitisinstandbymode,presstheSNOOZE/SLEEP/DIMMERbutton
toadjusttheLEDdisplaybrightnesstohighorlowlevel.
RADIO OPERATIONS
TUNING THE RADIO AND STORING THE PRESETS
1.) PressthePOWER/FUNCTIONbuttonontheunittoturnontheunit.
2.) PressthePOWER/FUNCTIONbuttonrepeatedlytoselecttheRADIOmode.
TheFMfrequencywillbedisplayed.
3.) Pressandholdeitherthe orbuttontoautomaticallysearchforastation
andstopwhenoneisfound.
NOTE:
Press or button repeatedly to ne tune the station received during auto
tuning.
4.) PresstheMEMORY/SETbuttonand or buttontostorethereceived
stationsinorder.
5.) PresstheMEMORY/SETbuttonagaintoconrmthesetting.
6.) Repeatsteps3-5tosearchfor,andstorethedesiredstations.20stationscan
bestoredintotal.
7.) PresstheCHMODEbuttonand or buttontoselectthestoredstationyou
wishtolistento.TheLEDdisplaywillshowthefrequencyofthepresetstation

7
youselected.Thentheunitwillstartplayback.
8.) AdjustthesoundlevelbypressingtheVOLUME+/AL1orVOLUME-/AL2
buttons.
NOTE:
i. Fully extend and relocate the FM antenna to get better reception
ii. If the received FM stations are in stereo mode, the unit will play in stereo mode
automatically. If reception is weak, press the MO/ST (Mono/Stereo) button to turn
the unit to mono mode.
ALARM OPERATIONS
Theunitprovidestwoalarms:AL1andAL2.Youcanchoosetousethem
independentlyorsimutaneously:
SETTING THE ALARM(S)
1.) PressandholdPOWER/FUNCTIONbuttontoturnofftheunit.
2.)PressandholdtheVOLUME+/AL1orVOLUME-/ALbuttonuntilthehourdigits
blinks.Thealarm1oralarm2indicatorwilllightdependingonwhichalarmis
chosen.
3.)Whenthehourdigitsblinks,pressthe or buttontoadjustyourdesired
hourdigits.
4.)PresstheVOLUME+/AL1orVOLUME-/AL2buttontosavethehoursetting,the
minutedigitswillblink.
5.)Whentheminutedigitsblink,pressthe or buttontoadjustyourdesired
minutedigits.
6.)PresstheVOLUME+/AL1orVOLUME-/AL2buttontosavetheminutesetting.
7.)PresstheVOLUME+/AL1orVOLUME-/AL2buttonand / atthesameto
selectwakeupmodeforbuzzer(showing“b”)orradio(showing“F”).
8.)PresstheVOLUME+/AL1orVOLUME-/AL2buttonand / atthesame
timeto adjustthevolumelevel.ThenpressVOLUME+/AL1orVOLUME-/AL2
/ atthesametoadjustthevolumelevel.PresstheVOLUME+/AL1or
VOLUME-/AL2buttontosave.
SNOOZE FUNCTION
Whenthealarmrings,presstheSNOOZE/SLEEP/DIMMERbuttononce.Thealarm
willstopandresumeafter9minutes.
TURNING THE ALARM ON/OFF
PressandholdPOWER/FUNCTIONbuttontoplacetheunitintoSTANDBYmode.
PresstheVOLUME+/AL1orVOLUME-/AL2todeactivatethealarm.Theprevious
presetswillbecancelledandyoucanfollowthealarmsettingstepstoresetthe
alarm.

8
LISTEN TO EXTERNAL AUDIO DEVICE
ThisunitprovideswithanauxiliaryinputjacktoconnectyourcellphoneorMP3
player,etc.
1.) Useanaudiocable(notincluded)with3.5mmstereoplugoneachendofthe
cable.
2.) PlugoneendintotheAUXINJackontherearoftheunitandtheotherendof
thecableintotheLine-outjackorphonejackonyourexternalaudiodevice.
3.) PressthePOWERFUNCTIONbuttonrepeatedlyuntil“AU”appearsonthe
display,theunitwillturntoAUX INmode.
4.) Activateyourexternaldevice.
5.) Duringplayback:
PresstheVOLUME+/AL1buttontoincreasethevolume.
PresstheVOLUME-/AL2buttontodecreasethevolume.
NOTE:
i. / or buttons only work with a Bluetooth source.
ii. If there is no sound, or the sound is not loud enough, you can increase the
volume from your source device.
iii. There is a USB port on the rear of the unit to charge an iPod/iPhone
device.
BLUETOOTH OPERATIONS
PAIRING
1. PressthePOWER/FUNCTIONbuttonrepeatedlyuntil“bt”appearsonthe
display.
2. ActivatetheBluetoothpairingonyourexternaldevice.Thesourcewillnowscan
forotherBluetoothdevicesandshouldndtheunit,identiedas‘SCR1996-PL
Choose it to pair with your device.
3. Pressthe buttontostartplayback.
NOTE:
i. Enter 0000 if asked for a password during pairing.
ii. Before pairing, disconnect the AUX IN cable.
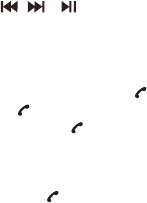
PLAYBACK CONTROL
Press toskiptotheprevioustrack.
Press toskiptothenexttrack.
Press toswitchbetweenplayandpause.
PressVOLUME+/ALARM1buttontoincreasethevolume.
PressVOLUME-/ALARM2buttontodecreasethevolume.
9
NOTE:
i. / or buttons may not work with some of the players in your external
devices.
RECEIVING A CALL
Thebuilt-inmicrophoneonthetopoftheunitenableshands-freebuttontoanswer
thecall.
Ifyoureceiveacall,pressthe buttontoanswerthecall.
Pressthe buttonagainifyouwanttohangup.
Pressandholdthe buttontorejectthecall.
PLACING A CALL
WhentheBluetoothdevicedialsacontactnumber,themusicplayingwillstopandthe
unitwillbecomeaphonespeaker.
Pressandhold buttontodialthelastnumbercalled.
SLEEP TIMER
Thesleeptimerallowsyoutoturntheunitoffafterthepresettimeisreached.
Youcanusethesleeptimertofallasleeptotheradiofor90,80,70,60,50,40,30,20
or10minutesintervals.
1.)SelectthedesiredradiostationoractivateyourAUXIN/Bluetoothsourceand
setthevolumetothecomfortablelevel.
2.) PresstheSNOOZE/SLEEP/DIMMERbuttonrepeatedlytoselectasleeptime.
Eachtimethebuttonispressed,thesleeptimewillbedecreasedin10minute
increments.Theunitwillplayfortheselectedlengthoftimethenautomatically
turnoff.

10
TROUBLESHOOTING
Ifyouexperiencedifcultiesintheuseoftheunit,pleasecheckthefollowing:
PROBLEM CAUSE SOLUTION
Theunitisnot
responding.
(Nopower).
ACadaptorisnotplugged
intothewalloutletorthe
otherendoftheadaptoris
notpluggedintotheDCIN
jackonthebackoftheunit.
PlugtheACadaptorintothewall
outletandplugtheotherendof
theACadaptorintotheDCIN
jackonthebackoftheunit.
Walloutletisnot
functioning.
Pluganotherdeviceintothe
sameoutlettoseewhetherthe
walloutletisworkingornot.
Theexternal
audiodevice
doesnot
respondtothe
unit.
Theunitissettothewrong
mode.
SettheunittoAUXIN/Bluetooth
mode.
Theexternalaudiodevice
islockedup.
Makesuretheexternalaudio
deviceisworkingproperly.
WeakFM
reception.
TheFMantennaisnotfully
extended.
Fullyextendandrelocate
antennaforbestreception.
Soundis
distorted.
Volume/Basslevelsettoo
high.
Decreasethevolumeleveland
adjusttheBasslevel.
Soundsourceisdistorted Theoriginalsoundsourceis
ofpoorquality.Distortionand
noiseareeasilynoticedwithhigh
powerspeakers.Tryadifferent
audiosource.
Nosoundfrom
theBluetooth
device.
Theunitissettothewrong
mode.
SettheunittoBluetoothmode
AUXINcableisconnected. DisconnecttheAUXINcable
For continuous improvement, specications and manual are subject to change without prior notice.
SPECIFICATIONS
PowerAdaptor: Input: AC100-240V~50/60Hz
Output: 5V 2A
Backupbattery: 2x1.5V ‘AAA’
FMrange: 87.5-108MHz
Bluetooth
workingdistance: Upto10metersmeasuredinopenspace.
(Wallandstructuresmayaffectrangeofdevice)
11
The FCC Wants You to Know
ThisequipmenthasbeentestedandfoundtocomplywiththelimitsforaClassBdigital
device,pursuanttoPart15oftheFCCRules.Theselimitsaredesignedtoprovide
reasonableprotectionagainstharmfulinterferenceinaresidentialinstallation.
Thisequipmentgenerates,usesandcanradiateradiofrequencyenergyand,ifnot
installedandusedinaccordancewiththeinstructions,maycauseharmfulinterferenceto
radiocommunications.However,thereisnoguaranteethatinterferencewillnotoccurin
aparticularinstallation.
Ifthisequipmentdoescauseharmfulinterferencetoradioortelevisionreception,which
canbedeterminedbyturningtheequipmentoffandon,theuserisencouragedtotryto
correcttheinterferencebyoneormoreofthefollowingmeasures:
• Reorientorrelocatethereceivingantenna.
• Increasetheseparationbetweentheequipmentandreceiver.
• Connecttheequipmentintoanoutletonacircuitdifferentfromthattowhichthe
receiverisconnected.
• Consultthedealeroranexperiencedradio/TVtechnicianforadditionalsuggestions.
Anychangesormodicationsnotexpresslyapprovedbythepartyresponsiblefor
compliancecouldvoidtheuser’sauthoritytooperatetheequipment.Whereshielded
interfacecableshavebeenprovidedwiththeproductorspeciedadditionalcomponents
oraccessorieselsewheredenedtobeusedwiththeinstallationoftheproduct,they
mustbeusedinordertoensurecompliancewithFCCregulation.
This Class B digital apparatus complies with Canadian ICES-003.