Junlan Electronic CAB90671 Wireless Stereo Pairing Speaker User Manual
Shenzhen Junlan Electronic Ltd Wireless Stereo Pairing Speaker
User Manual
MODEL:SP096-BLACK
Please Read This Instruction Manual Carefully and Keep It for Future Reference
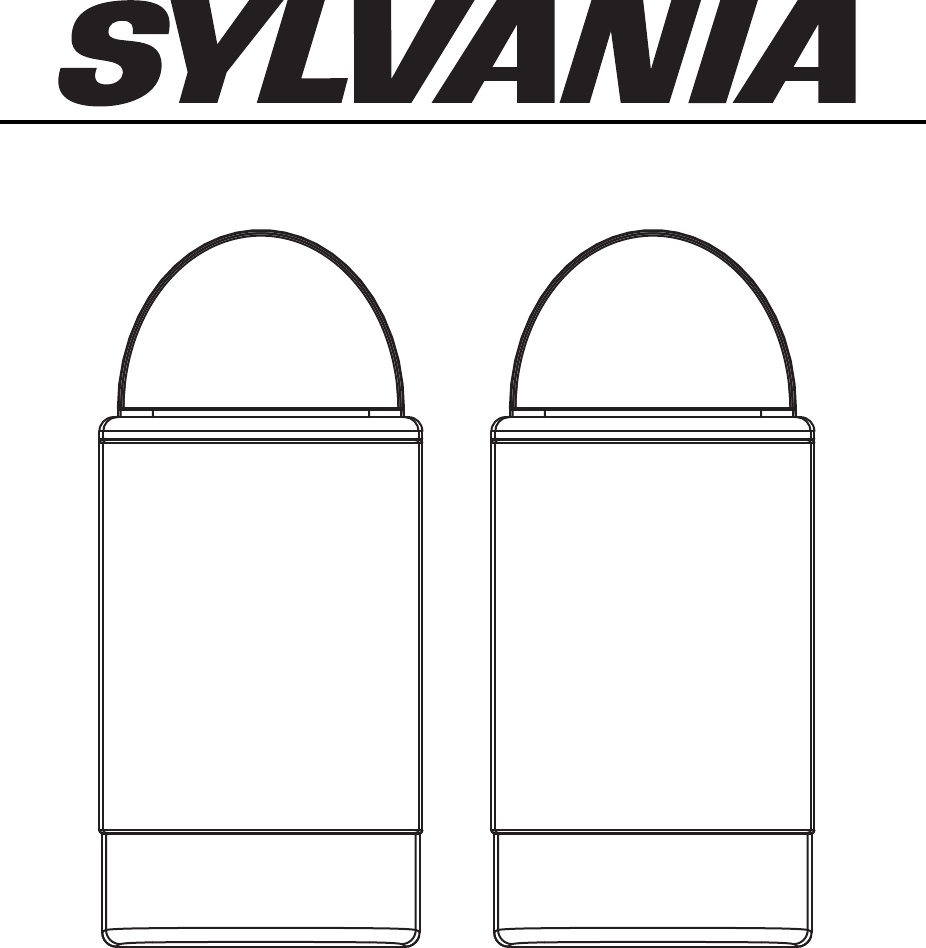
Bluetooth Waterproof Wireless Dual Speakers
2
CAUTION
RISK OF ELECTRIC SHOCK
DO NOT OPEN
CAUTION:
• THISDIGITALVIDEODISCPLAYEREMPLOYSA
LASERSYSTEM.
• TOENSUREPROPERUSEOFTHISPRODUCT,
PLEASEREADTHISOWNER`SMANUALCAREFULLY
ANDRETAINFORFUTUREREFERENCE.
• SHOULDTHEUNITREQUIREMAINTENANCE,
CONTACTANAUTHORIZEDSERVICEPROVIDER.
• MISUSEOFCONTROLS,ADJUSTMENTSTOTHE
UNITORTHEPERFORMANCEOFPROCEDURES
OTHERTHANTHOSESPECIFIEDHEREINMAY
RESULTINHAZARDOUSRADIATIONEXPOSURE.
• TOPREVENTDIRECTEXPOSURETOLASER
BEAM,DONOTTRYTOOPENTHEENCLOSURE.
VISIBLELASERRADIATIONMAYBEPRESENT
WHENTHEENCLOSUREISOPENED.
•DONOTSTAREINTOBEAM.
WARNING:
TOREDUCETHERISKOFFIREORELECTRICSHOCK,
DONOTEXPOSETHISPRODUCTTORAINOR
MOISTURE.
WARNING:
TOREDUCETHERISKOFFIREORELECTRIC
SHOCK,ANDANNOYINGINTERFERENCE,USETHE
RECOMMENDEDACCESSORIESONLY.
SURGE PROTECTORS:
It is recommended to use a surge protector for AC
connection.LightningandpowersurgesARENOT
covered under warranty for this product.
CAUTION:TOREDUCETHERISKOFELECTRICSHOCK,
DONOTREMOVECOVER(ORBACK).NOUSER-
SERVICEABLEPARTSINSIDE.REFERSERVICINGTO
QUALIFIEDSERVICEPERSONNEL.
The FCC Wants You to Know
This equipment has been tested and found to comply with the
limits for a Class B digital device, pursuant to Part 15 of the FCC
Rules. These limits are designed to provide reasonable protection
against harmful interference in a residential installation.
This equipment generates, uses and can radiate radio
frequency energy and, if not installed and used in accordance
with the instructions, may cause harmful interference to
radiocommunications.However,thereisnoguaranteethat
interference will not occur in a particular installation.
If this equipment does cause harmful interference to radio or
television reception, which can be determined by turning the
equipment off and on, the user is encouraged to try to correct
the interference by one or more of the following measures:
•Reorientorrelocatethereceivingantenna.
•Increasetheseparationbetweentheequipmentand
receiver.
•Connecttheequipmentintoanoutletonacircuitdifferent
from that to which the receiver is connected.
•Consultthedealeroranexperiencedradio/TVtechnicianfor
additional suggestions.
Any changes or modifications not expressly approved by
the party responsible for compliance could void the user’s
authority to operate the equipment. Where shielded interface
cables have been provided with the product or specified
additional components or accessories elsewhere defined to
be used with the installation of the product, they must be
used in order to ensure compliance with FCC regulation.
This Class B digital apparatus complies with Canadian
ICES-003.
The lightning flash with arrowhead symbol within an equilateral
triangle is intended to alert the user to the presence of uninsulated
dangerous voltage within the product’s enclosure that may be of
sufficient magnitude to constitute a risk of electric shock to persons.
The exclamation point within an equilateral triangle is intended
to alert the user to the presence of important operating and
maintenance(servicing)instructionsintheliteratureaccompanying
the appliance.
DANGER:Invisibleandhazardouslaserradiationwhenopenand
interlock failed or defeated. Avoid direct exposure to beam.
WARNING:
USEUNDERSUPERVISIONOFANADULTDUETOLONGCORD
This unit has a long AC cord or other long cord that can easily be tripped on or pulled on, causing injury,
Please make sure it is arranged so it will not drape over a tabletop, etc. where it can be pulled on by
children or tripped over accidentally.
Important Safety Instructions
This device complies with Industry Canada licence-exempt RSS standard(s).
Operation is subject to the following two conditions: (1) This device may not
cause interference, and (2) This device must accept any interference, including
interference that may cause undesired operation of the device.
Le présent appareil est conforme aux CNR d'Industrie Canada applicables aux
appareils radio exempts de licence. L'exploitation est autorisée aux deux conditions
suivantes:
(1) l'appareil ne doit pas produire de brouillage, et
(2) l'utilisateur de l'appareil doit accepter tout brouillage radioélectrique subi, même si le
brouillage est susceptible d'en compromettre le fonctionnement.
3

4
Before using the unit, be sure to read all operating instructions carefully. Please note that these are general
precautions and may not pertain to your unit. For example, this unit may not have the capability to be
connected to an outdoor antenna.
1) Read these instructions.
All the safety and operating instructions should be read before the product is operated.
2) Keep these instructions.
The safety and operating instructions should be retained for future reference.
3) Heed all warnings.
All warnings on the product and in the operating instructions should be adhered to.
4) Follow all instructions.
All operating and use instructions should be followed.
5) Do not use this apparatus near water.
Do not use this product near water and moisture, for example: near a bathtub, washbowl, kitchen sink or
laundry tub; in a wet basement; or near a swimming pool.
6) Clean only with dry cloth.
Unplug this product from the wall outlet before cleaning. Do not use liquid cleaners or aerosol cleaners.
Use a dry cloth for cleaning.
7) Do not block any ventilation openings. Install in accordance with the manufacturers instructions.
Slots and openings in the cabinet and in the back or bottom are provided for ventilation to ensure reliable
operation of the product and to protect it from overheating. These openings must not be blocked or
covered. The openings should never be blocked by placing the product on a bed, sofa, rug or other similar
surface. This product should never be placed near or over a radiator or heat source. This product should not
be placed in a built-in installation such as a bookcase or rack unless proper ventilation is provided or the
manufacturer’s instructions have been adhered to.
8) Do not install near any heat sources such as radiators, heat registers, stoves, or other apparatus
(including amplifiers) that produce heat.
9) Do not defeat the safety purpose of the polarized or grounding-type plug. A polarized plug has two
blades with one wider than the other. A grounding type plug has two blades and a third grounding
prong. The wide blade or the third prong are provided for your safety. If the provided plug does not
fit into your outlet, consult an electrician for replacement of the obsolete outlet.
10) Protect the power cord from being walked on or pinched particularly at plugs, convenience
receptacles, and the point where they exit from the apparatus.
11) Only use attachments/accessories specified by the manufacturer.
12) Use only with the cart, stand, tripod, bracket, or table specified by the manufacturer,
or sold with the apparatus. When a cart is used, use caution when moving the cart/
apparatus combination to avoid injury from tip-over.
Anapplianceandcartcombinationshouldbemovedwithcare.Quickstop,excessiveforce
and uneven surfaces may cause the appliance and cart combination to overturn.
13) Unplug this apparatus during lightning storms or when unused for long periods of time.
To protect your product from a lightning storm, or when it is left unattended and unused for long periods
of time, unplug it from the wall outlet and disconnect the antenna or cable system. This will prevent
damage to the product due to lightning and power-line surges.
14) Refer all servicing to qualified service personnel. Servicing is required when the apparatus has
been damaged in any way, such as power-supply cord or plug is damaged, liquid has been spilled or
objects have fallen into the apparatus, the apparatus has been exposed to rain or moisture or does
not operate normally, or has been dropped.
15) Power source
This product should be operated only from the type of power source indicated on the marking label.
If you are not sure of the type of power supply to your home, consult your appliance dealer or local power
company.
For products intended to operate from battery power, or other source, refer to the operation instructions.
16) Power lines
An outside antenna system should not be located in the vicinity of overhead power lines or other electric
light or power circuits, or where it can fall into such power lines or circuits. When installing an outside
antenna system, extreme care should be taken to keep from touching such power lines or circuits as
contact with them might be fatal.
Important Safety Instructions
17) Overloading
Do not overload wall outlets and extension cords as this can result in a risk of fire or electric shock.
18) Object and liquid entry
Neverpushobjectsofanykindintotheproductthroughopeningsastheymaytouchdangerousvoltage
pointsorshortoutpartsthatcouldresultinreorelectricshock.Neverspillorsprayanytypeofliquidon
the product.
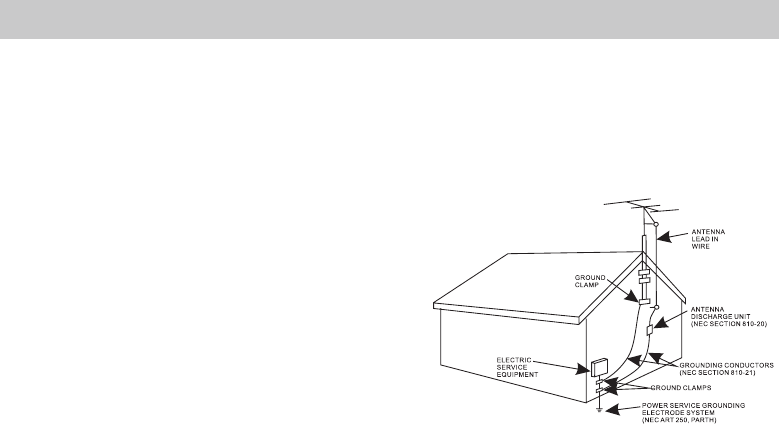
19) Outdoor antenna grounding
If an outside antenna is connected to the product, be
sure the antenna system is grounded so as to provide
some protection against voltage surges and built up
staticcharges.Section810oftheNationalElectricCode
ANSI/NFPA70providesinformationwithrespectto
proper grounding of the mast and supporting structure,
grounding of the lead-in wire to an antenna discharge
product,sizeofgroundingconductors,locationof
antenna-discharge product, connection to grounding
electrodes and requirements for the grounding
electrodes.
20) Service
Do not attempt to service this product yourself as opening or removing covers may expose you to
dangerousvoltageorotherhazards.Referallservicingtoqualiedservicepersonnel.
21) Replacement parts
When replacement parts are required, be sure the service technician uses replacement parts specified
bythemanufacturerorthosethathavethesamecharacteristicsastheoriginalparts.Unauthorized
substitutionsmayresultinreorelectricshockorotherhazards.
22) Safety check
Upon completion of any service or repairs to this product, ask the service technician to perform safety
checks to determine that the product is in proper operating condition.
23) Wall or ceiling mounting
The product should be mounted to a wall or ceiling only as recommended by the manufacturer.
24) Damage requiring service
Unplug this product from the wall outlet and refer service to qualified service personnel under the
following conditions.
a) Whenthepower-supplycordorplugisdamaged.
b) Ifliquidhasbeenspilledorobjectshavefallenintotheproduct.
c) Iftheproducthasbeenexposedtorainorwater.
d) Iftheproductdoesnotoperatenormallybyfollowingtheoperatinginstructions.Adjustonlythose
controls that are covered by the operating instructions, as an adjustment of other controls may result
in damage and will require extensive work by a qualified technician to restore the product to its
normal operation.
e) Iftheproducthasbeendroppedorthecabinethasbeendamaged.
f) Whentheproductexhibitsadistinctchangeinperformance-thisindicatesaneedforservice.
25) Note to CATV system installer
ThisreminderisprovidedtocalltheCATVsysteminstaller’sattentiontoArticle820-40oftheNECthat
provides guidelines for proper grounding and, in particular, specifies that the cable ground shall be
connected to the grounding system of the building, as close to the point of cable entry as practical.
NOTE:
Refer all servicing to qualified service personnel. Servicing is required when the unit has been damaged
in any way such as the following: the power-supply cord or plug has been damaged, liquid has been
spilled into unit, the unit has been exposed to rain or moisture, the unit has been dropped or the unit
does not operate normally.
Important Safety Instructions
5
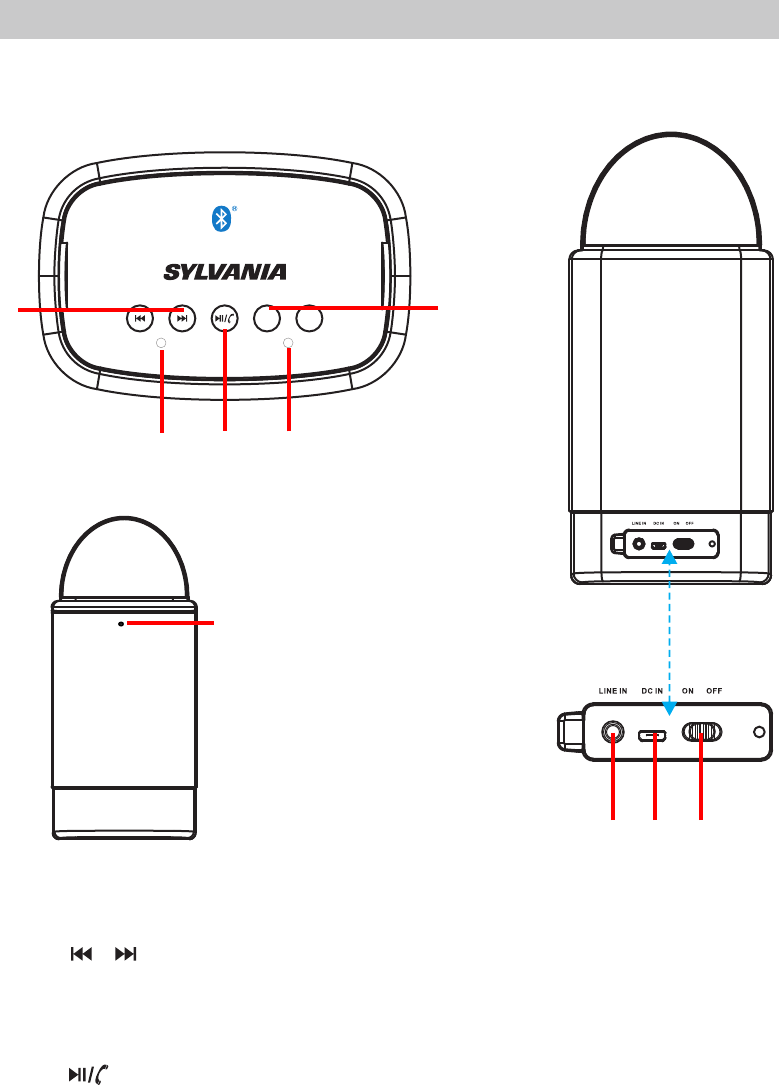
Vol- Vol+
BT/LINE IN CHARGE
TOP VIEW REAR VIEW
12
345
7 8 9
1. / (Previous/Next) Button
2. Vol - / Vol + (Volume Down / Volume Up) Button
3. BT/LINE IN Indicator
4. (Play/Pause/Hands-free) Button
5. Charge Indicator
7. LINE IN Jack
8. DC IN Port
9. Power ON/OFF Switch
6
PRODUCT OVERVIEW
6
6. Built-in Microphone
FRONT VIEW
During charging, the charging indicator will turn red, and it will turn off after fully charged.
7
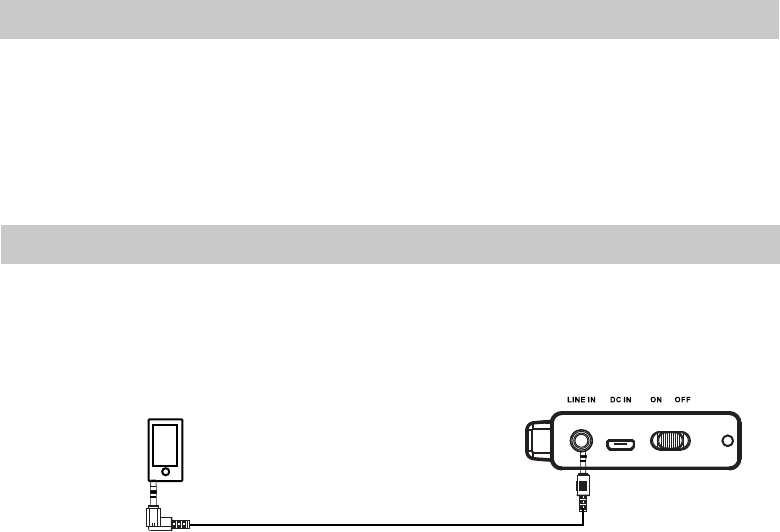
1. Connect the Headphone/Earphone; Aux
(such like MP3 player; Discman … etc) to the LINE IN jack on the rear panel of the unit
by the supplied Audio Connection Cable as the figure below:
Audio
Player
3. Power on the connected external player and start playback as usual.
out jack or Line out jack from the external audio
player
2. Push the power switch to "ON" position to power on the unit.
Rear View of the Unit
BATTERY CHARGING
1.Connect the smaller plug on mini-USB cable to the DC IN jack on the rear panel.
2.Connect the USB plug to a free USB port on a computer or a 5V USB AC adapter (not supplied).
LINE IN OPERATION
If the two units were connected and paired before, the two units will connect and pair with each
other automatically.
2. Touch " " button on one of the two units, then touch " " button on another unit, the two
units will search and pair with each other.
The deputy unit will enter standby mode without any sound output or operation after 10 minutes.
8
BLUETOOTH PAIRING AND CONNECTION
FIRST TIME PAIRING
1. Push the power switch to "ON" position to power on both units, the two unit will send a sound,
and the BT/LINE IN indicator will flash.
3. After successful pairing and connection, a chime will be heard and the BT/LINE IN indicator on
main unit will flash.
NOTE:
The unit from which the " " button being touched will be the main unit.
Repeat the operation of STEP 2 to switch the main unit before pairing with bluetooth enabled
audio player or mobile phone.
5. After successful connection, the BT/LINE IN indicator on main unit will stay lit.
6. Play track on bluetooth enabled audio player or mobile phone as asual.
4. Open the bluetooth on bluetooth enabled audio player or mobile phone and try to search and
pair with the main unit, the pairing name " SP096SP096
NOTE:
Before pairing, make sure the LINE IN cable is not plugged into the LINE IN jack.
" will appear, select it and make connection.
NOTE:
If the main unit had been switched before connected with the bluetooth enabled audio player
unit again although there is "SP096" listed on pairing name list.
During playing:
A:Touch or button to skip to previous or next track.
B:Touch button to pause, touch again to resume playing.
C:Touch VOL + or VOL - button to increase or decrease the volume.
or mobile phone, the bluetooth enabled audio player or mobile phone must search the main
The A, B, C operation above are simutaneous during playing.
For example, touch VOL + button on one of the two units, the volume on both units will increase.
NOTE:
The main unit will enter standby mode without any sound output or operation after about 11
minutes. Powering on both units by STEP 1.
Holding the button on main unit to cut off connection between main unit and bluetooth
off connection between main unit and the deputy
unit. (To reconnect the deputy unit, please pause playing on main unit, and restart deputy unit.
enabled audio player or mobile phone.
Holding the button on deputy unit to cut
DISCONNECTION:
After reconnection with main unit again, touch VOL - to set to minimum volume, then touch
VOL + to set to the desired volume.)

Double press " " button to redial the last called number.
Touch " " button to answer the incoming call.
Touch " " button again to end the call after conversation.
Holding the " "button to refuse the call.
9
INCOMING CALLING DURING PLAYING IN BT MODE
An incoming call received during playing in bluetooth mode, operate as the followings:

10
Check the followings before requesting service
SYMPTOM POSSIBLE CAUSE POSSIBLE SOULTION
No power
No sound
Sound distortion
Bluetooth
reception failure
Have not paired
The external device is far from
the unit
Volume level too high
The paired/connected device
is not in payback mode
Volume in minimum position Raise volume level by pressing the VOL
(Volume) + button.
Play music/movie in the paired/connected
device as usual and make sure the
volume level of it is in high level.
VOL (Volume ) - button.
Reduce the volume level by pressing
the
Put the external BT device close to the
unit.
The power is consumed
Reduce the volume level of the paired/
connected device.
Pair the unit with the BT Device as the
procedures stated in this manual.
Recharge the unit.
/rattle
TROUBLESHOOTING GUIDE

ACCESSORY
Speaker output power..............................................................................................2X3W
Playing time.................................................................around 5 hours (with 50% volume)
11
is a trademark on a registered trademark of Bluetooth
SIG Inc. All other trademarks and trade names are
those of their respective owners.
SPECIFICATION
Built-in battery............................................................................................3.7V,1000mAh
Charging power.........................................................................DC 5V 500mA
1 X Instruction manual
1 X USB charging cable
1 X 3.5 mm LINE IN cable
Bluetooth working range........................................................approximately 33 feet (10m)