Junlan Electronic CAW03012 SAMSUNG POWERED WIFI SPEAKER DOCK User Manual
Shenzhen Junlan Electronic Ltd SAMSUNG POWERED WIFI SPEAKER DOCK
Contents
- 1. User Manual
- 2. User manual
User Manual
SAMSUNG POWERED WIFI SPEAKER DOCK
MODEL:CAW-03012
PLEASE READ THIS INSTRUCTION MANUAL CAREFULLY BEFORE
OPERATION AND KEEP IT FOR FUTURE REFERENCE
-.
FCC Warnings
FCC NOTICE:
1.
the
f
f
v
&
2
3
4
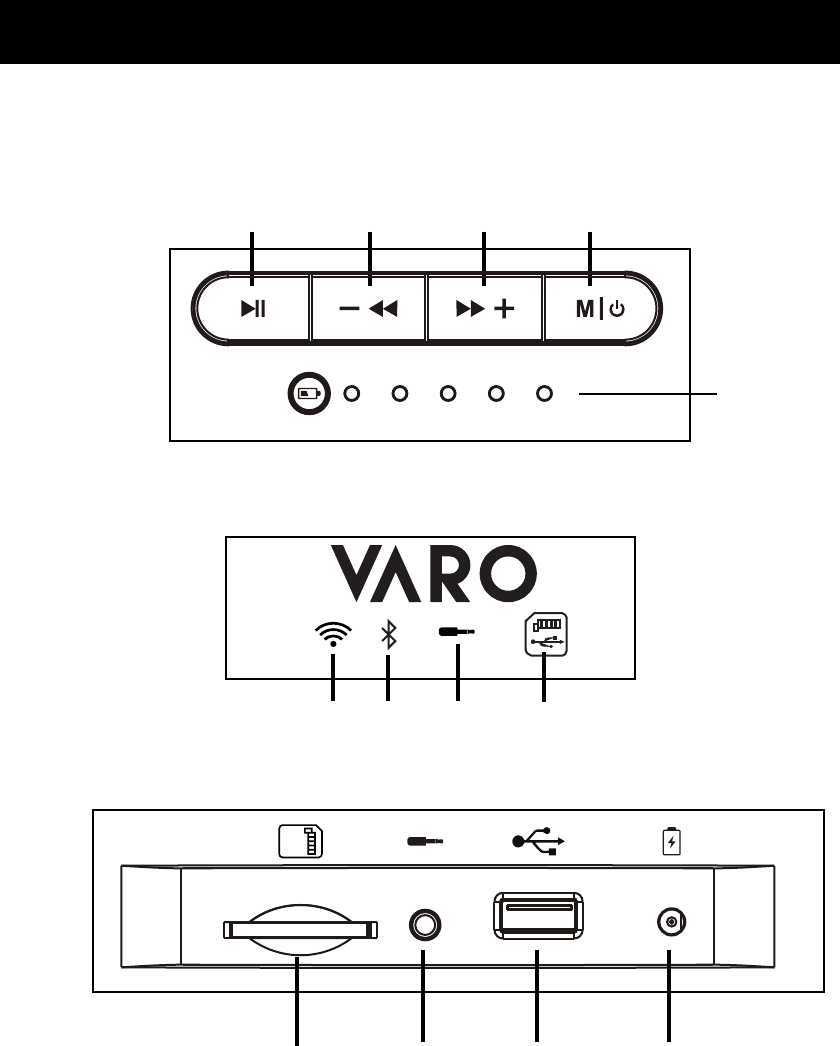
LOCATION OF CONTROLS
TOP VIEW
FRONT VIEW
REAR VIEW
1. Play/Pause (WiFi Pairing) Button
2. Previous (Volume Down) Button
3. Next (Volume Up) Button
4. Mode (Power On/Off) Button
6. WiFi Indicator
7. Bluetooth Indicator
8. AUX IN Indicator
9. SD/USB Indicator
11. AUX IN Jack
13. DC IN Jack
1 2 3 4
5
6 7 8 9
MAIN UNIT:
5. Battery Indicator
10. SD Card Slot
12. USB Port
10 11 12 13

Accessories:
Specification
Power supply.........................................................................................9.5V 2.2A
Audio output...................................................................................................6WX2+10W (RMS)
1 X 3.5mm Stereo AUX IN Cable
1 X Instruction Manual
1 X AC/DC Adapter for the main unit (9.5V, 2.2A )
Running Time.......................................................................around 3.2 hours(with 50% volume)
Recharging Time..................................................................................................around 3 hours
Bluetooth working range..................................................................32 feet (tested in open area)
WiFi working range...............................................................................................approx. 96 feet
Bluetooth version...................................................................................................................V4.1
5
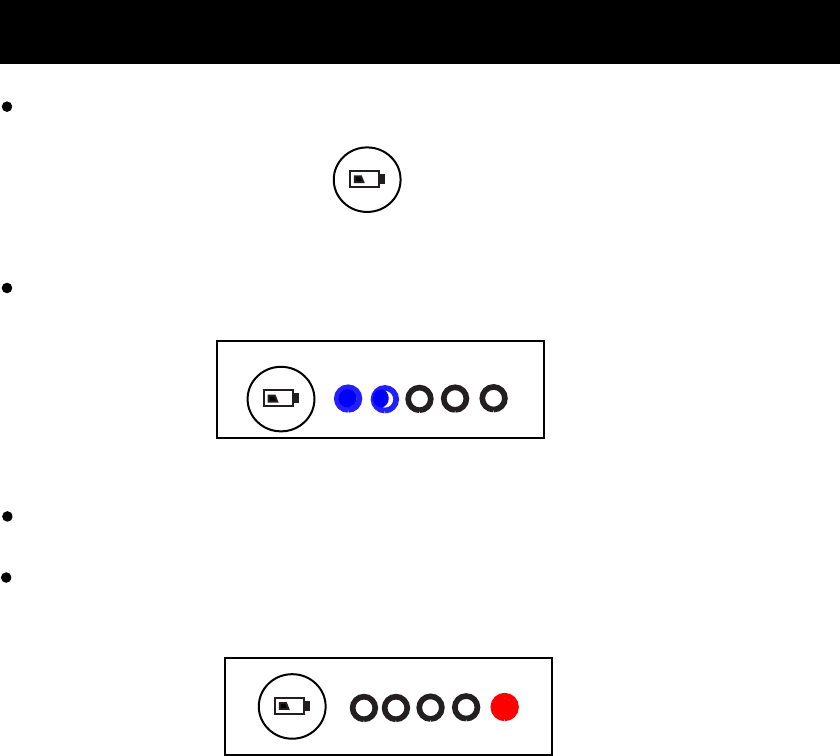
RECHARGING
The battery indicator will flash blue during low battery level.
Battery Indicator
Battery Indicator Button
Using the supplied Adapter to recharge through the DC IN jack at the rear of the main unit.
During playing, press the battery indicator button to display the battery level.
Battery Indicator
The red indicator will light up when charging, it will turn blue after fully charged.
6

BLUETOOTH OPERATION
Pairing the speaker with Bluetooth devices (phone or music device)
1. Press and hold the button to turn on the unit.
5. Once paired successfully, Bluetooth indicator will stop blinking and a tone will be heard.
6. If pairing is unsuccessful, turn off the speaker first and then re-pair following above steps.
M
2. Press the button repeatedly to turn to Bluetooth mode, the Bluetooth indicator on
M
front of the unit will light up and blink, and a tone sounds, now it is entering pairing mode.
3. Activate the Bluetooth function on your Bluetooth device (phone or music device). Please
refer to the manufacturer’s instructions of your device.
4. Once you have activated Bluetooth on your device, select the speaker “CAW-03012” from
the list of available Bluetooth devices.
7. Once you have paired the speaker with a device, the speaker will remember this device
and will pair automatically when the device’s Bluetooth is activated and in range.
8. If you want to pair it with a new device, press and hold the button to disconnect the
current pairing.
During playing:
A:Press the or button to skip to previous or next track.
B:Press the button to pause, press again to resume playing.
C:Press and hold the or button to decrease or increase the volume.
NOTE:
During playing, please do not insert the AUX IN cable into the AUX IN Jack, or it will switch
to AUX IN mode, the AUX IN indicator will light up, it will switch to WiFi mode when unplug
7
the AUX IN cable.

2. Press and hold the button to turn on the unit.
M
3. Press the button repeatedly to turn to AUX IN mode, the AUX IN indicator on
M
front of the unit will light up.
~ Insert the other end to the AUX IN jack on the rear of the main unit.
1. Connected the external audio device to the unit by an
~ Insert one end to the Phone; Line Out or AUX Out Jack on the external audio device.
audio connection cable with 3.5mm
stereo mini jacks as:
Mobile Phone
(Audio Connection Cable supplied)
To AUX IN jack on
the rear of the unit
Connect to the Phones; AUX Out;
Line Out Jack of the external devices
(Such like MP3 Player; cell phones;
iPod/iPad ... etc)
AUX IN OPERATION
4. Play music as usual on your external device.
MP3
8
NOTE: It will switch to AUX IN mode when AUX IN cable plugged into the AUX IN jack in
any other modes( such as WiFi, Bluetooth, USB, SD, OPTICAL).
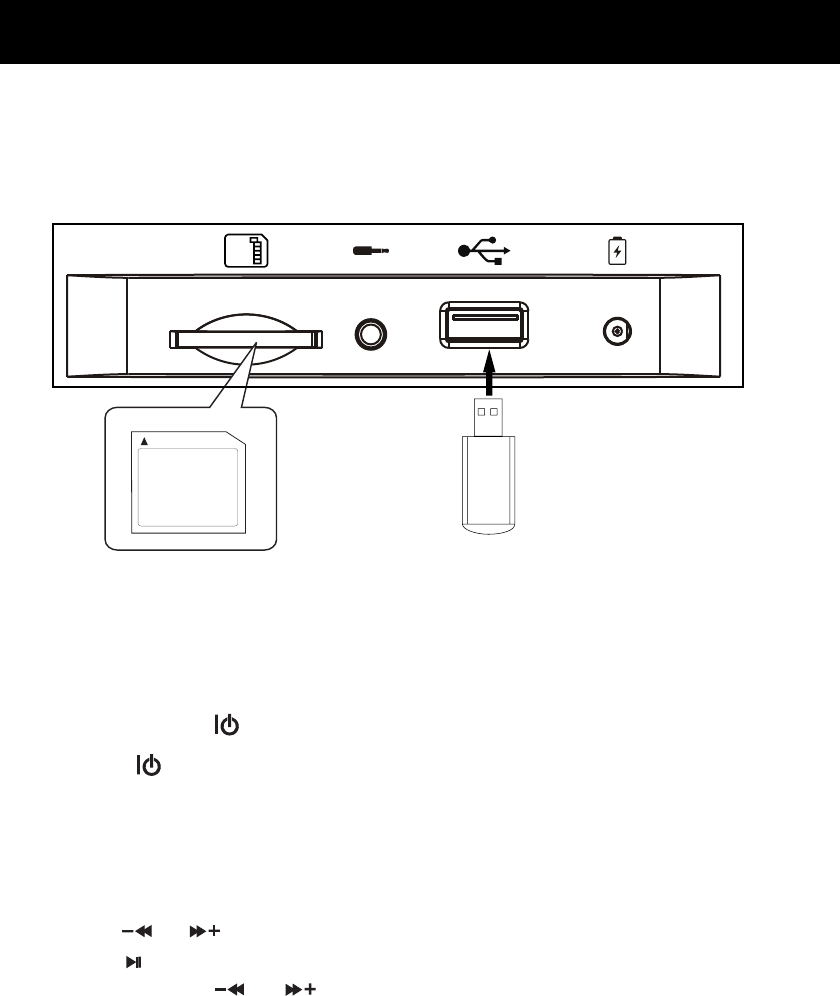
USB/Sd OPERATION
NOTE: Only the USB or SD Card inserted to the unit can the USB/SD mode be selected.
The latter one inserted to the unit will be played first.
1. Insert the USB device or SD memory card into the USB port/card slot as shown above figure.
2. Press and hold the button to turn on the unit.
M
3. Press the button repeatedly to turn to USB/SD mode, the USB/SD mode indicator on
M
front of the unit will light up.
During playing:
A:Press the or button to skip to previous or next track.
B:Press the button to pause, press again to resume playing.
C:Press and hold the or button to decrease or increase the volume.
4. The unit will automatically play the track after a few seconds.
REAR VIEW OF THE UNIT
9
Sd USB
10
Download and install the App and set the language of mobile phone to English.
Before connecting the mobile phone with the unit, search the
VARO WIFI CONTROLLER from network by the following website:
The App icon will appear like the Fig.1 after successful installation.
Fig. 1
PREPARATION
CONNECT THE PHONE WITH THE UNIT
Activate the WiFi on the phone, search and connect the router (WiFi Source),
Press and hold the button to turn on the unit, the WiFi indicator will light up and blink.
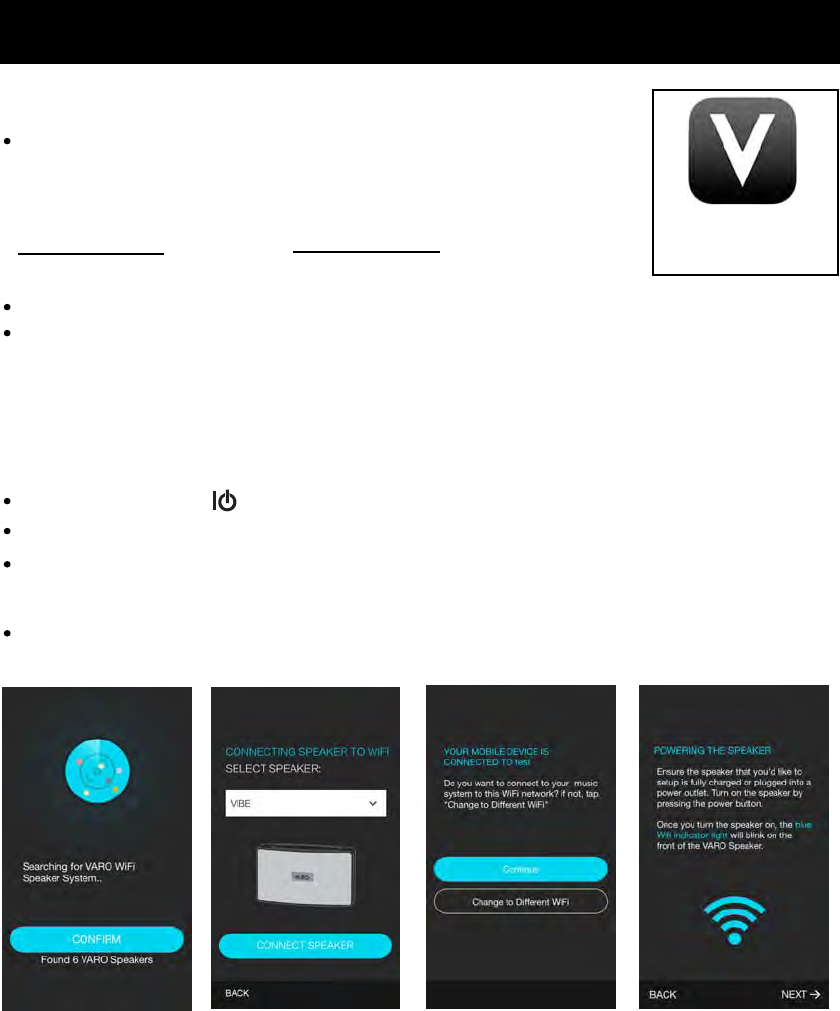
Tap VARO WIFI CONTROLLER icon to activate and it will try to search the devices (Fig.A).
Setup
VARO WIFI CONTROLLER
NOTE:Please make sure that there is no AUX IN cable plugged in AUX IN jack.
M
Android:
http://fir.im/bvaro
iOS:
http://fir.im/varo
Fig.A Fig.B
Select the VIBE on Fig.B and tap CONNECT SPEAKER, tap Continue on Fig.C.
Fig.C Fig.D
Read the tips on Fig.D and tap NEXT.
Setup
NOTE: There will be voice tone sounding during connection procedure like the following:
" Searching for Wifi connection "
" Waiting for Wifi connection "
" Wifi connected "
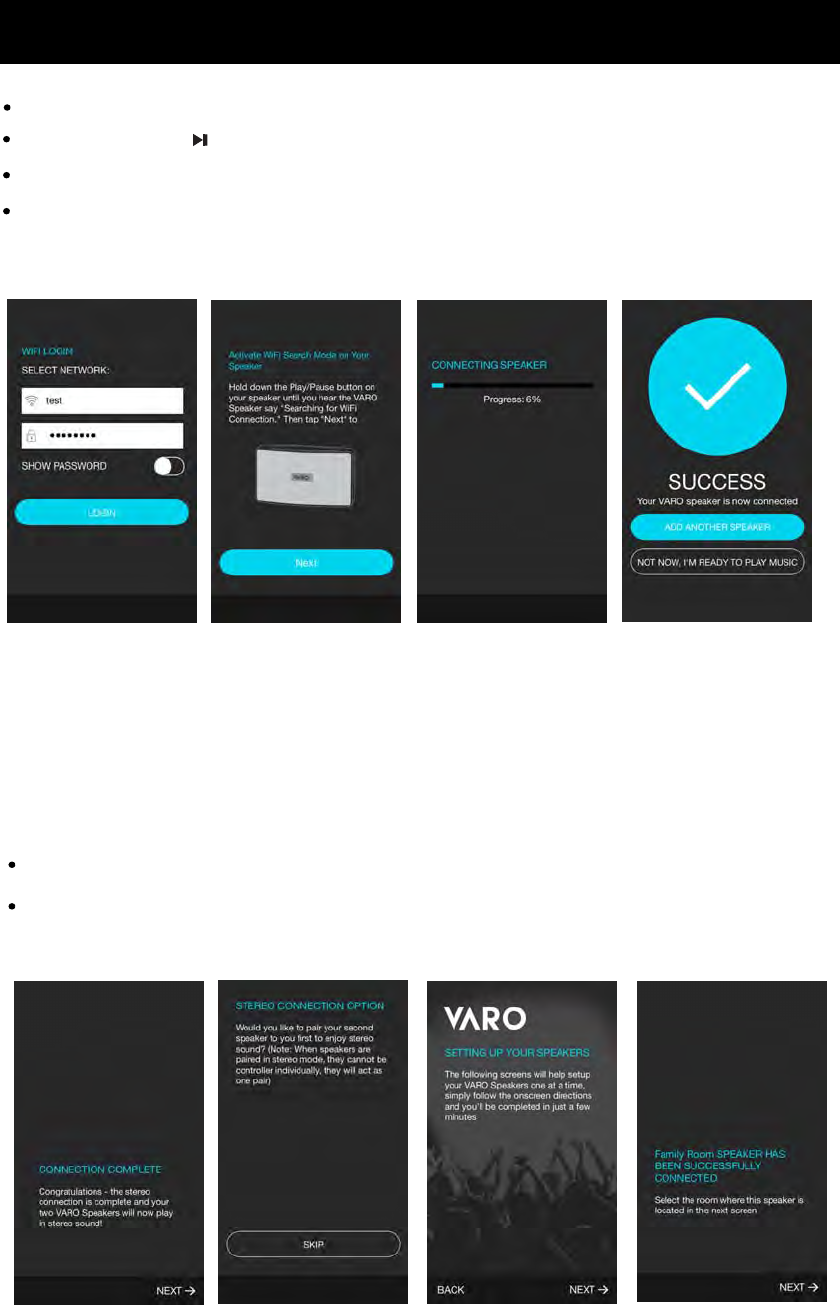
Select the same WiFi (router source) as the phone connected and tap LOGIN on Fig.E.
Fig.E
Press and hold the button on the unit as instructed on Fig.F and tap Next to continue.
Fig.F
Wait unit the progress bar reach 100% as instructed on Fig.G.
Fig.G Fig.H
Select to add another speaker or play music after successful connection as Fig.H.
Using the screen instructions and the voice tone to make connection and operations.
After connection completed, it will give instructions like Fig.I and tap Next to continue.
Fig.I
Read the onscreen instructions on Fig.J, Fig.K, Fig.L and continue.
Fig.J Fig.K Fig.L
11
Setup
Wait unit the progress bar reach 100% as instructed on Fig.G.
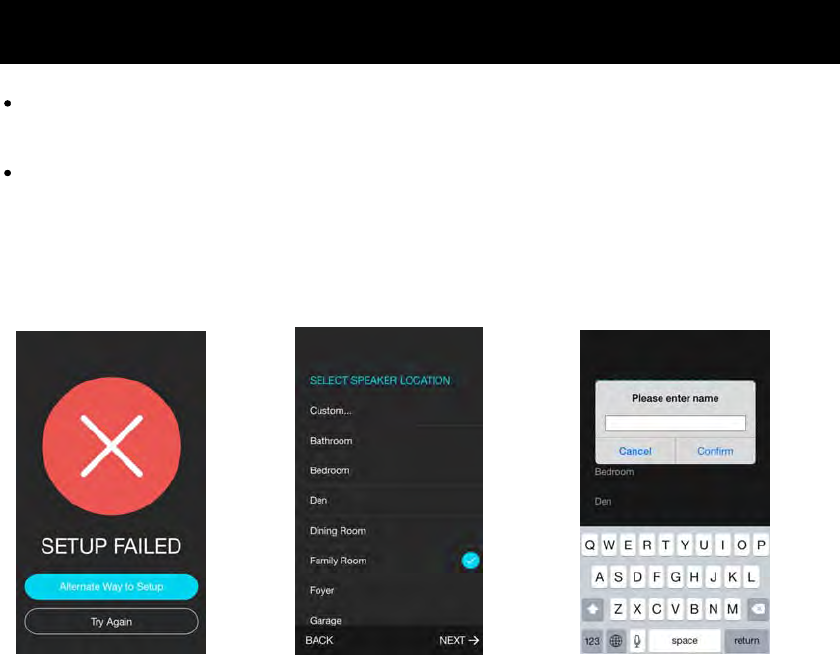
If it displays like Fig.M, tap Try Again to repeate the above stated steps to reconnect.
Fig.M Fig.N
If it does not fail to connect, continue to set the SPEAKER LOCATION, tap Custom...column
on Fig.N to rename the speaker location. Input the name and confirm on Fig.O.
Fig.O
12
Glance at The Function of Each Icon
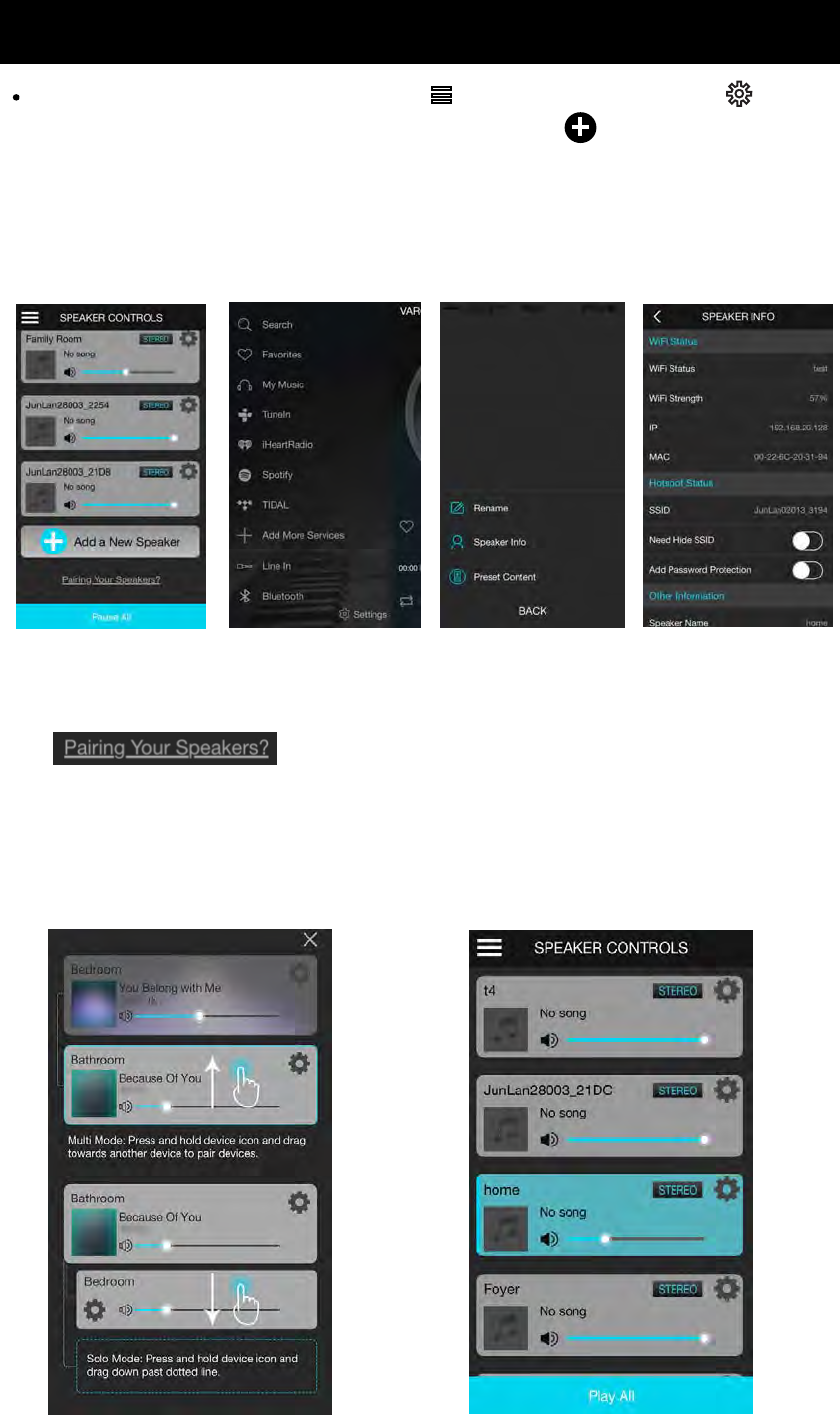
On SPEAKER CONTROLS page (Fig.P), tap to return to home page. Tap to
Fig.P
Rename, browse the Speaker Info and Preset Content. Tap Add a New Speaker to
add more speaker as onscreen instructions. Tap Pause All to pause playing on all speakers,
tap again to resume play all speakers. Tap volume level bar to adjust the volume, tap
Home Page Speaker Info Page
STEREO icon to set to LEFT channel or RIGHT channel.
Tap on SPEAKER CONTROLS page to set solo or multi mode.
as onscreen instructions like Fig.Q.
Fig.Q. Fig.R.
Drag down slowly from the top of the SPEAKER CONTROLS page window until the upward
arrow head appears then release to update the SPEAKER CONTROLS page, if there is
existing connected speaker, it will appear on the SPEAKER CONTROLS page. See Fig.R.
13
14
Guide of Using App Functions
Home Page
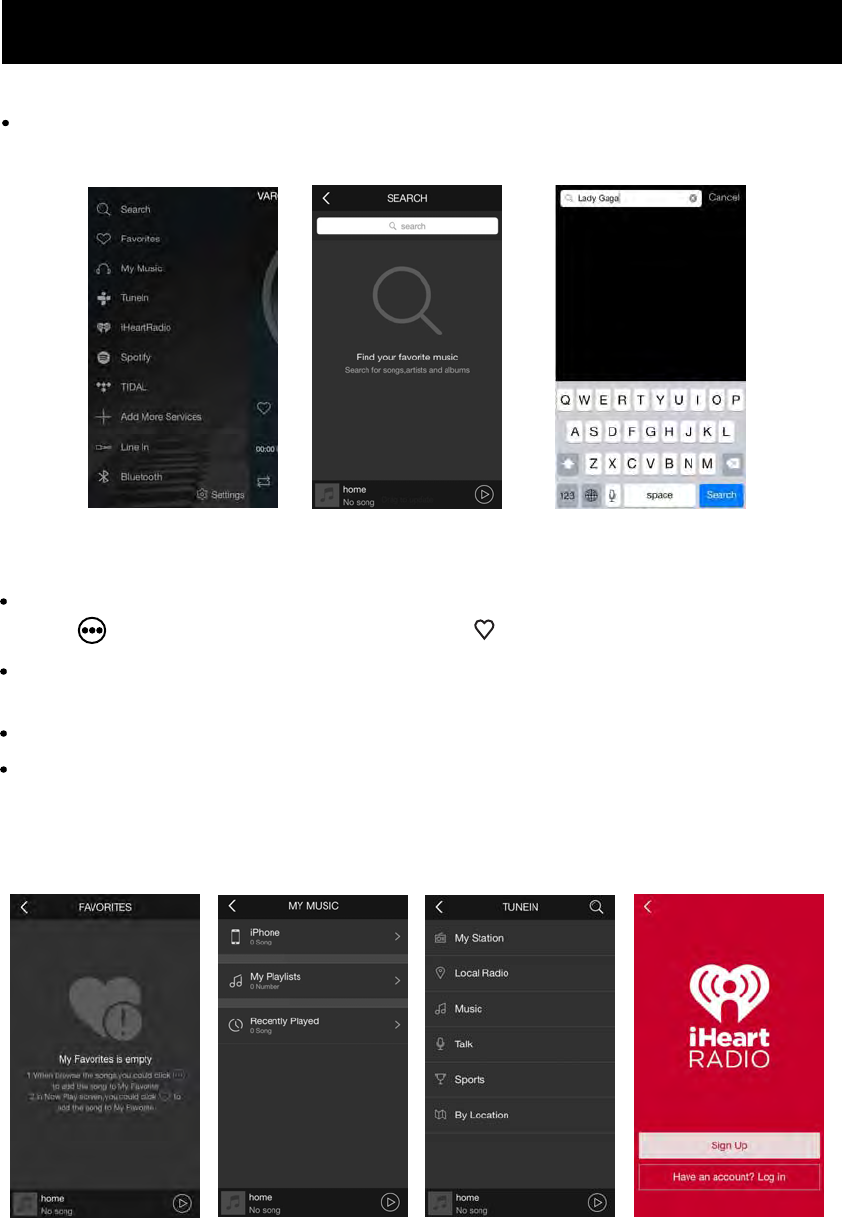
On Home Page, tap Search to search the desired music shown on the below pictures.
On Home Page, tap Favorites to to listen your favorite music, on music playing page,
tap the icon to add songs to My Playlist,
Favorites My Music
On Home Page, tap My Music to listen from native music, My Playlist or Recently
Played music.
TuneIn
On Home Page, tap TuneIn to listen online radio, or other programes.
On Home Page, tap iHeartRadio and sign up to listen iHeart radio.
iHeart
tap the icon to add songs to Favorites.
Guide of Using App Functions
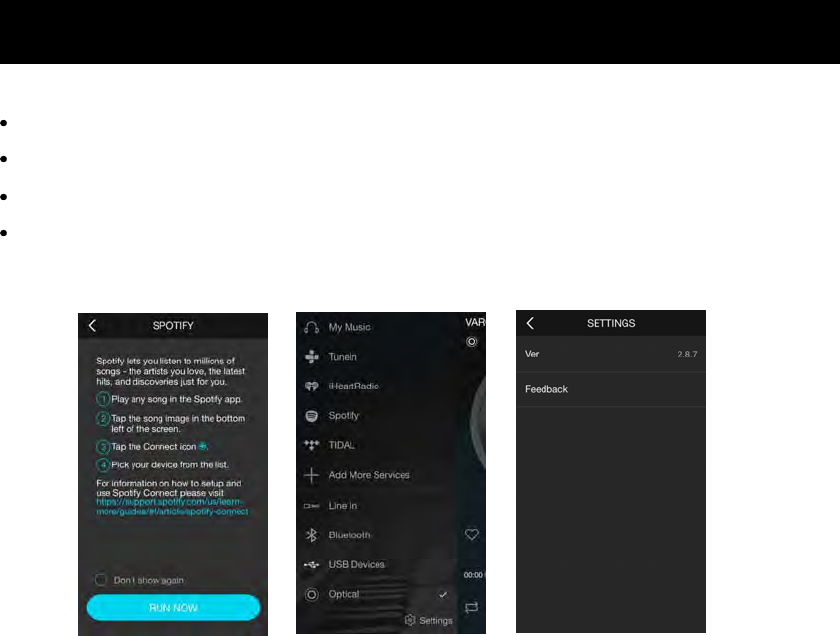
On Home Page, tap Sportify to listen music.
Sportify
On Home Page, tap Add More Services to add the desired online programs platform.
Tap Line in, Bluetooth, USB Devices or Optical to switch function mode on Fig.S.
Tap Setings to check the Version and Feedback information on Fig.T.
Fig.S Fig.T
NOTE: Other detail functions like adding, cancel, delete, manage...customize, etc. can be
operated according to the onscreen instructions.
15

FAQ
Q: Can't stream music to the device?
A: Make sure your phone or PAD are in the same Wi-Fi network as your device. If you use 3rd. music APP,
please check if the APP supports Airplay, DLNA or Qplay protocol.
Q: Can the APP system be controlled independently by two different phones/tablets at the same time or can it
only be controlled with one?
A:It can be controlled by different phones / tablets.
Q: Can I play my MP3 music collection on the iphone?
A: Yes. You just have to install the controller app on the iPhone. In the app, you will see an option to play
music on "This iPhone".
Q: What kinds of music format does it support?
A: Most of the format is available. Such as MP3, WMA, AAC (AAC+), Apple lossless, FLAC, APE, etc.
Q:Does it support multi-room playback?
A: Yes. Playback the same song in multiple speakers with minimal latency (less than 5 ms) or different songs
in multiple speakers with one App.
Q: Does the wireless transmission have loss of sound quality?
A:No. You mobile devices or other devices just send control instructions, and the adapter will download songs
metadata, decoding it and then playback in local speaker, so there is no lose of the music quality through
wireless transmission.
Q: Does it support R&L channel?
A: Yes, this is supported. You can find the sign in APP.
16