Junlan Electronic SBB081FG Bluetooth Speaker User Manual
Shenzhen Junlan Electronic Ltd Bluetooth Speaker
User manual

Please read this instruction manual carefully and keep it for future reference.
SOURCE
TUN- TUN+AUX VOL- VOL+
Instruction Manual
BLUETOOTH SPEAKER
Model: SBB-081FG
• CAUTION: TO PREVENT ELECTRIC SHOCK, MATCH WIDE BLADE OF PLUG TO WIDE
SLOT, FULLY INSERT.
• WARNING: moisture.
• CAUTION:
may result in hazardous radiation exposure.
• WARNING: for
compliance could void the user’s authority to operate the equipment.
WARNING: Do not place the unit on top of any soft, porous, or sensitive surfaces to avoid damaging
• WARNING:
it may be the cause.
• CAUTION: Danger of explosion if battery is incorrectly replaced. Replace only with the same
or equivalent type.
• WARNING : Shock hazard - Do Not Open.
Mains plug is used as disconnect device and it should remain readily operable during intended use.
Do not mix old and new batteries.
Do not mix alkaline, standard (carbon-zinc), or rechargeable (ni-cad, ni-mh, etc) batteries.
the surface. Use a protective barrier between the unit and surface to protect the surface.
the remote.
In order to disconnect the apparatus from the mains completely, the mains plug should be disconnected from
the wall outlet completely.
WARNING: TO REDUCE THE RISK OF
ELECTRIC SHOCK, DO NOT REMOVE
COVER (OR BACK). NO USER-
SERVICEABLE PARTS INSIDE. REFER
SERVICING TO QUALIFIED SERVICE
PERSONNEL.
ATTENTION
CAUTION
The exclamation point within an equilateral
triangle is intended to alert the user to the
presence of important operating and maintenance
(servicing) instructions in the literature
accompanying the appliance.
within an equilateral triangle, is intended to alert
the user to the presence of uninsulated “dangerous
voltage” within the product’s enclosure that may
electric shock to persons.
1
•

SAFETY INSTRUCTIONS
1.
Read these instructions.
2.
Keep these instructions.
3.
Heed all warnings.
4. Follow all instructions.
5. Do not use this apparatus near water. This apparatus shall not be exposed to dripping or splashing, and no objects filled
with liquids, such as vases, shall be placed on the apparatus.
6. Clean only with a dry cloth.
7. Do not block any ventilation openings. Install in accordance with the manufacturer’s instructions. The apparatus should
not be situated on a bed, sofa, rug or similar surface that may block the ventilation openings. The apparatus must not be
placed in a built-in installation, such as a closed bookcase or cabinet that may impede the flow of air through the ventilation
openings. Ventilation should not be impeded by covering the openings with items such as newspapers, tablecloths,
curtains, etc.
8. Do not install near any heat sources such as radiators, heat registers, stoves, or other apparatus (including amplifiers) that
produce heat. Extended exposure to temperatures higher that 170 degrees Fahrenheit, for example inside a closed vehicle
during the summer, may result in damage to your product.
9. No open flame sources, such as lighted candles, should be placed on the apparatus.
10. Do not defeat the safety purpose of the polarized or grounding-type plug. A polarized plug has two blades with one wider
than the other. A grounding type plug has two blades and a third grounding prong. The wide blade or the third prong is
provided for your safety. If the provided plug does not fit into your outlet, consult an electrician for the replacement of the
obsolete outlet.
11. Protect the power cord from being walked on or pinched – particularly at plugs, convenience receptacles, and the point
where they exit from the apparatus.
12. Do not install in an area which impedes the access to the power plug. Disconnecting the power plug is the only way to
completely remove power to the product and must be readily accessible at all times.
13. Power source – Use only power supplies of the type specified in the operating instructions or as marked on the appliance.
If a separate power supply is included with this apparatus, do not substitute with any other power supply – use only
manufacturer-provided power supplies.
14. Unplug this apparatus during lightning storms or when unused for long periods of time.
15. If the unit will be unused for long periods of time, the batteries should be removed.
16. Do not place this product on an unstable surface. The product may fall, causing injury to a child or adult and damage to the
product. Use only with a stand, bracket, or table recommended by
use a mounting accessory recommended by the manufacturer.
17. Move the appliance with care to avoid damage or injury.
18. Refer all servicing to qualified service personnel. Servicing is required when the apparatus has been damages in any way:
the power-supply cord or plug is damages, liquid has been spilled or objects have fallen into the apparatus, the apparatus
has been exposed to rain or moisture, does not operate normally, or has been dropped.
19. For products which incorporate batteries, please refer to local regulations for proper battery disposal.
2
Shock, do not expose this product to rain or moisture. The product must not be exposed to dripping water and water placed
on the product can be dangerous.
Changes or modifications not approved by the manufacturer could void the user’s authority to operate this device.
Usage of controls or adjustments or herein may result in hazardous exposure.
Refer all servicing to qualified service personnel.
To reduce the risk of fire or electrical. No fire sources such as candles should be placed near the unit and no object filled with
liquids should be placed on the product.
the manufacturer, or sold with
the product. Any mounting of the product should follow the manufacturer’s instructions, and should
CALIFORNIA PROP 65 WARNING
“WARNING”This product contains chemicals known to the State of California to cause birth defects or other
reproductive harm. For more information on these regulations and a list of chemicals, log on the following website:
http://www.oehha.ca.gov/prop65.html
Warning:
Caution:
CALIFORNIA PROP 65 WARNING
3
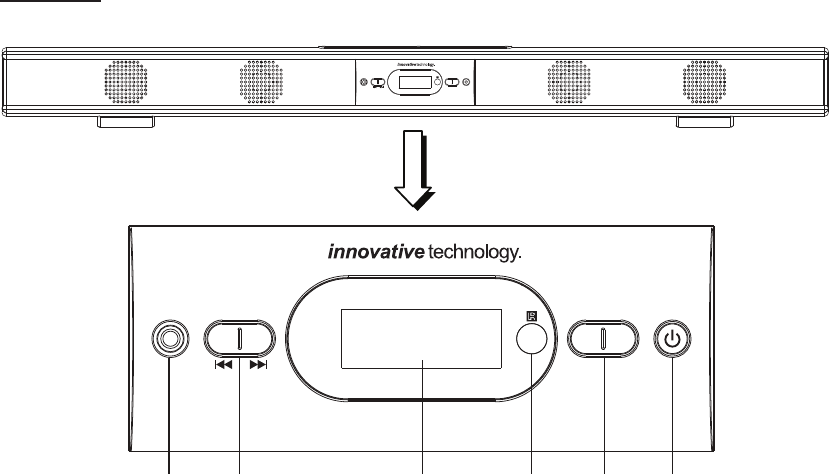
PRODUCT OVERVIEW
Front View
Tune up / next
1. AUX IN jack
2. Tune down / previous
3. LCD display
4. Remote sensor
5. Volume - (volume down)
Volume + (volume up)
6. Source / Standby button
INCLUDED IN THIS PACKAGE
1 x Power adapter
1
1 x Bluetooth® Stereo Soundbar
x Instruction manual
1 x Remote control
1 x CR 2025 button cell (included)
1 x 3.5mm aux in cable
1 x RCA audio cable
2 x
Wall mount brackets
4
4 x Wall anchors
x Screws
SOURCE
TUN- TUN+AUX VOL- VOL+
1 2 3 4 5 6
SOURCE
TUN- TUN+AUX VOL- VOL+
4
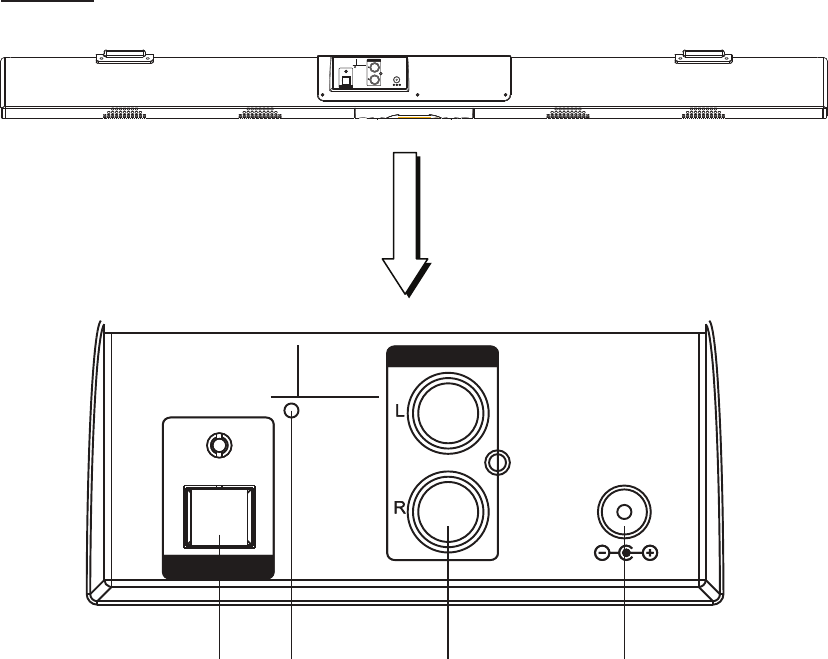
Rear View
1. Optical audio input
2. FM antenna
3. AUX IN jack
4. DC IN jack
AUX 2
OPTIC AL IN
FM ANT
DC 15V
AUX
OPTIC AL IN
FM ANT
DC 15V
AUX 2
OPTICAL IN
FM ANT
DC 15V
AUX
OPTICAL IN
FM ANT
DC 15V
1 2 3 4
5
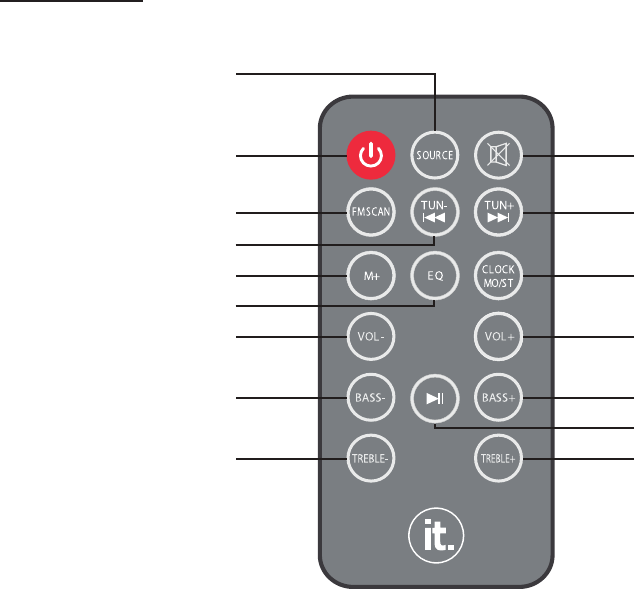
Remote Control
1. Source Button
2. Standby Button
3. FM SCAN Button
4. TUNE - Button / Previous Track
5. M + (Memory +) Button
6. EQ Button
12. CLOCK / MO / ST Button
13. VOL + (Volume +) Button
14. BASS + Button
15. Play / Pause Button
16. TREBLE + Button
7. VOL – (Volume –) Button
8. BASS – Button
9. Treble – Button
10. Mute Button
11. TUNE + Button /
Next Track
1
2
3
4
6
5
7
8
9
10
11
12
13
14
15
16
6
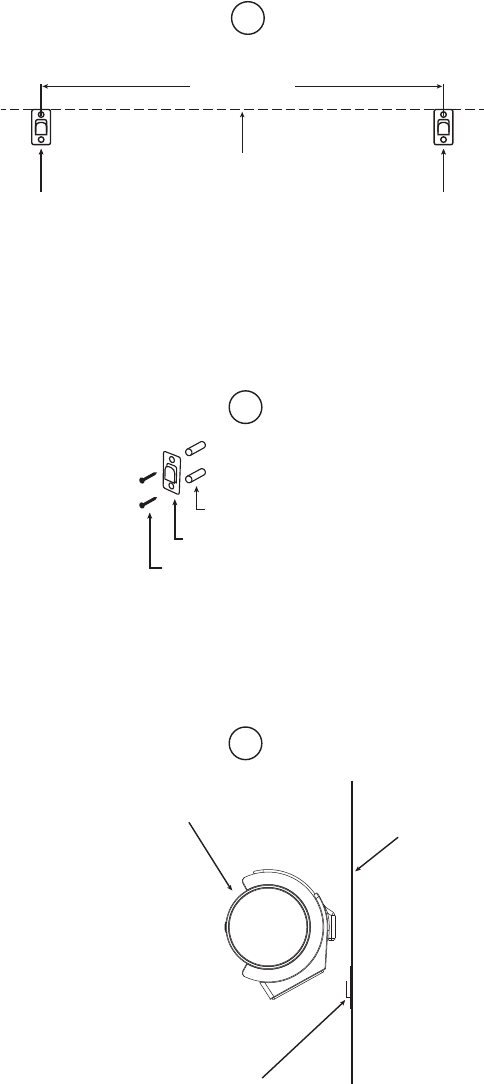
WALL MOUNTING INSTRUCTIONS
1. Using figure 1 above as a guide, measure the Stereo Soundbar to determine the position of the
where the metal brackets and screws should be mounted on the wall. Make sure the two brackets
are mounted at the same level.
Metal Bracket Metal Bracket
26” +0.25”
–0.25”
1
2
Wall Anchors
Metal Bracket
Screws
2. Insert the wall anchors into the screw holes and then insert the screws to fix the metal brackets
onto the wall.
3. Carefully hang the Stereo Soundbar onto the wall.
Note:
The gap between the metal bracket and plastic mounting holder on the rear of the unit is designed
for simple mounting, and allows for the unit to be movable.
3
Stereo Soundbar
Metal Bracket
Wall (side view)
7
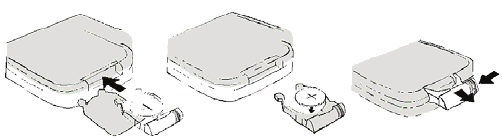
BATTERY INSTALLATION
- Before installation
Remove and discard the insulation tab. Out of the box the Remote Control has a battery and will
be usable after the tab is removed.
- How to replace battery for the remote control
1. Push and slide out the battery holder as shown below.
2. Replace the battery with a new CR2025 button cell with the polarity (+) side upward.
3. Slide the battery holder back into the remote control.
Battery precautions
• Never recharge the batteries, apply heat to them or take them apart.
• Battery shall not be exposed to excessive heat such as sunshine, fire or the like.
• Do not throw the batteries in fire!
• Attention should be drawn to the environmental aspects of battery disposal.
• If the remote control is not going to be used for a long time, remove the battery
to avoid damage caused by battery leakage corrosion.
POWER CONTROL
- To turn the unit ON
· Connect the supplied AC/DC adapter.
· Press the STANDBY button to turn ON the unit.
- To turn the unit OFF
· Press STANDBY button on the remote control or hold STANDBY button on the front of the unit.
NOTE:
If the unit is not used for a long period of time, disconnect the power adapter.
TIME SETTING
1. Switch the unit to standby mode.
2. Hold CLOCK/MO/ST button on the remote control until the hour digit flashes.
3.Then press TUNE+ or TUNE- button on the unit or remote control to adjust the hour.
4. Press CLOCK/MO/ST button on the remote control to confirm the hour setting and the minute
digit will flash.
5. Then press TUNE+ or TUNE- button on the unit or remote control to adjust the minute.
6. Press CLOCK/MO/ST button on the remote control to confirm the minute setting.
NOTE:
When disconnecting the power adapter, the setting will be canceled. Time has to be reset next time.
FM RADIO
Power ON the unit and press the SOURCE button until the FM frequency appears on the display.
- Search and store the stations
1. Hold TUNE+ or TUNE- button to search through stations forward or backward. The unit will
stop if a station is found. Then press FM SCAN button, “CH XX” will flash and then use M+
button to select the place you want the station stored to. Press FM SCAN button to confirm. Or;
2. Hold FM SCAN button then release. The unit will search and store the stations automatically.
- Listen to the preset stations
Press M+ button repeatedly to select the desired preset stations to listen to.
NOTE:
If the received FM stations are in stereo mode, the unit will play in stereo mode automatically. If
reception is weak, press the CLOCK/MO/ST button to turn the unit to mono mode. Press again to
turn to stereo mode.

8
3.5mm AUX IN (Front of Unit)
- 3.5mm AUX IN source may include:
·MP3 player, smartphones, tablets, computers or laptops
- 3.5mm AUX IN connection:
1. Connect a 3.5mm aux in cable (supplied) between the headphone or AUX/Audio output of
the personal audio player and the 3.5mm AUX IN jack on the front of the unit.
2. Power ON the unit and press SOURCE button repeatedly until “AUX” appears on the display.
Set your personal audio player/computer to play.
NOTE: If there is no sound, or if the volume is not loud enough, you may need to increase the
volume on the audio source.
- During playing
·Press MUTE button to turn off the sound. Press again to resume the sound.
·Press VOLUME+/- buttons to adjust the volume level.
·Press BASS+/- buttons to adjust bass level.
·Press TREBLE+/-buttons to adjust treble level.
·Press EQ button to switch between POP/JAZZ/CLASSIC/ROCK/NORMAL.
RCA AUX IN (Back of Unit)
- RCA AUX IN sources may include
·TV/DVD/VCR
- RCA AUX IN connection
1. Connect the RCA audio cable (supplied) to the audio output jack on TV/DVD/VCR/Etc. and the
AUX IN jack on the rear of the unit.
2. Press SOURCE button repeatedly until “AUX” appears on the display.
NOTE: Before using the RCA AUX IN connection, make sure the 3.5mm aux in cable is not
inserted into the 3.5mm AUX IN jack. If it is, audio will play from the audio source connected to
the 3.5mm AUX IN jack, NOT the RCA AUX IN jack.
AUX 2
AUX
Audio Out Jacks of
TV/DVD/VCRDVR
AUX IN Jacks of
Stereo Sounbar
Connect to the 3.5mm Audio Out jack
of external audio devices including Tablets,
Laptops, Smarphones, MP3 Players, etc.
SOURCE
TUN- TUN+AUX VOL- VOL+
3.5mm AUX IN jack on
Stereo Soundbar
3.5mm Aux In Cable (Included)
9
BLUETOOTH
- Pairing:
1.Press SOURCE button until "BT" appears on the display.
2. Turn ON Bluetooth functionality on your Bluetooth device. Typically, Bluetooth controls are
found in the device’s tools or settings menu (see your user manual). Turn ON Bluetooth
connectivity and make your device “discoverable”.
3. Choose “add a new Bluetooth device” or “setup Bluetooth device” on your device. It will start to
search. Once “Stereo Soundbar” appears on your device, select it. If your device prompts you
for a pass code please enter “0000”. If the pairing attempt fails or times out, please start the pairing
procedure again.
5. After your device and the “Stereo Soundbar” have connected to each other, sound can be heard.
NOTE:
The unit will automatically reconnect the last paired device when Bluetooth mode is reselected
from other mode. If for some reason the Bluetooth connection is lost due to external factors, or will
pairing process again.
- During playing:
Make sure the Bluetooth connection between the unit and the device is activated.
·Press PLAY/PAUSE button to suspend momentarily the playing track. Press again to resume
playing.
·Press TUNE + button to skip forward to the next track and TUNE - button to skip backward to the
previous track.
·Press MUTE button to turn off the sound. Press again to resume the sound.
·Press VOLUME +/- buttons to adjust the volume level.
·Press BASS +/- buttons to adjust bass level.
·Press TREBLE +/- buttons to adjust treble level.
·Press EQ button to switch between POP/JAZZ/CLASSIC/ROCK/NORMAL.
not auto reconnect, you must clear the from you Bluetooth Devices list and
begin the
“Stereo Soundbar”
10
OPTICAL IN
- Connecting
1. Press SOURCE button until "OPTI" appears on the display.
2.
NOTE: Not all entertainment systems are set up the same way. The diagram below is only one
example of how the connection can be made.
Follow the figure below to make connections.
Optical Out of
TV/DVD/Etc.
(referred to as
“Digital Out” on
some devices)
Optical Cable (not included)
OPTICAL OUT
Optical In jack on
rear panel of Stereo Soundbar
AUX 2
OPTICAL IN
FM ANT
DC 15V
AUX
OPTICAL IN
FM ANT
DC 15V
11
SPECIFICATIONS
Power source of the remote control................................................ DC 3V, 1x CR 2025 button cell
Output of the power adapter........................................................................................ DC 15V, 2A
Audio output........................................................................................................................ 10W x 2
Power consumption................................................................................................................... 25W
Bluetooth working range................................................................................................33FT (10M)
FM coverage............................................................................................................ 87.5-108.0MHz
FCC Statement:
This equipment has been tested and found to comply with the limits for a Class B digital
device, pursuant to Part 15 of the FCC Rules. These limits are designed to provide
reasonable protection against harmful interference in a residential installation. This
equipment generates, uses and can radiate radio frequency energy and, if not installed
and used in accordance with the instructions, may cause harmful interference to radio
communications. However, there is no guarantee that interference will not occur in a
particular installation. If this equipment does cause harmful interference to radio or
television reception, which can be determined by turning the equipment off and on, the
user is encouraged to try to correct the interference by one or more of the following
measures:
-- Reorient or relocate the receiving antenna.
-- Increase the separation between the equipment and receiver.
-- Connect the equipment into an outlet on a circuit different from that to which the
receiver is connected.
-- Consult the dealer or an experienced radio/TV technician for help.
This device complies with part 15 of the FCC Rules. Operation is subject to the
following two conditions:
(1) This device may not cause harmful interference. (2) this device must accept any
interference received, including interference that may cause undesired operation.
The antenna(s) used for this transmitter must be installed to provide a separation
distance of at least 20 cm from all persons and must not be co-located or operating in
conjunction with any other antenna or transmitter.
Bluetooth is a registered trademark of Bluetooth SIG, Inc. Other trademarks and trade names are
those of their respective owners.
12
Innovative Technology Electronics Corp. (IT) warrants the product to be free from “Defects” in materials under
normal use for a period of “One Year” from the date of the original purchase. The Warranty is “Not” transferable.
IT agrees, within the initial “90 Day” period, to repair or replace the product if it is determined to be defective at
“No Charge”. It is further agreed that IT will cover the cost to repair or replace damaged “Parts” only for a total
period of “One Year” from the date of the original purchase. The warranty does not cover cosmetic damage,
antennas, AC cords, cabinets, headbands, ear-pads, or damage due to line power surges, connection to
improper voltage supply or settings, misuse, mishandling, accident, acts of God or attempted repair by an
unauthorized service agent.
To obtain service, the purchaser MUST present an original sales receipt /
/
/proofofpurchase. Please
contact us at www.ithomeproducts.com to
to request an RMA (Return Material Authorization) number to
return products for service or
or replacement. Returns without an RMA number on the package will be
refused and returned to sender. Upon receipt of the returning item and our full inspection (IT) may issue a
replacement to customer for the same item or of one that has equivalent value and features. To return an item,
supply full name, return address, phone number, item purchased, receipt of purchase and reason for return to
obtain RMA number.
All returns must be in the original packaging or reasonable substitute to prevent damage.
Customer “Must” include full name, shipping address and telephone number inside of package. No return will
be shipped back to a PO Box or APO address.
Please include your check or money order in the amount of
•USD$5.00 for items $10.00 to $39.99 (Price Paid Per Unit)
•USD$10.00 for
for items $40.00 to $99.99. (Price Paid Per Unit)
•
•USD$16.00, for items $100.00 and up. (Price Paid Per Unit)
•
•
•
•Shipping fees are non-refundable
to be payable to Innovative Technology Electronics Corp. (for handling and return shipping charges)
(IT) will not be responsible for delays or unprocessed claims resulting from a purchaser’s failure to provide any /
all of the necessary information.
Send all inquiries or RMA request via our website www.ithomeproducts.com/support.
Innovative Technology Electronics Corp.
1 Channel Drive
Port Washington, NY 11050
Toll free: 1-877-483-2497
Website for support: www.ithomeproducts.com/support
There are no express warranties except as listed above.
REPAIR OR REPLACEMENT AS PROVIDED UNDER THIS WARRANTY IS THE EXCLUSIVE REMEDY OF
THE CUSTOMER, (IT) SHOULD NOT BE LIABLE FOR ANY INCIDENTAL OR CONSEQUENTIAL DAMAGES
FOR BREACH OF ANY EXPRESS OR IMPLIED WARRANTY ON THIS PRODUCT EXCEPT TO THE
EXTENT PROHIBITED BY APPLICABLE LAW. ANY IMPLIED WARRANTY OF MERCHANTABILITY OR
FITNESS FOR A PARTICULAR PURPOSE ON THIS PRODUCT IS LIMITED IN DURATION TO THE
DURATION OF THIS WARRANTY.
Some states do not allow the exclusion or limitation of incidental or consequential damages, or limitations on
how long an implied warranty lasts, so the above exclusions or limitations may not apply to you. This warranty
gives you specific legal rights and you may also have other rights, which vary from state to state.
Innovative Technology Electronics Corp,
Limited Warranty: 90 Days Labor, One Year Parts