Junlan Electronic TDV31041 10.1 BLUETOOTH DVD PLAYER WITH WIRELESS HEADPHONES User Manual
Shenzhen Junlan Electronic Ltd 10.1 BLUETOOTH DVD PLAYER WITH WIRELESS HEADPHONES
User Manual
10.1”BLUETOOTH DVD PLAYER WITH WIRELESS
HEADPHONES
User’s Guide for Model PDB1077B
For the most up-to-date version of this User’s Guide, go to www.gpx.com

2
Important Safety Instructions
• ReadtheseInstructions.
• KeeptheseInstructions.
• HeedallWarnings.
• Followallinstructions.
• Donotusethisapparatusnearwater.
• Cleanonlywithadrycloth.
• Donotblockanyventilationopenings.Installinaccordance
withthemanufacturer’sinstructions.
• Donotinstallnearanyheatsourcessuchasradiators,heat
registers,stoves,orotherapparatus(includingampliers)
thatproduceheat.
• Donotdefeatthesafetypurposeofthepolarizedor
grounding-typeplug.Apolarizedplughastwobladeswith
onewiderthantheother.Agroundingtypeplughastwo
bladesandathirdgroundingprong.Thewidebladeorthe
thirdprongareprovidedforyoursafety.Whentheprovided
plugdoesnottintoyouroutlet,consultanelectricianfor
replacementoftheobsoleteoutlet.
• Protectthepowercordfrombeingwalkedonorpinched
particularlyatplugs,conveniencereceptacles,andthepoint
wheretheyexitfromtheapparatus.
• Onlyuseattachments/accessoriesspeciedbythe
manufacturer.
• Unplugthisapparatusduringlightningstormsorwhen
unusedforlongperiodsoftime.
• Referallservicingtoqualiedservicepersonnel.Servicing
isrequiredwhentheapparatushasbeendamagedinany
way,suchaspower-supplycordorplugisdamaged,liquid
hasbeenspilledorobjectshavefallenintotheapparatus,
theapparatushasbeenexposedtorainormoisture,doesnot
operatenormally,orhasbeendropped.
• Useonlywithacart,stand,tripod,bracket,
ortablespeciedbythemanufacturer,or
soldwiththeapparatus.Whenacartis
used,usecautionwhenmovingthecart/
apparatuscombinationtoavoidinjury
fromtip-over.
Safety Instructions & Warnings
FCC Warnings
Warning:Changesormodicationstothisunitnotexpressly
approvedbythepartyresponsibleforcompliancecouldvoidthe
user’sauthoritytooperatetheequipment.
NOTE:Thisequipmenthasbeentestedandfoundtocomply
withthelimitsforaClassBdigitaldevice,pursuanttoPart
15oftheFCCRules.Theselimitsaredesignedtoprovide
reasonableprotectionagainstharmfulinterferenceina
residentialinstallation.Thisequipmentgenerates,uses,andcan
radiateradiofrequencyenergyand,ifnotinstalledandusedin
accordancewiththeinstructions,maycauseharmfulinterference
toradiocommunications.However,thereisnoguaranteethat
interferencewillnotoccurinaparticularinstallation.Ifthis
equipmentdoescauseharmfulinterferencetoradioortelevision
reception,whichcanbedeterminedbyturningtheequipmentoff
andon,theuserisencouragedtotrytocorrecttheinterference
byoneormoreofthefollowingmeasures:
• Reorientorrelocatethereceivingantenna.
• Increasetheseparationbetweentheequipmentandreceiver.
• Connecttheequipmentintoanoutletonacircuitdifferent
fromthattowhichthereceiverisconnected.
• Consultthedealeroranexperiencedradio/TVtechnician
forhelp.
FCC ID: OKUTDV31041
3
Battery Warnings
• WARNING:Donotingestbattery,ChemicalBurnHazard.
• Iftheremotecontrolsuppliedwiththisproductcontainsa
coin/buttoncellbatteryandthecoin/buttoncellbatteryis
swallowed,itcancausesevereinternalburnsinjust2hours
andcanleadtodeath.
• Keepnewandusedbatteriesawayfromchildren.Ifthe
batterycompartmentdoesnotclosesecurely,stopusingthe
productandkeepitawayfromchildren.
• Ifyouthinkbatteriesmighthavebeenswallowedor
placedinsideanypartofthebody,seekimmediatemedical
attention.
• CAUTION:Dangerofexplosionifbatteryisincorrectly
replaced.Replaceonlywiththesameorequivalenttype.
• WARNING:Thereisadangerofexplosionifyouattempt
tochargestandardAlkalinebatteriesintheunit.Onlyuse
rechargeableNiMHbatteries.
• Batteryshallnotbeexposedtoexcessiveheatsuchas
sunshine,re,orthelike.
• Donotmixoldandnewbatteries.
• Completelyreplacealloldbatterieswithnewones.
• Donotmixalkaline,standard(carbon-zinc),orrechargeable
(ni-cad,ni-mh,etc)batteries.
• Batteriesshouldberecycledordisposedofasperstateand
localguidelines.
Additional Warnings and Precautions
• CAUTION:TOPREVENTELECTRICSHOCK,MATCH
WIDEBLADEOFPLUGTOWIDESLOT,FULLY
INSERT.
• Mainsplugisusedasdisconnectdeviceanditshouldremain
readilyoperableduringintendeduse.Inordertodisconnect
theapparatusfromthemainscompletely,themainsplug
shouldbedisconnectedfromthemainssocketoutlet
completely.
• CAUTION:Useofcontrolsoradjustmentsorperformance
ofproceduresotherthanthosespeciedmayresultin
hazardousradiationexposure.
• WARNING:Changesormodicationstothisunitnot
expresslyapprovedbythepartyresponsibleforcompliance
couldvoidtheuser’sauthoritytooperatetheequipment.
• WARNING:Useofthisunitnearuorescentlightingmay
causeinterferenceregardinguseoftheremote.Iftheunitis
displayingerraticbehaviormoveawayfromanyuorescent
lighting,asitmaybethecause.
• WARNING:Shockhazard-DoNotOpen.
• Cautionandmarkinginformationislocatedattherearor
bottomoftheapparatus.
• WARNING:Toreducetheriskofreorelectricshock,
donotexposethisapparatustorain,moisture,dripping,or
splashing.
• Objectslledwithliquids,suchasvases,shallnotbeplaced
ontheapparatus.
• To avoid hearing damage,makesurethatthevolumeon
yourmusicplayeristurneddownbeforeconnectingyour
headphones.Afterplacingheadphonesin/onyourears,
graduallyturnupthevolumeuntilyoureachacomfortable
listeninglevel.
• ThisproductmeetsandcomplieswithallFederalregulations.
WARNING:Toreducetheriskofelectric
shock,donotremovecover(orback).No
user-serviceablepartsinside.Referservicing
toqualiedservicepersonnel.
ATTENTION
RISQUE D' ÉLECTROCUTION
NE PAS OUVRIR
CAUTION
RISK OF ELECTRIC SHOCK
DO NOT OPEN
Theexclamationpointwithinanequilateral
triangleisintendedtoalerttheuserto
thepresenceofimportantoperatingand
maintenance(servicing)instructionsinthe
literatureaccompanyingtheappliance.
Thissymbolindicatesthatthisproduct
incorporatesdoubleinsulationbetween
hazardousmainsvoltageanduseraccessible
parts.
Thelightningashwitharrowheadsymbol,
withinanequilateraltriangle,isintendedto
alerttheusertothepresenceofun-insulated
“dangerousvoltage”withintheproduct’s
enclosurethatmaybeofsufcientmagnitude
toconstituteariskofelectricshocktopersons.
WARNING:Thisproductcanexposeyouto
chemicalsincludinglead,whichisknownto
theStateofCaliforniatocausecancer.For
moreinformationgoto:www.P65Warnings.
ca.gov
ThisproductutilizesaClass1lasertoread
CompactDiscs.ThislaserCompactDisc
Playerisequippedwithsafetyswitchesto
avoidexposurewhentheCDdoorisopenand
thesafetyinterlocksaredefeated.Invisible
laserradiationispresentwhentheCDPlayer’s
lidisopenandthesystem’sinterlockhas
failedorbeendefeated.Itisveryimportant
thatyouavoiddirectexposuretothelaser
beamatalltimes.Pleasedonotattemptto
defeatorbypassthesafetyswitches.

4
Table of Contents
Overview . . . . . . . . . . . . . . . . . . . . . . . . . . . . . . . . . . . . . . . . . . . . . . . . . . . . . . . . . . . . . . . . . . . . . . . . . . . . . . . . . . . . . . . . . . . 5
DVD Player Features
Wireless Headphone Features
Includes
Power & Charging . . . . . . . . . . . . . . . . . . . . . . . . . . . . . . . . . . . . . . . . . . . . . . . . . . . . . . . . . . . . . . . . . . . . . . . . . . . . . . . . . . . 6
Portable DVD Player
Headphones
DVD Player . . . . . . . . . . . . . . . . . . . . . . . . . . . . . . . . . . . . . . . . . . . . . . . . . . . . . . . . . . . . . . . . . . . . . . . . . . . . . . . . . . . . . . . . . . 8
Controls & Features
Loading and Playing a Disc
Programming a Loaded Disc
Remote . . . . . . . . . . . . . . . . . . . . . . . . . . . . . . . . . . . . . . . . . . . . . . . . . . . . . . . . . . . . . . . . . . . . . . . . . . . . . . . . . . . . . . . . . . . . 10
Functions
Distance & Angle
Batteries
Wireless Headphones . . . . . . . . . . . . . . . . . . . . . . . . . . . . . . . . . . . . . . . . . . . . . . . . . . . . . . . . . . . . . . . . . . . . . . . . . . . . . . . 12
Features & Controls
Connecting to Other Devices . . . . . . . . . . . . . . . . . . . . . . . . . . . . . . . . . . . . . . . . . . . . . . . . . . . . . . . . . . . . . . . . . . . . . . . . 13
Pairing the Headphones and DVD Player
Headphone 3.5mm Audio Line Input
SD Memory Card
USB Storage Device
External Television or Screen
Customer Support . . . . . . . . . . . . . . . . . . . . . . . . . . . . . . . . . . . . . . . . . . . . . . . . . . . . . . . . . . . . . . . . . . . . . . . . . . . . . . . . . . 16
Contact Information
Warranty
International Support

5
Overview
DVD Player Features
• Bluetooth Wireless - 33 ft. range
• DVD/CD player
• 10.1" display
• 1024x600 native resolution
• 16:9 aspect ratio
• NTSC/PAL video system
• TTS (Voice Guide)
• SD/MMC card slot and USB port
• 3.5mm audio/video output
• Stereo headphone jack
• Built-in stereo speakers
• Built-in rechargeable battery - requires AC/DC
power adapter (included)
Wireless Headphone Features
• Bluetooth Wireless - 33 ft. range
• Built-in microphone
• Aux In (3.5mm audio line input)
• Adjustable headband
• On-ear controls
• Built-in rechargeable battery
Includes
• Remote control
• AC/DC power adapter
• 12V DC car adapter
• Micro-USB to USB charging cable (for headphones)
6
CARD
CARD
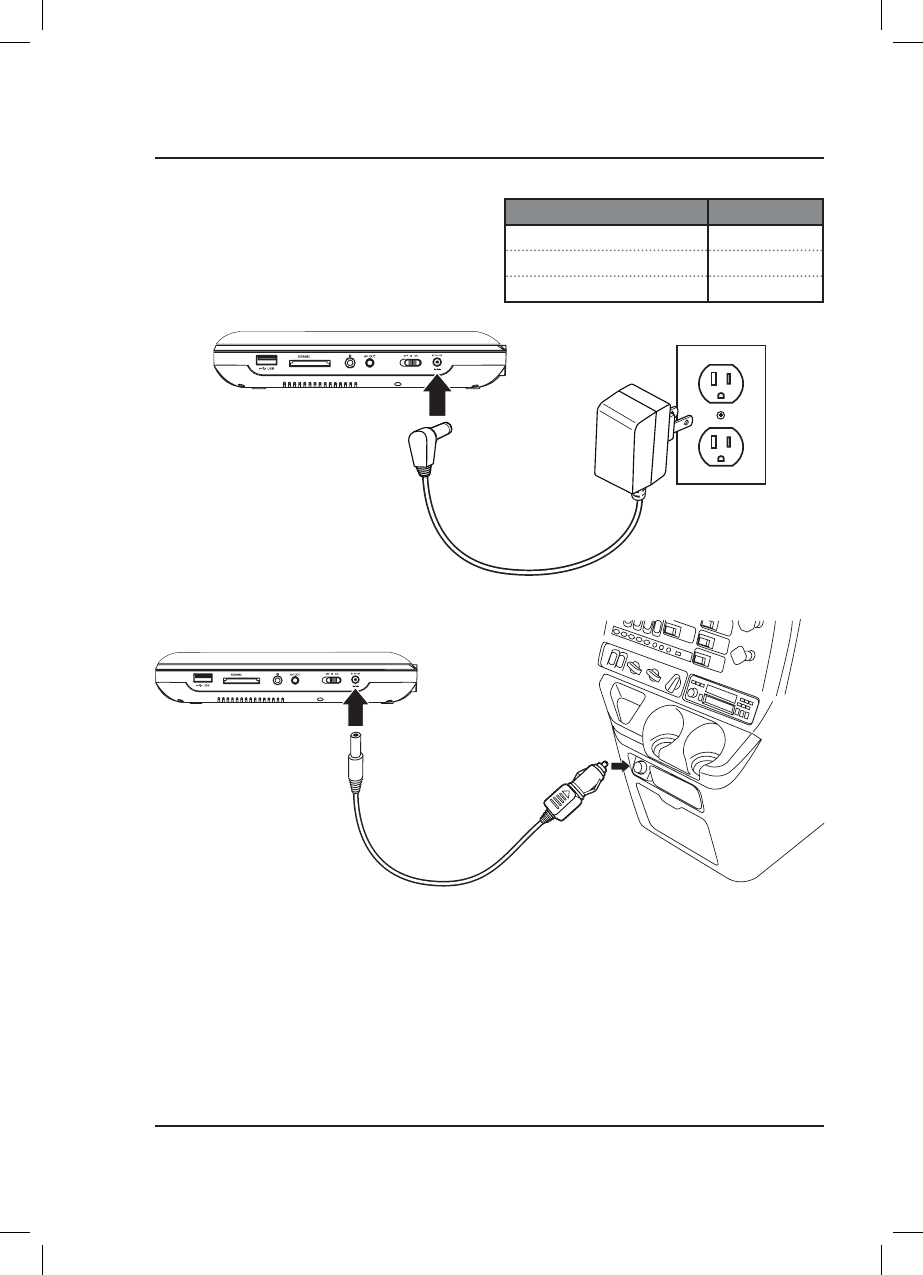
Portable DVD Player
The DVD player requires an AC/DC power adapter or 12V
DC car adapter (both included) to charge the battery.
For normal use, plug the AC/
DC adapter into the DC Power
Port on the DVD player and a
standard wall outlet.
For use in a car, plug the
12V DC car adapter into
the DC Power Port and a
12V power socket.
The car adapter is not
compatible with a 24V
power socket.
DVD Player Power Status Indicator Light
Power ON + Charging complete Green Light
Power OFF + Charging Red Light
Power OFF + Charging Complete Light OFF
Power & Charging
7
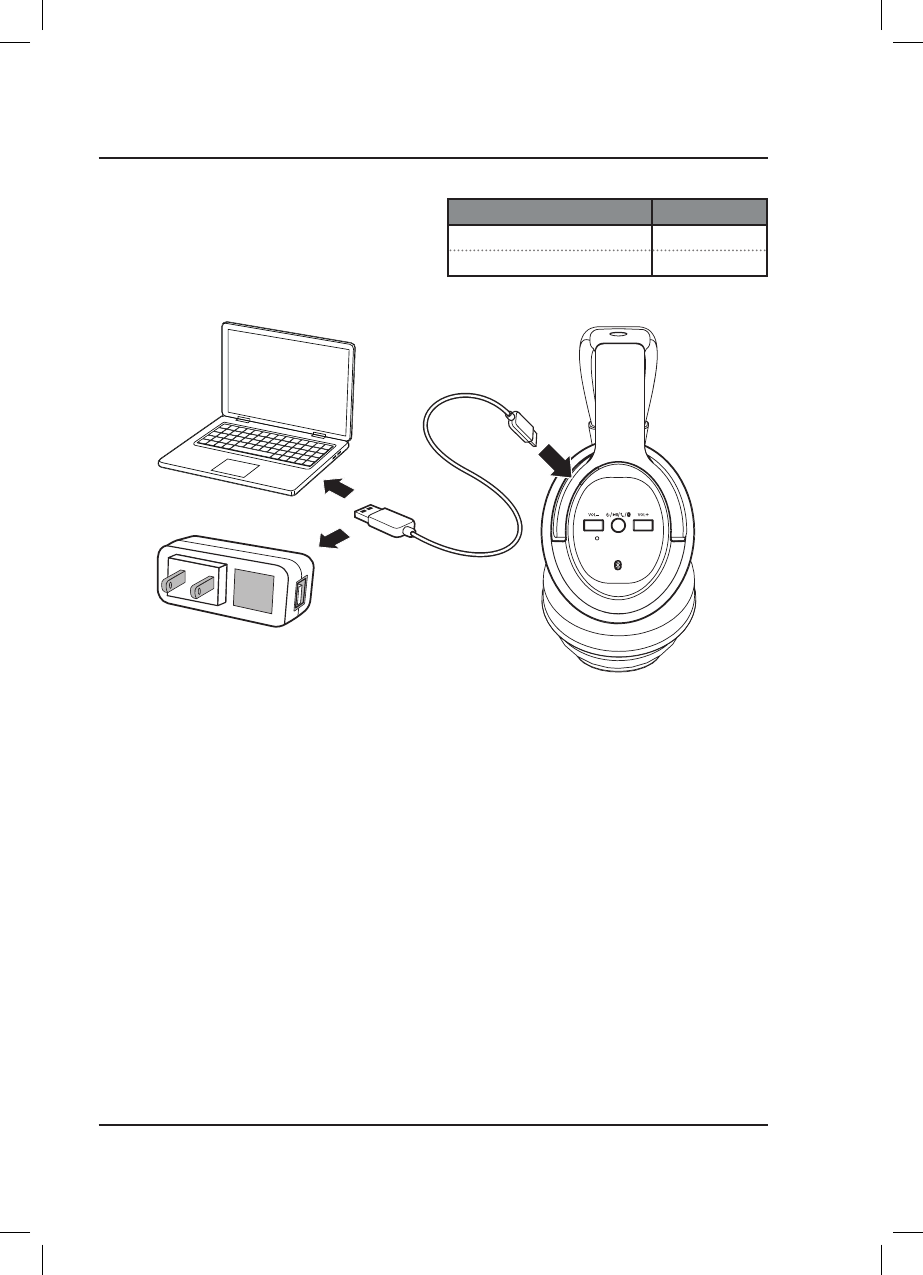
Headphones
The internal battery in the headphones requires a
Micro-USB to USB cable (included) to charge. Charge
fully before use. Initial charge time is approximately
2 hours. When battery is low, the LED indicator will
flash red for one minute, then the headphones will
automatically power off.
Notes About Batteries & Charging
• Do not charge for longer than 24 hours.
• Do not leave devices unattended while charging.
• Do not plug the car adapter into the 12V power socket until after the car ignition is on.
• Disconnect the car adapter from the power socket after use.
• The batteries in these devices are not replaceable. Attempting to remove the batteries may cause damage or
personal injury, and will void your warranty.
• When not in use, recharge and store devices within a temperature range of 40°F - 95°F (5°C - 35°C).
• The battery life of all batteries naturally shortens over time.
Using a Micro-USB to USB
cable (included), connect the
headphones to the USB port of
a powered on computer or USB
power adapter (not included).
Headphones Power Status Indicator Light
Battery Charging Red Light
Charging Complete Light OFF
8
SETUP
AUDIO MENU
PAIRSOURCE
CARD
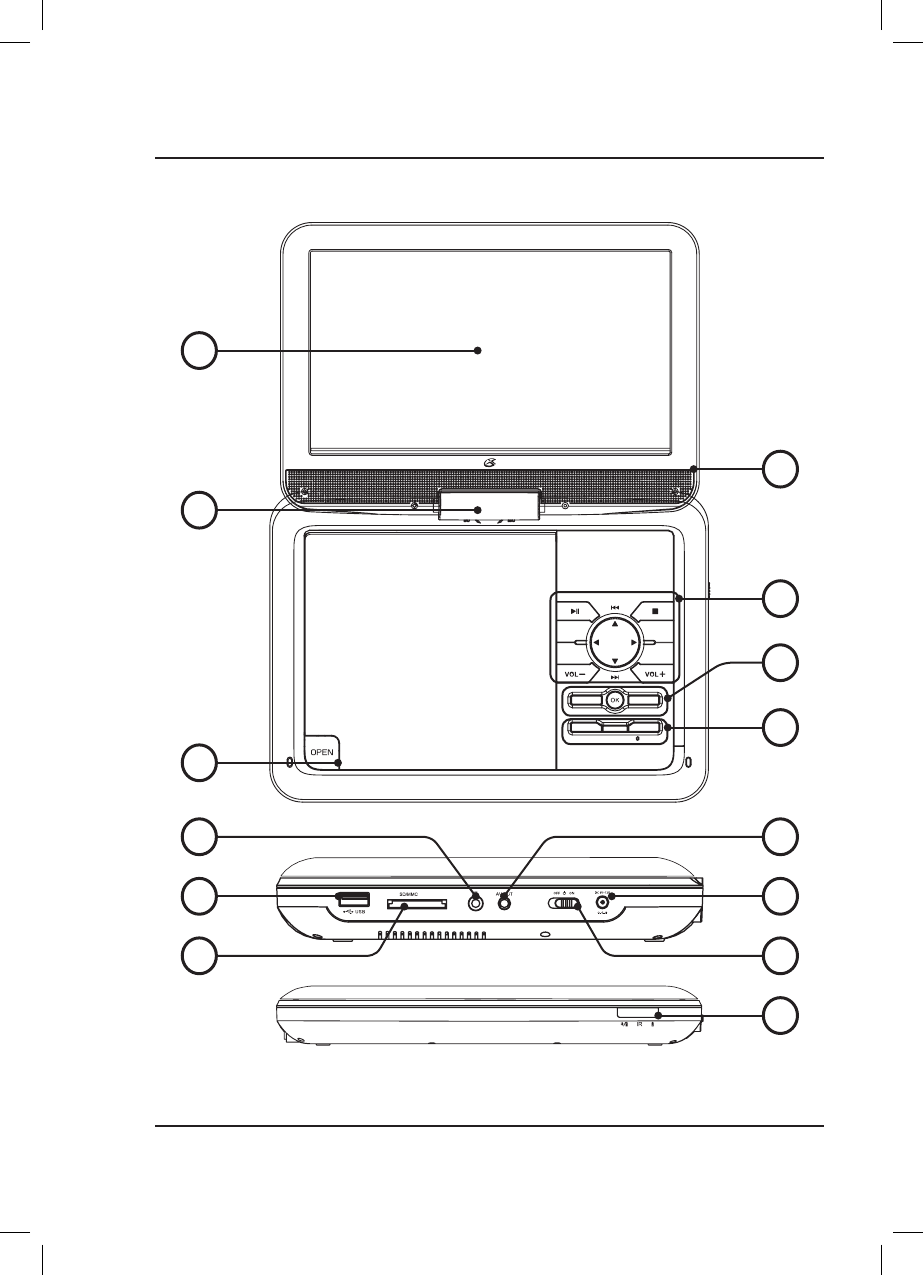
Controls & Features
DVD Player
1
3
7
8
9
10
2
4
6
11
13
14
12
5

9
1. 10.1" Display
2. Built-in Stereo Speakers
3. Display Swivel Joint
Adjusts viewing and rotation angle up to 180°.
4. Play Controls
Press to play or pause a loaded disc.
Press to stop playing a loaded disc.
Press to skip tracks or chapters.
Press to adjust the volume level.
Press for menu navigation.
5. Audio / OK / Menu
Press Audio to adjust audio settings for a loaded
DVD, including Voice Description and DVD
commentary (if available).
Press OK to confirm selections.
Press Menu to access DVD menus.
6. Setup / Source / Pair
Press Setup to access DVD player menus, settings,
and options.
Press Source to switch between DVD, CARD, and
USB modes. Press OK to confirm selection.
Press and hold Pair to pair to the included
headphones (see pg. 13).
7. Disc Player
Press Open to open the disc door. Load CDs or
DVDs label side facing up.
8. Stereo Headphone Jack
9. USB Port
10. SD Card Slot
11. 3.5mm AV Out
Use a 3.5mm to RCA audio/video cable (not
included) to connect to another device or screen
and play media through the AV Output.
12. DC Power Port
Connect power adapter (2x included) to charge
battery and power the unit.
13. Power Switch
Slide to power ON or OFF.
14. Remote Sensor / LED Indicators
Aim remote at this sensor (see pg. 11).
Power ON + Battery Charging - Solid green light.
Charging Battery - Solid red light (player OFF).
Charging Complete - No lights.
Bluetooth Unpaired - Flashing blue light.
Bluetooth Paired - Solid blue light.
Loading and Playing a Disc
1. Press Open to open the Disc Door.
2. Load a disc into the player, label side facing up, then close the disc door.
3. After a disc is loaded, it will begin playing automatically. If the disc does not begin playing automatically, press
the Play/Pause button. Use the controls on the player or the remote to play media, navigate settings menus, etc.
Programming a Loaded Disc
1. While the loaded disc is playing, press the Prog button on the remote.
2. Use the Arrow buttons to select a program slot.
3. Use the Number Keypad to enter in the chapter and title, or track.
4. Use the Arrow buttons to highlight the on-screen START button and press the OK button to begin playing.
10
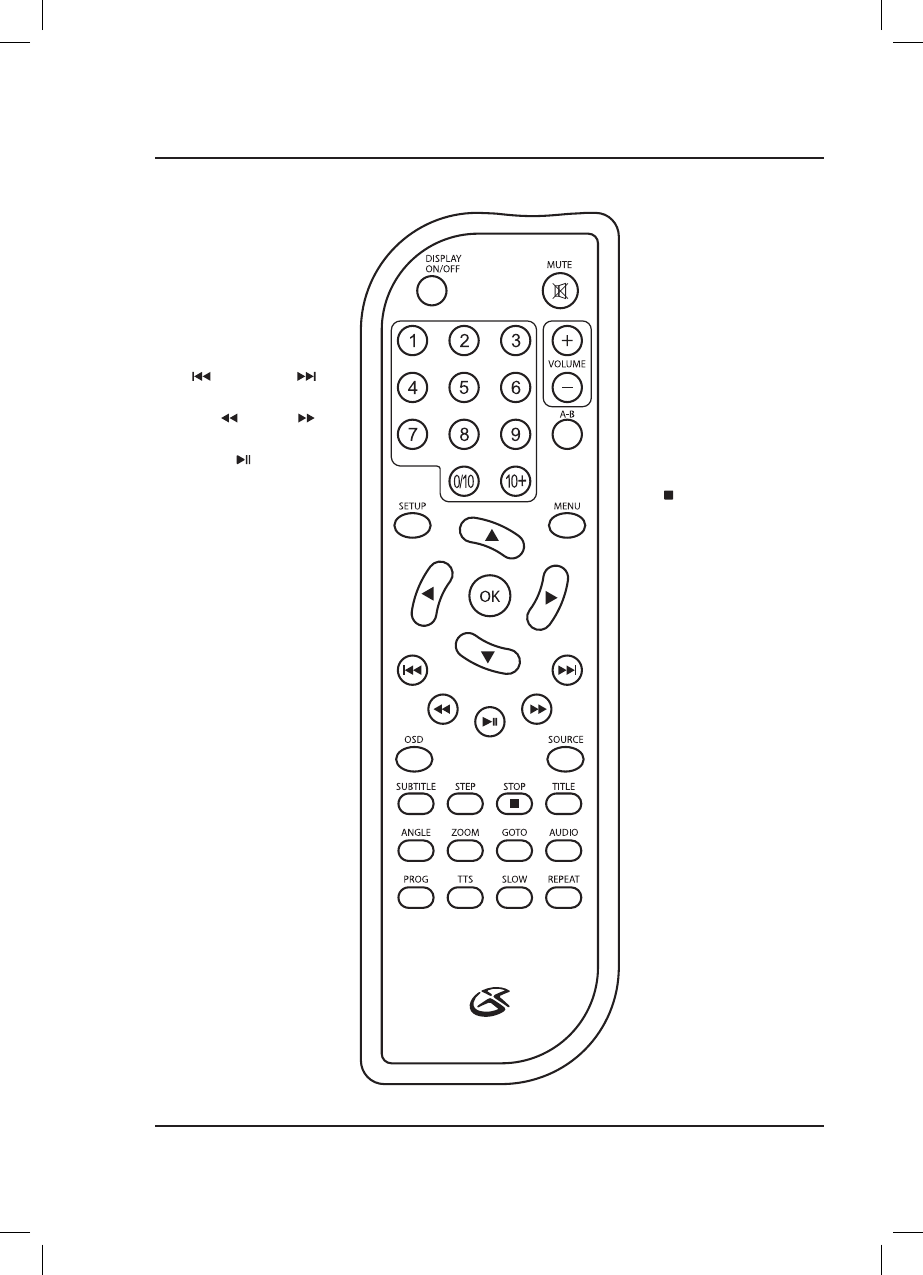
Functions
Remote
Display ON/OFF
Power the screen ON or OFF.
Number Keypad
Enter chapter / track numbers.
Setup
Press to access the setup menu.
Arrows/OK
Press to make selections
in the on screen or disc menus.
Previous / Next
Press to skip between chapters
or tracks.
Back / Fwd
Press to search through an
individual chapter or track.
Play / Pause
Press to play or pause.
OSD (On Screen Display)
Displays chapter, title, or track
information.
Subtitle
Press to cycle through subtitles-
English, French, Spanish, or OFF.
Step
Press to advance playback one
frame at a time.
Angle
Press to view alternate angles on
supported DVDs.
Zoom
Press to zoom in or out on a
loaded DVD.
Prog
Press to program a loaded disc to
play titles, chapters, or tracks in a
specified order.
TTS (Voice Guide)
Press to turn Talk-to-Text ON
or OFF (intended for visually
impaired users).
TTS announces menus and
remote functions.
Mute
Press to mute volume.
Volume
Press to adjust audio level.
Note: Volume cannot be adjusted
from the wireless headphones.
A-B
Create a repeating loop on a CD,
DVD, or media file.
Press to set A point (start), press
again to set B point (end).
Press a third time to cancel.
Menu (DVD)
Press to access DVD menus.
Source
Press and use the Arrow/OK
buttons to select the source.
Stop
Press to stop playback.
Title
Press to access the title menu on
a loaded DVD.
Press again to play DVD from the
beginning.
Go To
On a loaded disc, press to quickly
go to a specific track or chapter.
Use the Arrow/OK buttons to
enter and confirm your selection.
Audio
For DVD play, press to adjust
audio settings for the DVD,
including Voice Description and
DVD commentary (if available).
Angle
Press to view alternate angles on
supported DVDs.
Slow
Press to select slow motion play
speed.
Repeat
Press to repeat the current
selection or track.
11
OPEN
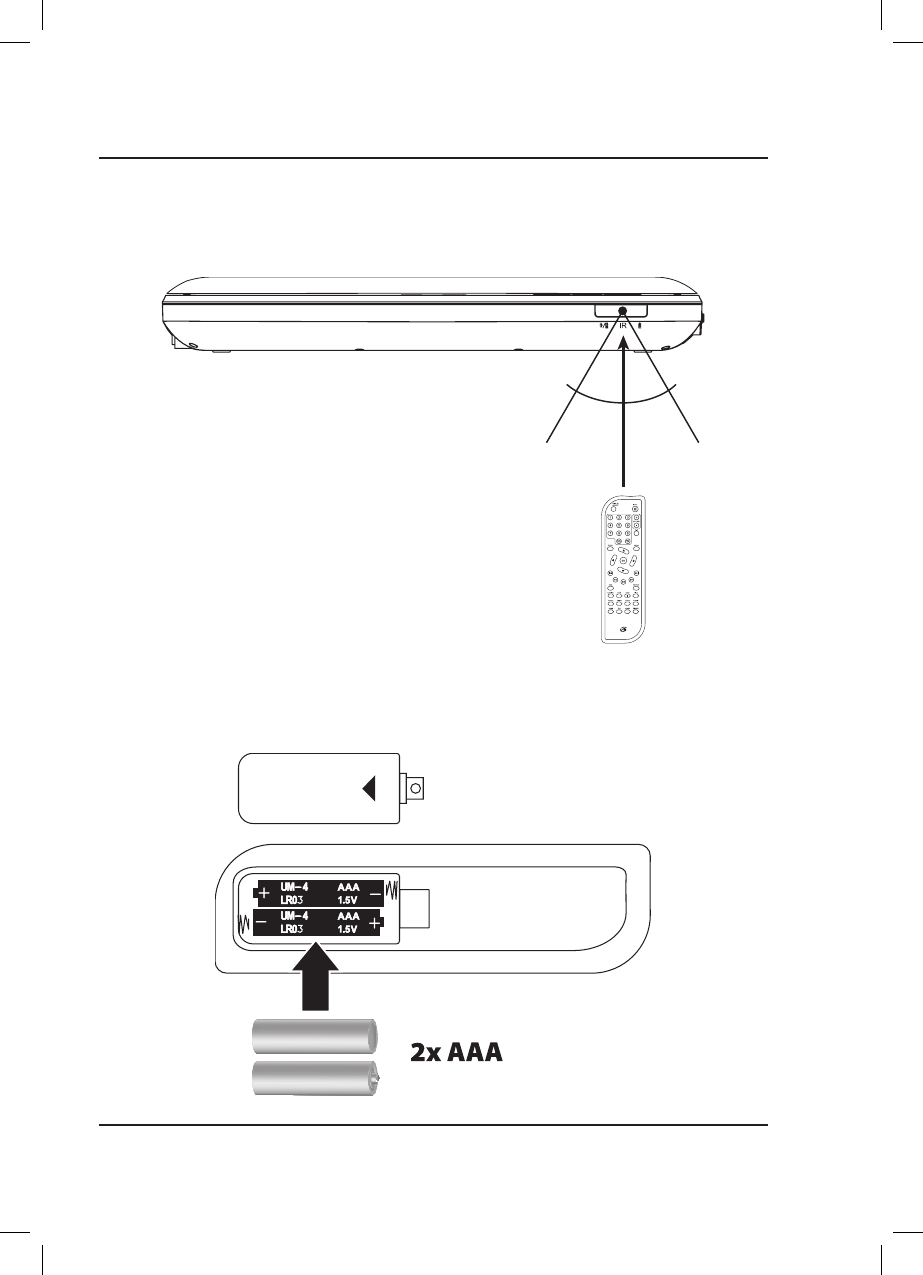
Batteries
Requires 2 AAA batteries (not included).
Distance & Angle
30° angle
15 ft. (5M) range

12
Wireless Headphones
Features & Controls
1. DC Power Port
Connect Micro-USB to USB power cable (included)
to charge battery.
2. Power / Play / Speakerphone / Pair
Power ON + Pair Bluetooth - Press and hold until
blue/red flashing indicator and voice prompt.
Power ON - Press and hold for 5 seconds to power
ON or OFF.
Play/Pause - Press to play or pause audio.
Speakerphone - Press to answer incoming call.
3. Volume
Press to adjust the volume level.
4. LED Indicator Light
Power ON + Bluetooth Paired - Solid blue light.
Pairing Bluetooth - Flashing blue/red light.
Charging Battery - Solid red light.
Charging Complete - No lights.
5. Microphone
6. Aux In (3.5mm audio line input)
3
4
1
2
5
6
13
CARD
Pairing the Headphones and DVD Player
After initial pairing, the DVD player and the headphones will stay paired unless unpaired manually by the user, or
erased due to a reset of either device. If this occurs or you find either unit is unable to connect, repeat these steps.
1. On the headphones, press and hold the button until the pairing indicator begins flashing red and
blue and a voice announces "Bluetooth is connecting." When pairing, remain within 3 feet of the unit.
2. On the DVD player, press and hold the Pair button until the LED indicator begins quickly flashing blue.
3. When successfully paired, the LED indicators on both the headphones and the DVD player will turn solid blue
and a voice will announce "Bluetooth connected" through the headphones. Media played from the DVD player
will now be heard through the headphones.
4. Use the controls on the DVD player to select and play media. Note: The volume controls on the DVD player and
remote will not adjust volume of the headphones.
5. After initial paring to the DVD player, press and hold the button for approximately 5 seconds.
The headphones will power ON and automatically reconnect with the DVD player. Make sure the DVD player is
also powered ON.
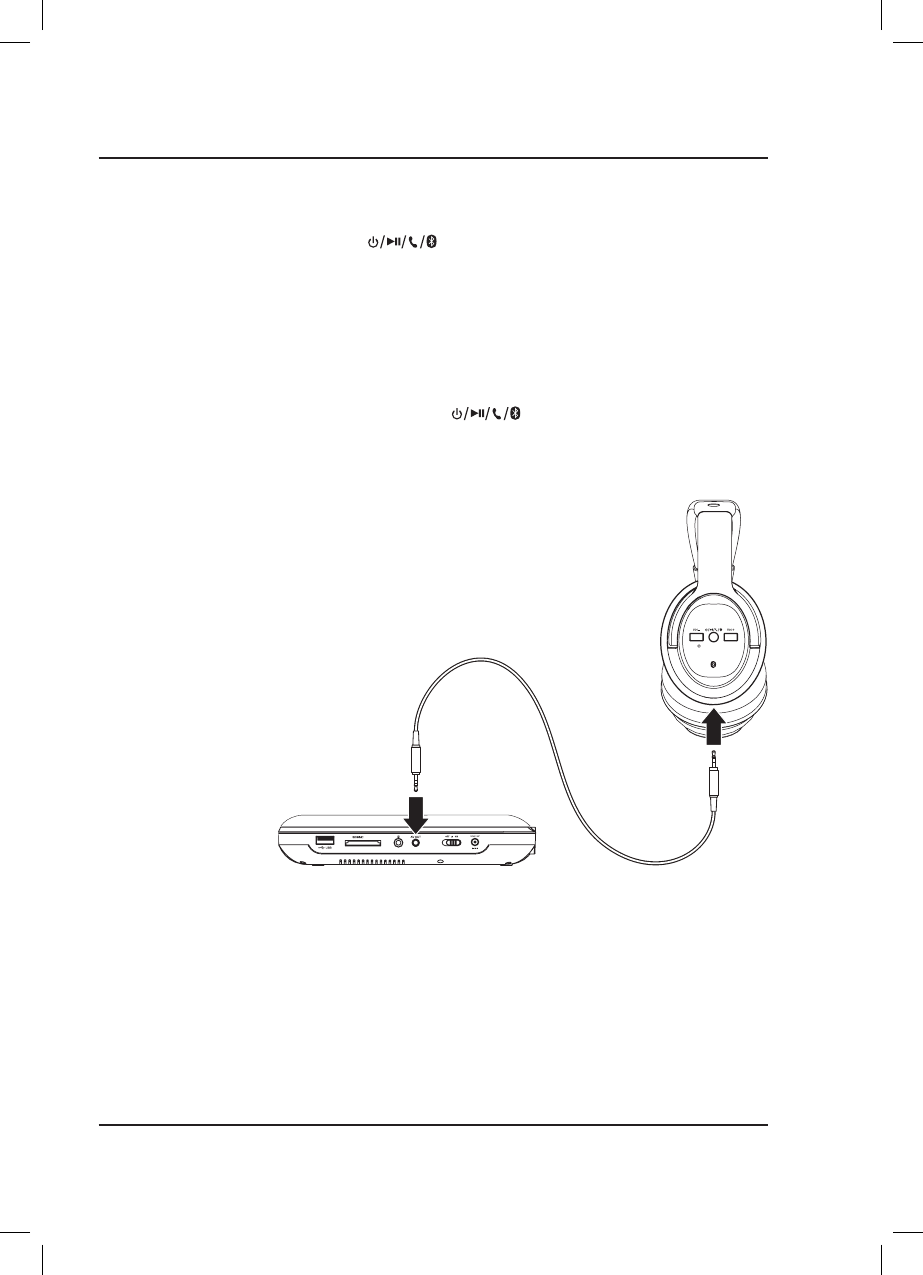
Headphone 3.5mm Audio Line Input
Requires a 3.5 mm audio input cable (not included).
1. Using a 3.5 mm audio input cable, connect the Headphone Jack on the portable
DVD player to the Aux In (3.5mm audio input) on the headphones.
2. The portable DVD player will automatically detect the connection and media from
the player will be heard through the headphones.
Connecting to Other Devices
14
Connecting to Other Devices
CARD
CAR D
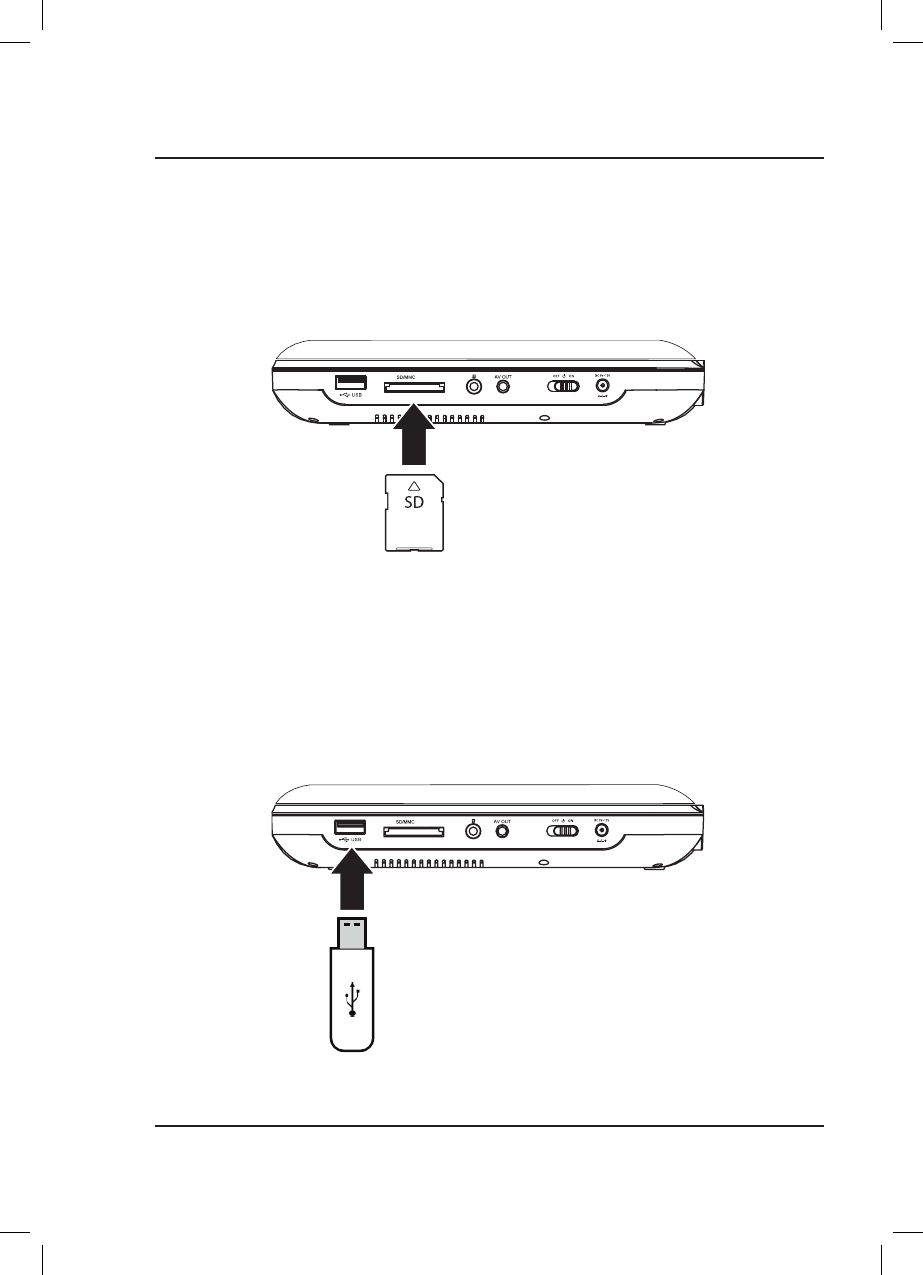
USB Storage Device
Supports USB drives up to 32GB.
Supports JPEG, AVI, VOB, MPEG 1, MPEG 2 and MPEG 4 file formats.
1. Load a USB drive into the USB Port.
2. Set the Source to USB.
3. Use the Arrow/OK buttons to select and play content from the connected USB thumb drive.
SD Memory Card
Supports SD cards up to 32GB.
Supports JPEG, AVI, VOB, MPEG 1, MPEG 2 and MPEG 4 file formats.
1. Load an SD card into the SD card slot.
2. Set the Source to CARD.
3. Use the Arrow/OK buttons to select and play content from the connected SD card.
15
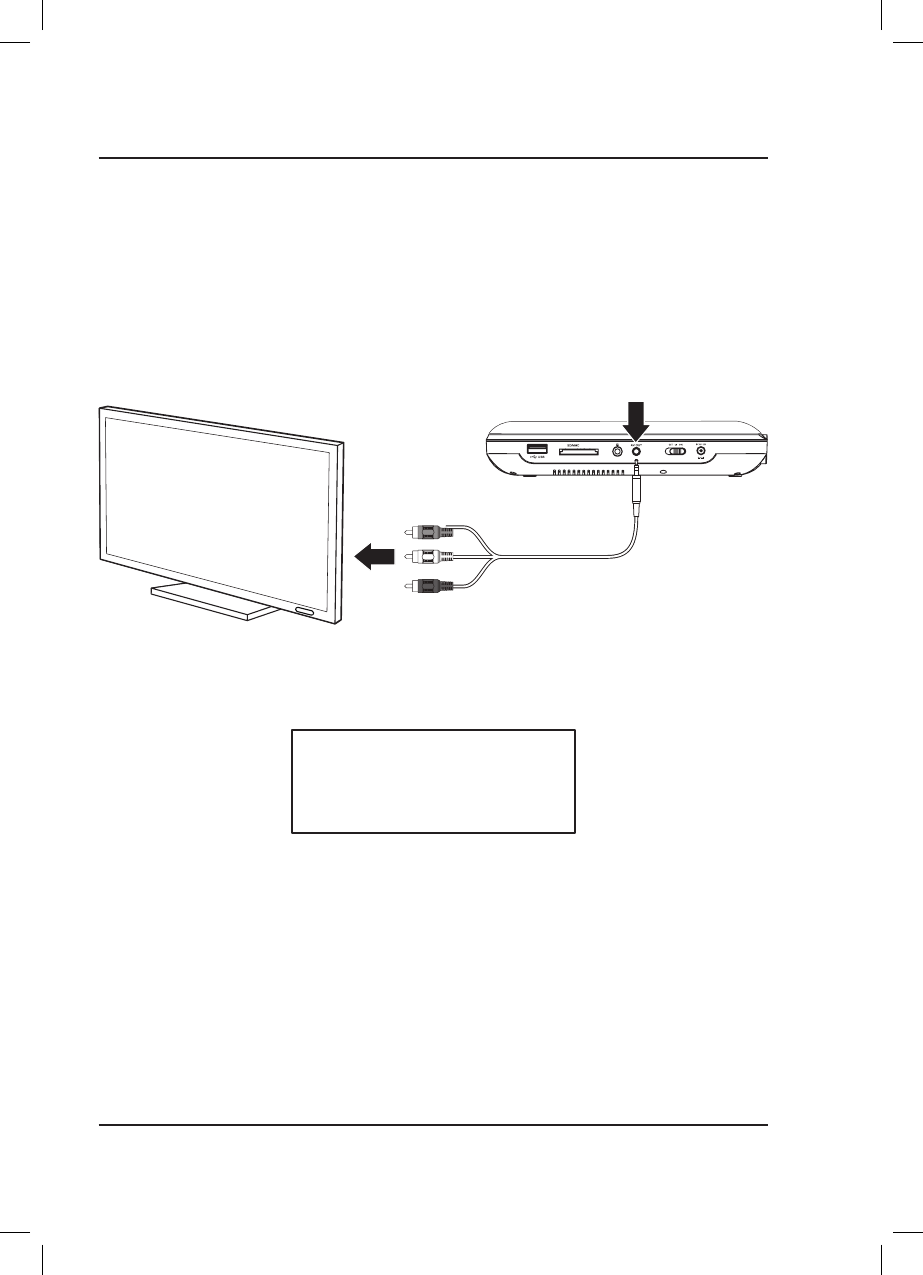
External Television or Screen
Requires 3.5mm to RCA Composite AV cable (red/white/yellow, not included).
1. Using an 3.5mm to RCA Composite cable, connect the Audio/Video Output on the portable DVD player to the
corresponding Audio/Video Inputs on a television or other external system.
2. Set the television's input source to the connected output from the DVD player.
3. The portable DVD player will automatically detect the connection and media from the player will be played
through the television. Use the controls on the portable DVD player and remote to select and play media. Use
the controls on the television to adjust volume.
CARD
NOTE: The portable DVD player's audio
output sends a fixed volume level to any
connected device.
To adjust the volume you must change it
from the connected device. Adjusting the
volume of the DVD player will have no effect.
Connect to TV Inputs
Video - Yellow
Audio Left Channel - White
Audio Right Channel - Red
AV OUT

16
Contact Information
Website: www.gpx.com
Email Support: prodinfo@dpiinc.com
Email Parts: partsinfo@dpiinc.com
Phone Support: 1-888-999-4215
Warranty
For Warranty Information and the most up-to-date version of this User’s
Guide, go to: www.gpx.com
International Support
To download this User’s Guide in English, Spanish, and French, or to get answers
to frequently asked questions, visit the support section at:
www.gpx.com
Para descargar este Manual del Usuario en inglés, español y francés, o para obtener respuestas a preguntas frecuentes,
visite la sección de apoyo en: www.gpx.com
Pour télécharger ce guide de l’utilisateur en anglais, espagnol ou français, ou pour obtenir des réponses à des
questions fréquemment posées, consultez la rubrique d’assistance sur: www.gpx.com
Copyright © 2017 Digital Products International (DPI, Inc.) All other trademarks appearing herein are the property of
their respective owners. Specifications are subject to change without notice.
Customer Support
Protect for Today
Sustain for Tomorrow
Made
Green