Junlan Electronic TSBB3210 BLUETOOTH TOWER SPEAKER User Manual
Shenzhen Junlan Electronic Ltd BLUETOOTH TOWER SPEAKER Users Manual
Users Manual
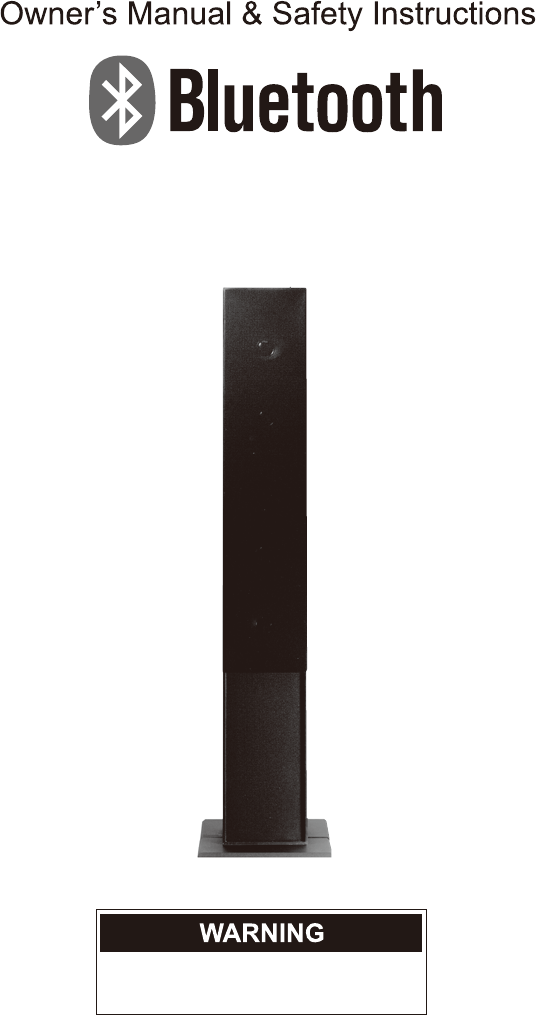
TSWCCL
Tower Speaker
with color changing lights
®
Read this material before using this product.
Failure to do so can result in serious injury.
SAVE THIS MANUAL.

Page 2
Important Safety Instructions
FCC NOTICE
This equipment has been tested and found to comply with the limits for a Class B digital device,
pursuant to part 15 of the FCC Rules. These limits are designed to provide residential protection against harmful interference in a
residential installation. This equipment generates, uses and can radiate radio frequency energy and, if not installed and used in
accordance with the instructions, may cause harmful interference to radio communications.
However, there is no guarantee that interference will not occur in a particular installation. If this equipment does cause harmful
interference to radio or television reception, which can be determined by turning the equipment off and on, the user is encouraged to try
to correct the interference by one or more of the following measures:
•
Reorient or relocate the receiving antenna.
•
Increase the separation between the equipment and receiver.
•
Connect the equipment into an outlet on a circuit different from that to which the receiver is connected.
•
Consult the dealer or an experienced radio/TV technician for help.
CAUTION: TO REDUCE THE RISK OF ELECTRIC SHOCK, DO NOT REMOVE COVER (OR BACK). NO USER-SERVICE-
ABLE PARTS INSIDE. REFER SERVICING TO QUALIFIED SERVICE PERSONNEL.
FCC NOTICE
To assure continued compliance, follow the attached installation instructions and use only shielded cables when connecting to other
devices. Modifications not authorized by the manufacturer may void user’s authority to operate this device.
1. Read these instructions
All the safety and operating instructions should be read before the product is operated.
2. Keep these instructions
The safety and operating instructions should be retained for future reference.
3. Heed all warning
All warnings on the product and in the operating instructions should be adhered to.
4. Follow all instructions
All operating and use instructions should be followed.
5. Do not use this apparatus near water
Do not use the product near water and moisture, for example: near a bathtub, washbowl, kitchen sink or laundry tub; in a wet
basement; or near a swimming pool.
6. Clean only with dry cloth
Unplug this product from the wall outlet before cleaning. Do not use liquid cleaners or aerosol cleaners. Use a dry cloth for cleaning.
7. Do not block any ventilation openings. Install in accordance with the instructions.
Slots and openings in the cabinet and in the back or bottom are provided for ventilation, to ensure reliable operation of the product and
to protect it from overheating. These openings can not be blocked or covered. The openings should never be blocked by placing the
product on a bed, sofa, rug or other similar surface. This product should never be placed near or on a radiator or heat source. This
product should not be placed in a built-in installation such as a bookcase or rack unless proper ventilation is provided or the
manufacturer’s instructions have been adhered to.
8. Do not defeat the safety purpose of the polarized or grounding-type plug. A polarized plug has two blades with one wider than the
other. A grounding type plug has two blades and a third grounding prong. The wide blade or the third prong are provided for your
safety. If the provided plug does not fit into your outlet, consult an electrician for replacement of the obsolete outlet.
9. Protect the power cord from being walked on or pinched particularly at plugs, convenience receptacles, and the point where they
exit from the apparatus.
10. Only use attachments / accessories specified by the manufacturer.
11. Use only with the cart, stand, tripod, bracket, or table specified by the manufacturer or sold with the apparatus. When a cart is used,
use caution when moving the cart/apparatus combination to avoid injury from tip-over.
Before using the unit, be sure to read all operating instructions carefully. Please note that these are general
precautions and may not pertain to your unit. For example, this unit may not have the capability to be connected
to an outdoor antenna.
Page 3
12. Unplug this apparatus during lightning storms or when unused for long periods of time.
13. Refer all servicing to qualified service personnel. Servicing is required when the apparatus has been damaged in any way, such as
power-supply cord or plug is damaged, liquid has been spilled or objects have fallen into the apparatus, the apparatus has been exposed to
rain or moisture, does not operate normally, or has been dropped.
14. Power Source
The product should be operated only from the type of power source indicated on the marking label. If you are not sure of the type of power
supply, consult your appliance dealer or local power company. For products intended to operate from battery power or other
sources, refer to the operating instructions.
15. Power lines
An outside antenna system should not be located in the vicinity of overhead power lines, other electric light, power circuits, or where it can
fall into such power lines or circuits. When installing an outside antenna system, extreme care should be taken to keep from touching such
power lines or circuits, as contact with them might be fatal.
16. Overloading
Do not overload wall outlets and extension cords, as this can result in a risk of fire or electric shock.
17. Object and liquid entry
Never push objects of any kind into the product, as they may touch dangerous voltage points or short out parts that could result in fire or
electric shock.Never spill or spray any type of liquid on the product.
18. Outdoor antenna grounding
If an outside antenna is connected to the product, be sure the antenna system is grounded so as to provide some protections against voltage
surges and built up static charges. Section 810 of the National Electrical Code, ANSI/NFPA 70, provides information with respect to proper
grounding of the master and supporting structure, grounding of the lead-in wire to an antenna discharge product, size of grounding
conductors, location of antenna discharge product, connection to grounding electrodes and requirements for grounding electrodes.
19. Service
Do not attempt to service this product by yourself, as opening or removing covers may expose you to dangerous voltage or other hazards.
Refer all servicing to qualified service personnel.
20. Replacement parts
When replacement parts are required, be sure the service technician uses replacement parts specified by the manufacturer or those that
have the same characteristics as the original part. Unauthorized substitutions may result in fire, electric shock or other hazards.
21. Safety check
Upon completion of any service or repair to this product, ask the service technician to perform safety checks to determine that the product is
in proper operating condition.
22. Wall or ceiling mounting
The product should be mounted to a wall or ceiling only as recommended by the manufacturer.
23. Damage requiring service
Unplug the product from the wall outlet and refer servicing to qualified service personnel under the following conditions:
a. When the power-supply cord or plug is damaged.
b. Liquid has been spilled or objects have fallen into the product.
c. The product has been exposed to rain or water.
d. The product does not operate normally by following the operating instructions.
Adjust only those controls that are covered by the operating instructions, as an adjustment of other controls may result in damage and will
require extensive work by a qualified technician to restore the product to its normal operation.
e. The product has been dropped or the cabinet has been damaged.
f. When the product exhibits a distinct change in performance-this indicates a need for service.
24.Note to CATV system installer
This reminder is provided to call the CATV system installer’s attention to Article 820-40 of the NEC that provides guidelines for proper
grounding and, in particular, specifies that the cable ground shall be connected to the grounding system of the building, as close to the point
of cable entry as practical.
Note:
Refer all servicing to qualified service personnel. Servicing is required when the unit has been damaged any way such as the following: the
power-supply cord or plug has been damaged, liquid has been spilled into the unit, the unit has been exposed to rain or moisure, the unit has
been dropped or the unit does not operate normally.
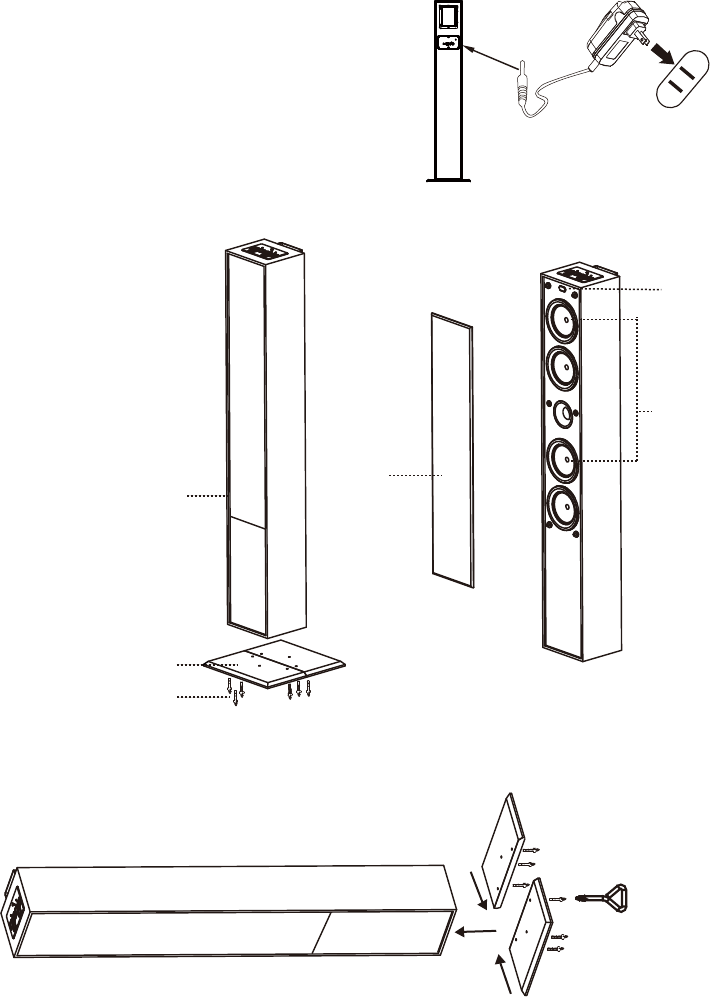
Attach the two wooden bases to the bottom of unit by the supplied assembly screws and screwdriver as the figure shows above.
Supplied screwdriver
Page 4
3
2
4
1
5
6
TO DC IN JACK
To Wall Outlet
Power Source
The speaker net can be taken out and reassembled as the figures show above.
Insert the small plug from the supplied AC/DC Adaptor to the DC IN
Jack on the unit. Insert the AC/DC adaptor to a wall outlet having
AC 100-240V~, 50/60 Hz.
NOTE: This AC/DC Adaptor is intended to be correctly oriented in
a vertical or floor mount position.
Installation
1. Main Body
2. Wooden Base
3. Screws
4. Speaker Net
5. Speakers
6. Remote Sensor
Assembly
1
2
4
35
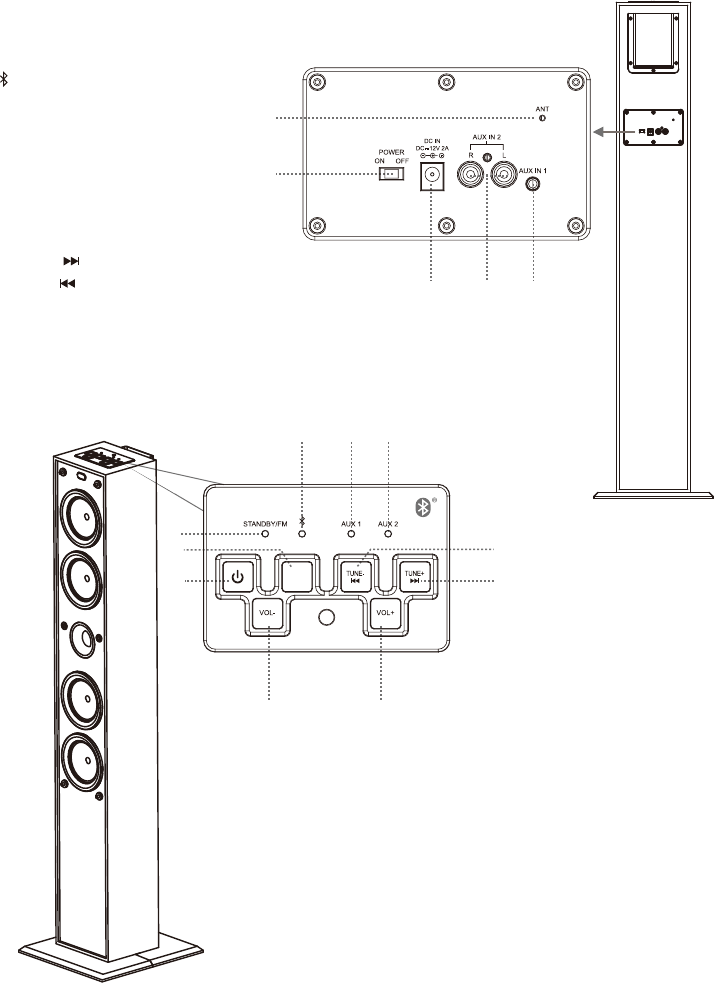
1. FM ANT (FM ANTENNA)
2. POWER ON/OFF SWITCH
3. DC IN JACK
4. AUX IN 2 JACKS
5. AUX IN 1 JACK
7. AUX 1 INDICATOR
8. AUX 2 INDICATOR
9. STANDBY/FM INDICATOR
10. SOURCE / LED ON/OFF BUTTON
11. STANDBY ON/OFF BUTTON
12. VOL - (VOLUME DOWN) BUTTON
13. VOL + (VOLUME UP) BUTTON
14. TUNE +/ BUTTON
15. TUNE -/ BUTTON
6. (BLUE TOOTH) INDICATOR
10
9
11
12 13
14
15
67 8
SOURCE
Location of Controls
Page 5
LED
ON/OFF
Page 6
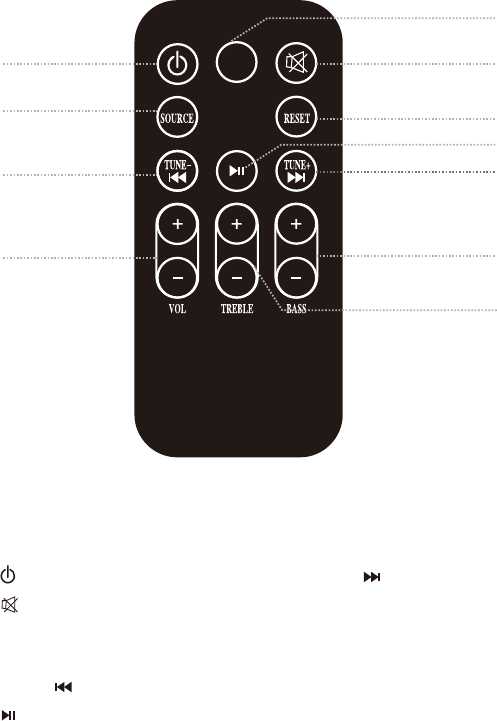
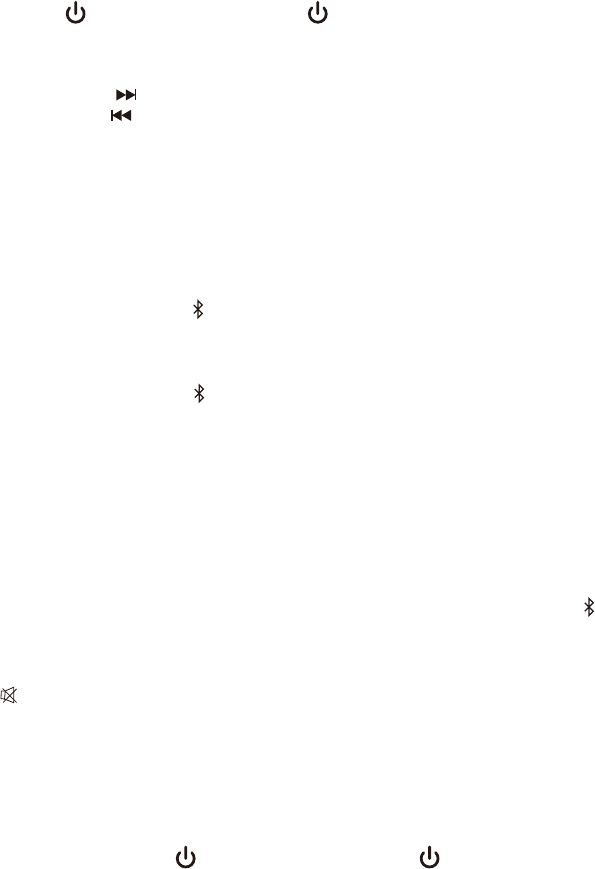
1. Standby ON/OFF BUTTON
2. (MUTE) BUTTON
3. SOURCE BUTTON
Please note that the play/pause button starts or pauses bluetooth
Audio playback only
4. RESET BUTTON
5. TUNE -/ BUTTON
8. VOL (VOLUME) +/- BUTTONS
9. TREBLE +/- BUTTONS
10. BASS +/- BUTTONS
11. LED ON/OFF BUTTON
6. (PLAY/PAUSE) BUTTON
7. TUNE +/ BUTTON
2
1
5
3
8
7
6
11
4
10
9
LED
ON/OFF
Remote Control - Location of Controls

Page 7
Battery Installation ( Remote Control )
-First time use:
Remove and discard the insulation film as the figure on right.
-Replacing battery for the remote control:
1. Push and slide out the battery tray as the figure below.
2. Replace the battery by a new button cell with the polarity ”+” face up as the figure below at the rear of remote control.
3. Close the battery tray.
Battery Precautions:
Follow these precautions when using a battery in this device:
1. Use only the size and type of battery specified.
2. Be sure to follow the correct polarity when installing the battery as indicated in the battery compartment. A reversed battery may cause
damage to the device.
3. Do not mix different types of batteries together or old batteries with fresh ones.
4. If the batteries in the device are consumed or the device is not to be used for a long period of time, remove the batteries to prevent damage
or injury from possible battery leakage.
5. Do not try to recharge the battery not intended to be recharged; it can overheat and rupture. Follow battery manufacturer’s instructions.
6. The batteries shall not be exposed to excessive heat such as sunshine or fire.
7. Clean the battery contacts and also those of the device prior to battery installation.
Effective Remote Transmitter Distance
NOTES:
1. When there is an obstacle between the unit and the transmitter, the
transmitter may not operate.
2. When direct sunlight, an incandescent lamp, fluorescent lamp or any
other strong light shines on the REMOTE SENSOR of the unit, the remote
operation maybe unstable.
8. This product contains a coin/button cell battery. If the coin/button cell battery is swallowed, it can cause severe
internal burn in just 2 hours and can lead to death.
Keep new and used batteries away from children. If the battery compartment does not close securely, stop using the
product and keep it away from children.
If you think batteries might have been swallowed or placed inside any part of the body, seek immediate medical
attention.
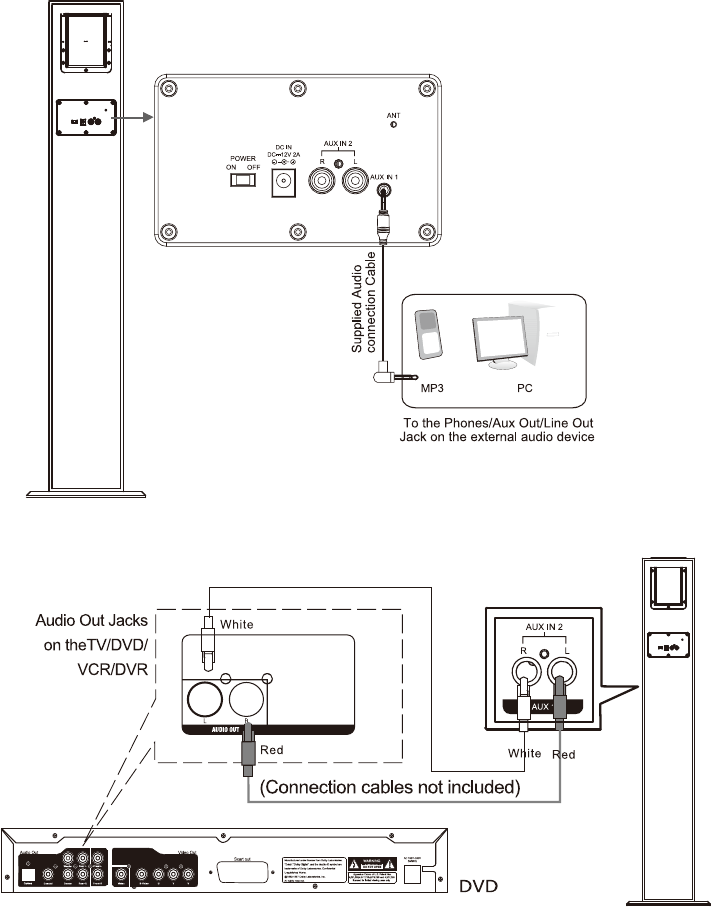
Connect to External Audio Device with 3.5mm Jack:
Connect to External Video/Audio Device with RCA Jacks:
Page 8
Connection
Page 9
1. Connect the external Audio or Video/Audio Devices to the unit as shown above.
2. Slide the POWER ON/OFF Switch on the rear of unit to ON position to turn the unit to Standby
mode. The Power Indicator will light.
3. Press and hold the button on the unit or press the button on the Remote Control to turn on
the unit from Standby mode.
4. Press the SOURCE/LED ON/OFF button on the unit or Remote Control to select desired input source.
A. If FM (Radio) is selected, STANDBY/FM Indicator will blink:
i. Press the TUNE +/ button repeatedly to search and play the next available FM station.
ii. Press the TUNE -/ button repeatedly to search and play the previous available FM station.
Notes:
● The Antenna wire on the rear of unit is for radio reception. If reception is weak, unwind
and extend the wire or relocate the wire to improve the radio reception.
● If a stereo FM station was searched, the unit will play in stereo mode automatically.
B. If AUX 1 is selected, the AUX 1 Indicator will light. This will play the music in the AUX 1
connected Audio device as usual.
C. If AUX 2 is selected, the AUX 2 Indicator will light. This will play the audio in the AUX 2
connected Video/Audio device as usual.
D. If BT (Blue Tooth) is selected, the Indicator will light and blink. If using BT for the first time
or re-pairing the unit to a new BT device, pair the unit to external BT devices as explained below:
i. Power on the external BT device and enter search mode.
ii. Start pairing by following the on screen instructions on the external BT device.
iii. After pairing is successful, the Indicator will stop blinking. (For more details on pairing
procedures, please refer to the user’s manual of your BT device.)
Notes:
● When the external BT device searches the unit, our model number “TSWCCL” will appear
on the display of external BT device.
● You may need to enter pairing code “0000”.
Normal operation after pairing:
i. Turn on the BT function of the external BT device.
ii. Power on the unit and select the input source to BT as described above.
iii. Wait a few seconds until the unit pairs to the external BT device automatically. (The
Indicator will stop blinking).
iv. Play the music in the paired BT device as usual.
5. Press the VOL (Volume) +/- buttons to adjust volume level.
6. Press the button on the remote control to turn off the sound temporarily, then press again to
turn the sound back on.
7. Press the BASS +/- buttons on the remote control to enhance or reduce the bass level (low audio
frequency) as desired.
8. Press the TREBLE +/- buttons on the remote control to enhance or reduce the treble level (high
audio frequency) as desired.
10. When finished, press and hold the button on the unit or press the button on the Remote
Control to turn off (standby) the unit.
NOTE: If the unit will not be used for an extended period of time, power off the unit by sliding the
POWER Switch to OFF position or unplugging the AC/DC Adaptor from the unit and wall outlet.
iv. Play the music in the paired BT device as usual.
Operations
9. Press the RESET button on the Remote Control to reset the BASS or TREBLE to default level.
Page 10
1 x Remote Control ( uses 1 x CR 2025 button cell,induded )
A )2,V21 CD tuptuO
1 x Audio Connection Cable with 3.5mm Stereo plugs
1 x User's Manual
2 x Wooden Stand
6 x Assembly Screws
1 x Screwdriver
1 x AC/DC Adaptor ( Input: AC 100-240V~,50/60Hz 1A;
Accessories:
FM 87.5-108 MHz
DC 12V,2A
2 x 10 W
DC 3V,1 x CR 2025 button cell (Included)
General Specifications
Power of speaker ............................
Radio Coverage...............................
Power Source of Remote Control....
Power Source.................................