Juster BIS302GN Bluetooth Speaker User Manual BIS302Ni1ju1
Juster Co., Ltd. Bluetooth Speaker BIS302Ni1ju1
Juster >
User Manual
OPERATION INSTRUCTIONS
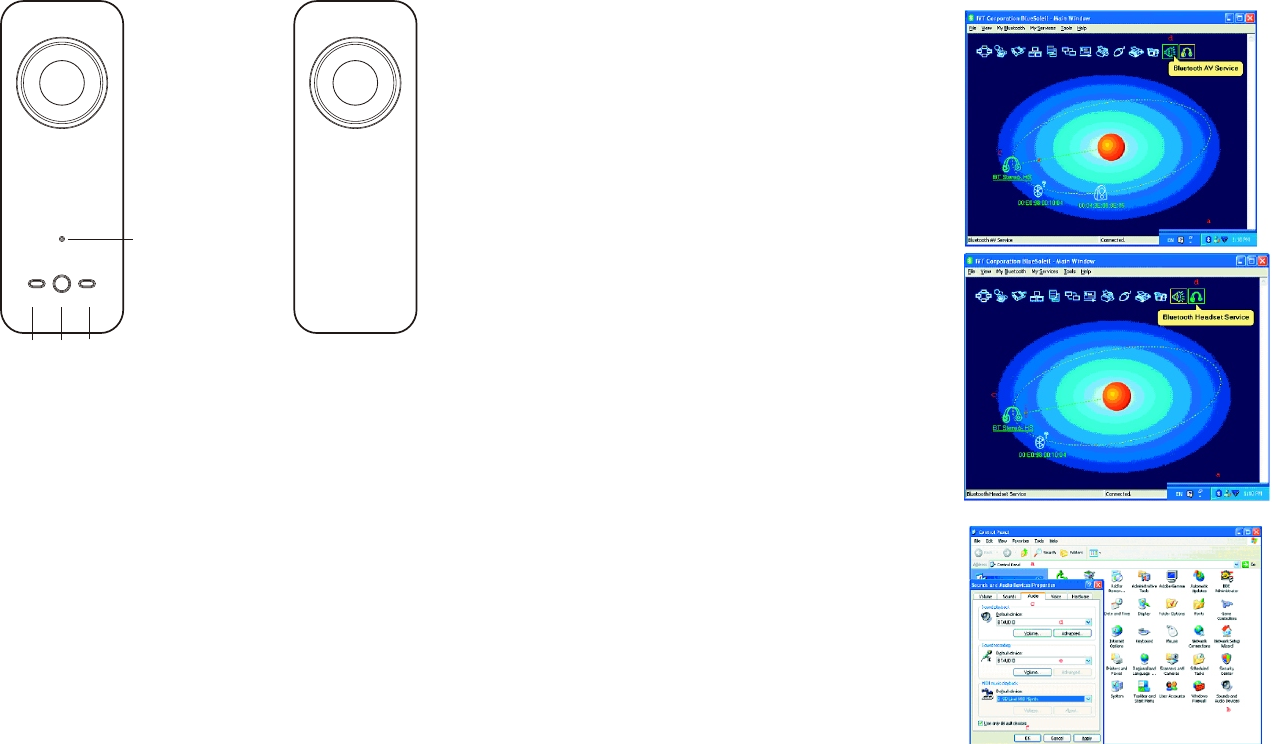
- SPEAKER CONTROLS
Press the POWER button to turn on the speaker system. The
Power/Pairing indicator LED is flashing that means the power is ON
and waiting to be connected to your Bluetooth audio source.
■ Prepare audio source
Using with your Bluetooth mobile phone
The Bluetooth Multimedia speakers can be used with a Bluetooth
Mobile Phone (equipped with A2DP-Bluetooth stereo).
1. Enable Bluetooth on your mobile phone (refer to your mobile
phone user manual).
2. In the phone's Bluetooth menu, search for devices (device
name:JA2).
3. Select Audio Speaker.
4. Enter the PIN code"0000". 07J-BIS302N
Using with your computer
IVT BlueSoleil™
To use the IVT BlueSoleil, first you must pair the Bluetooth
Multimedia speakers with your computer.
Search and connect
1. Double click the Bluetooth icon in
the task tray.
2. Select "My Bluetooth/Search
Bluetooth Device" in the menu, all
Bluetooth devices appear. When
search is over,double click on the
stereo headset icon and enter pin
code"0000", the icon will be
highlighted. Click the right button of
mouse, select "Connecting" then
red dot appear as shooting. This
means connection is successful.
Please repeat step 2 if connection
fails.
Note: The IVT BlueSoleil software is
not included with your Bluetooth
Multimedia speakers.
C o n f i g u r i n g W i n d o w s a u d i o
output
1. Open Control Panel and double
click Sound and Audio devices.
2. Select the Audio tab.
3. Under Sound playback, change
the device to BTAUDIO.
4. Under Sound recording, change
the device to BTAUDIO.
5. Click OK.
Vol-
POWER Vol+Vol-
Power
Bluetooth Speaker
Power/Pairing
Vol+
BIS-C302GN, BIS-C302, BIS-C302G, BIS-C302N
Juster Co.,Ltd.
Note: The Widcomm Bluetooth software is not included with your
Bluetooth Multmedia speakers.
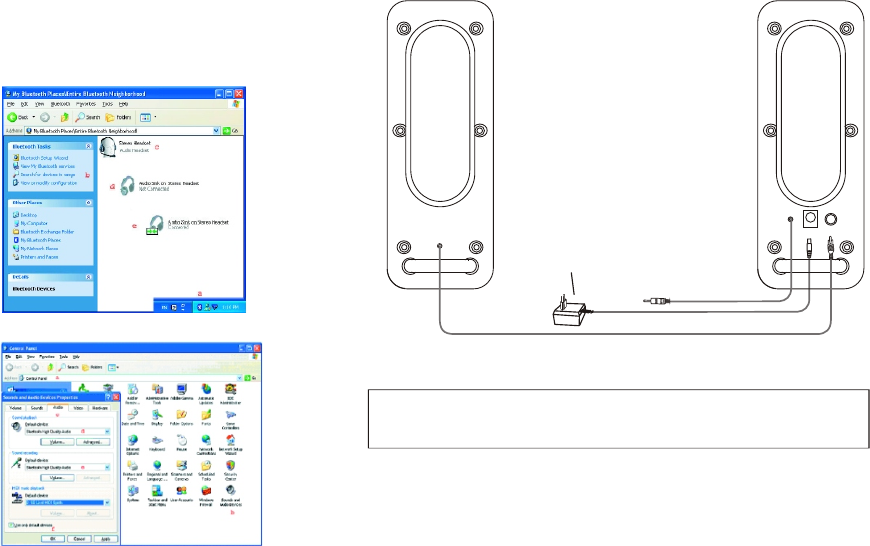
Widcomm® Bluetooth software
To use the Widcomm Bluetooth software, first you must pair the
Bluetooth Multimedia speakers.
Configuring Windows audio output
1. Open Control Panel and double
click Sound and Audio devices.
2. Select the Audio tab.
3. Under Sound playback, change the
device to Bluetooth High Quality
Audio.
4. Click OK.
- CONNECTIONS
Search and connect
1. Double click the Bluetooth icon in
the task tray.
2. Click Search for devices in range.
3. Double click the Stereo Headset
icon. Enter 0000 for pin code.
4. Right click on the stereo headset
icon and select Audio Sink on
Stereo Headset to create a
connection shortcut.
Power/Pairing LED will turn light when the speaker is connected to
your Bluetooth audio source successfully. The LED will flash per
second if you do not connect to your Bluetooth audio source after 3
minutes that means the speaker is coming into idle status. Please
connect again.
Press the VOL+ button to increase or the VOL- button to decrease the
listening level.
To turn off the speaker system, press the POWER button again.
The power/pairing LED will turn off.
SPEAKER CABLE
AUDIO CABLE
DC IN Left SP
Note:
For Europe: 230V/50Hz
For U.S.A.& Canada: 120V/60Hz
For Japan: 100V, 50/60Hz
For Australia: 240V/50Hz
*Connect the AC power cord to a suitable AC power outlet. The shape of
the plug may differ from that in the fig. to conform to local condition.
1. Insert the plug of the speaker cable into the Left SP
socket of the main speaker.
2. Insert the 3.5mm plug of the audio cable into the head-
phone or line output socket of the audio source.
3. Insert the DC plug of the adaptor into the DC IN socket.
Then Connect the AC power plug to a suitable AC outlet.
* Disconnect the AC power plug from the AC outlet when
the system is left unused for a long period of time.
Juster Co.,Ltd.
FCC Interference Statement
This equipment has been tested and found to comply with the limits for a class B digital device, pursuant to
part 15 of the FCC Rules. These limits are designed to provide reasonable protection against harmful interference
in a residential installation.
This equipment generates, uses and can radiate radio frequency energy and, if not installed and used in accordance
with the instructions, may cause harmful interference to radio communications. However, there is no guarantee that
interference will not occur in a particular installation. If this equipment does cause harmful interference to radio or
television reception, which can be determined by turning the equipment off and on, the user is encouraged to try to
correct the interference by one or more of the following measures:
---Reorient or relocate the receiving antenna.
---Increase the separation between the equipment and receiver.
---Connect the equipment into an outlet on a circuit different from that to which the receiver is connected.
---Consult the dealer or an experienced radio/TV technician for help.
Caution:
1. The device complies with Part 15 of the FCC rules. Operation is subject to the following two conditions:
(1)This device may not cause harmful interference.
(2)This device must accept any interference received, including interference that may cause undesired
operation.
2. This Transmitter must not be co-located or operating in conjunction with any other antenna or transmitter.
3. Changes or modifications to this unit not expressly approved by the party responsible for compliance could
void the user authority to operate the equipment.
Juster Co.,Ltd.