Jvc Kw Avx716 Users Manual LVT1778 001A
LVT1778-001A to the manual fb369ef8-3440-43b1-80b1-e99bbde79828
2015-01-23
: Jvc Jvc-Kw-Avx716-Users-Manual-320841 jvc-kw-avx716-users-manual-320841 jvc pdf
Open the PDF directly: View PDF ![]() .
.
Page Count: 666 [warning: Documents this large are best viewed by clicking the View PDF Link!]
- KW-ADV790J/KW-AVX710J
- INSTRUCTIONS
- IMPORTANT FOR LASER PRODUCTS
- Contents
- Playable disc types
- Basic operations — Monitor panel/touch panel
- Basic operations — Remote controller (RM-RK252)
- Before operating the unit
- Common operations
- Listening to the radio
- Disc operations
- Bluetooth® operations — Cellular phone/audio player
- Listening to the CD changer
- Listening to the satellite radio
- Listening to the HD Radio Broadcast
- Listening to the iPod
- Using other external components
- Sound equalization
- Assigning titles to the sources
- Menu operations
- Maintenance
- More about this unit
- Troubleshooting
- Specifications
- Installation/Connection Manual
- INSTRUCTIONS
- KW-AVX710E
- INSTRUCTIONS
- IMPORTANT FOR LASER PRODUCTS
- Contents
- Playable disc types
- Basic operations — Monitor panel/touch panel
- Basic operations — Remote controller (RM-RK252)
- Before operating the unit
- Common operations
- Listening to the radio
- Disc operations
- Bluetooth® operations — Cellular phone/audio player
- Listening to the CD changer
- Listening to the DAB tuner
- Listening to the iPod
- Using other external components
- Sound equalization
- Assigning titles to the sources
- Menu operations
- Maintenance
- More about this unit
- Troubleshooting
- Specifications
- Installation/Connection Manual
- INSTRUCTIONS
- KW-AVX710EE
- INSTRUCTIONS
- IMPORTANT FOR LASER PRODUCTS
- Contents
- Playable disc types
- Basic operations — Monitor panel/touch panel
- Basic operations — Remote controller (RM-RK252)
- Before operating the unit
- Common operations
- Listening to the radio
- Disc operations
- Bluetooth® operations — Cellular phone/audio player
- Listening to the CD changer
- Listening to the DAB tuner
- Listening to the iPod
- Using other external components
- Sound equalization
- Assigning titles to the sources
- Menu operations
- Maintenance
- More about this unit
- Troubleshooting
- Specifications
- Installation/Connection Manual
- INSTRUCTIONS
- KW-AVX716EU/KW-AVX710EU
- INSTRUCTIONS
- IMPORTANT FOR LASER PRODUCTS
- Contents
- Playable disc types
- Basic operations — Monitor panel/touch panel
- Basic operations — Remote controller (RM-RK252)
- Before operating the unit
- Common operations
- Listening to the radio
- Disc operations
- Bluetooth® operations — Cellular phone/audio player
- Listening to the CD changer
- Listening to the DAB tuner
- Listening to the iPod
- Using other external components
- Sound equalization
- Assigning titles to the sources
- Menu operations
- Maintenance
- More about this unit
- Troubleshooting
- Specifications
- Installation/Connection Manual
- INSTRUCTIONS
- KW-AVX716UT/KW-AVX710UT
- INSTRUCTIONS
- IMPORTANT FOR LASER PRODUCTS
- Contents
- Playable disc types
- Basic operations — Monitor panel/touch panel
- Basic operations — Remote controller (RM-RK252)
- Before operating the unit
- Common operations
- Listening to the radio
- Disc operations
- Bluetooth® operations — Cellular phone/audio player
- Listening to the CD changer
- Listening to the iPod
- Using other external components
- Sound equalization
- Assigning titles to the sources
- Menu operations
- Maintenance
- More about this unit
- Troubleshooting
- Specifications
- Installation/Connection Manual
- INSTRUCTIONS
- KW-AVX716U/KW-AVX710U
- INSTRUCTIONS
- IMPORTANT FOR LASER PRODUCTS
- Contents
- Playable disc types
- Basic operations — Monitor panel/touch panel
- Basic operations — Remote controller (RM-RK252)
- Before operating the unit
- Common operations
- Listening to the radio
- Disc operations
- Bluetooth® operations — Cellular phone/audio player
- Listening to the CD changer
- Listening to the iPod
- Using other external components
- Sound equalization
- Assigning titles to the sources
- Menu operations
- Maintenance
- More about this unit
- Troubleshooting
- Specifications
- Installation/Connection Manual
- INSTRUCTIONS
- KW-AVX716UN/KW-AVX710UN
- INSTRUCTIONS
- IMPORTANT FOR LASER PRODUCTS
- Contents
- Playable disc types
- Basic operations — Monitor panel/touch panel
- Basic operations — Remote controller (RM-RK252)
- Before operating the unit
- Common operations
- Listening to the radio
- Disc operations
- Bluetooth® operations — Cellular phone/audio player
- Listening to the CD changer
- Listening to the iPod
- Using other external components
- Sound equalization
- Assigning titles to the sources
- Menu operations
- Maintenance
- More about this unit
- Troubleshooting
- Specifications
- Installation/Connection Manual
- INSTRUCTIONS
- KW-AVX716A/KW-AVX710A
- INSTRUCTIONS
- IMPORTANT FOR LASER PRODUCTS
- Contents
- Playable disc types
- Basic operations — Monitor panel/touch panel
- Basic operations — Remote controller (RM-RK252)
- Before operating the unit
- Common operations
- Listening to the radio
- Disc operations
- Bluetooth® operations — Cellular phone/audio player
- Listening to the CD changer
- Listening to the iPod
- Using other external components
- Sound equalization
- Assigning titles to the sources
- Menu operations
- Maintenance
- More about this unit
- Troubleshooting
- Specifications
- Installation/Connection Manual
- INSTRUCTIONS
- KW-AVX714UI
- INSTRUCTIONS
- IMPORTANT FOR LASER PRODUCTS
- Contents
- Playable disc types
- Basic operations — Monitor panel/touch panel
- Basic operations — Remote controller (RM-RK252)
- Before operating the unit
- Common operations
- Listening to the radio
- Disc operations
- Bluetooth® operations — Cellular phone/audio player
- Listening to the CD changer
- Listening to the iPod
- Using other external components
- Sound equalization
- Assigning titles to the sources
- Menu operations
- Maintenance
- More about this unit
- Troubleshooting
- Specifications
- Installation/Connection Manual
- INSTRUCTIONS
ENGLISHESPAÑOL
FRANÇAIS
For installation and connections, refer to the separate manual.
Para la instalación y las conexiones, refiérase al manual separado.
Pour l’installation et les raccordements, se référer au manuel séparé.
INSTRUCTIONS
MANUAL DE INSTRUCCIONES
MANUEL D’INSTRUCTIONS
For canceling the display demonstration, see page 8.
Para cancelar la demonstración en pantalla, consulte la página 8.
Pour annuler la démonstration des affichages, référez-vous à la page 8.
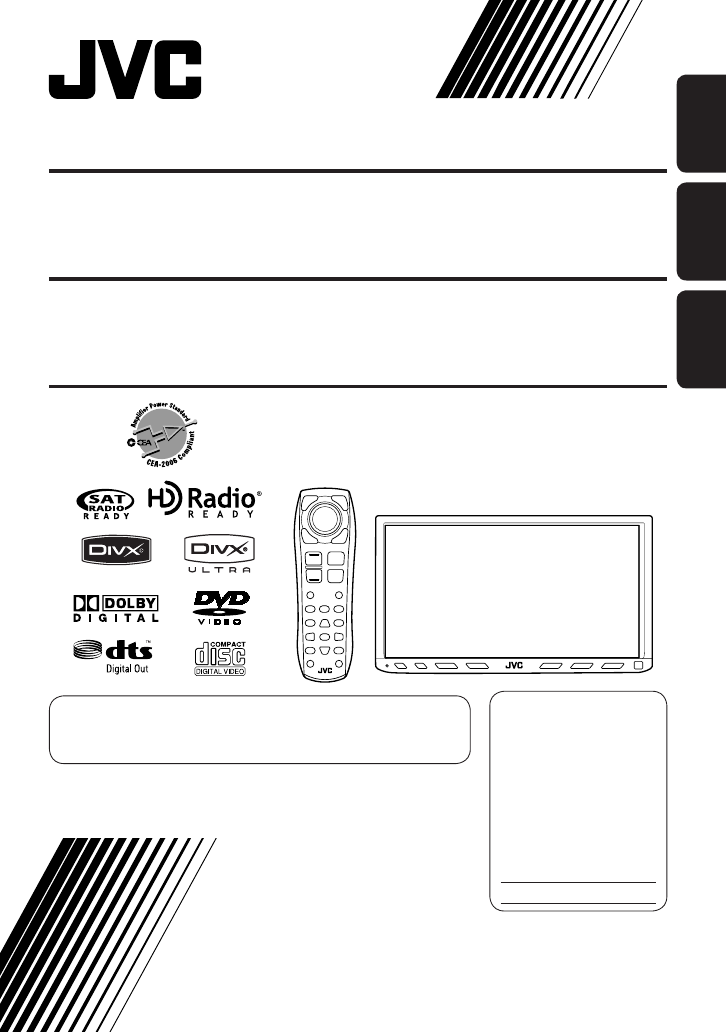
KW-ADV790
DVD RECEIVER WITH MONITOR KW-AVX710
For customer Use:
Enter below the Model No.
and Serial No. which are
located on the top or bottom
of the cabinet. Retain this
information for future
reference.
Model No.
Serial No.
KW-ADV790
RECEPTOR DVD CON MONITOR KW-AVX710
KW-ADV790
RÉCEPTEUR DVD ET MONITEUR KW-AVX710
LVT1778-001A
[J]
Cover_KW-AVX710J.indd 2Cover_KW-AVX710J.indd 2 07.11.27 8:20:33 PM07.11.27 8:20:33 PM

ENGLISH
2
Thank you for purchasing a JVC product.
Please read all instructions carefully before operation, to ensure your complete understanding and to obtain the best
possible performance from the unit.
IMPORTANT FOR LASER PRODUCTS
1. CLASS 1 LASER PRODUCT
2. CAUTION: Do not open the top cover. There are no user serviceable parts inside the unit; leave all servicing to
qualified service personnel.
3. CAUTION: (For U.S.A.) Visible and/or invisible class II laser radiation when open. Do not stare into beam.
(For Canada) Visible and/or invisible class 1M laser radiation when open. Do not view directly with
optical instruments.
4. REPRODUCTION OF LABEL: CAUTION LABEL, PLACED OUTSIDE THE UNIT.
WARNINGS:
To prevent accidents and damage
• DO NOT install any unit or wire any cable in a
location where;
– it may obstruct the steering wheel and
gearshift lever operations.
– it may obstruct the operation of safety devices
such as air bags.
– it may obstruct visibility.
• DO NOT operate the unit while driving.
If you need to operate the unit while driving, be
sure to look around carefully.
• The driver must not watch the monitor while
driving.
INFORMATION (For U.S.A.)
This equipment has been tested and found to
comply with the limits for a Class B digital device,
pursuant to Part 15 of the FCC Rules. These limits are
designed to provide reasonable protection against
harmful interference in a residential installation.
This equipment generates, uses, and can radiate
radio frequency energy and, if not installed and
used in accordance with the instructions, may cause
harmful interference to radio communications.
However, there is no guarantee that interference
will not occur in a particular installation. If this
equipment does cause harmful interference to radio
or television reception, which can be determined
by turning the equipment off and on, the user is
encouraged to try to correct the interference by one
or more of the following measures:
– Reorient or relocate the receiving antenna.
– Increase the separation between the equipment
and receiver.
– Connect the equipment into an outlet on a
circuit different from that to which the receiver is
connected.
– Consult the dealer or an experienced radio/TV
technician for help.
Caution
Changes or modifications not approved by JVC could
void the user’s authority to operate the equipment.
[European Union only]
CAUTION
This product has a fluorescent lamp that
contains mercury. Disposal of these materials
may be regulated in your community due to
environmental considerations. For disposal or
recycling information, please contact your local
authorities or for USA, the Electronic Industries
Alliance: http://www.eiae.org.
EN_KW-AVX710[J].indb 2EN_KW-AVX710[J].indb 2 07.12.5 11:58:46 AM07.12.5 11:58:46 AM

3
ENGLISH
INTRODUCTION
How to reset your unit
How to forcibly eject a disc
• If this does not work, reset the unit.
Cautions on the monitor:
• The monitor built in this unit has been produced
with high precision, but it may have some
ineffective dots. This is inevitable and is not
malfunction.
• Do not expose the monitor to direct sunlight.
• Do not operate the touch panel using a ball-point
pen or similar tool with the sharp tip.
Touch the buttons on the touch panel with your
finger directly (if you are wearing a glove, take it
off).
• When the temperature is very cold or very hot...
– Chemical changes occur inside, causing
malfunction.
– Pictures may not appear clearly or may move
slowly. Pictures may not be synchronized with
the sound or picture quality may decline in
such environments.
Contents
INTRODUCTION
Playable disc types .......................... 4
Basic operations—
Monitor panel/touch panel
............ 5
Basic operations—
Remote controller (RM-RK252) ...... 6
OPERATIONS
Before operating the unit ................ 8
Common operations ........................ 9
Listening to the radio ...................... 10
Disc operations ................................ 13
EXTERNAL DEVICES
Bluetooth® operations—
Cellular phone/audio player .......... 27
Listening to the CD changer .............. 34
Listening to the satellite radio ......... 36
Listening to the HD Radio™ Broadcast
.... 39
Listening to the iPod ........................ 40
Using other external components ..... 42
SETTINGS
Sound equalization .......................... 45
Assigning titles to the sources .......... 46
Menu operations ............................. 47
REFERENCES
Maintenance ................................... 56
More about this unit ........................ 57
Troubleshooting .............................. 64
Specifications .................................. 68
NO EJECT?
EMERGENCY EJECT?
Exit
ENTER
Back
11
3
2
at the same time
For safety...
• Do not raise the volume level too much, as this will
block outside sounds, making driving dangerous.
• Stop the car before performing any complicated
operations.
Temperature inside the car...
If you have parked the car for a long time in hot or cold
weather, wait until the temperature in the car becomes
normal before operating the unit.
• Your preset
adjustments will
also be erased.
EN_KW-AVX710[J].indb 3EN_KW-AVX710[J].indb 3 07.12.5 11:58:53 AM07.12.5 11:58:53 AM
ENGLISH
4
Disc type Recording format, file type, etc. Playable
DVD DVD Video (Region Code: 1)*1
DVD Audio
DVD-ROM
DVD Recordable/Rewritable
(DVD-R/-RW*2, +R/+RW*3)
• DVD Video: UDF bridge
• DVD-VR
• DivX/MPEG1/MPEG2/JPEG/MP3/
WMA/WAV: ISO 9660 level 1,
level 2, Romeo, Joliet
DVD Video
DVD-VR
DivX/MPEG1/MPEG2
JPEG
MP3/WMA/WAV
AAC
MPEG4
DVD+VR
DVD-RAM
Dual Disc DVD side
Non-DVD side
CD/VCD Audio CD/CD Text (CD-DA)/DTS-CD
VCD (Video CD)
SVCD (Super Video CD)
CD-ROM
CD-I (CD-I Ready)
CD Recordable/Rewritable
(CD-R/-RW)
• ISO 9660 level 1, level 2, Romeo,
Joliet
CD-DA
MP3/WMA/WAV
JPEG
DivX/MPEG1/MPEG2
AAC
MPEG4
*1 If you insert a DVD Video disc of an incorrect Region Code, “Region code error” appears on the screen.
*2 DVD-R recorded in multi-border format is also playable (except for dual layer discs).
DVD-RW dual layer discs are not playable.
*3 It is possible to play back finalized +R/+RW (Video format only) discs.
+RW double layer discs are not playable.
Playable disc types
Caution for DualDisc playback
The Non-DVD side of a “DualDisc” does not comply with the “Compact Disc Digital Audio” standard. Therefore,
the use of Non-DVD side of a DualDisc on this product may not be recommended.
EN_KW-AVX710[J].indb 4EN_KW-AVX710[J].indb 4 07.12.5 11:58:54 AM07.12.5 11:58:54 AM

5
ENGLISH
INTRODUCTION
Basic operations — Monitor panel/touch panel
• Turn on the power.
• Turn off the power. [Hold]
• Attenuate the sound (if the power is on).
Change the sources.
Remote sensorAdjust the volume.
Reset the unit.
• Use only when the internal system malfunctions.
Display <AV Menu> screen.
Display and erase the Short Cut windows.
Available functions vary among the sources. For details, see each source operation
section.
Change the display information.
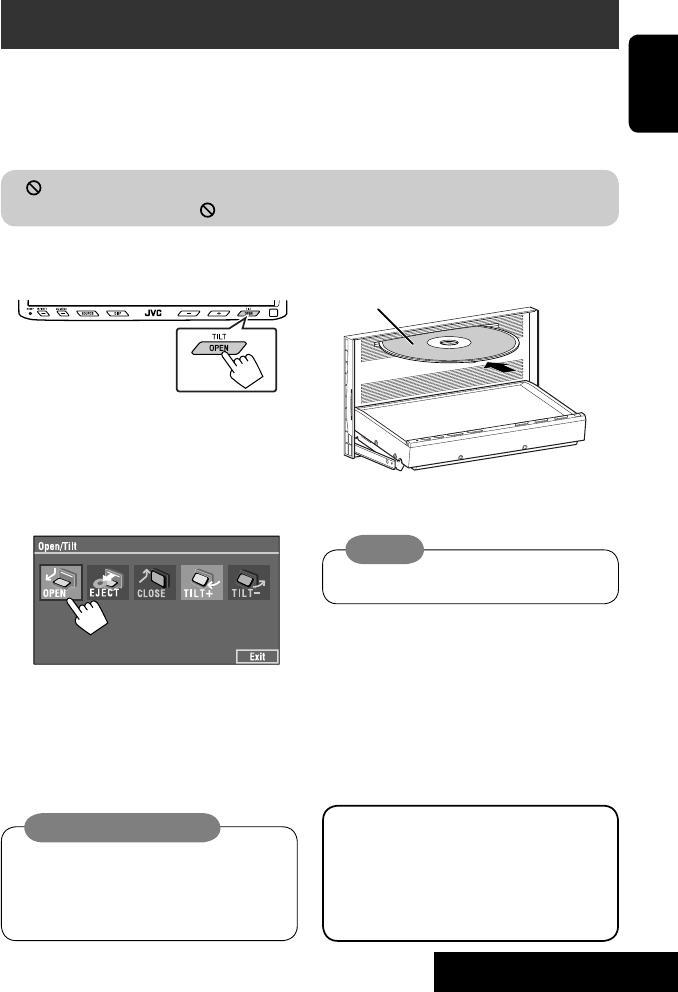
• [OPEN]: Open the monitor panel.
• [EJECT]: Eject the disc.
• [CLOSE]: Close the monitor panel.
• [TILT +/–]: Tilt the monitor panel.
• [Exit]: Erase this screen.
• Shaded icons cannot be used.
• In the explanation, buttons on the touch panel
are indicated inside [ ].
• For details on the touch panel operations, see
each source operation section.
Display <Source Menu> screen.
Display <AV Menu> screen.
☞ page 47
• Display <Open/Tilt> menu.
• Eject the disc and display <Open/Tilt>
menu. [Hold]
• Close the monitor panel when <Open/Tilt>
menu is displayed.
☞ page 47
☞ page 9
☞ page 9
<Open/Tilt> menu
EN_KW-AVX710[J].indb 5EN_KW-AVX710[J].indb 5 07.12.5 11:58:55 AM07.12.5 11:58:55 AM

ENGLISH
6
Basic operations — Remote controller (RM-RK252)
Main elements and features
1 • Turns on the power.
• Attenuates the sound if the power is on.
• Turns off the power if pressed and held (while
the power is on).
2 • Reverse search
• Reverse slow motion (during pause)
3 Adjusts the volume level.
• Does not function as “2nd VOL.”
4 • Displays <Dial Menu> screen.
• Displays <Redial> menu if pressed and held.
• Answers incoming calls.
5 • DVD/DivX 6: Shows the disc menu.
• VCD: Resumes PBC playback.
• DVD-VR: Shows the Original Program screen.
6 Shows the on-screen bar.
• Does not function as “ .“
R03/LR03/AAA
Installing the battery
Insert the batteries into the remote controller by
matching the polarity (+ and –) correctly.
Caution:
Battery shall not be exposed to excessive heat such
as sunshine, fire or the like.
• If the range or effectiveness of the remote controller
decreases, replace both batteries.
Before using the remote controller:
• Aim the remote controller directly at the remote
sensor on the unit.
• DO NOT expose the remote sensor to bright light
(direct sunlight or artificial lighting).
The unit is equipped with the steering wheel
remote control function.
• See the Installation/Connection Manual (separate
volume) for connection.
EN_KW-AVX710[J].indb 6EN_KW-AVX710[J].indb 6 07.12.5 11:58:55 AM07.12.5 11:58:55 AM

7
ENGLISH
INTRODUCTION
p • Forward search
• Forward slow motion (during pause)
q Selects the source.
w For disc operations:
Starts playback/pauses.
For Bluetooth operations:
• Answers incoming calls.
• Starts playback/pauses. (for audio player
operation).
e Changes the aspect ratio of the playback
pictures.
r “TUNER”/”SAT”/”HD Radio”: Selects the bands.
“DISC”: Stops playback.
“Bluetooth PHONE”: Ends the call.
“Bluetooth AUDIO”: Starts playback/pauses.
t VCD: Returns to the PBC menu.
y • DVD Video/DivX 6: Shows the disc menu.
• VCD: Resumes PBC playback.
• DVD-VR: Shows the Playlist screen.
u • Makes selection/settings.
• @ / #: Skips back or forward by five minutes
for DivX/MPEG1/MPEG2.
• % / fi: Changes discs for “CD-CH.”
i*3 • Switches number entry mode for “DISC.”
• Erases the misentry after entering a wrong
number.
• Does not function as “SURROUND.”
o*3 Number buttons
• Enters numbers.
• “TUNER”/”SAT”/”HD Radio”: Selects the preset
station directly.
*1 Functions as a number button only (see o ).
*2 Not used for this unit.
*3 Functions when pressed with SHIFT.
7 Functions with other buttons (see i and o).
8 Changes the display information.
9 For disc operations:
• 5 / ∞:
DVD: Selects the title.
DVD-VR: Selects the program/Playlist.
Other discs (except VCD/CD): Selects the
folders.
• 4 / ¢:
– Press briefly: reverse skip/forward skip
– Press and hold: reverse search/forward
search
For FM/AM and HD Radio operations:
• 5 / ∞:
FM/AM: Selects the preset stations.
HD Radio: Selects a multicast channel.
• 4 / ¢: Functions to search for stations.
– Press briefly: Auto Search
– Press and hold: Manual Search
For satellite tuner operations:
• 5 / ∞: Selects the categories.
• 4 / ¢:
– Selects a channel rapidly if pressed and held.
– Selects a channel if pressed.
For Apple iPod operations:
• ∞: Starts playback/pauses
• 5: Enters the main menu (then 5 / ∞
/ 4 / ¢ work as menu selecting
buttons).
In the main menu:
• 5: Returns to the previous menu.
• ∞: Confirms the selection.
• 4 / ¢
– Press briefly: Selects an item.
– Press and hold: Skips ten items at a time.
For Bluetooth operations:
• 4 / ¢: reverse skip/forward skip (for
audio player operation)
EN_KW-AVX710[J].indb 7EN_KW-AVX710[J].indb 7 07.12.5 11:58:56 AM07.12.5 11:58:56 AM

8
ENGLISH
You can cancel the demonstration on the screen and set
the clock.
• Non-available items will be shaded on the AV Menu
screens.
Indication language:
In this manual, English indications are used
for purpose of explanation. You can select the
indication language. (☞ page 49)
~ Turn on the power.
Ÿ Display <AV Menu> screen.
! Display <Setup> menu.
⁄ Cancel the demonstration.
Select <Off>.
@ Set the clock settings.
¤ Finish the procedure.
Before operating the unit
Moves to the succeeding menu page
Moves to the preceding menu page
Return to the previous screen.
EN_KW-AVX710[J].indb 8EN_KW-AVX710[J].indb 8 07.12.5 11:58:57 AM07.12.5 11:58:57 AM

OPERATIONS
9
ENGLISH
Changing the display
information
• Available display information varies among the
playback sources.
On the monitor panel only:
• Each time you press DISP, the display changes to
show the various information.
Ex. When the playback source is a DivX disc.
Selecting the playback source
• Available sources depend on the external
components you have connected, media you have
attached, and the <Input> settings you have made
(☞ page 52).
On the touch panel:
On the monitor panel:
TUNER or HD Radio = SAT = DISC (DVD/VCD/CD)
=CD-CH, iPod, or EXT-IN = Bluetooth PHONE
= Bluetooth AUDIO = AV-IN = (back to the
beginning)
• You cannot select these sources if they are not ready.
Exit
Source information screen
Clock time in large numbers
Navigation screen
(When <Navigation> is
selected for <AV Input>)
(☞ page 52)
Back to the beginning
Playback picture screen
(only for video sources)
Track list
Common operations
EN_KW-AVX710[J].indb 9EN_KW-AVX710[J].indb 9 07.12.5 11:58:57 AM07.12.5 11:58:57 AM

10
ENGLISH
When an FM stereo broadcast is
hard to receive
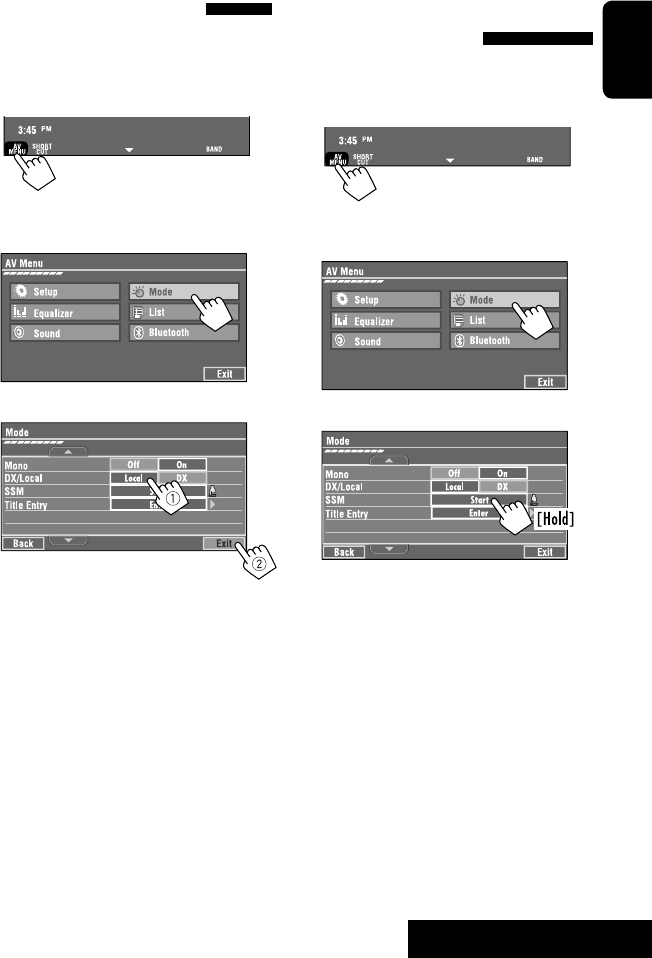
1 Press [AV MENU].
• You can also use AV MENU on the monitor panel.
2 Press [Mode].
Listening to the radio
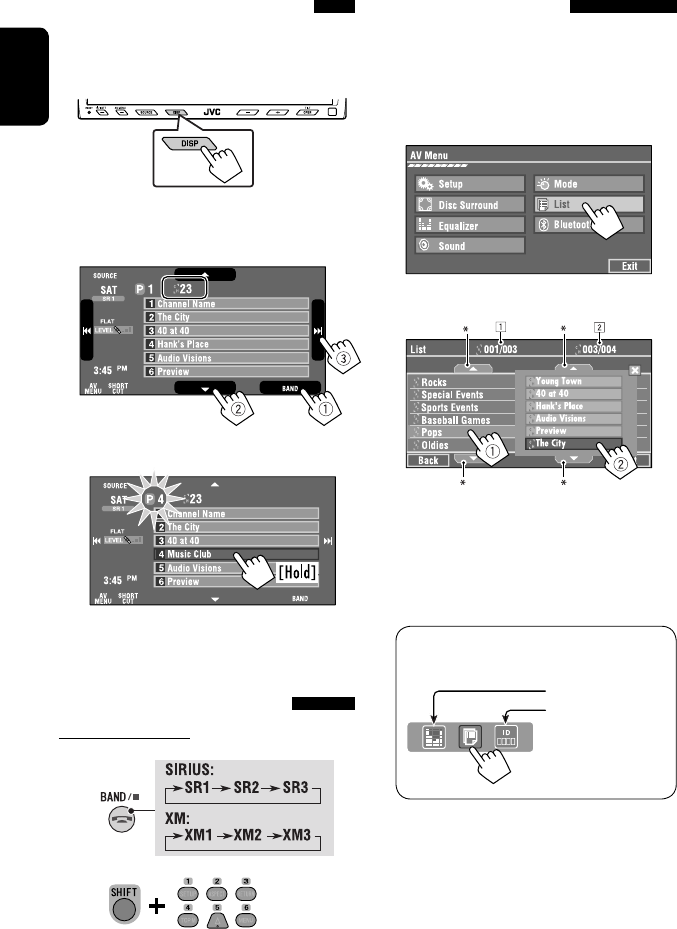
~ Press [SOURCE], then press [TUNER]. (☞ page 9)
• You can also use SOURCE on the monitor panel. Press it repeatedly.
Ÿ Press [BAND].
! Press [4] or [¢] to search for a station—Auto Search.
• Manual Search: Hold either [4]or [¢] until “Manual Search” appears on the screen, then press it
repeatedly.
• The ST indicator lights up when receiving an FM stereo broadcast with sufficient signal strength.
3
Reception improves, but stereo effect will be lost.
• The MONO indicator lights up.
To restore stereo effect, select <Off>.
Preset no.
Band
Tuner indicators
Assigned station name (☞ page 46). If no name is assigned,
the frequency of the station is displayed instead.
☞ page 9
Sound mode
(☞ page 45)
☞ page 45
: Buttons on the
touch panel. In
the explanation,
they are
indicated inside
[ ].
EN_KW-AVX710[J].indb 10EN_KW-AVX710[J].indb 10 07.12.5 11:58:58 AM07.12.5 11:58:58 AM
OPERATIONS
11
ENGLISH
FM station automatic presetting
—SSM (Strong-station
Sequential Memory)
This function works only for FM bands.
You can preset six stations for each band.
1 Press [AV MENU].
• You can also use AV MENU on the monitor panel.
2 Press [Mode].
3
Local FM stations with the strongest signals are
searched and stored automatically in the FM band.
Tuning in to stations with
sufficient signal strength
This function works only for FM bands. Once you have
activated this function (selected <Local>), it always
works when searching for FM stations.
1 Press [AV MENU].
• You can also use AV MENU on the monitor panel.
2 Press [Mode].
3
Only stations with sufficient signal strength will be
detected.
• The DX indicator goes off, then the LO indicator
lights up.
EN_KW-AVX710[J].indb 11EN_KW-AVX710[J].indb 11 07.12.5 11:58:59 AM07.12.5 11:58:59 AM
12
ENGLISH
Selecting a preset station
On the remote:
1
2
On the unit:
• To select directly on the touch panel
• To select from the Preset List
1
2
or
Hold
Manual presetting
Ex.: Storing FM station of 92.5 MHz into preset number
4 of the FM1 band.
1 Display the Preset List.
2 Tune in to a station you want to preset.
3 Select a preset number.
The station selected in step 2 is now stored in
preset number 4.
[Hold]
EN_KW-AVX710[J].indb 12EN_KW-AVX710[J].indb 12 07.12.5 11:58:59 AM07.12.5 11:58:59 AM
OPERATIONS
13
ENGLISH
~ Open the monitor panel.
<Open/Tilt> menu is displayed.
• By pressing and holding the button, you can
open the monitor panel and eject the disc.
Ÿ Press [OPEN].
Disc operations
The disc type is automatically detected, and playback starts automatically (for some discs: automatic start depends
on its internal program).
If a disc does not have any disc menu, all tracks on it will be played repeatedly until you change the source or eject
the disc.
If “ ” appears on the screen, the unit cannot accept the operation you have tried to do.
• In some cases, without showing “ ,” operations will not be accepted.
Label side
Caution on volume setting:
Discs produce very little noise compared with other
sources. Lower the volume before playing a disc
to avoid damaging the speakers by the sudden
increase of the output level.
When playing back a multi-channel encoded disc,
the multi-channel signals are downmixed.
• You can fully enjoy multi-channel sound by
connecting an amplifier or a decoder compatible
with these multi-channel sources. (☞ also page
61)
! Insert a disc.
Monitor panel closes automatically.
If not, press [CLOSE].
Caution:
Do not place your finger behind the monitor panel.
EN_KW-AVX710[J].indb 13EN_KW-AVX710[J].indb 13 07.12.5 11:59:00 AM07.12.5 11:59:00 AM

14
ENGLISH
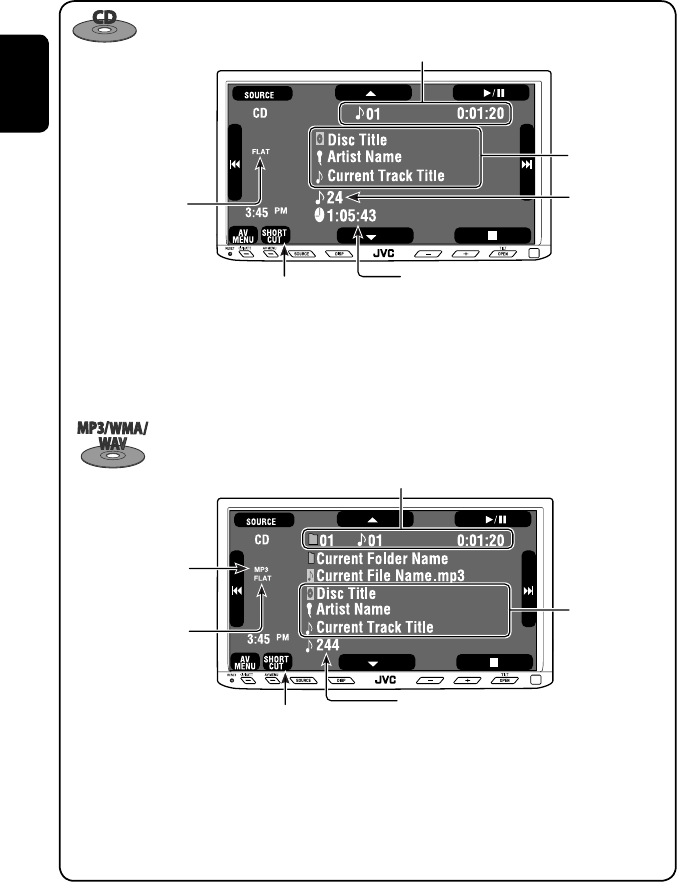
While playing the following discs, press .
• Each time you press the button, the display changes to show the different information. (☞ page 9)
Audio format
DVD Video: Title no./Chapter no./Playing time
DVD-VR: Program no. (or Playlist no.)/Chapter no./Playing time
Playback mode
Disc type *1Sampling frequency/Bit
rate/Recorded signal
channel no.
☞ page 19
[3 / 8] Start and pause playback
[7] Stop playback
[4 ¢] Press: Select chapter
Hold: Reverse/forward search*2
[5 ∞] Select title/program/playlist
*1 DVD-VR also indicates either PRG (program) or PLAY (playlist) playback.
*2 Search speed: x2 ] x10
: Buttons on the touch panel. In the explanation, they are indicated inside [ ].
These buttons also work when they are not shown on the touch panel (while watching the playback pictures
on the screen).
Sound mode
(☞ page 45)
EN_KW-AVX710[J].indb 14EN_KW-AVX710[J].indb 14 07.12.5 11:59:01 AM07.12.5 11:59:01 AM

OPERATIONS
15
ENGLISH
Track no./Playing time
[3 / 8] Start and pause playback
[7] Stop playback
[4 ¢] Press: Select track
Hold: Reverse/forward search*2
For DivX/MPEG1/MPEG2: Folder no./Track no./Playing time
For JPEG: Folder no./File no.
[3 / 8] Start and pause playback
[7] Stop playback
[4 ¢] Press: Select track
Hold: Reverse/forward search for DivX/MPEG1/MPEG2 *1
[5 ∞] Press: Select folder
Hold: Display Folder list
While playing the following discs, press .
• Each time you press the button, the display changes to show the different information (☞ page 9).
Disc type
☞ page 19
☞ page 19
The PBC indicator
lights up when PBC is
in use.
Total track no.
included on the
disc
Total track no.
included on the
disc
Total playing time
Sound mode
(☞ page 45)
Sound mode
(☞ page 45)
*1 Search speed: ¡1 ] ¡2
*2 Search speed: x2 ] x10
EN_KW-AVX710[J].indb 15EN_KW-AVX710[J].indb 15 07.12.5 11:59:01 AM07.12.5 11:59:01 AM
16
ENGLISH
Track no./Playing time
Only for CD Text *3
Folder no./Track no./Playing time
Audio format
(MP3/WMA/WAV)
☞ page 19
*3 “No Name” appears for conventional CDs.
*4 Search speed: x2 ] x10
Tag data appears
only when it is
recorded.
Sound mode
(☞ page 45)
☞ page 19
[3 / 8] Start and pause playback
[7] Stop playback
[4 ¢] Press: Select track
Hold: Reverse/forward search*4
[5 ∞] Press: Select folder
Hold: Display Folder list
[3 / 8] Start and pause playback
[7] Stop playback
[4 ¢] Press: Select track
Hold: Reverse/forward search*4
Total track no.
included on the disc
Total playing time
Total track no. included on the disc
Sound mode
(☞ page 45)
EN_KW-AVX710[J].indb 16EN_KW-AVX710[J].indb 16 07.12.5 11:59:02 AM07.12.5 11:59:02 AM

OPERATIONS
17
ENGLISH
Touch the screen (center portion).
Operation buttons on the screen
You can display the following operation buttons while watching the playback pictures on the screen.
• While the operation buttons are displayed, aspect ratio is fixed to <Full>. (☞ page 49)
• If no operation is done for about five seconds, the operation buttons disappear (except when a disc menu is
displayed).
Touch [KEY].
☞ pages 20 to 24 on how the operation buttons
particularly work for a variety of the discs
A
[SOURCE] Display <Source Menu> screen
[AV MENU] Display <AV Menu> screen
[SHORT CUT] Display the Short Cut buttons
[3 / 8] Start and pause playback
[7] Stop playback
[4 ¢] Press: Select track
Hold: Reverse/forward search
[5 ∞] Select folders
• The above buttons also work when they are not shown on
the screen (while watching the playback picture).
* While a disc menu is played back for DVD, [KEY] is
automatically displayed. On the disc menu, you can select a
menu item directly by touching it on the screen.
B
For DVD/VCD/DivX menu operation playback
[2 3 5 ∞] Select the menu items
[ENT] Confirm the selection
[TOP MENU] Display the disc menu
[MENU] Display the disc menu
[RETURN] Return to the previous menu or display the
menu (only for VCD with PBC)
C
For entering the numbers
[DIRECT CLR] • Switch between chapter/track entry and
title/group/folder entry
• Erase the last entry when you enter a
wrong number
[0]–[9]=[ENT]
Enter numbers
Ex.: To enter “105,” press [1], [0], [5], then [ENT]
*
Touch [KEY].
Touch [KEY].
To erase the operations, touch the screen again.
EN_KW-AVX710[J].indb 17EN_KW-AVX710[J].indb 17 07.12.5 11:59:02 AM07.12.5 11:59:02 AM

18
ENGLISH
1
• You can also use AV MENU on the monitor panel.
2
3
When one of the playback modes is selected, the
corresponding indicator lights up on the source
information screen.
To cancel, select <Off>.
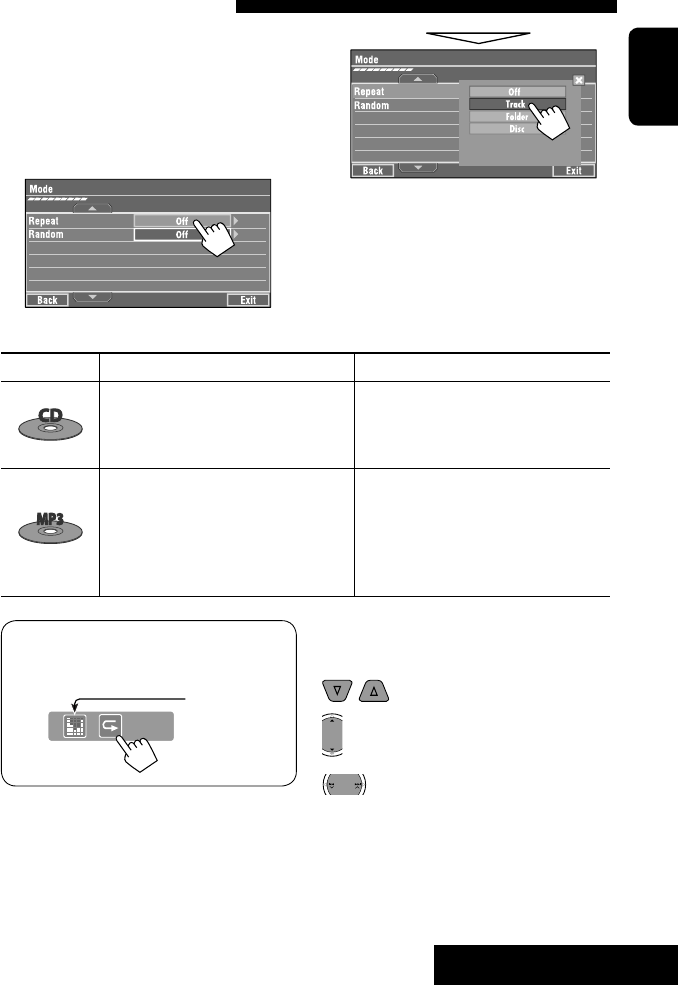
Selecting playback modes
You can use the following playback modes—Repeat or Random.
Ex.: To select Track Repeat
Disc type Repeat Random
Chapter: Repeats current chapter
Title: Repeats current title —
Chapter: Repeats current chapter
Program: Repeats current program (not
available for Playlist playback)
—
Track: Repeats current track
Folder: Repeats current folder
Folder: Randomly plays all tracks of current
folder, then tracks of next folders
Disc (All): Randomly plays all tracks
Folder: Repeats current folder —
Track: Repeats current track (PBC not in
use)
Disc (All): Randomly plays all tracks (PBC not
in use)
Track: Repeats current track*1Disc (All): Randomly plays all tracks
Track: Repeats current track*1
Folder: Repeats all tracks of the current
folder
Folder: Randomly plays all tracks of current
folder, then tracks of next folders
Disc (All): Randomly plays all tracks
*1 You can also use [SHORT CUT] to turn on and off Track Repeat.
EN_KW-AVX710[J].indb 18EN_KW-AVX710[J].indb 18 07.12.5 11:59:03 AM07.12.5 11:59:03 AM

OPERATIONS
19
ENGLISH
Prohibiting disc ejection
You can lock a disc in the loading slot.
To cancel the prohibition, repeat the same
procedure to select <EJECT OK?>.
Using Short Cut Icons
You can easily access the some frequently used
functions by using [SHORT CUT] on the touch panel.
1
2
• For video software:
• For audio software:
Selecting tracks on the list
If a disc includes folders, you can display the Folder/
Track (File) Lists, then start playback.
1
• You can also use AV MENU on the monitor panel.
2
3 Select a folder (1), then a track (2).
Selected track starts playing. (* Press to move to
the previous/next pages of the list)
1 Current folder list number/total folder list
number
2 Current track list number/total track list
number of the current folder
You can easily access the Track List by pressing DISP
on the monitor panel.
Selected track starts playing.
at the same time
Sound mode
(☞ page 45)
Turn on or off Track Repeat
(Repeat play: ☞ page 18)
Aspect ratio
(☞ page 49)
EN_KW-AVX710[J].indb 19EN_KW-AVX710[J].indb 19 07.12.5 11:59:04 AM07.12.5 11:59:04 AM

20
ENGLISH
Stop playback.
Start playback/pause (if pressed during playback).
Reverse/forward search*1 (No sound can be heard.)
Slow motion during pause*2 (No sound can be heard.)
Press: Select chapter (during playback or pause).
Hold: Reverse/forward search*3 (No sound can be heard.)
Select title (during playback or pause).
Select aspect ratio.
Select chapter.
Select title (when not playing).
Select title (during playback or pause).
Using menu driven features
1
2 Select an item you want to start playback.
3
*1 Search speed: x2 ] x5 ] x10 ] x20 ] x60
*2 Slow motion speed: 1/32 ] 1/16 ] 1/8 ] 1/4 ] 1/2
*3 Search speed: x2 ] x10
Operations using the remote controller—RM-RK252
Also functions as CLR (clear):
Erases a misentry if pressed
while holding SHIFT.
You can change the following items using the on-screen bar—audio language, audio stream, audio channel,
subtitle language, view angle, etc. (☞ pages 25 and 26)
twice
EN_KW-AVX710[J].indb 20EN_KW-AVX710[J].indb 20 07.12.5 11:59:05 AM07.12.5 11:59:05 AM

OPERATIONS
21
ENGLISH
Stop playback.
Start playback/pause (if pressed during playback).
Reverse/forward search*4 (No sound can be heard.)
Forward slow motion during pause*5 (No sound can be heard.)
• Reverse slow motion does not work.
Press: Select chapter (during playback or pause).
Hold: Reverse/forward search*6
Select program.
Select playlist (during playback or pause).
Select aspect ratio.
Select chapter.
Select program (when not playing).
Select program/playlist (during playback or pause).
Using Original Program/Playlist screens ( ☞ page 25)
1For Original Program
For Playlist
2 Select an item you want to start playback.
3 To erase the screen.
*4 Search speed: x2 ] x5 ] x10 ] x20 ] x60
*5 Slow motion speed: 1/32 ] 1/16 ] 1/8 ] 1/4 ] 1/2
*6 Search speed: x2 ] x10
twice
EN_KW-AVX710[J].indb 21EN_KW-AVX710[J].indb 21 07.12.5 11:59:05 AM07.12.5 11:59:05 AM

22
ENGLISH
Also functions as CLR (clear):
Erases a misentry if pressed
while holding SHIFT.
Stop playback.
Start playback/pause (if pressed during playback).
Reverse/forward search*1 (No sound can be heard.)
Press: Select track
Hold: Reverse/forward search*2 (No sound can be heard.)
Select folder.
Select aspect ratio.
Select track (within the same folder).
Select folder.
While playing...
Reverse/advance the scenes by five minutes.
For DivX6: Using menu driven features
1
2 Select an item you want to start playback.
3
*1 Search speed: ¡1 ] ¡2 ] ¡3
*2 Search speed: ¡1 ] ¡2
Current playback position
twice
2nd press 2nd press1st press 1st press 3rd press
EN_KW-AVX710[J].indb 22EN_KW-AVX710[J].indb 22 07.12.5 11:59:06 AM07.12.5 11:59:06 AM

OPERATIONS
23
ENGLISH
Stop playback.
Start playback/pause. (Slide show: each file is shown for a few seconds.)
Shows the current file until you change it if pressed during Slide show.
Select file.
Select folder.
Select aspect ratio.
Select file (within the same folder).
Select folder.
During PBC playback...
Select an item on the menu.
To return to the previous menu, press
To cancel PBC playback
1
2 Select the desired track.
• To resume PBC, press
Stop playback.
Start playback/pause (if pressed
during playback).
Reverse/forward search*3
Forward slow motion during pause*4
(No sound can be heard.)
• Reverse slow motion does not work.
Press: Select track.
Hold: Reverse/forward search*5 (No
sound can be heard.)
Select aspect ratio.
twice
*3 Search speed: x2 ] x5 ] x10 ] x20 ] x60
*4 Slow motion speed: 1/32 ] 1/16 ] 1/8 ] 1/4 ] 1/2
*5 Search speed: x2 ] x10
Select track.
EN_KW-AVX710[J].indb 23EN_KW-AVX710[J].indb 23 07.12.5 11:59:07 AM07.12.5 11:59:07 AM
24
ENGLISH
Stop playback.
Start playback/pause (if pressed during playback).
Reverse/forward search*1
Press: Select track.
Hold: Reverse/forward search*2
Select track.
*1 Search speed: x2 ] x5 ] x10 ] x20 ] x60
*2 Search speed: x2 ] x10
Stop playback.
Start playback/pause (if pressed during playback).
Reverse/forward search*3
Press: Select track.
Hold: Reverse/forward search*4
Select folder.
Select track (within the same folder).
Select folder.
*3 Search speed: x2 ] x5 ] x10 ] x20 ] x60
*4 Search speed: x2 ] x10
twice
Also functions as CLR (clear):
Erases a misentry if pressed
while holding SHIFT.
EN_KW-AVX710[J].indb 24EN_KW-AVX710[J].indb 24 07.12.5 11:59:08 AM07.12.5 11:59:08 AM

OPERATIONS
25
ENGLISH
Operations using the on-screen
bar
These operations are possible on the screen using
the remote controller, while playing the following
discs—DVD/VCD/DivX/MPEG1/MPEG2/JPEG.
1 Display the on-screen bar. (☞page 26)
Ex. For DVD-Video
2 Select an item.
3 Make a selection.
If a pop-up menu appears...
• For entering time/numbers...
:
Move the entry position
:
Select a number
To remove the on-screen bar
Using the list screens
You can use Original Program or Playlist
screen anytime while playing DVD-VR with its data
recorded.
1 Display the Original Program/Playlist screen.
2 Select an item you want.
To erase the screen
1 Original Program/Playlist number
2 Recording date
3 Recording source (TV station, the input terminal of
the recording equipment, etc.)
4 Start time of recording
5 Title of the program/playlist*
6 Highlight bar (current selection)
7 Creating date of playlist
8 Total number of chapters included in the playlist
9 Playback time
* The title of the original program or playlist may not be
displayed depending on the recording equipment.
EN_KW-AVX710[J].indb 25EN_KW-AVX710[J].indb 25 07.12.5 11:59:08 AM07.12.5 11:59:08 AM

26
ENGLISH
Information
Operation
On-screen bar
5 Time indication
Elapsed playing time of the disc
Remaining title time (for DVD)
Remaining disc time (for others)
Elapsed playing time of the current
chapter/track *2
Remaining time of the current
chapter/track *2
6 Playback status
Play
Reverse/forward search
Reverse/forward slow-motion
Pause
Stop
7 Operation icons
Change time indication (see 5)
Time Search (Specify a certain
scene by entering time.)
Title Search (by its number)
Chapter Search (by its number)
Track Search (by its number)
Repeat play *1
Random play *1
Change the audio language, audio
stream, or audio channel
Change or erase the subtitle
language
Change the view angle
*1 ☞ page 18
*2 Not applicable for DVD-VR
Above example is of DVD Video. Items shown on the bar vary due to the disc type.
1 Disc type
2 • DVD: Audio signal format
• VCD: PBC
3 Playback mode *1
DVD Video:
C. RPT: Chapter repeat
T. RPT: Title repeat
DVD-VR:
C. RPT: Chapter repeat
PG. RPT: Program repeat
DivX/MPEG1/MPEG2:
T. RPT: Track repeat
F. RPT: Folder repeat
F. RND: Folder random
A. RND: All (Disc) random
JPEG:
F. RPT: Folder repeat
VCD:
T. RPT: Track repeat
A. RND: All (Disc) random
4 Playback information
Current title/chapter
Current program/chapter
Current Playlist/chapter
Current track
Current folder/track
Current folder/file
EN_KW-AVX710[J].indb 26EN_KW-AVX710[J].indb 26 07.12.5 11:59:09 AM07.12.5 11:59:09 AM
27 EXTERNAL DEVICES
ENGLISH
Bluetooth® operations — Cellular phone/audio player
For Bluetooth operations, it is required to connect the
Bluetooth Adapter (KS-BTA200) to the CD changer jack
on the rear.
• Refer also to the instructions supplied with the
Bluetooth Adapter and the Bluetooth device.
• Refer to the list (included in the box) to see the
countries where you may use the Bluetooth®
function.
To use a Bluetooth device through the unit (“Bluetooth
PHONE” and “Bluetooth AUDIO”) for the first time,
you need to establish Bluetooth wireless connection
between the unit and the device.
• Once the connection is established, it is registered in
the unit even if you reset your unit. Up to five devices
can be registered in total.
• Only one device can be connected at a time for each
source (“Bluetooth PHONE” and “Bluetooth AUDIO”).
Connecting a new Bluetooth
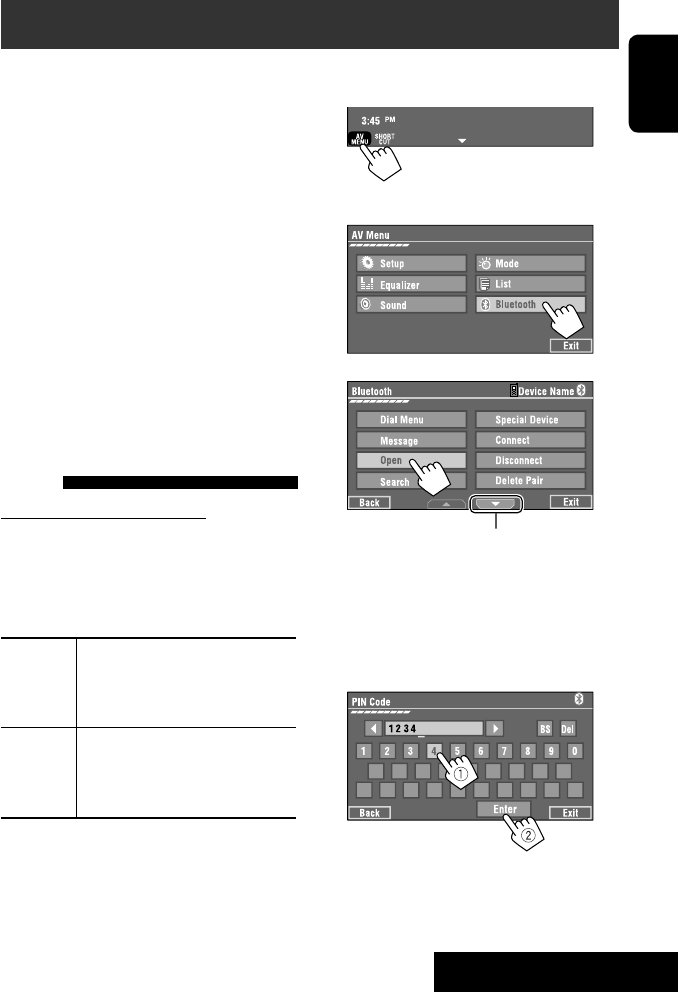
device
Registration (Pairing) methods
Use either of the following items in <Bluetooth>
menu to register and establish the connection with a
device.
• Select “Bluetooth PHONE” or “Bluetooth AUDIO” as
the source to operate <Bluetooth> menu.
Open Make the unit ready to establish
a new Bluetooth connection.
The connection is established by
operating the Bluetooth device.
Search Make the unit ready to establish
a new Bluetooth connection.
The connection is established by
operating this unit.
To register using <Open>
Preparation:
Operate the Bluetooth device to turn on its Bluetooth
function.
1 • Make sure “New Device” is selected. If not, press
[5] or [∞] to select it.
• You can also use AV MENU on the monitor panel.
2
3
4 Enter a PIN (Personal Identification
Number)* code to the unit.
• You can enter any number you like (1-digit to
16-digit number).
* Some devices have their own PIN code. Enter the
specified PIN code to the unit.
Go to other menu items
Continued on the next page
EN_KW-AVX710[J].indb 27EN_KW-AVX710[J].indb 27 07.12.5 11:59:11 AM07.12.5 11:59:11 AM

28
ENGLISH
You can enter [0] – [9] only.
• [BS]: Erases the character before the cursor.
• [Del]: Erases the character on the cursor.
• [Enter]: Confirms the entry.
5 Operate the Bluetooth device to connect
while “Open...” is displayed on the screen.
Enter the same PIN code (as entered in the above
step) on the device to be connected.
Now connection is established and you can use the
device through the unit.
The device remains registered even after you
disconnect the device. Use <Connect> (or activate
<Auto Connect>) to connect the same device
from next time (☞ the following, and page 55).
To register using <Search>
• Make sure “New Device” is selected. If not, press [5]
or [∞] to select it.
1 Press [AV MENU] on the touch panel or AV
MENU on the monitor panel.
2 Press [Bluetooth].
3 Press [Search].
The unit searches for available devices and displays
the list of them. (If no available device is detected,
“Device Unfound” appears.)
4 Select a device you want to connect.
5 Enter the specific PIN code of the device to
the unit.
• Refer to the instructions supplied with the device
to check the PIN code.
6 Operate the Bluetooth device to connect
while “Connecting...” is displayed on the
screen.
Now connection is established and you can use the
device through the unit.
To connect a special device <Special
Device>
1 Press [AV MENU] on the touch panel or AV
MENU on the monitor panel.
2 Press [Bluetooth].
3 Press [Special Device].
The unit displays the list of the preset devices.
4 Select a device you want to connect.
5 Use <Open> (or <Search>) to connect.
To connect/disconnect a registered
device
1 Select “Bluetooth PHONE” or “Bluetooth
AUDIO,” then select a registered device you
want to connect/disconnect.
2 Press [AV MENU] on the touch panel or AV
MENU on the monitor panel.
3 Press [Bluetooth].
4 Press [Connect] or [Disconnect].
• Select <Connect> to connect the selected
device.
• Select <Disconnect> to disconnect the selected
device.
To delete a registered device
1 Select “Bluetooth PHONE” or “Bluetooth
AUDIO,” then select a registered device you
want to delete.
2 Press [AV MENU] on the touch panel or AV
MENU on the monitor panel.
3 Press [Bluetooth].
4 Press [Delete Pairing].
Confirmation screen appears. Press [Yes].
EN_KW-AVX710[J].indb 28EN_KW-AVX710[J].indb 28 07.12.5 11:59:11 AM07.12.5 11:59:11 AM
29 EXTERNAL DEVICES
ENGLISH
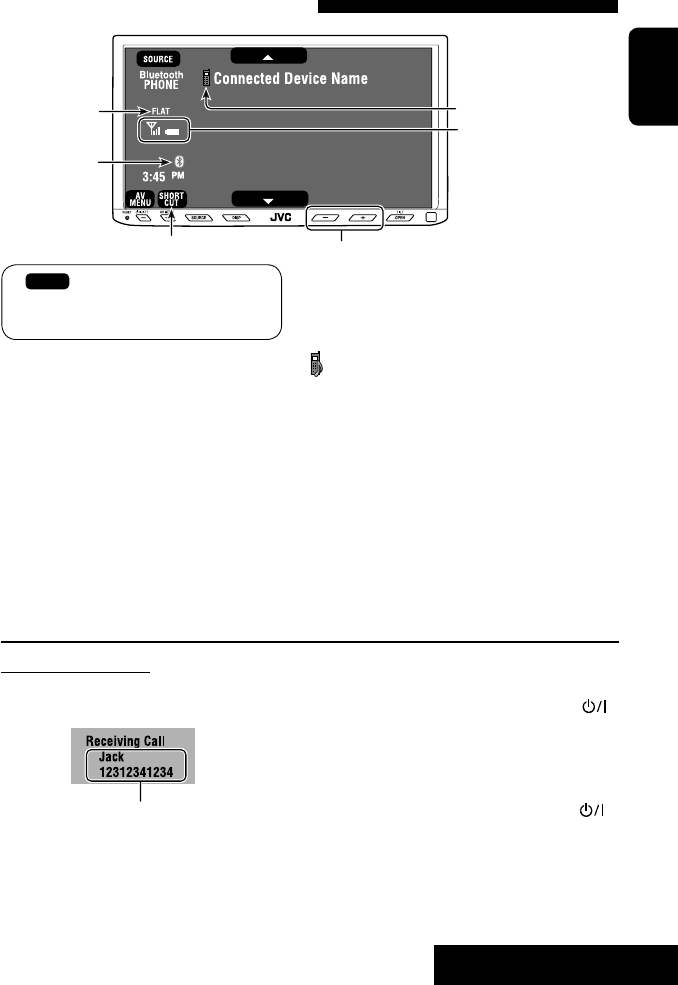
Using the Bluetooth cellular phone
Adjust the volume of the incoming calls.*2
When a call comes in...
The source is changed to “Bluetooth PHONE”
automatically.
Name and phone number (if acquired)
When <Auto Answer> is activated...
The unit answers the incoming call automatically.
(☞ page 55)
☞ page 31
When <Auto Answer> is deactivated...
To answer the incoming call
• Press any button on the monitor panel (except
/ATT or +/–).
• Press the message displayed on the touch panel.
To end the call
• Hold any button on the monitor panel (except
/ATT or +/–).
• Hold the message displayed on the touch panel.
• You can adjust the microphone volume. (☞ page 55)
~ Press [SOURCE], then press [Bluetooth PHONE]. (☞ page 9)
• You can also use SOURCE on the monitor panel. Press it repeatedly.
Ÿ Press [AV MENU].
• You can also use AV MENU on the monitor panel.
! Press [Bluetooth].
⁄ Establish the connection with a device, then make a call (or settings using <Bluetooth>
menu).
☞ page 55
Sound mode
(☞ page 45) Status of the device
Signal strength/Battery
remainder
(only when the information
comes from the device)
[AV MENU] Hold: Activates <Voice Dialing> function
[5 ∞] Select the registered device
(“New Device” appears when a new device can be registered.)
The Bluetooth icon
lights up when
the adapter is
connected.
: Buttons on the touch panel. In the
explanation, they are indicated inside
[ ].
*1 When a cellular phone with audio function is connected, appears.
*2 This adjustment does not affect the volume level of the other sources.
*1
EN_KW-AVX710[J].indb 29EN_KW-AVX710[J].indb 29 07.12.5 11:59:12 AM07.12.5 11:59:12 AM
30
ENGLISH
3
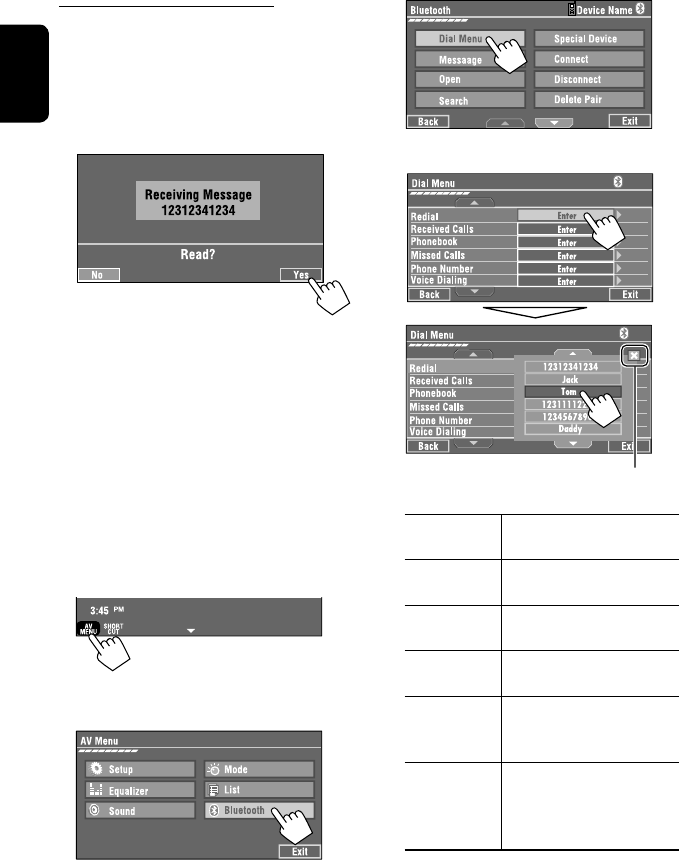
4 Select a calling method, then call.
Redial Shows the list of the phone
numbers you have dialed.
Received Calls Shows the list of the received
calls.
Phonebook Shows the phone book of the
connected cellular phone.
Missed Calls Shows the list of the missed
calls.
Phone
Number
Shows the phone number entry
screen = “Entering a phone
number” (☞ page 31).
Voice Dialling (Only when the connected
cellular phone has the voice
recognition system): = Speak
the name you want to call.
When a Text Message comes in...
If the cellular phone is compatible with Text Message,
you can read the messages on the screen.
• You cannot edit or send a message through the unit.
When <Message Info> is set to <Auto>...
The unit rings and the following screen is displayed to
inform you of a message arrival. (☞ page 55)
To read the message, press [Yes].
The source is changed to “Bluetooth PHONE.”
To read the message later, press [No].
• The message is stored into <Message> =
<Unread>. (☞ page 54)
When <Message Info> is set to <Manual>...
Access the message list to read messages. (☞ pages
54 and 55)
To make a call
1
• You can also use AV MENU on the monitor panel.
2
Cancel
EN_KW-AVX710[J].indb 30EN_KW-AVX710[J].indb 30 07.12.5 11:59:13 AM07.12.5 11:59:13 AM

31 EXTERNAL DEVICES
ENGLISH
To stop ringing (canceling the outgoing call)
Hold any button on the monitor panel (except /ATT
or +/–).
Entering a phone number
• You cannot use the remote controller to enter phone
numbers.
You can enter [0] – [9], [*], [#] (up to 32 numbers)
• [BS]: Erases the character before the cursor.
• [Del]: Erases the character on the cursor.
• [Preset]: Goes to Preset List. You can preset the
entered number by selecting a preset
number. (☞ page 32)
• [Dial]: Calls the entered number.
• You can easily access <Dial Menu> by pressing
[SHORT CUT] on the touch panel, then...
You can also access <Dial Menu> by holding
SOURCE on the monitor panel.
• You can easily activate <Voice Dialing> by
pressing [SHORT CUT] on the touch panel, then...
You can also activate <Voice Dialing> by
holding [AV MENU].
To redial previously dialed numbers
1
2
3
When using the remote controller, you can
display <Redial> menu anytime .
[Hold]
EN_KW-AVX710[J].indb 31EN_KW-AVX710[J].indb 31 07.12.5 11:59:14 AM07.12.5 11:59:14 AM

32
ENGLISH
To call a preset number
1
2
You can use the following buttons on the remote
controller for the Bluetooth phone operations.
Presetting the phone numbers
You can preset up to six phone numbers.
1 Select the phone number you want to preset
from <Phonebook>, <Redial>, <Received
Calls>, or <Missed Calls>.
1 Press [AV MENU] on the touch panel or AV
MENU on the monitor panel.
2 Press [Bluetooth].
3 Press [Dial Menu], then...
Ex.: Selecting <Received Calls>
2 Select a telephone number to store.
3 Select a preset number.
Now “Tom” is stored into preset no. 1.
• Display <Dial Menu> screen/Answer
the incoming call.
• Display the <Redial> menu if pressed
and held (regardless of the current
source).
End the call.
Adjust the volume.
Make a call to the preset numbers.
[Hold]
:
:
:
:
[Hold]
EN_KW-AVX710[J].indb 32EN_KW-AVX710[J].indb 32 07.12.5 11:59:14 AM07.12.5 11:59:14 AM

33 EXTERNAL DEVICES
ENGLISH
Bluetooth Information:
If you wish to receive more information about Bluetooth, visit the following JVC web site: <http://www.
jvc-victor.co.jp/english/car/>
You can use the following buttons on the remote
controller for the Bluetooth audio operations.
Using the Bluetooth audio player
☞ page 45
Sound mode
(☞ page 45)
[3 / 8] [7] Start and pause playback
[4 ¢] Reverse/forward skip
[5 ∞] Select the registered device
(“New Device” appears when a new device can
be registered.*3)
Status of the device
Signal strength/Battery
remainder
(only when the information
comes from the device)
The Bluetooth icon
lights up when
the adapter is
connected.
~ Press [SOURCE], then press [Bluetooth
AUDIO]. (☞ page 9)
• You can also use SOURCE on the monitor
panel. Press it repeatedly.
Ÿ Start playback.
: Buttons on the touch panel. In the
explanation, they are indicated
inside [ ].
*2
*1
*1 When a cellular phone with audio function is connected, appears.
*2 Indicates the button pressed. It may be different from the operation status.
*3 You cannot select “New Device” when a Bluetooth audio player is connected.
Start and pause playback.
Reverse/forward skip
Adjust the volume.
:
:
:
EN_KW-AVX710[J].indb 33EN_KW-AVX710[J].indb 33 07.12.5 11:59:15 AM07.12.5 11:59:15 AM

34
ENGLISH
Preparation:
Make sure <Changer> is selected for <External
Input>. (☞ page 52)
~ Press [SOURCE], then press [CD-CH]. (☞
page 9)
• You can also use SOURCE on the monitor
panel. Press it repeatedly.
Ÿ
• You can also use AV MENU on the monitor
panel.
! Display the Disc List.
Listening to the CD changer
It is recommended to use a JVC MP3-compatible CD changer with your unit.
• You can play only CDs (CD-DA) and MP3 discs.
Folder no./Track no./Playing time
Disc no.
MP3 indicator
☞ page 35
Tag data appears only when it is
recorded.
⁄ Select a disc to start playing.
• If you select an MP3 disc, the Track list of the
current folder appears. You can select a track
and start playing. (☞ also page 19)
• If you select a folder on the list, you can start
playing the first track of the folder.
To go to the other list
Sound mode
(☞ page 45)
[4 ¢] Press: Select track
Hold: Reverse/forward search
[5 ∞] Press: Select folders (only for MP3)
Hold: Display Disc list
Total track no. included on the
disc
Ex. while playing an MP3 disc
: Buttons on the touch panel. In the
explanation, they are indicated inside [ ].
EN_KW-AVX710[J].indb 34EN_KW-AVX710[J].indb 34 07.12.5 11:59:16 AM07.12.5 11:59:16 AM
35 EXTERNAL DEVICES
ENGLISH
When one of the playback modes is selected, the
corresponding indicator lights up on the source
information screen.
To cancel, select <Off>.
You can use following playback modes—Repeat or
Random.
Ex.: To select Track Repeat for an MP3 disc
1 Press [AV MENU] on the touch panel or AV
MENU on the monitor panel.
2 Press [Mode].
3
Selecting playback modes
Disc type Repeat Random
Track: Repeats current track
Disc: Repeats all tracks of the current disc
Disc: Randomly plays all tracks of the
current disc
All: Randomly plays all tracks of all
loaded discs
Track: Repeats current track
Folder: Repeats all tracks of the current
folder
Disc: Repeats all tracks of the current disc
Folder: Randomly plays all tracks of current
folder, then tracks of next folders
Disc: Randomly plays all tracks of the
current disc
All: Randomly plays all tracks of all
loaded discs
You can use the following buttons on the remote
controller to operate the CD changer.
You can easily turn on or off Track Repeat by
pressing [SHORT CUT] on the touch panel, then...
: Select disc.
: Select folder (MP3 only).
• Press: Select track.
• Hold: Reverse/forward search
☞ page 45
EN_KW-AVX710[J].indb 35EN_KW-AVX710[J].indb 35 07.12.5 11:59:16 AM07.12.5 11:59:16 AM

36
ENGLISH
For SIRIUS Radio
Activate your subscription after connection:
1 Turn on the power.
2 Select “SAT” for the source.
• ☞ also page 9.
The SIRIUS Satellite radio starts updating all the
SIRIUS channels. (☞ “GCI update” column below.)
• Once completed, SIRIUS Satellite radio tunes in
to the preset channel, CH184.
3 Check your SIRIUS ID, see page 51.
4 Contact SIRIUS on the internet at <http://
activate.siriusradio.com/> to activate your
subscription, or you can call SIRIUS toll-free
at 1-888-539-SIRIUS (7474).
“Subscription Updated Press Any Key to Continue”
appears on the monitor once subscription has been
completed.
For XM Radio
Activate your subscription after connection:
• Only Channel 0, 1, and 247 are available before
activation.
1 Turn on the power.
2 Select “SAT” for the source.
• ☞ also page 9.
The XMDirectTM Universal Tuner Box starts
updating all the XM channels. “Channel 1” is tuned
in automatically. (☞ “GCI update” column below.)
3 Check your XM Satellite radio ID labelled on
the casing of the XMDirectTM Universal Tuner
Box, or tune in to “Channel 0” (see page 37).
4 Contact XM Satellite radio on the internet
at <http://xmradio.com/activation/> to
activate your subscription, or you can call 1-
800-XM-RADIO (1-800-967-2346).
Once completed, the unit tunes in to one of the
available channels (Channel 4 or higher).
Listening to the satellite radio
Before operating, connect either one of the following (separately purchased) to the CD changer jack on the rear of
this unit.
• JVC SIRIUS Satellite radio interface, KS-SRA 100, for listening to SIRIUS Satellite radio.
• JVC Smart Digital Adaptor, XMDJVC 100, for listening to XM Satellite radio.
GCI (Global Control Information) update:
• If channels are updated after subscription, updating starts automatically, and no sound can be heard.
For SIRIUS: “Channel is Updating XX% completed” appears.
For XM : “UPDATING” appears.
• Updating takes a few minutes to complete.
• Do not press any buttons or perform any operations until updating is completed.
EN_KW-AVX710[J].indb 36EN_KW-AVX710[J].indb 36 07.12.5 11:59:17 AM07.12.5 11:59:17 AM
37 EXTERNAL DEVICES
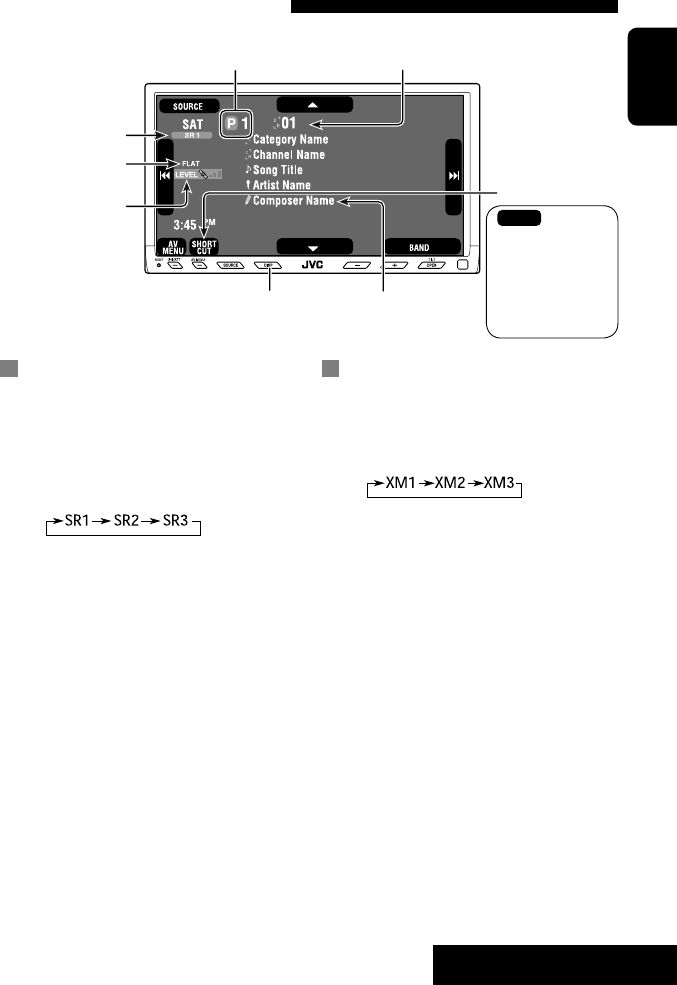
ENGLISH
Preset No.
Band
Signal Reception
indicator
☞ page 9
Sound mode
(☞ page 45) ☞ page 38
: Buttons on the
touch panel. In the
explanation, they
are indicated inside
[ ].
For SIRIUS Radio
~ Press [SOURCE], then press [SAT].
(☞ page 9)
• You can also use SOURCE on the monitor
panel. Press it repeatedly.
Ÿ Press [BAND].
! Press [5] or [∞] to select a category.
• To select a channel from all categories, select
<All>.
⁄ Press [4] or [¢] to make a
channel to listen to.
• Holding either button changes the channel
rapidly.
• While searching, invalid and unsubscribed
channels are skipped.
For XM Radio
~ Press [SOURCE], then press [SAT].
(☞ page 9)
Ÿ Press [BAND].
! Press [5] or [∞] to select a category.
• To select a channel from all categories
(including non-categorised channels), skip
this step.
• If you do not select a channel within 15
seconds, the category selected is canceled.
You can select a channel from all categories
now.
⁄ Press [4] or [¢] to select a
channel to listen to.
• Holding either button changes the channel
rapidly.
• While searching, invalid and unsubscribed
channels are skipped.
Channel No.
Only for SIRIUS
Tuning in to a channel you want
EN_KW-AVX710[J].indb 37EN_KW-AVX710[J].indb 37 07.12.5 11:59:18 AM07.12.5 11:59:18 AM
38
ENGLISH
Storing channels in memory
You can preset six channels for each band.
Ex.: Storing a channel into preset number 4
1 Display the Preset List.
• If you want to select a channel by channel name,
first select a channel, then display the Preset List.
2 Tune in to a station you want to preset.
3 Select a preset number.
The station selected in step 2 is now stored in
preset number 4.
Selecting preset channels
On the remote only:
1
2
Selecting on the lists
You can select a channel using the lists—Category
list/Channel list.
1 Press [AV MENU] on the touch panel or AV
MENU on the monitor panel.
2 Press [List].
3 Select a category (1), then a channel (2)
from the selected category.
* Press to move to the previous/next pages of the
list
1 Current category list number/total category
list number
2 Current channel list number/total channel list
number of the current category
• <List> menu can also be accessed by pressing
[SHORT CUT] on the touch panel, then...
☞ page 45
☞ page 51
(only SIRIUS Satellite
radio)
EN_KW-AVX710[J].indb 38EN_KW-AVX710[J].indb 38 07.12.5 11:59:18 AM07.12.5 11:59:18 AM
39 EXTERNAL DEVICES
ENGLISH
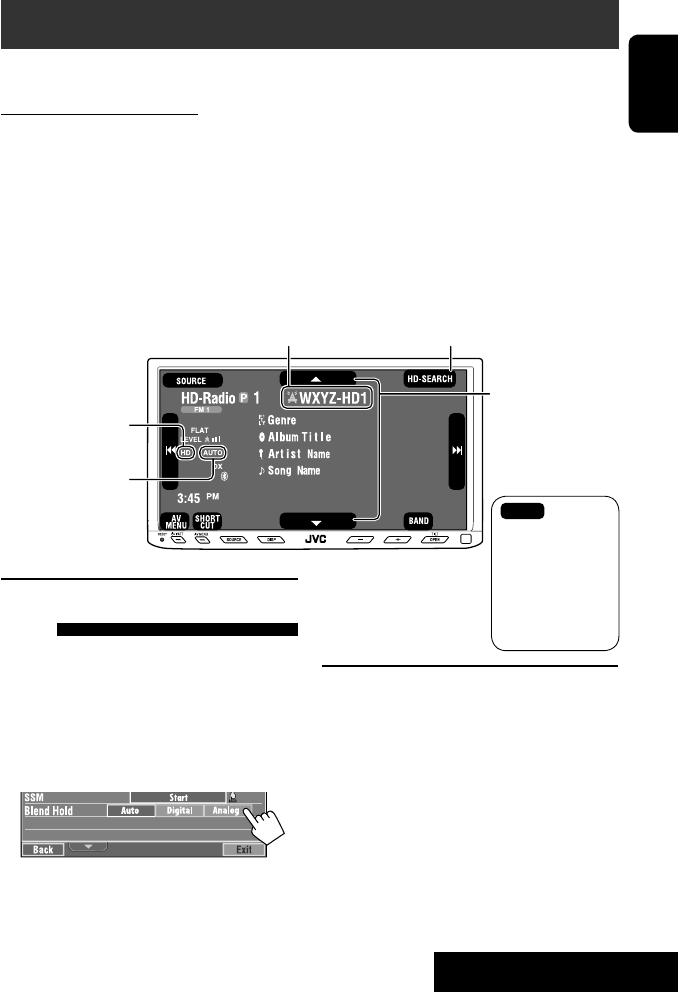
Changing HD Radio reception
mode
While receiving an HD Radio broadcast, the unit tunes
to digital or analog audio automatically due to the
receiving condition.
1 Press [AV MENU].
• You can also use AV MENU on the monitor panel.
2 Press [Mode].
3
• Auto: Switch between digital and analog audio
automatically
• Digital: Tuning to digital audio only
• Analog: Tuning to analog audio only
• If no sound can be heard from the selected setting,
change the setting to ANALOG or DIGITAL.
• The setting automatically changes to AUTO if you
tuned in to or change to another station, or if you
turned off the power.
• This setting cannot take effect for the conventional
FM/AM stations.
• If the radio station forces the reception mode to
digital, the DIGITAL indicator flashes.
Station Call Sign and channel number
HD Radio reception mode
Searching for HD Radio stations only
Flashes first then lights
up when a digital audio
broadcast is tuned in.
Up and down
the HD Radio
multicast
channels.
: Buttons on the
touch panel. In
the explanation,
they are
indicated inside
[ ].
Listening to the HD Radio™ Broadcast
Before operating, connect HD Radio tuner box, KT-HD300 (separately purchased) to the CD changer jack on the rear
of the unit.
What is HD Radio Technology?
HD Radio Technology can deliver high-quality digital sound—AM digital will have FM-like quality (in stereo) and FM
digital will have CD-like quality—with staticfree and clear reception. Furthermore, stations can offer text and data,
such as artist names and song titles.
• When the HD Radio tuner box is connected, it can also receive conventional analog broadcasts.
• Many HD Radio stations also offer more than one channel of programming. This service is called multicasting.
• To find HD Radio stations in your area, visit www.hdradio.com <http://www.hdradio.com/>.
Refer also to page 10 for basic radio operations.
EN_KW-AVX710[J].indb 39EN_KW-AVX710[J].indb 39 07.12.5 11:59:19 AM07.12.5 11:59:19 AM

40
ENGLISH
Listening to the iPod
It is required to connect the Interface adapter for iPod (KS-PD100) to the CD changer jack on the rear.
Preparation:
Make sure <iPod> is selected for <External Input>. (☞ page 52)
~ Press [SOURCE], then press [iPod] (☞ page 9)
Playback starts automatically.
• You can also use SOURCE on the monitor panel. Press it repeatedly.
Ÿ Press [4] or [¢] to select a track.
Track no./Playing time
☞ page 41
[4 ¢] Press: Select track
Hold: Reverse/forward search
[5] Enter player’s menu
[∞] Start playback/pause
• To resume, press again.
Sound mode
(☞ page 45)
: Buttons on the touch panel. In the
explanation, they are indicated
inside [ ].
EN_KW-AVX710[J].indb 40EN_KW-AVX710[J].indb 40 07.12.5 11:59:20 AM07.12.5 11:59:20 AM

41 EXTERNAL DEVICES
ENGLISH
Selecting a track from the
player’s menu
1 Press [5] to enter the player’s menu.
“SEARCH” flashes on the screen during menu
operations.
• This mode will be canceled if no operations are
done for about five seconds.
2 Press [4] or [¢] to select the desired
item.
Press: Select an item.
Hold: Skip ten items at a time if there are more
than ten items.
Playlists Ô Artists Ô Albums Ô Songs Ô
Genres Ô Composers Ô (back to the beginning)
3 Press [∞] to confirm the selection.
4 Repeat steps 2 and 3 to select a track.
• When a track is selected finally, playback starts.
• To return to the previous menu, press [5].
Selecting playback modes
1
• You can also use AV MENU on the monitor panel.
2
3 Select an appropriate option.
Repeat One: Functions the same as
“Repeat One.”
All: Functions the same as
“Repeat All.”
Random Album: Functions the same as
“Shuffle Albums.”
Song: Functions the same as
“Shuffle Songs.”
• When the playback modes are selected, the
corresponding indicators light up alternately on
the screen.
To cancel, select <Off>.
You can easily turn on or off Track Repeat by
pressing [SHORT CUT] on the touch panel, then...
☞ page 45
EN_KW-AVX710[J].indb 41EN_KW-AVX710[J].indb 41 07.12.5 11:59:20 AM07.12.5 11:59:20 AM

42
ENGLISH
Using other external components
AV-INPUT
You can connect an external component to the LINE IN/VIDEO IN terminals.
~ Press [SOURCE], then press [AV-IN]. (☞ page 9)
• You can also use SOURCE on the monitor panel. Press it repeatedly.
Ÿ Turn on the connected component and start playing the source.
To display the operation buttons (☞ page 17) while watching the playback picture
• If no operations are done for about five seconds, the operation buttons disappear.
• [KEY] does not work when the source is “AV-IN.”
Touch the screen (center portion).
You can easily access to <Aspect> setting
menu by pressing [SHORT CUT] on the
touch panel, then...
Assigned title (☞ page 46) Sound mode (☞ page 45)
Touch the screen (center portion).
: Buttons on the touch panel. In the explanation, they are indicated inside [ ].
These buttons also work when they are not shown on the touch panel (while watching the playback picture).
☞ page 45
EN_KW-AVX710[J].indb 42EN_KW-AVX710[J].indb 42 07.12.5 11:59:21 AM07.12.5 11:59:21 AM

43 EXTERNAL DEVICES
ENGLISH
To display the operation buttons (☞ page 17) while viewing the navigation screen
• The operation buttons displayed on the screen vary among the playback sources.
• If no operations are done for about five seconds, the operation buttons disappear.
• The above buttons except [KEY] also work when they are not shown on the screen (while viewing the navigation
screen).
Navigation screen
You can also connect a Navigation System to the VIDEO IN terminal so that you can watch the navigation screen.
Preparation:
Make sure <Navigation> is selected for <AV Input>. (☞ page 52)
To view the navigation screen (and listen to the navigation guidance*)
Press DISP on the monitor panel repeatedly. (☞ page 9)
• The aspect ratio of the navigation screen is fixed to
<Full> regardless of the <Aspect> setting. (☞ page
49)
* If your Navigation System is equipped with the voice guidance function.
When <Navigation> is selected for <AV Input> (☞ page 52)
• You can use the source “AV-IN” for listening to an audio source connected to the LINE IN terminals.
• Some status messages such as volume level will not appear on the screen.
Touch the screen (center portion). Touch the screen (center portion).
EN_KW-AVX710[J].indb 43EN_KW-AVX710[J].indb 43 07.12.5 11:59:21 AM07.12.5 11:59:21 AM

44
ENGLISH
EXT-INPUT
You can connect an external component to the CD changer jack on the rear using the Line Input Adapter—KS-U57
(not supplied) or AUX Input Adapter—KS-U58 (not supplied).
Preparation:
Make sure <External> is selected for <External Input>. (☞ page 52)
~ Press [SOURCE], then press [EXT-IN]. (☞ page 9)
• You can also use SOURCE on the monitor panel. Press it repeatedly.
Ÿ Turn on the connected component and start playing the source.
Assigned title (☞ page 46)
☞ page 45
Sound mode
(☞ page 45)
: Buttons on the touch panel. In the explanation, they are indicated inside [ ].
EN_KW-AVX710[J].indb 44EN_KW-AVX710[J].indb 44 07.12.5 11:59:22 AM07.12.5 11:59:22 AM
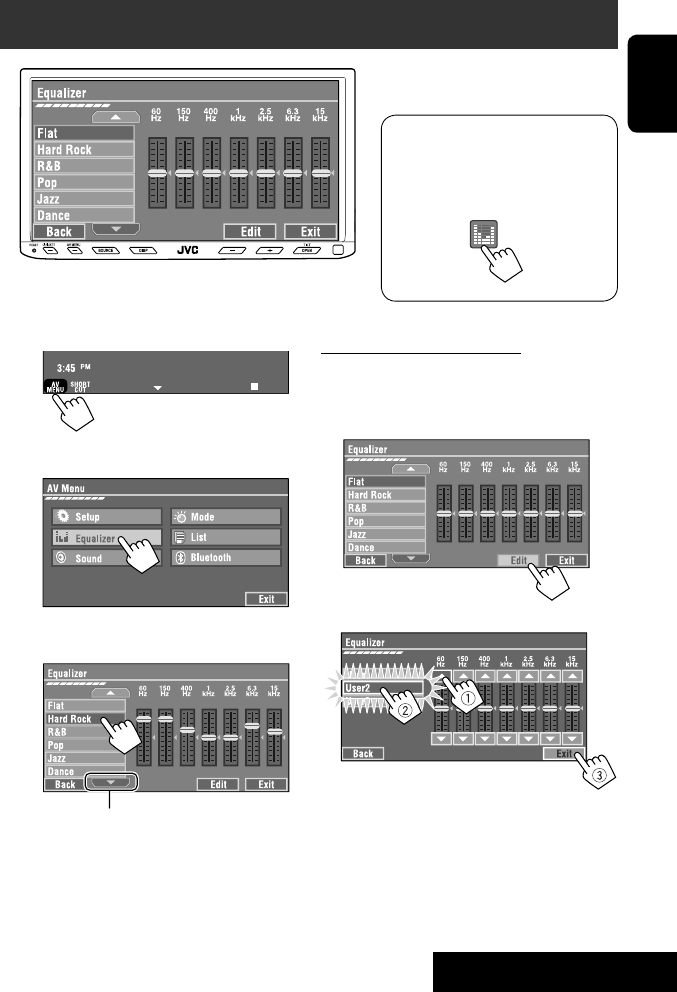
SETTINGS
45
ENGLISH
~
• You can also use AV MENU on the monitor panel.
Ÿ
! Select a sound mode.
• For preset values of each sound mode, ☞ page 62.
Sound equalization
Storing your own adjustments
You can store your adjustments into <User1>,
<User2>, and <User3>.
1 Repeat steps ~ and Ÿ, then in step !...
2 Adjust (1), then store (2).
Ex.: When storing into <User2>.
While playing back any source other
than “Bluetooth PHONE,” you can easily
access <Equalizer> menu by pressing
[SHORT CUT] on the touch panel, then...
Move to other six sound modes
EN_KW-AVX710[J].indb 45EN_KW-AVX710[J].indb 45 07.12.5 11:59:22 AM07.12.5 11:59:22 AM
46
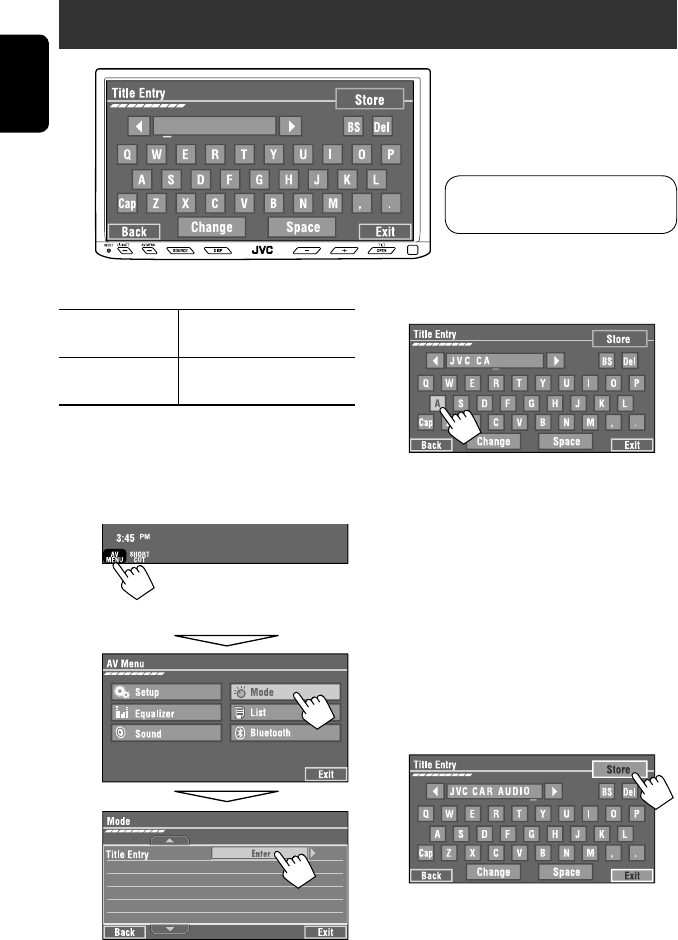
ENGLISH
You can assign titles as follows.
FM/AM stations Up to 16 characters—up to 30
stations.
AV-IN
EXT-IN
Up to 16 characters
~ Select the source. (☞ page 9)
• For FM/AM stations: Select the band, then
tune into a station.
Ÿ Display <Title Entry> screen.
• You can also use AV MENU on the monitor panel.
! Assign a title.
You can enter up to 16 characters (for available
characters, ☞ page 63).
• [Store]: Confirm the entry.
• [2/3]: Move the cursor.
• [BS]: Erase the character before the
cursor.
• [Del]: Erase the character on the cursor.
• [Cap]: Change the letter case (upper/
lower).
• [Change]: Change the character set.
• [Space]: Enter a space.
⁄ Finish the procedure.
Assigning titles to the sources
In the explanation, buttons on the
touch panel are indicated inside [ ].
EN_KW-AVX710[J].indb 46EN_KW-AVX710[J].indb 46 07.12.5 11:59:23 AM07.12.5 11:59:23 AM

SETTINGS
47
ENGLISH
!
Menu operations
The following steps are one of the fundamental
procedures. Some of the settings do not open the
sub-setting window, but just selecting an option will
change the setting.
• The display indications may change according to
change of the specifications.
Ex.: Changing the <AV Input> setting
~
• You can also use AV MENU on the monitor panel.
Ÿ
Non-available items will be shaded.
EN_KW-AVX710[J].indb 47EN_KW-AVX710[J].indb 47 07.12.5 11:59:23 AM07.12.5 11:59:23 AM
48
ENGLISH
Setup
Menu items Selectable settings, [reference page]
Display
Demonstration Off: Cancels.
On: Activates the demonstration on the screen. To stop it temporarily,
touch the screen.
Wall Paper You can select the background picture of the screen.
Horizon, Metal, Art, Plain
Color You can select the color of the background picture.
Blue, Light-Blue, Red, Orange, Yellow, Green, Purple, Dark-Blue,
Dark-Green, Brown, Light-Brown, Black
Scroll Off: Cancels.
Once: Scrolls the disc information once.
Auto: Repeats scrolling (five-second intervals).
• Holding DISP on the monitor panel scrolls the information regardless
of this setting.
Dimmer Off: Cancels.
On: Activates dimmer.
Auto: Dims the monitor when you turn on the headlights.*1
Dimmer Time Set : Activates the Dimmer Time setting below.
Dimmer Time Set Sets the Dimmer On/Off times.
Dimmer Level You can select the brightness for dimmer.
1 (bright), 2 (middle), 3 (dark)
Bright You can adjust brightness of the screen.
–15 (darkest) to +15 (brightest); Initial 00
Picture Adjust*2You can adjust the following to make the screen clear and legible for
watching the playback picture. The setting will be stored—one for
“DISC” (common) and the other for “AV-IN.”
–15 to +15; Initial 0
Bright: Adjust if the picture is too bright or too dark.
Contrast: Adjust the contrast.
Color: Adjust the color of the picture—lighter or darker.
Tint: Adjust the tint if the human skin color is unnatural.
• Press [5] or [∞] to adjust.
*1 The ILLUMINATION lead connection is required. (☞ Installation/Connection Manual)
*2 Adjustable only when the source is “DISC” (the inserted disc must contain pictures or movies) or “AV-IN.”
The procedure for setting an item is shown on page 47.
EN_KW-AVX710[J].indb 48EN_KW-AVX710[J].indb 48 07.12.5 11:59:24 AM07.12.5 11:59:24 AM

SETTINGS
49
ENGLISH
Menu items Selectable settings, [reference page]
Display
Aspect*3You can change the aspect ratio of the picture.
Aspect ratio of incoming signal
4:3 16:9
Regular:
For 4:3 original pictures
Full:
For 16:9 original pictures
Auto: • For “DISC”: Aspect ratio is automatically
selected to match to the incoming signals.
• For the other video sources: Aspect ratio is
fixed to <Regular>.
Language*4Select the indication language shown on the screen.
English, Español, Français, Deutsch, Italiano, Nederlands,
Svenska, Dansk, Руccĸий, Português
• The characters you can enter for assigning the titles also change
according to the language selected. ☞ [63]
Clock
Time Set Initial 1:00AM ☞ [8]
Time Format Select either 12-hour system or 24-hour system.
12Hours, 24Hours ☞ [8]
OSD Clock When <On> is selected, the clock time is displayed on the playback
picture. ☞ [8]
Off, On
Clock Adjust*5Off : Cancels.
Auto : The built-in clock is automatically adjusted using the clock time
data provided via the satellite radio channel.
*3 Not adjustable when no picture is shown.
*4 After you change the indication language setting, turn off then on the power so that your setting takes effect.
*5 Appears only when SIRIUS Satellite Radio or XM Satellite Radio is connected.
Initial: Underlined
EN_KW-AVX710[J].indb 49EN_KW-AVX710[J].indb 49 07.12.5 11:59:25 AM07.12.5 11:59:25 AM
50
ENGLISH
Menu items Selectable settings, [reference page]
Clock
Time Zone*1 *2Select your residential area from one of the following time zones for
clock adjustment.
Alaska, Pacific, Mountain, Central, Eastern, Atlantic,
Newfoundland
DST (Daylight Saving Time)*1
*2
Activates this if your residential area is subject to DST.
Off : Cancels.
On : Activates daylight saving time.
Disc
Menu Language*3Select the initial disc menu language; Initial English (☞ also page
62).
Audio Language*3Select the initial audio language; Initial English (☞ also page 62).
Subtitle*3Select the initial subtitle language or erase the subtitle (Off); Initial Off
(☞ also page 62).
Monitor Type*3Select the monitor type to watch a wide screen picture on the external
monitor.
16:9 : Select when the aspect ratio of the external monitor is 16:9.
4:3 LB (Letterbox)/4:3 PS (Pan Scan): Select when the aspect ratio of
the external monitor is 4:3.
• Refer to the illustrations on the left to see how the pictures are
shown on the screen.
OSD Position*3Select the position of the on-screen bar. ☞ [25]
1: Higher position
2: Lower position
File Type*3Select playback file type when a disc contains different types of files.
Audio: Plays back audio files.
Still Picture: Plays back JPEG files.
Video: Plays back DivX/MPEG1/MPEG2 files.
Audio&Video: Plays back audio files and DivX/MPEG1/MPEG2 files.
DivX Regist. (Registration)*3This unit has its own Registration Code. Once you have played back a
file with which the Registration Code recorded, this unit’s Registration
Code is overwritten for copyright protection.
*1 Appears only when SIRIUS Satellite Radio or XM Satellite Radio is connected.
*2 Appears only when <Clock Adjust> is set to <Auto>.
*3 Selectable only for “DISC.” (Playback stops when you change the setting.)
Position 1 Position 2
16:9 4:3LB
4:3PS
The procedure for setting an item is shown on page 47.
EN_KW-AVX710[J].indb 50EN_KW-AVX710[J].indb 50 07.12.5 11:59:25 AM07.12.5 11:59:25 AM

SETTINGS
51
ENGLISH
Menu items Selectable settings, [reference page]
Disc
D. Audio Output*3Select the signal format emitted through the DIGITAL OUT (optical)
terminal. (☞ also page 61)
PCM : Select this when connecting an amplifier or a decoder
incompatible with Dolby Digital, DTS, or MPEG Audio, or when
connecting to a recording device.
Dolby D : Select this when connecting an amplifier or a decoder
compatible with Dolby Digital.
Stream : Select this when connecting an amplifier or a decoder
compatible with Dolby Digital, DTS, or MPEG Audio.
Down Mix*3When playing back a multi-channel disc, this setting affects the signals
reproduced through the LINE OUT terminals.
Dolby SR : Select this to enjoy multi-channel surround audio by
connecting an amplifier compatible with Dolby Surround.
Stereo : Normally select this.
D. (Dynamic) Range
Compres. (Compression)*3
You can enjoy a powerful sound at a low volume level while playing
Dolby Digital software.
Auto: Select to apply the effect to multi-channel encoded software.
On: Select to always use this function.
Tuner
IF Band Width Auto: Increases the tuner selectivity to reduce interference noises
between adjacent stations. (Stereo effect may be lost.)
Wide: Subject to the interference from adjacent stations, but sound
quality will not be degraded and the stereo effect will remain.
Area Setting US : When using in North/Central/South America. FM/AM intervals are
set to 200 kHz/10 kHz.
Europe : When using in any other areas. FM/AM intervals are set to 50
kHz (100 kHz during auto search)/9 kHz.
SA : When using in South American countries where FM interval is 100
kHz. AM interval is set to 10 kHz.
Sirius ID*4Your SIRIUS identification number appears on the monitor.
*4 Appears only when SIRIUS Satellite Radio is connected.
Initial: Underlined
EN_KW-AVX710[J].indb 51EN_KW-AVX710[J].indb 51 07.12.5 11:59:26 AM07.12.5 11:59:26 AM
52
ENGLISH
Menu items Selectable settings, [reference page]
Input
AV Input*1
You can determine the use of LINE IN and VIDEO IN terminals. ☞ [42, 43
]
Off: Select when no component is connected (“AV-IN” is skipped while
selecting the source).
Audio&Video: Select when connecting an AV component such as a
VCR.
Audio: Select when connecting an audio component such as a portable
audio player.
Camera*2 : Select when connecting a rear view camera.
Navigation : Select when connecting a Navigation System.
External Input*3For connecting an external component to the CD changer jack on the
rear.
Changer/iPod*4: CD changer or iPod. ☞ [34, 40]
External: Any other than the above. ☞ [44]
• For connecting the Bluetooth adapter, this setting is not required. It is
automatically detected.
Others
Beep Off: Cancels.
On: Activates the key-touch tone.
Telephone Muting Off: Cancels.
Muting1, Muting2: Select either one which mutes the sounds while
using the cellular phone.
Power LED Flash Off: Cancels.
On: When the ignition is turned off, the lamp on the button
flashes.
TouchPanel Sens. Change the sensitivity of the touch panel. As the number decreases,
sensitivity becomes higher. 1/2/3
Initialize Initialize all settings you have made in <AV Menu>. Press and hold
[Enter] to initialize the settings, then reset the unit. ☞ [3]
*1 Not selectable when “AV-IN” is selected as the source.
*2 The REVERSE GEAR SIGNAL lead connection is required. See Installation/Connection Manual. The rear view through
the camera appears on the screen in <Full> aspect ratio (regardless of the aspect ratio setting) when you shift the
gear to the reverse (R) position. When you press DISP on the control panel, or when you shift the gear to another
position other than the reverse (R) position, the rear view screen is cleared.
*3 Not selectable when the component connected to the CD changer jack is selected as the source.
*4 The name of the component detected through the CD changer jack is shown.
The procedure for setting an item is shown on page 47.
EN_KW-AVX710[J].indb 52EN_KW-AVX710[J].indb 52 07.12.5 11:59:27 AM07.12.5 11:59:27 AM
SETTINGS
53
ENGLISH
Equalizer
Flat/Hard Rock/R&B/Pop/Jazz/Dance/Country/Reggae/Classic/User1/User2/User3 ☞ [45]
Sound
Menu items Selectable settings, [reference page]
Fader/Balance Adjust fader—speaker output balance between the front and rear speakers.
• Upmost—front only (F6)
• Downmost—rear only (R6)
When using a two-speaker system, set the fader to the center (0).
Adjust balance—speaker output balance between the left and right speakers.
• Leftmost—left only (L6)
• Rightmost—right only (R6) Initial 0
Volume Adjust Adjust and store auto-adjustment volume level for each source, comparing to
the FM volume level. The volume level will automatically increase or decrease
when you change the source.
–12 to +12; Initial 00
• You can make the adjustments separately for DVD and other discs.
Amplifier Gain You can change the maximum volume level of this unit.
Off: Deactivates the built-in amplifier.
Low: VOL 00 to 30 (Select this if the maximum power of the speakers is less
than 50 W.)
High: VOL 00 to 50
Mode*5
Menu items Selectable settings, [reference page]
Mono Only for FM. (Off, On) ☞ [10]
DX/Local Only for FM. (Local, DX) ☞ [11]
SSM*6Only for FM. Press and hold to start SSM. ☞ [11]
Title Entry*7Only for FM/AM stations, “AV-IN,” and “EXT-IN.” ☞ [46]
Blend Hold*8Only for HD Radio broadcast. ☞ [39]
Repeat ☞ [18, 35, 41]
Random ☞ [18, 35, 41]
*5 Items listed under <Mode> vary among the playback sources.
*6 Also available for AM when an HD Radio tuner box is connected.
*7 Unavailable for AM/FM stations when an HD Radio tuner box is connected.
*8 Appears only when an HD Radio tuner box is connected.
Initial: Underlined
EN_KW-AVX710[J].indb 53EN_KW-AVX710[J].indb 53 07.12.5 11:59:27 AM07.12.5 11:59:27 AM
54
ENGLISH
Bluetooth*1
Menu items Selectable settings, [reference page]
Dial Menu *2Select the method to make a call. ☞ [30]
Message*3You can read a message from the following message histories.
Unread: Messages you have not read.
Read: Messages you have read.
Unsent: Messages you have not sent.
Sent: Messages you have sent.
• The number of messages in each history is also shown.
Open ☞ [27]
Search ☞ [28]
Special Device Only for “New Device.”
Shows the list of Bluetooth devices which require some special procedure to
establish Bluetooth connection. Select a device you want to connect.
• After selecting the device, use <Open> or <Search> (☞ page 27 or 28)
for connection.
• Once the connection is established, it is registered in the unit. You can
connect the unit and the device by using <Connect> (☞ page 55) from
the next time.
*1 Selectable only for “Bluetooth PHONE” or “Bluetooth AUDIO.” Select a device (or “New Device”) before operating the
menu.
*2 Only for the device connected for “Bluetooth PHONE.”
*3 Selectable only when the source is “Bluetooth PHONE” and the connected cellular phone is compatible with Text
Message.
When operating the Bluetooth device, refer also to the instructions supplied with the device.
The procedure for setting an item is shown on page 47.
List
For “DISC”: Folder List and Track List (☞ page 19)
For “CD-CH”: Disc List, Folder List, and Track List (☞ page 34)
For “SAT”: Category List and Channel List (☞ page 38)
• For the other playback sources, you can display a list by pressing DISP on the monitor panel. (☞ page 9)
EN_KW-AVX710[J].indb 54EN_KW-AVX710[J].indb 54 07.12.5 11:59:28 AM07.12.5 11:59:28 AM
SETTINGS
55
ENGLISH
Menu items Selectable settings, [reference page]
Settings
Auto Connect *4When the unit is turned on, the connection is established automatically
with...
Off: No Bluetooth device.
Last: The last connected Bluetooth device.
Order: The available registered Bluetooth device found first.
Auto Answer *5Off: The unit does not answer the calls automatically. Answer the calls
manually.
On: The unit answers the incoming calls automatically.
Reject: The unit rejects all incoming calls.
Message Info *5Auto: The unit informs you of the arrival of a message by ringing and
displaying “Receiving Message.” To read the message, ☞ page 30.
Manual: The unit does not inform you of the arrival of a message.
MIC Setting *5Adjust microphone volume connected to the Bluetooth adapter.
01/02/03
Version *6The Bluetooth software and hardware versions are shown.
*4 Selectable only for “Bluetooth PHONE.”
*5 Only for the cellular phone connected for “Bluetooth PHONE.” Not selectable when “New Device” is selected.
*6 If you wish to receive more information about Bluetooth, visit the following JVC web site: <http://www.jvc-victor.
co.jp/english/car/>
SETTINGS
Bluetooth (continued)
Menu items Selectable settings, [reference page]
Connect Only for the registered devices.
After selecting a device from among the registered devices (☞ pages 27 and
28), establish the connection with it.
Disconnect Only for the device being connected.
Disconnect the current device before connecting another device.
Delete Pairing Only for the registered devices.
Delete the registered devices.
Initial: Underlined
EN_KW-AVX710[J].indb 55EN_KW-AVX710[J].indb 55 07.12.5 11:59:29 AM07.12.5 11:59:29 AM
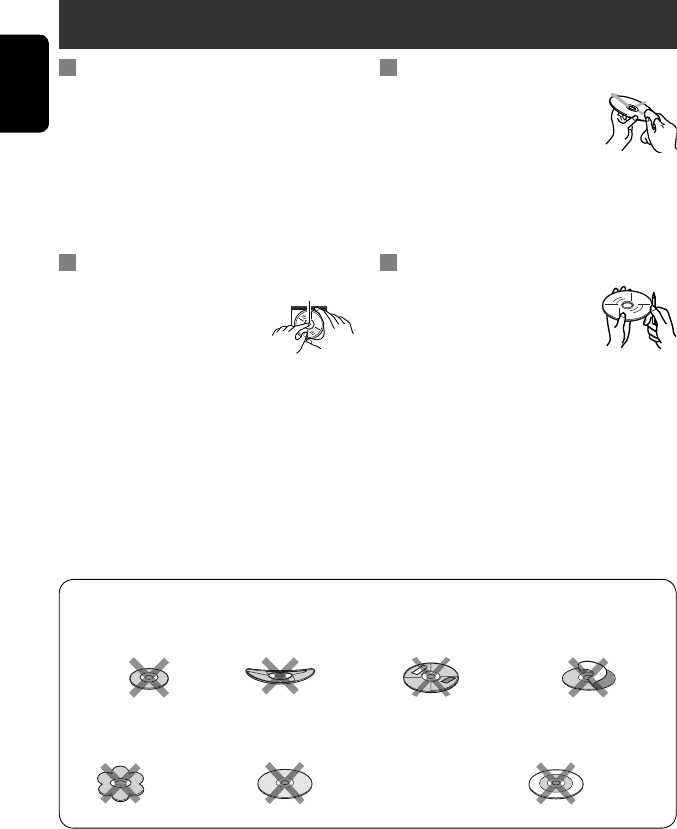
ENGLISH
56
Maintenance
Moisture condensation
Moisture may condense on the lens inside the unit in
the following cases:
• After starting the heater in the car.
• If it becomes very humid inside the car.
Should this occur, the unit may malfunction. In this
case, eject the disc and leave the unit turned on for a
few hours until the moisture evaporates.
How to handle discs
When removing a disc from its
case, press down the center holder of
the case and lift the disc out, holding it
by the edges.
• Always hold the disc by the edges. Do not touch its
recording surface.
When storing a disc into its case, gently insert the
disc around the center holder (with the printed surface
facing up).
• Make sure to store discs into the cases after use.
To keep discs clean
A dirty disc may not play correctly.
If a disc does become dirty, wipe it with
a soft cloth in a straight line from center
to edge.
• Do not use any solvent (for example, conventional
record cleaner, spray, thinner, benzine, etc.) to clean
discs.
To play new discs
New discs may have some rough spots
around the inner and outer edges. If
such a disc is used, this unit may reject
the disc.
To remove these rough spots, rub the edges with a
pencil or ball-point pen, etc.
Stick-on labelSticker and sticker residue
Unusual shape
Warped disc
Do not use the following discs:
Center holder
SingleCD—8 cm (3-3/16”) disc
C-thru Disc (semi-transparent disc) Transparent or semi-transparent on its
recording area
EN_KW-AVX710[J].indb 56EN_KW-AVX710[J].indb 56 07.12.5 11:59:29 AM07.12.5 11:59:29 AM

57 REFERENCES
ENGLISH
More about this unit
General
Turning on the power
• By pressing SOURCE on the monitor panel, you
can also turn on the power. If the source is ready,
playback starts.
Tuner (FM only)
Storing stations in memory
• When SSM is over, received stations are preset in no.
1 (lowest frequency) to no. 6 (highest frequency).
Disc
General
• In this manual, words “track” and “file” are
interchangeably used.
• This unit can only play back audio CD (CD-DA) files
if different type of audio files (MP3/WMA/WAV) are
recorded on the same disc.
• This unit can display only one-byte characters. No
other characters can be correctly displayed.
Inserting a disc
• When a disc is inserted upside down or has no
playable files, “Cannot play this disc Check the disc”
appears on the screen. Eject the disc.
Ejecting a disc
• If “No disc“ appears after removing a disc, insert a
disc or select another playback source.
• If the ejected disc is not removed within 15 seconds,
the disc is automatically inserted again into the
loading slot to protect it from dust.
Playing Recordable/Rewritable discs
• This unit can recognize a total of 5 000 files and 250
folders (a maximum of 999 files per folder).
• Use only “finalized” discs.
• This unit can play back multi-session discs; however,
unclosed sessions will be skipped while playing.
• This unit can recognize a total 25 characters for file/
folder names.
• Some discs or files may not be played back due to
their characteristics or recording conditions.
Playing DVD-VR
• For details about DVD-VR format and Playlist, refer
to the instructions supplied with the recording
equipment.
File playback
Playing DivX files
• This unit can play back DivX files with the extension
code <.divx>, <.div>, or <.avi> (regardless of the
letter case—upper/lower).
• This unit supports the DivX files whose resolution is
720 x 576 pixels or less.
• Audio stream should conform to MP3 or Dolby Digital.
• The file encoded in the interlaced scanning mode
may not be played back correctly.
• The maximum bit rate for video signals (average) is 4
Mbps.
Continued on the next page
EN_KW-AVX710[J].indb 57EN_KW-AVX710[J].indb 57 07.12.5 11:59:30 AM07.12.5 11:59:30 AM

ENGLISH
58
Playing MPEG1/MPEG2 files
• This unit can play back MPEG1/MPEG2 files with the
extension code <.mpg>, <.mpeg>, or <.mod>*.
* <.mod> is an extension code used for the MPEG2
files recorded by JVC Everio camcorders.
• The stream format should conform to MPEG system/
program stream.
The file format should be MP@ML (Main Profile at
Main Level)/SP@ML (Simple Profile at Main Level)/
MP@LL (Main Profile at Low Level).
• Audio streams should conform to MPEG1 Audio
Layer-2 or Dolby Digital.
• The maximum bit rate for video signals (average) is 4
Mbps.
Playing JPEG files
• This unit can play back JPEG files with the extension
code <.jpg>, or <.jpeg>.
• It is recommended that you record a file at 640 x 480
resolution.
• This unit can play back baseline JPEG files.
Progressive JPEG files or lossless JPEG files cannot be
played.
Playing MP3/WMA/WAV files
• This unit can play back files with the extension code
<.mp3>, <.wma>, or <.wav> (regardless of the
letter case—upper/lower).
• This unit can play back the files meeting the
conditions below:
– Bit rate:
MP3/WMA: 32 kbps — 320 kbps
– Sampling frequency:
48 kHz, 44.1 kHz, 32 kHz (for MPEG1)
24 kHz, 22.05 kHz, 16 kHz (for MPEG2)
48 kHz, 44.1 kHz, 32 kHz, 22.05 kHz (for WMA)
44.1 kHz (for WAV)
• This unit can show ID3 Tag Version
1.0/1.1/2.2/2.3/2.4 (for MP3).
• This unit can also show WAV/WMA Tag.
• This unit can play back files recorded in VBR (variable
bit rate).
• Files recorded in VBR have a discrepancy in elapsed
time indication.
• This unit cannot play back the following files:
– MP3 files encoded with MP3i and MP3 PRO
format.
– MP3 files encoded with Layer 1/2.
– WMA files encoded with lossless, professional,
and voice format.
– WMA files which are not based upon Windows
Media® Audio.
– WMA files copy-protected with DRM.
– Files which have the data such as AIFF, ATRAC3,
etc.
Disc/file information shown on the
external monitor
The following screens appear only on the external
monitor.
• CD
1 Selected playback mode
2 Elapsed playing time of the current track
3 Operation status
4 Current track number/total number of tracks
on the disc
5 Track information
6 Track list
7 Current track (highlighted bar)
TIME 00:14
Track : 6 / 14
Track Information
Cloudy
Fair
Fog
Hail
Indian summer
Rain
Shower
Snow
Thunder
Typhoon
Wind
Winter sky
Album
Four seasons
Artist
Robert M. Smith
Title
Rain
T. RPT
EN_KW-AVX710[J].indb 58EN_KW-AVX710[J].indb 58 07.12.5 11:59:30 AM07.12.5 11:59:30 AM
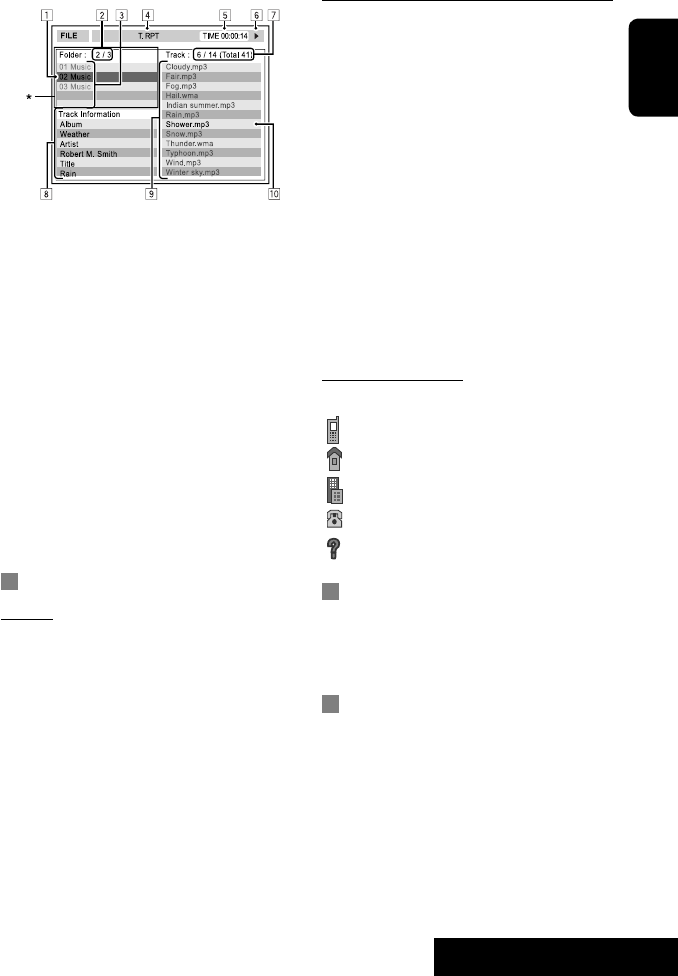
59 REFERENCES
ENGLISH
Warning messages for Bluetooth operations
• Connection Error: The device is registered but the
connection has failed. Use <Connect> to connect
the device again. (☞ page 28)
• Error: Try the operation again. If “Error” appears
again, check if the device supports the function you
have tried.
• Device Unfound: No available Bluetooth device is
detected by <Search>.
• Loading: The unit is updating the phone book and/
or Text Message.
• Please Wait...: The unit is preparing to use
the Bluetooth function. If the message does not
disappear, turn off and turn on the unit, then connect
the device again (or reset the unit).
• Reset 08: Check the connection between the
adapter and this unit.
Icons for phone types
• These icons indicate the phone type set on the device.
:Cellular phone
:Household phone
:Office
:General
:Other than above
CD changer
• If you select a folder, which does not include any
music files, on the list (☞ page 34), you will hear a
beep. Select another folder including music files.
HD Radio reception
• During SSM search...
– All stations including conventional FM/AM stations
are searched and stored for the selected band.
• DivX/MPEG1/MPEG2/JPEG/MP3/WMA/WAV
1 Current folder (highlighted bar)
2 Current folder number/total folder number
3 Folder list
4 Selected playback mode
5 Elapsed playing time of the current track (not
displayed for JPEG)
6 Operation status
7 Current track number/total number of tracks
in the current folder (total number of tracks on
the disc)
8 Track information (only for MP3/WMA/WAV)
9 Track list
p Current track (highlighted)
* If tag data includes “Jacket Picture” (baseline
JPEG), it will be displayed.
Bluetooth operations
General
• While driving, do not perform complicated operation
such as dialing the numbers, using phone book, etc.
When you perform these operations, stop your car in
a safe place.
• Some Bluetooth devices may not be connected to
this unit depending on the Bluetooth version of the
device.
• This unit may not work for some Bluetooth devices.
• Connecting condition may vary depending on
circumstances around you.
• When the unit is turned off, the device is
disconnected.
EN_KW-AVX710[J].indb 59EN_KW-AVX710[J].indb 59 07.12.5 11:59:31 AM07.12.5 11:59:31 AM

ENGLISH
60
Satellite radio operations
• You can also connect the JVC SIRIUS radio PnP (Plug
and Play), using the JVC SIRIUS radio adapter, KS-
U100K (not supplied) to the CD changer jack on the
rear. (Select “EXT-IN” as the source.)
By turning on/off the power of the unit, you can turn
on/off the JVC PnP. However, you cannot control it
from this unit.
• To know more about SIRIUS Satellite radio or to sign
up, visit <http://www.sirius.com>.
• For the latest channel listings and programming
information, or to sign up for XM Satellite radio, visit
<http://www.xmradio.com>.
iPod operations
• You can control the following types of iPods through
the interface adapter.
– iPod with dock connector (3rd Generation)
– iPod with Click Wheel (4th Generation)
– iPod mini
– iPod photo
– iPod nano *1
– iPod video (5th Generation) *2
*1 When you connect the iPod nano to the interface
adapter, be sure to disconnect the headphones;
otherwise, no sound is heard.
*2 It is not possible to browse video files on the
“Videos” menu while the iPod is connected to the
interface adapter.
• If the iPod does not play correctly, please update your
iPod software to the latest version. For details about
updating your iPod, visit <http://www.apple.com>.
• When you turn on this unit, the iPod is charged
through the adapter connected to this unit.
• While the iPod is connected, all operations from the
iPod are disabled. Perform all operations from this
unit.
• The text information may not be displayed correctly.
• The text information scrolls on the screen. This unit
can display up to 40 characters.
Notice:
When operating an iPod, some operations may not
be performed correctly or as intended. In this case,
visit the following JVC web site:
<http://www.jvc.co.jp/english/car/support/
ks-pd100/index.html>
Menu settings
• If you change the <Amplifier Gain> setting from
<High> to <Low> while the volume level is set
higher than “30,” the unit automatically changes the
volume level to “VOL 30.”
• After you change any of <Menu Language/Audio
Language/Subtitle> settings, turn off then on the
power, and re-insert the disc (or insert another disc)
so that your setting takes effect.
• When you select <16:9> for a picture whose aspect
ratio is 4:3, the picture slightly changes due to the
process for converting the picture width.
• Even if <4:3PS> is selected, the screen size may
become <4:3LB> for some discs.
EN_KW-AVX710[J].indb 60EN_KW-AVX710[J].indb 60 07.12.5 11:59:32 AM07.12.5 11:59:32 AM
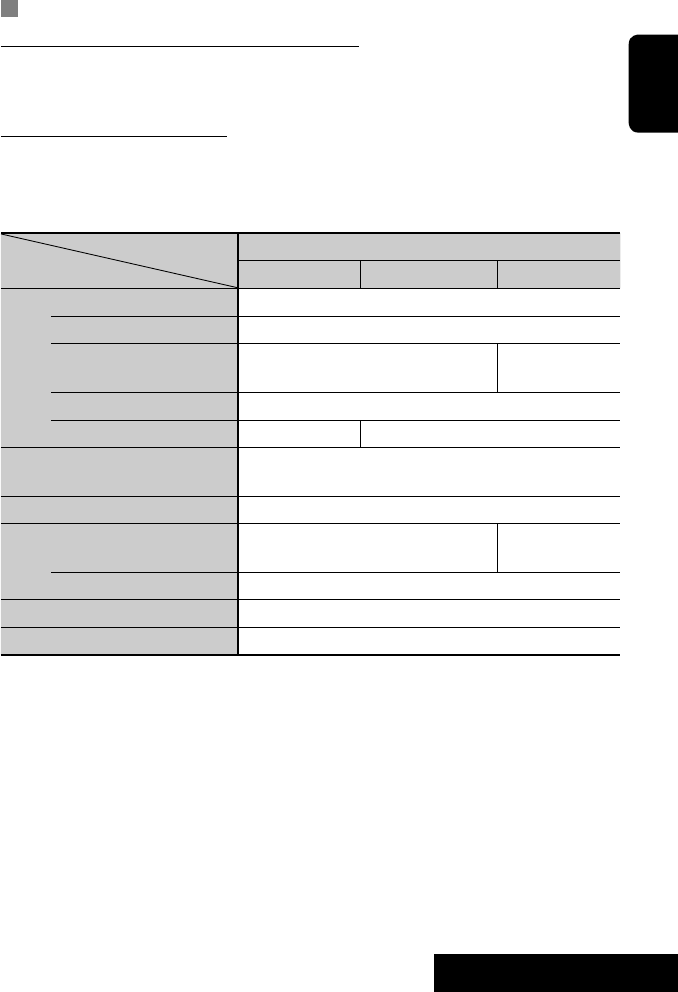
61 REFERENCES
ENGLISH
Sound signals emitted through the rear terminals
Through the analog terminals (Speaker out/REAR OUT)
2-channel signal is emitted. When playing multi-channel encoded disc, multi-channel signals are downmixed.
• DTS sound cannot be reproduced.
Through the DIGITAL OUT terminal
Digital signals (Linear PCM, Dolby Digital, DTS, MPEG Audio) are emitted.
• To reproduce the multi-channel sounds such as Dolby Digital, DTS, and MPEG Audio, connect an amplifier or a
decoder compatible with these multi-channel sources to this terminal, and set <D. Audio Output> correctly.
(☞ page 51)
<D. Audio Output>
Playback disc
Output signals
<Stream> <Dolby D> <PCM>
DVD 48 kHz, 16/20/24 bits Linear PCM 48 kHz, 16 bits stereo Linear PCM*
96 kHz, Linear PCM 48 kHz, 16 bits stereo Linear PCM
with Dolby Digital Dolby Digital bitstream 48 kHz, 16 bits stereo
Linear PCM
with DTS DTS bitstream
with MPEG Audio MPEG bitstream 48 kHz, 16 bits stereo Linear PCM
Audio CD, Video CD 44.1 kHz, 16 bits stereo Linear PCM /
48 kHz, 16 bits stereo Linear PCM
Audio CD with DTS DTS bitstream
DivX/
MPEG
with Dolby Digital Dolby Digital bitstream 48 kHz, 16 bits stereo
Linear PCM
with MPEG Audio 32/44.1/48 kHz, 16 bits Linear PCM
MP3/WMA 32/44.1/48 kHz, 16 bits Linear PCM
WAV 44.1 kHz, 16 bits Linear PCM
* Digital signals may be emitted at 20 or 24 bits (at their original bit rate) through the DIGITAL OUT terminal if the
discs are not copy-protected.
EN_KW-AVX710[J].indb 61EN_KW-AVX710[J].indb 61 07.12.5 11:59:32 AM07.12.5 11:59:32 AM
ENGLISH
62
Preset equalizing values
Frequency
Sound mode 60 Hz 150 Hz 400 Hz 1 kHz 2.5 kHz 6.3 kHz 15 kHz
Flat 00 00 00 00 00 00 00
Hard Rock +03 +03 +01 00 00 +02 +01
R&B +03 +02 +02 00 +01 +01 +03
Pop 00 +02 00 00 +01 +01 +02
Jazz +03 +02 +01 +01 +01 +03 +02
Dance +04 +02 00 –02 –01 +01 +01
Country +02 +01 00 00 00 +01 +02
Reggae +03 00 00 +01 +02 +02 +03
Classic +02 +03 +01 00 00 +02 00
User1/2/3 00 00 00 00 00 00 00
Language codes (for DVD/DivX language selection)
Code
Language
Code
Language
Code
Language
Code
Language
Code
Language
AA Afar FA Persian KK Kazakh NO Norwegian ST Sesotho
AB Abkhazian FI Finnish KL Greenlandic OC Occitan SU Sundanese
AF Afrikaans FJ Fiji KM Cambodian OM (Afan) Oromo SW Swahili
AM Ameharic FO Faroese KN Kannada OR Oriya TA Tamil
AR Arabic FY Frisian KO Korean (KOR) PA Panjabi TE Telugu
AS Assamese GA Irish KS Kashmiri PL Polish TG Tajik
AY Aymara GD Scots Gaelic KU Kurdish PS Pashto, Pushto TH Thai
AZ Azerbaijani GL Galician KY Kirghiz QU Quechua TI Tigrinya
BA Bashkir GN Guarani LA Latin RM
Rhaeto-Romance
TK Turkmen
BE Byelorussian GU Gujarati LN Lingala RN Kirundi TL Tagalog
BG Bulgarian HA Hausa LO Laothian RO Rumanian TN Setswana
BH Bihari HI Hindi LT Lithuanian RW Kinyarwanda TO Tonga
BI Bislama HR Croatian LV Latvian, Lettish SA Sanskrit TR Turkish
BN Bengali, Bangla HU Hungarian MG Malagasy SD Sindhi TS Tsonga
BO Tibetan HY Armenian MI Maori SG Sangho TT Tatar
BR Breton IA Interlingua MK Macedonian SH Serbo-Croatian TW Twi
CA Catalan IE Interlingue ML Malayalam SI Singhalese UK Ukrainian
CO Corsican IK Inupiak MN Mongolian SK Slovak UR Urdu
CS Czech IN Indonesian MO Moldavian SL Slovenian UZ Uzbek
CY Welsh IS Icelandic MR Marathi SM Samoan VI Vietnamese
DZ Bhutani IW Hebrew MS Malay (MAY) SN Shona VO Volapuk
EL Greek JA Japanese MT Maltese SO Somali WO Wolof
EO Esperanto JI Yiddish MY Burmese SQ Albanian XH Xhosa
ET Estonian JW Javanese NA Nauru SR Serbian YO Yoruba
EU Basque KA Georgian NE Nepali SS Siswati ZU Zulu
EN_KW-AVX710[J].indb 62EN_KW-AVX710[J].indb 62 07.12.5 11:59:33 AM07.12.5 11:59:33 AM

63 REFERENCES
ENGLISH
Characters shown on the screen
In addition to the roman alphabet (A – Z, a – z), you
can use the following characters to assign titles.
(☞ page 46)
• When <Руccĸий> is selected for <Language>.
(☞ page 49)
• When any language other than <Руccĸий> is
selected for <Language>. (☞ page 49)
Upper and lower cases
Numbers and symbols
Upper and lower cases
Numbers and symbols
• Manufactured under license from Dolby
Laboratories. Dolby and the double-D symbol are
trademarks of Dolby Laboratories.
• “DTS” and “DTS Digital Out” are registered
trademarks of DTS, Inc
• “DVD Logo” is a trademark of DVD Format/Logo
Licensing Corporation registered in the US, Japan
and other countries.
• DivX, DivX Ultra Certified, and associated logos
are trademarks of DivX, Inc. and are used under
license.
• Official DivX® Ultra Certified product
• Plays all versions of DivX® video (including DivX®
6) with enhanced playback of DivX® media files
and the DivX® Media Format
• Microsoft and Windows Media are either
registered trademarks or trademarks of Microsoft
Corporation in the United States and/or other
countries.
• HD Radio™ and the HD Radio Ready logo are
proprietary trademarks of iBiquity Digital Corp.
• “SIRIUS” and the SIRIUS dog logo are registered
trademarks of SIRIUS Satellite Radio Inc.
• XM and its corresponding logos are registered
trademarks of XM Satellite Radio Inc.
• “SAT Radio,” the SAT Radio logo and all related
marks are trademarks of SIRIUS Satellite Radio
Inc., and XM Satellite Radio, Inc.
• The Bluetooth word mark and logos are owned by
the Bluetooth SIG, Inc. and any use of such marks
by Victor Company of Japan, Limited (JVC) is under
license. Other trademarks and trade names are
those of their respective owners.
• iPod and iTunes are trademarks of Apple Inc.,
registered in the U.S. and other countries.
• This product incorporates copyright protection
technology that is protected by U.S. patents
and other intellectual property rights. Use of
this copyright protection technology must be
authorized by Macrovision, and is intended for
home and other limited viewing uses only unless
otherwise authorized by Macrovision. Reverse
engineering or disassembly is prohibited.
EN_KW-AVX710[J].indb 63EN_KW-AVX710[J].indb 63 07.12.5 11:59:34 AM07.12.5 11:59:34 AM

ENGLISH
64
Troubleshooting
What appears to be trouble is not always serious. Check the following points before calling a service center.
• For operations with the external components, refer also to the instructions supplied with the adapters used for the
connections (as well as the instructions supplied with the external components).
Symptoms Remedies/Causes
General
• No sound comes out of the speakers. • Adjust the volume to the optimum level.
• Check the cords and connections.
• DTS sound cannot be reproduced through the analog
terminals (Speaker out/REAR OUT).
• The screen is not clear and legible. Sunshine from the windshield may cause this symptom.
Adjust <Bright>. (☞ page 48)
• “Position Error Push Open Key” appears on
the screen.
The monitor panel angle has been forcibly adjusted, or its
adjustment has been interrupted while opening or closing.
Press OPEN/TILT.
• “Mecha Error Push Reset” appears on the
screen, and the panel does not move.
Reset the unit. (☞ page 3)
• “No Signal” appears. • Change the source.
• Start the playback on the external component connected
to VIDEO IN terminal.
• Check the cords and connections.
• Signal input is too weak.
• The buttons on the monitor panel do not
work.
When the monitor panel is open, only +/– (volume) and
OPEN/TILT work. The other buttons do not function.
• The unit does not work at all. Reset the unit. (☞ page 3)
FM/AM
• SSM automatic presetting does not work. Store stations manually. (☞ page 12)
• Static noise while listening to the radio. Connect the aerial firmly.
Disc in general
• Disc can be neither recognized nor played
back.
Eject the disc forcibly. (☞ page 3)
• Disc cannot be ejected. Unlock the disc. (☞ page 19)
• Recordable/Rewritable discs cannot be
played back.
• Tracks on the Recordable/Rewritable discs
cannot be skipped.
• Insert a finalized disc.
• Finalize the discs with the component which you used
for recording.
• Playback does not start. • Insert the disc correctly again.
• The format of files is not supported by the unit.
EN_KW-AVX710[J].indb 64EN_KW-AVX710[J].indb 64 07.12.5 11:59:35 AM07.12.5 11:59:35 AM

65 REFERENCES
ENGLISH
Symptoms Remedies/Causes
Disc in general
• The playback picture is not clear and legible. Adjust items in <Picture Adjust> menu. (☞ page 48)
• Sound and pictures are sometimes
interrupted or distorted.
• Stop playback while driving on rough roads.
• Change the disc.
• No playback picture is shown and “Parking
Brake” appears on the screen, even when the
parking brake is engaged.
Parking brake lead is not connected properly.
(☞ Installation/Connection Manual)
• No picture appears on the external monitor. • Connect the video cord correctly.
• Select the correct input on the external monitor.
• “Eject Error” or “Loading Error” appears on
the screen.
Change the source by pressing SOURCE.
• “Region code error” appears on the screen
when you insert a DVD Video.
Region code is not correct. (☞ page 4)
DivX/MPEG1/MPEG2/MP3/WMA/WAV
• Disc cannot be played back. • Change the disc.
• Record the tracks using a compliant application on the
appropriate discs. (☞ page 4)
• Add appropriate extension codes to the file names.
• Noise is generated. The track played back is not a playable file format. Skip to
another file.
• Tracks are not played back as you have
intended them to play.
Playback order may differ from that played back using
other players.
• Elapsed playing time is not correct. This sometimes occurs during playback. This is caused by
how the tracks are recorded.
• “Not Support” appears on the screen and
track skips.
The track is unplayable.
Bluetooth
• Bluetooth device does not detect the unit. This unit can be connected with one Bluetooth cellular
phone and one Bluetooth audio player at a time.
While connected to a device, this unit cannot be detected
from another device. Disconnect currently connected device
and search again.
• The unit does not detect the Bluetooth
device.
• Check the Bluetooth setting of the device.
• Search from the Bluetooth device. After the device
detects the unit, select <Open> on the unit to connect
the device. (☞ page 27)
• The unit does not make pairing with the
Bluetooth device.
• Enter the same PIN code for both the unit and target
device. If the PIN code of the device is not indicated on its
instructions, try “0000” or “1234.”
• Select the device name from <Special Device>, then
try to connect again. (☞ pages 28, 54)
• Echo or noise occurs. Adjust the microphone unit position.
EN_KW-AVX710[J].indb 65EN_KW-AVX710[J].indb 65 07.12.5 11:59:35 AM07.12.5 11:59:35 AM

ENGLISH
66
Symptoms Remedies/Causes
Bluetooth
• Phone sound quality is poor. • Reduce the distance between the unit and the Bluetooth
cellular phone.
• Move the car to place where you can get a better signal
reception.
• The sound is interrupted or skipped during
playback of a Bluetooth audio player.
• Reduce the distance between the unit and the Bluetooth
audio player.
• Disconnect the player connected for “Bluetooth PHONE.”
• Turn off, then turn on the unit.
• (When the sound is not yet restored,) connect the player
again.
• “New Device” cannot be selected for
“Bluetooth AUDIO.”
Bluetooth audio player is already connected. To select “New
Device,” disconnect it. (☞ page 28)
• The connected audio player cannot be
controlled.
Check whether the connected audio player supports AVRCP
(Audio Video Remote Control Profile).
• “Reset 08” appears on the screen. Check the connection between the adapter and this unit.
HD Radio reception
• Sound quality changes when receiving HD
Radio stations.
Fix the reception mode either to “Digital” or “Analog” (see
page 39).
• No sound can be heard. • “Analog” is selected when receiving all digital broadcast
of HD Radio station. Select “Digital” or “Auto” (see page
39).
• “Digital” is selected when receiving weak digital signals
or receiving conventional radio broadcast. Select
“Analog” or “Auto” (see page 39).
• “Reset 8” appears on the display. Recconect this unit and the HD Radio tuner box correctly,
then reset the unit.
CD changer
• “No Disc” appears on the screen. Insert a disc into the magazine.
• “No Magazine” appears on the screen. Insert the magazine.
• “Cannot play this disc Check the disc”
appears on the screen.
Current disc does not include playable files. Replace the disc
with one including playable files.
• “Reset 08” appears on the screen. Connect this unit and the CD changer correctly and press
the reset button of the CD changer.
• “Reset 01” – “Reset 07” appears on the
screen.
Press the reset button of the CD changer.
• The CD changer does not work at all. Reset the unit. (☞ page 3)
EN_KW-AVX710[J].indb 66EN_KW-AVX710[J].indb 66 07.12.5 11:59:36 AM07.12.5 11:59:36 AM

67 REFERENCES
ENGLISH
Symptoms Remedies/Causes
Satellite radio
• “CALL 1-888-539-SIRIUS TO SUBSCRIBE”
appears on the monitor.
Starts subscribing SIRIUS Satellite radio. (☞ page 36)
• “No Signal” or “NO SIGNAL” appears on the
monitor.
Move to an area with stronger signals.
• “No Antenna” or “ANTENNA” appears on the
monitor.
Connect the antenna firmly.
• “No CH” appears on the monitor for about 5
seconds, then returns to the previous display
when listening to the SIRIUS Satellite radio.
No broadcast on the selected channel.
Select another channel or continue listening to the previous
channel.
• “CH–––” appears on the display for about
2 seconds, then returns to the previous
channel while listening to the XM Satellite
radio.
Selected channel is no longer available or is unauthorized.
Select another channel or continue listening to the previous
channel.
• “NO NAME” appears on the monitor. No text information for the selected channel.
• “UPDATING” appears on the monitor and no
sound can be heard.
The receiver is updating the channel information and it
takes a few minutes to complete.
• “OFF AIR” appears on the monitor while
listening to the XM Satellite radio.
Selected channel is not broadcasting at this time. Select
another channel or continue listening to the previous
channel.
• “LOADING” appears on the monitor while
listening to the XM Satellite radio.
The unit is loading the channel information and audio. Text
information is temporarily unavailable.
• “Reset08” flashes on the monitor. Reconnect this unit and the Satellite radio correctly and
reset the unit.
• Satellite radio does not work at all. Reconnect the Satellite radio after a few seconds.
iPod
• The iPod does not turn on or does not work. • Check the connection.
• Charge the battery.
• Sound is distorted. Deactivate the equalizer either on this unit or the iPod.
• “Disconnect” appears on the screen. Check the connection.
• Playback stops. The headphones are disconnected during playback. Restart
playback.
• “No Files” appears on the screen. No tracks are stored. Import tracks to the iPod.
• “Reset 01” – “Reset 07” appears on the
screen.
Disconnect the adapter from both this unit and iPod. Then,
connect them again.
• “Reset 08” appears on the screen. Check the connection between the adapter and this unit.
• The iPod’s controls do not work after
disconnecting from this unit.
Reset the iPod.
AV-IN
• No picture appears on the screen. • Turn on the video component if it is not on.
• Connect the video component correctly.
• Playback picture is not clear and legible. Adjust items in <Picture Adjust> menu. (☞ page 48)
EN_KW-AVX710[J].indb 67EN_KW-AVX710[J].indb 67 07.12.5 11:59:36 AM07.12.5 11:59:36 AM
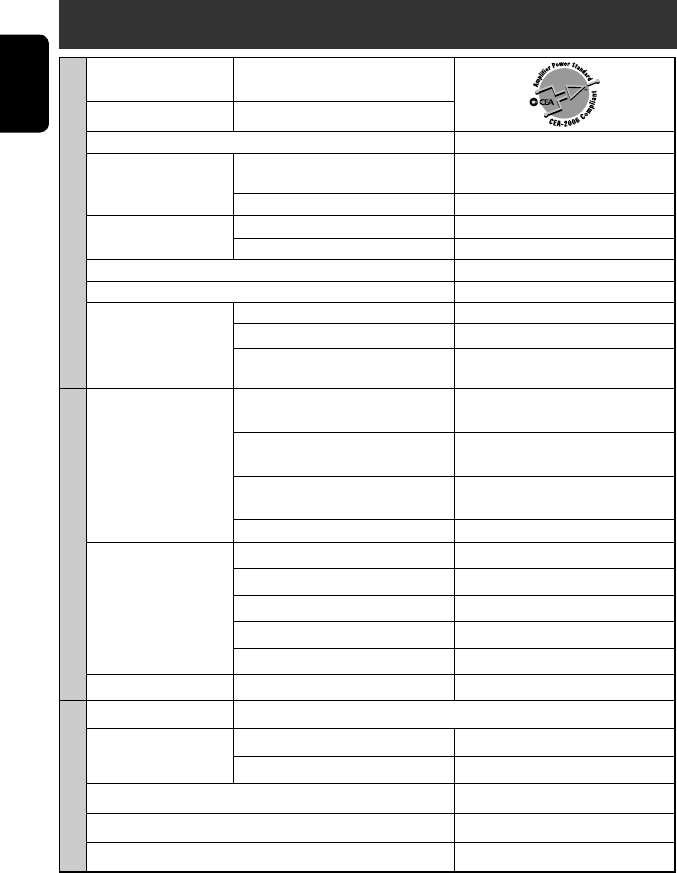
ENGLISH
68
Specifications
AMPLIFIER
Power Output: 20 W RMS × 4 Channels at 4 Ω and
≤ 1% THD+N
Signal-to-Noise Ratio: 80 dBA (reference: 1 W into 4 Ω)
Load Impedance: 4 (4 to 8 allowance)
Equalizer Control Range: Frequencies: 60 Hz, 150 Hz, 400 Hz, 1 kHz, 2.5 kHz,
6.3 kHz, 15 kHz
Level: ±10 dB
Audio Output Level
REAR OUT:
Line-Out Level/Impedance: 2.5 V/20 kΩ load (full scale)
Output Impedance: 1 kΩ
Color System: NTSC
Video Output (composite): 1 Vp-p/75 Ω
Other Terminals: Input: LINE IN, VIDEO IN, Antenna input
Output: VIDEO OUT
Others: CD changer, OE REMOTE, Reverse gear
signal, DIGITAL OUT (optical)
FM/AM TUNER
Frequency Range: FM (with channel interval set to 100
kHz or 200 kHz):
87.5 MHz to 107.9 MHz
FM (with channel interval set to 50
kHz):
87.5 MHz to 108.0 MHz
AM (with channel interval set to 10
kHz):
530 kHz to 1 710 kHz
AM (with channel interval set to 9 kHz): 531 kHz to 1 602 kHz
FM Tuner Usable Sensitivity: 11.3 dBf (1.0 V/75 Ω)
50 dB Quieting Sensitivity: 16.3 dBf (1.8 V/75 Ω)
Alternate Channel Selectivity (400 kHz): 65 dB
Frequency Response: 40 Hz to 15 000 Hz
Stereo Separation: 35 dB
AM Tuner Sensitivity/Selectivity: 20 V/35 dB
DVD/CD
Signal Detection System: Non-contact optical pickup (semiconductor laser)
Frequency Response: DVD, fs=48 kHz/96 kHz: 16 Hz to 22 000 Hz
VCD/CD: 16 Hz to 20 000 Hz
Dynamic Range: 93 dB
Signal-to-Noise Ratio: 95 dB
Wow and Flutter: Less than measurable limit
EN_KW-AVX710[J].indb 68EN_KW-AVX710[J].indb 68 07.12.5 11:59:37 AM07.12.5 11:59:37 AM

69 REFERENCES
ENGLISH
MONITOR
Screen Size: 7 inch wide liquid crystal display
Number of Pixel: 336 960 pixels: 480 × 3 (horizontal) × 234 (vertical)
Drive Method: TFT (Thin Film Transistor) active matrix format
Color System: NTSC/PAL
Aspect Ratio: 16:9 (wide)
GENERAL
Power Requirement: Operating Voltage: DC 14.4 V (11 V to 16 V allowance)
Grounding System: Negative ground
Allowable Storage Temperature: –10°C to +60°C (14°F to 140°F)
Allowable Operating Temperature: 0°C to +40°C (32°F to 104°F)
Dimensions (W × H × D)
(with trim plate and sleeve
attached):
Installation Size (approx.): 182 mm × 111 mm × 160 mm
(7-3/16” × 4-3/8” × 6-5/16”)
Panel Size (approx.): 188 mm × 117 mm × 10 mm
(7-7/16” × 4-5/8” × 7/16”)
Mass (approx.): 2.9 kg (6.4 lbs) (including trims and sleeve)
CAUTION: When ejecting the monitor, leave an
open space for the monitor to come out. If you do
not, the monitor may obstruct the steering wheel
and gearshift lever operations, and this may result
in a traffic accident.
Unit: mm (inch)
Required space for the monitor ejection
160 (6-5/16) 90.5 (3-5/8)
100 (3-15/16)
Design and specifications are subject to change without notice.
If a kit is necessary for your car, consult your telephone directory for the nearest car audio speciality shop.
EN_KW-AVX710[J].indb 69EN_KW-AVX710[J].indb 69 07.12.5 11:59:37 AM07.12.5 11:59:37 AM

EN, SP, FR
1207MNMMDWJEIN
© 2008 Victor Company of Japan, Limited
Having TROUBLE with operation?
Please reset your unit
Refer to page of How to reset your unit
Still having trouble??
USA ONLY
Call 1-800-252-5722
http://www.jvc.com
We can help you!
Rear_KW-AVX710J.indd 2Rear_KW-AVX710J.indd 2 07.11.21 3:08:53 PM07.11.21 3:08:53 PM
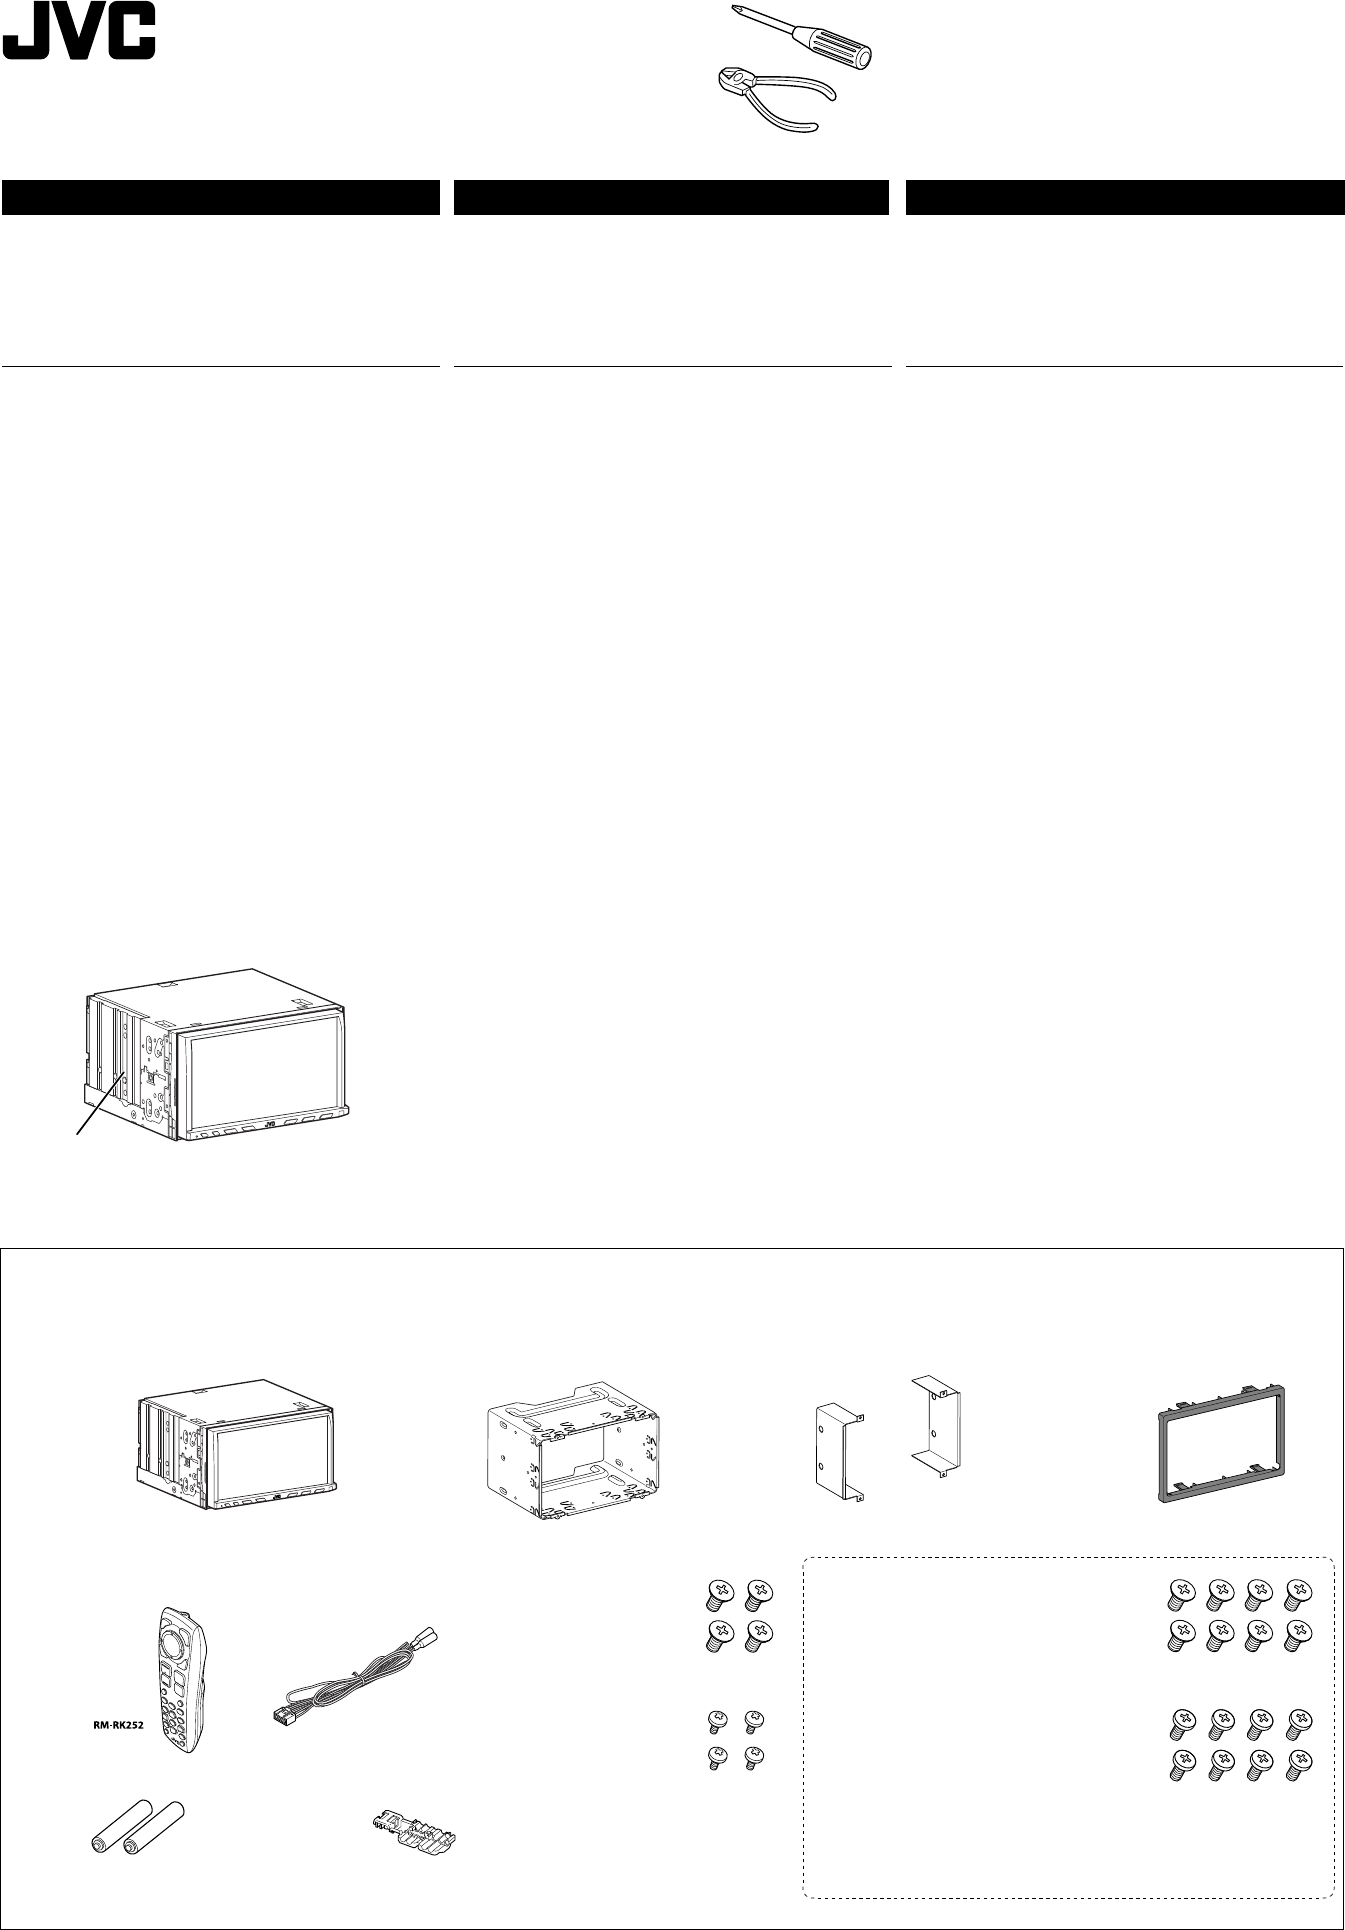
KW-ADV790/KW-AVX710
Installation/Connection Manual
Installation/Connection Manual
Manuel d’installation/raccordement
1
1207MNMMDWJEIN
EN, SP, FR
©2008 Victor Company of Japan, Limited
Parts list for installation and connection
The following parts are provided for this unit.
If anything is missing, contact your dealer immediately.
LVT1778-002A
[J]
ENGLISH
This unit is designed to operate on 12 V DC, NEGATIVE ground
electrical systems. If your vehicle does not have this system, a
voltage inverter is required, which can be purchased at JVC car audio
dealers.
WARNINGS
• DO NOT install any unit or wire any cable in a location where;
– it may obstruct the steering wheel and gearshift lever operations,
as this may result in a traffic accident.
– it may obstruct the operation of safety devices such as air bags, as
this may result in a fatal accident.
– it may obstruct visibility.
• DO NOT operate any unit while manipulating the steering wheel, as
this may result in a traffic accident.
• The driver must not watch the monitor while driving. It may lead to
carelessness and cause an accident.
• If you need to operate the unit while driving, be sure to look around
carefully or you may be involved in a traffic accident.
• If the parking brake is not engaged, “Parking Brake” flashes on the
monitor, and no playback picture will be shown.
– This warning appears only when the parking brake wire is
connected to the parking brake system built in the car.
Notes on electrical connections:
• Replace the fuse with one of the specified rating. If the fuse blows
frequently, consult your JVC car audio dealer.
• It is recommended to connect speakers with a maximum power
of more than 50 W (both at the rear and at the front, with an
impedance of 4 to 8 Ω).
If the maximum power is less than 50 W, change “Amplifier Gain”
setting to prevent the speakers from being damaged (see page 53 of
the INSTRUCTIONS).
• To prevent short circuits, cover the terminals of the UNUSED leads
with insulating tape.
• The heat sink becomes very hot after use. Be careful not to touch it
when removing this unit.
ESPAÑOL
Esta unidad está diseñada para funcionar con 12 V de CC, con
sistemas eléctricos de masa NEGATIVA. Si su vehículo no posee
este sistema, será necesario un inversor de tensión, que puede ser
adquirido en los concesionarios de JVC de equipos de audio para
automóviles.
ADVERTENCIAS
• NO instale ningún receptor o tienda ningún cable en una ubicación
donde;
– Donde pueda obstruir la maniobra del volante de dirección y del
cambio de engranajes, con el consiguiente riesgo de accidentes
de tráfico.
– Donde pueda obstruir el funcionamiento de dispositivos de
seguridad tales como bolsas de aire, pues podría resultar en un
accidente fatal.
– Donde pueda obstruir la visibilidad.
• NO OPERE la unidad mientras está maniobrando el volante de
dirección, pues podría producirse un accidente de tráfico.
• El conductor no debe mirar el monitor mientras conduce. Podría
producirse un descuido, y causar un accidente.
• Si necesita operar la unidad mientras conduce, asegúrese de mirar
atentamente a su alrededor pues de lo contrario, se podría producir
un accidente de tráfico.
• Si el freno de estacionamiento no está aplicado, parpadeará “Parking
Brake” en el monitor, y no se visualizará la imagen reproducida.
– Esta advertencia aparece únicamente cuando el cable del freno de
estacionamiento se encuentra conectado al sistema del freno de
estacionamiento incorporado al automóvil.
Notas sobre las conexiones eléctricas:
• Reemplace el fusible por otro del régimen especificado. Si el fusible
se funde frecuentemente, consulte con su concesionario de JVC de
equipos de audio para automóviles.
• Se recomienda conectar los altavoces con una potencia máxima de
más de 50 W (tanto atrás como adelante, con una impedancia de 4
Ω a 8 Ω).
Si la potencia máxima es de menos de 50 W, cambie “Amplifier
Gain” para evitar daños en los altavoces (consulte la página 53 de
MANUAL DE INSTRUCCIONES).
• Para evitar cortocircuitos, cubra los terminales de los cables NO
UTILIZADOS con cinta aislante.
• La unidad estará muy caliente después del uso. Tenga la precaución
de no quemarse al efectuar su desmontaje.
FRANÇAIS
Cet appareil est conçu pour fonctionner sur des sources de courant
continu de 12 V à masse NEGATIVE. Si votre véhicule n’offre pas ce
type d’alimentation, il vous faut un convertisseur de tension, que vous
pouvez acheter chez un revendeur d’autoradios JVC.
AVERTISSEMENTS
• N’INSTALLEZ aucun appareil ni aucun câble dans un endroit où:
– où il peut gêner l’accès au volant ou au levier de vitesse car cela
peut entraîner un accident de la circulation.
– où il peut gêner la manipulation de dispositifs de sécurité tels que
les airbags car cela peut entraîner un accident fatal.
– où il peut gêner la visibilité.
• NE COMMANDEZ pas l’appareil lors de la manipulation du volant
car cela peut entraîner un accident de la circulation.
• Le conducteur ne doit pas regarder le moniteur lorsqu’il conduit. Cela
peut lui faire perdre sa concentration et causer un accident.
• Si vous souhaitez opérer l’appareil pendant que vous conduisez,
assurez-vous de bien regarder autour de vous afin de ne pas causer
un accident de la circulation.
• Si le frein de stationnement n’est pas engagé, “Parking Brake” clignote
sur le moniteur et aucune image de lecture n’apparaît.
– Cet avertissement apparaît uniquement quand le fil du frein de
stationnement est connecté au système de frein de stationnement
intégré à la voiture.
Remarques sur les connexions électriques:
• Remplacer le fusible par un de la valeur précisée. Si le fusible saute
souvent, consulter votre revendeur d’autoradios JVC.
• Il est recommandé de connecter des enceintes avec une puissance
de plus de 50 W (les enceintes arrière et les enceintes avant,
avec une impédance comprise entre 4 Ω et 8 Ω). Si la puissance
maximum est inférieure à 50 W, changez “Amplifier Gain” pour
éviter d’endommager vos enceintes (voir page 53 du MANUAL
D’INSTRUCTIONS).
• Pour éviter les court-circuits, couvrir les bornes des fils qui ne sont
PAS UTILISÉS avec de la bande isolante.
• Le dissipateur de chaleur devient très chaud après usage. Faire
attention de ne pas le toucher en retirant cet appareil.
Lista de piezas para instalación y conexión
Con esta unidad se suministran las siguientes piezas.
Si hay algún elemento faltante, póngase inmediatamente en contacto
con su concesionario.
Liste des pièces pour l’installation et raccordement
Les pièces suivantes sont fournies avec cet appareil. Si quelque chose
manquait, contactez votre revendeur immédiatement.
Crimp connector
Conectores a presión
Raccord à sertir
Power cord
Cable de alimentación
Cordon d’alimentation
Batteries
Pilas
Piles
Remote controller
Control remoto
Télécommade
Main unit
Unidad principal
Appareil principal
Round head screws*1
(M2.6 x 3 mm/M2.6 x 1/8”)
Tornillos de cabeza esférica*1
(M2.6 x 3 mm/M2.6 x 1/8 pulgada)
Vis à tête ronde*1
(M2.6 x 3 mm/M2.6 x 1/8 pouces)
Sleeve*1
Cubierta*1
Manchon*1
Trim plate
Placa de guarnición
Plaque d’assemblage
Brackets*1
Ménsulas*1
Supports*1
Flat head screws*1
(M5 x 8 mm/M5 x 3/8”)
Tornillos de cabeza plana*1
(M5 x 8 mm/M5 x 3/8 pulgada)
Vis à tête plate*1
(M5 x 8 mm/M5 x 3/8 pouces)
Round head screws (M5 x 8 mm/M5 x 3/8”)
Tornillos de cabeza esférica
(M5 x 8 mm/M5 x 3/8 pulgada)
Vis à tête ronde (M5 x 8 mm/M5 x 3/8 pouces)
Flat head screws (M5 x 8 mm/M5 x 3/8”)
Tornillos de cabeza plana
(M5 x 8 mm/M5 x 3/8 pulgada)
Vis à tête plate (M5 x 8 mm/M5 x 3/8 pouces)
Use these screws when installing the unit without the supplied sleeve.
Utilice estos tornillos cuando instale la unidad sin la funda suministrada.
Utilisez ces vis lors de l’installation de l’appareil sans le manchon fourni.
*1 Fitted to the main unit when shipped *1 Fijado a la unidad principal cuando se expide de fábrica *1 Fixé à l’appareil lors de l’expédition.
Heat sink
Sumidero térmico
Dissipateur de chaleur
AVX710J_install.indb 1AVX710J_install.indb 1 07.12.5 10:13:09 AM07.12.5 10:13:09 AM

2
INSTALLATION (IN-DASH MOUNTING)
The following illustration shows a typical installation. However, you
should make adjustments corresponding to your specific car. If you
have any questions or require information regarding installation kits,
consult your JVC car audio dealer or a company supplying kits.
• If you are not sure how to install this unit correctly, have it installed
by a qualified technician.
Before installing the unit
• When mounting the unit, be sure to use the screws provided, as
instructed. If other screws are used, parts could become loose or
damaged.
• When tightening screws or bolts, be careful not to pinch any
connection cord.
• Make sure not to block the fan on the rear to maintain proper
ventilation when installing the unit.
1 Remove the audio system originally installed in the car, together
with its mounting brackets.
• Be sure to keep all the screws and parts removed from your car
for future use.
2 Install thesleeve in the dashboard of the car.
3 Attach the brackets to the main unit.
• make sure to use the supplied flat head screws (M5 x 8 mm/M5
x 3/8”). If longer screws are used, they could damage the unit.
4 Do the required electrical connections.
• See pages 3 and 4.
5 Install the main unit in the sleeve.
6 Attach the trim plate.
Install the unit at an angle of less than 30˚, taking it into account that the monitor would eject when in use.
Instale la unidad a un ángulo de menos de 30°, teniendo en cuenta que el monitor debe extraerse para su
uso (véase a la izquierda).
Installez l’appareil avec un angle de moins de 30°, en tenant compte du fait que le moniteur doit être déployé
lors de son utilisation (voir ci-à gauche).
30˚
Unit: mm (inch)
Unidad: mm (pulgada)
Unité: mm (pouces)
Required space for the monitor ejection
Espacio requerido para la expulsión del monitor
Espace requis pour le déploiement du moniteur
160 (6-5/16) 90.5 (3-5/8)
100 (3-15/16)
INSTALACION (MONTAJE EN EL TABLERO DE
INSTRUMENTOS)
La siguiente ilustración muestra una instalación típica. Sin embargo
usted deberá efectuar los ajustes correspondientes a su automóvil.
Si tiene alguna pregunta o necesita información acerca de las
herramientas para instalación, consulte con su concesionario de
JVC de equipos de audio para automóviles o a una compañía que
suministra tales herramientas.
• Si no está seguro de poder instalar la unidad correctamente, déjela
en manos de un técnico cualificado.
Antes de instalar la unidad
• Al instalar la unidad, asegúrese de usar los tornillos suministrados,
de acuerdo con las instrucciones. Si emplea otros tipos de tornillos,
corre el riesgo de que las piezas se aflojen o se dañen.
• Al apretar los tornillos o los pernos, asegúrese de que ningún cable
de conexión quede pillado.
• Al efectuar la instalación, asegúrese de no bloquear el ventilador del
panel trasero a fin de mantener una ventilación correcta.
INSTALLATION (MONTAGEDANS LE TABLEAU DE
BORD)
L’illustration suivante est un exemple d’installation typique.
Cependant, vous devez faire les ajustements correspondant à votre
voiture. Si vous avez des questions ou avez besoin d’information sur des
kits d’installation, consulter votre revendeur d’autoradios JVC ou une
compagnie d’approvisionnement.
• Si vous n’êtes pas sûr de pouvoir installer l’appareil correctement,
faite-le installer par un technicien qualifié.
Avant d’installer l’appareil
• Lors du montage de l’appareil, assurez-vous d’utiliser les vis fournies,
de la façon indiquée. Si vous utilisez d’autres vis, certaines pièces
peuvent être perdues ou endommagées.
• Lorsque vous serrez des vis ou des boulons, faites attention de ne pas
pincer un cordon de connexion.
• Assurez-vous de ne pas bloquer le ventilateur sur le panneau arrière
lors de l’installation afin de permettre une ventilation correcte.
3
2
4
5
6
1
Round head screws (M2.6 x 3 mm/M2.6 x 1/8”)
Tornillos de cabeza esférica (M2.6 x 3 mm/M2.6 x
1/8 pulgada)
Vis à tête ronde (M2.6 x 3 mm/M2.6 x 1/8 pouces)
Trim plate
Placa de guarnición
Plaque d’assemblage
Brackets
Ménsulas
Supports Flat head screws
(M5 x 8 mm/M5 x 3/8”)
Tornillos de cabeza plana
(M5 x 8 mm/M5 x 3/8 pulgada)
Vis à tête plate
(M5 x 8 mm/M5 x 3/8 pouces)
Sleeve
Cubierta
Manchon
1 Desmonte el sistema de audio instalado originalmente en el
coche, junto con los ménsulas de montaje.
• Asegúrese de guardar todos los tornillos y piezas quitados de
su vehículo para poderlos usar en el futuro.
2 Instale la cubierta en el cubretablero del automóvil.
3 Fije los ménsulas a la unidad principal.
• Certifique-se de que utiliza parafusos de cabeça chata (M5 x 8
mm/M5 x 3/8 pulgada). Parafusos maiores podem danificar a
unidade.
4 Realice todas las conexiones eléctricas necesarias.
• Consulte las páginas 3 y 4.
5 Coloque la unidad principal en la cubierta.
6 Fije la placa de guarnición.
1 Retirez le système audio d’origine installé dans la voiture en même
temps que les supports de montage.
• Assurez-vous de conserver toutes les vis et pièces détachées de
votre voiture pour une utilisation dans le future.
2 Installez le manchon dans le tableau de bord de la voiture.
3 Attachez les supports à l’appareil principal.
• Assurez-vous d’utiliser les vis à tête plate fournis —(M5 x 8
mm/M5 x 3/8 pouces). Vous risquez d’endommager l’appareil si
vous utilisez des vis plus longues.
4 Réalisez les connexions électriques requises.
• Référez-vous aux pages 3 et 4.
5 Installez l’appareil principal dans le manchon.
6 Fixez la plaque d’assemblage.
AVX710J_install.indb 2AVX710J_install.indb 2 07.12.5 10:13:18 AM07.12.5 10:13:18 AM
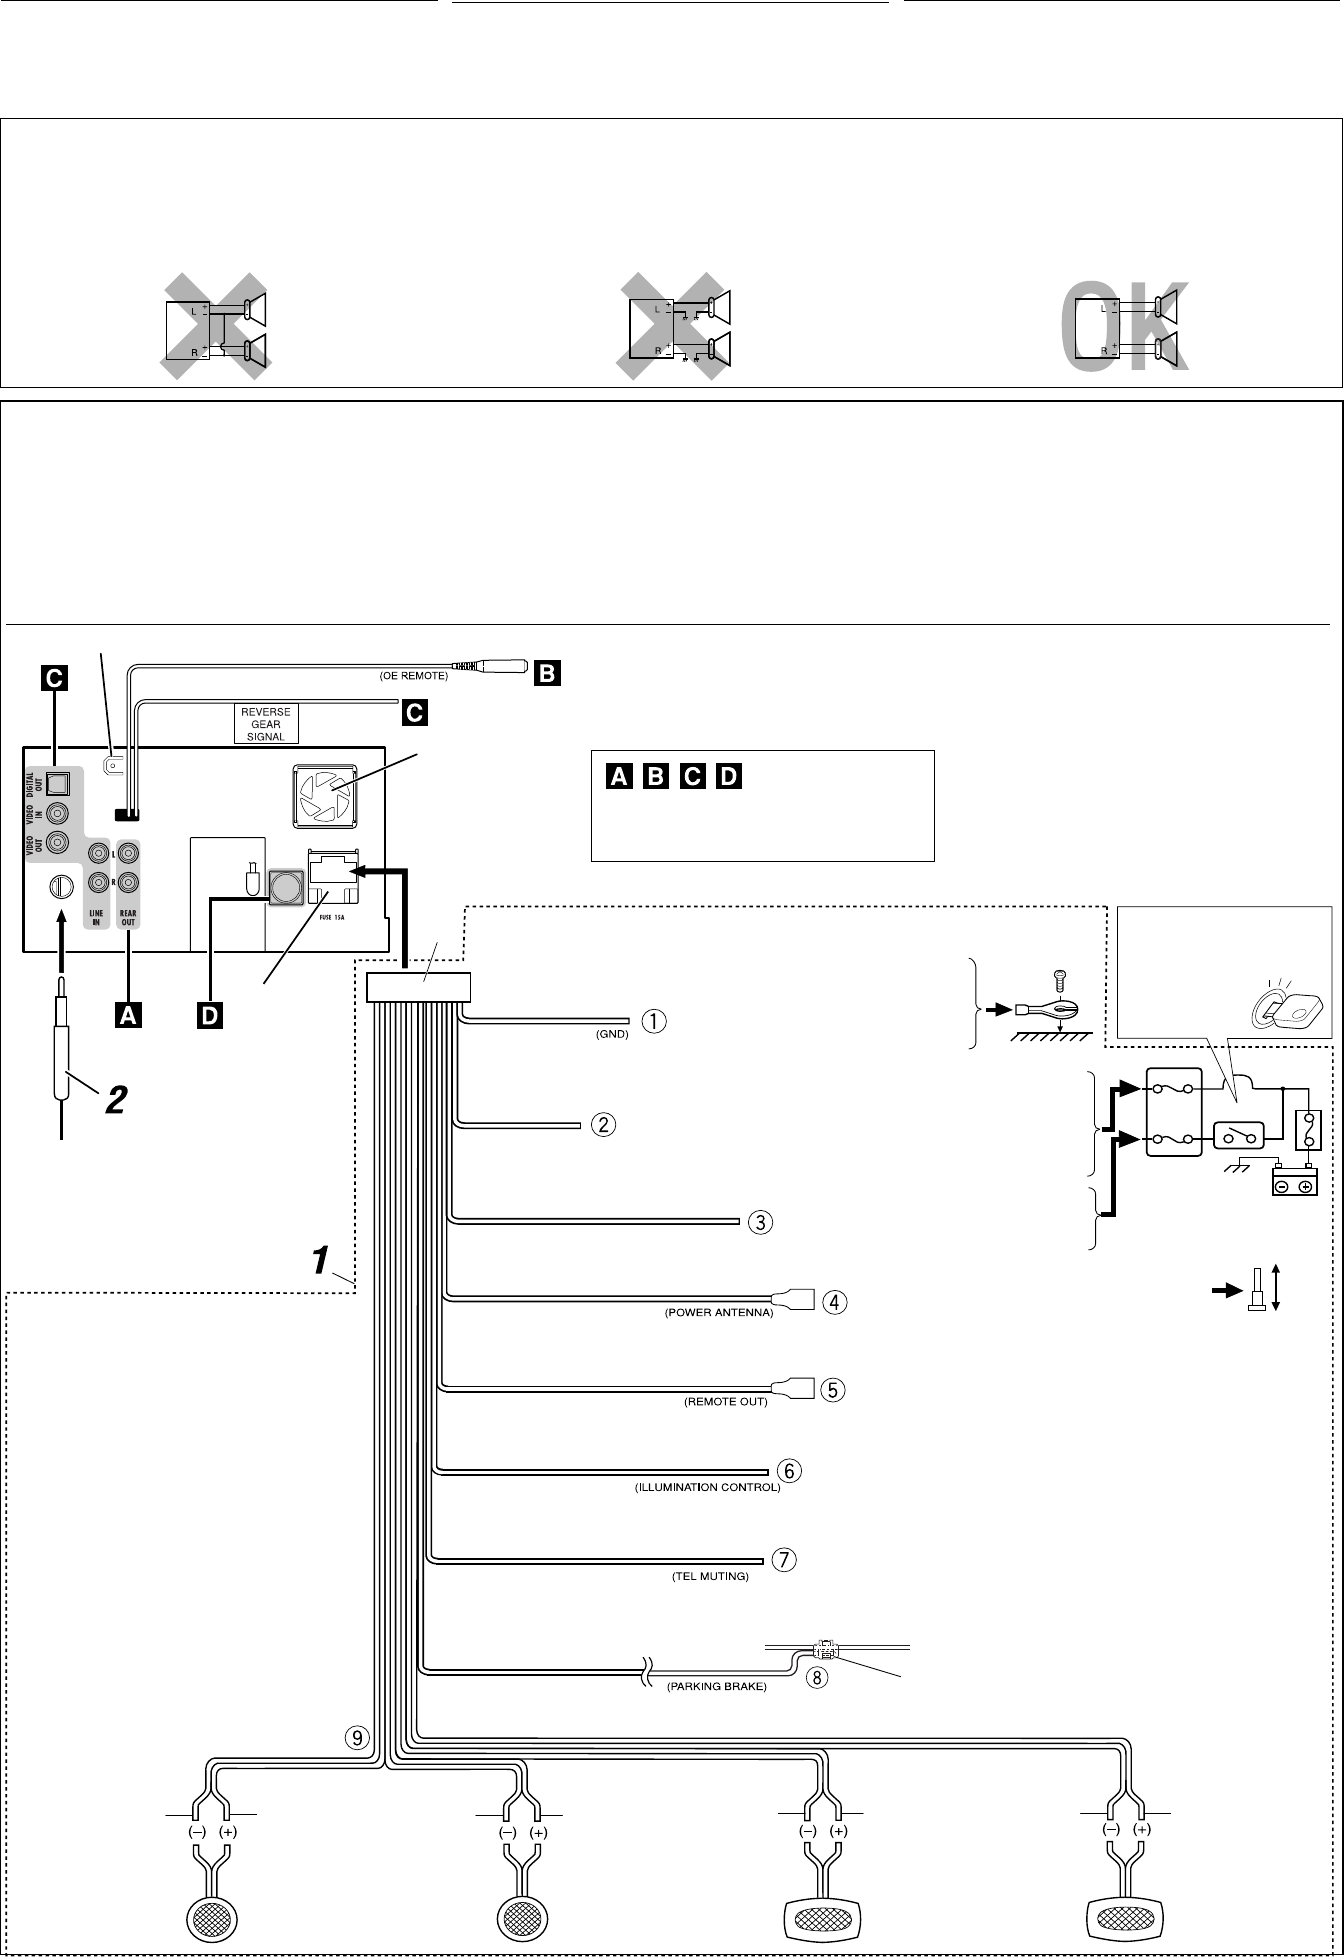
3
3
ELECTRICAL CONNECTIONS
To prevent short circuits, we recommend that you disconnect the
battery’s negative terminal and make all electrical connections before
installing the unit.
• Be sure to ground this unit to the car’s chassis again after
installation.
Before connecting: Check the wiring in the vehicle carefully.
Incorrect connection may cause serious damage to this unit.
The leads of the power cord and those of the connector from the car
body may be different in color.
1 Connect the colored leads of the power cord in the order specified
in the illustration below.
2 Connect the antenna cord.
3 Finally connect the wiring harness to the unit.
15 A fuse
Fusible de 15 A
Fusible 15 A
Rear ground terminal/Terminal de tierra posterior/Borne arrière de masse
*1 Not included for this unit
*1 No suministrado con esta unidad
*1 Non fourni avec cet appareil
Ignition switch
Interruptor de encendido
Interrupteur d’allumage
Fuse block
Bloque de fusibles
Porte-fusible
White with black stripe
Blanco con rayas negras
Blanc avec bande noire
White
Blanco
Blanc
Gray with black stripe
Gris con rayas negras
Gris avec bande noire
Gray
Gris
Gris
Green with black stripe
Verde con rayas negras
Vert avec bande noire
Green
Verde
Vert
Purple with black stripe
Púrpura con rayas negras
Violet avec bande noire
Purple
Púrpura
Violet
Left speaker (front)
Altavoz izquierdo (frontal)
Enceinte gauche (avant)
Right speaker (front)
Altavoz derecho (frontal)
Enceinte droit (avant)
Left speaker (rear)
Altavoz izquierdo (trasero)
Enceinte gauche (arrière)
Right speaker (rear)
Altavoz derecho (trasero)
Enceinte droit (arrière)
To metallic body or chassis of the car
A un cuerpo metálico o chasis del automóvil
Vers corps métallique ou châssis de la voiture
To a live terminal in the fuse block connecting to the car battery
(bypassing the ignition switch) (constant 12 V)
A un terminal activo del bloque de fusibles conectado a la batería del
automóvil (desviando el interruptor de encendido) (12 V constantes)
A une borne sous tension du porte-fusible connectée à la batterie de la
voiture (en dérivant l’interrupteur d’allumage) (12 V constant)
To an accessory terminal in the fuse block
A un terminal accesorio del bloque de fusibles
Vers borne accessoire du porte-fusible
To car light control switch
Al interruptor de control de las luces del automóvil
À l’interrupteur d’éclairage de la voiture
To cellular phone system
Al sistema de teléfono celular
À un système de téléphone cellulaire
Black
Negro
Noir
Yellow *2
Amarillo *2
Jaune *2
Red
Rojo
Rouge
Blue
Azul
Bleu
Orange with white stripe
Naranja con rayas blancas
Orange avec bande blanche
Brown
Marrón
Marron
Light green
Verde claro
Vert clair
Fan
Ventilador
Ventilateur
To parking brake (see diagram Å on page 4.)
Al freno de estacionamiento (véase diagrama Å de la página 4.)
Au frein de stationnement (voir le diagramme Å de la page 4.)
Crimp connector
Conectore a presión
Raccord à sertir
Blue with white stripe
Azul con rayas blancas
Bleu avec bande blanche
To automatic antenna if any (250 mA max.)
A la antena automática, si hubiere (250 mA máx.)
À l’antenne automatique s’il y en a une (250 mA max.)
To the remote lead of other equipment (200 mA max.)
Al conductor remoto del otro equipo (200 mA máx.)
Au fil de télécommande d’un autre appareil (200 mA max.)
*1
*1
*2 Before checking the operation of this unit prior to
installation, this lead must be connected, otherwise
power cannot be turned on.
*2 Antes de comprobar el funcionamiento de esta
unidad previa a de la instalación, es necesario
conectar este cable, de lo contrario no se podrá
conectar la alimentación.
*2 Pour vérifier le fonctionnement de cet appareil
avant installation, ce fil doit être raccordé, sinon
l’appareil ne peut pas être mis sous tension.
CONEXIONES ELECTRICAS
Para evitar cortocircuitos, recomendamos que desconecte el terminal
negativo de la batería y que efectúe todas las conexiones eléctricas
antes de instalar la unidad.
• Asegúrese de volver a conectar a masa esta unidad al chasis
del automóvil después de la instalación.
Antes de la conexión: Verifique atentamente el conexionado del
vehículo. Una conexión incorrecta podría producir daños graves en
la unidad. Los cordones del cable de alimentación y los del conector
procedentes de la carrocería del automóvil podrían ser de diferentes
en color.
1 Conecte los conductores de color del cable de alimentación en el
orden especificado en la ilustración de abajo.
2 Conecte el cable de antena.
3 Por último, conecte el cable de alimentación a la unidad.
RACCORDEMENTS ELECTRIQUES
Pour éviter tout court-circuit, nous vous recommandons de débrancher
la borne négative de la batterie et d’effectuer tous les raccordements
électriques avant d’installer l’appareil.
• Assurez-vous de raccorder de nouveau la mise à la masse de
cet appareil au châssis de la voiture après l’installation.
Avant de commencer la connexion: Vérifiez attentivement le
câblage du véhicule. Une connexion incorrecte peut endommager
sérieusement l’appareil. Le fil du cordon d’alimentation et ceux des
connecteurs du châssis de la voiture peuvent être différents en couleur.
1 Connectez les fils colorés du cordon d’alimentation dans l’ordre
spécifié sur l’illustration ci-dessous.
2 Connectez le cordon d’antenne.
3 Finalement, connectez le faisceau de fils à l’appareil.
See each diagram on pages 4-6.
Vea cada uno de los diagramas en las páginas 4-6.
Référez-vous à chaque diagramme des pages 4-6.
PRECAUTIONS on power supply and speaker connections:
• DO NOT connect the speaker leads of the power cord to the
car battery; otherwise, the unit will be seriously damaged.
• BEFORE connecting the speaker leads of the power cord to the
speakers, check the speaker wiring in your car.
PRECAUCIONES sobre las conexiones de la fuente de
alimentación y de los altavoces:
• NO conecte los conductores de altavoz del cable de
alimentación a la batería de automóvil, pues podrían
producirse graves daños en las unidades.
• ANTES de conectar a los altavoces los conductores de altavoz del
cable de alimentación, verifique el conexionado de altavoz de su
automóvil.
PRECAUTIONS sur l’alimentation et la connexion des enceintes
• NE CONNECTEZ PAS les fils d’enceintes du cordon
d’alimentation à la batterie; sinon, l’appareil serait
sérieusement endommagé.
• AVANT de connecter les fils d’enceintes du cordon d’alimentation
aux enceintes, vérifiez le câblage des enceintes de votre voiture.
AVX710J_install.indb 3AVX710J_install.indb 3 07.12.5 10:13:21 AM07.12.5 10:13:21 AM

ENGLISH FRANÇAIS ESPAÑOL
You can connect an amplifier to upgrade your car stereo system.
• You can supply the power to the amplifier by connecting the
remote leads (blue with white stripe) of this unit to the amplifier.
(To connect other equipment using the remote leads, Y-
connectors need to be separately purchased.)
• Disconnect the speakers from the unit, and connect them to the
amplifier. Leave the speaker leads of the unit unused.
• You can switch off the built-in amplifier and send the audio
signals only to the external amplifier to get clear sound and to
prevent internal heat built-up inside the unit. See page 53 of the
INSTRUCTIONS.
*3 Firmly attach the ground lead to the metallic body or to the
chassis of the car—to the place uncoated with paint (if coated
with paint, remove the paint before attaching the lead). Failure to
do so may cause damage to the unit.
Rear speakers
Altavoces traseros
Enceintes arrière
Front speakers
Altavoces delanteros
Enceintes avant
Connecting the parking brake lead
Connect the parking brake lead to the parking brake system
built in the car.
Parking brake lead (light green)
Cable del freno de estacionamiento (verde claro)
Fil du frein de stationnement (vert clair)
Parking brake
Freno de estacionamiento
Frein de stationnement
Crimp connector
Conectore a presión
Raccord à sertir
Parking brake switch (inside the car)
Interruptor del freno de estacionamiento
(dentro del automóvil)
Commutateur de frein de stationnement
(intérieur de la voiture)
To metallic body or chassis of the car
A un cuerpo metálico o chasis del automóvil
Vers corps métallique ou châssis de la voiture
JVC Amplifier
Amplificador de JVC
JVC Amplificateur
4
AConnecting an external amplifier / Conexión de un amplificador externo / Connexion d’un amplificateur extérieur
AConexión del cable del freno de
estacionamiento
Conecte el cable del freno de estacionamiento al sistema del freno de
estacionamiento instalado en el coche.
Connexion du fil de frein de stationnement
Connectez le fil de frein de stationnement au système de frein de
stationnement intégré à la voiture.
Puede conectar un amplificador para mejorar su sistema car estéreo.
• Puede suministrar alimentación al amplificador conectando los
conductores remotos (azul con rayas blancas) de esta unidad al
amplificador. (Para conectar otro equipo usando los conductores
remotos, se deben adquirir separadamente conectores en Y).
• Desconecte los altavoces de la unidad principal y conéctelos al
amplificador. Los conductores de los altavoces de la unidad quedan
sin usar.
• Puede desconectar el amplificador incorporado y enviar las señales
de audio sólo al(los) amplificador(es) externo(s) para obtener
sonidos nítidos y evitar la generación de calor dentro de la unidad.
Consulte la página 53 del MANUAL DE INSTRUCCIONES.
Vous pouvez connecter un amplificateur pour améliorer votre système
stéréo.
• Vous pouvez alimenter l’amplificateur en connectant les fils
de télécommande (bleu à bande blanche( de cet appareil à
l’amplificateur. (Pour connecter un autre appareil en utilisant
les fils de télécommande, vous devez acheter des connecteurs Y
séparément.)
• Déconnectez les enceintes de l’appareil principal et connectez-les
aux amplificateurs. Laissez les fils d’enceintes de l’appareil inutilisés.
• Vous pouvez mettre hors service l’amplificateur intégré et envoyer
les signaux audio uniquement vers un ou plusieurs amplificateurs
extérieurs pour obtenir des sons plus clairs et éviter un échauffement
interne de l’appareil. Référez-vous à la page 53 du MANUEL
D’INSTRUCTIONS.
*3 Fije firmemente el cable de tierra a un cuerpo metálico o chasis del
automóvil—a un lugar no cubierto con pintura (si está cubierto
con pintura, quítela antes de fijar el cable). De lo contrario, se
podrían producir daños en la unidad.
*3 Firmly attach the ground lead to the metallic body or to the chassis
of the car—to the place uncoated with paint (if coated with paint,
remove the paint before attaching the lead). Failure to do so may
cause damage to the unit.
Remote lead
Cable remoto
Fil d’alimentation à distance
Remote lead (Blue with white stripe)
Cable remoto (azul con rayas blancas)
Fil d’alimentation à distance (Bleu avec bande blanche)
Y-connector (not supplied for this unit)
Conector en Y (no suministrado con esta unidad)
Connecteur Y (non fourni avec cet appareil)
To the remote lead of other equipment
Al conductor remoto de otro equipo
Au fil de télécommande de l’autre appareil
B
If your car is equipped with the steering wheel remote controller,
you can operate this unit using the controller. For connection, an
exclusive remote adapter (not supplied) which matches your car is
required. For details, consult the same car audio dealer as where the
unit is purchased.
Connecting to the steering wheel remote controller / Conexión al control remoto del volante de dirección / Connexion d’un amplificateur
extérieur
OE remote adapter (not supplied)
Adaptador para control remoto OE (no suministrado)
Adaptateur pour télécommande au volant (non fourni)
Steering wheel remote controller (equipped in the car)
Control remoto del volante de dirección (equipado en el vehículo)
Télécommande de volant (installée dans la voiture)
OE REMOTE
Steering wheel remote
Entrada remota del volante de dirección
Télécommande de volant
Si su vehículo está equipado con control remoto en el volante de
dirección, podrá hacer funcionar este receptor utilizando dicho
control. Para la conexión, se requiere un adaptador remoto exclusivo
(no suministrado) que sea adecuado para su automóvil. Para los
detalles, consulte con el concesionario car audio donde compró el
receptor.
Si votre voiture est munie d’une télécommande de volant, vous
pouvez commander cet autoradio en utilisant la télécommande.
Pour la connexion, un adaptateur de télécommande exclusif (non
fourni) correspondant à votre voiture est requis. Pour en savoir plus,
consultez le revendeur autoradio auprès duquel vous avez acheté cet
autoradio.
KW-ADV790
KW-AVX710
a
AVX710J_install.indb 4AVX710J_install.indb 4 07.12.5 10:13:25 AM07.12.5 10:13:25 AM
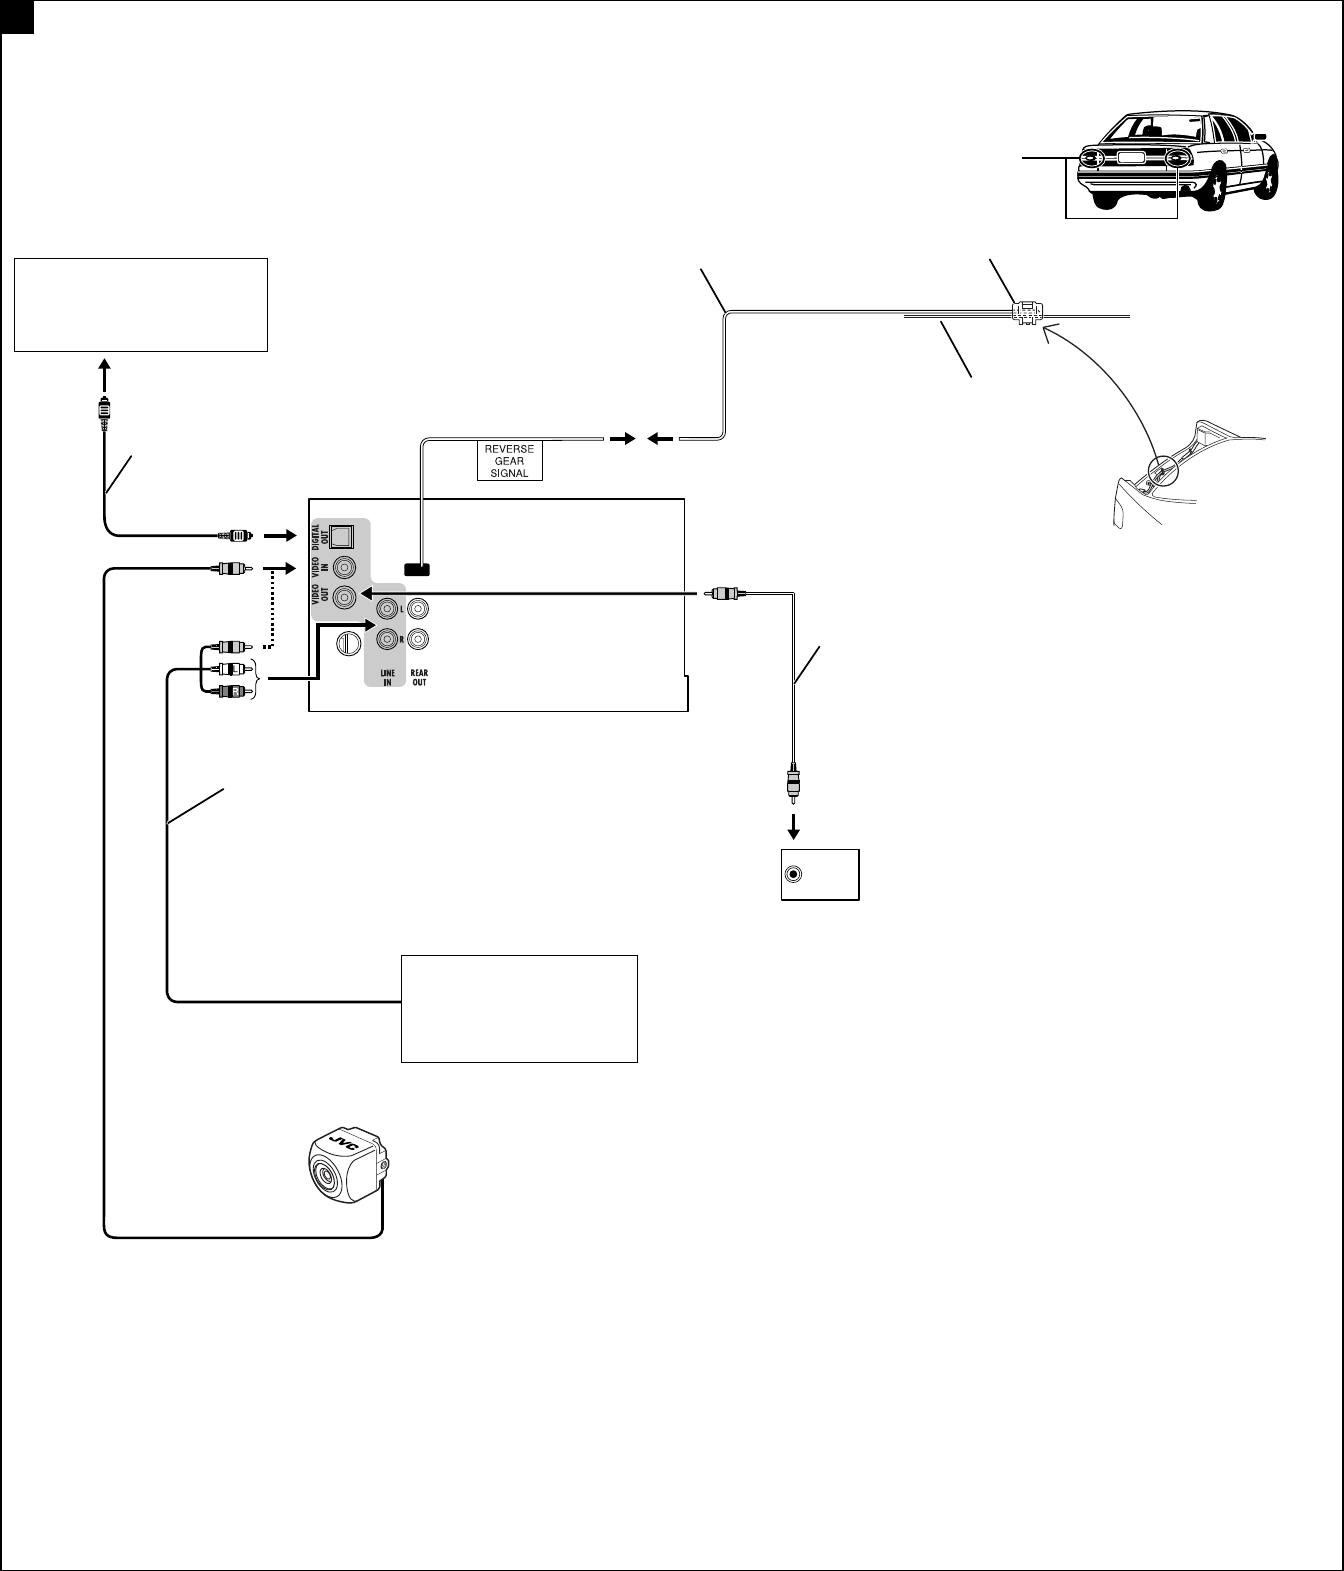
5
Connections for external component playback / Conexiones para la reproducción del componente externo / Connexions pour un appareil de
lecture extérieur
C
Rear view camera KV-CM1*6
Cámara de reprovisión KV-CM1*6
Caméra de recul KV-CM1*6
AV amplifier or decoder
Amplificador o decodificador AV
Amplificateur AV ou décodeur
Camcorder, Navigation System, etc.
Videocámara, sistema de
navegación, etc.
Caméscope, système de navigation,
etc.
External monitor
Monitor externo
Moniteur extérieur
Extension lead (not supplied)
Cable prolongador (no suministrado)
Cordon prolongateur (non fourni)
Video cord (not supplied)
Cable de video (no suministrados)
Cordon vidéo (non fourni)
Crimp connector (not supplied)*5
Conector de sujeción (no suministrado)
*5
Raccord à sertir (non fourni)*5
Audio/video cord (not supplied)
Cable de audio/vídeo (no suministrados)
Cordon audio/vidéo (non fourni)
Digital optical cable (not supplied)
Cable óptico digital (no suministrado)
Câble optique numérique (non fourni)
Reverse lamp
Luces de marcha atrás
Feux de recul
To reverse lamp
A la luz de marcha atrás
Aux feux de recul
Reverse lamp lead*4
Conductor de la luz de marcha atrás*4
Fil des feux de recul*4
To car battery
A la batería del automóvil
À la batterie de la voiture
*4 Required only when connecting a rear view camera to
VIDEO IN terminal.
*5 Refer to å in diagram Å on page 4.
*6 Set “AV Input” setting to “Camera” when using (see page 52 of
the INSTRUCTIONS).
*4 Se requiere solamente cuando se conecta una cámara de
retrovisión al terminal VIDEO IN.
*5 Consulte å en el diagrama Å de la página 4.
*6 Para usar, ajuste “AV Input” a “Camera” (véase la página 52 del
MANUAL DE INSTRUCCIONES).
*4 Requis uniquement lors de la connexion d’une caméra de recul à
la prise VIDEO IN.
*5 Reportez vous à å du diagramme Å de la page 4.
*6 Réglez “AV Input” sur “Camera” lors de l’utilisation (voir page 52
du MANUEL D’INSTRUCTIONS).
AVX710J_install.indb 5AVX710J_install.indb 5 07.12.5 10:13:27 AM07.12.5 10:13:27 AM
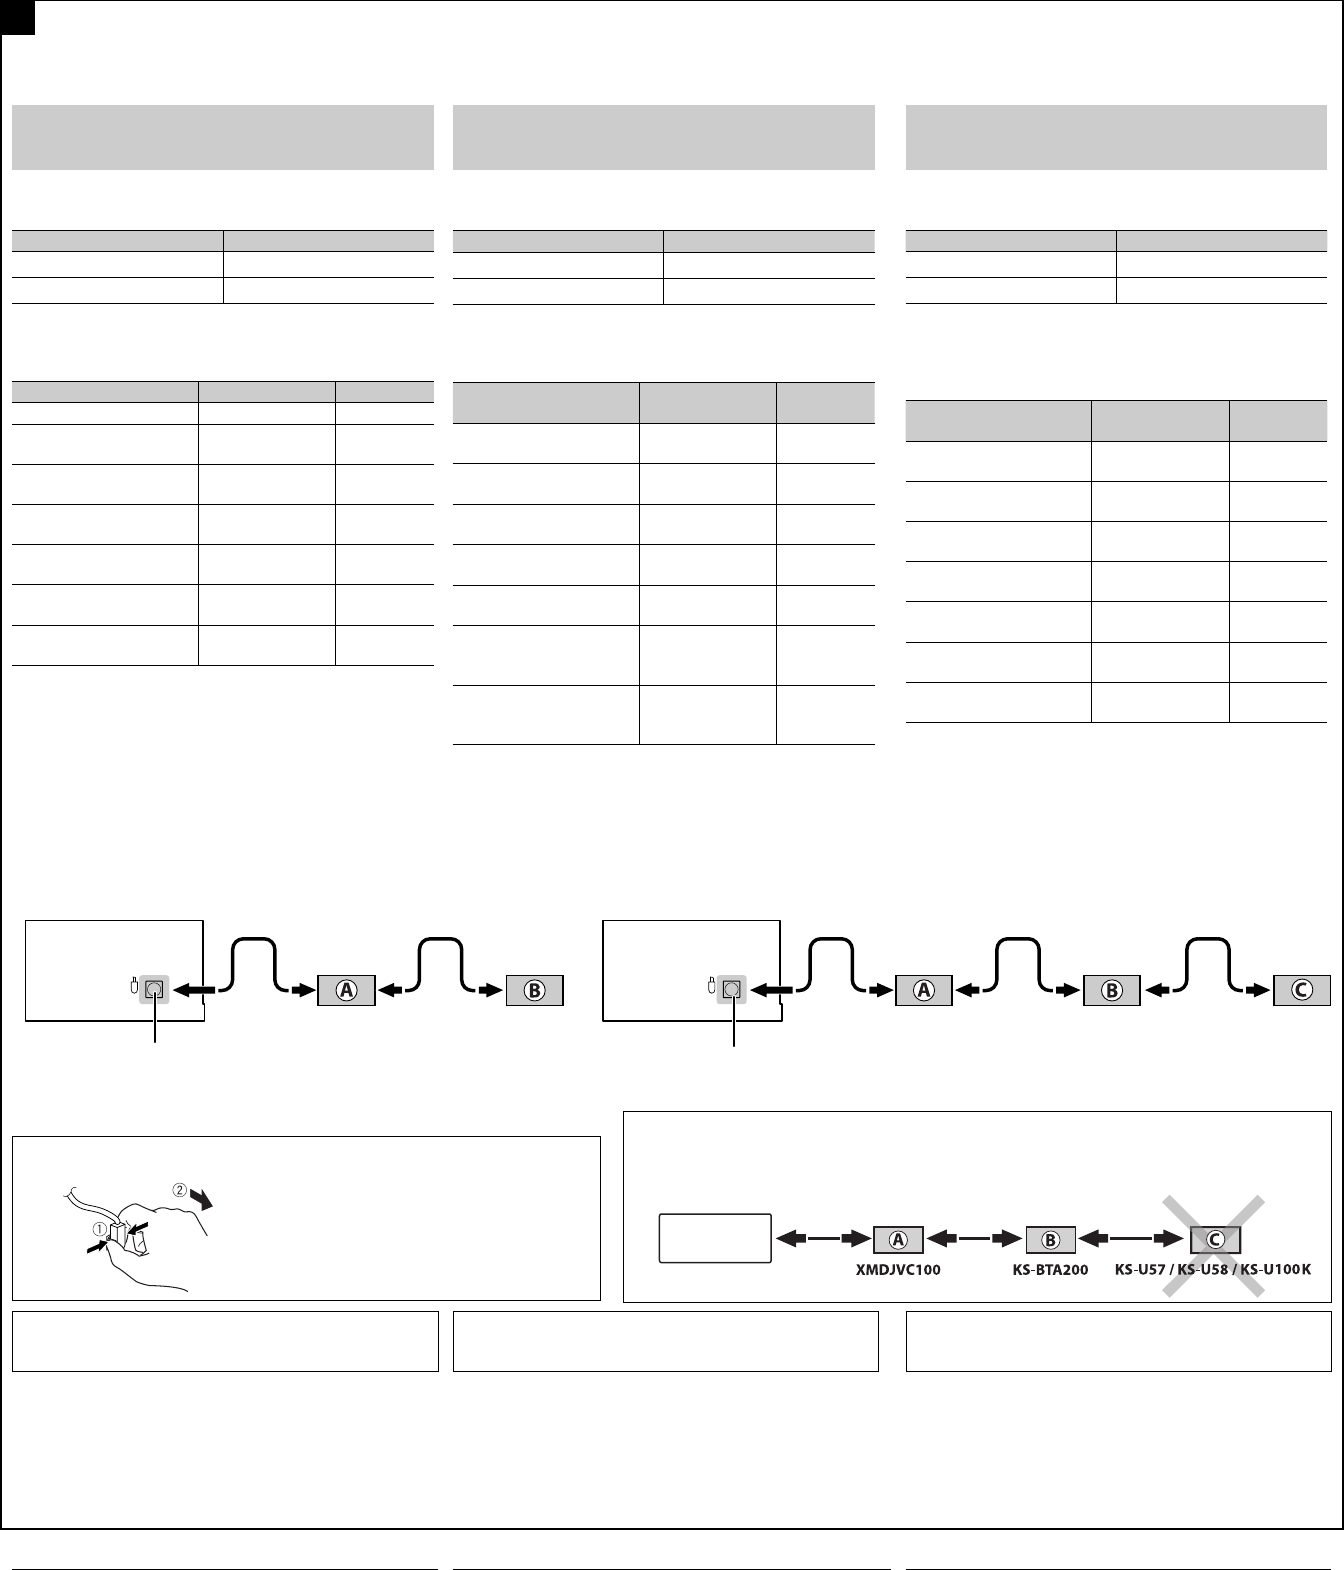
6
Connections to the CD changer jack / Conexión al jack del cambiador de CD / Connexions à la prise du changeur de CD
To disconnect the connector / Para desconectar el conector / Pour déconnecter le
connecteur
Hold the connector top tightly ( 1 ), then pull it out ( 2 ).
Sujete firmemente la parte superior del conector ( 1 ) y
seguidamente, extráigalo ( 2 ).
Tenez fermement le connecteur par-dessus ( 1 ) et tirez vers
l’extérieur ( 2 ).
HD Radio™ is a proprietary trademark of iBiquity Digital Corp.
iPod is a trademark of Apple Inc., registered in the U.S. and other
countries.
D
TROUBLESHOOTING
• The fuse blows.
* Are the red and black leads connected correctly?
• Power cannot be turned on.
* Is the yellow lead connected?
• No sound from the speakers.
* Is the speaker output lead short-circuited?
• Sound is distorted.
* Is the speaker output lead grounded?
* Are the “–” terminals of L and R speakers grounded in common?
• Noise interfere with sounds.
* Is the rear ground terminal connected to the car’s chassis using
shorter and thicker cords?
• Unit becomes hot.
* Is the speaker output lead grounded?
* Are the “–” terminals of L and R speakers grounded in common?
• This unit does not work at all.
* Have you reset your unit?
When connecting the external components, refer also to the
manuals supplied for the components and adapter.
CAUTION:
Before connecting the external components, make sure that
the unit is turned off.
You can connect the following JVC components to the CD changer
jack.
JVC component Model name
CD changer (CD-CH) CH-X1500, etc.
HD Radio™ tuner box KT-HD300
You can also connect the following components through the various
JVC adapters.
• Connection cords may need to be purchased separately.
Component Adapter Model name
Bluetooth device Bluetooth adapter KS-BTA200
iPod Interface adapter
for iPod
KS-PD100
XMDirect™ Universal Tuner
Box
Smart Digital
Adapter
XMDJVC100
SIRIUS satellite radio SIRIUS satellite
radio interface
KS-SRA100
JVC SIRIUS PnP SIRIUS radio
adapter
KS-U100K
Portable audio player with
line output jacks
Line input adapter KS-U57
Portable audio player with
3.5 mm stereo mini jack
AUX input adapter KS-U58
When connecting more than one component (maximum: three),
it is recommended that you connect the components in series as
explained below.
• XM Radio and SIRIUS satellite radio cannot be used together.
When connecting two components in series
Cuando conecta dos componentes en serie
Lors de la connexion de deux appareils en série
*7 To use these components, set the external input setting correctly
(see page 52 of the INSTRUCTIONS).
*8 Power cannot be supplied to the component through the CD
changer jack. You need to connect the power cord supplied for
the component separately.
CD changer jack / Jack para el cambiador de CD / Prise du changeur de CD
LOCALIZACIÓN DE AVERIAS
• El fusible se quema.
* ¿Están los conductores rojo y negro correctamente conectados?
• No es posible conectar la alimentación.
* ¿Está el cable amarillo conectado?
• No sale sonido de los altavoces.
* ¿Está el cable de salida del altavoz cortocircuitado?
• El sonido presenta distorsión.
* ¿Está el cable de salida del altavoz conectado a masa?
* ¿Están los terminales “–” de los altavoces L y R conectados a una
masa común?
• Perturbación de ruido.
* ¿El terminal de tierra trasero está conectado al chasis del automóvil
utilizando los cordones más corto y más grueso?
• La unidad se calienta.
* ¿Está el cable de salida del altavoz conectado a masa?
* ¿Están los terminales “–” de los altavoces L y R conectados a una
masa común?
• Este receptor no funciona en absoluto.
* ¿Reinicializó el receptor?
EN CAS DE DIFFICULTES
• Le fusible saute.
* Les fils rouge et noir sont-ils racordés correctement?
• L’appareil ne peut pas être mise sous tension.
* Le fil jaune est-elle raccordée?
• Pas de son des enceintes.
* Le fil de sortie d’enceinte est-il court-circuité?
• Le son est déformé.
* Le fil de sortie d’enceinte est-il à la masse?
* Les bornes “–” des enceintes gauche et droit sont-elles mises
ensemble à la masse?
• Interférence avec les sons.
* La prise arrière de mise à la terre est-elle connectée au châssis de la
voiture avec un cordon court et épais?
• L’appareil devient chaud.
* Le fil de sortie d’enceinte est-il à la masse?
* Les bornes “–” des enceintes gauche et droit sont-elles mises
ensemble à la masse?
• Cet appareil ne fonctionne pas du tout.
* Avez-vous réinitialisé votre appareil?
A KT-HD300*8 / KS-SRA100*8 / KS-BTA200 / XMDJVC100
B*7 CD-CH / KS-PD100 / KS-U57 / KS-U58 / KS-U100K
Cuando conecte componentes externos, consulte, también, los
manuales suministrados con los componentes y el adaptador.
PRECAUCIÓN:
Antes de conectar los componentes externos, asegúrese de que
la unidad esté apagada.
Puede conectar los siguientes componentes JVC al jack del
cambiador de CD.
Componente JVC Nombre del modelo
Cambiador de CD (CD-CH)
CH-X1500, etc.
Sintonizador HD Radio™ KT-HD300
También puede conectar los siguientes componentes mediante los
diversos adaptadores JVC.
• Puede ser necesario comprar los cables de conexión por separado.
Componente Adaptador Nombre del
modelo
Dispositivo Bluetooth Adaptador
Bluetooth
KS-BTA200
iPod Adaptador de
interfaz para iPod
KS-PD100
Sintonizador universal
XMDirecto™
Adaptador digital
inteligente
XMDJVC100
Radio por satélite SIRIUS Interfaz para radio
por satélite SIRIUS
KS-SRA100
SIRIUS PnP de JVC Adaptador para
radio SIRIUS
KS-U100K
Reproductor de audio
portátil con jacks de salida
de línea
Adaptador de
entrada por línea
KS-U57
Reproductor de audio
portátil con jack mini
estéreo de 3.5 mm
Adaptador de
entrada AUX
KS-U58
Cuando conecte más de un componente (máximo: tres), se
recomienda que conecte los componentes en serie, como se explica
a continuación.
• No puede utilizar juntas la radio XM y la radio satelital SIRIUS.
Lors de la connexion des appareils extérieurs, référez-vous aussi aux
manuels fournis avec les appareils et les adaptateurs.
PRECAUTION:
Avant de connecter les appareils extérieurs, assurez-vous que
l’appareil est hors tension.
Vous pouvez connecter les appareils JVC suivants à la prise de
changeur de CD.
Appareil JVC Nom du modèle
Changeur de CD (CD-CH) CH-X1500, etc.
Tuner HD Radio™ KT-HD300
Vous pouvez aussi connecter les appareils suivants en utilisant divers
adaptateurs JVC.
• Vous pouvez avoir besoin d’acheter certains cordons de connexion
séparément.
Appareil Adaptateur Nom du
modèle
Périphérique Bluetooth Adaptateur
Bluetooth
KS-BTA200
iPod
Adaptateur
d’interface pour iPod
KS-PD100
Tuner universel XMDirect™
Adaptateur
numérique intelligent
XMDJVC100
Radio satellite SIRIUS Interface pour radio
satellite SIRIUS
KS-SRA100
JVC SIRIUS PnP Adaptateur radio
SIRIUS
KS-U100K
Lecteur audio portable avec
prises de sortie de ligne
Adaptateur d’entrée
de ligne
KS-U57
Lecteur audio portable avec
mini fiche stéréo de 3.5 mm
Adaptateur d’entrée
auxiliaire
KS-U58
Lors de la connexion de plus d’un appareil (maximum: trois), il est
recommandé que vous connectiez les appareils en série comme nous
l’expliquons ci-dessous.
• La radio XM et SIRIUS ne peuvent pas être utilisées en même
temps.
When connecting three components in series / Cuando conecta tres componentes en serie /
Lors de la connexion de trois appareils en série
CD changer jack / Jack para el cambiador de CD/ Prise du
changeur de CD
HD Radio™ es una marca comercial de iBiquity Digital Corp.
iPod es una marca comercial de Apple Inc., registrada en los EE.UU.
y otros países.
HD Radio™ est une marque de commerce d’iBiquity Digital Corp.
iPod est une marque de commerce d’Apple Inc., enregistrée aux
États-Unis et dans les autres pays.
A KT-HD300*8 / KS-SRA100*8 / XMDJVC100
B KS-BTA200
C*7 KS-PD100 / KS-U57 / KS-U58 / KS-U100K
It is not recommended to connect KS-U57/KS-U58/KS-U100K at C in series with XMDJVC100/KS-BTA200.
No se recomienda conectar el KS-U57/KS-U58/KS-U100K en C en serie con XMDJVC100 y KS-BTA200.
Il n’est pas recommandé de connecter le KS-U57/KS-U58/KS-U100K en série à C in avec le XMDJVC100 et le
KS-BTA200.
*7*7
*7 Para utilizar estos componentes, configure el ajuste de entrada
externa correctamente (consulte la página 52 del MANUAL DE
INSTRUCCIONES).
*8 No puede suministrar energía eléctrica al componente a través
del jack del cambiador de CD. Es necesario conectar, aparte, el
cable de alimentación suministrado con el componente.
*7 Pour utiliser ces appareils, réglez l’entrée extérieure correctement
(voir page 52 du MANUEL D’INSTRUCTIONS).
*8 L’alimentation ne peut pas être fournie à l’appareil par la prise
de changeur de CD. Vous devez connecter séparément le cordon
d’alimentation fourni pour l’appareil.
KW-ADV790
KW-AVX710
KW-ADV790
KW-AVX710
KW-ADV790
KW-AVX710
AVX710J_install.indb 6AVX710J_install.indb 6 07.12.5 10:13:29 AM07.12.5 10:13:29 AM

ENGLISH
DEUTSCHFRANÇAIS
NEDERLANDS
KW-AVX710
For installation and connections, refer to the separate manual.
Für den Einbau und die Anschlüsse siehe das eigenständige Handbuch.
Pour l’installation et les raccordements, se référer au manuel séparé.
Bijzonderheden over de installatie en aansluiting van het apparaat vindt u in de desbetreffende handleiding.
INSTRUCTIONS
BEDIENUNGSANLEITUNG
MANUEL D’INSTRUCTIONS
GEBRUIKSAANWIJZING
LVT1779-001A
[E]
For canceling the display demonstration, see page 8.
Zum Abbrechen der Displaydemonstration siehe Seite 8.
Pour annuler la démonstration des affichages, référez-vous à la page 8.
Zie bladzijde 8 voor het annuleren van de displaydemonstratie.
DVD RECEIVER WITH MONITOR
DVD-RECEIVER MIT MONITOR
RÉCEPTEUR DVD ET MONITEUR
DVD-RECEIVER MET MONITOR
Cover_KW-AVX710[E]f.indd 2Cover_KW-AVX710[E]f.indd 2 07.12.7 2:33:37 PM07.12.7 2:33:37 PM
ENGLISH
2
Thank you for purchasing a JVC product.
Please read all instructions carefully before operation, to ensure your complete understanding and to obtain the best
possible performance from the unit.
IMPORTANT FOR LASER PRODUCTS
1. CLASS 1 LASER PRODUCT
2. CAUTION: Do not open the top cover. There are no user serviceable parts inside the unit; leave all servicing to
qualified service personnel.
3. CAUTION: Visible and/or invisible class 1M laser radiation when open. Do not view directly with optical
instruments.
4. REPRODUCTION OF LABEL: CAUTION LABEL, PLACED OUTSIDE THE UNIT.
Information for Users on Disposal of Old
Equipment
This symbol indicates that the product with
this symbol should not be disposed as general
household waste at its end-of-life. If you wish to
dispose of this product, please do so in accordance
with applicable national legislation or other rules in
your country and municipality. By disposing of this
product correctly, you will help to conserve natural
resources and will help prevent potential negative
effects on the environment and human health.
This symbol is only valid in
the European Union.
Cautions on the monitor:
• The monitor built in this unit has been produced
with high precision, but it may have some
ineffective dots. This is inevitable and is not
malfunction.
• Do not expose the monitor to direct sunlight.
• Do not operate the touch panel using a ball-point
pen or similar tool with the sharp tip.
Touch the buttons on the touch panel with your
finger directly (if you are wearing a glove, take it
off).
• When the temperature is very cold or very hot...
– Chemical changes occur inside, causing
malfunction.
– Pictures may not appear clearly or may move
slowly. Pictures may not be synchronized with
the sound or picture quality may decline in such
environments.
WARNINGS:
To prevent accidents and damage
• DO NOT install any unit or wire any cable in a
location where;
– it may obstruct the steering wheel and
gearshift lever operations.
– it may obstruct the operation of safety devices
such as air bags.
– it may obstruct visibility.
• DO NOT operate the unit while driving.
If you need to operate the unit while driving, be
sure to look around carefully.
• The driver must not watch the monitor while
driving.
EN_KW-AVX710[E]4.indb 2EN_KW-AVX710[E]4.indb 2 07.12.7 10:44:01 AM07.12.7 10:44:01 AM

3
ENGLISH
INTRODUCTION
How to reset your unit
• Your preset adjustments will also be erased.
How to forcibly eject a disc
• If this does not work, reset the unit.
For safety...
• Do not raise the volume level too much, as this will
block outside sounds, making driving dangerous.
• Stop the car before performing any complicated
operations.
Temperature inside the car...
If you have parked the car for a long time in hot or cold
weather, wait until the temperature in the car becomes
normal before operating the unit.
For security reasons, a numbered ID card is provided
with this unit, and the same ID number is imprinted on
the unit’s chassis. Keep the card in a safe place, as it will
help the authorities to identify your unit if stolen.
Contents
INTRODUCTION
Playable disc types .......................... 4
Basic operations—
Monitor panel/touch panel
............ 5
Basic operations—
Remote controller (RM-RK252) ...... 6
OPERATIONS
Before operating the unit ................ 8
Common operations ........................ 9
Listening to the radio ...................... 10
Disc operations ................................ 16
EXTERNAL DEVICES
Bluetooth® operations—
Cellular phone/audio player .......... 30
Listening to the CD changer .............. 37
Listening to the DAB tuner ............... 39
Listening to the iPod ........................ 43
Using other external components ..... 45
SETTINGS
Sound equalization .......................... 48
Assigning titles to the sources .......... 49
Menu operations ............................. 50
REFERENCES
Maintenance ................................... 60
More about this unit ........................ 61
Troubleshooting .............................. 68
Specifications .................................. 72
NO EJECT?
EMERGENCY EJECT?
Exit
ENTER
Back
11
3
2
at the same time
EN_KW-AVX710[E]4.indb 3EN_KW-AVX710[E]4.indb 3 07.12.7 10:44:05 AM07.12.7 10:44:05 AM

ENGLISH
4
Disc type Recording format, file type, etc. Playable
DVD DVD Video (Region Code: 2)*1
DVD Audio
DVD-ROM
DVD Recordable/Rewritable
(DVD-R/-RW*2, +R/+RW*3)
• DVD Video: UDF bridge
• DVD-VR
• DivX/MPEG1/MPEG2/JPEG/MP3/
WMA/WAV: ISO 9660 level 1,
level 2, Romeo, Joliet
DVD Video
DVD-VR
DivX/MPEG1/MPEG2
JPEG
MP3/WMA/WAV
AAC
MPEG4
DVD+VR
DVD-RAM
Dual Disc DVD side
Non-DVD side
CD/VCD Audio CD/CD Text (CD-DA)/DTS-CD
VCD (Video CD)
SVCD (Super Video CD)
CD-ROM
CD-I (CD-I Ready)
CD Recordable/Rewritable
(CD-R/-RW)
• ISO 9660 level 1, level 2, Romeo,
Joliet
CD-DA
MP3/WMA/WAV
JPEG
DivX/MPEG1/MPEG2
AAC
MPEG4
*1 If you insert a DVD Video disc of an incorrect Region Code, “Region code error” appears on the screen.
*2 DVD-R recorded in multi-border format is also playable (except for dual layer discs).
DVD-RW dual layer discs are not playable.
*3 It is possible to play back finalized +R/+RW (Video format only) discs.
+RW double layer discs are not playable.
Playable disc types
Caution for DualDisc playback
The Non-DVD side of a “DualDisc” does not comply with the “Compact Disc Digital Audio” standard. Therefore,
the use of Non-DVD side of a DualDisc on this product may not be recommended.
EN_KW-AVX710[E]4.indb 4EN_KW-AVX710[E]4.indb 4 07.12.7 10:44:06 AM07.12.7 10:44:06 AM

5
ENGLISH
INTRODUCTION
Basic operations — Monitor panel/touch panel
• Turn on the power.
• Turn off the power. [Hold]
• Attenuate the sound (if the power is on).
Change the sources.
Remote sensorAdjust the volume.
Reset the unit.
• Use only when the internal system malfunctions.
Display <AV Menu> screen.
Display and erase the Short Cut windows.
Available functions vary among the sources. For details, see each source operation
section.
Change the display information.
• [OPEN]: Open the monitor panel.
• [EJECT]: Eject the disc.
• [CLOSE]: Close the monitor panel.
• [TILT +/–]: Tilt the monitor panel.
• [Exit]: Erase this screen.
• Shaded icons cannot be used.
• In the explanation, buttons on the touch panel
are indicated inside [ ].
• For details on the touch panel operations, see
each source operation section.
Display <Source Menu> screen.
• Activate/deactivate TA
Standby Reception.
• Display <PTy Search> menu.
[Hold]
☞ page 12
• Display <Open/Tilt> menu.
• Eject the disc and display <Open/Tilt>
menu. [Hold]
• Close the monitor panel when <Open/Tilt>
menu is displayed.
☞ page 50
☞ page 9
☞ page 9
<Open/Tilt> menu
EN_KW-AVX710[E]4.indb 5EN_KW-AVX710[E]4.indb 5 07.12.7 10:44:07 AM07.12.7 10:44:07 AM

ENGLISH
6
Basic operations — Remote controller (RM-RK252)
Main elements and features
1 • Turns on the power.
• Attenuates the sound if the power is on.
• Turns off the power if pressed and held (while
the power is on).
2 • Reverse search
• Reverse slow motion (during pause)
3 Adjusts the volume level.
• Does not function as “2nd VOL.”
4 • Displays <Dial Menu> screen.
• Displays <Redial> menu if pressed and held.
• Answers incoming calls.
5 • DVD/DivX 6: Shows the disc menu.
• VCD: Resumes PBC playback.
• DVD-VR: Shows the Original Program screen.
6 Shows the on-screen bar.
• Does not function as “ .“
R03/LR03/AAA
Installing the battery
Insert the batteries into the remote controller by
matching the polarity (+ and –) correctly.
Caution:
Battery shall not be exposed to excessive heat such
as sunshine, fire or the like.
• If the range or effectiveness of the remote controller
decreases, replace both batteries.
Before using the remote controller:
• Aim the remote controller directly at the remote
sensor on the unit.
• DO NOT expose the remote sensor to bright light
(direct sunlight or artificial lighting).
The unit is equipped with the steering wheel
remote control function.
• See the Installation/Connection Manual (separate
volume) for connection.
EN_KW-AVX710[E]4.indb 6EN_KW-AVX710[E]4.indb 6 07.12.7 10:44:07 AM07.12.7 10:44:07 AM

7
ENGLISH
INTRODUCTION
p • Forward search
• Forward slow motion (during pause)
q Selects the source.
w For disc operations:
Starts playback/pauses.
For Bluetooth operations:
• Answers incoming calls.
• Starts playback/pauses. (for audio player
operation).
e Changes the aspect ratio of the playback
pictures.
r “TUNER”/”DAB”: Selects the bands.
“DISC”: Stops playback.
“Bluetooth PHONE”: Ends the call.
“Bluetooth AUDIO”: Starts playback/pauses.
t VCD: Returns to the PBC menu.
y • DVD Video/DivX 6: Shows the disc menu.
• VCD: Resumes PBC playback.
• DVD-VR: Shows the Playlist screen.
u • Makes selection/settings.
• @ / #: Skips back or forward by five minutes
for DivX/MPEG1/MPEG2.
• % / fi: Changes discs for “CD-CH.”
i*3 • Switches number entry mode for “DISC.”
• Erases the misentry after entering a wrong
number.
• Does not function as “SURROUND.”
o*3 Number buttons
• Enters numbers.
• “TUNER”/”DAB”: Selects the preset station/
service directly.
*1 Functions as a number button only (see o ).
*2 Not used for this unit.
*3 Functions when pressed with SHIFT.
7 Functions with other buttons (see i and o).
8 Changes the display information.
9 For disc operations:
• 5 / ∞:
DVD: Selects the title.
DVD-VR: Selects the program/Playlist.
Other discs (except VCD/CD): Selects the
folders.
• 4 / ¢:
– Press briefly: reverse skip/forward skip
– Press and hold: reverse search/forward
search
For FM/AM operations:
• 5 / ∞: Selects the preset stations.
• 4 / ¢: Functions to search for stations.
– Press briefly: Auto Search
– Press and hold: Manual Search
For DAB tuner operations:
• 5 / ∞: Select the services.
• 4 / ¢: Functions to search for
ensembles.
– Press briefly: Auto Search
– Press and hold: Manual Search
For Apple iPod operations:
• ∞: Starts playback/pauses
• 5: Enters the main menu (then 5 / ∞
/ 4 / ¢ work as menu selecting
buttons).
In the main menu:
• 5: Returns to the previous menu.
• ∞: Confirms the selection.
• 4 / ¢
– Press briefly: Selects an item.
– Press and hold: Skips ten items at a time.
For Bluetooth operations:
• 4 / ¢: reverse skip/forward skip (for
audio player operation)
EN_KW-AVX710[E]4.indb 7EN_KW-AVX710[E]4.indb 7 07.12.7 10:44:08 AM07.12.7 10:44:08 AM

8
ENGLISH
You can cancel the demonstration on the screen and set
the clock.
• Non-available items will be shaded on the AV Menu
screens.
Indication language:
In this manual, English indications are used
for purpose of explanation. You can select the
indication language. (☞ page 52)
~ Turn on the power.
Ÿ Display <AV Menu> screen.
! Display <Setup> menu.
⁄ Cancel the demonstration.
Select <Off>.
@ Set the clock settings.
¤ Finish the procedure.
Before operating the unit
Moves to the succeeding menu page
Moves to the preceding menu page
Return to the previous screen.
EN_KW-AVX710[E]4.indb 8EN_KW-AVX710[E]4.indb 8 07.12.7 10:44:09 AM07.12.7 10:44:09 AM

OPERATIONS
9
ENGLISH
Changing the display
information
• Available display information varies among the
playback sources.
On the monitor panel only:
• Each time you press DISP, the display changes to
show the various information.
Ex. When the playback source is a DivX disc.
Selecting the playback source
• Available sources depend on the external
components you have connected, media you have
attached, and the <Input> settings you have made
(☞ page 55).
On the touch panel:
On the monitor panel:
TUNER = DAB = DISC (DVD/VCD/CD) =CD-CH,
iPod, or EXT-IN = Bluetooth PHONE =
Bluetooth AUDIO = AV-IN = (back to the
beginning)
• You cannot select these sources if they are not ready.
Exit
Source information screen
Clock time in large numbers
Navigation screen
(When <Navigation> is
selected for <AV Input>)
(☞ page 55)
Back to the beginning
Playback picture screen
(only for video sources)
Track list
Common operations
EN_KW-AVX710[E]4.indb 9EN_KW-AVX710[E]4.indb 9 07.12.7 10:44:09 AM07.12.7 10:44:09 AM
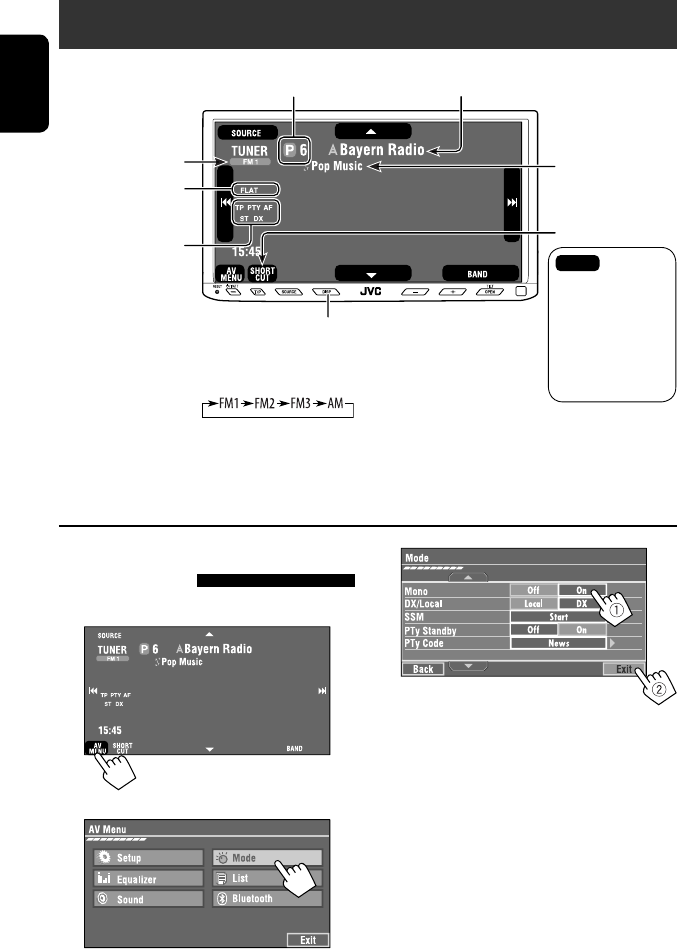
10
ENGLISH
When an FM stereo broadcast is
hard to receive
1 Press [AV MENU].
2 Press [Mode].
Listening to the radio
~ Press [SOURCE], then press [TUNER]. (☞ page 9)
• You can also use SOURCE on the monitor panel. Press it repeatedly.
Ÿ Press [BAND].
! Press [4] or [¢] to search for a station—Auto Search.
• Manual Search: Hold either [4]or [¢] until “Manual Search” appears on the screen, then press it
repeatedly.
• The ST indicator lights up when receiving an FM stereo broadcast with sufficient signal strength.
3
Reception improves, but stereo effect will be lost.
• The MONO indicator lights up.
To restore stereo effect, select <Off>.
Preset no.
Band
Tuner/Standby Reception
indicators
PS (station name) for FM RDS. If no PS signal is coming in, the
tuned frequency appears.
☞ page 9
Sound mode
(☞ page 48)
PTY code for FM RDS
☞ page 12
: Buttons on the
touch panel. In
the explanation,
they are
indicated inside
[ ].
EN_KW-AVX710[E]4.indb 10EN_KW-AVX710[E]4.indb 10 07.12.7 10:44:10 AM07.12.7 10:44:10 AM

OPERATIONS
11
ENGLISH
Manual presetting
Ex.: Storing FM station of 92.5 MHz into preset number
4 of the FM1 band.
1 Display the Preset List.
2 Tune in to a station you want to preset.
3 Select a preset number.
The station selected in step 2 is now stored in
preset number 4.
Tuning in to stations with
sufficient signal strength
This function works only for FM bands. Once you have
activated this function (selected <Local>), it always
works when searching for FM stations.
1 Press [AV MENU].
2 Press [Mode].
3
Only stations with sufficient signal strength will be
detected.
• The DX indicator goes off, then the LO indicator
lights up.
FM station automatic presetting
—SSM (Strong-station
Sequential Memory)
This function works only for FM bands.
You can preset six stations for each band.
1 Press [AV MENU].
2 Press [Mode].
3
Local FM stations with the strongest signals are
searched and stored automatically in the FM band.
EN_KW-AVX710[E]4.indb 11EN_KW-AVX710[E]4.indb 11 07.12.7 10:44:10 AM07.12.7 10:44:10 AM
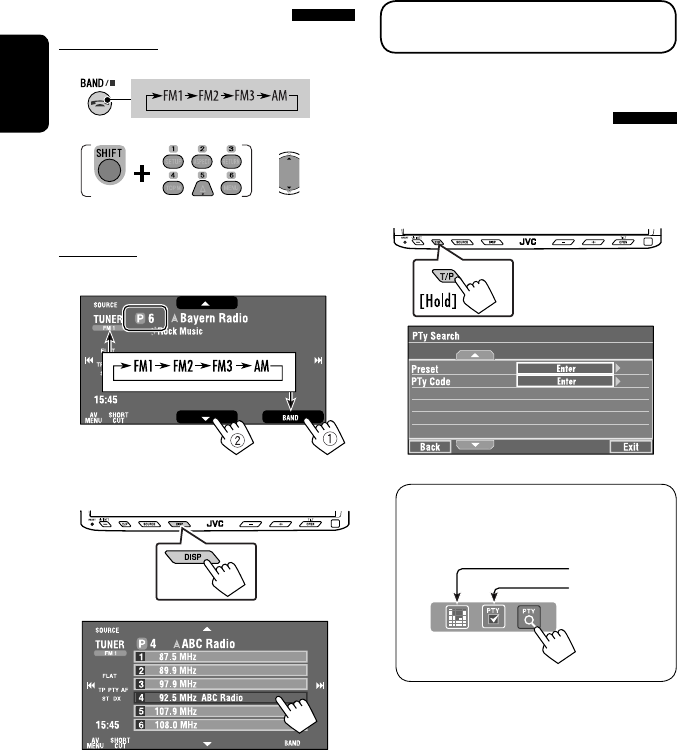
12
ENGLISH
The following features are available only for FM RDS
stations.
Searching for FM RDS
programme—PTY Search
You can search for your favorite programmes being
broadcast by selecting the PTY code for your favorite
programmes.
1 Display <PTy Search> menu.
You can also easily access <PTy Search> menu
by pressing [SHORT CUT] on the touch panel,
then...
Selecting a preset station
On the remote:
1
2
On the unit:
• To select directly on the touch panel
• To select from the Preset List
1
2
or
Hold
☞ page 14
☞ page 48
EN_KW-AVX710[E]4.indb 12EN_KW-AVX710[E]4.indb 12 07.12.7 10:44:11 AM07.12.7 10:44:11 AM

OPERATIONS
13
ENGLISH
Storing your favorite programme types
You can store your favorite PTY codes into the PTY
Preset List.
Ex.: Storing <Drama> into <Preset 1>
2 Select a PTY code.
• In the example below, a PTY code is selected
from the Preset List.
If you enter <PTy Code> menu below, you can
select one from 29 PTY codes.
PTY Search starts.
If there is a station broadcasting a programme
of the same PTY code as you have selected, that
station is tuned in.
Available PTY codes:
News, Current Affairs, Information, Sport,
Education, Drama, Cultures, Science, Varied Speech,
Pop Music, Rock Music, Easy Listening, Light Classics
M, Serious Classics, Other Music, Weather & Metr,
Finance, Children’s Progs, Social Affairs, Religion,
Phone In, Travel & Touring, Leisure & Hobby, Jazz
Music, Country Music, National Music, Oldies Music,
Folk Music, Documentary
EN_KW-AVX710[E]4.indb 13EN_KW-AVX710[E]4.indb 13 07.12.7 10:44:12 AM07.12.7 10:44:12 AM

14
ENGLISH
Activating/deactivating TA/PTY
Standby Reception
TA Standby Reception Indicator
Press on the monitor panel to
activate. TP
The unit will temporarily switch to
Traffic Announcement (TA) if available,
from any source other than AM.
• The volume changes to the preset
TA volume level if the current level is
lower than the preset level (☞ page
54).
Lights up
Not yet activated. Tune in to another
station providing the RDS signals.
Flashes
Press to deactivate. Goes off
PTY Standby Reception Indicator
To activate, display <AV Menu>
screen, press [Mode], then press
[On] for <PTy Standby>. (☞ next
column)
PTY
The unit will temporarily switch to
your favorite PTY programme from any
source other than AM.
Lights up
Not yet activated. Tune in to another
station providing the RDS signals.
Flashes
To deactivate, press [Off] for <PTy
Standby> in step 3 on the next
column.
Goes off
• When a DAB tuner is connected, TA Standby/PTY
Standby Reception also works for the DAB tuner and
searches for the services.
To activate PTY Standby Reception
1 Press [AV MENU].
2 Press [Mode].
3
PTY Standby Reception is now activated for PTY
code <News>: the initial setting.
You can easily activate or deactivate the PTY
Standby Reception by pressing [SHORT CUT] on the
touch panel, then...
☞ page 12
☞ page 48
EN_KW-AVX710[E]4.indb 14EN_KW-AVX710[E]4.indb 14 07.12.7 10:44:12 AM07.12.7 10:44:12 AM
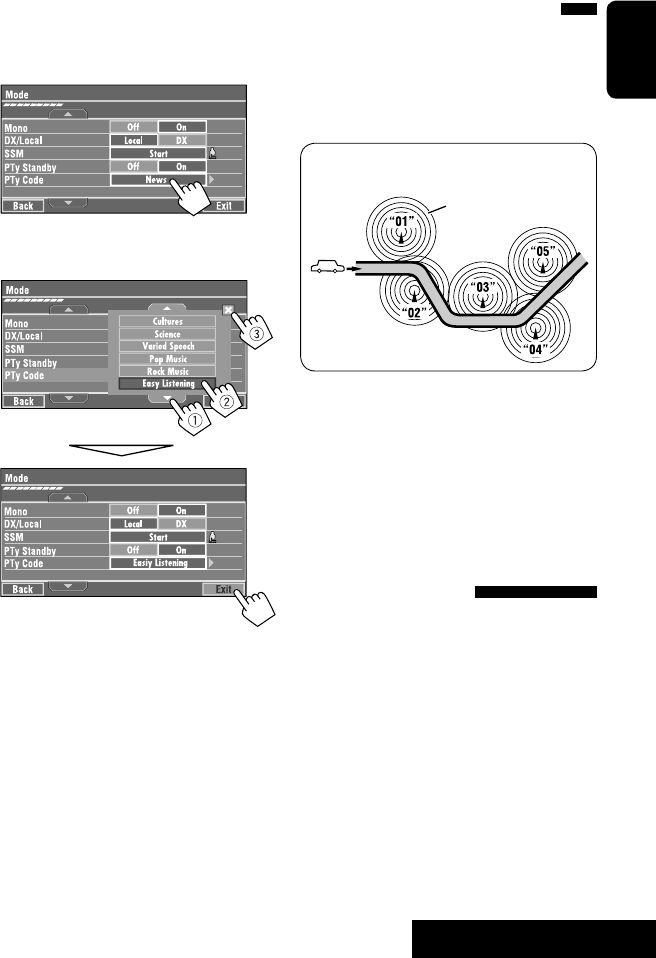
OPERATIONS
15
ENGLISH
To change the PTY code for PTY Standby
Reception
1 Press [AV MENU].
2 Press [Mode].
3
4 Select your favorite PTY code.
Tracing the same programme—
Network-Tracking Reception
When driving in an area where FM reception is not
sufficient enough, this unit automatically tunes in to
another FM RDS station of the same network, possibly
broadcasting the same programme with stronger
signals.
Programme A broadcasting on different frequency
areas (01 – 05)
When shipped from the factory, Network-Tracking
Reception is activated.
To change the Network-Tracking Reception
setting, see <AF Regional>. (☞ page 54)
• When the DAB tuner is connected, refer also to
“Tracing the same programme—Alternative
Frequency Reception (DAB AF).” (☞ page 42)
Automatic station selection—
Programme Search
Usually when you select preset stations, the preset
station is tuned in.
If the signals from the FM RDS preset station are not
sufficient for good reception, this unit, using the AF
data, tunes in to another station broadcasting the
same programme as the original preset station is
broadcasting. To activate this function, select <On> for
<Program Search>.(☞ page 54)
• The unit takes some time to tune in to another
station using programme search.
A
Ex.: Selecting <Easy Listening>
EN_KW-AVX710[E]4.indb 15EN_KW-AVX710[E]4.indb 15 07.12.7 10:44:13 AM07.12.7 10:44:13 AM

16
ENGLISH
~ Open the monitor panel.
<Open/Tilt> menu is displayed.
• By pressing and holding the button, you can
open the monitor panel and eject the disc.
Ÿ Press [OPEN].
Disc operations
The disc type is automatically detected, and playback starts automatically (for some discs: automatic start depends
on its internal program).
If a disc does not have any disc menu, all tracks on it will be played repeatedly until you change the source or eject
the disc.
If “ ” appears on the screen, the unit cannot accept the operation you have tried to do.
• In some cases, without showing “ ,” operations will not be accepted.
Label side
Caution on volume setting:
Discs produce very little noise compared with other
sources. Lower the volume before playing a disc
to avoid damaging the speakers by the sudden
increase of the output level.
When playing back a multi-channel encoded disc,
the multi-channel signals are downmixed.
• You can fully enjoy multi-channel sound by
connecting an amplifier or a decoder compatible
with these multi-channel sources. (☞ also page
65)
! Insert a disc.
Monitor panel closes automatically.
If not, press [CLOSE].
Caution:
Do not place your finger behind the monitor panel.
EN_KW-AVX710[E]4.indb 16EN_KW-AVX710[E]4.indb 16 07.12.7 10:44:13 AM07.12.7 10:44:13 AM

OPERATIONS
17
ENGLISH
While playing the following discs, press .
• Each time you press the button, the display changes to show the different information. (☞ page 9)
Audio format
DVD Video: Title no./Chapter no./Playing time
DVD-VR: Program no. (or Playlist no.)/Chapter no./Playing time
Playback mode
Disc type *1Sampling frequency/Bit
rate/Recorded signal
channel no.
☞ page 22
[3 / 8] Start and pause playback
[7] Stop playback
[4 ¢] Press: Select chapter
Hold: Reverse/forward search*2
[5 ∞] Select title/program/playlist
*1 DVD-VR also indicates either PRG (program) or PLAY (playlist) playback.
*2 Search speed: x2 ] x10
: Buttons on the touch panel. In the explanation, they are indicated inside [ ].
These buttons also work when they are not shown on the touch panel (while watching the playback pictures
on the screen).
Sound mode
(☞ page 48)
EN_KW-AVX710[E]4.indb 17EN_KW-AVX710[E]4.indb 17 07.12.7 10:44:14 AM07.12.7 10:44:14 AM

18
ENGLISH
Track no./Playing time
[3 / 8] Start and pause playback
[7] Stop playback
[4 ¢] Press: Select track
Hold: Reverse/forward search*2
For DivX/MPEG1/MPEG2: Folder no./Track no./Playing time
For JPEG: Folder no./File no.
[3 / 8] Start and pause playback
[7] Stop playback
[4 ¢] Press: Select track
Hold: Reverse/forward search for DivX/MPEG1/MPEG2 *1
[5 ∞] Press: Select folder
Hold: Display Folder list
While playing the following discs, press .
• Each time you press the button, the display changes to show the different information (☞ page 9).
Disc type
☞ page 22
☞ page 22
The PBC indicator
lights up when PBC is
in use.
Total track no.
included on the
disc
Total track no.
included on the
disc
Total playing time
Sound mode
(☞ page 48)
Sound mode
(☞ page 48)
*1 Search speed: ¡1 ] ¡2
*2 Search speed: x2 ] x10
EN_KW-AVX710[E]4.indb 18EN_KW-AVX710[E]4.indb 18 07.12.7 10:44:14 AM07.12.7 10:44:14 AM
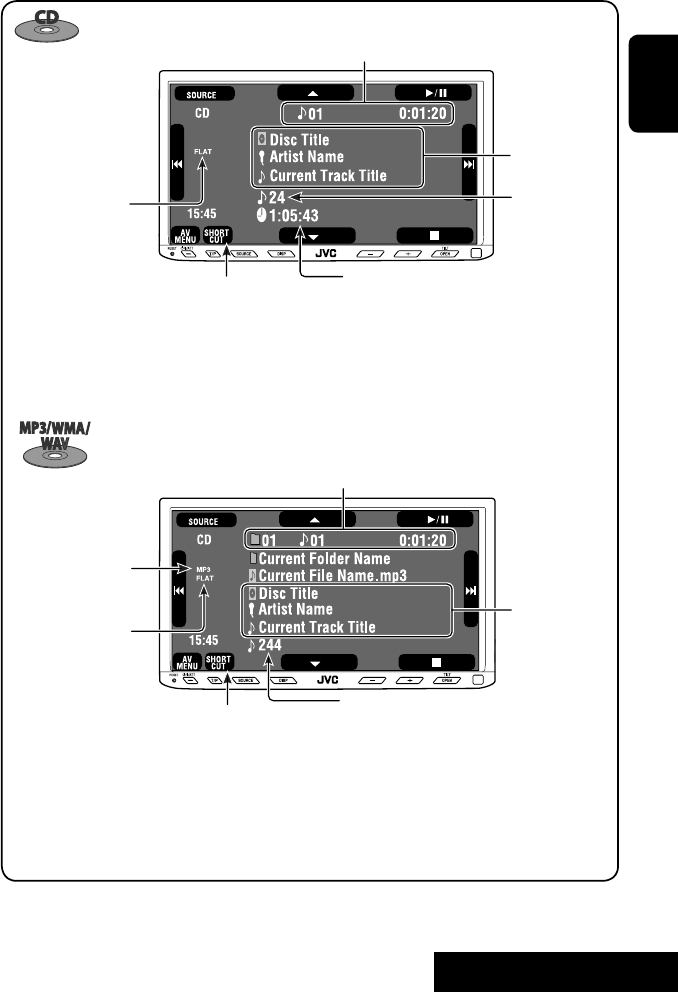
OPERATIONS
19
ENGLISH
Track no./Playing time
Only for CD Text *3
Folder no./Track no./Playing time
Audio format
(MP3/WMA/WAV)
☞ page 22
*3 “No Name” appears for conventional CDs.
*4 Search speed: x2 ] x10
Tag data appears
only when it is
recorded.
Sound mode
(☞ page 48)
☞ page 22
[3 / 8] Start and pause playback
[7] Stop playback
[4 ¢] Press: Select track
Hold: Reverse/forward search*4
[5 ∞] Press: Select folder
Hold: Display Folder list
[3 / 8] Start and pause playback
[7] Stop playback
[4 ¢] Press: Select track
Hold: Reverse/forward search*4
Total track no.
included on the disc
Total playing time
Total track no. included on the disc
Sound mode
(☞ page 48)
EN_KW-AVX710[E]4.indb 19EN_KW-AVX710[E]4.indb 19 07.12.7 10:44:15 AM07.12.7 10:44:15 AM

20
ENGLISH
Touch the screen (center portion).
Operation buttons on the screen
You can display the following operation buttons while watching the playback pictures on the screen.
• While the operation buttons are displayed, aspect ratio is fixed to <Full>. (☞ page 52)
• If no operation is done for about five seconds, the operation buttons disappear (except when a disc menu is
displayed).
Touch [KEY].
☞ pages 23 to 27 on how the operation buttons
particularly work for a variety of the discs
A
[SOURCE] Display <Source Menu> screen
[AV MENU] Display <AV Menu> screen
[SHORT CUT] Display the Short Cut buttons
[3 / 8] Start and pause playback
[7] Stop playback
[4 ¢] Press: Select track
Hold: Reverse/forward search
[5 ∞] Select folders
• The above buttons also work when they are not shown on
the screen (while watching the playback picture).
* While a disc menu is played back for DVD, [KEY] is
automatically displayed. On the disc menu, you can select a
menu item directly by touching it on the screen.
B
For DVD/VCD/DivX menu operation playback
[2 3 5 ∞] Select the menu items
[ENT] Confirm the selection
[TOP MENU] Display the disc menu
[MENU] Display the disc menu
[RETURN] Return to the previous menu or display the
menu (only for VCD with PBC)
C
For entering the numbers
[DIRECT CLR] • Switch between chapter/track entry and
title/group/folder entry
• Erase the last entry when you enter a
wrong number
[0]–[9]=[ENT]
Enter numbers
Ex.: To enter “105,” press [1], [0], [5], then [ENT]
*
Touch [KEY].
Touch [KEY].
To erase the operations, touch the screen again.
EN_KW-AVX710[E]4.indb 20EN_KW-AVX710[E]4.indb 20 07.12.7 10:44:15 AM07.12.7 10:44:15 AM

OPERATIONS
21
ENGLISH
1
2
3
When one of the playback modes is selected, the
corresponding indicator lights up on the source
information screen.
To cancel, select <Off>.
Selecting playback modes
You can use the following playback modes—Repeat or Random.
Ex.: To select Track Repeat
Disc type Repeat Random
Chapter: Repeats current chapter
Title: Repeats current title —
Chapter: Repeats current chapter
Program: Repeats current program (not
available for Playlist playback)
—
Track: Repeats current track
Folder: Repeats current folder
Folder: Randomly plays all tracks of current
folder, then tracks of next folders
Disc (All): Randomly plays all tracks
Folder: Repeats current folder —
Track: Repeats current track (PBC not in
use)
Disc (All): Randomly plays all tracks (PBC not
in use)
Track: Repeats current track*1Disc (All): Randomly plays all tracks
Track: Repeats current track*1
Folder: Repeats all tracks of the current
folder
Folder: Randomly plays all tracks of current
folder, then tracks of next folders
Disc (All): Randomly plays all tracks
*1 You can also use [SHORT CUT] to turn on and off Track Repeat.
EN_KW-AVX710[E]4.indb 21EN_KW-AVX710[E]4.indb 21 07.12.7 10:44:16 AM07.12.7 10:44:16 AM
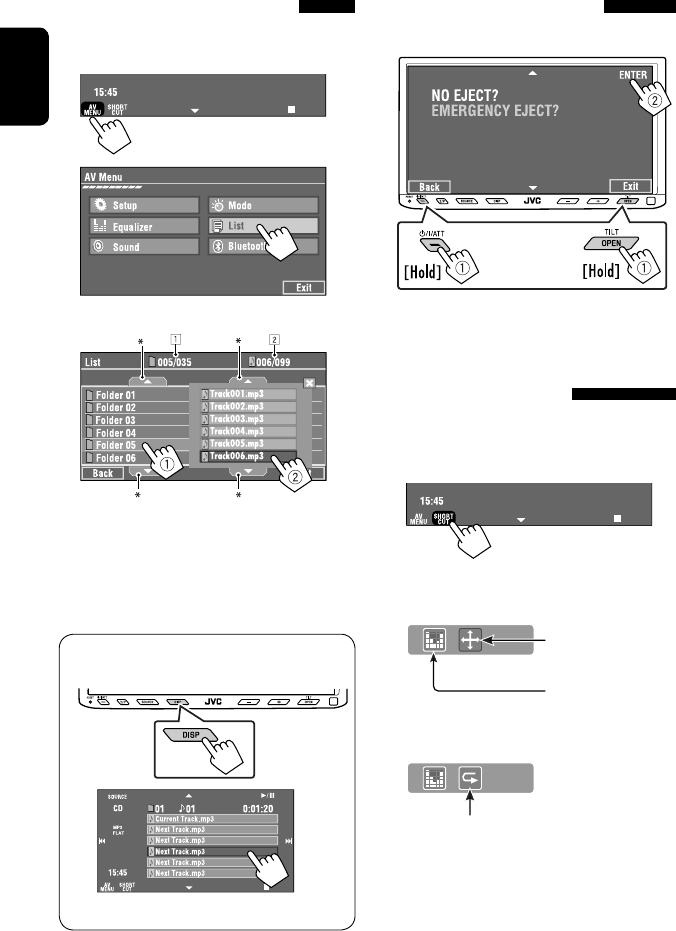
22
ENGLISH
Prohibiting disc ejection
You can lock a disc in the loading slot.
To cancel the prohibition, repeat the same
procedure to select <EJECT OK?>.
Using Short Cut Icons
You can easily access the some frequently used
functions by using [SHORT CUT] on the touch panel.
1
2
• For video software:
• For audio software:
Selecting tracks on the list
If a disc includes folders, you can display the Folder/
Track (File) Lists, then start playback.
1
2
3 Select a folder (1), then a track (2).
Selected track starts playing. (* Press to move to
the previous/next pages of the list)
1 Current folder list number/total folder list
number
2 Current track list number/total track list
number of the current folder
You can easily access the Track List by pressing DISP
on the monitor panel.
Selected track starts playing.
at the same time
Sound mode
(☞ page 48)
Turn on or off Track Repeat
(Repeat play: ☞ page 21)
Aspect ratio
(☞ page 52)
EN_KW-AVX710[E]4.indb 22EN_KW-AVX710[E]4.indb 22 07.12.7 10:44:17 AM07.12.7 10:44:17 AM

OPERATIONS
23
ENGLISH
Stop playback.
Start playback/pause (if pressed during playback).
Reverse/forward search*1 (No sound can be heard.)
Slow motion during pause*2 (No sound can be heard.)
Press: Select chapter (during playback or pause).
Hold: Reverse/forward search*3 (No sound can be heard.)
Select title (during playback or pause).
Select aspect ratio.
Select chapter.
Select title (when not playing).
Select title (during playback or pause).
Using menu driven features
1
2 Select an item you want to start playback.
3
*1 Search speed: x2 ] x5 ] x10 ] x20 ] x60
*2 Slow motion speed: 1/32 ] 1/16 ] 1/8 ] 1/4 ] 1/2
*3 Search speed: x2 ] x10
Operations using the remote controller—RM-RK252
Also functions as CLR (clear):
Erases a misentry if pressed
while holding SHIFT.
You can change the following items using the on-screen bar—audio language, audio stream, audio channel,
subtitle language, view angle, etc. (☞ pages 28 and 29)
twice
EN_KW-AVX710[E]4.indb 23EN_KW-AVX710[E]4.indb 23 07.12.7 10:44:17 AM07.12.7 10:44:17 AM

24
ENGLISH
Stop playback.
Start playback/pause (if pressed during playback).
Reverse/forward search*1 (No sound can be heard.)
Forward slow motion during pause*2 (No sound can be heard.)
• Reverse slow motion does not work.
Press: Select chapter (during playback or pause).
Hold: Reverse/forward search*3
Select program.
Select playlist (during playback or pause).
Select aspect ratio.
Select chapter.
Select program (when not playing).
Select program/playlist (during playback or pause).
Using Original Program/Playlist screens ( ☞ page 28)
1For Original Program
For Playlist
2 Select an item you want to start playback.
3 To erase the screen.
*1 Search speed: x2 ] x5 ] x10 ] x20 ] x60
*2 Slow motion speed: 1/32 ] 1/16 ] 1/8 ] 1/4 ] 1/2
*3 Search speed: x2 ] x10
twice
Also functions as CLR (clear):
Erases a misentry if pressed
while holding SHIFT.
EN_KW-AVX710[E]4.indb 24EN_KW-AVX710[E]4.indb 24 07.12.7 10:44:18 AM07.12.7 10:44:18 AM

OPERATIONS
25
ENGLISH
Stop playback.
Start playback/pause (if pressed during playback).
Reverse/forward search*4 (No sound can be heard.)
Press: Select track
Hold: Reverse/forward search*5 (No sound can be heard.)
Select folder.
Select aspect ratio.
Select track (within the same folder).
Select folder.
While playing...
Reverse/advance the scenes by five minutes.
For DivX6: Using menu driven features
1
2 Select an item you want to start playback.
3
*4 Search speed: ¡1 ] ¡2 ] ¡3
*5 Search speed: ¡1 ] ¡2
Current playback position
twice
2nd press 2nd press1st press 1st press 3rd press
EN_KW-AVX710[E]4.indb 25EN_KW-AVX710[E]4.indb 25 07.12.7 10:44:19 AM07.12.7 10:44:19 AM
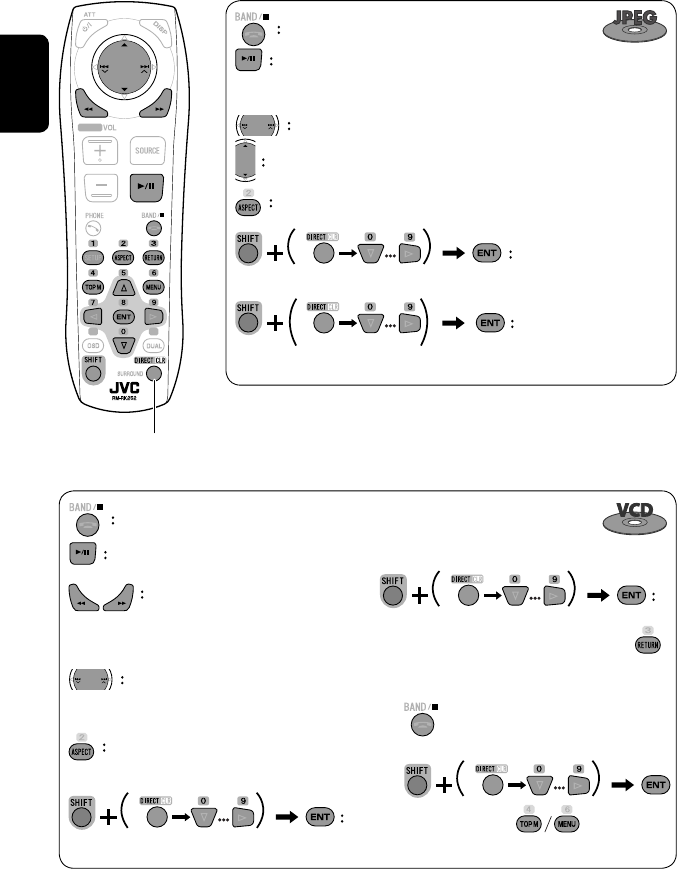
26
ENGLISH
Stop playback.
Start playback/pause. (Slide show: each file is shown for a few
seconds.)
Shows the current file until you change it if pressed during Slide show.
Select file.
Select folder.
Select aspect ratio.
Select file (within the same folder).
Select folder.
During PBC playback...
Select an item on the menu.
To return to the previous menu, press
To cancel PBC playback
1
2 Select the desired track.
• To resume PBC, press
Stop playback.
Start playback/pause (if pressed
during playback).
Reverse/forward search*1
Forward slow motion during pause*2
(No sound can be heard.)
• Reverse slow motion does not work.
Press: Select track.
Hold: Reverse/forward search*3 (No
sound can be heard.)
Select aspect ratio.
twice
*1 Search speed: x2 ] x5 ] x10 ] x20 ] x60
*2 Slow motion speed: 1/32 ] 1/16 ] 1/8 ] 1/4 ] 1/2
*3 Search speed: x2 ] x10
Also functions as CLR (clear):
Erases a misentry if pressed while holding SHIFT.
Select track.
EN_KW-AVX710[E]4.indb 26EN_KW-AVX710[E]4.indb 26 07.12.7 10:44:19 AM07.12.7 10:44:19 AM

OPERATIONS
27
ENGLISH
Stop playback.
Start playback/pause (if pressed during playback).
Reverse/forward search*4
Press: Select track.
Hold: Reverse/forward search*5
Select track.
Stop playback.
Start playback/pause (if pressed during playback).
Reverse/forward search*4
Press: Select track.
Hold: Reverse/forward search*5
Select folder.
Select track (within the same folder).
Select folder.
*4 Search speed: x2 ] x5 ] x10 ] x20 ] x60
*5 Search speed: x2 ] x10
twice
EN_KW-AVX710[E]4.indb 27EN_KW-AVX710[E]4.indb 27 07.12.7 10:44:20 AM07.12.7 10:44:20 AM

28
ENGLISH
Operations using the on-screen
bar
These operations are possible on the screen using
the remote controller, while playing the following
discs—DVD/VCD/DivX/MPEG1/MPEG2/JPEG.
1 Display the on-screen bar. (☞page 29)
Ex. For DVD-Video
2 Select an item.
3 Make a selection.
If a pop-up menu appears...
• For entering time/numbers...
:
Move the entry position
:
Select a number
To remove the on-screen bar
Using the list screens
You can use Original Program or Playlist
screen anytime while playing DVD-VR with its data
recorded.
1 Display the Original Program/Playlist screen.
2 Select an item you want.
To erase the screen
1 Original Program/Playlist number
2 Recording date
3 Recording source (TV station, the input terminal of
the recording equipment, etc.)
4 Start time of recording
5 Title of the program/playlist*
6 Highlight bar (current selection)
7 Creating date of playlist
8 Total number of chapters included in the playlist
9 Playback time
* The title of the original program or playlist may not be
displayed depending on the recording equipment.
EN_KW-AVX710[E]4.indb 28EN_KW-AVX710[E]4.indb 28 07.12.7 10:44:21 AM07.12.7 10:44:21 AM
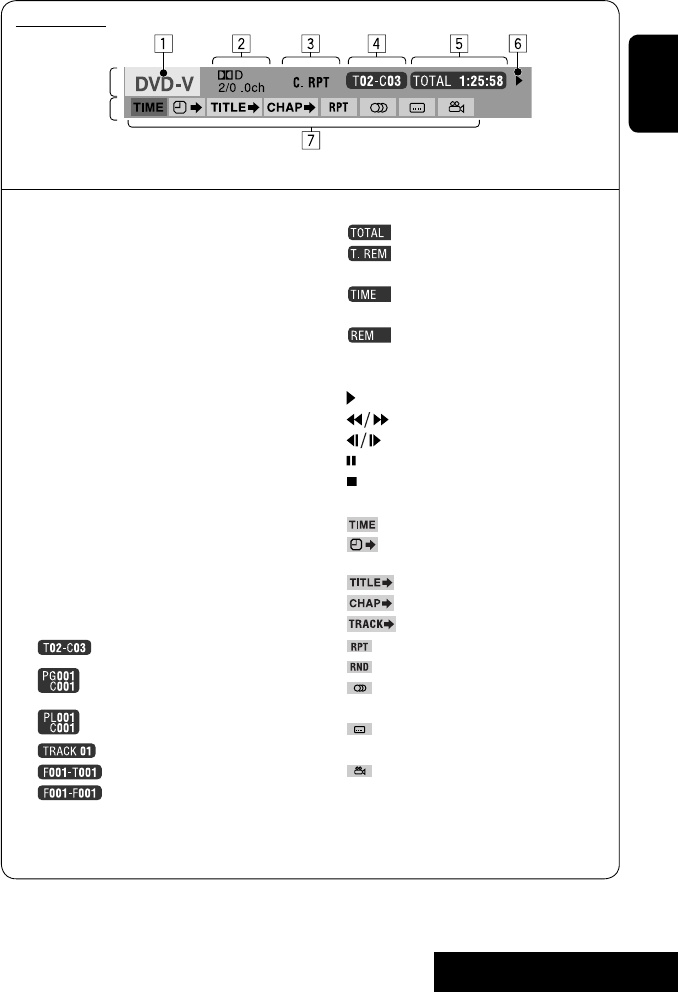
OPERATIONS
29
ENGLISH
Information
Operation
On-screen bar
5 Time indication
Elapsed playing time of the disc
Remaining title time (for DVD)
Remaining disc time (for others)
Elapsed playing time of the current
chapter/track *2
Remaining time of the current
chapter/track *2
6 Playback status
Play
Reverse/forward search
Reverse/forward slow-motion
Pause
Stop
7 Operation icons
Change time indication (see 5)
Time Search (Specify a certain
scene by entering time.)
Title Search (by its number)
Chapter Search (by its number)
Track Search (by its number)
Repeat play *1
Random play *1
Change the audio language, audio
stream, or audio channel
Change or erase the subtitle
language
Change the view angle
*1 ☞ page 21
*2 Not applicable for DVD-VR
Above example is of DVD Video. Items shown on the bar vary due to the disc type.
1 Disc type
2 • DVD: Audio signal format
• VCD: PBC
3 Playback mode *1
DVD Video:
C. RPT: Chapter repeat
T. RPT: Title repeat
DVD-VR:
C. RPT: Chapter repeat
PG. RPT: Program repeat
DivX/MPEG1/MPEG2:
T. RPT: Track repeat
F. RPT: Folder repeat
F. RND: Folder random
A. RND: All (Disc) random
JPEG:
F. RPT: Folder repeat
VCD:
T. RPT: Track repeat
A. RND: All (Disc) random
4 Playback information
Current title/chapter
Current program/chapter
Current Playlist/chapter
Current track
Current folder/track
Current folder/file
EN_KW-AVX710[E]4.indb 29EN_KW-AVX710[E]4.indb 29 07.12.7 10:44:22 AM07.12.7 10:44:22 AM

30
ENGLISH
Bluetooth® operations — Cellular phone/audio player
For Bluetooth operations, it is required to connect the
Bluetooth Adapter (KS-BTA200) to the CD changer jack
on the rear.
• Refer also to the instructions supplied with the
Bluetooth Adapter and the Bluetooth device.
• Refer to the list (included in the box) to see the
countries where you may use the Bluetooth®
function.
To use a Bluetooth device through the unit (“Bluetooth
PHONE” and “Bluetooth AUDIO”) for the first time,
you need to establish Bluetooth wireless connection
between the unit and the device.
• Once the connection is established, it is registered in
the unit even if you reset your unit. Up to five devices
can be registered in total.
• Only one device can be connected at a time for each
source (“Bluetooth PHONE” and “Bluetooth AUDIO”).
Connecting a new Bluetooth
device
Registration (Pairing) methods
Use either of the following items in <Bluetooth>
menu to register and establish the connection with a
device.
• Select “Bluetooth PHONE” or “Bluetooth AUDIO” as
the source to operate <Bluetooth> menu.
Open Make the unit ready to establish
a new Bluetooth connection.
The connection is established by
operating the Bluetooth device.
Search Make the unit ready to establish
a new Bluetooth connection.
The connection is established by
operating this unit.
To register using <Open>
Preparation:
Operate the Bluetooth device to turn on its Bluetooth
function.
1 • Make sure “New Device” is selected. If not, press
[5] or [∞] to select it.
2
3
4 Enter a PIN (Personal Identification
Number)* code to the unit.
• You can enter any number you like (1-digit to
16-digit number).
* Some devices have their own PIN code. Enter the
specified PIN code to the unit.
Go to other menu items
EN_KW-AVX710[E]4.indb 30EN_KW-AVX710[E]4.indb 30 07.12.7 10:44:23 AM07.12.7 10:44:23 AM

31 EXTERNAL DEVICES
ENGLISH
You can enter [0] – [9] only.
• [BS]: Erases the character before the cursor.
• [Del]: Erases the character on the cursor.
• [Enter]: Confirms the entry.
5 Operate the Bluetooth device to connect
while “Open...” is displayed on the screen.
Enter the same PIN code (as entered in the above
step) on the device to be connected.
Now connection is established and you can use the
device through the unit.
The device remains registered even after you
disconnect the device. Use <Connect> (or activate
<Auto Connect>) to connect the same device
from next time (☞ the following, and pages 58
and 59).
To register using <Search>
• Make sure “New Device” is selected. If not, press [5]
or [∞] to select it.
1 Press [AV MENU].
2 Press [Bluetooth].
3 Press [Search].
The unit searches for available devices and displays
the list of them. (If no available device is detected,
“Device Unfound” appears.)
4 Select a device you want to connect.
5 Enter the specific PIN code of the device to
the unit.
• Refer to the instructions supplied with the device
to check the PIN code.
6 Operate the Bluetooth device to connect
while “Connecting...” is displayed on the
screen.
Now connection is established and you can use the
device through the unit.
To connect a special device <Special
Device>
1 Press [AV MENU].
2 Press [Bluetooth].
3 Press [Special Device].
The unit displays the list of the preset devices.
4 Select a device you want to connect.
5 Use <Open> (or <Search>) to connect.
To connect/disconnect a registered
device
1 Select “Bluetooth PHONE” or “Bluetooth
AUDIO,” then select a registered device you
want to connect/disconnect.
2 Press [AV MENU].
3 Press [Bluetooth].
4 Press [Connect] or [Disconnect].
• Select <Connect> to connect the selected
device.
• Select <Disconnect> to disconnect the selected
device.
To delete a registered device
1 Select “Bluetooth PHONE” or “Bluetooth
AUDIO,” then select a registered device you
want to delete.
2 Press [AV MENU].
3 Press [Bluetooth].
4 Press [Delete Pairing].
Confirmation screen appears. Press [Yes].
EN_KW-AVX710[E]4.indb 31EN_KW-AVX710[E]4.indb 31 07.12.7 10:44:24 AM07.12.7 10:44:24 AM
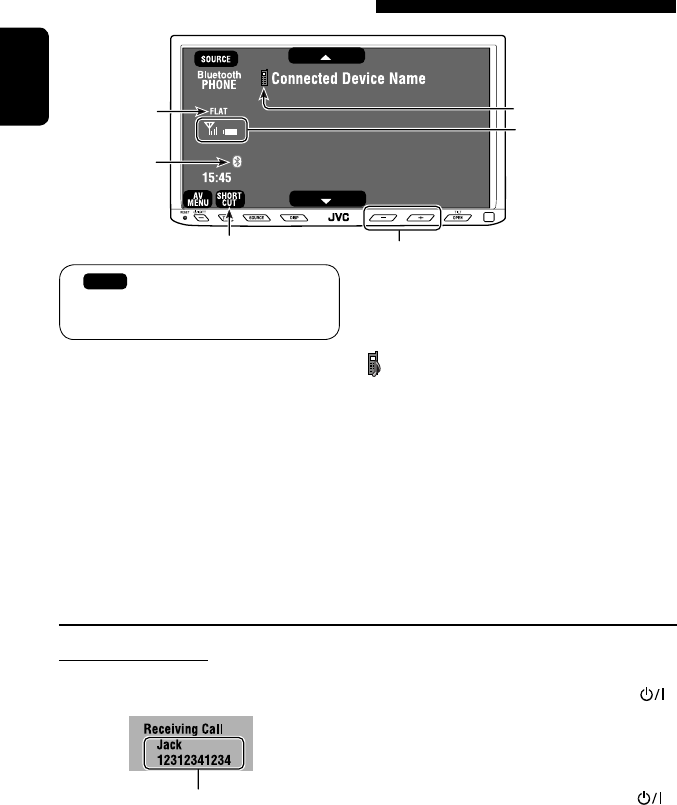
32
ENGLISH
Using the Bluetooth cellular phone
Adjust the volume of the incoming calls.*2
When a call comes in...
The source is changed to “Bluetooth PHONE”
automatically.
Name and phone number (if acquired)
When <Auto Answer> is activated...
The unit answers the incoming call automatically.
(☞ page 59)
☞ page 34
When <Auto Answer> is deactivated...
To answer the incoming call
• Press any button on the monitor panel (except
/ATT or +/–).
• Press the message displayed on the touch panel.
To end the call
• Hold any button on the monitor panel (except
/ATT or +/–).
• Hold the message displayed on the touch panel.
• You can adjust the microphone volume. (☞ page 59)
~ Press [SOURCE], then press [Bluetooth PHONE]. (☞ page 9)
• You can also use SOURCE on the monitor panel. Press it repeatedly.
Ÿ Press [AV MENU].
! Press [Bluetooth].
⁄ Establish the connection with a device, then make a call (or settings using <Bluetooth>
menu).
☞ pages 58 and 59
Sound mode
(☞ page 48) Status of the device
Signal strength/Battery
remainder
(only when the information
comes from the device)
[AV MENU] Hold: Activates <Voice Dialing> function
[5 ∞] Select the registered device
(“New Device” appears when a new device can be registered.)
The Bluetooth icon
lights up when
the adapter is
connected.
: Buttons on the touch panel. In the
explanation, they are indicated inside
[ ].
*1 When a cellular phone with audio function is connected, appears.
*2 This adjustment does not affect the volume level of the other sources.
*1
EN_KW-AVX710[E]4.indb 32EN_KW-AVX710[E]4.indb 32 07.12.7 10:44:24 AM07.12.7 10:44:24 AM

33 EXTERNAL DEVICES
ENGLISH
3
4 Select a calling method, then call.
Redial Shows the list of the phone
numbers you have dialed.
Received Calls Shows the list of the received
calls.
Phonebook Shows the phone book of the
connected cellular phone.
Missed Calls Shows the list of the missed
calls.
Phone
Number
Shows the phone number
entry screen = “Entering a
phone number” (☞ page 34).
Voice Dialing (Only when the connected
cellular phone has the voice
recognition system): = Speak
the name you want to call.
When an SMS comes in...
If the cellular phone is compatible with SMS (Short
Message Service), you can read the messages on the
screen.
• You cannot edit or send a message through the unit.
When <Message Info> is set to <Auto>...
The unit rings and the following screen is displayed to
inform you of a message arrival. (☞ page 59)
To read the message, press [Yes].
The source is changed to “Bluetooth PHONE.”
To read the message later, press [No].
• The message is stored into <Message> =
<Unread>. (☞ page 58)
When <Message Info> is set to <Manual>...
Access the message list to read messages. (☞ pages
58 and 59)
To make a call
1
2
Cancel
EN_KW-AVX710[E]4.indb 33EN_KW-AVX710[E]4.indb 33 07.12.7 10:44:25 AM07.12.7 10:44:25 AM

34
ENGLISH
To stop ringing (canceling the outgoing call)
Hold any button on the monitor panel (except /ATT
or +/–).
Entering a phone number
• You cannot use the remote controller to enter phone
numbers.
You can enter [0] – [9], [*], [#] (up to 32 numbers)
• [BS]: Erases the character before the cursor.
• [Del]: Erases the character on the cursor.
• [Preset]: Goes to Preset List. You can preset the
entered number by selecting a preset
number. (☞ page 35)
• [Dial]: Calls the entered number.
• You can easily access <Dial Menu> by pressing
[SHORT CUT] on the touch panel, then...
You can also access <Dial Menu> by holding
SOURCE on the monitor panel.
• You can easily activate <Voice Dialing> by
pressing [SHORT CUT] on the touch panel, then...
You can also activate <Voice Dialing> by
holding [AV MENU].
To redial previously dialed numbers
1
2
3
When using the remote controller, you can
display <Redial> menu anytime .
[Hold]
EN_KW-AVX710[E]4.indb 34EN_KW-AVX710[E]4.indb 34 07.12.7 10:44:26 AM07.12.7 10:44:26 AM

35 EXTERNAL DEVICES
ENGLISH
To call a preset number
1
2
You can use the following buttons on the remote
controller for the Bluetooth phone operations.
Presetting the phone numbers
You can preset up to six phone numbers.
1 Select the phone number you want to preset
from <Phonebook>, <Redial>, <Received
Calls>, or <Missed Calls>.
1 Press [AV MENU].
2 Press [Bluetooth].
3 Press [Dial Menu], then...
Ex.: Selecting <Received Calls>
2 Select a telephone number to store.
3 Select a preset number.
Now “Tom” is stored into preset no. 1.
• Display <Dial Menu> screen/Answer
the incoming call.
• Display the <Redial> menu if pressed
and held (regardless of the current
source).
End the call.
Adjust the volume.
Make a call to the preset numbers.
[Hold]
:
:
:
:
EN_KW-AVX710[E]4.indb 35EN_KW-AVX710[E]4.indb 35 07.12.7 10:44:27 AM07.12.7 10:44:27 AM

36
ENGLISH
Bluetooth Information:
If you wish to receive more information about Bluetooth, visit the following JVC web site: <http://www.
jvc-victor.co.jp/english/car/>
You can use the following buttons on the remote
controller for the Bluetooth audio operations.
Using the Bluetooth audio player
☞ page 48
Sound mode
(☞ page 48)
[3 / 8] [7] Start and pause playback
[4 ¢] Reverse/forward skip
[5 ∞] Select the registered device
(“New Device” appears when a new device can
be registered.*3)
Status of the device
Signal strength/Battery
remainder
(only when the information
comes from the device)
The Bluetooth icon
lights up when
the adapter is
connected.
~ Press [SOURCE], then press [Bluetooth
AUDIO]. (☞ page 9)
• You can also use SOURCE on the monitor
panel. Press it repeatedly.
Ÿ Start playback.
: Buttons on the touch panel. In the
explanation, they are indicated
inside [ ].
*2
*1
*1 When a cellular phone with audio function is connected, appears.
*2 Indicates the button pressed. It may be different from the operation status.
*3 You cannot select “New Device” when a Bluetooth audio player is connected.
Start and pause playback.
Reverse/forward skip
Adjust the volume.
:
:
:
EN_KW-AVX710[E]4.indb 36EN_KW-AVX710[E]4.indb 36 07.12.7 10:44:27 AM07.12.7 10:44:27 AM
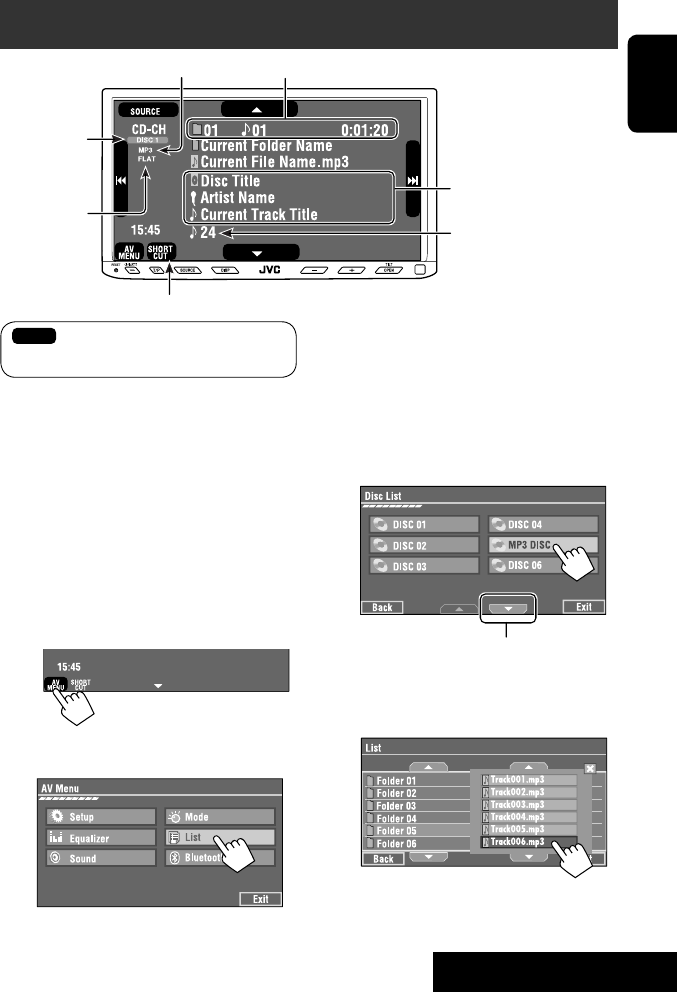
37 EXTERNAL DEVICES
ENGLISH
Preparation:
Make sure <Changer> is selected for <External
Input>. (☞ page 55)
~ Press [SOURCE], then press [CD-CH]. (☞
page 9)
• You can also use SOURCE on the monitor
panel. Press it repeatedly.
Ÿ
! Display the Disc List.
Listening to the CD changer
It is recommended to use a JVC MP3-compatible CD changer with your unit.
• You can play only CDs (CD-DA) and MP3 discs.
Folder no./Track no./Playing time
Disc no.
MP3 indicator
☞ page 38
Tag data appears only when it is
recorded.
⁄ Select a disc to start playing.
• If you select an MP3 disc, the Track list of the
current folder appears. You can select a track
and start playing. (☞ also page 22)
• If you select a folder on the list, you can start
playing the first track of the folder.
To go to the other list
Sound mode
(☞ page 48)
[4 ¢] Press: Select track
Hold: Reverse/forward search
[5 ∞] Press: Select folders (only for MP3)
Hold: Display Disc list
Total track no. included on the
disc
Ex. while playing an MP3 disc
: Buttons on the touch panel. In the
explanation, they are indicated inside [ ].
EN_KW-AVX710[E]4.indb 37EN_KW-AVX710[E]4.indb 37 07.12.7 10:44:28 AM07.12.7 10:44:28 AM

38
ENGLISH
When one of the playback modes is selected, the
corresponding indicator lights up on the source
information screen.
To cancel, select <Off>.
You can use following playback modes—Repeat or
Random.
Ex.: To select Track Repeat for an MP3 disc
1 Press [AV MENU].
2 Press [Mode].
3
Selecting playback modes
Disc type Repeat Random
Track: Repeats current track
Disc: Repeats all tracks of the current disc
Disc: Randomly plays all tracks of the
current disc
All: Randomly plays all tracks of all
loaded discs
Track: Repeats current track
Folder: Repeats all tracks of the current
folder
Disc: Repeats all tracks of the current disc
Folder: Randomly plays all tracks of current
folder, then tracks of next folders
Disc: Randomly plays all tracks of the
current disc
All: Randomly plays all tracks of all
loaded discs
You can use the following buttons on the remote
controller to operate the CD changer.
You can easily turn on or off Track Repeat by
pressing [SHORT CUT] on the touch panel, then...
: Select disc.
: Select folder (MP3 only).
• Press: Select track.
• Hold: Reverse/forward search
☞ page 48
EN_KW-AVX710[E]4.indb 38EN_KW-AVX710[E]4.indb 38 07.12.7 10:44:29 AM07.12.7 10:44:29 AM
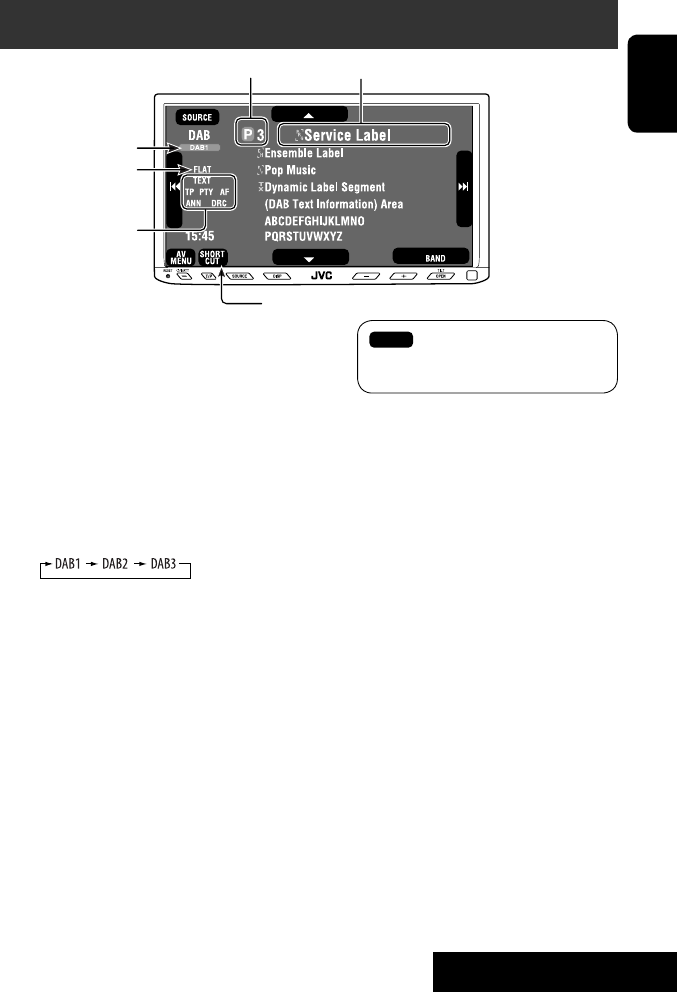
39 EXTERNAL DEVICES
ENGLISH
~ Press [SOURCE], then press [DAB]. (☞ page 9)
• You can also use SOURCE on the monitor panel. Press it repeatedly.
Ÿ Press [BAND].
! Press [4] or [¢] to search for an ensemble—Auto Search.
• Manual Search: Hold either [4]or [¢] until “Manual Search” appears on the screen, then press it
repeatedly.
⁄ Press [∞] or [5] to select a service (either primary or secondary) to listen to.
Listening to the DAB tuner
Preset no.
Band
☞ page 42
DAB indicators */Standby
Reception indicators
If no signal is received, “No DAB Signal” appears.
* While tuning in a service with DLS (Dynamic Label
Segment), the TEXT indicator lights up.
Sound mode
(☞ page 48)
: Buttons on the touch panel. In the
explanation, they are indicated
inside [ ].
EN_KW-AVX710[E]4.indb 39EN_KW-AVX710[E]4.indb 39 07.12.7 10:44:29 AM07.12.7 10:44:29 AM

40
ENGLISH
Manual presetting
1 Display the Preset List.
2 Tune in to a service you want to preset.
3 Select a preset number.
The service selected in step 2 is now stored in
preset number 2.
When surrounding sounds are
noisy
Some services provide Dynamic Range Control (DRC)
signals together with their regular programme signals.
DRC will reinforce the low level sounds to improve your
listening.
• The DRC indicator will light up while tuning in to a
service with the DRC signals.
1
2
3
• As the number increases, the effect becomes
stronger.
EN_KW-AVX710[E]4.indb 40EN_KW-AVX710[E]4.indb 40 07.12.7 10:44:30 AM07.12.7 10:44:30 AM
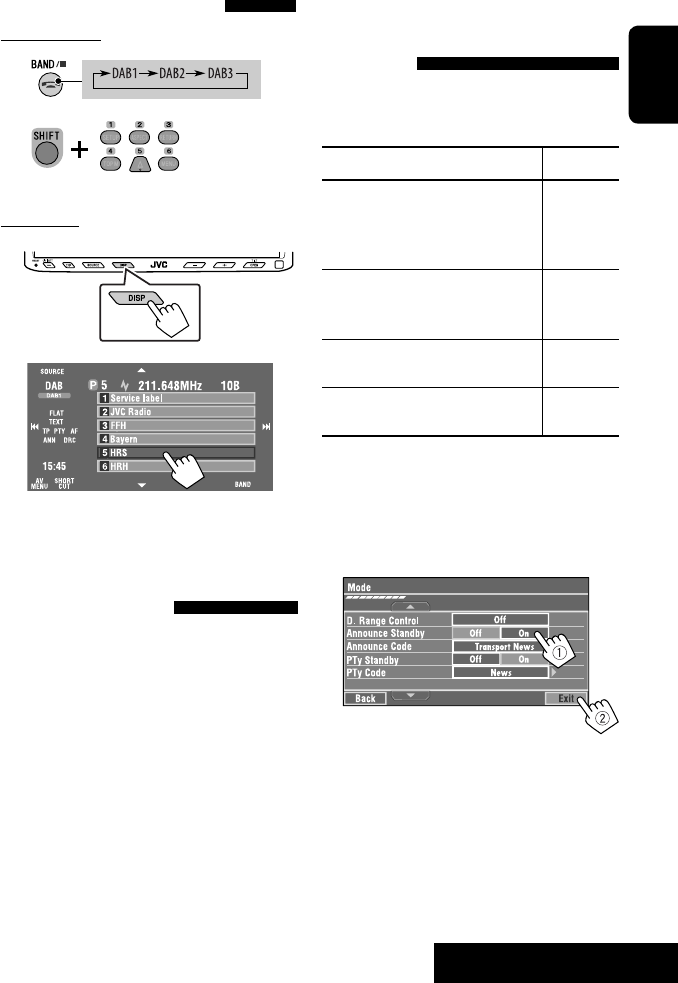
41 EXTERNAL DEVICES
ENGLISH
Selecting preset services
On the remote:
1
2
On the unit:
1
2
Activating/deactivating TA/PTY
Standby Reception
Operations are exactly the same as explained on page
14 for FM RDS stations.
• You cannot store PTY codes separately for the DAB
tuner and for the FM tuner.
Activating/deactivating
Announcement Standby
Reception
Announcement Standby Reception allows the
unit to switch temporarily to your favorite service
(announcement type).
Announcement Standby Reception Indicator
To activate, display <AV Menu>
screen, then select <Mode>, press
[On] for <Announce Standby>. (☞
below)
ANN
The unit will temporarily switch to your
favorite service from any source other
than FM/AM.
Lights up
Not yet activated. Tune in to another
service providing the related signals.
Flashes
To deactivate, press [Off] for
<Announce Standby> (☞ below).
Goes off
To activate Announcement Standby
Reception
1 Press [AV MENU].
2 Press [Mode].
3
Announcement Standby Reception is now
activated for PTY code <Transport News>: the
initial setting.
Continued on the next page
[Hold]
EN_KW-AVX710[E]4.indb 41EN_KW-AVX710[E]4.indb 41 07.12.7 10:44:30 AM07.12.7 10:44:30 AM

42
ENGLISH
Tracing the same programme—
Alternative Frequency Reception
(DAB AF)
• While receiving a DAB service:
When driving in an area where a service cannot be
received, this unit automatically tunes in to another
ensemble or FM RDS station broadcasting the same
programme.
• While receiving an FM RDS station:
When driving in an area where a DAB service is
broadcasting the same programme as the FM RDS
station, this unit automatically tunes in to the DAB
service.
When shipped from the factory, Alternative Frequency
Reception is activated.
To deactivate the Alternative Frequency
Reception, select <Off> for <DAB AF>. (☞ page
54)
You can easily activate and deactivate
Announcement Standby Reception by pressing
[SHORT CUT] on the touch panel, then...
To change the announcement type for
Announcement Standby Reception
1 Press [AV MENU].
2 Press [Mode].
3
4 Select your favorite announcement type.
Available announcement types:
Transport News, Warning, News, Weather, Event,
Special Event, Radio Info, Sports News, Financial
News
☞ page 48
☞ page 14
EN_KW-AVX710[E]4.indb 42EN_KW-AVX710[E]4.indb 42 07.12.7 10:44:31 AM07.12.7 10:44:31 AM

43 EXTERNAL DEVICES
ENGLISH
Listening to the iPod
It is required to connect the Interface adapter for iPod (KS-PD100) to the CD changer jack on the rear.
Preparation:
Make sure <iPod> is selected for <External Input>. (☞ page 55)
~ Press [SOURCE], then press [iPod] (☞ page 9)
Playback starts automatically.
• You can also use SOURCE on the monitor panel. Press it repeatedly.
Ÿ Press [4] or [¢] to select a track.
Track no./Playing time
☞ page 44
[4 ¢] Press: Select track
Hold: Reverse/forward search
[5] Enter player’s menu
[∞] Start playback/pause
• To resume, press again.
Sound mode
(☞ page 48)
: Buttons on the touch panel. In the
explanation, they are indicated
inside [ ].
EN_KW-AVX710[E]4.indb 43EN_KW-AVX710[E]4.indb 43 07.12.7 10:44:31 AM07.12.7 10:44:31 AM

44
ENGLISH
Selecting a track from the
player’s menu
1 Press [5] to enter the player’s menu.
“SEARCH” flashes on the screen during menu
operations.
• This mode will be canceled if no operations are
done for about five seconds.
2 Press [4] or [¢] to select the desired
item.
Press: Select an item.
Hold: Skip ten items at a time if there are more
than ten items.
Playlists Ô Artists Ô Albums Ô Songs Ô
Genres Ô Composers Ô (back to the beginning)
3 Press [∞] to confirm the selection.
4 Repeat steps 2 and 3 to select a track.
• When a track is selected finally, playback starts.
• To return to the previous menu, press [5].
Selecting playback modes
1
2
3 Select an appropriate option.
Repeat One: Functions the same as
“Repeat One.”
All: Functions the same as
“Repeat All.”
Random Album: Functions the same as
“Shuffle Albums.”
Song: Functions the same as
“Shuffle Songs.”
• When the playback modes are selected, the
corresponding indicators light up alternately on
the screen.
To cancel, select <Off>.
You can easily turn on or off Track Repeat by
pressing [SHORT CUT] on the touch panel, then...
☞ page 48
EN_KW-AVX710[E]4.indb 44EN_KW-AVX710[E]4.indb 44 07.12.7 10:44:32 AM07.12.7 10:44:32 AM

45 EXTERNAL DEVICES
ENGLISH
Using other external components
AV-INPUT
You can connect an external component to the LINE IN/VIDEO IN terminals.
~ Press [SOURCE], then press [AV-IN]. (☞ page 9)
• You can also use SOURCE on the monitor panel. Press it repeatedly.
Ÿ Turn on the connected component and start playing the source.
To display the operation buttons (☞ page 20) while watching the playback picture
• If no operations are done for about five seconds, the operation buttons disappear.
• [KEY] does not work when the source is “AV-IN.”
Touch the screen (center portion).
You can easily access to <Aspect> setting
menu by pressing [SHORT CUT] on the
touch panel, then...
Assigned title (☞ page 49) Sound mode (☞ page 48)
Touch the screen (center portion).
: Buttons on the touch panel. In the explanation, they are indicated inside [ ].
These buttons also work when they are not shown on the touch panel (while watching the playback picture).
Continued on the next page
☞ page 48
EN_KW-AVX710[E]4.indb 45EN_KW-AVX710[E]4.indb 45 07.12.7 10:44:32 AM07.12.7 10:44:32 AM

46
ENGLISH
To display the operation buttons (☞ page 20) while viewing the navigation screen
• The operation buttons displayed on the screen vary among the playback sources.
• If no operations are done for about five seconds, the operation buttons disappear.
• The above buttons except [KEY] also work when they are not shown on the screen (while viewing the navigation
screen).
Navigation screen
You can also connect a Navigation System to the VIDEO IN terminal so that you can watch the navigation screen.
Preparation:
Make sure <Navigation> is selected for <AV Input>. (☞ page 55)
To view the navigation screen (and listen to the navigation guidance*)
Press DISP on the monitor panel repeatedly. (☞ page 9)
• The aspect ratio of the navigation screen is fixed to
<Full> regardless of the <Aspect> setting. (☞ page
52)
* If your Navigation System is equipped with the voice guidance function.
When <Navigation> is selected for <AV Input> (☞ page 55)
• You can use the source “AV-IN” for listening to an audio source connected to the LINE IN terminals.
• Some status messages such as volume level will not appear on the screen.
Touch the screen (center portion). Touch the screen (center portion).
EN_KW-AVX710[E]4.indb 46EN_KW-AVX710[E]4.indb 46 07.12.7 10:44:33 AM07.12.7 10:44:33 AM
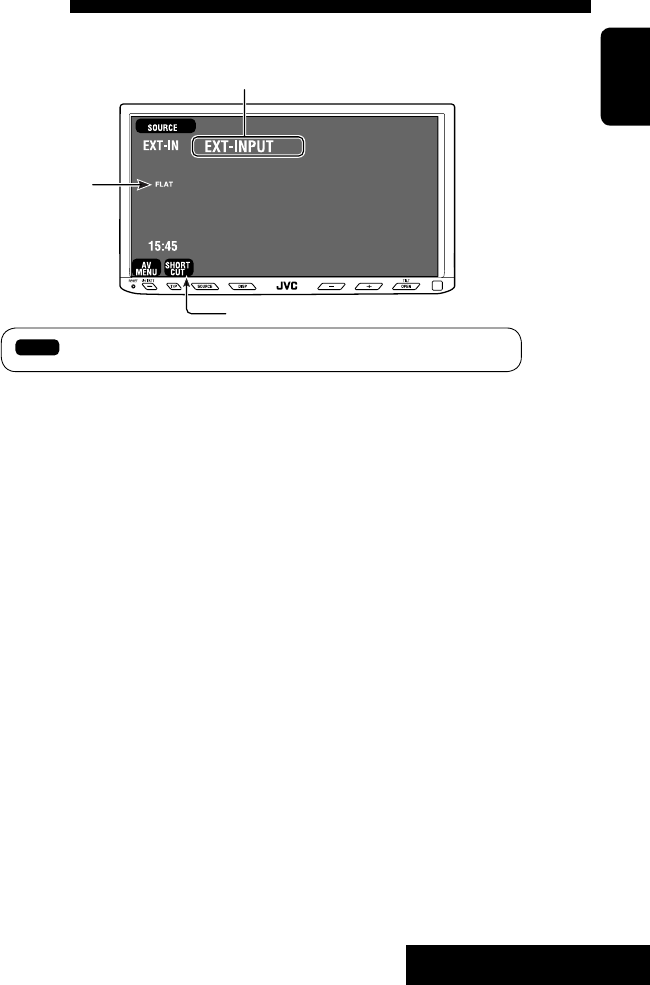
47 EXTERNAL DEVICES
ENGLISH
EXT-INPUT
You can connect an external component to the CD changer jack on the rear using the Line Input Adapter—KS-U57
(not supplied) or AUX Input Adapter—KS-U58 (not supplied).
Preparation:
Make sure <External> is selected for <External Input>. (☞ page 55)
~ Press [SOURCE], then press [EXT-IN]. (☞ page 9)
• You can also use SOURCE on the monitor panel. Press it repeatedly.
Ÿ Turn on the connected component and start playing the source.
Assigned title (☞ page 49)
☞ page 48
Sound mode
(☞ page 48)
EXTERNAL DEVICES
: Buttons on the touch panel. In the explanation, they are indicated inside [ ].
EN_KW-AVX710[E]4.indb 47EN_KW-AVX710[E]4.indb 47 07.12.7 10:44:33 AM07.12.7 10:44:33 AM

48
ENGLISH
~
Ÿ
! Select a sound mode.
Sound equalization
Storing your own adjustments
You can store your adjustments into <User1>,
<User2>, and <User3>.
1 Repeat steps ~ and Ÿ, then in step !...
2 Adjust (1), then store (2).
Ex.: When storing into <User2>.
While playing back any source other
than “Bluetooth PHONE,” you can easily
access <Equalizer> menu by pressing
[SHORT CUT] on the touch panel, then...
Move to other six sound modes
EN_KW-AVX710[E]4.indb 48EN_KW-AVX710[E]4.indb 48 07.12.7 10:44:33 AM07.12.7 10:44:33 AM

SETTINGS
49
ENGLISH
You can assign titles to “AV-IN” and “EXT-IN.”
~ Press [SOURCE], then press [AV-IN] or
[EXT-IN]. (☞ page 9)
• You can also use SOURCE on the monitor
panel. Press it repeatedly.
Ÿ Display <Title Entry> screen.
! Assign a title.
You can enter up to 16 characters (for available
characters, ☞ page 67).
• [Store]: Confirm the entry.
• [2/3]: Move the cursor.
• [BS]: Erase the character before the
cursor.
• [Del]: Erase the character on the cursor.
• [Cap]: Change the letter case (upper/
lower).
• [Change]: Change the character set.
• [Space]: Enter a space.
⁄ Finish the procedure.
Assigning titles to the sources
In the explanation, buttons on the
touch panel are indicated inside [ ].
EN_KW-AVX710[E]4.indb 49EN_KW-AVX710[E]4.indb 49 07.12.7 10:44:34 AM07.12.7 10:44:34 AM

50
ENGLISH
!
Menu operations
The following steps are one of the fundamental
procedures. Some of the settings do not open the
sub-setting window, but just selecting an option will
change the setting.
• The display indications may change according to
change of the specifications.
Ex.: Changing the <AV Input> setting
~
Ÿ
Non-available items will be shaded.
EN_KW-AVX710[E]4.indb 50EN_KW-AVX710[E]4.indb 50 07.12.7 10:44:34 AM07.12.7 10:44:34 AM
SETTINGS
51
ENGLISH
Setup
Menu items Selectable settings, [reference page]
Display
Demonstration Off: Cancels.
On: Activates the demonstration on the screen. To stop it temporarily,
touch the screen.
Wall Paper You can select the background picture of the screen.
Horizon, Metal, Art, Plain
Color You can select the color of the background picture.
Blue, Light-Blue, Red, Orange, Yellow, Green, Purple, Dark-Blue,
Dark-Green, Brown, Light-Brown, Black
Scroll Off: Cancels.
Once: Scrolls the disc information once.
Auto: Repeats scrolling (five-second intervals).
• Holding DISP on the monitor panel scrolls the information regardless
of this setting.
Dimmer Off: Cancels.
On: Activates dimmer.
Auto: Dims the monitor when you turn on the headlights.*1
Dimmer Time Set : Activates the Dimmer Time setting below.
Dimmer Time Set Sets the Dimmer On/Off times.
Dimmer Level You can select the brightness for dimmer.
1 (bright), 2 (middle), 3 (dark)
Bright You can adjust brightness of the screen.
–15 (darkest) to +15 (brightest); Initial 00
Picture Adjust*2You can adjust the following to make the screen clear and legible for
watching the playback picture. The setting will be stored—one for
“DISC” (common) and the other for “AV-IN.”
–15 to +15; Initial 0
Bright: Adjust if the picture is too bright or too dark.
Contrast: Adjust the contrast.
Color: Adjust the color of the picture—lighter or darker.
• Press [5] or [∞] to adjust.
• You cannot adjust <Tint>. (fixed)
Initial: Underlined
*1 The ILLUMINATION lead connection is required. (☞ Installation/Connection Manual)
*2 Adjustable only when the source is “DISC” (the inserted disc must contain pictures or movies) or “AV-IN.”
The procedure for setting an item is shown on page 50.
EN_KW-AVX710[E]4.indb 51EN_KW-AVX710[E]4.indb 51 07.12.7 10:44:35 AM07.12.7 10:44:35 AM

52
ENGLISH
Menu items Selectable settings, [reference page]
Display
Aspect*1You can change the aspect ratio of the picture.
Aspect ratio of incoming signal
4:3 16:9
Regular:
For 4:3 original pictures
Full:
For 16:9 original pictures
Auto: • For “DISC”: Aspect ratio is automatically
selected to match to the incoming signals.
• For the other video sources: Aspect ratio is
fixed to <Regular>.
Language*2Select the indication language shown on the screen.
English, Español, Français, Deutsch, Italiano, Nederlands,
Svenska, Dansk, Руccĸий, Português
• The characters you can enter for assigning the titles also change
according to the language selected, ☞ [67].
Clock
Time Set Initial 0:00 ☞ [8]
Time Format Select either 12-hour system or 24-hour system.
12Hours, 24Hours ☞ [8]
OSD Clock When <On> is selected, the clock time is displayed on the playback
picture.
Off, On
Clock Adjust Select <Auto> to adjust the clock automatically using the clock time
(CT) data from an FM RDS station.
Off, Auto ☞ [8]
*1 Not adjustable when no picture is shown.
*2 After you change the indication language setting, turn off then on the power so that your setting takes effect.
Initial: Underlined
EN_KW-AVX710[E]4.indb 52EN_KW-AVX710[E]4.indb 52 07.12.7 10:44:35 AM07.12.7 10:44:35 AM

SETTINGS
53
ENGLISH
Menu items Selectable settings, [reference page]
Disc
Menu Language*3Select the initial disc menu language; Initial English (☞ also page
66).
Audio Language*3Select the initial audio language; Initial English (☞ also page 66).
Subtitle*3Select the initial subtitle language or erase the subtitle (Off); Initial
English (☞ also page 66).
Monitor Type*3Select the monitor type to watch a wide screen picture on the external
monitor.
16:9 : Select when the aspect ratio of the external monitor is 16:9.
4:3 LB (Letterbox)/4:3 PS (Pan Scan): Select when the aspect ratio of
the external monitor is 4:3.
• Refer to the illustrations on the left to see how the pictures are
shown on the screen.
OSD Position*3Select the position of the on-screen bar. ☞ [28]
1: Higher position
2: Lower position
File Type*3Select playback file type when a disc contains different types of files.
Audio: Plays back audio files.
Still Picture: Plays back JPEG files.
Video: Plays back DivX/MPEG1/MPEG2 files.
Audio&Video: Plays back audio files and DivX/MPEG1/MPEG2 files.
DivX Regist. (Registration)*3This unit has its own Registration Code. Once you have played back a
file with which the Registration Code recorded, this unit’s Registration
Code is overwritten for copyright protection.
D. Audio Output*3Select the signal format emitted through the DIGITAL OUT (optical)
terminal. (☞ also page 65)
PCM : Select this when connecting an amplifier or a decoder
incompatible with Dolby Digital, DTS, or MPEG Audio, or when
connecting to a recording device.
Dolby D : Select this when connecting an amplifier or a decoder
compatible with Dolby Digital.
Stream : Select this when connecting an amplifier or a decoder
compatible with Dolby Digital, DTS, or MPEG Audio.
*3 Selectable only for “DISC.” (Playback stops when you change the setting.)
Position 1 Position 2
16:9 4:3LB
4:3PS
The procedure for setting an item is shown on page 50.
EN_KW-AVX710[E]4.indb 53EN_KW-AVX710[E]4.indb 53 07.12.7 10:44:36 AM07.12.7 10:44:36 AM

54
ENGLISH
Menu items Selectable settings, [reference page]
Disc
Down Mix*1When playing back a multi-channel disc, this setting affects the signals
reproduced through the LINE OUT terminals.
Dolby SR : Select this to enjoy multi-channel surround audio by
connecting an amplifier compatible with Dolby Surround.
Stereo : Normally select this.
D. (Dynamic) Range
Compres. (Compression)*1
You can enjoy a powerful sound at a low volume level while playing
Dolby Digital software.
Auto: Select to apply the effect to multi-channel encoded software.
On: Select to always use this function.
Tuner
IF Band Width Auto: Increases the tuner selectivity to reduce interference noises
between adjacent stations. (Stereo effect may be lost.)
Wide: Subject to the interference from adjacent stations, but sound
quality will not be degraded and the stereo effect will remain.
AF Regional When the received signals from the current station become weak...
Off: Cancels—not selectable when <DAB AF> is set to <On>.
AF Reg. (Regional): Switches to another station broadcasting the same
programme. The REG indicator lights up.
AF: Switches to another station. The programme may differ from the
one currently received (the AF indicator lights up). ☞ [15]
TA Volume 00 to 30 or 50*2; Initial 15 ☞ [14]
Program Search Off, On ☞ [15]
DAB AF*3Off, On ☞ [42]
*1 Selectable only for “DISC.” (Playback stops when you change the setting.)
*2 Depends on the amplifier gain control. (☞ page 56)
*3 Appears only when DAB tuner is connected.
Initial: Underlined
EN_KW-AVX710[E]4.indb 54EN_KW-AVX710[E]4.indb 54 07.12.7 10:44:37 AM07.12.7 10:44:37 AM

SETTINGS
55
ENGLISH
Menu items Selectable settings, [reference page]
Input
AV Input*4
You can determine the use of LINE IN and VIDEO IN terminals. ☞ [45, 46
]
Off: Select when no component is connected (“AV-IN” is skipped while
selecting the source).
Audio&Video: Select when connecting an AV component such as a
VCR.
Audio: Select when connecting an audio component such as a portable
audio player.
Camera*5 : Select when connecting a rear view camera.
Navigation : Select when connecting a Navigation System.
External Input*6For connecting an external component to the CD changer jack on the
rear.
Changer/iPod*7: CD changer or iPod. ☞ [37, 43]
External: Any other than the above. ☞ [47]
• For connecting the Bluetooth adapter and DAB tuner, this setting is
not required. They are automatically detected.
Others
Beep Off: Cancels.
On: Activates the key-touch tone.
Telephone Muting*8Off: Cancels.
Muting1, Muting2: Select either one which mutes the sounds while
using the car phone system.
Power LED Flash Off: Cancels.
On: When the ignition is turned off, the lamp on the button
flashes.
TouchPanel Sens. Change the sensitivity of the touch panel. As the number decreases,
sensitivity becomes higher. 1/2/3
Initialize Initialize all settings you have made in <AV Menu>. Press and hold
[Enter] to initialize the settings, then reset the unit. ☞ [3]
*4 Not selectable when “AV-IN” is selected as the source.
*5 The REVERSE GEAR SIGNAL lead connection is required. See Installation/Connection Manual. The rear view through
the camera appears on the screen in <Full> aspect ratio (regardless of the aspect ratio setting) when you shift the
gear to the reverse (R) position. When you press DISP on the control panel, or when you shift the gear to another
position other than the reverse (R) position, the rear view screen is cleared.
*6 Not selectable when the component connected to the CD changer jack is selected as the source.
*7 The name of the component detected through the CD changer jack is shown.
*8 The TEL MUTING lead connection is required. See Installation/Connection Manual.
The procedure for setting an item is shown on page 50.
EN_KW-AVX710[E]4.indb 55EN_KW-AVX710[E]4.indb 55 07.12.7 10:44:37 AM07.12.7 10:44:37 AM

56
ENGLISH
Equalizer
Flat/Hard Rock/R&B/Pop/Jazz/Dance/Country/Reggae/Classic/User1/User2/User3 ☞ [48]
Sound
Menu items Selectable settings, [reference page]
Fader/Balance Adjust fader—speaker output balance between the front and rear speakers.
• Upmost—front only (F6)
• Downmost—rear only (R6)
When using a two-speaker system, set the fader to the center (0).
Adjust balance—speaker output balance between the left and right speakers.
• Leftmost—left only (L6)
• Rightmost—right only (R6) Initial 0
Volume Adjust Adjust and store auto-adjustment volume level for each source, comparing to
the FM volume level. The volume level will automatically increase or decrease
when you change the source.
–12 to +12; Initial 00
• You can make the adjustments separately for DVD and other discs.
Amplifier Gain You can change the maximum volume level of this unit.
Off: Deactivates the built-in amplifier.
Low: VOL 00 to 30 (Select this if the maximum power of the speakers is less
than 50 W.)
High: VOL 00 to 50
Initial: Underlined
EN_KW-AVX710[E]4.indb 56EN_KW-AVX710[E]4.indb 56 07.12.7 10:44:38 AM07.12.7 10:44:38 AM
SETTINGS
57
ENGLISH
Mode*1
Menu items Selectable settings, [reference page]
Mono Only for FM. (Off, On) ☞ [10]
DX/Local Only for FM. (Local, DX) ☞ [11]
SSM Only for FM. Press and hold to start SSM. ☞ [11]
PTy Standby Only for FM/DAB. (Off, On) ☞ [14]
PTy Code Only for FM/DAB. (Initial News) ☞ [15]
Title Entry Only for “AV-IN” and “EXT-IN.” ☞ [49]
Repeat ☞ [21, 38, 44]
Random ☞ [21, 38, 44]
D.(Dynamic) Range Control Only for DAB. (Off, DRC1, DRC2, DRC3) ☞ [40]
Announce Standby Only for DAB. (Off, On) ☞ [41]
Announce Code Only for DAB. (Initial Transport News) ☞ [42]
*1 Items listed under <Mode> vary among the playback sources.
List
For “DISC”: Folder List and Track List (☞ page 22)
For “CD-CH”: Disc List, Folder List, and Track List (☞ page 37)
• For the other playback sources, you can display a list by pressing DISP on the monitor panel. (☞ page 9)
The procedure for setting an item is shown on page 50.
EN_KW-AVX710[E]4.indb 57EN_KW-AVX710[E]4.indb 57 07.12.7 10:44:39 AM07.12.7 10:44:39 AM

58
ENGLISH
Bluetooth*1
Menu items Selectable settings, [reference page]
Dial Menu *2Select the method to make a call. ☞ [33]
Message*3You can read a message from the following message histories.
Unread: Messages you have not read.
Read: Messages you have read.
Unsent: Messages you have not sent.
Sent: Messages you have sent.
• The number of messages in each history is also shown.
Open ☞ [30]
Search ☞ [31]
Special Device Only for “New Device.”
Shows the list of Bluetooth devices which require some special procedure to
establish Bluetooth connection. Select a device you want to connect.
• After selecting the device, use <Open> or <Search> (☞ page 30 or 31)
for connection.
• Once the connection is established, it is registered in the unit. You can
connect the unit and the device by using <Connect> (☞ below) from the
next time.
Connect Only for the registered devices.
After selecting a device from among the registered devices (☞ pages 30 and
31), establish the connection with it.
Disconnect Only for the device being connected.
Disconnect the current device before connecting another device.
Delete Pairing Only for the registered devices.
Delete the registered devices.
*1 Selectable only for “Bluetooth PHONE” or “Bluetooth AUDIO.” Select a device (or “New Device”) before operating the
menu.
*2 Only for the device connected for “Bluetooth PHONE.”
*3 Selectable only when the source is “Bluetooth PHONE” and the connected cellular phone is compatible with SMS
(Short Message Service).
When operating the Bluetooth device, refer also to the instructions supplied with the device.
EN_KW-AVX710[E]4.indb 58EN_KW-AVX710[E]4.indb 58 07.12.7 10:44:39 AM07.12.7 10:44:39 AM

SETTINGS
59
ENGLISH
Menu items Selectable settings, [reference page]
Settings
Auto Connect *4When the unit is turned on, the connection is established automatically
with...
Off: No Bluetooth device.
Last: The last connected Bluetooth device.
Order: The available registered Bluetooth device found first.
Auto Answer *5Off: The unit does not answer the calls automatically. Answer the calls
manually.
On: The unit answers the incoming calls automatically.
Reject: The unit rejects all incoming calls.
Message Info *5Auto: The unit informs you of the arrival of a message by ringing and
displaying “Receiving Message.” To read the message, ☞ page 33.
Manual: The unit does not inform you of the arrival of a message.
MIC Setting *5Adjust microphone volume connected to the Bluetooth adapter.
01/02/03
Version *6The Bluetooth software and hardware versions are shown.
Initial: Underlined
*4 Selectable only for “Bluetooth PHONE.”
*5 Only for the cellular phone connected for “Bluetooth PHONE.” Not selectable when “New Device” is selected.
*6 If you wish to receive more information about Bluetooth, visit the following JVC web site: <http://www.jvc-victor.
co.jp/english/car/>
SETTINGS
The procedure for setting an item is shown on page 50.
EN_KW-AVX710[E]4.indb 59EN_KW-AVX710[E]4.indb 59 07.12.7 10:44:40 AM07.12.7 10:44:40 AM

ENGLISH
60
Maintenance
Moisture condensation
Moisture may condense on the lens inside the unit in
the following cases:
• After starting the heater in the car.
• If it becomes very humid inside the car.
Should this occur, the unit may malfunction. In this
case, eject the disc and leave the unit turned on for a
few hours until the moisture evaporates.
How to handle discs
When removing a disc from its
case, press down the center holder of
the case and lift the disc out, holding it
by the edges.
• Always hold the disc by the edges. Do not touch its
recording surface.
When storing a disc into its case, gently insert the
disc around the center holder (with the printed surface
facing up).
• Make sure to store discs into the cases after use.
To keep discs clean
A dirty disc may not play correctly.
If a disc does become dirty, wipe it with
a soft cloth in a straight line from center
to edge.
• Do not use any solvent (for example, conventional
record cleaner, spray, thinner, benzine, etc.) to clean
discs.
To play new discs
New discs may have some rough spots
around the inner and outer edges. If
such a disc is used, this unit may reject
the disc.
To remove these rough spots, rub the edges with a
pencil or ball-point pen, etc.
Stick-on labelSticker and sticker residue
Unusual shape
Warped disc
Do not use the following discs:
Center holder
SingleCD—8 cm disc
C-thru Disc (semi-transparent disc) Transparent or semi-transparent on its
recording area
EN_KW-AVX710[E]4.indb 60EN_KW-AVX710[E]4.indb 60 07.12.7 10:44:40 AM07.12.7 10:44:40 AM

61 REFERENCES
ENGLISH
More about this unit
General
Turning on the power
• By pressing SOURCE on the monitor panel, you
can also turn on the power. If the source is ready,
playback starts.
Tuner (FM only)
Storing stations in memory
• When SSM is over, received stations are preset in no.
1 (lowest frequency) to no. 6 (highest frequency).
Disc
General
• In this manual, words “track” and “file” are
interchangeably used.
• This unit can only play back audio CD (CD-DA) files
if different type of audio files (MP3/WMA/WAV) are
recorded on the same disc.
• This unit can display only one-byte characters. No
other characters can be correctly displayed.
Inserting a disc
• When a disc is inserted upside down or has no
playable files, “Cannot play this disc Check the disc”
appears on the screen. Eject the disc.
Ejecting a disc
• If “No disc“ appears after removing a disc, insert a
disc or select another playback source.
• If the ejected disc is not removed within 15 seconds,
the disc is automatically inserted again into the
loading slot to protect it from dust.
Playing Recordable/Rewritable discs
• This unit can recognize a total of 5 000 files and 250
folders (a maximum of 999 files per folder).
• Use only “finalized” discs.
• This unit can play back multi-session discs; however,
unclosed sessions will be skipped while playing.
• This unit can recognize a total 25 characters for file/
folder names.
• Some discs or files may not be played back due to
their characteristics or recording conditions.
Playing DVD-VR
• For details about DVD-VR format and Playlist, refer
to the instructions supplied with the recording
equipment.
File playback
Playing DivX files
• This unit can play back DivX files with the extension
code <.divx>, <.div>, or <.avi> (regardless of the
letter case—upper/lower).
• This unit supports the DivX files whose resolution is
720 x 576 pixels or less.
• Audio stream should conform to MP3 or Dolby Digital.
• The file encoded in the interlaced scanning mode
may not be played back correctly.
• The maximum bit rate for video signals (average) is 4
Mbps.
Continued on the next page
EN_KW-AVX710[E]4.indb 61EN_KW-AVX710[E]4.indb 61 07.12.7 10:44:41 AM07.12.7 10:44:41 AM

ENGLISH
62
Playing MPEG1/MPEG2 files
• This unit can play back MPEG1/MPEG2 files with the
extension code <.mpg>, <.mpeg>, or <.mod>*.
* <.mod> is an extension code used for the MPEG2
files recorded by JVC Everio camcorders.
• The stream format should conform to MPEG system/
program stream.
The file format should be MP@ML (Main Profile at
Main Level)/SP@ML (Simple Profile at Main Level)/
MP@LL (Main Profile at Low Level).
• Audio streams should conform to MPEG1 Audio
Layer-2 or Dolby Digital.
• The maximum bit rate for video signals (average) is 4
Mbps.
Playing JPEG files
• This unit can play back JPEG files with the extension
code <.jpg>, or <.jpeg>.
• It is recommended that you record a file at 640 x 480
resolution.
• This unit can play back baseline JPEG files.
Progressive JPEG files or lossless JPEG files cannot be
played.
Playing MP3/WMA/WAV files
• This unit can play back files with the extension code
<.mp3>, <.wma>, or <.wav> (regardless of the
letter case—upper/lower).
• This unit can play back the files meeting the
conditions below:
– Bit rate:
MP3/WMA: 32 kbps — 320 kbps
– Sampling frequency:
48 kHz, 44.1 kHz, 32 kHz (for MPEG1)
24 kHz, 22.05 kHz, 16 kHz (for MPEG2)
48 kHz, 44.1 kHz, 32 kHz, 22.05 kHz (for WMA)
44.1 kHz (for WAV)
• This unit can show ID3 Tag Version
1.0/1.1/2.2/2.3/2.4 (for MP3).
• This unit can also show WAV/WMA Tag.
• This unit can play back files recorded in VBR (variable
bit rate).
• Files recorded in VBR have a discrepancy in elapsed
time indication.
• This unit cannot play back the following files:
– MP3 files encoded with MP3i and MP3 PRO
format.
– MP3 files encoded with Layer 1/2.
– WMA files encoded with lossless, professional,
and voice format.
– WMA files which are not based upon Windows
Media® Audio.
– WMA files copy-protected with DRM.
– Files which have the data such as AIFF, ATRAC3,
etc.
Disc/file information shown on the
external monitor
The following screens appear only on the external
monitor.
• CD
1 Selected playback mode
2 Elapsed playing time of the current track
3 Operation status
4 Current track number/total number of tracks
on the disc
5 Track information
6 Track list
7 Current track (highlighted bar)
TIME 00:14
Track : 6 / 14
Track Information
Cloudy
Fair
Fog
Hail
Indian summer
Rain
Shower
Snow
Thunder
Typhoon
Wind
Winter sky
Album
Four seasons
Artist
Robert M. Smith
Title
Rain
T. RPT
EN_KW-AVX710[E]4.indb 62EN_KW-AVX710[E]4.indb 62 07.12.7 10:44:41 AM07.12.7 10:44:41 AM

63 REFERENCES
ENGLISH
Bluetooth operations
General
• While driving, do not perform complicated operation
such as dialing the numbers, using phone book, etc.
When you perform these operations, stop your car in
a safe place.
• Some Bluetooth devices may not be connected to
this unit depending on the Bluetooth version of the
device.
• This unit may not work for some Bluetooth devices.
• Connecting condition may vary depending on
circumstances around you.
• When the unit is turned off, the device is
disconnected.
Warning messages for Bluetooth operations
• Connection Error: The device is registered but the
connection has failed. Use <Connect> to connect
the device again. (☞ page 31)
• Error: Try the operation again. If “Error” appears
again, check if the device supports the function you
have tried.
• Device Unfound: No available Bluetooth device is
detected by <Search>.
• Loading: The unit is updating the phone book and/
or SMS.
• Please Wait...: The unit is preparing to use
the Bluetooth function. If the message does not
disappear, turn off and turn on the unit, then connect
the device again (or reset the unit).
• Reset 08: Check the connection between the
adapter and this unit.
Icons for phone types
• These icons indicate the phone type set on the device.
:Cellular phone
:Household phone
:Office
:General
:Other than above
• DivX/MPEG1/MPEG2/JPEG/MP3/WMA/WAV
1 Current folder (highlighted bar)
2 Current folder number/total folder number
3 Folder list
4 Selected playback mode
5 Elapsed playing time of the current track (not
displayed for JPEG)
6 Operation status
7 Current track number/total number of tracks
in the current folder (total number of tracks on
the disc)
8 Track information (only for MP3/WMA/WAV)
9 Track list
p Current track (highlighted)
* If tag data includes “Jacket Picture” (baseline
JPEG), it will be displayed.
EN_KW-AVX710[E]4.indb 63EN_KW-AVX710[E]4.indb 63 07.12.7 10:44:42 AM07.12.7 10:44:42 AM

ENGLISH
64
CD changer
• If you select a folder, which does not include any
music files, on the list (☞ page 37), you will hear a
beep. Select another folder including music files.
DAB tuner
• Only the primary DAB service can be preset even
when you store a secondary service.
iPod operations
• You can control the following types of iPods through
the interface adapter.
– iPod with dock connector (3rd Generation)
– iPod with Click Wheel (4th Generation)
– iPod mini
– iPod photo
– iPod nano *1
– iPod video (5th Generation) *2
*1 When you connect the iPod nano to the interface
adapter, be sure to disconnect the headphones;
otherwise, no sound is heard.
*2 It is not possible to browse video files on the
“Videos” menu while the iPod is connected to the
interface adapter.
• If the iPod does not play correctly, please update your
iPod software to the latest version. For details about
updating your iPod, visit <http://www.apple.com>.
• When you turn on this unit, the iPod is charged
through the adapter connected to this unit.
• While the iPod is connected, all operations from the
iPod are disabled. Perform all operations from this
unit.
• The text information may not be displayed correctly.
• The text information scrolls on the screen. This unit
can display up to 40 characters.
Notice:
When operating an iPod, some operations may not
be performed correctly or as intended. In this case,
visit the following JVC web site:
<http://www.jvc.co.jp/english/car/support/
ks-pd100/index.html>
Menu settings
• If you change the <Amplifier Gain> setting from
<High> to <Low> while the volume level is set
higher than “30,” the unit automatically changes the
volume level to “VOL 30.”
• After you change any of <Menu Language/Audio
Language/Subtitle> settings, turn off then on the
power, and re-insert the disc (or insert another disc)
so that your setting takes effect.
• When you select <16:9> for a picture whose aspect
ratio is 4:3, the picture slightly changes due to the
process for converting the picture width.
• Even if <4:3PS> is selected, the screen size may
become <4:3LB> for some discs.
EN_KW-AVX710[E]4.indb 64EN_KW-AVX710[E]4.indb 64 07.12.7 10:44:42 AM07.12.7 10:44:42 AM

65 REFERENCES
ENGLISH
Sound signals emitted through the rear terminals
Through the analog terminals (Speaker out/REAR OUT)
2-channel signal is emitted. When playing multi-channel encoded disc, multi-channel signals are downmixed.
• DTS sound cannot be reproduced.
Through the DIGITAL OUT terminal
Digital signals (Linear PCM, Dolby Digital, DTS, MPEG Audio) are emitted.
• To reproduce the multi-channel sounds such as Dolby Digital, DTS, and MPEG Audio, connect an amplifier or a
decoder compatible with these multi-channel sources to this terminal, and set <D. Audio Output> correctly.
(☞ page 53)
<D. Audio Output>
Playback disc
Output signals
<Stream> <Dolby D> <PCM>
DVD 48 kHz, 16/20/24 bits Linear PCM 48 kHz, 16 bits stereo Linear PCM*
96 kHz, Linear PCM 48 kHz, 16 bits stereo Linear PCM
with Dolby Digital Dolby Digital bitstream 48 kHz, 16 bits stereo
Linear PCM
with DTS DTS bitstream
with MPEG Audio MPEG bitstream 48 kHz, 16 bits stereo Linear PCM
Audio CD, Video CD 44.1 kHz, 16 bits stereo Linear PCM /
48 kHz, 16 bits stereo Linear PCM
Audio CD with DTS DTS bitstream
DivX/
MPEG with Dolby Digital Dolby Digital bitstream 48 kHz, 16 bits stereo
Linear PCM
with MPEG Audio 32/44.1/48 kHz, 16 bits Linear PCM
MP3/WMA 32/44.1/48 kHz, 16 bits Linear PCM
WAV 44.1 kHz, 16 bits Linear PCM
* Digital signals may be emitted at 20 or 24 bits (at their original bit rate) through the DIGITAL OUT terminal if the
discs are not copy-protected.
EN_KW-AVX710[E]4.indb 65EN_KW-AVX710[E]4.indb 65 07.12.7 10:44:43 AM07.12.7 10:44:43 AM

ENGLISH
66
Preset equalizing values
Frequency
Sound mode 60 Hz 150 Hz 400 Hz 1 kHz 2.5 kHz 6.3 kHz 15 kHz
Flat 00 00 00 00 00 00 00
Hard Rock +03 +03 +01 00 00 +02 +01
R&B +03 +02 +02 00 +01 +01 +03
Pop 00 +02 00 00 +01 +01 +02
Jazz +03 +02 +01 +01 +01 +03 +02
Dance +04 +02 00 –02 –01 +01 +01
Country +02 +01 00 00 00 +01 +02
Reggae +03 00 00 +01 +02 +02 +03
Classic +02 +03 +01 00 00 +02 00
User1/2/3 00 00 00 00 00 00 00
Language codes (for DVD/DivX language selection)
Code
Language
Code
Language
Code
Language
Code
Language
Code
Language
AA Afar FA Persian KK Kazakh NO Norwegian ST Sesotho
AB Abkhazian FI Finnish KL Greenlandic OC Occitan SU Sundanese
AF Afrikaans FJ Fiji KM Cambodian OM (Afan) Oromo SW Swahili
AM Ameharic FO Faroese KN Kannada OR Oriya TA Tamil
AR Arabic FY Frisian KO Korean (KOR) PA Panjabi TE Telugu
AS Assamese GA Irish KS Kashmiri PL Polish TG Tajik
AY Aymara GD Scots Gaelic KU Kurdish PS Pashto, Pushto TH Thai
AZ Azerbaijani GL Galician KY Kirghiz QU Quechua TI Tigrinya
BA Bashkir GN Guarani LA Latin RM
Rhaeto-Romance
TK Turkmen
BE Byelorussian GU Gujarati LN Lingala RN Kirundi TL Tagalog
BG Bulgarian HA Hausa LO Laothian RO Rumanian TN Setswana
BH Bihari HI Hindi LT Lithuanian RW Kinyarwanda TO Tonga
BI Bislama HR Croatian LV Latvian, Lettish SA Sanskrit TR Turkish
BN Bengali, Bangla HU Hungarian MG Malagasy SD Sindhi TS Tsonga
BO Tibetan HY Armenian MI Maori SG Sangho TT Tatar
BR Breton IA Interlingua MK Macedonian SH Serbo-Croatian TW Twi
CA Catalan IE Interlingue ML Malayalam SI Singhalese UK Ukrainian
CO Corsican IK Inupiak MN Mongolian SK Slovak UR Urdu
CS Czech IN Indonesian MO Moldavian SL Slovenian UZ Uzbek
CY Welsh IS Icelandic MR Marathi SM Samoan VI Vietnamese
DZ Bhutani IW Hebrew MS Malay (MAY) SN Shona VO Volapuk
EL Greek JA Japanese MT Maltese SO Somali WO Wolof
EO Esperanto JI Yiddish MY Burmese SQ Albanian XH Xhosa
ET Estonian JW Javanese NA Nauru SR Serbian YO Yoruba
EU Basque KA Georgian NE Nepali SS Siswati ZU Zulu
EN_KW-AVX710[E]4.indb 66EN_KW-AVX710[E]4.indb 66 07.12.7 10:44:43 AM07.12.7 10:44:43 AM

67 REFERENCES
ENGLISH
Characters shown on the screen
In addition to the roman alphabet (A – Z, a – z), you
can use the following characters to assign titles.
(☞ page 49)
• When <Руccĸий> is selected for <Language>.
(☞ page 52)
• When any language other than <Руccĸий> is
selected for <Language>. (☞ page 52)
Upper and lower cases
Numbers and symbols
Upper and lower cases
Numbers and symbols
• Manufactured under license from Dolby
Laboratories. Dolby and the double-D symbol are
trademarks of Dolby Laboratories.
• “DTS” and “DTS Digital Out” are registered
trademarks of DTS, Inc
• “DVD Logo” is a trademark of DVD Format/Logo
Licensing Corporation registered in the US, Japan
and other countries.
• DivX, DivX Ultra Certified, and associated logos
are trademarks of DivX, Inc. and are used under
license.
• Official DivX® Ultra Certified product
• Plays all versions of DivX® video (including DivX®
6) with enhanced playback of DivX® media files
and the DivX® Media Format
• Microsoft and Windows Media are either
registered trademarks or trademarks of Microsoft
Corporation in the United States and/or other
countries.
• The Bluetooth word mark and logos are owned by
the Bluetooth SIG, Inc. and any use of such marks
by Victor Company of Japan, Limited (JVC) is under
license. Other trademarks and trade names are
those of their respective owners.
• iPod and iTunes are trademarks of Apple Inc.,
registered in the U.S. and other countries.
• This product incorporates copyright protection
technology that is protected by U.S. patents
and other intellectual property rights. Use of
this copyright protection technology must be
authorized by Macrovision, and is intended for
home and other limited viewing uses only unless
otherwise authorized by Macrovision. Reverse
engineering or disassembly is prohibited.
EN_KW-AVX710[E]4.indb 67EN_KW-AVX710[E]4.indb 67 07.12.7 10:44:45 AM07.12.7 10:44:45 AM

ENGLISH
68
Troubleshooting
What appears to be trouble is not always serious. Check the following points before calling a service center.
• For operations with the external components, refer also to the instructions supplied with the adapters used for the
connections (as well as the instructions supplied with the external components).
Symptoms Remedies/Causes
General
• No sound comes out of the speakers. • Adjust the volume to the optimum level.
• Check the cords and connections.
• DTS sound cannot be reproduced through the analog
terminals (Speaker out/REAR OUT).
• The screen is not clear and legible. Sunshine from the windscreen may cause this symptom.
Adjust <Bright>. (☞ page 51)
• “Position Error Push Open Key” appears on
the screen.
The monitor panel angle has been forcibly adjusted, or its
adjustment has been interrupted while opening or closing.
Press OPEN/TILT.
• “Mecha Error Push Reset” appears on the
screen, and the panel does not move.
Reset the unit. (☞ page 3)
• “No Signal” appears. • Change the source.
• Start the playback on the external component connected
to VIDEO IN terminal.
• Check the cords and connections.
• Signal input is too weak.
• The buttons on the monitor panel do not
work.
When the monitor panel is open, only +/– (volume) and
OPEN/TILT work. The other buttons do not function.
• The unit does not work at all. Reset the unit. (☞ page 3)
FM/AM
• SSM automatic presetting does not work. Store stations manually. (☞ page 11)
• Static noise while listening to the radio. Connect the aerial firmly.
EN_KW-AVX710[E]4.indb 68EN_KW-AVX710[E]4.indb 68 07.12.7 10:44:45 AM07.12.7 10:44:45 AM

69 REFERENCES
ENGLISH
Continued on the next page
Symptoms Remedies/Causes
Disc in general
• Disc can be neither recognized nor played
back.
Eject the disc forcibly. (☞ page 3)
• Disc cannot be ejected. Unlock the disc. (☞ page 22)
• Recordable/Rewritable discs cannot be
played back.
• Tracks on the Recordable/Rewritable discs
cannot be skipped.
• Insert a finalized disc.
• Finalize the discs with the component which you used
for recording.
• Playback does not start. • Insert the disc correctly again.
• The format of files is not supported by the unit.
• The playback picture is not clear and legible. Adjust items in <Picture Adjust> menu. (☞ page 51)
• Sound and pictures are sometimes
interrupted or distorted.
• Stop playback while driving on rough roads.
• Change the disc.
• No playback picture is shown and “Parking
Brake” appears on the screen, even when the
parking brake is engaged.
Parking brake lead is not connected properly.
(☞ Installation/Connection Manual)
• No picture appears on the external monitor. • Connect the video cord correctly.
• Select the correct input on the external monitor.
• “Eject Error” or “Loading Error” appears on
the screen.
Change the source by pressing SOURCE.
• “Region code error” appears on the screen
when you insert a DVD Video.
Region code is not correct. (☞ page 4)
DivX/MPEG1/MPEG2/MP3/WMA/WAV
• Disc cannot be played back. • Change the disc.
• Record the tracks using a compliant application on the
appropriate discs. (☞ page 4)
• Add appropriate extension codes to the file names.
• Noise is generated. The track played back is not a playable file format. Skip to
another file.
• Tracks are not played back as you have
intended them to play.
Playback order may differ from that played back using
other players.
• Elapsed playing time is not correct. This sometimes occurs during playback. This is caused by
how the tracks are recorded.
• “Not Support” appears on the screen and
track skips.
The track is unplayable.
EN_KW-AVX710[E]4.indb 69EN_KW-AVX710[E]4.indb 69 07.12.7 10:44:46 AM07.12.7 10:44:46 AM

ENGLISH
70
Symptoms Remedies/Causes
Bluetooth
• Bluetooth device does not detect the unit. This unit can be connected with one Bluetooth cellular
phone and one Bluetooth audio player at a time.
While connected to a device, this unit cannot be detected
from another device. Disconnect currently connected device
and search again.
• The unit does not detect the Bluetooth
device.
• Check the Bluetooth setting of the device.
• Search from the Bluetooth device. After the device
detects the unit, select <Open> on the unit to connect
the device. (☞ page 30)
• The unit does not make pairing with the
Bluetooth device.
• Enter the same PIN code for both the unit and target
device. If the PIN code of the device is not indicated on its
instructions, try “0000” or “1234.”
• Select the device name from <Special Device>, then
try to connect again. (☞ pages 31, 58)
• Echo or noise occurs. Adjust the microphone unit position.
• Phone sound quality is poor. • Reduce the distance between the unit and the Bluetooth
cellular phone.
• Move the car to place where you can get a better signal
reception.
• The sound is interrupted or skipped during
playback of a Bluetooth audio player.
• Reduce the distance between the unit and the Bluetooth
audio player.
• Disconnect the player connected for “Bluetooth PHONE.”
• Turn off, then turn on the unit.
• (When the sound is not yet restored,) connect the player
again.
• “New Device” cannot be selected for
“Bluetooth AUDIO.”
Bluetooth audio player is already connected. To select “New
Device,” disconnect it. (☞ page 31)
• The connected audio player cannot be
controlled.
Check whether the connected audio player supports AVRCP
(Audio Video Remote Control Profile).
• “Reset 08” appears on the screen. Check the connection between the adapter and this unit.
EN_KW-AVX710[E]4.indb 70EN_KW-AVX710[E]4.indb 70 07.12.7 10:44:46 AM07.12.7 10:44:46 AM

71 REFERENCES
ENGLISH
Symptoms Remedies/Causes
CD changer
• “No Disc” appears on the screen. Insert a disc into the magazine.
• “No Magazine” appears on the screen. Insert the magazine.
• “Cannot play this disc Check the disc”
appears on the screen.
Current disc does not include playable files. Replace the disc
with one including playable files.
• “Reset 08” appears on the screen. Connect this unit and the CD changer correctly and press
the reset button of the CD changer.
• “Reset 01” – “Reset 07” appears on the
screen.
Press the reset button of the CD changer.
• The CD changer does not work at all. Reset the unit. (☞ page 3)
DAB tuner
• “No DAB Signal” appears on the screen. Move to an area with stronger signals.
• “Reset 08” appears on the screen. Connect this unit and the DAB tuner correctly, then reset
the unit. (☞ page 3)
• The DAB tuner does not work at all. Connect this unit and the DAB tuner correctly, then reset
the unit. (☞ page 3)
• “Antenna Power NG” appears on the screen. Check the cords and connections.
iPod
• The iPod does not turn on or does not work. • Check the connection.
• Charge the battery.
• Sound is distorted. Deactivate the equalizer either on this unit or the iPod.
• “Disconnect” appears on the screen. Check the connection.
• Playback stops. The headphones are disconnected during playback. Restart
playback.
• “No Files” appears on the screen. No tracks are stored. Import tracks to the iPod.
• “Reset 01” – “Reset 07” appears on the
screen.
Disconnect the adapter from both this unit and iPod. Then,
connect them again.
• “Reset 08” appears on the screen. Check the connection between the adapter and this unit.
• The iPod’s controls do not work after
disconnecting from this unit.
Reset the iPod.
AV-IN
• No picture appears on the screen. • Turn on the video component if it is not on.
• Connect the video component correctly.
• Playback picture is not clear and legible. Adjust items in <Picture Adjust> menu. (☞ page 51)
EN_KW-AVX710[E]4.indb 71EN_KW-AVX710[E]4.indb 71 07.12.7 10:44:46 AM07.12.7 10:44:46 AM

ENGLISH
72
Specifications
AMPLIFIER
Maximum Power Output: Front/Rear: 50 W per channel
Continuous Power Output
(RMS):
Front/Rear: 20 W per channel into 4 Ω, 40 Hz to
20 000 Hz at no more than 0.8% total
harmonic distortion
Load Impedance: 4 (4 to 8 allowance)
Equalizer Control Range: Frequencies: 60 Hz, 150 Hz, 400 Hz, 1 kHz, 2.5 kHz,
6.3 kHz, 15 kHz
Level: ±10 dB
Signal-to-Noise Ratio: 70 dB
Audio Output Level
REAR OUT:
Line-Out Level/Impedance: 2.5 V/20 kΩ load (full scale)
Output Impedance: 1 kΩ
Color System: PAL
Video Output (composite): 1 Vp-p/75 Ω
Other Terminals: Input: LINE IN, VIDEO IN, Aerial input
Output: VIDEO OUT
Others: CD changer, OE REMOTE, Reverse gear
signal, DIGITAL OUT (optical)
FM/AM TUNER
Frequency Range: FM: 87.5 MHz to 108.0 MHz
AM: (MW) 522 kHz to 1 620 kHz
(LW) 144 kHz to 279 kHz
FM Tuner Usable Sensitivity: 11.3 dBf (1.0 V/75 Ω)
50 dB Quieting Sensitivity: 16.3 dBf (1.8 V/75 Ω)
Alternate Channel Selectivity (400 kHz): 65 dB
Frequency Response: 40 Hz to 15 000 Hz
Stereo Separation: 35 dB
MW Tuner Sensitivity/Selectivity: 20 V/35 dB
LW Tuner Sensitivity: 50 V
DVD/CD
Signal Detection System: Non-contact optical pickup (semiconductor laser)
Frequency Response: DVD, fs=48 kHz/96 kHz: 16 Hz to 22 000 Hz
VCD/CD: 16 Hz to 20 000 Hz
Dynamic Range: 93 dB
Signal-to-Noise Ratio: 95 dB
Wow and Flutter: Less than measurable limit
EN_KW-AVX710[E]4.indb 72EN_KW-AVX710[E]4.indb 72 07.12.7 10:44:47 AM07.12.7 10:44:47 AM

73 REFERENCES
ENGLISH
MONITOR
Screen Size: 7 inch wide liquid crystal display
Number of Pixel: 336 960 pixels: 480 × 3 (horizontal) × 234 (vertical)
Drive Method: TFT (Thin Film Transistor) active matrix format
Color System: NTSC/PAL
Aspect Ratio: 16:9 (wide)
GENERAL
Power Requirement: Operating Voltage: DC 14.4 V (11 V to 16 V allowance)
Grounding System: Negative ground
Allowable Storage Temperature: –10°C to +60°C
Allowable Operating Temperature: 0°C to +40°C
Dimensions (W × H × D):
• With trim plate and
sleeve attached
Installation Size (approx.): 182 mm × 111 mm × 160 mm
Panel Size (approx.): 188 mm × 117 mm × 10 mm
Mass (approx.): 2.9 kg (including trims and sleeve)
CAUTION: When ejecting the monitor, leave an
open space for the monitor to come out. If you do
not, the monitor may obstruct the steering wheel
and gearshift lever operations, and this may result
in a traffic accident.
Unit: mm
Required space for the monitor ejection
160 90.5
100
Design and specifications are subject to change without notice.
EN_KW-AVX710[E]4.indb 73EN_KW-AVX710[E]4.indb 73 07.12.7 10:44:47 AM07.12.7 10:44:47 AM

EN, GE, FR, NL
1207MNMMDWJEIN
Having TROUBLE with operation?
Please reset your unit
Refer to page of How to reset your unit
Haben Sie PROBLEME mit dem Betrieb?
Bitte setzen Sie Ihr Gerät zurück
Siehe Seite Zurücksetzen des Geräts
Vous avez des PROBLÈMES de fonctionnement?
Réinitialisez votre appareil
Référez-vous à la page intitulée Comment réinitialiser votre appareil
Hebt u PROBLEMEN met de bediening?
Stel het apparaat terug
Zie de pagina met de paragraaf Het apparaat terugstellen
© 2008 Victor Company of Japan, Limited
Dear Customer,
This apparatus is in conformance with the valid European
directives and standards regarding electromagnetic
compatibility and electrical safety.
European representative of Victor Company of Japan, Limited
is:
JVC Technology Centre Europe GmbH
Company name changed in:
JVC Technical Services Europe GmbH
Postfach 10 05 52
61145 Friedberg
Germany
Sehr geehrter Kunde, sehr geehrte Kundin,
dieses Gerät stimmt mit den gültigen europäischen Richtlinien
und Normen bezüglich elektromagnetischer Verträglichkeit
und elektrischer Sicherheit überein.
Die europäische Vertretung für die Victor Company of Japan,
Limited ist:
JVC Technology Centre Europe GmbH
Firmenname geändert in:
JVC Technical Services Europe GmbH
Postfach 10 05 52
61145 Friedberg
Deutschland
Cher(e) client(e),
Cet appareil est conforme aux directives et normes
européennes en vigueur concernant la compatibilité
électromagnétique et à la sécurité électrique.
Représentant européen de la société Victor Company of Japan,
Limited :
JVC Technology Centre Europe GmbH
Le nom de la compagnie a changé dans:
JVC Technical Services Europe GmbH
Postfach 10 05 52
61145 Friedberg
Allemagne
Geachte klant,
Dit apparaat voldoet aan de geldende Europese normen en
richtlijnen inzake elektromagnetische compatibiliteit en
elektrische veiligheid.
De Europese vertegenwoordiger van Victor Company of Japan,
Limited is:
JVC Technology Centre Europe GmbH
Bedrijfsnaam gewijzigd in:
JVC Technical Services Europe GmbH
Postfach 10 05 52
61145 Friedberg
Duitsland
Rear_KW-AVX710[E]f.indd 2Rear_KW-AVX710[E]f.indd 2 07.12.7 2:36:21 PM07.12.7 2:36:21 PM

1
KW-AVX710
Installation/Connection Manual
Einbau/Anschlußanleitung
Manuel d’installation/raccordement
Handleiding voor installatie/aansluiting
Crimp connector
Crimpanschlüsse
Raccord à sertir
Krimpaansluiting
Power cord
Stromkable
Cordon d’alimentation
Stroomkabel
Batteries
Batterien
Piles
Batterijen
Heat sink
Abstrahlblech
Dissipateur de
chaleur
Warmte-opnemer
1207MNMMDWJEIN
EN, GE, FR, NL
©2008 Victor Company of Japan, Limited
Remote controller
Fernbedienung
Télécommande
Afstandsbediening
LVT1779-006A
[E]
Teileliste für den Einbau und Anschluß
Die folgenden Teile werden zusammen mit diesem
Gerät geliefert. Falls etwas fehlt, wenden Sie sich
sofort an Ihren Fachhändler.
Liste des pièces pour l’installation et
raccordement
Les pièces suivantes sont fournies avec cet
appareil. Si quelque chose manquait, contactez
votre revendeur immédiatement.
Lijst van onderdelen die u bij installatie
en aansluiting nodig hebt
De volgende onderdelen worden bij het apparaat
geleverd. Raadpleeg direct de plaats van aankoop
indien er iets ontbreekt.
Parts list for installation and connection
The following parts are provided for this unit.
If anything is missing, contact your dealer
immediately.
Main unit
Hauptgerät
Appareil principal
Hoofdtoestel
Round head screws (M2.6 x 3 mm)*1
Rundkopfschrauben (M2,6 x 3 mm)*1
Vis à tête ronde (M2,6 x 3 mm)*1
Schroeven met ronde kop (M2,6 x 3 mm)*1
Sleeve*1
Halterung*1
Manchon*1
Huls*1
Trim plate
Frontrahmen
Plaque
d’assemblage
Sierplaat
Brackets*1
Konsolen*1
Supports*1
Beugels*1
Flat head screws (M5 x 8 mm)*1
Flachkopfschrauben (M5 x 8 mm)*1
Vis à tête plate (M5 x 8 mm)*1
Schroeven met platte kop (M5 x 8 mm)*1
ENGLISH
This unit is designed to operate on 12 V DC,
NEGATIVE ground electrical systems. If your
vehicle does not have this system, a voltage inverter
is required, which can be purchased at JVC IN-CAR
ENTERTAINMENT dealers.
FRANÇAIS
Cet appareil est conçu pour fonctionner sur des
sources de courant continu de 12 V à masse
NEGATIVE. Si votre véhicule n’offre pas ce type
d’alimentation, il vous faut un convertisseur
de tension, que vous pouvez acheter chez un
revendeur d’autoradios JVC.
DEUTSCH
Dieses Gerät ist für einen Betrieb in elektrischen
Anlagen mit 12 V Gleichstrom und (–) Erdung
ausgelegt. Verfügt Ihr Fahrzeug nicht über diese
Anlage, ist ein Spannungsinverter erforderlich, der
bei JVC Autoradiohändler erworben werden kann.
NEDERLANDS
Dit apparaat mag worden gebruikt bij elektrische
systemen die werken op 12 V gelijkstroom met
negatieve aarding. Als uw auto niet is uitgerust
met een dergelijk systeem, is een spanningsomzetter
vereist. Dit instrument kan worden aangeschaft bij
JVC car audio dealers.
WARNINGS
• DO NOT install any unit or wire any cable in a
location where;
– it may obstruct the steering wheel and gearshift
lever operations, as this may result in a traffic
accident.
– it may obstruct the operation of safety devices
such as air bags, as this may result in a fatal
accident.
– it may obstruct visibility.
• DO NOT operate any unit while manipulating
the steering wheel, as this may result in a traffic
accident.
• The driver must not watch the monitor while
driving. It may lead to carelessness and cause an
accident.
• If you need to operate the unit while driving,
be sure to look around carefully or you may be
involved in a traffic accident.
• If the parking brake is not engaged, “Parking
Brake” flashes on the monitor, and no playback
picture will be shown.
– This warning appears only when the parking
brake lead is connected to the parking brake
system built in the car.
Notes on electrical connections:
• Replace the fuse with one of the specified rating.
If the fuse blows frequently, consult your JVC
IN-CAR ENTERTAINMENT dealer.
• It is recommended to connect speakers with a
maximum power of more than 50 W (both at the
rear and at the front, with an impedance of 4 to
8 Ω).
If the maximum power is less than 50 W,
change “Amplifier Gain” setting to prevent the
speakers from being damaged (see page 56 of the
INSTRUCTIONS).
• To prevent short circuits, cover the terminals of
the UNUSED leads with insulating tape.
• The heat sink becomes very hot after use. Be
careful not to touch it when removing this unit.
WARNHINWEISE
• Installieren Sie keine Komponenten und
verdrahten Sie Kabel NICHT an den folgenden
Orten;
– an denen sie die Bewegungen des Lenkrads und
des Ganghebels behindern könnten. Anderenfalls
führt diese Behinderung möglicherweise zu
ernsten Verkehrsunfällen.
– an denen sie den Betrieb von Sicherheit
seinrichtungen, z.B. Airbags, behindern
könnten. Anderenfalls führt diese Behinderung
möglicherweise zu ernsten Verkehrsunfällen.
– an denen sie die Sicht behindern.
• Betätigen Sie beim Fahren KEINE Geräte.
Anderenfalls führt dies möglicherweise zu einem
ernste Verkehrsunfall.
• Der Fahrer darf während der Fahrt auf keinen Fall
auf den Monitor sehen. Dies könnte den Fahrer
ablenken und zu Unfällen führen.
• Wenn Sie das Gerät beim Fahren bedienen
müssen, dürfen Sie nicht den Blick von der Straße
nehmen, da sonst die Gefahr von Verkehrsunfällen
besteht.
• Ist die Feststellbremse nicht angezogen, erscheint
blinkend die Meldung “Parking Brake” auf dem
Monitor, und es erfolgt keine Bildwiedergabe.
– Diese Warnung wird nur angezeigt, wenn das
Feststellbremskabel an das in das Fahrzeug
eingebaute Feststellbremssystem angeschlossen
ist.
Hinweise zu elektrischen Anschlüssen:
• Die Sicherung mit einer der entsprechenden
Nennleistung ersetzen. Brennt die Sicherung
häufig durch, wenden Sie sich an ihren JVC
Autoradiohändler.
• Es wird empfohlen, Lautsprecher mit einer
Maximalleistung von mehr als 50 W anzuschließen
(sowohl hinten als auch vorne, mit einer Impedanz
von 4 Ω bis 8 Ω).
Wenn die Maximalleistung weniger als 50 W
beträgt, stellen Sie „Amplifier Gain“ anders ein,
um Schäden an den Lautsprechern zu vermeiden
(siehe Seite 56 der BEDIENUNGSANLEITUNG).
• Zur Vermeidung eines Kurzschlusses die
Anschlußklemmen der NICHT VERWENDETEN
Leitungen mit Isolierklebeband umwickeln.
• Das Abstrahlblech wird nach dem Gebrauch sehr
heiß. Beim Ausbau des Geräts darauf achten, das
Abstrahlblech nicht zu berühren.
AVERTISSEMENTS
• N’INSTALLEZ aucun appareil ni aucun câble
dans un endroit où:
– où il peut gêner l’accès au volant ou au levier
de vitesse car cela peut entraîner un accident
de la circulation.
– où il peut gêner la manipulation de dispositifs
de sécurité tels que les airbags car cela peut
entraîner un accident fatal.
– où il peut gêner la visibilité.
• NE COMMANDEZ pas l’appareil lors de la
manipulation du volant car cela peut entraîner
un accident de la circulation.
• Le conducteur ne doit pas regarder le moniteur
lorsqu’il conduit. Cela peut lui faire perdre sa
concentration et causer un accident.
• Si vous souhaitez opérer l’appareil pendant
que vous conduisez, assurez-vous de bien
regarder autour de vous afin de ne pas causer
un accident de la circulation.
• Si le frein de stationnement n’est pas engagé,
“Parking Brake” clignote sur le moniteur et
aucune image de lecture n’apparaît.
– Cet avertissement apparaît uniquement
quand le fil du frein de stationnement
est connecté au système de frein de
stationnement intégré à la voiture.
Remarques sur les connexions électriques:
• Remplacer le fusible par un de la valeur
précisée. Si le fusible saute souvent, consulter
votre revendeur d’autoradios JVC.
• Il est recommandé de connecter des enceintes
avec une puissance de plus de 50 W (les
enceintes arrière et les enceintes avant, avec
une impédance comprise entre 4 Ω et 8 Ω).
Si la puissance maximum est inférieure à
50 W, changez “Amplifier Gain” pour éviter
d’endommager vos enceintes (voir page 56 du
MANUEL D’INSTRUCTIONS).
• Pour éviter les court-circuits, couvrir les bornes
des fils qui ne sont PAS UTILISÉS avec de la
bande isolante.
• Le dissipateur de chaleur devient très chaud
après usage. Faire attention de ne pas le
toucher en retirant cet appareil.
WAARSCHUWING
• Installeer toestellen en aansluitkabels NIET op
plaatsen waar;
– dit een gevaar vormt voor het bedienen van
het stuur of de versnelling, aangezien elke
belemmering van de juiste werking van het
stuur en de versnelling tot een ongeluk kan
lijden.
– dit een gevaar vormt voor de airbag,
aangezien elke belemmering van de werking
van de airbag tot een dodelijk ongeluk kan
lijden.
– dit het uitzicht belemmert.
• Bedien GEEN enkele eenheid terwijl u uw handen
aan het stuur nodig hebt, aangezien dit anders
tot een ongeluk kan lijden.
• De bestuurder dient tijdens het rijden niet naar
de monitor te kijken. De aandacht wordt anders
afgeleid met mogelijk ongelukken als gevolg.
• Voorkom ongelukken en kijk derhalve uitermate
goed uit indien u het toestel tijdens het besturen
van de auto wilt bedienen.
• “Parking Brake” knippert op de monitor en er
wordt geen beeld getoond wanneer de handrem
niet is aangetrokken.
– Deze waarschuwing verschijnt uitsluitend
indien het handremdraad met het in de auto
ingebouwde handremsysteem is verbonden.
Opmerkingen voor de elektrische
verbindinge:
• Vervang de zekering door een exemplaar met
het aangegeven vermogen. Als de zekering
vaak doorslaat, moet u uw JVC car audio dealer
raadplegen.
• Sluit bij voorkeur luidsprekers met een hoger
maximaal vermogen dan 50 W (zowel achter als
voor, met een impedantie van 4 Ω t/m 8 Ω) aan.
Indien het maximale vermogen lager dan
50 W is, moet u “Amplifier Gain” in de andere
stand stellen zodat de luidsprekers niet kunnen
worden beschadigd (zie bladzijde 56 van de
GEBRUIKSAANWIJZING).
• Om kortsluiting te voorkomen, moet u de
aansluitklemmen van ONGEBRUIKTE gekleurde
draden met isolatieband bedekken.
• De warmte-opnemer kan na gebruik erg heet
worden. Raak de warmte-opnemer niet aan
wanneer u dit apparaat van zijn plaats haalt.
Round head screws (M5 x 8 mm)
Rundkopfschrauben (M5 x 8 mm)
Vis à tête ronde (M5 x 8 mm)
Schroeven met ronde kop (M5 x 8 mm)
Flat head screws (M5 x 8 mm)
Flachkopfschrauben (M5 x 8 mm)
Vis à tête plate (M5 x 8 mm)
Schroeven met platte kop (M5 x 8 mm)
Use these screws when installing the unit without the supplied sleeve.
Verwenden Sie diese Schrauben, wenn Sie das Gerät ohne die mitgelieferte Halterung einbauen.
Utilisez ces vis lors de l’installation de l’appareil sans le manchon fourni.
Gebruik deze schroeven wanneer u het toestel zonder de bijgeleverde huls installeert.
*1 Fitted to the main unit when shipped *1 Werkseitig am Hauptgerät angebracht *1 Fixé à l’appareil lors de l’expédition. *1 Bij het verlaten van de fabriek aan het
hoofdtoestel bevestigd.
KW-AVX710[E]instal_.indb 1KW-AVX710[E]instal_.indb 1 07.12.7 10:38:09 AM07.12.7 10:38:09 AM

2
3
INSTALLEREN (MONTEREN IN
DASHBOARD)
De volgende afbeelding toont een
standaardinstallatie. Afhankelijk van uw auto
moet het toestel mogelijk wat anders worden
geïnstalleerd. Raadpleeg uw JVC car audio dealer of
een leverancier van installatiekits indien u vragen
heeft of informatie over installatiekits wilt.
• Raadpleeg een erkend technicus indien u twijfels
heeft over het juist installeren van dit toestel.
Alvorens het toestel te installeren
• Gebruik beslist de bijgeleverde schroeven als
aangegeven voor het bevestigen van dit toestel.
Door het gebruik van andere schroeven, kunnen
onderdelen worden beschadigd of wordt het
toestel mogelijk niet correct bevestigd.
• Let bij het vastdraaien van schroeven en bouten
goed op zodat er geen snoeren, etc. worden
vastgekneld.
• Let goed op dat bij het installeren de ventilator op
het achterpaneel niet wordt gebokkeerd zodat het
toestel goed geventileerd kan worden.
1 Verwijder het oorspronkelijk geplaatste
audiosysteem, met de daarbij behorende
bevestigingsbeugels, uit de auto.
• Bewaar alle uit de auto verwijderde schroeven
en onderdelen voor later gebruik.
2 Plaats de huls in het dashboard van de auto.
3 Bevestig de beugels aan het hoofdtoestel.
• Gebruik beslist de bijgeleverde schroeven met
platte kop (M5 x 8 mm). Langere schroeven
kunnen het toestel namelijk beschadigen.
4 Maak de vereiste elektrische verbindingen.
• Zie bladzijden 3 en 4.
5 Installeer het hoofdtoestel in de huls.
6 Bevestig de sierplaat.
INSTALLATION (MONTAGE DANS LE
TABLEAU DE BORD)
L’illustration suivante est un exemple
d’installation typique. Cependant, vous devez
faire les ajustements correspondant à votre
voiture. Si vous avez des questions ou avez
besoin d’information sur des kits d’installation,
consulter votre revendeur d’autoradios JVC ou
une compagnie d’approvisionnement.
• Si vous n’êtes pas sûr de pouvoir installer
l’appareil correctement, faite-le installer par un
technicien qualifié.
Avant d’installer l’appareil
• Lors du montage de l’appareil, assurez-vous
d’utiliser les vis fournies, de la façon indiquée.
Si vous utilisez d’autres vis, certaines pièces
peuvent être perdues ou endommagées.
• Lorsque vous serrez des vis ou des boulons,
faites attention de ne pas pincer un cordon de
connexion.
• Assurez-vous de ne pas bloquer le ventilateur
sur le panneau arrière lors de l’installation afin
de permettre une ventilation correcte.
1 Retirez le système audio d’origine installé dans
la voiture en même temps que les supports de
montage.
• Assurez-vous de conserver toutes les vis et
pièces détachées de votre voiture pour une
utilisation dans le future.
2 Installez le manchon dans le tableau de bord
de la voiture.
3 Attachez les supports à l’appareil principal.
• Assurez-vous d’utiliser les vis à tête plate
fournis —(M5 × 8 mm). Vous risquez
d’endommager l’appareil si vous utilisez des
vis plus longues.
4 Réalisez les connexions électriques requises.
• Référez-vous aux pages 3 et 4.
5 Installez l’appareil principal dans le manchon.
6 Fixez la plaque d’assemblage
EINBAU
(IM ARMATURENBRETT)
Die folgende Abbildung zeigt die typische
Installation. Sie müssen aber Justierungen
entsprechend des vorliegenden Fahrzeugs
vornehmen. Wenn Sie Fragen haben oder weitere
Informationen zu Einbausätzen benötigen,
wenden Sie sich an Ihren Fachhändler für JVC
Autoradiohändler oder einen Fachhändler für die
Einbausätze.
• Wenn bezüglich des richtigen Einbaus
dieses Geräts Zweifel bestehen, immer einen
qualifizierten Techniker um Rat fragen.
Vor dem Einbau des Geräts
• Bei der Montage dieses Gerätssollen immer
die mitgelieferten Schrauben wie beschrieben
verwendet werden. Wenn andere Schrauben
verwendet werden, besteht die Gefahr, dass sich
Teile lockern oder beschädigt werden könnten.
• Beim Festziehen von Schrauben oder
Steckschrauben immer darauf achten, keine Kabel
einzuklemmen.
• Sicherstellen, dass nicht das Gebläse an der
Rückseite verdeckt wird, um richtige Ventilation
beim Einbau zu gewährleisten.
1 Bauen Sie die ursprünglich im Fahrzeug
vorhandene Audioanlage zusammen mit ihren
Befestigungsteilen aus.
• Alle aus dem Fahrzeug ausgebauten
Schrauben und anderen Teile müssen zur
Wiederverwendung aufbewahrt werden.
2 Die Halterung im Armaturenbrett des Fahrzeugs
einbauen.
3 Die Konsolen am Hauptgerät anbringen.
• Stellen Sie sicher, nur die mitgelieferten
Flachkopfschrauben zu verwenden (M5 x 8
mm). Wenn längere Schrauben verwendet
werden, kann dann das Gerät dadurch
beschädigt werden.
4 Erfordert keine elektrischen Verbindungen.
• Siehe Seite 3 und 4.
5 Das Hauptgerät in der Halterung einbauen.
6 Den Frontrahmen anbringen.
INSTALLATION (IN-DASH
MOUNTING)
The following illustration shows a typical
installation. However, you should make
adjustments corresponding to your specific car.
If you have any questions or require information
regarding installation kits, consult your
JVC IN-CAR ENTERTAINMENT dealer or a
company supplying kits.
• If you are not sure how to install this unit
correctly, have it installed by a qualified
technician.
Before installing the unit
• When mounting the unit, be sure to use the
screws provided, as instructed. If other screws are
used, parts could become loose or damaged.
• When tightening screws or bolts, be careful not to
pinch any connection cord.
• Make sure not to block the fan on the rear to
maintain proper ventilation when installing the
unit.
1 Remove the audio system originally installed in
the car, together with its mounting brackets.
• Be sure to keep all the screws and parts
removed from your car for future use.
2 Install the sleeve in the dashboard of the car.
3 Attach the brackets to the main unit.
• Make sure to use the supplied flat head screws
(M5 x 8 mm). If longer screws are used, they
could damage the unit.
4 Do the required electrical connections.
• See pages 3 and 4.
5 Install the main unit in the sleeve.
6 Attach the trim plate.
Install the unit at an angle of less than 30˚, taking it into account that the monitor would eject when in use.
Bauen Sie das Gerät ein einem Winkel von weniger als 30˚ ein, wobei Sie darauf achten, dass der Monitor bei Gebrauch ausfährt.
Installez l’appareil avec un angle de moins de 30°, en tenant compte du fait que le moniteur doit être déployé lors de son utilisation.
Installeer het toestel met een kleinere hoek dan 30˚, en controleer dat de monitor kan worden uitgeworpen voor gebruik.
30˚
2
4
5
6
1
Round head screws (M2.6 x 3 mm)
Rundkopfschrauben (M2,6 x 3 mm)
Vis à tête ronde (M2,6 x 3 mm)
Schroeven met ronde kop (M2,6 x 3 mm)
Trim plate
Frontrahmen
Plaque d’assemblage
Sierplaat
Brackets
Konsolen
Supports
Beugels
Flat head screws (M5 x 8 mm)
Flachkopfschrauben (M5 x 8 mm)
Vis à tête plate (M5 x 8 mm)
Schroeven met platte kop (M5 x 8 mm)
Sleeve
Halterung
Manchon
Huls
KW-AVX710[E]instal_.indb 2KW-AVX710[E]instal_.indb 2 07.12.7 10:38:19 AM07.12.7 10:38:19 AM

3
PRECAUTIONS on power supply and
speaker connections:
• DO NOT connect the speaker leads of the
power cord to the car battery; otherwise,
the unit will be seriously damaged.
• BEFORE connecting the speaker leads of the
power cord to the speakers, check the speaker
wiring in your car.
VORSICHTSMASSREGELN beim
Anschließen der Stromversorgung und
Lautsprecher:
• Die Lautsprecherleitungen des Netzkabels
NICHT an der Autobatterie anschließen, da
sonst das Gerät schwer beschädigt wird.
• VOR dem Anschließen der Lautsprecherleitungen
des Spannunsgversorgungskabels an die
Lautsprecher, die Lautsprecherverdrahtung in
Ihrem Auto überprüfen.
PRECAUTIONS sur l’alimentation et la
connexion des enceintes:
• NE CONNECTEZ PAS les fils d’enceintes du
cordon d’alimentation à la batterie; sinon,
l’appareil serait sérieusement endommagé.
• AVANT de connecter les fils d’enceintes du
cordon d’alimentation aux enceintes, vérifiez le
câblage des enceintes de votre voiture.
VOORZORGSMAATREGELEN bij
hetverbinden van de stroomkabeldraad
met de speakers:
• Verbind de speakerdraden van de
stroomkabel NIET met de accu van de auto;
als u dit wel doet, zal het apparaat ernstige
schade oplopen.
• VOORDAT u de speakerdraden van de stroomkabel
met de speakers verbindt, moet u de bedrading
van de speakers in uw auto controleren.
Y: Yellow
Gelb
Jaune
Geel
R: Red
Rot
Rouge
Rood
If your car is equipped with the ISO connector
Wenn Ihr Fahrzeug mit dem ISO-Steckverbinder ausgestattet ist
Si votre voiture est équippée d’un connecteur ISO
Indien uw auto een ISO-aansluiting heeft
• Connect the ISO connectors as illustrated.
• Schließen Sie die ISO-Steckverbinder an, wie in der Abbildung gezeigt.
• Connectez les connecteurs ISO comme montré sur l’illustration.
• Verbind de ISO-stekkers zoals afgebeeld.
From the car body
Von der Fahrzeugkarosserie
De la carrosserie de la voiture
Van het chassis van de auto
ISO connector of the supplied power cord
ISO-Stecker des mitgelieferten Stromkabels
Connecteur ISO pour le cordon d’alimentation fourni
ISO-stekker van het bijgeleverde spanningssnoer
View from the lead side
Von der Kabelseite aus gesehen
Vue à partir du côté des fils
Gezien vanaf de spanningstoevoerkant
For some VW/Audi or Opel (Vauxhall) automobiles
Bei bestimmten VW-/Audi- order Opel- (Vauxhall-) Fahrzeugen
Pour certaine voiture VW/Audi ou Opel (Vauxhall)
Voor bepaalde VW/Audi en Opel (Vauxhall) auto’s
Original wiring
Originalverdrahtung
Câblage original
Oorspronkelijke bedrading
Modified wiring 1
Modifizierte Verdrahtung 1
Câblage modifié 1
Veranderde bedrading 1
Use modified wiring 2 if the unit does not turn on.
Verwenden Sie die modifizierte Verdrahtung 2 wenn der Receiver nicht einschaltet.
Utilisez le câblage modifié 2 si l’appareil ne se met pas sous tension.
Gebruik methode 2 voor het veranderen van de bedrading indien de receiver niet wordt ingeschakeld.
Modified wiring 2
Modifizierte Verdrahtung 2
Câblage modifié 2
Veranderde bedrading 2
ISO connector
ISO-Steckverbinder
Connecteur ISO
ISO-aansluiting
ELECTRICAL CONNECTIONS
To prevent short circuits, we recommend that you
disconnect the battery’s negative terminal and make
all electrical connections before installing the unit.
• Be sure to ground this unit to the car’s
chassis again after installation.
ELEKTRISCHE ANSCHLÜSSE
Zur Vermeidung von Kurzschlüssen empfehlen wir,
daß Sie den negativen Batterieanschluß abtrennen
und alle elektrischen Anschlüsse herstellen, bevor
das Gerät eingebaut wird.
• Sicherstellen erneut, daß das Gerät nach
dem Einbau Chassis des Fahrzeugs geerdet
wird.
RACCORDEMENTS ELECTRIQUES
Pour éviter tout court-circuit, nous vous
recommandons de débrancher la borne
négative de la batterie et d’effectuer tous les
raccordements électriques avant d’installer
l’appareil.
• Assurez-vous de raccorder de nouveau la
mise à la masse de cet appareil au châssis de
la voiture après l’installation.
ELEKTRISCHE VERBINDINGEN
Om kortsluiting te voorkomen adviseren wij u om de
minpool van de accu los te maken en alle elektrische
verbindingen tot stand te brengen voordat u het
apparaat in de auto installeert.
• Aard dit toestel beslist weer op het chassis
van de auto na het installeren.
Connect the parking brake lead to the parking brake system built in the car.
Das Feststellbremsenkabel mit dem Feststellbremssystem des Fahrzeugs verbinden.
Connectez le fil de frein de stationnement au système de frein de
stationnement intégré à la voiture.
Verbind het handremdraad met het in de auto ingebouwde handremsysteem.
Unit: mm
Einheit: mm
Unité: mm
Eenheid: mm
Required space for the monitor ejection
Erforderlicher Platz für Monitorausschub
Espace requis pour le déploiement du moniteur
Vereiste vrije ruimte voor het uitwerpen van de monitor
160 90.5
100
Parking brake lead (light green)
Feststellbremsenkabel (hellgrün)
Fil du frein de stationnement (vert clair)
Handremdraad (lichtgroen)
To metallic body or chassis of the car
Zur metallenen Karosserie oder zum
Fahrwerk des Autos
Vers corps métallique ou châssis de
la voiture
Naar metalen ondergrond of chassis
van de auto
Crimp connector
Crimpanschlüsse
Raccord à sertir
Krimpaansluiting
Parking brake
Feststellbremse
Frein de stationnement
Handremsysteem
Parking brake switch (inside the car)
Feststellbremsenschalter (Fahrzeuginneres)
Commutateur de frein de stationnement (intérieur de la voiture)
Handremsysteemschakelaar (in de auto)
AConnecting the parking brake lead / Anschließen des Feststellbremsenkabels /
Connexion du fil de frein de stationnement
/ Verbinden van het handremdraad
You may need to modify the wiring of the supplied power cord as illustrated.
• Contact your authorized car dealer before installing this unit.
Es kann erforderlich sein, die Verdrahtung des mitgelieferten Stromkabels zu modifizieren, wie in der Abbildung gezeigt.
• Wenden Sie sich vor dem Einbau dieses Receivers an Ihre Auto-Fachwerkstatt.
Vous aurrez peut-être besoin de modifier le câblage du cordon d’alimentation fourni comme montré sur l’illustration.
• Contactez votre revendeur automobile autorisé avant d’installer l’appareil.
U moet mogelijk de bedrading van het bijgeleverde spanningssnoer als afgebeeld veranderen.
• Raadpleeg een erkend autogarage alvorens deze receiver te installeren.
a
KW-AVX710[E]instal_.indb 3KW-AVX710[E]instal_.indb 3 07.12.7 10:38:23 AM07.12.7 10:38:23 AM

4
ENGLISH FRANÇAIS DEUTSCH NEDERLANDS
Connections without using the ISO connector / Anschlüsse ohne Verwendung des ISO-Steckverbinders / Connexions sans utiliser le connecteur ISO / Verbinden zonder
gebruik van de ISO-aansluiting
Before connecting: Check the wiring in the
vehicle carefully. Incorrect connection may cause
serious damage to this unit. The leads of the
power cord and those of the connector from the
car body may be different in color.
1 Cut the ISO connector.
2 Connect the colored leads of the power cord in
the order specified in the illustration below.
3 Connect the aerial cord.
4 Finally connect the wiring harness to the unit.
Vor dem Anschließen: Die Verdrahtung im
Fahrzeug sorgfältig überprüfen. Falsche Anschlüsse
können ernsthafte Schäden am Gerät hervorrufen.
Die Leiter des Stromkabels und die Leiter des
Anschlusses im Fahrzeug können sich farblich
unterscheiden.
1 Schneiden Sie den ISO-Steckverbinder auf.
2 Die farbigen Adern des Stromkabels in der
Reihenfolge anschließen, wie in der Abbildung
unten gezeigt.
3 Das Antennenkabel anschließen.
4 Die Kabelbäume am Gerät anschließen.
Avant de commencer la connexion: Vérifiez
attentivement le câblage du véhicule. Une
connexion incorrecte peut endommager
sérieusement l’appareil. Le fil du cordon
d’alimentation et ceux des connecteurs du châssis
de la voiture peuvent être différents en couleur.
1 Coupez le connecteur ISO.
2 Connectez les fils colorés du cordon
d’alimentation dans l’ordre spécifié sur
l’illustration ci-dessous.
3 Connectez le cordon d’antenne.
4 Finalement, connectez le faisceau de fils à
l’appareil.
15 A fuse
15 A Sicherung
Fusible 15 A
Zekering 15 A
Rear ground terminal
Hintere Erdungscan-schlußklemme
Borne arrière de masse
Massaklem aan de achterkant
*2 Not supplied
*2 Nicht mitgeliefert
*2 Non fourni
*2 Niet bijgeleverd
Ignition switch
Zündschalter
Interrupteur d’allumage
Ontstekingsschakelaar
Fuse block
Sicherungsblock
Porte-fusible
Zekeringblok
White with black stripe
Weiß mit schwarzem
Streifen
Blanc avec bande noire
Wit met zwarte streep
White
Weiß
Blanc
Wit
Gray with black stripe
Grau mit schwarzem
Streifen
Gris avec bande noire
Grijs met zwarte streep
Gray
Grau
Gris
Grijs
Green with black stripe
Grün mit schwarzem
Streifen
Vert avec bande noire
Groen met zwarte streep
Green
Grün
Vert
Groen
Purple with black stripe
Lila mit schwarzem
Streifen
Violet avec bande noire
Paars met zwarte streep
Purple
Lila
Violet
Paars
Left speaker (front)
Linker Lautsprecher (vorne)
Enceinte gauche (avant)
Linkerspeaker (voorin)
Right speaker (front)
Rechter Lautsprecher (vorne)
Enceinte droit (avant)
Rechterspeaker (voorin)
Left speaker (rear)
Linker Lautsprecher (hinten)
Enceinte gauche (arrière)
Linkerspeaker (achterin)
Right speaker (rear)
Rechter Lautsprecher (hinten)
Enceinte droit (arrière)
Rechterspeaker (achterin)
To metallic body or chassis of the car
Zur metallenen Karosserie oder zum Fahrwerk des Autos
Vers corps métallique ou châssis de la voiture
Naar metalen ondergrond of chassis van de auto
To a live terminal in the fuse block connecting to the car battery (bypassing the
ignition switch) (constant 12 V)
Zur einer stromführenden Anschlußklemme im Sicherungsblock zum Anschließen
an die Autobatterie (Umgehen des Zündschalters) (konstant 12 V)
A une borne sous tension du porte-fusible connectée à la batterie de la
voiture (en dérivant l’interrupteur d’allumage) (12 V constant)
Naar een onder spanning staande aansluitklem in het zekeringblok die is
aangesloten op de accu van de auto (u passeert de ontstekingsschakelaar)
(constant 12 V)
To an accessory terminal in the fuse block
Zur einer Zubehöranschlußklemme im Sicherungsblock
Vers borne accessoire du porte-fusible
Naar een aansluitklem in het zekeringblok
To car light control switch
Zum Autobeleuchtungssteuerung-Schalter
À l’interrupteur d’éclairage de la voiture
Naar schakelaar van autoverlichting
To cellular phone system
Zur Mobiltelefon
À un système de téléphone cellulaire
Naar het mobiele-telefoonsysteem
Black
Schwarz
Noir
Zwart
Yellow*3
Gelb*3
Jaune*3
Geel*3
Red
Rot
Rouge
Rood
Blue with white stripe
Blau mit weißem Streifen
Bleu avec bande blanche
Blauw met witte streep
Orange with white stripe
Orange mit weißem Streifen
Orange avec bande blanche
Oranje met witte streep
Brown
Braun
Marron
Bruin
Light green
Hellgrün
Vert clair
Lichtgroen
To the remote lead of other equipment or power aerial if any (200 mA max.)
Zum Zusatzkabel des anderen Geräts oder der Motorantenne, sofern vorhanden (max.
200 mA)
Au fil de télécommande de l’autre appareil ou à l’antenne automatique s’il y en a une
(200 mA max.)
Naar afstandsdraad van andere apparatuur of antenne met circuit indien aanwezig
(200 mA max.)
Alvorens de verbindingen tot stand te
brengen: Moet u de bedrading in de auto
zorgvuldig. Het apparaat kan door verkeerde
verbindingen ernstige schade oplopen. De draden
van het stroomsnoer verschillen mogelijk van kleur
metde aansluitingen op het chassis van de auto.
1 Knip de ISO-stekker af.
2 Verbind de gekleurde draden van het
stroomsnoer in de afbeelding hieronder
aangegeven volgorde.
3 Sluit de antenne aan.
4 Verbind de draadbundel daarna met het
apparaat.
See each diagram on pages 5 and 6.
Sie jede Schemazeichnung auf Seite 5 und 6.
Référez-vous à chaque diagramme des pages 5 et 6.
Zie de afbeeldingen op bladzijden 5 en 6.
Fan
Teil
Ventilateur
Ventilator
ISO connector
ISO-Steckverbinder
Connecteur ISO
ISO-aansluiting
To parking brake (see diagram Å on page 3.)
An Feststellbremse (siehe Schaltplan Å auf Seite 3.)
Au frein de stationnement (voir le diagramme Å de
la page 3.)
Naar handremsysteem (zie schema Å op bladzijde 3.)
Crimp connector
Crimpanschlüsse
Raccord à sertir
Krimpaansluiting
*2
*2
*3 Before checking the operation of this unit
prior to installation, this lead must be
connected, otherwise power cannot be
turned on.
*3 Vor der Überprüfung der Funktionsfähigkeit
des Geräts vor dem Einbau, muß diese
Leitung angeschlossen werden, da sonst die
Stromversorgung nicht eingeschaltet werden
kann.
*3 Pour vérifier le fonctionnement de cet
appareil avant installation, ce fil doit être
raccordé, sinon l’appareil ne peut pas être
mis sous tension.
*3 Voordat u controleert of het apparaat werkt
(alvorens het te installeren), moet deze draad
aangesloten zijn. Als dit niet het geval is, kan
de stroom niet worden ingeschakeld.
Power cord
Stromkable
Cordon d’alimentation
Stroomkabel
OE REMOTE Steering wheel remote
OE REMOTE Lenkrad-Fernbedienung
OE REMOTE Télécommande de volant
OE REMOTE stuur-afstandsbediening
KW-AVX710[E]instal_.indb 4KW-AVX710[E]instal_.indb 4 07.12.7 10:38:27 AM07.12.7 10:38:27 AM

5
You can connect an amplifier to upgrade your car
stereo system.
• You can supply the power to the amplifier by
connecting the remote leads (blue with white
stripe) of this unit to the amplifier. (To connect
other equipment using the remote leads, Y-
connectors need to be separately purchased.)
• Disconnect the speakers from the unit, and
connect them to the amplifier. Leave the speaker
leads of the unit unused.
• You can switch off the built-in amplifier and
send the audio signals only to the external
amplifier to get clear sound and to prevent
internal heat built-up inside the unit. See page
56 of the INSTRUCTIONS.
*7 Firmly attach the ground lead to the metallic
body or to the chassis of the car—to the place
uncoated with paint (if coated with paint,
remove the paint before attaching the lead).
Failure to do so may cause damage to the unit.
*7 Attachez solidement le fil de mise à la masse
au châssis métallique de la voiture—à un
endroit qui n’est pas recouvert de peinture
(s’il est recouvert de peinture, enlevez d’abord
la peinture avant d’attacher le fil). L’appareil
peut être endommagé si cela n’est pas fait
correctement.
*7 Bevestig de aardedraad goed met een metalen
onderdeel of het chassis van de auto—bevestig
op een niet-gelakt gedeelte (indien gelakt,
schuur dan af alvorens de draad te bevestigen).
Het toestel kan worden beschadigd indien de
aardedraad niet goed is aangesloten.
*7 Verbinden Sie den Erdungsleiter mit der
Karosserie oder dem Rahmen des Fahrzeugs. Die
Kontaktstelle darf nicht lackiert sein (sollte die
Kontaktstelle lackiert sein, entfernen Sie den Lack
der Kontaktstelle, bevor Sie den Leiter befestigen).
Wenn der Erdungsleiter nicht ordnungsgemäß
angeschlossen wird, kann dieses Gerät beschädigt
werden.
Sie können einen Verstärker anschließen, um Ihre
Autostereoanlage zu erweitern.
• Sie können den Verstärker mit Strom versorgen,
indem Sie die Fernsteuerleitungen (blau mit
weißem Streifen) dieses Geräts an den Verstärker
anschließen. (Zum Anschluss anderer Geräte
mittels der Fernsteuerleitungen müssen Y-Stecker
getrennt beschafft werden.)
• Trennen Sie die Lautsprecher vom Hauptgerät ab
und schließen sie am Verstärker an. Lassen Sie die
Lautsprecherkabel des Geräts unbenutzt.
• Sie können den eingebauten Verstärker abschalten
und die Audiosignale ausschließlich zum externen
Verstärker ausgeben, um einen klaren Klang zu
erhalten und Hitzestau im Gerät zu vermeiden.
Siehe Seite 56 der BEDIENUNGSANLEITUNG.
Connecting an external amplifier / Anschließen eines externen Verstärkers / Connexion d’un amplificateur extérieur / Verbinden van een
externe versterker
Vous pouvez connecter un amplificateur pour
améliorer votre système stéréo.
• Vous pouvez alimenter l’amplificateur en
connectant les fils de télécommande (bleu à
bande blanche( de cet appareil à l’amplificateur.
(Pour connecter un autre appareil en utilisant
les fils de télécommande, vous devez acheter
des connecteurs Y séparément.)
• Déconnectez les enceintes de l’appareil
principal et connectez-les aux amplificateurs.
Laissez les fils d’enceintes de l’appareil inutilisés.
• Vous pouvez mettre hors service l’amplificateur
intégré et envoyer les signaux audio
uniquement vers un ou plusieurs amplificateurs
extérieurs pour obtenir des sons plus clairs et
éviter un échauffement interne de l’appareil.
Référez-vous à la page 56 du MANUEL
D’INSTRUCTIONS..
U kunt uw auto-stereosysteem met een versterker
uitbreiden.
• Voor stroomtoevoer naar de versterker moet
u de afstandsbedieningsdraden (blauw met
witte streep) van dit toestel met de versterker
verbinden. (Voor het verbinden van andere
apparatuur met gebruik van de afstandsbedie
ningsdraden, moet u los verkrijgbare Y-stekkers
gebruiken.)
• Ontkoppel de luidsprekers van het hoofdtoestel
en verbind de luidsprekers vervolgens
met de versterkers. Gebruik in dit geval de
luidsprekeraansluitingen van het toestel dus niet.
• U kunt de ingebouwde versterker uitschakelen
en uitsluitend de audiosignalen naar de externe
versterker sturen voor een helderder geluid en te
voorkomen dat dit toestel oververhit raakt. Zie
bladzijde 56 van de GEBRUIKSAANWIJZING.
*4 Required only when connecting a rear view
camera to VIDEO IN terminal.
*5 Refer to å in diagram Å on page 3.
*6 Set “AV Input” setting to “Camera” when
using (see page 55 of the INSTRUCTIONS).
*4 Nur erforderlich, wenn eine Rückfahrkamera am
Anschluss VIDEO IN angeschlossen wird.
*5 Siehe å in Schaltplan Å auf Seite 3.
*6 Stellen Sie die Einstellung “AV Input” auf
“Camera” bei der Verwendung (siehe Seite 55 in
der BEDIENUNGSANLEITUNG).
*4 Requis uniquement lors de la connexion d’une
caméra de recul à la prise VIDEO IN.
*5 Reportez vous à å du diagramme Å de la
page 3.
*
6
Réglez “AV Input” sur “Camera” lors de l’utilisation
(voir page 55 du MANUEL D’INSTRUCTIONS).
*4 Alleen vereist wanneer een achteruitkijkcamera
met de VIDEO IN aansluiting wordt verbonden.
*5 Zie å in afbeelding Å op bladzijde 3.
*6 Stel voor gebruik “AV Input” op “Camera” (zie
bladzijde 55 van de GEBRUIKSAANWIJZING).
Rear speakers
Hintere
Lautsprecher
Enceintes arrière
Achterspeakers
JVC Amplifier
JVC Verstärker
JVC Amplificateur
JVC Versterker
A
B
Audio/video cord (not supplied)
Audio-/Videokabel (nicht mitgeliefert)
Cordon audio/vidéo (non fourni)
Audio- en videosnoeren (niet bijgeleverd)
Video cord (not supplied)
Videokabel (nicht mitgeliefert)
Cordon vidéo (non fourni)
Videosnoer (niet meegeleverd)
Reverse lamp
Rückfahrleuchte
Feux de recul
Achteruitrijlamp
To reverse lamp
An Rückfahrleuchte
Aux feux de recul
Naar achteruitrijlamp
Crimp connector (not supplied)*5
Crimpanschlüsse (nicht mitgeliefert) *5
Raccord à sertir (non fourni)*5
Krimpaansluiting (niet bijgeleverd)*5
Rear view camera KV-CM1*6
Rückfahrkamera KV-CM1*6
Caméra de recul KV-CM1*6
Achteruitkijkcamera KV-CM1*6
C
Connections for external component playback / Anschlüsse für externe Komponente / Connexions pour un appareil de lecture extérieur /
Verbinden voor weergave van een extern component
If your car is equipped with the steering wheel
remote controller, you can operate this unit
using the controller. To do it, a JVC’s OE remote
adapter (not supplied) which matches with
your car is required. Consult your JVC IN-CAR
ENTERTAINMENT dealer for details.
Wenn Ihr Fahrzeug mit einer Lenkradferndienung
ausgestattet ist, können Sie damit diesen Receiver
steuern. Hierfür ist ein für Ihr Fahrzeug passender
Radio-Lenkrad-Fernbedienungsadaption von
JVC (nicht mitgeliefert) erforderlich. Für weitere
Einzelheiten wenden Sie sich an Ihren JVC
Autoradiohändler.
Si votre voiture est munie d’une télécommande
de volant, vous pouvez commander cet autoradio
en utilisant la télécommande. Pour le faire, un
adaptateur pour télécommande au volant JVC
(non fourni) correspondant à votre voiture est
nécessaire. Consultez votre revendeur d’autoradio
JVC pour les détails.
Indien uw auto een stuurwiel-afstandsbediening
heeft, kunt u deze receiver met die
afstandsbediening bedienen. Hiervoor heeft u
echter een JVC adapter (niet bijgeleverd) nodig die
geschikt is voor de stuurwiel-afstandsbediening
van uw auto. Raadpleeg uw JVC car audio dealer
voor details.
Connecting to the steering wheel remote controller / Anschluß an die Lenkradfernbedienung / Connexion de la télécommande de volant /
Verbinden met de stuurwiel-afstandsbediening
OE remote adapter (not supplied)
Radio-Lenkrad-Fernbedienungsadaption (nicht mitgeliefert)
Adaptateur pour télécommande au volant (non fourni)
Adapter voor stuurwiel-afstandsbediening (niet bijgeleverd)
Steering wheel remote controller (equipped in the car)
Lenkradfernbedienung (im Fahrzeug installiert)
Télécommande de volant (installée dans la voiture)
Stuurwiel-afstandsbediening (in de auto)
Reverse lamp lead*4
Rückfahrleuchtenleitung*4
Fil des feux de recul*4
Draad van achteruitrijlamp*4
To car battery
Zur Autobatterie
À la batterie de la voiture
Naar auto-accu
AV amplifier or decoder
AV-Verstärker oder -Decoder
Amplificateur AV ou décodeur
AV-versterker of decoder
External monitor
Externer Monitor
Moniteur extérieur
Externe monitor
To the remote lead of other equipment or power
aerial if any
Zum Zusatzkabel des anderen Geräts oder der
Motorantenne, sofern vorhanden
Au fil de télécommande de l’autre appareil ou à
l’antenne automatique s’il y en a une
Naar afstandsdraad van andere apparatuur of
antenne met circuit indien aanwezig
Y-connector (not supplied for this unit)
Y-Anschluß (für diesen Receiver nicht mitgeliefert)
Connecteur Y (non fourni avec cet appareil)
Y-connector (niet bij deze receiver bijgeleverd)
Remote lead
Fernbedienungsleitung
Fil d’alimentation à distance
Afstandbedieningsdraad
Remote lead (Blue with white stripe)
Fernbedienungsleitung (Blau mit weißem Streifen)
Fil d’alimentation à distance (Bleu avec bande blanche)
Afstandbedieningsdraad (Blauw met witte streep)
Front speakers
Vordere Lautsprecher
Enceintes avant
Voorspeakers
Digital optical cable (not supplied)
Digitales Optokabel (nicht mitgeliefert)
Câble optique numérique (non fourni)
Digitale optische kabel (niet bijgeleverd)
Extension lead (not supplied)
Rückwärtsgangsignal-skabel (nicht mitgeliefert)
Cordon prolongateur (non fourni)
Verlengsnoer (niet bijgeleverd)
Camcorder, Navigation System, etc.
Camcorder, Navigationssystem usw.
Caméscope, système de navigation, etc.
Camcorder, navigatiesysteem, etc.
OE REMOTE Steering wheel remote
OE REMOTE Lenkrad-Fernbedienung
OE REMOTE Télécommande de volant
OE REMOTE stuur-afstandsbediening
*7
KW-AVX710[E]instal_.indb 5KW-AVX710[E]instal_.indb 5 07.12.7 10:38:31 AM07.12.7 10:38:31 AM
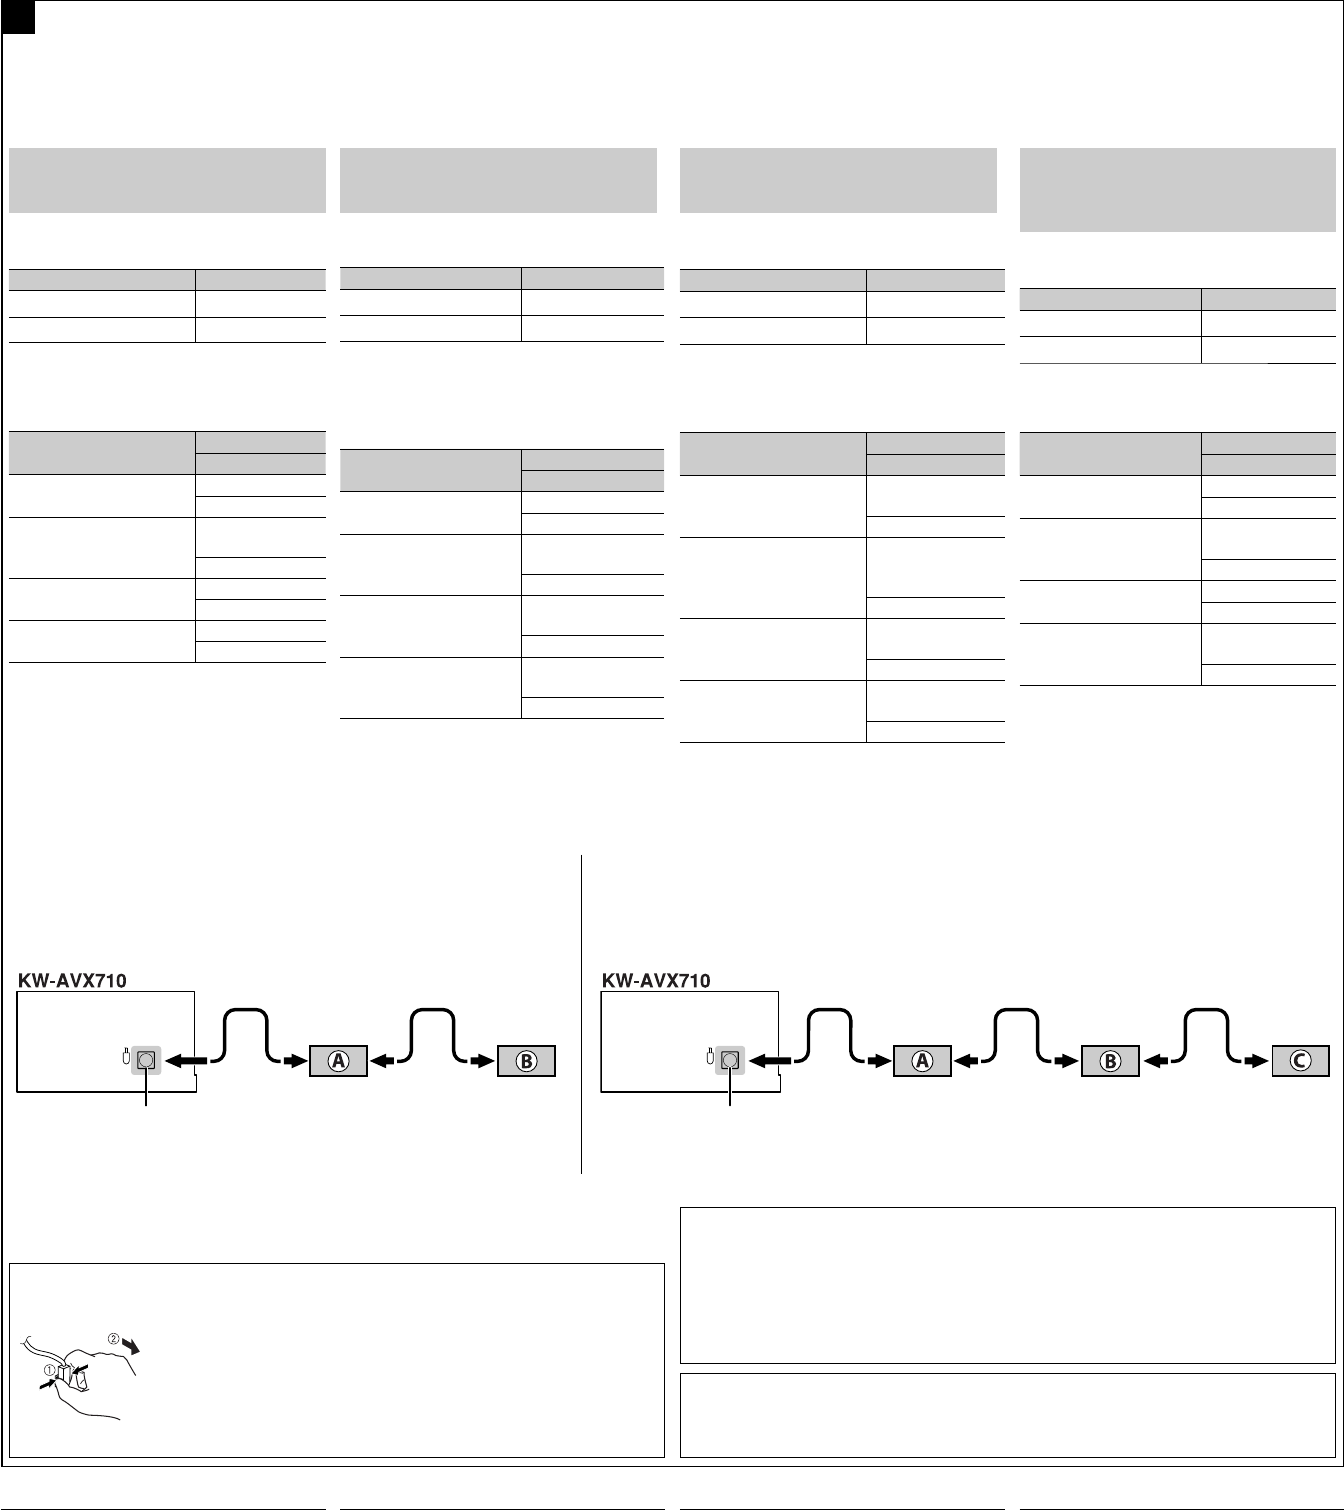
6
Zie tevens de gebruiksaanwijzingen van de andere
componenten en adapter voor het verbinden van
externe componenten.
WAARSCHUWING:
Controleer alvorens de externe componenten
aan te sluiten dat dit toestel beslist is
uitgeschakeld.
U kunt de volgende JVC componenten met de CD-
wisselaaraansluiting verbinden.
JVC component Modelnaam
CD-wisselaar (CD-CH) CH-X1500, etc
JVC DAB tuner KT-DB1000
U kunt tevens de volgende componenten via
diverse JVC adapter verbinden.
• U moet mogelijk aansluitsnoeren aanschaffen.
Component Adapter
Modelnaam
Bluetooth apparatuur Bluetooth adapter
KS-BTA200
iPod Interface-adapter
voor iPod
KS-PD100
Draagbare audiospeler met
lijnuitgangsaansluitingen
Lijningangsadapter
KS-U57
Draagbare audiospeler
met 3,5 mm stereo mini-
aansluiting
AUX-
ingangsadapter
KS-U58
Indien u meer dan een component aansluit
(maximaal: drie), dient u bij voorkeur de
componenten in-serie te verbinden zoals hieronder
wordt uitgelegd.
Lors de la connexion des appareils extérieurs,
référez-vous aussi aux manuels fournis avec les
appareils et les adaptateurs.
PRECAUTION:
Avant de connecter les appareils extérieurs,
assurez-vous que l’appareil est hors tension.
Vous pouvez connecter les appareils JVC suivants
à la prise de changeur de CD.
Appareil JVC Nom du modèle
Changeur de CD (CD-CH) CH-X1500, etc.
Tuner DAB JVC KT-DB1000
Vous pouvez aussi connecter les appareils
suivants en utilisant divers adaptateurs JVC.
• Vous pouvez avoir besoin d’acheter certains
cordons de connexion séparément.
Appareil Adaptateur
Nom du modèle
Périphérique Bluetooth Adaptateur
Bluetooth
KS-BTA200
iPod Adaptateur
d’interface pour
iPod
KS-PD100
Lecteur audio portable
avec prises de sortie de
ligne
Adaptateur
d’entrée de ligne
KS-U57
Lecteur audio portable
avec mini fiche stéréo de
3,5 mm
Adaptateur
d’entrée auxiliaire
KS-U58
Lors de la connexion de plus d’un appareil
(maximum: trois), il est recommandé que vous
connectiez les appareils en série comme nous
l’expliquons ci-dessous.
Beim Anschließen der externen Komponenten
siehe auch für die Komponenten und den Adapter
mitgelieferte Anleitungen.
ACHTUNG:
Vor dem Anschließen der externen Komponenten
sicherstellen, dass das Gerät ausgeschaltet ist.
Sie können die folgenden JVC-Komponenten an die
CD-Wechslerbuchse anschließen.
JVC-Komponente Model name
CD-Wechsler
(CD-CH)
CH-X1500, usw.
DAB-Tuner von JVC
KT-DB1000
Sie können auch die folgenden externen
Komponenten über die verschiedenen JVC-Adapter
anschließen.
• Es kann erforderlich sein, Verbindungskabel
getrennt zu kaufen.
Komponente Adapter
Modellname
Bluetooth-Gerät Bluetooth-Adapter
KS-BTA200
iPod Schnittstellenadapter
für iPodz
KS-PD100
Tragbarer Audio-Player
mit Line-Ausgangsbuchsen
Line-
Eingangsadapter
KS-U57
Tragbarer Audio-Player
mit 3,5-mm-Stereo-
Minibuchse
AUX-
Eingangsadapter
KS-U58
Beim Anschließen von mehr als einer Komponente
(Maximum: drei) wird empfohlen, dass Sie die
Komponenten in Serie anschließen, wie unten
beschrieben.
Connections to the CD changer jack / Anschlüsse an der CD-Wechsler-Buchse / Connexions à la prise du changeur de CD / Verbinden met de
CD-wisselaaraansluiting
D
TROUBLESHOOTING
• The fuse blows.
* Are the red and black leads connected correctly?
• Power cannot be turned on.
* Is the yellow lead connected?
• No sound from the speakers.
* Is the speaker output lead short-circuited?
• Sound is distorted.
* Is the speaker output lead grounded?
* Are the “–” terminals of L and R speakers
grounded in common?
• Noise interfere with sounds.
* Is the rear ground terminal connected to the car’s
chassis using shorter and thicker cords?
• Unit becomes hot.
* Is the speaker output lead grounded?
* Are the “–” terminals of L and R speakers
grounded in common?
• This unit does not work at all.
* Have you reset your unit?
FEHLERSUCHE
• Die Sicherung brennt durch.
* Sind die roten und schwarzen Leitungen richtig
angeschlossen?
• Stromversorgung kann nicht eingeschaltet
werden.
* Ist die gelbe Leitung angeschlossen?
• Kein Ton aus den Lautsprechern.
* Ist die Lautsprecherausgangsleitung kurzgeschlossen?
• Ton verzerrt.
* Ist die Lautsprecherausgangsleitung geerdet?
* Sind die (–) Anschlußklemmen der linken und
rechten Lautsprecher zusammen geerdet?
• Störgeräusche im Klang.
* Ist die hintere Erdungsklemme mit kürzeren
und dickeren Kabeln an das Fahrzeugchassis
angeschlossen?
• Gerät wird heiß.
* Ist die Lautsprecherausgangsleitung geerdet?
* Sind die (–) Anschlußklemmen der linken und
rechten Lautsprecher zusammen geerdet?
• Dieser Receiver funktioniert überhaupt
nicht.
* Haben Sie einen Reset am Receiver vorgenommen?
EN CAS DE DIFFICULTES
• Le fusible saute.
* Les fils rouge et noir sont-ils racordés
correctement?
• L’appareil ne peut pas être mise sous
tension.
* Le fil jaune est-elle raccordée?
• Pas de son des enceintes.
* Le fil de sortie d’enceinte est-il court-circuité?
• Le son est déformé.
* Le fil de sortie d’enceinte est-il à la masse?
* Les bornes “–” des enceintes gauche et droit
sont-elles mises ensemble à la masse?
• Interférence avec les sons.
* La prise arrière de mise à la terre est-elle
connectée au châssis de la voiture avec un
cordon court et épais?
• L’appareil devient chaud.
* Le fil de sortie d’enceinte est-il à la masse?
* Les bornes “–” des enceintes gauche et droit
sont-elles mises ensemble à la masse?
• Cet appareil ne fonctionne pas du tout.
* Avez-vous réinitialisé votre appareil?
PROBLEMEN OPLOSSEN
• De zekering slaat door.
* Zijn de rode en de zwarte draden op de juiste
manier aangesloten?
• De stroom kan niet worden ingeschakeld.
* Is de gele draad aangesloten?
• Er komt geen geluid uit de speakers.
* Is de uitgaande speakerdraad kortgesloten?
• Het geluid wordt vervormd.
* Is de uitgaande speakerdraad geaard?
* Zijn de “–” polen van de linker- en de
rechterspeakers gemeenschappelijk geaard?
• Geluid wordt door ruis gestoord.
* Is de aarde-aansluiting achter met gebruik van
kortere en dikkere snoeren met het chassis van de
auto verbonden?
• Het apparaat raakt verhit.
* Is de uitgaande speakerdraad geaard?
* Zijn de “–” polen van de linker- en de
rechterspeakers gemeenschappelijk geaard?
• Receiver werkt helemaal niet.
* Heeft u de receiver teruggesteld?
iPod is a trademark of Apple Inc., registered in the U.S. and other countries.
iPod ist ein Warenzeichen von Apple Inc., eingetragen in den USA und anderen Ländern.
iPod est une marque de commerce d’Apple Inc., enregistrée aux États-Unis et dans les autres pays.
iPod is een handelsmerk van Apple Inc., geregistreerd in de V.S. en andere landen.
When connecting the external components, refer
also to the manuals supplied for the components
and adapter.
CAUTION:
Before connecting the external components,
make sure that the unit is turned off.
You can connect the following JVC components
to the CD changer jack.
JVC component Model name
CD changer (CD-CH) CH-X1500, etc.
JVC DAB tuner KT-DB1000
You can also connect the following components
through the various JVC adapters.
• Connection cords may need to be purchased
separately.
Component Adapter
Model name
Bluetooth device Bluetooth adapter
KS-BTA200
iPod Interface adapter
for iPod
KS-PD100
Portable audio player with
line output jacks
Line input adapter
KS-U57
Portable audio player with
3.5 mm stereo mini jack
AUX input adapter
KS-U58
When connecting more than one component
(maximum: three), it is recommended that you
connect the components in series as explained
below.
When connecting two components in series
Beim Anschließen von zwei Komponenten in Serie
Lors de la connexion de deux appareils en série
Indien u twee componenten in-serie verbindt
CD changer jack
Buchse für CD-Wechsler
Prise du changeur de CD
Aansluiting voor CD-wisselaar
When connecting three components in series
Beim Anschließen von drei Komponenten in Serie
Lors de la connexion de trois appareils en série
Indien u drie componenten in-serie verbindt
A KS-BTA200
B KT-DB1000
C*8 KS-PD100 / KS-U57 / KS-U58
CD changer jack
Buchse für CD-Wechsler
Prise du changeur de CD
Aansluiting voor CD-wisselaar
*8 To use these components, set the external input setting correctly (see page 55 of the
INSTRUCTIONS).
*8 Zur Verwendung dieser Komponenten stellen Sie die externe Eingangseinstellung richtig ein (siehe
Seite 55 der BEDIENUNGSANLEITUNG).
*8 Pour utiliser ces appareils, réglez l’entrée extérieure correctement (voir page 55 du MANUEL
D’INSTRUCTIONS).
*8 Voor het gebruik van deze componenten moet de juiste externe ingangsinstelling zijn gekozen (zie
bladzijde 55 van de GEBRUIKSAANWIJZING).
To disconnect the connector / Zum Abtrennen des Steckverbinder / Pour déconnecter le connecteur /
Ontkoppelen van de stekker
Hold the connector top tightly ( 1 ), then pull it out ( 2 ).
Halten Sie die Steckverbinder-Oberseite fest ( 1 ) und ziehen Sie ihn heraus
( 2 ).
Tenez fermement le connecteur par-dessus ( 1 ) et tirez vers l’extérieur
( 2 ).
Druk stevig op de bovenkant van de stekker ( 1 ) en trek tegelijkertijd de
stekker ( 2 ) naar u toe.
A KS-BTA200 / KT-DB1000
B*8 CD-CH / KS-PD100 / KS-U57 / KS-U58
KW-AVX710[E]instal_.indb 6KW-AVX710[E]instal_.indb 6 07.12.7 10:38:36 AM07.12.7 10:38:36 AM
ENGLISHРУCCKИЙУКРАЇНА
KW-AVX710
LVT1779-005A
[EE]
For installation and connections, refer to the separate manual.
Указания по установке и выполнению соединений приводятся в отдельной инструкции.
Вказівки по встановленню та виконанню підключень наведені у окремій інструкції.
For canceling the display demonstration, see page 8.
Информацию об отмене демонстрации функций дисплея см. на стр. 8.
Інформацію щодо відміни демонстрації функцій дисплею див. на стор. 8.
INSTRUCTIONS
ИНСТРУКЦИИ ПО ЭКСПЛУАТАЦИИ
ІНСТРУКЦІЇ
DVD RECEIVER WITH MONITOR
DVD-ПРИЕМНИК С МОНИТОРОМ
ПРИЙМАЧ ТА ПРОГРАВАЧ DVD-ДИСКІВ ІЗ МОНІТОРОМ
Cover_KW-AVX710[EE].indd 2Cover_KW-AVX710[EE].indd 2 07.11.28 7:28:33 PM07.11.28 7:28:33 PM
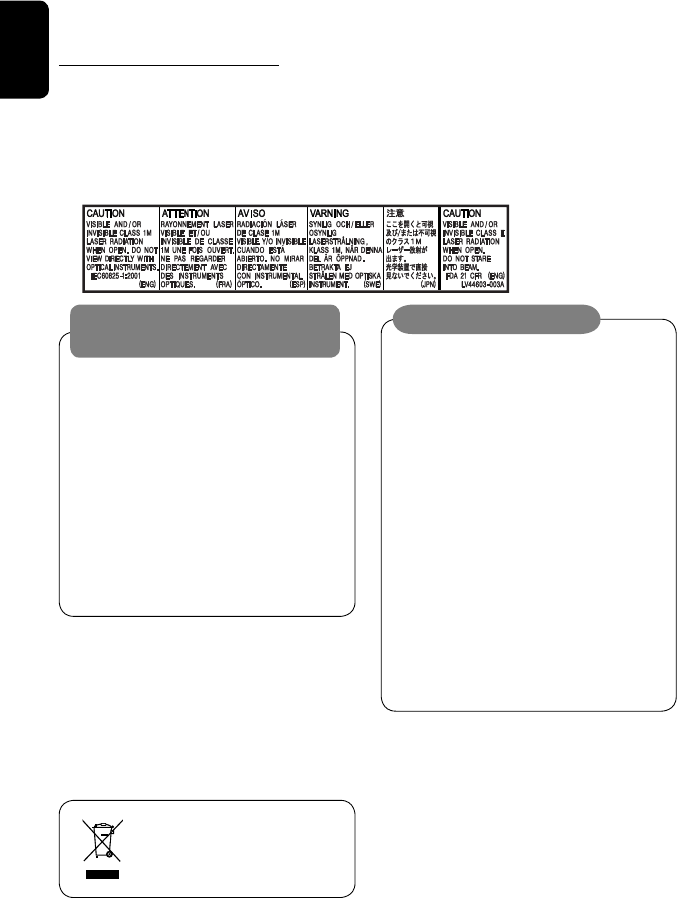
ENGLISH
2
Thank you for purchasing a JVC product.
Please read all instructions carefully before operation, to ensure your complete understanding and to obtain the best
possible performance from the unit.
IMPORTANT FOR LASER PRODUCTS
1. CLASS 1 LASER PRODUCT
2. CAUTION: Do not open the top cover. There are no user serviceable parts inside the unit; leave all servicing to
qualified service personnel.
3. CAUTION: Visible and/or invisible class 1M laser radiation when open. Do not view directly with optical
instruments.
4. REPRODUCTION OF LABEL: CAUTION LABEL, PLACED OUTSIDE THE UNIT.
Cautions on the monitor:
• The monitor built in this unit has been produced
with high precision, but it may have some
ineffective dots. This is inevitable and is not
malfunction.
• Do not expose the monitor to direct sunlight.
• Do not operate the touch panel using a ball-point
pen or similar tool with the sharp tip.
Touch the buttons on the touch panel with your
finger directly (if you are wearing a glove, take it
off).
• When the temperature is very cold or very hot...
– Chemical changes occur inside, causing
malfunction.
– Pictures may not appear clearly or may move
slowly. Pictures may not be synchronized with
the sound or picture quality may decline in such
environments.
WARNINGS:
To prevent accidents and damage
• DO NOT install any unit or wire any cable in a
location where;
– it may obstruct the steering wheel and
gearshift lever operations.
– it may obstruct the operation of safety devices
such as air bags.
– it may obstruct visibility.
• DO NOT operate the unit while driving.
If you need to operate the unit while driving, be
sure to look around carefully.
• The driver must not watch the monitor while
driving.
[European Union only]
EN_KW-AVX710[EE].indb 2EN_KW-AVX710[EE].indb 2 07.12.6 2:18:57 PM07.12.6 2:18:57 PM
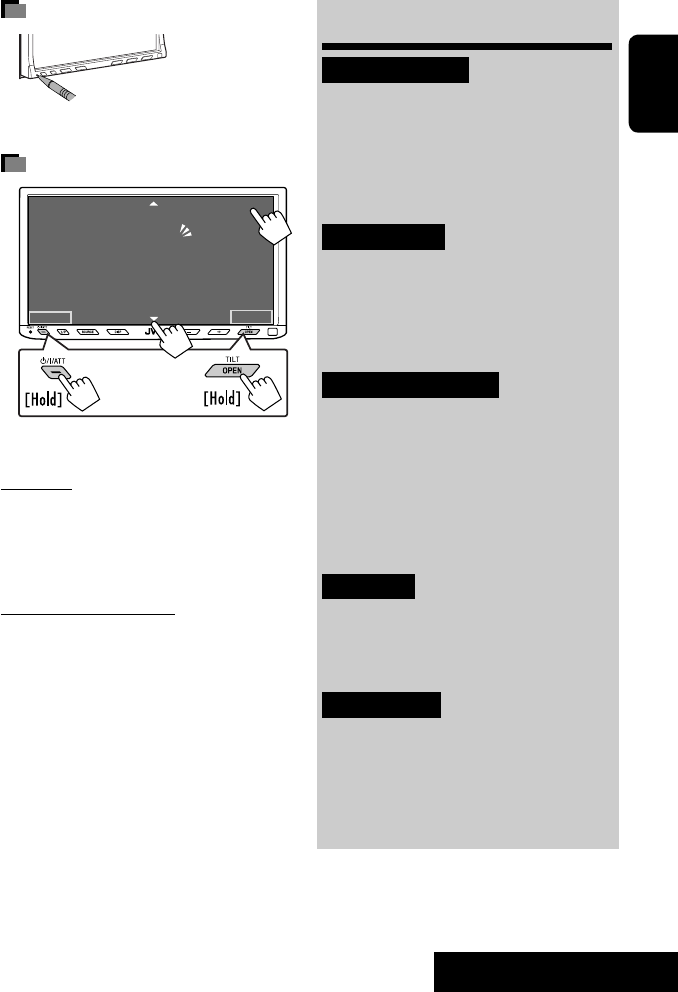
3
ENGLISH
INTRODUCTION
How to reset your unit
• Your preset adjustments will also be erased.
How to forcibly eject a disc
• If this does not work, reset the unit.
For safety...
• Do not raise the volume level too much, as this will
block outside sounds, making driving dangerous.
• Stop the car before performing any complicated
operations.
Temperature inside the car...
If you have parked the car for a long time in hot or cold
weather, wait until the temperature in the car becomes
normal before operating the unit.
Contents
INTRODUCTION
Playable disc types .......................... 4
Basic operations—
Monitor panel/touch panel
............ 5
Basic operations—
Remote controller (RM-RK252) ...... 6
OPERATIONS
Before operating the unit ................ 8
Common operations ........................ 9
Listening to the radio ...................... 10
Disc operations ................................ 16
EXTERNAL DEVICES
Bluetooth® operations—
Cellular phone/audio player .......... 30
Listening to the CD changer .............. 37
Listening to the DAB tuner ............... 39
Listening to the iPod ........................ 43
Using other external components ..... 45
SETTINGS
Sound equalization .......................... 48
Assigning titles to the sources .......... 49
Menu operations ............................. 50
REFERENCES
Maintenance ................................... 60
More about this unit ........................ 61
Troubleshooting .............................. 68
Specifications .................................. 72
NO EJECT?
EMERGENCY EJECT?
Exit
ENTER
Back
11
3
2
at the same time
EN_KW-AVX710[EE].indb 3EN_KW-AVX710[EE].indb 3 07.12.6 2:19:02 PM07.12.6 2:19:02 PM

ENGLISH
4
Disc type Recording format, file type, etc. Playable
DVD DVD Video (Region Code: 5)*1
DVD Audio
DVD-ROM
DVD Recordable/Rewritable
(DVD-R/-RW*2, +R/+RW*3)
• DVD Video: UDF bridge
• DVD-VR
• DivX/MPEG1/MPEG2/JPEG/MP3/
WMA/WAV: ISO 9660 level 1,
level 2, Romeo, Joliet
DVD Video
DVD-VR
DivX/MPEG1/MPEG2
JPEG
MP3/WMA/WAV
AAC
MPEG4
DVD+VR
DVD-RAM
Dual Disc DVD side
Non-DVD side
CD/VCD Audio CD/CD Text (CD-DA)/DTS-CD
VCD (Video CD)
SVCD (Super Video CD)
CD-ROM
CD-I (CD-I Ready)
CD Recordable/Rewritable
(CD-R/-RW)
• ISO 9660 level 1, level 2, Romeo,
Joliet
CD-DA
MP3/WMA/WAV
JPEG
DivX/MPEG1/MPEG2
AAC
MPEG4
*1 If you insert a DVD Video disc of an incorrect Region Code, “Region code error” appears on the screen.
*2 DVD-R recorded in multi-border format is also playable (except for dual layer discs).
DVD-RW dual layer discs are not playable.
*3 It is possible to play back finalized +R/+RW (Video format only) discs.
+RW double layer discs are not playable.
Playable disc types
Caution for DualDisc playback
The Non-DVD side of a “DualDisc” does not comply with the “Compact Disc Digital Audio” standard. Therefore,
the use of Non-DVD side of a DualDisc on this product may not be recommended.
EN_KW-AVX710[EE].indb 4EN_KW-AVX710[EE].indb 4 07.12.6 2:19:02 PM07.12.6 2:19:02 PM

5
ENGLISH
INTRODUCTION
Basic operations — Monitor panel/touch panel
• Turn on the power.
• Turn off the power. [Hold]
• Attenuate the sound (if the power is on).
Change the sources.
Remote sensorAdjust the volume.
Reset the unit.
• Use only when the internal system malfunctions.
Display <AV Menu> screen.
Display and erase the Short Cut windows.
Available functions vary among the sources. For details, see each source operation
section.
Change the display information.
• [OPEN]: Open the monitor panel.
• [EJECT]: Eject the disc.
• [CLOSE]: Close the monitor panel.
• [TILT +/–]: Tilt the monitor panel.
• [Exit]: Erase this screen.
• Shaded icons cannot be used.
• In the explanation, buttons on the touch panel
are indicated inside [ ].
• For details on the touch panel operations, see
each source operation section.
Display <Source Menu> screen.
• Activate/deactivate TA
Standby Reception.
• Display <PTy Search> menu.
[Hold]
☞ page 12
• Display <Open/Tilt> menu.
• Eject the disc and display <Open/Tilt>
menu. [Hold]
• Close the monitor panel when <Open/Tilt>
menu is displayed.
☞ page 50
☞ page 9
☞ page 9
<Open/Tilt> menu
EN_KW-AVX710[EE].indb 5EN_KW-AVX710[EE].indb 5 07.12.6 2:19:03 PM07.12.6 2:19:03 PM
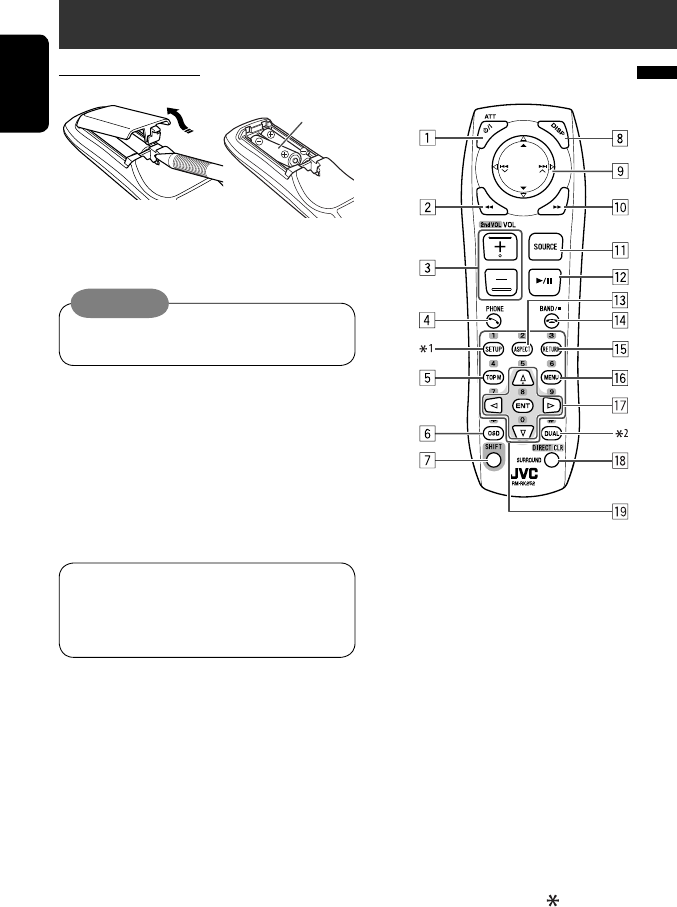
ENGLISH
6
Basic operations — Remote controller (RM-RK252)
Main elements and features
1 • Turns on the power.
• Attenuates the sound if the power is on.
• Turns off the power if pressed and held (while
the power is on).
2 • Reverse search
• Reverse slow motion (during pause)
3 Adjusts the volume level.
• Does not function as “2nd VOL.”
4 • Displays <Dial Menu> screen.
• Displays <Redial> menu if pressed and held.
• Answers incoming calls.
5 • DVD/DivX 6: Shows the disc menu.
• VCD: Resumes PBC playback.
• DVD-VR: Shows the Original Program screen.
6 Shows the on-screen bar.
• Does not function as “ .“
R03/LR03/AAA
Installing the battery
Insert the batteries into the remote controller by
matching the polarity (+ and –) correctly.
Caution:
Battery shall not be exposed to excessive heat such
as sunshine, fire or the like.
• If the range or effectiveness of the remote controller
decreases, replace both batteries.
Before using the remote controller:
• Aim the remote controller directly at the remote
sensor on the unit.
• DO NOT expose the remote sensor to bright light
(direct sunlight or artificial lighting).
The unit is equipped with the steering wheel
remote control function.
• See the Installation/Connection Manual (separate
volume) for connection.
EN_KW-AVX710[EE].indb 6EN_KW-AVX710[EE].indb 6 07.12.6 2:19:04 PM07.12.6 2:19:04 PM

7
ENGLISH
INTRODUCTION
p • Forward search
• Forward slow motion (during pause)
q Selects the source.
w For disc operations:
Starts playback/pauses.
For Bluetooth operations:
• Answers incoming calls.
• Starts playback/pauses. (for audio player
operation).
e Changes the aspect ratio of the playback
pictures.
r “TUNER”/”DAB”: Selects the bands.
“DISC”: Stops playback.
“Bluetooth PHONE”: Ends the call.
“Bluetooth AUDIO”: Starts playback/pauses.
t VCD: Returns to the PBC menu.
y • DVD Video/DivX 6: Shows the disc menu.
• VCD: Resumes PBC playback.
• DVD-VR: Shows the Playlist screen.
u • Makes selection/settings.
• @ / #: Skips back or forward by five minutes
for DivX/MPEG1/MPEG2.
• % / fi: Changes discs for “CD-CH.”
i*3 • Switches number entry mode for “DISC.”
• Erases the misentry after entering a wrong
number.
• Does not function as “SURROUND.”
o*3 Number buttons
• Enters numbers.
• “TUNER”/”DAB”: Selects the preset station/
service directly.
*1 Functions as a number button only (see o ).
*2 Not used for this unit.
*3 Functions when pressed with SHIFT.
7 Functions with other buttons (see i and o).
8 Changes the display information.
9 For disc operations:
• 5 / ∞:
DVD: Selects the title.
DVD-VR: Selects the program/Playlist.
Other discs (except VCD/CD): Selects the
folders.
• 4 / ¢:
– Press briefly: reverse skip/forward skip
– Press and hold: reverse search/forward
search
For FM/AM operations:
• 5 / ∞: Selects the preset stations.
• 4 / ¢: Functions to search for stations.
– Press briefly: Auto Search
– Press and hold: Manual Search
For DAB tuner operations:
• 5 / ∞: Select the services.
• 4 / ¢: Functions to search for
ensembles.
– Press briefly: Auto Search
– Press and hold: Manual Search
For Apple iPod operations:
• ∞: Starts playback/pauses
• 5: Enters the main menu (then 5 / ∞
/ 4 / ¢ work as menu selecting
buttons).
In the main menu:
• 5: Returns to the previous menu.
• ∞: Confirms the selection.
• 4 / ¢
– Press briefly: Selects an item.
– Press and hold: Skips ten items at a time.
For Bluetooth operations:
• 4 / ¢: reverse skip/forward skip (for
audio player operation)
EN_KW-AVX710[EE].indb 7EN_KW-AVX710[EE].indb 7 07.12.6 2:19:05 PM07.12.6 2:19:05 PM

8
ENGLISH
You can cancel the demonstration on the screen and set
the clock.
• Non-available items will be shaded on the AV Menu
screens.
Indication language:
In this manual, English indications are used
for purpose of explanation. You can select the
indication language. (☞ page 52)
~ Turn on the power.
Ÿ Display <AV Menu> screen.
! Display <Setup> menu.
⁄ Cancel the demonstration.
Select <Off>.
@ Set the clock settings.
¤ Finish the procedure.
Before operating the unit
Moves to the succeeding menu page
Moves to the preceding menu page
Return to the previous screen.
EN_KW-AVX710[EE].indb 8EN_KW-AVX710[EE].indb 8 07.12.6 2:19:05 PM07.12.6 2:19:05 PM

OPERATIONS
9
ENGLISH
Changing the display
information
• Available display information varies among the
playback sources.
On the monitor panel only:
• Each time you press DISP, the display changes to
show the various information.
Ex. When the playback source is a DivX disc.
Selecting the playback source
• Available sources depend on the external
components you have connected, media you have
attached, and the <Input> settings you have made
(☞ page 55).
On the touch panel:
On the monitor panel:
TUNER = DAB = DISC (DVD/VCD/CD) =CD-CH,
iPod, or EXT-IN = Bluetooth PHONE =
Bluetooth AUDIO = AV-IN = (back to the
beginning)
• You cannot select these sources if they are not ready.
Exit
Source information screen
Clock time in large numbers
Navigation screen
(When <Navigation> is
selected for <AV Input>)
(☞ page 55)
Back to the beginning
Playback picture screen
(only for video sources)
Track list
Common operations
EN_KW-AVX710[EE].indb 9EN_KW-AVX710[EE].indb 9 07.12.6 2:19:06 PM07.12.6 2:19:06 PM

10
ENGLISH
When an FM stereo broadcast is
hard to receive
1 Press [AV MENU].
2 Press [Mode].
Listening to the radio
~ Press [SOURCE], then press [TUNER]. (☞ page 9)
• You can also use SOURCE on the monitor panel. Press it repeatedly.
Ÿ Press [BAND].
! Press [4] or [¢] to search for a station—Auto Search.
• Manual Search: Hold either [4]or [¢] until “Manual Search” appears on the screen, then press it
repeatedly.
• The ST indicator lights up when receiving an FM stereo broadcast with sufficient signal strength.
3
Reception improves, but stereo effect will be lost.
• The MONO indicator lights up.
To restore stereo effect, select <Off>.
Preset no.
Band
Tuner/Standby Reception
indicators
PS (station name) for FM Radio Data System. If no PS signal is
coming in, the tuned frequency appears.
☞ page 9
Sound mode
(☞ page 48)
PTY code for FM Radio
Data System
☞ page 12
: Buttons on the
touch panel. In
the explanation,
they are
indicated inside
[ ].
EN_KW-AVX710[EE].indb 10EN_KW-AVX710[EE].indb 10 07.12.6 2:19:07 PM07.12.6 2:19:07 PM
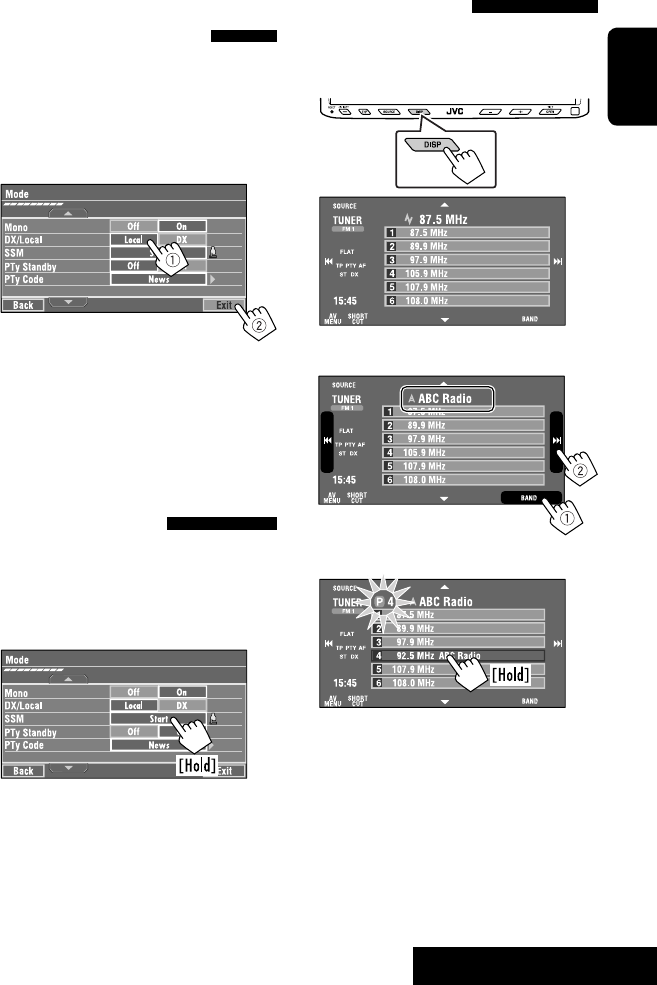
OPERATIONS
11
ENGLISH
Manual presetting
Ex.: Storing FM station of 92.5 MHz into preset number
4 of the FM1 band.
1 Display the Preset List.
2 Tune in to a station you want to preset.
3 Select a preset number.
The station selected in step 2 is now stored in
preset number 4.
Tuning in to stations with
sufficient signal strength
This function works only for FM bands. Once you have
activated this function (selected <Local>), it always
works when searching for FM stations.
1 Press [AV MENU].
2 Press [Mode].
3
Only stations with sufficient signal strength will be
detected.
• The DX indicator goes off, then the LO indicator
lights up.
FM station automatic presetting
—SSM (Strong-station
Sequential Memory)
This function works only for FM bands.
You can preset six stations for each band.
1 Press [AV MENU].
2 Press [Mode].
3
Local FM stations with the strongest signals are
searched and stored automatically in the FM band.
EN_KW-AVX710[EE].indb 11EN_KW-AVX710[EE].indb 11 07.12.6 2:19:07 PM07.12.6 2:19:07 PM
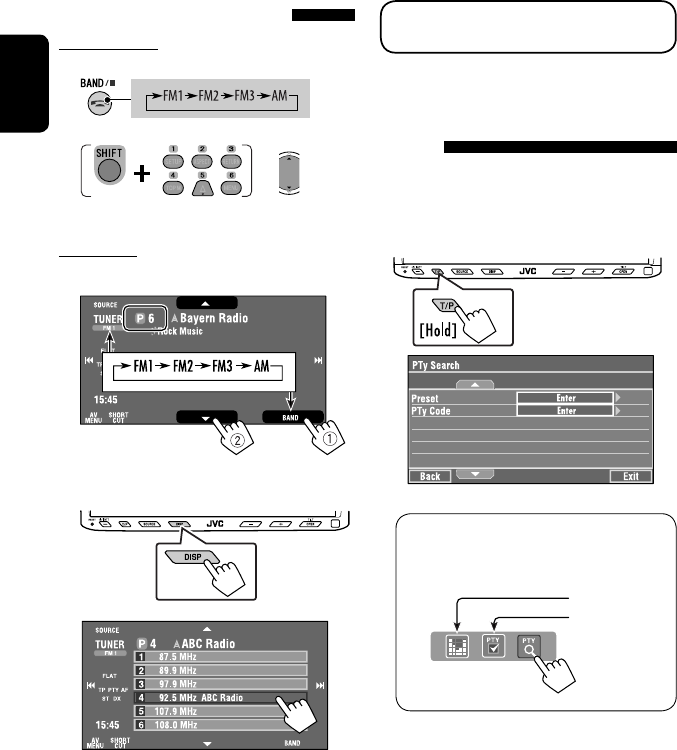
12
ENGLISH
The following features are available only for FM
Radio Data System stations.
Searching for FM Radio Data
System programme—PTY
Search
You can search for your favorite programmes being
broadcast by selecting the PTY code for your favorite
programmes.
1 Display <PTy Search> menu.
You can also easily access <PTy Search> menu
by pressing [SHORT CUT] on the touch panel,
then...
Selecting a preset station
On the remote:
1
2
On the unit:
• To select directly on the touch panel
• To select from the Preset List
1
2
or
Hold
☞ page 14
☞ page 48
EN_KW-AVX710[EE].indb 12EN_KW-AVX710[EE].indb 12 07.12.6 2:19:08 PM07.12.6 2:19:08 PM
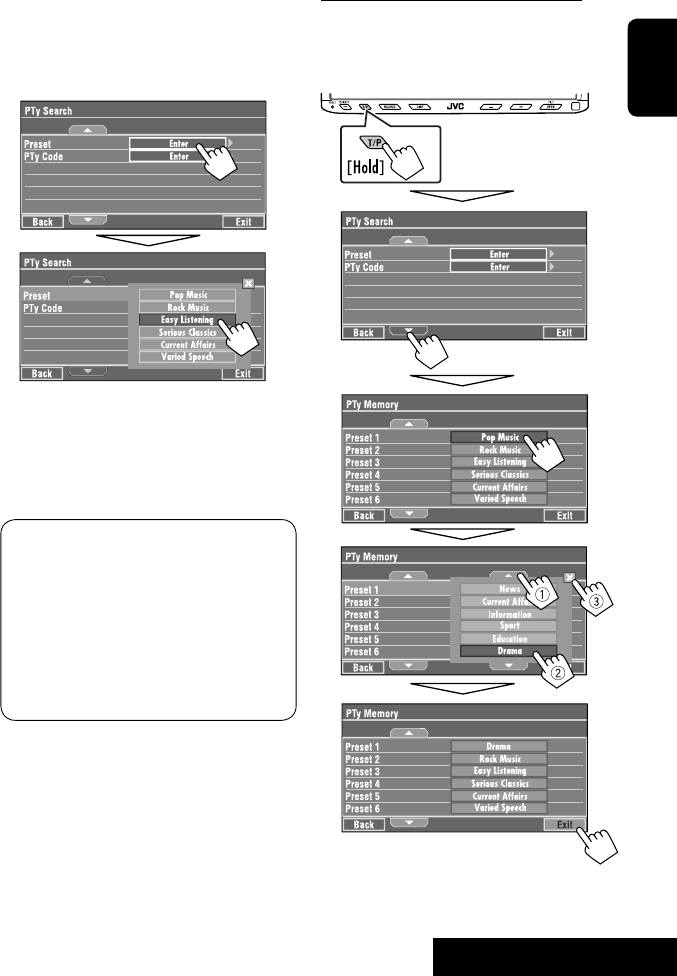
OPERATIONS
13
ENGLISH
Storing your favorite programme types
You can store your favorite PTY codes into the PTY
Preset List.
Ex.: Storing <Drama> into <Preset 1>
2 Select a PTY code.
• In the example below, a PTY code is selected
from the Preset List.
If you enter <PTy Code> menu below, you can
select one from 29 PTY codes.
PTY Search starts.
If there is a station broadcasting a programme
of the same PTY code as you have selected, that
station is tuned in.
Available PTY codes:
News, Current Affairs, Information, Sport,
Education, Drama, Cultures, Science, Varied Speech,
Pop Music, Rock Music, Easy Listening, Light Classics
M, Serious Classics, Other Music, Weather & Metr,
Finance, Children’s Progs, Social Affairs, Religion,
Phone In, Travel & Touring, Leisure & Hobby, Jazz
Music, Country Music, National Music, Oldies Music,
Folk Music, Documentary
EN_KW-AVX710[EE].indb 13EN_KW-AVX710[EE].indb 13 07.12.6 2:19:09 PM07.12.6 2:19:09 PM
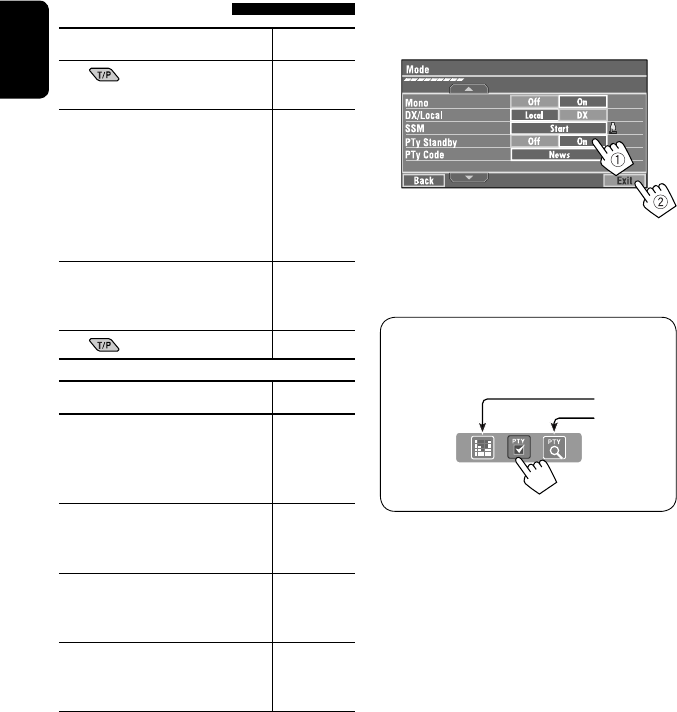
14
ENGLISH
Activating/deactivating TA/PTY
Standby Reception
TA Standby Reception Indicator
Press on the monitor panel to
activate. TP
The unit will temporarily switch to
Traffic Announcement (TA) if available,
from any source other than AM.
• The volume changes to the preset
TA volume level if the current level is
lower than the preset level (☞ page
54).
Lights up
Not yet activated. Tune in to another
station providing the Radio Data
System signals.
Flashes
Press to deactivate. Goes off
PTY Standby Reception Indicator
To activate, display <AV Menu>
screen, press [Mode], then press
[On] for <PTy Standby>. (☞ next
column)
PTY
The unit will temporarily switch to
your favorite PTY programme from any
source other than AM.
Lights up
Not yet activated. Tune in to another
station providing the Radio Data
System signals.
Flashes
To deactivate, press [Off] for <PTy
Standby> in step 3 on the next
column.
Goes off
• When a DAB tuner is connected, TA Standby/PTY
Standby Reception also works for the DAB tuner and
searches for the services.
To activate PTY Standby Reception
1 Press [AV MENU].
2 Press [Mode].
3
PTY Standby Reception is now activated for PTY
code <News>: the initial setting.
You can easily activate or deactivate the PTY
Standby Reception by pressing [SHORT CUT] on the
touch panel, then...
☞ page 12
☞ page 48
EN_KW-AVX710[EE].indb 14EN_KW-AVX710[EE].indb 14 07.12.6 2:19:09 PM07.12.6 2:19:09 PM

OPERATIONS
15
ENGLISH
To change the PTY code for PTY Standby
Reception
1 Press [AV MENU].
2 Press [Mode].
3
4 Select your favorite PTY code.
Tracing the same programme—
Network-Tracking Reception
When driving in an area where FM reception is not
sufficient enough, this unit automatically tunes in to
another FM Radio Data System station of the same
network, possibly broadcasting the same programme
with stronger signals.
Programme A broadcasting on different frequency
areas (01 – 05)
When shipped from the factory, Network-Tracking
Reception is activated.
To change the Network-Tracking Reception
setting, see <AF Regional>. (☞ page 54)
• When the DAB tuner is connected, refer also to
“Tracing the same programme—Alternative
Frequency Reception (DAB AF).” (☞ page 42)
Automatic station selection—
Programme Search
Usually when you select preset stations, the preset
station is tuned in.
If the signals from the FM Radio Data System preset
station are not sufficient for good reception, this
unit, using the AF data, tunes in to another station
broadcasting the same programme as the original
preset station is broadcasting. To activate this function,
select <On> for <Program Search>.(☞ page 54)
• The unit takes some time to tune in to another
station using programme search.
A
Ex.: Selecting <Easy Listening>
EN_KW-AVX710[EE].indb 15EN_KW-AVX710[EE].indb 15 07.12.6 2:19:10 PM07.12.6 2:19:10 PM

16
ENGLISH
~ Open the monitor panel.
<Open/Tilt> menu is displayed.
• By pressing and holding the button, you can
open the monitor panel and eject the disc.
Ÿ Press [OPEN].
Disc operations
The disc type is automatically detected, and playback starts automatically (for some discs: automatic start depends
on its internal program).
If a disc does not have any disc menu, all tracks on it will be played repeatedly until you change the source or eject
the disc.
If “ ” appears on the screen, the unit cannot accept the operation you have tried to do.
• In some cases, without showing “ ,” operations will not be accepted.
Label side
Caution on volume setting:
Discs produce very little noise compared with other
sources. Lower the volume before playing a disc
to avoid damaging the speakers by the sudden
increase of the output level.
When playing back a multi-channel encoded disc,
the multi-channel signals are downmixed.
• You can fully enjoy multi-channel sound by
connecting an amplifier or a decoder compatible
with these multi-channel sources. (☞ also page
65)
! Insert a disc.
Monitor panel closes automatically.
If not, press [CLOSE].
Caution:
Do not place your finger behind the monitor panel.
EN_KW-AVX710[EE].indb 16EN_KW-AVX710[EE].indb 16 07.12.6 2:19:10 PM07.12.6 2:19:10 PM
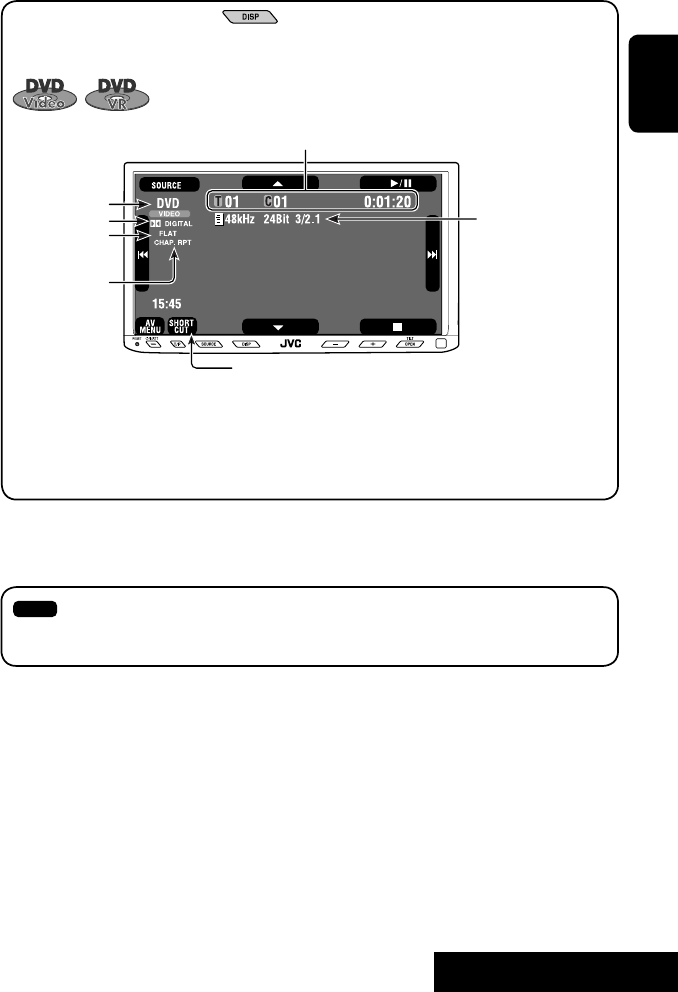
OPERATIONS
17
ENGLISH
While playing the following discs, press .
• Each time you press the button, the display changes to show the different information. (☞ page 9)
Audio format
DVD Video: Title no./Chapter no./Playing time
DVD-VR: Program no. (or Playlist no.)/Chapter no./Playing time
Playback mode
Disc type *1Sampling frequency/Bit
rate/Recorded signal
channel no.
☞ page 22
[3 / 8] Start and pause playback
[7] Stop playback
[4 ¢] Press: Select chapter
Hold: Reverse/forward search*2
[5 ∞] Select title/program/playlist
*1 DVD-VR also indicates either PRG (program) or PLAY (playlist) playback.
*2 Search speed: x2 ] x10
: Buttons on the touch panel. In the explanation, they are indicated inside [ ].
These buttons also work when they are not shown on the touch panel (while watching the playback pictures
on the screen).
Sound mode
(☞ page 48)
EN_KW-AVX710[EE].indb 17EN_KW-AVX710[EE].indb 17 07.12.6 2:19:11 PM07.12.6 2:19:11 PM

18
ENGLISH
Track no./Playing time
[3 / 8] Start and pause playback
[7] Stop playback
[4 ¢] Press: Select track
Hold: Reverse/forward search*2
For DivX/MPEG1/MPEG2: Folder no./Track no./Playing time
For JPEG: Folder no./File no.
[3 / 8] Start and pause playback
[7] Stop playback
[4 ¢] Press: Select track
Hold: Reverse/forward search for DivX/MPEG1/MPEG2 *1
[5 ∞] Press: Select folder
Hold: Display Folder list
While playing the following discs, press .
• Each time you press the button, the display changes to show the different information (☞ page 9).
Disc type
☞ page 22
☞ page 22
The PBC indicator
lights up when PBC is
in use.
Total track no.
included on the
disc
Total track no.
included on the
disc
Total playing time
Sound mode
(☞ page 48)
Sound mode
(☞ page 48)
*1 Search speed: ¡1 ] ¡2
*2 Search speed: x2 ] x10
EN_KW-AVX710[EE].indb 18EN_KW-AVX710[EE].indb 18 07.12.6 2:19:11 PM07.12.6 2:19:11 PM

OPERATIONS
19
ENGLISH
Track no./Playing time
Only for CD Text *3
Folder no./Track no./Playing time
Audio format
(MP3/WMA/WAV)
☞ page 22
*3 “No Name” appears for conventional CDs.
*4 Search speed: x2 ] x10
Tag data appears
only when it is
recorded.
Sound mode
(☞ page 48)
☞ page 22
[3 / 8] Start and pause playback
[7] Stop playback
[4 ¢] Press: Select track
Hold: Reverse/forward search*4
[5 ∞] Press: Select folder
Hold: Display Folder list
[3 / 8] Start and pause playback
[7] Stop playback
[4 ¢] Press: Select track
Hold: Reverse/forward search*4
Total track no.
included on the disc
Total playing time
Total track no. included on the disc
Sound mode
(☞ page 48)
EN_KW-AVX710[EE].indb 19EN_KW-AVX710[EE].indb 19 07.12.6 2:19:12 PM07.12.6 2:19:12 PM

20
ENGLISH
Touch the screen (center portion).
Operation buttons on the screen
You can display the following operation buttons while watching the playback pictures on the screen.
• While the operation buttons are displayed, aspect ratio is fixed to <Full>. (☞ page 52)
• If no operation is done for about five seconds, the operation buttons disappear (except when a disc menu is
displayed).
Touch [KEY].
☞ pages 23 to 27 on how the operation buttons
particularly work for a variety of the discs
A
[SOURCE] Display <Source Menu> screen
[AV MENU] Display <AV Menu> screen
[SHORT CUT] Display the Short Cut buttons
[3 / 8] Start and pause playback
[7] Stop playback
[4 ¢] Press: Select track
Hold: Reverse/forward search
[5 ∞] Select folders
• The above buttons also work when they are not shown on
the screen (while watching the playback picture).
* While a disc menu is played back for DVD, [KEY] is
automatically displayed. On the disc menu, you can select a
menu item directly by touching it on the screen.
B
For DVD/VCD/DivX menu operation playback
[2 3 5 ∞] Select the menu items
[ENT] Confirm the selection
[TOP MENU] Display the disc menu
[MENU] Display the disc menu
[RETURN] Return to the previous menu or display the
menu (only for VCD with PBC)
C
For entering the numbers
[DIRECT CLR] • Switch between chapter/track entry and
title/group/folder entry
• Erase the last entry when you enter a
wrong number
[0]–[9]=[ENT]
Enter numbers
Ex.: To enter “105,” press [1], [0], [5], then [ENT]
*
Touch [KEY].
Touch [KEY].
To erase the operations, touch the screen again.
EN_KW-AVX710[EE].indb 20EN_KW-AVX710[EE].indb 20 07.12.6 2:19:12 PM07.12.6 2:19:12 PM
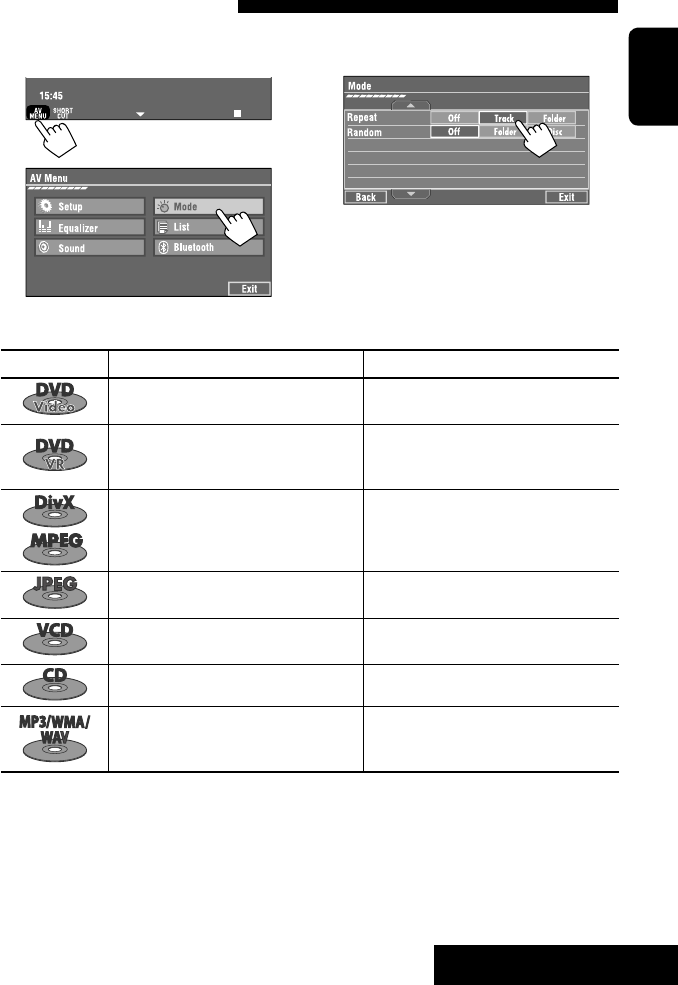
OPERATIONS
21
ENGLISH
1
2
3
When one of the playback modes is selected, the
corresponding indicator lights up on the source
information screen.
To cancel, select <Off>.
Selecting playback modes
You can use the following playback modes—Repeat or Random.
Ex.: To select Track Repeat
Disc type Repeat Random
Chapter: Repeats current chapter
Title: Repeats current title —
Chapter: Repeats current chapter
Program: Repeats current program (not
available for Playlist playback)
—
Track: Repeats current track
Folder: Repeats current folder
Folder: Randomly plays all tracks of current
folder, then tracks of next folders
Disc (All): Randomly plays all tracks
Folder: Repeats current folder —
Track: Repeats current track (PBC not in
use)
Disc (All): Randomly plays all tracks (PBC not
in use)
Track: Repeats current track*1Disc (All): Randomly plays all tracks
Track: Repeats current track*1
Folder: Repeats all tracks of the current
folder
Folder: Randomly plays all tracks of current
folder, then tracks of next folders
Disc (All): Randomly plays all tracks
*1 You can also use [SHORT CUT] to turn on and off Track Repeat.
EN_KW-AVX710[EE].indb 21EN_KW-AVX710[EE].indb 21 07.12.6 2:19:13 PM07.12.6 2:19:13 PM

22
ENGLISH
Prohibiting disc ejection
You can lock a disc in the loading slot.
To cancel the prohibition, repeat the same
procedure to select <EJECT OK?>.
Using Short Cut Icons
You can easily access the some frequently used
functions by using [SHORT CUT] on the touch panel.
1
2
• For video software:
• For audio software:
Selecting tracks on the list
If a disc includes folders, you can display the Folder/
Track (File) Lists, then start playback.
1
2
3 Select a folder (1), then a track (2).
Selected track starts playing. (* Press to move to
the previous/next pages of the list)
1 Current folder list number/total folder list
number
2 Current track list number/total track list
number of the current folder
You can easily access the Track List by pressing DISP
on the monitor panel.
Selected track starts playing.
at the same time
Sound mode
(☞ page 48)
Turn on or off Track Repeat
(Repeat play: ☞ page 21)
Aspect ratio
(☞ page 52)
EN_KW-AVX710[EE].indb 22EN_KW-AVX710[EE].indb 22 07.12.6 2:19:14 PM07.12.6 2:19:14 PM

OPERATIONS
23
ENGLISH
Stop playback.
Start playback/pause (if pressed during playback).
Reverse/forward search*1 (No sound can be heard.)
Slow motion during pause*2 (No sound can be heard.)
Press: Select chapter (during playback or pause).
Hold: Reverse/forward search*3 (No sound can be heard.)
Select title (during playback or pause).
Select aspect ratio.
Select chapter.
Select title (when not playing).
Select title (during playback or pause).
Using menu driven features
1
2 Select an item you want to start playback.
3
*1 Search speed: x2 ] x5 ] x10 ] x20 ] x60
*2 Slow motion speed: 1/32 ] 1/16 ] 1/8 ] 1/4 ] 1/2
*3 Search speed: x2 ] x10
Operations using the remote controller—RM-RK252
Also functions as CLR (clear):
Erases a misentry if pressed
while holding SHIFT.
You can change the following items using the on-screen bar—audio language, audio stream, audio channel,
subtitle language, view angle, etc. (☞ pages 28 and 29)
twice
EN_KW-AVX710[EE].indb 23EN_KW-AVX710[EE].indb 23 07.12.6 2:19:14 PM07.12.6 2:19:14 PM

24
ENGLISH
Stop playback.
Start playback/pause (if pressed during playback).
Reverse/forward search*1 (No sound can be heard.)
Forward slow motion during pause*2 (No sound can be heard.)
• Reverse slow motion does not work.
Press: Select chapter (during playback or pause).
Hold: Reverse/forward search*3
Select program.
Select playlist (during playback or pause).
Select aspect ratio.
Select chapter.
Select program (when not playing).
Select program/playlist (during playback or pause).
Using Original Program/Playlist screens ( ☞ page 28)
1For Original Program
For Playlist
2 Select an item you want to start playback.
3 To erase the screen.
*1 Search speed: x2 ] x5 ] x10 ] x20 ] x60
*2 Slow motion speed: 1/32 ] 1/16 ] 1/8 ] 1/4 ] 1/2
*3 Search speed: x2 ] x10
twice
Also functions as CLR (clear):
Erases a misentry if pressed
while holding SHIFT.
EN_KW-AVX710[EE].indb 24EN_KW-AVX710[EE].indb 24 07.12.6 2:19:15 PM07.12.6 2:19:15 PM

OPERATIONS
25
ENGLISH
Stop playback.
Start playback/pause (if pressed during playback).
Reverse/forward search*4 (No sound can be heard.)
Press: Select track
Hold: Reverse/forward search*5 (No sound can be heard.)
Select folder.
Select aspect ratio.
Select track (within the same folder).
Select folder.
While playing...
Reverse/advance the scenes by five minutes.
For DivX6: Using menu driven features
1
2 Select an item you want to start playback.
3
*4 Search speed: ¡1 ] ¡2 ] ¡3
*5 Search speed: ¡1 ] ¡2
Current playback position
twice
2nd press 2nd press1st press 1st press 3rd press
EN_KW-AVX710[EE].indb 25EN_KW-AVX710[EE].indb 25 07.12.6 2:19:16 PM07.12.6 2:19:16 PM

26
ENGLISH
Stop playback.
Start playback/pause. (Slide show: each file is shown for a few
seconds.)
Shows the current file until you change it if pressed during Slide show.
Select file.
Select folder.
Select aspect ratio.
Select file (within the same folder).
Select folder.
During PBC playback...
Select an item on the menu.
To return to the previous menu, press
To cancel PBC playback
1
2 Select the desired track.
• To resume PBC, press
Stop playback.
Start playback/pause (if pressed
during playback).
Reverse/forward search*1
Forward slow motion during pause*2
(No sound can be heard.)
• Reverse slow motion does not work.
Press: Select track.
Hold: Reverse/forward search*3 (No
sound can be heard.)
Select aspect ratio.
twice
*1 Search speed: x2 ] x5 ] x10 ] x20 ] x60
*2 Slow motion speed: 1/32 ] 1/16 ] 1/8 ] 1/4 ] 1/2
*3 Search speed: x2 ] x10
Also functions as CLR (clear):
Erases a misentry if pressed while holding SHIFT.
Select track.
EN_KW-AVX710[EE].indb 26EN_KW-AVX710[EE].indb 26 07.12.6 2:19:17 PM07.12.6 2:19:17 PM
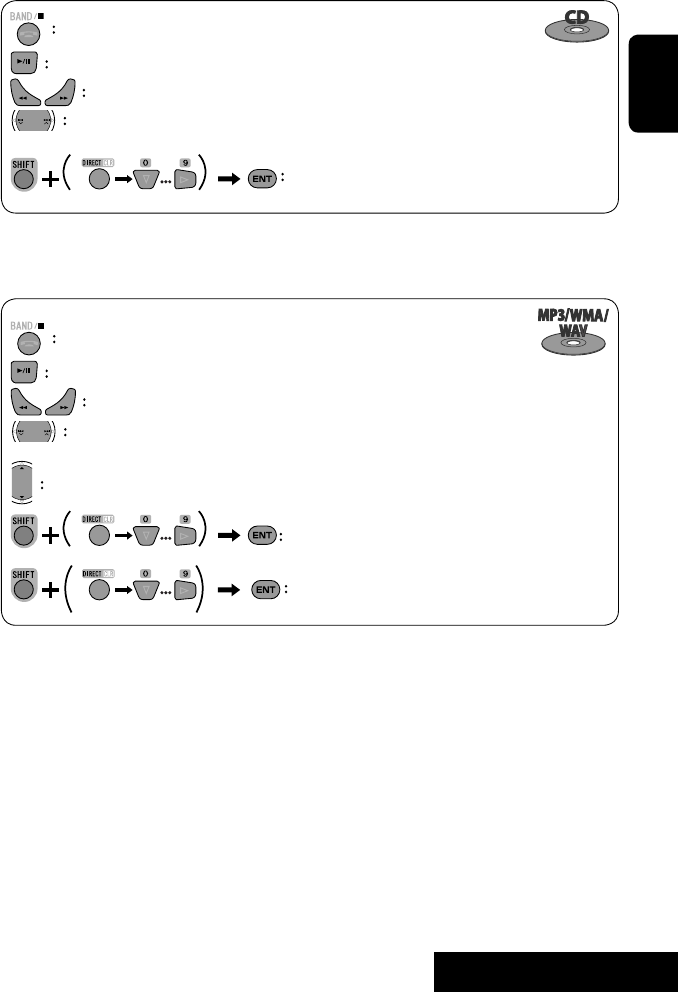
OPERATIONS
27
ENGLISH
Stop playback.
Start playback/pause (if pressed during playback).
Reverse/forward search*4
Press: Select track.
Hold: Reverse/forward search*5
Select track.
Stop playback.
Start playback/pause (if pressed during playback).
Reverse/forward search*4
Press: Select track.
Hold: Reverse/forward search*5
Select folder.
Select track (within the same folder).
Select folder.
*4 Search speed: x2 ] x5 ] x10 ] x20 ] x60
*5 Search speed: x2 ] x10
twice
EN_KW-AVX710[EE].indb 27EN_KW-AVX710[EE].indb 27 07.12.6 2:19:17 PM07.12.6 2:19:17 PM

28
ENGLISH
Operations using the on-screen
bar
These operations are possible on the screen using
the remote controller, while playing the following
discs—DVD/VCD/DivX/MPEG1/MPEG2/JPEG.
1 Display the on-screen bar. (☞page 29)
Ex. For DVD-Video
2 Select an item.
3 Make a selection.
If a pop-up menu appears...
• For entering time/numbers...
:
Move the entry position
:
Select a number
To remove the on-screen bar
Using the list screens
You can use Original Program or Playlist
screen anytime while playing DVD-VR with its data
recorded.
1 Display the Original Program/Playlist screen.
2 Select an item you want.
To erase the screen
1 Original Program/Playlist number
2 Recording date
3 Recording source (TV station, the input terminal of
the recording equipment, etc.)
4 Start time of recording
5 Title of the program/playlist*
6 Highlight bar (current selection)
7 Creating date of playlist
8 Total number of chapters included in the playlist
9 Playback time
* The title of the original program or playlist may not be
displayed depending on the recording equipment.
EN_KW-AVX710[EE].indb 28EN_KW-AVX710[EE].indb 28 07.12.6 2:19:18 PM07.12.6 2:19:18 PM

OPERATIONS
29
ENGLISH
Information
Operation
On-screen bar
5 Time indication
Elapsed playing time of the disc
Remaining title time (for DVD)
Remaining disc time (for others)
Elapsed playing time of the current
chapter/track *2
Remaining time of the current
chapter/track *2
6 Playback status
Play
Reverse/forward search
Reverse/forward slow-motion
Pause
Stop
7 Operation icons
Change time indication (see 5)
Time Search (Specify a certain
scene by entering time.)
Title Search (by its number)
Chapter Search (by its number)
Track Search (by its number)
Repeat play *1
Random play *1
Change the audio language, audio
stream, or audio channel
Change or erase the subtitle
language
Change the view angle
*1 ☞ page 21
*2 Not applicable for DVD-VR
Above example is of DVD Video. Items shown on the bar vary due to the disc type.
1 Disc type
2 • DVD: Audio signal format
• VCD: PBC
3 Playback mode *1
DVD Video:
C. RPT: Chapter repeat
T. RPT: Title repeat
DVD-VR:
C. RPT: Chapter repeat
PG. RPT: Program repeat
DivX/MPEG1/MPEG2:
T. RPT: Track repeat
F. RPT: Folder repeat
F. RND: Folder random
A. RND: All (Disc) random
JPEG:
F. RPT: Folder repeat
VCD:
T. RPT: Track repeat
A. RND: All (Disc) random
4 Playback information
Current title/chapter
Current program/chapter
Current Playlist/chapter
Current track
Current folder/track
Current folder/file
EN_KW-AVX710[EE].indb 29EN_KW-AVX710[EE].indb 29 07.12.6 2:19:19 PM07.12.6 2:19:19 PM

30
ENGLISH
Bluetooth® operations — Cellular phone/audio player
For Bluetooth operations, it is required to connect the
Bluetooth Adapter (KS-BTA200) to the CD changer jack
on the rear.
• Refer also to the instructions supplied with the
Bluetooth Adapter and the Bluetooth device.
• Refer to the list (included in the box) to see the
countries where you may use the Bluetooth®
function.
To use a Bluetooth device through the unit (“Bluetooth
PHONE” and “Bluetooth AUDIO”) for the first time,
you need to establish Bluetooth wireless connection
between the unit and the device.
• Once the connection is established, it is registered in
the unit even if you reset your unit. Up to five devices
can be registered in total.
• Only one device can be connected at a time for each
source (“Bluetooth PHONE” and “Bluetooth AUDIO”).
Connecting a new Bluetooth
device
Registration (Pairing) methods
Use either of the following items in <Bluetooth>
menu to register and establish the connection with a
device.
• Select “Bluetooth PHONE” or “Bluetooth AUDIO” as
the source to operate <Bluetooth> menu.
Open Make the unit ready to establish
a new Bluetooth connection.
The connection is established by
operating the Bluetooth device.
Search Make the unit ready to establish
a new Bluetooth connection.
The connection is established by
operating this unit.
To register using <Open>
Preparation:
Operate the Bluetooth device to turn on its Bluetooth
function.
1 • Make sure “New Device” is selected. If not, press
[5] or [∞] to select it.
2
3
4 Enter a PIN (Personal Identification
Number)* code to the unit.
• You can enter any number you like (1-digit to
16-digit number).
* Some devices have their own PIN code. Enter the
specified PIN code to the unit.
Go to other menu items
EN_KW-AVX710[EE].indb 30EN_KW-AVX710[EE].indb 30 07.12.6 2:19:20 PM07.12.6 2:19:20 PM

31 EXTERNAL DEVICES
ENGLISH
You can enter [0] – [9] only.
• [BS]: Erases the character before the cursor.
• [Del]: Erases the character on the cursor.
• [Enter]: Confirms the entry.
5 Operate the Bluetooth device to connect
while “Open...” is displayed on the screen.
Enter the same PIN code (as entered in the above
step) on the device to be connected.
Now connection is established and you can use the
device through the unit.
The device remains registered even after you
disconnect the device. Use <Connect> (or activate
<Auto Connect>) to connect the same device
from next time (☞ the following, and pages 58
and 59).
To register using <Search>
• Make sure “New Device” is selected. If not, press [5]
or [∞] to select it.
1 Press [AV MENU].
2 Press [Bluetooth].
3 Press [Search].
The unit searches for available devices and displays
the list of them. (If no available device is detected,
“Device Unfound” appears.)
4 Select a device you want to connect.
5 Enter the specific PIN code of the device to
the unit.
• Refer to the instructions supplied with the device
to check the PIN code.
6 Operate the Bluetooth device to connect
while “Connecting...” is displayed on the
screen.
Now connection is established and you can use the
device through the unit.
To connect a special device <Special
Device>
1 Press [AV MENU].
2 Press [Bluetooth].
3 Press [Special Device].
The unit displays the list of the preset devices.
4 Select a device you want to connect.
5 Use <Open> (or <Search>) to connect.
To connect/disconnect a registered
device
1 Select “Bluetooth PHONE” or “Bluetooth
AUDIO,” then select a registered device you
want to connect/disconnect.
2 Press [AV MENU].
3 Press [Bluetooth].
4 Press [Connect] or [Disconnect].
• Select <Connect> to connect the selected
device.
• Select <Disconnect> to disconnect the selected
device.
To delete a registered device
1 Select “Bluetooth PHONE” or “Bluetooth
AUDIO,” then select a registered device you
want to delete.
2 Press [AV MENU].
3 Press [Bluetooth].
4 Press [Delete Pairing].
Confirmation screen appears. Press [Yes].
EN_KW-AVX710[EE].indb 31EN_KW-AVX710[EE].indb 31 07.12.6 2:19:21 PM07.12.6 2:19:21 PM

32
ENGLISH
Using the Bluetooth cellular phone
Adjust the volume of the incoming calls.*2
When a call comes in...
The source is changed to “Bluetooth PHONE”
automatically.
Name and phone number (if acquired)
When <Auto Answer> is activated...
The unit answers the incoming call automatically.
(☞ page 59)
☞ page 34
When <Auto Answer> is deactivated...
To answer the incoming call
• Press any button on the monitor panel (except
/ATT or +/–).
• Press the message displayed on the touch panel.
To end the call
• Hold any button on the monitor panel (except
/ATT or +/–).
• Hold the message displayed on the touch panel.
• You can adjust the microphone volume. (☞ page 59)
~ Press [SOURCE], then press [Bluetooth PHONE]. (☞ page 9)
• You can also use SOURCE on the monitor panel. Press it repeatedly.
Ÿ Press [AV MENU].
! Press [Bluetooth].
⁄ Establish the connection with a device, then make a call (or settings using <Bluetooth>
menu).
☞ pages 58 and 59
Sound mode
(☞ page 48) Status of the device
Signal strength/Battery
remainder
(only when the information
comes from the device)
[AV MENU] Hold: Activates <Voice Dialing> function
[5 ∞] Select the registered device
(“New Device” appears when a new device can be registered.)
The Bluetooth icon
lights up when
the adapter is
connected.
: Buttons on the touch panel. In the
explanation, they are indicated inside
[ ].
*1 When a cellular phone with audio function is connected, appears.
*2 This adjustment does not affect the volume level of the other sources.
*1
EN_KW-AVX710[EE].indb 32EN_KW-AVX710[EE].indb 32 07.12.6 2:19:21 PM07.12.6 2:19:21 PM

33 EXTERNAL DEVICES
ENGLISH
3
4 Select a calling method, then call.
Redial Shows the list of the phone
numbers you have dialed.
Received Calls Shows the list of the received
calls.
Phonebook Shows the phone book of the
connected cellular phone.
Missed Calls Shows the list of the missed
calls.
Phone
Number
Shows the phone number
entry screen = “Entering a
phone number” (☞ page 34).
Voice Dialing (Only when the connected
cellular phone has the voice
recognition system): = Speak
the name you want to call.
When an SMS comes in...
If the cellular phone is compatible with SMS (Short
Message Service), you can read the messages on the
screen.
• You cannot edit or send a message through the unit.
When <Message Info> is set to <Auto>...
The unit rings and the following screen is displayed to
inform you of a message arrival. (☞ page 59)
To read the message, press [Yes].
The source is changed to “Bluetooth PHONE.”
To read the message later, press [No].
• The message is stored into <Message> =
<Unread>. (☞ page 58)
When <Message Info> is set to <Manual>...
Access the message list to read messages. (☞ pages
58 and 59)
To make a call
1
2
Cancel
EN_KW-AVX710[EE].indb 33EN_KW-AVX710[EE].indb 33 07.12.6 2:19:22 PM07.12.6 2:19:22 PM
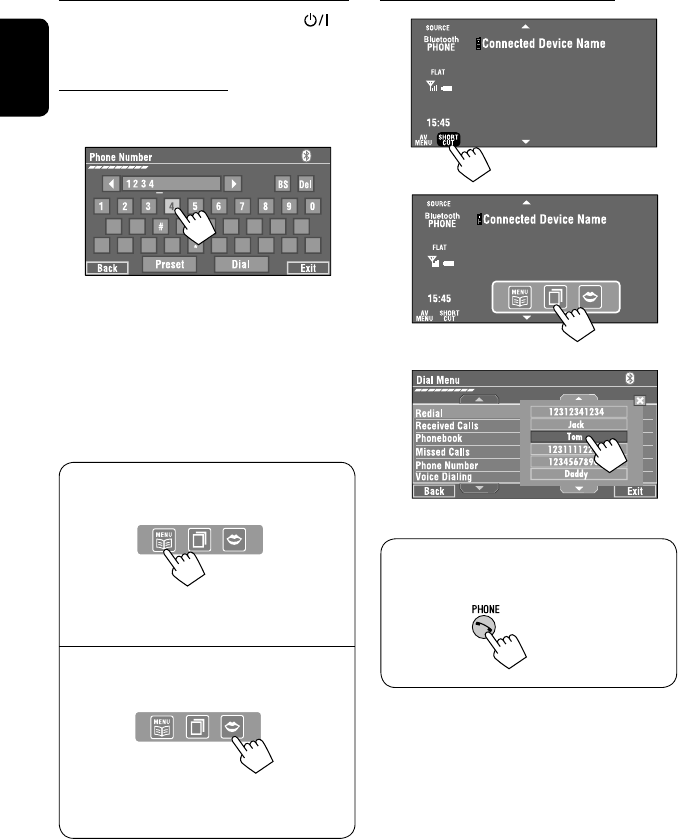
34
ENGLISH
To stop ringing (canceling the outgoing call)
Hold any button on the monitor panel (except /ATT
or +/–).
Entering a phone number
• You cannot use the remote controller to enter phone
numbers.
You can enter [0] – [9], [*], [#] (up to 32 numbers)
• [BS]: Erases the character before the cursor.
• [Del]: Erases the character on the cursor.
• [Preset]: Goes to Preset List. You can preset the
entered number by selecting a preset
number. (☞ page 35)
• [Dial]: Calls the entered number.
• You can easily access <Dial Menu> by pressing
[SHORT CUT] on the touch panel, then...
You can also access <Dial Menu> by holding
SOURCE on the monitor panel.
• You can easily activate <Voice Dialing> by
pressing [SHORT CUT] on the touch panel, then...
You can also activate <Voice Dialing> by
holding [AV MENU].
To redial previously dialed numbers
1
2
3
When using the remote controller, you can
display <Redial> menu anytime .
[Hold]
EN_KW-AVX710[EE].indb 34EN_KW-AVX710[EE].indb 34 07.12.6 2:19:23 PM07.12.6 2:19:23 PM

35 EXTERNAL DEVICES
ENGLISH
To call a preset number
1
2
You can use the following buttons on the remote
controller for the Bluetooth phone operations.
Presetting the phone numbers
You can preset up to six phone numbers.
1 Select the phone number you want to preset
from <Phonebook>, <Redial>, <Received
Calls>, or <Missed Calls>.
1 Press [AV MENU].
2 Press [Bluetooth].
3 Press [Dial Menu], then...
Ex.: Selecting <Received Calls>
2 Select a telephone number to store.
3 Select a preset number.
Now “Tom” is stored into preset no. 1.
• Display <Dial Menu> screen/Answer
the incoming call.
• Display the <Redial> menu if pressed
and held (regardless of the current
source).
End the call.
Adjust the volume.
Make a call to the preset numbers.
[Hold]
:
:
:
:
EN_KW-AVX710[EE].indb 35EN_KW-AVX710[EE].indb 35 07.12.6 2:19:24 PM07.12.6 2:19:24 PM

36
ENGLISH
Bluetooth Information:
If you wish to receive more information about Bluetooth, visit the following JVC web site: <http://www.
jvc-victor.co.jp/english/car/>
You can use the following buttons on the remote
controller for the Bluetooth audio operations.
Using the Bluetooth audio player
☞ page 48
Sound mode
(☞ page 48)
[3 / 8] [7] Start and pause playback
[4 ¢] Reverse/forward skip
[5 ∞] Select the registered device
(“New Device” appears when a new device can
be registered.*3)
Status of the device
Signal strength/Battery
remainder
(only when the information
comes from the device)
The Bluetooth icon
lights up when
the adapter is
connected.
~ Press [SOURCE], then press [Bluetooth
AUDIO]. (☞ page 9)
• You can also use SOURCE on the monitor
panel. Press it repeatedly.
Ÿ Start playback.
: Buttons on the touch panel. In the
explanation, they are indicated
inside [ ].
*2
*1
*1 When a cellular phone with audio function is connected, appears.
*2 Indicates the button pressed. It may be different from the operation status.
*3 You cannot select “New Device” when a Bluetooth audio player is connected.
Start and pause playback.
Reverse/forward skip
Adjust the volume.
:
:
:
EN_KW-AVX710[EE].indb 36EN_KW-AVX710[EE].indb 36 07.12.6 2:19:24 PM07.12.6 2:19:24 PM

37 EXTERNAL DEVICES
ENGLISH
Preparation:
Make sure <Changer> is selected for <External
Input>. (☞ page 55)
~ Press [SOURCE], then press [CD-CH]. (☞
page 9)
• You can also use SOURCE on the monitor
panel. Press it repeatedly.
Ÿ
! Display the Disc List.
Listening to the CD changer
It is recommended to use a JVC MP3-compatible CD changer with your unit.
• You can play only CDs (CD-DA) and MP3 discs.
Folder no./Track no./Playing time
Disc no.
MP3 indicator
☞ page 38
Tag data appears only when it is
recorded.
⁄ Select a disc to start playing.
• If you select an MP3 disc, the Track list of the
current folder appears. You can select a track
and start playing. (☞ also page 22)
• If you select a folder on the list, you can start
playing the first track of the folder.
To go to the other list
Sound mode
(☞ page 48)
[4 ¢] Press: Select track
Hold: Reverse/forward search
[5 ∞] Press: Select folders (only for MP3)
Hold: Display Disc list
Total track no. included on the
disc
Ex. while playing an MP3 disc
: Buttons on the touch panel. In the
explanation, they are indicated inside [ ].
EN_KW-AVX710[EE].indb 37EN_KW-AVX710[EE].indb 37 07.12.6 2:19:25 PM07.12.6 2:19:25 PM

38
ENGLISH
When one of the playback modes is selected, the
corresponding indicator lights up on the source
information screen.
To cancel, select <Off>.
You can use following playback modes—Repeat or
Random.
Ex.: To select Track Repeat for an MP3 disc
1 Press [AV MENU].
2 Press [Mode].
3
Selecting playback modes
Disc type Repeat Random
Track: Repeats current track
Disc: Repeats all tracks of the current disc
Disc: Randomly plays all tracks of the
current disc
All: Randomly plays all tracks of all
loaded discs
Track: Repeats current track
Folder: Repeats all tracks of the current
folder
Disc: Repeats all tracks of the current disc
Folder: Randomly plays all tracks of current
folder, then tracks of next folders
Disc: Randomly plays all tracks of the
current disc
All: Randomly plays all tracks of all
loaded discs
You can use the following buttons on the remote
controller to operate the CD changer.
You can easily turn on or off Track Repeat by
pressing [SHORT CUT] on the touch panel, then...
: Select disc.
: Select folder (MP3 only).
• Press: Select track.
• Hold: Reverse/forward search
☞ page 48
EN_KW-AVX710[EE].indb 38EN_KW-AVX710[EE].indb 38 07.12.6 2:19:26 PM07.12.6 2:19:26 PM

39 EXTERNAL DEVICES
ENGLISH
~ Press [SOURCE], then press [DAB]. (☞ page 9)
• You can also use SOURCE on the monitor panel. Press it repeatedly.
Ÿ Press [BAND].
! Press [4] or [¢] to search for an ensemble—Auto Search.
• Manual Search: Hold either [4]or [¢] until “Manual Search” appears on the screen, then press it
repeatedly.
⁄ Press [∞] or [5] to select a service (either primary or secondary) to listen to.
Listening to the DAB tuner
Preset no.
Band
☞ page 42
DAB indicators */Standby
Reception indicators
If no signal is received, “No DAB Signal” appears.
* While tuning in a service with DLS (Dynamic Label
Segment), the TEXT indicator lights up.
Sound mode
(☞ page 48)
: Buttons on the touch panel. In the
explanation, they are indicated
inside [ ].
EN_KW-AVX710[EE].indb 39EN_KW-AVX710[EE].indb 39 07.12.6 2:19:26 PM07.12.6 2:19:26 PM
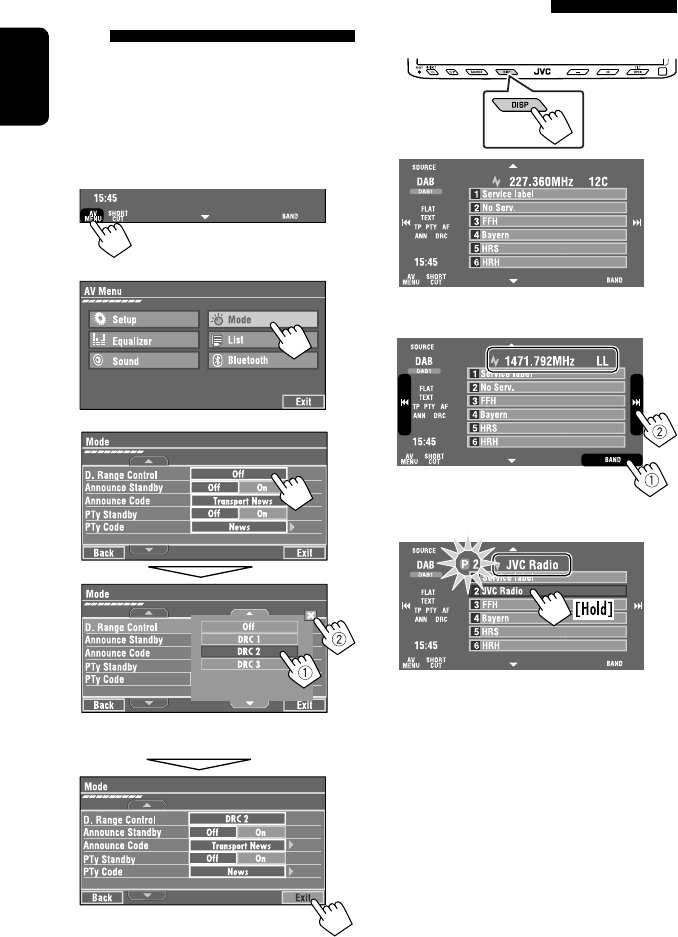
40
ENGLISH
Manual presetting
1 Display the Preset List.
2 Tune in to a service you want to preset.
3 Select a preset number.
The service selected in step 2 is now stored in
preset number 2.
When surrounding sounds are
noisy
Some services provide Dynamic Range Control (DRC)
signals together with their regular programme signals.
DRC will reinforce the low level sounds to improve your
listening.
• The DRC indicator will light up while tuning in to a
service with the DRC signals.
1
2
3
• As the number increases, the effect becomes
stronger.
EN_KW-AVX710[EE].indb 40EN_KW-AVX710[EE].indb 40 07.12.6 2:19:27 PM07.12.6 2:19:27 PM

41 EXTERNAL DEVICES
ENGLISH
Selecting preset services
On the remote:
1
2
On the unit:
1
2
Activating/deactivating TA/PTY
Standby Reception
Operations are exactly the same as explained on page
14 for FM Radio Data System stations.
• You cannot store PTY codes separately for the DAB
tuner and for the FM tuner.
Activating/deactivating
Announcement Standby
Reception
Announcement Standby Reception allows the
unit to switch temporarily to your favorite service
(announcement type).
Announcement Standby Reception Indicator
To activate, display <AV Menu>
screen, then select <Mode>, press
[On] for <Announce Standby>. (☞
below)
ANN
The unit will temporarily switch to your
favorite service from any source other
than FM/AM.
Lights up
Not yet activated. Tune in to another
service providing the related signals.
Flashes
To deactivate, press [Off] for
<Announce Standby> (☞ below).
Goes off
To activate Announcement Standby
Reception
1 Press [AV MENU].
2 Press [Mode].
3
Announcement Standby Reception is now
activated for PTY code <Transport News>: the
initial setting.
Continued on the next page
[Hold]
EN_KW-AVX710[EE].indb 41EN_KW-AVX710[EE].indb 41 07.12.6 2:19:27 PM07.12.6 2:19:27 PM
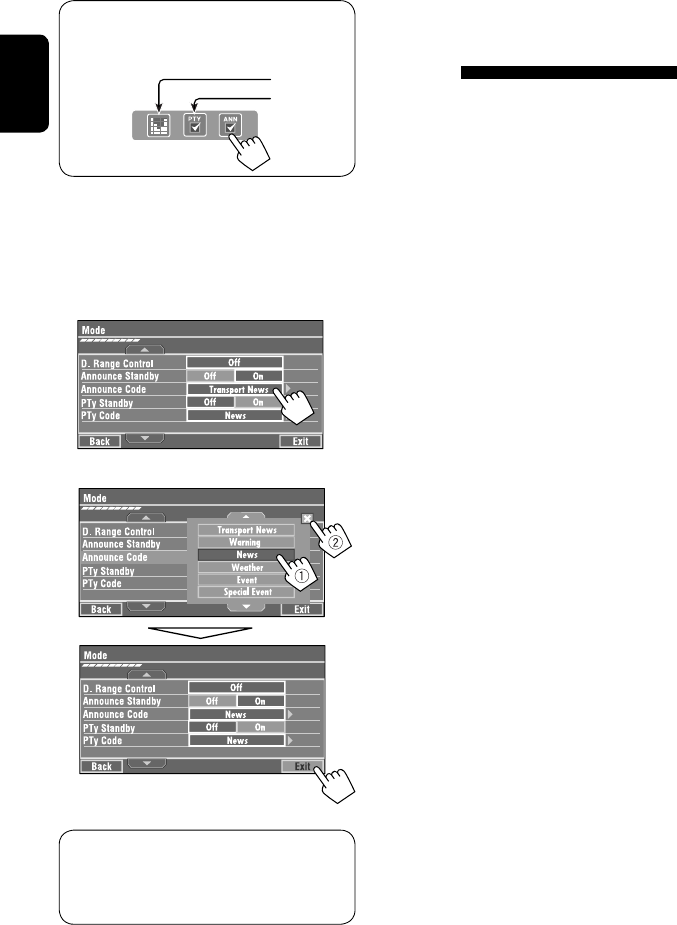
42
ENGLISH
Tracing the same programme—
Alternative Frequency Reception
(DAB AF)
• While receiving a DAB service:
When driving in an area where a service cannot
be received, this unit automatically tunes in to
another ensemble or FM Radio Data System station
broadcasting the same programme.
• While receiving an FM Radio Data System
station:
When driving in an area where a DAB service is
broadcasting the same programme as the FM Radio
Data System station, this unit automatically tunes in
to the DAB service.
When shipped from the factory, Alternative Frequency
Reception is activated.
To deactivate the Alternative Frequency
Reception, select <Off> for <DAB AF>. (☞ page
54)
You can easily activate and deactivate
Announcement Standby Reception by pressing
[SHORT CUT] on the touch panel, then...
To change the announcement type for
Announcement Standby Reception
1 Press [AV MENU].
2 Press [Mode].
3
4 Select your favorite announcement type.
Available announcement types:
Transport News, Warning, News, Weather, Event,
Special Event, Radio Info, Sports News, Financial
News
☞ page 48
☞ page 14
EN_KW-AVX710[EE].indb 42EN_KW-AVX710[EE].indb 42 07.12.6 2:19:28 PM07.12.6 2:19:28 PM

43 EXTERNAL DEVICES
ENGLISH
Listening to the iPod
It is required to connect the Interface adapter for iPod (KS-PD100) to the CD changer jack on the rear.
Preparation:
Make sure <iPod> is selected for <External Input>. (☞ page 55)
~ Press [SOURCE], then press [iPod] (☞ page 9)
Playback starts automatically.
• You can also use SOURCE on the monitor panel. Press it repeatedly.
Ÿ Press [4] or [¢] to select a track.
Track no./Playing time
☞ page 44
[4 ¢] Press: Select track
Hold: Reverse/forward search
[5] Enter player’s menu
[∞] Start playback/pause
• To resume, press again.
Sound mode
(☞ page 48)
: Buttons on the touch panel. In the
explanation, they are indicated
inside [ ].
EN_KW-AVX710[EE].indb 43EN_KW-AVX710[EE].indb 43 07.12.6 2:19:28 PM07.12.6 2:19:28 PM
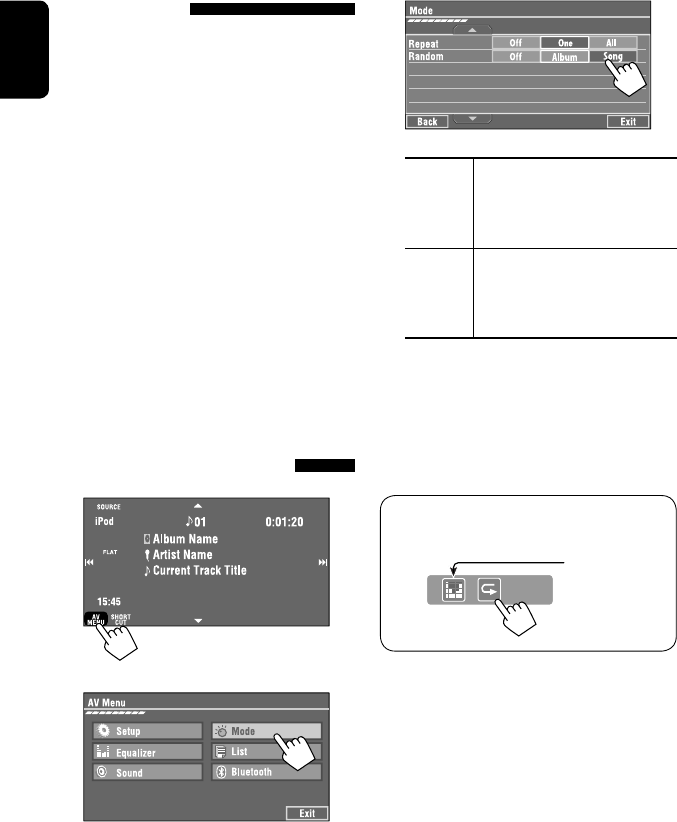
44
ENGLISH
Selecting a track from the
player’s menu
1 Press [5] to enter the player’s menu.
“SEARCH” flashes on the screen during menu
operations.
• This mode will be canceled if no operations are
done for about five seconds.
2 Press [4] or [¢] to select the desired
item.
Press: Select an item.
Hold: Skip ten items at a time if there are more
than ten items.
Playlists Ô Artists Ô Albums Ô Songs Ô
Genres Ô Composers Ô (back to the beginning)
3 Press [∞] to confirm the selection.
4 Repeat steps 2 and 3 to select a track.
• When a track is selected finally, playback starts.
• To return to the previous menu, press [5].
Selecting playback modes
1
2
3 Select an appropriate option.
Repeat One: Functions the same as
“Repeat One.”
All: Functions the same as
“Repeat All.”
Random Album: Functions the same as
“Shuffle Albums.”
Song: Functions the same as
“Shuffle Songs.”
• When the playback modes are selected, the
corresponding indicators light up alternately on
the screen.
To cancel, select <Off>.
You can easily turn on or off Track Repeat by
pressing [SHORT CUT] on the touch panel, then...
☞ page 48
EN_KW-AVX710[EE].indb 44EN_KW-AVX710[EE].indb 44 07.12.6 2:19:29 PM07.12.6 2:19:29 PM
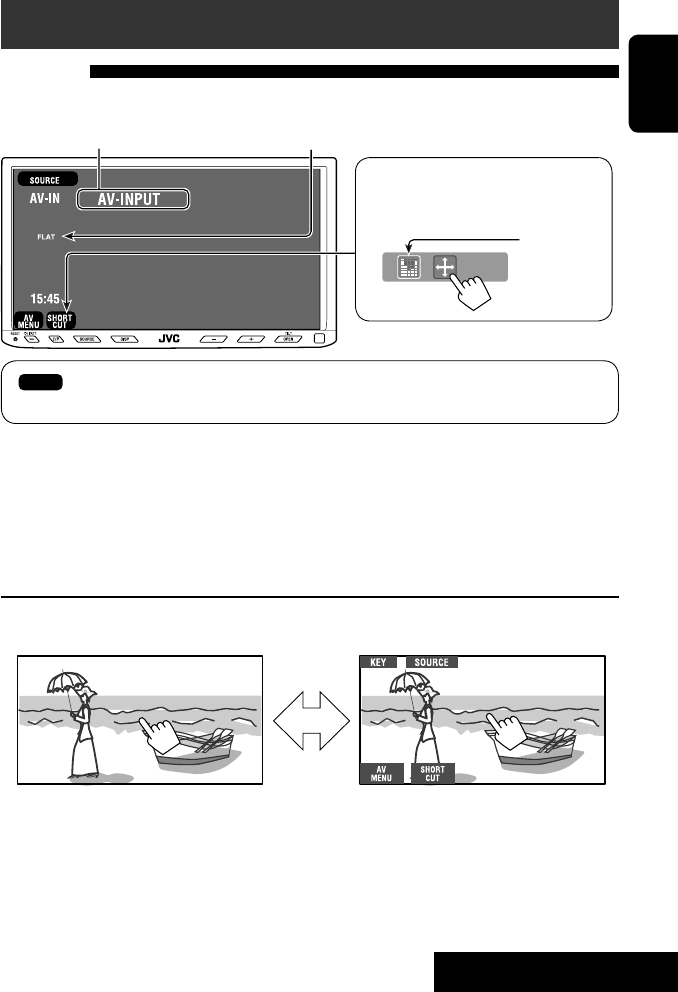
45 EXTERNAL DEVICES
ENGLISH
Using other external components
AV-INPUT
You can connect an external component to the LINE IN/VIDEO IN terminals.
~ Press [SOURCE], then press [AV-IN]. (☞ page 9)
• You can also use SOURCE on the monitor panel. Press it repeatedly.
Ÿ Turn on the connected component and start playing the source.
To display the operation buttons (☞ page 20) while watching the playback picture
• If no operations are done for about five seconds, the operation buttons disappear.
• [KEY] does not work when the source is “AV-IN.”
Touch the screen (center portion).
You can easily access to <Aspect> setting
menu by pressing [SHORT CUT] on the
touch panel, then...
Assigned title (☞ page 49) Sound mode (☞ page 48)
Touch the screen (center portion).
: Buttons on the touch panel. In the explanation, they are indicated inside [ ].
These buttons also work when they are not shown on the touch panel (while watching the playback picture).
Continued on the next page
☞ page 48
EN_KW-AVX710[EE].indb 45EN_KW-AVX710[EE].indb 45 07.12.6 2:19:29 PM07.12.6 2:19:29 PM

46
ENGLISH
To display the operation buttons (☞ page 20) while viewing the navigation screen
• The operation buttons displayed on the screen vary among the playback sources.
• If no operations are done for about five seconds, the operation buttons disappear.
• The above buttons except [KEY] also work when they are not shown on the screen (while viewing the navigation
screen).
Navigation screen
You can also connect a Navigation System to the VIDEO IN terminal so that you can watch the navigation screen.
Preparation:
Make sure <Navigation> is selected for <AV Input>. (☞ page 55)
To view the navigation screen (and listen to the navigation guidance*)
Press DISP on the monitor panel repeatedly. (☞ page 9)
• The aspect ratio of the navigation screen is fixed to
<Full> regardless of the <Aspect> setting. (☞ page
52)
* If your Navigation System is equipped with the voice guidance function.
When <Navigation> is selected for <AV Input> (☞ page 55)
• You can use the source “AV-IN” for listening to an audio source connected to the LINE IN terminals.
• Some status messages such as volume level will not appear on the screen.
Touch the screen (center portion). Touch the screen (center portion).
EN_KW-AVX710[EE].indb 46EN_KW-AVX710[EE].indb 46 07.12.6 2:19:30 PM07.12.6 2:19:30 PM

47 EXTERNAL DEVICES
ENGLISH
EXT-INPUT
You can connect an external component to the CD changer jack on the rear using the Line Input Adapter—KS-U57
(not supplied) or AUX Input Adapter—KS-U58 (not supplied).
Preparation:
Make sure <External> is selected for <External Input>. (☞ page 55)
~ Press [SOURCE], then press [EXT-IN]. (☞ page 9)
• You can also use SOURCE on the monitor panel. Press it repeatedly.
Ÿ Turn on the connected component and start playing the source.
Assigned title (☞ page 49)
☞ page 48
Sound mode
(☞ page 48)
EXTERNAL DEVICES
: Buttons on the touch panel. In the explanation, they are indicated inside [ ].
EN_KW-AVX710[EE].indb 47EN_KW-AVX710[EE].indb 47 07.12.6 2:19:30 PM07.12.6 2:19:30 PM

48
ENGLISH
~
Ÿ
! Select a sound mode.
Sound equalization
Storing your own adjustments
You can store your adjustments into <User1>,
<User2>, and <User3>.
1 Repeat steps ~ and Ÿ, then in step !...
2 Adjust (1), then store (2).
Ex.: When storing into <User2>.
While playing back any source other
than “Bluetooth PHONE,” you can easily
access <Equalizer> menu by pressing
[SHORT CUT] on the touch panel, then...
Move to other six sound modes
EN_KW-AVX710[EE].indb 48EN_KW-AVX710[EE].indb 48 07.12.6 2:19:31 PM07.12.6 2:19:31 PM
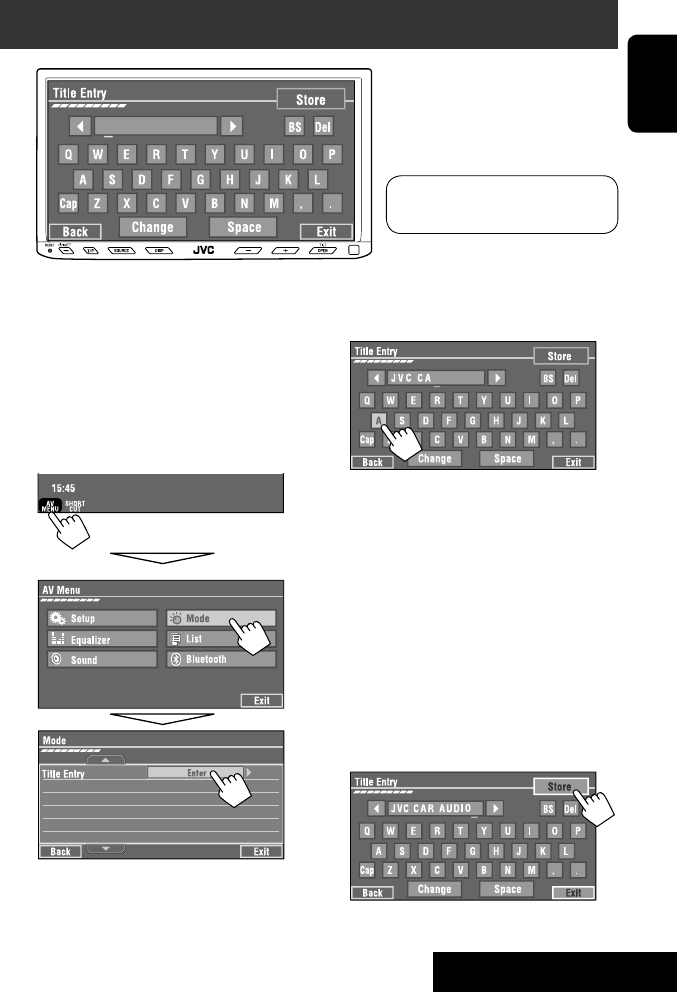
SETTINGS
49
ENGLISH
You can assign titles to “AV-IN” and “EXT-IN.”
~ Press [SOURCE], then press [AV-IN] or
[EXT-IN]. (☞ page 9)
• You can also use SOURCE on the monitor
panel. Press it repeatedly.
Ÿ Display <Title Entry> screen.
! Assign a title.
You can enter up to 16 characters (for available
characters, ☞ page 67).
• [Store]: Confirm the entry.
• [2/3]: Move the cursor.
• [BS]: Erase the character before the
cursor.
• [Del]: Erase the character on the cursor.
• [Cap]: Change the letter case (upper/
lower).
• [Change]: Change the character set.
• [Space]: Enter a space.
⁄ Finish the procedure.
Assigning titles to the sources
In the explanation, buttons on the
touch panel are indicated inside [ ].
EN_KW-AVX710[EE].indb 49EN_KW-AVX710[EE].indb 49 07.12.6 2:19:31 PM07.12.6 2:19:31 PM

50
ENGLISH
!
Menu operations
The following steps are one of the fundamental
procedures. Some of the settings do not open the
sub-setting window, but just selecting an option will
change the setting.
• The display indications may change according to
change of the specifications.
Ex.: Changing the <AV Input> setting
~
Ÿ
Non-available items will be shaded.
EN_KW-AVX710[EE].indb 50EN_KW-AVX710[EE].indb 50 07.12.6 2:19:32 PM07.12.6 2:19:32 PM

SETTINGS
51
ENGLISH
Setup
Menu items Selectable settings, [reference page]
Display
Demonstration Off: Cancels.
On: Activates the demonstration on the screen. To stop it temporarily,
touch the screen.
Wall Paper You can select the background picture of the screen.
Horizon, Metal, Art, Plain
Color You can select the color of the background picture.
Blue, Light-Blue, Red, Orange, Yellow, Green, Purple, Dark-Blue,
Dark-Green, Brown, Light-Brown, Black
Scroll Off: Cancels.
Once: Scrolls the disc information once.
Auto: Repeats scrolling (five-second intervals).
• Holding DISP on the monitor panel scrolls the information regardless
of this setting.
Dimmer Off: Cancels.
On: Activates dimmer.
Auto: Dims the monitor when you turn on the headlights.*1
Dimmer Time Set : Activates the Dimmer Time setting below.
Dimmer Time Set Sets the Dimmer On/Off times.
Dimmer Level You can select the brightness for dimmer.
1 (bright), 2 (middle), 3 (dark)
Bright You can adjust brightness of the screen.
–15 (darkest) to +15 (brightest); Initial 00
Picture Adjust*2You can adjust the following to make the screen clear and legible for
watching the playback picture. The setting will be stored—one for
“DISC” (common) and the other for “AV-IN.”
–15 to +15; Initial 0
Bright: Adjust if the picture is too bright or too dark.
Contrast: Adjust the contrast.
Color: Adjust the color of the picture—lighter or darker.
• Press [5] or [∞] to adjust.
• You cannot adjust <Tint>. (fixed)
Initial: Underlined
*1 The ILLUMINATION lead connection is required. (☞ Installation/Connection Manual)
*2 Adjustable only when the source is “DISC” (the inserted disc must contain pictures or movies) or “AV-IN.”
The procedure for setting an item is shown on page 50.
EN_KW-AVX710[EE].indb 51EN_KW-AVX710[EE].indb 51 07.12.6 2:19:32 PM07.12.6 2:19:32 PM

52
ENGLISH
Menu items Selectable settings, [reference page]
Display
Aspect*1You can change the aspect ratio of the picture.
Aspect ratio of incoming signal
4:3 16:9
Regular:
For 4:3 original pictures
Full:
For 16:9 original pictures
Auto: • For “DISC”: Aspect ratio is automatically
selected to match to the incoming signals.
• For the other video sources: Aspect ratio is
fixed to <Regular>.
Language*2Select the indication language shown on the screen.
English, Español, Français, Deutsch, Italiano, Nederlands,
Svenska, Dansk, Руccĸий, Português
• The characters you can enter for assigning the titles also change
according to the language selected, ☞ [67].
Clock
Time Set Initial 0:00 ☞ [8]
Time Format Select either 12-hour system or 24-hour system.
12Hours, 24Hours ☞ [8]
OSD Clock When <On> is selected, the clock time is displayed on the playback
picture.
Off, On
Clock Adjust Select <Auto> to adjust the clock automatically using the clock time
(CT) data from an FM Radio Data System station.
Off, Auto ☞ [8]
*1 Not adjustable when no picture is shown.
*2 After you change the indication language setting, turn off then on the power so that your setting takes effect.
Initial: Underlined
EN_KW-AVX710[EE].indb 52EN_KW-AVX710[EE].indb 52 07.12.6 2:19:33 PM07.12.6 2:19:33 PM

SETTINGS
53
ENGLISH
Menu items Selectable settings, [reference page]
Disc
Menu Language*3Select the initial disc menu language; Initial Руccĸий (☞ also page
66).
Audio Language*3Select the initial audio language; Initial Руccĸий (☞ also page 66).
Subtitle*3Select the initial subtitle language or erase the subtitle (Off); Initial
Руccĸий (☞ also page 66).
Monitor Type*3Select the monitor type to watch a wide screen picture on the external
monitor.
16:9 : Select when the aspect ratio of the external monitor is 16:9.
4:3 LB (Letterbox)/4:3 PS (Pan Scan): Select when the aspect ratio of
the external monitor is 4:3.
• Refer to the illustrations on the left to see how the pictures are
shown on the screen.
OSD Position*3Select the position of the on-screen bar. ☞ [28]
1: Higher position
2: Lower position
File Type*3Select playback file type when a disc contains different types of files.
Audio: Plays back audio files.
Still Picture: Plays back JPEG files.
Video: Plays back DivX/MPEG1/MPEG2 files.
Audio&Video: Plays back audio files and DivX/MPEG1/MPEG2 files.
DivX Regist. (Registration)*3This unit has its own Registration Code. Once you have played back a
file with which the Registration Code recorded, this unit’s Registration
Code is overwritten for copyright protection.
D. Audio Output*3Select the signal format emitted through the DIGITAL OUT (optical)
terminal. (☞ also page 65)
PCM : Select this when connecting an amplifier or a decoder
incompatible with Dolby Digital, DTS, or MPEG Audio, or when
connecting to a recording device.
Dolby D : Select this when connecting an amplifier or a decoder
compatible with Dolby Digital.
Stream : Select this when connecting an amplifier or a decoder
compatible with Dolby Digital, DTS, or MPEG Audio.
*3 Selectable only for “DISC.” (Playback stops when you change the setting.)
Position 1 Position 2
16:9 4:3LB
4:3PS
The procedure for setting an item is shown on page 50.
EN_KW-AVX710[EE].indb 53EN_KW-AVX710[EE].indb 53 07.12.6 2:19:33 PM07.12.6 2:19:33 PM
54
ENGLISH
Menu items Selectable settings, [reference page]
Disc
Down Mix*1When playing back a multi-channel disc, this setting affects the signals
reproduced through the LINE OUT terminals.
Dolby SR : Select this to enjoy multi-channel surround audio by
connecting an amplifier compatible with Dolby Surround.
Stereo : Normally select this.
D. (Dynamic) Range
Compres. (Compression)*1
You can enjoy a powerful sound at a low volume level while playing
Dolby Digital software.
Auto: Select to apply the effect to multi-channel encoded software.
On: Select to always use this function.
Tuner
IF Band Width Auto: Increases the tuner selectivity to reduce interference noises
between adjacent stations. (Stereo effect may be lost.)
Wide: Subject to the interference from adjacent stations, but sound
quality will not be degraded and the stereo effect will remain.
AF Regional When the received signals from the current station become weak...
Off: Cancels—not selectable when <DAB AF> is set to <On>.
AF Reg. (Regional): Switches to another station broadcasting the same
programme. The REG indicator lights up.
AF: Switches to another station. The programme may differ from the
one currently received (the AF indicator lights up). ☞ [15]
TA Volume 00 to 30 or 50*2; Initial 15 ☞ [14]
Program Search Off, On ☞ [15]
DAB AF*3Off, On ☞ [42]
*1 Selectable only for “DISC.” (Playback stops when you change the setting.)
*2 Depends on the amplifier gain control. (☞ page 56)
*3 Appears only when DAB tuner is connected.
Initial: Underlined
EN_KW-AVX710[EE].indb 54EN_KW-AVX710[EE].indb 54 07.12.6 2:19:34 PM07.12.6 2:19:34 PM
SETTINGS
55
ENGLISH
Menu items Selectable settings, [reference page]
Input
AV Input*4
You can determine the use of LINE IN and VIDEO IN terminals. ☞ [45, 46
]
Off: Select when no component is connected (“AV-IN” is skipped while
selecting the source).
Audio&Video: Select when connecting an AV component such as a
VCR.
Audio: Select when connecting an audio component such as a portable
audio player.
Camera*5 : Select when connecting a rear view camera.
Navigation : Select when connecting a Navigation System.
External Input*6For connecting an external component to the CD changer jack on the
rear.
Changer/iPod*7: CD changer or iPod. ☞ [37, 43]
External: Any other than the above. ☞ [47]
• For connecting the Bluetooth adapter and DAB tuner, this setting is
not required. They are automatically detected.
Others
Beep Off: Cancels.
On: Activates the key-touch tone.
Telephone Muting*8Off: Cancels.
Muting1, Muting2: Select either one which mutes the sounds while
using the car phone system.
Power LED Flash Off: Cancels.
On: When the ignition is turned off, the lamp on the button
flashes.
TouchPanel Sens. Change the sensitivity of the touch panel. As the number decreases,
sensitivity becomes higher. 1/2/3
Initialize Initialize all settings you have made in <AV Menu>. Press and hold
[Enter] to initialize the settings, then reset the unit. ☞ [3]
*4 Not selectable when “AV-IN” is selected as the source.
*5 The REVERSE GEAR SIGNAL lead connection is required. See Installation/Connection Manual. The rear view through
the camera appears on the screen in <Full> aspect ratio (regardless of the aspect ratio setting) when you shift the
gear to the reverse (R) position. When you press DISP on the control panel, or when you shift the gear to another
position other than the reverse (R) position, the rear view screen is cleared.
*6 Not selectable when the component connected to the CD changer jack is selected as the source.
*7 The name of the component detected through the CD changer jack is shown.
*8 The TEL MUTING lead connection is required. See Installation/Connection Manual.
The procedure for setting an item is shown on page 50.
EN_KW-AVX710[EE].indb 55EN_KW-AVX710[EE].indb 55 07.12.6 2:19:34 PM07.12.6 2:19:34 PM

56
ENGLISH
Equalizer
Flat/Hard Rock/R&B/Pop/Jazz/Dance/Country/Reggae/Classic/User1/User2/User3 ☞ [48]
Sound
Menu items Selectable settings, [reference page]
Fader/Balance Adjust fader—speaker output balance between the front and rear speakers.
• Upmost—front only (F6)
• Downmost—rear only (R6)
When using a two-speaker system, set the fader to the center (0).
Adjust balance—speaker output balance between the left and right speakers.
• Leftmost—left only (L6)
• Rightmost—right only (R6) Initial 0
Volume Adjust Adjust and store auto-adjustment volume level for each source, comparing to
the FM volume level. The volume level will automatically increase or decrease
when you change the source.
–12 to +12; Initial 00
• You can make the adjustments separately for DVD and other discs.
Amplifier Gain You can change the maximum volume level of this unit.
Off: Deactivates the built-in amplifier.
Low: VOL 00 to 30 (Select this if the maximum power of the speakers is less
than 50 W.)
High: VOL 00 to 50
Initial: Underlined
EN_KW-AVX710[EE].indb 56EN_KW-AVX710[EE].indb 56 07.12.6 2:19:35 PM07.12.6 2:19:35 PM

SETTINGS
57
ENGLISH
Mode*1
Menu items Selectable settings, [reference page]
Mono Only for FM. (Off, On) ☞ [10]
DX/Local Only for FM. (Local, DX) ☞ [11]
SSM Only for FM. Press and hold to start SSM. ☞ [11]
PTy Standby Only for FM/DAB. (Off, On) ☞ [14]
PTy Code Only for FM/DAB. (Initial News) ☞ [15]
Title Entry Only for “AV-IN” and “EXT-IN.” ☞ [49]
Repeat ☞ [21, 38, 44]
Random ☞ [21, 38, 44]
D.(Dynamic) Range Control Only for DAB. (Off, DRC1, DRC2, DRC3) ☞ [40]
Announce Standby Only for DAB. (Off, On) ☞ [41]
Announce Code Only for DAB. (Initial Transport News) ☞ [42]
*1 Items listed under <Mode> vary among the playback sources.
List
For “DISC”: Folder List and Track List (☞ page 22)
For “CD-CH”: Disc List, Folder List, and Track List (☞ page 37)
• For the other playback sources, you can display a list by pressing DISP on the monitor panel. (☞ page 9)
The procedure for setting an item is shown on page 50.
EN_KW-AVX710[EE].indb 57EN_KW-AVX710[EE].indb 57 07.12.6 2:19:36 PM07.12.6 2:19:36 PM

58
ENGLISH
Bluetooth*1
Menu items Selectable settings, [reference page]
Dial Menu *2Select the method to make a call. ☞ [33]
Message*3You can read a message from the following message histories.
Unread: Messages you have not read.
Read: Messages you have read.
Unsent: Messages you have not sent.
Sent: Messages you have sent.
• The number of messages in each history is also shown.
Open ☞ [30]
Search ☞ [31]
Special Device Only for “New Device.”
Shows the list of Bluetooth devices which require some special procedure to
establish Bluetooth connection. Select a device you want to connect.
• After selecting the device, use <Open> or <Search> (☞ page 30 or 31)
for connection.
• Once the connection is established, it is registered in the unit. You can
connect the unit and the device by using <Connect> (☞ below) from the
next time.
Connect Only for the registered devices.
After selecting a device from among the registered devices (☞ pages 30 and
31), establish the connection with it.
Disconnect Only for the device being connected.
Disconnect the current device before connecting another device.
Delete Pairing Only for the registered devices.
Delete the registered devices.
*1 Selectable only for “Bluetooth PHONE” or “Bluetooth AUDIO.” Select a device (or “New Device”) before operating the
menu.
*2 Only for the device connected for “Bluetooth PHONE.”
*3 Selectable only when the source is “Bluetooth PHONE” and the connected cellular phone is compatible with SMS
(Short Message Service).
When operating the Bluetooth device, refer also to the instructions supplied with the device.
EN_KW-AVX710[EE].indb 58EN_KW-AVX710[EE].indb 58 07.12.6 2:19:36 PM07.12.6 2:19:36 PM

SETTINGS
59
ENGLISH
Menu items Selectable settings, [reference page]
Settings
Auto Connect *4When the unit is turned on, the connection is established automatically
with...
Off: No Bluetooth device.
Last: The last connected Bluetooth device.
Order: The available registered Bluetooth device found first.
Auto Answer *5Off: The unit does not answer the calls automatically. Answer the calls
manually.
On: The unit answers the incoming calls automatically.
Reject: The unit rejects all incoming calls.
Message Info *5Auto: The unit informs you of the arrival of a message by ringing and
displaying “Receiving Message.” To read the message, ☞ page 33.
Manual: The unit does not inform you of the arrival of a message.
MIC Setting *5Adjust microphone volume connected to the Bluetooth adapter.
01/02/03
Version *6The Bluetooth software and hardware versions are shown.
Initial: Underlined
*4 Selectable only for “Bluetooth PHONE.”
*5 Only for the cellular phone connected for “Bluetooth PHONE.” Not selectable when “New Device” is selected.
*6 If you wish to receive more information about Bluetooth, visit the following JVC web site: <http://www.jvc-victor.
co.jp/english/car/>
SETTINGS
The procedure for setting an item is shown on page 50.
EN_KW-AVX710[EE].indb 59EN_KW-AVX710[EE].indb 59 07.12.6 2:19:37 PM07.12.6 2:19:37 PM

ENGLISH
60
Maintenance
Moisture condensation
Moisture may condense on the lens inside the unit in
the following cases:
• After starting the heater in the car.
• If it becomes very humid inside the car.
Should this occur, the unit may malfunction. In this
case, eject the disc and leave the unit turned on for a
few hours until the moisture evaporates.
How to handle discs
When removing a disc from its
case, press down the center holder of
the case and lift the disc out, holding it
by the edges.
• Always hold the disc by the edges. Do not touch its
recording surface.
When storing a disc into its case, gently insert the
disc around the center holder (with the printed surface
facing up).
• Make sure to store discs into the cases after use.
To keep discs clean
A dirty disc may not play correctly.
If a disc does become dirty, wipe it with
a soft cloth in a straight line from center
to edge.
• Do not use any solvent (for example, conventional
record cleaner, spray, thinner, benzine, etc.) to clean
discs.
To play new discs
New discs may have some rough spots
around the inner and outer edges. If
such a disc is used, this unit may reject
the disc.
To remove these rough spots, rub the edges with a
pencil or ball-point pen, etc.
Stick-on labelSticker and sticker residue
Unusual shape
Warped disc
Do not use the following discs:
Center holder
SingleCD—8 cm disc
C-thru Disc (semi-transparent disc) Transparent or semi-transparent on its
recording area
EN_KW-AVX710[EE].indb 60EN_KW-AVX710[EE].indb 60 07.12.6 2:19:37 PM07.12.6 2:19:37 PM

61 REFERENCES
ENGLISH
More about this unit
General
Turning on the power
• By pressing SOURCE on the monitor panel, you
can also turn on the power. If the source is ready,
playback starts.
Tuner (FM only)
Storing stations in memory
• When SSM is over, received stations are preset in no.
1 (lowest frequency) to no. 6 (highest frequency).
Disc
General
• In this manual, words “track” and “file” are
interchangeably used.
• This unit can only play back audio CD (CD-DA) files
if different type of audio files (MP3/WMA/WAV) are
recorded on the same disc.
• This unit can display only one-byte characters. No
other characters can be correctly displayed.
Inserting a disc
• When a disc is inserted upside down or has no
playable files, “Cannot play this disc Check the disc”
appears on the screen. Eject the disc.
Ejecting a disc
• If “No disc“ appears after removing a disc, insert a
disc or select another playback source.
• If the ejected disc is not removed within 15 seconds,
the disc is automatically inserted again into the
loading slot to protect it from dust.
Playing Recordable/Rewritable discs
• This unit can recognize a total of 5 000 files and 250
folders (a maximum of 999 files per folder).
• Use only “finalized” discs.
• This unit can play back multi-session discs; however,
unclosed sessions will be skipped while playing.
• This unit can recognize a total 25 characters for file/
folder names.
• Some discs or files may not be played back due to
their characteristics or recording conditions.
Playing DVD-VR
• For details about DVD-VR format and Playlist, refer
to the instructions supplied with the recording
equipment.
File playback
Playing DivX files
• This unit can play back DivX files with the extension
code <.divx>, <.div>, or <.avi> (regardless of the
letter case—upper/lower).
• This unit supports the DivX files whose resolution is
720 x 576 pixels or less.
• Audio stream should conform to MP3 or Dolby Digital.
• The file encoded in the interlaced scanning mode
may not be played back correctly.
• The maximum bit rate for video signals (average) is 4
Mbps.
Continued on the next page
EN_KW-AVX710[EE].indb 61EN_KW-AVX710[EE].indb 61 07.12.6 2:19:38 PM07.12.6 2:19:38 PM

ENGLISH
62
Playing MPEG1/MPEG2 files
• This unit can play back MPEG1/MPEG2 files with the
extension code <.mpg>, <.mpeg>, or <.mod>*.
* <.mod> is an extension code used for the MPEG2
files recorded by JVC Everio camcorders.
• The stream format should conform to MPEG system/
program stream.
The file format should be MP@ML (Main Profile at
Main Level)/SP@ML (Simple Profile at Main Level)/
MP@LL (Main Profile at Low Level).
• Audio streams should conform to MPEG1 Audio
Layer-2 or Dolby Digital.
• The maximum bit rate for video signals (average) is 4
Mbps.
Playing JPEG files
• This unit can play back JPEG files with the extension
code <.jpg>, or <.jpeg>.
• It is recommended that you record a file at 640 x 480
resolution.
• This unit can play back baseline JPEG files.
Progressive JPEG files or lossless JPEG files cannot be
played.
Playing MP3/WMA/WAV files
• This unit can play back files with the extension code
<.mp3>, <.wma>, or <.wav> (regardless of the
letter case—upper/lower).
• This unit can play back the files meeting the
conditions below:
– Bit rate:
MP3/WMA: 32 kbps — 320 kbps
– Sampling frequency:
48 kHz, 44.1 kHz, 32 kHz (for MPEG1)
24 kHz, 22.05 kHz, 16 kHz (for MPEG2)
48 kHz, 44.1 kHz, 32 kHz, 22.05 kHz (for WMA)
44.1 kHz (for WAV)
• This unit can show ID3 Tag Version
1.0/1.1/2.2/2.3/2.4 (for MP3).
• This unit can also show WAV/WMA Tag.
• This unit can play back files recorded in VBR (variable
bit rate).
• Files recorded in VBR have a discrepancy in elapsed
time indication.
• This unit cannot play back the following files:
– MP3 files encoded with MP3i and MP3 PRO
format.
– MP3 files encoded with Layer 1/2.
– WMA files encoded with lossless, professional,
and voice format.
– WMA files which are not based upon Windows
Media® Audio.
– WMA files copy-protected with DRM.
– Files which have the data such as AIFF, ATRAC3,
etc.
Disc/file information shown on the
external monitor
The following screens appear only on the external
monitor.
• CD
1 Selected playback mode
2 Elapsed playing time of the current track
3 Operation status
4 Current track number/total number of tracks
on the disc
5 Track information
6 Track list
7 Current track (highlighted bar)
TIME 00:14
Track : 6 / 14
Track Information
Cloudy
Fair
Fog
Hail
Indian summer
Rain
Shower
Snow
Thunder
Typhoon
Wind
Winter sky
Album
Four seasons
Artist
Robert M. Smith
Title
Rain
T. RPT
EN_KW-AVX710[EE].indb 62EN_KW-AVX710[EE].indb 62 07.12.6 2:19:38 PM07.12.6 2:19:38 PM

63 REFERENCES
ENGLISH
Bluetooth operations
General
• While driving, do not perform complicated operation
such as dialing the numbers, using phone book, etc.
When you perform these operations, stop your car in
a safe place.
• Some Bluetooth devices may not be connected to
this unit depending on the Bluetooth version of the
device.
• This unit may not work for some Bluetooth devices.
• Connecting condition may vary depending on
circumstances around you.
• When the unit is turned off, the device is
disconnected.
Warning messages for Bluetooth operations
• Connection Error: The device is registered but the
connection has failed. Use <Connect> to connect
the device again. (☞ page 31)
• Error: Try the operation again. If “Error” appears
again, check if the device supports the function you
have tried.
• Device Unfound: No available Bluetooth device is
detected by <Search>.
• Loading: The unit is updating the phone book and/
or SMS.
• Please Wait...: The unit is preparing to use
the Bluetooth function. If the message does not
disappear, turn off and turn on the unit, then connect
the device again (or reset the unit).
• Reset 08: Check the connection between the
adapter and this unit.
Icons for phone types
• These icons indicate the phone type set on the device.
:Cellular phone
:Household phone
:Office
:General
:Other than above
• DivX/MPEG1/MPEG2/JPEG/MP3/WMA/WAV
1 Current folder (highlighted bar)
2 Current folder number/total folder number
3 Folder list
4 Selected playback mode
5 Elapsed playing time of the current track (not
displayed for JPEG)
6 Operation status
7 Current track number/total number of tracks
in the current folder (total number of tracks on
the disc)
8 Track information (only for MP3/WMA/WAV)
9 Track list
p Current track (highlighted)
* If tag data includes “Jacket Picture” (baseline
JPEG), it will be displayed.
EN_KW-AVX710[EE].indb 63EN_KW-AVX710[EE].indb 63 07.12.6 2:19:39 PM07.12.6 2:19:39 PM

ENGLISH
64
CD changer
• If you select a folder, which does not include any
music files, on the list (☞ page 37), you will hear a
beep. Select another folder including music files.
DAB tuner
• Only the primary DAB service can be preset even
when you store a secondary service.
iPod operations
• You can control the following types of iPods through
the interface adapter.
– iPod with dock connector (3rd Generation)
– iPod with Click Wheel (4th Generation)
– iPod mini
– iPod photo
– iPod nano *1
– iPod video (5th Generation) *2
*1 When you connect the iPod nano to the interface
adapter, be sure to disconnect the headphones;
otherwise, no sound is heard.
*2 It is not possible to browse video files on the
“Videos” menu while the iPod is connected to the
interface adapter.
• If the iPod does not play correctly, please update your
iPod software to the latest version. For details about
updating your iPod, visit <http://www.apple.com>.
• When you turn on this unit, the iPod is charged
through the adapter connected to this unit.
• While the iPod is connected, all operations from the
iPod are disabled. Perform all operations from this
unit.
• The text information may not be displayed correctly.
• The text information scrolls on the screen. This unit
can display up to 40 characters.
Notice:
When operating an iPod, some operations may not
be performed correctly or as intended. In this case,
visit the following JVC web site:
<http://www.jvc.co.jp/english/car/support/
ks-pd100/index.html>
Menu settings
• If you change the <Amplifier Gain> setting from
<High> to <Low> while the volume level is set
higher than “30,” the unit automatically changes the
volume level to “VOL 30.”
• After you change any of <Menu Language/Audio
Language/Subtitle> settings, turn off then on the
power, and re-insert the disc (or insert another disc)
so that your setting takes effect.
• When you select <16:9> for a picture whose aspect
ratio is 4:3, the picture slightly changes due to the
process for converting the picture width.
• Even if <4:3PS> is selected, the screen size may
become <4:3LB> for some discs.
EN_KW-AVX710[EE].indb 64EN_KW-AVX710[EE].indb 64 07.12.6 2:19:39 PM07.12.6 2:19:39 PM

65 REFERENCES
ENGLISH
Sound signals emitted through the rear terminals
Through the analog terminals (Speaker out/REAR OUT)
2-channel signal is emitted. When playing multi-channel encoded disc, multi-channel signals are downmixed.
• DTS sound cannot be reproduced.
Through the DIGITAL OUT terminal
Digital signals (Linear PCM, Dolby Digital, DTS, MPEG Audio) are emitted.
• To reproduce the multi-channel sounds such as Dolby Digital, DTS, and MPEG Audio, connect an amplifier or a
decoder compatible with these multi-channel sources to this terminal, and set <D. Audio Output> correctly.
(☞ page 53)
<D. Audio Output>
Playback disc
Output signals
<Stream> <Dolby D> <PCM>
DVD 48 kHz, 16/20/24 bits Linear PCM 48 kHz, 16 bits stereo Linear PCM*
96 kHz, Linear PCM 48 kHz, 16 bits stereo Linear PCM
with Dolby Digital Dolby Digital bitstream 48 kHz, 16 bits stereo
Linear PCM
with DTS DTS bitstream
with MPEG Audio MPEG bitstream 48 kHz, 16 bits stereo Linear PCM
Audio CD, Video CD 44.1 kHz, 16 bits stereo Linear PCM /
48 kHz, 16 bits stereo Linear PCM
Audio CD with DTS DTS bitstream
DivX/
MPEG with Dolby Digital Dolby Digital bitstream 48 kHz, 16 bits stereo
Linear PCM
with MPEG Audio 32/44.1/48 kHz, 16 bits Linear PCM
MP3/WMA 32/44.1/48 kHz, 16 bits Linear PCM
WAV 44.1 kHz, 16 bits Linear PCM
* Digital signals may be emitted at 20 or 24 bits (at their original bit rate) through the DIGITAL OUT terminal if the
discs are not copy-protected.
EN_KW-AVX710[EE].indb 65EN_KW-AVX710[EE].indb 65 07.12.6 2:19:40 PM07.12.6 2:19:40 PM

ENGLISH
66
Preset equalizing values
Frequency
Sound mode 60 Hz 150 Hz 400 Hz 1 kHz 2.5 kHz 6.3 kHz 15 kHz
Flat 00 00 00 00 00 00 00
Hard Rock +03 +03 +01 00 00 +02 +01
R&B +03 +02 +02 00 +01 +01 +03
Pop 00 +02 00 00 +01 +01 +02
Jazz +03 +02 +01 +01 +01 +03 +02
Dance +04 +02 00 –02 –01 +01 +01
Country +02 +01 00 00 00 +01 +02
Reggae +03 00 00 +01 +02 +02 +03
Classic +02 +03 +01 00 00 +02 00
User1/2/3 00 00 00 00 00 00 00
Language codes (for DVD/DivX language selection)
Code
Language
Code
Language
Code
Language
Code
Language
Code
Language
AA Afar FA Persian KK Kazakh NO Norwegian ST Sesotho
AB Abkhazian FI Finnish KL Greenlandic OC Occitan SU Sundanese
AF Afrikaans FJ Fiji KM Cambodian OM (Afan) Oromo SW Swahili
AM Ameharic FO Faroese KN Kannada OR Oriya TA Tamil
AR Arabic FY Frisian KO Korean (KOR) PA Panjabi TE Telugu
AS Assamese GA Irish KS Kashmiri PL Polish TG Tajik
AY Aymara GD Scots Gaelic KU Kurdish PS Pashto, Pushto TH Thai
AZ Azerbaijani GL Galician KY Kirghiz QU Quechua TI Tigrinya
BA Bashkir GN Guarani LA Latin RM
Rhaeto-Romance
TK Turkmen
BE Byelorussian GU Gujarati LN Lingala RN Kirundi TL Tagalog
BG Bulgarian HA Hausa LO Laothian RO Rumanian TN Setswana
BH Bihari HI Hindi LT Lithuanian RW Kinyarwanda TO Tonga
BI Bislama HR Croatian LV Latvian, Lettish SA Sanskrit TR Turkish
BN Bengali, Bangla HU Hungarian MG Malagasy SD Sindhi TS Tsonga
BO Tibetan HY Armenian MI Maori SG Sangho TT Tatar
BR Breton IA Interlingua MK Macedonian SH Serbo-Croatian TW Twi
CA Catalan IE Interlingue ML Malayalam SI Singhalese UK Ukrainian
CO Corsican IK Inupiak MN Mongolian SK Slovak UR Urdu
CS Czech IN Indonesian MO Moldavian SL Slovenian UZ Uzbek
CY Welsh IS Icelandic MR Marathi SM Samoan VI Vietnamese
DZ Bhutani IW Hebrew MS Malay (MAY) SN Shona VO Volapuk
EL Greek JA Japanese MT Maltese SO Somali WO Wolof
EO Esperanto JI Yiddish MY Burmese SQ Albanian XH Xhosa
ET Estonian JW Javanese NA Nauru SR Serbian YO Yoruba
EU Basque KA Georgian NE Nepali SS Siswati ZU Zulu
EN_KW-AVX710[EE].indb 66EN_KW-AVX710[EE].indb 66 07.12.6 2:19:40 PM07.12.6 2:19:40 PM

67 REFERENCES
ENGLISH
• Manufactured under license from Dolby
Laboratories. Dolby and the double-D symbol are
trademarks of Dolby Laboratories.
• “DTS” and “DTS Digital Out” are registered
trademarks of DTS, Inc
• “DVD Logo” is a trademark of DVD Format/Logo
Licensing Corporation registered in the US, Japan
and other countries.
• DivX, DivX Ultra Certified, and associated logos
are trademarks of DivX, Inc. and are used under
license.
• Official DivX® Ultra Certified product
• Plays all versions of DivX® video (including DivX®
6) with enhanced playback of DivX® media files
and the DivX® Media Format
• Microsoft and Windows Media are either
registered trademarks or trademarks of Microsoft
Corporation in the United States and/or other
countries.
• The Bluetooth word mark and logos are owned by
the Bluetooth SIG, Inc. and any use of such marks
by Victor Company of Japan, Limited (JVC) is under
license. Other trademarks and trade names are
those of their respective owners.
• iPod and iTunes are trademarks of Apple Inc.,
registered in the U.S. and other countries.
• This product incorporates copyright protection
technology that is protected by U.S. patents
and other intellectual property rights. Use of
this copyright protection technology must be
authorized by Macrovision, and is intended for
home and other limited viewing uses only unless
otherwise authorized by Macrovision. Reverse
engineering or disassembly is prohibited.
Characters shown on the screen
In addition to the roman alphabet (A – Z, a – z), you
can use the following characters to assign titles.
(☞ page 49)
• When <Руccĸий> is selected for <Language>.
(☞ page 52)
• When any language other than <Руccĸий> is
selected for <Language>. (☞ page 52)
Upper and lower cases
Numbers and symbols
Upper and lower cases
Numbers and symbols
EN_KW-AVX710[EE].indb 67EN_KW-AVX710[EE].indb 67 07.12.6 2:19:42 PM07.12.6 2:19:42 PM

ENGLISH
68
Troubleshooting
What appears to be trouble is not always serious. Check the following points before calling a service center.
• For operations with the external components, refer also to the instructions supplied with the adapters used for the
connections (as well as the instructions supplied with the external components).
Symptoms Remedies/Causes
General
• No sound comes out of the speakers. • Adjust the volume to the optimum level.
• Check the cords and connections.
• DTS sound cannot be reproduced through the analog
terminals (Speaker out/REAR OUT).
• The screen is not clear and legible. Sunshine from the windscreen may cause this symptom.
Adjust <Bright>. (☞ page 51)
• “Position Error Push Open Key” appears on
the screen.
The monitor panel angle has been forcibly adjusted, or its
adjustment has been interrupted while opening or closing.
Press OPEN/TILT.
• “Mecha Error Push Reset” appears on the
screen, and the panel does not move.
Reset the unit. (☞ page 3)
• “No Signal” appears. • Change the source.
• Start the playback on the external component connected
to VIDEO IN terminal.
• Check the cords and connections.
• Signal input is too weak.
• The buttons on the monitor panel do not
work.
When the monitor panel is open, only +/– (volume) and
OPEN/TILT work. The other buttons do not function.
• The unit does not work at all. Reset the unit. (☞ page 3)
FM/AM
• SSM automatic presetting does not work. Store stations manually. (☞ page 11)
• Static noise while listening to the radio. Connect the aerial firmly.
EN_KW-AVX710[EE].indb 68EN_KW-AVX710[EE].indb 68 07.12.6 2:19:42 PM07.12.6 2:19:42 PM

69 REFERENCES
ENGLISH
Continued on the next page
Symptoms Remedies/Causes
Disc in general
• Disc can be neither recognized nor played
back.
Eject the disc forcibly. (☞ page 3)
• Disc cannot be ejected. Unlock the disc. (☞ page 22)
• Recordable/Rewritable discs cannot be
played back.
• Tracks on the Recordable/Rewritable discs
cannot be skipped.
• Insert a finalized disc.
• Finalize the discs with the component which you used
for recording.
• Playback does not start. • Insert the disc correctly again.
• The format of files is not supported by the unit.
• The playback picture is not clear and legible. Adjust items in <Picture Adjust> menu. (☞ page 51)
• Sound and pictures are sometimes
interrupted or distorted.
• Stop playback while driving on rough roads.
• Change the disc.
• No playback picture is shown and “Parking
Brake” appears on the screen, even when the
parking brake is engaged.
Parking brake lead is not connected properly.
(☞ Installation/Connection Manual)
• No picture appears on the external monitor. • Connect the video cord correctly.
• Select the correct input on the external monitor.
• “Eject Error” or “Loading Error” appears on
the screen.
Change the source by pressing SOURCE.
• “Region code error” appears on the screen
when you insert a DVD Video.
Region code is not correct. (☞ page 4)
DivX/MPEG1/MPEG2/MP3/WMA/WAV
• Disc cannot be played back. • Change the disc.
• Record the tracks using a compliant application on the
appropriate discs. (☞ page 4)
• Add appropriate extension codes to the file names.
• Noise is generated. The track played back is not a playable file format. Skip to
another file.
• Tracks are not played back as you have
intended them to play.
Playback order may differ from that played back using
other players.
• Elapsed playing time is not correct. This sometimes occurs during playback. This is caused by
how the tracks are recorded.
• “Not Support” appears on the screen and
track skips.
The track is unplayable.
EN_KW-AVX710[EE].indb 69EN_KW-AVX710[EE].indb 69 07.12.6 2:19:43 PM07.12.6 2:19:43 PM

ENGLISH
70
Symptoms Remedies/Causes
Bluetooth
• Bluetooth device does not detect the unit. This unit can be connected with one Bluetooth cellular
phone and one Bluetooth audio player at a time.
While connected to a device, this unit cannot be detected
from another device. Disconnect currently connected device
and search again.
• The unit does not detect the Bluetooth
device.
• Check the Bluetooth setting of the device.
• Search from the Bluetooth device. After the device
detects the unit, select <Open> on the unit to connect
the device. (☞ page 30)
• The unit does not make pairing with the
Bluetooth device.
• Enter the same PIN code for both the unit and target
device. If the PIN code of the device is not indicated on its
instructions, try “0000” or “1234.”
• Select the device name from <Special Device>, then
try to connect again. (☞ pages 31, 58)
• Echo or noise occurs. Adjust the microphone unit position.
• Phone sound quality is poor. • Reduce the distance between the unit and the Bluetooth
cellular phone.
• Move the car to place where you can get a better signal
reception.
• The sound is interrupted or skipped during
playback of a Bluetooth audio player.
• Reduce the distance between the unit and the Bluetooth
audio player.
• Disconnect the player connected for “Bluetooth PHONE.”
• Turn off, then turn on the unit.
• (When the sound is not yet restored,) connect the player
again.
• “New Device” cannot be selected for
“Bluetooth AUDIO.”
Bluetooth audio player is already connected. To select “New
Device,” disconnect it. (☞ page 31)
• The connected audio player cannot be
controlled.
Check whether the connected audio player supports AVRCP
(Audio Video Remote Control Profile).
• “Reset 08” appears on the screen. Check the connection between the adapter and this unit.
EN_KW-AVX710[EE].indb 70EN_KW-AVX710[EE].indb 70 07.12.6 2:19:43 PM07.12.6 2:19:43 PM

71 REFERENCES
ENGLISH
Symptoms Remedies/Causes
CD changer
• “No Disc” appears on the screen. Insert a disc into the magazine.
• “No Magazine” appears on the screen. Insert the magazine.
• “Cannot play this disc Check the disc”
appears on the screen.
Current disc does not include playable files. Replace the disc
with one including playable files.
• “Reset 08” appears on the screen. Connect this unit and the CD changer correctly and press
the reset button of the CD changer.
• “Reset 01” – “Reset 07” appears on the
screen.
Press the reset button of the CD changer.
• The CD changer does not work at all. Reset the unit. (☞ page 3)
DAB tuner
• “No DAB Signal” appears on the screen. Move to an area with stronger signals.
• “Reset 08” appears on the screen. Connect this unit and the DAB tuner correctly, then reset
the unit. (☞ page 3)
• The DAB tuner does not work at all. Connect this unit and the DAB tuner correctly, then reset
the unit. (☞ page 3)
• “Antenna Power NG” appears on the screen. Check the cords and connections.
iPod
• The iPod does not turn on or does not work. • Check the connection.
• Charge the battery.
• Sound is distorted. Deactivate the equalizer either on this unit or the iPod.
• “Disconnect” appears on the screen. Check the connection.
• Playback stops. The headphones are disconnected during playback. Restart
playback.
• “No Files” appears on the screen. No tracks are stored. Import tracks to the iPod.
• “Reset 01” – “Reset 07” appears on the
screen.
Disconnect the adapter from both this unit and iPod. Then,
connect them again.
• “Reset 08” appears on the screen. Check the connection between the adapter and this unit.
• The iPod’s controls do not work after
disconnecting from this unit.
Reset the iPod.
AV-IN
• No picture appears on the screen. • Turn on the video component if it is not on.
• Connect the video component correctly.
• Playback picture is not clear and legible. Adjust items in <Picture Adjust> menu. (☞ page 51)
EN_KW-AVX710[EE].indb 71EN_KW-AVX710[EE].indb 71 07.12.6 2:19:43 PM07.12.6 2:19:43 PM

ENGLISH
72
Specifications
AMPLIFIER
Maximum Power Output: Front/Rear: 50 W per channel
Continuous Power Output
(RMS):
Front/Rear: 20 W per channel into 4 Ω, 40 Hz to
20 000 Hz at no more than 0.8% total
harmonic distortion
Load Impedance: 4 (4 to 8 allowance)
Equalizer Control Range: Frequencies: 60 Hz, 150 Hz, 400 Hz, 1 kHz, 2.5 kHz,
6.3 kHz, 15 kHz
Level: ±10 dB
Signal-to-Noise Ratio: 70 dB
Audio Output Level
REAR OUT:
Line-Out Level/Impedance: 2.5 V/20 kΩ load (full scale)
Output Impedance: 1 kΩ
Color System: PAL
Video Output (composite): 1 Vp-p/75 Ω
Other Terminals: Input: LINE IN, VIDEO IN, Aerial input
Output: VIDEO OUT
Others: CD changer, OE REMOTE, Reverse gear
signal, DIGITAL OUT (optical)
FM/AM TUNER
Frequency Range: FM: 87.5 MHz to 108.0 MHz
AM: (MW) 522 kHz to 1 620 kHz
(LW) 144 kHz to 279 kHz
FM Tuner Usable Sensitivity: 11.3 dBf (1.0 V/75 Ω)
50 dB Quieting Sensitivity: 16.3 dBf (1.8 V/75 Ω)
Alternate Channel Selectivity (400 kHz): 65 dB
Frequency Response: 40 Hz to 15 000 Hz
Stereo Separation: 35 dB
MW Tuner Sensitivity/Selectivity: 20 V/35 dB
LW Tuner Sensitivity: 50 V
DVD/CD
Signal Detection System: Non-contact optical pickup (semiconductor laser)
Frequency Response: DVD, fs=48 kHz/96 kHz: 16 Hz to 22 000 Hz
VCD/CD: 16 Hz to 20 000 Hz
Dynamic Range: 93 dB
Signal-to-Noise Ratio: 95 dB
Wow and Flutter: Less than measurable limit
EN_KW-AVX710[EE].indb 72EN_KW-AVX710[EE].indb 72 07.12.6 2:19:44 PM07.12.6 2:19:44 PM

73 REFERENCES
ENGLISH
MONITOR
Screen Size: 7 inch wide liquid crystal display
Number of Pixel: 336 960 pixels: 480 × 3 (horizontal) × 234 (vertical)
Drive Method: TFT (Thin Film Transistor) active matrix format
Color System: NTSC/PAL
Aspect Ratio: 16:9 (wide)
GENERAL
Power Requirement: Operating Voltage: DC 14.4 V (11 V to 16 V allowance)
Grounding System: Negative ground
Allowable Storage Temperature: –10°C to +60°C
Allowable Operating Temperature: 0°C to +40°C
Dimensions (W × H × D):
• With trim plate and
sleeve attached
Installation Size (approx.): 182 mm × 111 mm × 160 mm
Panel Size (approx.): 188 mm × 117 mm × 10 mm
Mass (approx.): 2.9 kg (including trims and sleeve)
CAUTION: When ejecting the monitor, leave an
open space for the monitor to come out. If you do
not, the monitor may obstruct the steering wheel
and gearshift lever operations, and this may result
in a traffic accident.
Unit: mm
Required space for the monitor ejection
160 90.5
100
Design and specifications are subject to change without notice.
EN_KW-AVX710[EE].indb 73EN_KW-AVX710[EE].indb 73 07.12.6 2:19:44 PM07.12.6 2:19:44 PM

EN, RU, UK
1207MNMMDWJEIN
© 2008 Victor Company of Japan, Limited
Having TROUBLE with operation?
Please reset your unit
Refer to page of How to reset your unit
Затруднения при эксплуатации?
Пожалуйста, перезагрузите Ваше устройство
Для получения информации о перезагрузке Вашего устройства обратитесь на
соответствующую страницу
Маєте ПРОБЛЕМУ з функціонуванням?
Повторно налаштуйте систему
Див. сторінку “Як повторно налаштувати пристрій”
Bіктор Компані оф Джепен Лімітед
12, 3-чоме, Морійя-чо, Канагава-ку, Йокогама, Канагава 221-8520, Японія
Rear_KW-AVX710[EE].indd 2Rear_KW-AVX710[EE].indd 2 07.11.28 7:30:06 PM07.11.28 7:30:06 PM

1
KW-AVX710
Installation/Connection Manual
Руководство по установке/подключению
Керівництво зі встановлення та з’єднання
LVT1779-010A
[EE]
1207MNMMDWJEIN
EN, RU, UK
© 2008 Victor Company of Japan, Limited
ENGLISH
This unit is designed to operate on 12 V DC, NEGATIVE ground
electrical systems. If your vehicle does not have this system, a
voltage inverter is required, which can be purchased at JVC IN-CAR
ENTERTAINMENT dealers.
УКРАЇНА
Цей пристрій призначений для роботи під напругою 12 В
постійного струму; з електричними системами, що мають
заземлення ВІД’ЄМНОГО полюсу. Якщо ваше авто не оснащене
такою системою, потрібно використовувати інвертор напруги,
який можна придбати у дилерів устаткування JVC для автомобілів.
Heat sink
Радиатор
Радіатор
Parts list for installation and connection
The following parts are provided for this unit. If anything is missing,
contact your dealer immediately.
Перелік деталей для встановлення та з’єднання
У комплекті з цим пристроєм надаються такі деталі. Якщо
бракує якої-небудь деталі, негайно звертайтесь до дилера у
вашому регіоні.
Batteries
Батареи
Батареї
Power cord
Кабель питания
Шнур живлення
Remote controller
Диcтaнциoннoго
yпpaвлeния
Пульт дистанційного
керування
Main unit
Главное устройство
Головний пристрій
Sleeve*1
Муфта*1
Екран*1
Trim plate
Декоративную панель
Знімна пластина
*1 Fitted to the main unit when shipped
РУCCKИЙ
Это устройство разработано для эксплуатации на 12 В
постоянного напряжения с минусом на массе. Если Ваш
автомобиль не имеет этой системы, требуется инвертор
напряжения, который может быть приобретен у дилера
автомобилнего специалиста JVC.
ПРЕДУПРЕЖДЕНИЯ
• НЕ устанавливайте устройства и не прокладывайте провода в
местах, где:
– возникает препятствие для функционирования руля
и рычага переключения скоростей, так как это может
привести к аварии;
– возникает препятствие срабатыванию устройств
безопасности, например, пневмоподушки, что может
привести к несчастному случаю со смертельным исходом;
– может ухудшиться обзор.
• НЕ используйте устройство, когда управляете рулем; это
может привести к аварии.
• Водителю не следует смотреть на монитор во время
вождения. Это может быть опасно и может стать причиной
аварии.
• Если данное устройство используется во время поездки
на автомобиле, следует, не отвлекаясь, следить за
дорогой, иначе может произойти дорожно-транспортное
происшествие.
• Если стояночный тормоз не включен, на мониторе мигает
сообщение “Parking Brake”, и изображение воспроизведения
не отображается.
– Это предупреждение появляется только в том случае, если
провод стояночного тормоза подключен к стояночной
тормозной системе автомобиля.
Примечания по электрическим подключениям:
• Заменяйте предохранитель другим предохранителем
указанного класса. Если предохранитель сгорает слишком
часто, обратитесь к дилеру автомобилнего специалиста JVC.
• Рекомендуется подключать динамики с максимальной
мощностью более 50 Вт (к задней и передней панели
устройства, с полным сопротивлением от 4 Ω до 8 Ω).
Если максимальная мощность динамиков менее 50 Вт,
перейдите в режим “Amplifier Gain”, чтобы предотвратить их
повреждение (cм. ИНСТРУКЦИИ ПО ЭКСПЛУАТАЦИИ на стр.
56).
• Для предотвращения ороткого замыкания заклейте
НЕИСПОЛЬЗУЕМЫЕ концы изолирующей лентой.
• Радиатор во время использования сильно нагревается.
Старайтесь его не трогать во время удаления устройства.
Список деталей для установки и подключения
Следующие детали поставлены в комплекте с устройством. Если
какой-либо из указанных элементов отсутствует, обратитесь к
агенту по продажам.
WARNINGS
• DO NOT install any unit or wire any cable in a location where;
– it may obstruct the steering wheel and gearshift lever operations,
as this may result in a traffic accident.
– it may obstruct the operation of safety devices such as air bags, as
this may result in a fatal accident.
– it may obstruct visibility.
• DO NOT operate any unit while manipulating the steering wheel, as
this may result in a traffic accident.
• The driver must not watch the monitor while driving. It may lead to
carelessness and cause an accident.
• If you need to operate the unit while driving, be sure to look around
carefully or you may be involved in a traffic accident.
• If the parking brake is not engaged, “Parking Brake” flashes on the
monitor, and no playback picture will be shown.
– This warning appears only when the parking brake lead is
connected to the parking brake system built in the car.
Notes on electrical connections:
• Replace the fuse with one of the specified rating. If the fuse blows
frequently, consult your JVC IN-CAR ENTERTAINMENT dealer.
• It is recommended to connect speakers with a maximum power
of more than 50 W (both at the rear and at the front, with an
impedance of 4 to 8 Ω).
If the maximum power is less than 50 W, change “Amplifier Gain”
setting to prevent the speakers from being damaged (see page 56 of
the INSTRUCTIONS).
• To prevent short circuits, cover the terminals of the UNUSED leads
with insulating tape.
• The heat sink becomes very hot after use. Be careful not to touch it
when removing this unit.
ПОПЕРЕДЖЕННЯ
• НЕ встановлюйте ніяких пристроїв і не приєднуйте жодних
кабелів у місцях, де:
– вони можуть перешкоджати вправлятися з кермом і важелем
перемикання передач, тому що це може призвести до аварії
на дорозі;
– вони можуть перешкоджати роботі таких пристроїв
безпеки, як подушки безпеки, тому що це може призвести до
смертельного випадку.
– затуляти огляд.
• НЕ виконуйте ніяких операцій з пристроєм під час керування,
тому що це може призвести до аварії на дорозі.
• Під час руху водій не повинен відволікатися й дивитись на
монітор. Це може призвести до необачності та аварії.
• Якщо вам потрібно скористатися пристроєм підчас руху,
уважно стежте за дорогою, щоб не потрапити в аварію.
• Якщо автомобіль не на ручному гальмі, на екрані монітора
мигтітиме напис “Parking Brake”, зображення виводитись не
буде.
– Це попередження з’являється тільки тоді, коли провід
ручного гальма з’єднаний з ручним гальмом автомобіля.
Зауваження щодо електричних з’єднань:
• Заміняти запобіжник можна тільки запобіжником із вказаними
у специфікації номінальними характеристиками. Якщо
запобіжники часто виходять з ладу, проконсультуйтеся з
дилером устаткування JVC для автомобілів.
• Рекомендується підключати гучномовці з максимальною
потужністю, що перевищує 50 Вт (як для розташованих
спереду, так і для тих, що розміщуються позаду.
Рекомендований діапазон опору: від 4 до 8 Ом).
У разі, якщо потужність є меншою чим 50 Вт, змініть
налаштування “Amplifier Gain” (коефіцієнт підсилення)
задля запобігання пошкодженню гучномовців (див. стор. 56
ІНСТРУКЦІЇ).
• Для запобігання короткому замиканню, заізолюйте клеми
провідника, ЩО НЕ ВИКОРИСТОВУЄТЬСЯ, ізоляційною
стрічкою.
• По закінчені роботи радіатор стає надто гарячим. Будьте
обережні, не торкайтесь його при видалені цього пристрою.
Crimp connector
Обжимные разъемы
Обтиснене рознімання
Round head screws (M5 x 8 mm)
Болты с круглой головкой (M5 x 8 мм)
Гвинти з напівкруглими голівками
(M5 × 8 мм)
Flat head screws (M5 x 8 mm)
Болты с плоской головкой (M5 x 8 мм)
Гвинти з пласкими голівками
(M5 × 8 мм)
Use these screws when installing the unit without the supplied sleeve.
Используйте эти болты при установке устройства без поставляемой муфты.
Використовуйте ці гвинти для встановлення пристрою без монтажного
короба, що постачається в комплекті.
*1 Закреплено на основном устройстве при поставке *1 приєднаний до головного пристрою під час транспортування
Brackets*1
Декоративную панель*1
Кронштейны*1
Flat head screws (M5 x 8 mm)*1
Болты с плоской головкой (M5 x 8 мм)*1
Гвинти з пласкими голівками (M5 × 8 мм)*1
Round head screws (M2.6 x 3 mm)*1
Болты с круглой головкой (M2,6 x 3 мм)*1
Гвинти з напівкруглими голівками
(M2,6 × 3 мм)*1
AVX710[EE]_install.indb 1AVX710[EE]_install.indb 1 07.12.10 4:23:29 PM07.12.10 4:23:29 PM

22
3
30˚
2
4
5
6
1
INSTALLATION (IN-DASH
MOUNTING)
The following illustration shows a typical installation. However, you
should make adjustments corresponding to your specific car. If you
have any questions or require information regarding installation kits,
consult your JVC IN-CAR ENTERTAINMENT dealer or a company
supplying kits.
• If you are not sure how to install this unit correctly, have it installed
by a qualified technician.
Before installing the unit
• When mounting the unit, be sure to use the screws provided, as
instructed. If other screws are used, parts could become loose or
damaged.
• When tightening screws or bolts, be careful not to pinch any
connection cord.
• Make sure not to block the fan on the rear to maintain proper
ventilation when installing the unit.
1 Remove the audio system originally installed in the car, together
with its mounting brackets.
• Be sure to keep all the screws and parts removed from your car
for future use.
2 Install the sleeve in the dashboard of the car.
3 Attach the brackets to the main unit.
• Make sure to use the supplied flat head screws (M5 x 8 mm). If
longer screws are used, they could damage the unit.
4 Do the required electrical connections.
• See pages 3 and 4.
5 Install the main unit in the sleeve.
6 Attach the trim plate.
ВСТАНОВЛЕННЯ
(МОНТАЖ НА ПРИЛАДОВУ ПАНЕЛЬ)
Наведена нижче ілюстрація демонструє типовий процес
встановлення. Проте необхідно виконати регулювання у
відповідності до типу автомобіля. У разі будь яких запитань
або потреби у інформації щодо набору інструментів та
спорядження, проконсультуйтеся з дилером устаткування JVC
для автомобілів або з компанією, що постачає набір інструментів
та спорядження.
• Якщо ви не впевнені щодо правильності встановлення цього
пристрою, залучіть до його встановлення кваліфікованого
спеціаліста.
Перед встановленням пристрою
• При встановленні пристрою, використовуйте тільки гвинти
з комплекту постачання, відповідно до інструкцій. Якщо
використовуються інші гвинти, кріплення окремих частин
пристрою може ослабнути або пошкодитись.
• При затягуванні гвинтів чи болтів будьте обережні, щоб не
затиснути жоден з’єднувальний шнур.
• При встановленні переконайтеся, що вентилятор задньої
панелі не заблокований для забезпечення належної вентиляції.
1 Вийміть аудіосистему, встановлену в автомобілі виробником,
разом з монтажними кронштейнами.
• Зберігайте усі гвинти та деталі, видалені з автомобіля, для
подальшого використання.
2 Встановіть екран у приладову панель автомобіля.
3 Приєднайте кронштейни до головного пристрою.
• Використовуйте лише гвинти із пласкими голівками (M5
x 8 мм), що входять до комплекту поставки. Якщо гвинти
довші, вони можуть пошкодити пристрій.
4 Виконайте необхідні електричні з’єднання.
• Див. стор. 3 та 4.
5 Встановіть головний пристрій всередину екрану.
6 Приєднайте знімну пластину.
Sleeve
Муфта
Екран
Round head screws (M2.6 × 3 mm)
Болты с круглой головкой (M2,6 x 3 мм)
Гвинти з напівкруглими голівками (M2,6 × 3 мм)
Flat head screws (M5 × 8 mm)
Болты с плоской головкой (M5 x 8 мм)
Гвинти з пласкими голівками (M5 × 8 мм)
Trim plate
Декоративную панель
Знімна пластина
Brackets
Декоративную
панель
Кронштейны
УСТАНОВКА
(УСТАНОВКА В ПРИБОРНУЮ ПАНЕЛЬ)
На следующих иллюстрациях показана типовая установка.
Однако необходимо выполнить настройки, соответствующие
конкретному автомобилю. Если у Вас есть какие-либо
вопросы, касающиеся установки, обратитесь к Вашему дилеру
автомобильных систем JVC или в компанию, поставляющую
соответствующие принадлежности.
• Если Вы не знаете точно, как следует устанавливать это
устройство, обратитесь к квалифицированному специалисту.
Предостережение во время установки
• При установке устройства используйте только прилагаемые
болты в соответствии с инструкцией. В случае использования
других болтов существует вероятность, что детали могут быть
ненадежно закреплены или повреждены.
• Аккуратно затягивайте болты,чтобы не пережать
соединительные кабели.
• При установке для обеспечения правильной вентиляции не
закрывайте вентилятор на задней панели.
1 Извлеките аудиосистему, изначально установленную в
автомобиле, вместе с монтажными кронштейнами.
• Не теряйте винты и детали, извлеченные из автомобиля,
поскольку они будут использоваться в дальнейшем.
2 Вмонтируйте муфту в приборную панель автомобиля.
3 Прикрепите кронштейны к главному устройству.
• Используйте болты с плоской головкой (M5 x 8 мм),
которые входят в комплект поставки. При использовании
более длинных болтов можно повредить устройство.
4 Выполните необходимые электрические соединения.
• См. стр. 3 и 4.
5 Установите главное устройство в муфту.
6 Прикрепите декоративную панель.
Install the unit at an angle of less than 30˚, taking it into account that the monitor would eject when in use.
Установите устройство под углом менее 30 °,принимая во внимание то,что при использовании монитор будет выдвигаться.
Встановіть пристрій під кутом, меншим ніж 30˚, зважаючи на те, що монітор під час його використання буде знаходитися у
висунутому стані.
AVX710[EE]_install.indb 2AVX710[EE]_install.indb 2 07.12.10 4:23:40 PM07.12.10 4:23:40 PM

3
A
Unit: mm
Единицы измерения:мм
Пристрій: мм
Required space for the monitor ejection
Необходимое пространство для извлечения монитора
Необхідна площа для висування монітору
ЭЛЕКТРИЧЕСКИЕ ПОДКЛЮЧЕНИЯ
Для предотвращения коротких замыканий мы рекомендуем
Вам отсоединить отрицательный разъем аккумулятора и
осуществить все подключения перед установкой устройства.
• После установки обязательно заземлите данное
устройство на шасси автомобиля.
ПРЕДОСТЕРЕЖЕНИЯ по питанию и подключению
громкоговорителей:
• НЕ подключайте провода громкоговорителей к
аккумулятору автомобиля, иначе устройство будет
повреждено.
• ПЕРЕД подключением проводов громкоговорителей к кабелю
питания громкоговорителя проверьте схему соединений
громкоговорителей в Вашем автомобиле.
Connect the parking brake lead to the parking brake system
built in the car.
Подключить провод стояночного тормоза к проводке
стояночного тормоза автомобиля.
З’єднайте провід ручного гальма з системою ручного
гальма автомобілю.
Parking brake lead (light green)
Провод стояночного тормоза
(зеленого цвета)
Провід ручного гальма (ясно-
зеленого кольору)
To metallic body or chassis of the car
К металлическому корпусу или шасси
автомобиля
На металічний корпус або на шасі авто
Parking brake switch (inside the car)
Переключатель стояночного тормоза
(внутри автомобиля)
Перемикач ручного гальма (всередині
автомобіля)
Parking brake
Стояночный тормоз
Ручне гальмо
Connecting the parking brake lead / Подключение провода стояночного тормоза / З’єднання проводу ручного гальма
Crimp connector
Обжимные разъемы
Обтиснене рознімання
ELECTRICAL CONNECTIONS
To prevent short circuits, we recommend that you disconnect the
battery’s negative terminal and make all electrical connections
before installing the unit.
• Be sure to ground this unit to the car’s chassis again after
installation.
ЕЛЕКТРИЧНІ З’ЄДНАННЯ
Для запобігання коротким замиканням рекомендується
перед встановленням пристрою відключити від’ємну клему
акумулятора та виконати усі електричні з’єднання.
• Переконайтеся у тому, що після закінчення встановлення
пристрою, виконано його заземлення на шасі авто.
ЗАСТЕРЕЖЕННЯ щодо приєднання джерела
живлення та гучномовців:
• НЕ з’єднуйте провідники живлення гучномовців з
акумулятором. Невиконання такої вимоги призведе до
тяжкого ушкодження пристрою.
• ПЕРЕД тим, як з’єднати провідники живлення з
гучномовцями, перевірте схему з’єднання гучномовців
вашого авто.
PRECAUTIONS on power supply and speaker
connections:
• DO NOT connect the speaker leads of the power cord
to the car battery; otherwise, the unit will be seriously
damaged.
• BEFORE connecting the speaker leads of the power cord to the
speakers, check the speaker wiring in your car.
If your car is equipped with the ISO connector
Если автомобиль оснащен разъемом ISO
Якщо ваше авто оснащене розніманням за стандартом ISO
• Connect the ISO connectors as illustrated.
• Подключите разъемы ISO, как показано на рисунке.
• Приєднайте рознімання ISO, як рекомендовано на ілюстрації.
For some VW/Audi or Opel (Vauxhall) automobile
Для некоторых автомобилей VW/Audi или Opel (Vauxhall)
Для деяких авто марки VW/Audi або Opel (Vauxhall)
You may need to modify the wiring of the supplied power cord as illustrated.
• Contact your authorized car dealer before installing this unit.
Возможно, потребуется изменить схему соединений для прилагаемого шнура питания, как показано на рисунке.
• Перед установкой приемника обратитесь к авторизованному агенту по продажам автомобильных систем.
Вам, можливо, прийдеться внести зміни до з’єднання провідників шнура живлення згідно з ілюстрацією.
• Перед тим, як встановлювати цей пристрій, зв’яжіться з уповноваженим дилером вашого авто.
R: Red
Красный
Червоний
Use modified wiring 2 if the unit does not turn on.
Если приемник не включается, используйте преобразованную схему соединений 2.
Якщо пристрій не включається, скористуйтеся зміненою схемою з’єднання рознімань 2.
Modified wiring 2
Преобразованная схема
соединений 2
Змінена схема з’єднання
рознімань 2
From the car body
От корпуса автомобиля
Від корпусу авто
ISO connector of the supplied power cord
Разъем ISO шнура питания, входящего в
комплект поставки
Рознімання ISO шнура живлення, що входить до
комплекту постачання
View from the lead side
Вид со стороны выводов
Вид зі сторони електричних виводів
ISO connector
Разъем ISO
Рознімання ISO
Original wiring
Исходная схема соединений
Початкова схема з’єднання
рознімань
Y: Yellow
Желтый
Жовтий
Modified wiring 1
Преобразованная схема
соединений 1
Змінена схема з’єднання
рознімань 1
160 90.5
100
a
AVX710[EE]_install.indb 3AVX710[EE]_install.indb 3 07.12.10 4:23:43 PM07.12.10 4:23:43 PM

44
ISO Connector
Разъем ISO
Рознімання ISO
Power cord
Кабель питания
Шнур живлення
ENGLISH УКРАЇНА РУCCKИЙ
Before connecting: Check the wiring in the vehicle carefully.
Incorrect connection may cause serious damage to this unit.
The leads of the power cord and those of the connector from the car
body may be different in color.
1 Cut the ISO connector.
2 Connect the colored leads of the power cord in the order
specified in the illustration below.
3 Connect the aerial cord.
4 Finally connect the wiring harness to the unit.
Перед тим, як з’єднати: Уважно перевірте електричну
схему з’єднання вашого авто. Неправильне з’єднання може
спричинити тяжке пошкодження вашого пристрою.
Контакти шнура живлення та рознімання, яке йде від корпуса
авто можуть мати різні кольори.
1 Від’єднайте рознімання ISO.
2 З’єднайте кольорові провідники шнура живлення у
порядку, що наведений нижче на ілюстрації.
3 Приєднайте провід антени.
4 Виконайте кінцеве приєднання джгута провідників до
пристрою.
15 A fuse
Предохранитель 15 A
Запобіжник 15 А
Rear ground terminal
Задний разъем заземления
Тильна клема заземлення
Black
Черный
Чорний To metallic body or chassis of the car
К металлическому корпусу или шасси автомобиля
На металічний корпус або на шасі авто
Yellow *3
Желтый *3
Жовтий *3
To a live terminal in the fuse block connecting to the car battery (bypassing the
ignition switch) (constant 12 V)
К разъему фазы в блоке предохранителя (минуя блок зажигания)
(постоянный 12 В)
На клему фази у блоці запобіжників для з’єднання з акумулятором авто
(обминаючи перемикач запалення) (постійний струм 12 В)
Red
Красный
Червоний To an accessory terminal in the fuse block
К вспомогательному разъему в блоке предохранителя
На допоміжну клему у блоці запобіжників
Brown
Коричневый
Коричневий
Orange with white stripe
Оранжевый с белой полосой
Помаранчевий із білою смужкою
Light green
Зеленого цвета
Ясно-зелений
Blue with white stripe
Синий с белой полосой
Синій з білою смужкою
To cellular phone system
К системе сотового телефона
На систему стільникового телефону
To the remote lead of other equipment or power aerial if any (200 mA max.)
К удаленному проводу другого оборудования или антенны (макс. 200 мА)
На провідник зовнішнього пристрою іншого обладнання або на антену (якщо встановлена)
(максимальний струм 200 мА)
To parking brake (see diagram Å on page 3.)
К стояночному тормозу (см. схему Å на стр. 3.)
До ручного гальма (див. ілюстрацію Å на стор. 3.)
To car light control switch
К контрольному переключателю освещения автомобиля
До реле управління освітленням автомобіля
*3 Before checking the operation of this unit prior to
installation, this lead must be connected, otherwise
power cannot be turned on.
*3 Перед проверкой работы устройства подключите
этот провод, иначе питание не включится.
*3 Перед тим, як перевірити працездатність цього
виробу до його встановлення, цей контакт
необхідно приєднати, інакше живлення на прилад
подаватися не буде.
Left speaker (front)
Левый громкоговоритель (передний)
Лівий гучномовець (передній)
Right speaker (front)
Правый громкоговоритель (передний)
Правий гучномовець (передній)
Gray
Серый
Сірий
Gray with black
stripe
Серый с черной
полосой
Сірий з чорною
смужкою
White
Белый
Білий
White with black
stripe
Белый с черной
полосой
Білий з чорною
смужкою
Left speaker (rear)
Левый громкоговоритель (задний)
Лівий гучномовець (задній)
Right speaker (rear)
Правый громкоговоритель (задний)
Правий гучномовець (задній)
Purple
Пурпурный
Пурпурний
Purple with black
stripe
Пурпурный с
черной полосой
Пурпурний з
чорною смужкою
Green
Зеленый
Зелений
Green with black
stripe
Зеленый с
черной полосой
Зелений з чорною
смужкою
Fuse block
Блок
предохранителя
Блок
запобіжників
Fan
Вентилятор
Вентилятор
See each diagram on pages 5 and 6.
См. каждую схему на стр. 5 и 6
Зверніться до діаграм, що наведені на
сторінках 5 та 6.
Crimp connector
Обжимные разъемы
Обтиснене рознімання
Ignition switch
Переключатель зажигания
Перемикач запалювання
Перед началом подключений: Тщательно проверьте
проводку в автомобиле. Неправильное подключение может
привести к серьезному повреждению устройства.
Жилы силового кабеля и жилы соединителя от кузова
автомобиля могут быть разного цвета.
1 Обрежьте разъем ISO.
2 Подсоедините цветные провода шнура питания в указанном
ниже порядке.
3 Подключите кабель антенны.
4 В последнюю очередь подключите электропроводку к
устройству.
*2
*2
*2 Not supplied
*2 Не поставляются
*2 Не входить до комплекту
Connections without using the ISO connector / Подключение без использования разъема ISO / З’єднання без допомоги з’єднувача ISO
OE REMOTE Steering wheel remote
OE REMOTE Рулевой пульт
дистанционного управления
OE REMOTE Блок дистанційного
керування, установлений на кермі
AVX710[EE]_install.indb 4AVX710[EE]_install.indb 4 07.12.10 4:23:46 PM07.12.10 4:23:46 PM
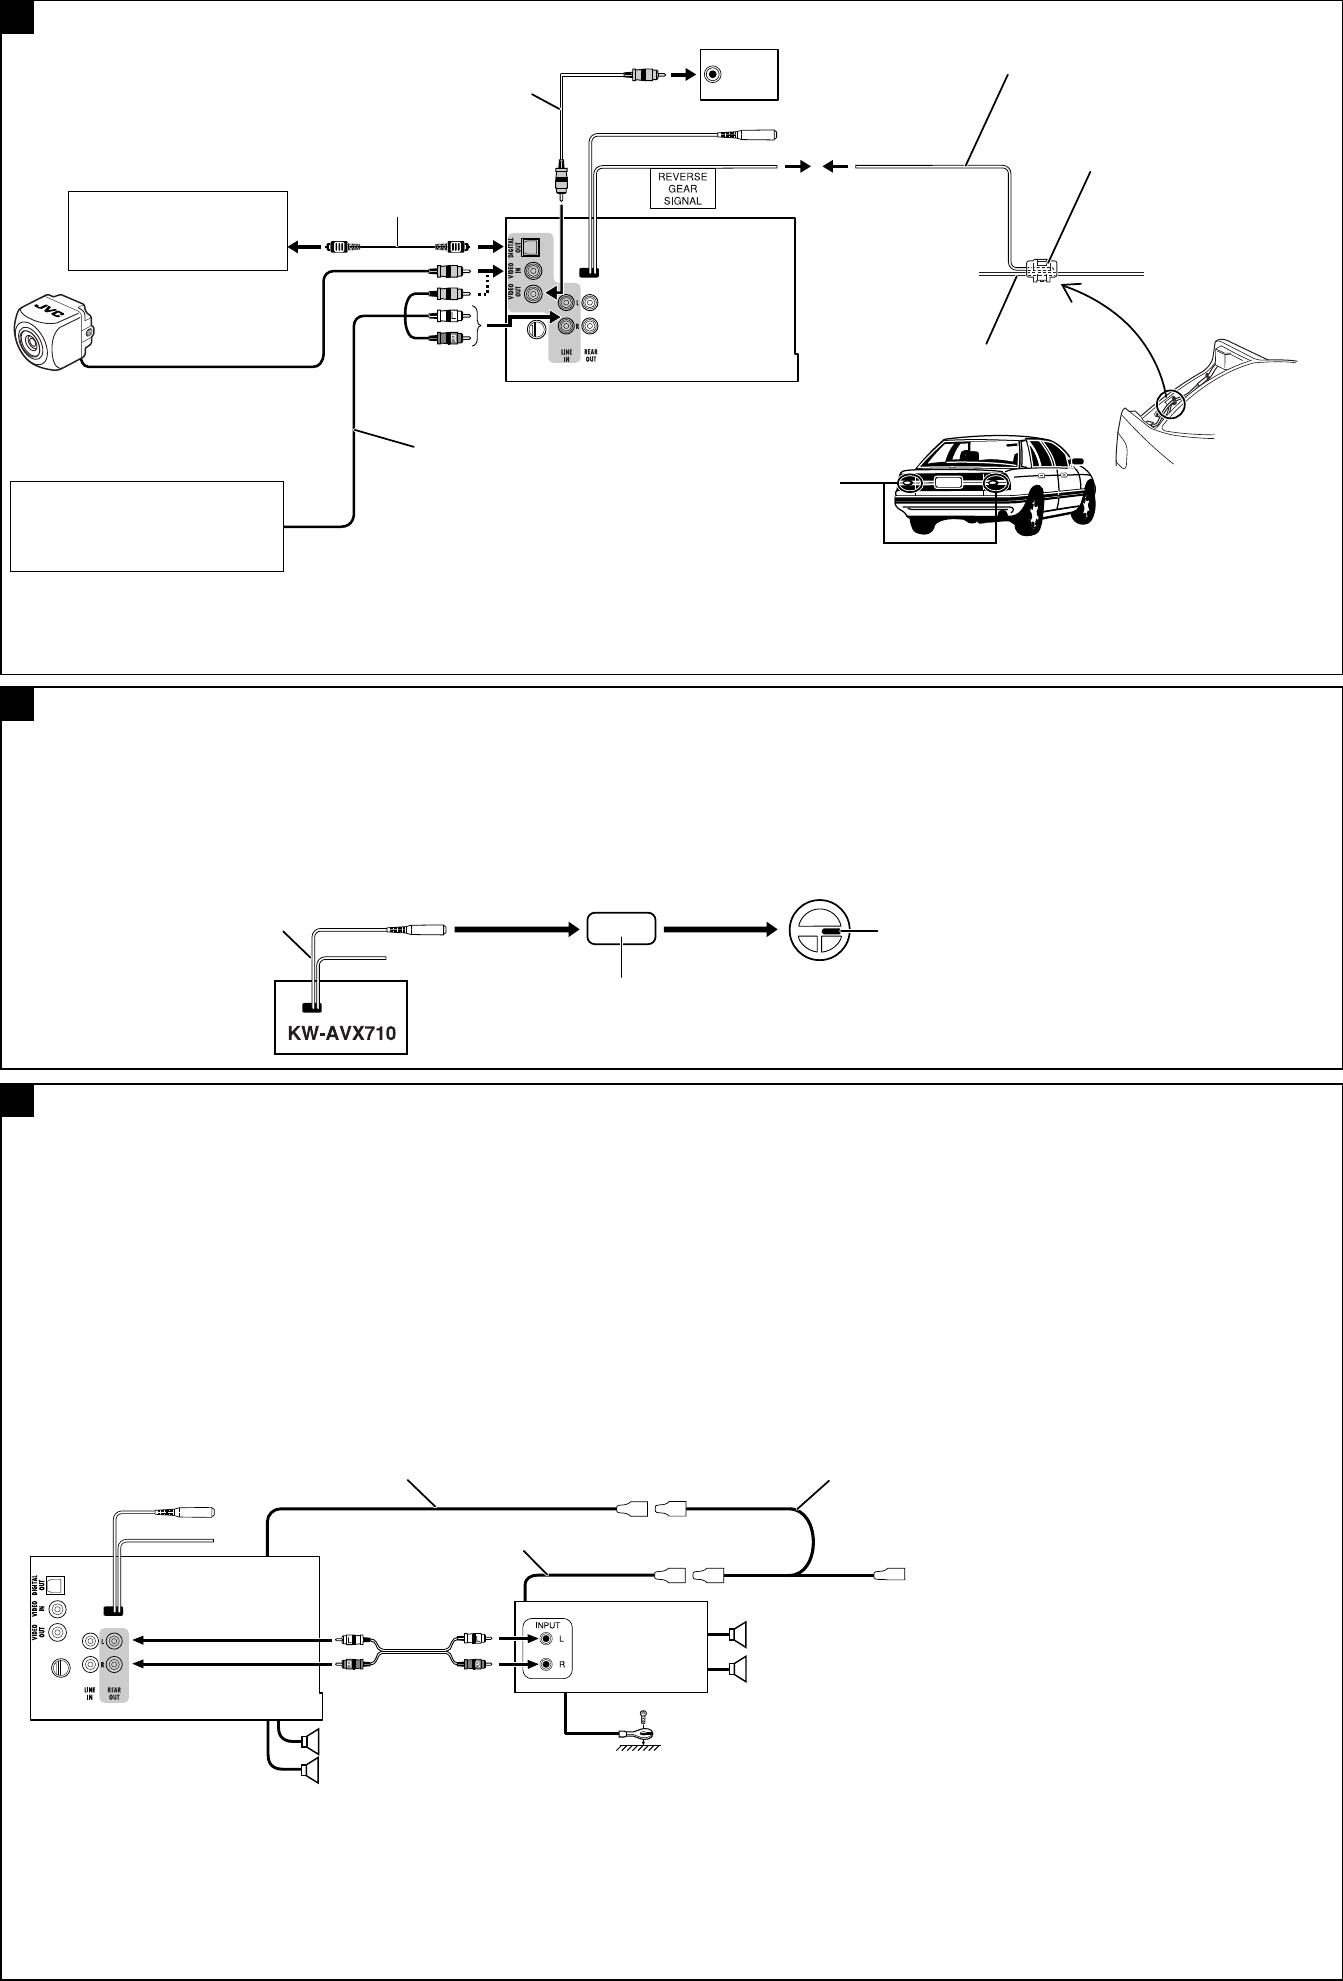
5555
A
B
C
AV amplifier or decoder
Усилитель или декодер AV
Підсилювач AV або декодер
To reverse lamp
К задней фаре
До ліхтаря задньої ходи
Reverse lamps
Задние фары
Ліхтарі задньої ходи
Reverse lamp lead*4
Провод задней фары*4
Провід ліхтаря задньої ходи*4
Steering wheel remote controller (equipped in the car)
Рулевой пульт дистанционного управления (устанавливаемый
в автомобиле)
Блок дистанційного керування, встановлений на кермі
(оснащення у авто)
OE remote adapter (not supplied)
Aдаптер рулевого пульта дистанционного управления OE (не поставляется)
Адаптер OE блоку дистанційного керування OE (не входить до комплекту)
To car battery
К аккумулятору
автомобиля
До акумулятору
Audio/video cord
(not supplied)
Аудио/видеокабели
(не поставляются)
Аудіо/відео шнури
(не входять до
комплекту)
Video cord (not supplied)
Видеошнур (не поставляется)
Відеошнур (не входить до комплекту)
If your car is equipped with the steering wheel remote controller,
you can operate this unit using the controller. To do it, a JVC’s
OE remote adapter (not supplied) which matches with your car is
required. Consult your JVC IN-CAR ENTERTAINMENT dealer for
details.
Якщо авто оснащене блоком дистанційного керування,
який встановлюється на кермі, можна керувати пристроєм
за його допомогою. Щоб зробити це, потрібен адаптер OE
блоку дистанційного керування компанії JVC (не входить до
комплекту), що підходить до даного типу авто. За додатковою
інформацією зверніться до свого регіонального дилера JVC.
*4 Required only when connecting a rear view camera to VIDEO IN
terminal.
*5 Refer to å in diagram Å on page 3.
*6 Set “AV Input” setting to “Camera” when using (see page 55 of the
INSTRUCTIONS).
Camcorder, Navigation System, etc.
Портативная видеокамера, система
навигации и т.д.
Відеокамера, система навігації та ін.
*4 Требуется только при подключении камеры заднего вида к
разъему VIDEO IN.
*5 См. å на схеме Å на стр. 3.
*6 Установите для настройки “AV Input” значение “Camera” при
использовании камеры (см. стр. 55 ИНСТРУКЦИЙ).
*4 Потрібен тільки в разі приєднання камери заднього виду до
входу VIDEO IN.
*5 див. å у діаграмі Å на стор. 3.
*6 При використанні задайте параметр “Camera” (фотокамера) для
налаштування “AV Input” (аудіовідеовхід) (див. стор. 55 розділу
ІНСТРУКЦІЇ).
Crimp connector (not supplied)*5
Обжимные разъемы (не входят в
комплект поставки)*5
Обтиснуте рознімання (не
постачається в комплекті)*5
Rear view camera KV-CM1*6
Камера заднего вида KV-CM1*6
Камера заднього виду KV-CM1*6
Connecting an external amplifier / Подключение внешнего усилителя / З’єднання з зовнішнім підсилювачем
You can connect an amplifier to upgrade your car stereo system.
• You can supply the power to the amplifier by connecting the
remote leads (blue with white stripe) of this unit to the amplifier.
(To connect other equipment using the remote leads, Y-
connectors need to be separately purchased.)
• Disconnect the speakers from this unit, connect them to the
amplifier. Leave the speaker leads of this unit unused.
• You can switch off the built-in amplifier and send the audio
signals only to the external amplifier to get clear sound and to
prevent internal heat built-up inside the unit. See page 56 of the
INSTRUCTIONS.
Rear speakers
Задние
громкоговорители
Задні гучномовці
Front speakers
Передние
громкоговорители
Передні гучномовці
JVC Amplifier
JVC-усилитель
Підсилювач JVC
Для покращення характеристик стереосистеми до неї можна
підключити підсилювач.
• Можна подати живлення на підсилювач, приєднавши
до нього провід дистанційного вмикання (синій із білою
смужкою). (Для приєднання іншого обладнання за
допомогою проводів дистанційного вмикання необхідно
додатково придбати Y-рознімання).
• Відключіть гучномовці від цього пристрою, приєднайте їх до
підсилювача. Залиште провідники гучномовців такими, що не
використовуються.
• Можна вимкнути вбудований підсилювач і спрямувати
звуковий сигнал тільки на зовнішній підсилювач, щоб
отримати якісний звук і запобігти збільшенню температури
всередині пристрою. Див. ІНСТРУКЦІЇ на стор. 56.
*7 Firmly attach the ground wire to the metallic body or to the chassis
of the car—to the place not coated with paint (if coated with paint,
remove the paint before attaching the lead). Failure to do so may
cause damage to the unit.
*7 Надійно прикрутіть провідник заземлення до металічного
корпусу або до шасі авто у місці, яке не має фарбового покриття
(якщо воно є, видаліть фарбу до підключення провідника).
Невиконання цієї вимоги може призвести до пошкодження
пристрою.
Если автомобиль оборудован рулевым пультом
дистанционного управления, его можно использовать для
управления данным устройством. Для этого необходим
адаптер рулевого пульта дистанционного управления JVC
OE (не поставляется), подходящий для Вашего автомобиля.
За более подробной информацией обратитесь к поставщику
автомобильных аудиосистем компании JVC.
Для обновления автомобильной стереосистемы можно
подключить усилитель.
• Для подачи питания на усилитель подключите провода
внешнего устройства (синие с белой полосой) к проводам
данного устройства и усилителя. (Для подключения другого
оборудования с помощью проводов внешнего устройства
необходимо приобрести Y-образные разъемы.)
• Отсоедините громкоговорители от данного устройства,
подключите их к усилителю. Оставьте провода
громкоговорителей данного устройства неиспользованными.
• Для получения более чистого звука и предотвращения
внутреннего перегрева устройства можно отключить
встроенный усилитель и использовать для усиления
аудиосигнала только внешний усилитель. См. ИНСТРУКЦИИ
ПО ЭКСПЛУАТАЦИИ на стр. 56.
*7 Плотно прикрепите заземляющий провод к металлическому
кузову или шасси автомобиля—в месте, не покрытом
краской (если оно покрыто краской, удалите краску
перед тем, как прикреплять провод). Невыполнение этого
требования может привести к повреждению данного
устройства.
Connections for external component playback / Подключения для воспроизведения с внешнего устройства / З’єднання для зовнішніх
пристроїв відтворення
External monitor
Внешний монитор
Зовнішній монітор
Y-connector (not supplied for this unit)
Разъем Y (не входит в комплект)
Y-рознімання (двійник) (не входить до комплекту
постачання цього пристрою)
Remote lead (Blue with white stripe)
Провод внешнего устройства (Синий с белой полосой)
Провідник зовнішнього пристрою (Синій з білою смужкою)
To the remote lead of other equipment or power aerial if any
К удаленному проводу другого оборудования или антенны
На провідник зовнішнього пристрою іншого обладнання або на
антену (якщо встановлена)
Remote lead
Провод внешнего
устройства
Провідник зовнішнього
пристрою
Connecting to the steering wheel remote controller / Подключение к рулевому пульту дистанционного управления /
З’єднання з блоком дистанційного керування, що встановлений на кермі
Extension lead (not supplied)
Удлинитель (не входит в комплект поставки)
Подовжувач (не постачається в комплекті)
Digital optical cable (not supplied)
Цифровой оптический кабель (не
поставляются)
Цифровий оптичний кабель (не
постачається в комплекті)
OE REMOTE Steering wheel remote
OE REMOTE Рулевой пульт
дистанционного управления
OE REMOTE Блок дистанційного
керування, установлений на кермі
*7
AVX710[EE]_install.indb 5AVX710[EE]_install.indb 5 07.12.10 4:23:50 PM07.12.10 4:23:50 PM
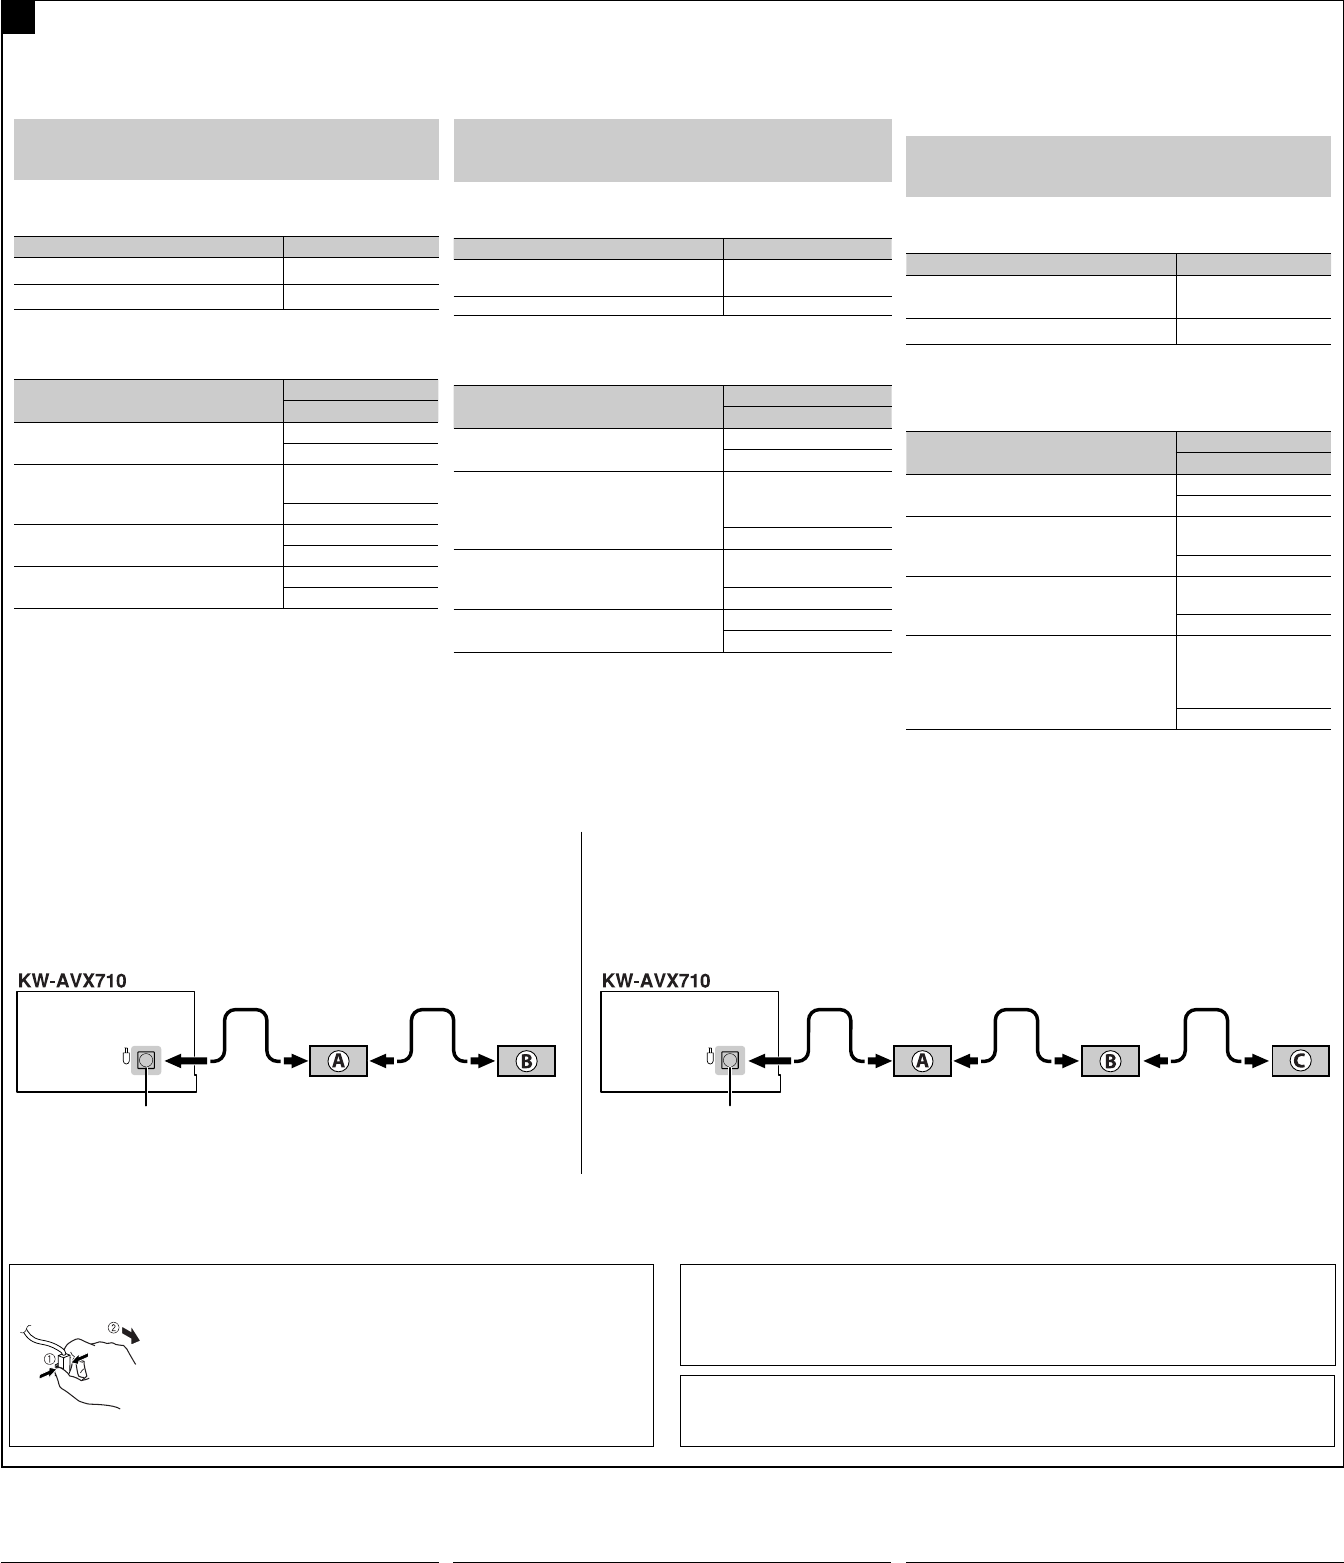
66
Connections to the CD changer jack / Соединения с устройством автоматической смены компакт-дисков / З’єднання із гніздом
пристрою для змінення компакт-дисків
D
iPod is a trademark of Apple Inc., registered in the U.S. and other countries.
iPod является торговой маркой Apple Inc., зарегистрированной в США и других странах.
iPod є торговою маркою Apple Inc., зареєстрованою у Сполучених Штатах та інших країнах.
*8 To use these components, set the external input setting correctly (see page 55 of the INSTRUCTIONS).
*8 Чтобы использовать данные устройства, необходима правильная настройка внешнего
входа (см. ИНСТРУКЦИИ ПО ЭКСПЛУАТАЦИИ на стр. 55).
*8 Для використання цих компонентів, в налаштуваннях зовнішнього входу встановіть “EXT IN”
(зовнішній вхід) - (див. стор. 55 розділу ІНСТРУКЦІЇ).
To disconnect the connector / Отключение от разъема / Відключення з’єднувача
Hold the connector top tightly (1), then pull it out (2).
Крепко возьмитесь за верхнюю часть разъема (1), затем выдерните
его (2).
Візьміться за верхню частину (1) з’єднувача, потім витягніть його (2).
BЫЯВЛЕНИЕ НЕИСПРАВНОСТЕЙ
• Сработал предохранитель.
* Правильно ли подключены черный и красный провода?
• Питание не включается.
* Подключен ли желтый провод?
• Звук не выводится через громкоговорители.
* Нет ли короткого замыкания на кабеле выхода
громкоговорителей?
• Звук искажен.
* Заземлен ли провод выхода громкоговорителей?
* Заземлены ли разъемы “–” правого (R) и левого (L)
громкоговорителей?
• Шум мешает звучанию.
* Соединен ли находящийся сзади зажим заземления с шасси
автомобиля с помощью более короткого и тонкого шнуров?
• Устройство нагревается.
* Заземлен ли провод выхода громкоговорителей?
* Заземлены ли разъемы “–” правого (R) и левого (L)
громкоговорителей?
• Приемник не работает.
* Выполнена ли перенастройка приемника?
CD changer jack
Разъем устройства автоматической
смены компакт-дисков
Гніздо пристрою зміни CD-дисків
When connecting two components in series
Последовательное подключение двух устройств
У разі послідовного приєднання двох компонентів
When connecting three components in series
При подключении трех устройств последовательно
У разі послідовного приєднання дрьох компонентів
A KS-BTA200
B KT-DB1000
C*8 KS-PD100 / KS-U57 / KS-U58
A KS-BTA200 / KT-DB1000
B*8 CD-CH / KS-PD100 / KS-U57 / KS-U58
При подключении внешних устройств см. также руководства,
поставляемые для устройств и адаптера.
ПРЕДОСТЕРЕЖЕНИЕ:
Перед подключением внешних компонентов убедитесь в
том, что устройство выключено.
К разъему устройства автоматической смены компакт-дисков
можно подключать указанные ниже устройства JVC.
Устройство JVC Название модели
Устройство автоматической смены
компакт-дисков (CD-CH)
CH-X1500 и т. д.
Тюнер DAB JVC KT-DB1000
Указанные ниже устройства можно также подключать с
помощью различных адаптеров JVC.
• Кабели подключения могут быть приобретены отдельно.
Компонентный Адаптер
Название модели
Устройство Bluetooth Адаптер Bluetooth
KS-BTA200
iPod Интерфейсный
адаптер для
проигрывателя iPod
KS-PD100
Портативный аудиопроигрыватель с
разъемами линейного выхода
Адаптер линейного
входа
KS-U57
Портативный аудиопроигрыватель со
стерео мини-разъемом 3,5 мм
Адаптер входа AUX
KS-U58
При подключении нескольких устройств (максимум: трех)
рекомендуется подключить устройства последовательно, как
описано ниже.
When connecting the external components, refer also to the
manuals supplied for the components and adapter.
CAUTION:
Before connecting the external components, make sure that the
unit is turned off.
You can connect the following JVC components to the CD changer
jack.
JVC component Model name
CD changer (CD-CH) CH-X1500, etc.
JVC DAB tuner KT-DB1000
You can also connect the following components through the
various JVC adapters.
• Connection cords may need to be purchased separately.
Component Adapter
Model name
Bluetooth device Bluetooth adapter
KS-BTA200
iPod Interface adapter for
iPod
KS-PD100
Portable audio player with line output
jacks
Line input adapter
KS-U57
Portable audio player with 3.5 mm stereo
mini jack
AUX input adapter
KS-U58
When connecting more than one component (maximum: three),
it is recommended that you connect the components in series as
explained below.
CD changer jack
Разъем устройства автоматической
смены компакт-дисков
Гніздо пристрою зміни CD-дисків
НЕСПРАВНОСТІ
• Вийшов з ладу запобіжник.
* Чи правильно приєднані червоний та чорний провідники?
• Не можна включити живлення.
* Чи приєднаний жовтий провідник?
• Звук з гучномовців відсутній.
* Чи не замкнуто “на коротко” вихідні провідники гучномовця?
• Звук спотворений.
* Чи не заземлені вихідні провідники гучномовця?
* Чи заземлені разом провідники “–” лівого та правого
гучномовця?
• Звук чути з перешкодами.
* Чи приєднано тильну клему заземлення до шасі авто за
допомогою коротших та товстіших шнурів?
• Пристрій нагрівається.
* Чи не заземлені вихідні провідники гучномовця?
* Чи заземлені разом провідники “–” лівого та правого
гучномовця?
• Цей пристрій не працює взагалі.
* Чи ви переналаштовували пристрій?
TROUBLESHOOTING
• The fuse blows.
* Are the red and black leads connected correctly?
• Power cannot be turned on.
* Is the yellow lead connected?
• No sound from the speakers.
* Is the speaker output lead short-circuited?
• Sound is distorted.
* Is the speaker output lead grounded?
* Are the “–” terminals of L and R speakers grounded in common?
• Noise interfere with sounds.
* Is the rear ground terminal connected to the car’s chassis using
shorter and thicker cords?
• Unit becomes hot.
* Is the speaker output lead grounded?
* Are the “–” terminals of L and R speakers grounded in common?
• This unit does not work at all.
* Have you reset your unit?
У разі приєднання зовнішніх компонентів, також зверніться
до посібника, що входить до комплекту постачання вказаних
компонентів та адаптера.
УВАГА:
Перед тим як приєднати зовнішній компонент,
переконайтеся утому, що ваш пристрій вимкнений.
Наведені нижче компоненти виробництва компанії JVC можна
приєднати через гніздо пристрою для зміни компакт-дисків.
Компонент виробництва JVC Назва моделі
Пристрій для зміни компакт-дисків
(CD-CH)
CH-X1500 та ін.
Тюнер цифрового радіомовлення JVC KT-DB1000
За допомогою різних адаптерів виробництва JVC можна також
приєднувати такі компоненти.
• Можливо, з’єднувальні кабелі вам доведеться придбати
окремо.
Компонент Адаптер
Назва моделі
Пристрій Bluetooth Адаптер Bluetooth
KS-BTA200
iPod Інтерфейсний
адаптер для iPod
KS-PD100
Портативний аудіопрогравач із
гніздами лінійних виходів
Адаптер лінійного
входу
KS-U57
Портативний аудіопрогравач зі
стереофонічним мініатюрним
штекером 3,5 мм
Адаптер вхідного
сигналу від
зовнішнього
пристрою
KS-U58
У разі приєднання більш ніж одного компонента (не більше
трьох) рекомендується приєднувати їх послідовно, згідно з
наведеними нижче поясненнями.
AVX710[EE]_install.indb 6AVX710[EE]_install.indb 6 07.12.10 4:23:55 PM07.12.10 4:23:55 PM

ENGLISHESPAÑOL
FRANÇAIS
KW-AVX716
KW-AVX710
For installation and connections, refer to the separate manual.
Para la instalación y las conexiones, refiérase al manual separado.
Pour l’installation et les raccordements, se référer au manuel séparé.
INSTRUCTIONS
MANUAL DE INSTRUCCIONES
MANUEL D’INSTRUCTIONS
LVT1779-003A
[EU]
For canceling the display demonstration, see page 8.
Para cancelar la demonstración en pantalla, consulte la página 8.
Pour annuler la démonstration des affichages, référez-vous à la page 8.
DVD RECEIVER WITH MONITOR
RECEPTOR DVD CON MONITOR
RÉCEPTEUR DVD ET MONITEUR
Cover_KW-AVX710[EU1].indd 2Cover_KW-AVX710[EU1].indd 2 07.12.18 6:58:00 PM07.12.18 6:58:00 PM

ENGLISH
2
Thank you for purchasing a JVC product.
Please read all instructions carefully before operation, to ensure your complete understanding and to obtain the best
possible performance from the unit.
IMPORTANT FOR LASER PRODUCTS
1. CLASS 1 LASER PRODUCT
2. CAUTION: Do not open the top cover. There are no user serviceable parts inside the unit; leave all servicing to
qualified service personnel.
3. CAUTION: Visible and/or invisible class 1M laser radiation when open. Do not view directly with optical
instruments.
4. REPRODUCTION OF LABEL: CAUTION LABEL, PLACED OUTSIDE THE UNIT.
Cautions on the monitor:
• The monitor built in this unit has been produced
with high precision, but it may have some
ineffective dots. This is inevitable and is not
malfunction.
• Do not expose the monitor to direct sunlight.
• Do not operate the touch panel using a ball-point
pen or similar tool with the sharp tip.
Touch the buttons on the touch panel with your
finger directly (if you are wearing a glove, take it
off).
• When the temperature is very cold or very hot...
– Chemical changes occur inside, causing
malfunction.
– Pictures may not appear clearly or may move
slowly. Pictures may not be synchronized with
the sound or picture quality may decline in such
environments.
WARNINGS:
To prevent accidents and damage
• DO NOT install any unit or wire any cable in a
location where;
– it may obstruct the steering wheel and
gearshift lever operations.
– it may obstruct the operation of safety devices
such as air bags.
– it may obstruct visibility.
• DO NOT operate the unit while driving.
If you need to operate the unit while driving, be
sure to look around carefully.
• The driver must not watch the monitor while
driving.
[European Union only]
EN_KW-AVX710[EU].indb 2EN_KW-AVX710[EU].indb 2 07.12.17 5:46:02 PM07.12.17 5:46:02 PM

3
ENGLISH
INTRODUCTION
How to reset your unit
• Your preset adjustments will also be erased.
How to forcibly eject a disc
• If this does not work, reset the unit.
For safety...
• Do not raise the volume level too much, as this will
block outside sounds, making driving dangerous.
• Stop the car before performing any complicated
operations.
Temperature inside the car...
If you have parked the car for a long time in hot or cold
weather, wait until the temperature in the car becomes
normal before operating the unit.
Contents
INTRODUCTION
Playable disc types .......................... 4
Basic operations—
Monitor panel/touch panel
............ 5
Basic operations—
Remote controller (RM-RK252) ...... 6
OPERATIONS
Before operating the unit ................ 8
Common operations ........................ 9
Listening to the radio ...................... 10
Disc operations ................................ 16
EXTERNAL DEVICES
Bluetooth® operations—
Cellular phone/audio player .......... 30
Listening to the CD changer .............. 37
Listening to the DAB tuner ............... 39
Listening to the iPod ........................ 43
Using other external components ..... 45
SETTINGS
Sound equalization .......................... 48
Assigning titles to the sources .......... 49
Menu operations ............................. 50
REFERENCES
Maintenance ................................... 60
More about this unit ........................ 61
Troubleshooting .............................. 68
Specifications .................................. 72
NO EJECT?
EMERGENCY EJECT?
Exit
ENTER
Back
11
3
2
at the same time
EN_KW-AVX710[EU].indb 3EN_KW-AVX710[EU].indb 3 07.12.17 5:46:06 PM07.12.17 5:46:06 PM

ENGLISH
4
Disc type Recording format, file type, etc. Playable
DVD DVD Video (Region Code: 2)*1
DVD Audio
DVD-ROM
DVD Recordable/Rewritable
(DVD-R/-RW*2, +R/+RW*3)
• DVD Video: UDF bridge
• DVD-VR
• DivX/MPEG1/MPEG2/JPEG/MP3/
WMA/WAV: ISO 9660 level 1,
level 2, Romeo, Joliet
DVD Video
DVD-VR
DivX/MPEG1/MPEG2
JPEG
MP3/WMA/WAV
AAC
MPEG4
DVD+VR
DVD-RAM
Dual Disc DVD side
Non-DVD side
CD/VCD Audio CD/CD Text (CD-DA)/DTS-CD
VCD (Video CD)
SVCD (Super Video CD)
CD-ROM
CD-I (CD-I Ready)
CD Recordable/Rewritable
(CD-R/-RW)
• ISO 9660 level 1, level 2, Romeo,
Joliet
CD-DA
MP3/WMA/WAV
JPEG
DivX/MPEG1/MPEG2
AAC
MPEG4
*1 If you insert a DVD Video disc of an incorrect Region Code, “Region code error” appears on the screen.
*2 DVD-R recorded in multi-border format is also playable (except for dual layer discs).
DVD-RW dual layer discs are not playable.
*3 It is possible to play back finalized +R/+RW (Video format only) discs.
+RW double layer discs are not playable.
Playable disc types
Caution for DualDisc playback
The Non-DVD side of a “DualDisc” does not comply with the “Compact Disc Digital Audio” standard. Therefore,
the use of Non-DVD side of a DualDisc on this product may not be recommended.
EN_KW-AVX710[EU].indb 4EN_KW-AVX710[EU].indb 4 07.12.17 5:46:06 PM07.12.17 5:46:06 PM

5
ENGLISH
INTRODUCTION
Basic operations — Monitor panel/touch panel
• Turn on the power.
• Turn off the power. [Hold]
• Attenuate the sound (if the power is on).
Change the sources.
Remote sensorAdjust the volume.
Reset the unit.
• Use only when the internal system malfunctions.
Display <AV Menu> screen.
Display and erase the Short Cut windows.
Available functions vary among the sources. For details, see each source operation
section.
Change the display information.
• [OPEN]: Open the monitor panel.
• [EJECT]: Eject the disc.
• [CLOSE]: Close the monitor panel.
• [TILT +/–]: Tilt the monitor panel.
• [Exit]: Erase this screen.
• Shaded icons cannot be used.
• In the explanation, buttons on the touch panel
are indicated inside [ ].
• For details on the touch panel operations, see
each source operation section.
Display <Source Menu> screen.
• Activate/deactivate TA
Standby Reception.
• Display <PTy Search> menu.
[Hold]
☞ page 12
• Display <Open/Tilt> menu.
• Eject the disc and display <Open/Tilt>
menu. [Hold]
• Close the monitor panel when <Open/Tilt>
menu is displayed.
☞ page 50
☞ page 9
☞ page 9
<Open/Tilt> menu
EN_KW-AVX710[EU].indb 5EN_KW-AVX710[EU].indb 5 07.12.17 5:46:07 PM07.12.17 5:46:07 PM

ENGLISH
6
Basic operations — Remote controller (RM-RK252)
Main elements and features
1 • Turns on the power.
• Attenuates the sound if the power is on.
• Turns off the power if pressed and held (while
the power is on).
2 • Reverse search
• Reverse slow motion (during pause)
3 Adjusts the volume level.
• Does not function as “2nd VOL.”
4 • Displays <Dial Menu> screen.
• Displays <Redial> menu if pressed and held.
• Answers incoming calls.
5 • DVD/DivX 6: Shows the disc menu.
• VCD: Resumes PBC playback.
• DVD-VR: Shows the Original Program screen.
6 Shows the on-screen bar.
• Does not function as “ .“
R03/LR03/AAA
Installing the battery
Insert the batteries into the remote controller by
matching the polarity (+ and –) correctly.
Caution:
Battery shall not be exposed to excessive heat such
as sunshine, fire or the like.
• If the range or effectiveness of the remote controller
decreases, replace both batteries.
Before using the remote controller:
• Aim the remote controller directly at the remote
sensor on the unit.
• DO NOT expose the remote sensor to bright light
(direct sunlight or artificial lighting).
The unit is equipped with the steering wheel
remote control function.
• See the Installation/Connection Manual (separate
volume) for connection.
EN_KW-AVX710[EU].indb 6EN_KW-AVX710[EU].indb 6 07.12.17 5:46:08 PM07.12.17 5:46:08 PM

7
ENGLISH
INTRODUCTION
p • Forward search
• Forward slow motion (during pause)
q Selects the source.
w For disc operations:
Starts playback/pauses.
For Bluetooth operations:
• Answers incoming calls.
• Starts playback/pauses. (for audio player
operation).
e Changes the aspect ratio of the playback
pictures.
r “TUNER”/”DAB”: Selects the bands.
“DISC”: Stops playback.
“Bluetooth PHONE”: Ends the call.
“Bluetooth AUDIO”: Starts playback/pauses.
t VCD: Returns to the PBC menu.
y • DVD Video/DivX 6: Shows the disc menu.
• VCD: Resumes PBC playback.
• DVD-VR: Shows the Playlist screen.
u • Makes selection/settings.
• @ / #: Skips back or forward by five minutes
for DivX/MPEG1/MPEG2.
• % / fi: Changes discs for “CD-CH.”
i*3 • Switches number entry mode for “DISC.”
• Erases the misentry after entering a wrong
number.
• Does not function as “SURROUND.”
o*3 Number buttons
• Enters numbers.
• “TUNER”/”DAB”: Selects the preset station/
service directly.
*1 Functions as a number button only (see o ).
*2 Not used for this unit.
*3 Functions when pressed with SHIFT.
7 Functions with other buttons (see i and o).
8 Changes the display information.
9 For disc operations:
• 5 / ∞:
DVD: Selects the title.
DVD-VR: Selects the program/Playlist.
Other discs (except VCD/CD): Selects the
folders.
• 4 / ¢:
– Press briefly: reverse skip/forward skip
– Press and hold: reverse search/forward
search
For FM/AM operations:
• 5 / ∞: Selects the preset stations.
• 4 / ¢: Functions to search for stations.
– Press briefly: Auto Search
– Press and hold: Manual Search
For DAB tuner operations:
• 5 / ∞: Select the services.
• 4 / ¢: Functions to search for
ensembles.
– Press briefly: Auto Search
– Press and hold: Manual Search
For Apple iPod operations:
• ∞: Starts playback/pauses
• 5: Enters the main menu (then 5 / ∞
/ 4 / ¢ work as menu selecting
buttons).
In the main menu:
• 5: Returns to the previous menu.
• ∞: Confirms the selection.
• 4 / ¢
– Press briefly: Selects an item.
– Press and hold: Skips ten items at a time.
For Bluetooth operations:
• 4 / ¢: reverse skip/forward skip (for
audio player operation)
EN_KW-AVX710[EU].indb 7EN_KW-AVX710[EU].indb 7 07.12.17 5:46:08 PM07.12.17 5:46:08 PM

8
ENGLISH
You can cancel the demonstration on the screen and set
the clock.
• Non-available items will be shaded on the AV Menu
screens.
Indication language:
In this manual, English indications are used
for purpose of explanation. You can select the
indication language. (☞ page 52)
~ Turn on the power.
Ÿ Display <AV Menu> screen.
! Display <Setup> menu.
⁄ Cancel the demonstration.
Select <Off>.
@ Set the clock settings.
¤ Finish the procedure.
Before operating the unit
Moves to the succeeding menu page
Moves to the preceding menu page
Return to the previous screen.
EN_KW-AVX710[EU].indb 8EN_KW-AVX710[EU].indb 8 07.12.17 5:46:09 PM07.12.17 5:46:09 PM
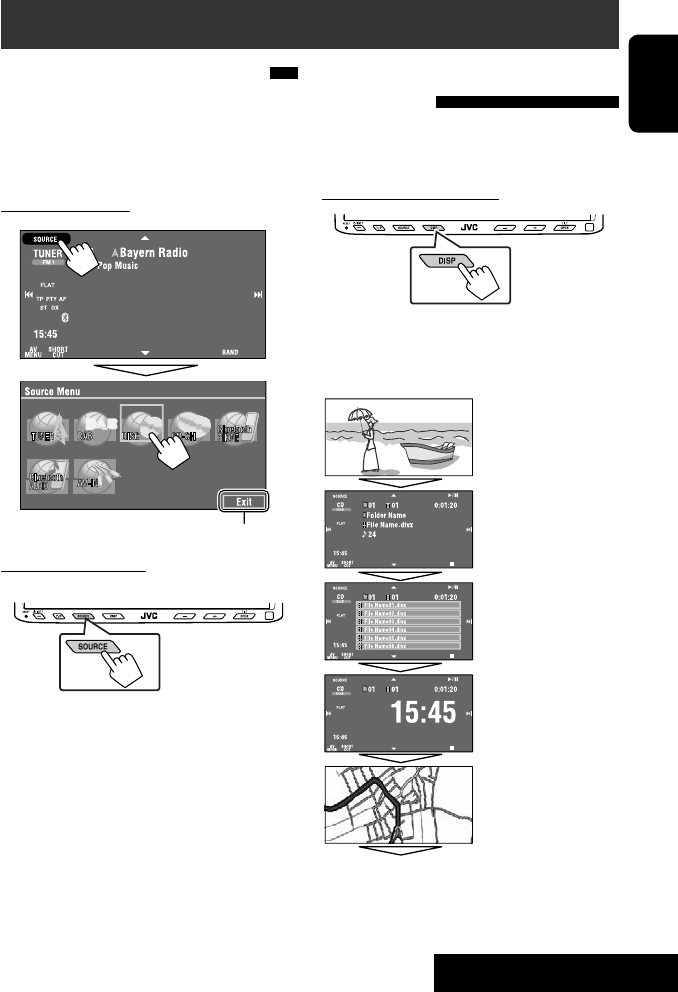
OPERATIONS
9
ENGLISH
Changing the display
information
• Available display information varies among the
playback sources.
On the monitor panel only:
• Each time you press DISP, the display changes to
show the various information.
Ex. When the playback source is a DivX disc.
Selecting the playback source
• Available sources depend on the external
components you have connected, media you have
attached, and the <Input> settings you have made
(☞ page 55).
On the touch panel:
On the monitor panel:
TUNER = DAB = DISC (DVD/VCD/CD) =CD-CH,
iPod, or EXT-IN = Bluetooth PHONE =
Bluetooth AUDIO = AV-IN = (back to the
beginning)
• You cannot select these sources if they are not ready.
Exit
Source information screen
Clock time in large numbers
Navigation screen
(When <Navigation> is
selected for <AV Input>)
(☞ page 55)
Back to the beginning
Playback picture screen
(only for video sources)
Track list
Common operations
EN_KW-AVX710[EU].indb 9EN_KW-AVX710[EU].indb 9 07.12.17 5:46:09 PM07.12.17 5:46:09 PM

10
ENGLISH
When an FM stereo broadcast is
hard to receive
1 Press [AV MENU].
2 Press [Mode].
Listening to the radio
~ Press [SOURCE], then press [TUNER]. (☞ page 9)
• You can also use SOURCE on the monitor panel. Press it repeatedly.
Ÿ Press [BAND].
! Press [4] or [¢] to search for a station—Auto Search.
• Manual Search: Hold either [4]or [¢] until “Manual Search” appears on the screen, then press it
repeatedly.
• The ST indicator lights up when receiving an FM stereo broadcast with sufficient signal strength.
3
Reception improves, but stereo effect will be lost.
• The MONO indicator lights up.
To restore stereo effect, select <Off>.
Preset no.
Band
Tuner/Standby Reception
indicators
PS (station name) for FM RDS. If no PS signal is coming in, the
tuned frequency appears.
☞ page 9
Sound mode
(☞ page 48)
PTY code for FM RDS
☞ page 12
: Buttons on the
touch panel. In
the explanation,
they are
indicated inside
[ ].
EN_KW-AVX710[EU].indb 10EN_KW-AVX710[EU].indb 10 07.12.17 5:46:10 PM07.12.17 5:46:10 PM

OPERATIONS
11
ENGLISH
Manual presetting
Ex.: Storing FM station of 92.5 MHz into preset number
4 of the FM1 band.
1 Display the Preset List.
2 Tune in to a station you want to preset.
3 Select a preset number.
The station selected in step 2 is now stored in
preset number 4.
Tuning in to stations with
sufficient signal strength
This function works only for FM bands. Once you have
activated this function (selected <Local>), it always
works when searching for FM stations.
1 Press [AV MENU].
2 Press [Mode].
3
Only stations with sufficient signal strength will be
detected.
• The DX indicator goes off, then the LO indicator
lights up.
FM station automatic presetting
—SSM (Strong-station
Sequential Memory)
This function works only for FM bands.
You can preset six stations for each band.
1 Press [AV MENU].
2 Press [Mode].
3
Local FM stations with the strongest signals are
searched and stored automatically in the FM band.
EN_KW-AVX710[EU].indb 11EN_KW-AVX710[EU].indb 11 07.12.17 5:46:11 PM07.12.17 5:46:11 PM

12
ENGLISH
The following features are available only for FM RDS
stations.
Searching for FM RDS
programme—PTY Search
You can search for your favorite programmes being
broadcast by selecting the PTY code for your favorite
programmes.
1 Display <PTy Search> menu.
You can also easily access <PTy Search> menu
by pressing [SHORT CUT] on the touch panel,
then...
Selecting a preset station
On the remote:
1
2
On the unit:
• To select directly on the touch panel
• To select from the Preset List
1
2
or
Hold
☞ page 14
☞ page 48
EN_KW-AVX710[EU].indb 12EN_KW-AVX710[EU].indb 12 07.12.17 5:46:11 PM07.12.17 5:46:11 PM

OPERATIONS
13
ENGLISH
Storing your favorite programme types
You can store your favorite PTY codes into the PTY
Preset List.
Ex.: Storing <Drama> into <Preset 1>
2 Select a PTY code.
• In the example below, a PTY code is selected
from the Preset List.
If you enter <PTy Code> menu below, you can
select one from 29 PTY codes.
PTY Search starts.
If there is a station broadcasting a programme
of the same PTY code as you have selected, that
station is tuned in.
Available PTY codes:
News, Current Affairs, Information, Sport,
Education, Drama, Cultures, Science, Varied Speech,
Pop Music, Rock Music, Easy Listening, Light Classics
M, Serious Classics, Other Music, Weather & Metr,
Finance, Children’s Progs, Social Affairs, Religion,
Phone In, Travel & Touring, Leisure & Hobby, Jazz
Music, Country Music, National Music, Oldies Music,
Folk Music, Documentary
EN_KW-AVX710[EU].indb 13EN_KW-AVX710[EU].indb 13 07.12.17 5:46:12 PM07.12.17 5:46:12 PM
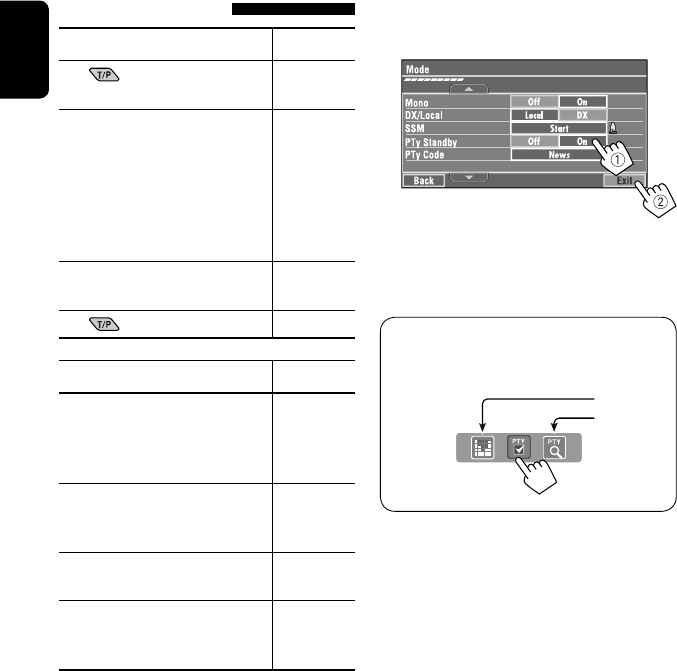
14
ENGLISH
Activating/deactivating TA/PTY
Standby Reception
TA Standby Reception Indicator
Press on the monitor panel to
activate. TP
The unit will temporarily switch to
Traffic Announcement (TA) if available,
from any source other than AM.
• The volume changes to the preset
TA volume level if the current level is
lower than the preset level (☞ page
54).
Lights up
Not yet activated. Tune in to another
station providing the RDS signals.
Flashes
Press to deactivate. Goes off
PTY Standby Reception Indicator
To activate, display <AV Menu>
screen, press [Mode], then press
[On] for <PTy Standby>. (☞ next
column)
PTY
The unit will temporarily switch to
your favorite PTY programme from any
source other than AM.
Lights up
Not yet activated. Tune in to another
station providing the RDS signals.
Flashes
To deactivate, press [Off] for <PTy
Standby> in step 3 on the next
column.
Goes off
• When a DAB tuner is connected, TA Standby/PTY
Standby Reception also works for the DAB tuner and
searches for the services.
To activate PTY Standby Reception
1 Press [AV MENU].
2 Press [Mode].
3
PTY Standby Reception is now activated for PTY
code <News>: the initial setting.
You can easily activate or deactivate the PTY
Standby Reception by pressing [SHORT CUT] on the
touch panel, then...
☞ page 12
☞ page 48
EN_KW-AVX710[EU].indb 14EN_KW-AVX710[EU].indb 14 07.12.17 5:46:12 PM07.12.17 5:46:12 PM

OPERATIONS
15
ENGLISH
To change the PTY code for PTY Standby
Reception
1 Press [AV MENU].
2 Press [Mode].
3
4 Select your favorite PTY code.
Tracing the same programme—
Network-Tracking Reception
When driving in an area where FM reception is not
sufficient enough, this unit automatically tunes in to
another FM RDS station of the same network, possibly
broadcasting the same programme with stronger
signals.
Programme A broadcasting on different frequency
areas (01 – 05)
When shipped from the factory, Network-Tracking
Reception is activated.
To change the Network-Tracking Reception
setting, see <AF Regional>. (☞ page 54)
• When the DAB tuner is connected, refer also to
“Tracing the same programme—Alternative
Frequency Reception (DAB AF).” (☞ page 42)
Automatic station selection—
Programme Search
Usually when you select preset stations, the preset
station is tuned in.
If the signals from the FM RDS preset station are not
sufficient for good reception, this unit, using the AF
data, tunes in to another station broadcasting the
same programme as the original preset station is
broadcasting. To activate this function, select <On> for
<Program Search>.(☞ page 54)
• The unit takes some time to tune in to another
station using programme search.
A
Ex.: Selecting <Easy Listening>
EN_KW-AVX710[EU].indb 15EN_KW-AVX710[EU].indb 15 07.12.17 5:46:13 PM07.12.17 5:46:13 PM

16
ENGLISH
~ Open the monitor panel.
<Open/Tilt> menu is displayed.
• By pressing and holding the button, you can
open the monitor panel and eject the disc.
Ÿ Press [OPEN].
Disc operations
The disc type is automatically detected, and playback starts automatically (for some discs: automatic start depends
on its internal program).
If a disc does not have any disc menu, all tracks on it will be played repeatedly until you change the source or eject
the disc.
If “ ” appears on the screen, the unit cannot accept the operation you have tried to do.
• In some cases, without showing “ ,” operations will not be accepted.
Label side
Caution on volume setting:
Discs produce very little noise compared with other
sources. Lower the volume before playing a disc
to avoid damaging the speakers by the sudden
increase of the output level.
When playing back a multi-channel encoded disc,
the multi-channel signals are downmixed.
• You can fully enjoy multi-channel sound by
connecting an amplifier or a decoder compatible
with these multi-channel sources. (☞ also page
65)
! Insert a disc.
Monitor panel closes automatically.
If not, press [CLOSE].
Caution:
Do not place your finger behind the monitor panel.
EN_KW-AVX710[EU].indb 16EN_KW-AVX710[EU].indb 16 07.12.17 5:46:13 PM07.12.17 5:46:13 PM

OPERATIONS
17
ENGLISH
While playing the following discs, press .
• Each time you press the button, the display changes to show the different information. (☞ page 9)
Audio format
DVD Video: Title no./Chapter no./Playing time
DVD-VR: Program no. (or Playlist no.)/Chapter no./Playing time
Playback mode
Disc type *1Sampling frequency/Bit
rate/Recorded signal
channel no.
☞ page 22
[3 / 8] Start and pause playback
[7] Stop playback
[4 ¢] Press: Select chapter
Hold: Reverse/forward search*2
[5 ∞] Select title/program/playlist
*1 DVD-VR also indicates either PRG (program) or PLAY (playlist) playback.
*2 Search speed: x2 ] x10
: Buttons on the touch panel. In the explanation, they are indicated inside [ ].
These buttons also work when they are not shown on the touch panel (while watching the playback pictures
on the screen).
Sound mode
(☞ page 48)
EN_KW-AVX710[EU].indb 17EN_KW-AVX710[EU].indb 17 07.12.17 5:46:14 PM07.12.17 5:46:14 PM
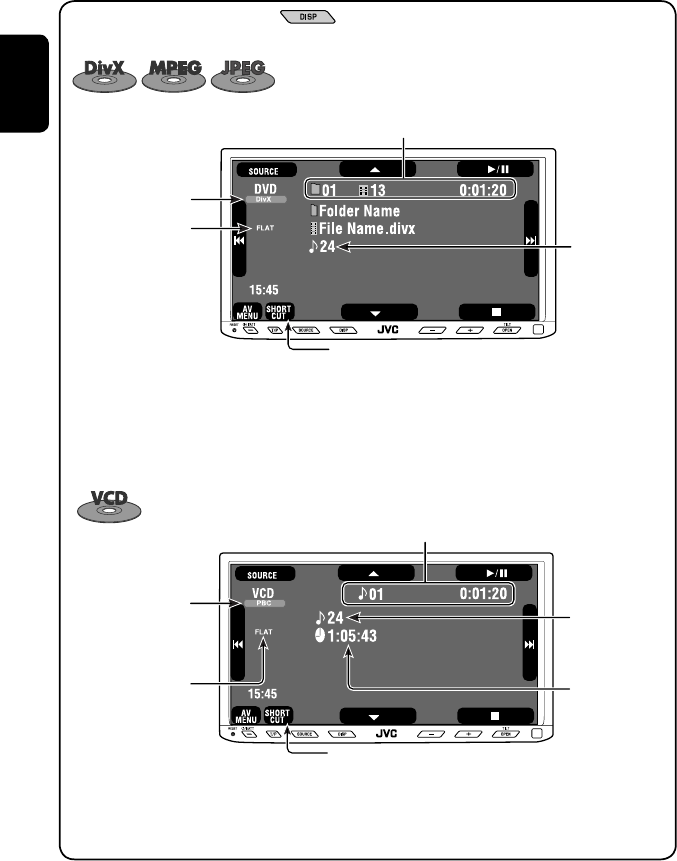
18
ENGLISH
Track no./Playing time
[3 / 8] Start and pause playback
[7] Stop playback
[4 ¢] Press: Select track
Hold: Reverse/forward search*2
For DivX/MPEG1/MPEG2: Folder no./Track no./Playing time
For JPEG: Folder no./File no.
[3 / 8] Start and pause playback
[7] Stop playback
[4 ¢] Press: Select track
Hold: Reverse/forward search for DivX/MPEG1/MPEG2 *1
[5 ∞] Press: Select folder
Hold: Display Folder list
While playing the following discs, press .
• Each time you press the button, the display changes to show the different information (☞ page 9).
Disc type
☞ page 22
☞ page 22
The PBC indicator
lights up when PBC is
in use.
Total track no.
included on the
disc
Total track no.
included on the
disc
Total playing time
Sound mode
(☞ page 48)
Sound mode
(☞ page 48)
*1 Search speed: ¡1 ] ¡2
*2 Search speed: x2 ] x10
EN_KW-AVX710[EU].indb 18EN_KW-AVX710[EU].indb 18 07.12.17 5:46:14 PM07.12.17 5:46:14 PM

OPERATIONS
19
ENGLISH
Track no./Playing time
Only for CD Text *3
Folder no./Track no./Playing time
Audio format
(MP3/WMA/WAV)
☞ page 22
*3 “No Name” appears for conventional CDs.
*4 Search speed: x2 ] x10
Tag data appears
only when it is
recorded.
Sound mode
(☞ page 48)
☞ page 22
[3 / 8] Start and pause playback
[7] Stop playback
[4 ¢] Press: Select track
Hold: Reverse/forward search*4
[5 ∞] Press: Select folder
Hold: Display Folder list
[3 / 8] Start and pause playback
[7] Stop playback
[4 ¢] Press: Select track
Hold: Reverse/forward search*4
Total track no.
included on the disc
Total playing time
Total track no. included on the disc
Sound mode
(☞ page 48)
EN_KW-AVX710[EU].indb 19EN_KW-AVX710[EU].indb 19 07.12.17 5:46:15 PM07.12.17 5:46:15 PM
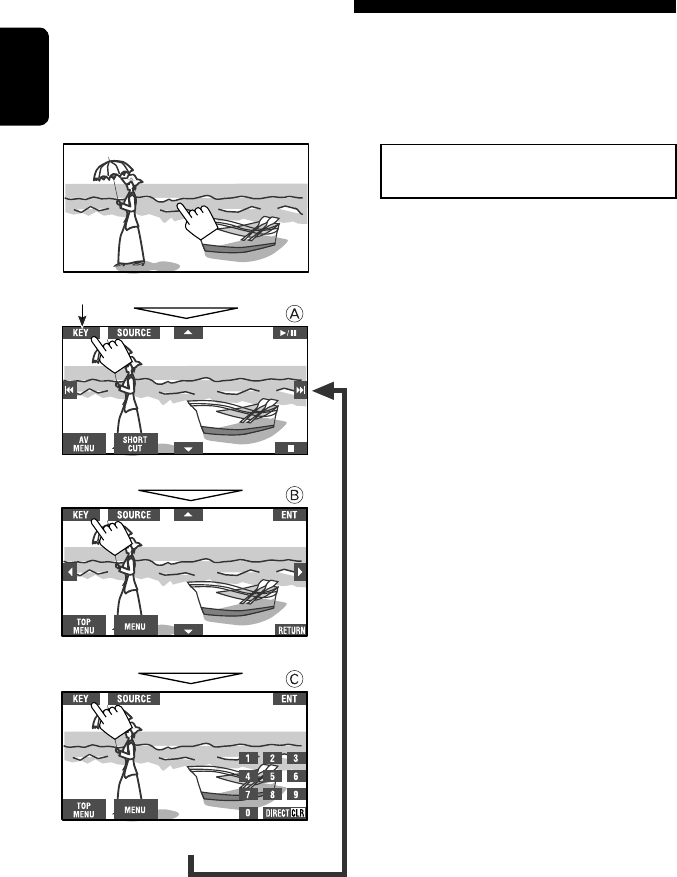
20
ENGLISH
Touch the screen (center portion).
Operation buttons on the screen
You can display the following operation buttons while watching the playback pictures on the screen.
• While the operation buttons are displayed, aspect ratio is fixed to <Full>. (☞ page 52)
• If no operation is done for about five seconds, the operation buttons disappear (except when a disc menu is
displayed).
Touch [KEY].
☞ pages 23 to 27 on how the operation buttons
particularly work for a variety of the discs
A
[SOURCE] Display <Source Menu> screen
[AV MENU] Display <AV Menu> screen
[SHORT CUT] Display the Short Cut buttons
[3 / 8] Start and pause playback
[7] Stop playback
[4 ¢] Press: Select track
Hold: Reverse/forward search
[5 ∞] Select folders
• The above buttons also work when they are not shown on
the screen (while watching the playback picture).
* While a disc menu is played back for DVD, [KEY] is
automatically displayed. On the disc menu, you can select a
menu item directly by touching it on the screen.
B
For DVD/VCD/DivX menu operation playback
[2 3 5 ∞] Select the menu items
[ENT] Confirm the selection
[TOP MENU] Display the disc menu
[MENU] Display the disc menu
[RETURN] Return to the previous menu or display the
menu (only for VCD with PBC)
C
For entering the numbers
[DIRECT CLR] • Switch between chapter/track entry and
title/group/folder entry
• Erase the last entry when you enter a
wrong number
[0]–[9]=[ENT]
Enter numbers
Ex.: To enter “105,” press [1], [0], [5], then [ENT]
*
Touch [KEY].
Touch [KEY].
To erase the operations, touch the screen again.
EN_KW-AVX710[EU].indb 20EN_KW-AVX710[EU].indb 20 07.12.17 5:46:15 PM07.12.17 5:46:15 PM

OPERATIONS
21
ENGLISH
1
2
3
When one of the playback modes is selected, the
corresponding indicator lights up on the source
information screen.
To cancel, select <Off>.
Selecting playback modes
You can use the following playback modes—Repeat or Random.
Ex.: To select Track Repeat
Disc type Repeat Random
Chapter: Repeats current chapter
Title: Repeats current title —
Chapter: Repeats current chapter
Program: Repeats current program (not
available for Playlist playback)
—
Track: Repeats current track
Folder: Repeats current folder
Folder: Randomly plays all tracks of current
folder, then tracks of next folders
Disc (All): Randomly plays all tracks
Folder: Repeats current folder —
Track: Repeats current track (PBC not in
use)
Disc (All): Randomly plays all tracks (PBC not
in use)
Track: Repeats current track*1Disc (All): Randomly plays all tracks
Track: Repeats current track*1
Folder: Repeats all tracks of the current
folder
Folder: Randomly plays all tracks of current
folder, then tracks of next folders
Disc (All): Randomly plays all tracks
*1 You can also use [SHORT CUT] to turn on and off Track Repeat.
EN_KW-AVX710[EU].indb 21EN_KW-AVX710[EU].indb 21 07.12.17 5:46:16 PM07.12.17 5:46:16 PM

22
ENGLISH
Prohibiting disc ejection
You can lock a disc in the loading slot.
To cancel the prohibition, repeat the same
procedure to select <EJECT OK?>.
Using Short Cut Icons
You can easily access the some frequently used
functions by using [SHORT CUT] on the touch panel.
1
2
• For video software:
• For audio software:
Selecting tracks on the list
If a disc includes folders, you can display the Folder/
Track (File) Lists, then start playback.
1
2
3 Select a folder (1), then a track (2).
Selected track starts playing. (* Press to move to
the previous/next pages of the list)
1 Current folder list number/total folder list
number
2 Current track list number/total track list
number of the current folder
You can easily access the Track List by pressing DISP
on the monitor panel.
Selected track starts playing.
at the same time
Sound mode
(☞ page 48)
Turn on or off Track Repeat
(Repeat play: ☞ page 21)
Aspect ratio
(☞ page 52)
EN_KW-AVX710[EU].indb 22EN_KW-AVX710[EU].indb 22 07.12.17 5:46:16 PM07.12.17 5:46:16 PM

OPERATIONS
23
ENGLISH
Stop playback.
Start playback/pause (if pressed during playback).
Reverse/forward search*1 (No sound can be heard.)
Slow motion during pause*2 (No sound can be heard.)
Press: Select chapter (during playback or pause).
Hold: Reverse/forward search*3 (No sound can be heard.)
Select title (during playback or pause).
Select aspect ratio.
Select chapter.
Select title (when not playing).
Select title (during playback or pause).
Using menu driven features
1
2 Select an item you want to start playback.
3
*1 Search speed: x2 ] x5 ] x10 ] x20 ] x60
*2 Slow motion speed: 1/32 ] 1/16 ] 1/8 ] 1/4 ] 1/2
*3 Search speed: x2 ] x10
Operations using the remote controller—RM-RK252
Also functions as CLR (clear):
Erases a misentry if pressed
while holding SHIFT.
You can change the following items using the on-screen bar—audio language, audio stream, audio channel,
subtitle language, view angle, etc. (☞ pages 28 and 29)
twice
EN_KW-AVX710[EU].indb 23EN_KW-AVX710[EU].indb 23 07.12.17 5:46:17 PM07.12.17 5:46:17 PM

24
ENGLISH
Stop playback.
Start playback/pause (if pressed during playback).
Reverse/forward search*1 (No sound can be heard.)
Forward slow motion during pause*2 (No sound can be heard.)
• Reverse slow motion does not work.
Press: Select chapter (during playback or pause).
Hold: Reverse/forward search*3
Select program.
Select playlist (during playback or pause).
Select aspect ratio.
Select chapter.
Select program (when not playing).
Select program/playlist (during playback or pause).
Using Original Program/Playlist screens ( ☞ page 28)
1For Original Program
For Playlist
2 Select an item you want to start playback.
3 To erase the screen.
*1 Search speed: x2 ] x5 ] x10 ] x20 ] x60
*2 Slow motion speed: 1/32 ] 1/16 ] 1/8 ] 1/4 ] 1/2
*3 Search speed: x2 ] x10
twice
Also functions as CLR (clear):
Erases a misentry if pressed
while holding SHIFT.
EN_KW-AVX710[EU].indb 24EN_KW-AVX710[EU].indb 24 07.12.17 5:46:18 PM07.12.17 5:46:18 PM

OPERATIONS
25
ENGLISH
Stop playback.
Start playback/pause (if pressed during playback).
Reverse/forward search*4 (No sound can be heard.)
Press: Select track
Hold: Reverse/forward search*5 (No sound can be heard.)
Select folder.
Select aspect ratio.
Select track (within the same folder).
Select folder.
While playing...
Reverse/advance the scenes by five minutes.
For DivX6: Using menu driven features
1
2 Select an item you want to start playback.
3
*4 Search speed: ¡1 ] ¡2 ] ¡3
*5 Search speed: ¡1 ] ¡2
Current playback position
twice
2nd press 2nd press1st press 1st press 3rd press
EN_KW-AVX710[EU].indb 25EN_KW-AVX710[EU].indb 25 07.12.17 5:46:19 PM07.12.17 5:46:19 PM

26
ENGLISH
Stop playback.
Start playback/pause. (Slide show: each file is shown for a few
seconds.)
Shows the current file until you change it if pressed during Slide show.
Select file.
Select folder.
Select aspect ratio.
Select file (within the same folder).
Select folder.
During PBC playback...
Select an item on the menu.
To return to the previous menu, press
To cancel PBC playback
1
2 Select the desired track.
• To resume PBC, press
Stop playback.
Start playback/pause (if pressed
during playback).
Reverse/forward search*1
Forward slow motion during pause*2
(No sound can be heard.)
• Reverse slow motion does not work.
Press: Select track.
Hold: Reverse/forward search*3 (No
sound can be heard.)
Select aspect ratio.
twice
*1 Search speed: x2 ] x5 ] x10 ] x20 ] x60
*2 Slow motion speed: 1/32 ] 1/16 ] 1/8 ] 1/4 ] 1/2
*3 Search speed: x2 ] x10
Also functions as CLR (clear):
Erases a misentry if pressed while holding SHIFT.
Select track.
EN_KW-AVX710[EU].indb 26EN_KW-AVX710[EU].indb 26 07.12.17 5:46:19 PM07.12.17 5:46:19 PM

OPERATIONS
27
ENGLISH
Stop playback.
Start playback/pause (if pressed during playback).
Reverse/forward search*4
Press: Select track.
Hold: Reverse/forward search*5
Select track.
Stop playback.
Start playback/pause (if pressed during playback).
Reverse/forward search*4
Press: Select track.
Hold: Reverse/forward search*5
Select folder.
Select track (within the same folder).
Select folder.
*4 Search speed: x2 ] x5 ] x10 ] x20 ] x60
*5 Search speed: x2 ] x10
twice
EN_KW-AVX710[EU].indb 27EN_KW-AVX710[EU].indb 27 07.12.17 5:46:20 PM07.12.17 5:46:20 PM
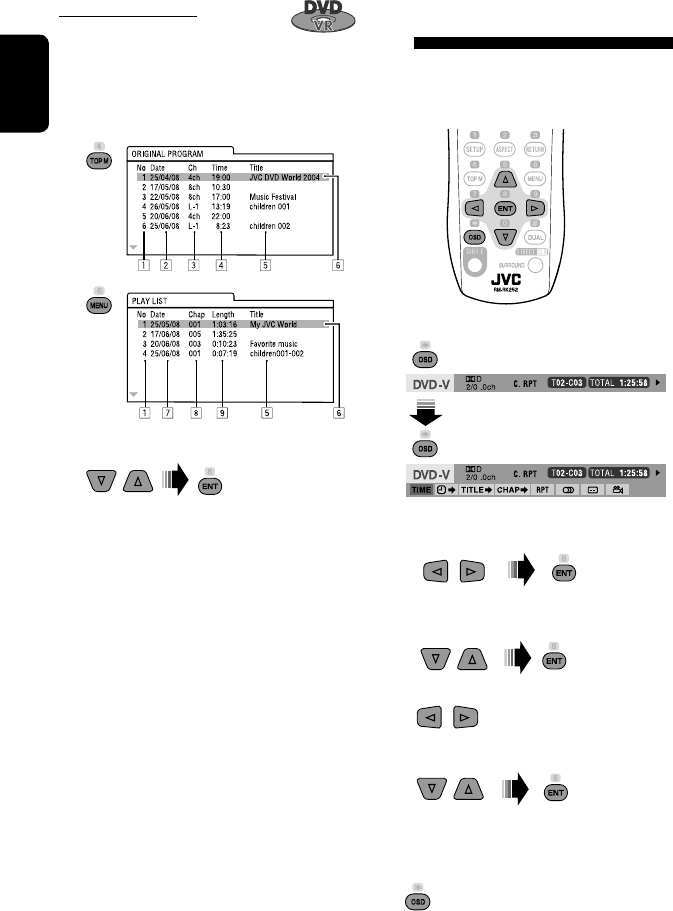
28
ENGLISH
Operations using the on-screen
bar
These operations are possible on the screen using
the remote controller, while playing the following
discs—DVD/VCD/DivX/MPEG1/MPEG2/JPEG.
1 Display the on-screen bar. (☞page 29)
Ex. For DVD-Video
2 Select an item.
3 Make a selection.
If a pop-up menu appears...
• For entering time/numbers...
:
Move the entry position
:
Select a number
To remove the on-screen bar
Using the list screens
You can use Original Program or Playlist
screen anytime while playing DVD-VR with its data
recorded.
1 Display the Original Program/Playlist screen.
2 Select an item you want.
To erase the screen
1 Original Program/Playlist number
2 Recording date
3 Recording source (TV station, the input terminal of
the recording equipment, etc.)
4 Start time of recording
5 Title of the program/playlist*
6 Highlight bar (current selection)
7 Creating date of playlist
8 Total number of chapters included in the playlist
9 Playback time
* The title of the original program or playlist may not be
displayed depending on the recording equipment.
EN_KW-AVX710[EU].indb 28EN_KW-AVX710[EU].indb 28 07.12.17 5:46:21 PM07.12.17 5:46:21 PM

OPERATIONS
29
ENGLISH
Information
Operation
On-screen bar
5 Time indication
Elapsed playing time of the disc
Remaining title time (for DVD)
Remaining disc time (for others)
Elapsed playing time of the current
chapter/track *2
Remaining time of the current
chapter/track *2
6 Playback status
Play
Reverse/forward search
Reverse/forward slow-motion
Pause
Stop
7 Operation icons
Change time indication (see 5)
Time Search (Specify a certain
scene by entering time.)
Title Search (by its number)
Chapter Search (by its number)
Track Search (by its number)
Repeat play *1
Random play *1
Change the audio language, audio
stream, or audio channel
Change or erase the subtitle
language
Change the view angle
*1 ☞ page 21
*2 Not applicable for DVD-VR
Above example is of DVD Video. Items shown on the bar vary due to the disc type.
1 Disc type
2 • DVD: Audio signal format
• VCD: PBC
3 Playback mode *1
DVD Video:
C. RPT: Chapter repeat
T. RPT: Title repeat
DVD-VR:
C. RPT: Chapter repeat
PG. RPT: Program repeat
DivX/MPEG1/MPEG2:
T. RPT: Track repeat
F. RPT: Folder repeat
F. RND: Folder random
A. RND: All (Disc) random
JPEG:
F. RPT: Folder repeat
VCD:
T. RPT: Track repeat
A. RND: All (Disc) random
4 Playback information
Current title/chapter
Current program/chapter
Current Playlist/chapter
Current track
Current folder/track
Current folder/file
EN_KW-AVX710[EU].indb 29EN_KW-AVX710[EU].indb 29 07.12.17 5:46:21 PM07.12.17 5:46:21 PM
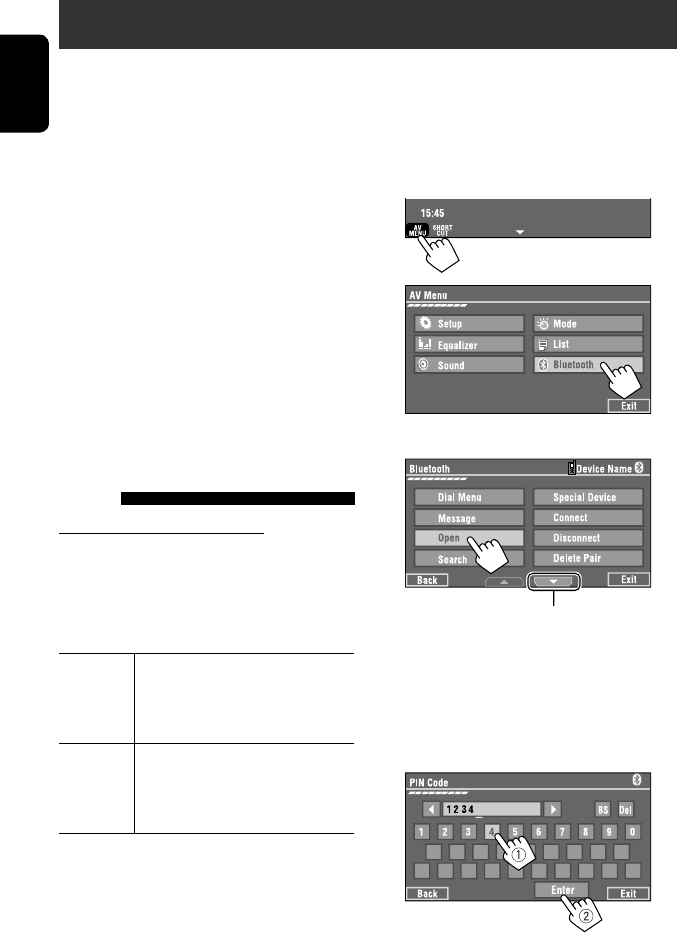
30
ENGLISH
Bluetooth® operations — Cellular phone/audio player
For Bluetooth operations, it is required to connect the
Bluetooth Adapter (KS-BTA200) to the CD changer jack
on the rear.
• Refer also to the instructions supplied with the
Bluetooth Adapter and the Bluetooth device.
• Refer to the list (included in the box) to see the
countries where you may use the Bluetooth®
function.
To use a Bluetooth device through the unit (“Bluetooth
PHONE” and “Bluetooth AUDIO”) for the first time,
you need to establish Bluetooth wireless connection
between the unit and the device.
• Once the connection is established, it is registered in
the unit even if you reset your unit. Up to five devices
can be registered in total.
• Only one device can be connected at a time for each
source (“Bluetooth PHONE” and “Bluetooth AUDIO”).
Connecting a new Bluetooth
device
Registration (Pairing) methods
Use either of the following items in <Bluetooth>
menu to register and establish the connection with a
device.
• Select “Bluetooth PHONE” or “Bluetooth AUDIO” as
the source to operate <Bluetooth> menu.
Open Make the unit ready to establish
a new Bluetooth connection.
The connection is established by
operating the Bluetooth device.
Search Make the unit ready to establish
a new Bluetooth connection.
The connection is established by
operating this unit.
To register using <Open>
Preparation:
Operate the Bluetooth device to turn on its Bluetooth
function.
1 • Make sure “New Device” is selected. If not, press
[5] or [∞] to select it.
2
3
4 Enter a PIN (Personal Identification
Number)* code to the unit.
• You can enter any number you like (1-digit to
16-digit number).
* Some devices have their own PIN code. Enter the
specified PIN code to the unit.
Go to other menu items
EN_KW-AVX710[EU].indb 30EN_KW-AVX710[EU].indb 30 07.12.17 5:46:23 PM07.12.17 5:46:23 PM

31 EXTERNAL DEVICES
ENGLISH
You can enter [0] – [9] only.
• [BS]: Erases the character before the cursor.
• [Del]: Erases the character on the cursor.
• [Enter]: Confirms the entry.
5 Operate the Bluetooth device to connect
while “Open...” is displayed on the screen.
Enter the same PIN code (as entered in the above
step) on the device to be connected.
Now connection is established and you can use the
device through the unit.
The device remains registered even after you
disconnect the device. Use <Connect> (or activate
<Auto Connect>) to connect the same device
from next time (☞ the following, and pages 58
and 59).
To register using <Search>
• Make sure “New Device” is selected. If not, press [5]
or [∞] to select it.
1 Press [AV MENU].
2 Press [Bluetooth].
3 Press [Search].
The unit searches for available devices and displays
the list of them. (If no available device is detected,
“Device Unfound” appears.)
4 Select a device you want to connect.
5 Enter the specific PIN code of the device to
the unit.
• Refer to the instructions supplied with the device
to check the PIN code.
6 Operate the Bluetooth device to connect
while “Connecting...” is displayed on the
screen.
Now connection is established and you can use the
device through the unit.
To connect a special device <Special
Device>
1 Press [AV MENU].
2 Press [Bluetooth].
3 Press [Special Device].
The unit displays the list of the preset devices.
4 Select a device you want to connect.
5 Use <Open> (or <Search>) to connect.
To connect/disconnect a registered
device
1 Select “Bluetooth PHONE” or “Bluetooth
AUDIO,” then select a registered device you
want to connect/disconnect.
2 Press [AV MENU].
3 Press [Bluetooth].
4 Press [Connect] or [Disconnect].
• Select <Connect> to connect the selected
device.
• Select <Disconnect> to disconnect the selected
device.
To delete a registered device
1 Select “Bluetooth PHONE” or “Bluetooth
AUDIO,” then select a registered device you
want to delete.
2 Press [AV MENU].
3 Press [Bluetooth].
4 Press [Delete Pairing].
Confirmation screen appears. Press [Yes].
EN_KW-AVX710[EU].indb 31EN_KW-AVX710[EU].indb 31 07.12.17 5:46:23 PM07.12.17 5:46:23 PM

32
ENGLISH
Using the Bluetooth cellular phone
Adjust the volume of the incoming calls.*2
When a call comes in...
The source is changed to “Bluetooth PHONE”
automatically.
Name and phone number (if acquired)
When <Auto Answer> is activated...
The unit answers the incoming call automatically.
(☞ page 59)
☞ page 34
When <Auto Answer> is deactivated...
To answer the incoming call
• Press any button on the monitor panel (except
/ATT or +/–).
• Press the message displayed on the touch panel.
To end the call
• Hold any button on the monitor panel (except
/ATT or +/–).
• Hold the message displayed on the touch panel.
• You can adjust the microphone volume. (☞ page 59)
~ Press [SOURCE], then press [Bluetooth PHONE]. (☞ page 9)
• You can also use SOURCE on the monitor panel. Press it repeatedly.
Ÿ Press [AV MENU].
! Press [Bluetooth].
⁄ Establish the connection with a device, then make a call (or settings using <Bluetooth>
menu).
☞ pages 58 and 59
Sound mode
(☞ page 48) Status of the device
Signal strength/Battery
remainder
(only when the information
comes from the device)
[AV MENU] Hold: Activates <Voice Dialing> function
[5 ∞] Select the registered device
(“New Device” appears when a new device can be registered.)
The Bluetooth icon
lights up when
the adapter is
connected.
: Buttons on the touch panel. In the
explanation, they are indicated inside
[ ].
*1 When a cellular phone with audio function is connected, appears.
*2 This adjustment does not affect the volume level of the other sources.
*1
EN_KW-AVX710[EU].indb 32EN_KW-AVX710[EU].indb 32 07.12.17 5:46:24 PM07.12.17 5:46:24 PM
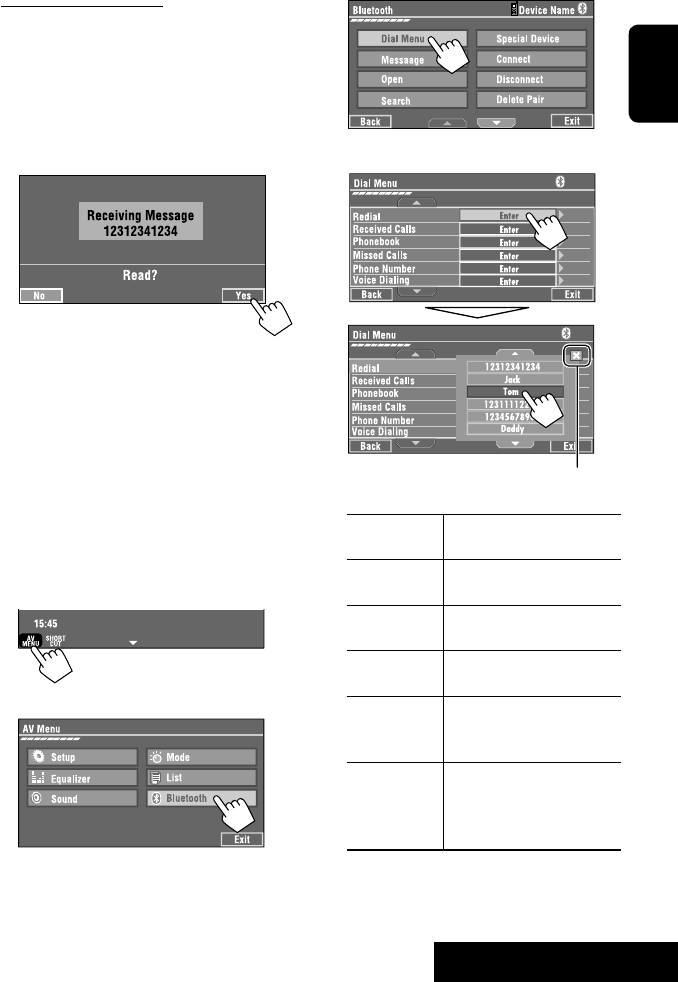
33 EXTERNAL DEVICES
ENGLISH
3
4 Select a calling method, then call.
Redial Shows the list of the phone
numbers you have dialed.
Received Calls Shows the list of the received
calls.
Phonebook Shows the phone book of the
connected cellular phone.
Missed Calls Shows the list of the missed
calls.
Phone
Number
Shows the phone number
entry screen = “Entering a
phone number” (☞ page 34).
Voice Dialing (Only when the connected
cellular phone has the voice
recognition system): = Speak
the name you want to call.
When an SMS comes in...
If the cellular phone is compatible with SMS (Short
Message Service), you can read the messages on the
screen.
• You cannot edit or send a message through the unit.
When <Message Info> is set to <Auto>...
The unit rings and the following screen is displayed to
inform you of a message arrival. (☞ page 59)
To read the message, press [Yes].
The source is changed to “Bluetooth PHONE.”
To read the message later, press [No].
• The message is stored into <Message> =
<Unread>. (☞ page 58)
When <Message Info> is set to <Manual>...
Access the message list to read messages. (☞ pages
58 and 59)
To make a call
1
2
Cancel
EN_KW-AVX710[EU].indb 33EN_KW-AVX710[EU].indb 33 07.12.17 5:46:25 PM07.12.17 5:46:25 PM

34
ENGLISH
To stop ringing (canceling the outgoing call)
Hold any button on the monitor panel (except /ATT
or +/–).
Entering a phone number
• You cannot use the remote controller to enter phone
numbers.
You can enter [0] – [9], [*], [#] (up to 32 numbers)
• [BS]: Erases the character before the cursor.
• [Del]: Erases the character on the cursor.
• [Preset]: Goes to Preset List. You can preset the
entered number by selecting a preset
number. (☞ page 35)
• [Dial]: Calls the entered number.
• You can easily access <Dial Menu> by pressing
[SHORT CUT] on the touch panel, then...
You can also access <Dial Menu> by holding
SOURCE on the monitor panel.
• You can easily activate <Voice Dialing> by
pressing [SHORT CUT] on the touch panel, then...
You can also activate <Voice Dialing> by
holding [AV MENU].
To redial previously dialed numbers
1
2
3
When using the remote controller, you can
display <Redial> menu anytime .
[Hold]
EN_KW-AVX710[EU].indb 34EN_KW-AVX710[EU].indb 34 07.12.17 5:46:25 PM07.12.17 5:46:25 PM
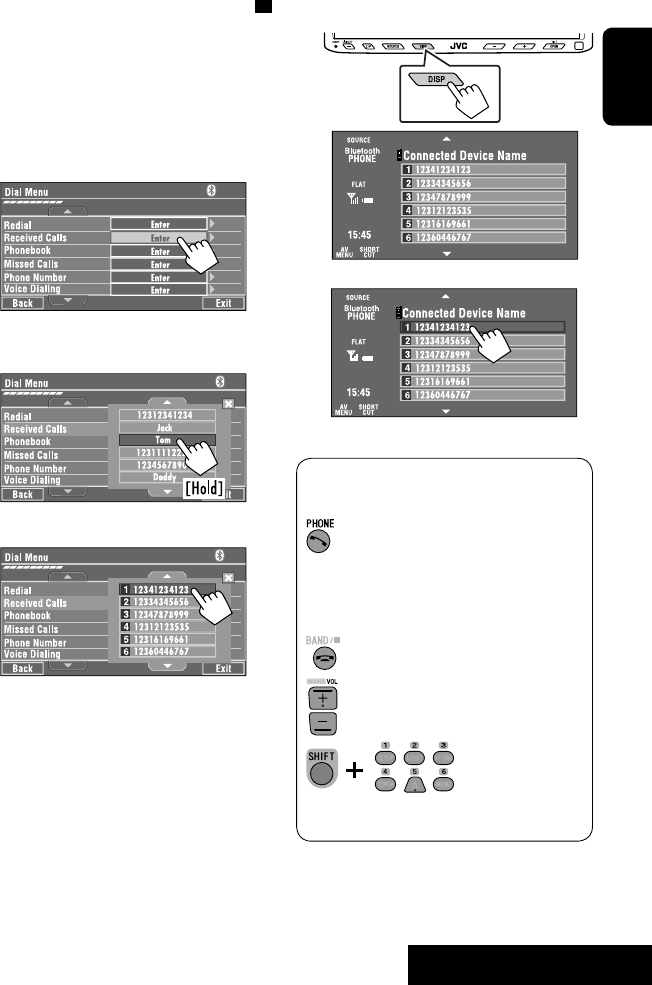
35 EXTERNAL DEVICES
ENGLISH
To call a preset number
1
2
You can use the following buttons on the remote
controller for the Bluetooth phone operations.
Presetting the phone numbers
You can preset up to six phone numbers.
1 Select the phone number you want to preset
from <Phonebook>, <Redial>, <Received
Calls>, or <Missed Calls>.
1 Press [AV MENU].
2 Press [Bluetooth].
3 Press [Dial Menu], then...
Ex.: Selecting <Received Calls>
2 Select a telephone number to store.
3 Select a preset number.
Now “Tom” is stored into preset no. 1.
• Display <Dial Menu> screen/Answer
the incoming call.
• Display the <Redial> menu if pressed
and held (regardless of the current
source).
End the call.
Adjust the volume.
Make a call to the preset numbers.
[Hold]
:
:
:
:
EN_KW-AVX710[EU].indb 35EN_KW-AVX710[EU].indb 35 07.12.17 5:46:26 PM07.12.17 5:46:26 PM
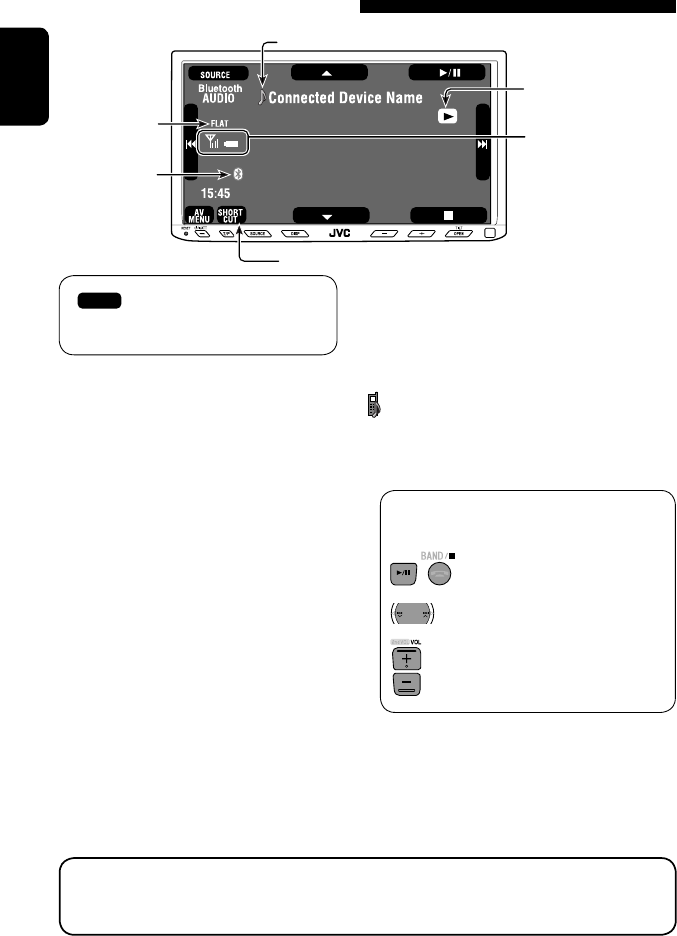
36
ENGLISH
Bluetooth Information:
If you wish to receive more information about Bluetooth, visit the following JVC web site: <http://www.
jvc-victor.co.jp/english/car/>
You can use the following buttons on the remote
controller for the Bluetooth audio operations.
Using the Bluetooth audio player
☞ page 48
Sound mode
(☞ page 48)
[3 / 8] [7] Start and pause playback
[4 ¢] Reverse/forward skip
[5 ∞] Select the registered device
(“New Device” appears when a new device can
be registered.*3)
Status of the device
Signal strength/Battery
remainder
(only when the information
comes from the device)
The Bluetooth icon
lights up when
the adapter is
connected.
~ Press [SOURCE], then press [Bluetooth
AUDIO]. (☞ page 9)
• You can also use SOURCE on the monitor
panel. Press it repeatedly.
Ÿ Start playback.
: Buttons on the touch panel. In the
explanation, they are indicated
inside [ ].
*2
*1
*1 When a cellular phone with audio function is connected, appears.
*2 Indicates the button pressed. It may be different from the operation status.
*3 You cannot select “New Device” when a Bluetooth audio player is connected.
Start and pause playback.
Reverse/forward skip
Adjust the volume.
:
:
:
EN_KW-AVX710[EU].indb 36EN_KW-AVX710[EU].indb 36 07.12.17 5:46:26 PM07.12.17 5:46:26 PM

37 EXTERNAL DEVICES
ENGLISH
Preparation:
Make sure <Changer> is selected for <External
Input>. (☞ page 55)
~ Press [SOURCE], then press [CD-CH]. (☞
page 9)
• You can also use SOURCE on the monitor
panel. Press it repeatedly.
Ÿ
! Display the Disc List.
Listening to the CD changer
It is recommended to use a JVC MP3-compatible CD changer with your unit.
• You can play only CDs (CD-DA) and MP3 discs.
Folder no./Track no./Playing time
Disc no.
MP3 indicator
☞ page 38
Tag data appears only when it is
recorded.
⁄ Select a disc to start playing.
• If you select an MP3 disc, the Track list of the
current folder appears. You can select a track
and start playing. (☞ also page 22)
• If you select a folder on the list, you can start
playing the first track of the folder.
To go to the other list
Sound mode
(☞ page 48)
[4 ¢] Press: Select track
Hold: Reverse/forward search
[5 ∞] Press: Select folders (only for MP3)
Hold: Display Disc list
Total track no. included on the
disc
Ex. while playing an MP3 disc
: Buttons on the touch panel. In the
explanation, they are indicated inside [ ].
EN_KW-AVX710[EU].indb 37EN_KW-AVX710[EU].indb 37 07.12.17 5:46:27 PM07.12.17 5:46:27 PM
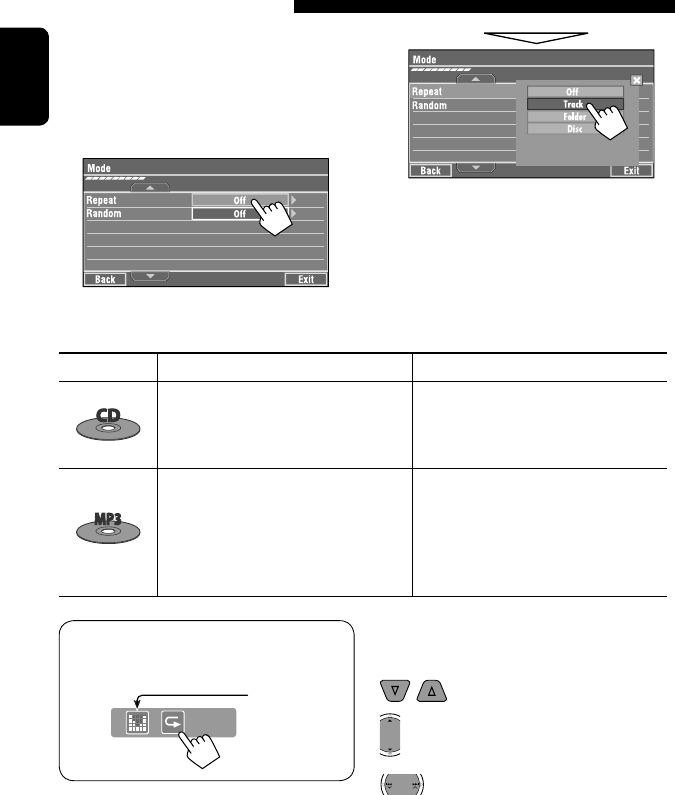
38
ENGLISH
When one of the playback modes is selected, the
corresponding indicator lights up on the source
information screen.
To cancel, select <Off>.
You can use following playback modes—Repeat or
Random.
Ex.: To select Track Repeat for an MP3 disc
1 Press [AV MENU].
2 Press [Mode].
3
Selecting playback modes
Disc type Repeat Random
Track: Repeats current track
Disc: Repeats all tracks of the current disc
Disc: Randomly plays all tracks of the
current disc
All: Randomly plays all tracks of all
loaded discs
Track: Repeats current track
Folder: Repeats all tracks of the current
folder
Disc: Repeats all tracks of the current disc
Folder: Randomly plays all tracks of current
folder, then tracks of next folders
Disc: Randomly plays all tracks of the
current disc
All: Randomly plays all tracks of all
loaded discs
You can use the following buttons on the remote
controller to operate the CD changer.
You can easily turn on or off Track Repeat by
pressing [SHORT CUT] on the touch panel, then...
: Select disc.
: Select folder (MP3 only).
• Press: Select track.
• Hold: Reverse/forward search
☞ page 48
EN_KW-AVX710[EU].indb 38EN_KW-AVX710[EU].indb 38 07.12.17 5:46:28 PM07.12.17 5:46:28 PM

39 EXTERNAL DEVICES
ENGLISH
~ Press [SOURCE], then press [DAB]. (☞ page 9)
• You can also use SOURCE on the monitor panel. Press it repeatedly.
Ÿ Press [BAND].
! Press [4] or [¢] to search for an ensemble—Auto Search.
• Manual Search: Hold either [4]or [¢] until “Manual Search” appears on the screen, then press it
repeatedly.
⁄ Press [∞] or [5] to select a service (either primary or secondary) to listen to.
Listening to the DAB tuner
Preset no.
Band
☞ page 42
DAB indicators */Standby
Reception indicators
If no signal is received, “No DAB Signal” appears.
* While tuning in a service with DLS (Dynamic Label
Segment), the TEXT indicator lights up.
Sound mode
(☞ page 48)
: Buttons on the touch panel. In the
explanation, they are indicated
inside [ ].
EN_KW-AVX710[EU].indb 39EN_KW-AVX710[EU].indb 39 07.12.17 5:46:28 PM07.12.17 5:46:28 PM

40
ENGLISH
Manual presetting
1 Display the Preset List.
2 Tune in to a service you want to preset.
3 Select a preset number.
The service selected in step 2 is now stored in
preset number 2.
When surrounding sounds are
noisy
Some services provide Dynamic Range Control (DRC)
signals together with their regular programme signals.
DRC will reinforce the low level sounds to improve your
listening.
• The DRC indicator will light up while tuning in to a
service with the DRC signals.
1
2
3
• As the number increases, the effect becomes
stronger.
EN_KW-AVX710[EU].indb 40EN_KW-AVX710[EU].indb 40 07.12.17 5:46:29 PM07.12.17 5:46:29 PM

41 EXTERNAL DEVICES
ENGLISH
Selecting preset services
On the remote:
1
2
On the unit:
1
2
Activating/deactivating TA/PTY
Standby Reception
Operations are exactly the same as explained on page
14 for FM RDS stations.
• You cannot store PTY codes separately for the DAB
tuner and for the FM tuner.
Activating/deactivating
Announcement Standby
Reception
Announcement Standby Reception allows the
unit to switch temporarily to your favorite service
(announcement type).
Announcement Standby Reception Indicator
To activate, display <AV Menu>
screen, then select <Mode>, press
[On] for <Announce Standby>. (☞
below)
ANN
The unit will temporarily switch to your
favorite service from any source other
than FM/AM.
Lights up
Not yet activated. Tune in to another
service providing the related signals.
Flashes
To deactivate, press [Off] for
<Announce Standby> (☞ below).
Goes off
To activate Announcement Standby
Reception
1 Press [AV MENU].
2 Press [Mode].
3
Announcement Standby Reception is now
activated for PTY code <Transport News>: the
initial setting.
Continued on the next page
[Hold]
EN_KW-AVX710[EU].indb 41EN_KW-AVX710[EU].indb 41 07.12.17 5:46:29 PM07.12.17 5:46:29 PM

42
ENGLISH
Tracing the same programme—
Alternative Frequency Reception
(DAB AF)
• While receiving a DAB service:
When driving in an area where a service cannot be
received, this unit automatically tunes in to another
ensemble or FM RDS station broadcasting the same
programme.
• While receiving an FM RDS station:
When driving in an area where a DAB service is
broadcasting the same programme as the FM RDS
station, this unit automatically tunes in to the DAB
service.
When shipped from the factory, Alternative Frequency
Reception is activated.
To deactivate the Alternative Frequency
Reception, select <Off> for <DAB AF>. (☞ page
54)
You can easily activate and deactivate
Announcement Standby Reception by pressing
[SHORT CUT] on the touch panel, then...
To change the announcement type for
Announcement Standby Reception
1 Press [AV MENU].
2 Press [Mode].
3
4 Select your favorite announcement type.
Available announcement types:
Transport News, Warning, News, Weather, Event,
Special Event, Radio Info, Sports News, Financial
News
☞ page 48
☞ page 14
EN_KW-AVX710[EU].indb 42EN_KW-AVX710[EU].indb 42 07.12.17 5:46:30 PM07.12.17 5:46:30 PM

43 EXTERNAL DEVICES
ENGLISH
Listening to the iPod
It is required to connect the Interface adapter for iPod (KS-PD100) to the CD changer jack on the rear.
Preparation:
Make sure <iPod> is selected for <External Input>. (☞ page 55)
~ Press [SOURCE], then press [iPod] (☞ page 9)
Playback starts automatically.
• You can also use SOURCE on the monitor panel. Press it repeatedly.
Ÿ Press [4] or [¢] to select a track.
Track no./Playing time
☞ page 44
[4 ¢] Press: Select track
Hold: Reverse/forward search
[5] Enter player’s menu
[∞] Start playback/pause
• To resume, press again.
Sound mode
(☞ page 48)
: Buttons on the touch panel. In the
explanation, they are indicated
inside [ ].
EN_KW-AVX710[EU].indb 43EN_KW-AVX710[EU].indb 43 07.12.17 5:46:30 PM07.12.17 5:46:30 PM

44
ENGLISH
Selecting a track from the
player’s menu
1 Press [5] to enter the player’s menu.
“SEARCH” flashes on the screen during menu
operations.
• This mode will be canceled if no operations are
done for about five seconds.
2 Press [4] or [¢] to select the desired
item.
Press: Select an item.
Hold: Skip ten items at a time if there are more
than ten items.
Playlists Ô Artists Ô Albums Ô Songs Ô
Genres Ô Composers Ô (back to the beginning)
3 Press [∞] to confirm the selection.
4 Repeat steps 2 and 3 to select a track.
• When a track is selected finally, playback starts.
• To return to the previous menu, press [5].
Selecting playback modes
1
2
3 Select an appropriate option.
Repeat One: Functions the same as
“Repeat One.”
All: Functions the same as
“Repeat All.”
Random Album: Functions the same as
“Shuffle Albums.”
Song: Functions the same as
“Shuffle Songs.”
• When the playback modes are selected, the
corresponding indicators light up alternately on
the screen.
To cancel, select <Off>.
You can easily turn on or off Track Repeat by
pressing [SHORT CUT] on the touch panel, then...
☞ page 48
EN_KW-AVX710[EU].indb 44EN_KW-AVX710[EU].indb 44 07.12.17 5:46:31 PM07.12.17 5:46:31 PM

45 EXTERNAL DEVICES
ENGLISH
Using other external components
AV-INPUT
You can connect an external component to the LINE IN/VIDEO IN terminals.
~ Press [SOURCE], then press [AV-IN]. (☞ page 9)
• You can also use SOURCE on the monitor panel. Press it repeatedly.
Ÿ Turn on the connected component and start playing the source.
To display the operation buttons (☞ page 20) while watching the playback picture
• If no operations are done for about five seconds, the operation buttons disappear.
• [KEY] does not work when the source is “AV-IN.”
Touch the screen (center portion).
You can easily access to <Aspect> setting
menu by pressing [SHORT CUT] on the
touch panel, then...
Assigned title (☞ page 49) Sound mode (☞ page 48)
Touch the screen (center portion).
: Buttons on the touch panel. In the explanation, they are indicated inside [ ].
These buttons also work when they are not shown on the touch panel (while watching the playback picture).
Continued on the next page
☞ page 48
EN_KW-AVX710[EU].indb 45EN_KW-AVX710[EU].indb 45 07.12.17 5:46:31 PM07.12.17 5:46:31 PM

46
ENGLISH
To display the operation buttons (☞ page 20) while viewing the navigation screen
• The operation buttons displayed on the screen vary among the playback sources.
• If no operations are done for about five seconds, the operation buttons disappear.
• The above buttons except [KEY] also work when they are not shown on the screen (while viewing the navigation
screen).
Navigation screen
You can also connect a Navigation System to the VIDEO IN terminal so that you can watch the navigation screen.
Preparation:
Make sure <Navigation> is selected for <AV Input>. (☞ page 55)
To view the navigation screen (and listen to the navigation guidance*)
Press DISP on the monitor panel repeatedly. (☞ page 9)
• The aspect ratio of the navigation screen is fixed to
<Full> regardless of the <Aspect> setting. (☞ page
52)
* If your Navigation System is equipped with the voice guidance function.
When <Navigation> is selected for <AV Input> (☞ page 55)
• You can use the source “AV-IN” for listening to an audio source connected to the LINE IN terminals.
• Some status messages such as volume level will not appear on the screen.
Touch the screen (center portion). Touch the screen (center portion).
EN_KW-AVX710[EU].indb 46EN_KW-AVX710[EU].indb 46 07.12.17 5:46:31 PM07.12.17 5:46:31 PM

47 EXTERNAL DEVICES
ENGLISH
EXT-INPUT
You can connect an external component to the CD changer jack on the rear using the Line Input Adapter—KS-U57
(not supplied) or AUX Input Adapter—KS-U58 (not supplied).
Preparation:
Make sure <External> is selected for <External Input>. (☞ page 55)
~ Press [SOURCE], then press [EXT-IN]. (☞ page 9)
• You can also use SOURCE on the monitor panel. Press it repeatedly.
Ÿ Turn on the connected component and start playing the source.
Assigned title (☞ page 49)
☞ page 48
Sound mode
(☞ page 48)
EXTERNAL DEVICES
: Buttons on the touch panel. In the explanation, they are indicated inside [ ].
EN_KW-AVX710[EU].indb 47EN_KW-AVX710[EU].indb 47 07.12.17 5:46:32 PM07.12.17 5:46:32 PM
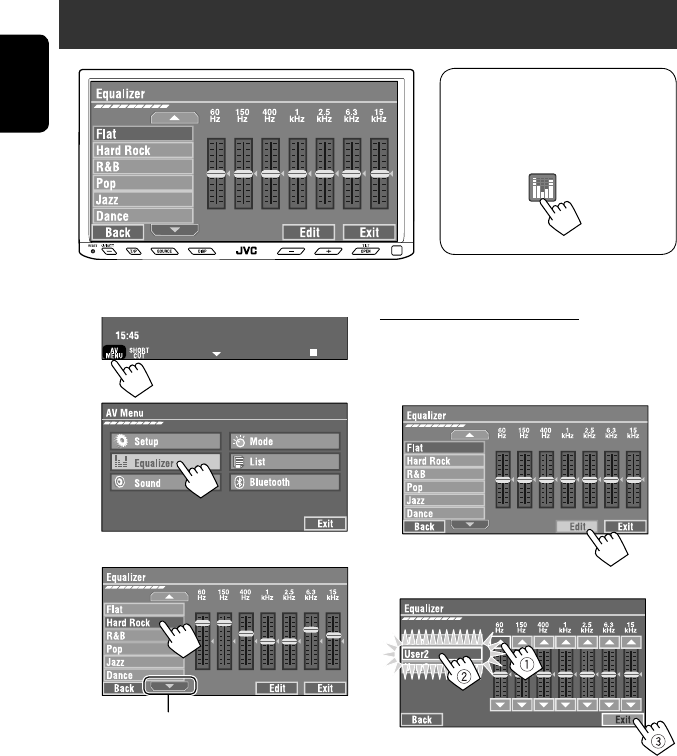
48
ENGLISH
~
Ÿ
! Select a sound mode.
Sound equalization
Storing your own adjustments
You can store your adjustments into <User1>,
<User2>, and <User3>.
1 Repeat steps ~ and Ÿ, then in step !...
2 Adjust (1), then store (2).
Ex.: When storing into <User2>.
While playing back any source other
than “Bluetooth PHONE,” you can easily
access <Equalizer> menu by pressing
[SHORT CUT] on the touch panel, then...
Move to other six sound modes
EN_KW-AVX710[EU].indb 48EN_KW-AVX710[EU].indb 48 07.12.17 5:46:32 PM07.12.17 5:46:32 PM

SETTINGS
49
ENGLISH
You can assign titles to “AV-IN” and “EXT-IN.”
~ Press [SOURCE], then press [AV-IN] or
[EXT-IN]. (☞ page 9)
• You can also use SOURCE on the monitor
panel. Press it repeatedly.
Ÿ Display <Title Entry> screen.
! Assign a title.
You can enter up to 16 characters (for available
characters, ☞ page 67).
• [Store]: Confirm the entry.
• [2/3]: Move the cursor.
• [BS]: Erase the character before the
cursor.
• [Del]: Erase the character on the cursor.
• [Cap]: Change the letter case (upper/
lower).
• [Change]: Change the character set.
• [Space]: Enter a space.
⁄ Finish the procedure.
Assigning titles to the sources
In the explanation, buttons on the
touch panel are indicated inside [ ].
EN_KW-AVX710[EU].indb 49EN_KW-AVX710[EU].indb 49 07.12.17 5:46:33 PM07.12.17 5:46:33 PM
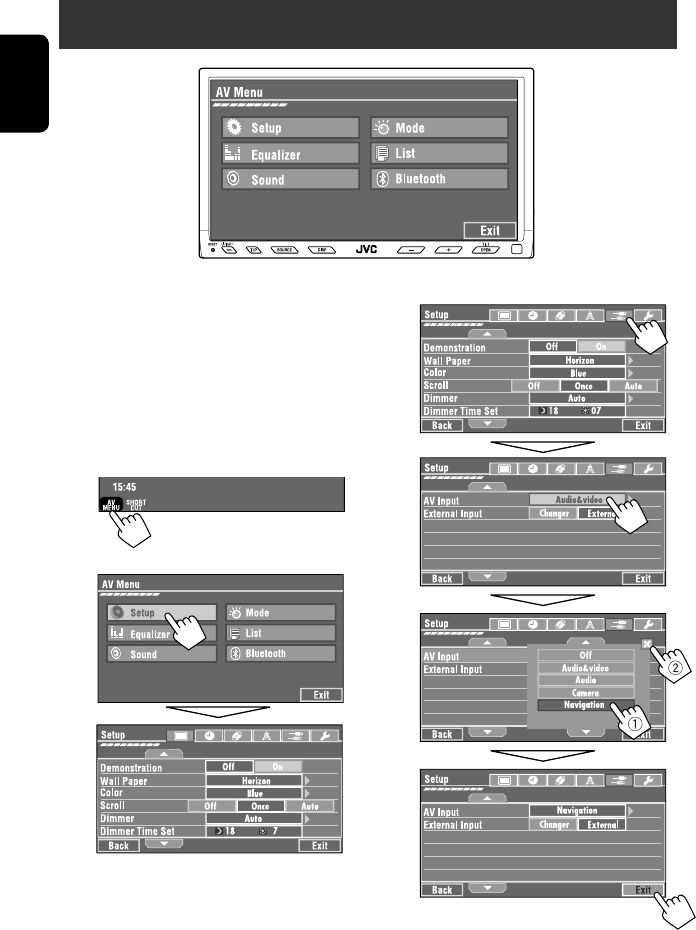
50
ENGLISH
!
Menu operations
The following steps are one of the fundamental
procedures. Some of the settings do not open the
sub-setting window, but just selecting an option will
change the setting.
• The display indications may change according to
change of the specifications.
Ex.: Changing the <AV Input> setting
~
Ÿ
Non-available items will be shaded.
EN_KW-AVX710[EU].indb 50EN_KW-AVX710[EU].indb 50 07.12.17 5:46:33 PM07.12.17 5:46:33 PM

SETTINGS
51
ENGLISH
Setup
Menu items Selectable settings, [reference page]
Display
Demonstration Off: Cancels.
On: Activates the demonstration on the screen. To stop it temporarily,
touch the screen.
Wall Paper You can select the background picture of the screen.
Horizon, Metal, Art, Plain
Color You can select the color of the background picture.
Blue, Light-Blue, Red, Orange, Yellow, Green, Purple, Dark-Blue,
Dark-Green, Brown, Light-Brown, Black
Scroll Off: Cancels.
Once: Scrolls the disc information once.
Auto: Repeats scrolling (five-second intervals).
• Holding DISP on the monitor panel scrolls the information regardless
of this setting.
Dimmer Off: Cancels.
On: Activates dimmer.
Auto: Dims the monitor when you turn on the headlights.*1
Dimmer Time Set : Activates the Dimmer Time setting below.
Dimmer Time Set Sets the Dimmer On/Off times.
Dimmer Level You can select the brightness for dimmer.
1 (bright), 2 (middle), 3 (dark)
Bright You can adjust brightness of the screen.
–15 (darkest) to +15 (brightest); Initial 00
Picture Adjust*2You can adjust the following to make the screen clear and legible for
watching the playback picture. The setting will be stored—one for
“DISC” (common) and the other for “AV-IN.”
–15 to +15; Initial 0
Bright: Adjust if the picture is too bright or too dark.
Contrast: Adjust the contrast.
Color: Adjust the color of the picture—lighter or darker.
• Press [5] or [∞] to adjust.
• You cannot adjust <Tint>. (fixed)
Initial: Underlined
*1 The ILLUMINATION lead connection is required. (☞ Installation/Connection Manual)
*2 Adjustable only when the source is “DISC” (the inserted disc must contain pictures or movies) or “AV-IN.”
The procedure for setting an item is shown on page 50.
EN_KW-AVX710[EU].indb 51EN_KW-AVX710[EU].indb 51 07.12.17 5:46:34 PM07.12.17 5:46:34 PM
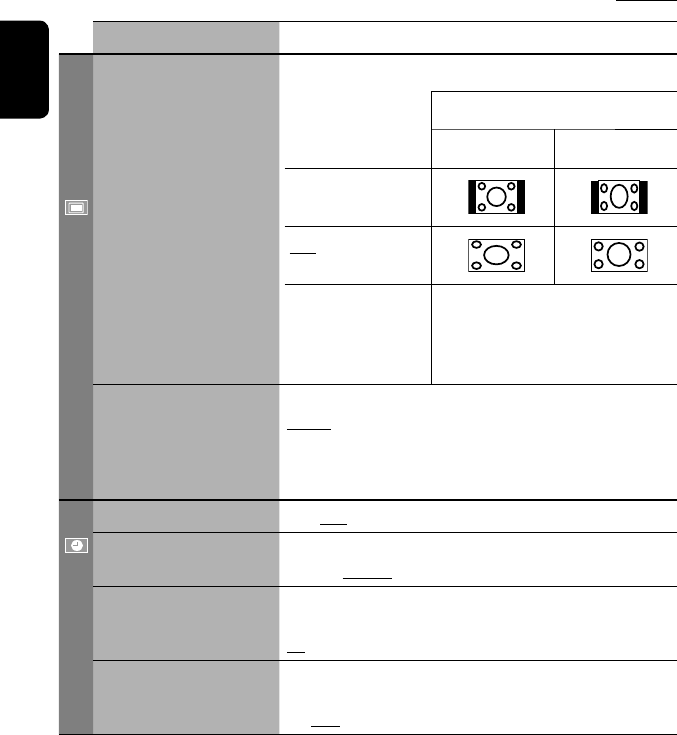
52
ENGLISH
Menu items Selectable settings, [reference page]
Display
Aspect*1You can change the aspect ratio of the picture.
Aspect ratio of incoming signal
4:3 16:9
Regular:
For 4:3 original pictures
Full:
For 16:9 original pictures
Auto: • For “DISC”: Aspect ratio is automatically
selected to match to the incoming signals.
• For the other video sources: Aspect ratio is
fixed to <Regular>.
Language*2Select the indication language shown on the screen.
English, Español, Français, Deutsch, Italiano, Nederlands,
Svenska, Dansk, Руccĸий, Português
• The characters you can enter for assigning the titles also change
according to the language selected, ☞ [67].
Clock
Time Set Initial 0:00 ☞ [8]
Time Format Select either 12-hour system or 24-hour system.
12Hours, 24Hours ☞ [8]
OSD Clock When <On> is selected, the clock time is displayed on the playback
picture.
Off, On
Clock Adjust Select <Auto> to adjust the clock automatically using the clock time
(CT) data from an FM RDS station.
Off, Auto ☞ [8]
*1 Not adjustable when no picture is shown.
*2 After you change the indication language setting, turn off then on the power so that your setting takes effect.
Initial: Underlined
EN_KW-AVX710[EU].indb 52EN_KW-AVX710[EU].indb 52 07.12.17 5:46:34 PM07.12.17 5:46:34 PM
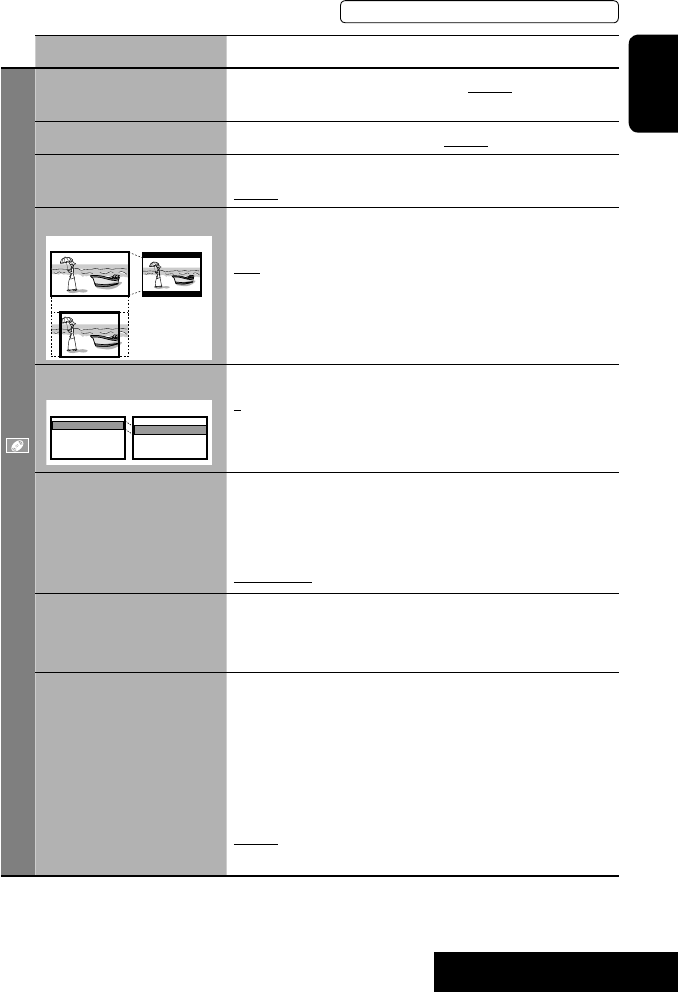
SETTINGS
53
ENGLISH
Menu items Selectable settings, [reference page]
Disc
Menu Language*3Select the initial disc menu language; Initial English (☞ also page
66).
Audio Language*3Select the initial audio language; Initial English (☞ also page 66).
Subtitle*3Select the initial subtitle language or erase the subtitle (Off); Initial
English (☞ also page 66).
Monitor Type*3Select the monitor type to watch a wide screen picture on the external
monitor.
16:9 : Select when the aspect ratio of the external monitor is 16:9.
4:3 LB (Letterbox)/4:3 PS (Pan Scan): Select when the aspect ratio of
the external monitor is 4:3.
• Refer to the illustrations on the left to see how the pictures are
shown on the screen.
OSD Position*3Select the position of the on-screen bar. ☞ [28]
1: Higher position
2: Lower position
File Type*3Select playback file type when a disc contains different types of files.
Audio: Plays back audio files.
Still Picture: Plays back JPEG files.
Video: Plays back DivX/MPEG1/MPEG2 files.
Audio&Video: Plays back audio files and DivX/MPEG1/MPEG2 files.
DivX Regist. (Registration)*3This unit has its own Registration Code. Once you have played back a
file with which the Registration Code recorded, this unit’s Registration
Code is overwritten for copyright protection.
D. Audio Output*3Select the signal format emitted through the DIGITAL OUT (optical)
terminal. (☞ also page 65)
PCM : Select this when connecting an amplifier or a decoder
incompatible with Dolby Digital, DTS, or MPEG Audio, or when
connecting to a recording device.
Dolby D : Select this when connecting an amplifier or a decoder
compatible with Dolby Digital.
Stream : Select this when connecting an amplifier or a decoder
compatible with Dolby Digital, DTS, or MPEG Audio.
*3 Selectable only for “DISC.” (Playback stops when you change the setting.)
Position 1 Position 2
16:9 4:3LB
4:3PS
The procedure for setting an item is shown on page 50.
EN_KW-AVX710[EU].indb 53EN_KW-AVX710[EU].indb 53 07.12.17 5:46:35 PM07.12.17 5:46:35 PM

54
ENGLISH
Menu items Selectable settings, [reference page]
Disc
Down Mix*1When playing back a multi-channel disc, this setting affects the signals
reproduced through the LINE OUT terminals.
Dolby SR : Select this to enjoy multi-channel surround audio by
connecting an amplifier compatible with Dolby Surround.
Stereo : Normally select this.
D. (Dynamic) Range
Compres. (Compression)*1
You can enjoy a powerful sound at a low volume level while playing
Dolby Digital software.
Auto: Select to apply the effect to multi-channel encoded software.
On: Select to always use this function.
Tuner
IF Band Width Auto: Increases the tuner selectivity to reduce interference noises
between adjacent stations. (Stereo effect may be lost.)
Wide: Subject to the interference from adjacent stations, but sound
quality will not be degraded and the stereo effect will remain.
AF Regional When the received signals from the current station become weak...
Off: Cancels—not selectable when <DAB AF> is set to <On>.
AF Reg. (Regional): Switches to another station broadcasting the same
programme. The REG indicator lights up.
AF: Switches to another station. The programme may differ from the
one currently received (the AF indicator lights up). ☞ [15]
TA Volume 00 to 30 or 50*2; Initial 15 ☞ [14]
Program Search Off, On ☞ [15]
DAB AF*3Off, On ☞ [42]
*1 Selectable only for “DISC.” (Playback stops when you change the setting.)
*2 Depends on the amplifier gain control. (☞ page 56)
*3 Appears only when DAB tuner is connected.
Initial: Underlined
EN_KW-AVX710[EU].indb 54EN_KW-AVX710[EU].indb 54 07.12.17 5:46:35 PM07.12.17 5:46:35 PM

SETTINGS
55
ENGLISH
Menu items Selectable settings, [reference page]
Input
AV Input*4
You can determine the use of LINE IN and VIDEO IN terminals. ☞ [45, 46
]
Off: Select when no component is connected (“AV-IN” is skipped while
selecting the source).
Audio&Video: Select when connecting an AV component such as a
VCR.
Audio: Select when connecting an audio component such as a portable
audio player.
Camera*5 : Select when connecting a rear view camera.
Navigation : Select when connecting a Navigation System.
External Input*6For connecting an external component to the CD changer jack on the
rear.
Changer/iPod*7: CD changer or iPod. ☞ [37, 43]
External: Any other than the above. ☞ [47]
• For connecting the Bluetooth adapter and DAB tuner, this setting is
not required. They are automatically detected.
Others
Beep Off: Cancels.
On: Activates the key-touch tone.
Telephone Muting*8Off: Cancels.
Muting1, Muting2: Select either one which mutes the sounds while
using the car phone system.
Power LED Flash Off: Cancels.
On: When the ignition is turned off, the lamp on the button
flashes.
TouchPanel Sens. Change the sensitivity of the touch panel. As the number decreases,
sensitivity becomes higher. 1/2/3
Initialize Initialize all settings you have made in <AV Menu>. Press and hold
[Enter] to initialize the settings, then reset the unit. ☞ [3]
*4 Not selectable when “AV-IN” is selected as the source.
*5 The REVERSE GEAR SIGNAL lead connection is required. See Installation/Connection Manual. The rear view through
the camera appears on the screen in <Full> aspect ratio (regardless of the aspect ratio setting) when you shift the
gear to the reverse (R) position. When you press DISP on the control panel, or when you shift the gear to another
position other than the reverse (R) position, the rear view screen is cleared.
*6 Not selectable when the component connected to the CD changer jack is selected as the source.
*7 The name of the component detected through the CD changer jack is shown.
*8 The TEL MUTING lead connection is required. See Installation/Connection Manual.
The procedure for setting an item is shown on page 50.
EN_KW-AVX710[EU].indb 55EN_KW-AVX710[EU].indb 55 07.12.17 5:46:36 PM07.12.17 5:46:36 PM

56
ENGLISH
Equalizer
Flat/Hard Rock/R&B/Pop/Jazz/Dance/Country/Reggae/Classic/User1/User2/User3 ☞ [48]
Sound
Menu items Selectable settings, [reference page]
Fader/Balance Adjust fader—speaker output balance between the front and rear speakers.
• Upmost—front only (F6)
• Downmost—rear only (R6)
When using a two-speaker system, set the fader to the center (0).
Adjust balance—speaker output balance between the left and right speakers.
• Leftmost—left only (L6)
• Rightmost—right only (R6) Initial 0
Volume Adjust Adjust and store auto-adjustment volume level for each source, comparing to
the FM volume level. The volume level will automatically increase or decrease
when you change the source.
–12 to +12; Initial 00
• You can make the adjustments separately for DVD and other discs.
Amplifier Gain You can change the maximum volume level of this unit.
Off: Deactivates the built-in amplifier.
Low: VOL 00 to 30 (Select this if the maximum power of the speakers is less
than 50 W.)
High: VOL 00 to 50
Initial: Underlined
EN_KW-AVX710[EU].indb 56EN_KW-AVX710[EU].indb 56 07.12.17 5:46:37 PM07.12.17 5:46:37 PM

SETTINGS
57
ENGLISH
Mode*1
Menu items Selectable settings, [reference page]
Mono Only for FM. (Off, On) ☞ [10]
DX/Local Only for FM. (Local, DX) ☞ [11]
SSM Only for FM. Press and hold to start SSM. ☞ [11]
PTy Standby Only for FM/DAB. (Off, On) ☞ [14]
PTy Code Only for FM/DAB. (Initial News) ☞ [15]
Title Entry Only for “AV-IN” and “EXT-IN.” ☞ [49]
Repeat ☞ [21, 38, 44]
Random ☞ [21, 38, 44]
D.(Dynamic) Range Control Only for DAB. (Off, DRC1, DRC2, DRC3) ☞ [40]
Announce Standby Only for DAB. (Off, On) ☞ [41]
Announce Code Only for DAB. (Initial Transport News) ☞ [42]
*1 Items listed under <Mode> vary among the playback sources.
List
For “DISC”: Folder List and Track List (☞ page 22)
For “CD-CH”: Disc List, Folder List, and Track List (☞ page 37)
• For the other playback sources, you can display a list by pressing DISP on the monitor panel. (☞ page 9)
The procedure for setting an item is shown on page 50.
EN_KW-AVX710[EU].indb 57EN_KW-AVX710[EU].indb 57 07.12.17 5:46:37 PM07.12.17 5:46:37 PM

58
ENGLISH
Bluetooth*1
Menu items Selectable settings, [reference page]
Dial Menu *2Select the method to make a call. ☞ [33]
Message*3You can read a message from the following message histories.
Unread: Messages you have not read.
Read: Messages you have read.
Unsent: Messages you have not sent.
Sent: Messages you have sent.
• The number of messages in each history is also shown.
Open ☞ [30]
Search ☞ [31]
Special Device Only for “New Device.”
Shows the list of Bluetooth devices which require some special procedure to
establish Bluetooth connection. Select a device you want to connect.
• After selecting the device, use <Open> or <Search> (☞ page 30 or 31)
for connection.
• Once the connection is established, it is registered in the unit. You can
connect the unit and the device by using <Connect> (☞ below) from the
next time.
Connect Only for the registered devices.
After selecting a device from among the registered devices (☞ pages 30 and
31), establish the connection with it.
Disconnect Only for the device being connected.
Disconnect the current device before connecting another device.
Delete Pairing Only for the registered devices.
Delete the registered devices.
*1 Selectable only for “Bluetooth PHONE” or “Bluetooth AUDIO.” Select a device (or “New Device”) before operating the
menu.
*2 Only for the device connected for “Bluetooth PHONE.”
*3 Selectable only when the source is “Bluetooth PHONE” and the connected cellular phone is compatible with SMS
(Short Message Service).
When operating the Bluetooth device, refer also to the instructions supplied with the device.
EN_KW-AVX710[EU].indb 58EN_KW-AVX710[EU].indb 58 07.12.17 5:46:38 PM07.12.17 5:46:38 PM

SETTINGS
59
ENGLISH
Menu items Selectable settings, [reference page]
Settings
Auto Connect *4When the unit is turned on, the connection is established automatically
with...
Off: No Bluetooth device.
Last: The last connected Bluetooth device.
Order: The available registered Bluetooth device found first.
Auto Answer *5Off: The unit does not answer the calls automatically. Answer the calls
manually.
On: The unit answers the incoming calls automatically.
Reject: The unit rejects all incoming calls.
Message Info *5Auto: The unit informs you of the arrival of a message by ringing and
displaying “Receiving Message.” To read the message, ☞ page 33.
Manual: The unit does not inform you of the arrival of a message.
MIC Setting *5Adjust microphone volume connected to the Bluetooth adapter.
01/02/03
Version *6The Bluetooth software and hardware versions are shown.
Initial: Underlined
*4 Selectable only for “Bluetooth PHONE.”
*5 Only for the cellular phone connected for “Bluetooth PHONE.” Not selectable when “New Device” is selected.
*6 If you wish to receive more information about Bluetooth, visit the following JVC web site: <http://www.jvc-victor.
co.jp/english/car/>
SETTINGS
The procedure for setting an item is shown on page 50.
EN_KW-AVX710[EU].indb 59EN_KW-AVX710[EU].indb 59 07.12.17 5:46:38 PM07.12.17 5:46:38 PM

ENGLISH
60
Maintenance
Moisture condensation
Moisture may condense on the lens inside the unit in
the following cases:
• After starting the heater in the car.
• If it becomes very humid inside the car.
Should this occur, the unit may malfunction. In this
case, eject the disc and leave the unit turned on for a
few hours until the moisture evaporates.
How to handle discs
When removing a disc from its
case, press down the center holder of
the case and lift the disc out, holding it
by the edges.
• Always hold the disc by the edges. Do not touch its
recording surface.
When storing a disc into its case, gently insert the
disc around the center holder (with the printed surface
facing up).
• Make sure to store discs into the cases after use.
To keep discs clean
A dirty disc may not play correctly.
If a disc does become dirty, wipe it with
a soft cloth in a straight line from center
to edge.
• Do not use any solvent (for example, conventional
record cleaner, spray, thinner, benzine, etc.) to clean
discs.
To play new discs
New discs may have some rough spots
around the inner and outer edges. If
such a disc is used, this unit may reject
the disc.
To remove these rough spots, rub the edges with a
pencil or ball-point pen, etc.
Stick-on labelSticker and sticker residue
Unusual shape
Warped disc
Do not use the following discs:
Center holder
SingleCD—8 cm disc
C-thru Disc (semi-transparent disc) Transparent or semi-transparent on its
recording area
EN_KW-AVX710[EU].indb 60EN_KW-AVX710[EU].indb 60 07.12.17 5:46:39 PM07.12.17 5:46:39 PM

61 REFERENCES
ENGLISH
More about this unit
General
Turning on the power
• By pressing SOURCE on the monitor panel, you
can also turn on the power. If the source is ready,
playback starts.
Tuner (FM only)
Storing stations in memory
• When SSM is over, received stations are preset in no.
1 (lowest frequency) to no. 6 (highest frequency).
Disc
General
• In this manual, words “track” and “file” are
interchangeably used.
• This unit can only play back audio CD (CD-DA) files
if different type of audio files (MP3/WMA/WAV) are
recorded on the same disc.
• This unit can display only one-byte characters. No
other characters can be correctly displayed.
Inserting a disc
• When a disc is inserted upside down or has no
playable files, “Cannot play this disc Check the disc”
appears on the screen. Eject the disc.
Ejecting a disc
• If “No disc“ appears after removing a disc, insert a
disc or select another playback source.
• If the ejected disc is not removed within 15 seconds,
the disc is automatically inserted again into the
loading slot to protect it from dust.
Playing Recordable/Rewritable discs
• This unit can recognize a total of 5 000 files and 250
folders (a maximum of 999 files per folder).
• Use only “finalized” discs.
• This unit can play back multi-session discs; however,
unclosed sessions will be skipped while playing.
• This unit can recognize a total 25 characters for file/
folder names.
• Some discs or files may not be played back due to
their characteristics or recording conditions.
Playing DVD-VR
• For details about DVD-VR format and Playlist, refer
to the instructions supplied with the recording
equipment.
File playback
Playing DivX files
• This unit can play back DivX files with the extension
code <.divx>, <.div>, or <.avi> (regardless of the
letter case—upper/lower).
• This unit supports the DivX files whose resolution is
720 x 576 pixels or less.
• Audio stream should conform to MP3 or Dolby Digital.
• The file encoded in the interlaced scanning mode
may not be played back correctly.
• The maximum bit rate for video signals (average) is 4
Mbps.
Continued on the next page
EN_KW-AVX710[EU].indb 61EN_KW-AVX710[EU].indb 61 07.12.17 5:46:39 PM07.12.17 5:46:39 PM
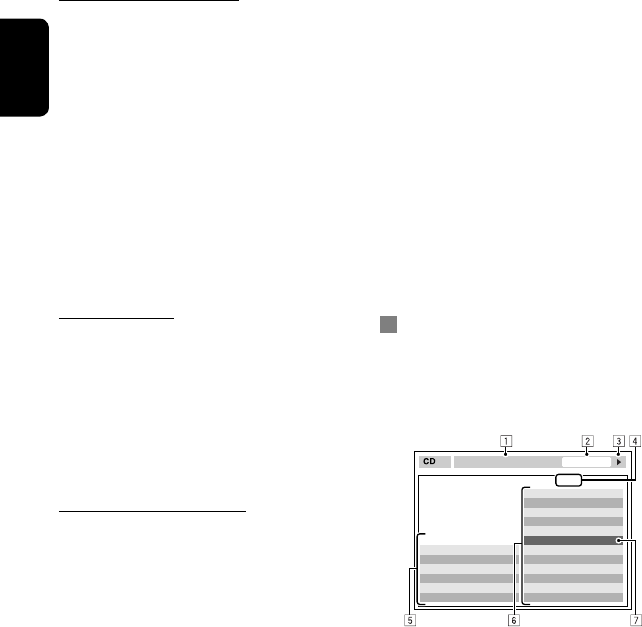
ENGLISH
62
Playing MPEG1/MPEG2 files
• This unit can play back MPEG1/MPEG2 files with the
extension code <.mpg>, <.mpeg>, or <.mod>*.
* <.mod> is an extension code used for the MPEG2
files recorded by JVC Everio camcorders.
• The stream format should conform to MPEG system/
program stream.
The file format should be MP@ML (Main Profile at
Main Level)/SP@ML (Simple Profile at Main Level)/
MP@LL (Main Profile at Low Level).
• Audio streams should conform to MPEG1 Audio
Layer-2 or Dolby Digital.
• The maximum bit rate for video signals (average) is 4
Mbps.
Playing JPEG files
• This unit can play back JPEG files with the extension
code <.jpg>, or <.jpeg>.
• It is recommended that you record a file at 640 x 480
resolution.
• This unit can play back baseline JPEG files.
Progressive JPEG files or lossless JPEG files cannot be
played.
Playing MP3/WMA/WAV files
• This unit can play back files with the extension code
<.mp3>, <.wma>, or <.wav> (regardless of the
letter case—upper/lower).
• This unit can play back the files meeting the
conditions below:
– Bit rate:
MP3/WMA: 32 kbps — 320 kbps
– Sampling frequency:
48 kHz, 44.1 kHz, 32 kHz (for MPEG1)
24 kHz, 22.05 kHz, 16 kHz (for MPEG2)
48 kHz, 44.1 kHz, 32 kHz, 22.05 kHz (for WMA)
44.1 kHz (for WAV)
• This unit can show ID3 Tag Version
1.0/1.1/2.2/2.3/2.4 (for MP3).
• This unit can also show WAV/WMA Tag.
• This unit can play back files recorded in VBR (variable
bit rate).
• Files recorded in VBR have a discrepancy in elapsed
time indication.
• This unit cannot play back the following files:
– MP3 files encoded with MP3i and MP3 PRO
format.
– MP3 files encoded with Layer 1/2.
– WMA files encoded with lossless, professional,
and voice format.
– WMA files which are not based upon Windows
Media® Audio.
– WMA files copy-protected with DRM.
– Files which have the data such as AIFF, ATRAC3,
etc.
Disc/file information shown on the
external monitor
The following screens appear only on the external
monitor.
• CD
1 Selected playback mode
2 Elapsed playing time of the current track
3 Operation status
4 Current track number/total number of tracks
on the disc
5 Track information
6 Track list
7 Current track (highlighted bar)
TIME 00:14
Track : 6 / 14
Track Information
Cloudy
Fair
Fog
Hail
Indian summer
Rain
Shower
Snow
Thunder
Typhoon
Wind
Winter sky
Album
Four seasons
Artist
Robert M. Smith
Title
Rain
T. RPT
EN_KW-AVX710[EU].indb 62EN_KW-AVX710[EU].indb 62 07.12.17 5:46:40 PM07.12.17 5:46:40 PM
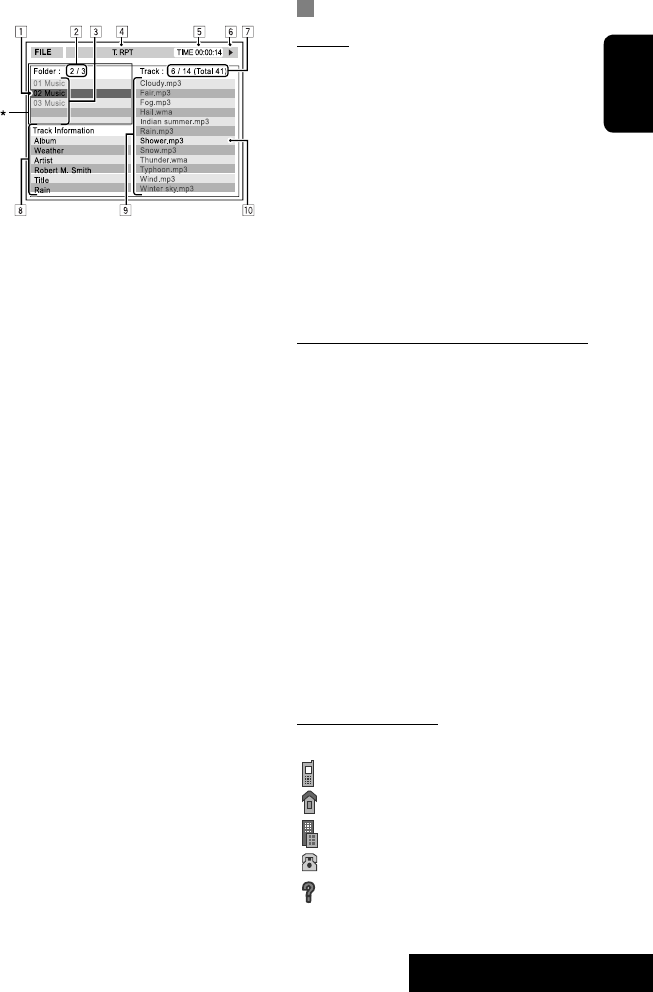
63 REFERENCES
ENGLISH
Bluetooth operations
General
• While driving, do not perform complicated operation
such as dialing the numbers, using phone book, etc.
When you perform these operations, stop your car in
a safe place.
• Some Bluetooth devices may not be connected to
this unit depending on the Bluetooth version of the
device.
• This unit may not work for some Bluetooth devices.
• Connecting condition may vary depending on
circumstances around you.
• When the unit is turned off, the device is
disconnected.
Warning messages for Bluetooth operations
• Connection Error: The device is registered but the
connection has failed. Use <Connect> to connect
the device again. (☞ page 31)
• Error: Try the operation again. If “Error” appears
again, check if the device supports the function you
have tried.
• Device Unfound: No available Bluetooth device is
detected by <Search>.
• Loading: The unit is updating the phone book and/
or SMS.
• Please Wait...: The unit is preparing to use
the Bluetooth function. If the message does not
disappear, turn off and turn on the unit, then connect
the device again (or reset the unit).
• Reset 08: Check the connection between the
adapter and this unit.
Icons for phone types
• These icons indicate the phone type set on the device.
:Cellular phone
:Household phone
:Office
:General
:Other than above
• DivX/MPEG1/MPEG2/JPEG/MP3/WMA/WAV
1 Current folder (highlighted bar)
2 Current folder number/total folder number
3 Folder list
4 Selected playback mode
5 Elapsed playing time of the current track (not
displayed for JPEG)
6 Operation status
7 Current track number/total number of tracks
in the current folder (total number of tracks on
the disc)
8 Track information (only for MP3/WMA/WAV)
9 Track list
p Current track (highlighted)
* If tag data includes “Jacket Picture” (baseline
JPEG), it will be displayed.
EN_KW-AVX710[EU].indb 63EN_KW-AVX710[EU].indb 63 07.12.17 5:46:40 PM07.12.17 5:46:40 PM

ENGLISH
64
CD changer
• If you select a folder, which does not include any
music files, on the list (☞ page 37), you will hear a
beep. Select another folder including music files.
DAB tuner
• Only the primary DAB service can be preset even
when you store a secondary service.
iPod operations
• You can control the following types of iPods through
the interface adapter.
– iPod with dock connector (3rd Generation)
– iPod with Click Wheel (4th Generation)
– iPod mini
– iPod photo
– iPod nano *1
– iPod video (5th Generation) *2
*1 When you connect the iPod nano to the interface
adapter, be sure to disconnect the headphones;
otherwise, no sound is heard.
*2 It is not possible to browse video files on the
“Videos” menu while the iPod is connected to the
interface adapter.
• If the iPod does not play correctly, please update your
iPod software to the latest version. For details about
updating your iPod, visit <http://www.apple.com>.
• When you turn on this unit, the iPod is charged
through the adapter connected to this unit.
• While the iPod is connected, all operations from the
iPod are disabled. Perform all operations from this
unit.
• The text information may not be displayed correctly.
• The text information scrolls on the screen. This unit
can display up to 40 characters.
Notice:
When operating an iPod, some operations may not
be performed correctly or as intended. In this case,
visit the following JVC web site:
<http://www.jvc.co.jp/english/car/support/
ks-pd100/index.html>
Menu settings
• If you change the <Amplifier Gain> setting from
<High> to <Low> while the volume level is set
higher than “30,” the unit automatically changes the
volume level to “VOL 30.”
• After you change any of <Menu Language/Audio
Language/Subtitle> settings, turn off then on the
power, and re-insert the disc (or insert another disc)
so that your setting takes effect.
• When you select <16:9> for a picture whose aspect
ratio is 4:3, the picture slightly changes due to the
process for converting the picture width.
• Even if <4:3PS> is selected, the screen size may
become <4:3LB> for some discs.
EN_KW-AVX710[EU].indb 64EN_KW-AVX710[EU].indb 64 07.12.17 5:46:41 PM07.12.17 5:46:41 PM

65 REFERENCES
ENGLISH
Sound signals emitted through the rear terminals
Through the analog terminals (Speaker out/REAR OUT)
2-channel signal is emitted. When playing multi-channel encoded disc, multi-channel signals are downmixed.
• DTS sound cannot be reproduced.
Through the DIGITAL OUT terminal
Digital signals (Linear PCM, Dolby Digital, DTS, MPEG Audio) are emitted.
• To reproduce the multi-channel sounds such as Dolby Digital, DTS, and MPEG Audio, connect an amplifier or a
decoder compatible with these multi-channel sources to this terminal, and set <D. Audio Output> correctly.
(☞ page 53)
<D. Audio Output>
Playback disc
Output signals
<Stream> <Dolby D> <PCM>
DVD 48 kHz, 16/20/24 bits Linear PCM 48 kHz, 16 bits stereo Linear PCM*
96 kHz, Linear PCM 48 kHz, 16 bits stereo Linear PCM
with Dolby Digital Dolby Digital bitstream 48 kHz, 16 bits stereo
Linear PCM
with DTS DTS bitstream
with MPEG Audio MPEG bitstream 48 kHz, 16 bits stereo Linear PCM
Audio CD, Video CD 44.1 kHz, 16 bits stereo Linear PCM /
48 kHz, 16 bits stereo Linear PCM
Audio CD with DTS DTS bitstream
DivX/
MPEG with Dolby Digital Dolby Digital bitstream 48 kHz, 16 bits stereo
Linear PCM
with MPEG Audio 32/44.1/48 kHz, 16 bits Linear PCM
MP3/WMA 32/44.1/48 kHz, 16 bits Linear PCM
WAV 44.1 kHz, 16 bits Linear PCM
* Digital signals may be emitted at 20 or 24 bits (at their original bit rate) through the DIGITAL OUT terminal if the
discs are not copy-protected.
EN_KW-AVX710[EU].indb 65EN_KW-AVX710[EU].indb 65 07.12.17 5:46:41 PM07.12.17 5:46:41 PM

ENGLISH
66
Preset equalizing values
Frequency
Sound mode 60 Hz 150 Hz 400 Hz 1 kHz 2.5 kHz 6.3 kHz 15 kHz
Flat 00 00 00 00 00 00 00
Hard Rock +03 +03 +01 00 00 +02 +01
R&B +03 +02 +02 00 +01 +01 +03
Pop 00 +02 00 00 +01 +01 +02
Jazz +03 +02 +01 +01 +01 +03 +02
Dance +04 +02 00 –02 –01 +01 +01
Country +02 +01 00 00 00 +01 +02
Reggae +03 00 00 +01 +02 +02 +03
Classic +02 +03 +01 00 00 +02 00
User1/2/3 00 00 00 00 00 00 00
Language codes (for DVD/DivX language selection)
Code
Language
Code
Language
Code
Language
Code
Language
Code
Language
AA Afar FA Persian KK Kazakh NO Norwegian ST Sesotho
AB Abkhazian FI Finnish KL Greenlandic OC Occitan SU Sundanese
AF Afrikaans FJ Fiji KM Cambodian OM (Afan) Oromo SW Swahili
AM Ameharic FO Faroese KN Kannada OR Oriya TA Tamil
AR Arabic FY Frisian KO Korean (KOR) PA Panjabi TE Telugu
AS Assamese GA Irish KS Kashmiri PL Polish TG Tajik
AY Aymara GD Scots Gaelic KU Kurdish PS Pashto, Pushto TH Thai
AZ Azerbaijani GL Galician KY Kirghiz QU Quechua TI Tigrinya
BA Bashkir GN Guarani LA Latin RM
Rhaeto-Romance
TK Turkmen
BE Byelorussian GU Gujarati LN Lingala RN Kirundi TL Tagalog
BG Bulgarian HA Hausa LO Laothian RO Rumanian TN Setswana
BH Bihari HI Hindi LT Lithuanian RW Kinyarwanda TO Tonga
BI Bislama HR Croatian LV Latvian, Lettish SA Sanskrit TR Turkish
BN Bengali, Bangla HU Hungarian MG Malagasy SD Sindhi TS Tsonga
BO Tibetan HY Armenian MI Maori SG Sangho TT Tatar
BR Breton IA Interlingua MK Macedonian SH Serbo-Croatian TW Twi
CA Catalan IE Interlingue ML Malayalam SI Singhalese UK Ukrainian
CO Corsican IK Inupiak MN Mongolian SK Slovak UR Urdu
CS Czech IN Indonesian MO Moldavian SL Slovenian UZ Uzbek
CY Welsh IS Icelandic MR Marathi SM Samoan VI Vietnamese
DZ Bhutani IW Hebrew MS Malay (MAY) SN Shona VO Volapuk
EL Greek JA Japanese MT Maltese SO Somali WO Wolof
EO Esperanto JI Yiddish MY Burmese SQ Albanian XH Xhosa
ET Estonian JW Javanese NA Nauru SR Serbian YO Yoruba
EU Basque KA Georgian NE Nepali SS Siswati ZU Zulu
EN_KW-AVX710[EU].indb 66EN_KW-AVX710[EU].indb 66 07.12.17 5:46:42 PM07.12.17 5:46:42 PM

67 REFERENCES
ENGLISH
Characters shown on the screen
In addition to the roman alphabet (A – Z, a – z), you
can use the following characters to assign titles.
(☞ page 49)
• When <Руccĸий> is selected for <Language>.
(☞ page 52)
• When any language other than <Руccĸий> is
selected for <Language>. (☞ page 52)
Upper and lower cases
Numbers and symbols
Upper and lower cases
Numbers and symbols
• Manufactured under license from Dolby
Laboratories. Dolby and the double-D symbol are
trademarks of Dolby Laboratories.
• “DTS” and “DTS Digital Out” are registered
trademarks of DTS, Inc
• “DVD Logo” is a trademark of DVD Format/Logo
Licensing Corporation registered in the US, Japan
and other countries.
• DivX, DivX Ultra Certified, and associated logos
are trademarks of DivX, Inc. and are used under
license.
• Official DivX® Ultra Certified product
• Plays all versions of DivX® video (including DivX®
6) with enhanced playback of DivX® media files
and the DivX® Media Format
• Microsoft and Windows Media are either
registered trademarks or trademarks of Microsoft
Corporation in the United States and/or other
countries.
• The Bluetooth word mark and logos are owned by
the Bluetooth SIG, Inc. and any use of such marks
by Victor Company of Japan, Limited (JVC) is under
license. Other trademarks and trade names are
those of their respective owners.
• iPod and iTunes are trademarks of Apple Inc.,
registered in the U.S. and other countries.
• This product incorporates copyright protection
technology that is protected by U.S. patents
and other intellectual property rights. Use of
this copyright protection technology must be
authorized by Macrovision, and is intended for
home and other limited viewing uses only unless
otherwise authorized by Macrovision. Reverse
engineering or disassembly is prohibited.
EN_KW-AVX710[EU].indb 67EN_KW-AVX710[EU].indb 67 07.12.17 5:46:43 PM07.12.17 5:46:43 PM

ENGLISH
68
Troubleshooting
What appears to be trouble is not always serious. Check the following points before calling a service center.
• For operations with the external components, refer also to the instructions supplied with the adapters used for the
connections (as well as the instructions supplied with the external components).
Symptoms Remedies/Causes
General
• No sound comes out of the speakers. • Adjust the volume to the optimum level.
• Check the cords and connections.
• DTS sound cannot be reproduced through the analog
terminals (Speaker out/REAR OUT).
• The screen is not clear and legible. Sunshine from the windscreen may cause this symptom.
Adjust <Bright>. (☞ page 51)
• “Position Error Push Open Key” appears on
the screen.
The monitor panel angle has been forcibly adjusted, or its
adjustment has been interrupted while opening or closing.
Press OPEN/TILT.
• “Mecha Error Push Reset” appears on the
screen, and the panel does not move.
Reset the unit. (☞ page 3)
• “No Signal” appears. • Change the source.
• Start the playback on the external component connected
to VIDEO IN terminal.
• Check the cords and connections.
• Signal input is too weak.
• The buttons on the monitor panel do not
work.
When the monitor panel is open, only +/– (volume) and
OPEN/TILT work. The other buttons do not function.
• The unit does not work at all. Reset the unit. (☞ page 3)
FM/AM
• SSM automatic presetting does not work. Store stations manually. (☞ page 11)
• Static noise while listening to the radio. Connect the aerial firmly.
EN_KW-AVX710[EU].indb 68EN_KW-AVX710[EU].indb 68 07.12.17 5:46:44 PM07.12.17 5:46:44 PM

69 REFERENCES
ENGLISH
Continued on the next page
Symptoms Remedies/Causes
Disc in general
• Disc can be neither recognized nor played
back.
Eject the disc forcibly. (☞ page 3)
• Disc cannot be ejected. Unlock the disc. (☞ page 22)
• Recordable/Rewritable discs cannot be
played back.
• Tracks on the Recordable/Rewritable discs
cannot be skipped.
• Insert a finalized disc.
• Finalize the discs with the component which you used
for recording.
• Playback does not start. • Insert the disc correctly again.
• The format of files is not supported by the unit.
• The playback picture is not clear and legible. Adjust items in <Picture Adjust> menu. (☞ page 51)
• Sound and pictures are sometimes
interrupted or distorted.
• Stop playback while driving on rough roads.
• Change the disc.
• No playback picture is shown and “Parking
Brake” appears on the screen, even when the
parking brake is engaged.
Parking brake lead is not connected properly.
(☞ Installation/Connection Manual)
• No picture appears on the external monitor. • Connect the video cord correctly.
• Select the correct input on the external monitor.
• “Eject Error” or “Loading Error” appears on
the screen.
Change the source by pressing SOURCE.
• “Region code error” appears on the screen
when you insert a DVD Video.
Region code is not correct. (☞ page 4)
DivX/MPEG1/MPEG2/MP3/WMA/WAV
• Disc cannot be played back. • Change the disc.
• Record the tracks using a compliant application on the
appropriate discs. (☞ page 4)
• Add appropriate extension codes to the file names.
• Noise is generated. The track played back is not a playable file format. Skip to
another file.
• Tracks are not played back as you have
intended them to play.
Playback order may differ from that played back using
other players.
• Elapsed playing time is not correct. This sometimes occurs during playback. This is caused by
how the tracks are recorded.
• “Not Support” appears on the screen and
track skips.
The track is unplayable.
EN_KW-AVX710[EU].indb 69EN_KW-AVX710[EU].indb 69 07.12.17 5:46:44 PM07.12.17 5:46:44 PM

ENGLISH
70
Symptoms Remedies/Causes
Bluetooth
• Bluetooth device does not detect the unit. This unit can be connected with one Bluetooth cellular
phone and one Bluetooth audio player at a time.
While connected to a device, this unit cannot be detected
from another device. Disconnect currently connected device
and search again.
• The unit does not detect the Bluetooth
device.
• Check the Bluetooth setting of the device.
• Search from the Bluetooth device. After the device
detects the unit, select <Open> on the unit to connect
the device. (☞ page 30)
• The unit does not make pairing with the
Bluetooth device.
• Enter the same PIN code for both the unit and target
device. If the PIN code of the device is not indicated on its
instructions, try “0000” or “1234.”
• Select the device name from <Special Device>, then
try to connect again. (☞ pages 31, 58)
• Echo or noise occurs. Adjust the microphone unit position.
• Phone sound quality is poor. • Reduce the distance between the unit and the Bluetooth
cellular phone.
• Move the car to place where you can get a better signal
reception.
• The sound is interrupted or skipped during
playback of a Bluetooth audio player.
• Reduce the distance between the unit and the Bluetooth
audio player.
• Disconnect the player connected for “Bluetooth PHONE.”
• Turn off, then turn on the unit.
• (When the sound is not yet restored,) connect the player
again.
• “New Device” cannot be selected for
“Bluetooth AUDIO.”
Bluetooth audio player is already connected. To select “New
Device,” disconnect it. (☞ page 31)
• The connected audio player cannot be
controlled.
Check whether the connected audio player supports AVRCP
(Audio Video Remote Control Profile).
• “Reset 08” appears on the screen. Check the connection between the adapter and this unit.
EN_KW-AVX710[EU].indb 70EN_KW-AVX710[EU].indb 70 07.12.17 5:46:44 PM07.12.17 5:46:44 PM

71 REFERENCES
ENGLISH
Symptoms Remedies/Causes
CD changer
• “No Disc” appears on the screen. Insert a disc into the magazine.
• “No Magazine” appears on the screen. Insert the magazine.
• “Cannot play this disc Check the disc”
appears on the screen.
Current disc does not include playable files. Replace the disc
with one including playable files.
• “Reset 08” appears on the screen. Connect this unit and the CD changer correctly and press
the reset button of the CD changer.
• “Reset 01” – “Reset 07” appears on the
screen.
Press the reset button of the CD changer.
• The CD changer does not work at all. Reset the unit. (☞ page 3)
DAB tuner
• “No DAB Signal” appears on the screen. Move to an area with stronger signals.
• “Reset 08” appears on the screen. Connect this unit and the DAB tuner correctly, then reset
the unit. (☞ page 3)
• The DAB tuner does not work at all. Connect this unit and the DAB tuner correctly, then reset
the unit. (☞ page 3)
• “Antenna Power NG” appears on the screen. Check the cords and connections.
iPod
• The iPod does not turn on or does not work. • Check the connection.
• Charge the battery.
• Sound is distorted. Deactivate the equalizer either on this unit or the iPod.
• “Disconnect” appears on the screen. Check the connection.
• Playback stops. The headphones are disconnected during playback. Restart
playback.
• “No Files” appears on the screen. No tracks are stored. Import tracks to the iPod.
• “Reset 01” – “Reset 07” appears on the
screen.
Disconnect the adapter from both this unit and iPod. Then,
connect them again.
• “Reset 08” appears on the screen. Check the connection between the adapter and this unit.
• The iPod’s controls do not work after
disconnecting from this unit.
Reset the iPod.
AV-IN
• No picture appears on the screen. • Turn on the video component if it is not on.
• Connect the video component correctly.
• Playback picture is not clear and legible. Adjust items in <Picture Adjust> menu. (☞ page 51)
EN_KW-AVX710[EU].indb 71EN_KW-AVX710[EU].indb 71 07.12.17 5:46:45 PM07.12.17 5:46:45 PM

ENGLISH
72
Specifications
AMPLIFIER
Maximum Power Output: Front/Rear: 50 W per channel
Continuous Power Output
(RMS):
Front/Rear: 20 W per channel into 4 Ω, 40 Hz to
20 000 Hz at no more than 0.8% total
harmonic distortion
Load Impedance: 4 (4 to 8 allowance)
Equalizer Control Range: Frequencies: 60 Hz, 150 Hz, 400 Hz, 1 kHz, 2.5 kHz,
6.3 kHz, 15 kHz
Level: ±10 dB
Signal-to-Noise Ratio: 70 dB
Audio Output Level
REAR OUT:
Line-Out Level/Impedance: 2.5 V/20 kΩ load (full scale)
Output Impedance: 1 kΩ
Color System: PAL
Video Output (composite): 1 Vp-p/75 Ω
Other Terminals: Input: LINE IN, VIDEO IN, Aerial input
Output: VIDEO OUT
Others: CD changer, OE REMOTE, Reverse gear
signal, DIGITAL OUT (optical)
FM/AM TUNER
Frequency Range: FM: 87.5 MHz to 108.0 MHz
AM: (MW) 522 kHz to 1 620 kHz
(LW) 144 kHz to 279 kHz
FM Tuner Usable Sensitivity: 11.3 dBf (1.0 V/75 Ω)
50 dB Quieting Sensitivity: 16.3 dBf (1.8 V/75 Ω)
Alternate Channel Selectivity (400 kHz): 65 dB
Frequency Response: 40 Hz to 15 000 Hz
Stereo Separation: 35 dB
MW Tuner Sensitivity/Selectivity: 20 V/35 dB
LW Tuner Sensitivity: 50 V
DVD/CD
Signal Detection System: Non-contact optical pickup (semiconductor laser)
Frequency Response: DVD, fs=48 kHz/96 kHz: 16 Hz to 22 000 Hz
VCD/CD: 16 Hz to 20 000 Hz
Dynamic Range: 93 dB
Signal-to-Noise Ratio: 95 dB
Wow and Flutter: Less than measurable limit
EN_KW-AVX710[EU].indb 72EN_KW-AVX710[EU].indb 72 07.12.17 5:46:45 PM07.12.17 5:46:45 PM

73 REFERENCES
ENGLISH
MONITOR
Screen Size: 7 inch wide liquid crystal display
Number of Pixel: 336 960 pixels: 480 × 3 (horizontal) × 234 (vertical)
Drive Method: TFT (Thin Film Transistor) active matrix format
Color System: NTSC/PAL
Aspect Ratio: 16:9 (wide)
GENERAL
Power Requirement: Operating Voltage: DC 14.4 V (11 V to 16 V allowance)
Grounding System: Negative ground
Allowable Storage Temperature: –10°C to +60°C
Allowable Operating Temperature: 0°C to +40°C
Dimensions (W × H × D):
• With trim plate and
sleeve attached
Installation Size (approx.): 182 mm × 111 mm × 160 mm
Panel Size (approx.): 188 mm × 117 mm × 10 mm
Mass (approx.): 2.9 kg (including trims and sleeve)
CAUTION: When ejecting the monitor, leave an
open space for the monitor to come out. If you do
not, the monitor may obstruct the steering wheel
and gearshift lever operations, and this may result
in a traffic accident.
Unit: mm
Required space for the monitor ejection
160 90.5
100
Design and specifications are subject to change without notice.
EN_KW-AVX710[EU].indb 73EN_KW-AVX710[EU].indb 73 07.12.17 5:46:46 PM07.12.17 5:46:46 PM

EN, SP, FR
1207MNMMDWJEIN
© 2008 Victor Company of Japan, Limited
Having TROUBLE with operation?
Please reset your unit
Refer to page of How to reset your unit
¿Tiene PROBLEMAS con la operación?
Por favor reinicialice su unidad
Consulte la página de Cómo reposicionar su unidad
Vous avez des PROBLÈMES de fonctionnement?
Réinitialisez votre appareil
Référez-vous à la page intitulée Comment réinitialiser votre appareil
Rear_KW-AVX710[EU1].indd 2Rear_KW-AVX710[EU1].indd 2 07.12.19 2:21:14 PM07.12.19 2:21:14 PM
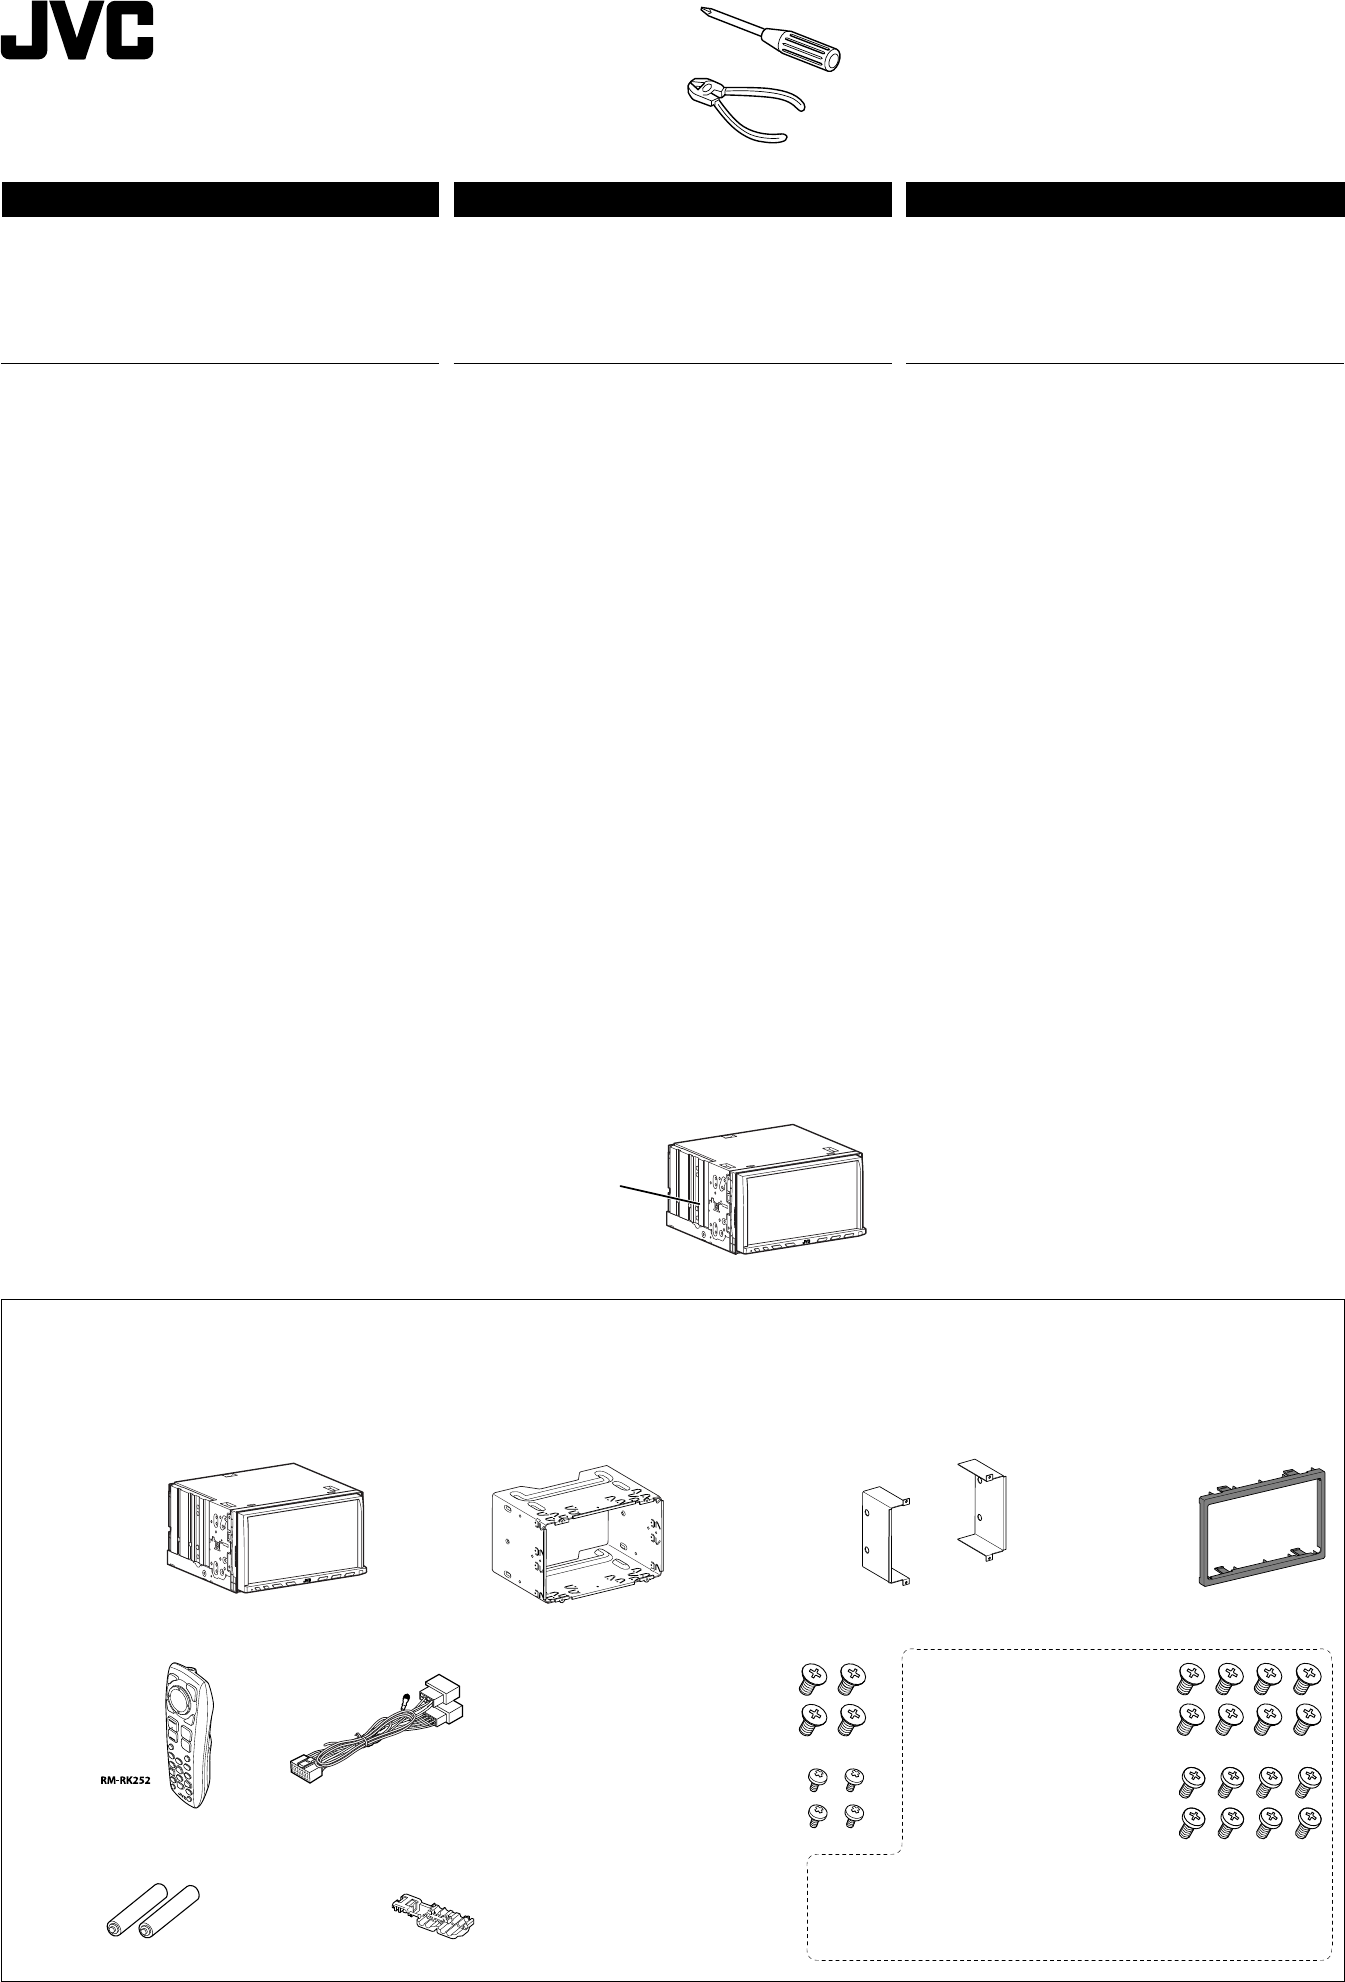
1
KW-AVX716/KW-AVX710
Installation/Connection Manual
Manual de instalación/conexión
Manuel d’installation/raccordement
LVT1779-008A
[EU]
1207MNMMDWJEIN
EN, SP, FR
© 2008 Victor Company of Japan, Limited
ENGLISH
This unit is designed to operate on 12 V DC, NEGATIVE ground
electrical systems. If your vehicle does not have this system, a
voltage inverter is required, which can be purchased at JVC IN-CAR
ENTERTAINMENT dealers.
FRANÇAIS
Cet appareil est conçu pour fonctionner sur des sources de courant
continu de 12 V à masse NEGATIVE. Si votre véhicule n’offre pas
ce type d’alimentation, il vous faut un convertisseur de tension, que
vous pouvez acheter chez un revendeur d’autoradios JVC.
.
Heat sink
Sumidero térmico
Dissipateur de chaleur
Parts list for installation and connection
The following parts are provided for this unit. If anything is missing,
contact your dealer immediately.
Liste des pièces pour l’installation et raccordement
Les pièces suivantes sont fournies avec cet appareil. Si quelque
chose manquait, contactez votre revendeur immédiatement.
Batteries
Pilas
Piles
Power cord
Cordón de alimentación
Cordon d’alimentation
Remote controller
Control remoto
Télécommande
Main unit
Unidad principal
Appareil principal
Sleeve*1
Cubierta*1
Manchon*1
Trim plate
Placa de guarnición
Plaque d’assemblage
*1 Fitted to the main unit when shipped
ESPAÑOL
Esta unidad está diseñada para funcionar con 12 V de CC, con
sistemas eléctricos de masa NEGATIVA. Si su vehículo no posee
este sistema, será necesario un inversor de tensión, que puede ser
adquirido en los concesionarios de JVC de equipos de audio para
automóviles.
ADVERTENCIAS
• NO instale ningún receptor o tienda ningún cable en una ubicación
donde;
– donde pueda obstruir la maniobra del volante de dirección y del
cambio de engranajes, con el consiguiente riesgo de accidentes de
tráfico.
– donde pueda obstruir el funcionamiento de dispositivos de
seguridad tales como bolsas de aire, pues podría resultar en un
accidente fatal.
– donde pueda obstruir la visibilidad.
• NO OPERE la unidad mientras está maniobrando el volante de
dirección, pues podría producirse un accidente de tráfico.
• El conductor no debe mirar el monitor mientras conduce. Podría
producirse un descuido, y causar un accidente.
• Si necesita operar la unidad mientras conduce, asegúrese de mirar
atentamente a su alrededor pues de lo contrario, se podría producir
un accidente de tráfico.
• Si el freno de estacionamiento no está aplicado, parpadeará “Parking
Brake” en el monitor, y no se visualizará la imagen reproducida.
– Esta advertencia aparece únicamente cuando el cable del freno de
estacionamiento se encuentra conectado al sistema del freno de
estacionamiento incorporado al automóvil.
Notas sobre las conexiones eléctricas:
• Reemplace el fusible por uno con la corriente especificada. Si el fusible
se quemase frecuentemente consulte con su concesionario de JVC de
equipos de audio para automóviles.
•
Se recomienda conectar los altavoces con una potencia máxima de más
de 50 W (tanto atrás como adelante, con una impedancia de 4 a
8 ).
Si la potencia máxima es de menos de 50 W, cambie “Amplifier
Gain” para evitar daños en los altavoces (consulte la página
5
6 del
MANUAL DE INSTRUCCIONES).
• Para evitar cortocircuitos, cubra los cables NO UTILIZADOS con
cinta aislante.
• El sumidero térmico estará muy caliente después del uso. Asegúrese
de no tocarlo al desmontar esta unidad.
Lista de piezas para instalación y conexión
Con esta unidad se suministran las siguientes piezas. Si hay algún
elemento faltante, póngase inmediatamente en contacto con su
concesionario.
WARNINGS
• DO NOT install any unit or wire any cable in a location where;
– it may obstruct the steering wheel and gearshift lever operations,
as this may result in a traffic accident.
– it may obstruct the operation of safety devices such as air bags, as
this may result in a fatal accident.
– it may obstruct visibility.
• DO NOT operate any unit while manipulating the steering wheel, as
this may result in a traffic accident.
• The driver must not watch the monitor while driving. It may lead to
carelessness and cause an accident.
• If you need to operate the unit while driving, be sure to look around
carefully or you may be involved in a traffic accident.
• If the parking brake is not engaged, “Parking Brake” flashes on the
monitor, and no playback picture will be shown.
– This warning appears only when the parking brake lead is
connected to the parking brake system built in the car.
Notes on electrical connections:
• Replace the fuse with one of the specified rating. If the fuse blows
frequently, consult your JVC IN-CAR ENTERTAINMENT dealer.
• It is recommended to connect speakers with a maximum power
of more than 50 W (both at the rear and at the front, with an
impedance of 4 to 8 Ω).
If the maximum power is less than 50 W, change “Amplifier Gain”
setting to prevent the speakers from being damaged (see page 56 of
the INSTRUCTIONS).
• To prevent short circuits, cover the terminals of the UNUSED leads
with insulating tape.
• The heat sink becomes very hot after use. Be careful not to touch it
when removing this unit.
AVERTISSEMENTS
• N’INSTALLEZ aucun appareil ni aucun câble dans un endroit où:
– où il peut gêner l’accès au volant ou au levier de vitesse car cela
peut entraîner un accident de la circulation.
– où il peut gêner la manipulation de dispositifs de sécurité tels
que les airbags car cela peut entraîner un accident fatal.
– où il peut gêner la visibilité.
• NE COMMANDEZ pas l’appareil lors de la manipulation du volant
car cela peut entraîner un accident de la circulation.
• Le conducteur ne doit pas regarder le moniteur lorsqu’il conduit.
Cela peut lui faire perdre sa concentration et causer un accident.
• Si vous souhaitez opérer l’appareil pendant que vous conduisez,
assurez-vous de bien regarder autour de vous afin de ne pas
causer un accident de la circulation.
• Si le frein de stationnement n’est pas engagé, “Parking Brake”
clignote sur le moniteur et aucune image de lecture n’apparaît.
– Cet avertissement apparaît uniquement quand le fil du
frein de stationnement est connecté au système de frein de
stationnement intégré à la voiture.
Remarques sur les connexions électriques:
• Remplacer le fusible par un de la valeur précisée. Si le fusible
saute souvent, consulter votre revendeur d’autoradios JVC.
• Il est recommandé de connecter des enceintes avec une
puissance de plus de 50 W (les enceintes arrière et les enceintes
avant, avec une impédance comprise entre 4 Ω et 8 Ω).
Si la puissance maximum est inférieure à 50 W, changez
“Amplifier Gain” pour éviter d’endommager vos enceintes (voir
page 56 du MANUEL D’INSTRUCTIONS).
• Pour éviter les court-circuits, couvrir les bornes des fils qui ne sont
PAS UTILISÉS avec de la bande isolante.
• Le dissipateur de chaleur devient très chaud après usage. Faire
attention de ne pas le toucher en retirant cet appareil.
Crimp connector
Conector de sujeción
Raccord à sertir
Round head screws (M5 x 8 mm)
Tornillos de cabeza esférica (M5 x 8 mm)
Vis à tête ronde (M5 x 8 mm)
Flat head screws (M5 x 8 mm)
Tornillos de cabeza plana (M5 x 8 mm)
Vis à tête plate (M5 x 8 mm)
Use these screws when installing the unit without the supplied sleeve.
Utilice estos tornillos cuando instale la unidad sin la funda suministrada.
Utilisez ces vis lors de l’installation de l’appareil sans le manchon fourni.
*1 Fijado a la unidad principal cuando se expide de fábrica *1 Fixé à l’appareil lors de l’expédition.
Brackets*1
Ménsulas*1
Supports*1
Flat head screws (M5 x 8 mm)*1
Tornillos de cabeza plana (M5 x 8 mm)*1
Vis à tête plate (M5 x 8 mm)*1
Round head screws (M2.6 x 3 mm)*1
Tornillos de cabeza esférica (M2,6 x 3 mm)*1
Vis à tête ronde (M2,6 x 3 mm)*1
AVX710[EU1]_install.indb 1AVX710[EU1]_install.indb 1 07.12.24 10:34:36 AM07.12.24 10:34:36 AM
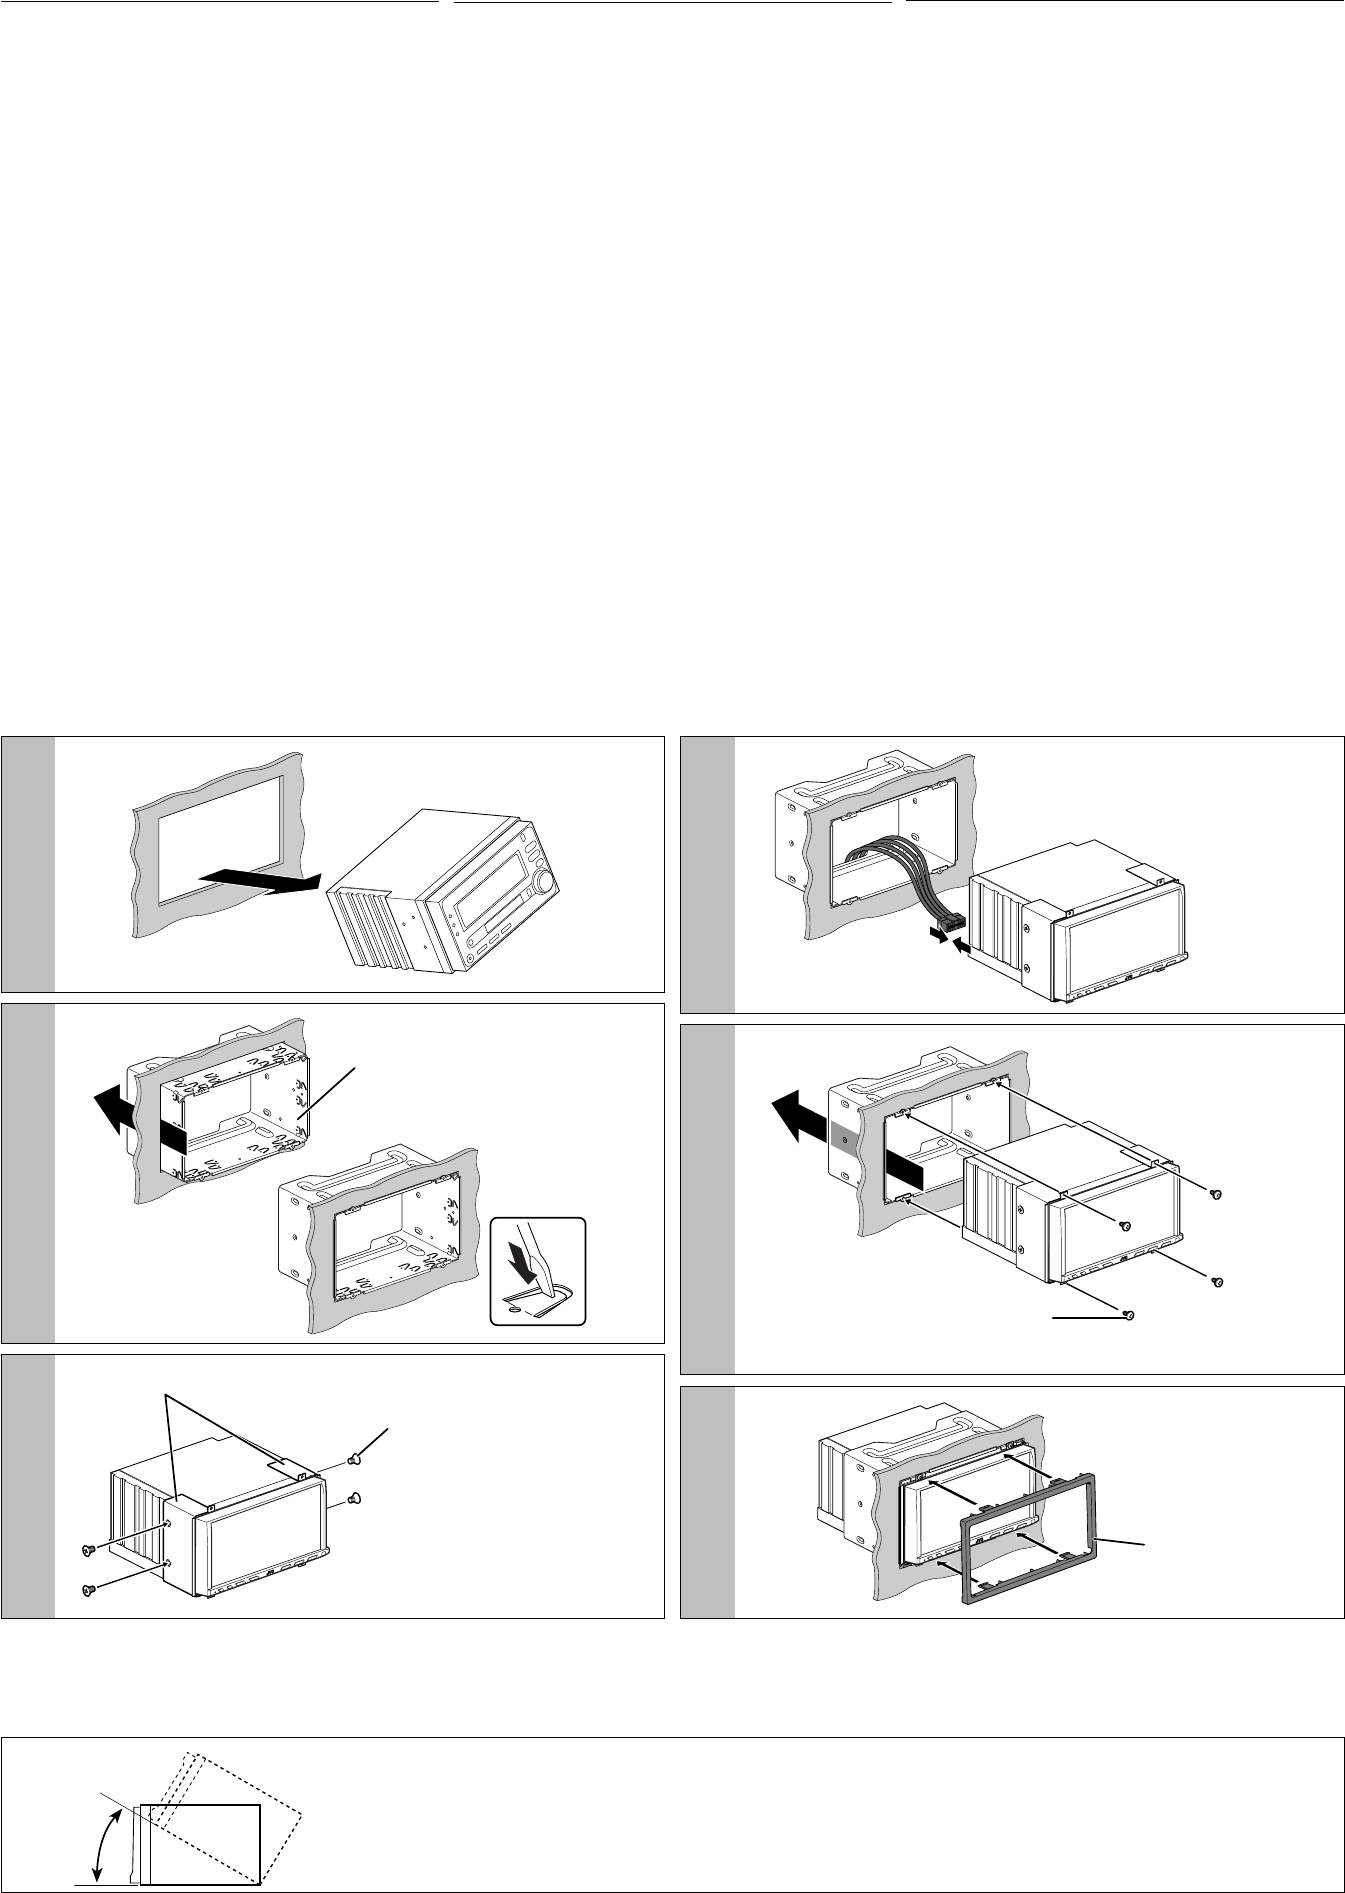
22
3
30˚
2
4
5
6
1
INSTALLATION (IN-DASH
MOUNTING)
The following illustration shows a typical installation. However, you
should make adjustments corresponding to your specific car. If you
have any questions or require information regarding installation kits,
consult your JVC IN-CAR ENTERTAINMENT dealer or a company
supplying kits.
• If you are not sure how to install this unit correctly, have it installed
by a qualified technician.
Before installing the unit
• When mounting the unit, be sure to use the screws provided, as
instructed. If other screws are used, parts could become loose or
damaged.
• When tightening screws or bolts, be careful not to pinch any
connection cord.
• Make sure not to block the fan on the rear to maintain proper
ventilation when installing the unit.
1 Remove the audio system originally installed in the car, together
with its mounting brackets.
• Be sure to keep all the screws and parts removed from your car
for future use.
2 Install the sleeve in the dashboard of the car.
3 Attach the brackets to the main unit.
• Make sure to use the supplied flat head screws (M5 x 8 mm). If
longer screws are used, they could damage the unit.
4 Do the required electrical connections.
• See pages 3 and 4.
5 Install the main unit in the sleeve.
6 Attach the trim plate.
INSTALLATION
(MONTAGE DANS LE TABLEAU DE BORD)
L’illustration suivante est un exemple d’installation typique.
Cependant, vous devez faire les ajustements correspondant à votre
voiture. Si vous avez des questions ou avez besoin d’information
sur des kits d’installation, consulter votre revendeur d’autoradios
JVC ou une compagnie d’approvisionnement.
• Si vous n’êtes pas sûr de pouvoir installer l’appareil correctement,
faite-le installer par un technicien qualifié.
Avant d’installer l’appareil
• Lors du montage de l’appareil, assurez-vous d’utiliser les vis
fournies, de la façon indiquée. Si vous utilisez d’autres vis,
certaines pièces peuvent être perdues ou endommagées.
• Lorsque vous serrez des vis ou des boulons, faites attention de ne
pas pincer un cordon de connexion.
• Assurez-vous de ne pas bloquer le ventilateur sur le panneau
arrière lors de l’installation afin de permettre une ventilation
correcte.
1 Retirez le système audio d’origine installé dans la voiture en
même temps que les supports de montage.
• Assurez-vous de conserver toutes les vis et pièces détachées
de votre voiture pour une utilisation dans le future.
2 Installez le manchon dans le tableau de bord de la voiture.
3 Attachez les supports à l’appareil principal.
• Assurez-vous d’utiliser les vis à tête plate fournis —(M5 × 8
mm). Vous risquez d’endommager l’appareil si vous utilisez des
vis plus longues.
4 Réalisez les connexions électriques requises.
• Référez-vous aux pages 3 et 4.
5 Installez l’appareil principal dans le manchon.
6 Fixez la plaque d’assemblage
Sleeve
Cubierta
Manchon
Round head screws (M2.6 × 3 mm)
Tornillos de cabeza esférica (M2,6 x 3 mm)
Vis à tête ronde (M2,6 x 3 mm)
Flat head screws (M5 × 8 mm)
Tornillos de cabeza plana (M5 x 8 mm)
Vis à tête plate (M5 x 8 mm)
Trim plate
Placa de guarnición
Plaque d’assemblage
Brackets
Ménsulas
Supports
INSTALACIÓN (MONTAJE EN EL TABLERO DE
INSTRUMENTOS)
La siguiente ilustración muestra una instalación típica. Sin embargo
usted deberá efectuar los ajustes correspondientes a su automóvil.
Si tiene alguna pregunta o necesita información acerca de las
herramientas para instalación, consulte con su concesionario de JVC de
equipos de audio para automóviles o a una compañía que suministra
tales herramientas.
• Si no está seguro de poder instalar la unidad correctamente, déjela en
manos de un técnico cualificado.
Antes de instalar la unidad
• Al instalar la unidad, asegúrese de usar los tornillos suministrados,
de acuerdo con las instrucciones. El uso de otros tornillos podrá
provocar flojedad de o daños a las piezas.
• Al apretar los tornillos o los pernos, asegúrese de que ningún cable de
conexión quede pillado.
• Al efectuar la instalación, asegúrese de no bloquear el ventilador del
panel trasero a fin de mantener una ventilación correcta.
1 Desmonte el sistema de audio instalado originalmente en el coche,
junto con los ménsulas de montaje.
• Asegúrese de guardar todos los tornillos y piezas quitados de su
vehículo para poderlos usar en el futuro.
2 Instale la cubierta en el cubretablero del automóvil.
3 Fije los ménsulas a la unidad principal.
• Asegúrese de usar los tornillos de cabeza plana suministrados
(M5 × 8 mm). El uso de tornillos más largos producir daños a la
unidad.
4
Realice todas las conexiones eléctricas necesarias.
• Consulte las páginas 3 y 4.
5 Coloque la unidad principal en la cubierta.
6 Fije la placa de guarnición.
Install the unit at an angle of less than 30˚, taking it into account that the monitor would eject when in use.
Instale la unidad a un ángulo de menos de 30˚, teniendo en cuenta que el monitor debe extraerse para su uso.
Installez l’appareil avec un angle de moins de 30°, en tenant compte du fait que le moniteur doit être déployé lors de son utilisation.
AVX710[EU1]_install.indb 2AVX710[EU1]_install.indb 2 07.12.24 10:34:45 AM07.12.24 10:34:45 AM
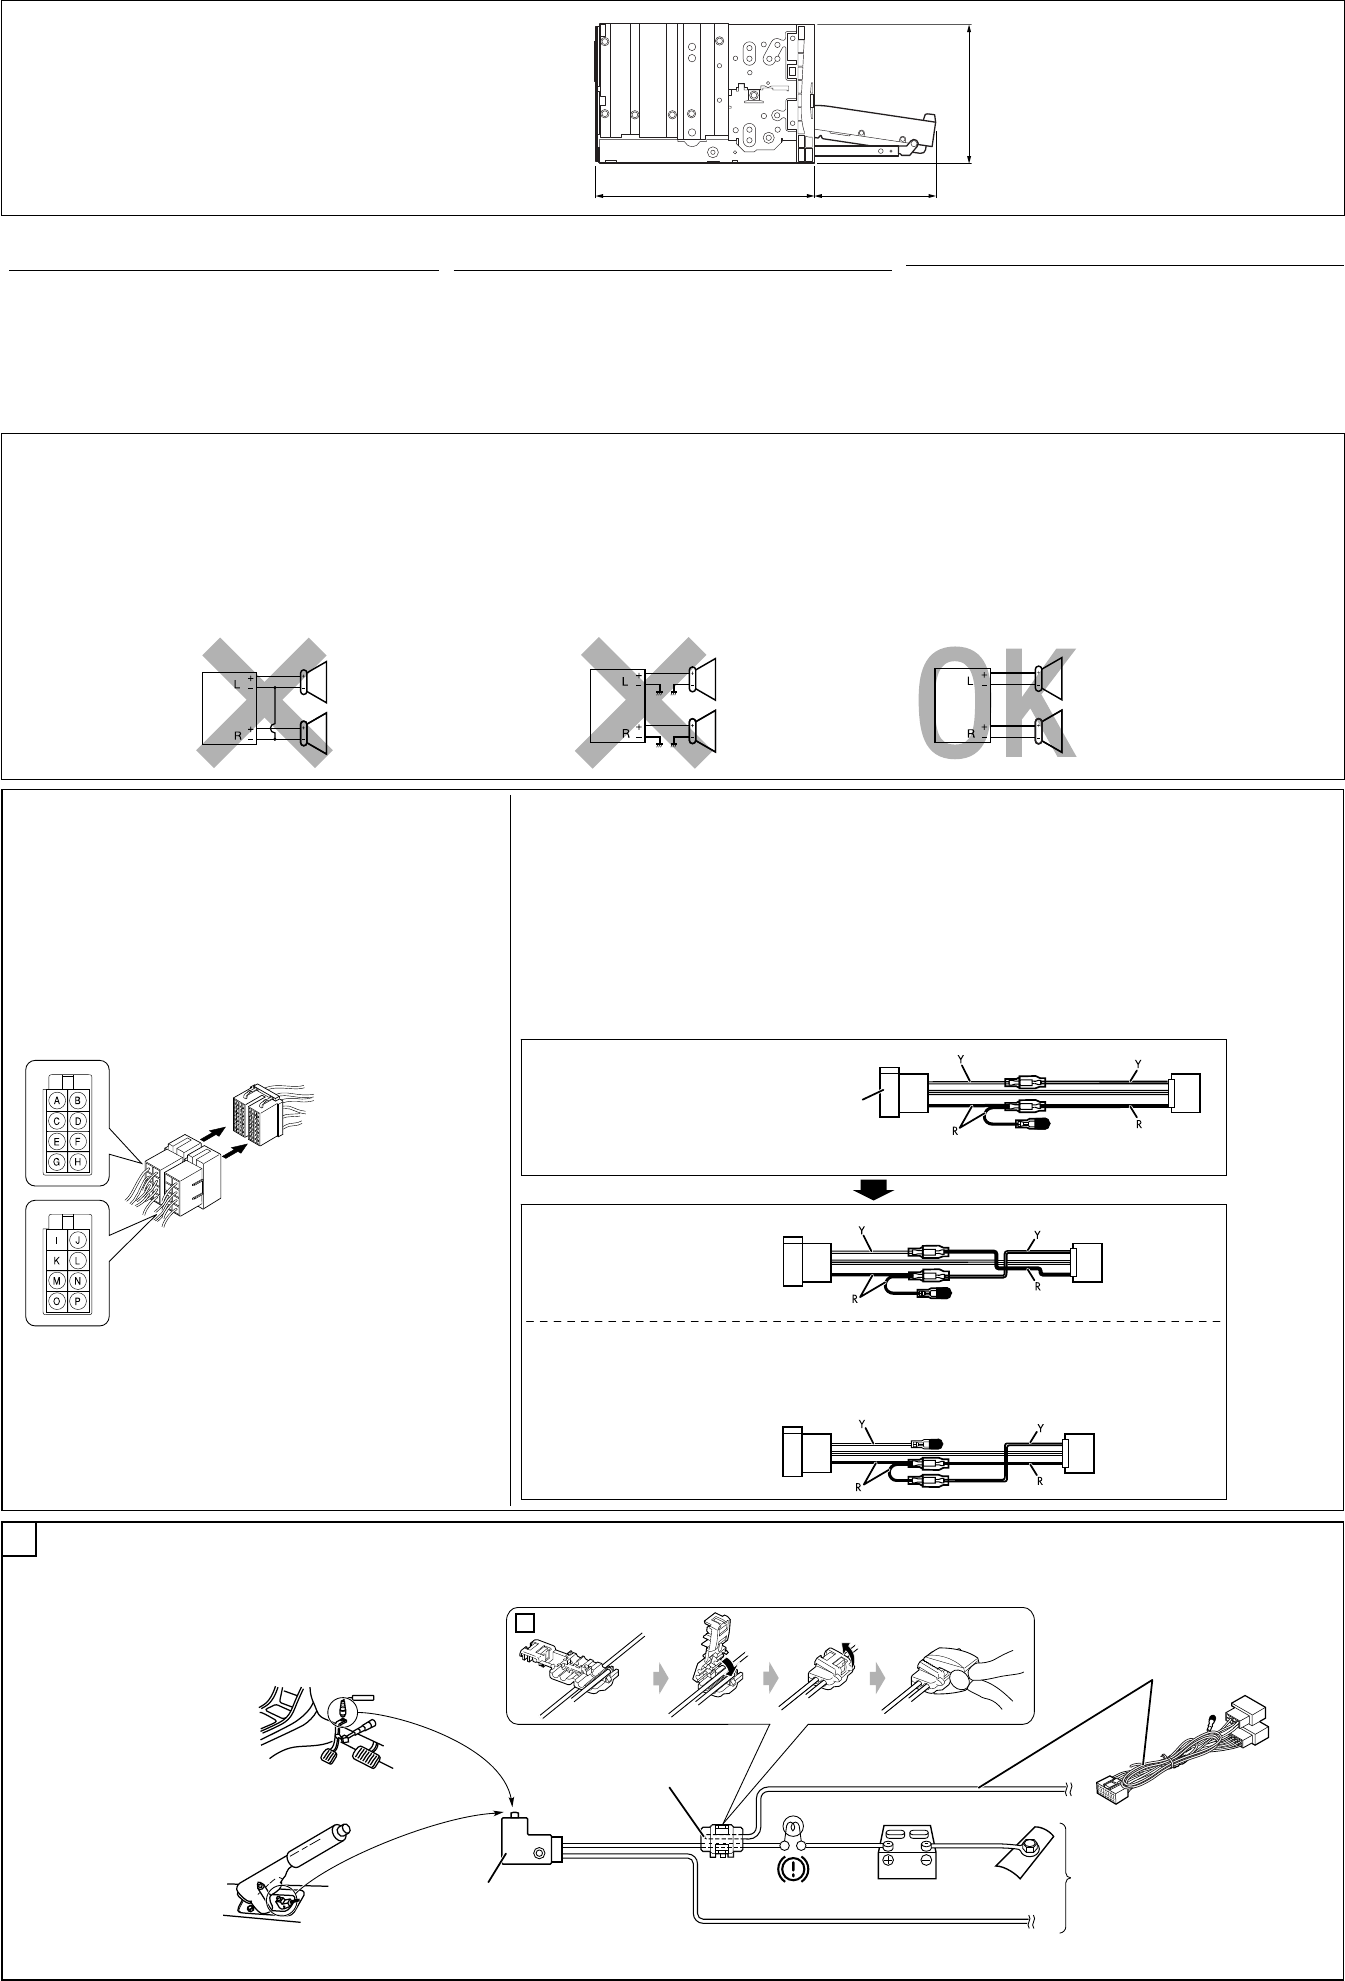
3
A
Unit: mm
Unidad: mm
Unité: mm
Required space for the monitor ejection
Espacio requerido para la expulsión del monitor
Espace requis pour le déploiement du moniteur
CONEXIONES ELECTRICAS
Para evitar cortocircuitos, recomendamos que desconecte el terminal
negativo de la batería y que efectúe todas las conexiones eléctricas antes
de instalar la unidad.
• Asegúrese de volver a conectar a masa esta unidad al chasis
del automóvil después de la instalación.
PRECAUCIONES sobre las conexiones de la fuente de
alimentación y de los altavoces:
• NO conecte los conductores de altavoz del cable de
alimentación a la batería de automóvil, pues podrían
producirse graves daños en la unidad.
• ANTES de conectar a los altavoces los conductores de altavoz del
cable de alimentación, verifique el conexionado de altavoz de su
automóvil.
Connect the parking brake lead to the parking brake system built in
the car.
Conecte el cable del freno de estacionamiento al sistema del freno de
estacionamiento instalado en el coche.
Connectez le fil de frein de stationnement au système de frein de
stationnement intégré à la voiture.
Parking brake lead (light green)
Cable del freno de estacionamiento
(verde claro)
Fil du frein de stationnement
(vert clair)
To metallic body or chassis of the car
A un cuerpo metálico o chasis del
automóvil
Vers corps métallique ou châssis de la
voiture
Parking brake switch (inside the car)
Interruptor del freno de estacionamiento
(dentro del automóvil)
Commutateur de frein de stationnement
(intérieur de la voiture)
Parking brake
Freno de estacionamiento
Frein de stationnement
Connecting the parking brake lead /
Conexión del cable del freno de estacionamiento
/
Connexion du fil de frein de stationnement
Crimp connector
Conector de sujeción
Raccord à sertir
ELECTRICAL CONNECTIONS
To prevent short circuits, we recommend that you disconnect the
battery’s negative terminal and make all electrical connections
before installing the unit.
• Be sure to ground this unit to the car’s chassis again after
installation.
RACCORDEMENTS ELECTRIQUES
Pour éviter tout court-circuit, nous vous recommandons de
débrancher la borne négative de la batterie et d’effectuer tous les
raccordements électriques avant d’installer l’appareil.
• Assurez-vous de raccorder de nouveau la mise à la masse de
cet appareil au châssis de la voiture après l’installation.
PRECAUTIONS sur l’alimentation et la connexion des
enceintes:
• NE CONNECTEZ PAS les fils d’enceintes du cordon
d’alimentation à la batterie; sinon, l’appareil serait
sérieusement endommagé.
• AVANT de connecter les fils d’enceintes du cordon
d’alimentation aux enceintes, vérifiez le câblage des enceintes
de votre voiture.
PRECAUTIONS on power supply and speaker
connections:
• DO NOT connect the speaker leads of the power cord
to the car battery; otherwise, the unit will be seriously
damaged.
• BEFORE connecting the speaker leads of the power cord to the
speakers, check the speaker wiring in your car.
If your car is equipped with the ISO connector
Si su automóvil está equipado con el conector ISO
Si votre voiture est équippée d’un connecteur ISO
• Connect the ISO connectors as illustrated.
• Conecte los conectores ISO tal como se indica en la ilustración.
• Connectez les connecteurs ISO comme montré sur l’illustration.
For some VW/Audi or Opel (Vauxhall) automobile
Para algunos automóviles VW/Audi u Opel (Vauxhall)
Pour certaine voiture VW/Audi ou Opel (Vauxhall)
You may need to modify the wiring of the supplied power cord as illustrated.
• Contact your authorized car dealer before installing this unit.
Podría ser necesario modificar el conexionado del cable de alimentación suministrado, tal como se indica en la ilustración.
• Antes de instalar esta unidad, consulte a su concesionario de automóviles autorizado.
Vous aurrez peut-être besoin de modifier le câblage du cordon d’alimentation fourni comme montré sur l’illustration.
• Contactez votre revendeur automobile autorisé avant d’installer l’appareil.
R: Red
Rojo
Rouge
Use modified wiring 2 if the unit does not turn on.
Si la unidad no se enciende, utilice el conexionado modificado 2.
Utilisez le câblage modifié 2 si l’appareil ne se met pas sous tension
Modified wiring 2
Conexionado modificado 2
Câblage modifié 2
From the car body
Desde la carrocería del vehículo
De la carrosserie de la voiture
ISO connector of the supplied power cord
Conector ISO del cable de alimentación suministrado
Connecteur ISO pour le cordon d’alimentation
fourni
View from the lead side
Vista desde el lado del conductor
Vue à partir du côté des fils
ISO connector
Conector ISO
Connecteur ISO
Original wiring
Conexionado original
Câblage original
Y: Yellow
Amarillo
Jaune
Modified wiring 1
Conexionado modificado 1
Câblage modifié 1
160 90.5
100
a
AVX710[EU1]_install.indb 3AVX710[EU1]_install.indb 3 07.12.24 10:34:48 AM07.12.24 10:34:48 AM
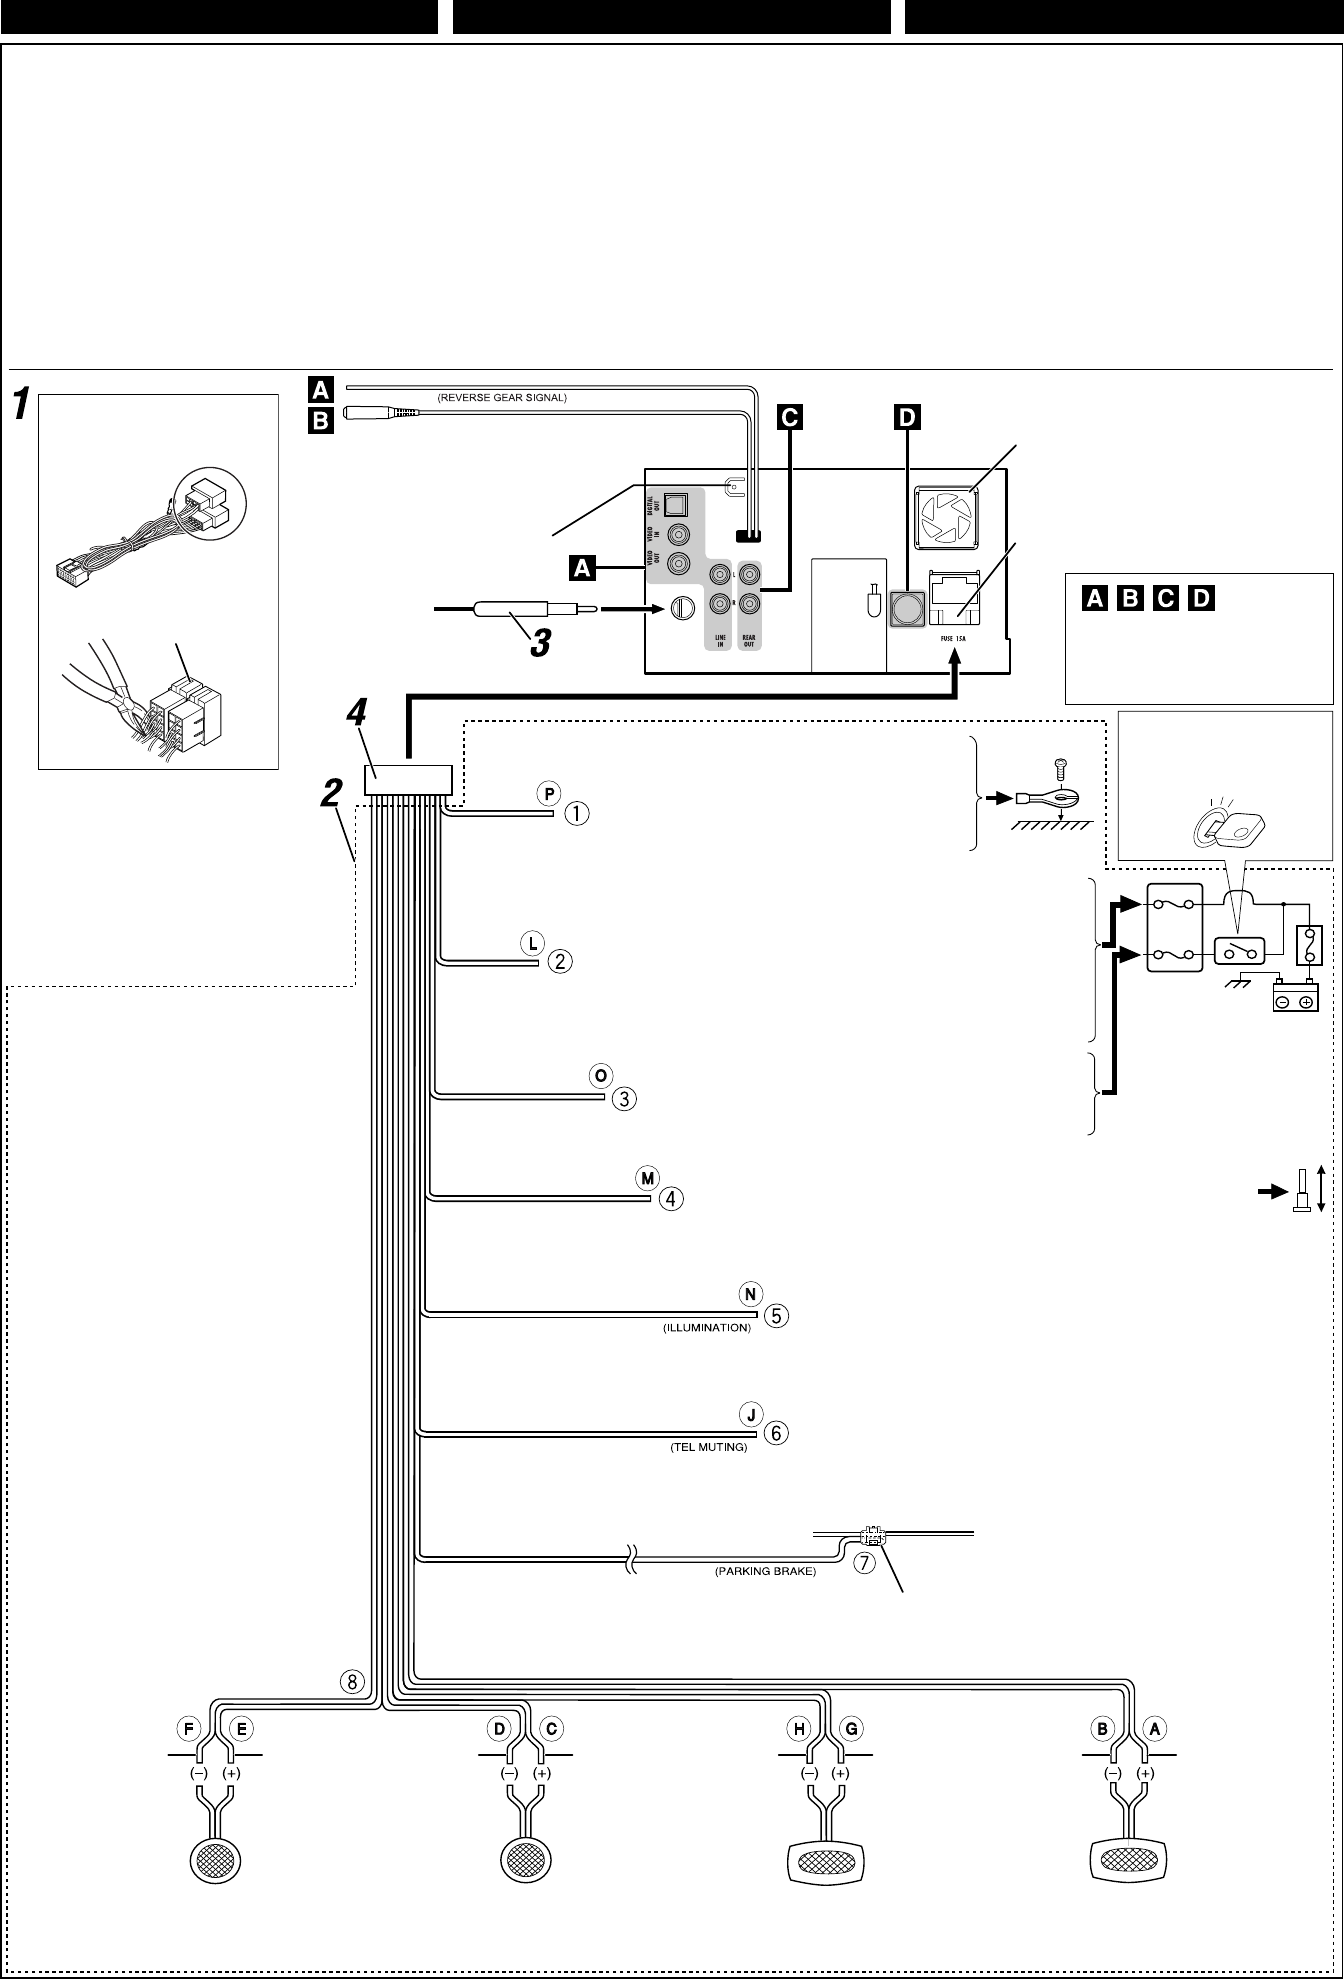
44
ISO Connector
Conector ISO
Connecteur ISO
Power cord
Cordón de alimentación
Cordon d’alimentation
ENGLISH FRANÇAIS ESPAÑOL
Before connecting: Check the wiring in the vehicle carefully.
Incorrect connection may cause serious damage to this unit.
The leads of the power cord and those of the connector from the car
body may be different in color.
1 Cut the ISO connector.
2 Connect the colored leads of the power cord in the order
specified in the illustration below.
3 Connect the aerial cord.
4 Finally connect the wiring harness to the unit.
Avant de commencer la connexion: Vérifiez attentivement
le câblage du véhicule. Une connexion incorrecte peut
endommager sérieusement l’appareil. Le fil du cordon
d’alimentation et ceux des connecteurs du châssis de la voiture
peuvent être différents en couleur.
1 Coupez le connecteur ISO.
2 Connectez les fils colorés du cordon d’alimentation dans
l’ordre spécifié sur l’illustration ci-dessous.
3 Connectez le cordon d’antenne.
4 Finalement, connectez le faisceau de fils à l’appareil.
15 A fuse
Fusible de 15 A
Fusible 15 A
Rear ground terminal
Terminal de tierra posterior
Borne arrière de masse
Black
Negro
Noir To metallic body or chassis of the car
A un cuerpo metálico o chasis del automóvil
Vers corps métallique ou châssis de la voiture
Yellow *3
Amarillo *3
Jaune*3
To a live terminal in the fuse block connecting to the car battery (bypassing
the ignition switch) (constant 12 V)
A un terminal activo del bloque de fusibles conectado a la batería del
automóvil (desviando el interruptor de encendido) (12 V constantes)
A une borne sous tension du porte-fusible connectée à la batterie de la
voiture (en dérivant l’interrupteur d’allumage) (12 V constant)
Red
Rojo
Rouge To an accessory terminal in the fuse block
A un terminal accesorio del bloque de fusibles
Vers borne accessoire du porte-fusible
Brown
Marrón
Marron
Orange with white stripe
Naranja con rayas blancas
Orange avec bande blanche
Light green
Verde claro
Vert clair
Blue with white stripe
Azul con rayas blancas
Bleu avec bande blanche
To cellular phone system
Al sistema de teléfono celular
À un système de téléphone cellulaire
To the remote lead of other equipment or power aerial if any (200 mA max.)
Al conductor remoto de otro equipo o de la antena automática, si hubiere (máx. 200 mA)
Au fil de télécommande de l’autre appareil ou à l’antenne automatique s’il y en a une
(200 mA max.)
To parking brake (see diagram Å on page 3.)
Al freno de estacionamiento (véase el diagrama Å
de la página 3.)
Au frein de stationnement (voir le diagramme Å
de la page 3.)
To car light control switch
Al interruptor de control de las luces del automóvil
À l’interrupteur d’éclairage de la voiture
*3 Before checking the operation of this unit prior to
installation, this lead must be connected, otherwise
power cannot be turned on.
*3 Antes de comprobar el funcionamiento de esta
unidad previa a de la instalación, es necesario
conectar este cable, de lo contrario no se podrá
conectar la alimentación.
*3 Pour vérifier le fonctionnement de cet appareil
avant installation, ce fil doit être raccordé, sinon
l’appareil ne peut pas être mis sous tension.
Left speaker (front)
Altavoz izquierdo (delantero)
Enceinte gauche (avant)
Right speaker (front)
Altavoz derecho (delantero)
Enceinte droit (avant)
Gray
Gris
Gris
Gray with black
stripe
Gris con rayas
negras
Gris avec bande
noire
White
Blanco
Blanc
White with black
stripe
Blanco con rayas
negras
Blanc avec bande
noire
Left speaker (rear)
Altavoz izquierdo (trasero)
Enceinte gauche (arrière)
Right speaker (rear)
Altavoz derecho (trasero)
Enceinte droit (arrière)
Purple
Púrpura
Violet
Purple with black
stripe
Púrpura con rayas
negras
Violet avec bande
noire
Green
Verde
Vert
Green with black
stripe
Verde con rayas
negras
Vert avec bande
noire
Fuse block
Bloque de fusibles
Porte-fusible
Fan
Ventilador
Ventilateur
See each diagram on pages 5 and 6.
Vea cada uno de los diagramas en las
páginas 5 y 6.
Référez-vous à chaque diagramme des
pages 5 et 6.
Crimp connector
Conector de sujeción
Raccord à sertir
Ignition switch
Interruptor de encendido
Interrupteur d’allumage
Antes de la conexión: Verifique atentamente el conexionado del
vehículo. Una conexión incorrecta podría producir daños graves en la
unidad.
Los cordones del cable de alimentación y los del conector procedentes de
la carrocería del automóvil podrían ser de diferentes en color.
1 Corte el connector ISO.
2 Conecte los conductores de color del cable de alimentación en el
orden especificado en la ilustración de abajo.
3 Conecte el cable de antena.
4 Por último, conecte el cable de alimentación a la unidad.
*2
*2
*2 Not supplied
*2 No suministrados
*2 Non fourni
Connections without using the ISO connector / Conexión sin usar el conector ISO / Connexions sans utiliser le connecteur ISO
OE REMOTE Steering wheel remote
ENTRADA REMOTA OE Entrada
remota del volante de dirección
OE REMOTE Télécommande de volant
AVX710[EU1]_install.indb 4AVX710[EU1]_install.indb 4 07.12.24 10:34:51 AM07.12.24 10:34:51 AM
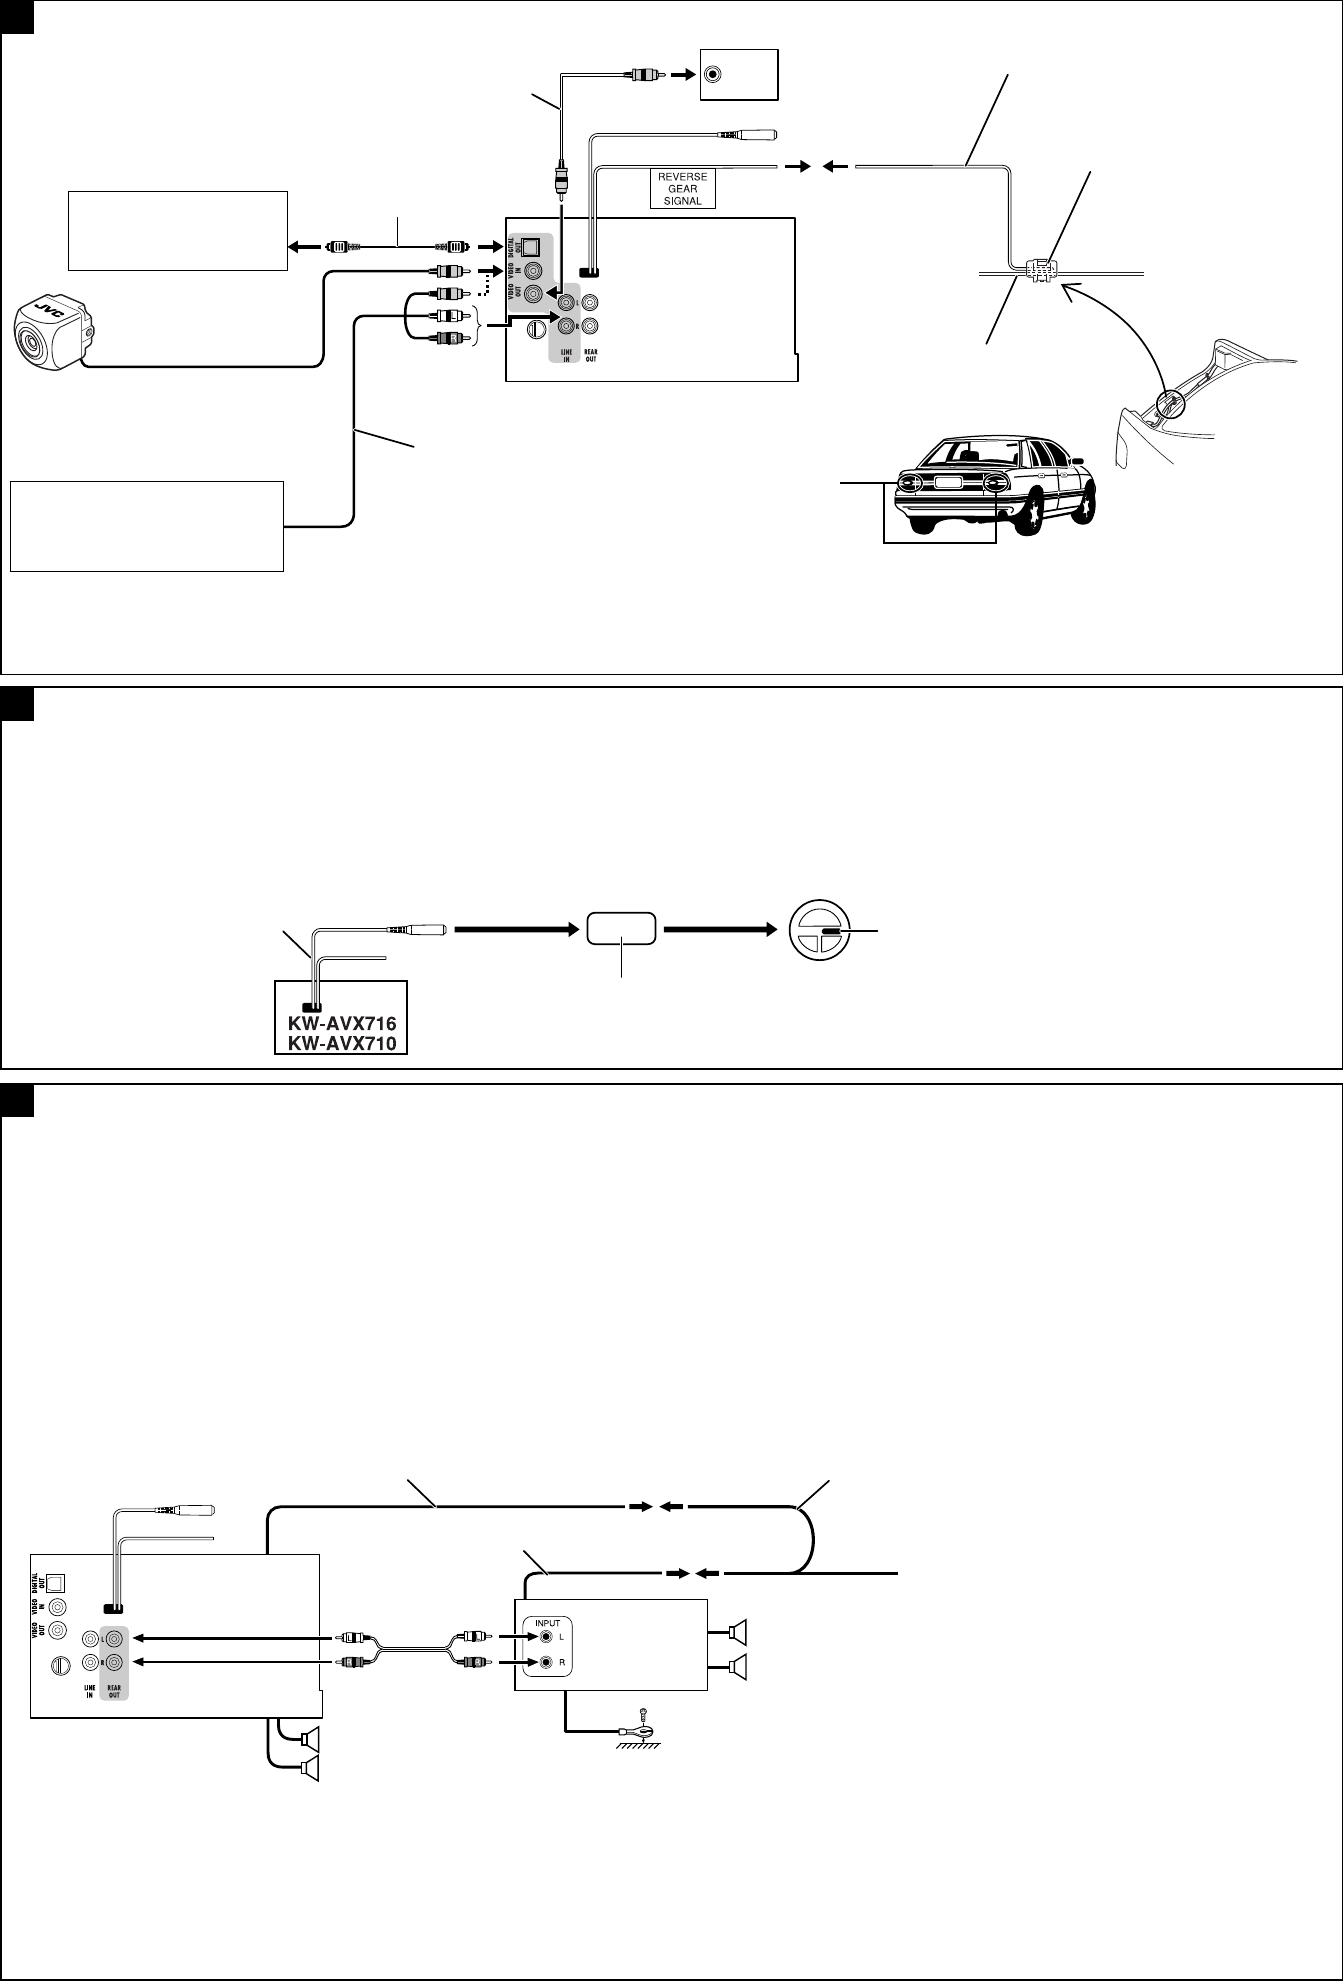
5555
A
B
C
AV amplifier or decoder
Amplificador o decodificador AV
Amplificateur AV ou décodeur
To reverse lamp
A la luz de marcha atrás
Aux feux de recul
Reverse lamps
Luces de marcha atrás
Feux de recul
Reverse lamp lead*4
Conductor de la luz de marcha
atrás*4
Fil des feux de recul*4
Steering wheel remote controller (equipped in the car)
Control remoto del volante de dirección (equipado en el vehículo)
Télécommande de volant (installée dans la voiture)
OE remote adapter (not supplied)
Adaptador para control remoto OE (no suministrado)
Adaptateur pour télécommande au volant (non fourni)
To car battery
A la batería del automóvil
À la batterie de la voiture
Audio/video cord (not supplied)
Cables de audio/vídeo (no suministrados)
Cordon audio/vidéo (non fourni)
Video cord (not supplied)
Cables de video (no suministrados)
Cordon vidéo (non fourni)
If your car is equipped with the steering wheel remote controller,
you can operate this unit using the controller. To do it, a JVC’s
OE remote adapter (not supplied) which matches with your car is
required. Consult your JVC IN-CAR ENTERTAINMENT dealer for
details.
Si votre voiture est munie d’une télécommande de volant, vous
pouvez commander cet autoradio en utilisant la télécommande.
Pour le faire, un adaptateur pour télécommande au volant
JVC (non fourni) correspondant à votre voiture est nécessaire.
Consultez votre revendeur d’autoradio JVC pour les détails.
*4 Required only when connecting a rear view camera to VIDEO
IN terminal.
*5 Refer to å in diagram Å on page 3.
*6 Set “AV Input” setting to “Camera” when using (see page 55 of the
INSTRUCTIONS).
Camcorder, Navigation System, etc.
Videocámara, sistema de navegación, etc.
Caméscope, système de navigation, etc.
*4 Se requiere solamente cuando se conecta una cámara de retrovisión
al terminal VIDEO IN.
*5 Consulte å en el diagrama Å de la página 3.
*6 Para usar, ajuste “AV Input” a “Camera” (consulte la página 55 del
MANUAL DE INSTRUCCIONES).
*4 Requis uniquement lors de la connexion d’une caméra de
recul à la prise VIDEO IN.
*5 Reportez vous à å du diagramme Å de la page 3.
*6 Réglez “AV Input” sur “Camera” lors de l’utilisation (voir page
55 du MANUEL D’INSTRUCTIONS).
Crimp connector (not supplied)*5
Conector de sujeción (no
suministrado)
*5
Raccord à sertir (non fourni)*5
Rear view camera KV-CM1*6
Cámara de reprovisión KV-CM1*6
Caméra de recul KV-CM1*6
Connecting an external amplifier / Conexión de un amplificador externo / Connexion d’un amplificateur extérieur
You can connect an amplifier to upgrade your car stereo system.
• You can supply the power to the amplifier by connecting the
remote leads (blue with white stripe) of this unit to the amplifier.
(To connect other equipment using the remote leads, Y-
connectors need to be separately purchased.)
• Disconnect the speakers from the unit, and connect them to the
amplifier. Leave the speaker leads of the unit unused.
• You can switch off the built-in amplifier and send the audio
signals only to the external amplifier to get clear sound and to
prevent internal heat built-up inside the unit. See page 56 of the
INSTRUCTIONS.
Rear speakers
Altavoces traseros
Enceintes arrière
Front speakers
Altavoces delanteros
Enceintes avant
JVC Amplifier
Amplificador de JVC
JVC Amplificateur
Vous pouvez connecter un amplificateur pour améliorer votre
système stéréo.
• Vous pouvez alimenter l’amplificateur en connectant les fils
de télécommande (bleu à bande blanche( de cet appareil à
l’amplificateur. (Pour connecter un autre appareil en utilisant les
fils de télécommande, vous devez acheter des connecteurs Y
séparément.)
• Déconnectez les enceintes de l’appareil principal et connectez-
les aux amplificateurs. Laissez les fils d’enceintes de l’appareil
inutilisés.
• Vous pouvez mettre hors service l’amplificateur intégré et
envoyer les signaux audio uniquement vers un ou plusieurs
amplificateurs extérieurs pour obtenir des sons plus clairs et
éviter un échauffement interne de l’appareil. Référez-vous à la
page 56 du MANUEL D’INSTRUCTIONS..
*7 Firmly attach the ground lead to the metallic body or to the
chassis of the car—to the place not coated with paint (if coated
with paint, remove the paint before attaching the lead). Failure to
do so may cause damage to the unit.
*7 Attachez solidement le fil de mise à la masse au châssis
métallique de la voiture—à un endroit qui n’est pas recouvert
de peinture (s’il est recouvert de peinture, enlevez d’abord
la peinture avant d’attacher le fil). L’appareil peut être
endommagé si cela n’est pas fait correctement.
Si su vehículo está equipado con control remoto en el volante de
dirección, podrá hacer funcionar este receptor utilizando dicho control.
Para ello, se requiere un adaptador para control remoto OE de JVC
(no suministrado) que corresponda con su vehículo. Para mayor
información, consulte con su concesionario car audio de JVC.
Puede conectar un amplificador para mejorar su sistema car estéreo.
• Puede suministrar alimentación al amplificador conectando los
conductores remotos (azul con rayas blancas) de esta unidad al
amplificador. (Para conectar otro equipo usando los conductores
remotos, se deben adquirir separadamente conectores en Y).
• Desconecte los altavoces de la unidad y conéctelos al amplificador.
Los conductores de los altavoces de la unidad quedan sin usar.
• Puede desconectar el amplificador incorporado y enviar las señales
de audio sólo al(los) amplificador(es) externo(s) para obtener sonidos
nítidos y evitar la generación de calor dentro de la unidad. Consulte
la página 56 del MANUAL DE INSTRUCCIONES.
*7 Fije firmemente el cable de tierra a un cuerpo metálico o chasis del
automóvil—a un lugar no cubierto con pintura (si está cubierto con
pintura, quítela antes de fijar el cable). De lo contrario, se podrían
producir daños en la unidad.
Connections for external component playback /
Conexiones para la reproducción del componente externo
/
Connexions pour un appareil de
lecture extérieur External monitor
Monitor externo
Moniteur extérieur
Y-connector (not supplied for this unit)
Conector en Y (no suministrado con esta unidad)
Connecteur Y (non fourni avec cet appareil)
Remote lead (Blue with white stripe)
Cable remoto (azul con rayas blancas)
Fil d’alimentation à distance (Bleu avec bande blanche)
To the remote lead of other equipment or power aerial if any
Al conductor remoto de otro equipo o de la antena automática,
si hubiere
Au fil de télécommande de l’autre appareil ou à l’antenne
automatique s’il y en a une
Remote lead
Cable remoto
Fil d’alimentation à
distance
Connecting to the steering wheel remote controller /Conexión al control remoto del volante de dirección / Connexion de
la télécommande de volant
Extension lead (not supplied)
Cable prolongador (no suministrado)
Cordon prolongateur (non fourni)
Digital optical cable (not supplied)
Cable óptico digital (no suministrado)
Câble optique numérique (non
fourni)
OE REMOTE Steering wheel remote
ENTRADA REMOTA OE Entrada remota
OE REMOTE Télécommande de volant
*7
AVX710[EU1]_install.indb 5AVX710[EU1]_install.indb 5 07.12.24 10:34:55 AM07.12.24 10:34:55 AM
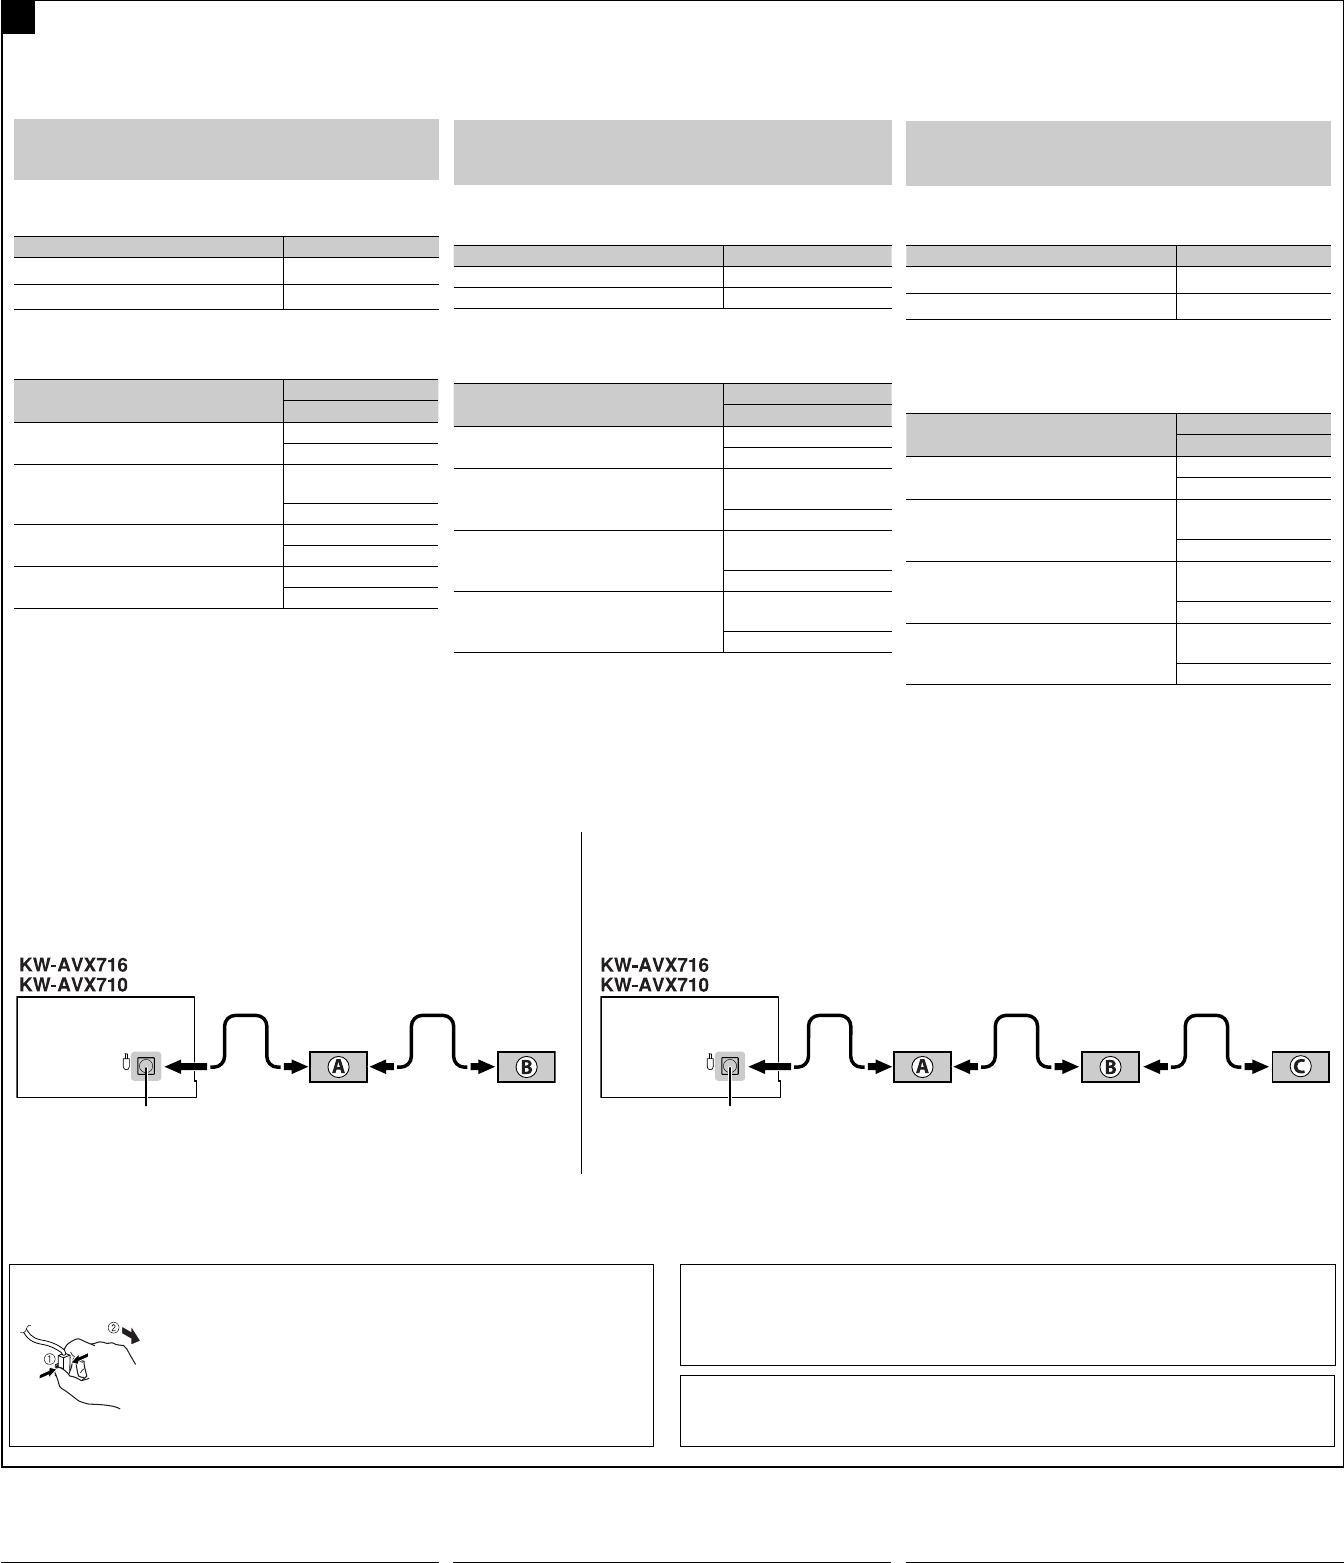
66
Connections to the CD changer jack / Conexión al jack del cambiador de CD / Connexions à la prise du changeur de CD
D
iPod is a trademark of Apple Inc., registered in the U.S. and other countries.
iPod es una marca comercial de Apple Inc., registrada en los EE.UU. y otros países.
iPod est une marque de commerce d’Apple Inc., enregistrée aux États-Unis et dans les autres pays.
*8 To use these components, set the external input setting correctly (see page 55 of the INSTRUCTIONS).
*8 Para utilizar estos componentes, configure el ajuste de entrada externa correctamente (consulte la
página 55 del MANUAL DE INSTRUCCIONES).
*8 Pour utiliser ces appareils, réglez l’entrée extérieure correctement (voir page 55 du MANUEL
D’INSTRUCTIONS).
To disconnect the connector / Para desconectar el conector / Pour déconnecter le connecteur
Hold the connector top tightly (1), then pull it out (2).
Sujete firmemente la parte superior del conector ( 1 ) y seguidamente,
extráigalo ( 2 ).
Tenez fermement le connecteur par-dessus ( 1 ) et tirez vers l’extérieur
( 2 ).
LOCALIZACIÓN DE AVERIAS
• El fusible se quema.
* ¿Están los conductores rojo y negro correctamente conectados?
• No es posible conectar la alimentación.
* ¿Está el cable amarillo conectado?
• No sale sonido de los altavoces.
* ¿Está el cable de salida del altavoz cortocircuitado?
• El sonido presenta distorsión.
* ¿Está el cable de salida del altavoz conectado a masa?
* ¿Están los terminales “–” de los altavoces L y R conectados a una
masa común?
• Perturbación de ruido.
* ¿El terminal de tierra trasero está conectado al chasis del automóvil
utilizando los cordones más corto y más grueso?
• La unidad se calienta.
* ¿Está el cable de salida del altavoz conectado a masa?
* ¿Están los terminales “–” de los altavoces L y R conectados a una
masa común?
• Este receptor no funciona en absoluto.
* ¿Reinicializó el receptor?
CD changer jack
Jack para el cambiador de CD
Prise du changeur de CD
When connecting two components in series
Cuando conecta dos componentes en serie
Lors de la connexion de deux appareils en série
When connecting three components in series
Cuando conecta tres componentes en serie
Lors de la connexion de trois appareils en série
A KS-BTA200
B KT-DB1000
C*8 KS-PD100 / KS-U57 / KS-U58
A KS-BTA200 / KT-DB1000
B*8 CD-CH / KS-PD100 / KS-U57 / KS-U58
Cuando conecte componentes externos, consulte, también, los manuales
suministrados con los componentes y el adaptador.
PRECAUCIÓN:
Antes de conectar los componentes externos, asegúrese de que la
unidad esté apagada.
Puede conectar los siguientes componentes JVC al jack del cambiador
de CD.
Componente JVC Nombre del modelo
Cambiador de CD (CD-CH)
CH-X1500, etc.
Sintonizador DAB de JVC KT-DB1000
También puede conectar los siguientes componentes mediante los
diversos adaptadores JVC.
• Puede ser necesario comprar los cables de conexión por separado.
Componente Adaptador
Nombre del modelo
Dispositivo Bluetooth Adaptador Bluetooth
KS-BTA200
iPod Adaptador de interfaz
para iPod
KS-PD100
Reproductor de audio portátil con jacks de
salida de línea
Adaptador de entrada
por línea
KS-U57
Reproductor de audio portátil con jack
mini estéreo de 3,5 mm
Adaptador de entrada
AUX
KS-U58
Cuando conecte más de un componente (máximo: tres), se recomienda
que conecte los componentes en serie, como se explica a continuación.
When connecting the external components, refer also to the
manuals supplied for the components and adapter.
CAUTION:
Before connecting the external components, make sure that the
unit is turned off.
You can connect the following JVC components to the CD changer
jack.
JVC component Model name
CD changer (CD-CH) CH-X1500, etc.
JVC DAB tuner KT-DB1000
You can also connect the following components through the
various JVC adapters.
• Connection cords may need to be purchased separately.
Component Adapter
Model name
Bluetooth device Bluetooth adapter
KS-BTA200
iPod Interface adapter for
iPod
KS-PD100
Portable audio player with line output
jacks
Line input adapter
KS-U57
Portable audio player with 3.5 mm stereo
mini jack
AUX input adapter
KS-U58
When connecting more than one component (maximum: three),
it is recommended that you connect the components in series as
explained below.
CD changer jack
Jack para el cambiador de CD
Prise du changeur de CD
EN CAS DE DIFFICULTES
• Le fusible saute.
* Les fils rouge et noir sont-ils racordés correctement?
• L’appareil ne peut pas être mise sous tension.
* Le fil jaune est-elle raccordée?
• Pas de son des enceintes.
* Le fil de sortie d’enceinte est-il court-circuité?
• Le son est déformé.
* Le fil de sortie d’enceinte est-il à la masse?
* Les bornes “–” des enceintes gauche et droit sont-elles mises
ensemble à la masse?
• Interférence avec les sons.
* La prise arrière de mise à la terre est-elle connectée au châssis de
la voiture avec un cordon court et épais?
• L’appareil devient chaud.
* Le fil de sortie d’enceinte est-il à la masse?
* Les bornes “–” des enceintes gauche et droit sont-elles mises
ensemble à la masse?
• Cet appareil ne fonctionne pas du tout.
* Avez-vous réinitialisé votre appareil?
TROUBLESHOOTING
• The fuse blows.
* Are the red and black leads connected correctly?
• Power cannot be turned on.
* Is the yellow lead connected?
• No sound from the speakers.
* Is the speaker output lead short-circuited?
• Sound is distorted.
* Is the speaker output lead grounded?
* Are the “–” terminals of L and R speakers grounded in common?
• Noise interfere with sounds.
* Is the rear ground terminal connected to the car’s chassis using
shorter and thicker cords?
• Unit becomes hot.
* Is the speaker output lead grounded?
* Are the “–” terminals of L and R speakers grounded in common?
• This unit does not work at all.
* Have you reset your unit?
Lors de la connexion des appareils extérieurs, référez-vous aussi
aux manuels fournis avec les appareils et les adaptateurs.
PRECAUTION:
Avant de connecter les appareils extérieurs, assurez-vous que
l’appareil est hors tension.
Vous pouvez connecter les appareils JVC suivants à la prise de
changeur de CD.
Appareil JVC Nom du modèle
Changeur de CD (CD-CH) CH-X1500, etc.
Tuner DAB JVC KT-DB1000
Vous pouvez aussi connecter les appareils suivants en utilisant
divers adaptateurs JVC.
• Vous pouvez avoir besoin d’acheter certains cordons de
connexion séparément.
Appareil Adaptateur
Nom du modèle
Périphérique Bluetooth Adaptateur Bluetooth
KS-BTA200
iPod Adaptateur
d’interface pour iPod
KS-PD100
Lecteur audio portable avec prises de
sortie de ligne
Adaptateur d’entrée
de ligne
KS-U57
Lecteur audio portable avec mini fiche
stéréo de 3,5 mm
Adaptateur d’entrée
auxiliaire
KS-U58
Lors de la connexion de plus d’un appareil (maximum: trois), il est
recommandé que vous connectiez les appareils en série comme
nous l’expliquons ci-dessous.
AVX710[EU1]_install.indb 6AVX710[EU1]_install.indb 6 07.12.24 10:35:00 AM07.12.24 10:35:00 AM
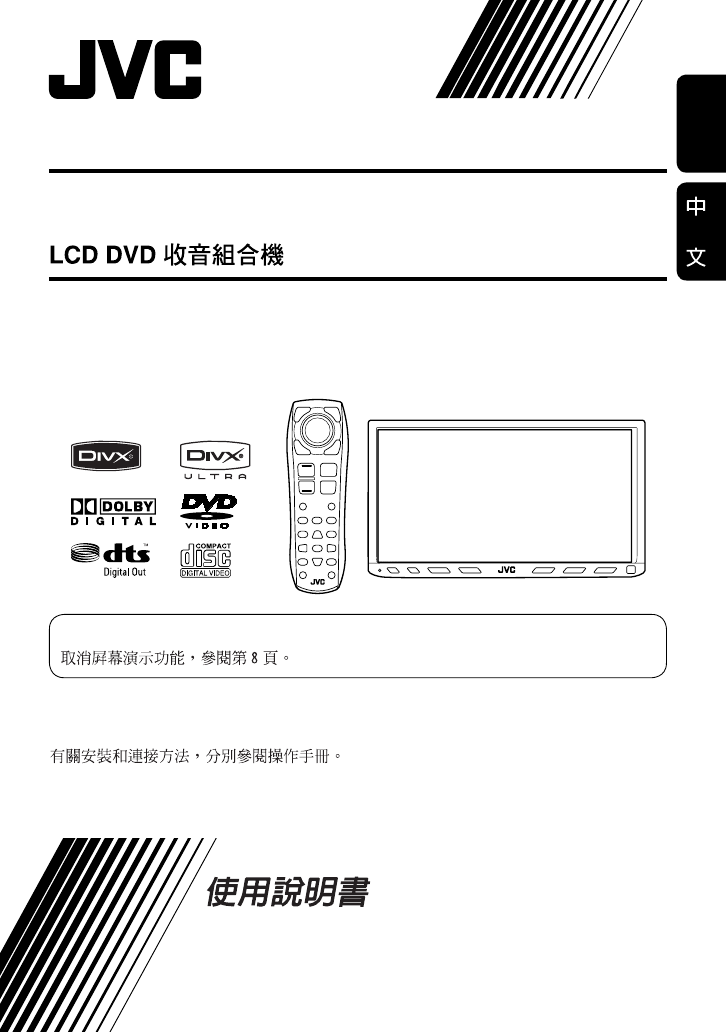
ENGLISH
For installation and connections, refer to the separate manual.
INSTRUCTIONS
LVT1780-005A
[UT]
For canceling the display demonstration, see page 8.
DVD RECEIVER WITH MONITOR
KW-AVX716
KW-AVX710
KW-AVX716
KW-AVX710
Cover_KW-AVX710UT_1.indd 2Cover_KW-AVX710UT_1.indd 2 08.2.12 10:36:27 AM08.2.12 10:36:27 AM

ENGLISH
2
Thank you for purchasing a JVC product.
Please read all instructions carefully before operation, to ensure your complete understanding and to obtain the best
possible performance from the unit.
IMPORTANT FOR LASER PRODUCTS
1. CLASS 1 LASER PRODUCT
2. CAUTION: Do not open the top cover. There are no user serviceable parts inside the unit; leave all servicing to
qualified service personnel.
3. CAUTION: Visible and/or invisible class 1M laser radiation when open. Do not view directly with optical
instruments.
4. REPRODUCTION OF LABEL: CAUTION LABEL, PLACED OUTSIDE THE UNIT.
[European Union only]
Cautions on the monitor:
• The monitor built in this unit has been produced
with high precision, but it may have some
ineffective dots. This is inevitable and is not
malfunction.
• Do not expose the monitor to direct sunlight.
• Do not operate the touch panel using a ball-point
pen or similar tool with the sharp tip.
Touch the buttons on the touch panel with your
finger directly (if you are wearing a glove, take it
off).
• When the temperature is very cold or very hot...
– Chemical changes occur inside, causing
malfunction.
– Pictures may not appear clearly or may move
slowly. Pictures may not be synchronized with
the sound or picture quality may decline in
such environments.
WARNINGS:
To prevent accidents and damage
• DO NOT install any unit or wire any cable in a
location where;
– it may obstruct the steering wheel and
gearshift lever operations.
– it may obstruct the operation of safety devices
such as air bags.
– it may obstruct visibility.
• DO NOT operate the unit while driving.
If you need to operate the unit while driving, be
sure to look around carefully.
• The driver must not watch the monitor while
driving.
EN_KW-AVX710[U].indb 2EN_KW-AVX710[U].indb 2 07.12.6 3:31:14 PM07.12.6 3:31:14 PM
3
ENGLISH
INTRODUCTION
How to reset your unit
• Your preset adjustments will also be erased.
How to forcibly eject a disc
• If this does not work, reset the unit.
For safety...
• Do not raise the volume level too much, as this will
block outside sounds, making driving dangerous.
• Stop the car before performing any complicated
operations.
Temperature inside the car...
If you have parked the car for a long time in hot or cold
weather, wait until the temperature in the car becomes
normal before operating the unit.
Contents
INTRODUCTION
Playable disc types .......................... 4
Basic operations—
Monitor panel/touch panel
............ 5
Basic operations—
Remote controller (RM-RK252) ...... 6
OPERATIONS
Before operating the unit ................ 8
Common operations ........................ 9
Listening to the radio ...................... 10
Disc operations ................................ 13
EXTERNAL DEVICES
Bluetooth® operations—
Cellular phone/audio player .......... 27
Listening to the CD changer .............. 34
Listening to the iPod ........................ 36
Using other external components ..... 38
SETTINGS
Sound equalization .......................... 41
Assigning titles to the sources .......... 42
Menu operations ............................. 43
REFERENCES
Maintenance ................................... 52
More about this unit ........................ 53
Troubleshooting .............................. 60
Specifications .................................. 64
NO EJECT?
EMERGENCY EJECT?
Exit
ENTER
Back
11
3
2
at the same time
EN_KW-AVX710[U].indb 3EN_KW-AVX710[U].indb 3 07.12.6 3:31:18 PM07.12.6 3:31:18 PM

ENGLISH
4
Disc type Recording format, file type, etc. Playable
DVD DVD Video (Region Code: 3)*1
DVD Audio
DVD-ROM
DVD Recordable/Rewritable
(DVD-R/-RW*2, +R/+RW*3)
• DVD Video: UDF bridge
• DVD-VR
• DivX/MPEG1/MPEG2/JPEG/MP3/
WMA/WAV: ISO 9660 level 1,
level 2, Romeo, Joliet
DVD Video
DVD-VR
DivX/MPEG1/MPEG2
JPEG
MP3/WMA/WAV
AAC
MPEG4
DVD+VR
DVD-RAM
Dual Disc DVD side
Non-DVD side
CD/VCD Audio CD/CD Text (CD-DA)/DTS-CD
VCD (Video CD)
SVCD (Super Video CD)
CD-ROM
CD-I (CD-I Ready)
CD Recordable/Rewritable
(CD-R/-RW)
• ISO 9660 level 1, level 2, Romeo,
Joliet
CD-DA
MP3/WMA/WAV
JPEG
DivX/MPEG1/MPEG2
AAC
MPEG4
*1 If you insert a DVD Video disc of an incorrect Region Code, “Region code error” appears on the screen.
*2 DVD-R recorded in multi-border format is also playable (except for dual layer discs).
DVD-RW dual layer discs are not playable.
*3 It is possible to play back finalized +R/+RW (Video format only) discs.
+RW double layer discs are not playable.
Playable disc types
Caution for DualDisc playback
The Non-DVD side of a “DualDisc” does not comply with the “Compact Disc Digital Audio” standard. Therefore,
the use of Non-DVD side of a DualDisc on this product may not be recommended.
EN_KW-AVX710[U].indb 4EN_KW-AVX710[U].indb 4 07.12.6 3:31:19 PM07.12.6 3:31:19 PM

5
ENGLISH
INTRODUCTION
Basic operations — Monitor panel/touch panel
• Turn on the power.
• Turn off the power. [Hold]
• Attenuate the sound (if the power is on).
Change the sources.
Remote sensorAdjust the volume.
Reset the unit.
• Use only when the internal system malfunctions.
Display <AV Menu> screen.
Display and erase the Short Cut windows.
Available functions vary among the sources. For details, see each source operation
section.
Change the display information.
• [OPEN]: Open the monitor panel.
• [EJECT]: Eject the disc.
• [CLOSE]: Close the monitor panel.
• [TILT +/–]: Tilt the monitor panel.
• [Exit]: Erase this screen.
• Shaded icons cannot be used.
• In the explanation, buttons on the touch panel
are indicated inside [ ].
• For details on the touch panel operations, see
each source operation section.
Display <Source Menu> screen.
Display <AV Menu> screen.
☞ page 43
• Display <Open/Tilt> menu.
• Eject the disc and display <Open/Tilt>
menu. [Hold]
• Close the monitor panel when <Open/Tilt>
menu is displayed.
☞ page 43
☞ page 9
☞ page 9
<Open/Tilt> menu
EN_KW-AVX710[U].indb 5EN_KW-AVX710[U].indb 5 07.12.6 3:31:20 PM07.12.6 3:31:20 PM

ENGLISH
6
Basic operations — Remote controller (RM-RK252)
Main elements and features
1 • Turns on the power.
• Attenuates the sound if the power is on.
• Turns off the power if pressed and held (while
the power is on).
2 • Reverse search
• Reverse slow motion (during pause)
3 Adjusts the volume level.
• Does not function as “2nd VOL.”
4 • Displays <Dial Menu> screen.
• Displays <Redial> menu if pressed and held.
• Answers incoming calls.
5 • DVD/DivX 6: Shows the disc menu.
• VCD: Resumes PBC playback.
• DVD-VR: Shows the Original Program screen.
6 Shows the on-screen bar.
• Does not function as “ .“
R03/LR03/AAA
Installing the battery
Insert the batteries into the remote controller by
matching the polarity (+ and –) correctly.
Caution:
Battery shall not be exposed to excessive heat such
as sunshine, fire or the like.
• If the range or effectiveness of the remote controller
decreases, replace both batteries.
Before using the remote controller:
• Aim the remote controller directly at the remote
sensor on the unit.
• DO NOT expose the remote sensor to bright light
(direct sunlight or artificial lighting).
EN_KW-AVX710[U].indb 6EN_KW-AVX710[U].indb 6 07.12.6 3:31:20 PM07.12.6 3:31:20 PM

7
ENGLISH
INTRODUCTION
p • Forward search
• Forward slow motion (during pause)
q Selects the source.
w For disc operations:
Starts playback/pauses.
For Bluetooth operations:
• Answers incoming calls.
• Starts playback/pauses. (for audio player
operation).
e Changes the aspect ratio of the playback
pictures.
r “TUNER”: Selects the bands.
“DISC”: Stops playback.
“Bluetooth PHONE”: Ends the call.
“Bluetooth AUDIO”: Starts playback/pauses.
t VCD: Returns to the PBC menu.
y • DVD Video/DivX 6: Shows the disc menu.
• VCD: Resumes PBC playback.
• DVD-VR: Shows the Playlist screen.
u • Makes selection/settings.
• @ / #: Skips back or forward by five minutes
for DivX/MPEG1/MPEG2.
• % / fi: Changes discs for “CD-CH.”
i*3 • Switches number entry mode for “DISC.”
• Erases the misentry after entering a wrong
number.
• Does not function as “SURROUND.”
o*3 Number buttons
• Enters numbers.
• “TUNER”: Selects the preset station directly.
*1 Functions as a number button only (see o ).
*2 Not used for this unit.
*3 Functions when pressed with SHIFT.
7 Functions with other buttons (see i and o).
8 Changes the display information.
9 For disc operations:
• 5 / ∞:
DVD: Selects the title.
DVD-VR: Selects the program/Playlist.
Other discs (except VCD/CD): Selects the
folders.
• 4 / ¢:
– Press briefly: reverse skip/forward skip
– Press and hold: reverse search/forward
search
For FM/AM operations:
• 5 / ∞: Selects the preset stations.
• 4 / ¢: Functions to search for stations.
– Press briefly: Auto Search
– Press and hold: Manual Search
For Apple iPod operations:
• ∞: Starts playback/pauses
• 5: Enters the main menu (then 5 / ∞
/ 4 / ¢ work as menu selecting
buttons).
In the main menu:
• 5: Returns to the previous menu.
• ∞: Confirms the selection.
• 4 / ¢
– Press briefly: Selects an item.
– Press and hold: Skips ten items at a time.
For Bluetooth operations:
• 4 / ¢: reverse skip/forward skip (for
audio player operation)
EN_KW-AVX710[U].indb 7EN_KW-AVX710[U].indb 7 07.12.6 3:31:21 PM07.12.6 3:31:21 PM
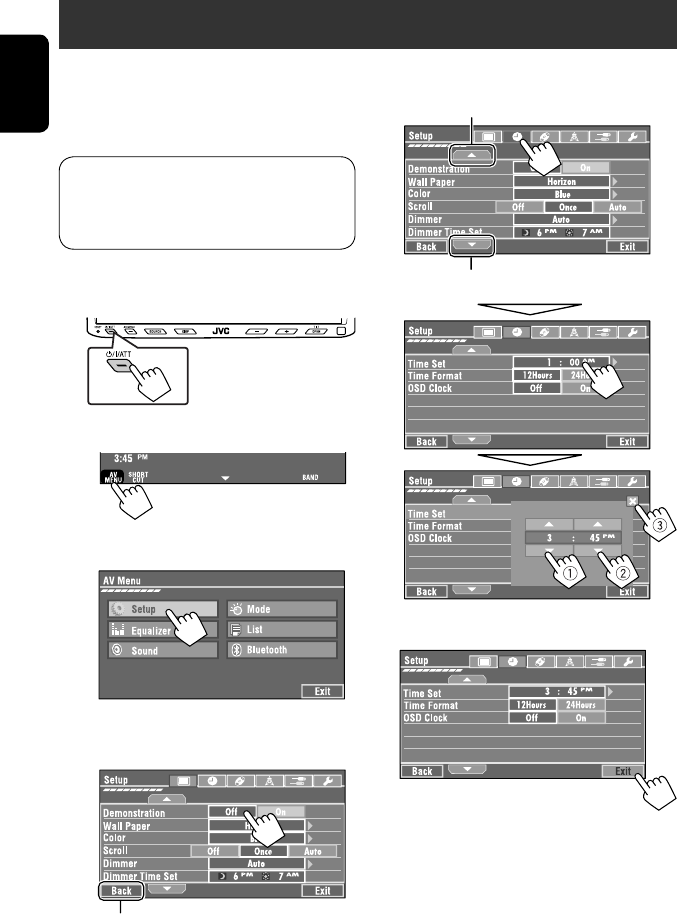
8
ENGLISH
You can cancel the demonstration on the screen and set
the clock.
• Non-available items will be shaded on the AV Menu
screens.
Indication language:
In this manual, English indications are used
for purpose of explanation. You can select the
indication language. (☞ page 45)
~ Turn on the power.
Ÿ Display <AV Menu> screen.
! Display <Setup> menu.
⁄ Cancel the demonstration.
Select <Off>.
@ Set the clock settings.
¤ Finish the procedure.
Before operating the unit
Moves to the succeeding menu page
Moves to the preceding menu page
Return to the previous screen.
EN_KW-AVX710[U].indb 8EN_KW-AVX710[U].indb 8 07.12.6 3:31:21 PM07.12.6 3:31:21 PM

OPERATIONS
9
ENGLISH
Changing the display
information
• Available display information varies among the
playback sources.
On the monitor panel only:
• Each time you press DISP, the display changes to
show the various information.
Ex. When the playback source is a DivX disc.
Selecting the playback source
• Available sources depend on the external
components you have connected, media you have
attached, and the <Input> settings you have made
(☞ page 47).
On the touch panel:
On the monitor panel:
TUNER = DISC (DVD/VCD/CD) =CD-CH, iPod, or
EXT-IN = Bluetooth PHONE = Bluetooth AUDIO
= AV-IN = (back to the beginning)
• You cannot select these sources if they are not ready.
Exit
Source information screen
Clock time in large numbers
Navigation screen
(When <Navigation> is
selected for <AV Input>)
(☞ page 47)
Back to the beginning
Playback picture screen
(only for video sources)
Track list
Common operations
EN_KW-AVX710[U].indb 9EN_KW-AVX710[U].indb 9 07.12.6 3:31:22 PM07.12.6 3:31:22 PM
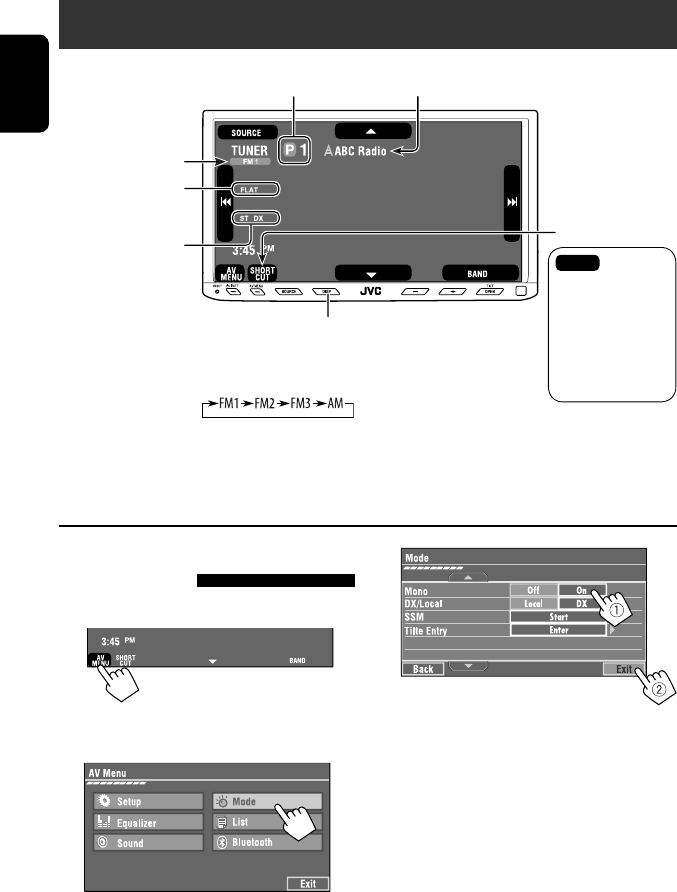
10
ENGLISH
When an FM stereo broadcast is
hard to receive
1 Press [AV MENU].
• You can also use AV MENU on the monitor panel.
2 Press [Mode].
Listening to the radio
~ Press [SOURCE], then press [TUNER]. (☞ page 9)
• You can also use SOURCE on the monitor panel. Press it repeatedly.
Ÿ Press [BAND].
! Press [4] or [¢] to search for a station—Auto Search.
• Manual Search: Hold either [4]or [¢] until “Manual Search” appears on the screen, then press it
repeatedly.
• The ST indicator lights up when receiving an FM stereo broadcast with sufficient signal strength.
3
Reception improves, but stereo effect will be lost.
• The MONO indicator lights up.
To restore stereo effect, select <Off>.
Preset no.
Band
Tuner indicators
Assigned station name (☞ page 42). If no name is assigned,
the frequency of the station is displayed instead.
☞ page 9
Sound mode
(☞ page 41)
☞ page 11,
: Buttons on the
touch panel. In
the explanation,
they are
indicated inside
[ ].
EN_KW-AVX710[U].indb 10EN_KW-AVX710[U].indb 10 07.12.6 3:31:23 PM07.12.6 3:31:23 PM
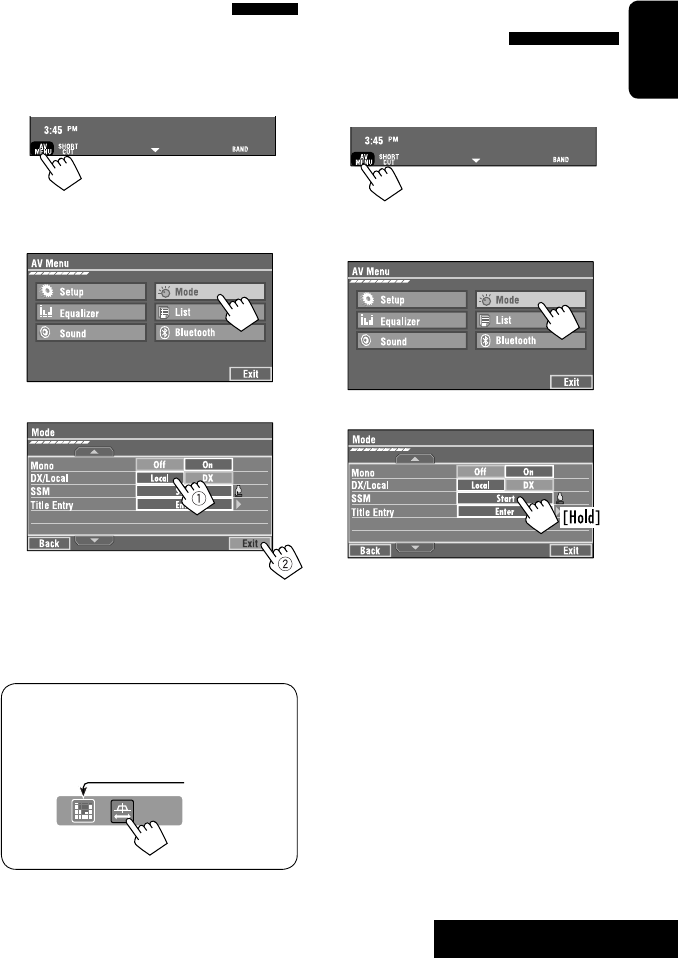
OPERATIONS
11
ENGLISH
FM station automatic presetting
—SSM (Strong-station
Sequential Memory)
This function works only for FM bands.
You can preset six stations for each band.
1 Press [AV MENU].
• You can also use AV MENU on the monitor panel.
2 Press [Mode].
3
Local FM stations with the strongest signals are
searched and stored automatically in the FM band.
Tuning in to stations with
sufficient signal strength
This function works only for FM bands. Once you have
activated this function (selected <Local>), it always
works when searching for FM stations.
1 Press [AV MENU].
• You can also use AV MENU on the monitor panel.
2 Press [Mode].
3
Only stations with sufficient signal strength will be
detected.
• The DX indicator goes off, then the LO indicator
lights up.
• You can also change <IF Band Width> setting
(for details, ☞ page 47).
<IF Band Width> menu can be accessed by
pressing [SHORT CUT] on the touch panel, then..
☞ page 41
EN_KW-AVX710[U].indb 11EN_KW-AVX710[U].indb 11 07.12.6 3:31:23 PM07.12.6 3:31:23 PM

12
ENGLISH
Selecting a preset station
On the remote:
1
2
On the unit:
• To select directly on the touch panel
• To select from the Preset List
1
2
or
Hold
Manual presetting
Ex.: Storing FM station of 92.5 MHz into preset number
4 of the FM1 band.
1 Display the Preset List.
2 Tune in to a station you want to preset.
3 Select a preset number.
The station selected in step 2 is now stored in
preset number 4.
[Hold]
EN_KW-AVX710[U].indb 12EN_KW-AVX710[U].indb 12 07.12.6 3:31:24 PM07.12.6 3:31:24 PM

OPERATIONS
13
ENGLISH
~ Open the monitor panel.
<Open/Tilt> menu is displayed.
• By pressing and holding the button, you can
open the monitor panel and eject the disc.
Ÿ Press [OPEN].
Disc operations
The disc type is automatically detected, and playback starts automatically (for some discs: automatic start depends
on its internal program).
If a disc does not have any disc menu, all tracks on it will be played repeatedly until you change the source or eject
the disc.
If “ ” appears on the screen, the unit cannot accept the operation you have tried to do.
• In some cases, without showing “ ,” operations will not be accepted.
Label side
Caution on volume setting:
Discs produce very little noise compared with other
sources. Lower the volume before playing a disc
to avoid damaging the speakers by the sudden
increase of the output level.
When playing back a multi-channel encoded disc,
the multi-channel signals are downmixed.
• You can fully enjoy multi-channel sound by
connecting an amplifier or a decoder compatible
with these multi-channel sources. (☞ also page
57)
! Insert a disc.
Monitor panel closes automatically.
If not, press [CLOSE].
Caution:
Do not place your finger behind the monitor panel.
EN_KW-AVX710[U].indb 13EN_KW-AVX710[U].indb 13 07.12.6 3:31:24 PM07.12.6 3:31:24 PM

14
ENGLISH
While playing the following discs, press .
• Each time you press the button, the display changes to show the different information. (☞ page 9)
Audio format
DVD Video: Title no./Chapter no./Playing time
DVD-VR: Program no. (or Playlist no.)/Chapter no./Playing time
Playback mode
Disc type *1Sampling frequency/Bit
rate/Recorded signal
channel no.
☞ page 19
[3 / 8] Start and pause playback
[7] Stop playback
[4 ¢] Press: Select chapter
Hold: Reverse/forward search*2
[5 ∞] Select title/program/playlist
*1 DVD-VR also indicates either PRG (program) or PLAY (playlist) playback.
*2 Search speed: x2 ] x10
: Buttons on the touch panel. In the explanation, they are indicated inside [ ].
These buttons also work when they are not shown on the touch panel (while watching the playback pictures
on the screen).
Sound mode
(☞ page 41)
EN_KW-AVX710[U].indb 14EN_KW-AVX710[U].indb 14 07.12.6 3:31:25 PM07.12.6 3:31:25 PM

OPERATIONS
15
ENGLISH
Track no./Playing time
[3 / 8] Start and pause playback
[7] Stop playback
[4 ¢] Press: Select track
Hold: Reverse/forward search*2
For DivX/MPEG1/MPEG2: Folder no./Track no./Playing time
For JPEG: Folder no./File no.
[3 / 8] Start and pause playback
[7] Stop playback
[4 ¢] Press: Select track
Hold: Reverse/forward search for DivX/MPEG1/MPEG2 *1
[5 ∞] Press: Select folder
Hold: Display Folder list
While playing the following discs, press .
• Each time you press the button, the display changes to show the different information (☞ page 9).
Disc type
☞ page 19
☞ page 19
The PBC indicator
lights up when PBC is
in use.
Total track no.
included on the
disc
Total track no.
included on the
disc
Total playing time
Sound mode
(☞ page 41)
Sound mode
(☞ page 41)
*1 Search speed: ¡1 ] ¡2
*2 Search speed: x2 ] x10
EN_KW-AVX710[U].indb 15EN_KW-AVX710[U].indb 15 07.12.6 3:31:25 PM07.12.6 3:31:25 PM

16
ENGLISH
Track no./Playing time
Only for CD Text *3
Folder no./Track no./Playing time
Audio format
(MP3/WMA/WAV)
☞ page 19
*3 “No Name” appears for conventional CDs.
*4 Search speed: x2 ] x10
Tag data appears
only when it is
recorded.
Sound mode
(☞ page 41)
☞ page 19
[3 / 8] Start and pause playback
[7] Stop playback
[4 ¢] Press: Select track
Hold: Reverse/forward search*4
[5 ∞] Press: Select folder
Hold: Display Folder list
[3 / 8] Start and pause playback
[7] Stop playback
[4 ¢] Press: Select track
Hold: Reverse/forward search*4
Total track no.
included on the disc
Total playing time
Total track no. included on the disc
Sound mode
(☞ page 41)
EN_KW-AVX710[U].indb 16EN_KW-AVX710[U].indb 16 07.12.6 3:31:26 PM07.12.6 3:31:26 PM

OPERATIONS
17
ENGLISH
Touch the screen (center portion).
Operation buttons on the screen
You can display the following operation buttons while watching the playback pictures on the screen.
• While the operation buttons are displayed, aspect ratio is fixed to <Full>. (☞ page 45)
• If no operation is done for about five seconds, the operation buttons disappear (except when a disc menu is
displayed).
Touch [KEY].
☞ pages 20 to 24 on how the operation buttons
particularly work for a variety of the discs
A
[SOURCE] Display <Source Menu> screen
[AV MENU] Display <AV Menu> screen
[SHORT CUT] Display the Short Cut buttons
[3 / 8] Start and pause playback
[7] Stop playback
[4 ¢] Press: Select track
Hold: Reverse/forward search
[5 ∞] Select folders
• The above buttons also work when they are not shown on
the screen (while watching the playback picture).
* While a disc menu is played back for DVD, [KEY] is
automatically displayed. On the disc menu, you can select a
menu item directly by touching it on the screen.
B
For DVD/VCD/DivX menu operation playback
[2 3 5 ∞] Select the menu items
[ENT] Confirm the selection
[TOP MENU] Display the disc menu
[MENU] Display the disc menu
[RETURN] Return to the previous menu or display the
menu (only for VCD with PBC)
C
For entering the numbers
[DIRECT CLR] • Switch between chapter/track entry and
title/group/folder entry
• Erase the last entry when you enter a
wrong number
[0]–[9]=[ENT]
Enter numbers
Ex.: To enter “105,” press [1], [0], [5], then [ENT]
*
Touch [KEY].
Touch [KEY].
To erase the operations, touch the screen again.
EN_KW-AVX710[U].indb 17EN_KW-AVX710[U].indb 17 07.12.6 3:31:27 PM07.12.6 3:31:27 PM

18
ENGLISH
1
• You can also use AV MENU on the monitor panel.
2
3
When one of the playback modes is selected, the
corresponding indicator lights up on the source
information screen.
To cancel, select <Off>.
Selecting playback modes
You can use the following playback modes—Repeat or Random.
Ex.: To select Track Repeat
Disc type Repeat Random
Chapter: Repeats current chapter
Title: Repeats current title —
Chapter: Repeats current chapter
Program: Repeats current program (not
available for Playlist playback)
—
Track: Repeats current track
Folder: Repeats current folder
Folder: Randomly plays all tracks of current
folder, then tracks of next folders
Disc (All): Randomly plays all tracks
Folder: Repeats current folder —
Track: Repeats current track (PBC not in
use)
Disc (All): Randomly plays all tracks (PBC not
in use)
Track: Repeats current track*1Disc (All): Randomly plays all tracks
Track: Repeats current track*1
Folder: Repeats all tracks of the current
folder
Folder: Randomly plays all tracks of current
folder, then tracks of next folders
Disc (All): Randomly plays all tracks
*1 You can also use [SHORT CUT] to turn on and off Track Repeat.
EN_KW-AVX710[U].indb 18EN_KW-AVX710[U].indb 18 07.12.6 3:31:28 PM07.12.6 3:31:28 PM

OPERATIONS
19
ENGLISH
Prohibiting disc ejection
You can lock a disc in the loading slot.
To cancel the prohibition, repeat the same
procedure to select <EJECT OK?>.
Using Short Cut Icons
You can easily access the some frequently used
functions by using [SHORT CUT] on the touch panel.
1
2
• For video software:
• For audio software:
Selecting tracks on the list
If a disc includes folders, you can display the Folder/
Track (File) Lists, then start playback.
1
• You can also use AV MENU on the monitor panel.
2
3 Select a folder (1), then a track (2).
Selected track starts playing. (* Press to move to
the previous/next pages of the list)
1 Current folder list number/total folder list
number
2 Current track list number/total track list
number of the current folder
You can easily access the Track List by pressing DISP
on the monitor panel.
Selected track starts playing.
at the same time
Sound mode
(☞ page 41)
Turn on or off Track Repeat
(Repeat play: ☞ page 18)
Aspect ratio
(☞ page 45)
EN_KW-AVX710[U].indb 19EN_KW-AVX710[U].indb 19 07.12.6 3:31:28 PM07.12.6 3:31:28 PM

20
ENGLISH
Stop playback.
Start playback/pause (if pressed during playback).
Reverse/forward search*1 (No sound can be heard.)
Slow motion during pause*2 (No sound can be heard.)
Press: Select chapter (during playback or pause).
Hold: Reverse/forward search*3 (No sound can be heard.)
Select title (during playback or pause).
Select aspect ratio.
Select chapter.
Select title (when not playing).
Select title (during playback or pause).
Using menu driven features
1
2 Select an item you want to start playback.
3
*1 Search speed: x2 ] x5 ] x10 ] x20 ] x60
*2 Slow motion speed: 1/32 ] 1/16 ] 1/8 ] 1/4 ] 1/2
*3 Search speed: x2 ] x10
Operations using the remote controller—RM-RK252
Also functions as CLR (clear):
Erases a misentry if pressed
while holding SHIFT.
You can change the following items using the on-screen bar—audio language, audio stream, audio channel,
subtitle language, view angle, etc. (☞ pages 25 and 26)
twice
EN_KW-AVX710[U].indb 20EN_KW-AVX710[U].indb 20 07.12.6 3:31:29 PM07.12.6 3:31:29 PM

OPERATIONS
21
ENGLISH
Stop playback.
Start playback/pause (if pressed during playback).
Reverse/forward search*4 (No sound can be heard.)
Forward slow motion during pause*5 (No sound can be heard.)
• Reverse slow motion does not work.
Press: Select chapter (during playback or pause).
Hold: Reverse/forward search*6
Select program.
Select playlist (during playback or pause).
Select aspect ratio.
Select chapter.
Select program (when not playing).
Select program/playlist (during playback or pause).
Using Original Program/Playlist screens ( ☞ page 25)
1For Original Program
For Playlist
2 Select an item you want to start playback.
3 To erase the screen.
*4 Search speed: x2 ] x5 ] x10 ] x20 ] x60
*5 Slow motion speed: 1/32 ] 1/16 ] 1/8 ] 1/4 ] 1/2
*6 Search speed: x2 ] x10
twice
EN_KW-AVX710[U].indb 21EN_KW-AVX710[U].indb 21 07.12.6 3:31:31 PM07.12.6 3:31:31 PM

22
ENGLISH
Also functions as CLR (clear):
Erases a misentry if pressed
while holding SHIFT.
Stop playback.
Start playback/pause (if pressed during playback).
Reverse/forward search*1 (No sound can be heard.)
Press: Select track
Hold: Reverse/forward search*2 (No sound can be heard.)
Select folder.
Select aspect ratio.
Select track (within the same folder).
Select folder.
While playing...
Reverse/advance the scenes by five minutes.
For DivX6: Using menu driven features
1
2 Select an item you want to start playback.
3
*1 Search speed: ¡1 ] ¡2 ] ¡3
*2 Search speed: ¡1 ] ¡2
Current playback position
twice
2nd press 2nd press1st press 1st press 3rd press
EN_KW-AVX710[U].indb 22EN_KW-AVX710[U].indb 22 07.12.6 3:31:31 PM07.12.6 3:31:31 PM

OPERATIONS
23
ENGLISH
Stop playback.
Start playback/pause. (Slide show: each file is shown for a few seconds.)
Shows the current file until you change it if pressed during Slide show.
Select file.
Select folder.
Select aspect ratio.
Select file (within the same folder).
Select folder.
During PBC playback...
Select an item on the menu.
To return to the previous menu, press
To cancel PBC playback
1
2 Select the desired track.
• To resume PBC, press
Stop playback.
Start playback/pause (if pressed
during playback).
Reverse/forward search*3
Forward slow motion during pause*4
(No sound can be heard.)
• Reverse slow motion does not work.
Press: Select track.
Hold: Reverse/forward search*5 (No
sound can be heard.)
Select aspect ratio.
twice
*3 Search speed: x2 ] x5 ] x10 ] x20 ] x60
*4 Slow motion speed: 1/32 ] 1/16 ] 1/8 ] 1/4 ] 1/2
*5 Search speed: x2 ] x10
Select track.
EN_KW-AVX710[U].indb 23EN_KW-AVX710[U].indb 23 07.12.6 3:31:32 PM07.12.6 3:31:32 PM

24
ENGLISH
Stop playback.
Start playback/pause (if pressed during playback).
Reverse/forward search*1
Press: Select track.
Hold: Reverse/forward search*2
Select track.
*1 Search speed: x2 ] x5 ] x10 ] x20 ] x60
*2 Search speed: x2 ] x10
Stop playback.
Start playback/pause (if pressed during playback).
Reverse/forward search*3
Press: Select track.
Hold: Reverse/forward search*4
Select folder.
Select track (within the same folder).
Select folder.
*3 Search speed: x2 ] x5 ] x10 ] x20 ] x60
*4 Search speed: x2 ] x10
twice
Also functions as CLR (clear):
Erases a misentry if pressed
while holding SHIFT.
EN_KW-AVX710[U].indb 24EN_KW-AVX710[U].indb 24 07.12.6 3:31:33 PM07.12.6 3:31:33 PM
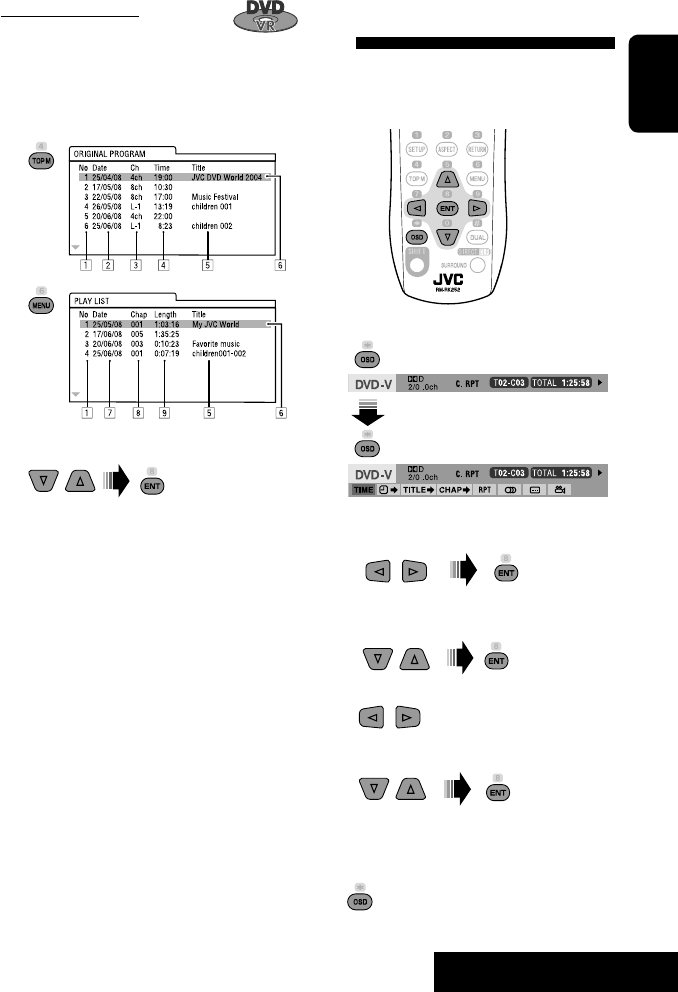
OPERATIONS
25
ENGLISH
Operations using the on-screen
bar
These operations are possible on the screen using
the remote controller, while playing the following
discs—DVD/VCD/DivX/MPEG1/MPEG2/JPEG.
1 Display the on-screen bar. (☞page 26)
Ex. For DVD-Video
2 Select an item.
3 Make a selection.
If a pop-up menu appears...
• For entering time/numbers...
:
Move the entry position
:
Select a number
To remove the on-screen bar
Using the list screens
You can use Original Program or Playlist
screen anytime while playing DVD-VR with its data
recorded.
1 Display the Original Program/Playlist screen.
2 Select an item you want.
To erase the screen
1 Original Program/Playlist number
2 Recording date
3 Recording source (TV station, the input terminal of
the recording equipment, etc.)
4 Start time of recording
5 Title of the program/playlist*
6 Highlight bar (current selection)
7 Creating date of playlist
8 Total number of chapters included in the playlist
9 Playback time
* The title of the original program or playlist may not be
displayed depending on the recording equipment.
EN_KW-AVX710[U].indb 25EN_KW-AVX710[U].indb 25 07.12.6 3:31:34 PM07.12.6 3:31:34 PM

26
ENGLISH
Information
Operation
On-screen bar
5 Time indication
Elapsed playing time of the disc
Remaining title time (for DVD)
Remaining disc time (for others)
Elapsed playing time of the current
chapter/track *2
Remaining time of the current
chapter/track *2
6 Playback status
Play
Reverse/forward search
Reverse/forward slow-motion
Pause
Stop
7 Operation icons
Change time indication (see 5)
Time Search (Specify a certain
scene by entering time.)
Title Search (by its number)
Chapter Search (by its number)
Track Search (by its number)
Repeat play *1
Random play *1
Change the audio language, audio
stream, or audio channel
Change or erase the subtitle
language
Change the view angle
*1 ☞ page 18
*2 Not applicable for DVD-VR
Above example is of DVD Video. Items shown on the bar vary due to the disc type.
1 Disc type
2 • DVD: Audio signal format
• VCD: PBC
3 Playback mode *1
DVD Video:
C. RPT: Chapter repeat
T. RPT: Title repeat
DVD-VR:
C. RPT: Chapter repeat
PG. RPT: Program repeat
DivX/MPEG1/MPEG2:
T. RPT: Track repeat
F. RPT: Folder repeat
F. RND: Folder random
A. RND: All (Disc) random
JPEG:
F. RPT: Folder repeat
VCD:
T. RPT: Track repeat
A. RND: All (Disc) random
4 Playback information
Current title/chapter
Current program/chapter
Current Playlist/chapter
Current track
Current folder/track
Current folder/file
EN_KW-AVX710[U].indb 26EN_KW-AVX710[U].indb 26 07.12.6 3:31:35 PM07.12.6 3:31:35 PM

27 EXTERNAL DEVICES
ENGLISH
Bluetooth® operations — Cellular phone/audio player
For Bluetooth operations, it is required to connect the
Bluetooth Adapter (KS-BTA200) to the CD changer jack
on the rear.
• Refer also to the instructions supplied with the
Bluetooth Adapter and the Bluetooth device.
• Refer to the list (included in the box) to see the
countries where you may use the Bluetooth®
function.
To use a Bluetooth device through the unit (“Bluetooth
PHONE” and “Bluetooth AUDIO”) for the first time,
you need to establish Bluetooth wireless connection
between the unit and the device.
• Once the connection is established, it is registered in
the unit even if you reset your unit. Up to five devices
can be registered in total.
• Only one device can be connected at a time for each
source (“Bluetooth PHONE” and “Bluetooth AUDIO”).
Connecting a new Bluetooth
device
Registration (Pairing) methods
Use either of the following items in <Bluetooth>
menu to register and establish the connection with a
device.
• Select “Bluetooth PHONE” or “Bluetooth AUDIO” as
the source to operate <Bluetooth> menu.
Open Make the unit ready to establish
a new Bluetooth connection.
The connection is established by
operating the Bluetooth device.
Search Make the unit ready to establish
a new Bluetooth connection.
The connection is established by
operating this unit.
To register using <Open>
Preparation:
Operate the Bluetooth device to turn on its Bluetooth
function.
1 • Make sure “New Device” is selected. If not, press
[5] or [∞] to select it.
• You can also use AV MENU on the monitor panel.
2
3
4 Enter a PIN (Personal Identification
Number)* code to the unit.
• You can enter any number you like (1-digit to
16-digit number).
* Some devices have their own PIN code. Enter the
specified PIN code to the unit.
Go to other menu items
Continued on the next page
EN_KW-AVX710[U].indb 27EN_KW-AVX710[U].indb 27 07.12.6 3:31:37 PM07.12.6 3:31:37 PM

28
ENGLISH
You can enter [0] – [9] only.
• [BS]: Erases the character before the cursor.
• [Del]: Erases the character on the cursor.
• [Enter]: Confirms the entry.
5 Operate the Bluetooth device to connect
while “Open...” is displayed on the screen.
Enter the same PIN code (as entered in the above
step) on the device to be connected.
Now connection is established and you can use the
device through the unit.
The device remains registered even after you
disconnect the device. Use <Connect> (or activate
<Auto Connect>) to connect the same device
from next time (☞ the following, and pages 50
and 51).
To register using <Search>
• Make sure “New Device” is selected. If not, press [5]
or [∞] to select it.
1 Press [AV MENU] on the touch panel or AV
MENU on the monitor panel.
2 Press [Bluetooth].
3 Press [Search].
The unit searches for available devices and displays
the list of them. (If no available device is detected,
“Device Unfound” appears.)
4 Select a device you want to connect.
5 Enter the specific PIN code of the device to
the unit.
• Refer to the instructions supplied with the device
to check the PIN code.
6 Operate the Bluetooth device to connect
while “Connecting...” is displayed on the
screen.
Now connection is established and you can use the
device through the unit.
To connect a special device <Special
Device>
1 Press [AV MENU] on the touch panel or AV
MENU on the monitor panel.
2 Press [Bluetooth].
3 Press [Special Device].
The unit displays the list of the preset devices.
4 Select a device you want to connect.
5 Use <Open> (or <Search>) to connect.
To connect/disconnect a registered
device
1 Select “Bluetooth PHONE” or “Bluetooth
AUDIO,” then select a registered device you
want to connect/disconnect.
2 Press [AV MENU] on the touch panel or AV
MENU on the monitor panel.
3 Press [Bluetooth].
4 Press [Connect] or [Disconnect].
• Select <Connect> to connect the selected
device.
• Select <Disconnect> to disconnect the selected
device.
To delete a registered device
1 Select “Bluetooth PHONE” or “Bluetooth
AUDIO,” then select a registered device you
want to delete.
2 Press [AV MENU] on the touch panel or AV
MENU on the monitor panel.
3 Press [Bluetooth].
4 Press [Delete Pairing].
Confirmation screen appears. Press [Yes].
EN_KW-AVX710[U].indb 28EN_KW-AVX710[U].indb 28 07.12.6 3:31:38 PM07.12.6 3:31:38 PM

29 EXTERNAL DEVICES
ENGLISH
Using the Bluetooth cellular phone
Adjust the volume of the incoming calls.*2
When a call comes in...
The source is changed to “Bluetooth PHONE”
automatically.
Name and phone number (if acquired)
When <Auto Answer> is activated...
The unit answers the incoming call automatically.
(☞ page 51)
☞ page 31
When <Auto Answer> is deactivated...
To answer the incoming call
• Press any button on the monitor panel (except
/ATT or +/–).
• Press the message displayed on the touch panel.
To end the call
• Hold any button on the monitor panel (except
/ATT or +/–).
• Hold the message displayed on the touch panel.
• You can adjust the microphone volume. (☞ page 51)
~ Press [SOURCE], then press [Bluetooth PHONE]. (☞ page 9)
• You can also use SOURCE on the monitor panel. Press it repeatedly.
Ÿ Press [AV MENU].
• You can also use AV MENU on the monitor panel.
! Press [Bluetooth].
⁄ Establish the connection with a device, then make a call (or settings using <Bluetooth>
menu).
☞ pages 50 and 51
Sound mode
(☞ page 41) Status of the device
Signal strength/Battery
remainder
(only when the information
comes from the device)
[AV MENU] Hold: Activates <Voice Dialing> function
[5 ∞] Select the registered device
(“New Device” appears when a new device can be registered.)
The Bluetooth icon
lights up when
the adapter is
connected.
: Buttons on the touch panel. In the
explanation, they are indicated inside
[ ].
*1 When a cellular phone with audio function is connected, appears.
*2 This adjustment does not affect the volume level of the other sources.
*1
EN_KW-AVX710[U].indb 29EN_KW-AVX710[U].indb 29 07.12.6 3:31:38 PM07.12.6 3:31:38 PM

30
ENGLISH
3
4 Select a calling method, then call.
Redial Shows the list of the phone
numbers you have dialed.
Received Calls Shows the list of the received
calls.
Phonebook Shows the phone book of the
connected cellular phone.
Missed Calls Shows the list of the missed
calls.
Phone
Number
Shows the phone number entry
screen = “Entering a phone
number” (☞ page 31).
Voice Dialling (Only when the connected
cellular phone has the voice
recognition system): = Speak
the name you want to call.
When an SMS comes in...
If the cellular phone is compatible with SMS (Short
Message Service), you can read the messages on the
screen.
• You cannot edit or send a message through the unit.
When <Message Info> is set to <Auto>...
The unit rings and the following screen is displayed to
inform you of a message arrival. (☞ page 51)
To read the message, press [Yes].
The source is changed to “Bluetooth PHONE.”
To read the message later, press [No].
• The message is stored into <Message> =
<Unread>. (☞ page 50)
When <Message Info> is set to <Manual>...
Access the message list to read messages. (☞ pages
50 and 51)
To make a call
1
• You can also use AV MENU on the monitor panel.
2
Cancel
EN_KW-AVX710[U].indb 30EN_KW-AVX710[U].indb 30 07.12.6 3:31:40 PM07.12.6 3:31:40 PM

31 EXTERNAL DEVICES
ENGLISH
To stop ringing (canceling the outgoing call)
Hold any button on the monitor panel (except /ATT
or +/–).
Entering a phone number
• You cannot use the remote controller to enter phone
numbers.
You can enter [0] – [9], [*], [#] (up to 32 numbers)
• [BS]: Erases the character before the cursor.
• [Del]: Erases the character on the cursor.
• [Preset]: Goes to Preset List. You can preset the
entered number by selecting a preset
number. (☞ page 32)
• [Dial]: Calls the entered number.
• You can easily access <Dial Menu> by pressing
[SHORT CUT] on the touch panel, then...
You can also access <Dial Menu> by holding
SOURCE on the monitor panel.
• You can easily activate <Voice Dialing> by
pressing [SHORT CUT] on the touch panel, then...
You can also activate <Voice Dialing> by
holding [AV MENU].
To redial previously dialed numbers
1
2
3
When using the remote controller, you can
display <Redial> menu anytime .
[Hold]
EN_KW-AVX710[U].indb 31EN_KW-AVX710[U].indb 31 07.12.6 3:31:41 PM07.12.6 3:31:41 PM

32
ENGLISH
To call a preset number
1
2
You can use the following buttons on the remote
controller for the Bluetooth phone operations.
Presetting the phone numbers
You can preset up to six phone numbers.
1 Select the phone number you want to preset
from <Phonebook>, <Redial>, <Received
Calls>, or <Missed Calls>.
1 Press [AV MENU] on the touch panel or AV
MENU on the monitor panel.
2 Press [Bluetooth].
3 Press [Dial Menu], then...
Ex.: Selecting <Received Calls>
2 Select a telephone number to store.
3 Select a preset number.
Now “Tom” is stored into preset no. 1.
• Display <Dial Menu> screen/Answer
the incoming call.
• Display the <Redial> menu if pressed
and held (regardless of the current
source).
End the call.
Adjust the volume.
Make a call to the preset numbers.
[Hold]
:
:
:
:
[Hold]
EN_KW-AVX710[U].indb 32EN_KW-AVX710[U].indb 32 07.12.6 3:31:42 PM07.12.6 3:31:42 PM

33 EXTERNAL DEVICES
ENGLISH
Bluetooth Information:
If you wish to receive more information about Bluetooth, visit the following JVC web site: <http://www.
jvc-victor.co.jp/english/car/>
You can use the following buttons on the remote
controller for the Bluetooth audio operations.
Using the Bluetooth audio player
☞ page 41
Sound mode
(☞ page 41)
[3 / 8] [7] Start and pause playback
[4 ¢] Reverse/forward skip
[5 ∞] Select the registered device
(“New Device” appears when a new device can
be registered.*3)
Status of the device
Signal strength/Battery
remainder
(only when the information
comes from the device)
The Bluetooth icon
lights up when
the adapter is
connected.
~ Press [SOURCE], then press [Bluetooth
AUDIO]. (☞ page 9)
• You can also use SOURCE on the monitor
panel. Press it repeatedly.
Ÿ Start playback.
: Buttons on the touch panel. In the
explanation, they are indicated
inside [ ].
*2
*1
*1 When a cellular phone with audio function is connected, appears.
*2 Indicates the button pressed. It may be different from the operation status.
*3 You cannot select “New Device” when a Bluetooth audio player is connected.
Start and pause playback.
Reverse/forward skip
Adjust the volume.
:
:
:
EN_KW-AVX710[U].indb 33EN_KW-AVX710[U].indb 33 07.12.6 3:31:43 PM07.12.6 3:31:43 PM
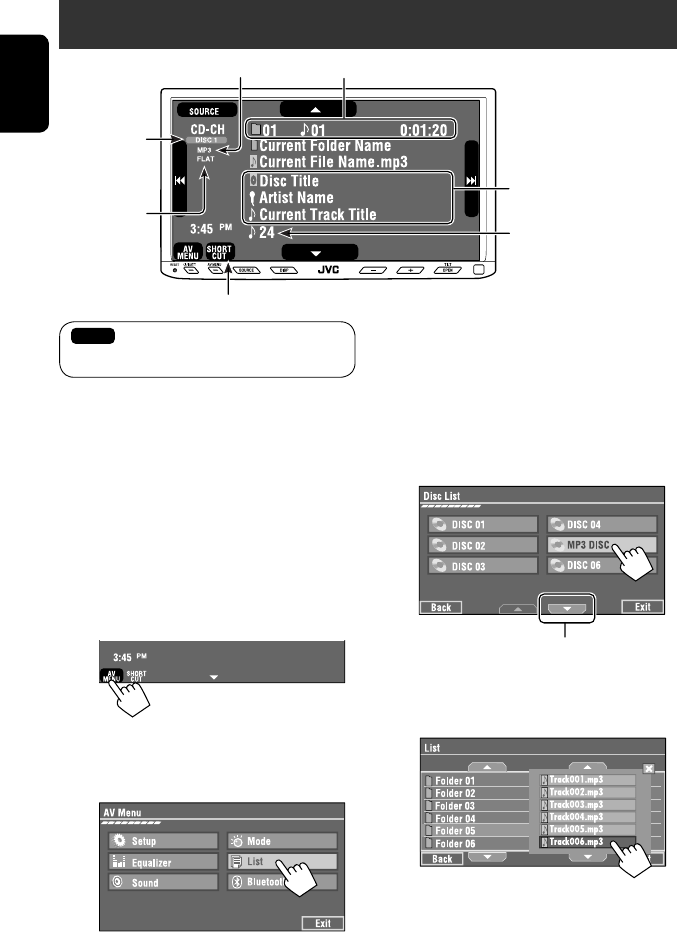
34
ENGLISH
Preparation:
Make sure <Changer> is selected for <External
Input>. (☞ page 47)
~ Press [SOURCE], then press [CD-CH]. (☞
page 9)
• You can also use SOURCE on the monitor
panel. Press it repeatedly.
Ÿ
• You can also use AV MENU on the monitor
panel.
! Display the Disc List.
Listening to the CD changer
It is recommended to use a JVC MP3-compatible CD changer with your unit.
• You can play only CDs (CD-DA) and MP3 discs.
Folder no./Track no./Playing time
Disc no.
MP3 indicator
☞ page 35
Tag data appears only when it is
recorded.
⁄ Select a disc to start playing.
• If you select an MP3 disc, the Track list of the
current folder appears. You can select a track
and start playing. (☞ also page 19)
• If you select a folder on the list, you can start
playing the first track of the folder.
To go to the other list
Sound mode
(☞ page 41)
[4 ¢] Press: Select track
Hold: Reverse/forward search
[5 ∞] Press: Select folders (only for MP3)
Hold: Display Disc list
Total track no. included on the
disc
Ex. while playing an MP3 disc
: Buttons on the touch panel. In the
explanation, they are indicated inside [ ].
EN_KW-AVX710[U].indb 34EN_KW-AVX710[U].indb 34 07.12.6 3:31:43 PM07.12.6 3:31:43 PM

35 EXTERNAL DEVICES
ENGLISH
When one of the playback modes is selected, the
corresponding indicator lights up on the source
information screen.
To cancel, select <Off>.
You can use following playback modes—Repeat or
Random.
Ex.: To select Track Repeat for an MP3 disc
1 Press [AV MENU] on the touch panel or AV
MENU on the monitor panel.
2 Press [Mode].
3
Selecting playback modes
Disc type Repeat Random
Track: Repeats current track
Disc: Repeats all tracks of the current disc
Disc: Randomly plays all tracks of the
current disc
All: Randomly plays all tracks of all
loaded discs
Track: Repeats current track
Folder: Repeats all tracks of the current
folder
Disc: Repeats all tracks of the current disc
Folder: Randomly plays all tracks of current
folder, then tracks of next folders
Disc: Randomly plays all tracks of the
current disc
All: Randomly plays all tracks of all
loaded discs
You can use the following buttons on the remote
controller to operate the CD changer.
You can easily turn on or off Track Repeat by
pressing [SHORT CUT] on the touch panel, then...
: Select disc.
: Select folder (MP3 only).
• Press: Select track.
• Hold: Reverse/forward search
☞ page 41
EN_KW-AVX710[U].indb 35EN_KW-AVX710[U].indb 35 07.12.6 3:31:44 PM07.12.6 3:31:44 PM

36
ENGLISH
Listening to the iPod
It is required to connect the Interface adapter for iPod (KS-PD100) to the CD changer jack on the rear.
Preparation:
Make sure <iPod> is selected for <External Input>. (☞ page 47)
~ Press [SOURCE], then press [iPod] (☞ page 9)
Playback starts automatically.
• You can also use SOURCE on the monitor panel. Press it repeatedly.
Ÿ Press [4] or [¢] to select a track.
Track no./Playing time
☞ page 37
[4 ¢] Press: Select track
Hold: Reverse/forward search
[5] Enter player’s menu
[∞] Start playback/pause
• To resume, press again.
Sound mode
(☞ page 41)
: Buttons on the touch panel. In the
explanation, they are indicated
inside [ ].
EN_KW-AVX710[U].indb 36EN_KW-AVX710[U].indb 36 07.12.6 3:31:44 PM07.12.6 3:31:44 PM

37 EXTERNAL DEVICES
ENGLISH
Selecting a track from the
player’s menu
1 Press [5] to enter the player’s menu.
“SEARCH” flashes on the screen during menu
operations.
• This mode will be canceled if no operations are
done for about five seconds.
2 Press [4] or [¢] to select the desired
item.
Press: Select an item.
Hold: Skip ten items at a time if there are more
than ten items.
Playlists Ô Artists Ô Albums Ô Songs Ô
Genres Ô Composers Ô (back to the beginning)
3 Press [∞] to confirm the selection.
4 Repeat steps 2 and 3 to select a track.
• When a track is selected finally, playback starts.
• To return to the previous menu, press [5].
Selecting playback modes
1
• You can also use AV MENU on the monitor panel.
2
3 Select an appropriate option.
Repeat One: Functions the same as
“Repeat One.”
All: Functions the same as
“Repeat All.”
Random Album: Functions the same as
“Shuffle Albums.”
Song: Functions the same as
“Shuffle Songs.”
• When the playback modes are selected, the
corresponding indicators light up alternately on
the screen.
To cancel, select <Off>.
You can easily turn on or off Track Repeat by
pressing [SHORT CUT] on the touch panel, then...
☞ page 41
EN_KW-AVX710[U].indb 37EN_KW-AVX710[U].indb 37 07.12.6 3:31:45 PM07.12.6 3:31:45 PM

38
ENGLISH
Using other external components
AV-INPUT
You can connect an external component to the LINE IN/VIDEO IN terminals.
~ Press [SOURCE], then press [AV-IN]. (☞ page 9)
• You can also use SOURCE on the monitor panel. Press it repeatedly.
Ÿ Turn on the connected component and start playing the source.
To display the operation buttons (☞ page 17) while watching the playback picture
• If no operations are done for about five seconds, the operation buttons disappear.
• [KEY] does not work when the source is “AV-IN.”
Touch the screen (center portion).
You can easily access to <Aspect> setting
menu by pressing [SHORT CUT] on the
touch panel, then...
Assigned title (☞ page 42) Sound mode (☞ page 41)
Touch the screen (center portion).
: Buttons on the touch panel. In the explanation, they are indicated inside [ ].
These buttons also work when they are not shown on the touch panel (while watching the playback picture).
☞ page 41
EN_KW-AVX710[U].indb 38EN_KW-AVX710[U].indb 38 07.12.6 3:31:45 PM07.12.6 3:31:45 PM
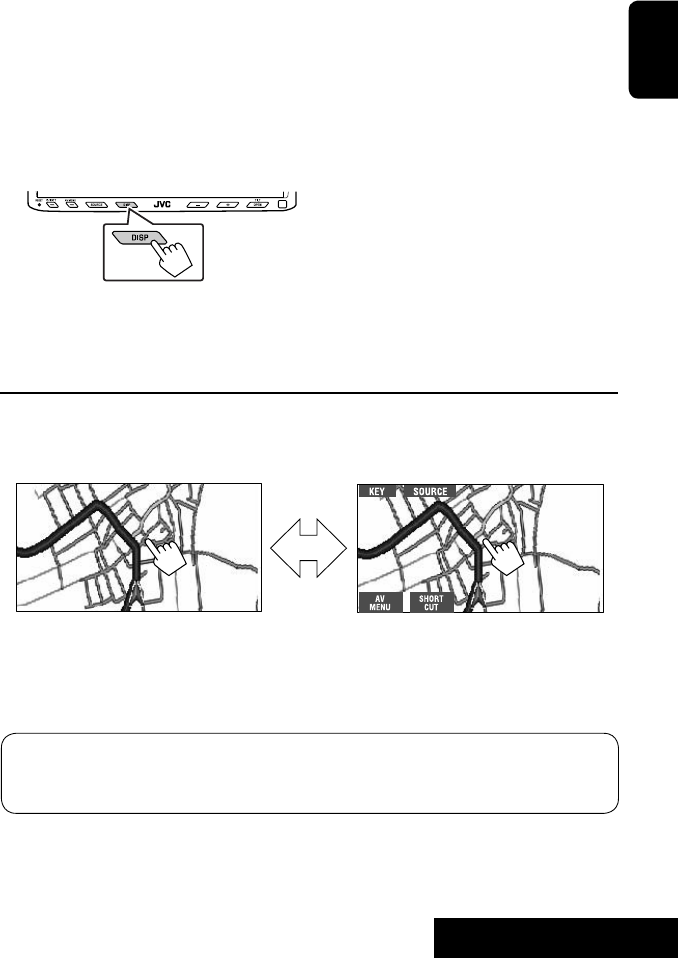
39 EXTERNAL DEVICES
ENGLISH
To display the operation buttons (☞ page 17) while viewing the navigation screen
• The operation buttons displayed on the screen vary among the playback sources.
• If no operations are done for about five seconds, the operation buttons disappear.
• The above buttons except [KEY] also work when they are not shown on the screen (while viewing the navigation
screen).
Navigation screen
You can also connect a Navigation System to the VIDEO IN terminal so that you can watch the navigation screen.
Preparation:
Make sure <Navigation> is selected for <AV Input>. (☞ page 47)
To view the navigation screen (and listen to the navigation guidance*)
Press DISP on the monitor panel repeatedly. (☞ page 9)
• The aspect ratio of the navigation screen is fixed to
<Full> regardless of the <Aspect> setting. (☞ page
45)
* If your Navigation System is equipped with the voice guidance function.
When <Navigation> is selected for <AV Input> (☞ page 47)
• You can use the source “AV-IN” for listening to an audio source connected to the LINE IN terminals.
• Some status messages such as volume level will not appear on the screen.
Touch the screen (center portion). Touch the screen (center portion).
EN_KW-AVX710[U].indb 39EN_KW-AVX710[U].indb 39 07.12.6 3:31:46 PM07.12.6 3:31:46 PM
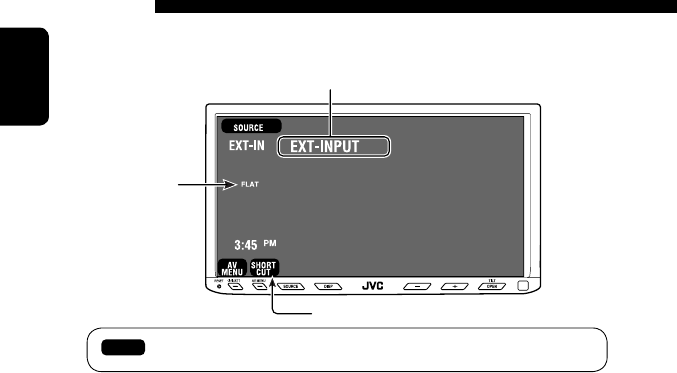
40
ENGLISH
EXT-INPUT
You can connect an external component to the CD changer jack on the rear using the Line Input Adapter—KS-U57
(not supplied) or AUX Input Adapter—KS-U58 (not supplied).
Preparation:
Make sure <External> is selected for <External Input>. (☞ page 47)
~ Press [SOURCE], then press [EXT-IN]. (☞ page 9)
• You can also use SOURCE on the monitor panel. Press it repeatedly.
Ÿ Turn on the connected component and start playing the source.
Assigned title (☞ page 42)
☞ page 41
Sound mode
(☞ page 41)
: Buttons on the touch panel. In the explanation, they are indicated inside [ ].
EN_KW-AVX710[U].indb 40EN_KW-AVX710[U].indb 40 07.12.6 3:31:46 PM07.12.6 3:31:46 PM

SETTINGS
41
ENGLISH
~
• You can also use AV MENU on the monitor panel.
Ÿ
! Select a sound mode.
• For preset values of each sound mode, ☞ page 58.
Sound equalization
Storing your own adjustments
You can store your adjustments into <User1>,
<User2>, and <User3>.
1 Repeat steps ~ and Ÿ, then in step !...
2 Adjust (1), then store (2).
Ex.: When storing into <User2>.
While playing back any source other
than “Bluetooth PHONE,” you can easily
access <Equalizer> menu by pressing
[SHORT CUT] on the touch panel, then...
Move to other six sound modes
EN_KW-AVX710[U].indb 41EN_KW-AVX710[U].indb 41 07.12.6 3:31:47 PM07.12.6 3:31:47 PM

42
ENGLISH
You can assign titles as follows.
FM/AM stations Up to 16 characters—up to 30
stations.
AV-IN
EXT-IN
Up to 16 characters
~ Select the source. (☞ page 9)
• For FM/AM stations: Select the band, then
tune into a station.
Ÿ Display <Title Entry> screen.
• You can also use AV MENU on the monitor panel.
! Assign a title.
You can enter up to 16 characters (for available
characters, ☞ page 59).
• [Store]: Confirm the entry.
• [2/3]: Move the cursor.
• [BS]: Erase the character before the
cursor.
• [Del]: Erase the character on the cursor.
• [Cap]: Change the letter case (upper/
lower).
• [Change]: Change the character set.
• [Space]: Enter a space.
⁄ Finish the procedure.
Assigning titles to the sources
In the explanation, buttons on the
touch panel are indicated inside [ ].
EN_KW-AVX710[U].indb 42EN_KW-AVX710[U].indb 42 07.12.6 3:31:47 PM07.12.6 3:31:47 PM
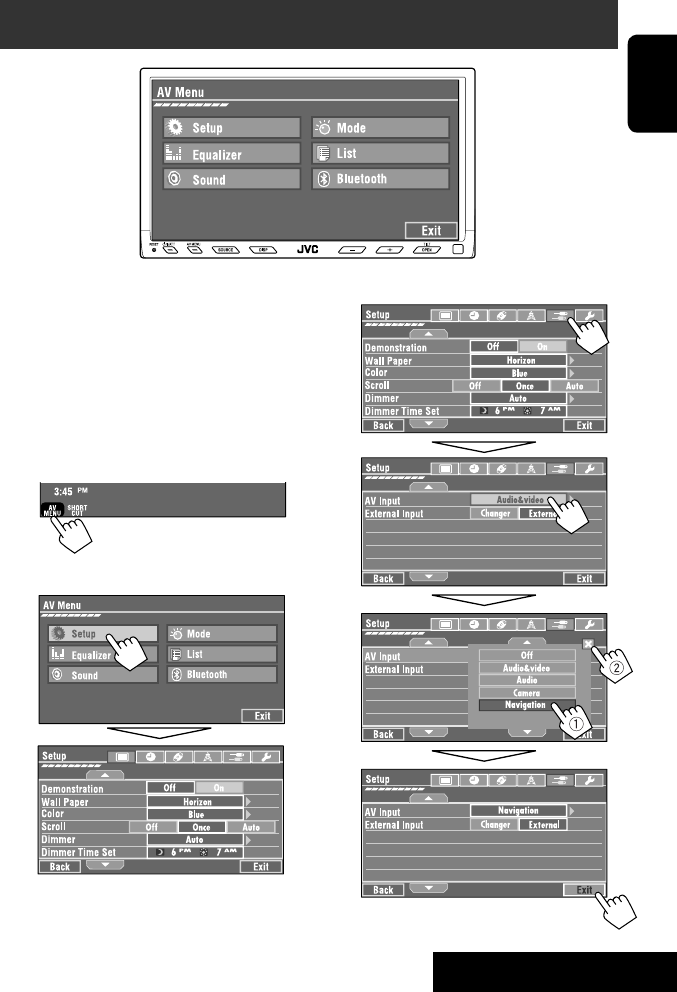
SETTINGS
43
ENGLISH
!
Menu operations
The following steps are one of the fundamental
procedures. Some of the settings do not open the
sub-setting window, but just selecting an option will
change the setting.
• The display indications may change according to
change of the specifications.
Ex.: Changing the <AV Input> setting
~
• You can also use AV MENU on the monitor panel.
Ÿ
Non-available items will be shaded.
EN_KW-AVX710[U].indb 43EN_KW-AVX710[U].indb 43 07.12.6 3:31:48 PM07.12.6 3:31:48 PM

44
ENGLISH
Setup
Menu items Selectable settings, [reference page]
Display
Demonstration Off: Cancels.
On: Activates the demonstration on the screen. To stop it temporarily,
touch the screen.
Wall Paper You can select the background picture of the screen.
Horizon, Metal, Art, Plain
Color You can select the color of the background picture.
Blue, Light-Blue, Red, Orange, Yellow, Green, Purple, Dark-Blue,
Dark-Green, Brown, Light-Brown, Black
Scroll Off: Cancels.
Once: Scrolls the disc information once.
Auto: Repeats scrolling (five-second intervals).
• Holding DISP on the monitor panel scrolls the information regardless
of this setting.
Dimmer Off: Cancels.
On: Activates dimmer.
Auto: Dims the monitor when you turn on the headlights.*1
Dimmer Time Set : Activates the Dimmer Time setting below.
Dimmer Time Set Sets the Dimmer On/Off times.
Dimmer Level You can select the brightness for dimmer.
1 (bright), 2 (middle), 3 (dark)
Bright You can adjust brightness of the screen.
–15 (darkest) to +15 (brightest); Initial 00
Picture Adjust*2You can adjust the following to make the screen clear and legible for
watching the playback picture. The setting will be stored—one for
“DISC” (common) and the other for “AV-IN.”
–15 to +15; Initial 0
Bright: Adjust if the picture is too bright or too dark.
Contrast: Adjust the contrast.
Color: Adjust the color of the picture—lighter or darker.
Tint: Adjust the tint if the human skin color is unnatural. (only when
color system setting is <NTSC>, ☞ next page)
• Press [5] or [∞] to adjust.
*1 The ILLUMINATION lead connection is required. (☞ Installation/Connection Manual)
*2 Adjustable only when the source is “DISC” (the inserted disc must contain pictures or movies) or “AV-IN.”
The procedure for setting an item is shown on page 43.
EN_KW-AVX710[U].indb 44EN_KW-AVX710[U].indb 44 07.12.6 3:31:48 PM07.12.6 3:31:48 PM

SETTINGS
45
ENGLISH
Menu items Selectable settings, [reference page]
Display
Aspect*3You can change the aspect ratio of the picture.
Aspect ratio of incoming signal
4:3 16:9
Regular:
For 4:3 original pictures
Full:
For 16:9 original pictures
Auto: • For “DISC”: Aspect ratio is automatically
selected to match to the incoming signals.
• For the other video sources: Aspect ratio is
fixed to <Regular>.
Language*4Select the indication language shown on the screen.
English, Español, Français, Deutsch, Italiano, Nederlands,
Svenska, Dansk, Руccĸий, Português
• The characters you can enter for assigning the titles also change
according to the language selected. ☞ [59]
NTSC/PAL Select the color system of the external monitor connected—NTSC, PAL.
• Turn off the power and turn it on again to make the new setting
effective.
Clock
Time Set Initial 1:00AM ☞ [8]
Time Format Select either 12-hour system or 24-hour system.
12Hours, 24Hours ☞ [8]
OSD Clock When <On> is selected, the clock time is displayed on the playback
picture. ☞ [8]
Off, On
*3 Not adjustable when no picture is shown.
*4 After you change the indication language setting, turn off then on the power so that your setting takes effect.
Initial: Underlined
EN_KW-AVX710[U].indb 45EN_KW-AVX710[U].indb 45 07.12.6 3:31:49 PM07.12.6 3:31:49 PM

46
ENGLISH
Menu items Selectable settings, [reference page]
Disc
Menu Language*1Select the initial disc menu language; Initial English (☞ also page
58).
Audio Language*1Select the initial audio language; Initial English (☞ also page 58).
Subtitle*1Select the initial subtitle language or erase the subtitle (Off); Initial
English (☞ also page 58).
Monitor Type*1Select the monitor type to watch a wide screen picture on the external
monitor.
16:9 : Select when the aspect ratio of the external monitor is 16:9.
4:3 LB (Letterbox)/4:3 PS (Pan Scan): Select when the aspect ratio of
the external monitor is 4:3.
• Refer to the illustrations on the left to see how the pictures are
shown on the screen.
OSD Position*1Select the position of the on-screen bar. ☞ [25]
1: Higher position
2: Lower position
File Type*1Select playback file type when a disc contains different types of files.
Audio: Plays back audio files.
Still Picture: Plays back JPEG files.
Video: Plays back DivX/MPEG1/MPEG2 files.
Audio&Video: Plays back audio files and DivX/MPEG1/MPEG2 files.
DivX Regist. (Registration)*1This unit has its own Registration Code. Once you have played back a
file with which the Registration Code recorded, this unit’s Registration
Code is overwritten for copyright protection.
D. Audio Output*1Select the signal format emitted through the DIGITAL OUT (optical)
terminal. (☞ also page 57)
PCM : Select this when connecting an amplifier or a decoder
incompatible with Dolby Digital, DTS, or MPEG Audio, or when
connecting to a recording device.
Dolby D : Select this when connecting an amplifier or a decoder
compatible with Dolby Digital.
Stream : Select this when connecting an amplifier or a decoder
compatible with Dolby Digital, DTS, or MPEG Audio.
*1 Selectable only for “DISC.” (Playback stops when you change the setting.)
Position 1 Position 2
16:9 4:3LB
4:3PS
The procedure for setting an item is shown on page 43.
EN_KW-AVX710[U].indb 46EN_KW-AVX710[U].indb 46 07.12.6 3:31:50 PM07.12.6 3:31:50 PM

SETTINGS
47
ENGLISH
Menu items Selectable settings, [reference page]
Disc
Down Mix*1When playing back a multi-channel disc, this setting affects the signals
reproduced through the LINE OUT terminals.
Dolby SR : Select this to enjoy multi-channel surround audio by
connecting an amplifier compatible with Dolby Surround.
Stereo : Normally select this.
D. (Dynamic) Range
Compres. (Compression)*1
You can enjoy a powerful sound at a low volume level while playing
Dolby Digital software.
Auto: Select to apply the effect to multi-channel encoded software.
On: Select to always use this function.
Tuner
IF Band Width Auto: Increases the tuner selectivity to reduce interference noises
between adjacent stations. (Stereo effect may be lost.)
Wide: Subject to the interference from adjacent stations, but sound
quality will not be degraded and the stereo effect will remain.
Input
AV Input*2
You can determine the use of LINE IN and VIDEO IN terminals. ☞ [38, 39
]
Off: Select when no component is connected (“AV-IN” is skipped while
selecting the source).
Audio&Video: Select when connecting an AV component such as a
VCR.
Audio: Select when connecting an audio component such as a portable
audio player.
Camera*3 : Select when connecting a rear view camera.
Navigation : Select when connecting a Navigation System.
External Input*4For connecting an external component to the CD changer jack on the
rear.
Changer/iPod*5: CD changer or iPod. ☞ [34, 36]
External: Any other than the above. ☞ [40]
• For connecting the Bluetooth adapter, this setting is not required. It is
automatically detected.
*2 Not selectable when “AV-IN” is selected as the source.
*3 The REVERSE GEAR SIGNAL lead connection is required. See Installation/Connection Manual. The rear view through
the camera appears on the screen in <Full> aspect ratio (regardless of the aspect ratio setting) when you shift the
gear to the reverse (R) position. When you press DISP on the control panel, or when you shift the gear to another
position other than the reverse (R) position, the rear view screen is cleared.
*4 Not selectable when the component connected to the CD changer jack is selected as the source.
*5 The name of the component detected through the CD changer jack is shown.
Initial: Underlined
EN_KW-AVX710[U].indb 47EN_KW-AVX710[U].indb 47 07.12.6 3:31:50 PM07.12.6 3:31:50 PM

48
ENGLISH
Menu items Selectable settings, [reference page]
Others
Beep Off: Cancels.
On: Activates the key-touch tone.
Telephone Muting Off: Cancels.
Muting1, Muting2: Select either one which mutes the sounds while
using the cellular phone.
Power LED Flash Off: Cancels.
On: When the ignition is turned off, the lamp on the button
flashes.
TouchPanel Sens. Change the sensitivity of the touch panel. As the number decreases,
sensitivity becomes higher. 1/2/3
Initialize Initialize all settings you have made in <AV Menu>. Press and hold
[Enter] to initialize the settings, then reset the unit. ☞ [3]
Equalizer
Flat/Hard Rock/R&B/Pop/Jazz/Dance/Country/Reggae/Classic/User1/User2/User3 ☞ [41]
The procedure for setting an item is shown on page 43.
EN_KW-AVX710[U].indb 48EN_KW-AVX710[U].indb 48 07.12.6 3:31:51 PM07.12.6 3:31:51 PM

SETTINGS
49
ENGLISH
Sound
Menu items Selectable settings, [reference page]
Fader/Balance Adjust fader—speaker output balance between the front and rear speakers.
• Upmost—front only (F6)
• Downmost—rear only (R6)
When using a two-speaker system, set the fader to the center (0).
Adjust balance—speaker output balance between the left and right speakers.
• Leftmost—left only (L6)
• Rightmost—right only (R6) Initial 0
Volume Adjust Adjust and store auto-adjustment volume level for each source, comparing to
the FM volume level. The volume level will automatically increase or decrease
when you change the source.
–12 to +12; Initial 00
• You can make the adjustments separately for DVD and other discs.
Amplifier Gain You can change the maximum volume level of this unit.
Off: Deactivates the built-in amplifier.
Low: VOL 00 to 30 (Select this if the maximum power of the speakers is less
than 50 W.)
High: VOL 00 to 50
Mode*1
Menu items Selectable settings, [reference page]
Mono Only for FM. (Off, On) ☞ [10]
DX/Local Only for FM. (Local, DX) ☞ [11]
SSM Only for FM. Press and hold to start SSM. ☞ [11]
Title Entry Only for FM/AM stations, “AV-IN,” and “EXT-IN.” ☞ [42]
Repeat ☞ [18, 35, 37]
Random ☞ [18, 35, 37]
*1 Items listed under <Mode> vary among the playback sources.
List
For “DISC”: Folder List and Track List (☞ page 19)
For “CD-CH”: Disc List, Folder List, and Track List (☞ page 34)
• For the other playback sources, you can display a list by pressing DISP on the monitor panel. (☞ page 9)
Initial: Underlined
EN_KW-AVX710[U].indb 49EN_KW-AVX710[U].indb 49 07.12.6 3:31:52 PM07.12.6 3:31:52 PM
50
ENGLISH
Bluetooth*1
Menu items Selectable settings, [reference page]
Dial Menu *2Select the method to make a call. ☞ [30]
Message*3You can read a message from the following message histories.
Unread: Messages you have not read.
Read: Messages you have read.
Unsent: Messages you have not sent.
Sent: Messages you have sent.
• The number of messages in each history is also shown.
Open ☞ [27]
Search ☞ [28]
Special Device Only for “New Device.”
Shows the list of Bluetooth devices which require some special procedure to
establish Bluetooth connection. Select a device you want to connect.
• After selecting the device, use <Open> or <Search> (☞ page 27 or 28)
for connection.
• Once the connection is established, it is registered in the unit. You can
connect the unit and the device by using <Connect> (☞ below) from the
next time.
Connect Only for the registered devices.
After selecting a device from among the registered devices (☞ pages 27 and
28), establish the connection with it.
Disconnect Only for the device being connected.
Disconnect the current device before connecting another device.
Delete Pairing Only for the registered devices.
Delete the registered devices.
*1 Selectable only for “Bluetooth PHONE” or “Bluetooth AUDIO.” Select a device (or “New Device”) before operating the
menu.
*2 Only for the device connected for “Bluetooth PHONE.”
*3 Selectable only when the source is “Bluetooth PHONE” and the connected cellular phone is compatible with SMS
(Short Message Service).
When operating the Bluetooth device, refer also to the instructions supplied with the device.
The procedure for setting an item is shown on page 43.
EN_KW-AVX710[U].indb 50EN_KW-AVX710[U].indb 50 07.12.6 3:31:53 PM07.12.6 3:31:53 PM

SETTINGS
51
ENGLISH
Menu items Selectable settings, [reference page]
Settings
Auto Connect *4When the unit is turned on, the connection is established automatically
with...
Off: No Bluetooth device.
Last: The last connected Bluetooth device.
Order: The available registered Bluetooth device found first.
Auto Answer *5Off: The unit does not answer the calls automatically. Answer the calls
manually.
On: The unit answers the incoming calls automatically.
Reject: The unit rejects all incoming calls.
Message Info *5Auto: The unit informs you of the arrival of a message by ringing and
displaying “Receiving Message.” To read the message, ☞ page 30.
Manual: The unit does not inform you of the arrival of a message.
MIC Setting *5Adjust microphone volume connected to the Bluetooth adapter.
01/02/03
Version *6The Bluetooth software and hardware versions are shown.
*4 Selectable only for “Bluetooth PHONE.”
*5 Only for the cellular phone connected for “Bluetooth PHONE.” Not selectable when “New Device” is selected.
*6 If you wish to receive more information about Bluetooth, visit the following JVC web site: <http://www.jvc-victor.
co.jp/english/car/>
SETTINGS
Initial: Underlined
EN_KW-AVX710[U].indb 51EN_KW-AVX710[U].indb 51 07.12.6 3:31:54 PM07.12.6 3:31:54 PM

ENGLISH
52
Maintenance
Moisture condensation
Moisture may condense on the lens inside the unit in
the following cases:
• After starting the heater in the car.
• If it becomes very humid inside the car.
Should this occur, the unit may malfunction. In this
case, eject the disc and leave the unit turned on for a
few hours until the moisture evaporates.
How to handle discs
When removing a disc from its
case, press down the center holder of
the case and lift the disc out, holding it
by the edges.
• Always hold the disc by the edges. Do not touch its
recording surface.
When storing a disc into its case, gently insert the
disc around the center holder (with the printed surface
facing up).
• Make sure to store discs into the cases after use.
To keep discs clean
A dirty disc may not play correctly.
If a disc does become dirty, wipe it with
a soft cloth in a straight line from center
to edge.
• Do not use any solvent (for example, conventional
record cleaner, spray, thinner, benzine, etc.) to clean
discs.
To play new discs
New discs may have some rough spots
around the inner and outer edges. If
such a disc is used, this unit may reject
the disc.
To remove these rough spots, rub the edges with a
pencil or ball-point pen, etc.
Stick-on labelSticker and sticker residue
Unusual shape
Warped disc
Do not use the following discs:
Center holder
SingleCD—8 cm disc
C-thru Disc (semi-transparent disc) Transparent or semi-transparent on its
recording area
EN_KW-AVX710[U].indb 52EN_KW-AVX710[U].indb 52 07.12.6 3:31:54 PM07.12.6 3:31:54 PM

53 REFERENCES
ENGLISH
More about this unit
General
Turning on the power
• By pressing SOURCE on the monitor panel, you
can also turn on the power. If the source is ready,
playback starts.
Tuner (FM only)
Storing stations in memory
• When SSM is over, received stations are preset in no.
1 (lowest frequency) to no. 6 (highest frequency).
Disc
General
• In this manual, words “track” and “file” are
interchangeably used.
• This unit can only play back audio CD (CD-DA) files
if different type of audio files (MP3/WMA/WAV) are
recorded on the same disc.
• This unit can display only one-byte characters. No
other characters can be correctly displayed.
Inserting a disc
• When a disc is inserted upside down or has no
playable files, “Cannot play this disc Check the disc”
appears on the screen. Eject the disc.
Ejecting a disc
• If “No disc“ appears after removing a disc, insert a
disc or select another playback source.
• If the ejected disc is not removed within 15 seconds,
the disc is automatically inserted again into the
loading slot to protect it from dust.
Playing Recordable/Rewritable discs
• This unit can recognize a total of 5 000 files and 250
folders (a maximum of 999 files per folder).
• Use only “finalized” discs.
• This unit can play back multi-session discs; however,
unclosed sessions will be skipped while playing.
• This unit can recognize a total 25 characters for file/
folder names.
• Some discs or files may not be played back due to
their characteristics or recording conditions.
Playing DVD-VR
• For details about DVD-VR format and Playlist, refer
to the instructions supplied with the recording
equipment.
File playback
Playing DivX files
• This unit can play back DivX files with the extension
code <.divx>, <.div>, or <.avi> (regardless of the
letter case—upper/lower).
• This unit supports the DivX files whose resolution is
720 x 576 pixels or less.
• Audio stream should conform to MP3 or Dolby Digital.
• The file encoded in the interlaced scanning mode
may not be played back correctly.
• The maximum bit rate for video signals (average) is 4
Mbps.
Continued on the next page
EN_KW-AVX710[U].indb 53EN_KW-AVX710[U].indb 53 07.12.6 3:31:55 PM07.12.6 3:31:55 PM

ENGLISH
54
Playing MPEG1/MPEG2 files
• This unit can play back MPEG1/MPEG2 files with the
extension code <.mpg>, <.mpeg>, or <.mod>*.
* <.mod> is an extension code used for the MPEG2
files recorded by JVC Everio camcorders.
• The stream format should conform to MPEG system/
program stream.
The file format should be MP@ML (Main Profile at
Main Level)/SP@ML (Simple Profile at Main Level)/
MP@LL (Main Profile at Low Level).
• Audio streams should conform to MPEG1 Audio
Layer-2 or Dolby Digital.
• The maximum bit rate for video signals (average) is 4
Mbps.
Playing JPEG files
• This unit can play back JPEG files with the extension
code <.jpg>, or <.jpeg>.
• It is recommended that you record a file at 640 x 480
resolution.
• This unit can play back baseline JPEG files.
Progressive JPEG files or lossless JPEG files cannot be
played.
Playing MP3/WMA/WAV files
• This unit can play back files with the extension code
<.mp3>, <.wma>, or <.wav> (regardless of the
letter case—upper/lower).
• This unit can play back the files meeting the
conditions below:
– Bit rate:
MP3/WMA: 32 kbps — 320 kbps
– Sampling frequency:
48 kHz, 44.1 kHz, 32 kHz (for MPEG1)
24 kHz, 22.05 kHz, 16 kHz (for MPEG2)
48 kHz, 44.1 kHz, 32 kHz, 22.05 kHz (for WMA)
44.1 kHz (for WAV)
• This unit can show ID3 Tag Version
1.0/1.1/2.2/2.3/2.4 (for MP3).
• This unit can also show WAV/WMA Tag.
• This unit can play back files recorded in VBR (variable
bit rate).
• Files recorded in VBR have a discrepancy in elapsed
time indication.
• This unit cannot play back the following files:
– MP3 files encoded with MP3i and MP3 PRO
format.
– MP3 files encoded with Layer 1/2.
– WMA files encoded with lossless, professional,
and voice format.
– WMA files which are not based upon Windows
Media® Audio.
– WMA files copy-protected with DRM.
– Files which have the data such as AIFF, ATRAC3,
etc.
Disc/file information shown on the
external monitor
The following screens appear only on the external
monitor.
• CD
1 Selected playback mode
2 Elapsed playing time of the current track
3 Operation status
4 Current track number/total number of tracks
on the disc
5 Track information
6 Track list
7 Current track (highlighted bar)
TIME 00:14
Track : 6 / 14
Track Information
Cloudy
Fair
Fog
Hail
Indian summer
Rain
Shower
Snow
Thunder
Typhoon
Wind
Winter sky
Album
Four seasons
Artist
Robert M. Smith
Title
Rain
T. RPT
EN_KW-AVX710[U].indb 54EN_KW-AVX710[U].indb 54 07.12.6 3:31:55 PM07.12.6 3:31:55 PM

55 REFERENCES
ENGLISH
Bluetooth operations
General
• While driving, do not perform complicated operation
such as dialing the numbers, using phone book, etc.
When you perform these operations, stop your car in
a safe place.
• Some Bluetooth devices may not be connected to
this unit depending on the Bluetooth version of the
device.
• This unit may not work for some Bluetooth devices.
• Connecting condition may vary depending on
circumstances around you.
• When the unit is turned off, the device is
disconnected.
Warning messages for Bluetooth operations
• Connection Error: The device is registered but the
connection has failed. Use <Connect> to connect
the device again. (☞ page 28)
• Error: Try the operation again. If “Error” appears
again, check if the device supports the function you
have tried.
• Device Unfound: No available Bluetooth device is
detected by <Search>.
• Loading: The unit is updating the phone book and/
or SMS.
• Please Wait...: The unit is preparing to use
the Bluetooth function. If the message does not
disappear, turn off and turn on the unit, then connect
the device again (or reset the unit).
• Reset 08: Check the connection between the
adapter and this unit.
Icons for phone types
• These icons indicate the phone type set on the device.
:Cellular phone
:Household phone
:Office
:General
:Other than above
• DivX/MPEG1/MPEG2/JPEG/MP3/WMA/WAV
1 Current folder (highlighted bar)
2 Current folder number/total folder number
3 Folder list
4 Selected playback mode
5 Elapsed playing time of the current track (not
displayed for JPEG)
6 Operation status
7 Current track number/total number of tracks
in the current folder (total number of tracks on
the disc)
8 Track information (only for MP3/WMA/WAV)
9 Track list
p Current track (highlighted)
* If tag data includes “Jacket Picture” (baseline
JPEG), it will be displayed.
EN_KW-AVX710[U].indb 55EN_KW-AVX710[U].indb 55 07.12.6 3:31:56 PM07.12.6 3:31:56 PM

ENGLISH
56
CD changer
• If you select a folder, which does not include any
music files, on the list (☞ page 34), you will hear a
beep. Select another folder including music files.
iPod operations
• You can control the following types of iPods through
the interface adapter.
– iPod with dock connector (3rd Generation)
– iPod with Click Wheel (4th Generation)
– iPod mini
– iPod photo
– iPod nano *1
– iPod video (5th Generation) *2
*1 When you connect the iPod nano to the interface
adapter, be sure to disconnect the headphones;
otherwise, no sound is heard.
*2 It is not possible to browse video files on the
“Videos” menu while the iPod is connected to the
interface adapter.
• If the iPod does not play correctly, please update your
iPod software to the latest version. For details about
updating your iPod, visit <http://www.apple.com>.
• When you turn on this unit, the iPod is charged
through the adapter connected to this unit.
• While the iPod is connected, all operations from the
iPod are disabled. Perform all operations from this
unit.
• The text information may not be displayed correctly.
• The text information scrolls on the screen. This unit
can display up to 40 characters.
Notice:
When operating an iPod, some operations may not
be performed correctly or as intended. In this case,
visit the following JVC web site:
<http://www.jvc.co.jp/english/car/support/
ks-pd100/index.html>
Menu settings
• If you change the <Amplifier Gain> setting from
<High> to <Low> while the volume level is set
higher than “30,” the unit automatically changes the
volume level to “VOL 30.”
• After you change any of <Menu Language/Audio
Language/Subtitle> settings, turn off then on the
power, and re-insert the disc (or insert another disc)
so that your setting takes effect.
• When you select <16:9> for a picture whose aspect
ratio is 4:3, the picture slightly changes due to the
process for converting the picture width.
• Even if <4:3PS> is selected, the screen size may
become <4:3LB> for some discs.
EN_KW-AVX710[U].indb 56EN_KW-AVX710[U].indb 56 07.12.6 3:31:57 PM07.12.6 3:31:57 PM

57 REFERENCES
ENGLISH
Sound signals emitted through the rear terminals
Through the analog terminals (Speaker out/REAR OUT)
2-channel signal is emitted. When playing multi-channel encoded disc, multi-channel signals are downmixed.
• DTS sound cannot be reproduced.
Through the DIGITAL OUT terminal
Digital signals (Linear PCM, Dolby Digital, DTS, MPEG Audio) are emitted.
• To reproduce the multi-channel sounds such as Dolby Digital, DTS, and MPEG Audio, connect an amplifier or a
decoder compatible with these multi-channel sources to this terminal, and set <D. Audio Output> correctly.
(☞ page 46)
<D. Audio Output>
Playback disc
Output signals
<Stream> <Dolby D> <PCM>
DVD 48 kHz, 16/20/24 bits Linear PCM 48 kHz, 16 bits stereo Linear PCM*
96 kHz, Linear PCM 48 kHz, 16 bits stereo Linear PCM
with Dolby Digital Dolby Digital bitstream 48 kHz, 16 bits stereo
Linear PCM
with DTS DTS bitstream
with MPEG Audio MPEG bitstream 48 kHz, 16 bits stereo Linear PCM
Audio CD, Video CD 44.1 kHz, 16 bits stereo Linear PCM /
48 kHz, 16 bits stereo Linear PCM
Audio CD with DTS DTS bitstream
DivX/
MPEG
with Dolby Digital Dolby Digital bitstream 48 kHz, 16 bits stereo
Linear PCM
with MPEG Audio 32/44.1/48 kHz, 16 bits Linear PCM
MP3/WMA 32/44.1/48 kHz, 16 bits Linear PCM
WAV 44.1 kHz, 16 bits Linear PCM
* Digital signals may be emitted at 20 or 24 bits (at their original bit rate) through the DIGITAL OUT terminal if the
discs are not copy-protected.
EN_KW-AVX710[U].indb 57EN_KW-AVX710[U].indb 57 07.12.6 3:31:57 PM07.12.6 3:31:57 PM

ENGLISH
58
Preset equalizing values
Frequency
Sound mode 60 Hz 150 Hz 400 Hz 1 kHz 2.5 kHz 6.3 kHz 15 kHz
Flat 00 00 00 00 00 00 00
Hard Rock +03 +03 +01 00 00 +02 +01
R&B +03 +02 +02 00 +01 +01 +03
Pop 00 +02 00 00 +01 +01 +02
Jazz +03 +02 +01 +01 +01 +03 +02
Dance +04 +02 00 –02 –01 +01 +01
Country +02 +01 00 00 00 +01 +02
Reggae +03 00 00 +01 +02 +02 +03
Classic +02 +03 +01 00 00 +02 00
User1/2/3 00 00 00 00 00 00 00
Language codes (for DVD/DivX language selection)
Code
Language
Code
Language
Code
Language
Code
Language
Code
Language
AA Afar FA Persian KK Kazakh NO Norwegian ST Sesotho
AB Abkhazian FI Finnish KL Greenlandic OC Occitan SU Sundanese
AF Afrikaans FJ Fiji KM Cambodian OM (Afan) Oromo SW Swahili
AM Ameharic FO Faroese KN Kannada OR Oriya TA Tamil
AR Arabic FY Frisian KO Korean (KOR) PA Panjabi TE Telugu
AS Assamese GA Irish KS Kashmiri PL Polish TG Tajik
AY Aymara GD Scots Gaelic KU Kurdish PS Pashto, Pushto TH Thai
AZ Azerbaijani GL Galician KY Kirghiz QU Quechua TI Tigrinya
BA Bashkir GN Guarani LA Latin RM
Rhaeto-Romance
TK Turkmen
BE Byelorussian GU Gujarati LN Lingala RN Kirundi TL Tagalog
BG Bulgarian HA Hausa LO Laothian RO Rumanian TN Setswana
BH Bihari HI Hindi LT Lithuanian RW Kinyarwanda TO Tonga
BI Bislama HR Croatian LV Latvian, Lettish SA Sanskrit TR Turkish
BN Bengali, Bangla HU Hungarian MG Malagasy SD Sindhi TS Tsonga
BO Tibetan HY Armenian MI Maori SG Sangho TT Tatar
BR Breton IA Interlingua MK Macedonian SH Serbo-Croatian TW Twi
CA Catalan IE Interlingue ML Malayalam SI Singhalese UK Ukrainian
CO Corsican IK Inupiak MN Mongolian SK Slovak UR Urdu
CS Czech IN Indonesian MO Moldavian SL Slovenian UZ Uzbek
CY Welsh IS Icelandic MR Marathi SM Samoan VI Vietnamese
DZ Bhutani IW Hebrew MS Malay (MAY) SN Shona VO Volapuk
EL Greek JA Japanese MT Maltese SO Somali WO Wolof
EO Esperanto JI Yiddish MY Burmese SQ Albanian XH Xhosa
ET Estonian JW Javanese NA Nauru SR Serbian YO Yoruba
EU Basque KA Georgian NE Nepali SS Siswati ZU Zulu
EN_KW-AVX710[U].indb 58EN_KW-AVX710[U].indb 58 07.12.6 3:31:58 PM07.12.6 3:31:58 PM
59 REFERENCES
ENGLISH
Characters shown on the screen
In addition to the roman alphabet (A – Z, a – z), you
can use the following characters to assign titles.
(☞ page 42)
• When <Руccĸий> is selected for <Language>.
(☞ page 45)
• When any language other than <Руccĸий> is
selected for <Language>. (☞ page 45)
Upper and lower cases
Numbers and symbols
Upper and lower cases
Numbers and symbols
• Manufactured under license from Dolby
Laboratories. Dolby and the double-D symbol are
trademarks of Dolby Laboratories.
• “DTS” and “DTS Digital Out” are registered
trademarks of DTS, Inc
• “DVD Logo” is a trademark of DVD Format/Logo
Licensing Corporation registered in the US, Japan
and other countries.
• DivX, DivX Ultra Certified, and associated logos
are trademarks of DivX, Inc. and are used under
license.
• Official DivX® Ultra Certified product
• Plays all versions of DivX® video (including DivX®
6) with enhanced playback of DivX® media files
and the DivX® Media Format
• Microsoft and Windows Media are either
registered trademarks or trademarks of Microsoft
Corporation in the United States and/or other
countries.
• The Bluetooth word mark and logos are owned by
the Bluetooth SIG, Inc. and any use of such marks
by Victor Company of Japan, Limited (JVC) is under
license. Other trademarks and trade names are
those of their respective owners.
• iPod and iTunes are trademarks of Apple Inc.,
registered in the U.S. and other countries.
• This product incorporates copyright protection
technology that is protected by U.S. patents
and other intellectual property rights. Use of
this copyright protection technology must be
authorized by Macrovision, and is intended for
home and other limited viewing uses only unless
otherwise authorized by Macrovision. Reverse
engineering or disassembly is prohibited.
EN_KW-AVX710[U].indb 59EN_KW-AVX710[U].indb 59 07.12.6 3:31:59 PM07.12.6 3:31:59 PM

ENGLISH
60
Troubleshooting
What appears to be trouble is not always serious. Check the following points before calling a service center.
• For operations with the external components, refer also to the instructions supplied with the adapters used for the
connections (as well as the instructions supplied with the external components).
Symptoms Remedies/Causes
General
• No sound comes out of the speakers. • Adjust the volume to the optimum level.
• Check the cords and connections.
• DTS sound cannot be reproduced through the analog
terminals (Speaker out/REAR OUT).
• The screen is not clear and legible. Sunshine from the windshield may cause this symptom.
Adjust <Bright>. (☞ page 44)
• “Position Error Push Open Key” appears on
the screen.
The monitor panel angle has been forcibly adjusted, or its
adjustment has been interrupted while opening or closing.
Press OPEN/TILT.
• “Mecha Error Push Reset” appears on the
screen, and the panel does not move.
Reset the unit. (☞ page 3)
• “No Signal” appears. • Change the source.
• Start the playback on the external component connected
to VIDEO IN terminal.
• Check the cords and connections.
• Signal input is too weak.
• The buttons on the monitor panel do not
work.
When the monitor panel is open, only +/– (volume) and
OPEN/TILT work. The other buttons do not function.
• The unit does not work at all. Reset the unit. (☞ page 3)
FM/AM
• SSM automatic presetting does not work. Store stations manually. (☞ page 12)
• Static noise while listening to the radio. Connect the aerial firmly.
EN_KW-AVX710[U].indb 60EN_KW-AVX710[U].indb 60 07.12.6 3:32:00 PM07.12.6 3:32:00 PM

61 REFERENCES
ENGLISH
Symptoms Remedies/Causes
Disc in general
• Disc can be neither recognized nor played
back.
Eject the disc forcibly. (☞ page 3)
• Disc cannot be ejected. Unlock the disc. (☞ page 19)
• Recordable/Rewritable discs cannot be
played back.
• Tracks on the Recordable/Rewritable discs
cannot be skipped.
• Insert a finalized disc.
• Finalize the discs with the component which you used
for recording.
• Playback does not start. • Insert the disc correctly again.
• The format of files is not supported by the unit.
• The playback picture is not clear and legible. Adjust items in <Picture Adjust> menu. (☞ page 44)
• Sound and pictures are sometimes
interrupted or distorted.
• Stop playback while driving on rough roads.
• Change the disc.
• No playback picture is shown and “Parking
Brake” appears on the screen, even when the
parking brake is engaged.
Parking brake lead is not connected properly.
(☞ Installation/Connection Manual)
• No picture appears on the external monitor. • Connect the video cord correctly.
• Select the correct input on the external monitor.
• “Eject Error” or “Loading Error” appears on
the screen.
Change the source by pressing SOURCE.
• “Region code error” appears on the screen
when you insert a DVD Video.
Region code is not correct. (☞ page 4)
DivX/MPEG1/MPEG2/MP3/WMA/WAV
• Disc cannot be played back. • Change the disc.
• Record the tracks using a compliant application on the
appropriate discs. (☞ page 4)
• Add appropriate extension codes to the file names.
• Noise is generated. The track played back is not a playable file format. Skip to
another file.
• Tracks are not played back as you have
intended them to play.
Playback order may differ from that played back using
other players.
• Elapsed playing time is not correct. This sometimes occurs during playback. This is caused by
how the tracks are recorded.
• “Not Support” appears on the screen and
track skips.
The track is unplayable.
EN_KW-AVX710[U].indb 61EN_KW-AVX710[U].indb 61 07.12.6 3:32:00 PM07.12.6 3:32:00 PM

ENGLISH
62
Symptoms Remedies/Causes
Bluetooth
• Bluetooth device does not detect the unit. This unit can be connected with one Bluetooth cellular
phone and one Bluetooth audio player at a time.
While connected to a device, this unit cannot be detected
from another device. Disconnect currently connected device
and search again.
• The unit does not detect the Bluetooth
device.
• Check the Bluetooth setting of the device.
• Search from the Bluetooth device. After the device
detects the unit, select <Open> on the unit to connect
the device. (☞ page 27)
• The unit does not make pairing with the
Bluetooth device.
• Enter the same PIN code for both the unit and target
device. If the PIN code of the device is not indicated on its
instructions, try “0000” or “1234.”
• Select the device name from <Special Device>, then
try to connect again. (☞ pages 28, 50)
• Echo or noise occurs. Adjust the microphone unit position.
• Phone sound quality is poor. • Reduce the distance between the unit and the Bluetooth
cellular phone.
• Move the car to place where you can get a better signal
reception.
• The sound is interrupted or skipped during
playback of a Bluetooth audio player.
• Reduce the distance between the unit and the Bluetooth
audio player.
• Disconnect the player connected for “Bluetooth PHONE.”
• Turn off, then turn on the unit.
• (When the sound is not yet restored,) connect the player
again.
• “New Device” cannot be selected for
“Bluetooth AUDIO.”
Bluetooth audio player is already connected. To select “New
Device,” disconnect it. (☞ page 28)
• The connected audio player cannot be
controlled.
Check whether the connected audio player supports AVRCP
(Audio Video Remote Control Profile).
• “Reset 08” appears on the screen. Check the connection between the adapter and this unit.
EN_KW-AVX710[U].indb 62EN_KW-AVX710[U].indb 62 07.12.6 3:32:00 PM07.12.6 3:32:00 PM

63 REFERENCES
ENGLISH
Symptoms Remedies/Causes
CD changer
• “No Disc” appears on the screen. Insert a disc into the magazine.
• “No Magazine” appears on the screen. Insert the magazine.
• “Cannot play this disc Check the disc”
appears on the screen.
Current disc does not include playable files. Replace the disc
with one including playable files.
• “Reset 08” appears on the screen. Connect this unit and the CD changer correctly and press
the reset button of the CD changer.
• “Reset 01” – “Reset 07” appears on the
screen.
Press the reset button of the CD changer.
• The CD changer does not work at all. Reset the unit. (☞ page 3)
iPod
• The iPod does not turn on or does not work. • Check the connection.
• Charge the battery.
• Sound is distorted. Deactivate the equalizer either on this unit or the iPod.
• “Disconnect” appears on the screen. Check the connection.
• Playback stops. The headphones are disconnected during playback. Restart
playback.
• “No Files” appears on the screen. No tracks are stored. Import tracks to the iPod.
• “Reset 01” – “Reset 07” appears on the
screen.
Disconnect the adapter from both this unit and iPod. Then,
connect them again.
• “Reset 08” appears on the screen. Check the connection between the adapter and this unit.
• The iPod’s controls do not work after
disconnecting from this unit.
Reset the iPod.
AV-IN
• No picture appears on the screen. • Turn on the video component if it is not on.
• Connect the video component correctly.
• Playback picture is not clear and legible. Adjust items in <Picture Adjust> menu. (☞ page 44)
EN_KW-AVX710[U].indb 63EN_KW-AVX710[U].indb 63 07.12.6 3:32:01 PM07.12.6 3:32:01 PM
ENGLISH
64
Specifications
AMPLIFIER
Maximum Power Output: Front/Rear: 50 W per channel
Continuous Power Output
(RMS):
Front/Rear: 20 W per channel into 4 Ω, 40 Hz to
20 000 Hz at no more than 0.8% total
harmonic distortion
Load Impedance: 4 (4 to 8 allowance)
Equalizer Control Range: Frequencies: 60 Hz, 150 Hz, 400 Hz, 1 kHz, 2.5 kHz,
6.3 kHz, 15 kHz
Level: ±10 dB
Signal-to-Noise Ratio: 70 dB
Audio Output Level
REAR OUT:
Line-Out Level/Impedance: 2.5 V/20 kΩ load (full scale)
Output Impedance: 1 kΩ
Color System: NTSC/PAL
Video Output (composite): 1 Vp-p/75 Ω
Other Terminals: Input: LINE IN, VIDEO IN, Antenna input
Output: VIDEO OUT
Others: CD changer, Reverse gear signal, DIGITAL
OUT (optical)
FM/AM TUNER
Frequency Range: FM: 87.5 MHz to 108.0 MHz
AM: 531 kHz to 1 602 kHz
FM Tuner Usable Sensitivity: 11.3 dBf (1.0 V/75 Ω)
50 dB Quieting Sensitivity: 16.3 dBf (1.8 V/75 Ω)
Alternate Channel Selectivity (400 kHz): 65 dB
Frequency Response: 40 Hz to 15 000 Hz
Stereo Separation: 35 dB
AM Tuner Sensitivity/Selectivity: 20 V/35 dB
DVD/CD
Signal Detection System: Non-contact optical pickup (semiconductor laser)
Frequency Response: DVD, fs=48 kHz/96 kHz: 16 Hz to 22 000 Hz
VCD/CD: 16 Hz to 20 000 Hz
Dynamic Range: 93 dB
Signal-to-Noise Ratio: 95 dB
Wow and Flutter: Less than measurable limit
EN_KW-AVX710[U].indb 64EN_KW-AVX710[U].indb 64 07.12.6 3:32:01 PM07.12.6 3:32:01 PM

65 REFERENCES
ENGLISH
MONITOR
Screen Size: 7 inch wide liquid crystal display
Number of Pixel: 336 960 pixels: 480 × 3 (horizontal) × 234 (vertical)
Drive Method: TFT (Thin Film Transistor) active matrix format
Color System: NTSC/PAL
Aspect Ratio: 16:9 (wide)
GENERAL
Power Requirement: Operating Voltage: DC 14.4 V (11 V to 16 V allowance)
Grounding System: Negative ground
Allowable Storage Temperature: –10°C to +60°C
Allowable Operating Temperature: 0°C to +40°C
Dimensions (W × H × D): Installation Size (approx.): 178 mm × 100 mm × 160 mm
Panel Size (approx.): 171 mm × 97 mm × 21 mm
Mass (approx.): 2.6 kg
CAUTION: When ejecting the monitor, leave an
open space for the monitor to come out. If you do
not, the monitor may obstruct the steering wheel
and gearshift lever operations, and this may result
in a traffic accident.
Unit: mm
Required space for the monitor ejection
160 90.5
100
Design and specifications are subject to change without notice.
EN_KW-AVX710[U].indb 65EN_KW-AVX710[U].indb 65 07.12.6 3:32:02 PM07.12.6 3:32:02 PM
EN, CT
0208MNMMDWJEIN
© 2008 Victor Company of Japan, Limited
Having TROUBLE with operation?
Please reset your unit
Refer to page of How to reset your unit
Rear_KW-AVX710UT_1.indd 2Rear_KW-AVX710UT_1.indd 2 08.2.12 10:38:55 AM08.2.12 10:38:55 AM
KW-AVX716/KW-AVX710
Installation/Connection Manual
ϰ༬ો˿̱
°“√µ‘¥µ—Èß/§ŸË¡◊Õ°“√µ‘¥µ—Èß
Crimp connector
қʪᏃ
¢—È«µËÕ”À√—∫Àπ’∫
Power cord
ྐཔ·ڄለӧ
“¬‡§‡∫‘≈°”≈—ß
Batteries
ྐЖ
·∫µ‡µÕ√’Ë
Heat sink
ಞᇊ̕
·ºËπ√–∫“¬§«“¡√ÈÕπ
1
1207MNMMDWJEIN
EN, CT, TH
©2008 Victor Company of Japan, Limited
Remote controller
ჲ
√’‚¡µ§Õπ‚∑√≈
Parts list for installation and connection
The following parts are provided for this unit.
If anything is missing, contact your dealer immediately.
Main unit
̟ጅ
µí«‡§√◊ËÕß
Round head screws (M5 x 8 mm)
ฐᏃᒘീ (M5 x 8 mm)
°√ŸÀ—«°≈¡ (M5 x 8 ¡¡)
Flat head screws (M5 x 8 mm)
ͦᏃᒘീ (M5 x 8 mm)
°√ŸÀ—«·∫π (M5 x 8 ¡¡)
LVT1780-008A
[U/UT]
ENGLISH
This unit is designed to operate on 12 V DC, NEGATIVE ground
electrical systems. If your vehicle does not have this system, a
voltage inverter is required, which can be purchased at JVC car audio
dealers.
WARNINGS
• DO NOT install any unit or wire any cable in a location where;
– it may obstruct the steering wheel and gearshift lever operations,
as this may result in a traffic accident.
– it may obstruct the operation of safety devices such as air bags, as
this may result in a fatal accident.
– it may obstruct visibility.
• DO NOT operate any unit while manipulating the steering wheel, as
this may result in a traffic accident.
• The driver must not watch the monitor while driving. It may lead to
carelessness and cause an accident.
• If you need to operate the unit while driving, be sure to look around
carefully or you may be involved in a traffic accident.
• If the parking brake is not engaged, “Parking Brake” flashes on the
monitor, and no playback picture will be shown.
– This warning appears only when the parking brake wire is
connected to the parking brake system built in the car.
Notes on electrical connections:
• Replace the fuse with one of the specified rating. If the fuse blows
frequently, consult your JVC car audio dealer.
• It is recommended to connect speakers with a maximum power
of more than 50 W (both at the rear and at the front, with an
impedance of 4 Ω to 8 Ω).
If the maximum power is less than 50 W, change “Amplifier Gain”
setting to prevent the speakers from being damaged (see page 49 of
the INSTRUCTIONS).
• To prevent short circuits, cover the terminals of the UNUSED leads
with insulating tape.
• The heat sink becomes very hot after use. Be careful not to touch it
when removing this unit.
Plate for use with a Nissan car
·ؠ̅୕ԆԾڄख
·ºËπ”À√—∫„™È°—∫√∂π‘—π
ˁ̂
ʹጅ෮̈́՟·ڈޠ12 V é࠸ોϚڅྑກԧéϨسڄԾቩ
ԅЉɾྐԦç۱ᄔ࠱ɾࡴྐᏫ᜵ಗç̣̈́ϚJVCԆԾ
ࡖᛏ˜ኀੋளකռé
ᙲѿ
• ˝ˡϚ̣ʓтϯ༫ʹጅྐង;
– ̈́Ҟᗉዬѕ̄ώᇟ֜᜵ᐑଁڄтѴ۱̈́˺ചΟ
Ֆݭé
– ̈́Ҟᗉዬѕϯη༫çϨϯηमெമڄтçѴ۱̈́
˺ചࠓ֡ڄΟՖݭé
– ̈́Ҟᗉඁ௴ڄтé
•
˝ˡϚዬѕ̄ώᇟڄཫദˀዬѕʹጅçѴ۱̈́˺ചΟՖݭé
• ኢአइçኢአ࢜˝ˡႌԠΕé̈́ࠓՓ˺ചՖ
ݭé
• Ϛኢአཫദˀࠜᄔ࠱ዬѕʹጅç˝৩࠱ં˝ٌำۮ̄çѴ۱̈́
˺ചΟՖݭé
• ࠜ˾۫ԾͶ⽂ϐç“Parking Brake” ϪᆟϚΕʕਕᖼç̝
ٗᆑ؞࿌̕é
– ෮ະ˾۫ԾለႩԆԾ˖ڄ˾۫ԾԦߟइЏᙱѾۑ
ࣥʼ̳é
нྑཕોईٍิ:
• ӕۘᎳീӦಗᖃ׆࠷மࡩڄۘᎳീéϨسۘᎳീગጛᖢç
ቁώJVC ԆԾࡖᛏ˜ኀੋ༿é
•
݈֜ۮಙᑵڄఛʨ᎔ʈ̷ᏻʨؠ50 Wçմۇӏ
4 Ωü8 ΩéϨسఛʨ̷ʮؠ 50 Wçቁቆओ
“Amplifier Gain”
׆ࡩç̣Վ̊ಙᑵ๑ᖢé
(
ኌ՟·იاएڄ୶49ࡗ
)
é
• Վ̊ྐഠཔçቁ·ഽሇઘ̸у͵՟·ྐለڄၷʪé
• ʹጅ՟·݈çಞᇊ݃̕ᇊéϕЏçϚ୰̳ʹጅइçʮ˻ʿ࠱
᙮ညಞᇊ̕é
‰∑¬
™ÿ¥ª√–°Õ∫π’ȉ¥È√—∫°“√ÕÕ°·∫∫¡“‡æ◊ËÕ„™Èß“π°—∫√–∫∫ °√–·‰øøÈ““¬¥‘π¢—È«≈∫°√–
·µ√ß 12 ‚«≈∑Ï À“°√∂¬πµÏ¢Õߧÿ≥‰¡Ë‰¥È„™È√–∫∫π’È µÈÕß„™È‡§√◊ËÕß·ª≈ß°√–
·‰ø™Ë«¬ ´÷Ëß“¡“√∂À“´◊ÈÕ‰¥È®“°√È“π¢“¬‡§√◊ËÕ߇’¬ß√∂¬πµÏ JVC
§”‡µ◊Õπ
• լ˓µ‘¥µ—È߇§√◊ËÕ߇≈ËπÀ√◊Õ‡¥‘𓬉ø„πµ”·ÀπËß∑’Ë;
– Õ“®°’¥¢«“ß°“√∑”ß“π¢Õßæ«ß¡“≈—¬·≈–§—π‡°’¬√Ï ‡æ√“–Õ“®°ËÕ„Àȇ°‘¥Õÿ∫—µ‡Àµÿ¢÷È
–
Õ“®°’¥¢«“ß°“√∑”ß“π¢ÕßÕÿª°√≥ϪÈÕß°—𧫓ª≈Õ¥¿—¬ ‡™Ëπ ·Õ√Ï·∫§ ‡æ√“–
Õ“®°ËÕ„Àȇ°‘¥Õ—πµ√“¬√È“¬·√ß∂÷ß™’«‘µ¢÷Èπ‰¥È
– Õ“®°’¥¢«“ß“¬µ“
• լ˓„™Èß“π¢≥–¢—∫¢’Ë ‡æ√“–Õ“®°ËÕ„Àȇ°‘¥Õÿ∫—µ‘‡Àµÿ¢÷Èπ‰¥È
• ºŸÈ¢—∫µÈÕ߉¡Ë¡Õß∑’ˮաÕ𑇵Õ√Ï¢≥–¢—∫¢’Ë ‡æ√“–Õ“®π”‰ªŸË§«“¡ª√–¡“∑‡≈‘π‡≈ËÕ·≈–
°ËÕ„Àȇ°‘¥Õÿ∫—µ‘‡Àµÿ‰¥È
• À“°µÈÕß°“√„™Èß“π‡§√◊ËÕߢ≥–¢—∫¢’Ë µÈÕß·πË„®«Ë“‰¥È„™È§«“¡√–¡—¥√–«—ßլ˓ߥ’
‡æ◊ËÕÀ≈’°‡≈’ˬ߰“√‡°‘¥Õÿ∫—µ‘‡Àµÿ
• À“°‰¡Ë‰¥È„ˇ∫√°¡◊Õ ¢ÈÕ§«“¡ “Parking Brake” ®–°–æ√‘∫∑’ËÀπÈ“®Õ ·≈–®–
‰¡Ë¡’¿“淥ߢ÷Èπ¡“
– §”‡µ◊Õππ’È®–ª√“°Ø¢÷Èπ‡©æ“–‡¡◊ËÕµËÕ“¬‡∫√°°—∫√–∫∫‡∫√°„π√∂¬πµÏ‰«È‡∑Ë“π—Èπ
¡ÈÕπŸ≈„π°“√•ËÕ√–∫∫‰ø:
• „™Èæ‘°—¥®”‡æ“–·∑πøî«À“°øî«Ï¢“¥∫ËÕ¬ „ÀȪ√÷°…“√È“ π¢“¬‡§√◊ËÕ߇’¬ß√∂¬πµÏ JVC
• ¢Õ·π–π”„ÀȵËÕ≈”‚æß ∑’Ë¡’°”≈—ߢ—∫ßÿ¥‡°‘π°«Ë“
50 W
(∑—ÈߥȓπÀπÈ“·≈–¥È“πÀ≈—ß
¡’§Ë“§«“¡µÈ“π∑“π 4 Ω ∂÷ß 8 Ω) ∂È“°”≈—ߢ—∫µË”°«Ë“ 50 W „Àȇª≈’ˬπ§Ë“
“Amplifier Gain” ‡æ◊ËÕªÈÕß°—π‰¡Ë„ÀÈ≈”‚æß™”√ÿ¥ (¥ŸÀπÈ“
49
§”·π–π”)
• °“√ªÈÕß°—π°“√≈—¥«ß®√ ®–µÈÕßæ—π¢—È«“¬µ–°—Ë« ∑’ˉ¡Ë„™È·≈È«¥È«¬‡∑ ªæ—𓬉ø
•
·ºËπ√–∫“¬§«“¡√ÈÕπ®–√ÈÕπ¡“°À≈—ß®“°„™È √–¡—¥√–«—ßլ˓‰ª —¡º—‡¡◊ËÕ∂Õ¥™ÿ¥ª√–°Õ∫π’È
Έءϰ༬֝ોڅྒྷέଢశ
ʹጅక̣ʓྒάé
ࠜചথ˲έщɾάྒάçቁѮոᑷുڄ˜ኀੋé
√“¬°“√Ë«πª√–°Õ∫”À√—∫µ‘¥µ—Èß·≈–‡™◊ËÕ¡µËÕ°—π
Ë«πª√–°Õ∫µËÕ‰ªπ’È„ÀÈ¡“°—∫™ÿ¥ª√–°Õ∫π’È À“°¡’‘Ëß„¥‰¡Ë§√∫ °√ÿ≥“µ‘¥µËÕµ—
«·∑π®”ÀπË“¬‚¥¬∑—π∑’
THCT1-3_AVX710-008A.indd 1THCT1-3_AVX710-008A.indd 1 12/6/07 3:37:44 PM12/6/07 3:37:44 PM

2
INSTALLATION (IN-DASH MOUNTING)
The following illustration shows a typical installation. However, you
should make adjustments corresponding to your specific car. If you
have any questions or require information regarding installation kits,
consult your JVC car audio dealer or a company supplying kits.
• If you are not sure how to install this unit correctly, have it installed
by a qualified technician.
Before installing the unit
• When mounting the unit, be sure to use the screws provided, as
instructed. If other screws are used, parts could become loose or
damaged.
• When tightening screws or bolts, be careful not to pinch any
connection cord.
• Make sure not to block the fan on the rear to maintain proper
ventilation when installing the unit.
Screws removed from the car in step 1
ϚӴᝢ1 નԆԾ؛ֈڄᒘീ
°√Ÿ∑’Ë∂Õ¥ÕÕ°®“°√∂¬πµÏ„π¢—ÈπµÕπ∑’Ë 1
1 Remove the audio system originally installed in the car, together
with its mounting brackets.
Note: Be sure to keep all the screws and parts removed from
your car for future use.
2 Attach the mounting brackets (removed from the car), to this
unit (see below).
3 Do the required electrical connections.
• See pages 3 to 6.
4 Install this unit using the screws removed in step 1.
The following example is for installation in a Toyota car. For more
details, consult your JVC car audio dealer.
Mounting bracket removed from the car
નԆԾ؛ֈڄ༫ށ
·∑Ëπ√Õß∑’Ë∂Õ¥ÕÕ°®“°√∂¬πµÏ
Supplied screws
కᒘീ
°√Ÿ∑’Ë„ÀÈ¡“æ√ÈÕ¡‡§√◊ËÕß
Install the unit at an angle of less than 30˚, taking it into account that the monitor would eject when in use.
અʹጅϯ༫Ϛ˲ؠ30˚ ڄԴܾçͫෝШᅱռ̣ܳ̈́Ϛ՟·इᅫ̳é
µ‘¥µ—Èß™ÿ¥ª√–°Õ∫∑’Ë¡ÿ¡µË”°«Ë“ 30˚ ‚¥¬§”π÷ß∂÷߇«≈“®Õ¡Õ𑇵Õ√Ï¥’¥ÕÕ°„π√–À«Ë“ß°“√„™È
Note: When installing the unit on the mounting bracket, make sure to use the supplied screws (M5 x 8 mm). If longer screws are
used, they could damage the unit.
ఖٍ: ϯ༫ʹጅන༫ށइçቁੀͫ՟·కڄᒘീ(M5 x 8 mm)éࠜ՟·̍ཛۂڄᒘീçЉᘕᒘീ̈́๑ᖢʹጅé
À¡“¬‡Àµÿ: ¢≥–µ‘¥µ—È߇§√◊ËÕß∫π·∑Ëπ√Õß ¢Õ„ÀÈ¥Ÿ„ÀÈ·πË„®«Ë“„™È°√Ÿ∑’Ë„ÀÈ¡“æ√ÈÕ¡‡§√◊ËÕß (M5 x 8 ¡¡) À“°„™È°√Ÿ¬“«°«Ë“∑’Ë√–∫ÿÕ“®∑”„Àȇ§√◊ËÕ߇’¬‰¥È
30˚
Select the appropriate type fitting to your
audio system space.
ዪቱϐڄࡖᛏԦϯ༫ڏڄܓ༙é
‡≈◊Õ°·∫∫∑’ˇÀ¡“–¡°—∫æ◊Èπ∑’Ë√–∫∫‡§√◊ËÕ߇’¬ß
If necessary, restore the protruding tabs.
ࠜЉͫ࠱çቁࡌ๘༫ʕ̴ሇé
À“°®”‡ªìπ „ÀÈßÕ·ºËπ¬÷¥
Unit: mm
వт: mm (ଔТ)
ÀπË«¬: ¡¡
Supplied screws
కᒘീ
°√Ÿ∑’Ë„ÀÈ¡“æ√ÈÕ¡‡§√◊ËÕß
Required space for the monitor ejection
։ܴᄕ˄ڐ
æ◊ÈÈπ∑’Ë«Ë“ßÀ’˵ÈÕß°“√”À√—∫¥—π®Õ¿“æÕÕ°
160 90.5
100
When installing the unit in a Nissan car
ັϰ༬͵ጆء̆ୖԇԿई
‡¡◊ËÕµ‘¥µ—È߇§√◊ËÕß„π√∂π‘—π
Plate for use with a Nissan car
·ؠ̅୕ԆԾڄख
·ºËπ”À√—∫„™È°—∫√∂π‘—π
ϰ༬(༬éׇ֤ϛᄮڸؼ˗)
ʓࡒڄ࿌༱ڷΕʄյܓڄϯ༫ദҺéѓݵϚᄑϯ༫इçᏻ
༳घየڄԆԾѕቱະڄቆዱéϨسЉᖅçᄔ࠱Љᘕ
ࢭ˔άڄཊऄçቁώ JVC ԆԾࡖᛏ˜ኀੋࢭ˔άաᏻ˙͌
༿é
• Ϩسʿᇧ׆Ϩщᇧϙϯ༫ʹጅçᏻቁϐतڄӑிʆ࢜գ
ϯ༫é
ϰ༬͵ጆ˄ۯ
• ະ༫ʕʹጅइͫෝݝຖݣΕ՟·కڄᒘീਐéϨس՟·մ͟
ڄᒘീਐçߟᘕྒά̈́ᖑ๑ᖢé
• ະᕬႌᒘീਐᒘनइç˝৩ʿ࠱Ꮻᐅռέщྐለé
• ະϯ༫ʕ݈ç˝৩ʿ࠱ۇዥռ݈ࡒػڄࡘ࣮̣႕ݠቱະڄ
ࡘé
°“√µ‘¥µ—Èß
(
°“√ª√–°Õ∫·ºßÀπÈ“ªí∑¡Ï‡¢È“
)
¿“æµ—«Õ¬Ë“ßµËÕ‰ªπ’È·¥ß∂÷ß°“√µ‘¥µ—Èß·∫∫∑—Ë«‰ª À“°§ÿ≥¡’ªô ≠À“À√◊ÕµÈÕß°“√¢ÈÕ¡Ÿ≈‡
°’ˬ«°—∫™ÿ¥µ‘¥µ—Èß °√ÿ≥“ª√÷°…“°—∫ºŸÈ¢“¬‡§√◊ËÕ߇’¬ß√∂¬πµÏ JVC ¢Õß∑Ë“πÀ√◊Õ∫√‘…—
• À“°§ÿ≥‰¡Ë¡—Ëπ„®„π«‘∏’°“√µ‘¥µ—È߇§√◊ËÕ߇’¬ßլ˓ß∂Ÿ°«‘∏’ ‚ª√¥„Àș˓ߺŸÈ™”π“≠∑”°“√µ‘¥
µ—È߇∑Ë“π—¡
°ËÕπ°“√µ‘¥µ—Èßµ—«‡§√◊ËÕß
• ‡¡◊ËÕ®–∑”°“√µ‘¥µ—Èßµ—«‡§√◊ËÕß ‚ª√¥„™È°√Ÿ∑’Ë·π∫¡“µ“¡§”·π–π” À“°¬÷¥‡§√◊ËÕߥȫ¬
°√Ÿ·∫∫Õ◊Ëπ Õ“®∑”„ÀÈ™‘ÈπË«πÀ≈«¡À√◊Õ‡°‘¥§«“¡‡’¬À“¬‰¥È
• ‡¡◊ËÕ®–¢—π·πËπ°√ŸÀ√◊Õ≈—°‡°≈’¬« µÈÕß√–«—߉¡Ë„ÀÈÀπ’∫“¬‡™◊ËÕ¡µËÕ
• °√ÿ≥“µ√«®Õ∫„ÀÈ·πË„®«Ë“¡‘‰¥Èªî¥°—Èπæ—¥≈¡µ√ß·ºßÀπÈ“°“°¥È“πÀ≈—ß
‡æ◊ËÕ„ÀÈ°“√√–∫“¬Õ“°“»‡ªìπ‰ªÕ¬Ë“߇À¡“–¡‡¡◊ËÕµ‘¥µ—Èß
1 ؛ֈࢍʹϯ༫ϚԆԾ˖ڄࡖᛏԦç̣˪մ༫ށé
ఖٍ: ቁੀͫۘॡЉનԆԾ؛ֈڄᒘീ֜ྒάਭ݈̅՟
·é
2 અ(નԆԾ؛ֈڄ) ༫ށϯʕʹጅ(ኌʓ࿌)é
3 ੭мͫ࠱ڄྐཔé
• ኌ୶3 в6ࡗé
4 ՟·ϚӴᝢ1 ؛ֈڄᒘീϯ༫ʹጅé
̣ʓ̣ᕙΉ(Toyota) ԆԾϯ༫բéቁᑷുڄJVC ԆԾࡖᛏ
˜ኀੋЉᘕӦϠஅé
1 ∂Õ¥√–∫∫‡§√◊ËÕ߇’¬ß∑’˵‘¥µ—Èß„π√∂‰«Èµ—Èß·µË·√° æ√ÈÕ¡∑—Èß·∑Ëπ√Õß
À¡“¬‡Àµÿ: ¥Ÿ„ÀÈ·πË„®«Ë“‡°Á∫°√Ÿ·≈–
™‘ÈπË«π∑âÈßÀ¡¥∑’Ë∂Õ¥ÕÕ°®“°√∂¬πµÏ¢Õß∑Ë“π‰«È„™ÈµËÕ‰ª
2 µ‘¥·∑Ëπ√Õß (∑’Ë∂Õ¥ÕÕ°®“°√∂¬πµÏ) ‡¢È“°—∫™ÿ¥ª√–°Õ∫π’È (¥Ÿ∑’˥ȓπ≈Ë“ß)
3 ¥”‡π‘π°“√µËÕ√–∫∫‰øøÈ“∑’Ë®”‡ªìπ
• ¥ŸÀπÈ“ 3 ∂÷ß 6
4 µ‘¥µ—Èß™ÿ¥ª√–°Õ∫π’È‚¥¬„™È°√Ÿ∑’Ë∂Õ¥ÕÕ°„π¢—ÈπµÕπ∑ 1
µ—«Õ¬Ë“ßµËÕ‰ªπ’ȇªìπ°“√µ‘¥µ—Èß„π√∂¬πµÏ‚µ‚¬µÈ“ ”À√—∫√“¬≈–‡Õ’¬¥‡æ‘Ë¡‡µ‘¡
°√ÿ≥“ª√÷°…“µ—«·∑π®”ÀπË“¬‡§√◊ËÕ߇’¬ß√∂¬πµÏ JVC
Mounting bracket removed from the car
નԆԾ؛ֈڄ༫ށ
·∑Ëπ√Õß∑’Ë∂Õ¥ÕÕ°®“°√∂¬πµÏ
THCT1-3_AVX710-008A.indd 2THCT1-3_AVX710-008A.indd 2 12/6/07 3:38:11 PM12/6/07 3:38:11 PM

(ILLUMINATION)
(REMOTE OUT)
(POWER ANTENNA)
(PARKING BRAKE)
(TEL MUTING)
REVERSE
GEAR
SIGNAL
3
2
1
3
ELECTRICAL CONNECTIONS
To prevent short circuits, we recommend that you disconnect the
battery’s negative terminal and make all electrical connections before
installing the unit.
• Be sure to ground this unit to the car’s chassis again after
installation.
Before connecting: Check the wiring in the vehicle carefully.
Incorrect connection may cause serious damage to this unit.
The leads of the power cord and those of the connector from the car
body may be different in color.
1 Connect the colored leads of the power cord in the order specified
in the illustration below.
2 Connect the antenna cord.
3 Finally connect the wiring harness to the unit.
15 A fuse
15 A ۘᎳീ
øî«Ï¢π“¥ 15 A
Rear ground terminal
ʹጅ݈ࠌϙၷʪ
®ÿ¥‡™◊ËÕ¡µËÕ“¬¥‘π¥È“πÀ≈—ß
*1 Not included for this unit
*1 ʿᎲʹጅಏա
*1 ‰¡Ë‰¥È„ÀÈ¡“°—∫™ÿ¥ª√–°Õ∫π’È
Ignition switch
ᓭ̑ළᘕ
«‘∑™Ï®ÿ¥√–‡∫‘¥
Fuse block
ۘᎳീవ˔
·ºßøî«
White with black stripe
ΎиઘЉ෨иঙ
’¢“«·∂∫¥”
White
Ύи
’¢“«
Gray with black stripe
НиઘЉ෨иঙ
’‡∑“·∂∫¥”
Gray
Ни
’‡∑“
Green with black stripe
ႋиઘЉ෨иঙ
’‡¢’¬«·∂∫¥”
Green
ႋи
’‡¢’¬«
Purple with black stripe
ാиઘЉ෨иঙ
’¡Ë«ß·∂∫¥”
Purple
ാи
’¡Ë«ß
Left speaker (front)
ͣಙᑵ(ۮ)
≈”‚æß´È“¬ (ÀπÈ“)
Right speaker (front)
͆ಙᑵ(ۮ)
≈”‚æߢ«“ (ÀπÈ“)
Left speaker (rear)
ͣಙᑵ(݈)
≈”‚æß´È“¬ (À≈—ß)
Right speaker (rear)
͆ಙᑵ(݈)
≈”‚æߢ«“ (À≈—ß)
To metallic body or chassis of the car
вہᚙᝂԆԾנᇟ
µËÕ°—∫‚§√ß‚≈À–À√◊Õ‡™´‘¢Õß√∂¬πµú
To a live terminal in the fuse block connecting to the car battery (bypassing
the ignition switch) (constant 12 V)
вۘᎳീవ˔˖ڄۈᚙၷʪçۘᎳീవ˔ؠԾ༫ྐЖߟ
(·ؠअཔᓭ̑ළᘕ)(ݔ׆ 12 V)
µµËÕ°—∫¢—È«∑’Ë¡’°√–·‰øøÈ“„π·ºßøî«Ï ´÷ËßµËÕ°—∫·∫µ‡µÕ√’Ë√∂¬πµ ( ‚¥¬‰¡ËµÈÕß„™È«‘∑™Ï®ÿ¥√–‡∫‘¥)
12 ‚«≈∑ϧß∑’Ë)
To an accessory terminal in the fuse block
вۘᎳീవ˔˖ڄۈᚙၷʪ
µËÕ°—∫¢—È«Ë«πª√–°Õ∫„π·ºßøî«
To car light control switch
вԆԾԾጜվළᘕ
«‘µ´Ï§«∫§ÿ¡‰ø¢Õß√∂¬πµ√Ï
To cellular phone system
вޟੂྐ༼Ԧ
µËÕ°—∫‚∑√»—æ∑χ§≈◊ËÕπ∑
Black
෨и
’¥”
Yellow *2
෦и *2
’’‡À≈◊Õß *2
Red
߹и
’·¥ß
Blue
ᕇи
’øÈ“
Orange with white stripe
ዻиઘЉΎиঙ
’È¡·∂∫¢“«
Brown
ሶи
’πÈ”µ“≈
Light green
ଠႋи
’‡¢’¬«ÕËÕπ
Fan
ࡘ࣮
æ—¥≈¡
To parking brake (see diagram Å on page 4.)
в˾۫Ծለ (ኌ୶ 4 ࡗʕڄ࿌ڷ Åé)
µËÕ°—∫‡∫√°¡◊Õ (¥Ÿ·ºπº—ß Å „πÀπÈ“ 4)
Crimp connector
қʪᏃ
¢—È«µËÕ”À√—∫Àπ’∫
Blue with white stripe
ᕇиઘЉΎиঙ
’πÈ”‡ß‘π≈“¬¢“«
To automatic antenna if any (250 mA max.)
вбੂ˭ለ(ࠜЉ༫)(ఛʨ250 mA)
‡“Õ“°“»‰øøÈ“Õ—µ‚π¡—µ‘ À“°¡’ (¢π“¥Ÿß¸¥ 250 mA)
To the remote lead of other equipment (200 mA max.)
в͏ɾށࡖᛏకڄჲለ(ఛʨ 200 mA)
µËÕ‡¢È“°—∫Õª°√≥ÏÕË◊π (¢π“¥Ÿß¸¥ 200 mA)
*1
*1
*2 Before checking the operation of this unit prior to
installation, this lead must be connected, otherwise
power cannot be turned on.
*2
ʹጅ͵ϯ༫इçනмʳѕٶٜᐓފ˃ۮç
ͫෝӕለʕçѴ۱ʿළ૧ྐé
*2 °ËÕπ°“√µ√«®Õ∫°“√∑”ß“π¢Õß™ÿ¥ª√–°Õ∫π’È°ËÕπ∑’Ë®–µ‘¥µ—Èß
µÈÕßµËÕ“¬µ–°—Ë«π’È°ËÕπ ¡‘©–π—Èπ®–‰¡“¡“√∂‡ªî¥‡§√◊ËÕ߉¥È
ྑཕો
Վ̊ഠཔçܿᙯϚϯ༫ʹጅ˃ۮç؋ළྐЖڄ࠷çՓӕЉ
ྐཔ௲Ϧé
• ϰ༬ҭ݉ੁͬઆ͵ጆڅϚሉࡍ๙ોгԿԾê
ોሉۯ: ̥அᐓފԆԾ˖ڄለཔéʿᇧڄለࠓʹጅᘷࡌ
๑ᖢé
ྐʍለڄ˺ለ֜ԾԽڄ˺ለϚᖄиʕ̈́Љʿψé
1 ՜ຖʓ࿌Ε˃ЎҺྐለڄᖄиለé
2 અ˭ለڄྐለ৹գé
3 ఛ݈çӕለӧڄᏃϚʹጅʕé
°“√‡™◊ËÕ¡‚¥¬„™È‰øøÈ“
‡æ◊ËÕªÈÕß°—π°“√‡°‘¥‰øøÈ“≈—¥«ß®√ ¢Õ·π–π”„ÀȪ≈¥¢—È«·∫µ‡µÕ√’Ë≈∫ÕÕ°
·≈È«®÷ßµËÕ“¬‰ø°ËÕ𵑥µ—È߇§√◊ËÕß
• µ√«®Õ∫„ÀÈ·πË„®«Ë“‰¥È‡¥‘𓬥‘πµËÕ√–À«Ë“߇§√◊ËÕß°—∫µ—«∂—ß
√∂¬πµÏ„À¡Ë·≈È«À≈—ß®“°µ‘¥µ—Èß
°ËÕ•∑”°“•‡™•ËÕ¡µËÕ: µ•«®†Õ•°“•‡¥‘•†“¬‰ø„•••¬•µÏլ˓ߕ–¡—¥•–«—լ˓„ÀȺ‘¥æ•
“¥„•°“•‡™•ËÕ¡µËÕ™ÿ¥ª•–°Õ•™ÿ¥•’ °“•‡™•ËÕ¡µËÕº‘¥æ•“¥Õ“®∑”„Àȇ°‘¥§«“¡‡’¬À“
¬•È“¬·•ß°—•™ÿ¥ª•–
°Õ••’ȉ¥È“•µ–°—Ë«¢Õ߆“¬‰ø ·•–¢ÕßÕÿª°••ÏµËÕ‡™•ËÕ¡®“°µ—«• ß••Õ“®¡’ ∑’ˉ¡Ë‡À¡•Õ•°—•
1 µËÕ“¬‰øﵓ¡≈”¥—∫∑’Ë√–∫ÿ„π√Ÿª¥È“π≈Ë“ß
2 ‡™◊ËÕ¡µËÕ°—∫“¬Õ“°“»
3 ÿ¥∑È“¬ µËÕË«π§«∫§ÿ¡°“√‡¥‘𓬉ø‡¢È“°—∫™ÿ¥ª√–°Õ∫™ÿ¥π’È
See each diagram on page 4 to 6.
ኌ୶ 4 в 6 ࡗʕڄ࿌ڷé
¥Ÿ·ºπº—ߵ˓ßÊ „πÀπÈ“ 4 ∂÷ß 6
THCT1-3_AVX710-008A.indd 3THCT1-3_AVX710-008A.indd 3 12/6/07 3:38:19 PM12/6/07 3:38:19 PM

ENGLISH ‰∑¬ ˁ̂
You can connect an amplifier to upgrade your car stereo system.
• You can supply the power to the amplifier by connecting the
remote leads (blue with white stripe) of this unit to the amplifier.
(To connect other equipment using the remote leads, Y-
connectors need to be separately purchased.)
• Disconnect the speakers from the unit, and connect them to the
amplifier. Leave the speaker leads of the unit unused.
• You can switch off the built-in amplifier and send the audio
signals only to the external amplifier to get clear sound and to
prevent internal heat built-up inside the unit. See page 49 of the
INSTRUCTIONS.
*3 Firmly attach the ground lead to the metallic body or to the
chassis of the car—to the place uncoated with paint (if coated
with paint, remove the paint before attaching the lead). Failure
to do so may cause damage to the unit.
Rear speakers
݈ಙᑵ
≈”‚æßÀ≈—ß
Front speakers
ۮಙᑵ
≈”‚æßÀπÈ“
PRECAUTIONS on power supply and speaker connections:
• DO NOT connect the speaker leads of the power cord to the
car battery; otherwise, the unit will be seriously damaged.
• BEFORE connecting the speaker leads of the power cord to the
speakers, check the speaker wiring in your car.
Connecting the parking brake lead
Connect the parking brake lead to the parking brake system
built in the car.
Parking brake lead (light green)
˾۫Ծለ(ଠႋи)
“¬‡∫√°¡◊Õ (’‡¢’¬«ÕËÕπ)
Parking brake
˾۫Ծ
‡∫√°¡◊Õ
Crimp connector
қʪᏃ
¢—È«µËÕ”À√—∫Àπ’∫
Parking brake switch (inside the car)
˾۫Ծළᘕ(тʝԾ˖)
«‘µ™Ï‡∫√°¡◊Õ (¿“¬„π√∂)
To metallic body or chassis of the car
вہᚙᝂԆԾנᇟ
µËÕ°—∫‚§√ß‚≈À–À√◊Õ‡™´‘¢Õß√∂¬πµú
JVC Amplifier
JVC ̸ୋ؟ʩወ
‡§√◊ËÕß∫¬“¬‡◊¬ß JVC
4
AConnecting an external amplifier / ો͚௱̸ୋ؟ʩወ / °“√µËÕ°—∫·Õ¡æ≈‘ø“¬‡ÕÕ√Ï¿“¬πÕ°
A
ྑກ֝ಚᑶወોሉٍิො:
• ˞ˢӖಚᑶወዘሉોᏄોгྑЗèѵ۲͵ጆઆᘸࡍ๒ᖣê
• ϚӕಙᑵለᏃвಙᑵ˃ۮçᐓފԆԾʕڄಙᑵ
ለཔé
¢ÈÕ§«√√–«—ß ”À√—∫°“√µËÕ·À≈Ë߮˓¬°”≈—ß·≈–≈”‚æß:
• լ˓µËÕ“¬µ–°—Ë«‡§‡∫‘≈°”≈—ߢÕß≈”‚æ߇¢È“°—∫·∫µ‡µÕ√’Ë√∂¬πµÏ ¡‘©–π—Èπ
™ÿ¥ª√–°Õ∫®–‰¥È√—∫§«“¡‡’¬À“¬¡“°
• °ËÕπ∑’Ë®–µËÕ“¬µ–°—Ë«‡§‡∫‘≈°”≈—ߢÕß≈”‚æ߇¢“°—∫≈”‚æß
„Àȵ√«®Õ∫°“√‡¥‘𓬉ø≈”‚æß„π√∂¢Õߧÿ≥„Àȇ√’¬∫√ÈÕ¬‡’¬°ËÕπ
ોг˿۬Կዘሉ
અ˾۫ԾለвԾ˖ڄ˾۫ԾԦé µËÕ“¬‡∫√°¡◊Õ
µËÕ“¬‡∫√°¡◊Õ°—∫√–∫∫‡∫√°¡◊Õ¢Õß√∂¬πµ
̷̣̈́؞ʨգ˥ঠڄԆԾࡖᛏԦé
• ̣̈́અʹጅڄჲለ(ᕇиઘЉΎиঙ) ռ̷؞ʨ
çᕉЏմաྐé
(࠱՟·ჲለմ̧కçᄔవጤᒯ Y ܓለé)
• અಙᑵ֜ʹጅ؋ළçιʕ̷؞ʨéઅʹጅڄಙᑵ
ለ؞ʿ·é
• ̣̈́ᘕ˖̷ܿ؞ʨçઅࡖᏁۑ༙෮෭ռ̷͙؞
ʨçનЩદռଡಣڄࡖçՓՎ̊ʹጅ˖௰ጻ႞ᇊඹéኌ
՟·იاएڄ୶ 49 ࡗé
‡æ◊ËÕ§ÿ≥¿“懒¬ß∑’Ë¥’¢÷Èπ ∑Ë“π“¡“√∂µËÕ·Õ¡æ≈‘ø“¬‡ÕÕ√χ¢È“°—∫
√–∫∫‡§√◊ËÕ߇’¬ß√∂¬πµÏ‰¥È
• ∑Ë“π“¡“√∂®Ë“¬‰ø„ÀÈ°—∫·Õ¡æ≈‘ø“¬‡ÕÕ√ω¥È¥È«¬°“√µËÕ“¬√’‚¡∑ (’øÈ“·∂∫¢“«)
¢Õ߇§√◊ËÕß°—∫·Õ¡æ≈‘ø“¬‡ÕÕ√Ï (À“°µÈÕß°“√µËÕ°—∫Õÿª°√≥ÏÕ◊Ëπ¥È«¬°“√„™È“¬√’‚¡∑
µÈÕß´◊ÈÕ¢—È«µËÕ√Ÿªµ—« Y ·¬°µË“ßÀ“°)
• ∂Õ¥“¬≈”‚æßÕÕ°®“°‡§√◊ËÕß·≈È«µËÕ°—∫·Õ¡ª≈‘ø“¬‡ÕÕ√Ï ª≈ËÕ¬“¬≈”‚æß∑‘È߉«È
‰¡ËµÈÕß„™È
•
“¡“√∂ªî¥«‘µ™Ï·Õ¡æ≈‘ø“¬‡ÕÕ√Ï„πµ—« ·≈È«Ëß—≠≠“≥‡’¬ß‰ª¬—ß·Õ¡æ≈‘ø“¬‡ÕÕ√Ï
¿“¬πÕ°‚¥¬‡©æ“– ‡æ◊ËÕ„Àȉ¥È‡’¬ß∑’˧¡™—¥·≈–ªÈÕß°—π‰¡Ë„Àȇ°‘¥§«“¡√ÈÕπ
–¡¢÷Èπ¿“¬„π™ÿ¥ª√–°Õ∫ ¥Ÿ∑’ËÀπÈ“ 49 ¢Õߧ”·π–π”„π°“√„™È
*3 અϙለႩہᚙԾᝂږԆԾנᇟႌંçளᏻ༳ԅЉூ
ٛွᕒႵ(ϨسʵดʕٛွçϚྐለۮçઅٛွս̓)é
Ϩسʿᆟਭç̈́๑ᖢʹጅé
*3 µËÕ≈«¥“¬¥‘π„ÀÈ·πËπ‡¢“°—∫µ—«∂—߇À≈Á° À√◊Õµ—«∂—ß√∂˙µ√ßË«π ∑’ˉ¡Ë¡’’’‡§≈◊Õ∫
(À“°¡’’‡§≈◊Õ∫Õ¬ŸË „ÀÈ¢Ÿ§¥’ÕÕ°°ËÕπ °ËÕπµËÕ≈«¥“¬¥‘π) À“°‰¡ËªØ‘∫—
µ‘µ“¡§”·π–π”π’È ‡§√◊ËÕßÕ“®™”√ÿ¥À√◊Õ‡’¬À“¬‰¥
Remote lead
ჲለ
“¬µ–°—Ë«•–¬–‰°•
Remote lead (Blue with white stripe)
ჲለ(ᕇиઘЉΎиঙ)
“¬µ–°—Ë«•–¬–‰°• (’πÈ”‡ß‘π≈“¬¢“«)
Y-connector (not supplied for this unit)
Y-ܓለ(ʿᎲʹጅಏա)
¢ÈÕµËÕ√Ÿªµ—« Y ( ‰¡Ë‰¥È„ÀÈ¡“°—∫™ÿ¥ª√–°Õ∫π’È)
To the remote lead of other equipment
в͏ɾށࡖᛏకڄჲለ
µËÕ‡¢È“°—∫Õª°√≥ÏÕË◊π
a
THCT4-6_AVX710-008A.indd 4THCT4-6_AVX710-008A.indd 4 12/6/07 3:38:52 PM12/6/07 3:38:52 PM

5
Connections for external component playback / ોս͚ો௱έ / °“√‡™◊ËÕ¡µËÕ”À√—∫°“√‡≈ËπÕÿª°√≥Ï¿“¬πÕ°
B
Rear view camera KV-CM1*6
݈ඁຖྰጅ KV-CM1*6
°≈ÈÕß¡ÕßÀ≈—ß KV-CM1*6
AV amplifier or decoder
AV ̷؞ʨᙲᇫ
·Õ¡æ≈‘ø“¬‡ÕÕ√Ï AV À√◊Õµ—«∂Õ¥√À—
Camcorder, Navigation System, etc.
ᎨߟጅèৃԦçമ
°≈ÈÕß«‘¥’‚Õ √–∫∫π”∑“ß œ≈œ
External monitor
͙Ε
¡Õ𑇵Õ√Ï¿“¬πÕ°
Extension lead (not supplied)
עۂለ (ԅЉక)
“¬‰øµËÕæË«ß ( ‰¡Ë‰¥È„ÀÈ¡“æ√ÈÕ¡‡§√◊ËÕß)
Video cord (not supplied)
ඁᏁྐង(ԅЉక)
«’¥’‚Õ ( ‰¡Ë‰¥È„ÀÈ¡“æ√ÈÕ¡‡§√◊ËÕß)
Crimp connector (not supplied)*5
қʪᏃ (ԅЉక)*5
¢—È«µËÕ”À√—∫Àπ’∫ ( ‰¡Ë‰¥È„ÀÈ¡“æ√ÈÕ¡‡§√◊ËÕß)*5
Audio/video cord (not supplied)
ࡖᏁ/ඁᏁྐង(ԅЉక)
“¬ÕÕ¥‘‚Õ/ «’¥’‚Õ ( ‰¡Ë‰¥È„ÀÈ¡“æ√ÈÕ¡‡§√◊ËÕß)
Digital optical cable (not supplied)
ᆚтγង (ԅЉక)
“¬„¬·°È«π”·ß·∫∫¥‘®‘µÕ≈
( ‰¡Ë‰¥È„ÀÈ¡“æ√ÈÕ¡‡§√◊ËÕß)
Reverse lamp
݈ጜ
‰ø∂Õ¬À≈—ß
To reverse lamp
вԾۑ༙ጜ
µËÕ°—∫‰ø—≠≠“≥‡«≈“∂Õ¬À≈—ß
Reverse lamp lead*4
Ծۑ༙ጜለ*4
“¬‰ø∑’ˉø—≠≠“≥‡«≈“∂Õ¬À≈—ß*4
To car battery
вԆԾྐЖ
§ËÕ°í∫·∫•‡•Õ√’Ë√∂¬π•Ï
*4 Required only when connecting a rear view camera to
VIDEO IN terminal.
*5 Refer to a in diagram A on page 4.
*6 Set “AV Input” setting to “Camera” when using (see page 47 of
the INSTRUCTIONS).
*4 ෮ᏻ݈ඁຖྰጅв VIDEO IN Ꮓइé
*5 ኌ a Ϛ࿌ A ڄ୶ 4 ࡗé
*6 ՟·इçઅ “Camera” ׆ “AV Input” (ኌ՟·იاएڄ୶
47 ࡗ)é
*4 „™È‡©æ“–‡¡◊ËÕµËÕ°≈ÈÕß¡ÕßÀ≈—ß°—∫™ËÕß VIDEO IN
*5 ¥Ÿ a „π·ºπº—ß A „πÀπÈ“ 4
*6 µ—Èß “AV Input” ‡¢È“°—∫ “Camera” ‡¡◊ËÕµÈÕß°“√„™Èß“π
(¥ŸÀπÈ“ 47 §”·π–π”)
THCT4-6_AVX710-008A.indd 5THCT4-6_AVX710-008A.indd 5 12/6/07 3:39:18 PM12/6/07 3:39:18 PM

6
Connections to the CD changer jack / ોսCDಘၫጆಎ˲ / °“√‡™◊ËÕ¡µËÕ°—∫À—«µËÕ´’¥’‡™π‡®Õ√Ï
To disconnect the connector / ؛ළ / ª≈¥¢—È«µËÕ
Hold the connector top tightly ( 1 ), then pull it out ( 2 ).
ӟႌʕ௰ ( 1 )ç݈અ˃̳( 2 )é
®—∫¥È“π∫π¢Õߢ—È«µËÕ„ÀÈ·πËπ ( 1 ) ®“°π—Èπ®÷ߥ—ßÕÕ° ( 2 )
iPod is a trademark of Apple Inc., registered in the U.S. and other
countries.
C
TROUBLESHOOTING
• The fuse blows.
* Are the red and black leads connected correctly?
• Power cannot be turned on.
* Is the yellow lead connected?
• No sound from the speakers.
* Is the speaker output lead short-circuited?
• Sound is distorted.
* Is the speaker output lead grounded?
* Are the “–” terminals of L and R speakers grounded in common?
• Noise interfere with sounds.
* Is the rear ground terminal connected to the car’s chassis using
shorter and thicker cords?
• Unit becomes hot.
* Is the speaker output lead grounded?
* Are the “–” terminals of L and R speakers grounded in common?
• This unit does not work at all.
* Have you reset your unit?
When connecting the external components, refer also to the
manuals supplied for the components and adapter.
CAUTION:
Before connecting the external components, make sure that
the unit is turned off.
You can connect the following JVC components to the CD changer
jack.
JVC component Model name
CD changer (CD-CH) CH-X1500, etc.
You can also connect the following components through the various
JVC adapters.
• Connection cords may need to be purchased separately.
Component Adapter Model name
Bluetooth device Bluetooth adapter KS-BTA200
iPod Interface adapter
for iPod
KS-PD100
Portable audio player with
line output jacks
Line input adapter KS-U57
Portable audio player with
3.5 mm stereo mini jack
AUX input adapter KS-U58
When connecting more than one component (maximum: two),
it is recommended that you connect the components in series as
explained below.
When connecting two components in series
ັсᑸճࡵ௱έई
‡¡◊ËÕ‡™◊ËÕ¡µËÕË«πª√–°Õ∫Õß™‘Èπ·∫∫Õπÿ°√¡
*7 To use these components, set the external input setting correctly
(see page 47 of the INSTRUCTIONS).
͙௰άइç͏ቁኌ௰ά˪ᕢಗ˃՟·˾̰é
ʯ˼:
ો͚ો௱έ˄ۯèቂᇨۙᘖ͵ጆê
̣̈́અ̣ʓ JVC ௰άռ CD ಗၪ˱é
JVC ௱έ ܔ༚ϐၴ
CD ಗၪ (CD-CH) CH-X1500çമ
ʛ̈́௫ཫύၲ JVC ᕢಗ̣ʓ௰άé
• ለ̈́ᄔ࠱వጤᒯé
௱έ ᕣಘወ ܔ༚ϐၴ
ᕇ̖༫ ᕇ̖ᕢಗ KS-BTA200
iPod iPod ˒ࡒᕢಗ KS-PD100
ઘለཔ᎔̳˱ڄ̈́Ϸ
ࡖᏁᆑ؞
ለཔ᎔ʈᕢಗ KS-U57
ઘ 3.5 ଔТਁіࡖᛏ˱
ڄ̈́ϷࡖᏁᆑ؞
AUX ᎔ʈᕢಗ KS-U58
ະϠࡴ௰άइ (ఛϠð2)çܿᙯ՜ʓ̄Εрᑷ௰άé
‡¡◊ËÕ‡™◊ËÕ¡µËÕÕÿª°√≥Ï¿“¬πÕ° „ÀÈ¥Ÿ¢ÈÕ¡Ÿ≈‡°’ˬ«°—∫Õÿª°√≥Ï¿“¬πÕ°·≈–Õ–·¥ª‡µÕ√Ï
®“°§ŸË¡◊Õ∑’Ë„ÀÈ¡“¥È«¬
¢ÈÕ§«√√–«—ß
:
°ËÕπ®–‡™◊ËÕ¡µËÕ°—∫Õÿª°√≥Ï¿“¬πÕ° °√ÿ≥“µ√«®Õ∫„ÀÈ·πË„®«Ë“ªî¥‡§√◊ËÕßÕ¬ŸË
∑Ë“π“¡“√∂‡™◊ËÕ¡µËÕË«πª√–°Õ∫ JVC µËÕ‰ªπ’ȇ¢È“°—∫™ËÕ߇’¬∫´’¥’‡™π‡®Õ√Ï
Ë«πª√–°Õ∫
JVC
™◊ËÕ√ÿËπ
´’¥’‡™π‡®Õ√Ï (CD-CH) CH-X1500 œ≈œ
‡™◊ËÕ¡µËÕË«πª√–°Õ∫µËÕ‰ªπ’Ⱥ˓πÕ–·¥ª‡µÕ√Ï·∫∫µË“ßÊ ¢Õß JVC ‰¥È‡™Ëπ°—π
• Õ“®µÈÕß´◊ÈÕ“¬‡™◊ËÕ¡µËյ˓ßÀ“°
Ë«πª√–°Õ∫ Õ–·¥ª‡µÕ√Ï ™◊ËÕ√ÿËπ
Õÿª°√≥Ï∫≈Ÿ∑Ÿ∏ Õ–·¥ª‡µÕ√Ï∫≈Ÿ∑Ÿ∏ KS-BTA200
iPod
Õ‘π‡∑Õ√χø
Õ–·¥ª‡µÕ√Ï”À√—∫√ÿËπ
iPod
KS-PD100
‡§√◊ËÕ߇≈Ëπ‡æ≈ß·∫∫æ°æ“
æ√ÈÕ¡¢—È«µËÕ Line Output Õ–·¥ª‡µÕ√Ï
Line Input
KS-U57
‡§√◊ËÕ߇≈Ëπ‡æ≈ß·∫∫æ°æ“
æ√ÈÕ¡™ËÕ߇’¬∫·∫∫ 3.5
¡¡.
Stereo Mini
Õ–·¥ª‡µÕ√Ï
AUX Input
KS-U58
‡¡◊ËÕ‡™◊ËÕ¡µËÕË«πª√–°Õ∫¡“°°«Ë“Àπ÷Ëß™‘Èπ
(
Ÿßÿ¥Õß™‘Èπ
)
¢Õ·π–π”„ÀÈ∑Ë“π‡™◊ËÕ¡
µËÕË«πª√–°Õ∫·∫∫Õπÿ°√¡µ“¡§”Õ∏‘∫“¬¢È“ß≈Ë“ß
iPod ݵApple Inc. (ᙧس˙͌) Ϛࠀ˪մ̧ࣁٌ̰ڄੋᆤé
*7 ࠱՟·௰άçቁᇧ׆͙௰᎔ʈ(ኌ՟·იاएڄ
୶ 47 ࡗ)é
iPod
‡ªìπ‡§√◊ËÕßÀ¡“¬°“√§È“¢Õß
Apple Inc.
´÷Ëß®¥∑–‡∫’¬π°“√§È“„πª√–‡∑»
À√—∞Õ‡¡√‘°“·≈–ª√–‡∑»Õ◊ËπÊ
*7 „π°“√„™ÈË«πª√–°Õ∫‡À≈Ë“π’È „Àȵ—Èߧ˓°“√√—∫—≠≠“≥Õÿª°√≥Ï¿“¬πÕ°„ÀÈ∂Ÿ°µÈÕß
(¥ŸÀπÈ“ 47 §”·π–π”)
CD changer jack
CDಗၪ˱
™ËÕ߇’¬∫µËÕ¢Õ߇§√◊ËÕ߇≈Ëπ´’¥ CD
A KS-BTA200
B*7 CD-CH / KS-PD100 / KS-U57 / KS-U58
ݮᄑਜ
• ۙᎴുጜᔄê
* ᐓފ߹иለᏃ֜෨иለᏃݵѴ᙮ᇧî
• ྑກˀ়ોê
* ᐓފ෦иለᏃݵѴʕî
• ಚᑶወԆЊᑶࡗê
* ᐓފಙᑵ᎔̳ለᏃݵѴഠཔî
• ᑶࡗ͜ॳê
* ᐓފಙᑵ᎔̳ၷʪݵѴϙî
* ᐓފಙᑵڄͣ (L) ç͆ (R) ၷʪڄ࠷ī–ĬݵѴθψ
ϙî
• ࡗʹᓿࡗᛐê
* ݈ϙၷʪႩԾԽݵѴ՟·ཛഠ֜ཛ۹ڄྐለî
• ͵ጆഛᇋê
* ᐓފಙᑵ᎔̳ၷʪݵѴϙî
* ᐓފಙᑵڄͣ (L) ç͆ (R) ၷʪڄ࠷ī–ĬݵѴθψ
ϙî
• ͵ጆҭθˀ়ᇨይіê
* ЉԅЉࡌʹጅî
°“√µ√«®Õ∫ª— ≠À“¢—¥¢ÈÕß
• øî«ú¢“¥
* ¡’°“√‡™◊ËÕ¡“¬µ–°—Ë«’¥”·≈–’·¥ßլ˓ß∂Ÿ°µÈÕßÀ√◊Õ‰¡ò
• ‰¡Ë“¡“√∂‡ª‘¥‡§√◊ËÕ߉¥È
* ¡’°“√‡™◊ËÕ¡“¬µ–°—Ë«’‡À≈◊ÕßÀ√◊Õ‰¡ò
• ‰¡Ë¡’‡’¬ßÕÕ°®“°≈”‚æß
* “¬µ–°—Ë«Ë«π∑’ËÕÕ°∑“ß≈”‚æ߇°‘¥‰øøÈ“≈—¥«ß®√À√◊Õ‰¡Ë
• ‡’¬ß‡æ’Ȭπ
* “¬µ–°—Ë«Ë«π∑’ËÕÕ°∑“ß≈”‚æßµËÕ≈ߥ‘πÀ√◊Õ‰¡Ë
* “¬¢—È«≈∫¢Õß≈”‚æߥȓπ´È“¬ (L) ·≈–¢«“ (R) µËÕ≈ߥ‘πµ“¡ª°µ‘À√◊Õ‰¡Ë
• ‡’¬ß√∫°«π
* ¡’°“√„™È“¬—ÈπÊ À√◊ÕÀπ“Ê µËÕ®“°‡§√◊ËÕßò«π∑’˵‘¥µ—Èß ‰«È∫πæ◊Èπ¥È“πÀ≈—ß
°—∫µ—«∂—ß√∂¬πµÏÀ√◊Õ‰¡Ë
• ™ÿ¥ª√–°Õ∫√ÈÕπ¢÷Èπ
* “¬µ–°—Ë«Ë«π∑’ËÕÕ°∑“ß≈”‚æßµËÕ≈ߥ‘πÀ√◊Õ‰¡Ë
* “¬¢—È«≈∫¢Õß≈”‚æߥȓπ´È“¬ (L) ·≈–¢«“ (R) µËÕ≈ߥ‘πµ“¡ª°µ‘À√◊Õ‰¡Ë
• ‡§√◊ËÕ߉¡Ë∑”ß“π‡≈¬
* ‰¥È∑”°“√√’‡´Áµ‡§√◊ËÕßÀ√◊Õ¬—ß
THCT4-6_AVX710-008A.indd 6THCT4-6_AVX710-008A.indd 6 12/6/07 3:39:23 PM12/6/07 3:39:23 PM
ENGLISH
For installation and connections, refer to the separate manual.
INSTRUCTIONS
LVT1780-002A
[U]
For canceling the display demonstration, see page 8.
DVD RECEIVER WITH MONITOR
KW-AVX716
KW-AVX710
KW-AVX716
KW-AVX710
KW-AVX716
KW-AVX710
Cover002A_KW-AVX710U_1.indd 2Cover002A_KW-AVX710U_1.indd 2 07.11.13 1:42:03 PM07.11.13 1:42:03 PM
ENGLISH
2
Thank you for purchasing a JVC product.
Please read all instructions carefully before operation, to ensure your complete understanding and to obtain the best
possible performance from the unit.
IMPORTANT FOR LASER PRODUCTS
1. CLASS 1 LASER PRODUCT
2. CAUTION: Do not open the top cover. There are no user serviceable parts inside the unit; leave all servicing to
qualified service personnel.
3. CAUTION: Visible and/or invisible class 1M laser radiation when open. Do not view directly with optical
instruments.
4. REPRODUCTION OF LABEL: CAUTION LABEL, PLACED OUTSIDE THE UNIT.
[European Union only]
Cautions on the monitor:
• The monitor built in this unit has been produced
with high precision, but it may have some
ineffective dots. This is inevitable and is not
malfunction.
• Do not expose the monitor to direct sunlight.
• Do not operate the touch panel using a ball-point
pen or similar tool with the sharp tip.
Touch the buttons on the touch panel with your
finger directly (if you are wearing a glove, take it
off).
• When the temperature is very cold or very hot...
– Chemical changes occur inside, causing
malfunction.
– Pictures may not appear clearly or may move
slowly. Pictures may not be synchronized with
the sound or picture quality may decline in
such environments.
WARNINGS:
To prevent accidents and damage
• DO NOT install any unit or wire any cable in a
location where;
– it may obstruct the steering wheel and
gearshift lever operations.
– it may obstruct the operation of safety devices
such as air bags.
– it may obstruct visibility.
• DO NOT operate the unit while driving.
If you need to operate the unit while driving, be
sure to look around carefully.
• The driver must not watch the monitor while
driving.
EN_KW-AVX710[U].indb 2EN_KW-AVX710[U].indb 2 07.12.6 3:31:14 PM07.12.6 3:31:14 PM

3
ENGLISH
INTRODUCTION
How to reset your unit
• Your preset adjustments will also be erased.
How to forcibly eject a disc
• If this does not work, reset the unit.
For safety...
• Do not raise the volume level too much, as this will
block outside sounds, making driving dangerous.
• Stop the car before performing any complicated
operations.
Temperature inside the car...
If you have parked the car for a long time in hot or cold
weather, wait until the temperature in the car becomes
normal before operating the unit.
Contents
INTRODUCTION
Playable disc types .......................... 4
Basic operations—
Monitor panel/touch panel
............ 5
Basic operations—
Remote controller (RM-RK252) ...... 6
OPERATIONS
Before operating the unit ................ 8
Common operations ........................ 9
Listening to the radio ...................... 10
Disc operations ................................ 13
EXTERNAL DEVICES
Bluetooth® operations—
Cellular phone/audio player .......... 27
Listening to the CD changer .............. 34
Listening to the iPod ........................ 36
Using other external components ..... 38
SETTINGS
Sound equalization .......................... 41
Assigning titles to the sources .......... 42
Menu operations ............................. 43
REFERENCES
Maintenance ................................... 52
More about this unit ........................ 53
Troubleshooting .............................. 60
Specifications .................................. 64
NO EJECT?
EMERGENCY EJECT?
Exit
ENTER
Back
11
3
2
at the same time
EN_KW-AVX710[U].indb 3EN_KW-AVX710[U].indb 3 07.12.6 3:31:18 PM07.12.6 3:31:18 PM

ENGLISH
4
Disc type Recording format, file type, etc. Playable
DVD DVD Video (Region Code: 3)*1
DVD Audio
DVD-ROM
DVD Recordable/Rewritable
(DVD-R/-RW*2, +R/+RW*3)
• DVD Video: UDF bridge
• DVD-VR
• DivX/MPEG1/MPEG2/JPEG/MP3/
WMA/WAV: ISO 9660 level 1,
level 2, Romeo, Joliet
DVD Video
DVD-VR
DivX/MPEG1/MPEG2
JPEG
MP3/WMA/WAV
AAC
MPEG4
DVD+VR
DVD-RAM
Dual Disc DVD side
Non-DVD side
CD/VCD Audio CD/CD Text (CD-DA)/DTS-CD
VCD (Video CD)
SVCD (Super Video CD)
CD-ROM
CD-I (CD-I Ready)
CD Recordable/Rewritable
(CD-R/-RW)
• ISO 9660 level 1, level 2, Romeo,
Joliet
CD-DA
MP3/WMA/WAV
JPEG
DivX/MPEG1/MPEG2
AAC
MPEG4
*1 If you insert a DVD Video disc of an incorrect Region Code, “Region code error” appears on the screen.
*2 DVD-R recorded in multi-border format is also playable (except for dual layer discs).
DVD-RW dual layer discs are not playable.
*3 It is possible to play back finalized +R/+RW (Video format only) discs.
+RW double layer discs are not playable.
Playable disc types
Caution for DualDisc playback
The Non-DVD side of a “DualDisc” does not comply with the “Compact Disc Digital Audio” standard. Therefore,
the use of Non-DVD side of a DualDisc on this product may not be recommended.
EN_KW-AVX710[U].indb 4EN_KW-AVX710[U].indb 4 07.12.6 3:31:19 PM07.12.6 3:31:19 PM
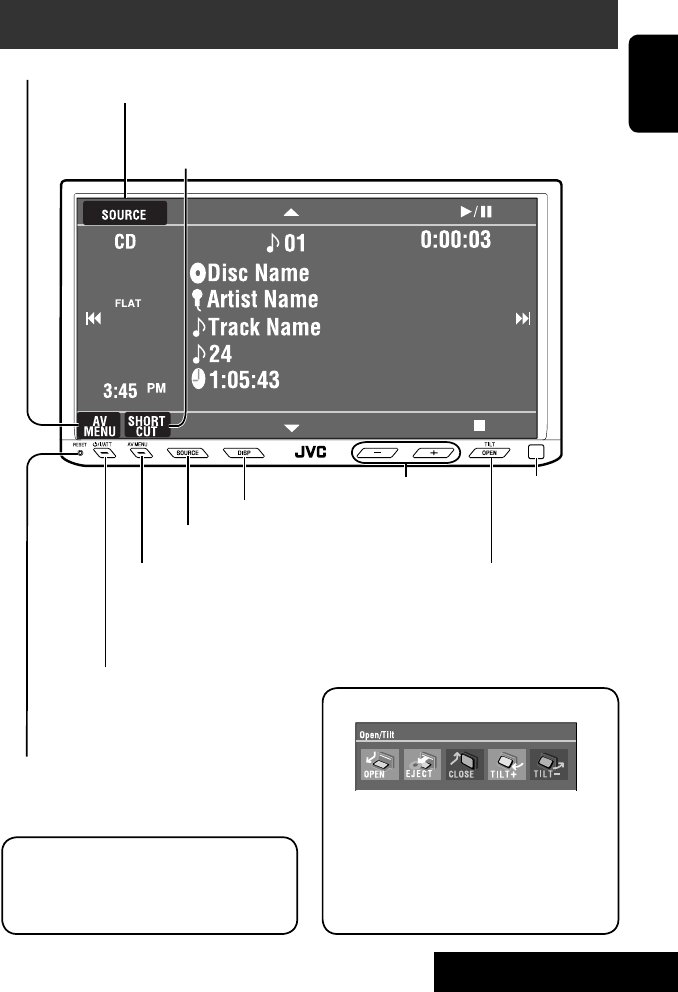
5
ENGLISH
INTRODUCTION
Basic operations — Monitor panel/touch panel
• Turn on the power.
• Turn off the power. [Hold]
• Attenuate the sound (if the power is on).
Change the sources.
Remote sensorAdjust the volume.
Reset the unit.
• Use only when the internal system malfunctions.
Display <AV Menu> screen.
Display and erase the Short Cut windows.
Available functions vary among the sources. For details, see each source operation
section.
Change the display information.
• [OPEN]: Open the monitor panel.
• [EJECT]: Eject the disc.
• [CLOSE]: Close the monitor panel.
• [TILT +/–]: Tilt the monitor panel.
• [Exit]: Erase this screen.
• Shaded icons cannot be used.
• In the explanation, buttons on the touch panel
are indicated inside [ ].
• For details on the touch panel operations, see
each source operation section.
Display <Source Menu> screen.
Display <AV Menu> screen.
☞ page 43
• Display <Open/Tilt> menu.
• Eject the disc and display <Open/Tilt>
menu. [Hold]
• Close the monitor panel when <Open/Tilt>
menu is displayed.
☞ page 43
☞ page 9
☞ page 9
<Open/Tilt> menu
EN_KW-AVX710[U].indb 5EN_KW-AVX710[U].indb 5 07.12.6 3:31:20 PM07.12.6 3:31:20 PM
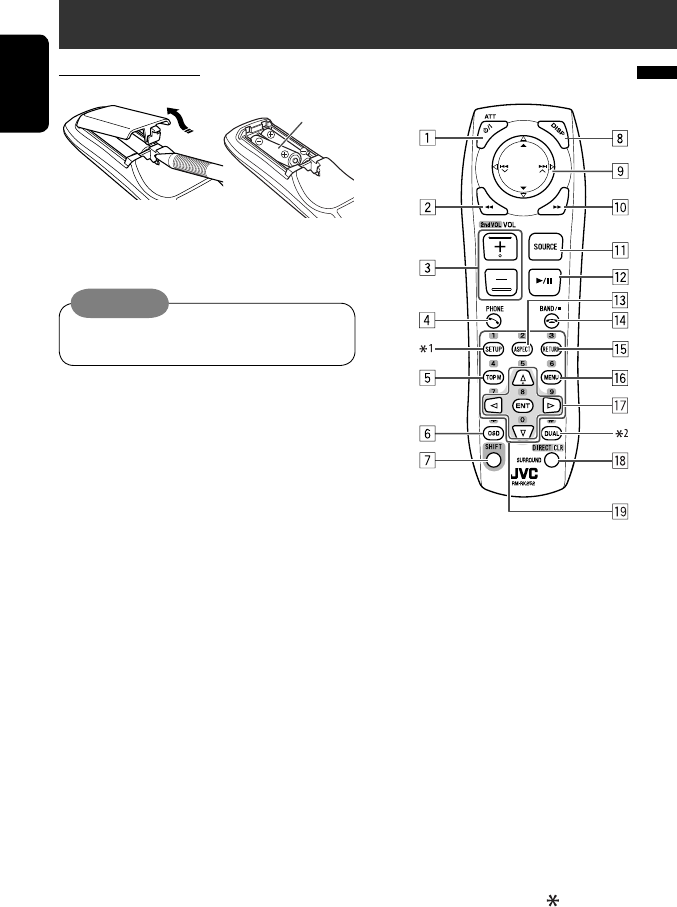
ENGLISH
6
Basic operations — Remote controller (RM-RK252)
Main elements and features
1 • Turns on the power.
• Attenuates the sound if the power is on.
• Turns off the power if pressed and held (while
the power is on).
2 • Reverse search
• Reverse slow motion (during pause)
3 Adjusts the volume level.
• Does not function as “2nd VOL.”
4 • Displays <Dial Menu> screen.
• Displays <Redial> menu if pressed and held.
• Answers incoming calls.
5 • DVD/DivX 6: Shows the disc menu.
• VCD: Resumes PBC playback.
• DVD-VR: Shows the Original Program screen.
6 Shows the on-screen bar.
• Does not function as “ .“
R03/LR03/AAA
Installing the battery
Insert the batteries into the remote controller by
matching the polarity (+ and –) correctly.
Caution:
Battery shall not be exposed to excessive heat such
as sunshine, fire or the like.
• If the range or effectiveness of the remote controller
decreases, replace both batteries.
Before using the remote controller:
• Aim the remote controller directly at the remote
sensor on the unit.
• DO NOT expose the remote sensor to bright light
(direct sunlight or artificial lighting).
EN_KW-AVX710[U].indb 6EN_KW-AVX710[U].indb 6 07.12.6 3:31:20 PM07.12.6 3:31:20 PM

7
ENGLISH
INTRODUCTION
p • Forward search
• Forward slow motion (during pause)
q Selects the source.
w For disc operations:
Starts playback/pauses.
For Bluetooth operations:
• Answers incoming calls.
• Starts playback/pauses. (for audio player
operation).
e Changes the aspect ratio of the playback
pictures.
r “TUNER”: Selects the bands.
“DISC”: Stops playback.
“Bluetooth PHONE”: Ends the call.
“Bluetooth AUDIO”: Starts playback/pauses.
t VCD: Returns to the PBC menu.
y • DVD Video/DivX 6: Shows the disc menu.
• VCD: Resumes PBC playback.
• DVD-VR: Shows the Playlist screen.
u • Makes selection/settings.
• @ / #: Skips back or forward by five minutes
for DivX/MPEG1/MPEG2.
• % / fi: Changes discs for “CD-CH.”
i*3 • Switches number entry mode for “DISC.”
• Erases the misentry after entering a wrong
number.
• Does not function as “SURROUND.”
o*3 Number buttons
• Enters numbers.
• “TUNER”: Selects the preset station directly.
*1 Functions as a number button only (see o ).
*2 Not used for this unit.
*3 Functions when pressed with SHIFT.
7 Functions with other buttons (see i and o).
8 Changes the display information.
9 For disc operations:
• 5 / ∞:
DVD: Selects the title.
DVD-VR: Selects the program/Playlist.
Other discs (except VCD/CD): Selects the
folders.
• 4 / ¢:
– Press briefly: reverse skip/forward skip
– Press and hold: reverse search/forward
search
For FM/AM operations:
• 5 / ∞: Selects the preset stations.
• 4 / ¢: Functions to search for stations.
– Press briefly: Auto Search
– Press and hold: Manual Search
For Apple iPod operations:
• ∞: Starts playback/pauses
• 5: Enters the main menu (then 5 / ∞
/ 4 / ¢ work as menu selecting
buttons).
In the main menu:
• 5: Returns to the previous menu.
• ∞: Confirms the selection.
• 4 / ¢
– Press briefly: Selects an item.
– Press and hold: Skips ten items at a time.
For Bluetooth operations:
• 4 / ¢: reverse skip/forward skip (for
audio player operation)
EN_KW-AVX710[U].indb 7EN_KW-AVX710[U].indb 7 07.12.6 3:31:21 PM07.12.6 3:31:21 PM

8
ENGLISH
You can cancel the demonstration on the screen and set
the clock.
• Non-available items will be shaded on the AV Menu
screens.
Indication language:
In this manual, English indications are used
for purpose of explanation. You can select the
indication language. (☞ page 45)
~ Turn on the power.
Ÿ Display <AV Menu> screen.
! Display <Setup> menu.
⁄ Cancel the demonstration.
Select <Off>.
@ Set the clock settings.
¤ Finish the procedure.
Before operating the unit
Moves to the succeeding menu page
Moves to the preceding menu page
Return to the previous screen.
EN_KW-AVX710[U].indb 8EN_KW-AVX710[U].indb 8 07.12.6 3:31:21 PM07.12.6 3:31:21 PM
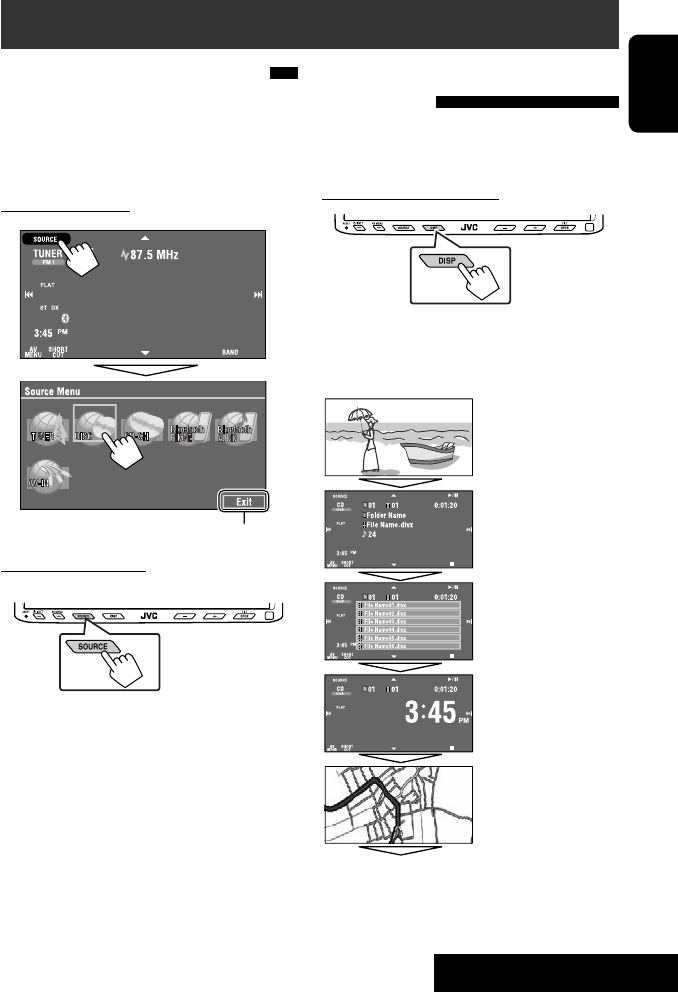
OPERATIONS
9
ENGLISH
Changing the display
information
• Available display information varies among the
playback sources.
On the monitor panel only:
• Each time you press DISP, the display changes to
show the various information.
Ex. When the playback source is a DivX disc.
Selecting the playback source
• Available sources depend on the external
components you have connected, media you have
attached, and the <Input> settings you have made
(☞ page 47).
On the touch panel:
On the monitor panel:
TUNER = DISC (DVD/VCD/CD) =CD-CH, iPod, or
EXT-IN = Bluetooth PHONE = Bluetooth AUDIO
= AV-IN = (back to the beginning)
• You cannot select these sources if they are not ready.
Exit
Source information screen
Clock time in large numbers
Navigation screen
(When <Navigation> is
selected for <AV Input>)
(☞ page 47)
Back to the beginning
Playback picture screen
(only for video sources)
Track list
Common operations
EN_KW-AVX710[U].indb 9EN_KW-AVX710[U].indb 9 07.12.6 3:31:22 PM07.12.6 3:31:22 PM

10
ENGLISH
When an FM stereo broadcast is
hard to receive
1 Press [AV MENU].
• You can also use AV MENU on the monitor panel.
2 Press [Mode].
Listening to the radio
~ Press [SOURCE], then press [TUNER]. (☞ page 9)
• You can also use SOURCE on the monitor panel. Press it repeatedly.
Ÿ Press [BAND].
! Press [4] or [¢] to search for a station—Auto Search.
• Manual Search: Hold either [4]or [¢] until “Manual Search” appears on the screen, then press it
repeatedly.
• The ST indicator lights up when receiving an FM stereo broadcast with sufficient signal strength.
3
Reception improves, but stereo effect will be lost.
• The MONO indicator lights up.
To restore stereo effect, select <Off>.
Preset no.
Band
Tuner indicators
Assigned station name (☞ page 42). If no name is assigned,
the frequency of the station is displayed instead.
☞ page 9
Sound mode
(☞ page 41)
☞ page 11,
: Buttons on the
touch panel. In
the explanation,
they are
indicated inside
[ ].
EN_KW-AVX710[U].indb 10EN_KW-AVX710[U].indb 10 07.12.6 3:31:23 PM07.12.6 3:31:23 PM

OPERATIONS
11
ENGLISH
FM station automatic presetting
—SSM (Strong-station
Sequential Memory)
This function works only for FM bands.
You can preset six stations for each band.
1 Press [AV MENU].
• You can also use AV MENU on the monitor panel.
2 Press [Mode].
3
Local FM stations with the strongest signals are
searched and stored automatically in the FM band.
Tuning in to stations with
sufficient signal strength
This function works only for FM bands. Once you have
activated this function (selected <Local>), it always
works when searching for FM stations.
1 Press [AV MENU].
• You can also use AV MENU on the monitor panel.
2 Press [Mode].
3
Only stations with sufficient signal strength will be
detected.
• The DX indicator goes off, then the LO indicator
lights up.
• You can also change <IF Band Width> setting
(for details, ☞ page 47).
<IF Band Width> menu can be accessed by
pressing [SHORT CUT] on the touch panel, then..
☞ page 41
EN_KW-AVX710[U].indb 11EN_KW-AVX710[U].indb 11 07.12.6 3:31:23 PM07.12.6 3:31:23 PM

12
ENGLISH
Selecting a preset station
On the remote:
1
2
On the unit:
• To select directly on the touch panel
• To select from the Preset List
1
2
or
Hold
Manual presetting
Ex.: Storing FM station of 92.5 MHz into preset number
4 of the FM1 band.
1 Display the Preset List.
2 Tune in to a station you want to preset.
3 Select a preset number.
The station selected in step 2 is now stored in
preset number 4.
[Hold]
EN_KW-AVX710[U].indb 12EN_KW-AVX710[U].indb 12 07.12.6 3:31:24 PM07.12.6 3:31:24 PM

OPERATIONS
13
ENGLISH
~ Open the monitor panel.
<Open/Tilt> menu is displayed.
• By pressing and holding the button, you can
open the monitor panel and eject the disc.
Ÿ Press [OPEN].
Disc operations
The disc type is automatically detected, and playback starts automatically (for some discs: automatic start depends
on its internal program).
If a disc does not have any disc menu, all tracks on it will be played repeatedly until you change the source or eject
the disc.
If “ ” appears on the screen, the unit cannot accept the operation you have tried to do.
• In some cases, without showing “ ,” operations will not be accepted.
Label side
Caution on volume setting:
Discs produce very little noise compared with other
sources. Lower the volume before playing a disc
to avoid damaging the speakers by the sudden
increase of the output level.
When playing back a multi-channel encoded disc,
the multi-channel signals are downmixed.
• You can fully enjoy multi-channel sound by
connecting an amplifier or a decoder compatible
with these multi-channel sources. (☞ also page
57)
! Insert a disc.
Monitor panel closes automatically.
If not, press [CLOSE].
Caution:
Do not place your finger behind the monitor panel.
EN_KW-AVX710[U].indb 13EN_KW-AVX710[U].indb 13 07.12.6 3:31:24 PM07.12.6 3:31:24 PM
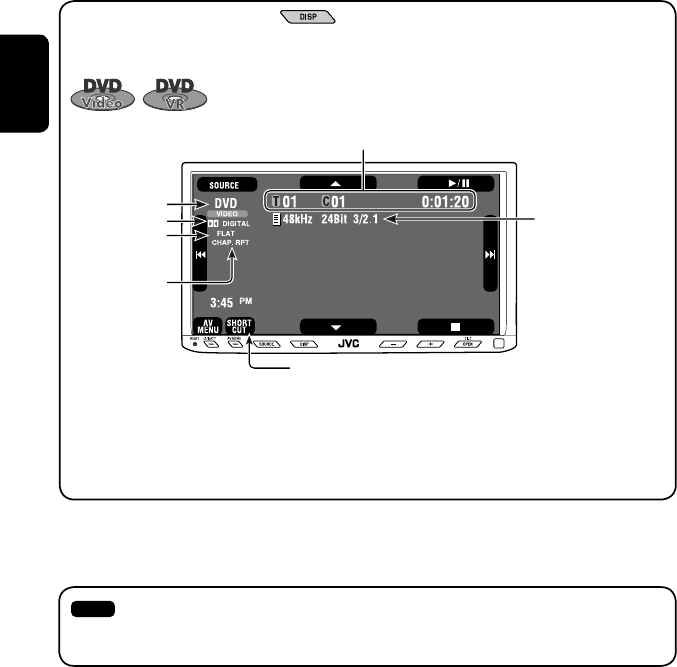
14
ENGLISH
While playing the following discs, press .
• Each time you press the button, the display changes to show the different information. (☞ page 9)
Audio format
DVD Video: Title no./Chapter no./Playing time
DVD-VR: Program no. (or Playlist no.)/Chapter no./Playing time
Playback mode
Disc type *1Sampling frequency/Bit
rate/Recorded signal
channel no.
☞ page 19
[3 / 8] Start and pause playback
[7] Stop playback
[4 ¢] Press: Select chapter
Hold: Reverse/forward search*2
[5 ∞] Select title/program/playlist
*1 DVD-VR also indicates either PRG (program) or PLAY (playlist) playback.
*2 Search speed: x2 ] x10
: Buttons on the touch panel. In the explanation, they are indicated inside [ ].
These buttons also work when they are not shown on the touch panel (while watching the playback pictures
on the screen).
Sound mode
(☞ page 41)
EN_KW-AVX710[U].indb 14EN_KW-AVX710[U].indb 14 07.12.6 3:31:25 PM07.12.6 3:31:25 PM
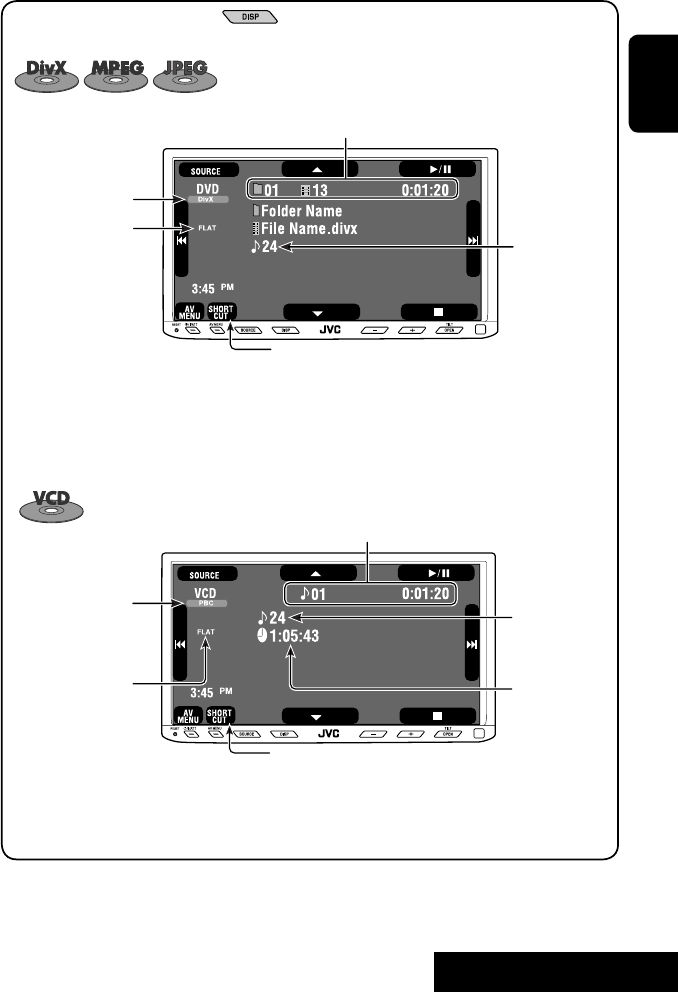
OPERATIONS
15
ENGLISH
Track no./Playing time
[3 / 8] Start and pause playback
[7] Stop playback
[4 ¢] Press: Select track
Hold: Reverse/forward search*2
For DivX/MPEG1/MPEG2: Folder no./Track no./Playing time
For JPEG: Folder no./File no.
[3 / 8] Start and pause playback
[7] Stop playback
[4 ¢] Press: Select track
Hold: Reverse/forward search for DivX/MPEG1/MPEG2 *1
[5 ∞] Press: Select folder
Hold: Display Folder list
While playing the following discs, press .
• Each time you press the button, the display changes to show the different information (☞ page 9).
Disc type
☞ page 19
☞ page 19
The PBC indicator
lights up when PBC is
in use.
Total track no.
included on the
disc
Total track no.
included on the
disc
Total playing time
Sound mode
(☞ page 41)
Sound mode
(☞ page 41)
*1 Search speed: ¡1 ] ¡2
*2 Search speed: x2 ] x10
EN_KW-AVX710[U].indb 15EN_KW-AVX710[U].indb 15 07.12.6 3:31:25 PM07.12.6 3:31:25 PM

16
ENGLISH
Track no./Playing time
Only for CD Text *3
Folder no./Track no./Playing time
Audio format
(MP3/WMA/WAV)
☞ page 19
*3 “No Name” appears for conventional CDs.
*4 Search speed: x2 ] x10
Tag data appears
only when it is
recorded.
Sound mode
(☞ page 41)
☞ page 19
[3 / 8] Start and pause playback
[7] Stop playback
[4 ¢] Press: Select track
Hold: Reverse/forward search*4
[5 ∞] Press: Select folder
Hold: Display Folder list
[3 / 8] Start and pause playback
[7] Stop playback
[4 ¢] Press: Select track
Hold: Reverse/forward search*4
Total track no.
included on the disc
Total playing time
Total track no. included on the disc
Sound mode
(☞ page 41)
EN_KW-AVX710[U].indb 16EN_KW-AVX710[U].indb 16 07.12.6 3:31:26 PM07.12.6 3:31:26 PM
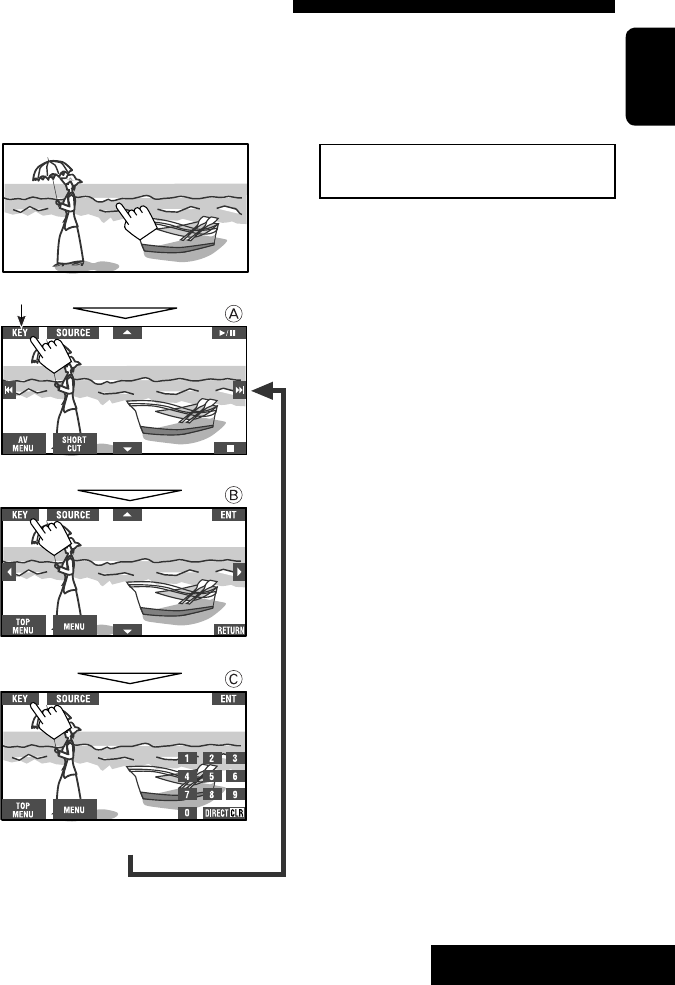
OPERATIONS
17
ENGLISH
Touch the screen (center portion).
Operation buttons on the screen
You can display the following operation buttons while watching the playback pictures on the screen.
• While the operation buttons are displayed, aspect ratio is fixed to <Full>. (☞ page 45)
• If no operation is done for about five seconds, the operation buttons disappear (except when a disc menu is
displayed).
Touch [KEY].
☞ pages 20 to 24 on how the operation buttons
particularly work for a variety of the discs
A
[SOURCE] Display <Source Menu> screen
[AV MENU] Display <AV Menu> screen
[SHORT CUT] Display the Short Cut buttons
[3 / 8] Start and pause playback
[7] Stop playback
[4 ¢] Press: Select track
Hold: Reverse/forward search
[5 ∞] Select folders
• The above buttons also work when they are not shown on
the screen (while watching the playback picture).
* While a disc menu is played back for DVD, [KEY] is
automatically displayed. On the disc menu, you can select a
menu item directly by touching it on the screen.
B
For DVD/VCD/DivX menu operation playback
[2 3 5 ∞] Select the menu items
[ENT] Confirm the selection
[TOP MENU] Display the disc menu
[MENU] Display the disc menu
[RETURN] Return to the previous menu or display the
menu (only for VCD with PBC)
C
For entering the numbers
[DIRECT CLR] • Switch between chapter/track entry and
title/group/folder entry
• Erase the last entry when you enter a
wrong number
[0]–[9]=[ENT]
Enter numbers
Ex.: To enter “105,” press [1], [0], [5], then [ENT]
*
Touch [KEY].
Touch [KEY].
To erase the operations, touch the screen again.
EN_KW-AVX710[U].indb 17EN_KW-AVX710[U].indb 17 07.12.6 3:31:27 PM07.12.6 3:31:27 PM

18
ENGLISH
1
• You can also use AV MENU on the monitor panel.
2
3
When one of the playback modes is selected, the
corresponding indicator lights up on the source
information screen.
To cancel, select <Off>.
Selecting playback modes
You can use the following playback modes—Repeat or Random.
Ex.: To select Track Repeat
Disc type Repeat Random
Chapter: Repeats current chapter
Title: Repeats current title —
Chapter: Repeats current chapter
Program: Repeats current program (not
available for Playlist playback)
—
Track: Repeats current track
Folder: Repeats current folder
Folder: Randomly plays all tracks of current
folder, then tracks of next folders
Disc (All): Randomly plays all tracks
Folder: Repeats current folder —
Track: Repeats current track (PBC not in
use)
Disc (All): Randomly plays all tracks (PBC not
in use)
Track: Repeats current track*1Disc (All): Randomly plays all tracks
Track: Repeats current track*1
Folder: Repeats all tracks of the current
folder
Folder: Randomly plays all tracks of current
folder, then tracks of next folders
Disc (All): Randomly plays all tracks
*1 You can also use [SHORT CUT] to turn on and off Track Repeat.
EN_KW-AVX710[U].indb 18EN_KW-AVX710[U].indb 18 07.12.6 3:31:28 PM07.12.6 3:31:28 PM
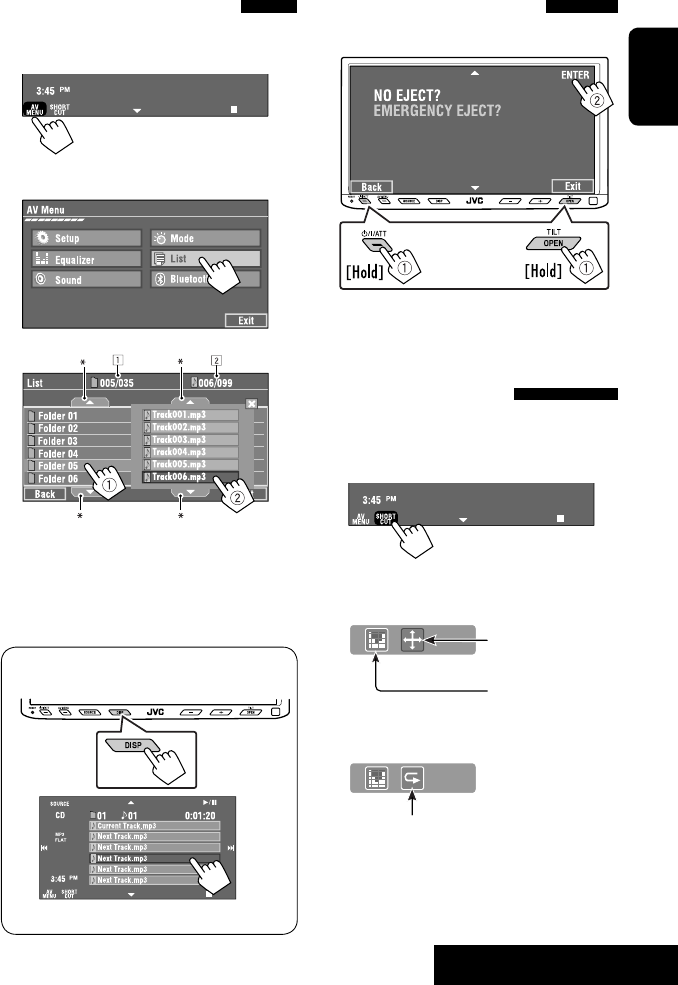
OPERATIONS
19
ENGLISH
Prohibiting disc ejection
You can lock a disc in the loading slot.
To cancel the prohibition, repeat the same
procedure to select <EJECT OK?>.
Using Short Cut Icons
You can easily access the some frequently used
functions by using [SHORT CUT] on the touch panel.
1
2
• For video software:
• For audio software:
Selecting tracks on the list
If a disc includes folders, you can display the Folder/
Track (File) Lists, then start playback.
1
• You can also use AV MENU on the monitor panel.
2
3 Select a folder (1), then a track (2).
Selected track starts playing. (* Press to move to
the previous/next pages of the list)
1 Current folder list number/total folder list
number
2 Current track list number/total track list
number of the current folder
You can easily access the Track List by pressing DISP
on the monitor panel.
Selected track starts playing.
at the same time
Sound mode
(☞ page 41)
Turn on or off Track Repeat
(Repeat play: ☞ page 18)
Aspect ratio
(☞ page 45)
EN_KW-AVX710[U].indb 19EN_KW-AVX710[U].indb 19 07.12.6 3:31:28 PM07.12.6 3:31:28 PM
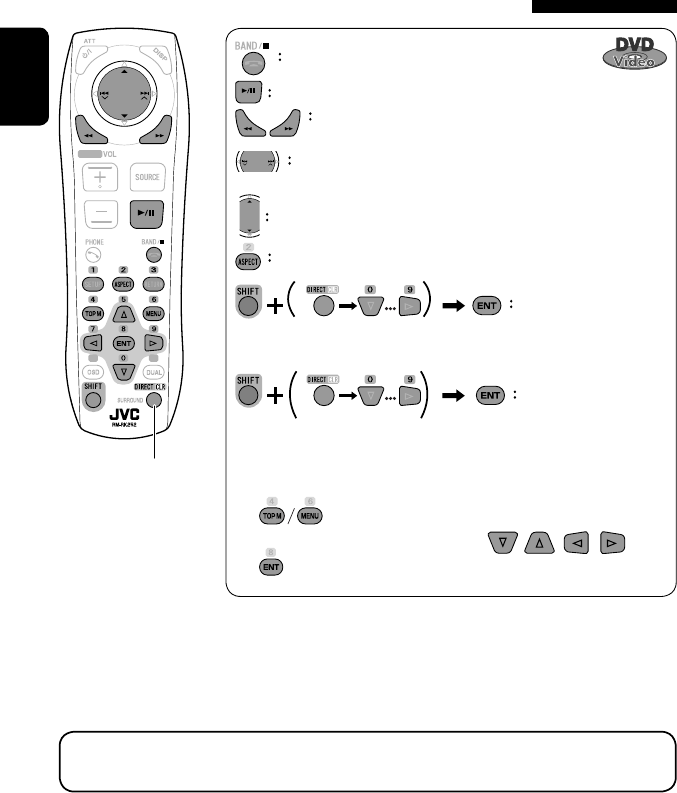
20
ENGLISH
Stop playback.
Start playback/pause (if pressed during playback).
Reverse/forward search*1 (No sound can be heard.)
Slow motion during pause*2 (No sound can be heard.)
Press: Select chapter (during playback or pause).
Hold: Reverse/forward search*3 (No sound can be heard.)
Select title (during playback or pause).
Select aspect ratio.
Select chapter.
Select title (when not playing).
Select title (during playback or pause).
Using menu driven features
1
2 Select an item you want to start playback.
3
*1 Search speed: x2 ] x5 ] x10 ] x20 ] x60
*2 Slow motion speed: 1/32 ] 1/16 ] 1/8 ] 1/4 ] 1/2
*3 Search speed: x2 ] x10
Operations using the remote controller—RM-RK252
Also functions as CLR (clear):
Erases a misentry if pressed
while holding SHIFT.
You can change the following items using the on-screen bar—audio language, audio stream, audio channel,
subtitle language, view angle, etc. (☞ pages 25 and 26)
twice
EN_KW-AVX710[U].indb 20EN_KW-AVX710[U].indb 20 07.12.6 3:31:29 PM07.12.6 3:31:29 PM

OPERATIONS
21
ENGLISH
Stop playback.
Start playback/pause (if pressed during playback).
Reverse/forward search*4 (No sound can be heard.)
Forward slow motion during pause*5 (No sound can be heard.)
• Reverse slow motion does not work.
Press: Select chapter (during playback or pause).
Hold: Reverse/forward search*6
Select program.
Select playlist (during playback or pause).
Select aspect ratio.
Select chapter.
Select program (when not playing).
Select program/playlist (during playback or pause).
Using Original Program/Playlist screens ( ☞ page 25)
1For Original Program
For Playlist
2 Select an item you want to start playback.
3 To erase the screen.
*4 Search speed: x2 ] x5 ] x10 ] x20 ] x60
*5 Slow motion speed: 1/32 ] 1/16 ] 1/8 ] 1/4 ] 1/2
*6 Search speed: x2 ] x10
twice
EN_KW-AVX710[U].indb 21EN_KW-AVX710[U].indb 21 07.12.6 3:31:31 PM07.12.6 3:31:31 PM
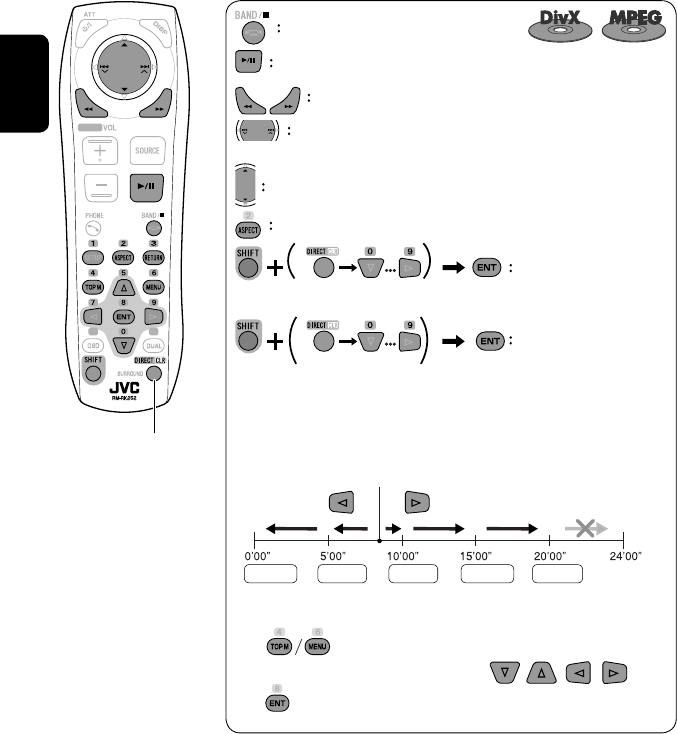
22
ENGLISH
Also functions as CLR (clear):
Erases a misentry if pressed
while holding SHIFT.
Stop playback.
Start playback/pause (if pressed during playback).
Reverse/forward search*1 (No sound can be heard.)
Press: Select track
Hold: Reverse/forward search*2 (No sound can be heard.)
Select folder.
Select aspect ratio.
Select track (within the same folder).
Select folder.
While playing...
Reverse/advance the scenes by five minutes.
For DivX6: Using menu driven features
1
2 Select an item you want to start playback.
3
*1 Search speed: ¡1 ] ¡2 ] ¡3
*2 Search speed: ¡1 ] ¡2
Current playback position
twice
2nd press 2nd press1st press 1st press 3rd press
EN_KW-AVX710[U].indb 22EN_KW-AVX710[U].indb 22 07.12.6 3:31:31 PM07.12.6 3:31:31 PM

OPERATIONS
23
ENGLISH
Stop playback.
Start playback/pause. (Slide show: each file is shown for a few seconds.)
Shows the current file until you change it if pressed during Slide show.
Select file.
Select folder.
Select aspect ratio.
Select file (within the same folder).
Select folder.
During PBC playback...
Select an item on the menu.
To return to the previous menu, press
To cancel PBC playback
1
2 Select the desired track.
• To resume PBC, press
Stop playback.
Start playback/pause (if pressed
during playback).
Reverse/forward search*3
Forward slow motion during pause*4
(No sound can be heard.)
• Reverse slow motion does not work.
Press: Select track.
Hold: Reverse/forward search*5 (No
sound can be heard.)
Select aspect ratio.
twice
*3 Search speed: x2 ] x5 ] x10 ] x20 ] x60
*4 Slow motion speed: 1/32 ] 1/16 ] 1/8 ] 1/4 ] 1/2
*5 Search speed: x2 ] x10
Select track.
EN_KW-AVX710[U].indb 23EN_KW-AVX710[U].indb 23 07.12.6 3:31:32 PM07.12.6 3:31:32 PM

24
ENGLISH
Stop playback.
Start playback/pause (if pressed during playback).
Reverse/forward search*1
Press: Select track.
Hold: Reverse/forward search*2
Select track.
*1 Search speed: x2 ] x5 ] x10 ] x20 ] x60
*2 Search speed: x2 ] x10
Stop playback.
Start playback/pause (if pressed during playback).
Reverse/forward search*3
Press: Select track.
Hold: Reverse/forward search*4
Select folder.
Select track (within the same folder).
Select folder.
*3 Search speed: x2 ] x5 ] x10 ] x20 ] x60
*4 Search speed: x2 ] x10
twice
Also functions as CLR (clear):
Erases a misentry if pressed
while holding SHIFT.
EN_KW-AVX710[U].indb 24EN_KW-AVX710[U].indb 24 07.12.6 3:31:33 PM07.12.6 3:31:33 PM

OPERATIONS
25
ENGLISH
Operations using the on-screen
bar
These operations are possible on the screen using
the remote controller, while playing the following
discs—DVD/VCD/DivX/MPEG1/MPEG2/JPEG.
1 Display the on-screen bar. (☞page 26)
Ex. For DVD-Video
2 Select an item.
3 Make a selection.
If a pop-up menu appears...
• For entering time/numbers...
:
Move the entry position
:
Select a number
To remove the on-screen bar
Using the list screens
You can use Original Program or Playlist
screen anytime while playing DVD-VR with its data
recorded.
1 Display the Original Program/Playlist screen.
2 Select an item you want.
To erase the screen
1 Original Program/Playlist number
2 Recording date
3 Recording source (TV station, the input terminal of
the recording equipment, etc.)
4 Start time of recording
5 Title of the program/playlist*
6 Highlight bar (current selection)
7 Creating date of playlist
8 Total number of chapters included in the playlist
9 Playback time
* The title of the original program or playlist may not be
displayed depending on the recording equipment.
EN_KW-AVX710[U].indb 25EN_KW-AVX710[U].indb 25 07.12.6 3:31:34 PM07.12.6 3:31:34 PM

26
ENGLISH
Information
Operation
On-screen bar
5 Time indication
Elapsed playing time of the disc
Remaining title time (for DVD)
Remaining disc time (for others)
Elapsed playing time of the current
chapter/track *2
Remaining time of the current
chapter/track *2
6 Playback status
Play
Reverse/forward search
Reverse/forward slow-motion
Pause
Stop
7 Operation icons
Change time indication (see 5)
Time Search (Specify a certain
scene by entering time.)
Title Search (by its number)
Chapter Search (by its number)
Track Search (by its number)
Repeat play *1
Random play *1
Change the audio language, audio
stream, or audio channel
Change or erase the subtitle
language
Change the view angle
*1 ☞ page 18
*2 Not applicable for DVD-VR
Above example is of DVD Video. Items shown on the bar vary due to the disc type.
1 Disc type
2 • DVD: Audio signal format
• VCD: PBC
3 Playback mode *1
DVD Video:
C. RPT: Chapter repeat
T. RPT: Title repeat
DVD-VR:
C. RPT: Chapter repeat
PG. RPT: Program repeat
DivX/MPEG1/MPEG2:
T. RPT: Track repeat
F. RPT: Folder repeat
F. RND: Folder random
A. RND: All (Disc) random
JPEG:
F. RPT: Folder repeat
VCD:
T. RPT: Track repeat
A. RND: All (Disc) random
4 Playback information
Current title/chapter
Current program/chapter
Current Playlist/chapter
Current track
Current folder/track
Current folder/file
EN_KW-AVX710[U].indb 26EN_KW-AVX710[U].indb 26 07.12.6 3:31:35 PM07.12.6 3:31:35 PM

27 EXTERNAL DEVICES
ENGLISH
Bluetooth® operations — Cellular phone/audio player
For Bluetooth operations, it is required to connect the
Bluetooth Adapter (KS-BTA200) to the CD changer jack
on the rear.
• Refer also to the instructions supplied with the
Bluetooth Adapter and the Bluetooth device.
• Refer to the list (included in the box) to see the
countries where you may use the Bluetooth®
function.
To use a Bluetooth device through the unit (“Bluetooth
PHONE” and “Bluetooth AUDIO”) for the first time,
you need to establish Bluetooth wireless connection
between the unit and the device.
• Once the connection is established, it is registered in
the unit even if you reset your unit. Up to five devices
can be registered in total.
• Only one device can be connected at a time for each
source (“Bluetooth PHONE” and “Bluetooth AUDIO”).
Connecting a new Bluetooth
device
Registration (Pairing) methods
Use either of the following items in <Bluetooth>
menu to register and establish the connection with a
device.
• Select “Bluetooth PHONE” or “Bluetooth AUDIO” as
the source to operate <Bluetooth> menu.
Open Make the unit ready to establish
a new Bluetooth connection.
The connection is established by
operating the Bluetooth device.
Search Make the unit ready to establish
a new Bluetooth connection.
The connection is established by
operating this unit.
To register using <Open>
Preparation:
Operate the Bluetooth device to turn on its Bluetooth
function.
1 • Make sure “New Device” is selected. If not, press
[5] or [∞] to select it.
• You can also use AV MENU on the monitor panel.
2
3
4 Enter a PIN (Personal Identification
Number)* code to the unit.
• You can enter any number you like (1-digit to
16-digit number).
* Some devices have their own PIN code. Enter the
specified PIN code to the unit.
Go to other menu items
Continued on the next page
EN_KW-AVX710[U].indb 27EN_KW-AVX710[U].indb 27 07.12.6 3:31:37 PM07.12.6 3:31:37 PM

28
ENGLISH
You can enter [0] – [9] only.
• [BS]: Erases the character before the cursor.
• [Del]: Erases the character on the cursor.
• [Enter]: Confirms the entry.
5 Operate the Bluetooth device to connect
while “Open...” is displayed on the screen.
Enter the same PIN code (as entered in the above
step) on the device to be connected.
Now connection is established and you can use the
device through the unit.
The device remains registered even after you
disconnect the device. Use <Connect> (or activate
<Auto Connect>) to connect the same device
from next time (☞ the following, and pages 50
and 51).
To register using <Search>
• Make sure “New Device” is selected. If not, press [5]
or [∞] to select it.
1 Press [AV MENU] on the touch panel or AV
MENU on the monitor panel.
2 Press [Bluetooth].
3 Press [Search].
The unit searches for available devices and displays
the list of them. (If no available device is detected,
“Device Unfound” appears.)
4 Select a device you want to connect.
5 Enter the specific PIN code of the device to
the unit.
• Refer to the instructions supplied with the device
to check the PIN code.
6 Operate the Bluetooth device to connect
while “Connecting...” is displayed on the
screen.
Now connection is established and you can use the
device through the unit.
To connect a special device <Special
Device>
1 Press [AV MENU] on the touch panel or AV
MENU on the monitor panel.
2 Press [Bluetooth].
3 Press [Special Device].
The unit displays the list of the preset devices.
4 Select a device you want to connect.
5 Use <Open> (or <Search>) to connect.
To connect/disconnect a registered
device
1 Select “Bluetooth PHONE” or “Bluetooth
AUDIO,” then select a registered device you
want to connect/disconnect.
2 Press [AV MENU] on the touch panel or AV
MENU on the monitor panel.
3 Press [Bluetooth].
4 Press [Connect] or [Disconnect].
• Select <Connect> to connect the selected
device.
• Select <Disconnect> to disconnect the selected
device.
To delete a registered device
1 Select “Bluetooth PHONE” or “Bluetooth
AUDIO,” then select a registered device you
want to delete.
2 Press [AV MENU] on the touch panel or AV
MENU on the monitor panel.
3 Press [Bluetooth].
4 Press [Delete Pairing].
Confirmation screen appears. Press [Yes].
EN_KW-AVX710[U].indb 28EN_KW-AVX710[U].indb 28 07.12.6 3:31:38 PM07.12.6 3:31:38 PM

29 EXTERNAL DEVICES
ENGLISH
Using the Bluetooth cellular phone
Adjust the volume of the incoming calls.*2
When a call comes in...
The source is changed to “Bluetooth PHONE”
automatically.
Name and phone number (if acquired)
When <Auto Answer> is activated...
The unit answers the incoming call automatically.
(☞ page 51)
☞ page 31
When <Auto Answer> is deactivated...
To answer the incoming call
• Press any button on the monitor panel (except
/ATT or +/–).
• Press the message displayed on the touch panel.
To end the call
• Hold any button on the monitor panel (except
/ATT or +/–).
• Hold the message displayed on the touch panel.
• You can adjust the microphone volume. (☞ page 51)
~ Press [SOURCE], then press [Bluetooth PHONE]. (☞ page 9)
• You can also use SOURCE on the monitor panel. Press it repeatedly.
Ÿ Press [AV MENU].
• You can also use AV MENU on the monitor panel.
! Press [Bluetooth].
⁄ Establish the connection with a device, then make a call (or settings using <Bluetooth>
menu).
☞ pages 50 and 51
Sound mode
(☞ page 41) Status of the device
Signal strength/Battery
remainder
(only when the information
comes from the device)
[AV MENU] Hold: Activates <Voice Dialing> function
[5 ∞] Select the registered device
(“New Device” appears when a new device can be registered.)
The Bluetooth icon
lights up when
the adapter is
connected.
: Buttons on the touch panel. In the
explanation, they are indicated inside
[ ].
*1 When a cellular phone with audio function is connected, appears.
*2 This adjustment does not affect the volume level of the other sources.
*1
EN_KW-AVX710[U].indb 29EN_KW-AVX710[U].indb 29 07.12.6 3:31:38 PM07.12.6 3:31:38 PM

30
ENGLISH
3
4 Select a calling method, then call.
Redial Shows the list of the phone
numbers you have dialed.
Received Calls Shows the list of the received
calls.
Phonebook Shows the phone book of the
connected cellular phone.
Missed Calls Shows the list of the missed
calls.
Phone
Number
Shows the phone number entry
screen = “Entering a phone
number” (☞ page 31).
Voice Dialling (Only when the connected
cellular phone has the voice
recognition system): = Speak
the name you want to call.
When an SMS comes in...
If the cellular phone is compatible with SMS (Short
Message Service), you can read the messages on the
screen.
• You cannot edit or send a message through the unit.
When <Message Info> is set to <Auto>...
The unit rings and the following screen is displayed to
inform you of a message arrival. (☞ page 51)
To read the message, press [Yes].
The source is changed to “Bluetooth PHONE.”
To read the message later, press [No].
• The message is stored into <Message> =
<Unread>. (☞ page 50)
When <Message Info> is set to <Manual>...
Access the message list to read messages. (☞ pages
50 and 51)
To make a call
1
• You can also use AV MENU on the monitor panel.
2
Cancel
EN_KW-AVX710[U].indb 30EN_KW-AVX710[U].indb 30 07.12.6 3:31:40 PM07.12.6 3:31:40 PM
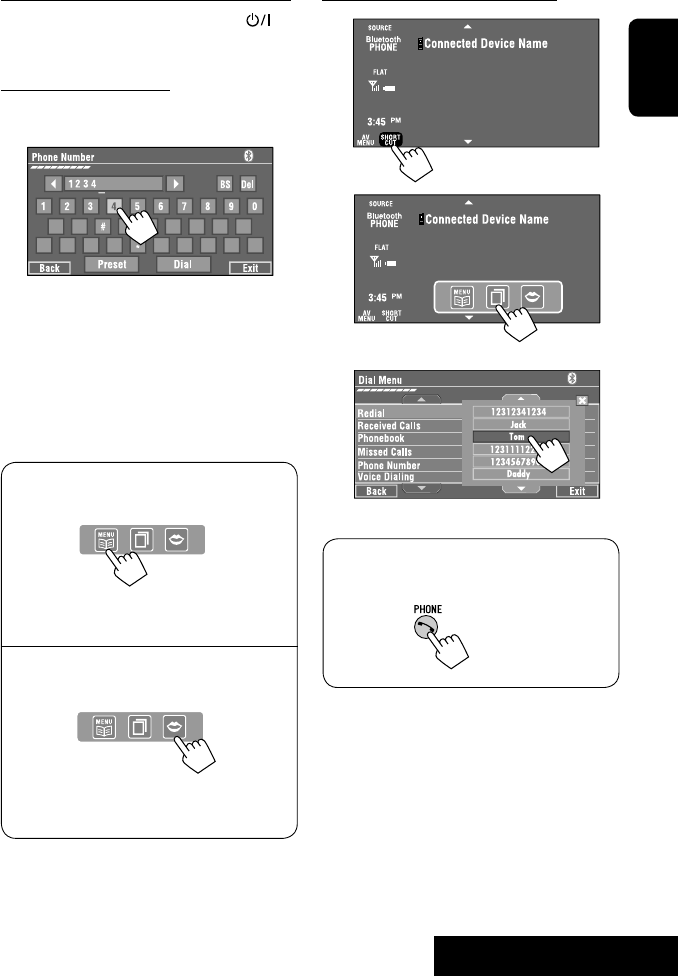
31 EXTERNAL DEVICES
ENGLISH
To stop ringing (canceling the outgoing call)
Hold any button on the monitor panel (except /ATT
or +/–).
Entering a phone number
• You cannot use the remote controller to enter phone
numbers.
You can enter [0] – [9], [*], [#] (up to 32 numbers)
• [BS]: Erases the character before the cursor.
• [Del]: Erases the character on the cursor.
• [Preset]: Goes to Preset List. You can preset the
entered number by selecting a preset
number. (☞ page 32)
• [Dial]: Calls the entered number.
• You can easily access <Dial Menu> by pressing
[SHORT CUT] on the touch panel, then...
You can also access <Dial Menu> by holding
SOURCE on the monitor panel.
• You can easily activate <Voice Dialing> by
pressing [SHORT CUT] on the touch panel, then...
You can also activate <Voice Dialing> by
holding [AV MENU].
To redial previously dialed numbers
1
2
3
When using the remote controller, you can
display <Redial> menu anytime .
[Hold]
EN_KW-AVX710[U].indb 31EN_KW-AVX710[U].indb 31 07.12.6 3:31:41 PM07.12.6 3:31:41 PM

32
ENGLISH
To call a preset number
1
2
You can use the following buttons on the remote
controller for the Bluetooth phone operations.
Presetting the phone numbers
You can preset up to six phone numbers.
1 Select the phone number you want to preset
from <Phonebook>, <Redial>, <Received
Calls>, or <Missed Calls>.
1 Press [AV MENU] on the touch panel or AV
MENU on the monitor panel.
2 Press [Bluetooth].
3 Press [Dial Menu], then...
Ex.: Selecting <Received Calls>
2 Select a telephone number to store.
3 Select a preset number.
Now “Tom” is stored into preset no. 1.
• Display <Dial Menu> screen/Answer
the incoming call.
• Display the <Redial> menu if pressed
and held (regardless of the current
source).
End the call.
Adjust the volume.
Make a call to the preset numbers.
[Hold]
:
:
:
:
[Hold]
EN_KW-AVX710[U].indb 32EN_KW-AVX710[U].indb 32 07.12.6 3:31:42 PM07.12.6 3:31:42 PM

33 EXTERNAL DEVICES
ENGLISH
Bluetooth Information:
If you wish to receive more information about Bluetooth, visit the following JVC web site: <http://www.
jvc-victor.co.jp/english/car/>
You can use the following buttons on the remote
controller for the Bluetooth audio operations.
Using the Bluetooth audio player
☞ page 41
Sound mode
(☞ page 41)
[3 / 8] [7] Start and pause playback
[4 ¢] Reverse/forward skip
[5 ∞] Select the registered device
(“New Device” appears when a new device can
be registered.*3)
Status of the device
Signal strength/Battery
remainder
(only when the information
comes from the device)
The Bluetooth icon
lights up when
the adapter is
connected.
~ Press [SOURCE], then press [Bluetooth
AUDIO]. (☞ page 9)
• You can also use SOURCE on the monitor
panel. Press it repeatedly.
Ÿ Start playback.
: Buttons on the touch panel. In the
explanation, they are indicated
inside [ ].
*2
*1
*1 When a cellular phone with audio function is connected, appears.
*2 Indicates the button pressed. It may be different from the operation status.
*3 You cannot select “New Device” when a Bluetooth audio player is connected.
Start and pause playback.
Reverse/forward skip
Adjust the volume.
:
:
:
EN_KW-AVX710[U].indb 33EN_KW-AVX710[U].indb 33 07.12.6 3:31:43 PM07.12.6 3:31:43 PM

34
ENGLISH
Preparation:
Make sure <Changer> is selected for <External
Input>. (☞ page 47)
~ Press [SOURCE], then press [CD-CH]. (☞
page 9)
• You can also use SOURCE on the monitor
panel. Press it repeatedly.
Ÿ
• You can also use AV MENU on the monitor
panel.
! Display the Disc List.
Listening to the CD changer
It is recommended to use a JVC MP3-compatible CD changer with your unit.
• You can play only CDs (CD-DA) and MP3 discs.
Folder no./Track no./Playing time
Disc no.
MP3 indicator
☞ page 35
Tag data appears only when it is
recorded.
⁄ Select a disc to start playing.
• If you select an MP3 disc, the Track list of the
current folder appears. You can select a track
and start playing. (☞ also page 19)
• If you select a folder on the list, you can start
playing the first track of the folder.
To go to the other list
Sound mode
(☞ page 41)
[4 ¢] Press: Select track
Hold: Reverse/forward search
[5 ∞] Press: Select folders (only for MP3)
Hold: Display Disc list
Total track no. included on the
disc
Ex. while playing an MP3 disc
: Buttons on the touch panel. In the
explanation, they are indicated inside [ ].
EN_KW-AVX710[U].indb 34EN_KW-AVX710[U].indb 34 07.12.6 3:31:43 PM07.12.6 3:31:43 PM

35 EXTERNAL DEVICES
ENGLISH
When one of the playback modes is selected, the
corresponding indicator lights up on the source
information screen.
To cancel, select <Off>.
You can use following playback modes—Repeat or
Random.
Ex.: To select Track Repeat for an MP3 disc
1 Press [AV MENU] on the touch panel or AV
MENU on the monitor panel.
2 Press [Mode].
3
Selecting playback modes
Disc type Repeat Random
Track: Repeats current track
Disc: Repeats all tracks of the current disc
Disc: Randomly plays all tracks of the
current disc
All: Randomly plays all tracks of all
loaded discs
Track: Repeats current track
Folder: Repeats all tracks of the current
folder
Disc: Repeats all tracks of the current disc
Folder: Randomly plays all tracks of current
folder, then tracks of next folders
Disc: Randomly plays all tracks of the
current disc
All: Randomly plays all tracks of all
loaded discs
You can use the following buttons on the remote
controller to operate the CD changer.
You can easily turn on or off Track Repeat by
pressing [SHORT CUT] on the touch panel, then...
: Select disc.
: Select folder (MP3 only).
• Press: Select track.
• Hold: Reverse/forward search
☞ page 41
EN_KW-AVX710[U].indb 35EN_KW-AVX710[U].indb 35 07.12.6 3:31:44 PM07.12.6 3:31:44 PM
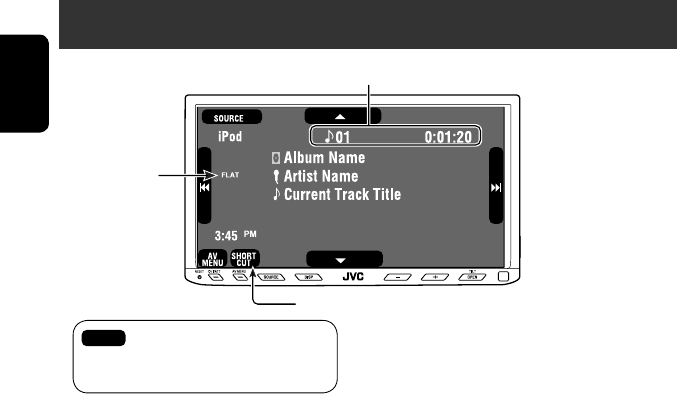
36
ENGLISH
Listening to the iPod
It is required to connect the Interface adapter for iPod (KS-PD100) to the CD changer jack on the rear.
Preparation:
Make sure <iPod> is selected for <External Input>. (☞ page 47)
~ Press [SOURCE], then press [iPod] (☞ page 9)
Playback starts automatically.
• You can also use SOURCE on the monitor panel. Press it repeatedly.
Ÿ Press [4] or [¢] to select a track.
Track no./Playing time
☞ page 37
[4 ¢] Press: Select track
Hold: Reverse/forward search
[5] Enter player’s menu
[∞] Start playback/pause
• To resume, press again.
Sound mode
(☞ page 41)
: Buttons on the touch panel. In the
explanation, they are indicated
inside [ ].
EN_KW-AVX710[U].indb 36EN_KW-AVX710[U].indb 36 07.12.6 3:31:44 PM07.12.6 3:31:44 PM
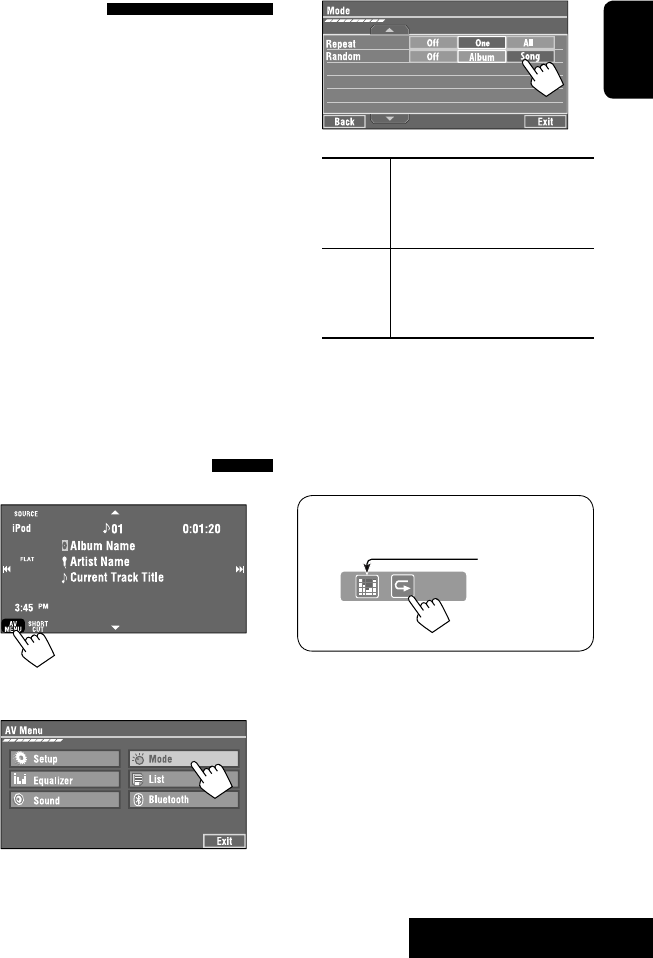
37 EXTERNAL DEVICES
ENGLISH
Selecting a track from the
player’s menu
1 Press [5] to enter the player’s menu.
“SEARCH” flashes on the screen during menu
operations.
• This mode will be canceled if no operations are
done for about five seconds.
2 Press [4] or [¢] to select the desired
item.
Press: Select an item.
Hold: Skip ten items at a time if there are more
than ten items.
Playlists Ô Artists Ô Albums Ô Songs Ô
Genres Ô Composers Ô (back to the beginning)
3 Press [∞] to confirm the selection.
4 Repeat steps 2 and 3 to select a track.
• When a track is selected finally, playback starts.
• To return to the previous menu, press [5].
Selecting playback modes
1
• You can also use AV MENU on the monitor panel.
2
3 Select an appropriate option.
Repeat One: Functions the same as
“Repeat One.”
All: Functions the same as
“Repeat All.”
Random Album: Functions the same as
“Shuffle Albums.”
Song: Functions the same as
“Shuffle Songs.”
• When the playback modes are selected, the
corresponding indicators light up alternately on
the screen.
To cancel, select <Off>.
You can easily turn on or off Track Repeat by
pressing [SHORT CUT] on the touch panel, then...
☞ page 41
EN_KW-AVX710[U].indb 37EN_KW-AVX710[U].indb 37 07.12.6 3:31:45 PM07.12.6 3:31:45 PM
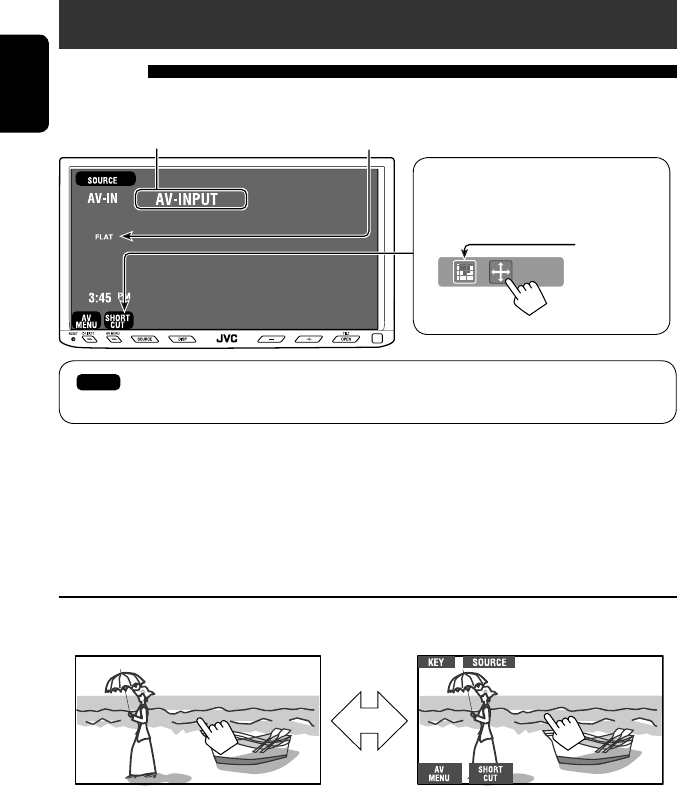
38
ENGLISH
Using other external components
AV-INPUT
You can connect an external component to the LINE IN/VIDEO IN terminals.
~ Press [SOURCE], then press [AV-IN]. (☞ page 9)
• You can also use SOURCE on the monitor panel. Press it repeatedly.
Ÿ Turn on the connected component and start playing the source.
To display the operation buttons (☞ page 17) while watching the playback picture
• If no operations are done for about five seconds, the operation buttons disappear.
• [KEY] does not work when the source is “AV-IN.”
Touch the screen (center portion).
You can easily access to <Aspect> setting
menu by pressing [SHORT CUT] on the
touch panel, then...
Assigned title (☞ page 42) Sound mode (☞ page 41)
Touch the screen (center portion).
: Buttons on the touch panel. In the explanation, they are indicated inside [ ].
These buttons also work when they are not shown on the touch panel (while watching the playback picture).
☞ page 41
EN_KW-AVX710[U].indb 38EN_KW-AVX710[U].indb 38 07.12.6 3:31:45 PM07.12.6 3:31:45 PM

39 EXTERNAL DEVICES
ENGLISH
To display the operation buttons (☞ page 17) while viewing the navigation screen
• The operation buttons displayed on the screen vary among the playback sources.
• If no operations are done for about five seconds, the operation buttons disappear.
• The above buttons except [KEY] also work when they are not shown on the screen (while viewing the navigation
screen).
Navigation screen
You can also connect a Navigation System to the VIDEO IN terminal so that you can watch the navigation screen.
Preparation:
Make sure <Navigation> is selected for <AV Input>. (☞ page 47)
To view the navigation screen (and listen to the navigation guidance*)
Press DISP on the monitor panel repeatedly. (☞ page 9)
• The aspect ratio of the navigation screen is fixed to
<Full> regardless of the <Aspect> setting. (☞ page
45)
* If your Navigation System is equipped with the voice guidance function.
When <Navigation> is selected for <AV Input> (☞ page 47)
• You can use the source “AV-IN” for listening to an audio source connected to the LINE IN terminals.
• Some status messages such as volume level will not appear on the screen.
Touch the screen (center portion). Touch the screen (center portion).
EN_KW-AVX710[U].indb 39EN_KW-AVX710[U].indb 39 07.12.6 3:31:46 PM07.12.6 3:31:46 PM

40
ENGLISH
EXT-INPUT
You can connect an external component to the CD changer jack on the rear using the Line Input Adapter—KS-U57
(not supplied) or AUX Input Adapter—KS-U58 (not supplied).
Preparation:
Make sure <External> is selected for <External Input>. (☞ page 47)
~ Press [SOURCE], then press [EXT-IN]. (☞ page 9)
• You can also use SOURCE on the monitor panel. Press it repeatedly.
Ÿ Turn on the connected component and start playing the source.
Assigned title (☞ page 42)
☞ page 41
Sound mode
(☞ page 41)
: Buttons on the touch panel. In the explanation, they are indicated inside [ ].
EN_KW-AVX710[U].indb 40EN_KW-AVX710[U].indb 40 07.12.6 3:31:46 PM07.12.6 3:31:46 PM

SETTINGS
41
ENGLISH
~
• You can also use AV MENU on the monitor panel.
Ÿ
! Select a sound mode.
• For preset values of each sound mode, ☞ page 58.
Sound equalization
Storing your own adjustments
You can store your adjustments into <User1>,
<User2>, and <User3>.
1 Repeat steps ~ and Ÿ, then in step !...
2 Adjust (1), then store (2).
Ex.: When storing into <User2>.
While playing back any source other
than “Bluetooth PHONE,” you can easily
access <Equalizer> menu by pressing
[SHORT CUT] on the touch panel, then...
Move to other six sound modes
EN_KW-AVX710[U].indb 41EN_KW-AVX710[U].indb 41 07.12.6 3:31:47 PM07.12.6 3:31:47 PM

42
ENGLISH
You can assign titles as follows.
FM/AM stations Up to 16 characters—up to 30
stations.
AV-IN
EXT-IN
Up to 16 characters
~ Select the source. (☞ page 9)
• For FM/AM stations: Select the band, then
tune into a station.
Ÿ Display <Title Entry> screen.
• You can also use AV MENU on the monitor panel.
! Assign a title.
You can enter up to 16 characters (for available
characters, ☞ page 59).
• [Store]: Confirm the entry.
• [2/3]: Move the cursor.
• [BS]: Erase the character before the
cursor.
• [Del]: Erase the character on the cursor.
• [Cap]: Change the letter case (upper/
lower).
• [Change]: Change the character set.
• [Space]: Enter a space.
⁄ Finish the procedure.
Assigning titles to the sources
In the explanation, buttons on the
touch panel are indicated inside [ ].
EN_KW-AVX710[U].indb 42EN_KW-AVX710[U].indb 42 07.12.6 3:31:47 PM07.12.6 3:31:47 PM

SETTINGS
43
ENGLISH
!
Menu operations
The following steps are one of the fundamental
procedures. Some of the settings do not open the
sub-setting window, but just selecting an option will
change the setting.
• The display indications may change according to
change of the specifications.
Ex.: Changing the <AV Input> setting
~
• You can also use AV MENU on the monitor panel.
Ÿ
Non-available items will be shaded.
EN_KW-AVX710[U].indb 43EN_KW-AVX710[U].indb 43 07.12.6 3:31:48 PM07.12.6 3:31:48 PM

44
ENGLISH
Setup
Menu items Selectable settings, [reference page]
Display
Demonstration Off: Cancels.
On: Activates the demonstration on the screen. To stop it temporarily,
touch the screen.
Wall Paper You can select the background picture of the screen.
Horizon, Metal, Art, Plain
Color You can select the color of the background picture.
Blue, Light-Blue, Red, Orange, Yellow, Green, Purple, Dark-Blue,
Dark-Green, Brown, Light-Brown, Black
Scroll Off: Cancels.
Once: Scrolls the disc information once.
Auto: Repeats scrolling (five-second intervals).
• Holding DISP on the monitor panel scrolls the information regardless
of this setting.
Dimmer Off: Cancels.
On: Activates dimmer.
Auto: Dims the monitor when you turn on the headlights.*1
Dimmer Time Set : Activates the Dimmer Time setting below.
Dimmer Time Set Sets the Dimmer On/Off times.
Dimmer Level You can select the brightness for dimmer.
1 (bright), 2 (middle), 3 (dark)
Bright You can adjust brightness of the screen.
–15 (darkest) to +15 (brightest); Initial 00
Picture Adjust*2You can adjust the following to make the screen clear and legible for
watching the playback picture. The setting will be stored—one for
“DISC” (common) and the other for “AV-IN.”
–15 to +15; Initial 0
Bright: Adjust if the picture is too bright or too dark.
Contrast: Adjust the contrast.
Color: Adjust the color of the picture—lighter or darker.
Tint: Adjust the tint if the human skin color is unnatural. (only when
color system setting is <NTSC>, ☞ next page)
• Press [5] or [∞] to adjust.
*1 The ILLUMINATION lead connection is required. (☞ Installation/Connection Manual)
*2 Adjustable only when the source is “DISC” (the inserted disc must contain pictures or movies) or “AV-IN.”
The procedure for setting an item is shown on page 43.
EN_KW-AVX710[U].indb 44EN_KW-AVX710[U].indb 44 07.12.6 3:31:48 PM07.12.6 3:31:48 PM
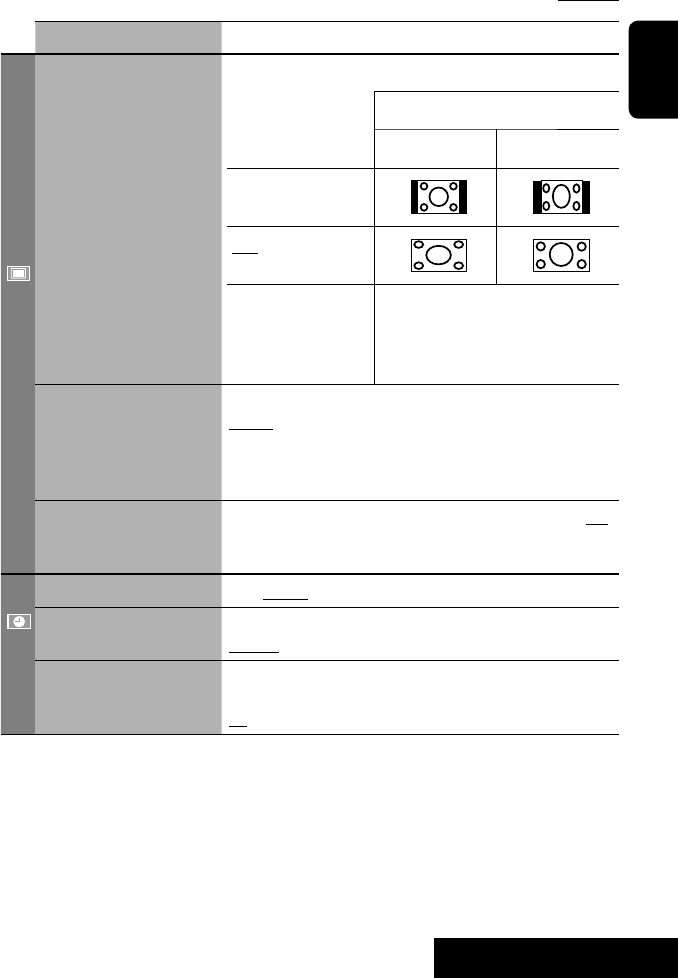
SETTINGS
45
ENGLISH
Menu items Selectable settings, [reference page]
Display
Aspect*3You can change the aspect ratio of the picture.
Aspect ratio of incoming signal
4:3 16:9
Regular:
For 4:3 original pictures
Full:
For 16:9 original pictures
Auto: • For “DISC”: Aspect ratio is automatically
selected to match to the incoming signals.
• For the other video sources: Aspect ratio is
fixed to <Regular>.
Language*4Select the indication language shown on the screen.
English, Español, Français, Deutsch, Italiano, Nederlands,
Svenska, Dansk, Руccĸий, Português
• The characters you can enter for assigning the titles also change
according to the language selected. ☞ [59]
NTSC/PAL Select the color system of the external monitor connected—NTSC, PAL.
• Turn off the power and turn it on again to make the new setting
effective.
Clock
Time Set Initial 1:00AM ☞ [8]
Time Format Select either 12-hour system or 24-hour system.
12Hours, 24Hours ☞ [8]
OSD Clock When <On> is selected, the clock time is displayed on the playback
picture. ☞ [8]
Off, On
*3 Not adjustable when no picture is shown.
*4 After you change the indication language setting, turn off then on the power so that your setting takes effect.
Initial: Underlined
EN_KW-AVX710[U].indb 45EN_KW-AVX710[U].indb 45 07.12.6 3:31:49 PM07.12.6 3:31:49 PM
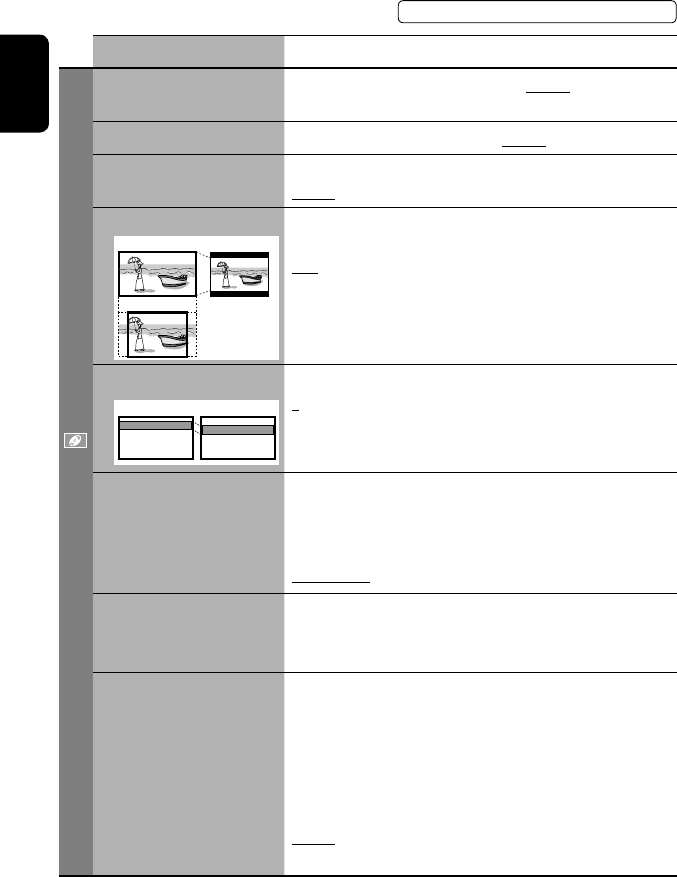
46
ENGLISH
Menu items Selectable settings, [reference page]
Disc
Menu Language*1Select the initial disc menu language; Initial English (☞ also page
58).
Audio Language*1Select the initial audio language; Initial English (☞ also page 58).
Subtitle*1Select the initial subtitle language or erase the subtitle (Off); Initial
English (☞ also page 58).
Monitor Type*1Select the monitor type to watch a wide screen picture on the external
monitor.
16:9 : Select when the aspect ratio of the external monitor is 16:9.
4:3 LB (Letterbox)/4:3 PS (Pan Scan): Select when the aspect ratio of
the external monitor is 4:3.
• Refer to the illustrations on the left to see how the pictures are
shown on the screen.
OSD Position*1Select the position of the on-screen bar. ☞ [25]
1: Higher position
2: Lower position
File Type*1Select playback file type when a disc contains different types of files.
Audio: Plays back audio files.
Still Picture: Plays back JPEG files.
Video: Plays back DivX/MPEG1/MPEG2 files.
Audio&Video: Plays back audio files and DivX/MPEG1/MPEG2 files.
DivX Regist. (Registration)*1This unit has its own Registration Code. Once you have played back a
file with which the Registration Code recorded, this unit’s Registration
Code is overwritten for copyright protection.
D. Audio Output*1Select the signal format emitted through the DIGITAL OUT (optical)
terminal. (☞ also page 57)
PCM : Select this when connecting an amplifier or a decoder
incompatible with Dolby Digital, DTS, or MPEG Audio, or when
connecting to a recording device.
Dolby D : Select this when connecting an amplifier or a decoder
compatible with Dolby Digital.
Stream : Select this when connecting an amplifier or a decoder
compatible with Dolby Digital, DTS, or MPEG Audio.
*1 Selectable only for “DISC.” (Playback stops when you change the setting.)
Position 1 Position 2
16:9 4:3LB
4:3PS
The procedure for setting an item is shown on page 43.
EN_KW-AVX710[U].indb 46EN_KW-AVX710[U].indb 46 07.12.6 3:31:50 PM07.12.6 3:31:50 PM

SETTINGS
47
ENGLISH
Menu items Selectable settings, [reference page]
Disc
Down Mix*1When playing back a multi-channel disc, this setting affects the signals
reproduced through the LINE OUT terminals.
Dolby SR : Select this to enjoy multi-channel surround audio by
connecting an amplifier compatible with Dolby Surround.
Stereo : Normally select this.
D. (Dynamic) Range
Compres. (Compression)*1
You can enjoy a powerful sound at a low volume level while playing
Dolby Digital software.
Auto: Select to apply the effect to multi-channel encoded software.
On: Select to always use this function.
Tuner
IF Band Width Auto: Increases the tuner selectivity to reduce interference noises
between adjacent stations. (Stereo effect may be lost.)
Wide: Subject to the interference from adjacent stations, but sound
quality will not be degraded and the stereo effect will remain.
Input
AV Input*2
You can determine the use of LINE IN and VIDEO IN terminals. ☞ [38, 39
]
Off: Select when no component is connected (“AV-IN” is skipped while
selecting the source).
Audio&Video: Select when connecting an AV component such as a
VCR.
Audio: Select when connecting an audio component such as a portable
audio player.
Camera*3 : Select when connecting a rear view camera.
Navigation : Select when connecting a Navigation System.
External Input*4For connecting an external component to the CD changer jack on the
rear.
Changer/iPod*5: CD changer or iPod. ☞ [34, 36]
External: Any other than the above. ☞ [40]
• For connecting the Bluetooth adapter, this setting is not required. It is
automatically detected.
*2 Not selectable when “AV-IN” is selected as the source.
*3 The REVERSE GEAR SIGNAL lead connection is required. See Installation/Connection Manual. The rear view through
the camera appears on the screen in <Full> aspect ratio (regardless of the aspect ratio setting) when you shift the
gear to the reverse (R) position. When you press DISP on the control panel, or when you shift the gear to another
position other than the reverse (R) position, the rear view screen is cleared.
*4 Not selectable when the component connected to the CD changer jack is selected as the source.
*5 The name of the component detected through the CD changer jack is shown.
Initial: Underlined
EN_KW-AVX710[U].indb 47EN_KW-AVX710[U].indb 47 07.12.6 3:31:50 PM07.12.6 3:31:50 PM

48
ENGLISH
Menu items Selectable settings, [reference page]
Others
Beep Off: Cancels.
On: Activates the key-touch tone.
Telephone Muting Off: Cancels.
Muting1, Muting2: Select either one which mutes the sounds while
using the cellular phone.
Power LED Flash Off: Cancels.
On: When the ignition is turned off, the lamp on the button
flashes.
TouchPanel Sens. Change the sensitivity of the touch panel. As the number decreases,
sensitivity becomes higher. 1/2/3
Initialize Initialize all settings you have made in <AV Menu>. Press and hold
[Enter] to initialize the settings, then reset the unit. ☞ [3]
Equalizer
Flat/Hard Rock/R&B/Pop/Jazz/Dance/Country/Reggae/Classic/User1/User2/User3 ☞ [41]
The procedure for setting an item is shown on page 43.
EN_KW-AVX710[U].indb 48EN_KW-AVX710[U].indb 48 07.12.6 3:31:51 PM07.12.6 3:31:51 PM

SETTINGS
49
ENGLISH
Sound
Menu items Selectable settings, [reference page]
Fader/Balance Adjust fader—speaker output balance between the front and rear speakers.
• Upmost—front only (F6)
• Downmost—rear only (R6)
When using a two-speaker system, set the fader to the center (0).
Adjust balance—speaker output balance between the left and right speakers.
• Leftmost—left only (L6)
• Rightmost—right only (R6) Initial 0
Volume Adjust Adjust and store auto-adjustment volume level for each source, comparing to
the FM volume level. The volume level will automatically increase or decrease
when you change the source.
–12 to +12; Initial 00
• You can make the adjustments separately for DVD and other discs.
Amplifier Gain You can change the maximum volume level of this unit.
Off: Deactivates the built-in amplifier.
Low: VOL 00 to 30 (Select this if the maximum power of the speakers is less
than 50 W.)
High: VOL 00 to 50
Mode*1
Menu items Selectable settings, [reference page]
Mono Only for FM. (Off, On) ☞ [10]
DX/Local Only for FM. (Local, DX) ☞ [11]
SSM Only for FM. Press and hold to start SSM. ☞ [11]
Title Entry Only for FM/AM stations, “AV-IN,” and “EXT-IN.” ☞ [42]
Repeat ☞ [18, 35, 37]
Random ☞ [18, 35, 37]
*1 Items listed under <Mode> vary among the playback sources.
List
For “DISC”: Folder List and Track List (☞ page 19)
For “CD-CH”: Disc List, Folder List, and Track List (☞ page 34)
• For the other playback sources, you can display a list by pressing DISP on the monitor panel. (☞ page 9)
Initial: Underlined
EN_KW-AVX710[U].indb 49EN_KW-AVX710[U].indb 49 07.12.6 3:31:52 PM07.12.6 3:31:52 PM

50
ENGLISH
Bluetooth*1
Menu items Selectable settings, [reference page]
Dial Menu *2Select the method to make a call. ☞ [30]
Message*3You can read a message from the following message histories.
Unread: Messages you have not read.
Read: Messages you have read.
Unsent: Messages you have not sent.
Sent: Messages you have sent.
• The number of messages in each history is also shown.
Open ☞ [27]
Search ☞ [28]
Special Device Only for “New Device.”
Shows the list of Bluetooth devices which require some special procedure to
establish Bluetooth connection. Select a device you want to connect.
• After selecting the device, use <Open> or <Search> (☞ page 27 or 28)
for connection.
• Once the connection is established, it is registered in the unit. You can
connect the unit and the device by using <Connect> (☞ below) from the
next time.
Connect Only for the registered devices.
After selecting a device from among the registered devices (☞ pages 27 and
28), establish the connection with it.
Disconnect Only for the device being connected.
Disconnect the current device before connecting another device.
Delete Pairing Only for the registered devices.
Delete the registered devices.
*1 Selectable only for “Bluetooth PHONE” or “Bluetooth AUDIO.” Select a device (or “New Device”) before operating the
menu.
*2 Only for the device connected for “Bluetooth PHONE.”
*3 Selectable only when the source is “Bluetooth PHONE” and the connected cellular phone is compatible with SMS
(Short Message Service).
When operating the Bluetooth device, refer also to the instructions supplied with the device.
The procedure for setting an item is shown on page 43.
EN_KW-AVX710[U].indb 50EN_KW-AVX710[U].indb 50 07.12.6 3:31:53 PM07.12.6 3:31:53 PM

SETTINGS
51
ENGLISH
Menu items Selectable settings, [reference page]
Settings
Auto Connect *4When the unit is turned on, the connection is established automatically
with...
Off: No Bluetooth device.
Last: The last connected Bluetooth device.
Order: The available registered Bluetooth device found first.
Auto Answer *5Off: The unit does not answer the calls automatically. Answer the calls
manually.
On: The unit answers the incoming calls automatically.
Reject: The unit rejects all incoming calls.
Message Info *5Auto: The unit informs you of the arrival of a message by ringing and
displaying “Receiving Message.” To read the message, ☞ page 30.
Manual: The unit does not inform you of the arrival of a message.
MIC Setting *5Adjust microphone volume connected to the Bluetooth adapter.
01/02/03
Version *6The Bluetooth software and hardware versions are shown.
*4 Selectable only for “Bluetooth PHONE.”
*5 Only for the cellular phone connected for “Bluetooth PHONE.” Not selectable when “New Device” is selected.
*6 If you wish to receive more information about Bluetooth, visit the following JVC web site: <http://www.jvc-victor.
co.jp/english/car/>
SETTINGS
Initial: Underlined
EN_KW-AVX710[U].indb 51EN_KW-AVX710[U].indb 51 07.12.6 3:31:54 PM07.12.6 3:31:54 PM

ENGLISH
52
Maintenance
Moisture condensation
Moisture may condense on the lens inside the unit in
the following cases:
• After starting the heater in the car.
• If it becomes very humid inside the car.
Should this occur, the unit may malfunction. In this
case, eject the disc and leave the unit turned on for a
few hours until the moisture evaporates.
How to handle discs
When removing a disc from its
case, press down the center holder of
the case and lift the disc out, holding it
by the edges.
• Always hold the disc by the edges. Do not touch its
recording surface.
When storing a disc into its case, gently insert the
disc around the center holder (with the printed surface
facing up).
• Make sure to store discs into the cases after use.
To keep discs clean
A dirty disc may not play correctly.
If a disc does become dirty, wipe it with
a soft cloth in a straight line from center
to edge.
• Do not use any solvent (for example, conventional
record cleaner, spray, thinner, benzine, etc.) to clean
discs.
To play new discs
New discs may have some rough spots
around the inner and outer edges. If
such a disc is used, this unit may reject
the disc.
To remove these rough spots, rub the edges with a
pencil or ball-point pen, etc.
Stick-on labelSticker and sticker residue
Unusual shape
Warped disc
Do not use the following discs:
Center holder
SingleCD—8 cm disc
C-thru Disc (semi-transparent disc) Transparent or semi-transparent on its
recording area
EN_KW-AVX710[U].indb 52EN_KW-AVX710[U].indb 52 07.12.6 3:31:54 PM07.12.6 3:31:54 PM

53 REFERENCES
ENGLISH
More about this unit
General
Turning on the power
• By pressing SOURCE on the monitor panel, you
can also turn on the power. If the source is ready,
playback starts.
Tuner (FM only)
Storing stations in memory
• When SSM is over, received stations are preset in no.
1 (lowest frequency) to no. 6 (highest frequency).
Disc
General
• In this manual, words “track” and “file” are
interchangeably used.
• This unit can only play back audio CD (CD-DA) files
if different type of audio files (MP3/WMA/WAV) are
recorded on the same disc.
• This unit can display only one-byte characters. No
other characters can be correctly displayed.
Inserting a disc
• When a disc is inserted upside down or has no
playable files, “Cannot play this disc Check the disc”
appears on the screen. Eject the disc.
Ejecting a disc
• If “No disc“ appears after removing a disc, insert a
disc or select another playback source.
• If the ejected disc is not removed within 15 seconds,
the disc is automatically inserted again into the
loading slot to protect it from dust.
Playing Recordable/Rewritable discs
• This unit can recognize a total of 5 000 files and 250
folders (a maximum of 999 files per folder).
• Use only “finalized” discs.
• This unit can play back multi-session discs; however,
unclosed sessions will be skipped while playing.
• This unit can recognize a total 25 characters for file/
folder names.
• Some discs or files may not be played back due to
their characteristics or recording conditions.
Playing DVD-VR
• For details about DVD-VR format and Playlist, refer
to the instructions supplied with the recording
equipment.
File playback
Playing DivX files
• This unit can play back DivX files with the extension
code <.divx>, <.div>, or <.avi> (regardless of the
letter case—upper/lower).
• This unit supports the DivX files whose resolution is
720 x 576 pixels or less.
• Audio stream should conform to MP3 or Dolby Digital.
• The file encoded in the interlaced scanning mode
may not be played back correctly.
• The maximum bit rate for video signals (average) is 4
Mbps.
Continued on the next page
EN_KW-AVX710[U].indb 53EN_KW-AVX710[U].indb 53 07.12.6 3:31:55 PM07.12.6 3:31:55 PM

ENGLISH
54
Playing MPEG1/MPEG2 files
• This unit can play back MPEG1/MPEG2 files with the
extension code <.mpg>, <.mpeg>, or <.mod>*.
* <.mod> is an extension code used for the MPEG2
files recorded by JVC Everio camcorders.
• The stream format should conform to MPEG system/
program stream.
The file format should be MP@ML (Main Profile at
Main Level)/SP@ML (Simple Profile at Main Level)/
MP@LL (Main Profile at Low Level).
• Audio streams should conform to MPEG1 Audio
Layer-2 or Dolby Digital.
• The maximum bit rate for video signals (average) is 4
Mbps.
Playing JPEG files
• This unit can play back JPEG files with the extension
code <.jpg>, or <.jpeg>.
• It is recommended that you record a file at 640 x 480
resolution.
• This unit can play back baseline JPEG files.
Progressive JPEG files or lossless JPEG files cannot be
played.
Playing MP3/WMA/WAV files
• This unit can play back files with the extension code
<.mp3>, <.wma>, or <.wav> (regardless of the
letter case—upper/lower).
• This unit can play back the files meeting the
conditions below:
– Bit rate:
MP3/WMA: 32 kbps — 320 kbps
– Sampling frequency:
48 kHz, 44.1 kHz, 32 kHz (for MPEG1)
24 kHz, 22.05 kHz, 16 kHz (for MPEG2)
48 kHz, 44.1 kHz, 32 kHz, 22.05 kHz (for WMA)
44.1 kHz (for WAV)
• This unit can show ID3 Tag Version
1.0/1.1/2.2/2.3/2.4 (for MP3).
• This unit can also show WAV/WMA Tag.
• This unit can play back files recorded in VBR (variable
bit rate).
• Files recorded in VBR have a discrepancy in elapsed
time indication.
• This unit cannot play back the following files:
– MP3 files encoded with MP3i and MP3 PRO
format.
– MP3 files encoded with Layer 1/2.
– WMA files encoded with lossless, professional,
and voice format.
– WMA files which are not based upon Windows
Media® Audio.
– WMA files copy-protected with DRM.
– Files which have the data such as AIFF, ATRAC3,
etc.
Disc/file information shown on the
external monitor
The following screens appear only on the external
monitor.
• CD
1 Selected playback mode
2 Elapsed playing time of the current track
3 Operation status
4 Current track number/total number of tracks
on the disc
5 Track information
6 Track list
7 Current track (highlighted bar)
TIME 00:14
Track : 6 / 14
Track Information
Cloudy
Fair
Fog
Hail
Indian summer
Rain
Shower
Snow
Thunder
Typhoon
Wind
Winter sky
Album
Four seasons
Artist
Robert M. Smith
Title
Rain
T. RPT
EN_KW-AVX710[U].indb 54EN_KW-AVX710[U].indb 54 07.12.6 3:31:55 PM07.12.6 3:31:55 PM

55 REFERENCES
ENGLISH
Bluetooth operations
General
• While driving, do not perform complicated operation
such as dialing the numbers, using phone book, etc.
When you perform these operations, stop your car in
a safe place.
• Some Bluetooth devices may not be connected to
this unit depending on the Bluetooth version of the
device.
• This unit may not work for some Bluetooth devices.
• Connecting condition may vary depending on
circumstances around you.
• When the unit is turned off, the device is
disconnected.
Warning messages for Bluetooth operations
• Connection Error: The device is registered but the
connection has failed. Use <Connect> to connect
the device again. (☞ page 28)
• Error: Try the operation again. If “Error” appears
again, check if the device supports the function you
have tried.
• Device Unfound: No available Bluetooth device is
detected by <Search>.
• Loading: The unit is updating the phone book and/
or SMS.
• Please Wait...: The unit is preparing to use
the Bluetooth function. If the message does not
disappear, turn off and turn on the unit, then connect
the device again (or reset the unit).
• Reset 08: Check the connection between the
adapter and this unit.
Icons for phone types
• These icons indicate the phone type set on the device.
:Cellular phone
:Household phone
:Office
:General
:Other than above
• DivX/MPEG1/MPEG2/JPEG/MP3/WMA/WAV
1 Current folder (highlighted bar)
2 Current folder number/total folder number
3 Folder list
4 Selected playback mode
5 Elapsed playing time of the current track (not
displayed for JPEG)
6 Operation status
7 Current track number/total number of tracks
in the current folder (total number of tracks on
the disc)
8 Track information (only for MP3/WMA/WAV)
9 Track list
p Current track (highlighted)
* If tag data includes “Jacket Picture” (baseline
JPEG), it will be displayed.
EN_KW-AVX710[U].indb 55EN_KW-AVX710[U].indb 55 07.12.6 3:31:56 PM07.12.6 3:31:56 PM

ENGLISH
56
CD changer
• If you select a folder, which does not include any
music files, on the list (☞ page 34), you will hear a
beep. Select another folder including music files.
iPod operations
• You can control the following types of iPods through
the interface adapter.
– iPod with dock connector (3rd Generation)
– iPod with Click Wheel (4th Generation)
– iPod mini
– iPod photo
– iPod nano *1
– iPod video (5th Generation) *2
*1 When you connect the iPod nano to the interface
adapter, be sure to disconnect the headphones;
otherwise, no sound is heard.
*2 It is not possible to browse video files on the
“Videos” menu while the iPod is connected to the
interface adapter.
• If the iPod does not play correctly, please update your
iPod software to the latest version. For details about
updating your iPod, visit <http://www.apple.com>.
• When you turn on this unit, the iPod is charged
through the adapter connected to this unit.
• While the iPod is connected, all operations from the
iPod are disabled. Perform all operations from this
unit.
• The text information may not be displayed correctly.
• The text information scrolls on the screen. This unit
can display up to 40 characters.
Notice:
When operating an iPod, some operations may not
be performed correctly or as intended. In this case,
visit the following JVC web site:
<http://www.jvc.co.jp/english/car/support/
ks-pd100/index.html>
Menu settings
• If you change the <Amplifier Gain> setting from
<High> to <Low> while the volume level is set
higher than “30,” the unit automatically changes the
volume level to “VOL 30.”
• After you change any of <Menu Language/Audio
Language/Subtitle> settings, turn off then on the
power, and re-insert the disc (or insert another disc)
so that your setting takes effect.
• When you select <16:9> for a picture whose aspect
ratio is 4:3, the picture slightly changes due to the
process for converting the picture width.
• Even if <4:3PS> is selected, the screen size may
become <4:3LB> for some discs.
EN_KW-AVX710[U].indb 56EN_KW-AVX710[U].indb 56 07.12.6 3:31:57 PM07.12.6 3:31:57 PM

57 REFERENCES
ENGLISH
Sound signals emitted through the rear terminals
Through the analog terminals (Speaker out/REAR OUT)
2-channel signal is emitted. When playing multi-channel encoded disc, multi-channel signals are downmixed.
• DTS sound cannot be reproduced.
Through the DIGITAL OUT terminal
Digital signals (Linear PCM, Dolby Digital, DTS, MPEG Audio) are emitted.
• To reproduce the multi-channel sounds such as Dolby Digital, DTS, and MPEG Audio, connect an amplifier or a
decoder compatible with these multi-channel sources to this terminal, and set <D. Audio Output> correctly.
(☞ page 46)
<D. Audio Output>
Playback disc
Output signals
<Stream> <Dolby D> <PCM>
DVD 48 kHz, 16/20/24 bits Linear PCM 48 kHz, 16 bits stereo Linear PCM*
96 kHz, Linear PCM 48 kHz, 16 bits stereo Linear PCM
with Dolby Digital Dolby Digital bitstream 48 kHz, 16 bits stereo
Linear PCM
with DTS DTS bitstream
with MPEG Audio MPEG bitstream 48 kHz, 16 bits stereo Linear PCM
Audio CD, Video CD 44.1 kHz, 16 bits stereo Linear PCM /
48 kHz, 16 bits stereo Linear PCM
Audio CD with DTS DTS bitstream
DivX/
MPEG
with Dolby Digital Dolby Digital bitstream 48 kHz, 16 bits stereo
Linear PCM
with MPEG Audio 32/44.1/48 kHz, 16 bits Linear PCM
MP3/WMA 32/44.1/48 kHz, 16 bits Linear PCM
WAV 44.1 kHz, 16 bits Linear PCM
* Digital signals may be emitted at 20 or 24 bits (at their original bit rate) through the DIGITAL OUT terminal if the
discs are not copy-protected.
EN_KW-AVX710[U].indb 57EN_KW-AVX710[U].indb 57 07.12.6 3:31:57 PM07.12.6 3:31:57 PM

ENGLISH
58
Preset equalizing values
Frequency
Sound mode 60 Hz 150 Hz 400 Hz 1 kHz 2.5 kHz 6.3 kHz 15 kHz
Flat 00 00 00 00 00 00 00
Hard Rock +03 +03 +01 00 00 +02 +01
R&B +03 +02 +02 00 +01 +01 +03
Pop 00 +02 00 00 +01 +01 +02
Jazz +03 +02 +01 +01 +01 +03 +02
Dance +04 +02 00 –02 –01 +01 +01
Country +02 +01 00 00 00 +01 +02
Reggae +03 00 00 +01 +02 +02 +03
Classic +02 +03 +01 00 00 +02 00
User1/2/3 00 00 00 00 00 00 00
Language codes (for DVD/DivX language selection)
Code
Language
Code
Language
Code
Language
Code
Language
Code
Language
AA Afar FA Persian KK Kazakh NO Norwegian ST Sesotho
AB Abkhazian FI Finnish KL Greenlandic OC Occitan SU Sundanese
AF Afrikaans FJ Fiji KM Cambodian OM (Afan) Oromo SW Swahili
AM Ameharic FO Faroese KN Kannada OR Oriya TA Tamil
AR Arabic FY Frisian KO Korean (KOR) PA Panjabi TE Telugu
AS Assamese GA Irish KS Kashmiri PL Polish TG Tajik
AY Aymara GD Scots Gaelic KU Kurdish PS Pashto, Pushto TH Thai
AZ Azerbaijani GL Galician KY Kirghiz QU Quechua TI Tigrinya
BA Bashkir GN Guarani LA Latin RM
Rhaeto-Romance
TK Turkmen
BE Byelorussian GU Gujarati LN Lingala RN Kirundi TL Tagalog
BG Bulgarian HA Hausa LO Laothian RO Rumanian TN Setswana
BH Bihari HI Hindi LT Lithuanian RW Kinyarwanda TO Tonga
BI Bislama HR Croatian LV Latvian, Lettish SA Sanskrit TR Turkish
BN Bengali, Bangla HU Hungarian MG Malagasy SD Sindhi TS Tsonga
BO Tibetan HY Armenian MI Maori SG Sangho TT Tatar
BR Breton IA Interlingua MK Macedonian SH Serbo-Croatian TW Twi
CA Catalan IE Interlingue ML Malayalam SI Singhalese UK Ukrainian
CO Corsican IK Inupiak MN Mongolian SK Slovak UR Urdu
CS Czech IN Indonesian MO Moldavian SL Slovenian UZ Uzbek
CY Welsh IS Icelandic MR Marathi SM Samoan VI Vietnamese
DZ Bhutani IW Hebrew MS Malay (MAY) SN Shona VO Volapuk
EL Greek JA Japanese MT Maltese SO Somali WO Wolof
EO Esperanto JI Yiddish MY Burmese SQ Albanian XH Xhosa
ET Estonian JW Javanese NA Nauru SR Serbian YO Yoruba
EU Basque KA Georgian NE Nepali SS Siswati ZU Zulu
EN_KW-AVX710[U].indb 58EN_KW-AVX710[U].indb 58 07.12.6 3:31:58 PM07.12.6 3:31:58 PM

59 REFERENCES
ENGLISH
Characters shown on the screen
In addition to the roman alphabet (A – Z, a – z), you
can use the following characters to assign titles.
(☞ page 42)
• When <Руccĸий> is selected for <Language>.
(☞ page 45)
• When any language other than <Руccĸий> is
selected for <Language>. (☞ page 45)
Upper and lower cases
Numbers and symbols
Upper and lower cases
Numbers and symbols
• Manufactured under license from Dolby
Laboratories. Dolby and the double-D symbol are
trademarks of Dolby Laboratories.
• “DTS” and “DTS Digital Out” are registered
trademarks of DTS, Inc
• “DVD Logo” is a trademark of DVD Format/Logo
Licensing Corporation registered in the US, Japan
and other countries.
• DivX, DivX Ultra Certified, and associated logos
are trademarks of DivX, Inc. and are used under
license.
• Official DivX® Ultra Certified product
• Plays all versions of DivX® video (including DivX®
6) with enhanced playback of DivX® media files
and the DivX® Media Format
• Microsoft and Windows Media are either
registered trademarks or trademarks of Microsoft
Corporation in the United States and/or other
countries.
• The Bluetooth word mark and logos are owned by
the Bluetooth SIG, Inc. and any use of such marks
by Victor Company of Japan, Limited (JVC) is under
license. Other trademarks and trade names are
those of their respective owners.
• iPod and iTunes are trademarks of Apple Inc.,
registered in the U.S. and other countries.
• This product incorporates copyright protection
technology that is protected by U.S. patents
and other intellectual property rights. Use of
this copyright protection technology must be
authorized by Macrovision, and is intended for
home and other limited viewing uses only unless
otherwise authorized by Macrovision. Reverse
engineering or disassembly is prohibited.
EN_KW-AVX710[U].indb 59EN_KW-AVX710[U].indb 59 07.12.6 3:31:59 PM07.12.6 3:31:59 PM

ENGLISH
60
Troubleshooting
What appears to be trouble is not always serious. Check the following points before calling a service center.
• For operations with the external components, refer also to the instructions supplied with the adapters used for the
connections (as well as the instructions supplied with the external components).
Symptoms Remedies/Causes
General
• No sound comes out of the speakers. • Adjust the volume to the optimum level.
• Check the cords and connections.
• DTS sound cannot be reproduced through the analog
terminals (Speaker out/REAR OUT).
• The screen is not clear and legible. Sunshine from the windshield may cause this symptom.
Adjust <Bright>. (☞ page 44)
• “Position Error Push Open Key” appears on
the screen.
The monitor panel angle has been forcibly adjusted, or its
adjustment has been interrupted while opening or closing.
Press OPEN/TILT.
• “Mecha Error Push Reset” appears on the
screen, and the panel does not move.
Reset the unit. (☞ page 3)
• “No Signal” appears. • Change the source.
• Start the playback on the external component connected
to VIDEO IN terminal.
• Check the cords and connections.
• Signal input is too weak.
• The buttons on the monitor panel do not
work.
When the monitor panel is open, only +/– (volume) and
OPEN/TILT work. The other buttons do not function.
• The unit does not work at all. Reset the unit. (☞ page 3)
FM/AM
• SSM automatic presetting does not work. Store stations manually. (☞ page 12)
• Static noise while listening to the radio. Connect the aerial firmly.
EN_KW-AVX710[U].indb 60EN_KW-AVX710[U].indb 60 07.12.6 3:32:00 PM07.12.6 3:32:00 PM

61 REFERENCES
ENGLISH
Symptoms Remedies/Causes
Disc in general
• Disc can be neither recognized nor played
back.
Eject the disc forcibly. (☞ page 3)
• Disc cannot be ejected. Unlock the disc. (☞ page 19)
• Recordable/Rewritable discs cannot be
played back.
• Tracks on the Recordable/Rewritable discs
cannot be skipped.
• Insert a finalized disc.
• Finalize the discs with the component which you used
for recording.
• Playback does not start. • Insert the disc correctly again.
• The format of files is not supported by the unit.
• The playback picture is not clear and legible. Adjust items in <Picture Adjust> menu. (☞ page 44)
• Sound and pictures are sometimes
interrupted or distorted.
• Stop playback while driving on rough roads.
• Change the disc.
• No playback picture is shown and “Parking
Brake” appears on the screen, even when the
parking brake is engaged.
Parking brake lead is not connected properly.
(☞ Installation/Connection Manual)
• No picture appears on the external monitor. • Connect the video cord correctly.
• Select the correct input on the external monitor.
• “Eject Error” or “Loading Error” appears on
the screen.
Change the source by pressing SOURCE.
• “Region code error” appears on the screen
when you insert a DVD Video.
Region code is not correct. (☞ page 4)
DivX/MPEG1/MPEG2/MP3/WMA/WAV
• Disc cannot be played back. • Change the disc.
• Record the tracks using a compliant application on the
appropriate discs. (☞ page 4)
• Add appropriate extension codes to the file names.
• Noise is generated. The track played back is not a playable file format. Skip to
another file.
• Tracks are not played back as you have
intended them to play.
Playback order may differ from that played back using
other players.
• Elapsed playing time is not correct. This sometimes occurs during playback. This is caused by
how the tracks are recorded.
• “Not Support” appears on the screen and
track skips.
The track is unplayable.
EN_KW-AVX710[U].indb 61EN_KW-AVX710[U].indb 61 07.12.6 3:32:00 PM07.12.6 3:32:00 PM

ENGLISH
62
Symptoms Remedies/Causes
Bluetooth
• Bluetooth device does not detect the unit. This unit can be connected with one Bluetooth cellular
phone and one Bluetooth audio player at a time.
While connected to a device, this unit cannot be detected
from another device. Disconnect currently connected device
and search again.
• The unit does not detect the Bluetooth
device.
• Check the Bluetooth setting of the device.
• Search from the Bluetooth device. After the device
detects the unit, select <Open> on the unit to connect
the device. (☞ page 27)
• The unit does not make pairing with the
Bluetooth device.
• Enter the same PIN code for both the unit and target
device. If the PIN code of the device is not indicated on its
instructions, try “0000” or “1234.”
• Select the device name from <Special Device>, then
try to connect again. (☞ pages 28, 50)
• Echo or noise occurs. Adjust the microphone unit position.
• Phone sound quality is poor. • Reduce the distance between the unit and the Bluetooth
cellular phone.
• Move the car to place where you can get a better signal
reception.
• The sound is interrupted or skipped during
playback of a Bluetooth audio player.
• Reduce the distance between the unit and the Bluetooth
audio player.
• Disconnect the player connected for “Bluetooth PHONE.”
• Turn off, then turn on the unit.
• (When the sound is not yet restored,) connect the player
again.
• “New Device” cannot be selected for
“Bluetooth AUDIO.”
Bluetooth audio player is already connected. To select “New
Device,” disconnect it. (☞ page 28)
• The connected audio player cannot be
controlled.
Check whether the connected audio player supports AVRCP
(Audio Video Remote Control Profile).
• “Reset 08” appears on the screen. Check the connection between the adapter and this unit.
EN_KW-AVX710[U].indb 62EN_KW-AVX710[U].indb 62 07.12.6 3:32:00 PM07.12.6 3:32:00 PM

63 REFERENCES
ENGLISH
Symptoms Remedies/Causes
CD changer
• “No Disc” appears on the screen. Insert a disc into the magazine.
• “No Magazine” appears on the screen. Insert the magazine.
• “Cannot play this disc Check the disc”
appears on the screen.
Current disc does not include playable files. Replace the disc
with one including playable files.
• “Reset 08” appears on the screen. Connect this unit and the CD changer correctly and press
the reset button of the CD changer.
• “Reset 01” – “Reset 07” appears on the
screen.
Press the reset button of the CD changer.
• The CD changer does not work at all. Reset the unit. (☞ page 3)
iPod
• The iPod does not turn on or does not work. • Check the connection.
• Charge the battery.
• Sound is distorted. Deactivate the equalizer either on this unit or the iPod.
• “Disconnect” appears on the screen. Check the connection.
• Playback stops. The headphones are disconnected during playback. Restart
playback.
• “No Files” appears on the screen. No tracks are stored. Import tracks to the iPod.
• “Reset 01” – “Reset 07” appears on the
screen.
Disconnect the adapter from both this unit and iPod. Then,
connect them again.
• “Reset 08” appears on the screen. Check the connection between the adapter and this unit.
• The iPod’s controls do not work after
disconnecting from this unit.
Reset the iPod.
AV-IN
• No picture appears on the screen. • Turn on the video component if it is not on.
• Connect the video component correctly.
• Playback picture is not clear and legible. Adjust items in <Picture Adjust> menu. (☞ page 44)
EN_KW-AVX710[U].indb 63EN_KW-AVX710[U].indb 63 07.12.6 3:32:01 PM07.12.6 3:32:01 PM

ENGLISH
64
Specifications
AMPLIFIER
Maximum Power Output: Front/Rear: 50 W per channel
Continuous Power Output
(RMS):
Front/Rear: 20 W per channel into 4 Ω, 40 Hz to
20 000 Hz at no more than 0.8% total
harmonic distortion
Load Impedance: 4 (4 to 8 allowance)
Equalizer Control Range: Frequencies: 60 Hz, 150 Hz, 400 Hz, 1 kHz, 2.5 kHz,
6.3 kHz, 15 kHz
Level: ±10 dB
Signal-to-Noise Ratio: 70 dB
Audio Output Level
REAR OUT:
Line-Out Level/Impedance: 2.5 V/20 kΩ load (full scale)
Output Impedance: 1 kΩ
Color System: NTSC/PAL
Video Output (composite): 1 Vp-p/75 Ω
Other Terminals: Input: LINE IN, VIDEO IN, Antenna input
Output: VIDEO OUT
Others: CD changer, Reverse gear signal, DIGITAL
OUT (optical)
FM/AM TUNER
Frequency Range: FM: 87.5 MHz to 108.0 MHz
AM: 531 kHz to 1 602 kHz
FM Tuner Usable Sensitivity: 11.3 dBf (1.0 V/75 Ω)
50 dB Quieting Sensitivity: 16.3 dBf (1.8 V/75 Ω)
Alternate Channel Selectivity (400 kHz): 65 dB
Frequency Response: 40 Hz to 15 000 Hz
Stereo Separation: 35 dB
AM Tuner Sensitivity/Selectivity: 20 V/35 dB
DVD/CD
Signal Detection System: Non-contact optical pickup (semiconductor laser)
Frequency Response: DVD, fs=48 kHz/96 kHz: 16 Hz to 22 000 Hz
VCD/CD: 16 Hz to 20 000 Hz
Dynamic Range: 93 dB
Signal-to-Noise Ratio: 95 dB
Wow and Flutter: Less than measurable limit
EN_KW-AVX710[U].indb 64EN_KW-AVX710[U].indb 64 07.12.6 3:32:01 PM07.12.6 3:32:01 PM

65 REFERENCES
ENGLISH
MONITOR
Screen Size: 7 inch wide liquid crystal display
Number of Pixel: 336 960 pixels: 480 × 3 (horizontal) × 234 (vertical)
Drive Method: TFT (Thin Film Transistor) active matrix format
Color System: NTSC/PAL
Aspect Ratio: 16:9 (wide)
GENERAL
Power Requirement: Operating Voltage: DC 14.4 V (11 V to 16 V allowance)
Grounding System: Negative ground
Allowable Storage Temperature: –10°C to +60°C
Allowable Operating Temperature: 0°C to +40°C
Dimensions (W × H × D): Installation Size (approx.): 178 mm × 100 mm × 160 mm
Panel Size (approx.): 171 mm × 97 mm × 21 mm
Mass (approx.): 2.6 kg
CAUTION: When ejecting the monitor, leave an
open space for the monitor to come out. If you do
not, the monitor may obstruct the steering wheel
and gearshift lever operations, and this may result
in a traffic accident.
Unit: mm
Required space for the monitor ejection
160 90.5
100
Design and specifications are subject to change without notice.
EN_KW-AVX710[U].indb 65EN_KW-AVX710[U].indb 65 07.12.6 3:32:02 PM07.12.6 3:32:02 PM
EN, CT, TH
1207MNMMDWJEIN
© 2008 Victor Company of Japan, Limited
Having TROUBLE with operation?
Please reset your unit
Refer to page of How to reset your unit
Rear002A_KW-AVX710U_1.indd 2Rear002A_KW-AVX710U_1.indd 2 07.11.13 1:42:47 PM07.11.13 1:42:47 PM

KW-AVX716/KW-AVX710
Installation/Connection Manual
ϰ༬ો˿̱
°“√µ‘¥µ—Èß/§ŸË¡◊Õ°“√µ‘¥µ—Èß
Crimp connector
қʪᏃ
¢—È«µËÕ”À√—∫Àπ’∫
Power cord
ྐཔ·ڄለӧ
“¬‡§‡∫‘≈°”≈—ß
Batteries
ྐЖ
·∫µ‡µÕ√’Ë
Heat sink
ಞᇊ̕
·ºËπ√–∫“¬§«“¡√ÈÕπ
1
1207MNMMDWJEIN
EN, CT, TH
©2008 Victor Company of Japan, Limited
Remote controller
ჲ
√’‚¡µ§Õπ‚∑√≈
Parts list for installation and connection
The following parts are provided for this unit.
If anything is missing, contact your dealer immediately.
Main unit
̟ጅ
µí«‡§√◊ËÕß
Round head screws (M5 x 8 mm)
ฐᏃᒘീ (M5 x 8 mm)
°√ŸÀ—«°≈¡ (M5 x 8 ¡¡)
Flat head screws (M5 x 8 mm)
ͦᏃᒘീ (M5 x 8 mm)
°√ŸÀ—«·∫π (M5 x 8 ¡¡)
LVT1780-008A
[U/UT]
ENGLISH
This unit is designed to operate on 12 V DC, NEGATIVE ground
electrical systems. If your vehicle does not have this system, a
voltage inverter is required, which can be purchased at JVC car audio
dealers.
WARNINGS
• DO NOT install any unit or wire any cable in a location where;
– it may obstruct the steering wheel and gearshift lever operations,
as this may result in a traffic accident.
– it may obstruct the operation of safety devices such as air bags, as
this may result in a fatal accident.
– it may obstruct visibility.
• DO NOT operate any unit while manipulating the steering wheel, as
this may result in a traffic accident.
• The driver must not watch the monitor while driving. It may lead to
carelessness and cause an accident.
• If you need to operate the unit while driving, be sure to look around
carefully or you may be involved in a traffic accident.
• If the parking brake is not engaged, “Parking Brake” flashes on the
monitor, and no playback picture will be shown.
– This warning appears only when the parking brake wire is
connected to the parking brake system built in the car.
Notes on electrical connections:
• Replace the fuse with one of the specified rating. If the fuse blows
frequently, consult your JVC car audio dealer.
• It is recommended to connect speakers with a maximum power
of more than 50 W (both at the rear and at the front, with an
impedance of 4 Ω to 8 Ω).
If the maximum power is less than 50 W, change “Amplifier Gain”
setting to prevent the speakers from being damaged (see page 49 of
the INSTRUCTIONS).
• To prevent short circuits, cover the terminals of the UNUSED leads
with insulating tape.
• The heat sink becomes very hot after use. Be careful not to touch it
when removing this unit.
Plate for use with a Nissan car
·ؠ̅୕ԆԾڄख
·ºËπ”À√—∫„™È°—∫√∂π‘—π
ˁ̂
ʹጅ෮̈́՟·ڈޠ12 V é࠸ોϚڅྑກԧéϨسڄԾቩ
ԅЉɾྐԦç۱ᄔ࠱ɾࡴྐᏫ᜵ಗç̣̈́ϚJVCԆԾ
ࡖᛏ˜ኀੋளකռé
ᙲѿ
• ˝ˡϚ̣ʓтϯ༫ʹጅྐង;
– ̈́Ҟᗉዬѕ̄ώᇟ֜᜵ᐑଁڄтѴ۱̈́˺ചΟ
Ֆݭé
– ̈́Ҟᗉዬѕϯη༫çϨϯηमெമڄтçѴ۱̈́
˺ചࠓ֡ڄΟՖݭé
– ̈́Ҟᗉඁ௴ڄтé
•
˝ˡϚዬѕ̄ώᇟڄཫദˀዬѕʹጅçѴ۱̈́˺ചΟՖݭé
• ኢአइçኢአ࢜˝ˡႌԠΕé̈́ࠓՓ˺ചՖ
ݭé
• Ϛኢአཫദˀࠜᄔ࠱ዬѕʹጅç˝৩࠱ં˝ٌำۮ̄çѴ۱̈́
˺ചΟՖݭé
• ࠜ˾۫ԾͶ⽂ϐç“Parking Brake” ϪᆟϚΕʕਕᖼç̝
ٗᆑ؞࿌̕é
– ෮ະ˾۫ԾለႩԆԾ˖ڄ˾۫ԾԦߟइЏᙱѾۑ
ࣥʼ̳é
нྑཕોईٍิ:
• ӕۘᎳീӦಗᖃ׆࠷மࡩڄۘᎳീéϨسۘᎳീગጛᖢç
ቁώJVC ԆԾࡖᛏ˜ኀੋ༿é
•
݈֜ۮಙᑵڄఛʨ᎔ʈ̷ᏻʨؠ50 Wçմۇӏ
4 Ωü8 ΩéϨسఛʨ̷ʮؠ 50 Wçቁቆओ
“Amplifier Gain”
׆ࡩç̣Վ̊ಙᑵ๑ᖢé
(
ኌ՟·იاएڄ୶49ࡗ
)
é
• Վ̊ྐഠཔçቁ·ഽሇઘ̸у͵՟·ྐለڄၷʪé
• ʹጅ՟·݈çಞᇊ݃̕ᇊéϕЏçϚ୰̳ʹጅइçʮ˻ʿ࠱
᙮ညಞᇊ̕é
‰∑¬
™ÿ¥ª√–°Õ∫π’ȉ¥È√—∫°“√ÕÕ°·∫∫¡“‡æ◊ËÕ„™Èß“π°—∫√–∫∫ °√–·‰øøÈ““¬¥‘π¢—È«≈∫°√–
·µ√ß 12 ‚«≈∑Ï À“°√∂¬πµÏ¢Õߧÿ≥‰¡Ë‰¥È„™È√–∫∫π’È µÈÕß„™È‡§√◊ËÕß·ª≈ß°√–
·‰ø™Ë«¬ ´÷Ëß“¡“√∂À“´◊ÈÕ‰¥È®“°√È“π¢“¬‡§√◊ËÕ߇’¬ß√∂¬πµÏ JVC
§”‡µ◊Õπ
• լ˓µ‘¥µ—È߇§√◊ËÕ߇≈ËπÀ√◊Õ‡¥‘𓬉ø„πµ”·ÀπËß∑’Ë;
– Õ“®°’¥¢«“ß°“√∑”ß“π¢Õßæ«ß¡“≈—¬·≈–§—π‡°’¬√Ï ‡æ√“–Õ“®°ËÕ„Àȇ°‘¥Õÿ∫—µ‡Àµÿ¢÷È
–
Õ“®°’¥¢«“ß°“√∑”ß“π¢ÕßÕÿª°√≥ϪÈÕß°—𧫓ª≈Õ¥¿—¬ ‡™Ëπ ·Õ√Ï·∫§ ‡æ√“–
Õ“®°ËÕ„Àȇ°‘¥Õ—πµ√“¬√È“¬·√ß∂÷ß™’«‘µ¢÷Èπ‰¥È
– Õ“®°’¥¢«“ß“¬µ“
• լ˓„™Èß“π¢≥–¢—∫¢’Ë ‡æ√“–Õ“®°ËÕ„Àȇ°‘¥Õÿ∫—µ‘‡Àµÿ¢÷Èπ‰¥È
• ºŸÈ¢—∫µÈÕ߉¡Ë¡Õß∑’ˮաÕ𑇵Õ√Ï¢≥–¢—∫¢’Ë ‡æ√“–Õ“®π”‰ªŸË§«“¡ª√–¡“∑‡≈‘π‡≈ËÕ·≈–
°ËÕ„Àȇ°‘¥Õÿ∫—µ‘‡Àµÿ‰¥È
• À“°µÈÕß°“√„™Èß“π‡§√◊ËÕߢ≥–¢—∫¢’Ë µÈÕß·πË„®«Ë“‰¥È„™È§«“¡√–¡—¥√–«—ßլ˓ߥ’
‡æ◊ËÕÀ≈’°‡≈’ˬ߰“√‡°‘¥Õÿ∫—µ‘‡Àµÿ
• À“°‰¡Ë‰¥È„ˇ∫√°¡◊Õ ¢ÈÕ§«“¡ “Parking Brake” ®–°–æ√‘∫∑’ËÀπÈ“®Õ ·≈–®–
‰¡Ë¡’¿“淥ߢ÷Èπ¡“
– §”‡µ◊Õππ’È®–ª√“°Ø¢÷Èπ‡©æ“–‡¡◊ËÕµËÕ“¬‡∫√°°—∫√–∫∫‡∫√°„π√∂¬πµÏ‰«È‡∑Ë“π—Èπ
¡ÈÕπŸ≈„π°“√•ËÕ√–∫∫‰ø:
• „™Èæ‘°—¥®”‡æ“–·∑πøî«À“°øî«Ï¢“¥∫ËÕ¬ „ÀȪ√÷°…“√È“ π¢“¬‡§√◊ËÕ߇’¬ß√∂¬πµÏ JVC
• ¢Õ·π–π”„ÀȵËÕ≈”‚æß ∑’Ë¡’°”≈—ߢ—∫ßÿ¥‡°‘π°«Ë“
50 W
(∑—ÈߥȓπÀπÈ“·≈–¥È“πÀ≈—ß
¡’§Ë“§«“¡µÈ“π∑“π 4 Ω ∂÷ß 8 Ω) ∂È“°”≈—ߢ—∫µË”°«Ë“ 50 W „Àȇª≈’ˬπ§Ë“
“Amplifier Gain” ‡æ◊ËÕªÈÕß°—π‰¡Ë„ÀÈ≈”‚æß™”√ÿ¥ (¥ŸÀπÈ“
49
§”·π–π”)
• °“√ªÈÕß°—π°“√≈—¥«ß®√ ®–µÈÕßæ—π¢—È«“¬µ–°—Ë« ∑’ˉ¡Ë„™È·≈È«¥È«¬‡∑ ªæ—𓬉ø
•
·ºËπ√–∫“¬§«“¡√ÈÕπ®–√ÈÕπ¡“°À≈—ß®“°„™È √–¡—¥√–«—ßլ˓‰ª —¡º—‡¡◊ËÕ∂Õ¥™ÿ¥ª√–°Õ∫π’È
Έءϰ༬֝ોڅྒྷέଢశ
ʹጅక̣ʓྒάé
ࠜചথ˲έщɾάྒάçቁѮոᑷുڄ˜ኀੋé
√“¬°“√Ë«πª√–°Õ∫”À√—∫µ‘¥µ—Èß·≈–‡™◊ËÕ¡µËÕ°—π
Ë«πª√–°Õ∫µËÕ‰ªπ’È„ÀÈ¡“°—∫™ÿ¥ª√–°Õ∫π’È À“°¡’‘Ëß„¥‰¡Ë§√∫ °√ÿ≥“µ‘¥µËÕµ—
«·∑π®”ÀπË“¬‚¥¬∑—π∑’
THCT1-3_AVX710-008A.indd 1THCT1-3_AVX710-008A.indd 1 12/6/07 3:37:44 PM12/6/07 3:37:44 PM

2
INSTALLATION (IN-DASH MOUNTING)
The following illustration shows a typical installation. However, you
should make adjustments corresponding to your specific car. If you
have any questions or require information regarding installation kits,
consult your JVC car audio dealer or a company supplying kits.
• If you are not sure how to install this unit correctly, have it installed
by a qualified technician.
Before installing the unit
• When mounting the unit, be sure to use the screws provided, as
instructed. If other screws are used, parts could become loose or
damaged.
• When tightening screws or bolts, be careful not to pinch any
connection cord.
• Make sure not to block the fan on the rear to maintain proper
ventilation when installing the unit.
Screws removed from the car in step 1
ϚӴᝢ1 નԆԾ؛ֈڄᒘീ
°√Ÿ∑’Ë∂Õ¥ÕÕ°®“°√∂¬πµÏ„π¢—ÈπµÕπ∑’Ë 1
1 Remove the audio system originally installed in the car, together
with its mounting brackets.
Note: Be sure to keep all the screws and parts removed from
your car for future use.
2 Attach the mounting brackets (removed from the car), to this
unit (see below).
3 Do the required electrical connections.
• See pages 3 to 6.
4 Install this unit using the screws removed in step 1.
The following example is for installation in a Toyota car. For more
details, consult your JVC car audio dealer.
Mounting bracket removed from the car
નԆԾ؛ֈڄ༫ށ
·∑Ëπ√Õß∑’Ë∂Õ¥ÕÕ°®“°√∂¬πµÏ
Supplied screws
కᒘീ
°√Ÿ∑’Ë„ÀÈ¡“æ√ÈÕ¡‡§√◊ËÕß
Install the unit at an angle of less than 30˚, taking it into account that the monitor would eject when in use.
અʹጅϯ༫Ϛ˲ؠ30˚ ڄԴܾçͫෝШᅱռ̣ܳ̈́Ϛ՟·इᅫ̳é
µ‘¥µ—Èß™ÿ¥ª√–°Õ∫∑’Ë¡ÿ¡µË”°«Ë“ 30˚ ‚¥¬§”π÷ß∂÷߇«≈“®Õ¡Õ𑇵Õ√Ï¥’¥ÕÕ°„π√–À«Ë“ß°“√„™È
Note: When installing the unit on the mounting bracket, make sure to use the supplied screws (M5 x 8 mm). If longer screws are
used, they could damage the unit.
ఖٍ: ϯ༫ʹጅන༫ށइçቁੀͫ՟·కڄᒘീ(M5 x 8 mm)éࠜ՟·̍ཛۂڄᒘീçЉᘕᒘീ̈́๑ᖢʹጅé
À¡“¬‡Àµÿ: ¢≥–µ‘¥µ—È߇§√◊ËÕß∫π·∑Ëπ√Õß ¢Õ„ÀÈ¥Ÿ„ÀÈ·πË„®«Ë“„™È°√Ÿ∑’Ë„ÀÈ¡“æ√ÈÕ¡‡§√◊ËÕß (M5 x 8 ¡¡) À“°„™È°√Ÿ¬“«°«Ë“∑’Ë√–∫ÿÕ“®∑”„Àȇ§√◊ËÕ߇’¬‰¥È
30˚
Select the appropriate type fitting to your
audio system space.
ዪቱϐڄࡖᛏԦϯ༫ڏڄܓ༙é
‡≈◊Õ°·∫∫∑’ˇÀ¡“–¡°—∫æ◊Èπ∑’Ë√–∫∫‡§√◊ËÕ߇’¬ß
If necessary, restore the protruding tabs.
ࠜЉͫ࠱çቁࡌ๘༫ʕ̴ሇé
À“°®”‡ªìπ „ÀÈßÕ·ºËπ¬÷¥
Unit: mm
వт: mm (ଔТ)
ÀπË«¬: ¡¡
Supplied screws
కᒘീ
°√Ÿ∑’Ë„ÀÈ¡“æ√ÈÕ¡‡§√◊ËÕß
Required space for the monitor ejection
։ܴᄕ˄ڐ
æ◊ÈÈπ∑’Ë«Ë“ßÀ’˵ÈÕß°“√”À√—∫¥—π®Õ¿“æÕÕ°
160 90.5
100
When installing the unit in a Nissan car
ັϰ༬͵ጆء̆ୖԇԿई
‡¡◊ËÕµ‘¥µ—È߇§√◊ËÕß„π√∂π‘—π
Plate for use with a Nissan car
·ؠ̅୕ԆԾڄख
·ºËπ”À√—∫„™È°—∫√∂π‘—π
ϰ༬(༬éׇ֤ϛᄮڸؼ˗)
ʓࡒڄ࿌༱ڷΕʄյܓڄϯ༫ദҺéѓݵϚᄑϯ༫इçᏻ
༳घየڄԆԾѕቱະڄቆዱéϨسЉᖅçᄔ࠱Љᘕ
ࢭ˔άڄཊऄçቁώ JVC ԆԾࡖᛏ˜ኀੋࢭ˔άաᏻ˙͌
༿é
• Ϩسʿᇧ׆Ϩщᇧϙϯ༫ʹጅçᏻቁϐतڄӑிʆ࢜գ
ϯ༫é
ϰ༬͵ጆ˄ۯ
• ະ༫ʕʹጅइͫෝݝຖݣΕ՟·కڄᒘീਐéϨس՟·մ͟
ڄᒘീਐçߟᘕྒά̈́ᖑ๑ᖢé
• ະᕬႌᒘീਐᒘनइç˝৩ʿ࠱Ꮻᐅռέщྐለé
• ະϯ༫ʕ݈ç˝৩ʿ࠱ۇዥռ݈ࡒػڄࡘ࣮̣႕ݠቱະڄ
ࡘé
°“√µ‘¥µ—Èß
(
°“√ª√–°Õ∫·ºßÀπÈ“ªí∑¡Ï‡¢È“
)
¿“æµ—«Õ¬Ë“ßµËÕ‰ªπ’È·¥ß∂÷ß°“√µ‘¥µ—Èß·∫∫∑—Ë«‰ª À“°§ÿ≥¡’ªô ≠À“À√◊ÕµÈÕß°“√¢ÈÕ¡Ÿ≈‡
°’ˬ«°—∫™ÿ¥µ‘¥µ—Èß °√ÿ≥“ª√÷°…“°—∫ºŸÈ¢“¬‡§√◊ËÕ߇’¬ß√∂¬πµÏ JVC ¢Õß∑Ë“πÀ√◊Õ∫√‘…—
• À“°§ÿ≥‰¡Ë¡—Ëπ„®„π«‘∏’°“√µ‘¥µ—È߇§√◊ËÕ߇’¬ßլ˓ß∂Ÿ°«‘∏’ ‚ª√¥„Àș˓ߺŸÈ™”π“≠∑”°“√µ‘¥
µ—È߇∑Ë“π—¡
°ËÕπ°“√µ‘¥µ—Èßµ—«‡§√◊ËÕß
• ‡¡◊ËÕ®–∑”°“√µ‘¥µ—Èßµ—«‡§√◊ËÕß ‚ª√¥„™È°√Ÿ∑’Ë·π∫¡“µ“¡§”·π–π” À“°¬÷¥‡§√◊ËÕߥȫ¬
°√Ÿ·∫∫Õ◊Ëπ Õ“®∑”„ÀÈ™‘ÈπË«πÀ≈«¡À√◊Õ‡°‘¥§«“¡‡’¬À“¬‰¥È
• ‡¡◊ËÕ®–¢—π·πËπ°√ŸÀ√◊Õ≈—°‡°≈’¬« µÈÕß√–«—߉¡Ë„ÀÈÀπ’∫“¬‡™◊ËÕ¡µËÕ
• °√ÿ≥“µ√«®Õ∫„ÀÈ·πË„®«Ë“¡‘‰¥Èªî¥°—Èπæ—¥≈¡µ√ß·ºßÀπÈ“°“°¥È“πÀ≈—ß
‡æ◊ËÕ„ÀÈ°“√√–∫“¬Õ“°“»‡ªìπ‰ªÕ¬Ë“߇À¡“–¡‡¡◊ËÕµ‘¥µ—Èß
1 ؛ֈࢍʹϯ༫ϚԆԾ˖ڄࡖᛏԦç̣˪մ༫ށé
ఖٍ: ቁੀͫۘॡЉનԆԾ؛ֈڄᒘീ֜ྒάਭ݈̅՟
·é
2 અ(નԆԾ؛ֈڄ) ༫ށϯʕʹጅ(ኌʓ࿌)é
3 ੭мͫ࠱ڄྐཔé
• ኌ୶3 в6ࡗé
4 ՟·ϚӴᝢ1 ؛ֈڄᒘീϯ༫ʹጅé
̣ʓ̣ᕙΉ(Toyota) ԆԾϯ༫բéቁᑷുڄJVC ԆԾࡖᛏ
˜ኀੋЉᘕӦϠஅé
1 ∂Õ¥√–∫∫‡§√◊ËÕ߇’¬ß∑’˵‘¥µ—Èß„π√∂‰«Èµ—Èß·µË·√° æ√ÈÕ¡∑—Èß·∑Ëπ√Õß
À¡“¬‡Àµÿ: ¥Ÿ„ÀÈ·πË„®«Ë“‡°Á∫°√Ÿ·≈–
™‘ÈπË«π∑âÈßÀ¡¥∑’Ë∂Õ¥ÕÕ°®“°√∂¬πµÏ¢Õß∑Ë“π‰«È„™ÈµËÕ‰ª
2 µ‘¥·∑Ëπ√Õß (∑’Ë∂Õ¥ÕÕ°®“°√∂¬πµÏ) ‡¢È“°—∫™ÿ¥ª√–°Õ∫π’È (¥Ÿ∑’˥ȓπ≈Ë“ß)
3 ¥”‡π‘π°“√µËÕ√–∫∫‰øøÈ“∑’Ë®”‡ªìπ
• ¥ŸÀπÈ“ 3 ∂÷ß 6
4 µ‘¥µ—Èß™ÿ¥ª√–°Õ∫π’È‚¥¬„™È°√Ÿ∑’Ë∂Õ¥ÕÕ°„π¢—ÈπµÕπ∑ 1
µ—«Õ¬Ë“ßµËÕ‰ªπ’ȇªìπ°“√µ‘¥µ—Èß„π√∂¬πµÏ‚µ‚¬µÈ“ ”À√—∫√“¬≈–‡Õ’¬¥‡æ‘Ë¡‡µ‘¡
°√ÿ≥“ª√÷°…“µ—«·∑π®”ÀπË“¬‡§√◊ËÕ߇’¬ß√∂¬πµÏ JVC
Mounting bracket removed from the car
નԆԾ؛ֈڄ༫ށ
·∑Ëπ√Õß∑’Ë∂Õ¥ÕÕ°®“°√∂¬πµÏ
THCT1-3_AVX710-008A.indd 2THCT1-3_AVX710-008A.indd 2 12/6/07 3:38:11 PM12/6/07 3:38:11 PM
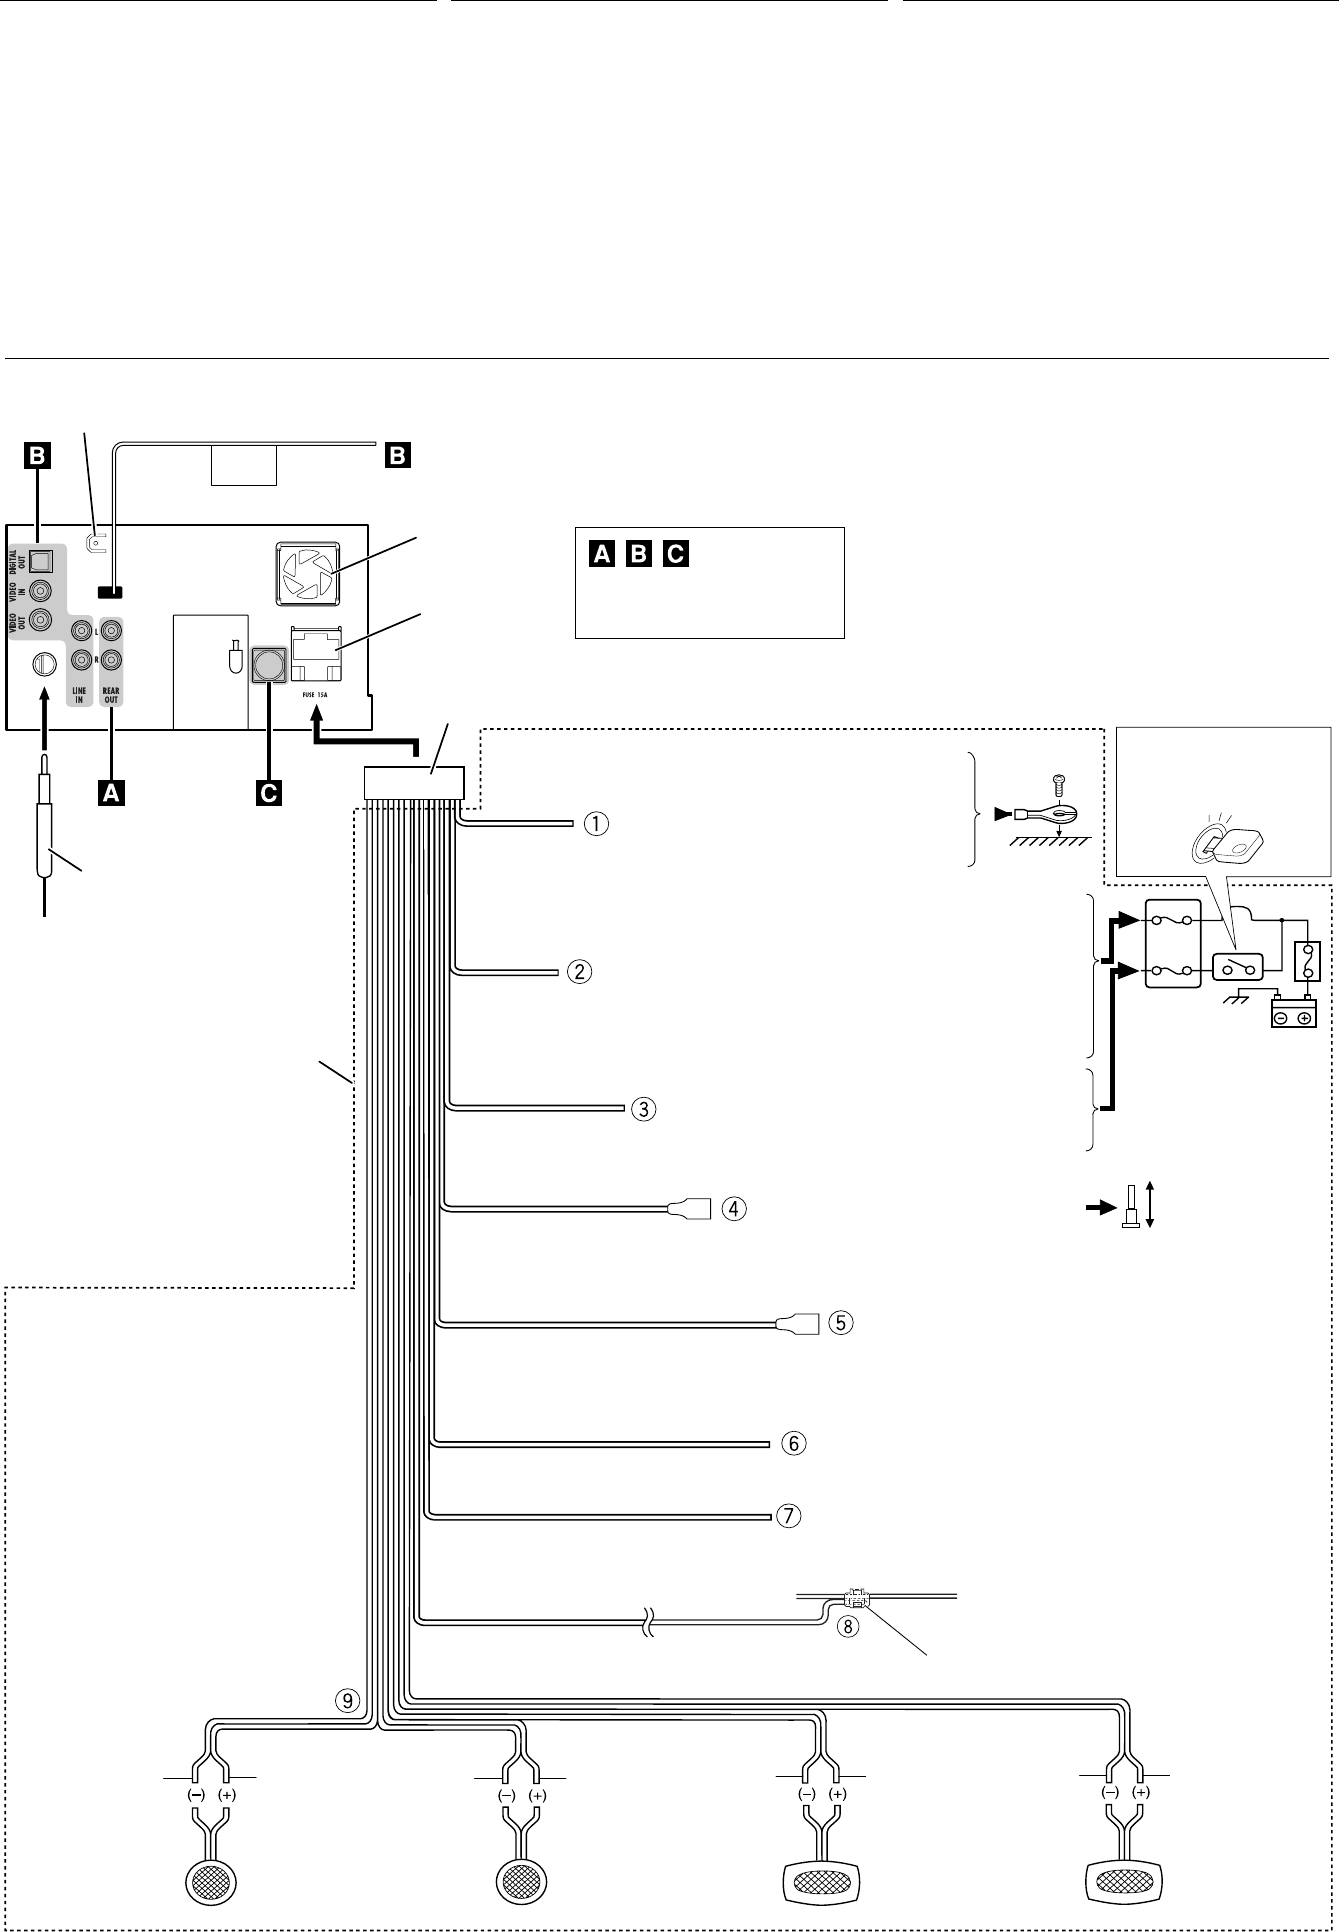
(ILLUMINATION)
(REMOTE OUT)
(POWER ANTENNA)
(PARKING BRAKE)
(TEL MUTING)
REVERSE
GEAR
SIGNAL
3
2
1
3
ELECTRICAL CONNECTIONS
To prevent short circuits, we recommend that you disconnect the
battery’s negative terminal and make all electrical connections before
installing the unit.
• Be sure to ground this unit to the car’s chassis again after
installation.
Before connecting: Check the wiring in the vehicle carefully.
Incorrect connection may cause serious damage to this unit.
The leads of the power cord and those of the connector from the car
body may be different in color.
1 Connect the colored leads of the power cord in the order specified
in the illustration below.
2 Connect the antenna cord.
3 Finally connect the wiring harness to the unit.
15 A fuse
15 A ۘᎳീ
øî«Ï¢π“¥ 15 A
Rear ground terminal
ʹጅ݈ࠌϙၷʪ
®ÿ¥‡™◊ËÕ¡µËÕ“¬¥‘π¥È“πÀ≈—ß
*1 Not included for this unit
*1 ʿᎲʹጅಏա
*1 ‰¡Ë‰¥È„ÀÈ¡“°—∫™ÿ¥ª√–°Õ∫π’È
Ignition switch
ᓭ̑ළᘕ
«‘∑™Ï®ÿ¥√–‡∫‘¥
Fuse block
ۘᎳീవ˔
·ºßøî«
White with black stripe
ΎиઘЉ෨иঙ
’¢“«·∂∫¥”
White
Ύи
’¢“«
Gray with black stripe
НиઘЉ෨иঙ
’‡∑“·∂∫¥”
Gray
Ни
’‡∑“
Green with black stripe
ႋиઘЉ෨иঙ
’‡¢’¬«·∂∫¥”
Green
ႋи
’‡¢’¬«
Purple with black stripe
ാиઘЉ෨иঙ
’¡Ë«ß·∂∫¥”
Purple
ാи
’¡Ë«ß
Left speaker (front)
ͣಙᑵ(ۮ)
≈”‚æß´È“¬ (ÀπÈ“)
Right speaker (front)
͆ಙᑵ(ۮ)
≈”‚æߢ«“ (ÀπÈ“)
Left speaker (rear)
ͣಙᑵ(݈)
≈”‚æß´È“¬ (À≈—ß)
Right speaker (rear)
͆ಙᑵ(݈)
≈”‚æߢ«“ (À≈—ß)
To metallic body or chassis of the car
вہᚙᝂԆԾנᇟ
µËÕ°—∫‚§√ß‚≈À–À√◊Õ‡™´‘¢Õß√∂¬πµú
To a live terminal in the fuse block connecting to the car battery (bypassing
the ignition switch) (constant 12 V)
вۘᎳീవ˔˖ڄۈᚙၷʪçۘᎳീవ˔ؠԾ༫ྐЖߟ
(·ؠअཔᓭ̑ළᘕ)(ݔ׆ 12 V)
µµËÕ°—∫¢—È«∑’Ë¡’°√–·‰øøÈ“„π·ºßøî«Ï ´÷ËßµËÕ°—∫·∫µ‡µÕ√’Ë√∂¬πµ ( ‚¥¬‰¡ËµÈÕß„™È«‘∑™Ï®ÿ¥√–‡∫‘¥)
12 ‚«≈∑ϧß∑’Ë)
To an accessory terminal in the fuse block
вۘᎳീవ˔˖ڄۈᚙၷʪ
µËÕ°—∫¢—È«Ë«πª√–°Õ∫„π·ºßøî«
To car light control switch
вԆԾԾጜվළᘕ
«‘µ´Ï§«∫§ÿ¡‰ø¢Õß√∂¬πµ√Ï
To cellular phone system
вޟੂྐ༼Ԧ
µËÕ°—∫‚∑√»—æ∑χ§≈◊ËÕπ∑
Black
෨и
’¥”
Yellow *2
෦и *2
’’‡À≈◊Õß *2
Red
߹и
’·¥ß
Blue
ᕇи
’øÈ“
Orange with white stripe
ዻиઘЉΎиঙ
’È¡·∂∫¢“«
Brown
ሶи
’πÈ”µ“≈
Light green
ଠႋи
’‡¢’¬«ÕËÕπ
Fan
ࡘ࣮
æ—¥≈¡
To parking brake (see diagram Å on page 4.)
в˾۫Ծለ (ኌ୶ 4 ࡗʕڄ࿌ڷ Åé)
µËÕ°—∫‡∫√°¡◊Õ (¥Ÿ·ºπº—ß Å „πÀπÈ“ 4)
Crimp connector
қʪᏃ
¢—È«µËÕ”À√—∫Àπ’∫
Blue with white stripe
ᕇиઘЉΎиঙ
’πÈ”‡ß‘π≈“¬¢“«
To automatic antenna if any (250 mA max.)
вбੂ˭ለ(ࠜЉ༫)(ఛʨ250 mA)
‡“Õ“°“»‰øøÈ“Õ—µ‚π¡—µ‘ À“°¡’ (¢π“¥Ÿß¸¥ 250 mA)
To the remote lead of other equipment (200 mA max.)
в͏ɾށࡖᛏకڄჲለ(ఛʨ 200 mA)
µËÕ‡¢È“°—∫Õª°√≥ÏÕË◊π (¢π“¥Ÿß¸¥ 200 mA)
*1
*1
*2 Before checking the operation of this unit prior to
installation, this lead must be connected, otherwise
power cannot be turned on.
*2
ʹጅ͵ϯ༫इçනмʳѕٶٜᐓފ˃ۮç
ͫෝӕለʕçѴ۱ʿළ૧ྐé
*2 °ËÕπ°“√µ√«®Õ∫°“√∑”ß“π¢Õß™ÿ¥ª√–°Õ∫π’È°ËÕπ∑’Ë®–µ‘¥µ—Èß
µÈÕßµËÕ“¬µ–°—Ë«π’È°ËÕπ ¡‘©–π—Èπ®–‰¡“¡“√∂‡ªî¥‡§√◊ËÕ߉¥È
ྑཕો
Վ̊ഠཔçܿᙯϚϯ༫ʹጅ˃ۮç؋ළྐЖڄ࠷çՓӕЉ
ྐཔ௲Ϧé
• ϰ༬ҭ݉ੁͬઆ͵ጆڅϚሉࡍ๙ોгԿԾê
ોሉۯ: ̥அᐓފԆԾ˖ڄለཔéʿᇧڄለࠓʹጅᘷࡌ
๑ᖢé
ྐʍለڄ˺ለ֜ԾԽڄ˺ለϚᖄиʕ̈́Љʿψé
1 ՜ຖʓ࿌Ε˃ЎҺྐለڄᖄиለé
2 અ˭ለڄྐለ৹գé
3 ఛ݈çӕለӧڄᏃϚʹጅʕé
°“√‡™◊ËÕ¡‚¥¬„™È‰øøÈ“
‡æ◊ËÕªÈÕß°—π°“√‡°‘¥‰øøÈ“≈—¥«ß®√ ¢Õ·π–π”„ÀȪ≈¥¢—È«·∫µ‡µÕ√’Ë≈∫ÕÕ°
·≈È«®÷ßµËÕ“¬‰ø°ËÕ𵑥µ—È߇§√◊ËÕß
• µ√«®Õ∫„ÀÈ·πË„®«Ë“‰¥È‡¥‘𓬥‘πµËÕ√–À«Ë“߇§√◊ËÕß°—∫µ—«∂—ß
√∂¬πµÏ„À¡Ë·≈È«À≈—ß®“°µ‘¥µ—Èß
°ËÕ•∑”°“•‡™•ËÕ¡µËÕ: µ•«®†Õ•°“•‡¥‘•†“¬‰ø„•••¬•µÏլ˓ߕ–¡—¥•–«—լ˓„ÀȺ‘¥æ•
“¥„•°“•‡™•ËÕ¡µËÕ™ÿ¥ª•–°Õ•™ÿ¥•’ °“•‡™•ËÕ¡µËÕº‘¥æ•“¥Õ“®∑”„Àȇ°‘¥§«“¡‡’¬À“
¬•È“¬·•ß°—•™ÿ¥ª•–
°Õ••’ȉ¥È“•µ–°—Ë«¢Õ߆“¬‰ø ·•–¢ÕßÕÿª°••ÏµËÕ‡™•ËÕ¡®“°µ—«• ß••Õ“®¡’ ∑’ˉ¡Ë‡À¡•Õ•°—•
1 µËÕ“¬‰øﵓ¡≈”¥—∫∑’Ë√–∫ÿ„π√Ÿª¥È“π≈Ë“ß
2 ‡™◊ËÕ¡µËÕ°—∫“¬Õ“°“»
3 ÿ¥∑È“¬ µËÕË«π§«∫§ÿ¡°“√‡¥‘𓬉ø‡¢È“°—∫™ÿ¥ª√–°Õ∫™ÿ¥π’È
See each diagram on page 4 to 6.
ኌ୶ 4 в 6 ࡗʕڄ࿌ڷé
¥Ÿ·ºπº—ߵ˓ßÊ „πÀπÈ“ 4 ∂÷ß 6
THCT1-3_AVX710-008A.indd 3THCT1-3_AVX710-008A.indd 3 12/6/07 3:38:19 PM12/6/07 3:38:19 PM
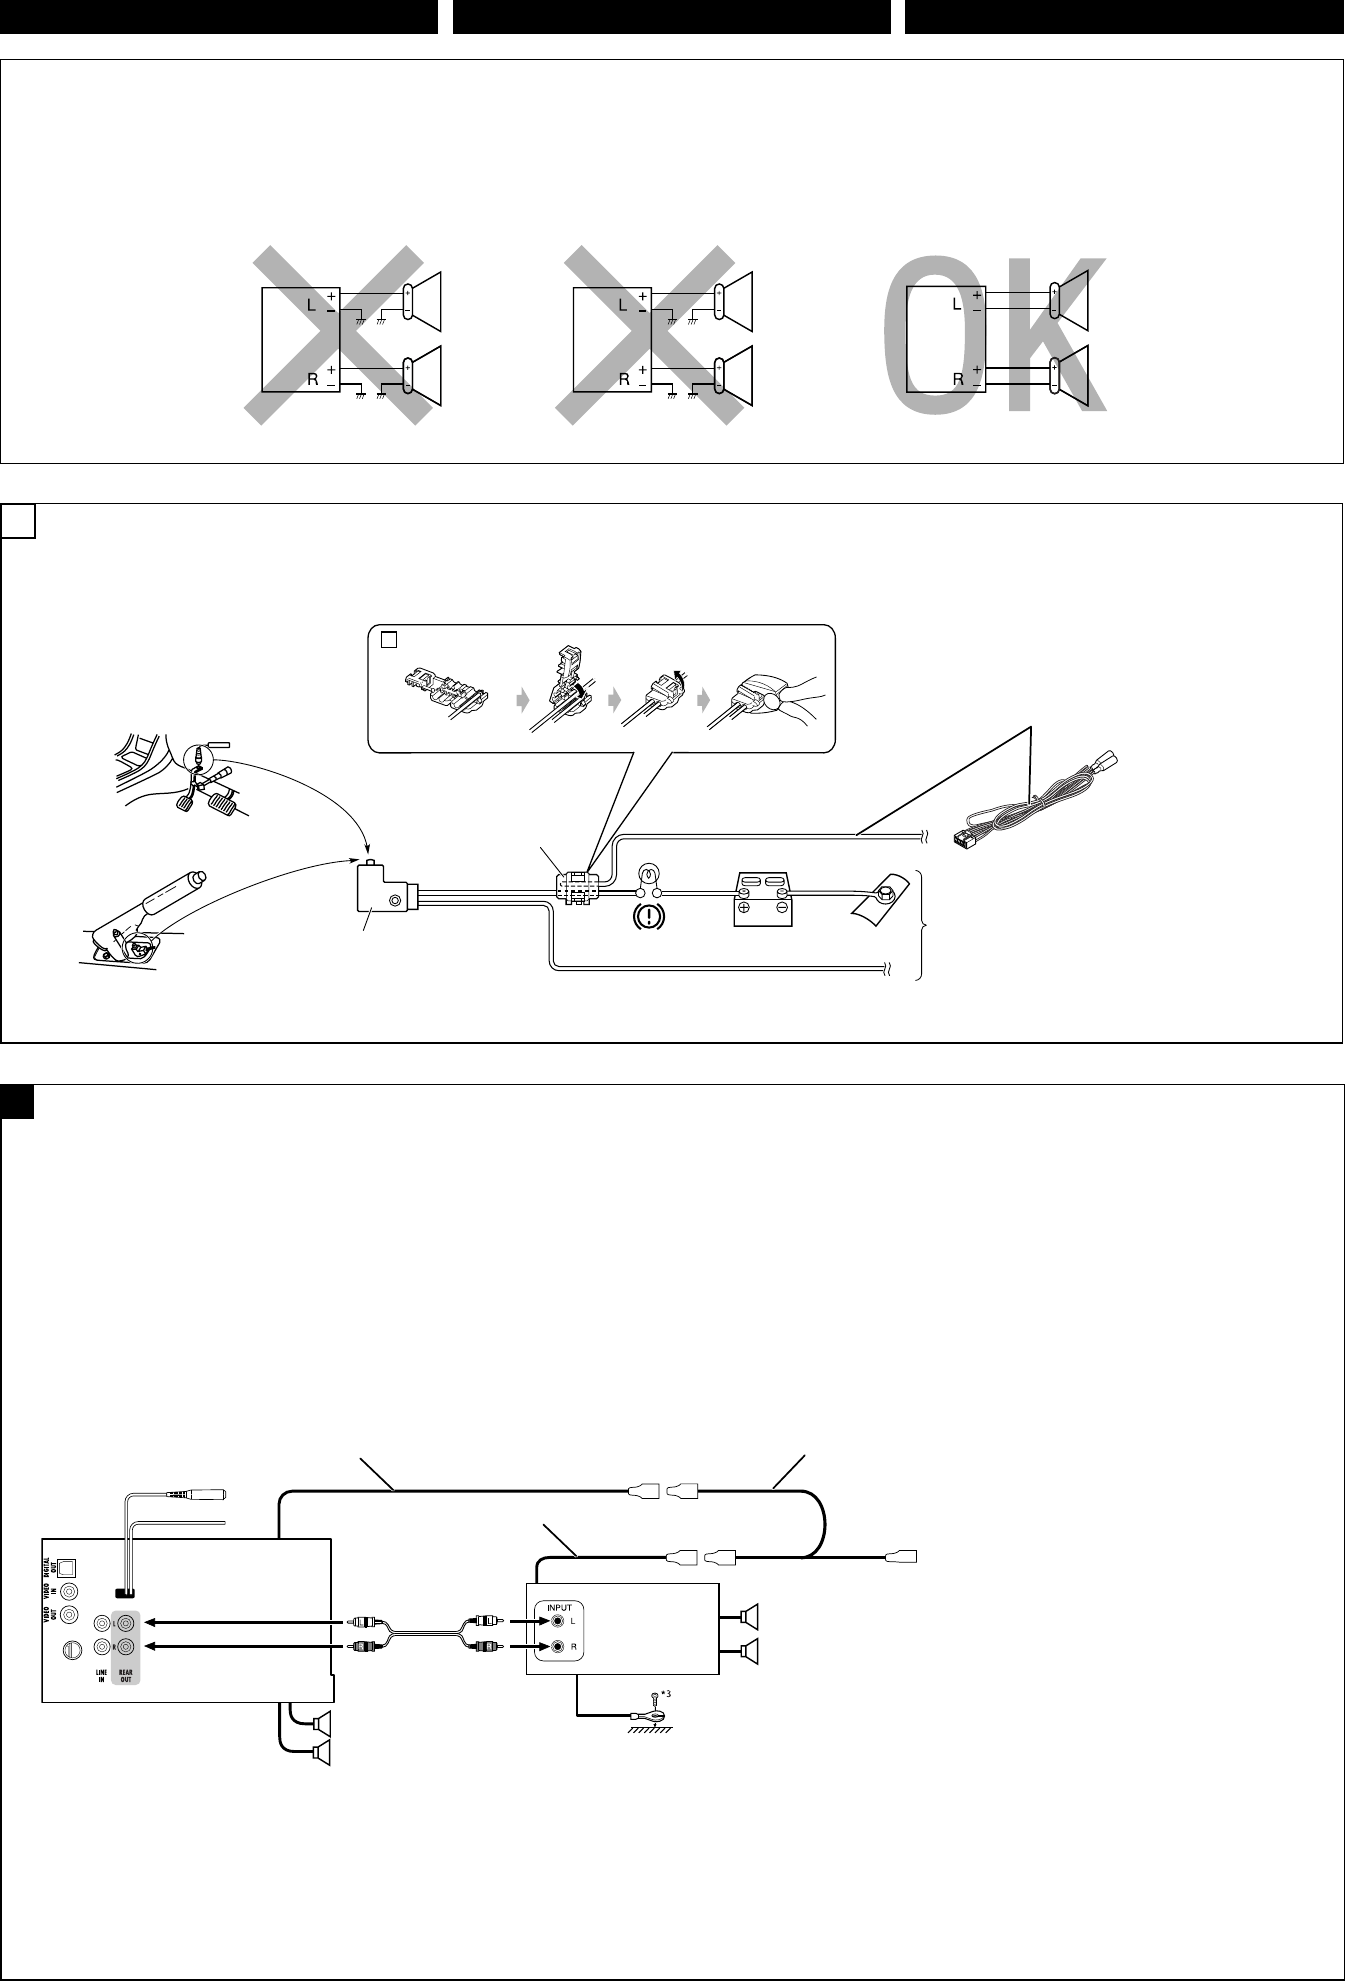
ENGLISH ‰∑¬ ˁ̂
You can connect an amplifier to upgrade your car stereo system.
• You can supply the power to the amplifier by connecting the
remote leads (blue with white stripe) of this unit to the amplifier.
(To connect other equipment using the remote leads, Y-
connectors need to be separately purchased.)
• Disconnect the speakers from the unit, and connect them to the
amplifier. Leave the speaker leads of the unit unused.
• You can switch off the built-in amplifier and send the audio
signals only to the external amplifier to get clear sound and to
prevent internal heat built-up inside the unit. See page 49 of the
INSTRUCTIONS.
*3 Firmly attach the ground lead to the metallic body or to the
chassis of the car—to the place uncoated with paint (if coated
with paint, remove the paint before attaching the lead). Failure
to do so may cause damage to the unit.
Rear speakers
݈ಙᑵ
≈”‚æßÀ≈—ß
Front speakers
ۮಙᑵ
≈”‚æßÀπÈ“
PRECAUTIONS on power supply and speaker connections:
• DO NOT connect the speaker leads of the power cord to the
car battery; otherwise, the unit will be seriously damaged.
• BEFORE connecting the speaker leads of the power cord to the
speakers, check the speaker wiring in your car.
Connecting the parking brake lead
Connect the parking brake lead to the parking brake system
built in the car.
Parking brake lead (light green)
˾۫Ծለ(ଠႋи)
“¬‡∫√°¡◊Õ (’‡¢’¬«ÕËÕπ)
Parking brake
˾۫Ծ
‡∫√°¡◊Õ
Crimp connector
қʪᏃ
¢—È«µËÕ”À√—∫Àπ’∫
Parking brake switch (inside the car)
˾۫Ծළᘕ(тʝԾ˖)
«‘µ™Ï‡∫√°¡◊Õ (¿“¬„π√∂)
To metallic body or chassis of the car
вہᚙᝂԆԾנᇟ
µËÕ°—∫‚§√ß‚≈À–À√◊Õ‡™´‘¢Õß√∂¬πµú
JVC Amplifier
JVC ̸ୋ؟ʩወ
‡§√◊ËÕß∫¬“¬‡◊¬ß JVC
4
AConnecting an external amplifier / ો͚௱̸ୋ؟ʩወ / °“√µËÕ°—∫·Õ¡æ≈‘ø“¬‡ÕÕ√Ï¿“¬πÕ°
A
ྑກ֝ಚᑶወોሉٍิො:
• ˞ˢӖಚᑶወዘሉોᏄોгྑЗèѵ۲͵ጆઆᘸࡍ๒ᖣê
• ϚӕಙᑵለᏃвಙᑵ˃ۮçᐓފԆԾʕڄಙᑵ
ለཔé
¢ÈÕ§«√√–«—ß ”À√—∫°“√µËÕ·À≈Ë߮˓¬°”≈—ß·≈–≈”‚æß:
• լ˓µËÕ“¬µ–°—Ë«‡§‡∫‘≈°”≈—ߢÕß≈”‚æ߇¢È“°—∫·∫µ‡µÕ√’Ë√∂¬πµÏ ¡‘©–π—Èπ
™ÿ¥ª√–°Õ∫®–‰¥È√—∫§«“¡‡’¬À“¬¡“°
• °ËÕπ∑’Ë®–µËÕ“¬µ–°—Ë«‡§‡∫‘≈°”≈—ߢÕß≈”‚æ߇¢“°—∫≈”‚æß
„Àȵ√«®Õ∫°“√‡¥‘𓬉ø≈”‚æß„π√∂¢Õߧÿ≥„Àȇ√’¬∫√ÈÕ¬‡’¬°ËÕπ
ોг˿۬Կዘሉ
અ˾۫ԾለвԾ˖ڄ˾۫ԾԦé µËÕ“¬‡∫√°¡◊Õ
µËÕ“¬‡∫√°¡◊Õ°—∫√–∫∫‡∫√°¡◊Õ¢Õß√∂¬πµ
̷̣̈́؞ʨգ˥ঠڄԆԾࡖᛏԦé
• ̣̈́અʹጅڄჲለ(ᕇиઘЉΎиঙ) ռ̷؞ʨ
çᕉЏմաྐé
(࠱՟·ჲለմ̧కçᄔవጤᒯ Y ܓለé)
• અಙᑵ֜ʹጅ؋ළçιʕ̷؞ʨéઅʹጅڄಙᑵ
ለ؞ʿ·é
• ̣̈́ᘕ˖̷ܿ؞ʨçઅࡖᏁۑ༙෮෭ռ̷͙؞
ʨçનЩદռଡಣڄࡖçՓՎ̊ʹጅ˖௰ጻ႞ᇊඹéኌ
՟·იاएڄ୶ 49 ࡗé
‡æ◊ËÕ§ÿ≥¿“懒¬ß∑’Ë¥’¢÷Èπ ∑Ë“π“¡“√∂µËÕ·Õ¡æ≈‘ø“¬‡ÕÕ√χ¢È“°—∫
√–∫∫‡§√◊ËÕ߇’¬ß√∂¬πµÏ‰¥È
• ∑Ë“π“¡“√∂®Ë“¬‰ø„ÀÈ°—∫·Õ¡æ≈‘ø“¬‡ÕÕ√ω¥È¥È«¬°“√µËÕ“¬√’‚¡∑ (’øÈ“·∂∫¢“«)
¢Õ߇§√◊ËÕß°—∫·Õ¡æ≈‘ø“¬‡ÕÕ√Ï (À“°µÈÕß°“√µËÕ°—∫Õÿª°√≥ÏÕ◊Ëπ¥È«¬°“√„™È“¬√’‚¡∑
µÈÕß´◊ÈÕ¢—È«µËÕ√Ÿªµ—« Y ·¬°µË“ßÀ“°)
• ∂Õ¥“¬≈”‚æßÕÕ°®“°‡§√◊ËÕß·≈È«µËÕ°—∫·Õ¡ª≈‘ø“¬‡ÕÕ√Ï ª≈ËÕ¬“¬≈”‚æß∑‘È߉«È
‰¡ËµÈÕß„™È
•
“¡“√∂ªî¥«‘µ™Ï·Õ¡æ≈‘ø“¬‡ÕÕ√Ï„πµ—« ·≈È«Ëß—≠≠“≥‡’¬ß‰ª¬—ß·Õ¡æ≈‘ø“¬‡ÕÕ√Ï
¿“¬πÕ°‚¥¬‡©æ“– ‡æ◊ËÕ„Àȉ¥È‡’¬ß∑’˧¡™—¥·≈–ªÈÕß°—π‰¡Ë„Àȇ°‘¥§«“¡√ÈÕπ
–¡¢÷Èπ¿“¬„π™ÿ¥ª√–°Õ∫ ¥Ÿ∑’ËÀπÈ“ 49 ¢Õߧ”·π–π”„π°“√„™È
*3 અϙለႩہᚙԾᝂږԆԾנᇟႌંçளᏻ༳ԅЉூ
ٛွᕒႵ(ϨسʵดʕٛွçϚྐለۮçઅٛွս̓)é
Ϩسʿᆟਭç̈́๑ᖢʹጅé
*3 µËÕ≈«¥“¬¥‘π„ÀÈ·πËπ‡¢“°—∫µ—«∂—߇À≈Á° À√◊Õµ—«∂—ß√∂˙µ√ßË«π ∑’ˉ¡Ë¡’’’‡§≈◊Õ∫
(À“°¡’’‡§≈◊Õ∫Õ¬ŸË „ÀÈ¢Ÿ§¥’ÕÕ°°ËÕπ °ËÕπµËÕ≈«¥“¬¥‘π) À“°‰¡ËªØ‘∫—
µ‘µ“¡§”·π–π”π’È ‡§√◊ËÕßÕ“®™”√ÿ¥À√◊Õ‡’¬À“¬‰¥
Remote lead
ჲለ
“¬µ–°—Ë«•–¬–‰°•
Remote lead (Blue with white stripe)
ჲለ(ᕇиઘЉΎиঙ)
“¬µ–°—Ë«•–¬–‰°• (’πÈ”‡ß‘π≈“¬¢“«)
Y-connector (not supplied for this unit)
Y-ܓለ(ʿᎲʹጅಏա)
¢ÈÕµËÕ√Ÿªµ—« Y ( ‰¡Ë‰¥È„ÀÈ¡“°—∫™ÿ¥ª√–°Õ∫π’È)
To the remote lead of other equipment
в͏ɾށࡖᛏకڄჲለ
µËÕ‡¢È“°—∫Õª°√≥ÏÕË◊π
a
THCT4-6_AVX710-008A.indd 4THCT4-6_AVX710-008A.indd 4 12/6/07 3:38:52 PM12/6/07 3:38:52 PM
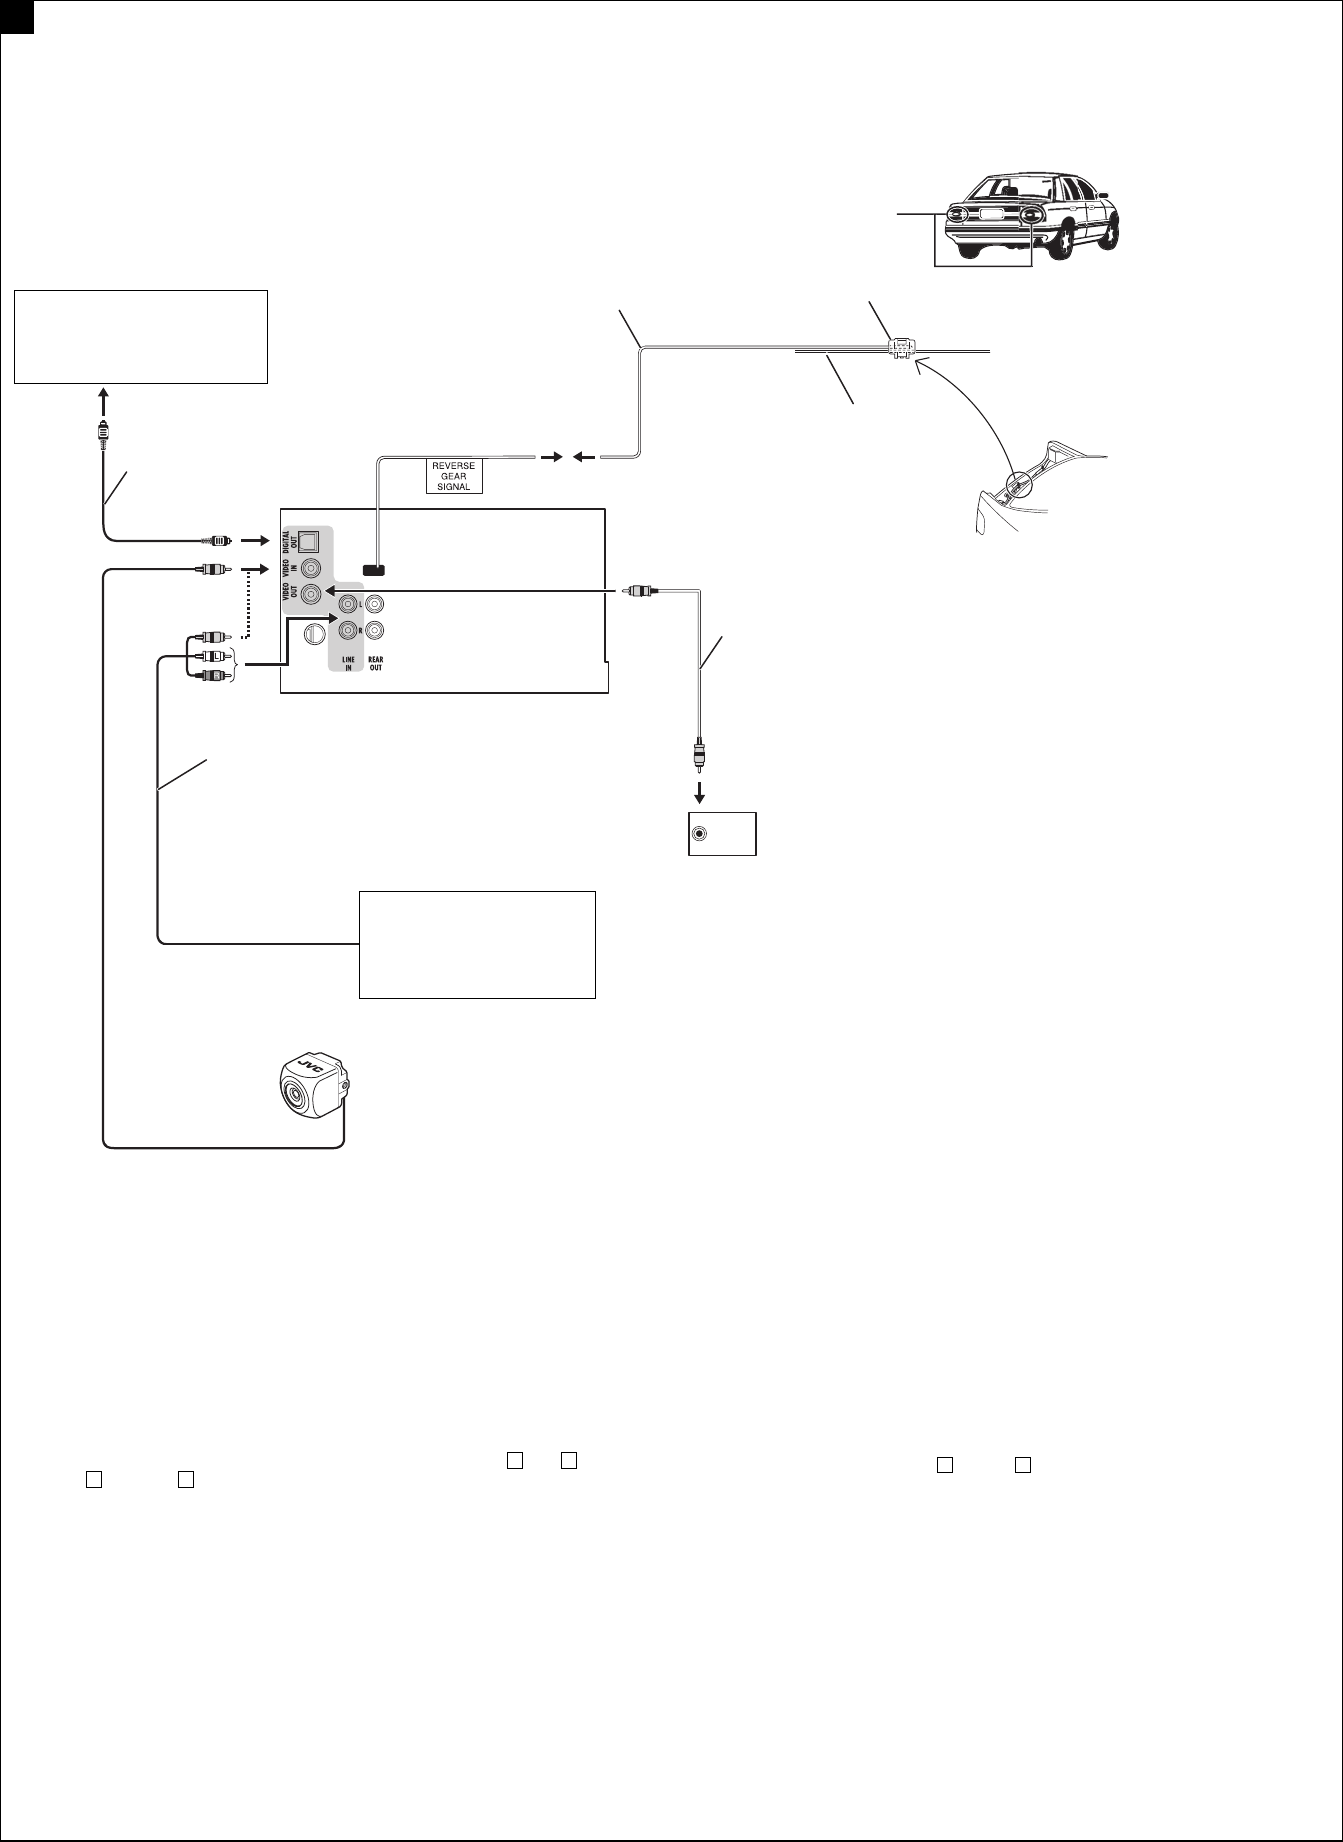
5
Connections for external component playback / ોս͚ો௱έ / °“√‡™◊ËÕ¡µËÕ”À√—∫°“√‡≈ËπÕÿª°√≥Ï¿“¬πÕ°
B
Rear view camera KV-CM1*6
݈ඁຖྰጅ KV-CM1*6
°≈ÈÕß¡ÕßÀ≈—ß KV-CM1*6
AV amplifier or decoder
AV ̷؞ʨᙲᇫ
·Õ¡æ≈‘ø“¬‡ÕÕ√Ï AV À√◊Õµ—«∂Õ¥√À—
Camcorder, Navigation System, etc.
ᎨߟጅèৃԦçമ
°≈ÈÕß«‘¥’‚Õ √–∫∫π”∑“ß œ≈œ
External monitor
͙Ε
¡Õ𑇵Õ√Ï¿“¬πÕ°
Extension lead (not supplied)
עۂለ (ԅЉక)
“¬‰øµËÕæË«ß ( ‰¡Ë‰¥È„ÀÈ¡“æ√ÈÕ¡‡§√◊ËÕß)
Video cord (not supplied)
ඁᏁྐង(ԅЉక)
«’¥’‚Õ ( ‰¡Ë‰¥È„ÀÈ¡“æ√ÈÕ¡‡§√◊ËÕß)
Crimp connector (not supplied)*5
қʪᏃ (ԅЉక)*5
¢—È«µËÕ”À√—∫Àπ’∫ ( ‰¡Ë‰¥È„ÀÈ¡“æ√ÈÕ¡‡§√◊ËÕß)*5
Audio/video cord (not supplied)
ࡖᏁ/ඁᏁྐង(ԅЉక)
“¬ÕÕ¥‘‚Õ/ «’¥’‚Õ ( ‰¡Ë‰¥È„ÀÈ¡“æ√ÈÕ¡‡§√◊ËÕß)
Digital optical cable (not supplied)
ᆚтγង (ԅЉక)
“¬„¬·°È«π”·ß·∫∫¥‘®‘µÕ≈
( ‰¡Ë‰¥È„ÀÈ¡“æ√ÈÕ¡‡§√◊ËÕß)
Reverse lamp
݈ጜ
‰ø∂Õ¬À≈—ß
To reverse lamp
вԾۑ༙ጜ
µËÕ°—∫‰ø—≠≠“≥‡«≈“∂Õ¬À≈—ß
Reverse lamp lead*4
Ծۑ༙ጜለ*4
“¬‰ø∑’ˉø—≠≠“≥‡«≈“∂Õ¬À≈—ß*4
To car battery
вԆԾྐЖ
§ËÕ°í∫·∫•‡•Õ√’Ë√∂¬π•Ï
*4 Required only when connecting a rear view camera to
VIDEO IN terminal.
*5 Refer to a in diagram A on page 4.
*6 Set “AV Input” setting to “Camera” when using (see page 47 of
the INSTRUCTIONS).
*4 ෮ᏻ݈ඁຖྰጅв VIDEO IN Ꮓइé
*5 ኌ a Ϛ࿌ A ڄ୶ 4 ࡗé
*6 ՟·इçઅ “Camera” ׆ “AV Input” (ኌ՟·იاएڄ୶
47 ࡗ)é
*4 „™È‡©æ“–‡¡◊ËÕµËÕ°≈ÈÕß¡ÕßÀ≈—ß°—∫™ËÕß VIDEO IN
*5 ¥Ÿ a „π·ºπº—ß A „πÀπÈ“ 4
*6 µ—Èß “AV Input” ‡¢È“°—∫ “Camera” ‡¡◊ËÕµÈÕß°“√„™Èß“π
(¥ŸÀπÈ“ 47 §”·π–π”)
THCT4-6_AVX710-008A.indd 5THCT4-6_AVX710-008A.indd 5 12/6/07 3:39:18 PM12/6/07 3:39:18 PM
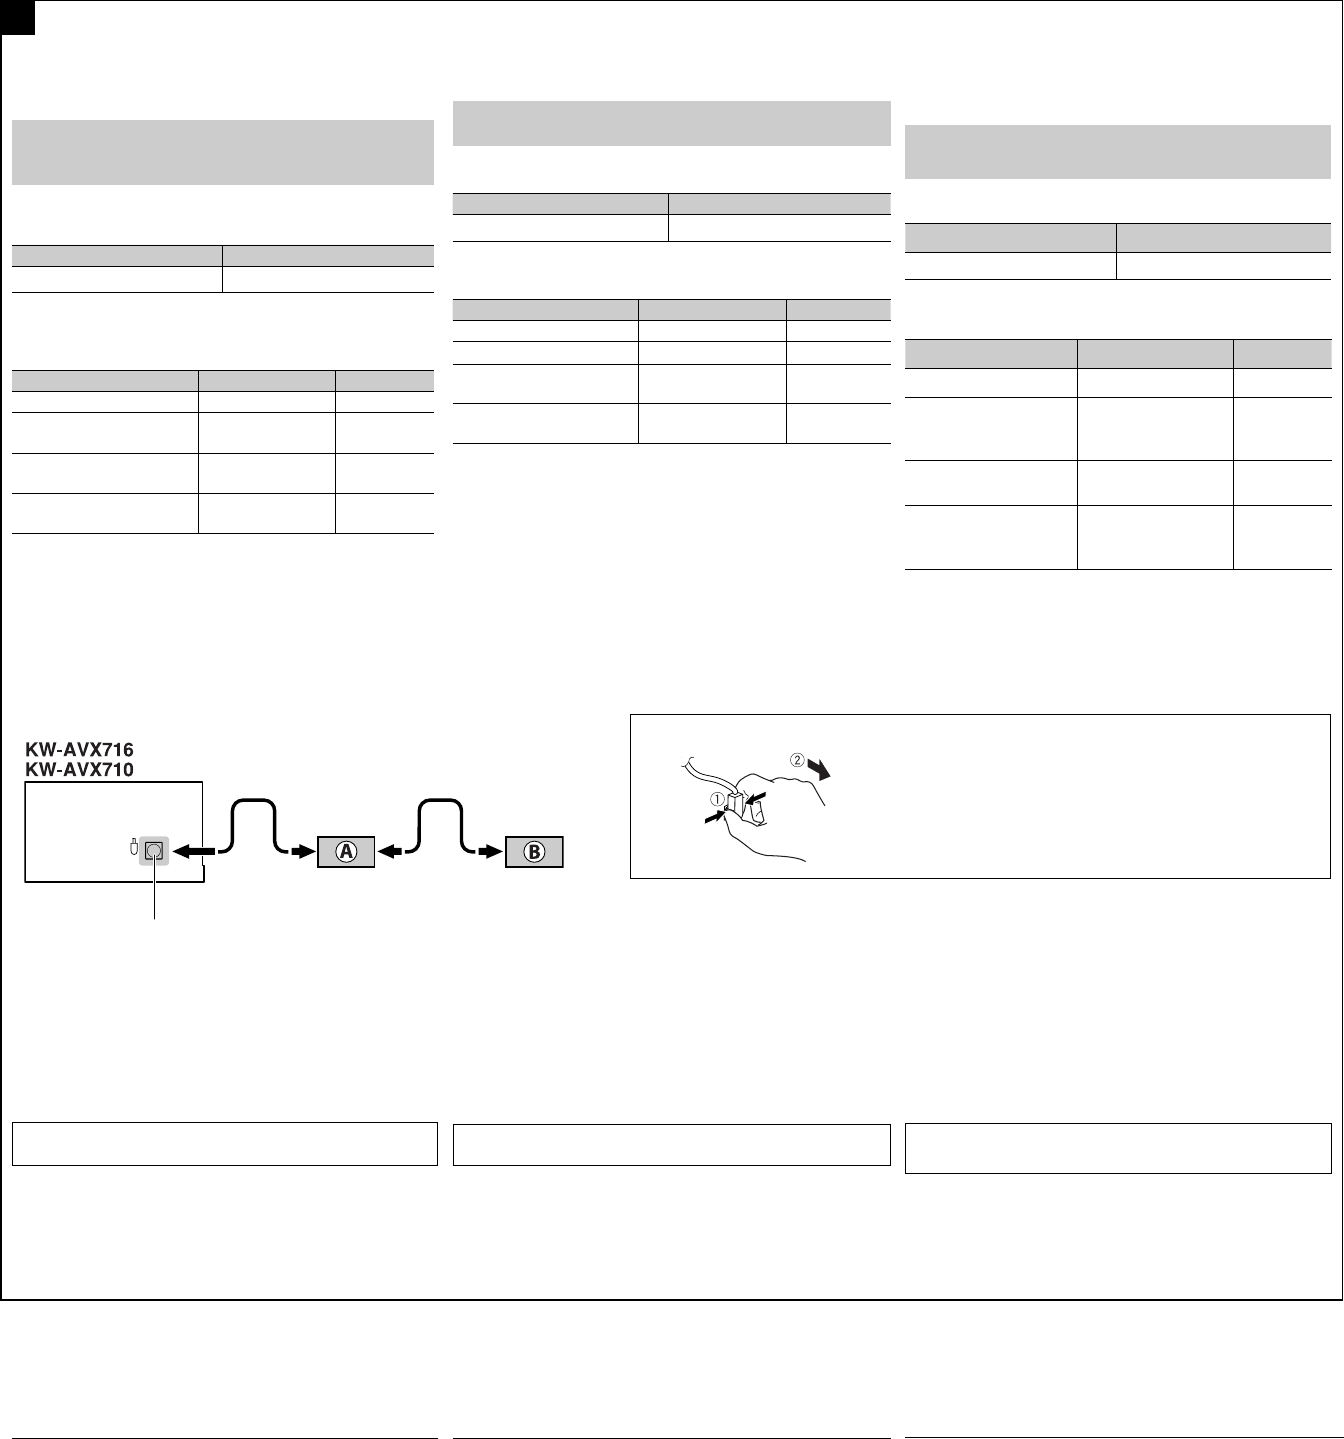
6
Connections to the CD changer jack / ોսCDಘၫጆಎ˲ / °“√‡™◊ËÕ¡µËÕ°—∫À—«µËÕ´’¥’‡™π‡®Õ√Ï
To disconnect the connector / ؛ළ / ª≈¥¢—È«µËÕ
Hold the connector top tightly ( 1 ), then pull it out ( 2 ).
ӟႌʕ௰ ( 1 )ç݈અ˃̳( 2 )é
®—∫¥È“π∫π¢Õߢ—È«µËÕ„ÀÈ·πËπ ( 1 ) ®“°π—Èπ®÷ߥ—ßÕÕ° ( 2 )
iPod is a trademark of Apple Inc., registered in the U.S. and other
countries.
C
TROUBLESHOOTING
• The fuse blows.
* Are the red and black leads connected correctly?
• Power cannot be turned on.
* Is the yellow lead connected?
• No sound from the speakers.
* Is the speaker output lead short-circuited?
• Sound is distorted.
* Is the speaker output lead grounded?
* Are the “–” terminals of L and R speakers grounded in common?
• Noise interfere with sounds.
* Is the rear ground terminal connected to the car’s chassis using
shorter and thicker cords?
• Unit becomes hot.
* Is the speaker output lead grounded?
* Are the “–” terminals of L and R speakers grounded in common?
• This unit does not work at all.
* Have you reset your unit?
When connecting the external components, refer also to the
manuals supplied for the components and adapter.
CAUTION:
Before connecting the external components, make sure that
the unit is turned off.
You can connect the following JVC components to the CD changer
jack.
JVC component Model name
CD changer (CD-CH) CH-X1500, etc.
You can also connect the following components through the various
JVC adapters.
• Connection cords may need to be purchased separately.
Component Adapter Model name
Bluetooth device Bluetooth adapter KS-BTA200
iPod Interface adapter
for iPod
KS-PD100
Portable audio player with
line output jacks
Line input adapter KS-U57
Portable audio player with
3.5 mm stereo mini jack
AUX input adapter KS-U58
When connecting more than one component (maximum: two),
it is recommended that you connect the components in series as
explained below.
When connecting two components in series
ັсᑸճࡵ௱έई
‡¡◊ËÕ‡™◊ËÕ¡µËÕË«πª√–°Õ∫Õß™‘Èπ·∫∫Õπÿ°√¡
*7 To use these components, set the external input setting correctly
(see page 47 of the INSTRUCTIONS).
͙௰άइç͏ቁኌ௰ά˪ᕢಗ˃՟·˾̰é
ʯ˼:
ો͚ો௱έ˄ۯèቂᇨۙᘖ͵ጆê
̣̈́અ̣ʓ JVC ௰άռ CD ಗၪ˱é
JVC ௱έ ܔ༚ϐၴ
CD ಗၪ (CD-CH) CH-X1500çമ
ʛ̈́௫ཫύၲ JVC ᕢಗ̣ʓ௰άé
• ለ̈́ᄔ࠱వጤᒯé
௱έ ᕣಘወ ܔ༚ϐၴ
ᕇ̖༫ ᕇ̖ᕢಗ KS-BTA200
iPod iPod ˒ࡒᕢಗ KS-PD100
ઘለཔ᎔̳˱ڄ̈́Ϸ
ࡖᏁᆑ؞
ለཔ᎔ʈᕢಗ KS-U57
ઘ 3.5 ଔТਁіࡖᛏ˱
ڄ̈́ϷࡖᏁᆑ؞
AUX ᎔ʈᕢಗ KS-U58
ະϠࡴ௰άइ (ఛϠð2)çܿᙯ՜ʓ̄Εрᑷ௰άé
‡¡◊ËÕ‡™◊ËÕ¡µËÕÕÿª°√≥Ï¿“¬πÕ° „ÀÈ¥Ÿ¢ÈÕ¡Ÿ≈‡°’ˬ«°—∫Õÿª°√≥Ï¿“¬πÕ°·≈–Õ–·¥ª‡µÕ√Ï
®“°§ŸË¡◊Õ∑’Ë„ÀÈ¡“¥È«¬
¢ÈÕ§«√√–«—ß
:
°ËÕπ®–‡™◊ËÕ¡µËÕ°—∫Õÿª°√≥Ï¿“¬πÕ° °√ÿ≥“µ√«®Õ∫„ÀÈ·πË„®«Ë“ªî¥‡§√◊ËÕßÕ¬ŸË
∑Ë“π“¡“√∂‡™◊ËÕ¡µËÕË«πª√–°Õ∫ JVC µËÕ‰ªπ’ȇ¢È“°—∫™ËÕ߇’¬∫´’¥’‡™π‡®Õ√Ï
Ë«πª√–°Õ∫
JVC
™◊ËÕ√ÿËπ
´’¥’‡™π‡®Õ√Ï (CD-CH) CH-X1500 œ≈œ
‡™◊ËÕ¡µËÕË«πª√–°Õ∫µËÕ‰ªπ’Ⱥ˓πÕ–·¥ª‡µÕ√Ï·∫∫µË“ßÊ ¢Õß JVC ‰¥È‡™Ëπ°—π
• Õ“®µÈÕß´◊ÈÕ“¬‡™◊ËÕ¡µËյ˓ßÀ“°
Ë«πª√–°Õ∫ Õ–·¥ª‡µÕ√Ï ™◊ËÕ√ÿËπ
Õÿª°√≥Ï∫≈Ÿ∑Ÿ∏ Õ–·¥ª‡µÕ√Ï∫≈Ÿ∑Ÿ∏ KS-BTA200
iPod
Õ‘π‡∑Õ√χø
Õ–·¥ª‡µÕ√Ï”À√—∫√ÿËπ
iPod
KS-PD100
‡§√◊ËÕ߇≈Ëπ‡æ≈ß·∫∫æ°æ“
æ√ÈÕ¡¢—È«µËÕ Line Output Õ–·¥ª‡µÕ√Ï
Line Input
KS-U57
‡§√◊ËÕ߇≈Ëπ‡æ≈ß·∫∫æ°æ“
æ√ÈÕ¡™ËÕ߇’¬∫·∫∫ 3.5
¡¡.
Stereo Mini
Õ–·¥ª‡µÕ√Ï
AUX Input
KS-U58
‡¡◊ËÕ‡™◊ËÕ¡µËÕË«πª√–°Õ∫¡“°°«Ë“Àπ÷Ëß™‘Èπ
(
Ÿßÿ¥Õß™‘Èπ
)
¢Õ·π–π”„ÀÈ∑Ë“π‡™◊ËÕ¡
µËÕË«πª√–°Õ∫·∫∫Õπÿ°√¡µ“¡§”Õ∏‘∫“¬¢È“ß≈Ë“ß
iPod ݵApple Inc. (ᙧس˙͌) Ϛࠀ˪մ̧ࣁٌ̰ڄੋᆤé
*7 ࠱՟·௰άçቁᇧ׆͙௰᎔ʈ(ኌ՟·იاएڄ
୶ 47 ࡗ)é
iPod
‡ªìπ‡§√◊ËÕßÀ¡“¬°“√§È“¢Õß
Apple Inc.
´÷Ëß®¥∑–‡∫’¬π°“√§È“„πª√–‡∑»
À√—∞Õ‡¡√‘°“·≈–ª√–‡∑»Õ◊ËπÊ
*7 „π°“√„™ÈË«πª√–°Õ∫‡À≈Ë“π’È „Àȵ—Èߧ˓°“√√—∫—≠≠“≥Õÿª°√≥Ï¿“¬πÕ°„ÀÈ∂Ÿ°µÈÕß
(¥ŸÀπÈ“ 47 §”·π–π”)
CD changer jack
CDಗၪ˱
™ËÕ߇’¬∫µËÕ¢Õ߇§√◊ËÕ߇≈Ëπ´’¥ CD
A KS-BTA200
B*7 CD-CH / KS-PD100 / KS-U57 / KS-U58
ݮᄑਜ
• ۙᎴുጜᔄê
* ᐓފ߹иለᏃ֜෨иለᏃݵѴ᙮ᇧî
• ྑກˀ়ોê
* ᐓފ෦иለᏃݵѴʕî
• ಚᑶወԆЊᑶࡗê
* ᐓފಙᑵ᎔̳ለᏃݵѴഠཔî
• ᑶࡗ͜ॳê
* ᐓފಙᑵ᎔̳ၷʪݵѴϙî
* ᐓފಙᑵڄͣ (L) ç͆ (R) ၷʪڄ࠷ī–ĬݵѴθψ
ϙî
• ࡗʹᓿࡗᛐê
* ݈ϙၷʪႩԾԽݵѴ՟·ཛഠ֜ཛ۹ڄྐለî
• ͵ጆഛᇋê
* ᐓފಙᑵ᎔̳ၷʪݵѴϙî
* ᐓފಙᑵڄͣ (L) ç͆ (R) ၷʪڄ࠷ī–ĬݵѴθψ
ϙî
• ͵ጆҭθˀ়ᇨይіê
* ЉԅЉࡌʹጅî
°“√µ√«®Õ∫ª— ≠À“¢—¥¢ÈÕß
• øî«ú¢“¥
* ¡’°“√‡™◊ËÕ¡“¬µ–°—Ë«’¥”·≈–’·¥ßլ˓ß∂Ÿ°µÈÕßÀ√◊Õ‰¡ò
• ‰¡Ë“¡“√∂‡ª‘¥‡§√◊ËÕ߉¥È
* ¡’°“√‡™◊ËÕ¡“¬µ–°—Ë«’‡À≈◊ÕßÀ√◊Õ‰¡ò
• ‰¡Ë¡’‡’¬ßÕÕ°®“°≈”‚æß
* “¬µ–°—Ë«Ë«π∑’ËÕÕ°∑“ß≈”‚æ߇°‘¥‰øøÈ“≈—¥«ß®√À√◊Õ‰¡Ë
• ‡’¬ß‡æ’Ȭπ
* “¬µ–°—Ë«Ë«π∑’ËÕÕ°∑“ß≈”‚æßµËÕ≈ߥ‘πÀ√◊Õ‰¡Ë
* “¬¢—È«≈∫¢Õß≈”‚æߥȓπ´È“¬ (L) ·≈–¢«“ (R) µËÕ≈ߥ‘πµ“¡ª°µ‘À√◊Õ‰¡Ë
• ‡’¬ß√∫°«π
* ¡’°“√„™È“¬—ÈπÊ À√◊ÕÀπ“Ê µËÕ®“°‡§√◊ËÕßò«π∑’˵‘¥µ—Èß ‰«È∫πæ◊Èπ¥È“πÀ≈—ß
°—∫µ—«∂—ß√∂¬πµÏÀ√◊Õ‰¡Ë
• ™ÿ¥ª√–°Õ∫√ÈÕπ¢÷Èπ
* “¬µ–°—Ë«Ë«π∑’ËÕÕ°∑“ß≈”‚æßµËÕ≈ߥ‘πÀ√◊Õ‰¡Ë
* “¬¢—È«≈∫¢Õß≈”‚æߥȓπ´È“¬ (L) ·≈–¢«“ (R) µËÕ≈ߥ‘πµ“¡ª°µ‘À√◊Õ‰¡Ë
• ‡§√◊ËÕ߉¡Ë∑”ß“π‡≈¬
* ‰¥È∑”°“√√’‡´Áµ‡§√◊ËÕßÀ√◊Õ¬—ß
THCT4-6_AVX710-008A.indd 6THCT4-6_AVX710-008A.indd 6 12/6/07 3:39:23 PM12/6/07 3:39:23 PM

ENGLISH
INDONESIA
For installation and connections, refer to the separate manual.
Untuk instalasi dan penyambungan, lihat buku pedoman terpisah.
INSTRUCTIONS
BUKU PETUNJUK
LVT1780-004A
[UN]
For canceling the display demonstration, see page 8.
Untuk membatalkan tampilan demonstrasi, lihat halaman 8.
DVD RECEIVER WITH MONITOR
KW-AVX716
KW-AVX710
KW-AVX716
KW-AVX710
ALAT PENERIMA DVD
DENGAN MONITOR
Cover_KW-AVX710UN.indd 2Cover_KW-AVX710UN.indd 2 07.12.17 5:19:29 PM07.12.17 5:19:29 PM

ENGLISH
2
Thank you for purchasing a JVC product.
Please read all instructions carefully before operation, to ensure your complete understanding and to obtain the best
possible performance from the unit.
IMPORTANT FOR LASER PRODUCTS
1. CLASS 1 LASER PRODUCT
2. CAUTION: Do not open the top cover. There are no user serviceable parts inside the unit; leave all servicing to
qualified service personnel.
3. CAUTION: Visible and/or invisible class 1M laser radiation when open. Do not view directly with optical
instruments.
4. REPRODUCTION OF LABEL: CAUTION LABEL, PLACED OUTSIDE THE UNIT.
[European Union only]
Cautions on the monitor:
• The monitor built in this unit has been produced
with high precision, but it may have some
ineffective dots. This is inevitable and is not
malfunction.
• Do not expose the monitor to direct sunlight.
• Do not operate the touch panel using a ball-point
pen or similar tool with the sharp tip.
Touch the buttons on the touch panel with your
finger directly (if you are wearing a glove, take it
off).
• When the temperature is very cold or very hot...
– Chemical changes occur inside, causing
malfunction.
– Pictures may not appear clearly or may move
slowly. Pictures may not be synchronized with
the sound or picture quality may decline in
such environments.
WARNINGS:
To prevent accidents and damage
• DO NOT install any unit or wire any cable in a
location where;
– it may obstruct the steering wheel and
gearshift lever operations.
– it may obstruct the operation of safety devices
such as air bags.
– it may obstruct visibility.
• DO NOT operate the unit while driving.
If you need to operate the unit while driving, be
sure to look around carefully.
• The driver must not watch the monitor while
driving.
EN_KW-AVX710[UN].indb 2EN_KW-AVX710[UN].indb 2 07.12.17 5:02:31 PM07.12.17 5:02:31 PM

3
ENGLISH
INTRODUCTION
How to reset your unit
• Your preset adjustments will also be erased.
How to forcibly eject a disc
• If this does not work, reset the unit.
For safety...
• Do not raise the volume level too much, as this will
block outside sounds, making driving dangerous.
• Stop the car before performing any complicated
operations.
Temperature inside the car...
If you have parked the car for a long time in hot or cold
weather, wait until the temperature in the car becomes
normal before operating the unit.
Contents
INTRODUCTION
Playable disc types .......................... 4
Basic operations—
Monitor panel/touch panel
............ 5
Basic operations—
Remote controller (RM-RK252) ...... 6
OPERATIONS
Before operating the unit ................ 8
Common operations ........................ 9
Listening to the radio ...................... 10
Disc operations ................................ 13
EXTERNAL DEVICES
Bluetooth® operations—
Cellular phone/audio player .......... 27
Listening to the CD changer .............. 34
Listening to the iPod ........................ 36
Using other external components ..... 38
SETTINGS
Sound equalization .......................... 41
Assigning titles to the sources .......... 42
Menu operations ............................. 43
REFERENCES
Maintenance ................................... 52
More about this unit ........................ 53
Troubleshooting .............................. 60
Specifications .................................. 64
NO EJECT?
EMERGENCY EJECT?
Exit
ENTER
Back
11
3
2
at the same time
EN_KW-AVX710[UN].indb 3EN_KW-AVX710[UN].indb 3 07.12.17 5:02:35 PM07.12.17 5:02:35 PM

ENGLISH
4
Disc type Recording format, file type, etc. Playable
DVD DVD Video (Region Code: 3)*1
DVD Audio
DVD-ROM
DVD Recordable/Rewritable
(DVD-R/-RW*2, +R/+RW*3)
• DVD Video: UDF bridge
• DVD-VR
• DivX/MPEG1/MPEG2/JPEG/MP3/
WMA/WAV: ISO 9660 level 1,
level 2, Romeo, Joliet
DVD Video
DVD-VR
DivX/MPEG1/MPEG2
JPEG
MP3/WMA/WAV
AAC
MPEG4
DVD+VR
DVD-RAM
Dual Disc DVD side
Non-DVD side
CD/VCD Audio CD/CD Text (CD-DA)/DTS-CD
VCD (Video CD)
SVCD (Super Video CD)
CD-ROM
CD-I (CD-I Ready)
CD Recordable/Rewritable
(CD-R/-RW)
• ISO 9660 level 1, level 2, Romeo,
Joliet
CD-DA
MP3/WMA/WAV
JPEG
DivX/MPEG1/MPEG2
AAC
MPEG4
*1 If you insert a DVD Video disc of an incorrect Region Code, “Region code error” appears on the screen.
*2 DVD-R recorded in multi-border format is also playable (except for dual layer discs).
DVD-RW dual layer discs are not playable.
*3 It is possible to play back finalized +R/+RW (Video format only) discs.
+RW double layer discs are not playable.
Playable disc types
Caution for DualDisc playback
The Non-DVD side of a “DualDisc” does not comply with the “Compact Disc Digital Audio” standard. Therefore,
the use of Non-DVD side of a DualDisc on this product may not be recommended.
EN_KW-AVX710[UN].indb 4EN_KW-AVX710[UN].indb 4 07.12.17 5:02:36 PM07.12.17 5:02:36 PM

5
ENGLISH
INTRODUCTION
Basic operations — Monitor panel/touch panel
• Turn on the power.
• Turn off the power. [Hold]
• Attenuate the sound (if the power is on).
Change the sources.
Remote sensorAdjust the volume.
Reset the unit.
• Use only when the internal system malfunctions.
Display <AV Menu> screen.
Display and erase the Short Cut windows.
Available functions vary among the sources. For details, see each source operation
section.
Change the display information.
• [OPEN]: Open the monitor panel.
• [EJECT]: Eject the disc.
• [CLOSE]: Close the monitor panel.
• [TILT +/–]: Tilt the monitor panel.
• [Exit]: Erase this screen.
• Shaded icons cannot be used.
• In the explanation, buttons on the touch panel
are indicated inside [ ].
• For details on the touch panel operations, see
each source operation section.
Display <Source Menu> screen.
Display <AV Menu> screen.
☞ page 43
• Display <Open/Tilt> menu.
• Eject the disc and display <Open/Tilt>
menu. [Hold]
• Close the monitor panel when <Open/Tilt>
menu is displayed.
☞ page 43
☞ page 9
☞ page 9
<Open/Tilt> menu
EN_KW-AVX710[UN].indb 5EN_KW-AVX710[UN].indb 5 07.12.17 5:02:37 PM07.12.17 5:02:37 PM

ENGLISH
6
Basic operations — Remote controller (RM-RK252)
Main elements and features
1 • Turns on the power.
• Attenuates the sound if the power is on.
• Turns off the power if pressed and held (while
the power is on).
2 • Reverse search
• Reverse slow motion (during pause)
3 Adjusts the volume level.
• Does not function as “2nd VOL.”
4 • Displays <Dial Menu> screen.
• Displays <Redial> menu if pressed and held.
• Answers incoming calls.
5 • DVD/DivX 6: Shows the disc menu.
• VCD: Resumes PBC playback.
• DVD-VR: Shows the Original Program screen.
6 Shows the on-screen bar.
• Does not function as “ .“
R03/LR03/AAA
Installing the battery
Insert the batteries into the remote controller by
matching the polarity (+ and –) correctly.
Caution:
Battery shall not be exposed to excessive heat such
as sunshine, fire or the like.
• If the range or effectiveness of the remote controller
decreases, replace both batteries.
Before using the remote controller:
• Aim the remote controller directly at the remote
sensor on the unit.
• DO NOT expose the remote sensor to bright light
(direct sunlight or artificial lighting).
EN_KW-AVX710[UN].indb 6EN_KW-AVX710[UN].indb 6 07.12.17 5:02:37 PM07.12.17 5:02:37 PM

7
ENGLISH
INTRODUCTION
p • Forward search
• Forward slow motion (during pause)
q Selects the source.
w For disc operations:
Starts playback/pauses.
For Bluetooth operations:
• Answers incoming calls.
• Starts playback/pauses. (for audio player
operation).
e Changes the aspect ratio of the playback
pictures.
r “TUNER”: Selects the bands.
“DISC”: Stops playback.
“Bluetooth PHONE”: Ends the call.
“Bluetooth AUDIO”: Starts playback/pauses.
t VCD: Returns to the PBC menu.
y • DVD Video/DivX 6: Shows the disc menu.
• VCD: Resumes PBC playback.
• DVD-VR: Shows the Playlist screen.
u • Makes selection/settings.
• @ / #: Skips back or forward by five minutes
for DivX/MPEG1/MPEG2.
• % / fi: Changes discs for “CD-CH.”
i*3 • Switches number entry mode for “DISC.”
• Erases the misentry after entering a wrong
number.
• Does not function as “SURROUND.”
o*3 Number buttons
• Enters numbers.
• “TUNER”: Selects the preset station directly.
*1 Functions as a number button only (see o ).
*2 Not used for this unit.
*3 Functions when pressed with SHIFT.
7 Functions with other buttons (see i and o).
8 Changes the display information.
9 For disc operations:
• 5 / ∞:
DVD: Selects the title.
DVD-VR: Selects the program/Playlist.
Other discs (except VCD/CD): Selects the
folders.
• 4 / ¢:
– Press briefly: reverse skip/forward skip
– Press and hold: reverse search/forward
search
For FM/AM operations:
• 5 / ∞: Selects the preset stations.
• 4 / ¢: Functions to search for stations.
– Press briefly: Auto Search
– Press and hold: Manual Search
For Apple iPod operations:
• ∞: Starts playback/pauses
• 5: Enters the main menu (then 5 / ∞
/ 4 / ¢ work as menu selecting
buttons).
In the main menu:
• 5: Returns to the previous menu.
• ∞: Confirms the selection.
• 4 / ¢
– Press briefly: Selects an item.
– Press and hold: Skips ten items at a time.
For Bluetooth operations:
• 4 / ¢: reverse skip/forward skip (for
audio player operation)
EN_KW-AVX710[UN].indb 7EN_KW-AVX710[UN].indb 7 07.12.17 5:02:38 PM07.12.17 5:02:38 PM

8
ENGLISH
You can cancel the demonstration on the screen and set
the clock.
• Non-available items will be shaded on the AV Menu
screens.
Indication language:
In this manual, English indications are used
for purpose of explanation. You can select the
indication language. (☞ page 45)
~ Turn on the power.
Ÿ Display <AV Menu> screen.
! Display <Setup> menu.
⁄ Cancel the demonstration.
Select <Off>.
@ Set the clock settings.
¤ Finish the procedure.
Before operating the unit
Moves to the succeeding menu page
Moves to the preceding menu page
Return to the previous screen.
EN_KW-AVX710[UN].indb 8EN_KW-AVX710[UN].indb 8 07.12.17 5:02:38 PM07.12.17 5:02:38 PM

OPERATIONS
9
ENGLISH
Changing the display
information
• Available display information varies among the
playback sources.
On the monitor panel only:
• Each time you press DISP, the display changes to
show the various information.
Ex. When the playback source is a DivX disc.
Selecting the playback source
• Available sources depend on the external
components you have connected, media you have
attached, and the <Input> settings you have made
(☞ page 47).
On the touch panel:
On the monitor panel:
TUNER = DISC (DVD/VCD/CD) =CD-CH, iPod, or
EXT-IN = Bluetooth PHONE = Bluetooth AUDIO
= AV-IN = (back to the beginning)
• You cannot select these sources if they are not ready.
Exit
Source information screen
Clock time in large numbers
Navigation screen
(When <Navigation> is
selected for <AV Input>)
(☞ page 47)
Back to the beginning
Playback picture screen
(only for video sources)
Track list
Common operations
EN_KW-AVX710[UN].indb 9EN_KW-AVX710[UN].indb 9 07.12.17 5:02:39 PM07.12.17 5:02:39 PM

10
ENGLISH
When an FM stereo broadcast is
hard to receive
1 Press [AV MENU].
• You can also use AV MENU on the monitor panel.
2 Press [Mode].
Listening to the radio
~ Press [SOURCE], then press [TUNER]. (☞ page 9)
• You can also use SOURCE on the monitor panel. Press it repeatedly.
Ÿ Press [BAND].
! Press [4] or [¢] to search for a station—Auto Search.
• Manual Search: Hold either [4]or [¢] until “Manual Search” appears on the screen, then press it
repeatedly.
• The ST indicator lights up when receiving an FM stereo broadcast with sufficient signal strength.
3
Reception improves, but stereo effect will be lost.
• The MONO indicator lights up.
To restore stereo effect, select <Off>.
Preset no.
Band
Tuner indicators
Assigned station name (☞ page 42). If no name is assigned,
the frequency of the station is displayed instead.
☞ page 9
Sound mode
(☞ page 41)
☞ page 11,
: Buttons on the
touch panel. In
the explanation,
they are
indicated inside
[ ].
EN_KW-AVX710[UN].indb 10EN_KW-AVX710[UN].indb 10 07.12.17 5:02:40 PM07.12.17 5:02:40 PM

OPERATIONS
11
ENGLISH
FM station automatic presetting
—SSM (Strong-station
Sequential Memory)
This function works only for FM bands.
You can preset six stations for each band.
1 Press [AV MENU].
• You can also use AV MENU on the monitor panel.
2 Press [Mode].
3
Local FM stations with the strongest signals are
searched and stored automatically in the FM band.
Tuning in to stations with
sufficient signal strength
This function works only for FM bands. Once you have
activated this function (selected <Local>), it always
works when searching for FM stations.
1 Press [AV MENU].
• You can also use AV MENU on the monitor panel.
2 Press [Mode].
3
Only stations with sufficient signal strength will be
detected.
• The DX indicator goes off, then the LO indicator
lights up.
• You can also change <IF Band Width> setting
(for details, ☞ page 47).
<IF Band Width> menu can be accessed by
pressing [SHORT CUT] on the touch panel, then..
☞ page 41
EN_KW-AVX710[UN].indb 11EN_KW-AVX710[UN].indb 11 07.12.17 5:02:40 PM07.12.17 5:02:40 PM

12
ENGLISH
Selecting a preset station
On the remote:
1
2
On the unit:
• To select directly on the touch panel
• To select from the Preset List
1
2
or
Hold
Manual presetting
Ex.: Storing FM station of 92.5 MHz into preset number
4 of the FM1 band.
1 Display the Preset List.
2 Tune in to a station you want to preset.
3 Select a preset number.
The station selected in step 2 is now stored in
preset number 4.
[Hold]
EN_KW-AVX710[UN].indb 12EN_KW-AVX710[UN].indb 12 07.12.17 5:02:41 PM07.12.17 5:02:41 PM

OPERATIONS
13
ENGLISH
~ Open the monitor panel.
<Open/Tilt> menu is displayed.
• By pressing and holding the button, you can
open the monitor panel and eject the disc.
Ÿ Press [OPEN].
Disc operations
The disc type is automatically detected, and playback starts automatically (for some discs: automatic start depends
on its internal program).
If a disc does not have any disc menu, all tracks on it will be played repeatedly until you change the source or eject
the disc.
If “ ” appears on the screen, the unit cannot accept the operation you have tried to do.
• In some cases, without showing “ ,” operations will not be accepted.
Label side
Caution on volume setting:
Discs produce very little noise compared with other
sources. Lower the volume before playing a disc
to avoid damaging the speakers by the sudden
increase of the output level.
When playing back a multi-channel encoded disc,
the multi-channel signals are downmixed.
• You can fully enjoy multi-channel sound by
connecting an amplifier or a decoder compatible
with these multi-channel sources. (☞ also page
57)
! Insert a disc.
Monitor panel closes automatically.
If not, press [CLOSE].
Caution:
Do not place your finger behind the monitor panel.
EN_KW-AVX710[UN].indb 13EN_KW-AVX710[UN].indb 13 07.12.17 5:02:42 PM07.12.17 5:02:42 PM

14
ENGLISH
While playing the following discs, press .
• Each time you press the button, the display changes to show the different information. (☞ page 9)
Audio format
DVD Video: Title no./Chapter no./Playing time
DVD-VR: Program no. (or Playlist no.)/Chapter no./Playing time
Playback mode
Disc type *1Sampling frequency/Bit
rate/Recorded signal
channel no.
☞ page 19
[3 / 8] Start and pause playback
[7] Stop playback
[4 ¢] Press: Select chapter
Hold: Reverse/forward search*2
[5 ∞] Select title/program/playlist
*1 DVD-VR also indicates either PRG (program) or PLAY (playlist) playback.
*2 Search speed: x2 ] x10
: Buttons on the touch panel. In the explanation, they are indicated inside [ ].
These buttons also work when they are not shown on the touch panel (while watching the playback pictures
on the screen).
Sound mode
(☞ page 41)
EN_KW-AVX710[UN].indb 14EN_KW-AVX710[UN].indb 14 07.12.17 5:02:42 PM07.12.17 5:02:42 PM

OPERATIONS
15
ENGLISH
Track no./Playing time
[3 / 8] Start and pause playback
[7] Stop playback
[4 ¢] Press: Select track
Hold: Reverse/forward search*2
For DivX/MPEG1/MPEG2: Folder no./Track no./Playing time
For JPEG: Folder no./File no.
[3 / 8] Start and pause playback
[7] Stop playback
[4 ¢] Press: Select track
Hold: Reverse/forward search for DivX/MPEG1/MPEG2 *1
[5 ∞] Press: Select folder
Hold: Display Folder list
While playing the following discs, press .
• Each time you press the button, the display changes to show the different information (☞ page 9).
Disc type
☞ page 19
☞ page 19
The PBC indicator
lights up when PBC is
in use.
Total track no.
included on the
disc
Total track no.
included on the
disc
Total playing time
Sound mode
(☞ page 41)
Sound mode
(☞ page 41)
*1 Search speed: ¡1 ] ¡2
*2 Search speed: x2 ] x10
EN_KW-AVX710[UN].indb 15EN_KW-AVX710[UN].indb 15 07.12.17 5:02:43 PM07.12.17 5:02:43 PM

16
ENGLISH
Track no./Playing time
Only for CD Text *3
Folder no./Track no./Playing time
Audio format
(MP3/WMA/WAV)
☞ page 19
*3 “No Name” appears for conventional CDs.
*4 Search speed: x2 ] x10
Tag data appears
only when it is
recorded.
Sound mode
(☞ page 41)
☞ page 19
[3 / 8] Start and pause playback
[7] Stop playback
[4 ¢] Press: Select track
Hold: Reverse/forward search*4
[5 ∞] Press: Select folder
Hold: Display Folder list
[3 / 8] Start and pause playback
[7] Stop playback
[4 ¢] Press: Select track
Hold: Reverse/forward search*4
Total track no.
included on the disc
Total playing time
Total track no. included on the disc
Sound mode
(☞ page 41)
EN_KW-AVX710[UN].indb 16EN_KW-AVX710[UN].indb 16 07.12.17 5:02:43 PM07.12.17 5:02:43 PM

OPERATIONS
17
ENGLISH
Touch the screen (center portion).
Operation buttons on the screen
You can display the following operation buttons while watching the playback pictures on the screen.
• While the operation buttons are displayed, aspect ratio is fixed to <Full>. (☞ page 45)
• If no operation is done for about five seconds, the operation buttons disappear (except when a disc menu is
displayed).
Touch [KEY].
☞ pages 20 to 24 on how the operation buttons
particularly work for a variety of the discs
A
[SOURCE] Display <Source Menu> screen
[AV MENU] Display <AV Menu> screen
[SHORT CUT] Display the Short Cut buttons
[3 / 8] Start and pause playback
[7] Stop playback
[4 ¢] Press: Select track
Hold: Reverse/forward search
[5 ∞] Select folders
• The above buttons also work when they are not shown on
the screen (while watching the playback picture).
* While a disc menu is played back for DVD, [KEY] is
automatically displayed. On the disc menu, you can select a
menu item directly by touching it on the screen.
B
For DVD/VCD/DivX menu operation playback
[2 3 5 ∞] Select the menu items
[ENT] Confirm the selection
[TOP MENU] Display the disc menu
[MENU] Display the disc menu
[RETURN] Return to the previous menu or display the
menu (only for VCD with PBC)
C
For entering the numbers
[DIRECT CLR] • Switch between chapter/track entry and
title/group/folder entry
• Erase the last entry when you enter a
wrong number
[0]–[9]=[ENT]
Enter numbers
Ex.: To enter “105,” press [1], [0], [5], then [ENT]
*
Touch [KEY].
Touch [KEY].
To erase the operations, touch the screen again.
EN_KW-AVX710[UN].indb 17EN_KW-AVX710[UN].indb 17 07.12.17 5:02:44 PM07.12.17 5:02:44 PM
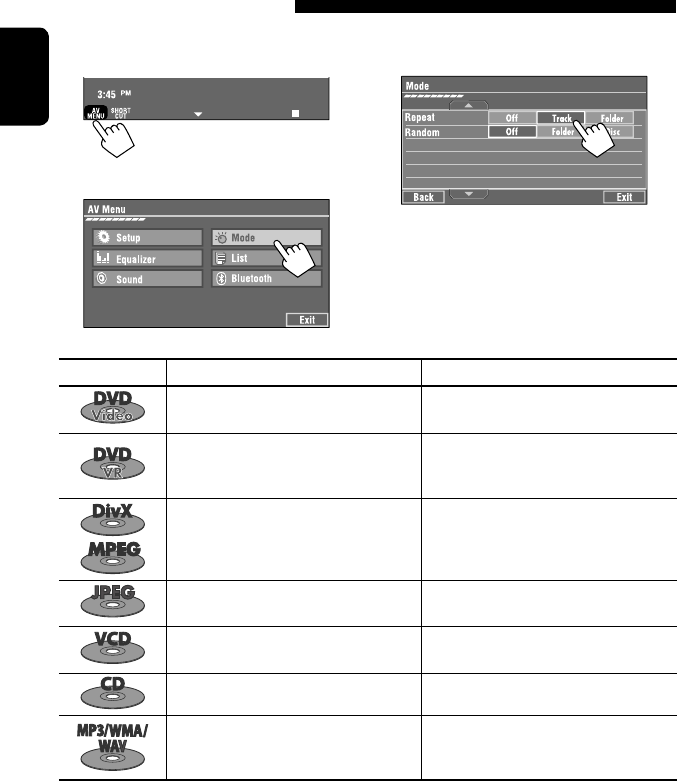
18
ENGLISH
1
• You can also use AV MENU on the monitor panel.
2
3
When one of the playback modes is selected, the
corresponding indicator lights up on the source
information screen.
To cancel, select <Off>.
Selecting playback modes
You can use the following playback modes—Repeat or Random.
Ex.: To select Track Repeat
Disc type Repeat Random
Chapter: Repeats current chapter
Title: Repeats current title —
Chapter: Repeats current chapter
Program: Repeats current program (not
available for Playlist playback)
—
Track: Repeats current track
Folder: Repeats current folder
Folder: Randomly plays all tracks of current
folder, then tracks of next folders
Disc (All): Randomly plays all tracks
Folder: Repeats current folder —
Track: Repeats current track (PBC not in
use)
Disc (All): Randomly plays all tracks (PBC not
in use)
Track: Repeats current track*1Disc (All): Randomly plays all tracks
Track: Repeats current track*1
Folder: Repeats all tracks of the current
folder
Folder: Randomly plays all tracks of current
folder, then tracks of next folders
Disc (All): Randomly plays all tracks
*1 You can also use [SHORT CUT] to turn on and off Track Repeat.
EN_KW-AVX710[UN].indb 18EN_KW-AVX710[UN].indb 18 07.12.17 5:02:44 PM07.12.17 5:02:44 PM

OPERATIONS
19
ENGLISH
Prohibiting disc ejection
You can lock a disc in the loading slot.
To cancel the prohibition, repeat the same
procedure to select <EJECT OK?>.
Using Short Cut Icons
You can easily access the some frequently used
functions by using [SHORT CUT] on the touch panel.
1
2
• For video software:
• For audio software:
Selecting tracks on the list
If a disc includes folders, you can display the Folder/
Track (File) Lists, then start playback.
1
• You can also use AV MENU on the monitor panel.
2
3 Select a folder (1), then a track (2).
Selected track starts playing. (* Press to move to
the previous/next pages of the list)
1 Current folder list number/total folder list
number
2 Current track list number/total track list
number of the current folder
You can easily access the Track List by pressing DISP
on the monitor panel.
Selected track starts playing.
at the same time
Sound mode
(☞ page 41)
Turn on or off Track Repeat
(Repeat play: ☞ page 18)
Aspect ratio
(☞ page 45)
EN_KW-AVX710[UN].indb 19EN_KW-AVX710[UN].indb 19 07.12.17 5:02:45 PM07.12.17 5:02:45 PM

20
ENGLISH
Stop playback.
Start playback/pause (if pressed during playback).
Reverse/forward search*1 (No sound can be heard.)
Slow motion during pause*2 (No sound can be heard.)
Press: Select chapter (during playback or pause).
Hold: Reverse/forward search*3 (No sound can be heard.)
Select title (during playback or pause).
Select aspect ratio.
Select chapter.
Select title (when not playing).
Select title (during playback or pause).
Using menu driven features
1
2 Select an item you want to start playback.
3
*1 Search speed: x2 ] x5 ] x10 ] x20 ] x60
*2 Slow motion speed: 1/32 ] 1/16 ] 1/8 ] 1/4 ] 1/2
*3 Search speed: x2 ] x10
Operations using the remote controller—RM-RK252
Also functions as CLR (clear):
Erases a misentry if pressed
while holding SHIFT.
You can change the following items using the on-screen bar—audio language, audio stream, audio channel,
subtitle language, view angle, etc. (☞ pages 25 and 26)
twice
EN_KW-AVX710[UN].indb 20EN_KW-AVX710[UN].indb 20 07.12.17 5:02:46 PM07.12.17 5:02:46 PM

OPERATIONS
21
ENGLISH
Stop playback.
Start playback/pause (if pressed during playback).
Reverse/forward search*4 (No sound can be heard.)
Forward slow motion during pause*5 (No sound can be heard.)
• Reverse slow motion does not work.
Press: Select chapter (during playback or pause).
Hold: Reverse/forward search*6
Select program.
Select playlist (during playback or pause).
Select aspect ratio.
Select chapter.
Select program (when not playing).
Select program/playlist (during playback or pause).
Using Original Program/Playlist screens ( ☞ page 25)
1For Original Program
For Playlist
2 Select an item you want to start playback.
3 To erase the screen.
*4 Search speed: x2 ] x5 ] x10 ] x20 ] x60
*5 Slow motion speed: 1/32 ] 1/16 ] 1/8 ] 1/4 ] 1/2
*6 Search speed: x2 ] x10
twice
EN_KW-AVX710[UN].indb 21EN_KW-AVX710[UN].indb 21 07.12.17 5:02:47 PM07.12.17 5:02:47 PM

22
ENGLISH
Also functions as CLR (clear):
Erases a misentry if pressed
while holding SHIFT.
Stop playback.
Start playback/pause (if pressed during playback).
Reverse/forward search*1 (No sound can be heard.)
Press: Select track
Hold: Reverse/forward search*2 (No sound can be heard.)
Select folder.
Select aspect ratio.
Select track (within the same folder).
Select folder.
While playing...
Reverse/advance the scenes by five minutes.
For DivX6: Using menu driven features
1
2 Select an item you want to start playback.
3
*1 Search speed: ¡1 ] ¡2 ] ¡3
*2 Search speed: ¡1 ] ¡2
Current playback position
twice
2nd press 2nd press1st press 1st press 3rd press
EN_KW-AVX710[UN].indb 22EN_KW-AVX710[UN].indb 22 07.12.17 5:02:47 PM07.12.17 5:02:47 PM
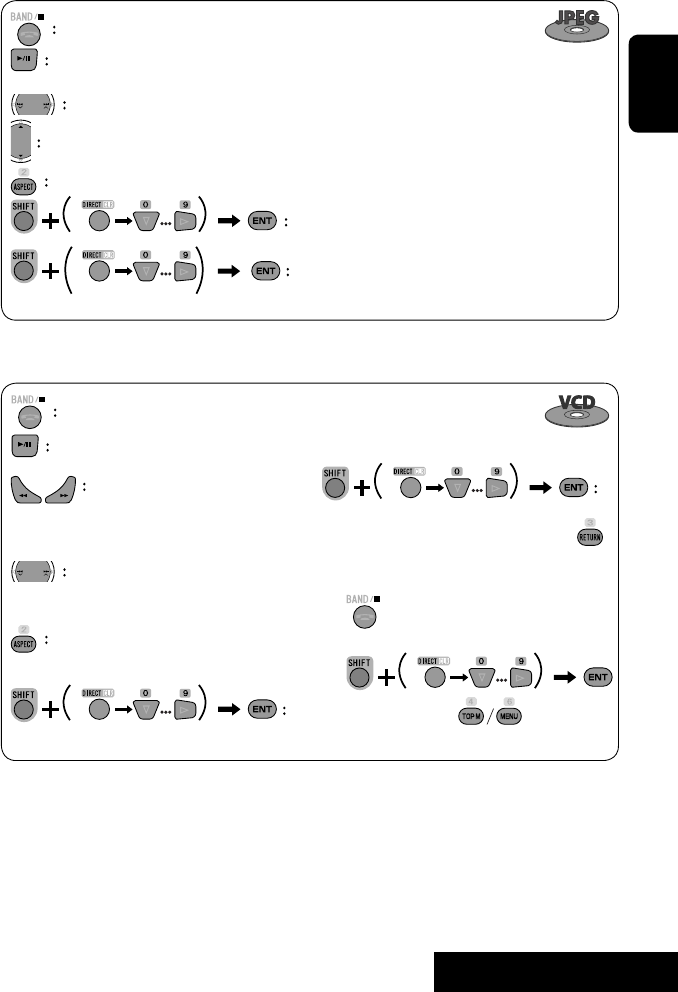
OPERATIONS
23
ENGLISH
Stop playback.
Start playback/pause. (Slide show: each file is shown for a few seconds.)
Shows the current file until you change it if pressed during Slide show.
Select file.
Select folder.
Select aspect ratio.
Select file (within the same folder).
Select folder.
During PBC playback...
Select an item on the menu.
To return to the previous menu, press
To cancel PBC playback
1
2 Select the desired track.
• To resume PBC, press
Stop playback.
Start playback/pause (if pressed
during playback).
Reverse/forward search*3
Forward slow motion during pause*4
(No sound can be heard.)
• Reverse slow motion does not work.
Press: Select track.
Hold: Reverse/forward search*5 (No
sound can be heard.)
Select aspect ratio.
twice
*3 Search speed: x2 ] x5 ] x10 ] x20 ] x60
*4 Slow motion speed: 1/32 ] 1/16 ] 1/8 ] 1/4 ] 1/2
*5 Search speed: x2 ] x10
Select track.
EN_KW-AVX710[UN].indb 23EN_KW-AVX710[UN].indb 23 07.12.17 5:02:48 PM07.12.17 5:02:48 PM

24
ENGLISH
Stop playback.
Start playback/pause (if pressed during playback).
Reverse/forward search*1
Press: Select track.
Hold: Reverse/forward search*2
Select track.
*1 Search speed: x2 ] x5 ] x10 ] x20 ] x60
*2 Search speed: x2 ] x10
Stop playback.
Start playback/pause (if pressed during playback).
Reverse/forward search*3
Press: Select track.
Hold: Reverse/forward search*4
Select folder.
Select track (within the same folder).
Select folder.
*3 Search speed: x2 ] x5 ] x10 ] x20 ] x60
*4 Search speed: x2 ] x10
twice
Also functions as CLR (clear):
Erases a misentry if pressed
while holding SHIFT.
EN_KW-AVX710[UN].indb 24EN_KW-AVX710[UN].indb 24 07.12.17 5:02:49 PM07.12.17 5:02:49 PM

OPERATIONS
25
ENGLISH
Operations using the on-screen
bar
These operations are possible on the screen using
the remote controller, while playing the following
discs—DVD/VCD/DivX/MPEG1/MPEG2/JPEG.
1 Display the on-screen bar. (☞page 26)
Ex. For DVD-Video
2 Select an item.
3 Make a selection.
If a pop-up menu appears...
• For entering time/numbers...
:
Move the entry position
:
Select a number
To remove the on-screen bar
Using the list screens
You can use Original Program or Playlist
screen anytime while playing DVD-VR with its data
recorded.
1 Display the Original Program/Playlist screen.
2 Select an item you want.
To erase the screen
1 Original Program/Playlist number
2 Recording date
3 Recording source (TV station, the input terminal of
the recording equipment, etc.)
4 Start time of recording
5 Title of the program/playlist*
6 Highlight bar (current selection)
7 Creating date of playlist
8 Total number of chapters included in the playlist
9 Playback time
* The title of the original program or playlist may not be
displayed depending on the recording equipment.
EN_KW-AVX710[UN].indb 25EN_KW-AVX710[UN].indb 25 07.12.17 5:02:50 PM07.12.17 5:02:50 PM
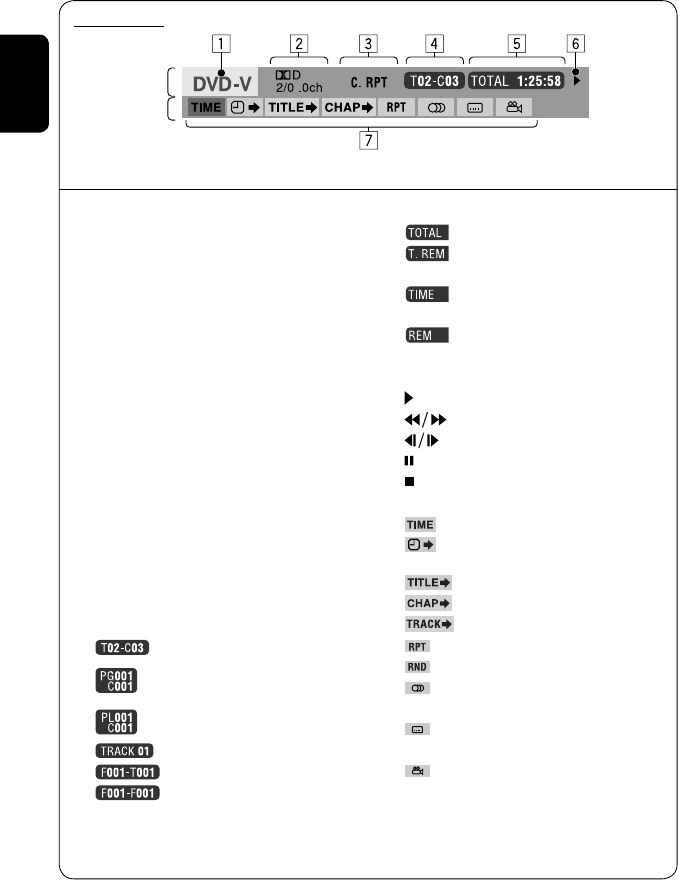
26
ENGLISH
Information
Operation
On-screen bar
5 Time indication
Elapsed playing time of the disc
Remaining title time (for DVD)
Remaining disc time (for others)
Elapsed playing time of the current
chapter/track *2
Remaining time of the current
chapter/track *2
6 Playback status
Play
Reverse/forward search
Reverse/forward slow-motion
Pause
Stop
7 Operation icons
Change time indication (see 5)
Time Search (Specify a certain
scene by entering time.)
Title Search (by its number)
Chapter Search (by its number)
Track Search (by its number)
Repeat play *1
Random play *1
Change the audio language, audio
stream, or audio channel
Change or erase the subtitle
language
Change the view angle
*1 ☞ page 18
*2 Not applicable for DVD-VR
Above example is of DVD Video. Items shown on the bar vary due to the disc type.
1 Disc type
2 • DVD: Audio signal format
• VCD: PBC
3 Playback mode *1
DVD Video:
C. RPT: Chapter repeat
T. RPT: Title repeat
DVD-VR:
C. RPT: Chapter repeat
PG. RPT: Program repeat
DivX/MPEG1/MPEG2:
T. RPT: Track repeat
F. RPT: Folder repeat
F. RND: Folder random
A. RND: All (Disc) random
JPEG:
F. RPT: Folder repeat
VCD:
T. RPT: Track repeat
A. RND: All (Disc) random
4 Playback information
Current title/chapter
Current program/chapter
Current Playlist/chapter
Current track
Current folder/track
Current folder/file
EN_KW-AVX710[UN].indb 26EN_KW-AVX710[UN].indb 26 07.12.17 5:02:51 PM07.12.17 5:02:51 PM

27 EXTERNAL DEVICES
ENGLISH
Bluetooth® operations — Cellular phone/audio player
For Bluetooth operations, it is required to connect the
Bluetooth Adapter (KS-BTA200) to the CD changer jack
on the rear.
• Refer also to the instructions supplied with the
Bluetooth Adapter and the Bluetooth device.
• Refer to the list (included in the box) to see the
countries where you may use the Bluetooth®
function.
To use a Bluetooth device through the unit (“Bluetooth
PHONE” and “Bluetooth AUDIO”) for the first time,
you need to establish Bluetooth wireless connection
between the unit and the device.
• Once the connection is established, it is registered in
the unit even if you reset your unit. Up to five devices
can be registered in total.
• Only one device can be connected at a time for each
source (“Bluetooth PHONE” and “Bluetooth AUDIO”).
Connecting a new Bluetooth
device
Registration (Pairing) methods
Use either of the following items in <Bluetooth>
menu to register and establish the connection with a
device.
• Select “Bluetooth PHONE” or “Bluetooth AUDIO” as
the source to operate <Bluetooth> menu.
Open Make the unit ready to establish
a new Bluetooth connection.
The connection is established by
operating the Bluetooth device.
Search Make the unit ready to establish
a new Bluetooth connection.
The connection is established by
operating this unit.
To register using <Open>
Preparation:
Operate the Bluetooth device to turn on its Bluetooth
function.
1 • Make sure “New Device” is selected. If not, press
[5] or [∞] to select it.
• You can also use AV MENU on the monitor panel.
2
3
4 Enter a PIN (Personal Identification
Number)* code to the unit.
• You can enter any number you like (1-digit to
16-digit number).
* Some devices have their own PIN code. Enter the
specified PIN code to the unit.
Go to other menu items
Continued on the next page
EN_KW-AVX710[UN].indb 27EN_KW-AVX710[UN].indb 27 07.12.17 5:02:52 PM07.12.17 5:02:52 PM

28
ENGLISH
You can enter [0] – [9] only.
• [BS]: Erases the character before the cursor.
• [Del]: Erases the character on the cursor.
• [Enter]: Confirms the entry.
5 Operate the Bluetooth device to connect
while “Open...” is displayed on the screen.
Enter the same PIN code (as entered in the above
step) on the device to be connected.
Now connection is established and you can use the
device through the unit.
The device remains registered even after you
disconnect the device. Use <Connect> (or activate
<Auto Connect>) to connect the same device
from next time (☞ the following, and pages 50
and 51).
To register using <Search>
• Make sure “New Device” is selected. If not, press [5]
or [∞] to select it.
1 Press [AV MENU] on the touch panel or AV
MENU on the monitor panel.
2 Press [Bluetooth].
3 Press [Search].
The unit searches for available devices and displays
the list of them. (If no available device is detected,
“Device Unfound” appears.)
4 Select a device you want to connect.
5 Enter the specific PIN code of the device to
the unit.
• Refer to the instructions supplied with the device
to check the PIN code.
6 Operate the Bluetooth device to connect
while “Connecting...” is displayed on the
screen.
Now connection is established and you can use the
device through the unit.
To connect a special device <Special
Device>
1 Press [AV MENU] on the touch panel or AV
MENU on the monitor panel.
2 Press [Bluetooth].
3 Press [Special Device].
The unit displays the list of the preset devices.
4 Select a device you want to connect.
5 Use <Open> (or <Search>) to connect.
To connect/disconnect a registered
device
1 Select “Bluetooth PHONE” or “Bluetooth
AUDIO,” then select a registered device you
want to connect/disconnect.
2 Press [AV MENU] on the touch panel or AV
MENU on the monitor panel.
3 Press [Bluetooth].
4 Press [Connect] or [Disconnect].
• Select <Connect> to connect the selected
device.
• Select <Disconnect> to disconnect the selected
device.
To delete a registered device
1 Select “Bluetooth PHONE” or “Bluetooth
AUDIO,” then select a registered device you
want to delete.
2 Press [AV MENU] on the touch panel or AV
MENU on the monitor panel.
3 Press [Bluetooth].
4 Press [Delete Pairing].
Confirmation screen appears. Press [Yes].
EN_KW-AVX710[UN].indb 28EN_KW-AVX710[UN].indb 28 07.12.17 5:02:53 PM07.12.17 5:02:53 PM

29 EXTERNAL DEVICES
ENGLISH
Using the Bluetooth cellular phone
Adjust the volume of the incoming calls.*2
When a call comes in...
The source is changed to “Bluetooth PHONE”
automatically.
Name and phone number (if acquired)
When <Auto Answer> is activated...
The unit answers the incoming call automatically.
(☞ page 51)
☞ page 31
When <Auto Answer> is deactivated...
To answer the incoming call
• Press any button on the monitor panel (except
/ATT or +/–).
• Press the message displayed on the touch panel.
To end the call
• Hold any button on the monitor panel (except
/ATT or +/–).
• Hold the message displayed on the touch panel.
• You can adjust the microphone volume. (☞ page 51)
~ Press [SOURCE], then press [Bluetooth PHONE]. (☞ page 9)
• You can also use SOURCE on the monitor panel. Press it repeatedly.
Ÿ Press [AV MENU].
• You can also use AV MENU on the monitor panel.
! Press [Bluetooth].
⁄ Establish the connection with a device, then make a call (or settings using <Bluetooth>
menu).
☞ pages 50 and 51
Sound mode
(☞ page 41) Status of the device
Signal strength/Battery
remainder
(only when the information
comes from the device)
[AV MENU] Hold: Activates <Voice Dialing> function
[5 ∞] Select the registered device
(“New Device” appears when a new device can be registered.)
The Bluetooth icon
lights up when
the adapter is
connected.
: Buttons on the touch panel. In the
explanation, they are indicated inside
[ ].
*1 When a cellular phone with audio function is connected, appears.
*2 This adjustment does not affect the volume level of the other sources.
*1
EN_KW-AVX710[UN].indb 29EN_KW-AVX710[UN].indb 29 07.12.17 5:02:53 PM07.12.17 5:02:53 PM
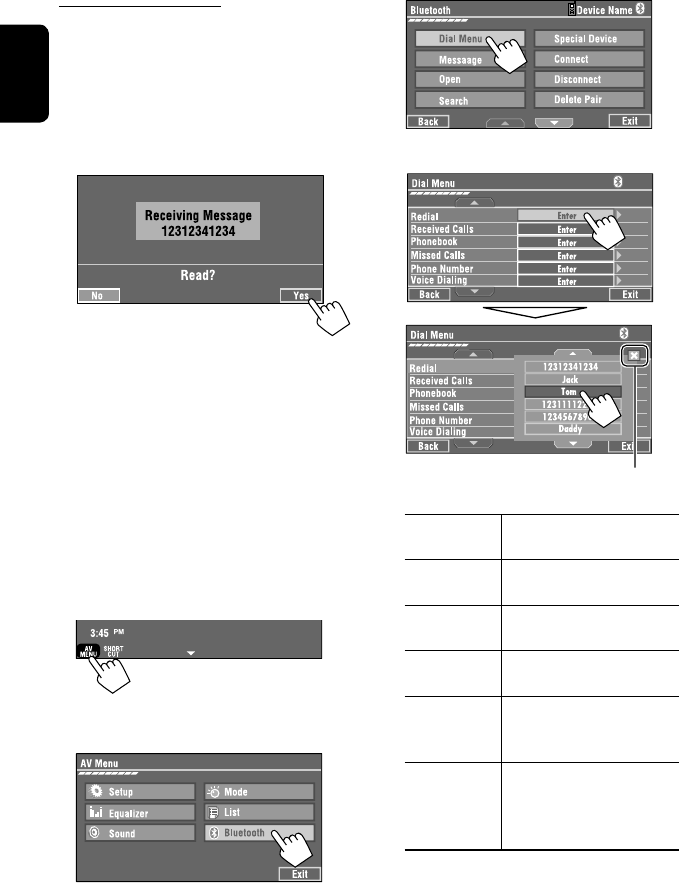
30
ENGLISH
3
4 Select a calling method, then call.
Redial Shows the list of the phone
numbers you have dialed.
Received Calls Shows the list of the received
calls.
Phonebook Shows the phone book of the
connected cellular phone.
Missed Calls Shows the list of the missed
calls.
Phone
Number
Shows the phone number entry
screen = “Entering a phone
number” (☞ page 31).
Voice Dialling (Only when the connected
cellular phone has the voice
recognition system): = Speak
the name you want to call.
When an SMS comes in...
If the cellular phone is compatible with SMS (Short
Message Service), you can read the messages on the
screen.
• You cannot edit or send a message through the unit.
When <Message Info> is set to <Auto>...
The unit rings and the following screen is displayed to
inform you of a message arrival. (☞ page 51)
To read the message, press [Yes].
The source is changed to “Bluetooth PHONE.”
To read the message later, press [No].
• The message is stored into <Message> =
<Unread>. (☞ page 50)
When <Message Info> is set to <Manual>...
Access the message list to read messages. (☞ pages
50 and 51)
To make a call
1
• You can also use AV MENU on the monitor panel.
2
Cancel
EN_KW-AVX710[UN].indb 30EN_KW-AVX710[UN].indb 30 07.12.17 5:02:54 PM07.12.17 5:02:54 PM

31 EXTERNAL DEVICES
ENGLISH
To stop ringing (canceling the outgoing call)
Hold any button on the monitor panel (except /ATT
or +/–).
Entering a phone number
• You cannot use the remote controller to enter phone
numbers.
You can enter [0] – [9], [*], [#] (up to 32 numbers)
• [BS]: Erases the character before the cursor.
• [Del]: Erases the character on the cursor.
• [Preset]: Goes to Preset List. You can preset the
entered number by selecting a preset
number. (☞ page 32)
• [Dial]: Calls the entered number.
• You can easily access <Dial Menu> by pressing
[SHORT CUT] on the touch panel, then...
You can also access <Dial Menu> by holding
SOURCE on the monitor panel.
• You can easily activate <Voice Dialing> by
pressing [SHORT CUT] on the touch panel, then...
You can also activate <Voice Dialing> by
holding [AV MENU].
To redial previously dialed numbers
1
2
3
When using the remote controller, you can
display <Redial> menu anytime .
[Hold]
EN_KW-AVX710[UN].indb 31EN_KW-AVX710[UN].indb 31 07.12.17 5:02:55 PM07.12.17 5:02:55 PM
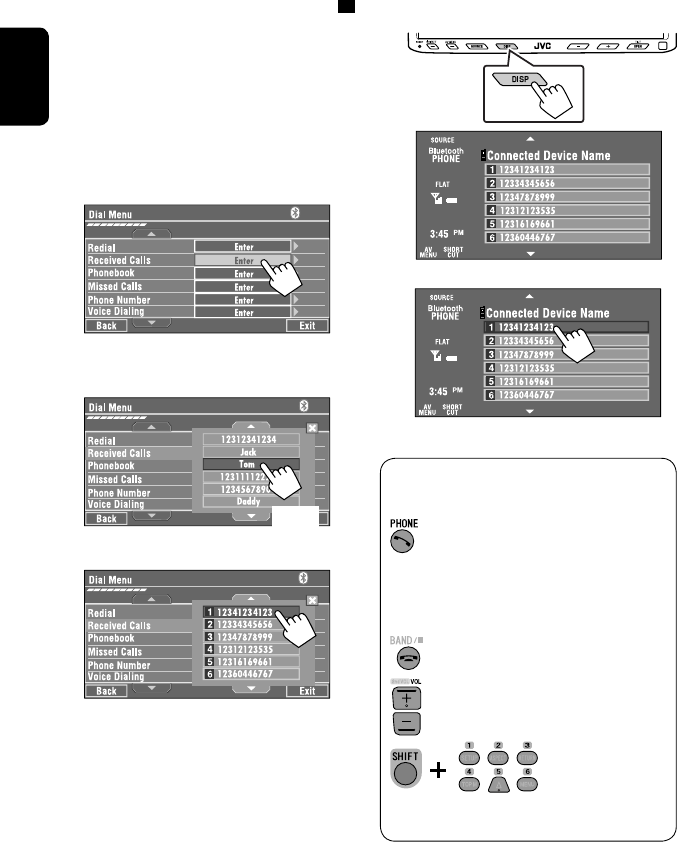
32
ENGLISH
To call a preset number
1
2
You can use the following buttons on the remote
controller for the Bluetooth phone operations.
Presetting the phone numbers
You can preset up to six phone numbers.
1 Select the phone number you want to preset
from <Phonebook>, <Redial>, <Received
Calls>, or <Missed Calls>.
1 Press [AV MENU] on the touch panel or AV
MENU on the monitor panel.
2 Press [Bluetooth].
3 Press [Dial Menu], then...
Ex.: Selecting <Received Calls>
2 Select a telephone number to store.
3 Select a preset number.
Now “Tom” is stored into preset no. 1.
• Display <Dial Menu> screen/Answer
the incoming call.
• Display the <Redial> menu if pressed
and held (regardless of the current
source).
End the call.
Adjust the volume.
Make a call to the preset numbers.
[Hold]
:
:
:
:
[Hold]
EN_KW-AVX710[UN].indb 32EN_KW-AVX710[UN].indb 32 07.12.17 5:02:56 PM07.12.17 5:02:56 PM

33 EXTERNAL DEVICES
ENGLISH
Bluetooth Information:
If you wish to receive more information about Bluetooth, visit the following JVC web site: <http://www.
jvc-victor.co.jp/english/car/>
You can use the following buttons on the remote
controller for the Bluetooth audio operations.
Using the Bluetooth audio player
☞ page 41
Sound mode
(☞ page 41)
[3 / 8] [7] Start and pause playback
[4 ¢] Reverse/forward skip
[5 ∞] Select the registered device
(“New Device” appears when a new device can
be registered.*3)
Status of the device
Signal strength/Battery
remainder
(only when the information
comes from the device)
The Bluetooth icon
lights up when
the adapter is
connected.
~ Press [SOURCE], then press [Bluetooth
AUDIO]. (☞ page 9)
• You can also use SOURCE on the monitor
panel. Press it repeatedly.
Ÿ Start playback.
: Buttons on the touch panel. In the
explanation, they are indicated
inside [ ].
*2
*1
*1 When a cellular phone with audio function is connected, appears.
*2 Indicates the button pressed. It may be different from the operation status.
*3 You cannot select “New Device” when a Bluetooth audio player is connected.
Start and pause playback.
Reverse/forward skip
Adjust the volume.
:
:
:
EN_KW-AVX710[UN].indb 33EN_KW-AVX710[UN].indb 33 07.12.17 5:02:56 PM07.12.17 5:02:56 PM

34
ENGLISH
Preparation:
Make sure <Changer> is selected for <External
Input>. (☞ page 47)
~ Press [SOURCE], then press [CD-CH]. (☞
page 9)
• You can also use SOURCE on the monitor
panel. Press it repeatedly.
Ÿ
• You can also use AV MENU on the monitor
panel.
! Display the Disc List.
Listening to the CD changer
It is recommended to use a JVC MP3-compatible CD changer with your unit.
• You can play only CDs (CD-DA) and MP3 discs.
Folder no./Track no./Playing time
Disc no.
MP3 indicator
☞ page 35
Tag data appears only when it is
recorded.
⁄ Select a disc to start playing.
• If you select an MP3 disc, the Track list of the
current folder appears. You can select a track
and start playing. (☞ also page 19)
• If you select a folder on the list, you can start
playing the first track of the folder.
To go to the other list
Sound mode
(☞ page 41)
[4 ¢] Press: Select track
Hold: Reverse/forward search
[5 ∞] Press: Select folders (only for MP3)
Hold: Display Disc list
Total track no. included on the
disc
Ex. while playing an MP3 disc
: Buttons on the touch panel. In the
explanation, they are indicated inside [ ].
EN_KW-AVX710[UN].indb 34EN_KW-AVX710[UN].indb 34 07.12.17 5:02:57 PM07.12.17 5:02:57 PM
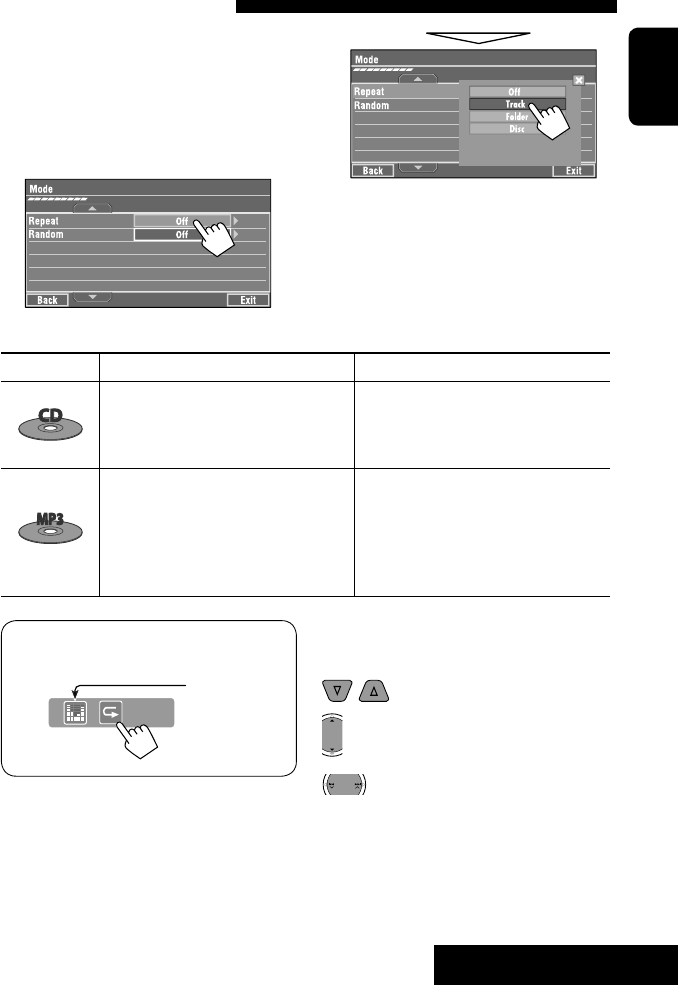
35 EXTERNAL DEVICES
ENGLISH
When one of the playback modes is selected, the
corresponding indicator lights up on the source
information screen.
To cancel, select <Off>.
You can use following playback modes—Repeat or
Random.
Ex.: To select Track Repeat for an MP3 disc
1 Press [AV MENU] on the touch panel or AV
MENU on the monitor panel.
2 Press [Mode].
3
Selecting playback modes
Disc type Repeat Random
Track: Repeats current track
Disc: Repeats all tracks of the current disc
Disc: Randomly plays all tracks of the
current disc
All: Randomly plays all tracks of all
loaded discs
Track: Repeats current track
Folder: Repeats all tracks of the current
folder
Disc: Repeats all tracks of the current disc
Folder: Randomly plays all tracks of current
folder, then tracks of next folders
Disc: Randomly plays all tracks of the
current disc
All: Randomly plays all tracks of all
loaded discs
You can use the following buttons on the remote
controller to operate the CD changer.
You can easily turn on or off Track Repeat by
pressing [SHORT CUT] on the touch panel, then...
: Select disc.
: Select folder (MP3 only).
• Press: Select track.
• Hold: Reverse/forward search
☞ page 41
EN_KW-AVX710[UN].indb 35EN_KW-AVX710[UN].indb 35 07.12.17 5:02:57 PM07.12.17 5:02:57 PM

36
ENGLISH
Listening to the iPod
It is required to connect the Interface adapter for iPod (KS-PD100) to the CD changer jack on the rear.
Preparation:
Make sure <iPod> is selected for <External Input>. (☞ page 47)
~ Press [SOURCE], then press [iPod] (☞ page 9)
Playback starts automatically.
• You can also use SOURCE on the monitor panel. Press it repeatedly.
Ÿ Press [4] or [¢] to select a track.
Track no./Playing time
☞ page 37
[4 ¢] Press: Select track
Hold: Reverse/forward search
[5] Enter player’s menu
[∞] Start playback/pause
• To resume, press again.
Sound mode
(☞ page 41)
: Buttons on the touch panel. In the
explanation, they are indicated
inside [ ].
EN_KW-AVX710[UN].indb 36EN_KW-AVX710[UN].indb 36 07.12.17 5:02:58 PM07.12.17 5:02:58 PM

37 EXTERNAL DEVICES
ENGLISH
Selecting a track from the
player’s menu
1 Press [5] to enter the player’s menu.
“SEARCH” flashes on the screen during menu
operations.
• This mode will be canceled if no operations are
done for about five seconds.
2 Press [4] or [¢] to select the desired
item.
Press: Select an item.
Hold: Skip ten items at a time if there are more
than ten items.
Playlists Ô Artists Ô Albums Ô Songs Ô
Genres Ô Composers Ô (back to the beginning)
3 Press [∞] to confirm the selection.
4 Repeat steps 2 and 3 to select a track.
• When a track is selected finally, playback starts.
• To return to the previous menu, press [5].
Selecting playback modes
1
• You can also use AV MENU on the monitor panel.
2
3 Select an appropriate option.
Repeat One: Functions the same as
“Repeat One.”
All: Functions the same as
“Repeat All.”
Random Album: Functions the same as
“Shuffle Albums.”
Song: Functions the same as
“Shuffle Songs.”
• When the playback modes are selected, the
corresponding indicators light up alternately on
the screen.
To cancel, select <Off>.
You can easily turn on or off Track Repeat by
pressing [SHORT CUT] on the touch panel, then...
☞ page 41
EN_KW-AVX710[UN].indb 37EN_KW-AVX710[UN].indb 37 07.12.17 5:02:58 PM07.12.17 5:02:58 PM

38
ENGLISH
Using other external components
AV-INPUT
You can connect an external component to the LINE IN/VIDEO IN terminals.
~ Press [SOURCE], then press [AV-IN]. (☞ page 9)
• You can also use SOURCE on the monitor panel. Press it repeatedly.
Ÿ Turn on the connected component and start playing the source.
To display the operation buttons (☞ page 17) while watching the playback picture
• If no operations are done for about five seconds, the operation buttons disappear.
• [KEY] does not work when the source is “AV-IN.”
Touch the screen (center portion).
You can easily access to <Aspect> setting
menu by pressing [SHORT CUT] on the
touch panel, then...
Assigned title (☞ page 42) Sound mode (☞ page 41)
Touch the screen (center portion).
: Buttons on the touch panel. In the explanation, they are indicated inside [ ].
These buttons also work when they are not shown on the touch panel (while watching the playback picture).
☞ page 41
EN_KW-AVX710[UN].indb 38EN_KW-AVX710[UN].indb 38 07.12.17 5:02:59 PM07.12.17 5:02:59 PM

39 EXTERNAL DEVICES
ENGLISH
To display the operation buttons (☞ page 17) while viewing the navigation screen
• The operation buttons displayed on the screen vary among the playback sources.
• If no operations are done for about five seconds, the operation buttons disappear.
• The above buttons except [KEY] also work when they are not shown on the screen (while viewing the navigation
screen).
Navigation screen
You can also connect a Navigation System to the VIDEO IN terminal so that you can watch the navigation screen.
Preparation:
Make sure <Navigation> is selected for <AV Input>. (☞ page 47)
To view the navigation screen (and listen to the navigation guidance*)
Press DISP on the monitor panel repeatedly. (☞ page 9)
• The aspect ratio of the navigation screen is fixed to
<Full> regardless of the <Aspect> setting. (☞ page
45)
* If your Navigation System is equipped with the voice guidance function.
When <Navigation> is selected for <AV Input> (☞ page 47)
• You can use the source “AV-IN” for listening to an audio source connected to the LINE IN terminals.
• Some status messages such as volume level will not appear on the screen.
Touch the screen (center portion). Touch the screen (center portion).
EN_KW-AVX710[UN].indb 39EN_KW-AVX710[UN].indb 39 07.12.17 5:03:00 PM07.12.17 5:03:00 PM

40
ENGLISH
EXT-INPUT
You can connect an external component to the CD changer jack on the rear using the Line Input Adapter—KS-U57
(not supplied) or AUX Input Adapter—KS-U58 (not supplied).
Preparation:
Make sure <External> is selected for <External Input>. (☞ page 47)
~ Press [SOURCE], then press [EXT-IN]. (☞ page 9)
• You can also use SOURCE on the monitor panel. Press it repeatedly.
Ÿ Turn on the connected component and start playing the source.
Assigned title (☞ page 42)
☞ page 41
Sound mode
(☞ page 41)
: Buttons on the touch panel. In the explanation, they are indicated inside [ ].
EN_KW-AVX710[UN].indb 40EN_KW-AVX710[UN].indb 40 07.12.17 5:03:00 PM07.12.17 5:03:00 PM

SETTINGS
41
ENGLISH
~
• You can also use AV MENU on the monitor panel.
Ÿ
! Select a sound mode.
• For preset values of each sound mode, ☞ page 58.
Sound equalization
Storing your own adjustments
You can store your adjustments into <User1>,
<User2>, and <User3>.
1 Repeat steps ~ and Ÿ, then in step !...
2 Adjust (1), then store (2).
Ex.: When storing into <User2>.
While playing back any source other
than “Bluetooth PHONE,” you can easily
access <Equalizer> menu by pressing
[SHORT CUT] on the touch panel, then...
Move to other six sound modes
EN_KW-AVX710[UN].indb 41EN_KW-AVX710[UN].indb 41 07.12.17 5:03:00 PM07.12.17 5:03:00 PM

42
ENGLISH
You can assign titles as follows.
FM/AM stations Up to 16 characters—up to 30
stations.
AV-IN
EXT-IN
Up to 16 characters
~ Select the source. (☞ page 9)
• For FM/AM stations: Select the band, then
tune into a station.
Ÿ Display <Title Entry> screen.
• You can also use AV MENU on the monitor panel.
! Assign a title.
You can enter up to 16 characters (for available
characters, ☞ page 59).
• [Store]: Confirm the entry.
• [2/3]: Move the cursor.
• [BS]: Erase the character before the
cursor.
• [Del]: Erase the character on the cursor.
• [Cap]: Change the letter case (upper/
lower).
• [Change]: Change the character set.
• [Space]: Enter a space.
⁄ Finish the procedure.
Assigning titles to the sources
In the explanation, buttons on the
touch panel are indicated inside [ ].
EN_KW-AVX710[UN].indb 42EN_KW-AVX710[UN].indb 42 07.12.17 5:03:01 PM07.12.17 5:03:01 PM

SETTINGS
43
ENGLISH
!
Menu operations
The following steps are one of the fundamental
procedures. Some of the settings do not open the
sub-setting window, but just selecting an option will
change the setting.
• The display indications may change according to
change of the specifications.
Ex.: Changing the <AV Input> setting
~
• You can also use AV MENU on the monitor panel.
Ÿ
Non-available items will be shaded.
EN_KW-AVX710[UN].indb 43EN_KW-AVX710[UN].indb 43 07.12.17 5:03:02 PM07.12.17 5:03:02 PM

44
ENGLISH
Setup
Menu items Selectable settings, [reference page]
Display
Demonstration Off: Cancels.
On: Activates the demonstration on the screen. To stop it temporarily,
touch the screen.
Wall Paper You can select the background picture of the screen.
Horizon, Metal, Art, Plain
Color You can select the color of the background picture.
Blue, Light-Blue, Red, Orange, Yellow, Green, Purple, Dark-Blue,
Dark-Green, Brown, Light-Brown, Black
Scroll Off: Cancels.
Once: Scrolls the disc information once.
Auto: Repeats scrolling (five-second intervals).
• Holding DISP on the monitor panel scrolls the information regardless
of this setting.
Dimmer Off: Cancels.
On: Activates dimmer.
Auto: Dims the monitor when you turn on the headlights.*1
Dimmer Time Set : Activates the Dimmer Time setting below.
Dimmer Time Set Sets the Dimmer On/Off times.
Dimmer Level You can select the brightness for dimmer.
1 (bright), 2 (middle), 3 (dark)
Bright You can adjust brightness of the screen.
–15 (darkest) to +15 (brightest); Initial 00
Picture Adjust*2You can adjust the following to make the screen clear and legible for
watching the playback picture. The setting will be stored—one for
“DISC” (common) and the other for “AV-IN.”
–15 to +15; Initial 0
Bright: Adjust if the picture is too bright or too dark.
Contrast: Adjust the contrast.
Color: Adjust the color of the picture—lighter or darker.
Tint: Adjust the tint if the human skin color is unnatural. (only when
color system setting is <NTSC>, ☞ next page)
• Press [5] or [∞] to adjust.
*1 The ILLUMINATION lead connection is required. (☞ Installation/Connection Manual)
*2 Adjustable only when the source is “DISC” (the inserted disc must contain pictures or movies) or “AV-IN.”
The procedure for setting an item is shown on page 43.
EN_KW-AVX710[UN].indb 44EN_KW-AVX710[UN].indb 44 07.12.17 5:03:02 PM07.12.17 5:03:02 PM

SETTINGS
45
ENGLISH
Menu items Selectable settings, [reference page]
Display
Aspect*3You can change the aspect ratio of the picture.
Aspect ratio of incoming signal
4:3 16:9
Regular:
For 4:3 original pictures
Full:
For 16:9 original pictures
Auto: • For “DISC”: Aspect ratio is automatically
selected to match to the incoming signals.
• For the other video sources: Aspect ratio is
fixed to <Regular>.
Language*4Select the indication language shown on the screen.
English, Español, Français, Deutsch, Italiano, Nederlands,
Svenska, Dansk, Руccĸий, Português
• The characters you can enter for assigning the titles also change
according to the language selected. ☞ [59]
NTSC/PAL Select the color system of the external monitor connected—NTSC, PAL.
• Turn off the power and turn it on again to make the new setting
effective.
Clock
Time Set Initial 1:00AM ☞ [8]
Time Format Select either 12-hour system or 24-hour system.
12Hours, 24Hours ☞ [8]
OSD Clock When <On> is selected, the clock time is displayed on the playback
picture. ☞ [8]
Off, On
*3 Not adjustable when no picture is shown.
*4 After you change the indication language setting, turn off then on the power so that your setting takes effect.
Initial: Underlined
EN_KW-AVX710[UN].indb 45EN_KW-AVX710[UN].indb 45 07.12.17 5:03:03 PM07.12.17 5:03:03 PM

46
ENGLISH
Menu items Selectable settings, [reference page]
Disc
Menu Language*1Select the initial disc menu language; Initial English (☞ also page
58).
Audio Language*1Select the initial audio language; Initial English (☞ also page 58).
Subtitle*1Select the initial subtitle language or erase the subtitle (Off); Initial
English (☞ also page 58).
Monitor Type*1Select the monitor type to watch a wide screen picture on the external
monitor.
16:9 : Select when the aspect ratio of the external monitor is 16:9.
4:3 LB (Letterbox)/4:3 PS (Pan Scan): Select when the aspect ratio of
the external monitor is 4:3.
• Refer to the illustrations on the left to see how the pictures are
shown on the screen.
OSD Position*1Select the position of the on-screen bar. ☞ [25]
1: Higher position
2: Lower position
File Type*1Select playback file type when a disc contains different types of files.
Audio: Plays back audio files.
Still Picture: Plays back JPEG files.
Video: Plays back DivX/MPEG1/MPEG2 files.
Audio&Video: Plays back audio files and DivX/MPEG1/MPEG2 files.
DivX Regist. (Registration)*1This unit has its own Registration Code. Once you have played back a
file with which the Registration Code recorded, this unit’s Registration
Code is overwritten for copyright protection.
D. Audio Output*1Select the signal format emitted through the DIGITAL OUT (optical)
terminal. (☞ also page 57)
PCM : Select this when connecting an amplifier or a decoder
incompatible with Dolby Digital, DTS, or MPEG Audio, or when
connecting to a recording device.
Dolby D : Select this when connecting an amplifier or a decoder
compatible with Dolby Digital.
Stream : Select this when connecting an amplifier or a decoder
compatible with Dolby Digital, DTS, or MPEG Audio.
*1 Selectable only for “DISC.” (Playback stops when you change the setting.)
Position 1 Position 2
16:9 4:3LB
4:3PS
The procedure for setting an item is shown on page 43.
EN_KW-AVX710[UN].indb 46EN_KW-AVX710[UN].indb 46 07.12.17 5:03:03 PM07.12.17 5:03:03 PM

SETTINGS
47
ENGLISH
Menu items Selectable settings, [reference page]
Disc
Down Mix*1When playing back a multi-channel disc, this setting affects the signals
reproduced through the LINE OUT terminals.
Dolby SR : Select this to enjoy multi-channel surround audio by
connecting an amplifier compatible with Dolby Surround.
Stereo : Normally select this.
D. (Dynamic) Range
Compres. (Compression)*1
You can enjoy a powerful sound at a low volume level while playing
Dolby Digital software.
Auto: Select to apply the effect to multi-channel encoded software.
On: Select to always use this function.
Tuner
IF Band Width Auto: Increases the tuner selectivity to reduce interference noises
between adjacent stations. (Stereo effect may be lost.)
Wide: Subject to the interference from adjacent stations, but sound
quality will not be degraded and the stereo effect will remain.
Input
AV Input*2
You can determine the use of LINE IN and VIDEO IN terminals. ☞ [38, 39
]
Off: Select when no component is connected (“AV-IN” is skipped while
selecting the source).
Audio&Video: Select when connecting an AV component such as a
VCR.
Audio: Select when connecting an audio component such as a portable
audio player.
Camera*3 : Select when connecting a rear view camera.
Navigation : Select when connecting a Navigation System.
External Input*4For connecting an external component to the CD changer jack on the
rear.
Changer/iPod*5: CD changer or iPod. ☞ [34, 36]
External: Any other than the above. ☞ [40]
• For connecting the Bluetooth adapter, this setting is not required. It is
automatically detected.
*2 Not selectable when “AV-IN” is selected as the source.
*3 The REVERSE GEAR SIGNAL lead connection is required. See Installation/Connection Manual. The rear view through
the camera appears on the screen in <Full> aspect ratio (regardless of the aspect ratio setting) when you shift the
gear to the reverse (R) position. When you press DISP on the control panel, or when you shift the gear to another
position other than the reverse (R) position, the rear view screen is cleared.
*4 Not selectable when the component connected to the CD changer jack is selected as the source.
*5 The name of the component detected through the CD changer jack is shown.
Initial: Underlined
EN_KW-AVX710[UN].indb 47EN_KW-AVX710[UN].indb 47 07.12.17 5:03:04 PM07.12.17 5:03:04 PM

48
ENGLISH
Menu items Selectable settings, [reference page]
Others
Beep Off: Cancels.
On: Activates the key-touch tone.
Telephone Muting Off: Cancels.
Muting1, Muting2: Select either one which mutes the sounds while
using the cellular phone.
Power LED Flash Off: Cancels.
On: When the ignition is turned off, the lamp on the button
flashes.
TouchPanel Sens. Change the sensitivity of the touch panel. As the number decreases,
sensitivity becomes higher. 1/2/3
Initialize Initialize all settings you have made in <AV Menu>. Press and hold
[Enter] to initialize the settings, then reset the unit. ☞ [3]
Equalizer
Flat/Hard Rock/R&B/Pop/Jazz/Dance/Country/Reggae/Classic/User1/User2/User3 ☞ [41]
The procedure for setting an item is shown on page 43.
EN_KW-AVX710[UN].indb 48EN_KW-AVX710[UN].indb 48 07.12.17 5:03:05 PM07.12.17 5:03:05 PM
SETTINGS
49
ENGLISH
Sound
Menu items Selectable settings, [reference page]
Fader/Balance Adjust fader—speaker output balance between the front and rear speakers.
• Upmost—front only (F6)
• Downmost—rear only (R6)
When using a two-speaker system, set the fader to the center (0).
Adjust balance—speaker output balance between the left and right speakers.
• Leftmost—left only (L6)
• Rightmost—right only (R6) Initial 0
Volume Adjust Adjust and store auto-adjustment volume level for each source, comparing to
the FM volume level. The volume level will automatically increase or decrease
when you change the source.
–12 to +12; Initial 00
• You can make the adjustments separately for DVD and other discs.
Amplifier Gain You can change the maximum volume level of this unit.
Off: Deactivates the built-in amplifier.
Low: VOL 00 to 30 (Select this if the maximum power of the speakers is less
than 50 W.)
High: VOL 00 to 50
Mode*1
Menu items Selectable settings, [reference page]
Mono Only for FM. (Off, On) ☞ [10]
DX/Local Only for FM. (Local, DX) ☞ [11]
SSM Only for FM. Press and hold to start SSM. ☞ [11]
Title Entry Only for FM/AM stations, “AV-IN,” and “EXT-IN.” ☞ [42]
Repeat ☞ [18, 35, 37]
Random ☞ [18, 35, 37]
*1 Items listed under <Mode> vary among the playback sources.
List
For “DISC”: Folder List and Track List (☞ page 19)
For “CD-CH”: Disc List, Folder List, and Track List (☞ page 34)
• For the other playback sources, you can display a list by pressing DISP on the monitor panel. (☞ page 9)
Initial: Underlined
EN_KW-AVX710[UN].indb 49EN_KW-AVX710[UN].indb 49 07.12.17 5:03:05 PM07.12.17 5:03:05 PM

50
ENGLISH
Bluetooth*1
Menu items Selectable settings, [reference page]
Dial Menu *2Select the method to make a call. ☞ [30]
Message*3You can read a message from the following message histories.
Unread: Messages you have not read.
Read: Messages you have read.
Unsent: Messages you have not sent.
Sent: Messages you have sent.
• The number of messages in each history is also shown.
Open ☞ [27]
Search ☞ [28]
Special Device Only for “New Device.”
Shows the list of Bluetooth devices which require some special procedure to
establish Bluetooth connection. Select a device you want to connect.
• After selecting the device, use <Open> or <Search> (☞ page 27 or 28)
for connection.
• Once the connection is established, it is registered in the unit. You can
connect the unit and the device by using <Connect> (☞ below) from the
next time.
Connect Only for the registered devices.
After selecting a device from among the registered devices (☞ pages 27 and
28), establish the connection with it.
Disconnect Only for the device being connected.
Disconnect the current device before connecting another device.
Delete Pairing Only for the registered devices.
Delete the registered devices.
*1 Selectable only for “Bluetooth PHONE” or “Bluetooth AUDIO.” Select a device (or “New Device”) before operating the
menu.
*2 Only for the device connected for “Bluetooth PHONE.”
*3 Selectable only when the source is “Bluetooth PHONE” and the connected cellular phone is compatible with SMS
(Short Message Service).
When operating the Bluetooth device, refer also to the instructions supplied with the device.
The procedure for setting an item is shown on page 43.
EN_KW-AVX710[UN].indb 50EN_KW-AVX710[UN].indb 50 07.12.17 5:03:06 PM07.12.17 5:03:06 PM

SETTINGS
51
ENGLISH
Menu items Selectable settings, [reference page]
Settings
Auto Connect *4When the unit is turned on, the connection is established automatically
with...
Off: No Bluetooth device.
Last: The last connected Bluetooth device.
Order: The available registered Bluetooth device found first.
Auto Answer *5Off: The unit does not answer the calls automatically. Answer the calls
manually.
On: The unit answers the incoming calls automatically.
Reject: The unit rejects all incoming calls.
Message Info *5Auto: The unit informs you of the arrival of a message by ringing and
displaying “Receiving Message.” To read the message, ☞ page 30.
Manual: The unit does not inform you of the arrival of a message.
MIC Setting *5Adjust microphone volume connected to the Bluetooth adapter.
01/02/03
Version *6The Bluetooth software and hardware versions are shown.
*4 Selectable only for “Bluetooth PHONE.”
*5 Only for the cellular phone connected for “Bluetooth PHONE.” Not selectable when “New Device” is selected.
*6 If you wish to receive more information about Bluetooth, visit the following JVC web site: <http://www.jvc-victor.
co.jp/english/car/>
SETTINGS
Initial: Underlined
EN_KW-AVX710[UN].indb 51EN_KW-AVX710[UN].indb 51 07.12.17 5:03:07 PM07.12.17 5:03:07 PM

ENGLISH
52
Maintenance
Moisture condensation
Moisture may condense on the lens inside the unit in
the following cases:
• After starting the heater in the car.
• If it becomes very humid inside the car.
Should this occur, the unit may malfunction. In this
case, eject the disc and leave the unit turned on for a
few hours until the moisture evaporates.
How to handle discs
When removing a disc from its
case, press down the center holder of
the case and lift the disc out, holding it
by the edges.
• Always hold the disc by the edges. Do not touch its
recording surface.
When storing a disc into its case, gently insert the
disc around the center holder (with the printed surface
facing up).
• Make sure to store discs into the cases after use.
To keep discs clean
A dirty disc may not play correctly.
If a disc does become dirty, wipe it with
a soft cloth in a straight line from center
to edge.
• Do not use any solvent (for example, conventional
record cleaner, spray, thinner, benzine, etc.) to clean
discs.
To play new discs
New discs may have some rough spots
around the inner and outer edges. If
such a disc is used, this unit may reject
the disc.
To remove these rough spots, rub the edges with a
pencil or ball-point pen, etc.
Stick-on labelSticker and sticker residue
Unusual shape
Warped disc
Do not use the following discs:
Center holder
SingleCD—8 cm disc
C-thru Disc (semi-transparent disc) Transparent or semi-transparent on its
recording area
EN_KW-AVX710[UN].indb 52EN_KW-AVX710[UN].indb 52 07.12.17 5:03:07 PM07.12.17 5:03:07 PM

53 REFERENCES
ENGLISH
More about this unit
General
Turning on the power
• By pressing SOURCE on the monitor panel, you
can also turn on the power. If the source is ready,
playback starts.
Tuner (FM only)
Storing stations in memory
• When SSM is over, received stations are preset in no.
1 (lowest frequency) to no. 6 (highest frequency).
Disc
General
• In this manual, words “track” and “file” are
interchangeably used.
• This unit can only play back audio CD (CD-DA) files
if different type of audio files (MP3/WMA/WAV) are
recorded on the same disc.
• This unit can display only one-byte characters. No
other characters can be correctly displayed.
Inserting a disc
• When a disc is inserted upside down or has no
playable files, “Cannot play this disc Check the disc”
appears on the screen. Eject the disc.
Ejecting a disc
• If “No disc“ appears after removing a disc, insert a
disc or select another playback source.
• If the ejected disc is not removed within 15 seconds,
the disc is automatically inserted again into the
loading slot to protect it from dust.
Playing Recordable/Rewritable discs
• This unit can recognize a total of 5 000 files and 250
folders (a maximum of 999 files per folder).
• Use only “finalized” discs.
• This unit can play back multi-session discs; however,
unclosed sessions will be skipped while playing.
• This unit can recognize a total 25 characters for file/
folder names.
• Some discs or files may not be played back due to
their characteristics or recording conditions.
Playing DVD-VR
• For details about DVD-VR format and Playlist, refer
to the instructions supplied with the recording
equipment.
File playback
Playing DivX files
• This unit can play back DivX files with the extension
code <.divx>, <.div>, or <.avi> (regardless of the
letter case—upper/lower).
• This unit supports the DivX files whose resolution is
720 x 576 pixels or less.
• Audio stream should conform to MP3 or Dolby Digital.
• The file encoded in the interlaced scanning mode
may not be played back correctly.
• The maximum bit rate for video signals (average) is 4
Mbps.
Continued on the next page
EN_KW-AVX710[UN].indb 53EN_KW-AVX710[UN].indb 53 07.12.17 5:03:07 PM07.12.17 5:03:07 PM

ENGLISH
54
Playing MPEG1/MPEG2 files
• This unit can play back MPEG1/MPEG2 files with the
extension code <.mpg>, <.mpeg>, or <.mod>*.
* <.mod> is an extension code used for the MPEG2
files recorded by JVC Everio camcorders.
• The stream format should conform to MPEG system/
program stream.
The file format should be MP@ML (Main Profile at
Main Level)/SP@ML (Simple Profile at Main Level)/
MP@LL (Main Profile at Low Level).
• Audio streams should conform to MPEG1 Audio
Layer-2 or Dolby Digital.
• The maximum bit rate for video signals (average) is 4
Mbps.
Playing JPEG files
• This unit can play back JPEG files with the extension
code <.jpg>, or <.jpeg>.
• It is recommended that you record a file at 640 x 480
resolution.
• This unit can play back baseline JPEG files.
Progressive JPEG files or lossless JPEG files cannot be
played.
Playing MP3/WMA/WAV files
• This unit can play back files with the extension code
<.mp3>, <.wma>, or <.wav> (regardless of the
letter case—upper/lower).
• This unit can play back the files meeting the
conditions below:
– Bit rate:
MP3/WMA: 32 kbps — 320 kbps
– Sampling frequency:
48 kHz, 44.1 kHz, 32 kHz (for MPEG1)
24 kHz, 22.05 kHz, 16 kHz (for MPEG2)
48 kHz, 44.1 kHz, 32 kHz, 22.05 kHz (for WMA)
44.1 kHz (for WAV)
• This unit can show ID3 Tag Version
1.0/1.1/2.2/2.3/2.4 (for MP3).
• This unit can also show WAV/WMA Tag.
• This unit can play back files recorded in VBR (variable
bit rate).
• Files recorded in VBR have a discrepancy in elapsed
time indication.
• This unit cannot play back the following files:
– MP3 files encoded with MP3i and MP3 PRO
format.
– MP3 files encoded with Layer 1/2.
– WMA files encoded with lossless, professional,
and voice format.
– WMA files which are not based upon Windows
Media® Audio.
– WMA files copy-protected with DRM.
– Files which have the data such as AIFF, ATRAC3,
etc.
Disc/file information shown on the
external monitor
The following screens appear only on the external
monitor.
• CD
1 Selected playback mode
2 Elapsed playing time of the current track
3 Operation status
4 Current track number/total number of tracks
on the disc
5 Track information
6 Track list
7 Current track (highlighted bar)
TIME 00:14
Track : 6 / 14
Track Information
Cloudy
Fair
Fog
Hail
Indian summer
Rain
Shower
Snow
Thunder
Typhoon
Wind
Winter sky
Album
Four seasons
Artist
Robert M. Smith
Title
Rain
T. RPT
EN_KW-AVX710[UN].indb 54EN_KW-AVX710[UN].indb 54 07.12.17 5:03:08 PM07.12.17 5:03:08 PM

55 REFERENCES
ENGLISH
Bluetooth operations
General
• While driving, do not perform complicated operation
such as dialing the numbers, using phone book, etc.
When you perform these operations, stop your car in
a safe place.
• Some Bluetooth devices may not be connected to
this unit depending on the Bluetooth version of the
device.
• This unit may not work for some Bluetooth devices.
• Connecting condition may vary depending on
circumstances around you.
• When the unit is turned off, the device is
disconnected.
Warning messages for Bluetooth operations
• Connection Error: The device is registered but the
connection has failed. Use <Connect> to connect
the device again. (☞ page 28)
• Error: Try the operation again. If “Error” appears
again, check if the device supports the function you
have tried.
• Device Unfound: No available Bluetooth device is
detected by <Search>.
• Loading: The unit is updating the phone book and/
or SMS.
• Please Wait...: The unit is preparing to use
the Bluetooth function. If the message does not
disappear, turn off and turn on the unit, then connect
the device again (or reset the unit).
• Reset 08: Check the connection between the
adapter and this unit.
Icons for phone types
• These icons indicate the phone type set on the device.
:Cellular phone
:Household phone
:Office
:General
:Other than above
• DivX/MPEG1/MPEG2/JPEG/MP3/WMA/WAV
1 Current folder (highlighted bar)
2 Current folder number/total folder number
3 Folder list
4 Selected playback mode
5 Elapsed playing time of the current track (not
displayed for JPEG)
6 Operation status
7 Current track number/total number of tracks
in the current folder (total number of tracks on
the disc)
8 Track information (only for MP3/WMA/WAV)
9 Track list
p Current track (highlighted)
* If tag data includes “Jacket Picture” (baseline
JPEG), it will be displayed.
EN_KW-AVX710[UN].indb 55EN_KW-AVX710[UN].indb 55 07.12.17 5:03:08 PM07.12.17 5:03:08 PM

ENGLISH
56
CD changer
• If you select a folder, which does not include any
music files, on the list (☞ page 34), you will hear a
beep. Select another folder including music files.
iPod operations
• You can control the following types of iPods through
the interface adapter.
– iPod with dock connector (3rd Generation)
– iPod with Click Wheel (4th Generation)
– iPod mini
– iPod photo
– iPod nano *1
– iPod video (5th Generation) *2
*1 When you connect the iPod nano to the interface
adapter, be sure to disconnect the headphones;
otherwise, no sound is heard.
*2 It is not possible to browse video files on the
“Videos” menu while the iPod is connected to the
interface adapter.
• If the iPod does not play correctly, please update your
iPod software to the latest version. For details about
updating your iPod, visit <http://www.apple.com>.
• When you turn on this unit, the iPod is charged
through the adapter connected to this unit.
• While the iPod is connected, all operations from the
iPod are disabled. Perform all operations from this
unit.
• The text information may not be displayed correctly.
• The text information scrolls on the screen. This unit
can display up to 40 characters.
Notice:
When operating an iPod, some operations may not
be performed correctly or as intended. In this case,
visit the following JVC web site:
<http://www.jvc.co.jp/english/car/support/
ks-pd100/index.html>
Menu settings
• If you change the <Amplifier Gain> setting from
<High> to <Low> while the volume level is set
higher than “30,” the unit automatically changes the
volume level to “VOL 30.”
• After you change any of <Menu Language/Audio
Language/Subtitle> settings, turn off then on the
power, and re-insert the disc (or insert another disc)
so that your setting takes effect.
• When you select <16:9> for a picture whose aspect
ratio is 4:3, the picture slightly changes due to the
process for converting the picture width.
• Even if <4:3PS> is selected, the screen size may
become <4:3LB> for some discs.
EN_KW-AVX710[UN].indb 56EN_KW-AVX710[UN].indb 56 07.12.17 5:03:09 PM07.12.17 5:03:09 PM

57 REFERENCES
ENGLISH
Sound signals emitted through the rear terminals
Through the analog terminals (Speaker out/REAR OUT)
2-channel signal is emitted. When playing multi-channel encoded disc, multi-channel signals are downmixed.
• DTS sound cannot be reproduced.
Through the DIGITAL OUT terminal
Digital signals (Linear PCM, Dolby Digital, DTS, MPEG Audio) are emitted.
• To reproduce the multi-channel sounds such as Dolby Digital, DTS, and MPEG Audio, connect an amplifier or a
decoder compatible with these multi-channel sources to this terminal, and set <D. Audio Output> correctly.
(☞ page 46)
<D. Audio Output>
Playback disc
Output signals
<Stream> <Dolby D> <PCM>
DVD 48 kHz, 16/20/24 bits Linear PCM 48 kHz, 16 bits stereo Linear PCM*
96 kHz, Linear PCM 48 kHz, 16 bits stereo Linear PCM
with Dolby Digital Dolby Digital bitstream 48 kHz, 16 bits stereo
Linear PCM
with DTS DTS bitstream
with MPEG Audio MPEG bitstream 48 kHz, 16 bits stereo Linear PCM
Audio CD, Video CD 44.1 kHz, 16 bits stereo Linear PCM /
48 kHz, 16 bits stereo Linear PCM
Audio CD with DTS DTS bitstream
DivX/
MPEG
with Dolby Digital Dolby Digital bitstream 48 kHz, 16 bits stereo
Linear PCM
with MPEG Audio 32/44.1/48 kHz, 16 bits Linear PCM
MP3/WMA 32/44.1/48 kHz, 16 bits Linear PCM
WAV 44.1 kHz, 16 bits Linear PCM
* Digital signals may be emitted at 20 or 24 bits (at their original bit rate) through the DIGITAL OUT terminal if the
discs are not copy-protected.
EN_KW-AVX710[UN].indb 57EN_KW-AVX710[UN].indb 57 07.12.17 5:03:10 PM07.12.17 5:03:10 PM

ENGLISH
58
Preset equalizing values
Frequency
Sound mode 60 Hz 150 Hz 400 Hz 1 kHz 2.5 kHz 6.3 kHz 15 kHz
Flat 00 00 00 00 00 00 00
Hard Rock +03 +03 +01 00 00 +02 +01
R&B +03 +02 +02 00 +01 +01 +03
Pop 00 +02 00 00 +01 +01 +02
Jazz +03 +02 +01 +01 +01 +03 +02
Dance +04 +02 00 –02 –01 +01 +01
Country +02 +01 00 00 00 +01 +02
Reggae +03 00 00 +01 +02 +02 +03
Classic +02 +03 +01 00 00 +02 00
User1/2/3 00 00 00 00 00 00 00
Language codes (for DVD/DivX language selection)
Code
Language
Code
Language
Code
Language
Code
Language
Code
Language
AA Afar FA Persian KK Kazakh NO Norwegian ST Sesotho
AB Abkhazian FI Finnish KL Greenlandic OC Occitan SU Sundanese
AF Afrikaans FJ Fiji KM Cambodian OM (Afan) Oromo SW Swahili
AM Ameharic FO Faroese KN Kannada OR Oriya TA Tamil
AR Arabic FY Frisian KO Korean (KOR) PA Panjabi TE Telugu
AS Assamese GA Irish KS Kashmiri PL Polish TG Tajik
AY Aymara GD Scots Gaelic KU Kurdish PS Pashto, Pushto TH Thai
AZ Azerbaijani GL Galician KY Kirghiz QU Quechua TI Tigrinya
BA Bashkir GN Guarani LA Latin RM
Rhaeto-Romance
TK Turkmen
BE Byelorussian GU Gujarati LN Lingala RN Kirundi TL Tagalog
BG Bulgarian HA Hausa LO Laothian RO Rumanian TN Setswana
BH Bihari HI Hindi LT Lithuanian RW Kinyarwanda TO Tonga
BI Bislama HR Croatian LV Latvian, Lettish SA Sanskrit TR Turkish
BN Bengali, Bangla HU Hungarian MG Malagasy SD Sindhi TS Tsonga
BO Tibetan HY Armenian MI Maori SG Sangho TT Tatar
BR Breton IA Interlingua MK Macedonian SH Serbo-Croatian TW Twi
CA Catalan IE Interlingue ML Malayalam SI Singhalese UK Ukrainian
CO Corsican IK Inupiak MN Mongolian SK Slovak UR Urdu
CS Czech IN Indonesian MO Moldavian SL Slovenian UZ Uzbek
CY Welsh IS Icelandic MR Marathi SM Samoan VI Vietnamese
DZ Bhutani IW Hebrew MS Malay (MAY) SN Shona VO Volapuk
EL Greek JA Japanese MT Maltese SO Somali WO Wolof
EO Esperanto JI Yiddish MY Burmese SQ Albanian XH Xhosa
ET Estonian JW Javanese NA Nauru SR Serbian YO Yoruba
EU Basque KA Georgian NE Nepali SS Siswati ZU Zulu
EN_KW-AVX710[UN].indb 58EN_KW-AVX710[UN].indb 58 07.12.17 5:03:10 PM07.12.17 5:03:10 PM

59 REFERENCES
ENGLISH
Characters shown on the screen
In addition to the roman alphabet (A – Z, a – z), you
can use the following characters to assign titles.
(☞ page 42)
• When <Руccĸий> is selected for <Language>.
(☞ page 45)
• When any language other than <Руccĸий> is
selected for <Language>. (☞ page 45)
Upper and lower cases
Numbers and symbols
Upper and lower cases
Numbers and symbols
• Manufactured under license from Dolby
Laboratories. Dolby and the double-D symbol are
trademarks of Dolby Laboratories.
• “DTS” and “DTS Digital Out” are registered
trademarks of DTS, Inc
• “DVD Logo” is a trademark of DVD Format/Logo
Licensing Corporation registered in the US, Japan
and other countries.
• DivX, DivX Ultra Certified, and associated logos
are trademarks of DivX, Inc. and are used under
license.
• Official DivX® Ultra Certified product
• Plays all versions of DivX® video (including DivX®
6) with enhanced playback of DivX® media files
and the DivX® Media Format
• Microsoft and Windows Media are either
registered trademarks or trademarks of Microsoft
Corporation in the United States and/or other
countries.
• The Bluetooth word mark and logos are owned by
the Bluetooth SIG, Inc. and any use of such marks
by Victor Company of Japan, Limited (JVC) is under
license. Other trademarks and trade names are
those of their respective owners.
• iPod and iTunes are trademarks of Apple Inc.,
registered in the U.S. and other countries.
• This product incorporates copyright protection
technology that is protected by U.S. patents
and other intellectual property rights. Use of
this copyright protection technology must be
authorized by Macrovision, and is intended for
home and other limited viewing uses only unless
otherwise authorized by Macrovision. Reverse
engineering or disassembly is prohibited.
EN_KW-AVX710[UN].indb 59EN_KW-AVX710[UN].indb 59 07.12.17 5:03:11 PM07.12.17 5:03:11 PM

ENGLISH
60
Troubleshooting
What appears to be trouble is not always serious. Check the following points before calling a service center.
• For operations with the external components, refer also to the instructions supplied with the adapters used for the
connections (as well as the instructions supplied with the external components).
Symptoms Remedies/Causes
General
• No sound comes out of the speakers. • Adjust the volume to the optimum level.
• Check the cords and connections.
• DTS sound cannot be reproduced through the analog
terminals (Speaker out/REAR OUT).
• The screen is not clear and legible. Sunshine from the windshield may cause this symptom.
Adjust <Bright>. (☞ page 44)
• “Position Error Push Open Key” appears on
the screen.
The monitor panel angle has been forcibly adjusted, or its
adjustment has been interrupted while opening or closing.
Press OPEN/TILT.
• “Mecha Error Push Reset” appears on the
screen, and the panel does not move.
Reset the unit. (☞ page 3)
• “No Signal” appears. • Change the source.
• Start the playback on the external component connected
to VIDEO IN terminal.
• Check the cords and connections.
• Signal input is too weak.
• The buttons on the monitor panel do not
work.
When the monitor panel is open, only +/– (volume) and
OPEN/TILT work. The other buttons do not function.
• The unit does not work at all. Reset the unit. (☞ page 3)
FM/AM
• SSM automatic presetting does not work. Store stations manually. (☞ page 12)
• Static noise while listening to the radio. Connect the aerial firmly.
EN_KW-AVX710[UN].indb 60EN_KW-AVX710[UN].indb 60 07.12.17 5:03:12 PM07.12.17 5:03:12 PM

61 REFERENCES
ENGLISH
Symptoms Remedies/Causes
Disc in general
• Disc can be neither recognized nor played
back.
Eject the disc forcibly. (☞ page 3)
• Disc cannot be ejected. Unlock the disc. (☞ page 19)
• Recordable/Rewritable discs cannot be
played back.
• Tracks on the Recordable/Rewritable discs
cannot be skipped.
• Insert a finalized disc.
• Finalize the discs with the component which you used
for recording.
• Playback does not start. • Insert the disc correctly again.
• The format of files is not supported by the unit.
• The playback picture is not clear and legible. Adjust items in <Picture Adjust> menu. (☞ page 44)
• Sound and pictures are sometimes
interrupted or distorted.
• Stop playback while driving on rough roads.
• Change the disc.
• No playback picture is shown and “Parking
Brake” appears on the screen, even when the
parking brake is engaged.
Parking brake lead is not connected properly.
(☞ Installation/Connection Manual)
• No picture appears on the external monitor. • Connect the video cord correctly.
• Select the correct input on the external monitor.
• “Eject Error” or “Loading Error” appears on
the screen.
Change the source by pressing SOURCE.
• “Region code error” appears on the screen
when you insert a DVD Video.
Region code is not correct. (☞ page 4)
DivX/MPEG1/MPEG2/MP3/WMA/WAV
• Disc cannot be played back. • Change the disc.
• Record the tracks using a compliant application on the
appropriate discs. (☞ page 4)
• Add appropriate extension codes to the file names.
• Noise is generated. The track played back is not a playable file format. Skip to
another file.
• Tracks are not played back as you have
intended them to play.
Playback order may differ from that played back using
other players.
• Elapsed playing time is not correct. This sometimes occurs during playback. This is caused by
how the tracks are recorded.
• “Not Support” appears on the screen and
track skips.
The track is unplayable.
EN_KW-AVX710[UN].indb 61EN_KW-AVX710[UN].indb 61 07.12.17 5:03:12 PM07.12.17 5:03:12 PM

ENGLISH
62
Symptoms Remedies/Causes
Bluetooth
• Bluetooth device does not detect the unit. This unit can be connected with one Bluetooth cellular
phone and one Bluetooth audio player at a time.
While connected to a device, this unit cannot be detected
from another device. Disconnect currently connected device
and search again.
• The unit does not detect the Bluetooth
device.
• Check the Bluetooth setting of the device.
• Search from the Bluetooth device. After the device
detects the unit, select <Open> on the unit to connect
the device. (☞ page 27)
• The unit does not make pairing with the
Bluetooth device.
• Enter the same PIN code for both the unit and target
device. If the PIN code of the device is not indicated on its
instructions, try “0000” or “1234.”
• Select the device name from <Special Device>, then
try to connect again. (☞ pages 28, 50)
• Echo or noise occurs. Adjust the microphone unit position.
• Phone sound quality is poor. • Reduce the distance between the unit and the Bluetooth
cellular phone.
• Move the car to place where you can get a better signal
reception.
• The sound is interrupted or skipped during
playback of a Bluetooth audio player.
• Reduce the distance between the unit and the Bluetooth
audio player.
• Disconnect the player connected for “Bluetooth PHONE.”
• Turn off, then turn on the unit.
• (When the sound is not yet restored,) connect the player
again.
• “New Device” cannot be selected for
“Bluetooth AUDIO.”
Bluetooth audio player is already connected. To select “New
Device,” disconnect it. (☞ page 28)
• The connected audio player cannot be
controlled.
Check whether the connected audio player supports AVRCP
(Audio Video Remote Control Profile).
• “Reset 08” appears on the screen. Check the connection between the adapter and this unit.
EN_KW-AVX710[UN].indb 62EN_KW-AVX710[UN].indb 62 07.12.17 5:03:13 PM07.12.17 5:03:13 PM

63 REFERENCES
ENGLISH
Symptoms Remedies/Causes
CD changer
• “No Disc” appears on the screen. Insert a disc into the magazine.
• “No Magazine” appears on the screen. Insert the magazine.
• “Cannot play this disc Check the disc”
appears on the screen.
Current disc does not include playable files. Replace the disc
with one including playable files.
• “Reset 08” appears on the screen. Connect this unit and the CD changer correctly and press
the reset button of the CD changer.
• “Reset 01” – “Reset 07” appears on the
screen.
Press the reset button of the CD changer.
• The CD changer does not work at all. Reset the unit. (☞ page 3)
iPod
• The iPod does not turn on or does not work. • Check the connection.
• Charge the battery.
• Sound is distorted. Deactivate the equalizer either on this unit or the iPod.
• “Disconnect” appears on the screen. Check the connection.
• Playback stops. The headphones are disconnected during playback. Restart
playback.
• “No Files” appears on the screen. No tracks are stored. Import tracks to the iPod.
• “Reset 01” – “Reset 07” appears on the
screen.
Disconnect the adapter from both this unit and iPod. Then,
connect them again.
• “Reset 08” appears on the screen. Check the connection between the adapter and this unit.
• The iPod’s controls do not work after
disconnecting from this unit.
Reset the iPod.
AV-IN
• No picture appears on the screen. • Turn on the video component if it is not on.
• Connect the video component correctly.
• Playback picture is not clear and legible. Adjust items in <Picture Adjust> menu. (☞ page 44)
EN_KW-AVX710[UN].indb 63EN_KW-AVX710[UN].indb 63 07.12.17 5:03:13 PM07.12.17 5:03:13 PM

ENGLISH
64
Specifications
AMPLIFIER
Maximum Power Output: Front/Rear: 50 W per channel
Continuous Power Output
(RMS):
Front/Rear: 20 W per channel into 4 Ω, 40 Hz to
20 000 Hz at no more than 0.8% total
harmonic distortion
Load Impedance: 4 (4 to 8 allowance)
Equalizer Control Range: Frequencies: 60 Hz, 150 Hz, 400 Hz, 1 kHz, 2.5 kHz,
6.3 kHz, 15 kHz
Level: ±10 dB
Signal-to-Noise Ratio: 70 dB
Audio Output Level
REAR OUT:
Line-Out Level/Impedance: 2.5 V/20 kΩ load (full scale)
Output Impedance: 1 kΩ
Color System: NTSC/PAL
Video Output (composite): 1 Vp-p/75 Ω
Other Terminals: Input: LINE IN, VIDEO IN, Antenna input
Output: VIDEO OUT
Others: CD changer, Reverse gear signal, DIGITAL
OUT (optical)
FM/AM TUNER
Frequency Range: FM: 87.5 MHz to 108.0 MHz
AM: 531 kHz to 1 602 kHz
FM Tuner Usable Sensitivity: 11.3 dBf (1.0 V/75 Ω)
50 dB Quieting Sensitivity: 16.3 dBf (1.8 V/75 Ω)
Alternate Channel Selectivity (400 kHz): 65 dB
Frequency Response: 40 Hz to 15 000 Hz
Stereo Separation: 35 dB
AM Tuner Sensitivity/Selectivity: 20 V/35 dB
DVD/CD
Signal Detection System: Non-contact optical pickup (semiconductor laser)
Frequency Response: DVD, fs=48 kHz/96 kHz: 16 Hz to 22 000 Hz
VCD/CD: 16 Hz to 20 000 Hz
Dynamic Range: 93 dB
Signal-to-Noise Ratio: 95 dB
Wow and Flutter: Less than measurable limit
EN_KW-AVX710[UN].indb 64EN_KW-AVX710[UN].indb 64 07.12.17 5:03:13 PM07.12.17 5:03:13 PM
65 REFERENCES
ENGLISH
MONITOR
Screen Size: 7 inch wide liquid crystal display
Number of Pixel: 336 960 pixels: 480 × 3 (horizontal) × 234 (vertical)
Drive Method: TFT (Thin Film Transistor) active matrix format
Color System: NTSC/PAL
Aspect Ratio: 16:9 (wide)
GENERAL
Power Requirement: Operating Voltage: DC 14.4 V (11 V to 16 V allowance)
Grounding System: Negative ground
Allowable Storage Temperature: –10°C to +60°C
Allowable Operating Temperature: 0°C to +40°C
Dimensions (W × H × D): Installation Size (approx.): 178 mm × 100 mm × 160 mm
Panel Size (approx.): 171 mm × 97 mm × 21 mm
Mass (approx.): 2.6 kg
CAUTION: When ejecting the monitor, leave an
open space for the monitor to come out. If you do
not, the monitor may obstruct the steering wheel
and gearshift lever operations, and this may result
in a traffic accident.
Unit: mm
Required space for the monitor ejection
160 90.5
100
Design and specifications are subject to change without notice.
EN_KW-AVX710[UN].indb 65EN_KW-AVX710[UN].indb 65 07.12.17 5:03:14 PM07.12.17 5:03:14 PM

EN, IN
1207MNMMDWJEIN
© 2008 Victor Company of Japan, Limited
Having TROUBLE with operation?
Please reset your unit
Refer to page of How to reset your unit
Ada MASALAH dengan cara
pengoperasian?
Setel kembali unit Anda
Lihat halaman mengenai Bagaimana mereset unit anda
Rear_KW-AVX710UN.indd 2Rear_KW-AVX710UN.indd 2 07.12.17 5:23:46 PM07.12.17 5:23:46 PM
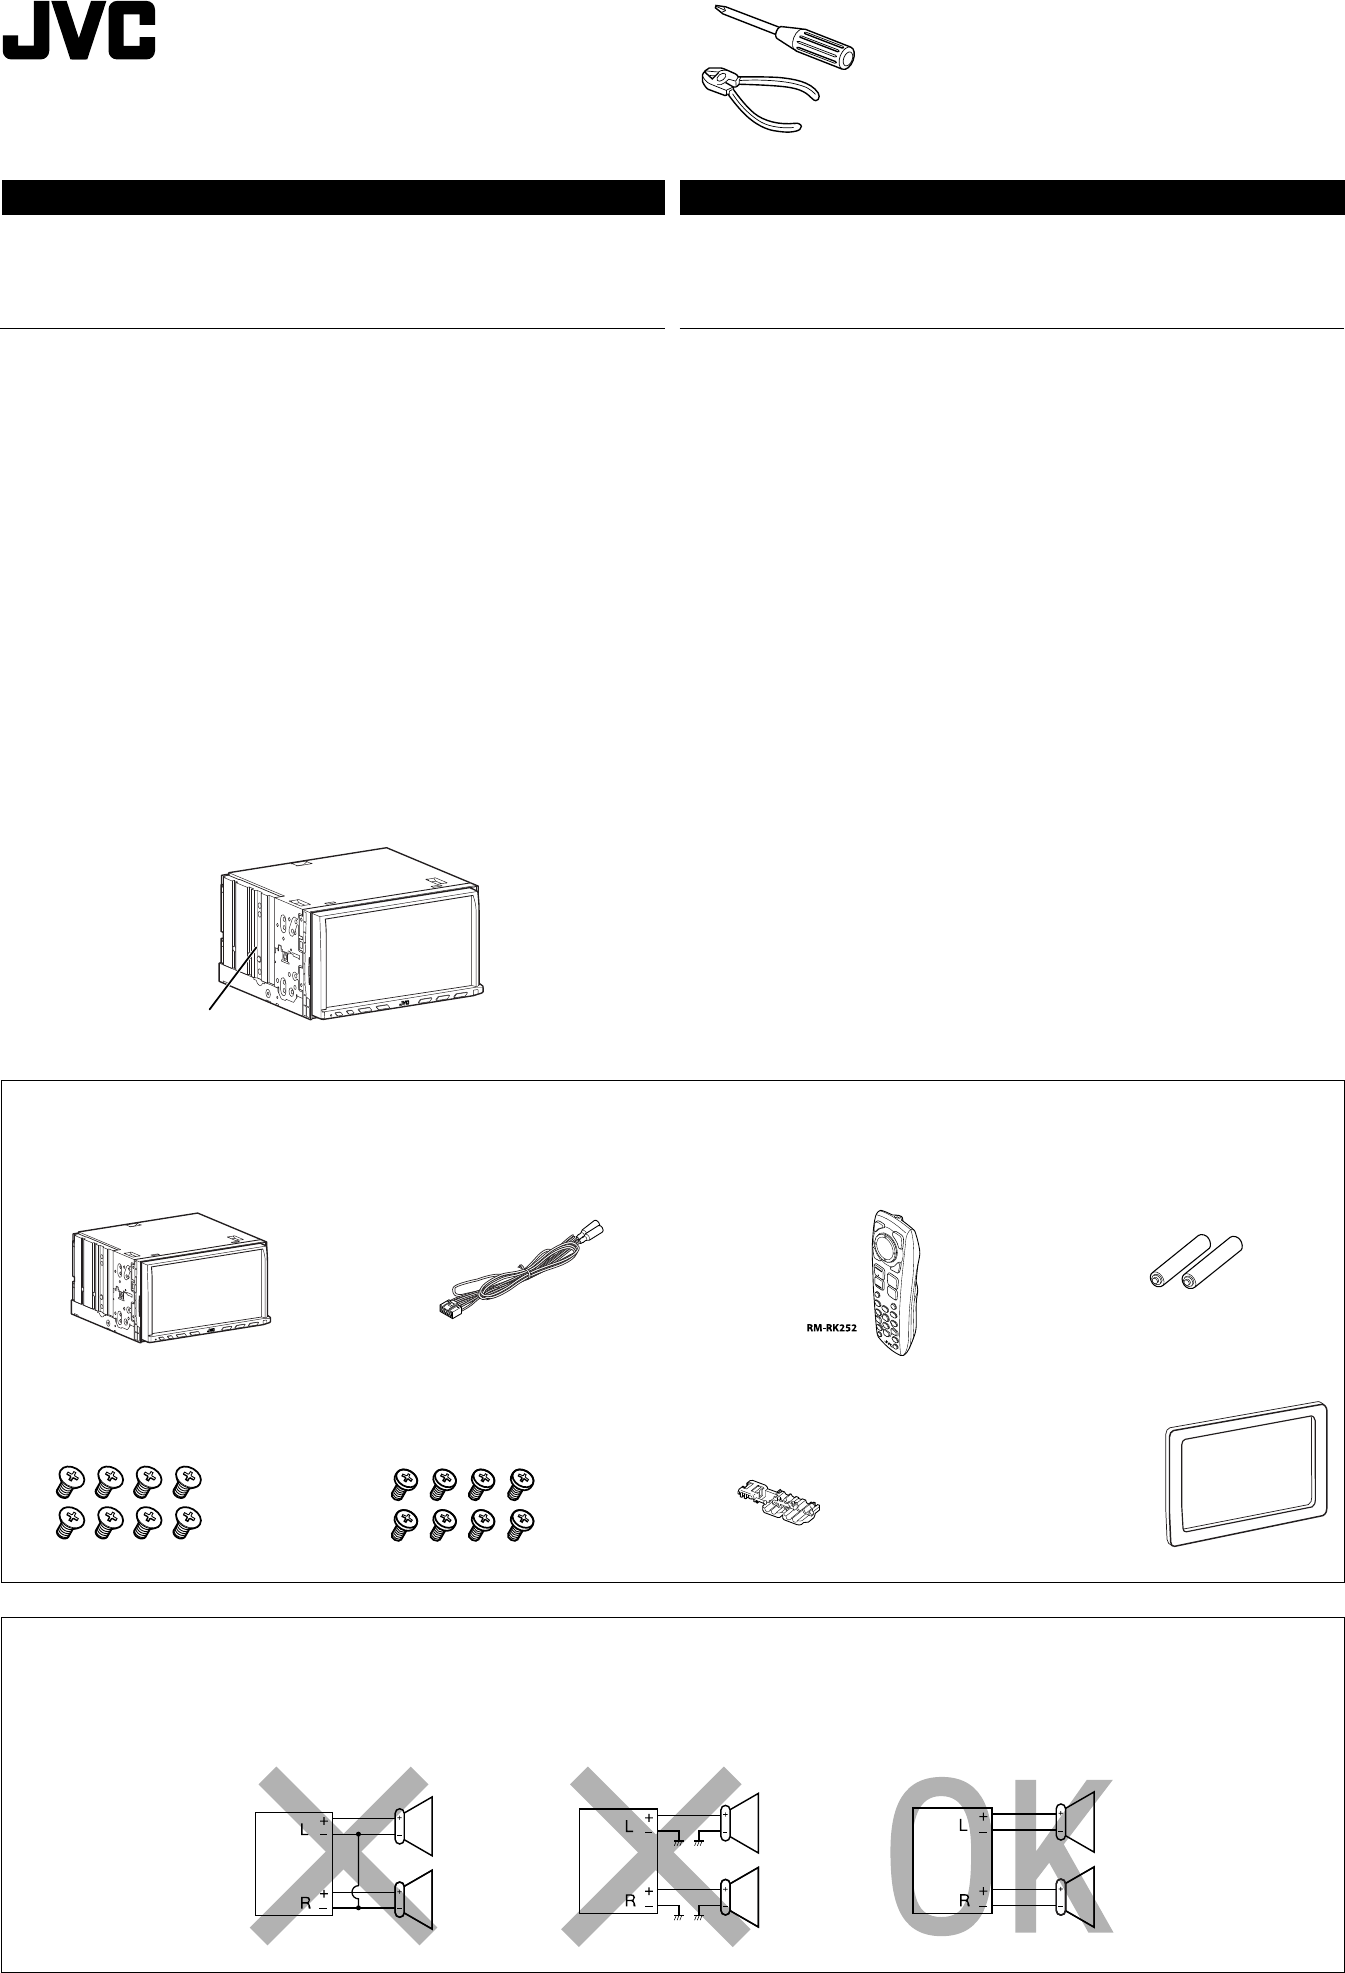
1
KW-AVX716/KW-AVX710
Installation/Connection Manual
Manual Pemasangan/Penyambungan
1207MNMMDWJEIN
EN, IN
© 2008 Victor Company of Japan, Limited
Daftar bagian-bagian untuk pemasangan dan penyambungan
Bagian-bagian berikut disediakan untuk unit ini.
Jika ada yang hilang, segera hubungi penyalur Anda.
Parts list for installation and connection
The following parts are provided for this unit.
If anything is missing, contact your dealer immediately.
LVT1780-010A
[UN]
INDONESIA
Unit ini didesain untuk beroperasi hanya pada sistem listrik 12 V DC yang di-ground NEGATIVE. Jika
kendaraan Anda tidak dilengkapi sistem ini, maka diperlukan alat pembalik tegangan yang dapat dibeli
di penyalur-penyalur audio mobil JVC.
PERINGATAN
• JANGAN menginstal unit apa pun atau menjalin kabel apa pun pada lokasi di mana;
– unit dapat menghalangi pengoperasian roda kemudi dan tuas persneling, karena dapat
mengakibatkan kecelakaan lalu lintas.
– unit dapat menghalangi pengoperasian alat keselamatan seperti kantung udara, karena hal ini
dapat mengakibatkan kecelakaan yang fatal.
– ini dapat menghalangi pandangan.
• JANGAN mengoperasikan unit apa pun sewaktu mengendalikan roda kemudi, karena hal ini dapat
mengakibatkan kecelakaan lalu lintas.
• Pengemudi tidak boleh menonton ke monitor sewaktu mengemudi. Ini dapat mengakibatkan
kecerobohan dan menyebabkan kecelakaan.
• Jika Anda harus mengoperasikan unit selagi mengemudi, pastikan Anda melihat ke sekeliling
dengan cermat, karena kalau tidak, Anda bisa terlibat kecelakaan lalu lintas.
• Jika rem parkir tidak bekerja, terlihat tulisan “Parking Brake” berkedip pada monitor dan tidak ada
pemutaran gambar yang akan ditunjukkan.
– Peringatan ini hanya muncul apabila kabel rem parkir terhubung ke sistem rem parkir yang
terpasang dalam mobil.
Catatan mengenai sambungan listrik:
• Ganti sekring dengan voltase yang sudah ditetapkan. Jika sekring sering meledak, konsultasikan
pada penyalur audio mobil JVC anda.
• Disarankan untuk menghubungkan speaker-speaker dengan maksimum power lebih dari 50 W
(keduanya di belakang dan di depan, dengan sebuah impedansi 4 Ω sampai 8 Ω).
Jika maksimum power kurang dari 50 W, ganti pengaturan “Amplifier Gain” (“PENAMBAH PENGUAT”)
untuk mencegah speaker-speaker dari kerusakan (lihat halaman 49 dari BUKU PETUNJUK).
• Untuk mencegah hubungan pendek, tutup ujung-ujung terminal-terminal TIDAK DIGUNAKAN
dengan pita isolasi.
• Pendingin menjadi sangat panas setelah digunakan. Hati-hati untuk tidak menyentuhnya ketika
memindahkan unit ini.
ENGLISH
This unit is designed to operate on 12 V DC, NEGATIVE ground electrical systems. If your vehicle does
not have this system, a voltage inverter is required, which can be purchased at JVC car audio dealers.
WARNINGS
• DO NOT install any unit or wire any cable in a location where;
– it may obstruct the steering wheel and gearshift lever operations, as this may result in a traffic accident.
– it may obstruct the operation of safety devices such as air bags, as this may result in a fatal accident.
– it may obstruct visibility.
• DO NOT operate any unit while manipulating the steering wheel, as this may result in a traffic accident.
• The driver must not watch the monitor while driving. It may lead to carelessness and cause an accident.
• If you need to operate the unit while driving, be sure to look around carefully or you may be involved in
a traffic accident.
• If the parking brake is not engaged, “Parking Brake” flashes on the monitor, and no playback picture will
be shown.
– This warning appears only when the parking brake wire is connected to the parking brake system built
in the car.
Notes on electrical connections:
• Replace the fuse with one of the specified rating. If the fuse blows frequently, consult your JVC car audio
dealer.
• It is recommended to connect speakers with maximum power of more than 50 W (both at the rear and
at the front, with an impedance of 4 to 8 Ω).
If the maximum power is less than 50 W, change “Amplifier Gain” setting to prevent the speakers from
being damaged (see page 49 of the INSTRUCTIONS).
• To prevent short circuits, cover the terminals of the UNUSED leads with insulating tape.
• The heat sink becomes very hot after use. Be careful not to touch it when removing this unit.
Main unit
Unit utama
Power cord
Kabel listrik
Round head screws (M5 × 8 mm)
Sekrup-sekrup kepala bulat (M5 × 8 mm)
Flat head screws (M5 × 8 mm)
Sekrup-sekrup kepala datar (M5 × 8 mm)
Crimp connector
Konektor kerut
Remote controller
Remote kontrol
Batteries
Baterai
Plate for use with a Nissan car
Pelat untuk digunakan dengan
mobil Nissan
PRECAUTIONS on power supply and speaker connections:
• DO NOT connect the speaker leads of the power cord to the car battery; otherwise, the unit
will be seriously damaged.
• BEFORE connecting the speaker leads of the power cord to the speakers, check the speaker wiring in
your car.
TINDAKAN-TINDAKAN PENCEGAHAN pada suplai power dan sambungan-sambungan
speaker:
• JANGAN sambungkan ujung-ujung speaker dari kabel power ke baterai mobil; sebaliknya,
unit tersebut akan secara serius rusak.
• SEBELUM menyambung ujung-ujung speaker dari kabel power ke speaker-speaker, cek perkabelan
speaker dalam mobil Anda.
Heat sink
Endapan panas
AVX710[UN]_install.indb 1AVX710[UN]_install.indb 1 07.12.24 11:30:31 AM07.12.24 11:30:31 AM
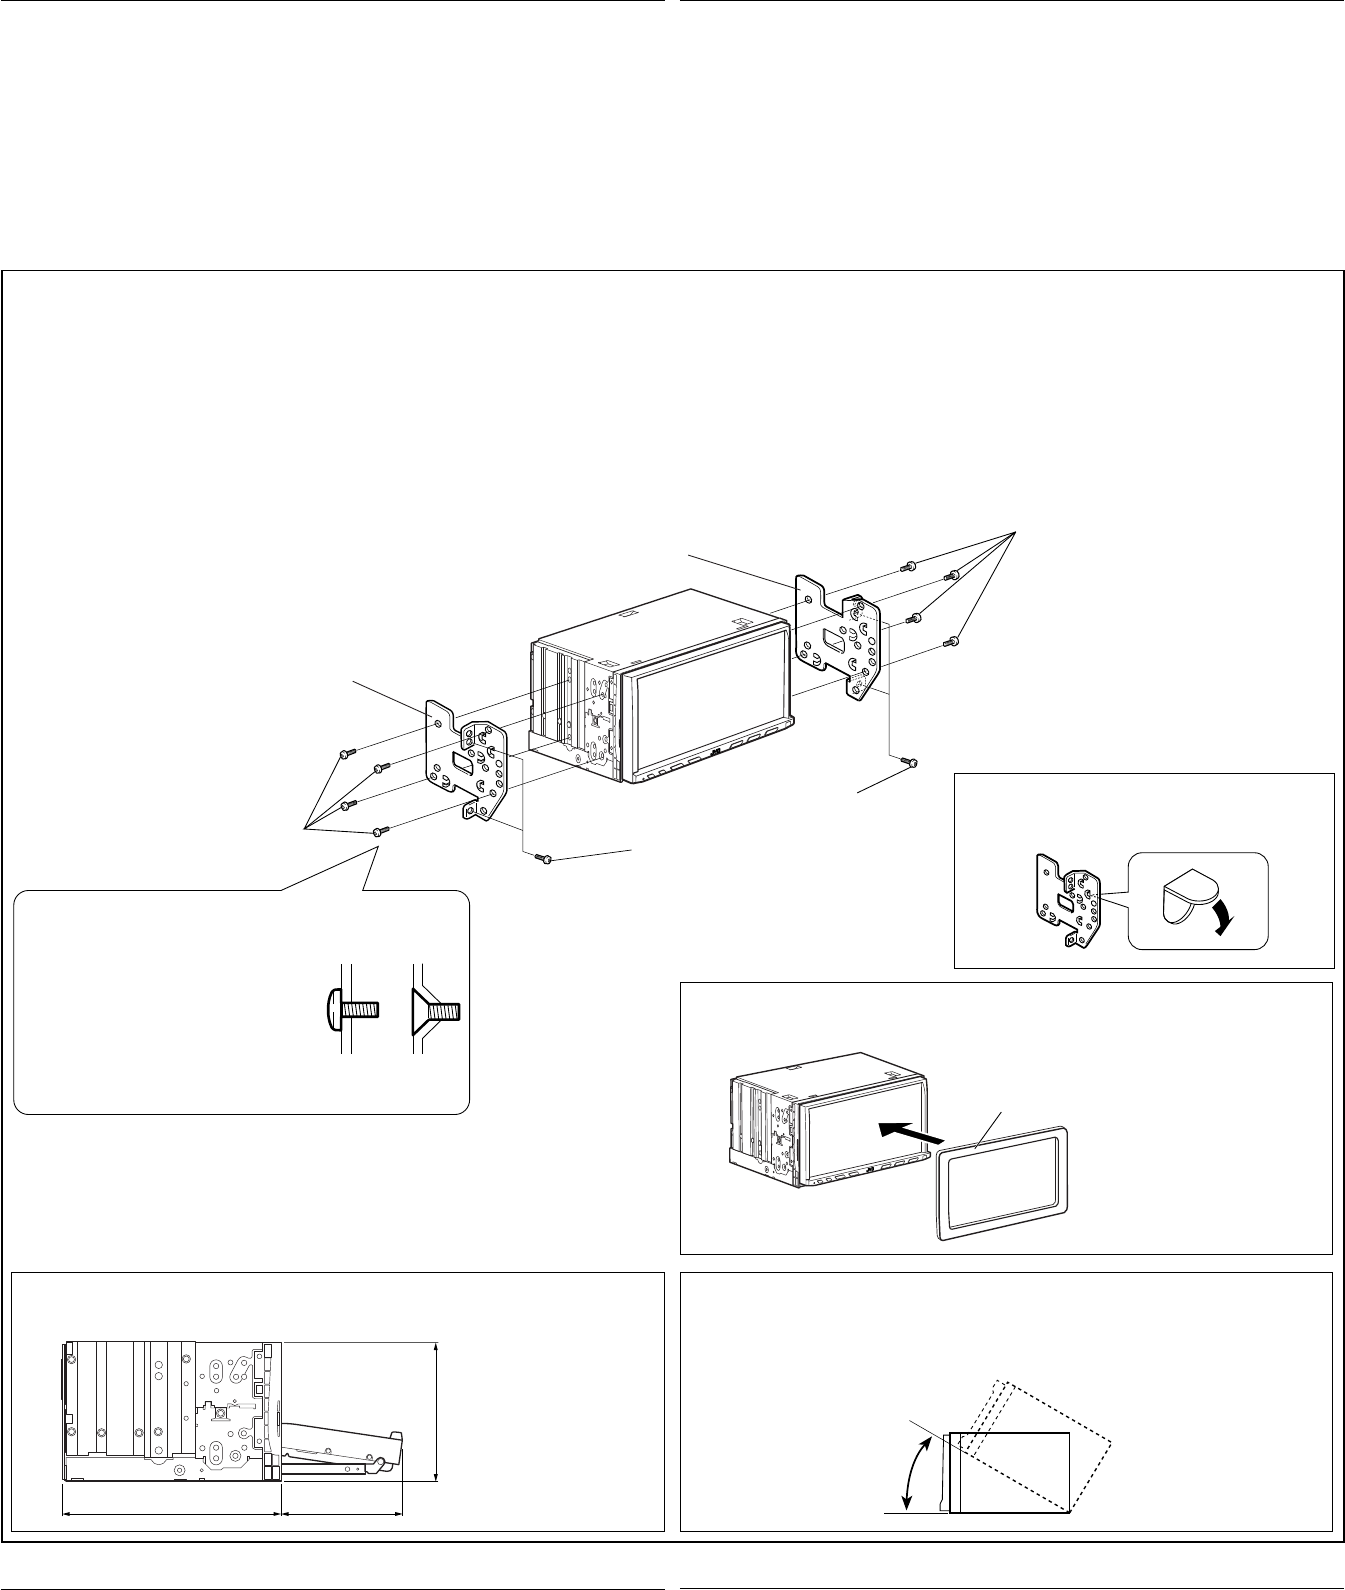
160 90.5
100
30˚
2
INSTALLATION (IN-DASH MOUNTING)
The following illustration shows a typical installation. However, you should make adjustments
corresponding to your specific car. If you have any questions or require information regarding installation
kits, consult your JVC car audio dealer or a company supplying kits.
• If you are not sure how to install this unit correctly, have it installed by a qualified technician.
Before installing the unit
• When mounting the unit, be sure to use the screws provided, as instructed. If other screws are used,
parts could become loose or damaged.
• When tightening screws or bolts, be careful not to pinch any connection cord.
• Make sure not to block the fan on the rear to maintain proper ventilation when installing the unit.
1 Remove the audio system originally installed in the car, together with its mounting brackets.
Note: Be sure to keep all the screws and parts removed from your car for future use.
2 Attach the mounting brackets (removed from the car), to this unit (see below).
3 Do the required electrical connections.
• See pages 3 and 4.
4 Install this unit using the screws removed in step 1.
The following example is for installation in a Toyota car. For more details, consult your JVC car audio
dealer.
If necessary, restore the protruding tabs.
Jika perlu, pasang kembali tab yang menonjol keluar.
Supplied screws
Sekrup-sekrup yang disediakan
Note : When installing the unit on the mounting bracket, make sure to use the supplied screws
(M5 x 8 mm). If longer screws are used, they could damage the unit.
Catatan : Apabila memasang unit pada braket montasi, pastikan Anda menggunakan sekrup-sekrup
yang disediakan (M5 x 8 mm). Jika menggunakan sekrup-sekrup yang lebih panjang, bisa
merusak unit.
PEMASANGAN (DALAM BINGKAI TEMPATNYA)
Ilustrasi berikut menunjukkan pemasangan yang khas. Namun, Anda harus melakukan penyesuaian pada
mobil tertentu. Jika ada pertanyaan atau perlu informasi mengenai kit pemasangan, tanyakan kepada
penyalur audio mobil JVC atau perusahaan yang menyediakannya.
• Jika Anda tidak tahu pasti cara memasang unit ini dengan benar, serahkan pemasangan kepada
teknisi yang memenuhi syarat.
Sebelum memasang unit
• Apabila memasang unit, pastikan Anda menggunakan sekrup-sekrup yang tersedia sebagaimana
yang diinstruksikan. Jika menggunakan sekrup lain, komponen bisa menjadi longgar atau rusak.
• Sewaktu mengencangkan sekrup-sekrup atau baut, hati-hati, jangan sampai menjepit kabel
sambungan yang manapun.
• Pastikan tidak ada yang menghalangi kipas pada panel belakang untuk menjaga aliran udara yang
baik apabila kipas ini dipasang.
1 Copot sistem audio yang aslinya terpasang dalam mobil berikut braket montasi.
Catatan: Pastikan Anda menyimpan semua sekrup-sekrup dan komponen yang dilepaskan dari
mobil untuk penggunaan di kemudian hari.
2 Pasangkan braket montasi (yang dilepaskan dari mobil) ke unit ini (lihat di bawah).
3 Lakukan koneksi listrik yang diperlukan.
• Lihat halaman 3 dan 4.
4 Pasang unit ini dengan menggunakan sekrup-sekrup yang dilepaskan pada langkah 1.
Berikut adalah contoh pemasangan pada mobil Toyota. Untuk rincian lebih lanjut, tanyakan kepada
penyalur audio mobil JVC.
TROUBLESHOOTING
• The fuse blows.
* Are the red and black leads connected correctly?
• Power cannot be turned on.
* Is the yellow lead connected?
• No sound from the speakers.
* Is the speaker output lead short-circuited?
• Sound is distorted.
* Is the speaker output lead grounded?
* Are the “–” terminals of L and R speakers grounded in common?
• Noise interfere with sounds.
* Is the rear ground terminal connected to the car’s chassis using shorter and thicker cords?
• Unit becomes hot.
* Is the speaker output lead grounded?
* Are the “–” terminals of L and R speakers grounded in common?
• This unit does not work at all.
* Have you reset your unit?
PEMECAHAN MASALAH
• Sekring meledak.
* Apakah ujung-ujung merah dan hitam tersambung dengan benar?
• Power tidak dapat dihidupkan.
* Apakah ujung kuning sudah tersambung?
• Tidak ada suara dari speaker.
* Apakah ujung keluaran speaker terhubung pendek?
• Suara terdistorsi.
* Apakah ujung keluaran speaker sudah ditanahkan?
* Apakah terminal-terminal “–” dari speaker-speaker L dan R sudah ditanahkan secara umum?
• Berisik yang mengganggu suara-suara.
* Apakah terminal tanahan belakang tersambung ke casis mobil menggunakan kabel-kabel terpendek
dan tertebal?
• Alat penerima ini menjadi panas.
* Apakah ujung keluaran speaker sudah ditanahkan?
* Apakah terminal-terminal “–” dari speaker-speaker L dan R sudah ditanahkan secara umum?
• Alat penerima ini tidak bekerja secara keseluruhan.
* Apakah anda sudah reset (memasang kembali) alat penerima anda?
When installing the unit in a Nissan car
Apabila memasang unit dalam mobil Nissan
Install the unit at an angle of less than 30˚, taking it into account that the monitor would eject when
in use.
Pasang unit tersebut pada sudut kurang dari 30˚, perhitungkan bahwa monitor akan keluar ketika
sedang digunakan.
Required space for the monitor ejection
Ruang yang diperlukan untuk pengeluaran monitor
Unit: mm
Unit: mm
Mounting bracket removed from the car
Braket montasi dilepaskan dari mobil
Screws removed from the car in step 1
Sekrup-sekrup yang dilepaskan dari
mobil pada langkah 1
Supplied screws
Sekrup-sekrup yang disediakan
Select the appropriate type fitting to your
audio system space.
Pilih tipe sambungan yang sesuai untuk
ruang sistem audio Anda.
Mounting bracket removed from the car
Braket montasi dilepaskan dari mobil
Plate for use with a Nissan car
Pelat untuk digunakan dengan mobil Nissan
AVX710[UN]_install.indb 2AVX710[UN]_install.indb 2 07.12.24 11:30:36 AM07.12.24 11:30:36 AM
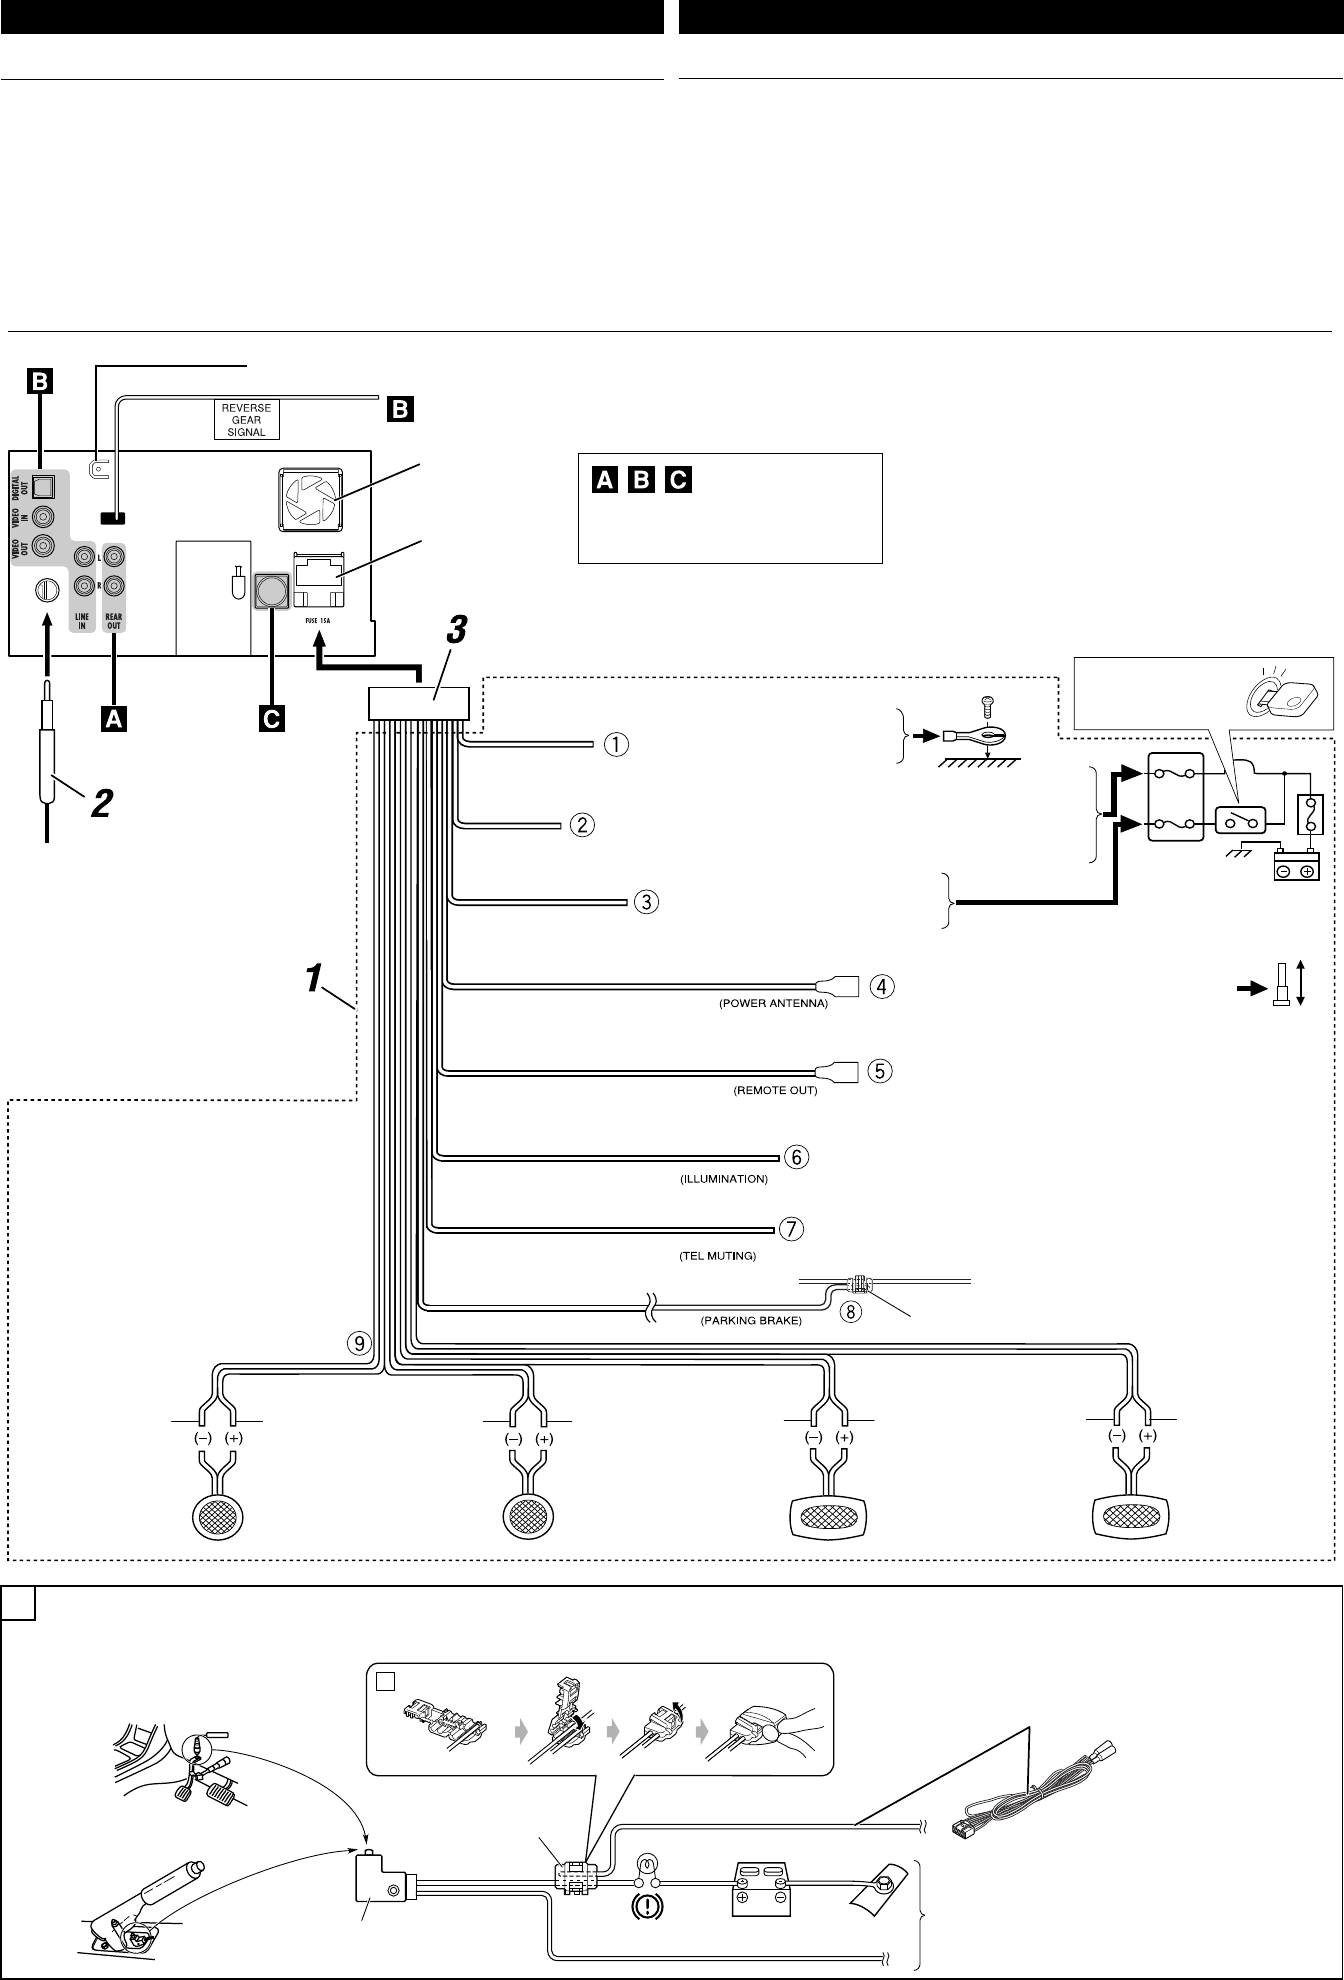
3
ELECTRICAL CONNECTIONS
To prevent short circuits, we recommend that you disconnect the battery’s negative terminal and make all
electrical connections before installing the unit.
• Be sure to ground this unit to the car’s chassis again after installation.
SAMBUNGAN-SAMBUNGAN LISTRIK
Untuk mencegah hubungan pendek, kami menyarankan anda memutuskan sambungan terminal negatif
baterai dan membuat semua sambungan-sambungan listrik sebelum memasang unit.
• Pastikan untuk mentanahkan unit ini ke casis mobil kembali setelah pemasangan.
INDONESIA ENGLISH
Before connecting: Check the wiring in the vehicle carefully. Incorrect connection may cause serious
damage to this unit.
The leads of the power cord and those of the connector from the car body may be different in color.
1 Connect the colored leads of the power cord in the order specified in the illustration below.
2 Connect the antenna cord.
3 Finally connect the wiring harness to the unit.
Sebelum penyambungan: Cek perkabelan dalam mobil dengan hati-hati. Penyambungan yang tidak
benar mungkin menyebabkan kerusakan serius pada unit.
Ujung dari kabel power dan beberapa konektor dari bodi mobil mungkin berbeda dalam warna.
1 Sambungkan ujung berwarna dari kabel power dalam urutan spesifikasi pada ilustrasi di bawah.
2 Sambungkan kabel antena.
3 Akhirnya sambungkan dudukan kabel ke unit.
*1
*1
15 A fuse
Sekring 15 A
Fan
Kipas
*1 Not included for this unit
*1 Tidak disertakan untuk unit ini
Ignition switch
Saklar kontak
To a live terminal in the fuse block connecting to the car battery (bypassing
the ignition switch)
Ke terminal aktif dalam blok sekring yang menghubungkan ke baterai
mobil (tanpa melalui kunci kontak)
To metallic body or chassis of the car
Ke besi bodi atau casis dari mobil
tersebut
To an accessory terminal in the fuse block
Ke terminal aksesori dalam blok sekring
To the remote lead of other equipment (200 mA max.)
Ke ujung jauh dari peralatan lain (maksimum 200 mA.)
To automatic antenna if any (250 mA max.)
Ke antena otomatis jika ada (maksimum 250 mA.)
Fuse block
Blok sekring
To cellular phone system
Ke sistem telepon selular
To car light control switch
Ke saklar kontrol lampu mobil
Crimp connector
Konektor kerut
To parking brake (see below).
Ke rem parkir (lihat di bawah).
Ye l l o w *2
Kuning *2
Red
Merah
Orange with white stripe
Oranye dengan strip putih
Black
Hitam
Light green
Hijau muda
Brown
Cokelat
Blue with white stripe
Biru dengan strip putih
Blue
Biru
*2 Before checking the operation of this unit prior to
installation, this lead must be connected, otherwise
power cannot be turned on.
*2 Sebelum pengecekan pengoperasian dari unit
ini sebelum pemasangan, ujung ini harus sudah
dihubungkan, selain itu power tidak dapat
dihidupkan.
Left speaker (rear)
Speaker kiri (belakang)
Right speaker (front)
Speaker kanan (depan)
Left speaker (front)
Speaker kiri (depan)
Right speaker (rear)
Speaker kanan
(belakang)
Gray with black stripe
Abu-abu dengan strip
hitam
White
Putih
White with black stripe
Putih dengan strip
hitam
Green with black stripe
Hijau den gan strip
hitam
Gray
Abu-abu
Green
Hijau
Purple with black stripe
Ungu dengan strip
hitam
Purple
Ungu
Connecting the parking brake lead
Connect the parking brake lead to the parking brake system built in the car.
Menghubungkan ujung rem parkir
Menghubungkan ujung rem parkir ke sistem rem parkir yang terpasang dalam mobil.
To metallic body or chassis of the car
Ke besi bodi atau casis dari mobil tersebut
Parking brake switch (inside the car)
Saklar rem parkir (di dalam mobil)
Parking brake lead (light green)
Ujung rem parkir (hijau muda)
Parking brake
Rem parkir
Crimp connector
Konektor kerut
Rear ground terminal
Terminal tanah belakang
A
See each diagram on page 4.
Lihat setiap diagram di halaman 4.
a
AVX710[UN]_install.indb 3AVX710[UN]_install.indb 3 07.12.24 11:30:38 AM07.12.24 11:30:38 AM
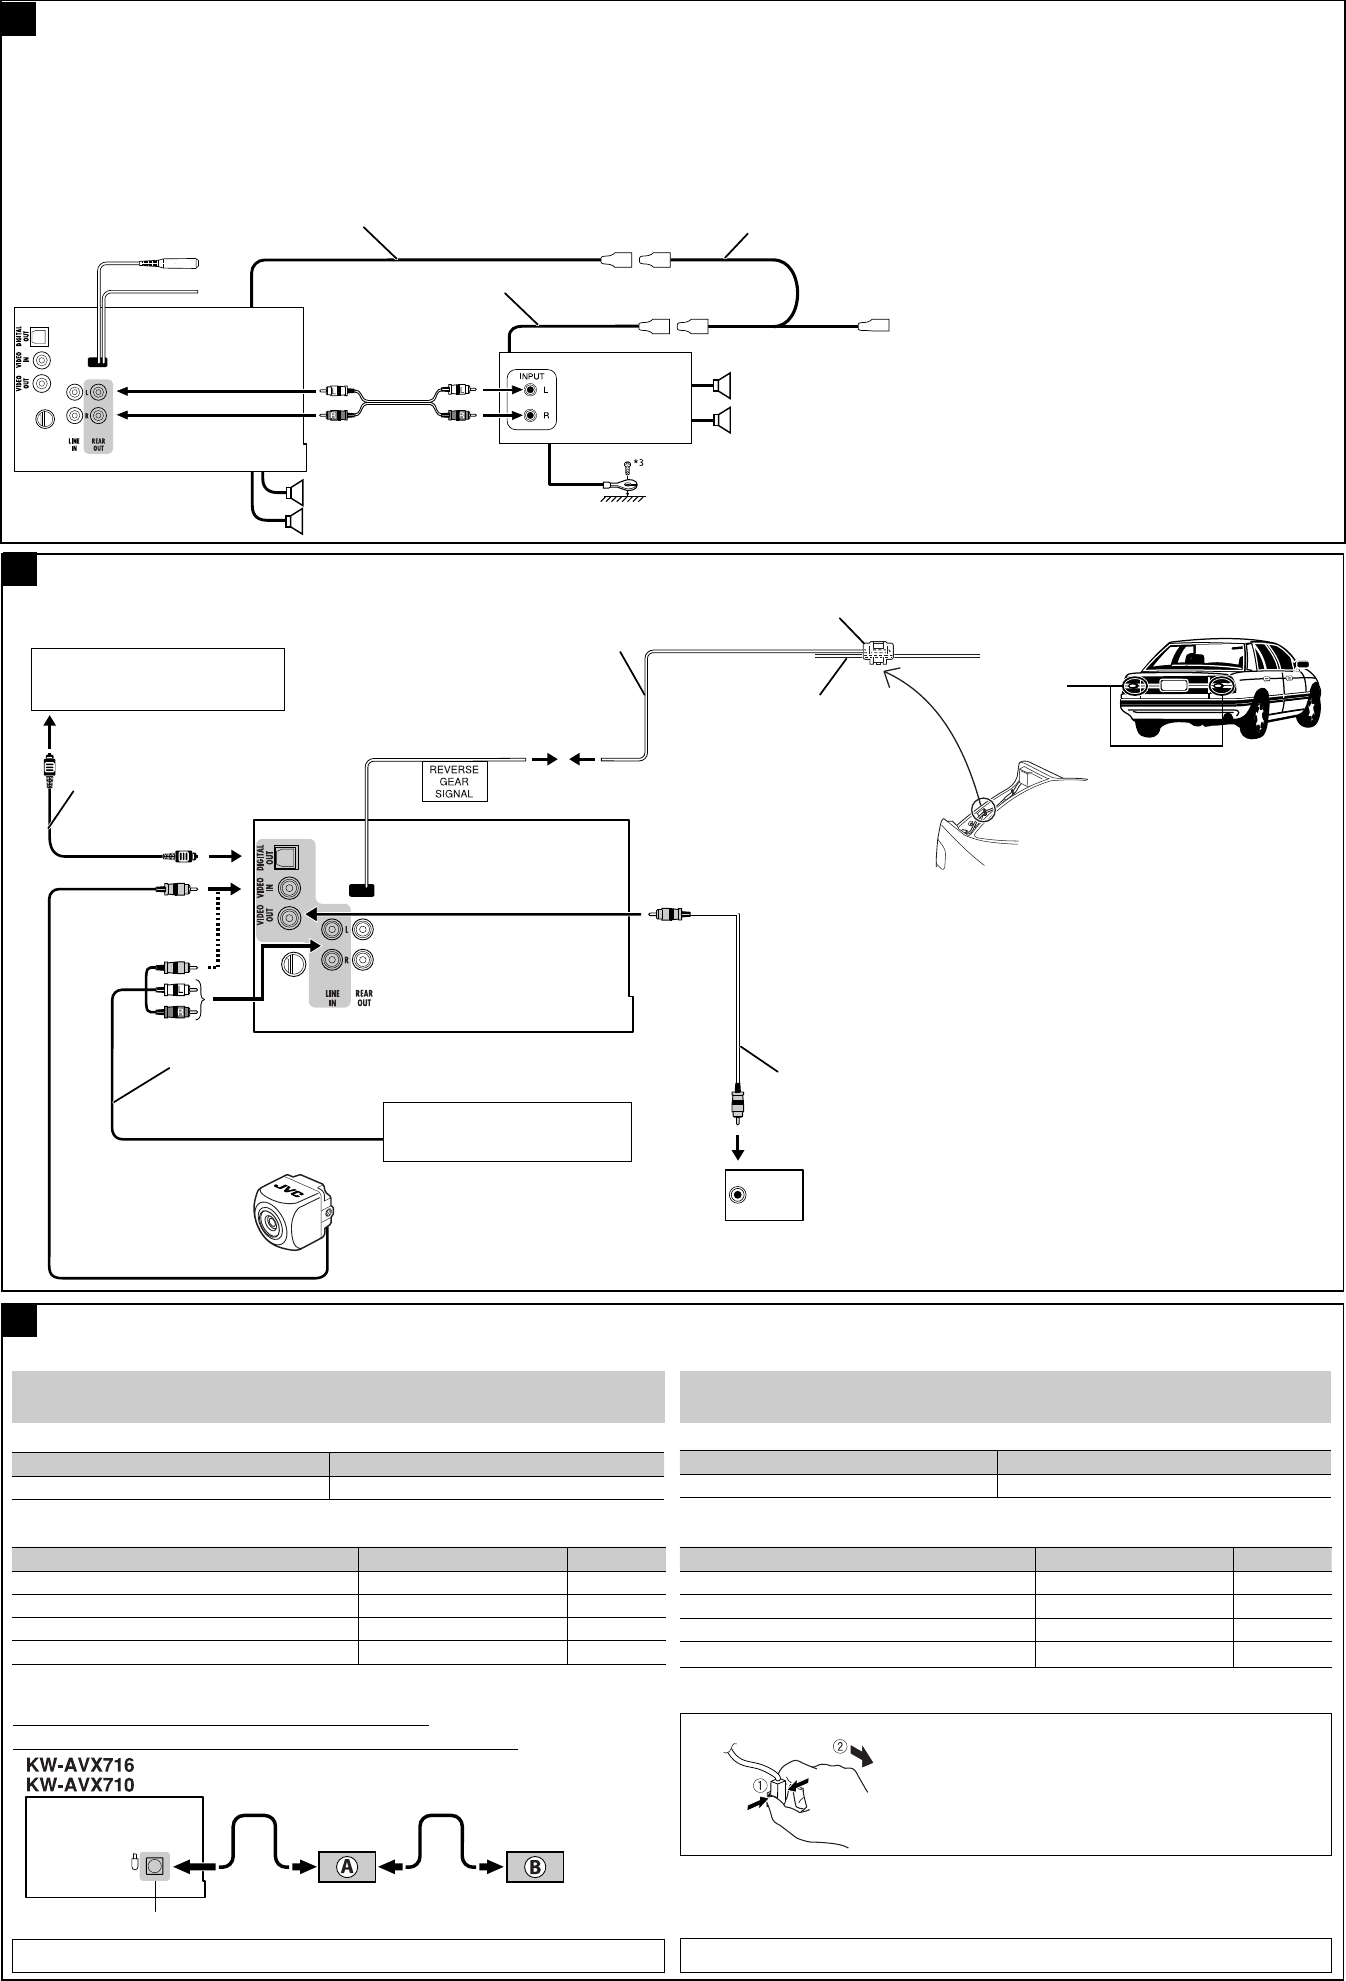
4
*3 Firmly attach the ground lead to the metallic body or to the chassis of the
car—to the place uncoated with paint (if coated with paint, remove the
paint before attaching the lead). Failure to do so may cause damage to the
unit.
*3 Pasangkan dengan kuat kabel tanah ke bodi besi atau ke casis dari
mobil—pada tempat yang tidak dilapisi cat (jika dilapisi cat, hilangkan
cat sebelum memasang kabel). Kegagalan melakukan ini mungkin
menyebabkan kerusakan pada unit tersebut.
A
Anda dapat menyambungkan penguat untuk meningkatkan sistem stereo mobil anda.
• Anda dapat mengalirkan daya listrik ke amplifier dengan menghubungkan kabel penyambung
(warna biru dengan strip putih) unit ini ke amplifier. (Untuk menghubungkan peralatan lain dengan
menggunakan kabel penyambung, konektor Y harus dibeli secara terpisah.)
• Putuskan sambungan speaker-speaker dari unit ini, sambungkan ini ke penguat. Biarkan ujung
speaker dari unit ini tidak digunakan.
• Anda dapat mematikan amplifier built-in dan mengirimkan sinyal audio hanya ke amplifier
eksternal untuk mendapatkan suara yang bersih dan mencegah penimbunan panas di bagian
dalam unit. Lihat BUKU PETUNJUK di halaman 49.
Connecting an external amplifier / Penyambungan penguat eksternal
Connections for external component playback / Koneksi untuk pemutaran komponen eksternal
B
To reverse lamp
Ke lampu mundur
Audio/video cord (not supplied)
Kabel audio/video (tidak disediakan)
To car battery
Ke baterai
Crimp connector (not supplied)*5
Konektor kerut (tidak disediakan)*5
Reverse lamp lead*4
Ujung lampu mundur*4
Video cord (not
supplied)
Kabel video (tidak
disediakan)
*4 Required only when connecting a rear view camera to
VIDEO IN terminal.
*5 Refer to å in diagram Å on page 3.
*6 Set “AV Input” setting to “Camera” when using (see
page 47 of the INSTRUCTIONS).
*4 Hanya diperlukan apabila menghubungkan kamera
tampilan belakang ke terminal VIDEO IN.
*5 Lihat å di diagram Å di halaman 3.
*6 Tetapkan pengaturan “AV Input” ke “Camera” bila
menggunakan (lihat BUKU PETUNJUK di halaman 47).
Rear speakers
Speaker-speaker
belakang
Remote lead (Blue with white stripe)
Ujung jauh (Biru dengan strip putih)
Remote lead
Ujung jauh
JVC Amplifier
Penguat JVC
You can connect an amplifier to upgrade your car stereo system.
• You can supply the power to the amplifier by connecting the remote leads (blue with white stripe) of
this unit to the amplifier. (To connect other equipment using the remote leads, Y-connectors need to
be separately purchased.)
• Disconnect the speakers from the unit, and connect them to the amplifier. Leave the speaker leads of
the unit unused.
• You can switch off the built-in amplifier and send the audio signals only to the external amplifier
to get clear sound and to prevent internal heat built-up inside the unit. See page 49 of the
INSTRUCTIONS.
Front speakers
Speaker-speaker
depan
Y-connector (not supplied for this unit)
Konektor Y (tidak disediakan untuk unit ini)
To the remote lead of other equipment
Ke ujung jauh dari peralatan lain
Bila menghubungkan komponen eksternal, rujuk juga buku petunjuk yang dibekalkan untuk komponen dan adaptor.
Peringatan:
Sebelum menyambungkan komponen eksternal, pastikan bahwa unit sudah dimatikan.
Anda dapat menghubungkan komponen JVC berikut ini ke jack CD changer.
Komponen JVC Nama model
CD changer (CD-CH) CH-X1500, dsb.
Anda juga dapat menghubungkan komponen berikut ini melalui berbagai adaptor JVC.
• Kabel koneksi mungkin harus dibeli secara terpisah.
Komponen Adaptor Nama model
Perangkat Bluetooth Adaptor Bluetooth KS-BTA200
iPod Adaptor interface untuk iPod KS-PD100
Audio player portabel dengan jack line output Adaptor line input KS-U57
Audio player portabel dengan jack stereo mini 3,5 mm
Adaptor AUX input KS-U58
Bila menghubungkan beberapa komponen (maksimum: dua), dianjurkan agar anda menghubungkan
komponen dalam rangkaian seperti dijelaskan di bawah.
Connections to the CD changer jack / Koneksi ke jack CD changer
When connecting the external components, refer also to the manuals supplied for the components and adapter.
CAUTION:
Before connecting the external components, make sure that the unit is turned off.
You can connect the following JVC components to the CD changer jack.
JVC component Model name
CD changer (CD-CH) CH-X1500, etc.
You can also connect the following components through the various JVC adapters.
• Connection cords may need to be purchased separately.
Component Adapter Model name
Bluetooth device Bluetooth adapter KS-BTA200
iPod Interface adapter for iPod KS-PD100
Portable audio player with line output jacks Line input adapter KS-U57
Portable audio player with 3.5 mm stereo mini jack AUX input adapter KS-U58
When connecting more than one component (maximum: two), it is recommended that you connect the
components in series as explained below.
CD changer jack / Konector CD changer
When connecting two components in series /
Bila menghubungkan dua komponen dalam rangkaian
To disconnect the connector / Untuk memutuskan konektor
Hold the connector top tightly (
1 ), then pull it out ( 2 ).
Pegang erat konektor (
1 ) lalu tarik keluar ( 2 ).
iPod adalah merek dagang dari Apple Inc., terdaftar di Amerika Serikat dan di negara-negara lain.
C
iPod is a trademark of Apple Inc., registered in the U.S. and other countries.
*7 To use these components, set the external input setting correctly (see page 47 of the
INSTRUCTIONS).
*7 Untuk menggunakan komponen ini, lakukan pengaturan masukan eksternal yang benar (lihat
halaman 47 dari BUKU PETUNJUK).
A KS-BTA200
B*7 CD-CH / KS-PD100 / KS-U57 / KS-U58
Reverse lamp
Lampu mundur
Camcorder, Navigation System, etc.
Camcorder, Navigation System, dsb..
Rear view camera KV-CM1*6
Kamera tampak belakang KV-CM1*6
External monitor
Monitor eksternal
AV amplifier or decoder
Amplifier AV atau decoder
Digital optical cable (not supplied)
Kabel optik digital (tidak disediakan)
Extension lead (not supplied)
Kabel sambungan (tidak disertakan)
AVX710[UN]_install.indb 4AVX710[UN]_install.indb 4 07.12.24 11:30:40 AM07.12.24 11:30:40 AM

For installation and connections, refer to the separate manual.
INSTRUCTIONS
LVT1780-001A
[A]
For canceling the display demonstration, see page 8.
DVD RECEIVER WITH MONITOR
KW-AVX716
KW-AVX710
Cover_KW-AVX710_A.indd 2Cover_KW-AVX710_A.indd 2 07.12.17 2:27:41 PM07.12.17 2:27:41 PM
2
Thank you for purchasing a JVC product.
Please read all instructions carefully before operation, to ensure your complete understanding and to obtain the best
possible performance from the unit.
IMPORTANT FOR LASER PRODUCTS
1. CLASS 1 LASER PRODUCT
2. CAUTION: Do not open the top cover. There are no user serviceable parts inside the unit; leave all servicing to
qualified service personnel.
3. CAUTION: Visible and/or invisible class 1M laser radiation when open. Do not view directly with optical
instruments.
4. REPRODUCTION OF LABEL: CAUTION LABEL, PLACED OUTSIDE THE UNIT.
[European Union only]
Cautions on the monitor:
• The monitor built in this unit has been produced
with high precision, but it may have some
ineffective dots. This is inevitable and is not
malfunction.
• Do not expose the monitor to direct sunlight.
• Do not operate the touch panel using a ball-point
pen or similar tool with the sharp tip.
Touch the buttons on the touch panel with your
finger directly (if you are wearing a glove, take it
off).
• When the temperature is very cold or very hot...
– Chemical changes occur inside, causing
malfunction.
– Pictures may not appear clearly or may move
slowly. Pictures may not be synchronized with
the sound or picture quality may decline in
such environments.
WARNINGS:
To prevent accidents and damage
• DO NOT install any unit or wire any cable in a
location where;
– it may obstruct the steering wheel and
gearshift lever operations.
– it may obstruct the operation of safety devices
such as air bags.
– it may obstruct visibility.
• DO NOT operate the unit while driving.
If you need to operate the unit while driving, be
sure to look around carefully.
• The driver must not watch the monitor while
driving.
EN_KW-AVX710[A].indb 2EN_KW-AVX710[A].indb 2 07.12.17 4:48:39 PM07.12.17 4:48:39 PM

3INTRODUCTION
How to reset your unit
• Your preset adjustments will also be erased.
How to forcibly eject a disc
• If this does not work, reset the unit.
For safety...
• Do not raise the volume level too much, as this will
block outside sounds, making driving dangerous.
• Stop the car before performing any complicated
operations.
Temperature inside the car...
If you have parked the car for a long time in hot or cold
weather, wait until the temperature in the car becomes
normal before operating the unit.
Contents
INTRODUCTION
Playable disc types .......................... 4
Basic operations—
Monitor panel/touch panel
............ 5
Basic operations—
Remote controller (RM-RK252) ...... 6
OPERATIONS
Before operating the unit ................ 8
Common operations ........................ 9
Listening to the radio ...................... 10
Disc operations ................................ 13
EXTERNAL DEVICES
Bluetooth® operations—
Cellular phone/audio player .......... 27
Listening to the CD changer .............. 34
Listening to the iPod ........................ 36
Using other external components ..... 38
SETTINGS
Sound equalization .......................... 41
Assigning titles to the sources .......... 42
Menu operations ............................. 43
REFERENCES
Maintenance ................................... 52
More about this unit ........................ 53
Troubleshooting .............................. 60
Specifications .................................. 64
NO EJECT?
EMERGENCY EJECT?
Exit
ENTER
Back
11
3
2
at the same time
EN_KW-AVX710[A].indb 3EN_KW-AVX710[A].indb 3 07.12.17 4:48:45 PM07.12.17 4:48:45 PM

4
Disc type Recording format, file type, etc. Playable
DVD DVD Video (Region Code: 4)*1
DVD Audio
DVD-ROM
DVD Recordable/Rewritable
(DVD-R/-RW*2, +R/+RW*3)
• DVD Video: UDF bridge
• DVD-VR
• DivX/MPEG1/MPEG2/JPEG/MP3/
WMA/WAV: ISO 9660 level 1,
level 2, Romeo, Joliet
DVD Video
DVD-VR
DivX/MPEG1/MPEG2
JPEG
MP3/WMA/WAV
AAC
MPEG4
DVD+VR
DVD-RAM
Dual Disc DVD side
Non-DVD side
CD/VCD Audio CD/CD Text (CD-DA)/DTS-CD
VCD (Video CD)
SVCD (Super Video CD)
CD-ROM
CD-I (CD-I Ready)
CD Recordable/Rewritable
(CD-R/-RW)
• ISO 9660 level 1, level 2, Romeo,
Joliet
CD-DA
MP3/WMA/WAV
JPEG
DivX/MPEG1/MPEG2
AAC
MPEG4
*1 If you insert a DVD Video disc of an incorrect Region Code, “Region code error” appears on the screen.
*2 DVD-R recorded in multi-border format is also playable (except for dual layer discs).
DVD-RW dual layer discs are not playable.
*3 It is possible to play back finalized +R/+RW (Video format only) discs.
+RW double layer discs are not playable.
Playable disc types
Caution for DualDisc playback
The Non-DVD side of a “DualDisc” does not comply with the “Compact Disc Digital Audio” standard. Therefore,
the use of Non-DVD side of a DualDisc on this product may not be recommended.
EN_KW-AVX710[A].indb 4EN_KW-AVX710[A].indb 4 07.12.17 4:48:45 PM07.12.17 4:48:45 PM
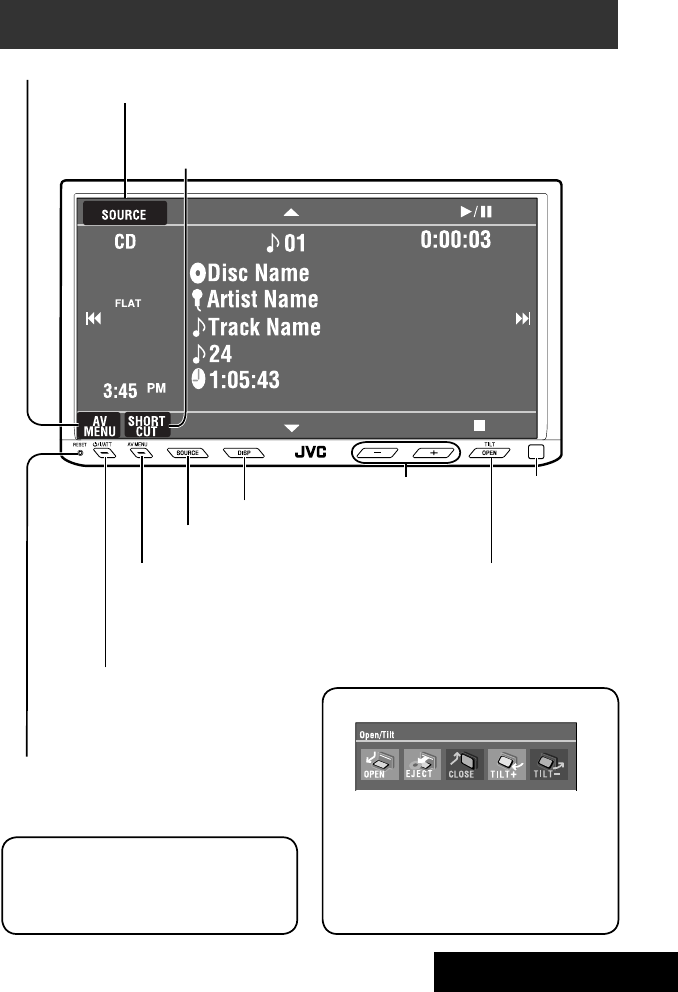
5INTRODUCTION
Basic operations — Monitor panel/touch panel
• Turn on the power.
• Turn off the power. [Hold]
• Attenuate the sound (if the power is on).
Change the sources.
Remote sensorAdjust the volume.
Reset the unit.
• Use only when the internal system malfunctions.
Display <AV Menu> screen.
Display and erase the Short Cut windows.
Available functions vary among the sources. For details, see each source operation
section.
Change the display information.
• [OPEN]: Open the monitor panel.
• [EJECT]: Eject the disc.
• [CLOSE]: Close the monitor panel.
• [TILT +/–]: Tilt the monitor panel.
• [Exit]: Erase this screen.
• Shaded icons cannot be used.
• In the explanation, buttons on the touch panel
are indicated inside [ ].
• For details on the touch panel operations, see
each source operation section.
Display <Source Menu> screen.
Display <AV Menu> screen.
☞ page 43
• Display <Open/Tilt> menu.
• Eject the disc and display <Open/Tilt>
menu. [Hold]
• Close the monitor panel when <Open/Tilt>
menu is displayed.
☞ page 43
☞ page 9
☞ page 9
<Open/Tilt> menu
EN_KW-AVX710[A].indb 5EN_KW-AVX710[A].indb 5 07.12.17 4:48:46 PM07.12.17 4:48:46 PM

6
Basic operations — Remote controller (RM-RK252)
Main elements and features
1 • Turns on the power.
• Attenuates the sound if the power is on.
• Turns off the power if pressed and held (while
the power is on).
2 • Reverse search
• Reverse slow motion (during pause)
3 Adjusts the volume level.
• Does not function as “2nd VOL.”
4 • Displays <Dial Menu> screen.
• Displays <Redial> menu if pressed and held.
• Answers incoming calls.
5 • DVD/DivX 6: Shows the disc menu.
• VCD: Resumes PBC playback.
• DVD-VR: Shows the Original Program screen.
6 Shows the on-screen bar.
• Does not function as “ .“
R03/LR03/AAA
Installing the battery
Insert the batteries into the remote controller by
matching the polarity (+ and –) correctly.
Caution:
Battery shall not be exposed to excessive heat such
as sunshine, fire or the like.
• If the range or effectiveness of the remote controller
decreases, replace both batteries.
Before using the remote controller:
• Aim the remote controller directly at the remote
sensor on the unit.
• DO NOT expose the remote sensor to bright light
(direct sunlight or artificial lighting).
EN_KW-AVX710[A].indb 6EN_KW-AVX710[A].indb 6 07.12.17 4:48:47 PM07.12.17 4:48:47 PM

7INTRODUCTION
p • Forward search
• Forward slow motion (during pause)
q Selects the source.
w For disc operations:
Starts playback/pauses.
For Bluetooth operations:
• Answers incoming calls.
• Starts playback/pauses. (for audio player
operation).
e Changes the aspect ratio of the playback
pictures.
r “TUNER”: Selects the bands.
“DISC”: Stops playback.
“Bluetooth PHONE”: Ends the call.
“Bluetooth AUDIO”: Starts playback/pauses.
t VCD: Returns to the PBC menu.
y • DVD Video/DivX 6: Shows the disc menu.
• VCD: Resumes PBC playback.
• DVD-VR: Shows the Playlist screen.
u • Makes selection/settings.
• @ / #: Skips back or forward by five minutes
for DivX/MPEG1/MPEG2.
• % / fi: Changes discs for “CD-CH.”
i*3 • Switches number entry mode for “DISC.”
• Erases the misentry after entering a wrong
number.
• Does not function as “SURROUND.”
o*3 Number buttons
• Enters numbers.
• “TUNER”: Selects the preset station directly.
*1 Functions as a number button only (see o ).
*2 Not used for this unit.
*3 Functions when pressed with SHIFT.
7 Functions with other buttons (see i and o).
8 Changes the display information.
9 For disc operations:
• 5 / ∞:
DVD: Selects the title.
DVD-VR: Selects the program/Playlist.
Other discs (except VCD/CD): Selects the
folders.
• 4 / ¢:
– Press briefly: reverse skip/forward skip
– Press and hold: reverse search/forward
search
For FM/AM operations:
• 5 / ∞: Selects the preset stations.
• 4 / ¢: Functions to search for stations.
– Press briefly: Auto Search
– Press and hold: Manual Search
For Apple iPod operations:
• ∞: Starts playback/pauses
• 5: Enters the main menu (then 5 / ∞
/ 4 / ¢ work as menu selecting
buttons).
In the main menu:
• 5: Returns to the previous menu.
• ∞: Confirms the selection.
• 4 / ¢
– Press briefly: Selects an item.
– Press and hold: Skips ten items at a time.
For Bluetooth operations:
• 4 / ¢: reverse skip/forward skip (for
audio player operation)
EN_KW-AVX710[A].indb 7EN_KW-AVX710[A].indb 7 07.12.17 4:48:48 PM07.12.17 4:48:48 PM
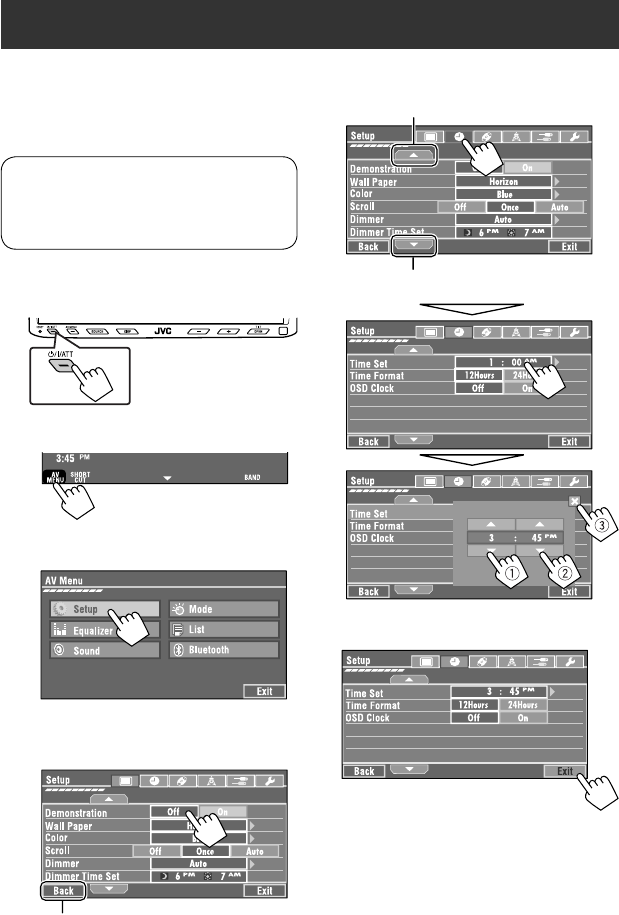
8
You can cancel the demonstration on the screen and set
the clock.
• Non-available items will be shaded on the AV Menu
screens.
Indication language:
In this manual, English indications are used
for purpose of explanation. You can select the
indication language. (☞ page 45)
~ Turn on the power.
Ÿ Display <AV Menu> screen.
! Display <Setup> menu.
⁄ Cancel the demonstration.
Select <Off>.
@ Set the clock settings.
¤ Finish the procedure.
Before operating the unit
Moves to the succeeding menu page
Moves to the preceding menu page
Return to the previous screen.
EN_KW-AVX710[A].indb 8EN_KW-AVX710[A].indb 8 07.12.17 4:48:48 PM07.12.17 4:48:48 PM

OPERATIONS
9
Changing the display
information
• Available display information varies among the
playback sources.
On the monitor panel only:
• Each time you press DISP, the display changes to
show the various information.
Ex. When the playback source is a DivX disc.
Selecting the playback source
• Available sources depend on the external
components you have connected, media you have
attached, and the <Input> settings you have made
(☞ page 47).
On the touch panel:
On the monitor panel:
TUNER = DISC (DVD/VCD/CD) =CD-CH, iPod, or
EXT-IN = Bluetooth PHONE = Bluetooth AUDIO
= AV-IN = (back to the beginning)
• You cannot select these sources if they are not ready.
Exit
Source information screen
Clock time in large numbers
Navigation screen
(When <Navigation> is
selected for <AV Input>)
(☞ page 47)
Back to the beginning
Playback picture screen
(only for video sources)
Track list
Common operations
EN_KW-AVX710[A].indb 9EN_KW-AVX710[A].indb 9 07.12.17 4:48:49 PM07.12.17 4:48:49 PM

10
When an FM stereo broadcast is
hard to receive
1 Press [AV MENU].
• You can also use AV MENU on the monitor panel.
2 Press [Mode].
Listening to the radio
~ Press [SOURCE], then press [TUNER]. (☞ page 9)
• You can also use SOURCE on the monitor panel. Press it repeatedly.
Ÿ Press [BAND].
! Press [4] or [¢] to search for a station—Auto Search.
• Manual Search: Hold either [4]or [¢] until “Manual Search” appears on the screen, then press it
repeatedly.
• The ST indicator lights up when receiving an FM stereo broadcast with sufficient signal strength.
3
Reception improves, but stereo effect will be lost.
• The MONO indicator lights up.
To restore stereo effect, select <Off>.
Preset no.
Band
Tuner indicators
Assigned station name (☞ page 42). If no name is assigned,
the frequency of the station is displayed instead.
☞ page 9
Sound mode
(☞ page 41)
☞ page 11,
: Buttons on the
touch panel. In
the explanation,
they are
indicated inside
[ ].
EN_KW-AVX710[A].indb 10EN_KW-AVX710[A].indb 10 07.12.17 4:48:50 PM07.12.17 4:48:50 PM

OPERATIONS
11
FM station automatic presetting
—SSM (Strong-station
Sequential Memory)
This function works only for FM bands.
You can preset six stations for each band.
1 Press [AV MENU].
• You can also use AV MENU on the monitor panel.
2 Press [Mode].
3
Local FM stations with the strongest signals are
searched and stored automatically in the FM band.
Tuning in to stations with
sufficient signal strength
This function works only for FM bands. Once you have
activated this function (selected <Local>), it always
works when searching for FM stations.
1 Press [AV MENU].
• You can also use AV MENU on the monitor panel.
2 Press [Mode].
3
Only stations with sufficient signal strength will be
detected.
• The DX indicator goes off, then the LO indicator
lights up.
• You can also change <IF Band Width> setting
(for details, ☞ page 47).
<IF Band Width> menu can be accessed by
pressing [SHORT CUT] on the touch panel, then..
☞ page 41
EN_KW-AVX710[A].indb 11EN_KW-AVX710[A].indb 11 07.12.17 4:48:50 PM07.12.17 4:48:50 PM

12
Selecting a preset station
On the remote:
1
2
On the unit:
• To select directly on the touch panel
• To select from the Preset List
1
2
or
Hold
Manual presetting
Ex.: Storing FM station of 92.5 MHz into preset number
4 of the FM1 band.
1 Display the Preset List.
2 Tune in to a station you want to preset.
3 Select a preset number.
The station selected in step 2 is now stored in
preset number 4.
[Hold]
EN_KW-AVX710[A].indb 12EN_KW-AVX710[A].indb 12 07.12.17 4:48:51 PM07.12.17 4:48:51 PM
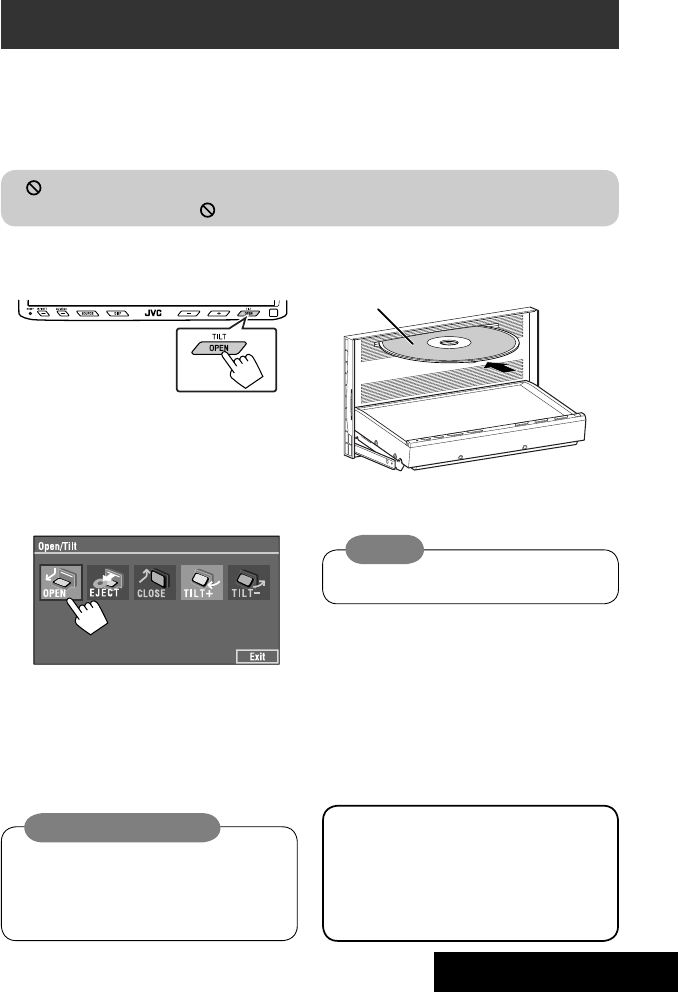
OPERATIONS
13
~ Open the monitor panel.
<Open/Tilt> menu is displayed.
• By pressing and holding the button, you can
open the monitor panel and eject the disc.
Ÿ Press [OPEN].
Disc operations
The disc type is automatically detected, and playback starts automatically (for some discs: automatic start depends
on its internal program).
If a disc does not have any disc menu, all tracks on it will be played repeatedly until you change the source or eject
the disc.
If “ ” appears on the screen, the unit cannot accept the operation you have tried to do.
• In some cases, without showing “ ,” operations will not be accepted.
Label side
Caution on volume setting:
Discs produce very little noise compared with other
sources. Lower the volume before playing a disc
to avoid damaging the speakers by the sudden
increase of the output level.
When playing back a multi-channel encoded disc,
the multi-channel signals are downmixed.
• You can fully enjoy multi-channel sound by
connecting an amplifier or a decoder compatible
with these multi-channel sources. (☞ also page
57)
! Insert a disc.
Monitor panel closes automatically.
If not, press [CLOSE].
Caution:
Do not place your finger behind the monitor panel.
EN_KW-AVX710[A].indb 13EN_KW-AVX710[A].indb 13 07.12.17 4:48:52 PM07.12.17 4:48:52 PM
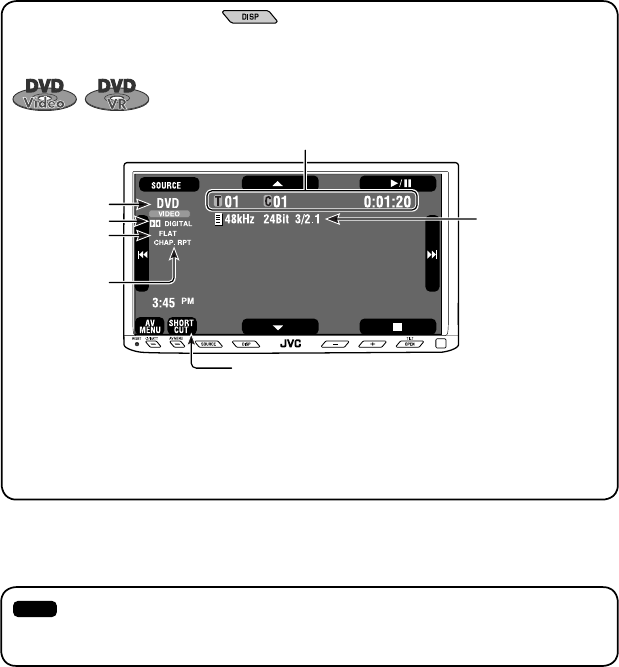
14
While playing the following discs, press .
• Each time you press the button, the display changes to show the different information. (☞ page 9)
Audio format
DVD Video: Title no./Chapter no./Playing time
DVD-VR: Program no. (or Playlist no.)/Chapter no./Playing time
Playback mode
Disc type *1Sampling frequency/Bit
rate/Recorded signal
channel no.
☞ page 19
[3 / 8] Start and pause playback
[7] Stop playback
[4 ¢] Press: Select chapter
Hold: Reverse/forward search*2
[5 ∞] Select title/program/playlist
*1 DVD-VR also indicates either PRG (program) or PLAY (playlist) playback.
*2 Search speed: x2 ] x10
: Buttons on the touch panel. In the explanation, they are indicated inside [ ].
These buttons also work when they are not shown on the touch panel (while watching the playback pictures
on the screen).
Sound mode
(☞ page 41)
EN_KW-AVX710[A].indb 14EN_KW-AVX710[A].indb 14 07.12.17 4:48:52 PM07.12.17 4:48:52 PM

OPERATIONS
15
Track no./Playing time
[3 / 8] Start and pause playback
[7] Stop playback
[4 ¢] Press: Select track
Hold: Reverse/forward search*2
For DivX/MPEG1/MPEG2: Folder no./Track no./Playing time
For JPEG: Folder no./File no.
[3 / 8] Start and pause playback
[7] Stop playback
[4 ¢] Press: Select track
Hold: Reverse/forward search for DivX/MPEG1/MPEG2 *1
[5 ∞] Press: Select folder
Hold: Display Folder list
While playing the following discs, press .
• Each time you press the button, the display changes to show the different information (☞ page 9).
Disc type
☞ page 19
☞ page 19
The PBC indicator
lights up when PBC is
in use.
Total track no.
included on the
disc
Total track no.
included on the
disc
Total playing time
Sound mode
(☞ page 41)
Sound mode
(☞ page 41)
*1 Search speed: ¡1 ] ¡2
*2 Search speed: x2 ] x10
EN_KW-AVX710[A].indb 15EN_KW-AVX710[A].indb 15 07.12.17 4:48:53 PM07.12.17 4:48:53 PM
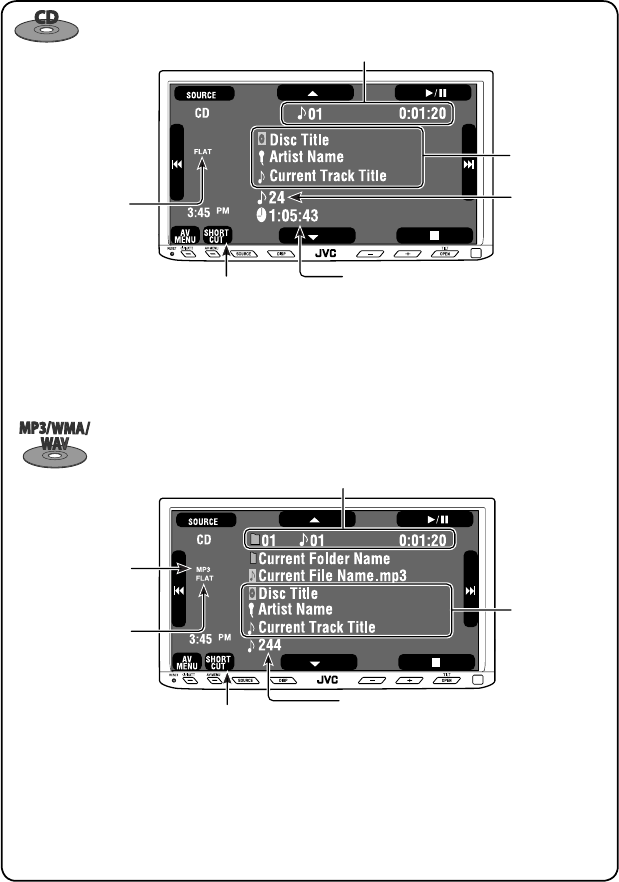
16
Track no./Playing time
Only for CD Text *3
Folder no./Track no./Playing time
Audio format
(MP3/WMA/WAV)
☞ page 19
*3 “No Name” appears for conventional CDs.
*4 Search speed: x2 ] x10
Tag data appears
only when it is
recorded.
Sound mode
(☞ page 41)
☞ page 19
[3 / 8] Start and pause playback
[7] Stop playback
[4 ¢] Press: Select track
Hold: Reverse/forward search*4
[5 ∞] Press: Select folder
Hold: Display Folder list
[3 / 8] Start and pause playback
[7] Stop playback
[4 ¢] Press: Select track
Hold: Reverse/forward search*4
Total track no.
included on the disc
Total playing time
Total track no. included on the disc
Sound mode
(☞ page 41)
EN_KW-AVX710[A].indb 16EN_KW-AVX710[A].indb 16 07.12.17 4:48:53 PM07.12.17 4:48:53 PM
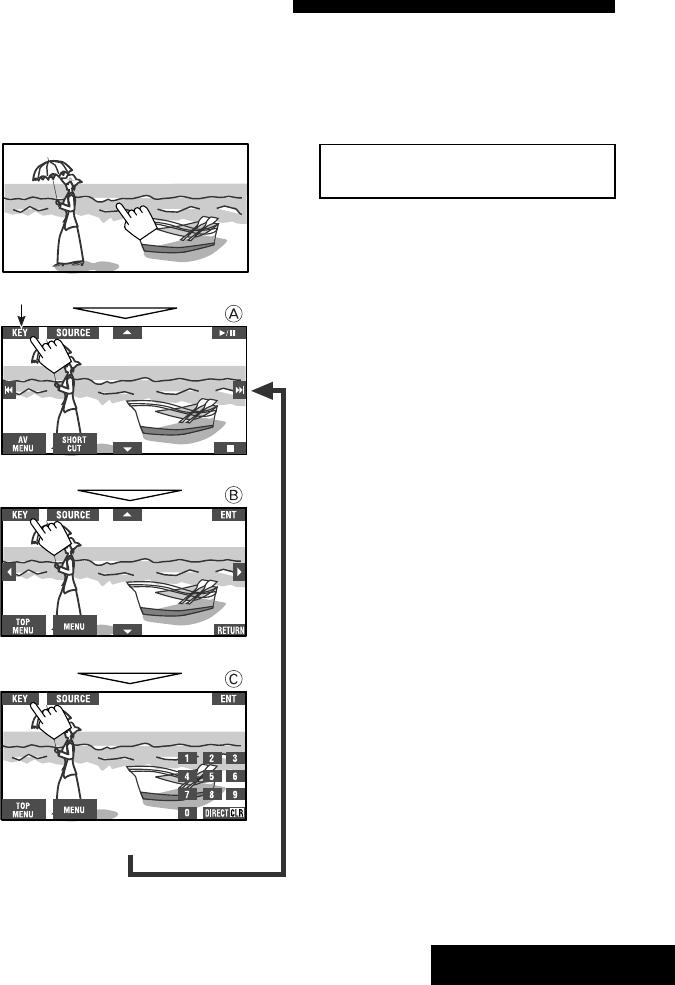
OPERATIONS
17
Touch the screen (center portion).
Operation buttons on the screen
You can display the following operation buttons while watching the playback pictures on the screen.
• While the operation buttons are displayed, aspect ratio is fixed to <Full>. (☞ page 45)
• If no operation is done for about five seconds, the operation buttons disappear (except when a disc menu is
displayed).
Touch [KEY].
☞ pages 20 to 24 on how the operation buttons
particularly work for a variety of the discs
A
[SOURCE] Display <Source Menu> screen
[AV MENU] Display <AV Menu> screen
[SHORT CUT] Display the Short Cut buttons
[3 / 8] Start and pause playback
[7] Stop playback
[4 ¢] Press: Select track
Hold: Reverse/forward search
[5 ∞] Select folders
• The above buttons also work when they are not shown on
the screen (while watching the playback picture).
* While a disc menu is played back for DVD, [KEY] is
automatically displayed. On the disc menu, you can select a
menu item directly by touching it on the screen.
B
For DVD/VCD/DivX menu operation playback
[2 3 5 ∞] Select the menu items
[ENT] Confirm the selection
[TOP MENU] Display the disc menu
[MENU] Display the disc menu
[RETURN] Return to the previous menu or display the
menu (only for VCD with PBC)
C
For entering the numbers
[DIRECT CLR] • Switch between chapter/track entry and
title/group/folder entry
• Erase the last entry when you enter a
wrong number
[0]–[9]=[ENT]
Enter numbers
Ex.: To enter “105,” press [1], [0], [5], then [ENT]
*
Touch [KEY].
Touch [KEY].
To erase the operations, touch the screen again.
EN_KW-AVX710[A].indb 17EN_KW-AVX710[A].indb 17 07.12.17 4:48:54 PM07.12.17 4:48:54 PM
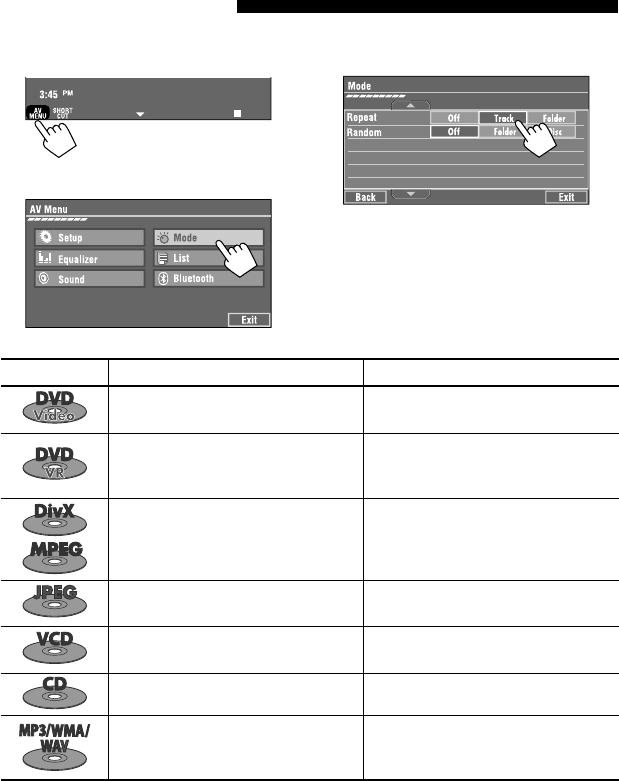
18
1
• You can also use AV MENU on the monitor panel.
2
3
When one of the playback modes is selected, the
corresponding indicator lights up on the source
information screen.
To cancel, select <Off>.
Selecting playback modes
You can use the following playback modes—Repeat or Random.
Ex.: To select Track Repeat
Disc type Repeat Random
Chapter: Repeats current chapter
Title: Repeats current title —
Chapter: Repeats current chapter
Program: Repeats current program (not
available for Playlist playback)
—
Track: Repeats current track
Folder: Repeats current folder
Folder: Randomly plays all tracks of current
folder, then tracks of next folders
Disc (All): Randomly plays all tracks
Folder: Repeats current folder —
Track: Repeats current track (PBC not in
use)
Disc (All): Randomly plays all tracks (PBC not
in use)
Track: Repeats current track*1Disc (All): Randomly plays all tracks
Track: Repeats current track*1
Folder: Repeats all tracks of the current
folder
Folder: Randomly plays all tracks of current
folder, then tracks of next folders
Disc (All): Randomly plays all tracks
*1 You can also use [SHORT CUT] to turn on and off Track Repeat.
EN_KW-AVX710[A].indb 18EN_KW-AVX710[A].indb 18 07.12.17 4:48:55 PM07.12.17 4:48:55 PM
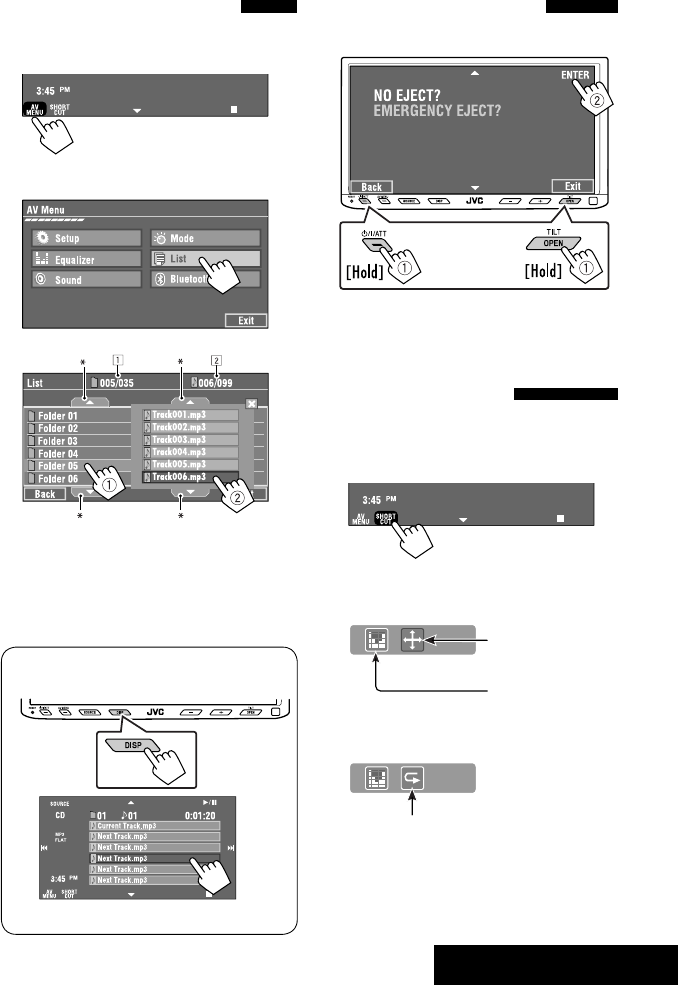
OPERATIONS
19
Prohibiting disc ejection
You can lock a disc in the loading slot.
To cancel the prohibition, repeat the same
procedure to select <EJECT OK?>.
Using Short Cut Icons
You can easily access the some frequently used
functions by using [SHORT CUT] on the touch panel.
1
2
• For video software:
• For audio software:
Selecting tracks on the list
If a disc includes folders, you can display the Folder/
Track (File) Lists, then start playback.
1
• You can also use AV MENU on the monitor panel.
2
3 Select a folder (1), then a track (2).
Selected track starts playing. (* Press to move to
the previous/next pages of the list)
1 Current folder list number/total folder list
number
2 Current track list number/total track list
number of the current folder
You can easily access the Track List by pressing DISP
on the monitor panel.
Selected track starts playing.
at the same time
Sound mode
(☞ page 41)
Turn on or off Track Repeat
(Repeat play: ☞ page 18)
Aspect ratio
(☞ page 45)
EN_KW-AVX710[A].indb 19EN_KW-AVX710[A].indb 19 07.12.17 4:48:55 PM07.12.17 4:48:55 PM

20
Stop playback.
Start playback/pause (if pressed during playback).
Reverse/forward search*1 (No sound can be heard.)
Slow motion during pause*2 (No sound can be heard.)
Press: Select chapter (during playback or pause).
Hold: Reverse/forward search*3 (No sound can be heard.)
Select title (during playback or pause).
Select aspect ratio.
Select chapter.
Select title (when not playing).
Select title (during playback or pause).
Using menu driven features
1
2 Select an item you want to start playback.
3
*1 Search speed: x2 ] x5 ] x10 ] x20 ] x60
*2 Slow motion speed: 1/32 ] 1/16 ] 1/8 ] 1/4 ] 1/2
*3 Search speed: x2 ] x10
Operations using the remote controller—RM-RK252
Also functions as CLR (clear):
Erases a misentry if pressed
while holding SHIFT.
You can change the following items using the on-screen bar—audio language, audio stream, audio channel,
subtitle language, view angle, etc. (☞ pages 25 and 26)
twice
EN_KW-AVX710[A].indb 20EN_KW-AVX710[A].indb 20 07.12.17 4:48:56 PM07.12.17 4:48:56 PM

OPERATIONS
21
Stop playback.
Start playback/pause (if pressed during playback).
Reverse/forward search*4 (No sound can be heard.)
Forward slow motion during pause*5 (No sound can be heard.)
• Reverse slow motion does not work.
Press: Select chapter (during playback or pause).
Hold: Reverse/forward search*6
Select program.
Select playlist (during playback or pause).
Select aspect ratio.
Select chapter.
Select program (when not playing).
Select program/playlist (during playback or pause).
Using Original Program/Playlist screens ( ☞ page 25)
1For Original Program
For Playlist
2 Select an item you want to start playback.
3 To erase the screen.
*4 Search speed: x2 ] x5 ] x10 ] x20 ] x60
*5 Slow motion speed: 1/32 ] 1/16 ] 1/8 ] 1/4 ] 1/2
*6 Search speed: x2 ] x10
twice
EN_KW-AVX710[A].indb 21EN_KW-AVX710[A].indb 21 07.12.17 4:48:57 PM07.12.17 4:48:57 PM

22
Also functions as CLR (clear):
Erases a misentry if pressed
while holding SHIFT.
Stop playback.
Start playback/pause (if pressed during playback).
Reverse/forward search*1 (No sound can be heard.)
Press: Select track
Hold: Reverse/forward search*2 (No sound can be heard.)
Select folder.
Select aspect ratio.
Select track (within the same folder).
Select folder.
While playing...
Reverse/advance the scenes by five minutes.
For DivX6: Using menu driven features
1
2 Select an item you want to start playback.
3
*1 Search speed: ¡1 ] ¡2 ] ¡3
*2 Search speed: ¡1 ] ¡2
Current playback position
twice
2nd press 2nd press1st press 1st press 3rd press
EN_KW-AVX710[A].indb 22EN_KW-AVX710[A].indb 22 07.12.17 4:48:58 PM07.12.17 4:48:58 PM

OPERATIONS
23
Stop playback.
Start playback/pause. (Slide show: each file is shown for a few seconds.)
Shows the current file until you change it if pressed during Slide show.
Select file.
Select folder.
Select aspect ratio.
Select file (within the same folder).
Select folder.
During PBC playback...
Select an item on the menu.
To return to the previous menu, press
To cancel PBC playback
1
2 Select the desired track.
• To resume PBC, press
Stop playback.
Start playback/pause (if pressed
during playback).
Reverse/forward search*3
Forward slow motion during pause*4
(No sound can be heard.)
• Reverse slow motion does not work.
Press: Select track.
Hold: Reverse/forward search*5 (No
sound can be heard.)
Select aspect ratio.
twice
*3 Search speed: x2 ] x5 ] x10 ] x20 ] x60
*4 Slow motion speed: 1/32 ] 1/16 ] 1/8 ] 1/4 ] 1/2
*5 Search speed: x2 ] x10
Select track.
EN_KW-AVX710[A].indb 23EN_KW-AVX710[A].indb 23 07.12.17 4:48:58 PM07.12.17 4:48:58 PM

24
Stop playback.
Start playback/pause (if pressed during playback).
Reverse/forward search*1
Press: Select track.
Hold: Reverse/forward search*2
Select track.
*1 Search speed: x2 ] x5 ] x10 ] x20 ] x60
*2 Search speed: x2 ] x10
Stop playback.
Start playback/pause (if pressed during playback).
Reverse/forward search*3
Press: Select track.
Hold: Reverse/forward search*4
Select folder.
Select track (within the same folder).
Select folder.
*3 Search speed: x2 ] x5 ] x10 ] x20 ] x60
*4 Search speed: x2 ] x10
twice
Also functions as CLR (clear):
Erases a misentry if pressed
while holding SHIFT.
EN_KW-AVX710[A].indb 24EN_KW-AVX710[A].indb 24 07.12.17 4:48:59 PM07.12.17 4:48:59 PM

OPERATIONS
25
Operations using the on-screen
bar
These operations are possible on the screen using
the remote controller, while playing the following
discs—DVD/VCD/DivX/MPEG1/MPEG2/JPEG.
1 Display the on-screen bar. (☞page 26)
Ex. For DVD-Video
2 Select an item.
3 Make a selection.
If a pop-up menu appears...
• For entering time/numbers...
:
Move the entry position
:
Select a number
To remove the on-screen bar
Using the list screens
You can use Original Program or Playlist
screen anytime while playing DVD-VR with its data
recorded.
1 Display the Original Program/Playlist screen.
2 Select an item you want.
To erase the screen
1 Original Program/Playlist number
2 Recording date
3 Recording source (TV station, the input terminal of
the recording equipment, etc.)
4 Start time of recording
5 Title of the program/playlist*
6 Highlight bar (current selection)
7 Creating date of playlist
8 Total number of chapters included in the playlist
9 Playback time
* The title of the original program or playlist may not be
displayed depending on the recording equipment.
EN_KW-AVX710[A].indb 25EN_KW-AVX710[A].indb 25 07.12.17 4:49:00 PM07.12.17 4:49:00 PM

26
Information
Operation
On-screen bar
5 Time indication
Elapsed playing time of the disc
Remaining title time (for DVD)
Remaining disc time (for others)
Elapsed playing time of the current
chapter/track *2
Remaining time of the current
chapter/track *2
6 Playback status
Play
Reverse/forward search
Reverse/forward slow-motion
Pause
Stop
7 Operation icons
Change time indication (see 5)
Time Search (Specify a certain
scene by entering time.)
Title Search (by its number)
Chapter Search (by its number)
Track Search (by its number)
Repeat play *1
Random play *1
Change the audio language, audio
stream, or audio channel
Change or erase the subtitle
language
Change the view angle
*1 ☞ page 18
*2 Not applicable for DVD-VR
Above example is of DVD Video. Items shown on the bar vary due to the disc type.
1 Disc type
2 • DVD: Audio signal format
• VCD: PBC
3 Playback mode *1
DVD Video:
C. RPT: Chapter repeat
T. RPT: Title repeat
DVD-VR:
C. RPT: Chapter repeat
PG. RPT: Program repeat
DivX/MPEG1/MPEG2:
T. RPT: Track repeat
F. RPT: Folder repeat
F. RND: Folder random
A. RND: All (Disc) random
JPEG:
F. RPT: Folder repeat
VCD:
T. RPT: Track repeat
A. RND: All (Disc) random
4 Playback information
Current title/chapter
Current program/chapter
Current Playlist/chapter
Current track
Current folder/track
Current folder/file
EN_KW-AVX710[A].indb 26EN_KW-AVX710[A].indb 26 07.12.17 4:49:01 PM07.12.17 4:49:01 PM

27 EXTERNAL DEVICES
Bluetooth® operations — Cellular phone/audio player
For Bluetooth operations, it is required to connect the
Bluetooth Adapter (KS-BTA200) to the CD changer jack
on the rear.
• Refer also to the instructions supplied with the
Bluetooth Adapter and the Bluetooth device.
• Refer to the list (included in the box) to see the
countries where you may use the Bluetooth®
function.
To use a Bluetooth device through the unit (“Bluetooth
PHONE” and “Bluetooth AUDIO”) for the first time,
you need to establish Bluetooth wireless connection
between the unit and the device.
• Once the connection is established, it is registered in
the unit even if you reset your unit. Up to five devices
can be registered in total.
• Only one device can be connected at a time for each
source (“Bluetooth PHONE” and “Bluetooth AUDIO”).
Connecting a new Bluetooth
device
Registration (Pairing) methods
Use either of the following items in <Bluetooth>
menu to register and establish the connection with a
device.
• Select “Bluetooth PHONE” or “Bluetooth AUDIO” as
the source to operate <Bluetooth> menu.
Open Make the unit ready to establish
a new Bluetooth connection.
The connection is established by
operating the Bluetooth device.
Search Make the unit ready to establish
a new Bluetooth connection.
The connection is established by
operating this unit.
To register using <Open>
Preparation:
Operate the Bluetooth device to turn on its Bluetooth
function.
1 • Make sure “New Device” is selected. If not, press
[5] or [∞] to select it.
• You can also use AV MENU on the monitor panel.
2
3
4 Enter a PIN (Personal Identification
Number)* code to the unit.
• You can enter any number you like (1-digit to
16-digit number).
* Some devices have their own PIN code. Enter the
specified PIN code to the unit.
Go to other menu items
Continued on the next page
EN_KW-AVX710[A].indb 27EN_KW-AVX710[A].indb 27 07.12.17 4:49:02 PM07.12.17 4:49:02 PM

28
You can enter [0] – [9] only.
• [BS]: Erases the character before the cursor.
• [Del]: Erases the character on the cursor.
• [Enter]: Confirms the entry.
5 Operate the Bluetooth device to connect
while “Open...” is displayed on the screen.
Enter the same PIN code (as entered in the above
step) on the device to be connected.
Now connection is established and you can use the
device through the unit.
The device remains registered even after you
disconnect the device. Use <Connect> (or activate
<Auto Connect>) to connect the same device
from next time (☞ the following, and pages 50
and 51).
To register using <Search>
• Make sure “New Device” is selected. If not, press [5]
or [∞] to select it.
1 Press [AV MENU] on the touch panel or AV
MENU on the monitor panel.
2 Press [Bluetooth].
3 Press [Search].
The unit searches for available devices and displays
the list of them. (If no available device is detected,
“Device Unfound” appears.)
4 Select a device you want to connect.
5 Enter the specific PIN code of the device to
the unit.
• Refer to the instructions supplied with the device
to check the PIN code.
6 Operate the Bluetooth device to connect
while “Connecting...” is displayed on the
screen.
Now connection is established and you can use the
device through the unit.
To connect a special device <Special
Device>
1 Press [AV MENU] on the touch panel or AV
MENU on the monitor panel.
2 Press [Bluetooth].
3 Press [Special Device].
The unit displays the list of the preset devices.
4 Select a device you want to connect.
5 Use <Open> (or <Search>) to connect.
To connect/disconnect a registered
device
1 Select “Bluetooth PHONE” or “Bluetooth
AUDIO,” then select a registered device you
want to connect/disconnect.
2 Press [AV MENU] on the touch panel or AV
MENU on the monitor panel.
3 Press [Bluetooth].
4 Press [Connect] or [Disconnect].
• Select <Connect> to connect the selected
device.
• Select <Disconnect> to disconnect the selected
device.
To delete a registered device
1 Select “Bluetooth PHONE” or “Bluetooth
AUDIO,” then select a registered device you
want to delete.
2 Press [AV MENU] on the touch panel or AV
MENU on the monitor panel.
3 Press [Bluetooth].
4 Press [Delete Pairing].
Confirmation screen appears. Press [Yes].
EN_KW-AVX710[A].indb 28EN_KW-AVX710[A].indb 28 07.12.17 4:49:03 PM07.12.17 4:49:03 PM
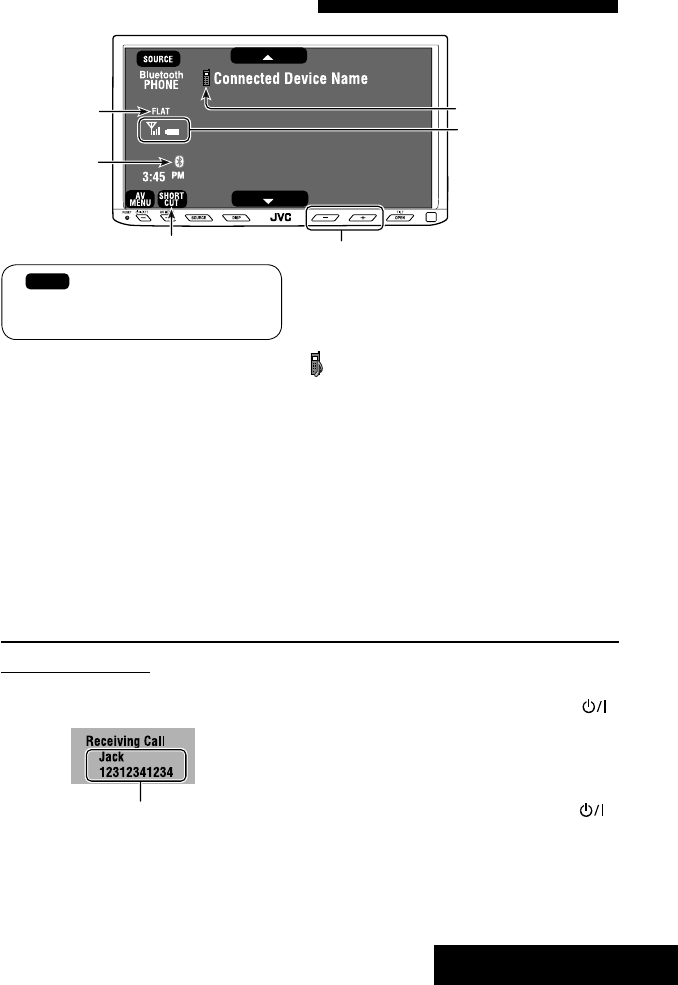
29 EXTERNAL DEVICES
Using the Bluetooth cellular phone
Adjust the volume of the incoming calls.*2
When a call comes in...
The source is changed to “Bluetooth PHONE”
automatically.
Name and phone number (if acquired)
When <Auto Answer> is activated...
The unit answers the incoming call automatically.
(☞ page 51)
☞ page 31
When <Auto Answer> is deactivated...
To answer the incoming call
• Press any button on the monitor panel (except
/ATT or +/–).
• Press the message displayed on the touch panel.
To end the call
• Hold any button on the monitor panel (except
/ATT or +/–).
• Hold the message displayed on the touch panel.
• You can adjust the microphone volume. (☞ page 51)
~ Press [SOURCE], then press [Bluetooth PHONE]. (☞ page 9)
• You can also use SOURCE on the monitor panel. Press it repeatedly.
Ÿ Press [AV MENU].
• You can also use AV MENU on the monitor panel.
! Press [Bluetooth].
⁄ Establish the connection with a device, then make a call (or settings using <Bluetooth>
menu).
☞ pages 50 and 51
Sound mode
(☞ page 41) Status of the device
Signal strength/Battery
remainder
(only when the information
comes from the device)
[AV MENU] Hold: Activates <Voice Dialing> function
[5 ∞] Select the registered device
(“New Device” appears when a new device can be registered.)
The Bluetooth icon
lights up when
the adapter is
connected.
: Buttons on the touch panel. In the
explanation, they are indicated inside
[ ].
*1 When a cellular phone with audio function is connected, appears.
*2 This adjustment does not affect the volume level of the other sources.
*1
EN_KW-AVX710[A].indb 29EN_KW-AVX710[A].indb 29 07.12.17 4:49:04 PM07.12.17 4:49:04 PM
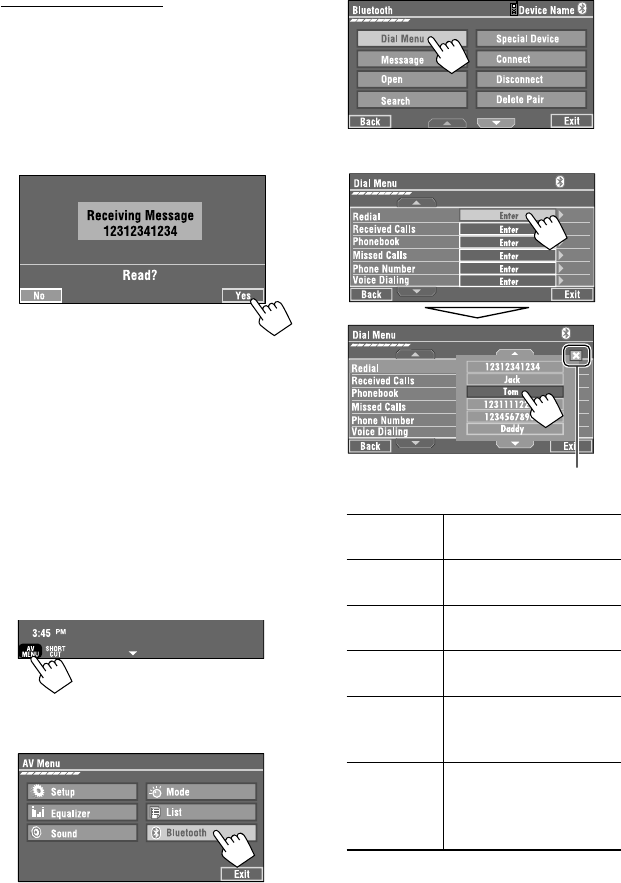
30
3
4 Select a calling method, then call.
Redial Shows the list of the phone
numbers you have dialed.
Received Calls Shows the list of the received
calls.
Phonebook Shows the phone book of the
connected cellular phone.
Missed Calls Shows the list of the missed
calls.
Phone
Number
Shows the phone number entry
screen = “Entering a phone
number” (☞ page 31).
Voice Dialling (Only when the connected
cellular phone has the voice
recognition system): = Speak
the name you want to call.
When an SMS comes in...
If the cellular phone is compatible with SMS (Short
Message Service), you can read the messages on the
screen.
• You cannot edit or send a message through the unit.
When <Message Info> is set to <Auto>...
The unit rings and the following screen is displayed to
inform you of a message arrival. (☞ page 51)
To read the message, press [Yes].
The source is changed to “Bluetooth PHONE.”
To read the message later, press [No].
• The message is stored into <Message> =
<Unread>. (☞ page 50)
When <Message Info> is set to <Manual>...
Access the message list to read messages. (☞ pages
50 and 51)
To make a call
1
• You can also use AV MENU on the monitor panel.
2
Cancel
EN_KW-AVX710[A].indb 30EN_KW-AVX710[A].indb 30 07.12.17 4:49:04 PM07.12.17 4:49:04 PM
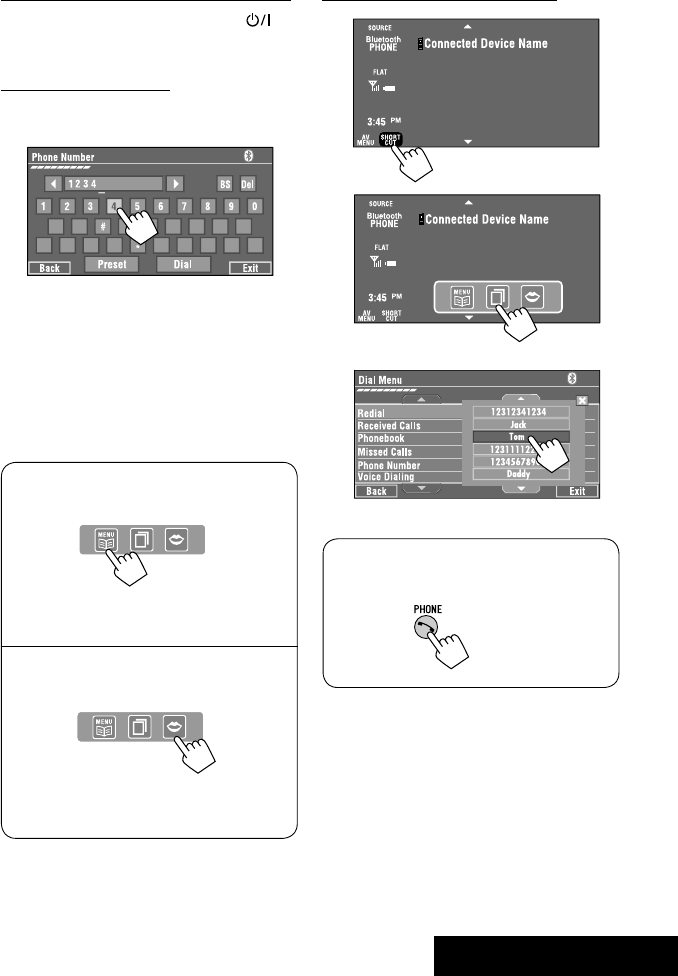
31 EXTERNAL DEVICES
To stop ringing (canceling the outgoing call)
Hold any button on the monitor panel (except /ATT
or +/–).
Entering a phone number
• You cannot use the remote controller to enter phone
numbers.
You can enter [0] – [9], [*], [#] (up to 32 numbers)
• [BS]: Erases the character before the cursor.
• [Del]: Erases the character on the cursor.
• [Preset]: Goes to Preset List. You can preset the
entered number by selecting a preset
number. (☞ page 32)
• [Dial]: Calls the entered number.
• You can easily access <Dial Menu> by pressing
[SHORT CUT] on the touch panel, then...
You can also access <Dial Menu> by holding
SOURCE on the monitor panel.
• You can easily activate <Voice Dialing> by
pressing [SHORT CUT] on the touch panel, then...
You can also activate <Voice Dialing> by
holding [AV MENU].
To redial previously dialed numbers
1
2
3
When using the remote controller, you can
display <Redial> menu anytime .
[Hold]
EN_KW-AVX710[A].indb 31EN_KW-AVX710[A].indb 31 07.12.17 4:49:05 PM07.12.17 4:49:05 PM

32
To call a preset number
1
2
You can use the following buttons on the remote
controller for the Bluetooth phone operations.
Presetting the phone numbers
You can preset up to six phone numbers.
1 Select the phone number you want to preset
from <Phonebook>, <Redial>, <Received
Calls>, or <Missed Calls>.
1 Press [AV MENU] on the touch panel or AV
MENU on the monitor panel.
2 Press [Bluetooth].
3 Press [Dial Menu], then...
Ex.: Selecting <Received Calls>
2 Select a telephone number to store.
3 Select a preset number.
Now “Tom” is stored into preset no. 1.
• Display <Dial Menu> screen/Answer
the incoming call.
• Display the <Redial> menu if pressed
and held (regardless of the current
source).
End the call.
Adjust the volume.
Make a call to the preset numbers.
[Hold]
:
:
:
:
[Hold]
EN_KW-AVX710[A].indb 32EN_KW-AVX710[A].indb 32 07.12.17 4:49:06 PM07.12.17 4:49:06 PM
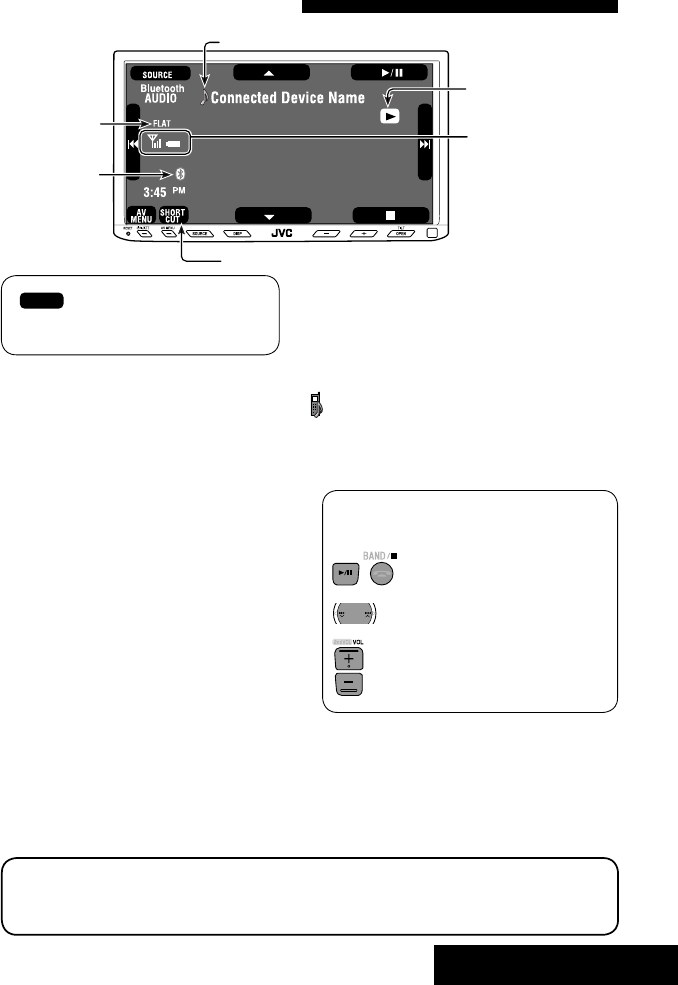
33 EXTERNAL DEVICES
Bluetooth Information:
If you wish to receive more information about Bluetooth, visit the following JVC web site: <http://www.
jvc-victor.co.jp/english/car/>
You can use the following buttons on the remote
controller for the Bluetooth audio operations.
Using the Bluetooth audio player
☞ page 41
Sound mode
(☞ page 41)
[3 / 8] [7] Start and pause playback
[4 ¢] Reverse/forward skip
[5 ∞] Select the registered device
(“New Device” appears when a new device can
be registered.*3)
Status of the device
Signal strength/Battery
remainder
(only when the information
comes from the device)
The Bluetooth icon
lights up when
the adapter is
connected.
~ Press [SOURCE], then press [Bluetooth
AUDIO]. (☞ page 9)
• You can also use SOURCE on the monitor
panel. Press it repeatedly.
Ÿ Start playback.
: Buttons on the touch panel. In the
explanation, they are indicated
inside [ ].
*2
*1
*1 When a cellular phone with audio function is connected, appears.
*2 Indicates the button pressed. It may be different from the operation status.
*3 You cannot select “New Device” when a Bluetooth audio player is connected.
Start and pause playback.
Reverse/forward skip
Adjust the volume.
:
:
:
EN_KW-AVX710[A].indb 33EN_KW-AVX710[A].indb 33 07.12.17 4:49:07 PM07.12.17 4:49:07 PM

34
Preparation:
Make sure <Changer> is selected for <External
Input>. (☞ page 47)
~ Press [SOURCE], then press [CD-CH]. (☞
page 9)
• You can also use SOURCE on the monitor
panel. Press it repeatedly.
Ÿ
• You can also use AV MENU on the monitor
panel.
! Display the Disc List.
Listening to the CD changer
It is recommended to use a JVC MP3-compatible CD changer with your unit.
• You can play only CDs (CD-DA) and MP3 discs.
Folder no./Track no./Playing time
Disc no.
MP3 indicator
☞ page 35
Tag data appears only when it is
recorded.
⁄ Select a disc to start playing.
• If you select an MP3 disc, the Track list of the
current folder appears. You can select a track
and start playing. (☞ also page 19)
• If you select a folder on the list, you can start
playing the first track of the folder.
To go to the other list
Sound mode
(☞ page 41)
[4 ¢] Press: Select track
Hold: Reverse/forward search
[5 ∞] Press: Select folders (only for MP3)
Hold: Display Disc list
Total track no. included on the
disc
Ex. while playing an MP3 disc
: Buttons on the touch panel. In the
explanation, they are indicated inside [ ].
EN_KW-AVX710[A].indb 34EN_KW-AVX710[A].indb 34 07.12.17 4:49:07 PM07.12.17 4:49:07 PM

35 EXTERNAL DEVICES
When one of the playback modes is selected, the
corresponding indicator lights up on the source
information screen.
To cancel, select <Off>.
You can use following playback modes—Repeat or
Random.
Ex.: To select Track Repeat for an MP3 disc
1 Press [AV MENU] on the touch panel or AV
MENU on the monitor panel.
2 Press [Mode].
3
Selecting playback modes
Disc type Repeat Random
Track: Repeats current track
Disc: Repeats all tracks of the current disc
Disc: Randomly plays all tracks of the
current disc
All: Randomly plays all tracks of all
loaded discs
Track: Repeats current track
Folder: Repeats all tracks of the current
folder
Disc: Repeats all tracks of the current disc
Folder: Randomly plays all tracks of current
folder, then tracks of next folders
Disc: Randomly plays all tracks of the
current disc
All: Randomly plays all tracks of all
loaded discs
You can use the following buttons on the remote
controller to operate the CD changer.
You can easily turn on or off Track Repeat by
pressing [SHORT CUT] on the touch panel, then...
: Select disc.
: Select folder (MP3 only).
• Press: Select track.
• Hold: Reverse/forward search
☞ page 41
EN_KW-AVX710[A].indb 35EN_KW-AVX710[A].indb 35 07.12.17 4:49:08 PM07.12.17 4:49:08 PM

36
Listening to the iPod
It is required to connect the Interface adapter for iPod (KS-PD100) to the CD changer jack on the rear.
Preparation:
Make sure <iPod> is selected for <External Input>. (☞ page 47)
~ Press [SOURCE], then press [iPod] (☞ page 9)
Playback starts automatically.
• You can also use SOURCE on the monitor panel. Press it repeatedly.
Ÿ Press [4] or [¢] to select a track.
Track no./Playing time
☞ page 37
[4 ¢] Press: Select track
Hold: Reverse/forward search
[5] Enter player’s menu
[∞] Start playback/pause
• To resume, press again.
Sound mode
(☞ page 41)
: Buttons on the touch panel. In the
explanation, they are indicated
inside [ ].
EN_KW-AVX710[A].indb 36EN_KW-AVX710[A].indb 36 07.12.17 4:49:09 PM07.12.17 4:49:09 PM
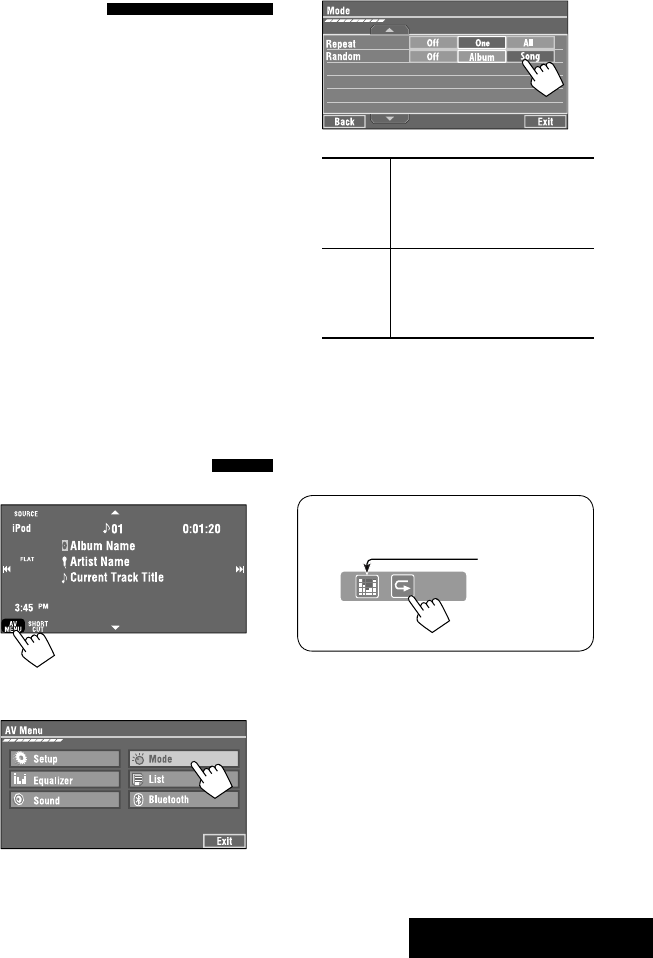
37 EXTERNAL DEVICES
Selecting a track from the
player’s menu
1 Press [5] to enter the player’s menu.
“SEARCH” flashes on the screen during menu
operations.
• This mode will be canceled if no operations are
done for about five seconds.
2 Press [4] or [¢] to select the desired
item.
Press: Select an item.
Hold: Skip ten items at a time if there are more
than ten items.
Playlists Ô Artists Ô Albums Ô Songs Ô
Genres Ô Composers Ô (back to the beginning)
3 Press [∞] to confirm the selection.
4 Repeat steps 2 and 3 to select a track.
• When a track is selected finally, playback starts.
• To return to the previous menu, press [5].
Selecting playback modes
1
• You can also use AV MENU on the monitor panel.
2
3 Select an appropriate option.
Repeat One: Functions the same as
“Repeat One.”
All: Functions the same as
“Repeat All.”
Random Album: Functions the same as
“Shuffle Albums.”
Song: Functions the same as
“Shuffle Songs.”
• When the playback modes are selected, the
corresponding indicators light up alternately on
the screen.
To cancel, select <Off>.
You can easily turn on or off Track Repeat by
pressing [SHORT CUT] on the touch panel, then...
☞ page 41
EN_KW-AVX710[A].indb 37EN_KW-AVX710[A].indb 37 07.12.17 4:49:09 PM07.12.17 4:49:09 PM

38
Using other external components
AV-INPUT
You can connect an external component to the LINE IN/VIDEO IN terminals.
~ Press [SOURCE], then press [AV-IN]. (☞ page 9)
• You can also use SOURCE on the monitor panel. Press it repeatedly.
Ÿ Turn on the connected component and start playing the source.
To display the operation buttons (☞ page 17) while watching the playback picture
• If no operations are done for about five seconds, the operation buttons disappear.
• [KEY] does not work when the source is “AV-IN.”
Touch the screen (center portion).
You can easily access to <Aspect> setting
menu by pressing [SHORT CUT] on the
touch panel, then...
Assigned title (☞ page 42) Sound mode (☞ page 41)
Touch the screen (center portion).
: Buttons on the touch panel. In the explanation, they are indicated inside [ ].
These buttons also work when they are not shown on the touch panel (while watching the playback picture).
☞ page 41
EN_KW-AVX710[A].indb 38EN_KW-AVX710[A].indb 38 07.12.17 4:49:10 PM07.12.17 4:49:10 PM

39 EXTERNAL DEVICES
To display the operation buttons (☞ page 17) while viewing the navigation screen
• The operation buttons displayed on the screen vary among the playback sources.
• If no operations are done for about five seconds, the operation buttons disappear.
• The above buttons except [KEY] also work when they are not shown on the screen (while viewing the navigation
screen).
Navigation screen
You can also connect a Navigation System to the VIDEO IN terminal so that you can watch the navigation screen.
Preparation:
Make sure <Navigation> is selected for <AV Input>. (☞ page 47)
To view the navigation screen (and listen to the navigation guidance*)
Press DISP on the monitor panel repeatedly. (☞ page 9)
• The aspect ratio of the navigation screen is fixed to
<Full> regardless of the <Aspect> setting. (☞ page
45)
* If your Navigation System is equipped with the voice guidance function.
When <Navigation> is selected for <AV Input> (☞ page 47)
• You can use the source “AV-IN” for listening to an audio source connected to the LINE IN terminals.
• Some status messages such as volume level will not appear on the screen.
Touch the screen (center portion). Touch the screen (center portion).
EN_KW-AVX710[A].indb 39EN_KW-AVX710[A].indb 39 07.12.17 4:49:10 PM07.12.17 4:49:10 PM
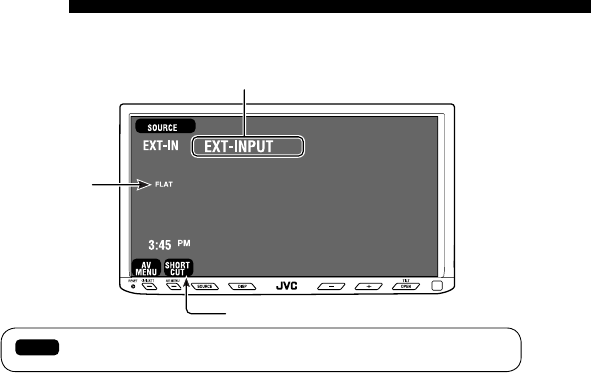
40
EXT-INPUT
You can connect an external component to the CD changer jack on the rear using the Line Input Adapter—KS-U57
(not supplied) or AUX Input Adapter—KS-U58 (not supplied).
Preparation:
Make sure <External> is selected for <External Input>. (☞ page 47)
~ Press [SOURCE], then press [EXT-IN]. (☞ page 9)
• You can also use SOURCE on the monitor panel. Press it repeatedly.
Ÿ Turn on the connected component and start playing the source.
Assigned title (☞ page 42)
☞ page 41
Sound mode
(☞ page 41)
: Buttons on the touch panel. In the explanation, they are indicated inside [ ].
EN_KW-AVX710[A].indb 40EN_KW-AVX710[A].indb 40 07.12.17 4:49:10 PM07.12.17 4:49:10 PM
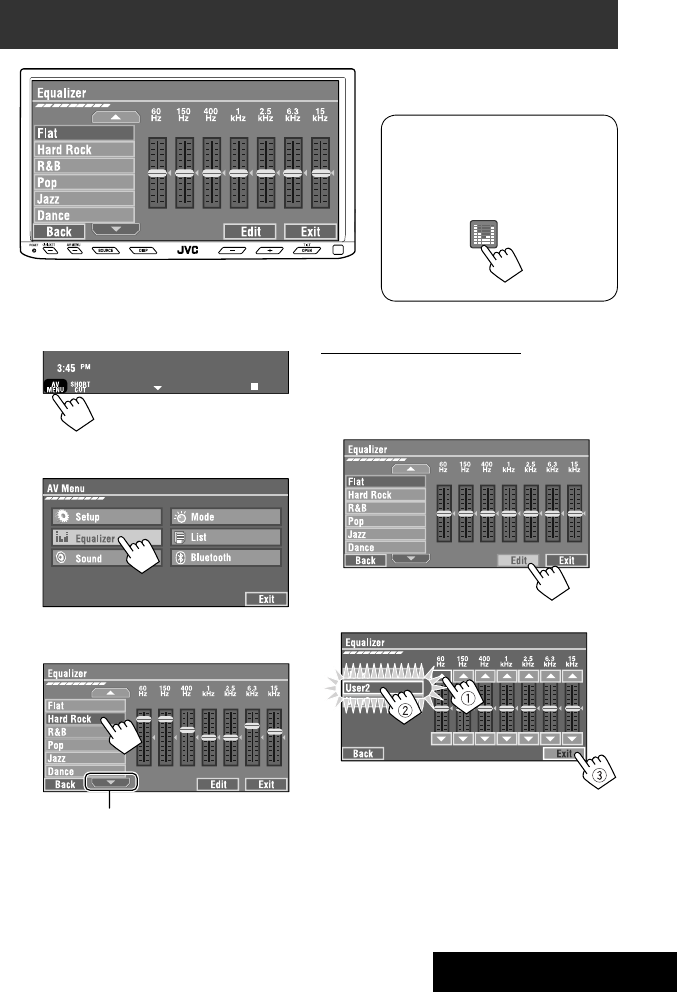
SETTINGS
41
~
• You can also use AV MENU on the monitor panel.
Ÿ
! Select a sound mode.
• For preset values of each sound mode, ☞ page 58.
Sound equalization
Storing your own adjustments
You can store your adjustments into <User1>,
<User2>, and <User3>.
1 Repeat steps ~ and Ÿ, then in step !...
2 Adjust (1), then store (2).
Ex.: When storing into <User2>.
While playing back any source other
than “Bluetooth PHONE,” you can easily
access <Equalizer> menu by pressing
[SHORT CUT] on the touch panel, then...
Move to other six sound modes
EN_KW-AVX710[A].indb 41EN_KW-AVX710[A].indb 41 07.12.17 4:49:11 PM07.12.17 4:49:11 PM

42
You can assign titles as follows.
FM/AM stations Up to 16 characters—up to 30
stations.
AV-IN
EXT-IN
Up to 16 characters
~ Select the source. (☞ page 9)
• For FM/AM stations: Select the band, then
tune into a station.
Ÿ Display <Title Entry> screen.
• You can also use AV MENU on the monitor panel.
! Assign a title.
You can enter up to 16 characters (for available
characters, ☞ page 59).
• [Store]: Confirm the entry.
• [2/3]: Move the cursor.
• [BS]: Erase the character before the
cursor.
• [Del]: Erase the character on the cursor.
• [Cap]: Change the letter case (upper/
lower).
• [Change]: Change the character set.
• [Space]: Enter a space.
⁄ Finish the procedure.
Assigning titles to the sources
In the explanation, buttons on the
touch panel are indicated inside [ ].
EN_KW-AVX710[A].indb 42EN_KW-AVX710[A].indb 42 07.12.17 4:49:12 PM07.12.17 4:49:12 PM

SETTINGS
43
!
Menu operations
The following steps are one of the fundamental
procedures. Some of the settings do not open the
sub-setting window, but just selecting an option will
change the setting.
• The display indications may change according to
change of the specifications.
Ex.: Changing the <AV Input> setting
~
• You can also use AV MENU on the monitor panel.
Ÿ
Non-available items will be shaded.
EN_KW-AVX710[A].indb 43EN_KW-AVX710[A].indb 43 07.12.17 4:49:12 PM07.12.17 4:49:12 PM
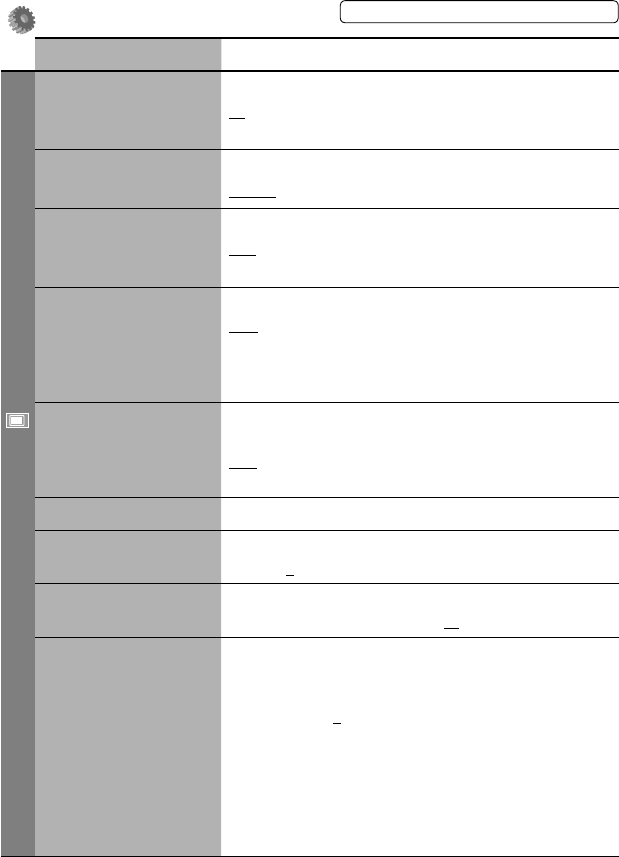
44
Setup
Menu items Selectable settings, [reference page]
Display
Demonstration Off: Cancels.
On: Activates the demonstration on the screen. To stop it temporarily,
touch the screen.
Wall Paper You can select the background picture of the screen.
Horizon, Metal, Art, Plain
Color You can select the color of the background picture.
Blue, Light-Blue, Red, Orange, Yellow, Green, Purple, Dark-Blue,
Dark-Green, Brown, Light-Brown, Black
Scroll Off: Cancels.
Once: Scrolls the disc information once.
Auto: Repeats scrolling (five-second intervals).
• Holding DISP on the monitor panel scrolls the information regardless
of this setting.
Dimmer Off: Cancels.
On: Activates dimmer.
Auto: Dims the monitor when you turn on the headlights.*1
Dimmer Time Set : Activates the Dimmer Time setting below.
Dimmer Time Set Sets the Dimmer On/Off times.
Dimmer Level You can select the brightness for dimmer.
1 (bright), 2 (middle), 3 (dark)
Bright You can adjust brightness of the screen.
–15 (darkest) to +15 (brightest); Initial 00
Picture Adjust*2You can adjust the following to make the screen clear and legible for
watching the playback picture. The setting will be stored—one for
“DISC” (common) and the other for “AV-IN.”
–15 to +15; Initial 0
Bright: Adjust if the picture is too bright or too dark.
Contrast: Adjust the contrast.
Color: Adjust the color of the picture—lighter or darker.
Tint: Adjust the tint if the human skin color is unnatural. (only when
color system setting is <NTSC>, ☞ next page)
• Press [5] or [∞] to adjust.
*1 The ILLUMINATION lead connection is required. (☞ Installation/Connection Manual)
*2 Adjustable only when the source is “DISC” (the inserted disc must contain pictures or movies) or “AV-IN.”
The procedure for setting an item is shown on page 43.
EN_KW-AVX710[A].indb 44EN_KW-AVX710[A].indb 44 07.12.17 4:49:13 PM07.12.17 4:49:13 PM
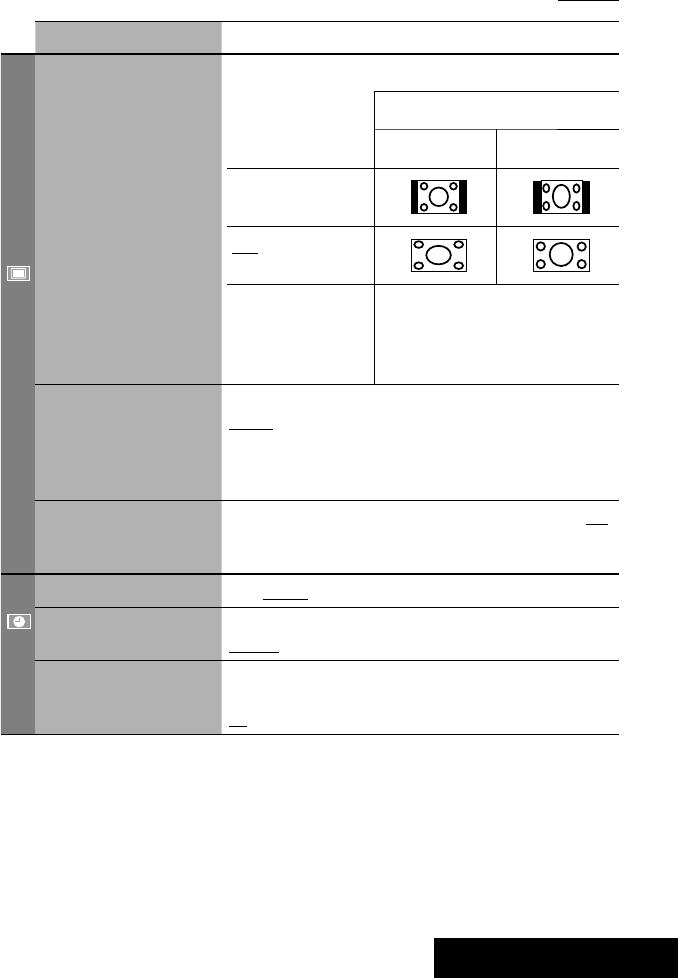
SETTINGS
45
Menu items Selectable settings, [reference page]
Display
Aspect*3You can change the aspect ratio of the picture.
Aspect ratio of incoming signal
4:3 16:9
Regular:
For 4:3 original pictures
Full:
For 16:9 original pictures
Auto: • For “DISC”: Aspect ratio is automatically
selected to match to the incoming signals.
• For the other video sources: Aspect ratio is
fixed to <Regular>.
Language*4Select the indication language shown on the screen.
English, Español, Français, Deutsch, Italiano, Nederlands,
Svenska, Dansk, Руccĸий, Português
• The characters you can enter for assigning the titles also change
according to the language selected. ☞ [59]
NTSC/PAL Select the color system of the external monitor connected—NTSC, PAL.
• Turn off the power and turn it on again to make the new setting
effective.
Clock
Time Set Initial 1:00AM ☞ [8]
Time Format Select either 12-hour system or 24-hour system.
12Hours, 24Hours ☞ [8]
OSD Clock When <On> is selected, the clock time is displayed on the playback
picture. ☞ [8]
Off, On
*3 Not adjustable when no picture is shown.
*4 After you change the indication language setting, turn off then on the power so that your setting takes effect.
Initial: Underlined
EN_KW-AVX710[A].indb 45EN_KW-AVX710[A].indb 45 07.12.17 4:49:13 PM07.12.17 4:49:13 PM

46
Menu items Selectable settings, [reference page]
Disc
Menu Language*1Select the initial disc menu language; Initial English (☞ also page
58).
Audio Language*1Select the initial audio language; Initial English (☞ also page 58).
Subtitle*1Select the initial subtitle language or erase the subtitle (Off); Initial
English (☞ also page 58).
Monitor Type*1Select the monitor type to watch a wide screen picture on the external
monitor.
16:9 : Select when the aspect ratio of the external monitor is 16:9.
4:3 LB (Letterbox)/4:3 PS (Pan Scan): Select when the aspect ratio of
the external monitor is 4:3.
• Refer to the illustrations on the left to see how the pictures are
shown on the screen.
OSD Position*1Select the position of the on-screen bar. ☞ [25]
1: Higher position
2: Lower position
File Type*1Select playback file type when a disc contains different types of files.
Audio: Plays back audio files.
Still Picture: Plays back JPEG files.
Video: Plays back DivX/MPEG1/MPEG2 files.
Audio&Video: Plays back audio files and DivX/MPEG1/MPEG2 files.
DivX Regist. (Registration)*1This unit has its own Registration Code. Once you have played back a
file with which the Registration Code recorded, this unit’s Registration
Code is overwritten for copyright protection.
D. Audio Output*1Select the signal format emitted through the DIGITAL OUT (optical)
terminal. (☞ also page 57)
PCM : Select this when connecting an amplifier or a decoder
incompatible with Dolby Digital, DTS, or MPEG Audio, or when
connecting to a recording device.
Dolby D : Select this when connecting an amplifier or a decoder
compatible with Dolby Digital.
Stream : Select this when connecting an amplifier or a decoder
compatible with Dolby Digital, DTS, or MPEG Audio.
*1 Selectable only for “DISC.” (Playback stops when you change the setting.)
Position 1 Position 2
16:9 4:3LB
4:3PS
The procedure for setting an item is shown on page 43.
EN_KW-AVX710[A].indb 46EN_KW-AVX710[A].indb 46 07.12.17 4:49:14 PM07.12.17 4:49:14 PM

SETTINGS
47
Menu items Selectable settings, [reference page]
Disc
Down Mix*1When playing back a multi-channel disc, this setting affects the signals
reproduced through the LINE OUT terminals.
Dolby SR : Select this to enjoy multi-channel surround audio by
connecting an amplifier compatible with Dolby Surround.
Stereo : Normally select this.
D. (Dynamic) Range
Compres. (Compression)*1
You can enjoy a powerful sound at a low volume level while playing
Dolby Digital software.
Auto: Select to apply the effect to multi-channel encoded software.
On: Select to always use this function.
Tuner
IF Band Width Auto: Increases the tuner selectivity to reduce interference noises
between adjacent stations. (Stereo effect may be lost.)
Wide: Subject to the interference from adjacent stations, but sound
quality will not be degraded and the stereo effect will remain.
Input
AV Input*2
You can determine the use of LINE IN and VIDEO IN terminals. ☞ [38, 39
]
Off: Select when no component is connected (“AV-IN” is skipped while
selecting the source).
Audio&Video: Select when connecting an AV component such as a
VCR.
Audio: Select when connecting an audio component such as a portable
audio player.
Camera*3 : Select when connecting a rear view camera.
Navigation : Select when connecting a Navigation System.
External Input*4For connecting an external component to the CD changer jack on the
rear.
Changer/iPod*5: CD changer or iPod. ☞ [34, 36]
External: Any other than the above. ☞ [40]
• For connecting the Bluetooth adapter, this setting is not required. It is
automatically detected.
*2 Not selectable when “AV-IN” is selected as the source.
*3 The REVERSE GEAR SIGNAL lead connection is required. See Installation/Connection Manual. The rear view through
the camera appears on the screen in <Full> aspect ratio (regardless of the aspect ratio setting) when you shift the
gear to the reverse (R) position. When you press DISP on the control panel, or when you shift the gear to another
position other than the reverse (R) position, the rear view screen is cleared.
*4 Not selectable when the component connected to the CD changer jack is selected as the source.
*5 The name of the component detected through the CD changer jack is shown.
Initial: Underlined
EN_KW-AVX710[A].indb 47EN_KW-AVX710[A].indb 47 07.12.17 4:49:15 PM07.12.17 4:49:15 PM

48
Menu items Selectable settings, [reference page]
Others
Beep Off: Cancels.
On: Activates the key-touch tone.
Telephone Muting Off: Cancels.
Muting1, Muting2: Select either one which mutes the sounds while
using the cellular phone.
Power LED Flash Off: Cancels.
On: When the ignition is turned off, the lamp on the button
flashes.
TouchPanel Sens. Change the sensitivity of the touch panel. As the number decreases,
sensitivity becomes higher. 1/2/3
Initialize Initialize all settings you have made in <AV Menu>. Press and hold
[Enter] to initialize the settings, then reset the unit. ☞ [3]
Equalizer
Flat/Hard Rock/R&B/Pop/Jazz/Dance/Country/Reggae/Classic/User1/User2/User3 ☞ [41]
The procedure for setting an item is shown on page 43.
EN_KW-AVX710[A].indb 48EN_KW-AVX710[A].indb 48 07.12.17 4:49:15 PM07.12.17 4:49:15 PM
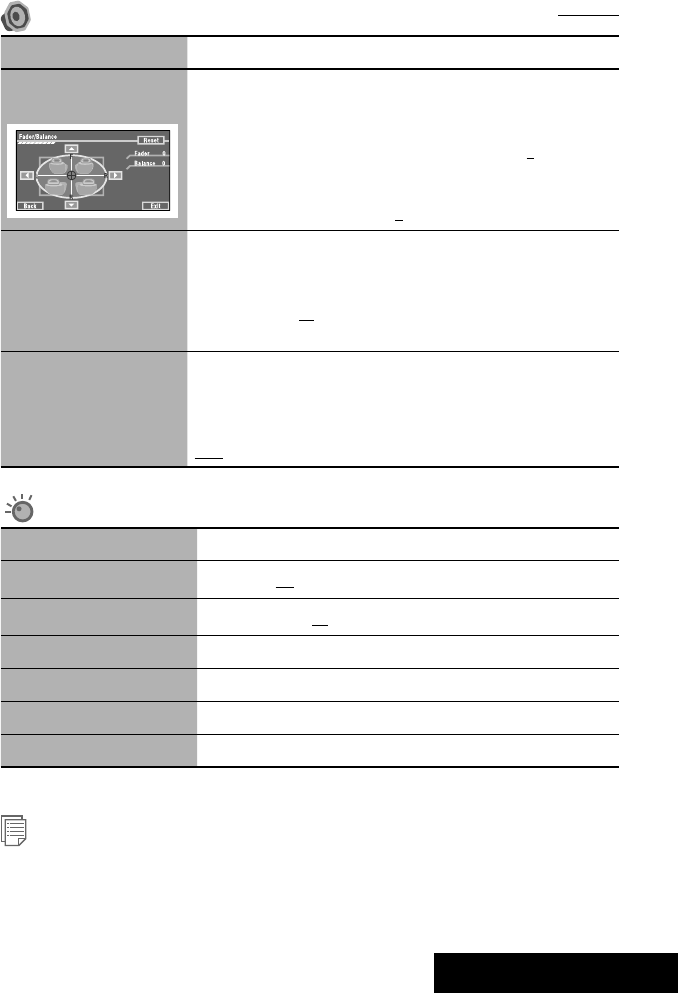
SETTINGS
49
Sound
Menu items Selectable settings, [reference page]
Fader/Balance Adjust fader—speaker output balance between the front and rear speakers.
• Upmost—front only (F6)
• Downmost—rear only (R6)
When using a two-speaker system, set the fader to the center (0).
Adjust balance—speaker output balance between the left and right speakers.
• Leftmost—left only (L6)
• Rightmost—right only (R6) Initial 0
Volume Adjust Adjust and store auto-adjustment volume level for each source, comparing to
the FM volume level. The volume level will automatically increase or decrease
when you change the source.
–12 to +12; Initial 00
• You can make the adjustments separately for DVD and other discs.
Amplifier Gain You can change the maximum volume level of this unit.
Off: Deactivates the built-in amplifier.
Low: VOL 00 to 30 (Select this if the maximum power of the speakers is less
than 50 W.)
High: VOL 00 to 50
Mode*1
Menu items Selectable settings, [reference page]
Mono Only for FM. (Off, On) ☞ [10]
DX/Local Only for FM. (Local, DX) ☞ [11]
SSM Only for FM. Press and hold to start SSM. ☞ [11]
Title Entry Only for FM/AM stations, “AV-IN,” and “EXT-IN.” ☞ [42]
Repeat ☞ [18, 35, 37]
Random ☞ [18, 35, 37]
*1 Items listed under <Mode> vary among the playback sources.
List
For “DISC”: Folder List and Track List (☞ page 19)
For “CD-CH”: Disc List, Folder List, and Track List (☞ page 34)
• For the other playback sources, you can display a list by pressing DISP on the monitor panel. (☞ page 9)
Initial: Underlined
EN_KW-AVX710[A].indb 49EN_KW-AVX710[A].indb 49 07.12.17 4:49:16 PM07.12.17 4:49:16 PM

50
Bluetooth*1
Menu items Selectable settings, [reference page]
Dial Menu *2Select the method to make a call. ☞ [30]
Message*3You can read a message from the following message histories.
Unread: Messages you have not read.
Read: Messages you have read.
Unsent: Messages you have not sent.
Sent: Messages you have sent.
• The number of messages in each history is also shown.
Open ☞ [27]
Search ☞ [28]
Special Device Only for “New Device.”
Shows the list of Bluetooth devices which require some special procedure to
establish Bluetooth connection. Select a device you want to connect.
• After selecting the device, use <Open> or <Search> (☞ page 27 or 28)
for connection.
• Once the connection is established, it is registered in the unit. You can
connect the unit and the device by using <Connect> (☞ below) from the
next time.
Connect Only for the registered devices.
After selecting a device from among the registered devices (☞ pages 27 and
28), establish the connection with it.
Disconnect Only for the device being connected.
Disconnect the current device before connecting another device.
Delete Pairing Only for the registered devices.
Delete the registered devices.
*1 Selectable only for “Bluetooth PHONE” or “Bluetooth AUDIO.” Select a device (or “New Device”) before operating the
menu.
*2 Only for the device connected for “Bluetooth PHONE.”
*3 Selectable only when the source is “Bluetooth PHONE” and the connected cellular phone is compatible with SMS
(Short Message Service).
When operating the Bluetooth device, refer also to the instructions supplied with the device.
The procedure for setting an item is shown on page 43.
EN_KW-AVX710[A].indb 50EN_KW-AVX710[A].indb 50 07.12.17 4:49:17 PM07.12.17 4:49:17 PM

SETTINGS
51
Menu items Selectable settings, [reference page]
Settings
Auto Connect *4When the unit is turned on, the connection is established automatically
with...
Off: No Bluetooth device.
Last: The last connected Bluetooth device.
Order: The available registered Bluetooth device found first.
Auto Answer *5Off: The unit does not answer the calls automatically. Answer the calls
manually.
On: The unit answers the incoming calls automatically.
Reject: The unit rejects all incoming calls.
Message Info *5Auto: The unit informs you of the arrival of a message by ringing and
displaying “Receiving Message.” To read the message, ☞ page 30.
Manual: The unit does not inform you of the arrival of a message.
MIC Setting *5Adjust microphone volume connected to the Bluetooth adapter.
01/02/03
Version *6The Bluetooth software and hardware versions are shown.
*4 Selectable only for “Bluetooth PHONE.”
*5 Only for the cellular phone connected for “Bluetooth PHONE.” Not selectable when “New Device” is selected.
*6 If you wish to receive more information about Bluetooth, visit the following JVC web site: <http://www.jvc-victor.
co.jp/english/car/>
SETTINGS
Initial: Underlined
EN_KW-AVX710[A].indb 51EN_KW-AVX710[A].indb 51 07.12.17 4:49:17 PM07.12.17 4:49:17 PM

52
Maintenance
Moisture condensation
Moisture may condense on the lens inside the unit in
the following cases:
• After starting the heater in the car.
• If it becomes very humid inside the car.
Should this occur, the unit may malfunction. In this
case, eject the disc and leave the unit turned on for a
few hours until the moisture evaporates.
How to handle discs
When removing a disc from its
case, press down the center holder of
the case and lift the disc out, holding it
by the edges.
• Always hold the disc by the edges. Do not touch its
recording surface.
When storing a disc into its case, gently insert the
disc around the center holder (with the printed surface
facing up).
• Make sure to store discs into the cases after use.
To keep discs clean
A dirty disc may not play correctly.
If a disc does become dirty, wipe it with
a soft cloth in a straight line from center
to edge.
• Do not use any solvent (for example, conventional
record cleaner, spray, thinner, benzine, etc.) to clean
discs.
To play new discs
New discs may have some rough spots
around the inner and outer edges. If
such a disc is used, this unit may reject
the disc.
To remove these rough spots, rub the edges with a
pencil or ball-point pen, etc.
Stick-on labelSticker and sticker residue
Unusual shape
Warped disc
Do not use the following discs:
Center holder
SingleCD—8 cm disc
C-thru Disc (semi-transparent disc) Transparent or semi-transparent on its
recording area
EN_KW-AVX710[A].indb 52EN_KW-AVX710[A].indb 52 07.12.17 4:49:18 PM07.12.17 4:49:18 PM

53 REFERENCES
More about this unit
General
Turning on the power
• By pressing SOURCE on the monitor panel, you
can also turn on the power. If the source is ready,
playback starts.
Tuner (FM only)
Storing stations in memory
• When SSM is over, received stations are preset in no.
1 (lowest frequency) to no. 6 (highest frequency).
Disc
General
• In this manual, words “track” and “file” are
interchangeably used.
• This unit can only play back audio CD (CD-DA) files
if different type of audio files (MP3/WMA/WAV) are
recorded on the same disc.
• This unit can display only one-byte characters. No
other characters can be correctly displayed.
Inserting a disc
• When a disc is inserted upside down or has no
playable files, “Cannot play this disc Check the disc”
appears on the screen. Eject the disc.
Ejecting a disc
• If “No disc“ appears after removing a disc, insert a
disc or select another playback source.
• If the ejected disc is not removed within 15 seconds,
the disc is automatically inserted again into the
loading slot to protect it from dust.
Playing Recordable/Rewritable discs
• This unit can recognize a total of 5 000 files and 250
folders (a maximum of 999 files per folder).
• Use only “finalized” discs.
• This unit can play back multi-session discs; however,
unclosed sessions will be skipped while playing.
• This unit can recognize a total 25 characters for file/
folder names.
• Some discs or files may not be played back due to
their characteristics or recording conditions.
Playing DVD-VR
• For details about DVD-VR format and Playlist, refer
to the instructions supplied with the recording
equipment.
File playback
Playing DivX files
• This unit can play back DivX files with the extension
code <.divx>, <.div>, or <.avi> (regardless of the
letter case—upper/lower).
• This unit supports the DivX files whose resolution is
720 x 576 pixels or less.
• Audio stream should conform to MP3 or Dolby Digital.
• The file encoded in the interlaced scanning mode
may not be played back correctly.
• The maximum bit rate for video signals (average) is 4
Mbps.
Continued on the next page
EN_KW-AVX710[A].indb 53EN_KW-AVX710[A].indb 53 07.12.17 4:49:18 PM07.12.17 4:49:18 PM

54
Playing MPEG1/MPEG2 files
• This unit can play back MPEG1/MPEG2 files with the
extension code <.mpg>, <.mpeg>, or <.mod>*.
* <.mod> is an extension code used for the MPEG2
files recorded by JVC Everio camcorders.
• The stream format should conform to MPEG system/
program stream.
The file format should be MP@ML (Main Profile at
Main Level)/SP@ML (Simple Profile at Main Level)/
MP@LL (Main Profile at Low Level).
• Audio streams should conform to MPEG1 Audio
Layer-2 or Dolby Digital.
• The maximum bit rate for video signals (average) is 4
Mbps.
Playing JPEG files
• This unit can play back JPEG files with the extension
code <.jpg>, or <.jpeg>.
• It is recommended that you record a file at 640 x 480
resolution.
• This unit can play back baseline JPEG files.
Progressive JPEG files or lossless JPEG files cannot be
played.
Playing MP3/WMA/WAV files
• This unit can play back files with the extension code
<.mp3>, <.wma>, or <.wav> (regardless of the
letter case—upper/lower).
• This unit can play back the files meeting the
conditions below:
– Bit rate:
MP3/WMA: 32 kbps — 320 kbps
– Sampling frequency:
48 kHz, 44.1 kHz, 32 kHz (for MPEG1)
24 kHz, 22.05 kHz, 16 kHz (for MPEG2)
48 kHz, 44.1 kHz, 32 kHz, 22.05 kHz (for WMA)
44.1 kHz (for WAV)
• This unit can show ID3 Tag Version
1.0/1.1/2.2/2.3/2.4 (for MP3).
• This unit can also show WAV/WMA Tag.
• This unit can play back files recorded in VBR (variable
bit rate).
• Files recorded in VBR have a discrepancy in elapsed
time indication.
• This unit cannot play back the following files:
– MP3 files encoded with MP3i and MP3 PRO
format.
– MP3 files encoded with Layer 1/2.
– WMA files encoded with lossless, professional,
and voice format.
– WMA files which are not based upon Windows
Media® Audio.
– WMA files copy-protected with DRM.
– Files which have the data such as AIFF, ATRAC3,
etc.
Disc/file information shown on the
external monitor
The following screens appear only on the external
monitor.
• CD
1 Selected playback mode
2 Elapsed playing time of the current track
3 Operation status
4 Current track number/total number of tracks
on the disc
5 Track information
6 Track list
7 Current track (highlighted bar)
TIME 00:14
Track : 6 / 14
Track Information
Cloudy
Fair
Fog
Hail
Indian summer
Rain
Shower
Snow
Thunder
Typhoon
Wind
Winter sky
Album
Four seasons
Artist
Robert M. Smith
Title
Rain
T. RPT
EN_KW-AVX710[A].indb 54EN_KW-AVX710[A].indb 54 07.12.17 4:49:19 PM07.12.17 4:49:19 PM

55 REFERENCES
Bluetooth operations
General
• While driving, do not perform complicated operation
such as dialing the numbers, using phone book, etc.
When you perform these operations, stop your car in
a safe place.
• Some Bluetooth devices may not be connected to
this unit depending on the Bluetooth version of the
device.
• This unit may not work for some Bluetooth devices.
• Connecting condition may vary depending on
circumstances around you.
• When the unit is turned off, the device is
disconnected.
Warning messages for Bluetooth operations
• Connection Error: The device is registered but the
connection has failed. Use <Connect> to connect
the device again. (☞ page 28)
• Error: Try the operation again. If “Error” appears
again, check if the device supports the function you
have tried.
• Device Unfound: No available Bluetooth device is
detected by <Search>.
• Loading: The unit is updating the phone book and/
or SMS.
• Please Wait...: The unit is preparing to use
the Bluetooth function. If the message does not
disappear, turn off and turn on the unit, then connect
the device again (or reset the unit).
• Reset 08: Check the connection between the
adapter and this unit.
Icons for phone types
• These icons indicate the phone type set on the device.
:Cellular phone
:Household phone
:Office
:General
:Other than above
• DivX/MPEG1/MPEG2/JPEG/MP3/WMA/WAV
1 Current folder (highlighted bar)
2 Current folder number/total folder number
3 Folder list
4 Selected playback mode
5 Elapsed playing time of the current track (not
displayed for JPEG)
6 Operation status
7 Current track number/total number of tracks
in the current folder (total number of tracks on
the disc)
8 Track information (only for MP3/WMA/WAV)
9 Track list
p Current track (highlighted)
* If tag data includes “Jacket Picture” (baseline
JPEG), it will be displayed.
EN_KW-AVX710[A].indb 55EN_KW-AVX710[A].indb 55 07.12.17 4:49:19 PM07.12.17 4:49:19 PM

56
CD changer
• If you select a folder, which does not include any
music files, on the list (☞ page 34), you will hear a
beep. Select another folder including music files.
iPod operations
• You can control the following types of iPods through
the interface adapter.
– iPod with dock connector (3rd Generation)
– iPod with Click Wheel (4th Generation)
– iPod mini
– iPod photo
– iPod nano *1
– iPod video (5th Generation) *2
*1 When you connect the iPod nano to the interface
adapter, be sure to disconnect the headphones;
otherwise, no sound is heard.
*2 It is not possible to browse video files on the
“Videos” menu while the iPod is connected to the
interface adapter.
• If the iPod does not play correctly, please update your
iPod software to the latest version. For details about
updating your iPod, visit <http://www.apple.com>.
• When you turn on this unit, the iPod is charged
through the adapter connected to this unit.
• While the iPod is connected, all operations from the
iPod are disabled. Perform all operations from this
unit.
• The text information may not be displayed correctly.
• The text information scrolls on the screen. This unit
can display up to 40 characters.
Notice:
When operating an iPod, some operations may not
be performed correctly or as intended. In this case,
visit the following JVC web site:
<http://www.jvc.co.jp/english/car/support/
ks-pd100/index.html>
Menu settings
• If you change the <Amplifier Gain> setting from
<High> to <Low> while the volume level is set
higher than “30,” the unit automatically changes the
volume level to “VOL 30.”
• After you change any of <Menu Language/Audio
Language/Subtitle> settings, turn off then on the
power, and re-insert the disc (or insert another disc)
so that your setting takes effect.
• When you select <16:9> for a picture whose aspect
ratio is 4:3, the picture slightly changes due to the
process for converting the picture width.
• Even if <4:3PS> is selected, the screen size may
become <4:3LB> for some discs.
EN_KW-AVX710[A].indb 56EN_KW-AVX710[A].indb 56 07.12.17 4:49:20 PM07.12.17 4:49:20 PM
57 REFERENCES
Sound signals emitted through the rear terminals
Through the analog terminals (Speaker out/REAR OUT)
2-channel signal is emitted. When playing multi-channel encoded disc, multi-channel signals are downmixed.
• DTS sound cannot be reproduced.
Through the DIGITAL OUT terminal
Digital signals (Linear PCM, Dolby Digital, DTS, MPEG Audio) are emitted.
• To reproduce the multi-channel sounds such as Dolby Digital, DTS, and MPEG Audio, connect an amplifier or a
decoder compatible with these multi-channel sources to this terminal, and set <D. Audio Output> correctly.
(☞ page 46)
<D. Audio Output>
Playback disc
Output signals
<Stream> <Dolby D> <PCM>
DVD 48 kHz, 16/20/24 bits Linear PCM 48 kHz, 16 bits stereo Linear PCM*
96 kHz, Linear PCM 48 kHz, 16 bits stereo Linear PCM
with Dolby Digital Dolby Digital bitstream 48 kHz, 16 bits stereo
Linear PCM
with DTS DTS bitstream
with MPEG Audio MPEG bitstream 48 kHz, 16 bits stereo Linear PCM
Audio CD, Video CD 44.1 kHz, 16 bits stereo Linear PCM /
48 kHz, 16 bits stereo Linear PCM
Audio CD with DTS DTS bitstream
DivX/
MPEG
with Dolby Digital Dolby Digital bitstream 48 kHz, 16 bits stereo
Linear PCM
with MPEG Audio 32/44.1/48 kHz, 16 bits Linear PCM
MP3/WMA 32/44.1/48 kHz, 16 bits Linear PCM
WAV 44.1 kHz, 16 bits Linear PCM
* Digital signals may be emitted at 20 or 24 bits (at their original bit rate) through the DIGITAL OUT terminal if the
discs are not copy-protected.
EN_KW-AVX710[A].indb 57EN_KW-AVX710[A].indb 57 07.12.17 4:49:20 PM07.12.17 4:49:20 PM
58
Preset equalizing values
Frequency
Sound mode 60 Hz 150 Hz 400 Hz 1 kHz 2.5 kHz 6.3 kHz 15 kHz
Flat 00 00 00 00 00 00 00
Hard Rock +03 +03 +01 00 00 +02 +01
R&B +03 +02 +02 00 +01 +01 +03
Pop 00 +02 00 00 +01 +01 +02
Jazz +03 +02 +01 +01 +01 +03 +02
Dance +04 +02 00 –02 –01 +01 +01
Country +02 +01 00 00 00 +01 +02
Reggae +03 00 00 +01 +02 +02 +03
Classic +02 +03 +01 00 00 +02 00
User1/2/3 00 00 00 00 00 00 00
Language codes (for DVD/DivX language selection)
Code
Language
Code
Language
Code
Language
Code
Language
Code
Language
AA Afar FA Persian KK Kazakh NO Norwegian ST Sesotho
AB Abkhazian FI Finnish KL Greenlandic OC Occitan SU Sundanese
AF Afrikaans FJ Fiji KM Cambodian OM (Afan) Oromo SW Swahili
AM Ameharic FO Faroese KN Kannada OR Oriya TA Tamil
AR Arabic FY Frisian KO Korean (KOR) PA Panjabi TE Telugu
AS Assamese GA Irish KS Kashmiri PL Polish TG Tajik
AY Aymara GD Scots Gaelic KU Kurdish PS Pashto, Pushto TH Thai
AZ Azerbaijani GL Galician KY Kirghiz QU Quechua TI Tigrinya
BA Bashkir GN Guarani LA Latin RM
Rhaeto-Romance
TK Turkmen
BE Byelorussian GU Gujarati LN Lingala RN Kirundi TL Tagalog
BG Bulgarian HA Hausa LO Laothian RO Rumanian TN Setswana
BH Bihari HI Hindi LT Lithuanian RW Kinyarwanda TO Tonga
BI Bislama HR Croatian LV Latvian, Lettish SA Sanskrit TR Turkish
BN Bengali, Bangla HU Hungarian MG Malagasy SD Sindhi TS Tsonga
BO Tibetan HY Armenian MI Maori SG Sangho TT Tatar
BR Breton IA Interlingua MK Macedonian SH Serbo-Croatian TW Twi
CA Catalan IE Interlingue ML Malayalam SI Singhalese UK Ukrainian
CO Corsican IK Inupiak MN Mongolian SK Slovak UR Urdu
CS Czech IN Indonesian MO Moldavian SL Slovenian UZ Uzbek
CY Welsh IS Icelandic MR Marathi SM Samoan VI Vietnamese
DZ Bhutani IW Hebrew MS Malay (MAY) SN Shona VO Volapuk
EL Greek JA Japanese MT Maltese SO Somali WO Wolof
EO Esperanto JI Yiddish MY Burmese SQ Albanian XH Xhosa
ET Estonian JW Javanese NA Nauru SR Serbian YO Yoruba
EU Basque KA Georgian NE Nepali SS Siswati ZU Zulu
EN_KW-AVX710[A].indb 58EN_KW-AVX710[A].indb 58 07.12.17 4:49:21 PM07.12.17 4:49:21 PM

59 REFERENCES
Characters shown on the screen
In addition to the roman alphabet (A – Z, a – z), you
can use the following characters to assign titles.
(☞ page 42)
• When <Руccĸий> is selected for <Language>.
(☞ page 45)
• When any language other than <Руccĸий> is
selected for <Language>. (☞ page 45)
Upper and lower cases
Numbers and symbols
Upper and lower cases
Numbers and symbols
• Manufactured under license from Dolby
Laboratories. Dolby and the double-D symbol are
trademarks of Dolby Laboratories.
• “DTS” and “DTS Digital Out” are registered
trademarks of DTS, Inc
• “DVD Logo” is a trademark of DVD Format/Logo
Licensing Corporation registered in the US, Japan
and other countries.
• DivX, DivX Ultra Certified, and associated logos
are trademarks of DivX, Inc. and are used under
license.
• Official DivX® Ultra Certified product
• Plays all versions of DivX® video (including DivX®
6) with enhanced playback of DivX® media files
and the DivX® Media Format
• Microsoft and Windows Media are either
registered trademarks or trademarks of Microsoft
Corporation in the United States and/or other
countries.
• The Bluetooth word mark and logos are owned by
the Bluetooth SIG, Inc. and any use of such marks
by Victor Company of Japan, Limited (JVC) is under
license. Other trademarks and trade names are
those of their respective owners.
• iPod and iTunes are trademarks of Apple Inc.,
registered in the U.S. and other countries.
• This product incorporates copyright protection
technology that is protected by U.S. patents
and other intellectual property rights. Use of
this copyright protection technology must be
authorized by Macrovision, and is intended for
home and other limited viewing uses only unless
otherwise authorized by Macrovision. Reverse
engineering or disassembly is prohibited.
EN_KW-AVX710[A].indb 59EN_KW-AVX710[A].indb 59 07.12.17 4:49:22 PM07.12.17 4:49:22 PM

60
Troubleshooting
What appears to be trouble is not always serious. Check the following points before calling a service center.
• For operations with the external components, refer also to the instructions supplied with the adapters used for the
connections (as well as the instructions supplied with the external components).
Symptoms Remedies/Causes
General
• No sound comes out of the speakers. • Adjust the volume to the optimum level.
• Check the cords and connections.
• DTS sound cannot be reproduced through the analog
terminals (Speaker out/REAR OUT).
• The screen is not clear and legible. Sunshine from the windshield may cause this symptom.
Adjust <Bright>. (☞ page 44)
• “Position Error Push Open Key” appears on
the screen.
The monitor panel angle has been forcibly adjusted, or its
adjustment has been interrupted while opening or closing.
Press OPEN/TILT.
• “Mecha Error Push Reset” appears on the
screen, and the panel does not move.
Reset the unit. (☞ page 3)
• “No Signal” appears. • Change the source.
• Start the playback on the external component connected
to VIDEO IN terminal.
• Check the cords and connections.
• Signal input is too weak.
• The buttons on the monitor panel do not
work.
When the monitor panel is open, only +/– (volume) and
OPEN/TILT work. The other buttons do not function.
• The unit does not work at all. Reset the unit. (☞ page 3)
FM/AM
• SSM automatic presetting does not work. Store stations manually. (☞ page 12)
• Static noise while listening to the radio. Connect the aerial firmly.
EN_KW-AVX710[A].indb 60EN_KW-AVX710[A].indb 60 07.12.17 4:49:23 PM07.12.17 4:49:23 PM

61 REFERENCES
Symptoms Remedies/Causes
Disc in general
• Disc can be neither recognized nor played
back.
Eject the disc forcibly. (☞ page 3)
• Disc cannot be ejected. Unlock the disc. (☞ page 19)
• Recordable/Rewritable discs cannot be
played back.
• Tracks on the Recordable/Rewritable discs
cannot be skipped.
• Insert a finalized disc.
• Finalize the discs with the component which you used
for recording.
• Playback does not start. • Insert the disc correctly again.
• The format of files is not supported by the unit.
• The playback picture is not clear and legible. Adjust items in <Picture Adjust> menu. (☞ page 44)
• Sound and pictures are sometimes
interrupted or distorted.
• Stop playback while driving on rough roads.
• Change the disc.
• No playback picture is shown and “Parking
Brake” appears on the screen, even when the
parking brake is engaged.
Parking brake lead is not connected properly.
(☞ Installation/Connection Manual)
• No picture appears on the external monitor. • Connect the video cord correctly.
• Select the correct input on the external monitor.
• “Eject Error” or “Loading Error” appears on
the screen.
Change the source by pressing SOURCE.
• “Region code error” appears on the screen
when you insert a DVD Video.
Region code is not correct. (☞ page 4)
DivX/MPEG1/MPEG2/MP3/WMA/WAV
• Disc cannot be played back. • Change the disc.
• Record the tracks using a compliant application on the
appropriate discs. (☞ page 4)
• Add appropriate extension codes to the file names.
• Noise is generated. The track played back is not a playable file format. Skip to
another file.
• Tracks are not played back as you have
intended them to play.
Playback order may differ from that played back using
other players.
• Elapsed playing time is not correct. This sometimes occurs during playback. This is caused by
how the tracks are recorded.
• “Not Support” appears on the screen and
track skips.
The track is unplayable.
EN_KW-AVX710[A].indb 61EN_KW-AVX710[A].indb 61 07.12.17 4:49:23 PM07.12.17 4:49:23 PM

62
Symptoms Remedies/Causes
Bluetooth
• Bluetooth device does not detect the unit. This unit can be connected with one Bluetooth cellular
phone and one Bluetooth audio player at a time.
While connected to a device, this unit cannot be detected
from another device. Disconnect currently connected device
and search again.
• The unit does not detect the Bluetooth
device.
• Check the Bluetooth setting of the device.
• Search from the Bluetooth device. After the device
detects the unit, select <Open> on the unit to connect
the device. (☞ page 27)
• The unit does not make pairing with the
Bluetooth device.
• Enter the same PIN code for both the unit and target
device. If the PIN code of the device is not indicated on its
instructions, try “0000” or “1234.”
• Select the device name from <Special Device>, then
try to connect again. (☞ pages 28, 50)
• Echo or noise occurs. Adjust the microphone unit position.
• Phone sound quality is poor. • Reduce the distance between the unit and the Bluetooth
cellular phone.
• Move the car to place where you can get a better signal
reception.
• The sound is interrupted or skipped during
playback of a Bluetooth audio player.
• Reduce the distance between the unit and the Bluetooth
audio player.
• Disconnect the player connected for “Bluetooth PHONE.”
• Turn off, then turn on the unit.
• (When the sound is not yet restored,) connect the player
again.
• “New Device” cannot be selected for
“Bluetooth AUDIO.”
Bluetooth audio player is already connected. To select “New
Device,” disconnect it. (☞ page 28)
• The connected audio player cannot be
controlled.
Check whether the connected audio player supports AVRCP
(Audio Video Remote Control Profile).
• “Reset 08” appears on the screen. Check the connection between the adapter and this unit.
EN_KW-AVX710[A].indb 62EN_KW-AVX710[A].indb 62 07.12.17 4:49:24 PM07.12.17 4:49:24 PM

63 REFERENCES
Symptoms Remedies/Causes
CD changer
• “No Disc” appears on the screen. Insert a disc into the magazine.
• “No Magazine” appears on the screen. Insert the magazine.
• “Cannot play this disc Check the disc”
appears on the screen.
Current disc does not include playable files. Replace the disc
with one including playable files.
• “Reset 08” appears on the screen. Connect this unit and the CD changer correctly and press
the reset button of the CD changer.
• “Reset 01” – “Reset 07” appears on the
screen.
Press the reset button of the CD changer.
• The CD changer does not work at all. Reset the unit. (☞ page 3)
iPod
• The iPod does not turn on or does not work. • Check the connection.
• Charge the battery.
• Sound is distorted. Deactivate the equalizer either on this unit or the iPod.
• “Disconnect” appears on the screen. Check the connection.
• Playback stops. The headphones are disconnected during playback. Restart
playback.
• “No Files” appears on the screen. No tracks are stored. Import tracks to the iPod.
• “Reset 01” – “Reset 07” appears on the
screen.
Disconnect the adapter from both this unit and iPod. Then,
connect them again.
• “Reset 08” appears on the screen. Check the connection between the adapter and this unit.
• The iPod’s controls do not work after
disconnecting from this unit.
Reset the iPod.
AV-IN
• No picture appears on the screen. • Turn on the video component if it is not on.
• Connect the video component correctly.
• Playback picture is not clear and legible. Adjust items in <Picture Adjust> menu. (☞ page 44)
EN_KW-AVX710[A].indb 63EN_KW-AVX710[A].indb 63 07.12.17 4:49:24 PM07.12.17 4:49:24 PM

64
Specifications
AMPLIFIER
Maximum Power Output: Front/Rear: 50 W per channel
Continuous Power Output
(RMS):
Front/Rear: 20 W per channel into 4 Ω, 40 Hz to
20 000 Hz at no more than 0.8% total
harmonic distortion
Load Impedance: 4 (4 to 8 allowance)
Equalizer Control Range: Frequencies: 60 Hz, 150 Hz, 400 Hz, 1 kHz, 2.5 kHz,
6.3 kHz, 15 kHz
Level: ±10 dB
Signal-to-Noise Ratio: 70 dB
Audio Output Level
REAR OUT:
Line-Out Level/Impedance: 2.5 V/20 kΩ load (full scale)
Output Impedance: 1 kΩ
Color System: NTSC/PAL
Video Output (composite): 1 Vp-p/75 Ω
Other Terminals: Input: LINE IN, VIDEO IN, Antenna input
Output: VIDEO OUT
Others: CD changer, Reverse gear signal, DIGITAL
OUT (optical)
FM/AM TUNER
Frequency Range: FM: 87.5 MHz to 108.0 MHz
AM: 531 kHz to 1 602 kHz
FM Tuner Usable Sensitivity: 11.3 dBf (1.0 V/75 Ω)
50 dB Quieting Sensitivity: 16.3 dBf (1.8 V/75 Ω)
Alternate Channel Selectivity (400 kHz): 65 dB
Frequency Response: 40 Hz to 15 000 Hz
Stereo Separation: 35 dB
AM Tuner Sensitivity/Selectivity: 20 V/35 dB
DVD/CD
Signal Detection System: Non-contact optical pickup (semiconductor laser)
Frequency Response: DVD, fs=48 kHz/96 kHz: 16 Hz to 22 000 Hz
VCD/CD: 16 Hz to 20 000 Hz
Dynamic Range: 93 dB
Signal-to-Noise Ratio: 95 dB
Wow and Flutter: Less than measurable limit
EN_KW-AVX710[A].indb 64EN_KW-AVX710[A].indb 64 07.12.17 4:49:24 PM07.12.17 4:49:24 PM

65 REFERENCES
MONITOR
Screen Size: 7 inch wide liquid crystal display
Number of Pixel: 336 960 pixels: 480 × 3 (horizontal) × 234 (vertical)
Drive Method: TFT (Thin Film Transistor) active matrix format
Color System: NTSC/PAL
Aspect Ratio: 16:9 (wide)
GENERAL
Power Requirement: Operating Voltage: DC 14.4 V (11 V to 16 V allowance)
Grounding System: Negative ground
Allowable Storage Temperature: –10°C to +60°C
Allowable Operating Temperature: 0°C to +40°C
Dimensions (W × H × D): Installation Size (approx.): 178 mm × 100 mm × 160 mm
Panel Size (approx.): 171 mm × 97 mm × 21 mm
Mass (approx.): 2.6 kg
CAUTION: When ejecting the monitor, leave an
open space for the monitor to come out. If you do
not, the monitor may obstruct the steering wheel
and gearshift lever operations, and this may result
in a traffic accident.
Unit: mm
Required space for the monitor ejection
160 90.5
100
Design and specifications are subject to change without notice.
EN_KW-AVX710[A].indb 65EN_KW-AVX710[A].indb 65 07.12.17 4:49:25 PM07.12.17 4:49:25 PM

EN
1207MNMMDWJEIN
© 2008 Victor Company of Japan, Limited
Having TROUBLE with operation?
Please reset your unit
Refer to page of How to reset your unit
Rear_KW-AVX710A.indd 2Rear_KW-AVX710A.indd 2 07.12.17 2:48:35 PM07.12.17 2:48:35 PM
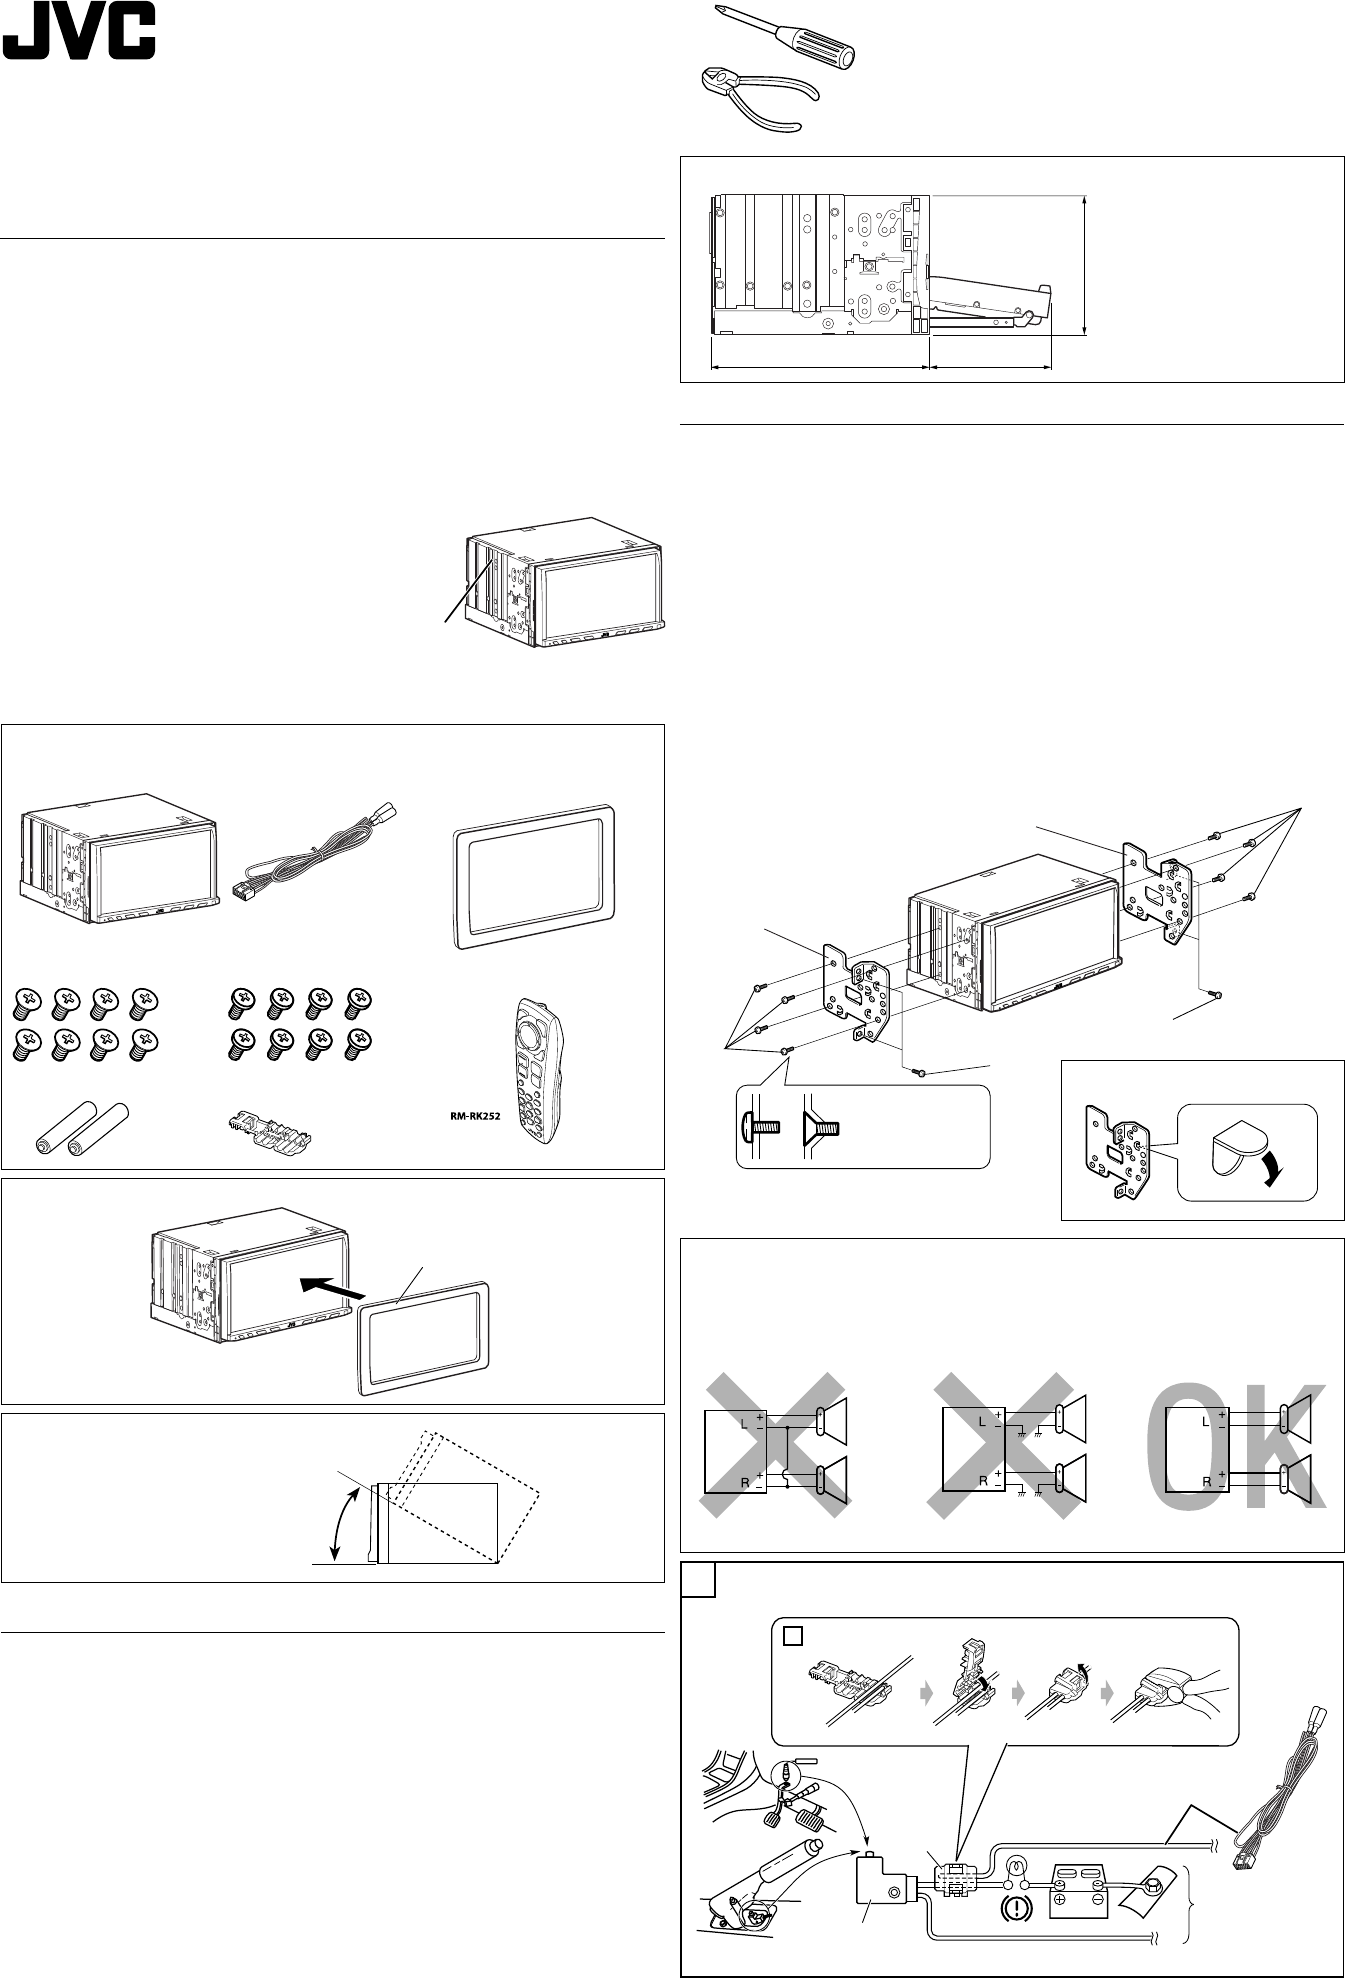
160 90.5
100
30˚
1
This unit is designed to operate on 12 V DC, NEGATIVE ground electrical systems. If your vehicle does
not have this system, a voltage inverter is required, which can be purchased at JVC car audio dealers.
WARNINGS
• DO NOT install any unit or wire any cable in a location where;
– it may obstruct the steering wheel and gearshift lever operations, as this may result in a traffic accident.
– it may obstruct the operation of safety devices such as air bags, as this may result in a fatal accident.
– it may obstruct visibility.
• DO NOT operate any unit while manipulating the steering wheel, as this may result in a traffic accident.
• The driver must not watch the monitor while driving. It may lead to carelessness and cause an accident.
• If you need to operate the unit while driving, be sure to look around carefully or you may be involved in
a traffic accident.
• If the parking brake is not engaged, “Parking Brake” flashes on the monitor, and no playback picture will
be shown.
– This warning appears only when the parking brake wire is connected to the parking brake system built
in the car.
Notes on electrical connections:
• Replace the fuse with one of the specified rating. If the
fuse blows frequently, consult your JVC car audio dealer.
• It is recommended to connect speakers with maximum
power of more than 50 W (both at the rear and at the
front, with an impedance of 4 to 8 Ω).
If the maximum power is less than 50 W, change
“Amplifier Gain” setting to prevent the speakers from
being damaged (see page 49 of the INSTRUCTIONS).
• To prevent short circuits, cover the terminals of the UNUSED leads with insulating tape.
• The heat sink becomes very hot after use. Be careful not to touch it when removing this unit.
KW-AVX716/KW-AVX710
Installation/Connection Manual
1207MNMMDWJEIN
EN
© 2008 Victor Company of Japan, Limited
Parts list for installation and connection
The following parts are provided for this unit. If anything is missing, contact your dealer immediately.
INSTALLATION (IN-DASH MOUNTING)
The following illustration shows a typical installation. However, you should make adjustments
corresponding to your specific car. If you have any questions or require information regarding installation
kits, consult your JVC car audio dealer or a company supplying kits.
• If you are not sure how to install this unit correctly, have it installed by a qualified technician.
Before installing the unit
• When mounting the unit, be sure to use the screws provided, as instructed. If other screws are used,
parts could become loose or damaged.
• When tightening screws or bolts, be careful not to pinch any connection cord.
• Make sure not to block the fan on the rear to maintain proper ventilation when installing the unit.
1 Remove the audio system originally installed in the car, together with its mounting brackets.
Note: Be sure to keep all the screws and parts removed from your car for future use.
2 Attach the mounting brackets (removed from the car), to this unit (see below).
3 Do the required electrical connections.
• See page 2.
4 Install this unit using the screws removed in step 1.
The following example is for installation in a Toyota car. For more details, consult your JVC car audio
dealer.
LVT1780-007A
[A]
Main unit Power cord
Round head screws (M5 × 8 mm)Flat head screws (M5 × 8 mm)
Crimp connector
Remote controller
Batteries If necessary, restore the protruding tabs.
Supplied screws
Note: When installing the unit on the mounting bracket,
make sure to use the supplied screws (M5 x 8 mm). If
longer screws are used, they could damage the unit.
TROUBLESHOOTING
• The fuse blows.
* Are the red and black leads connected correctly?
• Power cannot be turned on.
* Is the yellow lead connected?
• No sound from the speakers.
* Is the speaker output lead short-circuited?
• Sound is distorted.
* Is the speaker output lead grounded?
* Are the “–” terminals of L and R speakers grounded in common?
• Noise interfere with sounds.
* Is the rear ground terminal connected to the car’s chassis using shorter and thicker cords?
• Unit becomes hot.
* Is the speaker output lead grounded?
* Are the “–” terminals of L and R speakers grounded in common?
• This unit does not work at all.
* Have you reset your unit?
Plate for use with a Nissan car
When installing the unit in a Nissan car
Install the unit at an angle of less than
30˚, taking it into account that the
monitor would eject when in use.
Required space for the monitor ejection
Unit: mm
PRECAUTIONS on power supply and speaker connections:
• DO NOT connect the speaker leads of the power cord to the car battery; otherwise, the unit
will be seriously damaged.
• BEFORE connecting the speaker leads of the power cord to the speakers, check the speaker wiring in
your car.
Mounting bracket
removed from the car
Screws removed from the car in
step 1
Supplied
screws
Select the appropriate
type fitting to your
audio system space.
Mounting bracket removed from the car
Heat sink
Plate for use with a Nissan car
To metallic body or
chassis of the car
Parking brake switch
(inside the car)
Parking brake lead (light green)
Parking brake
Crimp
connector
Connecting the parking brake lead
Connect the parking brake lead to the parking brake system built in the car.
A
a
Install_AVX710A.indd 1Install_AVX710A.indd 1 07.12.24 11:25:34 AM07.12.24 11:25:34 AM

2
ELECTRICAL CONNECTIONS
To prevent short circuits, we recommend that you disconnect the battery’s negative terminal and make all electrical connections before installing the unit.
• Be sure to ground this unit to the car’s chassis again after installation.
Before connecting: Check the wiring in the vehicle carefully. Incorrect connection may cause serious damage to this unit.
The leads of the power cord and those of the connector from the car body may be different in color.
1 Connect the colored leads of the power cord in the order specified in the illustration below.
2 Connect the antenna cord.
3 Finally connect the wiring harness to the unit.
15 A fuse
*1 Not included for this unit
Ignition switch
To a live terminal in the fuse block connecting to
the car battery (bypassing the ignition switch)
To metallic body or
chassis of the car
To an accessory terminal in the fuse block
To the remote lead of other equipment (200 mA max.)
To automatic antenna
if any (250 mA max.) Fuse block
To cellular phone system
To car light control switch
Crimp connector
To parking brake (see diagram Å on page 1.)
Ye l l o w *2
Red
Orange with white stripe
Black
Light green
Brown
Blue with white stripe
Blue
*2 Before checking the operation of this unit prior to
installation, this lead must be connected, otherwise
power cannot be turned on.
Left speaker (rear)Right speaker (front)Left speaker (front) Right speaker (rear)
Gray with black stripeWhiteWhite with black stripe Green with black stripeGray Green Purple with black stripe Purple
Rear ground terminal
See each diagram below.
Fan
*3 Firmly attach the ground lead to the metallic body or to the chassis of the car—to the place uncoated
with paint (if coated with paint, remove the paint before attaching the lead). Failure to do so may
cause damage to the unit.
AConnecting an external amplifier
Rear
speakers
Remote lead (Blue with white stripe)
Remote lead
JVC Amplifier
You can connect an amplifier to upgrade your car stereo system.
• You can supply the power to the amplifier by connecting the remote leads (blue with white stripe) of
this unit to the amplifier. (To connect other equipment using the remote leads, Y-connectors need to
be separately purchased.)
• Disconnect the speakers from the unit, and connect them to the amplifier. Leave the speaker leads of
the unit unused.
• You can switch off the built-in amplifier and send the audio signals only to the external amplifier
to get clear sound and to prevent internal heat built-up inside the unit. See page 49 of the
INSTRUCTIONS.
Front speakers
Y-connector (not
supplied for this unit)
To the remote
lead of other
equipment
Connections for external component playback
B
To reverse
lamp
Audio/video cord (not supplied)
To car battery
Crimp connector
(not supplied)*5
Reverse lamp lead*4
Video cord
(not supplied)
*4 Required only when connecting a rear view camera
to VIDEO IN terminal.
*5 Refer to å in diagram Å on page 1.
*6 Set “AV Input” setting to “Camera” when using (see
page 47 of the INSTRUCTIONS).
Connections to the CD changer jack
When connecting the external components, refer also to the manuals supplied for the components and adapter.
CAUTION:
Before connecting the external components, make sure that the unit is turned off.
You can connect the following JVC components to the CD changer jack.
JVC component Model name
CD changer (CD-CH) CH-X1500, etc.
You can also connect the following components through the various JVC adapters.
• Connection cords may need to be purchased separately.
Component Adapter Model name
Bluetooth device Bluetooth adapter KS-BTA200
iPod Interface adapter for iPod KS-PD100
Portable audio player with line output jacks Line input adapter KS-U57
Portable audio player with 3.5 mm stereo mini jack AUX input adapter KS-U58
When connecting more than one component (maximum: two), it is recommended that you connect the
components in series as explained below.
CD changer jack
When connecting two components in series
To disconnect the connector
Hold the connector top tightly
(
1 ), then pull it out ( 2 ).
C
iPod is a trademark of Apple Inc., registered in the U.S. and other countries.
*7 To use these components,
set the external input setting
correctly (see page 47 of the
INSTRUCTIONS).
A KS-BTA200
B*7 CD-CH / KS-PD100 / KS-U57 / KS-U58
Camcorder, Navigation
System, etc.
Rear view camera KV-CM1*6
External
monitor
AV amplifier or decoder
Digital optical cable
(not supplied)
Extension lead (not supplied)
Reverse lamp
*1
*1
*3
Install_AVX710A.indd 2Install_AVX710A.indd 2 07.12.24 11:25:40 AM07.12.24 11:25:40 AM
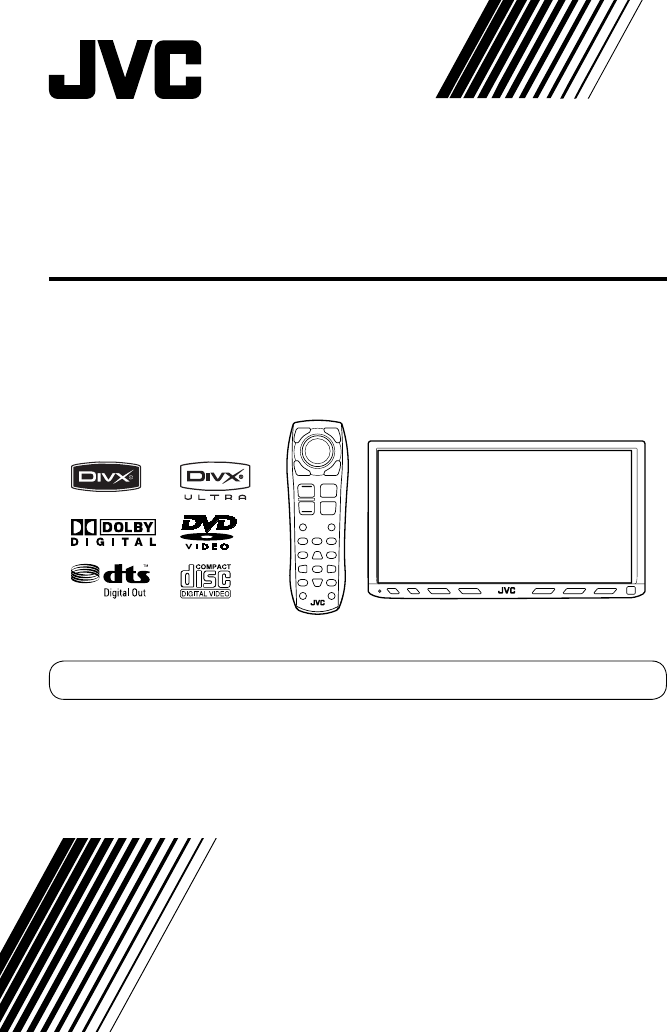
For installation and connections, refer to the separate manual.
INSTRUCTIONS
LVT1780-012A
[UI]
For canceling the display demonstration, see page 8.
DVD RECEIVER WITH MONITOR
KW-AVX714
Cover_KW-AVX714[UI].indd 2Cover_KW-AVX714[UI].indd 2 08.1.11 10:28:21 AM08.1.11 10:28:21 AM

2
Thank you for purchasing a JVC product.
Please read all instructions carefully before operation, to ensure your complete understanding and to obtain the best
possible performance from the unit.
IMPORTANT FOR LASER PRODUCTS
1. CLASS 1 LASER PRODUCT
2. CAUTION: Do not open the top cover. There are no user serviceable parts inside the unit; leave all servicing to
qualified service personnel.
3. CAUTION: Visible and/or invisible class 1M laser radiation when open. Do not view directly with optical
instruments.
4. REPRODUCTION OF LABEL: CAUTION LABEL, PLACED OUTSIDE THE UNIT.
[European Union only]
Cautions on the monitor:
• The monitor built in this unit has been produced
with high precision, but it may have some
ineffective dots. This is inevitable and is not
malfunction.
• Do not expose the monitor to direct sunlight.
• Do not operate the touch panel using a ball-point
pen or similar tool with the sharp tip.
Touch the buttons on the touch panel with your
finger directly (if you are wearing a glove, take it
off).
• When the temperature is very cold or very hot...
– Chemical changes occur inside, causing
malfunction.
– Pictures may not appear clearly or may move
slowly. Pictures may not be synchronized with
the sound or picture quality may decline in
such environments.
WARNINGS:
To prevent accidents and damage
• DO NOT install any unit or wire any cable in a
location where;
– it may obstruct the steering wheel and
gearshift lever operations.
– it may obstruct the operation of safety devices
such as air bags.
– it may obstruct visibility.
• DO NOT operate the unit while driving.
If you need to operate the unit while driving, be
sure to look around carefully.
• The driver must not watch the monitor while
driving.
EN_KW-AVX714[UI].indb 2EN_KW-AVX714[UI].indb 2 08.1.16 2:37:40 PM08.1.16 2:37:40 PM
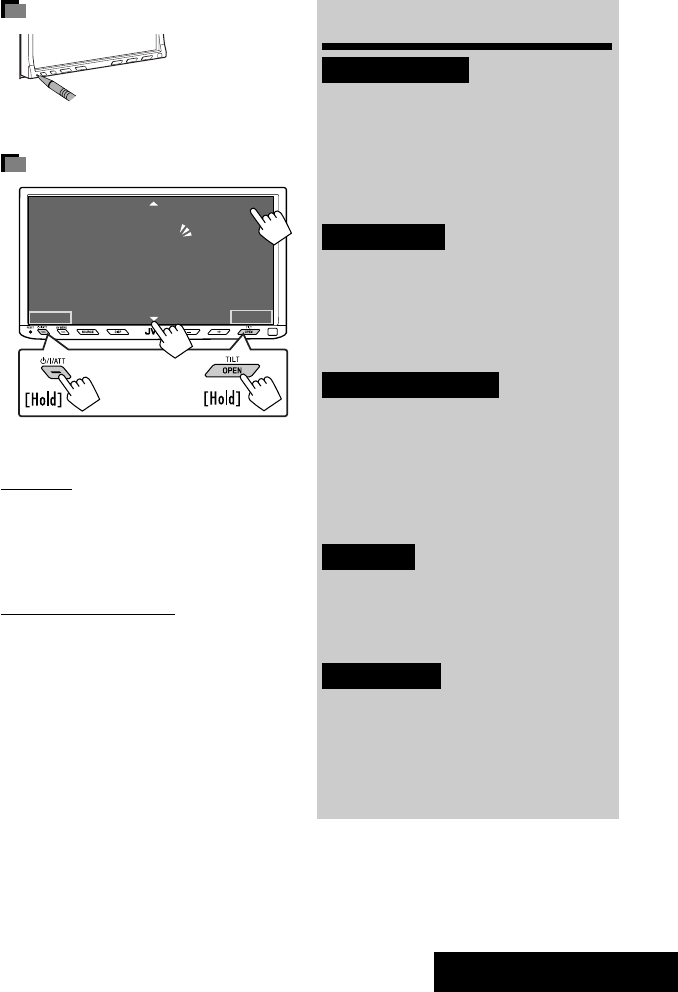
3INTRODUCTION
How to reset your unit
• Your preset adjustments will also be erased.
How to forcibly eject a disc
• If this does not work, reset the unit.
For safety...
• Do not raise the volume level too much, as this will
block outside sounds, making driving dangerous.
• Stop the car before performing any complicated
operations.
Temperature inside the car...
If you have parked the car for a long time in hot or cold
weather, wait until the temperature in the car becomes
normal before operating the unit.
Contents
INTRODUCTION
Playable disc types .......................... 4
Basic operations—
Monitor panel/touch panel ............ 5
Basic operations—
Remote controller (RM-RK252) ...... 6
OPERATIONS
Before operating the unit ................ 8
Common operations ........................ 9
Listening to the radio ...................... 10
Disc operations ................................ 13
EXTERNAL DEVICES
Bluetooth® operations—
Cellular phone/audio player .......... 27
Listening to the CD changer .............. 34
Listening to the iPod ........................ 36
Using other external components ..... 38
SETTINGS
Sound equalization .......................... 41
Assigning titles to the sources .......... 42
Menu operations ............................. 43
REFERENCES
Maintenance ................................... 52
More about this unit ........................ 53
Troubleshooting .............................. 60
Specifications .................................. 64
NO EJECT?
EMERGENCY EJECT?
Exit
ENTER
Back
11
3
2
at the same time
EN_KW-AVX714[UI].indb 3EN_KW-AVX714[UI].indb 3 08.1.16 2:37:49 PM08.1.16 2:37:49 PM
4
Disc type Recording format, file type, etc. Playable
DVD DVD Video (Region Code: 5)*1
DVD Audio
DVD-ROM
DVD Recordable/Rewritable
(DVD-R/-RW*2, +R/+RW*3)
• DVD Video: UDF bridge
• DVD-VR
• DivX/MPEG1/MPEG2/JPEG/MP3/
WMA/WAV: ISO 9660 level 1,
level 2, Romeo, Joliet
DVD Video
DVD-VR
DivX/MPEG1/MPEG2
JPEG
MP3/WMA/WAV
AAC
MPEG4
DVD+VR
DVD-RAM
Dual Disc DVD side
Non-DVD side
CD/VCD Audio CD/CD Text (CD-DA)/DTS-CD
VCD (Video CD)
SVCD (Super Video CD)
CD-ROM
CD-I (CD-I Ready)
CD Recordable/Rewritable
(CD-R/-RW)
• ISO 9660 level 1, level 2, Romeo,
Joliet
CD-DA
MP3/WMA/WAV
JPEG
DivX/MPEG1/MPEG2
AAC
MPEG4
*1 If you insert a DVD Video disc of an incorrect Region Code, “Region code error” appears on the screen.
*2 DVD-R recorded in multi-border format is also playable (except for dual layer discs).
DVD-RW dual layer discs are not playable.
*3 It is possible to play back finalized +R/+RW (Video format only) discs.
+RW double layer discs are not playable.
Playable disc types
Caution for DualDisc playback
The Non-DVD side of a “DualDisc” does not comply with the “Compact Disc Digital Audio” standard. Therefore,
the use of Non-DVD side of a DualDisc on this product may not be recommended.
EN_KW-AVX714[UI].indb 4EN_KW-AVX714[UI].indb 4 08.1.16 2:37:50 PM08.1.16 2:37:50 PM

5INTRODUCTION
Basic operations — Monitor panel/touch panel
• Turn on the power.
• Turn off the power. [Hold]
• Attenuate the sound (if the power is on).
Change the sources.
Remote sensorAdjust the volume.
Reset the unit.
• Use only when the internal system malfunctions.
Display <AV Menu> screen.
Display and erase the Short Cut windows.
Available functions vary among the sources. For details, see each source operation
section.
Change the display information.
• [OPEN]: Open the monitor panel.
• [EJECT]: Eject the disc.
• [CLOSE]: Close the monitor panel.
• [TILT +/–]: Tilt the monitor panel.
• [Exit]: Erase this screen.
• Shaded icons cannot be used.
• In the explanation, buttons on the touch panel
are indicated inside [ ].
• For details on the touch panel operations, see
each source operation section.
Display <Source Menu> screen.
Display <AV Menu> screen.
☞ page 43
• Display <Open/Tilt> menu.
• Eject the disc and display <Open/Tilt>
menu. [Hold]
• Close the monitor panel when <Open/Tilt>
menu is displayed.
☞ page 43
☞ page 9
☞ page 9
<Open/Tilt> menu
EN_KW-AVX714[UI].indb 5EN_KW-AVX714[UI].indb 5 08.1.16 2:37:51 PM08.1.16 2:37:51 PM
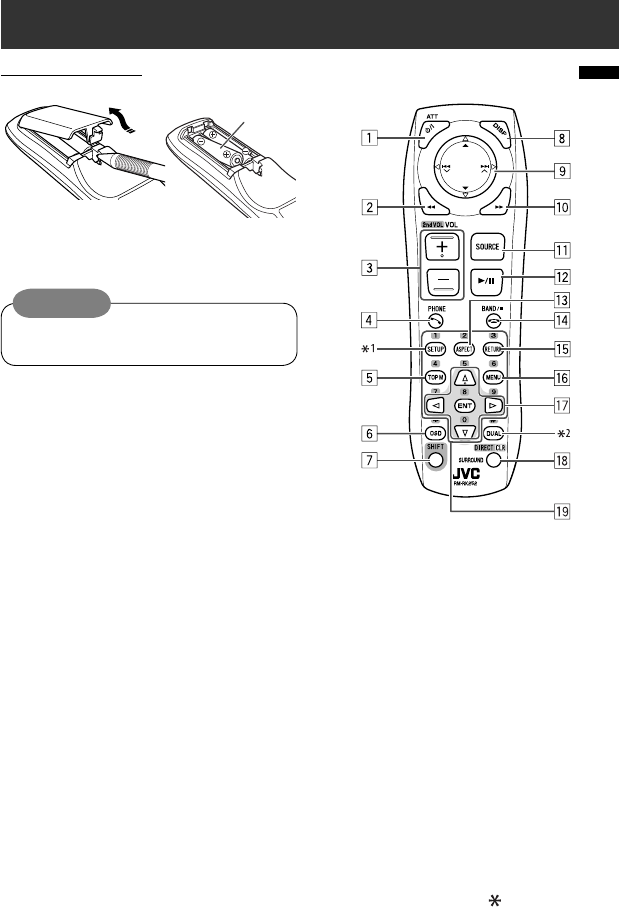
6
Basic operations — Remote controller (RM-RK252)
Main elements and features
1 • Turns on the power.
• Attenuates the sound if the power is on.
• Turns off the power if pressed and held (while
the power is on).
2 • Reverse search
• Reverse slow motion (during pause)
3 Adjusts the volume level.
• Does not function as “2nd VOL.”
4 • Displays <Dial Menu> screen.
• Displays <Redial> menu if pressed and held.
• Answers incoming calls.
5 • DVD/DivX 6: Shows the disc menu.
• VCD: Resumes PBC playback.
• DVD-VR: Shows the Original Program screen.
6 Shows the on-screen bar.
• Does not function as “ .“
R03/LR03/AAA
Installing the battery
Insert the batteries into the remote controller by
matching the polarity (+ and –) correctly.
Caution:
Battery shall not be exposed to excessive heat such
as sunshine, fire or the like.
• If the range or effectiveness of the remote controller
decreases, replace both batteries.
Before using the remote controller:
• Aim the remote controller directly at the remote
sensor on the unit.
• DO NOT expose the remote sensor to bright light
(direct sunlight or artificial lighting).
EN_KW-AVX714[UI].indb 6EN_KW-AVX714[UI].indb 6 08.1.16 2:37:52 PM08.1.16 2:37:52 PM

7INTRODUCTION
p • Forward search
• Forward slow motion (during pause)
q Selects the source.
w For disc operations:
Starts playback/pauses.
For Bluetooth operations:
• Answers incoming calls.
• Starts playback/pauses. (for audio player
operation).
e Changes the aspect ratio of the playback
pictures.
r “TUNER”: Selects the bands.
“DISC”: Stops playback.
“Bluetooth PHONE”: Ends the call.
“Bluetooth AUDIO”: Starts playback/pauses.
t VCD: Returns to the PBC menu.
y • DVD Video/DivX 6: Shows the disc menu.
• VCD: Resumes PBC playback.
• DVD-VR: Shows the Playlist screen.
u • Makes selection/settings.
• @ / #: Skips back or forward by five minutes
for DivX/MPEG1/MPEG2.
• % / fi: Changes discs for “CD-CH.”
i*3 • Switches number entry mode for “DISC.”
• Erases the misentry after entering a wrong
number.
• Does not function as “SURROUND.”
o*3 Number buttons
• Enters numbers.
• “TUNER”: Selects the preset station directly.
*1 Functions as a number button only (see o ).
*2 Not used for this unit.
*3 Functions when pressed with SHIFT.
7 Functions with other buttons (see i and o).
8 Changes the display information.
9 For disc operations:
• 5 / ∞:
DVD: Selects the title.
DVD-VR: Selects the program/Playlist.
Other discs (except VCD/CD): Selects the
folders.
• 4 / ¢:
– Press briefly: reverse skip/forward skip
– Press and hold: reverse search/forward
search
For FM/AM operations:
• 5 / ∞: Selects the preset stations.
• 4 / ¢: Functions to search for stations.
– Press briefly: Auto Search
– Press and hold: Manual Search
For Apple iPod operations:
• ∞: Starts playback/pauses
• 5: Enters the main menu (then 5 / ∞
/ 4 / ¢ work as menu selecting
buttons).
In the main menu:
• 5: Returns to the previous menu.
• ∞: Confirms the selection.
• 4 / ¢
– Press briefly: Selects an item.
– Press and hold: Skips ten items at a time.
For Bluetooth operations:
• 4 / ¢: reverse skip/forward skip (for
audio player operation)
EN_KW-AVX714[UI].indb 7EN_KW-AVX714[UI].indb 7 08.1.16 2:37:52 PM08.1.16 2:37:52 PM

8
You can cancel the demonstration on the screen and set
the clock.
• Non-available items will be shaded on the AV Menu
screens.
Indication language:
In this manual, English indications are used
for purpose of explanation. You can select the
indication language. (☞ page 45)
~ Turn on the power.
Ÿ Display <AV Menu> screen.
! Display <Setup> menu.
⁄ Cancel the demonstration.
Select <Off>.
@ Set the clock settings.
¤ Finish the procedure.
Before operating the unit
Moves to the succeeding menu page
Moves to the preceding menu page
Return to the previous screen.
EN_KW-AVX714[UI].indb 8EN_KW-AVX714[UI].indb 8 08.1.16 2:37:53 PM08.1.16 2:37:53 PM

OPERATIONS
9
Changing the display
information
• Available display information varies among the
playback sources.
On the monitor panel only:
• Each time you press DISP, the display changes to
show the various information.
Ex. When the playback source is a DivX disc.
Selecting the playback source
• Available sources depend on the external
components you have connected, media you have
attached, and the <Input> settings you have made
(☞ page 47).
On the touch panel:
On the monitor panel:
TUNER = DISC (DVD/VCD/CD) =CD-CH, iPod, or
EXT-IN = Bluetooth PHONE = Bluetooth AUDIO
= AV-IN = (back to the beginning)
• You cannot select these sources if they are not ready.
Exit
Source information screen
Clock time in large numbers
Navigation screen
(When <Navigation> is
selected for <AV Input>)
(☞ page 47)
Back to the beginning
Playback picture screen
(only for video sources)
Track list
Common operations
EN_KW-AVX714[UI].indb 9EN_KW-AVX714[UI].indb 9 08.1.16 2:37:54 PM08.1.16 2:37:54 PM
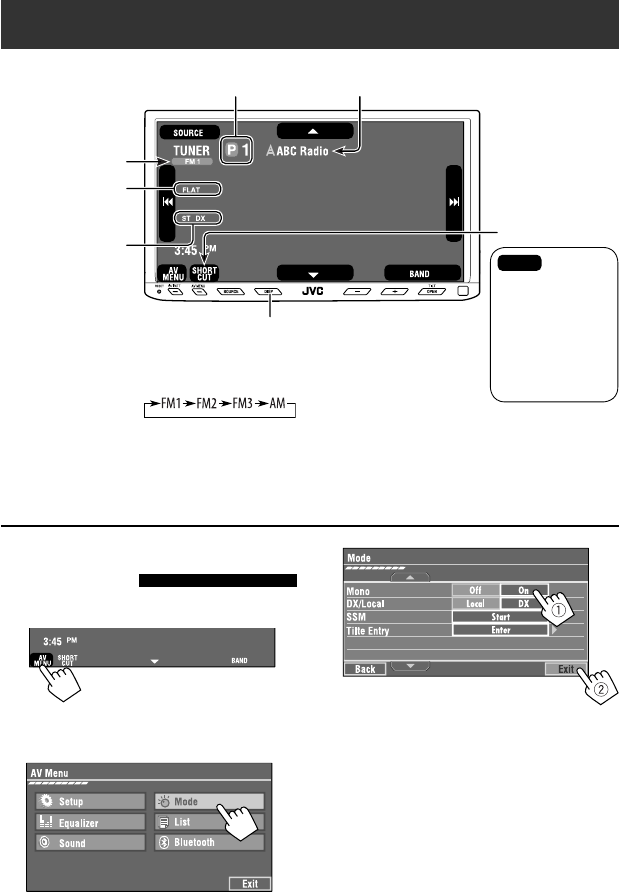
10
When an FM stereo broadcast is
hard to receive
1 Press [AV MENU].
• You can also use AV MENU on the monitor panel.
2 Press [Mode].
Listening to the radio
~ Press [SOURCE], then press [TUNER]. (☞ page 9)
• You can also use SOURCE on the monitor panel. Press it repeatedly.
Ÿ Press [BAND].
! Press [4] or [¢] to search for a station—Auto Search.
• Manual Search: Hold either [4]or [¢] until “Manual Search” appears on the screen, then press it
repeatedly.
• The ST indicator lights up when receiving an FM stereo broadcast with sufficient signal strength.
3
Reception improves, but stereo effect will be lost.
• The MONO indicator lights up.
To restore stereo effect, select <Off>.
Preset no.
Band
Tuner indicators
Assigned station name (☞ page 42). If no name is assigned,
the frequency of the station is displayed instead.
☞ page 9
Sound mode
(☞ page 41)
☞ page 11,
: Buttons on the
touch panel. In
the explanation,
they are
indicated inside
[ ].
EN_KW-AVX714[UI].indb 10EN_KW-AVX714[UI].indb 10 08.1.16 2:37:55 PM08.1.16 2:37:55 PM

OPERATIONS
11
FM station automatic presetting
—SSM (Strong-station
Sequential Memory)
This function works only for FM bands.
You can preset six stations for each band.
1 Press [AV MENU].
• You can also use AV MENU on the monitor panel.
2 Press [Mode].
3
Local FM stations with the strongest signals are
searched and stored automatically in the FM band.
Tuning in to stations with
sufficient signal strength
This function works only for FM bands. Once you have
activated this function (selected <Local>), it always
works when searching for FM stations.
1 Press [AV MENU].
• You can also use AV MENU on the monitor panel.
2 Press [Mode].
3
Only stations with sufficient signal strength will be
detected.
• The DX indicator goes off, then the LO indicator
lights up.
• You can also change <IF Band Width> setting
(for details, ☞ page 47).
<IF Band Width> menu can be accessed by
pressing [SHORT CUT] on the touch panel, then..
☞ page 41
EN_KW-AVX714[UI].indb 11EN_KW-AVX714[UI].indb 11 08.1.16 2:37:55 PM08.1.16 2:37:55 PM
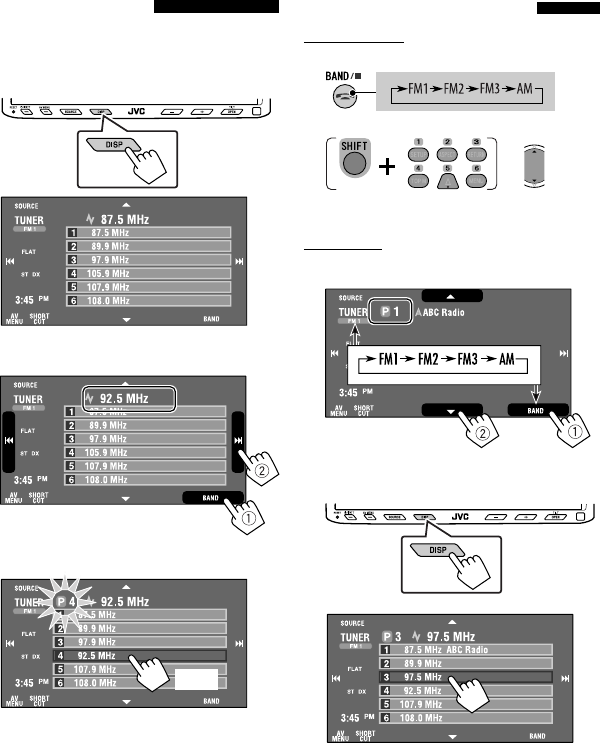
12
Selecting a preset station
On the remote:
1
2
On the unit:
• To select directly on the touch panel
• To select from the Preset List
1
2
or
Hold
Manual presetting
Ex.: Storing FM station of 92.5 MHz into preset number
4 of the FM1 band.
1 Display the Preset List.
2 Tune in to a station you want to preset.
3 Select a preset number.
The station selected in step 2 is now stored in
preset number 4.
[Hold]
EN_KW-AVX714[UI].indb 12EN_KW-AVX714[UI].indb 12 08.1.16 2:37:56 PM08.1.16 2:37:56 PM

OPERATIONS
13
~ Open the monitor panel.
<Open/Tilt> menu is displayed.
• By pressing and holding the button, you can
open the monitor panel and eject the disc.
Ÿ Press [OPEN].
Disc operations
The disc type is automatically detected, and playback starts automatically (for some discs: automatic start depends
on its internal program).
If a disc does not have any disc menu, all tracks on it will be played repeatedly until you change the source or eject
the disc.
If “ ” appears on the screen, the unit cannot accept the operation you have tried to do.
• In some cases, without showing “ ,” operations will not be accepted.
Label side
Caution on volume setting:
Discs produce very little noise compared with other
sources. Lower the volume before playing a disc
to avoid damaging the speakers by the sudden
increase of the output level.
When playing back a multi-channel encoded disc,
the multi-channel signals are downmixed.
• You can fully enjoy multi-channel sound by
connecting an amplifier or a decoder compatible
with these multi-channel sources. (☞ also page
57)
! Insert a disc.
Monitor panel closes automatically.
If not, press [CLOSE].
Caution:
Do not place your finger behind the monitor panel.
EN_KW-AVX714[UI].indb 13EN_KW-AVX714[UI].indb 13 08.1.16 2:37:57 PM08.1.16 2:37:57 PM

14
While playing the following discs, press .
• Each time you press the button, the display changes to show the different information. (☞ page 9)
Audio format
DVD Video: Title no./Chapter no./Playing time
DVD-VR: Program no. (or Playlist no.)/Chapter no./Playing time
Playback mode
Disc type *1Sampling frequency/Bit
rate/Recorded signal
channel no.
☞ page 19
[3 / 8] Start and pause playback
[7] Stop playback
[4 ¢] Press: Select chapter
Hold: Reverse/forward search*2
[5 ∞] Select title/program/playlist
*1 DVD-VR also indicates either PRG (program) or PLAY (playlist) playback.
*2 Search speed: x2 ] x10
: Buttons on the touch panel. In the explanation, they are indicated inside [ ].
These buttons also work when they are not shown on the touch panel (while watching the playback pictures
on the screen).
Sound mode
(☞ page 41)
EN_KW-AVX714[UI].indb 14EN_KW-AVX714[UI].indb 14 08.1.16 2:37:58 PM08.1.16 2:37:58 PM

OPERATIONS
15
Track no./Playing time
[3 / 8] Start and pause playback
[7] Stop playback
[4 ¢] Press: Select track
Hold: Reverse/forward search*2
For DivX/MPEG1/MPEG2: Folder no./Track no./Playing time
For JPEG: Folder no./File no.
[3 / 8] Start and pause playback
[7] Stop playback
[4 ¢] Press: Select track
Hold: Reverse/forward search for DivX/MPEG1/MPEG2 *1
[5 ∞] Press: Select folder
Hold: Display Folder list
While playing the following discs, press .
• Each time you press the button, the display changes to show the different information (☞ page 9).
Disc type
☞ page 19
☞ page 19
The PBC indicator
lights up when PBC is
in use.
Total track no.
included on the
disc
Total track no.
included on the
disc
Total playing time
Sound mode
(☞ page 41)
Sound mode
(☞ page 41)
*1 Search speed: ¡1 ] ¡2
*2 Search speed: x2 ] x10
EN_KW-AVX714[UI].indb 15EN_KW-AVX714[UI].indb 15 08.1.16 2:37:58 PM08.1.16 2:37:58 PM

16
Track no./Playing time
Only for CD Text *3
Folder no./Track no./Playing time
Audio format
(MP3/WMA/WAV)
☞ page 19
*3 “No Name” appears for conventional CDs.
*4 Search speed: x2 ] x10
Tag data appears
only when it is
recorded.
Sound mode
(☞ page 41)
☞ page 19
[3 / 8] Start and pause playback
[7] Stop playback
[4 ¢] Press: Select track
Hold: Reverse/forward search*4
[5 ∞] Press: Select folder
Hold: Display Folder list
[3 / 8] Start and pause playback
[7] Stop playback
[4 ¢] Press: Select track
Hold: Reverse/forward search*4
Total track no.
included on the disc
Total playing time
Total track no. included on the disc
Sound mode
(☞ page 41)
EN_KW-AVX714[UI].indb 16EN_KW-AVX714[UI].indb 16 08.1.16 2:37:59 PM08.1.16 2:37:59 PM

OPERATIONS
17
Touch the screen (center portion).
Operation buttons on the screen
You can display the following operation buttons while watching the playback pictures on the screen.
• While the operation buttons are displayed, aspect ratio is fixed to <Full>. (☞ page 45)
• If no operation is done for about five seconds, the operation buttons disappear (except when a disc menu is
displayed).
Touch [KEY].
☞ pages 20 to 24 on how the operation buttons
particularly work for a variety of the discs
A
[SOURCE] Display <Source Menu> screen
[AV MENU] Display <AV Menu> screen
[SHORT CUT] Display the Short Cut buttons
[3 / 8] Start and pause playback
[7] Stop playback
[4 ¢] Press: Select track
Hold: Reverse/forward search
[5 ∞] Select folders
• The above buttons also work when they are not shown on
the screen (while watching the playback picture).
* While a disc menu is played back for DVD, [KEY] is
automatically displayed. On the disc menu, you can select a
menu item directly by touching it on the screen.
B
For DVD/VCD/DivX menu operation playback
[2 3 5 ∞] Select the menu items
[ENT] Confirm the selection
[TOP MENU] Display the disc menu
[MENU] Display the disc menu
[RETURN] Return to the previous menu or display the
menu (only for VCD with PBC)
C
For entering the numbers
[DIRECT CLR] • Switch between chapter/track entry and
title/group/folder entry
• Erase the last entry when you enter a
wrong number
[0]–[9]=[ENT]
Enter numbers
Ex.: To enter “105,” press [1], [0], [5], then [ENT]
*
Touch [KEY].
Touch [KEY].
To erase the operations, touch the screen again.
EN_KW-AVX714[UI].indb 17EN_KW-AVX714[UI].indb 17 08.1.16 2:37:59 PM08.1.16 2:37:59 PM

18
1
• You can also use AV MENU on the monitor panel.
2
3
When one of the playback modes is selected, the
corresponding indicator lights up on the source
information screen.
To cancel, select <Off>.
Selecting playback modes
You can use the following playback modes—Repeat or Random.
Ex.: To select Track Repeat
Disc type Repeat Random
Chapter: Repeats current chapter
Title: Repeats current title —
Chapter: Repeats current chapter
Program: Repeats current program (not
available for Playlist playback)
—
Track: Repeats current track
Folder: Repeats current folder
Folder: Randomly plays all tracks of current
folder, then tracks of next folders
Disc (All): Randomly plays all tracks
Folder: Repeats current folder —
Track: Repeats current track (PBC not in
use)
Disc (All): Randomly plays all tracks (PBC not
in use)
Track: Repeats current track*1Disc (All): Randomly plays all tracks
Track: Repeats current track*1
Folder: Repeats all tracks of the current
folder
Folder: Randomly plays all tracks of current
folder, then tracks of next folders
Disc (All): Randomly plays all tracks
*1 You can also use [SHORT CUT] to turn on and off Track Repeat.
EN_KW-AVX714[UI].indb 18EN_KW-AVX714[UI].indb 18 08.1.16 2:38:00 PM08.1.16 2:38:00 PM

OPERATIONS
19
Prohibiting disc ejection
You can lock a disc in the loading slot.
To cancel the prohibition, repeat the same
procedure to select <EJECT OK?>.
Using Short Cut Icons
You can easily access the some frequently used
functions by using [SHORT CUT] on the touch panel.
1
2
• For video software:
• For audio software:
Selecting tracks on the list
If a disc includes folders, you can display the Folder/
Track (File) Lists, then start playback.
1
• You can also use AV MENU on the monitor panel.
2
3 Select a folder (1), then a track (2).
Selected track starts playing. (* Press to move to
the previous/next pages of the list)
1 Current folder list number/total folder list
number
2 Current track list number/total track list
number of the current folder
You can easily access the Track List by pressing DISP
on the monitor panel.
Selected track starts playing.
at the same time
Sound mode
(☞ page 41)
Turn on or off Track Repeat
(Repeat play: ☞ page 18)
Aspect ratio
(☞ page 45)
EN_KW-AVX714[UI].indb 19EN_KW-AVX714[UI].indb 19 08.1.16 2:38:01 PM08.1.16 2:38:01 PM

20
Stop playback.
Start playback/pause (if pressed during playback).
Reverse/forward search*1 (No sound can be heard.)
Slow motion during pause*2 (No sound can be heard.)
Press: Select chapter (during playback or pause).
Hold: Reverse/forward search*3 (No sound can be heard.)
Select title (during playback or pause).
Select aspect ratio.
Select chapter.
Select title (when not playing).
Select title (during playback or pause).
Using menu driven features
1
2 Select an item you want to start playback.
3
*1 Search speed: x2 ] x5 ] x10 ] x20 ] x60
*2 Slow motion speed: 1/32 ] 1/16 ] 1/8 ] 1/4 ] 1/2
*3 Search speed: x2 ] x10
Operations using the remote controller—RM-RK252
Also functions as CLR (clear):
Erases a misentry if pressed
while holding SHIFT.
You can change the following items using the on-screen bar—audio language, audio stream, audio channel,
subtitle language, view angle, etc. (☞ pages 25 and 26)
twice
EN_KW-AVX714[UI].indb 20EN_KW-AVX714[UI].indb 20 08.1.16 2:38:02 PM08.1.16 2:38:02 PM
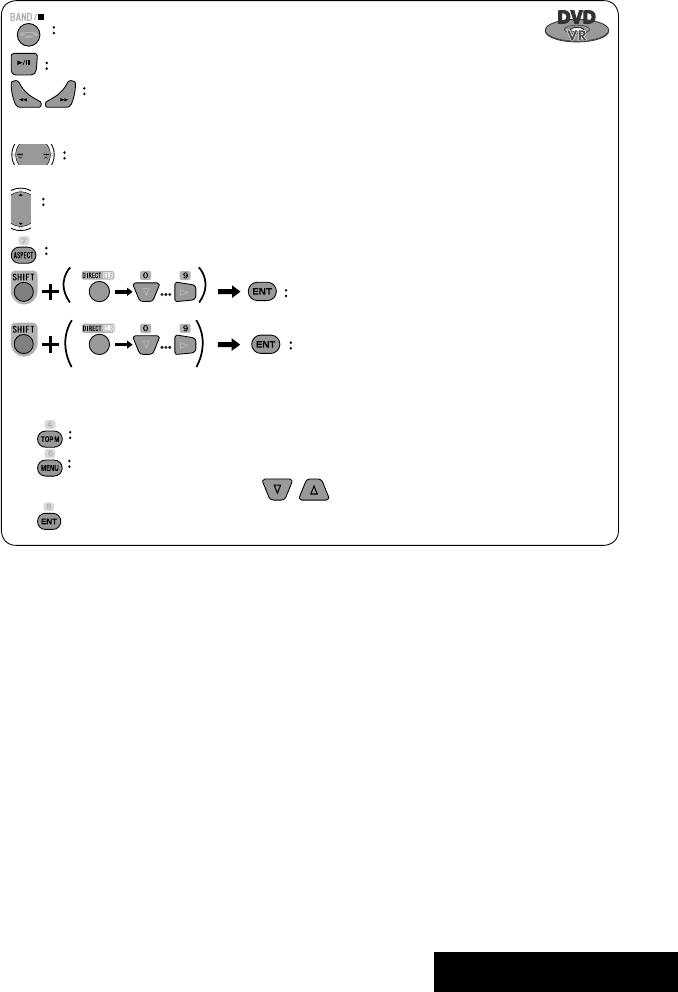
OPERATIONS
21
Stop playback.
Start playback/pause (if pressed during playback).
Reverse/forward search*4 (No sound can be heard.)
Forward slow motion during pause*5 (No sound can be heard.)
• Reverse slow motion does not work.
Press: Select chapter (during playback or pause).
Hold: Reverse/forward search*6
Select program.
Select playlist (during playback or pause).
Select aspect ratio.
Select chapter.
Select program (when not playing).
Select program/playlist (during playback or pause).
Using Original Program/Playlist screens ( ☞ page 25)
1For Original Program
For Playlist
2 Select an item you want to start playback.
3 To erase the screen.
*4 Search speed: x2 ] x5 ] x10 ] x20 ] x60
*5 Slow motion speed: 1/32 ] 1/16 ] 1/8 ] 1/4 ] 1/2
*6 Search speed: x2 ] x10
twice
EN_KW-AVX714[UI].indb 21EN_KW-AVX714[UI].indb 21 08.1.16 2:38:03 PM08.1.16 2:38:03 PM
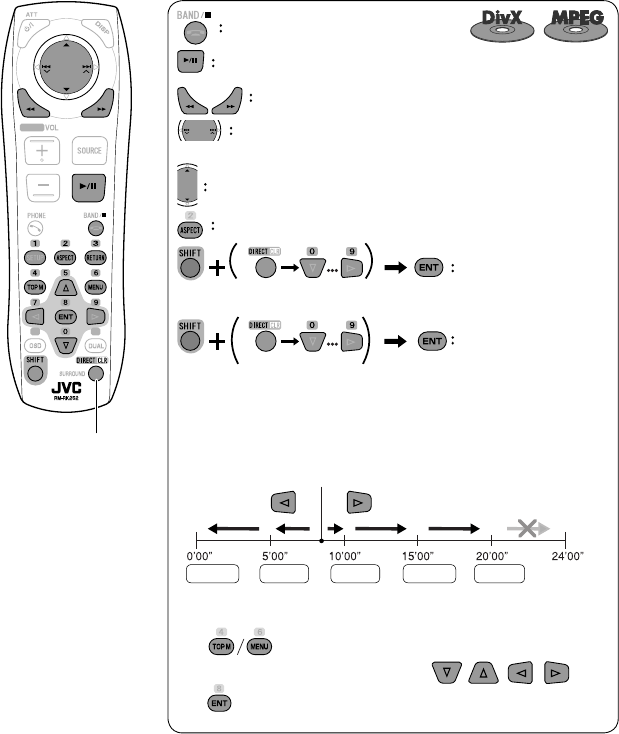
22
Also functions as CLR (clear):
Erases a misentry if pressed
while holding SHIFT.
Stop playback.
Start playback/pause (if pressed during playback).
Reverse/forward search*1 (No sound can be heard.)
Press: Select track
Hold: Reverse/forward search*2 (No sound can be heard.)
Select folder.
Select aspect ratio.
Select track (within the same folder).
Select folder.
While playing...
Reverse/advance the scenes by five minutes.
For DivX6: Using menu driven features
1
2 Select an item you want to start playback.
3
*1 Search speed: ¡1 ] ¡2 ] ¡3
*2 Search speed: ¡1 ] ¡2
Current playback position
twice
2nd press 2nd press1st press 1st press 3rd press
EN_KW-AVX714[UI].indb 22EN_KW-AVX714[UI].indb 22 08.1.16 2:38:04 PM08.1.16 2:38:04 PM
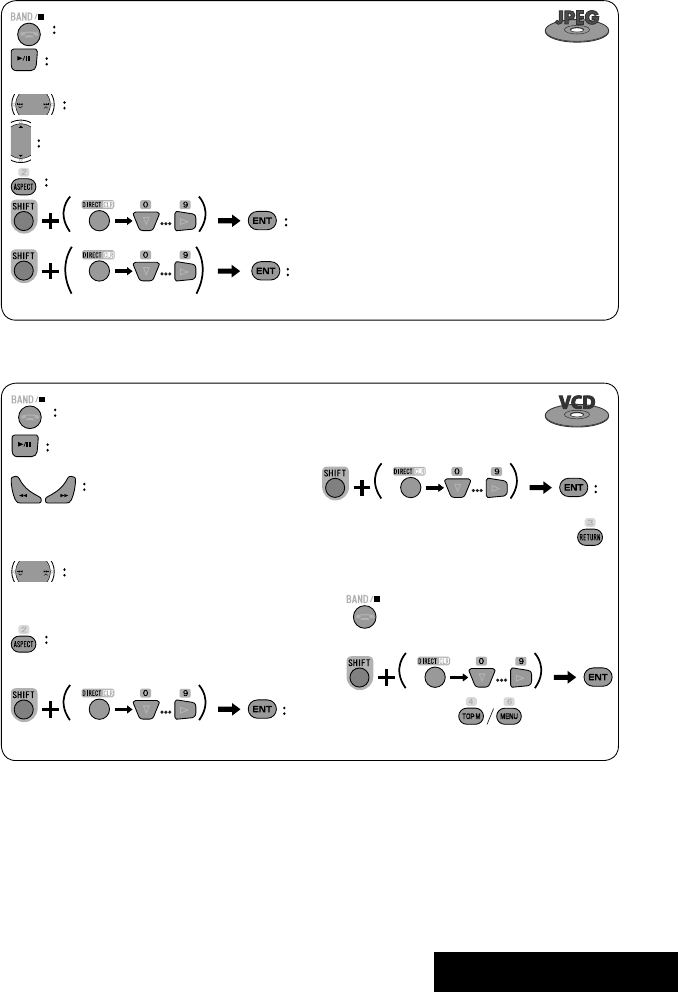
OPERATIONS
23
Stop playback.
Start playback/pause. (Slide show: each file is shown for a few seconds.)
Shows the current file until you change it if pressed during Slide show.
Select file.
Select folder.
Select aspect ratio.
Select file (within the same folder).
Select folder.
During PBC playback...
Select an item on the menu.
To return to the previous menu, press
To cancel PBC playback
1
2 Select the desired track.
• To resume PBC, press
Stop playback.
Start playback/pause (if pressed
during playback).
Reverse/forward search*3
Forward slow motion during pause*4
(No sound can be heard.)
• Reverse slow motion does not work.
Press: Select track.
Hold: Reverse/forward search*5 (No
sound can be heard.)
Select aspect ratio.
twice
*3 Search speed: x2 ] x5 ] x10 ] x20 ] x60
*4 Slow motion speed: 1/32 ] 1/16 ] 1/8 ] 1/4 ] 1/2
*5 Search speed: x2 ] x10
Select track.
EN_KW-AVX714[UI].indb 23EN_KW-AVX714[UI].indb 23 08.1.16 2:38:04 PM08.1.16 2:38:04 PM
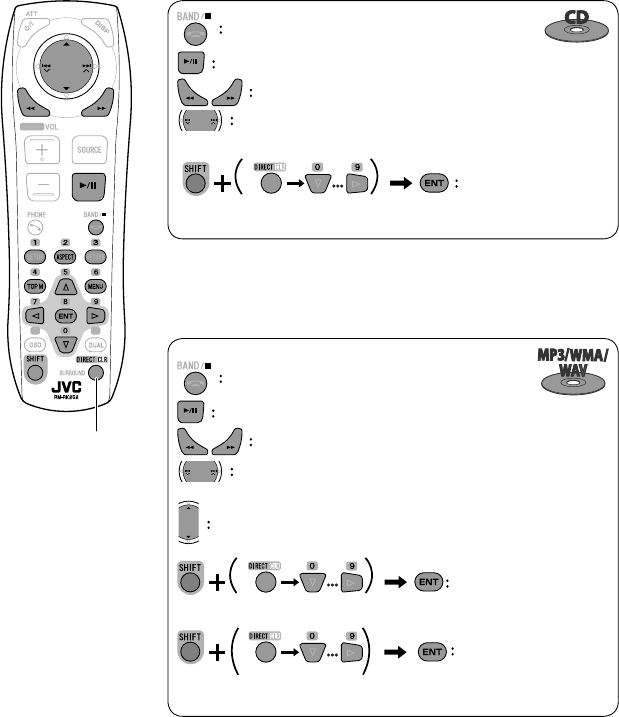
24
Stop playback.
Start playback/pause (if pressed during playback).
Reverse/forward search*1
Press: Select track.
Hold: Reverse/forward search*2
Select track.
*1 Search speed: x2 ] x5 ] x10 ] x20 ] x60
*2 Search speed: x2 ] x10
Stop playback.
Start playback/pause (if pressed during playback).
Reverse/forward search*3
Press: Select track.
Hold: Reverse/forward search*4
Select folder.
Select track (within the same folder).
Select folder.
*3 Search speed: x2 ] x5 ] x10 ] x20 ] x60
*4 Search speed: x2 ] x10
twice
Also functions as CLR (clear):
Erases a misentry if pressed
while holding SHIFT.
EN_KW-AVX714[UI].indb 24EN_KW-AVX714[UI].indb 24 08.1.16 2:38:05 PM08.1.16 2:38:05 PM
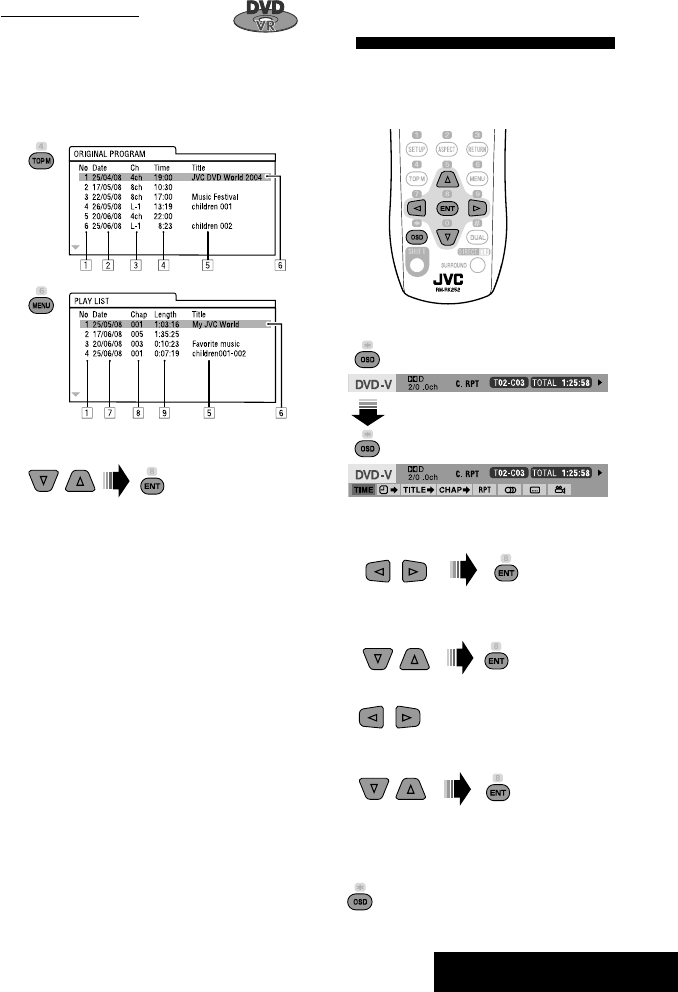
OPERATIONS
25
Operations using the on-screen
bar
These operations are possible on the screen using
the remote controller, while playing the following
discs—DVD/VCD/DivX/MPEG1/MPEG2/JPEG.
1 Display the on-screen bar. (☞page 26)
Ex. For DVD-Video
2 Select an item.
3 Make a selection.
If a pop-up menu appears...
• For entering time/numbers...
:
Move the entry position
:
Select a number
To remove the on-screen bar
Using the list screens
You can use Original Program or Playlist
screen anytime while playing DVD-VR with its data
recorded.
1 Display the Original Program/Playlist screen.
2 Select an item you want.
To erase the screen
1 Original Program/Playlist number
2 Recording date
3 Recording source (TV station, the input terminal of
the recording equipment, etc.)
4 Start time of recording
5 Title of the program/playlist*
6 Highlight bar (current selection)
7 Creating date of playlist
8 Total number of chapters included in the playlist
9 Playback time
* The title of the original program or playlist may not be
displayed depending on the recording equipment.
EN_KW-AVX714[UI].indb 25EN_KW-AVX714[UI].indb 25 08.1.16 2:38:06 PM08.1.16 2:38:06 PM

26
Information
Operation
On-screen bar
5 Time indication
Elapsed playing time of the disc
Remaining title time (for DVD)
Remaining disc time (for others)
Elapsed playing time of the current
chapter/track *2
Remaining time of the current
chapter/track *2
6 Playback status
Play
Reverse/forward search
Reverse/forward slow-motion
Pause
Stop
7 Operation icons
Change time indication (see 5)
Time Search (Specify a certain
scene by entering time.)
Title Search (by its number)
Chapter Search (by its number)
Track Search (by its number)
Repeat play *1
Random play *1
Change the audio language, audio
stream, or audio channel
Change or erase the subtitle
language
Change the view angle
*1 ☞ page 18
*2 Not applicable for DVD-VR
Above example is of DVD Video. Items shown on the bar vary due to the disc type.
1 Disc type
2 • DVD: Audio signal format
• VCD: PBC
3 Playback mode *1
DVD Video:
C. RPT: Chapter repeat
T. RPT: Title repeat
DVD-VR:
C. RPT: Chapter repeat
PG. RPT: Program repeat
DivX/MPEG1/MPEG2:
T. RPT: Track repeat
F. RPT: Folder repeat
F. RND: Folder random
A. RND: All (Disc) random
JPEG:
F. RPT: Folder repeat
VCD:
T. RPT: Track repeat
A. RND: All (Disc) random
4 Playback information
Current title/chapter
Current program/chapter
Current Playlist/chapter
Current track
Current folder/track
Current folder/file
EN_KW-AVX714[UI].indb 26EN_KW-AVX714[UI].indb 26 08.1.16 2:38:07 PM08.1.16 2:38:07 PM
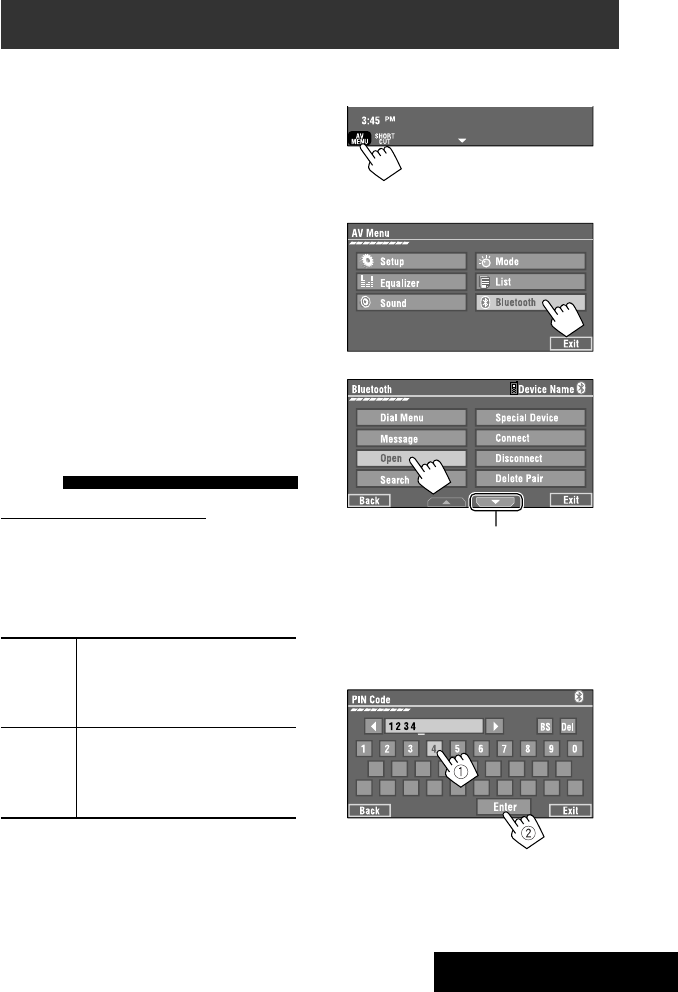
27 EXTERNAL DEVICES
Bluetooth® operations — Cellular phone/audio player
For Bluetooth operations, it is required to connect the
Bluetooth Adapter (KS-BTA200) to the CD changer jack
on the rear.
• Refer also to the instructions supplied with the
Bluetooth Adapter and the Bluetooth device.
• Refer to the list (included in the box) to see the
countries where you may use the Bluetooth®
function.
To use a Bluetooth device through the unit (“Bluetooth
PHONE” and “Bluetooth AUDIO”) for the first time,
you need to establish Bluetooth wireless connection
between the unit and the device.
• Once the connection is established, it is registered in
the unit even if you reset your unit. Up to five devices
can be registered in total.
• Only one device can be connected at a time for each
source (“Bluetooth PHONE” and “Bluetooth AUDIO”).
Connecting a new Bluetooth
device
Registration (Pairing) methods
Use either of the following items in <Bluetooth>
menu to register and establish the connection with a
device.
• Select “Bluetooth PHONE” or “Bluetooth AUDIO” as
the source to operate <Bluetooth> menu.
Open Make the unit ready to establish
a new Bluetooth connection.
The connection is established by
operating the Bluetooth device.
Search Make the unit ready to establish
a new Bluetooth connection.
The connection is established by
operating this unit.
To register using <Open>
Preparation:
Operate the Bluetooth device to turn on its Bluetooth
function.
1 • Make sure “New Device” is selected. If not, press
[5] or [∞] to select it.
• You can also use AV MENU on the monitor panel.
2
3
4 Enter a PIN (Personal Identification
Number)* code to the unit.
• You can enter any number you like (1-digit to
16-digit number).
* Some devices have their own PIN code. Enter the
specified PIN code to the unit.
Go to other menu items
Continued on the next page
EN_KW-AVX714[UI].indb 27EN_KW-AVX714[UI].indb 27 08.1.16 2:38:09 PM08.1.16 2:38:09 PM

28
You can enter [0] – [9] only.
• [BS]: Erases the character before the cursor.
• [Del]: Erases the character on the cursor.
• [Enter]: Confirms the entry.
5 Operate the Bluetooth device to connect
while “Open...” is displayed on the screen.
Enter the same PIN code (as entered in the above
step) on the device to be connected.
Now connection is established and you can use the
device through the unit.
The device remains registered even after you
disconnect the device. Use <Connect> (or activate
<Auto Connect>) to connect the same device
from next time (☞ the following, and pages 50
and 51).
To register using <Search>
• Make sure “New Device” is selected. If not, press [5]
or [∞] to select it.
1 Press [AV MENU] on the touch panel or AV
MENU on the monitor panel.
2 Press [Bluetooth].
3 Press [Search].
The unit searches for available devices and displays
the list of them. (If no available device is detected,
“Device Unfound” appears.)
4 Select a device you want to connect.
5 Enter the specific PIN code of the device to
the unit.
• Refer to the instructions supplied with the device
to check the PIN code.
6 Operate the Bluetooth device to connect
while “Connecting...” is displayed on the
screen.
Now connection is established and you can use the
device through the unit.
To connect a special device <Special
Device>
1 Press [AV MENU] on the touch panel or AV
MENU on the monitor panel.
2 Press [Bluetooth].
3 Press [Special Device].
The unit displays the list of the preset devices.
4 Select a device you want to connect.
5 Use <Open> (or <Search>) to connect.
To connect/disconnect a registered
device
1 Select “Bluetooth PHONE” or “Bluetooth
AUDIO,” then select a registered device you
want to connect/disconnect.
2 Press [AV MENU] on the touch panel or AV
MENU on the monitor panel.
3 Press [Bluetooth].
4 Press [Connect] or [Disconnect].
• Select <Connect> to connect the selected
device.
• Select <Disconnect> to disconnect the selected
device.
To delete a registered device
1 Select “Bluetooth PHONE” or “Bluetooth
AUDIO,” then select a registered device you
want to delete.
2 Press [AV MENU] on the touch panel or AV
MENU on the monitor panel.
3 Press [Bluetooth].
4 Press [Delete Pairing].
Confirmation screen appears. Press [Yes].
EN_KW-AVX714[UI].indb 28EN_KW-AVX714[UI].indb 28 08.1.16 2:38:10 PM08.1.16 2:38:10 PM

29 EXTERNAL DEVICES
Using the Bluetooth cellular phone
Adjust the volume of the incoming calls.*2
When a call comes in...
The source is changed to “Bluetooth PHONE”
automatically.
Name and phone number (if acquired)
When <Auto Answer> is activated...
The unit answers the incoming call automatically.
(☞ page 51)
☞ page 31
When <Auto Answer> is deactivated...
To answer the incoming call
• Press any button on the monitor panel (except
/ATT or +/–).
• Press the message displayed on the touch panel.
To end the call
• Hold any button on the monitor panel (except
/ATT or +/–).
• Hold the message displayed on the touch panel.
• You can adjust the microphone volume. (☞ page 51)
~ Press [SOURCE], then press [Bluetooth PHONE]. (☞ page 9)
• You can also use SOURCE on the monitor panel. Press it repeatedly.
Ÿ Press [AV MENU].
• You can also use AV MENU on the monitor panel.
! Press [Bluetooth].
⁄ Establish the connection with a device, then make a call (or settings using <Bluetooth>
menu).
☞ pages 50 and 51
Sound mode
(☞ page 41) Status of the device
Signal strength/Battery
remainder
(only when the information
comes from the device)
[AV MENU] Hold: Activates <Voice Dialing> function
[5 ∞] Select the registered device
(“New Device” appears when a new device can be registered.)
The Bluetooth icon
lights up when
the adapter is
connected.
: Buttons on the touch panel. In the
explanation, they are indicated inside
[ ].
*1 When a cellular phone with audio function is connected, appears.
*2 This adjustment does not affect the volume level of the other sources.
*1
EN_KW-AVX714[UI].indb 29EN_KW-AVX714[UI].indb 29 08.1.16 2:38:10 PM08.1.16 2:38:10 PM

30
3
4 Select a calling method, then call.
Redial Shows the list of the phone
numbers you have dialed.
Received Calls Shows the list of the received
calls.
Phonebook Shows the phone book of the
connected cellular phone.
Missed Calls Shows the list of the missed
calls.
Phone
Number
Shows the phone number entry
screen = “Entering a phone
number” (☞ page 31).
Voice Dialling (Only when the connected
cellular phone has the voice
recognition system): = Speak
the name you want to call.
When an SMS comes in...
If the cellular phone is compatible with SMS (Short
Message Service), you can read the messages on the
screen.
• You cannot edit or send a message through the unit.
When <Message Info> is set to <Auto>...
The unit rings and the following screen is displayed to
inform you of a message arrival. (☞ page 51)
To read the message, press [Yes].
The source is changed to “Bluetooth PHONE.”
To read the message later, press [No].
• The message is stored into <Message> =
<Unread>. (☞ page 50)
When <Message Info> is set to <Manual>...
Access the message list to read messages. (☞ pages
50 and 51)
To make a call
1
• You can also use AV MENU on the monitor panel.
2
Cancel
EN_KW-AVX714[UI].indb 30EN_KW-AVX714[UI].indb 30 08.1.16 2:38:12 PM08.1.16 2:38:12 PM

31 EXTERNAL DEVICES
To stop ringing (canceling the outgoing call)
Hold any button on the monitor panel (except /ATT
or +/–).
Entering a phone number
• You cannot use the remote controller to enter phone
numbers.
You can enter [0] – [9], [*], [#] (up to 32 numbers)
• [BS]: Erases the character before the cursor.
• [Del]: Erases the character on the cursor.
• [Preset]: Goes to Preset List. You can preset the
entered number by selecting a preset
number. (☞ page 32)
• [Dial]: Calls the entered number.
• You can easily access <Dial Menu> by pressing
[SHORT CUT] on the touch panel, then...
You can also access <Dial Menu> by holding
SOURCE on the monitor panel.
• You can easily activate <Voice Dialing> by
pressing [SHORT CUT] on the touch panel, then...
You can also activate <Voice Dialing> by
holding [AV MENU].
To redial previously dialed numbers
1
2
3
When using the remote controller, you can
display <Redial> menu anytime .
[Hold]
EN_KW-AVX714[UI].indb 31EN_KW-AVX714[UI].indb 31 08.1.16 2:38:12 PM08.1.16 2:38:12 PM

32
To call a preset number
1
2
You can use the following buttons on the remote
controller for the Bluetooth phone operations.
Presetting the phone numbers
You can preset up to six phone numbers.
1 Select the phone number you want to preset
from <Phonebook>, <Redial>, <Received
Calls>, or <Missed Calls>.
1 Press [AV MENU] on the touch panel or AV
MENU on the monitor panel.
2 Press [Bluetooth].
3 Press [Dial Menu], then...
Ex.: Selecting <Received Calls>
2 Select a telephone number to store.
3 Select a preset number.
Now “Tom” is stored into preset no. 1.
• Display <Dial Menu> screen/Answer
the incoming call.
• Display the <Redial> menu if pressed
and held (regardless of the current
source).
End the call.
Adjust the volume.
Make a call to the preset numbers.
[Hold]
:
:
:
:
[Hold]
EN_KW-AVX714[UI].indb 32EN_KW-AVX714[UI].indb 32 08.1.16 2:38:13 PM08.1.16 2:38:13 PM

33 EXTERNAL DEVICES
Bluetooth Information:
If you wish to receive more information about Bluetooth, visit the following JVC web site: <http://www.
jvc-victor.co.jp/english/car/>
You can use the following buttons on the remote
controller for the Bluetooth audio operations.
Using the Bluetooth audio player
☞ page 41
Sound mode
(☞ page 41)
[3 / 8] [7] Start and pause playback
[4 ¢] Reverse/forward skip
[5 ∞] Select the registered device
(“New Device” appears when a new device can
be registered.*3)
Status of the device
Signal strength/Battery
remainder
(only when the information
comes from the device)
The Bluetooth icon
lights up when
the adapter is
connected.
~ Press [SOURCE], then press [Bluetooth
AUDIO]. (☞ page 9)
• You can also use SOURCE on the monitor
panel. Press it repeatedly.
Ÿ Start playback.
: Buttons on the touch panel. In the
explanation, they are indicated
inside [ ].
*2
*1
*1 When a cellular phone with audio function is connected, appears.
*2 Indicates the button pressed. It may be different from the operation status.
*3 You cannot select “New Device” when a Bluetooth audio player is connected.
Start and pause playback.
Reverse/forward skip
Adjust the volume.
:
:
:
EN_KW-AVX714[UI].indb 33EN_KW-AVX714[UI].indb 33 08.1.16 2:38:15 PM08.1.16 2:38:15 PM
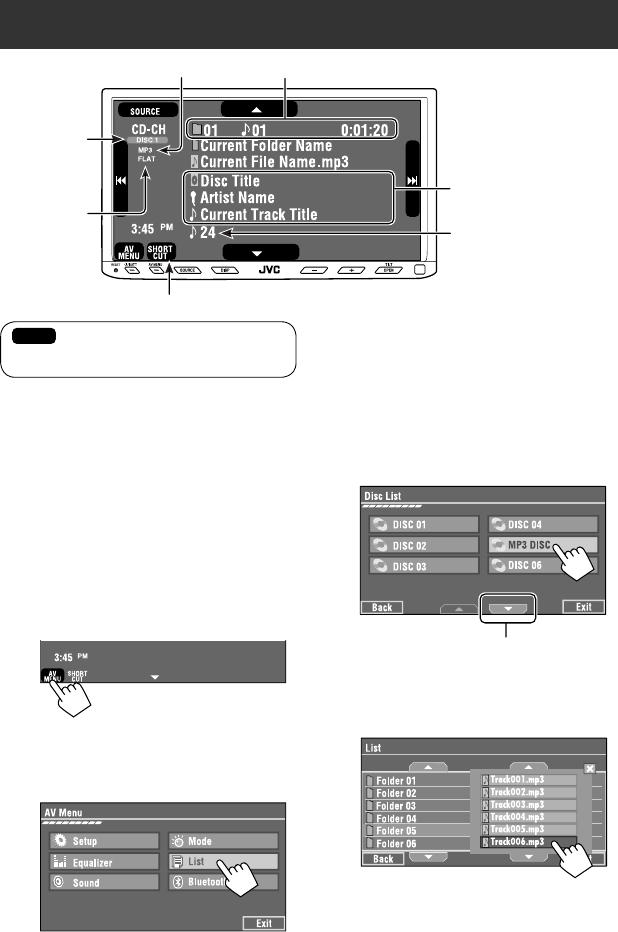
34
Preparation:
Make sure <Changer> is selected for <External
Input>. (☞ page 47)
~ Press [SOURCE], then press [CD-CH]. (☞
page 9)
• You can also use SOURCE on the monitor
panel. Press it repeatedly.
Ÿ
• You can also use AV MENU on the monitor
panel.
! Display the Disc List.
Listening to the CD changer
It is recommended to use a JVC MP3-compatible CD changer with your unit.
• You can play only CDs (CD-DA) and MP3 discs.
Folder no./Track no./Playing time
Disc no.
MP3 indicator
☞ page 35
Tag data appears only when it is
recorded.
⁄ Select a disc to start playing.
• If you select an MP3 disc, the Track list of the
current folder appears. You can select a track
and start playing. (☞ also page 19)
• If you select a folder on the list, you can start
playing the first track of the folder.
To go to the other list
Sound mode
(☞ page 41)
[4 ¢] Press: Select track
Hold: Reverse/forward search
[5 ∞] Press: Select folders (only for MP3)
Hold: Display Disc list
Total track no. included on the
disc
Ex. while playing an MP3 disc
: Buttons on the touch panel. In the
explanation, they are indicated inside [ ].
EN_KW-AVX714[UI].indb 34EN_KW-AVX714[UI].indb 34 08.1.16 2:38:15 PM08.1.16 2:38:15 PM
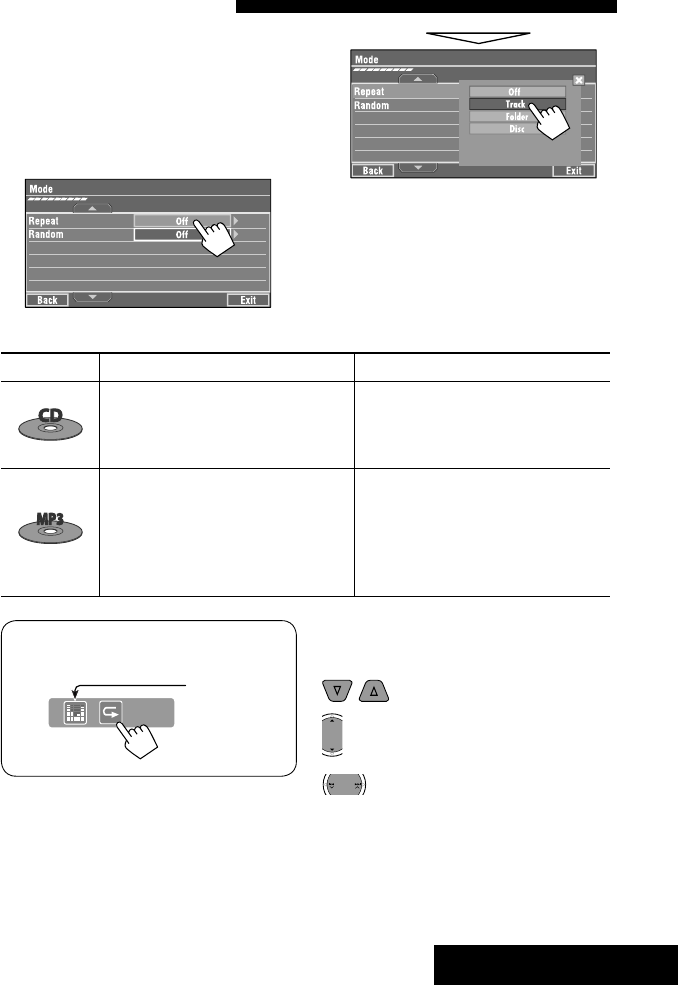
35 EXTERNAL DEVICES
When one of the playback modes is selected, the
corresponding indicator lights up on the source
information screen.
To cancel, select <Off>.
You can use following playback modes—Repeat or
Random.
Ex.: To select Track Repeat for an MP3 disc
1 Press [AV MENU] on the touch panel or AV
MENU on the monitor panel.
2 Press [Mode].
3
Selecting playback modes
Disc type Repeat Random
Track: Repeats current track
Disc: Repeats all tracks of the current disc
Disc: Randomly plays all tracks of the
current disc
All: Randomly plays all tracks of all
loaded discs
Track: Repeats current track
Folder: Repeats all tracks of the current
folder
Disc: Repeats all tracks of the current disc
Folder: Randomly plays all tracks of current
folder, then tracks of next folders
Disc: Randomly plays all tracks of the
current disc
All: Randomly plays all tracks of all
loaded discs
You can use the following buttons on the remote
controller to operate the CD changer.
You can easily turn on or off Track Repeat by
pressing [SHORT CUT] on the touch panel, then...
: Select disc.
: Select folder (MP3 only).
• Press: Select track.
• Hold: Reverse/forward search
☞ page 41
EN_KW-AVX714[UI].indb 35EN_KW-AVX714[UI].indb 35 08.1.16 2:38:16 PM08.1.16 2:38:16 PM

36
Listening to the iPod
It is required to connect the Interface adapter for iPod (KS-PD100) to the CD changer jack on the rear.
Preparation:
Make sure <iPod> is selected for <External Input>. (☞ page 47)
~ Press [SOURCE], then press [iPod] (☞ page 9)
Playback starts automatically.
• You can also use SOURCE on the monitor panel. Press it repeatedly.
Ÿ Press [4] or [¢] to select a track.
Track no./Playing time
☞ page 37
[4 ¢] Press: Select track
Hold: Reverse/forward search
[5] Enter player’s menu
[∞] Start playback/pause
• To resume, press again.
Sound mode
(☞ page 41)
: Buttons on the touch panel. In the
explanation, they are indicated
inside [ ].
EN_KW-AVX714[UI].indb 36EN_KW-AVX714[UI].indb 36 08.1.16 2:38:17 PM08.1.16 2:38:17 PM

37 EXTERNAL DEVICES
Selecting a track from the
player’s menu
1 Press [5] to enter the player’s menu.
“SEARCH” flashes on the screen during menu
operations.
• This mode will be canceled if no operations are
done for about five seconds.
2 Press [4] or [¢] to select the desired
item.
Press: Select an item.
Hold: Skip ten items at a time if there are more
than ten items.
Playlists Ô Artists Ô Albums Ô Songs Ô
Genres Ô Composers Ô (back to the beginning)
3 Press [∞] to confirm the selection.
4 Repeat steps 2 and 3 to select a track.
• When a track is selected finally, playback starts.
• To return to the previous menu, press [5].
Selecting playback modes
1
• You can also use AV MENU on the monitor panel.
2
3 Select an appropriate option.
Repeat One: Functions the same as
“Repeat One.”
All: Functions the same as
“Repeat All.”
Random Album: Functions the same as
“Shuffle Albums.”
Song: Functions the same as
“Shuffle Songs.”
• When the playback modes are selected, the
corresponding indicators light up alternately on
the screen.
To cancel, select <Off>.
You can easily turn on or off Track Repeat by
pressing [SHORT CUT] on the touch panel, then...
☞ page 41
EN_KW-AVX714[UI].indb 37EN_KW-AVX714[UI].indb 37 08.1.16 2:38:17 PM08.1.16 2:38:17 PM
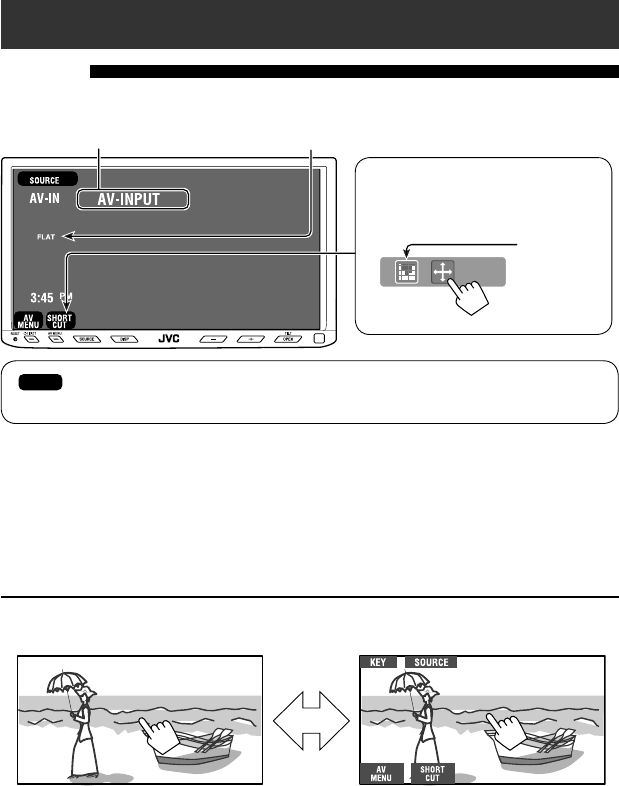
38
Using other external components
AV-INPUT
You can connect an external component to the LINE IN/VIDEO IN terminals.
~ Press [SOURCE], then press [AV-IN]. (☞ page 9)
• You can also use SOURCE on the monitor panel. Press it repeatedly.
Ÿ Turn on the connected component and start playing the source.
To display the operation buttons (☞ page 17) while watching the playback picture
• If no operations are done for about five seconds, the operation buttons disappear.
• [KEY] does not work when the source is “AV-IN.”
Touch the screen (center portion).
You can easily access to <Aspect> setting
menu by pressing [SHORT CUT] on the
touch panel, then...
Assigned title (☞ page 42) Sound mode (☞ page 41)
Touch the screen (center portion).
: Buttons on the touch panel. In the explanation, they are indicated inside [ ].
These buttons also work when they are not shown on the touch panel (while watching the playback picture).
☞ page 41
EN_KW-AVX714[UI].indb 38EN_KW-AVX714[UI].indb 38 08.1.16 2:38:18 PM08.1.16 2:38:18 PM
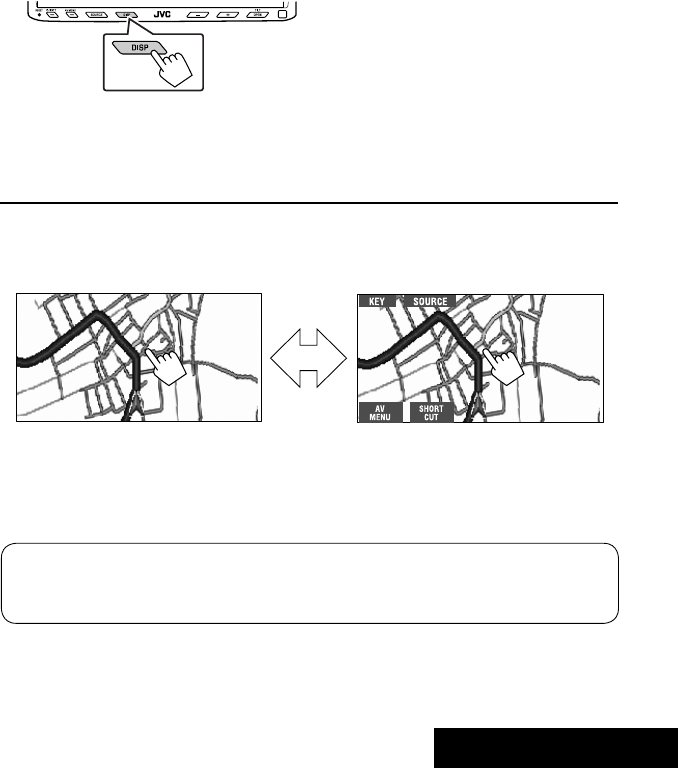
39 EXTERNAL DEVICES
To display the operation buttons (☞ page 17) while viewing the navigation screen
• The operation buttons displayed on the screen vary among the playback sources.
• If no operations are done for about five seconds, the operation buttons disappear.
• The above buttons except [KEY] also work when they are not shown on the screen (while viewing the navigation
screen).
Navigation screen
You can also connect a Navigation System to the VIDEO IN terminal so that you can watch the navigation screen.
Preparation:
Make sure <Navigation> is selected for <AV Input>. (☞ page 47)
To view the navigation screen (and listen to the navigation guidance*)
Press DISP on the monitor panel repeatedly. (☞ page 9)
• The aspect ratio of the navigation screen is fixed to
<Full> regardless of the <Aspect> setting. (☞ page
45)
* If your Navigation System is equipped with the voice guidance function.
When <Navigation> is selected for <AV Input> (☞ page 47)
• You can use the source “AV-IN” for listening to an audio source connected to the LINE IN terminals.
• Some status messages such as volume level will not appear on the screen.
Touch the screen (center portion). Touch the screen (center portion).
EN_KW-AVX714[UI].indb 39EN_KW-AVX714[UI].indb 39 08.1.16 2:38:18 PM08.1.16 2:38:18 PM

40
EXT-INPUT
You can connect an external component to the CD changer jack on the rear using the Line Input Adapter—KS-U57
(not supplied) or AUX Input Adapter—KS-U58 (not supplied).
Preparation:
Make sure <External> is selected for <External Input>. (☞ page 47)
~ Press [SOURCE], then press [EXT-IN]. (☞ page 9)
• You can also use SOURCE on the monitor panel. Press it repeatedly.
Ÿ Turn on the connected component and start playing the source.
Assigned title (☞ page 42)
☞ page 41
Sound mode
(☞ page 41)
: Buttons on the touch panel. In the explanation, they are indicated inside [ ].
EN_KW-AVX714[UI].indb 40EN_KW-AVX714[UI].indb 40 08.1.16 2:38:19 PM08.1.16 2:38:19 PM

SETTINGS
41
~
• You can also use AV MENU on the monitor panel.
Ÿ
! Select a sound mode.
• For preset values of each sound mode, ☞ page 58.
Sound equalization
Storing your own adjustments
You can store your adjustments into <User1>,
<User2>, and <User3>.
1 Repeat steps ~ and Ÿ, then in step !...
2 Adjust (1), then store (2).
Ex.: When storing into <User2>.
While playing back any source other
than “Bluetooth PHONE,” you can easily
access <Equalizer> menu by pressing
[SHORT CUT] on the touch panel, then...
Move to other six sound modes
EN_KW-AVX714[UI].indb 41EN_KW-AVX714[UI].indb 41 08.1.16 2:38:19 PM08.1.16 2:38:19 PM
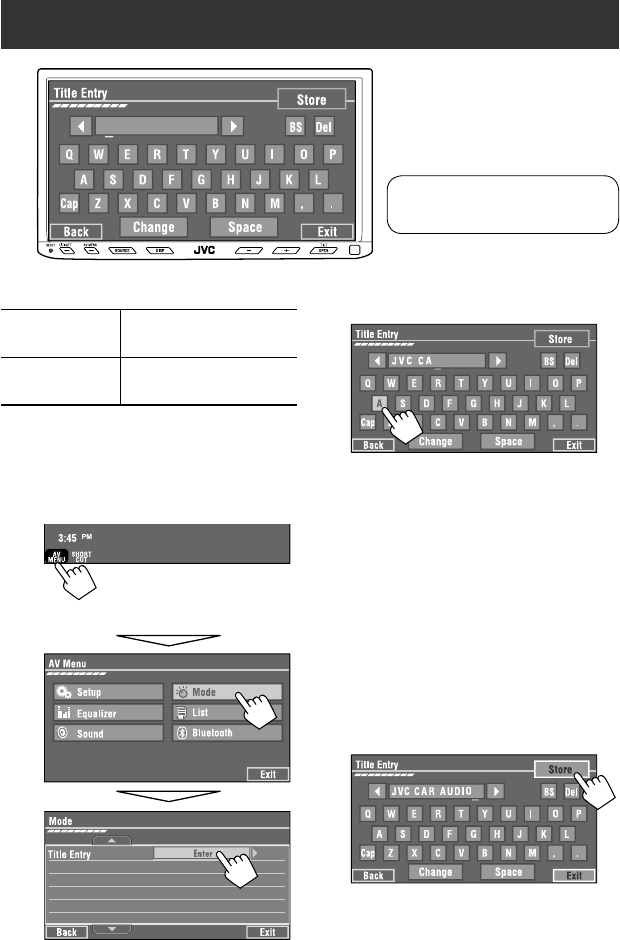
42
You can assign titles as follows.
FM/AM stations Up to 16 characters—up to 30
stations.
AV-IN
EXT-IN
Up to 16 characters
~ Select the source. (☞ page 9)
• For FM/AM stations: Select the band, then
tune into a station.
Ÿ Display <Title Entry> screen.
• You can also use AV MENU on the monitor panel.
! Assign a title.
You can enter up to 16 characters (for available
characters, ☞ page 59).
• [Store]: Confirm the entry.
• [2/3]: Move the cursor.
• [BS]: Erase the character before the
cursor.
• [Del]: Erase the character on the cursor.
• [Cap]: Change the letter case (upper/
lower).
• [Change]: Change the character set.
• [Space]: Enter a space.
⁄ Finish the procedure.
Assigning titles to the sources
In the explanation, buttons on the
touch panel are indicated inside [ ].
EN_KW-AVX714[UI].indb 42EN_KW-AVX714[UI].indb 42 08.1.16 2:38:20 PM08.1.16 2:38:20 PM
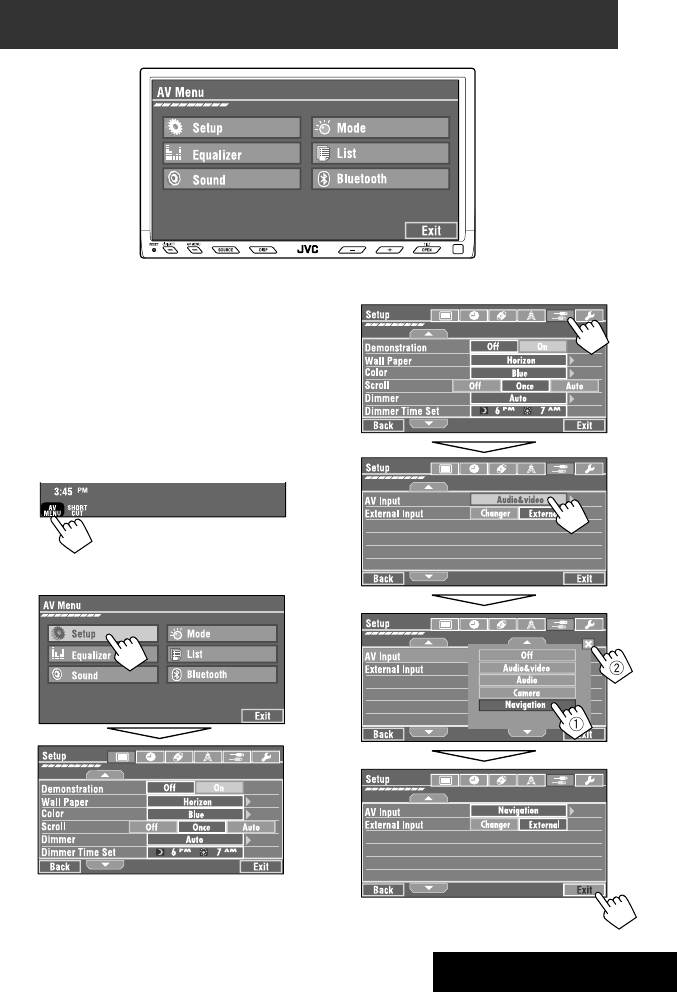
SETTINGS
43
!
Menu operations
The following steps are one of the fundamental
procedures. Some of the settings do not open the
sub-setting window, but just selecting an option will
change the setting.
• The display indications may change according to
change of the specifications.
Ex.: Changing the <AV Input> setting
~
• You can also use AV MENU on the monitor panel.
Ÿ
Non-available items will be shaded.
EN_KW-AVX714[UI].indb 43EN_KW-AVX714[UI].indb 43 08.1.16 2:38:20 PM08.1.16 2:38:20 PM

44
Setup
Menu items Selectable settings, [reference page]
Display
Demonstration Off: Cancels.
On: Activates the demonstration on the screen. To stop it temporarily,
touch the screen.
Wall Paper You can select the background picture of the screen.
Horizon, Metal, Art, Plain
Color You can select the color of the background picture.
Blue, Light-Blue, Red, Orange, Yellow, Green, Purple, Dark-Blue,
Dark-Green, Brown, Light-Brown, Black
Scroll Off: Cancels.
Once: Scrolls the disc information once.
Auto: Repeats scrolling (five-second intervals).
• Holding DISP on the monitor panel scrolls the information regardless
of this setting.
Dimmer Off: Cancels.
On: Activates dimmer.
Auto: Dims the monitor when you turn on the headlights.*1
Dimmer Time Set : Activates the Dimmer Time setting below.
Dimmer Time Set Sets the Dimmer On/Off times.
Dimmer Level You can select the brightness for dimmer.
1 (bright), 2 (middle), 3 (dark)
Bright You can adjust brightness of the screen.
–15 (darkest) to +15 (brightest); Initial 00
Picture Adjust*2You can adjust the following to make the screen clear and legible for
watching the playback picture. The setting will be stored—one for
“DISC” (common) and the other for “AV-IN.”
–15 to +15; Initial 0
Bright: Adjust if the picture is too bright or too dark.
Contrast: Adjust the contrast.
Color: Adjust the color of the picture—lighter or darker.
Tint: Adjust the tint if the human skin color is unnatural. (only when
color system setting is <NTSC>, ☞ next page)
• Press [5] or [∞] to adjust.
*1 The ILLUMINATION lead connection is required. (☞ Installation/Connection Manual)
*2 Adjustable only when the source is “DISC” (the inserted disc must contain pictures or movies) or “AV-IN.”
The procedure for setting an item is shown on page 43.
EN_KW-AVX714[UI].indb 44EN_KW-AVX714[UI].indb 44 08.1.16 2:38:21 PM08.1.16 2:38:21 PM

SETTINGS
45
Menu items Selectable settings, [reference page]
Display
Aspect*3You can change the aspect ratio of the picture.
Aspect ratio of incoming signal
4:3 16:9
Regular:
For 4:3 original pictures
Full:
For 16:9 original pictures
Auto: • For “DISC”: Aspect ratio is automatically
selected to match to the incoming signals.
• For the other video sources: Aspect ratio is
fixed to <Regular>.
Language*4Select the indication language shown on the screen.
English, Español, Français, Deutsch, Italiano, Nederlands,
Svenska, Dansk, Руccĸий, Português
• The characters you can enter for assigning the titles also change
according to the language selected. ☞ [59]
NTSC/PAL Select the color system of the external monitor connected—NTSC, PAL.
• Turn off the power and turn it on again to make the new setting
effective.
Clock
Time Set Initial 1:00AM ☞ [8]
Time Format Select either 12-hour system or 24-hour system.
12Hours, 24Hours ☞ [8]
OSD Clock When <On> is selected, the clock time is displayed on the playback
picture. ☞ [8]
Off, On
*3 Not adjustable when no picture is shown.
*4 After you change the indication language setting, turn off then on the power so that your setting takes effect.
Initial: Underlined
EN_KW-AVX714[UI].indb 45EN_KW-AVX714[UI].indb 45 08.1.16 2:38:22 PM08.1.16 2:38:22 PM
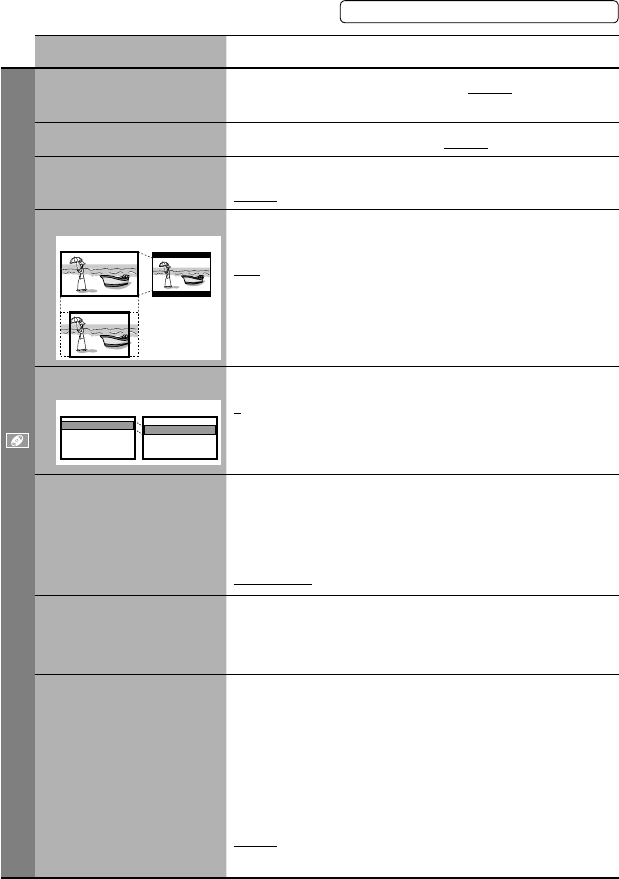
46
Menu items Selectable settings, [reference page]
Disc
Menu Language*1Select the initial disc menu language; Initial English (☞ also page
58).
Audio Language*1Select the initial audio language; Initial English (☞ also page 58).
Subtitle*1Select the initial subtitle language or erase the subtitle (Off); Initial
English (☞ also page 58).
Monitor Type*1Select the monitor type to watch a wide screen picture on the external
monitor.
16:9 : Select when the aspect ratio of the external monitor is 16:9.
4:3 LB (Letterbox)/4:3 PS (Pan Scan): Select when the aspect ratio of
the external monitor is 4:3.
• Refer to the illustrations on the left to see how the pictures are
shown on the screen.
OSD Position*1Select the position of the on-screen bar. ☞ [25]
1: Higher position
2: Lower position
File Type*1Select playback file type when a disc contains different types of files.
Audio: Plays back audio files.
Still Picture: Plays back JPEG files.
Video: Plays back DivX/MPEG1/MPEG2 files.
Audio&Video: Plays back audio files and DivX/MPEG1/MPEG2 files.
DivX Regist. (Registration)*1This unit has its own Registration Code. Once you have played back a
file with which the Registration Code recorded, this unit’s Registration
Code is overwritten for copyright protection.
D. Audio Output*1Select the signal format emitted through the DIGITAL OUT (optical)
terminal. (☞ also page 57)
PCM : Select this when connecting an amplifier or a decoder
incompatible with Dolby Digital, DTS, or MPEG Audio, or when
connecting to a recording device.
Dolby D : Select this when connecting an amplifier or a decoder
compatible with Dolby Digital.
Stream : Select this when connecting an amplifier or a decoder
compatible with Dolby Digital, DTS, or MPEG Audio.
*1 Selectable only for “DISC.” (Playback stops when you change the setting.)
Position 1 Position 2
16:9 4:3LB
4:3PS
The procedure for setting an item is shown on page 43.
EN_KW-AVX714[UI].indb 46EN_KW-AVX714[UI].indb 46 08.1.16 2:38:23 PM08.1.16 2:38:23 PM

SETTINGS
47
Menu items Selectable settings, [reference page]
Disc
Down Mix*1When playing back a multi-channel disc, this setting affects the signals
reproduced through the LINE OUT terminals.
Dolby SR : Select this to enjoy multi-channel surround audio by
connecting an amplifier compatible with Dolby Surround.
Stereo : Normally select this.
D. (Dynamic) Range
Compres. (Compression)*1
You can enjoy a powerful sound at a low volume level while playing
Dolby Digital software.
Auto: Select to apply the effect to multi-channel encoded software.
On: Select to always use this function.
Tuner
IF Band Width Auto: Increases the tuner selectivity to reduce interference noises
between adjacent stations. (Stereo effect may be lost.)
Wide: Subject to the interference from adjacent stations, but sound
quality will not be degraded and the stereo effect will remain.
Input
AV Input*2
You can determine the use of LINE IN and VIDEO IN terminals. ☞ [38, 39
]
Off: Select when no component is connected (“AV-IN” is skipped while
selecting the source).
Audio&Video: Select when connecting an AV component such as a
VCR.
Audio: Select when connecting an audio component such as a portable
audio player.
Camera*3 : Select when connecting a rear view camera.
Navigation : Select when connecting a Navigation System.
External Input*4For connecting an external component to the CD changer jack on the
rear.
Changer/iPod*5: CD changer or iPod. ☞ [34, 36]
External: Any other than the above. ☞ [40]
• For connecting the Bluetooth adapter, this setting is not required. It is
automatically detected.
*2 Not selectable when “AV-IN” is selected as the source.
*3 The REVERSE GEAR SIGNAL lead connection is required. See Installation/Connection Manual. The rear view through
the camera appears on the screen in <Full> aspect ratio (regardless of the aspect ratio setting) when you shift the
gear to the reverse (R) position. When you press DISP on the control panel, or when you shift the gear to another
position other than the reverse (R) position, the rear view screen is cleared.
*4 Not selectable when the component connected to the CD changer jack is selected as the source.
*5 The name of the component detected through the CD changer jack is shown.
Initial: Underlined
EN_KW-AVX714[UI].indb 47EN_KW-AVX714[UI].indb 47 08.1.16 2:38:23 PM08.1.16 2:38:23 PM
48
Menu items Selectable settings, [reference page]
Others
Beep Off: Cancels.
On: Activates the key-touch tone.
Telephone Muting Off: Cancels.
Muting1, Muting2: Select either one which mutes the sounds while
using the cellular phone.
Power LED Flash Off: Cancels.
On: When the ignition is turned off, the lamp on the button
flashes.
TouchPanel Sens. Change the sensitivity of the touch panel. As the number decreases,
sensitivity becomes higher. 1/2/3
Initialize Initialize all settings you have made in <AV Menu>. Press and hold
[Enter] to initialize the settings, then reset the unit. ☞ [3]
Equalizer
Flat/Hard Rock/R&B/Pop/Jazz/Dance/Country/Reggae/Classic/User1/User2/User3 ☞ [41]
The procedure for setting an item is shown on page 43.
EN_KW-AVX714[UI].indb 48EN_KW-AVX714[UI].indb 48 08.1.16 2:38:24 PM08.1.16 2:38:24 PM
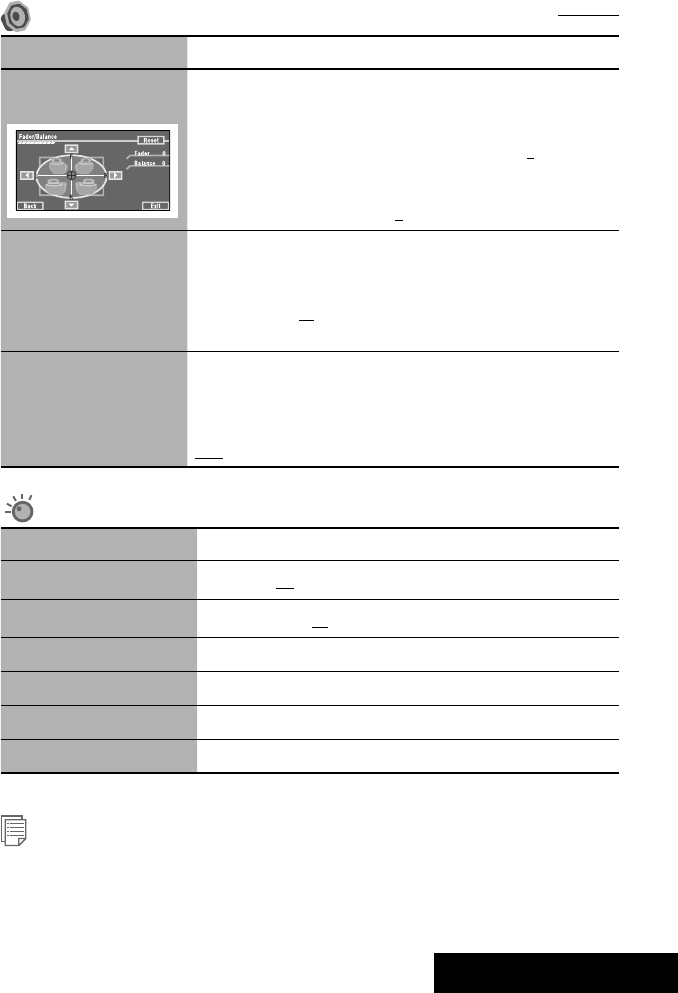
SETTINGS
49
Sound
Menu items Selectable settings, [reference page]
Fader/Balance Adjust fader—speaker output balance between the front and rear speakers.
• Upmost—front only (F6)
• Downmost—rear only (R6)
When using a two-speaker system, set the fader to the center (0).
Adjust balance—speaker output balance between the left and right speakers.
• Leftmost—left only (L6)
• Rightmost—right only (R6) Initial 0
Volume Adjust Adjust and store auto-adjustment volume level for each source, comparing to
the FM volume level. The volume level will automatically increase or decrease
when you change the source.
–12 to +12; Initial 00
• You can make the adjustments separately for DVD and other discs.
Amplifier Gain You can change the maximum volume level of this unit.
Off: Deactivates the built-in amplifier.
Low: VOL 00 to 30 (Select this if the maximum power of the speakers is less
than 50 W.)
High: VOL 00 to 50
Mode*1
Menu items Selectable settings, [reference page]
Mono Only for FM. (Off, On) ☞ [10]
DX/Local Only for FM. (Local, DX) ☞ [11]
SSM Only for FM. Press and hold to start SSM. ☞ [11]
Title Entry Only for FM/AM stations, “AV-IN,” and “EXT-IN.” ☞ [42]
Repeat ☞ [18, 35, 37]
Random ☞ [18, 35, 37]
*1 Items listed under <Mode> vary among the playback sources.
List
For “DISC”: Folder List and Track List (☞ page 19)
For “CD-CH”: Disc List, Folder List, and Track List (☞ page 34)
• For the other playback sources, you can display a list by pressing DISP on the monitor panel. (☞ page 9)
Initial: Underlined
EN_KW-AVX714[UI].indb 49EN_KW-AVX714[UI].indb 49 08.1.16 2:38:25 PM08.1.16 2:38:25 PM

50
Bluetooth*1
Menu items Selectable settings, [reference page]
Dial Menu *2Select the method to make a call. ☞ [30]
Message*3You can read a message from the following message histories.
Unread: Messages you have not read.
Read: Messages you have read.
Unsent: Messages you have not sent.
Sent: Messages you have sent.
• The number of messages in each history is also shown.
Open ☞ [27]
Search ☞ [28]
Special Device Only for “New Device.”
Shows the list of Bluetooth devices which require some special procedure to
establish Bluetooth connection. Select a device you want to connect.
• After selecting the device, use <Open> or <Search> (☞ page 27 or 28)
for connection.
• Once the connection is established, it is registered in the unit. You can
connect the unit and the device by using <Connect> (☞ below) from the
next time.
Connect Only for the registered devices.
After selecting a device from among the registered devices (☞ pages 27 and
28), establish the connection with it.
Disconnect Only for the device being connected.
Disconnect the current device before connecting another device.
Delete Pairing Only for the registered devices.
Delete the registered devices.
*1 Selectable only for “Bluetooth PHONE” or “Bluetooth AUDIO.” Select a device (or “New Device”) before operating the
menu.
*2 Only for the device connected for “Bluetooth PHONE.”
*3 Selectable only when the source is “Bluetooth PHONE” and the connected cellular phone is compatible with SMS
(Short Message Service).
When operating the Bluetooth device, refer also to the instructions supplied with the device.
The procedure for setting an item is shown on page 43.
EN_KW-AVX714[UI].indb 50EN_KW-AVX714[UI].indb 50 08.1.16 2:38:26 PM08.1.16 2:38:26 PM

SETTINGS
51
Menu items Selectable settings, [reference page]
Settings
Auto Connect *4When the unit is turned on, the connection is established automatically
with...
Off: No Bluetooth device.
Last: The last connected Bluetooth device.
Order: The available registered Bluetooth device found first.
Auto Answer *5Off: The unit does not answer the calls automatically. Answer the calls
manually.
On: The unit answers the incoming calls automatically.
Reject: The unit rejects all incoming calls.
Message Info *5Auto: The unit informs you of the arrival of a message by ringing and
displaying “Receiving Message.” To read the message, ☞ page 30.
Manual: The unit does not inform you of the arrival of a message.
MIC Setting *5Adjust microphone volume connected to the Bluetooth adapter.
01/02/03
Version *6The Bluetooth software and hardware versions are shown.
*4 Selectable only for “Bluetooth PHONE.”
*5 Only for the cellular phone connected for “Bluetooth PHONE.” Not selectable when “New Device” is selected.
*6 If you wish to receive more information about Bluetooth, visit the following JVC web site: <http://www.jvc-victor.
co.jp/english/car/>
SETTINGS
Initial: Underlined
EN_KW-AVX714[UI].indb 51EN_KW-AVX714[UI].indb 51 08.1.16 2:38:26 PM08.1.16 2:38:26 PM
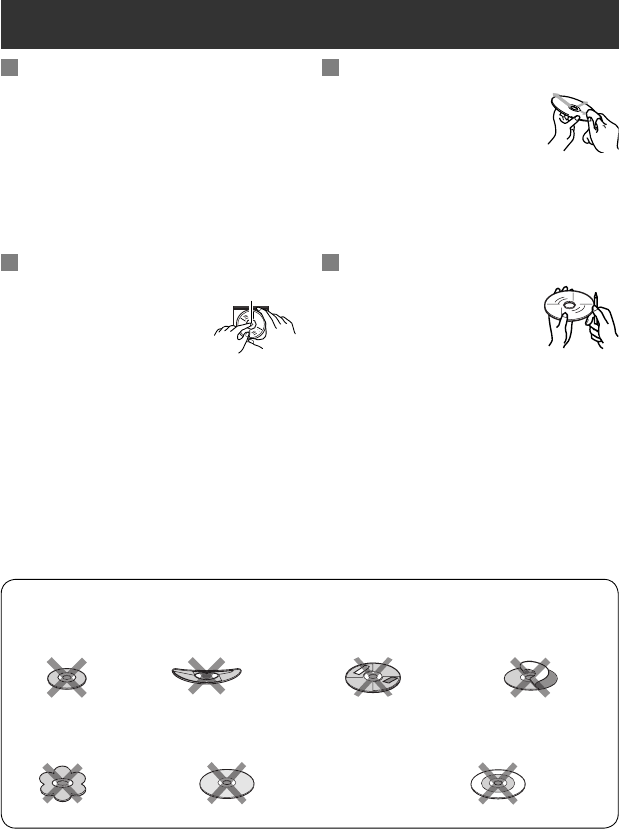
52
Maintenance
Moisture condensation
Moisture may condense on the lens inside the unit in
the following cases:
• After starting the heater in the car.
• If it becomes very humid inside the car.
Should this occur, the unit may malfunction. In this
case, eject the disc and leave the unit turned on for a
few hours until the moisture evaporates.
How to handle discs
When removing a disc from its
case, press down the center holder of
the case and lift the disc out, holding it
by the edges.
• Always hold the disc by the edges. Do not touch its
recording surface.
When storing a disc into its case, gently insert the
disc around the center holder (with the printed surface
facing up).
• Make sure to store discs into the cases after use.
To keep discs clean
A dirty disc may not play correctly.
If a disc does become dirty, wipe it with
a soft cloth in a straight line from center
to edge.
• Do not use any solvent (for example, conventional
record cleaner, spray, thinner, benzine, etc.) to clean
discs.
To play new discs
New discs may have some rough spots
around the inner and outer edges. If
such a disc is used, this unit may reject
the disc.
To remove these rough spots, rub the edges with a
pencil or ball-point pen, etc.
Stick-on labelSticker and sticker residue
Unusual shape
Warped disc
Do not use the following discs:
Center holder
SingleCD—8 cm disc
C-thru Disc (semi-transparent disc) Transparent or semi-transparent on its
recording area
EN_KW-AVX714[UI].indb 52EN_KW-AVX714[UI].indb 52 08.1.16 2:38:27 PM08.1.16 2:38:27 PM

53 REFERENCES
More about this unit
General
Turning on the power
• By pressing SOURCE on the monitor panel, you
can also turn on the power. If the source is ready,
playback starts.
Tuner (FM only)
Storing stations in memory
• When SSM is over, received stations are preset in no.
1 (lowest frequency) to no. 6 (highest frequency).
Disc
General
• In this manual, words “track” and “file” are
interchangeably used.
• This unit can only play back audio CD (CD-DA) files
if different type of audio files (MP3/WMA/WAV) are
recorded on the same disc.
• This unit can display only one-byte characters. No
other characters can be correctly displayed.
Inserting a disc
• When a disc is inserted upside down or has no
playable files, “Cannot play this disc Check the disc”
appears on the screen. Eject the disc.
Ejecting a disc
• If “No disc“ appears after removing a disc, insert a
disc or select another playback source.
• If the ejected disc is not removed within 15 seconds,
the disc is automatically inserted again into the
loading slot to protect it from dust.
Playing Recordable/Rewritable discs
• This unit can recognize a total of 5 000 files and 250
folders (a maximum of 999 files per folder).
• Use only “finalized” discs.
• This unit can play back multi-session discs; however,
unclosed sessions will be skipped while playing.
• This unit can recognize a total 25 characters for file/
folder names.
• Some discs or files may not be played back due to
their characteristics or recording conditions.
Playing DVD-VR
• For details about DVD-VR format and Playlist, refer
to the instructions supplied with the recording
equipment.
File playback
Playing DivX files
• This unit can play back DivX files with the extension
code <.divx>, <.div>, or <.avi> (regardless of the
letter case—upper/lower).
• This unit supports the DivX files whose resolution is
720 x 576 pixels or less.
• Audio stream should conform to MP3 or Dolby Digital.
• The file encoded in the interlaced scanning mode
may not be played back correctly.
• The maximum bit rate for video signals (average) is 4
Mbps.
Continued on the next page
EN_KW-AVX714[UI].indb 53EN_KW-AVX714[UI].indb 53 08.1.16 2:38:27 PM08.1.16 2:38:27 PM
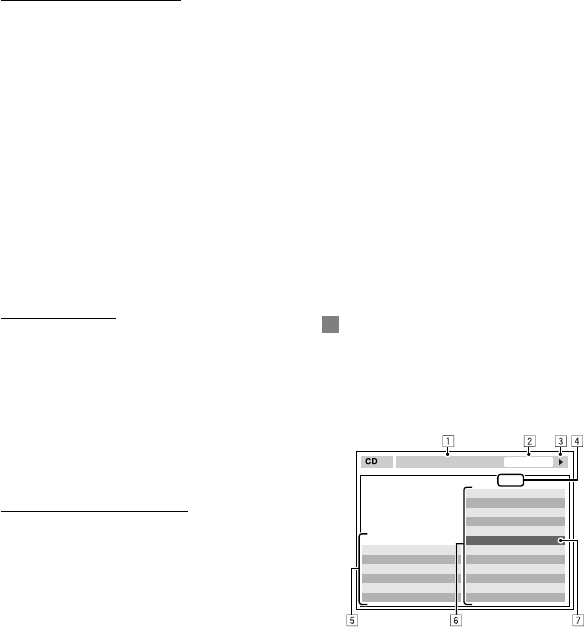
54
Playing MPEG1/MPEG2 files
• This unit can play back MPEG1/MPEG2 files with the
extension code <.mpg>, <.mpeg>, or <.mod>*.
* <.mod> is an extension code used for the MPEG2
files recorded by JVC Everio camcorders.
• The stream format should conform to MPEG system/
program stream.
The file format should be MP@ML (Main Profile at
Main Level)/SP@ML (Simple Profile at Main Level)/
MP@LL (Main Profile at Low Level).
• Audio streams should conform to MPEG1 Audio
Layer-2 or Dolby Digital.
• The maximum bit rate for video signals (average) is 4
Mbps.
Playing JPEG files
• This unit can play back JPEG files with the extension
code <.jpg>, or <.jpeg>.
• It is recommended that you record a file at 640 x 480
resolution.
• This unit can play back baseline JPEG files.
Progressive JPEG files or lossless JPEG files cannot be
played.
Playing MP3/WMA/WAV files
• This unit can play back files with the extension code
<.mp3>, <.wma>, or <.wav> (regardless of the
letter case—upper/lower).
• This unit can play back the files meeting the
conditions below:
– Bit rate:
MP3/WMA: 32 kbps — 320 kbps
– Sampling frequency:
48 kHz, 44.1 kHz, 32 kHz (for MPEG1)
24 kHz, 22.05 kHz, 16 kHz (for MPEG2)
48 kHz, 44.1 kHz, 32 kHz, 22.05 kHz (for WMA)
44.1 kHz (for WAV)
• This unit can show ID3 Tag Version
1.0/1.1/2.2/2.3/2.4 (for MP3).
• This unit can also show WAV/WMA Tag.
• This unit can play back files recorded in VBR (variable
bit rate).
• Files recorded in VBR have a discrepancy in elapsed
time indication.
• This unit cannot play back the following files:
– MP3 files encoded with MP3i and MP3 PRO
format.
– MP3 files encoded with Layer 1/2.
– WMA files encoded with lossless, professional,
and voice format.
– WMA files which are not based upon Windows
Media® Audio.
– WMA files copy-protected with DRM.
– Files which have the data such as AIFF, ATRAC3,
etc.
Disc/file information shown on the
external monitor
The following screens appear only on the external
monitor.
• CD
1 Selected playback mode
2 Elapsed playing time of the current track
3 Operation status
4 Current track number/total number of tracks
on the disc
5 Track information
6 Track list
7 Current track (highlighted bar)
TIME 00:14
Track : 6 / 14
Track Information
Cloudy
Fair
Fog
Hail
Indian summer
Rain
Shower
Snow
Thunder
Typhoon
Wind
Winter sky
Album
Four seasons
Artist
Robert M. Smith
Title
Rain
T. RPT
EN_KW-AVX714[UI].indb 54EN_KW-AVX714[UI].indb 54 08.1.16 2:38:28 PM08.1.16 2:38:28 PM
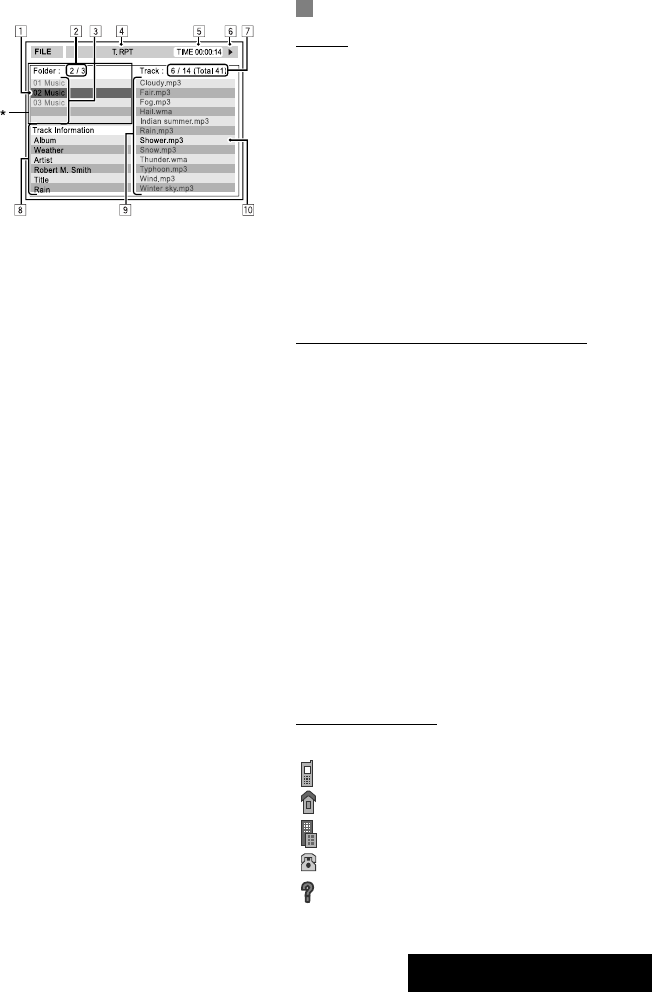
55 REFERENCES
Bluetooth operations
General
• While driving, do not perform complicated operation
such as dialing the numbers, using phone book, etc.
When you perform these operations, stop your car in
a safe place.
• Some Bluetooth devices may not be connected to
this unit depending on the Bluetooth version of the
device.
• This unit may not work for some Bluetooth devices.
• Connecting condition may vary depending on
circumstances around you.
• When the unit is turned off, the device is
disconnected.
Warning messages for Bluetooth operations
• Connection Error: The device is registered but the
connection has failed. Use <Connect> to connect
the device again. (☞ page 28)
• Error: Try the operation again. If “Error” appears
again, check if the device supports the function you
have tried.
• Device Unfound: No available Bluetooth device is
detected by <Search>.
• Loading: The unit is updating the phone book and/
or SMS.
• Please Wait...: The unit is preparing to use
the Bluetooth function. If the message does not
disappear, turn off and turn on the unit, then connect
the device again (or reset the unit).
• Reset 08: Check the connection between the
adapter and this unit.
Icons for phone types
• These icons indicate the phone type set on the device.
:Cellular phone
:Household phone
:Office
:General
:Other than above
• DivX/MPEG1/MPEG2/JPEG/MP3/WMA/WAV
1 Current folder (highlighted bar)
2 Current folder number/total folder number
3 Folder list
4 Selected playback mode
5 Elapsed playing time of the current track (not
displayed for JPEG)
6 Operation status
7 Current track number/total number of tracks
in the current folder (total number of tracks on
the disc)
8 Track information (only for MP3/WMA/WAV)
9 Track list
p Current track (highlighted)
* If tag data includes “Jacket Picture” (baseline
JPEG), it will be displayed.
EN_KW-AVX714[UI].indb 55EN_KW-AVX714[UI].indb 55 08.1.16 2:38:28 PM08.1.16 2:38:28 PM

56
CD changer
• If you select a folder, which does not include any
music files, on the list (☞ page 34), you will hear a
beep. Select another folder including music files.
iPod operations
• You can control the following types of iPods through
the interface adapter.
– iPod with dock connector (3rd Generation)
– iPod with Click Wheel (4th Generation)
– iPod mini
– iPod photo
– iPod nano *1
– iPod video (5th Generation) *2
*1 When you connect the iPod nano to the interface
adapter, be sure to disconnect the headphones;
otherwise, no sound is heard.
*2 It is not possible to browse video files on the
“Videos” menu while the iPod is connected to the
interface adapter.
• If the iPod does not play correctly, please update your
iPod software to the latest version. For details about
updating your iPod, visit <http://www.apple.com>.
• When you turn on this unit, the iPod is charged
through the adapter connected to this unit.
• While the iPod is connected, all operations from the
iPod are disabled. Perform all operations from this
unit.
• The text information may not be displayed correctly.
• The text information scrolls on the screen. This unit
can display up to 40 characters.
Notice:
When operating an iPod, some operations may not
be performed correctly or as intended. In this case,
visit the following JVC web site:
<http://www.jvc.co.jp/english/car/support/
ks-pd100/index.html>
Menu settings
• If you change the <Amplifier Gain> setting from
<High> to <Low> while the volume level is set
higher than “30,” the unit automatically changes the
volume level to “VOL 30.”
• After you change any of <Menu Language/Audio
Language/Subtitle> settings, turn off then on the
power, and re-insert the disc (or insert another disc)
so that your setting takes effect.
• When you select <16:9> for a picture whose aspect
ratio is 4:3, the picture slightly changes due to the
process for converting the picture width.
• Even if <4:3PS> is selected, the screen size may
become <4:3LB> for some discs.
EN_KW-AVX714[UI].indb 56EN_KW-AVX714[UI].indb 56 08.1.16 2:38:29 PM08.1.16 2:38:29 PM

57 REFERENCES
Sound signals emitted through the rear terminals
Through the analog terminals (Speaker out/REAR OUT)
2-channel signal is emitted. When playing multi-channel encoded disc, multi-channel signals are downmixed.
• DTS sound cannot be reproduced.
Through the DIGITAL OUT terminal
Digital signals (Linear PCM, Dolby Digital, DTS, MPEG Audio) are emitted.
• To reproduce the multi-channel sounds such as Dolby Digital, DTS, and MPEG Audio, connect an amplifier or a
decoder compatible with these multi-channel sources to this terminal, and set <D. Audio Output> correctly.
(☞ page 46)
<D. Audio Output>
Playback disc
Output signals
<Stream> <Dolby D> <PCM>
DVD 48 kHz, 16/20/24 bits Linear PCM 48 kHz, 16 bits stereo Linear PCM*
96 kHz, Linear PCM 48 kHz, 16 bits stereo Linear PCM
with Dolby Digital Dolby Digital bitstream 48 kHz, 16 bits stereo
Linear PCM
with DTS DTS bitstream
with MPEG Audio MPEG bitstream 48 kHz, 16 bits stereo Linear PCM
Audio CD, Video CD 44.1 kHz, 16 bits stereo Linear PCM /
48 kHz, 16 bits stereo Linear PCM
Audio CD with DTS DTS bitstream
DivX/
MPEG
with Dolby Digital Dolby Digital bitstream 48 kHz, 16 bits stereo
Linear PCM
with MPEG Audio 32/44.1/48 kHz, 16 bits Linear PCM
MP3/WMA 32/44.1/48 kHz, 16 bits Linear PCM
WAV 44.1 kHz, 16 bits Linear PCM
* Digital signals may be emitted at 20 or 24 bits (at their original bit rate) through the DIGITAL OUT terminal if the
discs are not copy-protected.
EN_KW-AVX714[UI].indb 57EN_KW-AVX714[UI].indb 57 08.1.16 2:38:29 PM08.1.16 2:38:29 PM
58
Preset equalizing values
Frequency
Sound mode 60 Hz 150 Hz 400 Hz 1 kHz 2.5 kHz 6.3 kHz 15 kHz
Flat 00 00 00 00 00 00 00
Hard Rock +03 +03 +01 00 00 +02 +01
R&B +03 +02 +02 00 +01 +01 +03
Pop 00 +02 00 00 +01 +01 +02
Jazz +03 +02 +01 +01 +01 +03 +02
Dance +04 +02 00 –02 –01 +01 +01
Country +02 +01 00 00 00 +01 +02
Reggae +03 00 00 +01 +02 +02 +03
Classic +02 +03 +01 00 00 +02 00
User1/2/3 00 00 00 00 00 00 00
Language codes (for DVD/DivX language selection)
Code
Language
Code
Language
Code
Language
Code
Language
Code
Language
AA Afar FA Persian KK Kazakh NO Norwegian ST Sesotho
AB Abkhazian FI Finnish KL Greenlandic OC Occitan SU Sundanese
AF Afrikaans FJ Fiji KM Cambodian OM (Afan) Oromo SW Swahili
AM Ameharic FO Faroese KN Kannada OR Oriya TA Tamil
AR Arabic FY Frisian KO Korean (KOR) PA Panjabi TE Telugu
AS Assamese GA Irish KS Kashmiri PL Polish TG Tajik
AY Aymara GD Scots Gaelic KU Kurdish PS Pashto, Pushto TH Thai
AZ Azerbaijani GL Galician KY Kirghiz QU Quechua TI Tigrinya
BA Bashkir GN Guarani LA Latin RM
Rhaeto-Romance
TK Turkmen
BE Byelorussian GU Gujarati LN Lingala RN Kirundi TL Tagalog
BG Bulgarian HA Hausa LO Laothian RO Rumanian TN Setswana
BH Bihari HI Hindi LT Lithuanian RW Kinyarwanda TO Tonga
BI Bislama HR Croatian LV Latvian, Lettish SA Sanskrit TR Turkish
BN Bengali, Bangla HU Hungarian MG Malagasy SD Sindhi TS Tsonga
BO Tibetan HY Armenian MI Maori SG Sangho TT Tatar
BR Breton IA Interlingua MK Macedonian SH Serbo-Croatian TW Twi
CA Catalan IE Interlingue ML Malayalam SI Singhalese UK Ukrainian
CO Corsican IK Inupiak MN Mongolian SK Slovak UR Urdu
CS Czech IN Indonesian MO Moldavian SL Slovenian UZ Uzbek
CY Welsh IS Icelandic MR Marathi SM Samoan VI Vietnamese
DZ Bhutani IW Hebrew MS Malay (MAY) SN Shona VO Volapuk
EL Greek JA Japanese MT Maltese SO Somali WO Wolof
EO Esperanto JI Yiddish MY Burmese SQ Albanian XH Xhosa
ET Estonian JW Javanese NA Nauru SR Serbian YO Yoruba
EU Basque KA Georgian NE Nepali SS Siswati ZU Zulu
EN_KW-AVX714[UI].indb 58EN_KW-AVX714[UI].indb 58 08.1.16 2:38:30 PM08.1.16 2:38:30 PM
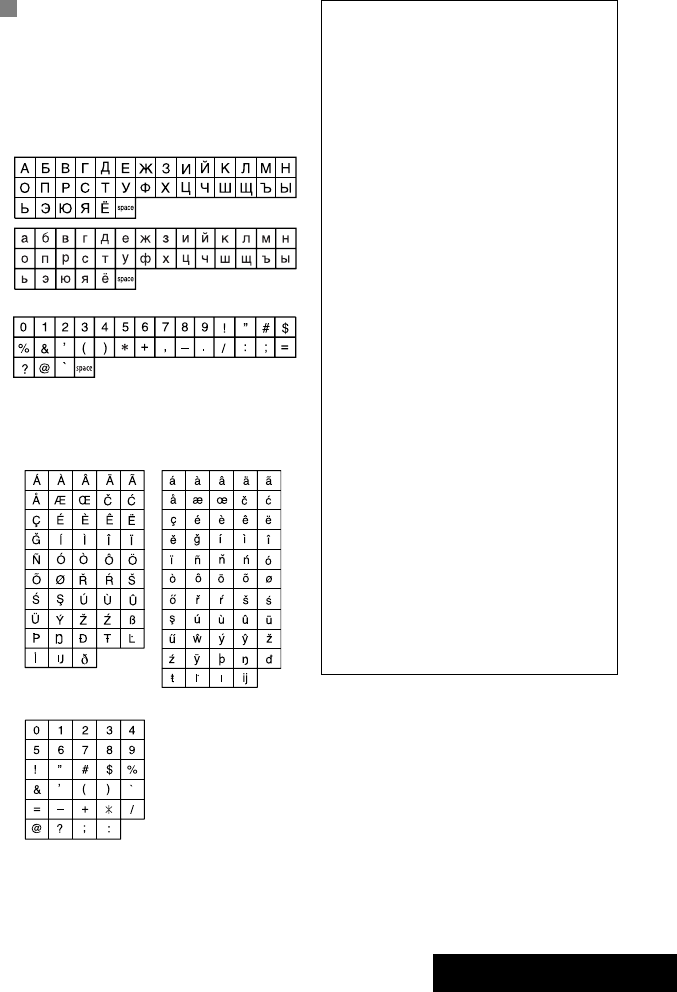
59 REFERENCES
Characters shown on the screen
In addition to the roman alphabet (A – Z, a – z), you
can use the following characters to assign titles.
(☞ page 42)
• When <Руccĸий> is selected for <Language>.
(☞ page 45)
• When any language other than <Руccĸий> is
selected for <Language>. (☞ page 45)
Upper and lower cases
Numbers and symbols
Upper and lower cases
Numbers and symbols
• Manufactured under license from Dolby
Laboratories. Dolby and the double-D symbol are
trademarks of Dolby Laboratories.
• “DTS” and “DTS Digital Out” are registered
trademarks of DTS, Inc
• “DVD Logo” is a trademark of DVD Format/Logo
Licensing Corporation registered in the US, Japan
and other countries.
• DivX, DivX Ultra Certified, and associated logos
are trademarks of DivX, Inc. and are used under
license.
• Official DivX® Ultra Certified product
• Plays all versions of DivX® video (including DivX®
6) with enhanced playback of DivX® media files
and the DivX® Media Format
• Microsoft and Windows Media are either
registered trademarks or trademarks of Microsoft
Corporation in the United States and/or other
countries.
• The Bluetooth word mark and logos are owned by
the Bluetooth SIG, Inc. and any use of such marks
by Victor Company of Japan, Limited (JVC) is under
license. Other trademarks and trade names are
those of their respective owners.
• iPod and iTunes are trademarks of Apple Inc.,
registered in the U.S. and other countries.
• This product incorporates copyright protection
technology that is protected by U.S. patents
and other intellectual property rights. Use of
this copyright protection technology must be
authorized by Macrovision, and is intended for
home and other limited viewing uses only unless
otherwise authorized by Macrovision. Reverse
engineering or disassembly is prohibited.
EN_KW-AVX714[UI].indb 59EN_KW-AVX714[UI].indb 59 08.1.16 2:38:31 PM08.1.16 2:38:31 PM

60
Troubleshooting
What appears to be trouble is not always serious. Check the following points before calling a service center.
• For operations with the external components, refer also to the instructions supplied with the adapters used for the
connections (as well as the instructions supplied with the external components).
Symptoms Remedies/Causes
General
• No sound comes out of the speakers. • Adjust the volume to the optimum level.
• Check the cords and connections.
• DTS sound cannot be reproduced through the analog
terminals (Speaker out/REAR OUT).
• The screen is not clear and legible. Sunshine from the windshield may cause this symptom.
Adjust <Bright>. (☞ page 44)
• “Position Error Push Open Key” appears on
the screen.
The monitor panel angle has been forcibly adjusted, or its
adjustment has been interrupted while opening or closing.
Press OPEN/TILT.
• “Mecha Error Push Reset” appears on the
screen, and the panel does not move.
Reset the unit. (☞ page 3)
• “No Signal” appears. • Change the source.
• Start the playback on the external component connected
to VIDEO IN terminal.
• Check the cords and connections.
• Signal input is too weak.
• The buttons on the monitor panel do not
work.
When the monitor panel is open, only +/– (volume) and
OPEN/TILT work. The other buttons do not function.
• The unit does not work at all. Reset the unit. (☞ page 3)
FM/AM
• SSM automatic presetting does not work. Store stations manually. (☞ page 12)
• Static noise while listening to the radio. Connect the aerial firmly.
EN_KW-AVX714[UI].indb 60EN_KW-AVX714[UI].indb 60 08.1.16 2:38:31 PM08.1.16 2:38:31 PM

61 REFERENCES
Symptoms Remedies/Causes
Disc in general
• Disc can be neither recognized nor played
back.
Eject the disc forcibly. (☞ page 3)
• Disc cannot be ejected. Unlock the disc. (☞ page 19)
• Recordable/Rewritable discs cannot be
played back.
• Tracks on the Recordable/Rewritable discs
cannot be skipped.
• Insert a finalized disc.
• Finalize the discs with the component which you used
for recording.
• Playback does not start. • Insert the disc correctly again.
• The format of files is not supported by the unit.
• The playback picture is not clear and legible. Adjust items in <Picture Adjust> menu. (☞ page 44)
• Sound and pictures are sometimes
interrupted or distorted.
• Stop playback while driving on rough roads.
• Change the disc.
• No playback picture is shown and “Parking
Brake” appears on the screen, even when the
parking brake is engaged.
Parking brake lead is not connected properly.
(☞ Installation/Connection Manual)
• No picture appears on the external monitor. • Connect the video cord correctly.
• Select the correct input on the external monitor.
• “Eject Error” or “Loading Error” appears on
the screen.
Change the source by pressing SOURCE.
• “Region code error” appears on the screen
when you insert a DVD Video.
Region code is not correct. (☞ page 4)
DivX/MPEG1/MPEG2/MP3/WMA/WAV
• Disc cannot be played back. • Change the disc.
• Record the tracks using a compliant application on the
appropriate discs. (☞ page 4)
• Add appropriate extension codes to the file names.
• Noise is generated. The track played back is not a playable file format. Skip to
another file.
• Tracks are not played back as you have
intended them to play.
Playback order may differ from that played back using
other players.
• Elapsed playing time is not correct. This sometimes occurs during playback. This is caused by
how the tracks are recorded.
• “Not Support” appears on the screen and
track skips.
The track is unplayable.
EN_KW-AVX714[UI].indb 61EN_KW-AVX714[UI].indb 61 08.1.16 2:38:32 PM08.1.16 2:38:32 PM

62
Symptoms Remedies/Causes
Bluetooth
• Bluetooth device does not detect the unit. This unit can be connected with one Bluetooth cellular
phone and one Bluetooth audio player at a time.
While connected to a device, this unit cannot be detected
from another device. Disconnect currently connected device
and search again.
• The unit does not detect the Bluetooth
device.
• Check the Bluetooth setting of the device.
• Search from the Bluetooth device. After the device
detects the unit, select <Open> on the unit to connect
the device. (☞ page 27)
• The unit does not make pairing with the
Bluetooth device.
• Enter the same PIN code for both the unit and target
device. If the PIN code of the device is not indicated on its
instructions, try “0000” or “1234.”
• Select the device name from <Special Device>, then
try to connect again. (☞ pages 28, 50)
• Echo or noise occurs. Adjust the microphone unit position.
• Phone sound quality is poor. • Reduce the distance between the unit and the Bluetooth
cellular phone.
• Move the car to place where you can get a better signal
reception.
• The sound is interrupted or skipped during
playback of a Bluetooth audio player.
• Reduce the distance between the unit and the Bluetooth
audio player.
• Disconnect the player connected for “Bluetooth PHONE.”
• Turn off, then turn on the unit.
• (When the sound is not yet restored,) connect the player
again.
• “New Device” cannot be selected for
“Bluetooth AUDIO.”
Bluetooth audio player is already connected. To select “New
Device,” disconnect it. (☞ page 28)
• The connected audio player cannot be
controlled.
Check whether the connected audio player supports AVRCP
(Audio Video Remote Control Profile).
• “Reset 08” appears on the screen. Check the connection between the adapter and this unit.
EN_KW-AVX714[UI].indb 62EN_KW-AVX714[UI].indb 62 08.1.16 2:38:32 PM08.1.16 2:38:32 PM

63 REFERENCES
Symptoms Remedies/Causes
CD changer
• “No Disc” appears on the screen. Insert a disc into the magazine.
• “No Magazine” appears on the screen. Insert the magazine.
• “Cannot play this disc Check the disc”
appears on the screen.
Current disc does not include playable files. Replace the disc
with one including playable files.
• “Reset 08” appears on the screen. Connect this unit and the CD changer correctly and press
the reset button of the CD changer.
• “Reset 01” – “Reset 07” appears on the
screen.
Press the reset button of the CD changer.
• The CD changer does not work at all. Reset the unit. (☞ page 3)
iPod
• The iPod does not turn on or does not work. • Check the connection.
• Charge the battery.
• Sound is distorted. Deactivate the equalizer either on this unit or the iPod.
• “Disconnect” appears on the screen. Check the connection.
• Playback stops. The headphones are disconnected during playback. Restart
playback.
• “No Files” appears on the screen. No tracks are stored. Import tracks to the iPod.
• “Reset 01” – “Reset 07” appears on the
screen.
Disconnect the adapter from both this unit and iPod. Then,
connect them again.
• “Reset 08” appears on the screen. Check the connection between the adapter and this unit.
• The iPod’s controls do not work after
disconnecting from this unit.
Reset the iPod.
AV-IN
• No picture appears on the screen. • Turn on the video component if it is not on.
• Connect the video component correctly.
• Playback picture is not clear and legible. Adjust items in <Picture Adjust> menu. (☞ page 44)
EN_KW-AVX714[UI].indb 63EN_KW-AVX714[UI].indb 63 08.1.16 2:38:32 PM08.1.16 2:38:32 PM

64
Specifications
AMPLIFIER
Maximum Power Output: Front/Rear: 50 W per channel
Continuous Power Output
(RMS):
Front/Rear: 20 W per channel into 4 Ω, 40 Hz to
20 000 Hz at no more than 0.8% total
harmonic distortion
Load Impedance: 4 Ω (4 Ω to 8 Ω allowance)
Equalizer Control Range: Frequencies: 60 Hz, 150 Hz, 400 Hz, 1 kHz, 2.5 kHz,
6.3 kHz, 15 kHz
Level: ±10 dB
Signal-to-Noise Ratio: 70 dB
Audio Output Level
REAR OUT:
Line-Out Level/Impedance: 2.5 V/20 kΩ load (full scale)
Output Impedance: 1 kΩ
Color System: NTSC/PAL
Video Output (composite): 1 Vp-p/75 Ω
Other Terminals: Input: LINE IN, VIDEO IN, Antenna input
Output: VIDEO OUT
Others: CD changer, Reverse gear signal, DIGITAL
OUT (optical)
FM/AM TUNER
Frequency Range: FM: 87.5 MHz to 108.0 MHz
AM: 531 kHz to 1 602 kHz
FM Tuner Usable Sensitivity: 11.3 dBf (1.0 μV/75 Ω)
50 dB Quieting Sensitivity: 16.3 dBf (1.8 μV/75 Ω)
Alternate Channel Selectivity (400 kHz): 65 dB
Frequency Response: 40 Hz to 15 000 Hz
Stereo Separation: 35 dB
AM Tuner Sensitivity/Selectivity: 20 μV/35 dB
DVD/CD
Signal Detection System: Non-contact optical pickup (semiconductor laser)
Frequency Response: DVD, fs=48 kHz/96 kHz: 16 Hz to 22 000 Hz
VCD/CD: 16 Hz to 20 000 Hz
Dynamic Range: 93 dB
Signal-to-Noise Ratio: 95 dB
Wow and Flutter: Less than measurable limit
EN_KW-AVX714[UI].indb 64EN_KW-AVX714[UI].indb 64 08.1.16 2:38:33 PM08.1.16 2:38:33 PM
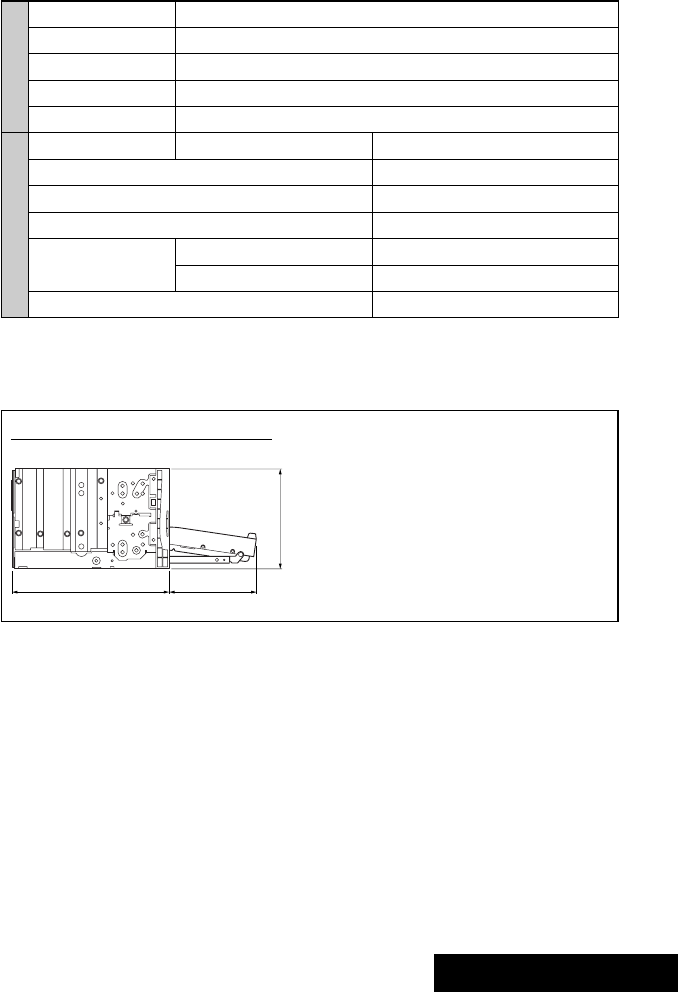
65 REFERENCES
MONITOR
Screen Size: 7 inch wide liquid crystal display
Number of Pixel: 336 960 pixels: 480 × 3 (horizontal) × 234 (vertical)
Drive Method: TFT (Thin Film Transistor) active matrix format
Color System: NTSC/PAL
Aspect Ratio: 16:9 (wide)
GENERAL
Power Requirement: Operating Voltage: DC 14.4 V (11 V to 16 V allowance)
Grounding System: Negative ground
Allowable Storage Temperature: –10°C to +60°C
Allowable Operating Temperature: 0°C to +40°C
Dimensions (W × H × D): Installation Size (approx.): 178 mm × 100 mm × 160 mm
Panel Size (approx.): 171 mm × 97 mm × 21 mm
Mass (approx.): 2.6 kg
CAUTION: When ejecting the monitor, leave an
open space for the monitor to come out. If you do
not, the monitor may obstruct the steering wheel
and gearshift lever operations, and this may result
in a traffic accident.
Unit: mm
Required space for the monitor ejection
160 90.5
100
Design and specifications are subject to change without notice.
EN_KW-AVX714[UI].indb 65EN_KW-AVX714[UI].indb 65 08.1.16 2:38:33 PM08.1.16 2:38:33 PM

EN
0108MNMMDWJEIN
© 2008 Victor Company of Japan, Limited
Having TROUBLE with operation?
Please reset your unit
Refer to page of How to reset your unit
Rear_KW-AVX714[UI].indd 2Rear_KW-AVX714[UI].indd 2 08.1.11 10:31:26 AM08.1.11 10:31:26 AM

160 90.5
100
30˚
1
This unit is designed to operate on 12 V DC, NEGATIVE ground electrical systems. If your vehicle does
not have this system, a voltage inverter is required, which can be purchased at JVC car audio dealers.
WARNINGS
• DO NOT install any unit or wire any cable in a location where;
– it may obstruct the steering wheel and gearshift lever operations, as this may result in a traffic accident.
– it may obstruct the operation of safety devices such as air bags, as this may result in a fatal accident.
– it may obstruct visibility.
• DO NOT operate any unit while manipulating the steering wheel, as this may result in a traffic accident.
• The driver must not watch the monitor while driving. It may lead to carelessness and cause an accident.
• If you need to operate the unit while driving, be sure to look around carefully or you may be involved in
a traffic accident.
• If the parking brake is not engaged, “Parking Brake” flashes on the monitor, and no playback picture will
be shown.
– This warning appears only when the parking brake wire is connected to the parking brake system built
in the car.
Notes on electrical connections:
• Replace the fuse with one of the specified rating. If the
fuse blows frequently, consult your JVC car audio dealer.
• It is recommended to connect speakers with maximum
power of more than 50 W (both at the rear and at the
front, with an impedance of 4 to 8 Ω).
If the maximum power is less than 50 W, change
“Amplifier Gain” setting to prevent the speakers from
being damaged (see page 49 of the INSTRUCTIONS).
• To prevent short circuits, cover the terminals of the UNUSED leads with insulating tape.
• The heat sink becomes very hot after use. Be careful not to touch it when removing this unit.
KW-AVX714
Installation/Connection Manual
0108MNMMDWJEIN
EN
© 2008 Victor Company of Japan, Limited
Parts list for installation and connection
The following parts are provided for this unit. If anything is missing, contact your dealer immediately.
INSTALLATION (IN-DASH MOUNTING)
The following illustration shows a typical installation. However, you should make adjustments
corresponding to your specific car. If you have any questions or require information regarding installation
kits, consult your JVC car audio dealer or a company supplying kits.
• If you are not sure how to install this unit correctly, have it installed by a qualified technician.
Before installing the unit
• When mounting the unit, be sure to use the screws provided, as instructed. If other screws are used,
parts could become loose or damaged.
• When tightening screws or bolts, be careful not to pinch any connection cord.
• Make sure not to block the fan on the rear to maintain proper ventilation when installing the unit.
1 Remove the audio system originally installed in the car, together with its mounting brackets.
Note: Be sure to keep all the screws and parts removed from your car for future use.
2 Attach the mounting brackets (removed from the car), to this unit (see below).
3 Do the required electrical connections.
• See page 2.
4 Install this unit using the screws removed in step 1.
The following example is for installation in a Toyota car. For more details, consult your JVC car audio
dealer.
LVT1780-013A
[UI]
Main unit Power cord
Round head screws (M5 × 8 mm)Flat head screws (M5 × 8 mm)
Crimp connector
Remote controller
Batteries If necessary, restore the protruding tabs.
Supplied screws
Note: When installing the unit on the mounting bracket,
make sure to use the supplied screws (M5 x 8 mm). If
longer screws are used, they could damage the unit.
TROUBLESHOOTING
• The fuse blows.
* Are the red and black leads connected correctly?
• Power cannot be turned on.
* Is the yellow lead connected?
• No sound from the speakers.
* Is the speaker output lead short-circuited?
• Sound is distorted.
* Is the speaker output lead grounded?
* Are the “–” terminals of L and R speakers grounded in common?
• Noise interfere with sounds.
* Is the rear ground terminal connected to the car’s chassis using shorter and thicker cords?
• Unit becomes hot.
* Is the speaker output lead grounded?
* Are the “–” terminals of L and R speakers grounded in common?
• This unit does not work at all.
* Have you reset your unit?
Plate for use with a Nissan car
When installing the unit in a Nissan car
Install the unit at an angle of less than
30˚, taking it into account that the
monitor would eject when in use.
Required space for the monitor ejection
Unit: mm
PRECAUTIONS on power supply and speaker connections:
• DO NOT connect the speaker leads of the power cord to the car battery; otherwise, the unit
will be seriously damaged.
• BEFORE connecting the speaker leads of the power cord to the speakers, check the speaker wiring in
your car.
Mounting bracket
removed from the car
Screws removed from the car in
step 1
Supplied
screws
Select the appropriate
type fitting to your
audio system space.
Mounting bracket removed from the car
Heat sink
Plate for use with a Nissan car
To metallic body or
chassis of the car
Parking brake switch
(inside the car)
Parking brake lead (light green)
Parking brake
Crimp
connector
Connecting the parking brake lead
Connect the parking brake lead to the parking brake system built in the car.
A
a
Install_AVX714[UI].indd 1Install_AVX714[UI].indd 1 08.1.10 2:34:03 PM08.1.10 2:34:03 PM
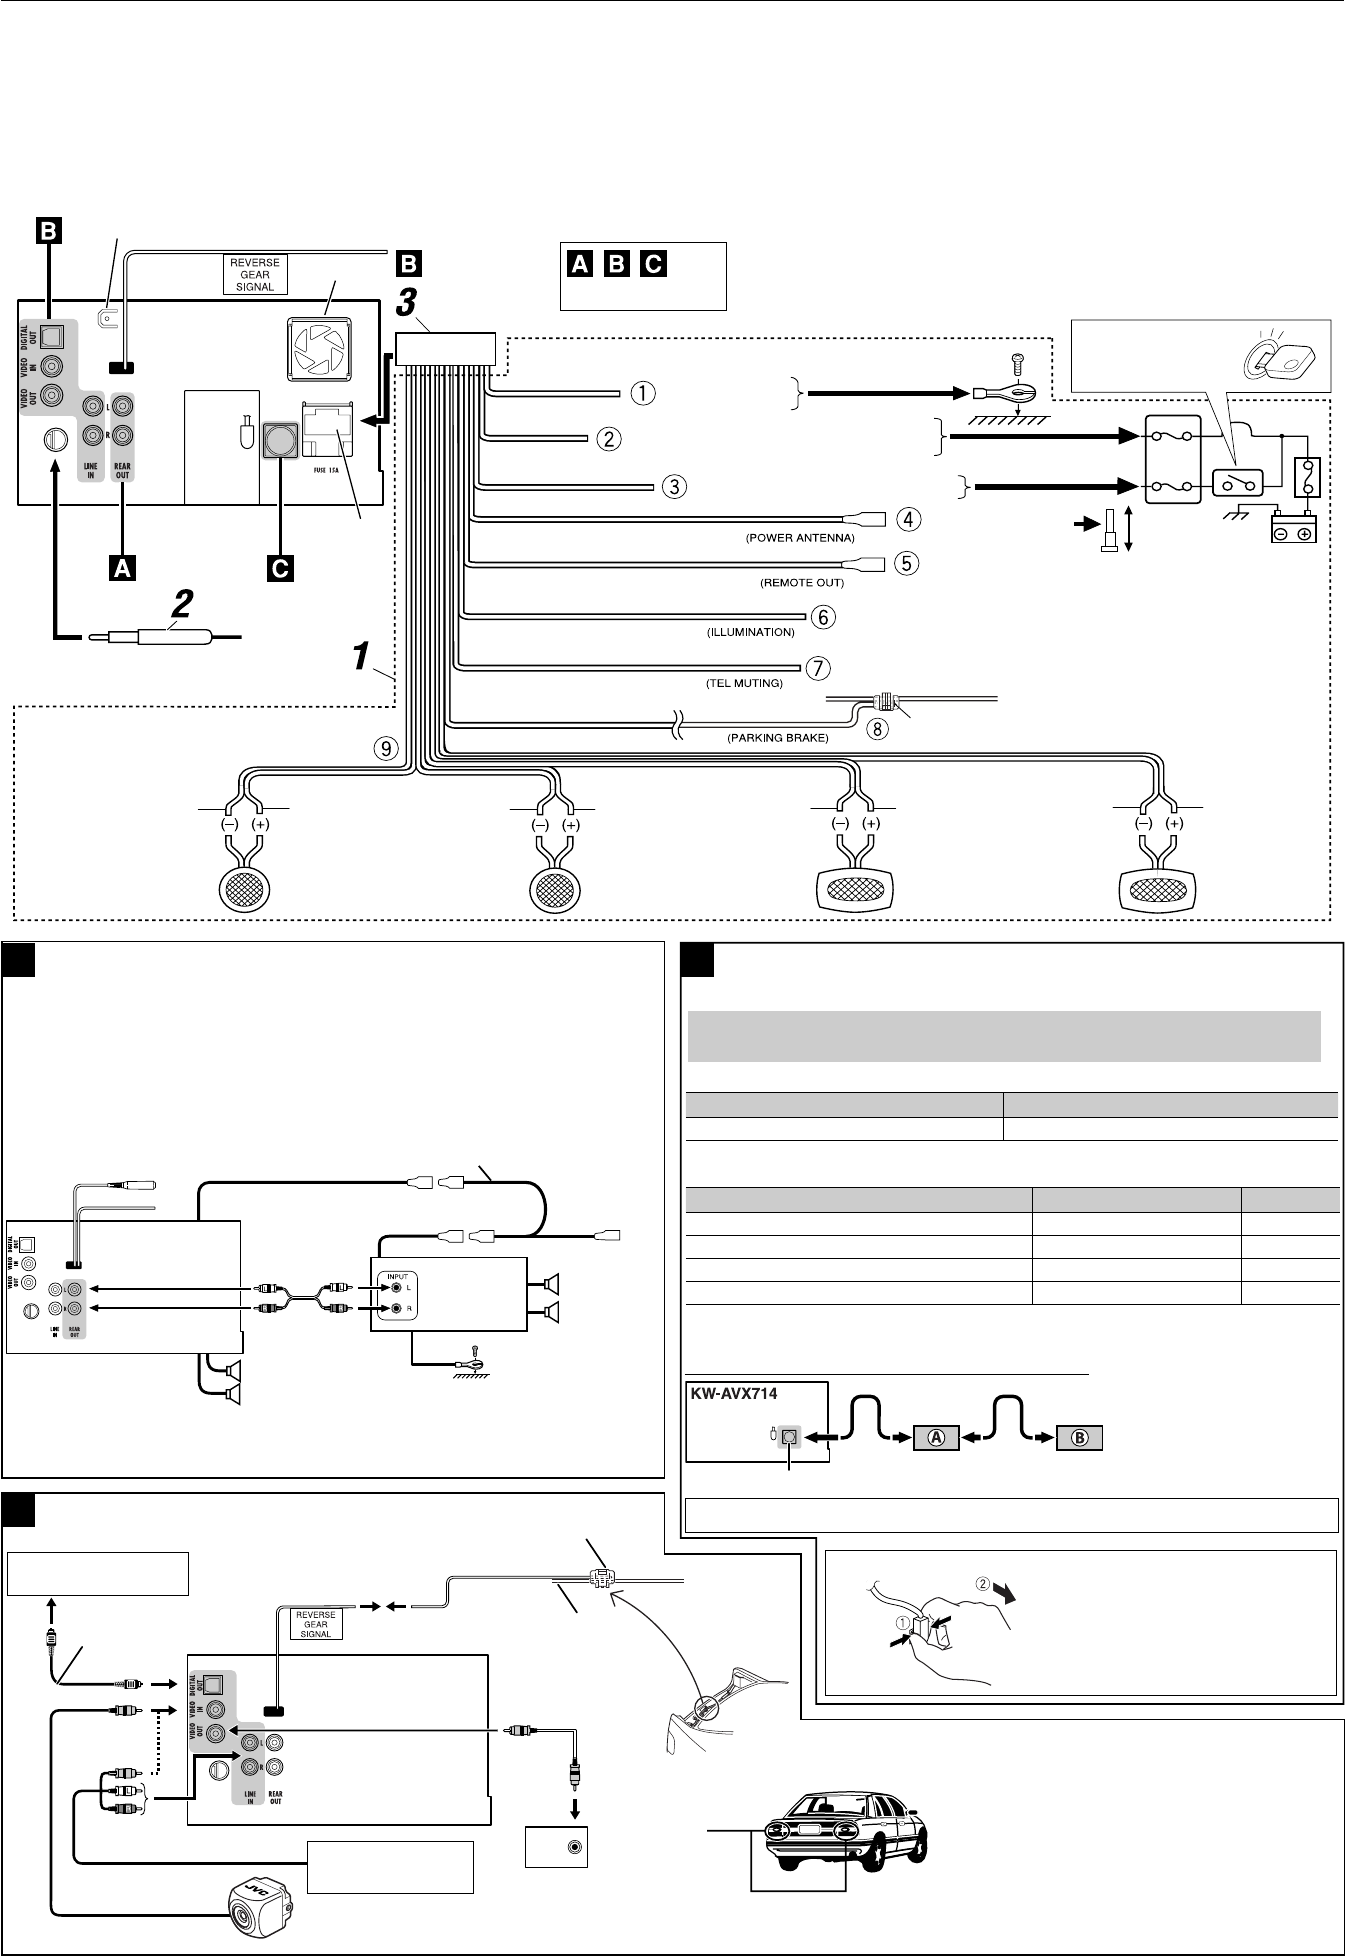
2
ELECTRICAL CONNECTIONS
To prevent short circuits, we recommend that you disconnect the battery’s negative terminal and make all electrical connections before installing the unit.
• Be sure to ground this unit to the car’s chassis again after installation.
Before connecting: Check the wiring in the vehicle carefully. Incorrect connection may cause serious damage to this unit.
The leads of the power cord and those of the connector from the car body may be different in color.
1 Connect the colored leads of the power cord in the order specified in the illustration below.
2 Connect the antenna cord.
3 Finally connect the wiring harness to the unit.
15 A fuse
*1 Not included for this unit
Ignition switch
To a live terminal in the fuse block connecting to
the car battery (bypassing the ignition switch)
To metallic body or
chassis of the car
To an accessory terminal in the fuse block
To the remote lead of other equipment (200 mA max.)
To automatic antenna
if any (250 mA max.) Fuse block
To cellular phone system
To car light control switch
Crimp connector
To parking brake (see diagram Å on page 1.)
Ye l l o w *2
Red
Orange with white stripe
Black
Light green
Brown
Blue with white stripe
Blue
*2 Before checking the operation of this unit prior to
installation, this lead must be connected, otherwise
power cannot be turned on.
Left speaker (rear)Right speaker (front)Left speaker (front) Right speaker (rear)
Gray with black stripeWhiteWhite with black stripe Green with black stripeGray Green Purple with black stripe Purple
Rear ground terminal
See each diagram below.
Fan
*3 Firmly attach the ground lead to the metallic body or to the chassis of the car—to the place uncoated
with paint (if coated with paint, remove the paint before attaching the lead). Failure to do so may
cause damage to the unit.
AConnecting an external amplifier
Rear
speakers
Remote lead (Blue with white stripe)
Remote lead
JVC Amplifier
You can connect an amplifier to upgrade your car stereo system.
• You can supply the power to the amplifier by connecting the remote leads (blue with white stripe) of
this unit to the amplifier. (To connect other equipment using the remote leads, Y-connectors need to
be separately purchased.)
• Disconnect the speakers from the unit, and connect them to the amplifier. Leave the speaker leads of
the unit unused.
• You can switch off the built-in amplifier and send the audio signals only to the external amplifier
to get clear sound and to prevent internal heat built-up inside the unit. See page 49 of the
INSTRUCTIONS.
Front speakers
Y-connector (not
supplied for this unit)
To the remote
lead of other
equipment
Connections for external component playback
B
To reverse
lamp
Audio/video cord (not supplied)
To car battery
Crimp connector
(not supplied)*5
Reverse lamp lead*4
Video cord
(not supplied)
*4 Required only when connecting a rear view camera
to VIDEO IN terminal.
*5 Refer to å in diagram Å on page 1.
*6 Set “AV Input” setting to “Camera” when using (see
page 47 of the INSTRUCTIONS).
Connections to the CD changer jack
When connecting the external components, refer also to the manuals supplied for the components and adapter.
CAUTION:
Before connecting the external components, make sure that the unit is turned off.
You can connect the following JVC components to the CD changer jack.
JVC component Model name
CD changer (CD-CH) CH-X1500, etc.
You can also connect the following components through the various JVC adapters.
• Connection cords may need to be purchased separately.
Component Adapter Model name
Bluetooth device Bluetooth adapter KS-BTA200
iPod Interface adapter for iPod KS-PD100
Portable audio player with line output jacks Line input adapter KS-U57
Portable audio player with 3.5 mm stereo mini jack AUX input adapter KS-U58
When connecting more than one component (maximum: two), it is recommended that you connect the
components in series as explained below.
CD changer jack
When connecting two components in series
To disconnect the connector
Hold the connector top tightly
(
1 ), then pull it out ( 2 ).
C
iPod is a trademark of Apple Inc., registered in the U.S. and other countries.
*7 To use these components,
set the external input setting
correctly (see page 47 of the
INSTRUCTIONS).
A KS-BTA200
B*7 CD-CH / KS-PD100 / KS-U57 / KS-U58
Camcorder, Navigation
System, etc.
Rear view camera KV-CM1*6
External
monitor
AV amplifier or decoder
Digital optical cable
(not supplied)
Extension lead (not supplied)
Reverse lamp
*1
*1
*3
Install_AVX714[UI].indd 2Install_AVX714[UI].indd 2 08.1.11 10:14:32 AM08.1.11 10:14:32 AM
